

Samsung S760 User Manual

ATDTS0Recalls the stored phone number as AT&Z0 by tone dial
ATDPS0Recalls the stored phone number as AT&Z0 by pulse dial
AT+MS=X Sets protocol for modem connection
(X=V90, V34)
AT+MS=V90 (default setting)
Try to connect with V.90 (max 56 Kbps)
AT+MS=V34
Try to connect with V.34 (max 33.6 Kbps)
64 Using the Modem

Using the LAN
Ideal for customers who want basic 10/100 connectivity. Delivers industry-leading
performance through Intel's latest 82559 chip design. Common drivers and Intel's
PROSet utility enable widespread compatibility and ease of installation.
Installing the LAN Driver in Windows Me
Beforeyoubegin verify thatthe"3Com 10/100MiniPCIEthernet Adapter"is installed
otherwise you will have to install it.
Install the LAN Driver
Windows Me has its own PCI Ethernet Adapter driver, simply install the LAN driver
according to the instructions below.
1. Start > Settings > Control Panel > System, double-click the system icon.
2. Click the DeviceManager tab.
3. Double-click Network Adapters in the list area.
4. Click the Drivertab,thenclickUpdate Driver.
5. Select "Specify thelocation of the driver (Advanced)" and click Next.
6. Select "Search for a better driver than the one your device is using "Removable
Media (Floppy, CD-ROM...)" and "Specify a location" then click Browse
(Recommended)".
Select the D:\Driver\LanDrv\WinMe from your CD-ROM. and after click Next.
7. Click Next.
8. ClickFinish.(Windows has finishedinstallinganupdateddriver for your hardware
device)
9. Click Yes, to restart your computer a nd complete the driver installation.
Configuring Network Environment
1. After youc omplete theinstallationofthe NetworkAdapterDriver, double-clickthe
Network icon in the control panel.
Using the LAN 65
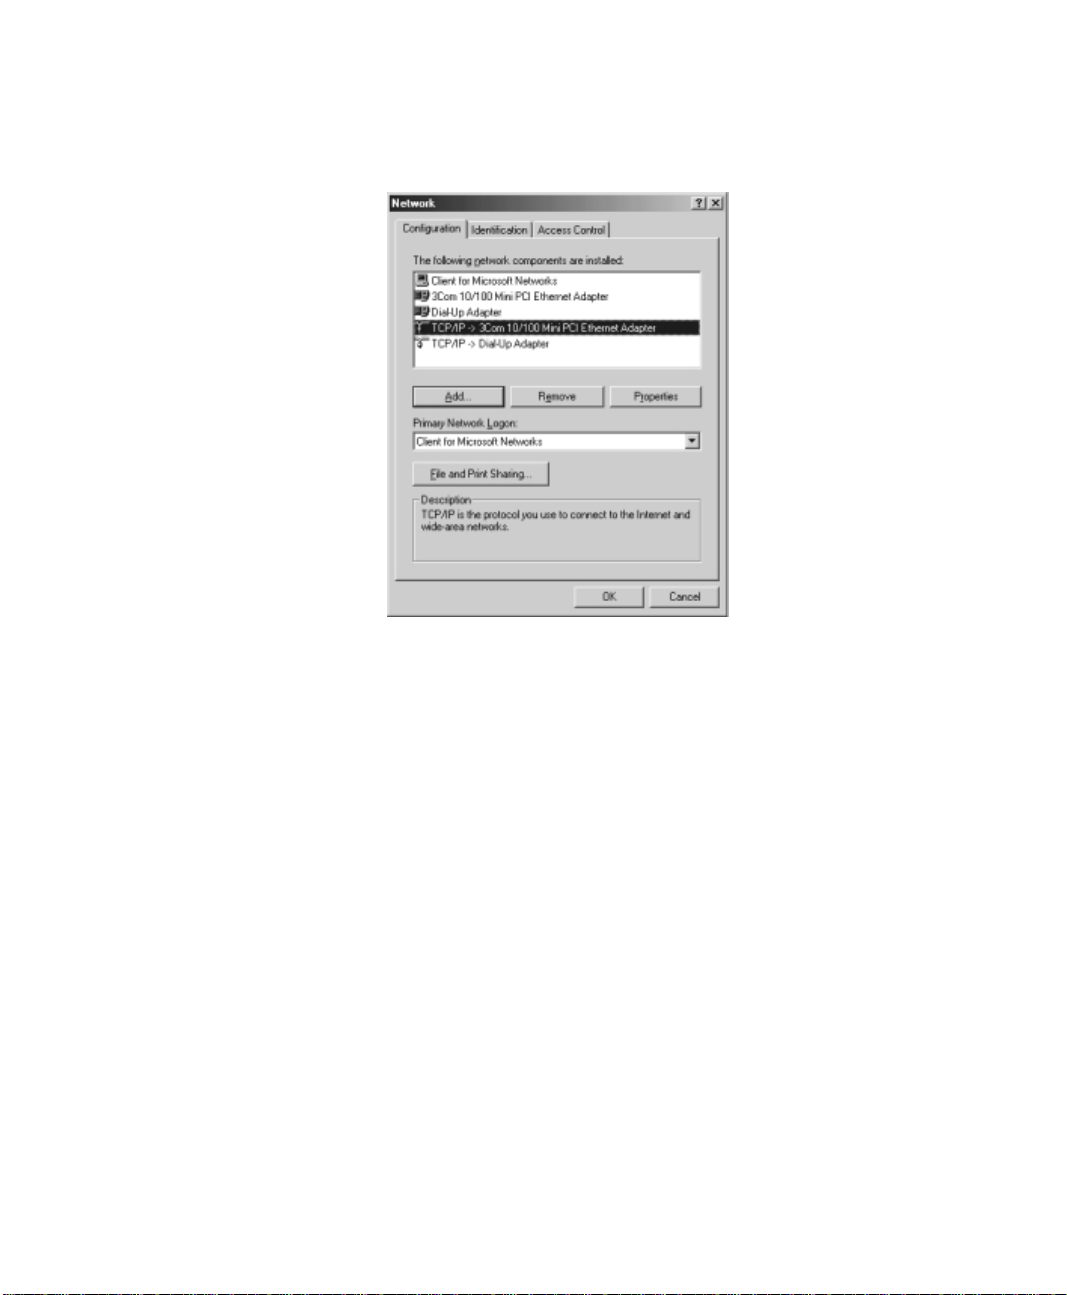
2. Click the NetworkConfiguration tab, then ensure that "3Com 10/100Mini PCI
Adapter" is Installed.
Figure 40. Installing the LAN Driver
3. Select TCP/IP -> 3Com 10/100 Mini PCI E thernet Adapterin the list of network
components in the installed list, a nd click Properties.
4. From the TCP/IP Properties, click theIP Address tab. Select Specify an IP address
5. Click the Gatewaytab,then enter gateway address in the New gateway and Click
6. Click the DNS Configuration tab, then selectEnableDNS, and enter the host name
7. If you finish the TCP/IP set-up, click OK.
8. From the Network dialog box, click Add.
66 Using the LAN
and then enter your IP address and the appropriate subnet mask.
If you use DHCP server, select "Obtain an IP address automatically".
Add.
If you use DHCP server, this process is not needed.
in theHost, enter the domain name in the Domain and DNS server address in the
DNS server Search Order.
Click "Add". If you use DHCP server, this process is not needed.

9. From the Select Network Component type dialog box, select protocol and then
Click Add.
10. From the Select Network Protocol dialog box, select Microsoft in the
Manufactures list and then select IPX/SPX-compatible Protocol.ClickOK.
11.Re peat 8 and 9. SelectMicrosoftin the Manufactureslist,andthenselectNetBEUI.
Click OK.
12.Click Network "Identification" tab, type in anything you wish to identify this
computer in Computer Name, Workgroup,Computer Description.Keepinmind
that each Computer Nameis unique on a network.
13.When you finish the network set-up, click OK from the Network dialog box.
14.Re start your computer to update the system.
Installing the LAN Driver in Windows 98
You can install the LAN driver as shown in the following.
LAN Driver Installation
Windows 98 has itsown Intel (R) PRO/100+ PCI adapter driver, but install the LAN
driver according to the instructions below.
1. From the Control Panel, double-click the System icon.
2. Click the Device Manager tab.
3. Double-click Other Devices or Network Adapters in the list area.
4. Double-click a PCI Ethernet Controller (or Intel (R) PRO/100+ PCI adapter).
5. Click the Driver tab, then click Update Driver.
6. Click Next at the Update Device Driver Wizard.
7. Select "Display a list of all thedrivers in a specific location..." and click Next.
8. Click Disk and select Have Disk.
9. Insert the Intel PRO/100+ adapter disk or System Software CD and select Specify
a location, then enter the appropriate drive for your disk media (A:, D:, etc.), and
Click OK.
Using the LAN 67

10.The Update Wizard displays the message that it has found the driver and select
Intel (R) PRO/100+ PCI Adapter,thenClickOK.
11.From the Update Device Driver Wizard, Click Next.
Ifadialog box displaysfile not foundmessage,enter thedriverdirectory,
and click
OK
.
12.From the Update Wizard, Click Finish.
13.Restart your computer when prompted to update your computer.
Configuring Network Environment
1. If you complete installing Network Adapter driver, from the control panel, double-
click the Network icon.
2. Click Network Configuration tab, then ensure that Intel (R) PRO/100+PCI
Adapter is installed.
3. Select TCP/IP >Intel (R) PRO/100+ PCI Adapter in the The following network
components are installed list, and click Properties.
4. From the TCP/IP Properties, click theIP Address tab. Select Specify an IP address
and then enter your IP address and the appropriate subnet mask. If youuse DHCP
server, selectObtain an IP address automatically.
5. Click the Gatewaytab,then enter gateway address in the New gateway and Click
Add. If you use DHCP server, this process is not needed.
6. Click the DNS Configuration tab, then selectEnableDNS, and enter the host name
7. If you finish the TCP/IP setup, click OK.
8. From the Network dialog box, click Add.
9. From the Select Network Component type dialog box, select protocol, click Add.
10.FromtheSelectNetworkProtocoldialog box, select Microsoft in the Manufactures
11.Repeat 8 and 9. Select Microsoft in theManufacturers list, and then select
12.If you finish the network setup, from Network dialog box, click OK.
13.Re start your computer to update the system.
68 Using the LAN
in theHost,domainname in the Domain and DNS server address in the DNS server
Search Or der.ClickAdd. If you use DHCP server, this process is not needed.
list and then select IPX/SPX-compatible Protocol, click OK.
NetBEUI,click OK.
Windows Me Sound Card Driver Installation
When you add a new sound deviceWindows Me will recognize the addition of PCI
Multimedia Audio Device and start the driver installation process automatically.
Sound Card Driver Installation
When Windows ME automatically detectsa 'PCI MultimediaAudioDevice', clickthe
Next and Finish buttons.
1. Insert the System Utility CD.
2. Click the Star' button, point to Settings and then click Control Panel.
Double-Click System icon.
•
Choose Device Manager tab.
•
Select Sound, Video and Game controller and ESS Allegro P CI Audio (WDM).
•
Click Properties.
•
3. Click Update Driver.
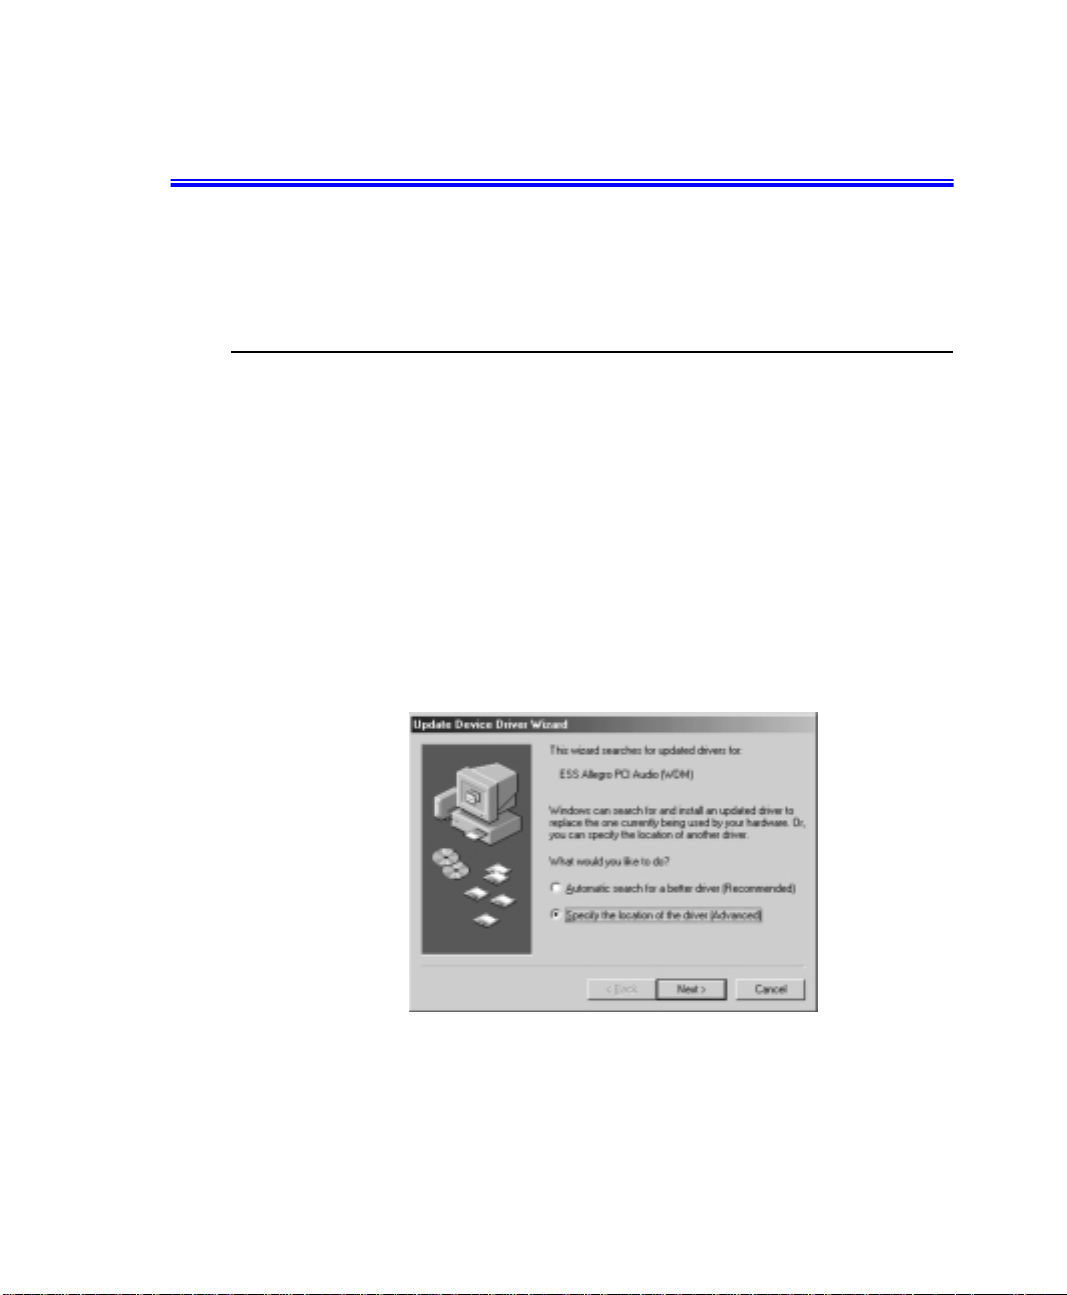
4. Select Specify the location of the driver (Advanced) and click Next.
Figure 41. Device Driver Update Wizard (S pec ify Location)
5. Check Specify a location and type D:\Audio\Winme and then click Next.
Windows Me Sound Card Driver Installation 69
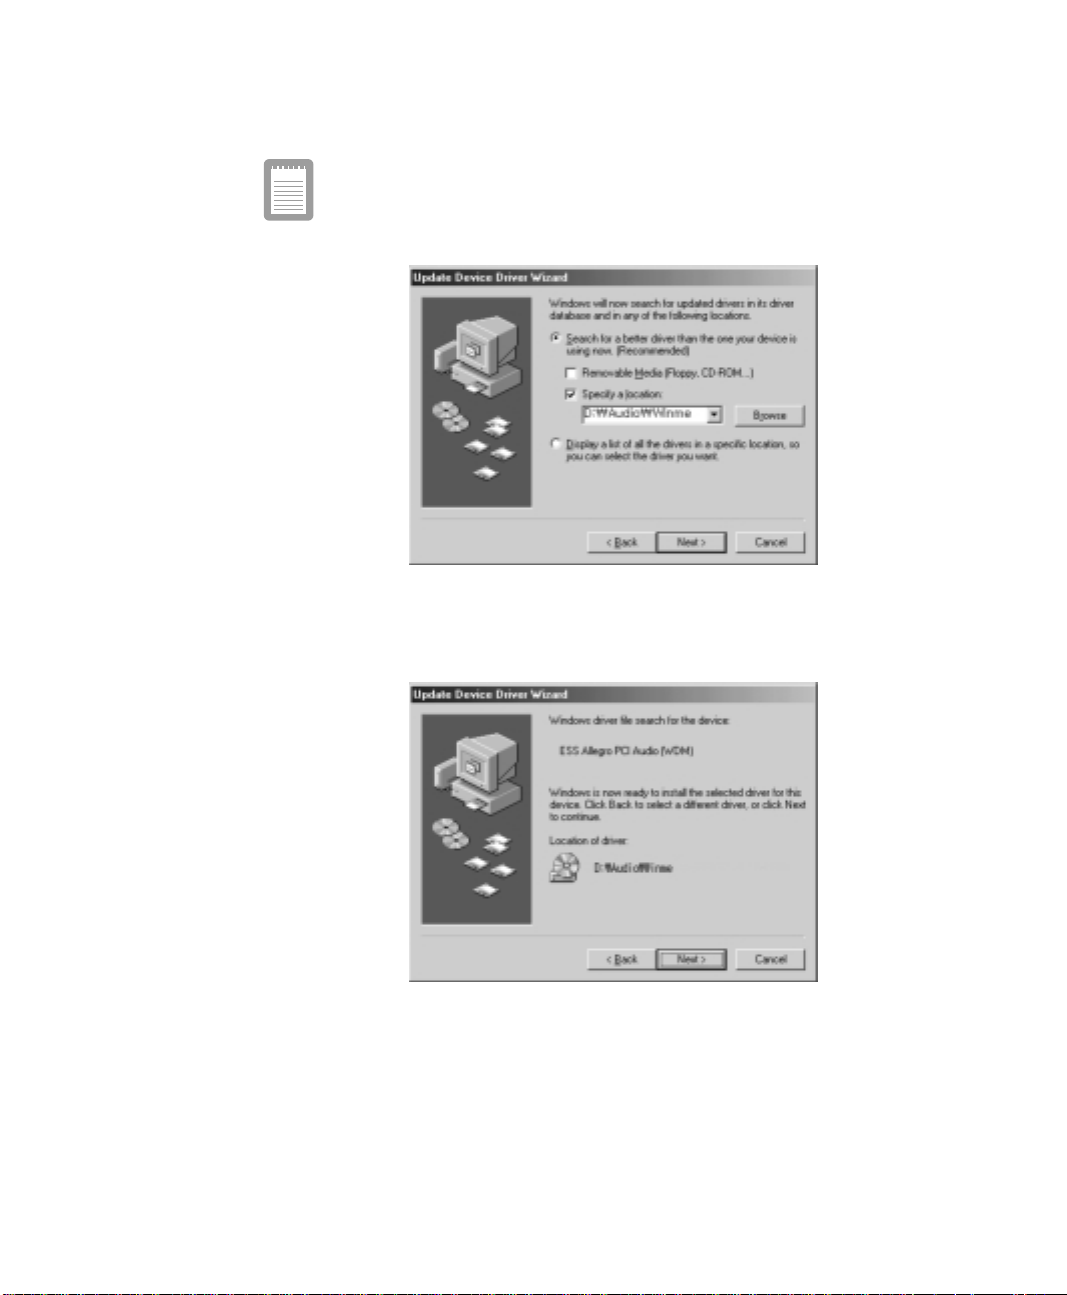
('D:\' may be the name of your CD-ROM Drive. If not type in the actual
drive letter of your CD-ROM Drive).
Figure 42. Device Driver Update Wizard (File Location)
6. ClickNext when the dialog appears saying that Windows is nowready to install
the driver.
Figure 43. Device Driver Update Wizard (Install Start)
70 Windows Me Sound Card Driver Installation

7. Click OK when the dialog appears saying that Windows has finished installing.
Figure 44. Device Driver Update Wizard (Install Complete)
8. Restart the systemto update yourfiles.
Windows Me Sound Card Driver Installation 71

Using System Setup
The System Setup program enables you to configure your computer hardware and set
security and power-savings options. The settings you choose are stored in batterymaintained CMOS memory that saves the information even when the computer’s
power is turned off. When your computer is turned back on, it is configured with the
values found in this memory.
Run System Setup if you get a message promptingyou to run the program. You may
also want to runSystemSetup, particularly the first time you use your computer, to set
the time and date, use security or power-management features, or alter the settings of
other features.
Your computer’s version of System Setup may not include all the fields
listed here or may include additional fields. Field names and order of
appearance can vary according to the version of th e BIOS (basic input/
output system) on your computer.
You can use the configuration listing at the back of this manual to record information
specificto your computer.(See ”Recordingthe ComputerHardwareConfiguration”on
page 133.) Fill it out asyou completeyour System Setup configuration. This list he lps
you describe your computer if you must contact your authorized reseller for service or
product information.
Starting System Setup
To start System Setup, turn on yourcomputer and then press <F2> when prompted.
The System Setup screen appears.
The topoftheSystem Setupscreenhasa menu bar with the selectionslisted inTable4.
Menu Function
Main Changesthe basic system configuration.
Advanced Configures advanced features on your computer.
Security Enables security features, including passwords
Power Configures power-management features.
72 Using System Setup
Table4. System SetupMenus
and backup and virus-check reminders.

Boot Specifies the order of boot devices and
Exit Specifies how to exit System Setup.
configures boot features.
To open a menu,use theleftor right arrow keys to select the menu name and thenpress
<Enter>.
Table 5 liststhe keys you can use to navigate through SystemSetup.
Table 5. System Setup Navigation Keys
Navigation Key
<F1> <Alt+H> Displays the General Help window.
<Esc> Exits the current menu.
<Left Arrow> and
<Right Arrow>
keys
<Up Arrow> and
<Down Arrow>
keys
<Tab> Moves the cursor forward throughthe cells for a
<Tab+Shift> Movesthe cursor backward through the cells for a
<Home> <PgUp> Movesthe cursor to the field at the top of the window.
<End> <PgDn> Moves the cursor to the field at the bottom of the
<F5> <-> Scrolls backwards through the options for the
<F6> <+> or
<F9> Sets the parameters for the current menu to their
<F10> Sets the parameters for the current menu to their
<Enter> Executes commands or opens a submenu.
Alternate
Key
Keypad arrow
keys
Keypad arrow
keys
<Space>
Function
Select a different menu. Pressing <ESC> at the Main
menu bringsyouto the Exit menu.
Move the cursor up and down between fields.
highlightedfield. If the field has only one cell, the
<Tab> key moves the cursor down to the next field.
highlightedfield. If the field has only one cell, the
<Tab+Shift> key combination moves the cursorup to
the previous field.
window.
highlighted field.
Scrolls forward through the options for the highlighted
field.
defaultvalues.
previous values.
UsingSystem Setup 73

A pointersymbol appearingtothe left of a field indicatesthatyoucanopen a submenu
from this field. A submenu containsadditionaloptions for a field. To open asubmenu,
highlightthe fieldandpress<Enter>.Usethes ame keys to entervaluesandmove from
field to field within submenus as you use within menus.
When you highlight a field, information about the field appears on the right side of the
screen.System Setup alsoprovidesaGeneralHelpscreenthat can be opened from any
menu by pressing<F1> or <Alt+H>. The GeneralHelpscreen liststhenavigation keys
with their corresponding alternates and functions.
When a scroll bar appears to the right of a helpwindow,more informationisavailable
than can be displayed in the window. Usethe <PgUp> and <PgDn> keys or the <Up
Arrow> and <Down Arrow> keys to scroll through the entire help document. Press
<Home> todisplaythe first page,orpress<End>to go to the lastpage.To exitthe help
window, press <Enter>or <Esc>.
If your computer will not boot after you have changed settings in System Setup and
exited the program, reboot and press <F2> to reenter System Setup. Once in System
Setup, you can try to change the values that caused your computer boot to fail. If the
problem persists, press <F9> to load the default values.
Main Menu
When you open System Setup,the Mainmenu appears.Youcan makechangestoyour
computer’s basic system configuration from this menu. The fields displayed in this
menu are described below.
System Time:
Sets your computer to the time that you specify, usually the current time. Enter th e
hour,minute, and secondintheformathh:mm:ss. Use a 24-hour clock. Use the tabkey
to move between the hour,minute, and second cells. Use the hyphen key <- > or
<Space> bar to decrease or increase the numbers.
System Date:
Sets your computer to the date that you specify, usually the current date. Enter the
month, day, and year in the format mm:dd:yyyy.Usethetabkeytomovebetweenthe
month,day,and year cells. Use the hyphen key <-> or <Space> bar todecrease or
increase the num bers. This field supports year dates of 2000 and beyond.
Legacy DisketteA:
Specifies a drive type for floppy drive A. 1.44 MB, 3 1/2”(default) floppy disk can be
used.
74 Using System Setup

Primary Master and Secondary Master:
Your computercan support two IDE drives. The Main menu containstwo IDE adapter
fields to configure these drives. Primary Master defines thehard drive installed in the
computer. Secondary Master definesthe CD-ROM and DVD-ROM drives or
Removable drives.
To configure a replacement or upgrade hard drive, move thecursor to select the
Primary Masterfield in theSystem SetupMain menu,andthenpress the <Enter>key.
The submenu appears.
Normally, you can use the Auto option of the Typefieldinthesubmenuto
automatically set the values for the other fields in the submenu. Manually set the other
fields in this submenu only if the drive you have installed in your computer is not
recognized by System Setup.
Set the Auto option of the Type field in the Secondary Master submenu
toenablethesystem to boot fromBootableCD-ROMs, you will also need
to check the boot device priority field and Bootable CD check field.
After you make your selectionsfrom thissubmenu, press the <Esc> key to exit back to
the Main menu.
Before attempting to configure a hard drive, make sure you have the
configuration information supplied by the manufacturer of the hard
drive. Incorrect drive settingscan cause your computer to malfunction.
The Primary and Secondary Masterfieldscalls up a submenu. The following fieldsare
found in the submenu:
Type:
Configures the hard drive type. Normally, select Autoat this field to have your
computer attempt to automatically detect the drive type and set the values for the
remaining fields in this submenu manually, specify User. Manually enter the
number of cylinders, heads, sectors per track, and write precompensation for your
drive. Refer to your drive’s user documentation or look on the drive to obtain t his
information.
If no drive is installed or if you are removing a drive and not replacing it, select
None.
Maximum Capacity:
Shows the maximum capacity of the drive. This field is for reference only.
Multi-Sector Transfers:
Sets the number of sectors per block to the highest number supported by the drive.
Configuration options are Disabled, 2 Sectors, 4 Sectors, 8 Sectors,and 16 Sectors.
UsingSystem Setup 75

LBA M ode Control:
Enables or disables 28-bit addressing of the hard drive, without regard for
cylinders, heads, and sectors. Note that enabling this field may decrease the access
speed of the hard drive.
32 Bit I/O:
Enables or disables 32-Bit I/O (input/output). When Enabled (default), your hard
drive can work with applications with 32-bit input and output. If the field is
Disabled,your computer works with 16-bit input and output and has lower
performance.
Transfer Mode:
Selects the method for transferring data between the hard drive and system
memory. Refer to your drive’s user documentation to specify the correct option for
this field. Options are Standard, Fast PIO 1, F ast PIO 2, Fast PIO 3, and Fast
PIO 4.
Ultra DMA Mode:
Enables the hard drive to use ultraDMA (direct memory access) transfer mode to
transfer data between the drive and systemmemory. Options are Mode 0, Mode 1,
Mode 2, and Disabled.
CPU Type: Displays the CPU type detected during start up.
CPU Speed: Displays the CPU speed detected during start up.
System Memory:Displays the amount of conventional memory detected by your
computer during startup. This field is for reference only.
Extended Memory: Displays the amount of extended memory detected by your
computer during startup. This field is for reference only.
BIOS Version: Displays theBIOS version of your system.
Micom Version: Displays the Firmwareversion of your system.
Advanced Menu
Selecting Advanced from the menu bar displays the Advanced menu.
InstalledO/S:
Select the operating system installed on your systemwhich you will use most
commonly. An incorrect setting can cause the unexpected system behavior.
PS/2 Mouse:
Disabled prevents both the touchpad and external PS/2 port from functioning.Single
76 Using System Setup

mouse (default) enables the external PS /2 port or the touchpad, and external PS/2 port
has priority. Dual Mouse allows the use of both the touchpad and PS/2 port.
Screen Expansion:
Enables or disables the Screen Expansion mode. If you set this field to Enabled, the
systemexpandsVGAmode(DOSmodeor 640x480 Graphicmode)to use the full size
of the LCD.If this field is Disabled VGA mode appears as a640x480 box inthe LCD.
TV Out Mode:
Select TV s tandard such as NTSC (default),PAL.
Display Configuration:
Enableyouto set the default display. Options areLCD, CRT and Both. ChooseLCDto
use the built-in display only, CRT to use an external monitor only or BOTH to have
both built-in and external displays used as the default. If you select CRT and no
external monitor is attached you will see no display until you attach the external
monitor. The default is LCD.
I/O Device Configuration:
Opens the I/O Device Configuration submenu if you press <Enter> when this field is
highlighted. If you attempt to set two ports to the same settings,the fields will be
marked with asterisks.
The submenu contains these fields:
Serial port:
Configures serial port. The options for this field are Enabled (default), and
Disabled. If you set this field to Enabled, you can set the BaseI/O Address field to
3F8 IRQ4 (default), 2F8 IRQ3, 3E8 IRQ4, or 2E8 IRQ3. When the field is set to
Enabled, the computer’s operating system uses the default configuration or the
configuration you choose. If you select Disabled, you free up an IR Q for use by
another device.
Infrared port:
Configuresthe infrared port. The options for thisfield are Enabled,andDisabled
(default).Ifyou set this field to Enabled, you can set the Base I/O Addressfieldand
the Mode field and the Mode field. Settings for theBase I/O Address are 3F8 IRQ4,
2F8 IRQ3 (default), 3E8 IRQ4, or 2E8 IRQ3. Mode FIR (fast infrared) enables you
to set the DMA channel to3or1.
When the Infrared port field is set to Enabled, the c omputer’s operating system
uses the default configuration or the configuration you choose. If youselect
Disabled, you free up an IRQ for use by another device.
Parallel port:
Configuresthe parallel port. The options for this field are Enabled (default), and
UsingSystem Setup 77

Disabled.If you setthis field to Enabled,you can setthe Mode field and theBaseI/
O Address field. Settings for the Base I /O Address are 378 IRQ7(default), 378
IRQ5, 278 IRQ7, 278 IR O5, 3RC IRQ7, and 3RC IRQ5. Settings for the Mode are
Output only, B i-directional,EPP (enhanced parallel port), and ECP (extended
capabilities port). SelectingtheECP setting enablesyou to set the DMAChannelto
1, 2, or 3.
When the Parallel port field is set to Enabled, the computer’s operating system
uses the default configuration or the configuration you choose. If youselect
Disabled, you free up an IRQ for use by another device.
Floppy disk controller:
Configures the floppy disk controller. The options for this field areEnabled
(default), and Disabled. When the Floppy disk controller fieldissettoEnabled,the
computer’s operating system uses the default configuration for the controller.
Local Bus IDE adapter:
Enablesthe integratedIDElocal busadapters.Options areEnabled(default), Disabled,
Both,and Primary.
Large Disk Access Mode:
Enables your computer’s operating system to work with drives larger than 540 MB.
Choose DOS (default) for Microsoft operating systems. Choose Other for any other
operating systems.
Security Menu
Selecting Security from the menu bar displays the Security menu. Yourcomputer’s
advanced security system allows you to set two different passwords to prevent
unauthorized access to system resources, data, and System Setup. From the Security
menu, you can enable a boot password, disk access, a system backup reminder, and a
virus check reminder.
Security fields marked with an asterisk (
Setup with a system supervisor password or if no passwords are in effect. You cannot
access these fields with a user password.
Set User Password:
Enables you to set a user password to control access to the system at boot. See
”Creating a Password” on page 86 for instructionson setting a password.The user
password allows restricted access to the System Setup Security menu; the user has
access only to changing his own password and to enabling or disablingPassword on
boot. A supervisor password m ust be set before a userpassword can be set.
78 Using System Setup
) can only be changed if you start System
*

Set Su pervisor Password:*
Enables you to set the supervisor password to control access to the System Setup
utility. See ”Creating a Password” on page 86 for instructionson setting a password.
Password on boot:
Determines whether t he computer prompts for a password when startingup.The
options are E nabled and Disabled. A supervisor password must be set before you can
enable this option.
Fixed disk boot sector:*
Enables you to write-protect the hard drive boot sector to protect against viruses and
alterations.Onlya user withthe supervisorpasswordcan accessthis field. The options
for this field are Normal (default) and Write Protect.
Processor Serial Number:
Controls detection of the processorserial number.
Power Menu
The P ower menu of System Setup allows you to enable and adjust your computer’s
sophisticated power-saving f eatures. En abling these features extends the life of the
battery.
If your computer shipped with Windows 98 or Windows Me installed, the
Power Management works with the settings in the Power Options of
Control Panel. But if your computer has DOS, Windows 95thePower
Management works with the settings in System Setup.
Intel (R) Speedstep (TM): When CPU supports Speedstep (TM), this field willappear
on this menu. The maini dea of Speedstep is to save the power. T he CPUsupported by
the Speedstep adjusts its speed according to the power supply method, such as by the
battery or by the AC adapter. If this field is set toPerformance,it reduces the battery
usagetimebythehighCPUspeed,or set to Battery increasesthebattery usagetimeby
the slower CPU speed. And when it is set to Automatic, the system adjusts its speed
according to the power supply method, such asby the battery or by the AC adapter.
Disabled means that this function does not activated.
Power Savings:
Enables and disables Maximum Performance mode. Theoptions are Maximum
Performance, Maximum Power Saving (default),Customizedand Disabled. Ifyou set
this field to Maximum Performance, the microprocessor and hard drive run at full
speed,unlessaffectedbyotherpower-savingssettings. Ifyouset this fieldto Maximum
UsingSystem Setup 79

Power Saving, the microprocessor and the hard drive runat slow speed,when there is
nouserinput or deviceactivity.ChooseCustomizedto alter these settings and Disabled
to turn off the Power management function.
IdleMode:
Turns on or off the idle mode power savings. On slows downtheCPUwhenthe system
is not busy.
Suspend Time out:
Sets the period of computer inactivity from Suspend th at must pass before your
computer automatically goes into rest mode. When the rest time-out expires, your
computer goes to the rest mode according to Suspend Mode.
Standby Mode:
Specifies the type of rest mode your computer enters:
Save to RAM: Saves power byturningoffthe microprocessor and all devices except
•
system memory and controller, video memory and controller.
Save To Disk (default): Provides the greatest power-saving capabilities by
•
essentially turning off your computer. In the save to disk mode, all sy stem logic
(except for your c omputer wakeup circuitry and battery charger) is turned off.
During save to disk mode, the system and video memory aresavedtothe hard drive
and are restored when your computer resumes from rest.
When the computer enters save to disk mode, itwillnotresumenormal operation at
a specified time no matter how the Resume On Time field is set.
Resume On Modem Ring:
Enables the computer to resume operationfromrest mode in the event of modem
communication. The computer will resume only if the Suspend Mode field is set to
Save to RAM, not Save To Disk. The default setting is Off. Windows 98 does not use
this item.
ResumeOn Time:
Enables the computer to resume operationfromrest mode at a scheduled time. The
computer will resume only if the Suspend Mode field is set to Save to RAM, not Save
To Disk. If you set this field to On, you must set the Resume Time field as well. The
default setting isOff. Windows 98 does not u se this feature.
ResumeTime:
Specifies the time for your computer to automatically resume from rest mode. Enter
two-digit numbers to indicate the hour, minutes, and seconds in the formathh:mm:ss.
Use a 24-hour clock. Use the tab key to move between the hour, minute, and second
cells.Usethehyphen key <-> or <Space>bart o decrease or increasethenumbers. You
must set this option if you enable Resume On Time.
80 Using System Setup

Smart Battery Calibration:
Enables you to discharge the system battery completely for a more accurate battery
level detection. This option only works with the smart battery if the AC Adapter is not
plugged in.
Calibrationreminder:*
Enablesthe computertoprompt you tostartthe batterycalibration.Theprompt appears
eachtimeyou start yourcomputeror rebootuntilyou respondwithY(yes).The options
for this field are:
Monthly: When youstart your computer for the first time each month, theprompt
•
appears.
Disabled: The prompt never appears. Thisis the default setting.
•
Boot Menu
The Boot menu enables you to select a boot device and set boot options.
Logo Screen:
Enables (default)or Disables the display of the boottimelogo. If you select Disabled,
the diagnostic POST screen is displayed during boot
Summary screen:
Displays the system configuration when the computer starts. The options a re Enabled
and Disabled (default).
Boot Device Priority:
Enables you to select the order in which the computer attempts to boot from different
devices. The field has four options: Diskette Drive, Removable Devices, Hard Drive,
and ATAPI CD/DVD-ROM Drive.
To choose a device as the first, second,or third boot device:
1. Press <Enter> at the Boot Device Priority field
2. Highlight the option with the <Up Arrow> or <Down Arrow> key.
3. Use <+>, <-> keys until the option moves up or down in the list of options and the
number 1, 2, 3, or 4 appearsbeside the option.
4. Press <Esc> to return to the Boot menu.
Thedefaultsetting is1.Diskette Drive, 2. Removable Devices, 3.Hard Drive, 4. ATAPI
CD/DVD-ROM Drive.
UsingSystem Setup 81

If you want to start the system using a bootable CD, change the ATAP I
CD-ROMDrivetobe the first priorityand make sure that Autoissetin the
Type field of the Secondary Master Submenu at Main page.
Exit Menu
Select Exit or press < Exc> from the menu bar to display the Exit menu.
Pressing <Esc> does not exit this menu. You must select one of the
options from this menu or a menu bar item to exit this menu.
Exit Saving Changes:
Enablesyou to exit System Setup and saves your changes.When you select this item
and press <Enter>,a m essage appears askingyou ifyou wanttosaveyourchangesand
exit System Setup. ChooseYes and press <Enter> to save yourchanges and exit.
Choose No and press <Enter>to remain in System Setup.
Exit Discarding Changes:
Enables you to exit System Setup without saving your changes. Whenyou select this
item and press <Enter> a message appears asking you if you want to save changes
before exiting. Choose No and press<Enter> to exit without saving changes. Choose
Yes and press <Enter> to savechanges and exit.
Load Setup Defaults:
Loads the default values for all System Setup parameters. When you select this option
and press <Enter>,a message appears asking if you want to load the default
configuration.Choose Yes and press <Enter> to load default settings and remain in
System Setup. Choose No and press <Enter> to retain your changes and remain in
System Setup.
Discard Changes:
Enables you to discard the selections you have made and restore the values you
previously saved. When youselect this option andpress <Enter>, a message appears
asking if you wa nt to load the previous configuration.Choose Yes and press<Enter>
toloadthe previoussettingsandremain inS ystem Setup.Choose Noandpress<Enter>
to retain your changes and remain in System Setup.
Save Changes:
Saves your selections without exiting System Setup. When you select this option and
press <Enter>, a message appears asking if you want to save configuration changes.
82 Using System Setup

Choose Yes and press <Enter> to save changes and remain in System Setup. Choose
No and press <Enter> to discard changesand remain in System Setup.
UsingSystem Setup 83
 Loading...