

Samsung RMC30C1 Users Manual
Contact SAMSUNG WORLDWIDE
If you have any questions or comments relating to Samsung products, please contact
the SAMSUNG customer care center.
Comment contacter Samsung dans le monde
Si vous avez des suggestions ou des questions concernant les produits Samsung,
veuillez contacter le Service Consommateurs Samsung.
Comuníquese con SAMSUNG WORLDWIDE
Si desea formular alguna pregunta o comentario en relación con los productos de
Samsung, comuníquese con el centro de atención al cliente de SAMSUNG.
Country
Customer Care Center
CANADA 1-800-SAMSUNG
(726-7864)
MEXICO 01-800-SAMSUNG
(726-7864)
U.S.A 1-800-SAMSUNG
(726-7864)
A Warning that batteries (battery pack or batteries installed) shall not be exposed to
excessive heat such as sunshine, fire or the like.
CAUTION
Danger of explosion if battery is incorrectly replaced. Replace only with the same or
equivalent type.
“excessive sound pressure from earphones and headphones can cause hearing loss.”
Web Site Address
www.
samsung.
com
www.
samsung.
com
www.
samsung.
com
Samsung Electronics Canada
Inc., Customer Service 55
Standish Court Mississauga,
Ontario L5R 4B2 Canada
C.P 11570 AV. Presidente
Masaryk No.111, Int. 701 Col.
Chapultepec Morales, Delegacion
Miguel Hidalgo Mexico D.F
Samsung Electronics America,
Inc. 105 Challenger Road
Ridgefield Park, NJ 07660-0511
LED-C9000
Touch Remote
user manual
imagine the possibilities
Thank you for purchasing this Samsung product.
To receive more complete service, please register
your product at
www.samsung.com/register
BN68-02921A-00
[BN68-02921A]Touch Remote-00L03.indb 1 2010-03-16 오전 10:50:39
Contents
........
Use basic fu nct ions
Firs t Time U ser Setup
Setting u p the N etwo rk
TV co ntro l menu
Ser vice s
Mult ime dia
CH Info
Devic es contro l
Setting s menu
Troubl esho otin g
Spec ifi cat ion
* Product design and specifications may be changed without notice.
* Avoid displaying still images (such as jpeg picture files) or still image elements (such
as TV Program logos, panorama or 4:3 format images, stock or news bars at the
Touch Remote
screen bottom etc.) on the screen. The continuous display of a still picture can
cause uneven wear of the screen phosphors, which can affect image quality. To
reduce the risk of this occurring, please follow these recommendations:
• Avoid displaying the same TV channel for long periods.
• Always try to display any image on a full screen. Use the TV set picture format menu for
best possible match.
• Reduce brightness and contrast values to the minimum required to achieve the desired
picture quality. Exceeding these values may speed up the burn-in process.
• Frequently use all the TV features designed to reduce image retention and screen burn-
in. Refer to the proper user manual section for details.
2
03 Description
04 Inserting the battery
04 Charging the battery
........
05 First Time User Setup
........
06 Setting Up Your Remote
........
10 TV control menu
........
13 HOT-KEY menu
13 Twin Display
........
14 Photo / Music / Movie (from your PC)
........
15 View the Channel List
15 Touch Remote Channel List
16 Antenna Mode / Channel List Mode
16 Channel Edit (analog channels only)
........
17 Add External device
19 Learning Remote
........
20 Add Macro
21 Channel macro
21 Remote Settings
........
24 Troubleshooting
........
25 Specifi cation
Use basic functions
MUTE
SOURCE
CH
VOL
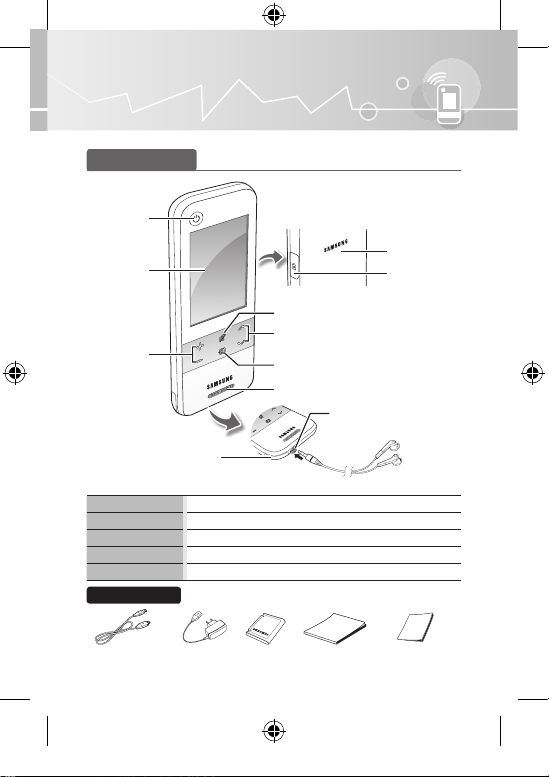
Description
TV Power
button
Touch screen
Battery cover
Charge port
MUTE button
Volume
button
MUTE
SOURCE
VOL
CH
Channel button
SOURCE button
Speaker
Phone Jack
(Sold separately)
IR receiver for learning
external devices.
Power
MUTE
Volume
Channel
SOURCE
Turn the TV on and off.
Mute or unmute.
Press to control the volume.
Press to change channels.
Display the source list (TV, PC, etc.) on the screen.
Touch Remote
Accessories
User Manual
USB Cable Power Adapter Battery User Manual Quick Setup Guide
/ Warranty Card
3
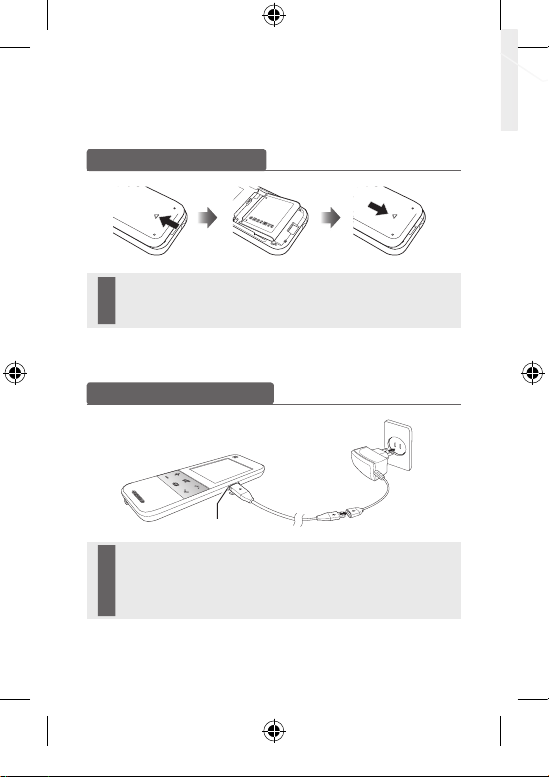
Inserting the battery
VOL
CH
MUTE
SOURCE
1 Slide and open the battery cover in the direction of the arrow.
2 Insert the battery with the Samsung logo facing up.
3 Slide and close the battery cover in the direction of the arrow.
Charging the battery
Charge the battery fully before using the remote control.
VOL
MUTE
SOURCE
CH
Touch Remote
1 Plug the small end of the USB cable into the charge port with the triangle
facing up.
2 Plug the power adapter into the outlet. The triangle lights up red.
3 When the battery is f ully charge d, the t riangle turns green. Unplug the
adapter from the wall outlet.
Charge Port
(A)
4
(B)
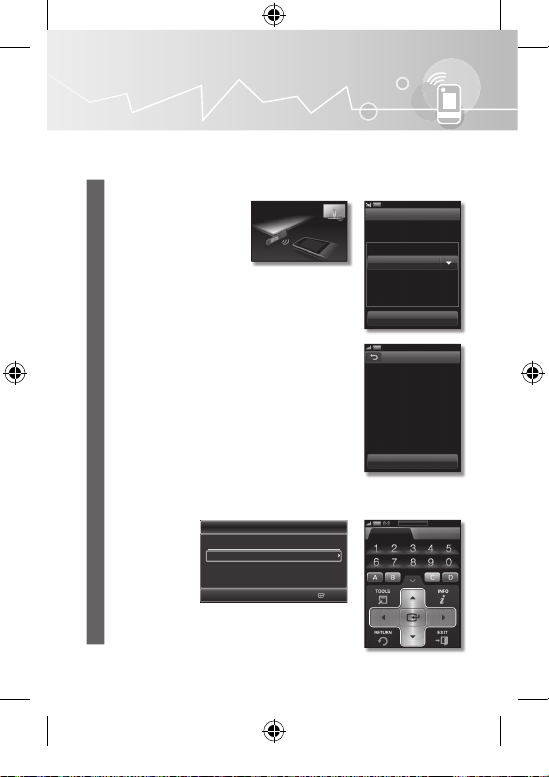
First Time User Setup
The default setup screen appears when your touch remote is turned on for the first
time. To connect the touch remote to the TV, you must complete the following steps.
1 Select the desired language, and then tap <OK>.
Welcome
Select a Language.
Language
English
OK
2 Select <OK> to connect the touch remote. If you want
to connect to it later or if you have changed the touch
remote to a new one, select <Skip>. If you selected
<Skip>, refer to “Setting up the Network” (p. 7) when you
want to connect the TV and touch remote.
• The Samsung Wireless LAN Adapter must be connected
to the TV before you establish a connection.
• The Samsung Wireless LAN Adapter and touch remote
must be parallel and no farther than 8 inches (20cm)
apart.
• If you are failed, reconnect the Samsung Wireless LAN
Adapter, and then try again.
• For initial TV settings, refer to the TV manual.
Plug & Play
Select Language of the OSD.
Menu Language : English
Enter
Connect TV
Succeed!
Complete the confi guration of
this remote control.
Do the TV confi guration as the
TV screen information.
OK
Keyboard
TV Control Services
Touch Remote
5
Setting up the Network
Setting Up Your Remote
You can set up your Touch Remote to control your TV in three ways:
•
As a standard, IR (Infra Red) remote
As an IR remote, your LCD Touch Remote works the same way as a standard push
button remote, except you touch icons and symbols on the LCD screen to control
your TV instead of pushing buttons. Using your Touch Remote as an IR remote
requires no more set up than a standard remote and gives you access to most of
the remote’s functions and features.
•
As an extended distance, Wi-Fi remote
As an extended distance, Wi-Fi remote, your Touch Remote offers all the functions
and features of the IR mode and, because it uses Wi-Fi radio waves instead of
infra red waves to control your TV, it lets you control your TV from a much greater
distance and even from around corners. It also gives you access to the Twin Display
function which lets you watch the program or content that is on your TV screen
on the LCD screen of the Touch remote. The long distance, Wi-Fi mode requires a
few additional setup steps. It also requires you to attach Samsung’s Wireless LAN
Adaptor (WIS09ABGN, WIS09ABGN2, or WIS10ABGN) to one of your TV’s USB
ports.
•
As a networked, Wi-Fi remote
As a networked, Wi-Fi remote, your Touch Remote gives you all the functions and
features of the IR and the extended distance modes and also gives you access to
the Multimedia function which lets you listen to or view music, movie, and picture
fi les from your PC on your TV screen. You can also download upgrades to your
Touch Remote’s software directly from the Internet.
The networked, Wi-Fi mode requires the largest number of setup steps. In addition,
to use the networked, Wi-Fi mode, you need a working local area network and
a wireless router. You also need to attach Samsung’s Wireless LAN Adaptor
Touch Remote
(WIS09ABGN, WIS09ABGN2, or WIS10ABGN) to one of your TV’s USB ports. To
use the Multimedia function, you need to install Samsung’s PC Share Manager on
your PC. You can download PC Share Manager from http://www.samsung.com.
6
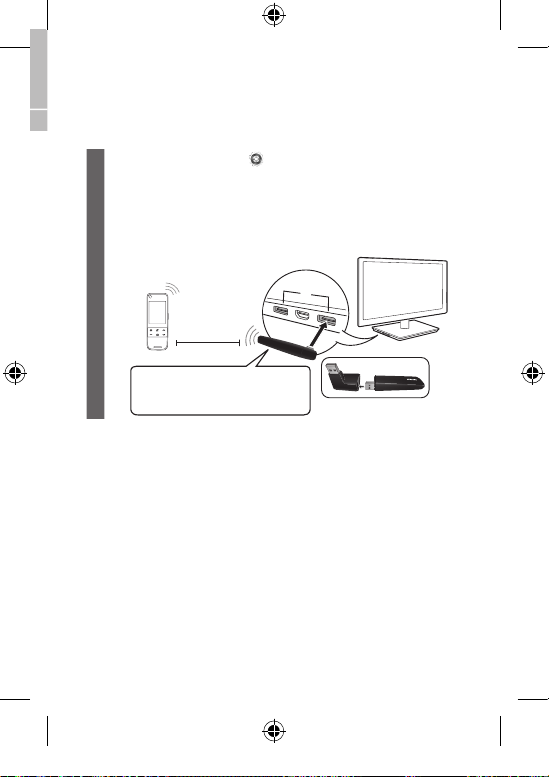
In the services main screen, tap g
• A connection cannot be established using Network Setup unless the TV and
touch remote are connected in First Time User Setup.
• Configure the network settings for the TV before you connect the TV and touch
remote. For details, refer to the TV manual.
• The touch remote uses IR signals. Point the touch remote at the IR sensor on the
TV when you press a button.
Touch Remote
Within 8 Inches
(20 cm)
If you want to use the SAMSUNG Wireless
LAN Adapter(WIS09ABGN, WIS09ABGN2
or WIS10ABGN), you should use a gender
featuring for the connection.
<Remote Settings>
Stand Side Panel
or
g
<Network>
.
Touch Remote
7
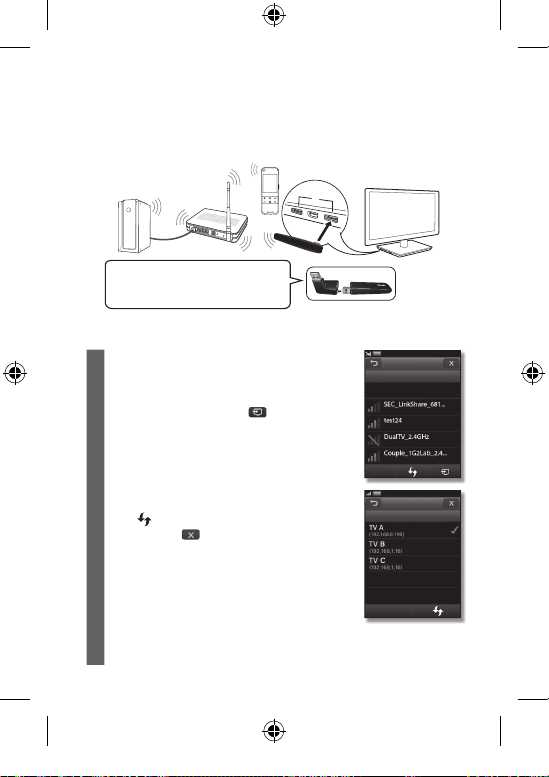
How to connect using the Samsung Wireless LAN Adapter
1 Connect the Samsung Wireless LAN Adapter to the TV.
• To connect using Samsung Auto Confi guration, turn off
any other devices nearby that support auto confi guration
fi rst.
2 Keep within 8 inches (20cm) between Touch Remote and
Samsung Wireless LAN Adapter.
3 On the <Network> Screen, tap <Auto Confi guration>.
• It may take about one minute to establish a wireless
connection between the TV and Touch Remote using the
Samsung Wireless LAN Adapter.
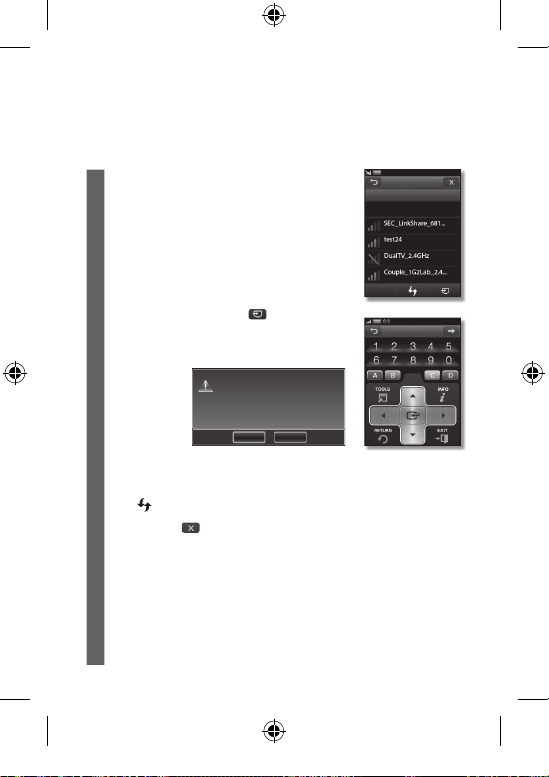
4
If the network is connected, tap
screen appears.
• If the connection fails, choose one of the other connection
methods: PBC(WPS), auto confi guration, or manual
confi guration.
5 On the <Connect TV> screen, select the TV you want to
connect.
• If the TV you want to connect cannot be found on the list,
to retry.
tap
6
When done, tap
Touch Remote
.
. The <Connect TV>
New remote
Touch_remote(00-12-FB-D2-F2-39) has
been detected. Choose whether to use
the remote control.
Allow
Deny
8
Network
Select a Network.
Auto Confi guration
Unsecured
Secured
Unsecured
Secured
PBC(WPS)
Connect TV
Touch Remote
PC
If you want to use the SAMSUNG Wireless
LAN Adapter (WIS09ABGN, WIS09ABGN2
or WIS10ABGN ), you should use a gender
featuring for the connection.
Wireless
Router
Stand Side Panel
or
How to connect using the wireless router
1 On the <Network> screen, select the APs (Access Point)
connected to the TV.
• To connect the network, you can select one of the other
methods: PBC(WPS), PIN or Security Key.
2
If the network is connected, tap
screen appears.
• If the connection fails, choose one of the other connection
methods: PBC(WPS), auto confi guration, or manual
confi guration.
3 On the <Connect TV> screen, select the TV you want to
connect.
• If the TV you want to connect cannot be found on the list,
to retry.
tap
4
When done, tap
.
. The <Connect TV>
Network
Select a Network.
Auto Confi guration
Unsecured
Secured
Unsecured
Secured
PBC(WPS)
Connect TV
Select a TV.
Touch Remote
9
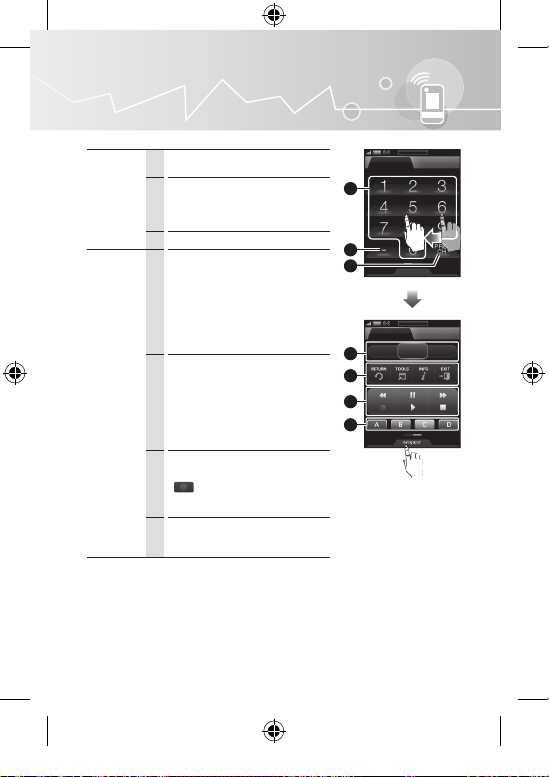
TV control menu
Press numbers to directly access
1
channels.
Number
keys
Menu keys
Touch Remote
10
Press the dash (-) to access
additional digital channels broadcast
2
on the same channel.
For example, 22-1, 22-2, etc.
Returns to the previous channel.
3
CONTENT: Displays the Content
View, which includes Channel List,
Internet@TV, Media Play, AllShare,
and 3D.
4
MENU: Brings up the OSD (On
Screen Display).
INTERNET@TV: Link to various
internet services.
RETURN: Returns to the previous
menu.
TOOLS: Quickly select frequently
used functions.
5
INFO: Displays information on the
TV screen.
EXIT: Exits the menu.
Use these buttons in Media Play
and Anynet+ modes.
6
(
: Controls recording for
Samsung recorders that have the
Anynet+ feature)
Buttons used in the Channel List,
Internet@TV, Media Play menu,
7
etc.
1
2
3
4
5
6
7
Keyboard
TV Control Services
Navigation
Keyboard
TV Control Services
CONTENT
MENU
INTERNET
@TV
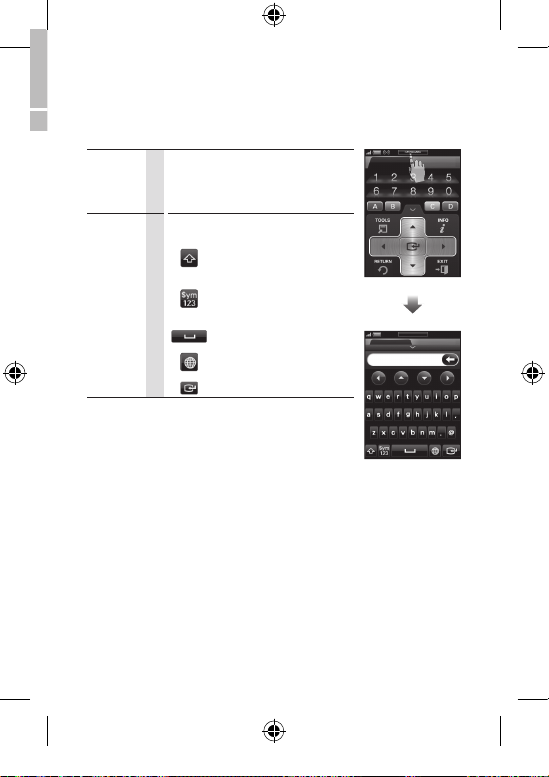
Navigation
Keyboard
Move left, right, up, down, return, and
exit.
You can use the QWERTY keyboard to
type text on the TV screen.
Enables you to change the
text fi elds to lower case and
upper case.
Enables you to change the
text fi elds to numbers and
icons.
Inputs a blank space on the
text fi elds.
Changes the language for the
QWERTY keyboard.
Confi rms your input.
TV Control Services
Keyboard
TV Control Services
Touch Remote
11

Services
With Services, you can go directly to an item which was originally set on the main
screen.
Play the program of the main
TV on the remote screen
simultaneously.
Listen to or view the music,
movies, and pictures from your
PC.
Provide the on-air channel list.
CH info
Add, edit, and search channels.
Devices
Add the external device you want
control
to control.
Set the TV and the remote control
Settings
menus.
Touch Remote
12
Twin display
Multimedia
Press to view net contents and search information
such as time and news through your TV without
opening an internet browser on your PC.
Press to access the media of the connected
device. (Blu-ray player, DVD player, etc.)
Press to switch the video effect from 2D to 3D,
so you can enjoy 3D multimedia using a pair of
3D Active glasses.
Press to access content provided by Yahoo!
widget.
Press to create a channel list on the TV screen
that lets you access favorite channels quickly.
Move to the favorite channel you set previously.
Press to set the screen ratio to 16:9, Zoom1,
Zoom2, or 4:3.
Press to turn the subtitle setting on and off.
Press to set the multi-track sound to SAP or
stereo.
TV Control Services
TV Control Services
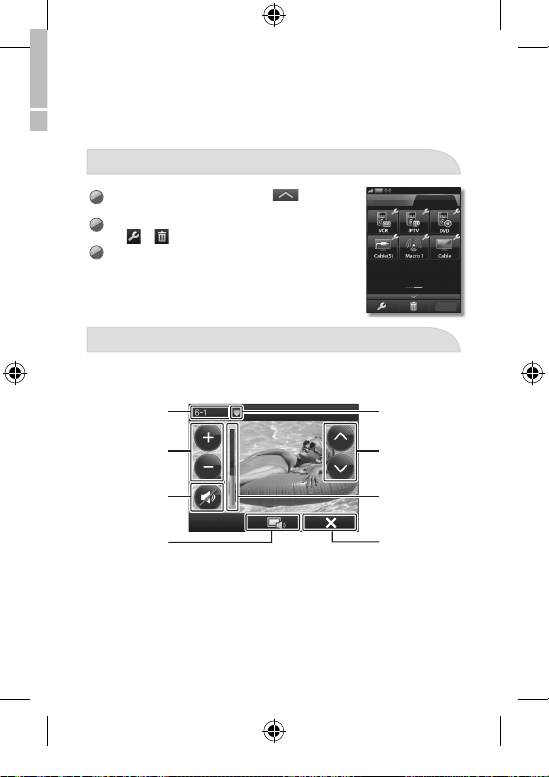
HOT-KEY menu
On the Services main screen, Touch to manage
1
the HOT-KEYS.
To modify or delete a hot key, drag and drop the hot key
2
to or .
Tap
.
<OK>
3
TV Control Services
OK
Twin Display
With Twin Display, you can watch the channel displayed on the main TV simultaneously
on the LCD screen of the remote.
The Touch Remote does not support 3D pictures.
Channel
information
Volume button
Cable
Favorite
Channel
Channel button
Mute button
ON/OFF the main
TV button
<Touch Remote Screen>
Volume Bar
EXIT button
Touch Remote
13
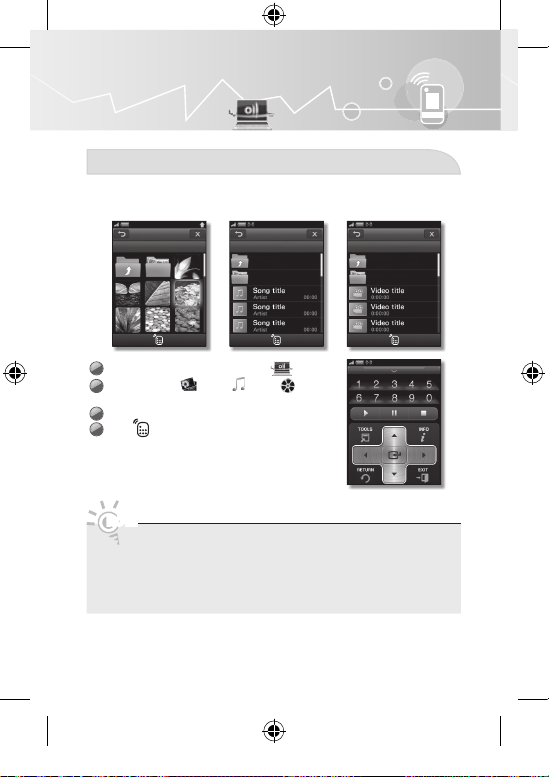
Multimedia
Photo / Music / Movie (from your PC)
Before you can use the Multimedia function, you must link your TV and the Touch
remote to your home network and install Samsung PC Share manager on your PC.
Photo
Folder name
On the Services main screen, touch .
1
Select <Photo , Music , Movie > on the
2
contents screen.
You can view or play the contents on TV.
3
Tap to control the contents.
4
NOTE
Touch Remote
• You must install Samsung PC Share Manger (ver 4.0 or higher) on your PC and
allow access to your TV and the Touch Remote to play contents from your PC
on your TV using the remote.
• The PC, TV and Touch Remote should be connected to the same sub-
network.
• You can download PC Share Manager from www.Samsung.com
14
Music
Folder name
Upper Folder
Folder 2
Upper Folder
Folder 2
Movie
Folder name

CH Info
You can configure various settings for your TV channels with features such as Program
information, Favorite channels and Channel editing.
View the Channel List
On the Services main screen, touch .
1
• The channel list appears. If there are no stored
channels, a pop-up message appears.
Tap . The list of channels added to the TV will
2
appear.
Tap a channel. The current channel on the TV switches
3
to the selected channel.
Search
Channel List
Cable
Cable
Cable
Cable
Cable
Cable Added
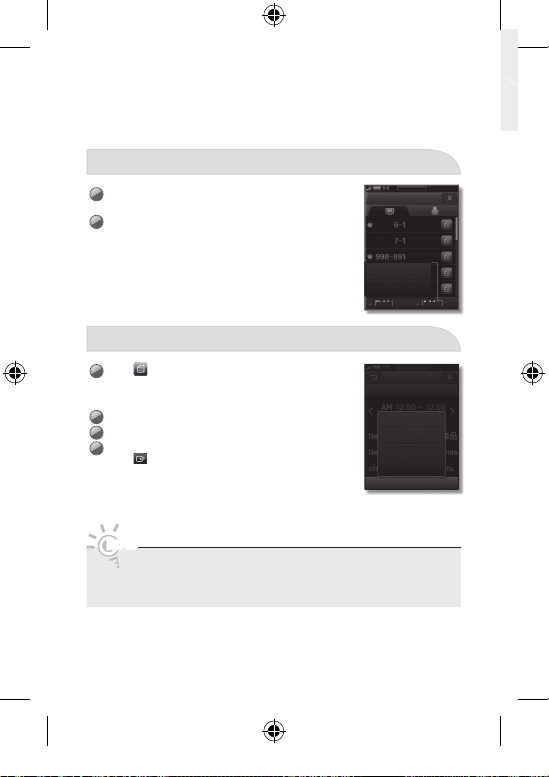
Touch Remote Channel List
Tap . The list of channels added to the Touch
1
Remote appears.
To register a channel as a hot key in Services, touch
2
and hold the channel in the channel list submenu
for one second. After the <Add to Services> menu
appears at the bottom of the screen, drag and drop the
channel to <Add to Services>.
If a channel is added to the list of channels of the Touch
3
Remote, a hot key for the channel is created in the
<Services> main screen.
To delete a channel from the list of channels in the
4
Touch Remote, drag and drop the channel to
• Channels can also be modifi ed or deleted in the
<Services> main screen.
Search
Channel List
Cable
Cable
Cable
Cable
Cable
TV Control Services
.
Touch Remote
15
Antenna Mode / Channel List Mode
Cable
Cable
To change the antenna mode, tap <Air/Cable> on the
1
Channel list screen.
To change the channel list mode, tap <All/Added/
2
Favorite> on the Channel list screen.
Channel Edit (analog channels only)
Tap on the Channel list screen.
1
• The channel list is appears. If there are no stored
channels, a pop-up message appears.
Tap <Option> on the Detail Info screen.
2
Tap <Edit Name> on the Option menu.
3
Enter the desired channel name using the keyboard.
4
Tap . Even if you are viewing an external source
on the TV, you can view TV channels on The Touch
Remote screen by tapping <Preview>.
Touch Remote
NOTE
• When you change the attitude of the remote from vertical to horizontal or
vise versa, the remote screen automatically changes from portrait view to
landscape view or back.
16
Search
Channel List
Cable
Cable
Cable
Air
Cable
Cable
Cable
Cable Added
Search
Channel List
Preview
Watch On TV
Guide
Edit Name
Option

Devices control
This function lets you control connected external devices such as Blu-ray players,
DVD players, etc. with your LCD remote. After you connect the device to the TV, the
LCD remote can learn the navigation, number, and other keys needed to operate and
control the device. The LCD remote controls the devices with its standard, IR (infra red)
control functionality.
• Make sure the external device is properly connected to the TV before adding it to the
remote control.
Add External device
On the Services main screen, touch .
1
Tap <Device type> on the screen.
2
To change the device name, tap <Edit>.
3
Select the input source on the list.
4
Select <Remote Settings> on the screen to search for
5
the desired code set.
Select the brand on the list and choose the code set
6
you want.
Add Remote
Device Type
Select
Source
Select Source
Remote Settings
Search CodeSet
Select Brand
Rowa
Sampo
Samsung
Sanyo
Schmartz
Schneider
Edit
Done
Search
Touch Remote
17
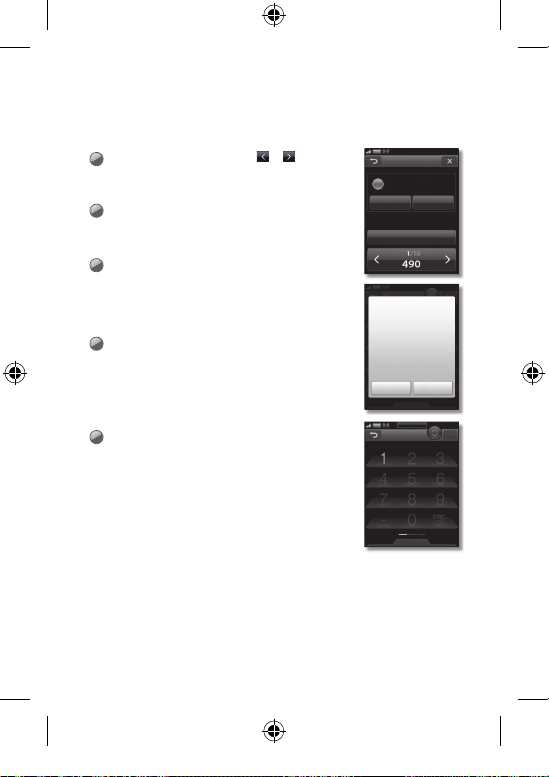
Change the code set by tapping or and then
7
select <Send IR>.
If the external device turns on or off, select <Apply> to
register the external device.
If you can’t find codeset on the list, tap <Learn> to
8
start the remote’s external device registration process.
• Tap <Help> for learning guide or tap <OK> to start
learning.
You must now assign the control buttons on the
9
device’s remote to corresponding buttons on the LCD
remote. To begin, tap a button on the LCD remote’s
screen to which you want to assign a button from the
device’s remote.
• The selected button blinks.
Press the corresponding button on the device’s remote.
10
• When the button LCD remote’s stops blinking, the
assignment is complete. Assign the other buttons in the
same way.
• To register the Channel, Volume and Mute buttons on
an external device, tap <VOL/CH> at the top of the
touch remote.
Select <OK> to complete the registration.
11
Test
Send IR to device
POWER
Send IR
Detail
Apply
Select a button, and enter the
device remote control button
you wish to learn within 10
seconds. Press OK to fi nish
learning.
Help OK
Navigation
VOL/CH
Learn
OK
Touch Remote
18
Navigation
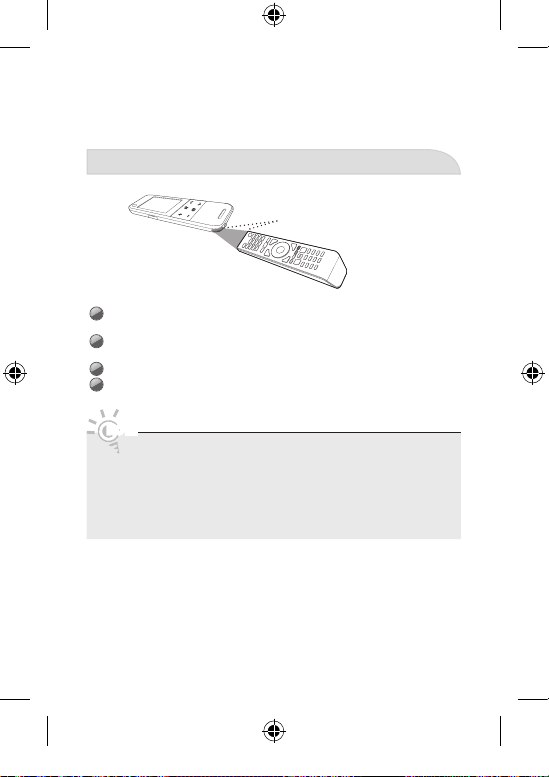
Learning Remote
IR receiver
The distance between Samsung remote and the remote to be learnt is at a ideal
1
distance of 2cm.
The learning LED is directly facing the remote to be learnt (within 45-60 degree
2
depending on the LED chosen).
The two remotes are placed on a fl at non glossy surface.
3
The remote to be learnt does not feature a long signal.
4
NOTE
• Put the LCD remote and the device remote about 2cm apart and confi gured
as shown above. If you do not, the remote learning process may not operate
normally.
• Some external device remote controls are not compatible with the LCD
remote. Search the codeset to fi nd the compatible remotes.
• During remote control learning, ensure there is no object between the IR
sensors on the Touch Remote and the remote control for the external device.
Touch Remote
19
Settings menu
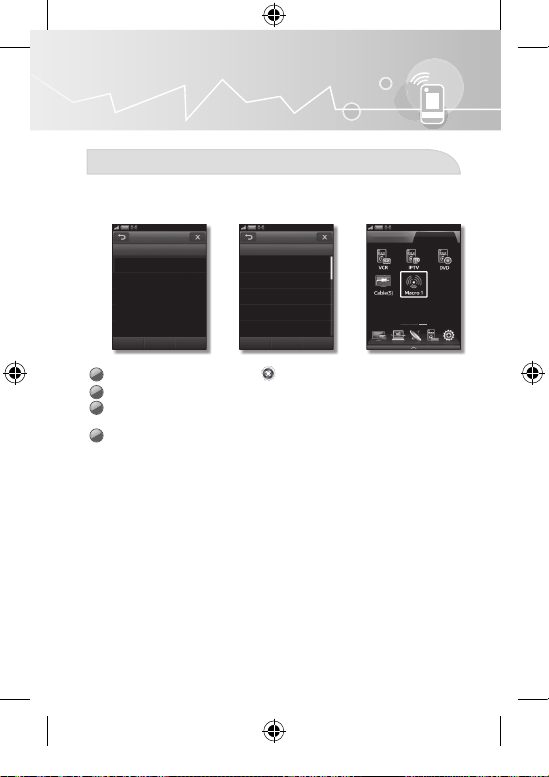
Add Macro
You can register a function of an added external device as a hot key in <Services>.
When you tap that hot key, the device performs the function. For example, turns on.
Add Macro
Device List
TV
Next
On the Services main screen, tap g <Add Macro>.
1
Select a device, then a function, and then tap <Next>.
2
Select <Add> to add the function and <Edit> to rename it. (for example, DVD
3
On).
Tap <Test>. If the key works properly, select <Done>.
4
ex) Power Macro ( TV Power ON - 1sec - STB Power ON)
Touch Remote
20
Add Macro
Select device control
POWER
POWER ON
POWER OFF
VOL-UP
VOL-DOWN
Next
TV Control Services
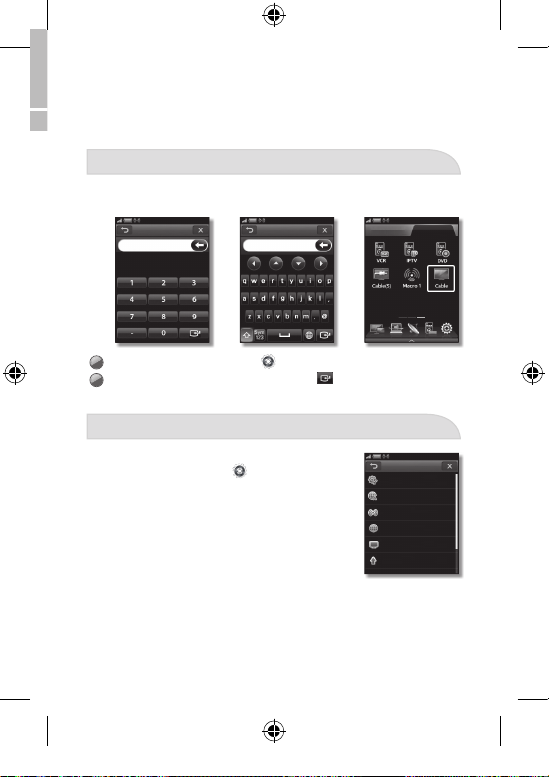
Channel macro
You can register a function of an added external device as a hot key in <Services>.
When you tap that hot key, the device performs the function. For example, turns on.
Channel macro Channel macro
Enter the channel number. Enter the channel name.
On the Services main screen, tap g <Channel macro>.
1
Modify and rename the target channel and tap .
2
TV Control Services
Remote Settings
You can control a range of settings on the remote.
On the Services main screen, tap
g <Remote Settings>.
Remote Settings
General Settings
Language
Select Signal
Network
Connect TV
S/W Upgrade
Touch Remote
21
General Settings
Set the Basic settings.
• <Button Volume>: Control the volume of the remote.
• <Brightness>: Control the brightness of the screen.
• <Touch Alert Tone>: Set the screen touch mode to sound or vibration.
• <Backlight Duration>: Set the interval time of the auto LCD off.
Language
Select the menu language from three choices.
• <Language>: Set the desired language type.
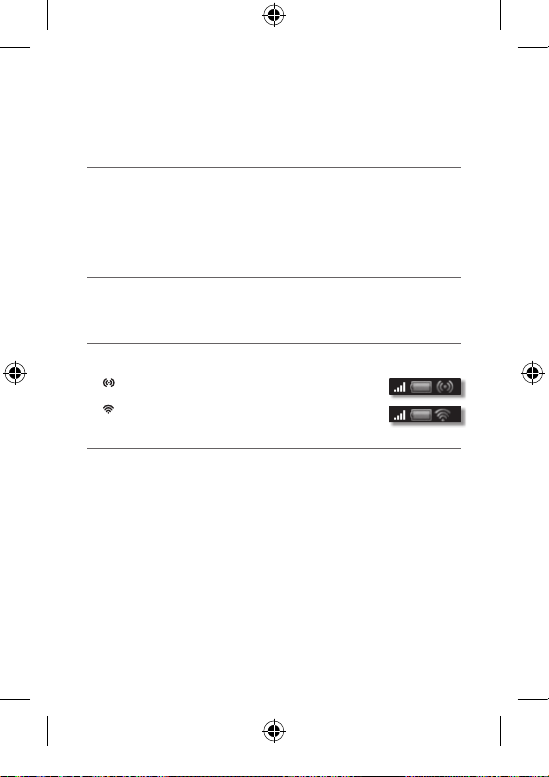
Select Signal
Select the type of signal emitted by the remote control.
• <WIFI(AUTO)>: “WIFI” is the default option when the TV is linked to the Touch Remote.
( : The remote displays this icon If it transmits the signal by wifi .)
• <IR>: Infra red.
(
: The remote displays this icon If it transmits the signal by IR.)
Network
For configuring <Network> settings, see page 6.
• Network conditions and environmental factors (including but not limited to) volume of
network traffi c, building materials, and construction may lower actual data throughput
rate.
• Environmental conditions will affect wireless signal coverage.
Touch Remote
22
Connect TV
For configuring <Connect TV> settings, see page 8.
S/W Upgrade
Upgrade the software of the remote control to the latest version. The charger must be
connected before you perform an upgrade.
Initialization
Reset the remote control to initial settings. The user settings will be deleted and
manufacturer’s default settings restored.
Self Diagnosis
Test the current state of network and the video and sound.
System Information
Check the network and software version information.
Touch Remote
23
 Loading...