

Sl E
Y Sl
E
GREEN
EF
E
TO
IV1257A
'S I STALLAT
CONTENTS
SAFETY WARNING SIGNS ..............................................................2
OPERATINGINSTRUCTIONS.......................................................4
SETTINGUPTHEREFRIGERATOR.......................................................4
MAJORFEATURES....................................................................................4
CONTROLPANEL......................................................................................5
DIGITALPANEL...........................................................................................6
TEMPERATURECONTROL .....................................................................7
ICEANDCOLDWATERDISPENSER.....................................................7
SHELVESANDBINS..................................................................................8
FOODSTORAGEGUIDE ..........................................................................9
ARCTICSELECTZONETM DRAWERGUIDE.........................................11
FRESHSELECTZONETM DRAWERGUIDE...........................................12
REMOVINGTHE FREEZERACCESSORIES.........................................13
REMOVINGTHE FRIDGEACCESSORIES..........................................13
REMOVINGTHEARCTICSELECTZONEACCESSORIES.................14
REMOVINGTHE FRESHSELECTZONEACCESSORIES..................14
CLEANINGTHEACCESSORIES............................................................15
CHANGINGTHE INTERIORLIGHT........................................................16
WATERFILTER.........................................................................................18
DOORS......................................................................................................18
INSTALLATION INSTRUCTIONS...............................................19
INSTALLATIONOF THE REFRIGERATOR............................................20
ADJUSTINGTHE HEIGHTBETWEENTHEDOORS............................21
REMOVINGTHE REFRIGERATORDOORS..........................................24
REATTACHINGTHE REFRIGERATORDOORS....................................25
CHECKINGTHEWATERDISPENSERLINE..........................................32
INSTALLATIONOF THEWATERDISPENSERLINE.............................32
BEFOREYOUCALL FORSERVICE.......................................................37
DA99-01418A REV(0.1)
• Beforeoperatingtheappliance,pleasereadandretainthismanualthoroughlyforyourreference.
• Becausethefollowingoperatinginstructionscovervariousmodels,thecharacteristicsofyourrefrigeratormay
differslightlyfromthosedescribedinthismanual.
/k
WARNING
•Theapplianceisnotintendedforuseby childrenor infirmpersonswithoutadultsupervision.
• Childrenshouldbesupervisedto ensurethattheydo notplaywiththeappliance.
•Thisrefrigeratormustbe properlyinstalledand locatedinaccordancewiththe manualbeforeitisused.
• Usethisapplianceonlyforitsintendedpurposeasdescribedinthisinstructionmanual.
•Westronglyrecommendthatany servicingbeperformedbya qualifiedindividual.
•Thisproductisintendedonlyforthe storageoffoodina domesticenvironment.
CAUTION/WARNINGSUSED OTHERSIGNS USED
Q Represents something you must NOT do.
Represents something you must NOT
/k
WARNING
Indicates that a danger of
death or serious injury exists.
disassemble.
(_) Represents something you must NOT touch.
O Represents something you must follow.
Indicates that you must disconnect the
_' power plug from the socket.
Represents that a ground is needed to pre-
O vent electric shock.
CAUTION
Indicates that a risk of
personal injury or material
damage exists.
It is recommended that this should be
handled by a service center.
Please follow the Safety Warning Signs to prevent injury to users or other persons.
After reading these owner's manual, please keep it in a safe place for reference.
/_ WARNING SIGNS
Q o not plugseveralappliancesintothe samemultiple
receptacle.
•Thiscouldcauseoverheatingandthe riskof fire.
Makesure that the power plug is notsquashed or dam-
aged bythe back of the refrigerator,
•A damagedpowerplugmayoverheatandcausefire.
Do not directly spray water inside oroutside the refrig-
erator/ freezer.
•Thereisa riskof electricshock.
Do not use aerosols near the refrigerator.
•Thereisa riskof explosionorfire.
Do not bend the power cord excessively or place heavy
articles on it.
•Thisconstitutesa firehazard.Ifthe powercordis dam-
aged,haveit replacedimmediatelyby themanufacturer
or itsserviceagent.
Do not insert the power plug with wet hands.
•Youmayreceiveanelectricshock.
Do not puta containerfilled withwater onthe refrigerator.
• Ifspilled,thereisa riskoffire orelectricshock.
Do not install the refrigerator in a damp place or a
place where it maycome in contact with water.
• Deterioratedinsulationoftheelectricalparts maycause
electricshock orfire.
Do not store volatile or flammable substances in the
refrigerator.
•Thestorageof benzene,thinner,alcohol,ether,LPgas
andothersuchproductsmaycauseexplosions.
Q Donot use a cordthat showscracksorabrasiondam-
agealongits lengthorat either end.
Donot use mechanicaldevicesorany othermeansto
acceleratethedefrostingprocess,
otherthanthose recommendedbythe manufacturer.
Donot damagetherefrigerantcircuit.
Donot placeor usean electricalapplianceinsidethe
refrigerator/freezer,unlesstheyare of a type recom-
mendedbythe manufacturer.
Do disassemble the
not or repair refrigeratorbyyourself.
•You runthe risk of causing a fire, malfunctionand/or
personalinjury.
{_ Pullthe powerplug out of the socketbefore
changingthe refrigerator'sinteriorlight.
• Otherwise,there is a risk of electricshock.
If you wish to dispose of the refrigerator,throw it
awayby first removing the doors and seals.
• Do soin a waythat itis not possiblefora childto
remaintrapped inside.
The refrigerator must be grounded.
O
eYou mustground therefrigeratorto preventany
power leakagesor electric shockscaused bycurrent
leakage from the refrigerator.
Never usegas pipes, telephonelines or other
potential lightening rods as ground.
• Improperuseofthe groundplugcan resultina risk of
electricshock.
//_ CAUTIONSIGNS
Q Do not overfillthe refrigerator with food.
• Whenyou open thedoor, an item mayfall out and
causepersonal injuryor material damage.
Donot put bottles orglasscontainersin the freezer.
• Whenthe contents freeze,the glass may break and
causepersonal injury.
If the wall socket is loose, do not insert the power
plug.
• Thereis a riskof electric shock or fire.
Do notdisconnectthe power cord by pulling on it.
®
• Damage to the cord maycause a short-circuit, fire
and/orelectric shock.
• If the powercord is damaged,it mustbe replaced
bythe manufacturer,a certified service agent or
qualifiedservice personnel.
Do notstore articleson the top ofthe appliance.
• Whenyouopen or close the door,the articlesmayfall
andcausepersonalinjuryand/ormaterialdamage.
Do notstore pharmaceutical products, scientific
materialsand temperature-sensitiveproducts in
the refrigerator.
• Products that requirestricttemperature controls
mustnot be stored in the refrigerator.
Do not let children hang on the door because a
serious injury may occur.
If you sensechemical odor or smoke, pull out the
power plug immediately and contact your SAM-
SUNG Electronicsservice center.
Do notre-freeze frozen foods that havethawed
completely.
Do nottouch the inside walls of the freezeror
products stored in the freezer with wet hands.
• It maycause frostbite.
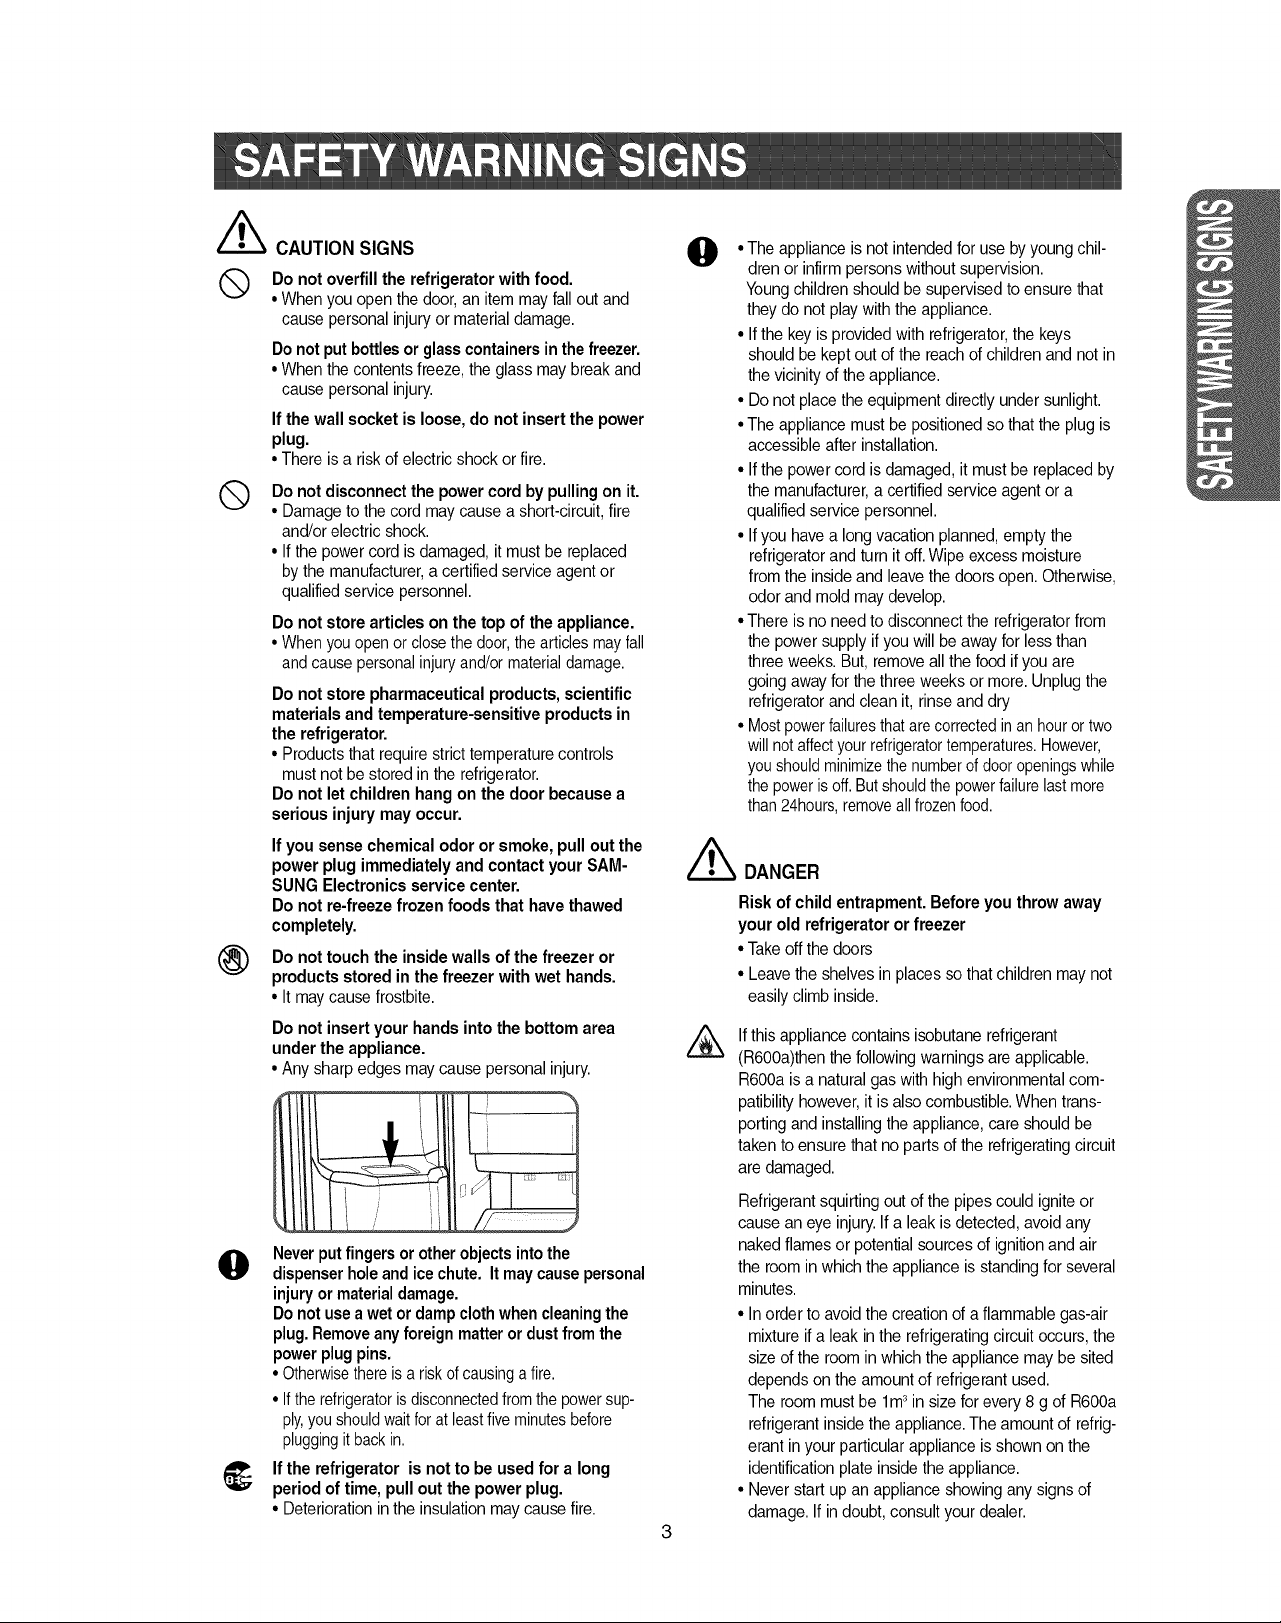
Do notinsert your hands into the bottom area
under the appliance.
• Any sharp edges maycause personal injury.
Neverput fingers or otherobjectsintothe
@
dispenserholeandice chute. It maycausepersonal
injuryormaterialdamage.
Donotusea wet or dampclothwhencleaningthe
plug.Removeanyforeign matteror dustfrom the
powerplugpins.
• Otherwisethereisa riskof causingafire.
• Ifthe refrigeratorisdisconnectedfromthe powersup-
ply,youshouldwaitforat leastfive minutesbefore
pluggingit backin.
_; If the refrigerator is not to be used for a long
period of time, pull outthe power plug.
• Deteriorationin the insulation may causefire.
•The appliance is not intendedfor use byyoung chil-
0
/_ DANGER
dren or infirm personswithout supervision.
Youngchildrenshould be supervisedto ensurethat
they do not play with the appliance.
• Ifthe key is providedwith refrigerator,the keys
shouldbe kept out of the reachof children and not in
the vicinity ofthe appliance.
• Donot placethe equipment directly undersunlight.
•The appliance must be positionedso that the plug is
accessibleafter installation.
• Ifthe power cord is damaged,it mustbe replaced by
the manufacturer,a certified serviceagentor a
qualified servicepersonnel.
• Ifyou havea long vacationplanned, emptythe
refrigeratorand turn it off.Wipe excess moisture
from the insideand leavethe doorsopen. Otherwise,
odor and mold maydevelop.
•There is no need to disconnectthe refrigeratorfrom
the power supply ifyou will beaway forless than
three weeks.But, removeall the foodif you are
goingaway for the threeweeks ormore. Unplug the
refrigeratorand clean it, rinseand dry
• Mostpowerfailuresthatare correctedin an houror two
willnot affectyourrefrigeratortemperatures.However,
youshouldminimizethenumberof dooropeningswhile
thepoweris off.Butshouldthe powerfailurelastmore
than24hours,removeallfrozenfood.
Risk of child entrapment.Before you throw away
your old refrigeratoror freezer
• Takeoff the doors
• Leavethe shelvesin places sothat childrenmay not
easilyclimb inside.
Ifthis appliance containsisobutanerefrigerant
(R6OOa)thenthe followingwarnings areapplicable.
R6OOaisa naturalgas withhigh environmentalcom-
patibilityhowever,it is also combustible.When trans-
portingand installingthe appliance, care should be
takento ensure that no parts ofthe refrigeratingcircuit
are damaged.
Refrigerantsquirting outof the pipes couldignite or
causean eye injury.If a leak is detected,avoid any
nakedflames or potential sourcesof ignitionand air
the roomin which the applianceis standingfor several
minutes.
• In order to avoid the creationof aflammable gas-air
mixture if a leak inthe refrigeratingcircuitoccurs,the
size of the room in which theappliance may be sited
dependson the amountof refrigerantused.
The roommust be lm 3in size for every 8 g of R6OOa
refrigerantinsidethe appliance.The amount of refrig-
erant in your particularappliance is shown on the
identificationplate insidethe appliance.
• Neverstart up an appliance showingany signs of
damage. If in doubt,consult your dealer.
Onceyou have performedthefollowing steps,your refrigeratorshould befully operational.If not,check
the power supplyand electricitysource. If you haveany questions,contactyourSAMSUNG Electronics
servicecenter.
Cable tie
Placethe refrigeratorin an appropriate
locationwith reasonableclearancebetween
thewall andthe refrigerator.(referto instal-
lationinstructionsin this mannal)
When the refrigerator is plugged in,
the interior light should come on when
you open the doors.
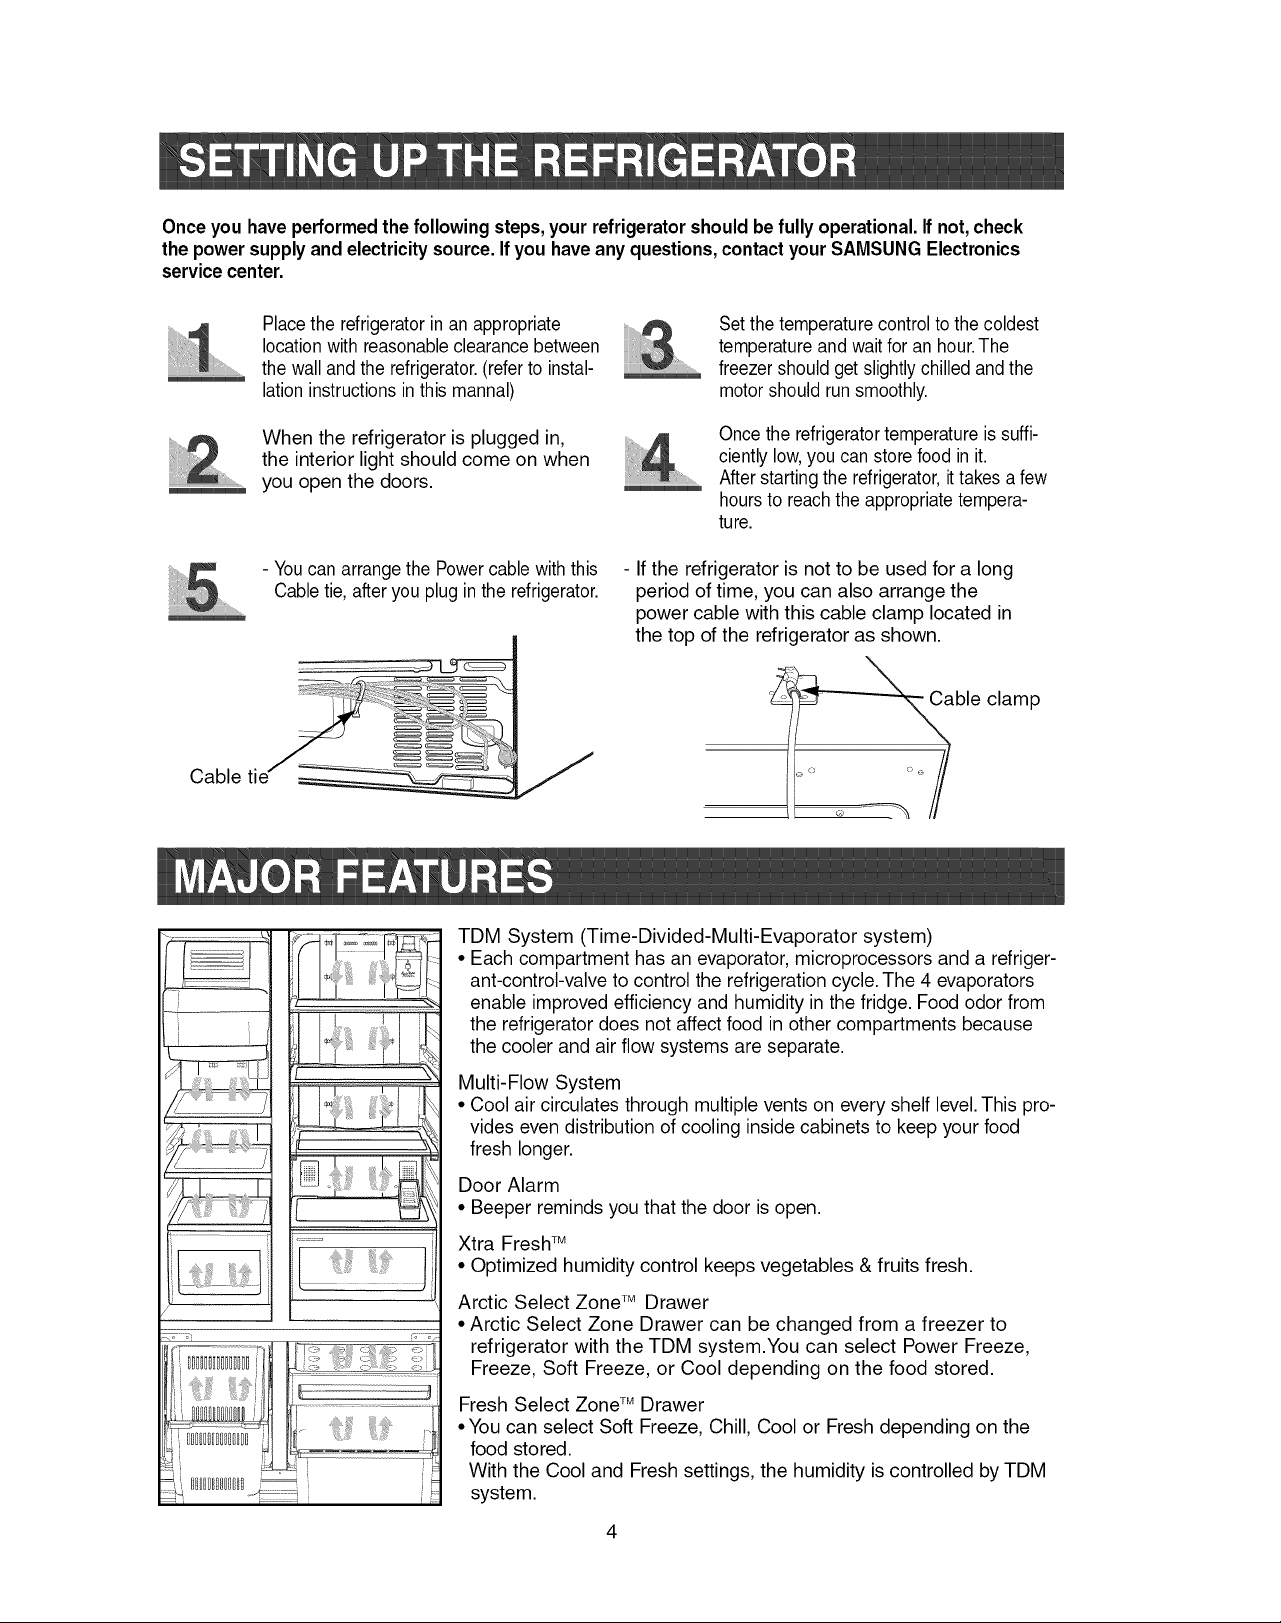
- Youcan arrange the Powercablewith this
Cabletie, afteryou plug inthe refrigerator.
Setthetemperaturecontrolto the coldest
.................
temperatureand waitfor an hour.The
freezer should get slightlychilled andthe
motorshould runsmoothly.
Once the refrigeratortemperatureissuffi-
ciently low,you can storefood in it.
After starting the refrigerator,ittakes a few
hoursto reachthe appropriatetempera-
ture.
- If the refrigerator is not to be used for a long
period of time, you can also arrange the
power cable with this cable clamp located in
the top of the refrigerator as shown.
ble
clamp
o
Q
i I
TDM System (Time-Divided-Multi-Evaporator system)
• Each compartment has an evaporator, microprocessors and a refriger-
ant-control-valve to control the refrigeration cycle. The 4 evaporators
enable improved efficiency and humidity in the fridge. Food odor from
the refrigerator does not affect food in other compartments because
the cooler and air flow systems are separate.
Multi-Flow System
• Cool air circulates through multiple vents on every shelf level.This pro-
vides even distribution of cooling inside cabinets to keep your food
fresh longer.
Door Alarm
• Beeper reminds you that the door is open.
Xtra FreshTM
• Optimized humidity control keeps vegetables & fruits fresh.
Arctic Select ZoneTM Drawer
• Arctic Select Zone Drawer can be changed from a freezer to
refrigerator with the TDM system.You can select Power Freeze,
Freeze, Soft Freeze, or Cool depending on the food stored.
Fresh Select ZoneTM Drawer
•You can select Soft Freeze, Chill, Cool or Fresh depending on the
food stored.
With the Cool and Fresh settings, the humidity is controlled by TDM
J
J
system.
J
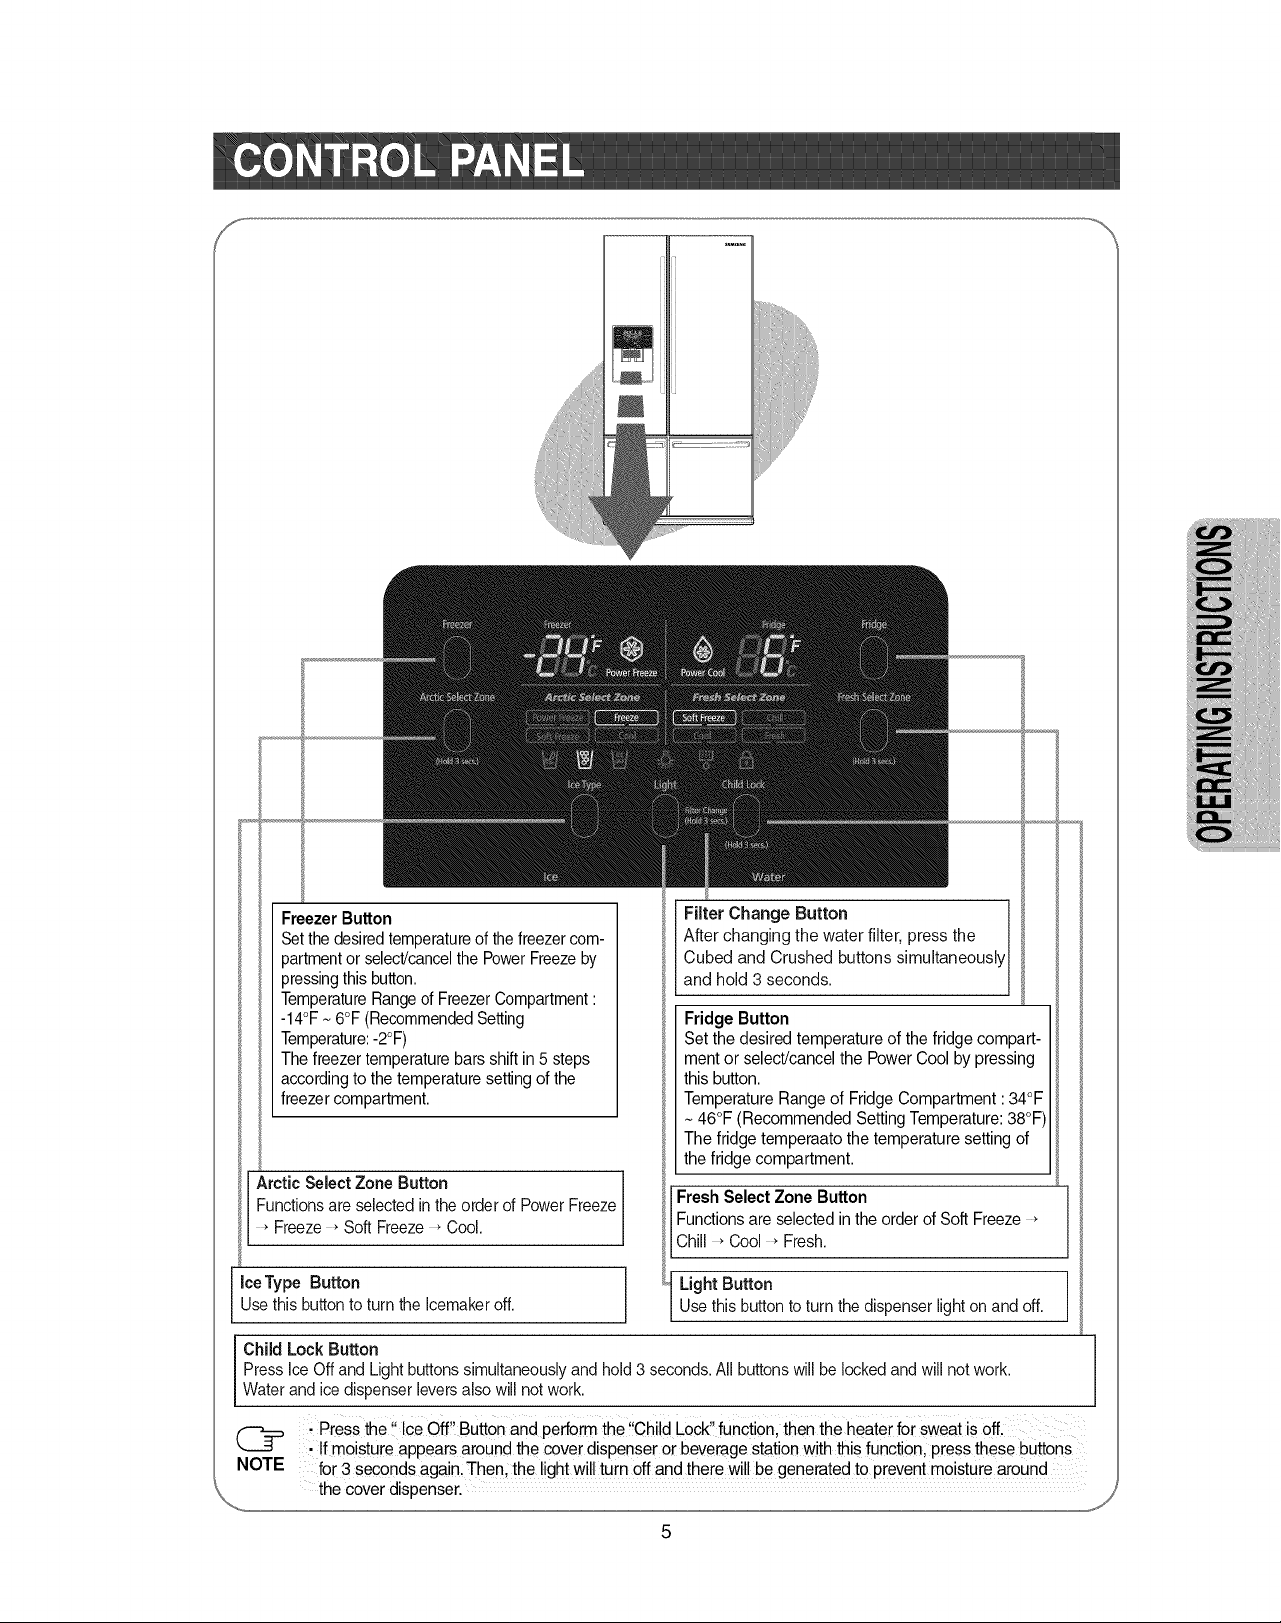
Freezer Button
Set the desiredtemperatureof the freezercom-
partmentor select/cancelthePowerFreezeby
pressingthis button.
TemperatureRangeof FreezerCompartment:
-14°F~ 6°F (RecommendedSetting
Temperature:-2°F)
The freezertemperature bars shiftin 5 steps
accordingto the temperature settingof the
freezer compartment.
ArcticSelect Zone Button
Functionsare selectedinthe order of PowerFreeze
Freeze * Soft Freeze _Cool.
Filter Change Button
After changing the water filter, press the
Cubed and Crushed buttons simultaneously
and hold 3 seconds.
Fridge Button
Set the desired temperature of the fridge compart-
ment or select/cancelthe Power Cool by pressing
thisbutton.
TemperatureRange of FridgeCompartment :34°F
46°F (Recommended Setting Temperature:38°F
The fridgetemperaato the temperature setting of
the fridge compartment.
Fresh Select Zone Button
Functionsare selectedin the order of Soft Freeze
Chill _Cool _Fresh.
IceType Button
Use this buttonto turn the Icemakeroff.
Child LockButton
PressIceOff and Light buttons simultaneouslyand hold3 seconds.All buttonswill be lockedand will notwork.
Waterand icedispenserlevers alsowill not work.
@ • !fmoisture appears around the cover dispenser or beveragestation with this function, pressthese buttons
NOTE for 3 seconds again. Then,the lightwi!l turn 0ffand there wi!! begenerated to preventmoisture around
%.,,.
;Press the!' iceoff,! Button and perfoim the !!Chi!dLock,,function, then the heater for sweat is off.
the cover dispenser.
Light Button
J
Use this button to turn the dispenserlight on and off.
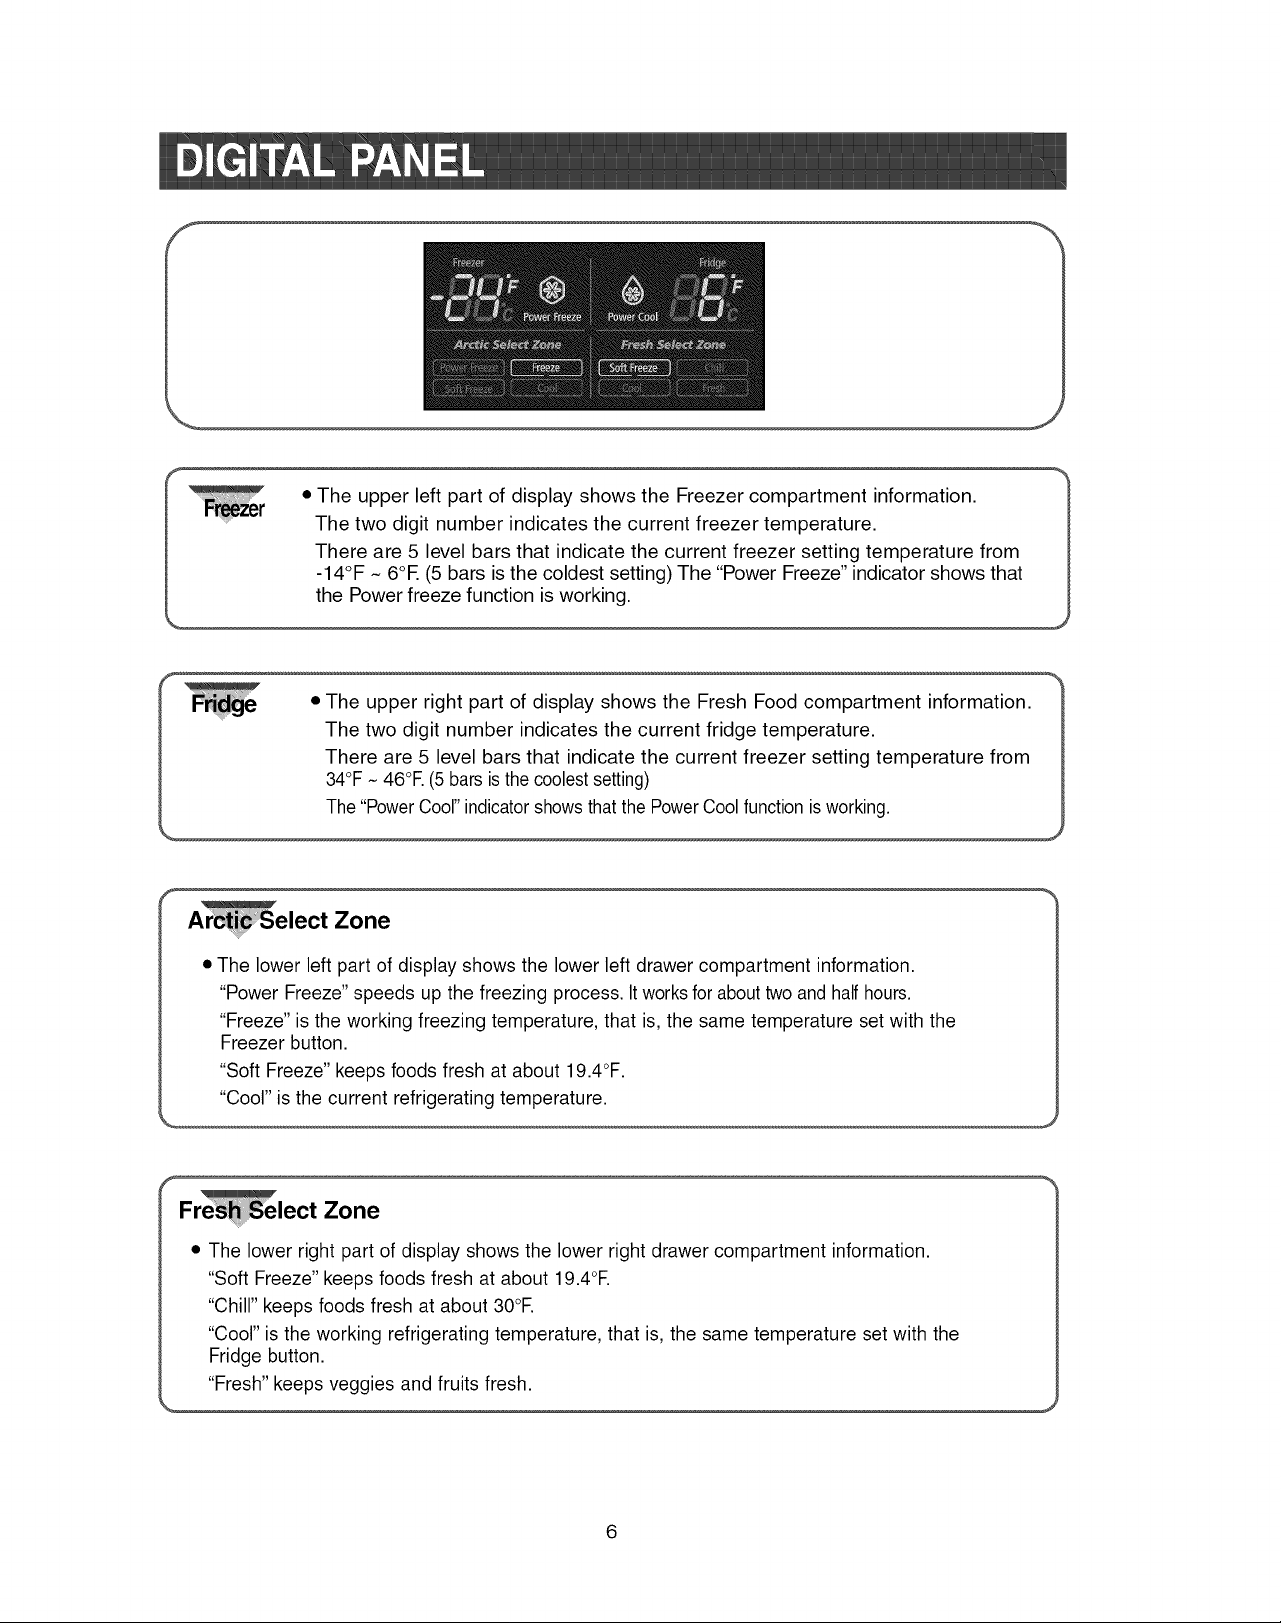
• The upper left part of display shows the Freezer compartment information.
The two digit number indicates the current freezer temperature.
There are 5 level bars that indicate the current freezer setting temperature from
-14°F N6OE (5 bars is the coldest setting) The "Power Freeze" indicator shows that
the Power freeze function is working.
• The upper right part of display shows the Fresh Food compartment information.
The two digit number indicates the current fridge temperature.
There are 5 level bars that indicate the current freezer setting temperature from
34°F~ 46°E (5 bars is the coolestsetting)
The"PowerCool"indicatorshowsthat thePowerCool functionisworking.
lect Zone
• The lower left part of display shows the lower left drawer compartment information.
"Power Freeze" speeds up the freezing process. It worksfor about two andhalfhours.
"Freeze" is the working freezing temperature, that is, the same temperature set with the
Freezer button.
"Soft Freeze" keeps foods fresh at about 19.4°F.
"Cool" is the current refrigerating temperature.
F lect Zone
• The lower right part of display shows the lower right drawer compartment information.
"Soft Freeze" keeps foods fresh at about 19.4°E
"Chill" keeps foods fresh at about 30°E
"Cool" is the working refrigerating temperature, that is, the same temperature set with the
Fridge button.
"Fresh" keeps veggies and fruits fresh.
Freezer
• Thefreezer temperaturecan be set between
-14°Fand 6°E
• Pressthe Freezer buttonrepeatedly untilthe desired
set temperature is shown inthetemperaturedisplay.
• The temperaturedisplaychanges insequence
between-14°F and 6°E
• Afterfive seconds,the display revertsto the actual
freezer temperature,whichchanges as the freezer
reachesthe newtemperature.
Power Freeze
• If youselect "PowerFreeze",the insidetemperatureof
the freezerwilldecreasefor abouttwo anda half hours.
• After "PowerFreeze"finishes,it automaticallyreturnsto
freezersettingtemperature.
Fridge
• The refrigeratortemperaturecan be set between
34°Fand 46°E
• Pressthe Fridge button repeatedlyuntilthe desired
temperatureis showninthe temperature display.
• Thetemperaturedisplaychanges insequence and
revertsin the same wayas thefreezer.
Power Cool
• If youselect "PowerCool",the insidetemperatureof
the fridge willdecreasefor abouttwo and a half hours.
• After"Power Cool"finishes, it automaticallyreturnsto
originalfridgetemperatureyouset.
• When icecream is storedabove4°F in freezer,itma melt
• The temperatureof the freezerOrthe fridge rises fromfrequent openingsand from warmfood.
This may cause thedigital displayto blink:Thedigital displaywillstop blinkingwhenthe freezer
WARNING and refrigeratorreturnto the normaltemperature.
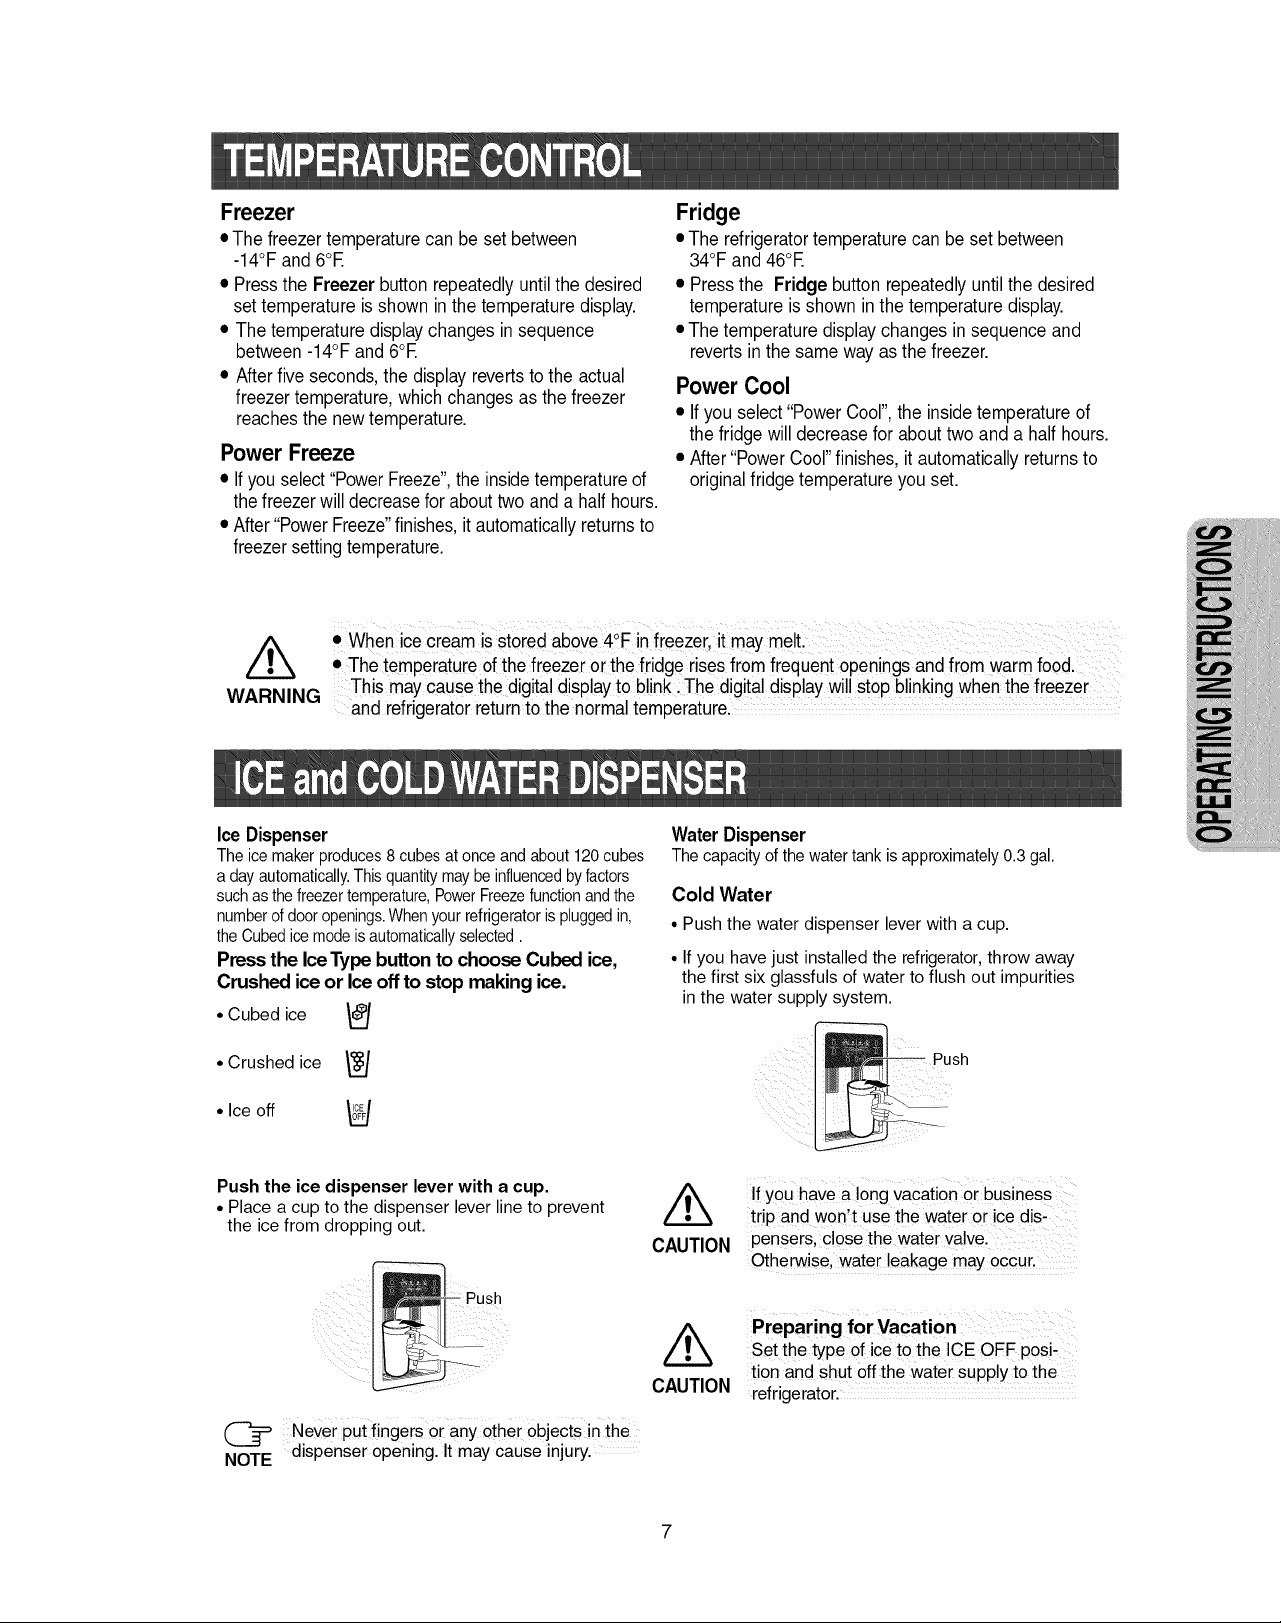
Ice Dispenser
Theicemakerproduces8cubesatonceandabout120cubes
Water Dispenser
Thecapacityof thewatertankisapproximately0.3gal.
adayautomatically.Thisquantitymaybeinfluencedbyfactors
suchasthefreezertemperature,PowerFreezefunctionandthe
numberofdooropenings.Whenyourrefrigeratoris pluggedin,
theCubedicemodeisautomaticallyselected.
Press the IceType buttonto choose Cubed ice,
Crushed iceor Ice off to stop making ice.
• Cubed ice I_/
• Crushed ice
• Ice off
Push the ice dispenser lever with a cup.
• Place a cup to the dispenser lever line to prevent
the ice from dropping out.
L.J
Cold Water
• Push the water dispenser lever with a cup.
• If you have just installed the refrigerator,throw away
the first six glassfuls of water to flush out impurities
in the water supply system.
CAUTION
- Push
CAUTION
Y •
ush
Ifyou have a long vacation or business
trip and won't use the water or ice dis-
pensers, close the water valve.
Otherwise, water leakage may occur.
Preparing for Vacation
Set the type of ice to the ICE OFF posi-
tion and shut off the water supply to the
refrigerator.
Never put fingers or any other objects in the
NOTE dispenser opening. It may cause injury.
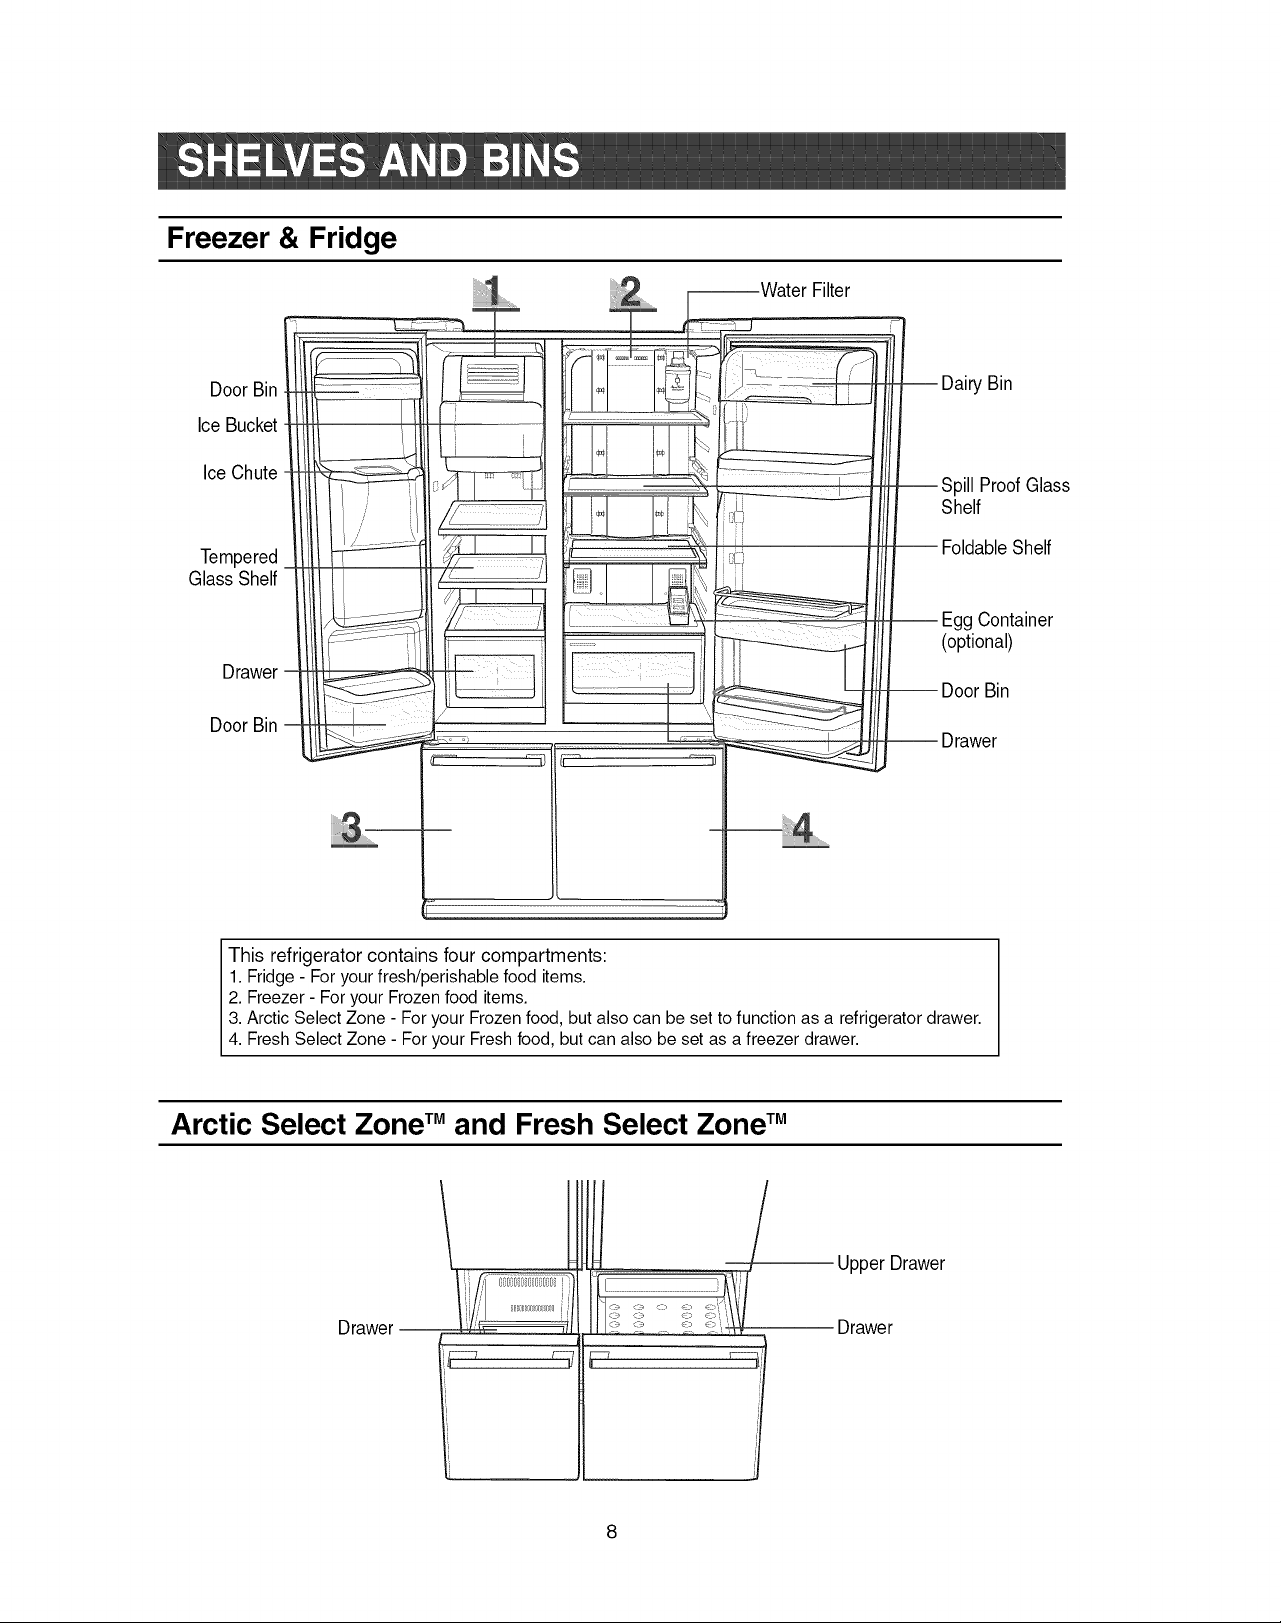
Freezer & Fridge
......F_water Filter
DoorBin
Ice Bucket
IceChute
Tempered
Glass Shelf
Drawer
DoorBin
This refrigerator contains four compartments:
1. Fridge - For your fresh/perishable food items.
2. Freezer - For your Frozen food items.
3. Arctic Select Zone - For your Frozen food, but also can be set to function as a refrigerator drawer.
4. Fresh Select Zone - For your Fresh food, but can also be set as a freezer drawer.
_ I_
t
-- Dairy Bin
--Spill ProofGlass
Shelf
-- FoldableShelf
Egg Container
(optional)
-- DoorBin
-- Drawer
Arctic Select Zone TM and Fresh Select Zone TM
l _/
Drawer--
y_
UpperDrawer
Drawer

FROZEN FOOD STORAGE IN FREEZER
IceChute
Do not putyour fingers hands or anyother unsutableobjectsinthe chute or ice,maker bucket
WARNING
.......
as this may result inpersonal injury or material damage,
Door Bin (Fixed Pocket)
• Can be usedfor small packagesoffrozenfood
Tempered Glass Shelf
• Can be used to store alltypes offrozen food.
Drawer
• Can be used to store meatand dryfoods.Storedfoodshould be wrapped
securely usingfoil or othersuitable wrappingmaterials or containers.
• Toget the best performance from your Refrigerator
- Do not place foods too closely in front of the vents at the rear ofthe appliance as it can obstruct
free air circulation in the freezer compartment.
- Wrap up food properly or place it in an airtight container before putting it in the fridge or freezer
• Do not place carbonated or fizzy drinks in the freezer compartment
• Pleaseobserve maximum storage times and expiration dates of frozen goods.
FRESH FOOD STORAGE IN FRIDGE
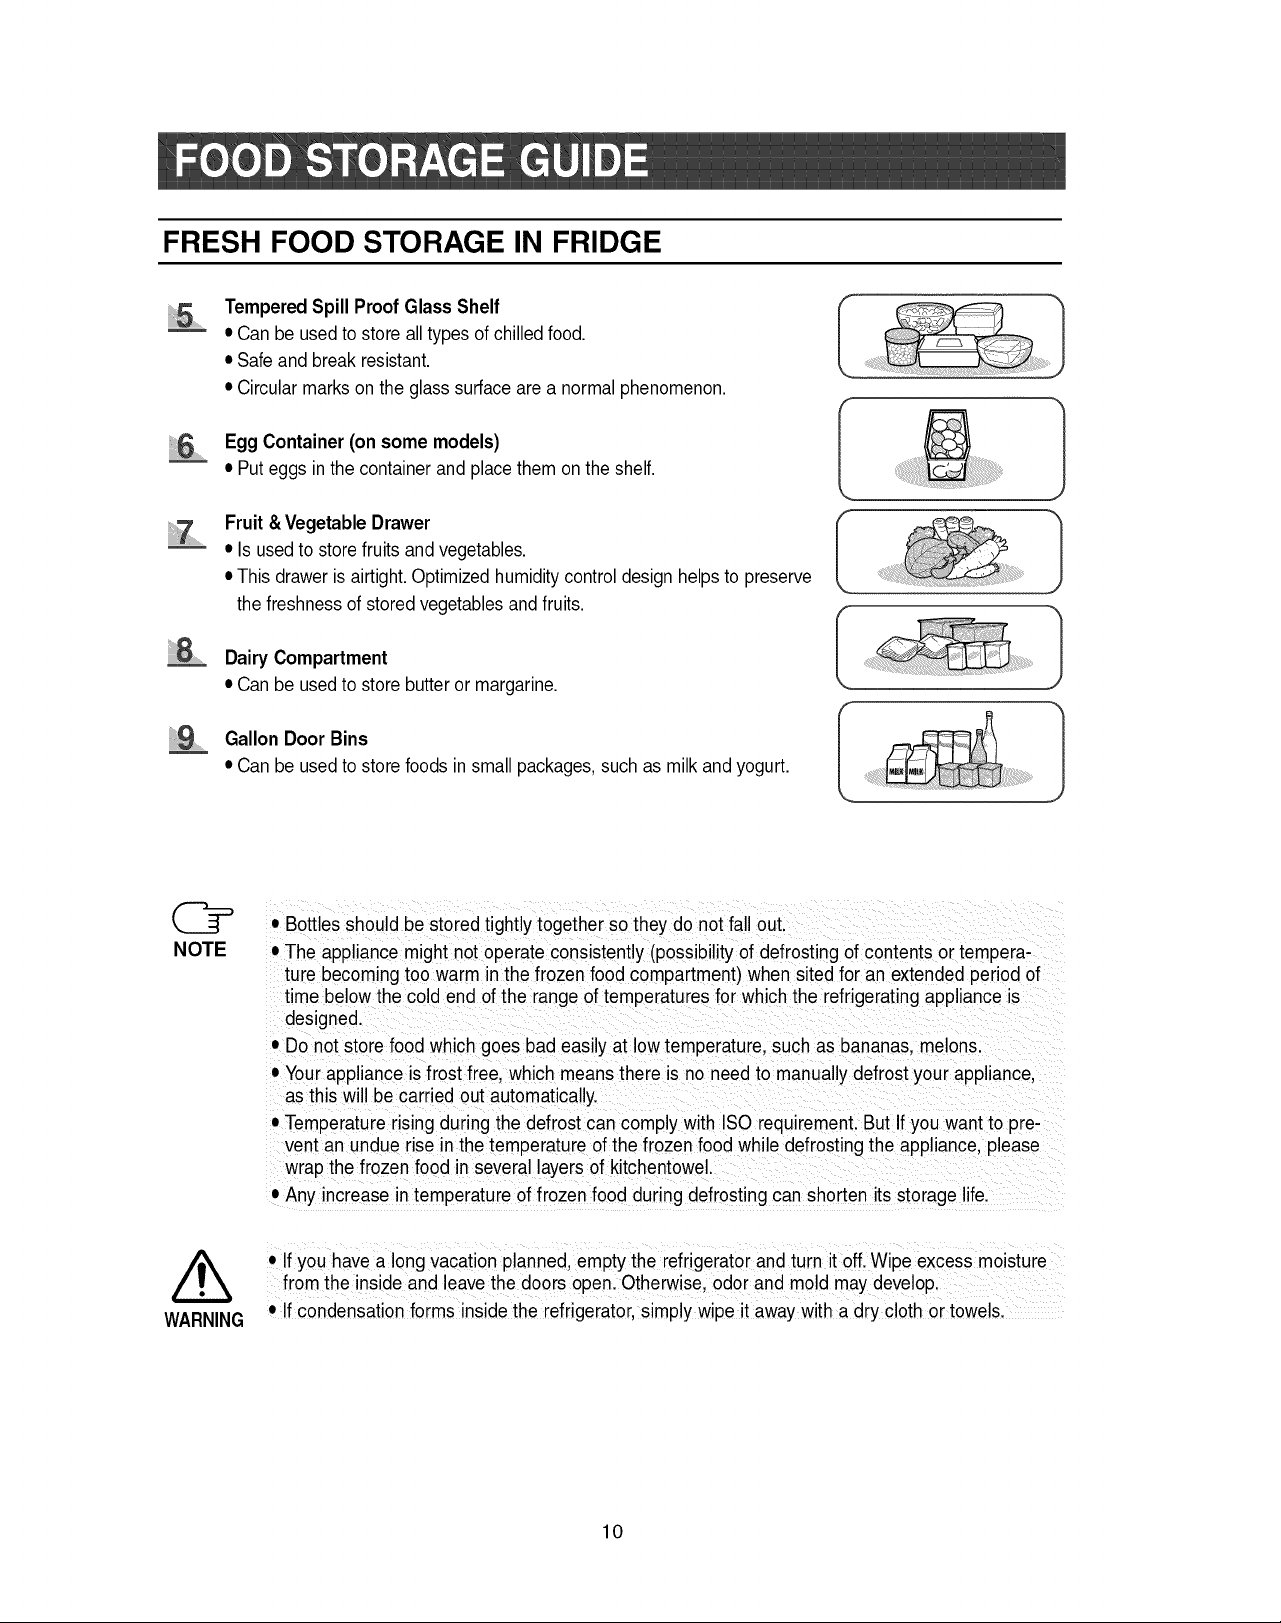
Tempered Spill ProofGlassShelf
• Can be usedtostore alltypes of chilledfood.
• Safe and breakresistant.
• Circularmarks on the glass surfaceare a normalphenomenon.
EggContainer(on some models)
• Put eggs in the containerand placethem onthe shelf.
Fruit&Vegetable Drawer
• Is usedto storefruits and vegetables.
• This drawer is airtight.Optimizedhumiditycontrol designhelps to preserve
the freshnessof stored vegetablesand fruits.
Dairy Compartment
• Can be usedto store butteror margarine.
Gallon Door Bins
iii iii9.............
• Can be usedtostore foods insmall packages,such as milkand yogurt.
NOTE
/t,,
WARNING
• Bottles should be stored tightlytogetherso they do not fall out.
• The appliance might not operate consistently (possibility of defrosting of contents or tempera-
ture becoming too warm in the frozen food compartment) when sitedfor an extended period of
time below the cold end of the range of temperatures for which the refrigerating appliance is
designed.
• Do not storefood which goes bad easily at lowtemperature, such as bananas, melons.
• Your appliance is frost free, which means there is no need to manually defrost your appliance,
as this will be carried out automatically.
• Temperature rising during the defrost can comply with ISO requirement. But If you want to pre-
vent an undue rise nthe temperature of the frozen food while defrosting the appliance, please
wrap the frozen food in severallayers of kitchentowel.
• Any increase in temperatureof frozen food during defrosting can shorten its storage life.
• Ifyou have along vacationplanned, empty the refrigeratorand turn itoff. Wipe excess mo sture
from the inside and leavethe doors openl Otherwise, odor and mold may develop,
• If condensation forms inside the refrigerator,simply wipe it awaywith a dry clothor towels.
10
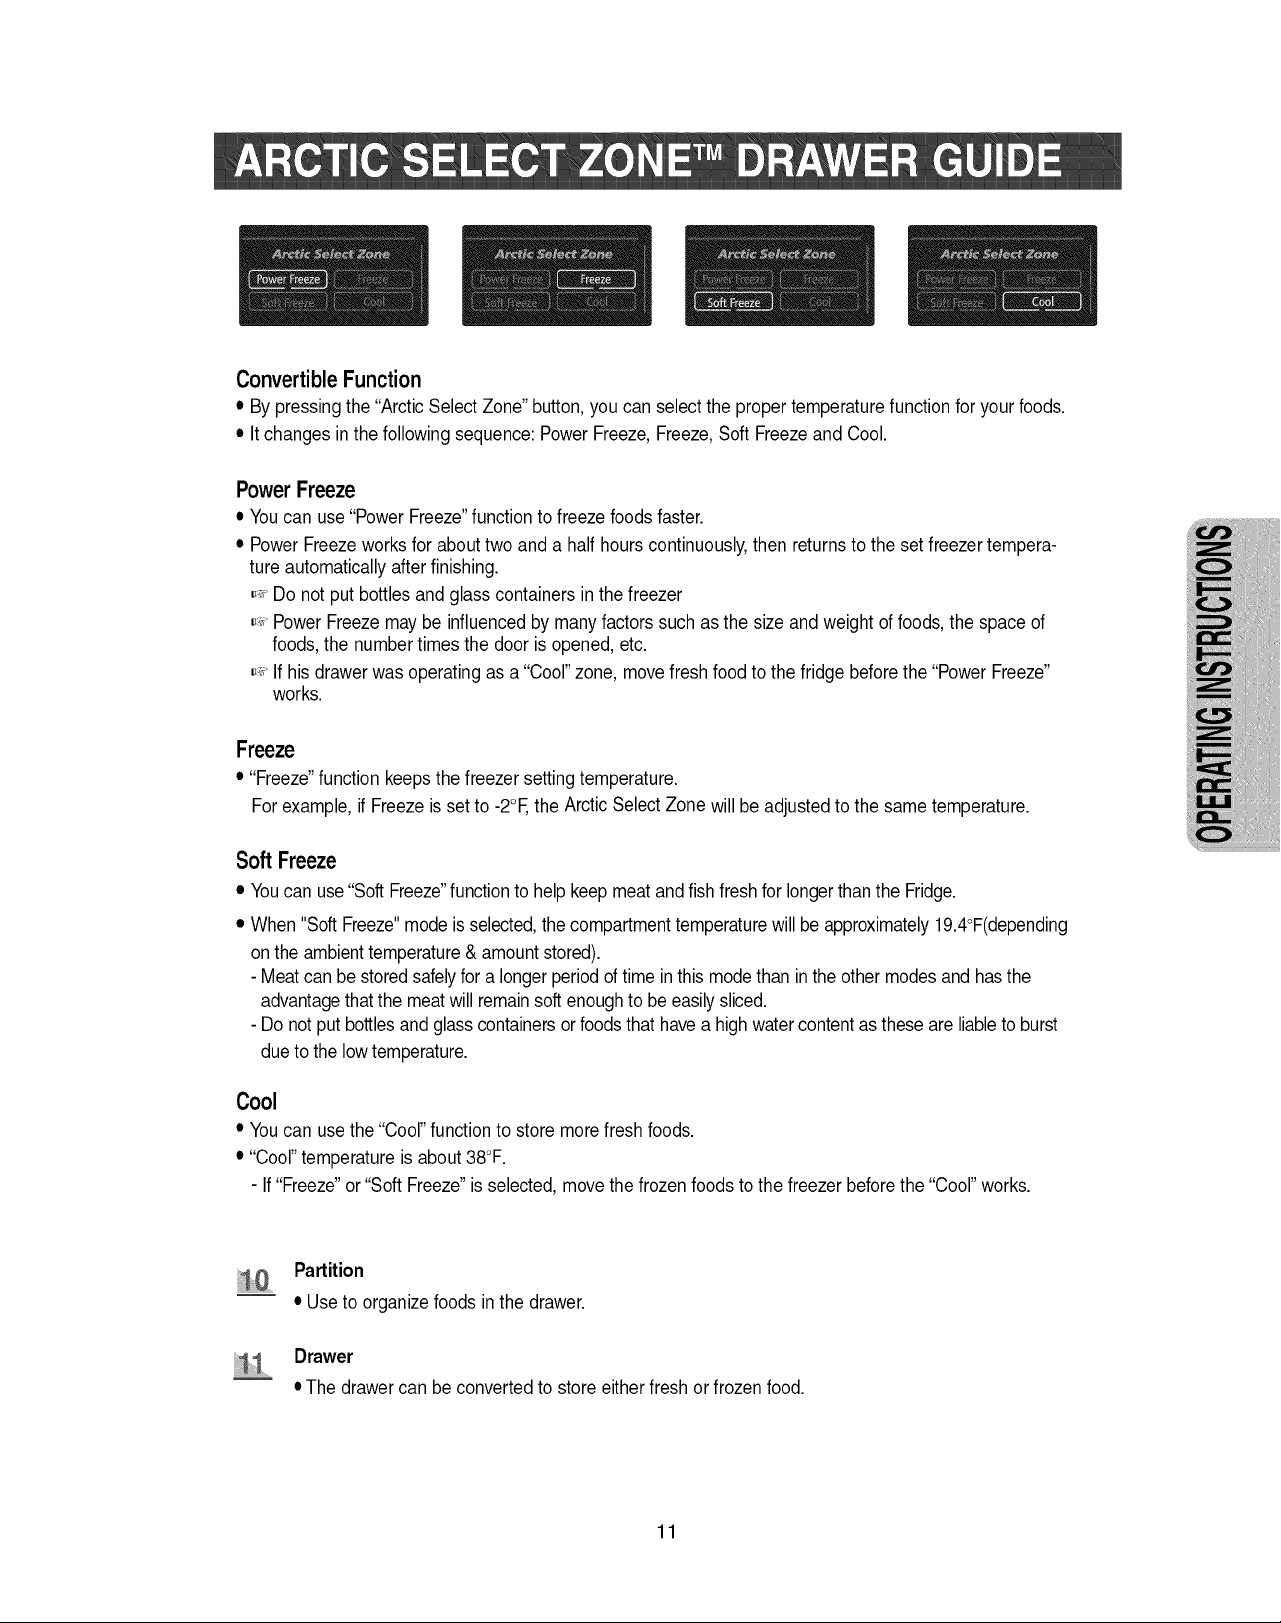
ConvertibleFunction
• By pressingthe "ArcticSelect Zone"button,you can selectthe propertemperaturefunctionfor yourfoods.
• It changesinthe followingsequence: Power Freeze,Freeze,Soft Freezeand Cool.
PowerFreeze
• Youcan use"PowerFreeze"functionto freeze foodsfaster.
• Power Freezeworks for abouttwo anda halfhours continuously,then returnsto the set freezertempera-
ture automaticallyafterfinishing.
,_' Donot put bottlesand glasscontainersin the freezer
,_' PowerFreezemay be influencedby manyfactors suchasthe size andweight of foods,the space of
foods,the numbertimes the door is opened, etc.
,_' If his drawerwas operatingas a "Cool"zone, movefresh food to the fridge beforethe "PowerFreeze"
works.
Freeze
• "Freeze"functionkeepsthe freezer settingtemperature.
Forexample,if Freezeisset to -2°E the ArcticSelect Zone will be adjustedto the sametemperature.
Soft Freeze
• Youcan use "Soft Freeze"functionto helpkeepmeat andfishfresh forlongerthan the Fridge.
• When "Soft Freeze"modeisselected,the compartmenttemperaturewillbe approximately19.4°F(depending
on the ambienttemperature& amountstored).
- Meatcan be storedsafelyfora longerperiodof time inthis modethan inthe other modesand hasthe
advantagethatthe meatwill remainsoft enoughto be easilysliced.
- Donotput bottlesandglass containersorfoodsthat havea highwatercontentasthese are liableto burst
due to the lowtemperature.
Cool
• Youcan usethe "Cool"functionto store morefresh foods.
• "Cool"temperature is about38°F.
- If "Freeze"or"Soft Freeze"is selected,movethe frozenfoods to the freezerbeforethe"Cool"works.
Partition
....
• Use to organizefoods inthe drawer.
Drawer
•The drawercan be convertedto store eitherfresh orfrozen food.
11
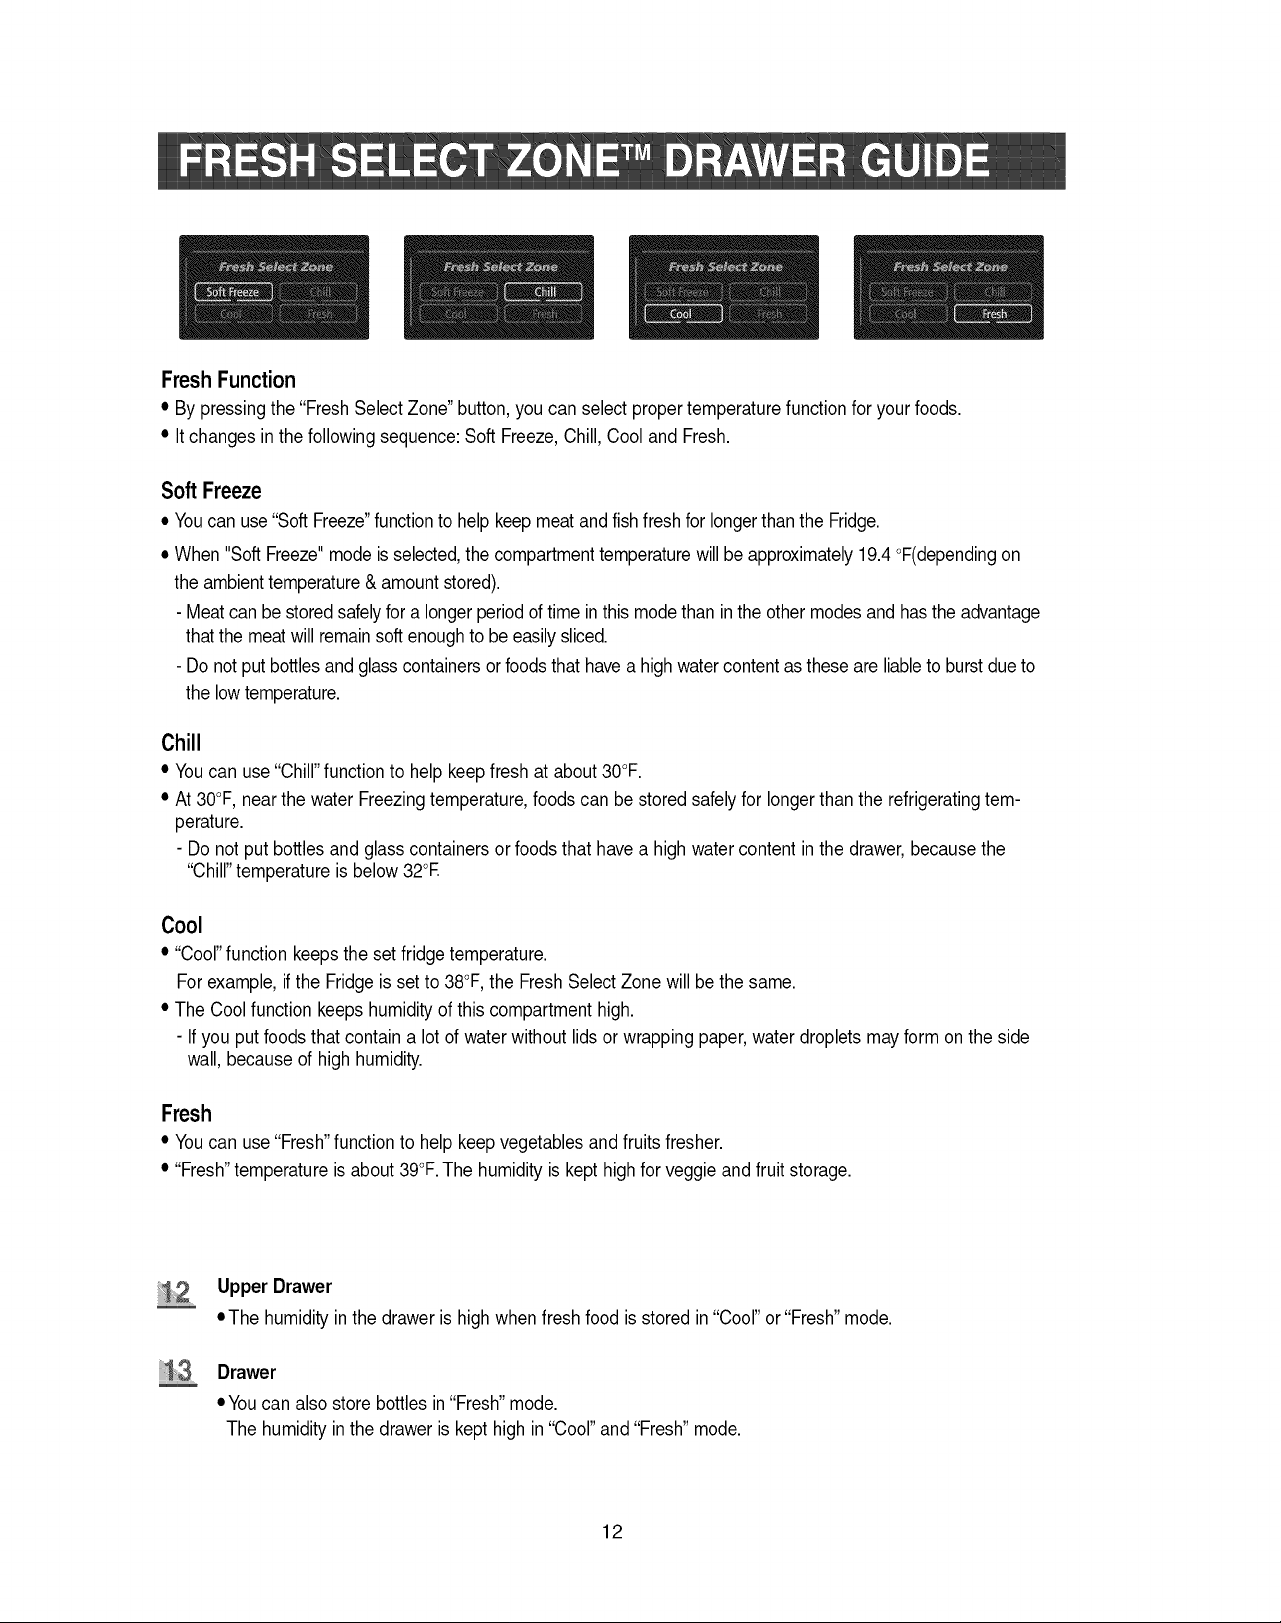
FreshFunction
• By pressingthe "FreshSelect Zone"button,you can selectpropertemperaturefunctionforyourfoods.
• Itchanges in the followingsequence:Soft Freeze,Chill,Cool and Fresh.
Soft Freeze
• Youcan use"SoftFreeze"functionto helpkeepmeatand fishfreshfor longerthanthe Fridge.
• When "Soft Freeze"modeisselected,the compartmenttemperaturewillbe approximately19.4°F(dependingon
the ambienttemperature& amountstored).
- Meatcan bestoredsafelyfor a longerperiodoftime inthis modethan inthe othermodesand hasthe advantage
that the meatwill remainsoft enoughto beeasilysliced.
- Do notputbottlesand glasscontainersorfoodsthat havea highwatercontentasthese are liableto burstdueto
the lowtemperature.
Chill
• Youcan use "Chill"functionto help keep fresh at about30°F.
• At 30°F,nearthe water Freezingtemperature,foods can bestored safelyfor longerthan the refrigeratingtem-
perature.
- Do notput bottlesand glasscontainersor foods that have a high watercontent inthe drawer,becausethe
"Chill"temperatureisbelow32°E
Cool
• "Cool"functionkeepsthe set fridge temperature.
Forexample,ifthe Fridgeisset to 38°F,the FreshSelectZone will bethe same.
• The Coolfunction keepshumidityofthis compartmenthigh.
- Ifyou put foodsthat contain a lotof waterwithout lidsor wrapping paper, water dropletsmay form on the side
wall, because of highhumidity.
Fresh
• Youcan use "Fresh"functionto help keep vegetablesand fruitsfresher.
• "Fresh"temperatureisabout39°F.The humidity is kept highforveggie andfruit storage.
Upper Drawer
• The humidityin the drawer is highwhen fresh food is storedin"Cool" or"Fresh"mode.
Drawer
• Youcan alsostore bottlesin "Fresh"mode.
The humidityinthe draweris kepthigh in"Cool"and "Fresh"mode.
12

Tray Shelf (optional)
• Pullthe shelf out asfar as
itgoes.Then lift it up and
removeit.
........IceBucket
• Removethe bucketby
lifting it up and pullingit
out.
iiiiiiii i ........
Door Bin
• Hold the door binwith both
handsand then lift it up.
Drawer
• Removethedrawerby
pullingit out and slightly lift-
ing it up.
Spill Proof Glass Shelf
• Pullthe shelf out asfar as it willgo.Then lift it upand
gently remove it.
FoldableShelf
O Slidethe glass shelf(@) underthe glassshelf (_).
Tilt upthe glass shelves(@&(_) as shownbelow and lift upthe
shelveswith bothhands.
_) Holdthe raisedglass shelves(@ &(_) and pulloutwith care.
5 ......Front Leg Cover
• Removetwo screws.
• Liftit upand pullthe coveroff.
• Toreattachthe front leg
cover,attach itcloselyto
the refrigerator,thenslide it
down.
• DO notuse excessiveforcewhen
NOTE
removingthe cover.It maycause aninjury.
iiii i i s
NOTE
@ ,, Before removingthefreezer and fridgeaccessories,please removethe food.
NOTE
, When Youreplacethe FoldableShelf,followthe aboveinStructionsin reVersel
Vegetable & Fruit Drawer
• Removethe drawerby holdingthe handle,pullingthe drawerout, and then liftingupthe side ofthe
drawerbottomsmoothlywith the other hand.
......Gallon Door Bin
• Hold the bin withboth handsand remove itby lifting it up.
13

iiii_........
\
Open the door,and pullthe Arctic SelectZone Door
out tothe end to takethe basketout.
NOTE
• Emptythe basketbeforetaking itout. .........................
iiii!iiii:il,,,................
Open the FreshSelect Zone Door.
Holdthe front side of upperdrawer,and pull itout.
8 .......
Lift the front sideof basketfirst,
and take it out carefully(usingbothhands).
\
\
Pull the front sideof upper coverout.
iiii_lii_i4...............
Pullthe frontside of cover out.
@
NOTE
° Empty the basketfirst beforetaking itout. ........................
/
Lift the front sideof basketfirst,
and take it out carefully(usingbothhands).
14
/

Interior
• Cleantheaccessorieswithamilddetergent,thenwipeoutwithadrycloth.
• Afterwashingtheaccessories,makesurethattheyaredrybeforeusingthemagain.
Exterior
•Wipethedigitalpanelanddisplaypanelwithacleancloth.
•Thedoors,handlesandcabinetsurfacesshouldbecleanedwithamilddetergentandsoft
cloth,thenwipedoffwithadrycloth.
-DonotuseBenzene,ThinnerorCloroxTM for cleaning.
- Do notspraywater directlyon the surfaceof the refrigeratorwhile cleaning.
Rear
• Use avacuum cleanerto removedust once ortwice ayear.
• Do notremovethe coveras thereisa risk of shock..............
WARNING
Iceand water dispenser
• Use a dampcloth to cleanthe ice and water dispenser.Then wipe itout with a drycloth.
• Tokeepthe drainagegrid dry,do nottouch the ice andwater dispenser.
Rubberdoor seals
• If the rubberdoor seals aredirty,the door will notclose properly,andthe refrigeratorwill not
be able to functionefficiently.Cleanthe doorswith a milddetergentand dampcloth.Then
wipe witha dry cloth.
/_ • Donot spraythe refrigeratorwithwater While isplugged in;as may cause anelectricshock.
WARNING • DOnot cleanit with benzene,thinner or car detergentlIt may cause a fire,
//_ 'Wi e excess moisture from the inside and leave the doors o en
CAUTION #Otherwise, odor and mold may developl
P P ,
it it
15

Before changing the interior light, unplug the refrigerator from the power supply.
If you have difficulty with changing the light, contact your service center.
WARNING
CAUTION
INTERIORLIGHTINTHE FRIDGE
Upper
1
Pushbothsidesof the upper
lampcover, marked---*around
the topof cold air duct,then pull
outthe airduct.
__m__
÷
_o®
........Push both sides of the bottom
lampcover,marked--*on the
air duct, then pullout.
OOD OOO[_
®od_
After changingthe bulb,
reattachthe bottom light
cover,then the upper light
cover.
n_
I1\ _ I
_ IIIL-PF_ _o_
_t rf_
,÷
4,,
,o®
4,,
dJo,
_oo®
÷
,o®
j
16

/k
WARNING
Before changing the interior lighL unplug the refrigeratorfrom the power supp!y.
if you have difficulty with changing the light, contact your service center,
/k
CAUTION
Light bulbs may be hot. ............................
INTERIORLIGHTINTHE FREEZER
The freezer light is located in the bottom of the auger motor case.
Pushthe centerof the light Change the bulb with a
cover's upper side,and then _ new one.
pull down the light cover.
rear hook rear hook
front hook
Replacement bulbs for both the freezer and fridge are at avai!ab!e retail outlets such as Wal-mart,
The Home Depot and Lowe & ....................................................................
NOTE Use replacement bu!b size A! 5, maximum 40 watts,
Reattach the light cover.
First, align the rear hook of
light coverto light case, and
then push the front hook.
INTERIORLIGHTIN ARCTIC& FRESHSELECTZONE
The Arctic & Fresh Select Zone light is located in the bottom of partition in the refrigerator.
...... Open the doorof the compart- Checkthe lamp-cover
ment where you want to _ attachedto the lowerpart of
replacethe lamp,and emptyit Partition in the refrigerator.
of allfood.
14 ......Replacethe lampwith a new
one.
................................ ! t _\
@ Replacementbulbs for boththeArctic& FreshSelectZone areat availableretailoutlets suchas WalmarL
NOTE Use replacement bulb size E17, maximum 30watts.
The Home Depot and Lowe&
i_ Fitthe rear hook of cover lamp into
the groovefirst, and lift it to fit onto
thefront hook into the groove.
Pushthefrontsideofthe lamp
coverinsiderefrigeratorto sepa-
ratethefronthook.Pushitdown
to separate.
17

Thewater"FilterIndicator"light
•"FilterIndicato¢'lightletsyouknowwhenitistimetochangeyourwaterfiltercartridge.Thelight
willchangefromgreentoorange.Thistellsyouthatitisalmosttimetochangethecurrentcartridge.
Itisrecommendedthatyoureplacethecartridgewhenthelightchangestored.
(see"Installthewaterfilter'sectionformoreinformation)
•Ifyouinstallwaterfilter,throwawaythefirstsixglassfullsofwaterfilter,oruntilwaterflowsclearlyto
flushimpuritiesinthewatersupplysystem.
Usingthedispenserwithoutthewaterfilter
•Youcannotusethewaterandicedispenserwithouta waterfiltercartridgebecausethewaterline
blocksatthewatersupply.
Orderingreplacementfilters
•Toordermorewaterfiltercartridges,call1-800-SAMSUNGandaskforaccessoryPart# DA29-
00003BorcontactyourauthorizedSamsungdealer.
Therefrigeratordoorshaveaspecialdooropeningandclosingfeaturetomakesurethatthedoors
closeallthewayandaresecurelysealed.
Whenopeningthedoor,itwillonlyopensofar.Afterreachingacertainpoint,itwillremainopen.
Whenthedoorispartiallyopen,itwillcloseautomatically.
18

Checking the Dimensions of your Entrance Door
Check the dimensions of your entrance door to determine whether the refrigerator can pass
through it.
Model RM255AB* / RM257AB*
Capacity (Cu. Ft)
Width
without hinge
with hinge
with handle
without door
Dimension
(inches)
Case Height
Depth
Selecting the Location for the Refrigerator
• Select a location with easy access to the water supply.
• Select a location with enough space for the refrigerator.
• Select a location without direct exposure to sunlight.
• Select a location with a level floor or close to it.
• Before disassembling the freezer door, the water supply line needs to be disconnected.
(If not, the water supply line may be damaged.) ....................................................................
, See !!Removing the Freezer Door" on page 25.
Allowsufficientspace for aircirculationof the internalcoolingsystem.
•Whenthe refrigeratordoes nothaveenough space,the internalcoolingsystemmay not workcorrectly.
24.55
35 3/4"
68 5/8"
70"
36 1/10"
30 3/8"
1 inch
1 inch
1/8 inch
Z Z Z Z Z Z
Allow clearance to the right, !eft, back and top when installing therefrigerator.
This has the advantage of reduc ng power consumption.
,Do not install the refrigerator where the temperature will go below 50°F (!00C).
19

• Be careful When opening the door so
CAUTION
cSi
that it does not come in contact with
other parts of the refrigerator,
LEVELLING
If the front of the appliance is slightly higher than the rear, the door can be opened and closed easier.
The appliance tilts down to the left.
Turn the left adjusting leg in the direction of
the arrow with a flat head screwdriver until
the appliance is level.
The appliance tilts down to the right.
Turnthe right adjusting leg inthe direction of
the arrowwith a flat head screwdriver until
the appliance is level.
)
//_ • Allow sufficient space to installthe refrigerator on a flat surface.
WARNING _If your refrigerator is not level, the internalcooling system may n0t work correctly.
20

Please level the refrigerator first
The doors will be uneven if the refrigerator is not level.
Case 1) Freezer door is lower than
the refrigerator door.
Case 2) Freezer door is higher than
the fridge door
Insert a flat-blade screwdriver (-) (d_)into a slot of
the control lever (@),turn it clockwise and level the
refrigerator.
i
(_ DRIVER(-) ""........ "" ".. ,
@ CONTROL LEVER
Insert a flat-blade screwdriver (-) (d_)into a slot of
the control lever (@),turn it clockwise and level
the refrigerator.
i
@
NOTE
@ CONTROL LEVER
Do not make small adjustments with thecontrol lever, Please referto the next page.
21

Making small adjustments between doors.
If the door of fridge is lower than that of the freezer,
adjustment part
1) If you open the Fresh Select Zone Door (d)), you can see the hinge-mid (@).
2) Insert enclosed hex wrench (®) into the shaft (_4h)of the hinge mid.
3) Please adjust the height difference between the doors turning the hex wrench (®) clockwise ( -_,,.._ )
or counter clockwise ( _ ).
@ When yoUturn counter clockwise(), the do0r g0es UP:
NOTE
4) After adjusting the doors, please insert enclosed fastener-ring (®) using a plier (¢h)in the gap between
the hinge-grommet (®) and the hinge-mid (@).
The number of the fastener-ring to insert depends on the gap.
NOTE
Fourfastener,rings are enclosed with the refrigerator...................
22

If the Arctic Select Zone Door is lower than the Fresh Select Zone Door.
|
!
;' adjustment part
Arctic Select
/
/
Fresh Select Zone
1) Locate the height-adjuster (@) in the Arctic Select Zone.
Unscrew the four phillips screws (@) slightly to loosen the door.
2) Unscrew the adjuster-phillips screw (®) two turns to rotate the adjuster.
3) Find the best adjuster-level to align the door gap.
CASE) The gap is about 2mm (0.08inch) as shown below.
gap
IA_t_s_l_tzo,eboo,I|1_oo, I
i
i
m
i
reference plane _:;, _:_:i_ /
o> 't<:>%,_ ,
- Rotatedownthe adjuster-facewith+2.0 numberto reducethe doorgap.
- The numberofthe adjusterto rotatedependsonthe gap.
After adjustment, tighten the screws (@ & ®) in reverse order.
(_ The adjuster in the Fresh Select zone can be used in the same wayl
NOTE
23
i,i,i_

Removing the Front Leg Cover
1 L
I
l
HOOK _
Unscrew two phillips screws from the front leg cover.
Pull the front leg-cover down with both hands and remove it by lifting it up with the upper rib.
Then, disengage the lower hooks.
Removing the Freezer Door
NOTE • Becareful notto pinch thewater tubingand wireharness on the door.
' Placedoorson a protectedSurfacel
1) With the door closed,remove the upper hinge cover (d_)using a screwdriver, and then remove the
water tube by pressing the coupler-ring (@)and pulling the water tube (@)away.
Do not cut the water tube. Separate it from the coupler.
24

Removing the Freezer Door
2) Disengage the hooks on the connector - cover ((4))protecting the connector and open it.
Push the lever-hook (®) on the connector and disconnect the wires.
3) Pull and open the latch (®), and take off the door hinge (®) along the arrow.
Be careful when removing the door to ensure that it does not fall on you.
4) Remove the door from the lower
hinge(®)carefully lifting the door(®).
i
!
i
5) Remove the phillips screw(®)and two hex
head screws (@)from the lower hinge
25

Removing the Fridge Door
1) With the door closed, remove the upper hinge cover (5_)using a screwdriver.
2) Pull and open the latch (@),and take off the door hinge (®) along the arrow.
3) Remove the door from the lower hinge (_4h)by
lifting the door (®).
Ji
ii-
i
4) Remove the phillips screw (_h)and two hex
head screws (®) from the lower hinge.
i L
®
26
I
I
J

How to disassemble/assemble the Arctic Select Zone Door
1) Open the Arctic Select Zone Door. 2) Take out the box in the Arctic Select
Zone Door.
\
3) Locate the eight phillips screws in the Arctic Select Zone. To lift the door up, unscrew the eight
phillips screws(Q) four turns. Do not remove the screws (_) out.
(You don't need to unscrew the adjuster-phillips screw(@ )
4) Remove the door carefully from the rail lifting up
the door with both hands.
To allow screw(5_) heads to pass through the rail
holes.
(_= When you assemble the Arctic Select Zone Door, follow the instructions above in reverse order.
NOTE
27
5) Slide the rail carefully to the inside.

How to disassemble/assemble the Fresh Select Zone Door
1) Open the Fresh Select Zone Door. 2) Take out the box in the Fresh Select Zone.
3) Locate the eight phillips screws inthe Fresh Select Zone. To lift the door up, unscrew the eight phillips
screws(@) four turns. Do not remove the screws (_) out.
(You don't need to unscrew the adjuster-phillips screw(@)
4) Remove the door carefully from the rail lifting up
5) Slide the rail carefully to the inside.
the door with both hands.To allow screw(5_) heads
to pass through the rail holes.
[
ii _--_"_"
(_ when you assemble the FreshSelect zone Door, followthe instructions above in reverse Orderl
NOTE
28

Reattaching the Freezer Door
1) Reattach a phillips screw (@_)and two hex head
screws (@)to the hinge.
3) Insert the upper hinge shaft (®) into the hole (@).After levelling between the hinge brackets (®).
Reattach and close the latch (@)along the arrow.
Connect the water tube (@)and the wires (@).Then, place the water tube(@) on the hanger (@)
2) Place the hole in the bottom of the door (@)
over the hinge (@).
J
NOTE
4) Put the connector (@) in the guide (@)of the
connector-cover and close it.
Be sure to insert the water tube and push to the end. ..................
5) Put the front part of the upper hinge cover (@)
on the front part of the upper hinge (@) and
reattach it from the front of the upper hinge
cover first.
6) Reattach a phillips screw to the hinge cover (@).
29

Reattaching the Fridge Door
1) Reattach a phillips screw (@_)and two hex head
screws (@)to the hinge.
............... .........-
3) Insert the upper hinge shaft (®) into the hole (@).After levelling between the hinge brackets (®).
Reattach and close the latch (@)along the arrow.
2) Place the hole in the bottom of the door (@)
over the hinge (@).
--_®
4) Put the front part of the upper hinge cover (®) on the front part of the upper hinge (®) and reattach it
from the front part of the upper hinge cover first.
5) Reattach a phillips screw to the hinge cover (@).
30

Reattaching the Front Leg Cover
-i
I
I
HOOK //,_
Hold the front leg-cover with both hands and insert it by sliding the hooks along the
guide at the bottom.
Then, lift up the leg-front-cover a little bit and snap the upper ribs into the locking tabs.
Tighten two phillips screws to the front leg cover.
/_ _FRONT LEG COVER
31

1)Inordertooperatetheicemakerproperly,waterpressureof1.4N8.5kgf/cm2(0.14N0.83Mpa,
19.9-120.9psi,1.37-8.3bar)isrequired.
Inthisrangea100ccpapercupcanbefilledin10seconds.
2)Thewaterfilterremovesparticles.Itdoesnotsterilizeordestroyanymicro-organisms.
3)Iftherefrigeratorisinstalledinanareawithlowwaterpressure(1.4kgf/cm2,0.14Mpa,19.9psi,
1.37bar),youshouldinstallaboosterpumptocompensateforthelowpressure.
4)Ensurethewaterstoragetankinsidetherefrigeratorispreperlyfilledinitially.Pushthewater
dispenserleveruntilthewaterrunsfromtheoutlet.
(_ Auniversalwatersupplykitisavailableatextra€ostfr0mYourdealerlTherefrigerator
NOTEmanufacturerrecommendsusingawatersupplykitcontainingcoppertubing.
Checking the Parts
Water filter
Tappingscrew
Water pipe
Clip A
(Case 1)
Connecting to water supply line
- Shut off the main water supply line and turn the Ice
maker to the off position.
- Locate the nearest cold drinking water line.
- Follow the instructions in the ice maker installation kit.
Pipe-Connect Water Packing
1. Cold Water line
2. Pipe Clamp.
&Copper (or Plastic) line
4.Compression Nut
5.Compression Sleeve
6.Shut Off Valve
7.Packing Nut.
6 5 4
32

Connect the water line to the refrigerator.
1) Slip the compression nut through the provided
plastic tubing.
2) Tighten the compression nut onto the 1/4"
compression fitting.
(_= Do not overtighten the compression nut. o,- _,
NOTE ," ,
J_
• Using Copper Tubing
- Slip the compression nut and ferrule on
copper tubing as shown.
• Using Plastic Tubing
- Insert the molded end of the plastic tubing
into the compression fitting.
3) Tighten the compression nut onto the com-
pression fitting.
CopperTubing (Purchased)
(Purchased)
4) Turn water on and check for any leakage.
C_
NOTE
Waterline must be €onnected tO drinkable water only.
Cut off 1/4inch of the provided plastic tubing squarely to prevent leaks when reconnecting.
(Case 2)
Check the water supply line
Connect the water pipe with coupler and tap.
- Close the main water tap.
- Connect coupler "A" to the tap.
- Every joint should be protected with sealing tape.
Refrigerator
Ferrule
d),° _Compresslon Nut (1/4")
, ', (Provided)
t "
"It
m
=
---_Compression Fitting
, (Provided)
i
m
CompressionNut(1/4")
(Purchased)
PlasticTubing
IHousehold Water Line]
The water line must be connected
to the cold water pipe.
If # is connected to the hot water
pipe, it may cause the
purifier to malfunction.
!f theCouplerdoes notfit onthe cur[ent tap, go
the nearestauthorized service dealerand purchase
the dght c0upler fittings,
Connect the water line to the refrigerator.
- Remove the compressor cover of the refrigerator. WATERLINE
- Connect the water line to the valve, as shown in the figure.
- When connected, check if there is any leakage.
If any, repeat the connection.
- Reattach the compressor cover of the refrigerator.
33
COUPLER "A"
TAP
CONNECTIONNUT
COMPRESSORCOVEROF
REFRIGERATOR

Secure the water line.
- Using clip "A", fix the water line to the wall (the back of refrigerator).
-When the water line is secure, make sure it is not excessively bent, pinched or
squashed.
Complete the installation of the water supply line.
- Power on the refrigerator and press the lever on the right of the
dispenser until water runs out through the water line and all air has been emptied.
- At this time, check for any possible leakages at the join point in the water line.
After securing the water line, move the refrigerator to the required location.
Install the water filter.
1) Remove the fixed cap (A) as shown, the fixed cap separates from
the Water Filter Compartment by rotating it counterclockwise.
Remove the water filter from the box and put a month indicator
stick on the filter as shown.
Keep the cap(A) in a safe place for recapping, when you
NOTE don't need to use the filter.............
2) If the water filter was installed in March, put on the "SEP" sticker.
3) Remove the Red protective cap from the filter, then position and
insert the filter as shown.
4) Slowly turn the water filter clockwise 90° to align
the indication mark on the cover, locking the filter in
position. Do not overtighten.
SEPARATION
OF RED CAP
STICKER
(MONTH INDICATION)
,,_2_, _ COVER FILTER
\
T ALIGN THE INDICATION MARK
NOTE please check that the indication line aligns with the lock position.
(A)_
WITH LOCK POSITION.
34

Removeanyresidualmatterinsidethewatersupplylineafterinstallingfilter.
1) Turn on the main water supply & shut-off the valve of the
water supply line.
2) Run water through the dispenser until the water runs clear
(6N7 minutes). This will clean the water supply system and
clear air from the lines.
3) Additional flushing may be required in some households.
4) Open the fridge door and check if water leaks around the
water filter.
NOTE
• A newlyqnstalled water filtercartridge may Causewater to briefly spurt from the dispenserl
Check the amount of water supplied to the ice tray.
1) To remove : Set the type of ice to the "Ice Off" position. Lift up
(L#)and pull out (@)the ice bucket in the freezer.
To replace :When replacing the drawer, be sure to press it firm-
ly into place. If it does not go all the way back, remove it and
rotate the drive mechanism 1/4 turn. Then push the drawer back
again.
2) Throw away the first few batches of ice to allow the water line to
clear.
Be sure nothing interferes with the sweep of the feeler arm.
When the bin fills to the level of the feeler arm, the icemaker will
stop producing ice.
It is normal for several cubes to be joined
together.
If ice is not used frequently, old ice cubes will
become cloudy, taste stale and shrink.
ICE MAK
ICE BUCKE
/
Rotate'_
° Placethe ice tray at theoriginally provided posistion by manufacturer in order to achieveoptimal
NOTE ice.freezing.
DrieVc_anism
35

3) Important Facts About Your Dispenser :
Do not add ice from trays or bags to the storage bin. It may not crush or dispense well.
Avoid overfilling glass with ice and use of narrow or extra-tall glasses. Backed-up ice can jam the
chute or cause the door inthe chute to freeze shut. If ice is blocking the chute, poke it through with
a wooden spoon.
Beverages and foods should not be quick-chilled in the ice storage bin.
To keep dispensed ice from missing the glass, put the glass close to, but not touching, the dis-
penser opening.
Some crushed ice may be dispensed even though you selected CUBES. This happens occasionally
when a few cubes accidentally get directed to the crusher.
After crushed ice is dispensed, some water may drip from the chute.
4) Water Supply to the Icemaker :
The icemaker must be connected to a cold water line.
Start the Icemaker :
5)
Set the type of ice to the "Cubed Ice" or "Crushed Ice" position. The icemaker will not begin to oper-
ate until it reachs its operating of 10.4°F(-12°C) or below. It will then begin operation automatically if
the type of ice is in the "Cubed Ice" or "Crushed Ice" position.
• !f there is nowater supplyl turnoff the icemaker to save energy:
• Inlower water pressure conditions, the water valve may turn on upto 3 times to make sure enough
water reaches the icemaker.
•Allow the appliance to stand for 2hours after installation.
WARNING
Use only the ice maker provided with the refrigerator.
36

Possible Causes What To Do
Disconnectedpowerplug
Isthe temperaturecontrolon the display
setto thecorrecttemperature'?
Isthe refrigeratorin directsunlightor locat-
edneara heat source'?
• Isthe backof the refrigeratortoo closeto
thewall'?
Isthe temperaturecontrolon the display
setto thecorrecttemperature?
the roomtoolow'?
water
contentinthe coldestpartof therefrigerator.
Isthe backof the refligeratortoo near tothe *Movetherefrigeratorto theproperlocation.
wall'?
Wasanythingdroppedbehind or under the • Removethe foreignobject.
• A "ticking"sound may be heardfrom inside
therefrigerator.Thisis normalandoccurs
becausevariousaccessoriescontractor
expand.
{,And-condensatorsare installedin thefront
cornersof the refrigeratorto preventcon-
densation.
Condensationcanoccur whenyou leavethe
dooropenfora longtime.
theice makin_function'?
Isthere anyice inthe storave unit'?
• Isthe waterpipe connectedand the shut-off
• Checkthat the powerplug is properlycon-
nected.
• Trysettingit to a lower temperature,
•Movetherefrigeratortotheproperloca-
tion.
• Trysettin_it to a warmertemperature.
• Checkthat the flooris levelledandstable.
•Normalstate
•Seethecontrolpanel,
•Seetheicecontainer,
•Seethevalve.
Isthe freezertemperaturetoowarm'?
Didyouwaitfor 12hours afterinstallation
ofthe water_ line beforemakin_ice'?
Thebubblingcomesfromthe refrigerant
circulatinginthe refrigeratorand isnormal.
Wrapstrongsmellingfood so thatit is air-
tight.Throwaway anyrotten food.
•Setthetemperaturelower.
•Normalstate
Isthe air vent blocked?
Isthe door closed_'?
Isthe waterpipeconnectedand the shut-off
Isthe water supplypipecrashed?
Isthe watertankfrozenbecause therefrig-
eratortemperatureis toolow'?Selecta
warmersettingon the displaypanel.
Levelinglegs needadjusting
37
•Allowsufficientspacebetween storedfood
forefficientaircirculation.
• See installationof therefrigerator

Possible Causes What To Do
Water filter clogged.
Door left open.
Temperature control was not
set cold enough.
Defrost heater is on.
Icemaker turned oft or water
supply turned oft.
Ice cubes are frozen to ice-
maker feeler arm.
Irregular ice clumps in stor-
age container.
Dispenser is LOCKED.
Water dispenser has not
been used for a long time.
Normal when refrigerator is
first installed.
Water dispenser has not
been used for a long time.
Watersystemhasbeendrained.
Watersupplylinetumed off or
notconnected.
Waterfilterclogged.
Air may be trappedin the
watersystem.
DispenserisLOCKED.
Newly-installedfiltercartridge.
Waterin reservoirisfrozen.
Refrigeratorcontrolsettingis
toocold.
Ice cubes stuckin icemaker.
(Greenpower light on
icemakerblinking).
Drainin thebottomofthe
freezerclogged.
Cubesjammed inchute.
Supplylineorshutoffvalve is
• Replacethefiltercartridgewitha newcartridgeorwithplug.
• Check to see if package is holdingdoor open.
• See aboutthe controls.
• This is normal.
• Turn on icemaker or water supply.
• Removecubes and movethe feelerarmto theON position.
• Break up and discardremainingclumps.
• Freezermay be too warm.Adjustthe freezercontrolto a
coldersetting,onepositionat a time,until clumpsdo not
fom_.
• Press andhold theCHILDLOCKfor3 seconds.
• Dispensewateruntilallwater in systemis replenished.
• Wait 24hours fortherefrigeratorto completelycooldown.
• Dispensewateruntilallwater in systemis replenished.
• Allow severalhoursfor replenishedsupplyto chill.
• SeeInstallingthe waterline.
• Replacefilter cartridgeor removefilter andinstallplug.
• Press thedispenserarmfor at leasttwo minutes.
• Press andhold theCHILDLOCKpad for 3 seconds.
• Run waterfromthe dispenserfor 3 minutes(aboutone and
a half gallons).
• Call forservice.
• Set to awarmersetting.
• Turn off theicemaker,removecubes,andturntheicemaker
back on.
• See Care andcleaning.
• Check thefilterlock.
• Poke icethroughwitha woodenspoon.
• Call a plumber.
Waterfilterclogged.
DispenserisLOCKED.
• Replacefilter cartridgeor removefilter andinstallplug.
• Press andhold theCHILDLOCKpad for 3 seconds.
38

SAMSUNG REFRIGERATOR
This SAMSUNG brand product,as suppliedand distributedby SamsungElectronicsAmerica,Inc.(SAMSUNG)and delivered new,
in the originalcarton to the originalconsumer purchaser,is warrantedby SAMSUNGagainst manufacturingdefectsin materials
andworkmanshipfor a limitedwarranty period of:
One(1)Year Partsand Laboron Refrigerator
Five(5)Years Partsand Laboron Sealed RefrigerationSystem Only*
(*Compressor,evaporator,condenser,drier,connecting tubing)
This limitedwarranty begins on theoriginaldate of purchase,and isvalid onlyon products purchasedand used in the United
States. Toreceivewarrantyservice,the purchasermust contactSAMSUNGfor problemdeterminationand service procedures.
Warrantyservicecan only be performedby a SAMSUNG authorizedservice center. The originaldated billof salemust be
presentedupon requestas proof of purchaseto SAMSUNG or SAMSUNG'sauthorized servicecenter.
SAMSUNGwill repair or replaceany part foundto be defective,at our optionandat no charge as stipulatedherein,with new or
reconditionedpartsduring thelimited warrantyperiod specified above. All replacedparts and productsbecomethe property of
SAMSUNGand must be returnedto SAMSUNG. Replacementparts andproducts assumethe remainingoriginalwarranty,or
ninety(90) days,whicheveris longer.
In-homeservice will be providedduring thewarrantylabor period subjectto availabilitywithin the contiguousUnited States.In-
home service is not availablein all areas. Toreceivein-home service,the productmust be unobstructedand accessiblefromfloor
levelto service personnel. If duringin-homeservice repair cannotbe completed, it maybe necessary to remove,repairand return
the product. If in-homeservice is unavailable,SAMSUNGmay elect,at our option,to providefor transportationof our choiceto
andfrom a SAMSUNG authorizedservice center. Otherwise,transportationto andfrom the SAMSUNGauthorizedservicecenter
is theresponsibilityof the purchaser.
This limitedwarranty covers manufacturingdefects in materials and workmanshipencounteredin normal, noncommercialuseof
thisproduct,and shall not applyto the following,including,but not limitedto:damage whichoccurs in shipment;deliveryand
installation;applicationsanduses forwhich this product was notintended;altered productor serial numbers;cosmeticdamage or
exteriorfinish;accidents,abuse, neglect,fire,water,lightningor other acts of nature;use of products,equipment, systems, utilities,
services,parts, supplies,accessories,applications,installations,repairs,external plumbingand leaks,externalwiring, circuit
breakers,fuses or connectorsnot suppliedand authorized by SAMSUNG, or whichdamage thisproduct or resultin service
problems;incorrectelectrical line voltage,fluctuationsand surges;customer adjustmentsand failureto followoperating instructions,
cleaning,maintenanceand environmentalinstructionsthat are covered and prescribed inthe instructionbook; loss of food due to
spoilage;consumableitems includingfiltersand lightbulbs.
THERE ARE NO EXPRESSWARRANTIESOTHERTHAN THOSELISTEDAND DESCRIBEDABOVE, AND NO WARRANTIES
WHETHEREXPRESS ORIMPLIED,INCLUDING,BUT NOT LIMITEDTO,ANY IMPLIEDWARRANTIESOF
MERCHANTABILITYOR FITNESSFOR A PARTICULARPURPOSE, SHALL APPLYAFTERTHE EXPRESSWARRANTY
PERIODS STATEDABOVE,AND NO OTHEREXPRESS WARRANTYOR GUARANTY GIVEN BY ANY PERSON,FIRMOR
CORPORATIONWITH RESPECTTO THIS PRODUCT SHALL BE BINDINGON SAMSUNG. SAMSUNGSHALL NOTBE
LIABLE FOR LOSSOF REVENUE OR PROFITS,FAILURETO REALIZE SAVINGSOR OTHERBENEFITS,OR ANY OTHER
SPECIAL, INCIDENTALOR CONSEQUENTIAL DAMAGESCAUSED BY THE USE, MISUSEOR INABILITYTO USETHIS
PRODUCT,REGARDLESSOF THE LEGALTHEORY ON WHICHTHE CLAIM ISBASED,AND EVENIF SAMSUNG HASBEEN
ADVISEDOF THE POSSIBILITYOF SUCH DAMAGES. NOR SHALL RECOVERYOFANY KIND AGAINSTSAMSUNG BE
GREATERINAMOUNTTHAN THE PURCHASEPRICE OF THE PRODUCT SOLD BYSAMSUNG AND CAUSINGTHE
ALLEGED DAMAGE. WITHOUT LIMITINGTHE FOREGOING, PURCHASERASSUMESALL RISK AND LIABILITYFOR LOSS,
DAMAGEOR INJURYTO PURCHASERAND PURCHASER'SPROPERTYAND TOOTHERSANDTHEIR PROPERTY
ARISINGOUT OF THE USE, MISUSE OR INABILITYTO USE THIS PRODUCTSOLD BY SAMSUNG NOT CAUSED DIRECTLY
BYTHE NEGLIGENCEOF SAMSUNG. THIS LIMITEDWARRANTY SHALL NOT EXTENDTO ANYONEOTHERTHAN THE
ORIGINAL PURCHASEROF THISPRODUCT,IS NONTRANSFERABLEANDSTATESYOUR EXCLUSIVEREMEDY.
Some states do not allowlimitationson howlong an impliedwarrantylasts,or the exclusionor limitationof incidentalor
consequentialdamages,so the abovelimitationsor exclusionsmay notapply to you. Thiswarrantygivesyou specificlegal rights,
andyou mayalsohave otherrights, which vary fromstate tostate.
Toobtain warrantyservice, please contact SAMSUNGat:
SAMSUNGCUSTOMERCARE CENTER
SamsungElectronicsAmerica, Inc.
105ChallengerRoad RidgefieldPark NJ07660-0511
1-800-SAMSUNG(1-800-726-7864)and www.samsung.com
061002

If you have any questions or comments relating to Samsung products,
please contact the SAMSUNG customer care center.
SAMSUNG ELECTRONICS AMERICA, INC.
105 Challenger Road Ridgefield Park, NJ 07660-0511
1-800-SAMS U NG(1-800-726-7864)
www.samsung.com
 Loading...