

Samsung RF4287HARS, RF4287HAWP, RF4287HABP, RF4287HARS/XAA, RF4287HAPN/XAA Service Manual
...
BOTTOM MOUNT FREEZER
MODEL NAME : RF4287HARS
RF4287HAPN
RF4287HAWP
RF4287HABP
MODEL CODE : RF4287HARS/XAA
RF4287HAPN/XAA
RF4287HAWP/XAA
RF4287HABP/XAA
RF4287HARS/XAC
REFRIGERATOR
REFRIGERATOR CONTENTS
1. PRECAUTIONS(SAFETY WARNINGS)··6
2. PRODUCT SPECIFICATIONS
········
10
3. DISASSEMBLY AND REASSEMBLY··27
4. TROUBLESHOOTING
················
56
5. EXPLODED VIEW & PARTS LIST
····
105
6. PCB DIAGRAM
····················
122
7. WIRING DIAGRAM
··················
127
8. SCHEMATIC DIAGRAM
············
131
For the latest parts information, Please access to our service web site
(●North America : http://service.samsungportal.com)
RF4287HA
**
AW3 SM-EN 2011.3.31 2:50 PM 페이지1 i n
IMPORTANT SAFETY NOTICE
The service guide is for service men with adequate backgrounds of
electrical, electronic, and mechanical experience. Any attempt to repair
a major appliance may result in personal injury and property damage.
The manufacturer or dealer cannot be responsible for the interpretation
of this information.
SAMSUNG ELECTRONICS AMERICA, INC.
Technical Service Guide
Copyright ⓒ2010
All rights reserved. This service guide may not be reproduced in whole or in
part in any form without written permission from the SAMSUNG ELECTRONICS
Company.
WARNING
AW3 SM-EN 2011.3.31 2:50 PM 페이지3 i n

Contents
1. Precautions(Safety Warnings)·····································6
2. Product Specifications ·······································10
2-1) Introduction of main function···································11
2-2) Specifications ·········································13
2-3) Interior Views ·········································14
2-4) Model Specification &Specification Chart ·····························15
2-5) Dimensions of Refrigerator (Inches) ·······························18
2-6) Optional Material Specification ··································19
2-7) Refrigerant Route in Refrigeration cycle ······························20
2-7-1.Principle of freezeer ····································21
2-7-2.Operation theory of refrigeration cycle components ······················22
2-7-3.Refrigeration Cycle Type··································25
2-8) Cooling Air Circulation ·····································26
3. Disassembly and Reassembly ····································27
3-1) PRECAUTION·········································28
3-2) Refrigerator Door ·······································29
3-3) Door Handle Freezer ······································31
3-4) Door Handle Freezer & Flex zone ································32
3-5) Refrigerator Light ·······································33
3-6) Cover-Display & Water-Dispenser ································33
3-7) Water-Dispenser ········································34
3-8) Glass Shelf ··········································35
3-9) Foldable Glass Shelf ······································36
3-10) Vegetable & Fruit Drawers Shelf ································36
3-11) Case Water ·········································37
3-12) Case Water Filter ·······································38
3-13) Water Tank ·········································39
3-14) Motor Damper ········································41
3-15) Water Filter (Assembly & Disassembly) ·····························42
3-16) Vertical Hinged Section ····································43
3-17) Evaporator Cover In Refrigerator ································44
3-18) Evaporator In Refrigerator ···································45
3-19) Freezer Door ·········································46
3-20) Convertible Door ·······································47
3-21) Flex Zone Door ········································48
3-22) Ice-Maker ··········································49
3-23) Flex Zone Light ········································50
3-24) Freezer Light ·········································50
3-25) Side Light ··········································51
3-26) Door Switch In Freezer ····································51
3-27) Evaporator Cover In Freezer ··································52
3-28) Evaporator In Freezer ·····································52
3-29) Machine Compartment·····································53
3-30) Electric Box ·········································55
4. TROUBLESHOOTING ·······································56
4-1) Function for failure diagnosis ··································57
4-1-1. Test mode (manual operation / manual defrost function) ····················57
4-1-2. Display function of Communication error ··························58
4-1-3. Self-diagnostic function ··································59
4-1-4. Display function of Load condition ·····························62
4-1-5. Exhibition mode setting function ······························63
4-1-6. Option setting function ··································64
4-1-7. Option TABLE ······································66
4-2) Diagnostic method according to the trouble symptom(Flow Chart) ··················67
4-2-1. If the trouble is detected by self-diagnosis ··························69
4-2-2. If FAN does not operate ··································80
AW3 SM-EN 2011.3.31 2:50 PM 페이지4 i n

Contents
4-2-3. If ICE Room Fan does not operate ·····························81
4-2-4. If FAN does not operate (Flex Room - FAN) ·························82
4-2-5. If Ice Maker does not operate ·······························83
4-2-6. If defrost does not operate (F,R DEF Heater) ························84
4-2-7. If Power is not supplied ··································85
4-2-8. If compressor does not operate ······························86
4-2-9. When alarm sounds continuously without stop(related with buzzer sound) ············88
4-2-10. If Mid Drawer Panel PCB does not work normally ······················90
4-2-11. When refrigerator ROOM Lamp does not light up ······················91
4-2-12. If ICE Water is not supplied································92
4-2-13. If Cubed or Crushed Ice is not supplied ··························93
4-2-14. If Cover Ice Route Motor(Geard Motor) is not working normally ················94
4-2-15. If Inverter PCB Power is not supplied ···························95
4-2-16. LED blinking frequency depending on protecting functions ··················96
Spm internal diode voltage ·····································97
Inverter controller board connector location ······························98
Inverter pcb circuit diagram ·····································99
4-3-1. inrush current protecting circuit ······························100
4-3-2. power source(hybrid ic) ·································100
4-3-3. location sensing resistance area ·····························101
4-3-4. sensing current area···································101
4-3-5. comp operating signal area ································102
4-3-6. bootstrap charging area ·································102
5. Exploded View & PARTS LIST ···································103
5-1) Freezer ···········································104
5-2) Refrigerator ·········································106
5-3) Cabinet ···········································109
5-4) Disassembly of Door Refrigerator L ·······························112
5-5) Disassembly of Door Refrigerator R ·······························113
5-6) Disassembly of Door freezert ··································116
5-7) Disassembly of Flex Zone Door ·································118
6. PCB DIAGRAM ··········································120
6-1) PCB Layout with part position ·································121
6-2) PCB Layout with part position (Inverter Board) ··························122
6-3) Connector Layout with part position (Main Board) ·························123
6-3-1. RF4287HA** ······································123
6-4) Connector Layout with part position (Inverter Board) ························124
6-4-1. RF4287HA** ······································124
7. WIRING DIAGRAM ········································125
7-1) Model : RFG295AA**[BETTER] ·································125
7-2) Model : RF4287AA**[BEST] ··································126
7-3) Model : RFG299AA**[7" LCD] ·································127
7-4) Model : RFG294AA**[SEARS] ·································128
8. SCHEMATIC DIAGRAM ······································129
8-1) Whole block diagram ·····································129
8-1-1. MAIN BLOCK(RF4287**)·································129
8-1-2. INVERTER BLOCK(RF4287***)······························130
8-2) CIRCUIT DIAGRAM······································131
8-2-1. MAIN ·········································131
8-2-2. INVERTER ·······································132
AW3 SM-EN 2011.3.31 2:50 PM 페이지5 i n
6
1. PRECAUTIONS(SAFETY WARNINGS)
●
Unplug the appliance before the changing or repairing the electric parts.
→
Be careful the electric shock.
●
When exchanging the parts, use the correct parts.
→
Check the model name, rating voltage, rating current, running
temperature symbols.
●
When troubleshooting, connect firmly the types of harness.
→
Make not to be separated when some power is imposed.
●
Check the traces of water infiltration at the electric parts.
→
If there is a trace of water infiltration, exchange or tape the parts.
●
Check the assemble status of parts after troubleshooting.
→
It must be in the same assembled state when compared with the state before
disassembly.
●
Check the use circumstance of refrigerator.
→
If the refrigerator is installed at the place that is damp or wet, or
status of installation is unstable, change the installation place.
●
Ground the refrigerator properly
→
Particularly, Be sure to earth when there is a risk of an electric
leakage by humidity or wetness.
●
Do not use multi plugs in a plug socket at the same time.
Check if the power cord and socket is damaged, pressed, squeezed,
or fired.
→
If the plug or plug socket is damaged, repair or exchange it
immediately.
●
Do not allow consumers to repair the appliance by themselves.
●
Do not store other materials except the foods.
→
Drugs or scientific materials : difficult to keep precise temperature.
→
The inflammables(alcohol, benzene, ether, LP gas, butane gas etc.):
have risk of explosion.
AW3 SM-EN 2011.3.31 2:50 PM 페이지6 i n

7
PRECAUTIONS(SAFETY WARNINGS)
Read all instructions before repairing the product and follow the instructions
in order to prevent danger or property damage.
Plug out and remove all the items in regrigerator prior to repair.
CAUTION/WARNING SYMBOLS DISPLAYED
SYMBOLS
Indicates that a
danger of death
or serious injury
exists.
Indicates that a risk
of personal injury
or material damage
exists.
means “Prohibited”.
means “Do not disassemble”.
means “No contact”.
means ”Warning or Caution”.
means “Earth or Ground”.
means “Unplug the unit before
preforming service”
Plug out to exchange the interior
lamp.
●
It may cause electric shock.
Warning
Warning & Caution
Caution
Unplug
Use the rated components
on the replacement.
●
Check the correct model, rated
voltage, rated current, operating
temperature and so on.
On repair, make sure that the
wires such as harness are
bundled tightly.
●
Bundle tightly wires in order not to be
detached by the external force and then not
to be wetted.
Check if there is any trace
indicating the permeation
of water.
●
If there is that kind of trace, change
the related components or do the
necessary treatment
such as taping
using the
insulating tape.
After repair, check the
assembled state of components.
●
It must be in the same assembled state
when compared with the state before
disassembly.
On repair, remove completely dust
or other things of housing parts,
harness parts, and check parts.
●
Cleaning may prevent the possible fire by
tracking or short.
Rated
components
AW3 SM-EN 2011.3.31 2:50 PM 페이지7 i n
8
PRECAUTIONS(SAFETY WARNINGS)
❈
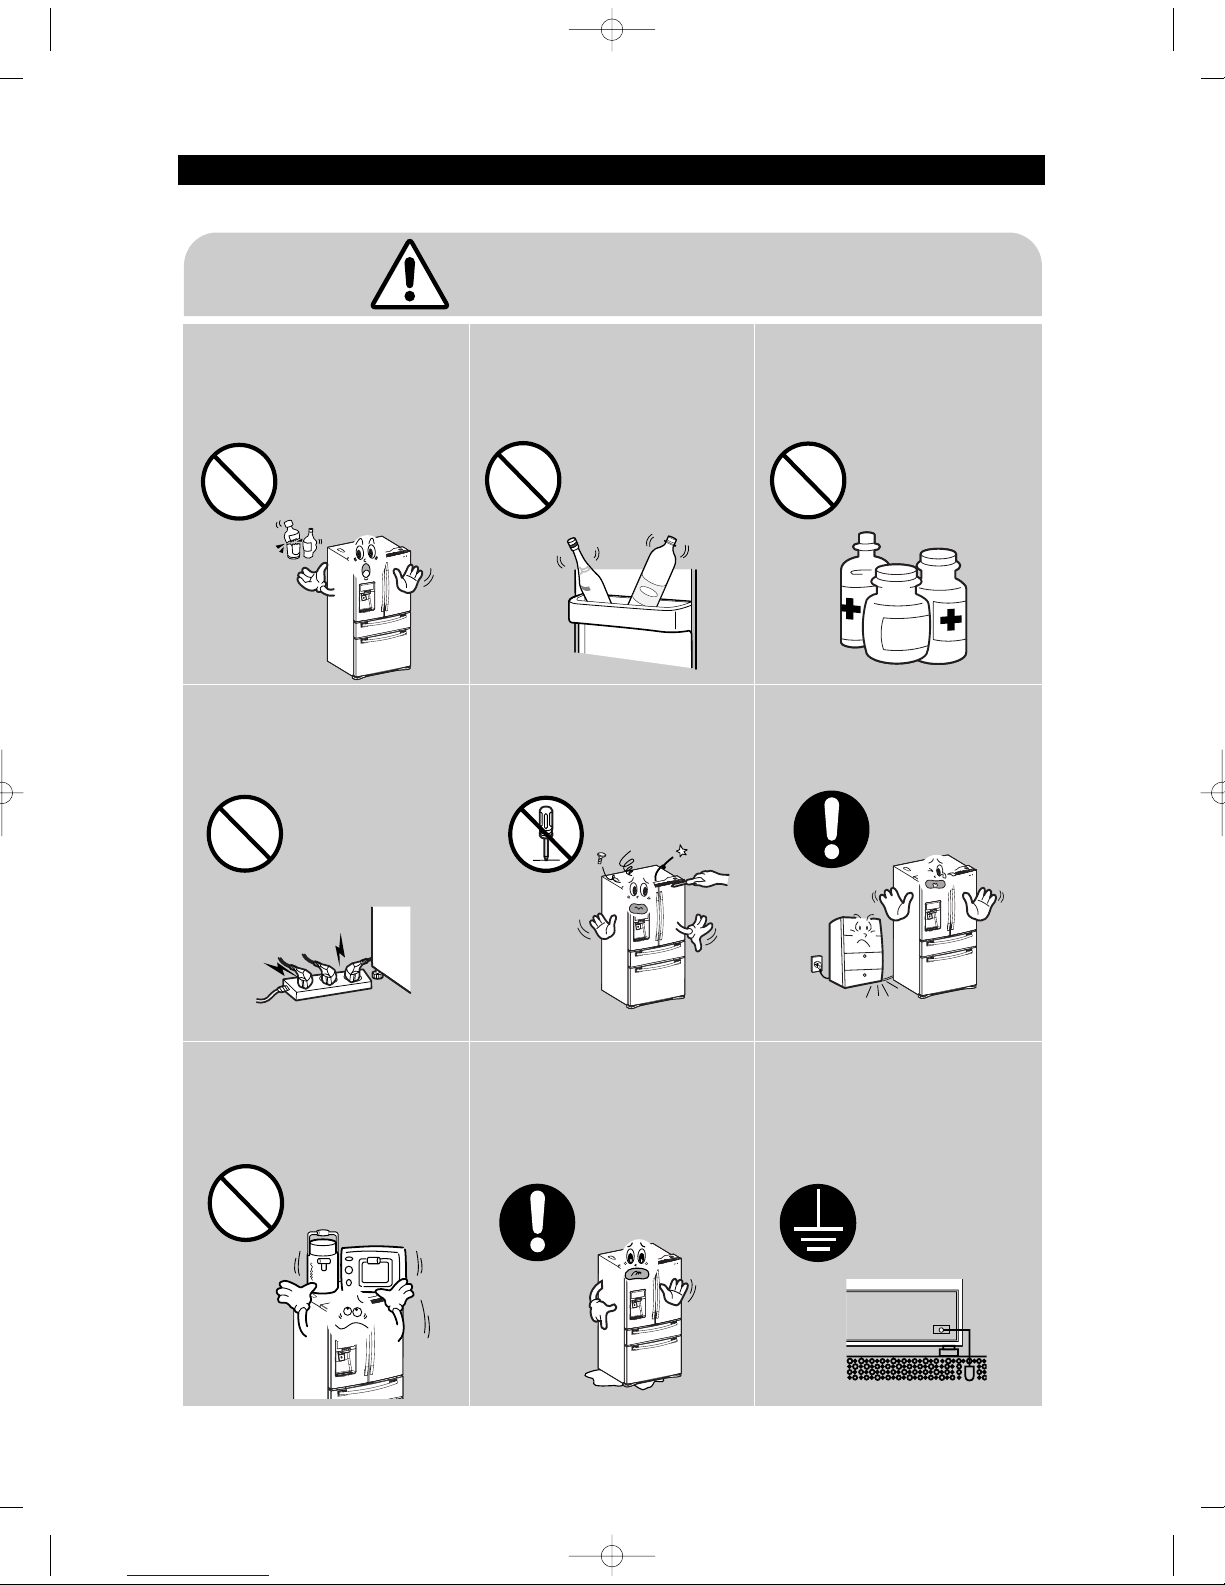
Please let users know following warnings & cautions in detail.
Do not allow users to put bottles or
kinds of glass in the freezer.
●
Freezing of the contents may inflict a wound.
Do not allow users to store narrow
and lengthy bottles or foods in a
small multi-purpose room.
●
It may hurt you when refrigerator door is
opened and closed resulting in falling stuff
down.
Do not allow users to store
pharmaceutical products, scientific
materials, etc., in the refrigerator.
●
The products which need precise
temperature control should not be stored in
the refrigerator.
Do not allow users to store
articles on the product.
●
Opening or closing the door may cause
things to fall down, which may cause
injury.
Prohibition
Warning & Caution
Do not allow users to
disassemble, repair or alter.
●
It may cause fire or abnormal
operation which leads to injury.
Do not
disassemble
Do not allow users to plug
several appliances into the same
power receptable.
●
May cause abnormal generation of
heat or fire.
Prohibition
Do not allow users to bend the
power cord with excessive force
or do not have the power cord
pressed by heavy article.
●
May cause fire.
Do not allow users to install the
refrigerator in the wet place or
the place where water splashes.
●
Deterioration of insulation of electric
parts may cause electric shock or fire.
Make sure of the earth.
●
Be sure the product is properly grounded.
Earth
AW3 SM-EN 2011.3.31 2:50 PM 페이지8 i n
9
PRECAUTIONS(SAFETY WARNINGS)
For proper installation, this refrigerator must be
placed on a level surface of hard material that is
the same height as the rest of the flooring. This
surface should be strong enough to support a fully
loaded refrigerator, or approximately
660lbs(299kg).
FLOORING
Protect the finish of the flooring. Cut a large
section of the cardboard carton and place
under the refrigerator where you are working.
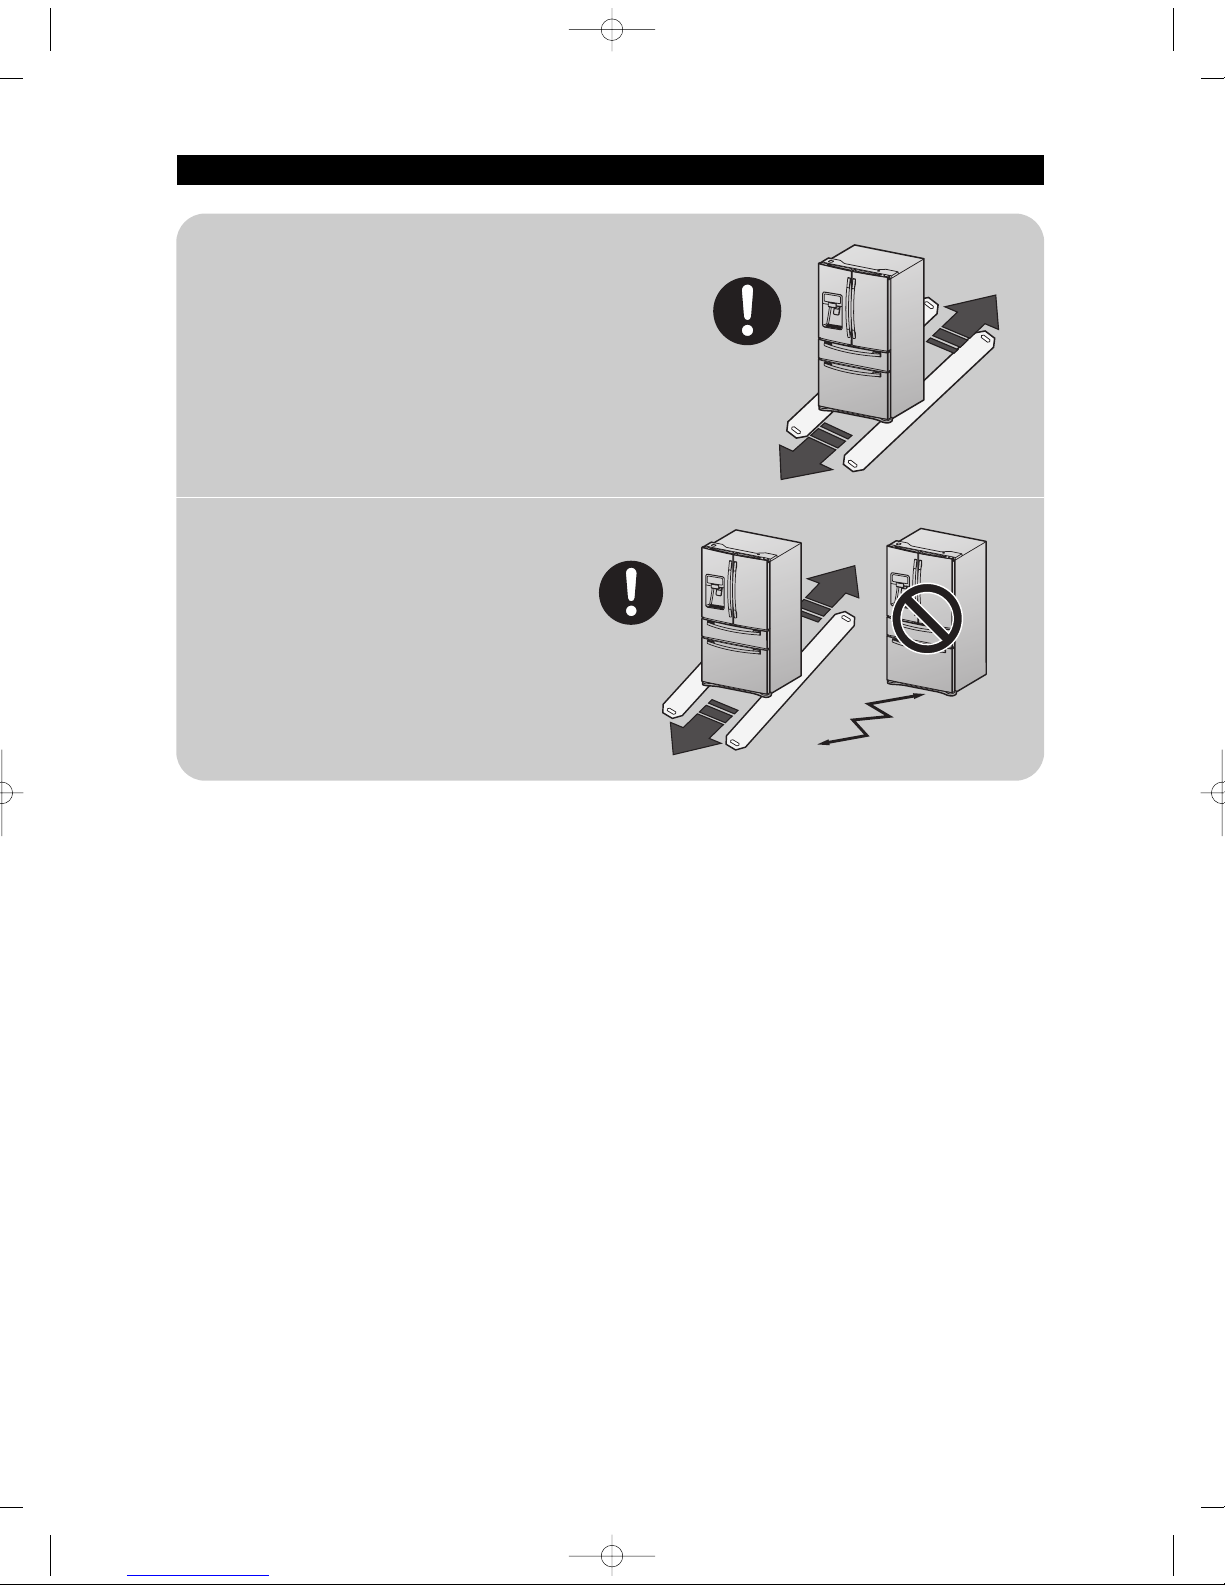
When moving, be sure to pull the unit straight
out and push back in straight.
MOVING
AW3 SM-EN 2011.3.31 2:50 PM 페이지9 i n

10
2. PRODUCT SPECIFICATIONS
2-1) Introduction of main function ··································11
2-2) Specifications·········································13
2-3) Interior Views ········································14
2-4) Model Specification &Specification Chart ·····························15
2-5) Dimensions of Refrigerator (Inches) ·······························18
2-6) Optional Material Specification ·································19
2-7) Refrigerant Route in Refrigeration cycle ·····························20
2-7-1.Principle of freezeer ···································21
2-7-2.Operation theory of refrigeration cycle components······················22
2-7-3.Refrigeration Cycle Type ·································25
2-8) Cooling Air Circulation ·····································26
AW3 SM-EN 2011.3.31 2:50 PM 페 이 지 1 0 i n
11
2. PRODUCT SPECIFICATIONS
●●
A newly developed SAMSUNG bottom mount freezer in 2010 has the following
characteristics.
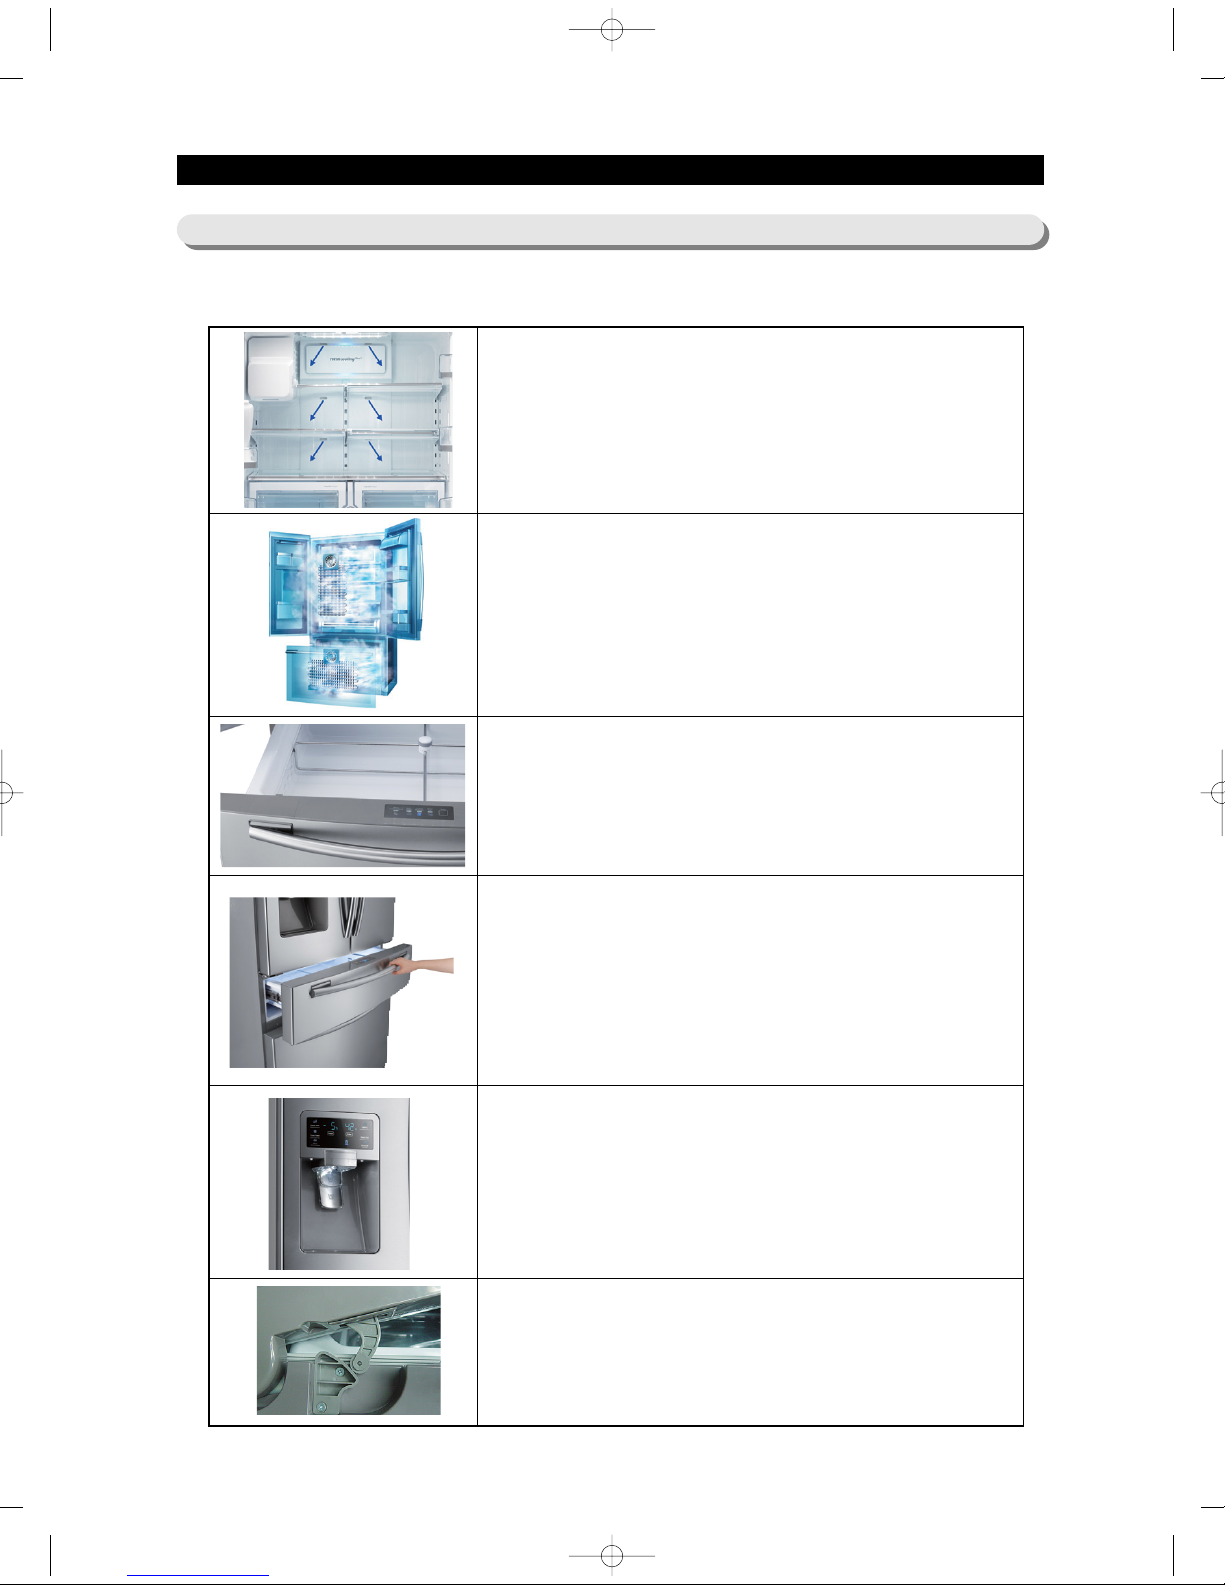
2-1) Introduction of Main Function
Surround Multi Flow
●●
Uniform cooling for each shelf and even in corner in fresh
food compartment by centerpositioned fan and duct with
multiple flow effluences.
Twin Cooling System
●●
The refrigerator and the freezer have two evaporators.
Given this independent system, the freezer and the
refrigerator are cooled individually as required and are,
therefore, more efficient.
Food odor from the refrigerator does not affect food in the
freezer due to separate air flow circulation.
Counter Height Design
●●
The Independent Mid Drawer(Flex zone) is counter
Height to fit contemporary kitchen.
Two Lever Dispenser
●●
Two lever dispenser can be get ice or water easily.
Secure Auto Close Door System
●●
Secure Auto Close Door System
●●
Cool tight doors
●●
Energy saving
●●
Preventing sweat on fridge doors
Flex Zone
●●
The Flex Zone is a full-width independent mid drawer with
adjustable temperature control.
AW3 SM-EN 2011.3.31 2:50 PM 페 이 지 1 1 i n
12
2. PRODUCT SPECIFICATIONS
1
2
3
4
5
Ez-Open
Handle
System
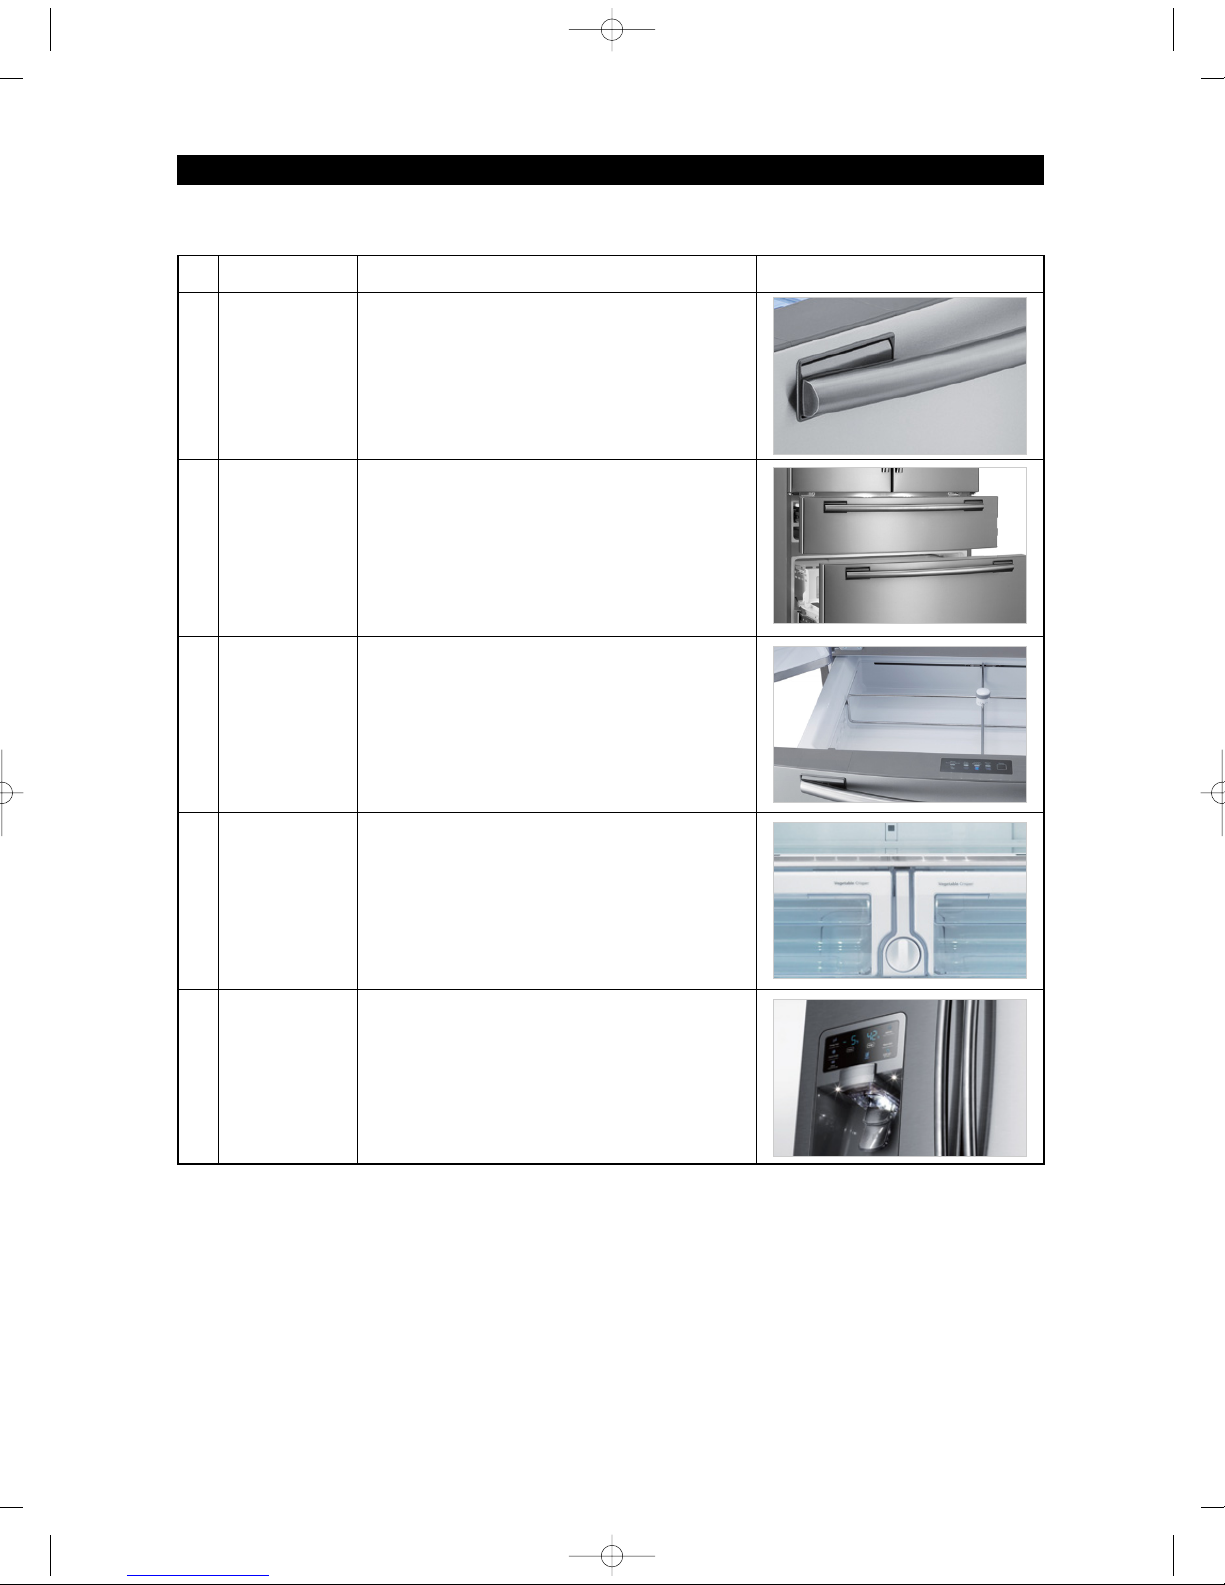
NO Item Details
▶ Changing Items
New Model
The freezer door and Mid drawer
(Flex zone) are more user-friendly.
So, They come as much convenient.
Emotional
Lighting
The lighting helps you find groceries
Easier by lighting down when you open
Mid drawer(Flex zone) and freezer door.
Slim Water
Filtration
System
Touch
Sensor
Lighting
Slim water filter is placed between
crispers for changing filter conveniently
without removing items from
Refrigerator.
The display change more wider and
apply Blue LED lighting.
And Touch Sensor Lighting make the
refrigerator graceful.
Smart
Divider
- Easy rail partition can divide off 4
independent space easily.
- The rail partition allow you to divide
the space of the convertible room
easier.
AW3 SM-EN 2011.3.31 2:50 PM 페 이 지 1 2 i n
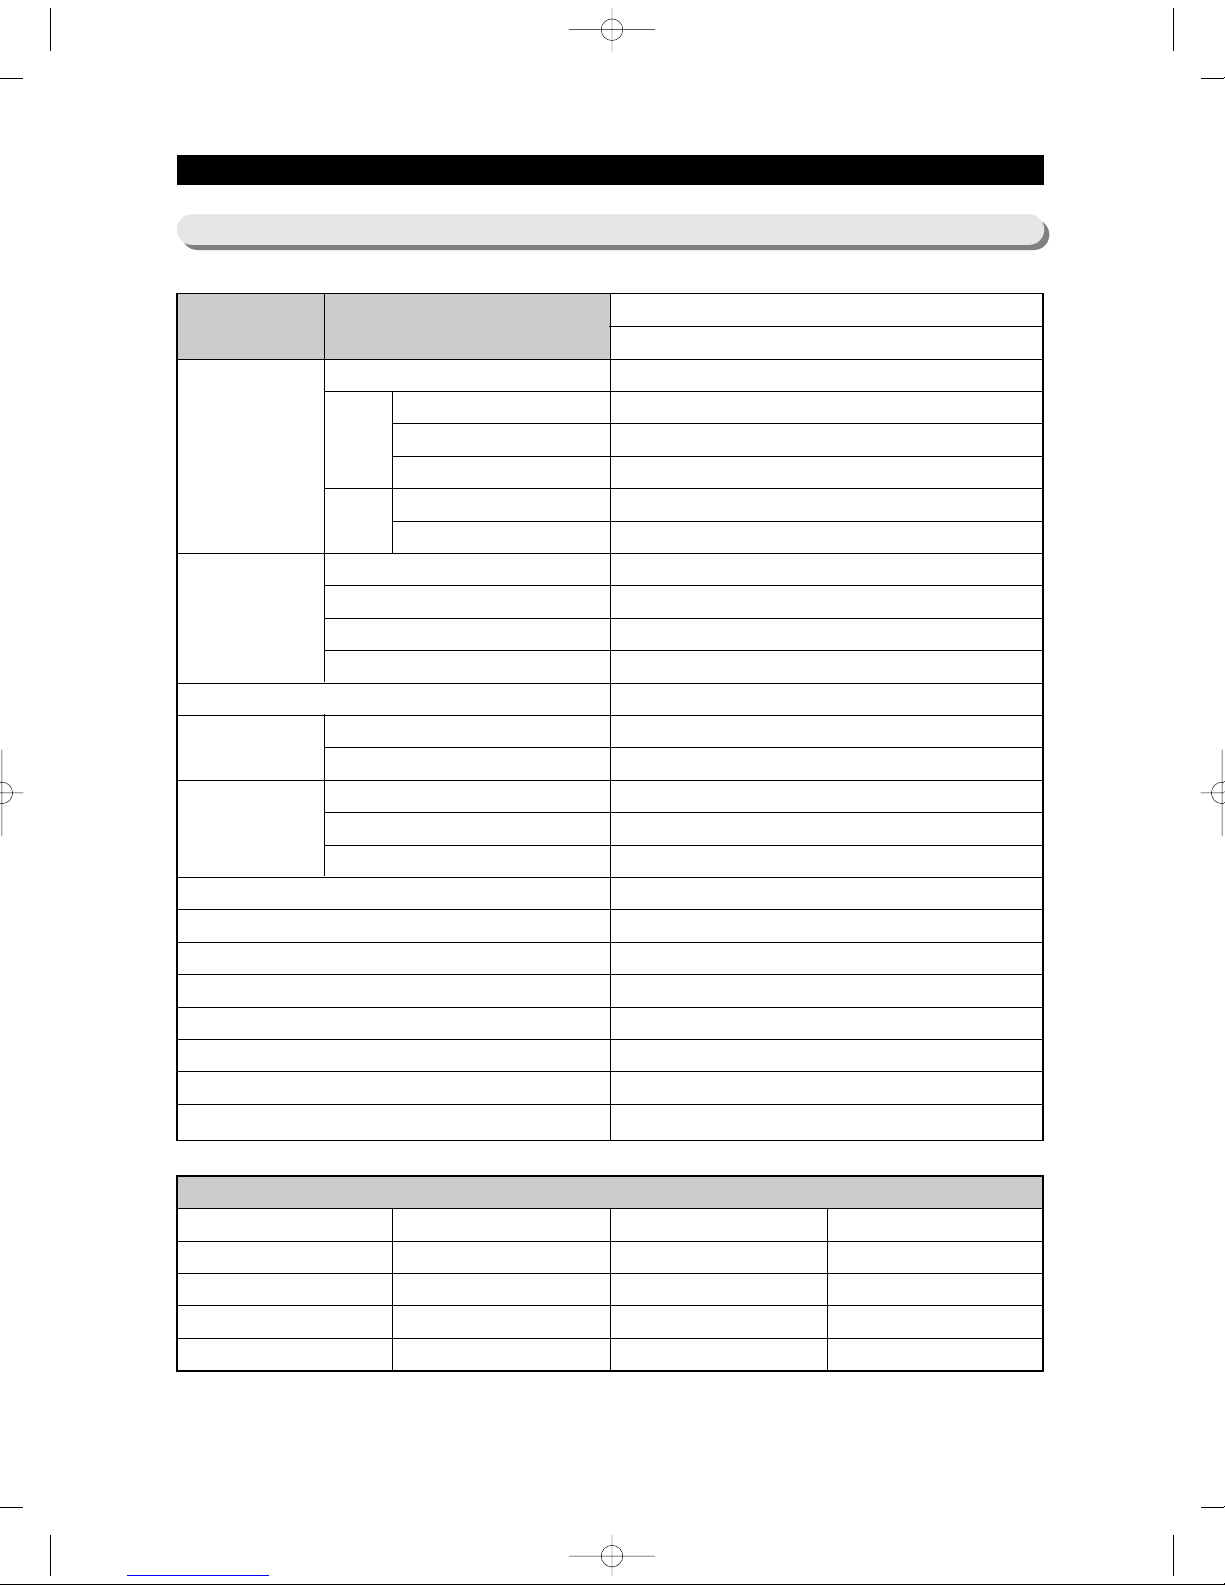
Defrost Control ··············From 12 to 22 hrs(comp.run time)
Thermo Bimetal Protector ··········140°F(60℃)(off) 104°F(40℃)(on)
Defrost Thermistor(502AT) ·········· F: 50°F(10℃)(off)
R: 59°F(15℃)(off)
Electrical RatingAC115V 60Hz ···········11.6 Amps
Maximum Current Leakage ··············0.25 mA
Maximum Ground Path Resistance ··········0.1 Ohm
Energy Consumption ··············562kWh/year
Ambient Temperature ········70
℉(21℃) 90℉(32℃)
Refrigerator···············34℉(1℃)∼46℉(7℃)
34℉(1℃)∼46℉(7℃)
Flex Zone················29℉(-1℃)~42℉(5℃)
29℉(-1℃)~42℉(5℃)
Freezer ··············· -8℉(-22℃)∼8℉(-14℃)
-8℉(-22℃)∼8℉(-14℃)
Run Time,%··············60 80
Refrigerant Charge (R134a) ···········5.64 oz(160g)
MKV190C-L2B ·············1314 Btu/hr(0.385kw)
Compressor oil ················· Freol α15c
R Capillary tube(Dia, Length) ··········0.032"",118
""((00..8822mmmm,,33550000mmmm))
F Capillary tube(Dia, Length) ··········0.032"",118
""((00..8822mmmm,,33550000mmmm))
Clearance must be provided for air circulation
AT TO P ·····················2" (50mm)
AT SIDES ··················· 3¾"(95mm)
AT REAR ···················· 2" (50mm)
ELECTRICAL SPECIFICATIONS REFRIGERATOR
13
2-2) Specifications
PRODUCT SPECIFICATIONS
NO LOAD PERFORMANCE
REFRIGERATION SYSTEM
INSTALLATION
FREEZER
FLEX ZONE
CompressorStep Valve
C-FanDryer
Condenser Water Valve
AW3 SM-EN 2011.3.31 2:52 PM 페 이 지 1 3 i n
14
PRODUCT SPECIFICATIONS
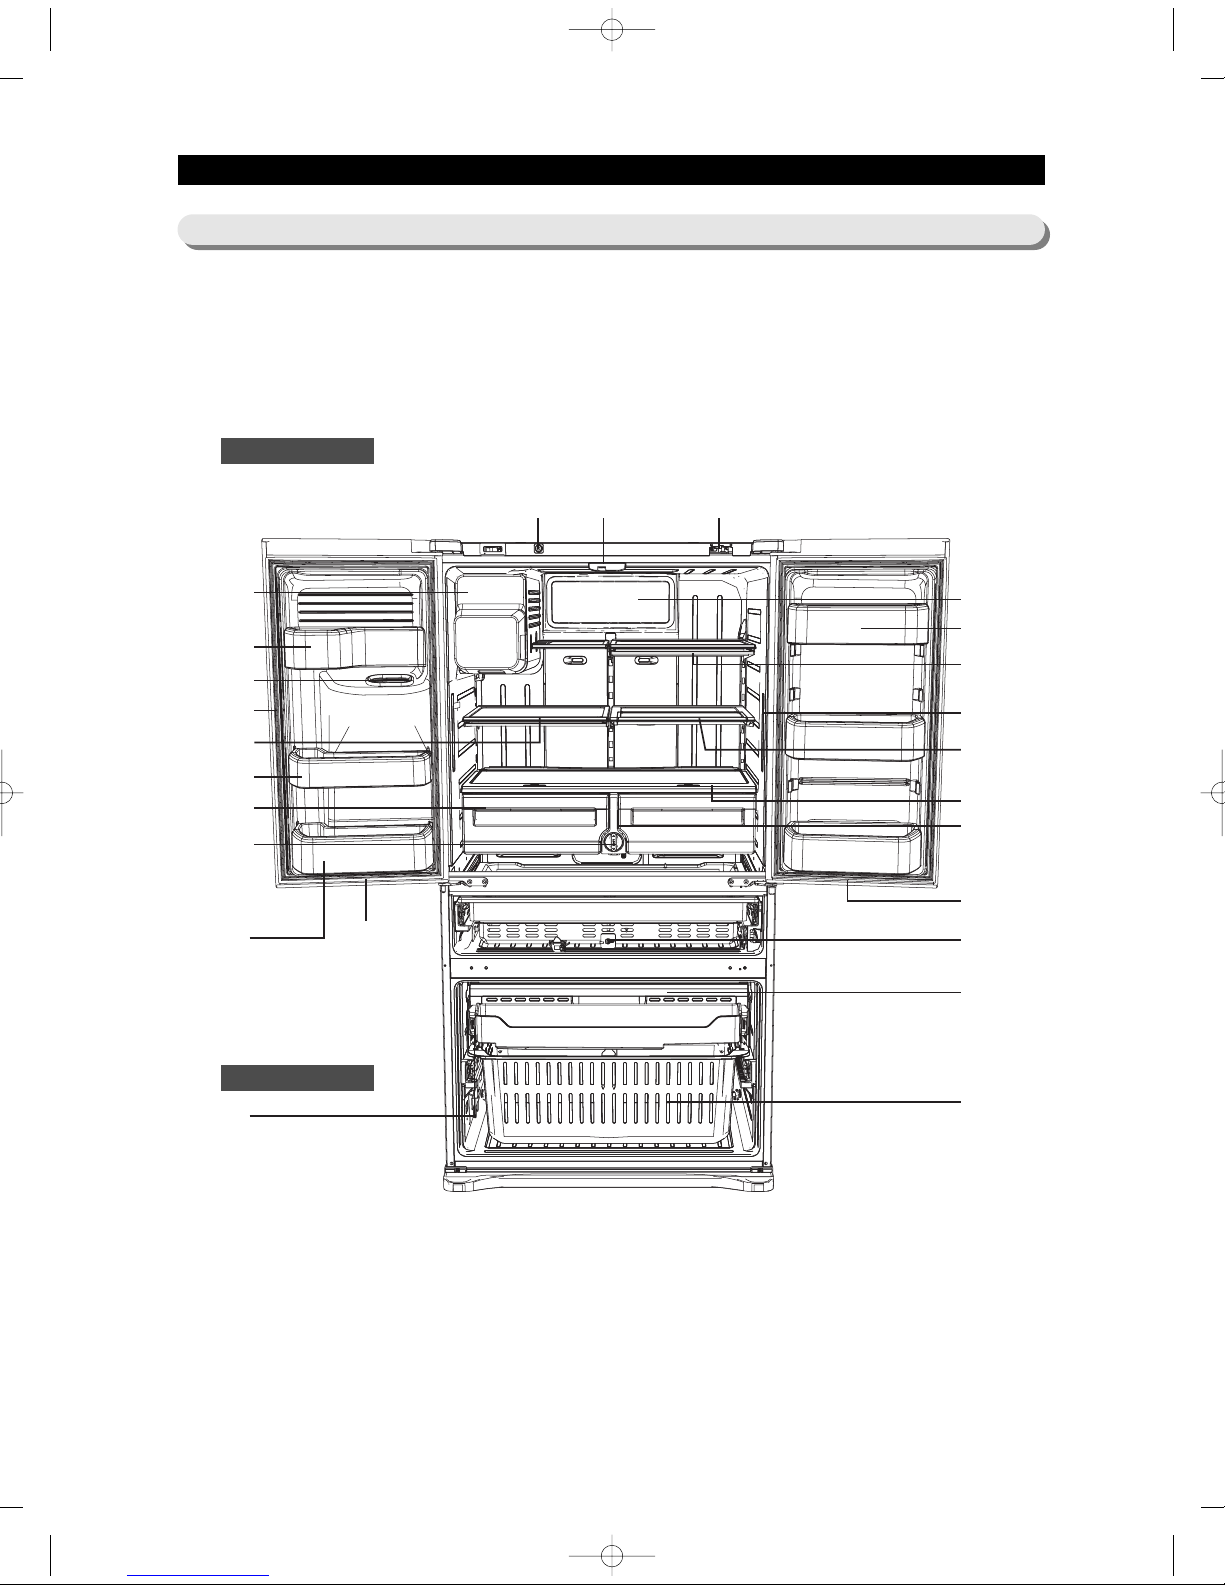
2-3)
Interior Views
Freezer
Refrigerator
Light Door Closer
Cover Eva (Light)
Interlocking switch
FF Ice-Maker
Dis Door Bins
Cap Chute
Vertical Hinged
Section
Slide-Shelf
Mid Door Bins
Left Door Bins
Tilting Pocket
Light
Vegetable & Fruit
Drawers
Water Filter
Right Door Bins
Tempered glass
shelves
Light
Auto Pull Out
Drawer
Freezer Drawer
GUARD
Light
Convertible
Room
Light
Cover Veg
Quick-Space
Glass Shelf
AW3 SM-EN 2011.3.31 2:52 PM 페 이 지 1 4 i n
15
COLOR
ModelITEM
2-4) Model Specification &Specification Chart
PRODUCT SPECIFICATIONS
External size
Net
Capacity
Weight
Packing
D
H
W
Efficiency of Volume
On Cabinet
W/O Handle
With Handle
W/O Hinge Cap
With Hinge Cap
Total
Freezer
Flex Zone
Refrigerator
Set
Packing
Width
Depth
Height
Black
Real STS
White
Platinum STS
Cabinet (Both Side)
All Black
Noble STS
Snow White
Noble STS
Door
Empire Black
Versailles Stainless
Snow White
Stainless Platinum
Molding
I Black
Creamy STS
Snow White
Creamy STS
Compressor
Rated Frequency and Frequency
Refrigerant
Foaming Agent
Refrigerant Input Amount
Type Refrigerator
Motor Rated Consumption Power
Electric Heater Rated Consumption Power
RF4287HA
**
Ice & Water Dispenser with Pantry
35 3/4 inch (908mm)
29 7/8 inch (760mm)
33 3/4 inch (858mm)
36 1/4 inch (920mm)
68 1/2 inch (1740mm)
69 7/8 inch (1774mm)
27.98 Cu.ft (792ℓ)
7.74 Cu.ft (219ℓ)
3.97 Cu.ft (112ℓ)
16.28 Cu.ft (461ℓ)
60%
362.4 Pounds (164kg)
402.1 Pounds (182kg)
38 5/8 Inch (980mm)
39 3/8 Inch (1001mm)
75 5/8 Inch (1923mm)
Reciprocate
AC 115V/60Hz
R 134a
C-Pentane
5.64 oz (160g)
Indirect Cooling Method Refrigerator
140W
340W
AW3 SM-EN 2011.3.31 2:52 PM 페 이 지 1 5 i n
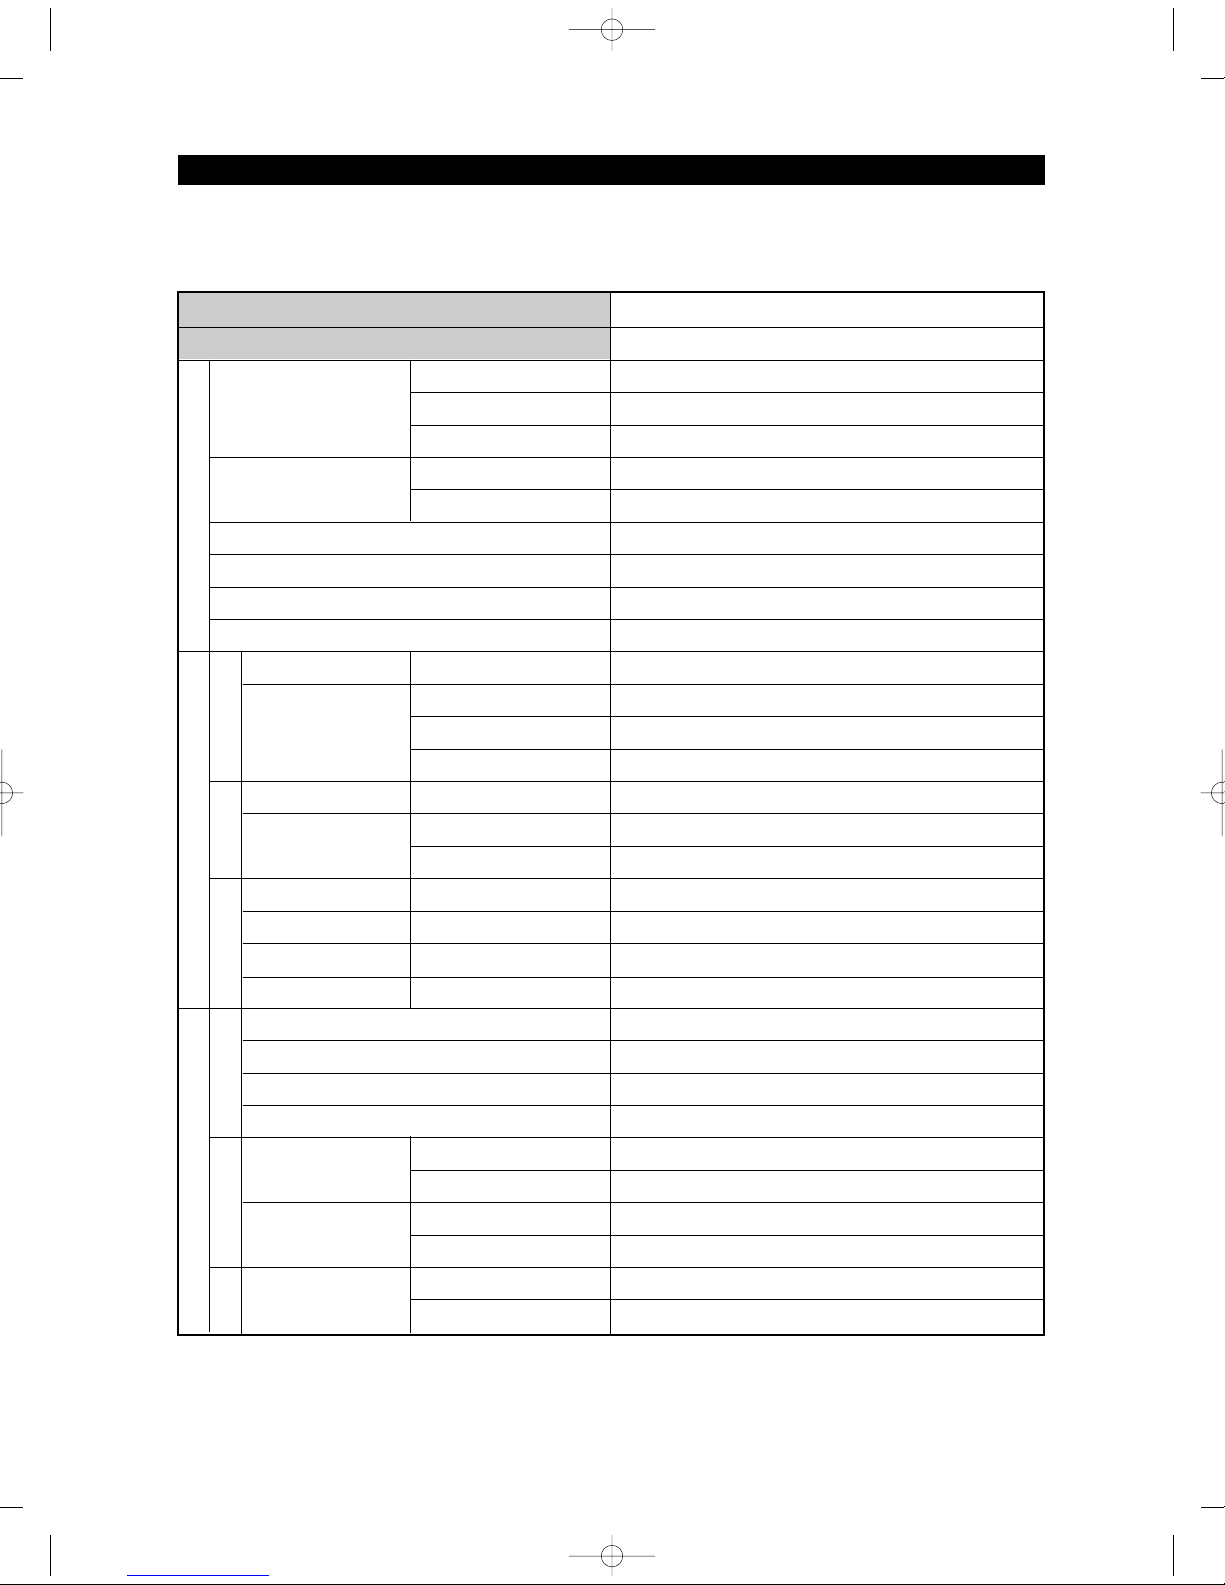
16
Items
Model
PRODUCT SPECIFICATIONS
Compressor
Evaporator
Model
First Defrost Cycle (Concurrent defrost of F and R)
Defrost Cycle(FRE)
Defrost Cycle(REF)
Pause time
THERMISTOR
(F-SENSOR)
502AT
Temperature Selection
-8℉(-22℃)
-2℉(-19℃)
8℉(-14℃)
Model
THERMISTOR
(R-SENSOR)
502AT
F/R Defrost-
Sensor
F/R Bimetal-thermo
Protector
Temperature Selection
34℉(1℃)
38℉(3℃)
46℉(7℃)
Model
SPEC
Rated
Operating temperature
Condenser
Dryer
Capillary tube(Dia x Length)
Refrigerant
Model
Starting type
Oil Charge
Freezer
Refrigerator
MKV190C-L2B
BLDC
FREOL α- 15c
SPLIT FIN TYPE
SPLIT FIN TYPE
Forced and Natural Convection Type
Molecular shieve XH-9
R : 0.032” x 118” (0.82mm x 3500mm) / F : 0.032” x 118” (0.82mm x 3500mm)
R134a
6hr ±10min
12~23hr(vary according to the conditions used)
6~11hr(vary according to the conditions used)
12 ±1min
THERMISTOR (502AT)
5.0 ㏀ at 77℉(25℃)
AC 125V 10A
Off : 140℉(60℃) / On : 104℉(40℃)
F/R Fuse
Rated
Operating temperature
AC 250V 10A
Off: 230℉(110℃)
ON(℉)
-5℉(-20℃)
1℉(-17℃)
11℉(-12℃)
ON(℉)
36℉(2℃)
40℉(4℃)
48℉(8℃)
OFF(℉)
-11℉(-24℃)
-5℉(-21℃)
5℉(-15℃)
OFF(℉)
32℉(0℃)
36℉(2℃)
44℉(6℃)
Specification
RF4287HA
Components for Freezer
Defrost Related Components
Freezer
Refrigerator
Model
THERMISTOR
(F-SENSOR)
502AT
Temperature Selection
29℉(-1℃)
42℉(5℃)
ON(℉)
32℉(0℃)
45℉(7℃)
OFF(℉)
26℉(-3℃)
39℉(4℃)
Flex
Defrost Cycle
Defrost Sensor
Fuse
Room Temperature Sensor Components
AW3 SM-EN 2011.3.31 2:52 PM 페 이 지 1 6 i n
17
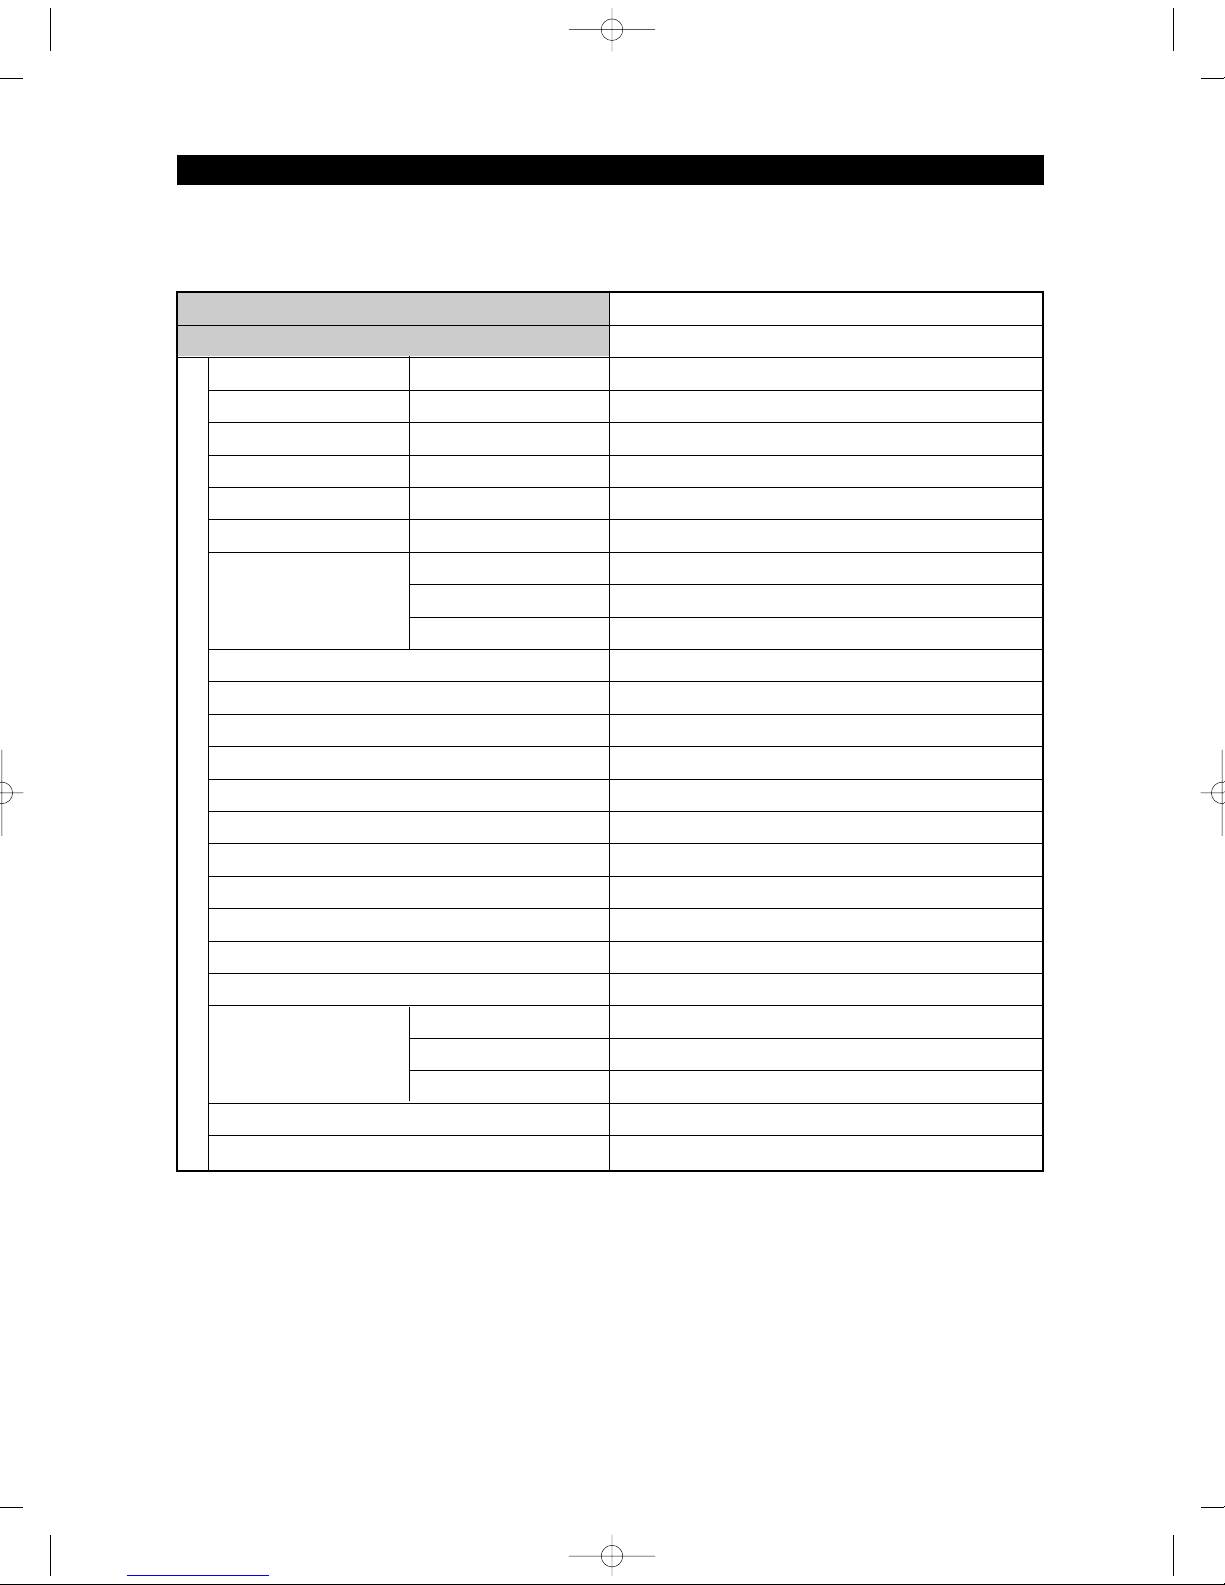
PRODUCT SPECIFICATIONS
Items
Model
Defrost Heater(FRE)
Defrost Heater(REF)
DISPENSER Heater
FRENCH Heater
ICE Duct Heater
Damper
Interlock with French Heater
-
Interlock with Defrost Heater (FRE)
-
Model
Temp.ON
Temp.OFF
Over Load Relay
Rated Voltage
Motor-BLDC(FRE)
Motor BLDC(ICE ROOM)
Motor-BLDC(REF)
Motor-BLDC(CIRCUIT)
Motor-DAMPER(PANTRY)
Lamp LED(REF)
Lamp LED(Flex&FRE)
Lamp LED(REF Side)
Lamp LED(Vegetable)
Lamp LED(REF Eva)
Heated at F Defrost
Heated at R Defrost
Door Switch
FRE
REF & Flex
REF(ICE ROOM)
Power Cord
Earth Screw
Specification
RF4287HA
Electric Components
AC 120V, 230W
AC120V, 120W
AC120V, 1.6W
AC120V, 7W
AC120V, 7W
DC 12V, 1W
4TM445PHBYY-82
257± 41℉(125± 5℃)
156.2± 48.2℉(69± 9℃)
AC 115V/ 60Hz
DC12V / FDQT06SS3
DC12V / DREP5020LB
DC12V / FDQT06SS3
DC12V / FDQT04SS2
DC12V / NSBY001TD1
DC12V / 290~380mA
DC 12V / 45~75mA
DC 12V / 45~75mA
DC 12V / 95~145mA
DC 12V / 65~95mA
AC 125V 1.5A (1EA)
DC200V 1.5A / MS-406-SS-01(2EA)
125~250V /11A, EMB606
AC125V 15A
BSBN (BRASS SCREW)
AW3 SM-EN 2011.3.31 2:52 PM 페 이 지 1 7 i n

18
PRODUCT SPECIFICATIONS
2-5)Dimensions of Refrigerator (Inches)
AW3 SM-EN 2011.3.31 2:52 PM 페 이 지 1 8 i n
19
PRODUCT SPECIFICATIONS
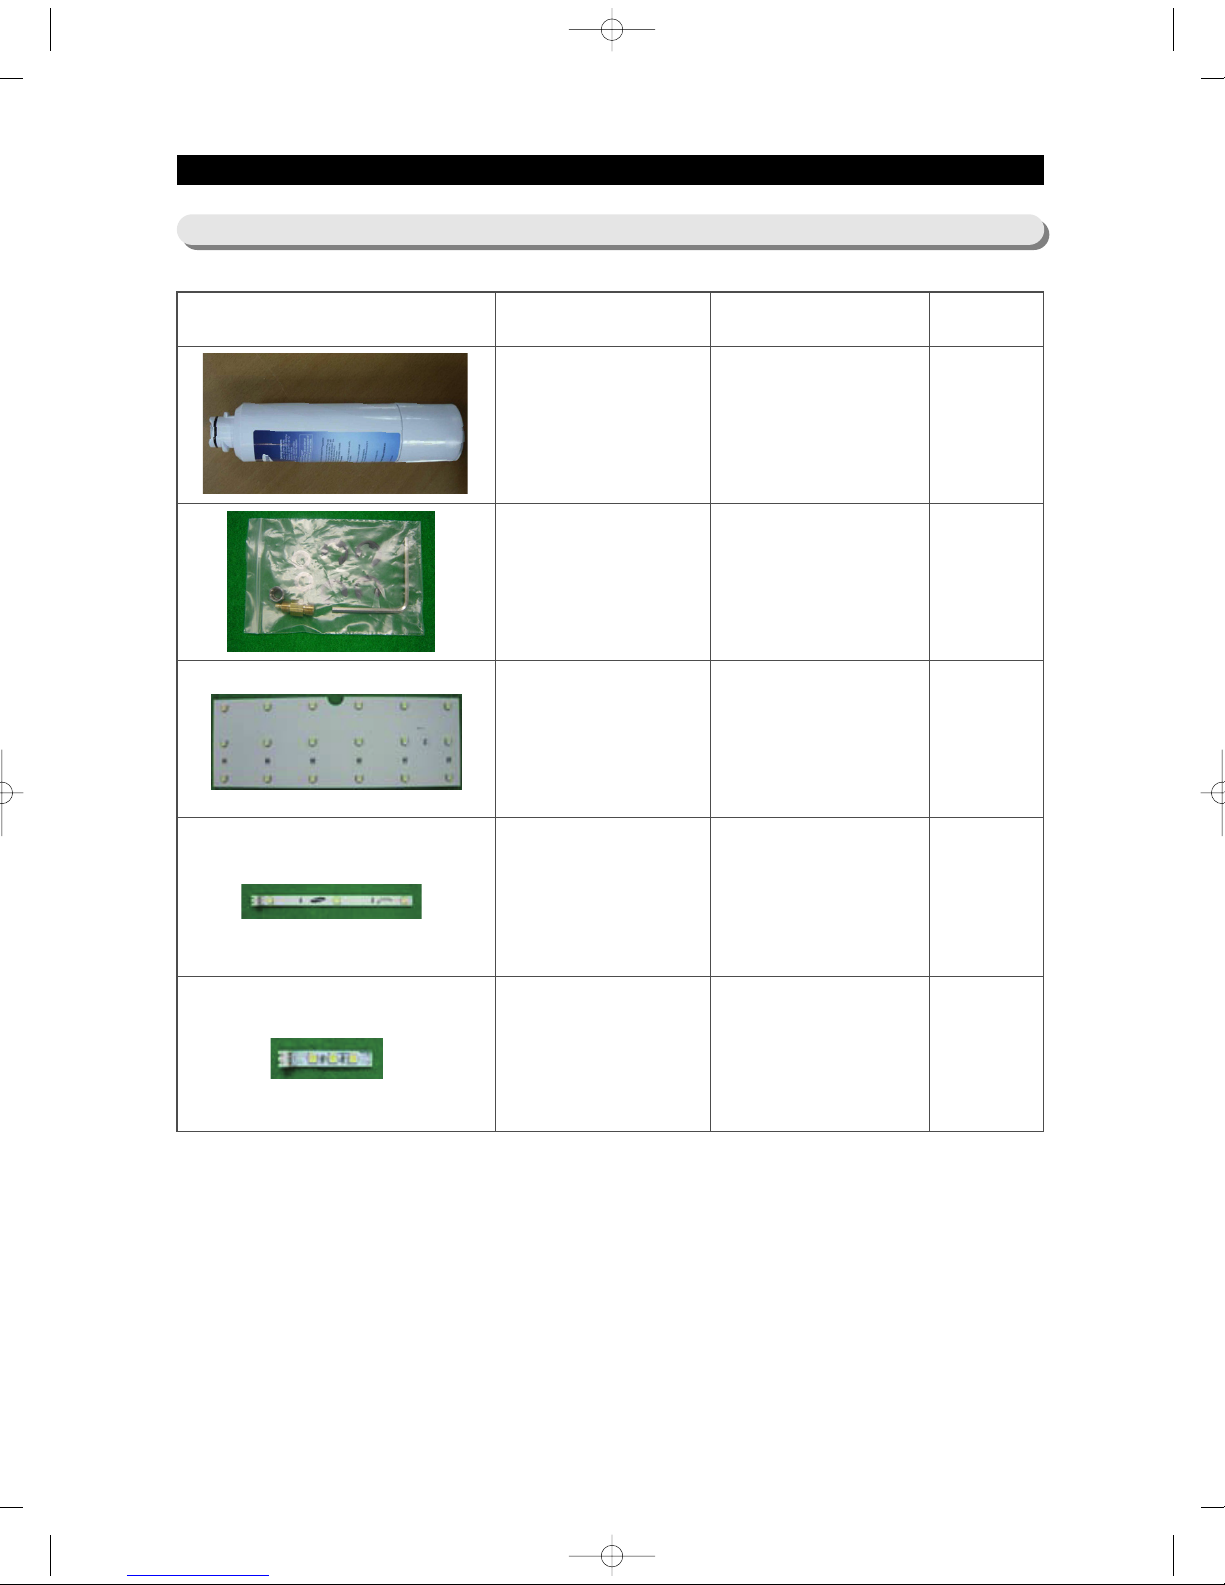
2-6) Optional Material Specification
Part Name Part Code AMOUNT
FILTER
WATER-ASSY
DA29-00020B
DA99-00240S
DA96-00398H
DA96-00392C
DA41-00519R
1
1
1
2
4
ASSY-
PACKING SUB
LED LAMP REF
LED LAMP SIDE
LED LMAP
CONV(FRE)
AW3 SM-EN 2011.3.31 2:52 PM 페 이 지 1 9 i n
20
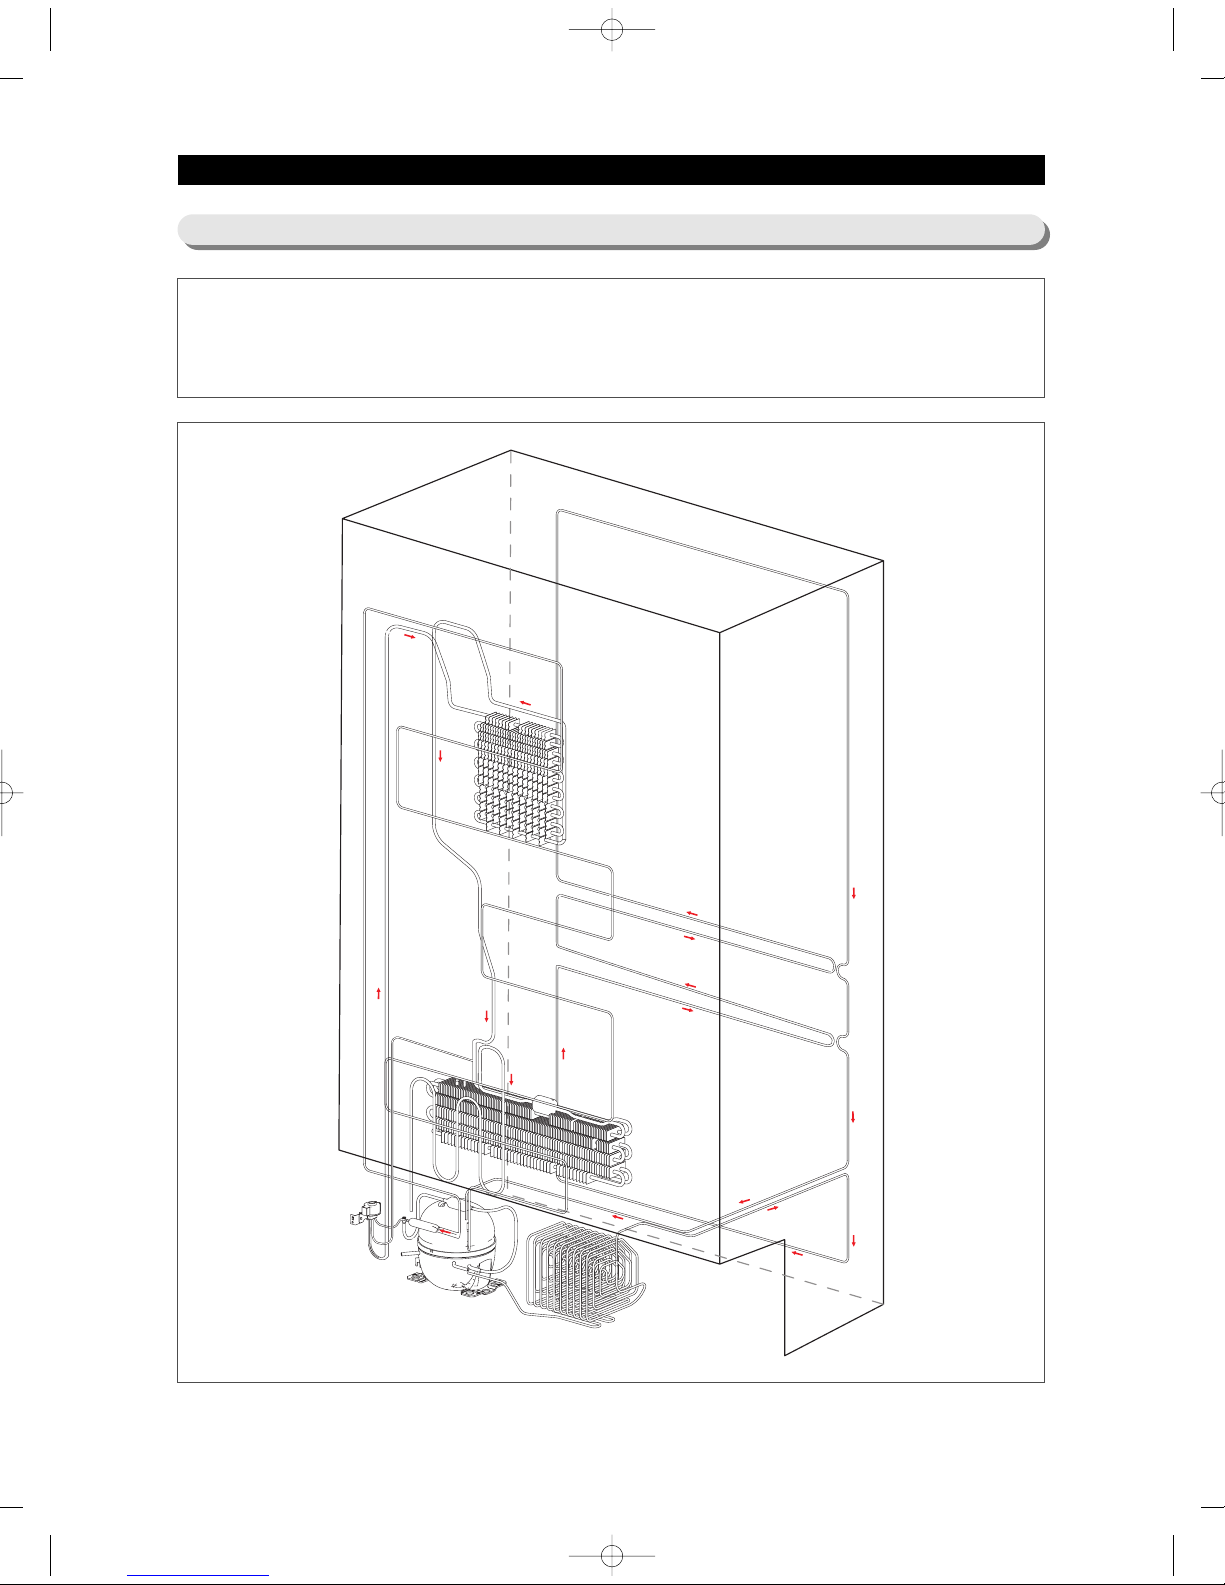
1. Compressor → Condenser → Hot Pipe → Back Cluster Pipe → Dryer → Ref Capillary Tube → Refrigerator
Evaporator → Freezer Evaporator → Suction Pipe → Compressor
2. Compressor → Condenser → Hot Pipe → Back Cluster Pipe → Dryer → Fre Capillary Tube → Freezer
Evaporator → Suction Pipe → Compressor
PRODUCT SPECIFICATIONS
2-7) Refrigerant Route in Refrigeration cycle
AW3 SM-EN 2011.3.31 2:52 PM 페 이 지 2 0 i n
21
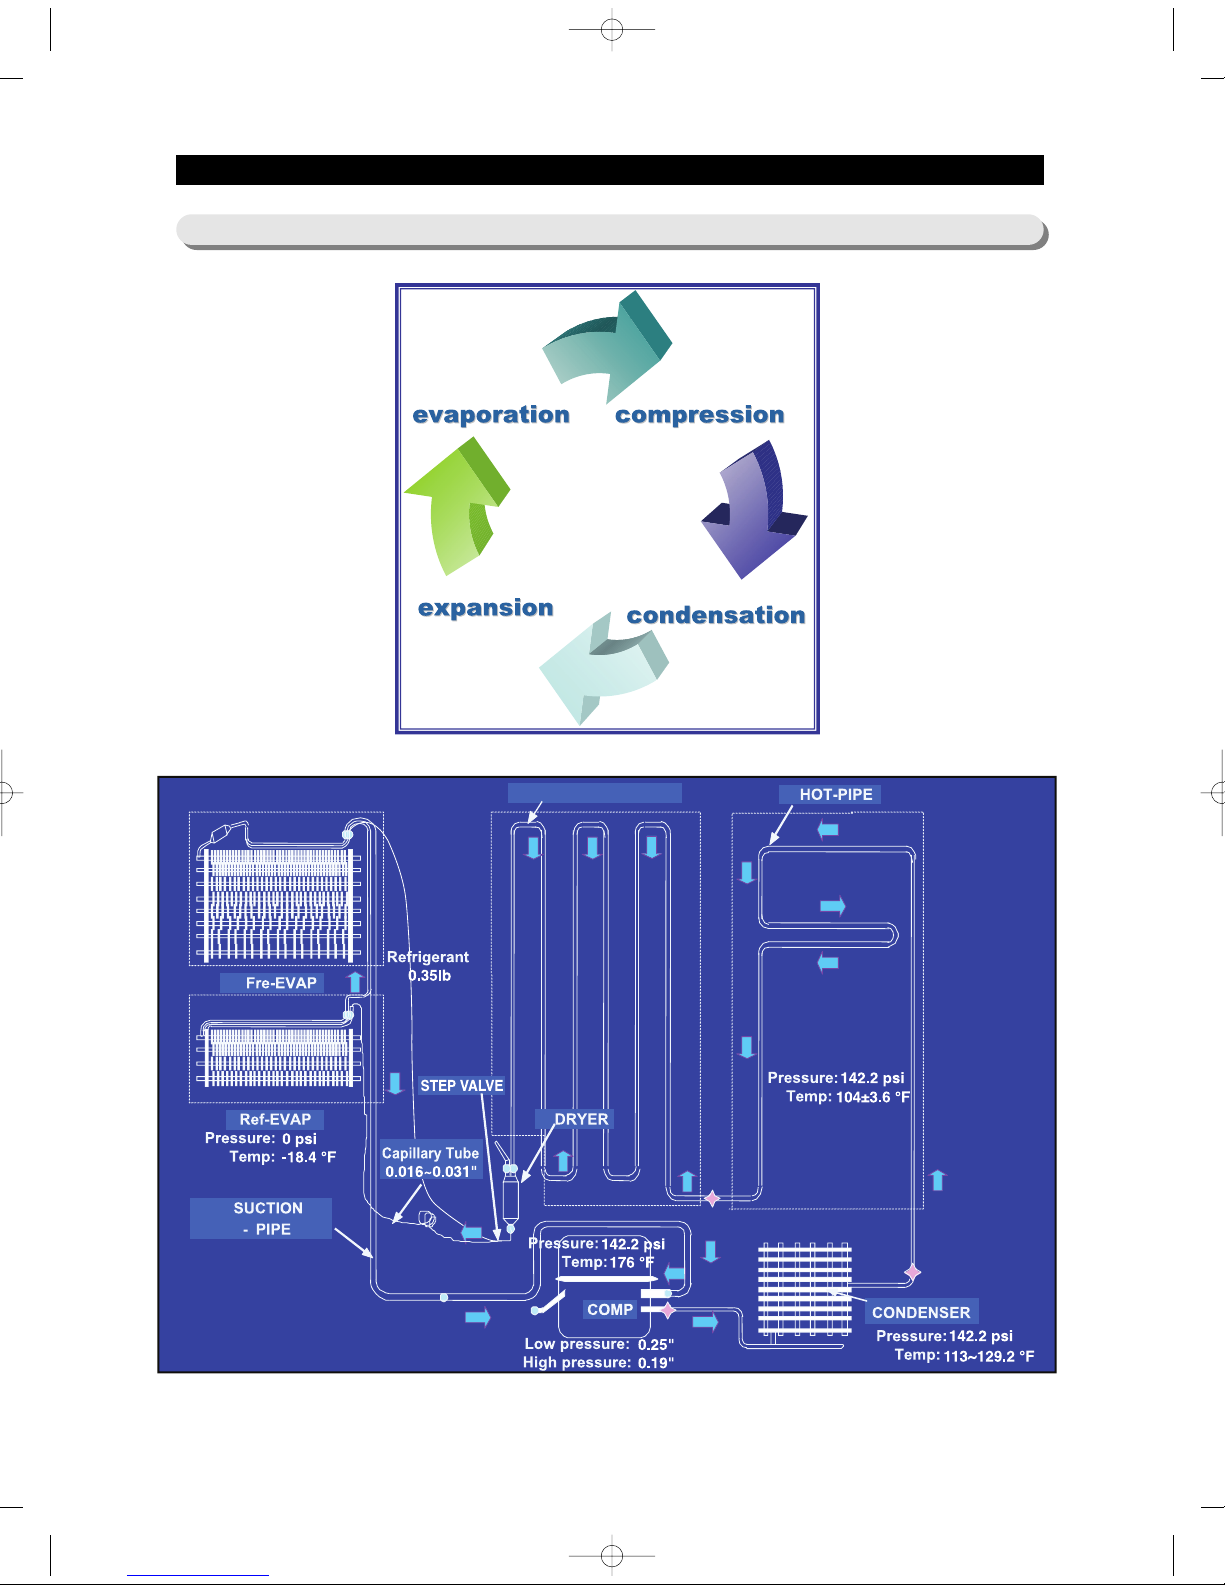
PRODUCT SPECIFICATIONS
2-7-1. PRINCIPLE OF FREEZEER
BACK CLUSTER-PIPE
AW3 SM-EN 2011.3.31 2:52 PM 페 이 지 2 1 i n

22
PRODUCT SPECIFICATIONS
2-7-2. Operation theory of refrigeration cycle components
■ Condenser
1) Role: A device which radiates heat to the outside (water/air) to make liquid state for the high
temperature / high pressure gas refrigerant discharged from compressor
2) Types
A. Air-cooling Type : Condense air by circulating naturally or manually.
1) Natural Convection Type : Used for the household refrigerator which has small condensing
capacity.
2) Manual Convection Type : Circulate air manually by FAN-Motor (Large capacity)
B. Water-cooling Type : Make cooling water pass through the pipe in the condenser (Large
capacity)
※ Location
① CLUSTER heat-radiating type : All Pipes effective for radiating heat are formed in the
right/left, and front side of refrigerator with hard urethanes and radiate heat through the
whole surfaces of cabinet to ambient air.
② Install the condenser on the outside of the product. (An old model)
③ Make them cluster at the lower part of product and radiate heat manually by fan.
☞ Radiate condensed potential heat up to liquefy completely and make change the state
without changing the gas temperature itself.
※ Pipe thickness
① Low pressure: 6.3mm ② High pressure : 4.7mm ③ Capillary : About 0.4-0.8mm
※ Condenser length (Based on 300ℓ): 26.5 M
① Assistance : 5 M ② HOT-PIPE: 6.6 M ③ CLUSTER-PIPE: 15 M
■ Capillary
1. Role: A device which makes low temperature and pressure refrigerant by reducing the
pressure the normal temperature / high pressure liquid refrigerant condensed from
condenser, and supply it to the evaporator.
A. To evaporate more lower temperature in case of evaporation.
B. It flows to the evaporator without back flowing to condenser, if compressor stops, and the
difference of pressure between high pressure and low pressure is small so it is easy to
operate the compressor again.
2. Outline
A. Thickness : About 0.4-0.8ßÆ
B. Length : It is changeable to low temperature and pressure (10->5ß∏/ß≤) depends on the
2M of thin and long copper pipe wall resistance.
AW3 SM-EN 2011.3.31 2:52 PM 페 이 지 2 2 i n

23
PRODUCT SPECIFICATIONS
2-7-2. Operation theory of refrigeration cycle components
■ Evaporator
1. Role: As the low pressure liquid refrigerant flowed from capillary absorbs heat inside of the
refrigerator, it becomes low pressure gas and refrigerate the foods.
2. Theory: The low pressure refrigerant flowed to evaporator operates cooling which takes
ambient evaporated potential heat with maintaining the evaporation up to evaporate
completely.
3.Types of Evaporator
A. ROLL-BOND Evaporator → Direct Cooling ONE-DOOR Type
☞ Rolled and adhere the 2 aluminum plate and then make refrigerant passage.
B. PIN-PIPE Type → Indirect cooling TWO-DOOR Type
☞ a small aluminum plate on the aluminum pipe to increase the cooling effect.
■ Compressor
1. Role: It operates same as pump which pull out the subterranean water. It inhales the low
temperature and pressure refrigerant gas (flowed out) from evaporator and make high
temperature and pressure refrigerant liquid in the compressor and send it to the condenser.
2. Type of Condenser
a. Back-and-forth motion type: A method that pistol makes back-and-forth motion through
shaft and cylinder of motor rotation and compresses. ※ Used for household refrigerant
b. Rotary Type: A method that inhales the refrigerant gas through the gap between the
outside of rotor electric attached on the shaft and the inside of cylinder and compresses.
c. Centrifugal Type
3. Please insert the explanation of inverter comp operation theory.
■ Dryer
1. Role: Absorb the moisture from the refrigerant that refrigeration cycle circulates and
eliminate the foreign substance.
2. Structure: If even some moisture is included refrigerant is impossible to circulate by freezing
the small capillary outlet, so silica gel or molecular sieve is (included and) sealed to absorb
the internal moisture, and install a minute net to eliminate the foreign substance.
AW3 SM-EN 2011.3.31 2:52 PM 페 이 지 2 3 i n

24
PRODUCT SPECIFICATIONS
2-7-2. Operation theory of refrigeration cycle components
※.Influence of moisture
① Moisture precipitation – Blocked by ice
② Refrigerant and reaction
③ Life reduction of oil
④ Acceleration of oxidization
⑤ Copper plating phenomenon
⑥ Gas dissolution by the interaction of synthetic insulating material (insulator)
※.Influence of foreign substance
① Increase of condensed temperature.
② Increase of temperature.
③ Decrease of cooling efficiency
④ Shorten the life by friction between oil and foreign substance in the compressor.
■ Accumulator
1. Role : To send a pure refrigerant gas to compressor by removing completely the refrigerant
liquid from evaporator.
※ If a refrigerant liquid go into the compressor, overload is occurred.
AW3 SM-EN 2011.3.31 2:52 PM 페 이 지 2 4 i n
25
PRODUCT SPECIFICATIONS
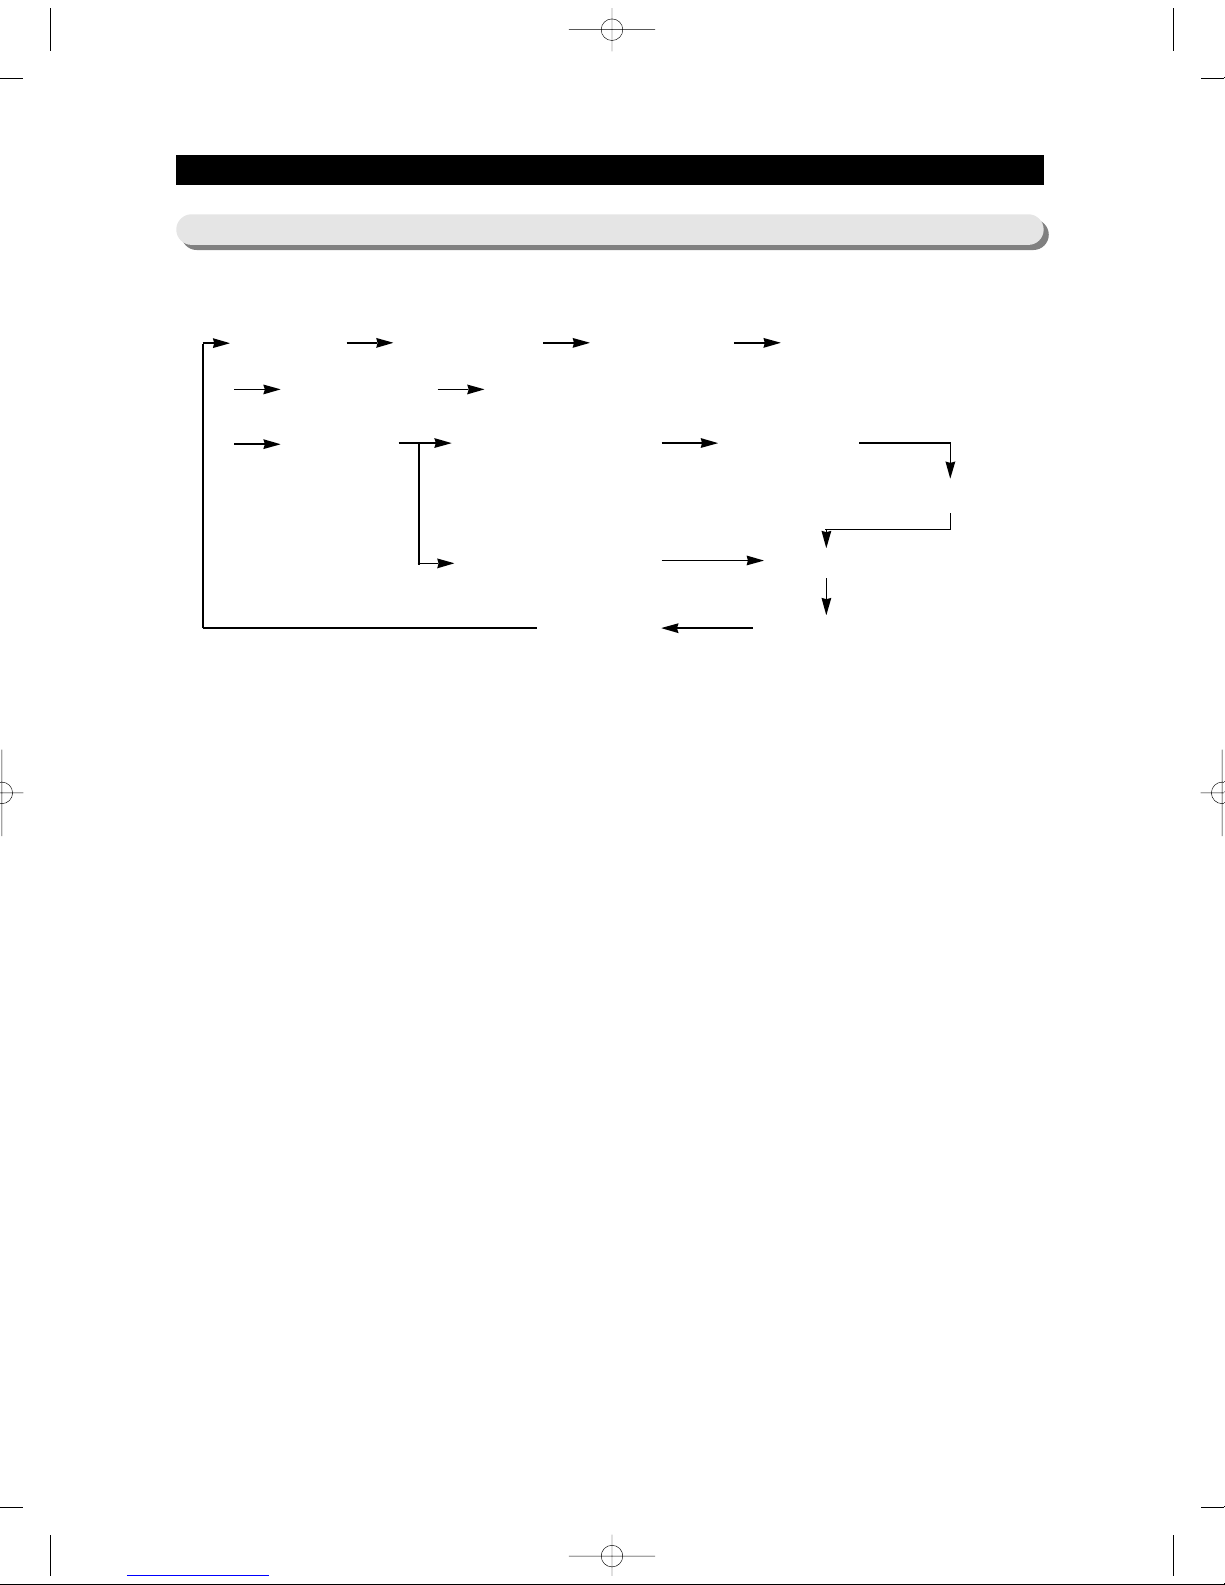
2-7-3. Refrigeration Cycle Type
TDM Cycle
Compressor
Ref Hot-Pipe
3Way Valve Ref Capillary Tube
Fre Capillary Tube
Ref Evaporator
Fre Evaporator
AccumulatorSuction Pipe
Connected Pipe
Back Cluster
Condenser Fre Hot-Pipe Flex Hot-Pipe
AW3 SM-EN 2011.3.31 2:52 PM 페 이 지 2 5 i n
26
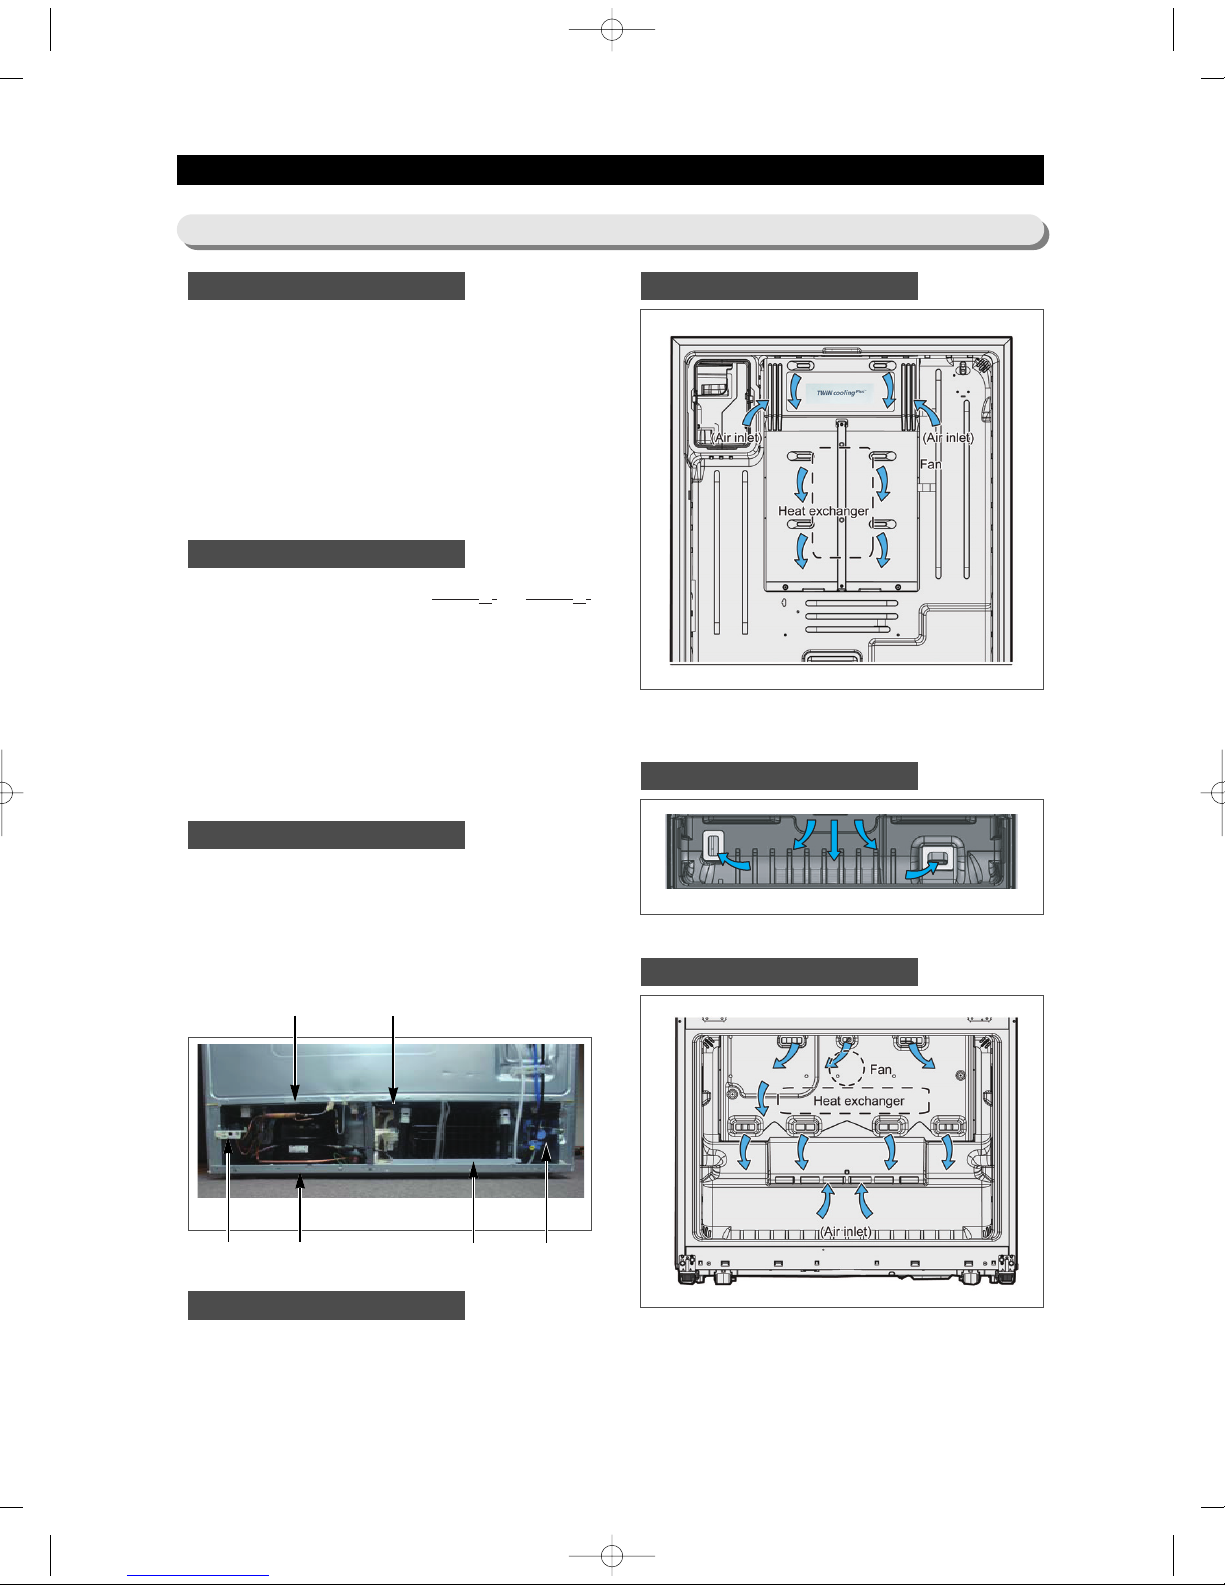
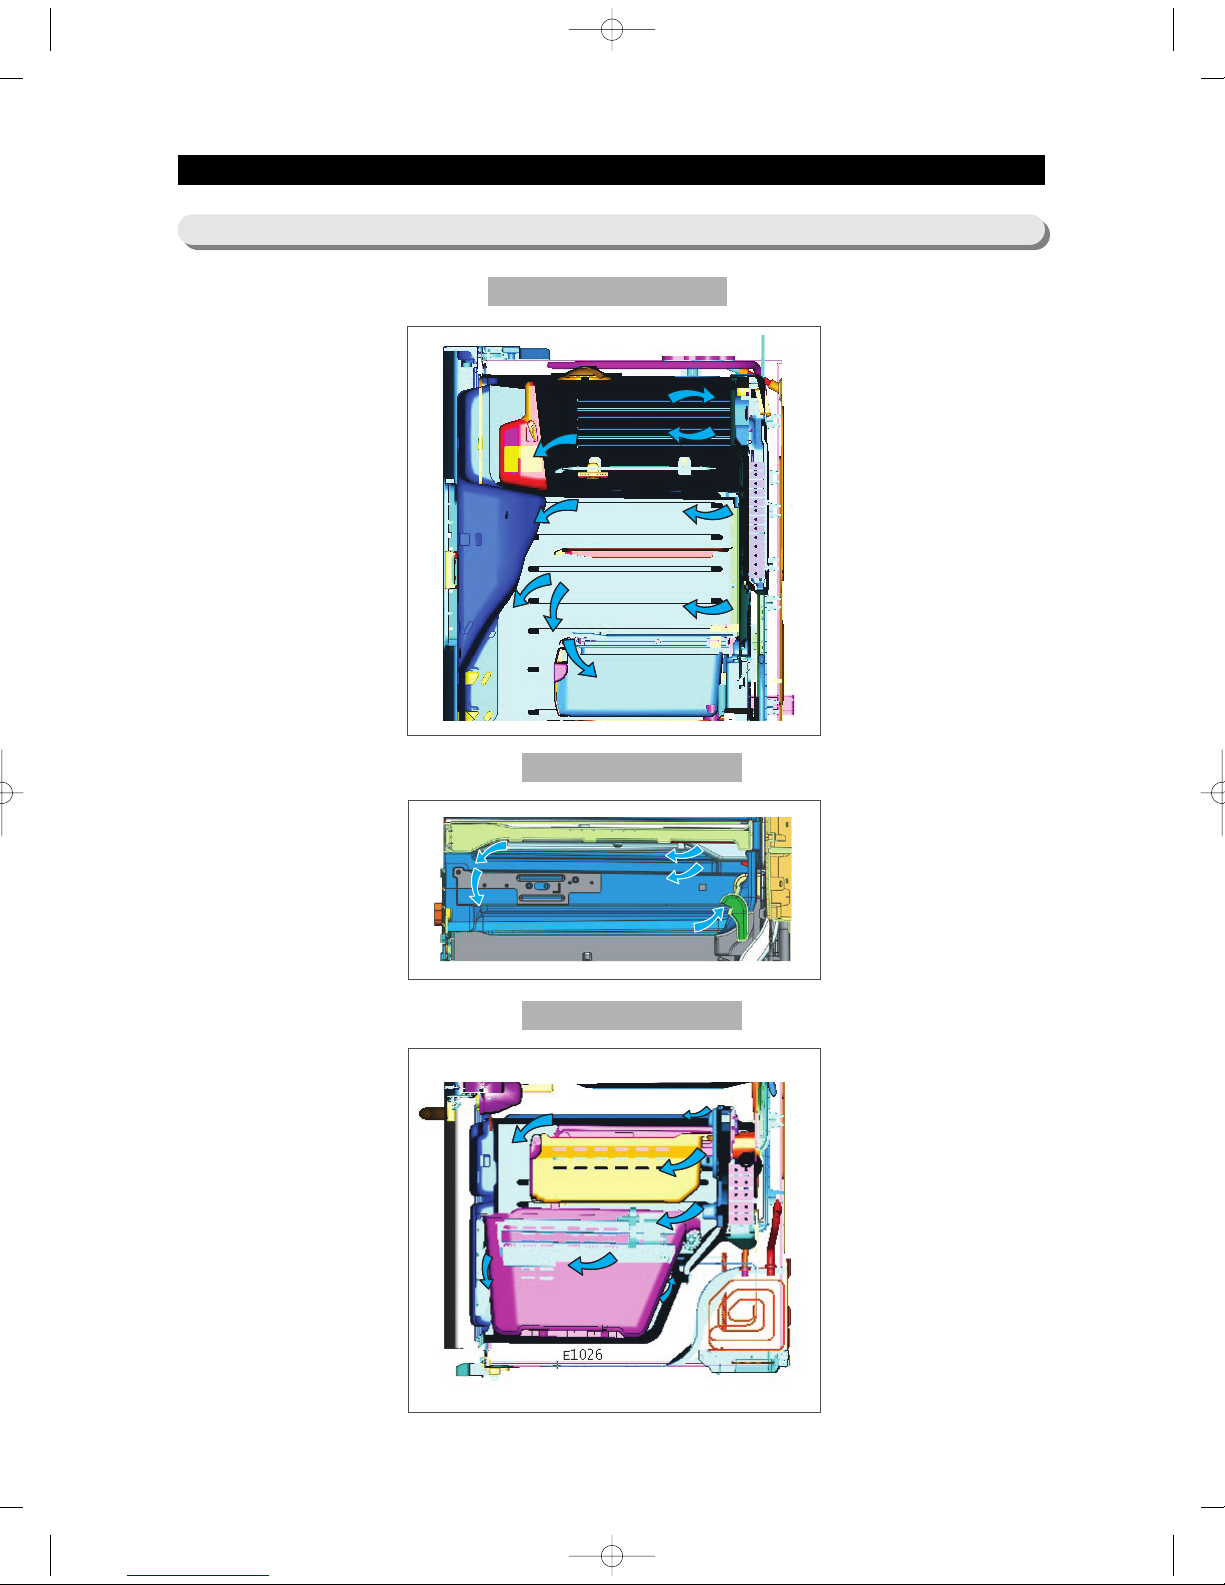
Refrigerator
PRODUCT SPECIFICATIONS
2-8) Cooling Air Circulation
Freezer
Flex Zone
AW3 SM-EN 2011.3.31 2:52 PM 페 이 지 2 6 i n

27
3. DISASSEMBLY AND REASSEMBLY
3-1) PRECAUTION·········································28
3-2) Refrigerator Door ·······································29
3-3) Door Handle Freezer ······································31
3-4) Door Handle Freezer & Flex zone ································32
3-5) Refrigerator Light ·······································33
3-6) Cover-Display & Water-Dispenser ································33
3-7) Water-Dispenser········································34
3-8) Glass Shelf ··········································35
3-9) Foldable Glass Shelf ······································36
3-10) Vegetable & Fruit Drawers Shelf ································36
3-11) Case Water ·········································37
3-12) Case Water Filter ·······································38
3-13) Water Tank ·········································39
3-14) Motor Damper ········································41
3-15) Water Filter (Assembly & Disassembly) ·····························42
3-16) Vertical Hinged Section ····································43
3-17) Evaporator Cover In Refrigerator ································44
3-18) Evaporator In Refrigerator ···································45
3-19) Freezer Door ·········································46
3-20) Convertible Door ·······································47
3-21) Flex Zone Door ········································48
3-22) Ice-Maker ··········································49
3-23) Flex Zone Light ········································50
3-24) Freezer Light ·········································50
3-25) Side Light ··········································51
3-26) Door Switch In Freezer ····································51
3-27) Evaporator Cover In Freezer ··································52
3-28) Evaporator In Freezer ·····································52
3-29) Machine Compartment ····································53
3-30) Electric Box ·········································55
AW3 SM-EN 2011.3.31 2:52 PM 페 이 지 2 7 i n
28
DISASSEMBLY AND REASSEMBLY
• Unplug the refrigerator before cleaning and making repairs.
• Do not dissemble or repair the refrigerator by yourself.
- It may cause risk of causing a fire, malfunction and/or personal injury.
• Remove any foreign matter or dust from the power plug pins.
- Otherwise there is a risk of fire.
• Do not use a cord that shows cracks or abrasion damage along its length or at either end.
• Do not plug several appliances into the same multiple power board. The refrigerator should always be
plugged into its own individual electrical which has a voltage rating that matched the rating plate.
- This provides the best performance and also prevents overloading house wiring circuits, which could
cause a fire hazard from overheated wires.
• Do not install the refrigerator in a damp place or place where it may come in contact with water.
- Deteriorated insulation of electrical parts may cause an electric shock or fire.
• The refrigerator must be grounded.
- You must ground the refrigerator to prevent any power leakages or electric shocks caused by current
leakage from the refrigerator.
• Do not put bottles or glass containers in the freezer.
- When the contents freeze, the glass may break and cause personal injury.
• Do not store volatile or flammable substances in the refrigerator.
- The storage of benzene, thinner, alcohol, ether, LP gas and other such products may cause
explosions.
- Required Tools
3-1) PRECAUTION
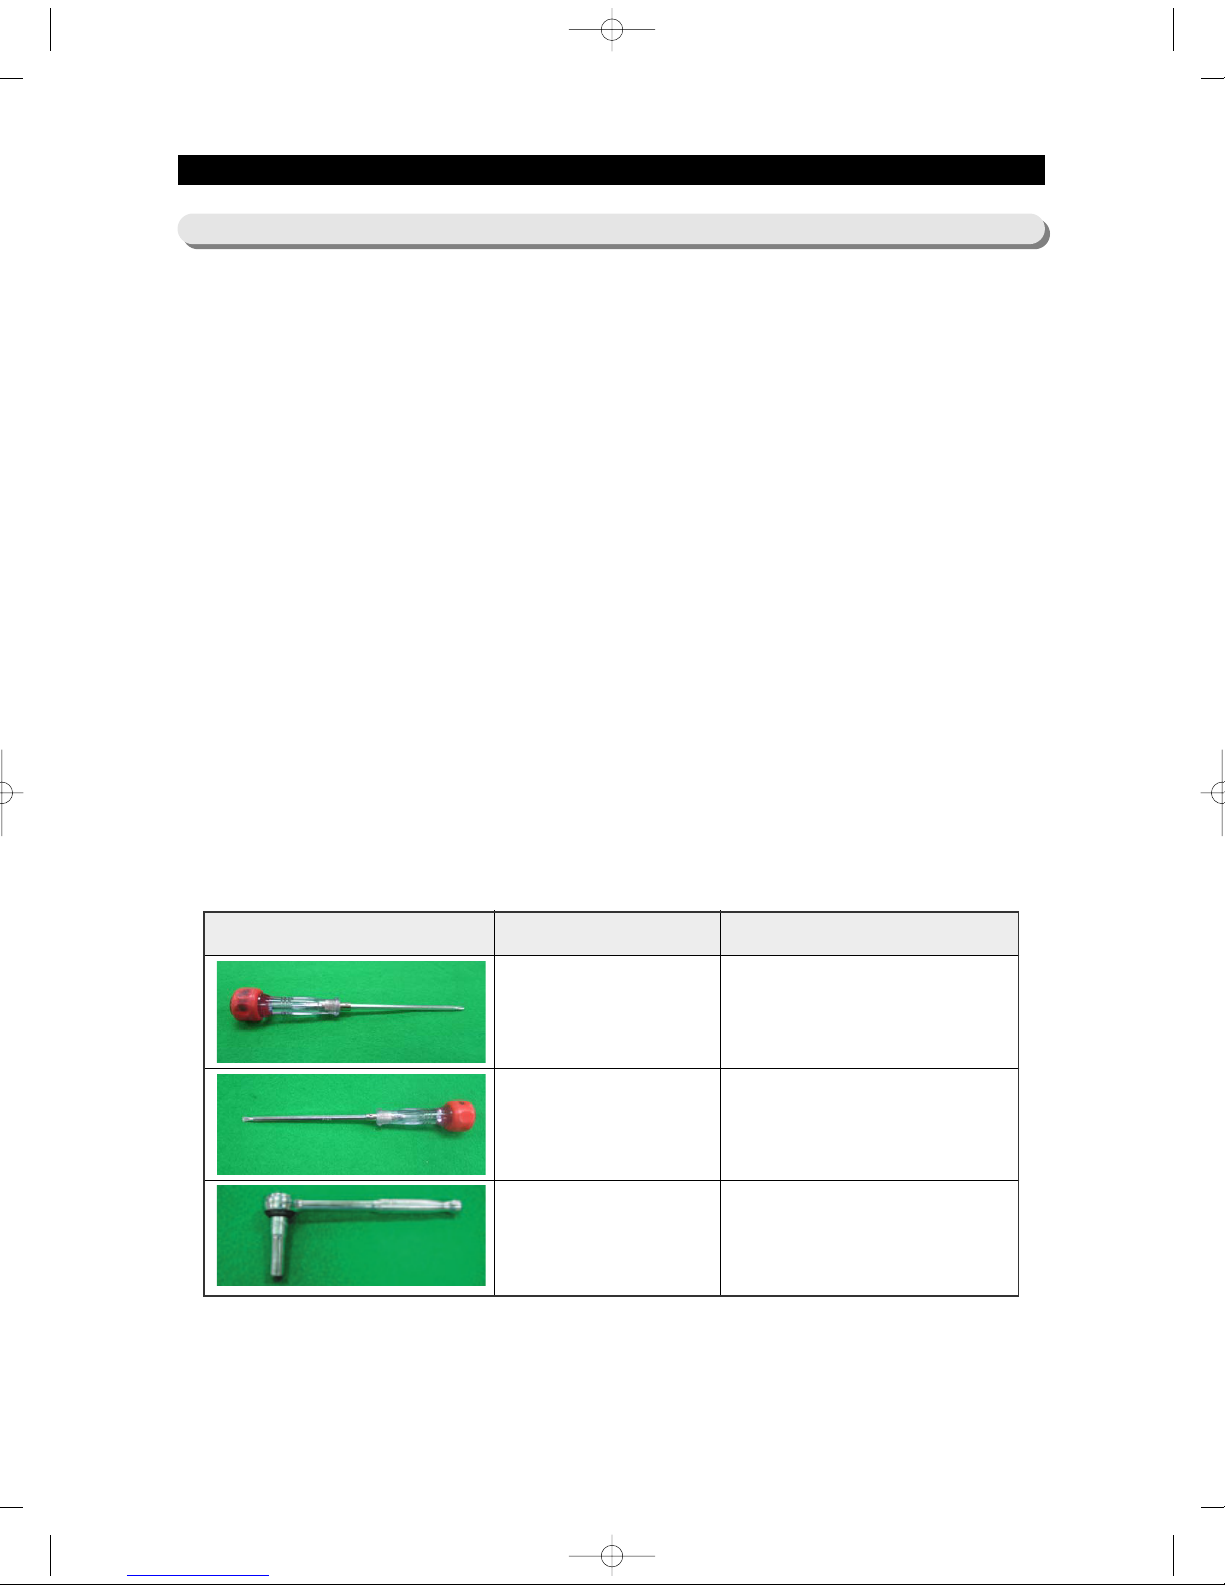
IMAGE ITEM USE
Phillips Head Driver
Use for assembling and
disassembling of screw
Flat Head Driver
Use for assembling and disassembling
of HomeBar, Dispenser, Deli
Cartessen Box, Main PBA etc...
Socket Wrench Ø10mm
Use for assembling and
disassembling of Door Hinge
AW3 SM-EN 2011.3.31 2:52 PM 페 이 지 2 8 i n
29
3-2) Refrigerator Door
DISASSEMBLY AND REASSEMBLY
Refrigerator
Door
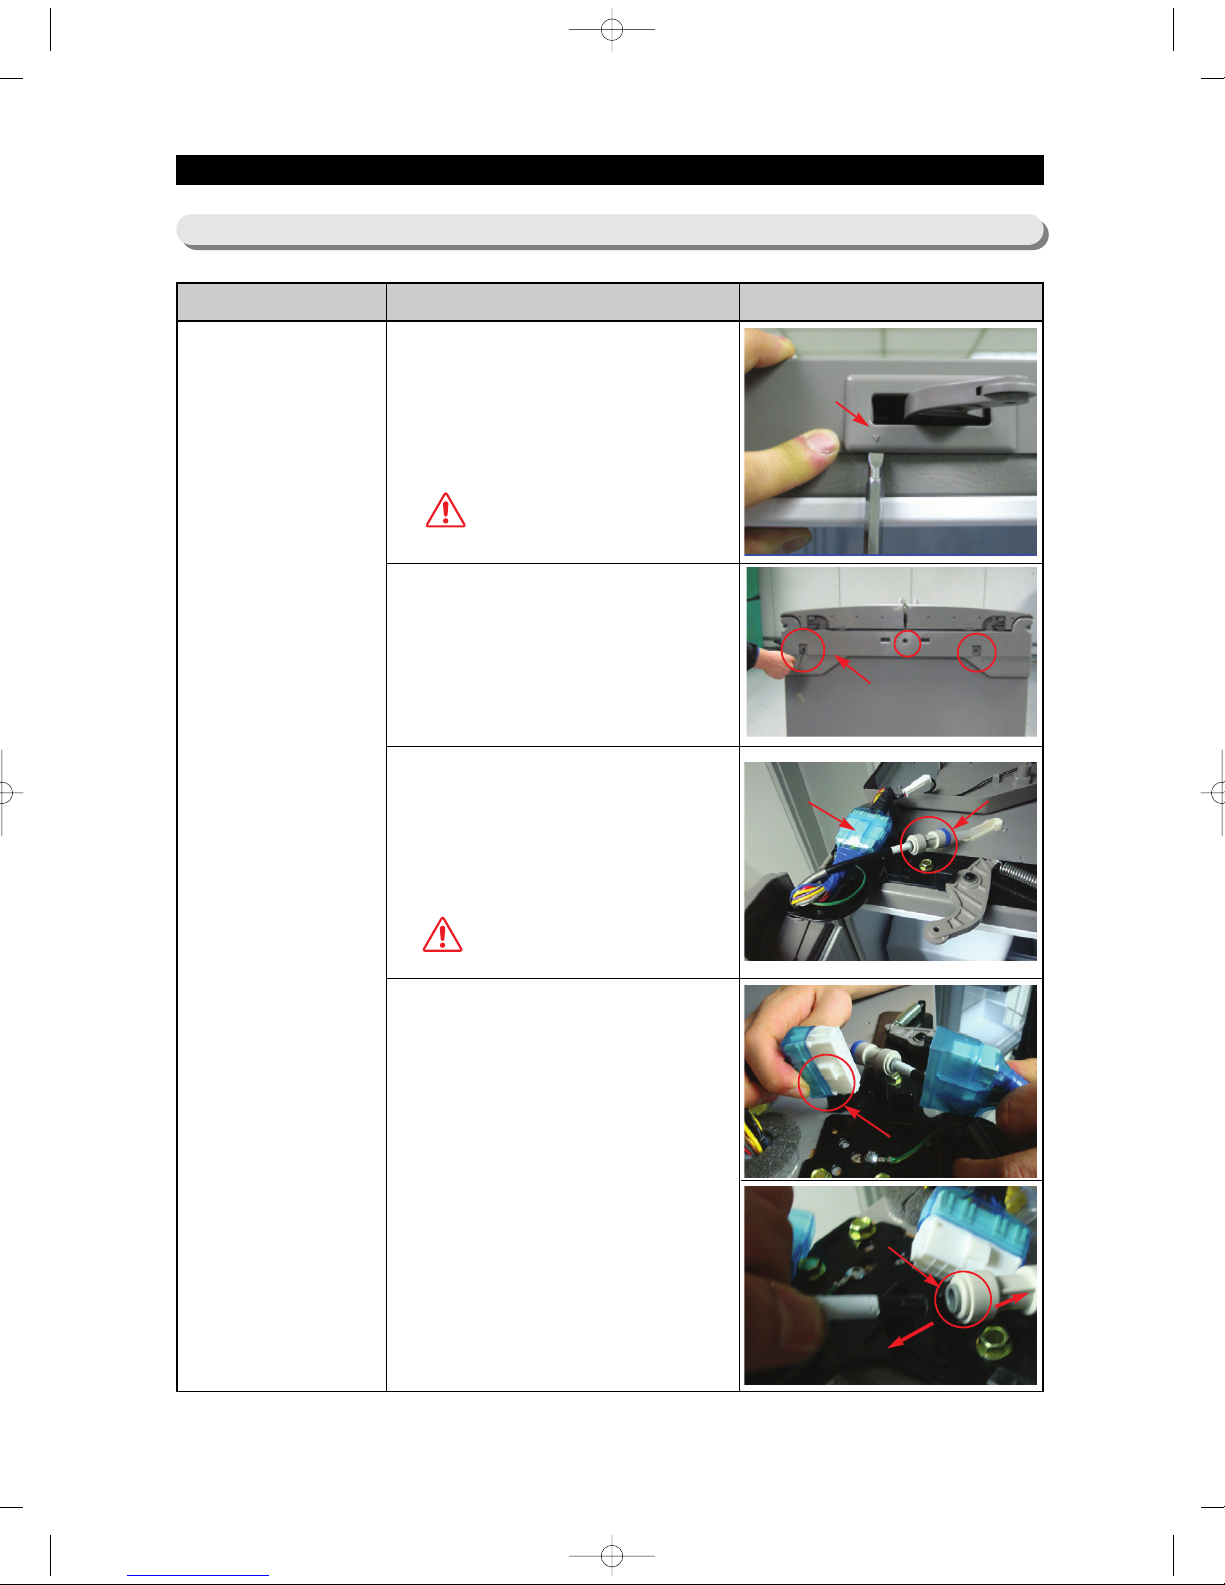
Part Name How To Do Descriptive Picture
1. With the door opened, remove
the Cap Top Table() with a Flat
head screwdriver, and close the
door.
4. Disconnect the water tube ()
by pulling the tube fitting()
apart as shown in the picture.
3. Disconnect the electrical
connector() above the upper
left door hinge To disconnect the
connector() more easily, press
the end of the hook() and pull
connector.
2. Remove the 3 screws holding
down the Top Table and remove
the Top Table().
Be careful not to scratch or
break the parts
CAUTION
Before doing the above,
make sure that the unit is
plugged out.
CAUTION
AW3 SM-EN 2011.3.31 2:53 PM 페 이 지 2 9 i n
30
DISASSEMBLY AND REASSEMBLY
Refrigerator
Door
Part Name How To Do Descriptive Picture
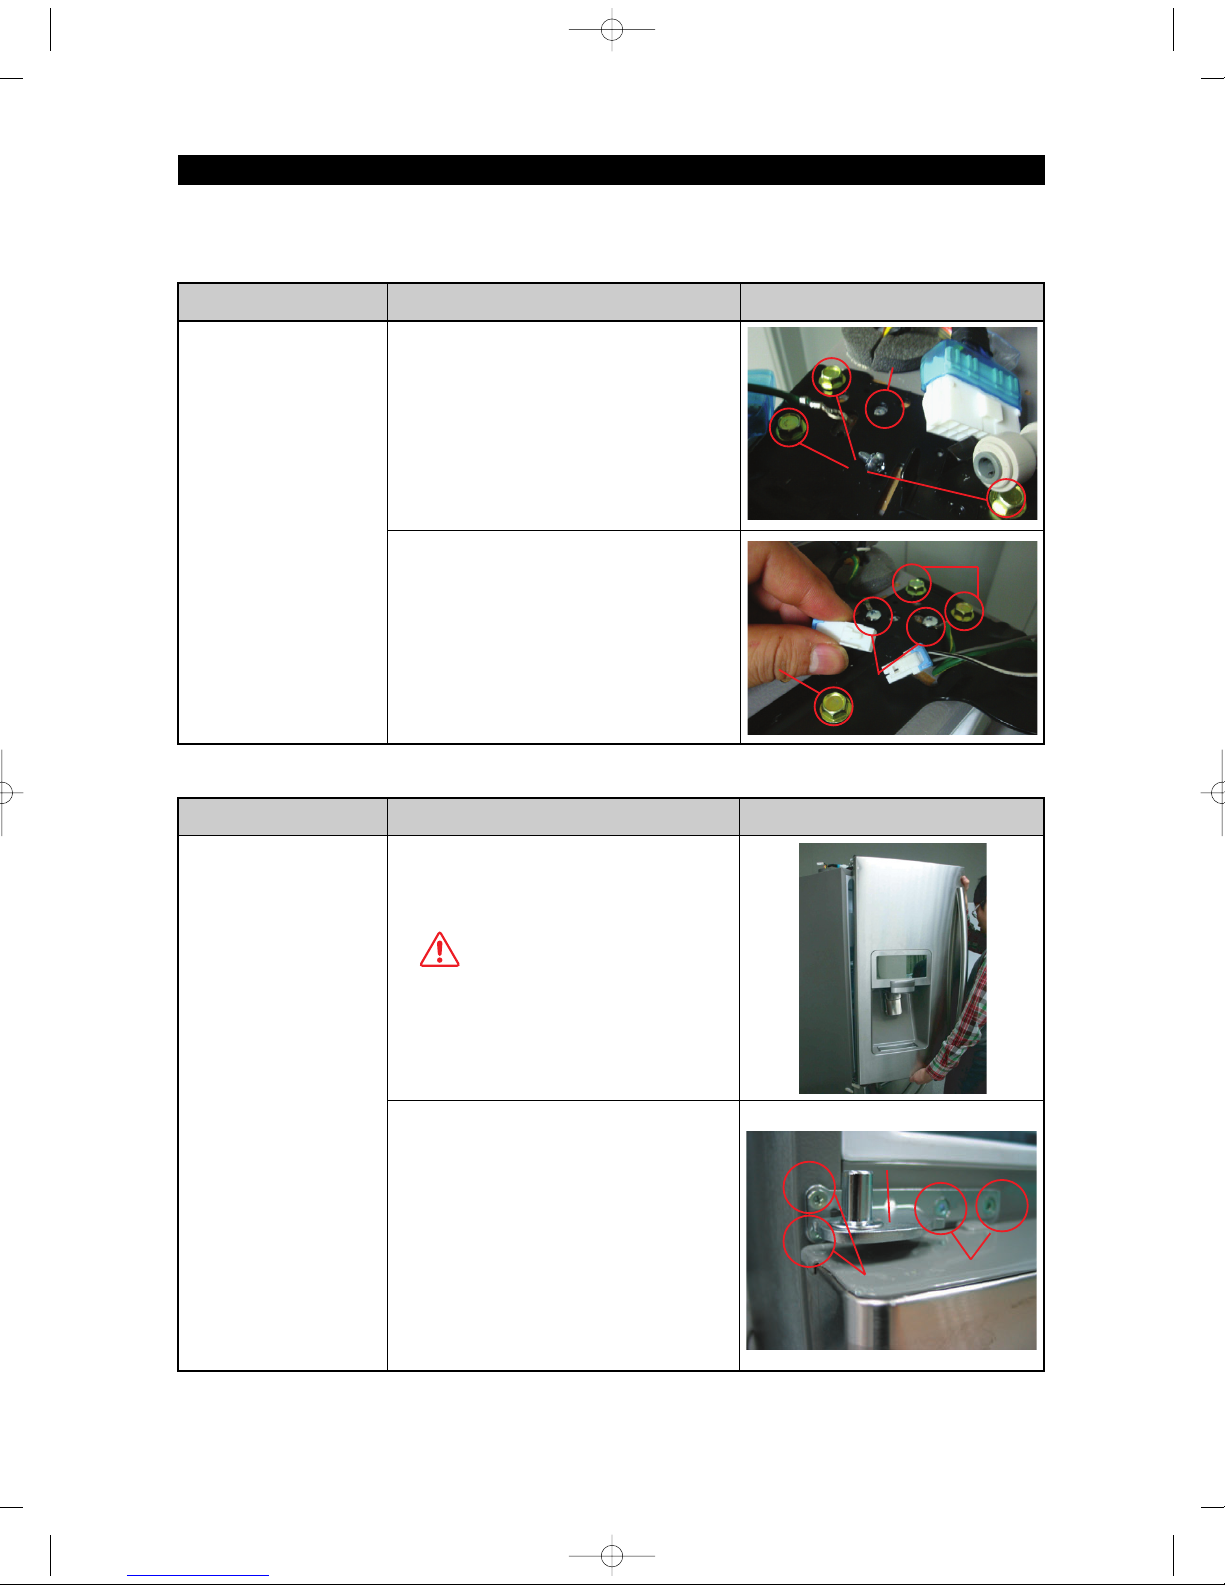
6. Lift the door straightly up to
remove.
7. With a Philips head screwdriver,
remove the two screws ()
attatched to the lower left and
right door hinges.
With a wrench(10mm), remove
the 2 flat head screws ()
attatched to the lower left and
right door hinges.
Remove the lower left and right
door hinges ().
Refrigerator
Door
Part Name How To Do Descriptive Picture
5-1. Left door hinge
With a Philips head
screwdriver, remove the
ground screws () and
remove the 3 hex head
bolts().
5-2. Right door hinge
At first, disconnect the LED
housing () and with a
Philips head screwdriver,
remove the ground screws
() and remove the 3 hex
head bolts().
Be careful not to drop the
door.
CAUTION
AW3 SM-EN 2011.3.31 2:53 PM 페 이 지 3 0 i n
31
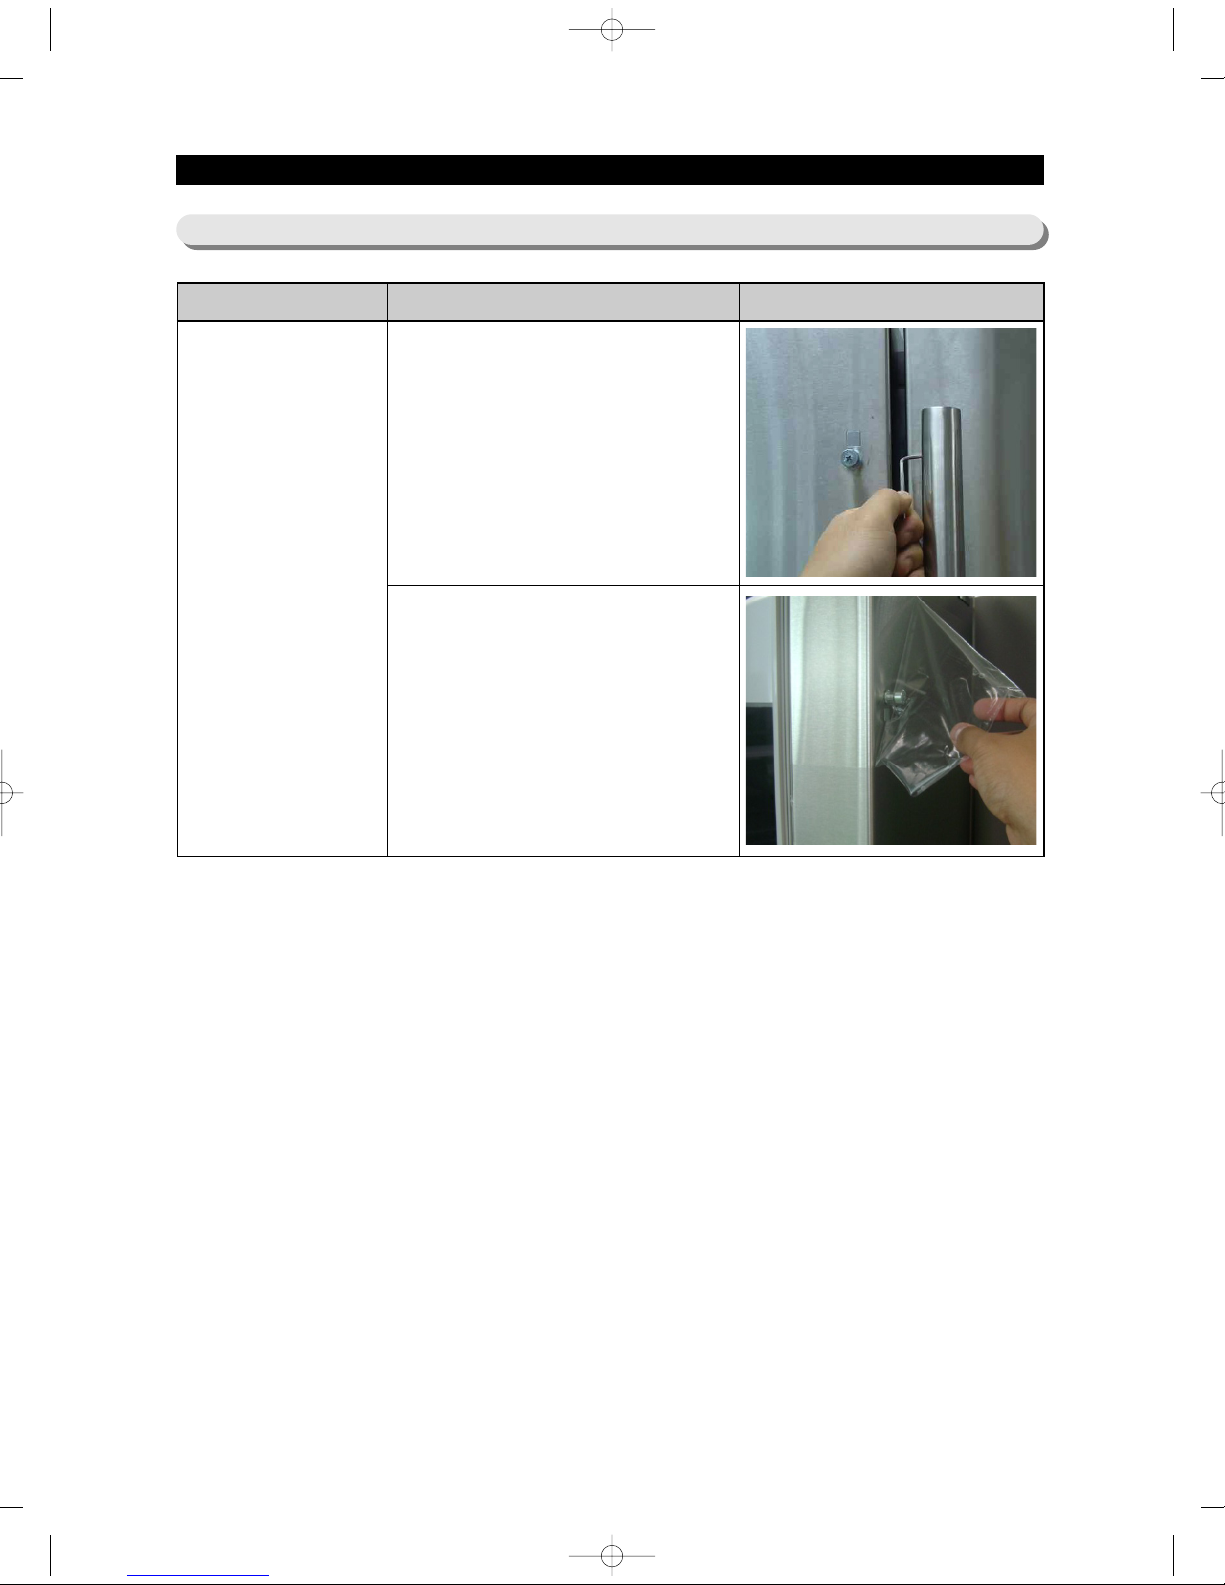
Door Handle
Fridge
Part Name How To Do Descriptive Picture
1. Loose Set Screw with 0.1in Hex
wrench and pull front the
handle.
2. Remove the cover vinyl of door.
DISASSEMBLY AND REASSEMBLY
3-3) Door Handle Refrigerator
AW3 SM-EN 2011.3.31 2:53 PM 페 이 지 3 1 i n
 Loading...