

Page 1
Refrigerator
user manual
imagine the possibilities
Thank you for purchasing your Samsung product.
To receive more complete service,
please register your product at
www.samsung.com/register
RF267
DA68-01812G.indb 1 2009.8.10 9:7:33 AM
English
Français
Page 2
Features of your new Refrigerator
KEY FEATURES OF YOUR NEW REFRIGERATOR
Your Samsung French Door Refrigerator comes equipped with various innovative storage and energy-efficient
features.
Twin Cooling System
The Refrigerator and Freezer have separate evaporators. Due to this independent cooling system,
the Freezer and Refrigerator cool more efficiently.
Additionally, this separate air flow system prevents food odor of one compartment from seeping into
other compartments.
Cool Select Pantry
TM
The Cool Select pantryTM is a full-width drawer with adjustable temperature control.
Bigger & Wider Space
The wide shelf area and pantry provide enough space for larger items like a pizza box, etc.
The wide freezer drawer also provides enough space for 2~3 turkeys.
Secure Auto Close
The Secure Auto Close feature will automatically close a door that is slightly open.
Compact Ice Maker
The Ice maker can dispense cubed or crushed ice.
Digital Display and Temperature Control
A helpful beeper alerts you if door is ajar.
Tilting Pocket
The Tilting pocket can be used to store up to a 16” pizza.
Auto Pull Out Drawer
The upper drawer in the freezer comes out automatically as you just open the freezer door.
Easy Handle
Freezer door can be opened with less eort.
Energy Star
Energy star labeled this product could save your energy costs.
For easy future reference, write the model and
serial number down which can be found on the left
side of the refrigerator.
Model #
Serial #
2_ Features
Page 3
Safety Information
SAFETY INFORMATION
Before using your new Samsung French Door Refrigerator, please read this manual thoroughly to
ensure that you know how to safely and efficiently operate the features and functions that your
new appliance oers.
Because the following instruction covers various models, the characteristics of your Refrigerator
may dier slightly from the Refrigerator described in this manual. If you have any question, contact
us at 1-800-SAMSUNG or find help and information online at www.samsung.com.
What the icons and signs in this user manual mean :
WARNING
Hazards or unsafe practices that may result in .
CAUTION
Hazards or unsafe practices that may result in
.
CAUTION
To reduce the risk of fire, explosion, electric shock, or personal injury when using your
refrigerator, follow these basic safety precautions:
Do NOT attempt.
Do NOT disassemble.
Do NOT touch.
Follow directions explicitly.
Unplug the power plug from the wall socket.
Make sure the machine is grounded to prevent electric shock.
Call the service center for help.
SEVERE WARNING SIGNS
Do not plug several appliances into the same power receptacle.
Large appliances draw a lot of power. Powering more than one appliance or machine from a single power source
could cause overheating and cause a fire.
Make sure that the power plug is not kinked or damaged by the back of the Refrigerator.
Do not spray water directly into or on the outside of the Refrigerator/Freezer drawer.
Do not use aerosols near the Refrigerator.
Safety Information _3
Page 4
Do not put undue stress on the power cord or place heavy articles on it.
Placing heavy articles on the power cord create the risk of explosion or fire.
Do not insert the power plug with wet hands.
It may cause electric shock.
Do not put a container filled with water on the Refrigerator.
If it spills, it may cause fire or electric shock.
Do not install the Refrigerator in a damp place or water closed places.
Wet and/or deteriorated insulation of the internal electrical parts may cause electric shock or fire.
Do not store volatile or flammable substances in the Refrigerator.
Storing benzene, thinner, alcohol, ether, LP gas and other such products may cause explosions.
Do not disassemble or repair the Refrigerator by yourself.
You run the risk of fire, appliance malfunctions and/or personal injury. Call your nearest service center for
help from a qualified service technician.
Unplug the Refrigerator before changing the interior light.
Changing the light while the Refrigerator is plugged in may cause electric shock.
If you wish to dispose of the Refrigerator, remove the doors and seals before throwing
it away.
.rotaregirfeRehtotnibmilcyehtfidlihcapartnenac)slaesriehtdna(sroodehT
Make sure that the doors are o, and ensure that no one is suocated by being locked inside.
The Refrigerator must be safely grounded
Always make sure that you have grounded the Refrigerator before attempting to investigate or repair any
part of the appliance. Power leakages can cause severe electric shock.
Never use gas pipes, telephone lines or other potential lightning attractors as an
electrical ground.
Improper use of the grounding plug can result in a risk of electric shock. If it is necessary to use an
extension cord to power the Refrigerator, use only a 3-wire extension cord that has a 3-blade ground
plug and a 3-slot receptacle that will accept the plug on the appliance. The marked rating of the extention
cord should be AC 115V~120V, 10A, or more. Additionally, if a grounding adapter is used, make sure the
receptacle box is also fully grounded.
Safety Information
4_ Safety Information
Page 5

CAUTION SIGNS
Use good judgment when filling the Refrigerator with food and drinks.
ŘIn an overfull Refrigerator, heavy, fragile, bulky or breakable items may fall out and cause personal injury
and/or damage to surrounding objects.
Do not put bottles or glass containers in the Freezer drawer.
ŘWhen the contents freeze and then expand, the glass may break and cause personal injury or leave
dangerous glass shards in the Freezer.
If the electrical wall socket is loose, do not insert the power plug.
ŘThere is a risk of electric shock or fire. Have the plug looked at by a licensed electrician.
Never unplug your Refrigerator by pulling on the power cord.
ŘAlways grip the power cord firmly and pull straight out from the outlet. Yanking or pulling on the power
cord may cause a short-circuit, fire and/or electric shock.
ŘA damaged power cord must be replaced by the manufacturer, a certified service agent or qualified service
personnel.
Do not store articles on the top of the appliance.
ŘWhen you open or close the door, the articles may fall and cause personal injury and /or damage to
surrounding objects.
Do not store pharmaceutical products, scientific materials and temperature-sensitive
products in the refrigerator.
ŘProducts that require exact temperature controls should not be stored in the Refrigerator.
Do not allow children to climb, stand or hang on shelves and handles of the
Refrigerator. They could damage the Refrigerator and seriously injure themselves.
Do not sit on the freezer door. The door may break.
Do not allow children to climb into the freezer basket.
If you notice a chemical or burning plastic smell or see smoke, unplug the Refrigerator
immediately and contact your Samsung Electronics Service Center.
After your Refrigerator is in operation, do not touch the cold surfaces in the Freezer
compartment. Particularly when hands are damp or wet, skin may adhere to these
extremely cold surfaces.
ŘSkin may stick to the surface and you may get frostbite.
Do not put your hands under the appliance.
ŘAny sharp edges may cause personal injury.
Never put fingers or other objects into the water dispenser hole or ice chute.
Safety Information _5
CAUTION
,) /QVLJ! !"")5
Page 6
It may cause personal injury and/or material damage.
If the Refrigerator will not be used for a long period of time (for example, over several
months), unplug the power from the wall.
Over time, deterioration in the power cord insulation may cause fire.
Do not use a wet or damp cloth when cleaning the plug.
Remove any dust or foreign matter from the power plug pins.
A Dirty power plug can increase the risk of fire.
If the Refrigerator is disconnected from the power supply, you should wait for at least
five minutes before plugging it back in.
Do not place the equipment directly in sunlight.
The appliance must be positioned for easy access to power source.
If the power cord is damaged, it must be replaced by the manufacturer, a certified
service agent or qualified service personnel.
If you have a long vacation planned, empty the Refrigerator and turn it o.
Wipe excess moisture from the inside and leave the doors open to keep odor and mold from developing.
Service Warranty and Modification
Any changes or modifications performed by a 3rd party on this finished appliance is not covered under
Samsung warranty service, nor can Samsung be responsible for safety issues that result from 3rd party
modifications.
Children can get trapped inside Refrigerators.
Before you throw away your old Refrigerator or Freezer, make sure that you;
Take o the doors.
Leave all shelves in places so that children may not easily climb inside and shut the door while they are
inside.
This appliance is not intended for use by small children or infirm persons without capable, adult
supervision. Small children should be supervised when using the appliance.
Safety Information
6_ Safety Information
CAUTION
Page 7
Contents
08
22
08 Getting ready to install the refrigerator
09 Setting up the Refrigerator
09 How to assemble the handle
10 Removing the refrigerator doors
12 Disassemble the freezer drawer
13 Reattaching the refrigerator doors
15 Assem ble the freezer drawer
16 Adjusting the doors
17 Making minor adjustments between doors
18 Adjusting the freezer drawer level
18 Checking the water dispenser line
20 Installing the water line
22 Using the control panel
23 Using the digital display
24 Controlling the temperature
25 Using the ice and cold water dispenser
26 Ice production
27 Parts and features
28 Storing food
29 Using the cool select pantry™
29 Using the tilting pocket
30 Removing the refrigerator access ories
31 Using the doors
emoving the freezer access ories
32 R
33 Cleaning the refrigerator
34 Changing t he interior light led
35 Changing the water filter
40
WARRANTY
41
WIRING DIAGRAM
42
40 Troubleshooting
41 Warranty
42 Wiring diagram
Contents _7
Page 8
Setting up your French Door Refrigerator
GETTING READY TO INSTALL THE REFRIGERATOR
Congratulations on your purchase of the Samsung French Door Refrigerator. We hope you enjoy the state-of-art
location with easy access to the water supply.
location without direct exposure to sunlight.
location with level (or nearly level) flooring.
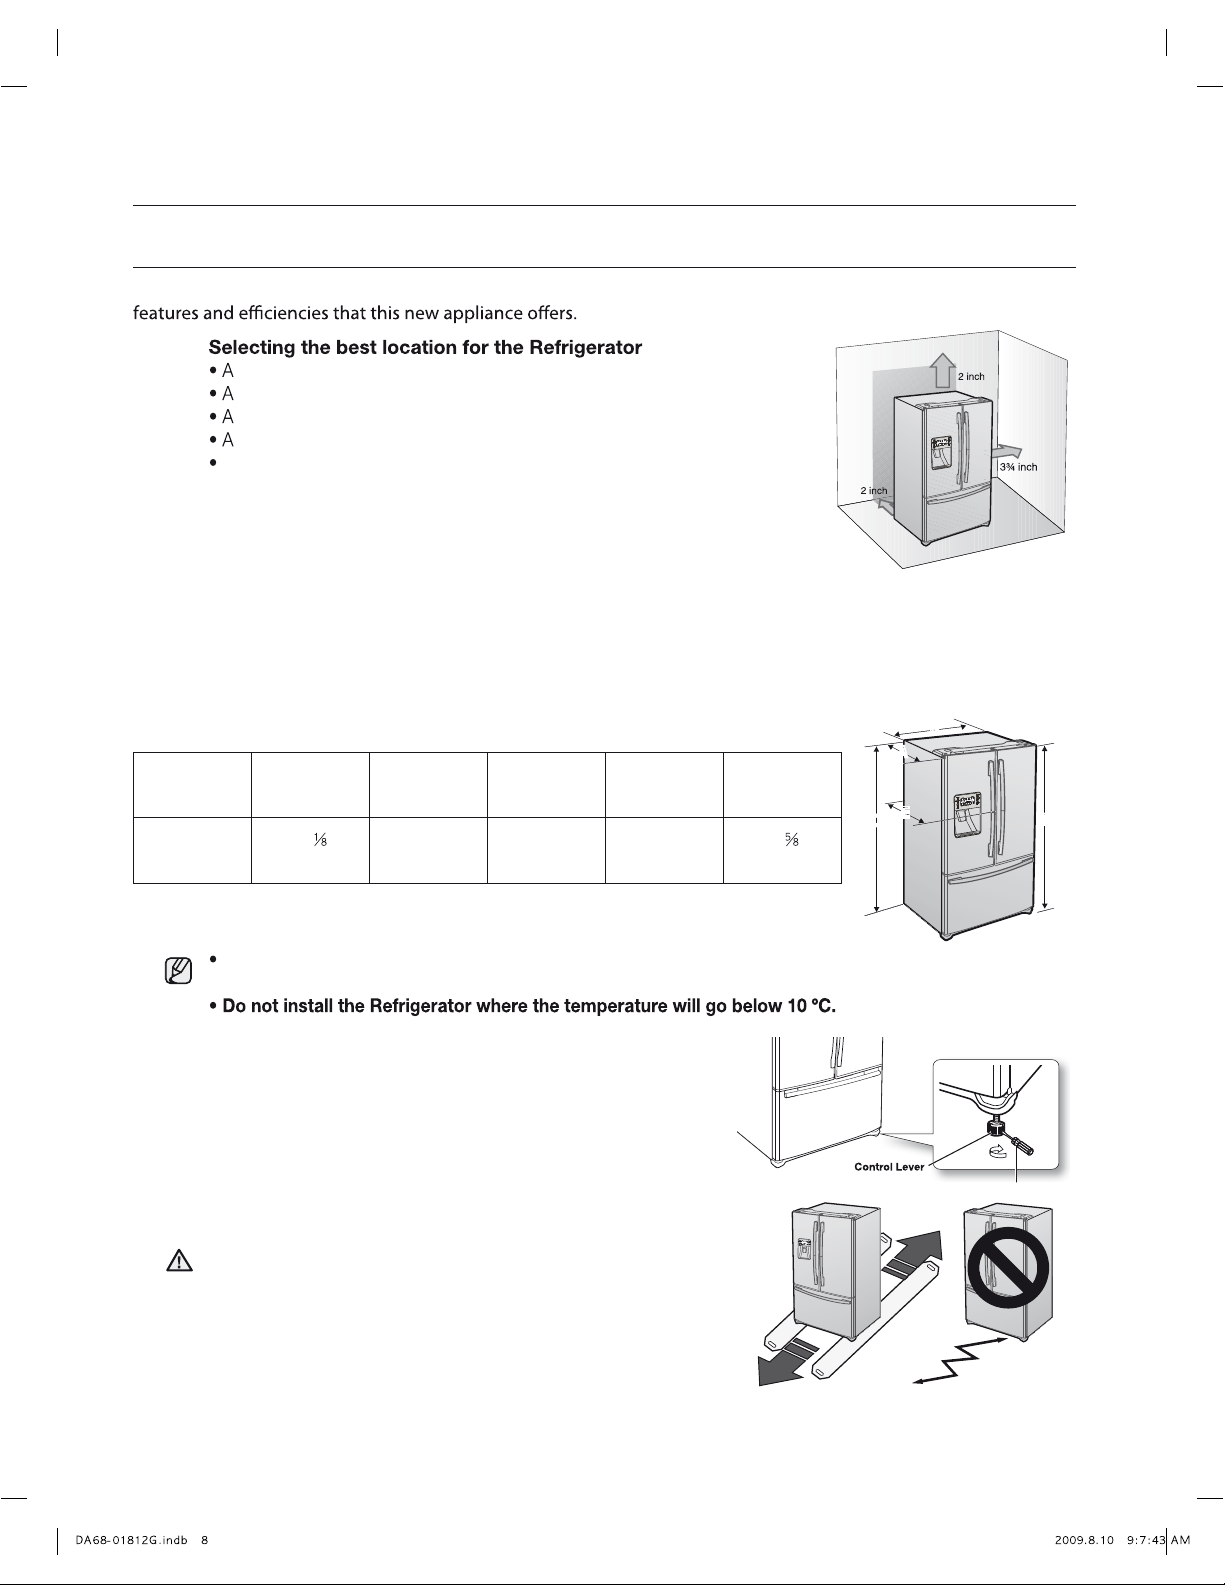
location with enough space for the Refrigerator doors to open easily.
Allow sufficient space for air circulation of the internal cooling system.
If the Refrigerator does not have enough space, the internal cooling
system may not work properly.
If your refrigerator has an ice maker, allow extra space at the back for the water
line connections. When you install the refrigerator next to a fixed wall, minimum
clearance is 3 ¾” (95mm) between the refrigerator and wall to allow the door to
swing open.
First thing! Make sure that you can easily move your Refrigerator to its final location by measuring doorways
(both width and height), thresholds, ceilings, stairways, etc.
The following chart details the exact height and depth of Samsung French Door Refrigerator.
B
B
A
A
Model
RF267
Depth
“A”
29- ”
(83.6cm)
Width
“B”
35-¾”
(90.8cm)
Height
“C”
69”
(175.2cm)
Overall
Height “D”
69-¾”
(177.4cm)
Depth
“E”
35- ”
(90.5cm)
E
E
C
C
D
D
When moving your refrigerator
To prevent floor damage be sure the front levelling legs are
in the up position (above the floor). Refer to ‘Levelling the
refrigerator’ in the manual.
To protect the finish of the flooring, place the protection
sheet such as packing carton under the refrigerator.
When installing, servicing or cleaning behind the refrigerator,
CAUTION
be sure to pull the unit straight out and push back in straight
after finishing.
8_ Setting Up
Allow clearance to the right, left, back and top when installing. This will help reduce power
consumption and keep your energy bills lower.
Screwdriver
Page 9
SETTING UP THE REFRIGERATOR
Now that you have your new Refrigerator installed in place, you are ready to set up and enjoy the features and functions of
the appliance. By completing the following steps, your Refrigerator should be fully operational.
1. Place the Refrigerator in an appropriate location with reasonable clearance between the wall and the
Refrigerator. Refer to installation instructions in this manual.
2. Once the Refrigerator is plugged in, make sure the interior light comes on when you open the doors.
3. Set the Temperature control to the coldest temperature and wait for an hour. The Freezer will get slightly chilled
and the motor will run smoothly.
4. After powering the Refrigerator, it will take a few hours to reach the appropriate temperature. You can store food
and drinks in the Refrigerator after the temperature is sufficiently cool.
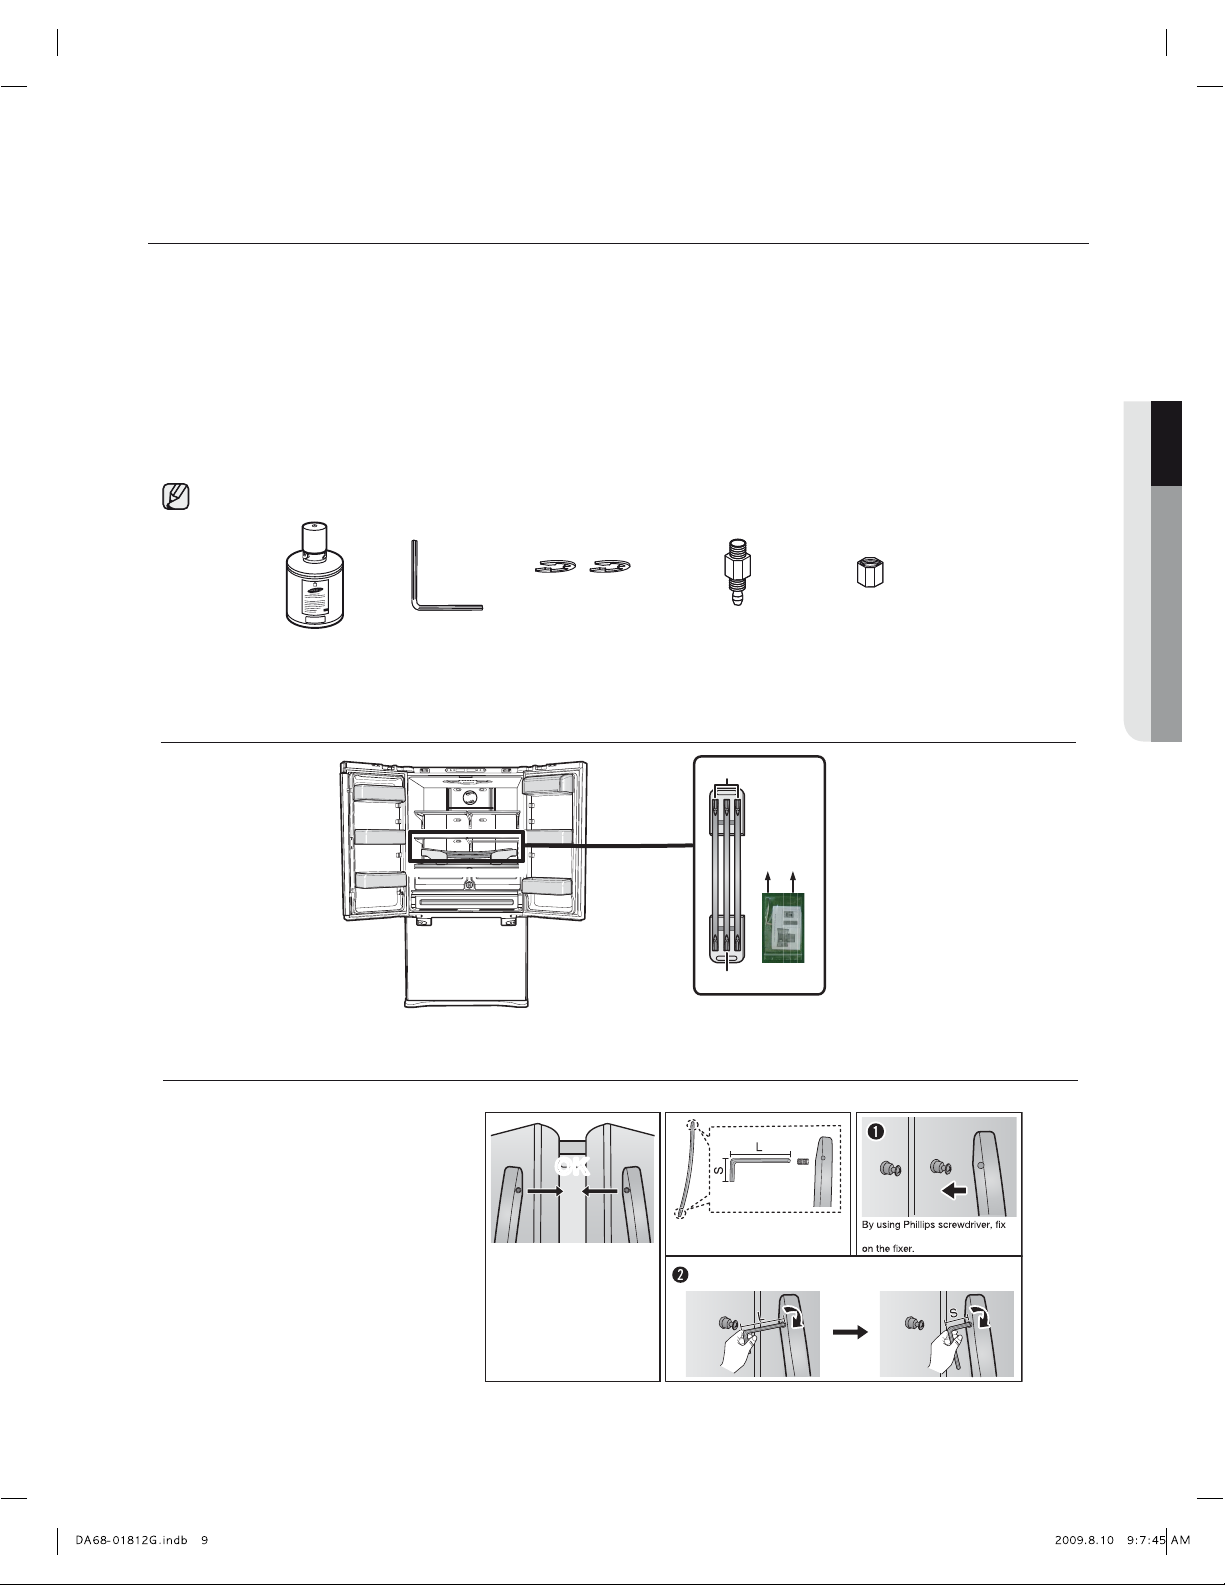
Check the accessory list below.
01 SETTING UP
Water filter
(DA29-00002B)
Hex wrench
(DA80-00002C)
Fastener
(DA60-00143B)
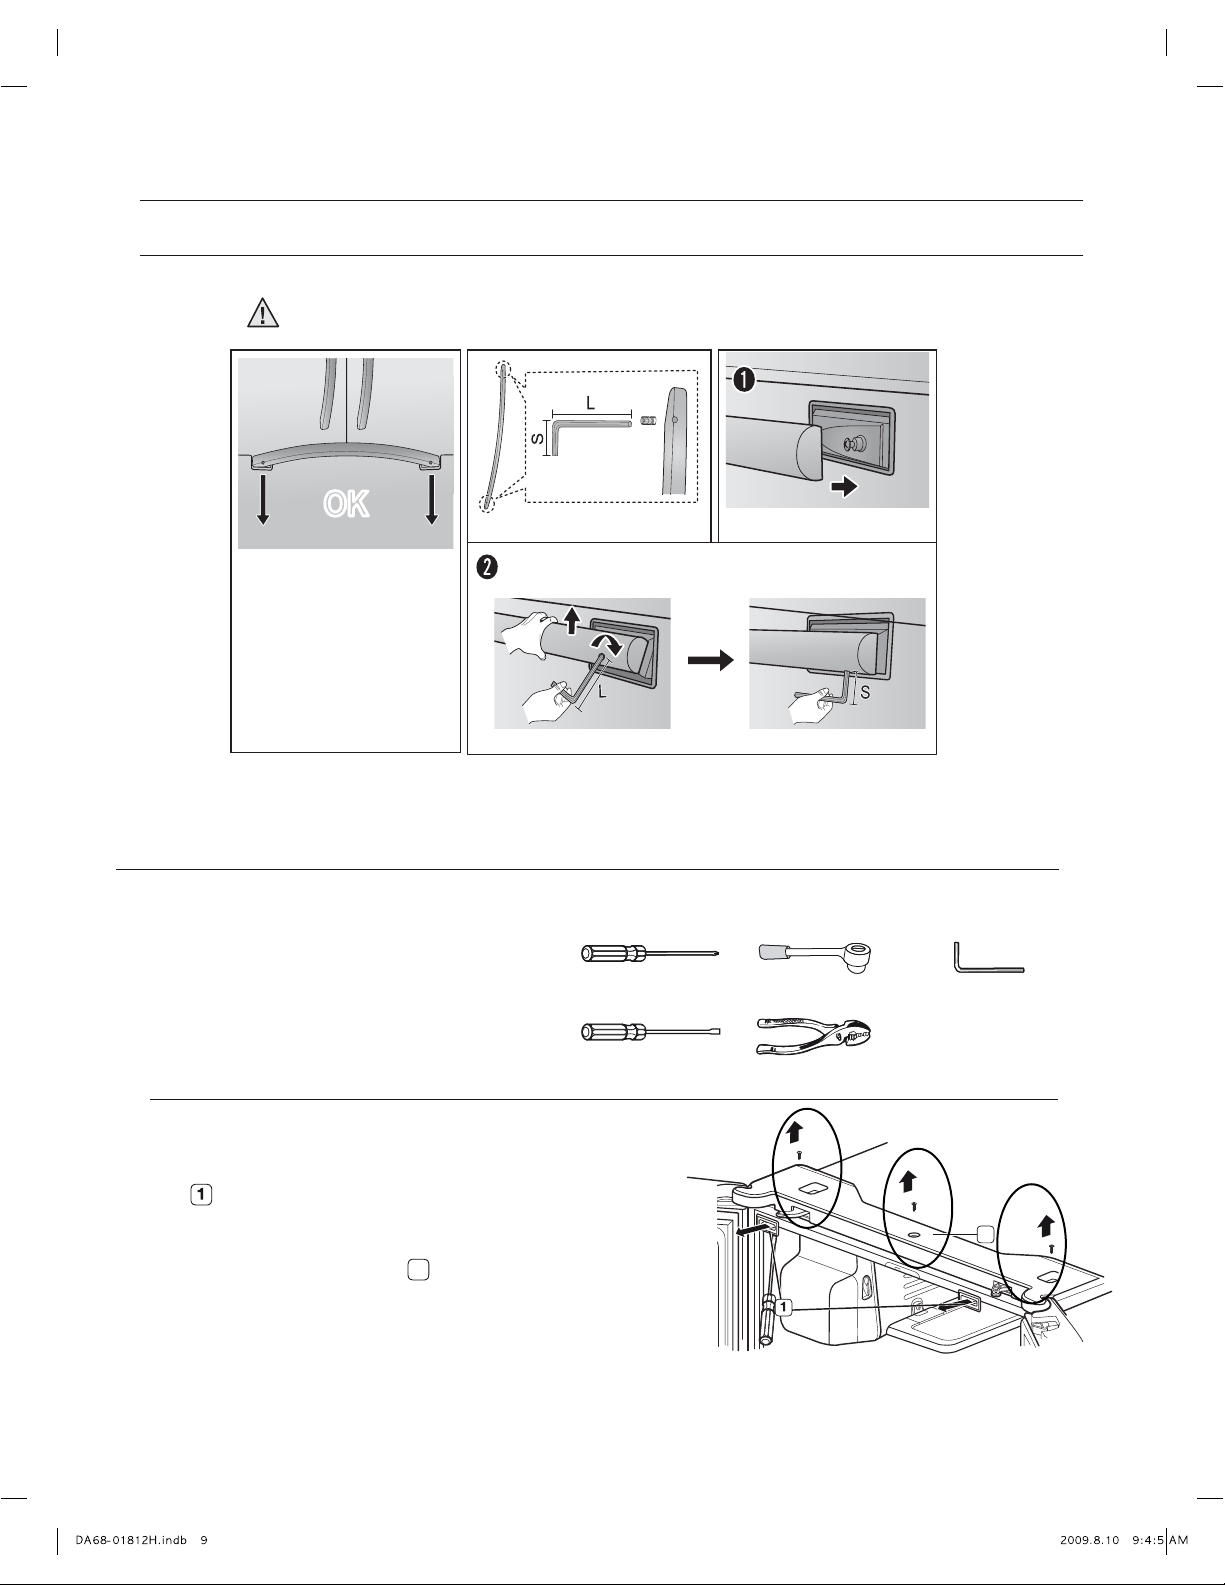
COMPONENTS FOR HANDLE ASSEMBLY
[ 3-DOOR TYPE ]
HOW TO ASSEMBLE THE HANDLE
OKOK
Fridge door handle assembly
To best conceal the connection
points : Assemble the handles
with the mounting screws facing
each other.
Compressin fitting
(DA62-00305A)
Fridge
Freezer
By using L-wrench, Fix the screw with the Longer part of it and
then fully tighten up with the Shorter part.
Compression nut
Wrench : 3/32 inch
Label Handle Instruction
(DA74-00070B)
the screw and then put the handle
(Optional)
Setting Up _9
Page 10
Setting up your French Door Refrigerator
HOW TO ASSEMBLE THE HANDLES (CONT’D)
Freezer / Flex zone door handle assembly
•
CAUTION
Please do not remove the Freezer/ Flex Zone drawer.
Handle can be attached without removing the door.
OKOK
To best conceal the connection
points : Assemble the handles
with the mounting screws facing
down.
By using L-wrench, Fix the screw with the Longer part of it and
then fully tighten up with the Shorter part.
*
Tilt up the Handle bar and turn the wrench.
Put the handle on the xer
REMOVING THE REFRIGERATOR DOORS
If the Refrigerator is too large to pass through your doorway easily, you can remove the refrigerator doors.
Tools you will need
Philips screwdriver 10mm Socket Wrench Allen wrench(5mm)
Flat-blade screwdriver Pliers
Disassemble the Refrigerator doors
1.
With the door opened, remove the Top Table cap
) with a Flat head screwdriver, and close the
(
door.
Remove the 3 screws holding down the Top Table
2
and remove the Top Table(
PICTURE.
10_Setting Up
) AS SHOWN IN THE
2
Page 11
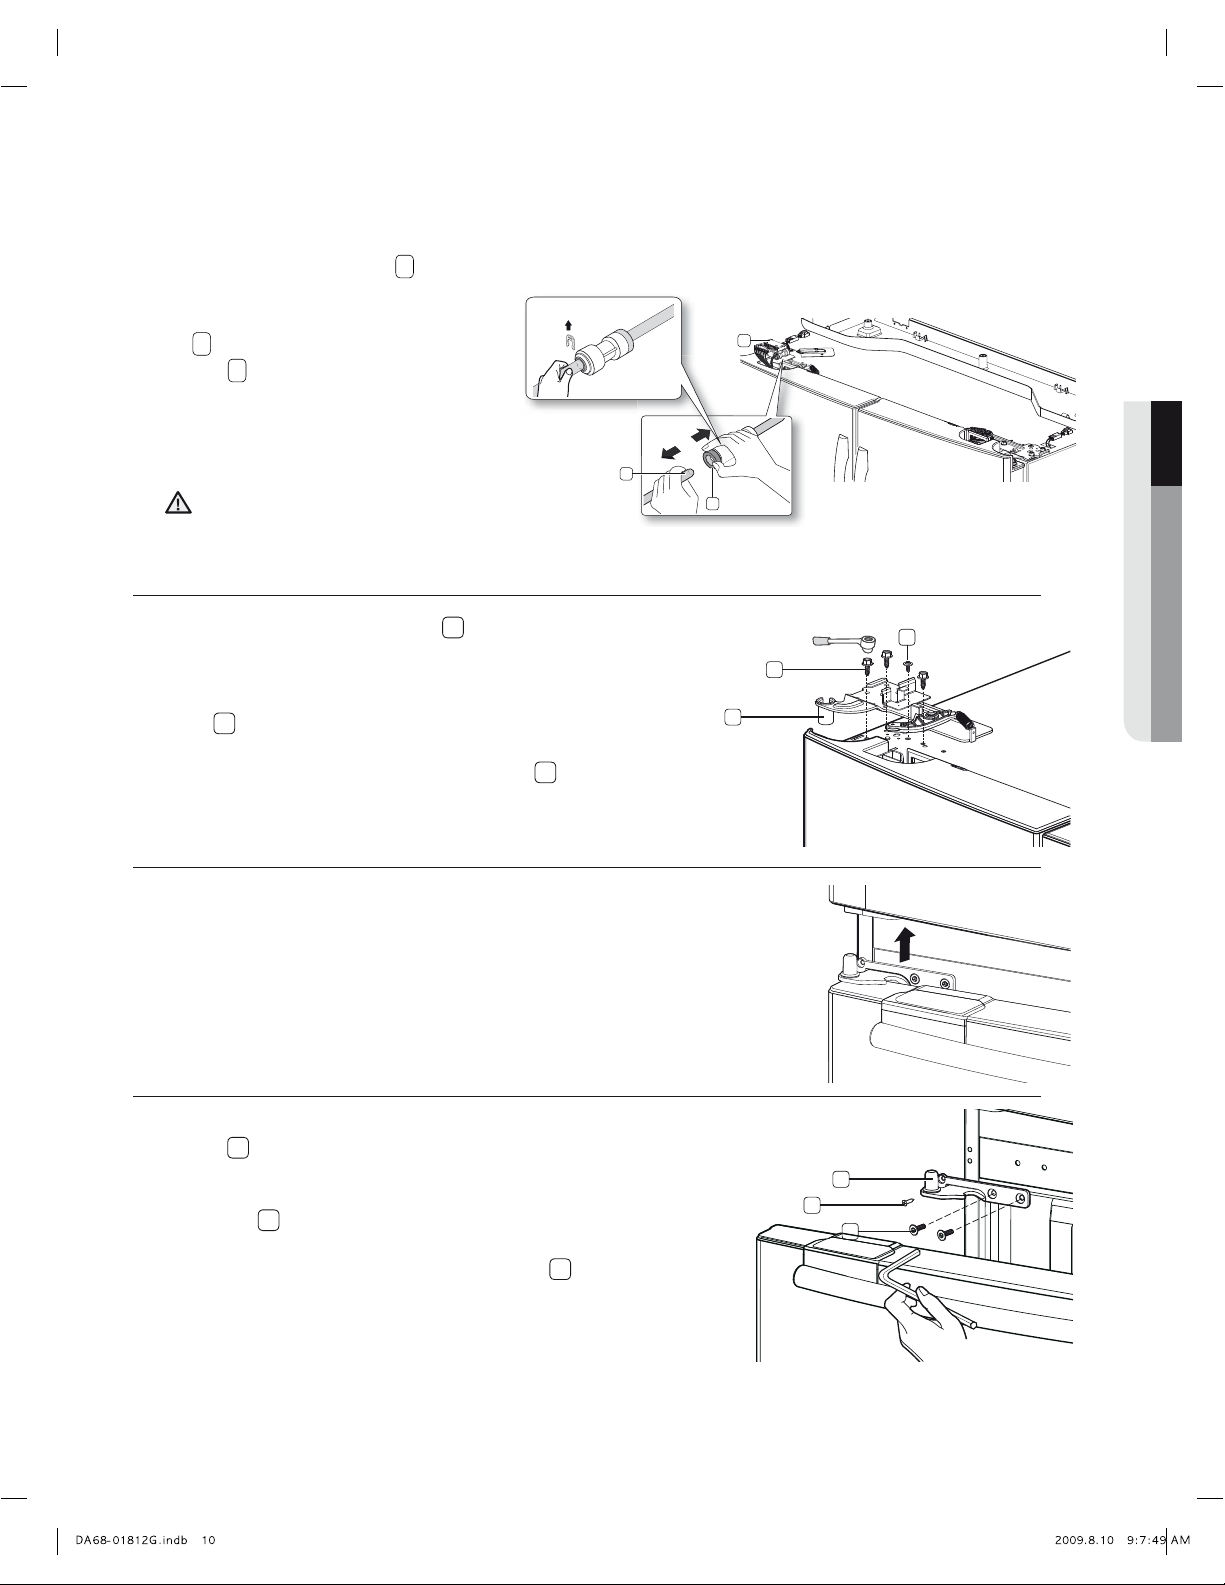
3. Remove the three hex head bolts(6) attached
to the upper left and right door hinges with a
Wrench(10mm).
With a Philips head screwdriver, remove the ground
screw(
7
) attached to the upper left and right door
hinges.
Remove the upper left and right door hinges(
8
).
4. Lift the door straight up to remove.
5. With a Philips head screwdriver, remove the two
screws(
) attached to the lower left and right
door hinges.
With an Allen Wrench(5mm), remove the two hex
head bolts(
) attached to the lower left and right
door hinges.
Remove the lower left and right door hinges(
).
6
7
8
3
4
5
Red Clip
(1/4”)
If a red clip is on the coupler, it must be removed
before removing the tube.
CAUTION
2. Disconnect the oneconnector ( )
3
on left side door, pressing the middle
part while is taking away. Remove the tube
( ) with pressing
strongly the dark gray
4
5
color ( ) of thewater line couple, take away
the hose atthe same time.
Be sure to close the door to prevent doors damage.
9
10
11
9
10
11
01 SETTING UP
Setting up_11
Page 12
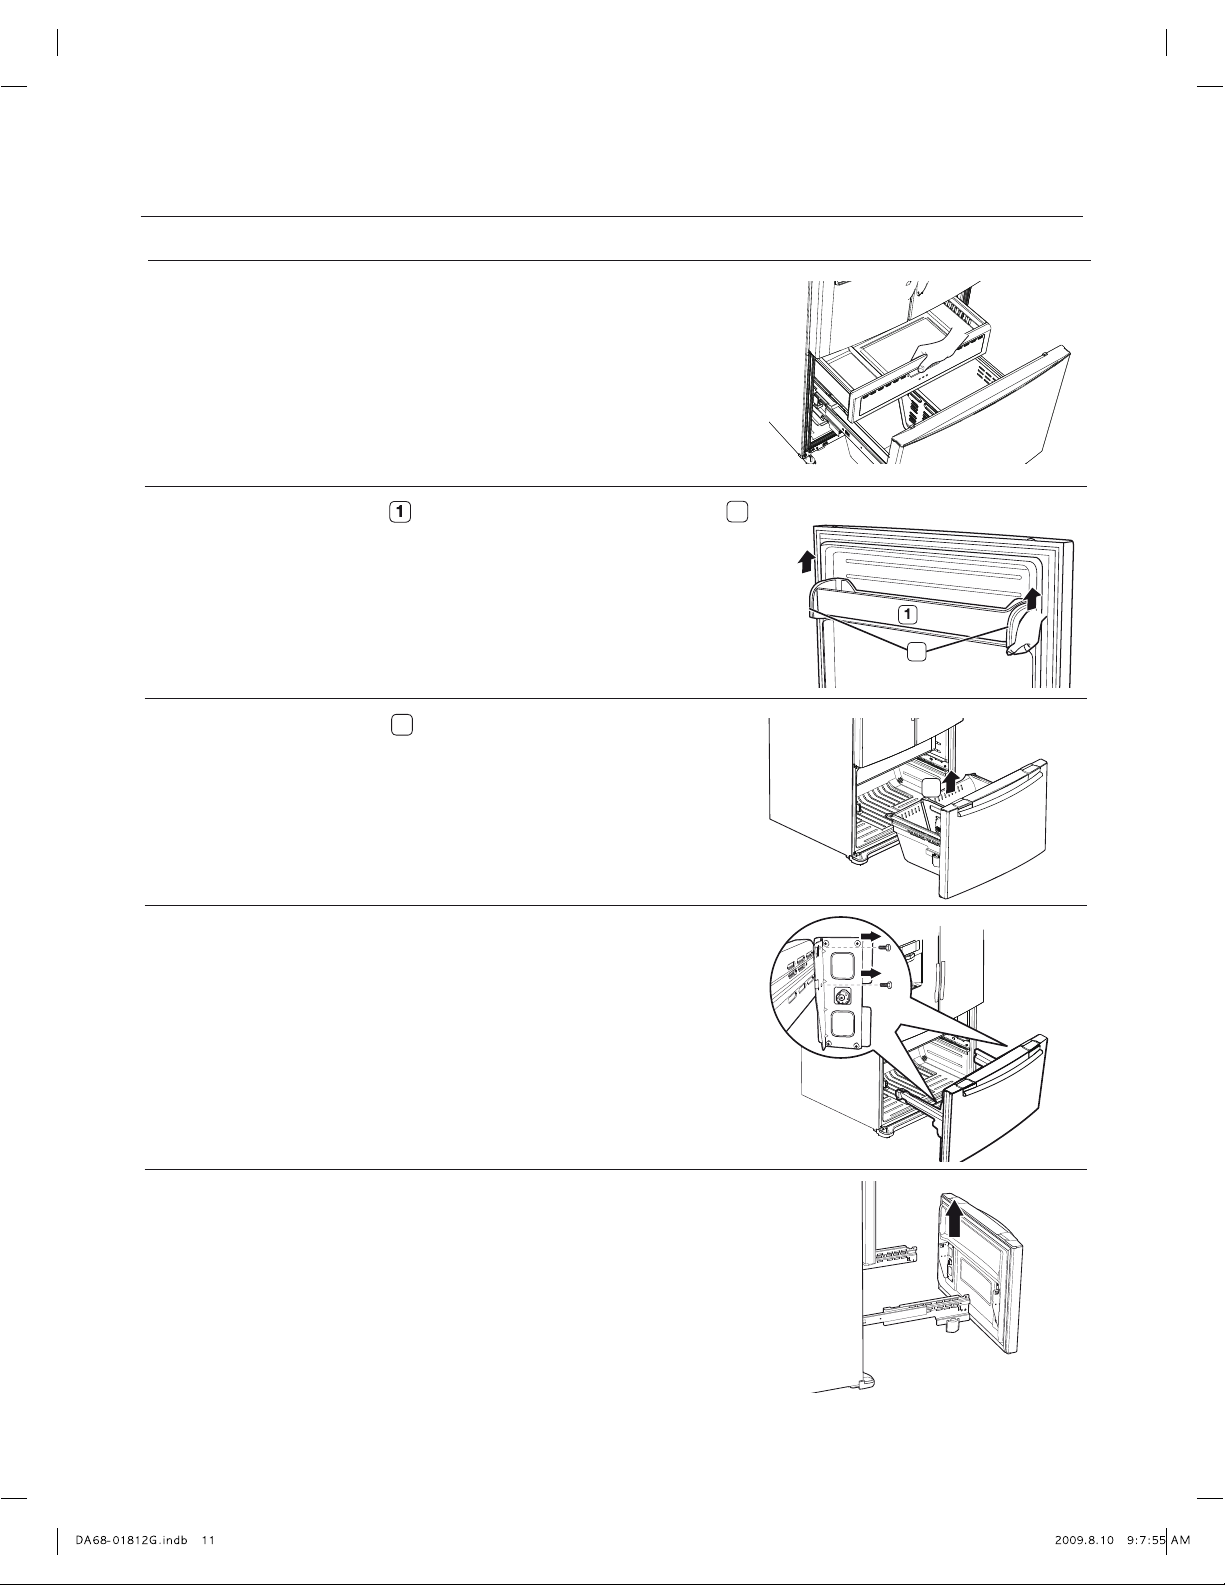
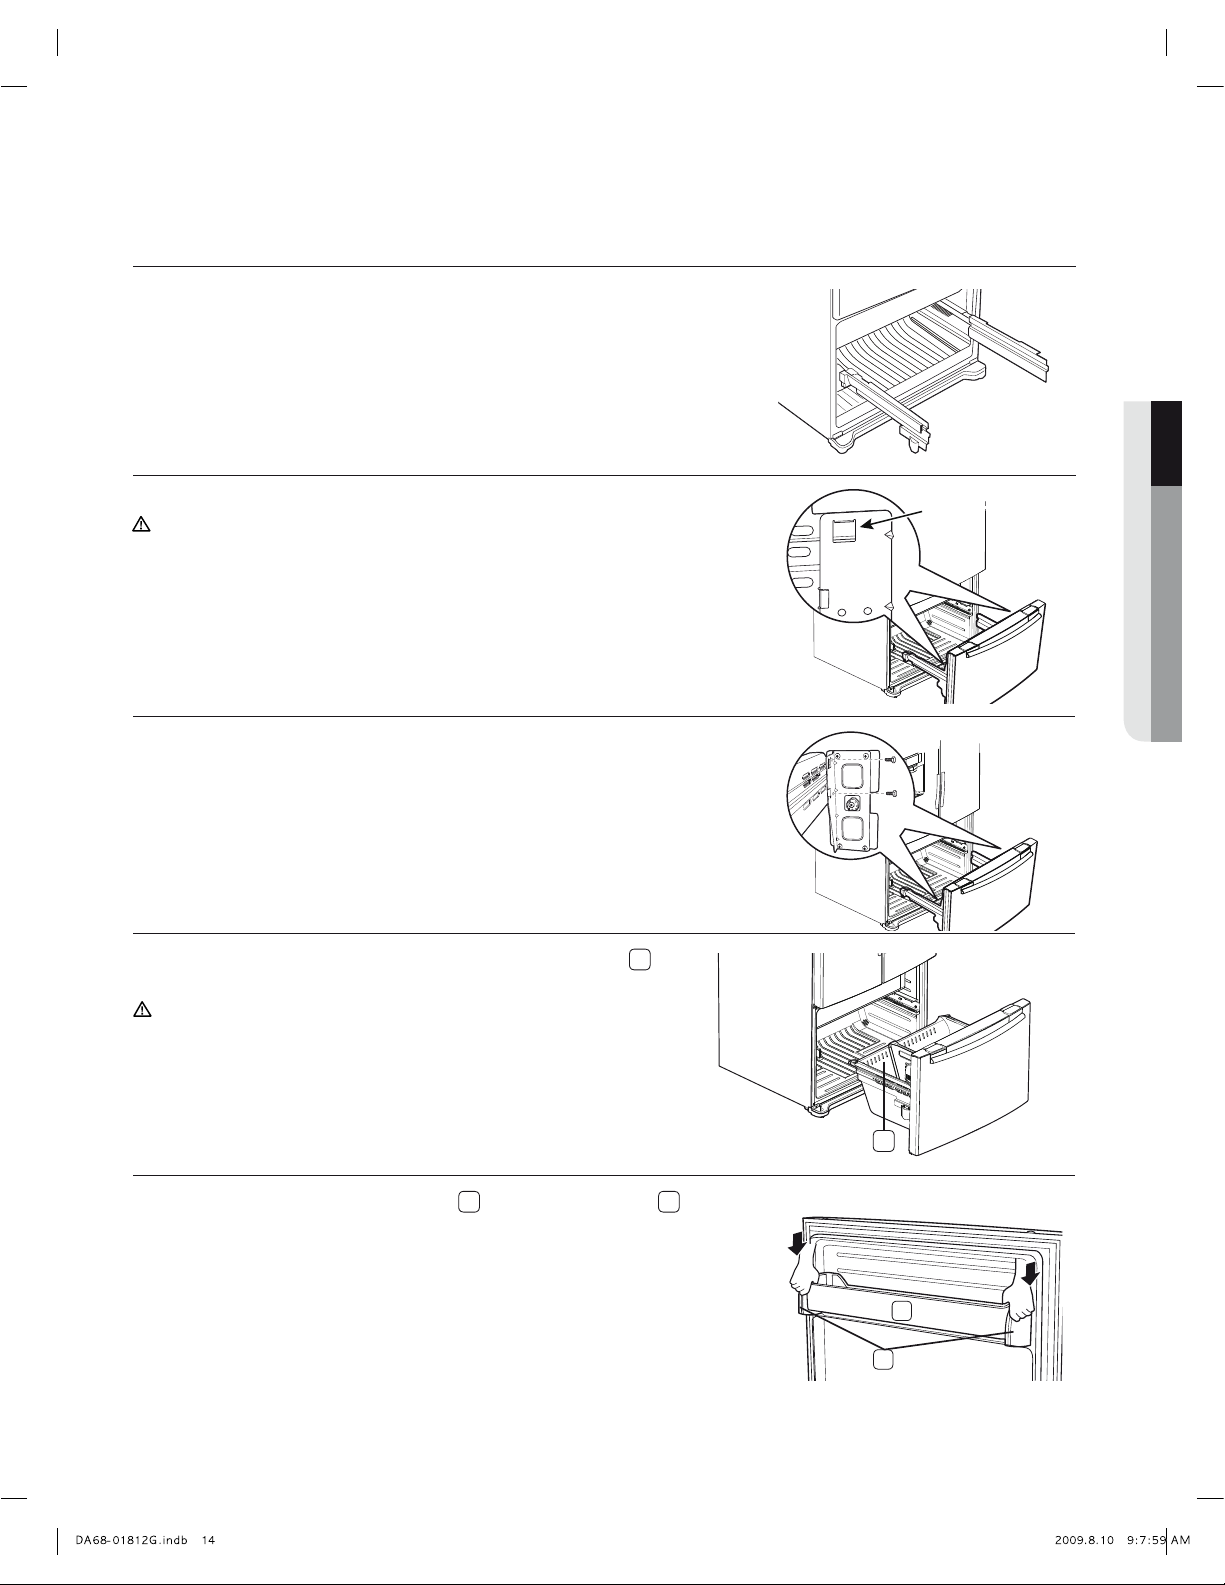
4. Remove four 10mm hex-head bolts from both sides.
5. Lift the freezer door up from the rails.
2. Remove the tilting pocket(
) by pulling strongly on both brackets( )
2
upward at the same time.
3. Take out the lower basket(
3
) by lifting the basket up fr om
rail system.
1. rtilitnurewardreppuehthsuP eaches to the cabinet r ear wall.
DISASSEMBLE THE FREEZER DRAWER
2
3
Setting up your French Door Refrigerator
12_Setting up
Page 13

Setting Up_13
REATTACHING THE REFRIGERATOR DOORS
Assemble the Refrigerator doors
1. Reattach the lower left and right door hinges(
).
spilihPahti W head screwdriver, insert and tighten the
two screws(
) into the lower left and right door hinges.
With a Allen Wrench(5mm), insert and tighten the two hex
head bolts(
) into the lower left and right door hinges.
2. Place the hole in the bottom of the door over the lower
hinge(
).
Be careful not to miss the hinge cap because it can
.
3. Insert the upper hinges(
9
) into the holes at the top
of the doors.
With a Wrench(10mm), insert and tighten the 3 hex
head bolts(
7
) into the upper left and right door
hinges.
With a Philips head screwdriver, insert and tighten
the ground screw(
8
) into the upper left and right
door hinges.
9
7
8
01 SETTING UP
Page 14
14_Setting Up
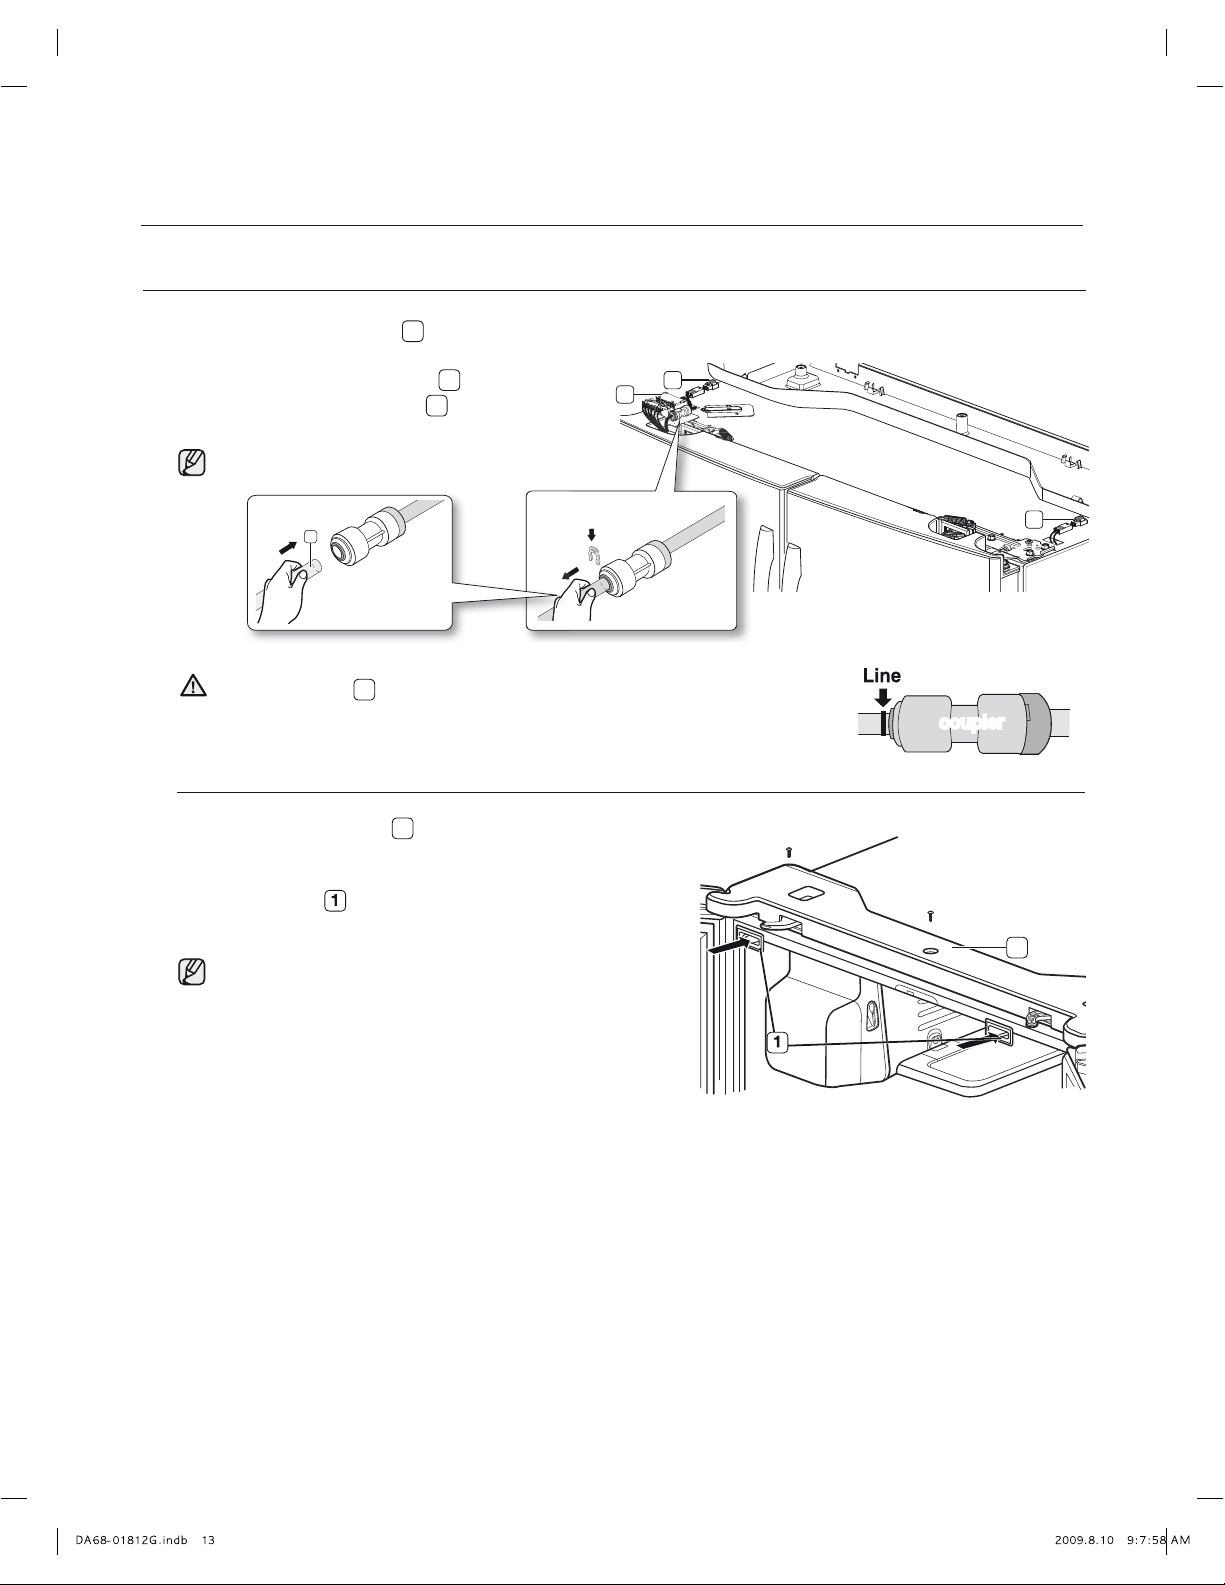
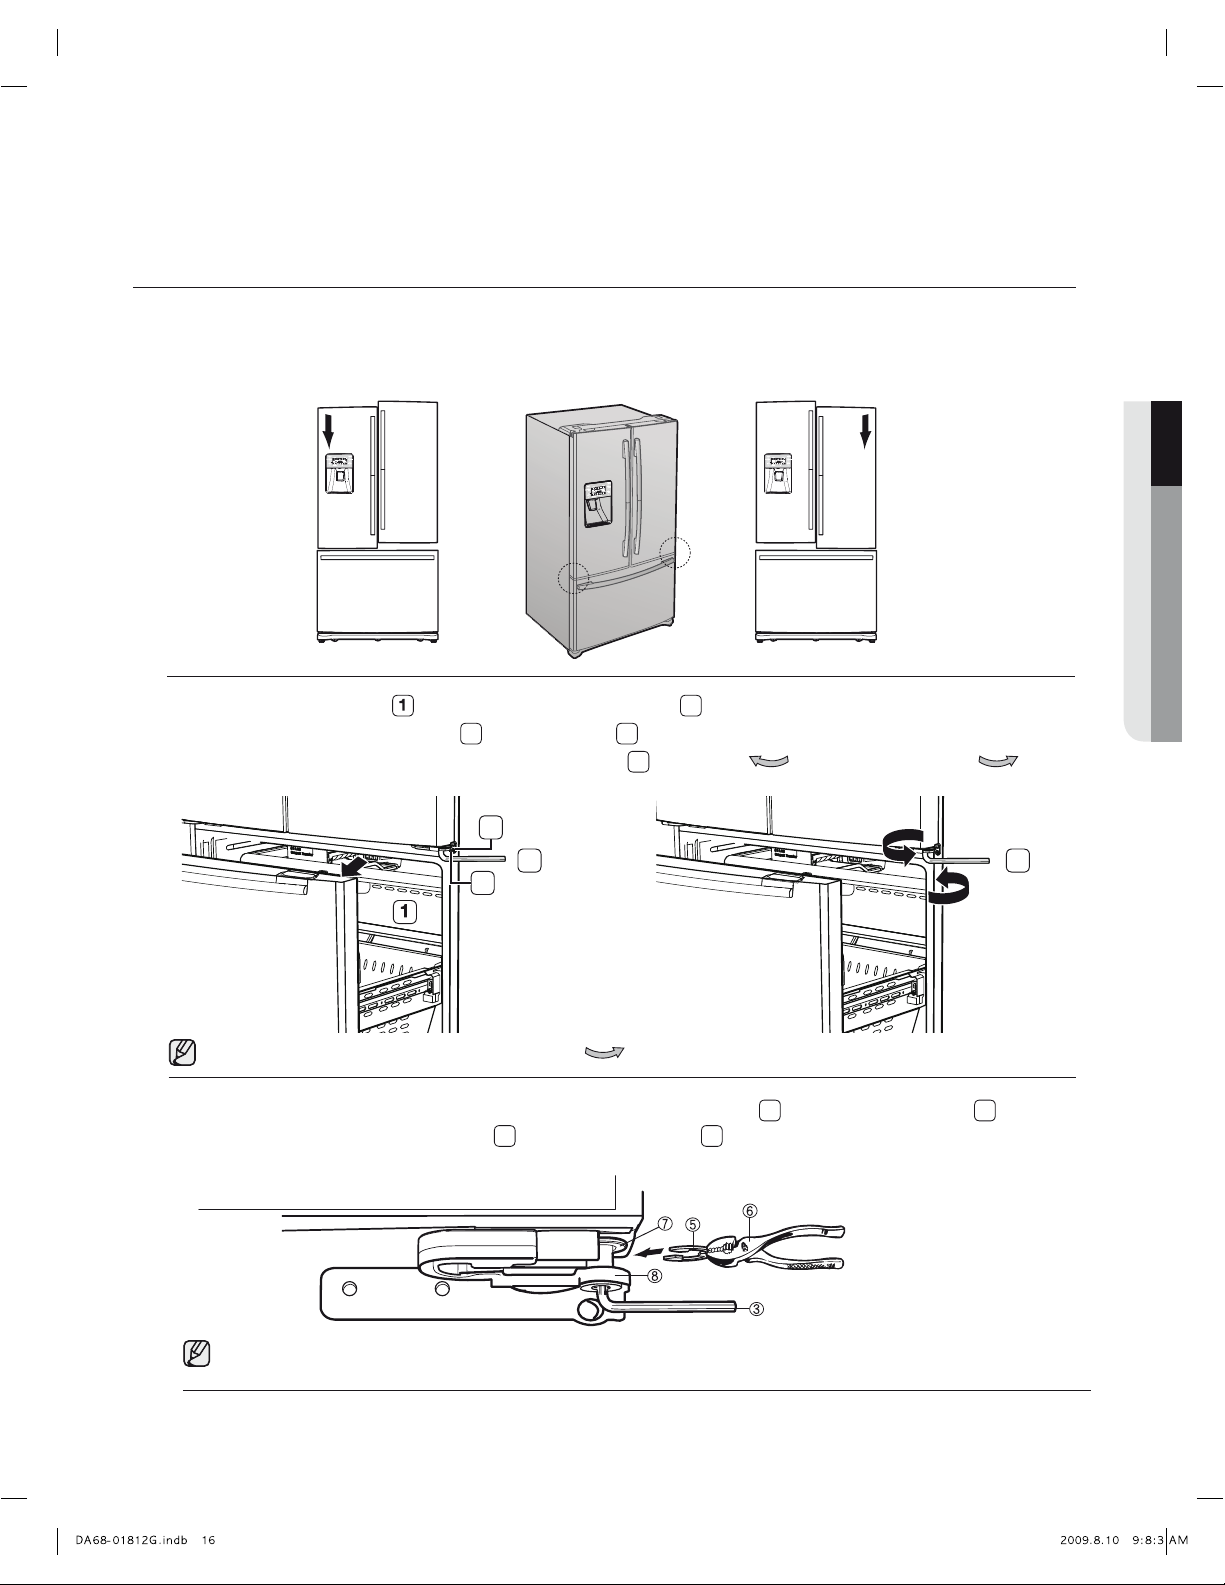
REATTACHING THE REFRIGERATOR DOORS
3
4
Red Clip
(1/4”)
Dispenser
Door Tube
Cabinet
Tube
5
3
5. Position the Top Table(2) in place.
With a Philips head screwdriver, insert and tighten the 3
screws into the Top Table. With the door opened, reinsert the
Top Table cap(
) and close the doors.
When reattaching the top table, make sure that the
wires are not pressed or damaged by the top table.
2
4. Connect the water line (5) and then insert a
clip on the coupler with pulling tube.
Connect the one connector(
4
) on left side
door and two connectors (
3
) at each side
of the top cap.
The clip is enveloped inside of the top cap.
The water line (
5
) must be fully inserted to the marked line to prevent
water leakage from the dispenser.
CAUTION
coupler
Be sure to sensor (yellow cable) is inside the top table.
Setting up your French Door Refrigerator
Page 15
Setting Up_15
ASSEMBLE THE FREEZER DRAWER
2. Hang the freezer door front onto open slots on the sides.
3. Tighten four 10mm hex-head screws completely.
4. With the drawer pulled out fully, insert the lower basket (
6
) into
the rail system.
5. Hook the ends of the tilting pocket (
7
) into both brackets (8),
and push down until they lock into place.
1. Pull out the rails to the full length on each side of the cabinet evenly.
7
8
Slot
Slot
6
CAUTION
Make sure the door is well assembled on the rail
CAUTION
If the drawer is not properly assembled on the rail, the door
will not close and it will cause frost.
01 SETTING UP
Page 16
16_Setting Up
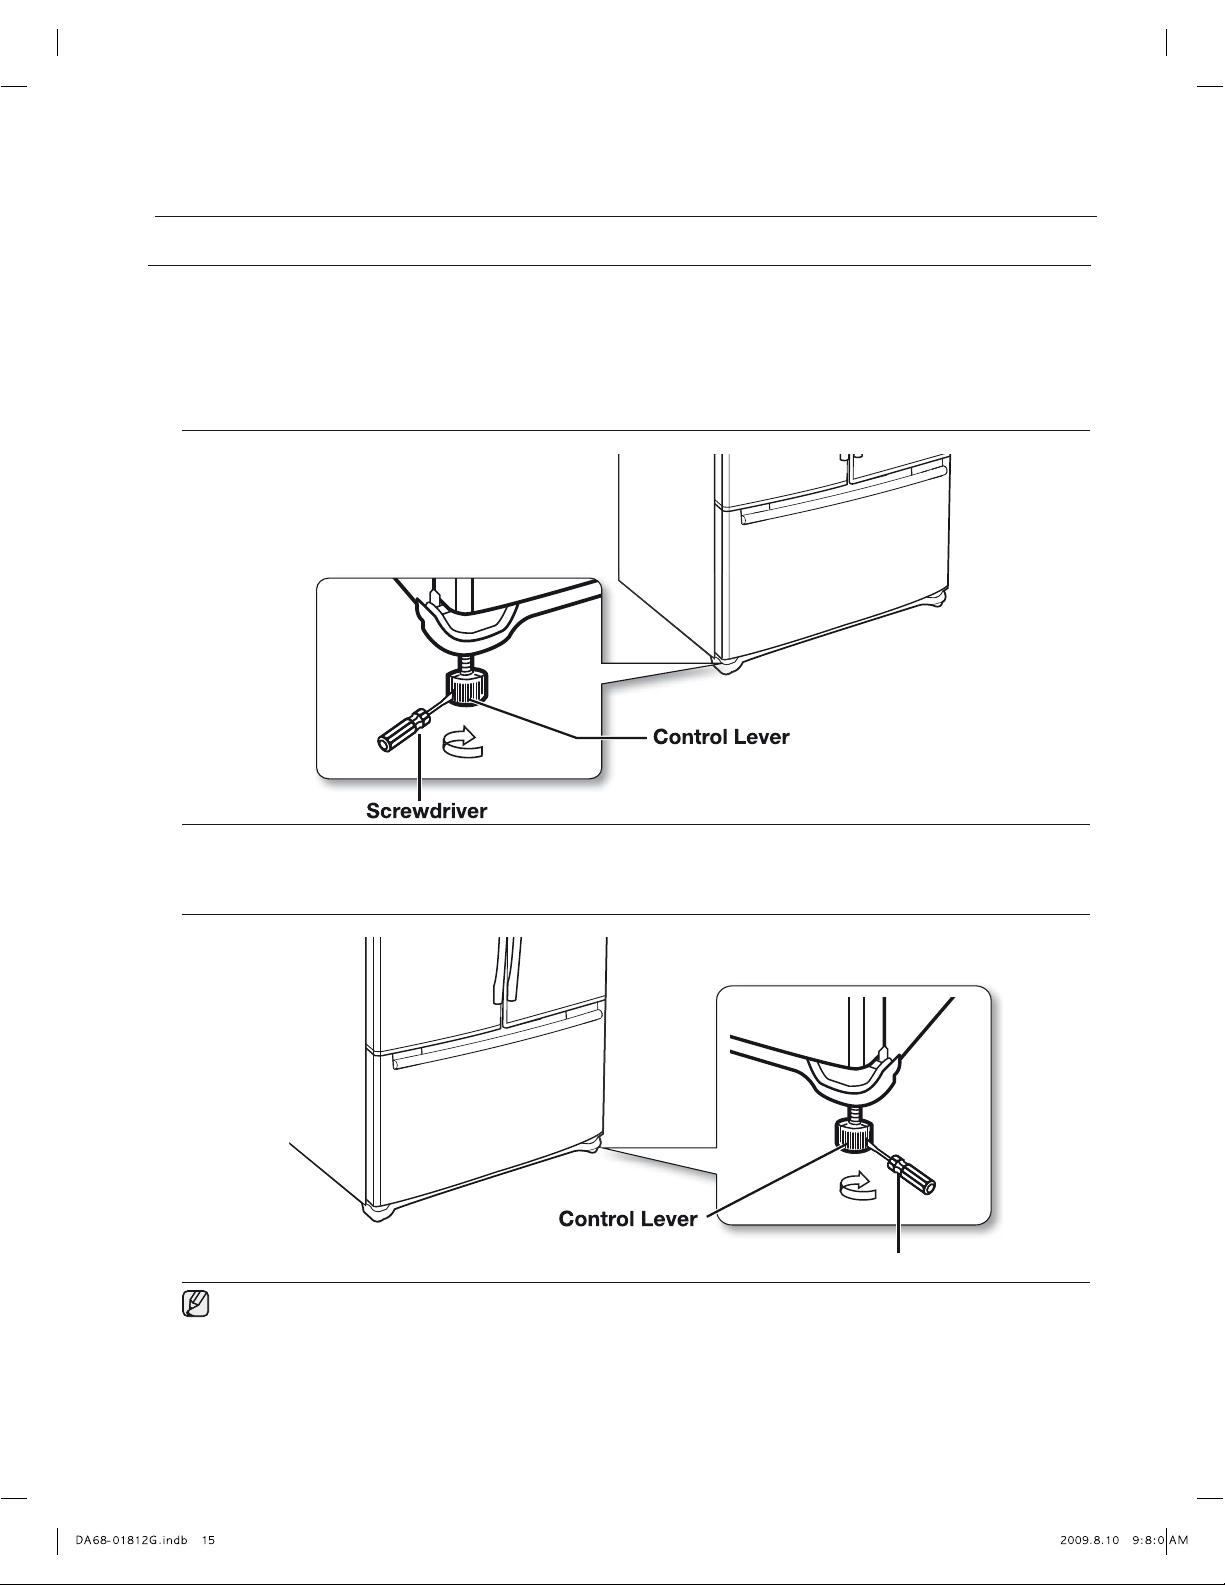
ADJUSTING THE DOORS
Now that the doors are back on the Refrigerator, you want to make sure the Refrigerator is level so that you can
make final adjustments. If the Refrigerator is not level, it will not be possible to get the doors perfectly even.
When the Left door is lower than the Right door.
Insert a flat-blade screwdriver into a notch on the left control lever, turn it clockwise or counter-clockwise
to level the left door.
When the Left door is higher than the Right door.
Insert a flat-blade screwdriver into a notch on the right control lever, turn it clockwise or counter-clockwise
to level the right door.
We do not recommend making small adjustments with the control lever. Instead, refer to the next page for the
best way to make minor adjustments to the doors.
Screwdriver
Setting up your French Door Refrigerator
Page 17
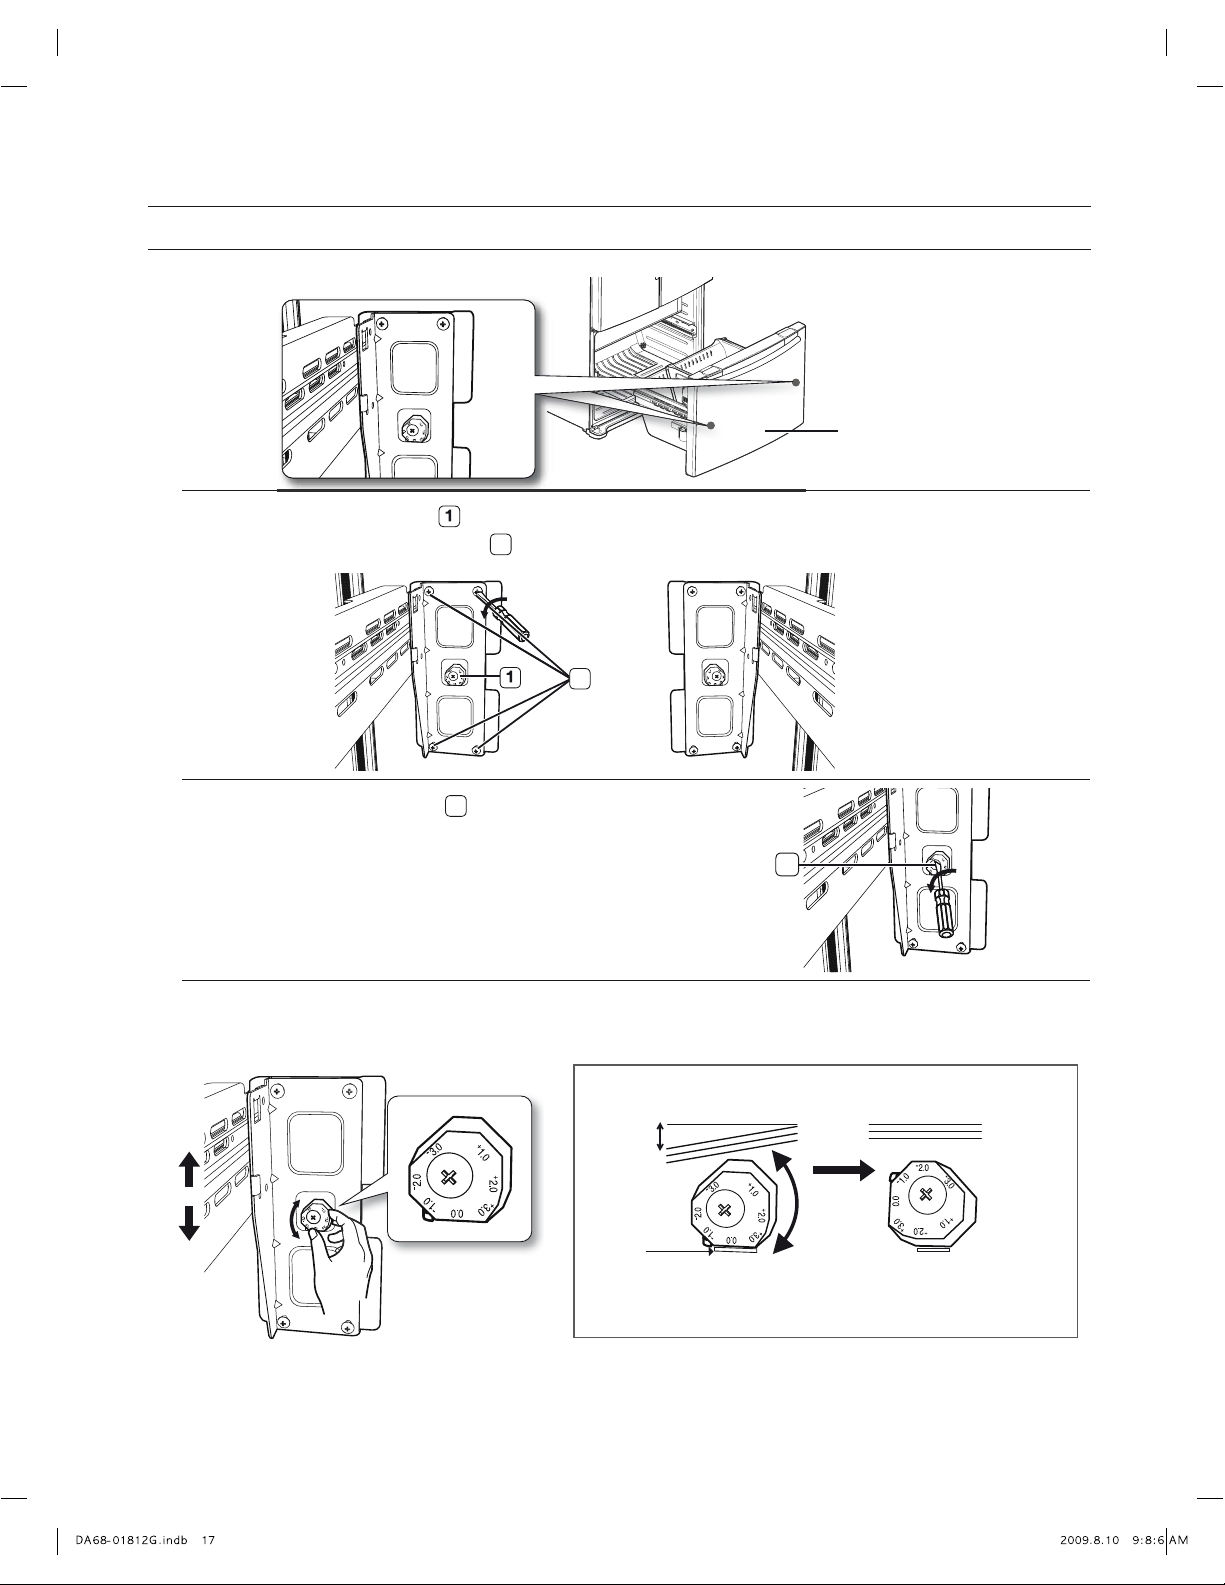
MAKING MINOR ADJUSTMENTS BETWEEN DOORS
Remember a level Refrigerator is necessary for getting the doors perfectly even. If you need help, review the
previous section on leveling the Refrigerator.
When the left
door is lower
than the right
door.
Adjustment
part
1. If you open the drawer (
2. Insert the supplied hex wrench (
), you can see the lower hinge (2).
3
) into the shaft (4) of the lower hinge.
3. Please adjust the height by turning the hex wrench (
2
4
Adjustment
part
3
) clockwise(
When the left
door is higher
than the right
door.
) or counter-clockwise( ).
33
01 SETTING UP
when you turn the hex wrench counter-clockwise( ), the door will move up.
1. After adjusting the doors, please insert the supplied fastener-ring (
7
gap between the hinge-grommet (
) and the lower hinge(8). The number of fastener-rings you’ll need
to insert depends on the gap.
Two fastener-rings are enclosed with the refrigerator.
The thickness of each fastener-ring is 0.04 inch.
5
) using a pair of pliers (6) in the
Setting Up_17
Page 18
18_Setting Up
ADJUSTING THE FREEZER DRAWER LEVEL
1. Locate the height-adjuster (
) in the freezer drawer.
Unscrew the four Phillips screws (
2
) slightly to loosen the door.
2. Loosen the controller screw(
3
) with a Phillips
screwdriver.
3. Find the best level to align the door slope.
Freezer Drawer
Adjustment part
2
3
Example) The slope is about 2mm (0.08inch) as shown below.
- Rotate the Height Adjuster to +2.0 to reduce the door
slope.
Slope
Reference
plane
Setting up your French Door Refrigerator
Page 19
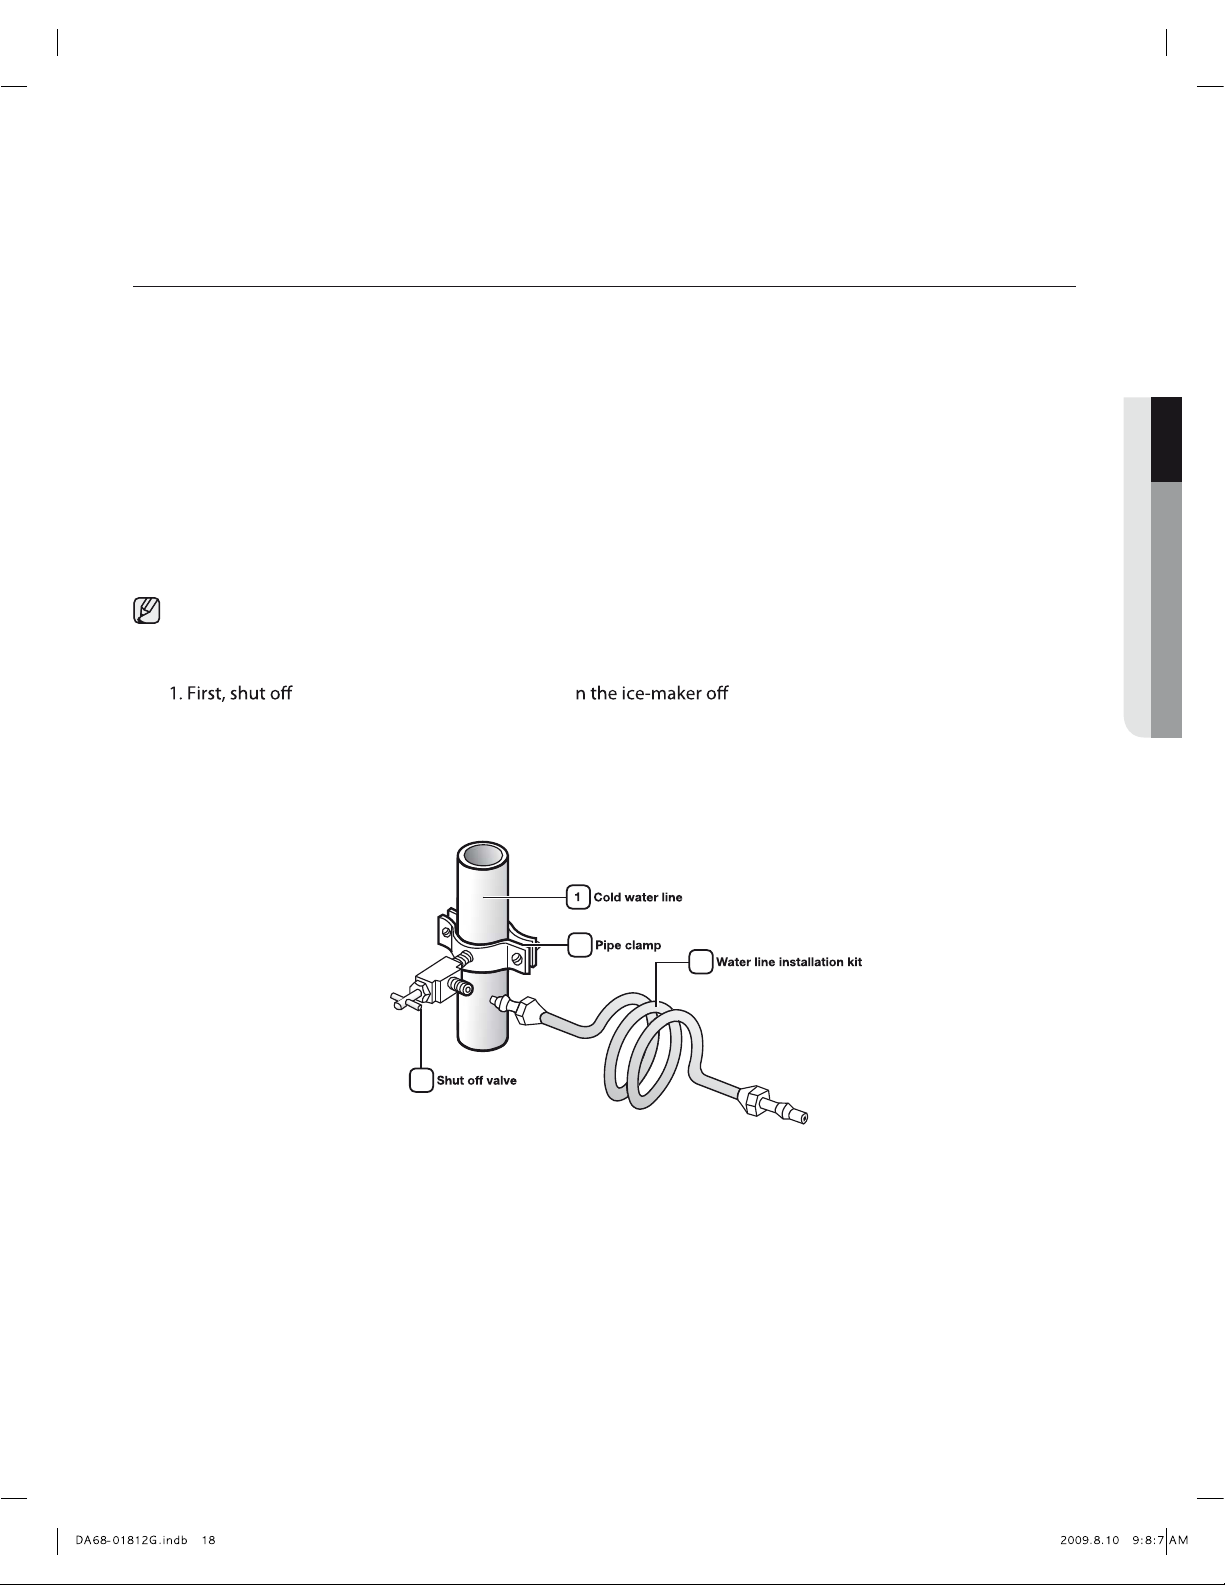
CHECKING THE WATER DISPENSER LINE
A water dispenser is one of the helpful features on your new Samsung Refrigerator. To help promote better
health, the Samsung water filter removes unwanted particles from your water. However, it does not sterilize or
destroy microorganisms. You may need to purchase a water purifying system to do that.
In order for the ice maker to operate properly, a water pressure of 20~125 psi (pound per square inch) is
required.
Under normal conditions, a 170 cc (5.75 oz.) paper cup can be filled in 10 seconds.
If the Refrigerator is installed in an area with low water pressure (below 20psi), you can install a booster pump to
compensate for the low pressure.
Make sure the water storage tank inside the Refrigerator is properly filled. To do this, press the water dispenser
lever until the water runs from the water outlet.
Setting Up_18
Water line installation kits are available at extra cost from your dealer. We recommend using a water supply kit that
contains copper tubing.
Connecting to the water supply line
the main water supply line and tur .
2. Locate the nearest cold, drinking water line.
3. After connecting the water supply to the water filter, turn your main water supply back on and flush four
or more gallons into a bucket to clear and prime the water filter.
2
3
4
01 SETTING UP
Page 20
20_Setting Up
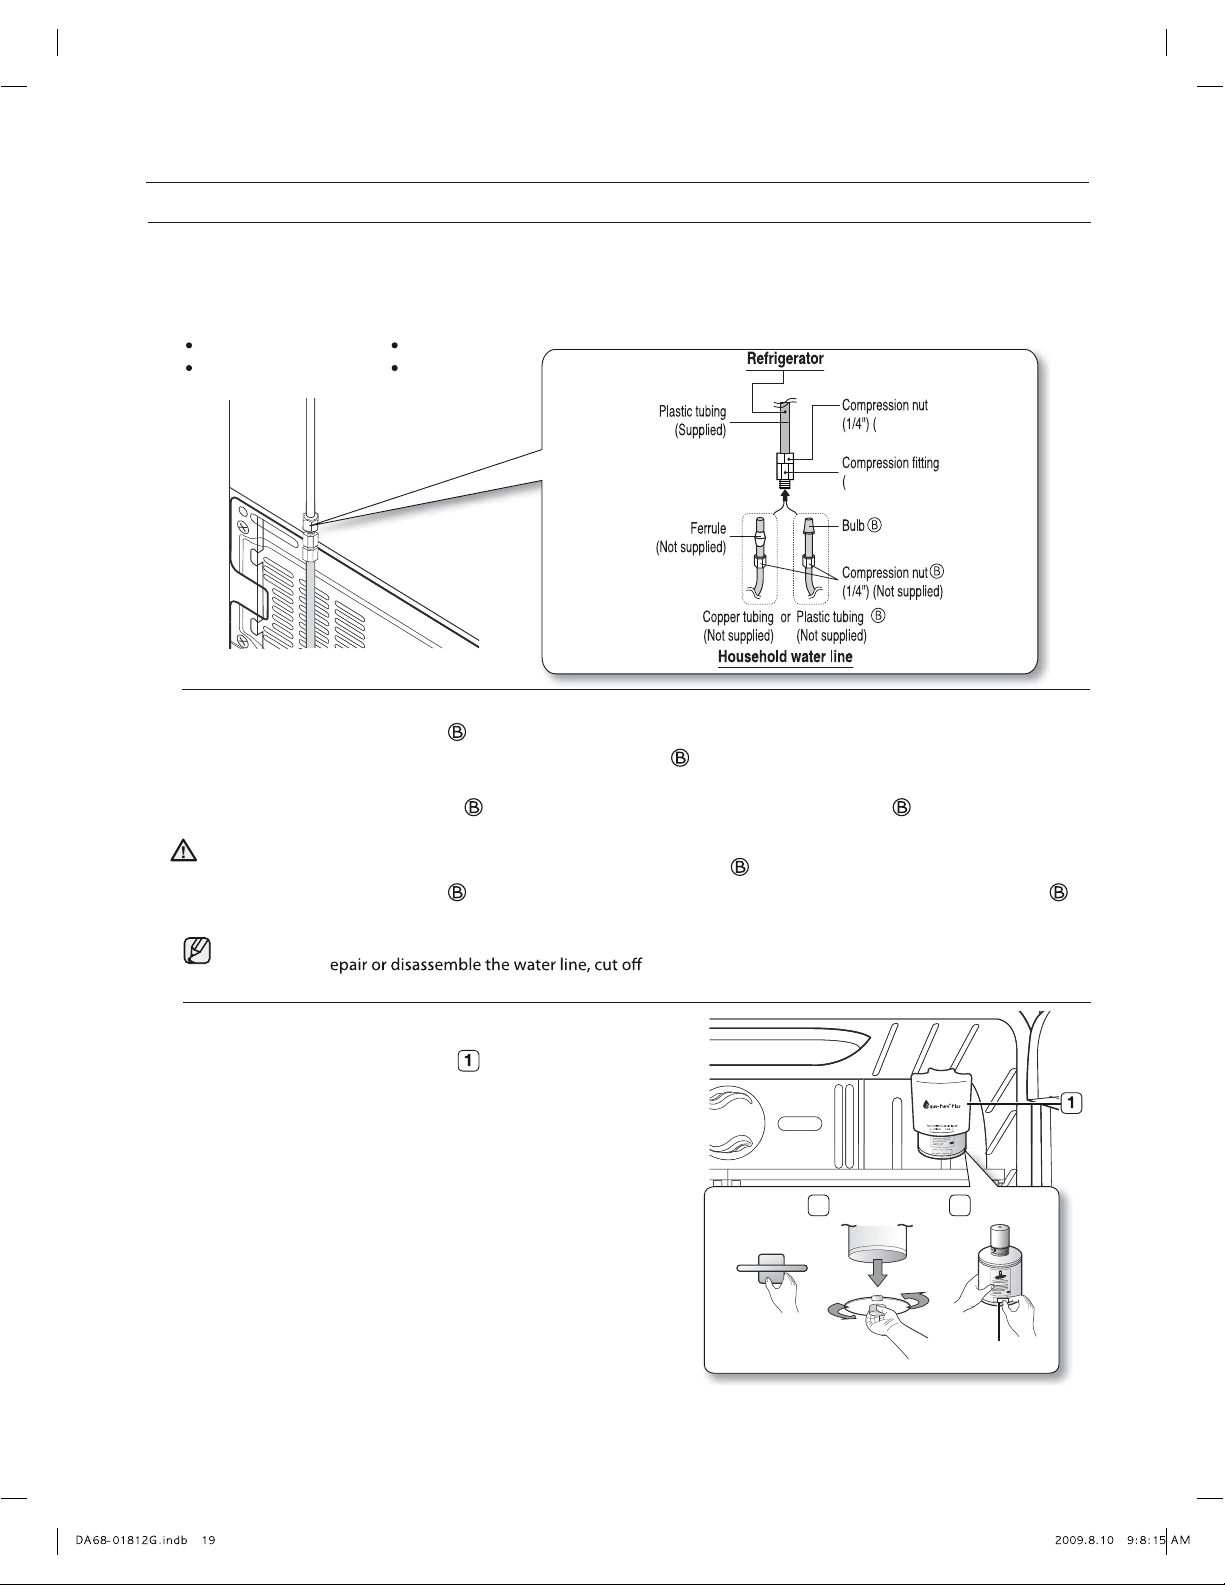
INSTALLING THE WATER LINE
Connecting the water line to the Refrigerator.
There are several items that you need to purchase to complete this connection. You
may find these items sold as a kit at your local hardware store.
1/4” compression nut
plastic tubing
copper tubing
ferrule
Installing the water filter.
1. Remove the water filter cover(
)
2. Remove the fixed cap by turning it counter clockwise.
Keep the cap in a safe place for later use if you don’t
use the filter.
3. Remove the water filter from the box and put a
replacement indicator sticker on the filter as shown.
Place a sticker on the filter that dates six months in
the future. For example, if you install the water filter in
March, put the “SEP” sticker on the filter to remind you
to replace it in September. That way you’ll know when
it is time to replace the filter. Normally, a filter life is
about 6 months.
2 3
Sticker
(month indicator)
Only connect the water line to a drinkable water source.
If you have to r
1/4“ of the plastic tubing to make sure you get a snug,
leak-free connection.
Do not use without the molded end(Bulb) of the plastic tubing .
1. Tighten the compression nut onto the 1/4” compression fitting.
- If you are using copper tubing, slip the compression nut
(not included) and ferrule (not included) on
copper tubing (not included) as shown.
- If you are using plastic tubing
, insert the molded end(Bulb) of the plastic tubing into the
compression fitting.
2. Tighten the compression nut
onto the compression fitting. Do not over-tighten the compression nut .
3. Turn water on and check for any leakage.
CAUTION
Assembled)
Assembled)
Setting up your French Door Refrigerator
Page 21

Setting Up_21
4. Remove the filter cap and insert the filter into the filter
housing.
5. Slowly turn the water filter 90º clockwise to align with the
printing mark on the cover, locking the filter in position.
Make sure to align the water filter label mark with center of
cover filter printing as illustrated. Remember, do not overtighten.
You should remove the right side upper glass shelf before installing water filters.
Removing any residual matter inside the water supply line after
installing the water filter.
1. Turn ON the main water supply & turn OFF the valve to the water supply line.
2. Run water through the dispenser until the water runs clear (approx. 6-7
minutes). This will clean the water supply system and remove air from the lines.
3. Additional flushing may be required in some households.
4. Open the Refrigerator door and make sure there are no water leaks coming
from the water filter.
Be sure to flush the dispenser thoroughly, otherwise water may drip from the dispenser.
This means that there is still air in the line.
Turn until the
labels are aligned.
Separation
of red cap.
Cover filter.
4 5
Reverse Osmosis Water Supply
IMPORTANT : The pressure of the water supply coming out of a reverse osmosis system going to the
water inlet valve of the refrigerator needs to be between 35 and 120 psi (241 and 827 kPa).
If a reverse osmosis water filtration system is connected to your cold water supply, the water pressure to
the reverse osmosis system needs to be a minimum of 40 to 60 psi (276 to 414 kPa.)
If the water pressure to the reverse osmosis system is less than 40 to 60 psi (276 to 414 kPa):
necessary.
with a reverse osmosis system. Remove the water filter.
If you have questions about your water pressure, call a licensed, qualified plumber.
01 SETTING UP
Page 22
22_Operating
Operating your SAMSUNG French Door
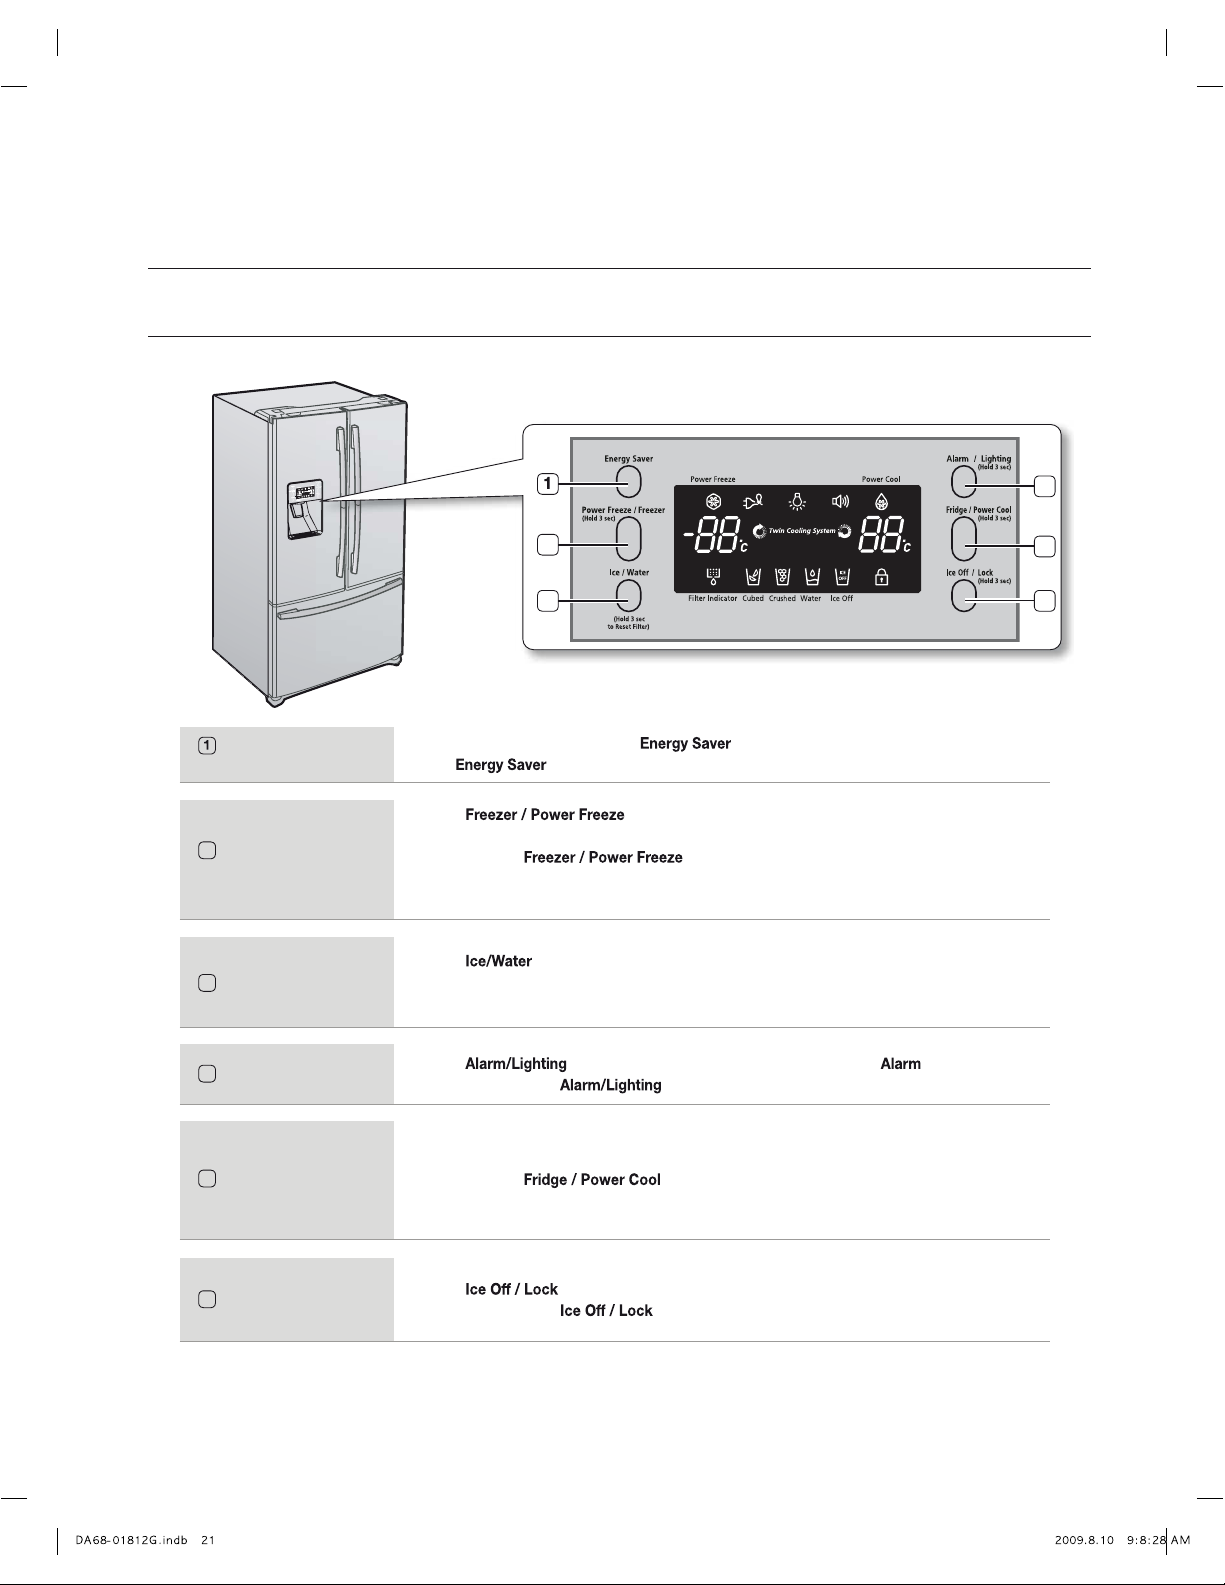
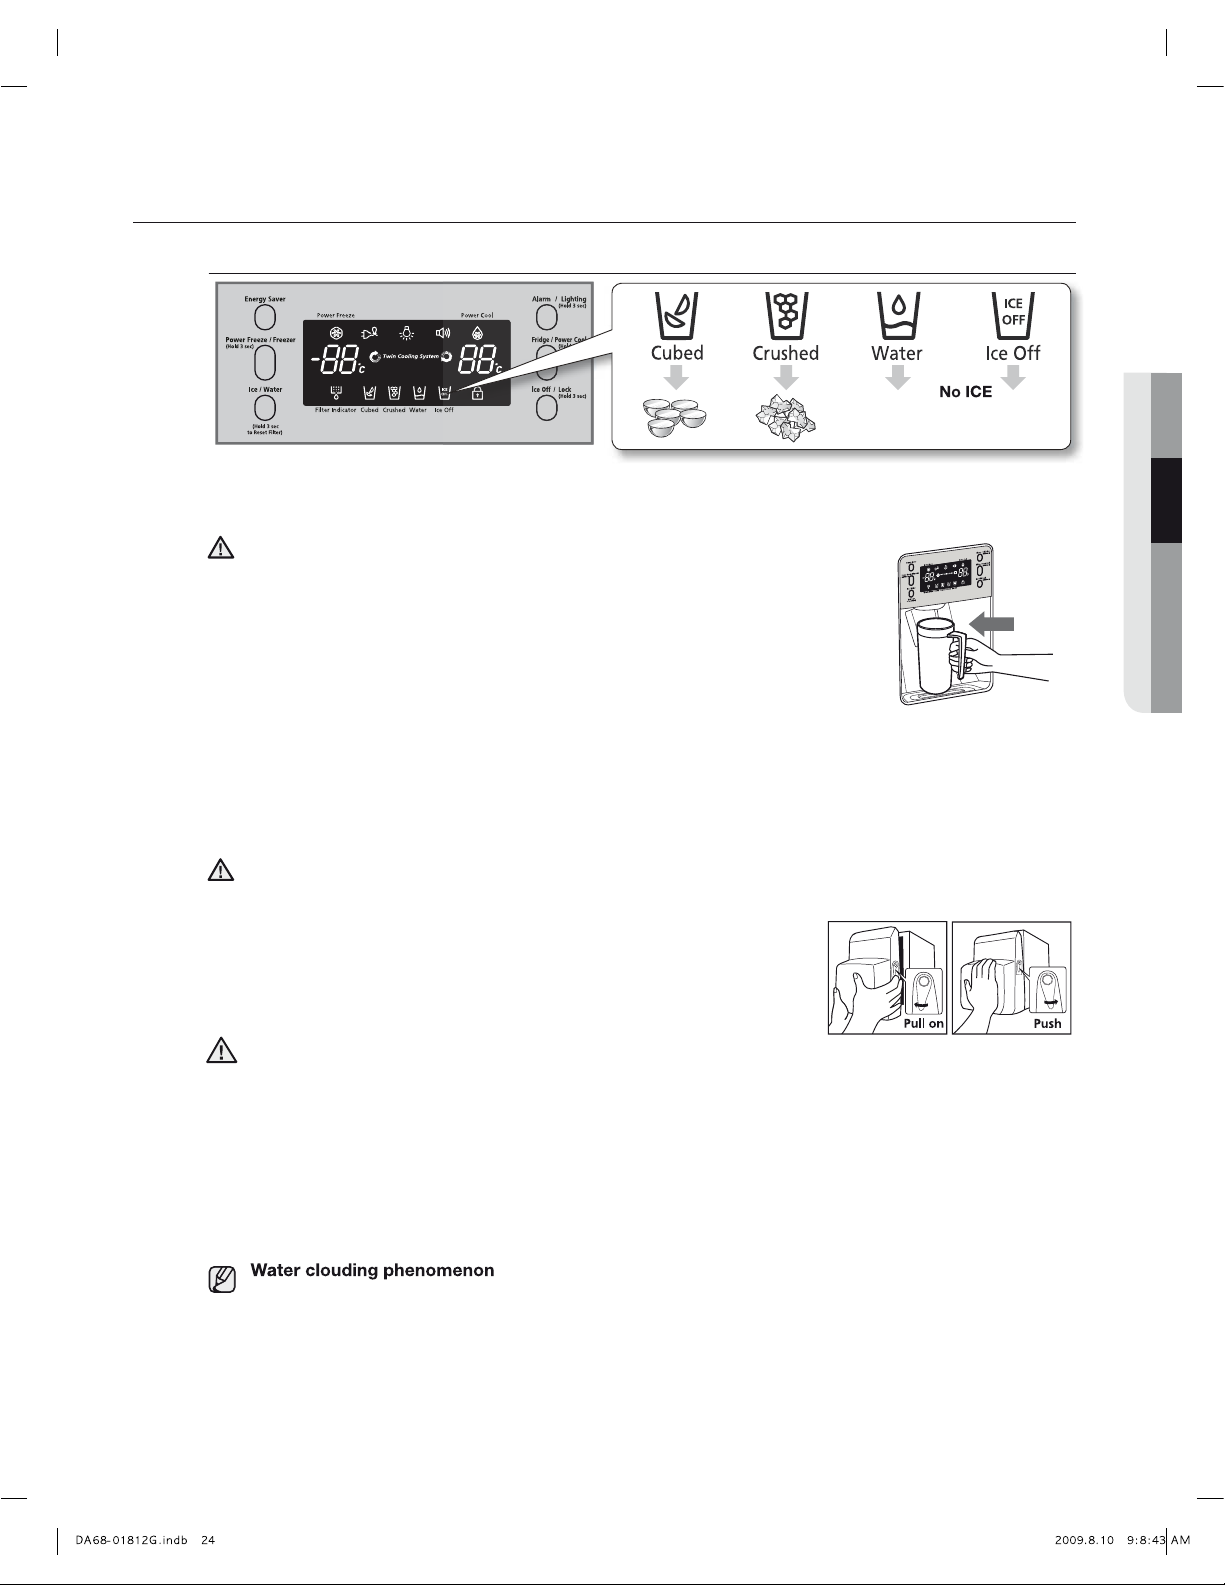
Press the button to set the Freezer to your desired temperature.
You can set the temperature between -14°C and -25°C.
Press and hold the
Button for 3 seconds, to speed up the time needed to
freeze products in the Freezer. It can be helpful if you need to quickly freeze easily spoiled items or if the
temperature in the Freezer has warmed dramatically (For example, if the door was left open).
For better energy efficiency, press the button. If condensation occurs on the doors,
turn the function o.
(
) Energy Saver
Button
(
2
) Freezer / Power
Freeze Button
Press the button to select the ice or water function. You can select water or the types of
ice(cube/crushed ice).
After making a selection, press the dispenser lever.
(
3
) Ice / Water Button
Press the button to turn o the door open alarm. Initially the is set to on.
If you press and hold the button for 3 seconds, the Dispenser LED Lamp will stay on.
(
4
) Alarm / Lighting Button
Press the Fridge / Power Cool button to set the fridge to your desired temperature.
You can set the temperature between 1°C and 7°C.
Press and hold the
button for 3 seconds, to speed up the time needed to cool
products in the Refrigerator. It can be helpful if you need to quickly cool easily spoiled items or if the
temperature in the fridge has warmed dramatically (For example, if the door was left open).
(
5
) Fridge / Power Cool
Button
Press the button to turn the ice making function o.
If you press and hold the
button for 3 seconds, the Display and Dispenser will be locked.
(
6
) Ice O / Lock Button
2
3
4
5
6
Refrigerator
USING THE CONTROL PANEL
Page 23
Operating_23
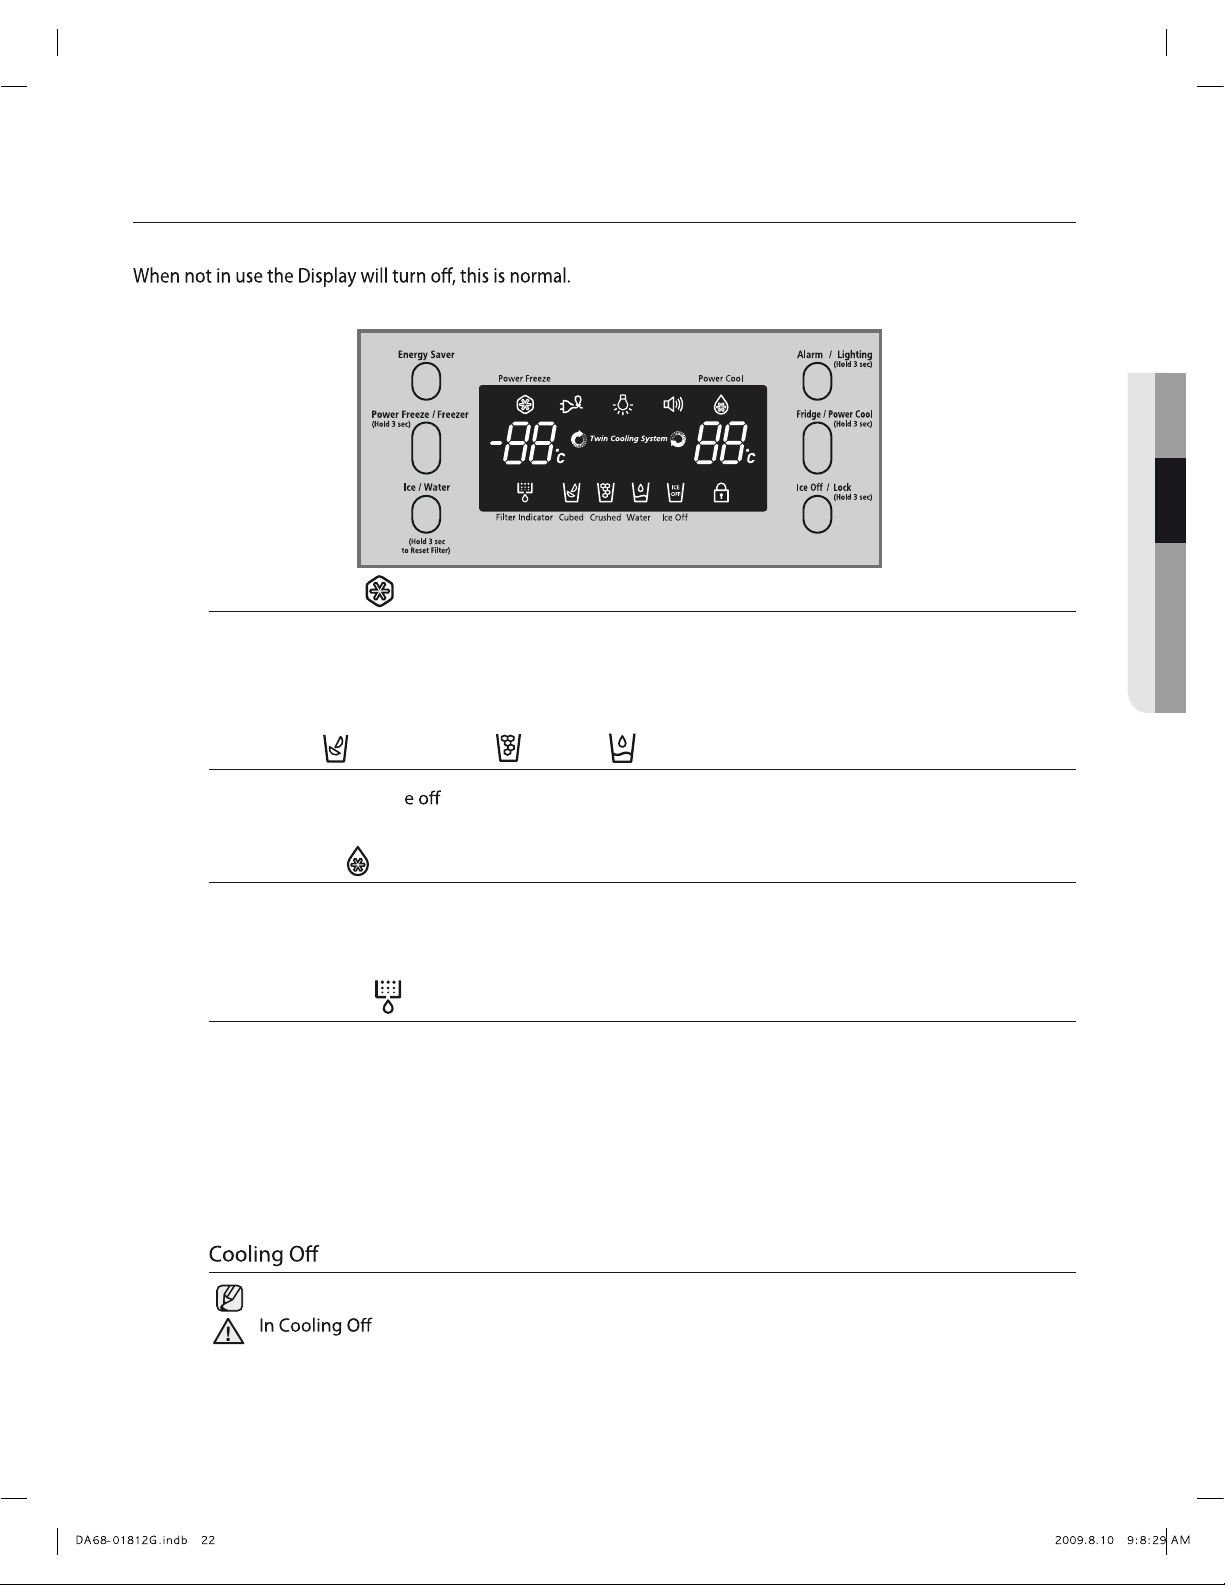
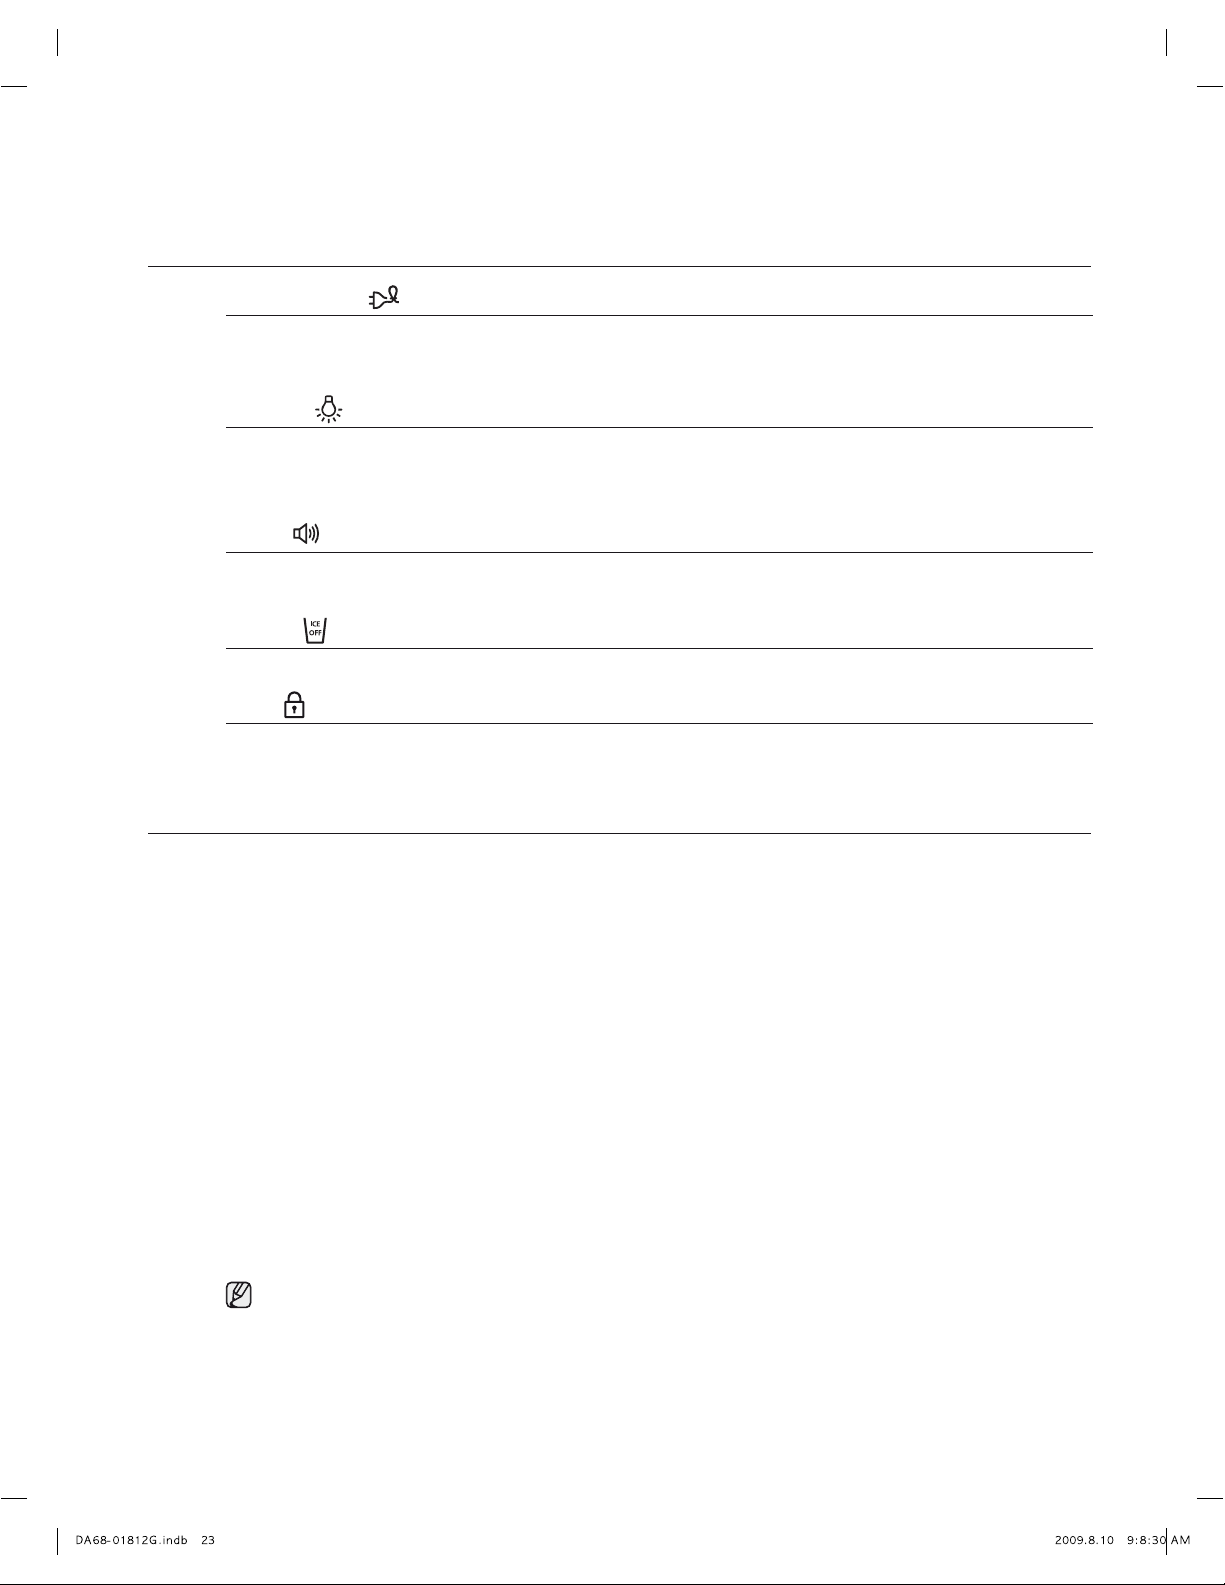
USING THE DIGITAL DISPLAY
Power Freeze
This icon will light up when you activate the “Power Freeze” feature. “Power Freeze” is great when you
need a lot of ice.
When you have enough ice, just press the button again to cancel the “Power Freeze” mode.
If you select “Power Freeze” , the inside temperature of the Freezer will decrease for about two and a half
hours.
Power Cool
This icon will light up when you activate the “Power Cool” button. For a quick fridge cool down, use
“Power Cool” .
If you select “Power Cool” , the inside temperature of the Fridge will decrease for about two and a half
hours.
Filter Indicator
When the filter indicator light is on, it is time to change the filter. Typically this happens about
every 6 months.
The filter Indicator will be Blue when you initially insert the water filter.
The filter Indicator will be Light Pink when you have used your water filter for 5 months.
The filter Indicator will be Red when you have used your water filter for 6 months.
After removing the old water filter and installing a new one (see page 33 for instructions on how to do
this), reset the indicator by pressing and holding the “Ice/Water” button for 3 seconds.
Cubed Ice , Crushed Ice , Water
Enjoy cubed or crushed ice by selecting your preference from the digital control panel. If you don’t
need ice, turn the featur
to save on water and energy consumption. The Ice type light indicates the
type of ice(or no ice) that is currently chosen.
Mode (“OF & OF” code on the display)
Mode, the refrigerator works but doesn’t make cool air. To cancel this mode, press
the Power Freeze and Freezer buttons at the same time for 3 seconds until a “Ding-dong” sound
is heard and the unit will now cool.
CAUTION
This function is for store display refrigerators. It is not for customer use.
02 OPERATING
Page 24
24_Operating
Operating your SAMSUNG French Door
CONTROLLING THE TEMPERATURE
Basic T emperature of Freezer and Refrigerator Compartments
The basic temperature and/or recommended temperature of Freezer and Refrigerator Compartments are
-19°C and 3°C respectively.
If the temperature of Freezer and Refrigerator Compartments are too high or low, adjust the temperature
manually.
Controlling the Freezer temperature
The Freezer temperature can be set between -14°C and -25°C to suit your particular needs. Press the
Freezer button repeatedly until the desired temperature is shown in the temperature display. Keep in
mind that foods like ice cream may melt at -15°C.
The temperature display will move sequentially from -25°C to -14°C. When the display reaches -14°C,
it will begin again at -25°C.
Controlling the Refrigerator temperature
The Refrigerator temperature can be set between 7°C and 1°C as your particular needs. Press the
Fridge button repeatedly until the desired temperature is shown in the temperature display. The
temperature control process for the Fridge works just like the Freezer process. Press the Fridge button
to set your desired temperature. After a few seconds, the Fridge will begin adjusting towards the newly
set temperature. This will be reflected in the digital display.
The temperature of the Freezer or the Refrigerator may rise when you open the doors too frequently, or if a
large amount of warm or hot food is placed in either side.
This may cause the digital display to blink. Once the Freezer and Refrigerator temperature return to their
normal set temperatures, the blinking will stop.
If the blinking continues, you may need to “reset” the Refrigerator. Try unplugging the appliance, wait for
ar
ound 10 minutes and then plug the power cord back in.
Energy Saver
This icon will light up when you activate the “Energy Saver” function is automatically set to “ON” when poer is
supplied to the Refrigerator. If condensation occurs on the doors, turn the Energy Saver function o.
Alarm
This icon will light up when you activate the “Alarm” feature. The door alarm will sound if any door is open for
more than 3 minutes. The beeping stops when you close the door. Initially the Alarm is set to on.
Ice O
This icon will light up when you activate the “Ice O” feature. In this case, the ice will not be produced.
Lock
This icon will light up when you activate the “Lock” feature. In this case, you won’t to be able to use the
control panel. If you press and hold the Ice O / Lock button for 3 seconds, you will be able to use the
contr
ol panel again.
Lighting
This icon will light up when you activate the “Lighting” feature. In this case, the dispenser light(under the
display) will be on constantly. If you would like the dispenser light to come on only when using the dispenser,
turn the “Lighting” feature o.
Refrigerator
Page 25
Operating_25
PUSH
If you have a long vacation or business trip, close the water valve and shut o the water supply to the Refrigerator. This
will help prevent accidental leakages.
Do not put your fingers, hands or any other unsuitable objects in the chute or ice-maker bucket.
- It may result in personal injury or material damage.
Never put your finger or any other objects in the dispenser opening.
- It may cause injury.
Do not disassemble the Ice Maker personally. It may cause disorder.
Do not wash or spray the ice bucket with water.
Just wipe it with a dry cloth. In order to operate the ice maker properly, water pressure of 138~862 Kpa is required.
CAUTION
Select this if you
want to turn ice
maker o.
All water provided to refrigerators flows through the core filter which is an alkaline water filter. In this process,
the pressure in the water that has flowed out of the filter gets increased, and oxygen and nitrogen become
saturated. When this water flows out in the air, the pressure plummets and the oxygen and nitrogen get
supersaturated so that they turn into gas bubbles. The water could look misty due to these oxygen bubbles.
The water may look temporarily cloudy due to these oxygen bubbles. After a few seconds, the water will
look clear.
USING THE ICE AND COLD WATER DISPENSER
Using the Ice O Function
When selecting the Ice O mode, remove all ice cubes from the bucket.
If you are not using the ice dispenser the ice cubes may clump together.
Pull the lock lever forward to throw away ice cubes or remove clumped ice
from the bucket. Push the bucket back until you hear a click.
Using the Water dispenser
Place a glass underneath the water outlet and push gently against the water dispenser lever with your
glass. Make sure the glass is in line with the dispenser to prevent the water from splashing out.
If you have just installed the Refrigerator or just installed a new water filter, pour out the first six
glassfuls of water to flush out impurities in the water supply system. Make sure water flows cleanly
before drinking.
Using the Ice Dispenser
Place a glass underneath the ice dispenser and push gently against the dispenser lever with your glass.
Make sure the glass is in line with the dispenser to prevent the ice from bouncing out.
Press the Ice / Water button to select the type of you want
If the Freezer door is left open for a long time, condensation may form or the ice
inside the Ice-Maker may clump. Please close the door as soon as possible.
The Ice Dispenser may eject only a few ice cubes if there is not enough ice in the
Ice-Maker.
Use the Ice Dispenser when there is enough ice.
If the Freezer door is open for a long time or a lot of ice is dispensed at once,
condensation may trickle down the Dispenser lever.
CAUTION
When you do not use the water dispenser for 2~3 days (especially during the summer), the dispensed water may have a
funny smell or taste. If this occurs, we recommend that you discard the first 1~2 glasses for better tasting water.
CAUTION
02 OPERATING
Page 26
26_Operating
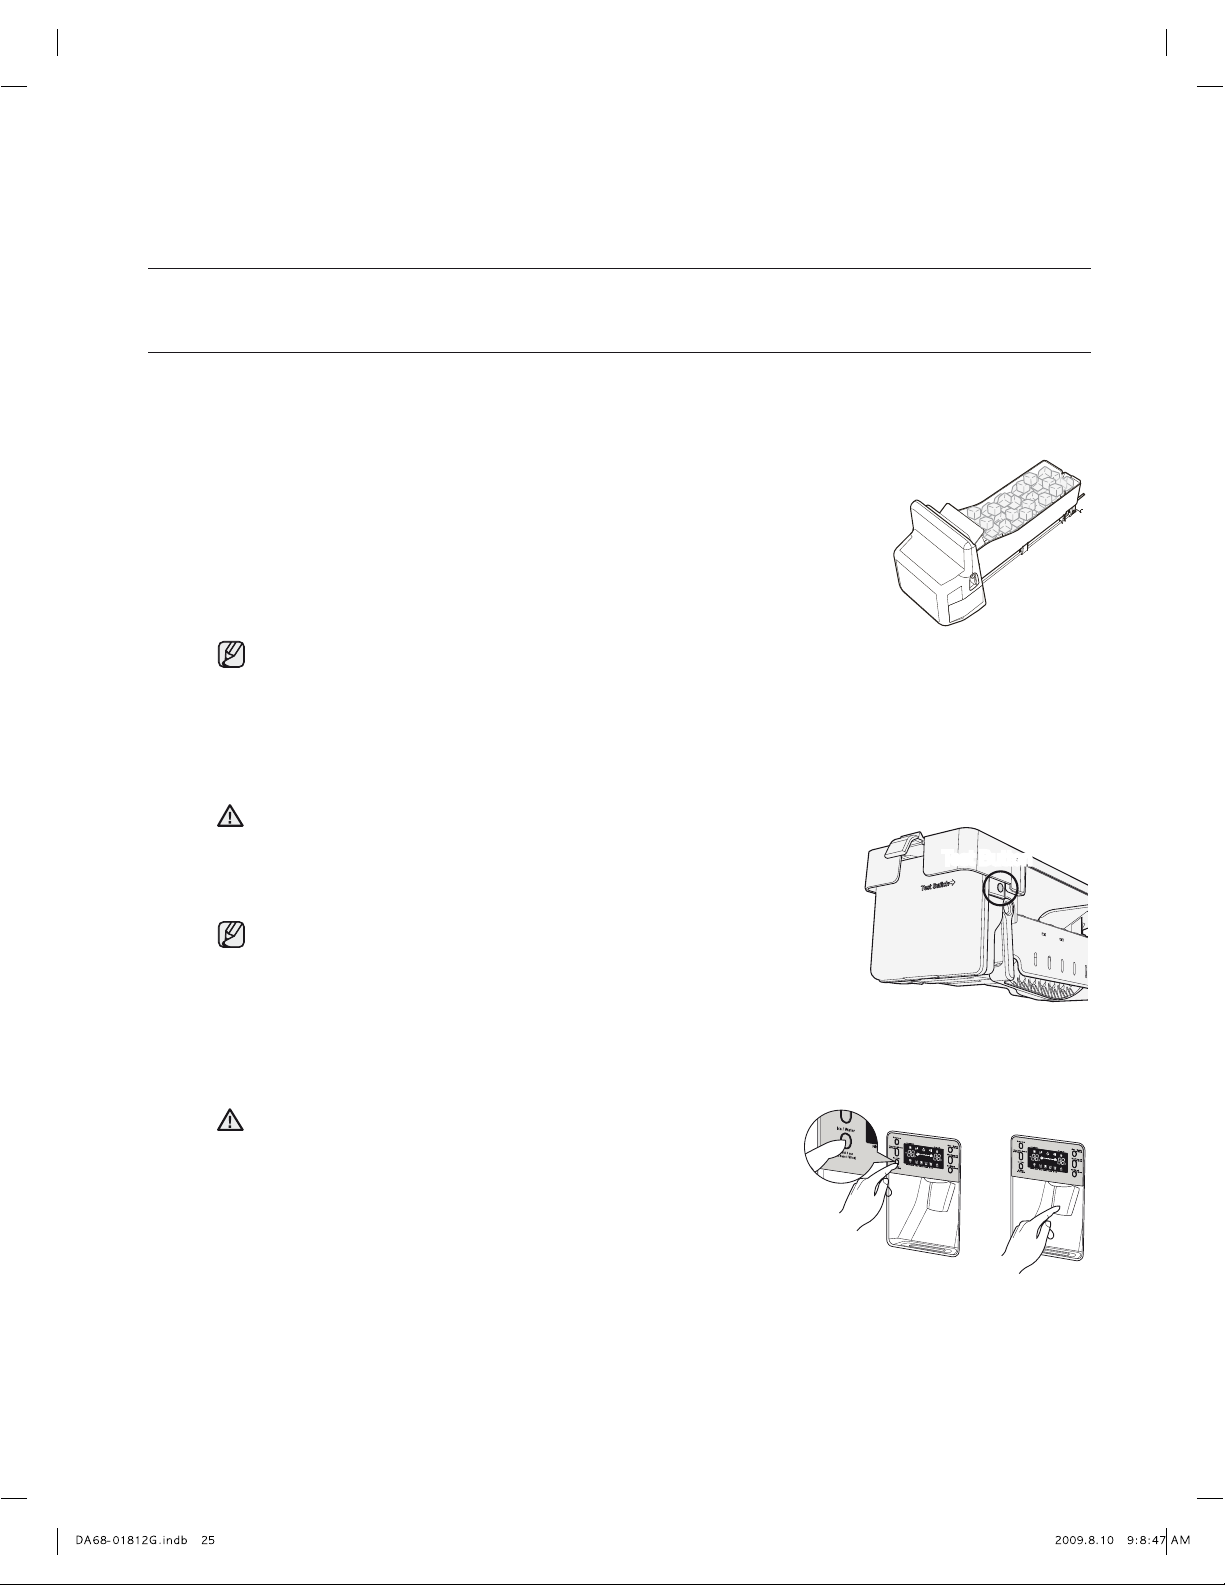
ICE PRODUCTION
Operating your SAMSUNG French Door
Normal Use
To fill ice bucket to maximum capacity after installation, make sure to do the
following steps.
1. Allow your refrigerator to operate and cool down for 24 hours (or 1 full day).
2. Waiting 24 hours will allow your ice maker to cool properly.
3. Dispense 4 to 6 ice cubes into the glass.
4. After 8 and 16 hours, dispense a full glass of ice at each time.
Please wait 1 second before removing the cup after dispensing water to
prevent spills. Do not pull out the lever dispenser after taking out ice or
water. It comes back automatically. Ice is made in cubes. When you select
“Crushed”, the icemaker grinds the ice cubes into crushed ice.
Test button
In case ice doesn’t come out, pull out the ice bucket and press test button
located on the right side of ice maker.
Test Button
Whenever all ice is used at one time, the above step 3 and 4 must be repeated (before dispense the first
4 to 6 ice cubes, it needs waiting 8 hours). This will replenish the ice cubes and ensure maximum ice
production.
CAUTION
When you dump the ice from the ice bucket, you should press the
dispenser lever once with ‘ICE CUBED’ or ‘CRUSHED’ function ON to
get new ice faster after replacing the ice bucket in the refrigerator.
CAUTION
Refrigerator
Page 27
Operating your SAMSUNG French Door
Refrigerator wherever it appears
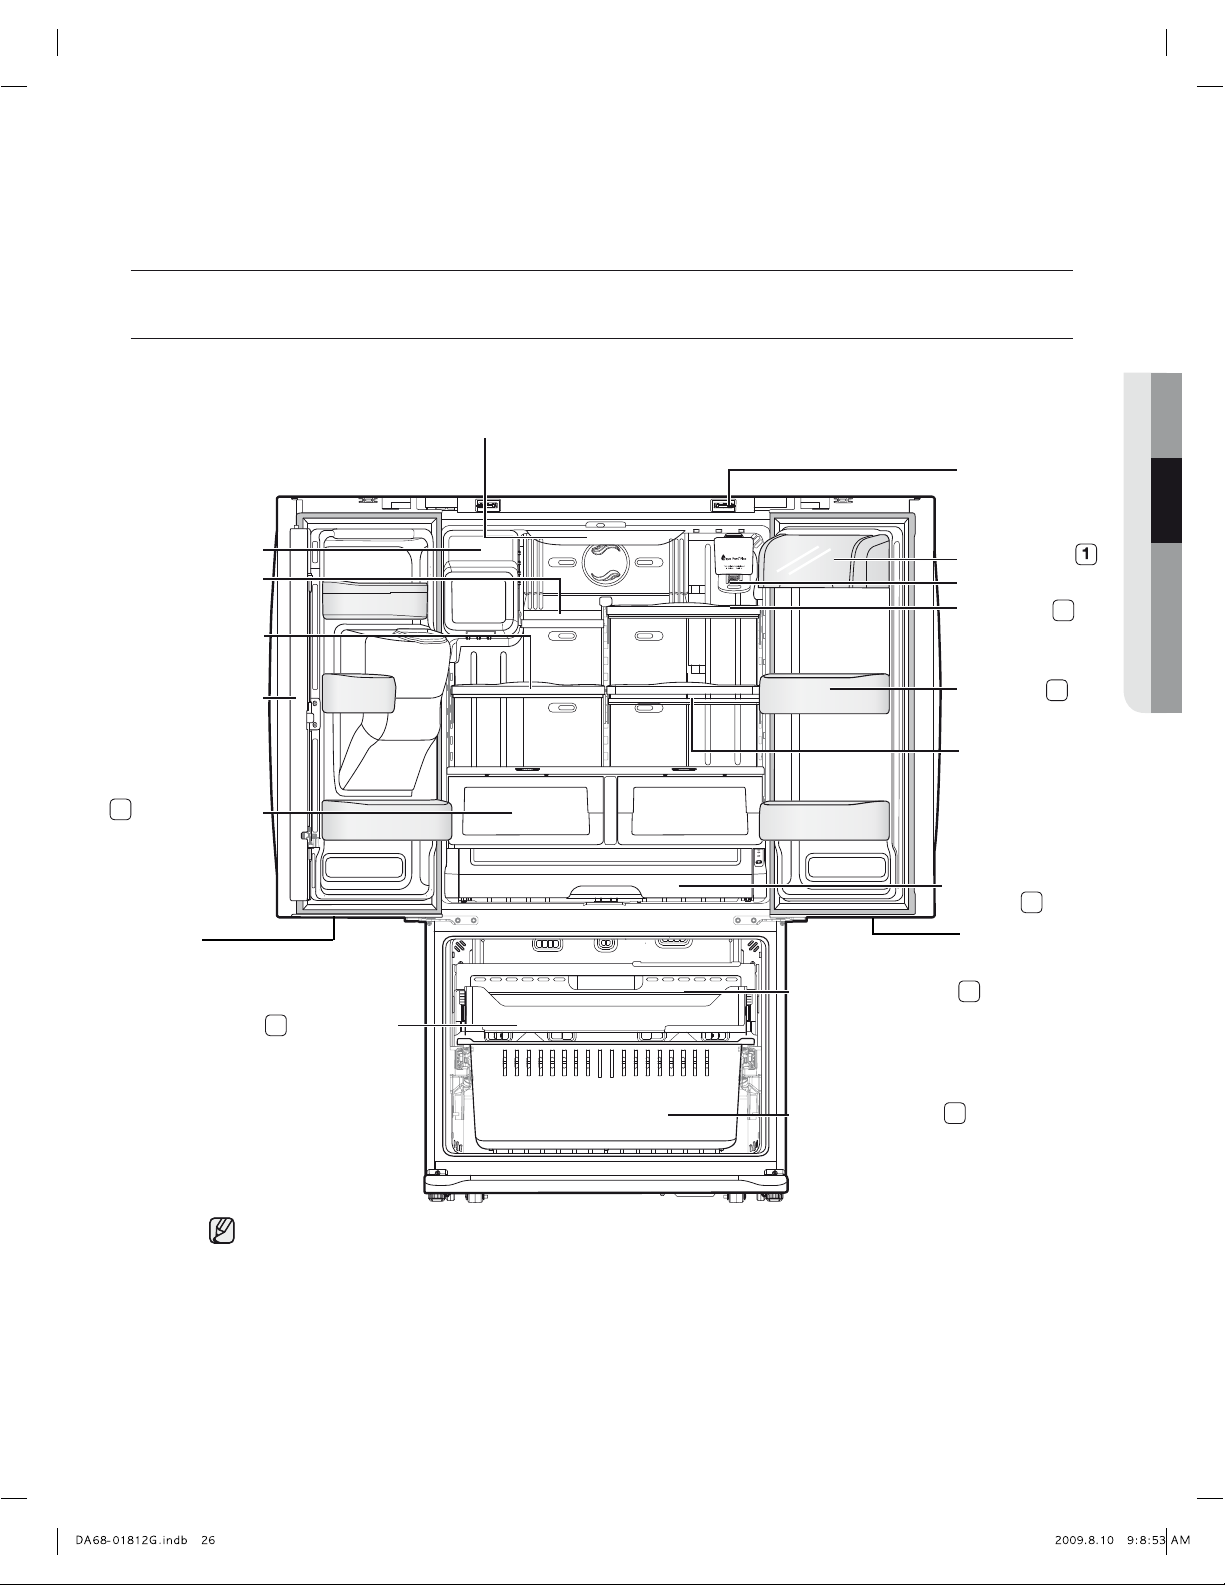
PARTS AND FEATURES
Ice-Maker
Foldable-Shelf
Slide-Shelf
Vertical Hinged
Section
4
Vegetable & Fruit
LED Light
Drawers
Use this page to become more familiar with the parts and features of the Refrigerator.
LED Light
Auto Door Closer
Dairy
Compartment
Water Filter
Slide-Shelf
Door Bins
Quick-Space
Glass Shelf
Cool Select
TM
Pantry
5
LED Light
02 OPERATING
3
2
Auto Pull Out Drawer
7
Tilting Pocket
Freezer Drawer Bin
When closing the door, make sure the Vertical Hinged Section is in the correct position to avoid scratching
the other door.
If the Vertical Hinged Section is reversed, put it back to the right position and close the door.
Moisture may occur at times on the Vertical Hinged Section.
The door handle may become loose over time.
If this happens, tighten the bolts found on the inside of the door.
If you close one door with a lot of force, the other door may open.
6
8
Operating_27
Page 28

Operating your SAMSUNG French Door
Refrigerator
STORING FOOD
The Samsung French Door Refrigerator has been designed to provide you with maximum space saving
features and functions. Here are some of the customized compartments we have created to keep your food
fresher longer. In order to further prevent odor from seeping into the ice compartment, stored food should be
wrapped securely and as airtight as possible.
STORING FOOD IN THE REFRIGERATOR
(
) DAIRY
COMPARTMENT
2
(
) DOOR BINS
3
(
TE MPE RED G LAS S)
SHELVES
4
(
) VEGETABLE & FRUIT
DRAWERS
5
(
COOL S ELECT)
PANTRY™
Do not place any large articles of food under the lamp in the Refrigerator. An air sensor is located near the lamp and if the sensor
is blocked, your Refrigerator may become too cold. Please place Vegetable and Fruits in the Vegetable and Fruits drawers to avo id
freezing them. If the foods in your Refrigerator become frozen, please set the temperature higher.
Can be used to store small dairy items like butter or margarine, yogurt or
cream cheese bricks
Designed to handle large, bulky items such as gallons of milk or other large
bottles and containers.
Designed to be crack-resistant, the shelves can be used to store all types of food
and drinks. Circular marks on the glass surface are a normal phenomenon
and can usually be wiped clean with a damp cloth.
Used to preserve the freshness of your stored vegetables and fruits.
This drawer has been specifically designed to control the level of humidity
within the compartment. Keep vegetables and fruits separate if possible.
Can be used for large party trays, deli items, pizza, beverages or
miscellaneous items.
STORING FOOD IN THE FREEZER DRAWER
(
6
AUTO PULL OUT)
DRAWER
Best use to store meats or dry foods. Stored food should be placed in a
container or wrapped securely using foil or other suitable wrapping materials.
7
(
TILTING P OCKET)
8
(
) FREEZER DRAWER
BIN
28_Operating
Can be used for small packages of frozen food.
You can also store a 16” pizza.
Can be used to store meat and dry foods.
Stored food should be placed in a container or wrapped securely
using foil or other suitable wrapping materials.
Bottles should be stored tightly together so that they do not tip and fall out when the Refrigerator door is opened.
If you plan to go away for a long time, empty the Refrigerator and tur . Wipe the excess moisture from
the inside of the appliance and leave the doors open. This helps keep odor and mold from developing.
Page 29

Operating_29
USING THE COOL SELECT PANTRY™
USING THE TILTING POCKET
The Cool Select Pantry™ is a full-width drawer with adjustable
temperature control. This pantry can be used for large party
trays, deli items, pizza, beverages or miscellaneous items.
There is a temperature control which can adjust the amount of
cold air allowed into the pantry.
The control is located on the right side of the pantry.
Fruits and vegetables may be damaged when the “chilled” mode is set.
Do not store lettuce or other leafy produce in this pantry.
Do not store glass bottles in this pantry. If they are frozen, they can break and cause personal injury.
CAUTION
Selection Button
1. When “Deli” is selected, the temperature of the pantry can
be kept around 5°C. This feature helps keep food fresh for a
long time.
Pantry temperature can be maintained under recommended
temperature setting(Freezer:-19°C, Fridge:3°C)
2. When “Fresh” is selected, the temperature of the pantry can
be kept around 3°C. This feature helps keep food fresh for a
longer time.
Pantry temperature can be maintained under recommended
temperature setting (Freezer : -19°C, Fridge : 3°C)
3. When “Chilled” is selected, the temperature of the pantry
can be kept around 1°C. This feature also helps keep meat
or fish fresh for a longer time.
Pantry temperature can be maintained under recommended
temperature setting (Freezer : -19°C, Fridge : 3°C)
Deli
· pineapple
· lemon
· avocado
· potato
Fresh
· cucumbers
· apples
· oranges
· grapes
· zucchinis
· corn
Chilled
· steaks
· hard cheeses
· cold cuts
· bacon
· hot dogs
The Tilting Pocket can be used to store up to a 16” pizza if you
place it shown in the illustration.
02 OPERATING
Page 30

30_Operating
1. Door Bins & Dairy Compartment
To remove - Simply lift the bin up and pull straight out.
To relocate - Slide it in above the desired location and push down
until it stops.
Do not adjust a bin full of foods.
CAUTION
Injury may occur if the door bins are not firmly assembled.
Do not allow children to play with bins. Sharp corners of the bins
may cause injury.
2. Tempered Glass Shelves
To remove - Tilt up the front of the shelf in the direction
shown
() and lift it up vertically
(
2
)
.
Pull the shelf out.
To relocate - ehtediugdnapuflehsehtfotnorfehttliT
shelf hooks into the slots at a desired height.
Then lower the front of the shelf so that the
hooks can drop into the slots.
CAUTION
The Tempered Glass shelves are heavy.
Use special care when removing them.
3. Vegetable & Fruit Drawers
To remove -
Pull the drawer out to full extension.
Tilt up the front of drawer and pull straight out.
To relocate - Insert the drawer into the frame rails and push back into
place.
CAUTION
The glass shelf over the drawer is not firmly secured. Be careful
when lifting.
Do not open the drawer while the pantry is open.
It may cause scratch or breakage to it’s cover.
Operating your SAMSUNG French Door
2
Refrigerator
REMOVING THE REFRIGERATOR ACCESSORIES
Page 31

Operating_31
USING THE DOORS
The Refrigerator doors ensures that the doors close all the way and are securely sealed.
When the Refrigerator door is only partially open, it will automatically close. The door will stay open when opened more than
around 3 Inches.
4. Cool Select Pantry™
To remove the pantry - Pull the pantry out to full extension.
Tilt up the front side of pantry and
pull straight out.
To relocate the pantry -
ehtfokcabehtotsliarehthsuP
Refrigerator. Place the drawer onto
the rails and slide the pantry back
until it is in place.
To remove the divider - Pull the pantry completely out to full extension and raise the front side of the
divider to unhook it from the rear wall of the pantry, then lift the divider out.
To relocate the divider - Hook the back of the divider over the rear wall of the pantry and push the
divider down.
02 OPERATING
Page 32

32_Operating
Operating your SAMSUNG French Door
REMOVING THE FREEZER ACCESSORIES
1. Tilting Pocket
To remove - Pull the brackets
() upward until you hear a
clicking sound and remove the pocket
To replace - Hook the ends of the pocket into both brackets
() and push down until it locks into place.
2. Auto Pull out Drawer
To remove - Pull the drawer out to full extension.
Tilt up rear of drawer and lift straight out.
To relocate - Place the drawer onto the rails by tilting it up.
Lower the drawer into place until it is horizontal
and slide the drawer in.
2
If you remove the divider to clean the basket bin, you must reinstall the
divider using 1 screw after cleaning to prevent children from getting
trapped inside the basket.
WARNING
Do not allow baby or children go inside the drawer bin. They could
damage the Refrigerator and seriously injure themselves. Do not sit on
the Freezer door. The door may break. Do not allow children to climb
into the Freezer basket.
CAUTION
2
To remove the drawer - Pull the drawer out fully. Tilt up the rear
of the bin and lift it out to remove.
To relocate the drawer - Place the bin into the rail assembly.
To remove the divider - Pull the divider straight up.
To relocate the divider -
Hook the top corners of divider(
)
over the hole of the bin(
2
).
Refrigerator
Page 33

Operating_33
CLEANING THE REFRIGERATOR
Caring for your Samsung French Door Refrigerator prolongs the life of your appliance and helps
keep it odor and germ-free.
Cleaning the Interior
Clean the inside walls and accessories with a mild
detergent and then wipe dry with a soft cloth. You can
remove the drawers and shelves for a more thorough
cleaning. Just make sure to dry drawers and shelves
before putting them back into place.
Cleaning the Exterior
Wipe the digital panel and display panel with a clean,
soft cloth. Spray water onto the cleaning cloth instead
of spraying directly on the surface of the Refrigerator.
It helps ensure an even distribution of moisture to the
surface. The doors, handles and cabinet surfaces should
be cleaned with a mild detergent and then wiped dry with
a soft cloth. To keep your appliance looking its best, the
exterior should be polished once or twice a year.
CAUTION
CAUTION
Do not use Benzene, Thinner or Clorox for cleaning. They may
damage the surface of the appliance and may cause fire.
Cleaning the Ice/Water Dispenser
Push down one end of the tray dispenser and remove it.
Wipe the Ice / Water Dispenser with a clean and soft cloth.
CAUTION
Do not spray the Refrigerator with water while it is plugged in, as it may cause an electric shock.
Do not clean the Refrigerator with benzene, thinner or car detergent due to risk of fire.
Cleaning behind the Refrigerator
ecnoecnailppaehtdnihebmuucav,noitalumuccatriddnatsudfoeerfstrapdesopxednasdrocpeekoT
or twice a year.
CAUTION
Do not remove the back cover. Doing so may cause an electric shock.
Cleaning the Rubber door seals
esolctonyamsroodeht,ytrideraslaesroodrebburehtfI
properly, and the Refrigerator will not operate efficiently.
Keep the door seals free of grit or grime by cleaning the
doors with a mild detergent and damp cloth. Wipe dry
with a clean, soft cloth.
Printed letters on the display may be erased if the stainless cleaner
is applied directly to the area where the letters are printed.
02 OPERATING
Page 34

Operating your SAMSUNG French
Door Refrigerator
CHANGING THE INTERIOR LIGHT LED
34_Operating
DA68-01812G.indb 33 2009.8.10 9:9:42 AM
Page 35

CHANGING THE WATER FILTER
To reduce risk of water damage to your property DO NOT use generic brands of water filter in your SAMSUNG
Refrigerator. USE ONLY SAMSUNG BRAND WATER FILTERS.
WARNING
SAMSUNG will not be legally responsable for any damage, Including, but not limited to property damage caused by
water leekage from use of a generic water filter. SAMSUNG’ Refrigerators are designed to work ONLY WITH SAMSUNG
Water filter.
The “Filter Indicator” light lets you know when it is time to change your water filter cartridge. To give you
preparation time to get a new filter, the red light will come on just before the capacity og the current filter
runs out. Changing the filter on time provides you with the freshest, cleanest water from your fridge.
The “Filter Indicator” light lets you know when it is time to change your water filter cartridge. To
1. Take a new water filter and put a month indicator sticker on the filter as shown.
The date on the sticker must be six months from the current date. For example, if you are replacing
the water filter in March, put the “SEP” (September) sticker on the filter to remind you to replace in
September. Normal filter life is about every 6 months.
2. Remove the new filter’s protective cap and remove the old filter.
3. Position and insert the new filter into the filter housing.
Slowly turn the water filter clockwise to align with the printing mark on the cover, locking the filter in
position. Make sure to align the water filter label mark with the center of cover filter printing as illustrated.
Remember, do not over-tighten.
Cover filter
2 3
02 OPERATING
Sticker
(month
indicator)
4.
Once you have completed this process, press and hole the Ice /Water button for 3 seconds to reset the
Turn until the
labels are aligned.
filter schedule.
5. Lastly, run about six glassfuls of water through water dispenser to clean the water supply system.
Make sure that water flows clearly again before drinking.
Be sure to flush the dispenser thoroughly otherwise water may drip from the dispenser.
This means that there is still air in the line.
Do NOT use the water or ice dispenser without a water filter cartridge because the water line may
become blocked.
Ordering replacement Water Filter
For replacement waster filter you can visit your local service center or contact the Samsung Parts distributor.
Be sure the replacement water filter has the SAMSUNG logo on the box and the water filter.
Link : http://www.samsungparts.com
Operating_35
Page 36

36_Operating
WATER FILTER CHART
This system has been tested according to NSF/ANSI Standards 42 and 53 for the reduction of the substances listed below.
The concentration of the indicated substances in water entering the system wasreduced to a concentration less than or
equal to the permissible limit for water leaving the system, as specifi ed in NSF/ANSI 42 and 53.
To a capacity of 300 gallons (1,136 liters).
Note that while the testing was performed under standard laboratory conditions, actual performance may vary.
System tested and certifi ed by NSF International against NSF/ANSI Standard 42 for
the reduction of Chlorine Taste and Odor, Particulate Class I, and against NSF/ANSI
Standard 53 for the reduction of Cysts, Turbidity, Lead, Asbestos, Benzene, Carbofuran,
p-Dichlorobenzene and Mercury.
Contaminant
Reduction
Average Influent
Concentration
NSF Specified
Influent Challenge
Concentration Units
apply to each row
Average %
Reduction
Average
Product Water
Concentration
Max.
Permissible
Product Water
Concentration
NSF Reduction
Requirements
NSF Test
Chlorine taste
and odor
2.1 mg/L 2.0 mg/L ± 10% 97.6 0.05 mg/L NA > 50% J-00029741
Particulate
Class I Particle size :
< 0.5 to < 1 um
10,566,666
pt/mL
At least 10,000
particles/mL
98.4 171,833 pts/mL NA > 85% J-00029739
Cysts* 127,500 cysts/L
Minimum 50,000
cysts/L
99.99 <1cyst/L NA > 99.95% J-00031000
Turbidity 10.5 11±1 NTU 98.6 0.15 NTU 0.5 NTU > 0.5 NTU J-00033223
Lead @ pH 6.5 153 ug/L 0.15±10% 99.3 <1ug/L 0.010 mg/L 10 ug/L J-00039590
Lead @ pH 8.5 155 ug/L 0.15±10% >99.4 <1ug/L 0.010 mg/L 10 ug/L J-00039591
Mercury @ pH
6.5
5.97 ug/L 0.006±10% 96.6 <0.2 ug/L 0.002 mg/L 2 ug/L J-00039589
Mercury @ pH
8.5
6.29 ug/L 0.006±10% 88.9 0.7 ug/L 0.002 mg/L 2ug/L J-00039586
Asbestos 140 MFL
107 to 108 fibers
> um in length
> 99 <0.17 MFL NA 99% J-00029743
Benzene 13.88 ug/L 0.015±10% 96.4 <0.5 ug/L 0.005 mg/L < 5 u
g/L J-0029751
Carbofuran 79.6 ug/L 0.190 mg/L 98.7 1 ug/L 0.001 mg/L < 40 ug/L J-00029750
p-Dichloroben-
zene
237.5 ug/L 0.225±10% 99.8 0.525 ug/L 0.075 mg/L < 75 ug/L J-00029749
Operating your SAMSUNG French
Door Refrigerator
Page 37

Operating_37
WATER FILTER CERTIFICATION
Page 38

38_Operating
FOOD STORAGE TIPS
Freezer
DAIRY PRODUCTS
Butter 2-3 Weeks 6-9 Months Wrap or cover tightly.
dednemmocertoNskeeW2-1kliM
Check date code. Most milk and similar products are sold in date-coded
cartons that indicate a products’s peak freshness. Re-seal with cap or
wrap tightly. Do not return unused protions to oroginal container.
Cream Cheese, cheese
food, and cheese
spread
2-4 Weeks Not recommended
Check date code. Keep all cheese tightly packed in moisture proof wrap
Hard Cheese (unopened)
3-4 Months 6 Months
Hard Cheese (opened) 2 Months Not recommended
Cottage Cheese 10-15 Days Not recommended
Cream 7-10 Days 2 Months
Check date code. Most yogurt, creams, and similar products are sold in
date-coded cartons that indicate a product’s peak freshness. Re-seal or
cover tightly. Do not return unused portions to original container.
Sour Cream 2 Weeks Not recommended
Cream Dips (opened) 1 Week Not recommended
Yogurt 10-14 Days Not recommended
Check date code. Keep covered.
Frozen Yogurt na 2 Months
EGGS
Eggs (uncooked) 3-4 Weeks Not recommended
Check date code. Store eggs in coldest part of refrigerator and in their
original container.
Eggs (cooked) 1 weeks Not recommended Store in covered container
Leftover egg dishes 3-4 Days Not recommended Store in covered container
FRESH FRUITS
Apples 1 Month Not recommended
If storing in refrigerator, do not wash fruit before storing. Store in moisture resistant bags or containers. Wrap cut fruits. Some fruits darken
when refrigerated.
Bananas 2-4 Days Not recommended
Peaches, Melons,
Pears, Avocados
3-5 Days Not recommended
Berries and Cherries 2-3 Days 12 Months
Apricots 3-5 Days Not recommended
Grapes 2-5 Days na
Pineapple (un-cut) 2-3 Days Not recommended
Pineapple (cut) 5-7 Days 6-12 Months
Citrus 1-2 Weeks Not recommended Store uncovered.
Juice 6 Days Not recommended
Check date code and re-seal in original container. Do not return unused
portions to original container.
Frozen Juice Thawing only 12 Months Check date code. Do not re-freeze.
Operating your SAMSUNG French
Door Refrigerator
Page 39

Freezer
FISH AND SHELLFISH
Fish
Fatty Fish (mackerel,
trout, salmon)
Lean Fish (cod, flounder,
etc)
Frozen or Breaded na 3 Months
Shellfish
Shrimp (uncooked) 1-2 Days 12 Months
Cooked Fish or Shellfish 2-3 Days 3 Months
MEAT
Fresh, Uncooked
Chops 2-4 Days 6-12 Months
Ground 1 Day 3-4 Months
Roast 2-4 Days 6-12 Months
Bacon 1-2 Weeks 1-2 Months
Sausage 1-2 Days 1-2 Months
Steak 2-4 Days 6-9 Months
Poultry 1 Day 12 Months
Lunch meat 3-5 Days 1 Month
Cooked
Meat 2-3 Days 2-3 Months
Poultry 2-3 Days 4-5 Months
Ham 1-2 weeks 1-2 Months
1-2 Days 2-3 Months
1-2 Days 6 Months
02 OPERATING
Keep in original wrapper and store in coldest part of refrigerator. Package in vapor-proof and moisture proof wrap for freezer. Freeze at 0ºF.
Thaw in refrigerator or Check date code. Freeze in original packaging.
To freeze package in vapor-proof and moisture-proof container.Crab 3-5 Days 10 Months
Check date code for use. Store in coldest part of refrigerator in original
packaging. Add more packaging in moisture-proof and vapor-proof
container for freezing. Recommended refrigerator temperature 33ºF to
36ºF and freezer temperature 0ºF to 2ºF
Check date code for use. Store in coldest part of regrigerator in original
packaging. Package in moisture-proof and vapor-proof container for
freezing.
Sources:
American Meat Institute Foundation. 1994. Yellow pages: answers to predictable questions consumers ask about meat and poultry.
American Meat Institute Food Marketing Institute. 1999. The food keeper. Food Marketing Institute, Washington, D.C. Freeland-Gr
J.H. and G.C. Peckham. 1996. Foundations of food preparation, 6th ed. Pr
s, NJ. Hillers, V.N. 1
aves,
993. Storing foods at home. Washington State University Cooperative Extension, Pullman, WA. Publ. EB 1205.
National Restaurant Association. 2001. Be cool-chill out! Refrigerate promptly. National Restaurant Association Education Found
International Food Safety Council, Washington, D.C. USDA. 1997. Basics for handling food safely. U.S. Department of Agriculture
ation¼s
, Food
Safety and Inspection Service, Washington, D.C.
Operating_39
Page 40

NOITULOSMELBORP
The Refrigerator does not work at all
or it does not chill sufficiently.
Try setting it to a lower temperature.
The food in the
Refrigerator is frozen.
Try setting it to a warmer temperature.
keeping them in the Cool Select Pantry™.
You hear unusual noise or sounds.
because various accessories are contracting or expanding according to the
temperature of the Refrigerator interior.
The fr
ont corners and vertical hinged
section of the appliance are hot and
condensation is occurring.
of the Refrigerator to prevent condensation.
for a long time.
Ice Maker is not producing ice.
You can hear water bubbling in the
Refrigerator.
through the Refrigerator.
There is a bad smell in the Refrigerator.
Frost forms on the walls of the Freezer.
Water dispenser is not functioning.
Make sure the tubing is free and clear of any obstruction.
Try selecting a warmer setting on the main display panel.
Troubleshooting
40_Troubleshooting
Page 41

In case the need for servicing arises
Warranty Information
Limited Warranty for Original Purchaser
This Samsung product is warranted by Samsung Electronics Canada, Inc. (hereafter referred to as
SECA) against manufacturing defects in material or workmanship for the following periods:
Labor : 1 year (in-home)
Parts : 1 year
Compressor inverter: 10 year
SECA further warrants that if this product fails to operate properly within the specified warranty period
and the failure is due to improper workmanship or defective material, SECA will repair or replace the
product at its option.
All warranty repairs or part replacements must be performed by a SECA Authorized Service Center. (To
find the nearest SECA Service Center, call 1-800-SAMSUNG (7267864) or visit our web site at www.
samsung.com/ca)
Obligation to the Original Owner
The original dated sales receipt must be retained by the customer and is the only acceptable proof of
purchase. It must be presented to a SECA Authorized Service Center at the time service is requested
before warranty services are rendered. On all carry-in models, transportation to and from the Authorized
Service Center is the responsibility of the customer.
Exclusions of the Warranty
This warranty does not cover damage due to accident, fire, flood, and/or other Acts of God, misuse,
incorrectline voltage,improperinstallation, improperor unauthorizedrepairs,commercial use,ordamage
that occurs during shipping. Customer adjustments
covered under the terms of this warranty. This warranty will automatically be voided for any unit found
with a missing or altered serial number. This warranty is valid only on products purchased and used in
the Canada.
which a
re esplained in this owner s manual are not
04 WARRANTY
Samsung Electronics Canada Inc., Customer Service
55 Standish Court Mississauga, Ontario L5R 4B2
Canada
If you have any questions or comments relating to Samsung products,
please contact the SAMSUNG customer care center.
SAMSUNG ELECTRONICS CANADA, INC.
55 STANDISH COURT MISSISSAUGA, ONTARIO L5R 4B2 CANADA
TEL : 905-542-3535 FAX : 905-542-3835
1-800-SAMSUNG (7267864)
www.samsung.com/ca
Warranty_41
Page 42

Wiring diagram
42_Wirring diagram
DA68-01812G.indb 41 2009.8.10 9:9:57 AM
Page 43

Memo
Page 44

Scan the QR code* or visit
www.samsung.com/spsn
to view our helpful
How-to Videos and Live Shows
Requires reader to be installed on your
*
smartphonme
Page 45

Réfrigérateur
guide de l’utilisateur
imaginer les possibilités
Merci d’acheter ce produit Samsung.
Pour recevoir un service plus complet, veuillez
enregistrer votre produit à
Enregistrez vos produits Samsung en vous
connectant sur : www.samsung.com/register
RF267
DA68-01812G.indb 1 2009.8.10 9:9:58 AM
Français
Page 46

Caractéristiques de votre nouveau réfrigérateur
CARACTÉRISTIQUES PRINCIPALES DE VOTRE NOUVEAU RÉFRIGÉRATEUR
Votre réfrigérateur à portes françaises Samsung est équipé de plusieurs caractéristiques efficaces pour
économiser de l’espace et de l’énergie, en innovant dans les formes de conservation.
Le réfrigérateur et le congélateur ont des évaporateurs séparés. Grâce à ce système de
refroidissement indépendant, le congélateur et le réfrigérateur refroidissent plus efficacement.
D’ailleurs, ce système de flux d’air séparés évite le passage des odeurs des aliments vers l’autre
compartiment.
Cool Select Pantry
TM
Cool Select pantryTM est un large tiroir avec un contrôle de température réglable.
La Grande zone de clayettes et le tiroir fournissent de l’espace suffisant pour des objets grands,
comme des boîtes de pizza, etc.
Le Grand tiroir du congélateur fournit aussi de l’espace pour 2 ou 3 dindes.
La fonction Fermeture automatique sécurisée fermera automatiquement la porte si elle est à peine
ouverte.
Le Machine à glace peut distribuer des glaçons ou de la glace pilée.
Un son aimable vous indique que la porte bâille.
Dans le Compartiment inclinable vous pouvez conserver même des pizzas de 16’’.
Le tiroir supérieur du congélateur sort automatiquement lorsque vous ouvrez la porte du
congélateur.
La porte du congélateur peut être ouverte avec peu d’eort.
Homologué Energy star, ce produit peut représenter une économie de coûts de l’énergie.
Pour des futures références, notez le modèle et le
numéro de série qui se trouvent sur le côté gauche
du réfrigérateur.
Modèle #
Numéro de série
#
2_ Caractéristiques
Page 47

Information de sécurité
INFORMATION DE SÉCURITE
Avant d’utiliser votre nouveau réfrigérateur à portes françaises Samsung, lisez ce manuel
complètement pour vous assurer de savoir comment utiliser efficacement et avec sécurité les
dispositifs et les fonctions que vous ore votre nouvel appareil.
Les instructions suivantes recouvrent plusieurs modèles, et donc les caractéristiques de votre
réfrigérateur peuvent diérer un peu de celles du réfrigérateur décrit dans ce guide.
Si vous avez des questions, contactez-nous à 1-800-SAMSUNG ou trouvez de l’assistance et de
l’information sur www.samsung.com.
Signification des icônes et des signes utilisés dans ce guide :
Risques ou pratiques dangereuses qui peuvent aboutir à des blessures sévères ou à la
mort.
ATTENTION
Risques ou pratiques dangereuses qui peuvent aboutir à des blessures simples ou à des
dégâts matériels.
ATTENTION
Pour réduire les risques d’incendie, d’explosion, de choc électrique et de blessures lors
d’utiliser votre réfrigérateur, suivez les suivantes précautions de sécurité :
N’essayez pas.
Ne démontez pas.
Ne touchez pas.
Suivez les instructions au pied de la lettre.
Débranchez la corde d’alimentation de la prise murale.
Vérifiez que la machine est correctement reliée à la terre pour éviter des chocs électriques.
Si vous en avez besoin, appelez le centre d’assistance.
SIGNES IMPORTANTS DE DANGER
Ne branchez pas plusieurs appareils sur la même prise.
seule prise peut produire une surchaue et un incendie.
Information de sécurité _3
Page 48

Placer des objets lourds sur la corde d’alimentation entraîne un risque d’explosion ou d’incendie.
Cela peut produire un choc électrique.
Si l’eau se dégage, un incendie ou un choc électrique peut arriver.
L’humidité et/ou un isolement détérioré des pièces électriques internes peut produire un choc électrique
ou un incendie.
Stocker du benzène, du diluant, de l’alcool, de l’éther, du gaz propane et d’autres produits similaires peut
produire des explosions.
Vous courez des risques d’incendie, de défauts de fonctionnement de l’appareil et/ou de blessures.
Appelez au centre d’assistance plus proche pour obtenir l’aide d’un technicien qualifié.
Changer l’ampoule tandis que le réfrigérateur est branché peut produire un choc électrique.
de le jeter.
Si des enfants entrent au réfrigérateur, les portes (et leurs joints) peuvent les enfermer. Vérifiez que les
portes sont enlevées et que personne n’est suoqué en demeurant enfermé à l’intérieur.
Vérifiez toujours que vous avez raccordé le réfrigérateur à la terre avant d’essayer d’y faire des recherches
ou de réparer une partie de l’appareil, des fuites électriques pouvant produire de chocs électriques
sévères.
Une utilisation incorrecte de la prise de terre peut déboucher sur un risque de choc électrique. S’il est
nécessaire d’utiliser une rallonge pour brancher le réfrigérateur, utilisez en seulement à trois bornes, avec
trois bornes dans la prise et dans le réceptacle, qui acceptera la prise de l’appareil. La cotation de la
rallonge doit être de 115V~120V - 10A, ou plus. En outre, si vous utilisez un adaptateur de terre, vérifiez
que la boîte de prise de courrant est aussi bien reliée à la terre.
Information de sécurité
4_ Information de sécurité
Page 49

6,*1$8;'ő$77(17,21
8WLOLVH]OHERQVHQVORUVGHUHPSOLUOHU«IULJ«UDWHXUDYHFGHVDOLPHQWVHWGHVERLVVRQV
ŘDans un réfrigérateur trop chargé, les objets lourds, fragiles ou encombrants peuvent tomber et produire
des blessures et/ou endommager les objets proches.
1HPHWWH]SDVGHERXWHLOOHVRXGHU«FLSLHQWVHQYHUUHGDQVOHWLURLUFRQJ«ODWHXU
ŘSi le contenu gèle et se dilate, le verre peut se casser et produire des blessures ou laisser des dangereux
morceaux de verre dans le congélateur.
6LODSULVH«OHFWULTXHPXUDOHHVWO¤FKHQő\LQWURGXLVH]SDVODSULVHGHODFRUGH
ŘIl y a un risque de choc électrique ou d’incendie. Faites inspecter la prise par un électricien qualifié.
1HMDPDLVG«EUDQFKH]YRWUHU«IULJ«UDWHXUHQWLUDQWGHODFRUGHGőDOLPHQWDWLRQ
ŘPrenez toujours la corde fermement et tirez de façon opposée à la prise murale. Ne tirez pas sèchement
de la corde d’alimentation, ce qui peut produire un court-circuit, un incendie et/ou un choc électrique.
ŘUne corde endommagée peut être remplacée par le fabriquant, par un centre d’assistance agréé ou par
du personnel qualifié.
1HSRVH]SDVGőREMHWVVXUOőDSSDUHLO
ŘLes objets peuvent tomber lorsque vous ouvrez ou fermez la porte, et produire des blessures et/ou
endommager les objets voisins.
1HFRQVHUYH]SDVGHSURGXLWVSKDUPDFHXWLTXHVVFLHQWLƂTXHVRXVHQVLEOHV¢OD
WHPS«UDWXUHGDQVOHU«IULJ«UDWHXU
ŘLes produits nécessitant un contrôle exact de la température ne doivent pas être gardés dans le
réfrigérateur.
1HSHUPHWWH]SDVDX[HQIDQWVGHJULPSHUPDUFKHUVXURXVőDFFURFKHUDX[FOD\HWWHVHW
DX[SRLJQ«HVGXU«IULJ«UDWHXU,OVSHXYHQWHQGRPPDJHUOHU«IULJ«UDWHXUHWVHEOHVVHU
JUDYHPHQW1HYRXVDVVH\H]SDVVXUODSRUWHGXFRQJ«ODWHXUHOOHSHXWVHFDVVHU1H
SHUPHWWH]SDVDX[HQIDQWVGHJULPSHUGDQVOHSDQLHUGXFRQJ«ODWHXU
6LYRXVVHQWH]XQHRGHXU¢SODVWLTXHEU½O«RXVLYRXVYR\H]GHODIXP«HG«EUDQFKH]
OHU«IULJ«UDWHXULPP«GLDWHPHQWHWFRQWDFWH]YRWUHFHQWUHGőDVVLVWDQFH6DPVXQJ
electronics.
1HWRXFKH]SDVOHVVXUIDFHVIURLGHVGXFRPSDUWLPHQWFRQJ«ODWHXUVLYRWUHU«IULJ«UDWHXU
HVWHQPDUFKHSDUWLFXOLªUHPHQWVLYRXVDYH]OHVPDLQVKXPLGHVRXPRXLOO«HVSXLVTXH
YRWUHSHDXSHXWDGK«UHU¢FHVVXUIDFHVH[WU¬PHPHQWIURLGHV
ŘLa peau peut se coller à la surface et vous pouvez souffrir une engelure.
Ne mettez pas vos mains sous la machine.
ŘLes bords pointus peuvent causer des lésions.
Information de sécurité _5
ATTENTION
,) /QVLJ! !"!"!)5
Page 50

dans la chute de glaçons.
Cela peut vous produire des blessures et/ou des dégâts matériels.
Au cours du temps, la détérioration de la corde d’alimentation peut produire un incendie.
Une corde d’alimentation sale risque plus l’incendie.
au moins cinq minutes avant de le rebrancher.
tension.
Séchez l’excès d’humidité l’intérieure et laissez les portes ouvertes pour éviter le développement d’odeurs
et de moisissure.
Garantie-service et modifications
Tout changement ou modification entrepris par une troisième personne sur cet appareil terminé est en
dehors du service-garantie Samsung, ni peut être Samsung responsable de problèmes de sécurité
résultant de modifications entreprises par une troisième personne.
Avant de jeter votre ancien réfrigérateur ou congélateur, vérifiez que vous :
Enlevez les portes.
Laissez toutes les clayettes en place pour que les enfants n’y entrent pas facilement et y restent enfermés.
Cet appareil n’est pas conçu pour être utilisé par des enfants ou des personnes infirmes sans
supervision adulte et capable. Les enfants en bas âge doivent être supervisés par les adultes
lorsqu’ils utilisent l’appareil.
Information de sécurité
6_ Information de sécurité
ATTENTION
Page 51

Table des matières
08
22
08 Preparation pour installer le refrigerateur
09 Installation du refrigerateur
09 Comment assembler la poignée
10 Enlever les portes du réfrigérateur
12 Démonter le tiroir du congélateur
13 Rattacher les portes du réfrigérateur
15 Assembler le tiroir du congélateur
16 Ajuster les portes
17 Faire des petits ajustements entre les portes
18 Ajuster le niveau du tiroir du congélateur
19 Verifier l'arriveé d'eau au distributeur
20 Installer la conduite d'eau
22 Utiliser le panneau de contrôle
23 Utilisation de l'affichage numérique
tilisation du distributeur de glace et d'eau froide
25 U
27 Piêces et particularités
28 C
onserver des aliments
29 Utiliser the cool select pantry™
29 Utilisation du compartiment inclinable
30 Enlever les accessoires du refrigerateur
31 Employer les portes
32 Enlever les accessoires du congelateur
33 Nettoyage du réfrigérateur
34 Changer de la lampe LED
35 Changer le filtre d'eau
DÉPANNAGE
40 Dépannage
40
WARRANTY
41 Warranty
41
DIAGRAMME DE CIRCUIT
42 Diagramme de circuit
42
Table des matières _7
Page 52

Installation de votre Réfrigérateur a portes françaises
PREPARATION POUR INSTALLER LE REFRIGERATEUR
Félicitation pour votre acquisition du Réfrigérateur à portes françaises Samsung. Nous espérons que vous allez
ouvrent facilement.
refroidissement.
Si le réfrigérateur n’a pas de place suffisante, il est possible que le
système interne de refroidissement ne marche pas correctement.
Si votre réfrigérateur possède une machine à glaçons, prévoyez de l’espace à
l’arrière pour le branchement des conduites d’eau. Lorsque vous installez le réfrigérateur à proximité d’un mur
fixe, prévoyez un espace de 95 mm minimum entre le réfrigérateur et le mur pour permettre l’ouverture de la porte.
D’abord ! Vérifiez que vous pouvez bouger le réfrigérateur à sa place finale en mesurant les portes (en largeur et
en hauteur), les seuils, les plafonds, les escaliers, etc.
La carte suivante détaille la hauteur et la profondeur exactes du Réfrigérateur à portes françaises Samsung.
B
B
A
A
E
E
C
C
D
D
Modèle
RF267
Profondeur
“A”
29- ”
(83.6cm)
largeur
“B”
35-¾”
(90.8cm)
Hauteur
“C”
69”
(175.2cm)
Hauteur
totale “D”
69-¾”
(177.4cm)
Profondeur
“E”
35- ”
(90.5cm)
Pour empêcher d’endommager le sol, assurez-vous que les
pieds de mise à niveau sont en position haute (au-dessus
du sol). Référez-vous à la partie « mettre le réfrigérateur de
niveau » du manuel.
Pour protéger la finition du plancher, intercalez une feuille
de protection telle que le carton d’emballage sous le
réfrigérateur.
Lors de l’installation, de la maintenance ou du nettoyage du
ATTENTION
réfrigérateur, assurez-vous de tirer l’unité tout droit et de le
repousser directement après avoir fini.
8_ Installation
Lors de l’installation, laissez de l’espace vers la gauche, la droite, le haut et l’arrière. Cela aide à réduire la
consommation d’électricité et maintient basses les factures d’électricité.
Tournevis
Page 53

INSTALLATION DU REFRIGERATEUR
Maintenant, vous avez mis votre nouveau réfrigérateur en place, et vous êtes prêt à le régler et à apprécier les
caractéristiques et les fonctions de l’appareil
1. Placez le réfrigérateur dans un endroit approprié, avec de bonnes distances entre le mur et le réfrigérateur.
Consultez les instructions d’installation dans ce guide.
2. Une fois le réfrigérateur branché, vérifiez que la lumière intérieure s’allume lorsque vous ouvrez les portes.
3. Réglez le contrôle de température et attendez une heure. Le congélateur refroidira un peu et le moteurmarchera
doucement.
4. Après mettre le réfrigérateur sous tension, il tardera quelques heures à atteindre la température appropriée.
Vous pouvez garder des aliments et des boissons dans le réfrigérateur une fois que la température sera
suffisamment froide.
Vérifiez la liste d’accessoires cidessous
01 INSTALLATION
Filtre d’eau
(DA29-00003B)
Clé six-pans
(DA80-00002C)
Cheville expansive
(DA60-00143B)
PIÈCES POUR L’ASSEMBLAGE DE LA POIGNÉE
[ MODÈLE 3 PORTES ]
COMMENT ASSEMBLER LA POIGNÉE
OKOK
Assemblage de la poignée du réfrigérateur
Pour mieux masquer les points
de connexion : Assemblez
les poignées avec les vis de
montage dirigées l’une vers
l’autre.
À l’aide d’une clé Allen, engagez la vis avec la partie longue et
serrez-la avec la partie courte de la clé.
Raccord à
compression
(DA62-00305A)
Réfrigérateur
Clé : 3/32 pouce
Congélateur
Joint conique du
raccord démontable
(DA74-00070B)
Étiquette d’instructions
d’assemblage de la poignée
la vis, puis remettre la poignée
(Option)
Installation _9
Page 54

Installation de votre Réfrigérateur a portes françaises
Assemblage de la poignée du congélateur / tiroir Flex Zone
•
ATTENTON
Assemblage de la poignée du
congélateur / tiroir Flex Zone
OKOK
À l’aide d’une clé Allen, engagez la vis avec la partie longue et
Pour mieux masquer les points
de connexion : Assemblez
les poignées avec les vis de
montage dirigées vers le bas.
ENLEVER LES PORTES DU RÉFRIGÉRATEUR
Si le réfrigérateur est trop large pour passer facilement à travers la porte, vous pouvez en enlever les portes.
serrez-la avec la partie courte de la clé.
*
Incliner la poignée en la soulevant, puis tourner la clé.
Outils indispensables
1.
Ouvez la porte, enlevez le capot de la Table du
haut (
la porte. Enlevez les 3 vis qui rattachent la Table du
haut et enlevez celle-ci(
LA FIGURE.
10_installation
) avec un tournevis plat et ensuite fermez
2
)COMME LE MONTRE
Tournevis cruciforme Clé à douille 10 mm Allen Clé(5mm)
Tournevis plat Tenailles
2
Page 55

Installation_11
3. A l’aide d’une clé (10mm), enlevez les 3 boulons
six-pans (
6
) rattachés aux charnières supérieures
des deux portes. Avec un tournevis cruciforme,
enlevez les vis de terre (
7
) rattachées aux charnières
supérieures des deux portes. Enlevez les charnières
supérieures des deux portes (
8
).
4. Soulevez un peu la porte pour l’enlever.
5. Avec un tournevis à tête Philips, retirez les deux vis (
)
fixées aux charnières de porte inférieures gauche et droite.
Avec une clef Allen (5mm), retirez les deux boulons à tête
hexagonale (
) fixés aux charnières de porte inférieures
gauche et droite. Retirez les charnières de porte inférieures
gauche et droite (
).
6
7
8
2.
3
4
5
3
4
5
Étrier rouge
(1/4")
Si un clip rouge se trouve sur le coupleur, il doit
être enlevé avant d’enlever le tube.
ATTENTION
Débrancher le connecteur ( )sur le
panneau latéral gauche, en appuyant sur
la languette située au milieu tout en se
retirant. Retirer le tube ( ) de poussée
dur de se séparer de couplage en ligne gris
foncé ( ) de l'eau, retirer le tuyau en
même temps.
9
9
10
11
10
11
01 INSTALLATION
Page 56

12_Installation
4. Retirez quatre boulons à tête hexagonale de 10 mm des
deux côtés.
5. Soulevez la porte du congélateur des rails.
2. Enlevez le Compartiment inclinable (
)forte en tirant des deux supports
(
2
) vers le haut en même temps.
3. Enlevez le panier inférieur (
3
) en le relevant du système de
glissières.
1. .elbuemuderèirrarumelengiettali’uqecà’uqsujrueirépusrioritelzessuoP
DÉMONTER LE TIROIR DU CONGÉLATEUR
2
3
Installation de votre Réfrigérateur a portes françaises
Page 57

Installation_13
RATTACHER LES PORTES DU RÉFRIGÉRATEUR
1. Rattachez les charnières inférieures des deux portes ( ).
Introduisez les 2 vis (
) dans les charnières inférieures des
deux portes et serrez avec un tournevis cruciforme.
A l’aide d’une clé (5mm), introduisez et serrez les 2 boulons
six-pans (
) dans les charnières inférieures des deux
portes.
2. Placez le trou dans le bas de la porte sur la charnière
inférieure (
).
Faites attention à ne pas perdre le capot de la
charnière, vu qu’il peut y sortir facilement.
3. Introduisez les charnières supérieures (
9
) dans les
trous sur le haut des portes.
Avec une clé (10mm), introduisez et serrez les
3 boulons six-pans (
7
) dans les charnières
supérieures des deux portes.
Introduisez les vis de terre (
8
) dans les charnières
supérieures des deux portes et serrez avec un
tournevis cruciforme.
9
7
8
01 INSTALLATION
Page 58

14_Installation
RATTACHER LES PORTES DU RÉFRIGÉRATEUR
4. Reliez la ligne d’eau (
5
) et puis insérez
un clip sur le raccord en tirant le tube.
Raccordez le connecteur (
4
) sur la porte
gauche et les deux connecteurs (
3
) situés
de chaque côté du capot supérieur.
3
4
Étrier rouge
(1/4")
Tube de la
porte du
distributeur
Tube du
ret
5
3
5. Positionnez la Table du haut (2) en place. Introduisez les
3 vis dans la Table du haut et serrez avec un tournevis
cruciforme. Avec la porte ouverte, réintroduisez le capot de
la Table du haut (
) et fermez les portes.
Veillez à ce que les fils ne soient pas pincés ou
endommagés en remettant le panneau supérieur.
2
Le clip est enveloppé à l’intérieur du capuchon
supérieur.
La ligne d’eau (
5
) doit être entièrement insérée jusqu’à la ligne repère
pour empêcher la fuite d’eau du distributeur
ATTENTION
coupleur
Installation de votre Réfrigérateur a portes françaises
Page 59

Installation_15
ASSEMBLER LE TIROIR DU CONGÉLATEUR
2. Suspendez la porte du congélateur dans les fentes
ouvertes sur les cotés.
1. Enlevez les rails à pleine longueur de chaque côté du meuble de façon
égale.
3. Serrez complètement les quatre boulons à tête hexagonale de
10 mm.
4. Ayant tiré du tiroir complètement, introduisez le panier
inférieur (
6
) dans le système de glissières.
5. Accrochez les extrêmes du Compartiment inclinable (
7
) dans
les deux supports (
8
) et poussez vers le bas pour qu’ils
s’enclenchent en place.
7
8
Slot
Slot
6
Assurez-vous que la porte est bien monté sur le rail.
Si le tiroir n'est pas correctement monté sur le rail, la porte
ne se ferme pas et le gel Sener.
ATTENTION
ATTENTION
01 INSTALLATION
Page 60

16_Installation
AJUSTER LES PORTES
Puisque les portes sont à nouveau dans le réfrigérateur, vous avez à vérifier que le réfrigérateur est nivelé et
faire les ajustements finaux. Si le réfrigérateur n’est pas nivelé, il ne sera pas possible que les portes soient
parfaitement nivelées.
Si la porte gauche est plus basse que la porte droite.
Introduisez un tournevis plat dans une entaille dans le levier de contrôle gauche, et tournez-le en sens
horaire ou anti-horaire pour niveler la portex gauche.
Si la porte gauche est plus haute que la porte droite.
Introduisez un tournevis plat dans une entaille dans le levier de contrôle droit, et tournez-le en sens horaire
ou anti-horaire pour niveler la porte gauche.
Nous ne conseillons pas de faire les petits ajustements avec le levier de contrôle. Plutôt, consultez la page
suivante pour savoir la meilleure façon de faire des petits ajustements aux portes.
tournevis
Installation de votre Réfrigérateur a portes françaises
Page 61

FAIRE DES PETITS AJUSTEMENTS ENTRE LES PORTES
Souvenez-vous que le réfrigérateur doit être nivelé pour que les portes le soient aussi. Si vous avez besoin
d’aide, consultez la section antérieure qui explique comment niveler le réfrigérateur.
Si la porte
gauche est plus
basse que la
porte droite.
Pièce
d’ajustement
1. Si vous ouvrez le tiroir (
2. Introduisez la clé six-pans fournie (
), vous verrez la charnière inférieure (2).
3
) dans l’arbre (4) de la charnière inférieure.
3. Ajustez la hauteur en tournant la clé six-pans (
2
4
Pièce
d’ajustement
3
) en sens horaire (
Si la porte
gauche est
plus haute que
la porte droite.
) ou anti-horaire ( ).
01 INSTALLATION
33
lorsque vous tournez la clé six-pans en sens anti-horaire ( ), la porte bougera vers le haut.
5
1. Après avoir ajusté les portes, introduisez la cheville expansive fournie (
7
dans l’ouverture entre l’entretoise (
) et la charnière inférieure (8). La quantité de chevilles expansives
) au moyen de tenailles (6)
à introduire dépend de l’ouverture.
Deux chevilles expansives sont inclues dans le réfrigérateur.
Chaque cheville expansive a une épaisseur de 0,04 pouce.
Installation_17
Page 62

18_Installation
AJUSTER LE NIVEAU DU TIROIR DU CONGÉLATEUR
1. Repérez le régulateur de hauteur (
) dans le tiroir du congélateur.
Dévissez un peu les quatre vis cruciformes (
2
) pour lâcher la porte.
2. Lâchez la vis de contrôle (
3
) avec un tournevis
cruciforme.
3. Trouvez le meilleur niveau pour aligner la pente de la porte.
Tiroir du congélateur
Pièce d’ajustement
2
3
Exemple) La pente est d’environ 2mm (0,08 pouce) comme il est
montré dessous.
- Faites tourner le régulateur de hauteur à +2,0 pour réduire
la pente de la porte.
Slope
Niveau de
référence
Installation de votre Réfrigérateur a portes françaises
Page 63

Le distributeur d’eau est un des éléments utiles de votre nouveau réfrigérateur Samsung. Pour promouvoir la
santé, le filtre d’eau Samsung enlève de l’eau les particules non désirées. Cependant, il ne stérilise ni détruit pas
les microorganismes. Pour cela, vous devez acheter un système de purification d’eau.
Pour que la machine à glace fonctionne correctement, il faut une pression d’eau de 20~125 psi (livres par pied
carré). Sous des conditions normales, une tasse de 170 cc (5,75 oz.) est remplie en 10 secondes.
Si le réfrigérateur est installé dans une zone à pression d’eau très basse (sous 20 psi), vous pouvez installer un
surpresseur pour compenser la faible pression.
Vérifiez que le réservoir d’eau dans le réfrigérateur est rempli correctement. Pour cela, pressez le levier du
distributeur d’eau jusqu’à ce que l’eau coule par la sortie d’eau.
Installation_19
Des kits d’installation de conduite d’eau sont disponibles avec des frais supplémentaires chez votre fournisseur. Nous
conseillons d’utiliser un kit de d’arrivée d’eau contenant des tuyaux en cuivre.
1. D’abord, coupez l’arrivée d’eau principale et éteignez le distributeur de glace.
2. Repérez la conduite d’eau froide potable la plus proche.
3. Après connecter l’arrivée d’eau au filtre d’eau, ouvrez à nouveau l’arrivée d’eau principale et faites entrer
4 gallons (15 litres) ou plus dans un seau pour nettoyer le filtre d’eau.
2
3
4
01 INSTALLATION
Page 64

20_Installation
Vous devez acheter plusieurs éléments avant de compléter cette connexion. Vous pouvez les trouver en kit
chez votre quincaillerie du quartier.
Connectez la conduite d’eau uniquement à une source d’eau potable.
Si vous devez réparer ou démonter la tuyauterie, coupez 1/4’’ du tuyau en plastique pour vous assurer une
connexion sûre et libre de fuites.
Joint conique du raccord
démontable 1/4’’
Tuyau en plastique
Tuyau en cuivre
Virole
1. Enlevez le couvercle du filtre d’eau (
)
2. Enlevez le capot en le tournant en sens anti-horaire.
Rangez le capot dans un endroit sûr pour l’utiliser au
cas que de ne pas utiliser de filtre.
3. Enlevez le filtre d’eau de la boîte et collez-y une
étiquette indicatrice comme il est montré. Collez sur le
filtre une étiquette ayant une date six mois après. Par
exemple, si vous installez le filtre d’eau en mars, collez
l’étiquette « SEP » sur le filtre pour vous rappeler de
le remplacer en septembre. Comme ça, vous saurez
quand il est temps de changer le filtre. Normalement,
un filtre dure 6 mois.
2 3
Etiquette
(indicatrice du mois)
Ne pas utiliser sans l’extrémité moulée (ampoule) de la tuyauterie en plastique .
1. Serrez le joint conique du raccord démontable dans le raccord à compression 1/4”.
- Si vous utilisez du tuyau en cuivre, glissez le joint conique du raccord démontable
(non fourni) et
l’embout (non fourni) dans le tuyau en cuivre (non fourni) comme il est montré.
- Si vous utilisez une tuyauterie en plastique , insérez l’extrémité moulée (ampoule) de la tuyauterie
dans le raccord de compression.
2. Serrez le joint conique du raccord démontable B dans le raccord à compression, sans le serrer de trop.
3. Ouvrez à nouveau le passage d’eau et vérifiez qu’il n’y a pas de fuites.
ATTENTION
Réfrigérateur
Tuyau en plastique
(Fourni)
Ecrou de serrage
(1/4”) (Fourni)
Adaptador de compresión
(Ensamblada)
Poire
Ecrou de serrage
(1/4”) (Non fourni)
Virole
(Non fourni)
Tuyau en cuivre ou tuyau en plastique
(Non fourni) (Non fourni)
Cabalisation d’eau domestique
Installation de votre Réfrigérateur a portes françaises
Page 65

Installation_21
4. Enlevez le capot du filtre en introduisez le filtre dans son
logement.
5. Tournez lentement le filtre d’eau 90º en sens horaire pour
l’aligner avec la marque sur le couvercle, enclenchant le
filtre en place.
Vérifiez que la marque sur le filtre d’eau est alignée avec
le centre du dessin sur le couvercle du filtre, comme il est
illustré. Souvenez-vous de ne pas serrer de trop.
Vous devez enlever la clayette en verre supérieure droite avant d’installer les filtres d’eau.
1. Ouvrez le passage d’eau principal et coupez le robinet de l’arrivée d’eau.
2. Faites couler l’eau à travers le distributeur jusqu’à ce qu’elle soit claire (6-7
minutes environ). Après le système d’arrivée d’eau sera propre et libre d’air.
3. Une purge plus longue peut se révéler nécessaire dans certains logements.
4. Ouvrez la porte du réfrigérateur et vérifiez qu’il n’y a pas de fuite d’eau en
provenance du filtre d’eau.
Souvenez-vous de purger le distributeur complètement, autrement il peut y avoir un égouttement d’eau au distributeur.
Cela signifie qu’il y a encore de l’air dans les tuyaux.
Tournez jusqu’à
ce que les
marques soient
alignées.
Séparation
du capot
rouge.
Couvercle du filtre.
4 5
IMPORTANT : La pression de l’alimentation en eau en sortie d’un osmoseur inverse allant à la soupape
d’admission de l’eau du réfrigérateur doit être entre 35 et 120 psi (241 et 827 kPa).
Si un système de filtration de l’eau osmosée inverse est relié à votre alimentation en eau froide, la pression
d’eau de l’osmoseur inverse doit se situer entre 40 et 60 psi au minimum (276 à 414 kPa).
Si la pression d’eau de l’osmoseur inverse est inférieure à 40 à 60 psi (276 à 414 kPa) :
est utilisé en même temps qu’un osmoseur inverse. Démontez le filtre à eau.
Si vous avez des interrogations au sujet de votre pression d’eau, contactez un plombier agréé et qualifié.
01 INSTALLATION
Page 66

22_En marche
Utilisation du Réfrigérateur à portes
Appuyez sur la touche Congélateur / Geler vite pour régler le réfrigérateur à la température désirée. Vous
pouvez régler la température entre -14ºC et -25ºC. Appuyez et maintenez la touche Congélateur / Geler
vite pendant 3 secondes pour accélérer le temps requis pour geler les produits dans le congélateur.
Cela peut être utile si vous avez besoin de geler rapidement des aliments qui se gâtent facilement ou
si la température du congélateur a augmenté dramatiquement (par exemple, si la porte a été laissée
ouverte).
Pour une meilleure efficacité énergétique, appuyez sur la touche Economie d’énergie. S’il y a de la
condensation sur les portes, éteignez la fonction Economie d’énergie.
(
) Touche Economie
d’énergie
(
2
) Touche Congélateur /
Geler vite
Appuyez sur la touche Glace / Eau pour sélectionner la fonction glace ou eau. Vous pouvez sélectionner
l’eau ou les deux formes de glace (glaçons / glace pilée).Après avoir fait la sélection, pressez le levier du
distributeur.
(
3
) Touche Glace / Eau
Appuyez sur la touche Alarme / Lumière pour éteindre l’alarme d’ouverture de porte. Initialement,
l’alarme est allumée. Si vous appuyez et maintenez la touche Alarme / Lumière pendant 3 secondes, la
lumière LED du distributeur restera allumée.
(
4
) Touche Alarme /
Lumière
Appuyez sur la touche Réfrigérateur / Refroidir vite pour régler le réfrigérateur à la température désirée.
Vous pouvez régler la température entre 1ºC et 7ºC. Appuyez et maintenez la touche Réfrigérateur /
Refroidir vite pendant 3 secondes pour augmenter la vitesse de refroidissement des produits dans le
réfrigérateur. Cela peut être utile si vous avez besoin de refroidir rapidement des aliments qui se gâtent
facilement ou si la température du réfrigérateur a augmenté dramatiquement (par exemple, si la porte a
été laissée ouverte).
(
5
) Touche Réfrigérateur /
Refroidir vite
Appuyez sur la touche Sans glace / Verrouillage pour éteindre la production de glace.
Si vous appuyez et maintenez la touche Sans glace / Verrouillage pendant 3 secondes, l’affichage et le
distributeur seront verrouillés.
(
6
) Touche Sans glace /
Verrouillage
2
3
4
5
6
françaises SAMSUNG
UTILISER LE PANNEAU DE CONTRÔLE
Page 67

En marche_23
S’il n’est pas utilisé, l’affichage s’éteindra. Cela est normal.
geler vite
Cet icône s’allumera lorsque vous activez la caractéristique « Geler vite ». « Geler vite » est très utile si
vous avez besoin de beaucoup de glace. Appuyez sur la touche « Geler vite » et la production de glace
augmentera. Lorsque vous en aurez suffisante, appuyez encore sur la touche pourannuler le mode « Geler
vite ». Si vous sélectionnez « Geler vite », la température dans le congélateur tombera pendant deux heures
et demie environ.
Refroidir vite
Cet icône s’allume lorsque vous activez la touche « Refroidir vite ». Pour un refroidissement rapide du
réfrigérateur, utilisez « Refroidir vite ».
Si vous sélectionnez « Refroidir vite », la température du réfrigérateur tombera pendant deux heures et
demie environ.
Indicateur du filtre
Lorsque la lumière indicatrice du filtre est allumée, c’est l’heure de changer le filtre. Cela arrive
typiquement tous les 6 mois.
L’indicateur du filtre tourne initialement au bleu lorsque vous introduisez le filtre d’eau.
L’indicateur du filtre tourne au rose lorsque vous avez utilisé le filtre d’eau pendant 5 mois.
L’indicateur du filtre tourne au rouge lorsque vous avez utilisé le filtre d’eau pendant 6 mois.
Après avoir retiré le filtre à air usagé et installé le nouveau (voir page 33 pour plus de détails sur la
procédure), réinitialisez l’indicateur en maintenant appuyée la touche « Glace/Eau » (Ice/Water) pendant
3secondes.
Obtenez des glaçons ou de la glace pilée en sélectionnant votre choix dans le panneau de contrôle
numérique. Si vous n’avez pas besoin de glace, éteignez la fonction pour économiser de l’eau et de
l’énergie. La lumière du type de glace indique le type de glace (ou l’absence de glace) actuellement
choisi.
En mode refr , le réfrigérateur fonctionne mais ne conditionne pas l’air. Pour
annuler ce mode, appuyer sur les boutons Power Freeze et Freezer en même temps pendant
3 secondes jusqu’à ce qu’une sonorité de type « ding-dong » se fasse entendre et que l’unité
maintenant conditionne l’air.
Cette fonction est destinée aux réfrigérateurs de présentation en vitrine de magasin.
Non destinés à la vente à la clientèle.
ATTENTION
02 EN MARCHE
Page 68

24_En marche
Utilisation du Réfrigérateur à portes
CONTROLE DE LA TEMPERATURE
La température de base recommandée pour les compartiments congélateur et réfrigérateur sont de
-19°C/3°C. Si les températures du congélateur et du réfrigérateur sont trop hautes ou trop basses,
justez la température manuellement.
La température du congélateur peut être réglée entre -14ºC et -25ºC en fonction de vos besoins.
Appuyez maintes fois sur la touche Congélateur jusqu’à ce que la température désirée soit montrée
sur l’affichage de température. Rappelezvous que des aliments comme la glace fondent sur les
-15ºC. L’affichage de température passe séquentiellement de -25ºC à -14ºC. Lorsque l’affichage
atteint -14ºC, il recommence à -25ºC. Cinq secondes après le réglage de la nouvelle température,
l’affichage montre à nouveau la température actuelle du congélateur. Cependant, cette valeur change
graduellement vers la nouvelle température.
La température du réfrigérateur peut être réglée entre 7ºC et 1ºC en fonction de vos besoins.
Appuyez maintes fois sur la touche Réfrigérateur jusqu’à ce que la température désirée soit montrée
sur l’affichage de température. Le processus de contrôle de la température du réfrigérateur est égal
à celui du congélateur. Appuyez sur la touche Réfrigérateur pour régler la température choisie. Après
quelques secondes, le réfrigérateur commence à ajuster vers la nouvelle température réglée. Cela est
appréciable sur l’affichage numérique.
Les températures du congélateur ou du réfrigérateur peuvent monter si vous ouvrez trop fréquemment les
portes, ou si beaucoup d’aliments chauds y sont placés. Cela peut produire que l’affichage numérique
clignote. Une fois que le congélateur et le réfrigérateur retournent à leurs températures normales, le
clignotement s’arrête. Si le clignotement continue, il est possible que vous deviez « réinitialiser » le
réfrigérateur. Essayez-le en débranchant l’appareil, attendant dix minutes et rebranchant la corde
d’alimentation.
Cet icône s’allume lorsque vous activez la caractéristique « Economie d’énergie ». La fonction « Economie
d’énergie » est allumée lorsque vous fournissez de l’énergie au réfrigérateur installé. S’il y a de la condensation,
éteignez la fonction « Economie d’énergie ».
Alarme
Cet icône s’allume lorsque vous activez la fonction « Alarme ». L’alarme de la porte sonne si une des portes est
ouverte plus de 3 minutes. Le son bip s’arrête si vous fermez la porte. Initialement, « Alarme » est allumée.
Sans glace
Cet icône s’allume lorsque vous activez la fonction « Sans glace ». Dans ce cas, il n’y aura pas de production de glace.
verrouillage
Cet icône s’allume lorsque vous activez la fonction « Verrouillage ». Dans ce cas, vous ne pourrez pas
utiliser le panneau de contrôle. Si vous appuyez et maintenez la touche Sans glace / Verrouillage pendant 3
secondes, vous pourr
ez utiliser à nouveau le panneau de contrôle.
Cet icône s’allume lorsque vous activez la caractéristique « Lumière ». Dans ce cas, la lumière du distributeur
(sous l’affichage) sera constamment allumée. Si vous voulez que la lumière du distributeur s’allume
seulement lorsque celui-ci est utilisé, éteignez la fonction « Lumièr
e ».
françaises SAMSUNG
Page 69

En marche_25
POUSSER
Sélectionnez cette option
si vous souhaitez éteindre
la machine à glaçons.
Si vous partez en long voyage ou en vacances, fermez le robinet de sectionnement et coupez l’arrivée d’au
au réfrigérateur. Cela aide à prévenir les fuites accidentelles. Ne mettez pas les doigts, les mains ou des
objets inappropriés dans la chute du seau de la machine à glace.
- Vous pouvez vous blesser ou produire des dégâts matériels.
Ne jamais mettez les doigts ou d’autres objets dans l’ouverture du distributeur.
- Vous pouvez vous blesser. Ne lavez pas ni arrosez de l’eau dans le seau à glace.
Nettoyez seulement avec un chion sec. Pour le fonctionnement correct de la machine à glace il faut une
pression de 138~862 Kpa.
ATTENTION
Toute l’eau fournie aux réfrigérateurs traverse le filtre principal qui est un filtre à eau alkalin.
Dans ce processus, la pression de l’eau qui en sortie du filtre est augmentée, et l’oxygène et l’azote
deviennent saturés. Quand l’eau s’écoule dans l’air, la pression descend et l’oxygène et l’azote deviennent
sursaturés de sorte qu’ils se transforment en bulles de gaz. L’eau peut sembler trouble en raison de la
présence de ces bulles oxygène. L’eau peut apparaître temporairement trouble en raison de la présence de
ces bulles de l’oxygène. L’eau s’éclaircit après quelques secondes.
Utilisation de la fonction Sans glace
Lors de sélectionner le mode Sans glace, enlevez tous les glaçons du
seau. Si vous n’utilisez pas le distributeur, les glaçons peuvent fondre
ensemble.
Tirez du levier de verrouillage pour jeter les glaçons ou la glace entassée
du seau. Renfoncez le seau jusqu’à entendre un déclic.
placez un verre sous le distributeur d’eau et poussez doucement contre le levier du distributeur avec le
verre. vérifiez que le verre est en ligne avec le distributeur pour éviter que l’eau éclabousse.
Si vous venez d’installer le réfrigérateur ou de changer le filtre d’eau, jetez les six premiers
verres d’eau pour vous débarrasser des impuretés du système d’eau. vérifiez que l’eau coule
propre avant de la boire.
Utilisation du distributeur de glace
Placez un verre sous le distributeur de glace et poussez doucement contre le levier du distributeur avec
le verre. Vérifiez que le verre est en ligne avec le distributeur pour éviter que la glace saute dehors.
Appuyez sur la touche Glace / Eau pour sélectionner le type désiré
Si la porte du congélateur est laissée ouverte longtemps, il peut se former de
la condensation ou la glace dans la machine à glace peut s’entasser. Fermez
la porte si vite que possible. Le distributeur de glace peut n’orir que peu de
glaçons s’il n’y a pas de glace suffisante dans la machine. Utilisez le distributeur
lorsqu’il y a de la glace suffisante. Si la porte du congélateur est ouverte pendant
longtemps ou si beaucoup de glace est distribuée d’un coup, la condensation
peut immobiliser le levier du distributeur.
ATTENTION
Lorsque vous n’utilisez pas le distributeur d’eau pendant 2 ou 3 jours (en particulier pendant l’été), l’eau distribuée peut
avoir un goût ou une odeur étrange. Dans ce cas, nous vous recommandons de ne pas boire l’eau du premier verre ;
elle sera meilleure ensuite.
ATTENTION
Tirer
Pousser
02 EN MARCHE
Page 70

26_En marche
PRODUCTION DE GLACE
Utilisation du Réfrigérateur à portes
Attendez 1 seconde avant d’enlever le récipient après la chute de l’eau pour
éviter les éclaboussures. Ne tirez pas du levier du distributeur après prendre
la glace ou l’eau. Il se rabat automatiquement. La glace est produite en
glaçons. Lorsque vous sélectionnez « Pilée », la machine à glace moud les
glaçons à glace pilée.
Si la glace ne sort pas, tirez sur le seau à glace et appuyez sur le bouton
d’essai situé du côté droit de la machine à glaçons.
ATTENTION
Bouton d’essai
Utilisation normale
Pour remplir le bac à glace à la capacité maximum après installation, assurezvous de suivre les étapes suivantes.
1. Laissez votre réfrigérateur refroidir pendant 24 heures (1 jour complet).
2. L’attente de 24 heures permettra à votre machine à glace de se refroidir
correctement.
3. Faites couler 4 à 6 glaçons dans le verre.
4. Après 8 et 16 heures, faites couler un verre de glace complet à chaque fois.
Lorsque toute la glace est utilisée en même temps, les étapes 3 et 4 ci-dessous doivent être répétées
(avant de faire couler les 4 ou 6 premiers glaçons, veuillez attendre 8 heures). Ceci permettra de
compléter le niveau des glaçons et d’assurer la production maximum de glace.
Quand vous videz la glace du bac à glace, vous devez appuyer
sur le levier du distributeur une fois avec la fonction « ICE CUBED »
(glaçons) ou « CRUSHED » (glace pilée) en marche pour obtenir la
nouvelle glace plus rapidement après avoir remis le bac à glace dans
le réfrigérateur.
ATTENTION
françaises SAMSUNG
Page 71

PIÊCES ET PARTICULARITÉS
Machine à glace
Clayette pliable
Clayette glissante
Section verticale
articulée
4
Bacs à légumes et
LED Lumière
Utilisez cette page pour vous familiariser avec les pièces et les particularités du réfrigérateur
LED Lumière
fruits
Ferme-porte
automatique
Laiterie
Filtre d’eau
Clayette
glissante
Bacs des portes
2
Clayette en verre
Quick-Space
Cool Select
TM
Pantry
5
LED Lumière
02 EN MARCHE
3
6
7
Compartiment
Tiroir extractible
inclinable
Bac du tiroir du
congélateur
8
Quand vous fermez la porte, vérifiez que la Section verticale articulée est dans sa position correcte. Sinon,
elle peut produire des éraflures sur l’autre porte.
Si la Section verticale articulée est inversée, remettez-la sur pied et fermez la porte.
De l’humidité peut apparaîtr
euse installée dans
l’articulation pour éviter l’humidité. La poignée de la porte peut relâcher au cours du temp.
Si cela arrive, serrez les boulons qui se trouvent à l’intérieur de la porte.
Une porte peut s’ouvrir si vous fermez l’autre trop fortement.
En marche_27
Page 72

CONSERVER DES ALIMENTS
Le Réfrigérateur a portes françaises Samsung a été conçu pour fournir un maximum d’espace de stockage et de
fonctions. Voici certains des compartiments personnalisés que nous avons créé pour conserver vos aliments frais
plus longtemps. Dans le but de prévenir le passage d’odeurs vers le compartiment à glace, les aliments stockés
doivent être enveloppés le plus hermétiquement possible.
CONSERVER DES ALIMENTS DANS LE RÉFRIGÉRATEUR
(
) LAITERIE
2
(
) TIROIRS DES
PORTES
3
(
) CLAYETTES EN
VERRE TREMPE
4
(
) BACS A FRUITS ET
LÉGUMES
5
(
C OOL SELE CT)
PANTRY™
Ne placez pas des objets grands sous la lampe du réfrigérateur. Il y a un senseur d’air près de la lampe, et s’il est bloqué vo tre
réfrigérateur peut se refroidir excessivement. Placez fruits et végétaux dans leur compartiment pour éviter qu’ils gèlent. Si l es aliments
dans votre réfrigérateur gèlent, augmentez la température.
Vous pouvez conserver ici des petits produits laitiers, comme du beurre ou
de la margarine, du yaourt ou des morceaux de fromage.
Ils ont été conçus pour soutenir des bouteilles et des récipients larges,
comme des gallons de lait.
Conçus pour résister à la fracture, sur les clayettes vous pouvez garder toutes
sortes de nourritures et de boissons. L’apparition de marques circulaires sur le
Pour préserver frais les fruits et végétaux conservés. Ce bac a été particulièrement
conçu pour contrôler le niveau d’humidité intérieure. Conservez les fruits et les
végétaux séparés s’il est possible.
Pour stocker des plateaux larges, des spécialités alimentaires, des
boissons ou des objets divers.
CONSERVER DES ALIMENTS DANS LE TIROIR DU CONGÉLATEUR
6
(
R ETIR ER LE TIROIR)
A utiliser pour ranger des viandes ou des aliments secs. Il est souhaitable d’y
envelopper les aliments, avec du papier d’aluminium par exemple, ou de les
garder dans des récipients.
7
(
C OMPARTIMENT)
INCLINABLE
8
(
B AC DU TIR OIR DU)
CONGÉLATEUR
28_En marche
Peut être utilisé pour des petits paquets d’aliments gelés.
Vous y pouvez même ranger une pizza de 16’’.
Vous y pouvez conserver des viandes ou des aliments secs. Il est
souhaitable d’y envelopper les aliments, avec du papier d’aluminium
par exemple, ou de les garder dans des récipients.
Il faut garder les bouteilles serrées, de façon à ce qu’elles ne tombent ni soient renversées lorsque la porte du
réfrigérateur est ouverte.
Si vous envisagez de partir longtemps, videz le réfrigérateur et mettez-le hors tension. Nettoyez l’excès
d’humidité de l’intérieur de l’appareil et laissez les portes ouvertes. Cela aidera à éviter le développement
d’odeurs et de moisissure.
Page 73

En marche_29
UTILISER THE COOL SELECT PANTRY™
UTILISATION DU COMPARTIMENT INCLINABLE
Cool Select Pantry™ est un tiroir à largeur maximale qui
compte avec un contrôle de température réglable.
Vous pouvez utiliser ce tiroir pour stocker des plateaux larges,
des spécialités alimentaires, des boissons ou des objets
divers.
Il y a un contrôle de température qui peut ajuster la quantité
d’air froid permis dans le tiroir.
Ce contrôle est placé sur le côté droit du tiroir.
Si le mode « Bien frais » est sélectionné, les fruits et légumes peuvent en résulter
défavorisées. Ne stockez pas de laitue ou d’autres légumes-feuilles dans ce tiroir.
Ne rangez pas bouteilles en verre dans ce tiroir. Si elles gèlent, elles peuvent se briser et produire des blessures.
ATTENTION
1. Si « Deli » est sélectionné, la température du tiroir est
d’environ 5ºC. Ce réglage aide à conserver les aliments
frais plus longtemps. La température du tiroir peut être
maintenue sous le réglage de température recommandée
(congélateur : -19ºC, réfrigérateur : 3ºC).
2. Si « Frais » est sélectionné, la température du tiroir est
d’environ 3ºC. Ce réglage aide à conserver les aliments frais
pendant plus longtemps. La température du tiroir peut être
maintenue sous le réglage de température recommandée
(congélateur : -19ºC, réfrigérateur : 3ºC).
3. Si « Bien frais » est sélectionné, la température du tiroir
est d’environ 1ºC. Ce réglage aide aussi à conserver frais
les viandes et les poissons pendant plus longtemps. La
température du tiroir peut être maintenue sous le réglage
de température recommandée (congélateur : -19ºC,
réfrigérateur : 3ºC).
Deli
· ananas
· citron
· avocat
· pomme de terre
Frais
· concombres
· pommes
· oranges
· raisin
· courgettes
· maïs
Bien frais
· steaks
· fromages durs
· charcuterie
· lard
· saucisses
Le Compartiment inclinable peut être utilisé pour conserver
même une pizza de 16’’, comme sur l’illustration.
02 EN MARCHE
Page 74

1. Balconnets et laiterie
Pour enlever - Relevez le balconnet et tirez dehors.
Pour replacer - Glissez le balconnet sur l’endroit désiré et poussez
vers le bas jusqu’au fond.
N’ajustez pas un balconnet plein d’aliments.
ATTENTION
Si les balconnets ne sont pas fermement rattachés, des accidents
peuvent se produire. Ne permettez pas aux enfantes de jouer
avec les balconnets. Les coins pointus des balconnets peuvent
produire des blessures.
Pour enlever - Inclinez l’avant de la clayette en direction de
() et relevezla en direction de
() . Tirez
la clayette dehors.
Pour replacer - Inclinez l’avant de la clayette vers le haut et
guidez ses crochets dans les rainures à la
hauteur désirée. Ensuite baissez l’avant de
la clayette pour que les crochets tombent
dans les rainures.
ATTENTION
Les clayettes en verre trempé sont lourdes.
Faites bien attention lors de les enlever.
Pour enlever - Tirez le bac dehors entièrement.
Inclinez l’avant du bac et tirez directement.
Pour replacer - Introduisez le bac dans les glissières et enfoncez-le en
place.
ATTENTION
La clayette en verre sur le bac n’est pas rattachée fermement.
Soyez prudent lors de le relever. N’ouvrez pas le bac si le tiroir
Cool Select Pantry™ est ouvert.
Cela peut érafler ou casser sa couverture.
Utilisation du Réfrigérateur à portes
2
françaises SAMSUNG
ENLEVER LES ACCESSOIRES DU REFRIGERATEUR
30_En marche
Page 75

En marche_31
EMPLOYER LES PORTES
Les portes du réfrigérateur ferment entièrement et sont très bien scellées.
Si la porte du réfrigérateur est ouverte seulement en partie, elle fermera automatiquement, sauf si elle est ouverte plus de 3
pouces (7cm).
4. Cool Select Pantry™
Pour enlever le tiroir - Tirez du tiroir entièrement. Inclinez
l’avant du tiroir et tirez directement
dehors.
Pour replacer le tiroir – Enfoncez les glissières vers l’arrière
du réfrigérateur. Placez le tiroir dans
les glissières et glissez le tiroir jusqu’à
ce qu’il soit en place.
Pour enlever le diviseur – Tirez dehors le tiroir complètement et levez l’avant du diviseur pour le
décrocher du mur arrière du tiroir, ensuite soulevez dehors le tiroir.
Pour replacer le diviseur – Accrochez l’arrière du diviseur sur le mur arrière du tiroir et tirez le diviseur
vers le bas.
Diviseur
02 EN MARCHE
Page 76

Utilisation du Réfrigérateur à portes
ENLEVER LES ACCESSOIRES DU CONGELATEUR
1. Compartiment inclinable
Pour enlever - Tirez des crochets
() vers le haut jusqu’à
entendre un déclic et enlevez le compartiment.
Pour replacer - Accrochez les extrêmes du compartiment dans
les deux crochets
() et poussez jusqu’à ce
qu’ils enclenchent en place.
2. Tiroir extractible
Pour retirer – Tirez le tiroir à son extension complète.
Relevez l’arrière du tiroir et soulevez droit vers
l’extérieur.
Pour replacer – Placez le tiroir sur les rails en le relevant.
Abaissez le tiroir à sa place jusqu’à ce qu’il
soit horizontal et glissez le tir
oir à l’intérieur.
2
2
Pour le retirer - Tirez le tiroir du possible. Inclinez le dos de
compartimietno et soulevez-le.
Pour les remplacer -
Insérer le chargeur dans les rails de montage
Pour supprimer le fractionnement -
Tirez sur la division.
Pour remplacer la division -
Coins supérieurs crochet de la division
dans la chambre creuse.
Si vous souhaitez supprimer le diviseur pour nettoyer
vis après le nettoyage pour éviter que les enfants d'entrer dans le tiroir.
Ne laissez pas les bébés ou enfants dans le tiroir du bas. Ils peuvent
sérieusement se dommages ou endommager le réfrigérateur. Ne pas utiliser
la porte du congélateur siège, la porte peut être rompu. Ne laissez pas les
enfants à monter ou à entrer dans le congélateur.
ATTENTION
ATTENTION
Diviseur
3. Compartiment du tiroir réfrigérateur
1
françaises SAMSUNG
32_En marche
Page 77

En marche_33
NETTOYAGE DU RÉFRIGÉRATEUR
Vos soins pour le Réfrigérateur à portes françaises Samsung prolongent la vie utile de l’appareil et
aident à le conserver libre d’odeurs et de germes.
Nettoyez l’intérieur des murs et les accessoires avec un
détergeant doux et essuyez-les avec un chion doux.
Vous pouvez enlever les tiroirs et les clayettes pour un
nettoyage plus profond. Simplement, assurez-vous
de sécher bien les tiroirs et les clayettes avant de les
remettre en place.
Essuyez le panneau numérique et l’affichage avec un
chion propre et doux. Arrosez de l’eau sur le chion
au lieu de l’arroser directement sur la surface du
réfrigérateur. Cela aide à assurer une bonne distribution
de l’humidité sur la surface. Les portes, les poignées et
les surfaces doivent être nettoyées avec du détergent
doux et ensuite essuyées avec un chion doux. Pour que
votre appareil conserve la meilleure apparence, il faut
lustrer l’extérieur une ou deux fois par an.
ATTENTION
ATTENTION
N’utilisez pas du benzène, du solvant ou du clorox pour nettoyer.
Ils peuvent endommager la surface de l’appareil et produire un
incendie.
Nettoyage du distributeur de glace et eau
Poussez vers le bas l’extrême du plateau du distributeur et
enlevez-le. Essuyez le Distributeur à glace et eau avec un
chion propre et doux.
ATTENTION
N’arrosez pas le réfrigérateur avec de l’eau pendant qu’il est branché, puisque cela peut produire un
choc électrique. Ne nettoyez pas le réfrigérateur avec du benzène, du solvant ou du détergent pour
voitures à cause du risque d’incendie.
ednoitalumucca’dteerèissuopedserbilseésopxeseitrapsertuaseltesedrocselrevresnocruoP
saleté, aspirez derrière l’appareil une ou deux fois par an.
ATTENTION
N’enlevez pas le couvercle arrière. Cela peut vous produire un choc électrique.
Nettoyage des joints des portes
Il est possible que le réfrigérateur ne marche pas
efficacement si les joints des portes sont sales et les portes
ne ferment pas correctement. Conservez les joints des
portes libres de sable et de crasse en nettoyant les portes
avec un détergeant doux et un chion humide. Séchez avec
un chion propre et doux.
Des lettres imprimées sur l’écran peuvent s’eacer si un agent
nettoyant à acier inoxydable est appliqué sur ces lettres imprimées.
02 EN MARCHE
Page 78

Utilisation du Réfrigérateur à portes
françaises SAMSUNG
CHANGER DE LA LAMPE LED
Ne pas démonter ou remplacer le type d'éclairage LED.
ATTENTION
Pour changer le type de contact LED d'éclairage au centre de service Samsung ou
votre revendeur agréé Samsung.
ATTENTION
Si les utilisateurs au hasard échange de la lampe LED par vous-même, tis peut entraîner un choc
électrique ou de blessure.
Lorsque la lampe intérieure ou extérieure LED est éteinte, s'il vous plaît contactez votre agent de service.
SAMSUNG Electrinique Canada Inc., Service à la Clientèle
55 Standish Court Mississauga, Ontario L5R 4B2
Canada
34_En marche
DA68-01812G.indb 33 2009.8.10 9:12:1 AM
Page 79

ATTENTION
Pour réduire les risques de dégâts d'eau à votre propriété NE PAS utiliser les marques génériques de filtrer l'eau
dans votre SAMSUNG Réfrigérateur. UTILISER SEULEMENT LES FILTRES eau de marque SAMSUNG. SAMSUNG
ne sera pas juridiquement responsable pour tout dommage, incluant mais non limité à des dommages matériels
causés par leekage l'eau de l'utilisation d'un filtre à eau générique. Réfrigérateurs Samsung sont conçus pour
fonctionner uniquement avec SAMSUNG Filtre à eau.
La lumière de l’« Indicateur du filtre » vous permet de savoir quand il est temps de changer la
cartouche du filtre. Pour vous donner du temps de trouver un nouveau filtre, la lumière rouge
s’allume juste avant que la capacité du filtre actuel soit dépassée. Changer le filtre à temps fait
que votre réfrigérateur vous fournisse de l’eau fraîche et propre.
1. Enlevez le filtre d’eau de la boîte et collez sur le filtre une étiquette indicatrice de mois, comme il est
montré. Placez sur le filtre l’étiquette correspondant à la date six mois après. Par exemple, si vous
remplacez le filtre d’eau en mars, collez l’étiquette marquée « SEP » (septembre) sur le filtre pour vous
souvenir de la remplacer en septembre. La durée de vie normale d’un filtre est de six mois.
2. Enlevez le capot protecteur du nouveau filtre et enlevez l’ancien filtre.
3. Positionnez et introduisez le nouveau filtre dans son compartiment. Tournez lentement le filtre d’eau
en sens horaire pour l’aligner avec la marque imprimée sur le couvercle, en enclenchant sa position.
Assurezvous d’aligner la marque du filtre d’eau et le centre de l’impression sur le couvercle du filtre
comme il est illustré. Ne l’oubliez pas : ne serrez pas de trop.
Couverture du filtre
2 3
02 EN MARCHE
Etiquette
(indicatrice
du mois)
Tournez jusqu’à ce
que les marques
soient alignées
4. Une fois avoir complété ce processus, appuyez et maintenez pendant 3 secondes la touche Glace / Eau
pour réinitialiser le calendrier du filtre.
5. Finalement, faites passer six verres pleins d’eau à travers le distributeur et jetez-les. Vérifiez que l’eau
coule à nouveau claire avant de la boire.
Vérifiez que vous purgez complètement le distributeur, sinon l’eau peut couler dehors.
Cela signifie qu’il y a encore de l’air dans les tuyaux.
N’UTILISEZ PAS le distributeur d’eau et glace sans une cartouche de filtre d’eau, parce que la conduite
d’eau peut en résulter bloquée.
Pour obtenir un filtre à eau de rechange, vous pouvez visiter votre centre de services local ou communiquer
avec le distributeur de pièces Samsung. Assurez-vous que le filtre de rechange et la boîte qui le contient portent
le logo SAMSUNG.
Link : http://www.samsungparts.com
En marche_35
Page 80

36_En marche
Utilisation du Réfrigérateur à portes
TABLEAU DU FILTRE À EAU
Ce système a été testé selon les normes NSF/ANSI 42 et 53 pour la réduction des substances énumérées ci-dessous. La
concentration des substances indiquées dans l’eau entrant dans le système a été réduite à une concentration inférieure ou
égale à la limite permise pour l’eau quittant le système, comme spécifié dans les normes NSF/ANSI 42 et 53.
À une capacité de 300 gallons (1 136 litres).
Notez que tandis que l’essai a été réalisé sous les conditions d’un laboratoire standard, les performances réelles peuvent vari er.
Le système testé et certifié par NSF International selon la norme NSF/ANSI 42 pour la
réduction du goût et de l’odeur de chlore, classe particulaire I, et selon la norme NSF/
ANSI 53 pour la réduction de kystes, de turbidité, du plomb, d’amiante, de benzène, de
carbofuranne, de p-Di chlorobenzène et de mercure.
contaminant
Concentration
affluante
moyenne
affluantes de concentration
% moyens de
Concentration
moyenne en eau
de produit
Concentration
permise
maximale en
eau de produit
Conditions de
Essai NSF
Goût et odeur de
chlore
2,1 mg/l 2,0 mg/l ± 10% 97,6 0,05 mg/l S.O. > 50% J-00029741
Dimension particulaire
de la classe I : < 0,5 à
< 1 µm
10 566 666 pt/ml
Au moins 10 000
particules/ml
98,4 171,833 pts/ml S.O. > 85% J-00029739
Kystes* 127 500 kystes/l
Minimum 50 000
kystes/l
99,99 <1 kystes/l S,O, > 99,95% J-00031000
Turbidité 10,5 11±1 NTU 98,6 0,15 NTU 0,5 NTU > 0,5 NTU J-00033223
Plomb à pH 6,5 153 ug/L 0,15±10% 99,3 <1ug/L 0,010 mg/L 10 ug/L J-00039590
Plomb à pH 8,5 155 ug/L 0,15±10% >99,4 <1ug/L 0,010 mg/L 10 ug/L J-00039591
Mercu
re à pH 6,5 5,97 ug/L 0,006±10% 96,6 <0,2 ug/L 0,002 mg/L 2 ug/L J-00039589
Mercure à pH 8,5 6,29 ug/L 0,006±10% 88,9 0,7 ug/L 0,002 mg/L 2 ug/L J-00039586
Amiante 140 MFL
107 à 108 fibres
> µm en longueur
> 99 <0,17 MFL S,O, 99% J-00029743
Benzène 13,88 ug/L 0,015±10% 96,4 <0,5 ug/L 0,005 mg/L < 5 ug/L J-0029751
Carbofuranne 79,6 ug/L 0,190 mg/L 98,7 1 ug/L 0,001 mg/L < 40 ug/L J-00029750
P-Di chloroben-
zène
237,5 ug/L 0,225±10% 99,8 0,525 ug/L 0,075 mg/L < 75 ug/L J-00029749
françaises SAMSUNG
Page 81

En marche_37
CERTIFICATION DU FILTRE A EAU
État de Californie
Département de la santé publique
Dispositif de traitement de l'eau
Numéro de certificat
04 - 1660
Date de publication : juillet 7, 2004
Date de révision : juin 2, 2008
Éléments de rechange
DA29-00003
DA29-00003G
Samsung DA61-00159A-B
Samsung DA97-06317A
Fabricant : Cuno Incorporated
Les dispositifs de traitement de l'eau énumérés sur ce certificat ont répondu aux exigences d'essai conformément
au Paragraphe 116830 du code de santés et sécurité pour les contaminants relatifs à la santé suivants :
Contaminants microbiologiques et turbidité Contaminants inorganiques/radiologiques
Amiante
Plomb
Mercure
Kystes
Turbidité
Contaminants organiques
Benzène
Carbofuranne
p-Di chlorobenzène
Débit de service nominal : 0,5 gal/minCapacité de service nominale : 300 gallons
N’utilisez pas de l'eau microbiologiquement peu sûre ou de l'eau de qualité inconnue, sauf que les systèmes
certifiés pour la réduction de kyste peuvent être utilisés sur les eaux désinfectées qui peuvent contenir les
kystes filtrables.
É
Marque déposée/désignation du modèle
Utilisation du Réfrigérateur à portes
françaises SAMSUNG
Page 82

38_ En marche
ASTUCES POUR LE STOCKAGE DE NOURRITURE
PRODUITS LAITIERS
Beurre 2 ou 3 semaines 6 à 9 mois Enveloppez ou couvrez soigneusement.
édnammocernoNseniames2à1tiaL
Vérifiez la date. La plupart des laits et produits semblables sont vendus
dans des emballages datés qui indiquent la fraîcheur maximale d’un
produit. Refermez avec le couvercle ou enveloppez soigneusement. Ne
retournez pas les portions inutilisées dans l’emballage d’origine.
Fromage fondu, fromage, et fromage à
tartiner
2 à 4 semaines Non recommandé
Vérifiez la date. Conservez tout le fromage soigneusement emballé dans
un emballage étanche à l’humidité.
Fromage à pâte dure
(non-ouvert)
3 à 4 mois 6 mois
Fromage à pâte dure
(ouvert)
2 mois Non recommandé
Fromage blanc 10 à 15 jours Non recommandé
Crème 7 à 10 jours 2 mois
Vérifiez la date. La plupart des yaourts, crèmes, et des produits semblables sont vendus dans des cartons datés qui indiquent la fraîcheur
maximale d’un produit. Refermez ou couvrez soigneusement.
Ne retournez pas les portions inutilisées dans l’emballage d’origine.
Crème sure 2 semaines Non recommandé
Crème à tremper
(ouvert)
1 semaine Non recommandé
Yaourt 10 à 14 jours Non recommandé
Vérifiez la date. Conservez couvert.
Yaourt surgelé S.O. 2 mois
ŒUFS
Œufs (crus) 3-4 semaines Non recommandé
Vérifiez la date. Stockez les œufs dans la zone la plus froide du réfrigérateur et dans leur récipient d’origine.
Œufs (cuits) 1 semaine Non recommandé Stockez dans un récipient couvert.
Plats de surplus d’œufs 3 à 4 jours Non recommandé Stockez dans un récipient couvert.
FRUITS FRAIS
Pommes 1 mois Non recommandé
Pour stocker dans le réfrigérateur, ne lavez pas le fruit avant le stockage.
Stockez dans les sacs ou des récipients résistants à l’humidité. Enveloppez les fruits coupés. Certains fruits noircissent une fois réfrigérés.
Bananes 2 à 4 jours Non recommandé
Pêches, melons, poires,
avocats
3 à 5 jours Non recommandé
Baies et cerises 2 à 3 jours 12 mois
Abricots 3 à 5 jours Non recommandé
Raisins 2 à 5 jours S.O.
Ananas (non coupé) 2 à 3 jours Non recommandé
Ananas (coupé) 5 à 7 jours 6 à 12 mois
Citron 1 à 2 semaines Non recommandé Stockez non couvert.
édnammocernoNsruoj6suJ
Vérifiez la date et refermez dans le récipient d’origine. Ne retournez pas
les portions inutilisées dans l’emballage d’origine.
Jus surgelé Dégel seulement 12 mois Vérifier la date. Ne recongelez pas.
Page 83

En marche_39
POISSONS, MOLLUSQUES ET CRUSTACÉS
Poisson
Poisson gras (maquereau, truite, saumon)
1 à 2 jours 2 à 3 mois
Conservez dans l’emballage d’origine et stockez dans la zone la plus
froide du réfrigérateur. Emballez dans un emballage à l’épreuve de la
vapeur et de l’humidité pour le congélateur. Congelez à 0°F. Dégelez
dans le réfrigérateur ou sous l’eau courante froide. Vérifiez la date. Congelez dans l’emballage d’origine.
Poisson maigre (morue,
flet, etc.)
1 à 2 jours 6 mois
Congelé ou pané S.O. 3 Months
Mollusques et crustacés
Crevette (crue) 1 à 2 jours 12 mois
Pour congeler, emballez dans un récipient à l’épreuve de la vapeur et de
l’humidité.
Crabe 3 à 5 jours 10 mois
Poissons, mollusques
ou crustacés cuits
2 à 3 jours 3 mois
VIANDE
Frais, cru
Côtelettes 2 à 4 jours 6 à 12 mois
Vérifiez la date avant utilisation. Stockez dans la zone la plus froide du
réfrigérateur dans l’emballage d’origine. Ajouter d’autre emballage dans
le récipient à l’épreuve de l’humidité et de la vapeur pour le congeler. La
température recommandée est de 33 à 36°F pour le réfrigérateur et de 0
à 2°F pour le congélateur.
Moulu 1 jour 3 à 4 mois
siom21à6sruoj4à2itôR
siom2à1seniames2à1draL
Saucisse 1-2 Days 1 à 2 mois
Bifteck 2 à 4 jours 6 à 9 mois
Volaille 1 jour 12 mois
Viande de déjeuner 3 à 5 jours 1 mois
Cuit
Viande 2 à 3 jours 2 à 3 mois
Vérifiez la date avant utilisation. Stockez dans la zone la plus froide du
réfrigérateur dans l’emballage d’origine. Emballez dans un emballage à
l’épreuve de la vapeur et de l’humidité pour le congélateur.
Volaille 2 à 3 jours 4 à 5 mois
Jambon 1 à 2 semaines 1 à 2 mois
Sources:
American Meat Institute Foundation. 1994. Pages jaunes : les réponses aux questions fréquentes des consommateurs à propos de la
viande et la volaille. American Meat Institute Food Marketing Institute. 1999. The food keeper. Food Marketing Institute, Washington, D.C.
Freeland-Graves, J.H. et G.C. Peckham. 1996. Foundations of food preparation, 6th ed. Pr
s, NJ. Hillers,
V.N. 1993. Storing foods at home. Washington State University Cooperative Extension, Pullman, WA. Publ. EB 1205.
National Restaurant Association. 2001. Be cool-chill out! Refrigerate promptly. National Restaurant Association Education Foundation’s
International Food Safety Council, Washington, D.C. USDA. 1997. Basics for handling food safely. U.S. Department of Agriculture, Food
Safety and Inspection Service, Washington, D.C.
Utilisation du Réfrigérateur à portes
02 EN MARCHE
françaises SAMSUNG
Page 84

40_Dépannage
PROBLEMES SOLUTION
Le réfrigérateur ne marche pas
du tout ou il ne refroidit pas
suffisamment.
Les aliments dans le réfrigérateur
sont gelés.
Essayez avec une température plus chaude.
Essayez en passant ces objets vers le corps principal du réfrigérateur au lieu de les
mettre dans le Cool Select Pantry™.
Vous sentez des bruits ou des
sons inhabituels.
se produit parce que les accessoires rétrécissent ou s’élargissent selon la température
existante à l’intérieur du réfrigérateur.
Les coins avant et la section
verticale articulée de l’appareil
sont chauds et il y a de la
condensation.
dans la section verticale articulée du réfrigérateur pour éviter la condensation.
Il peut y avoir de la condensation si vous laissez longtemps la porte ouverte.
La Machine à glace ne produit pas
de glace
Essayez en réglant le réfrigérateur à une température plus basse.
Vous entendez l’eau faire des
bulles dans le réfrigérateur
Il y a une mauvaise odeur dans le
réfrigérateur
suspectes.
Il y a du gèle sur les murs du
congélateur.
Le distributeur d’eau ne marche
pas.
Vérifiez que le tuyau est libre de toute obstruction.
Essayez en sélectionnant un réglage plus chaud sur le panneau d’affichage principal.
Dépannage
Page 85

Si un appel de service devient nécessaire
Garantie
Ce produit Samsung est garanti par SAMSUNG ELECTRONICS CANADA INC. (ci-après appelé SECA)
contre tous défauts de matériaux ou de fabrication pendant les périodes précisées ci-dessous :
Main-d’œuvre : Un (1) an (à la maison)
Pièces : Un (1) an
Compresseur inverseur : 10 ans
SECA garantit également que lors du défaut de fonctionnement correct de ce produit durant la période
de la garantie spécifiée, si ce manque de fonctionnement est le résultat d’une erreur de fabrication ou
d’un défaut matériel, SECA réparera ou remplacera, à sa discrétion, cet appareil.
Toutes les réparations sous garantie ou remplacements depièces doivent être
de service agréé SECA. Pourobtenir le nom et l’adresse du Centre de serviceagréé le plusprès de chez
vous, composez le 1-800-SAMSUNG (7267864) ou consultez notre site Internet au www.samsung.
com/ca
Le reçu de vente initial doit être conservé en tant que preuve d’achat. Il doit être présenté au Centre de
service agr
Pour tous lesmodèles portatifs, le client est responsable du transport au et à partir duCentre de service
agréé.
ectué.
ectués dans un Centre
04 WARRANTY
Exclusions de la garantie
Cette garantie ne couvre pas les dommages occasionnés par un accident, un incendie, une inondation
ou tout cas de force majeure, ni par une mauvaise utilisation, le branchement à une tension incorrecte,
une mauvaiseinstallation, des réparationsimpropres ounon autorisées, l’usageà des finscommerciales
ou les dommages survenus lors du transport. Les réglages décrits dans ce manuel et
le client ne sont pas couverts par cette garantie. Cette garantie s’annule automatiquement pour tout
appareil dont le numéro de série a été modifié ou est manquant. La présente garantie ne couvre que les
appareils achetés et utilisés au Canada.
55 Standish Court Mississauga, Ontario L5R 4B2
Canada
Si vous avez des suggestions ou des questions concernant les produits
Samsung, veuillez contacter le Service Consommateurs Samsung.
SAMSUNG ELECTRONICS CANADA,INC.
55 STANDISH COURT MISSISSAUGA, ONTARIO L5R 4B2 CANADA
1-800-SAMSUNG (7267864)
www.samsung.com/ca
ectués par
Garantie_41
Page 86

Diagramme de circuit
42_Diagramme de circuit
DA68-01812G.indb 41 2009.8.10 9:9:57 AM
Page 87

Memo
Page 88

Si vous avez des suggestions ou des questions concernant les produits
Samsung, veuillez contacter le Service Consommateurs Samsung.
SAMSUNG ELECTRONICS CANADA,INC.
55 STANDISH COURT MISSISSAUGA, ONTARIO L5R 4B2 CANADA
1-800-SAMSUNG (7267864)
www.samsung.com/ca
Scannez le code QR * ou visitez
www.samsung.com/spsn
pour voir nos utile
Comment-aux vidéos et des
spectacles
Lecteur nécessite d'être installé sur votre
Scan avec votre smartphone
*
smartphone
DA68-01812S REV(0.4)
DA68-01812G.indb 42 2009.8.10 9:12:17 AM
 Loading...