

Samsung PS50A566S2M, PS50A566S2W, PS50A567S3M, PS50A567S3W, PS50A568S1W User Manual
...
Plasma TV
user manual
imagine the possibilities
Thank you for purchasing this Samsung product.
To receive more complete service, please register your
product at
www.samsung.com/global/register
Model Serial No.
User Instructions
Screen Image retention
Do not display a still image (such as on a video game or when hooking up a PC to this PDP) on the
plasma monitor panel for more than 2 hours as it can cause screen image retention. This image
retention is also known as “screen burn”. To avoid such image retention, reduce the degree of
brightness and contrast of the screen when displaying a still image.
Height
The PDP can normally operate only under 2000m in height. It might abnormally function at a place
over 2000m in height so do not install and operate there.
Heat on the top of the PDP TV
The top side of the product may be hot after long period of use as heat dissipates from the panel
through the vent hole in the upper part of the product. This is normal and does not indicate any defect
or operation failure of the product. However, children should be prevented from touching the upper
part of the product.
The product is making a ‘cracking’ noise.
A ‘cracking’ noise may occur when the product contracts or expands due to a change of surrounding
environment such as temperature or humidity. This is normal and not a defect of the unit.
Cell Defects
The PDP uses a panel consisting of 1,230,000(SD-level) to 3,150,000(HD-level) pixels which require
sophisticated technology to produce. However, there may be few bright or dark pixels on the screen.
These pixels will have no impact on the performance of the product.
Avoid operating the TV at temperatures below 5°C(41°F)
A still image displayed too long may cause permanent damage to the PDP Panel.
Watching the PDP TV in 4:3 format for a long period of time may leave traces
of borders displayed on the left, right and centre of the screen caused by the
difference of light emission on the screen. Playing a DVD or a game console
may cause similar effect to the screen. Damages caused by the above effect are
not covered by the Warranty.
Afterimage on the Screen.
Displaying still images from Video games and PC for longer than a certain period of time may
produce partial afterimages. To prevent this effect, reduce the ‘brightness’ and ‘contrast’ when
displaying still images.
Warranty
- Warranty does not cover any damage caused by image retention.
- Burn-in is not covered by the warranty.
Installation
Be sure to contact an authorized service centre, when installing your set in a location with heavy
dust, high or low temperatures, high humidity, chemical substance and where it operates continually
such as the airport, the train station etc. Failure to do so may cause a serious damage to your set.
Any functions related to Digital TV (DVB) will only work in countries or areas where DVB-T (MPEG2)
digital terrestrial signals are broadcasted. Please confirm with your local dealer if you can receive
DVB-T signals. Although this TV set follows the DVB-T specification, maintaining compatibility with
the future coming DVB-T digital terrestrial broadcasts is not guaranteed. Several functions may not be
available in some countries.
© 2008 Samsung Electronics Co., Ltd. All rights reserved.
English - 2

Contents
English
General Information
User Instructions ............................................. 2
Checking Parts ................................................ 4
Using the Stand-Base ..................................... 4
Control Panel ................................................. 5
Connection Panel ............................................ 6
Viewing the Remote Control ...........................8
Operation
Switching Your Television On and Off ............. 9
Viewing the Menus .......................................... 9
Plug & Play Feature ...................................... 10
Using the TOOLS Button ..............................12
Viewing External Signal Sources .................. 12
Editing Device Names ................................... 13
Channel Control
Storing Channels Automatically .................... 14
Storing Channels Manually ........................... 15
Viewing the EPG (Electronic Programme
Guide) Information ....................................... 16
Viewing All Channels .................................... 17
Erasing and Adding Channels ....................... 18
Setting Your Favourite Channels .................. 19
Reserving a Program (Time Viewing) ........... 20
Confirming a Viewing Reservation ................21
Assigning Names to Channels ......................22
Sorting the Stored Channels - Analogue ....... 23
Selecting and Deselecting All Channels .......24
Storing Channels in Memory (Auto Store) ....24
Setting the Channel Mode ............................ 24
Locking Channels ......................................... 25
Fine Tuning Analogue Channels ................... 25
Viewing Signal Information ........................... 26
LNA (Low Noise Amplifier) ............................26
Picture Control
Changing the Picture Standard .....................27
Customizing the Picture Settings .................. 27
Configuring Detailed Settings on the Picture 28
Picture Options ............................................. 29
Resetting the Picture Settings to the Factory
Defaults ......................................................... 31
Sound Control
Sound Features ............................................ 32
Selecting the Sound Mode
(depending on the model) .............................34
Connecting Headphones (Sold separately) ..34
Function Description
Time Features ............................................... 35
Language / Change PIN / Parental Lock /
Subtitle / Teletext Language / Preference /
Light Effect / Melody/ Entertainment /
Energy Saving / PIP ..................................... 36
Upgrading the Software ................................ 39
Common Interface ........................................ 40
PC Display
Setting up Your PC Software
(Based on Windows XP) ............................... 41
Input Mode (PC) ............................................42
Setting the PC ............................................... 43
WISELINK
Using the WISELINK Function ...................... 45
Using the Photo List ...................................... 46
Viewing a Photo or Slide Show ..................... 52
Using the Music List ...................................... 56
Playing a Music File ...................................... 61
Using the Setup Menu .................................. 63
About Anynet
What is Anynet+? .......................................... 64
Connecting Anynet+ Devices ........................ 64
Setting Up Anynet+ ....................................... 65
Scanning and Switching between
Anynet+ Devices ........................................... 65
Recording ...................................................... 66
Listening through a Receiver ........................67
Check Points before Requesting Service ..... 67
+
Appendix
Teletext Feature (depending on the model) .. 68
Wall Mount Kit Specifications (VESA) ...........70
Auto Wall - mount adjustment
(Sold separately) ........................................... 71
How to assemble the Stand-Base
(depending on the model) ............................. 72
Securing the TV to the Wall ..........................73
Troubleshooting ............................................ 74
Specifications ................................................ 75
Symbols
Press
English - 3
¯
Important
Note
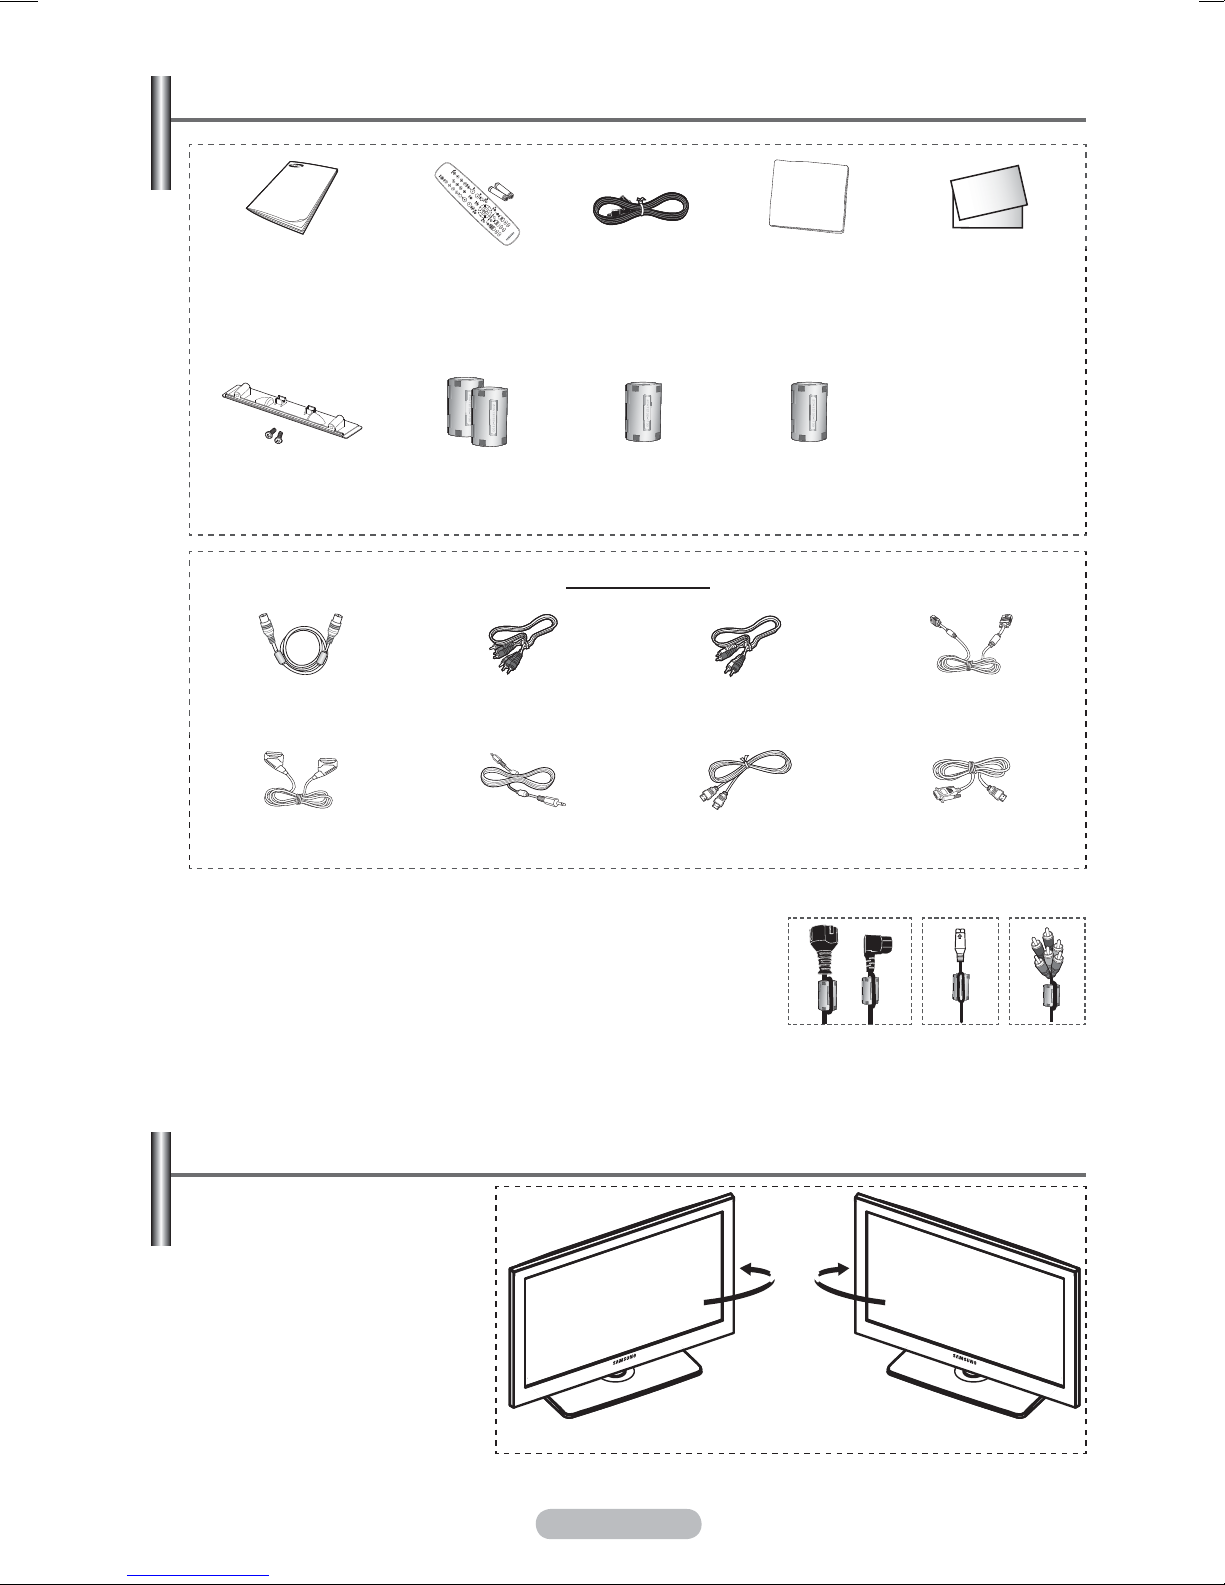
Checking Parts
Owner’s Instructions Remote Control/
AAA Batteries
Cover-Bottom / Screws (2ea)
(Refer to page 71)
Antenna Cable Component Cables Audio Cables PC Cable
Scart Cable PC Audio Cable HDMI Cable HDMI/DVI Cable
Ferrite Core for
Power Cord
Power Cord Cloth-Clean Warranty Card/
Ferrite Core for
S-Video
Sold Separately
Ferrite Core for
Component
Safety Guide Manual
(Not available in all
locations)
Ferrite Core (Power Cord, S-Video, Component)
¯
The ferrite cores are used to shield the cables from interference.
When connecting a cable, open the ferrite core and clip it around
the cable near the plug.
Using the Stand-Base
Two or more people
¯
should carry the PDP.
Never lay the PDP on the
floor because of possible
damage to the screen.
Always keep the PDP
upright.
The PDP can rotate 20
degrees in right and left
directions.
-20° ~ 20°
English - 4
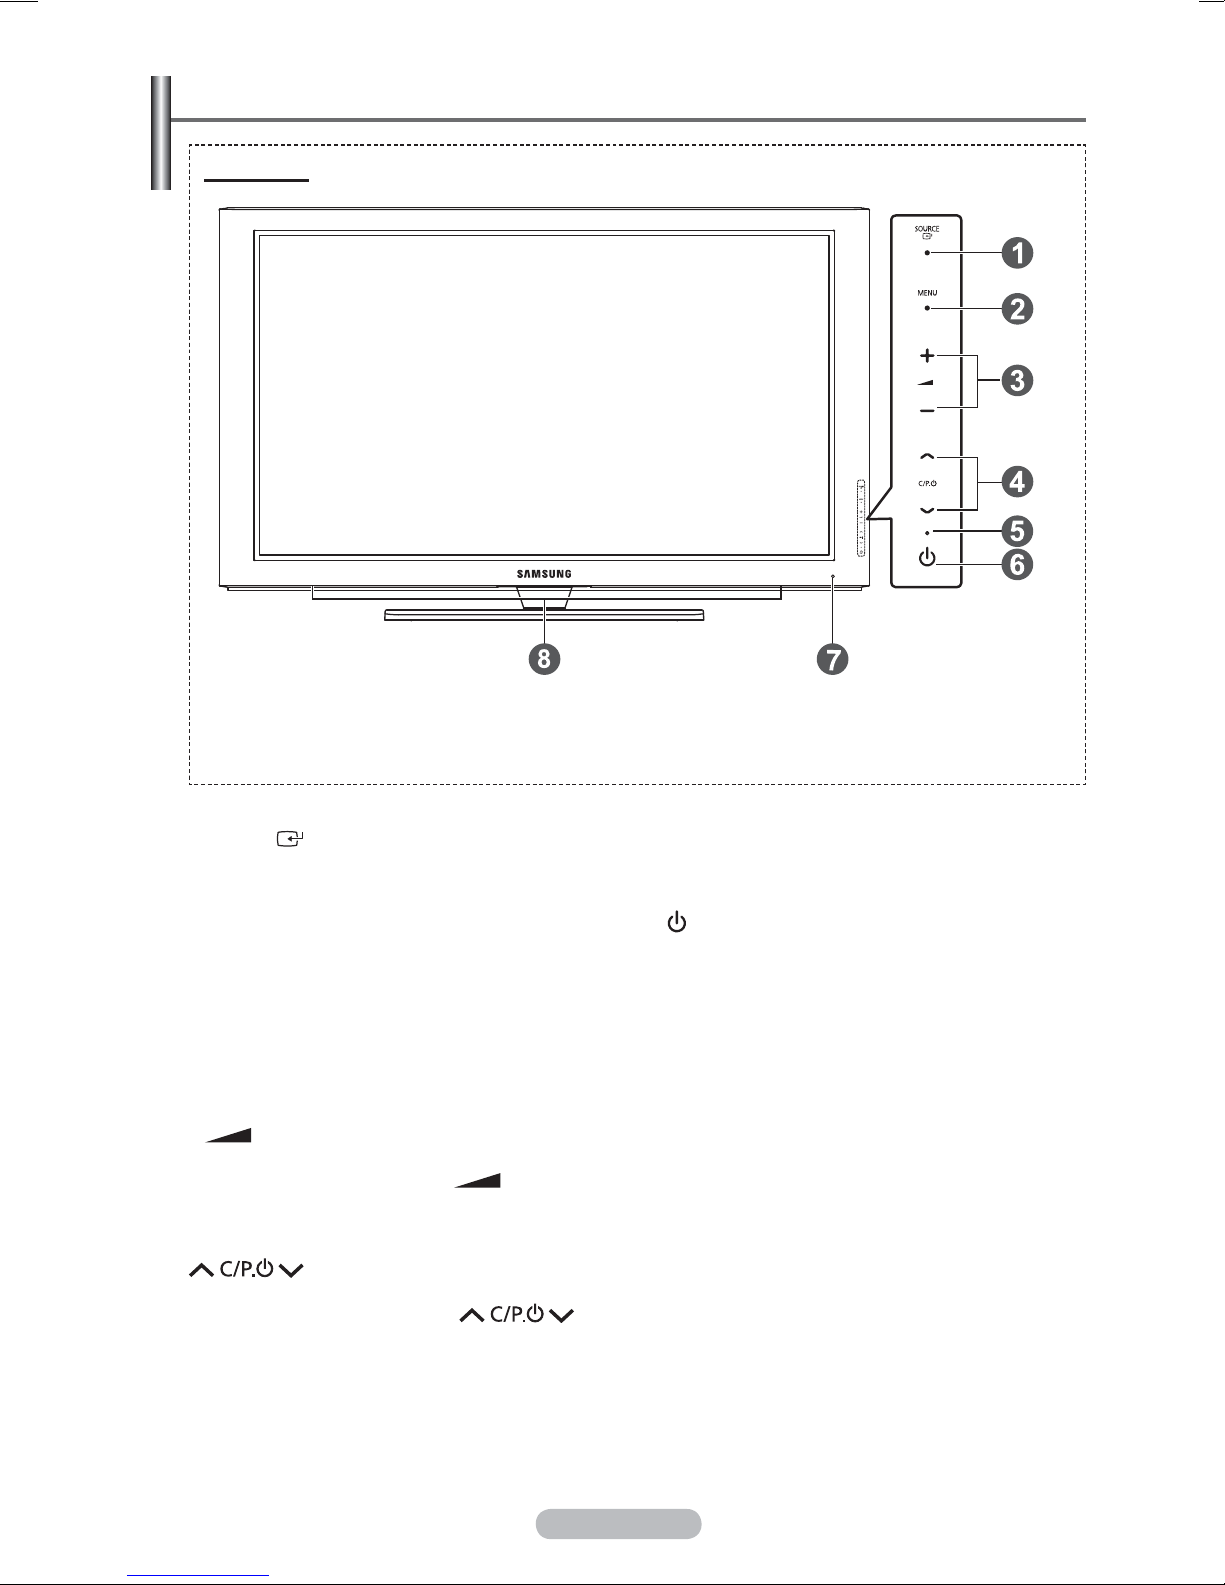
Control Panel
Front Panel
The product colour and shape may vary depending on the model.
¯
1
SOURCE
Toggles between all the available input sources
(TV, Ext.1, Ext.2, AV, S-Video, Component, PC,
HDMI1, HDMI2/DVI, HDMI3, USB).
In the on-screen menu, use this button as
¯
you would use the
remote control.
2
MENU
Press to see an on-screen menu of your TV’s
features.
3
– +
Press to increase or decrease the volume. In
the on-screen menu, use the
as you would use the
remote control.
4
Press to change channels.
In the on-screen menu, use the
buttons as you would use the
on the remote control.
ENTER button on the
–
◄ and ► buttons on the
+ buttons
▲ and ▼ buttons
5
Power Indicator
Blinks and turns off when the power is on and
lights up in stand-by mode.
6
7
8
POWER
Press to turn the TV on and off.
Remote Control Sensor
Aim the remote control towards this spot on the
TV.
Speakers
English - 5
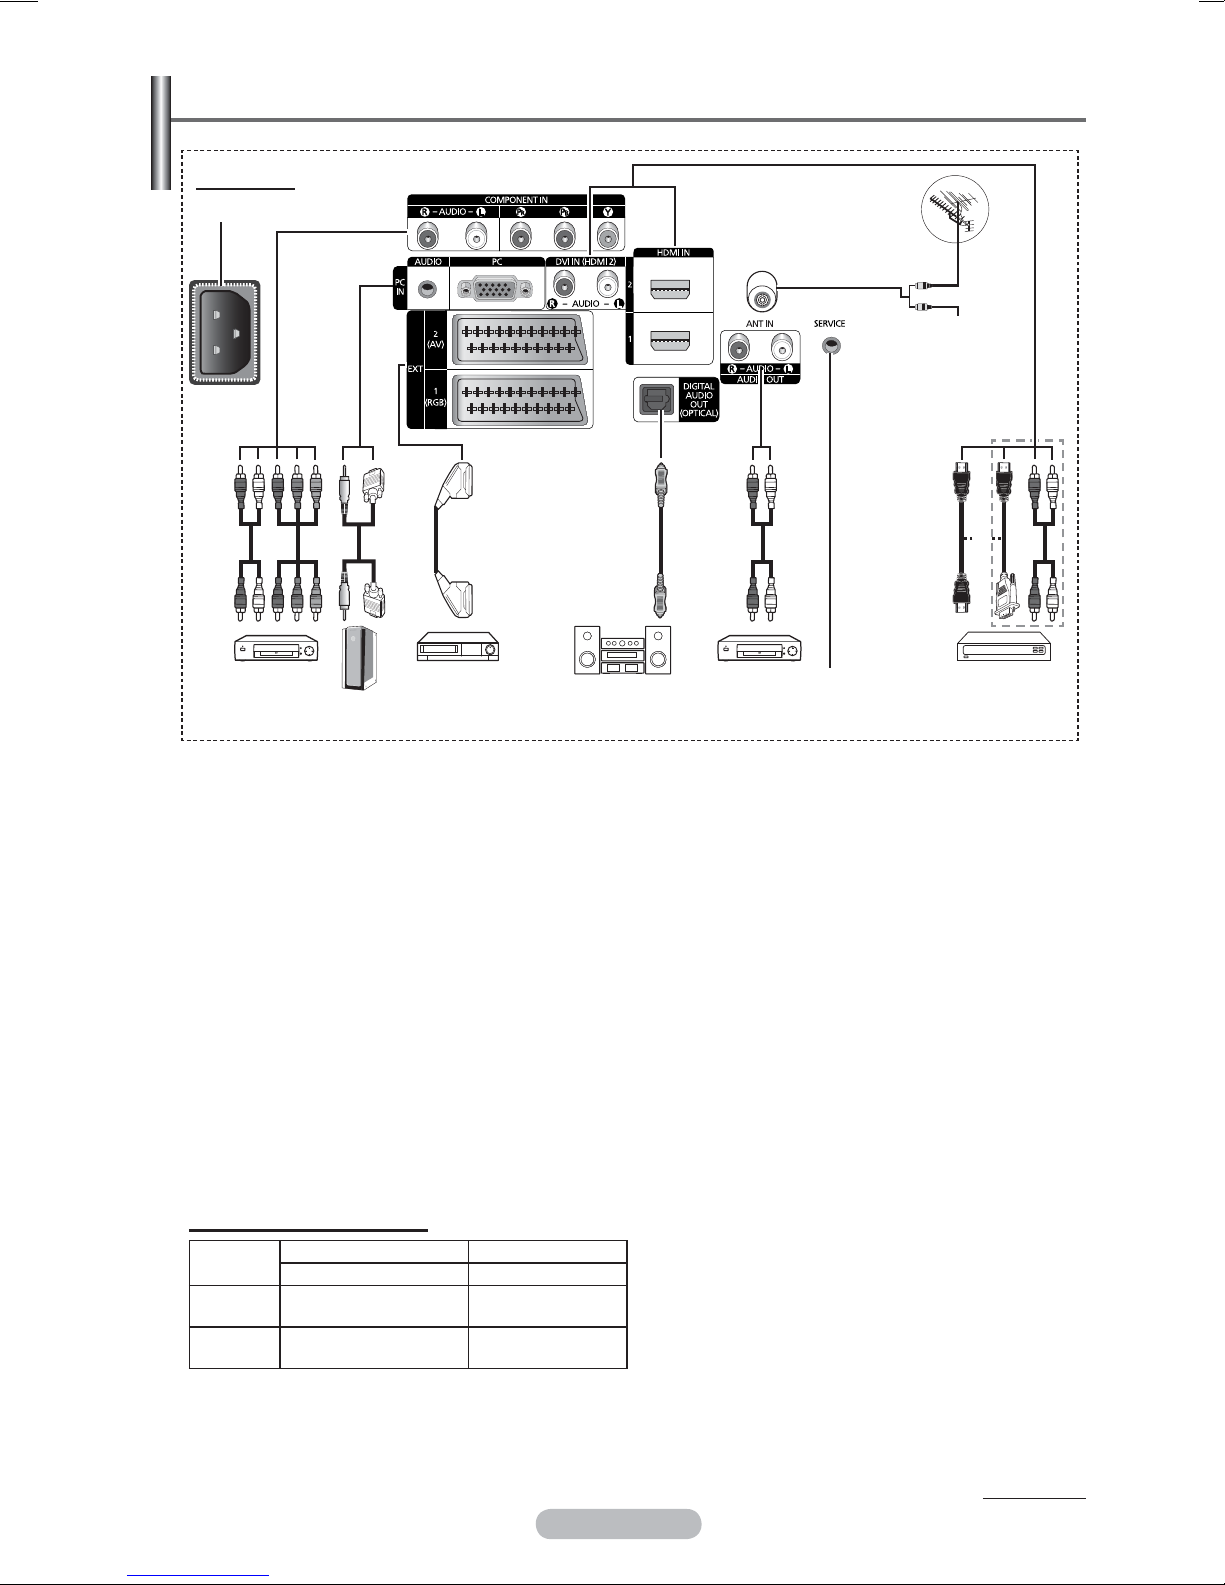
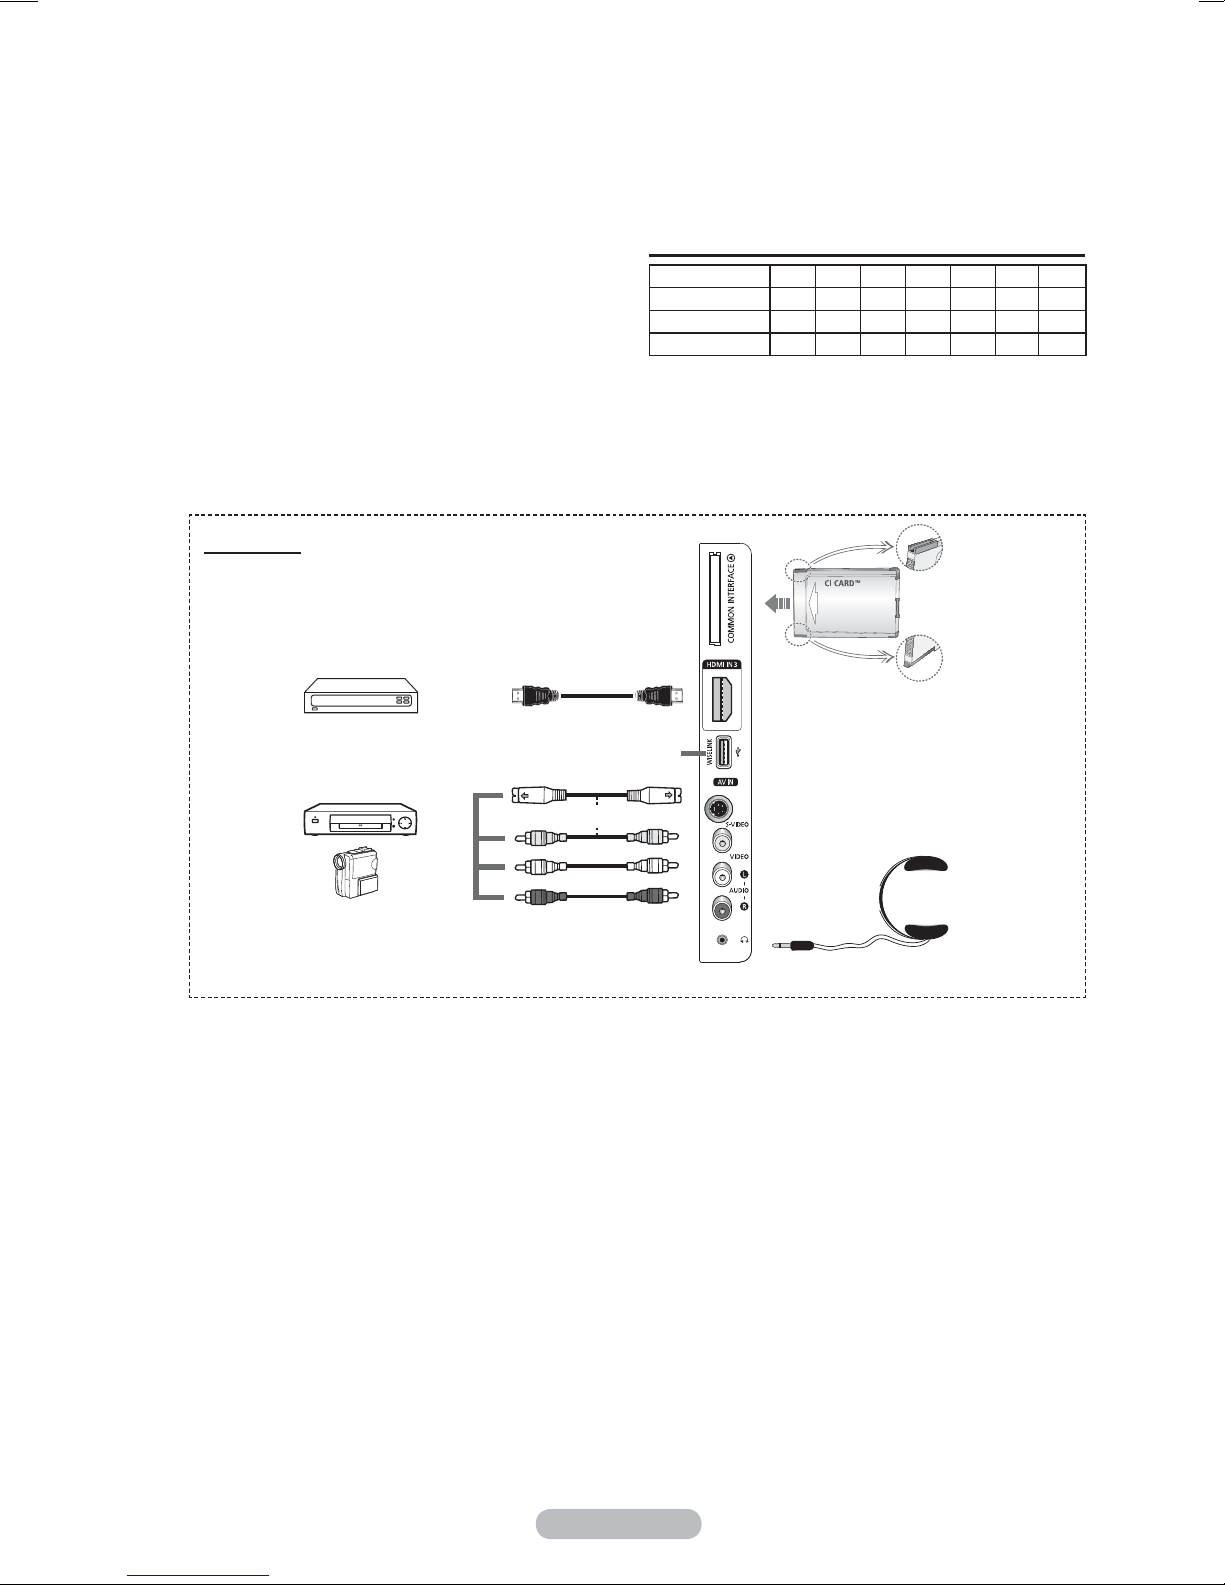
Connection Panel
Rear Panel
1
9
or
Cable Television
Network
or
432685
The product colour and shape may vary depending on the model.
¯
Whenever you connect an audio or video system to your set, ensure that all elements are
1
2
Audio (AUDIO L/R) and video (Y/P
3
4
Input/Output Specification
Connector
switched off.
When connecting an external device, match the colour of the connection terminal to the cable.
POWER IN
Connect the supplied power cord.
COMPONENT IN
B/PR) inputs
for Component.
PC IN(PC) / AUDIO
Connect to the video and audio output jack on
your PC.
EXT 1, EXT 2
Inputs or outputs for external devices, such as
VCR, DVD, video game device or video disc
players.
Input Output
Video Audio(L/R) RGB Video + Audio(L/R)
EXT 1
EXT 2
Only TV or DTV
output is available.
Output you can
choose.
5
DIGITAL AUDIO OUT (OPTICAL)
Connect to a Digital Audio Component.
6
AUDIO OUT(AUDIO R/L)
Connect RCA audio signals from the TV to an
external source, such as Audio equipment.
7
SERVICE
− Connector for service.
− Connect the serial jack between the
electro-motion wall mount bracket and your
TV when you want to adjust the TV viewing
angle using your remote control.
7
Continued...
English - 6
8
HDMI IN 1,2
- No additional Audio connection is needed
for an HDMI to HDMI connection.
- When using an HDMI/DVI cable connection,
you must use the HDMI IN 2 jack.
What is HDMI?
¯
- “High Definition Multimedia interface”
allows the transmission of high definition
digital video data and multiple channels
of digital audio.
- The HDMI/DVI terminal supports DVI
connection to an extended device with
the appropriate cable (not supplied). The
difference between HDMI and DVI is that
the HDMI device is smaller in size, has
the HDCP (High Bandwidth Digital Copy
Protection) coding feature installed, and
supports multi - channel digital audio.
Side Panel
DVI IN(HDMI2) AUDIO L/R
DVI audio outputs for external devices.
9
ANT IN
75Ω Coaxial connector for Aerial/Cable
Network.
Supported modes for HDMI/DVI and Component
480i 480p 576i 576p 720p
HDMI/DVI 50Hz
HDMI/DVI 60Hz
Component O O O O O
XXXOOOO
XOXXOOO
1
1080i
O
1080p
O
2
3
4
or
The product colour and shape may vary depending on the model.
Ê
1
COMMON INTERFACE Slot
Insert CI (Common Interface) card into the slot.
(refer to page 40)
− When ‘CI Card’ isn’t inserted in some
channels, “Scramble Signal” is displayed on
the screen.
− The pairing information containing a
telephone number, CI CARD ID, Host
ID,and other information will be displayed
in about 2~3 minutes. If an error message
is displayed, please contact your service
provider.
− When the channel information configuration
has finished, the message “Updating
Completed” is displayed, indicating that the
channel list is now updated.
¯ Insert the CI-Card in the direction marked
on it.
2
HDMI IN 3
Connect to the HDMI jack of a device with
HDMI output.
3
WISELINK
Connect a USB mass storage device to view
photo files (JPEG) and play audio files (MP3).
4
S-VIDEO or VIDEO / AUDIO L/R
Video (S-Video or Video) and audio inputs
for external devices, such as a camcorder or
VCR.
5
HEADPHONES JACK
You can connect a set of headphones if you
wish to watch a television programme without
disturbing the other people in the room.
Prolonged use of headphones at a high
¯
volume may damage your hearing.
5
English - 7
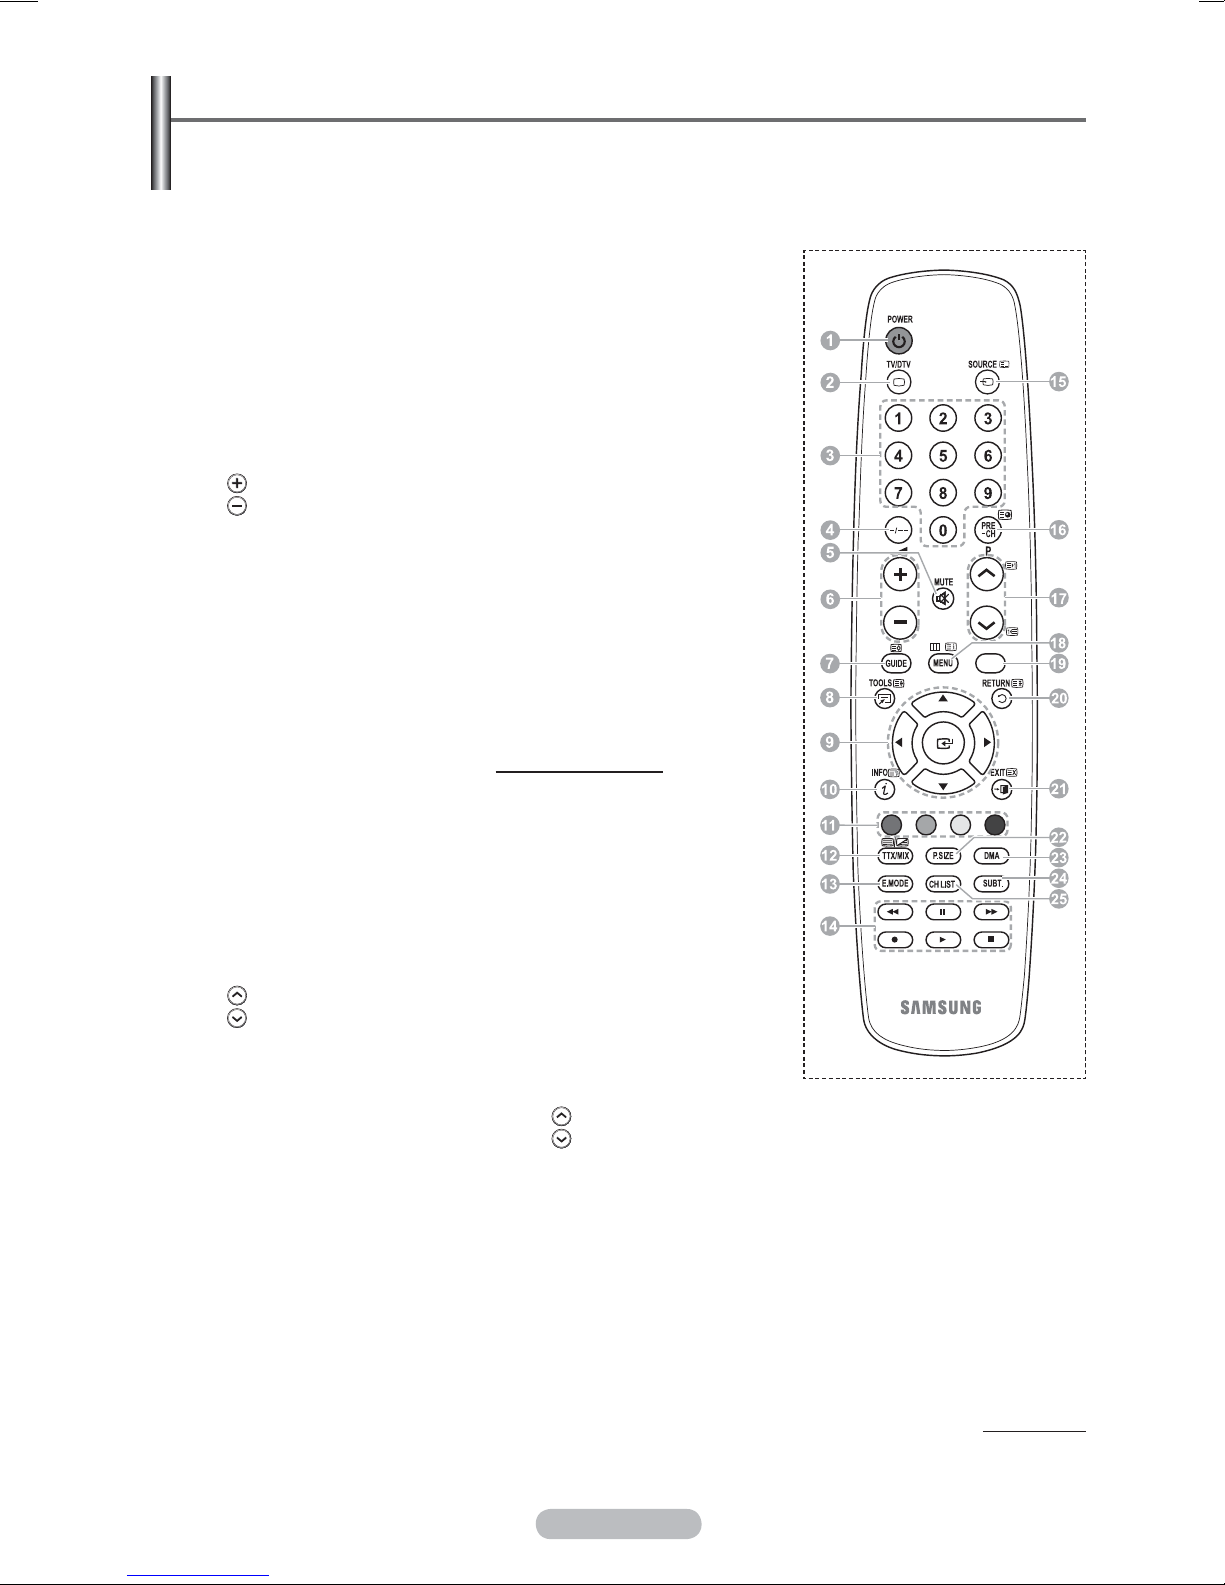
Viewing the Remote Control
The performance of the remote control may be affected by bright light.
1
POWER button
(turns the TV on and off)
2
Selects the TV and DTV
mode directly
3
Number buttons for direct
channel access
4
One/Two-digit channel
selection
5
Temporary sound switch-off
6
Volume increase
Volume decrease
7
Electronic Program Guide
(EPG) display
8
Use to quickly select
frequently used functions.
9
Control the cursor in the
menu
0
Use to see information on
the current broadcast
!
Use these buttons in the
Channel list and WISELINK,
etc.
#
Press to select the optional
display and sound modes for
sports, cinema and games.
$
VCR/DVD Function (Rewind,
Stop, Play/Pause, Fast/
Forward)
%
Available source selection
^
Previous channel
&
Next channel
Previous channel
*
Displays the main on-screen
menu
(
This function enables you to
view and play photo (JPEG)
and audio files (MP3) from
an external device. (See
page 46 (JPEG), 56 (MP3))
)
Returns to the previous
menu
a
Exit the on-screen menu
b
Picture size selection
c
Use this when connecting
a SAMSUNG DMA (Digital
Media Adapter) device
through an HDMI interface
and switching to DMA
mode.(The DMA button is
optional.)
For more information on
the operating procedures,
refer to the user manual
of the DMA. This button
is available when
“Anynet+(HDMI-CEC)" is
“On” (see page 64)
d
Digital subtitle display
e
Channel control button
(Refer to page 18)
Teletext Functions
(Refer to page 68)
2
Exit from the teletext display
(depending on the model)
7
Teletext store
8
Teletext size
0
Teletext reveal
!
Fastext topic selection
@
Teletext display/mix both
teletext information and the
normal broadcast
%
Teletext mode selection
(LIST/FLOF)
^
Teletext sub page
&
P :Teletext next page
P
:Teletext previous page
*
Teletext index
)
Teletext hold
a
Teletext cancel
W.LINK
Continued...
English - 8
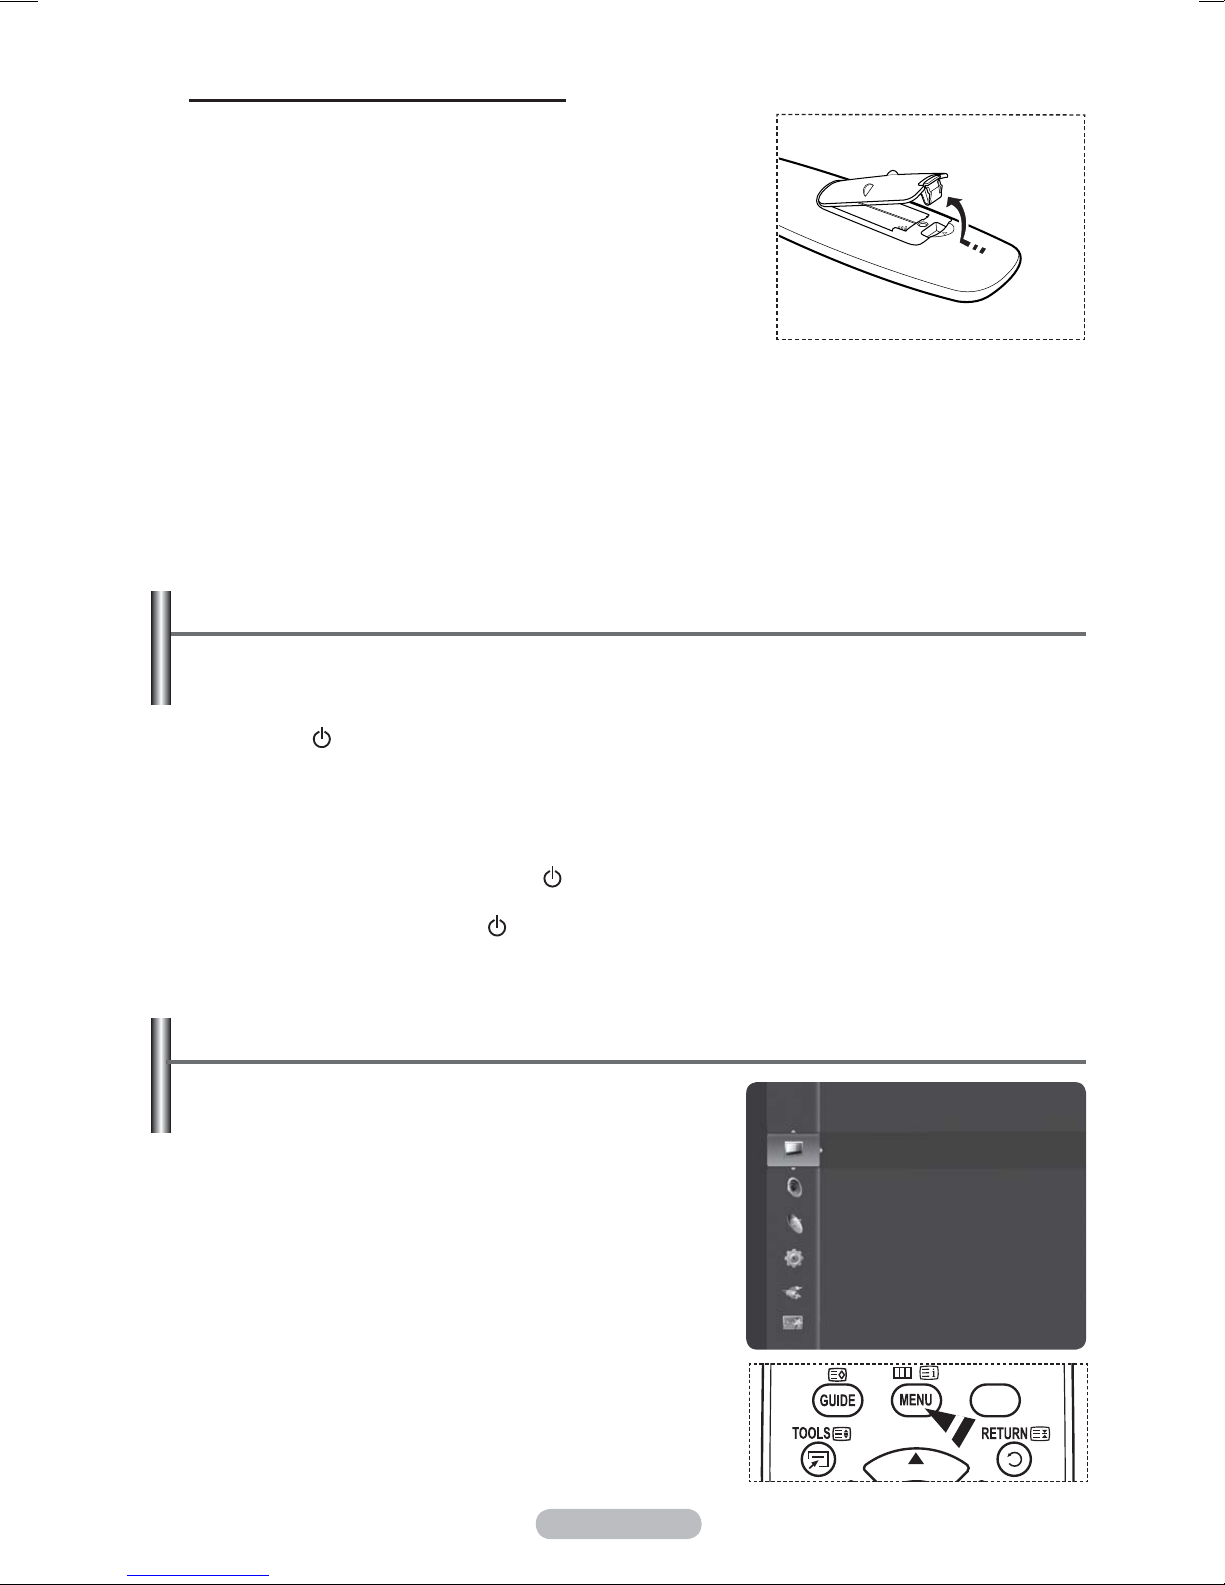
Installing Batteries in the Remote Control
1 Lift the cover at the back of the remote control upward as
shown in the figure.
2 Install two AAA size batteries.
Make sure to match the “+” and “–” ends of the
¯
3 Close the cover as shown in the figure.
¯
If the remote control doesn’t work! Check the following:
¯
1. Is the TV power on?
2. Are the plus and minus ends of the batteries reversed?
3. Are the batteries drained?
4. Is there a power cut, or is the power cord unplugged?
5. Is there a special fluorescent light or a neon sign nearby?
batteries with the diagram inside the compartment.
Do not mix battery types, i.e. alkaline and manganese.
Remove the batteries and store them in a cool and dry
place if you won’t be using the remote control for a long
time. The remote control can be used up to about 23 feet
from the TV. (Assuming typical TV usage, the batteries last
for about one year.)
Switching Your Television On and Off
The mains lead is attached to the rear of the television.
1 Plug the mains lead into an appropriate socket.
The main voltage is indicated on the rear of the television and the frequency is 50 or 60Hz.
¯
2 Press the
the remote control to switch the television on. The channel that you were watching last is re-selected
automatically. If you have not yet stored any channels, no clear picture appears. Refer to “Storing
Channels Automatically” on page 14 or “Storing Channels Manually” on page 15.
If the television is initially powered on, several basic customer settings proceed automatically.
¯
Refer to “Plug & Play Feature” on page 10.
3 To switch the television off, press the
the
POWER button on the remote control.
4 To switch the TV on, press the
button or number buttons on the remote control.
(Power) button (On/Off) on the front of the television or press the POWER button on
(Power) button (On/Off) on the front of the television or press
(Power) button (On/Off) on the front of the TV or press the POWER
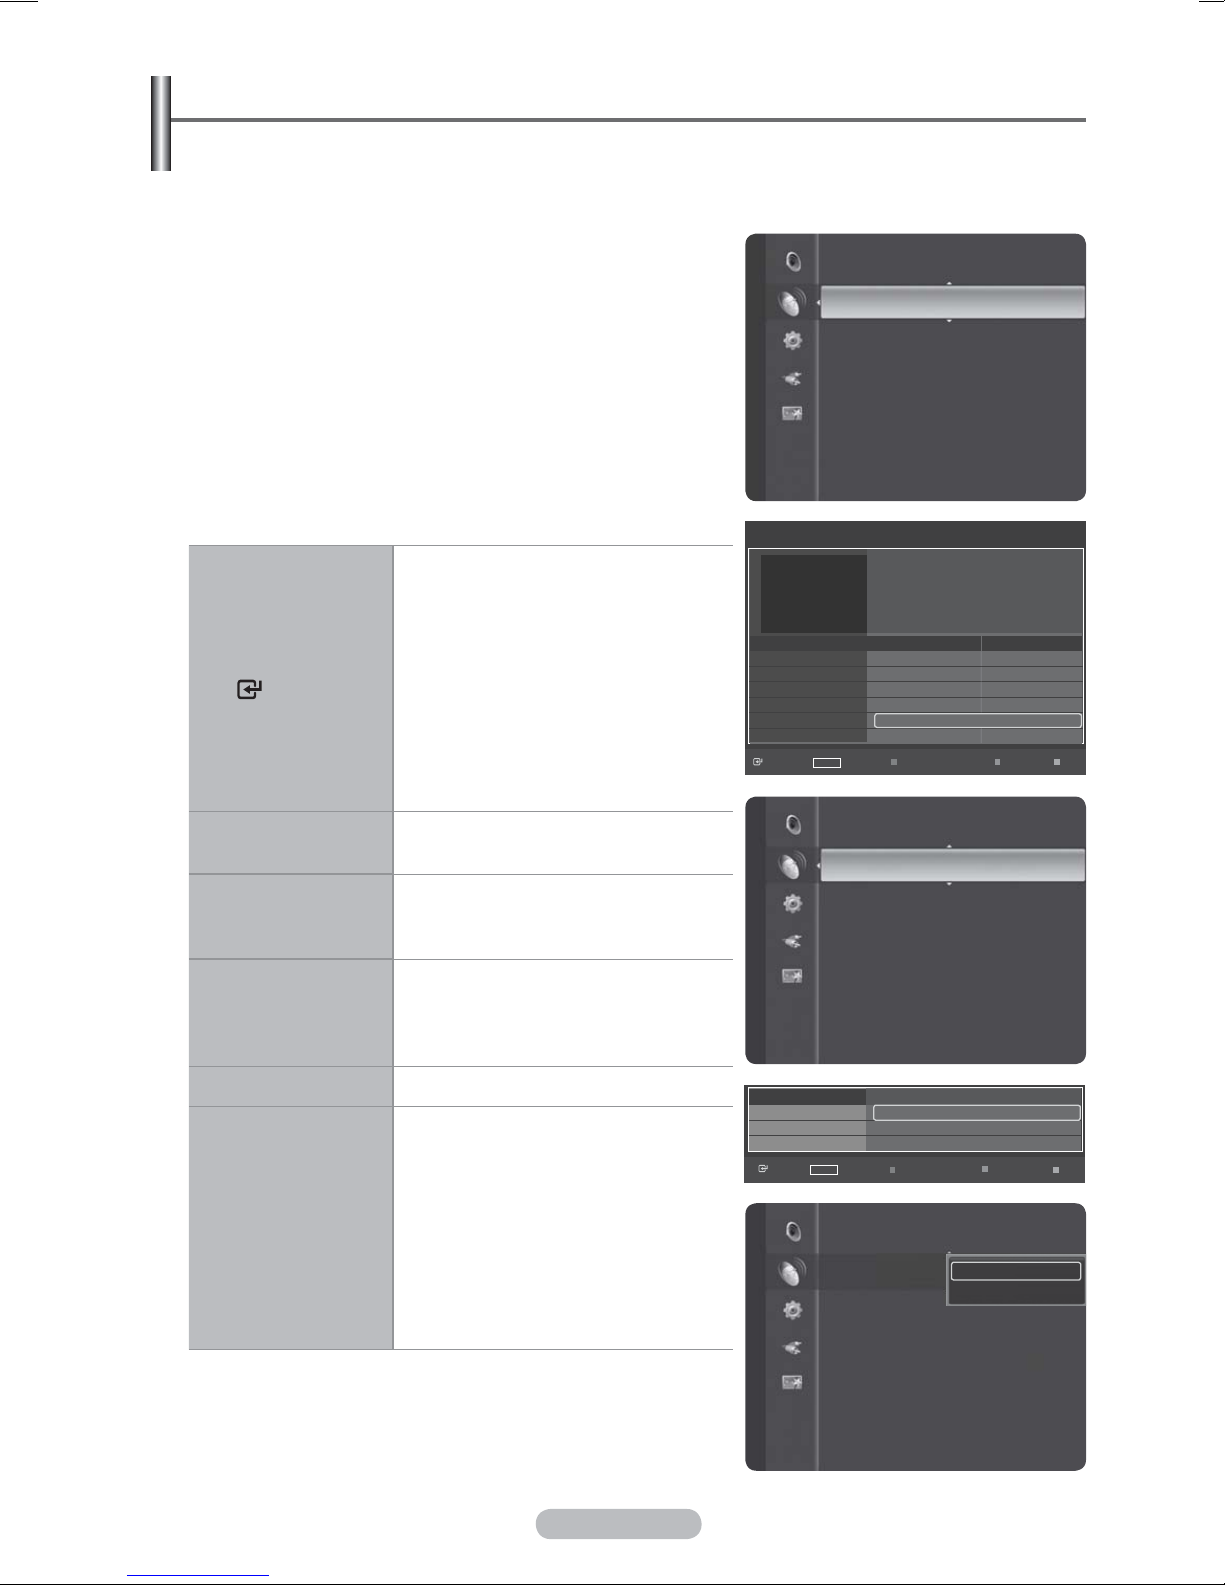
Viewing the Menus
1 Press the MENU button.
The main menu is displayed on the screen.
Its left side has six icons:
Setup, Input, and Application
2 Press the ▲ or ▼ button to select one of the icons.
Press the
3 Press the ▲ or ▼ button to move to items in the menu.
Press the
4 Press the ▲/▼/◄/► button to change the selected items.
Press the
5 Press the EXIT button to exit from the menu.
ENTER button to access the icon’s sub-menu.
ENTER button to enter items in the menu.
RETURN button to return to the previous menu.
Picture, Sound, Channel,
English - 9
Picture
Mode : Standard
Cell Light : 7
Contrast : 95
Brightness : 45
Sharpness : 50
Colour : 50
Tint (G/R) : G50/R50
Detailed Settings
W.LINK

Plug & Play Feature
When the television is initially powered on, several basic customer settings proceed automatically
and subsequently.The following settings are available.
If you accidentally select the wrong country for your TV, the characters on the screen may be wrongly
displayed.
Any functions related to Digital TV (DVB) will only work in countries or areas where DVB-T (MPEG2)
digital terrestrial signals are broadcasted. Please confirm with your local dealer if you can receive
DVB-T signals. Although this TV set follows the DVB-T specification, maintaining compatibility with
the future coming DVB-T digital terrestrial broadcasts is not guaranteed. Several functions may not
be available in some countries.
The Screen Saver is activated if there is no remote control key input for longer than 1 minute while
¯
Plug & Play is running.
1 If the television is in standby mode, press the POWER
button on the remote control. The message
Les menus
Langue, Enr. démo, Canaux et Heure seront définis. is
Les menus Langue, Enr. démo, Canaux et Heure seront définis.
Plug & Play
displayed.
OK
2 Press the ENTER button, Select the OSD Language
menu is automatically displayed. Press the
button.
3 Select the appropriate language by pressing the ▲ or ▼
button. Press the
The message
ENTER button to confirm your choice.
Select ‘Home Use’ when installing this
ENTER
Plug & Play
Select the OSD Language
Menu Language : English
TV in your home. is displayed.
Plug & Play
Select 'Home Use' when installing this TV in your home.
4 Press the ◄ or ► button to select Store Demo or Home
Use, then press the ENTER button. The message to
Store Demo
check the connected status of the antenna is displayed.
The default selection is Home Use.
¯
We recommend setting the TV to Home Use mode
¯
for the best picture in your home environment.
Store Demo mode is only intended for use in retail
¯
environments.
If the unit is accidentally set to Store Demo mode
¯
and you want to return to
Home Use (Standard):
Select the channel source to memorize.
Digital & Analogue
Digital
Analogue
Plug & Play
Press the Volume button on the TV. When the
volume OSD is displayed, press and hold the
MENU
button on the TV for 5 seconds.
Plug & Play
5 Press the ▲ or ▼ button to select the channel source to
memorize. Press the ENTER button to select Start.
Auto Store in progress. Channel 6
Digital Channels : 0
Analogue Channels : --
Digital & Analogue: “Digital” and “Analogue” channels.
Digital: “Digital” channels.
Analogue: “Analogue” channels.
The channel search will start and end automatically.
Stop
Press the ENTER button at any time to interrupt the
memorization process.
After all the available channels are stored, the message Set the Clock Mode is displayed.
Entrer
▲
Nederlands
English
Soumi
▼
Move
Home Use
Move Enter
Enter Skip
Enter
EnterMove
1%
Start
Start
Start
Skip
Continued...
English - 10
To stop the search before it has finished, press the
¯
ENTER button with stop selected.
Press the ◄ or ► button to select Yes, then press
the ENTER button. The Auto Store menu then
reappears. Press the ENTER button when channel
memorization is completed.
6 The message Set the Clock Mode is displayed. Press
the ENTER button. Press the ▲ or ▼ button to select
Manual for setting the current time manually, then press
the ENTER button. The message Set current date and
time. is displayed.
If you select Auto, the message Enjoy your viewing
¯
is displayed. If you have received a digital signal, the
time will be set automatically.
7 Press the ◄ or ► button to move to Day, Month, Year,
Hour or Minute. Set the date and time you want by
pressing the ▲ or ▼ button, then press the ENTER
button.
You can set the Day, Month, Year, Hour and Minute
¯
directly by pressing the number buttons on the
remote control.
8 The message Enjoy your viewing. is displayed. When
you have finished, press the ENTER button.
Even if the ENTER button is not pressed, the
¯
message will automatically disappear after several
seconds.
Plug & Play
Auto Store is completed.
Digital channels: 20
Analogue channels: 36
OK
Plug & Play
Set the Clock Mode.
Clock Mode : Auto
Set current date and time
Day
01
Hour
00
Enjoy your viewing.
Auto
Manual
Plug & Play
Month
01
Minute
00
Plug & Play
Enter
Move
Skip
Enter Skip
Year
2008
SkipEnterAdjustMove
If you want to reset this feature …
1 Press the
MENU button to display the menu.
2 Press the ▲ or ▼ button to select Setup, then press the
ENTER button.
3 Press the ENTER button again to select Plug & Play.
4 Enter your 4 digit PIN number. The default PIN number of
a new TV set is “0-0-0-0”.
For further details on setting up options, refer to the
¯
pages 10-11.
The Plug & Play feature is only available in the TV
¯
mode.
OK
Setup
Plug & Play ►
Language : English
Time
Change PIN
Parental Lock
Subtitle
Teletext Language : ----
Preference
Plug & Play
The Menu Language, Store Demo, Channels and Time will
be set.
0~9
Enter PIN Return
English - 11
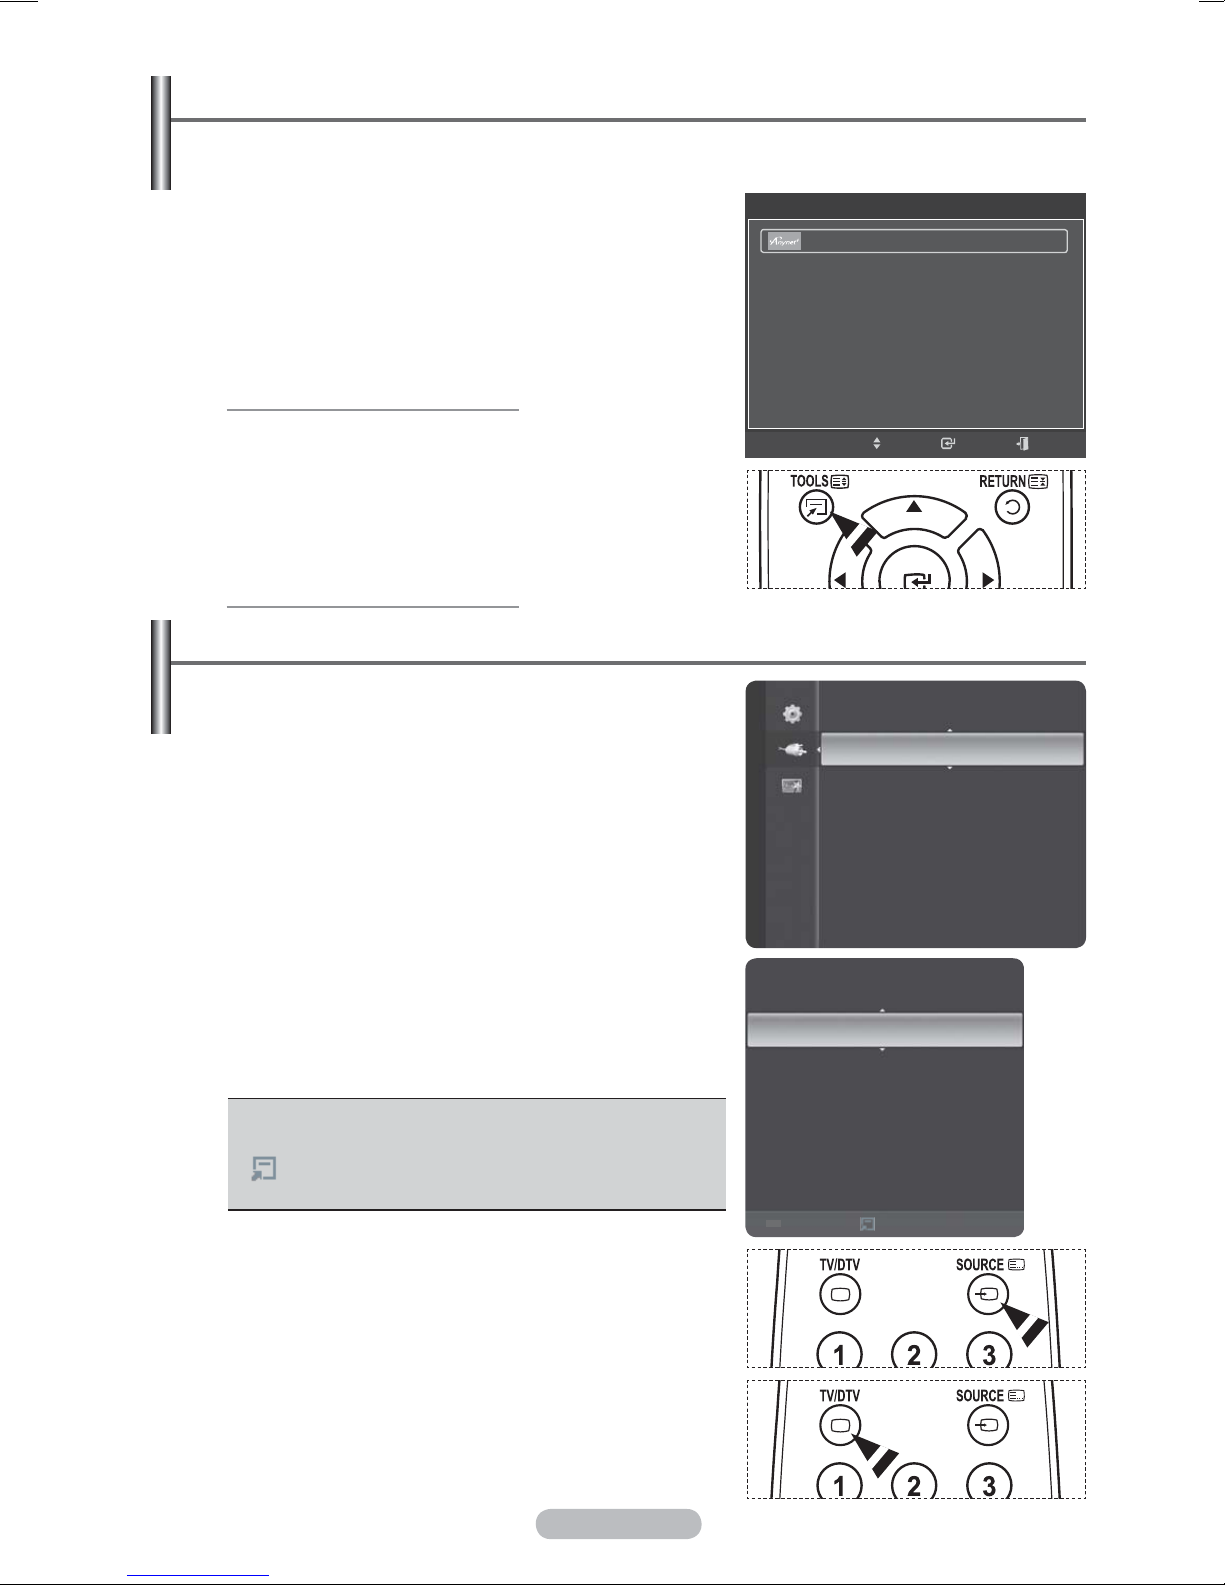
Using the TOOLS Button
You can use the TOOLS button to select your frequently used functions quickly and easily. The
“TOOLS” menu changes depending on which external input mode you are viewing.
1 Press the TOOLS button.
The Tools menu will appear.
2 Press the ▲ or ▼ button to select a menu, then press the
ENTER button.
3 Press the ▲/▼/◄/►/ENTER buttons to display, change, or
use the selected items.
For a more detailed description of each function, refer to
the corresponding page.
• Device List, see page 65
• Picture Mode, see page 27
• Sound Mode, see page 32
• Sleep Timer, see page 35
• SRS TS XT, see page 32
• Energy Saving, see page 38
• Dual I II, see page 34
• PIP, see page 38
Viewing External Signal Sources
You can switch between viewing signals from connected
equipment, such as a VCR, DVD, Set-Top Box, and the TV
source.
1 Press the MENU button to display the menu.
2 Press the ▲ or ▼ button to select Input, then press the
ENTER button.
3 Press the ENTER button again to select Source List.
4 Press the ▲ or ▼ button to select the signal source, then
press the ENTER button.
Available signal sources: TV,Ext1,Ext2, AV, S-Video,
Component, PC, HDMI1, HDMI2/DVI, HDMI3, USB
You can choose only those external devices that are
¯
connected to the TV.
Input
Tools
Device List
Picture Mode : Standard
Sound Mode : Standard
Sleep Timer : Off
SRS TS XT : Off
Energy Saving : Off
Dual I II : Mono
Move Enter Exit
Source List
Edit Name
Using the Color buttons on the remote with the Source list.
¯
• Red (Refresh): Refreshes the connecting external
devices.
•
(Option): Displays the Edit Name and Information
menus.
You can select these options simply by pressing the
¯
SOURCE button on the remote control.
To watch television programme again, press the TV/DTV
¯
button and select the channel number required.
English - 12
TV
Ext.1
Ext.2
AV
S-Video
Component
PC
Refresh Option
----
----
----
----
----
----
Editing Device Names
You can give a name to the external source.
1 Press the MENU button to display the menu.
2 Press the ▲ or ▼ button to select Input, then press the
ENTER button.
3 Press the ▲ or ▼ button to select Edit Name, then press
the
ENTER button.
4 Press the ▲ or ▼ button to select the external source to
be edited, then press the
ENTER button.
5 Select the required device by pressing ▲ or ▼, then press
the
ENTER button.
Available device names:
VCR, DVD, Cable STB, Satellite
STB, PVR STB, AV Receiver, Game, Camcorder, PC, TV,
IPTV, Blu-Ray, HD DVD, Digital Media Adapter.
6 Press the EXIT button to exit.
Input
Ext.1 :
Ext.2 :
AV :
S-Video :
Component :
PC :
HDMI1 :
Source List
Edit Name ►
Edit Name
----
►
----
----
----
----
----
----
Enter ReturnMove
Edit Name
Ext 1 :
Ext 2 :
AV :
S-Video :
Component :
PC :
HDMI1 :
----
----
----
VCR
----
DVD
----
Cable STB
----
Satellite STB
PVR STB
Enter ReturnMove
English - 13
Storing Channels Automatically
You can scan for the frequency ranges available to you (availability depends on your country).
Automatically allocated programme numbers may not correspond to actual or desired programme
numbers. However you can sort numbers manually and clear any channels you do not wish to
watch.
1 Press the MENU button to display the menu.
2 Press the ▲ or ▼ button to select Channel, then press the
ENTER button.
3 Press the ▲ or ▼ button to select Auto Store, then press
the
ENTER button.
4 Press the ▲ or ▼ button to select the channel source to
memorize. Press the
Digital & Analogue: “Digital” and “Analogue”
¯
channels.
ENTER button to select Start.
Digital: “Digital” channels.
Analogue: “Analogue” channels.
Scans for all channels with active broadcast stations
¯
and stores them in the TV’s memory.
If you want to stop Auto Store, press the ENTER
¯
button.
The
Select
the
5 Press the
When there is a locked channel by Channel Lock
¯
Stop Auto Store? message will be displayed.
Yes by pressing the ◄ or ► button, then press
ENTER button.
EXIT button to exit.
setting, PIN input screen appears. (refer to page 25)
Channel
Auto Store
Manual Store
Full Guide
Mini Guide
Default Guide : Mini Guide
Channel List
Channel Mode : Added Channels
Child Lock : On
Select the channel source to memorize.
Digital & Analogue
Digital
Analogue
Auto Store is progress. Channel 6
Digital Channels : 0
Analogue Channels : --
Auto Store
Auto Store
►
EnterMove
Start
Start
Start
Return
4%
Stop
Plug & Play
Auto Store is incomplete.
Digital channels: 20
Analogue channels: 36
OK
Enter
Enter Skip
Return
English - 14
Storing Channels Manually
You can store television channels, including those received via cable networks.
When storing channels manually, you can choose:
Whether or not to store each of the channels found.
The programme number of each stored channel which you wish to identify.
1 Press the MENU button to display the menu.
2 Press the ▲ or ▼ button to select Channel, then press the
ENTER button.
Channel
3 Press the ▲ or ▼ button to select Manual Store, then
press the
ENTER button.
4 Select the required option by pressing the ▲ or ▼ button,
then press the
5
When you are satisfied with your setting, press the ENTER button.
ENTER button.
6 Press the EXIT button to exit.
Digital Channel
Channel
Press the ▲, ▼ or numeric buttons (0~9) to select a channel.
The available channels are 5~69. The corresponding
frequency for the selected channel is automatically set
Channel
Frequency
You can specify the frequency (KHz) using the numeric buttons
(0~9). If you do not know the exact frequency, follow the above
step to select the frequency automatically using channel.
Bandwidth
Press the ▲ or ▼ button to select a bandwidth. The
available bandwidths are 7 and 8 MHz.
Analogue Channel
Programme (Programme number to be assigned to a
channel)
Press the ▲ or ▼ button until you find the correct number.
You can also select the channel number directly by
¯
pressing the numeric buttons (0~9).
Colour System: Auto/PAL/SECAM/NTSC4.43
Press the ▲ or ▼ button to select the required colour standard.
Sound System: BG/DK/I/L
Press the ▲ or ▼ button to select the required sound
standard.
Channel (When you know the number of the channel to be stored)
Press the ▲ or ▼ button to select C (Air channel) or S
(Cable channel).
Press the ► button, then press the ▲ or ▼ button to select
C
the required number.
You can also select the channel number directly by
¯
pressing the numeric buttons (0~9).
If there is abnormal sound or no sound, re-select the sound standard required.
¯
Search (When you do not know the channel numbers)
Press the ▲ or ▼ button to start the search.
The tuner scans the frequency range until the first channel or the channel that you selected is
received on the screen.
Store (When you store the channel and associated programme number)
Set to
OK by pressing the ENTER button.
Channel mode
¯
-
P (Programme mode): When completing tuning, the broadcasting stations in your area have been
assigned to position numbers from P00 to P99. You can select a channel by entering the position
number in this mode.
-
C (Air channel mode): You can select a channel by entering the assigned number to each air
broadcasting station in this mode.
-
S (Cable channel mode): You can select a channel by entering the assigned number for each cable
channel in this mode.
English - 15
Auto Store
Manual Store ►
Full Guide
Mini Guide
Default Guide : Mini Guide
Channel List
Channel Mode : Added Channels
Child Lock : On
Fine Tune
Auto Store
Manual Store
Full Guide
Mini Guide
Default Guide : Mini Guide
Channel List
Channel Mode : Added Channels
Child Lock : On
Fine Tune
Manual Store
Channel
5
Programme
1
Channel
Frequency
178750 KHz
AdjustMove
Manual Store
Colour SystemBGSound System
AUTO
Search
--
40 MHz
Digital Channel
Analogue Channel
Bandwidth
8 MHz
Search
AdjustMove
Return
Store
?
Return
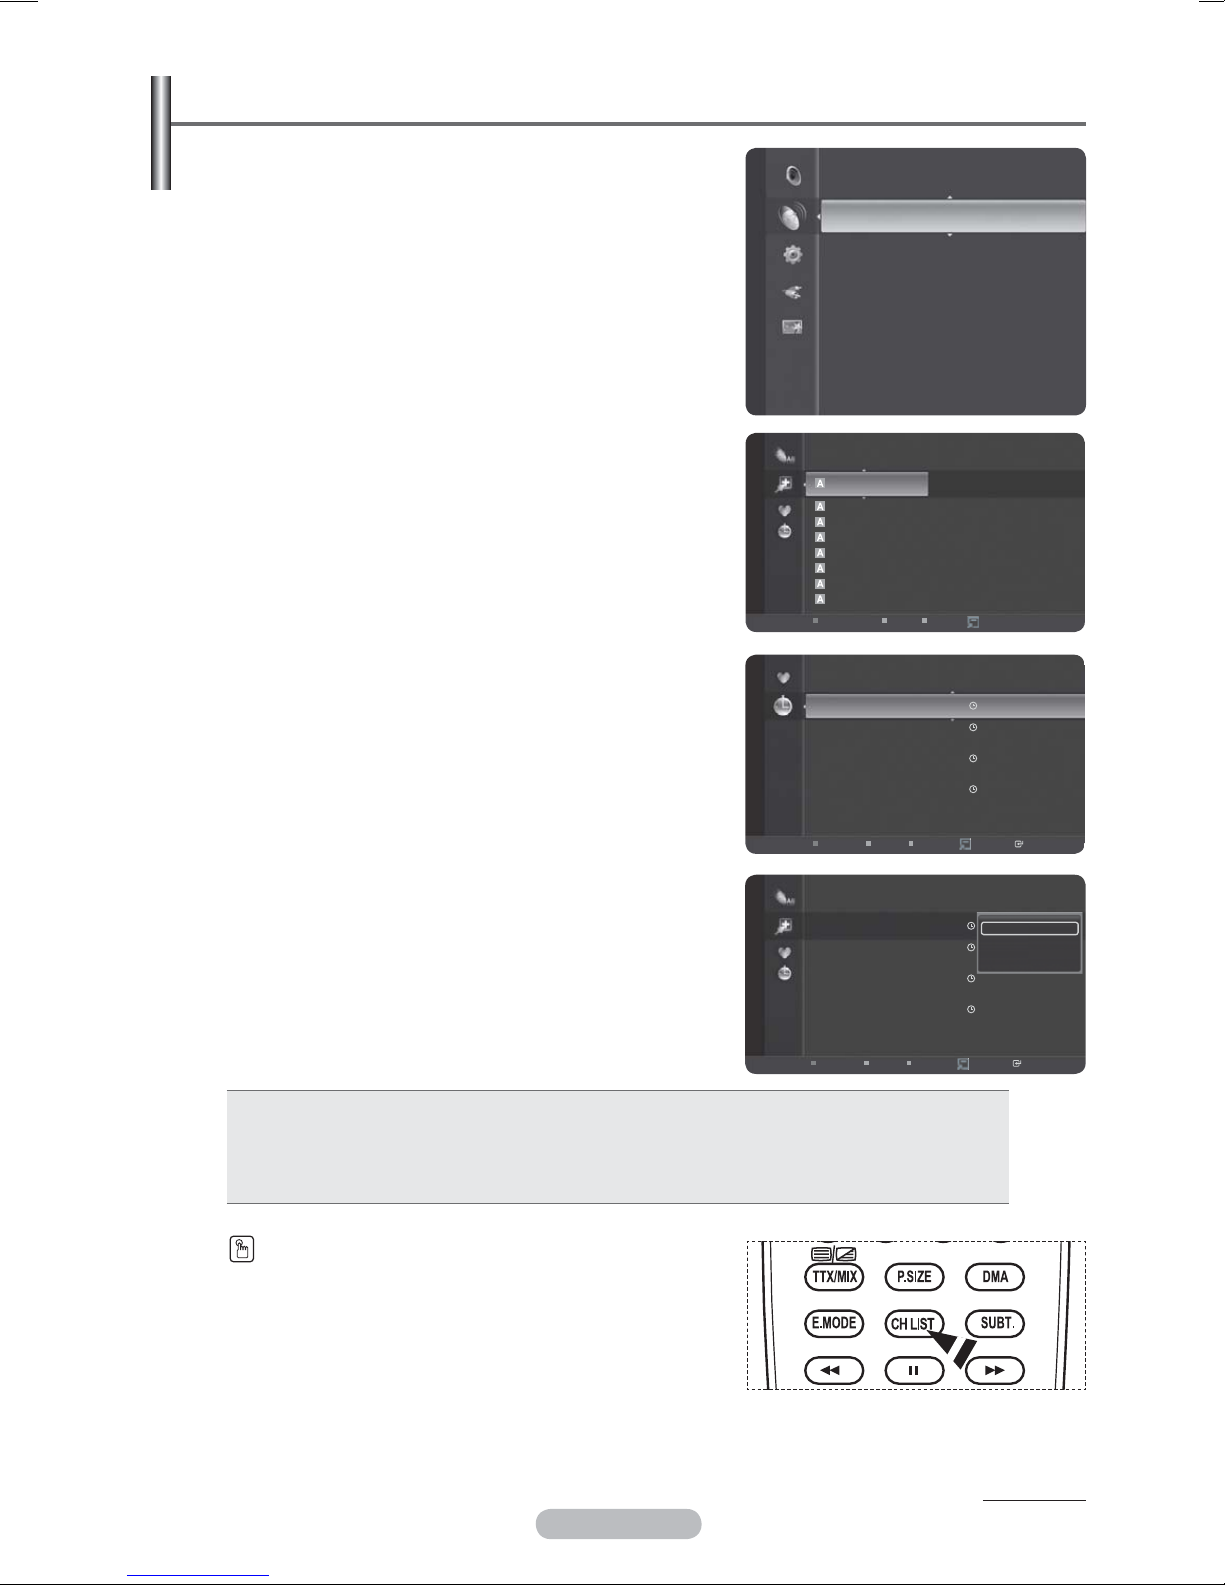
Viewing the EPG (Electronic Programme Guide) Information
The EPG (Electronic Programme Guide) information is provided by the broadcasters. Programme
entries may appear blank or out of date as a result of the information broadcast on a given
channel. The display will dynamically update as soon as new information becomes available.
1 Press the MENU button to display the menu.
2 Press the ▲ or ▼ button to select Channel, then press the
ENTER button.
3 Press the ▲ or ▼ button to select Full Guide, Mini Guide or
Default Guide then press the ENTER button.
Full Guide
For the six channels indicated in the left-hand column, displays
the Current programme and the Next programme information.
One hours of programme information is displayed
¯
which may be scrolled forwards or backwards in time.
Mini Guide
The information of each program is displayed by each line
on the current channel Mini Guide screen from the current
program onwards according to the program starting time order.
Select a programme by pressing the
▲/▼/◄/► button.
If the next progrmme is selected,
it is scheduled with the clock icon
▲/▼/◄/►,
(ENTER)
displayed. If the
pressed again, press the ▲/▼/◄/►
button to select
ENTER button is
Cancel Schedules,
the scheduling is canceled with the
clock icon gone.
For details about scheduling
programmes, refer to the section.
RED
Toggle between the
Full Guide.
Mini Guide or
Full Guide: Scroll backwards quickly
GREEN
(24 hours).
Mini Guide: Display next page quickly.
Full Guide: Scroll forwards quickly
YELLOW
(24 hours).
Mini Guide: Display previous page
quickly.
Channel
Full Guide
Today 12:00 - 13:00 13:00 - 14:00
▲801 BBC NEWS 24 BBC Ne.. BBC News
802 BBC ONE BBC Ne.. Departure Lounge
803 BBC THREE
804 BBC THREE
805 BBCi
▼806 Canal 7
Watch
Channel
Auto Store
Manual Store
Full Guide
Mini Guide
Default Guide : Mini Guide
Channel List
Channel Mode : Added Channels
Child Lock : On
Fine Tune
Signal Information
DTV 805 BBCi
BBCi
18:00~0:00
BBCi-featuring news, sport, weather and TV..
This is BBC THREE
This Weakest L..
BBCi
information
INFO
Manual Store
Full Guide
Mini Guide
Default Guide : Mini Guide
Channel List
Channel Mode : Added Channels
Child Lock : On
Fine Tune
Signal Information
LNA : On
Mini Guide
18:08 Fri 5 Aug
The 7 O’..
Tsunami..
No Information
+24 Hours
Exit
BLUE Exit the guide.
INFO button for the detailed
information. Channel Number,
Running Time, Status Bar, Parental
Level, Video Quality Information
INFO
(HD/SD), Sound Modes, Subtitle or
Teletext, languages of Subtitle or
Teletext and brief summary of the
highlighted programme are included
on the detailed information. “…” will
be appeared if the summary is long.
Default Guide: Mini Guide/Full Guide
Press the ▲ or ▼ button to select Mini Guide or Full
Guide. Press the ENTER button. The selected guide menu
is displayed.
You can also display the guide menu simply by
¯
pressing the
GUIDE button.
English - 16
Mini Guide DTV 801 BBC NEWS 24
18:00 BBC News
18:30 Sportsday
19:00 BBC News
Watch
Channel
information
INFO
Full Guide Exit
Full Guide
Mini Guide
Default Guide
Channel List
Channel Mode : Added Channels
Child Lock : On
Fine Tune
Signal Information
LNA : On
Next Page
Mini Guide
: Mini GuideMini Guide
Full Guide

Viewing All Channels
Show all currently available channels. To use the Channel List
function, first run Auto Program.
1 Press the MENU button.
Press the ▲ or ▼ button to select Channel, then press the
ENTER button.
Press the ▲ or ▼ button to select Channel List, then press
the ENTER button.
2 Press the ◄ button to select Added Channels.
3 Press the ▲ or ▼ button to select All Channels, then press
the ENTER button. Shows all currently available channels.
4 Press the ▲ or ▼ button to select a channel to view, then
press the ENTER button.
Mini Guide
Channel
Added Channels All Channels
Default Guide :Mini Guide
Channel List
Channel Mode : Added Channels
Child Lock : On
Fine Tune
Signal Information
LNA : Off
824 UKTV Gold
825 UKTV style
1 C --
2 C -3 C -4 C -5 C -6 C -7 C -8 C --
All Channel Type Zoom
824 UKTV Gold
825 UKTV style
1 C --
2 C -3 C -4 C -5 C -6 C -7 C -8 C --
All
Channel Type Zoom
Select Option
Select Option
Press the CH LIST button on the remote control to bring up
the channel lists.
Using the Color buttons on the Remote with the Channel List
• Red (Channel Type): Toggle between your “TV”, “Radio”,
“Data/Other” and “All”.
• Green (Zoom): Enlarges or shrinks a channel number.
• Yellow (Select): Selects multiple channel lists.
•
(Option): Displays the “Delete”(or “Add”), “Add to
Favourite”(or “Delete from Favourite”), “Lock”,
“Timer Viewing”, “Edit Channel Name”, “Sort”,
“Edit Channel Number”, “Select All”, “Deselect
All” or “Auto Store” menu. (The Options menus
may differ depending on the situation.)
A gray-colored channel indicates the channel has been deleted. The Add menu only appears for
¯
deleted channels.
A channel marked with ♥ mark means the channel has been set as a Favourite.
¯
The Delete from Favourite menu only appears for channels with the ♥ mark.
English - 17
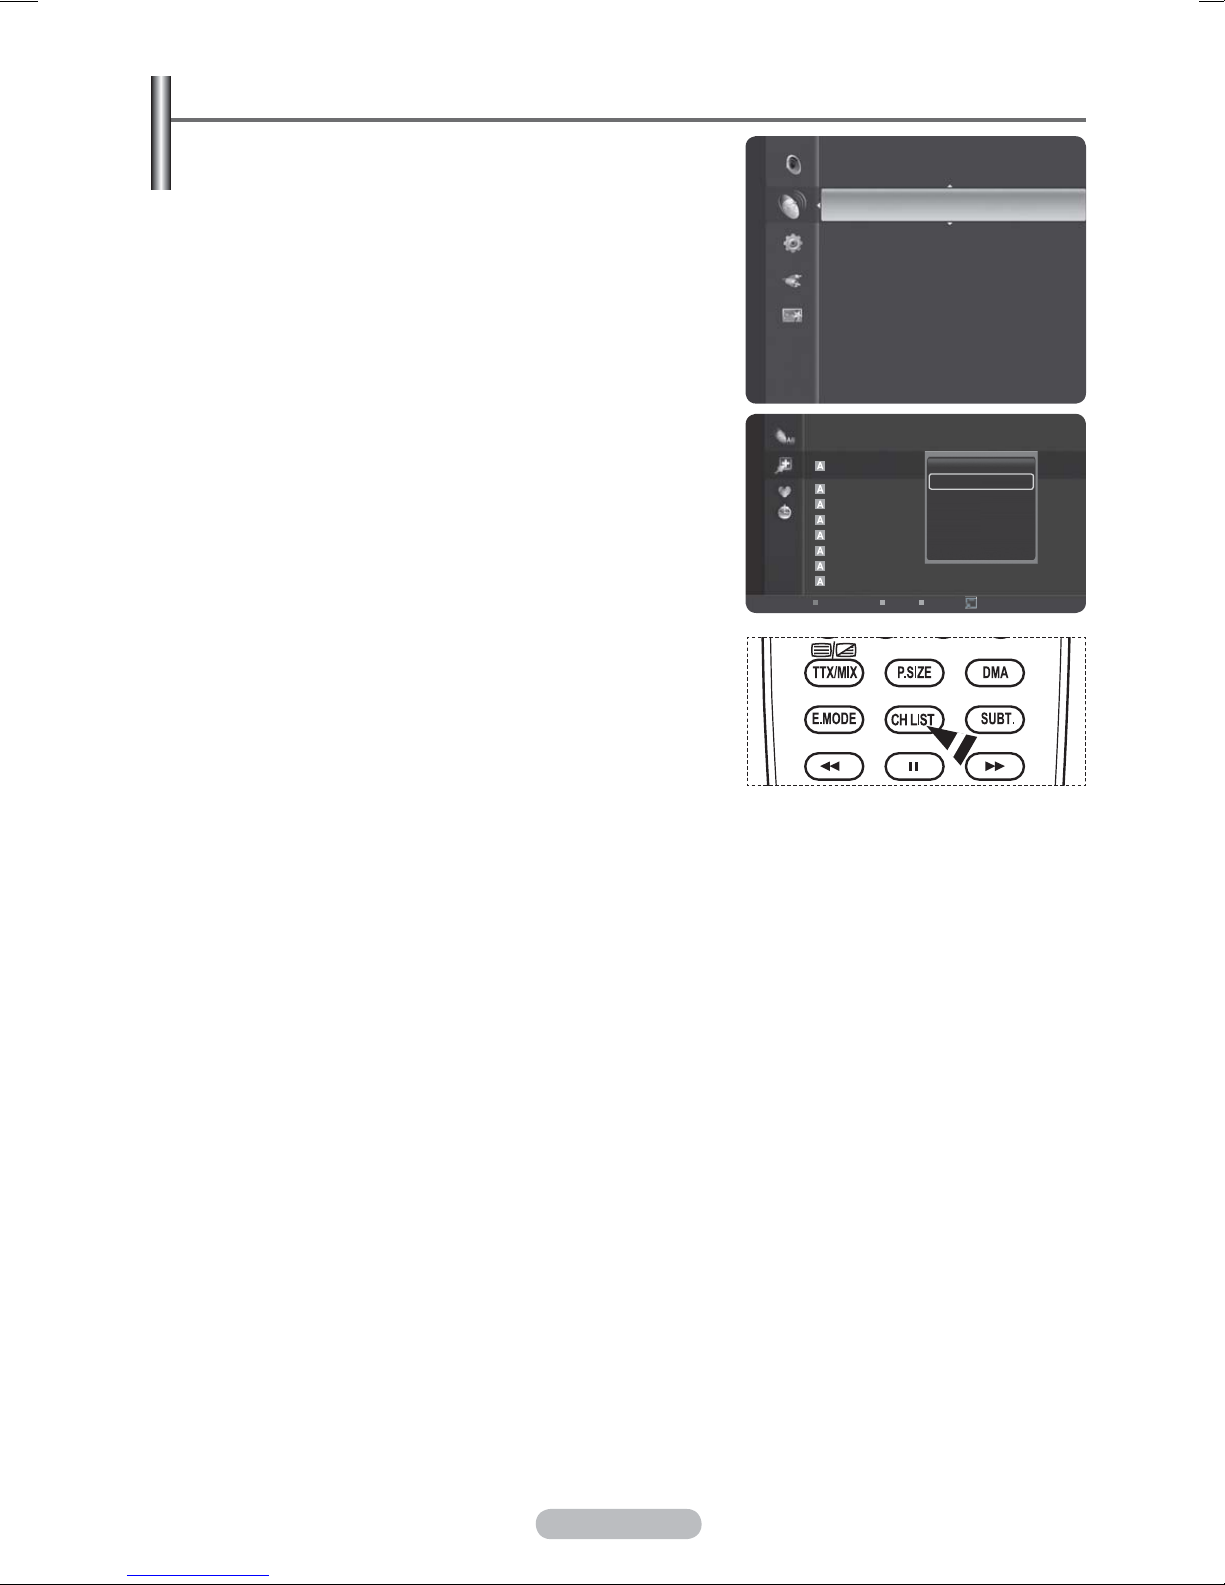
Erasing and Adding Channels
You can delete or add a channel to display the channels
you want.
Channel
1 Press the MENU button.
Press the ▲ or ▼ button to select Channel, then press the
ENTER button.
Press the ▲ or ▼ button to select Channel List, then
press the ENTER button.
2 Press the ◄ button to select Added Channels.
3 Press the ▲ or ▼ button to select All Channels.
Shows all currently available channels. Press the ENTER
button.
4 Press the ▲ or ▼ button to select a channel to delete, then
press the TOOLS button.
Added Channels
5 Press the ENTER button to select Delete.
All deleted channels will be shown on All Channels menu.
6 Press the EXIT button to exit.
You can also add a channel to the All Channels menu
¯
in the same manner.
A channel must be deleted before it can be added
¯
back to the Added Channels list.
To Add (Restore) a channel back to the Added
¯
Channel List, follow steps 1-3 above, press the ▲ or
▼ button to select a channel to add, the press the
All Channels
TOOLS button. Press the ENTER button to select Add.
Mini Guide
Default Guide : Mini Guide
Channel List
Channel Mode : Added Channels
Child Lock :On
Fine Tune
Signal Information
LN A : Of f
824 UKTV Gold
825 UKTV style
1 C --
2 C -3 C -4 C -5 C -6 C -7 C -8 C --
All Channel Type Zoom
824 UKTV Gold
825 UKTV style
1 C --
2 C -3 C -4 C -5 C -6 C -7 C -8 C --
All
Channel Type Zoom
Select Option
Select Option
Press the CH LIST button on the remote control to
¯
bring up the channel lists.
Added Channels
All
824 UKTV Gold
825 UKTV style
1 C --
2 C -3 C -4 C -5 C -6 C -7 C -8 C --
Channel Type Zoom
Delete
Add to Favourite
Timer Viewing
Edit Channel Name
Sort
Select All
▼
Select Option
English - 18
Setting Your Favourite Channels
You can set channels you watch frequently as Favourite.
1 Press the MENU button.
Channel
Press the ▲ or ▼ button to select Channel, then press the
ENTER button.
Press the ▲ or ▼ button to select Channel List, then
press the ENTER button.
2 Press the ◄ button to select Added Channels.
3 Press the ▲ or ▼ button to select All Channels, then
press the ENTER button.
Shows all currently available channels.
¯
4 Press the ▲ or ▼ button to select a channel as a favourite
channel.
Adding multiple channels to Favourite.
¯
All Channels
Press the ▲ or ▼ button to select the desired channel
in the channel list. Then press the yellow button.
Repeat the above operation to select multiple
channels. The mark appears to the left of the
selected channels.
5 Press the TOOLS button.
6 Press the ▲ or ▼ button to select Add to Favourite, then
press the ENTER button.
The “♥” symbol will be displayed and the channel will be set
as a favourite.
7 To cancel your favourite channel selection, press the
TOOLS button when a favourite channel is selected. Press
the ▲ or ▼ button to select Delete from Favourite, then
press the ENTER button. The channel is deleted from
Favourites and the “♥” mark disappears.
Press the EXIT button to exit.
You can also Add or Delete a channel from Favourite in the Added Channels menu in the same
¯
manner.
All favourite channels will be shown on Favourite menu.
¯
Press the CH LIST button on the remote control to bring up the channel lists.
¯
Mini Guide
Default Guide : Mini Guide
Channel List
Channel Mode : Added Channels
Child Lock : On
Fine Tune
Signal Information
LN A : Of f
824 UKTV Gold
825 UKTV style
1 C --
2 C -3 C -4 C -5 C -6 C -7 C -8 C --
All Channel Type Zoom
Delete
Add to Favourite
Timer Viewing
Edit Channel Name
Sort
Select All
Select Option
▼
English - 19
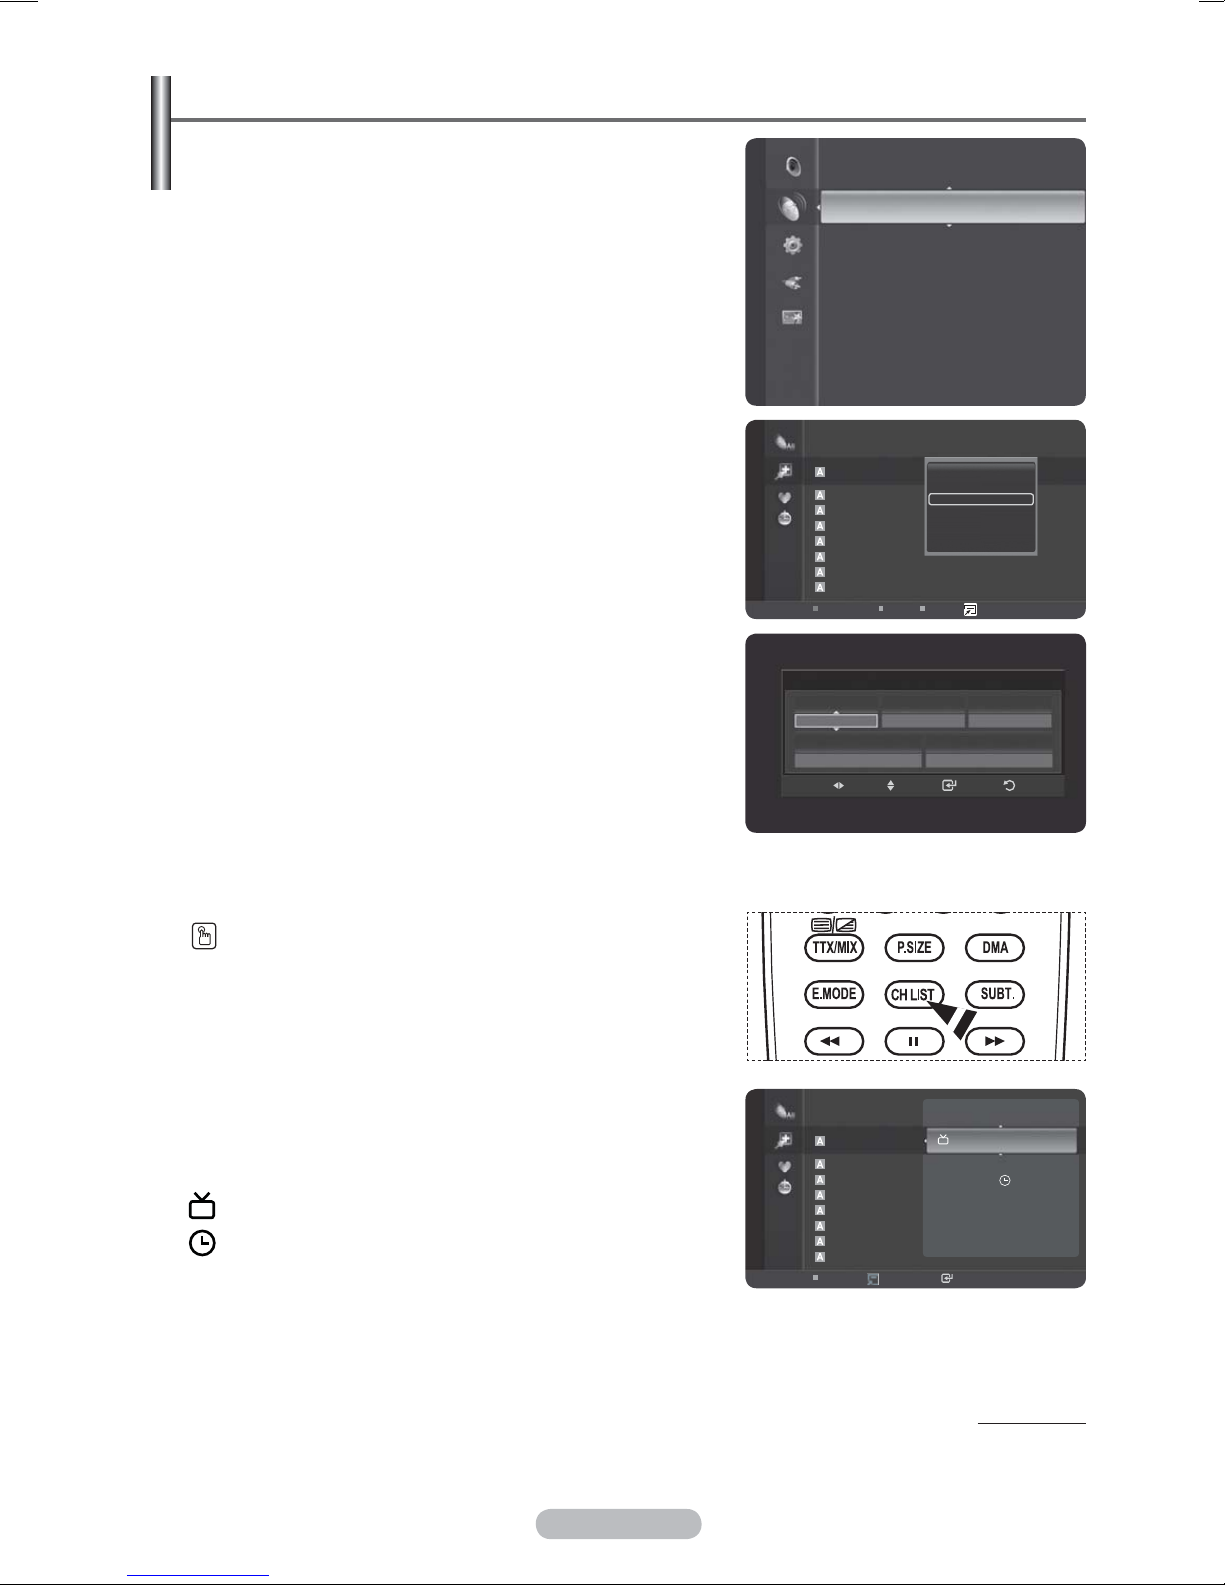
Reserving a Program (Time Viewing)
If you reserve a program you want to watch, the channel is
automatically switched to the reserved channel in the Channel
Channel
List; even when you are watching another channel.
To reserve a program, set the current time fi rst. See pages 35.
Reserved chanels can only be set if they are in the Channel List
(See page 17).
1 Press the MENU button.
Press the ▲ or ▼ button to select Channel, then press the
ENTER button.
Press the ▲ or ▼ button to select Channel List, then
press the ENTER button.
2 Press the ▲ or ▼ button to select a channel, then press
Added Channels
the TOOLS button.
3 Press the ▲ or ▼ button to select Timer Viewing, then
press the ENTER button.
The Reserve a Program (Timer Viewing) screen appears.
4 Press the ▲/▼/◄/► buttons to reserve a program and
then press the ENTER button.
Air
Reserving a program has been completed.
Press the EXIT button to exit.
You can also reserve a program in the All Channels or
¯
Favourites menus using the same procedures.
For information on how to confirm a viewing
¯
reservation, refer to page 21. Only memorized
channels can be reserved.
Mini Guide
Default Guide :Mini Guide
Channel List
Channel Mode : Added Channels
Child Lock : On
Fine Tune
Signal Information
LNA : Off
824 UKTV Gold
825 UKTV style
1 C --
2 C -3 C -4 C -5 C -6 C -7 C -8 C --
Channel Type
Antenna Channel Repeat
DTV
Date
01-01-2008
Delete
Delete from Favourite
Timer Viewing
Edit Channel Name
Sort
Select All
Zoom
Select Option
Timer Viewing
1 Once
▼
Start Time
10:09
Enter ReturnMove Adjust
You can set the channel, month, day, year, hour and
¯
minute directly by pressing the number buttons on the
remote control.
Press the CH LIST button on the remote control to bring
up the channel lists.
Digital Program Guide and Viewing Reservation
When a digital channel is selected, and you press the ► button,
Added Channels
the Program Guide for the channel appears. You can reserve a
program according to the procedures described above.
: A program currently being broadcast.
: A reserved program.
Air Zoom
824 UKTV Gold
825 UKTV style
1 C --
2 C -3 C -4 C -5 C -6 C -7 C -8 C --
Option
1/22/2008
12:47 2.0
3:54 HD 1 99
6:44 HD 1 100
7:49 HD
8:59 +
10:08
10:37
Watch
Continued...
English - 20
Confirming a Viewing Reservation
You can view, modify or delete a reservation.
1 Press the MENU button.
Channel
Press the ▲ or ▼ button to select Channel, then press the
ENTER button.
Press the ▲ or ▼ button to select Channel List, then
press the ENTER button.
2 Press the ◄ button to select Added Channels.
3 Press the ▲ or ▼ button to select Programmed, then
press the ENTER button.
You can view the program reservations.
Modifying a viewing reservation
Added Channels
4 To select a reservation item to be modifi ed, press the ▲ or
▼ button and then press the TOOLS button.
5 Press the ENTER button to select Change Info.
6 Press the ▲/▼/◄/► buttons to change a reservation
setting and then press the ENTER button.
The reservation modifi cation is applied.
Canceling a reservation
Programmed
4 To select a reservation item to be canceled, press the ▲ or
▼ button, and then press the TOOLS button.
5 Press the ▲ or ▼ button to select Cancel Schedules,
then press the ENTER button.
6 Press the ◄ or ► button to select OK, then press the
ENTER button.
The viewing reservation has been canceled.
Programmed
Press the EXIT button to exit.
Mini Guide
Default Guide :Mini Guide
Channel List
Channel Mode : Added Channels
Child Lock : On
Fine Tune
Signal Information
LNA : Off
824 UKTV Gold
825 UKTV style
1 C --
2 C -3 C -4 C -5 C -6 C -7 C -8 C --
Channel Type
Air
2008/2/3
3:15 1 Air
4:15 2 Air No Program Name
2008/2/4
2:14 3 Air No Program Name
2008/2/5
2:15 4 Air No Program Name
Air Antenna Zoom
2008/2/3
3:15 1 Air No Program Name
4:15 2 Air No Program Name
2008/2/4
2:14 3 Air No Program Name
2008/2/5
2:15 4 Air No Program Name
Zoom Select Option
No Program Name
Select Option Information
Change Info
Cancel Schedules
Information
Select All
Programmed Menu
• Change Info: Select to change a viewing reservation.
• Cancel Schedules: Select to cancel a viewing reservation.
• Information: Select to view a viewing reservation.
• Select All / Deselect All:
Press the CH LIST button on the remote control to
bring up the channel lists.
Air Antenna Zoom
Select Option Information
You can select(or Deselect) all channel in the channel list.
Continued...
English - 21
Assigning Names to Channels
Channel names will be assigned automatically when
channel information is broadcast. These names can be
changed, allowing you to assign new names.
Editing the Channel Name-Analogue
1 Press the MENU button to display the menu.
2 Press the ▲ or ▼ button to select Channel, then press the
ENTER button.
3 Press the ▲ or ▼ button to select Channel List, then
press the ENTER button.
4 Press the ▲ or ▼ button to select the channel to be
assigned to a new name, then press the TOOLS button.
5 Press the ▲ or ▼ button to select Edit Channel Name,
then press the ENTER button.
6 Press the ▲/▼/◄/► button to select a letter, a number, or
a symbol, then press the ENTER button.
• Number buttons: You can enter numbers.
• Red button: You can switch between English and Characters.
• Green button: You can delete an already entered character.
• Yellow button: You can enter a blank space.
• Blue button: Press this button to finish renaming a channel.
7 Repeat steps 5 to 6 for each channel to be assigned to a
new name.
8 Press the EXIT button to exit.
Mini Guide
Channel
Default Guide : Mini Guide
Channel List
Channel Mode : Added Channels
Child Lock : On
Fine Tune
Signal Information
LNA : Off
Added Channels
824 Television
825 UKTV style
1 C --
2 C -3 C -4 C -5 C -6 C -7 C -8 C --
All Channel Type Zoom
6
A
V
Select Option ►Next Program
Edit Channel Name
_
Delete
Delete form Favourite
Timer Viewing
Edit Channel Name
Sort
Select All
▼
Number
Character
Delete
Blank
Done
Enter ReturnMove
Editing the Channel Number-Digital
Added Channels
1 Press the MENU button.
Press the ▲ or ▼ button to select Channel, then press the
ENTER button.
Press the ▲ or ▼ button to select Channel List, then
press the ENTER button.
2 Select the channel number that you wish to edit by
pressing the ▲ or ▼ button repeatedly, then press the
TOOLS button.
3 Press the ▲ or ▼ button to select Edit Channel Number,
then press the ENTER button.
4 Then you can edit the Channel Number pressing the ▲ or
▼ button repeatedly. You can also edit the channel number
by pressing the number buttons on the remote control.
824 Television
825 UKTV style
826 UKTB style
2 C -3 C -4 C -5 C -6 C -7 C -8 C --
All Channel Type Zoom
Edit Channel Number
Channel
803
Delete
Add to Favourite
Timer Viewing
Edit Channel Number
Select All
Auto Store
TOOLS
Select Option
Name
BBC Radio 1
ReturnEnterMove
English - 22
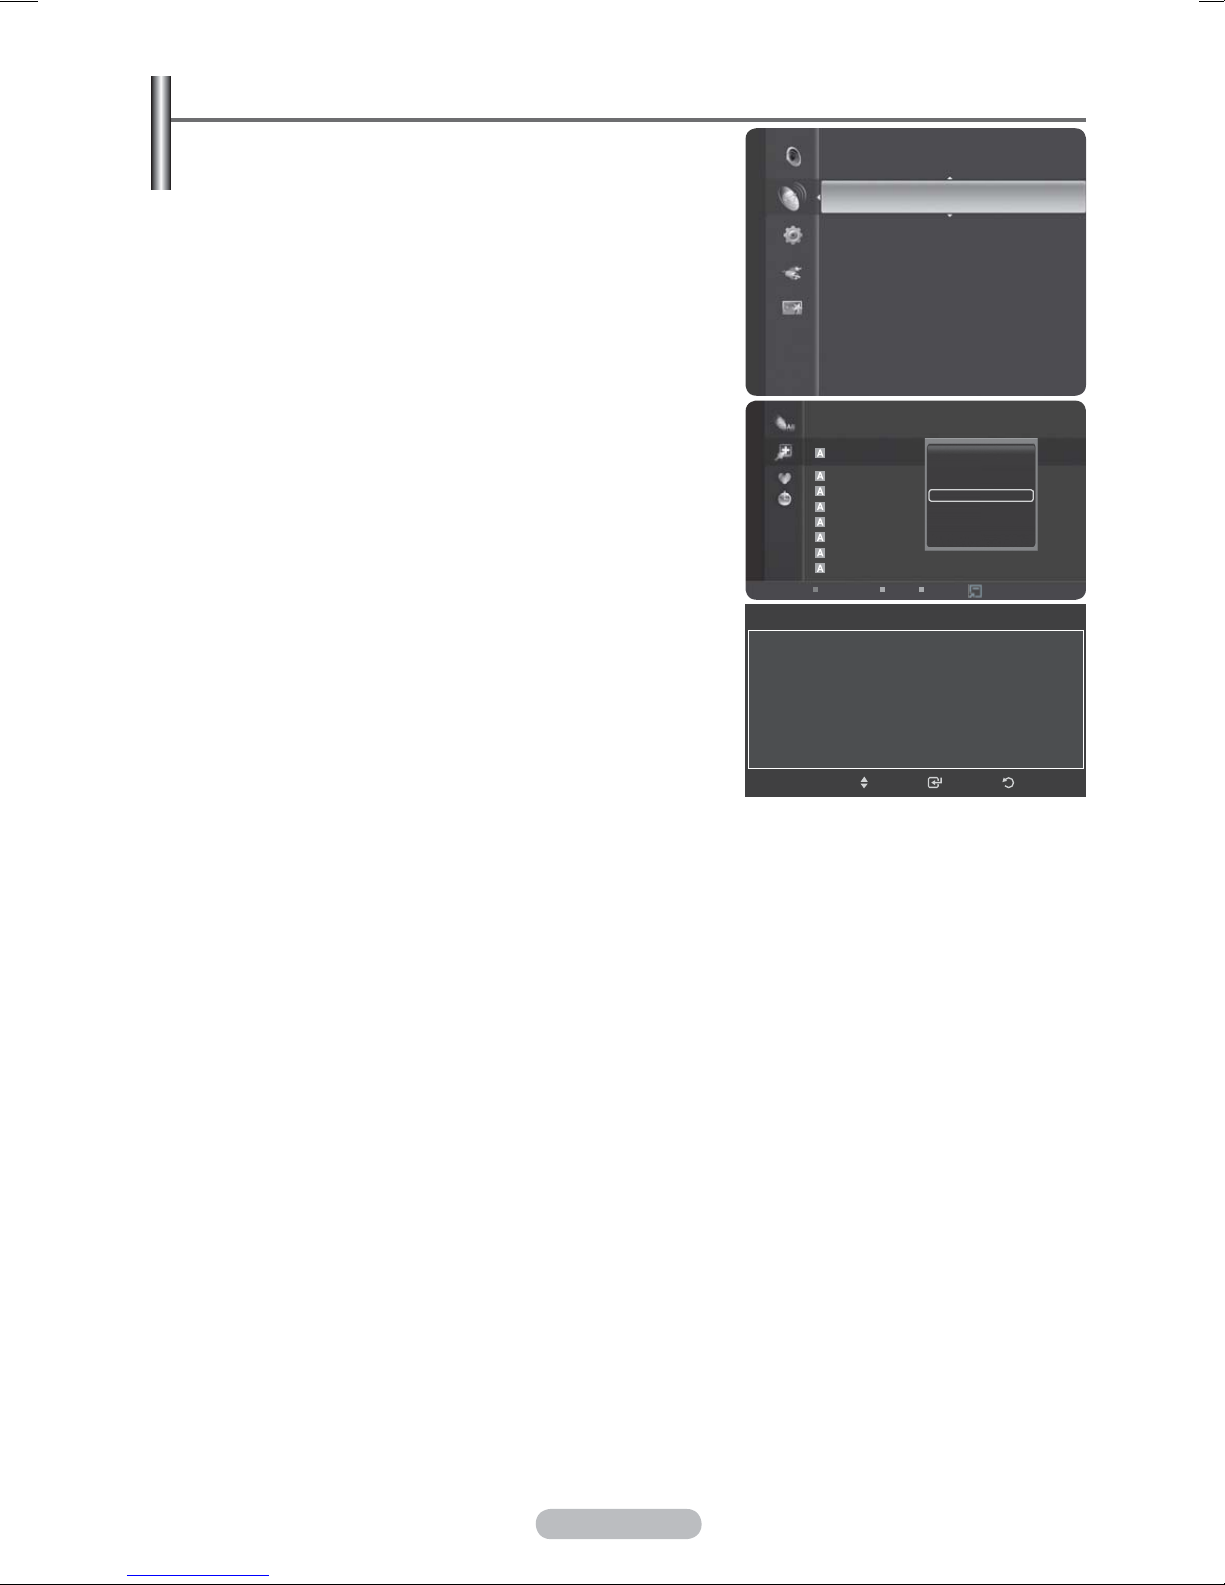
Sorting the Stored Channels - Analogue
This operation allows you to change the programme
numbers of the stored channels.
Channel
This operation may be necessary after using the auto
store.
1 Press the MENU button to display the menu.
2 Press the ▲ or ▼ button to select Channel, then press the
ENTER button.
3 Press the ▲ or ▼ button to select Channel List, then
press the ENTER button.
4 Press the TOOLS button.
5 Press the ▲ or ▼ button to select Sort, then press the
ENTER button.
Added Channels
6 Select the channel that you wish to move by pressing the
▲ or ▼ button, then press the ENTER button.
7 Select the number of the programme to which the channel
is to be moved by pressing the ▲ or ▼ button.
Press the ENTER button. The channel is moved to its new
position and all other channels are shifted accordingly.
8 Repeat steps 4 to 7 until you have moved all the channels
to the required programme numbers.
9 Press the EXIT button to exit.
0 C-1 C04
2 C05
3 C06
4 C08
5 C09
Mini Guide
Default Guide : Mini Guide
Channel List
Channel Mode : Added Channels
Child Lock : On
Fine Tune
Signal Information
LNA : Off
824 Television
825 UKTV style
1 C --
2 C -3 C -4 C -5 C -6 C -7 C -8 C --
All Channel Type Zoom
Delete
Delete form Favourite
Timer Viewing
Edit Channel Name
Sort
Select All
Select Option
Sort
Move
▼
▼
ReturnEnter
English - 23
Selecting and Deselecting All Channels
1 Press the MENU button.
Press the ▲ or ▼ button to select Channel, then press the
ENTER button.
Press the ▲ or ▼ button to select Channel List, then
press the ENTER button.
2 Press the ▲ or ▼ button to select the Channel to be
assigned a new name, then press the TOOLS button.
3 Press the ▲ or ▼ button to select Select All or Deselect
Added Channels
824 Television
825 UKTV style
1 C --
2 C - 3 C --
w
4 C --
5 C - 6 C - 7 C - 8 C --
All Channel Type Zoom
All, then press the ENTER button.
You can select(or Deselect) all channel in the channel list.
¯
The mark appears to the left of the selected channels.
¯
Storing Channels in Memory (Auto Store)
1 Press the MENU button.
Press the ▲ or ▼ button to select Channel, then press the
ENTER button.
Press the ▲ or ▼ button to select Channel List, then press
the ENTER button.
2 Press the ▲ or ▼ button to select the channel to be
assigned a new name, then press the TOOLS button.
3 Press the ▲ or ▼ button to select Auto Store, then press
the ENTER button.
For further details on setting up options, refer to page 14.
¯
When there is a locked channel by Channel Lock setting, PIN input screen appears.
¯
(refer to page 25)
Added Channels
824 Television
825 UKTV style
1 C --
2 C -3 C -4 C -5 C -6 C -7 C -8 C --
All Channel Type Zoom
▲
Add to Favourite
Timer Viewing
Edit Channel Name
Sort
Select All
Auto Store
Select Option
▲
Add to Favourite
Timer Viewing
Edit Channel Name
Sort
Select All
Auto Store
Select Option
Setting the Channel Mode
You can display either the added channels list or the favourite
channels list when the CH LIST button on the remote control is
pressed.
1 Press the MENU button.
Press the ▲ or ▼ button to select Channel, then press the
ENTER button.
Press the ▲ or ▼ button to select Channel Mode, then
press the ENTER button.
2 Press the ▲ or ▼ button to select Added Channels or
Favourite Channels, then press the ENTER button.
3 Press the EXIT button to exit.
Channel
Channel
Default Guide : Mini Guide
Channel List
Channel Mode : Added Channels
Child Lock : On
Fine Tune
Signal Information
LNA : Off
Default Guide : Mini Guide
Channel List
Channel Mode : Added Channels
Child Lock : On
Fine Tune
Signal Information
LNA : Off
Added Channels
Favourite Channels
English - 24
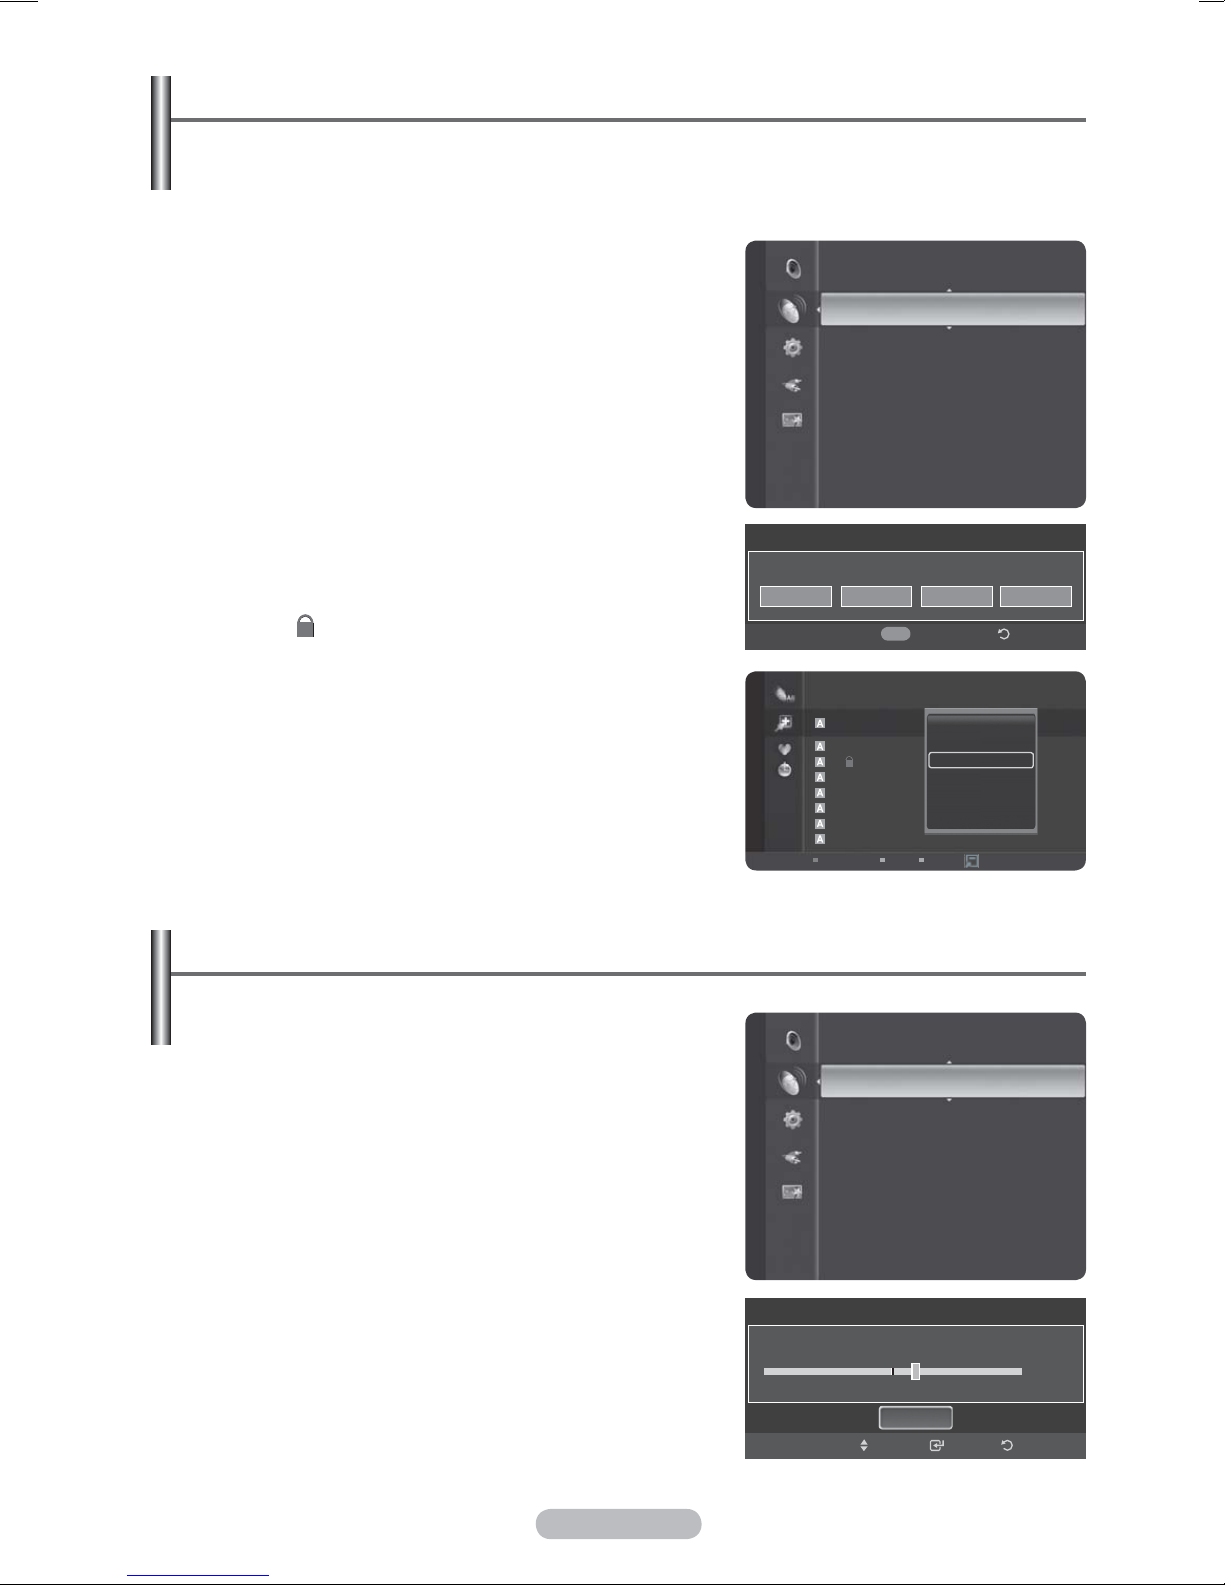
Locking Channels
This feature allows you to prevent unauthorized users, such as children, from watching unsuitable
programmes by muting out video and audio. Child Lock cannot be released using the buttons on
the side. Only the remote control can release the Child Lock setting, so keep the remote control
away from children.
Locking channels
1 Press the MENU button to display the menu.
2 Press the ▲ or ▼ button to select Channel, then press the
Channel
ENTER button.
3 Press the ▲ or ▼ button to select Child Lock, then press
the ENTER button.
Enter your 4 digit PIN number.
The default PIN number of a new TV set is “0-0-0-0”.
¯
If you want to change PIN number, refer to page 36.
¯
4 Press the ▲ or ▼ button to select On, then press the
ENTER button.
5 Press the ▲ or ▼ button to select Channel List, then
press the ENTER button.
6 Press the ▲ or ▼ button to select a channel to be locked,
then press the TOOLS button.
The symbol will be displayed and the channel will be
¯
locked.
Unlocking channels
7 Press the ▲ or ▼ button to select Unlock, then press the
All Channels
ENTER button.
Enter your 4 digit PIN number.
The channel is unlocked and the (lock icon) mark also
¯
disappears.
The default PIN number of a new TV set is “0-0-0-0”.
¯
If there is a locked channel by "Channel Lock" setting,
¯
PIN input screen appears when you start "Auto Store" or "Plug&Play".(refer to page10)
Enter PIN
All Channel Type Zoom
Channel List
Channel Mode : Added Channels
Child Lock
* ***
0~9
: On
Enter PIN
►
Delete
Add to Favourite
Lock
Timer Viewing
Edit Channel Name
Sort
▼
Select Option
Child Lock
Fine Tune
Signal Information
LNA : On
824 UKTV Gold
825 UKTV style
1 C --
2 C -3 C -4 C -5 C -6 C -7 C -8 C --
Return
Fine Tuning Analogue Channels
Use fine tuning to manually adjust a particular channel for optimal reception.
1 Press the MENU button to display the menu.
Press the ▲ or ▼ button to select Channel, then press the
ENTER button.
2 Press the ▲ or ▼ button to select Fine Tune, then press
the ENTER button.
3 Press the ◄ or ► button to adjust the fine tuning.
To store the fine tuning setting in the TV’s memory, press
the ENTER button.
If you do not store the fine-tuned channel in memory,
¯
adjustments are not saved.
4 To reset the fine tuning setting, press the ▼ button to
select Reset, then press the ENTER button.
Press the EXIT button to exit.
Only Analogue TV channels can be fine tuned.
¯
“ * ” will appear next to the number of fine-tuned
¯
channels.
English - 25
Channel
ATV 6 * Fine Tuned
Channel Mode : Added Channels
Child Lock : On
Fine Tune ►
Signal Information
LNA : Off
Fine Tune
Reset
Move
Enter
+5
Return
Viewing Signal Information
You can get information about the signal status.
Press the MENU button to display the menu. Press the ▲ or
1
▼ button to select Channel, then press the ENTER button.
2 Press the ▲ or ▼ button to select Signal Information ,
then press the
ENTER button.
3 Press the EXIT button to exit.
If the signal status is poor, the No Signal. message is
¯
displayed.
While viewing a Digital channel, this function can be
¯
selected.
LNA (Low Noise Amplifier)
Child Lock : On
Channel
Service ID : 0403
Multiplex : (TSID 0004,ONID 20fa)
Network : (ID 20fa)
Bit error level 0
Signal Strength 82
Fine Tune
Signal Information ►
LNA : Off
Signal Information
OK
ReturnEnter
This function is very useful in the situation that the TV is used in weak signal.
LNA amplifies the TV signal in the weak signal area, a low-noise preamplifier boosts the incoming
signal.
1 Press the MENU button to display the menu.
2 Press the ▲ or ▼ button to select Channel, then press the
ENTER button.
3 Press the ▲ or ▼ button to select LNA, then press the
Channel
Fine Tune
Signal Information
LN A
Off
On
ENTER button.
4 Select Off or On by pressing the ▲ or ▼ button, then
press the
ENTER button.
5 Press the EXIT button to exit.
While viewing an Analogue channel, this function can
¯
be selected.
English - 26
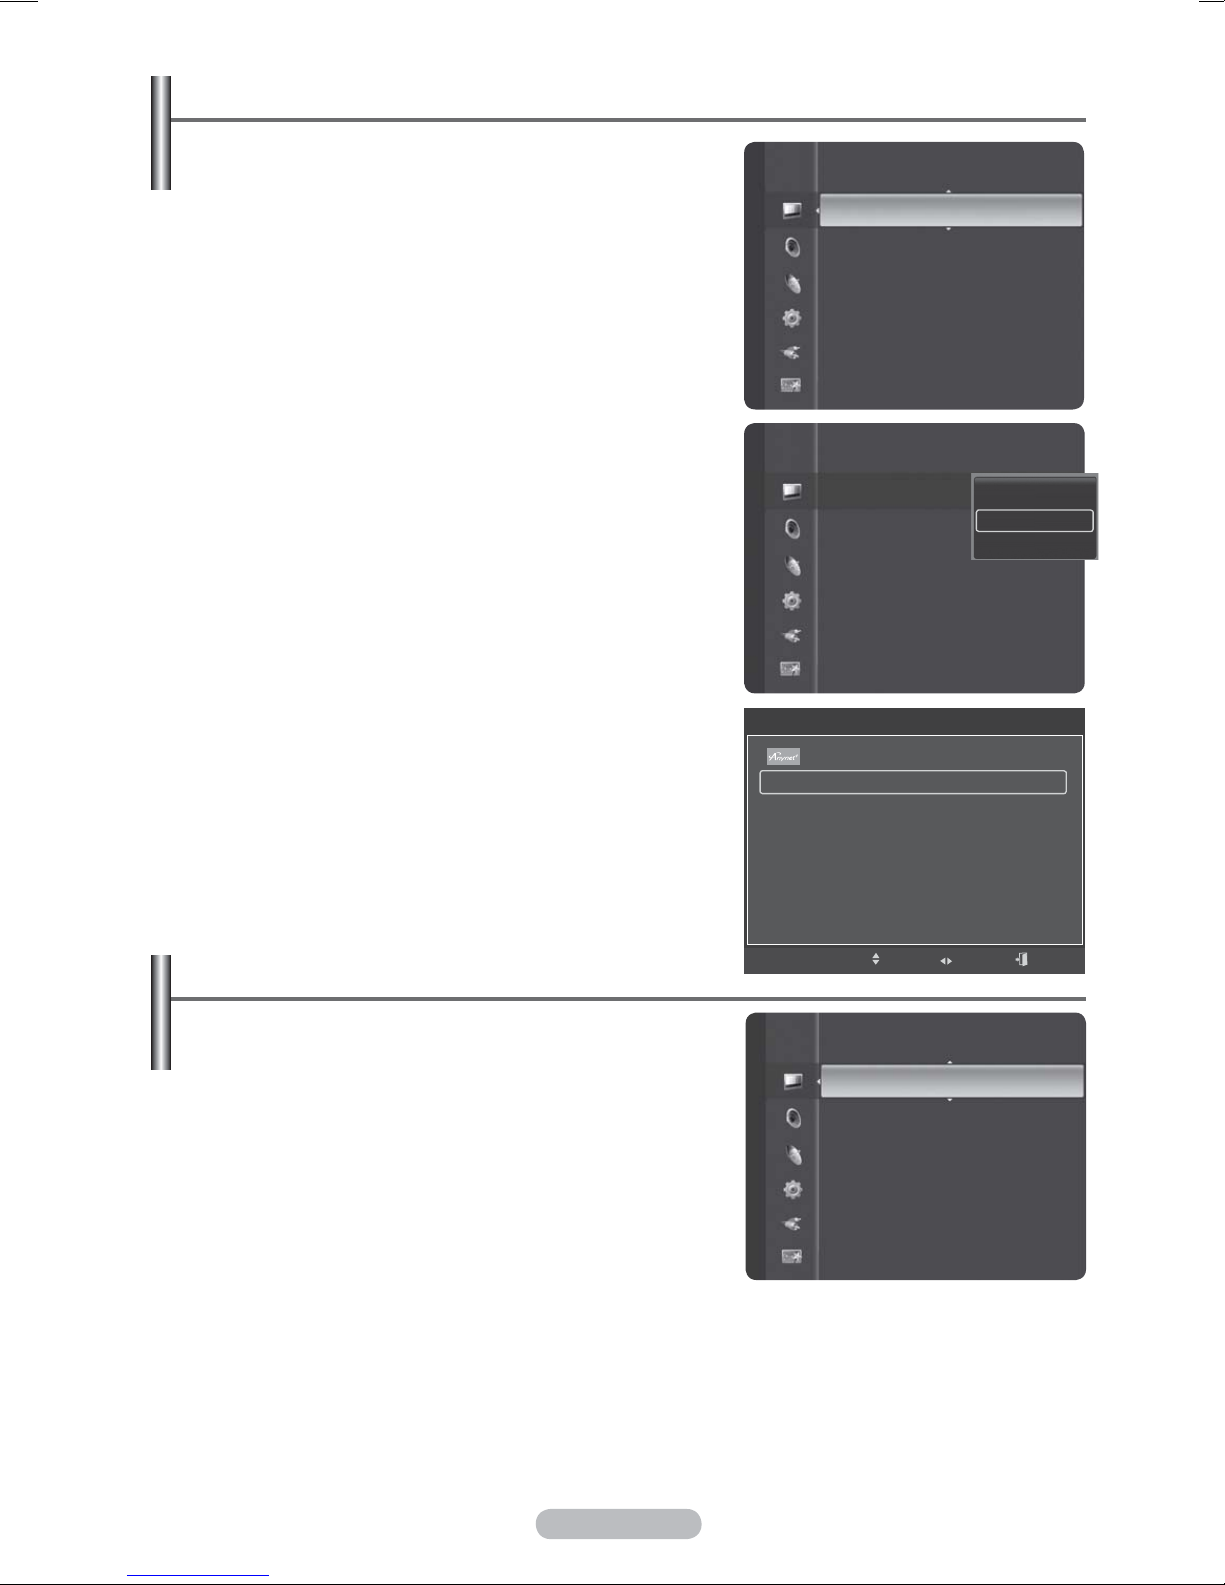
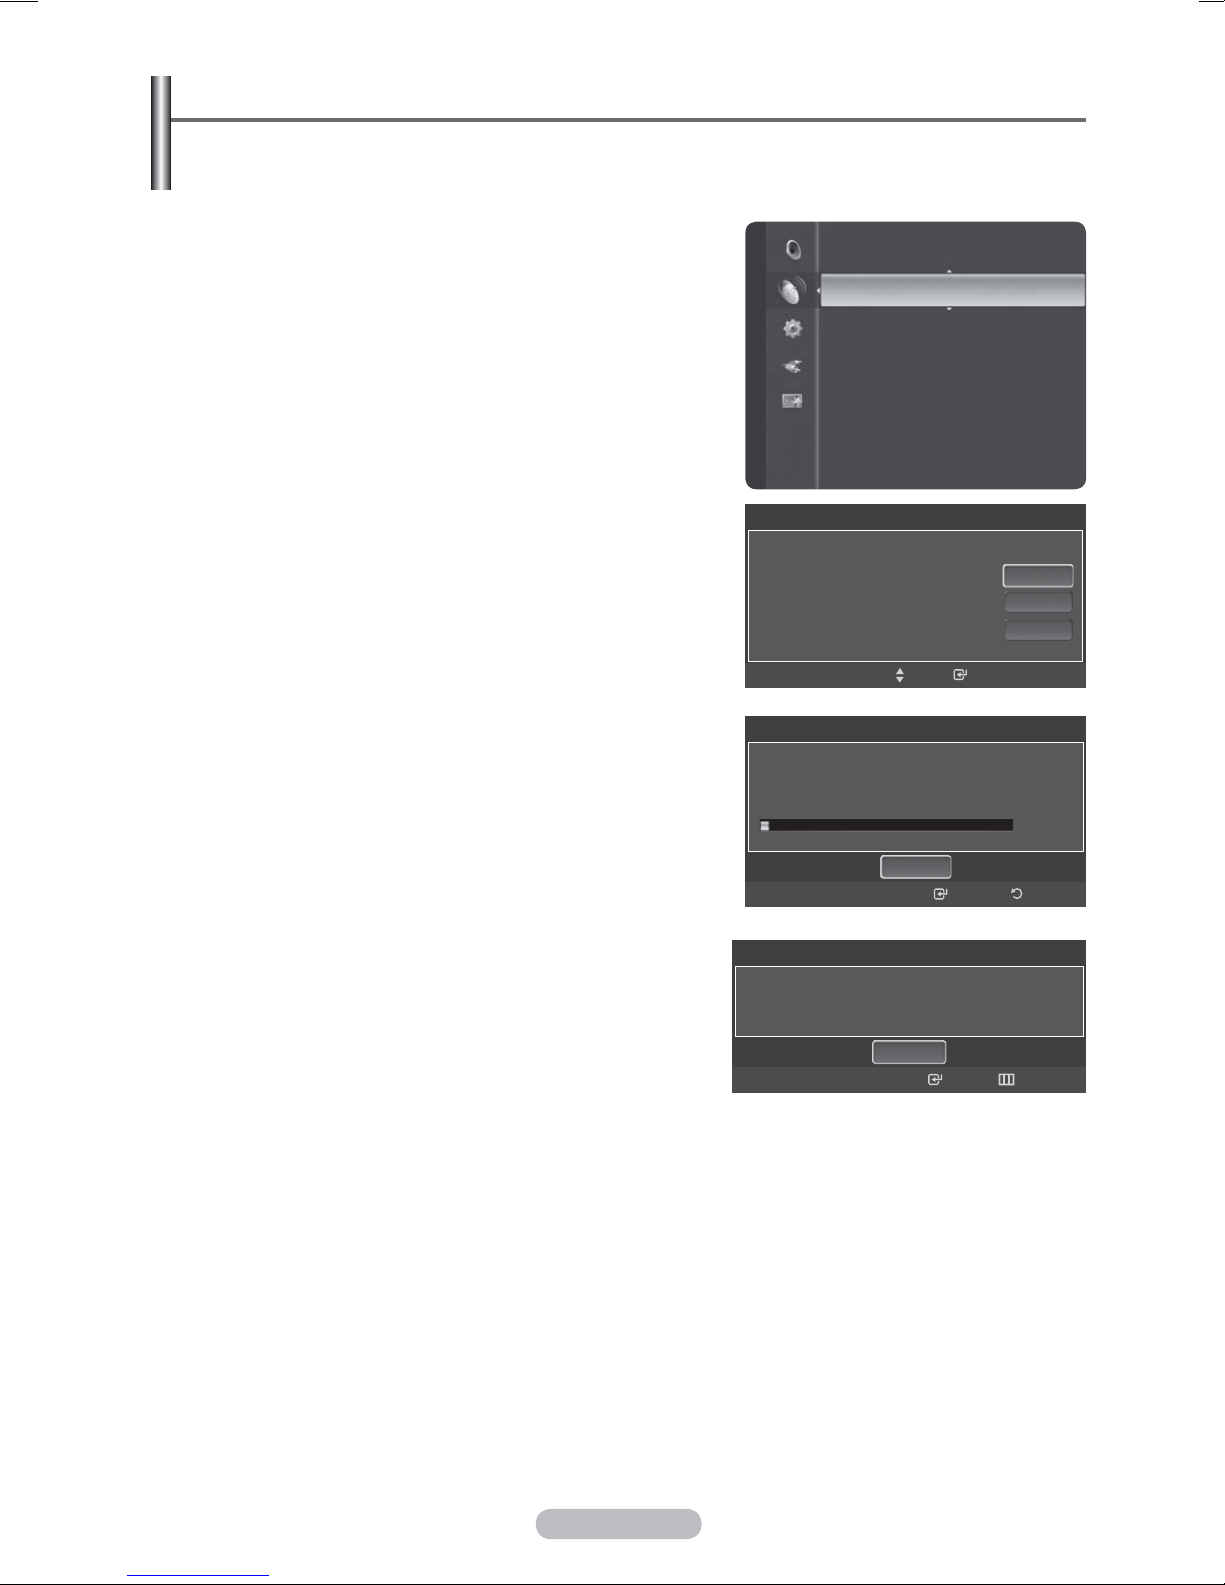
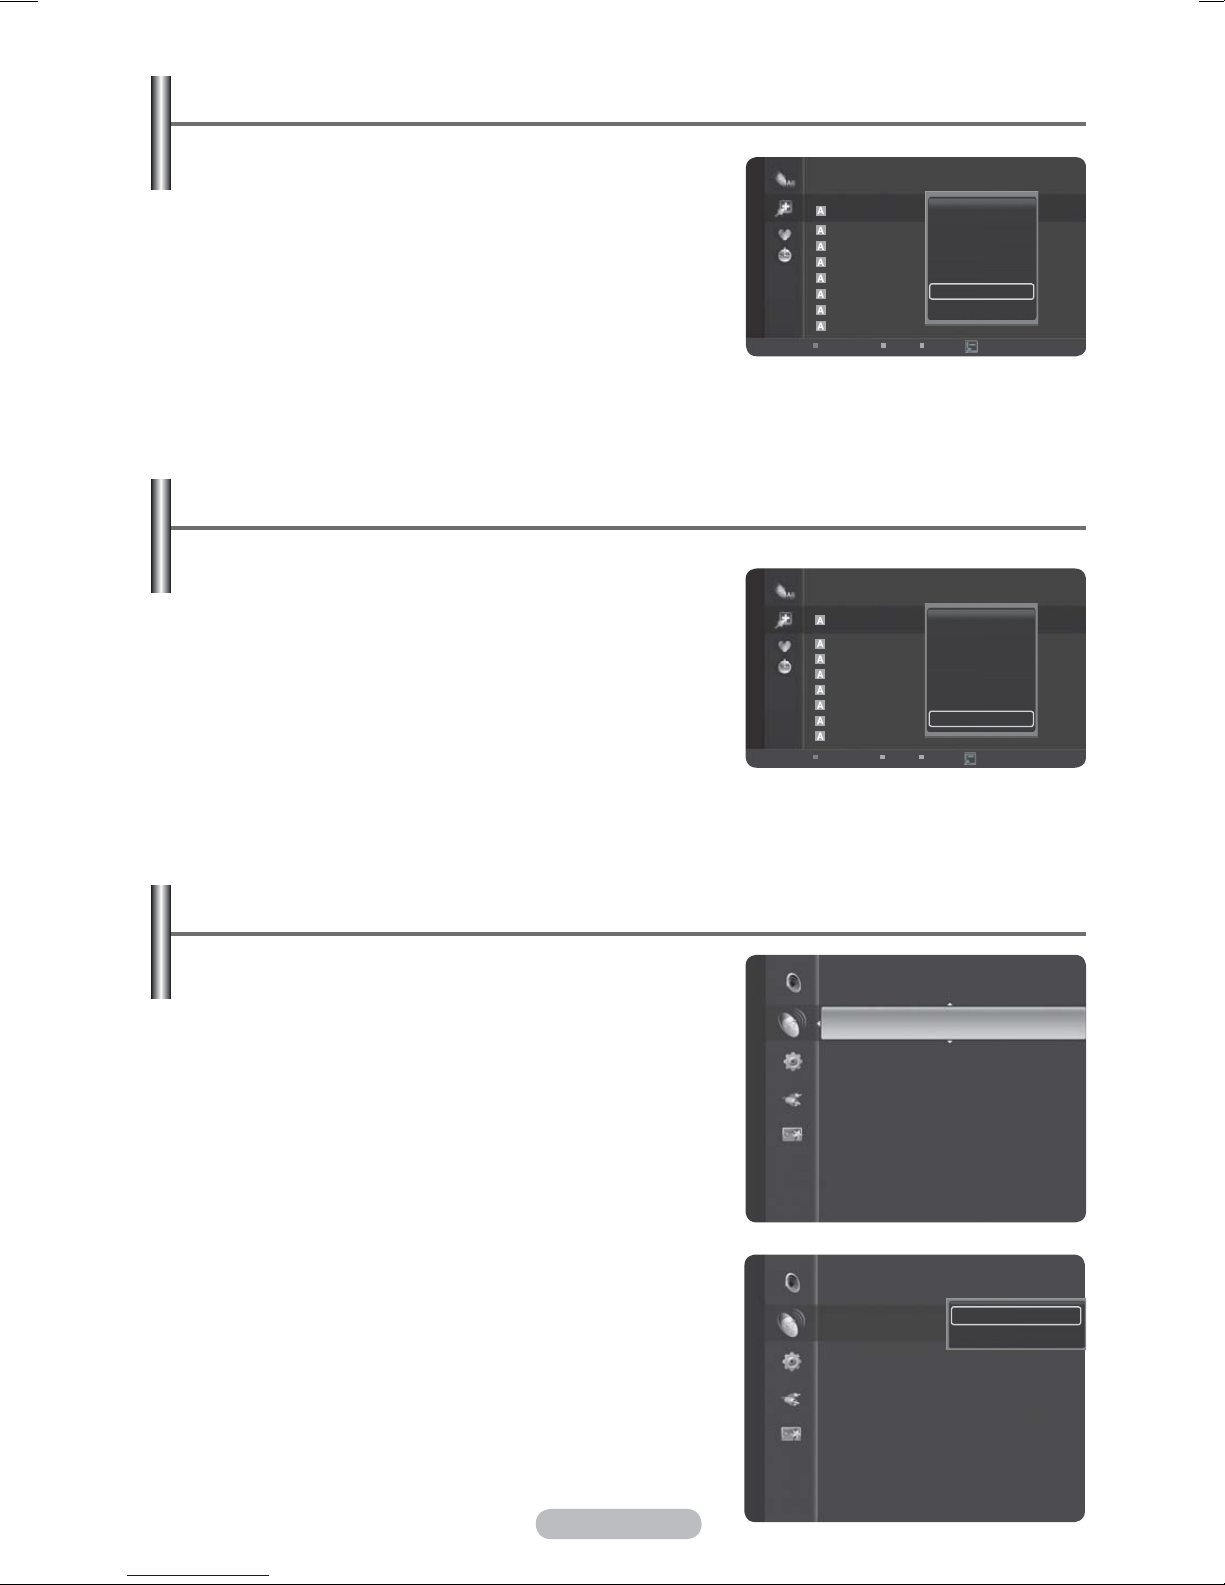
Changing the Picture Standard
You can select the type of picture which best corresponds
to your viewing requirements.
1 Press the MENU button to display the menu.
2 Press the ENTER button to select Picture.
3 Press the ENTER button again to select Mode.
4 Select the required mode by pressing the ▲ or ▼ button,
then press the
Available modes:
The settings values may vary depending on the input
¯
ENTER button.
Dynamic, Standard, Movie
source.
5 Press the EXIT button to exit.
Picture
Mode
:
Cell Light :7
Contrast : 95
Brightness : 45
Sharpness : 50
Colour : 50
Tint (G/R) : G50/R50
Detailed Settings
Standard ►
¯
Choose Dynamic for viewing the TV during the day or
when there is bright light in the room.
Choose Standard for general TV watching mode.
Choose Movie when viewing the movie.
Picture
Easy Setting
1 Press the TOOLS button on the remote control.
2 Press the ▲ or ▼ button to select Picture Mode.
3 Press the ◄ or ► button to select the required option.
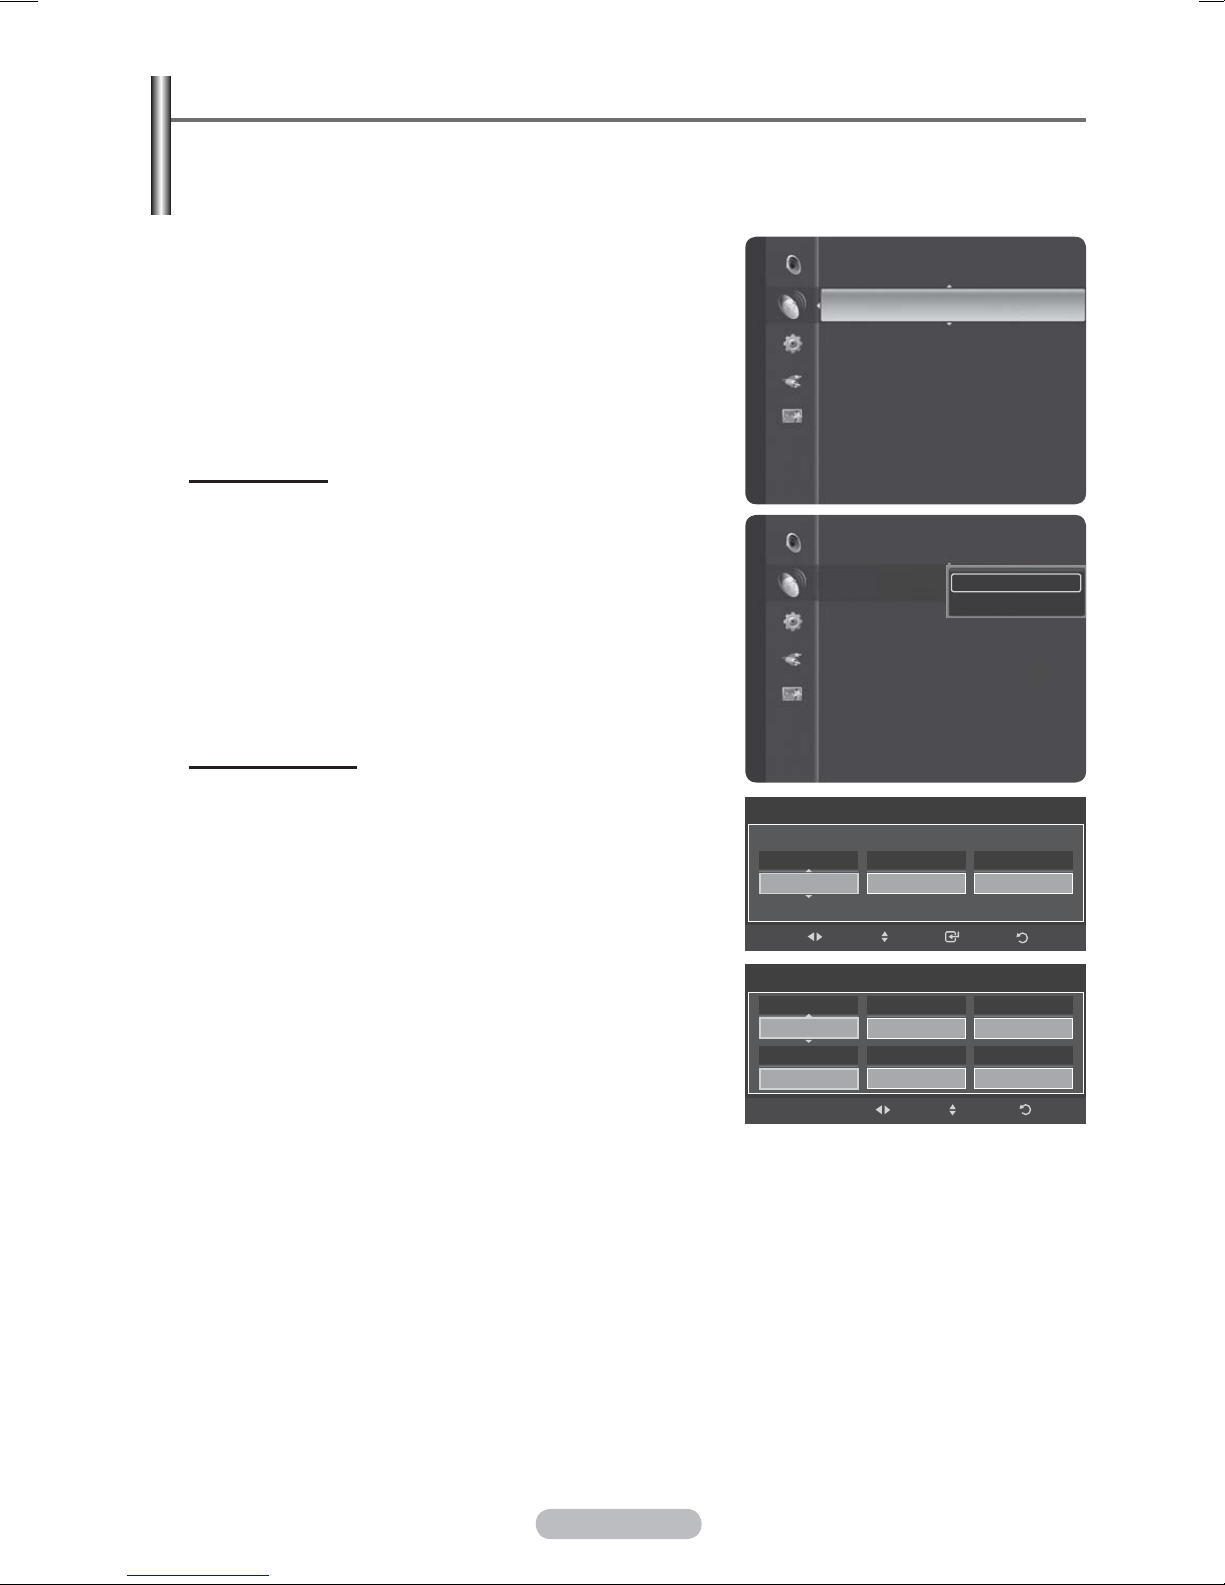
Customizing the Picture Settings
Your television has several setting options that allow you
to control the picture quality.
1 Press the MENU button to display the menu.
2 Press the ENTER button to select Picture.
3 Press the ENTER button again to select Mode.
4 Select the required mode by pressing the ▲ or ▼ button,
then press the ENTER button.
Available modes:
Dynamic, Standard, Movie
5 Select the required option by pressing the ▲ or ▼ button,
then press the ENTER button.
6 When you are satisfied with your setting, press the ENTER
button.
7 Press the EXIT button to exit.
Picture
Mode
:
Cell Light :7
Contrast : 80
Brightness : 45
Sharpness : 50
Colour : 50
Tint (G/R) : G50/R50
Detailed Settings
Tools
Device List
Picture Mode ◄ Standard ►
Sound Mode : Standard
Sleep Timer : Off
SRS TS XT : Off
Energy Saving : Off
Dual I II : Mono
Move Adjust Exit
Mode
:
Cell Light :7 ►
Contrast : 95
Brightness : 45
Sharpness : 50
Colour : 50
Tint (G/R)
: G50/R50
Detailed Settings
Picture Options
Dynamic
Standard
Movie
Standard
Cell Light – Contrast – Brightness – Sharpness – Colour – Tint(G/R)
In TV, Ext., AV, S-Video modes of the PAL system, you cannot use the Tint Function.
¯
In PC mode, you can only make changes to Contrast and Brightness.
¯
Press the ◄ or ► button until you reach the optimal setting.
English - 27
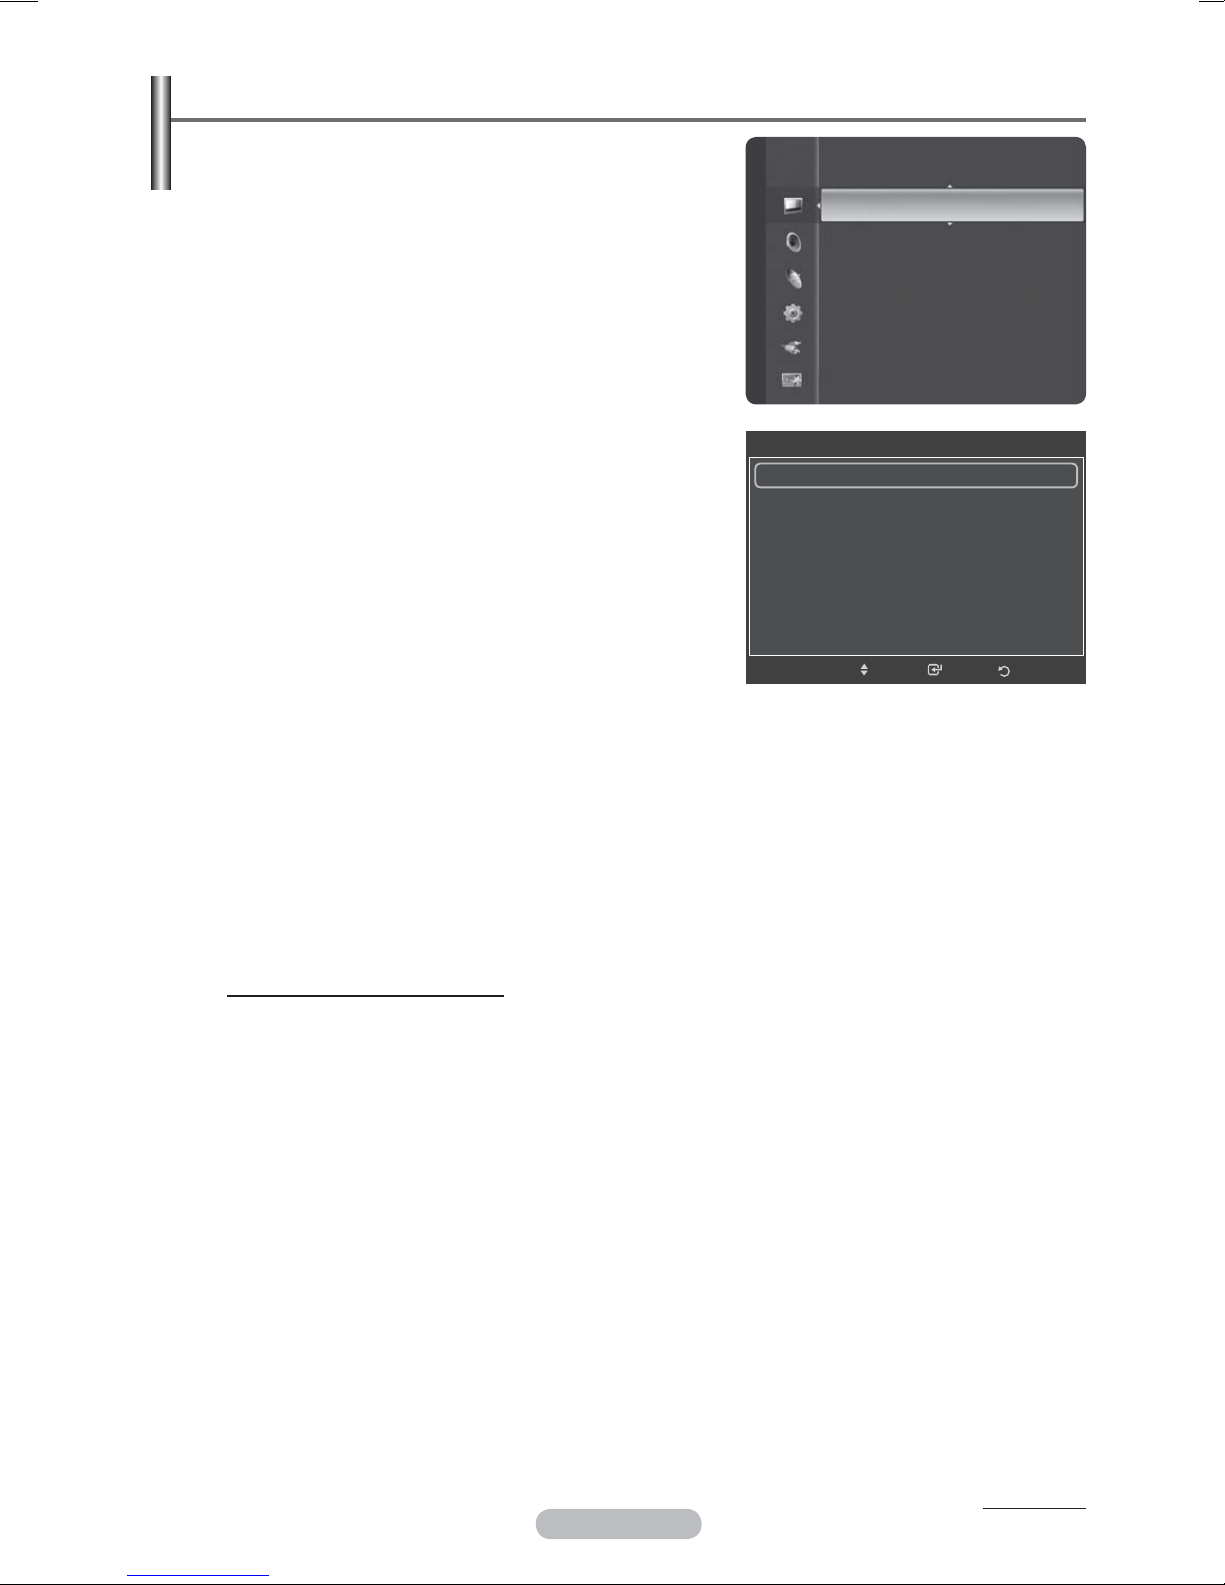
Configuring Detailed Settings on the Picture
You can set detailed picture settings.
1 Press the MENU button to display the menu.
Picture
2 Press the ENTER button to select Picture.
3 Press the ▲ or ▼ button to select Detailed Settings, then
press the
ENTER button.
4 Select the required option by pressing the ▲ or ▼ button,
then press the
Available options:
ENTER button.
Black Adjust, Dynamic Contrast,
Colour : 50
Tint (G/R) : G50/R50
Detailed Settings ►
Picture Options
Picture Reset
Gamma, Colour Space, White Balance, Flesh Tone,
Edge Enhancement, xvYCC
5 When you are satisfied with your setting, press the ENTER
button.
6 Press the EXIT button to exit.
Detailed Settings is available in Standard or Movie mode.
¯
In PC mode, you can only make changes to Dynamic
¯
Contrast, Gamma and White Balance from among the
Detailed Settings items.
Black Adjust: Off/Low/Medium/High
You can directly select the black level on the screen to
adjust the screen depth.
Dynamic Contrast: Off/Low/Medium/High
Black Adjust : Off
Dynamic Contrast : Low
Gamma : 0
Colour Space : Native
White Balance
Flesh Tone : 0
Edge Enhancement : On
Detailed Settings
Move
►
ReturnEnter
You can adjust the screen contrast so that the optimal
contrast is provided.
Gamma: -3 ~ +3
You can adjust the middle brightness of pictures.
Press the ◄ or ► button until you reach the optimal setting.
Colour Space : Auto/Native/Custom
Colour space is a colour matrix composed of red, green and blue colours.
Select your favourite colour space to experience the most natural colour.
− Auto: Auto Colour Space automatically adjusts to the most natural colour tone based on program
sources.
− Native: Native Colour Space offers deep and rich colour tone.
− Custom: Adjusts the colour range to suit your preference. (see “Customizing the Colour Space”)
Customizing the Colour Space
Colour: Red/Green/Blue/Yellow/Cyan/Magenta
Adjusts the Colour range to suit your preference.
Colour is available when
Colour Space is set to Custom.
Press the ▲ or ▼ button to select Red, Green, Blue, Yellow, Cyan or Magenta.
Press the
ENTER button.
− Red/Green/Blue: In Colour, you can adjust the RGB values for the selected colour.
Press the ▲ or ▼ button to select Red, Green or Blue to change it. Press the ENTER button.
Press the ◄ or ► button to decrease or increase the value of a particular item.
Press the
ENTER button.
− Reset: Resets the colour space to the default values.
White Balance: R-Offset/G-Offset/B-Offset/R-Gain/G-Gain/B-Gain/Reset
You can adjust the colour temperature for more natural picture colours.
R-Offset/G-Offset/B-Offset/R-Gain/G-Gain/B-Gain: Changing the adjustment value will refresh the
adjusted screen.
Select the required option by pressing the ▲ or ▼ button, then press the ENTER button.
Press the ◄ or ► button until you reach the optimal setting.
Reset: The previously adjusted white balance will be reset to the factory defaults.
Continued...
English - 28
Flesh Tone:-15~+15
You can emphasize the pink tone in the picture.
Press the ◄ or ► button until you reach the optimal setting.
Changing the adjustment value will refresh the adjusted screen.
¯
Edge Enhancement: Off/On
You can emphasize object boundaries.
xvYCC: Off/On
Setting the
external device (ie. DVD player) connected to the HDMI or Component IN jacks. You must set the
Picture Mode to Movie to enjoy this feature.
The xvYCC function works only in Component or HDMI mode
¯
If xvYCC function is active, PIP cannot be selected.
¯
xvYCC mode to On increases detail and colour space when watching movies from an
Picture Options
You can set detailed picture settings.
1 Press the MENU button to display the menu.
2 Press the ENTER button to select Picture.
3 Press the ▲ or ▼ button to select Picture Options, then
press the
4 Select the required option by pressing the ▲ or ▼ button,
then press the
5 When you are satisfied with your setting, press the ENTER
button.
6 Press the EXIT button to exit.
In PC mode, you can only make changes to the Colour
¯
Tone, Size and Screen Burn Protection from among the
items in
Colour Tone: Cool2/Cool1/Normal/Warm1/Warm2
¯
Size: Auto Wide/16:9/Wide Zoom/Zoom/4:3/Just Scan
You can select the picture size which best corresponds to
your viewing requirements.
−
Auto Wide: Expanding and pulling up the picture from
4:3 to 16:9 ratio.
¯
− 16:9: Sets the picture to 16:9 wide mode.
−
Wide Zoom: Magnify the size of the picture more than 4:3.
Move the screen up/down using the ▲ or ▼ button after
selecting the
−
Zoom: Magnify the size of the picture vertically on screen.
− 4:3: Sets the picture to 4:3 normal mode.
−
Just Scan: Use this function to see the full image without any cutoff when HDMI(720p/1080i/
1080p), Component(1080i/1080p) or DTV(1080i) signals are input.
After selecting Just Scan in HDMI (1080i/1080p) or Component (1080i/1080p) mode: Press
the ◄ or ► button to select Position, then press the ENTER button. Press the ▲, ▼, ◄ or ►
button to move the picture.
Reset: Press the ◄ or ► button to select Reset, then press the ENTER button. You can initialize
the setting.
¯
¯
¯
¯
¯
¯
¯
ENTER button.
ENTER button.
Picture Options.
When the picture mode is set to Dynamic or
Standard, Warm1 and Warm2 cannot be selected.
Auto Wide function is available only in TV, Ext.1,
Ext.2, AV and S-Video mode.
Position by pressing the ► or ENTER button.
With the HDMI Just Scan picture size, depending on the AV devices, the screen may be cut off
or a specific colour appears on the screen.
For an HDMI (1080p) connection of 24, 25, 30, 50, and 60 Hz, and for a Component (1080p)
connection of 50 and 60Hz, only the input source is supported.
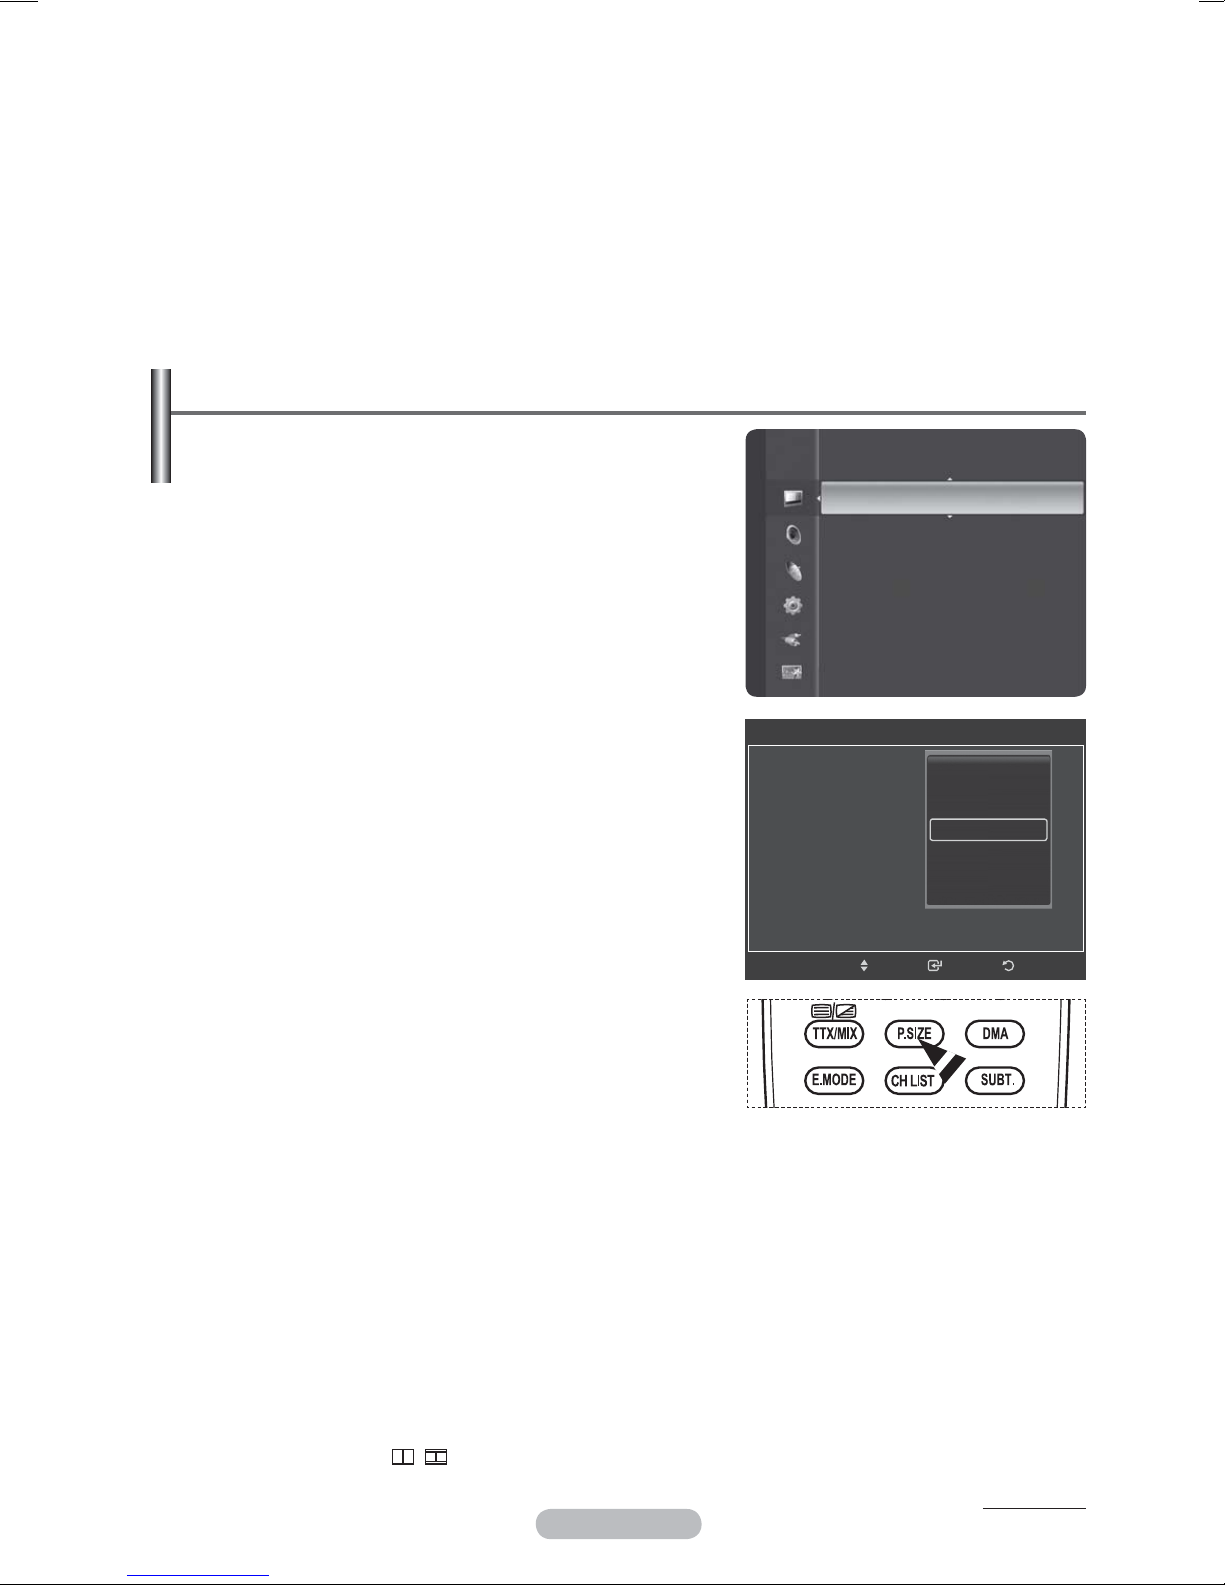
You can change the picture size simply by pressing the P.SIZE button on the remote control.
Depending on the input source, the picture size options may vary.
The items available may differ depending on the selected mode.
When Double ( , ) mode has been set in PIP, the Picture Size cannot be set.
In PC Mode, only "16:9" and "4:3" mode can be adjusted.
English - 29
Picture
Colour Tone :
Size
Screen Mode
Digital NR :
DNle : 2min
HDMI Black Level : 2min
Movie Plus :Off
Tint (G/R) : G50/R50
Detailed Settings
Picture Options ►
Picture Reset
Picture Options
Cool2
:
Move
Cool1
Normal
Warm1
Warm2
ReturnEnter
Continued...

Positioning and Sizing the screen using Zoom
− Resizing the screen using the Zoom enables the positioning and sizing of the screen to up/down direction
using the ▲ or ▼ button as well as the screen size.
− Move the screen up/down using the ▲ or ▼ button after selecting the Position by pressing the ◄ or ► button.
− Resize the screen vertically using the ▲ or ▼ button after selecting the Size by pressing the ◄ or ► button.
Screen Mode: 16:9/Wide Zoom/Zoom/4:3
When setting the picture size to Auto Wide in a 16:9 wide
TV, you can determine the picture size you want to see the
4:3 WSS (Wide Screen Service) image or nothing. Each
individual European country requires different picture size
so this function is intended for users to select it.
− 16:9: Sets the picture to 16:9 wide mode.
−
Wide Zoom: Magnify the size of the picture more than
4:3.
−
Zoom: Magnify the size of the picture vertically on
screen.
− 4:3: Sets the picture to 4:3 normal mode.
This function is available in Auto Wide mode.
¯
This function is not available in PC,Component or HDMI mode.
¯
Digital NR: Off/Low/Medium/High/Auto
If the signal received by the television is weak, you can activate this feature to reduce any static and
ghosting that may appear on the screen.
When the signal is weak, select one of the other options until the best picture is displayed.
¯
DNIe: Off/Demo/On
This TV includes the DNIe function so as to provide a high visual quality. If you set DNIe to on, you
can view the screen with the DNIe feature activated. If you set the DNIe to Demo, you can view the
applied DNIe and normal pictures on the screen, for demonstration purposes. Using this function, you
can view the difference in the visual quality.
DNIeTM (Digital Natural Image engine)
¯
This feature brings you more detailed image with 3D noise reduction, detail enhancement, contrast
enhancement and white enhancement. New image compensation Algorithm gives brighter, clearer, more
detailed image to you. DNIe
This function is available only in Dynamic mode.
¯
HDMI Black Level: Normal/Low
Using this function, you can adjust the image quality when the screen burn (appearance of black
level, low contrast, low colour, etc.) is encountered by the HDMI input for RGB limited range (16 to
235).
This function is active only when the external input connects to HDMI(RGB signals).
¯
Movie Plus: Off/Low/Medium/High/Demo
You can view more natural skin and clear text even in fast moving scenes.
It is not supported in HDMI 1080p/24Hz, 25Hz, 30Hz mode.
¯
This function is not available in “Wide Zoom” and “Zoom” modes.
¯
This function is not available when "PIP" is set to "On".
¯
Blue Only Mode: Off/On
This function is for AV device measurement experts. This function displays the blue signal only by
removing the red and green signals from the video signal so as to provide a Blue Filter effect that is
used to adjust the Colour and Tint of video equipment such as DVD players, Home Theaters, etc.
Using this function, you can adjust the Colour and Tint to preferred values appropriate to the signal
level of each video device using the Red/Green/Blue/ Cyan/Magenta/ Yellow Colour Bar Patterns,
without using an additional Blue Filter.
Blue Only Mode is available when the picture mode is set to Movie or Standard.
¯
TM
technology will fit every signal into your eyes.
Colour Tone : Normal
Size
Screen Mode
Digital NR :
DNle : 2min
HDMI Black Level : 2min
Movie Plus :Low
Picture Options
:
16:9
Wide Zoom
Zoom
4:3
Move
ReturnEnter
Continued...
English - 30
 Loading...