

Page 1

Technical Manuals Online! - http://www.tech-man.com
Page 2

Technical Manuals Online! - http://www.tech-man.com
Page 3

About This Manual
The DCS-816 digital keyphone system can easily change system settings by using the keyset.
An MMC (Man Machine Code) is a program, which sets up the system according to your needs. This
chapter explains how to use a keyphone MMC program. It consists of four parts as follows.
y
Introduction to programming
y
Precautions before starting programming
y
Programming procedure
y
Programming using MMCs
i
Technical Manuals Online! - http://www.tech-man.com
Page 4

DCS-816 Programming Guide
ii
Table of Contents
Chapter 1 Introducti on to Pr ogrammin g....................................................................................... 1-1
PROGRAMMING OVERVIEW ..................................................................................................................1-1
PROGRAMMING LEVELS............................................................................................................. ............1-1
Chapter 2 Programmi ng Proce dures............................................................................................. 2-1
PROGRAM LIST...........................................................................................................................................2-1
PROGRAM PROCEDURES........................................................................................................................2-2
DCS-816 DEFAULT DATA........................................................................................................... ..............2-3
SPECIAL APPLICATIONS.........................................................................................................................2-8
Chapter 3 Programmi ng Using MMCs.............................................................................................3-1
Technical Manuals Online! - http://www.tech-man.com
Page 5

Technical Manuals Online! - http://www.tech-man.com
Page 6

Technical Manuals Online! - http://www.tech-man.com
Page 7
Chapter 1 Introduction to Programming
PROGRAMMING OVERVIEW
The DCS-816 system arrives from the factory with default data. Connect it to trunks, stations and power,
turn the system on and it is fully operational. The only thing left to do is customise the data to fit the
customer’s needs. This is called programming the system.
MMC stands for Man Machine Code and each program is assigned a different three-digit code (e.g. 100).
These MMC codes are used to view, create or change customer data. Programming is simply deciding what
needs to be done and knowing which MMC is used to do it. For example: use MMC 601 to create a station
group; enter system speed dial numbers in MMC 705; and assign soft keys to individual keysets using MMC
722.
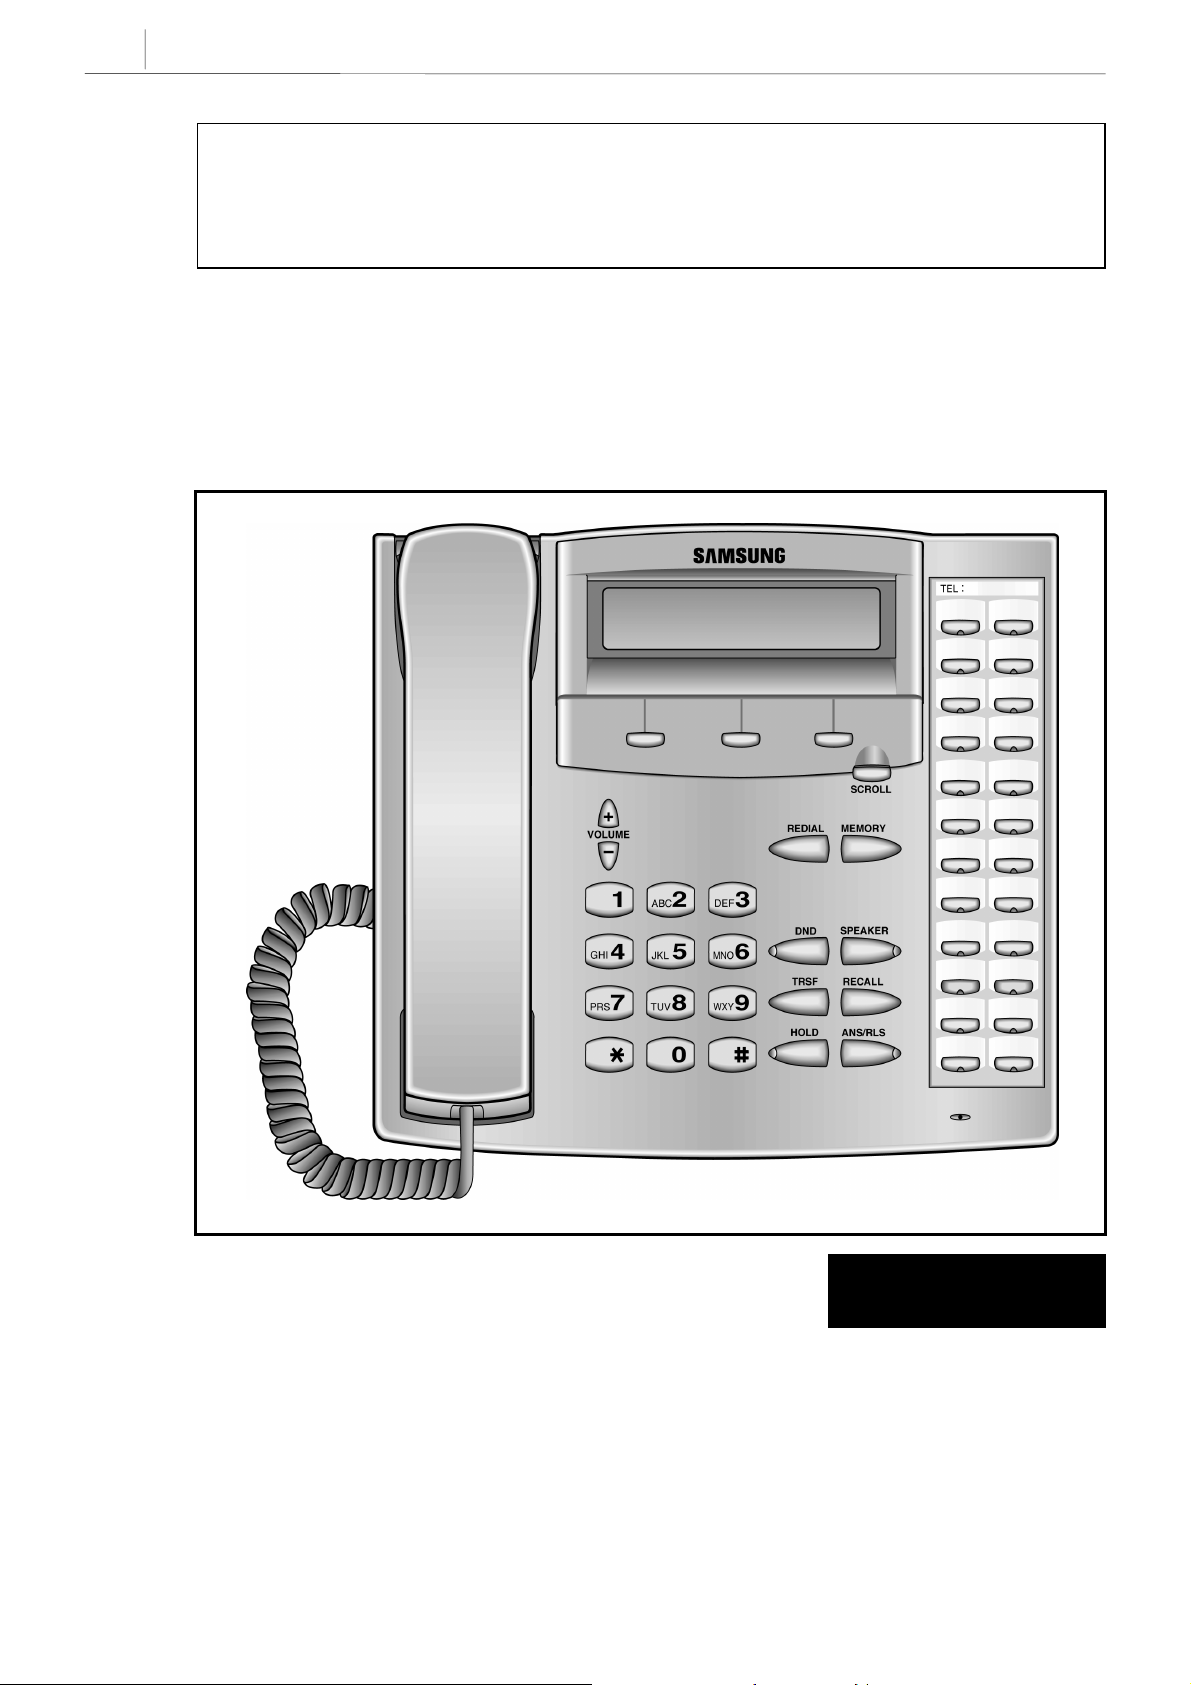
System programming may be done from any LCD 12B or 24B keyset. The first thing you must do is open
system programming. As a security measure, a passcode must be known to do this. Figure 1–1 shows the
keys on a display keyset that have special functions during programming.
1-1
This manual describes standard settings. Some MMC codes and default data may be different
CAUTION
from those shown depending on the country selected in MMC 812.
PROGRAMMING LEVELS
There are three levels of programming: technician (or system), customer and station. Technician and
customer levels are under passcode protection while station programming does not require a passcode.
To prevent conflicting data from being entered, only one person at a time can enter programming with the
technician or customer passcode. While programming is in progress, normal system operation is not
affected. For your convenience, the system displays [xxx PGM MODE] when another keyset is in
programming mode.
Technician (Sys t em) level
This level is entered via MMC 800 and requires the technician’s passcode. It allows access to all system
programs, station programs and maintenance programs.
Customer level
This level is entered via MMC 200 and requires the customer passcode. It allows access to station programs
and system programs permitted by the technician in MMC 802. When using the customer passcode to
access station programs, data for all stations can be viewed or changed.
Station level
All keysets can access station programs 102–121 without using a passcode. Each user can only change
station data for his/her own keyset.
When an LCD 12B or 24B keyset is in programming mode, the display shows instructions, prompts and
choices. Existing data is always displayed before it can be changed. The keystroke sequence for each MMC
is detailed in the following pages.
However, before you begin entering customer data:
Technical Manuals Online! - http://www.tech-man.com
Page 8
1-2
Chapter 1
Introduction to Programming
IMPORTANT
When installing this system, and before doing any other programming, use MMC 812 first to select your
country code and to reset and clear memory. This will ensure that you begin with clean, default data.
Remember that to begin programming using an MMC you must press the TRSF key. When you have
finished entering data for an MMC and wish to program another MMC, press the SPK key to store the data
and advance to the next MMC. To end programming you must press the TRSF key again to store the data
and exit programming.
Now begin entering customer data.
1 13
LEFT
SOFT
DIAL
RIGHT
SOFT
2 14
3 15
4 16
5 17
6 18
7 A
8 B
9 C
10 D
11 E
12 F
SPECIAL KEY FUNCTIONS
Technical Manuals Online! - http://www.tech-man.com
FIGURE 1-1
Page 9

Technical Manuals Online! - http://www.tech-man.com
Page 10

Technical Manuals Online! - http://www.tech-man.com
Page 11

Chapter 2 Programming Procedures
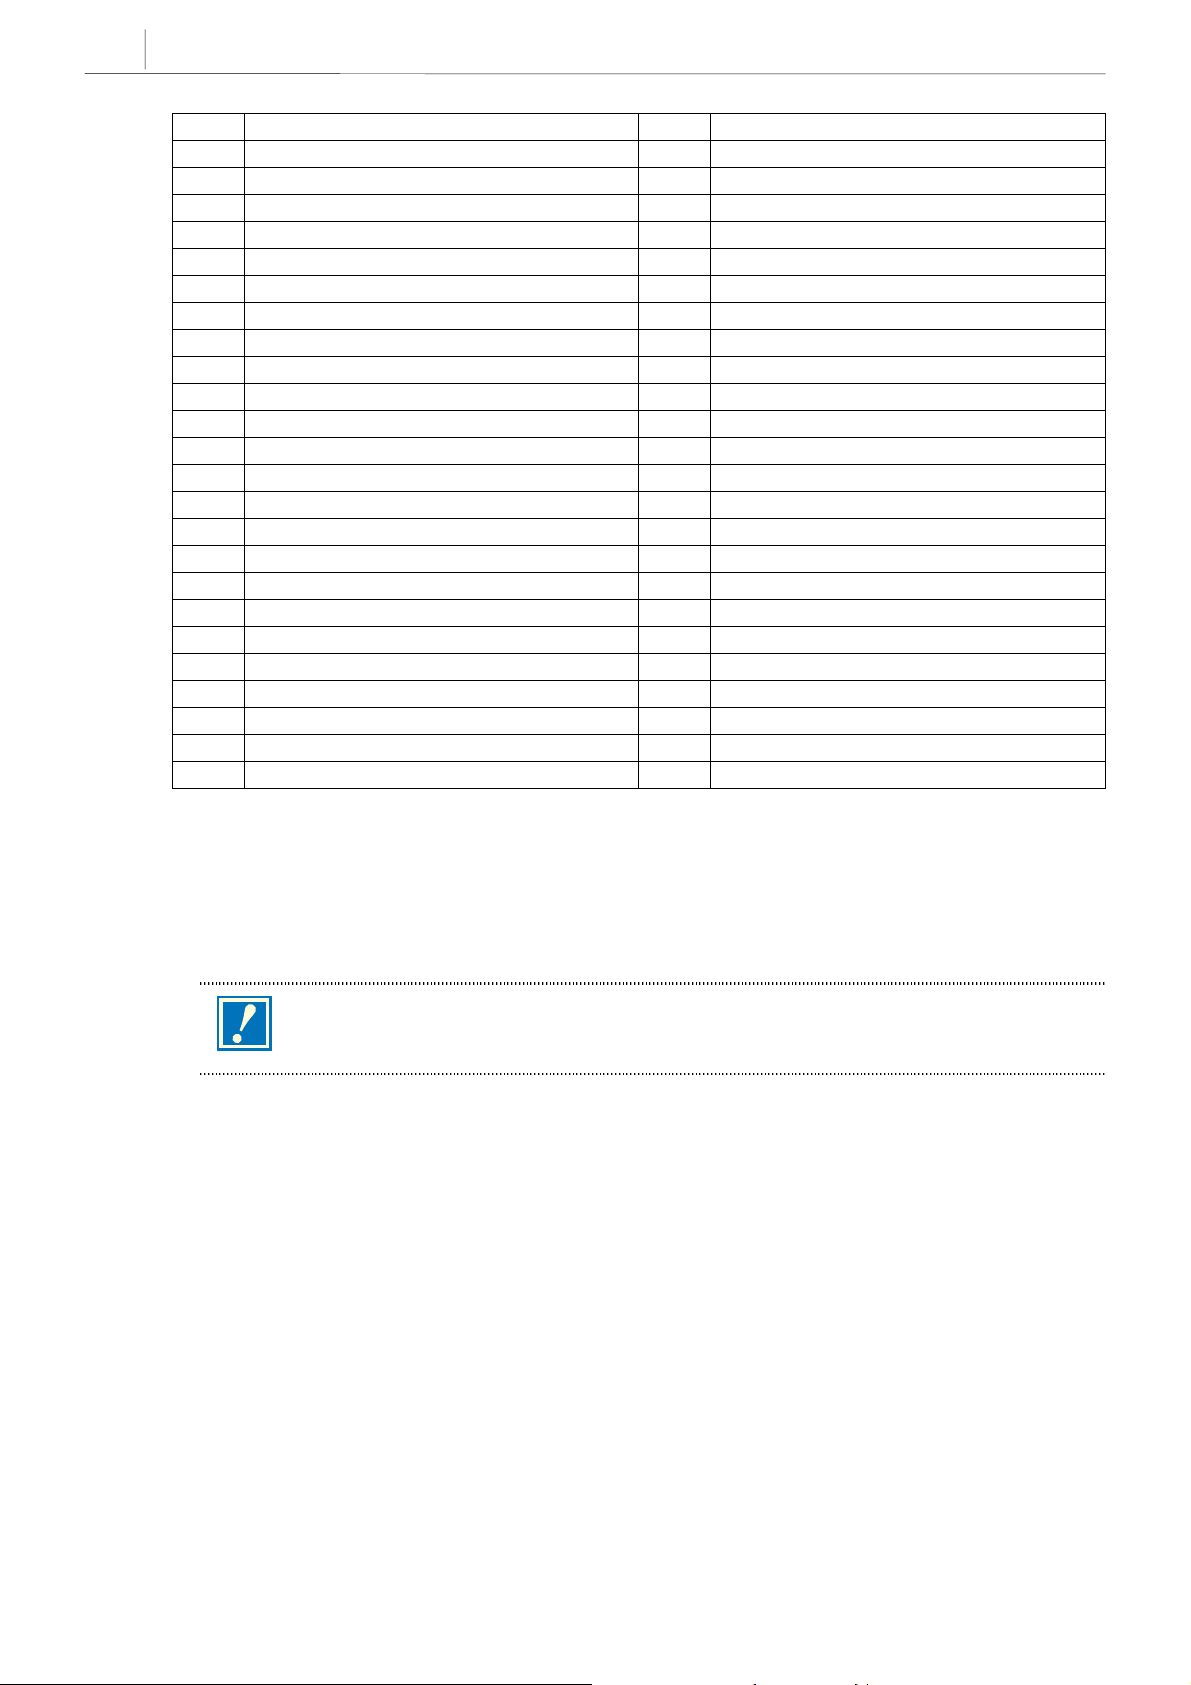
PROGRAM LIST
100: STATION LOCK 401: C.O./PBX LINE
101: CHANGE USER PASSCODE 402: TRUNK DIAL TYPE
102: CALL FORWARD 403: TRUNK TOLL CLASS
103: SET ANSWER MODE 404: TRUNK NAME
104: STATION NAME 405: TRUNK NUMBER
105: STATION SPEED DIAL 406: TRUNK RING ASSIGNMENT
106: STATION SPEED DIAL NAME 407: FORCED TRUNK RELEASE
107: KEY EXTENDER 408: ASSIGN TRUNK MUSIC ON HOLD
108: STATION STATUS 409: TRUNK STATUS READ
109: DAT E DISPLAY 410: ASSIGN DISA TRUNK
110: STATION ON/OFF 414: MPD/PRS SIGNAL
111: KEYSET RING TONE 415: REPORT TRUNK ABANDON DATA
112: ALARM REMINDER 418: CARD RESTART
113: VIEW MEMO NUMBER 419: BRI OPTION
114: KEYSET VOLUME 421: MSN DIGIT
115: SET PROGRAMMEDMESSAGE 422: ASSIGN TRUNK COS
116: ALARM AND MESSAGE 423: S/T MODE
119: SET CLIP DISPLAY 424: S0 MAPPING
121: KEYSET LANGUAGE 426: TRUNK GAIN CONTROL
200: OP E N C U S TO M ER P R OG R A MM I NG 428: ASSIGN TRUNK/TRUNK USE
201 CHANGE CUSTOMERP ASSCODE
202: CH A NG E F EAT UR E PAS SC O D ES 500: SYSTEM–WIDE COUNTERS
203: ASSIGN UA DEVICE 501: SYSTEM–WIDE TIMERS
204: COMMON BELL CONTROL 502: STATION–WIDE TIMERS
205: ASSIGN LOUD BELL 503: TRUNK–WIDE TIMERS
206: BARGE–IN TYPE 504: PULSE MAKE/BREAK RATIO
207: ASSIGN VM/AA PORT 505: ASSIGN DATE AND TIME
208: ASSIGN RING TYPE 506: TONE CADENCE
209: ASSIGN ADD–ON MODULE 507: ASSIGN AUTO NIGHT TIME
210: CUSTOMER ON/OFF 508: CALL COST
211: DOOR RING ASSIGNMENT 510: SLI RING CADENCE
214: DI S A A L A RM R I NG I N G S TATI ON 512: HOLIDA Y
219: CO M MO N RE L A Y S E R V I CE T Y PE 600: ASSIGN OPERATOR GROUP
220: ISDN SERVICE TYPE 601: ASSIGN STATION GROUP
300: CU STO MER ON/ OFF PE R ST A T ION 602: STATION GROUP NAME
301: ASSIGN STATION COS 603: ASSIGN TRUNK GROUP
302: PICKUP GROUPS 604: ASSIGN INTERNAL PAGE ZONE
303: ASSIGN BOSS/SECRETARY 605: ASSIGN EXTERNAL PAGE ZONE
304: ASSIGN STATION/TRUNK USE 606: ASSIGN SPEED BLOCK
305: ASSIGN FORCED CODE 607: UCD OPTIONS
306: HOT LINE 608: ASSIGN CLIP REVIEW BLOCK
308:
309: AS SIGN ST A T ION M US IC O N H OL D 701: ASSIGN COS CONTENTS
310: LCR CLASS OF SERVICE 702: TOLL DENY TABLE
312: ALLOW CLIP 703: TOLL ALLOWANCE TABLE
314: CONFIRM OUTGOING CALL 704: ASSIGN WILD CHARACTER
315: SET RELOCATION 705: ASSIGN SYSTEM SPEED DIAL
316: COPY STATION USABLE 706: SYSTEM SPEED DIAL BY NAME
317: ASSIGN STATION/STATION USE 707: AUTHORISATION CODE
ASSIGN BACKGROUND MUSIC SOURCE
700: COPY COS CONTENTS
2-1
Technical Manuals Online! - http://www.tech-man.com
Page 12
2-2
Chapter 2
Programming Procedures
318: DISTINCTIVE RING 708: ACCOUN T CODE
319: BRANCH GROUP 709: TOLL PASS CODE
400: CUSTOMER ON/OFF PER TRUNK 710: LCR DIGIT TABLE
711: LCR TIME TABLE 736:
712: LCR ROUTE TABLE 740: STATION PAIR
713: LCR MODIFY DIGIT TABLE 750: VMS RESTART
714: DI D N UM B ER & N A M E T R A NS L ATI O N 751: ASSIGN MAILBOX
715: PROGRAMMED STATION MESSAGE 752: AUTO RECORD
716: UK LCR OPTION 753: WARNING DESTINATION
718: MY AREA CODE 754: VM HALT
720: COPY KEY PROGRAMMING 755: VM ALARM
721: SAVE STATION KEYPROGRAMMING 756: ASSIGN VM MOH
722: Station Key Programming 757 VM IN/OUT
723: System Key Programming 800: Enable Technician Program
724: DIAL NUMBERING PLAN 801: CHANGE TECHNICIAN PASSCODE
725: SMDR Options 802: CUSTOMER ACCESS MMC NUMBER
726: VM/AA Options 804: SYSTEM I/O PARAMETER
727: SYSTEM VERSION DISPLAY 805: TX LEVEL & GAIN
728: CLIP TRANSLATION TABLE 806: CARD PRE–INSTALL
730: AA RECORD GAIN 807: VOLUME CONTROL
731: AA RAM CLEAR 809: SYSTEM MMC LANGUAGE
732: AA TRANS TABLE 810: HALT PROCESSING
733:
734:
735:
AA PLAN TABLE
AA MESSAGE MATCH
AA USE TABLE
811: RESET SYSTEM
812: COUNTRY CODE
ASSIGN AA MOH
PROGRAM PROCEDURES
The instructions for each MMC assume that you have already opened programming. First, run MMC 812,
Country Code, to set your country (e.g U.K.) before you do any other programming.
This manual describes standard settings. Some MMC codes and default data may be different
from those shown depending on the country selected in MMC 812.
CAUTION
Helpful hint:
When you are finished programming in MMC codes 100–812 and have other programming to do, press SPK
to exit the MMC but stay in the programming mode and use one of the following methods.
1.Dial another MMC code directly and continue programming.
2.Press VOLUME UP and DOWN keys to scroll through all MMC codes. When the desired MMC code is
reached, press SPK and continue programming.
Pressing TRSF will always save changes and exit programming mode.
Technical Manuals Online! - http://www.tech-man.com
Page 13
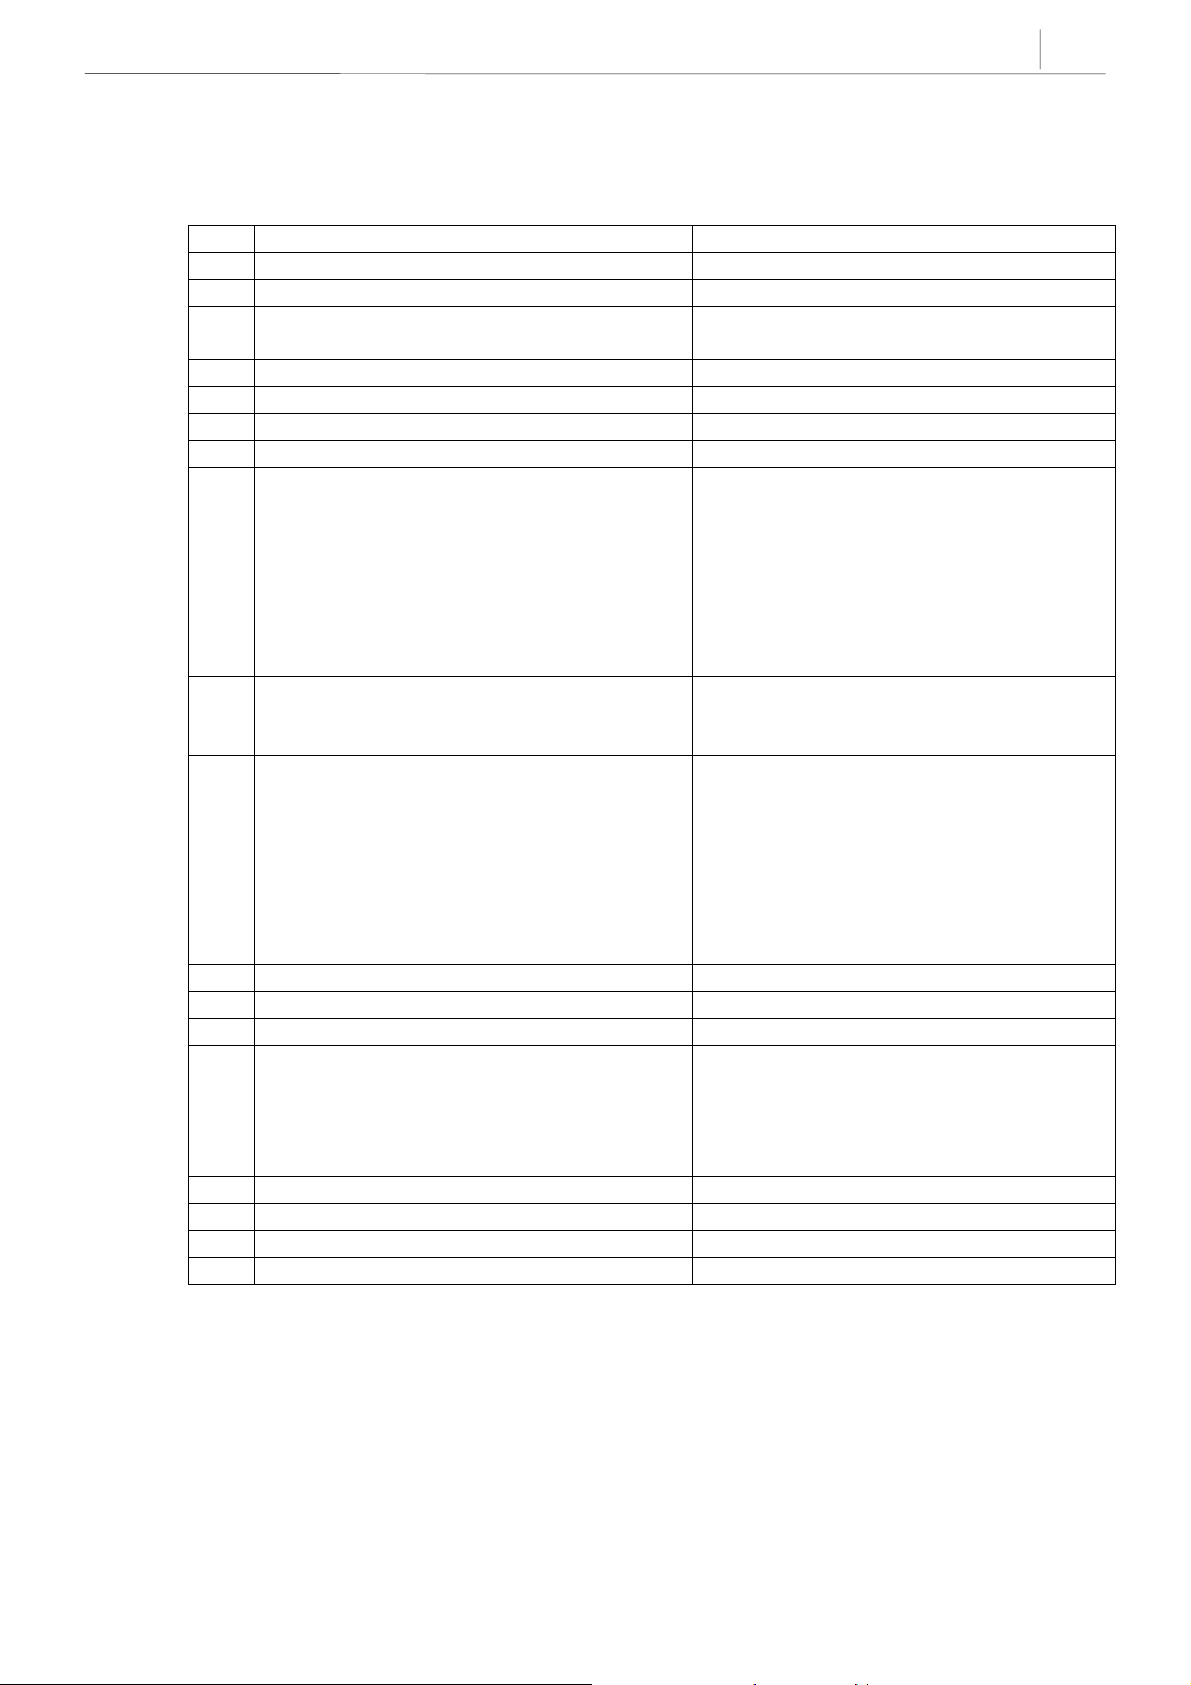
DCS-816 DEFAULT DATA
Station Programs
100: STATION LOCK All stations unlocked
101: CHANGE USER PASSCODE All station passcodes = 1234
102: CALL FORWARD None
103: SET ANSWER MODE All keysets ring
104: STATION NAME None
105: STATION SPEED DIAL None
106: STATION SPEED DIAL NAME None
107: KEY EXTENDER None
108: STATION STATUS PORT NUMBER: Follows H/W position
109: DATE DISPLAY COUNTRY: WESTERN
110: STATION ON/OFF AUTO HOLD: OFF
111: KEYSET RING TONE SELECTION 5
112: ALARM REMINDER Alarms set to NOTSET
113: VIEW MEMO NUMBER No memos entered
114: KEYSET VOLUME RING VOLUME: 4
115: SET PROGRAMMEDMESSAGE No messages selected
116: ALARM AND MESSAGE Alarms set to notset
119: SET CLIP DISPLAY Number first
121: KEYSET LANGUAGE ENGLISH
2-3
Ring frequency default is 5
TYPE: Follows phone type
PICKUP GROUP: 01
SGR: NONE
BOSS’SECR: NONE
PAGE : NONE
DAY COS NO: 01
NIGHT COS NO: 01
CLOCK: 24 CLOCK
DISPLAY: LOWER CASE
AUTO TIMER: ON
HEADSET USE: OFF
HOT KEYPAD: ON
KEY TONE: ON
PAGE REJOIN: ON
RING PREFERENCE: ON
CALL COST: OFF
OFF HOOK RING VOLUME: 4
HANDSET VOLUME: 4
SPEAKER VOLUME: 13
BGM VOLUME: 13
Technical Manuals Online! - http://www.tech-man.com
Page 14

2-4
Chapter 2
Programming Procedures
System Programs
200: OPEN CUSTOMERPROGRAMMING Closed (Disabled)
201: CHANGE CUSTOMER PASSCODE Passcode = 1234
202: CHANGE FEATURE PASSCODES DAY/NIGHT 0000
DISA ALARM 5678
ALARM CLR 8765
AA RECORD 4321
203: ASSIGN UA DEVICE None
204: COMMON BELL CONTROL Continuous
205: ASSIGN LOUD BELL Unassigned
206: BARGE–IN TYPE NO BARGE–IN
207: ASSIGN VM/AA PORT NORMAL PORT
208: ASSIGN RING TYPE ICM RING
209: ASSIGN ADD–ON MODULE MASTER = NONE
210: CUSTOMER ON/OFF DISA PSWD: ON
LCR ENABLE: OFF
PERI UCD SET: OFF
CID CODE INS: OFF
DISA MOH: OFF
TRANSFER MOH: OFF
DSP SSPDNAME: OFF
DDI BSY ROUT: OFF
DDI NOT ROUT: OFF
ALL PICK UP: OFF
ARD TONE CHK: ON
VPN ENABLE: OFF
IN TOLL CHK: OFF
211: DOOR RING ASSIGNMENT Station group 500
214: DISA ALARM RINGING STATION DAY 500
NIGHT 500
219: COMMON RELAY SERVICE TYPE External Page
220: ISDN SERVICE TYPE VOICE
300: CUSTOMER ON/OFF PER STATION STN CALL PRT : OFF
FWD DLY USE : OFF
The others set to ON
301: ASSIGN STATION COS Day class = 01
Night class = 01
302: PICKUP GROUPS All stations 01
303: ASSIGN BOSS/SECRETARY None
304: ASSIGN STATION/TRUNK USE DIAL = Yes
ANS = Yes
305: ASSIGN FORCED CODE None
306: HOT LINE None
308: ASSIGN BACKGROUND MUSIC SOURCE None
Technical Manuals Online! - http://www.tech-man.com
Page 15

309: ASSIGN STATION MUSIC ON HOLD Tone
310: LCR CLASS OF SERVICE Least Cost Routing COS 1
312: ALLOW CLIP REV YES
SND YES
INFO C.O Tel.
314: CONFIRM OUTGOING CALL None
315: SET RELOCATION None
316: COPY STATION USABLE None
317: ASSIGN STATION/STATION US E DIAL=Yes ANS=Yes
318: DISTINCTI VE RING T=F–STN, C=F–STN
319: BRANCH GROUP None
400: CUSTOMER ON/OFF PER TRUNK 1A2 EMULATE: Off
TRUNK INC DND: Off
TRUNK FORWARD: On
LCR ALLOW: Off
401: C.O./PBX LINE All Trunks C.O. Line
402: TRUNK DIAL TYPE All Tr unks DTMF
403: TRUNK TOLL CLASS All T runks F–STN day/night
404: TRUNK NAME No names entered
405: TRUNK NUMBER No numbers entered
406: TRUNK RING ASSIGNMENT All trunks day : 500
407: FORCED TRUNK RELEASE None
408: ASSIGN TRUNK MUSIC ON H OLD SOURCE T one
409: TRUNK STATUS READ SEE MMC 409
410: ASSIGN DISA TRUNK All trunks normal
414: MPD/PRS SIGNAL None
415: REPORT TRK ABANDON DATA All trunks will report data
418: CARD RESTART None
419: BRI OPTION CHANNEL ANY: YES
421: MSN DIGIT NONE
422: ASSIGN TRUNK COS DAY CLASS: 01
423: S/T MODE TRUNK
424: S0 MAPPING None
426: TRUNK GAIN CONTROL RX=0dB, TX=0dB for all trunks
428: ASSIGN TRK-TRK USE DIAL:Yes
night: 500
BRI MODE: P
DLSEND: OVERLAP
NIGHT CLASS: 01
P NOR
–
2-5
Technical Manuals Online! - http://www.tech-man.com
Page 16

2-6
Chapter 2
Programming Procedures
500: SYSTEM–WIDE COUNTERS Alarm Rem Cntr=5
Auto Rdl Counter=5
DISA Call Cntr=99
DISA Lock Cntr=3
New Call Counter=99
UCD Visual Alarm=0
UCD Audio Alarm=0
UCD CS Level 1=0
UCD CS Level 2=0
501: SYSTEM–WIDE TIMERS SEE MMC 501
502: STATION–WIDE TIMERS SEE MMC 502
503: TRUNK–WIDE TIMERS SEE MMC 503
504: PULSE MAKE/BREAK RATIO Make/Break = 33
Pulses Per Second = 10
505: ASSIGN DATE AND TIME Follows software version release data
506: TONE CADENCE SEE MMC 506
507: ASSIGN AUTO NIGHT TIME None
508: CALL COST UNIT COST PER MP: 200
PENCE
CALL COST RATE: 100%
510: SLI RING CADENCE SEE MMC 510
512: ASSIGN HOLIDAY None
600: ASSIGN OPERATOR GROUP DAY:500 NIGHT:500
601: ASSIGN STATION GROUP SEE MMC 601
602: STATION GROUP NAME None
603: ASSIGN TRUNK GROUP All analogue trunks are in group 9
All digital trunks are in group 80
604: ASSIGN STATION TO PAGE ZONE No stations assigned
All zone is set
605: ASSIGN EXTERNAL PAGE ZONE None
606: ASSIGN SPEED BLOCK System: 200 entries(20 blocks)
Stations: One bin of 10 entries
(1 block)
607: UCD OPTIONS SEE MMC 607
608: ASSIGN CLIP REVIEW BLOCK One bin of 10 entries
700: COPY COS CONTENTS None
701: ASSIGN COS CONTENTS SEE MMC 701
702: TOLL DENY TABLE All entries are set to 0
703: TOLL ALLOWANCE TABLE All entries are set to 0
704: ASSIGN WILD CHARACTER All entries are set to 0
705: ASSIGN SYSTEM SPEED DIAL None
706: SYSTEM SPEED DIAL BY NAME No names
707: AUTHORISATION CODE COS: 01
Technical Manuals Online! - http://www.tech-man.com
Page 17

708: ACCOUNT CODE None
709: TOLL PASS CODE None
710: LCR DIGIT TABLE SEE MMC 710
711: LCR TIME TABLE All Day 0000: 1
712: LCR ROUTE TABLE 01: 1 C: 1 G: 9 M: 001
713: LCR MODIFY DIGIT TABLE 002: I : 132 003: DEL: 03
714: DID NUMBER AND NAME TRANSLATION SEE MMC 714
715: PROGRAMMED STATION MESSAGE SEE MMC 715
716: UK LCR OPTION SEE MMC 716
718: MY AREA CO DE SEE MMC 718
720: COPY KEY PROGRAMMING None
721: SAVE STATION KEY PROGRAMMING None
722: STATION KEY PROGRAMMING SEE MMC 722
723: SYSTEM KEY PROGRAMMING SEE MMC 723
724: DIAL NUMBERING PLAN SEE MMC 724
725: SMDR OPTIONS SEE MMC 725
726: VM/AA OPTIONS SEE MMC 726
727: SYSTEM VERSION DISPLAY SEE MMC 727
728: CLIP TRANSLATION TABLE None
730: AA RECORD GAI N 0dB
731: AA RAM CLEAR None
732: AA TRANS TABLE SEE MMC 732
733: AA PLAN TABLE SEE MMC 733
734: AA MESSAGE MATCH MSG index number
735: AA USE TABLE Plan 01
736: ASSIGN AA MOH NOT USE
740: STATION PAIR None
750: VMS RESTART DOWNLOAD = YES
751: ASSIGN MAILBOX All stations = YES
All groups = NO
752: AUTO RECORD NONE
753: WARNING DESTINATION DEST = 500
754: VM HALT PROC
755: VM ALARM 80%
756: ASSIGN VM MOH Not Use
757: VM IN/OUT IN
800: ENABLE TECHNICIAN PROGRAM DISABLE
801: CHANGE TECHNICIAN PASSCODE Default passcode = 4321
2-7
Technical Manuals Online! - http://www.tech-man.com
Page 18

2-8
Chapter 2
Programming Procedures
802: CUSTOMER ACCESS MMC NUMBER SEE MMC 802
804: SYSTEM I/O PA RAMETER SEE MMC 804
805: TX LEVEL AND GAIN SEE MMC 805
806: CARD PRE–INSTALL None
807: VOLUME CONTROL SEE MMC 807
809: SYSTEM MMC LANGUAGE ENGLISH
810: HALT PROCESSING None
811: RESET SYSTEM None
812: COUNTRY CODE None
SPECIAL APPLICATIONS
This part of the manual is titled “Special Applications” because it provides information about interfacing
with customer–provided equipment (CPE) or using a feature in a different way than it was intended. Perhaps
an application may require a combination of CPE, creative programming, unusual feature operation or all of
the above.
Because these applications require installation instructions and a combination of programming sequences,
there is no obvious place to put this information; therefore, it is placed here. As additional special
applications are reported from the field, they will be included in this section.
Technical Manuals Online! - http://www.tech-man.com
Page 19

VOICE MAIL/AUTO ATTENDANT INTEGRATION
This section focuses mainly on in–band integration.
Because of the increased popularity of voice mail and auto attendant use, DCS-816 includes many
programmable options to address this demand. The degree of integration that can be achieved depends on
the abilities of the voice mail/auto attendant (VM/AA) system as well as the telephone system.
This list details the capabilities provided by the DCS-816 for voice mail via in–band integration.
Hardware Provisions
The VM/AA system must be connected to single line circuits on any SLI port.
Each port is equipped with a dedicated DTMF receiver for detecting DTMF signalling from the VM/AA.
These ports also provide an instant break in loop current when the calling party hangs up. This is called a
disconnect signal.
2-9
Software Provisions
SCREENED OR UNSCREENED TRANSFER
There are no special codes needed to transfer a call. Simply hookflash, receive transfer dial tone and dial the
destination.
DIRECT IN LINES
Any C.O. call can be assigned to ring at an individual station or a station hunt group assigned to the VM/AA.
CALLS OR RECALLS TO THE OPERATOR
Dialling 0 will always result in a ringback signal. If the operator is busy, the call continues to ring in queue to
the operator. This prevents a caller from dialling 0 and reaching another mailbox because the operator is
busy.
MESSAGE WAITING
A VM/AA port can leave a message at any station or group of stations. The message waiting indication can
be set or cancelled at any station or station group with or without the stations ringing.
IN–BAND SIGNALLING
DCS-816 can be programmed to send the calling station’s extension number after the voice mail system
answers. These DTMF signals may include a leading digit to indicate the type of call and additional
information about the original caller. DTMF signals may also be substituted for call progress tones to speed
up voice mail call processing. This program allows call forwarding to a mailbox and bypassing of the main
greeting for automatic message retrieval. Blind transfers may be performed because the recall will be
correctly identified.
The effectiveness of this program depends on the ability of the voice mai l system to make use
of this information.
NOTE
STATION HUNT GROUP WITH OVERFLOW
Each station group can have an individual overflow destination with an individual overflow timer. The
overflow destination will ring whenever a call to the group is not answered. If the voice mail system
becomes inoperative, calls are automatically routed to the overflow destination.
Technical Manuals Online! - http://www.tech-man.com
Page 20

2-10
Chapter 2
Programming Procedures
INTERNAL CALL FORWARDING TO VOICE MAIL
This option in MMC 300 will allow or deny intercom calls from following call forward to voice mail. This
feature conserves disk drive space by only storing calls originating outside the system.
ONE–TOUCH VOICE MAIL ACCESS
One–touch speed dial keys can be programmed to automatically dial, log into and retrieve messages from
voice mail.
CALL PROGRESS TONES
The only tones sent to a VM/AA port are dial tone, busy and ringback. To eliminate confusion, busy tone is
substituted for DND or error tones on voice mail ports only.
Technical Manuals Online! - http://www.tech-man.com
Page 21

2-11
INDIVIDUAL STATION PAGE
The system was not designed to permit page announcements to individual keysets. However, a forced auto
answer key (FAUTO) can be used to accomplish this
1. Program a keyset for RING in MMC 103.
2. Assign an FAUTO key to each keyset that is allowed to page individual keysets.
3. Call another station. When you hear ringback tone, press the FAUTO key. The ringing will stop and an
Auto Answer call is set up.
To prevent the use of this feature from getting out of control, only assign FAUTO keys to those
NOTE
keysets needing to page individual keyset s.
.
Technical Manuals Online! - http://www.tech-man.com
Page 22

2-12
Chapter 2
Programming Procedures
CALLING LINE INDICATION PRESENTATION
(CLIP)
Hardware Provisions
ISDN trunk cards
Software Provisions
The MMCs related to CLIP are listed below with a short description of their use. They are listed in the
recommended order in which they should be programmed. This sequence is suggested so that the installer
gets a better understanding of how the feature works. There is no technical reason to follow this sequence.
zMMC 312 ALLOW CLIP This MMC is used by the technician to
determine which keysets are allowed to receive
CLIP displays
.
zMMCs 722 and 723 These MMCs have had new keys related to
CLIP features added to them. It is strongly
recommended that all keysets allowed CLIP in
MMC 312 are programmed with a CLIP key.
zMMC 728 CLIP TRANSLATION This MMC allows the technician to create a list
of names that correspond to numbers received
from the Central Office (C.O.). These names will
be displayed when a call rings in that has
NUMBER ONLY data provided by the C.O.
zMMC 725 SMDR OPTIONS The ability to print CLIP data and abandoned
calls has been added to this MMC
zMMC 119 CLIP DISPLAY This MMC is used by the end user to determine
which piece of CLIP data is displayed when a
call rings at the user’s station.
zMMC 501 SYSTEM TIMERS This MMC has two new timers related t o CLIP.
The only timer that may need
CLIP DISPLAY TIME. Thi s is the length of
time that CLIP data is displayed after the CLIP
key is pressed.
adjustment is the
zMMC 415 TRK ABANDON This MMC is used by the technician to
zMMC 608 CLIP BLOCK This MMC is used by the technician to assign
Technical Manuals Online! - http://www.tech-man.com
determine which trunks will record data in the
Call Abandon list and print with an Abandon “A”
flag on SMDR.
CLIP Review blocks to keysets to allow the
user to review CLIP data for previous calls.
Page 23

2-13
zMMC 701 CLASS OF SERVICE All of the CLIP features have been added to this
MMC to enable the technician to allow or deny
them
.
zMMC 724 NUMBER PLAN CLIP features have been added to this MMC to
allow a technician to assign an access code
where necessary.
Technical Manuals Online! - http://www.tech-man.com
Page 24

2-14
Chapter 2
Programming Procedures
TOLL RESTRICTION (CALL BARRING)
OVERVIEW
DCS-816 allows each station to be assigned a class of service (COS) for use in the day mode and a COS for
use in the night mode. This COS determines the station’s dialling class, which can be set to A through H.
Class A has no general restrictions and is not configurable but it will follow the restrictions set in the Class
of Service table (see MMC 701) and Class H is restricted to internal calls only.
Classes B, C, D, E, F and G are controlled by the entries listed in the deny table in MMC 702, the allow
table in MMC 703 and the wild cards defined in MMC 704.
Toll Restriction (Call Barring) Rules
1. The deny entries prevent certain numbers from being dialled. The allow entries are the only exceptions
to these deny entries.
2. Listing numbers in the allow tables without any entries in the deny tables is the same as having no
restriction.
3. When changing any entry or BCDEFG status, you must enter all digits.
The system has a Wild Card facility, these wildcards consists of three characters (X, Y or Z), these
characters can be set to equal all DTMF digit from 1~9, 0, ✱ and #.
The following examples are provided as an aid to help understand how to use the deny and allow tables.
Example
Customer requirements:
z Phones with dialling class B can only dial local calls (i.e. cannot dial any
z
Classes C and D are restricted (denied) from dialling 0860 and 0850 numbers.
z
Classes E and F are restricted from dialling 0891 and 0898 numbers
z
Class G can dial any number.
z
All classes except B can dial 192
z
All classes can dial 999 calls.
number starting with 0)
.
Technical Manuals Online! - http://www.tech-man.com
Page 25

2-15
Toll Deny Table
The entry in the toll allow table is used to override the toll deny table for specific numbers, i.e. all classes
(even class B) can dial 01865.
Entry Digits BCDEFG
001 0 100000
002 0850 111000
003 0891 100110
004 0898 100110
005 192 100000
006 0860 111000
Toll Allow Table
Entry Digits BCDEFG
0001 01865 111111
Technical Manuals Online! - http://www.tech-man.com
Page 26

2-16
Chapter 2
Programming Procedures
(This page is left blank intentionally.)
Technical Manuals Online! - http://www.tech-man.com
Page 27

Technical Manuals Online! - http://www.tech-man.com
Page 28

Technical Manuals Online! - http://www.tech-man.com
Page 29

Chapter 3 Programming Using MMCs
This section explains how to1 program using the MMCs. You should read the instructions for each program
carefully before starting the program.
First, decide what changes are required to the system, and therefore which MMCs you need to use. Then,
“ENABLE” the keyset and follow the procedure for your selected program(s).
The default data of each MMC may vary according to each country.
NOTE
3-1
Technical Manuals Online! - http://www.tech-man.com
Page 30

3-2
Chapter 3
Programming Using MMCs
100 STATION LOCK
Allows the system administrator or technician to lock or unlock an individual station or all stations
simultaneously. The three options are as follows:
0 UNLOCKED Unlocks a locked station.
1 LOCKED OUTNot allowed to access C.O line for dial out
2 LOCKED ALLNot allowed to initiate any action with this mode
PROGRAM KEYS
UP & DOWN Used to scroll through options
KEYPAD Used to enter selections
SOFT KEYS Move cursor left and right
SPK Used to store data and advance to next MMC
HOLD Used to clear previous entry
ANS/RLS Used to select ALL
ACTION DISPLAY
1. Press TRSF 100
Display shows
2. Dial station number (e.g., 205)
OR
Press UP or DOWN to select station and press RIGHT soft key
to move cursor
Press UP or DOWN to select station and use
RIGHT soft key to move cursor
OR
Press ANS/RLS to select all stations
3. Enter 0 to unlock or 1 to lock (e.g. 1)
OR
Press UP or DOWN key to make selection and press
Use UP and DOWN key to make selection and press
RIGHT soft key to return to
[201] STN LOCK
UNLOCKED
[205] STN LOCK
UNLOCKED
[ALL] STN LOCK
??
[205] STN LOCK
LOCKED OUT
4. Press TRSF to save and exit
OR
Press SPK to save and advance to nex
MMC
DEFAULT DATA
All stations unlocked
RELATED ITEMS:
Station user programming
Technical Manuals Online! - http://www.tech-man.com
Page 31

3-3
101 CHANGE USER PASSCODE
Allows the system administrator or technician to reset any keyset’s passcode to its default value of “1234.”
This MMC cannot display station passcodes; it can only reset them to default.
Keyset users can set or change their individual passcodes. The passcode is used to lock or unlock the
keyset for toll restriction (call barring) override and to access the DISA feature.
NOTE
.
Default passcodes cannot be used for toll restriction override or for DISA access.
PROGRAM KEYS
UP & DOWN Used to scroll through options
KEYPAD Used to enter selections
SOFT KEYS Move cursor left and right
SPK Used to store data and advance to next MMC
HOLD Used to clear previous entry
ANS/RLS Used to select ALL
ACTION DISPLAY
1.
Press TRSF 101
Display shows
2.
Dial keyset number (e.g., 205)
OR
Use UP or DOWN to scroll through keyset numbers
and press RIGHT soft key to move the cursor right
[201] PASSCODE
PASSCODE: ✱✱✱✱
[205] PASSCODE
PASSCODE: ✱✱✱✱
3.
Press HOLD to reset passcode
4. Press TRSF to store and exit
OR
Press SPK to s tor e a nd adva nce to n ext M MC
DEFAULT DATA
All station passcodes = 1234
RELATED ITEMS
MMC 100 Station Lock
[205] PASSCODE
PASSCODE : 1234
Technical Manuals Online! - http://www.tech-man.com
Page 32

3-4
Chapter 3
Programming Using MMCs
102 CALL FORWARD
Allows the system administrator to program the call forward destinations for other station users. The MMC
also allows call forward to be set after the destination has been entered.
DCS-816 allows five types of call forwarding. FORWARD ALL, FORWARD NO ANSWER, FORWARD
BUSY, FORWARD FOLLOW ME and FORWARD EXTERNAL. There is an additional opt ion, FORWARD
BUSY/NO ANSWER, that allows both of these options to be activated at the same time, provided that
destinations have been entered for both.
0 FORWARD CANCEL
1 ALL CALL
2 BUSY
3 NO ANSWER
4 BUSY/NO ANSWER
5 EXT
PROGRAM KEYS
UP & DOWN Used to scroll through options
KEYPAD Used to enter selections
SOFT KEYS Move cursor left and right
SPK Used to store data and advance to next MMC
HOLD Used to clear previous entry
Technical Manuals Online! - http://www.tech-man.com
Page 33

ACTION DISPLAY
3-5
1. Press TRSF 102
Display shows
2. Dial station number (e.g., 205)
OR
Press UP or DOWN to select station and press RIGHT
soft key to move cursor
3. Dial 0–5 to select forward type (e.g. 1)
OR
Press UP or DOWN to select forward type and press
RIGHT soft key to move cursor
4. Dial destination number (e.g., 201)
OR
Press UP or DOWN to select destination and press
RIGHT soft key to move cursor
5. Dial 1 for YES, 0 for NO
OR
Press UP or DOWN to select YES or NO and press
RIGHT soft key to return to step 2
[201] FORWARD
0:FORWARD CANCEL
[205] FORWARD
0:FORWARD CANCEL
[205] FORWARD
1:ALL CALL:NONE
[205] FORWARD
1:ALL CALL:201
[205] FORWARD
CURENTLY SET :YES
6. Press TRSF to store and exit
OR
Press SPK to store and advance to next MMC
DEFAULT DATA
None
RELATED ITEMS
MMC 301 Assign Station COS
MMC 501 System-Wide Timers
MMC 502 Station-Wide Timers
MMC 701 Assign COS Contents
MMC 722 Station Key Programming
MMC 723 System Key Programming
Technical Manuals Online! - http://www.tech-man.com
Page 34

3-6
Chapter 3
Programming Using MMCs
103 SET ANSWER MODE
Allows the system administrator to change the answer mode of any keyset or add–on module (AOM). Each
keyset or AOM can have its answer mode set to one of the following options:
0. RING: The keyset will ring in one of eight custom ring patterns. Calls are answered by pressing the
ANS/RLS key or by lifting the handset.
1. AUTO: After giving a short attention tone, the keyset will automatically answer calls on the speakerphone.
When a C.O. line is transferred to a keyset in Auto Answer, the screened portion of the call will be Auto
Answer, but the keyset or AOM will ring when the transfer is complete if the user has not pressed the
ANS/RLS key or lifted the handset.
2. VOICE: The keyset will not ring. After a short attention tone, callers can make an announcement but the
ANS/RLS key or handset must be used to answer calls.
PROGRAM KEYS
UP&DOWN Used to scroll through options
KEYPAD Used to enter selections
SOFT KEYS Move cursor left and right
SPK Used to store data and advance to next MMC
HOL Used to clear previous entry
ANS/RLS Used to select ALL
ACTION DISPLAY
1. Press TRSF 103
Display shows
2. Dial keyset number (e.g., 205)
OR
Press UP or DOWN to select keyset
and press RIGHT soft key to move cursor
OR
Press ANS/RLS to select All
3. Dial 0, 1 or 2 to change answer mode (e.g., 2)
OR
Press UP or DOWN to select answer mode and
press RIGHT soft key to return to step 2 above
4. Press TRSF to store and exit
OR
Press SPK to store and advance to next MMC
[201] ANS MODE
RING MODE
[205] ANS MODE
RING MODE
[ALL] ANS MODE
?
[205] ANS MODE
VOICE ANNOUNCE
DEFAULT DATA
All keysets ring
Ring frequency default is 5
RELATED ITEMS
MMC 111 Keyset Ring Tone
Technical Manuals Online! - http://www.tech-man.com
Page 35

3-7
104 STATION NAME
Allows the system administrator or technician to enter a name (up to 11 characters) to identify an individual
station.
Names are written using the keypad. Each key press selects a character. Pressing the dial pad key moves
the cursor to the next position. For example, if the directory name is “SAM SMITH,” press the number “7”
four times to get the letter “S.” Now press the number “2” once to get the letter “A.” Continue selecting
characters from the table below to complete the name. Pressing the bottom left programmable key will
change the letter from upper case to lower case.
When the character you want appears on the same dial pad key as the previous character,
press the UP key to move the cursor to the right.
NOTE
COUNT 12345
DIAL 0 <> . ) 0
DIAL 1 Space ? , ! 1
DIAL 2 ABC@2
DIAL 3 DEF#3
DIAL 4 GH I $ 4
DIAL 5 JKL%5
DIAL 6 MNO^6
DIAL 7 PQRS7
DIAL 8 TUV 8
DIAL 9 WX Y Z 9
DIAL * :=[ ]
The # key can be used for the following special characters: #, space, &, !, :, ?, ., ,, %, $, –, <, >, /, =, [, ], @,
^, (, ), _, +, {, }, |, ;,", →,` , and \.
PROGRAM KEYS
UP & DOWN Used to scroll through options
KEYPAD Used to enter selections
SOFT KEYS Move cursor left and right
SPK Used to store data and advance to next MMC
HOLD Used to clear previous entry
A Key 19: acts as toggle between upper case and lower case
Technical Manuals Online! - http://www.tech-man.com
Page 36

3-8
Chapter 3
Programming Using MMCs
ACTION DISPLAY
1. Press TRSF 104
Display shows
2. Dial station number (e.g., 205)
OR
Press UP or DOWN to select station and press
RIGHT soft key to move cursor
3. Enter the station name using the procedure described
above and press RIGHT soft key to return to step 2
4. Press TRSF to store and exit
OR
Press SPK to store and advance to next MMC
DEFAULT DATA
None
RELATED ITEMS
[201] STN NAME
[205] STN NAME
_
[205] STN NAME
SAM SMITH
“A” button is button #19 on keyset
“B” button is button #20 on keyset
“C” button is button #21 on keyset
“D” button is button #22 on keyset
“E” button is button #23 on keyset
“F” button is button #24 on keyset
Technical Manuals Online! - http://www.tech-man.com
Page 37

3-9
105 STATION SPEED DIAL
Allows the system administrator or technician to program the personal speed dial locations assigned to a
station. This must be done for single line telephones because these stations cannot access programming.
Each station may have up to 50 locations or bins assigned to it in MMC 606 Assign Speed Block. The speed
dial bins are numbered 00–49. Each speed dial number consists of a trunk or trunk group access code
followed by a separator and up to 24 digits to be dialled. These dialled digits may consist of 0–9, ✻ and #. If
the system recognises a valid trunk or trunk group access number, it will automatically insert the separator.
PROGRAM KEYS
UP & DOWN Used to scroll through options
KEYPAD Used to enter selections
SOFT KEYS Move cursor left and right
SPK Used to store data and advance to next MMC
HOLD Used to clear previous entry
B Used to insert a flash code “F”
C Used to insert a pause code “P”
D Used to insert a pulse/tone conversion code “C”
E Used to mask/unmask following digits (shows as “[” or “]”)
F Used to enter name for speed dial bin (see MMC 106)
Technical Manuals Online! - http://www.tech-man.com
Page 38

3-10
Chapter 3
Programming Using MMCs
ACTION DISPLAY
1. Press TRSF 105
Display shows
2. Dial station number(e.g., 205)
OR
Press UP or DOWN to select station and press
RIGHT soft key to move cursor
If selected station has no speed dial bins, the display
will be as shown and a new station may be selected
3. Dial location number (e.g., 05)
OR
Press UP or DOWN to select location and press
RIGHT soft key to move cursor
4.
E nter trunk access code (e.g., 9) followed by
the number to be dialled (e.g., 4264100)
OR
Press the RIGHT soft key to return to step 2
OR
Press the LEFT soft key to return to step 3
Press HOLD button to clear an entry
If an error is made, use DOWN arrow to step back
[201] SPEED DIAL
00 :
[205] SPEED DIAL
00 :
[205] SPEED DIAL
SPDBLK NOT EXIST
[205] SPEED DIAL
05: _
[205] SPEED DIAL
05 : 9–4264100_
5.
Press “F” button to access MMC 106 Station
Speed Dial Name
OR
Press TRSF to save and exit
OR
Press SPK to s ave a nd ad vance to ne xt MMC
DEFAULT DATA
None
RELATED ITEMS
MMC 106 Station Speed Dial Name
MMC 606 Assign Speed Block
“B” button is button #20 on keyset
“C” button is button #21 on keyset
“D” button is button #22 on keyset
“E” button is button #23 on keyset
“F” button is button #24 on keyset
Technical Manuals Online! - http://www.tech-man.com
Page 39

3-11
106 STATION SPEED DIAL NAME
Allows a name (up to 11 characters) to be entered for each personal speed dial location. This name enables
the speed dial number to be located when the directory dial feature is used. The directory dial feature allows
the display keyset user to select a speed dial location by viewing its name.
Names are written using the keypad. Each press of a key selects a character. Pressing the dial keypad moves
the cursor to the next position. For example, if the directory name is “SAM SMITH,” press the number “7”
four times to get the letter “S.” Now press the number “2” once to get the letter “A.” Continue selecting
characters from the table below to complete your message. Pressing the bottom left programmable ke y
changes the letter from upper case to lower case.
When the character you want appears on the same dial keypad as the previous character,
NOTE
COUNT 12345
DIAL 0
DIAL 1 Space ? , ! 1
DIAL 2 ABC@2
DIAL 3 DEF#3
DIAL 4 GH I $ 4
DIAL 5 JKL%5
DIAL 6 MNO^6
DIAL 7 PQRS7
DIAL 8 TUV 8
DIAL 9 WX Y Z 9
DIAL :=[ ]
press the UP key to move the cursor to the right.
<>
.
)
0
The # key can be used for the following special characters: #, space, &, !, :, ?, ., ,, %, $, –, <, >, /, =, [, ], @,
^, (, ), _, +, {, }, |, ;,", →,` , and \.
PROGRAM KEYS
UP & DOWN Used to scroll through options
KEYPAD Used to enter selections
SOFT KEYS Move cursor left and right
SPK Used to store data and advance to next MMC
HOLD Used to clear previous entry
A Key 19, acts as toggle between upper case and lower case
Technical Manuals Online! - http://www.tech-man.com
Page 40

3-12
Chapter 3
Programming Using MMCs
ACTION DISPLAY
1. Press TRSF 106
Display shows
2. Dial station number (e.g., 205)
OR
Press UP or DOWN to select station and press
RIGHT soft key to move cursor
If selected station has no speed dial bins, the display
will be as shown and a new station may be selected.
3. Dial speed dial location (e.g., 01)
OR
Press UP or DOWN to scroll through location numbers
and press RIGHT soft key to move cursor
5.
Enter the location name using the procedure described
above and press RIGHT soft key to return to step 2.
[201] SPEED NAME
00:
[205] SPEED NAME
00:
[205] SPEED NAME
SPDBLK NOT EXIST
[205] SPEED NAME
01:_
[205] SPEED NAME
01:SAM SMITH
5. Press TRSF to store and exit
OR
Press SPK to store and advance to next MMC
DEFAULT DATA
None
RELATED ITEMS
MMC 105 Station Speed Dial
MMC 606 Assign Speed Block
“A” button is button #19 on keyset
“B” button is button #20 on keyset
“C” button is button #21 on keyset
“D” button is button #22 on keyset
“E” button is button #23 on keyset
“F” button is button #24 on keyset
Technical Manuals Online! - http://www.tech-man.com
Page 41

3-13
107 KEY EXTENDER
Used to view the programmable keys assigned to keyset stations. In addition, it allows the system
administrator to assign key extenders to some keys making a general access feature key more specific.
The feature keys that can have extenders are listed below.
FEATURE KEY EXTENDER
BOSS Boss and Secretary (1–4)
DIR Directory dial by name type (1–3)
DP Direct Pick Up (extension or station group number)
DS Direct Station Select (station number)
FWRD Call Forward (0–5)
GPIK Group Pick Up (01–08)
IOG In/Out Group (Station Group Number)
MMP Meet Me Page (0–5)
PAGE Page (0–5)
SG Station Group (500–509)
SPD Speed Dial (00–49, 500–799)
SP UCD Supervisor (UCD/ACD Group Number)
PGM Programmed Station Message (01–20)
VT VM transfer (VM/AA Group Number)
PROGRAM KEYS
UP & DOWN Used to scroll through options
KEYPAD Used to enter selections
SOFT KEYS Move cursor left and right
SPK Used to store data and advance to next MMC
HOLD Used to clear previous entry
Technical Manuals Online! - http://www.tech-man.com
Page 42
3-14
Chapter 3
Programming Using MMCs
ACTION DISPLAY
1. Press TRSF 107
Display shows first station
2. Dial station number (e.g., 205)
OR
Use UP or DOWN to scroll through station numbers
and press RIGHT soft key to move the cursor
3. Enter key number (e.g., 18)
OR
Press UP and DOWN to scroll through keys and
use RIGHT soft key to move the cursor
OR
Use above table to select desired extender
System will return to this step
4. Press TRSF to store and exit
OR
Press SPK to store and advance to the next MMC
[201] EXT (MAST)
01:CALL1 →
[205] EXT (MAST)
01:CALL1 →
[205] EXT (MAST)
18:DS →
[205] EXT (MAST)
18:DS →DS207
If the RIGHT soft key will not move the cursor to the right, you are attempting to add an
NOTE
extender to a key that cannot have one.
DEFAULT DATA
None
RELATED ITEMS
MMC 720 Copy Key Programming
MMC 721 Save Station Key Programming
MMC 722 Station Key Programming
MMC 723 System Key Programming
Technical Manuals Online! - http://www.tech-man.com
Page 43

3-15
108 STATION STATUS
This is a read–only MMC. Displays the following attributes of a station port:
0 PORT NO Slot (BDLI,BSLI,AA) / Port (1–12)
1 TYPE Type of Phone
2 PICKUP GROUP None, 01–08
3 SGR Station Group Number
4 BOSS–SECR None, BOSS, SECR
5 PAGE Page Zone (1–4, *)
6 DAY COS NO COS (01–10)
7 NIGHT COS NO COS (01–10)
PROGRAM KEYS
UP & DOWN Used to scroll through options
KEYPAD Used to enter selections
SOFT KEYS Move cursor left and right
SPK Used to advance to next MMC
ACTION DISPLAY
1. Press TRSF 108
Display shows first station
2. Dial station number (e.g., 205)
OR
Press UP or DOWN to select station and press
RIGHT soft key to move cursor
3. Dial 0–7 to select station status type (e.g., 2)
OR
Press UP or DOWN to select status and press RIGHT
soft key to return to step 2
4. Press TRSF to exit
OR
Press SPK to advance to next MMC
[201] STN STATUS
PORT NO:BASE01
[205] STN STATUS
PORT NO:BASE05
[205] STN STATUS
PICKUP GROUP:01
DEFAULT DATA
PORT N0 Follows hardware position
TYPE Follows phone type
PICKUP GRP 0 1
SGR None
BOSS–SECR None
PAGE None
DAY COS NO 01
NIGHT COS NO 01
Technical Manuals Online! - http://www.tech-man.com
Page 44

3-16
Chapter 3
Programming Using MMCs
RELATED ITEMS
MMC 301 Assign Station COS
MMC 302 Pickup Groups
MMC 303 Assign Boss/Secretary
MMC 601 Assign Station Group
MMC 604 Assign Station to Page Zone
Technical Manuals Online! - http://www.tech-man.com
Page 45

3-17
109 DATE DISPLAY
Allows the system administrator or technician to select the date and time display mode on a per–station
basis or system–wide.
0 COUNTRY Sets overall display format and has two options:
0 = ORIENTALMM/DD DAYHH:MM
1 = WESTERNDAY DD MONHH:MM
1 CLOCK Sets format of clock display and has two options:
0 = 12 CLOCKDisplays 1
1 = 24 CLOCKDisplays 1
2 DISPLAY Sets format of DAY and MON display and has two options:
0 = UPPER CASEDisplays Friday as FRI and March as MAR
1 = LOWER CASEDisplays Friday as Fri and March as Mar
PROGRAM KEYS
. as 01:00
P.M
. as 13:00
P.M
UP & DOWN Used to scroll through options
KEYPAD Used to enter selections
SOFT KEYS Move cursor left and right
SPK Used to store data and advance to next MMC
HOLD Used to clear previous entry
ANS/RLS Used to select ALL
ACTION DISPLAY
1. Press TRSF 109
Display shows
2. Dial station number (e.g., 205)
OR
Press UP or DOWN to select station and press
RIGHT soft key to move cursor
OR
Press ANS/RLS for all keysets
3. Dial 0–2 to select mode
OR
Press UP or DOWN to scroll through modes and press
RIGHT soft key to move cursor
[201] DAY FORMAT
COUNTRY:WESTERN
[205] DAY FORMAT
COUNTRY:WESTERN
[ALL] DAY FORMAT
COUNTRY:WESTERN
[205] DAY FORMAT
COUNTRY:ORIENTAL
4. Press UP or DOWN to select format (e.g. 0) and press
RIGHT soft key to return
to step 2
5. Press TRSF to store and exit
OR
Press SPK to store and advance to next MMC
Technical Manuals Online! - http://www.tech-man.com
Page 46

3-18
Chapter 3
Programming Using MMCs
DEFAULT DATA
COUNTRY: WESTERN
CLOCK: 24 CLOCK
DISPLAY: LOWER CASE
RELATED ITEMS
MMC 505 Assign Date and Time
Technical Manuals Online! - http://www.tech-man.com
Page 47

3-19
110 STATION ON/OFF
Allows the system administrator to set any of the keyset features listed below.
00 AUTO HOLD Automatically places an existing C.O. call on hold if a CALL button, trunk
key or trunk route key is pressed during that call.
01 AUTO TIMER Automatically starts the stopwatch timer during a C.O.
call.
02 HEADSET USE When ON, this feature disables the hookswitch allowing a headset user to
answer all calls by pressing the ANS/RLS button.
03 HOT KEYPAD When ON, this feature allows the user to dial directory
numbers without having to first lift the handset or press the SPK button.
04 KEY TONE Allows the user to hear a slight tone when pressing buttons on keyset.
05 PAGE REJOIN Allows the user to hear the latter part of page announcements if keyset
becomes free during a page.
06 RING PREF. When OFF, requires the user to press the fast flashing button to answer a
ringing call after lifting the handset.
07 CALL COST If enabled (ON), LCD shows real–time call cost based on Metering Pulses
arrived.
08 NOT CONT.CID When OFF, the Caller ID will be continue display after the keyset user
answered call.
09 AME BGM This feature selects whether a station using Answer Machine Emulation
will hear their personal greeting or BGM while callers are listening to the
personal greeting. A BGM source must be selected for this to work.
10 AME PSWD When ON, station users who have AME set must enter their station
password to listen to messages being left.
PROGRAM KEYS
UP & DOWN Used to scroll through options
KEYPAD Used to enter selections
SOFT KEYS Move cursor left and right
SPK Used to store data and advance to next MMC
HOLD Used to clear previous entry
ANS/RLS Used to select ALL
Technical Manuals Online! - http://www.tech-man.com
Page 48

3-20
Chapter 3
Programming Using MMCs
ACTION DISPLAY
1. Press TRSF 110
Display shows
2. Dial keyset number (e.g., 205)
OR
Press UP or DOWN to select keyset and press RIGHT
soft key to move cursor
OR
Press ANS/RLS for ALL
3. Dial option number from above list (00–10, e.g. 03)
OR
Press UP or DOWN to select option and press RIGHT
soft key to move cursor
4. Dial 1 for ON or 0 for OFF
OR
Press UP or DOWN to select ON or OFF and press LEFT
or RIGHT soft key to return to step
[201] STN ON/OFF
AUTO HOLD :OFF
[205] STN ON/OFF
AUTO HOLD :OFF
[ALL] STN ON/OFF
AUTO HOLD :?
[205] STN ON/OFF
AUTO HOLD :OFF
[205] STN ON/OFF
HOT KEYPAD :ON
5. Press TRSF to store and exit
OR
Press SPK to store and advance to next MMC
DEFAULT DATA
AUTO HOLD OFF AUTO TIMER ON
HEADSET USE OFF HOT KEYPAD ON
KEY TONE ON PAGE REJOIN ON
RING PREFERENCE ONCALL COST OFF
NOT CONT.CID OF F AME BGM OFF
AME PSWD OFF
RELATED ITEMS
MMC 301 Assign Station COS
MMC 701 Assign COS Contents
[205] STN ON/OFF
HOT KEYPAD :OFF
Technical Manuals Online! - http://www.tech-man.com
Page 49

3-21
111 KEYSET RING TONE
Allows the system administrator or technician to select the ring tone heard at each keyset. There are eight
ring tones available. A short tone burst of the selection will be heard when the dial keypad is pressed.
PROGRAM KEYS
UP & DOWN Used to scroll through options
KEYPAD Used to enter selections
SOFT KEYS Move cursor left and right
SPK Used to store data and advance to next MMC
HOLD Used to clear previous entry
ANS/RLS Used to select ALL
ACTION DISPLAY
1. Press TRSF 111
Display shows
2. Dial keyset number (e.g., 205)
OR
Press UP or DOWN to select station and press
RIGHT soft key to move cursor
OR
Press ANS/RLS to select All
3. Dial 1–8 to select ring tone
OR
Press UP or DOWN to select ring tone and press
RIGHT soft key to move cursor
4. Press TRSF to store and exit
OR
Press SPK to store and advance to next MMC
[201] RING TONE
SELECTION 5
[205] RING TONE
SELECTION 5
[ALL] RING TONE
SELECTION ?
[205] RING TONE
SELECTION 5
DEFAULT DATA
SELECTION 5
RELATED ITEMS
MMC 114 Keyset Volume
Technical Manuals Online! - http://www.tech-man.com
Page 50

3-22
Chapter 3
Programming Using MMCs
112 ALARM REMINDER
Allows the system administrator or technician to set or change the alarm clock/appointment reminder
feature for any station. This must be done for single line telephones, as they cannot access programming.
Two alarms may be set for each station and each alarm may be defined as a one–time or TODAY alarm or as
a DAILY alarm. The TODAY alarm is automatically cancelled after it rings, while the DAILY alarm rings
every day at the same time.
0 NOTSET
1 TODAY
2 DAILY
PROGRAM KEYS
UP & DOWN Used to scroll through options
KEYPAD Used to enter selections
SOFT KEYS Move cursor left and right
SPK Used to store data and advance to next MMC
HOLD Used to clear previous entry
ACTION DISPLAY
1. Press TRSF 112
Display shows
2. Dial station number (e.g., 205)
OR
Press UP or DOWN to select station and press
RIGHT soft key
3. Dial 1–2 to select alarm (e.g., 1)
OR
Press UP or DOWN to select alarm and press
RIGHT soft key
4. Enter alarm time in 24–hour clock format
(e.g., 1300 for 1pm)
5. Dial entry from above list for alarm type
(e.g. 2)
OR
Press UP or DOWN to select alarm type and press
RIGHT soft key to move cursor and return to step 2
[201] ALM CLK(1)
HHMM: ÎNOTSET
[205] ALM CLK(1)
HHMM: ÎNOTSET
[205] ALM CLK(1)
HHMM: ÎNOTSET
[205] ALM CLK (1)
HHMM:1300ÎNOTSET
[205] ALM CLK(1)
HHMM:1300ÎDAILY
6. Press TRSF to store and exit
OR
Press SPK to store and advance to next MMC
Technical Manuals Online! - http://www.tech-man.com
Page 51

DEFAULT DATA
Alarms set to NOTSET
RELATED ITEMS
None
3-23
Technical Manuals Online! - http://www.tech-man.com
Page 52

3-24
Chapter 3
Programming Using MMCs
113 VIEW MEMO NUMBER
Allows a station user the ability to view a memo left by the user. A memo can be left by entering it via the
dial keypad using the table below. MMC 116 (Alarm and Message) can be programmed to remind the user to
read the memo. A memo of up to 13 characters can be entered. For example, using the dial keypad, press
“6” once to enter the letter “M,” and press “3” twice for an “E.” Pressing the “A” key will change the
letters from upper case to lower case.
When the desired character appears on the same dial keypad key as the previous character,
NOTE
COUNT 12345
DIAL 0 0
DIAL 1 1 Space ? , !
DIAL 2 2A B C@
DIAL 3 3D E F #
DIAL 4 4G H I $
DIAL 5 5J KL%
DIAL 6 6M N O ^
DIAL 7 7P Q R S
DIAL 8 8T U V
DIAL 9 9W X Y Z
DIAL * :=[ ]
press the UP key to move the cursor to the right.
<>. )
The # key can be used for the following special characters: #, space, &, !, :, ?, ., ,, %, $, –, <, >, /, =, [, ], @,
^, (, ), _, +, {, }, |, ;,", →,` , and \.
PROGRAM KEYS
UP & DOWN Used to scroll through options
KEYPAD Used to enter selections
SOFT KEYS Move cursor left and right
SPK Used to store data and advance to next MMC
HOLD Used to clear previous entry
Technical Manuals Online! - http://www.tech-man.com
Page 53

ACTION DISPLAY
3-25
1. Press TRSF 113
Display shows
2. Press RIGHT soft key to move cursor and add
memo via dial keypad using procedure above
3. Press TRSF
to store and exit
OR
Press SPK to store and advance to next MMC
DEFAULT DATA
No memos entered
RELATED ITEMS
“A” button is button #19 on keyset
“B” button is button #20 on keyset
“C” button is button #21 on keyset
“D” button is button #22 on keyset
“E” button is button #23 on keyset
“F” button is button #24 on keyset
[201] VIEW MEMO
1:
[201] VIEW MEMO
1:NEED BREAD
Technical Manuals Online! - http://www.tech-man.com
Page 54

3-26
Chapter 3
Programming Using MMCs
114 KEYSET VOLUME
Allows the system administrator to set the volume for any or all keysets.
0 RING VOLUME Set a level for keyset ring volume. There are eight volume levels: level
1 is the lowest and level 8 the highest.
1 OFF–RING VOL Set a level for keyset off–hook ring volume. There are eight volume
levels: level 1 is the lowest and level 8 the highest.
2 HANDSET VOL Set a level for keyset heard volume through handset. There are eight
volume levels: level 1 is the lowest and level 8 the highest.
3 SPEAKER VOL Set a level for keyset heard volume through speaker. There are 16
volume levels: level 1 is the lowest and level 16 the highest.
4 BGM VOLUME Set a level for keyset background music volume. There are 16 volume
levels: level 1 is the lowest and level 16 the highest.
PROGRAM KEYS
UP & DOWN Used to scroll through options
KEYPAD Used to enter selections
SOFT KEYS Move cursor left and right
SPK Used to store data and advance to next MMC
ANS/RLS Used to select ALL
Technical Manuals Online! - http://www.tech-man.com
Page 55

ACTION DISPLAY
1. Press TRSF 114
Display shows
[201] STN VOLUME
RING VOLUME : 4
3-27
2. Dial keyset number (e.g. 205)
3.Press UP or DOWN to select next volume
3.Press UP or DOWN to select next volume
3.Press UP or DOWN to select next volume
3.Press UP or DOWN to select next volume
4. Press TRSF to store and exit
OR
Press SPK to store and advance to next MMC
[205] STN VOLUME
RING VOLUME : 4
[205] STN VOLUME
OFF–RING VOL: 4
[205] STN VOLUME
HANDSET VOL : 4
[205] STN VOLUME
SPEAKER VOL :13
[205] STN VOLUME
BGM VOLUME :13
DEFAULT DATA
RING VOLUME 4
OFF–HOOK RING VOLUME 4
HANDSET VOLUME 4
SPEAKER VOLUME 13
BGM VOLUME 13
RELATED ITEMS
MMC 111 Keyset Ring Tone
Technical Manuals Online! - http://www.tech-man.com
Page 56

3-28
Chapter 3
Programming Using MMCs
115
SET PROGRAMMED MESSAGE
Allows the system administrator to set a programmed message at any or all keysets. There are 20 messages
available: 10 are pre–programmed and 10 can be customised in MMC 715, Programmed Message.
Programmed station messages are numbered 01–20.
PROGRAM KEYS
UP & DOWN Used to scroll through options
KEYPAD Used to enter selections
SOFT KEYS Move cursor left and right
SPK Used to store data and advance to next MMC
HOLD Used to clear previous entry
ANS/RLS Used to select ALL
ACTION DISPLAY
1. Press TRSF 115
Display shows
2. Dial station number (e.g., 205)
OR
Press UP or DOWN to select station and press
RIGHT soft key to move cursor
OR
Press ANS/RLS to select All
[201] PGMMSG(00)
CANCEL PGM MSG
[205] PGMMSG(00)
CANCEL PGM MSG
[ALL] PGMMSG(??)
3. Dial 01–20 to select message number (e.g., 05)
OR
Press UP or DOWN to select message and press
RIGHT soft key to return to step 2
4. Press TRSF to store and exit
OR
Press SPK to store and advance to next MMC
DEFAULT DATA
No messages selected
RELATED ITEMS
MMC 715 Programmed Station Message
MMC 722 Station Key Programming
MMC 723 System Key Programming
[205] PGMMSG(05)
PAGE ME
Technical Manuals Online! - http://www.tech-man.com
Page 57

3-29
116 ALARM AND MESSAGE
Allows the system administrator or technician to set or change the alarm clock/appointment reminder
feature for any station. This must be done for single line telephone because they cannot access
programming. Two alarms may be set for each station and each alarm may be defined as a one–time or
TODAY alarm or as a DAILY alarm. The TODAY alarm is automatically cancelled after it rings, while the
DAILY alarm rings ever y day at the same time. It is also possible to set a message to display when the alarm
is sounded.
0 NOTSET
1 TODAY
2 DAILY
Messages are written using the keypad. Each press of a key will select a character. Pressing the dial pad key
will move the cursor to the next position. For example, if the directory name is “SAM SMITH,” press the
number “7” four times to get the letter “S.” Now press the number “2” once to get the letter “A.” Continue
selecting characters from the table below to complete your message. Pressing the “A” key will change the
letter from upper case to lower case.
COUNT 12345
DIAL 0 <> . ) 0
DIAL 1 Space ? , ! 1
DIAL 2 AB C@2
DIAL 3 DE F# 3
DIAL 4 GH I $ 4
DIAL 5 JKL%5
DIAL 6 MN O^ 6
DIAL 7 PQ R S 7
DIAL 8 TU V 8
DIAL 9 WX Y Z 9
DIAL * := [ ]
PROGRAM KEYS
UP & DOWN Used to scroll through options
KEYPAD Used to enter selections
SOFT KEYS Move cursor left and right
SPK Used to store data and advance to next MMC
HOLD Used to clear previous entry
A Key 19, acts as toggle between upper case and lower case
Technical Manuals Online! - http://www.tech-man.com
Page 58

3-30
Chapter 3
Programming Using MMCs
ACTION DISPLAY
1. Press TRSF 116
Display shows
[201] ALM REM(1)
HHMM: ÎNOTSET
2. Dial station number (e.g., 205)
OR
Press UP or DOWN to select station and press
RIGHT soft key to move cursor
OR
Press ANS/RLS to select all stations
3. Dial 1–2 to select alarm (e.g., 2)
OR
Press UP or DOWN to select alarm and press
RIGHT soft key to move cursor
4. Enter alarm time in 24–hour clock format
(e.g., 1300 for 1pm)
Display will automatically advance to step 5
5. Dial valid entry from above list for alarm type (e.g. 2)
OR
Press UP or DOWN to select alarm type and press
RIGHT soft key to move cursor
[205] ALM REM(1)
HHMM: ÎNOTSET
[ALL] ALM REM(1)
HHMM: ÎNOTSET
[205] ALM REM(2)
HHMM: ÎNOTSET
[205] ALM REM(2)
HHMM:1300ÎNOTSET
[205] ALM REM(2)
HHMM:1300ÎDAILY
6. Enter messages using above table and press RIGHT
soft key to return to step 2
7. Press TRSF to store and exit
OR
Press SPK to store and advance to next MMC
DEFAULT DATA
Alarms set to NOTSET
RELATED ITEMS
None
[205] ALM REM(2)
Sam SMITH
Technical Manuals Online! - http://www.tech-man.com
Page 59

3-31
119 SET CLIP DISPLAY
Allows the technician to change the order in which the CLIP information is displayed on an LCD set. CLIP
display options are as follows:
0 NO DISPLAY No CLIP data will be displayed.
1 NUMBER FIRST The CLIP number received from the central office
will be displayed first.
2 NAME FIRST The CLIP name will be displayed first.
PROGRAM KEYS
UP & DOWN Used to scroll through options
KEYPAD Used to enter selections
SPK Save data and advance to next MMC
ANS/RLS Used to select ALL
ACTION DISPLAY
1. Press TRSF 119
Display shows
2. Enter station number (e.g., 204)
OR
Press UP or DOWN to scroll through stations and
press RIGHT soft key to select a station
OR
Press ANS/RLS to select ALL
3. Dial display option 0, 1 or 2 (e.g., 2)
OR
Press UP or DOWN to select option and press RIGHT
or LEFT soft key to return to step 2
4. Press TRSF to store and exit
OR
Press SPK to save and advance to next MMC
[201] CLIP DISP.
NUMBER FIRST
[204] CLIP DISP.
NUMBER FIRST
[ALL] CLIP DISP.
?
[204] CLIP DISP.
NAME FIRST
DEFAULT DATA
Number first
RELATED ITEMS
None
Technical Manuals Online! - http://www.tech-man.com
Page 60

3-32
Chapter 3
Programming Using MMCs
121 KEYSET LANGUAGE
Allows keyset users the ability to assign an LCD display based on user’s own language.
0 ENGLISH
1 GERMAN
2PORTUGAL
3NORSK
4DANISH
5DUTCH
6ITALY
7SWEDISH
8SPANISH
PROGRAM KEYS
UP & DOWN Used to scroll through options
KEYPAD Used to enter selections
SOFT KEYS Move cursor left and right
SPK Used to store data and advance to next MMC
HOLD Used to clear previous entry
ANS/RLS Used to select ALL
ACTION DISPLAY
1. Press TRSF 121
Display shows
2. Dial keyset number (e.g., 205)
OR
Press UP or DOWN to select keyset and press
RIGHT soft key
OR
Press ANS/RLS to select All
3. Dial number for language required
OR
Press UP or DOWN to select language and press
RIGHT soft key.
4. Press TRSF to store and exit
OR
Press SPK to store and advance to next MMC
[201] LANGUAGE
ENGLISH
[205] LANGUAGE
ENGLISH
[ALL] LANGUAGE
?
[205] LANGUAGE
GERMAN
Technical Manuals Online! - http://www.tech-man.com
Page 61

DEFAULT DATA
ENGLISH
RELATED ITEMS
Multi–Language
3-33
Technical Manuals Online! - http://www.tech-man.com
Page 62

3-34
Chapter 3
Programming Using MMCs
200
Used to open (enable) and close (disable) customer–level programming. If programming is not opened and
an attempt is made to access a system MMC, the error message [NOT PERMIT] will be displayed. A fourdigit passcode is required to access this MMC. Each digit can be 0–9. When opened, this MMC enables
access to all MMCs allowed in MMC 802, Customer Access MMC Number.
PROGRAM KEYS
UP & DOWN Select open or closed
KEYPAD Used to enter passcode
SPK Save data and advance to next MMC
TRSF Exit programming
ACTION DISPLAY
1. Press TRSF 200
Display shows
2. Enter passcode
OPEN CUSTOMER
PROGRAMMING
ENABLE CUS.PROG.
PASSCODE:
ENABLE CUS.PROG.
PASSCODE:
Correct code shows
Incorrect code shows
3. Press UP or DOWN arrow key to select ENABLE
or DISABLE and press RIGHT soft key
OR Dial 1 for ENABLE or 0 for DISABLE
4. Press SPK to advance to MMC entry level and
press UP or DOWN key to select MMC (e.g, 212)
OR
Enter MMC number an d press RIGHT soft
key to enter MMC
5. Press TRSF key to exit
ENABLE CUS.PROG.
DISABLE
ENABLE CUS.PROG.
PASSWORD ERROR
ENABLE CUS.PROG.
ENABLE
212:ALARM RING
SELECT PROG. ID
Technical Manuals Online! - http://www.tech-man.com
Page 63

DEFAULT DATA
Closed (Disabled)
RELATED ITEMS
MMC 201 Change Customer Passcode
MMC 501 System–Wide Timers
MMC 802 Customer Access MMC Number
3-35
Technical Manuals Online! - http://www.tech-man.com
Page 64

3-36
Chapter 3
Programming Using MMCs
201
Used to change the passcode allowing access to MMC 200 Open Customer Programming from its current
value.
The passcode is four digits long. Each digit can be 0–9. The current (old) passcode is required
for this MMC.
NOTE
CHANGE CUSTOMERPASSCODE
PROGRAM KEYS
KEYPAD Used to enter passcodes
SPK Save data and advance to next MMC
ACTION DISPLAY
1. Press TRSF 201
2. Enter new passcode via dial keypad
(maximum four digits)
CUST. PASSCODE
NEW CODE:
CUST. PASSCODE
NEW CODE:
3. Verify new passcode via dial keypad
Passcode verified (go to step 4)
OR
Passcode failure
Return to step 2
4. Press TRSF to store and exit
OR
Press SPK to store and advance to next MMC
DEFAULT DATA
Passcode = 1234
RELATED ITEMS
CUST. PASSCODE
VERIFY :
CUST. PASSCODE
VERIFY :SUCCESS
CUST. PASSCODE
VERIFY :FAILURE
MMC 200 Open Customer Programming
Technical Manuals Online! - http://www.tech-man.com
Page 65

3-37
202
Used to change the passcodes for the following features: DAY/NIGHT, DISA ALARM, ALARM CLR and AA
RECORD.
The passcode is four digits long. Each digit can be 0–9. The current (old) passcode is required
for this MMC.
NOTE
PROGRAM KEYS
KEYPAD Used to enter passcodes
SPK Save data and advance to next MMC
ACTION DISPLAY
1. Press TRSF 202
Display shows
2. Press UP or DOWN key to make selection
Press RIGHT soft key to move cursor to
passcode entry
CHANGE FEATURE PASSCODES
CHANGE PASSCODE
DAY/NIGHT :0000
CHANGE PASSCODE
DISA ALARM :5678
3. Enter new passcode via dial keypad and
press RIGHT soft key to return to step 2
Continue to change other passcodes
4. Press TRSF to store and exit
OR
Press SPK to store and advance to
next MMC
DEFAULT DATA
DAY/NIGHT 0000
DISA ALARM 5678
ALARM CLR 8765
AA RECORD 4321
RELATED ITEMS
MMC 214 DISA Alarm Ringing Station
MMC 410 Assign DISA Trunk
MMC 507 Assign Auto Night Time
CHANGE PASSCODE
DISA ALARM :9999
Technical Manuals Online! - http://www.tech-man.com
Page 66

3-38
Chapter 3
Programming Using MMCs
203 ASSIGN UA DEVICE
Assigns ringing device to be accessed when a Universal Answer (UA) key is pressed or the UA pickup code
is dialled. UA assignment is made in MMC 601 Assign Station Group for a group and then the group is
entered here. The UA device may be one of the device types listed below. The device type is automatically
determined by the directory number (DN) entered.
DIRECTORY NUMBER
201–216 STATION The UA device is a keyset or SLT.
361 ROP Ring over page.
500–509 STATION GROUP The UA device is a station group.
Only one of the above options can be selected. If the ability to ring more than one item (e.g.,
NOTE
NOTE
NOTENOTE
an external page zone) is required, a station group containing a zone code must be created.
DEVICE TYPE
DESCRIPTION
PROGRAM KEYS
UP & DOWN Used to scroll through options
KEYPAD Used to enter DN of selected device
SPK Used to store data and advance to next MMC
HOLD Used to clear previous entry
ACTION DISPLAY
1. Press TRSF 203
Display shows current assignment
ASSIGN UA PORT
NONE–NO UA
2. Dial DN of UA device (e.g., 205)
OR
Use UP and DOWN keys to scroll through
available devices
3. Press TRSF to store and exit
OR
Press SPK to store and advance to next MMC
DEFAULT DATA
None
RELATED ITEMS
MMC 204 Common Bell Control
MMC 219 Common Relay Service Type
MMC 601 Assign Station Group
MMC 605 Assign External Page Zone
ASSIGN UA PORT
205 –STATION
Technical Manuals Online! - http://www.tech-man.com
Page 67

3-39
204 COMMON BELL CONTROL
Determines whether the common bell relay contacts have an interrupted or continuous closure when
activated. If interrupted is chosen, the relay follows an internal C.O. ring pattern of one second closed
followed by three seconds open.
If assigned dry contact to Common bell, common bell relay pairs are assigned as 362.
PROGRAM KEYS
UP & DOWN Used to scroll through options
KEYPAD Used to enter selections
SOFT KEYS Used to store data and advance to next MMC
ACTION DISPLAY
1. Press TRSF 204
Display shows current setting
[362] COM/LD BEL
CONTINUOUS
2. Dial common bell number (362 only)
OR
Press UP or DOWN key to make selection of
common bell numbers and press RIGHT soft key
to advance cursor
3. Dial 0 for continuous or 1 for interrupted operation
OR
Use UP or DOWN to scroll through options
Press RIGHT soft key to return to step 2
4. Press TRSF to store and exit
OR
Press SPK to store and advance to next MMC
DEFAULT DATA
Continuous(When Common bell or Loud bell is assigned at MMC 219)
RELATED ITEMS
[362] COM/LD BEL
CONTINUOUS
[362] COM/LD BEL
INTERRUPTED
MMC 203 Assign UA Device
MMC 219 Common Relay Service Type
MMC 601 Assign Station Group
Technical Manuals Online! - http://www.tech-man.com
Page 68

3-40
Chapter 3
Programming Using MMCs
205 ASSIGN LOUD BELL
Designates the station that controls the loud bell ring output of a base board (assigned in MMC 219,
Common Relay Service Type).
The loud bell will follow the ring cadence of the designated station. Only a station can be assigned to control
the loud bell; a station group cannot be assigned.
PROGRAM KEYS
UP & DOWN Used to scroll through options
KEYPAD Used to enter selections
SOFT KEYS Move cursor left and right
SPK Used to store data and advance to next MMC
HOLD Clears previous entry
ACTION DISPLAY
1. Press TRSF 205
Display shows current setting
2. Dial loud bell number (362 only)
OR
Use UP or DOWN to scroll through loud bell numbers
and press RIGHT soft key to move the cursor
3. Enter station number (e.g.,201)
OR
Press UP or DOWN key to make selection and press
RIGHT soft key to return to step 2
4. Press TRSF to store and exit
OR
Press SPK to store and advance to next MMC
DEFAULT DATA
Unassigned
[362] LOUD BELL
RING PAIR : NONE
[362] LOUD BELL
RING PAIR : NONE
[362] LOUD BELL
RING PAIR :201
RELATED ITEMS
MMC 219 Common Relay Service Type
Technical Manuals Online! - http://www.tech-man.com
Page 69

3-41
206 BARGE–IN TYPE
Sets the type of barge–in that is permitted.
OPTION TYPE OF BARGE–IN DESCRIPTION
0 NO BARGE–IN Barge–in feature is unavailable regardless of a station’s
barge–in status.
1 BARGE–IN WITH TONE Barge–in will have an intrusion tone and display at the
barged–in on station.
2 BARGE–IN WITHOUT TONE Barge–in is allowed. There is no barge–in tone or display
at the barged–in on station and the barging–in station will
be muted.
PROGRAM KEYS
UP & DOWN Used to scroll through options
KEYPAD Used to enter selections
SOFT KEYS Move cursor left and right
SPK Used to store data and advance to next MMC
ACTION DISPLAY
1. Press TRSF 206
Display shows
2. Dial 0–2 to select barge–in type (e.g., 2)
OR
Press UP or DOWN to select barge–in type
and press RIGHT soft key
3. Press TRSF to store and exit
OR
Press SPK to store and advance to next MMC
BARGE IN TYPE
NO BARGE IN
BARGE IN TYPE
WITHOUT
DEFAULT DATA
NO BARGE–IN
RELATED ITEMS
MMC 301 Assign Station COS
MMC 701 Assign COS Contents
TONE
Technical Manuals Online! - http://www.tech-man.com
Page 70

3-42
Chapter 3
Programming Using MMCs
207 ASSIGN VM/AA PORT
Enables SLI ports to be designated as NORMAL or VMAA. VMAA ports receive digits designated in MMC
726, VM/AA Options, and also receive a true disconnect signal upon completion of a call. Only SLI cards, not
keyset daughter-boards, support disconnect signal. Do not make VMAA ports data; this will return them to a
single line port and stop voice mail integration. VMAA ports have the equivalent of data protect written in
the program and are protected against tones.
PROGRAM KEYS
UP & DOWN Used to scroll through options
KEYPAD Used to enter selections
SOFT KEYS Move cursor left and right
SPK Used to store data and advance to next MMC
HOLD Used to clear previous entry
ANS/RLS Used to select ALL
ACTION DISPLAY
1. Press TRSF 207
Display shows
2. Dial station number (e.g., 215)
OR
Press UP or DOWN to select station
and press RIGHT soft key to move cursor
3. Dial 1 or 0 to select port type (1=VMAA, 0=NORMAL)
OR
Press UP or DOWN to select option and press
RIGHT soft key
4. Press TRSF to store and exit
OR
Press SPK to store and advance to next MMC
DEFAULT DATA
Normal port
[213] VMAA PORT
NORMAL
[215] VMAA PORT
NORMAL PORT
[215] VMAA PORT
VMAA PORT
PORT
RELATED ITEMS
MMC 726 VM/AA Options
MMC 601 Assign Station Group
Technical Manuals Online! - http://www.tech-man.com
Page 71

3-43
208
Provides the flexibility to program single lines to have ICM ringing, C.O. ringing and data secure. With the
many types of external ringing devices, all configurations can be met. All devices will also have a positive
disconnect signal. Do not make VM/AA ports data; this will return them to a single line port and stop voice
mail integration.
0 ICM RING
1CO RING
2 DATA RING
PROGRAM KEYS
UP & DOWN Used to scroll through options
KEYPAD Used to enter selections
SOFT KEYS Move cursor left and right
SPK Used to store data and advance to next MMC
HOLD Used to clear previous entry
ANS/RLS Used to select ALL
ACTION DISPLAY
1. Press TRSF 208
Display shows
ASSIGN RING TYPE
[213] RING TYPE
ICM RING
2. Dial station number (e.g., 215)
OR
Press UP or DOWN to select station and press
RIGHT soft key to move cursor
3. Dial 0, 1, or 2 to select port type (e.g., 2)
OR
Press UP or DOWN to select option and press LEFT
or RIGHT soft key to return to step 2
4. Press TRSF to store and exit
OR
Press SPK to store and advance to next MMC
DEFAULT DATA
ICM RING
RELATED ITEMS
None
[215] RING TYPE
ICM RING
[215] RING TYPE
DATA RING
Technical Manuals Online! - http://www.tech-man.com
Page 72

3-44
Chapter 3
Programming Using MMCs
209 ASSIGN ADD–ON MODULE
<Only for Reference>
Designates to which station an add–on module (AOM) is assigned.
PROGRAM KEYS
UP & DOWN Used to scroll through options
KEYPAD Used to enter selections
SOFT KEYS Move cursor left and right
RELEASE Used to store data and advance to next MMC
HOLD Clears previous entry
ACTION DISPLAY
1. Press TRSF 209
Display shows first AOM
2. Dial AOM number
OR
Press UP or DOWN to scroll through AOM numbers
and press soft keys to move the cursor
3. Enter station number (e.g., 201)
OR
Press UP or DOWN to select station numbers
4. Press TRSF to store and exit
OR
Press SPK to store and advance to next MMC
DEFAULT DATA
MASTER = NONE
[205] AOM MASTER
MASTER:NONE
[205] AOM MASTER
MASTER:NONE
[205] AOM MASTER
MASTER:201
RELATED ITEMS
None
Technical Manuals Online! - http://www.tech-man.com
Page 73

3-45
210 CUSTOMER ON/OFF
Allows the system administrator to set in system features. Each system option has a corresponding dialling
number, as listed below. All options toggle ON/OFF.
0 DISA PSWD Determine whether outside customers are required to enter DISA
password (Yes=ON, No=OFF).
1 LCR ENABL EEnables LCR feature in the system.
3 PERI UCD SET Periodic UCD information provider. Enables UCD statistics data on a per
UCD group basis to print out on the I/O port which has been set as SMDR
or UCD REPT in real time (every 10 seconds). This allows extended
manipulation of the information by an external third–party–
providedsoftware package.
4 CID CODE INSAllows the digit ‘1’ to be automatically inserted for a toll call.
5 DISA MOH An additional option that can be presented to outside DISA callers: a
variable indication provided by an MOH source instead of a fixed DISA dial
tone.
6 TRANSFER MOH Callers who have been transferred from an extension or ACD group or AA
group will hear MOH, until answered by the called extension, instead of
transfer dial tone.
7 DSP SSPDNAME LCD displays programmed name of SYSTEM SPEED bin (in MMC 706) if
it has been programmed; if not, it shows digits programmed in MMC 705
even if this is set to ON.
8 DID BSY ROUT Busy DID call can be routed to an assigned destination, in MMC 406,
before the call is dropped out.
9 DID NOT ROUT Not used DID call can be routed to an assigned destination, in MMC 406,
before the call is dropped out.
12 ALL PICK UP Independent pick up group, can pick up the all calls.
13 ARD TONE CHK When system detects CO BUSY TONE from Centeral Office, return to
autoredial state.
15 VPN ENABLE Allows to use VPN(Virtual Private Network) feature at linked with
network.
16 IN TOLL CHK Enables toll checking for incoming call.
17 ISDN PROGCON This option is used to determine the call connection when the network
provides 2
message.
18 ISDNTRK BUSY If ON, when the destinations of an incoming ISDN trunk call are all busy,
the call is dropped out and outside caller will hear busy tone. This feature
is only applied to ISDN Trunks when the destination is an Unconditional
Station Group.
nd
progress in message to our system instead of connect
Technical Manuals Online! - http://www.tech-man.com
Page 74

3-46
Chapter 3
Programming Using MMCs
19 ISDN KEYFAC Allows to use ISDN Keypad facility.
20 USE EURO Allows to use EURO currency for call cost.
PROGRAM KEYS
UP & DOWN Used to scroll through options
KEYPAD Used to enter selections
SOFT KEYS Move cursor left and right
SPK Used to store data and advance to next MMC
ACTION DISPLAY
1. Press TRSF 210
Display shows
TEN. ON AND OFF
DISA PSWD :OFF
2. Dial option number (e.g. 0)
Press RIGHT soft key to move cursor
3. Dial 1 for ON or 0 for OFF
OR
Press UP or DOWN to make selection and press
RIGHT soft key
4. Repeat steps 2–3 for other options
OR
Press TRSF to store and exit
OR
Press SPK to store and advance to next MMC
DEFAULT DATA
DISA PSWD On LCR ENABLE Off
PERI UCD SET Off CID CODE INS Off
DISA MOH Off TRANSFER MOH Off
DSP SSPDNAME Off DID BSY ROUT Off
DID NOT ROUT Off ALL PICK UP Off
ARD TONE CHK On VPN ENABLE Off
IN TOLL CHK Off ISDN PROGCON Off
ISDNTRK BUSY Off ISDN KEYFAC ON
USE EURO Off
TEN. ON AND OFF
DISA PSWD :OFF
TEN. ON AND OFF
DISA PSWD :ON
RELATED ITEMS
None
Technical Manuals Online! - http://www.tech-man.com
Page 75

3-47
211 DOOR RING ASSIGNMENT
Designates which devices will ring when a door phone button is pressed and which ring mode the devices
will follow.
There are two types of device that can ring; these are listed below with their default directory numbers.
DEVICE DEFAULT DIRE C TOR Y NUMBER
Station 201–212
Station group 500–509
PROGRAM KEYS
UP & DOWN Used to scroll through options
KEYPAD Used to enter selections
SOFT KEYS Move cursor left and right
SPK Used to store data and advance to next MMC
HOLD Clears previous entry
ANS/RLS Used to select ALL
ACTION DISPLAY
1. Press TRSF 211
Display shows first door phone
2. Dial door phone number (e.g., 212)
OR
Press UP or DOWN to scroll through door phone
numbers and use the RIGHT soft key to move cursor
OR
Press ANS/RLS to select All door ring
3. Enter new DAY/NIGHT selection via dial keypad
OR
Press UP or DOWN key to make selection and
press RIGHT soft key
4. Press RIGHT soft key to return to step 2
OR
Press LEFT soft key to return to step 3
OR
Press TRSF to store and exit
OR
Press SPK to store and advance to next MMC
[211] DOOR RING
D:500 N:500
[211] DOOR RING
D:500 N:500
[ALL] DOOR RING
D:500 N:500
[212] DOOR RING
D:201 N:500
Technical Manuals Online! - http://www.tech-man.com
Page 76

3-48
Chapter 3
Programming Using MMCs
DEFAULT DATA
Station group 500
RELATED ITEMS
None
Technical Manuals Online! - http://www.tech-man.com
Page 77

3-49
214
Assigns the DISA alarm to ring at a specific phone. It is recommended that the person who can clear the
alarm also receives the notification. There can be two distinct stations for notification. Both a day and a night
station can be selected. A valid destination can be either a station group (500–509) or an individual station
–
212).
(201
DISA ALARM RINGING STATION
PROGRAM KEYS
UP & DOWN Used to scroll through options
KEYPAD Used to enter selections
SOFT KEYS Move cursor left and right
SPK Used to store data and advance to next MMC
HOLD Used to clear previous entry
ACTION DISPLAY
1. Press TRSF 214
Display shows
2. Enter in valid day destination number (e.g., 212)
OR
Press UP or DOWN key to make selection
and press RIGHT soft key to advance cursor
DISA ALARM RING
D:500 N:500
DISA ALARM RING
D:212 N:500
3. Enter in valid night destination number (e.g., 205)
OR
Press UP or DOWN key to make selection
4. Press TRSF to store and exit
OR
Press SPK to store and advance to next MMC
DEFAULT DATA
Day 500
Night 500
RELATED ITEMS
MMC 202 Change Feature Passcodes
MMC 410 Assign DISA Trunk
DISA ALARM RING
D:212 N:205
Technical Manuals Online! - http://www.tech-man.com
Page 78

3-50
Chapter 3
Programming Using MMCs
219
This MMC is used to define the function of the common relay in the base board. The relay can be used for
one of the following:
0 EXTERNAL PAGE
1 COMMON BELL
2 LOUD BELL
3 NOT USE
COMMON RELAY SERVICE TYPE
ACTION DISPLAY
1. Press TRSF 219
Display shows
2.Use UP or DOWN to scroll through options
[361] RELAY TYPE
NOT USE
[361] RELAY TYPE
COMMON BELL
[361] RELAY TYPE
LOUD BELL
3. Press TRSF to store and exit
OR
Press SPK to store and advance to next MMC
DEFAULT DATA
External Page
RELATED ITEMS
MMC 203 Assign UA Device
MMC 204 Common Bell Control
MMC 205 Assign Loud Bell
[361] RELAY TYPE
NOT USE
Technical Manuals Online! - http://www.tech-man.com
Page 79

3-51
220
Assigns the ISDN service type. Services consist of BC (Bearer Capability) and HLC (High Layer Capability).
TYPE
0 VOICE Voice service Speech Telephone
1 FAX 3 G3 FAX service 3.1kHz Audio FAX G2/G3
2 AUDIO 3.1 3.1kHz Audio service 3.1kHz Audio None
3 MODEM MODEM service 3.1kHz Audio Telephony
PROGRAM KEYS
UP & DOWN Used to scroll through options
KEYPAD Used to enter selections
SOFT KEYS Move cursor left and right
SPK Used to store data and advance to next MMC
HOLD Used to clear previous entry
ACTION DISPLAY
1. Press TRSF 220
TYPE
TYPETYPE
Display shows
ISDN SERVICE TYPE
DESCRIPTION
DESCRIPTION BC
DESCRIPTIONDESCRIPTION
BC
BCBC
HLC
HLC
HLCHLC
[213] ISDN SVC
VOICE
2. Dial station number (SLT only e.g., 215)
OR
Press UP or DOWN to select station
and press RIGHT soft key to move cursor
3. Select service type 0 - 3 (e.g., 2)
OR
Press UP or DOWN to select option and press
RIGHT soft key
4. Press TRSF to store and exit
OR
Press SPK to store and advance to next MMC
DEFAULT DATA
VOICE
RELATED ITEMS
MMC 430 ISDN Number Type & Plan
[215] ISDN SVC
VOICE
[215] ISDN SVC
AUDIO 3.1
Technical Manuals Online! - http://www.tech-man.com
Page 80

3-52
Chapter 3
Programming Using MMCs
300
Allows the following features to be enabled on a per–station basis.
ACCESS DIAL Determines whether a user can select a trunk or trunk group by dialling
its directory number (DN). This selection should be turned OFF when
using LCR.
MICROPHONE Allows all keysets to be used in the speakerphone mode.
OFF–HOOK RING Allows a short burst of ring tone to indicate another call.
SMDR PRINT When the station is set for no C.O. calls to and from this station, the
station will not print on SMDR. This includes transferred calls or calls
picked up from hold or park.
TGR ADV.TONE When this feature is set to ON, a warning tone will be heard each time
LCR advances to the next route.
VMAA FORWARD When this feature is set to ON, it allows calls to be forwarded to voice
mail.
STN CALL PRT Allows print out station to station call.
CUSTOME R ON/O FF PE R STATION
FWD DLY USE Set FWD No Ans. Destination in MMC 102 but do not enable the feature
(alternatively use code 603 + stn no., then 600 to cancel the feature),
when a call is presented to this station and the Forward no answer timer
expires, the call will overflow to the station set as the Forward no answer
destination.
PROGRAM KEYS
UP & DOWN Used to scroll through options
KEYPAD Used to enter selections
SOFT KEYS Move cursor left and right
SPK Used to store data and advance to next MMC
HOLD Used to clear previous entry
ANS/RLS Used to select ALL
Technical Manuals Online! - http://www.tech-man.com
Page 81

ACTION DISPLAY
1. Press TRSF 300
Display shows
[201] CUS.ON/OFF
ACCESS DIAL :ON
3-53
2. Dial station number (e.g., 205)
OR
Press UP or DOWN to select station
OR
Press ANS/RLS for all and press RIGHT soft
key to move cursor
2. Press UP or DOWN to select feature and press
RIGHT soft key to move cursor
4. Dial 1 for ON or 0 for OFF
OR
Press UP or DOWN to select and press RIGHT soft key
5. Press LEFT soft key to return to step 2
Press RIGHT soft key to return to step 1
OR
Press TRSF to store and exit
OR
Press SPK to store and advance to next MMC
[205] CUS.ON/OFF
ACCESS DIAL :ON
[ALL] CUS.ON/OFF
ACCESS DIAL :ON
[ALL] CUS.ON/OFF
ACCESS DIAL :ON
[ALL] CUS.ON/OFF
ACCESS DIAL :OFF
DEFAULT DATA: STN CALL PRT
STN CALL PRT: OFF
FWD DLY USE: OFF
Other features set to ON
RELATED ITEMS
LCR programming
Technical Manuals Online! - http://www.tech-man.com
Page 82

3-54
Chapter 3
Programming Using MMCs
301 ASSIGN STATION COS
Used to assign a day and night class of service to each keyset. There are 10 different classes of service that
are be defined in MMC 701, Assign COS Contents. Classes of service are numbered 01–10.
PROGRAM KEYS
UP & DOWN Used to scroll through options
KEYPAD Used to enter selections
SOFT KEYS Move cursor left and right
SPK Used to store data and advance to next MMC
HOLD Used to clear previous entry
ANS/RLS Used to select ALL
Technical Manuals Online! - http://www.tech-man.com
Page 83

ACTION DISPLAY
1. Press TRSF 301
Display shows
[201] STN COS
DAY:01 NIGHT:01
3-55
2. Dial station number (e.g., 205)
OR
Press UP and DOWN to scroll through stations
and press RIGHT soft key to advance to step 3
to enter Day COS
OR
Press UP and DOWN to scroll through stations
and press LEFT soft key to advance to step 4
to enter Night COS
OR
Press ANS/RLS to select all stations
3. Enter day class of service (e.g., 05)
OR
Press UP and DOWN to scroll through classes of
service and press RIGHT soft key to advance to step 4
to enter Night COS
OR
Press UP and DOWN to scroll through classes of service
and press LEFT soft key to return to step 2
to enter other stations
[205] STN COS
DAY:01 NIGHT: 01
[ALL] STN COS
DAY:?? NIGHT:??
[205] STN COS
DAY:05 NIGHT:01
4. Enter night class of service (e.g., 05)
OR
Press UP and DOWN to scroll through classes of service
and press RIGHT soft key to return to step 2
to enter other stations
OR
Press UP and DOWN to scroll through classes of service
and press LEFT soft key to return to step 3
5. Press TRSF to save and exit
OR
Press SPK to save and advance to next MMC
DEFAULT DATA
Day class= 01
Night class= 01
RELATED ITEMS
MMC 701 Assign COS Contents
[205] STN COS
DAY:05 NIGHT:05
Technical Manuals Online! - http://www.tech-man.com
Page 84

3-56
Chapter 3
Programming Using MMCs
302 PICKUP GROUPS
Allows the assignment of stations into call pickup groups. There are eight pickup groups. An unlimited
number of members can belong to each group. Stations can only be in one pickup group at any given time.
PROGRAM KEYS
UP & DOWN Used to scroll through options
KEYPAD Used to enter selections
SOFT KEYS Move cursor left and right
SPK Used to store data and advance to next MMC
HOLD Used to clear previous entry
ANS/RLS Used to select ALL
ACTION DISPLAY
1. Press TRSF 302
Display shows
[201] PICKUP GRP
PICKUP GRP :NONE
2. Dial station number ( e.g., 205)
OR
Use UP or DOWN to select station number and
press RIGHT soft key
OR
Press ANS/RLS key to select all
3. Dial pickup group number (e.g. 05)
OR
Press UP or DOWN to select group number
3. Press RIGHT soft key to return to step 2 to enter more stations
OR
Press LEFT soft key to return to step 3
OR
Press TRSF to store and exit
OR
Press SPK to store and advance to next MMC
DEFAULT DATA
[205] PICKUP GRP
PICKUP GRP :NONE
[ALL] PICKUP GRP
PICKUP GRP :??
[205] PICKUP GRP
PICKUP GRP :05
All stations 01
RELATED ITEMS
MMC 107 Key Extender
MMC 722 Station Key Programming
MMC 723 System Key Programming
Technical Manuals Online! - http://www.tech-man.com
Page 85

3-57
303 ASSIGN BOSS/SECRETARY
Assigns BOSS keysets to SECRETARY keysets. One BOSS station can have up to a nd including four
SECRETARY stations, and one SECRETARY station can have up to and including four BOSS stations. A
dedicated BOSS key must be programmed on the SECRETARY keyset(s). A dedicated BOSS key must also
be programmed on the BOSS keyset.
PROGRAM KEYS
UP & DOWN Used to scroll through options
KEYPAD Used to enter selections
SOFT KEYS Move cursor left and right
SPK Used to store data and advance to next MMC
HOLD Used to clear previous entry
ANS/RLS Used to select ALL
F BUTTON Used to toggle BOSS/SECRETARY field
ACTION DISPLAY
1. Press TRSF 303
Display shows
2. Dial BOSS station number (e.g., 205)
OR
Press UP or DOWN to select station and press
RIGHT soft key
3. Dial SECRETARY station number (e.g., 201)
OR
Press UP or DOWN to select station
Press RIGHT soft key to return to step 3 to enter
more SECR numbers
Press LEFT soft key to return to step 2 and
4.
continuous entries
OR
Press TRSF to store and exit
OR
Press SPK to store and advance to next MMC
BOSS STN:NONE
SECR 1:NONE
BOSS STN :205
SECR 1:NONE
BOSS STN:205
SECR 1:201
BOSS STN:205
SECR 2:202
DEFAULT DATA
None
RELATED ITEMS
MMC 722 Station Key Programming
Technical Manuals Online! - http://www.tech-man.com
Page 86

3-58
Chapter 3
Programming Using MMCs
304 ASSIGN STATION/TRUNK USE
Allows trunks the ability on a per–station basis to answer incoming calls, to dial out or to do both. If a station
is set to NO Dial, the station will not have the ability to place a call. If the station is set to NO Answer, the
station cannot answer an incoming call.
NOTE
NOTE
NOTENOTE
MMC 406 Trunk Ring Assignment overri d es this MMC for the Answer option.
PROGRAM KEYS
UP & DOWN Used to scroll through options
KEYPAD Used to enter selections
SOFT KEYS Move cursor left and right
SPK Used to store data and advance to next MMC
HOLD Used to clear previous entry
ANS/RLS Used to select ALL
ACTION DISPLAY
1. Press TRSF 304
Display shows
2. Dial the station number (e.g., 205)
OR
Press UP or DOWN key to select station and press
RIGHT soft key
[201] USE [701]
DIAL:YES
[205] USE [701]
DIAL:YES ANS:YES
ANS:YES
3. Dial the trunk ID number (e.g., 704)
OR
Press UP or DOWN key to select trunk and press
RIGHT soft key
4. Press UP or DOWN key to select YES/NO option
OR
Dial 1 for YES or 0 for NO and press RIGHT soft key to
move cursor to ANS option
Press UP or DOWN key to select YES/NO option
OR
Dial 1 for YES or 0 for NO and press RIGHT soft key to
return to step 2
5. Press TRSF to store and exit
OR
Press SPK to store and advance to next MMC
[205] USE [704]
DIAL:YES ANS:YES
[205] USE [704]
DIAL:NO ANS:YES
[205] USE [704]
DIAL:NO ANS:NO
Technical Manuals Online! - http://www.tech-man.com
Page 87

DEFAULT DATA
DIAL= Yes ANS= Yes
RELATED ITEMS
MMC 316 Copy Station Usable
MMC 406 Trunk Ring Assignment
MMC 722 Station Key Programming
MMC 723 System Key Programming
3-59
Technical Manuals Online! - http://www.tech-man.com
Page 88

3-60
Chapter 3
Programming Using MMCs
305 ASSIGN FORCED CODE
Allows the assignment of either account or authorisation codes on a per–station basis or on an all–station
basis.
PROGRAM KEYS
UP & DOWN Used to scroll through options
KEYPAD Used to enter selections
SOFT KEYS Move cursor left and right
SPK Used to store data and advance to next MMC
HOLD Used to clear previous entry
ANS/RLS Used to select ALL
FEATURE KEYS
NONE
0
AUTHORISE CODE
1
2
ACCOUNT CODE
ACTION DISPLAY
1. Press TRSF 305
Display shows
2. Dial station number ( e.g., 205)
OR
Press UP or DOWN key to select station and press
RIGHT soft key to move cursor
3. Dial a feature option 0-2 (e.g., 2)
OR
Press UP or DOWN key to select option
and press RIGHT soft key to return step 2
4. Press TRSF to store and exit
OR
Press SPK to store and advance to next MMC
[201] FORCD CODE
NONE
[205] FORCD CODE
NONE
[205] FORCD CODE
ACCOUNT CODE
DEFAULT DATA
None
RELATED ITEMS
MMC 707 Authorisation Code
MMC 708 Account Code
Technical Manuals Online! - http://www.tech-man.com
Page 89

3-61
306 HOT LINE
Allows a station to make an intercom call to a station or station group. Alternatively, it seizes a trunk to
allow a station the ability to make a predetermined outgoing call, upon the expiration of a timer (see MMC
501, System-Wide Timers, Off–Hook Selection Timer). A maximum of 18 digits may be dialled with pauses,
flash and OCC added in the dial string (the access code for the trunk is not counted).
PROGRAM KEYS
UP & DOWN Used to scroll through options
KEYPAD Used to enter selections
SOFT KEYS Move cursor left and right
SPK Used to store data and advance to next MMC
HOLD Used to clear previous entry
ANS/RLS Used to select ALL
ACTION DISPLAY
1. Press TRSF 306
Display shows
Press RIGHT soft key to advance cursor
2. Enter station number via dial keypad (e.g. 202)
OR
Press UP or DOWN to make selection and press
RIGHT soft key to return to step 1
3. Enter trunk ID (e.g. 701) followed by max 18 digits
4. Press TRSF to store and exit
OR
Press SPK to store and advance to next MMC
DEFAULT DATA
None
RELATED ITEMS
[201] HOT LINE
NONE
[201] HOT LINE
202
[201] HOT LINE
701–1305P4264100
None
Technical Manuals Online! - http://www.tech-man.com
Page 90

3-62
Chapter 3
Programming Using MMCs
308
Assigns a background music (BGM) source to keysets. There is a music source on the base board (switch
select internal/external). The default directory number of a background music source is 371.
ASSIGN BACKGROUND MUSIC SOURCE
PROGRAM KEYS
UP & DOWN Used to scroll through options
KEYPAD Used to enter selections
SOFT KEYS Move cursor left and right
SPEAKER Used to store data and advance to next MMC
HOLD Used to clear previous entry
ANS/RLS Used to select ALL
ACTION DISPLAY
1. Press TRSF 308
Display shows current setting
2. Dial keyset number (e.g., 205)
OR
Use UP or DOWN to scroll through keyset numbers
and press RIGHT soft key to move the cursor
OR
Press ANS/RLS to select all stations
[201] BGM SOURCE
BGM SOURCE:NONE
[205] BGM SOURCE
BGM SOURCE:NONE
[ALL] BGM SOURCE
BGM SOURCE:?
3. Enter source number (e.g., 371)
OR
Press UP or DOWN key to make selection and press
RIGHT soft key to return to step 2
4. Press TRSF to store and exit
OR
Press SPK to store and advance to next MMC
DEFAULT DATA
None
RELATED ITEMS
MMC 309 Assign Station Music On Hold
MMC 408 Assign Trunk Music On Hold Source
[205] BGM SOURCE
BGM SOURCE:371
Technical Manuals Online! - http://www.tech-man.com
Page 91

3-63
309
Allows the system administrator to select which Music On Hold (MOH) source can be heard on each station.
There are four possible selections for each music source: TONE, NONE, INTERNAL and EXTERNAL
(customer–provided MOH source and switch select internal/external).
There is a music source on the base board (switch select internal/external). The default directory number of
a background music source is 371.
PROGRAM KEYS
UP & DOWN Used to scroll through options
KEYPAD Used to enter selections
SOFT KEYS Move cursor left and right
SPK Used to store data and advance to next MMC
HOLD Used to clear previous entry
ANS/RLS Used to select ALL
ACTION DISPLAY
1. Press TRSF 309
Display shows current setting
ASSIGN STATION MUSIC ON HOLD
[201] STN MOH
MOH SOURCE:NONE
2. Dial keyset number (e.g., 205)
OR
Use UP or DOWN to scroll through keyset numbers
and press RIGHT soft key to move the cursor
OR
Press ANS/RLS to select all stations
3. Enter source number (e.g., 371)
OR
Press UP or DOWN key to make selection and press
RIGHT soft key to return to step 2
4. Press TRSF to store and exit
OR
Press SPK to store and advance to next MMC
DEFAULT DATA
Tone
RELATED ITEMS
[205] STN MOH
MOH SOURCE:NONE
[ALL] STN MOH
MOH SOURCE:?
[205] STN MOH
MOH SOURCE:371
MMC 308 Assign Background Music Source
MMC 408 Assign Trunk Music On Hold Source
Technical Manuals Online! - http://www.tech-man.com
Page 92

3-64
Chapter 3
Programming Using MMCs
310 LCR CLASS OF SERVICE
Assigns the LCR class of service allowed for a station on a per–station basis. There are eight classes which
may be assigned.
PROGRAM KEYS
UP & DOWN Used to scroll through options
KEYPAD Used to enter selections
SOFT KEYS Move cursor left and right
SPK Used to store data and advance to next MMC
HOLD Used to clear previous entry
ANS/RLS Used to select ALL
ACTION DISPLAY
1. Press TRSF 310
Display shows
2. Dial station number (e.g., 205)
OR
Press UP or DOWN to select station and press
RIGHT soft key to move cursor
OR
Press ANS/RLS to select All stations
3. Dial 1–8 to select class type (e.g., 3)
OR
Press UP or DOWN to select class type and press
RIGHT soft key to return to step 2
4. Press TRSF to store and exit
OR
Press SPK to store and advance to next MMC
[201] LCR CLASS
LCR CLASS 1
[205] LCR CLASS
LCR CLASS 1
[ALL] LCR CLASS
LCR CLASS ?
[205] LCR CLASS
LCR CLASS 3
DEFAULT DATA
Least Cost Routing COS 1
RELATED ITEMS
LCR programming
Technical Manuals Online! - http://www.tech-man.com
Page 93

3-65
312 ALLOW CLIP
Allows the system administrator or technician to either:
– allow or prevent receipt of CLIP data from the network
OR
– request or restrict sending of CLIP data to the network.
Each station can have the following options:
SEND: YES request the network to send Caller ID when outgoing call is made.
NO request the network NOT to send Caller ID when outgoing call is
made.
RCV: YES allow display of CLIP data at LCD 24B and LCD 12B keysets.
NO prevent display of CLIP data at LCD 24B and LCD 12B keysets.
INFO: CLIP data to send to the network.
0. C.O Tel.
1. Ext Number
2. C.O Tel+Ext Number
3. DID Number
Technical Manuals Online! - http://www.tech-man.com
Page 94

3-66
Chapter 3
Programming Using MMCs
ACTION DISPLAY
1. Press TRSF 312
Display shows
2. Dial station number (e.g., 205)
OR
Press UP or DOWN to select station and press right
soft key to move cursor
OR
Press ANS/RLS to select all
3. Dial 0 or 1 to select option
OR
Press UP or DOWN to select option and press right
soft key to move cursor to SND field
[201] ALLOW CLIP
RCV:YES SND:YES
[205] ALLOW CLIP
RCV:YES SND:YES
OR
OR
OROR
[ALL] ALLOW CLIP
RCV:YES SND:YES
[205] ALLOW CLIP
RCV:YES SND:YES
OR
OR
OROR
[ALL] ALLOW CLIP
RCV:YES SND:YES
4. Dial 0 or 1 to select option for SND
OR
Press UP or DOWN to select option and press right
soft key to move cursor to INFO field
5. Dial 0 ~ 3 to select option
OR
Press UP or DOWN to select option and press right
soft key to move cursor to step 2
6. Press TRSF to store and exit
OR
Press SPK to save and advance to next MMC
DEFAULT DATA
RCVYES
SNDYES
INFO C.O Tel.
[205] ALLOW CLIP
RCV:YES SND:YES
OR
OR
OROR
[ALL] ALLOW CLIP
RCV:YES SND:YES
[205] ALLOW CLIP
INFO: C.O Tel.
OR
OR
OROR
[ALL] ALLOW CLIP
INFO: C.O Tel.
RELATED ITEMS
MMC 119 Set CLIP Display
Technical Manuals Online! - http://www.tech-man.com
Page 95

3-67
314 CONFIRM OUTGOING CALL
Allows outgoing call restriction, disconnect or confirm with tone.
PROGRAM KEYS
UP & DOWN Used to scroll through options
KEYPAD Used to enter selections
SOFT KEYS Move cursor left and right
SPK Used to store data and advance to next MMC
HOLD Used to clear previous entry
ANS/RLS Used to select ALL
FEATURE KEYS
0NONE
1 CONFIRM TONE
2DISCONNECT
ACTION DISPLAY
1. Press TRSF 314
Display shows
2. Dial station number ( e.g., 205)
OR
Press UP or DOWN key to select station
and press RIGHT soft key to move cursor
3. Dial a feature option 0-2 (e.g., 1)
OR
Press UP or DOWN key to select option
and press RIGHT soft key to return step 2
4. Press TRSF to store and exit
OR
Press SPK to store and advance to next MMC
[201] CO CONFIRM
NONE
[205] CO CONFIRM
NONE
[205] CO CONFIRM
CONFIRM TONE
DEFAULT DATA
None
RELATED ITEMS
MMC 501 System-Wide Timers
Technical Manuals Online! - http://www.tech-man.com
Page 96

3-68
Chapter 3
Programming Using MMCs
315 SET RELOCATION
Used when a station moves its phone to another location (different port). All the previous data are moved to
the new location automatically.
ACTION DISPLAY
1. Press TRSF 315
Display shows
2. Dial the original station number (e.g., 205)
OR
Press UP or DOWN key to select station
and press RIGHT soft key
3. Dial the new location's station number
(e.g., 210)
4. Press TRSF to store and exit
OR
Press SPK to store and advance to next MMC
DEFAULT DATA
None
RELATED ITEMS
SET RELOCATION
EXT_ EXT
SET RELOCATION
EXT205 EXT
SET RELOCATION
EXT205 EXT210
None
Technical Manuals Online! - http://www.tech-man.com
Page 97

3-69
316 COPY STATION USABLE
Copy the condition of station/trunk usability and station/station usability from one station to another station.
PROGRAM KEYS
UP & DOWN Used to scroll through options
KEYPAD Used to enter selections
SOFT KEYS Move cursor left and right
SPK Used to store data and advance to next MMC
HOLD Used to clear previous entry
ACTION DISPLAY
1. Press TRSF 316
Display shows
2. Enter destination station number (e.g., 205)
OR
Press UP or DOWN key to make selection and
press RIGHT soft key to move cursor
3. Enter the source station number (e.g., 210)
OR
Press UP or DOWN key to make selection and
press RIGHT soft key to move cursor
4. Press TRSF to store and exit
OR
Press SPK to store and advance to next MMC
DEFAULT DATA
None
[201] CPY USABLE
FROM:NONE
[205] CPY USABLE
FROM:NONE
[205] CPY USABLE
FROM:210
RELATED ITEMS
MMC 304 Assign Station/Trunk Use
MMC 317 Assign Station/Station Use
Technical Manuals Online! - http://www.tech-man.com
Page 98

3-70
Chapter 3
Programming Using MMCs
317 ASSIGN STATION/S T AT I ON USE
Used to control whether a station can dial, and/or answer calls for, specific stations.
PROGRAM KEYS
UP & DOWN Used to scroll through options
KEYPAD Used to enter selections
SOFT KEYS Move cursor left and right
SPK Used to store data and advance to next MMC
HOLD Used to clear previous entry
ANS/RLS Used to select ALL
ACTION DISPLAY
1. Press TRSF 317
Display shows
2. Dial the station number (e.g., 205)
OR
Press UP or DOWN key to select station and press
RIGHT soft key
OR
Press ANS/RLS to select all stations
3. Dial the station number (e.g., 204)
OR
Press UP or DOWN key to select station and press
RIGHT soft key
4. Dial 1 for YES or 0 for NO for DIAL
OR
Press UP or DOWN key to select YES/NO and press
RIGHT soft key to move cursor
[201] USE [202]
DIAL:YES
[205] USE [201]
DIAL:YES
[205] USE [204]
DIAL:YES
[205] USE [204]
DIAL:NO ANS:YES
5. Dial 1 for YES or 0 for NO for ANS
OR
Press UP or DOWN key to select YES/NO and press
RIGHT soft key to return to step 2
6. Press TRSF to store and exit
OR
Press SPK to store and advance to next MMC
DEFAULT DATA
DIAL=Yes ANS=Yes
RELATED ITEMS
MMC 314 Copy Station Usable
Technical Manuals Online! - http://www.tech-man.com
[205] USE [204]
DIAL:NO ANS:NO
Page 99

3-71
318 DISTINCTIVE RING
Sets a distinctive ring for stations. You can set both tone (T) and cadence (C) to one of eight ring values
(1–8), or to follow the station ring (F–STN).
PROGRAM KEYS
UP & DOWN Used to scroll through options
KEYPAD Used to enter selections
SOFT KEYS Move cursor left and right
SPK Used to store data and advance to next MMC
ACTION DISPLAY
1. Press TRSF 318
Display shows
2. Dial station number (e.g., 205)
OR
Press UP or DOWN to select station and
press right soft key to move cursor
3. Press UP or DOWN to select T value (e.g., 1) and
press right soft key to move cursor to C field
4. Press UP or DOWN to select C value(e.g. 2)
5. Press TRSF to store and exit
OR
Press SPK to save and advance to next MMC
DEFAULT DATA
[201] DIST.RING
T:F–STN C:F–STN
[205] DIST.RING
T:F–STN C:F–STN
[205] DIST.RING
T:1 C:F–STN
[205] DIST.RING
T:1 C:2
T: F–STN
C: F–STN
RELATED ITEMS
None
Technical Manuals Online! - http://www.tech-man.com
Page 100

3-72
Chapter 3
Programming Using MMCs
319 BRANCH GROUP
Allows the assignment of stations into branch groups. There is a maximum of eight branch groups. When
CO ring is ringing at station, any station assigned the same branch group can answer the incoming call by
going off hook.
PROGRAM KEYS
UP & DOWN Used to scroll through options
KEYPAD Used to enter selections
SOFT KEYS Move cursor left and right
SPK Used to store data and advance to next MMC
HOLD Used to clear previous entry
ANS/RLS Used to select ALL
ACTION DISPLAY
1. Press TRSF 319
Display shows
2. Dial station number (e.g., 205)
OR
Press UP or DOWN to select station
and press right soft key to move cursor
OR
Press ANS/RLS to select all
3. Dial 0 or 1 to select option
OR
Press UP or DOWN to select group
and press right soft key to save
4. Press TRSF to store and exit
OR
Press SPK to save and advance to next MMC
[21] BRANCH GRP
BRANCH GRP : NONE
[24] BRANCH GRP
BRANCH GRP : NONE
OR
OR
OROR
[ALL] BRANCH GRP
BRANCH GRP : ??
[24] BRANCH GRP
BRANCH GRP : 04
OR
OR
OROR
[ALL] BRANCH GRP
BRANCH GRP : 08
DEFAULT DATA
None
RELATED ITEMS
None
Technical Manuals Online! - http://www.tech-man.com
 Loading...