

Samsung pl43e490, pl51e490 User Manual
© 2012 Samsung Electronics Co., Ltd. All rights reserved.
BN68-04070B-00
Contact SAMSUNG WORLDWIDE
If you have any questions or comments relating to Samsung products, please contact the SAMSUNG customer care center.
Contacte con SAMSUNG WORLD WIDE
Si tiene alguna pregunta o comentario referente a nuestros productos, por favor contacte con nuestro Servicio de Atención al Cliente.
Country
Customer Care Center
Web Site
ARGENTINA 0800-333-3733 www.samsung.com
BRAZIL
0800-124-421
4004-0000
www.samsung.com
CHILE 800-SAMSUNG(726-7864) www.samsung.com
COLOMBIA 01-8000112112 www.samsung.com
COSTA RICA 0-800-507-7267 www.samsung.com
DOMINICA 1-800-751-2676
www.samsung.com
ECUADOR 1-800-10-7267 www.samsung.com
EL SALVADOR 800-6225 www.samsung.com
GUATEMALA 1-800-299-0013 www.samsung.com
HONDURAS 800-7919267 www.samsung.com
JAMAICA 1-800-234-7267 www.samsung.com
NICARAGUA 00-1800-5077267 www.samsung.com
PANAMA 800-7267 www.samsung.com
PERU 0-800-777-08 www.samsung.com
PUERTO RICO 1-800-682-3180 www.samsung.com
TRINIDAD & TOBAGO 1-800-SAMSUNG(726-7864) www.samsung.com
VENEZUELA 0-800-100-5303 www.samsung.com
LED TV
User Manual
imagine the possibilities
Thank you for purchasing this Samsung product.
To receive more complete service, please register
your product at
www.samsung.com/register
Model _____________ Serial No. _____________
E-MANUAL
[PD490-ZS]BN68-04070B.indb 1 2012-01-30 �� 2:06:46
English - 2
For more information on how to view the e-Manual (P. 12)
Figures and illustrations in this User Manual are provided for reference only and may differ from actual product appearance.
Product design and specifications may be changed without notice.
Important User Information
• Screen Image retention
Do not display a still image (such as that from a video game) on the plasma display panel for more than a few minutes. Still images can cause screen
image retention (burn in). To avoid such image retention, reduce the degree of brightness and contrast of the screen when displaying a still image.
• Heat on the top of the Plasma TV
The top side of the TV may become hot after long periods of use as heat dissipates from the panel through the vent hole in the upper part of the TV.
This is normal and does not indicate any defect or operational failure of unit.
However, children should be prevented from touching the upper part of the TV.
• The TV is making a ‘cracking’ noise.
A ‘cracking’ noise may occur when the TV contracts or expands due to a change in the surrounding environment such as temperature or humidity.
This is normal and not a defect.
• Cell Defects
The PDP uses a panel consisting of 2,360,000 (HD-level) to 6,221,000 (FHD-level) pixels which require sophisticated technology to produce.
However, there may be a few bright or dark pixels on the screen. These pixels will have no impact on the performance of the product.
• Avoid operating the TV at temperatures below 41°F (5°C)
• A still image displayed too long may cause permanent damage to the PDP Panel.
Watching the Plasma TV in 4:3 format for a long period of time may leave traces of the borders on the left, right, top, or bottom of
the screen. Playing a DVD or a game console may have a similar effect.
Damage caused by the above effect is not covered by the warranty.
• After-images on the Screen.
Displaying still images from Video games and PC for longer than a certain period of time may produce partial after-images.
To prevent this effect, reduce the ‘brightness’ and ‘contrast’ when displaying still images for a long time.
• Warranty
Warranty does not cover any damage caused by image retention.
Burn-in is not covered by the warranty.
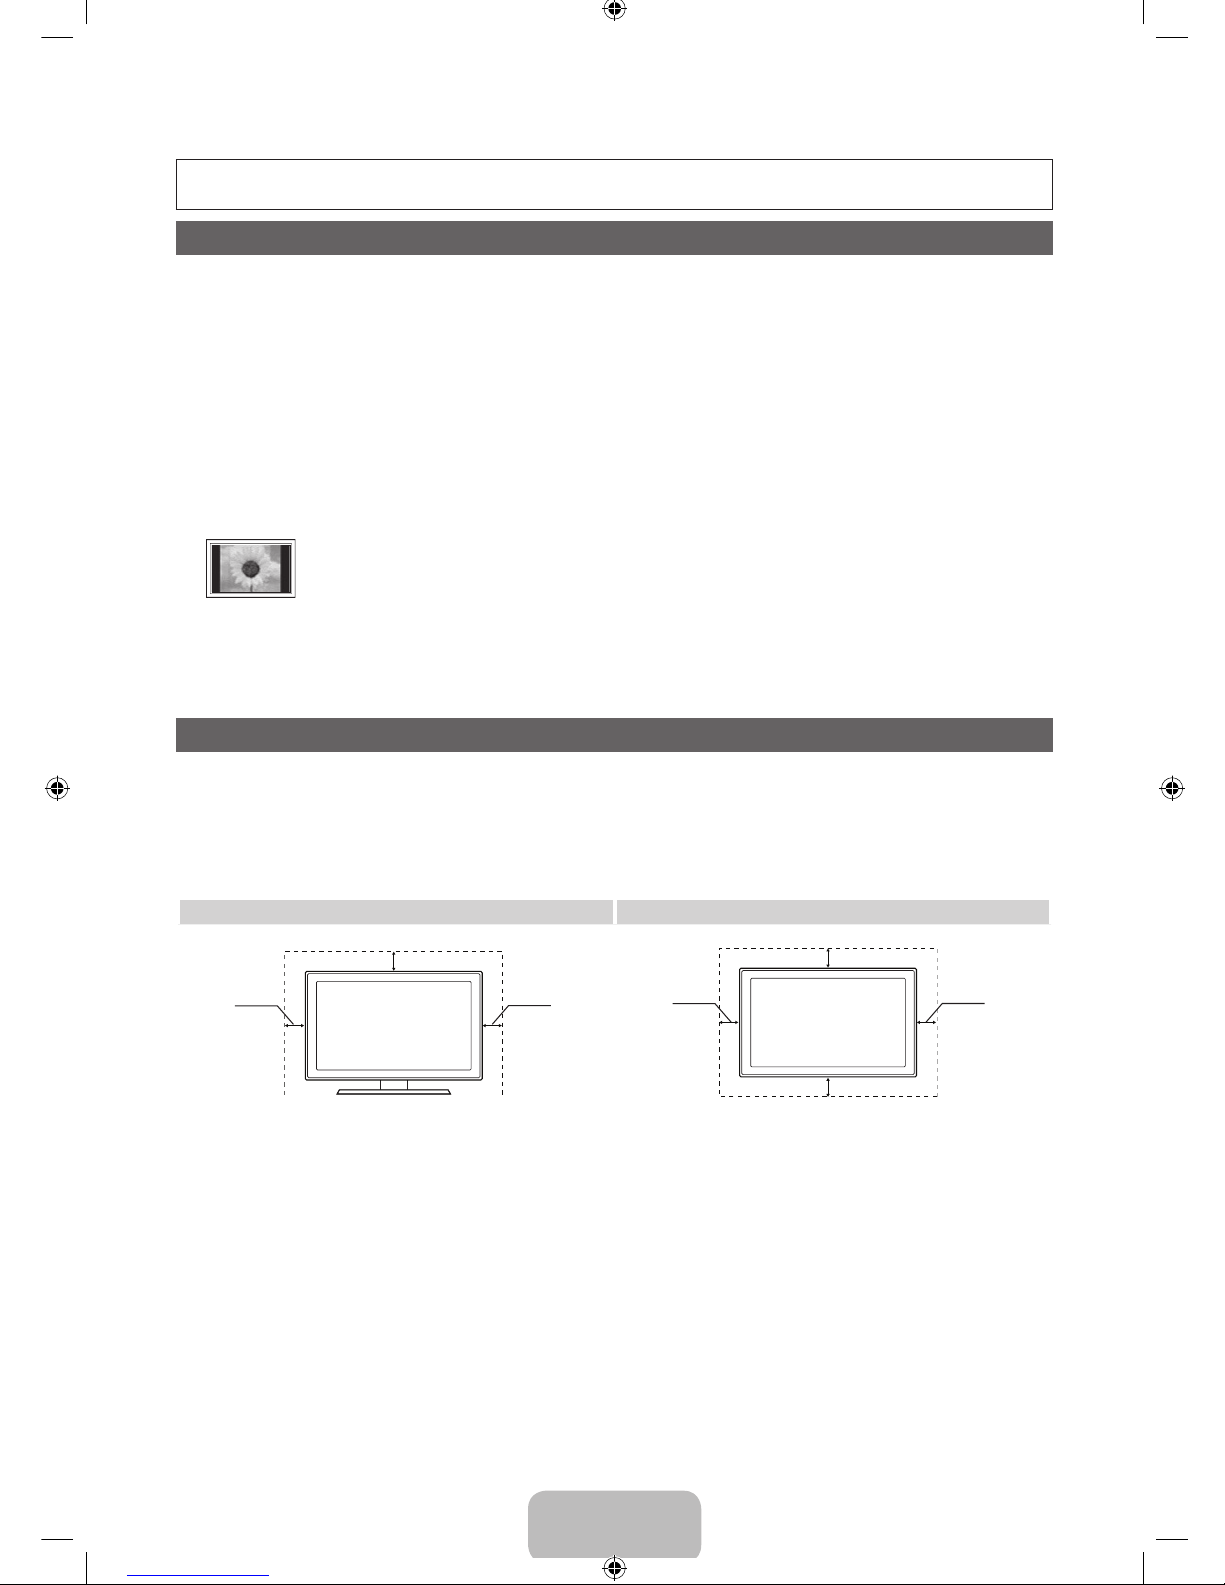
Securing the Installation Space
Keep the required distances between the product and other objects (e.g. walls) to ensure proper ventilation.
Failing to do so may result in fire or a problem with the product due to an increase in the internal temperature of the product.
✎
When using a stand or wall-mount, use parts provided by Samsung Electronics only.
• If you use parts provided by another manufacturer, it may result in a problem with the product or an injury due to the product falling.
✎
The appearance may differ depending on the product.
✎
Be careful when you contact the TV because some parts can be somewhat hot.
Installation with a stand. Installation with a wall-mount.
4 inches
4 inches
4 inches
4 inches
4 inches
4 inches
4 inches
[PD490-ZS]BN68-04070B.indb 2 2012-01-30 �� 2:06:46
English - 3
Accessories
✎
Please make sure the following items are included with your TV. If any items are missing, contact your dealer.
✎
The items’ colors and shapes may vary depending on the models.
✎
Check that there are no accessories hidden behind packing materials when you open the box.
y Remote Control & Batteries (AAA x 2)
y Owner’s Instructions
y Warranty Card / Safety Guide (Not available in some locations)
y Cleaning-Cloth
y Power Cord
y 3D Glasses
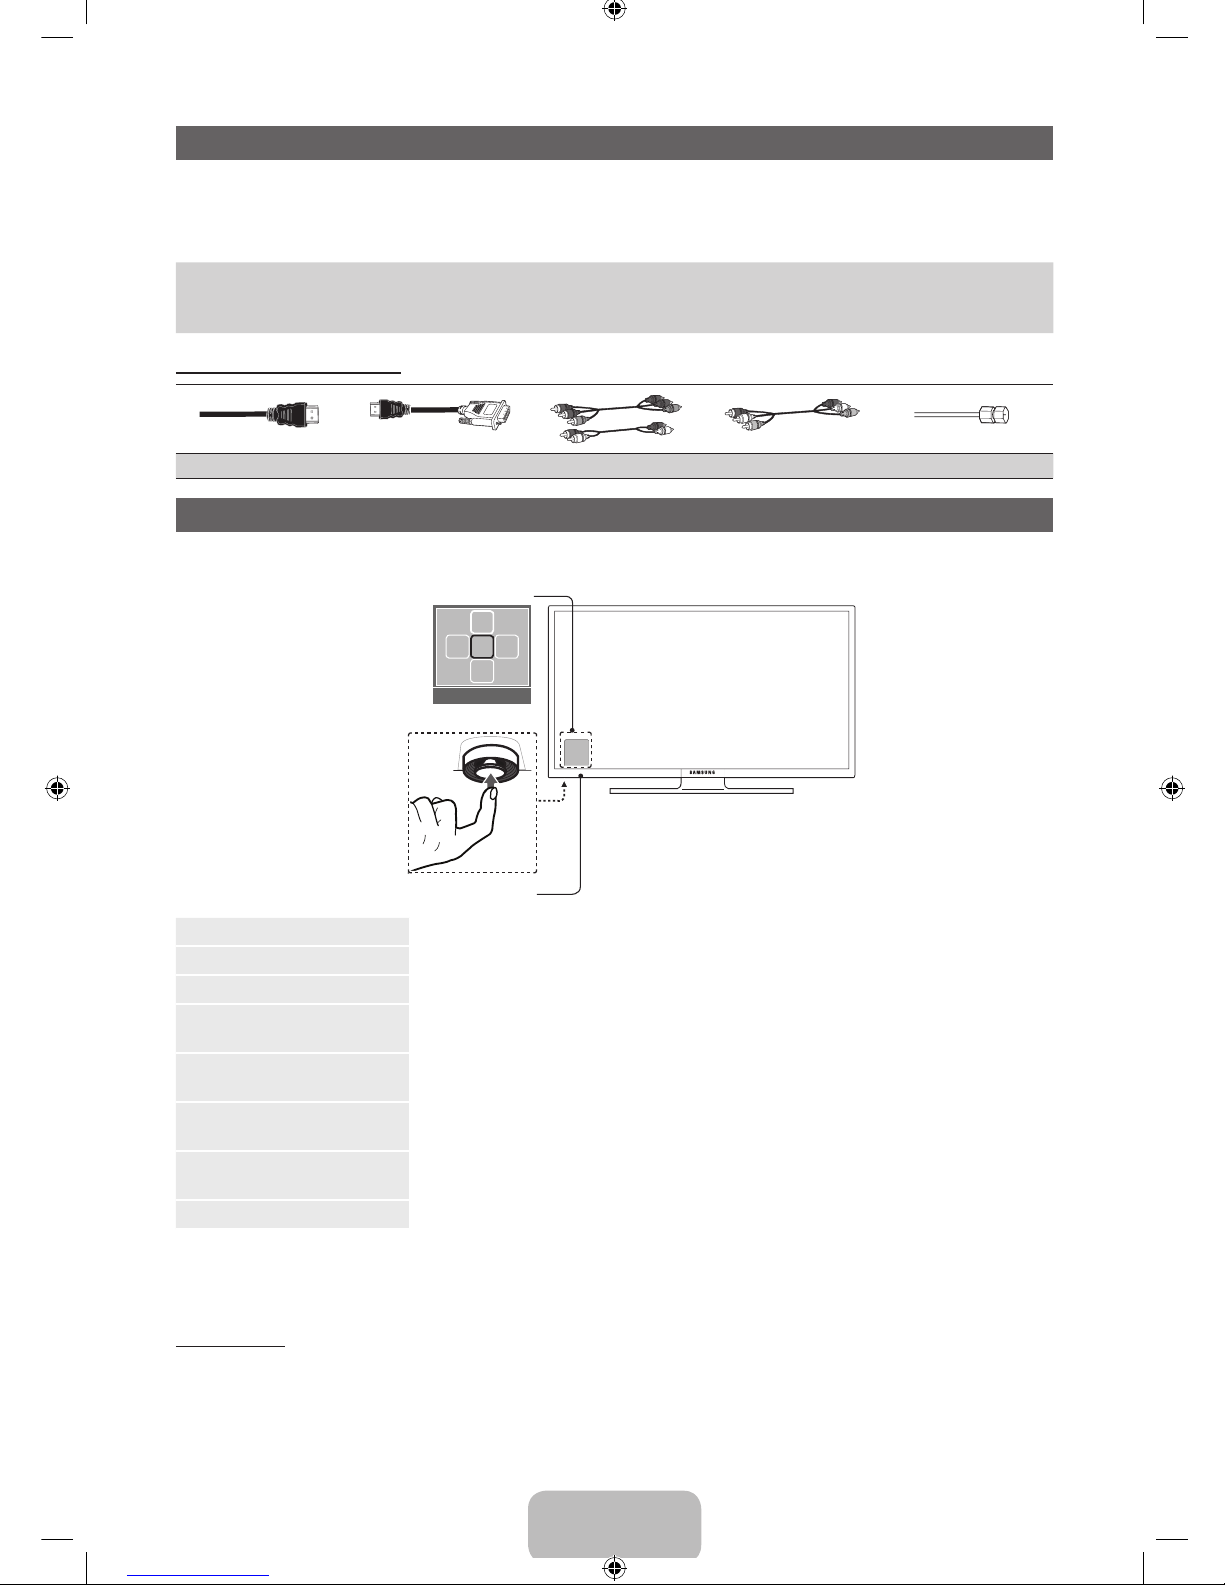
Input Cables (Sold Separately)
HDMI HDMI-DVI Component Composite (AV) Coaxial (RF)
Viewing the Control Panel
✎
The product color and shape may vary depending on the model.
Power on Turns the TV on by pressing the controller in standby mode.
Adjusting the volume Adjusts the volume by moving the controller from side to side when the power is on.
Selecting a channel Selects a channel by moving the controller up and down when the power is on.
Using the function menu
Press the controller when the power is on, then the function menu screen appears. If you press it again,
the function menu screen disappears.
Selecting the MENU (m)
Selects the MENU(m) by moving the controller in the function menu screen. The OSD(On Screen
Display) of your TV’s feature appears.
Selecting the CONTENT
Selects the CONTENT by moving the controller in the function menu screen. The Contents Home main
screen appears.
Selecting the Source (s)
Selects the Source(s) by moving the controller in the function menu screen. The Source list screen
appears.
Power Off (P) Selects the Power Off (P) to turn the TV off by moving the controller in the function menu screen.
✎
Exits the menu when pressing the controller more than 1 second.
✎
When selecting the function by moving the controller to the up/down/left/ right directions, be sure not to press the
controller. If you press it first, you cannot operate it to move the up/down/left/right directions.
Standby mode
Your TV enters Standby mode when you turn it off and continues to consume a small amount of electric power. To be safe
and to decrease power consumption, do not leave your TV in standby mode for long periods of time (when you are away on
vacation, for example). It is best to unplug the power cord.
Function menu
TV Controller
Remote control sensor
CONTENT
m R s
P
Return
[PD490-ZS]BN68-04070B.indb 3 2012-01-30 �� 2:06:48
English - 4
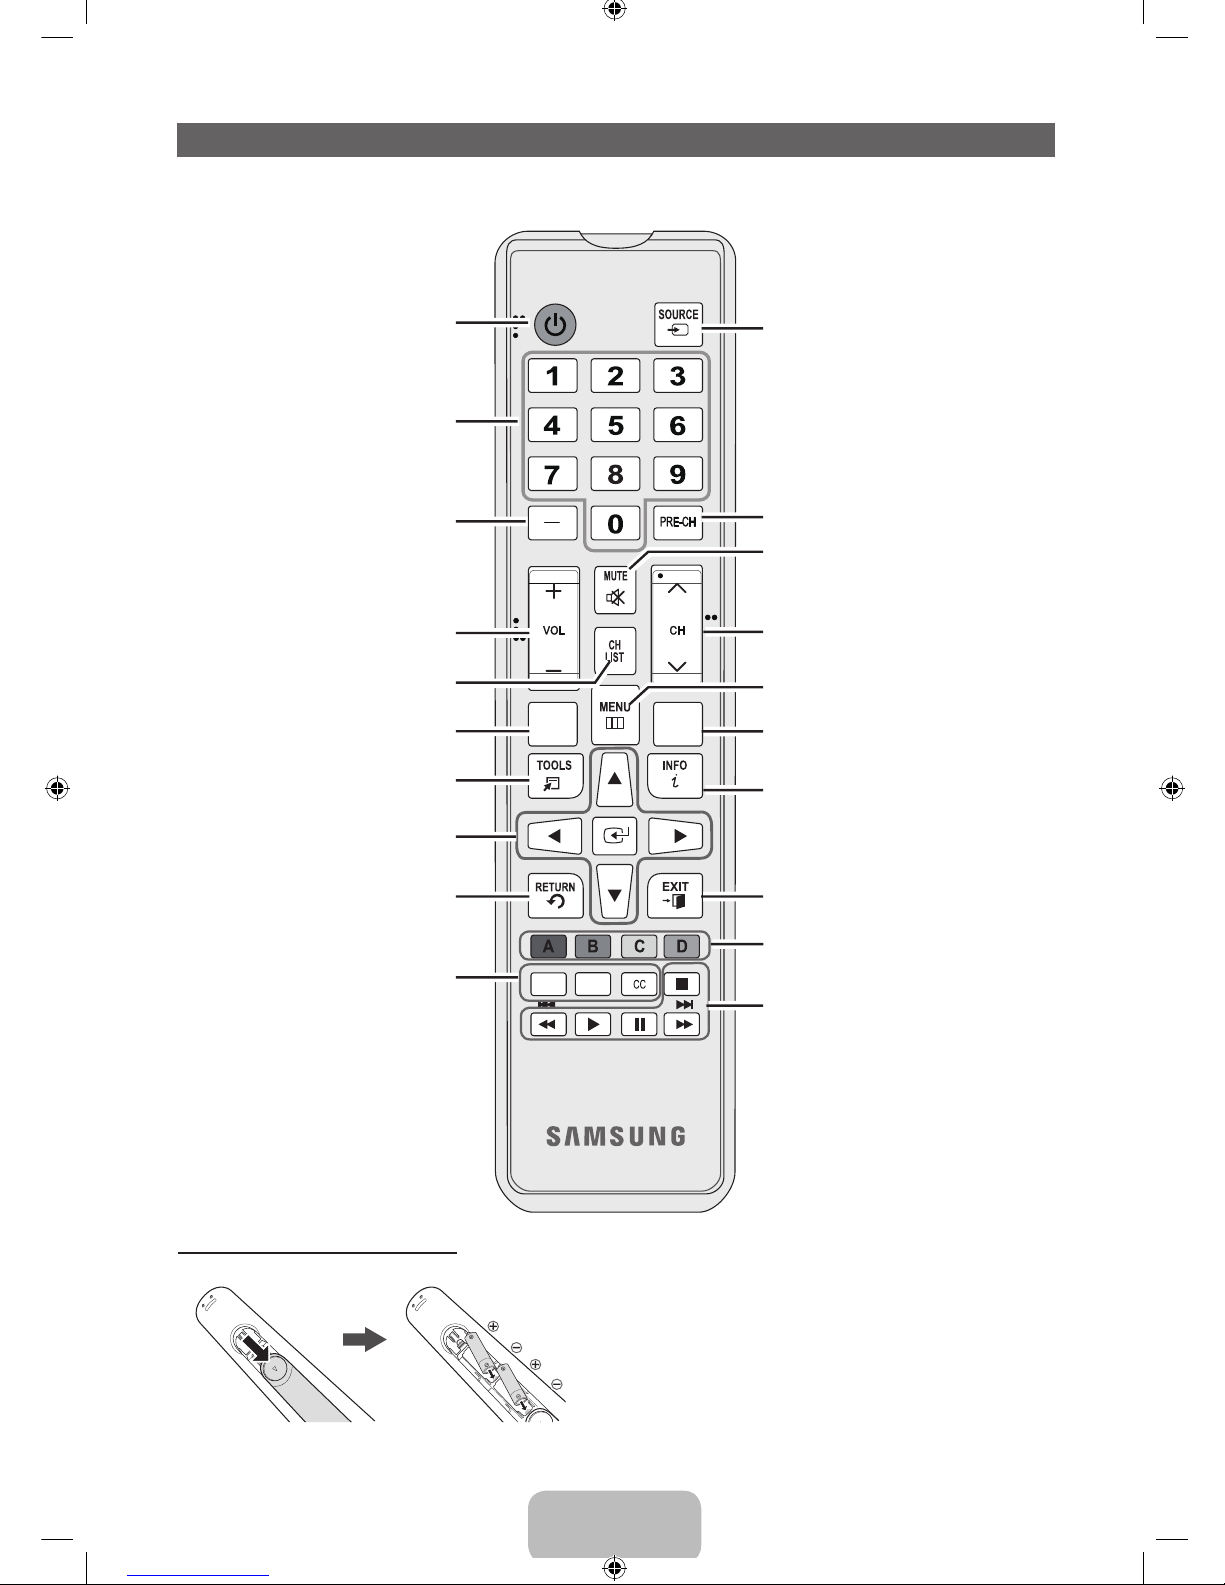
Remote Control Buttons
✎
This remote control has Braille points on the Power, Channel, and Volume buttons and can be used by visually impaired
persons.
Installing batteries (Battery size: AAA)
✎
NOTE
x
Use the remote control within 23 feet of the TV.
x
Bright light may affect the performance of the remote
control. Avoid using when near special fluorescent lights or
neon signs.
x
The color and shape may vary depending on the model.
Press to select additional channels
(digital) being broadcast by the same
station. For example, to select channel
‘54.3’, press ‘54’, then press ‘-’ and
‘3’.
Return to the previous channel.
Press to directly access to channels.
Turns the TV on and off.
Use these buttons in a specific feature.
E-MANUAL: Displays the e-Manual.
3D: Turns the 3D image on or off.
CC: Controls the caption decoder.
Cut off the sound temporarily.
Display the EPG (Electronic Program
Guide).
Displays the channel list on the screen.
Press to display information on the TV
screen.
Quickly select frequently used
functions.
Selects the on-screen menu items and
changes the values seen on the menu.
Exit the menu.
Return to the previous menu.
Display and select the available video
sources.
Use these buttons according to the
direction on screen.
Change channels.
Displays the main on-screen menu.
View the Contents Home.
Adjusts the volume.
E-MANUAL
GUIDE
CONTENT
X
[PD490-ZS]BN68-04070B.indb 4 2012-01-30 �� 2:06:48

English - 5
Connecting to an Antenna
When the TV is initially powered on, basic settings proceed automatically.
✎
Connecting the power cord and antenna.
✎
The PDP device may interfere with an amateur radio or AM radio.
✎
When using two-way radio mobile and portable units or amateur radio or AM radio near by your TV, this may cause the
TV to malfunction.
Setup (Initial Setup)
When the TV is initially powered on, a sequence of on-screen prompts will assist in configuring basic settings. Press the
POWERP button. Setup is available only when the Source is set to TV.
✎
To start the Setup, enter the password using the remote control. The default password is 0-0-0-0.
✎
To return to the previous step, press the Previous button.
1
Menu Language:
Selecting a menu
language
Press the ▲ or ▼ button, then press the ENTERE button. Select the
desired OSD (On Screen Display) language.
POWER
INFO
GUIDE
2
Use Mode: Selecting
the usage mode
Press the ▲ or ▼ button, then press the ENTERE button.
y Select the Home Use mode. Store Demo Mode is for retail
environments.
y When pressing TV controller, the function menu screen appears. Select
the MENU(m) and press it more than 5 seconds using the controller.
The Store Demo mode is set. Cancel the Store Demo by selecting
Source(s) and pressing it more than 5 seconds.
y Store Demo is only for shop display. If you select it, several functions
are not able to use. Please select Home Use when you watch at home.
3
Network Settings:
Configure network
settings
1. Connect LAN Cable or Samsung Wireless LAN Adaptor, select the Next, then press the
ENTERE button.
✎
If you select the Skip, you have to set network in the Network Settings
respectively. For more information, refer to “Setting the Wired Network / Setting
the Wireless Network” in the e-Manual.
2. Complete the network settings in accordance with your desired way.
4
Software Upgrade:
Upgrading the software
to latest version
When checking software version if there is a brand-new version, upgrade the software to
latest version by pressing Upgrade Now.
✎
Press Upgrade Later to upgrade later. For more information, refer to “Software
Upgrade” in the e-Manual.
✎
You can only upgrade software, when the Network Settings is successfully
completed.
ANT OUT
VHF/UHF Antenna
Power Input
or
Cable
Antenna Cable (Not Supplied)
[PD490-ZS]BN68-04070B.indb 5 2012-01-30 �� 2:06:50

English - 6
5
Auto Program (1):
Selecting how you
watch your TV
y I use an aerial cable to connect to TV.: Memorize all of the available channels using
RF cable.
y I use a set-top box.: Do not need Auto program when connecting a TV to set-top box.
✎
You can complete Setup by selecting it.
6
Auto Program
(2): Selecting and
memorizing channels
Select the Next to run Auto Program.
Press the ▲ or ▼ button to select Air or Cable, and then press the ENTERE button.
The channel search will start automatically.
For more information, refer to Channel → Auto Program.
✎
Press the ENTERE button at any time to interrupt the memorization process.
7
Clock: Setting the
Clock Mode
Set the Clock Mode automatically or manually.
y Auto : Select the time zone where you live. (for Brazil, Chile)
y Manual : Allows you to manually set the current date and time.
8
Setup Complete
Press the ENTERE button.
✎
The completed settings are displayed.
If You Want to Reset This Feature...
O
MENUm → System → Setup → ENTER
E
[PD490-ZS]BN68-04070B.indb 6 2012-01-30 �� 2:06:50

English - 7
Connecting to an AV Device
¦ Available devices: DVD, Blu-ray player, HD cable box, HD STB (Set-Top-Box) satellite
receiver
Using an HDMI or an HDMI to DVI Cable: HD connection (up to 1080p)
✎
HDMI IN 1(DVI), 2 / DVI AUDIO IN
x
If an HDMI to DVI cable is connected to the HDMI IN 1(DVI) port, the audio does not work.
x
The picture may not display normally (if at all) or the audio may not work if an external device that uses an older
version of HDMI mode is connected to the TV. If such a problem occurs, ask the manufacturer of the external
device about the HDMI version and, if out of date, request an upgrade.
x
Be sure to purchase a certified HDMI cable. Otherwise, the picture may not display or a connection error may
occur.
x
A basic high-speed HDMI cable or one with ethernet is recommended. This product does not support the
ethernet function via HDMI.
¦ Available devices: DVD, Blu-ray player, cable box, STB satellite receiver, VCR
Using a Component (up to 1080p) or an Audio/Video Cable (480i only)
✎
When connecting to AV IN, the color of the AV IN [Y/VIDEO] jack (green) will not match the video cable (yellow).
✎
For better picture quality, we recommend the Component connection over the A/V connection.
Device
Device
Red
Red
White
White Yellow
Red Blue Green
Audio Cable
(Not Supplied)
Audio Cable
(Not Supplied)
Video Cable
(Not Supplied)
Component Cable
(Not Supplied)
WR
HDMI OUT
DVI OUT
9$
9$
Device
Device
WhiteRed
Audio Cable (Not Supplied)
HDMI Cable (Not Supplied)
HDMI to DVI Cable (Not Supplied)
[PD490-ZS]BN68-04070B.indb 7 2012-01-30 �� 2:06:52
English - 8
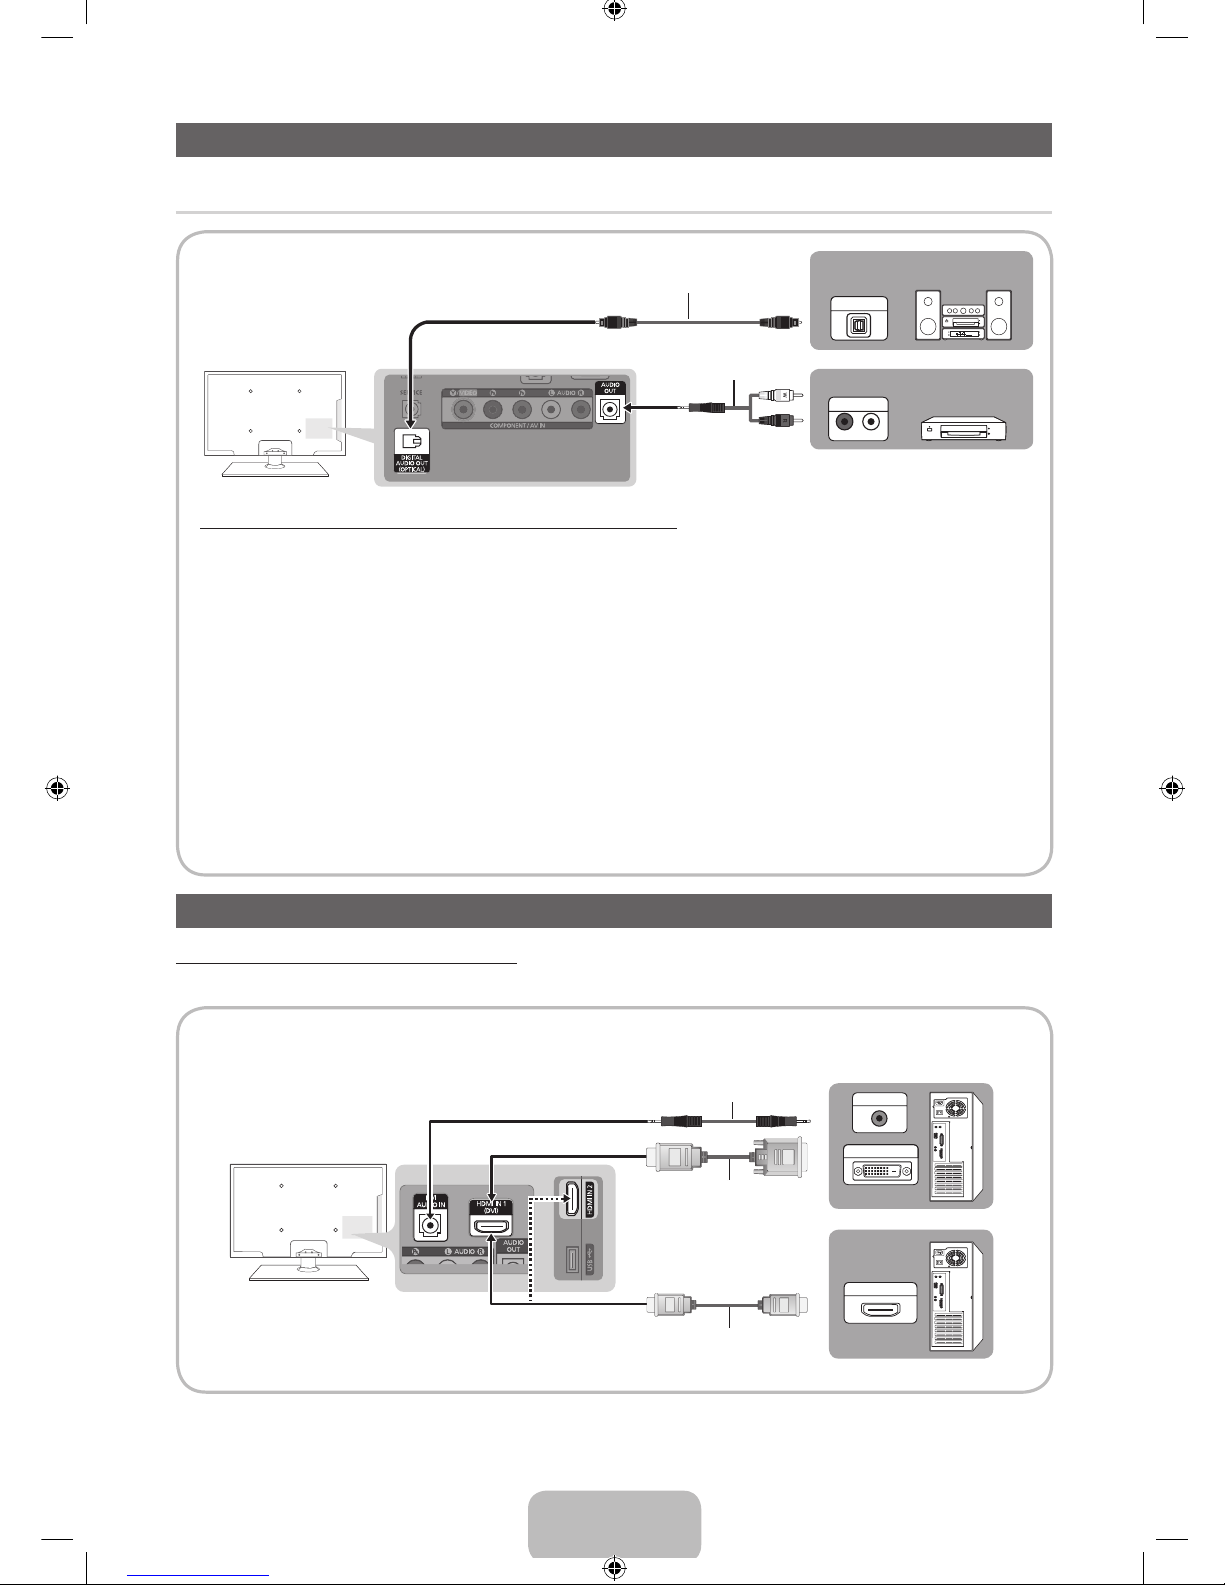
Connecting to an Audio Device
¦ Available devices: Digital Audio System, Amplifier, DVD home theater
Using an Optical (Digital) or an Audio (Analog) Cable Connection
✎
DIGITAL AUDIO OUT (OPTICAL)
x
When a Digital Audio System is connected to the DIGITAL AUDIO OUT (OPTICAL) jack, decrease the volume
of both the TV and the system.
x
5.1 CH (channel) audio is available when the TV is connected to an external device supporting 5.1 CH.
x
When the receiver (home theater) is set to on, you can hear sound output from the TV’s optical jack. When the
TV is receiving a DTV signal, the TV will send 5.1 CH sound to the home theater receiver. When the source is
a digital component such as a DVD / Blu-ray player / cable box / STB (Set-Top-Box) satellite receiver and is
connected to the TV via HDMI, only 2 CH audio will be heard from the home theater receiver. If you want to
hear 5.1 CH audio, connect the digital audio out jack from your DVD / Blu-ray player / cable box / STB satellite
receiver directly to an amplifier or home theater.
✎
AUDIO OUT: Connects to the audio input jacks on your amplifier/DVD home theater.
x
When connecting, use the appropriate connector.
x
When an audio amplifier is connected to the AUDIO OUT jacks: Decrease the volume of the TV and adjust the
volume level with the amplifier’s volume control.
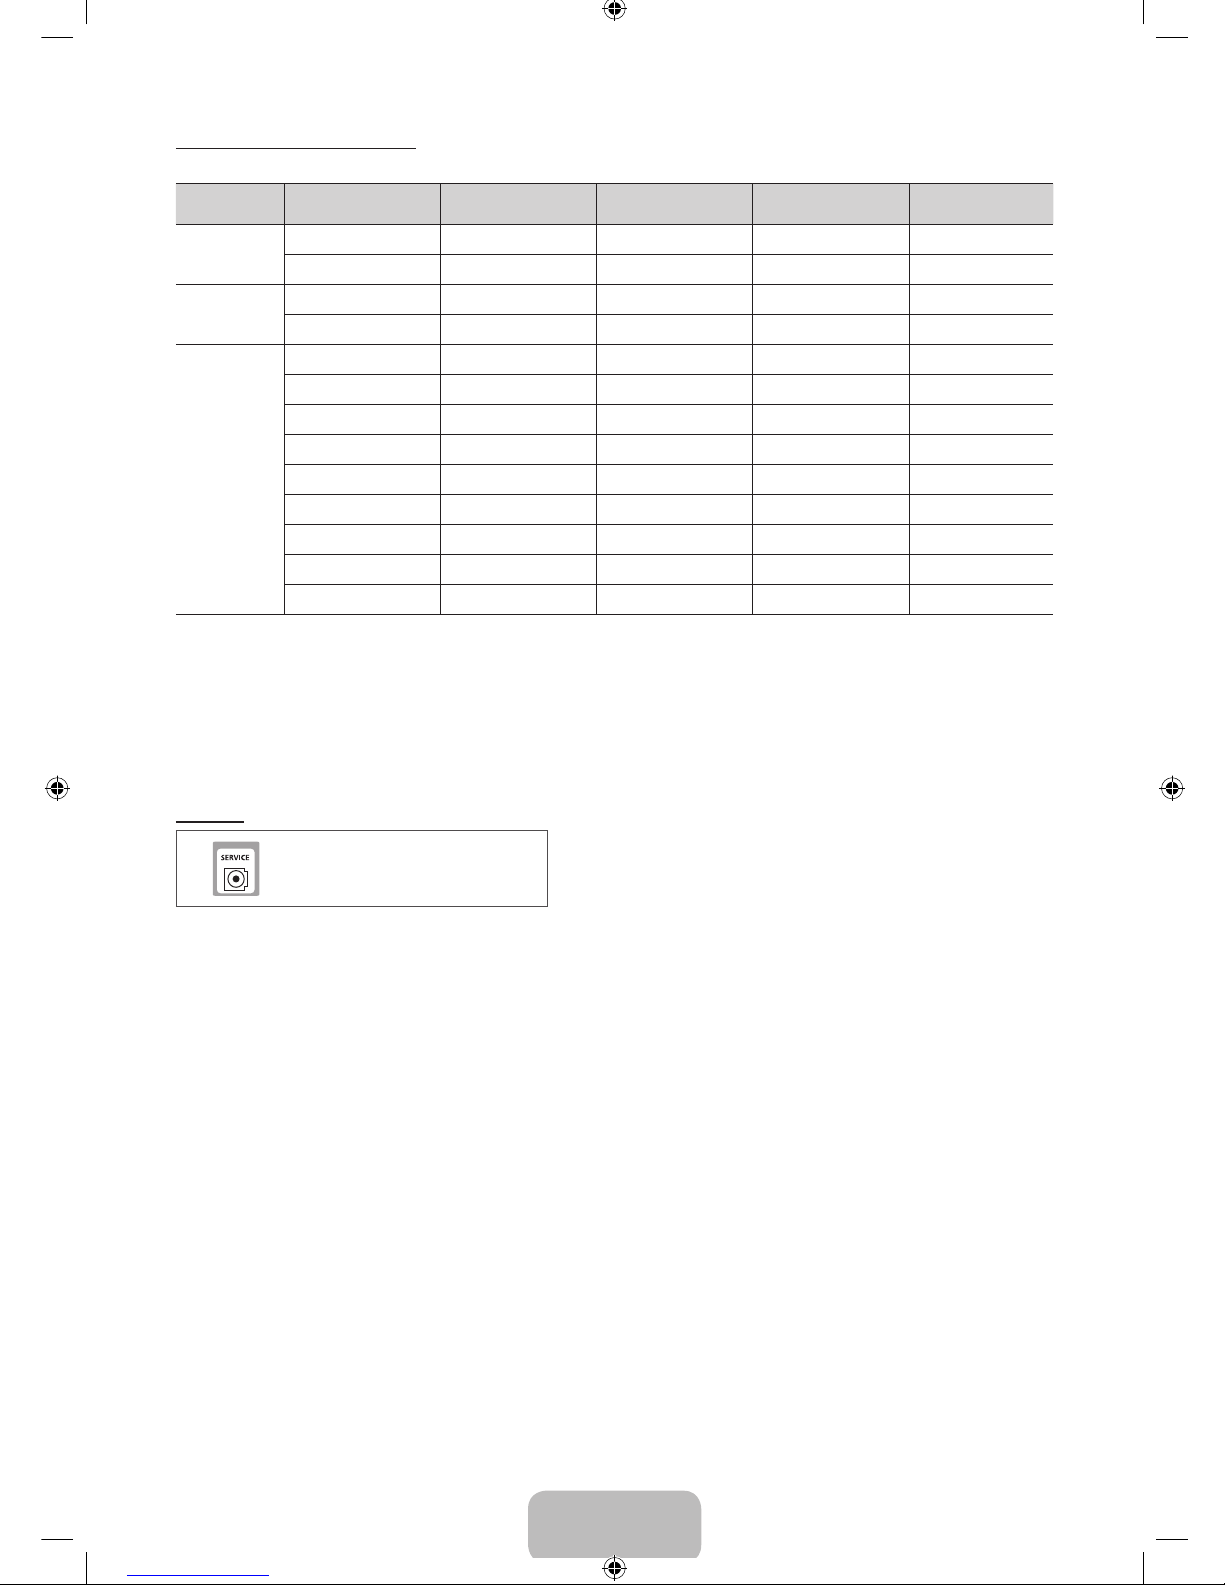
Connecting to a PC
Using an HDMI cable or an HDMI to DVI cable
✎
Connecting through the HDMI cable may not be supported depending on the PC.
HDMI OUT
DVI OUT
AUDIO OUT
Audio Cable (Not Supplied)
HDMI to DVI Cable (Not Supplied)
HDMI Cable (Not Supplied)
OPTICAL
R-AUDIO-L
AUDIO IN
Optical Cable (Not Supplied)
Audio Cable (Not Supplied)
Digital Audio System
Amplifier / DVD home theater
[PD490-ZS]BN68-04070B.indb 8 2012-01-30 �� 2:06:57
English - 9
Display Modes (HDMI/DVI Input)
Optimal resolution is 1024 x 768@60Hz.
Mode Resolution
Horizontal Frequency
(KHz)
Vertical Frequency
(Hz)
Pixel Clock Frequency
(MHz)
Sync Polarity
(H / V)
IBM
640 x 350 31.469 70.086 25.175 +/-
720 x 400 31.469 70.087 28.322 -/+
MAC
640 x 480 35.000 66.667 30.240 -/-
832 x 624 49.726 74.551 57.284 -/-
VESA DMT
640 x 480 31.469 59.940 25.175 -/-
640 x 480 37.861 72.809 31.500 -/-
640 x 480 37.500 75.000 31.500 -/-
800 x 600 37.879 60.317 40.000 +/+
800 x 600 48.077 72.188 50.000 +/+
800 x 600 46.875 75.000 49.500 +/+
1024 x 768 48.363 60.004 65.000 -/-
1024 x 768 56.476 70.069 75.000 -/-
1024 x 768 60.023 75.029 78.750 +/+
✎
NOTE
x
For HDMI/DVI cable connection, you must use the HDMI IN 1(DVI) jack.
x
If an HDMI to DVI cable is connected to the HDMI IN 1(DVI) port, the audio does not work.
x
The interlace mode is not supported.
x
The set might operate abnormally if a non-standard video format is selected.
x
PC(D-Sub) input is not supported.
SERVICE
Connector for service only.
[PD490-ZS]BN68-04070B.indb 9 2012-01-30 �� 2:06:58

English - 10
Changing the Input Source
Source
Use to select TV or other external input sources such as DVD / Blu-ray players / cable box / STB satellite
receiver connected to the TV.
■■ TV / HDMI1/DVI / HDMI2 / AV / Component
✎
In the Source, connected inputs will be highlighted.
✎
PC(D-Sub) input is not supported. If you want to connect PC to the TV, use HDMI1/DVI input.
How to use Edit Name
In the Source, press the TOOLS button, and then you can set an external input sources name you want.
■ VCR / DVD / Cable STB / Satellite STB / PVR STB / AV Receiver / Game / Camcorder / PC / DVI PC / DVI Devices /
TV / IPTV / Blu-ray / HD DVD / DMA: Name the device connected to the input jacks to make your input source selection
easier.
✎
When connecting a PC to the HDMI IN 1(DVI) port with HDMI cable, you should set the TV to PC mode under Edit Name.
✎
When connecting a PC to the HDMI IN 1(DVI) port with HDMI to DVI cable, you should set the TV to DVI PC mode under
Edit Name.
✎
When connecting an AV devices to the HDMI IN 1(DVI) port with HDMI to DVI cable, you should set the TV to DVI
Devices mode under Edit Name.
Information
You can see detailed information about the connected external device.
[PD490-ZS]BN68-04070B.indb 10 2012-01-30 �� 2:06:58
 Loading...