

Page 1
Contate a SAMSUNG EM TODO O MUNDO
SUPPORT
Caso tenha dúvidas ou comentários sobre os produtos da Samsung, entre em contato com o centro de atendimento ao cliente da
SAMSUNG.
País
ARGENTINA 0800-333-3733 www.samsung.com/ar
BRASIL 0800-124-421
CHILE 800-SAMSUNG(726-7864)
COLOMBIA 01-8000112112 www.samsung.com.co
COSTA RICA 0-800-507-7267 www.samsung.com/latin
REP. DOMINICANA 1-800-751-2676 www.samsung.com/latin
EQUADOR 1-800-10-7267 www.samsung.com/latin
EL SALVADOR 800-6225 www.samsung.com/latin
GUATEMALA 1-800-299-0013 www.samsung.com/latin
HONDURAS 800-27919267 www.samsung.com/latin
JAMAICA 1-800-234-7267 www.samsung.com/latin
NICARAGUA 00-1800-5077267 www.samsung.com/latin
PANAMA 800-7267 www.samsung.com/latin
PERU 0-800-777-08 www.samsung.com/latin
PORTO RICO 1-800-682-3180 www.samsung.com/latin
TRINIDAD & TOBAGO 1-800-SAMSUNG(726-7864) www.samsung.com/latin
VENEZUELA 0-800-100-5303 www.samsung.com
Assistência Técnica
4004-0000
From mobile 02-482 82 00
Web Site
www.samsung.com.br
www.samsung.com/cl
Plasma TV
Manual do Usuário
© 2012 Samsung Electronics Co., Ltd. All rights reserved.
Obrigado por adquirir este produto Samsung.
Para receber um serviço mais completo, registre
seu produto no site
www.samsung.com/register
BN68-04073A-03
Page 2
A detailed User’s Manual is built into your TV. For more information about how to view this e-Manual see page 43.
Figures and illustrations in this User Manual are provided for reference only and may differ from actual product appearances. Product design and
specifications may be changed without notice.
User Instructions
• Screen Image retention
Do not display a still image (such as on a video game) on the plasma display panel for more than several minutes as it can cause screen image
retention. This image retention is also known as ‘screen burn’. To avoid such image retention, refer to e-Manual to reduce the degree of brightness
and contrast of the screen when displaying a still image.
• Heat on the top of the Plasma TV
The top side of the product may be hot after long periods of use as heat dissipates from the panel through the vent hole in the upper part of the
product. This is normal and does not indicate any defect or operation failure of the product. However, children should be prevented from touching
the upper part of the TV.
• The TV is making a ‘cracking’ noise.
A ‘cracking’ noise may occur when the product contracts or expands due to a change in the surrounding environment such as temperature or
humidity. This is normal and not a defect of the unit.
• Cell Defects
Your plasma TV has a panel containing 2,360,000 (HD-level) to 6,221,000 (FHD-level) pixels which require sophisticated technology to produce.
However, there may be a few bright or dark pixels on the screen. These pixels will have no impact on the performance of the product.
• Avoid operating the TV at temperatures below 41°F (5°C)
• A still image displayed too long may cause permanent damage to the PDP Panel.
Watching the Plasma TV in 4:3 format for a long period of time may leave traces of borders displayed on the left, right and center
of the screen caused by the difference of light emission on the screen. Playing a DVD or a game console may cause similar effects
to the screen. Damages caused by the above effect are not covered by the Warranty.
• After-images on the Screen.
Displaying still images from Video games or a PC for longer than a certain period of time may produce partial after-images.
To prevent this effect, reduce the ‘brightness’ and ‘contrast’ when displaying still images for a long time.
• Warranty
Warranty does not cover any damage caused by image retention. Burn-in is not covered by the warranty.
• Caution
The glass screen of your PDP TV can break if you accidently drop the TV. Handle the TV with care.
When moving the TV, always have two or more people pick it up and carry it as a safety precaution. Do not lay the TV flat on its
face or back.
Your Samsung Plasma TV is a high quality television that has been carefully packaged to protect the integrity of its glass panel and component parts
during shipment. It is, nonetheless, a fragile piece of electronics that requires careful handling. Refrain from putting undue stress on any part of the
packaging when shipping or unpacking the TV. Use care when installing the TV. Avoid placing the TV in a location where it may be struck, exposed to
sharp impacts, or fall. Panel breakage caused by a fall or impact strike is not covered under the manufacturer's warranty.
English - 2
Page 3
List of Features
• 3D: This exciting new feature enables you to view 3D content.
• SMART HUB: Your gateway to all your content, integrated in one place.
− Provides diverse entertainment choices.
− Lets you control your entertainment life with an easy-to-use, user friendly user interface.
− Gives you easy access to diverse apps, with more being added every day.
− Lets you customize your TV by grouping and sorting apps to your taste.
• AllShare Play: Lets you access, view, or play photos, videos, or music located on USB devices,
digital cameras, cell phones, and PCs. PCs and cell phones can be accessed wirelessly, through your
wireless network.
• Anynet+ (HDMI-CEC): Allows you to control all connected Samsung devices that support Anynet+
with your Samsung TV’s remote.
• e-Manual: A detailed, on-screen user's manual that's built into your TV. (page 43)
• SMART Interaction: Using this function, you can access and control menu options and functions
using speech or gestures. (page 33)
Accessories and Cables
Please make sure the following items are included with your TV. If any items are missing, contact your
✎
dealer.
The items’ colors and shapes may vary depending on the model.
✎
Make sure that there are no accessories hidden behind or under packing materials after you open the
✎
box.
• Smart Touch Control & Batteries (AA x 2)
• IR Blaster & Batteries (AA x 4)
• Remote Control & Batteries (AAA x 2)
• User Manual
Input Cables (Sold Separately)
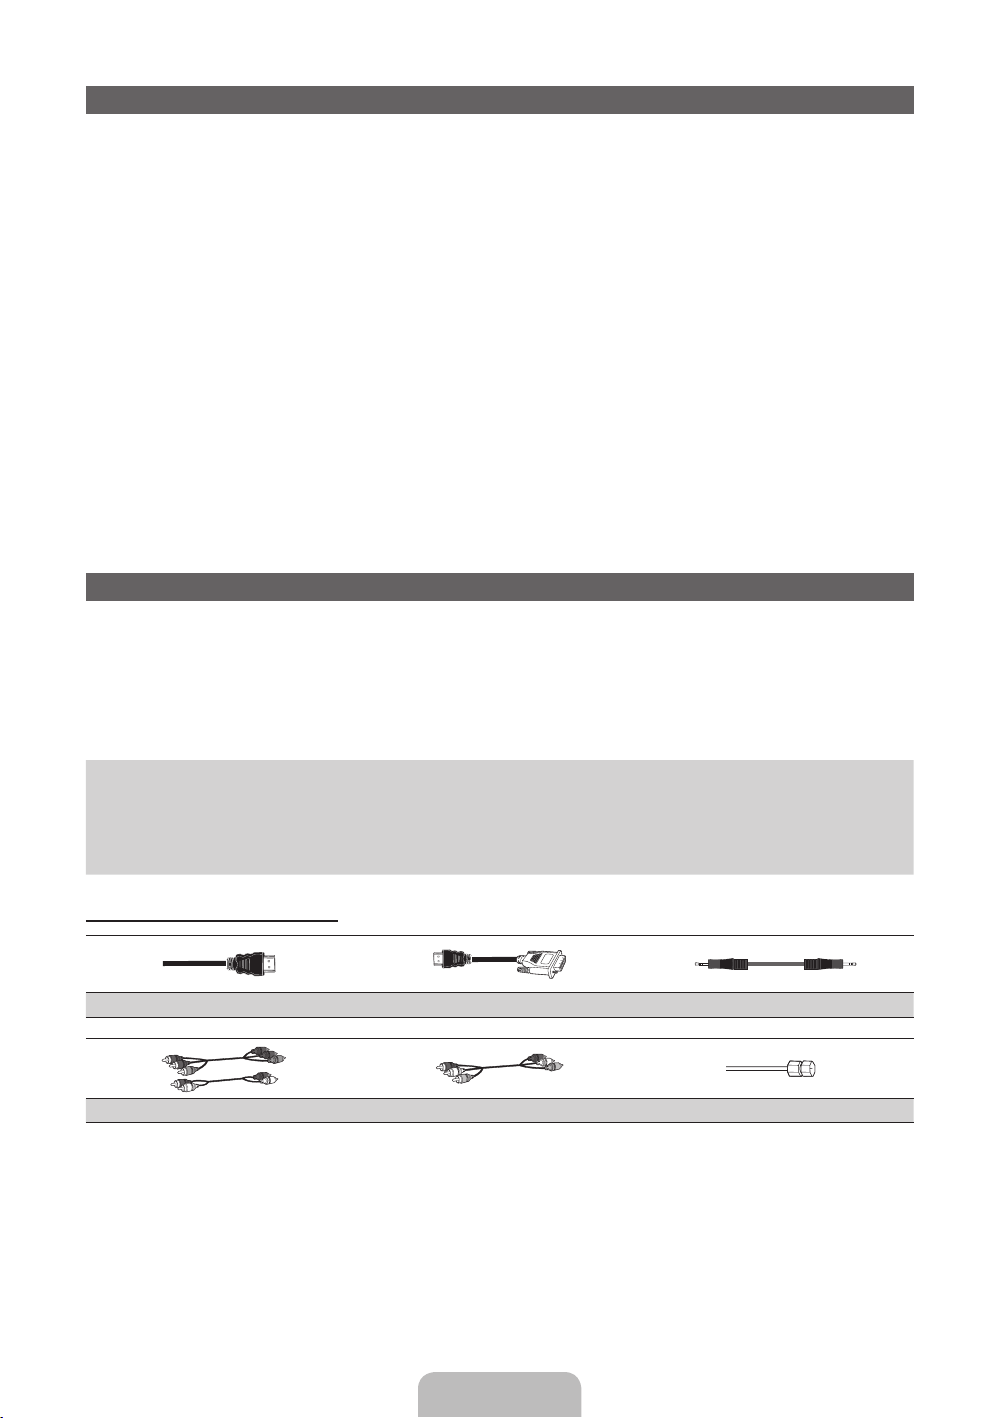
HDMI HDMI-DVI Audio
Component Composite (AV) Coaxial (RF)
• Cleaning Cloth
• Warranty Card / Safety Guide
• 3D Active Glasses
• Power Cord
English - 3
Page 4
Providing Proper Ventilation for Your TV
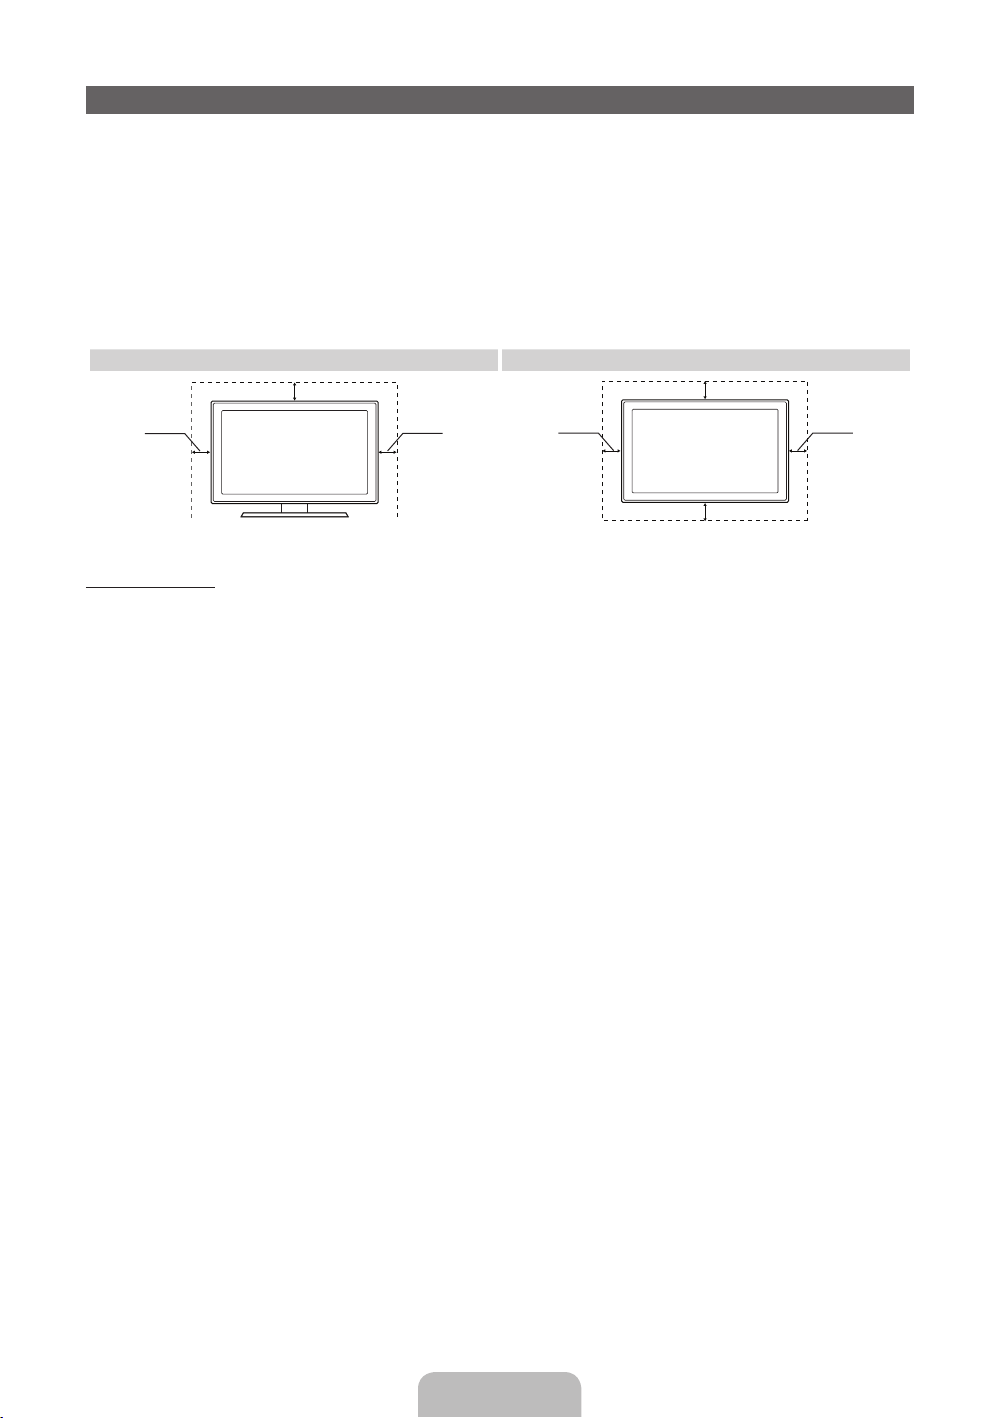
Keep the required distances between the product and other objects (e.g. walls) to ensure proper
ventilation.
Failing to maintain proper ventilation may result in a fire or a problem with the product caused by an
increase in its internal temperature.
Whether you install your TV using a stand or a wall-mount, we strongly recommend you use parts
✎
provided by Samsung Electronics only.
• If you use parts provided by another manufacturer, it may cause difficulties with the product or result
in injury caused by the product falling.
Installation with a stand. Installation with a wall-mount.
10 cm
10 cm
10 cm
10 cm
Other Warnings
The actual appearance of the TV may differ from the images in this manual, depending on the model.
✎
Be careful when you touch the TV. Some parts can be somewhat hot.
✎
10 cm
10 cm
10 cm
English - 4
Page 5
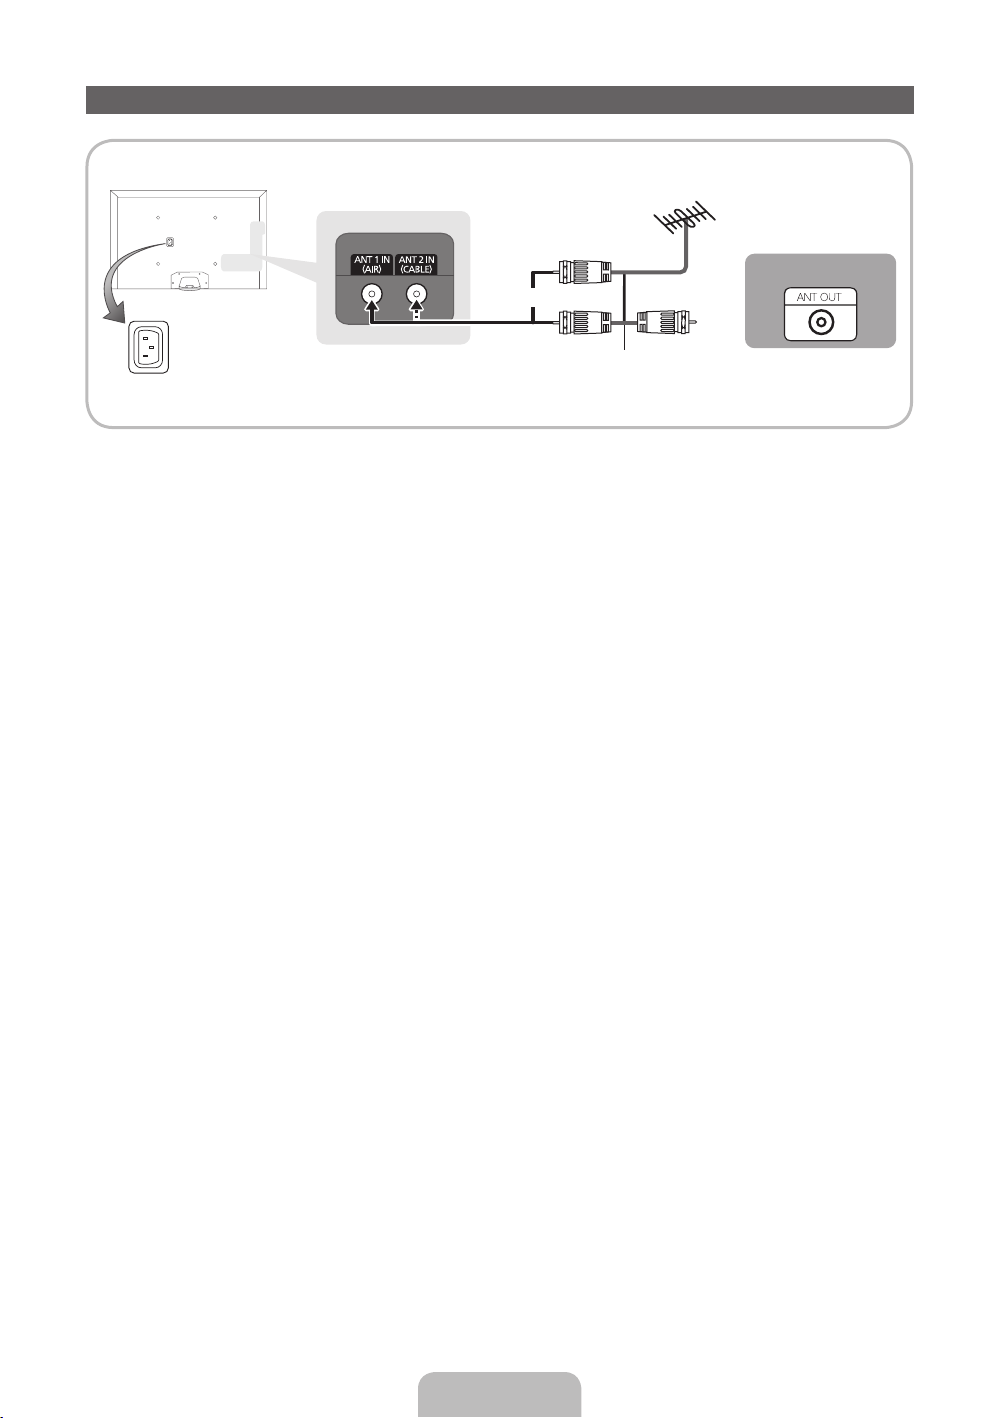
Connecting the Power Cord and the Antenna or Cable Connection
VHF/UHF Antenna
Cable
or
Antenna Cable (Not Supplied)
Power Input
Plug the power cord into a wall outlet only after you have made all other connections.
✎
If you are connecting your TV to a cable or satellite box using HDMI, Component, or Composite
✎
connections, you do not need to connect the ANT IN jack to an antenna or a cable connection.
The Plasma TV may interfere with an amateur radio or AM radio.
✎
Using two-way radio mobile and portable units or amateur radio or AM radio near your TV may cause
✎
the TV to malfunction.
Use caution when you move or swivel the TV if the antenna cable is tightly connected. You could
✎
break the antenna jack off the TV.
English - 5
Page 6
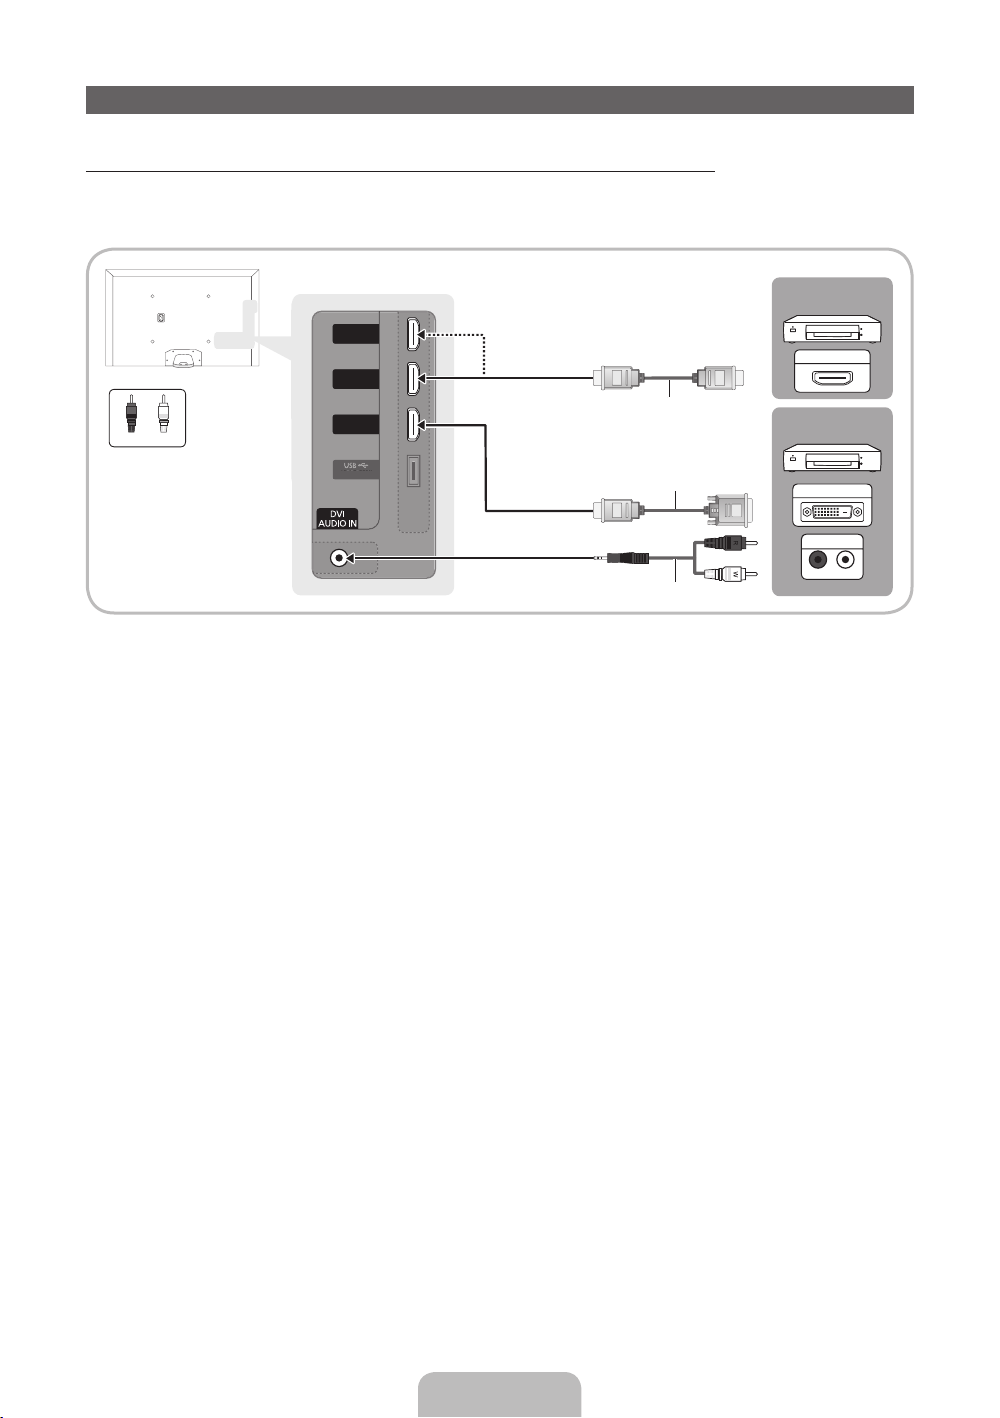
Connecting to AV Devices (Blu-ray Players, DVD Players, etc.)
(HDD 5V 1A)
HDMI IN
2
(ARC)
HDMI IN
3
(MHL)
HDMI IN
1
(DVI)
(
)
HDMI IN
2
(ARC)
3
(
)
1
(
)
R-AUDIO-L
Using an HDMI Cable for an HD connection (up to 1080p, HD digital signals)
For the best quality HD picture, we recommend using an HDMI connection.
Use with DVD players, Blu-ray players, HD cable boxes, and HD Set-Top Box satellite receivers.
HDMI IN
3
(MHL)
MHL
HDMI IN
2
(ARC)
WR
Red
White
HDMI IN
1
(DVI)
DVI
HDMI Cable (Not Supplied)
Device
HDMI OUT
Device
HDD 5V 1A
HDMI IN 1 (DVI), HDMI IN 2 (ARC), HDMI IN 3 (MHL)
✎
HDMI to DVI Cable (Not Supplied)
Audio Cable (Not Supplied)
DVI OUT
AUDIO OUT
• For the best picture and audio quality, connect digital devices to the TV using HDMI cables.
• An HDMI cable supports digital video and audio signals, and does not require an audio cable.
− To connect the TV to a digital device that does not support HDMI output, use an HDMI to DVI
cable and audio cables.
• If you connect an external device to the TV that uses an older version of HDMI, the video and audio
may not work. If this occurs, ask the manufacturer of the device about the HDMI version and, if it is
out of date, request an upgrade.
• Be sure to purchase a certified HDMI cable. Otherwise, the picture may not display or a connection
error may occur.
• We recommend using a basic high-speed HDMI cable or an HDMI cable that is Ethernet
compatible. Note that this product does not support the Ethernet function via HDMI.
• This product supports the 3D and ARC (Audio Return Channel) functions via an HDMI cable. Note
that the ARC function is supported by the HDMI IN 2 (ARC) port only.
• The ARC function allows digital audio to output via the HDMI IN 2 (ARC) port on the TV. It can be
enabled only when the TV is connected with an audio receiver that supports the ARC function.
• This product supports the Mobile High-Definition Link (MHL) function via an HDMI-MHL cable. Note
that the MHL function is supported by the HDMI IN 3 (MHL) port only.
• The MHL function lets you display a mobile device's screen via the HDMI IN 3 (MHL) port on the
TV. It can be enabled only when the TV is connected with a mobile device that supports the MHL
function. For more detailed information, see "Using the MHL function" in e-Manual.
• When you use MHL devices via a MHL cable, Picture Size is set to Screen Fit automatically. But if
you use MHL devices via an HDMI cable, Picture Size is not set to Screen Fit automatically. To view
an original size, select Screen Fit in the Picture Size menu (Menu → Picture → Picture Size).
• If you use MHL devices via an HDMI cable, The TV will be recognized as the HDMI input. In this
case, the TV may work differently than when you use MHL devices via a MHL cable.
English - 6
Page 7
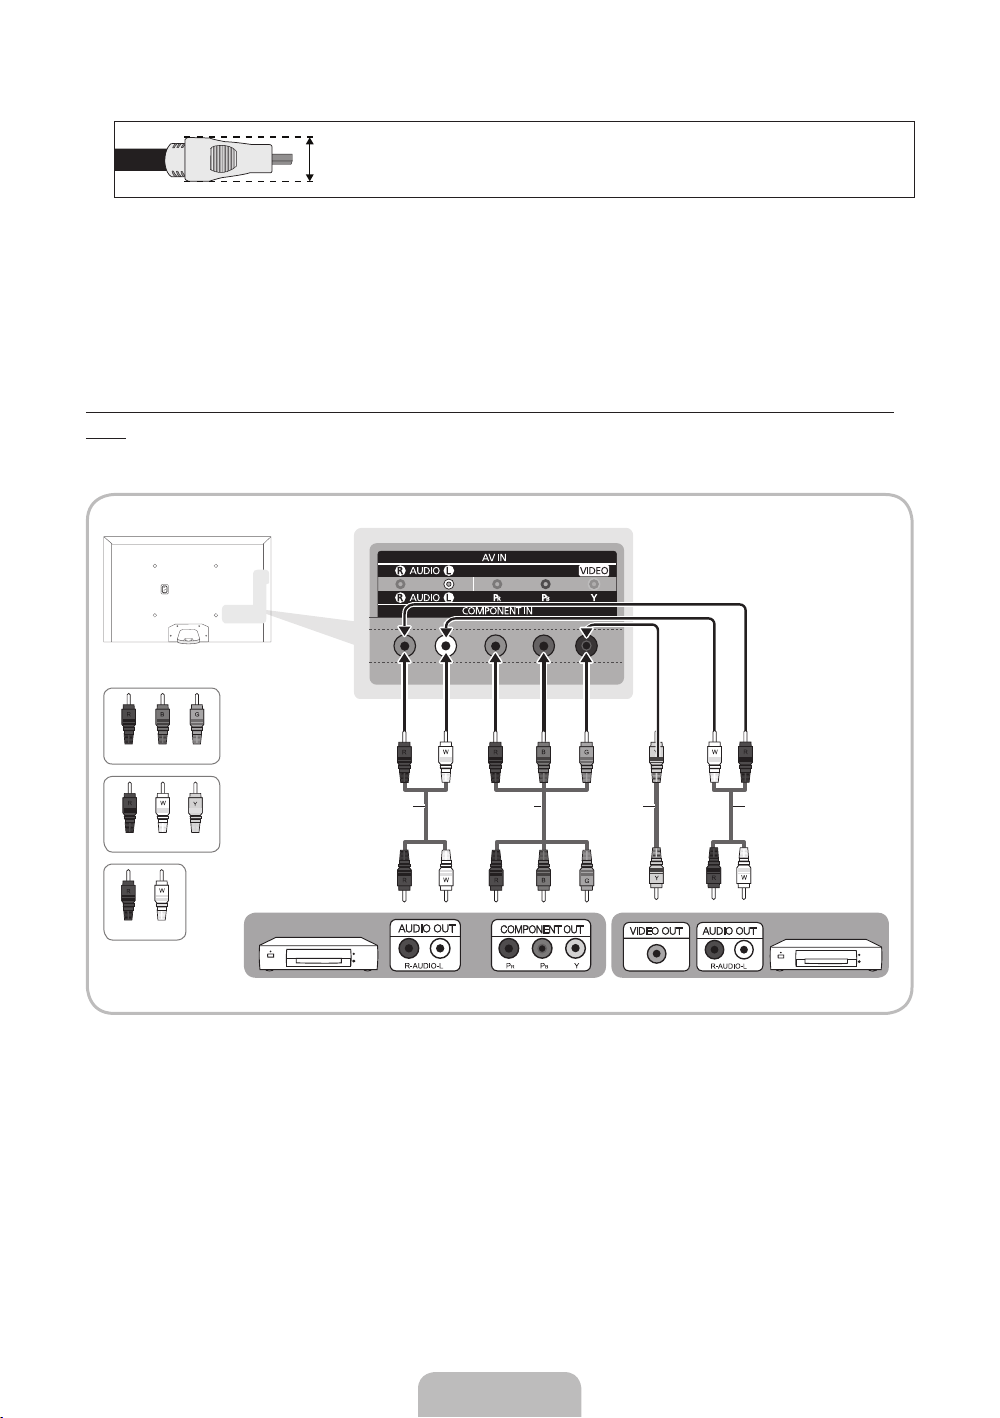
For the best cable connection to this product, use cables no thicker than the cable illustrated below:
✎
• Maximum thickness - 0.55 inches (14mm)
Using a Component Cable (up to 1080p HD signals) or an Audio/Video Cable (480i analog signals
only)
Use with DVD players, Blu-ray players, cable boxes, STB satellite receivers, VCRs.
Red
Blue Green
Audio Cable
(Not Supplied)
Red
White Yellow
Red White
For better picture quality, we recommend the Component connection over the A/V connection.
✎
When you connect a Video cable to AV IN, the color of the AV IN [VIDEO] jack (green) will not match
✎
Component Cable
(Not Supplied)
Video Cable
(Not Supplied)
Audio Cable
(Not Supplied)
DeviceDevice
the video cable (yellow).
English - 7
Page 8
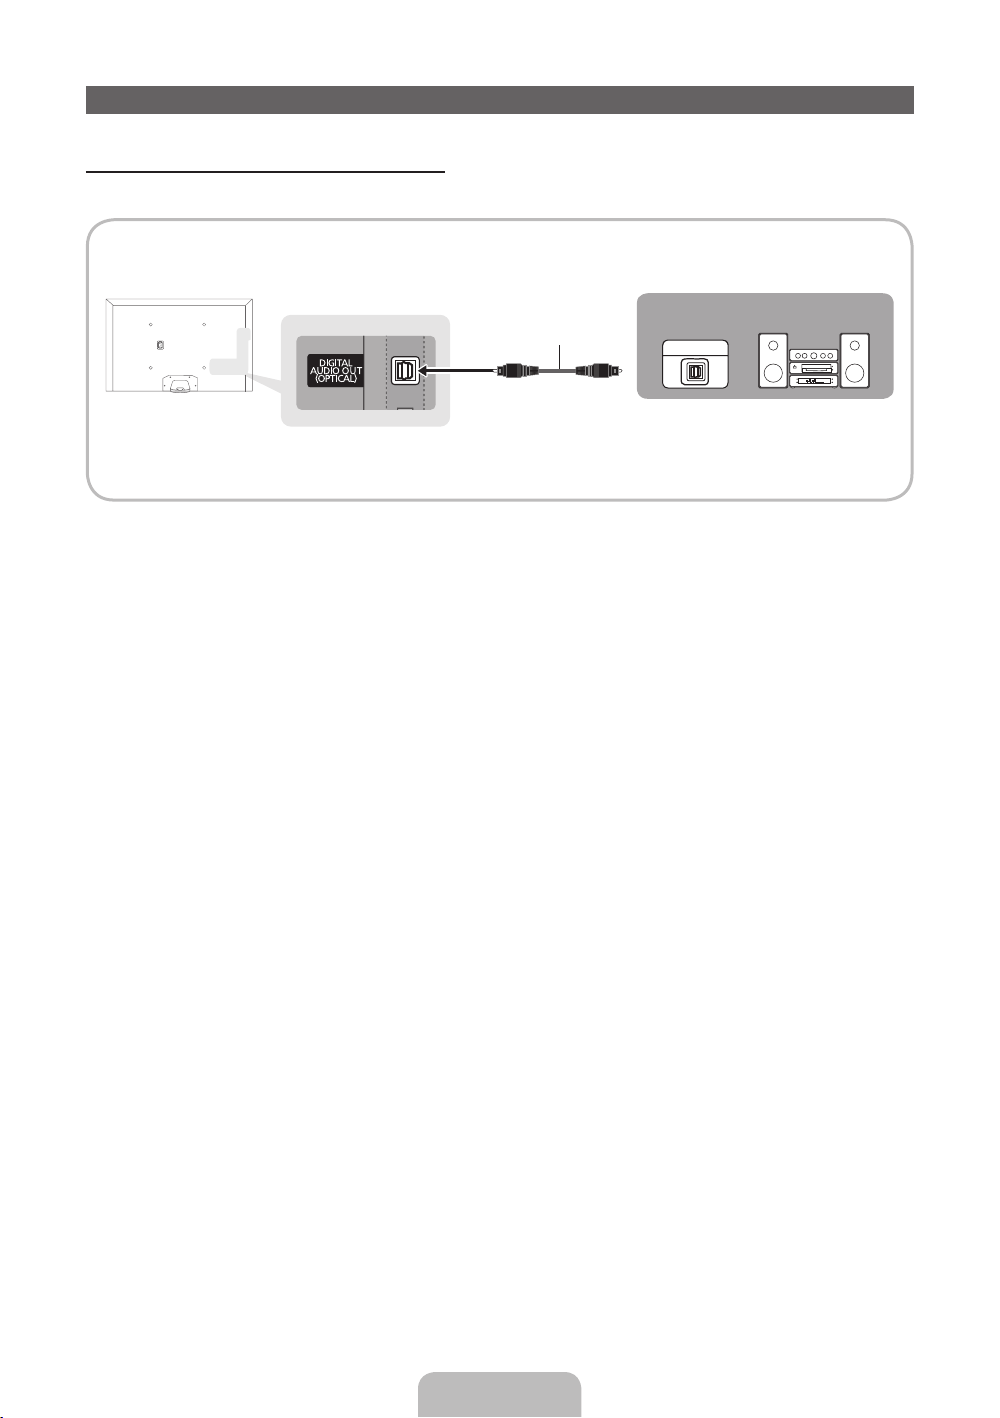
Connecting to Audio Devices
Using an Optical (Digital) Cable Connection
Use with Digital Audio Systems, Amplifiers, and Home Theaters.
Digital Audio System
DIGITAL AUDIO OUT (OPTICAL)
✎
Optical Cable (Not Supplied)
OPTICAL
• When you connect a Digital Audio System to the DIGITAL AUDIO OUT (OPTICAL) jack, decrease
the volume of both the TV and the system.
• 5.1 CH (channel) audio is available when you connect the TV to an external device supporting 5.1
CH.
• When the receiver (home theater) is set to on, you can hear sound output from the TV’s optical jack.
When the TV is receiving a DTV signal, the TV will send 5.1 CH sound to the home theater receiver.
When the source is a digital component such as a DVD player / Blu-ray player / cable box / STB
(Set-Top Box) satellite receiver and you connected it to the TV via HDMI, you will only hear 2 CH
audio from the home theater receiver. If you want to hear 5.1 CH audio, connect the digital audio
out jack from your DVD / Blu-ray player / cable box / STB satellite receiver directly to an amplifier or
home theater.
English - 8
Page 9
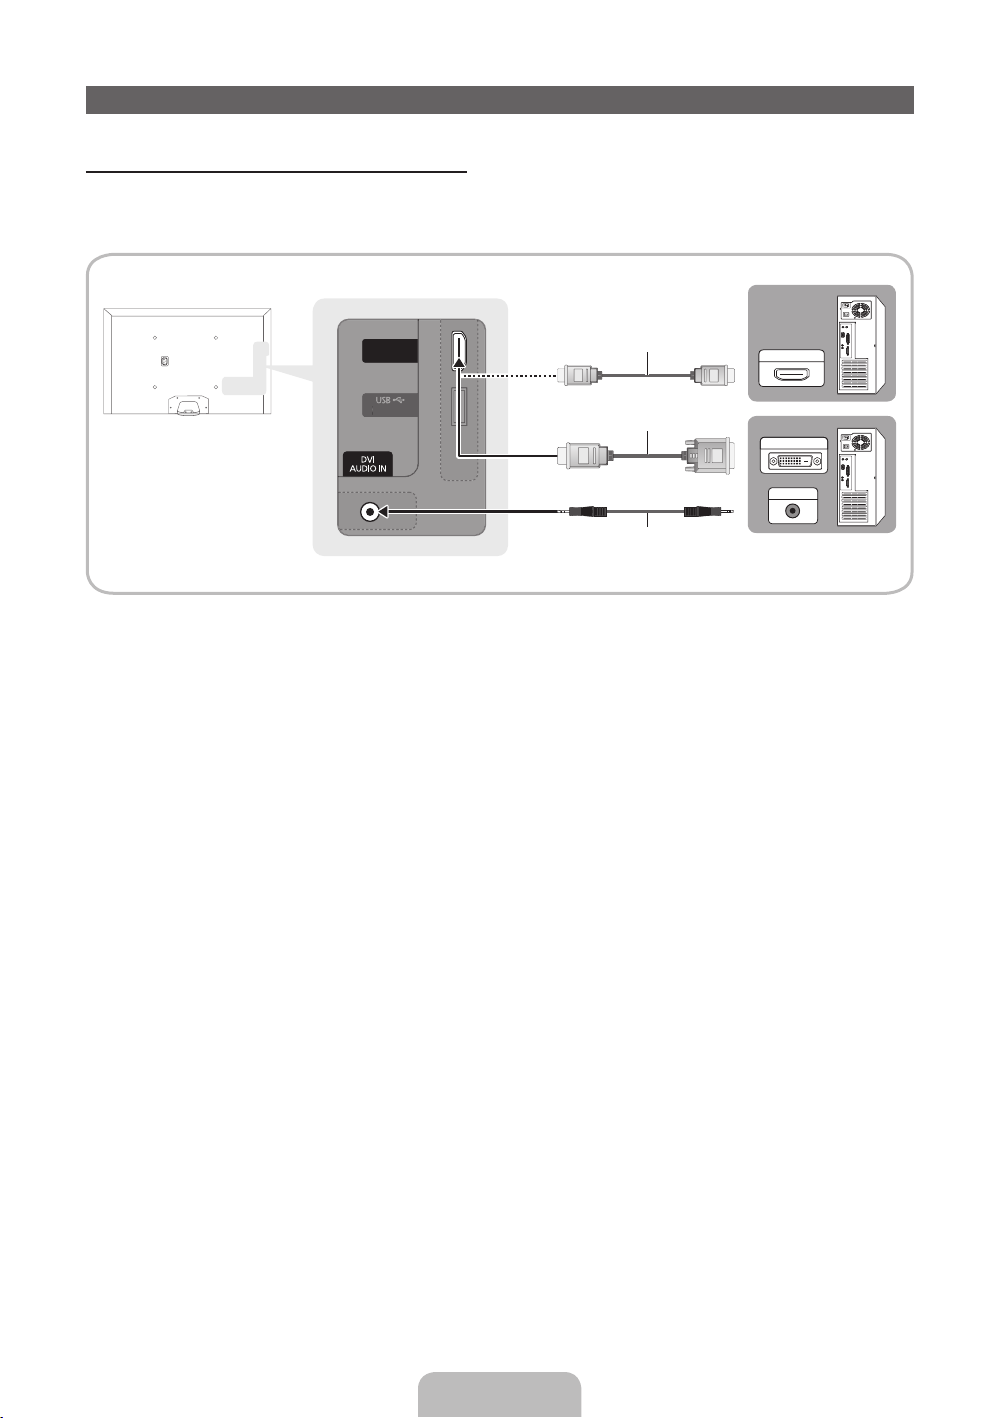
Connecting to a PC
AUDIO OUT
DVI OUT
HDMI OUT
(HDD 5V 1A)
HDMI IN
1
(DVI)
(
HDD 5V 1A)
1 (DVI)
HDMI IN
1
(DVI)
Using an HDMI cable or an HDMI to DVI cable
Your PC may not support an HDMI connection.
✎
Use your PC speakers for audio.
✎
HDMI Cable (Not Supplied)
HDMI to DVI Cable (Not Supplied)
Audio Cable (Not Supplied)
The optimal resolution is 1920 X 1080 @ 60 Hz. See the Display Resolution page for all available
resolutions (page 53).
NOTE
✎
• For an HDMI to DVI cable connection, you must use the HDMI IN 1 (DVI) jack.
• For PCs with DVI video out jacks, use an HDMI to DVI cable to connect the DVI out on the PC to
the HDMI IN 1 (DVI) jack on the TV. Use the PC's speakers for audio.
• PC (D-Sub) input is not supported.
English - 9
Page 10
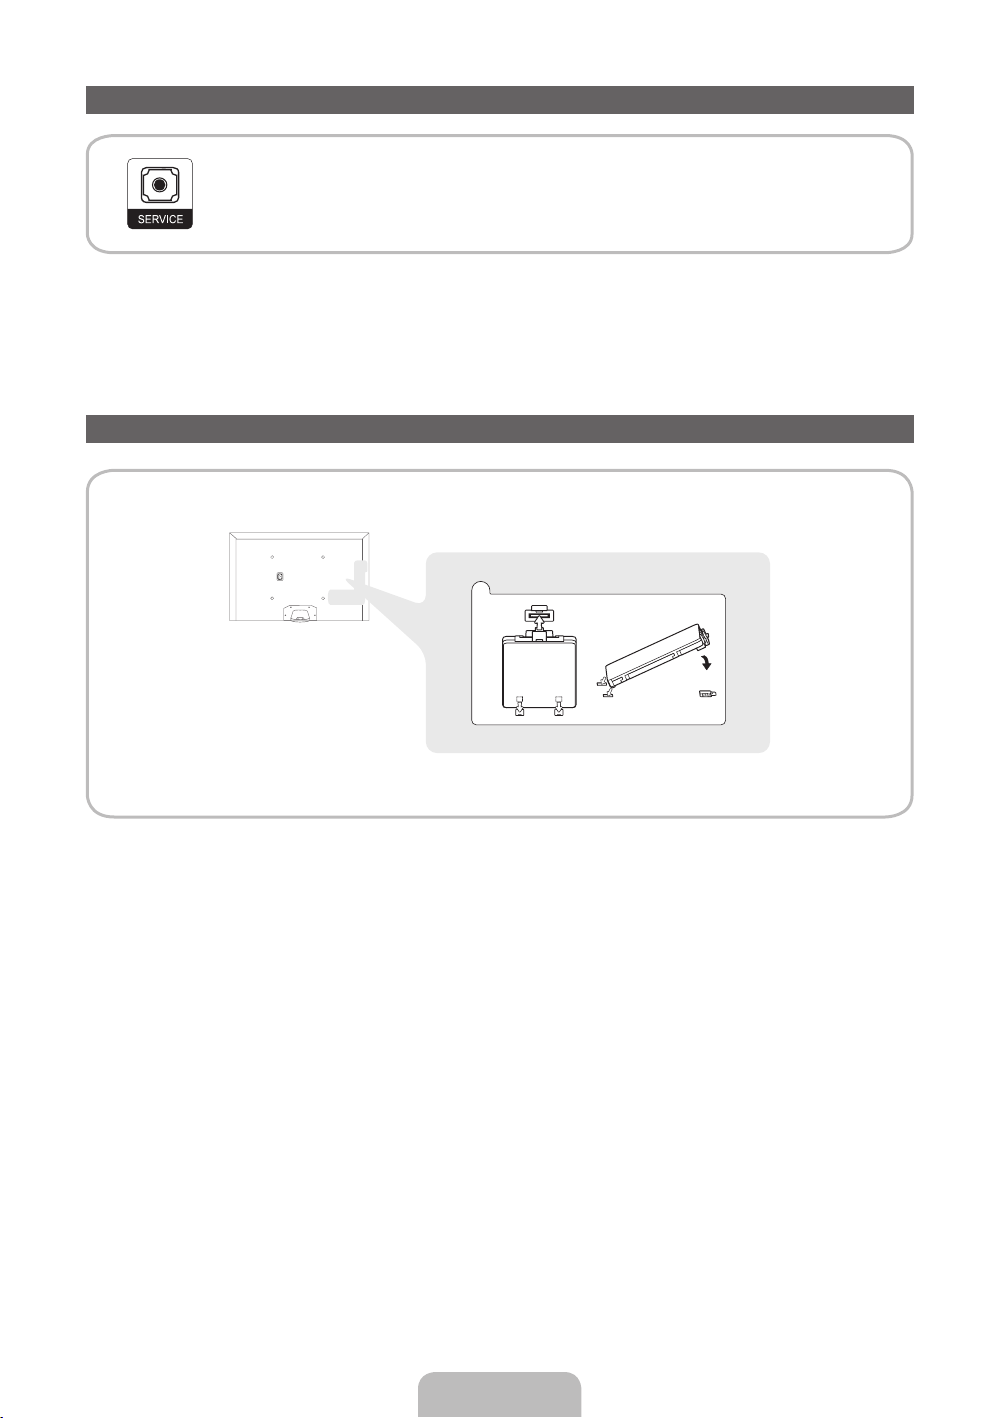
Connecting to a Service Cable
SERVICE: Connector for service only.
The Evolution Kit Slot (Kit Sold Separately)
This socket is designed to accept an extension device called the Evolution Kit. The Evolution Kit enables
the TV to run a variety of the latest applications for a better user experience.
The Evolution Kit, which may not be available depending on the product, will be sold separately in 2013 or
later.
English - 10
Page 11
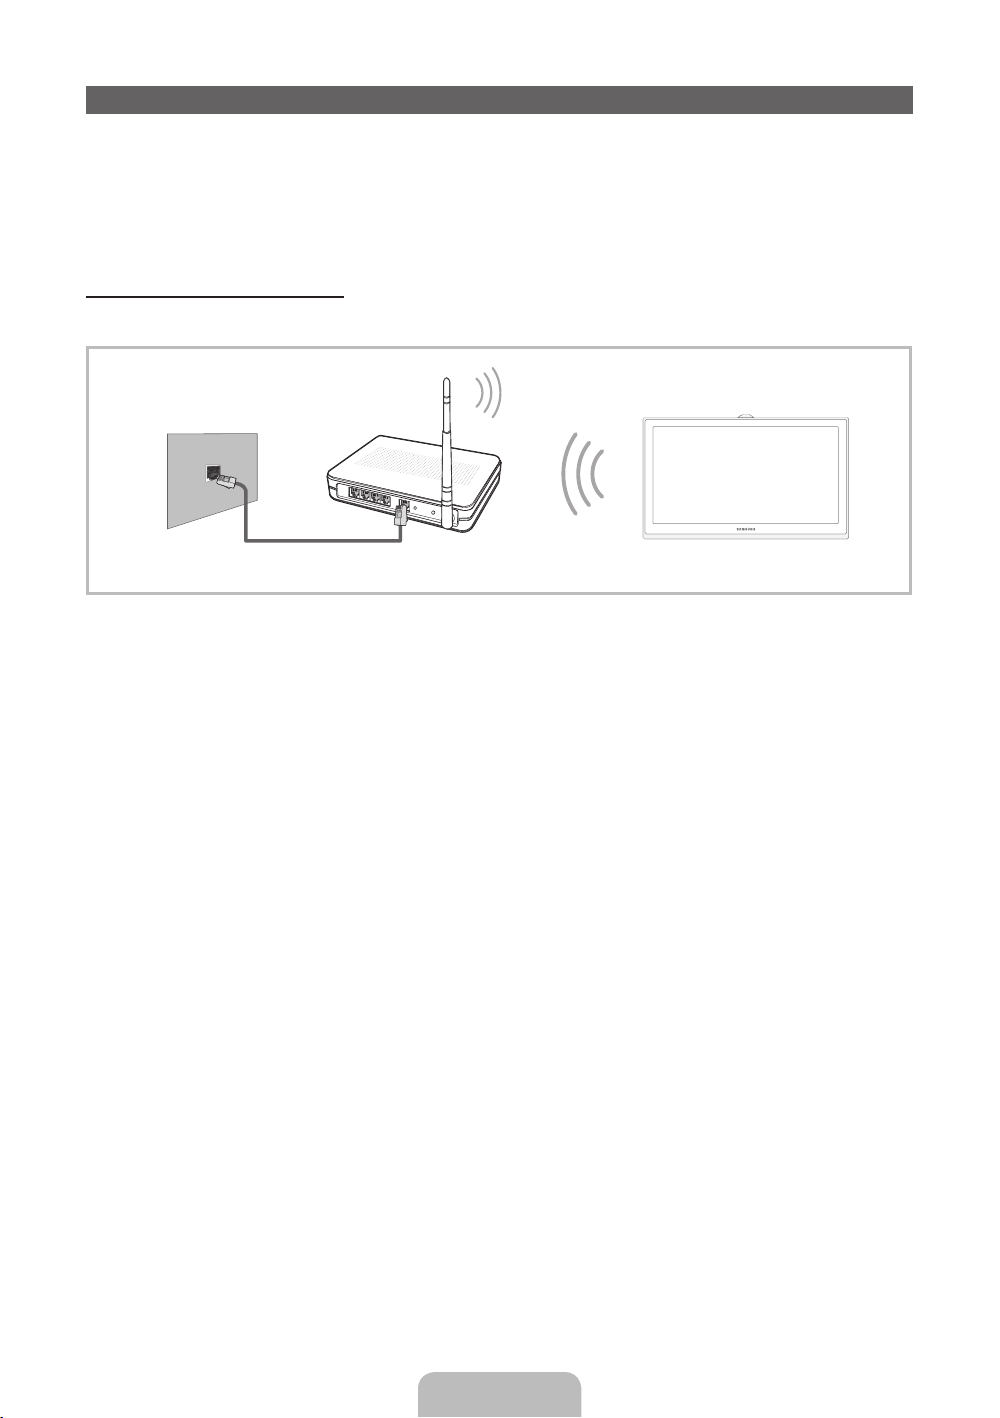
Connecting to a Network
You can set up your TV so that it can access SMART TV applications through your local area network
(LAN) using a wired or wireless connection.
After you have “physically” connected your TV to your network, you must configure the network
✎
connection to complete the process. You can configure the connection during the Initial Setup
process (see page 15) or after the Initial Setup process, through the TV’s menu.
Network Connection - Wireless
You can connect your TV to your local area network (LAN) through a standard wireless router or modem.
Wireless IP Router or Modem
The LAN Port on the Wall
This TV supports the IEEE 802.11a/b/g and n communication protocols. Samsung recommends using
IEEE 802.11n. When you play video over a network connection, the video may not play smoothly.
Most wireless network systems incorporate a security system that requires devices that access the
network through an access point (an AP), a wireless IP router, or wireless modem to transmit an encrypted
security code called an access key.
Your TV is compatible with the following security protocols:
• Authentication Mode: OPEN, SHARED, WPAPSK, WPA2PSK
• Encryption Type: WEP, TKIP, AES
If you select Pure High-throughput (Greenfield) 802.11n mode and the Encryption type is set to WEP or
TKIP on your AP or wireless router, Samsung TVs will not support a connection in compliance with new
Wi-Fi certification specifications.
that has a DHCP Server
LAN Cable (Not Supplied)
English - 11
Page 12
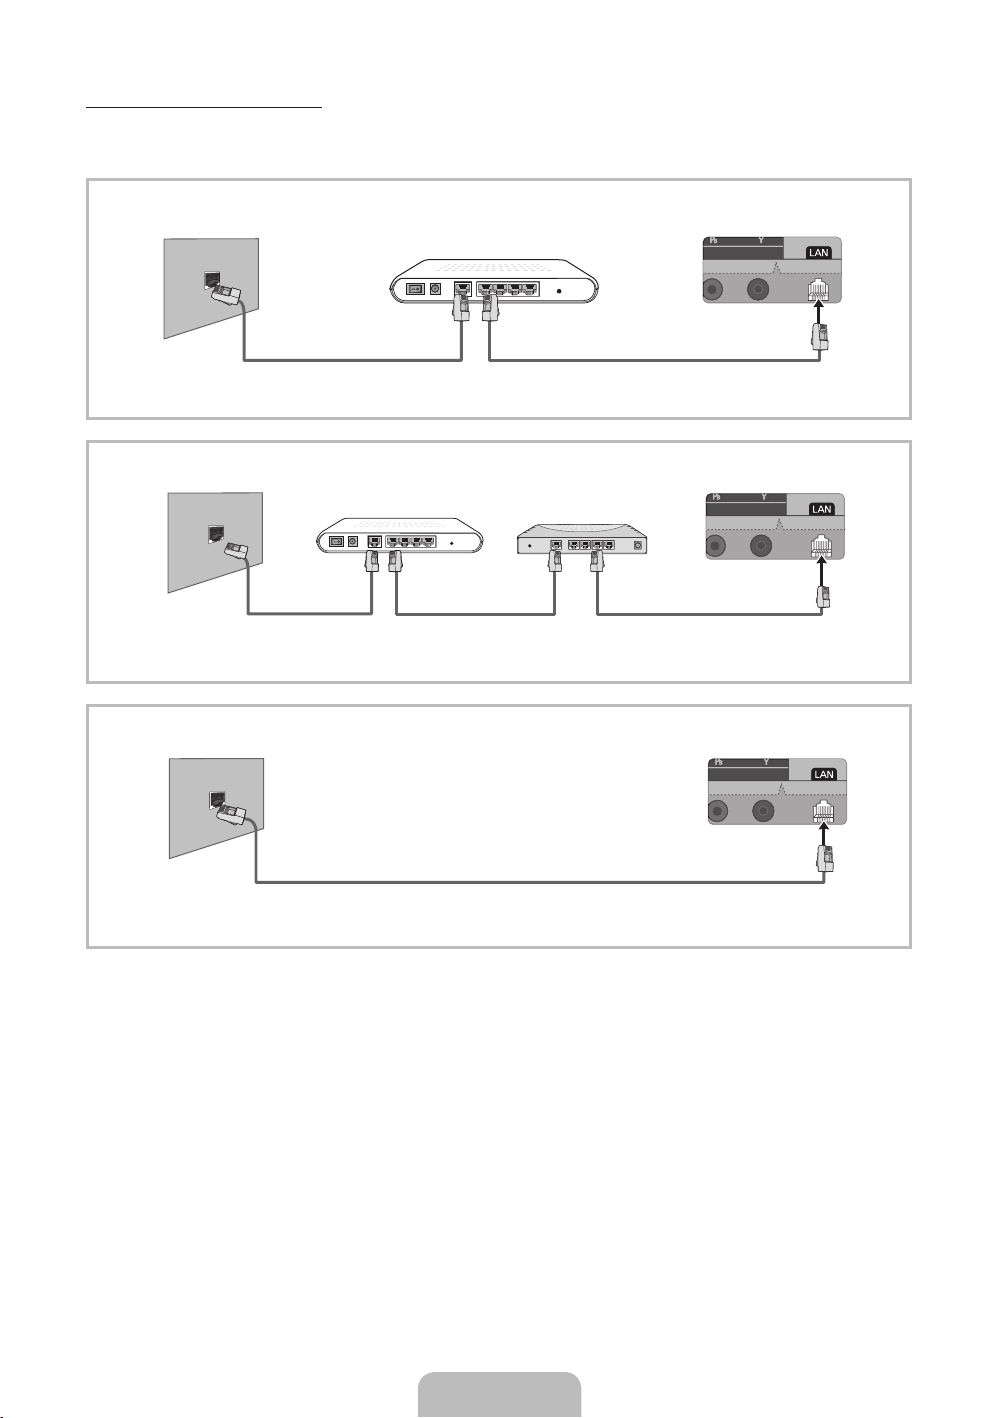
Network Connection - Wired
There are three main ways to connect your TV to your network using cable, depending on your network
setup. They are illustrated below:
The Modem Port on the Wall
The Modem Port on the Wall
Modem Cable
(Not Supplied)
The LAN Port on the Wall TV Rear Panel
External Modem
(ADSL / VDSL / Cable TV)
External Modem
(ADSL / VDSL / Cable TV)
IP Router that has a
DHCP Server
LAN Cable
(Not Supplied)
LAN Cable (Not Supplied)Modem Cable (Not Supplied)
(Not Supplied)
TV Rear Panel
TV Rear Panel
LAN Cable
LAN Cable (Not Supplied)
The TV does not support network speeds less than or equal to 10Mbps.
✎
Use Cat 5 (STP Type*) cable for the connection. (*Shielded Twisted Pair)
✎
English - 12
Page 13
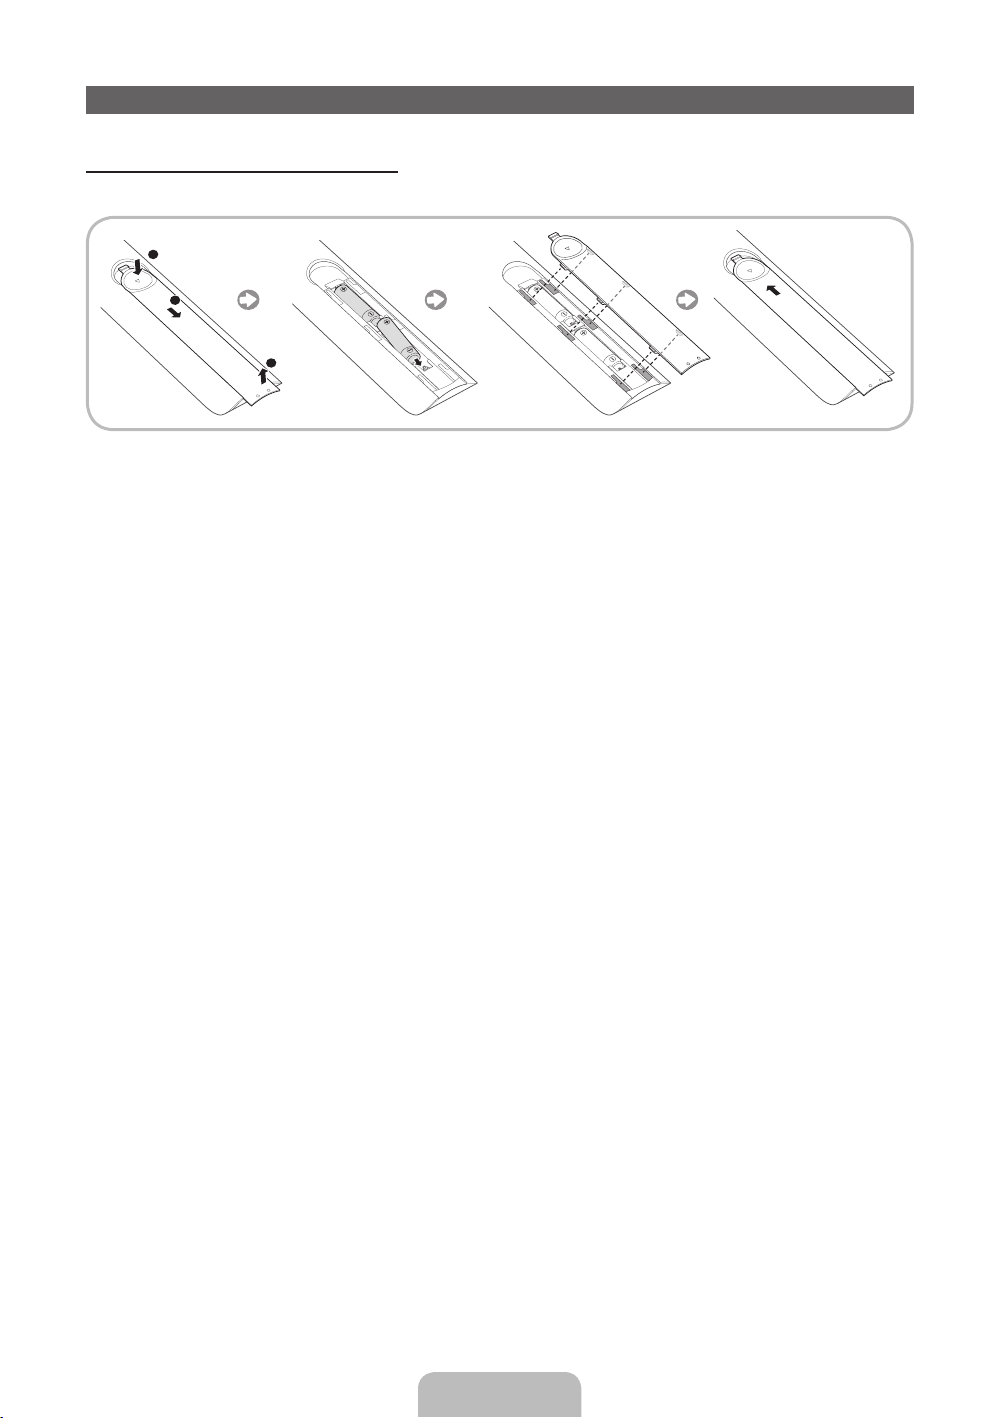
The Standard Remote Control
Installing batteries (Battery size: AAA)
Match the polarity of the batteries to the symbols in the battery compartment.
1
2
3
Your TV also comes with a Smart Touch Control. For information about the Smart Touch Control, see
✎
page 24.
NOTE
✎
• Install the batteries so that the polarity of the batteries (+/-) matches the illustration in the battery
compartment.
• Use the remote control within 23 feet of the TV.
• Bright light may affect the performance of the remote control. Avoid using it near fluorescent lights
or neon signs.
• The color and shape of the remote may vary depending on the model.
English - 13
Page 14
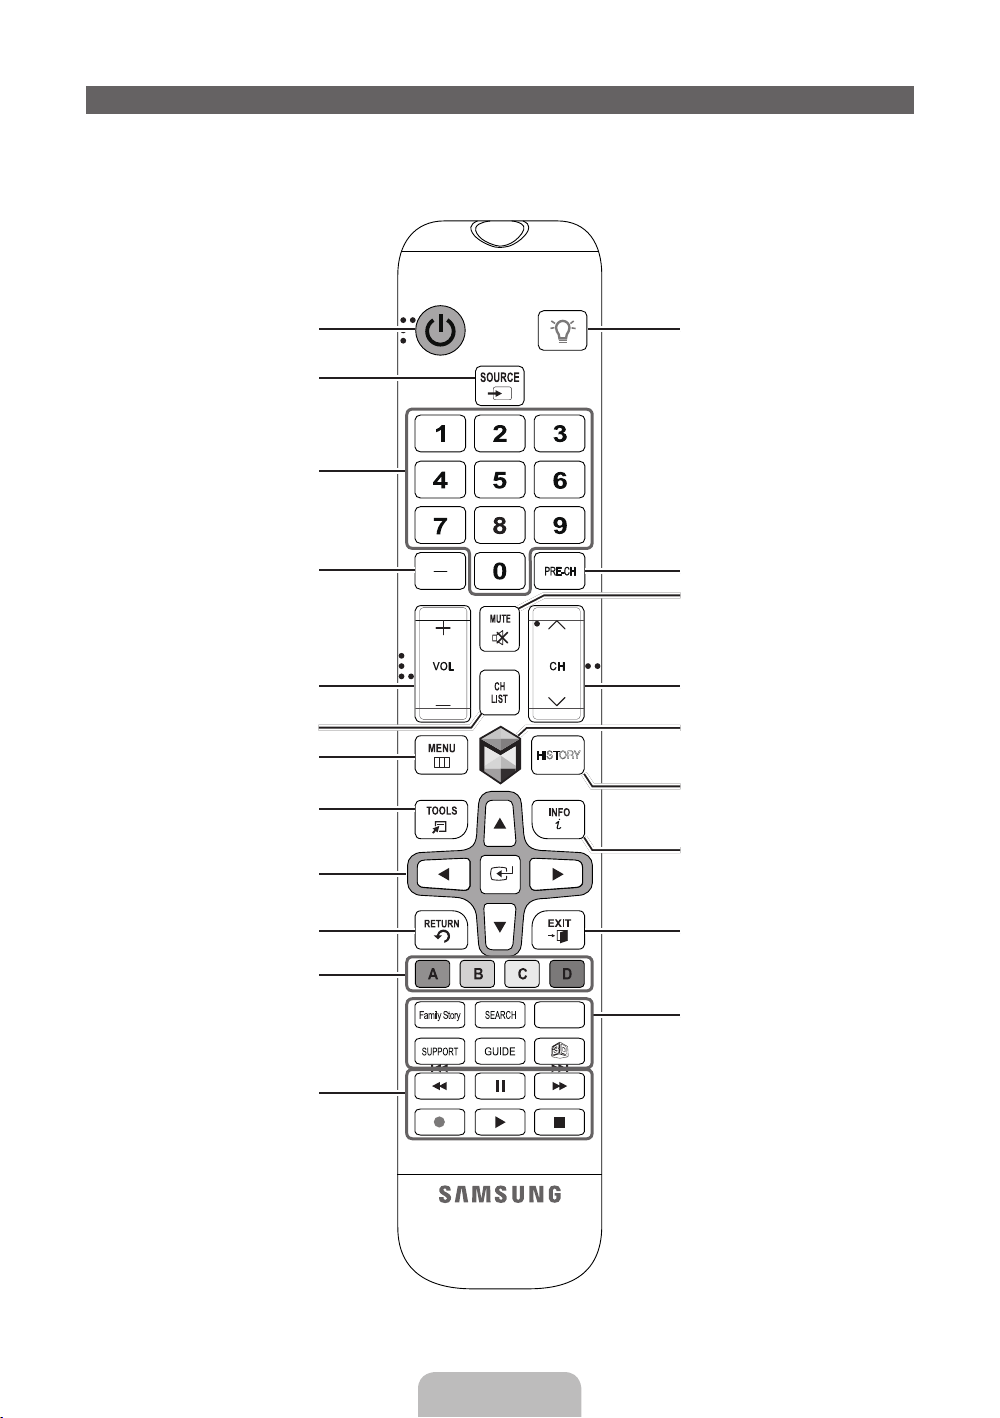
The Standard Remote Control Buttons
This remote control has Braille points on the Power, Channel, and Volume buttons and can be used
✎
by visually impaired persons.
Turns the TV on and off.
Displays and selects the available video
sources. (page 19)
Gives direct access to channels.
Press to select additional digital
channels being broadcast by the same
digital station. For example, to select
channel ‘54.3’, press ‘54’, then press
‘-’ and ‘3’.
Adjusts the volume.
Displays channel lists on the screen.
Opens the OSD (Menu).
Quickly select frequently used functions.
Use this button in a specific feature.
Moves the cursor, selects the on-screen
menu items, and changes the values
seen on the menu.
Returns to the previous menu.
HISTORY
Turns the remote control light on or
off. When on, the buttons become
illuminated for a moment when pressed.
(Using the remote control with this button
set to On will reduce the battery usage
time.)
Return to the previous channel.
Cuts off the sound temporarily.
Changes channels.
Brings up the Smart Hub applications.
See e-Manual chapter Advanced
Features → Smart Hub.
Displays a list of recently used functions.
You can select a function again easily
and quickly.
Displays information on the TV screen.
Exits the menu.
Use these buttons according to the
directions on screen.
Use these buttons in a specific feature.
For details, refer to the e-Manual.
English - 14
CAMERA
Family Story: Connect to the Family
Story application. See e-Manual chapter
Advanced Features → Family Story.
SEARCH: Starts recommended search
word and search function. See e-Manual
chapter Advanced Features → Search.
CAMERA: Connect to camera
application.
SUPPORT: Lets you use various
support functions including th e-Manual.
(page 43)
GUIDE: Displays the EPG (Electronic
Program Guide).
X
: Turns the 3D image on or off. See
e-Manual chapter Advanced Features
→ 3D.
Page 15

Configuring the Basic Settings in Initial Setup
When you turn the TV on for the first time, a sequence of screens and on-screen prompts will assist you in
configuring the TV’s basic settings. Plug the power cord into a wall outlet, and then press the P button to
turn on the TV.
Use the standard remote to run the Initial Setup.
✎
Setup is available only when the input source is set to TV. See "Changing the Input Source" (page
✎
19).
To return to the previous step in the Setup sequence, select Previous.
✎
If you are not using a cable box or satellite box, make sure you have connected the TV to an antenna
✎
or cable connection before you turn on the TV. See page 5 for instructions.
If you want to configure a wired network connection during Setup, make sure you've connected a
✎
LAN cable to your TV. See pages 12 for instructions. If you want to configure a wireless network
connection during Setup, make sure your wireless modem or router is on and working.
Menu Language:
1
Select a Language.
Use Mode: Select
2
the Home Use
Mode.
Network Settings:
3
Configure the
network settings
To configure
✎
later, select Skip.
You can set up
the network
connection later
using the onscreen Network
menu.
After you press the P button, the Start screen appears. Select Next
to continue. The Menu Language screen appears. Select the menu
language you want using your remote, and then select Next. The TV will
display on-screen menus using the language you select beginning with
the next step in the Setup process.
On the Use Mode screen, select the Home Use mode using your
remote, and then select Next. The Network Settings screen appears.
Store Demo is for retail environments only. If you select Store
✎
Demo, some functions will not work, and the TV will reset all
functions to their factory default after a certain period of time. For
more information about Store Demo, go to the end of this section.
To configuring your network settings, select Next using your remote, and
then go to 3A - Wireless Network or 3B - Wired Network on the next
page.
If you do not know your network configuration information or want to
configure the settings later, or do not have a network, select Skip, and
then go to 5 - Auto Program (1) on page 17.
To configure network settings later, refer to “Setting up the Wired or
Wireless Network” in the e-Manual or see the Network Connection
sections in this manual (pages 11 and 41).
English - 15
Page 16

3
Wireless Network 1. The TV searches for and then displays all the wireless networks
a
within range. When done, it displays a list of the networks. In the list
of networks, move the highlight to select a network, and then select
Next. If the selected network requires a Security Key, the Security
Key screen appears.
If you have a WPS(PBC) compatible router, select WPS(PBC)
✎
instead, and then follow the directions on the screen. When
done, go to Step 4.
2. Enter your network security key or WPS PIN using your remote.
Enter numbers and letters using your remote.
✎
• If you are using the standard remote, you can enter numbers
by pressing the number buttons on the remote.
• To enter a letter, move the highlight to the letter, and then
select it. You can enter numbers in the same fashion if you
choose.
To display capital letters (or redisplay small letters if capital letters
✎
are displayed), select Caps or Shift.
To display symbols and punctuation, select 1F. To redisplay
✎
letters, select 1F again.
3. When done, select Next if you have entered a security key or WPS
PIN if you have entered a WPS PIN.
4. The TV checks the wireless connection. If the connection is
successful, the You are connected to the Internet. If you have any
problems using online services, please contact your Internet
Service Provider. message appears. Select Next, and then go to 4
Software Upgrade Step.
If the connection fails, select Previous, repeat Step 1 and 2,
✎
carefully re-enter your security key or WPS PIN, then repeat
Steps 3 and 4. If it fails again, select Next on the “Connection
Failed” screen, and then go to 5 - Auto Program (1) on the next
page. Configure your network later through Network Settings
in the TV’s Menu. For more information, refer to “Setting up the
Wired or Wireless Network” in the e-Manual or see the Network
Connection sections in this manual (pages 11 and 41).
3
Wired Network The TV checks the network connection, then displays the You are
b
connected to the Internet. If you have any problems using online
services, please contact your Internet Service Provider.message
appears. Select Next. The Software Upgrade screen appears.
English - 16
Page 17

Software Upgrade:
4
Upgrading the
software to the latest
version
To update later,
✎
select Skip.
When Network Settings is complete, your TV will check for a new
software version automatically. If new software is available, the TV
downloads and installs the new software. When the download is
complete, select Next.
If you want to upgrade later, select Skip. For more information, refer
✎
to Software Update (Preference Features → Support Menu) in the
e-Manual.
This may take some time, depending on your network status.
✎
You can only upgrade software if your TV has an active network
✎
connection.
If no new update software is available, a no new updates message
✎
appears on the screen. Select OK.
Auto Program (1):
5
Select where your
TV signal comes
from.
Auto Program (2):
6
Select the search
options.
Select the appropriate option for your TV using your remote, and then
select Next.
• Yes, I need to.: Select if you have an antenna or a cable connection
without a set-top box. If you select this option, go to 6 - Auto
Program (2) Step.
• No, I don’t need to.: Select if you have a satellite or cable set-top
box. You do not need to run Auto Program. If you select this option,
go to 8 - Clock on the next page.
1. Select Air or Cable using your remote. A check appears on your
selection. When done, select Next. You can check both if you have
both connected.
2. When done, select Next.
English - 17
Page 18
Auto Program (3):
7
Channel
memorization
Clock: Set the Clock Select Auto or Manual, and then select Next.
8
Channel memorization stars. Channel memorization can take up to 45
minutes, depending on your cable system.
For more information, refer to Auto Program (Channel Menu →
Memorizing Channels) in the e-Manual.
Select Stop at any time to halt the memorization process.
✎
If you selected No, I don’t need to. in 5 - Auto Program (1), you can
✎
only set the current time and date manually, using your remote.
Auto
If you selected Auto, the TV will automatically download the correct time
from a digital channel. Depending on the country, the Time Zone screen
will appear. Select your Time Zone, and then select Next.
Manual
If you selected Manual, you’ll go to the Clock screen. Select Date or
Time. You can set the current date and time using your remote. When
done setting the Date and Time, select Next.
Voice and Motion
9
Control: Setting the
Voice and Motion
Control function.
Setup Complete Review the Setup data, and then select Close to finish.
10
Set the Universal
11
Remote
If You Want to Rerun Setup...
Menu → System → Setup
If You Want to Turn the Store Demo Off.
• To cancel Store Demo, bring up the Function menu using the Controller, push the Controller to the
right (to Source (s)) and hold for more than 5 seconds. See page 22 for information about the
Controller.
• Select System - Setup (Initial Setup). Enter your 4 digit PIN number. The default PIN number is “0-0-0-
0”. If you want to change the PIN number, use the Change PIN function.
You can turn the Voice and Motion Control function on or off. Select Off
or On, and then select Next.
The completed settings are displayed.
✎
1. Turn on the POWER button on the bottom of the IR Blaster, and then
press the PAIRING button.
2. Select Yes to start the Universal Remote Setup.
For more detailed information about the Universal Remote Setup,
✎
refer to "Setting up the Universal Remote Control" section in the
manual (page 31).
English - 18
Page 19

Changing the Input Source
Source
™ → Source
When you are watching TV and you want to watch a movie on your DVD player or Blu-ray player or switch
to your cable box or STB satellite receiver, you need to change the Source.
■ TV / HDMI1/DVI / HDMI2 / HDMI3 / AV / Component
1. Press the ™ button on your remote. The Smart Hub screen appears.
2. Select Source. The Source screen appears.
3. Select a desired external input source.
Alternatively, you can access the Source screen by selecting the SOURCEs button on your
✎
standard remote or selecting Source with the Smart Touch Control (see page 24).
You can only choose external devices that are connected to the TV. In the displayed Source list,
✎
connected inputs are highlighted.
How to Use Edit Name
Edit Name lets you associate a device name to an input source. To access Edit Name, open the Tools
menu when the Source list is displayed. The following selections appear under Edit Name:
■ VCR / DVD / Cable STB / Satellite STB / PVR STB / AV Receiver / Game / Camcorder / PC / DVI
PC / DVI Devices / TV / IPTV / Blu-ray / HD DVD / DMA: Select an input jack, and then select the
name of the device connected to that jack from the list that appears. For example, if you have your Bluray player attached to HDMI IN 2, select Blu-ray for that input.
If you connect a PC to the HDMI IN 1 (DVI) port with an HDMI cable, assign PC to HDMI1/DVI in
✎
Edit Name.
If you connect a PC to the HDMI IN 1 (DVI) port with an HDMI to DVI cable, assign DVI PC to
✎
HDMI1/DVI in Edit Name.
If you connect an AV device to the HDMI IN 1 (DVI) port with an HDMI to DVI cable, assign DVI
✎
Devices to HDMI1/DVI in Edit Name.
Information
You can see detailed information about the selected external device.
Refresh
If the external devices are not displayed in the Source list, open the Tools menu, and then select Refresh.
The list will display all connected devices.
Alternatively, you can refresh the Source list by selecting a using your remote.
✎
English - 19
Page 20

Auto Run Data Service (Brasil Only)
Allows the user to use information (text, still images, graphics, documents, Software, etc.) transmitted via
broadcast media. If the channel you are currently watching provides data service. you can enjoy a variety of
data services.
Menu → System → Auto Run Data Service
Auto Run Data Service (On / Off)
Sets whether or not to Automatically run date service. Auto Run Data Service automatically runs data
service without user intervention.
1. If Auto Run Data Service is On, The data serive will automatically run with loading banner.
2. Press the OK(E) button, the data service screen will be displayed.
3. Select a desired option by using your remote on the data service screen. The selected service will be
started.
4. If you select Exit using your remote, data service will be closed.
If any other secondary function is under way, Auto Run Data Service may not work Provided data
✎
service information may vary depending on broadcast.
Main Data Service buttons and their functions
▲ / ▼ / ◄ / ►
OK Runs a selected item.
EXIT Stops a running Auto Run Data Service.
Operations may differ depending on the service provider.
✎
Moves the Auto Run Data Service menu up, down, left and right.
English - 20
Page 21
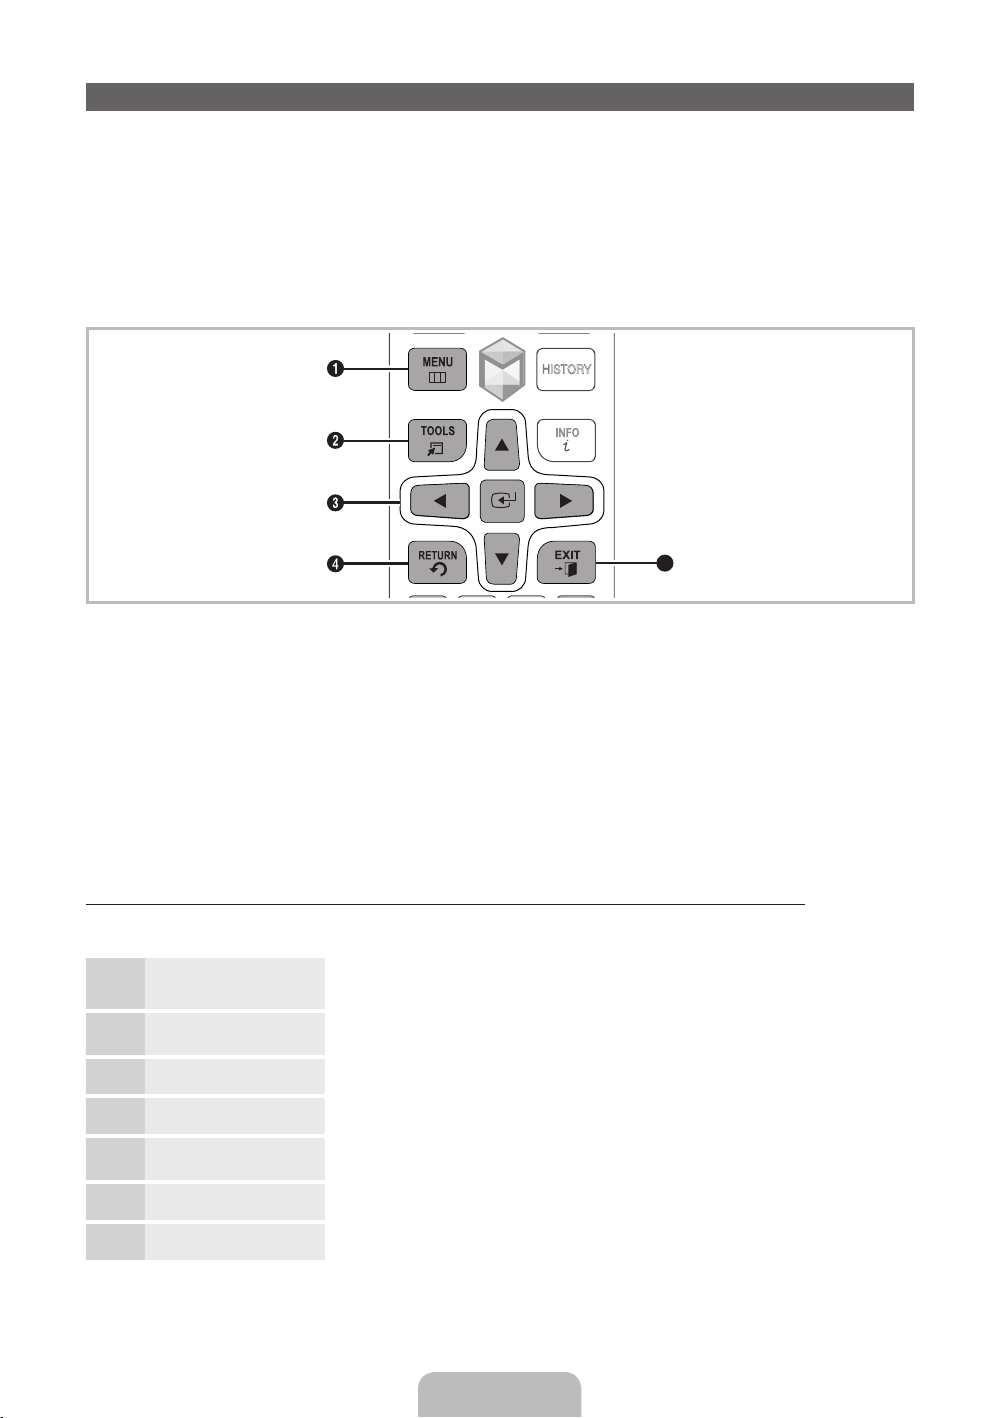
How to Navigate Menus
HISTORY
Your TV’s Main and Tools menus contains functions that let you control the TV’s features. For example, in
the Main menu you can change the size and configuration of the picture, its brightness, its contrast and so
on. There are also functions that let you control the TV’s sound, channel configuration, energy use, and a
host of other features. To access the main, on-screen menu, press the MENUm button on your remote.
To access Tools menus, press the TOOLST button. Tools menus are available when the TOOLST menu
Icon is displayed on the bottom right of the screen
The illustration below displays the buttons on the standard remote you use to navigate the menus and
select and adjust different functions. For information about using the Smart Touch Control, see page 24.
5
1 MENUm button: Displays the main on-screen menu.
2 TOOLST button: Displays the Tools menus when available.
3 E and Direction buttons: Use the Direction buttons to move the cursor and highlight an item. Use the
Enter button to select an item or confirm the setting.
4 RETURNR button: Returns to the previous menu.
5 EXITe button: Exits the on-screen menu.
How to Operate the Main Menu (OSD - On Screen Display) Using the Standard Remote
The access steps may differ depending on the menu option you select.
MENUm
1
u / d Select a main menu option on the left side of the screen with the u or d
2
E Press E to access the sub-menus.
3
u / d Select the desired submenu with the u or d button.
4
u / d / l / r Adjust the value of an item with the l, r, u, or d button. The
5
E Press E to confirm the selection.
6
EXITe Press EXITe.
7
The main menu options appear on the screen:
Picture, Sound, Channel, Network, System, Support.
button.
adjustment in the OSD may differ depending on the selected menu.
English - 21
Page 22
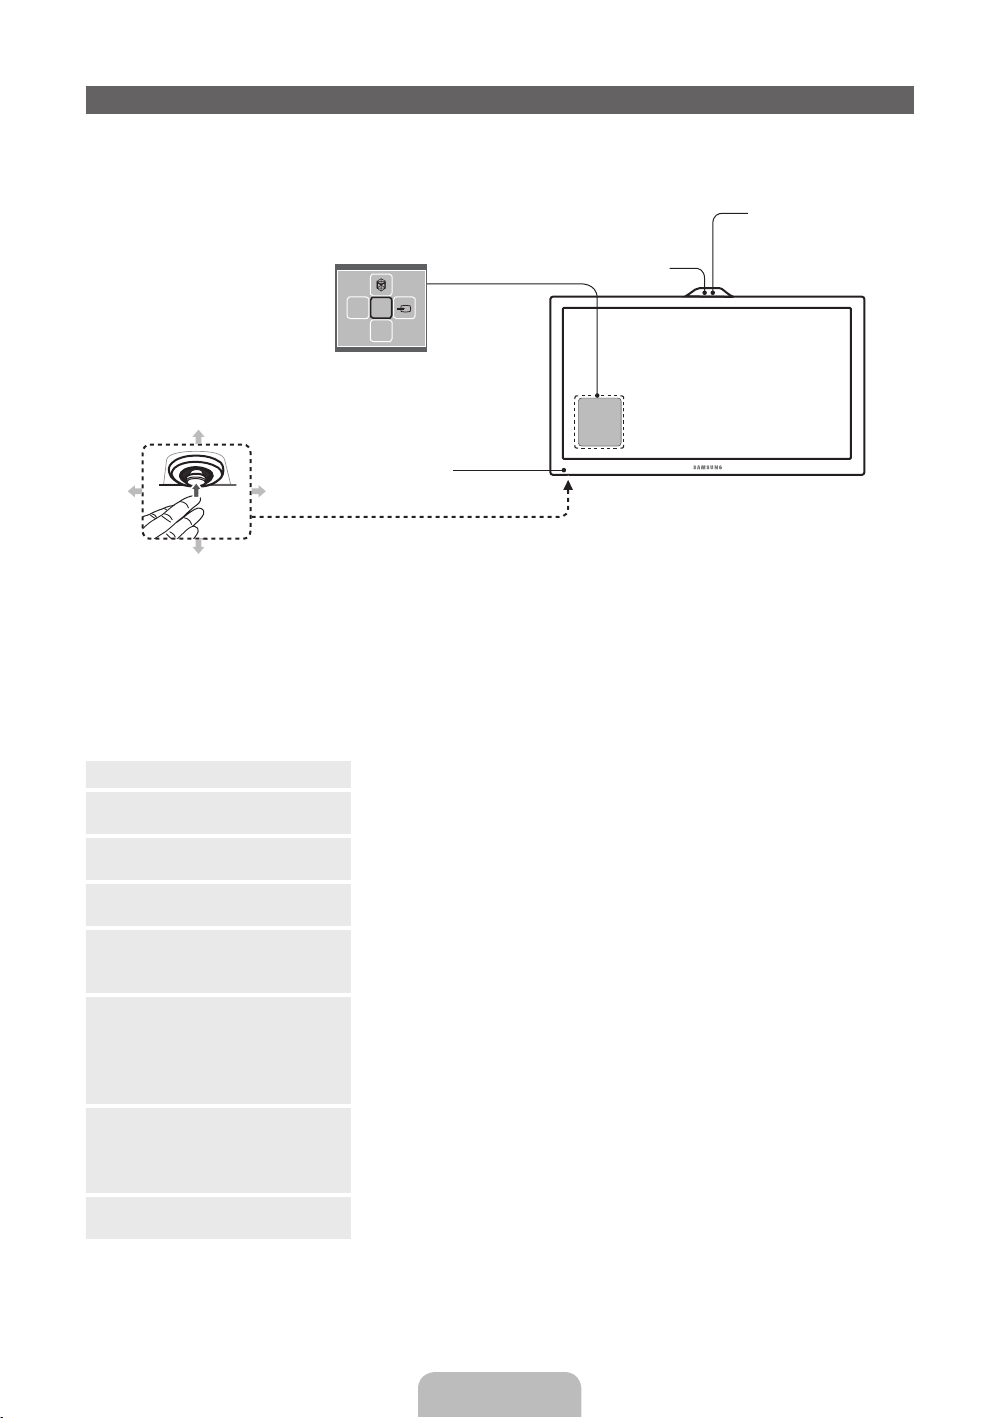
Using the TV's Controller
The product color and shape may vary depending on the model.
✎
The TV's Controller, a small joy stick like button on the bottom left side of the TV, lets you control the
✎
TV without the remote control.
Function menu
mR
P
Down(Front)
Remote control sensor
Left
Up(Rear)
Follow these instructions facing the front of your TV.
✎
When you use a TV camera, you should check whether a tape attached or not in rear of the TV
✎
Right
Camera
camera, and then you can use a TV camera after adjust a camera angle. When you don't use a TV
camera, we recommend to use after a camera lens fixes to upwards. In this case, Face recognition
and Motion Control functions is not available.
When selecting the function by moving the controller to the up/down/left/right directions, be sure not to
✎
press the controller. If you press it first, you cannot operate it to move the up/down/left/right directions.
Power on Turn the TV on by pressing the Controller when the TV is in standby mode.
Adjusting the volume Adjust the volume by moving the Controller from side to side when the
power is on.
Selecting a channel Select a channel by moving the Controller backwards and forwards
when the power is on.
Using the Function menu
To view and use the Function menu, press and release the Controller when the
power is on. To close the Function menu, press and release the Controller again.
Selecting the SMART HUB (™) With the Function menu visible, select SMART HUB (™) by moving the
Controller backwards. The SMART HUB main screen appears. Select an
application by moving the Controller, and then pressing the Controller.
Selecting the MENU (m) With the Function menu visible, select the MENU (m) by moving the
Controller to the left. The OSD (On Screen Display) Menu appears. Select
an option by moving the Controller to the right. Move the Controller to the
right or left, or backwards and forwards to make additional selections. To
change a parameter, select it, and then press the Controller.
Selecting a Source (s) With the Function menu visible, open the Source (s) list by pushing
the Controller to the right. The Source list screen appears. To select a
source, move the Controller back and forth. When the source you want
is highlighted, press the Controller.
Power Off (P) With the Function menu visible, select Power Off (P) by pulling the
Controller forwards, and then press the Controller.
Remote control sensor
When you use the Smart Touch
Control, a standby LED does not
work (except P button).
To close the Menu, SMART HUB, or Source, press the Controller for more than 1 second.
✎
English - 22
Page 23

Standby mode
Your TV enters Standby mode when you turn it off and continues to consume a small amount of electric
power. To be safe and to decrease power consumption, do not leave your TV in standby mode for long
periods of time (when you are away on vacation, for example). It is best to unplug the power cord.
Using Smart Hub
Smart Hub provides easy, on-screen access to five functions that let you manage and access channels,
set favorite channels, access photos, videos, or music on USB devices, cameras, and PCs, select video
sources, and set the TV to turn on automatically when a show you want to watch is on. The five functions
are listed below:
• Channel: Lets you manage channels, select favorite channels, add channels to and delete channels
from the Added Ch. list the channels that appear when you press the z button.
• Web Browser: Lets you browse the Internet.
• Schedule Manager: Lets you schedule shows and channels for viewing.
• Source: Lets you select a connected external video source to view.
• AllShare Play: Lets you access, view, or play photos, videos, or music located on USB devices,
digital cameras, cell phones, and PCs. PCs and cell phones can be accessed wirelessly, through your
wireless network.
Smart Hub also provides an easy-to-use gateway to a host of on-line media and entertainment including
apps from the Samsung Apps store, streaming videos and movies, kids sites, and more.
To access Smart Hub, press the ™ button on your remote.
✎
For more information about Smart Hub, see the e-Manual.
✎
English - 23
Page 24
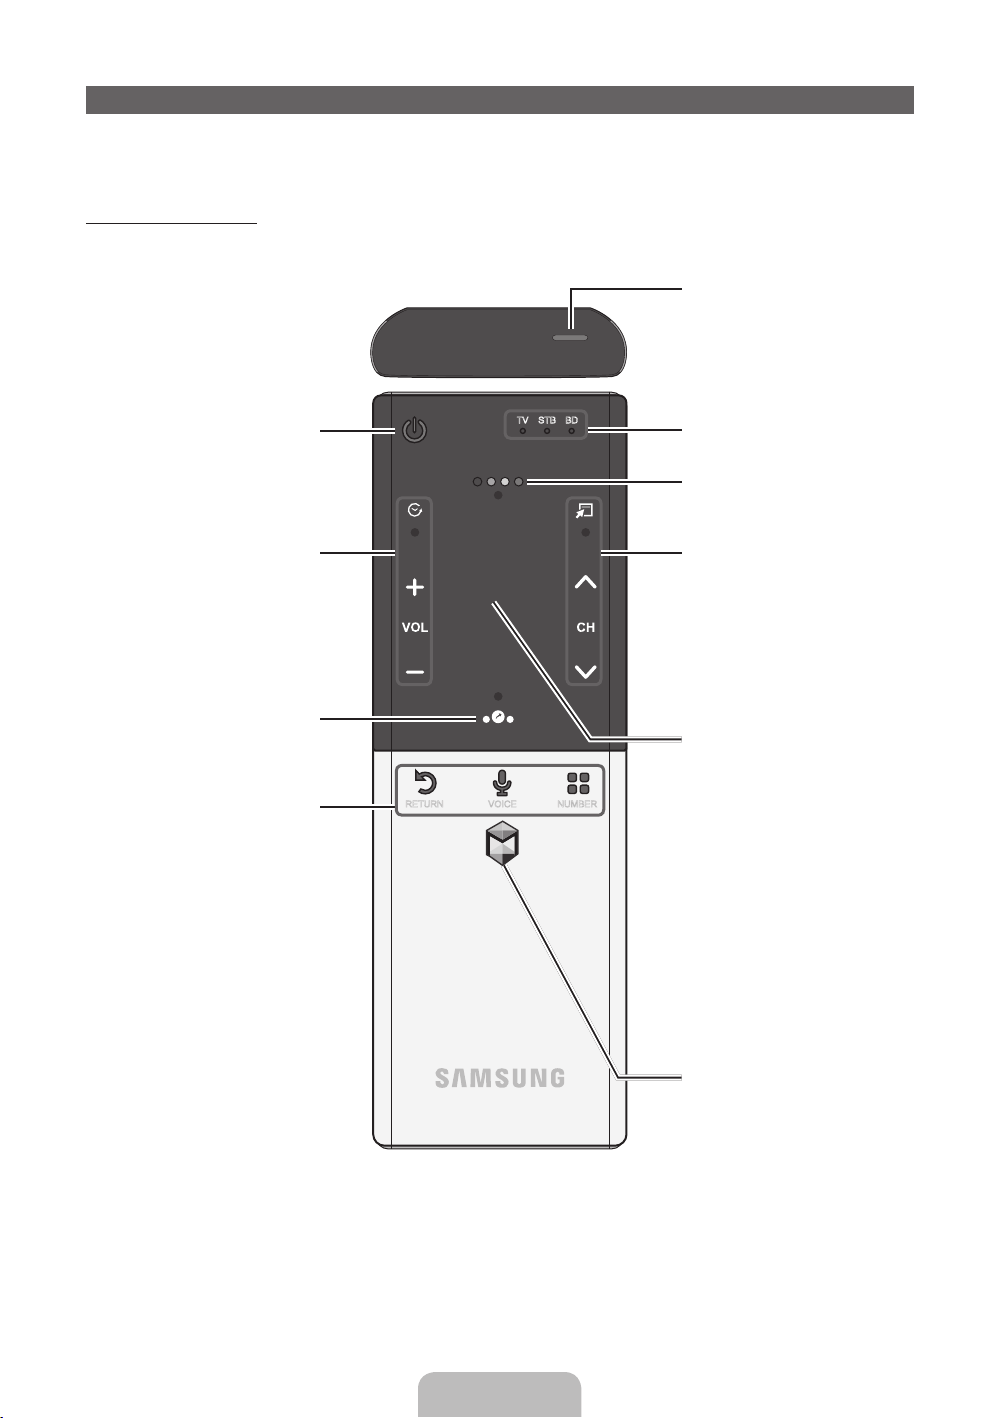
The Smart Touch Control and The IR Blaster
For more detailed information about Smart Touch Control, see "Using the Smart Touch Control" in
✎
e-Manual.
Smart Touch Control
You can speak a voice command that
displayed to the TV using MIC. To use
MIC, press the VOICE
remote.
Voice Control function can be
✎
affected recognition by unclear
pronunciation, voice level, or
surrounding noise.
LED to show the active device.
Displays color and playing control
functions. You can select a function
using the Touch Pad.
T
: Quickly select frequently used
functions. Use this button in a specific
feature. For details, refer to e-Manual.
z
: Changes channels.
Turns the TV on and off.
Š
: Displays a list of recently used
functions. You can select a function
again using the Touch Pad easily and
y
: Adjusts the Volume.
quickly.
.*$
TV STB BD
˜
button on your
Displays the shortcut functions list. You
can select a function using the Touch
RETURNR: Returns to the previous
VOICE
˜
: Lets you access the Voice
Control function. When you press
the button, the TV displays the
command list. You can speak using the
microphone embedded in your remote.
For more detailed information
✎
about the Voice Control function,
see "SMART Interaction" in the
e-manual or see page 33.
š
NUMBER
button screen. You can select a number
: Displays the Number
using the Touch Pad.
Pad.
menu.
RETURN VOICE NUMBER
Touch Pad
• Drag on the Touch Pad to move the
focus on the screen.
• Click on the Touch Pad to run the
focused item.
• If you don't press any button within
30 seconds, the Smart Touch
Control is set to Sleep mode
automatically. To wake up the Smart
Touch Control, press the Touch Pad.
• If you press and hold the Touch Pad,
it has the same effect as pressing
M
the MUTE
remote. However, this action scrolls
the page on a Web Browser.
• Press the Touch Pad or RETURN
button to return to the general
mode.
Brings up the Smart Hub applications.
See the e-Manual chapter Advanced
Features → Smart Hub.
To exit an application that is
✎
running easily, press the
button on your
™
button.
R
English - 24
Page 25
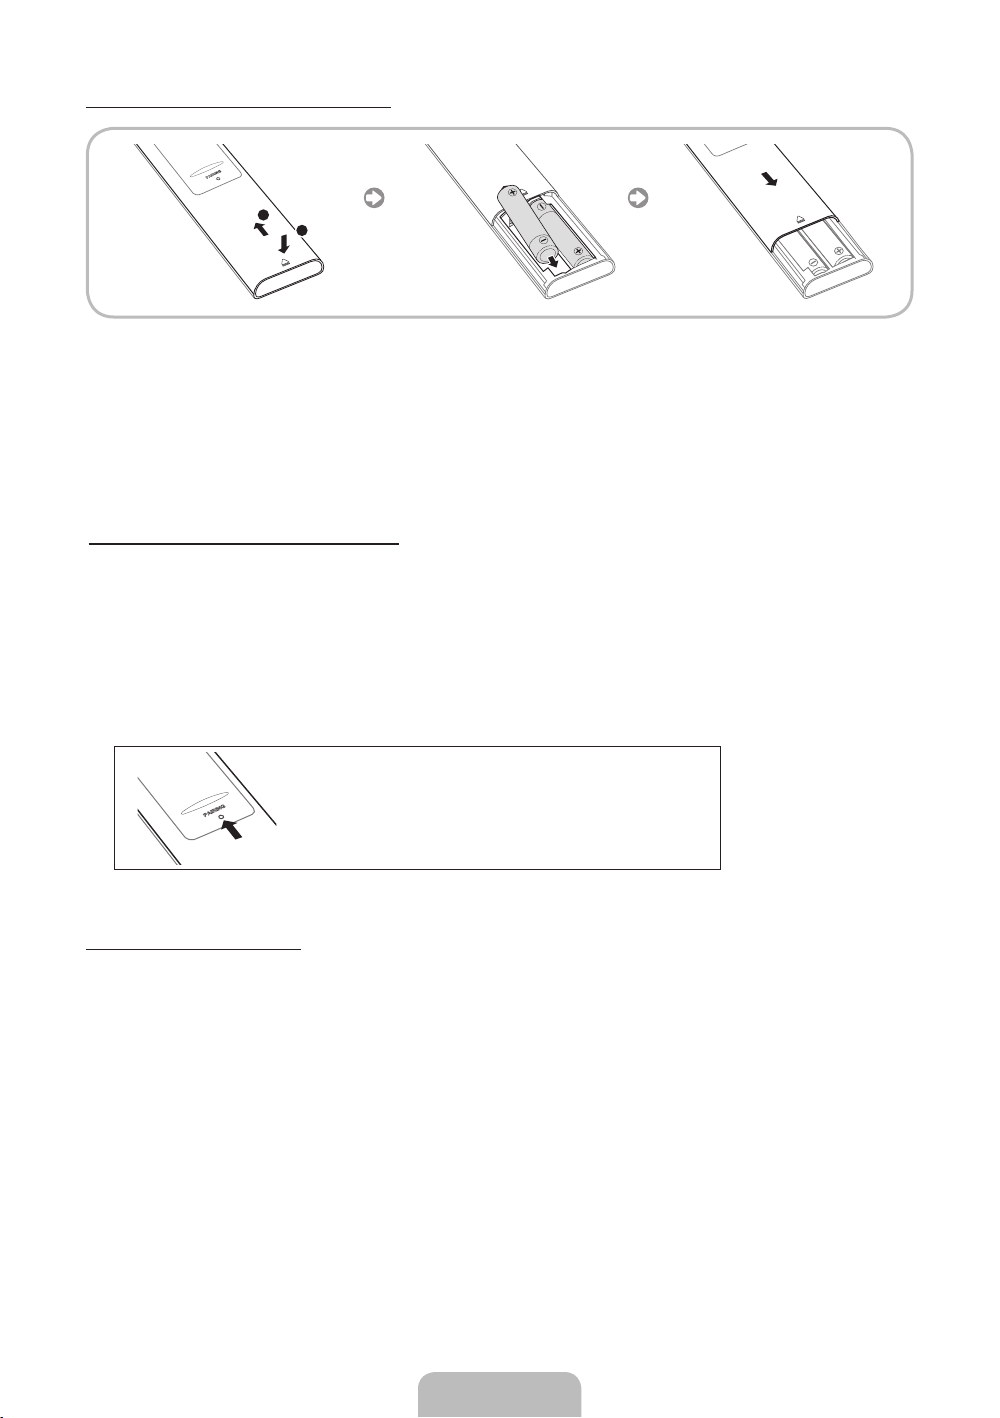
Installing batteries (Battery size : AA)
2
11
1. Press the back of the remote at the very bottom with both thumbs, and then slide the battery cover up
in the direction of the arrow.
2. Install two batteries so that the polarity of the batteries (+/-) matches the illustration in the battery
compartment.
3. Slide the cover down in the direction of the arrow to close the battery cover.
Initial Pairing for Smart Touch Control
After you have run the Initial Setup on your TV, you should connect your Smart Touch Control to your TV.
1. Point the Smart Touch Control toward the IR sensor of the TV and press any key on the Smart Touch
Control.
2. The connection icon appears at the bottom left of the screen and the Smart Touch Control is
automatically connected to the TV.
If you want to perform the pairing process again, press the reset button in the center of the back
✎
cover using a pin or the tip of an unbent paper clip. The Smart Touch Control will be initialized.
• Smart Touch Control PAIRING Reset button.
Calibrating the Touch Pad
To calibrate the Touch Pad on the Smart Touch Control, follow these steps:
1. Press the NUMBERš button for 3 seconds. The calibration starts.
2. When done, all the LEDs on the top of the Smart Touch Control blink twice simultaneously.
While calibrating, don't touch the Touch Pad.
✎
If the Touch Pad looses accuracy, re-calibrate the Touch Pad by repeating Steps 1 and 2.
✎
English - 25
Page 26
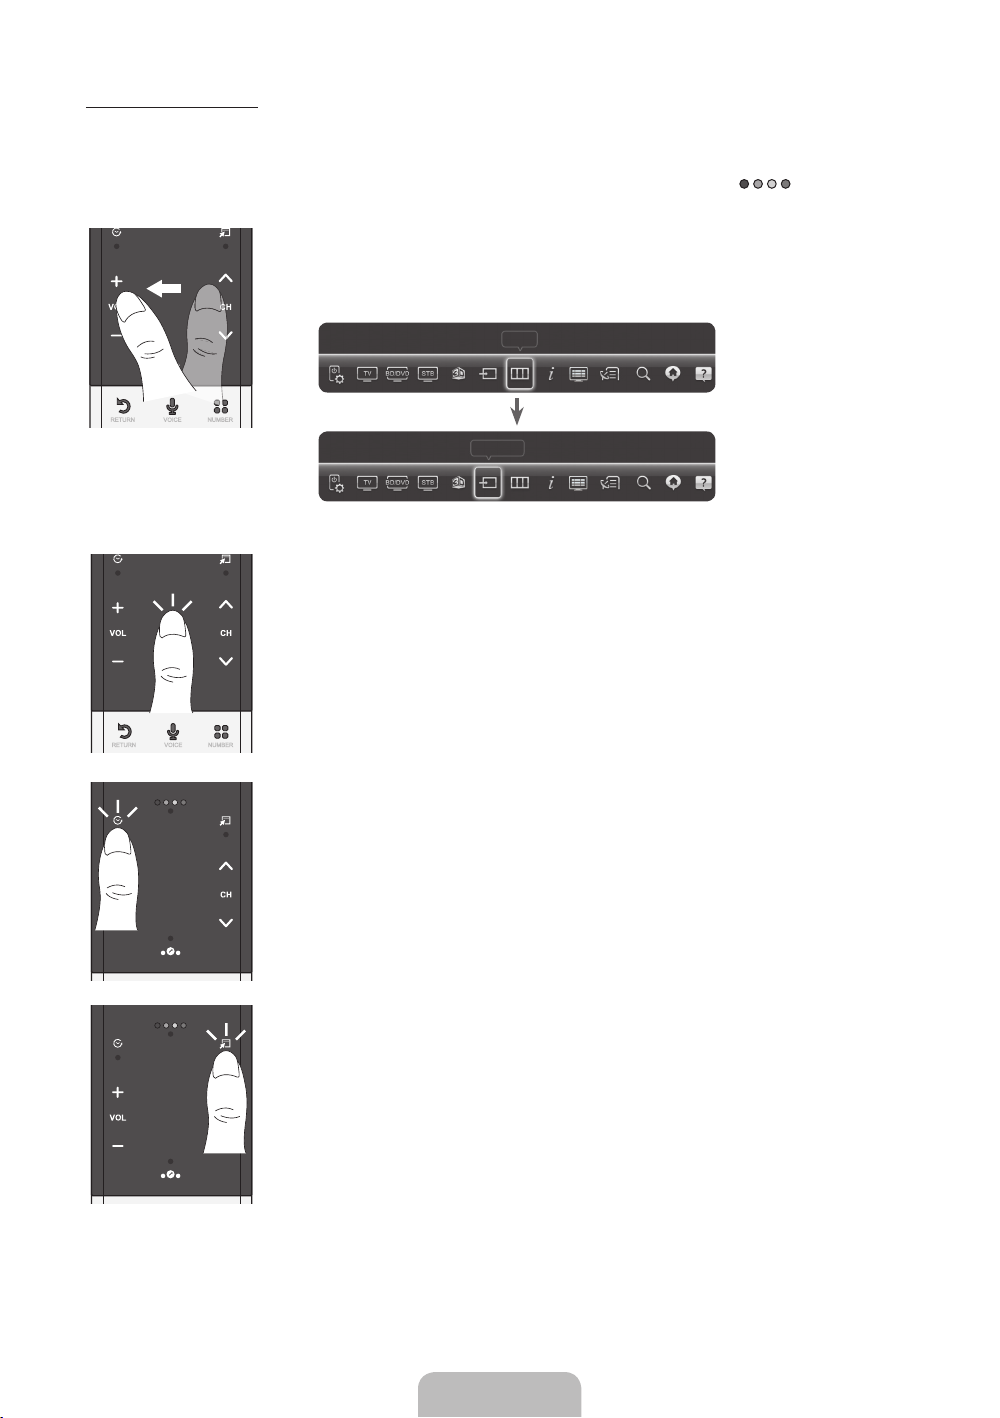
Using the Touch Pad
To display the shortcut functions list on the bottom of the screen, press the ‹ button at the bottom of the
Touch Pad. This list includes Menu, Source, CH List, 3D, Support, and a number of other functions.
To display the color and playing control functions on the top of the screen, press the
button on the
top of the Touch Pad.
To Move the highlight: Rest your finger on the Touch Pad, and then slide it from
one side to the other, from top to bottom, or bottom to top.
To move the highlight continuously, flick your finger across the Touch Pad
✎
from right to left, left to right, top to bottom, or bottom to top.
Menu
RETURN VOICE NUMBER
Source
To Select an item: Press the Touch Pad.
RETURN VOICE NUMBER
Open the History screen.: Press the Š button in the left of the Touch Pad.
Displays a list of recently used functions. You can select a function again using
the Touch Pad easily and quickly.
Open the Tools menu.: Press the T button in the right of the Touch Pad.
Quickly select frequently used functions.
English - 26
Page 27
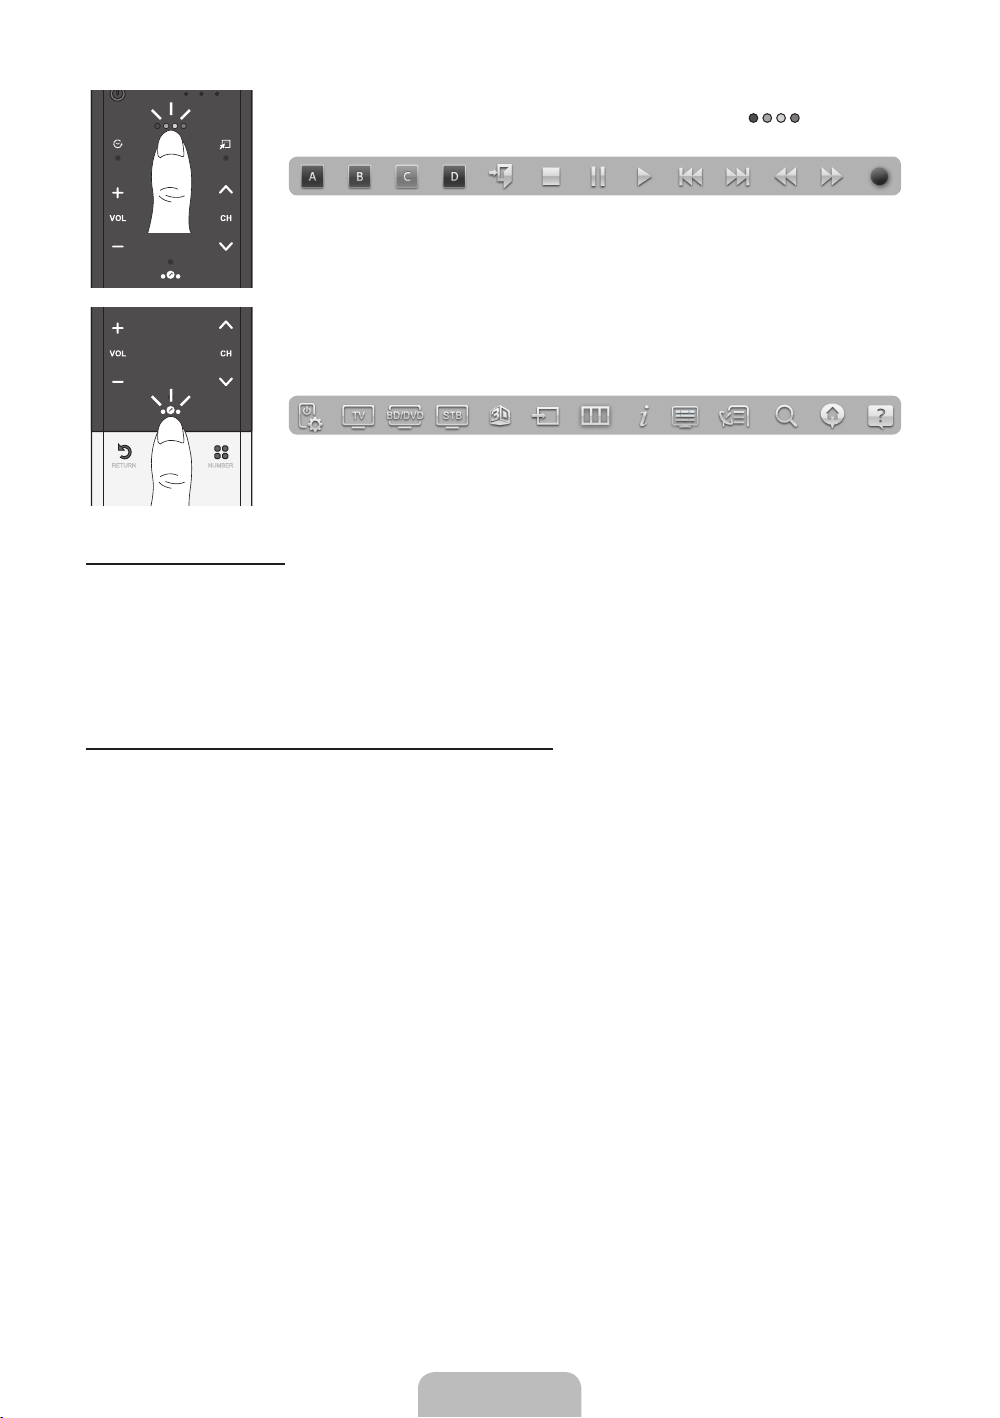
Open the color, playing control and exit buttons.: To display the color, exit
and play control buttons at the top of the screen, press the button at the
top of the Touch Pad.
e: Close all menus shown on the screen.
Open the shortcut functions screen.: Press the ‹ button in the bottom
center of the Touch Pad.
You can select a desired function (e.g. Menu (m), Source (s), Info (`), etc.)
easily.
RETURN VOICE NUMBER
Using the Mute function
− If you press and hold the Touch Pad, it has same effect as pressing the MUTEm button on your
remote.
− However, if you press and hold the touch pad when using Web Browser, the Touch Pad switches to
the Scroll mode. When you press the Touch Pad again, the Scroll mode switches general mode.
− Press the Touch Pad or RETURNR button to return to the general mode.
To Enter a channel number through Smart Touch Control
1. While watching a broadcast, press the NUMBERš button on the Smart Touch Control. The TV
displays the number button screen.
2. Using the Touch Pad, highlight a number, and then press the Touch Pad. The TV displays a list of
channels that start with the number you selected.
3. Using the Touch Pad, highlight the channel in the list you want, and then press the Touch Pad.
You can also change the channel by touching the up or down channel icon on the Touch Pad. If
✎
you touch the Touch Pad immediately after, the TV displays the list of memorized channels. Select a
channel by moving or flicking your finger up or down, and then pressing the Touch Pad.
If you change a channel by entering the channel number, that channel number is memorized and
✎
added to the Added Ch. list automatically. You can change channels using the memorized channel
list easily and quickly.
English - 27
Page 28
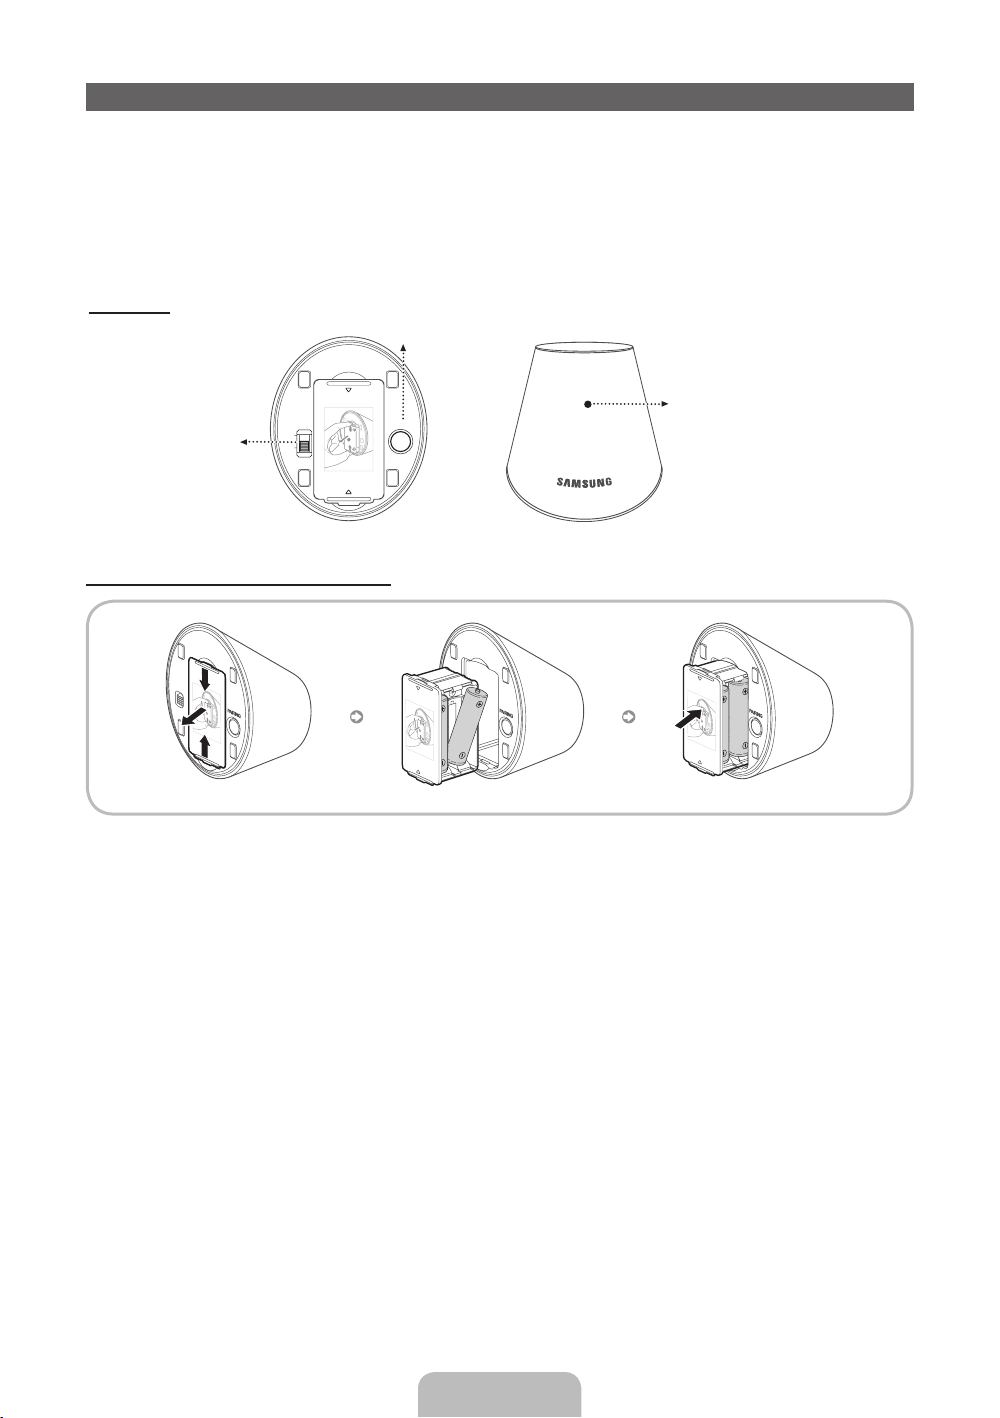
The IR Blaster
1
1
2
1
1
2
1
1
2
1
When you connect an IR Blaster with your TV, you can control connected external devices with your TV
using the Smart Touch Control.
If you control an external device by using the Smart Touch Control, the IR Blaster sends an IR signal
✎
into a corresponding external device.
Install the IR Blaster within 50 cm and 45 degrees of the up, down, left and right directions of the IR
✎
sensor of the external device.
IR Blaster
Pairing Button
Power Switch
OPEN
ON
OFF
PAIRING
OPEN
Device Indicator LED
IR Blaster shows the pairing state.
Installing batteries (Battery size : AA)
X
1
2
1
OPEN
OPEN
OPEN
OPEN
1. Hold the both sides of the battery holder and pull it out.
2. Install four batteries so that the polarity of the batteries (+/-) matches the illustration in the battery
compartment.
3. Push it back.
English - 28
Page 29
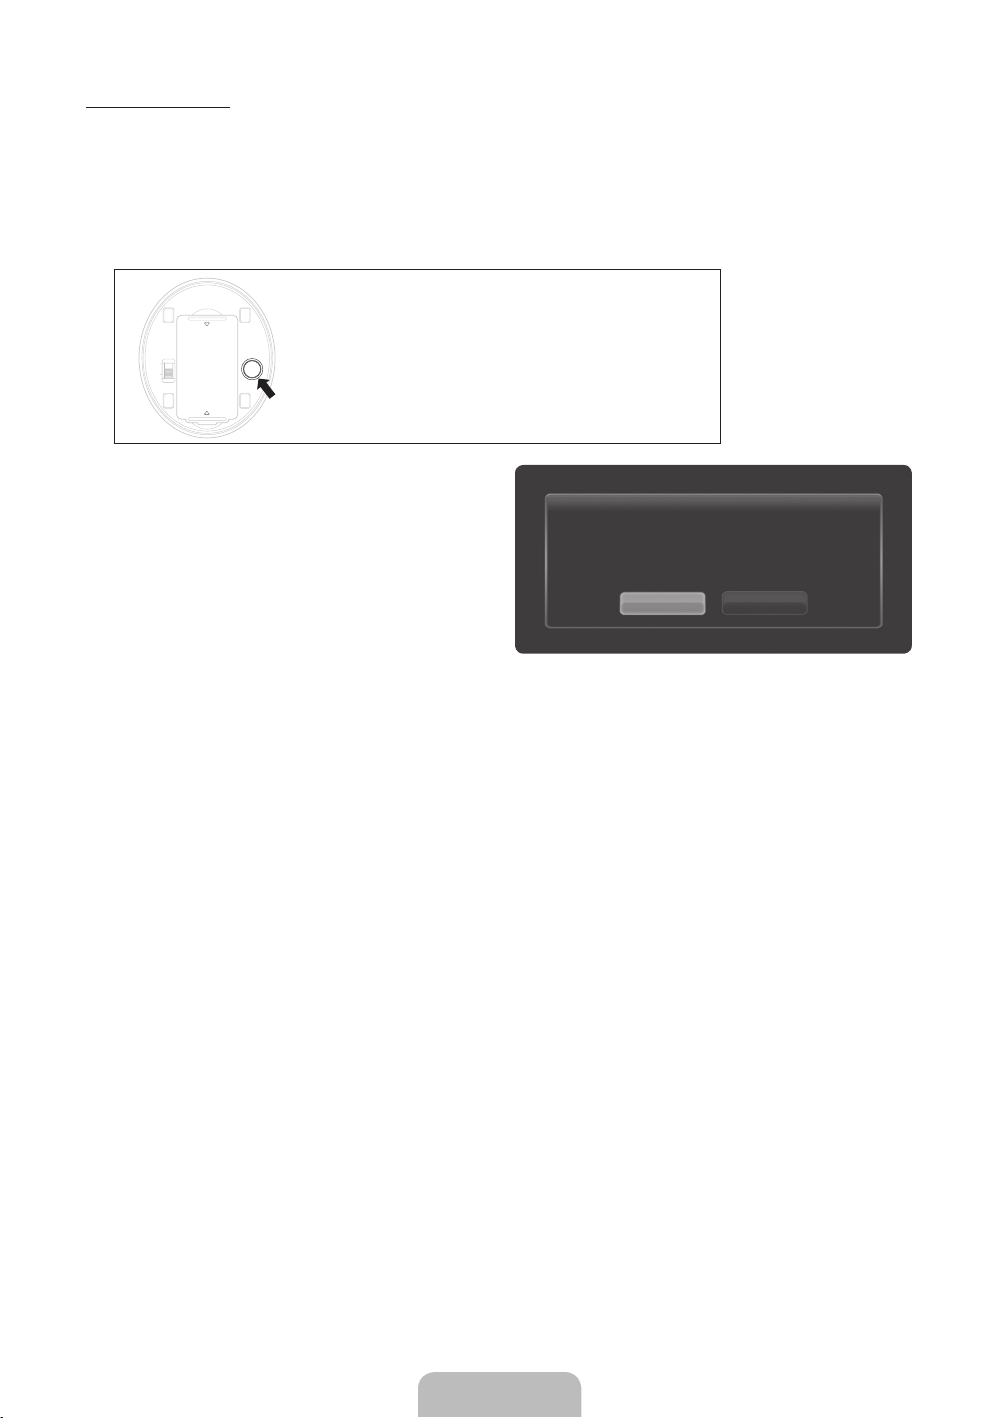
IR Blaster Pairing
O
O
O
O
1. When you turn the IR Blaster on, the LED blinks.
2. Briefly point the IR Blaster toward the IR sensor of the TV and press the PAIRING button at the bottom.
3. The connection icons appear on the bottom left of the screen, and the TV connects to IR Blaster
automatically.
If the connection process failed, please turn off and on the IR Blaster, try again from step 2.
✎
PEN
N
FF
To set an Universal Remote Control after pairing
✎
PAIRING
PEN
• IR Blaster PAIRING Reset button.
an IR Blaster, select Yes.
To use IR Blaster, universal remote control
setup needs to be complete. Do you want to
continue with setup?
Yes No
Precautions for Using an IR Blaster
[
To use an IR Blaster, the IR Blaster must be located nearby with external devices connected to the TV.
Note that it should be no obstacle between the external device's IR receiver and an IR Blaster.
English - 29
Page 30
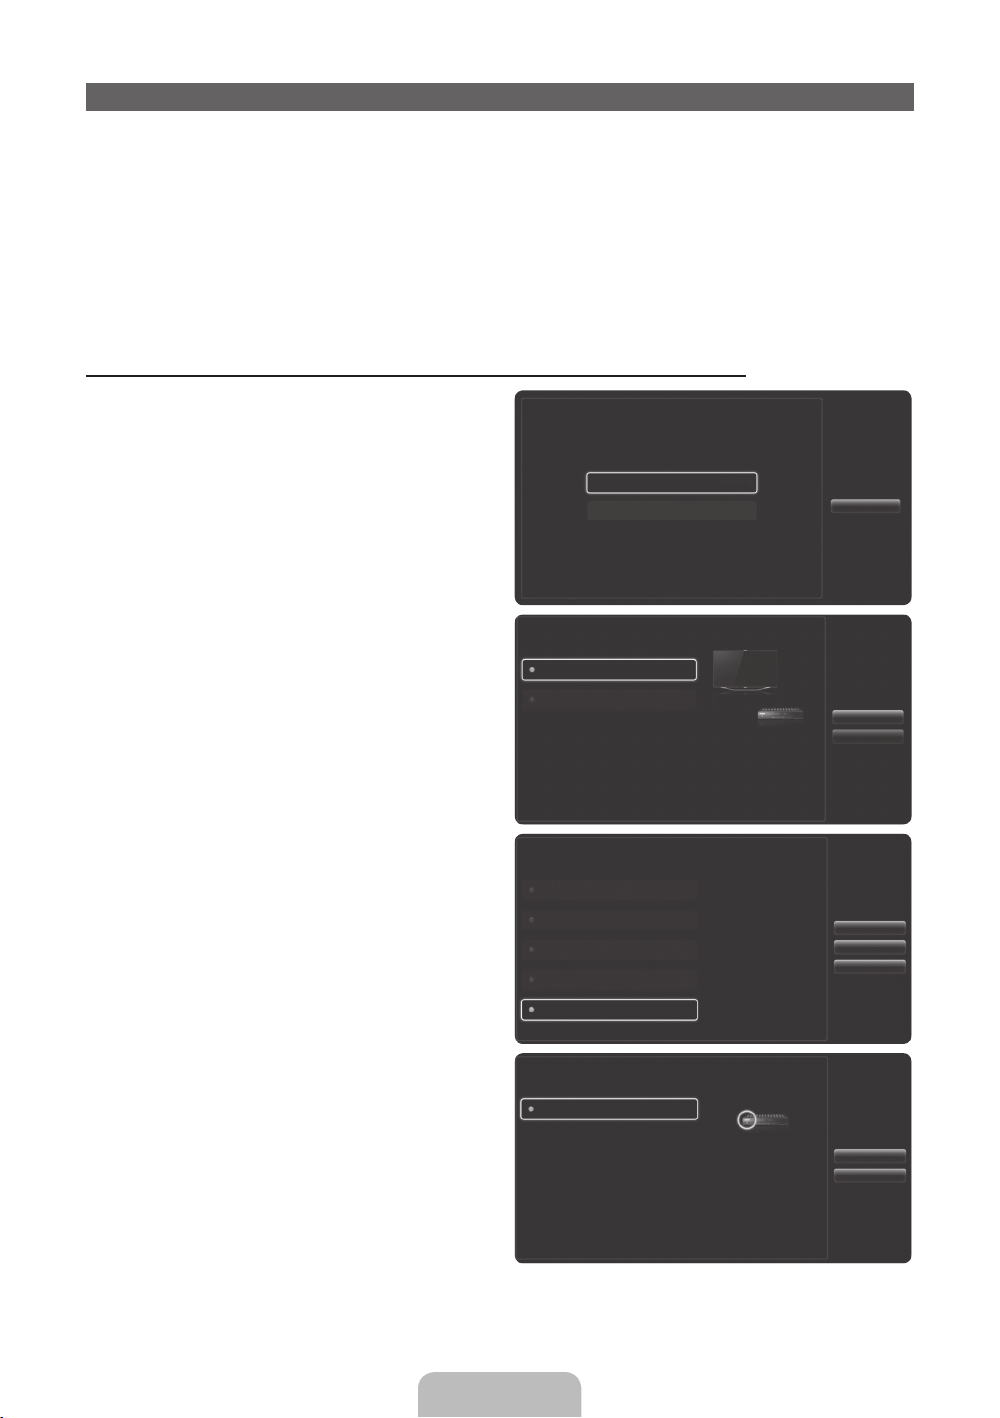
Setting up the Universal Remote Control
Lets you control a Set-Top Box (STB) or a BD player or both connected to the TV using your Smart Touch
Control. After you connect the device to the TV, the Smart Touch Control can control the navigation,
number, and other keys needed to operate and control the device.
The displayed image may differ depending application version.
✎
The Universal Remote Control can adjust TV's volume, but STB's volume cannot be adjusted. Watch
✎
STB after adjusting STB's volume to appropriate level.
Depending on the version of an application, the Universal Remote Setup instructions may differ. In this
✎
case, please follow the instructions on the screen.
To connect the external device to your Smart Touch Control, follow these steps:
1. Select Add a device to control, and then press
the Touch Pad.
What do you want to do?
Add a device to control
View remote control settings
Previous
2. Select an external device from the connected
devices, and then press the Touch Pad.
3. Select the port used to connect the external
device, and then press the Touch Pad.
Make sure that the selected device is on. If
✎
it is turned off, turn the power on and press
Refresh.
4. Select Search brands/TV service providers,
and then press the Touch Pad. A keyboard and
an entry field appear. Enter the first few letters of
the brand name of your device using the Smart
Touch Control, and then select Done at the
bottom of the keyboard. In the list that appears
below the entry field, select the brand name of
your device, and then press the Touch Pad.
If you want to search the brand of STB (Set-
✎
Top box), you can search the STB by using
the brand name or a cable provider.
Which Device you want to Control
Set-top box
Blu-ray/DVD player
Select a device to
control. The device
you select must be
powered on and
connected to your TV.
Which port is your Set-top box plugged in to?
HDMI1
HDMI2
HDMI3
AV
Component
What is the brand/TV service provider of Set-top box?
Search brands/TV service providers
Select the port that the
Set-top box is connected
to.
If the port you want to
select is deactivated,
please power on Set-top
box you want to connect
and press the refresh
button.
Select 'Search brands
/ TV service provider'
then enter the brand
name/service provider
of your Set-top box.
Previous
Next
Refresh
Previous
Next
Previous
Next
English - 30
Page 31
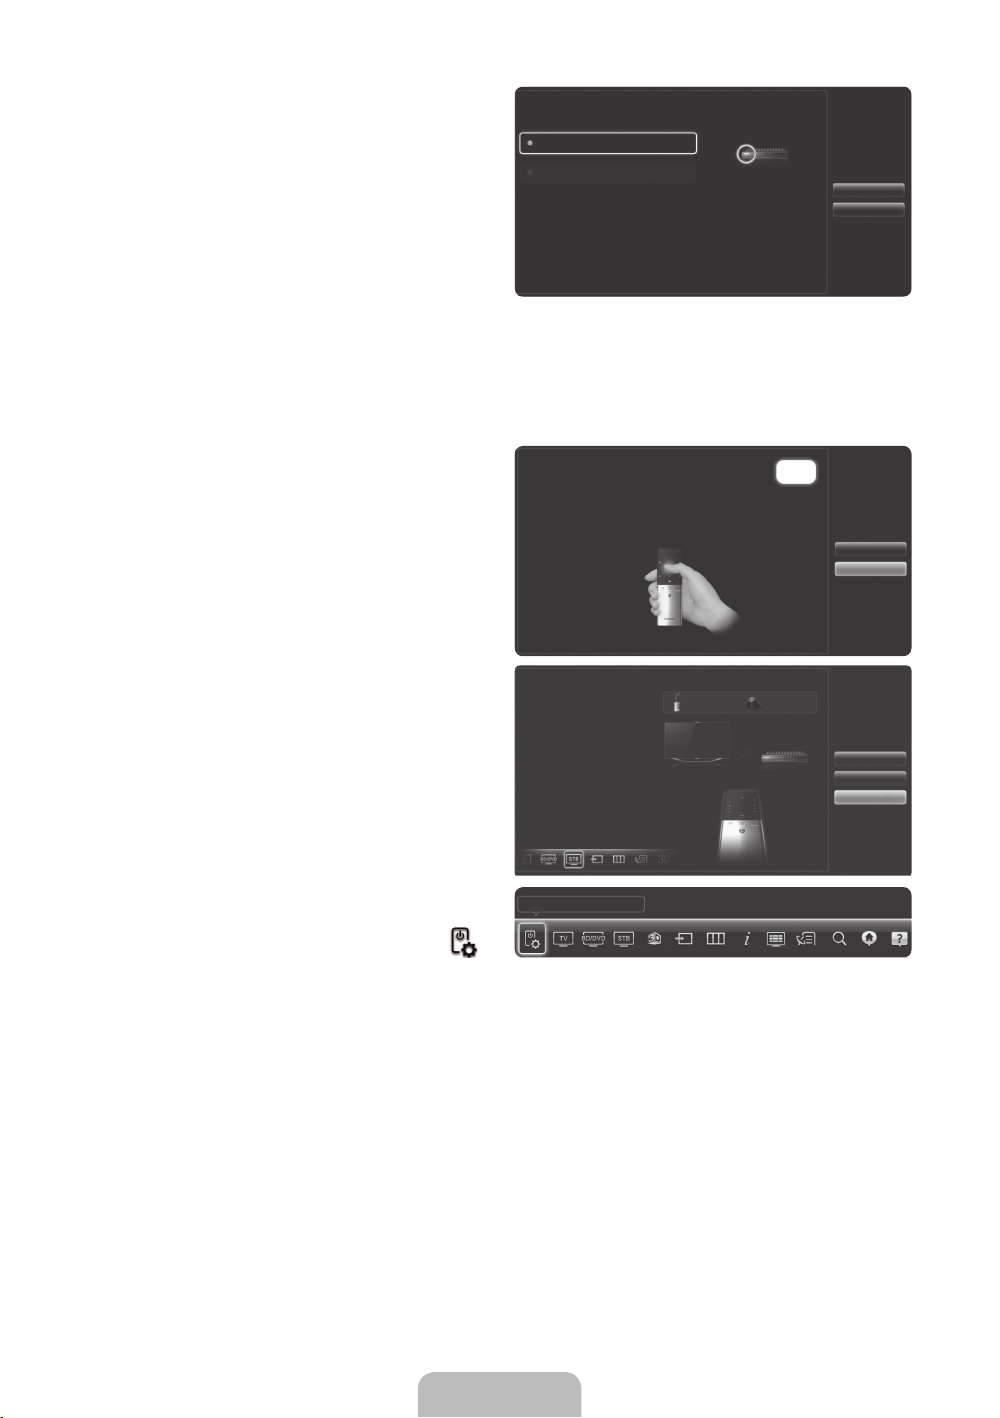
5. Select Search Model, and then press the Touch
Pad. A keyboard and an entry fi eld appear. Enter
the fi rst few letters and numbers of the model
name of your device using the Touch Control,
and then select Done at the bottom of the
keyboard. In the list that appears below the entry
fi eld, select the model name of your device, and
then press the Touch Pad.
If the search for model name does not work
✎
properly, search with a part of the model
name or use the search for recommended
model code.
For more information on the search for
✎
recommended model code function, refer to
page 32.
What is the model number of your Set-top box
Search Model
Recommended model
Check the model
number of your
Set-top box. Then
select ‘Search Model’
and enter the correct
model number for your
Set-top box.
Previous
Next
6. Select Download, and then press the Touch
Pad. Download the confi guration data for the IR
Blaster in the same way.
7. When all the settings are complete, select the
Complete button and press the Touch Pad.
To reset IR Blaster and Smart Touch Control,
✎
press the ‹ button on Smart Touch Control,
and then select Universal Remote Setup
Setup data for your device will now be downloaded to
your Smart Touch Control.
Select Download on the TV screen using your Smart
Touch Control.
Universal remote setup complete
Congratulation! Your
Set-top Box-Samsung
connected via Component
is now ready.
Now you can use Watch
TV (set-top box) option to
control your set-top box
Universal Remote Setup
.
1/26
Previous
Download
Previous
Set up another
Complete
English - 31
Page 32
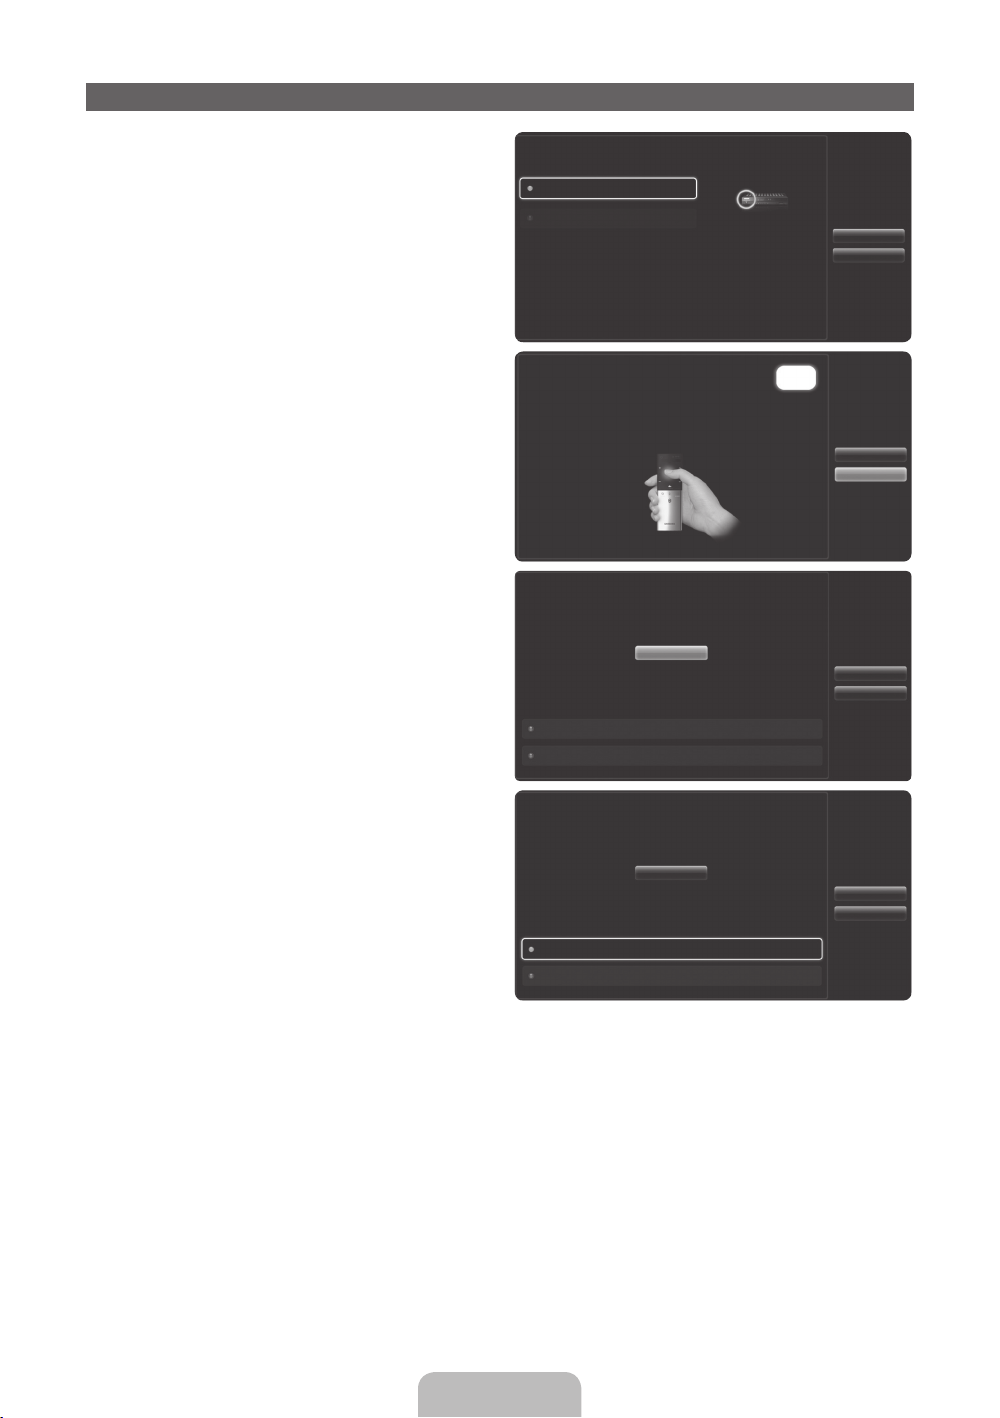
Using the Search for Recommended Model Code
1. In the Search Model step in the integrated
remote control setup, select the Recommended
model and press the Touch Pad.
2. Select Download to download the
recommended model code.
3. Point the Smart Touch Control forward to the IR
sensor of the external device and press the Touch
Pad to test if the device works.
What is the model number of your Set-top Box
Search Model
Recommended model
If you can't find your
exact model, select
Recommended Model.
Universal remote setup data will now be downloaded to
your Smart Touch control.
Press Download button on the TV Screen using your
Smart Touch Control.
Point your remote towards the Set-top box, than press the button
below until the power is turned off and on on your Set-top box.
TEST
Is it working?
Yes, go to the next step
No, try the test with a different code set
1/26
Previous
Next
Previous
Download
Previous
Next
4. If the downloaded recommended model code
does not work, repeat the steps from step 3.
When you use the BD home theater by using Universal Remote, some buttons may not be supported.
✎
Point your remote towards the Set-top box, than press the button
below until the power is turned off and on on your Set-top box.
TEST
Is it working?
Yes, go to the next step
No, try the test with a different code set
In this case, we recommend to use Anynet+ (HDMI-CEC) function.
Previous
Next
English - 32
Page 33

SMART Interaction
Using this function, you can access and control menu options and functions using speech, motions or face
recognition.
SMART INTERACTION DISCLAIMER
• Face Recognition Log-in
In order for Face recognition to function, a thumbnail image of your face will be stored in your TV for
logging-in purposes.
Logging into the Smart Hub using Face recognition may be less secure than using an ID and password.
• TV Camera Usage
Before using the TV Camera, you should be aware that under some circumstances and under certain
legal conditions your misuse of the TV Camera can result in legal liability for you. By using the TV
Camera, you agree that you will not use the camera (i) in locations where cameras are generally
prohibited (such as bathrooms, locker rooms or changing rooms), (ii) in any manner that will result in an
invasion of a person’s privacy or (iii) in violation of any applicable laws, regulations or statutes.
You should check to see whether there is a sticker attached to the rear of the TV Camera.
In order to adjust the TV Camera angle, you must first remove the sticker.
When you are finished using and don't want to use the TV Camera anymore, we recommend rotating
the TV Camera lens and tucking it into the bezel of the TV. This will prevent any inadvertent and
unintentional TV Camera functionalities and Face Recognition and Motion Control will not be functional.
• Motion Control
Motion Control works with the built-in TV Camera so it is important that you are within the sightline
of the TV Camera. Performance will vary depending on the lighting conditions in your surrounding
environment.
We recommend performing the Motion Control Environment Test (as described below) prior to using
Motion Control to ensure that the TV Camera will be able to see you.
• Voice Control and Voice Text Input
We recommend using the Smart Touch Control for Voice Control and Voice Text Input functionalities.
Voice Control and Voice Text Input are not available in all languages, dialects or regions.
Performance will vary depending on the language chosen, your pronunciation of such language, the
volume of your voice and ambient noise levels in your surrounding area.
We recommend performing the Voice Control Environment Test (as described below) prior to using
Voice Control or Voice Text Input to test the level and clarity of your voice and the ambient sounds in
your surrounding area.
Voice Text Input requires express agreement with both Samsung's voice privacy notice and a third
party's voice privacy policy.
The Voice Text Input function enables users to enter text with users' voice without using the remote
control or the mouse or keyboard connected to the TV. This function is useful when using search
function, web browser, and other applications that require text input.
English - 33
Page 34
Voice Control
Menu → System → Voice and Motion Control → Voice Control
Voice Control lets you activate and access certain menus and
functions on your Smart TV with the sound of your voice.
For accurate voice recognition, refer to the Standard Voice
✎
Command list at the Samsung web site.
To improve the accuracy and performance of Voice Control,
✎
you must pronounce words and phrases clearly and correctly
in the language you selected in Language.
Voice Control performance varies depending on language,
✎
local dialects, pronunciation, voice and ambient noise level.
Ambient noise may cause Voice Control to malfunction. Your
✎
surrounding ambient noise levels should be below 40dB.
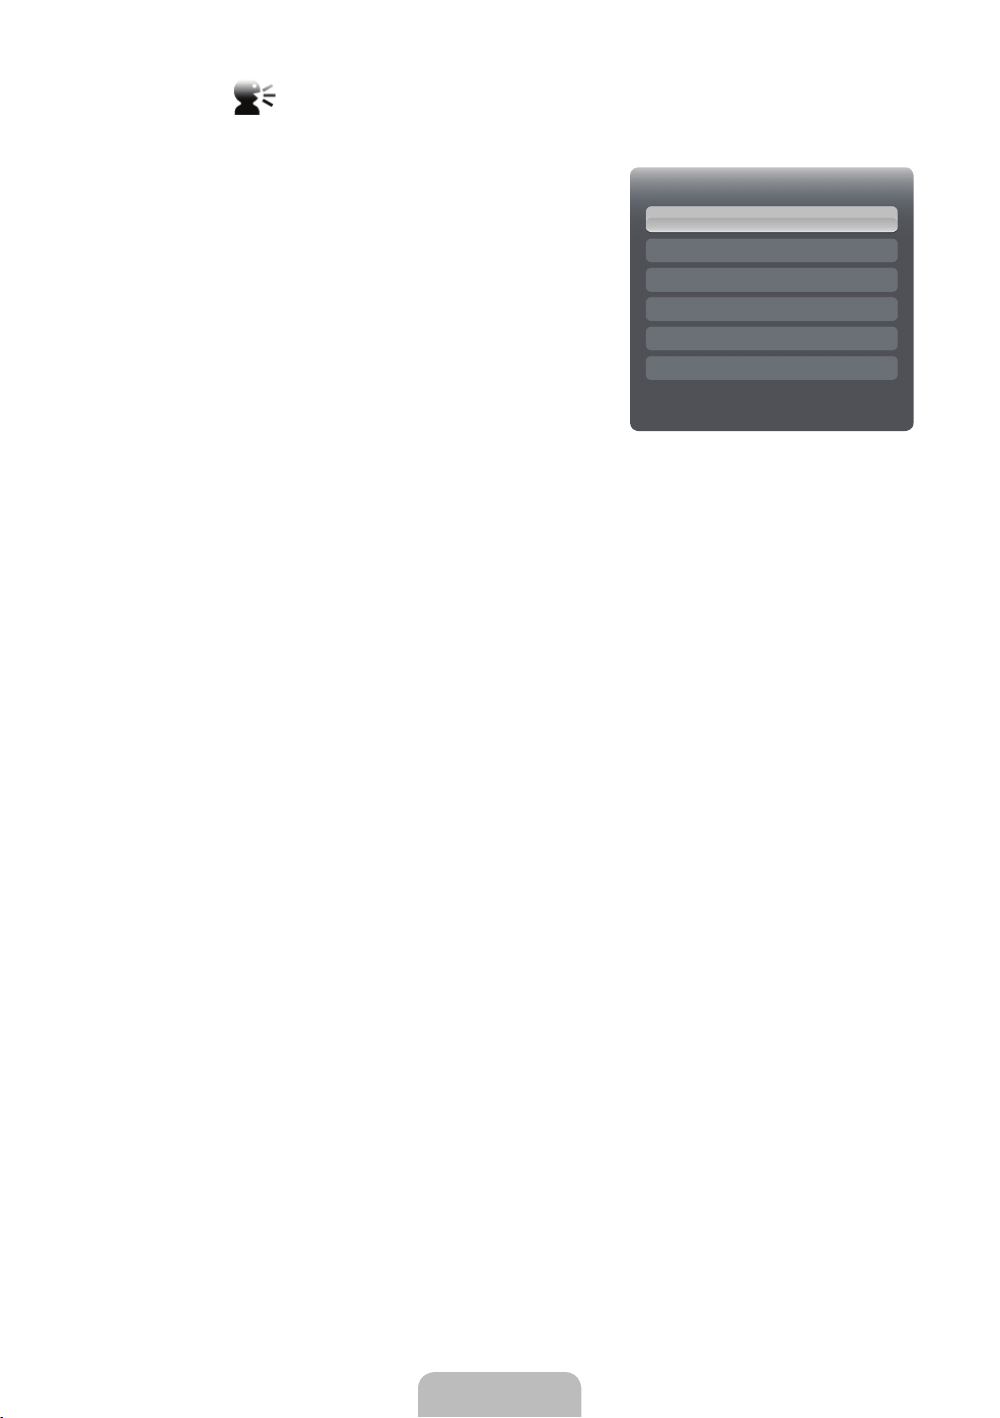
You can either speak directly to the TV using the built in microphone, or use the VOICE˜ button on your
Smart Touch Control and speak into the microphone on the remote. To activate Voice Control say the
Trigger words “Hi TV” or “Smart TV”. This will bring up the Voice Command Bar.
We recommend using the Voice Control function via the microphone attached to your TV from within
✎
13 ft of your TV.
When you use microphone attached to your TV, your voice may not be recognized because
✎
of ambient noise in your surrounding environment or other factors. If this occurs, try using the
microphone on your Smart Touch Control by pressing the VOICE˜ button on your Smart Touch
Control.
The VOICE˜ button on your remote is always activated.
✎
If you want to use the TV's microphone, turn on the preference in System settings. (System → Voice and
Motion Control → Voice Control)
When using the microphone on your Smart Touch Control, speak a voice command using your
✎
normal speaking voice into the microphone on your Smart Touch Control. The optimum distance from
your face should be approximately 0.3 – 0.4 feet. If the volume of your voice is too high or low, your
voice command may not be recognized by your Smart Touch Control. The optimum volume level is
approximately 60dB.
■ Voice Control
Turns the Voice Control function on or off.
■ Language
Select the recognition language you want to use.
■ Trigger Words
You can select the Trigger Words to enable Voice Control functionality.
In most cases it will either be “Hi TV” or “Smart TV”. Please check your TV settings to confi rm.
Speaking the words, “Hi TV” or “Smart TV” will bring up the Voice Command Bar.
Voice Control
Voice Control Off
Language English
Trigger Words Hi TV
Voice Command Bar Size Minimum
Voice Sensitivity
Voice Control Environment Test
English - 34
Page 35

■ Voice Command Bar Size
Set the Voice Command Bar mode to Minimum or Full. Minimum displays the least number of
phrases you can use. Full displays a complete list of phrases.
The Voice Command Bar will list the various voice commands that are available.
There are several options which may vary depending on the source, feature or function running in the
background.
■ Voice Sensitivity
You can configure the sensitivity of Voice Recognition.
− Howling: Select howling levels. This setting will adjust your TV’s responsiveness based on echoing
and reverberation in your surrounding environment.
− Recognition responsiveness: Select the responsiveness level of Voice recognition.
■ Voice Control Environment Test
To run the Voice Control Environment Test, to be sure the room your TV is in will work properly with
Voice Controls. Sit or stand no more than 13 feet away in front of the TV. Choose Start to begin the
Voice Control Environment Test. While remaining quiet select Next to conduct the Voice Control
Environment Test. This measures the ambient noise in the room.
The ambient noise in your room should be below 40 decibels for Voice Control to work properly.
✎
Mic & Speaker Test: Select Start with your remote to begin the Mic & Speaker Test. A melody will
play on your TV during this test. This measures the noise in the room against the volume of your TV
speakers.
If you have external speakers connected this test may not run properly. Be sure to use the TV’s
✎
internal speakers.
Voice Control Test: The Voice Control Test measures the volume and clarity of your voice. During this
test you will need to say the phrase on the screen with a loud and clear voice. Select Start to begin.
The TV will play the phrase you said, and then it will wait for you to repeat it.
You will have [TWENTY] seconds to complete the test. Repeat the phrase with a loud and clear voice.
When the TV recognizes you it will show the Voice Control Test Complete screen. Select OK to finish.
Voice Control is now enabled and configured on your Samsung Smart TV.
To disable Voice Control go to the Voice Control menu, choose Voice Control and select Off.
English - 35
Page 36

To use the Voice Control function, follow these steps:
1. Speak the Trigger Words that you selected into the microphone embedded in the TV or press the
VOICE˜ button on your remote. The TV displays the Voice Command Bar.
When you use Voice Control, the volume is set to 5 by default.
✎
2. Say a word or phrase listed in the Voice Command Bar.
Pronounce the word or phrase clearly and correctly in the language you selected in Language.
✎
Voice Control performance varies depending on language, local dialects, pronunciation, voice
✎
and ambient noise level.
3. Wait until recognition is complete, and then say the next command in the same fashion.
To exit the Voice Control mode, speak the Trigger Words or "Cancel" using the TV's
✎
microphone, or press the RETURNR button.
Please note that in some cases, if your Voice Control function is set to On, your TV may be
✎
inadvertently turned on by ambient noise in your surrounding area. If this is a concern for you, you
should turn Off the Voice Control functionality.
Using the Voice Text Input Mode
1. Say "Search All" while in Voice Control mode.
2. Say the word or phrase you wish to search for.
3. The TV executes the spoken function.
Voice Text Input Mode performance may vary depending on the language spoken, your pronunciation,
✎
the volume of your voice and your surrounding environment, including ambient noise levels.
Motion Control
Menu → System → Voice and Motion Control → Motion Control
Motion Control works with the Smart TVs built-in camera and
allows you to use motion to open apps in Smart Hub, navigate web
pages, and control certain TV functions.
Motion Control function can be affected by your posture, your
✎
hand position, or ambient brightness conditions.
Some applications may not support Motion Control.
✎
You may experience physical fatigue when you use the Motion
✎
Control for extended periods.
When you use Motion Control, please avoid direct sunlight.
✎
We recommend using Motion Control function within about
✎
5 – 13 ft with your TV. The TV Camera's recognition range may
differ depending on the angle of camera or other conditions.
Motion Control
Motion Control Off
Motion Guide Bar Size
Motion Control Environment Test
English - 36
Page 37

Because Motion Control works with the built-in camera on top of the Smart TV, it is important that you are
within the sightline of the TV Camera and nothing is obstructing its view of you. If the TV Camera is facing
too high, or too low, you can adjust it using the dial on the back of the TV. Motion Control works best in a
well lit room. For best results, be sure the light in the room is illuminating the front of you. The TV Camera is
looking for movement, so there should be contrast between you and the background. Before using Motion
Control recommended to run a Motion Control Environment Test (as described below) which measures
the ambient light in the room, and ensures the built-in TV Camera is able to see you. (System → Voice
and Motion Control → Motion Control → Motion Control Environment Test).
■ Motion Control
Turns the Motion Control fuction on or off.
■ Motion Guide Bar Size
Sets the Motion Guide Bar Size mode between Minimum or Full.
■ Motion Control Environment Test
Brightness Test: In order for Motion Controls to work there must be sufficient light in the room. The
Brightness Test measures the ambient light in the room. Stand or sit no more than 13 feet away from
your TV and select the start option. The Brightness Test will begin and should take about 10 seconds.
If there is not sufficient light in the room you will get a prompt that reads Brightness Test failed. This
means that it is too dark for Motion Control to see your movements. It is suggested that you increase
the brightness in your room. Also, check the angle of the camera to be sure it is facing out at you.
Rotate the camera angle dial located on the back of the camera. After checking these things, select
retest. If there is enough light in the room the prompt will read Brightness Test complete. This means
there is enough light in the room for Motion Controls to work properly. (Appropriate ambient brightness:
50 – 500 Lux)
Avoid positioning the TV Camera directly into sunlight or any other illuminating light source.
✎
Camera Angle Test: This will help determine whether the TV Camera can see you in order to use
Motion Control. Stand or sit in front of your TV so that you can see yourself in the rectangle on the
screen. If the camera is facing too high, or too low you can adjust it using the camera angle dial located
on the back of the camera. Now, with your TV remote in one hand, select Start. With your other hand,
wave slowly left to right at the TV. Be sure your hand is flat and your palm is facing directly at the TV.
Wave your entire hand and arm in a deliberate manner, and not simply a flicking of the wrist. This is the
best way for the TV to recognize your hand. When the Camera Angle test is complete, a cursor will
appear on the screen.
Motion Control is now enabled and configured on your Samsung Smart TV.
To disable Motion Control, open the Motion Control Menu, select Motion Control and choose Off.
English - 37
Page 38

To use the Motion Control function, follow these steps:
1. With Motion Control confi gured and activated, stand or sit in front of your TV. Make sure your hand
is fl at and palm is directly toward the TV wave three or four times side to side in a deliberate manner.
When the TV recognizes you, the arrow cursor will appear on the screen. You are now able to control
the TV with motion.
If you drop your hand out of range of the TV camera Motion Control will close. Simply raise your
✎
hand within 3 seconds to reactivate Motion Control.
2. Control the TV using your hands.
While using the Motion Control, if you use other devices (i.e. remote control, keyboard, etc.), Motion
✎
Control closes.
Pointing Navigation
•
Moves the cursor to the position you want.
− Action: Spread your hand and guide the cursor to position you want.
•
Run / Select
Selects an item or executes a command that is indicated by the cursor or is highlighted.
− Action: Clench your fi st.
•
Return
Return to the previous menu.
− Action: Spread your hand and rotate counterclockwise.
• Channel / Volume Control
Changes the channel or adjust the volume.
To increase or decrease the volume, move the cursor to hover over the w or v Volume
✎
button. The cursor will turn blue and a small circle will appear indicating you can now control
this function. Simply close your hand to make a fist and open it again. The volume will increase
or decrease one number every time you do this. Or hold the volume control by keeping your
fist clenched. These same actions can control the channel up and down feature.
•
Scroll
Scroll the page in the direction you want.
Some applications may not support this function.
✎
On the web page of your choice, simply move the cursor to the top or bottom or far left or right of
the screen, the page will automatically scroll on the direction of your move.
Those are just some of the ways you can use Motion Control with Smart Interaction on your 2012
Samsung Smart TV.
English - 38
Page 39

Face recognition
™ → Tools → Settings → Account Manager → Change account information
Enable or disable the Face recognition function.
Face recognition lets you register your face with your Samsung account so that you can log into your
Smart Hub account using the Face recognition function without inputting your account ID or your account
password.
You can register your face to only one account.
✎
To register your face in your Samsung account, follow these steps:
To use this function, you must log into Smart Hub. If you don't have a Samsung Account, you
✎
should create one before using this function. To create your Samsung Account, refer to “Creating an
Account” (Advanced Features → Smart Hub) in the e-Manual.
1. On the Smart Hub screen, open the Tools menu using your Smart Touch Control, and then select
Settings.
2. Select Account Manager. The Account Manager screen appears.
3. Select Change account information. The Change account information screen appears.
4. Select Register Face. A pop-up message appears. If you agree to use Face recognition, select OK. A
QWERTY Keyboard screen appears.
5. For security purposes you may be prompted to enter your password. When done, Select OK. Now
your TV Camera will activate.
6. Position yourself so your face is in the center of the red face recognition circle. If the camera is facing
too high, or too low you can adjust it using the camera angle dial located on the back of the camera.
When your face is properly aligned, the red circle will turn green. Hold in place for a second. When
complete a prompt will appear letting you know your face was registered for the associated Samsung
Account.
If Face recognition fails, select Retry and then try again.
✎
7. If successful, your face is now registered with your Samsung account. The Continue to Register Service
window will appear.
To close the window, select OK. You can register services later using Link to other accounts in
✎
the Smart Hub menu (Settings → Account Manager → Link to other accounts).
English - 39
Page 40
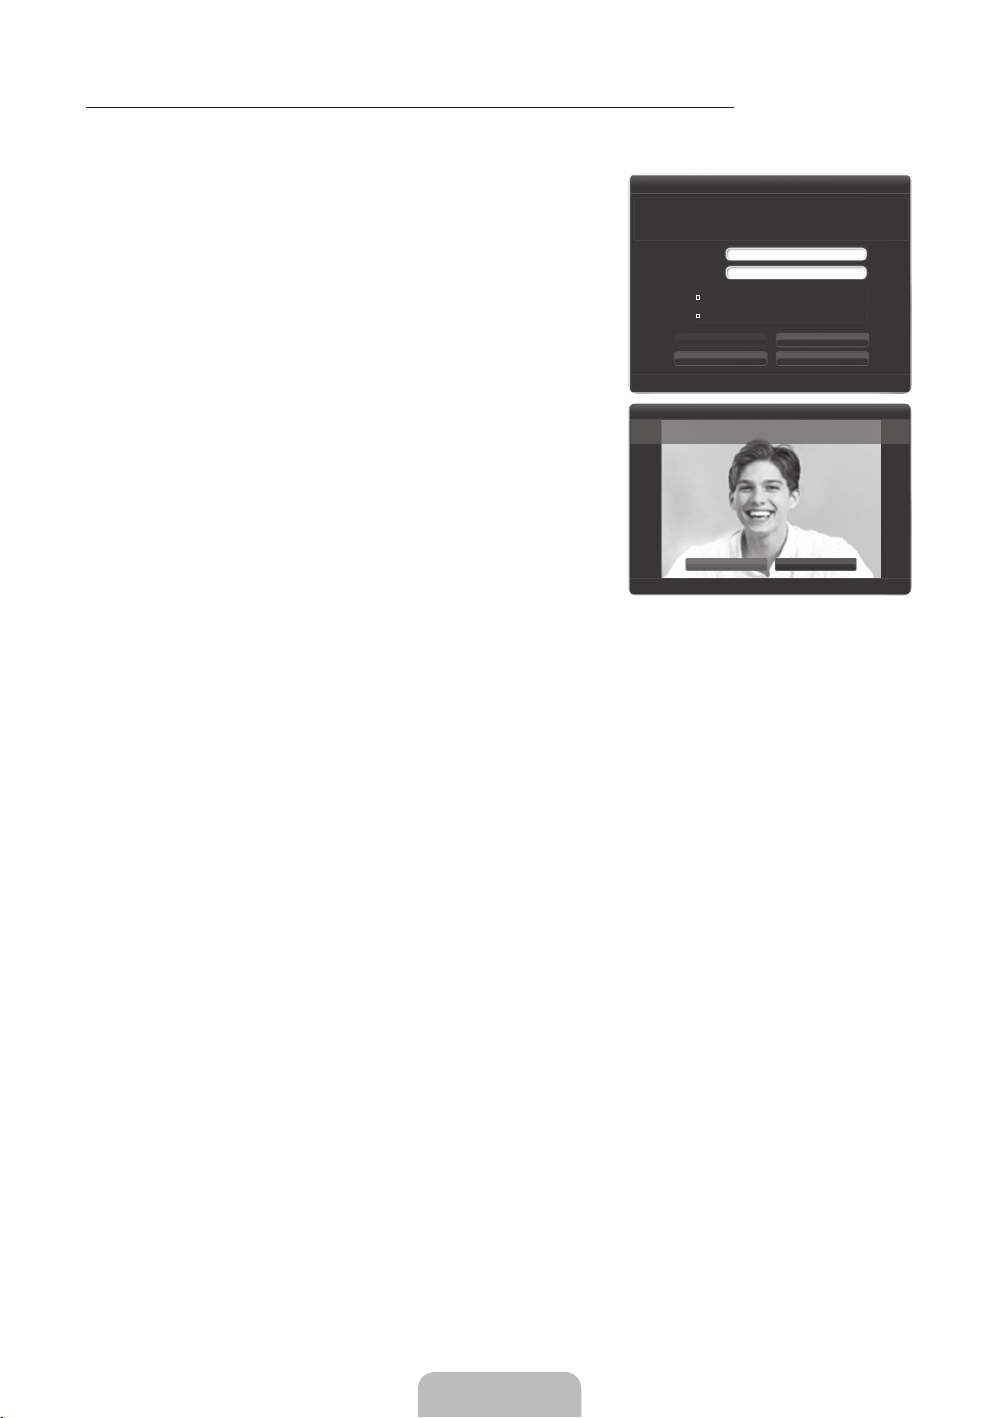
To log in to your Samsung account using Face recognition, follow these steps:
If you use Face recognition to log into Smart Hub, it may be less secure than logging in with an ID
✎
and password.
1. With the Smart Hub screen displayed, select a using your
remote. The Samsung Account screen appears.
2. Select Face Recognition Mode. The Face recognition screen
appears.
To return to the Samsung Account screen, select
✎
What is Samsung Account? A Samsung Account is an integrated
membership account that lets you access all the services
provided by Samsung through a single registered account.
Samsung Account Press [Enter]
Password Press [Enter]
Face Recognition Mode
You can log in using facial recognition. Turn your face
towards the TV with your face level with the camera.
Log In
Remember my password
Sign me in automatically
Log In
Create Account
Log In
Cancel
Password mode.
Password mode Pause
3. The TV starts Face recognition. Face the front of the TV screen. Try to hold still.
A green circle indicates a registered face. A red circle indicates an unregistered face.
✎
If the TV fails to recognize your face, try again.
✎
4. Once the TV recognizes your face, it will log you into your Samsung account automatically.
If the TV recognizes two or more registered faces, the Samsung account list appears. Select your
✎
account to log in.
If your face is unregistered, you can register your face in your Samsung account. Follow steps 4
✎
through 5 in the “To register your face to your Samsung account:” procedure above.
If you have no account, you can create one. For more detailed information, refer to “Creating an
✎
Account” (Advanced Features → Smart Hub) in the e-Manual.
Although you are using the Face recognition function, if you set to enter password on the Change
✎
account information screen, you should enter your Samsung account password.
RReturn
RReturn
English - 40
Page 41

Configuring Network Connections
After you have run the initial setup, you can configure or reconfigure the network connections through the
TV's menu.
Configuring a Wireless Network Connection
The instructions below are for networks that use the Dynamic Host Configuration Protocol (DHCP) to
configure network connections automatically. Most wireless networks use DHCP. If you have a Static IP
network, see your user’s manual for configuration instructions.
To configure the network connection for a network that uses DHCP, follow these steps:
1. Connect your TV to your network as shown in the illustration on page 11.
2. Turn on your TV, and then go to the Network Settings screen. (Menu → Network → Network
Settings)
3. Select Start. The Network function searches for available wireless networks. When done, it displays a
list of the available networks.
4. In the list of networks, move the Highlight to select a network, select Next.
If you have a WPS(PBC) compatible router, select WPS(PBC) instead, and then follow the
✎
directions on the screen.
5. Enter your network security key or WPS PIN using your remote.
Enter numbers and letters using your remote.
✎
• If you are using the standard remote, you can enter numbers by pressing the number buttons
on the remote.
• To enter a letter, move the Highlight to the letter, and then select it. You can enter numbers in
the same fashion if you choose.
To display capital letters (or redisplay small letters if capital letters are displayed), select Caps or
✎
Shift.
To display symbols and punctuation, select 1F. To redisplay letters, select 1F again.
✎
6. When done, select Next if you have entered a security key or WPS PIN if you have entered a WPS PIN.
7. The TV checks the wireless connection. If the connection is successful, the “You are connected to the
Internet. If you have any problems using online services, please contact your Internet Service
Provider.” message appears. Select Next using your remote.
For more detailed information, see “Setting up the Wireless Network” in the e-Manual.
✎
If you want to configure the connection manually, select IP Settings on the Network Connection
✎
screen. Set IP Setting to Enter manually, and then enter the IP Address, Subnet Mask,
Gateway, and DNS Server manually.
English - 41
Page 42

Configuring a Wired Network Connection
Most home networks use the Dynamic Host Configuration Protocol (DHCP) to configure network
connections. Home networks that support DHCP automatically provide the IP address, subnet mask,
gateway, and DNS values your TV needs to access the Internet so you don’t have to enter them manually.
If you have a Static IP network, see your user’s manual for configuration instructions.
To configure the network connection for a wired network that uses DHCP, follow these steps:
1. Connect your TV to your network as shown in one of the illustrations on page 12.
2. Turn on your TV, go to the Network Settings screen. (Menu → Network → Network Settings)
3. Select Start.
4. The Network Connection screen appears, and verifies the network connection. When the connection
has been verified, the “You are connected to the Internet. If you have any problems using online
services, please contact your Internet Service Provider.” message appears. Network set up is
completed.
If your TV cannot acquire network the connection values automatically or if you want to set the
✎
connection manually, select IP Settings on the network connection screen. Set IP Setting to Enter
manually, and then enter the IP Address, Subnet Mask, Gateway, and DNS Server manually.
For more detailed information, refer to “Setting up the Wired Network” in the e-Manual.
✎
English - 42
Page 43
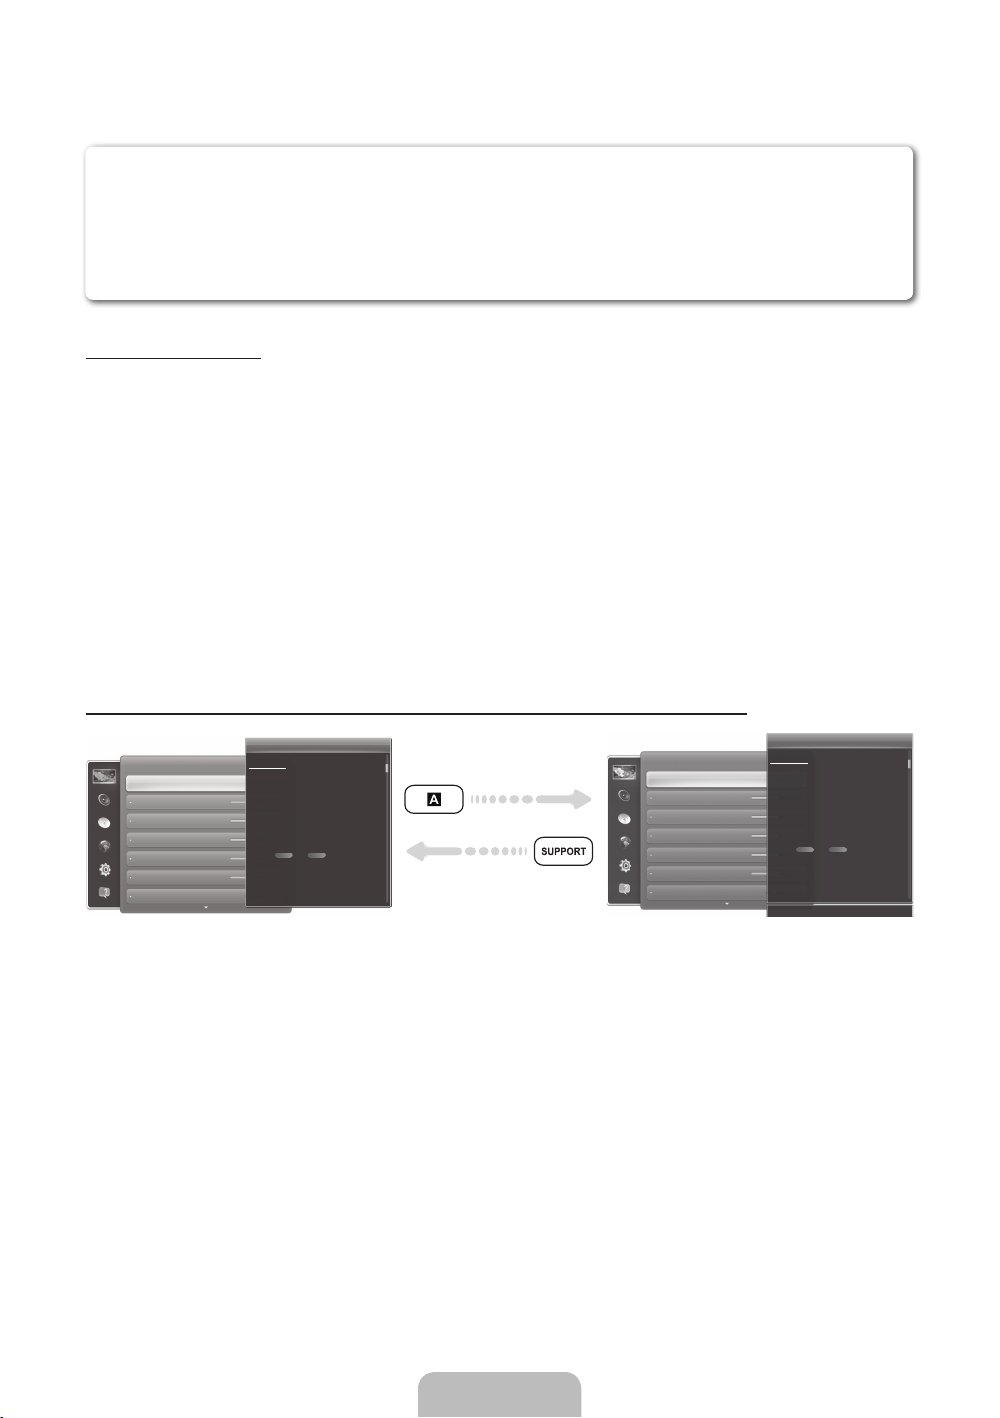
How to view the e-Manual
You can fi nd instructions for your TV’s features in the e-Manual. To open the e-Manual, press the
SUPPORT button on your standard remote or select Support using the Smart Touch Control.
You can also access it through the menu:
Menu → Support → e-Manual
Access the e-Manual
To use the e-Manual, follow these steps:
1. When you need to help, select SUPPORT using your remote. The Support screen appears.
2. Select e-Manual using your remote. The e-Manual screen appears.
3. Select a desired category.
4. Select a desired topic. The e-Manual displays the page you want to see.
Blue words in e-Manual refer to menu options or selections in the TV's on screen menu.
✎
Green icons in the e-Manual refer to a button on your remote.
✎
Arrow steps (e.g. Menu → Support → e-Manual) in the e-Manual signify the sequence of steps
✎
required to access an option or activate a function.
How to toggle between an e-Manual topic and the corresponding OSD menu(s).
Changing the Preset Picture Mode
Picture
Picture Mode
Cell Light
Contrast
Brightness
Sharpness
Color
Tint (G/R) G50
This function is not enabled in some menus.
✎
You can’t use the Tr y N ow function if the menu is not available.
✎
Picture Mode
Menu → Picture → Picture Mode
Picture modes apply preset adjustments to the picture.
N When your TV is connected to a PC via the HDMI to DVI cable,
you can only select Entertain and Standard.
• Dynamic
Brightens the screen. Suitable for a bright room.
• Standard
Suitable for a normal environment.
• Natural
for LED TV / Relax for PDP TV
Suitable for reducing eye strain.
• Movie
Darkens the screen, making it less glary. Suitable for watching
movies in a darkened room.
Picture
Picture Mode
Cell Light
Contrast
Brightness
Sharpness
Color
Tint (G/R) G50
1. To go to the topic's corresponding menu option, select a using your remote.
2. To return to the e-Manual screen, select SUPPORT using your remote.
Changing the Preset Picture Mode
Picture Mode
Menu → Picture → Picture Mode
Picture modes apply preset adjustments to the picture.
N When your TV is connected to a PC via the HDMI to DVI cable,
you can only select Entertain and Standard.
• Dynamic
Brightens the screen. Suitable for a bright room.
• Standard
Suitable for a normal environment.
• Natural
for LED TV / Relax for PDP TV
Suitable for reducing eye strain.
• Movie
Darkens the screen, making it less glary. Suitable for watching
movies in a darkened room.
‘ Back to e-Manual
English - 43
Page 44

Using the colored and function buttons with the e-Manual
• Scroll bar: Scroll the e-Manual screen up or down.
• l / r: Moves to the previous or next chapter.
• a Try Now: Move to the OSD menu that corresponds to the topic. To return to the e-Manual screen,
select SUPPORT using your remote.
• b Home: Moves to the e-Manual home screen.
• { Position: Each time you select {, you change the position of the e-Manual screen.
• } Index: Displays the Index screen.
• R Return: Return to the previous screen.
How to search for a topic on the index page
1. Select } using your remote. The Index screen appears.
2. To search for a topic, select a letter. The Index displays a list of topics and keywords that begin with the
letter you selected.
3. Select a topic or keyword you want.
4. The e-Manual page with the topic appears.
To close the Index screen, press the RETURNR button.
✎
To Change the screen position of the e-Manual
If the e-Manual screen is not invisible well because the OSD Menus screen, you can change the e-Manual
screen's position.
1. Move the Highlight to the e-Manual screen by pressing the SUPPORT button on your standard remote
or select Support using the Smart Touch Control.
2. Press the { button on your standard remote, or select { using the Smart Touch Control. Each time
you select { using your remote, the position of the e-Manual will change.
English - 44
Page 45

Troubleshooting
If the TV seems to have a problem, first review this list of possible problems and solution. Also review the
Troubleshooting Section in the e-Manual. If none of the troubleshooting tips apply, visit www.samsung.
com/support or call Samsung customer Service.
Issues Solutions and Explanations
Flickering and Dimming If your Samsung Television is flickering or dimming sporadically, you may
need to disable some of its energy efficient features such as the Eco
Sensor or the Energy Saving feature. Follow the steps below with your
remote to turn these features off or on.
• Energy Saving: User Menu → System → Eco Solution → Energy
Saving
• Eco Sensor: User Menu → System → Eco Solution → Eco Sensor
Component Connections /
Screen Color
Screen Brightness If you find that the colors on your Samsung TV are correct but just a little
If you find that the color on your Samsung television’s screen is not
correct or black and white, first run a Self Diagnosis on the TV to make
sure there are no device issues.
• Self Diagnosis: User Menu → Support → Self Diagnosis →
Picture Test
If the problem does not appear in the Picture test, make sure:
• Your connections are all consistent. For example, if you’ve used the
AV In jack on your TV, make sure you have used the AV Out jack on
your video source.
• You have connected to your devices to the correct jacks. For example,
if you use the Component jacks, labeled Pb, Pr, and Y, to connect
your TV and video source, make sure you have connected the blue Pb
jack on the video source to the blue Pb jack on the TV, the red Pr jack
on the source to the red Pr jack on the TV.
too dark or bright, try adjusting the following settings in the Picture option
in the Main menu:
• Cell Light, Contrast, Brightness, Sharpness, Color, Tint (G/R) and
so on. Go in to “Picture” on user Menu then try adjusting options
mentioned above.
English - 45
Page 46

Issues Solutions and Explanations
Unwanted Powering Off If your Samsung TV appears to turn off by itself, there may be an issue
with either your Timer settings or your Eco friendly No Signal Power Off
feature.
First make sure Sleep Timer is not accidentally set. The Sleep Timer
turns off the TV automatically after a certain period of time has passed.
• Sleep Timer: User Menu → System → Time → Sleep Timer
If the Sleep Timer is not activated, you may have engaged the No Signal
Power Off or Auto Power Off feature.
• No Signal Power Off : User Menu → System → Eco Solution →
No Signal Power Off
• Auto Power Off: User Menu → System → Eco Solution → Auto
Power Off
Trouble Powering On Before you turn the TV on, find the red light on the right or left
bottom of your TV. Press the power on button on the TV or remote
and the light should blink about 5 times before the TV turns on.
If you find that you are having trouble powering on your Samsung
television, there are a number of things to check before making a call to
the service department.
• If you happen to be using the TV as a monitor and the stand-by light
only blinks for a few seconds when you press the power button, your
PC is in sleep mode. To take your PC out of sleep mode, press a key
on your keyboard or move the mouse. Then try turning your TV on.
If you’re sure your power cord, remote control, and PC are functioning
properly, you may be having a cable issue. If you have a cable or satellite
box, your TV may appear to be off because the cable or satellite box is
not outputting a signal. To test the signal output of your cable or satellite
box, press the guide or info button on the cable or satellite box remote
control. If the screen displays the guide or info data, the problem is
caused by the box.
Cannot Find a Channel
Re-run Setup (Go to User Menu → System → Setup) or run Auto
Program. (Go to User Menu → Channel → Auto Program).
English - 46
Page 47
Issues Solutions and Explanations
The TV won’t turn on. • Make sure the AC power cord is securely plugged in to the wall outlet
and the TV.
• Make sure the wall outlet is working.
• Try pressing the P button on the TV to make sure the problem is not
the remote. If the TV turns on, refer to “Remote control does not work”
below.
There is no picture/video. • Check the cable connections. Remove and reconnect all cables
connected to the TV and external devices.
• Set the video outputs of your external devices (Cable/Sat Box, DVD,
Blu-ray etc.) to match the TV's input connections. For example, if an
external device’s output is HDMI, it should be connected to an HDMI
input on the TV.
• Make sure your connected devices are powered on.
• Be sure to select the correct input source
• Reboot the connected device by unplugging it, and then reconnecting
the device’s power cable.
The remote control does not
work.
The cable/set top box remote
control doesn’t turn the TV on
or off, or adjust the volume.
• Replace the remote control batteries. Make sure the batteries are
installed with their poles (+/–) in the correct direction.
• Clean the sensor’s transmission window on the remote.
• Try pointing the remote directly at the TV from 5~6 feet away.
• Program the Cable/Set remote control to operate the TV. Refer to the
Cable/Set-Top Box user manual for the SAMSUNG TV code.
This TFT LED panel uses a panel consisting of sub pixels which require sophisticated technology to
✎
produce. There may be, however, a few bright or dark pixels on the screen. These pixels will have no
impact on the performance of the product.
To keep your TV in optimum condition, upgrade to the latest firmware on the Samsung web site by
✎
USB (samsung.com → Support → Downloads).
License
English - 47
Page 48
Installing the Wall Mount (Optional)
Wall or Ceiling Mounting
If you mount this product on a wall, it should be mounted only as recommended by the
manufacturer. Unless it is correctly mounted, the product may slide or fall, causing serious
injury to a child or adult, and serious damage to the product.
Installing the Wall Mount Kit
The wall mount kit (sold separately) lets you mount the TV on the wall.
For detailed information about installing the wall mount, see the instructions provided with the wall mount.
We recommend you contact a technician for assistance when installing the wall mount bracket. We do not
advice you to do it yourself. Samsung Electronics is not responsible for any damage to the product or injury
to yourself or others if you elect to install the wall mount on your own.
Wall Mount Kit Specifications (VESA)
Install your wall mount on a solid wall perpendicular to the floor. Before attaching the wall mount to
✎
surfaces other than plaster board, please contact your nearest dealer for additional information. If you
install the TV on a ceiling or slanted wall, it may fall and result in severe personal injury.
NOTE
✎
• Standard dimensions for wall mount kits are shown in the table below.
• Samsung wall mount kits contain a detailed installation manual and all parts necessary for assembly
are provided.
• Do not use screws that do not comply with the VESA standard screw specifications.
• Do not use screws that are longer than the standard length or do not comply with the VESA
standard screw specifications. Screws that are too long may cause damage to the inside of the TV
set.
• For wall mounts that do not comply with the VESA standard screw specifications, the length of the
screws may differ depending on the wall mount specifications.
• Do not fasten the screws too firmly. This may damage the product or cause the product to fall,
leading to personal injury. Samsung is not liable for these kinds of accidents.
• Samsung is not liable for product damage or personal injury when a non-VESA or non-specified
wall mount is used or the consumer fails to follow the product installation instructions.
• Do not mount the TV at more than a 15 degree tilt.
• Always have two people mount the TV on a wall.
English - 48
Page 49
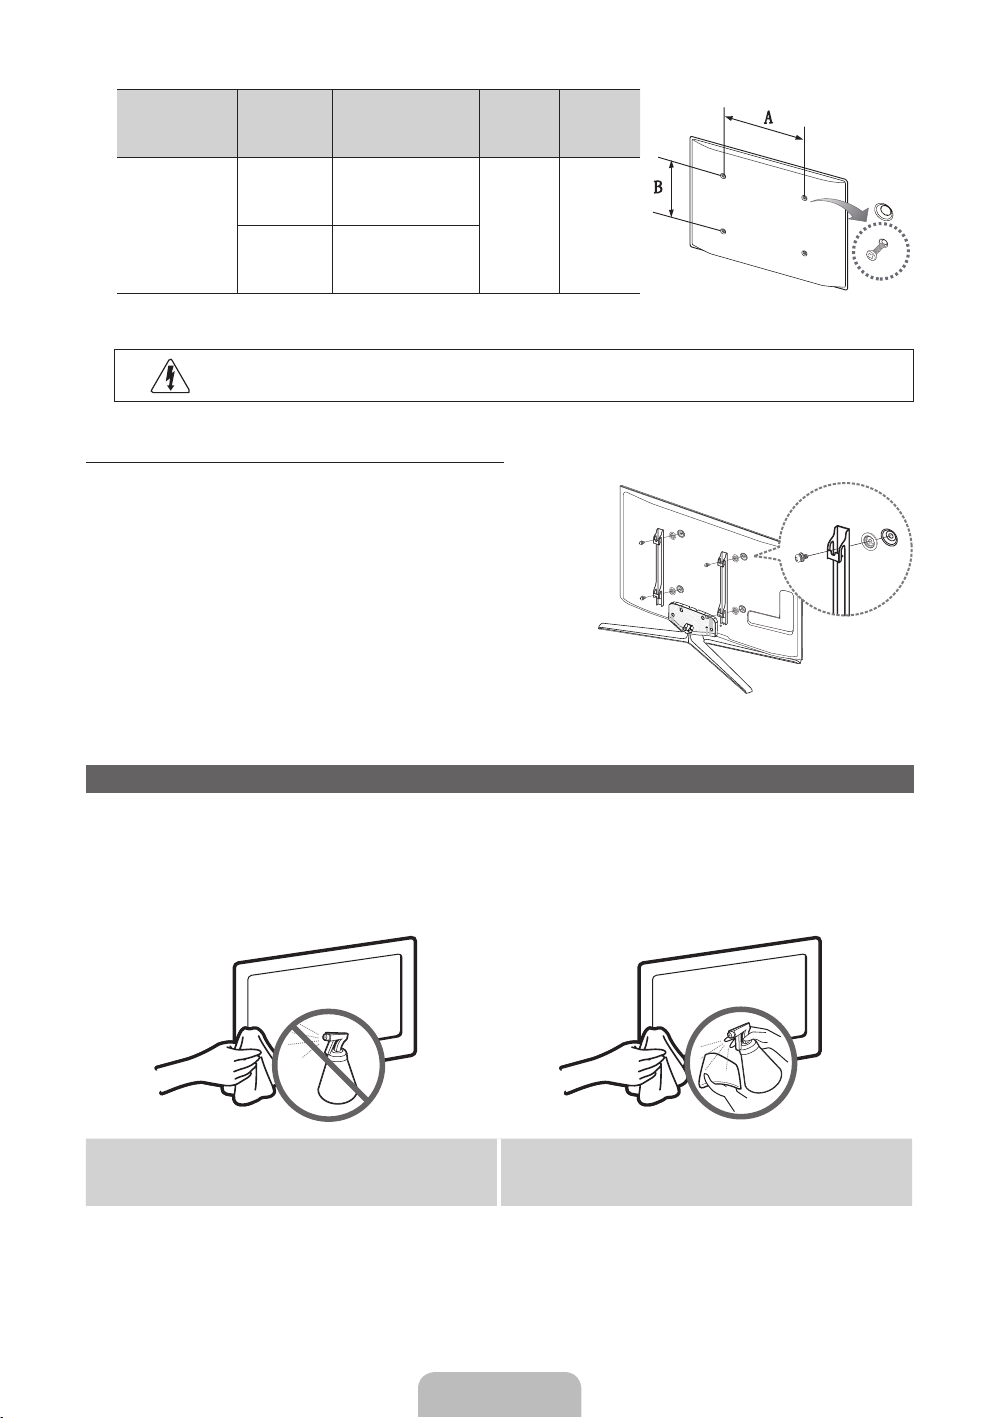
Product Family
PDP TV
[Ultra-Slim]
Remove the screws in the mounting holes before you install the wall mount.
✎
TV size in
inches
51 400 X 400
64 600 X 400
VESA screw hole specs
(A * B) in millimeters
Standard
Screw
M8 4
Quantity
Do not install your Wall Mount Kit while your TV is turned on. It may result in personal
injury due to electric shock.
Installing a Wall Mount from Another Manufacturer
To install a wall-mount from another manufacturer, use the HolderRing.
Storage and Maintenance
If a sticker was attached to the TV screen, some debris can remain after you remove the sticker.
✎
Please clean the debris off before watching TV.
The exterior and screen of the product can get scratched during cleaning. Be sure to wipe the exterior
✎
and screen carefully using the cloth provided or a soft cloth to prevent scratches.
Do not spray water directly onto the product. Any
liquid that goes into the product may cause a
failure, fire, or electric shock.
Clean the product with a soft cloth dampened with
a small amount of water. Do not use a flammable
liquid (e.g. benzene, thinners) or a cleaning agent.
English - 49
Page 50
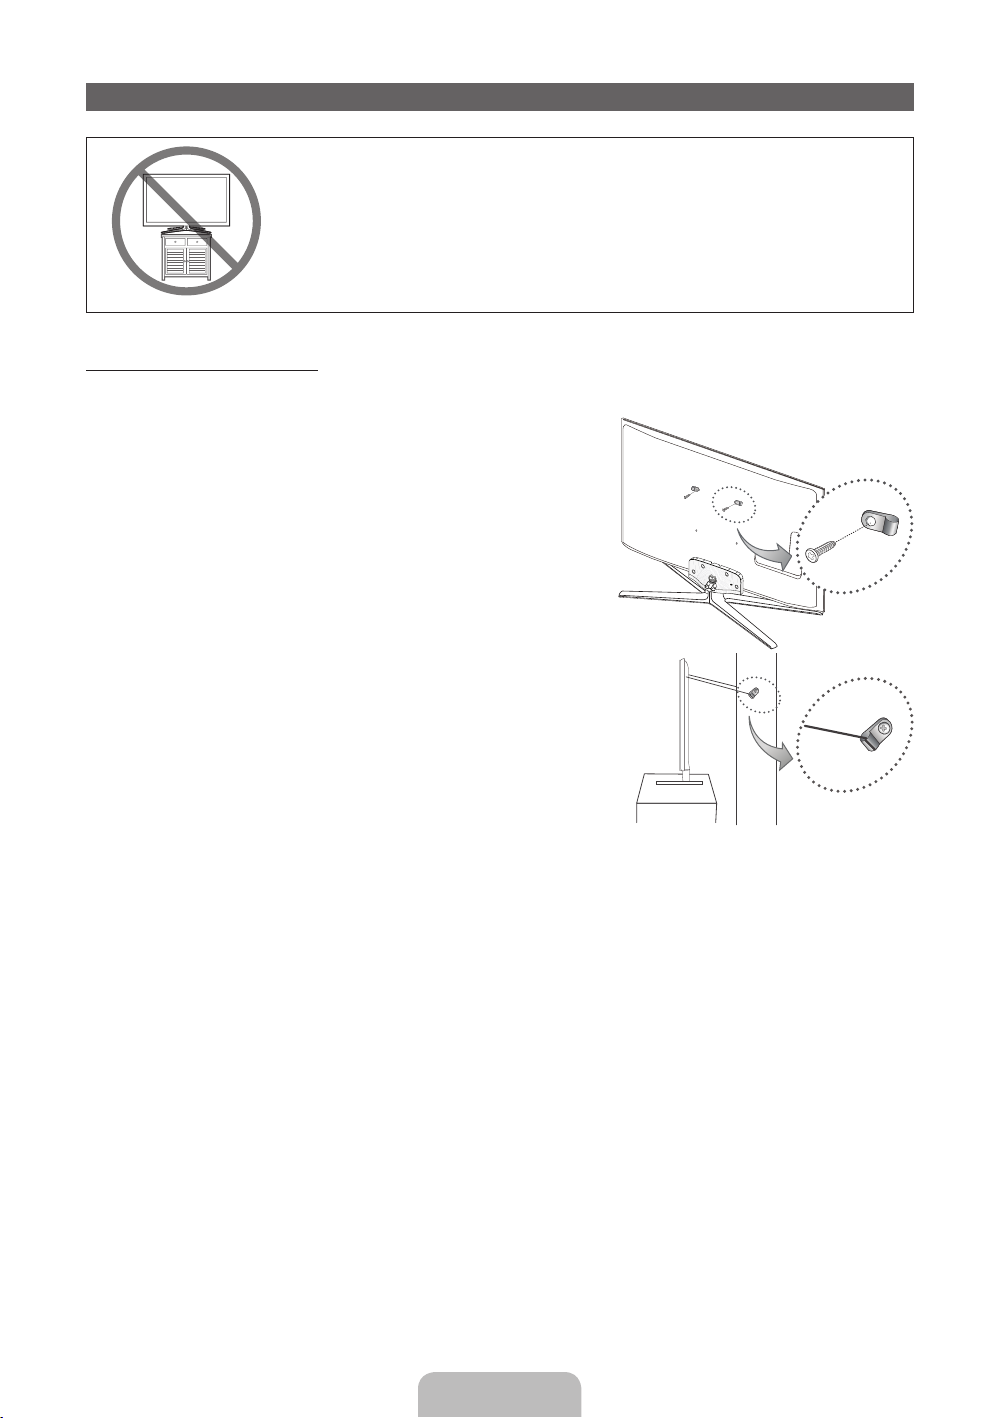
Securing the TV to the Wall
Caution: Pulling, pushing, or climbing on the TV may cause the TV to fall.
In particular, ensure your children do not hang over or destabilize the TV.
Doing so may cause the TV to tip over, causing serious injuries or death.
Follow all safety precautions provided in the Safety Flyer included with
your TV. For added stability and safety, you can purchase and install the
To Avoid the TV from Falling
1. Put the screws into the clamps and fi rmly fasten them onto the
wall. Confi rm that the screws have been fi rmly installed onto the
wall.
You may need additional material such as an anchor
✎
depending on the type of wall.
Since the necessary clamps, screws, and string are not
✎
supplied, please purchase these additionally.
2. Remove the screws from the back center of the TV, put the
screws into the clamps, and then fasten the screws onto the TV
again.
Screws may not be supplied with the product. In this case,
✎
please purchase the screws of the following specifications.
Screw Specifications
✎
For a 51 ~ 64 inch: M8
3. Connect the clamps fi xed onto the TV and the clamps fi xed
onto the wall with a strong cable and then tie the string tightly.
Install the TV near to the wall so that it does not fall
✎
backwards.
It is safe to connect the string so that the clamps fixed on the wall are equal to or lower than the
✎
clamps fixed on the TV.
Untie the string before moving the TV.
✎
4. Verify all connections are properly secured. Periodically check connections for any sign of fatigue for
failure. If you have any doubt about the security of your connections, contact a professional installer.
anti-fall device as described below.
Wall
English - 50
Page 51
Specifications - Smart Touch Control
Model Name RMCTPE1
Power Source Battery (AA x 2)
To extend the battery life, use of alkaline battery is recommended
Compatibility LED TV Above LED E7000
PDP TV E8000
Dimension
(W x H x D)
Weight Without Batteries
Including Batteries
2.0 x 6.1 x 0.7 inches
(52.0 x 154.0 x 19.5 mm)
0.1 lbs (84.0 g)
0.2 lbs (130.0 g)
Specifications - IR Blaster
Model Name VG-IRB2000
Power Source Battery (AA x 4)
To extend the battery life, use of alkaline battery is recommended
Compatibility LED TV Above LED E7000
PDP TV E8000
Dimension
(W x H x D)
Weight Without Batteries
Including Batteries
3.7 x 2.6 x 3.1 inches
(95.0 x 65.0 x 79.0 mm)
0.1 lbs (86.5 g)
0.3 lbs (178.5 g)
English - 51
Page 52
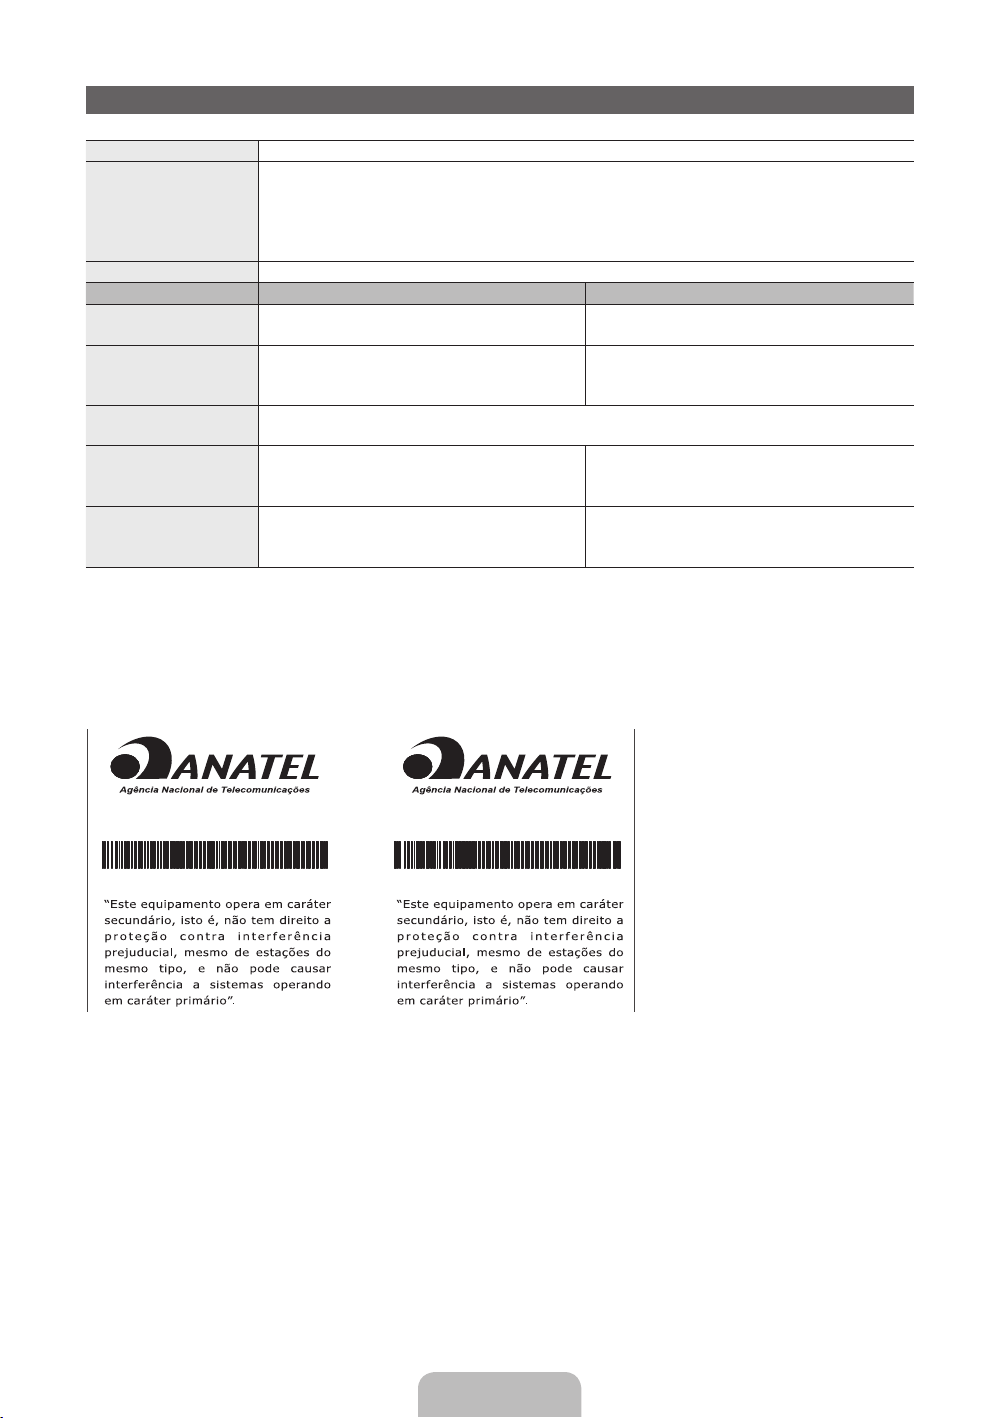
Specifications
Display Resolution 1920 x 1080
Environmental Considerations
Operating Temperature
Operating Humidity
Storage Temperature
Storage Humidity
Stand Swivel (Left / Right) -20˚ ~ 20˚
Model Name PL51E8000 PL64E8000
Screen Size
(Diagonal)
Power Consumption
Normal operation
Standby
Sound
(Output) 10 W X 2
Dimensions (WxHxD)
Body
With stand
Weight
Without Stand
With Stand
Design and specifications are subject to change without prior notice.
✎
For information about the power supply, and more about power consumption, refer to the label
✎
51˝ Class
(50.7˝ measured diagonally)
348 W
<0.15W
1193.0 x 713.0 x 55.1 mm
1193.0 x 806.3 x 309.3 mm
21.3 kg
23.6 kg
attached to the product.
50°F to 104°F (10°C to 40°C)
10% to 80%, non-condensing
-4°F to 113°F (-20°C to 45°C)
5% to 95%, non-condensing
64 Class
(64.0˝ measured diagonally)
480 W
<0.2W
1485.0 x 882.8 x 55.1 mm
1485.0 x 971.8 x 351.7 mm
34.5 kg
37.7 kg
RMCTPE1
0597-12-3269
(01) 0789250999021 9
VG-IRB2000
0598-12-3269
(01) 0789250999020 2
English - 52
Page 53
Display Resolution
When you use your TV as a computer monitor, you can also select one of the standard resolutions listed in
the Resolution column. The TV will automatically adjust to the resolution you choose.
Mode Resolution
IBM
MAC
VESA DMT
NOTE
✎
640 x 350
720 x 400
640 x 480
832 x 624
1152 x 870
640 x 480
640 x 480
640 x 480
800 x 600
800 x 600
800 x 600
1024 x 768
1024 x 768
1024 x 768
1152 x 864
1280 x 720
1280 x 800
1280 x 1024
1280 x 1024
1366 x 768
1440 x 900
1600 x 900RB
1680 x 1050
1920 x 1080
Horizontal Frequency
(KHz)
31.469
31.469
35.000
49.726
68.681
31.469
37.861
37.500
37.879
48.077
46.875
48.363
56.476
60.023
67.500
45.000
49.702
63.981
79.976
47.712
55.935
60.000
65.290
67.500
Vertical Frequency
(Hz)
70.086
70.087
66.667
74.551
75.062
59.940
72.809
75.000
60.317
72.188
75.000
60.004
70.069
75.029
75.000
60.000
59.810
60.020
75.025
59.790
59.887
60.000
59.954
60.000
Pixel Clock Frequency
• The interlaced mode is not supported.
• The set might operate abnormally if you select a non-standard video format.
(MHz)
25.175
28.322
30.240
57.284
100.000
25.175
31.500
31.500
40.000
50.000
49.500
65.000
75.000
78.750
108.000
74.250
83.500
108.000
135.000
85.500
106.500
108.000
146.250
148.500
Sync Polarity
(H / V)
+/-
-/+
-/-
-/-
-/-
-/-
-/-
-/+/+
+/+
+/+
-/-
-/+/+
+/+
+/+
-/+
+/+
+/+
+/+
-/+
+/+
-/+
+/+
English - 53
Page 54
Video Codec
File Extension Container Video Codec Resolution Frame rate (fps) Bit rate (Mbps) Audio Codec
*.avi
*.mkv
*.asf
*.wmv
*.mp4
*.mov
*.3gp
*.vro
*.mpg
*.mpeg
*.ts
*.tp
*.trp
*.mov
*.flv
*.vob
*.svi
*.m2ts
*.mts
*.divx
*.webm WebM VP8 6 – 30 8 Vorbis
AVI
MKV
ASF
MP4
3GP
VRO
VOB
PS
TS
Divx 3.11/4.x/5.x/6.x
MPEG4 SP/ASP
H.264 BP/MP/HP
Motion JPEG
Window Media Video v9
MPEG2
MPEG1
VP6 640 x 480 4
SVAF
MVC 24 / 25 / 30 40
1920 x 1080
6 – 30
1920 x 1080
30
30
AC3
LPCM
ADPCM(IMA,
MS)
AAC
HE-AAC
WMA
DD+
MPEG(MP3)
DTS Core
G.711(A-Law,
μ-Law)
Other Restriction
Video content will not play, or not play correctly, if there is an error in the content or the container.
✎
Sound or video may not work if the contents have a standard bit rate/frame rate above the compatible
✎
Frame/sec listed in the table above.
If the Index Table is in error, the Seek (Jump) function is not supported.
✎
When you play video over a network connection, the video may not be played smoothly.
✎
The menu may take longer to appear if the video’s bit rate exceeds 10Mbps.
✎
Some USB/digital camera devices may not be compatible with the player.
✎
Video decoder
• Supports up to H.264, Level 4.1
• H.264 FMO / ASO / RS, VC1 SP / MP / AP L4 and AVCHD are not supported.
• For all Video codecs except MVC, VP8, VP6:
− Below 1280 x 720: 60 frame max
− Above 1280 x 720: 30 frame max
− GMC 2 over is not supported.
• Supports only SVAF Top/Bottom and Side by Side.
• Supports only BD MVC Spec.
Audio decoder
• WMA 10 Pro supports up to 5.1 channel. WMA lossless audio is not supported.
• RealAudio 10 lossless is not supported.
• QCELP, AMR NB/WB are not supported.
• If Vorbis is only in Webm container, supports up to 2 channel.
English - 54
Page 55
Para obter mais informações sobre como usar o e-Manual (P. 43)
As figuras e ilustrações deste Manual de usuário são fornecidas apenas para fins de referência e podem ser diferentes das aparências reais dos
produtos. O design e as especificações do produto podem ser alterados sem aviso prévio.
Para obter máxima qualidade de imagem sem distorção é necessário sinal digital de alta qualidade em formato widescreen e uso de *conversor/
decodificador de sinal. *Este modelo já possui o conversor/decodificador de sinal integrado.
Instruções ao usuário
• Retenção da imagem na tela
Não exiba uma imagem estática (como em um videogame) no painel do monitor de plasma por mais de alguns minutos, pois isso pode causar
retenção da imagem na tela. Essa retenção de imagem também é conhecida como "queima de tela". Para evitar esse tipo de retenção da imagem,
consulte o e-Manual para reduzir o nível de brilho e contraste da tela ao exibir uma imagem estática.
• Aquecimento da parte superior da TV de plasma
A parte superior do produto pode esquentar após longos períodos de uso, uma vez que o calor é dissipado da tela através da saída de ventilação
na parte superior do produto. Isso é normal e não indica nenhum defeito ou problema operacional do produto. No entanto, é recomendável não
deixar que crianças toquem na parte de cima da TV.
• A TV está fazendo um ruído de "estalo".
Um ruído de "estalo" pode ocorrer quando há contração ou expansão do produto devido a mudança do ambiente, como temperatura ou umidade.
Isso é normal e não é defeito da unidade.
• Defeitos na célula
Sua TV de plasma possui um painel composto de 2.360.000 (nível HD) a 6.221.000 (nível FHD) pixels que requerem uma tecnologia sofisticada
para produção. Entretanto, pode haver alguns pixels luminosos ou escuros na tela. Esses pixels não causarão nenhum impacto no desempenho do
produto.
• Evite operar a TV em temperaturas abaixo de 5 °C.
• Uma imagem estática exibida por muito tempo pode causar dano permanente no painel PDP.
O fato de assistir a TV de Plasma no formato 4:3 por um longo período pode deixar traços de bordas exibidos nas partes
esquerda, direita e central da tela, causados pela diferença da emissão de luz na tela. A utilização de um DVD ou de um console
de videogame pode causar efeitos semelhantes na tela. Os danos provocados pelo efeito acima não são cobertos pela Garantia.
• Retenção de imagens na tela.
A exibição de imagens estáticas de videogames ou computador por mais tempo que um determinado período pode produzir pós-imagens parciais.
Para evitar esse efeito, reduza o brilho e o contraste ao exibir imagens estáticas por longos períodos.
• Garantia
A garantia não cobre defeitos causados por retenção de imagens. A queima de tela não está coberta pela garantia.
• Cuidado
A tela de vidro de sua TV PDP pode quebrar se a TV for derrubada acidentalmente. Manuseie a TV com cuidado.
Quando mover a TV, sempre peça que duas ou mais pessoas a levantem e carreguem, como medida de segurança. Não deite a
TV sobre a parte dianteira ou traseira.
A TV de plasma Samsung é uma televisão de alta qualidade que foi cuidadosamente embalada para proteger a integridade de seu painel de vidro e
de suas peças durante o envio. No entanto, é um aparelho eletrônico frágil que deve ser manuseado com cuidado. Evite colocar pressão exagerada
sobre qualquer parte da embalagem durante o envio ou a abertura da embalagem da TV. Tome cuidado durante a instalação da TV. Evite colocar
a TV em local onde possa ser atingida, exposta a impactos fortes ou cair. A quebra do painel causada por quedas ou impactos não é coberta pela
garantia do fabricante.
Português - 2
Page 56
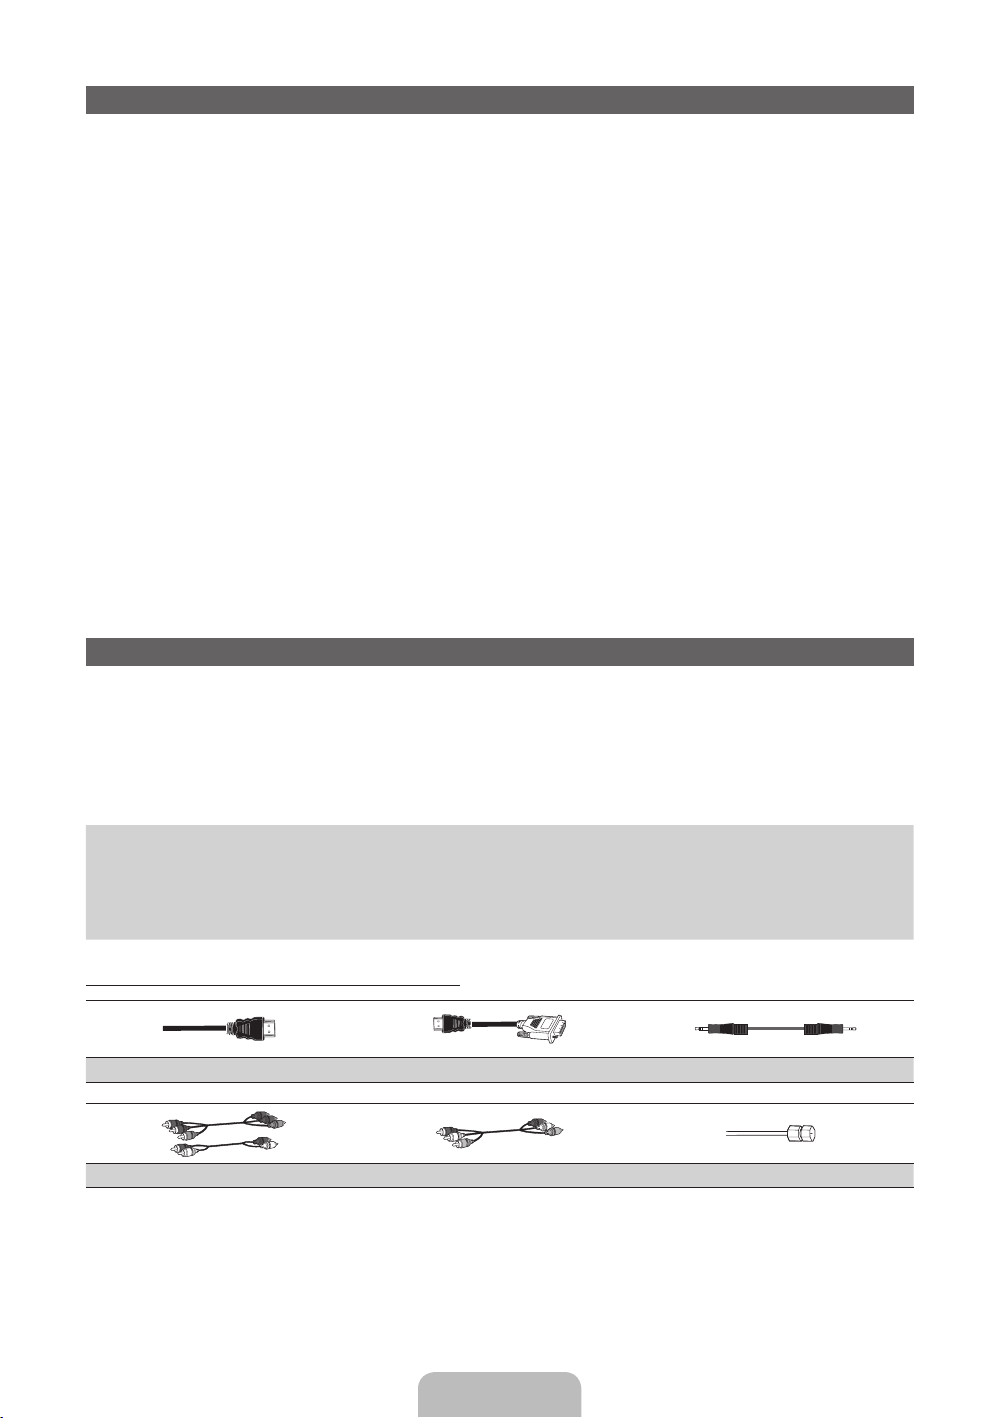
Lista de Funções
• 3D: Este novo e incrível recurso permite a exibição de conteúdo 3D.
• SMART HUB: Sua porta de entrada para todos os conteúdos integrados em um só lugar.
− Oferece diversas opções de entretenimento.
− Permite controlar o entretenimento no seu dia a dia com uma interface de usuário simples e fácil de
usar.
− Fornece acesso fácil a vários aplicativos, sendo que novos aplicativos são adicionados todos os
dias.
− Permite agrupar e classificar os aplicativos de acordo com suas preferências para personalizar sua
TV.
• AllShare Play: Permite acessar, ver ou reproduzir fotos, vídeos ou músicas localizados em dispositivos
USB, câmeras digitais, celulares e computadores. Os computadores e celulares podem ser acessados
por conexão sem fio através da sua rede sem fio.
• Anynet+ (HDMI-CEC): Permite que você controle todos os dispositivos Samsung conectados
compatíveis com Anynet+ com o controle remoto da sua TV Samsung.
• e-Manual: Um manual do usuário detalhado e integrado em sua TV. (página 43)
• Interação SMART: Essa função permite acessar e controlar funções e opções de menu usando fala
ou gestos. (página 33)
Acessórios e cabos
Verifique se os itens a seguir vieram acompanhando sua TV. Se algum item estiver faltando, entre em
✎
contato com o seu revendedor.
As cores e os formatos dos itens podem variar dependendo do modelo.
✎
Verifique se não há nenhum acessório escondido atrás dos materiais da embalagem após abrir a
✎
caixa.
• Smart Touch Control e pilhas (AA x 2)
• IR Blaster e pilhas (AA x 4)
• Controle remoto e pilhas (AAA x 2)
• Manual do usuário
Cabos de entrada (vendidos separadamente)
HDMI HDMI/DVI Áudio
Componente Composto (AV) Coaxial (RF)
• Pano de limpeza
• Certificado de garantia / Guia de segurança
• Óculos 3D Active
• Cabo de alimentação
Português - 3
Page 57
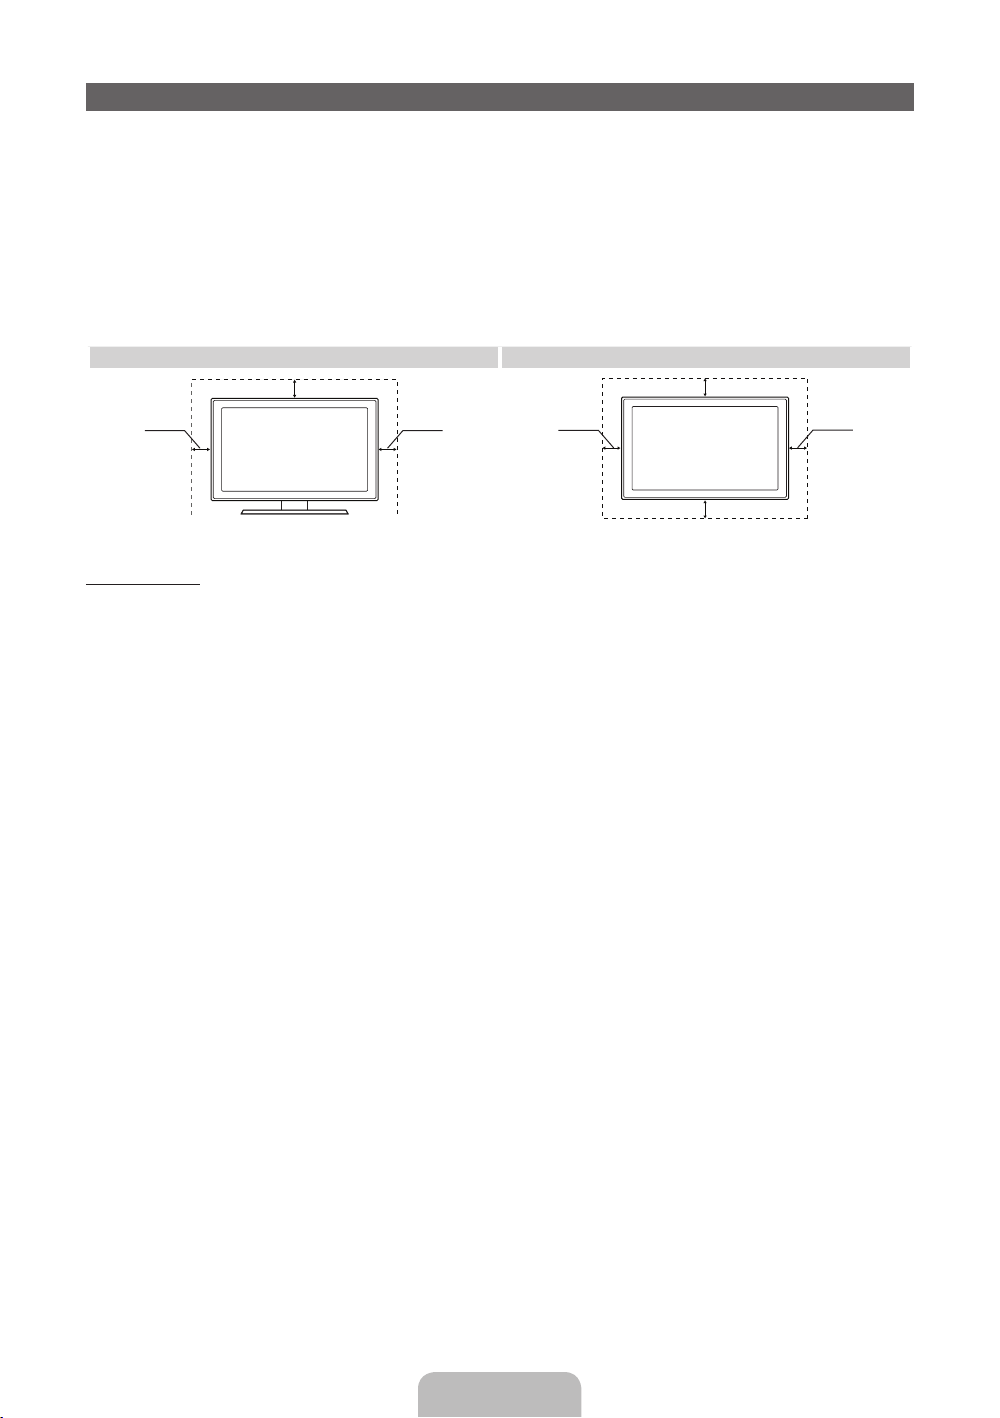
Segurança do espaço de instalação
Respeite as distâncias requeridas entre o produto e outros objetos (por exemplo, paredes) para garantir
que haja ventilação adequada.
Não proporcionar a ventilação adequada pode causar fogo ou um problema com o produto devido a um
aumento da temperatura interna.
Independentemente de usar uma base ou suporte de parede para a TV, é altamente recomendado
✎
utilizar somente as peças fornecidas pela Samsung Electronics.
• Se você usar peças fornecidas por outro fabricante, podem ocorrer problemas com o produto ou
ferimentos causados pela queda do produto.
Instalação com uma base. Instalação com um suporte de parede.
10 cm
10 cm
10 cm
10 cm
Outros avisos
A aparência real da TV pode ser diferente das imagens neste manual, dependendo do modelo.
✎
Tenha cuidado ao tocar na TV. Algumas peças podem estar um pouco quentes.
✎
10 cm
10 cm
10 cm
Português - 4
Page 58
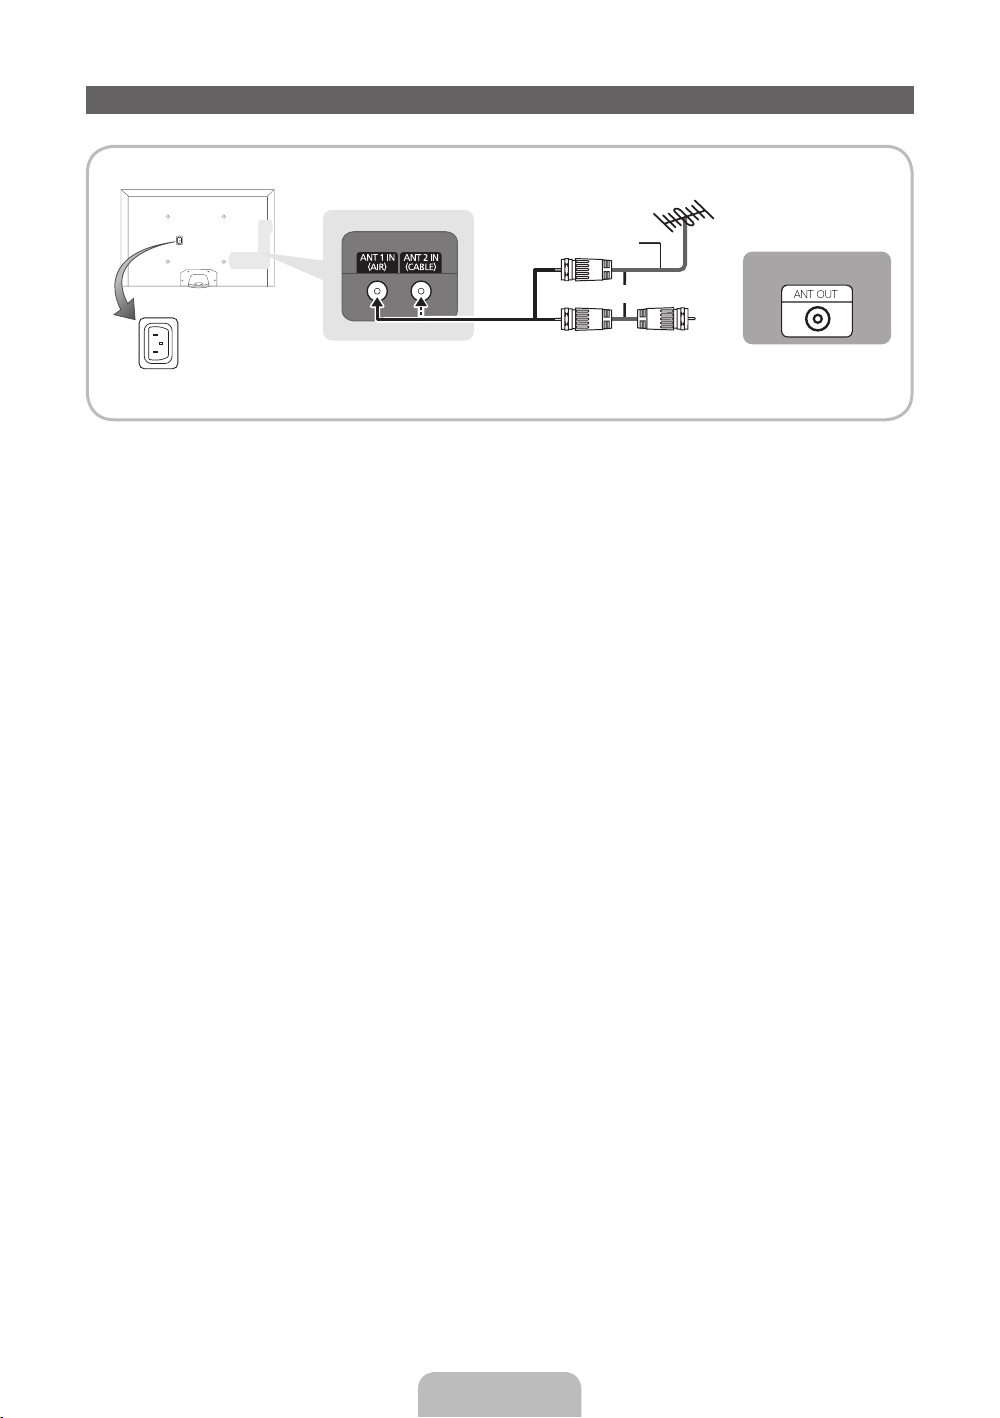
Conexão do cabo de alimentação e da antena ou conexão de cabo
Antena VHF/UHF
Cabo de antena (não fornecido)
Cabo
ou
Entrada de energia
Conecte o cabo de alimentação na tomada somente após ter concluído todas as outras conexões.
✎
Caso esteja conectando sua TV a um receptor de TV a cabo ou de satélite por meio de conexões
✎
HDMI, Componente ou Composta, não é preciso conectar a entrada ANT IN a uma antena ou
conexão de cabo.
A TV de plasma pode causar interferência em rádio amador ou rádio AM.
✎
O uso de rádio transmissor/receptor portátil, rádio amador ou rádio AM próximo à sua TV pode
✎
danificá-la.
Tenha cuidado ao mover ou girar a TV caso o cabo da antena já esteja totalmente conectado, já que
✎
o conector de antena da TV pode quebrar.
Português - 5
Page 59
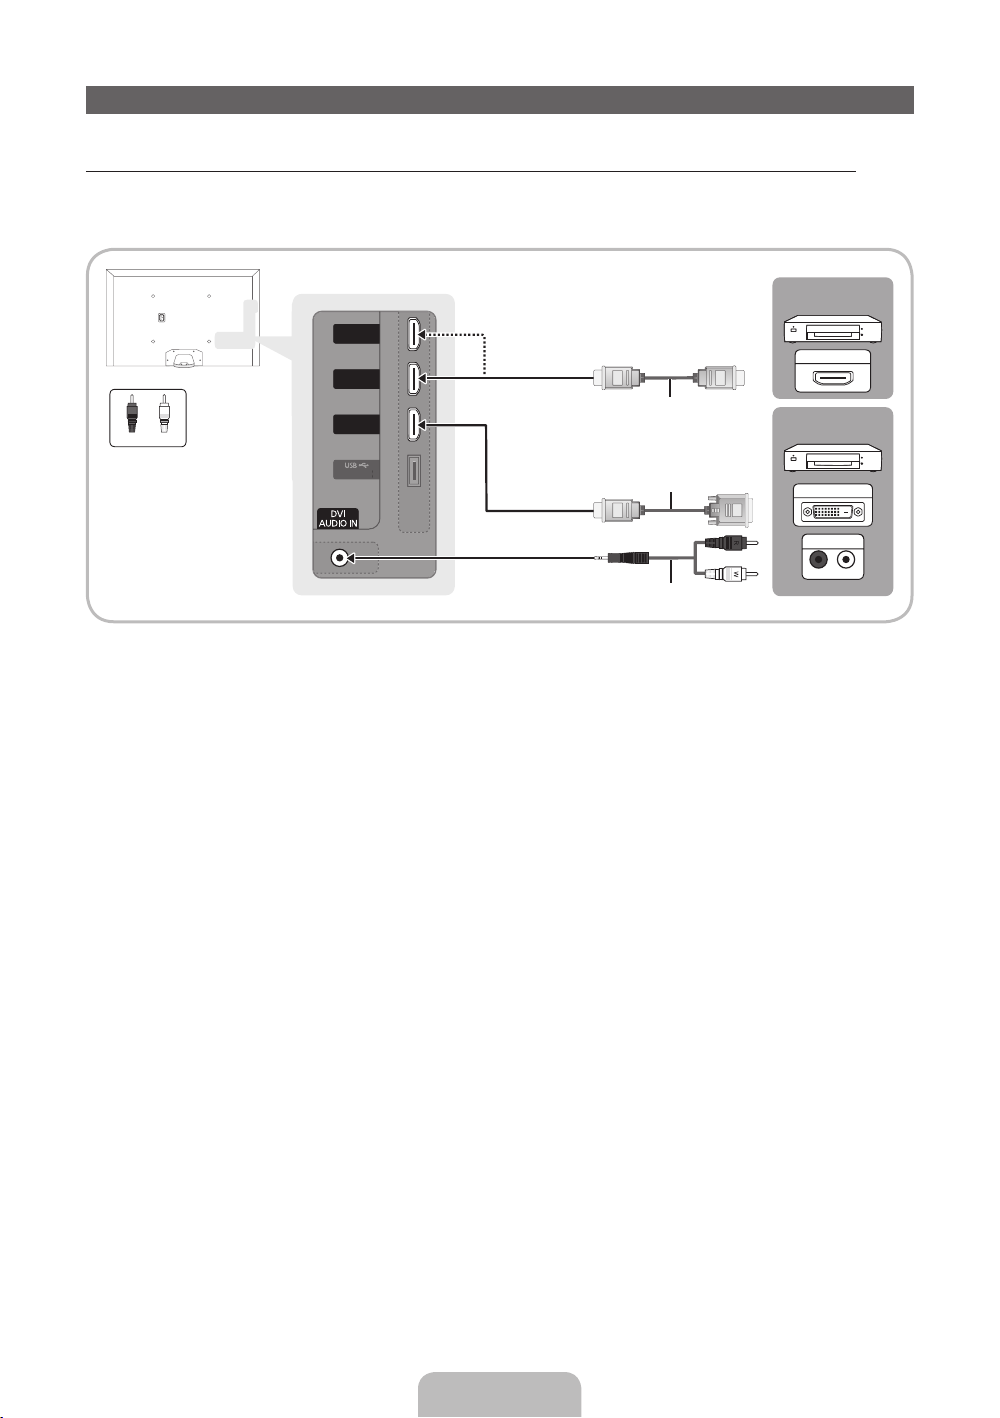
Conexão com dispositivos AV (Blu-ray players, DVD players, etc.)
(HDD 5V 1A)
HDMI IN
2
(ARC)
HDMI IN
3
(MHL)
HDMI IN
1
(DVI)
(
)
HDMI IN
2
(ARC)
HDMI IN
3
(
)
1
(
)
R-AUDIO-L
Utilização de um cabo HDMI para uma conexão HD (alta definição, até 1080p, sinais digitais)
Para a melhor qualidade de imagem em alta definição (HD), recomendamos o uso de uma conexão HDMI.
Utilize com DVD players, Blu-ray players, receptores de TV a cabo HD e receptores de satélite HD.
Dispositivo
HDMI IN
3
(MHL)
MHL
HDMI OUT
Dispositivo
Vermelho
WR
Branco
HDMI IN
2
(ARC)
HDMI IN
1
(DVI)
DVI
Cabo HDMI (não fornecido)
HDD 5V 1A
HDMI IN 1 (DVI), HDMI IN 2 (ARC), HDMI IN 3 (MHL)
✎
Cabo HDMI/DVI (não fornecido)
Cabo de áudio (não fornecido)
DVI OUT
AUDIO OUT
• Para obter a melhor qualidade de imagem e áudio, conecte dispositivos digitais à TV usando cabos HDMI.
• O cabo HDMI é compatível com sinais digitais de vídeo e áudio e não requer um cabo de áudio.
− Para conectar a TV a um dispositivo digital que não seja compatível com a saída HDMI, utilize
cabos HDMI/DVI e cabos de áudio.
• Caso conecte um dispositivo externo a uma TV que utilize uma versão anterior de HDMI, o vídeo e
o áudio podem não funcionar. Se isso ocorrer, informe-se com o fabricante do dispositivo sobre a
versão de HDMI e, se estiver desatualizada, solicite uma atualização.
• Certifique-se de comprar um cabo HDMI certificado. Caso contrário, a imagem poderá não ser
exibida ou poderá ocorrer um erro de conexão.
• Recomendamos a utilização de cabo HDMI básico de alta velocidade ou de cabo HDMI compatível
com Ethernet. Observe que este produto não é compatível com a função Ethernet via HDMI.
• Este produto é compatível com as funções 3D e ARC (canal de retorno de áudio) por meio de cabo
HDMI. Observe que a função ARC é compatível apenas com a porta HDMI IN 2 (ARC).
• A função ARC permite a saída de áudio digital por meio da porta HDMI IN 2 (ARC) na TV. Ela poderá ser ativada
somente quando a TV estiver conectada a um receptor de áudio que seja compatível com a função ARC.
• Este produto é compatível com a função Mobile High-Definition Link (MHL) por meio de um cabo
HDMI-MHL. Observe que a função MHL é compatível apenas com a porta HDMI IN 3 (MHL).
• A função MHL permite exibir a tela de um dispositivo móvel por meio da porta HDMI IN 3 (MHL) na TV. Ela
pode ser ativada somente quando a TV estiver conectada a um dispositivo móvel que seja compatível com
a função MHL. Para obter informações mais detalhadas, consulte “Uso da função MHL" no e-Manual.
• Ao usar dispositivos MHL conectados por um cabo MHL, o Tam. Imagem será definido como Ajuste
à Tela automaticamente. No entanto, caso use dispositivos MHL conectados por um cabo HDMI, o
Tam. Imagem não será definido como Ajuste à Tela automaticamente. Para visualizar um tamanho
original, selecione Ajuste à Tela, no menu Tam. Imagem (Menu → Imagem → Tam. Imagem).
• Caso use dispositivos MHL conectados por um cabo HDMI, a TV será reconhecida como a
entrada HDMI. Nesse caso, a TV poderá funcionar de maneira diferente de como funcionaria ao
usar dispositivos MHL conectados por um cabo MHL.
Português - 6
Page 60
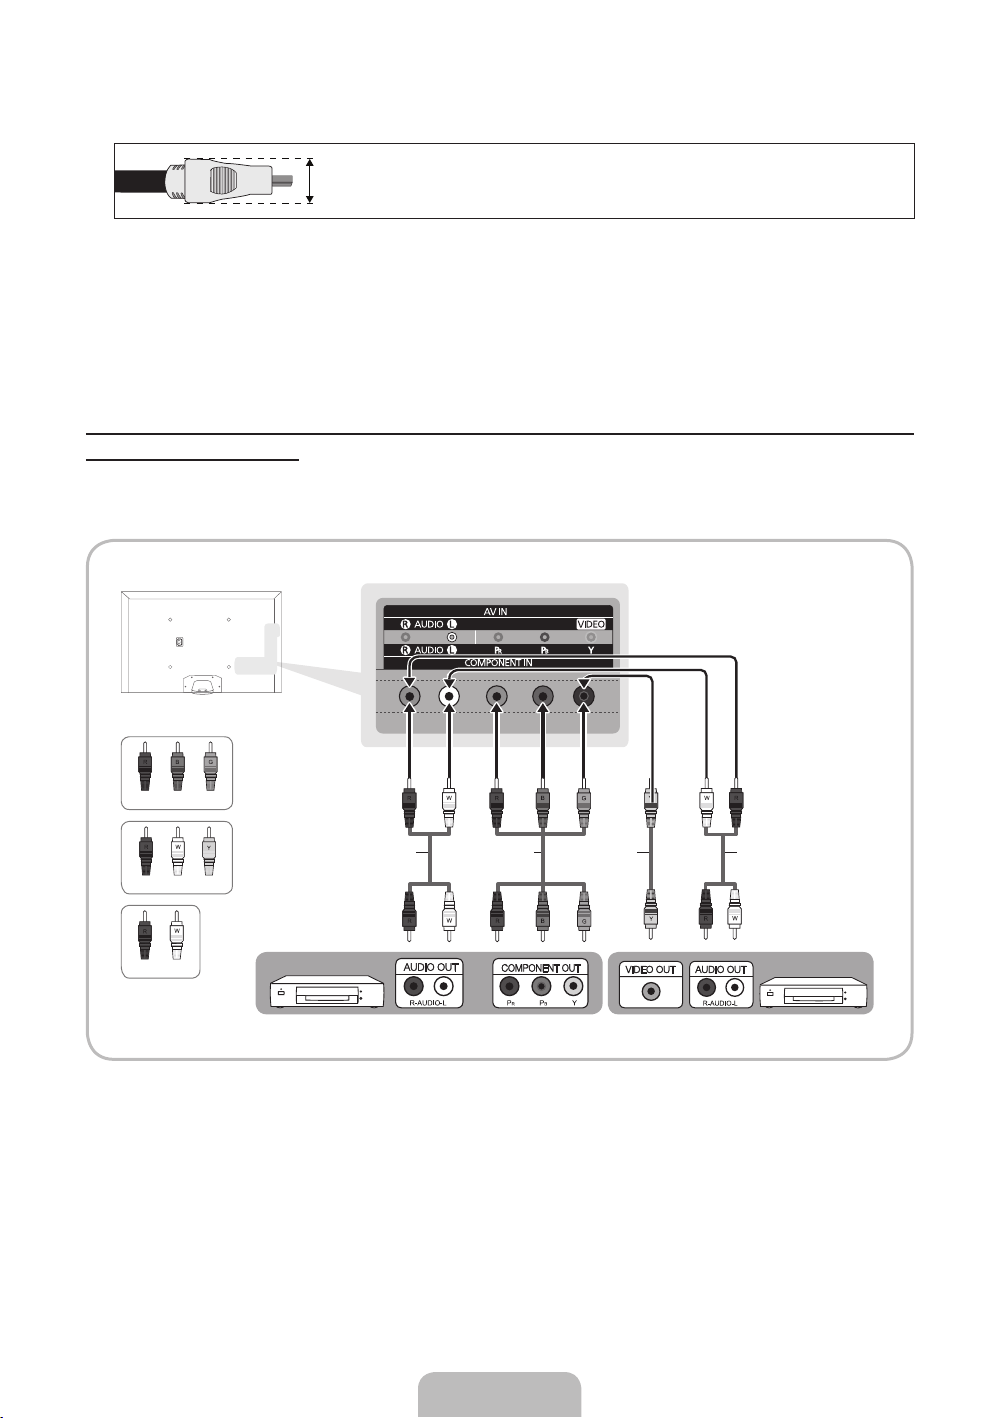
Para obter a melhor conexão a cabo para este produto, use cabos que não sejam mais grossos do
✎
que o cabo ilustrado abaixo:
• Espessura máxima – 14 mm.
Utilização de um cabo Componente (sinais HD de até 1080p) ou um cabo de Áudio/Vídeo (somente
sinais analógicos de 480i)
Utilize com DVD players, Blu-ray players, receptores de TV a cabo e decodificadores de sinais e vídeo
cassetes.
Vermelho
Azul Verde
Cabo de áudio
(não fornecido)
Vermelho
BrancoAmarelo
Vermelho Branco
Para obter a melhor qualidade de imagem, recomendamos a conexão Componente, em vez de A/V.
✎
Ao conectar um cabo de vídeo à entrada AV IN, a cor da entrada AV IN [VIDEO] (verde) será igual à
✎
Dispositivo
Cabo componente
(não fornecido)
Cabo de vídeo
(não fornecido)
Cabo de áudio
(não fornecido)
Dispositivo
cor do cabo de vídeo (amarelo).
Português - 7
Page 61
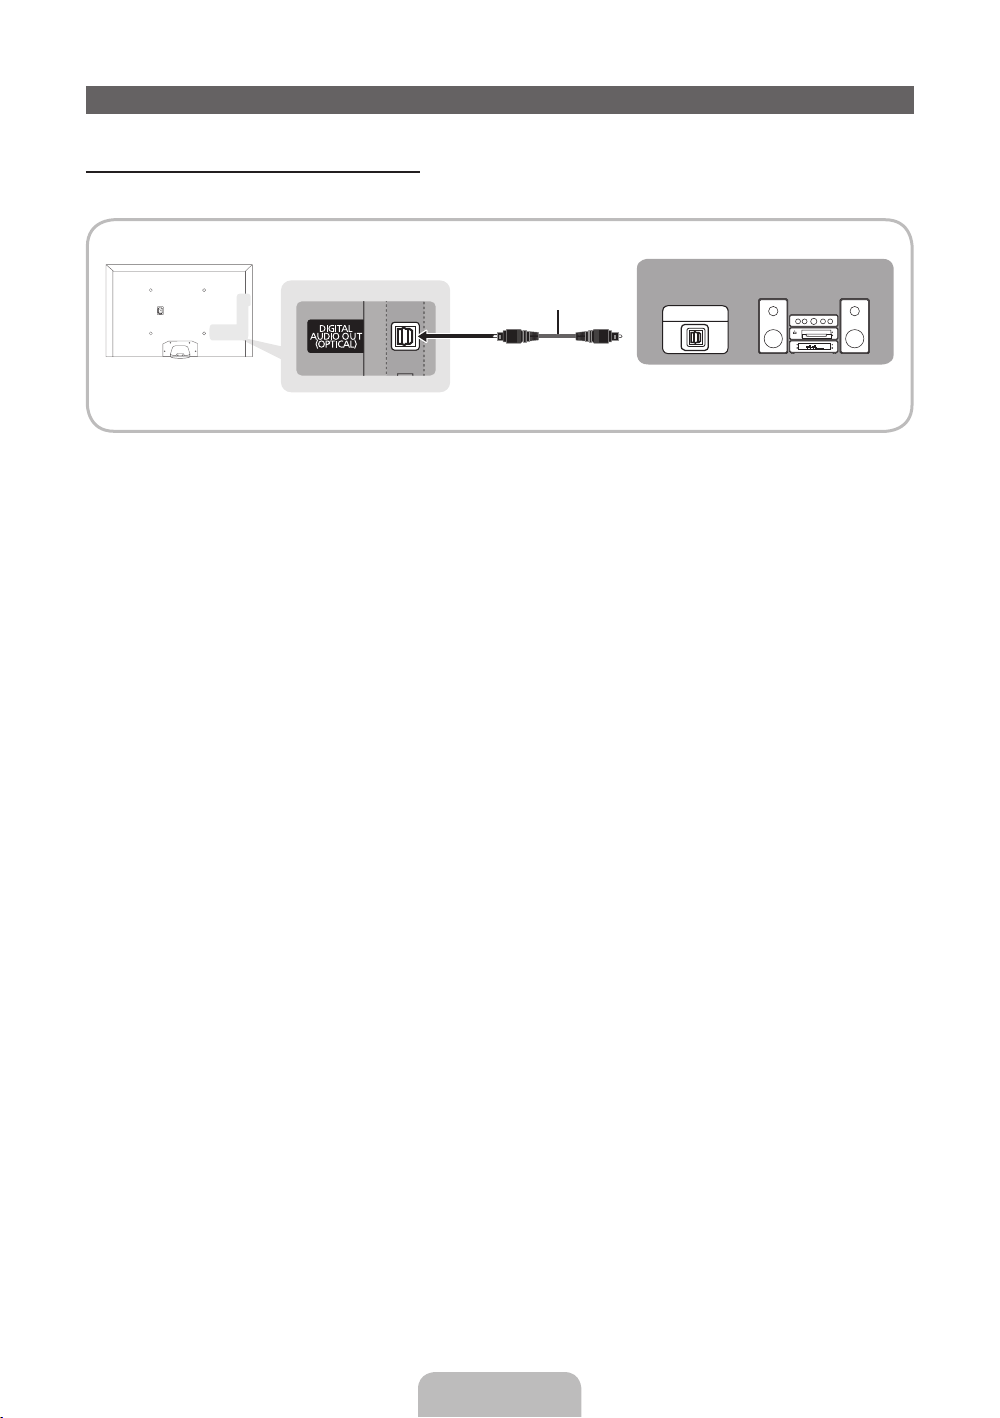
Conexão com dispositivos de áudio
Uso de conexão via cabo óptico (digital)
Uso com sistemas de áudio digital, amplificadores e home theaters.
Sistema de áudio digital
DIGITAL AUDIO OUT (OPTICAL)
✎
Cabo óptico (não fornecido)
OPTICAL
• Quando um sistema de áudio digital for conectado à saída DIGITAL AUDIO OUT (OPTICAL),
reduza o volume da TV e do sistema.
• O áudio de 5.1 canais fica disponível quando a TV é conectada a um dispositivo externo
compatível com 5.1 canais.
• Quando o receptor (home theater) estiver ligado, será possível ouvir a reprodução de som pela
saída óptica da TV. Quando a TV estiver recebendo sinal de DTV, ela enviará som de 5.1 canais
ao receptor do home theater. Quando a fonte é um aparelho digital (DVD player / Blu-ray player /
receptor de TV a cabo / receptor de satélite (decodificador de sinais) conectado à TV via HDMI,
você ouvirá somente som de 2 canais do receptor do home theater. Caso deseje ouvir áudio de
5.1 canais, conecte a saída Digital Audio Out do seu DVD / Blu-ray player / receptor de TV a cabo /
receptor de satélite (decodificador de sinais) diretamente a um amplificador ou home theater.
Português - 8
Page 62
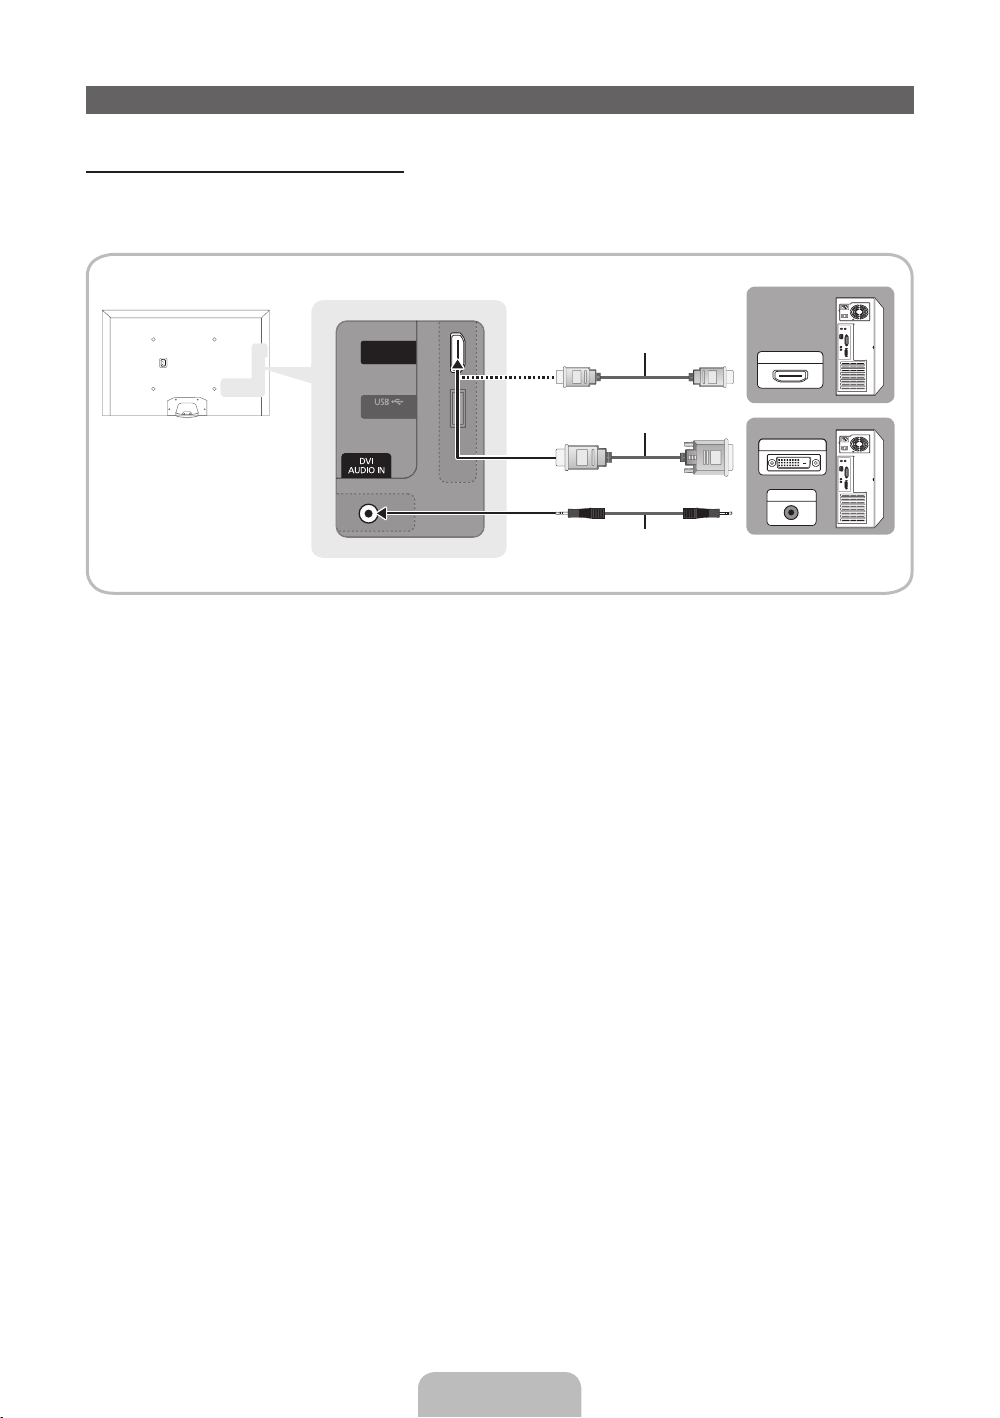
Conexão com um computador
AUDIO OUT
DVI OUT
HDMI OUT
(HDD 5V 1A)
HDMI IN
1
(DVI)
(
HDD 5V 1A)
1 (DVI)
HDMI IN
1
(DVI)
Uso de cabo HDMI ou cabo HDMI/DVI
Seu computador pode não ser compatível com conexão HDMI.
✎
Utilize os alto-falantes do computador para o áudio.
✎
Cabo HDMI (não fornecido)
Cabo HDMI/DVI (não fornecido)
Cabo de áudio (não fornecido)
A resolução ideal é de 1920 x 1080 a 60 Hz. Consulte a página Resolução da tela para verificar todas as
resoluções disponíveis (página 53).
NOTA
✎
• Para uma conexão com cabo HDMI/DVI, é necessário utilizar a entrada HDMI IN 1(DVI).
• Para computadores com saídas de vídeo DVI, utilize um cabo HDMI/DVI para conectar a saída DVI
do computador à entrada HDMI IN 1 (DVI) da TV. Utilize os alto-falantes do computador para o
áudio.
• A entrada do computador (D-Sub) não é suportada.
Português - 9
Page 63
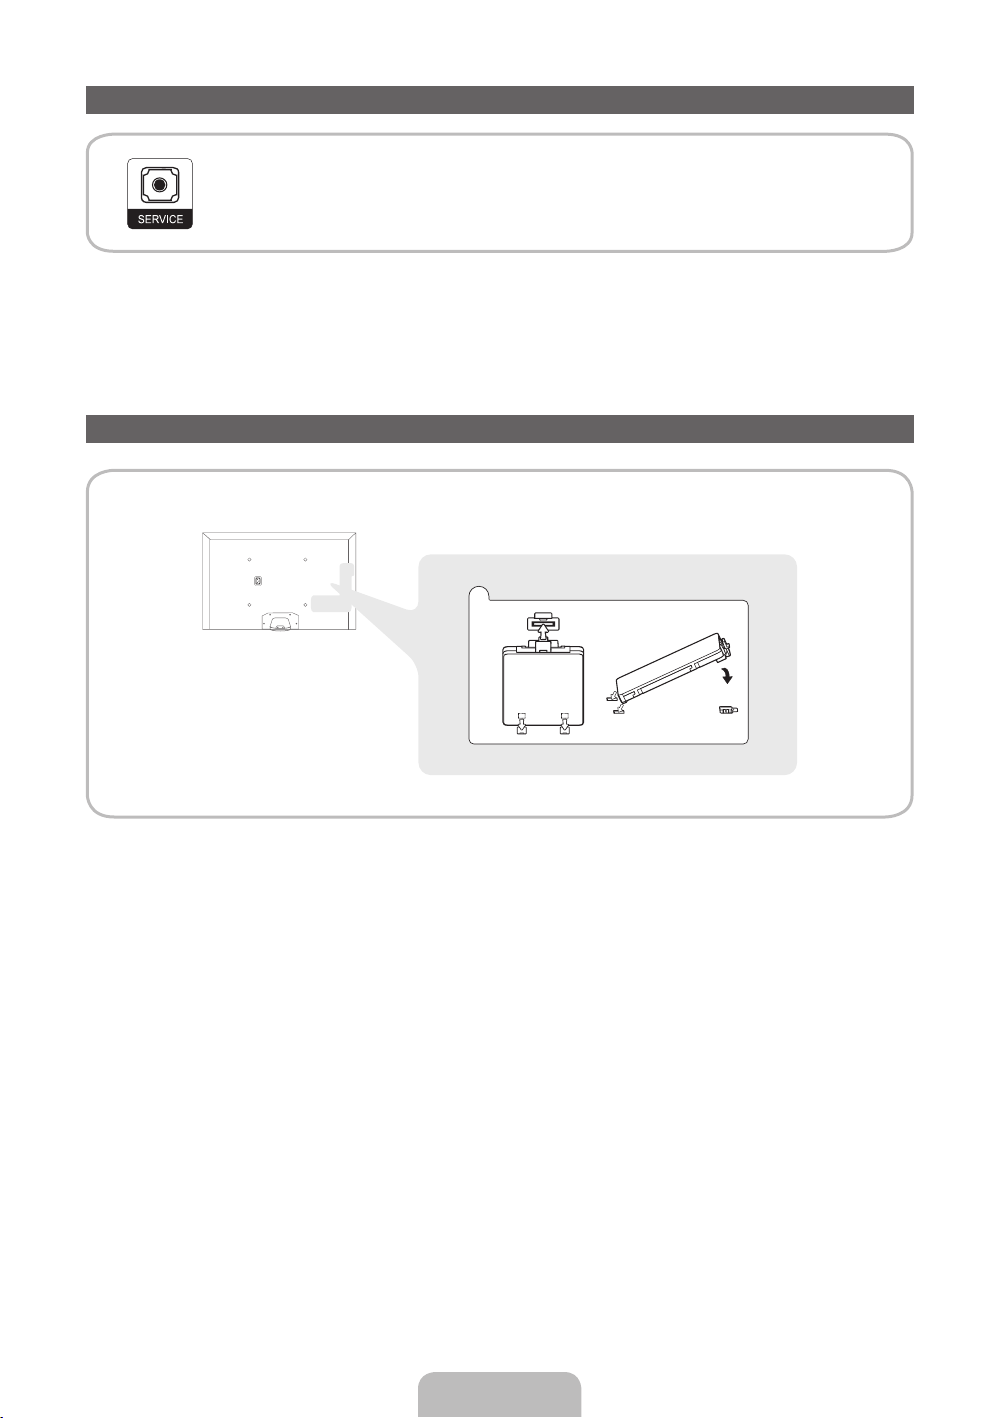
Conectando à entrada de Serviço
SERVICE: Conector apenas para manutenção.
Encaixe do kit Evolution (kit vendido separadamente)
Este soquete é projetado para aceitar um dispositivo de extensão chamado kit Evolution. O kit Evolution
permite que a TV execute uma variedade dos aplicativos mais recentes para oferecer uma experiência de
usuário melhor.
O kit Evolution, que pode não estar disponível dependendo do produto. Será vendido separadamente em
2013 ou em data posterior.
Português - 10
Page 64
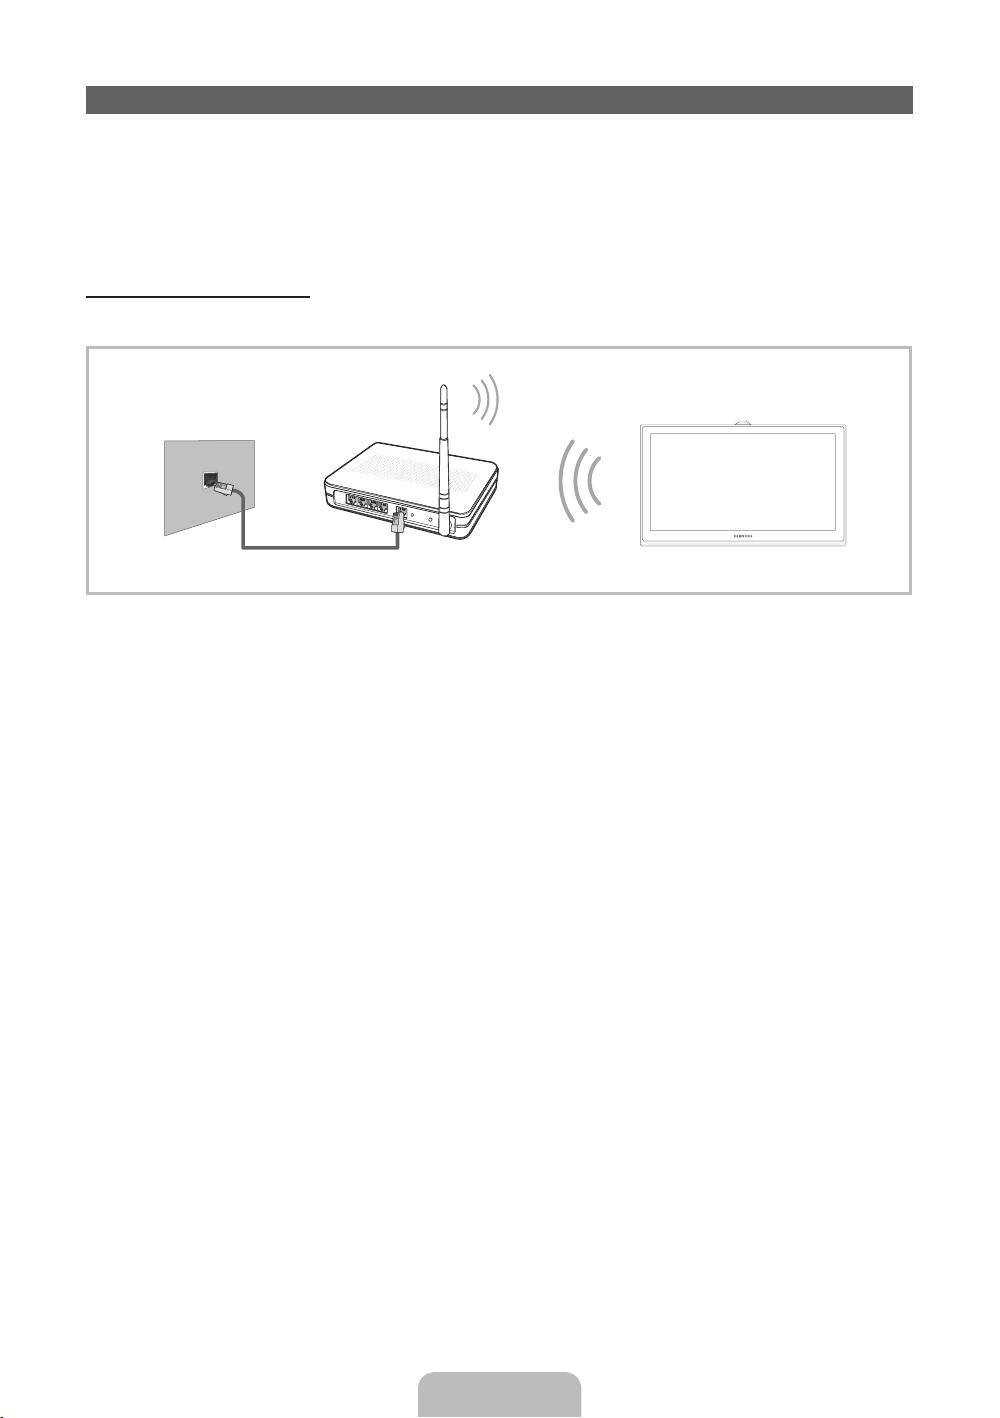
Conexão a uma rede
É possível configurar sua TV para acessar os aplicativos SMART TV através da sua rede local (LAN)
usando conexão a cabo ou sem fio.
Após ter conectado "fisicamente" a TV à rede, é necessário configurar a conexão de rede para
✎
concluir o processo. É possível configurar a conexão durante ou após o processo de configuração
inicial (consulte a página 15), a partir do menu da TV.
Conexão de rede – Sem fio
Você pode conectar a TV à rede local (LAN) por meio de um roteador sem fio ou modem padrão.
Modem ou roteador IP sem fio
Porta LAN na parede
Esta TV é compatível com os protocolos de comunicação IEEE 802.11 a/b/g e n. A Samsung recomenda
a utilização do protocolo IEEE 802.11n. Ao reproduzir um vídeo a partir de uma conexão de rede, o vídeo
pode não ser reproduzido com fluidez.
A maioria dos sistemas de rede sem fio tem um sistema de segurança que exige que os dispositivos que
acessam a rede por meio de um ponto de acesso (um PA), um roteador IP sem fio ou um modem sem fio
transmitam um código de segurança criptografado chamado de chave de acesso.
Sua TV é compatível com os seguintes protocolos de segurança:
• Modo de autenticação: OPEN, SHARED, WPAPSK, WPA2PSK
• Tipo de criptografia: WEP, TKIP, AES
Se o modo Transmissão Elevada Pura (Ambiente intacto) 802.11n for selecionado e o tipo de criptografia
for configurado como WEP ou TKIP em seu ponto de acesso ou roteador sem fio, as TVs Samsung não
serão compatíveis com uma conexão que esteja em conformidade com as novas especificações da
certificação de Wi-Fi.
que possui um servidor DHCP
Cabo de rede (não fornecido)
Português - 11
Page 65
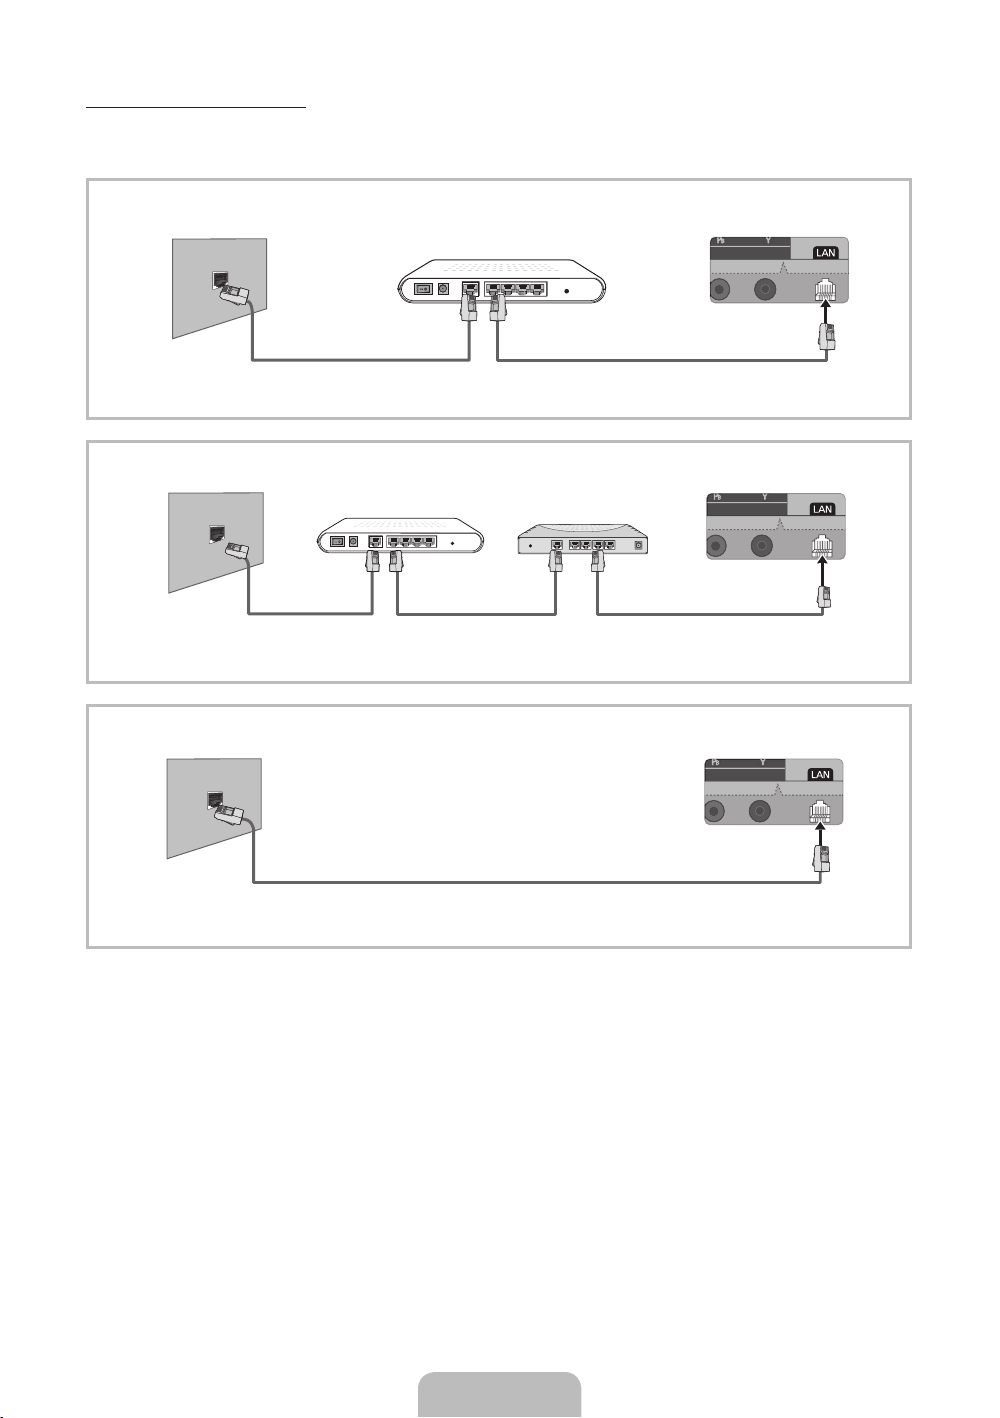
Conexão de rede – A cabo
Há três maneiras principais para conectar sua TV à rede usando o cabo, dependendo da configuração da
rede. Elas estão ilustradas abaixo:
Porta do modem na parede Painel traseiro da TV
Porta do modem na parede
Cabo do modem
(não fornecido)
Porta LAN na parede Painel traseiro da TV
Modem externo
(ADSL / VDSL / TV a cabo)
Modem externo
(ADSL / VDSL / TV a cabo)
Cabo de rede (não fornecido)Cabo do modem (não fornecido)
Roteador IP que possui
um servidor DHCP
Cabo de rede
(não fornecido)
Painel traseiro da TV
Cabo de rede
(não fornecido)
Cabo de rede (não fornecido)
A TV não é compatível com velocidades de rede menores ou iguais a 10 Mbps.
✎
Utilize um cabo Cat. 5 (tipo STP*) para a conexão. (*Par torcido com proteção)
✎
Português - 12
Page 66
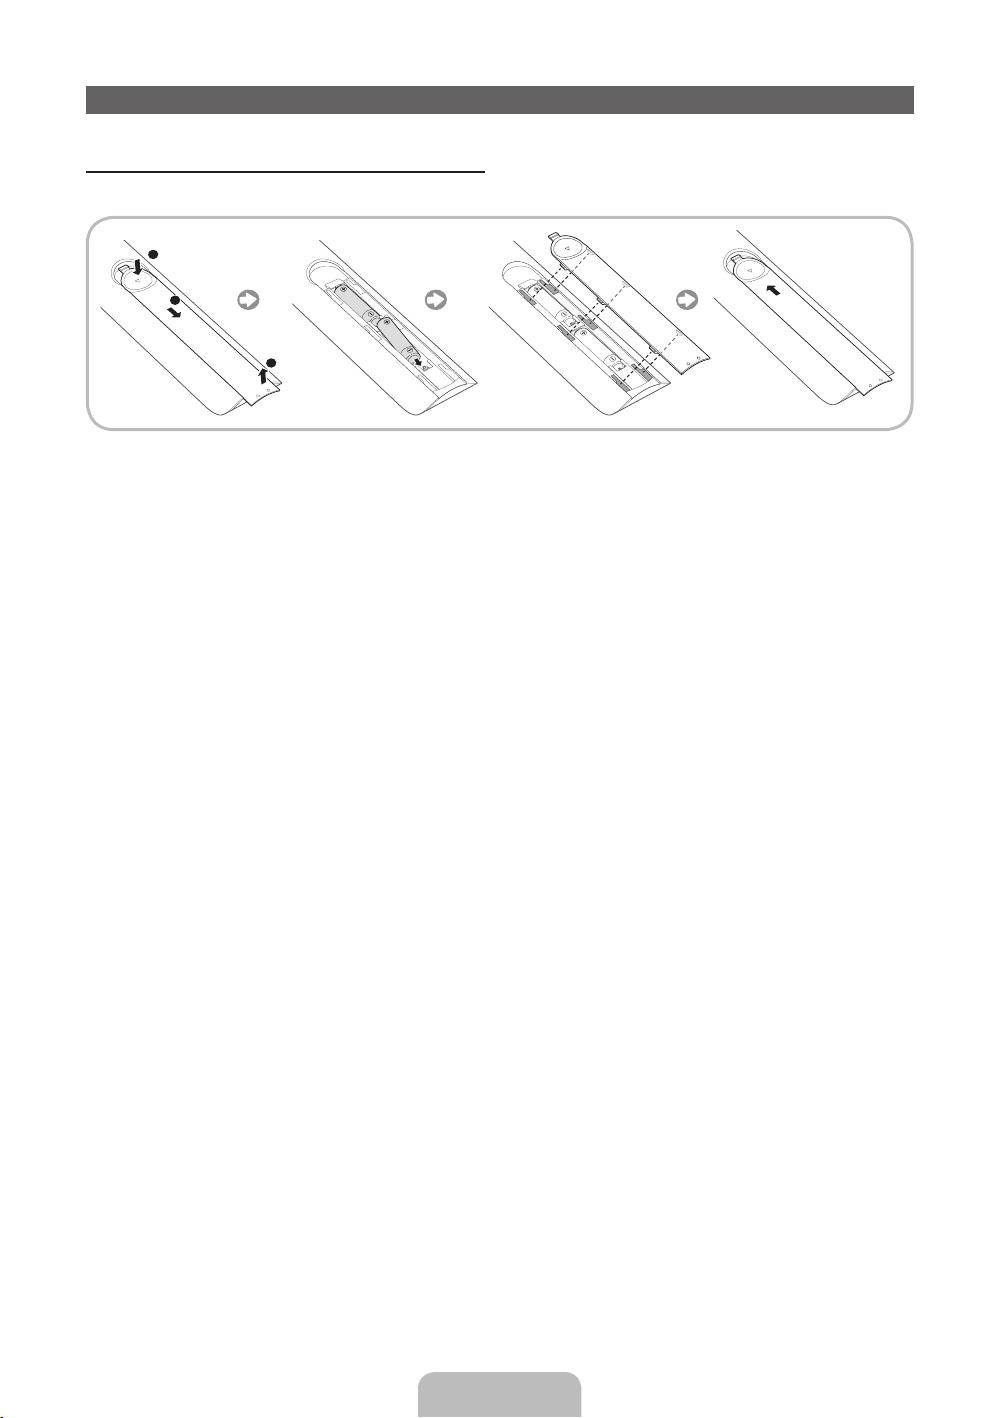
Controle remoto padrão
Instalação das pilhas (tamanho das pilhas: AAA)
Faça com que a polaridade das pilhas corresponda aos símbolos no compartimento.
1
2
3
Sua TV também possui um Smart Touch Control. Para obter informações sobre o Smart Touch
✎
Control, consulte a página 24.
NOTA
✎
• Coloque as pilhas de modo que a polaridade delas (+/-) corresponda à ilustração no
compartimento.
• Utilize o controle remoto a uma distância de 7 metros da TV.
• Luzes brilhantes podem afetar o desempenho do controle remoto. Evite utilizá-lo próximo a luzes
fluorescentes ou letreiros de neon.
• A cor e o formato do controle remoto podem variar, dependendo do modelo.
Português - 13
Page 67
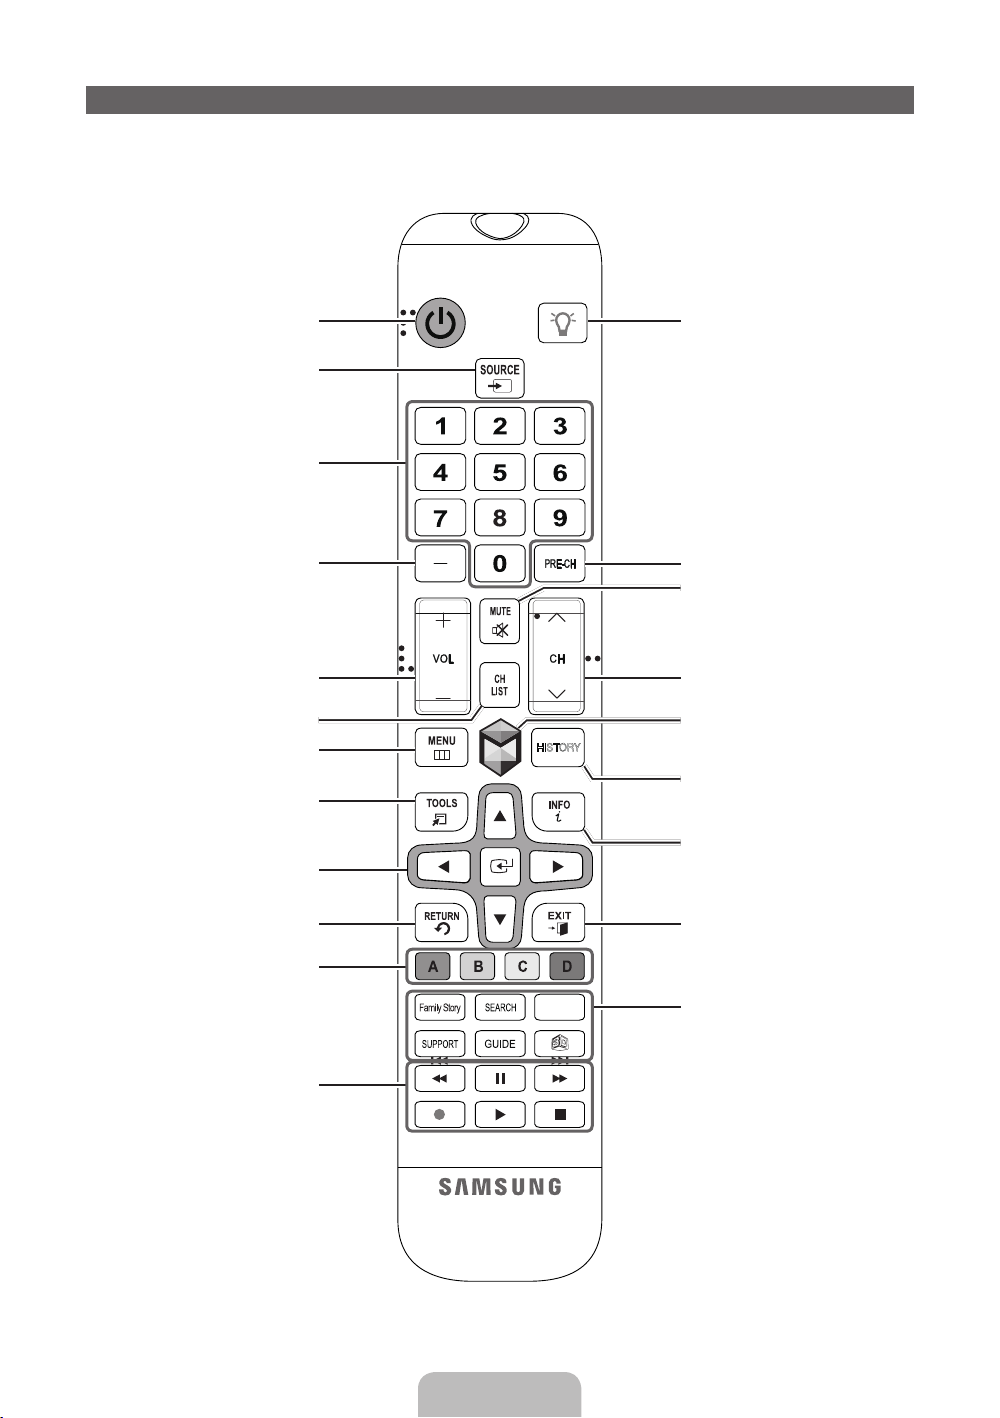
Botões do controle remoto padrão
Este controle remoto tem pontos de braille nos botões Ligar/desligar, Canal e Volume, e pode ser
✎
usado por pessoas com deficiência visual.
Liga e desliga a TV.
Exibe e seleciona as fontes de vídeo
disponíveis. (página 19)
Dá acesso direto aos canais.
Pressione para selecionar mais canais
digitais transmitidos pela mesma
estação digital. Por exemplo, para
selecionar o canal "54.3", pressione "54"
e, em seguida, "-" e "3".
Ajusta o volume.
Exibe a lista de canais na tela.
Abre o menu na tela.
Seleciona rapidamente funções
utilizadas com frequência. Utilize esse
botão em um recurso específico.
Move o cursor, seleciona os itens do
menu na tela e altera os valores vistos
no menu.
Retorna ao menu anterior.
HISTORY
Liga ou desliga a iluminação do controle
remoto. Quando ligado, os botões se
iluminam por um momento ao serem
pressionados. (O uso do controle remoto
com esse botão ligado reduzirá o tempo
de uso das pilhas.)
Volta ao canal anterior.
Elimina o som temporariamente.
Muda os canais.
Acessa os aplicativos do Smart
Hub. Consulte o capítulo Recursos
avançados → Smart Hub no e-Manual.
Exibe uma lista de funções utilizadas
recentemente. Você pode selecionar
uma função novamente de forma fácil
e rápida.
Exibe informações na tela da TV.
Sai do menu.
Utilize esses botões de acordo com as
direções na tela.
Utilize esses botões em um recurso
específico. Para obter detalhes, consulte
o e-Manual.
CAMERA
Português - 14
Family Story: Conecta ao aplicativo
Family Story. Consulte o capítulo
Funções Avançadas → Family Story no
e-Manual.
SEARCH: Inicia a função de busca
e a palavra de busca recomendada.
Consulte o capítulo Recursos
avançados → Busca no e-Manual.
CAMERA: Conecta a um aplicativo de
câmera.
SUPPORT: Permite o uso de várias
funções de suporte, incluindo o
e-Manual. (página 43)
GUIDE: Apresenta o EPG (Electronic
Program Guide).
X
: Liga ou desliga a imagem 3D.
Consulte o capítulo Funções Avançadas
→ 3D no e-Manual.
Page 68

Configuração Inicial
Quando a TV for ligada pela primeira vez, uma sequência de telas e avisos será exibida para ajudá-lo a
definir as configurações básicas da TV. Conecte o cabo de alimentação em uma tomada e pressione o
botão P para ligar a TV.
Utilize o controle remoto padrão para executar a configuração inicial.
✎
A Configuração está disponível somente quando a fonte de entrada estiver definida como TV.
✎
Consulte "Alteração da fonte de entrada" (página 19).
Para voltar ao passo anterior na sequência de Configuração, selecione Anterior.
✎
Caso não esteja usando um receptor de TV a cabo ou satélite, certifique-se de que conectou a TV a
✎
uma antena ou conexão de cabo antes de ligá-la. Consulte a página 5 para instruções.
Caso deseje configurar uma conexão de rede a cabo durante a Configuração, certifique-se de ter
✎
conectado um cabo de rede à TV. Consulte a página 12 para instruções. Caso deseje configurar uma
conexão de rede sem fio durante a Configuração, certifique-se de que o modem ou roteador sem fio
está ligado e funcionando.
Menu Idioma: Seleção
1
de um idioma.
Modo de Uso: Seleção
2
do modo Casa.
Configurações de
3
Rede: Definição das
configurações de rede
Para configurar em
✎
outro momento,
selecione Ignorar.
Você pode configurar
a conexão de rede
em outro momento a
partir do menu de tela
Rede.
Após pressionar o botão P, a tela inicial será exibida. Selecione
Avançar para continuar. A tela de idioma do menu será exibida.
Escolha o idioma para o menu com o controle remoto e, em
seguida, selecione Avançar. A TV exibirá menus de tela no idioma
selecionado, iniciando com o próximo passo no processo de
Configuração.
Na tela Modo de Uso, selecione o modo Casa com o controle
remoto e, em seguida, selecione Avançar. A tela configurações de
rede será exibida.
O modo Loja somente deve ser utilizado por lojas. Caso
✎
selecione Loja, algumas funções não funcionarão e a TV
restaurará todas as funções ao padrão de fábrica após um
determinado período. Para obter mais informações sobre o
modo Loja, vá para o final desta seção.
Para definir as configurações de rede, selecione Avançar com o
controle remoto e, em seguida, vá para 3A – Rede sem fio ou 3B –
Rede a cabo na próxima página.
Se você não souber as informações para configurar sua rede ou
quiser configurá-las em outro momento ou, ainda, se não tiver uma
rede, selecione Ignorar e vá para 5 - Prog. Automática (1), na
página 17.
Para configurar a rede em outro momento, consulte “Configuração
de rede a cabo ou sem fio”, no e-Manual, ou consulte as seções de
conexão de rede neste manual (páginas 11 e 41).
Português - 15
Page 69

3
Rede Sem Fio 1. A TV buscará todas as redes sem fio no alcance e as exibirá. Ao
a
fim da busca, será exibida uma lista de redes. Na lista de redes,
mova o item realçado para escolher uma rede e, em seguida,
selecione Avançar. Caso a rede selecionada requeira uma
chave de segurança, a tela Chave seg será exibida.
Caso possua um roteador compatível com WPS(PBC),
✎
selecione WPS(PBC) e, em seguida, siga as instruções
exibidas na tela. Ao terminar, vá para o passo 4.
2. Digite a chave de segurança de sua rede ou senha WPS com o
controle remoto.
Digite os números e letras com o controle remoto.
✎
• Caso esteja usando o controle remoto padrão, é possível
digitar números pressionando os botões numéricos no
controle remoto.
• Para digitar uma letra, mova o item realçado até a letra e,
em seguida, selecione-a. É possível digitar números da
mesma forma, se desejar.
Para exibir letras maiúsculas (ou voltar a exibir minúsculas
✎
caso as maiúsculas estejam sendo exibidas), selecione
Caps ou Shift.
Para exibir símbolos e pontuação, selecione 1F. Para voltar
✎
a exibir letras, selecione 1F novamente.
3. Ao terminar, selecione Avançar caso já tenha digitado uma
chave de segurança ou Senha WPS caso já tenha digitado uma
senha WPS.
4. A TV verificará a conexão sem fio. Caso a conexão seja
realizada com sucesso, a mensagem Você está conectado à
Internet. Se você tiver algum problema usando os serviços
on-line, contate o seu Provedor de acesso à Internet. será
exibida. Selecione Avançar e, em seguida, vá para o passo 4
Atualização de SW .
Em caso de falha na conexão, selecione Anterior, repita os
✎
passos 1 e 2, digite novamente sua chave de segurança
ou senha WPS com atenção e, em seguida, repita os
passos 3 e 4. Em caso de nova falha, selecione Avançar
na tela “Falha na conexão” e, em seguida, vá para o passo
5 – Prog. Automática (1) na próxima página. Configure
sua rede em outro momento por meio de Configurações
de Rede no menu da TV. Para mais informações, consulte
"Configuração de rede a cabo ou sem fio", no e-Manual,
ou consulte as seções de conexão de rede neste manual
(páginas 11 e 41).
3
Rede a Cabo A TV verificará a conexão de rede e, em seguida, a mensagem
b
Você está conectado à Internet. Se você tiver algum problema
usando os serviços on-line, contate o seu Provedor de acesso
à Internet. será exibida. Selecione Avançar. A tela Atualização de
SW será exibida.
Português - 16
Page 70

Atualização de SW:
4
Atualização do software
para a última versão.
Para atualizar em
✎
outro momento,
selecione Ignorar.
Quando as Configurações de Rede estiverem completas, a TV
automaticamente verificará se existe uma nova versão do software.
Caso haja um novo software disponível, a TV fará o download e o
instalará. Quando o download terminar, selecione Avançar.
Se desejar atualizar em outro momento, selecione Ignorar.
✎
Para mais informações, consulte Atualização de Software
(Funções preferenciais → Menu de suporte), no e-Manual.
Isso pode levar algum tempo, dependendo do status da rede.
✎
Só será possível atualizar o software se sua TV tiver uma
✎
conexão de rede ativa.
Se nenhum software de atualização novo estiver disponível,
✎
será exibida na tela uma mensagem com a informação de que
não existem atualizações novas. Selecione OK.
Prog. Automática (1):
5
Seleção da origem do
sinal da TV.
Prog. Automática (2):
6
Seleção das opções de
busca.
Selecione a opção adequada à sua TV com o controle remoto e
selecione Avançar.
• Sim, eu preciso.: Selecione se você tiver uma conexão com
antena ou cabo sem um decodificador de sinais. Ao selecionar
essa opção, vá para o passo 6 – Prog. Automática (2).
• Não, eu não preciso.: Selecione se você tiver um decodificador
de sinais ou receptor de satélite. Não é necessário executar
a Prog. Automática. Caso selecione essa opção, vá para o
passo 8 – Relógio na próxima página.
1. Selecione Ar ou Cabo com o controle remoto. A opção
selecionada será marcada. Ao terminar, selecione Avançar.
É possível selecionar as duas opções se ambas estiverem
conectadas.
2. Ao terminar, selecione Avançar.
Português - 17
Page 71
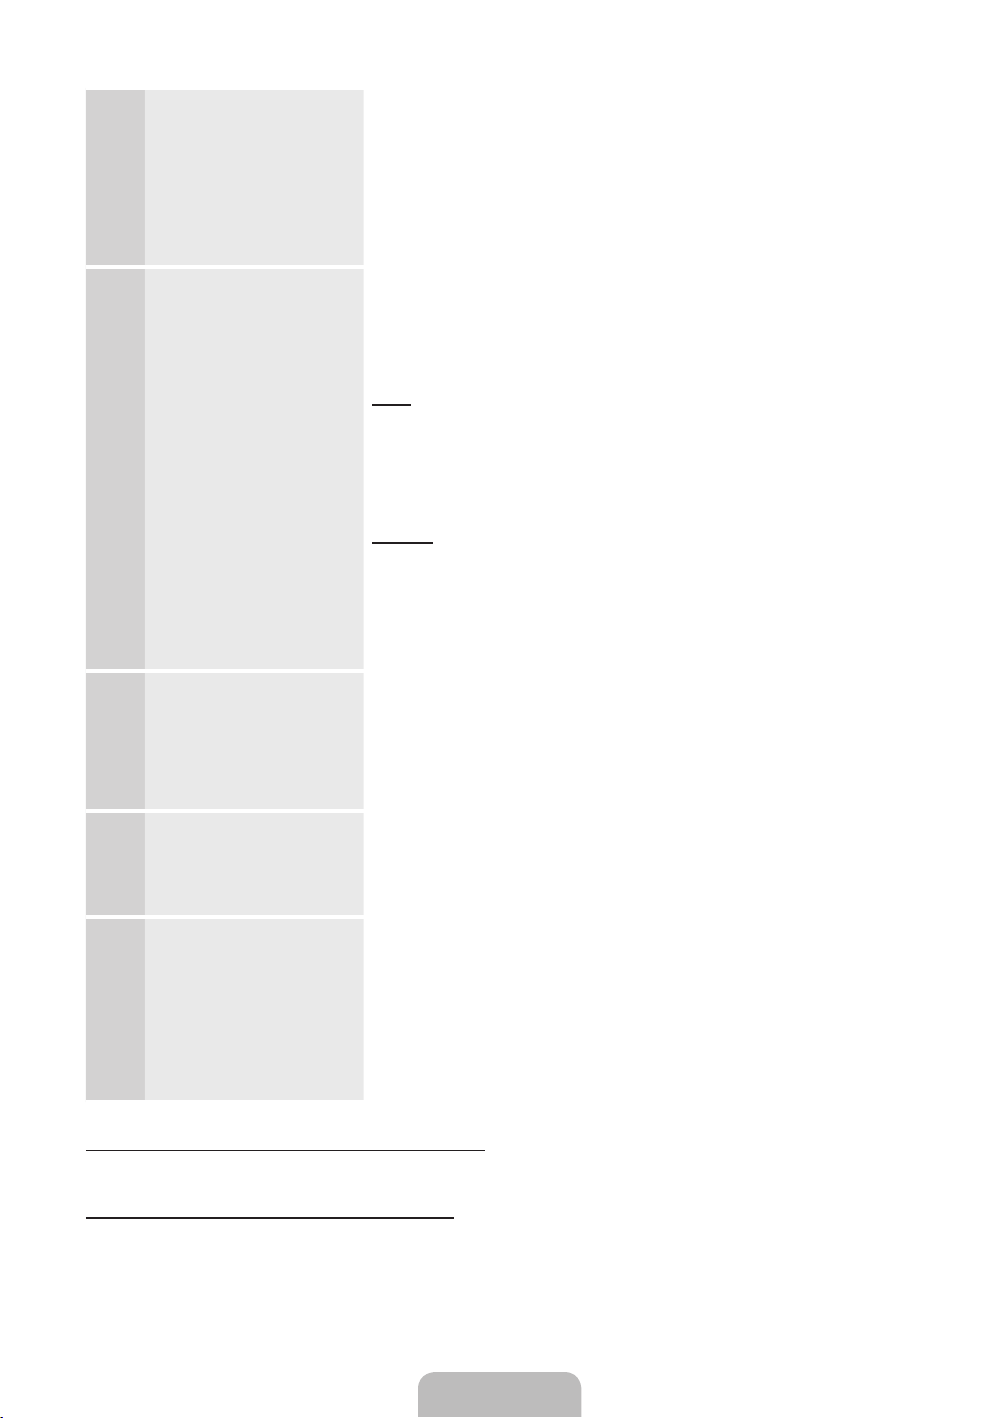
Prog. Automática (3):
7
Memorização de canais
A memorização de canais é iniciada. Esse processo pode levar até
45 minutos, dependendo do seu sistema a cabo.
Para mais informações, consulte Prog. Automática (Menu Canal →
Memorização de canais), no e-Manual.
Selecione Parar a qualquer momento para interromper o
✎
processo de memorização.
Relógio: Ajuste do
8
relógio
Controle por Voz
9
e Movimentos:
Configuração da função
Controle por Voz e
Movimentos.
Configuração:
10
Conclusão
Selecione Auto ou Manual e selecione Avançar.
Se tiver selecionado Não, eu não preciso. em 5 - Prog.
✎
Automática (1), somente será possível configurar a hora e a
data atuais manualmente, com o controle remoto.
Auto
Caso tenha selecionado Auto, a TV baixará automaticamente a
hora certa a partir de um canal digital. Dependendo do país, a tela
Fuso Horário será exibida. Selecione seu Fuso Horário e então
selecione Avançar.
Manual
Se tiver selecionado Manual, você será direcionado para a tela
Relógio. Selecione Data ou Hora. É possível configurar a hora e a
data atuais com o controle remoto. Quando terminar de configurar
Data e Hora, selecione Avançar.
É possível ativar ou desativar a função Controle por Voz e
Movimentos. Selecione Deslig. ou Ligado e selecione Avançar.
Revise os dados da configuração e, em seguida, selecione Fechar
para concluir.
As configurações concluídas serão exibidas.
✎
Configurar o controle
11
remoto universal
Caso deseje executar Configuração novamente.
Menu → Sistema → Configuração
Caso deseje configurar o modo Loja Deslig..
• Para cancelar o modo Loja, acesse o menu Função com o controle, mova o controle para a direita
(para Entrada (s)) mantenha-o pressionado por mais de 5 segundos. Consulte a página 22 para
mais informações sobre o controle.
• Selecione Sistema – Configuração (Configuração Inicial). Insira sua senha de 4 dígitos. A senha
padrão é “0-0-0-0”. Se quiser alterar a senha, utilize a função Mudar Senha.
1. Pressione o interruptor POWER na parte inferior do IR Blaster e,
em seguida, pressione o botão PAIRING.
2. Selecione Sim para iniciar a configuração do controle remoto universal.
Para obter informações mais detalhadas sobre a configuração
✎
do controle remoto universal, consulte a seção "Configuração
do controle remoto universal" no manual (página 30).
Português - 18
Page 72

Alteração da fonte de entrada
Entrada
™ → Entrada
Quando estiver assistindo TV e quiser assistir a um filme no seu DVD player, ou Blu-ray player, ou mudar
para o seu receptor de TV a cabo ou satélite, será necessário alterar a entrada.
■ TV / HDMI1/DVI / HDMI2 / HDMI3 / AV / Componente
1. Pressione o botão ™ no controle remoto. A tela Smart Hub será exibida.
2. Selecione Entrada. A tela Entrada será exibida.
3. Selecione a fonte de entrada externa desejada.
Como alternativa, é possível acessar a tela Entrada selecionando o botão SOURCEs no controle
✎
remoto padrão ou selecionado Entrada com o Smart Touch Control (consulte a página 24).
Só é possível escolher entre os dispositivos externos que estão conectados à TV. Na lista Entrada
✎
exibida, as entradas conectadas estão realçadas.
Editar Nome
Editar Nome permite associar um nome de dispositivo a uma fonte de entrada. Para acessar Editar
Nome, abra o menu Ferramentas quando a lista Entrada for exibida. As opções a seguir são exibidas em
Editar Nome:
■ VCR / DVD / Sinal Cabo / Sinal Satélite / PVR STB / Receptor AV / Jogos / Filmadora / PC / DVI
PC / Dispositivos DVI / TV / IPTV / Blu-ray / HD DVD / DMA: Selecione uma entrada e, em seguida,
selecione o nome do dispositivo conectado a essa entrada na lista que será exibida. Por exemplo, se o
Blu-ray player estiver conectado à porta HDMI IN 2, selecione Blu-ray para essa entrada.
Se você conectar um computador à porta HDMI IN 1 (DVI) com um cabo HDMI, defina PC para
✎
HDMI1/DVI em Editar Nome.
Se você conectar um computador à porta HDMI IN 1 (DVI) com um cabo HDMI/DVI, defina DVI PC
✎
para HDMI1/DVI em Editar Nome.
Se você conectar um dispositivo AV à porta HDMI IN 1 (DVI) com um cabo HDMI/DVI, defina
✎
Dispositivos DVI para HDMI1/DVI em Editar Nome.
Informação
Permite ver informações detalhadas sobre o dispositivo externo selecionado.
Atualizar
Caso os dispositivos externos não estejam exibidos na lista Entrada, abra o menu Ferramentas e, em
seguida, selecione Atualizar. A lista exibirá todos os dispositivos conectados.
Como alternativa, é possível atualizar a lista Entrada ao selecionar a com o controle remoto.
✎
Português - 19
Page 73
Auto Inic. Ser. Dados (somente para o Brasil)
Permite que o usuário use as informações (texto, imagens estáticas, gráficos, documentos, software, etc.)
transmitidas por meio de mídia de difusão. Se o canal assistido no momento fornecer serviços de dados, é
possível usufruir diversos serviços de dados.
Menu → Sistema → Auto Inic. Ser. Dados
Auto Inic. Ser. Dados (Ligado / Deslig.)
Define se o serviço de dados será executado automaticamente ou não. O Auto Inic. Ser. Dados executa
o serviço de dados automaticamente, sem intervenção do usuário.
1. Se o Auto Inic. Ser. Dados estiver definido como Ligado, o serviço de dados será executado
automaticamente com uma barra de progresso.
2. Pressione o botão OK(E) e a tela do serviço de dados será exibida.
3. Selecione a opção desejada com o controle remoto na tela Serviço de Dados. O serviço selecionado
será iniciado.
4. Se você selecionar Sair com o controle remoto, o serviço de dados será fechado.
Se alguma outra função secundária estiver em andamento, o Auto Inic. Ser. Dados pode não
✎
funcionar, uma vez que as informações do serviço de dados podem variar dependendo da
transmissão.
Botões dos principais serviços de dados e suas funções
▲ / ▼ / ◄ / ►
OK Executa um item selecionado.
EXIT Interrompe um Auto Inic. Ser. Dados em execução.
As operações podem variar de acordo com o fornecedor de serviços.
✎
Move o menu do Auto Inic. Ser. Dados para cima, baixo, esquerda ou direita.
Português - 20
Page 74
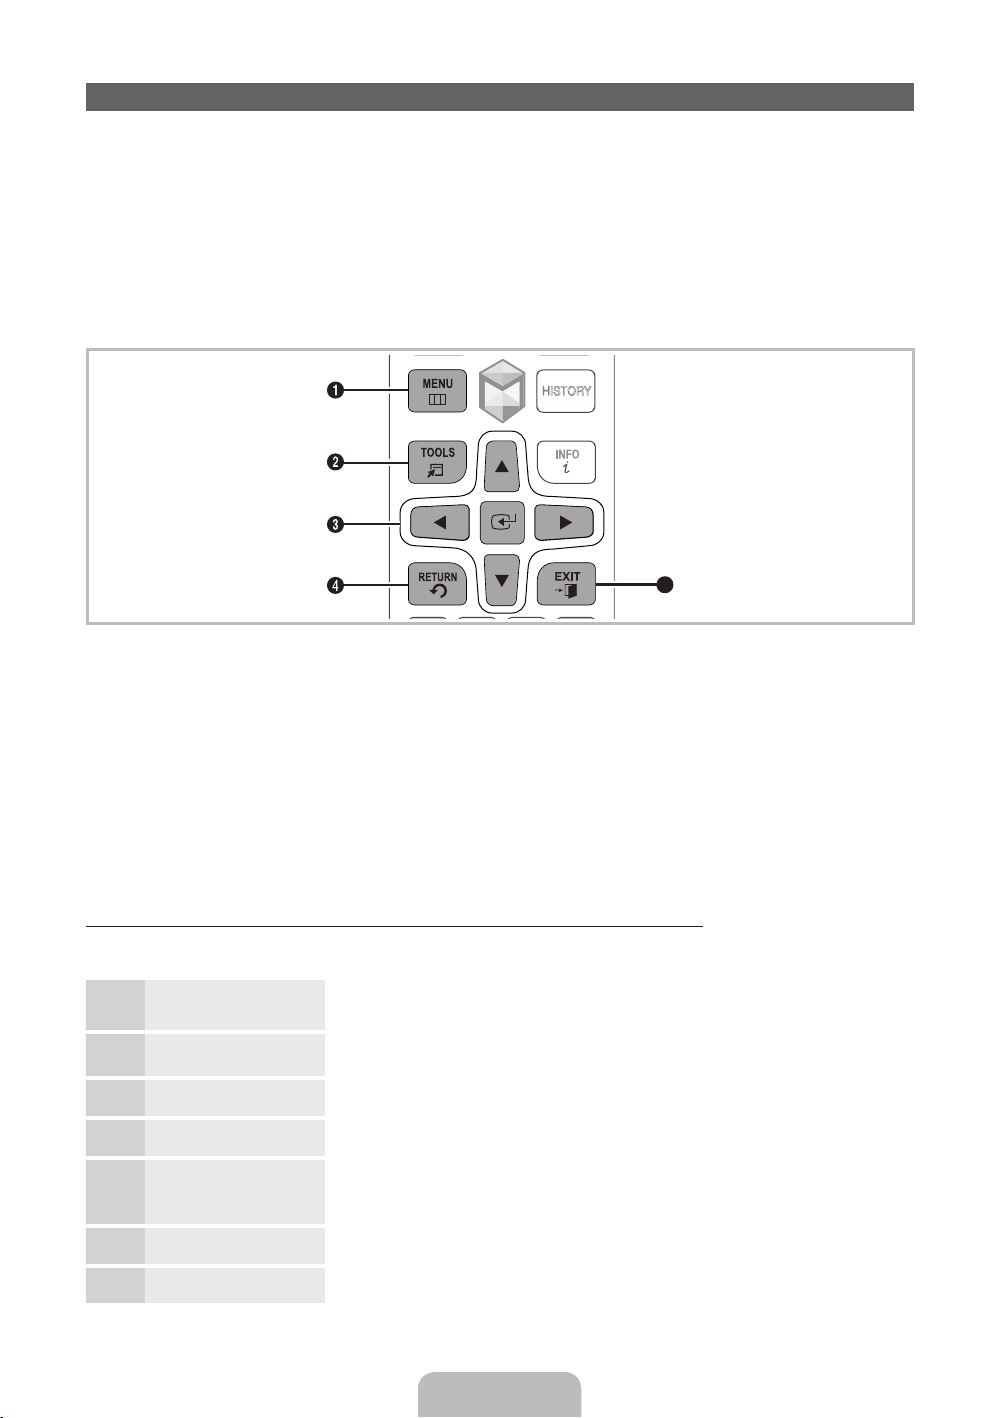
Como navegar pelos menus
HISTORY
Os menus Principal e Ferramentas da TV contêm funções que permitem controlar as funções da TV. Por
exemplo, o menu Principal permite alterar o tamanho e a configuração da imagem, seu brilho, contraste,
etc. Também há funções que permitem controlar o áudio da TV, a configuração dos canais, utilização de
energia e várias outras funções. Para acessar o menu de tela Principal, pressione o botão MENUm no
controle remoto. Para acessar o menu Ferramentas, pressione o botão TOOLST. O menu Ferramentas
está disponível quando o ícone do menu TOOLST é exibido na parte inferior direita da tela.
A ilustração abaixo exibe os botões do controle remoto padrão que são usados para navegar pelos menus
e selecionar ou ajustar as diferentes funções. Para obter informações sobre como usar o Smart Touch
Control, consulte a página 24.
5
1 Botões MENUm: Exibe o menu de tela Principal.
2 Botões TOOLST: Exibe o menu Ferramentas, quando disponível.
3 Botões E e de direção: Use os botões de direção para mover o cursor e realçar um item. Use o
botão Enter para selecionar um item ou confirmar a configuração.
4 Botões RETURNR: Volta ao menu anterior.
5 Botões EXITe: Sai do menu de tela.
Operação do menu principal (menu de tela) com o controle remoto padrão
Os passos de acesso podem ser diferentes dependendo da opção de menu selecionada.
MENUm
1
u / d
2
E Pressione E para acessar os submenus.
3
u / d Selecione o submenu desejado utilizando o botão u ou d.
4
u / d / l / r Ajuste o valor de um item com o botão l, r, u ou d. Os passos para
5
E Pressione E para confirmar a seleção.
6
EXITe Pressione EXITe.
7
As opções do menu Principal são exibidas na tela:
Imagem, Som, Canal, Rede, Sistema, Suporte.
Selecione uma opção do menu Principal no lado esquerdo da tela com o
botão u ou d.
ajuste do menu na tela podem ser diferentes dependendo do menu
selecionado.
Português - 21
Page 75
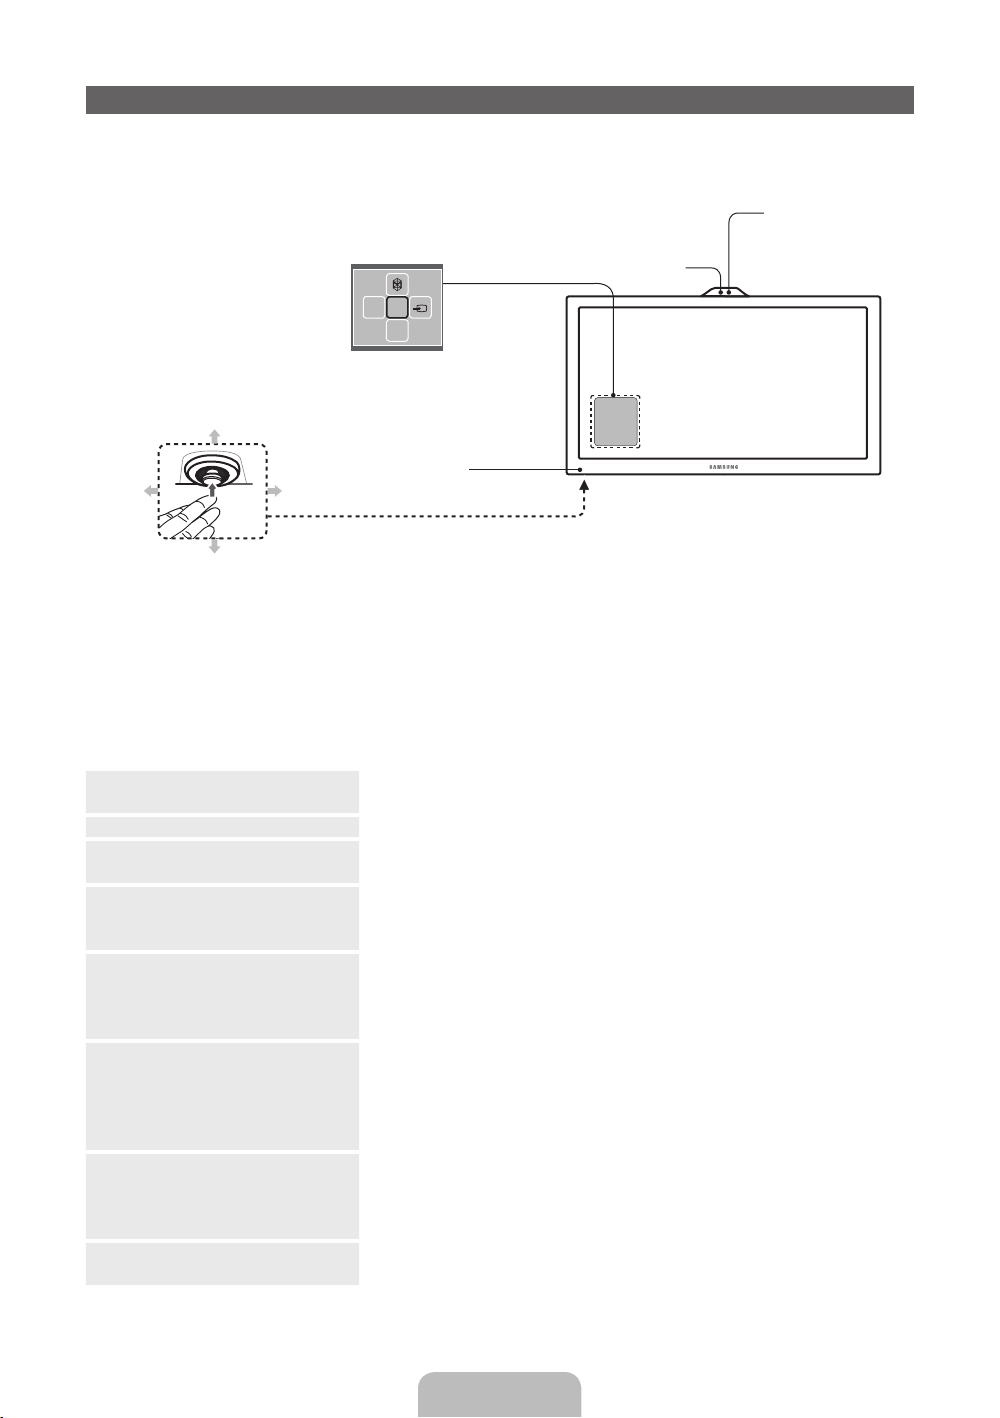
Uso do controle da TV
A cor e o formato do produto podem variar, dependendo do modelo.
✎
O controle da TV, um pequeno joystick em formato de botão no canto inferior esquerdo da TV,
✎
permite que controle a TV sem o controle remoto.
Menu de funções
mR
P
Para baixo (Frente)
Sensor do controle remoto
Esquerda
Para cima (Trás)
Siga estas instruções enquanto estiver de frente para a tela de TV.
✎
Ao usar uma câmera de TV, você deve verificar se há uma fita presa na parte posterior da câmera
✎
Direita
Câmera
de TV. Em seguida, é possível usar a câmera de TV após ajustar seu ângulo. Quando não desejar
usar uma câmera de TV, recomendamos utilizar uma lente voltada para cima. Nesse caso,
Reconhecimento facial e Controle por Movimentos não ficará disponível.
Ao mover o controle para cima/baixo/esquerda/direita para selecionar a função, não o pressione.
✎
Caso o pressione, não será possível usá-lo para mover a seleção para cima/baixo/esquerda/direita.
Sensor do controle remoto
Ao usar o Smart Touch Control,
o LED de espera não funciona
(exceto o botão P).
Ligar Ligue a TV ao pressionar o controle quando a TV está em modo
Standby.
Ajuste de volume
Ajuste o volume ao mover o controle de um lado para outro com a TV ligada.
Seleção de canal Selecione um canal ao mover o controle para a frente e para trás com
a TV ligada.
Uso do menu Função Para exibir e utilizar o menu Função, pressione e solte o controle com
a TV ligada. Para fechar o menu Função, pressione e solte novamente
o controle.
Seleção do SMART HUB (™) Com o menu Funções visível, selecione SMART HUB (™) movendo
o controle para baixo e então pressione-o. A tela principal do SMART
HUB será exibida. Selecione um aplicativo movendo o controle e, em
seguida, pressionando-o.
Seleção do MENU (m) Com o menu Função visível, selecione o MENU (m) movendo o controle
para a esquerda. Será exibido o menu na tela. Selecione uma opção
movendo o controle para a direita. Mova o controle para a direita, para
a esquerda, para a frente e para trás para efetuar mais seleções. Para
alterar um parâmetro, selecione-o e, em seguida, pressione o controle.
Seleção de Entrada (s) Com o menu Função visível, abra a lista Entrada (s) movendo o
controle para a direita. A lista Entrada será exibida. Para selecionar
uma fonte, mova o controle para a frente e para trás. Quando a fonte
desejada estiver realçada, pressione o controle.
Desligar (P) Com o menu Função visível, selecione Desligar (P) movendo o
controle para a frente e então pressione-o.
Para fechar o Menu, SMART HUB ou Entrada, pressione o controle por mais de 1 segundo.
✎
Português - 22
Page 76

Modo Standby
Sua TV entra no modo Standby quando você a desliga e ela continua a consumir uma pequena
quantidade de energia. Por questões de segurança e para reduzir o consumo de energia, não deixe sua
TV no modo Standby por longos períodos (quando você viajar, por exemplo). É melhor desconectar o
cabo de alimentação.
Uso do Smart Hub
O Smart Hub proporciona acesso fácil, usando a tela, as cinco funções que permitem gerenciar e
acessar canais, definir canais favoritos, acessar fotos, vídeos ou músicas em dispositivos USB, câmeras
e computadores, selecionar fontes de vídeo e configurar a TV para ligar automaticamente quando o
programa desejado for exibido. As cinco funções são listadas abaixo:
• Canal: Permite gerenciar canais, selecionar canais favoritos, adicionar canais e excluir canais da lista
Canal adic. (os canais exibidos ao pressionar o botão z.
• Web Browser: Permite navegar na Internet.
• Ger. Agendamento: Permite agendar programas e canais para exibição.
• Entrada: Permite selecionar uma fonte de vídeo externa conectada para exibição.
• AllShare Play: Permite acessar, ver ou reproduzir fotos, vídeos ou músicas localizados em dispositivos
USB, câmeras digitais, celulares e computadores. Os computadores e celulares podem ser acessados
por conexão sem fio através da sua rede sem fio.
O Smart Hub também fornece um portal de fácil uso para várias mídias e entretenimento on-line, incluindo
aplicativos da loja Samsung Apps, streaming de vídeos e filmes, sites infantis e muito mais.
Para acessar o Smart Hub, pressione o botão ™ no controle remoto.
✎
Para obter mais informações sobre o Smart Hub, consulte o e-Manual.
✎
Português - 23
Page 77
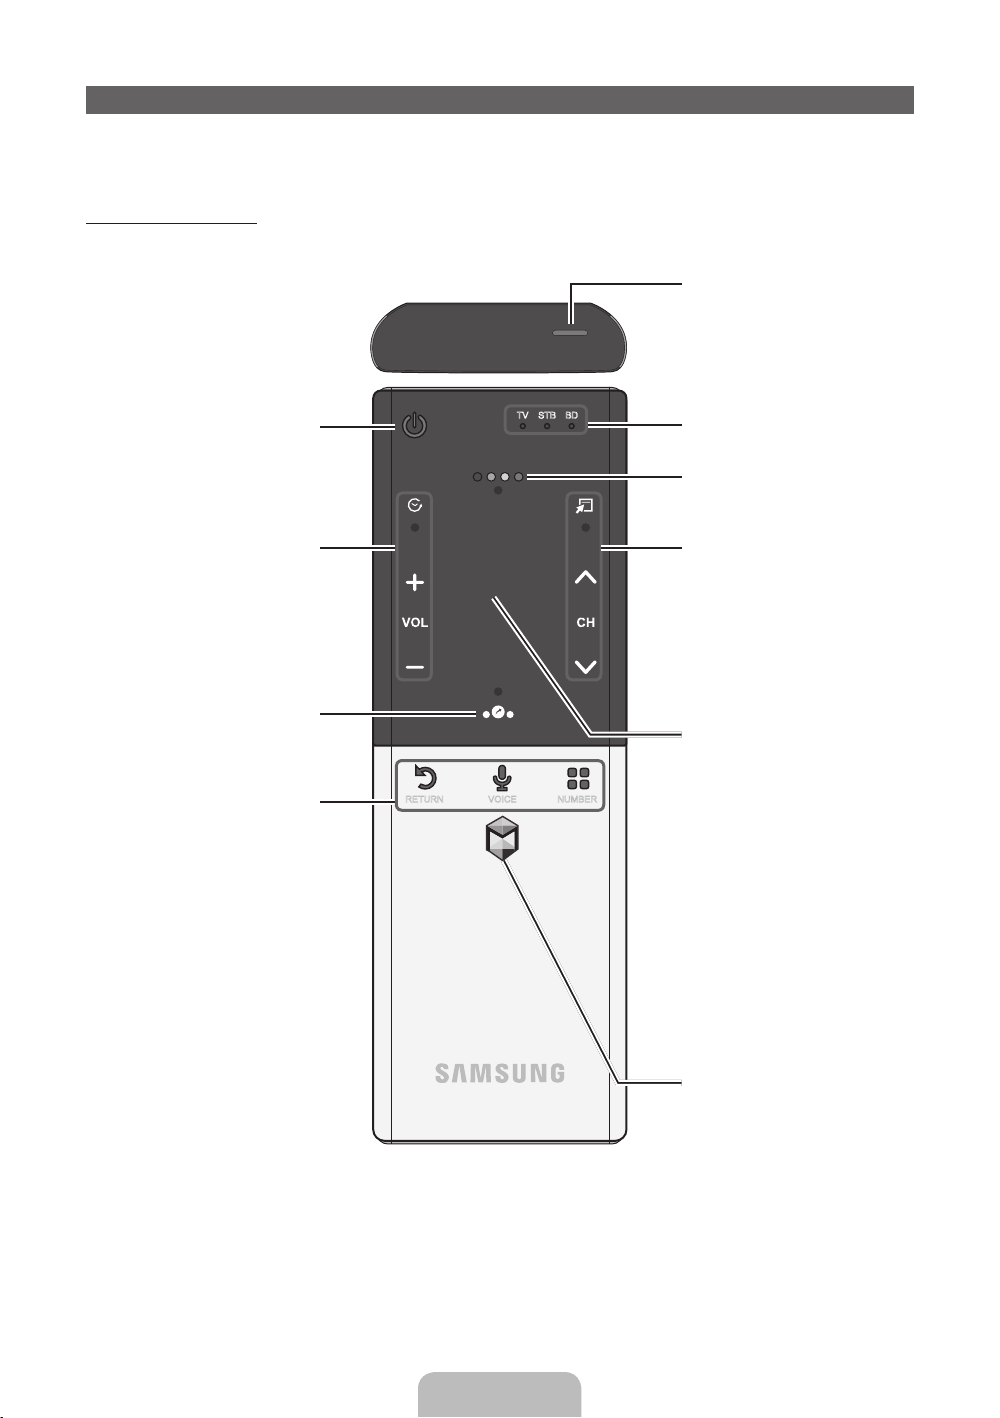
O Smart Touch Control e o IR Blaster
Para obter informações mais detalhadas sobre o Smart Touch Control, consulte "Uso do Smart
✎
Touch Control" no e-Manual.
Smart Touch Control
Você pode falar um comando por voz
que será exibido na TV com o MIC. Para
usar o MIC, pressione o botão VOICE
no controle remoto.
O reconhecimento da função
✎
Controle por Voz pode ser afetado
por pronúncia imprecisa, volume
baixo da voz ou ruído ambiente.
LED que indica o dispositivo ativo.
Exibe as funções de cor e controle de
jogos. Você pode selecionar uma função
usando o touch pad.
T
: Seleciona rapidamente funções
utilizadas com frequência. Utilize esse
botão em um recurso específico. Para
mais detalhes, consulte o e-Manual.
z
: Muda os canais.
Liga e desliga a TV.
Š
: Exibe uma lista de funções utilizadas
recentemente. Permite selecionar
novamente uma função usando o Touch
Pad de forma rápida e fácil.
y
: Ajusta o volume.
.*$
TV STB BD
˜
Exibe a lista de funções de atalhos. Você
pode selecionar uma função usando o
RETURNR: Volta ao menu anterior.
VOICE
˜
: Permite acessar a função
Controle por Voz. Ao pressionar o
botão, a TV exibe a lista de comandos.
É possível falar usando o microfone
integrado no controle remoto. Para obter
informações mais detalhadas sobre
a função Controle por Voz, consulte
"Interação SMART", no e-Manual, ou a
NUMBER
š
Number. Você pode selecionar um
: Exibe a tela do botão
número com o Touch Pad.
Touch Pad.
página 33.
RETURN VOICE NUMBER
Touch Pad
• Passe o dedo rapidamente pelo
Touch Pad para mover o foco da
tela.
• Clique no Touch Pad para executar
o item focado.
• Se você não pressionar nenhum
botão durante 30 segundos,
o Smart Touch Control entrará
em modo de hibernação
automaticamente. Para reativar o
Smart Touch Control, pressione o
Touch Pad.
• Se pressionar o Touch Pad, o efeito
será o mesmo que pressionar o
botão MUTE
Contudo, essa ação faz rolar a
página em um Web Browser.
• Pressione o touchpad ou o botão
RETURN
geral.
Exibe os aplicativos do Smart Hub.
Consulte o capítulo Funções Avançadas
→ Smart Hub, no e-Manual.
Para sair facilmente de um
✎
aplicativo que está em execução,
pressione o botão
M
do controle remoto.
R
para voltar ao modo
™
.
Português - 24
Page 78
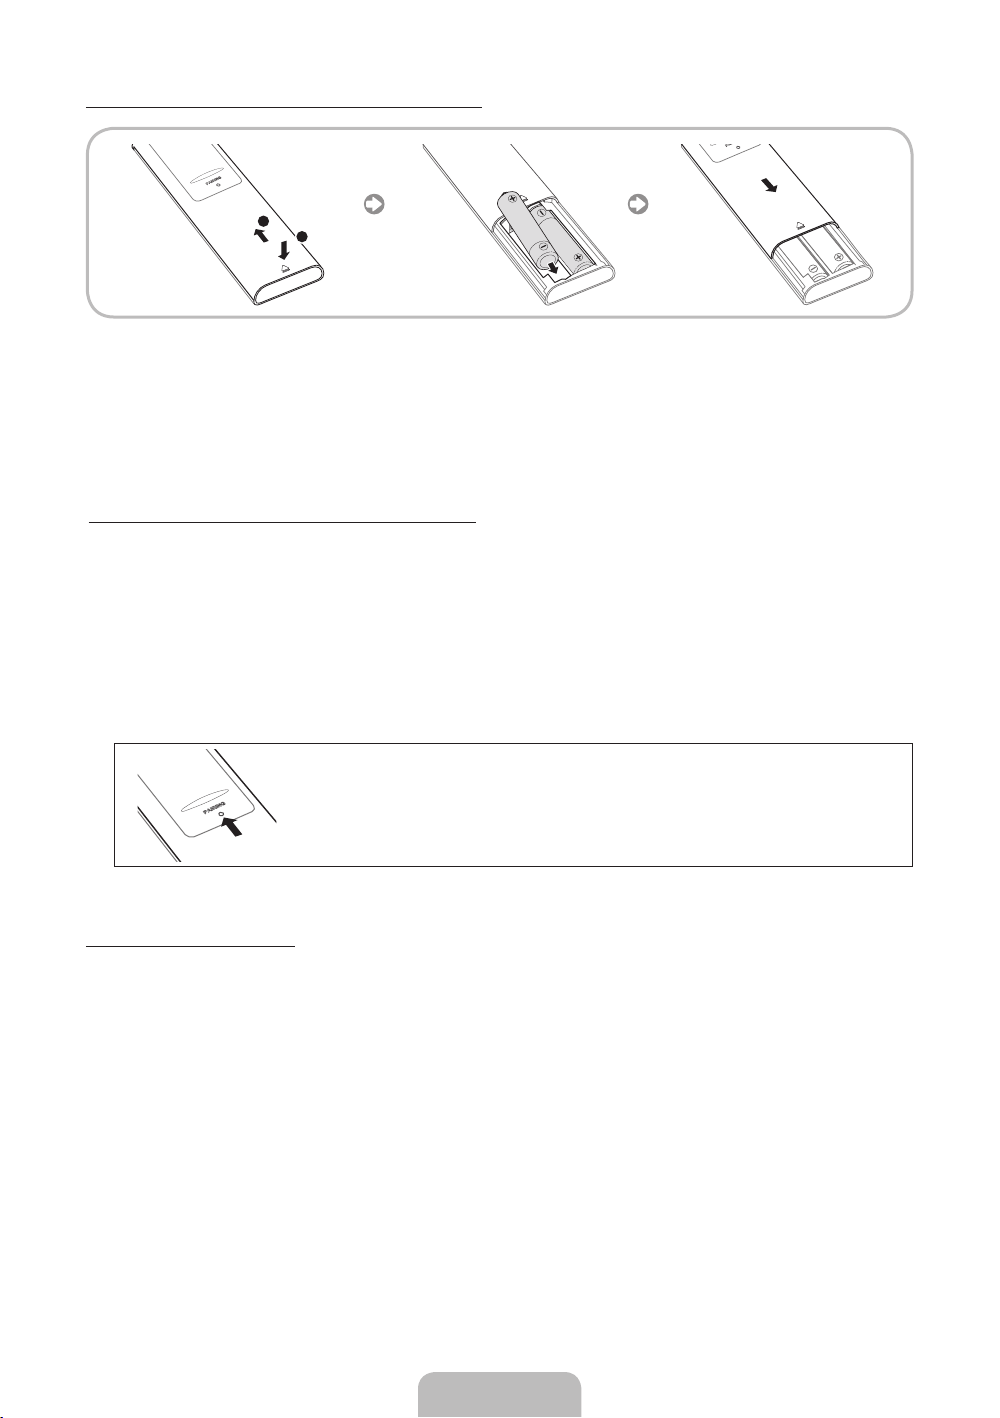
Colocação das pilhas (tamanho das pilhas : AA)
2
11
1. Pressione a extremidade da parte posterior do controle remoto com os dois polegares e, em seguida,
deslize a tampa da pilha para cima, na direção da seta.
2. Coloque duas pilhas de modo que a polaridade delas (+/-) corresponda à ilustração no compartimento.
3. Deslize a tampa para baixo na direção da seta para fechar a tampa da pilha.
Pareamento inicial para o Smart Touch Control
Após executar a configuração inicial na TV, conecte o Smart Touch Control à TV.
1. Direcione o Smart Touch Control para o sensor de infravermelho (IR) da TV e, em seguida, pressione
qualquer botão no Smart Touch Control.
2. O ícone de conexão será exibido na parte inferior esquerda da tela e o Smart Touch Control será
conectado à TV automaticamente.
Caso deseje realizar o processo de pareamento novamente, pressione o botão restaurar no centro
✎
da tampa posterior usando um alfinete ou a ponta de um clipe de papel. O Smart Touch Control será
iniciado.
• Botão de restaurar PAIRING do Smart Touch Control.
Calibração do Touch Pad
Para calibrar o Touch Pad no Smart Touch Control, siga os seguintes passos:
1. Pressione o botão NUMBERš por 3 segundos. A calibração será iniciada.
2. Ao terminar, todos os LEDs da parte superior do Smart Touch Control piscarão duas vezes ao mesmo
tempo.
Durante a calibração, não toque o Touch Pad.
✎
Se o Touch Pad perder a precisão, recalibre-o repetindo os passos 1 e 2.
✎
Português - 25
Page 79
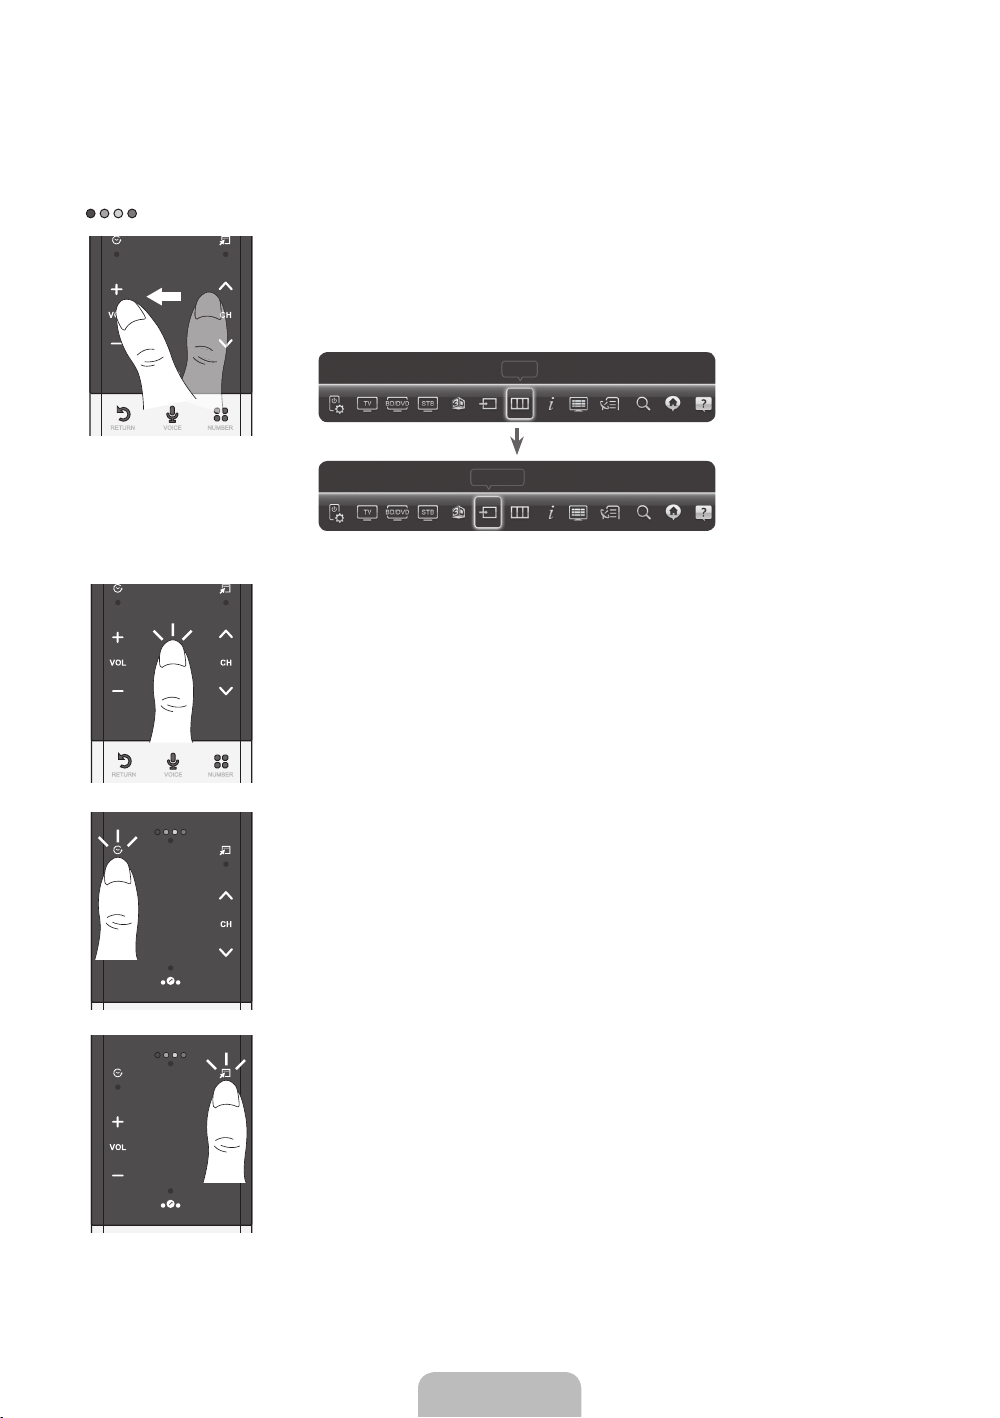
Uso do Touch Pad
Para exibir a lista de funções de atalho na parte inferior da tela, pressione o botão ‹ na parte inferior do
Touch Pad. A lista inclui Menu, Entrada, Lis. CA., 3D, Suporte e várias outras funções.
Para exibir as funções de controle de cor e de reprodução na parte superior da tela, pressione o botão
na parte superior do Touch Pad.
Mover o item realçado: Coloque o dedo no Touch Pad e deslize-o de um lado
para o outro, de cima para baixo ou de baixo para cima.
Para mover item realçado continuamente, movimente o dedo pelo Touch
✎
Pad da direita para esquerda, esquerda para direita, cima para baixo ou
baixo para cima.
Menu
RETURN VOICE NUMBER
Entrada
Selecionar um item: Pressione o Touch Pad.
RETURN VOICE NUMBER
Abra a tela Histórico.: Pressione o botão Š à esquerda do Touch Pad. Exibe
uma lista de funções utilizadas recentemente. ermite selecionar novamente uma
função usando o Touch Pad de forma rápida e fácil.
Abra o menu Ferramentas.: Pressione o botão T à direita do Touch Pad.
Selecionar rapidamente funções utilizadas com frequência.
Português - 26
Page 80
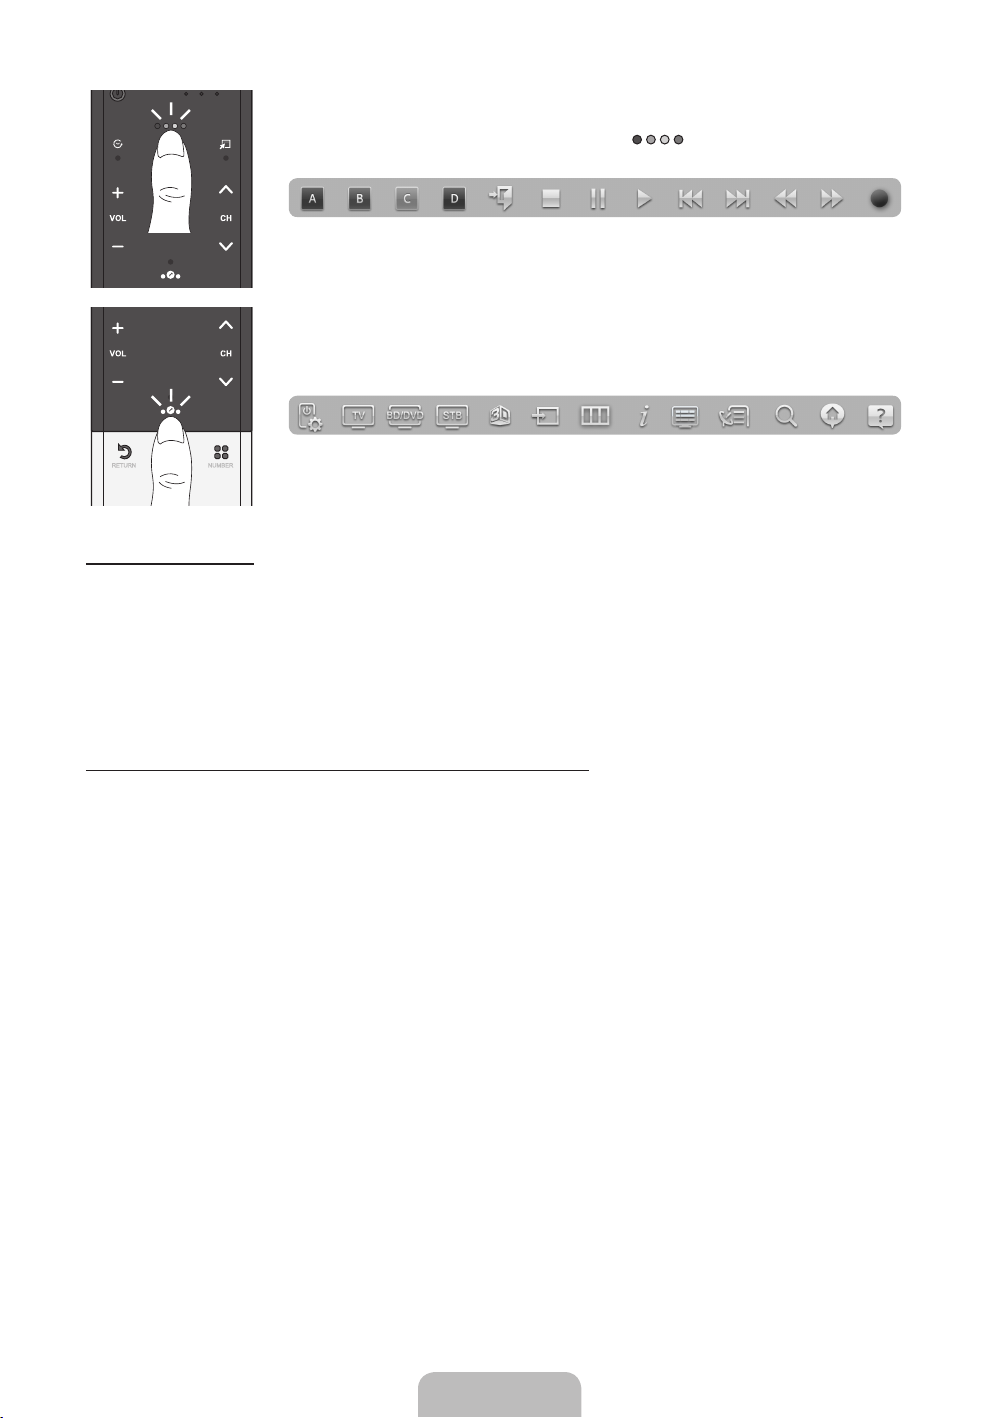
Aceda aos botões coloridos, de controle de reprodução e para sair.: Para
exibir as funções dos botões coloridos, de controle de reprodução e para sair
na parte superior da tela, pressione o botão na parte superior do Touch
Pad.
e: Feche todos os menus exibidos na tela.
Abrir a tela de funções de atalhos.: Pressione o botão ‹ na parte central
inferior do Touch Pad.
É possível selecionar a função desejada (por exemplo, Menu (m), Source (s),
Info (`), etc.) facilmente.
RETURN VOICE NUMBER
Uso da função Mute
− Se você pressionar e manter o Touch Pad pressionado, o efeito será o mesmo de pressionar o botão
MUTEM no controle remoto.
− No entanto, se você pressionar e manter o Touch Pad pressionado enquanto usa o Web Browser,
o Touch Pad mudará para o modo Rolar. Ao pressionar o Touch Pad novamente, o modo Rolar será
alterado para o modo geral.
− Pressione o touchpad ou o botão RETURNR para voltar ao modo geral.
Para digitar um número de canal com o Smart Touch Control
1. Ao assistir à transmissão, pressione o botão NUMBERš no controle de toque inteligente. TV exibirá a
tela de botões numéricos.
2. A partir do Touch Pad, realce um número e pressione o Touch Pad. A TV exibirá uma lista dos canais
que começam com o número selecionado.
3. A partir do Touch Pad, realce o canal desejado na lista e pressione o Touch Pad.
É possível mudar o canal ao tocar o ícone de canal para cima ou para baixo no Touch Pad. Se você
✎
tocar o Touch Pad imediatamente depois, a TV exibirá a lista de canais memorizados. Selecione um
canal ao mover o dedo para cima ou para baixo e pressionar o Touch Pad.
Se você mudar de canal inserindo o número do canal, esse canal será memorizado e adicionado à
✎
list Canal adic. automaticamente. É possível mudar o canal de forma fácil e rápida utilizando a lista
de canais memorizados.
Português - 27
Page 81
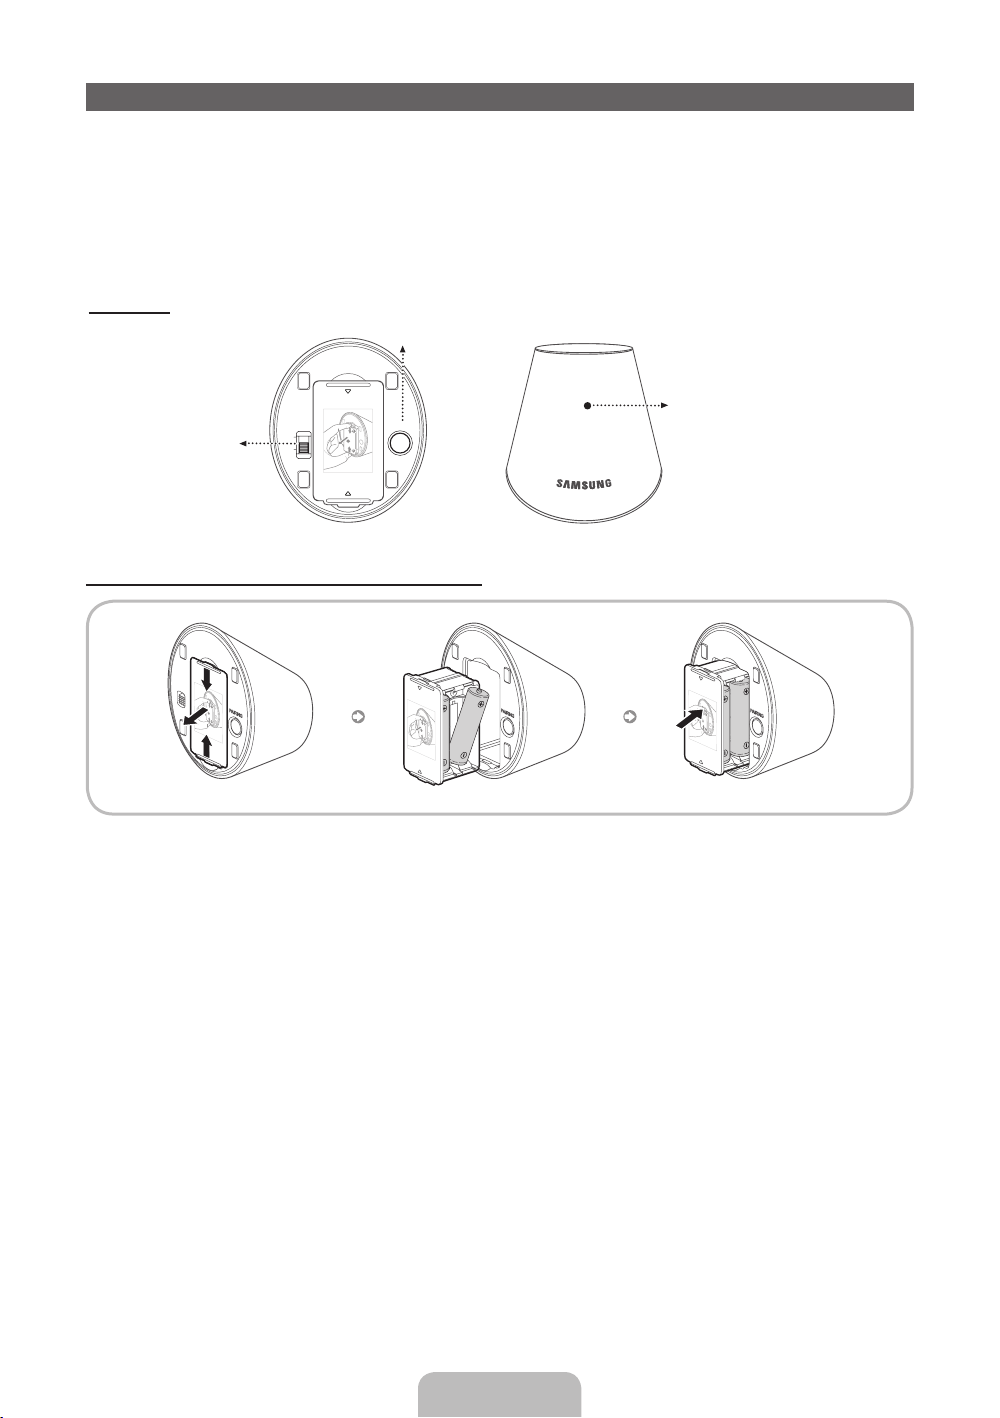
IR Blaster
1
1
2
1
1
2
1
1
2
1
Ao conectar um IR Blaster à TV, é possível controlar os dispositivos externos conectados à TV com o
Smart Touch Control.
Se controlar um dispositivo externo usando o Smart Touch Control, o IR Blaster enviará um sinal
✎
infravermelho ao dispositivo externo correspondente.
Instale o IR Blaster a até 30 cm e 45 graus acima, abaixo, à esquerda ou à direita do sensor de
✎
infravermelho (IR) do dispositivo externo.
IR Blaster
Botão de pareamento
Interruptor de
alimentação
OPEN
ON
OFF
PAIRING
OPEN
LED indicador do dispositivo
O IR Blaster exibirá o estado de
pareamento.
Colocação das pilhas (tamanho das pilhas : AA)
X
1
2
1
OPEN
OPEN
OPEN
OPEN
1. Segure os dois lados do suporte de pilhas e puxe-o.
2. Coloque quatro pilhas de modo que a polaridade delas (+/-) corresponda à ilustração no
compartimento.
3. Encaixe-o novamente.
Português - 28
Page 82
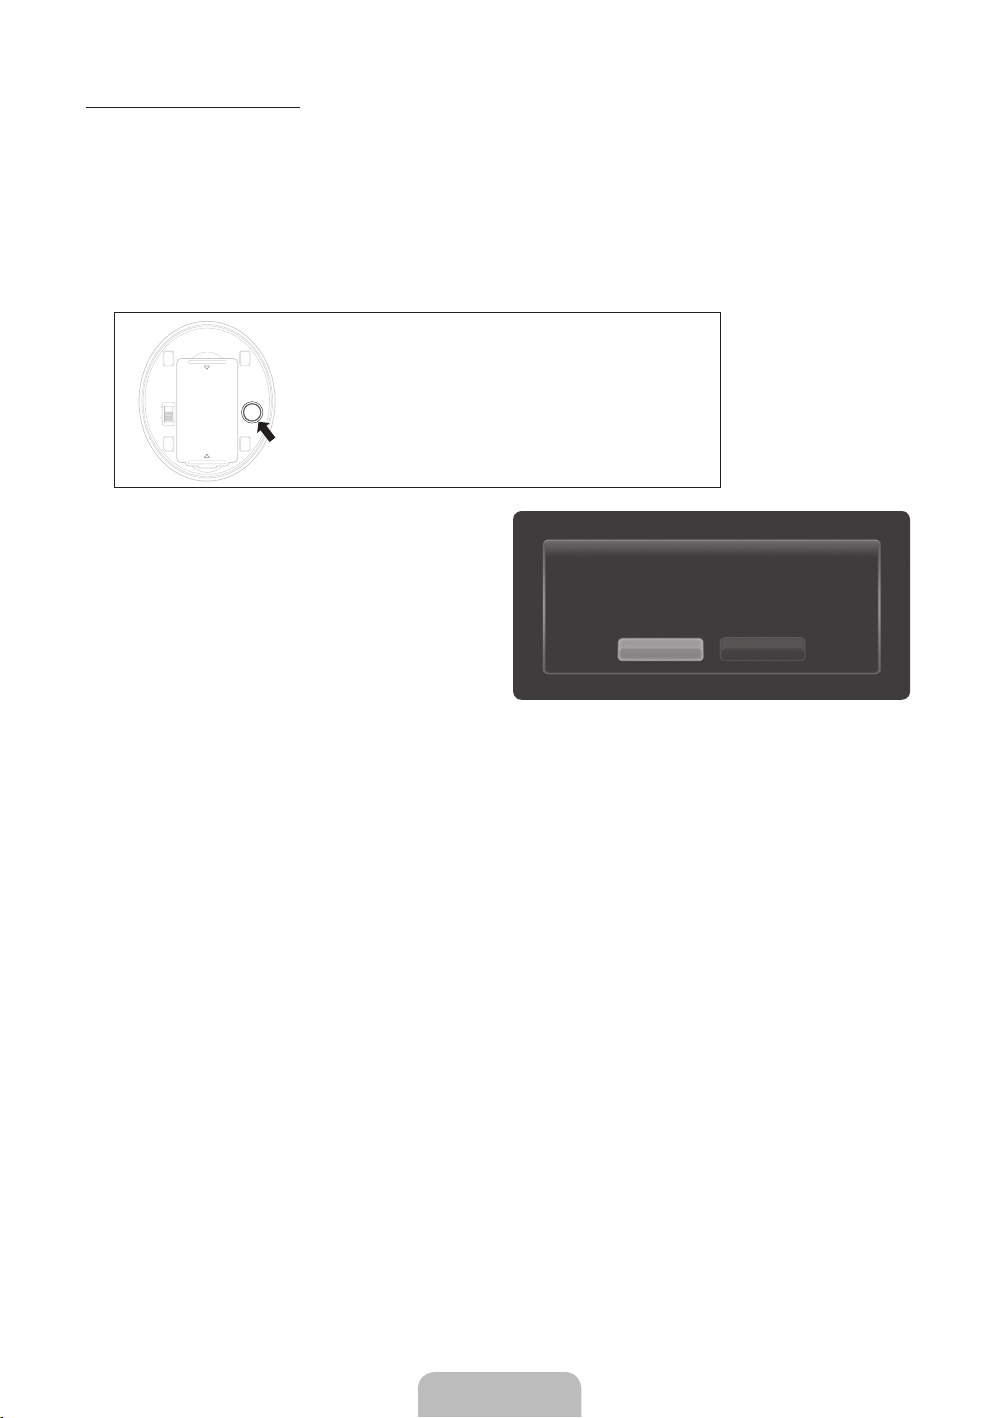
Pareamento do IR Blaster
O
O
O
O
1. Ao ligar o IR Blaster, o LED pisca.
2. Pressione rapidamente o botão PAIRING, localizado na parte inferior do IR Blaster, com o dispositivo
direcionado ao sensor de infravermelho (IR) da TV.
3. Os ícones de conexão são exibidos na parte inferior esquerda da tela; a TV se conectará ao IR Blaster
automaticamente.
Caso o processo de conexão falhe, desligue e ligue o IR Blaster e tente novamente a partir da etapa
✎
2.
PEN
N
FF
Para configurar um controle remoto universal
✎
PAIRING
PEN
• Botão de Restaurar PAIRING do IR Blaster.
depois de emparelhar um IR Blaster, selecione
Sim.
Para usar o IR Blaster, a config. do contr.
rem. universal deve estar concluída. Deseja
continuar a configuração?
Sim Não
Precauções para o uso de um IR Blaster
[
Para usar um IR Blaster, ele deve estar localizado próximo a dispositivos externos conectados à TV.
Observe que não deve haver obstáculos entre o receptor IR do dispositivo externo e um IR Blaster.
Português - 29
Page 83
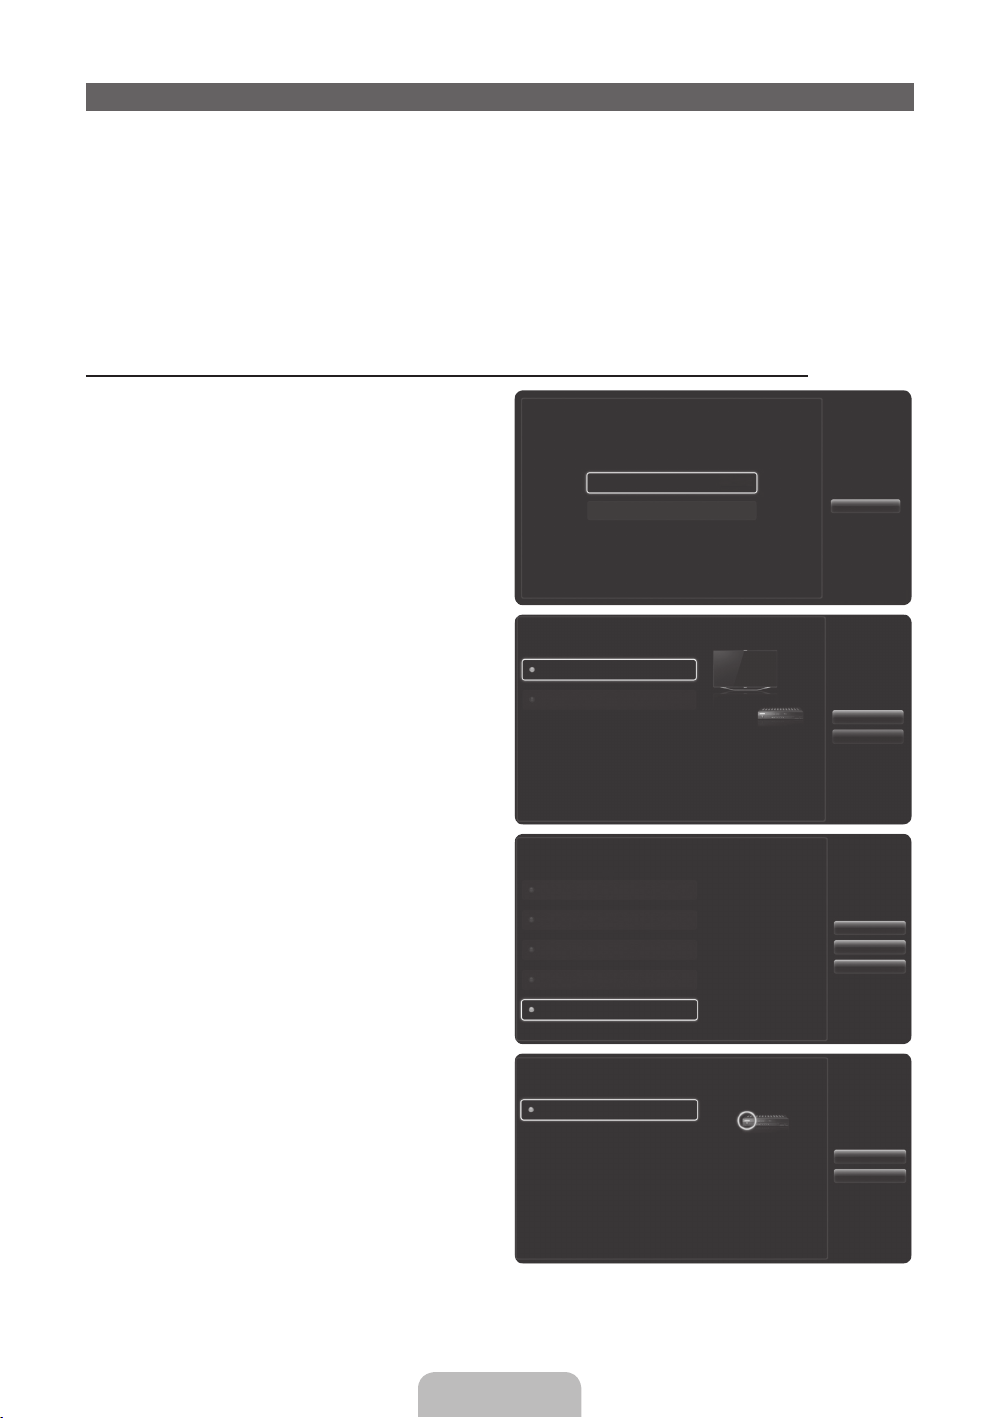
Configuração do controle remoto universal
Permite controlar o decodificador de sinais (STB) ou o leitor BD (ou ambos) conectados à TV usando o
Smart Touch Control. Após conectar o dispositivo à TV, o Smart Touch Control pode controlar as teclas de
navegação, numéricas e outras teclas necessárias para operar e controlar o dispositivo.
A imagem exibida poderá variar dependendo da versão.
✎
O controle remoto universal pode ajustar o volume da TV, mas o volume do STB não pode ser
✎
ajustado. Verifique o STB após ajustar o respectivo volume para o nível apropriado.
Consoante a versão de um aplicativo, as instruções de Conf. Controle Universal podem diferir. Nesse
✎
caso, siga as instruções na tela.
Para conectar o dispositivo externo ao Smart Touch Control, siga os seguintes passos:
1. Selecione a opção Adic. um disp. ao controle e
toque o Touch Pad.
O que deseja fazer?
Adic. um disp. ao controle
Ver configuração do controle remoto
Anterior
2. Selecione o dispositivo externo desejado entre
aqueles conectados e toque o Touch Pad.
3. Selecione a porta da TV à qual o dispositivo
externo está conectado e, em seguida,
pressione o Touch Pad.
Lembre-se de ligar o dispositivo selecionado.
✎
Caso esteja desligado, ligue-o e pressione
Atualizar.
4. Selecione Buscar marcas/provedores serviço
de TV, em seguida, pressione o Touch Pad. Um
teclado e um campo de entrada serão exibidos.
Digite as primeiras letras da marca do seu
dispositivo com o controle de toque inteligente.
Em seguida, selecione Concluído na parte de
baixo do teclado. Na lista exibida abaixo do
campo de entrada, selecione a marca do seu
dispositivo e pressione o Touch Pad.
Caso deseje pesquisar a marca do
✎
decodificador de sinais (STB), é possível usar
o nome da marca ou um provedor de serviço
a cabo.
Qual dispositivo deseja controlar
Receptor digital
Blu-ray/DVD player
Selecione o
dispositivo a
ser controlado.
O dispositivo
selecionado deverá
estar conectado à TV.
À qual porta o Receptor digital está conectado?
HDMI1
HDMI2
HDMI3
AV
Componente
Qual é a marca/provedor de serviço de TV de Receptor digital?
Buscar marcas/provedores serviço de TV
Selecione a porta a que
Receptor digital está
conectado.
Se a porta que deseja
selecionar está
desativada, ligue o
Receptor digital que
deseja selecionar e
pressione o botão
Atualizar.
Selec. “buscar
marcas/prov. de
serviços de TV” e
digite o nome da
marca/prov. de serviço
da sua Receptor
digital.
Anterior
Avançar
Atualizar
Anterior
Avançar
Anterior
Avançar
Português - 30
Page 84
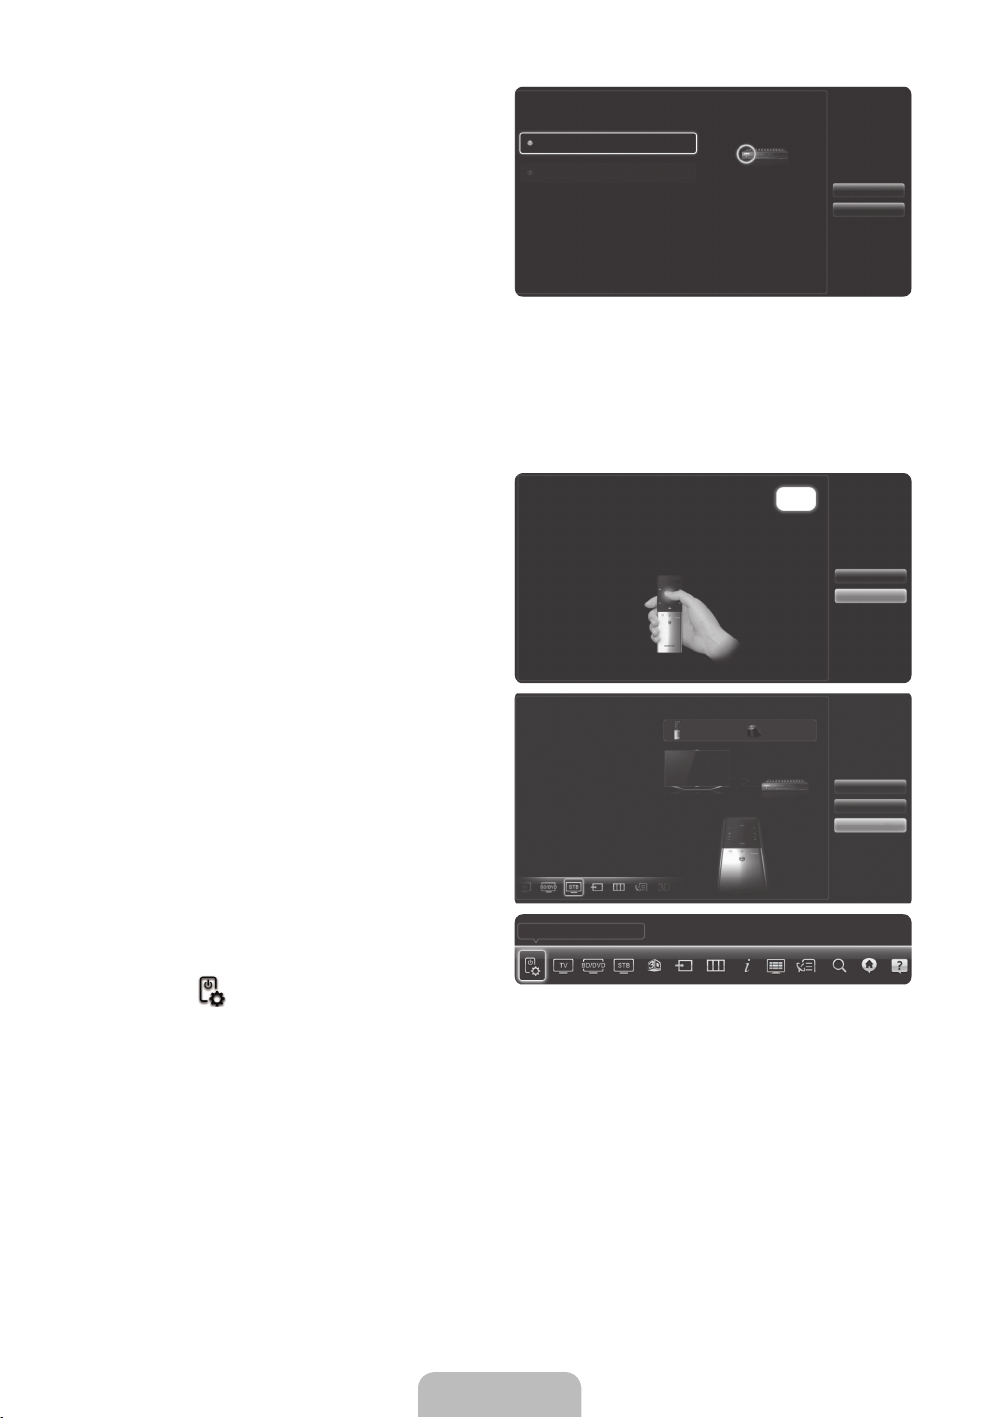
5. Selecione Pesquisar Modelo, em seguida,
pressione o Touch Pad. Um teclado e um campo
de entrada serão exibidos. Digite as primeiras
letras e números do nome do modelo de seu
dispositivo com o Smart Touch Control. Em
seguida, selecione Concluído na parte de baixo
do teclado. Na lista exibida abaixo do campo de
entrada, selecione o nome do modelo de seu
dispositivo e, em seguida, pressione o Touch
Pad.
Caso a busca pelo nome do modelo não
✎
funcione corretamente, faça a busca
usando uma parte do nome do modelo
ou use a opção Pesquisar código modelo
recomendado.
Para a opção Busca pelo código do modelo
✎
recomendado, consulte a página 32.
6. Selecione Transferir, em seguida, pressione
o Touch Pad. Faça o download dos dados de
confi guração para o IR Blaster usando o mesmo
método.
Qual é o número do modelo do Receptor digital
Pesquisar Modelo
Modelo recomendado
Verifi que o número
do modelo de seu
Receptor digital.
Depois, selecione
“Pesquisar Modelo”
e digite o número do
modelo correto de seu
Os dados de confi gurações do dispositivo serão
baixados para o Smart Touch Control.
Selecione Fazer Download na tela da TV usando o Smart
Touch Control.
Receptor digital.
Anterior
Avançar
1/26
Anterior
Transferir
7. Ao concluir todas as confi gurações, selecione o
Concluído e toque o Touch Pad.
Para restaurar o IR Blaster e o Smart Touch
✎
Control, pressione o botão ‹ do Smart Touch
Control e, em seguida, selecione Conf. Controle
Universal
.
Conf. Controle Universal conclusão
Parabéns! Receptor digitalSamsung estão conectados
através de Componente e
prontos para serem usados.
Agora, você pode usar a
opção Ver TV (Receptor
digital) para controlar o
conversor.
Conf. Controle Universal
Anterior
Confi g. outro dispositivo
Conclusão
Português - 31
Page 85
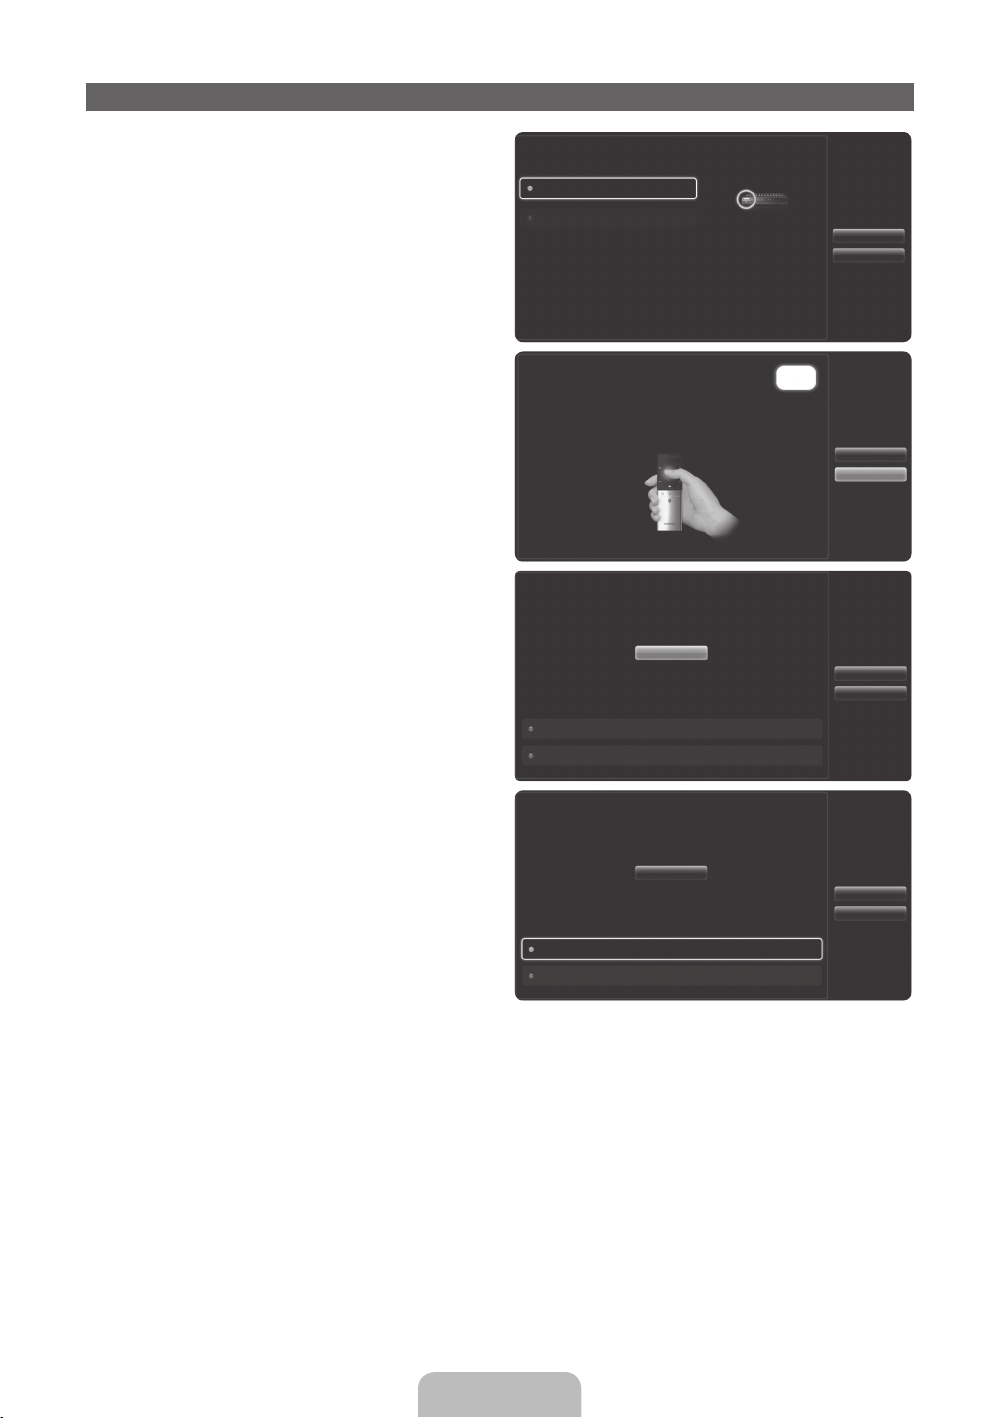
Uso da opção Busca pelo código do modelo recomendado.
1. Na etapa de Pesquisar Modelo, na configuração
integrada do controle remoto, selecione Modelo
recomendado e toque o Touch Pad.
2. Selecione Transferir para fazer o download do
código do modelo recomendado.
3. Direcione o Smart Touch Control para o sensor
de infravermelho (IR) do dispositivo externo e, em
seguida, pressione o Touch Pad para verificar se
o dispositivo funciona.
Qual é o número do modelo do Receptor digital
Pesquisar Modelo
Modelo recomendado
Se você não conseguir
encontrar o mod.
certo, selec.
Os dados de configuração de controles remotos
universais serão baixados para seu controle de toque
inteligente.
Pressione botão de Transferir na TV com o Smart Touch
Control.
Pressione o botão abaixo até ligar e desligar o Receptor digital.
Testar
Está funcionando?
Sim, vá para a próx. etapa.
Não, tente testar com outro conj. códigos.
Anterior
Avançar
1/26
Anterior
Transferir
Anterior
Avançar
4. Caso o código do modelo recomendado
recebido por download não funcione, repita o
Pressione o botão abaixo até ligar e desligar o Receptor digital.
processo a partir do passo 3.
Testar
Está funcionando?
Sim, vá para a próx. etapa.
Não, tente testar com outro conj. códigos.
Caso utilize o controle remoto universal para o home theater BD, alguns botões podem não ser
✎
compatíveis. Nesse caso, recomendamos usar a função Anynet+ (HDMI-CEC).
Anterior
Avançar
Português - 32
Page 86

Interação SMART
Essa função permite acessar e controlar funções e opções de menu usando fala, movimentos ou
reconhecimento facial.
AVISO DE ISENÇÃO DE RESPONSABILIDADE DA INTERAÇÃO SMART
• Login de reconhecimento facial
Para que o Reconhecimento facial funcione, uma imagem em miniatura do seu rosto será armazenada
na TV para fins de login.
Fazer o login no Smart Hub usando o Reconhecimento facial pode ser menos seguro do que usando
ID e senha.
• Uso da câmera da TV
Antes de usar a câmera da TV, você deve estar ciente de que, em algumas circunstâncias e sob
algumas condições legais, o uso inadequado da câmera da TV pode resultar em responsabilidade
legal. Ao usar a câmera da TV, você concorda que não a usará (i) em locais onde câmeras são
geralmente proibidas (como em banheiros, vestiários ou provadores), (ii) de maneira que possa resultar
em invasão da privacidade de uma pessoa ou (iii) para violar qualquer lei, regulamento ou estatuto
aplicável.
Recomendamos que verifique se há um adesivo colado à parte traseira da câmera da TV.
Para ajustar o ângulo da câmera da TV, primeiro é necessário retirar o adesivo.
Quando terminar de usar e não quiser mais usar a câmera da TV, recomendamos que gire a lente da
mesma e a enfie na chanfradura da TV. O que impedirá qualquer uso não intencional da câmera da TV
e que o Reconhecimento facial e o Controle por Movimentos funcionem.
• Controle por Movimentos
O Controle por Movimentos funciona com a câmera integrada da TV, motivo pelo qual é importante
que esteja na linha de visão da mesma. O desempenho irá variar, dependendo das condições de
iluminação do ambiente em que se encontra.
Recomendamos realizar o Teste do Ambiente de Controle por Movimentos (descrição abaixo) antes
de usar o Controle por Movimentos para garantir que a câmera da TV consiga ver você.
• Controle de Voz e Entrada de texto por voz
Recomendamos que use o Smart Touch Control para as funções de Controle por Voz e Entrada de
texto por voz.
O Controle por Voz e a Entrada de texto por voz não estão disponíveis em todos os idiomas, dialetos
ou regiões.
O desempenho irá variar, dependendo do idioma selecionado, sua pronúncia em tal idioma, volume de
sua voz e níveis de ruído ambiente no local em que se encontra.
Recomendamos que realize o Teste do Ambiente de Controle por Voz (descrição abaixo) antes de
soar o Controle por Voz ou a Entrada de texto por voz, para testar o nível de clareza de sua voz e os
som ambiente do local em que se encontra.
A Entrada de texto por voz exige um consentimento expresso do aviso de privacidade de voz da
Samsung e da política de privacidade de voz de terceiros.
A função de entrada de texto por voz permite aos usuários introduzir texto com a voz, sem o uso do
controle remoto, do mouse ou do teclado ligado à TV. Esta função é útil quando se usa a função de
busca, o navegador e outros aplicativos que impliquem a entrada de texto.
Português - 33
Page 87
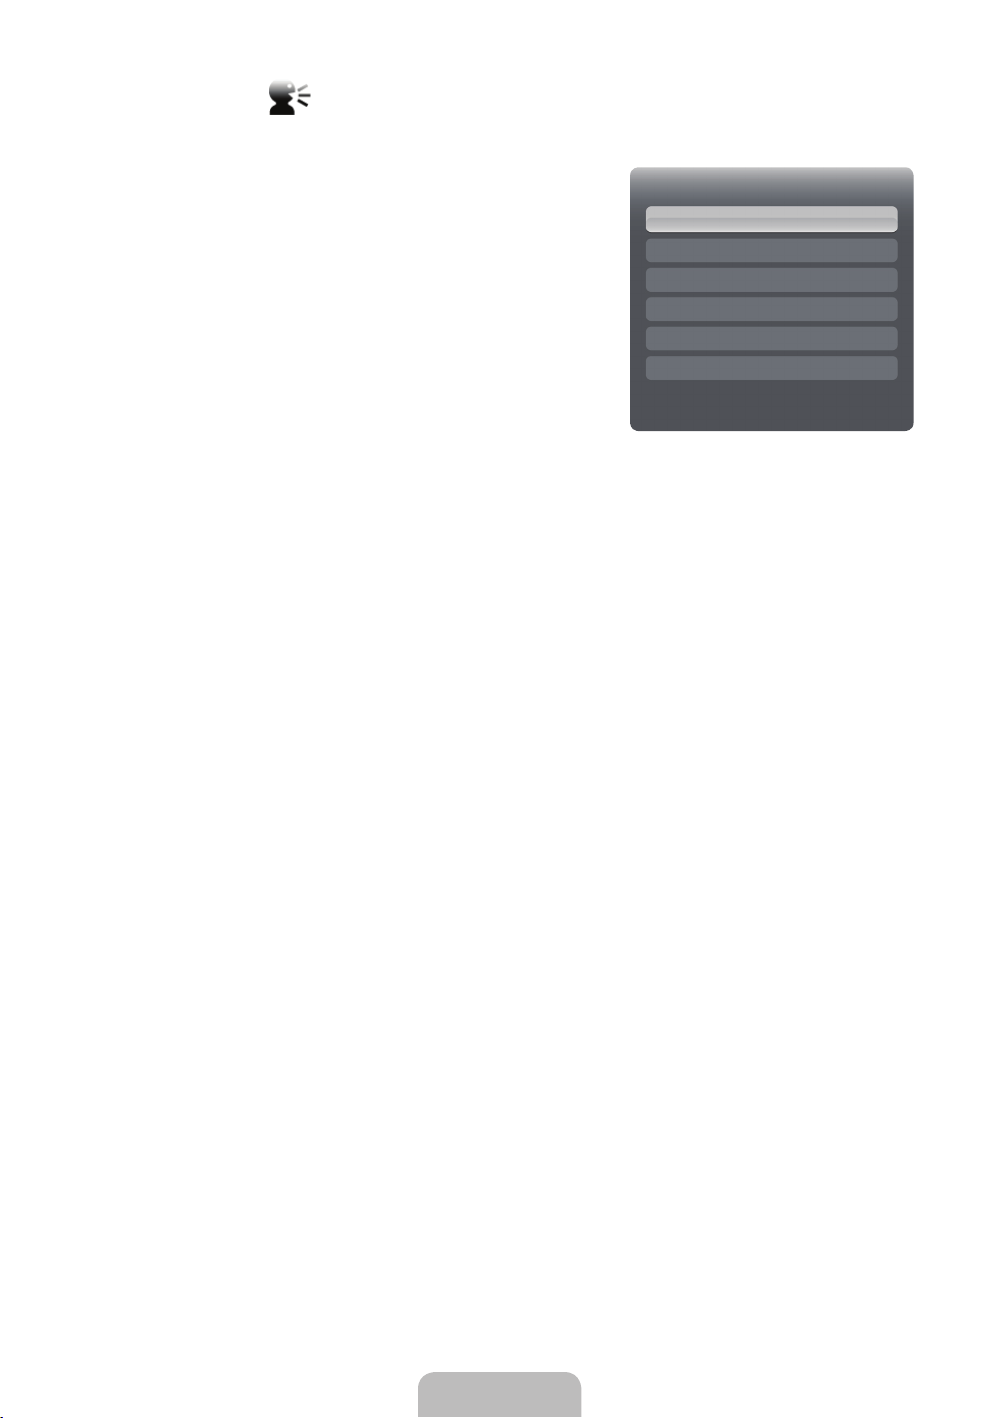
Controle por Voz
Menu → Sistema → Controle por Voz e Movimentos → Controle por Voz
O Controle por Voz permite que você ative e acesse determinados
menus e funções na sua Smart TV usando o som da sua voz.
Para um reconhecimento de voz preciso, consulte a lista de
✎
comandos de voz padrão no site da Samsung.
Para aprimorar a precisão e o desempenho do Controle por
✎
Voz, você deve pronunciar palavras e expressões de forma
clara e correta no idioma selecionado em Idioma.
O desempenho do Controle por Voz varia dependendo do
✎
idioma, dialetos locais, pronúncia, voz e nível de ruídos do
ambiente.
Ruídos ambientes podem fazer com que o Controle por Voz
✎
não funcione corretamente. Os níveis de ruído ambiente do
local em que se encontra devem ficar abaixo de 40 dB.
É possível falar diretamente para a TV usando o microfone integrado ou usar o botão VOICE˜ do Smart
Touch Control e falar no microfone do controle remoto. Para ativar o Controle por Voz, diga a palavra-
chave "Hi TV" (Oi, TV) ou "Smart TV". Isso fará com que a Barra de Comando de Voz seja exibida.
Recomendamos usar a função Controle por Voz com o microfone integrado na sua TV a uma
✎
distância máxima de 4 metros da mesma.
Ao usar o microfone integrado na TV, sua voz pode não ser reconhecida devido ao ruído ambiente do
✎
local em que se encontra ou a outros fatores. Se isso ocorrer, tente usar o microfone de seu Smart
Touch Control pressionando o botão VOICE˜ do mesmo.
O botão VOICE˜ do controle remoto está sempre ativado.
✎
Caso deseje usar o microfone da TV, ative a preferência nas confi gurações do sistema. (Sistema →
Controle por Voz e Movimentos → Controle por Voz)
Ao usar o microfone de seu Smart Touch Control, diga um comando de voz com sua voz normal em
✎
direção ao microfone de seu Smart Touch Control. A distância ideal de seu rosto deve ser de cerca
de 9 – 12 cm. Caso o volume de sua voz esteja alto ou baixo demais, seu comando de voz pode não
ser reconhecido por seu Smart Touch Control. O nível de volume ideal é de cerca de 60 dB.
Controle por Voz
Controle por Voz Off
Idioma Português
Palavras Acionadoras HI TV
Tam. Barra de Comando de Voz
Sensibilidade voz
Teste do Ambiente de Controle por Voz
Mínimo
■ Controle por Voz
Ativa ou desativa a função Controle por Voz.
■ Idioma
Seleciona o idioma de reconhecimento que deseja usar.
■ Palavras Acionadoras
É possível selecionar as Palavras Acionadoras que ativam a funcionalidade Controle por Voz.
Na maioria dos casos, ela será "Hi TV" (Oi, TV) ou "Smart TV". Verifi que as confi gurações de sua TV
para confi rmar.
Ao falar "Hi TV" (Oi, TV) ou "Smart TV", será exibida a Barra de Comando de Voz.
Português - 34
Page 88

■ Tam. Barra de Comando de Voz
Define o modo da Barra de Comando de Voz como Mínimo ou Tela Cheia. Mínimo exibe o menor
número de expressões que você pode usar. Tela Cheia exibe uma lista completa de expressões.
A Barra de Comando de Voz listará os diversos comandos de voz disponíveis.
Há diversas opções que podem variar dependendo da entrada, recurso ou função em execução em
segundo plano.
■ Sensibilidade voz
You can configure the sensitivity of Voice Recognition.
− Eco: Selecione os níveis de eco. Essa configuração ajustará a resposta da TV com base no eco e
reverberação do local.
− Resposta do reconhecimento: Selecione o nível de resposta do Reconhecimento de voz.
■ Teste do Ambiente de Controle por Voz
Para executar o Teste do Ambiente de Controle por Voz, para ter certeza de que a sala em que se
localiza permitirá que os controles por voz funcionem corretamente. Sente-se ou fique de pé a uma
distância máxima de 4 metros em frente à TV. Selecione Iniciar para começar o Teste do Ambiente
de Controle por Voz. Em silêncio, selecione Avançar para realizar o Teste do Ambiente de Controle
por Voz. Ele medirá o ruído ambiente da sala.
O ruído ambiente de sua sala não deve ultrapassar 40 dB para que o Controle por Voz funcione
✎
corretamente.
Teste do Mic. e Alto-Falantes: Selecione Iniciar com o controle remoto para começar o Teste do
Mic. e Alto-Falantes. Uma melodia será reproduzida na TV durante esse teste. Permitindo medir o
ruído da sala em relação ao volume dos alto-falantes de sua TV.
Caso tenha alto-falantes externos conectados, esse teste pode não funcionar corretamente.
✎
Lembre-se de usar os alto-falantes internos da TV.
Teste do Controle por Voz: O Teste do Controle por Voz mede o volume e a clareza de sua voz.
Durante esse teste, será necessário dizer a expressão exibida na tela com voz alta e clara. Selecione
Iniciar para começar. A TV reproduzirá a expressão que você falou e, em seguida, aguardará que você
a repita.
Você terá [VINTE] segundos para terminar o teste. Repita a expressão com voz alta e clara. Quando a
TV reconhecer você, ela exibirá a tela de Conclusão do Teste do Controle por Voz. Selecione OK para
terminar.
O Controle por Voz agora está ativado e configurado na sua Smart TV Samsung.
Para desativar o Controle por Voz, vá para o menu Controle por Voz, selecione Controle por Voz e
escolha Deslig..
Português - 35
Page 89
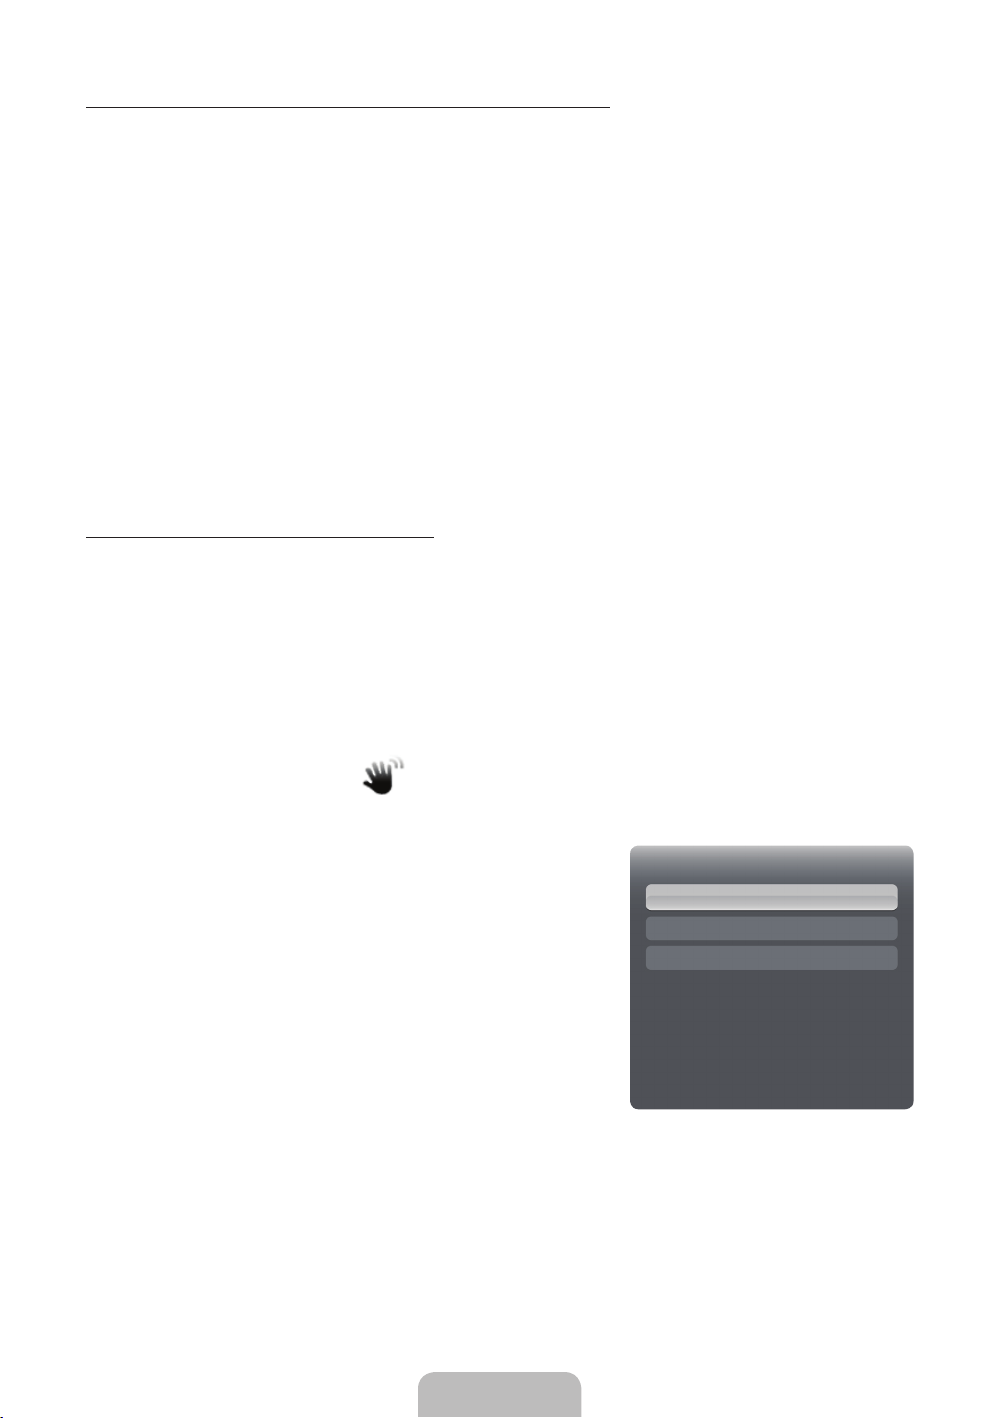
Para usar a função Controle por Voz, siga os seguintes passos:
1. Pronuncie as Palavras Acionadoras que você selecionou usando o microfone integrado na TV ou
pressione o botão VOICE˜ no controle remoto. A TV exibirá a Barra de Comando de Voz.
Ao usar o Controle por Voz, o volume é ajustado para 5 por padrão.
✎
2. Pronuncie uma palavra ou expressão listada na Barra de Comando de Voz.
Pronuncie a palavra ou expressão de maneira clara e correta no idioma selecionado em Idioma.
✎
O desempenho do Controle por Voz varia dependendo do idioma, dialetos locais, pronúncia, voz
✎
e nível de ruídos do ambiente.
3. Aguarde até que o reconhecimento seja concluído e, em seguida, diga o próximo comando da mesma
maneira.
Para sair do modo Controle por Voz, pronuncie as Palavras Acionadoras ou "Cancelar" usando
✎
o microfone da TV, ou pressione o botão RETURNR.
Observe que, em alguns casos, se sua função Controle por Voz estiver definida como On, sua TV
✎
pode ser ligada por acidente devido ao ruído ambiente do local em que ela se encontra. Se isso for
algo que lhe preocupa, recomendamos que selecione Deslig. na funcionalidade Controle por Voz.
Uso do modo de entrada de texto por voz
1. Diga "Buscar tudo" enquanto estiver no modo Controle por Voz.
2. Diga a palavra ou expressão que deseja buscar.
3. A TV executará a função pronunciada.
O desempenho do modo de entrada de texto por voz pode variar dependendo do idioma falado, sua
✎
pronúncia, o volume de sua voz e o ambiente ao redor, incluindo os níveis de ruído ambiente.
Controle por Movimentos
Menu → System → Voice and Motion Control → Controle por Movimentos
O Controle por Movimentos funciona com a câmera integrada da
Smart TV e permite que você use movimentos para abrir aplicativos
no Smart Hub, navegar por páginas da Internet e controlar
determinadas funções da TV.
A função Controle por Movimentos pode ser afetada pela
✎
sua postura, posição da mão ou condições de iluminação do
ambiente.
Alguns aplicativos podem não ser compatíveis com o Controle
✎
por Movimentos.
Você poderá sentir cansaço físico se usar o Controle por
✎
Movimentos por longos períodos de tempo.
Ao usar o Controle por Movimentos, evite a luz solar direta.
✎
Recomendamos o uso da função Controle por Movimentos a
✎
cerca de 1,5 a 4 metros da TV. O alcance do reconhecimento
da câmera da TV pode diferir dependendo do ângulo da
câmera ou de outras condições.
Controle por Movimentos
Controle por Movimentos Off
Motion Guide Bar Size
Motion Control Environment Test
Português - 36
Page 90

Como o Controle por Movimentos funciona com a câmera integrada na parte superior da Smart TV,
é importante que você fique na linha de visão dessa câmera e nada obstrua a linha de visão dela até
você. Caso a câmera da TV esteja muito direcionada para o alto ou para baixo, ajuste o botão giratório
na parte traseira da TV. O Controle por Movimentos funciona melhor em uma sala bem iluminada. Para
melhores resultados, certifique-se de que a luz da sala esteja iluminando o espaço à sua frente. A câmera
da TV busca movimentos, o que significa que deve haver contraste entre você e o fundo. Antes de usar
o Controle por Movimentos , recomendamos que execute um Teste do Ambiente de Controle por
Movimentos (descrição abaixo), que mede a luz ambiente da sala e garante que a câmera integrada
da TV é capaz de enxergar você. (Sistema → Controle por Voz e Movimentos → Controle por
Movimentos → Teste do Ambiente de Controle por Movimentos).
■ Controle por Movimentos
Ativa ou desativa a função Controle por Movimentos.
■ Tam. Barra do Guia de Movimentos
Configura o modo Tam. Barra do Guia de Movimentos como Mínimo ou Tela Cheia.
■ Teste do Ambiente de Controle por Movimentos
Teste de Brilho: Para que o Controle por Movimentos funcione, é necessário que haja luz suficiente na
sala. O Teste de Brilho mede a luz ambiente da sala. Sente-se ou fique de pé a uma distância máxima
de 4 metros de sua TV e selecione a opção de início. O Teste de Brilho será iniciado e levará cerca
de 10 segundos. Caso não haja iluminação suficiente na sala, será exibida a mensagem indicando a
falha do Teste de Brilho. Isso significa que está escuro demais para que o Controle por Movimentos
enxergue seus movimentos. Recomenda-se que aumente o brilho de sua sala. Além disso, verifique o
ângulo da câmera para confirmar que está direcionada para você. Gire o botão do ângulo da câmera,
localizada na parte traseira da mesma. Após verificar esses itens, selecione o teste novamente. Caso
haja iluminação suficiente na sala, a mensagem indicará a conclusão do Teste de Brilho. O que significa
que há iluminação suficiente na sala para que o Controle por Movimentos funcione corretamente.
(Iluminação ambiente adequada: 50 – 500 Lux)
Evite posicionar a câmera da TV diretamente sob a luz solar ou qualquer outra fonte de luz.
✎
Teste de Ângulo da Câmera: Ajudará a determinar se a câmera da TV é capaz de enxergá-lo para
usar o Controle por Movimentos. Fique de pé ou sente-se em frente à TV de modo que consiga
enxergar a si próprio(a) no retângulo da tela. Se a câmera estiver muito direcionada para cima ou
para baixo, ajuste-a usando o botão de ângulo da câmera, localizado na parte traseira da mesma.
Agora, com o controle remoto da TV em uma mão, selecione Iniciar. Balance a outra mão lentamente
da esquerda para a direita em frente à TV. Lembre-se de manter a mão estendida e com a palma
virada diretamente para a TV. Balance sua mão e braço inteiros de maneira clara, em vez de fazer
simplesmente um leve movimento do pulso. Pois se trata da melhor maneira para que a TV reconheça
sua mão. Ao concluir o teste de ângulo da câmera, um cursor será exibido na tela.
O Controle por Movimentos agora está ativado e configurado na sua Smart TV Samsung.
Para desativar o Controle por Movimentos, abra o menu Controle por Movimentos, selecione
Controle por Movimentos e escolha Deslig..
Português - 37
Page 91

Para usar a função Controle por Movimentos, siga os seguintes passos:
1. Com o Controle por Movimentos confi gurado e ativado, fi que de pé ou sentado em frente à TV.
Lembre-se de manter a mão estendida e a palma direcionada para a TV. Balance-a de três a quatro
vezes de um lado para o outro de modo claro. Quando a TV o reconhecer, o cursor de seta será
exibido na tela. Agora você já pode controlar a TV com seus movimentos.
Se sua mão sair do alcance da câmera da TV, o Controle por Movimentos será fechado. Basta
✎
levantar sua mão em até três segundos para reativar o Controle por Movimentos.
2. Controle a TV usando suas mãos.
Ao utilizar o Controle por Movimentos se usar outros dispositivos (por exemplo, controle remoto,
✎
teclado, etc.) para controlar a TV, o Controle por Movimentos será fechado.
Indicador Navegação
•
Move o cursor para a posição desejada.
− Ação: Abra sua mão e guie o cursor para a posição desejada.
•
Executar / Selec.
Seleciona um item ou executa o comando indicado pelo cursor ou realçado.
− Ação: Cerre o pulso.
•
Return
Volta ao menu anterior.
− Ação: Abra a mão e gire-a no sentido anti-horário.
• Controle de de canal / volume
Muda de canal ou ajusta o volume.
Para aumentar ou reduzir o volume, mova o cursor sobre o botão de volume w ou v.
✎
O cursor ficará azul e um pequeno círculo será exibido, indicando que agora você pode
controlar essa função. Basta fechar sua mão, criando um punho, e a abrir novamente. O
volume será aumentado ou reduzido em um número a cada vez que você fizer isso. Outra
opção é segurar o controle de volume ao manter seu punho cerrado. Essas mesmas ações
servem para a função de seleção do canal seguinte/anterior.
•
Rolar
Rola a página na direção desejada.
Alguns aplicativos podem não ser compatíveis com essa função.
✎
Na página da Internet desejada, basta mover o cursor para a parte superior ou inferior, ou para a
extremidade esquerda ou direita da tela, para que a página role automaticamente na direção de
seu movimento.
Essas são apenas algumas das maneiras nas quais você pode usar o Controle por Movimentos com a
Interação Smart em sua Smart TV Samsung 2012.
Português - 38
Page 92

Reconhecimento facial
™ → Ferram. → Config. → Gerenciador Contas → Mudar informações da conta
Ativa ou desativa a função de reconhecimento facial.
O reconhecimento facial permite registrar seu rosto junto à sua conta Samsung para que consiga acessar
sua conta do Smart Hub usando a função de Reconhecimento facial, não sendo necessário digitar o ID ou
a senha de sua conta.
Você pode registrar seu rosto em apenas uma conta.
✎
Para registrar seu rosto em sua conta da Samsung, siga os seguintes passos:
Para usar esta função, é necessário conectar-se ao Smart Hub. Se você não tiver uma Conta da
✎
Samsung, é necessário criar uma antes de usar essa função. Para criar sua Conta da Samsung,
consulte "Criação de uma conta” (Recursos avançados → Smart Hub), no e-Manual.
1. Na tela Smart Hub, abra o menu Ferram. com o Smart Touch Control e selecione Config..
2. Selecione Gerenciador Contas. A tela Gerenciador Contas será exibida.
3. Selecione Mudar informações da conta. A tela Mudar informações da conta será exibida.
4. Selecione Registrar Face. Uma mensagem pop-up será exibida. Se aceitar usar a função de
Reconhecimento facial, selecione OK. Uma tela de teclado QWERTY será exibida.
5. Por razões de segurança, pode ser necessário digitar sua senha. Ao terminar, selecione OK. Agora a
câmera de sua TV será ativada.
6. Posicione-se de modo que seu rosto fique no centro do círculo vermelho de reconhecimento facial.
Se a câmera estiver muito direcionada para cima ou para baixo, ajuste-a usando o botão de ângulo
da câmera, localizado na parte traseira da mesma. Quando seu rosto estiver alinhado corretamente,
o círculo vermelho ficará verde. Fique imóvel por um segundo. Quando o processo estiver concluído,
uma mensagem será exibida informando que seu rosto foi registrado para a conta da Samsung
associada.
Se o Reconhecimento facial falhar, selecione Tentar Nov. e, em seguida, tente novamente.
✎
7. Caso obtenha sucesso, seu rosto estará registrado em sua conta da Samsung. A janela indicando o
prosseguimento para o registro de serviço será exibida.
Para fechar a janela, selecione OK. É possível registrar os serviços em outro momento usando
✎
o recurso Vincular a outras contas , no menu Smart Hub (Config. → Gerenciador Contas →
Vincular a outras contas).
Português - 39
Page 93
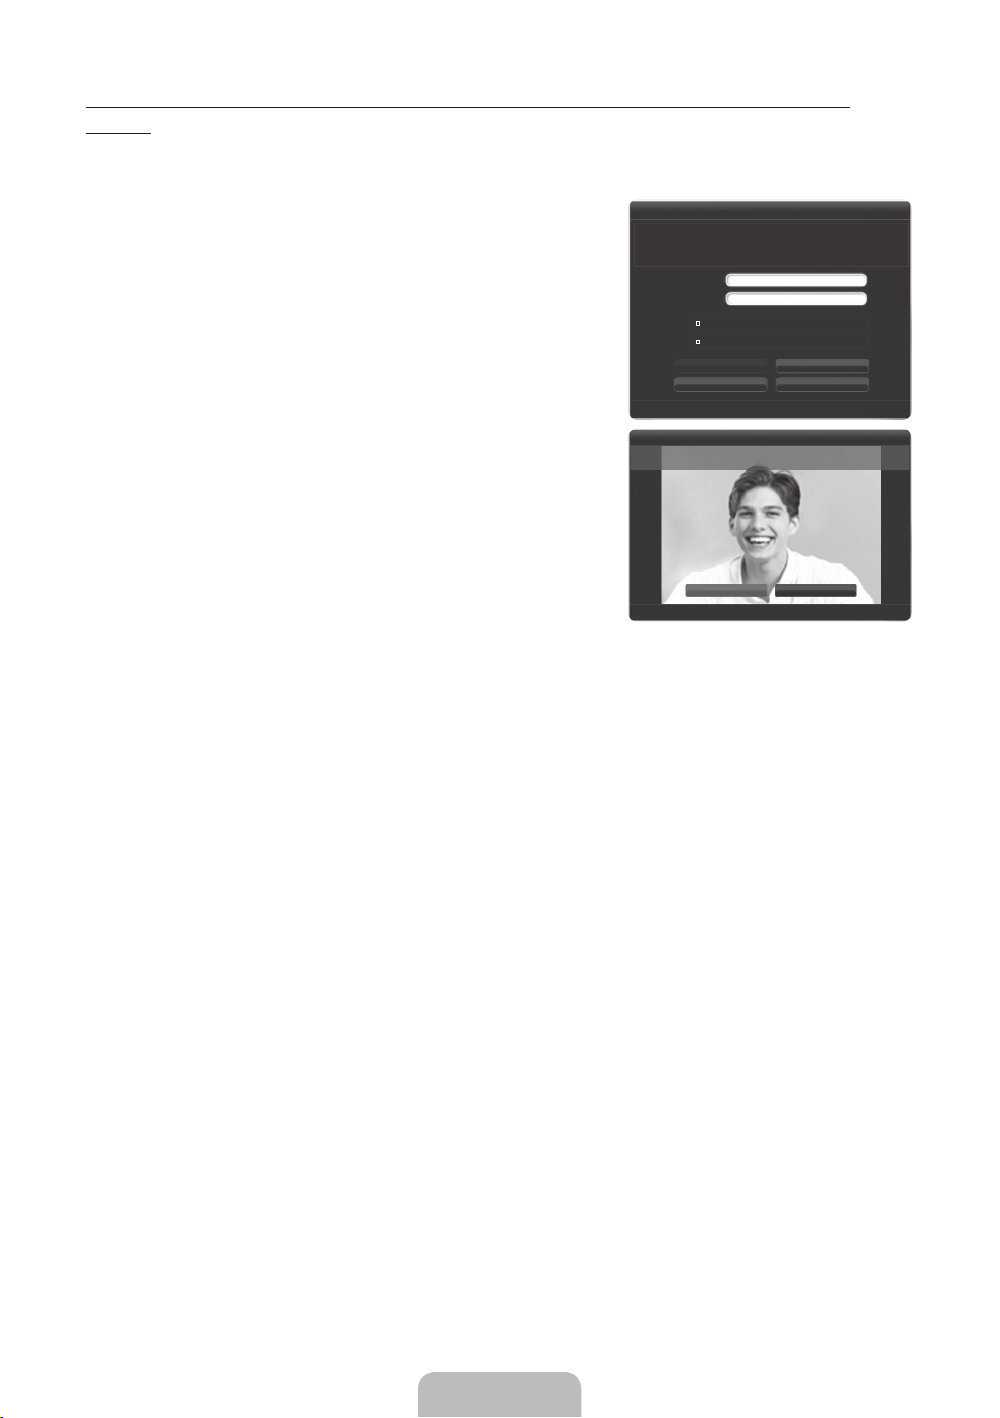
Para conectar-se à sua conta Samsung usando o Reconhecimento facial, siga os seguintes
passos:
Usar o Reconhecimento facial para acessar o Smart Hub pode ser menos seguro do que acessá-lo
✎
com um ID e uma senha.
1. Na tela Smart Hub exibida, selecione a com o controle remoto.
A tela Conta da Samsung será exibida.
2. Selecione Modo Rec. Facial. A tela de Reconhecimento facial
será exibida.
Para voltar à tela Conta da Samsung, selecione o Modo
✎
O que é a Conta Samsung? A Conta Samsung é uma conta de
associação integrada que permite acessar todos os serviços
fornecidos pela Samsung através de uma única conta registrada.
Conta da Samsung
Senha Press. [Enter]
Modo Rec. Facial
Faça login usando o reconhecimento facial. Fique de frente
para a TV, alinhando o nível da face com a câmera.
Login
Press. [Enter]
Lembrar minha senha
Fazer login autom.
Login
Login
Cancelar
Criar Conta
de Senha.
Modo de Senha Pausa
3. A TV iniciará o Reconhecimento facial. Fique de frente para a tela da TV. Tente ficar imóvel.
Um círculo verde indica que seu rosto está registrado. Um círculo vermelho indica que seu rosto
✎
não está registrado.
Se a TV não reconhecer seu rosto, tente novamente.
✎
4. Após a TV reconhecer seu rosto, ela se conectará à sua conta da Samsung automaticamente.
Se a TV reconhecer dois ou mais rostos registrados, será exibida uma lista de contas Samsung.
✎
Selecione sua conta para conectar-se.
Se seu rosto não estiver registrado, você pode registrá-lo em sua conta Samsung. Siga os passos
✎
4 e 5 do procedimento "Para registrar seu rosto em sua conta Samsung:" acima.
Caso não tenha uma conta, é possível criar uma. Para obter informações mais detalhadas,
✎
consulte “Criar uma conta” (Recursos avançados → Smart Hub) no e-Manual.
Embora esteja usando a função de Reconhecimento facial, se você configurar para digitar a senha
✎
na tela Mudar informações da conta, deverá digitar a senha de sua conta da Samsung.
RRetornar
RRetornar
Português - 40
Page 94

Configuração de conexões de rede
Após ter executado a configuração inicial, será possível configurar ou reconfigurar as conexões de rede
usando o menu da TV.
Configuração de conexão de rede sem fio
As instruções abaixo são para redes que utilizam o Dynamic Host Configuration Protocol (DHCP –
Protocolo de configuração dinâmica de hosts) para configurar conexões de rede automaticamente. A
maioria das redes sem fio usa DHCP. Caso tenha uma rede de IP estático, procure as instruções de
configuração no manual do usuário.
Para configurar sua conexão de rede para uma rede que utiliza o protocolo DHCP, siga os seguintes
passos:
1. Conecte a TV à sua rede conforme mostra a ilustração na página 11.
2. Ligue a TV e acesse a tela Configurações de Rede. (Menu → Rede → Configurações de Rede)
3. Selecione Iniciar. A função Rede pesquisará as redes sem fio disponíveis. Quando terminar, será
exibida uma lista com as redes disponíveis.
4. Na lista de redes, mova o item realçado para escolher uma rede e selecione Avançar.
Caso possua um roteador compatível com WPS(PBC), selecione WPS(PBC) e, em seguida, siga
✎
as instruções exibidas na tela.
5. Digite a chave de segurança de sua rede ou senha WPS com o controle remoto.
Digite os números e letras com o controle remoto.
✎
• Caso esteja usando o controle remoto padrão, é possível digitar números pressionando os
botões numéricos no controle remoto.
• Para digitar uma letra, mova o item realçado até a letra e, em seguida, selecione-a. É possível
digitar números da mesma forma, se desejar.
Para exibir letras maiúsculas (ou voltar a exibir minúsculas caso as maiúsculas estejam sendo
✎
exibidas), selecione Caps ou Shift.
Para exibir símbolos e pontuação, selecione 1F. Para voltar a exibir letras, selecione 1F
✎
novamente.
6. Ao terminar, selecione Avançar caso já tenha digitado uma chave de segurança ou Senha WPS caso
já tenha digitado uma senha WPS.
7. A TV verificará a conexão sem fio. Caso a conexão seja realizada com sucesso, a mensagem "Você
está conectado à Internet. Se você tiver algum problema usando os serviços on-line, contate o
seu Provedor de acesso à Internet.” será exibida. Selecione Avançar com o controle remoto.
Para obter informações mais detalhadas, consulte "Configuração de rede sem fio" no e-Manual.
✎
Caso deseje configurar a conexão manualmente, selecione Config de IP na tela de conexão de
✎
rede. Ajuste Config de IP como Digitar manualmente e, em seguida, digite o Endereço IP,
Máscara Sub-rede, Gateway e o Servidor DNS manualmente.
Português - 41
Page 95

Configuração de conexão de rede a cabo
A maioria das redes domésticas utiliza o Dynamic Host Configuration Protocol (DHCP – Protocolo de
configuração dinâmica de hosts) para configurar conexões de rede. Redes domésticas compatíveis com
DHCP fornecem automaticamente os valores de endereço IP, máscara de sub-rede, gateway e DNS,
necessários para que a TV acesse a Internet. Assim, você não precisa digitá-los manualmente. Caso tenha
uma rede de IP estático, procure as instruções de configuração no manual do usuário.
Para configurar uma conexão para uma rede a cabo que utiliza o protocolo DHCP, siga os seguinte
passos:
1. Conecte a TV à sua rede conforme mostram as ilustrações na página 12.
2. Ligue a TV e acesse a tela Configurações de Rede. (Menu → Rede → Configurações de Rede)
3. Selecione Iniciar.
4. A tela de conexão de rede será exibida e verificará a conexão de rede. Após a verificação da conexão,
será exibida a mensagem “Você está conectado à Internet. Se você tiver algum problema usando
os serviços on-line, contate o seu Provedor de acesso à Internet.”. A configuração da rede foi
concluída.
Caso a TV não encontre os valores de conexão de rede automaticamente ou você queira configurar
✎
a conexão manualmente, selecione Config de IP na tela de conexão de rede. Ajuste Config de IP
como Digitar manualmente e, em seguida, digite o Endereço IP, Máscara Sub-rede, Gateway e o
Servidor DNS manualmente.
Para obter informações mais detalhadas, consulte "Configuração de rede a cabo" no e-Manual.
✎
Português - 42
Page 96
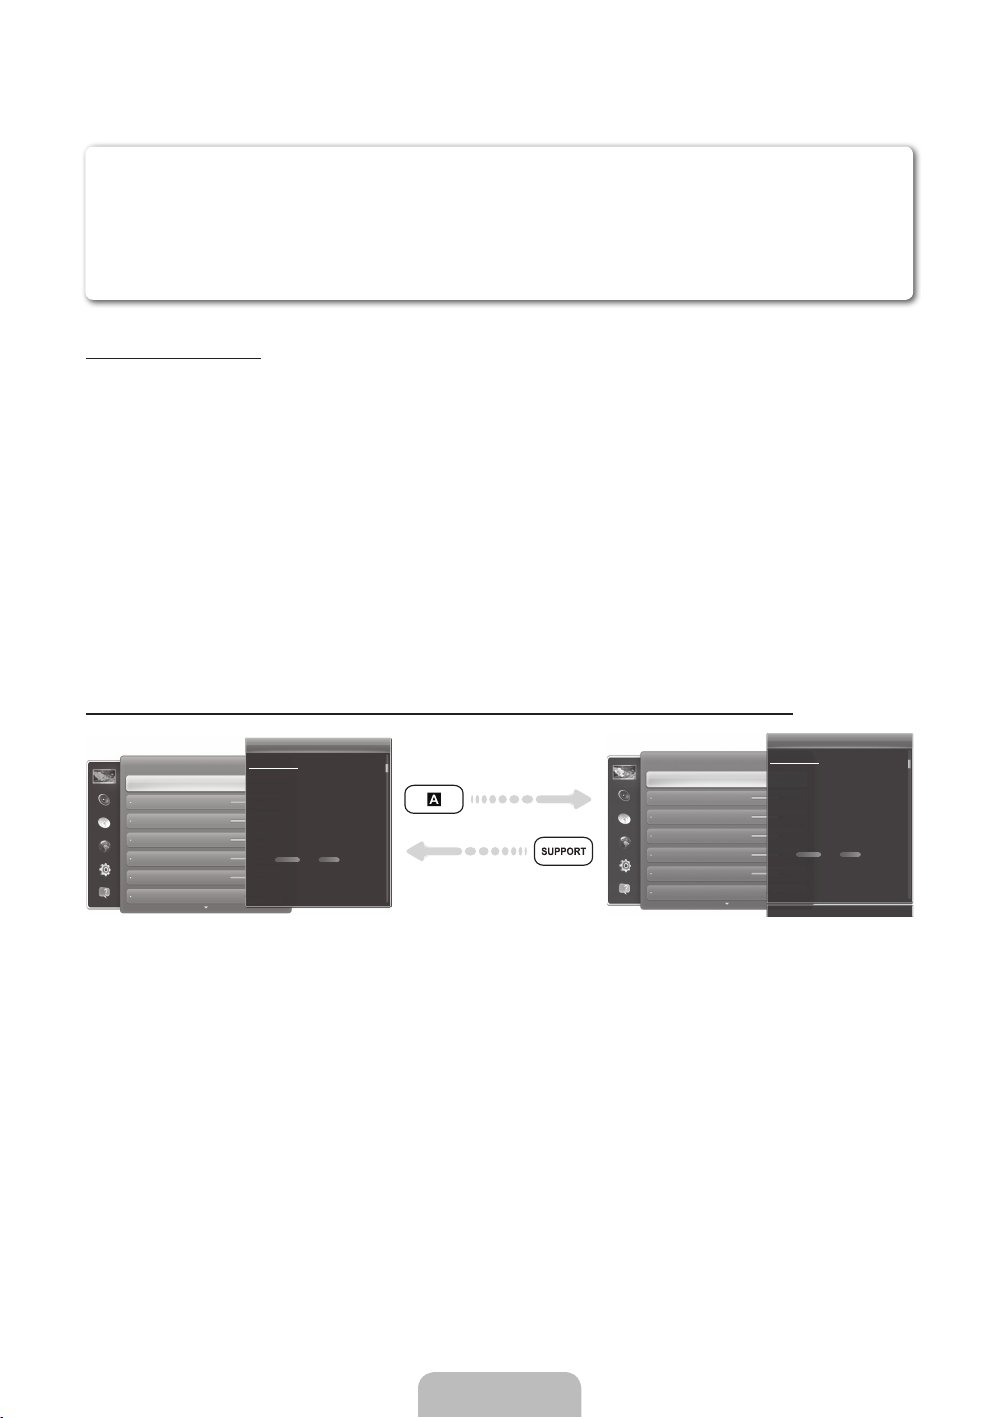
Como visualizar o e-Manual
Você pode encontrar instruções sobre os recursos da TV no e-Manual. Para abrir o e-Manual,
pressione o botão SUPPORT no controle remoto padrão ou selecione Suporte com o Smart Touch
Control.
Também é possível acessá-lo por meio do menu:
Menu → Suporte → e-Manual
Acesso ao e-Manual.
Para usar o e-Manual, siga os seguintes passos:
1. Quando precisar de ajuda, selecione SUPPORT com o controle remoto. A tela Suporte será exibida.
2. Selecione e-Manual com o controle remoto. A tela e-Manual será exibida.
3. Selecione a categoria desejada.
4. Selecione o tópico desejado. O e-Manual exibe a página que você deseja visualizar.
As palavras em azul no e-Manual referem-se a opções ou seleções do menu de tela da TV.
✎
Ícones verdes no e-Manual se referem a botões no controle remoto.
✎
Passos com setas (ex.: Menu → Suporte → e-Manual) no e-Manual indicam a sequência de passos
✎
necessária para acessar uma opção ou ativar uma função.
Como alternar entre um tópico do e-Manual e o(s) menu(s) na tela correspondente(s).
Alteração do modo de imagem predefi nido
Imagem
Modo de Imagem
Luz da Célula
Contraste
Brilho
Nitidez
Cor
Matiz (Vd/Vm) Vd50
Esta função não está ativada em alguns menus.
✎
Não será possível utilizar a função Exp. Agora se o menu não estiver disponível.
✎
Modo de Imagem
Menu → Imagem → Modo de Imagem
Os modos de imagem aplicam ajustes predefi nidos na imagem.
N Quando a TV está conectada a um computador através
do cabo HDMI/DVI, somente é possível selecionar
Entretenimento e Padrão.
• Dinâmico
Aumenta o brilho da tela. Adequado para um ambiente bem
iluminado.
• Padrão
Adequado para um ambiente normal.
• Natural
para TV de LED / Relaxar para TV PDP
Adequado para reduzir o desconforto nos olhos.
• Filme
Escurece a tela, tornando-a menos brilhante. Adequado para
assistir a fi lmes em um ambiente escuro.
Imagem
Modo de Imagem
Luz da Célula
Contraste
Brilho
Nitidez
Cor
Matiz (Vd/Vm) Vd50
Alteração do modo de imagem predefi nido
Modo de Imagem
Menu → Imagem → Modo de Imagem
Os modos de imagem aplicam ajustes predefi nidos na imagem.
N Quando a TV está conectada a um computador através
do cabo HDMI/DVI, somente é possível selecionar
Entretenimento e Padrão.
• Dinâmico
Aumenta o brilho da tela. Adequado para um ambiente bem
iluminado.
• Padrão
Adequado para um ambiente normal.
• Natural
para TV de LED / Relaxar para TV PDP
Adequado para reduzir o desconforto nos olhos.
• Filme
Escurece a tela, tornando-a menos brilhante. Adequado para
assistir a fi lmes em um ambiente escuro.
1. Para ir para a opção de menu correspondente do tópico, selecione a com o controle remoto.
2. Para voltar à tela do e-Manual, selecione SUPPORT com o controle remoto.
‘ Voltar para o e-manual
Português - 43
Page 97

Uso dos botões coloridos e botões de função com o e-Manual
• Barra de rolagem: Rola a tela do e-Manual para cima ou para baixo.
• l / r: Direciona para o capítulo anterior ou seguinte.
• a Exp. Agora: Move o menu na tela que corresponde ao tópico. Para voltar à tela do e-Manual,
selecione SUPPORT com o controle remoto.
• b Início: Direciona para a tela inicial do e-Manual.
• { Posição: Cada vez que você selecionar {, a posição da tela do e-Manual é alterada.
• } Índice: Exibe a tela Índice.
• R Retornar: Volta à tela anterior.
Como pesquisar um tópico na página Índice
1. Selecione } com o controle remoto. A tela Índice será exibida.
2. Para pesquisar um tópico, selecione uma letra. O Índice exibirá uma lista de tópicos e palavras-chave
que começam com a letra selecionada.
3. Selecione a palavra-chave ou tópico desejado.
4. A página do e-Manual com o tópico será exibida.
Para fechar a tela Índice, pressione o botão RETURNR.
✎
Alteração da posição da tela do e-Manual
Se a tela do e-Manual não estiver bem visível devido à tela dos menus de tela, é possível alterar a posição
da tela do e-Manual.
1. Mova o item realçado para a tela do e-Manual ao pressionar o botão SUPPORT no controle remoto
padrão ou selecionar Suporte com o Smart Touch Control.
2. Pressione o botão { no controle remoto padrão ou selecione { com o Smart Touch Control. Cada
vez que você selecionar { com o controle remoto, a posição da tela do e-Manual será alterada.
Português - 44
Page 98

Solução de problemas
Se a TV aparenta ter algum problema, primeiro verifique esta lista de possíveis problemas e soluções.
Além disso, verifique também a seção de solução de problemas no e-Manual. Se nenhuma das dicas
de solução de problemas se aplicar ao seu caso, visite o site www.samsung.com/support ou entre em
contato com a central de atendimento ao cliente Samsung.
Problemas Soluções e informações
Oscilação de brilho e
intensidade de luz
Conexões componente / cor
da tela
Brilho da tela Caso as cores na sua TV Samsung estejam corretas, mas um pouco
Caso sua TV Samsung apresente oscilação de brilho e intensidade de
luz esporadicamente, pode ser necessário desativar alguns de seus
recursos de economia de energia, como o recurso Sensor Ecológico
ou Economia Energia. Siga os seguintes passos com o controle remoto
para desativar ou ativar esses recursos.
• Economia Energia: Menu → Sistema → Solução Ecológica →
Economia Energia
• Sensor Ecológico: Menu → Sistema → Solução Ecológica →
Sensor Ecológico
Caso ache que a cor da tela de sua TV Samsung não está correta ou que
ela está "preto e branco", primeiro execute um Auto Diagnóstico para se
certificar de que não existam problemas com o dispositivo.
• Auto Diagnóstico: Menu → Suporte → Auto Diagnóstico → Teste
de Imagem
Caso o problema não apareça no teste de imagem, tente verificar o
seguinte:
• Suas conexões estão consistentes. Por exemplo, se tiver usado a
entrada AV In na TV, certifique-se se ter utilizado a saída AV Out na
fonte de vídeo.
• Você conectou seus dispositivos nas entradas corretas. Por exemplo,
caso use as portas Componente, denominadas na TV como Pb,
Pr e Y, para conectar sua TV e fonte de vídeo, certifique-se de ter
conectado a porta azul Pb na fonte de vídeo à porta Pb azul da TV,
assim como a porta vermelha Pr da fonte de vídeo à porta vermelha
Pr da TV.
escuras ou claras demais, tente ajustar estas configurações na opção
Imagem do menu principal:
• Luz da Célula, Contraste, Brilho, Nitidez, Cor, Matiz (Vd/Vm),
entre outras. Acesse “Imagem”, no menu, e tente ajustar as opções
mencionadas acima.
Português - 45
Page 99

Problemas Soluções e informações
Desligamento indesejado Caso sua TV Samsung pareça estar desligando sozinha, pode haver um
problema com suas configurações de Temporizador ou com o recurso
ecológico Sem Sinal Espera.
Primeiro, certifique-se de que o Sleep Timer não foi programado
acidentalmente. O Sleep Timer desliga a TV automaticamente após um
determinado período de tempo.
• Sleep Timer: Menu → Sistema → Hora → Sleep Timer
Se o Sleep Timer não estiver ativado, talvez você tenha selecionado o
recurso Sem Sinal Espera ou Deslig. Automático.
• Sem Sinal Espera: Menu → Sistema → Solução Ecológica →
Sem Sinal Espera
• Deslig. Automático: Menu → Sistema → Solução Ecológica →
Deslig. Automático
Problemas ao ligar a TV Antes de ligar a TV, encontre a luz vermelha na parte inferior direita
ou esquerda da TV. Pressione o botão para ligar na TV ou no
controle remoto. A luz deve piscar cerca de 5 vezes antes da TV
ligar.
Se estiver com problemas para ligar sua TV Samsung, há vários detalhes
a verificar antes de ligar para a central de atendimento.
• Se estiver utilizando a TV como monitor e a luz standby piscar por
apenas alguns segundos ao pressionar o botão de alimentação, isso
significa que seu computador está em modo de descanso. Para tirar
seu computador do modo de descanso, pressione alguma tecla ou
mova o mouse. Em seguida, tente ligar a TV.
Se tiver certeza de que o cabo de energia, o controle remoto e o
computador estão funcionando adequadamente, pode haver problema
com algum cabo. Se tiver um decodificador ou receptor de satélite,
pode parecer que sua TV está desligada porque o decodificador ou o
receptor de satélite não está enviando sinal. Para testar o envio de sinal
do decodificador ou receptor de satélite, pressione o botão de guia ou
informações no controle remoto do decodificador ou receptor de satélite.
Se a tela exibir o guia ou as informações, o problema é causado pelo
decodificador / receptor.
Não consigo encontrar um
canal
Execute novamente a Configuração (Acesse Menu → Sistema →
Configuração) ou execute a Prog. Automática. (Acesse Menu → Canal
→ Prog. Automática).
Português - 46
Page 100
Problemas Soluções e informações
A TV não liga. • Certifique-se de que o cabo de alimentação CA está conectado
corretamente à tomada de parede e à TV.
• Certifique-se de que a tomada de parede está funcionando.
• Experimente pressionar o botão P na TV para verificar se problema
não é o controle remoto. Caso a TV ligue, consulte a seção “O
controle remoto não funciona”, localizada mais abaixo.
Não há imagem/vídeo. • Verifique as conexões de cabo. Retire e reconecte todos os cabos
conectados à TV e aos dispositivos externos.
• Defina as saídas de vídeo de seus dispositivos externos (cabo/
receptor de satélite, DVD, Blu-ray, etc.) de modo compatível com
as conexões de entrada da TV. Por exemplo, caso a saída de um
dispositivo externo seja HDMI, ela deve ser conectada a uma entrada
HDMI da TV.
• Certifique-se de que seus dispositivos conectados estão ligados.
• Certifique-se de selecionar a fonte de entrada correta.
• Reinicie o dispositivo conectado, desconectando e reconectando o
cabo de alimentação do dispositivo.
O controle remoto não
funciona.
O controle remoto do
decodificador de sinais/
receptor não liga ou desliga a
TV e nem ajusta seu volume.
• Substitua as pilhas do controle remoto. Verifique se as pilhas estão
instaladas com os polos (+/-) na posição correta.
• Limpe a janela de transmissão do sensor do controle remoto.
• Tente apontar o controle remoto diretamente para a TV a cerca de 1,5
m de distância.
• Programe o controle remoto do decodificador/receptor para operar a
TV. Consulte o manual do usuário do decodificador de sinais/receptor
para obter o código da TV SAMSUNG.
Esse painel TFT LED usa um painel formado por subpixels que requerem tecnologia sofisticada de
✎
produção. No entanto, pode haver alguns pixels luminosos ou escuros na tela. Esses pixels não terão
nenhum impacto no desempenho do produto.
Para manter sua TV em condição ideal, atualize o firmware no site da Samsung por meio de USB
✎
(samsung.com → Suporte → Downloads).
Licença
Português - 47
 Loading...