

Page 1

Built-in Oven
user manual
BF641 SERIES
imagine the possibilities
Thank you for purchasing this Samsung product.
Please register your product at
www.samsung.com/global/register
Page 2

Using This Manual
EN
Thank you for choosing a SAMSUNG Built - In Oven.
This Owner’s Manual contains important information on safety and instructions intended to assist
you in the operation and maintenance of your appliance.
Please take the time to read this Owner’s Manual before using your oven and keep this book for
future reference.
The following symbols are used in the text of this Owner’s Manual.
☛ ✉
Important Note
Safety Instructions
Installation of this oven must be performed only by a licensed electrician. The installer is
responsible for connecting the appliance to the mains power supply in observance of the relevant
safety recommendations.
Electrical safety
If the oven has been damaged in transport, do not connect it.
● This appliance must be connected to the mains power supply only by a specially licensed
electrician.
● In the event of a fault or damage to the appliance, do not attempt to operate it.
● Repairs
● If the supply cord is defective, it must be replaced by a special cord or assembly available
● Electrical leads and cables should not be allowed to touch the oven.
● The oven should be connected to the mains power supply by means of an approved circuit
● The rating plate is located on the right side of the door.
● The power supply of the appliance should be turned off when it is being repaired or
● Take care when connecting electrical appliances to sockets near the oven.
WARNING
The appliance should be powered down before replacing the lamp to avoid the possibility of
electric shock. During oven operation, the interior surfaces become very hot.
should be performed by a licensed technician only. Improper repair may result
in considerable danger to you and others. If your oven needs repair, contact a SAMSUNG
Service Centre or your dealer.
from the manufacturer or an authorised service agent.
breaker or fuse. Never use multiple plug adapters or extension leads.
cleaned.
2
Page 3

3
EN
Safety Instructions (Continued)
Safety during operation
● This oven has been designed only for the cooking of household foods.
● During use, the oven interior surfaces become hot enough to cause burns. Do not touch
heating elements or interior surfaces of the oven until they have had time to cool.
● Never store flammable materials in the oven.
● The oven surfaces become hot when the appliance is operated at a high temperature for
an extended period of time.
● When cooking, take care when opening the oven door as hot air and steam can escape
rapidly.
● When cooking dishes that contain alcohol, the alcohol may evaporate due to the high
temperatures and the vapour can catch fire if it comes into contact with a hot part of the
oven.
● For your safety, do not use high-pressure water cleaners or steam jet cleaners.
● Children should be kept at a safe distance when the oven is in use.
● Frozen foods such as pizzas should be cooked on the Big grid. If the baking tray is used, it
may become deformed due to the great variation in temperatures.
● Do not pour water into the oven bottom when it is hot. This could cause damage to the
enamel surface.
● The oven door must be closed during cooking.
● Do not line the oven bottom with aluminium foil and do not place any baking trays or tins on
it. The aluminium foil blocks the heat, which may result in damage to the enamel surfaces
and cause poor cooking results.
● Fruit juices will leave stains, which can become indelible on the enamel surfaces of the
oven.
● Do not rest bakeware on the open oven door.
● This appliance is not intended for use by young children or infirm persons without the
adequate supervision of a responsible person ensuring that they are using the appliance
safely.
● Young children should be supervised to ensure that they do not play with the appliance.
Disposal Instructions
Disposing of the packaging material
● The material used to package this appliance is recyclable.
● Dispose of the packaging materials in the appropriate container at your local waste
disposal facility.
Disposing of old appliances
WARNING
Before disposing of old appliances, make them inoperable so that they cannot be a source of
danger.
To do this, disconnect the appliance from the mains supply and remove the mains lead.
To protect the environment, it is important that old appliances are disposed of in the correct
manner.
● The appliance must not be disposed of with household rubbish.
● You can obtain information about collection dates and public refuse disposal sites from
your local refuse department or council.
Page 4

Installation & Maintenance
EN
Safety instructions for the installation
This oven may be installed only by an approved electrician. The installer is responsible for
connecting the appliance to the mains and in so doing for observing the relevant safety
regulations.
● Ensure protection from live parts when installing the oven.
● The kitchen cabinet in which the oven is built in must satisfy stability requirements as
specified in DIN 68930.
Technical Specifications
Input voltage / frequency
Volume (usable capacity)
Output rating
Net weight
Weight with packaging
Housing (W x H x D)
Oven interior (W x H x D)
230 V ~ 50 Hz
65 L
max. 3400 W
approx. 33 kg
approx. 38 kg
595 x 595 x 566 mm
440 x 365 x 405 mm
Power Connection
If the appliance is not connected to the mains with a plug,
a multi-pole isolator switch (with at least 3 mm contact
spacing) must be provided in order to satisfy safety
regulations. The power cable (H05 RR-F or H05 VV-F, min.
1.5 m, 1.5 ~ 2.5 mm²) must be of sufficient length to be
connected to the oven, even if the oven stands on the floor
in front of its built-in cabinet. Open the rear connection
cover of the oven with a screwdriver and loosen the screws
of the cable clamp before you connect the power lines to
the relevant connection terminals. The oven is earthed
via the ( )-terminal. If the oven is connected to the
mains with a plug, this plug must remain accessible after
the oven is installed. Samsung will take no responsibility
for accidents that originate from a missing or faulty earth
connection.
Installation in the Cabinet
This is a built-in oven, which
needs to be installed into an
upper or lower cabinet.
● Observe minimum distances.
● Fix oven on both sides using
screws.
After installation, remove the vinyl
protective film from the door to
the appliance and the protective
film from the interior surfaces of
the oven.
min. 560
min. 550
min. 590
max. 600
min. 550
min. 50
Upper Cabinet
min. 600
min. 560
min. 50
Lower Cabinet
4
Page 5
5
EN
Parts and Features
2
3
4
1
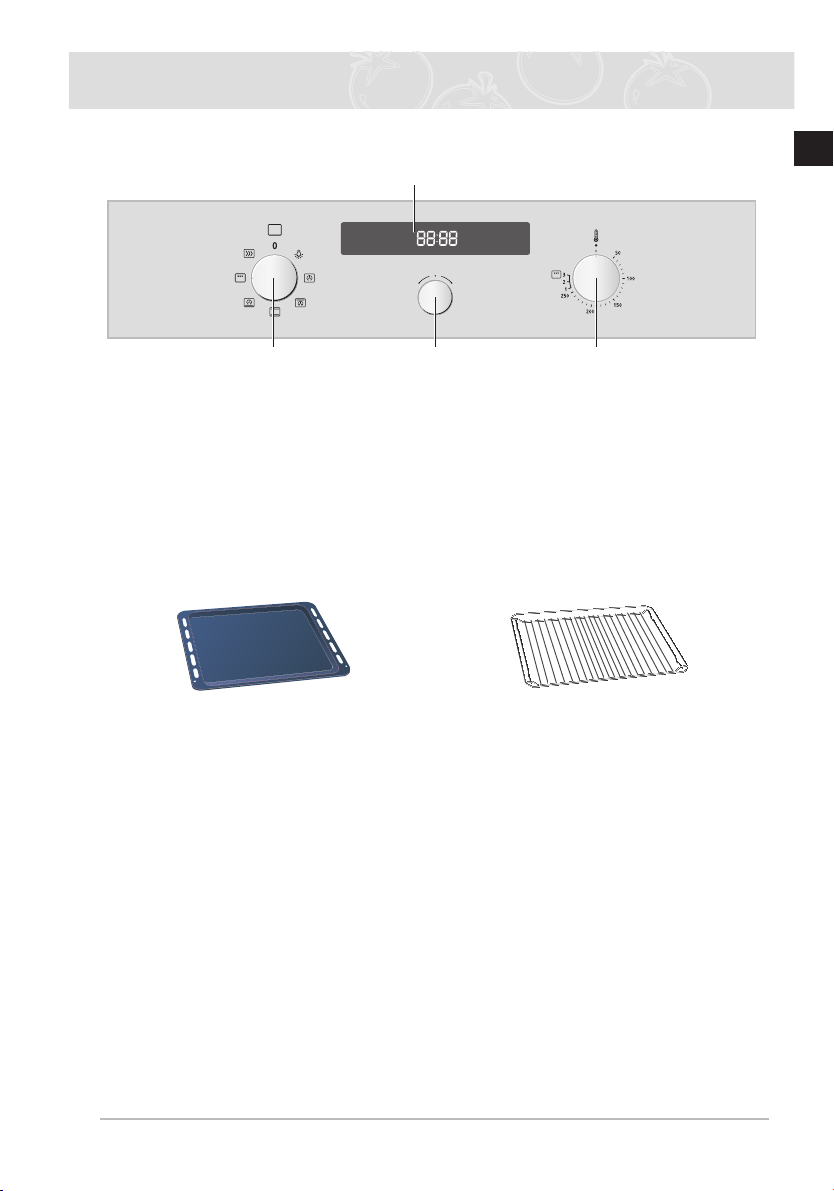
Oven controls
1. Function Select Knob
2. Window Display
✉ Front design
The front panel is available in various material and color options including stainless
steel, white, black and glass. For purposes of quality improvement, the appearance
may be subject to change.
3. Temp Control Knob
4. Time Select Knob
Accessory
BAKING TRAY
The baking tray could be used for the
preparation of cakes, cookies and other
pastries.
☛ Be sure to attach the accessory correctly to the racks. Trays need to have at least
2 cm space towards the bottom of the oven, otherwise the enamel surface could be
damaged.
☛ Be very carefull removing meals and/or accessories out of the oven. Hot meals,
accessories and surfaces can burn you!
BIG GRID
The big grid should be used for grilling
and roasting meals. You could use it with
casseroles and other baking pots.
Page 6
Settings
EN
Time setting
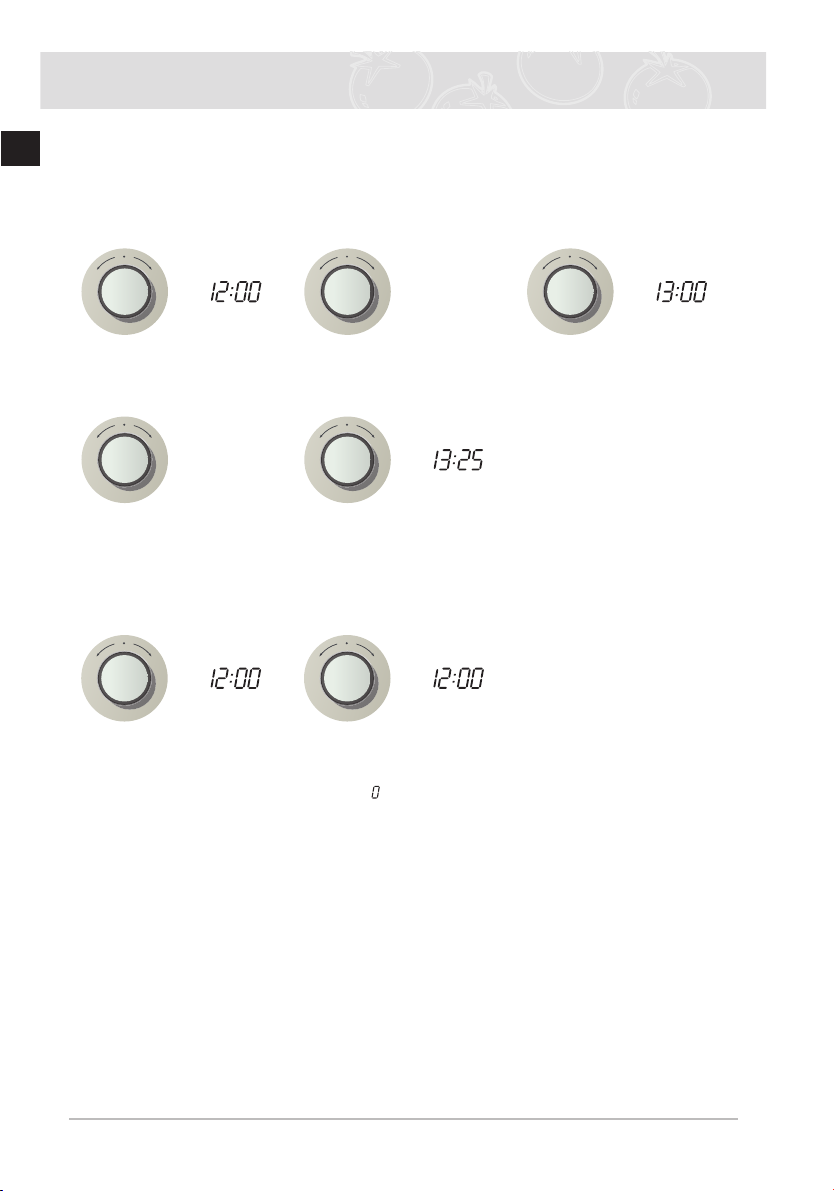
If the oven is pluged to the power suply for the first time, its display will illuminate for short time
and after 3 seconds 12:00 starts to blink. Before the oven can be used the time setting must be
completed.
Press Time Select
1
Knob, hour figures
blink.
Turn Time Select
4
Knob, set desired
time in minutes.
Set Timer
Turn Time Select
2
Knob, set desired
time in hours.
Press Time Select
5
Knob to confirm.
Press Time Select
3
Knob, minute figures
blink.
Turn Time Select
1
Knob, set timer time. 2
✉ While the timer is operating, the “ ” mark on the left side of the screen rotates to
indicate the process.
If you want to stop the timer operation, set the timer to 0:00.
While it is operating, press the Time selection knob to display the clock for the
current time.
Press Time Select
Knob to confirm.
6
Page 7
7
EN
Oven Use
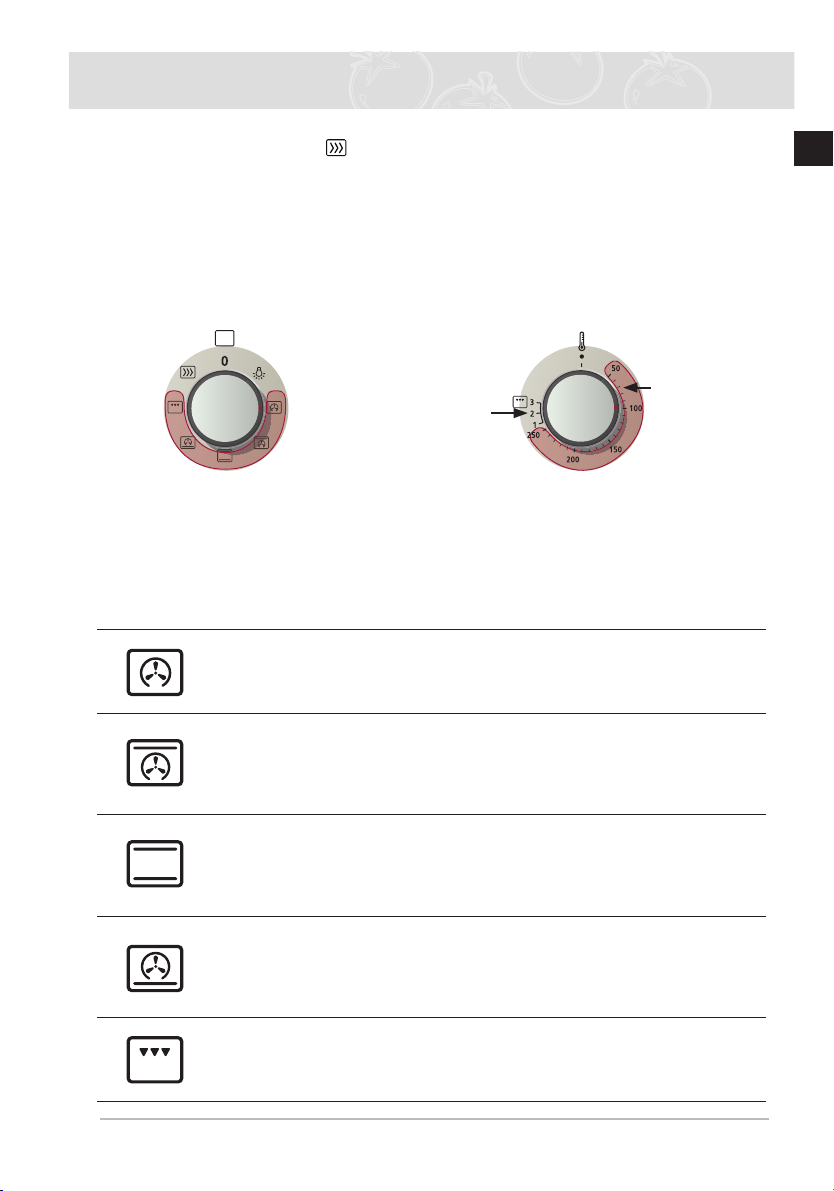
Using the Fast Preheating( ) mode
If you use the FAST PREHEATING option, you can increase the temperature up to the set
value in no time.
This will drastically shorten your waiting time until the preheating is done.
Use the FAST PREHEATING option to increase the temperature to the set value until the
preheating is completed. Then switch to Cooking mode before proceeding.
However, you do not need to use FAST PREHEATING
for grilling food.
Using the Cooking mode
Grill
temperature
1 Low
2 Medium
3 High
Turn Function Select Knob,
1
set desired the cooking mode. 2
Select the desired temperature by turning the
Temp Control Knob.
✉ If you select the Grill function and set the temperature between 50°C and 250°C, or if
you select Normal Cooking mode and set the temperature between Grill 1 and 3, you
are asked to reset the temperature with a buzzer and popup message.
Set the
temperature
for all cooking
other than
grilling.
Oven functions
Convection
The heat generated by the convection is shared evenly in the oven by fans.
This function should be used for frozen dishes and baking.
Suggested temperature: 170°C
Top Heat + Convection
The heat generated by the upper heating system and the convection is
shared evenly in the oven by fans. This function should be used for roasting
crusty dishes like meat.
Suggested temperature: 190°C
Conventional
Heat is emitted from the upper and lower heating system. This function
should be used for standard baking and roasting of almost any type of
dishes.
Suggested temperature: 200°C
Bottom Heat Convection
The heat generated by the lower heating system and the convection is
shared evenly in the oven by fans. This function should be used for pizzas,
bread and cakes.
Suggested temperature: 190°C
Large Grill
Heat is emitted from the large area grill. This function should be used for
scalloped dishes like lasagne and grilling meat.
Suggested temperature: Medium
Page 8
Oven Use (Continued)
EN
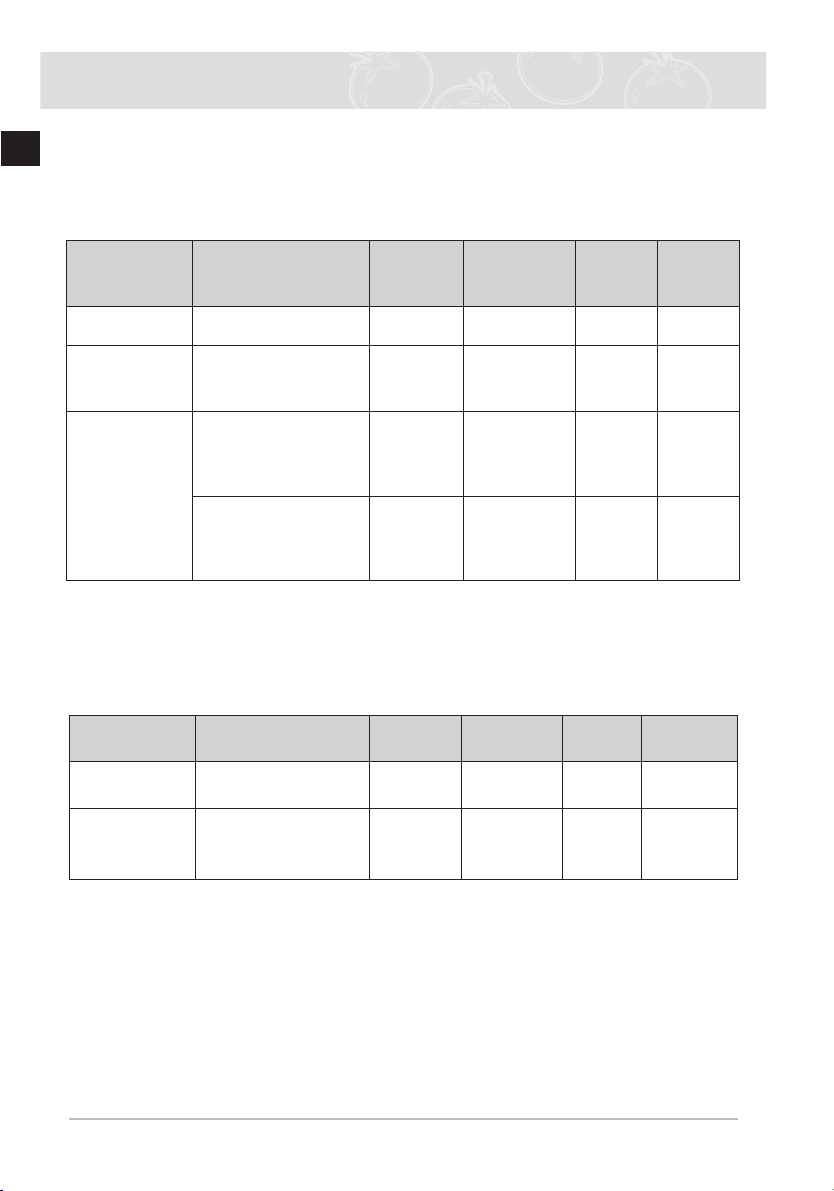
Test dishes
According to standard EN 60350
1. Baking
The recommendations for baking refer to preheated oven.
Type of Food Dish & Notes
Small Cakes Baking tray 2 Conventional 170-190 15-25
Fatless
Sponge Cake
Apple Pie
2. Grilling
Preheat the empty oven for 5 minutes using Large Grill function.
Use this function with the maximum temperature setting of high.
Type of Food Dish & Notes
White Bread
Toasts
Beef Burgers
Baking tin on Big grid
(Dark coated, ø 26
cm)
Big grid + Baking tray
+ 2 Springform cake
tins (Dark coated, ø
20 cm)
Big grid + 2
Springform cake tins
(Dark coated, ø 20
cm)
Big grid 5 Large Grill high
Big grid
Baking tray
(to catch drippings)
Shelf
level
1+3 Convection 170-190 80-100
Placed
diagonally
Shelf
level
Cooking
Mode
1 Conventional 160-180 25-35
1
Conventional 180-200 75-90
Cooking
Mode
4
Large Grill high
3
Temp.
°C
Temp. °CCooking
Cooking
time
min
time min
1st 1-2
2nd 1-1 1/2
st
1
7-10
2nd 5-8
8
Page 9
9
EN
Cleaning and Care
Hand Cleaning
☛ Make sure the oven and accessory is cool before cleaning.
Oven Interior
● For cleaning the interior of the oven, use a clean cloth and a mild cleaning agent or warm
soapy water.
● Do not hand-clean the door seal.
● Do not use scouring pads or cleaning sponges.
● To remove stubborn soil, use a special oven cleaner.
● The cover casing should be cleaned using hot water, detergent and a soft nylon brush.
Do not use abrasive cleaning agents, hard brushes, scouring pads or cloths, steel wool, knives
or other abrasive materials.
Oven Exterior
● For cleaning the exterior of the oven, use a clean cloth and a mild cleaning agent or warm
soapy water.
● Dry with kitchen roll or a dry towel.
● Do not use scourers, caustic cleaners or abrasive products.
Stainless steel oven fronts
● Do not use steel wool, scouring pads or other abrasives. They may damage the finish.
Aluminium oven fronts
● Wipe the surface gently with a soft clean cloth or microfiber cloth and a mild window
cleaning detergent.
Accessory
Wash the accessory after every use and dry it with a kitchen towel. If necessary, lay in warm
soapy water for about 30 minutes for easier cleaning.
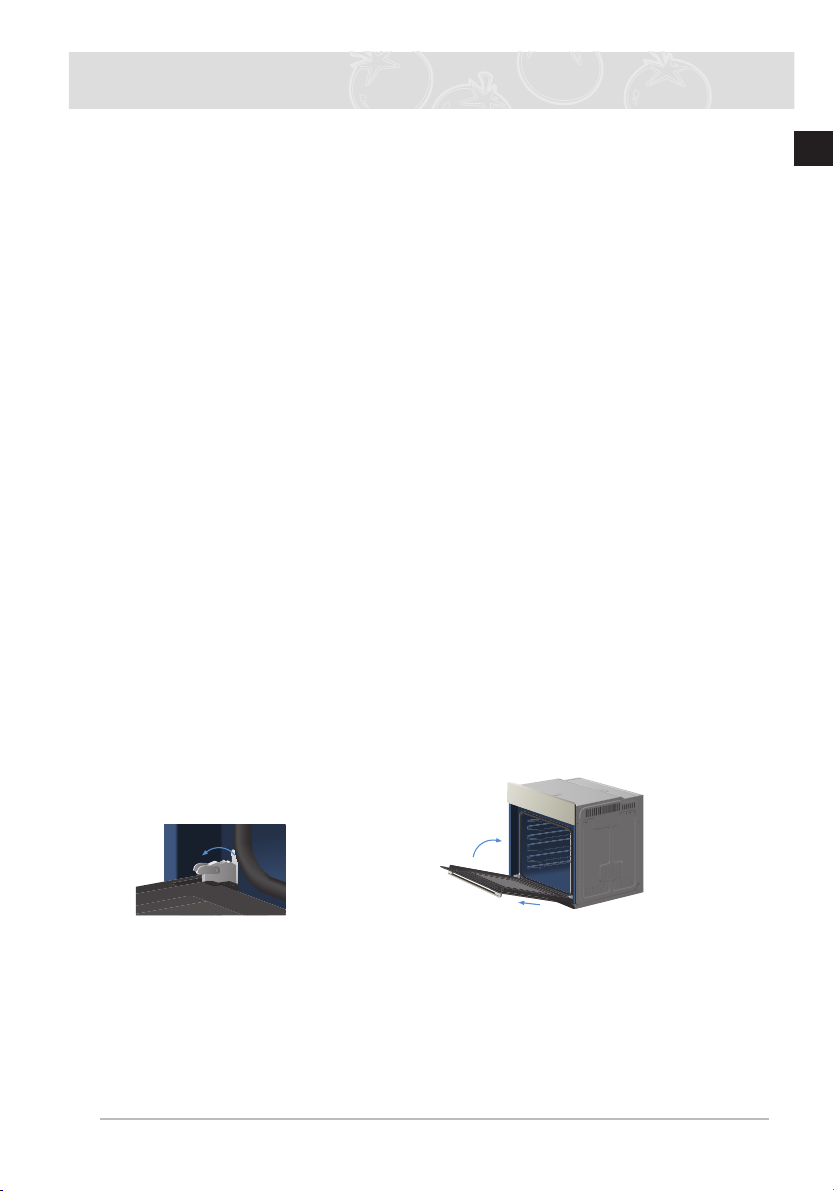
Door Removal
For normal use, the oven door must not be removed but if removal is necessary, for example,
for cleaning purposes, follow these instructions. CAUTION: The oven door is heavy.
Open the door and flip
1
open the clips at both
hinges completely.
Close the door by approximately 70°. With both
2
hands, grasp the sides of the oven door at its middle
and pull-lift until the hinges can be taken out.
Page 10
Cleaning and Care (continued)
EN
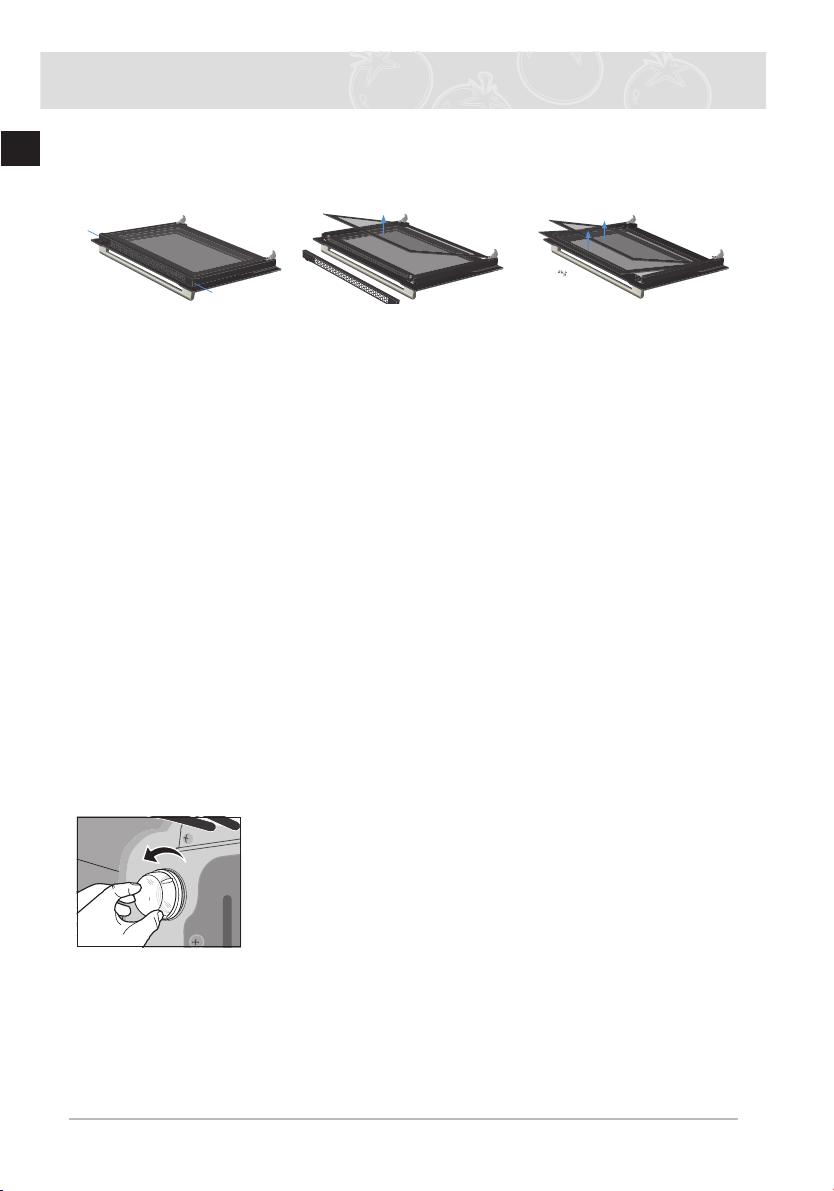
Door Glass Removal
The oven door is equipped with three sheets of glass placed against each other. These sheets
can be removed for cleaning.
Remove the two
1
screws on the left and
right sides of the door.
Detach the covering
2
and remove glass 1
from the door.
Lift glass 2 and
3
remove the two holder
glass rubber from the
top of the sheet, then
remove glass 3. Clean
the sheets with warm
water or washing-up
liquid and polish dry
them with a soft clean
cloth.
✉ The Door-Glass is different from 2EA to 4EA model by model.
But, the method of the disassembly and assembly is same.
✉ When assembly the inner glass 1, put printing to direction below.
Bulb Exchange
☛ Danger of electric shock!
Before replacing any of the oven bulbs, take the following steps:
● Switch oven Off.
● Disconnect the oven from the mains.
● Protect the oven light bulb and the glass cap by laying a cloth on the bottom of
the oven compartment.
● Bulbs can be purchased from the SAMSUNG Service Centre.
Rear oven lamp
1. Remove cap by turning anticlockwise and remove the metal
ring, the sheet ring and clean the glass cap. If necessary,
replace the bulb with a 25 watt, 230 V, 300 °C heat-resistant
oven light bulb.
2. Clean the glass cap, the metal ring and the sheet ring if
necessary.
3. Fit the metal and the sheet ring to the glass cap.
4. Place glass cap where you have removed it in step 1 and
turn it clockwise to keep it in place.
10
Page 11
11
EN
Warranty & Service
FAQs and Troubleshooting
What should I do if the oven doesn’t heat up?
Check to see if one of the following actions resolves the issue:
● The oven may not be switched on. Switch the oven on.
● The clock may not be set. Set the clock (see section “Time setting”).
● Check to see if the required settings have been applied.
● A household fuse may have blown or a circuit breaker may have tripped. Replace the fuses
or reset the circuit. If this happens repeatedly, call an authorised electrician.
What should I do if, even though the oven function and temperature have been set, the oven does
not heat up?
There may be problems with the internal electrical connections. Call your local service centre.
What should I do if an error code appears and the oven does not heat up?
There is a fault in the internal electrical circuit connection. Call your local service centre.
What should I do if the time display is blinking?
There was a power failure. Set the clock (see section “Time setting”).
What should I do if the oven light doesn’t illuminate?
The oven light is faulty. Replace the oven light bulb (see section “Bulb Exchange”).
What should I do if the oven’s fan is running without having been set?
Following use, the oven’s fan runs until the oven has cooled down. Call your local service
centre if the fan continues to run after the oven has cooled down.
Error and Safety codes
Error and
Safety codes
E-
1)
General Functions Solution
An error of the oven may cause
low performance and problems
in safety. Stop using the oven
immediately.
Call local SAMSUNG service
centre.
**
-SE-
SAFETY SHUTOFF
S-01
- - - -
1) * refers to all numbers or characters.
Oven has continued operating at set
temperature for prolonged time.
If you did not select an appropriate
temperature for the mode.
Turn oven off and remove food.
Allow oven to cool before using
again.
Select the correct temperature
for the mode.
(see section “Using the Fast
Preheating mode”)
Page 12
QUESTIONS OR COMMENTS
COUNTRY CALL OR VISIT US ONLINE AT
BELGIUM 0032 (0)2 201 24 18 www.samsung.com/be
CZECH REPUBLIC 844 000 844 www.samsung.com/cz
DENMARK 70 70 19 70 www.samsung.com/dk
FINLAND 030-6227 515 www.samsung.com/fi
FRANCE
GERMANY 01805 - SAMSUNG(726-7864 € 0,14/Min) www.samsung.com
HUNGARY
ITALIA
LUXEMBURG 0035 (0)2 261 03 710 www.samsung.com/be
NETHERLANDS 0900-SAMSUNG (726-7864 € 0,10/Min) www.samsung.com/nl
NORWAY
POLAND
PORTUGAL
SLOVAKIA
SPAIN
SWEDEN 0771-400 200 www.samsung.com/se
U.K 0845 SAMSUNG (7267864) www.samsung.com
EIRE 0818 717 100 www.samsung.com/ie
AUSTRIA 0800-SAMSUNG(726-7864) www.samsung.com/at
Switzerland 0800-SAMSUNG(726-7864) www.samsung.com/ch
3260 SAMSUNG (€ 0,15/Min)
08 25 08 65 65 (€ 0,15/Min)
06-80-SAMSUNG(726-7864) www.samsung.com
800-SAMSUNG(726-7864) www.samsung.com
815-56 480 www.samsung.com/no
0 801 801 881
022-607-93-33
80820-SAMSUNG(726-7864) www.samsung.com/pt
0800-SAMSUNG(726-7864) www.samsung.com/sk
902 10 11 30 www.samsung.com
www.samsung.com
www.samsung.com/pl
Code No.: DG68-00142Y
 Loading...