

Page 1
Gas Range
User manual
NX58J7750S*
NX58J7750S�_AA_AC_DG68-00623A-02_EN.indd 1 2015-06-25 �� 10:15:34
Page 2
WARNING:
exactly, a re or explosion may result causing property damage,
personal injury, or death.
• DO NOT store or use gasoline or other ammable vapors and
liquids in the vicinity of this or any other appliance.
• WHAT TO DO IF YOU SMELL GAS:
- DO NOT try to light any appliance.
- DO NOT touch any electrical switch.
- DO NOT use any phone in your building.
- Immediately call your gas supplier from a neighbor’s
phone. Follow the gas supplier’s instructions.
- If you cannot reach your gas supplier, call the re
department.
• Installation and service must be performed by a qualied
installer, service agency, or the gas supplier.
If the information in this manual is not followed
Anti-tip device
WARNING
ALL RANGES CAN TIP, RESULTING IN PERSONAL INJURY.
TIPPING RANGES CAN CAUSE BURNS FROM SPILLS,
PERSONAL INJURY, AND/OR DEATH.
INSTALL AND CHECK THE ANTI-TIP BRACKET USING THE
INSTRUCTIONS AND TEMPLATE SUPPLIED WITH THE
BRACKET.
• To prevent accidental tipping of the range, attach an approved
anti-tip device to the oor. (See Installing the Anti-Tip Device
in the Installation Instructions.) Check for proper installation by
carefully tipping the range forward. The anti-tip device should
engage and prevent the range from tipping over.
2 English
NX58J7750S�_AA_AC_DG68-00623A-02_EN.indd 2 2015-06-25 �� 10:15:35
Page 3

• If the range is pulled out away from the wall for any reason, make
sure the anti-tip device is reengaged after the range has been
pushed back into place.
• Follow the installation instructions found in the Installation
Manual. Failure to follow these instructions can result in death,
serious personal injury, and/or property damage.
• To prevent the range from tipping, do not step/sit/lean on the
door or drawer.
• If the range is pulled out away from the wall for service or
cleaning, make sure the anti-tip device is reengaged after the
range has been pushed back into place. See "Installing the Anti-Tip
Device" in the installation instructions.
English 3
NX58J7750S�_AA_AC_DG68-00623A-02_EN.indd 3 2015-06-25 �� 10:15:35
Page 4
Contents
Key features 6
Contents
Bigger is better 6
A cooktop with 5 burners 6
Enhanced convenience with easy maintenance 6
Important safety information 7
Read all instructions before using this appliance 7
Symbols used in this manual 7
State of California Proposition 65 Warning 7
Commonwealth of Massachusetts 7
General safety 8
Fire safety 9
Gas safety 10
Electrical and grounding safety 10
Installation safety 11
Location safety 12
Cooktop safety 13
Oven safety 15
Storage drawer safety 16
Self-cleaning oven safety 16
Overview 17
Layout 17
What’s included 18
Control panel 19
Clock 20
Kitchen timer 21
Oven vent/cooling vent 21
Gas range 22
Cookware 22
Wok grate 23
Griddle 24
Gas burners 25
Ignition 26
4 English
NX58J7750S�_AA_AC_DG68-00623A-02_EN.indd 4 2015-06-25 �� 10:15:35
Page 5
Gas oven 27
Single mode 27
Twin mode 28
Cooking mode 30
Broiling 33
Recipe guide 35
Temperature setting guides 37
Using the oven racks 39
Using the gliding rack 43
Cooking options 45
Slow cook, dehydrate, proong 56
Maintenance 62
Cleaning 62
Replacement 69
Reinstallation 70
Troubleshooting 72
Checkpoints 72
Information codes 80
Warranty 81
Contents
English 5
NX58J7750S�_AA_AC_DG68-00623A-02_EN.indd 5 2015-06-25 �� 10:15:35
Page 6

Key features
Bigger is better
With a capacity of 5.8 cubic feet, this Samsung gas oven range offers more space than many
other leading brands in the United States and Canadian markets. The enhanced capacity
Key features
means a better cooking experience.
A cooktop with 5 burners
Power burners, simmer burners, as well as a center oval burner provide exible cooktop heat
for a variety of cookware. The center oval burner delivers heat evenly over a large area, and
provides the optimum temperatures for griddle cooking.
Enhanced convenience with easy maintenance
The Samsung gas oven range combines all the benets of 3 separate home appliances - gas
range, gas oven, and storage drawer - to maximize your convenience with its careful, stylish
design.
6 English
NX58J7750S�_AA_AC_DG68-00623A-02_EN.indd 6 2015-06-25 �� 10:15:35
Page 7
Important safety information
READ ALL INSTRUCTIONS BEFORE USING THIS APPLIANCE
• All electrical and gas equipment with moving parts can be dangerous. Please read the
important safety instructions for this appliance in this manual. The instructions must be
followed to minimize the risk of injury, death, or property damage.
• Save this manual. Please Do Not Discard.
Symbols used in this manual
WARNING
Hazards or unsafe practices that may result in severe personal injury or death.
CAUTION
Hazards or unsafe practices that may result in electric shock, personal injury, or property
damage.
NOTE
Useful tips and instructions.
Important safety information
These warning icons and symbols are here to prevent injury to you and others. Please follow
them explicitly. After reading this section, keep it in a safe place for future reference.
State of California Proposition 65 Warning
• This product contains chemicals known to the State of California to cause cancer and
reproductive toxicity.
• Gas appliances can cause low-level exposure to Proposition 65 listed substances,
including but not limited to, benzene, carbon monoxide, formaldehyde and soot,
substances resulting from the incomplete combustion of natural gas or LP fuels.
Commonwealth of Massachusetts
• This product must be installed by a licensed plumber or gas tter qualied or licensed by
the State of Massachusetts. When using ball-type gas shut-off valves, you must use the
T-handle type. Multiple exible gas lines must not be connected in series.
English 7
NX58J7750S�_AA_AC_DG68-00623A-02_EN.indd 7 2015-06-25 �� 10:15:35
Page 8
Important safety information
Important safety information
General safety
WARNING
To reduce the risk of re, electric shock, personal injuries, and/or death, obey the following
precautions.
• Do not touch any part of the range, including but not
limited to, oven burners, surface burners, or interior
surfaces during or immediately after cooking.
• Know the location of the gas shut-off valve and how to
shut it off.
• Make sure the anti-tip device is properly installed on
the range. See the installation instructions for more
information.
• Do not let children near the range. Do not let children go into the range or onto the range.
Do not let children play with the range or any part(s) of the range. Do not leave children
unattended in an area where the range is in use. For children’s safety, we recommend
utilizing the control/door lockout feature.
• Remove all packaging materials from the range before operating to prevent ignition of
these materials. Keep all packaging materials out of children’s reach. Properly dispose the
packaging materials after the range is unpacked.
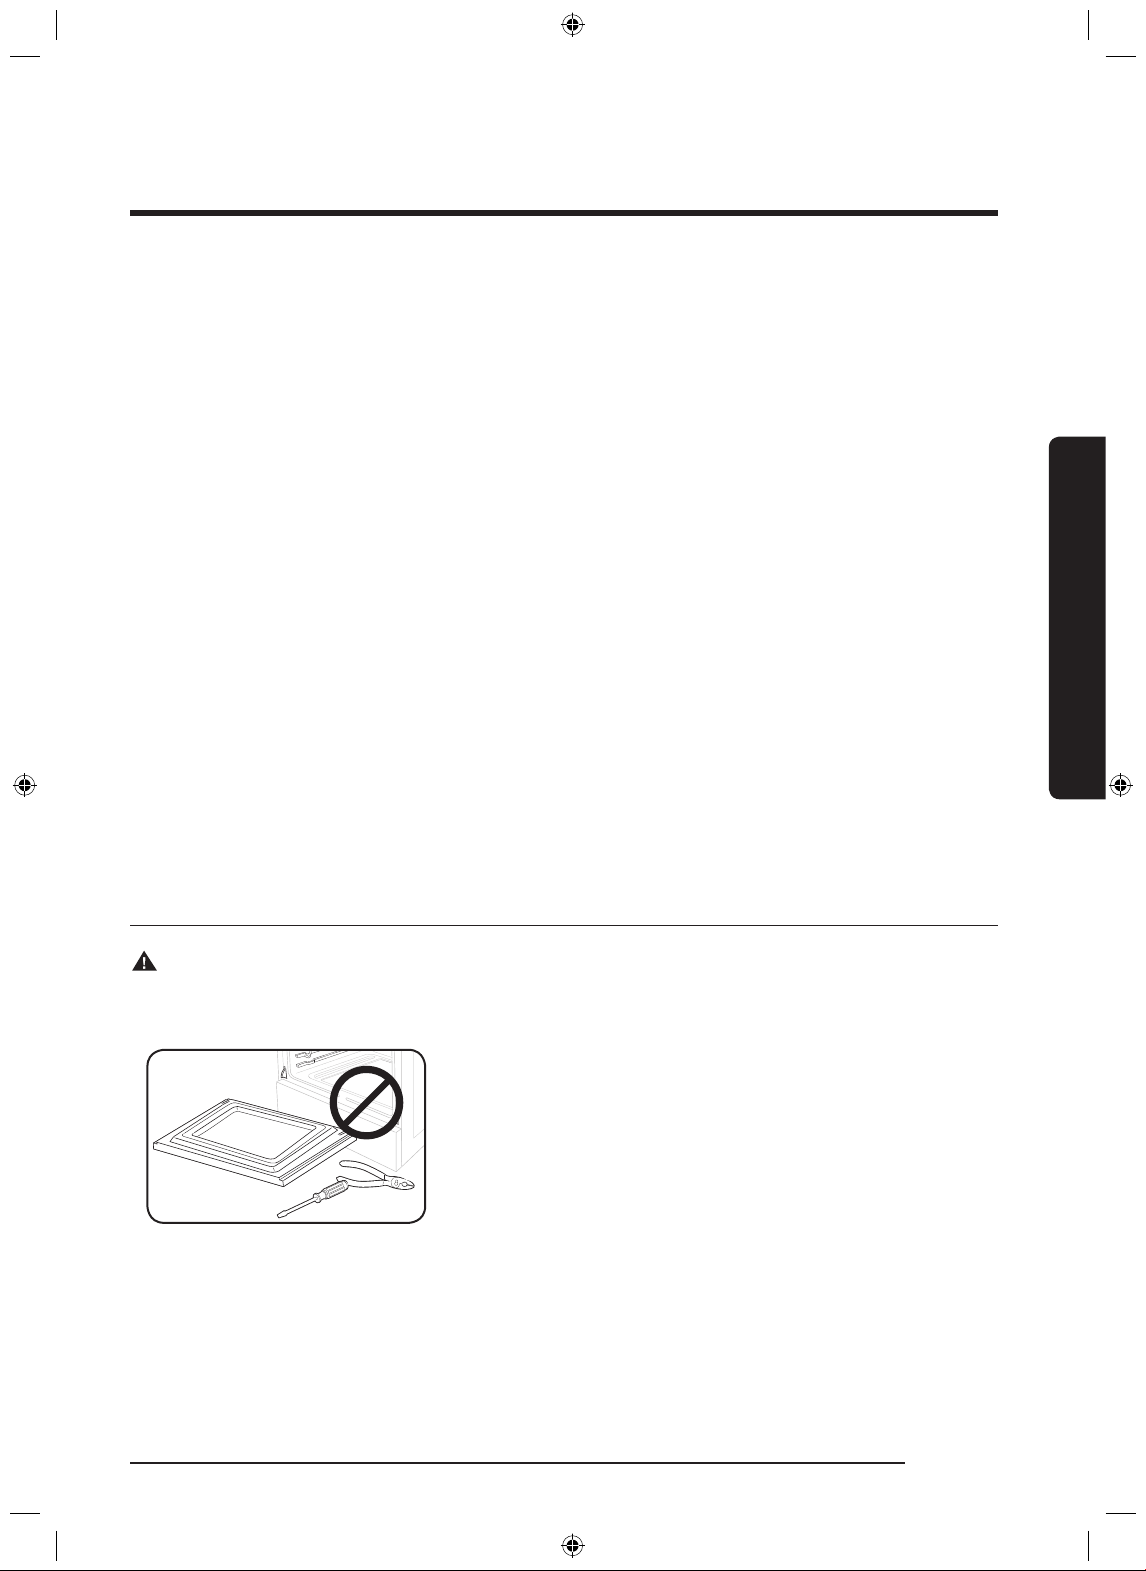
• Do not store any object of interest to children on the cooktop or backguard of the range.
Children climbing on the range to reach items could be killed or seriously injured.
• Do not operate the range if the range or any part of the range is damaged,
malfunctioning, or missing parts.
• Do not use the range as a space heater. Use the range for cooking only.
• Do not use oven cleaners or oven liners in or around any part of the oven.
• Use only dry pot holders.
• Do not use the range to heat unopened food containers.
• Do not strike the oven glass.
• When disposing of the range, cut off the power cord and remove the door.
• Unplug or disconnect power before servicing.
• Make sure all meat and poultry is cooked thoroughly. Meat should always be cooked to
an internal temperature of 160 °F (71 °C). Poultry should always be cooked to an internal
temperature of 180 °F (82 °C).
• Do not make any attempt to operate the electric ignition oven during an electrical power
failure.
• Keep the appliance area clear and free of combustible materials, gasoline, and other
ammable vapors and liquids.
8 English
NX58J7750S�_AA_AC_DG68-00623A-02_EN.indd 8 2015-06-25 �� 10:15:35
Page 9
Fire safety
WARNING
To reduce the risk of re, electric shock, personal injuries, and/or death, obey the following
precautions.
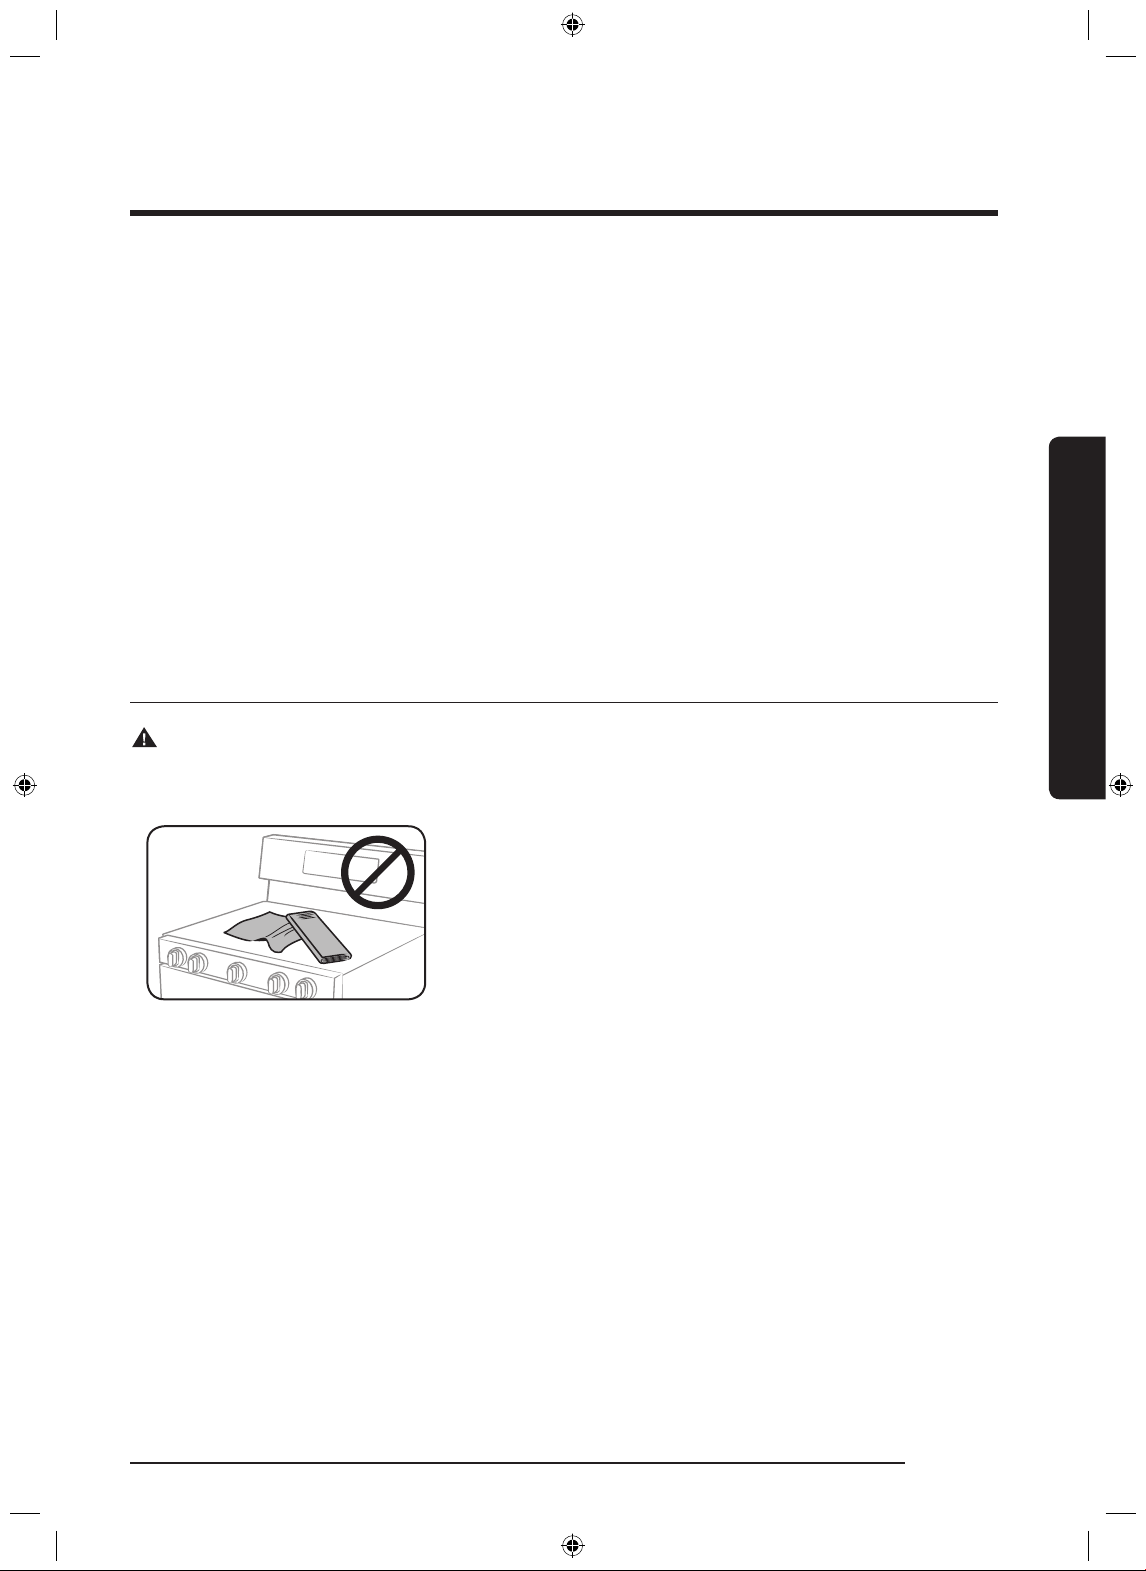
• Do not store, place, or use ammable or combustible
materials such as paper, plastic, pot holders, linens,
curtains, gasoline or other ammable vapors or liquids
near the range.
• Do not wear loose tting or hanging garments while
using the range.
• To avoid grease buildup, regularly clean the vents.
• Do not let pot holders or other ammable materials
touch a heating element. Do not use a towel or other
bulky cloths in place of a pot holder.
• Do not use water on a grease re. To put out a grease re, turn off the heat source and
smother the re with a tight-tting lid or use a multipurpose dry chemical or foam-type
re extinguisher.
• If a grease re should occur in the oven, turn off the oven by pressing the OFF/CLEAR
button. Keep the oven door closed until the re goes out. If necessary, use a multipurpose
dry chemical or foam-type fire extinguisher.
• Do not heat unopened food containers. The buildup of pressure may cause the containers
to burst and result in injury.
• NEVER use this appliance as a space heater to heat or warm the room. Doing so may
result in carbon monoxide poisoning and overheating of the oven. Do not use the oven
for storage. Paper and other ammable items stored in the oven can ignite.
• Do not leave items such as paper, cooking utensils or food in the oven when not in use.
Items stored in an oven can ignite.
Important safety information
English 9
NX58J7750S�_AA_AC_DG68-00623A-02_EN.indd 9 2015-06-25 �� 10:15:36
Page 10
Important safety information
Important safety information
Gas safety
WARNING
To reduce the risk of re, electric shock, personal injuries, and/or death, obey the following
precautions.
If you smell gas:
• Close the valve and do not use the range.
• Do not light a match, candle, or cigarette.
• Do not turn on any gas or electric appliances.
• Do not touch any electrical switches or plug a power
cord into an outlet.
• Do not use any phone in your building.
• Evacuate the room, building, or area of all occupants.
• Immediately call your gas supplier from a neighbor’s
phone. Follow the gas supplier’s instructions.
• If you cannot reach your gas supplier, call the re
department.
Checking for gas leaks
• Leak testing of the appliance shall be conducted according to the manufacturer’s
instructions. Do not use a ame to check for gas leaks. Use a brush to spread a soapy
water mixture around the area you are checking. If there is a gas leak, you will see small
bubbles in the soapy water mixture at the leak point.
Electrical and grounding safety
WARNING
To reduce the risk of re, electric shock, personal injuries, and/or death, obey the following
precautions.
• Plug into a grounded 3-prong outlet.
• Do not remove the ground prong.
• Do not use an adapter or an extension cord.
• Do not use a damaged power plug, power cord, or loose
power outlet.
• Do not modify the power plug, power cord, or power
outlet in any way.
• Do not put a fuse in a neutral or ground circuit.
10 English
NX58J7750S�_AA_AC_DG68-00623A-02_EN.indd 10 2015-06-25 �� 10:15:36
Page 11
• Use a dedicated 120-volt, 60-Hz, 20-amp, AC, fused electrical circuit for this range. A
time-delay fuse or circuit breaker is recommended. Do not plug more than one appliance
into this circuit.
• Do not connect the ground wire to plastic plumbing lines, gas lines, or hot water pipes.
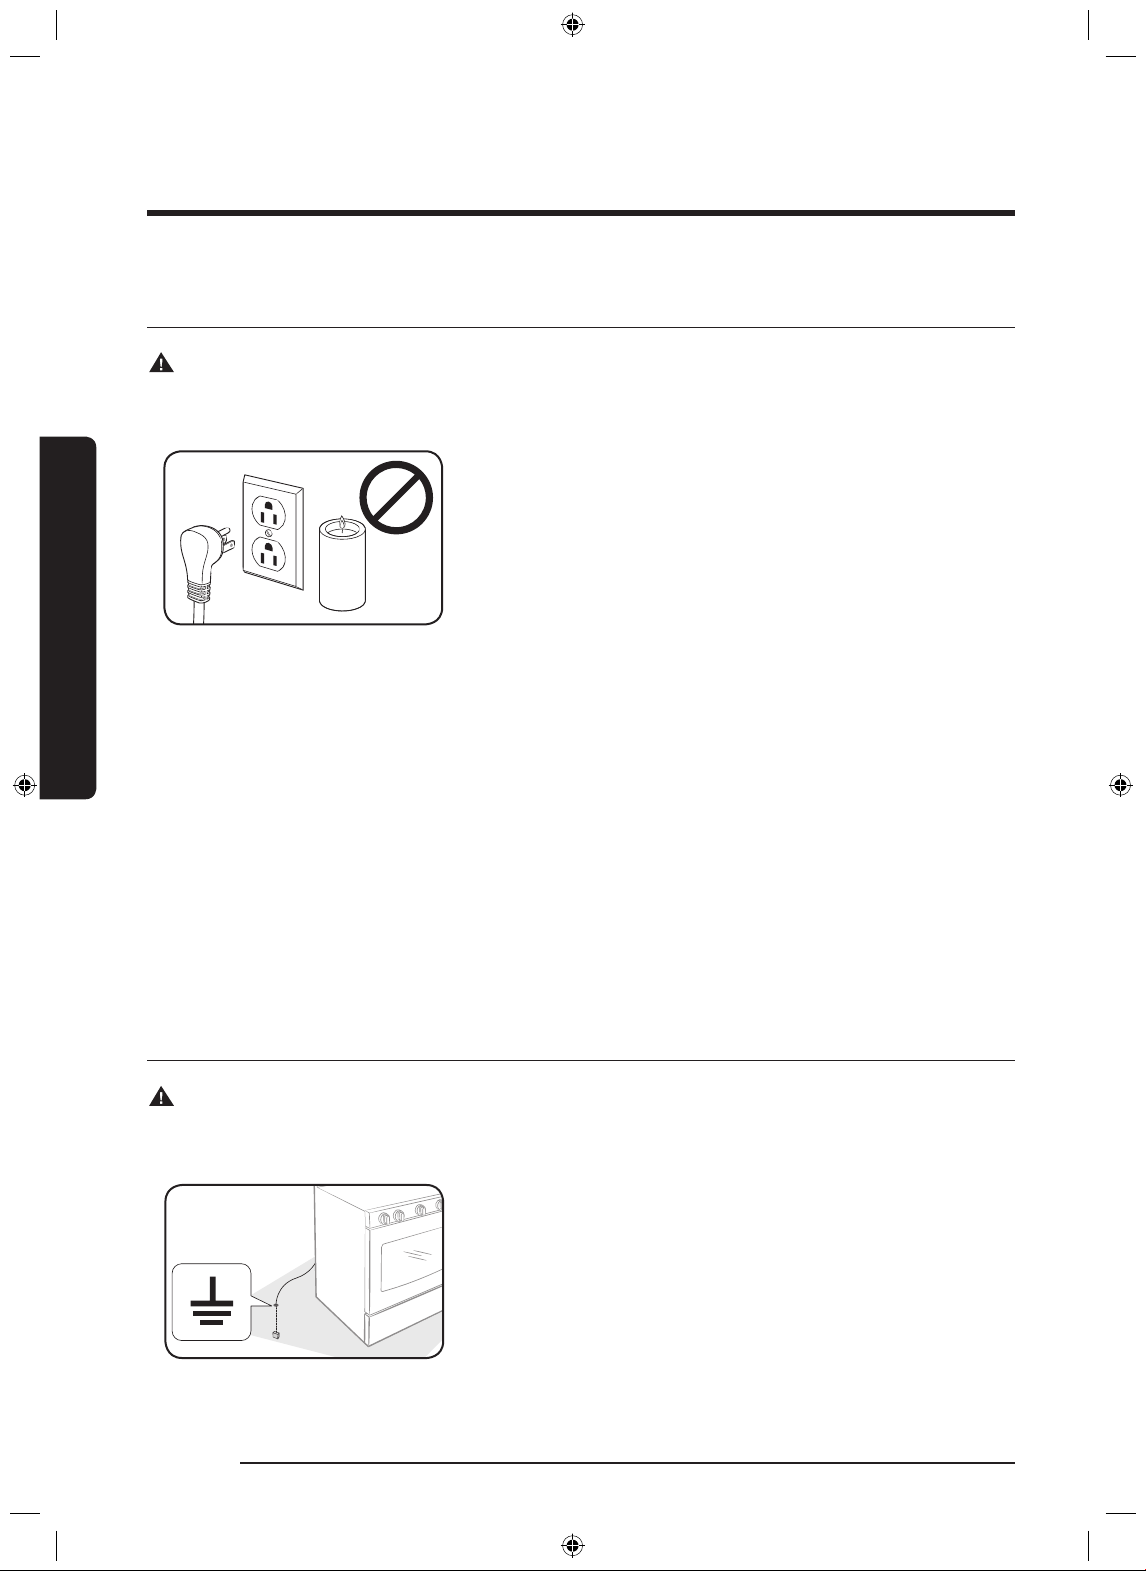
• This range must be Earth grounded. In the event of a malfunction or breakdown,
grounding will reduce the risk of electrical shock by providing a path for the electric
current. This range is equipped with a cord having a grounding plug. The plug must
be rmly plugged into an outlet that is properly installed and grounded in accordance
with the local codes and ordinances. If you are unsure whether your electrical outlet is
properly grounded, have it checked by a licensed electrician.
• The range is supplied with a 3-pronged grounded plug. This cord must be plugged into
a mating, grounded 3-prong outlet that meets all local codes and ordinances. If codes
permit the use of a separate ground wire, we recommend that a qualied electrician
determine the proper path for this ground wire.
• Electrical service to the range must conform to local codes. Barring local codes, it
should meet the latest ANSI/NFPA No. 70 – Latest Revision (for the U.S.) or the Canadian
Electrical Code CSA C22.1 – Latest Revisions.
• It is the personal responsibility of the range owner to provide the correct electrical
service for this range.
Important safety information
Installation safety
WARNING
To reduce the risk of re, electric shock, personal injuries, and/or death, obey the following
precautions.
• Have your range installed and properly grounded by a
qualified installer, in accordance with the installation
instructions. Any adjustment and service should be
performed only by qualied gas range installers or
service technicians.
• Do not attempt to service, modify, or replace your
range or any part of your range unless it is specically
recommended in this manual. All other service should
be referred to a qualied technician.
• Always use new exible connectors when installing a gas appliance. Do not use old
exible connectors.
• Make sure the anti-tip device is properly installed on the range. See the installation
instructions for more information.
English 11
NX58J7750S�_AA_AC_DG68-00623A-02_EN.indd 11 2015-06-25 �� 10:15:37
Page 12
Important safety information
Important safety information
• Due to the size and weight of the range, have two or more people move the range.
• Remove all tape and packaging materials.
• Remove all accessories from the cooktop, oven, and/or lower drawer. Grates and griddles
are heavy. Use caution when handling them.
• Make sure no parts came loose during shipping.
• Make sure your range is correctly installed and adjusted by a qualied service technician
or installer for the type of gas (natural or LP) you will use. For your range to utilize LP
gas, the installer must replace the 5 surface burner orices and 2 oven orices with the
provided LP orice set, and reverse the GPR adapter. These adjustments must be made
by a qualied service technician in accordance with the manufacturer’s instructions and
all codes and requirements of the authority having jurisdiction. The qualied agency
performing this work assumes the gas conversion responsibility.
• Installation of this range must conform with local codes or, in the absence of local
codes, with the National Fuel Gas Code, ANSI Z223.1/NFPA.54, latest edition. In
Canada, installation must conform with the current Natural Gas Installation Code, CAN/
CGA-B149.1, or the current Propane Installation Code, CAN/CGA-B149.2, and with local
codes where applicable. This range has been design-certied by ETL according to ANSI
Z21.1, latest edition, and Canadian Gas Association according to CAN/CGA-1.1, latest
edition.
Location safety
WARNING
To reduce the risk of re, electric shock, personal injuries, and/or death, obey the following
precautions.
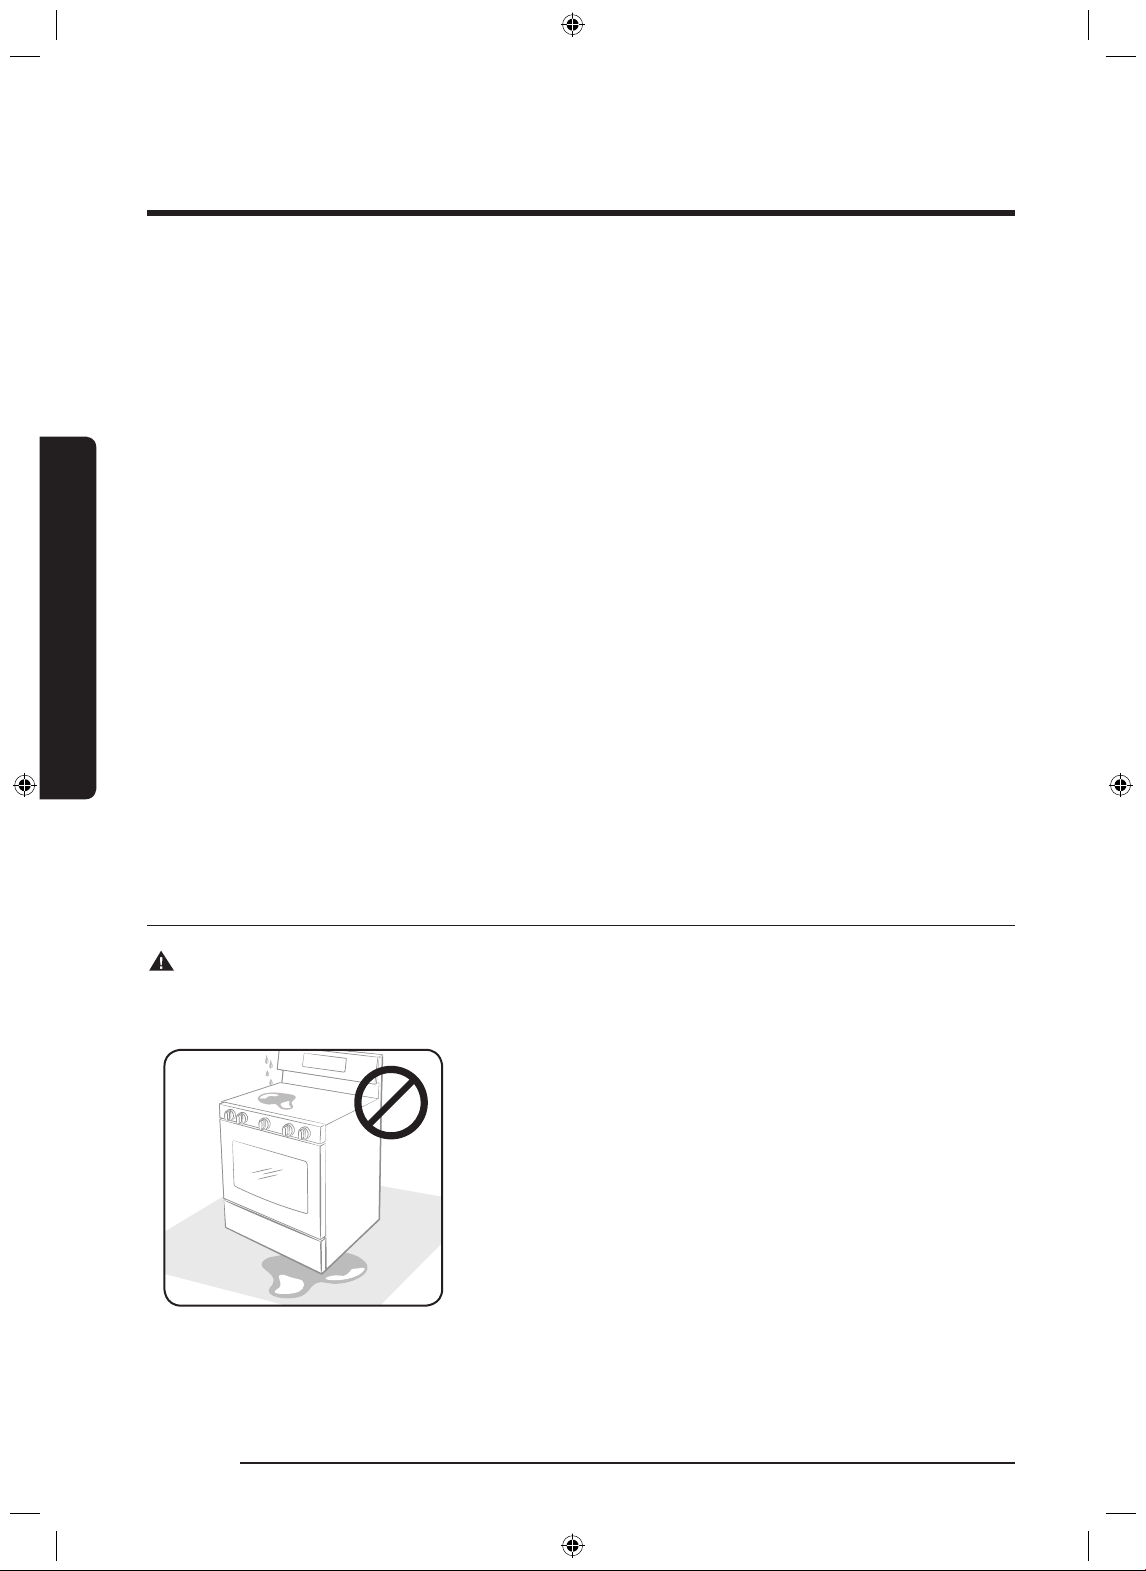
• This range is for indoor, household use only. Do not
install the range in areas exposed to the weather and/
or water.
• Do not install the range in a place which is exposed to a
strong draft.
• Select a level, well-constructed oor that can support
the range’s weight. Synthetic ooring, such as linoleum,
must withstand 180 °F (82 °C) temperatures without
shrinking, warping, or discoloring. Do not install the
range directly over interior kitchen carpeting unless a
sheet of ¼ inch plywood or a similar insulator is placed
between the range and carpeting.
• Select a location where a grounded, 3- prong outlet is easily accessible.
12 English
NX58J7750S�_AA_AC_DG68-00623A-02_EN.indd 12 2015-06-25 �� 10:15:37
Page 13
• If the range is located near a window, do not hang long curtains or paper blinds on that
window.
• For the range to ventilate properly, make sure the range’s vents are not blocked, and that
there is enough clearance at the top, back, sides, and underneath the range. The vents
allow the necessary exhaust for the range to operate properly with correct combustion.
• Make sure the wall coverings around the range can withstand heat up to 200 °F (93 °C)
generated by the range.
• Cabinet storage above the surface of the range should be avoided. If cabinet storage
above the range is necessary: allow a minimum clearance of 40 inches (102 cm) between
the cooking surface and the bottom of cabinets; or install a range hood that projects
horizontally a minimum of 5 inches (12.7 cm) beyond the bottom of the cabinets.
Cooktop safety
WARNING
To reduce the risk of re, electric shock, personal injuries, and/or death, obey the following
precautions.
• Make sure all burners are off when not in use.
• Do not use aluminium foil to line the grates or any
part of the cooktop. It may cause carbon monoxide
poisoning. Aluminum foil linings may also trap heat,
causing a re hazard.
• Do not leave burners unattended on medium or high
heat settings.
• Before igniting, make sure all burner caps are properly
in place and all burners are level.
• Always use the LITE position when igniting the burners and make sure the burners have
ignited. If ignition fails, turn the knob to OFF and wait until the gas has dissipated.
• When you set a burner to simmer, do not turn the knob quickly. Make sure the ame
stays on.
• Do not place any objects other than cookware on the cooktop.
• This cooktop is designed to cook with a wok or wok ring attachment. To ame food, you
must have a ventilation hood. When you ame food, the hood must be on.
• Before removing or changing cookware, turn off the burners.
• Remove food and cookware immediately after cooking.
• Before removing any parts of the burner for cleaning, make sure the range is off and
completely cool.
• After cleaning the burner spreader, make sure it is completely dry before re-assembling.
Important safety information
English 13
NX58J7750S�_AA_AC_DG68-00623A-02_EN.indd 13 2015-06-25 �� 10:15:37
Page 14
Important safety information
Important safety information
• Make sure the spark mark on the dual burner spreader is placed beside the electrode
when it is assembled.
• To avoid carbon monoxide poisoning, do not pour water into the cooktop well while
cleaning.
• Select cookware that is designed for range top cooking. Use cookware that is large
enough to cover the burner grates. Adjust the burner ames so that the ames do not
extend beyond the bottom of the cookware.
• To avoid cookware discoloration, deformity, and/or carbon monoxide poisoning, do not
use cookware that is substantially larger than the grate.
• Make sure cookware handles are turned to the side or rear of the cooktop, but not over
other surface burners.
• Stand away from the range while frying.
• Always heat frying oils slowly, and watch as they heat. If you are frying foods at high
heat, carefully watch during the cooking process. If you are going to use a combination of
fats or oils when frying, mix them together before heating.
• Use a deep-fryer thermometer whenever possible. This prevents overheating the fryer
beyond the smoking point.
• Use a minimum amount of oil when shallow pan-frying or deep-frying. Avoid cooking
unthawed food or food with excessive amounts of ice.
• Before moving cookware full of fats or oils, make sure it has completely cooled.
• To prevent delayed eruptive boiling, always allow heated liquids to stand at least 20
seconds after you have turned off the burner so that the temperature in the liquid can
stabilize. In the event of scalding, follow these rst aid instructions:
1. Immerse the scalded area in cool or lukewarm water for at least 10 minutes.
2. Do not apply any creams, oils, or lotions.
3. Cover with a clean, dry cloth.
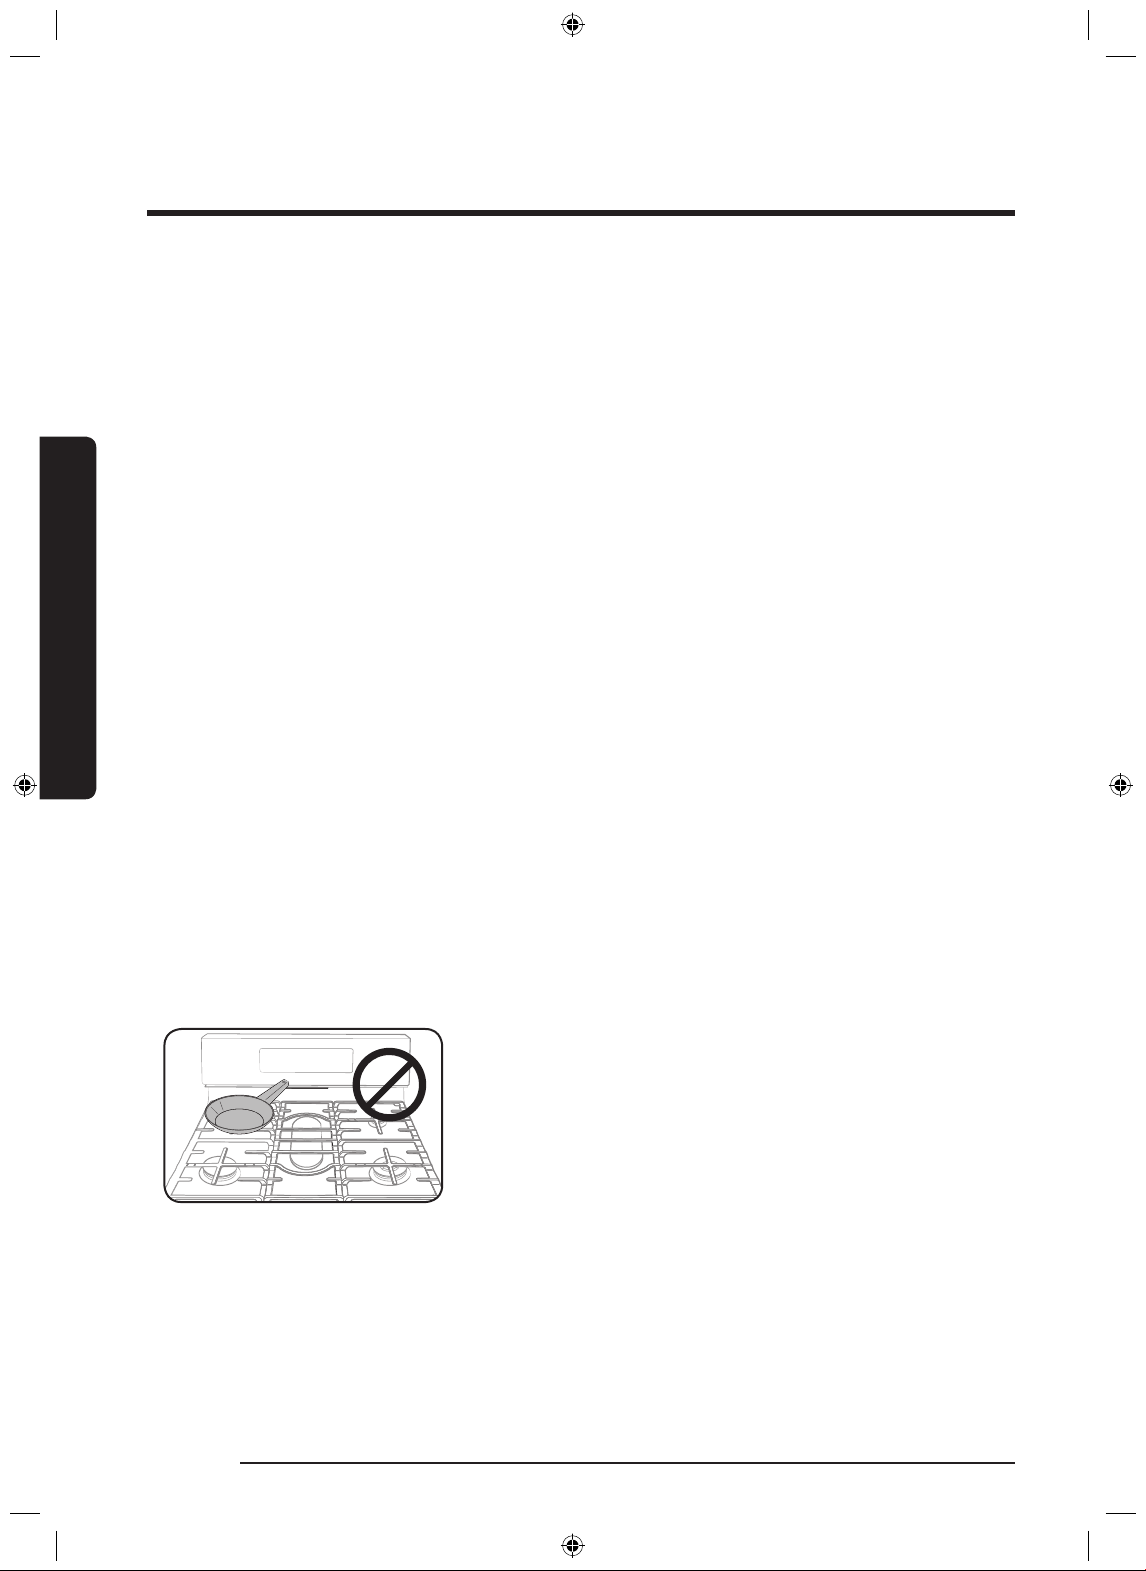
• Place pots in the center of the grate. Do not place a pot
larger than 9” in diameter on the rear burners. If you
place an oversized pot in the wrong position, it might
disrupt necessary air circulation and make the ame on
the burner sputter and burn inefciently.
14 English
NX58J7750S�_AA_AC_DG68-00623A-02_EN.indd 14 2015-06-25 �� 10:15:38
Page 15
Oven safety
WARNING
To reduce the risk of re, electric shock, personal injuries, and/or death, obey the following
precautions.
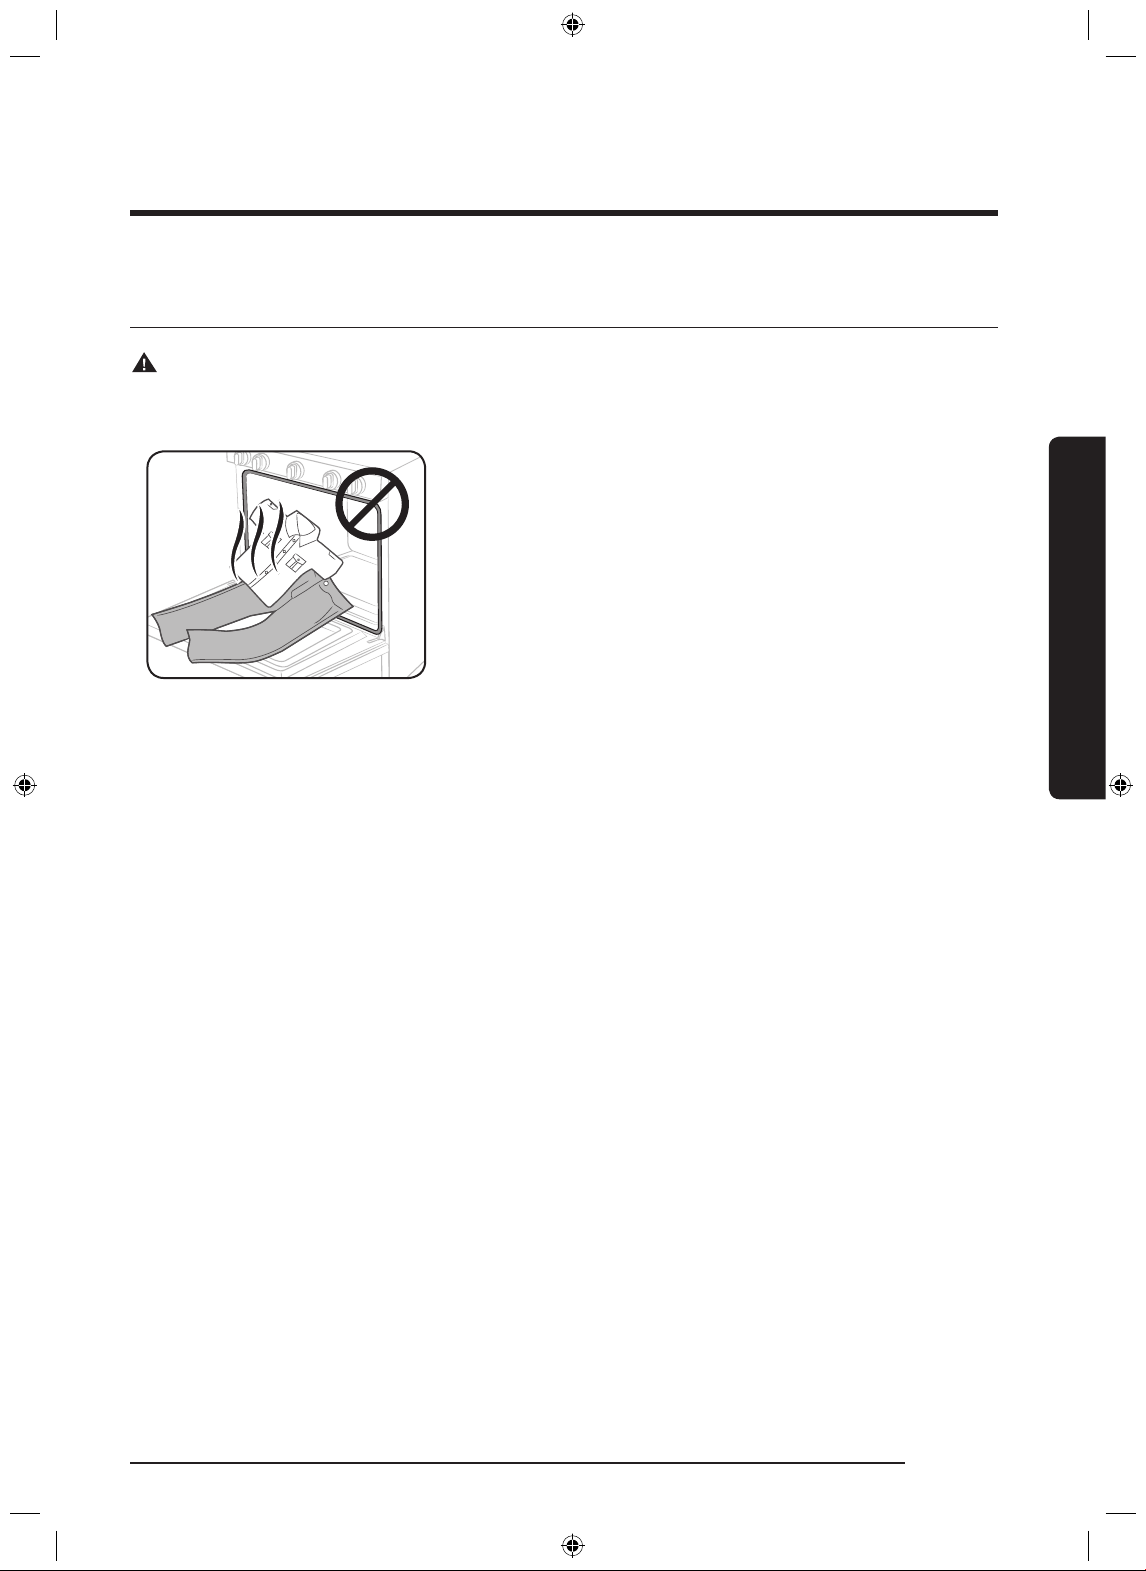
• Do not use the oven for non-cooking purposes such
as drying clothes or storage. Use the oven for cooking
only.
• Make sure the inner portion of the split oven-rack is in
the proper position within the outer rack.
• Make sure the oven racks are placed on the same level
on each side.
• Do not damage, move, or clean the door gasket.
• Do not spray water on the oven glass while the oven is on or just after you have turned it
off.
• Do not use aluminium foil or foil liners anywhere in the oven. Do not use aluminium foil
or similar material to cover any holes or passages in the oven bottom or to cover an oven
rack. It may cause carbon monoxide poisoning. Aluminum foil linings may also trap heat,
causing a re hazard.
• Stand away from the oven when opening the oven door.
• Keep the oven free from grease buildup.
• When repositioning the oven racks, make sure the oven is completely cool.
• Only use cookware that is recommended for use in gas ovens.
• To avoid damaging the burner control knobs, always bake and/or broil with the oven
door closed.
• Do not broil meat too close to the burner ame. Trim excess fat from meat before
cooking.
• When using cooking or roasting bags in the oven, follow the manufacturer’s directions.
• NEVER cover any slots, holes, or passages in the oven bottom or cover an entire rack
with material such as aluminum foil. Doing so blocks air ow through the oven and may
cause carbon monoxide poisoning. Aluminum foil linings may also trap heat, causing a
re hazard.
Important safety information
English 15
NX58J7750S�_AA_AC_DG68-00623A-02_EN.indd 15 2015-06-25 �� 10:15:38
Page 16
Important safety information
Important safety information
Storage drawer safety
WARNING
To reduce the risk of re, electric shock, personal injuries, and/or death, obey the following
precautions.
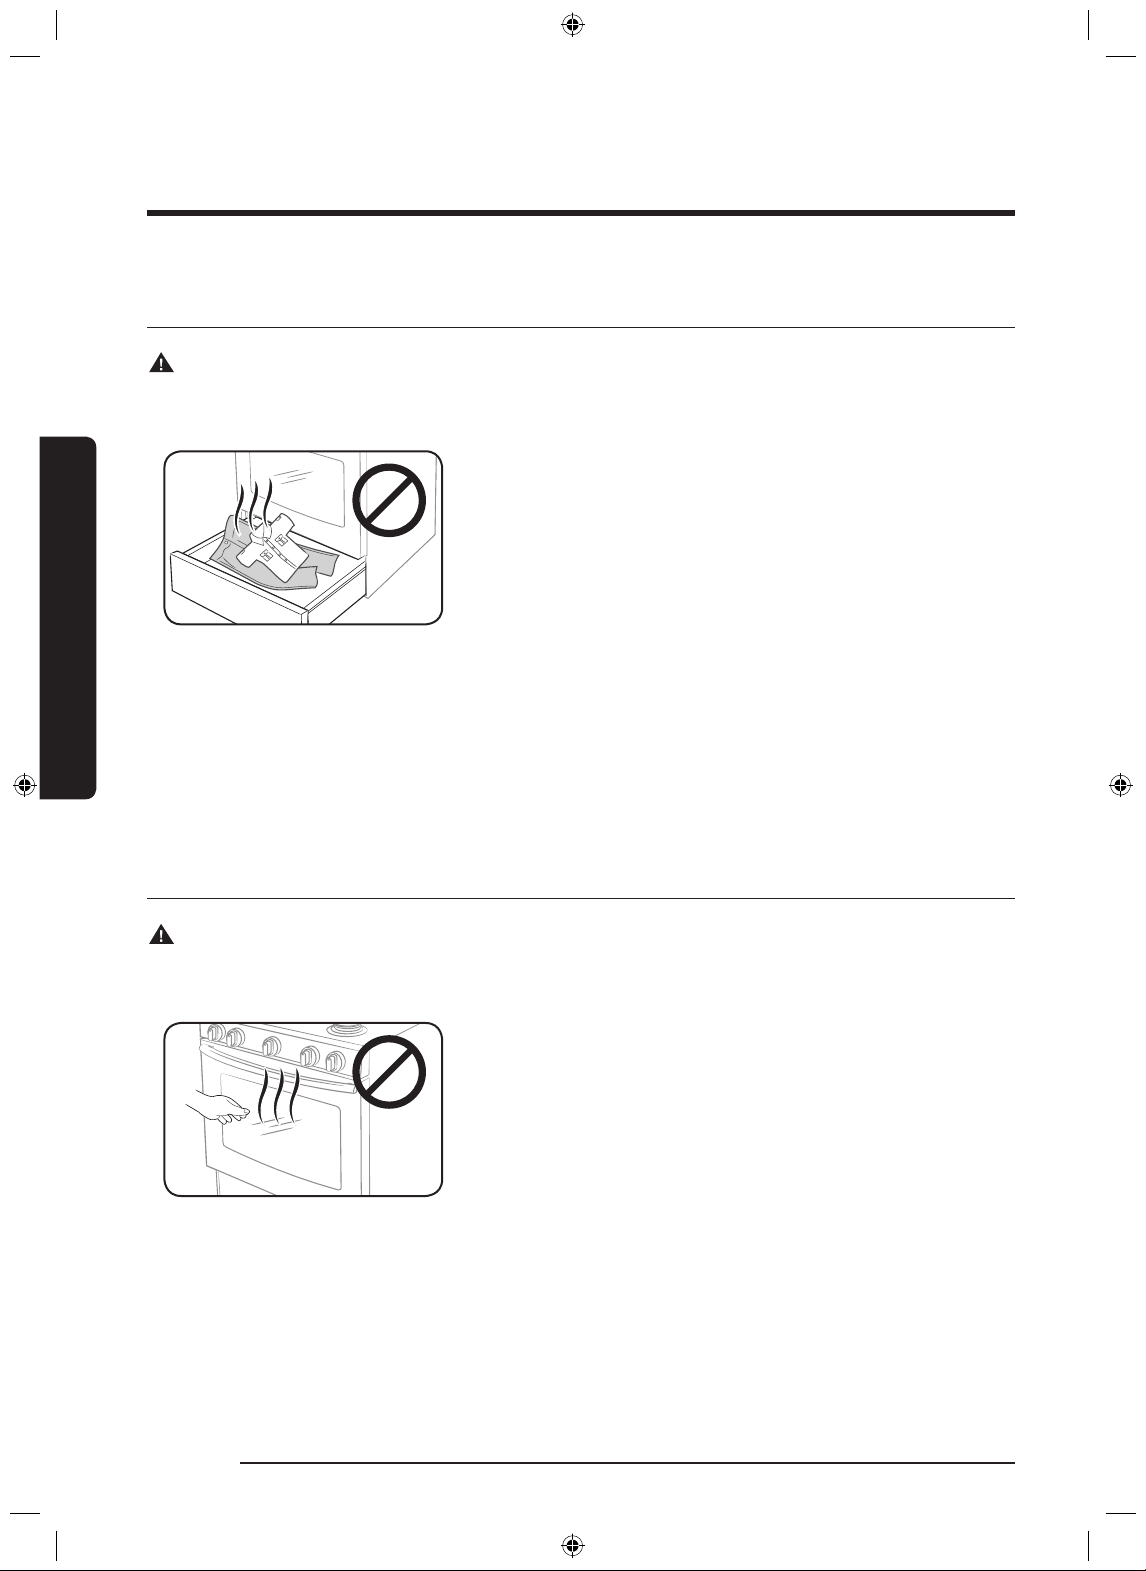
• Do not use the drawer for non-cooking purposes such
as drying clothes or storage. Use the drawer for cooking
purposes only.
• Do not touch the interior drawer surface or heating element.
• To avoid steam burns, use caution when opening the drawer.
• Do not use aluminium foil to line the drawer.
• Do not use the drawer in the oven. Do not put the drawer in the oven during a self-
cleaning cycle.
• Do not leave containers of fat drippings in or near the drawer.
Self-cleaning oven safety
WARNING
To reduce the risk of re, electric shock, personal injuries, and/or death, obey the following
precautions.
• The self-cleaning feature operates the oven at
temperatures high enough to burn away food soils in
the oven. The range is extremely hot during a selfcleaning cycle. Do not touch any surfaces of the range
during a self-cleaning cycle.
• Keep children away from the oven during a selfcleaning cycle.
• Before starting a self-cleaning cycle, remove all racks, cookware, and utensils from the
oven. Only porcelain-coated oven racks may be left in the oven.
• Before starting a self-cleaning cycle, wipe grease and food soils from the oven.
• Do not put the lower drawer into the oven cavity when you run a self-cleaning cycle.
• When opening the door after a self-cleaning cycle, stand away from the oven.
• If the self-cleaning cycle malfunctions, turn off the oven, disconnect the power supply,
and contact a qualied service technician.
16 English
NX58J7750S�_AA_AC_DG68-00623A-02_EN.indd 16 2015-06-25 �� 10:15:39
Page 17
Overview
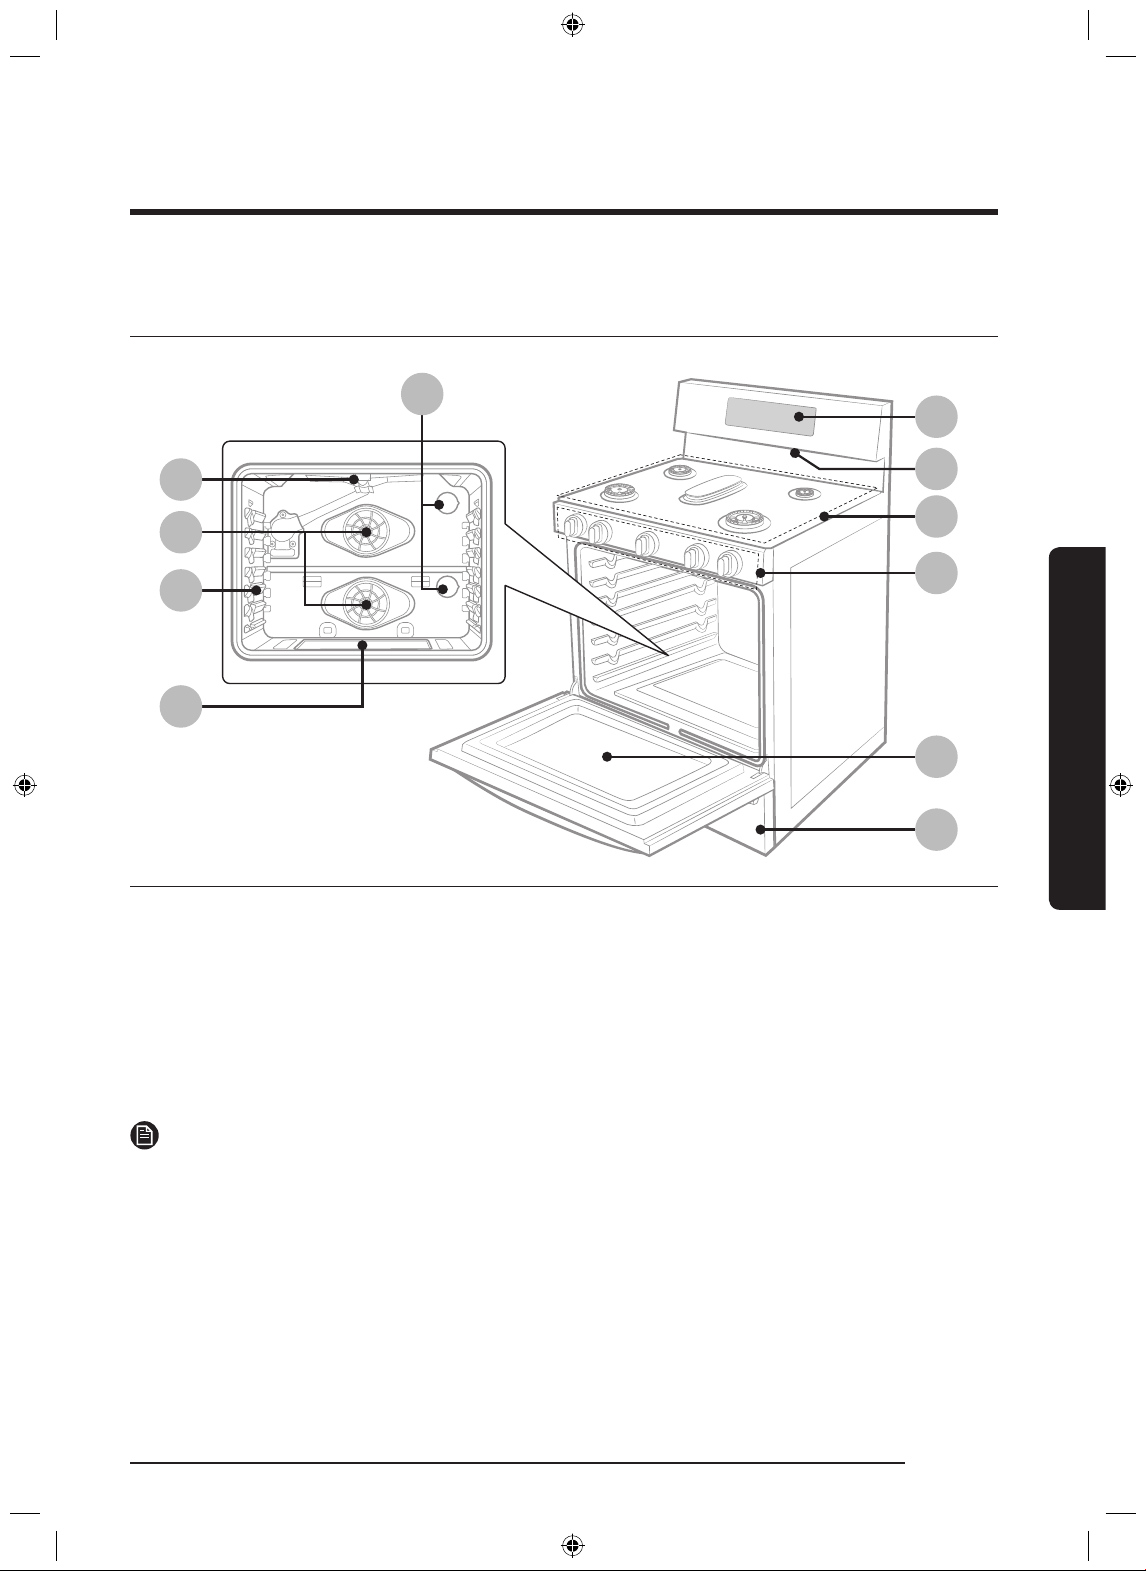
Layout
07
01
11
08
09
10
01 Display 02 Surface burner knobs
(5 pcs)
04 Oven vent 05 Removable oven door 06 Storage drawer
07 Oven lights * (2
locations)
08 Convection fan/
Convection heater
03 Surface burners
09 Oven rack system
04
03
02
05
06
Overview
10 Bake oven burner 11 Broil oven burner
NOTE
If you need a part marked with a "*", you can buy it from the Samsung Contact Center (1-800726-7864).
English 17
NX58J7750S�_AA_AC_DG68-00623A-02_EN.indd 17 2015-06-25 �� 10:15:39
Page 18
Overview
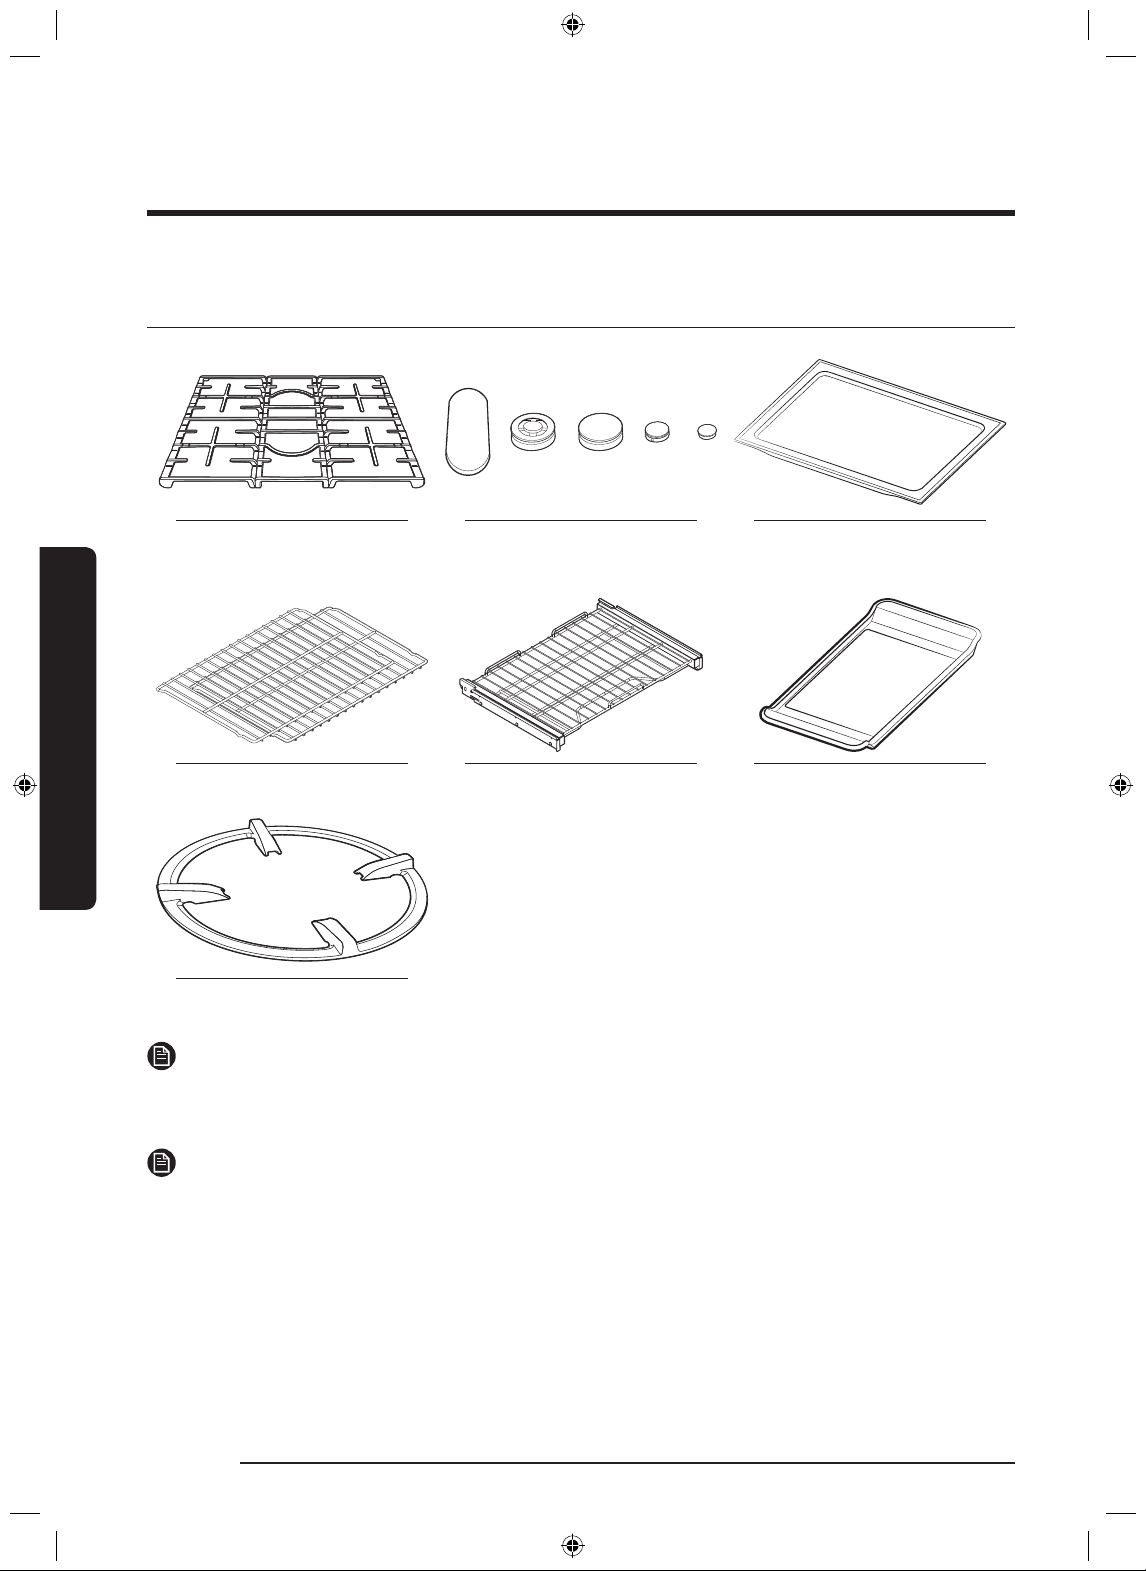
What’s included
Overview
Surface burner grates (3) * Surface burners and caps
(5) *
Flat rack (2) * Gliding rack (1) * Griddle (1) *
Work grate (1) *
NOTE
If you need an accessory marked with a *, you can buy it from the Samsung Contact Center
(1-800-726-7864).
Smart divider (1) *
NOTE
If you need an accessory marked with an * (asterisk), please contact the Samsung Call Center
using the phone number listed on the last page of this manual or visit our on-line parts web
site at www.samsungparts.com.
18 English
NX58J7750S�_AA_AC_DG68-00623A-02_EN.indd 18 2015-06-25 �� 10:15:41
Page 19
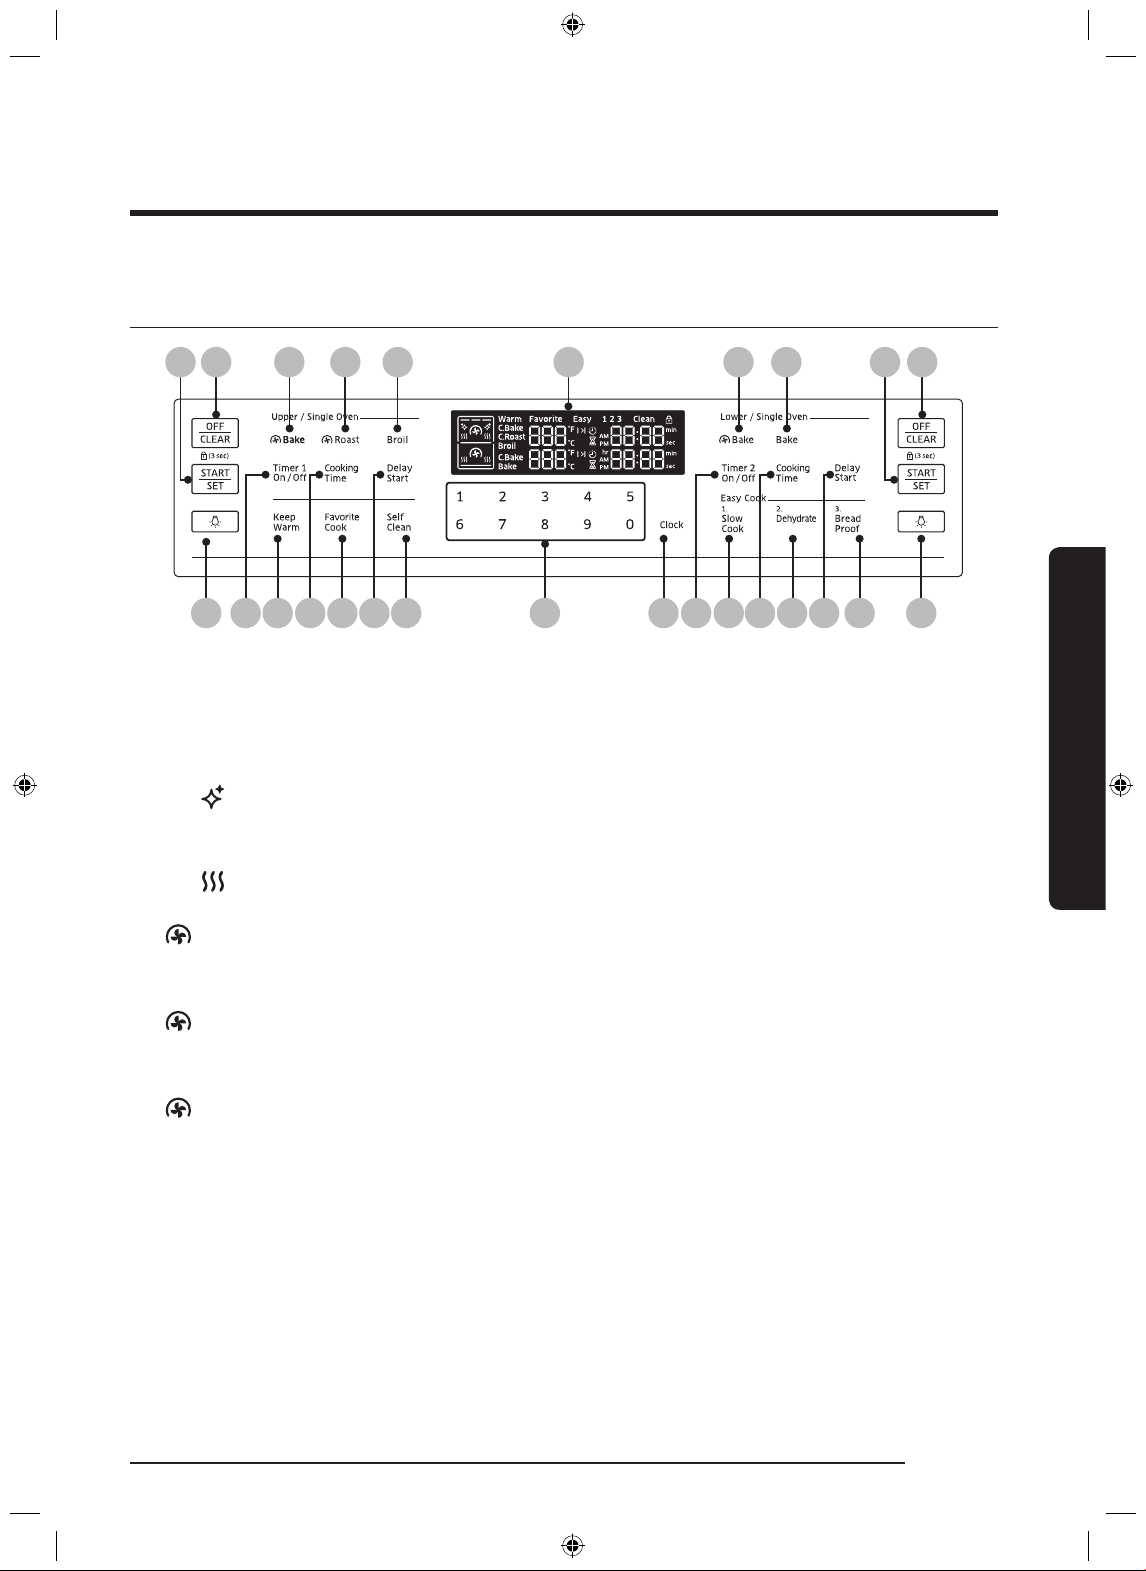
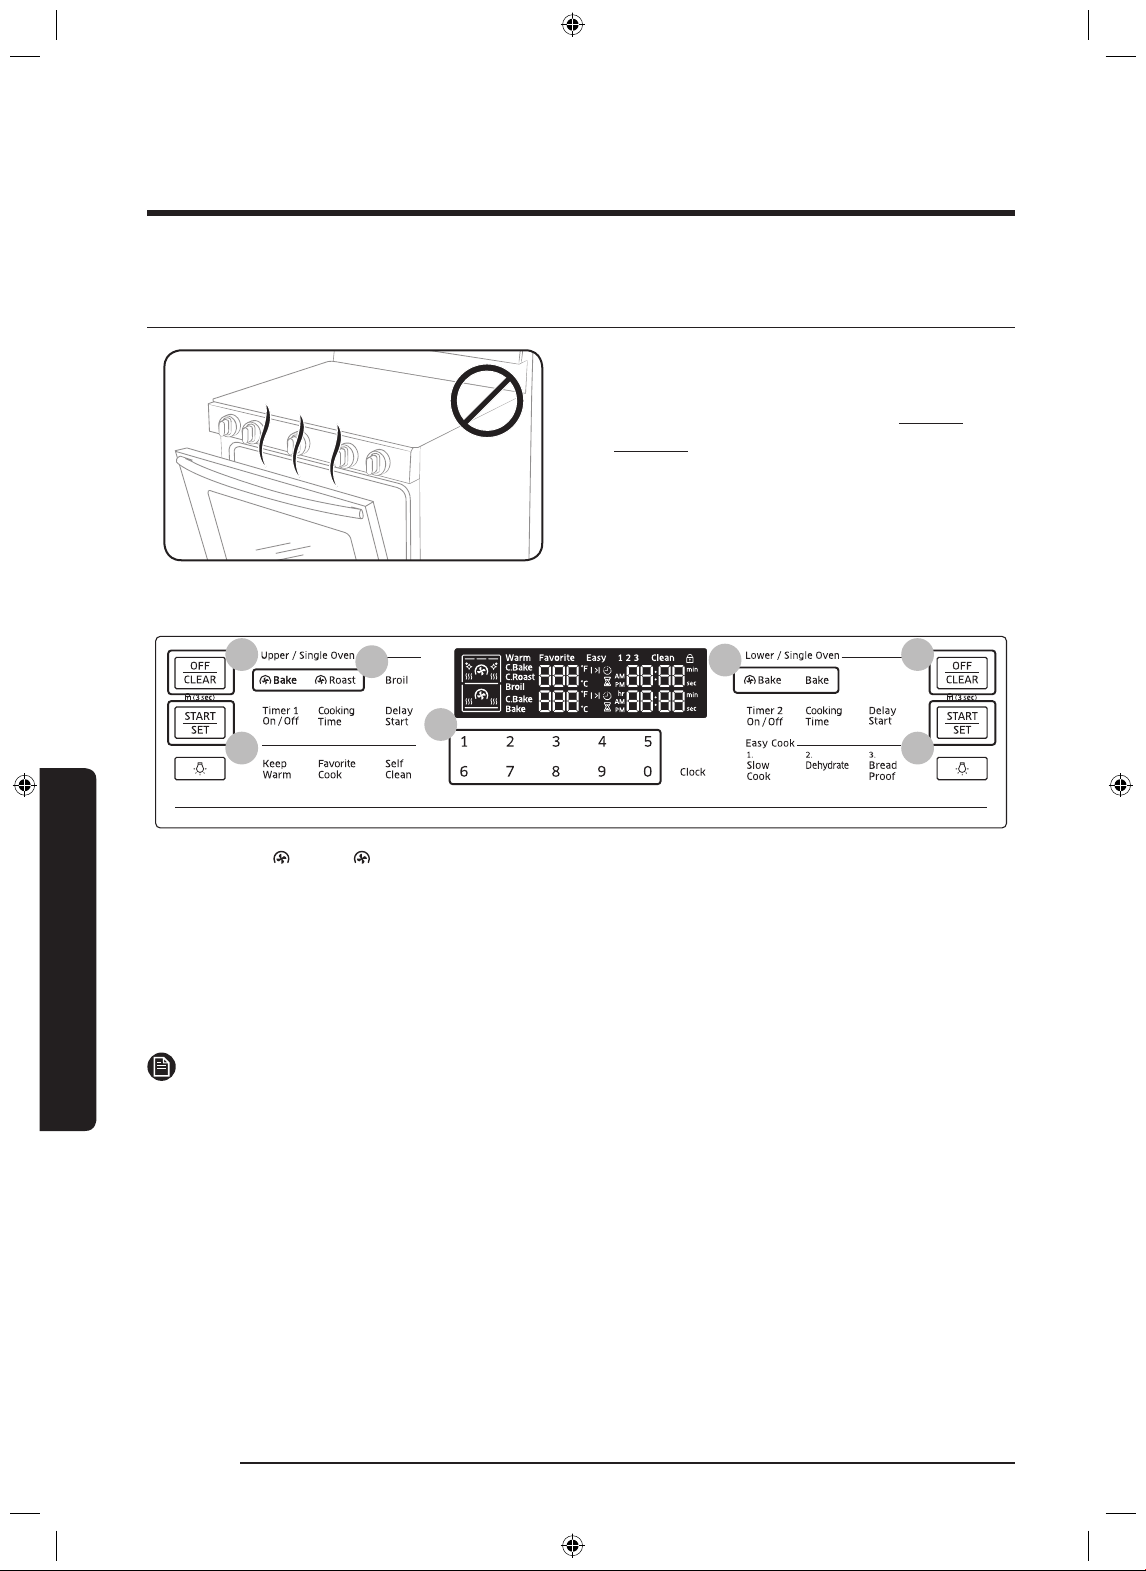
Control panel
07
08 02 03 04 01 05 06 07 08
12 09 13 10 14 11 15 1716 18 21 19 22 20 23 24
01 Display: Shows the time of day, oven
temperature, whether the oven is in the
bake, broil or self-cleaning mode, and
the time set for the timer or automatic
oven operations.
• : When you use the self-cleaning
feature, this icon appears in the
display.
• : When the oven is pre-heating,
this icon appears in the display.
02
Bake: Activate convection baking
for the Upper Oven in Twin mode or the
entire oven in Single mode.
03
Roast: Activate convection roasting.
04 Broil: Broil food using the upper oven
burner only.
05
Bake: Activate convection baking
for the Lower Oven in Twin mode or the
entire oven in Single mode.
06 Bake: Bake food using the lower oven
burner.
07 START/SET: Start a function or set the
time.
08 OFF/CLEAR (Lock): Cancel the current
operation but not the timer. Lock the
control panel and the door to prevent
accidents.
09 Timer1 On/Off: Activate or deactivate
the timer. (Single/Upper in Twin mode)
10 Cooking Time: Set the cooking time.
(Single/Upper in Twin mode)
11 Delay Start: Set the oven to start at
a certain time. (Single/Upper in Twin
mode)
12 Oven Light: Turn on/Turn off the oven
light. (Upper)
13 Keep Warm: Keep cooked food warm at
lower temperatures.
14 Favorite Cook: Activates the Favorite
cook feature. This feature lets you
preprogram up to three frequently used
cooking cycles so they can be set and
started with the touch of a pad
15 Self Clean: Burn off food residues using
very high temperatures.
16 Numbers: Use to set the times,
temperature, or presets.
17 Clock: Set the clock time.
18 Timer2 On/Off: Activate or deactivate
the timer. (Single/Lower in Twin mode)
19 Cooking Time: Set the cooking time.
(Single/Lower in Twin mode)
20 Delay Start: Set the oven to start at
a certain time. (Single/Lower in Twin
mode)
Overview
English 19
NX58J7750S�_AA_AC_DG68-00623A-02_EN.indd 19 2015-06-25 �� 10:15:42
Page 20
Overview
01
02
03
01
02
03
Overview
21 Slow Cook: Activates Slow Cook
which cooks food slowly at lower
temperatures.
22 Dehydrate: Activates the Dehydrate
23 Bread Proof: Activates the Bread proof
function.
24 Oven Light: Turn on/Turn off the oven
light. (Lower)
function.
Clock
You must set the clock correctly to ensure the automatic features work properly. This product
supports two time formats: 12-hour (default) and 24-hour.
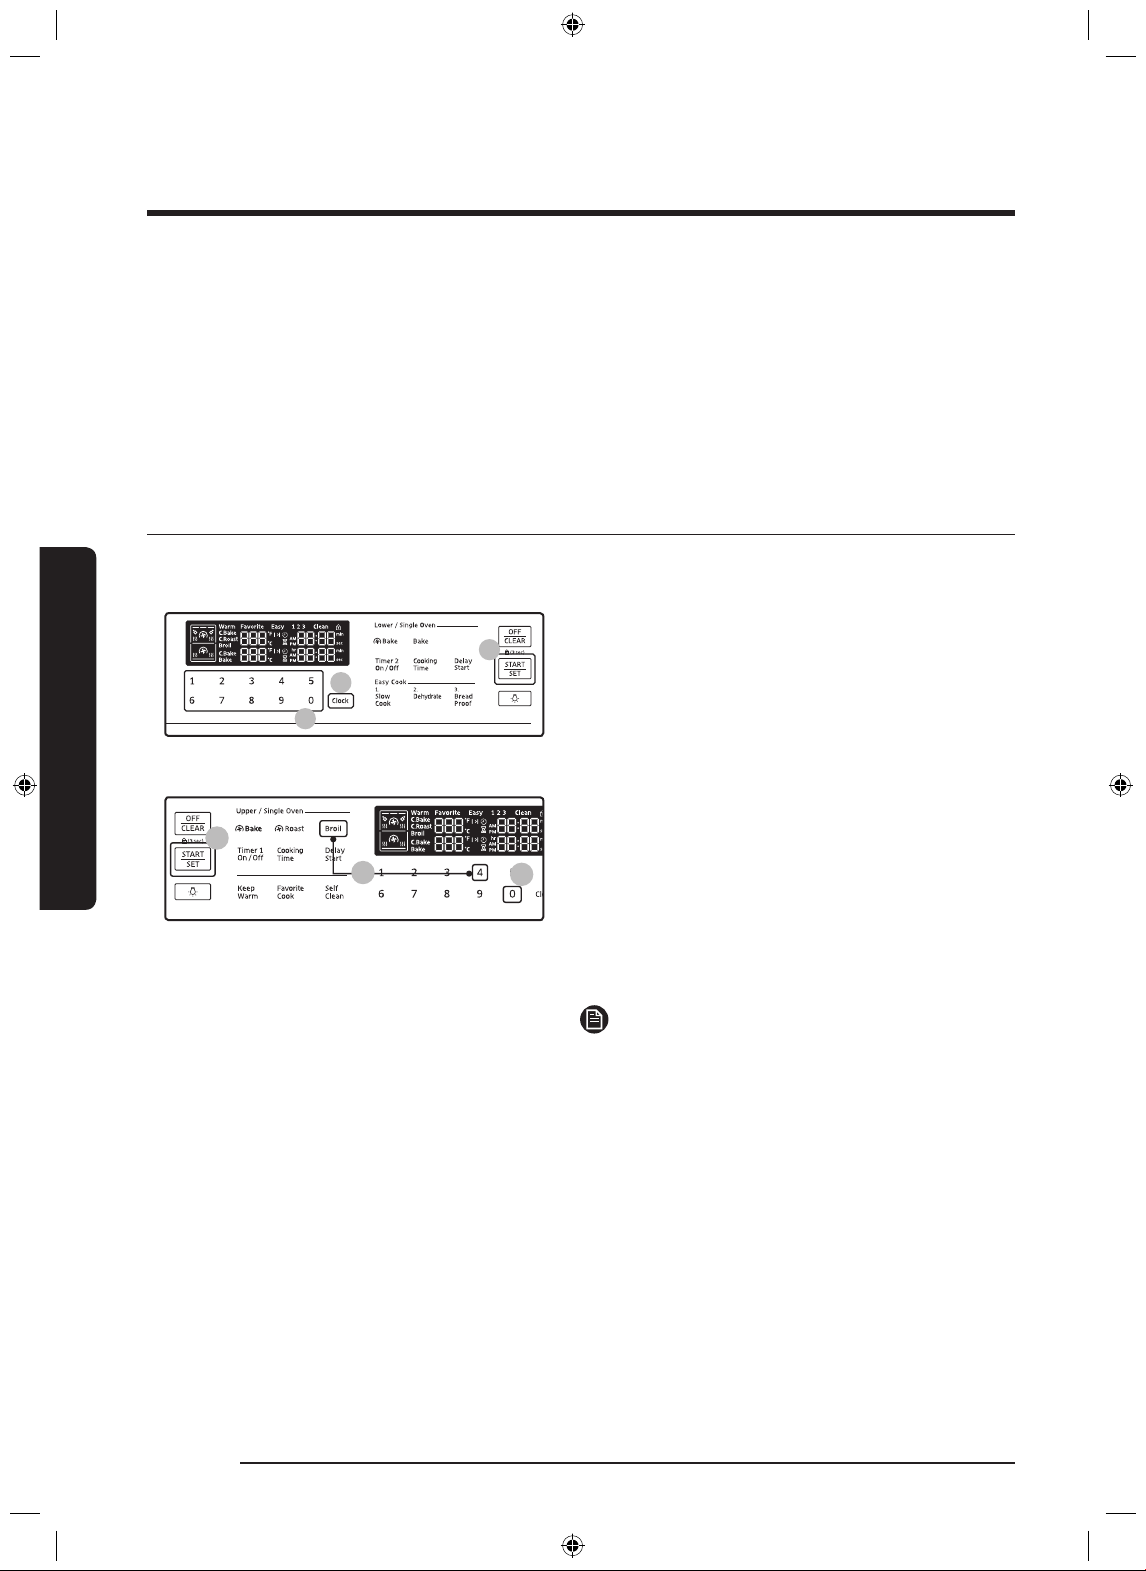
To set the clock time
1. Press the CLOCK pad.
2. Enter the current time using the number
pad.
3. Press the START/SET pad to conrm the
settings.
To change the time format(12hr/24hr)
1. Press and hold the Broil and 4 pads for
3 sec.
2. Press the 0 Pad to toggle between the 12-
hour and 24-hour display setting
3. Press the START/SET pad to change the
clock display mode.
NOTE
You can set/change the clock or the kitchen
timer before you start a cooking mode or
while most cooking modes are operating.
However, you cannot set or change the time if
a time based function is operating (Time Bake,
for example) or the Sabbath option is enabled.
20 English
NX58J7750S�_AA_AC_DG68-00623A-02_EN.indd 20 2015-06-25 �� 10:15:43
Page 21
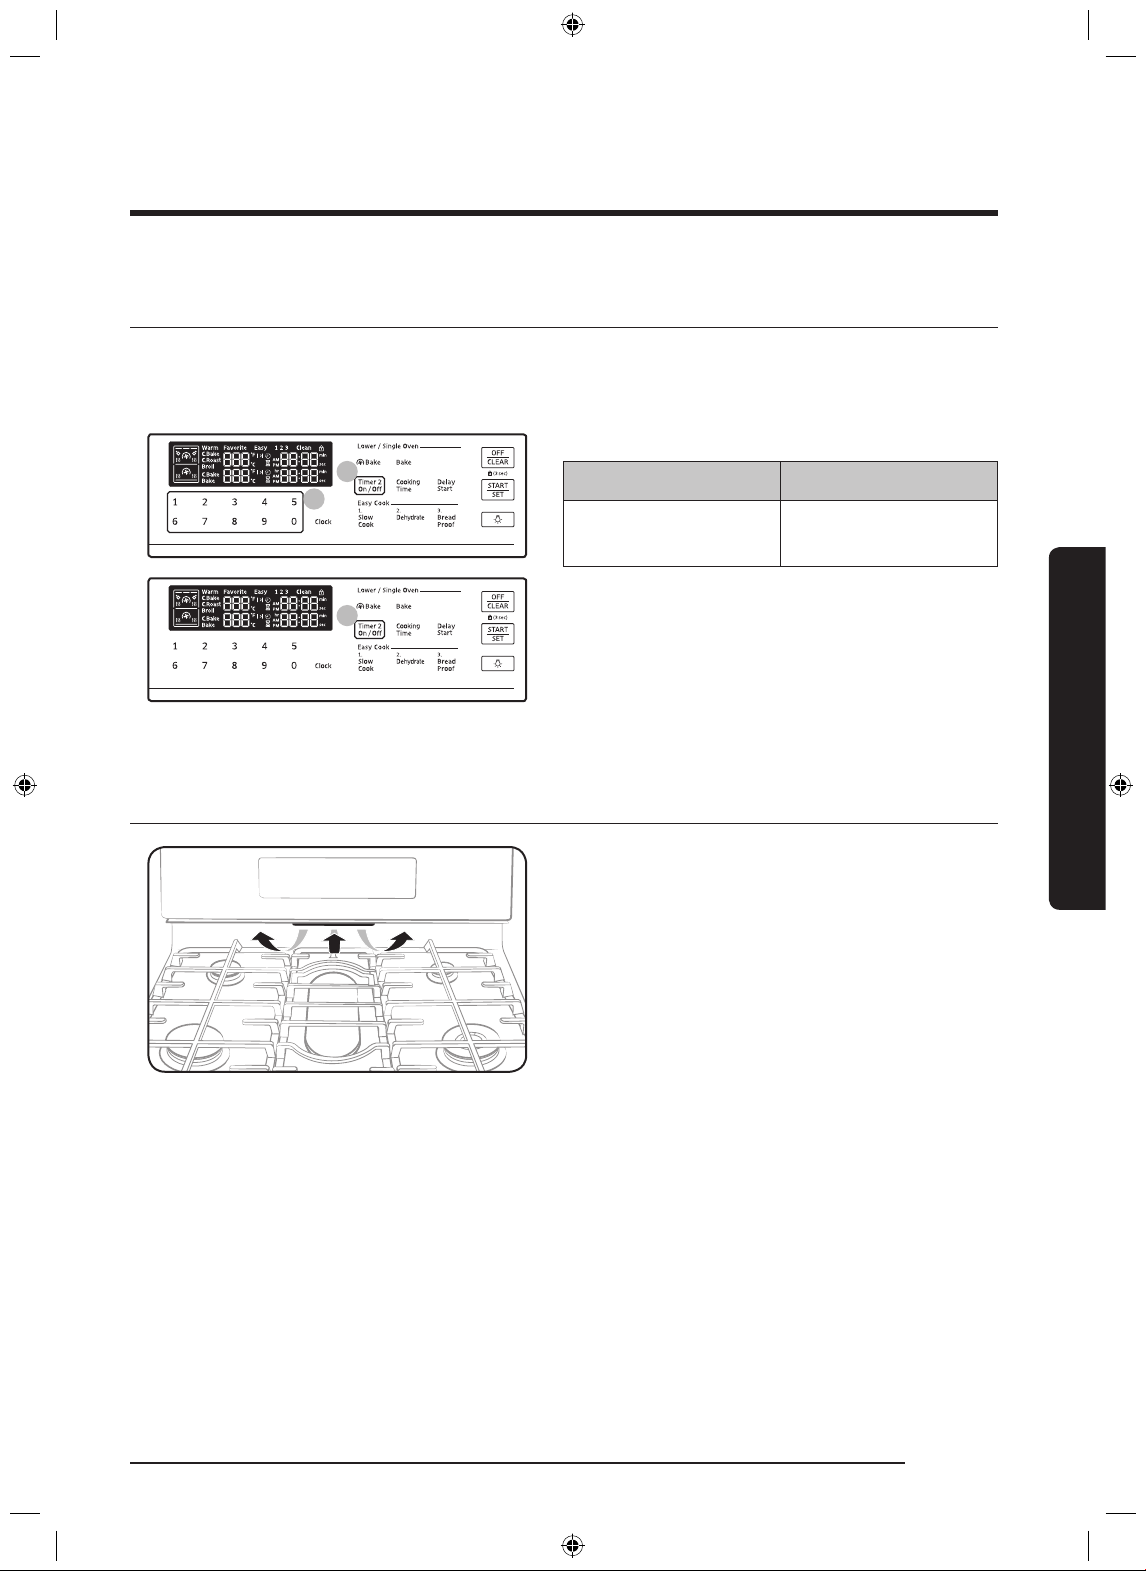
Kitchen timer
02
01
03
The kitchen timer gives you an extra timer you can use to time cooking tasks such a boiling
eggs. It does not, however, start or stop any cooking operation. You can set the timer from
1 minute to 9 hours and 99 minutes.
1. Press the Timer On/Off pad.
Once Twice
Hours/Minutes Turn off or Cancel
the timer
2. Press the number pads to enter the
amounts of time you want in minutes or
hours and minutes.
3. Press the Timer On/Off pad to start the
timer.
Oven vent/cooling vent
The oven vent is located under the oven
Control panel. Proper air circulation prevents
oven burner combustion problems and
ensures good performance.
• Do not block the vent or its surroundings
with objects.
• Use caution when placing items near
the vent. Hot steam can cause them to
overheat or melt.
Overview
English 21
NX58J7750S�_AA_AC_DG68-00623A-02_EN.indd 21 2015-06-25 �� 10:15:43
Page 22
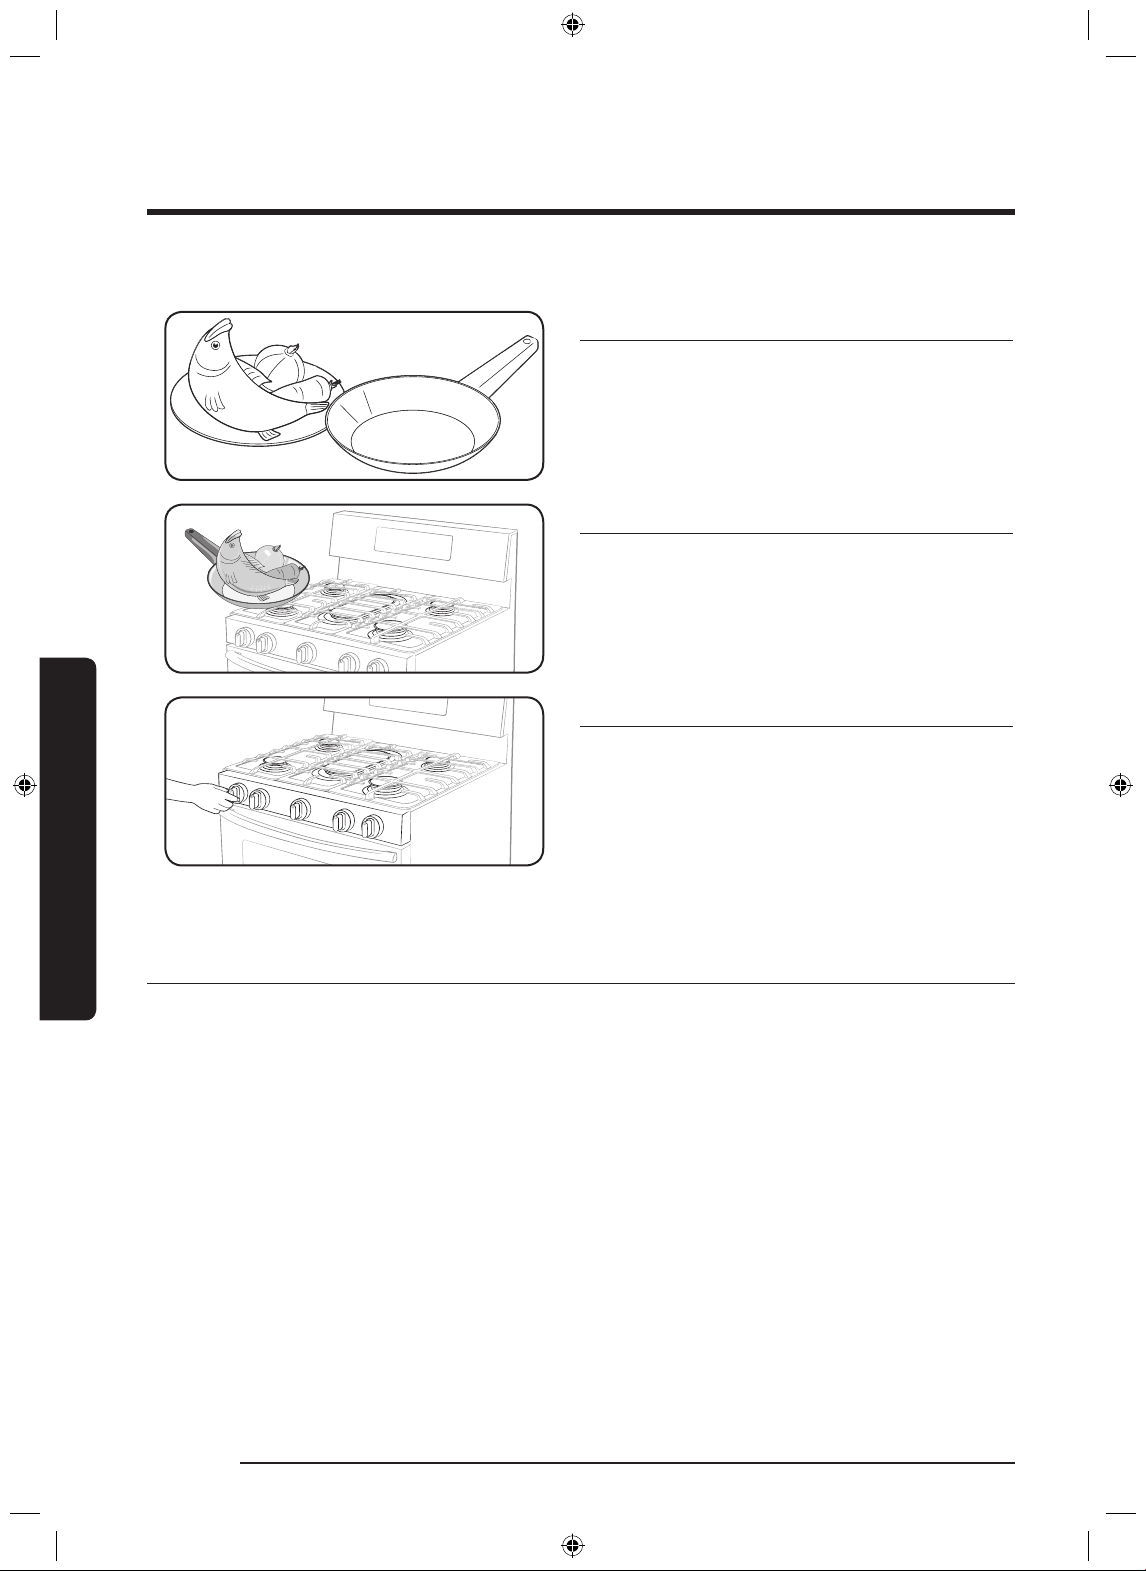
Gas range
STEP 1
Put all ingredients into a cooking container
(pan, pot, etc).
STEP 2
Place the container on a surface burner.
STEP 3
Ignite the surface burner.
Gas range
Cookware
Requirements
• Flat bottom and straight sides
• Tight-tting lid
• Well-balanced with the handle weighing less than the main portion of the pot or pan.
Material characteristics
• Aluminum: An excellent heat conductor. Some types of food may cause the aluminum to
darken. However, anodized aluminum cookware resists staining and pitting.
• Copper: An excellent heat conductor but discolors easily.
• Stainless steel: A slow heat conductor with uneven cooking performance but is durable,
easy to clean, and resists staining.
• Cast-Iron: A poor conductor but retains heat very well.
• Enamelware: Heating characteristics depend on the base material.
• Glass: A slow heat conductor. Use only glass cookware that is specied for top-of-range
cooking or oven use.
22 English
NX58J7750S�_AA_AC_DG68-00623A-02_EN.indd 22 2015-06-25 �� 10:15:44
Page 23
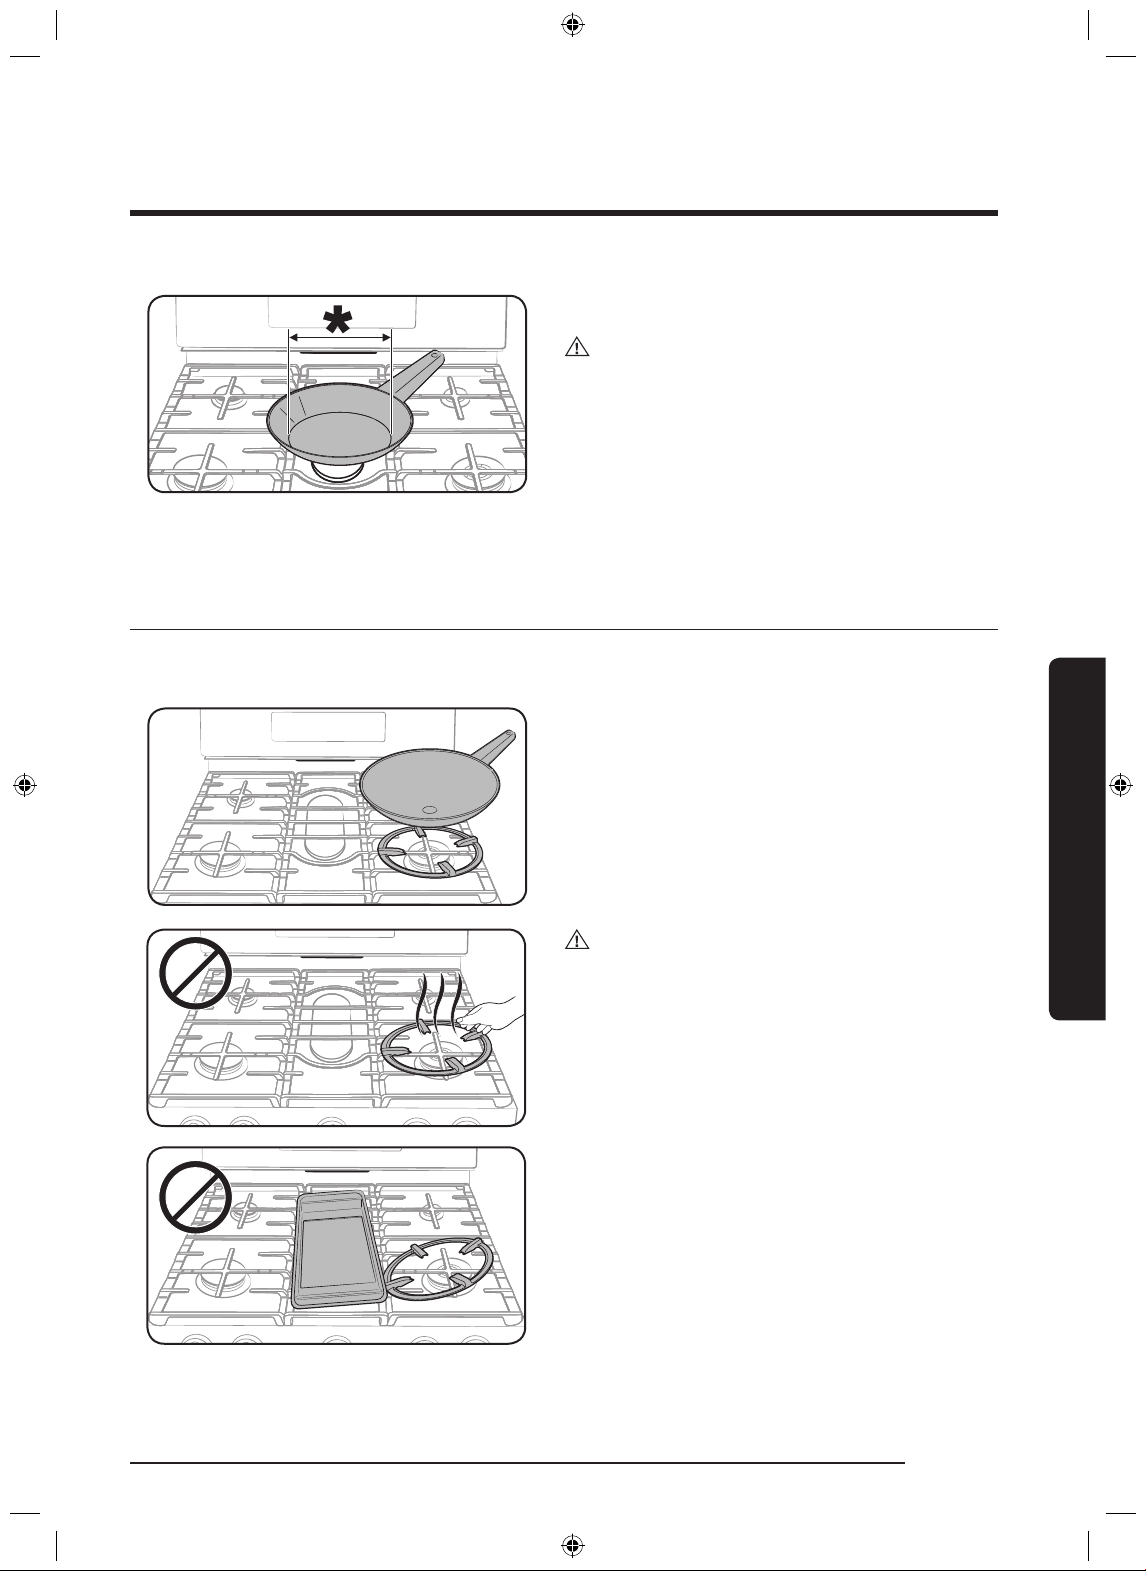
Size limitations
CAUTION
Do not place a small pan or pot with a bottom
diameter of about 6 inches or less on the
center grate. This cookware may tip over. Use
the rear burners for this small-sized cookware.
* : 6 inches or less
Wok grate
Woks are often used for stir frying, pan frying, deep frying, and poaching. The provided wok
grate supports 12” to 14” woks.
1. Turn off all burners, and wait until the
grates completely cool down.
2. Place the wok grate on either side grate.
3. Put a wok on the wok grate. Make sure the
wok settles on the work grate.
4. Turn on the burner, and adjust the ame
level as appropriate.
Gas range
CAUTION
• Do not remove the wok grate until the
cooktop grates, surfaces, and wok grate
completely cool down.
• When using the cooktop or oven, the wok
grate on the cooktop may become very
hot. Use oven gloves when placing or
removing the wok grate.
• Do not use utensils with a at bottom or
with a diameter less than the wok ring
diameter. The utensil may tip over.
• Do not use an oversized utensil. The
burner ames may spread out, causing
damage nearby.
• Do not use the wok grate and the griddle
at the same time.
English 23
NX58J7750S�_AA_AC_DG68-00623A-02_EN.indd 23 2015-06-25 �� 10:15:47
Page 24
Gas range
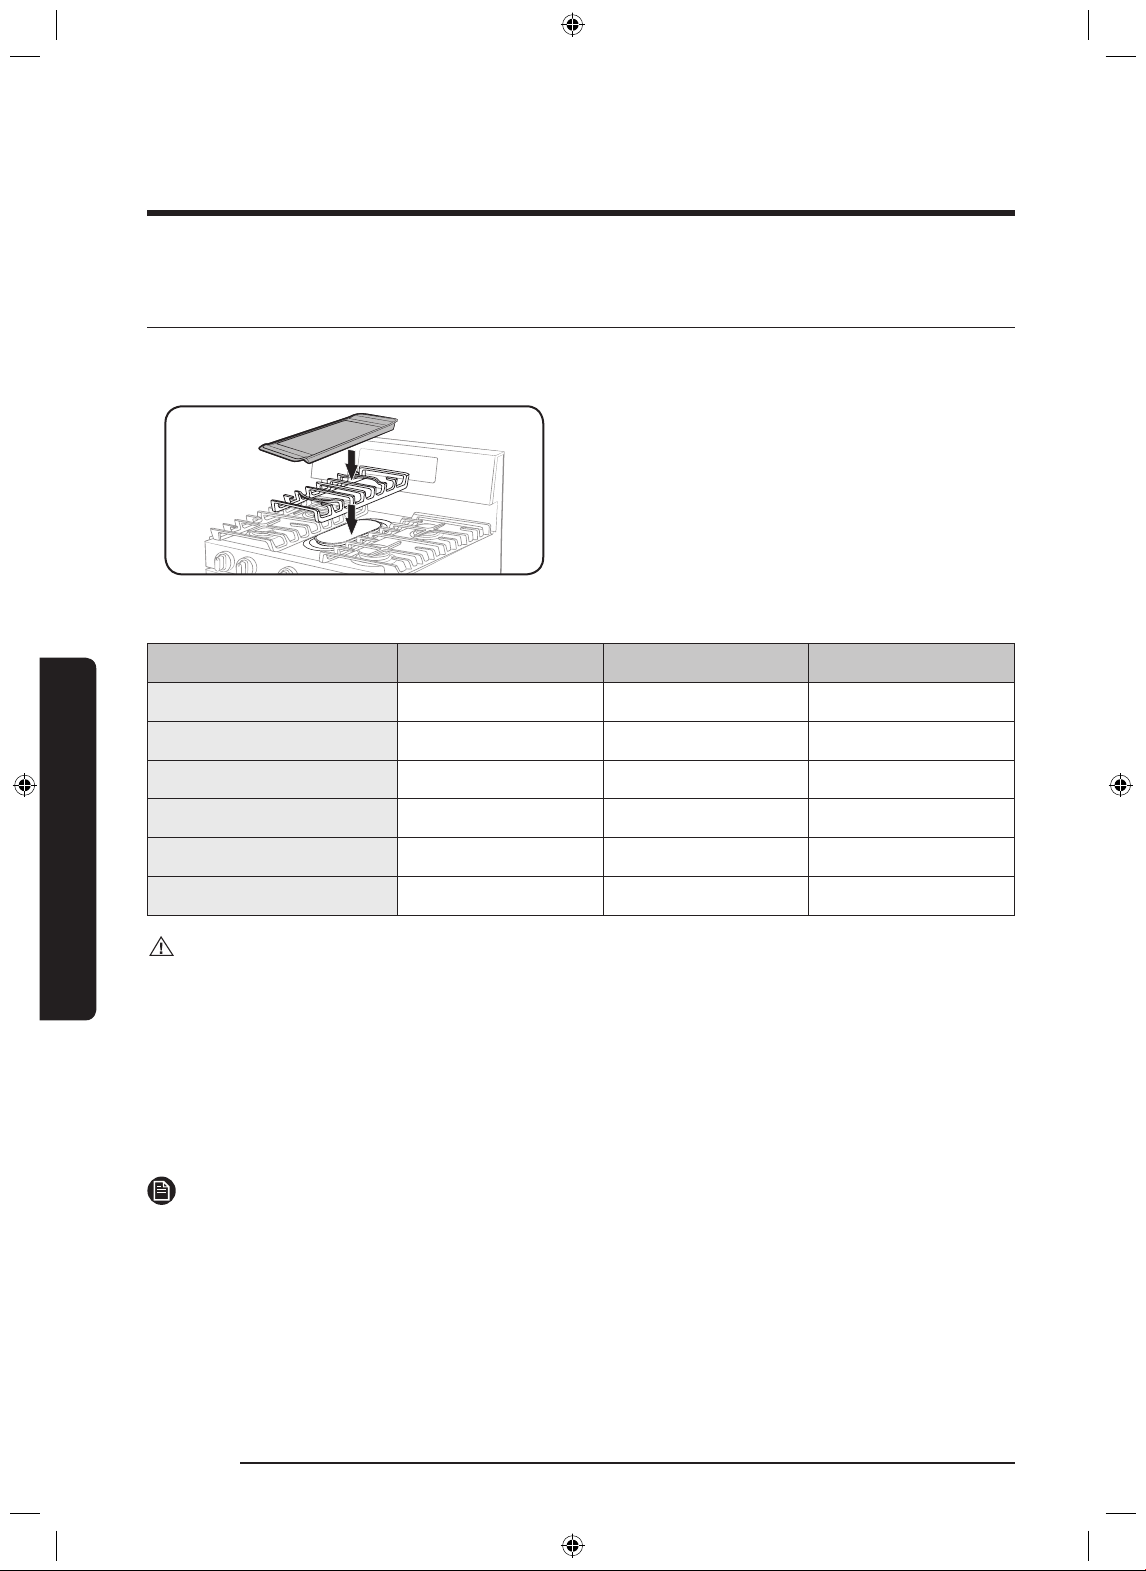
Griddle
The removable coated griddle provides an extra cooking surface. This is useful especially
when cooking meats, pancakes, or other foods requiring a large cooking space.
The griddle can be used only with the center
burner on the center grate. Use caution when
putting the griddle on the center grate.
In most cases, you should preheat the griddle before cooking. See the table below.
Type of Food Preheating Time Preheat Condition Cook Condition
Pancakes
Hamburgers
Gas range
Fried Eggs
Bacon
Breakfast Sausages
Grilled Cheese Sandwich
CAUTION
• Do not remove the griddle until the cooktop grates, surfaces, and griddle itself cool down.
• If you leave the griddle on the cooktop, it may become very hot when you use the
cooktop or oven. Use oven gloves when placing or removing the griddle.
• Do not overheat the griddle. This can damage the coating of the griddle.
• Do not use metal utensils that can damage the griddle surface.
• Do not use the griddle for other purposes like a cutting board or storage.
• Do not cook excessively greasy foods. The grease may spill over.
NOTES
• You may need to adjust heat settings for the griddle over time.
• The griddle may discolor over time as it becomes seasoned with use.
• Do not let rust remain on the griddle. If rust appears on the griddle, remove it as soon as
possible.
5 min. 5 (MED-HI) 4 (MED)
5 min. 7 (HI) 5 (MED-HI)
5 min. 7 (HI) 5 (MED-LO)
- - 4 (MED)
5 min. 7 (HI) 5 (MED)
4 min. 7 (HI) 6 (MED-HI)
24 English
NX58J7750S�_AA_AC_DG68-00623A-02_EN.indd 24 2015-06-25 �� 10:15:48
Page 25

Gas burners
C
LR
LF RF
RR
Each burner has a corresponding knob that
lets you to set the ame level from LO to
HI. In addition, each burner knob has a LITE
setting. Turning a knob to LITE ignites the
corresponding burner. The burner indicators
are located above each knob, showing which
burner the knob controls. Each burner is
designed for specic cooking purposes. See
the table below.
Position Purpose Food type Characteristics
Right Front (RF)
18,000 BTU
Right Rear (RR)
5,000 BTU
Center (C)
9,500 BTU
Left Front (LF)
15,000 BTU
Left Rear (LR)
9,500 BTU
* Tomato sauce needs to be stirred while it is simmering.
Power heating Boiling food Maximum output
Low simmering Chocolate, casseroles,
sauces
Grilling/Griddling Pancakes,
hamburgers, fried
eggs, hot sandwiches
Quick heating General General-purpose
General heating/Low
simmering
General food,
casseroles, Tomato
Sauce*
Delicate food that
requires low heat for
a long time
General-purpose
cooking
Gas range
cooking
General-purpose
cooking
English 25
NX58J7750S�_AA_AC_DG68-00623A-02_EN.indd 25 2015-06-25 �� 10:15:48
Page 26
Gas range
1
2
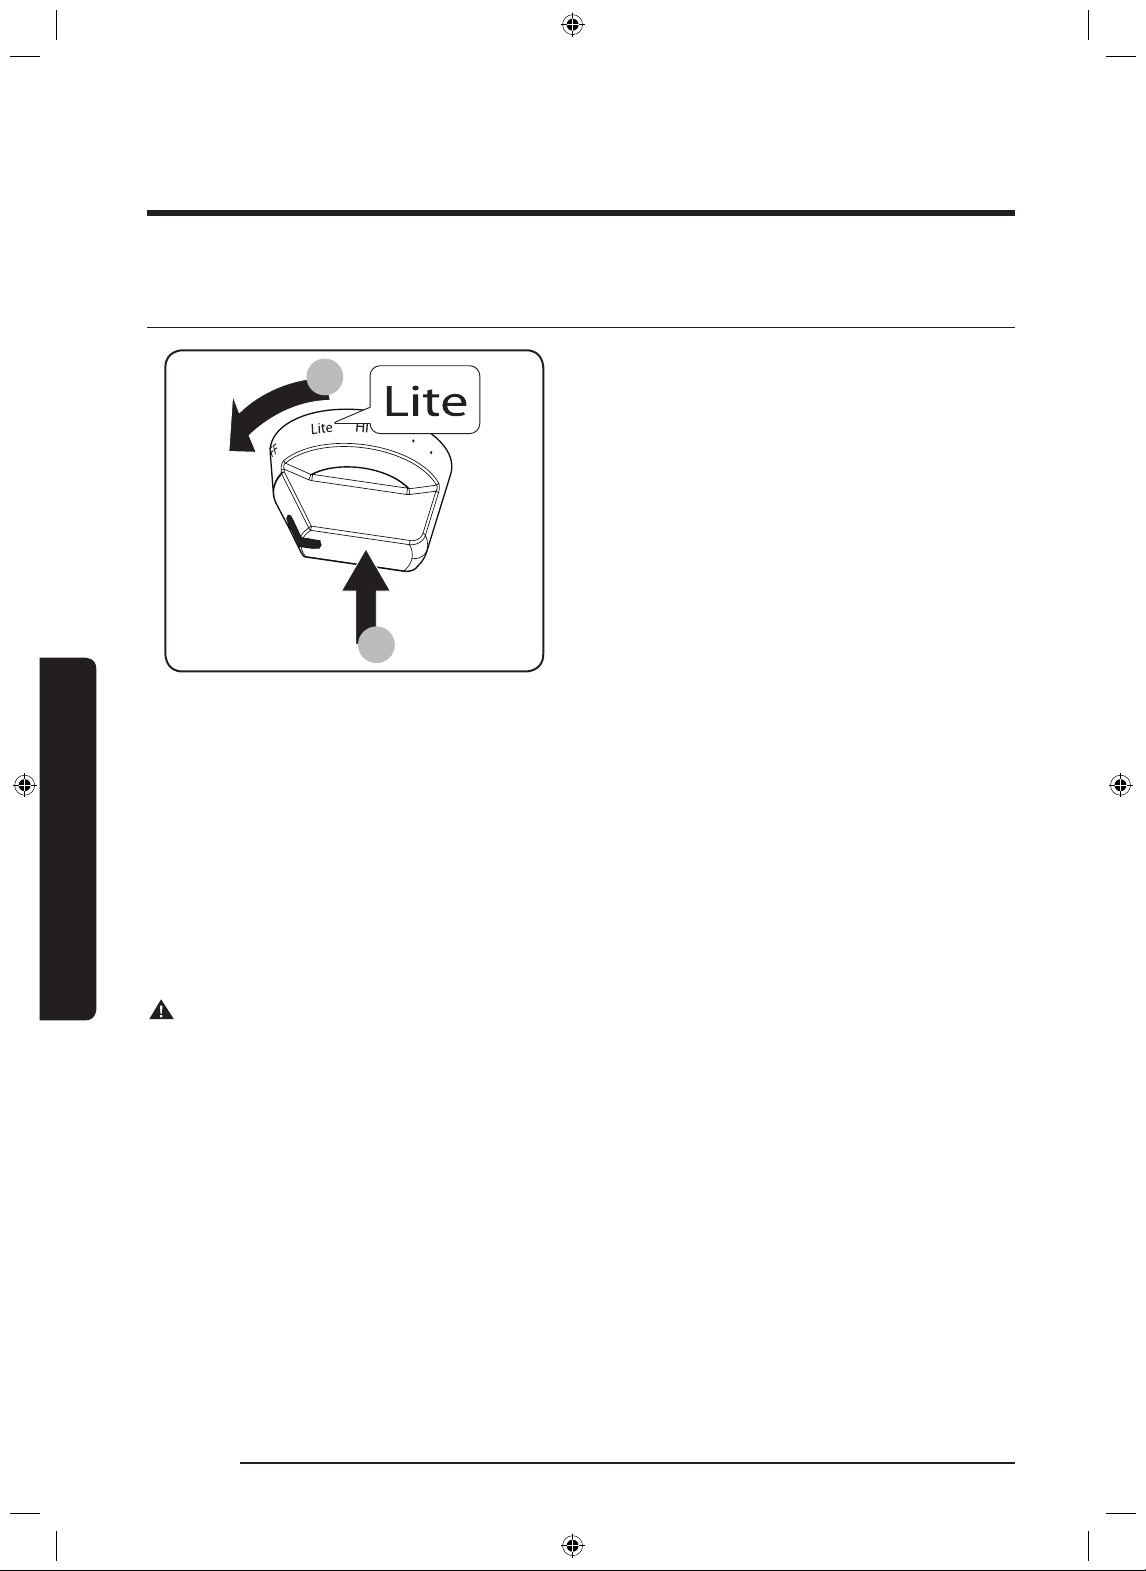
Ignition
Make sure all surface burners are properly
installed. To light a burner:
1. Push in the control knob, and then turn
it to the LITE position. You will hear a
“clicking” sound indicating the electronic
ignition system is working properly.
2. After the surface burner lights, turn
the control knob to shift it out of the
LITE position and turn off the electronic
ignition system.
3. Turn the control knob to adjust the ame
level.
Manual ignition
If there is a power failure, you can ignite the burner manually. Use caution when doing this.
Gas range
1. Hold a long gas grill lighter to the surface burner you want to light.
2. Push in the control knob for that burner, and then turn it to the LITE position. Turn on the
grill lighter to ignite the burner.
3. After the burner is lit, turn the control knob to adjust the ame level.
Flame level
The ames on the burners should always stay under the cookware, and should not extend
beyond the cookware bottom at any time.
WARNING
Flames larger than the cookware bottom may result in a re or physical injury.
26 English
NX58J7750S�_AA_AC_DG68-00623A-02_EN.indd 26 2015-06-25 �� 10:15:48
Page 27
Gas oven
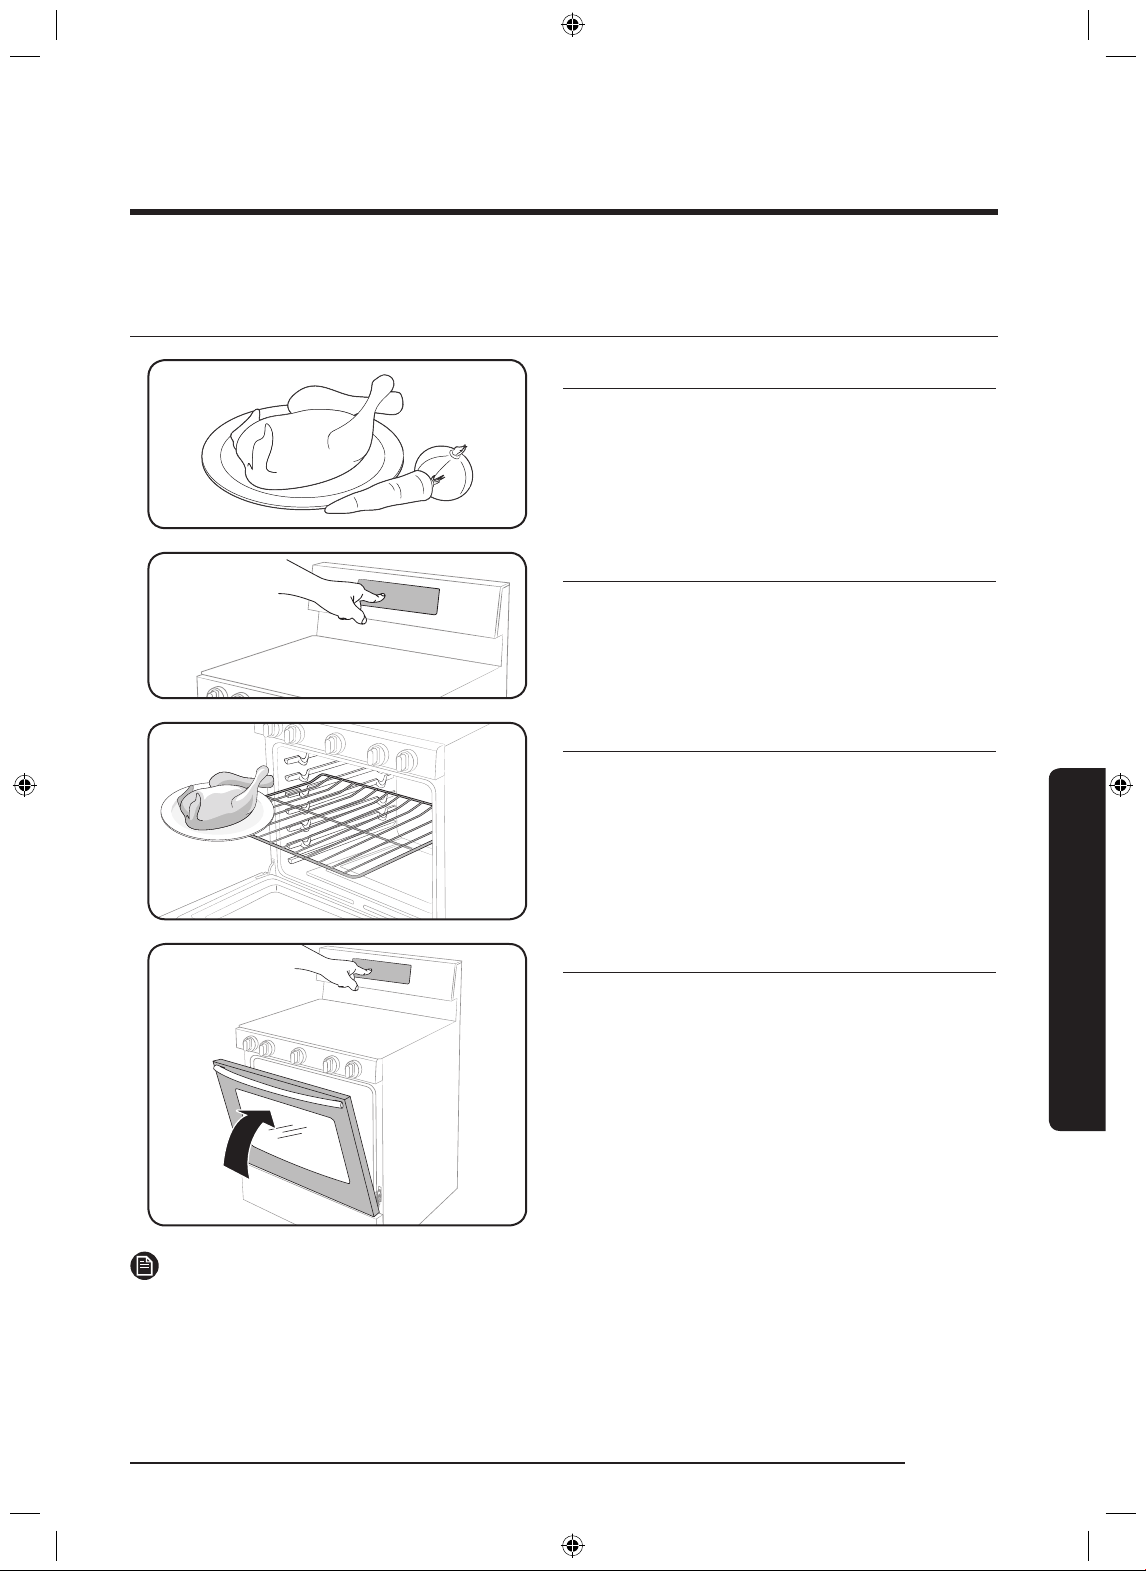
Single mode
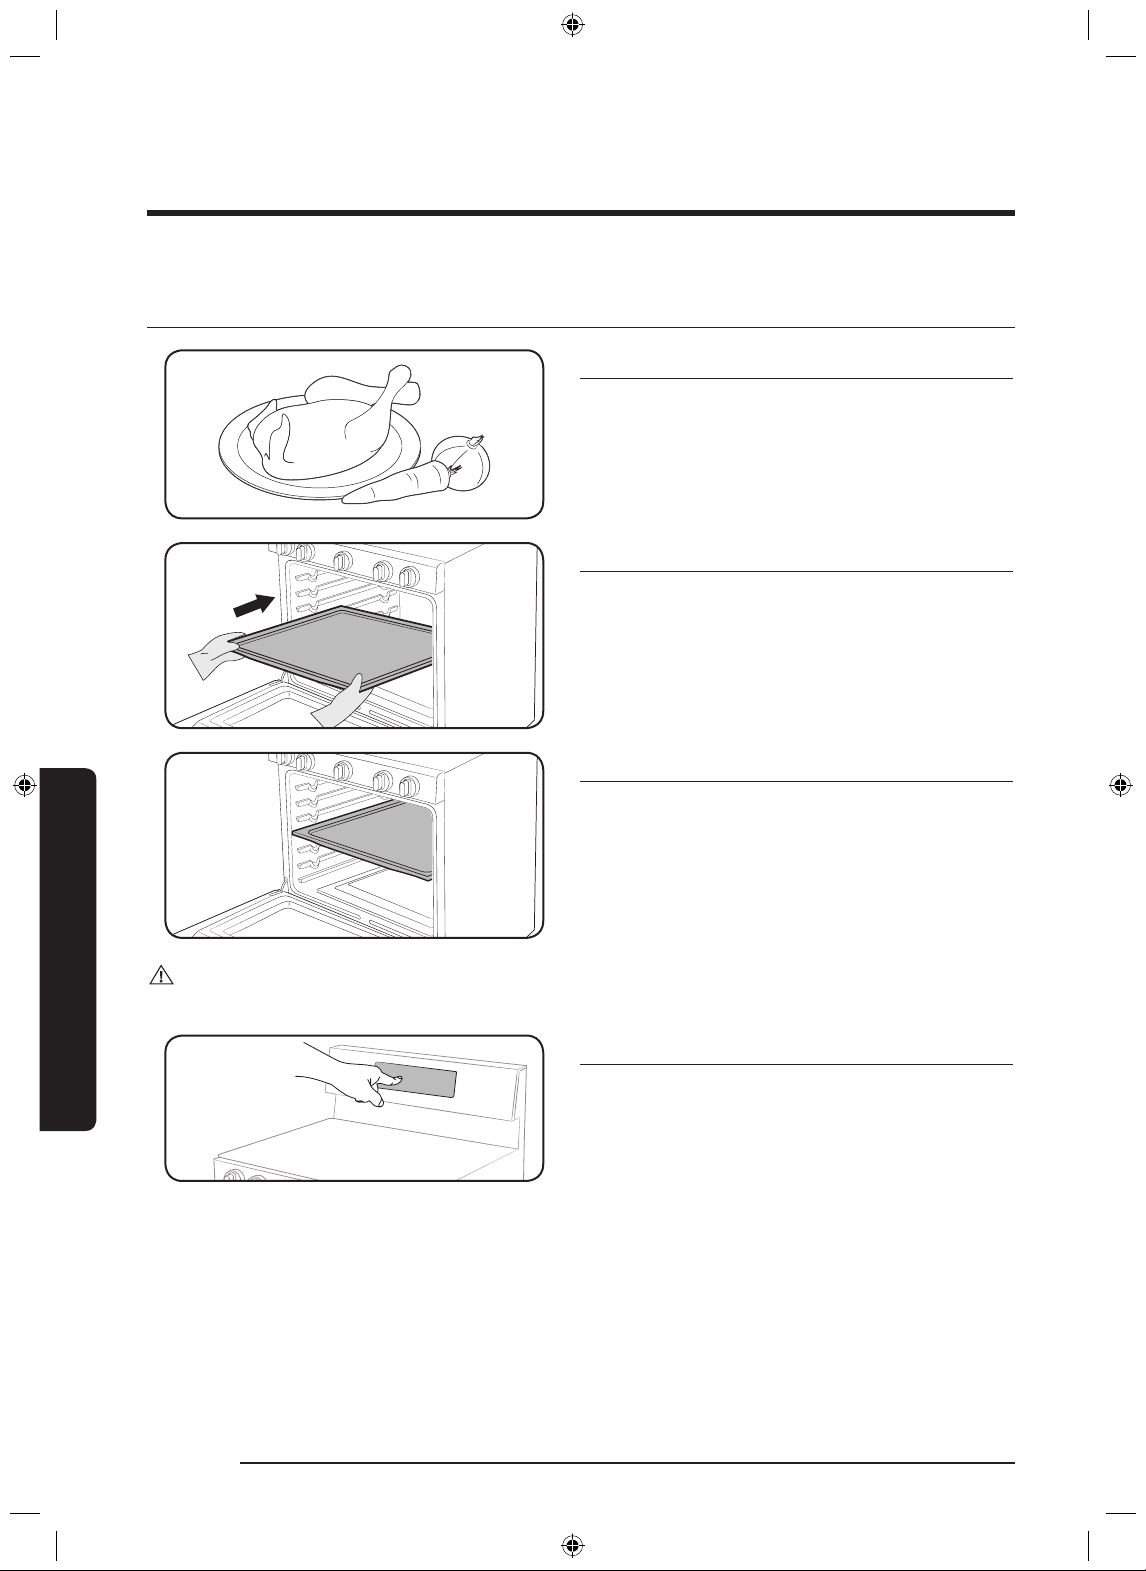
STEP 1
Put all ingredients in a heat-safe container.
STEP 2
Select a cooking mode, and then start
preheating.
STEP 3
Place the container on a rack.
STEP 4
Close the door and start cooking.
NOTE
The cooling fan automatically runs for a certain amount of time after cooking is complete.
Gas oven
English 27
NX58J7750S�_AA_AC_DG68-00623A-02_EN.indd 27 2015-06-25 �� 10:15:49
Page 28
Gas oven
Twin mode
STEP 1
Put all ingredients in a heat-safe container.
STEP 2
Insert the Smart divider into 4th rack position.
STEP 3
Gas oven
Push the Smart divider in until the range
beeps.
CAUTION
• When the Smart divider is properly inserted, the “-” icon appears.
STEP 4
Select a cooking mode, and then start
preheating.
28 English
NX58J7750S�_AA_AC_DG68-00623A-02_EN.indd 28 2015-06-25 �� 10:15:50
Page 29
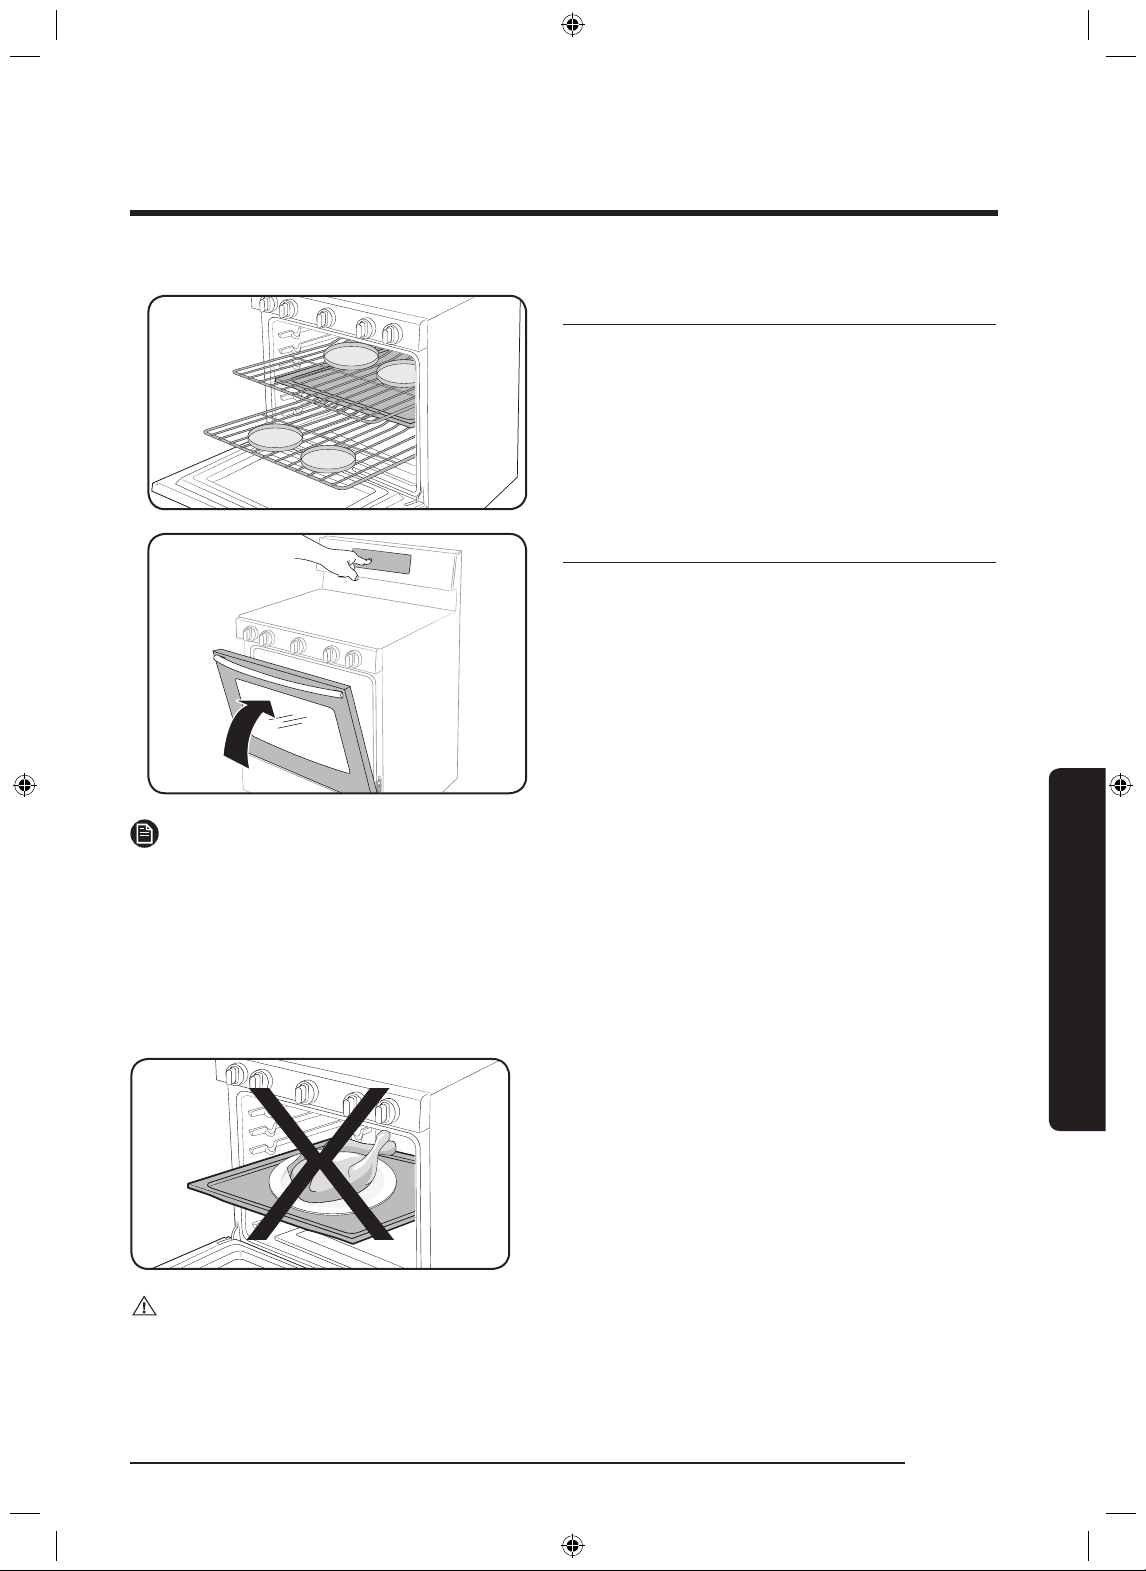
STEP 5
Arrange food containers on the racks.
STEP 6
Close the door and start cooking.
NOTES
• To use Twin mode operation, insert the Smart divider.
• The cooling fan automatically runs for a certain amount of time after cooking is complete.
• When you are not using the Smart divider, store it at room temperature.
• Handle the Smart divider with both hands.
• Use oven gloves when inserting or removing the Smart divider.
• Do not put food containers directly on the Smart divider for cooking purposes.
• Please note the time for the upper and lower ovens to preheat were different.
Gas oven
CAUTION
Range displays “-dc-”
• Check the Smart divider to see if it is installed correctly.
• Do not insert/remove the Smart divider during cooking.
English 29
NX58J7750S�_AA_AC_DG68-00623A-02_EN.indd 29 2015-06-25 �� 10:15:50
Page 30
Gas oven
Cooking mode
Baking and roasting (Single mode)
• Make sure to close the door before you
start cooking.
• If you leave the door open for 20-30
seconds while the oven is in convection
baking/roasting, baking, broiling, Easy
Cook, or Favorite Cook modes, the oven
burner shuts off. To restart the burner,
close the door.
Gas oven
04
03
1. Press the Bake, Roast, or Bake button.
2. If necessary, use the number pad to change the default temperature (350 °F). You can set
the oven to any temperature from 175 °F to 550 °F.
3. Press the START/SET button.
• The oven preheats until it reaches the temperature you set.
• When preheating is complete, place the food in the oven, and then close the door.
4. When cooking is complete, press the OFF/CLEAR button, and then take out the food
NOTE
To change the temperature during cooking, repeat steps 1 through 3 above.
01
02
01
04
03
30 English
NX58J7750S�_AA_AC_DG68-00623A-02_EN.indd 30 2015-06-25 �� 10:15:51
Page 31

Baking and Roasting (Twin mode upper)
05
04
02
03
1. Insert the Smart divider into the cavity.
2. Press the Bake or Roast pad on the left side of the Control Panel.
3. If necessary, use the number pad to change the default temperature (350 °F). You can set
the oven to any temperature from 175 °F to 480 °F.
4. Press the START/SET button.
• The oven preheats until it reaches the temperature you set.
• When preheating is complete, place the food in the oven, and then close the door.
5. When cooking is complete, press the OFF/CLEAR pad.
Baking and Roasting (Twin mode lower)
02
03
05
04
1. Insert the Smart divider into the cavity.
2. Press the Bake or Bake pad on the right side of the Control Panel.
3. If necessary, use the number pad to change the default temperature (350 °F). You can set
the oven to any temperature from 175 °F to 480 °F.
4. Press the START/SET button.
• The oven preheats until it reaches the temperature you set.
• When preheating is complete, place the food in the oven, and then close the door.
5. When cooking is complete, press the OFF/CLEAR pad.
NOTE
Your oven has different temperature setting ranges when you use the upper oven and lower
oven simultaneously. See "Temperature setting guides" on page 37 for details.
English 31
NX58J7750S�_AA_AC_DG68-00623A-02_EN.indd 31 2015-06-25 �� 10:15:52
Gas oven
Page 32

Gas oven
Convection cooking
The convection fan at the back of the oven circulates hot air evenly throughout the oven
cavities so that food is evenly cooked and browned in less time than with regular heat.
NOTE
When using convection cooking, always pre-heat the oven for the best results.
Convection baking • Ideal for foods being cooked using multiple racks.
• Good for large quantities of food.
• Provides the best performance for cookies, biscuits, brownies,
cupcakes, cream puffs, sweet rolls, angel food cake, and bread.
• Cookies bake best when cooked on at cookie sheets.
• When convection baking using a single rack, place the rack in
rack position 3 or 4. (In Twin mode, position A or 1)
• When convection baking using two racks, place the racks in
positions 3 and 5 (Cakes, Cookies). When convection baking
using three racks, place the racks in positons 2, 4, and 6.
• The oven automatically adjusts the temperature for convection
baking.
Gas oven
Convection roasting • Good for larger, tender cuts of meat, uncovered.
• For best performance, place a broiler pan and grid under the
meat or poultry. The pan catches grease spills and the grid
prevents grease spatters.
• Heated air circulates over, under, and around the food. Meat
and poultry are browned on all sides as if they were cooked
on a rotisserie.
CAUTION
Precautions in using only the upper oven:
• You must preheat the oven. If not, the food may be overcooked or burnt on the
surface and undercooked inside.
• To change the temperature during cooking, rst remove the food and change the
temperature. Then, put the food back inside the oven. Otherwise, the food may be
burnt by the broil burner while preheating.
• Do not bake food over 50 mm in height.
• The cooking time may be longer than with single-oven cooking.
32 English
NX58J7750S�_AA_AC_DG68-00623A-02_EN.indd 32 2015-06-25 �� 10:15:52
Page 33

Broiling
Broiling uses the oven broil burner at the top of the oven to cook and brown food. Meat or
sh must be put on a broiling grid in a broiling pan. Preheating for 5 minutes before broiling
is recommended.
Broiling (Single mode)
05
03
02
1. Put food on a broiling grid in a broiling pan.
2. Press the Broil pad once for high temperature broiling or twice for low.
3. Press the START/SET pad to start the broiler.
4. Let the oven pre-heat for 5 minutes.
5. Place the pan on the desired rack, and then close the oven door.
6. When one side of the food is browned, turn it over, close the oven door, and start cooking
the other side.
7. When cooking is complete, press the OFF/CLEAR pad.
Gas oven
English 33
NX58J7750S�_AA_AC_DG68-00623A-02_EN.indd 33 2015-06-25 �� 10:15:52
Page 34

Gas oven
Broiling (Twin mode)
Gas oven
05
04
1. Insert the Smart divider into the cavity.
2. Put food on a broiling grid in a broiling pan.
3. Press the Broil pad once for high temperature broiling or twice for low.
4. Press the START/SET pad to start the broiler.
5. Let the oven pre-heat for 5 minutes.
6. Place the pan on the desired rack, and then close the oven door.
7. When one side of the food is browned, turn it over, close the oven door, and start cooking
the other side.
8. When cooking is complete, press the OFF/CLEAR pad.
NOTES
• Use the low temperature setting for poultry or thick cuts of meat to prevent overbroiling.
• In general, to prevent overbroiling, press the Broil button to switch from High to Low.
• Use caution when you open the oven door to turn over the food. The air escaping from
the oven will be very hot.
• Your oven has different temperature setting ranges when you use the upper oven and
lower oven simultaneously. See "Temperature setting guides" on page 37 for details.
03
34 English
NX58J7750S�_AA_AC_DG68-00623A-02_EN.indd 34 2015-06-25 �� 10:15:52
Page 35

Recipe guide
Broiling guide
For detailed instructions, see pages 33 and 34.
NOTES
• This is for reference only.
• Preheating for 5 minutes before broiling is recommended.
• The size, weight, thickness, starting temperature, and your doneness preference will
affect broiling times.
• This guide is based on meats at refrigerator temperature.
Food Doneness Size Thickness
Medium 9 patties 1" HI 6 B
Hamburgers
Medium 9 patties ¾" HI 6 B 5:00 4:00
Medium - 1" HI 6 B
Well done - 1" HI 5 A
Beef steak
Medium - 1½" HI 6 B
Well done - 1½" HI 5 A
Chicken
pieces
Chicken
breasts
Well done 2-2½ lbs. ¾"-1" HI 5 A
Well done 2-3 pcs - HI 5 A
Broil
setting
Rack position Cooking time
Single Upper 1st side 2nd side
5:00-
5:30
7:00-
6:00
10:00-
12:00
9:00-
10:00
15:00-
18:00
15:00-
17:00
15:00-
18:00
4:00-
4:30
6:00-
5:00
7:00-
8:00
6:00-
7:00
14:00-
17:00
13:00-
15:00
12:00-
15:00
Gas oven
Pork chops Well done 1 lb. ½" HI 5 A
Medium 10 oz. 1" HI 4 A
9:00-
11:00
8:00-
12:00
6:00-
9:00
5:00-
8:00
Lamb chops
Well done 1 lb. 1½" HI 4 A
NX58J7750S�_AA_AC_DG68-00623A-02_EN.indd 35 2015-06-25 �� 10:15:53
10:00-
15:00
7:00-
11:00
English 35
Page 36

Gas oven
Food Doneness Size Thickness
Fish llets Well done - ¼-½" HI 5 A
Ham slices
(precooked)
CAUTION
Make sure to close the door after turning over the food.
- - ½" HI 4 A
Broil
setting
Rack position Cooking time
Single Upper 1st side 2nd side
5:00-
6:00
6:00-
9:00
3:00-
4:00
5:00-
6:00
Gas oven
36 English
NX58J7750S�_AA_AC_DG68-00623A-02_EN.indd 36 2015-06-25 �� 10:15:53
Page 37

Temperature setting guides
Twin Mode Temperature setting ranges
Your oven has different temperature setting ranges when you use the upper oven and lower
oven simultaneously. The range for each oven changes, depending on the function and
temperature setting of the other oven. See the tables below and on the next page for details.
(O - Available, X - Not available)
Upper Oven
Mode Set Temp.
Broil
Bake
Roast
Lower Oven
Mode Set Temp.
Lower Oven
Available Setting Function and Temp.
Bake
Bake
Min Max Min Max
HI 400 ˚F 480 ˚F 400 ˚F 480 ˚F
LO 325 ˚F 480 ˚F 325 ˚F 480 ˚F
480 ˚F 400 ˚F 480 ˚F 400 ˚F 480 ˚F
450 ˚F 350 ˚F 480 ˚F 350 ˚F 480 ˚F
300 ˚F 250 ˚F 375 ˚F 250 ˚F 375 ˚F
250 ˚F 225 ˚F 300 ˚F 225 ˚F 300 ˚F
175 ˚F 175 ˚F 200 ˚F 175 ˚F 200 ˚F
Upper Oven
Available Setting Function and Temp.
Broil
Bake & Roast
LO HI Min Max
Gas oven
480 ˚F O O 400 ˚F 480 ˚F
450 ˚F O O 350 ˚F 480 ˚F
350 ˚F O X 275 ˚F 450 ˚F
Bake
325 ˚F O X 275 ˚F 400 ˚F
250 ˚F X X 225 ˚F 300 ˚F
175 ˚F X X 175 ˚F 200 ˚F
English 37
NX58J7750S�_AA_AC_DG68-00623A-02_EN.indd 37 2015-06-25 �� 10:15:53
Page 38

Gas oven
Gas oven
Lower Oven
Mode Set Temp.
480 ˚F O O 400 ˚F 480 ˚F
450 ˚F O O 350 ˚F 480 ˚F
350 ˚F O X 275 ˚F 450 ˚F
Bake
Temperature Limitations by Mode
Feature
Bake 175˚F (79˚C) 550˚F (288˚C) 175˚F (79˚C) 480˚F (249˚C)
Broil LO HI LO HI
Bake
325 ˚F O X 275 ˚F 400 ˚F
250 ˚F X X 225 ˚F 300 ˚F
175 ˚F X X 175 ˚F 200 ˚F
Single Mode Twin Mode
Min Max Min Max
175˚F (79˚C) 550˚F (288˚C) 175˚F (79˚C) 480˚F (249˚C)
Available Setting Function and Temp.
Broil
LO HI Min Max
Upper Oven
Bake & Roast
Roast
Self-Clean 2 hours 4 hours -
Keep Warm - 3 hours -
For
(95 °C) if necessary. See “Auto Conversion” on page 60 for details.
38 English
NX58J7750S�_AA_AC_DG68-00623A-02_EN.indd 38 2015-06-25 �� 10:15:53
Bake or Roast, use Auto Conversion to set the minimum temperature to 200 °F
175˚F (79˚C) 550˚F (288˚C) 175˚F (79˚C) 480˚F (249˚C)
Page 39

Using the oven racks
07
06
05
04
03
02
01
Single Mode - One Oven Cavity
Your gas oven range comes with 3 racks and 7 rack positions. The rack positions are
delineated by rack guides which support the racks. Each rack guide has a stop that prevents
racks from loosening during the oven's operation. Each rack has stoppers that need to be
placed correctly on the rack guides. The stoppers prevent the racks from accidently coming
out of the oven completely when you pull the racks out.
Type of food Rack position
Broiling hamburgers 6
Broiling meats or small cuts
of poultry, sh
Bundt cakes, Pound cakes,
Frozen pies, casseroles
Fresh Pizza, Angel food
cakes, Small roasts
6-4
4 or 3
2
Turkey, Large roasts, Hams 1
CAUTION
• Do not cover an oven rack with aluminum foil. This will hamper heat circulation, resulting
in poor baking.
• Do not place aluminum foil on the oven bottom. The aluminum can melt and damage the
oven.
• Arrange the oven racks only when the oven is cool.
• When placing an oven rack in the topmost rack position (position 7), make sure the rack is
situated stably on the embossed stop.
• When you use the gliding rack and a at rack, always place the gliding rack below the at
rack.
NOTE
This table is for reference only.
Gas oven
NX58J7750S�_AA_AC_DG68-00623A-02_EN.indd 39 2015-06-25 �� 10:15:53
English 39
Page 40

Gas oven
B
C
A
04
03
02
01
Twin Mode - Two Oven Cavities
In Twin mode, the Smart Divider separates the oven into an upper oven and lower oven. The
upper oven and lower oven each has 3 rack positions.
Gas oven
Type of food
Rack position
Upper Lower
Frozen Pies - 1
Angle Food Cakes - 1
Bundt or pound cakes - 1
Mufns, Brownies,
Cookies, Cup cakes, Layer
A 1
cakes, Pies, Biscuits
• The upper oven has 3 rack positions
Casseroles - 1
(A, B, C)
• The lower oven has 3 racks positions
(1, 2, 3)
Small roasts, Hams A 1
Small chickens, Turkey
pieces, Meduim roasts
- 1
CAUTION
Precautions in using only the upper oven:
• You must preheat the oven. If not, the food may be overcooked or burnt on the surface
and undercooked inside.
• To change the temperature during cooking, rst remove the food and change the
temperature. Then, put the food back inside the oven. Otherwise, the food may be burnt
by the broil burner while preheating.
• In Convection baking mode, do not bake food over 50 mm in height.
• The cooking time may be longer than with single-oven cooking.
NOTES
• This table is for reference only.
• When using the upper oven mode, always pre-heat before cooking items such as pizza.
• We recommend cooking pizza and pies using the 2nd rack position in Single mode or the
2nd rack position of the lower oven in Twin mode for crispy bottoms.
40 English
NX58J7750S�_AA_AC_DG68-00623A-02_EN.indd 40 2015-06-25 �� 10:15:54
Page 41

Multi-rack Baking
5
3
5
3
Cake pan positions
• When baking cakes or cookies on
two racks in Single mode, place the
racks in positions 3 and 5 for the best
performance.
• When using 4 pans on two racks: Place
two pans in the rear of the upper rack,
and the other two in the front of the lower
rack.
• When baking multiple items on one rack,
maintain a 1” to 1.5” (2.5 cm to 3.8 cm)
space between items.
• When baking cookies on multiple racks,
place the oven racks in positions 3 and 5.
Cookie sheet positions
Inserting and removing an oven rack
To insert an oven rack
1. Place the rear end of the rack on a rack
guide.
2. Slide the rack into the rack guide while
holding the front end of the rack.
To remove an oven rack
1. Pull out the rack until it stops.
2. Pull up the front end of the rack and
remove it from the rack guide.
English 41
Gas oven
NX58J7750S�_AA_AC_DG68-00623A-02_EN.indd 41 2015-06-25 �� 10:15:55
Page 42

Gas oven
5
3
Rack and Pan Placement
Single Oven Rack
Multiple Oven Rack
Centering the baking pans in the oven as
much as possible will produce better results.
If baking with more than one pan, place the
pans so each has at least 1˝ to 1½˝ of air
space around it.
If baking on two racks in Single mode, place
the oven racks in positions 3 and 5 for the
best results.
When baking in Single mode on a single oven
rack, place the rack in position 3 or 4.
• When you use the Gliding Rack, place the
Gliding Rack below the at rack.
Gas oven
42 English
NX58J7750S�_AA_AC_DG68-00623A-02_EN.indd 42 2015-06-25 �� 10:15:55
Page 43

Using the gliding rack
The fully extendable Gliding Rack makes food preparation easier, especially when preparing
heavier dishes. The Gliding Rack has 2 glide tracks that allow you to extend the rack well out
of the oven without touching the sides of the oven walls.
Installing the Gliding rack
• With the Gliding Rack in the “Closed”
position and the oven off, carefully insert
the Gliding Rack between the guides untill
the rack reaches the back.
• When using the Gliding Rack in the oven,
be sure to pull on the handle of the rack
only to slide the gliding portion of the rack
in and out. If you grasp the frame while
using the rack, you will pull the entire
Gliding Rack out towards you.
English 43
NX58J7750S�_AA_AC_DG68-00623A-02_EN.indd 43 2015-06-25 �� 10:15:56
Gas oven
Page 44

Gas oven
Removing the Gliding rack
• With the Gliding Rack in the “Closed”
position and the oven off and cool, grasp
the rack and frame and pull both towards
you to remove.
CAUTION
• Do not install the Gliding Rack directly
above a at rack.
• You will not be able to install it properly
and the rack could fall.
• Remove the Gliding rack before starting a
Self-cleaning cycle.
Gas oven
NOTE
You can install the Gliding Rack in any rack position except the highest (level 7) and lowest
(level 1) rack positions in the oven.
44 English
NX58J7750S�_AA_AC_DG68-00623A-02_EN.indd 44 2015-06-25 �� 10:15:57
Page 45

Cooking options
CAUTION
Food that can easily spoil, such as milk, eggs, sh, poultry, and meat, should be chilled in a
refrigerator before they are placed in the oven. Even when chilled, they should not stand for
more than 1 hour before cooking begins and should be removed promptly when cooking is
completed.
Timed Cook (Single mode)
Timed cooking instructs the oven to cook foods at a set temperature for a set length of time.
The oven automatically turns off when it nishes.
Mode: Bake /
Bake / Roast / Slow Cook / Dehydrate
01
05 05
03
04
01
03
1. Press the button corresponding to a desired cooking mode such as Bake on the left or
right side of the panel.
2. If necessary, change the temperature using the number pad.
3. Press the Cooking Time button on the left or right side of the panel.
4. Set the cooking time between 1 minute and 9 hours and 99 minutes (9:99) using the
number pad.
5. Press the START/SET button on the right or left side of the panel. The oven will
automatically light and start preheating. The temperature will increase until it reaches the
temperature you set.
6. When preheating is complete, put the container with the food on a rack, and then close
the door. The oven starts cooking for the amount of time you set.
7. When the cooking time has elapsed, the oven will automatically shut off and then beep.
NOTE
To change the programmed cooking time, press the Cooking Time button and enter a
different time. Then, press the START/SET button.
Gas oven
English 45
NX58J7750S�_AA_AC_DG68-00623A-02_EN.indd 45 2015-06-25 �� 10:15:57
Page 46

Gas oven
Timed Cook (Upper oven mode)
02
Gas oven
06
1. Insert the Smart divider into the cavity.
2. Press the button corresponding to a desired cooking mode such as
side of the panel.
3. If necessary, change the temperature using the number pad.
4. Press the Cooking Time button on the left side of the panel.
5. Set the cooking time between 1 minute and 9 hours and 99 minutes (9:99) using the
number pad.
6. Press the START/SET button on the left side of the panel. The oven will automatically
light and start preheating. The temperature will increase until it reaches the temperature
you set.
7. When preheating is complete, put the container with the food on a rack, and then close
the door. The oven starts cooking for the amount of time you set.
8. When the cooking time has elapsed, the oven will automatically shut off and then beep.
04
05
Bake on the left
46 English
NX58J7750S�_AA_AC_DG68-00623A-02_EN.indd 46 2015-06-25 �� 10:15:57
Page 47

Timed Cook (Lower oven mode)
02
05
04
06
1. Insert the Smart divider into the cavity.
2. Press the button corresponding to a desired cooking mode such as
Bake on the right
side of the panel.
3. If necessary, change the temperature using the number pad.
4. Press the Cooking Time button on the right side of the panel.
5. Set the cooking time between 1 minute and 9 hours and 99 minutes (9:99) using the
number pad.
6. Press the START/SET button on the right side of the panel. The oven will automatically
light and start preheating. The temperature will increase until it reaches the temperature
you set.
7. When preheating is complete, put the container with the food on a rack, and then close
the door. The oven starts cooking for the amount of time you set.
8. When the cooking time has elapsed, the oven will automatically shut off and then beep.
Gas oven
English 47
NX58J7750S�_AA_AC_DG68-00623A-02_EN.indd 47 2015-06-25 �� 10:15:58
Page 48

Gas oven
Delay Start (Single mode)
The Delay Start function lets you use the kitchen timer to automatically start and stop
another cooking program. Delay Start can be set before other cooking operations for up to
12 hours.
Mode: Bake /
Bake / Roast / Slow Cook / Dehydrate / Self-clean
Gas oven
02
06
04
08 08
03 05 07
1. Place the container with the food on a rack, and then close the door.
2. Press the button corresponding to a desired cooking mode such as
right side of the panel.
3. If necessary, change the temperature using the number pad.
4. Press the Cooking Time button on the left or right side of the panel.
5. Set the cooking time between 1 minute and 9 hours and 99 minutes (9:99) using the
number pad.
6. Press the Delay Start button on the left or right side of the panel.
7. Set the starting time using the number pad.
8. Press the START/SET button on the left or right side of the panel.
9. The oven starts cooking at the set time, and turns off automatically when it completes
cooking.
NOTES
• To change the starting time, press the Delay Start button, and enter a new starting time.
Then, press the START/SET button.
• To change the programmed cooking time, press the Cooking Time button and enter a
different time. Then, press the START/SET button.
04
02
06
Bake on the left or
48 English
NX58J7750S�_AA_AC_DG68-00623A-02_EN.indd 48 2015-06-25 �� 10:15:58
Page 49

Delay Start (Upper mode)
02
06
04
08
03 05 07
1. Insert the Smart divider into the cavity. Place the container with the food on a rack in the
upper oven, and then close the door.
2. Press the button corresponding to a desired cooking mode such as
Bake on the left
side of the panel.
3. If necessary, change the temperature using the number pad.
4. Press the Cooking Time button on the left side of the panel.
5. Set the cooking time between 1 minute and 9 hours and 99 minutes (9:99) using the
number pad.
6. Press the Delay Start button on the left side of the panel.
7. Set the starting time using the number pad.
8. Press the START/SET button on the left side of the panel.
9. The oven starts cooking at the set time, and turns off automatically when it completes
cooking.
English 49
NX58J7750S�_AA_AC_DG68-00623A-02_EN.indd 49 2015-06-25 �� 10:15:58
Gas oven
Page 50

Gas oven
Delay Start (Lower mode)
02
06
Gas oven
04
03 05 07
1. Insert the Smart divider into the cavity. Place the container with the food on a rack in the
lower oven, and then close the door.
2. Press the button corresponding to a desired cooking mode such as
side of the panel.
3. If necessary, change the temperature using the number pad.
4. Press the Cooking Time button on the right side of the panel.
5. Set the cooking time between 1 minute and 9 hours and 99 minutes (9:99) using the
number pad.
6. Press the Delay Start button on the right side of the panel.
7. Set the starting time using the number pad.
8. Press the START/SET button on the right side of the panel.
9. The oven starts cooking at the set time, and turns off automatically when it completes
cooking.
Bake on the right
08
50 English
NX58J7750S�_AA_AC_DG68-00623A-02_EN.indd 50 2015-06-25 �� 10:15:59
Page 51

Keep Warm (Single mode only)
Keep cooked food warm at a low temperature up to 3 hours.
03
02
03
1. Place the container with the food on a rack, and then close the door.
2. Press the Keep Warm button.
3. Press the START/SET button on the left or right side of the panel. The oven heats up to
170 °F (77 °C).
NOTES
• You can cancel warming at any time by pressing the OFF/CLEAR button.
• To set the warming function during a timed cooking, press the Keep Warm button in
timed cooking mode. When the timed cooking is complete, the oven will lower the
temperature to the warming default, and keep that temperature until the warming
nishes or is canceled.
• Use this function only for Single mode, because your oven can't keep a low temperature
of this function during twin mode cooking.
The Sabbath Option (Single mode only)
(For use on the Jewish Sabbath & Holidays)
K
Use this option only for baking on the Jewish Sabbath & Holidays. For more
information, visit the website at http://www.star-k.org
Gas oven
With the Sabbath option
• The oven temperature can be set higher or lower after you have set this option.
• The display doesn’t change and no beep sounds when you change the temperature.
• Once the oven is properly set for baking with the Sabbath option active, the oven will
remain continuously on until the Sabbath feature is cancelled. This will override the
factory preset 12 hour energy saving feature.
• If the oven light is needed during the Sabbath, press OVEN LIGHT before activating the
Sabbath feature. Once the oven light is turned on and the Sabbath option is active, the
oven light will remain on until the Sabbath option is turned off.
• If you want the oven light off, be sure to turn it off before activating the Sabbath feature.
• Do not use the surface cooktop when the Sabbath option is on.
English 51
NX58J7750S�_AA_AC_DG68-00623A-02_EN.indd 51 2015-06-25 �� 10:15:59
Page 52

Gas oven
Gas oven
To enable the Sabbath option
01
03
02
04
1. Press the Bake pad.
2. Enter a desired temperature using the number pad. The default temperature is 350 °F.
3. Press the START/SET pad. The display temperature changes after the oven temperature
reaches 175 °F.
4. Press the Bake and Number 1 buttons simultaneously for 3 seconds to display “SAb”.
Once “SAb” appears, the oven control no longer beeps or displays any further changes.
NOTES
• You can change the oven temperature once baking starts, but the display will not change
or beep. After changing the temperature, it takes 15 seconds before the oven recognizes
the change.
• You can turn off the oven at any time by pressing OFF/CLEAR. However, this doesn’t
deactivate the Sabbath option.
• To deactivate the Sabbath option, hold down Bake and Number 1 simultaneously for 3
seconds.
• You can set the cooking time before activating the Sabbath option.
• After a power failure, the oven will not resume operation automatically. “SAb” will appear
in the control panel, but the oven will not go back on. Food can be safely removed from
the oven, but you should not turn off the Sabbath option and turn the oven back on until
after the Sabbath/Holidays.
• After the Sabbath observance, turn off the Sabbath option by pressing and holding Bake
and Number 1 simultaneously for at least 3 seconds.
CAUTION
• Do not attempt to activate any other functions except for Bake when the Sabbath option
is on. Only the following buttons will function properly: Number Pad, Bake, Oven Start/
Set, and Oven Off.
• Do not open the oven door or change the oven temperature for about 30 minutes after
you have started the Sabbath option. Let the oven reach the set temperature. The oven
fan operates only when the oven temperature increases.
52 English
NX58J7750S�_AA_AC_DG68-00623A-02_EN.indd 52 2015-06-25 �� 10:15:59
Page 53

Favorite Cook (Single mode)
01
02
03
Create a favorite cooking recipe with 3 different personalized settings. This is available only
with baking, convection baking, or convection roasting.
To set or change a favorite cook mode
02
02
04
07
06
04
07
03 05
1. Press the button corresponding to a desired cooking mode such as Bake on either side
of the panel.
2. Keep the default temperature (350 °F) or enter a desired temperature using the number
pad.
3. Press the Cooking Time button on either side of the panel.
4. Enter a desired cooking time using the number pad.
5. Press the Favorite Cook button either side of the panel.
Once Twice Three times
Single Mode
Recipe 1 Recipe 2 Recipe 3
Cakes Meats Chicken
Default settings
Bake 325 °F
Roast 350 °F Roast 375 °F
6. Press the START/SET button on either side of the panel to save the changes.
Gas oven
To use or recall a favorite cook mode
1. Press the Favorite Cook button the
number of times that corresponds to
where the recipe setting is stored.
2. Press START/SET button to start cooking.
3. When the cooking is complete, press the
OFF/CLEAR button, and take out the food.
NX58J7750S�_AA_AC_DG68-00623A-02_EN.indd 53 2015-06-25 �� 10:16:00
English 53
Page 54

Gas oven
Favorite Cook (Twin mode)
Create a favorite cooking recipe with 3 different personalized settings. You need to choose
the upper oven or lower oven when you save your favorite cooking recipe. This is available
only with baking, convection baking, or convection roasting.
To set or change a favorite cook mode
Gas oven
02
04
07
1. Insert the Smart divider into the cavity.
2. Press the button corresponding to a desired cooking mode such as
of the panel.
NOTE
Once you have selected an oven to use (for example, Lower) and consequently a side of the
panel to use (for example, right), you must push the buttons on that side of the panel for the
remaining steps in this procedure, except when you enter the temperature and cooking time.
3. Keep the default temperature (350 °F) or enter a desired temperature using the number
pad.
4. Press the Cooking Time button either side of the panel.
5. Enter a desired cooking time using the number pad.
6. Press Favorite Cook button on either side of the panel.
Twin Mode
06
03 05
Once Twice Three times
Recipe 1 Recipe 2 Recipe 3
04
02
07
Bake on either side
Upper Upper Upper
Default settings
7. Press the START/SET button on either side of the panel to save the changes.
54 English
NX58J7750S�_AA_AC_DG68-00623A-02_EN.indd 54 2015-06-25 �� 10:16:00
Cakes Meats Chicken
Bake 325 °F Roast 325 °F Roast 375 °F
Page 55

To use or recall a favorite cook mode
01
02
03
1. Press the Favorite Cook button the number
of times that corresponds to where the
recipe setting is stored.
2. Press START/SET button to start cooking.
3. When the cooking is complete, press the
OFF/CLEAR button, and take out the food.
NOTES
• If you use the upper oven and lower oven simultaneously, Favorite Cook can save the
settings for only one.
• If you press the Favorite Cook button before Twin mode cooking, the saved cavity is
shown on the display.
NX58J7750S�_AA_AC_DG68-00623A-02_EN.indd 55 2015-06-25 �� 10:16:00
English 55
Gas oven
Page 56

Gas oven
Slow cook, dehydrate, proong
Slow cook (Single mode only)
The Slow cook feature cooks food slowly at lower oven temperatures. The extended cooking
times allow better distribution of avors in many recipes. This feature is ideal for roasting
beef, pork & poultry. Slow cooking meats may result on the exterior of meats becoming dark
but nor burnt. This is normal.
02
01
1. Press Slow Cook once for HI or twice for LO.
2. Press START/SET.
Gas oven
NOTE
Use only 1 rack and place the rack in position 1 or 2 for the best results.
Preheating the oven is not necessary.
56 English
NX58J7750S�_AA_AC_DG68-00623A-02_EN.indd 56 2015-06-25 �� 10:16:01
Page 57

Dehydrate (Single mode only)
Dehydrate dries food or removes moisture from food via heat circulation. After drying the
food, keep it in a cool and dry place. For fruit, adding lemon or pineapple juice or sprinkling
sugar on the fruit helps the fruit retain sweetness.
03
01
02
1. Press Dehydrate. The default temperature is 150 ˚F.
2. Enter the temperature you want on number pad. (100 ˚F-175 ˚F)
3. Press START/SET.
Recommended Dehydration Temperatures
Category Rack position Temperature (˚F)
Vegetables or Fruit
Meat
3 or 4 100-150
3 or 4 145-175
NOTES
• Drying time depends on the amount of moisture inside of the food, the size of the food,
and the humidity in the air.
• Preheating the oven is not necessary.
Gas oven
English 57
NX58J7750S�_AA_AC_DG68-00623A-02_EN.indd 57 2015-06-25 �� 10:16:01
Page 58

Gas oven
Bread Proof (Single mode only)
The Bread Proof function automatically provides the optimum temperature for the bread
proof process, and therefore does not have a temperature adjustment.
If you press Bread Proof when the oven temperature is above 100 ˚F, Hot will appear in the
display. Because this function produces the best results when started while the oven is cool,
we recommend that you wait until the oven has cooled down and Hot disappears from the
display.
03
02
01
1. Press Bread Proof.
2. Press START/SET.
3. Press OFF/CLEAR at any time to turn off the Bread Proof function.
Gas oven
NOTE
Use rack position 3 for bread proong.
58 English
NX58J7750S�_AA_AC_DG68-00623A-02_EN.indd 58 2015-06-25 �� 10:16:01
Page 59

Non-Cooking Functions
03
04
02
03
04
01
02
Temperature adjust
The oven temperature has been calibrated at the factory. When rst using the oven, follow
the recommended recipe times and temperatures. If it appears that the oven is too hot or
too cool, you can recalibrate the oven temperature. Before recalibrating, test a recipe by
using a temperature setting that is higher or lower than recommended. The baking results
should help you decide how much of an adjustment is needed. The oven temperature can be
adjusted by ±35 °F (±19 °C).
1. Press the Broil button and 1 on the
number pad simultaneously for 3 seconds.
2. Press the Broil button to select a higher(+)
or lower(-) temperature.
3. Enter an adjusting temperature value (0-
35) using the number pad.
4. Press the START/SET button to save the
changes.
NOTE
This adjustment does not affect the broiling or
the self-cleaning temperature, and is retained
in memory after a power failure.
Temp. Unit (°F / °C)
Change the temperature format of the oven to Fahrenheit or Centigrade. The default is
Fahrenheit.
1. Press the Broil button and 2 on the
number pad simultaneously for 3 seconds.
2. Press 0 on the number pad to select
Fahrenheit or Centigrade.
3. Press the START/SET button to save the
changes.
NX58J7750S�_AA_AC_DG68-00623A-02_EN.indd 59 2015-06-25 �� 10:16:02
English 59
Gas oven
Page 60

Gas oven
03
01
02
03
01
02
03
01
02
03
01
02
Auto Conversion
Auto Conversion automatically converts regular baking temperatures to convection baking
temperatures. For example, if you enter a regular recipe temperature of 350 °F and press
START/SET, the oven displays the converted temperature of 325 °F.
1. Press the Broil button and 3 on the
number pad simultaneously for 3 seconds.
2. Press 0 on the number pad to select Off or
On. (Default setting is *OFF.)
3. Press the START/SET button to save the
changes.
Energy saving
This will automatically turn off the oven 12 hours after baking starts or 3 hours after broiling
starts.
1. Press the Broil button and 5 on the
number pad simultaneously for 3 seconds.
2. Press 0 on the number pad to select Off or
On.
3. Press the START/SET button to save the
changes.
Gas oven
Sound
Mute/unmute the oven.
1. Press the Broil button and 6 on the
number pad simultaneously for 3 seconds.
2. Press 0 on the number pad to select
unmute or mute.
3. Press the START/SET button to save the
changes.
Demo mode
This is used by retailers for display purposes only. In this mode, the heating element does not
operate.
1. Press the Broil button and 7 on the
number pad simultaneously for 3 seconds.
2. Press 0 on the number pad to select Off or
On.
3. Press the START/SET button to save the
changes.
60 English
NX58J7750S�_AA_AC_DG68-00623A-02_EN.indd 60 2015-06-25 �� 10:16:03
Page 61

Oven light
Turns the oven light on and off.
Press the Oven Light button to turn the oven light on and off.
Oven lock
Lock the control panel and the door to prevent accidental operations and/or product tipping.
Press and hold the OFF/CLEAR button for 3 seconds to lock or unlock both the control panel
and the door. When the Oven Lock is on, the oven panel does not operate and the oven door
is locked and cannot be opened.
English 61
Gas oven
NX58J7750S�_AA_AC_DG68-00623A-02_EN.indd 61 2015-06-25 �� 10:16:04
Page 62

Maintenance
Cleaning
Control panel
First, lock the control panel and the door to prevent accidental operations and/or product
tipping.
1. Press and hold the OFF/CLEAR button for 3 seconds to lock both the control panel and the
door.
2. Clean the control panel using a soft cloth dampened with plain water, warm soapy water,
or glass cleaner. Do not spray cleansers directly onto the control panel.
3. When done, press and hold the OFF/CLEAR button again for 3 seconds.
WARNING
• Make sure the control panel turns off and all surfaces of the gas oven are cool before
cleaning. Otherwise, you can get burned.
• If the gas oven has been moved away from the wall, make sure the anti-tip device is
reinstalled properly when the gas oven has been put into place again. Otherwise, the gas
oven may tip over, causing physical injuries.
• Do not use steel-wool or abrasive cleansers of any kind. These can scratch or damage the
surface.
Stainless steel surface
1. Remove any spills, spots, and grease stains using a soft, wet cloth.
2. Apply an approved stainless steel cleanser to a cloth or paper towel.
3. Clean one small area at a time, rubbing with the grain of the stainless steel if applicable.
Maintenance
4. When done, dry the surface using a soft, dry cloth.
5. Repeat steps 2 through 4 as many times as necessary.
CAUTION
• Do not use a steel-wool pad or abrasive cleanser on stainless steel surfaces. It will scratch
the surface.
• Do not spray any type of cleanser into the manifold holes. The ignition system is located
in those holes and must be kept free of moisture.
Racks
To keep the racks clean, remove them from the cavity, and soak them in lukewarm soapy
water. Then, scour impurities off of the racks using a plastic scouring pad. If the racks do not
slide in and out smoothly after you have cleaned them, rub the side rail guides with wax
paper or a cloth containing a few drops of cooking oil. This will help the racks glide more
easily on their tracks.
62 English
NX58J7750S�_AA_AC_DG68-00623A-02_EN.indd 62 2015-06-25 �� 10:16:04
Page 63

Gliding rack
1. Remove the gliding rack from the oven.
2. Fully extend the gliding rack on a table. It
is a good idea to put newspaper beneath
the rack for later cleanup.
3. If the sliding tracks are soiled, remove dirt
and grime using a paper towel. Reapply
the graphite lubricant according to the
instructions below:
To apply the graphite lubricant
1. Shake the graphite lubricant before
opening it.
2. Apply 4 drops of lubricant to the inner
side of the left sliding track, and 4 drops
to the outer side of the left sliding track.
3. Repeat step 2 above on the right sliding
track.
4. Extend and collapse the gliding rack
several times to distribute the lubricant
English 63
NX58J7750S�_AA_AC_DG68-00623A-02_EN.indd 63 2015-06-25 �� 10:16:06
Maintenance
Page 64

Maintenance
*
NOTES
• Do not use a dishwasher to clean the racks.
• If a rack does not slide in and out smoothly, apply a few drops of cooking oil to the oven
rack guides.
• If a rack becomes too difcult to slide in or out, lubricate the rack.
• To purchase the graphite lubricant, contact us at 1-800-SAMSUNG (726-7864).
• For online shopping, visit http://www.samsungparts.com/Default.aspx and search for part
DG81-01629A.
CAUTION
• Do not leave racks in the oven during the self-cleaning cycle. The extreme heat generated
in this cycle can permanently peel off the rack coating and make it difcult to remove the
rack.
• Do not spray cooking oil or lubricant directly onto the gliding rack.
Door
Do not remove the inner gasket of the oven door for cleaning.
Inner side
• Inner surface: Clean the inner side of the door manually using a soapy plastic scouring
pad, and then wipe with a dry cloth. Take care not to get the gasket wet or allow moisture
into the door.
• Inner glass: The inner glass is cleaned automatically during the self-cleaning cycle.
Outer side
Maintenance
• Outer surface: Follow the cleaning instructions for the stainless steel surface in the
previous section.
• Outer glass: Clean the outer glass using a glass cleanser or soapy water. Rinse and dry
thoroughly. Take care not to get the gasket wet or allow moisture into the door.
CAUTION
Do not let moisture enter the door or contact
the door gasket (*). Moisture may reduce the
gasket’s performance.
64 English
NX58J7750S�_AA_AC_DG68-00623A-02_EN.indd 64 2015-06-25 �� 10:16:06
Page 65

Surface burners
Burner controls
Make sure all surface burner knobs are in the OFF position.
1. Pull out the knobs from the control valve
stems as shown.
2. Clean the knobs in warm, soapy water.
Then, rinse and dry them thoroughly.
3. Clean the stainless steel surfaces using
stainless steel cleaner.
4. Reinsert the knobs into the control valve
stems.
CAUTION
• Do not clean the control knobs in a dish washer.
• Do not spray cleansers directly onto the control panel. Moisture entering the electric
circuits may cause electric shock or product damage.
Cooktop surface
The porcelain-enameled cooktop surface needs to be kept clean. It is advisable to remove
food spills immediately after they take place.
1. Turn off all surface burners.
2. Wait until all burner grates cool down, and
then remove them.
3. Clean the cooktop surface using a soft
cloth. If food spills run into gaps of the
burner components, remove the burner
cap and the head, and wipe out the spills.
4. When cleaning is nished, reinsert the
burner components, and put the burner
grates into position.
Maintenance
CAUTION
• Do not use a steel-wool pad or abrasive cleaner, which can scratch or damage the enamel
surface.
• Do not remove the cooktop surface to clean it. The gas lines leading to the burner
manifolds can be damaged, resulting in a re or system failure.
English 65
NX58J7750S�_AA_AC_DG68-00623A-02_EN.indd 65 2015-06-25 �� 10:16:08
Page 66

Maintenance
1
3
2
7
8
6
Burner grates and components
Turn off all surface burners, and make sure they are all cooled down.
1. Remove the burner grates.
2. Remove the burner caps from the burner
heads.
3. Remove the burner heads from the valve
manifolds to reveal the starter electrodes.
4. Clean all removable grates and burner
components in warm, soapy water. Do not
use steel-wool pads or abrasive cleaners.
5. Rinse and dry grates and burner
components thoroughly.
6. Return the burner heads to their positions
on top of the manifold valves. Make sure
a starter electrode is inserted through the
hole in each burner head.
7. Return the burner caps to their positions
on top of burner heads. To ensure proper
and safe operation, make sure the burner
caps lie at on top of the burner heads.
8. Reinstall the burner grates in their
respective positions.
9. Turn on each burner and check if it
operates properly. After verifying that a
Maintenance
burner operates normally, turn it off.
NOTES
• Check the right position of the Double ring
Top Bottom
burner.
• The precise simmer burner(RR) cap and
the inner Double ring burner (RF) cap are
interchangeable.
CAUTION
• The starter electrodes are not removable. Do not attempt to remove them by force.
• Make sure all burner components (heads and caps) are reinstalled properly. They are
stable and rest at when installed properly.
• To avoid chipping, do not bang grates and caps against each other or hard surfaces such
as cast iron cookware.
66 English
NX58J7750S�_AA_AC_DG68-00623A-02_EN.indd 66 2015-06-25 �� 10:16:10
Page 67

Self-cleaning (Single mode only)
This self-cleaning oven uses high temperatures (well above cooking temperatures) to burn off
leftover grease and residue completely or reduce them to a nely powdered ash that you can
wipe away with a damp cloth.
CAUTION
• Do not leave small children unattended near the gas oven during the self-cleaning cycle.
The outside surfaces of the gas oven can get extremely hot.
• Some birds are extremely sensitive to fumes from a self-cleaning gas oven. Relocate birds
to a well-ventilated room away from the gas oven.
• Do not line the oven, oven racks, or oven bottom with aluminum foil. Doing so will result
in poor heat distribution, produce poor baking results, and cause permanent damage
to the oven interior. The aluminum foil will melt onto and adhere to the interior oven
surfaces.
• Do not force the oven door open during the self-cleaning cycle. This will damage the
automatic door-locking system. The door automatically locks when the self-cleaning cycle
is started and stays locked until the cycle is cancelled and the oven temperature is below
392 °F.
• Use caution when opening the oven door after the self-cleaning cycle. The gas oven will
still be VERY HOT and hot air and steam might escape when the door is open.
To perform the self-cleaning cycle
Make sure the door lock is released. Remove all racks from the oven cavity.
03 03
02
1. Make sure the oven door is unlocked and closed completely.
2. Press the Self Clean button, and then select the cleaning time. See the table below.
Once Twice Three times
2-hour cycle 3-hour cycle 4-hour cycle
3. Press the START/SET button. The oven door is locked and the oven begins to heat up.
4. When the cycle is complete, the oven beeps 6 times. The door will remain locked and the
Lock icon will blink until the oven temperature falls below 392 °F (200 °C).
5. When the Lock icon changes to an open lock, you can open the oven door. The Lock icon
changes to an open lock when the oven temperature drops below 392 °F (200 °C).
English 67
NX58J7750S�_AA_AC_DG68-00623A-02_EN.indd 67 2015-06-25 �� 10:16:10
Maintenance
Page 68

Maintenance
6. Press the OFF/CLEAR button to display the time of the day.
CAUTION
Do not use the surface burners while the gas oven is performing a self-cleaning cycle.
To delay starting the self-cleaning cycle
02
04 04
03
1. Repeat steps 1 and 2 on the previous page.
2. Press the Delay Start button. The oven door locks.
3. Set the time you want the oven to start self-cleaning using the number pad.
4. Press the START/SET button. The oven will start self-cleaning at your specied time.
To cancel the self-cleaning cycle
You may nd it necessary to stop or interrupt a self-cleaning cycle due to smoke in the oven.
To turn off the self-cleaning cycle, press the OFF/CLEAR button. The cycle turns off, but the
door remains locked and the Lock icon blinks until the oven temperature falls below 392 °F
(200 °C).
Maintenance
After self-cleaning
• The door stays locked until the internal oven temperature falls below 392 °F.
• When the oven has cooled down, wipe the oven surfaces with a cloth to remove ash
residue.
• Stubborn stains can be removed using a steel-wool pad. Lime deposits can be removed
using a vinegar-soaking cloth.
• If you are not satised with the cleaning results, repeat the cycle. “HOT” appears on the
display until the oven cools down. Wait until the message disappears, and start a new
cycle.
• The cooling fan automatically runs for certain amount of time after self-cleaning.
CAUTION
Do not attempt to open the oven door immediately after the self-cleaning cycle is complete.
The oven is still very hot when the door unlocks. Escaping hot air and/or steam could burn
you.
68 English
NX58J7750S�_AA_AC_DG68-00623A-02_EN.indd 68 2015-06-25 �� 10:16:11
Page 69

Replacement
Oven light
The oven light is a standard 40-watt appliance bulb. It comes on when you open the oven
door.
1. Turn off the oven.
2. Make sure the oven and oven light are
cool.
3. Open the door, and remove the glass cover
by turning it counterclockwise.
4. Remove the oven light from the socket by
turning it counterclockwise.
5. Insert a new 40-watt appliance bulb into
the socket, and then turn it clockwise to
tighten.
6. Reinsert the glass cover, and then turn it
clockwise to tighten.
CAUTION
To prevent electric shock, make sure the gas oven is turned off and cool before replacing the
oven light.
NOTES
• The oven light does not operate during the self-cleaning cycle.
• Remove the racks if they prevent you from accessing the oven light.
Maintenance
English 69
NX58J7750S�_AA_AC_DG68-00623A-02_EN.indd 69 2015-06-25 �� 10:16:11
Page 70

Maintenance
1
2
Reinstallation
Oven door
To remove the oven door
1. Turn off the oven.
2. Fully open the oven door.
3. Pull the hinge locks away from the oven
body and down toward the door frame
into the unlocked position.
4. Close the door to 5 degrees from vertical.
This is the removal position.
5. While holding both sides of the oven door
tightly, lift it up and out until the hinge
arms come clear of the slots at the bottom
of the oven door.
6. Place the door in a safe location.
Maintenance
WARNING
• The door is very heavy. Be careful when removing and lifting the door. Do not lift the
door by the handle.
• Take care when moving the oven door. Improper handling could result in physical injury.
• To prevent electric shock, make sure the oven is turned off before removing the oven
door.
70 English
NX58J7750S�_AA_AC_DG68-00623A-02_EN.indd 70 2015-06-25 �� 10:16:12
Page 71

To re-install the oven door
Storage drawer
1. Firmly grasp both sides of the door at the
top.
2. With the door set at the same angle as the
removal position (about 5 degrees from
vertical), slide the hinge arms into the
hinge slots at the bottom of the door.
3. Open the door fully. If you cannot open
the door fully, the hinge arms are not
properly in the hinge slots.
4. Lock the hinge arms by pushing them up
against the front frame of the oven.
5. Close the door, and make sure it opens and
closes normally.
1. Slide open the drawer until it stops.
2. Locate the roller guide clips on either
side. Using both hands, pull down the left
clip while lifting the right clip, and then
remove the drawer.
3. Clean the drawer in warm, soapy water
using a cloth or soft brush. Then, rinse and
dry it thoroughly.
4. Put the drawer in the roller guides on
either side, and then snap the clips into
place.
English 71
NX58J7750S�_AA_AC_DG68-00623A-02_EN.indd 71 2015-06-25 �� 10:16:13
Maintenance
Page 72

Troubleshooting
If you encounter a problem with the gas oven, rst check the table below and try the
suggestions.
Checkpoints
Gas safety
Problem Possible cause Action
Troubleshooting
You smell gas. There is a gas leak. The
surface burner knob is not
in the OFF position and the
burner is not lit.
Surface burner
Problem Possible cause Action
All burners do not
light.
The power cord is not
plugged into the electrical
outlet.
A fuse in your home may
be blown or the circuit
breaker tripped.
Clear the room, building, or area of all
occupants.
Immediately call your gas supplier
from a neighbor’s phone. Do not call
from your phone. It is electrical and
could cause a spark that could ignite
the gas. Follow the gas supplier’s
instructions.
If you cannot reach your gas supplier,
call the re department.
Make sure the electrical plug is
plugged into a live, properly grounded
outlet.
Replace the fuse or reset the circuit
breaker.
The gas supply is not
properly connected or
turned on.
Surface burners do
not light.
72 English
NX58J7750S�_AA_AC_DG68-00623A-02_EN.indd 72 2015-06-25 �� 10:16:13
The control knob is not set
properly.
The burner caps are not in
place.
The burner base is
misaligned.
See the Installation Instructions that
came with your range.
Push in the control knob and turn it to
the LITE position.
Clean the electrodes.
Put the burner cap on the burner head.
Align the burner base.
Page 73

Problem Possible cause Action
Surface burner
clicks during
operation.
The burners do
not burn evenly.
Very large or
yellow surface
burner ames.
Surface burners
light but oven
burners do not
light.
The control knob has been
left in the LITE position.
After the burner lights, turn the control
knob to a desired setting.
If the burner still clicks, contact a
service technician.
Surface burner components
See 66.
and caps are not assembled
correctly and level.
Surface burners are dirty. Clean surface burner components.
(See 65.)
Wrong orice is assembled. Check the burner orice size and
contact your installer if you have
the wrong orice (LP gas instead of
natural gas or natural gas instead of
LP gas).
The oven door lock is
turned on.
The display will show the Lock icon.
Hold the oven door open and press the
START/SET button for 3 seconds. The
oven will beep and the Lock icon will
turn off.
Gas Pressure Regulator
shut off switch is in the ‘off
position.
Call a qualied service technician.
Troubleshooting
English 73
NX58J7750S�_AA_AC_DG68-00623A-02_EN.indd 73 2015-06-25 �� 10:16:13
Page 74

Troubleshooting
Oven
Problem Possible cause Action
The oven control
beeps and displays
an information
code.
Very large or
yellow oven
burner ames.
Oven temperature
is too hot or cold.
Oven burner will
not shut off.
You have a function
information code. See the
“Information codes” chart
on 80.
The oven burner air
adjustment shutters need to
be adjusted.
Gas supply is not properly
connected or turned on.
Oven thermostat needs
adjustment.
The oven door lock is
turned on.
Press the OFF/CLEAR button and
restart the oven.
If the problem persists, disconnect
all power to the range for at least
30 seconds and then reconnect the
power. If this does not solve the
problem, call for service.
Call for a qualied service technician.
See the Installation Instructions that
came with your range.
See 59.
The display will show the Lock icon.
Hold the oven door open and press the
START/SET button for 3 seconds. The
oven will beep and the Lock icon will
turn off.
The Sabbath function has
been activated.
Troubleshooting
74 English
NX58J7750S�_AA_AC_DG68-00623A-02_EN.indd 74 2015-06-25 �� 10:16:13
SAb and the time of day will show
in the display. All other controls and
signals will be deactivated. To turn off
the oven only, press the OFF/CLEAR
button.
To cancel the Sabbath function and
reactivate the controls and signals,
press and hold the Bake and Touch to
Wake-Up buttons simultaneously for
3 seconds.
Page 75

Problem Possible cause Action
Oven light (lamp)
will not turn on.
Oven smokes
excessively during
broiling.
The oven door lock is
turned on.
The Sabbath function has
been activated.
Loose or burned-out bulb.
The switch operating the
oven light needs to be
replaced.
Meat or food not properly
prepared before broiling.
Improperly positioned top
oven rack.
The display will show the Lock icon.
Hold the oven door open and press the
START/SET button for 3 seconds. The
oven will beep and the Lock icon will
turn off.
SAb and the time of day will show
in the display. All other controls and
signals will be deactivated. To cancel
the Sabbath function and reactivate
the light switch and other controls,
press and hold the Bake and Touch to
Wake-Up buttons simultaneously for
3 seconds.
See 69.
Call for a qualied service technician.
Cut away excess fat and/or fatty edges
that may curl.
See broiling guide on 35.
Controls are not being set
See 33.
properly.
Cooking is
nished, but the
cooling fan is still
Greasy buildup on oven
surfaces.
the fan automatically runs
for a certain amount of time
to ventilate inside the oven.
Regular cleaning is necessary when
broiling frequently.
This is not a product malfunction, so
there is no need to worry.
running.
English 75
NX58J7750S�_AA_AC_DG68-00623A-02_EN.indd 75 2015-06-25 �� 10:16:13
Troubleshooting
Page 76

Troubleshooting
Problem Possible cause Action
Oven will not selfclean.
Crackling or
popping sound.
The oven door lock is
turned on.
The Smart Divider is
installed in the oven.
The oven is too hot. Let the oven cool down and reset
The self-cleaning oven
controls are not properly
set.
This is normal. This is the sound of the metal heating
The display will show the Lock icon.
Hold the oven door open and press the
START/SET button for 3 seconds. The
oven will beep and the Lock icon will
turn off.
Self-clean will not operate with the
Smart Divider installed. Remove it
from the oven.
the controls. The self-clean cycle will
not lock the oven door if the oven
temperature is too hot. The door must
lock before the self-clean cycle can
start.
Reset the self-cleaning oven controls.
(See 67.)
and cooling during any cooking or
cleaning function.
Excessive smoking
during a selfcleaning cycle.
Troubleshooting
Oven door will not
open after a selfcleaning cycle.
76 English
NX58J7750S�_AA_AC_DG68-00623A-02_EN.indd 76 2015-06-25 �� 10:16:13
This is the rst time the
oven has been cleaned.
This is normal. The oven door will stay locked until
This is normal. The oven will always
smoke more the rst time it is cleaned.
Wipe up all excessive soil before
starting the self-cleaning cycle.
If smoke persists, press the OFF/CLEAR
button. Open the windows to clear the
smoke from the room. After the oven
has cooled and unlocked, wipe up
excessive soil and reset the oven for
self-cleaning.
the oven temperature drops below
392 °F.
Page 77

Problem Possible cause Action
Oven not clean
after a selfcleaning cycle.
Steam or smoke
coming from
under the control
panel.
Burning or oily
odor coming from
the vent.
A ne dust or ash is normal. This can be wiped clean with a damp
cloth.
Set the self-cleaning cycle for a longer
cleaning time.
The cycle was not long enough to burn
off the dirt buildup.
Extremely dirty ovens require hand-
cleaning of excessive spillovers and
food buildup before starting a self-
cleaning cycle. Multiple self-cleaning
cycles may be necessary to completely
clean the oven.
This is normal. The oven vent is located there. More
steam is visible when using the
convection functions or when baking
or roasting multiple items at the same
time.
This is normal for a new
oven and will disappear
within 1/2 hour of the rst
To speed the process, set a self-
cleaning cycle for a minimum of
3 hours. (See 67.)
bake cycle.
Strong odor. This is temporary. The insulation around the inside of the
oven emits an odor the rst few times
the oven is used.
Oven racks are
difcult to slide.
This is normal. Apply a small amount of vegetable oil
to a paper towel and wipe the edges of
the oven racks with the paper towel.
Racks become dull and hard to slide if
they are left in the oven during a self-
clean cycle.
Fan noise. This is normal. The convection fan runs until the
function is over or the door is opened.
Convection fan is
not working.
NX58J7750S�_AA_AC_DG68-00623A-02_EN.indd 77 2015-06-25 �� 10:16:14
This is normal. The fan starts automatically when the
oven reaches the preheat temperature.
English 77
Troubleshooting
Page 78

Troubleshooting
Others
Problem Possible cause Action
The product is not
level.
Display goes
blank.
Food does not
bake or roast
properly in the
oven.
The appliance has been
installed improperly.
The leveling leg(s) is (are)
damaged or uneven.
The kitchen cabinets are not
properly aligned and make
the range appear to be not
level.
The electrical outlet Ground
Fault Interrupter (GFI or
GFCI) has been tripped and
needs to be reset.
Your digital control has
been damaged.
The wrong cooking mode is
selected.
The oven racks have not
been positioned properly
for the foods being cooked.
Make sure the oor is level, strong,
and stable. If the oor sags or slopes,
contact a carpenter.
Check and level the range. (See the
Installation Instructions.)
Ensure that cabinets are square and
provide sufcient room for installation.
Replace fuse or reset circuit breaker.
See 30.
See 39.
Incorrect cookware or
cookware of improper size
is being used.
Troubleshooting
78 English
NX58J7750S�_AA_AC_DG68-00623A-02_EN.indd 78 2015-06-25 �� 10:16:14
The oven thermostat needs
adjustment.
There is aluminum foil on
racks and/or oven bottom.
The clock or timers are not
set correctly.
See 22.
See 59.
Remove foil.
See 20 and 21.
Page 79

Problem Possible cause Action
Food does not
broil properly in
the oven.
Oven controls not set
properly.
Oven door was not closed
during broiling.
The rack has not been
properly positioned.
See 33.
See 30.
See broiling guide on 35.
English 79
NX58J7750S�_AA_AC_DG68-00623A-02_EN.indd 79 2015-06-25 �� 10:16:14
Troubleshooting
Page 80

Troubleshooting
Information codes
Code symbol Meaning Solution
Troubleshooting
Check the oven sensor.
Oven overheating.
Check the cooling system.
Check the door lock.
Check the PCB signals.
Check the contol panel pads
Check the divider switch.
1. Press the OFF/CLEAR button
and restart the oven.
2. If the problem persists,
disconnect all power to the
oven range for at least 30
seconds and then reconnect
the power.
1. If the Divider is in the oven,
make sure it is pushed in all
the way.
2. If the Divider is not in the
oven, see if something is
pressing against the divider
switch in the back of the oven.
3. If the Divider is all the way in
or there is nothing pressing
against the Divider switch,
press the OFF/CLEAR button
and restart the oven. If the
problem persists, disconnect
all power to the oven range
for at least 30 seconds, and
then reconnect the power.
** If these solutions do not solve the problem, contact a local Samsung service center
1-800-SAMSUNG (1-800-726-7864).
80 English
NX58J7750S�_AA_AC_DG68-00623A-02_EN.indd 80 2015-06-25 �� 10:16:15
Page 81

Warranty
PLEASE DO NOT DISCARD.
SAMSUNG GAS RANGE
LIMITED WARRANTY TO ORIGINAL PURCHASER
This SAMSUNG brand product, as supplied and distributed by SAMSUNG ELECTRONICS
AMERICA or CANADA INC. (SAMSUNG) and delivered new, in the original carton to the original
consumer purchaser, is warranted by SAMSUNG against manufacturing defects in materials and
workmanship for a limited warranty period of:
One (1) Year Parts and Labor
This limited warranty begins on the original date of purchase, and is valid only on products
purchased and used in the United States or Canada. To receive warranty service, the purchaser
must contact SAMSUNG for problem determination and service procedures. Warranty service
can only be performed by a SAMSUNG-authorized service center, and any unauthorized service
will void this warranty. The original dated bill of sale must be presented upon request as
proof of purchase to SAMSUNG or SAMSUNG’s authorized service center. Samsung will provide
in-home service during the one (1) year warranty period at no charge subject to availability
within the contiguous United States or Canada. In-home service is not available in all areas.
To receive in-home service, product must be unobstructed and accessible to the service agent.
If service is not available, Samsung may elect to provide transportation of the product to and
from an authorized service center.
SAMSUNG will repair or replace this product, at our option and at no charge as stipulated
herein, with new or reconditioned parts or products if found to be defective during the limited
warranty period specied above. All replaced parts and products become the property of
SAMSUNG and must be returned to SAMSUNG. Replacement parts and products assume the
remaining original warranty, or ninety (90) days, whichever is longer.
This limited warranty shall not cover cases of incorrect electric current, voltage or supply, light
bulbs, house fuses, house wiring, cost of a service call for instructions, or xing installation
errors. Furthermore, damage to the cooktop caused by the use of cleaners other than the
recommended cleaners and pads and damage to the cooktop caused by hardened spills of
sugary materials or melted plastic that are not cleaned according to the directions in the
use and care guide are not covered. SAMSUNG does not warrant uninterrupted or error-free
operation of the product.
EXCEPT AS SET FORTH HEREIN, THERE ARE NO WARRANTIES OR CONDITIONS ON THIS
PRODUCT EITHER EXPRESS OR IMPLIED AND SAMSUNG DISCLAIMS ALL WARRANTIES AND
CONDITIONS INCLUDING, BUT NOT LIMITED TO, ANY IMPLIED WARRANTIES AND CONDITIONS
OF MERCHANTABILITY, INFRINGEMENT, OR FITNESS FOR A PARTICULAR PURPOSE.
English 81
Warranty
NX58J7750S�_AA_AC_DG68-00623A-02_EN.indd 81 2015-06-25 �� 10:16:15
Page 82

Warranty
NO WARRANTY OR GUARANTEE GIVEN BY ANY PERSON, FIRM, OR CORPORATION WITH
RESPECT TO THIS PRODUCT SHALL BE BINDING ON SAMSUNG.
SAMSUNG SHALL NOT BE LIABLE FOR LOSS OF REVENUE OR PROFITS, FAILURE TO REALIZE
SAVINGS OR OTHER BENEFITS, OR ANY OTHER GENERAL, INDIRECT, SPECIAL, INCIDENTAL, OR
CONSEQUENTIAL DAMAGES CAUSED BY THE USE, MISUSE, OR INABILITY TO USE THIS PRODUCT,
REGARDLESS OF THE LEGAL THEORY ON WHICH THE CLAIM IS BASED, AND EVEN IF SAMSUNG
HAS BEEN ADVISED OF THE POSSIBILITY OF SUCH DAMAGES.
NOR SHALL RECOVERY OF ANY KIND AGAINST SAMSUNG BE GREATER IN AMOUNT THAN THE
PURCHASE PRICE OF THE PRODUCT SOLD BY SAMSUNG AND CAUSING THE ALLEGED DAMAGE.
WITHOUT LIMITING THE FOREGOING, PURCHASER ASSUMES ALL RISK AND LIABILITY FOR
LOSS, DAMAGE, OR INJURY TO PURCHASER AND PURCHASER’S PROPERTY AND TO OTHERS
AND THEIR PROPERTY ARISING OUT OF THE USE, MISUSE, OR INABILITY TO USE THIS PRODUCT.
THIS LIMITED WARRANTY SHALL NOT EXTEND TO ANYONE OTHER THAN THE ORIGINAL
PURCHASER OF THIS PRODUCT, IS NONTRANSFERABLE, AND STATES YOUR EXCLUSIVE REMEDY.
Some states or provinces do not allow limitations on how long an implied warranty lasts, or
the exclusion or limitation of incidental or consequential damages, so the above limitations or
exclusions may not apply to you.
Warranty
This warranty gives you specic legal rights, and you may also have other rights which vary
from state to state or province to province.
To obtain warranty service, please contact SAMSUNG at:
Samsung Electronics America, Inc.
85 Challenger Road Ridgefield Park, NJ 07660
1-800-SAMSUNG (726-7864) and www.samsung.com/us/support
Samsung Electronics Canada Inc.
2050 Derry Road West, Mississauga, Ontario L5N 0B9 Canada
1-800-SAMSUNG (726-7864) and www.samsung.com/ca/support (English)
www.samsung.com/ca_fr/support (French)
Registration
Please register your product online at www.samsung.com/register.
82 English
NX58J7750S�_AA_AC_DG68-00623A-02_EN.indd 82 2015-06-25 �� 10:16:15
Page 83

Questions
For questions about features, operation/performance, parts, accessories, or service, call 1-800726-7864, or visit our Web site at www.samsung.com/us/support, www.samsung.com/ca/
support (English), www.samsung.com/ca_fr/ support (French).
Model # Serial #
Please attach your receipt (or a copy) to this manual. You may need it, along with your model
and serial number, when calling for assistance.
English 83
NX58J7750S�_AA_AC_DG68-00623A-02_EN.indd 83 2015-06-25 �� 10:16:15
Warranty
Page 84

Please be advised that the Samsung warranty does NOT cover service calls to explain product
operation, correct improper installation, or perform normal cleaning or maintenance.
QUESTIONS OR COMMENTS
COUNTRY CALL OR VISIT US ONLINE AT
U.S.A
Consumer Electronics
CANADA
1-800-SAMSUNG
(726-7864)
1-800-SAMSUNG
(726-7864)
www.samsung.com/us/support
www.samsung.com/ca/support (English)
www.samsung.com/ca_fr/support (French)
DG68-00623A-02
NX58J7750S�_AA_AC_DG68-00623A-02_EN.indd 84 2015-06-25 �� 10:16:15
Page 85

Cuisinière à gaz
Manuel d’utilisation
NX58J7750S*
NX58J7750S�_AA_AC_DG68-00623A-02_CFR.indd 1 2015-06-25 �� 10:19:05
Page 86

AVERTISSEMENT : Si vous ne respectez pas scrupuleusement les
informations contenues dans ce manuel, vous risquez de provoquer
un incendie ou un choc électrique et, par conséquent, des dégâts
matériels, blessures ou accidents mortels.
• N'entreposez et n'utilisez pas d'essence ou d'autres vapeurs et
liquides inammables à proximité de cet appareil ou de tout autre.
• DANS LE CAS OÙ VOUS SENTEZ UNE ODEUR DE GAZ :
- N’allumez AUCUN appareil.
- NE touchez AUCUN commutateur électrique.
- N'utilisez PAS de téléphone dans votre immeuble.
- Appelez immédiatement votre fournisseur de gaz à partir
du téléphone d'un voisin. Suivez les instructions de votre
fournisseur de gaz.
- Si vous ne parvenez pas à joindre votre fournisseur de gaz,
appelez les pompiers.
• L'installation et l'entretien doivent être effectués par un installateur
qualié, une agence de maintenance ou votre fournisseur de gaz.
Dispositif anti-basculement
AVERTISSEMENT
TOUTES LES CUISINIÈRES SONT SUSCEPTIBLES DE BASCULER
ET DE PROVOQUER DES BLESSURES.
LE BASCULEMENT D'UNE CUISINIÈRE PEUT PROVOQUER DES
BRÛLURES DUES AUX PROJECTIONS, DES BLESSURES ET/OU
DES ACCIDENTS MORTELS.
INSTALLEZ ET VÉRIFIEZ LE DISPOSITIF ANTI-BASCULEMENT EN
UTILISANT LES INSTRUCTIONS ET LE GABARIT D'INSTALLATION
FOURNI AVEC LE DISPOSITIF.
2 Français canadien
NX58J7750S�_AA_AC_DG68-00623A-02_CFR.indd 2 2015-06-25 �� 10:19:05
Page 87

• An d'éviter le basculement de la cuisinière, xez-la correctement
au sol à l'aide d'un support anti-basculement adapté. (L'installation
du dispositif anti-basculement gure dans les consignes
d'installation.) Vériez l'installation correcte en basculant la
cuisinière vers l'avant avec précaution. Veillez à ce que le
dispositif anti-basculement soit en place an d'empêcher la
cuisinière de basculer.
• Si la cuisinière est, pour une quelconque raison, retirée du
mur, assurez-vous que le dispositif anti-basculement est
convenablement remonté une fois que la cuisinière est remise en
place.
• Respectez les consignes d'installations décrites dans le manuel
d'installation. Le non-respect de ces consignes peut entraîner des
accidents mortels, blessures et/ou dégâts matériels.
• Pour éviter le basculement de la cuisinière, ne marchez pas, ne
vous asseyez pas, ne vous appuyez pas sur la porte ou le tiroir.
• Si la cuisinière est, pour des raisons d'entretien ou de nettoyage,
retirée du mur, assurez-vous que le dispositif anti-basculement est
convenablement remonté une fois que la cuisinière est remise en
place. (« L'installation du dispositif anti-basculement » gure dans
les consignes d'installation.)
Français canadien 3
NX58J7750S�_AA_AC_DG68-00623A-02_CFR.indd 3 2015-06-25 �� 10:19:05
Page 88

Table des matières
Table des matières
Fonctions clés 6
Plus d'espace 6
Table de cuisson à 5 brûleurs 6
Plus de commodité et un entretien facile 6
Informations importantes relatives à la sécurité 7
Lisez toutes les consignes de sécurité avant d'utiliser l’appareil. 7
Symboles utilisés dans ce manuel 7
Avertissement de la Proposition 65 adoptée par l'État de la Californie 7
Commonwealth du Massachusetts 7
Sécurité générale 8
Sécurité incendie 9
Sécurité liée au gaz 10
Sécurité électrique et mise à la terre 10
Sécurité liée à l'installation 11
Sécurité de l'emplacement 12
Sécurité liée à la table de cuisson 13
Sécurité liée au four 15
Sécurité du tiroir de rangement 16
Sécurité liée à l'auto-nettoyage du four 16
Présentation 17
Disposition 17
Accessoires fournis 18
Tableau de commande 19
Horloge 20
Minuterie 21
Ventilation du four/orice de refroidissement 21
Cuisinière à gaz 22
Récipient 22
Grille du Wok 23
Gril 24
Brûleurs à gaz 25
Allumage 26
4 Français canadien
NX58J7750S�_AA_AC_DG68-00623A-02_CFR.indd 4 2015-06-25 �� 10:19:05
Page 89

Four à gaz 27
Mode Unique 27
Mode Double 28
Mode de cuisson 30
Cuisson au gril 33
Guide des recettes 35
Guides de réglage de la température 37
Utilisation des grilles du four 39
Utilisation de la grille coulissante 43
Options de cuisson 45
Cuisson lente, Déshydratation des aliments, Levée 56
Entretien 62
Nettoyage 62
Remplacement 69
Réinstallation 70
Dépannage 72
Points à contrôler 72
Codes d'information 80
Garantie 81
Table des matières
Français canadien 5
NX58J7750S�_AA_AC_DG68-00623A-02_CFR.indd 5 2015-06-25 �� 10:19:05
Page 90

Fonctions clés
Plus d'espace
Dotée d'une capacité de 5,8 pieds cubes, cette cuisinière à gaz Samsung dispose d'un espace
bien plus important que toutes les marques concurrentes présentes sur les marchés américain
Fonctions clés
et canadien. La capacité accrue signie une meilleure qualité de cuisson.
Table de cuisson à 5 brûleurs
Des brûleurs haute puissance, des brûleurs de mijotage ainsi qu'un brûleur ovale central
fournissent une chaleur de cuisson réglable pour une grande variété d'ustensiles. Le brûleur
ovale central fournit une chaleur homogène sur une zone importante et procure des
températures optimales pour la cuisson au gril.
Plus de commodité et un entretien facile
La cuisinière avec four à gaz Samsung réunit tous les avantages de 3 appareils domestiques
séparés - une cuisinière à gaz, un four à gaz et un tiroir de rangement - pour une satisfaction
optimale de l'utilisateur accompagnée d'une conception soignée et élégante.
6 Français canadien
NX58J7750S�_AA_AC_DG68-00623A-02_CFR.indd 6 2015-06-25 �� 10:19:05
Page 91

Consignes de sécurité importantes
LISEZ TOUTES LES CONSIGNES DE SÉCURITÉ AVANT D'UTILISER L’APPAREIL.
• Tous les appareils électriques et à gaz comportant des pièces mobiles présentent un
danger. Veuillez lire les consignes de sécurité importantes pour cet appareil dans
ce manuel. Ces instructions doivent être respectées an de minimiser les risques de
blessures graves, voire mortelles ou de dégâts matériels.
• Conservez ce manuel. Veuillez ne pas le jeter.
Symboles utilisés dans ce manuel
AVERTISSEMENT
Risques ou manipulations dangereuses susceptibles d'entraîner des blessures graves, voire
mortelles.
ATTENTION
Risques ou manipulations dangereuses susceptibles d'entraîner un choc électrique, des
blessures physiques ou des dégâts matériels.
Consignes de sécurité importantes
REMARQUE
Conseils et consignes utiles.
Les icônes et symboles d'avertissement sont là pour minimiser les risques de blessure ;
veillez à bien les respecter. Après lecture de cette rubrique, conservez le manuel dans un
endroit sûr an de pouvoir le consulter ultérieurement.
Avertissement de la Proposition 65 adoptée par l'État de la Californie
• Ce produit contient des substances chimiques reconnues par l'État de la Californie comme
étant des substances toxiques pour la reproduction et provoquant des cancers.
• Des appareils à gaz peuvent causer une exposition mineure aux substances répertoriées
dans la Proposition 65, y compris, mais sans limitation, le benzène, le monoxyde de
carbone, le formaldéhyde et la suie, qui sont principalement dégagés par une combustion
incomplète du gaz naturel ou du GPL.
Commonwealth du Massachusetts
• Cet appareil doit être installé par un plombier certié ou un monteur d'installations au gaz
qualié ou certié par l'État du Massachusetts. Lorsque des vannes à bille sont utilisées
pour la fermeture du gaz, elles doivent être munies d'une poignée en T. Il ne faut pas
connecter plusieurs canalisations de gaz exibles en série.
Français canadien 7
NX58J7750S�_AA_AC_DG68-00623A-02_CFR.indd 7 2015-06-25 �� 10:19:05
Page 92

Consignes de sécurité importantes
Sécurité générale
AVERTISSEMENT
Pour réduire le risque d'incendie, de choc électrique, de blessures et/ou de mort, respectez les
précautions suivantes.
Consignes de sécurité importantes
• Gardez les enfants éloignés de la cuisinière. Ne laissez pas les enfants entrer dans ou
monter sur la cuisinière. Ne laissez pas les enfants jouer avec la cuisinière ni aucune de
ses parties. Ne laissez jamais les enfants sans surveillance dans la pièce où est installée la
cuisinière. Pour la sécurité des enfants nous recommandons l'utilisation du dispositif de
verrouillage des commandes/de la porte.
• Retirez tout élément d'emballage de votre cuisinière avant de l'utiliser an d'éviter qu'ils
ne prennent feu. Gardez tous les éléments d'emballage hors de la portée des enfants. Jetez
correctement les matériaux d'emballage une fois la cuisinière déballée.
• N'entreposez pas d'objets susceptibles d'éveiller l'intérêt des enfants sur la table de cuisson
ou sur le dosseret de la cuisinière. Les enfants risquent, en grimpant sur la cuisinière, de se
blesser gravement, voire mortellement.
• Ne faites pas fonctionner la cuisinière si une partie est endommagée, en cas de
dysfonctionnement ou si des pièces manquent.
• N'utilisez pas la cuisinière comme chauffage. Utilisez la cuisinière uniquement pour la
cuisson.
• N'utilisez pas de nettoyants pour four ou de revêtements de protection dans ou autour
d'aucune partie du four.
• Utilisez uniquement des maniques sèches.
• N'utilisez pas la cuisinière pour chauffer des aliments contenus dans des récipients fermés.
• Évitez tout choc sur le verre du four.
• Lors de la mise au rebut de la cuisinière, coupez le cordon d'alimentation et retirez la porte.
• Débranchez la cuisinière ou mettez-la hors tension avant de procéder à la réparation.
• Assurez-vous que la viande et la volaille sont totalement cuites. La viande doit toujours
être cuite à une température de 160 °F (71 °C). La volaille devrait toujours être cuite à une
température interne de 180 °F (82 °C).
• Ne tentez pas de faire fonctionner le four à allumage électrique pendant une panne de
courant.
• Ne touchez pas à aucune partie de la cuisinière, y
compris mais sans se limiter aux brûleurs du four, aux
brûleurs de surface ou aux surfaces internes pendant ou
immédiatement après la cuisson.
• Repérez la vanne de coupure de gaz et la façon de la
fermer.
• Assurez-vous que le dispositif anti-basculement est
correctement installé sur la cuisinière. Reportez-vous
aux consignes d'installation pour plus d'informations.
8 Français canadien
NX58J7750S�_AA_AC_DG68-00623A-02_CFR.indd 8 2015-06-25 �� 10:19:06
Page 93

• Gardez la cuisinière et ses alentours propres et n'entreposez pas de matériaux combustibles,
d'essence ou d'autres vapeurs et liquides inammables à proximité.
Sécurité incendie
AVERTISSEMENT
Pour réduire le risque d'incendie, de choc électrique, de blessures et/ou de mort, respectez les
précautions suivantes.
• N'entreposez, ne placez ni n'utilisez jamais des
matériaux inammables ou combustibles tels que
papier, du plastique, des maniques, tissus, rideaux ou
autres vapeurs ou liquides inammables à proximité de
la cuisinière.
• Ne portez jamais de vêtements amples et des
accessoires pendants lorsque vous utilisez cette
cuisinière.
• Pour éviter l'accumulation de la graisse, nettoyez
régulièrement les orices de ventilation.
• Ne laissez pas de maniques ou autres matériaux
inammables toucher un élément chauffant. N'utilisez
pas de serviette ou tout autre torchon volumineux
comme manique.
• N'utilisez pas d'eau pour éteindre les ammes de friture. Pour éteindre les ammes de
friture, éteignez la source de chaleur et étouffez les ammes à l'aide d'un couvercle
hermétique ou en utilisant un extincteur multifonction à poudre ou à mousse.
• Si un incendie lié à la graisse se déclare à l'intérieur du four, éteignez le four en appuyant
sur le bouton OFF/CLEAR (ARRÊT/EFFACER). Maintenez la porte du four fermée jusqu'à
extinction de l'incendie. Si nécessaire, utilisez un extincteur multifonction à poudre ou à
mousse.
• Ne faites pas chauffer des aliments contenus dans des récipients fermés. L'accumulation
de pression pourrait faire exploser les contenants et provoquer des blessures.
• N'utilisez JAMAIS cet appareil en tant que chauffage intérieur pour chauffer une pièce. Le
non-respect de cette consigne peut entraîner une intoxication au monoxyde de carbone
et une surchauffe du four. N'entreposez pas d'objets à l'intérieur du four. Du papier et
d'autres matériaux inammables stockés dans le four peuvent prendre feu.
• Ne laissez pas d'éléments tels que des papiers, des ustensiles de cuisine ou des aliments à
l'intérieur du four lorsque celui-ci est inutilisé. Les éléments rangés dans le four peuvent
s'enammer.
Consignes de sécurité importantes
Français canadien 9
NX58J7750S�_AA_AC_DG68-00623A-02_CFR.indd 9 2015-06-25 �� 10:19:06
Page 94

Consignes de sécurité importantes
Sécurité liée au gaz
AVERTISSEMENT
Pour réduire le risque d'incendie, de choc électrique, de blessures et/ou de mort, respectez les
précautions suivantes.
Si vous sentez une odeur de gaz :
Consignes de sécurité importantes
• Fermez la vanne et n'utilisez pas la cuisinière.
• N'allumez pas d'allumette, de bougie ou de cigarette.
• N'allumez aucun appareil au gaz ou électrique.
• Ne touchez aucun commutateur électrique et ne
branchez pas de cordon d'alimentation sur une prise.
• N'utilisez pas de téléphone dans votre immeuble.
• Évacuez la pièce, l'immeuble ou le quartier de tous les
occupants.
• Appelez immédiatement votre fournisseur de gaz à
partir du téléphone d'un voisin. Suivez les instructions
de votre fournisseur de gaz.
• Si vous ne parvenez pas à joindre votre fournisseur de
gaz, appelez les pompiers.
Vérication des fuites de gaz
• Un test de fuite de l'appareil doit être effectué selon les instructions du fabricant.
pas de amme pour vérier s'il y a des fuites de gaz.
de l'eau savonneuse autour de l'endroit à vérier. En cas de fuite de gaz, vous verrez au
niveau de la fuite de petites bulles dans l'eau savonneuse.
Utilisez plutôt un pinceau pour étaler
N'utilisez
Sécurité électrique et mise à la terre
AVERTISSEMENT
Pour réduire le risque d'incendie, de choc électrique, de blessures et/ou de mort, respectez les
précautions suivantes.
• Branchez l'appareil sur une prise murale tripolaire reliée à
la terre.
• Ne retirez pas la broche de mise à la terre.
• N'utilisez pas d'adaptateur ou de rallonge.
• N'utilisez jamais une che ou un cordon d'alimentation
endommagé(e) ou une prise d'alimentation mal xée.
• Ne modifiez pas d'aucune manière la che ou le cordon
d'alimentation ou la prise murale.
• Ne mettez pas de fusible dans un circuit neutre ou de terre.
10 Français canadien
NX58J7750S�_AA_AC_DG68-00623A-02_CFR.indd 10 2015-06-25 �� 10:19:06
Page 95

• Utilisez un circuit électrique dédié de 120 V, 60 Hz, 20 A (CA) avec fusible pour cette
cuisinière. Il est recommandé d'utiliser un fusible à retardement ou un disjoncteur. Ne
branchez pas plusieurs appareils sur ce circuit.
• Ne branchez pas le câble de mise à la terre sur des canalisations en plastique ou des
conduites de gaz ou d'eau chaude.
• Cet appareil doit être correctement relié à la terre. La mise à la terre réduit le risque
d'électrocution, car elle fournit au courant un chemin de sortie en cas de dysfonctionnement
ou de panne. Cette cuisinière est équipée d'un cordon disposant d'une prise de mise
à la terre. La che doit être branchée sur une prise secteur posée et mise à la terre
conformément à la législation en vigueur. Si vous n'êtes pas sûr que la prise soit
correctement mise à la terre, consultez un électricien qualié an qu'il vérie.
• Cette cuisinière est fournie avec une prise tripolaire reliée à la terre. Ce cordon doit être
branché dans une prise murale tripolaire mise à la terre et être conforme aux normes
électriques en vigueur. Si les normes permettent l'utilisation d'un câble de mise à la
terre séparé, nous vous recommandons de faire appel à un électricien qualié an qu'il
détermine le chemin approprié pour ce câble.
• L'installation électrique de la cuisinière doit être conforme aux codes locaux. En dehors des
codes locaux, l'installation électrique doit être conforme à la dernière norme ANSI/NFPA
N°70 – dernière édition (pour les États-Unis) ou au code électrique canadien CSA C22.1 –
dernière édition.
• Il relève de la responsabilité du propriétaire de la cuisinière de fournir une installation
électrique conforme.
Consignes de sécurité importantes
Sécurité liée à l'installation
AVERTISSEMENT
Pour réduire le risque d'incendie, de choc électrique, de blessures et/ou de mort, respectez les
précautions suivantes.
• Assurez-vous que votre cuisinière est correctement
installée et mise à la terre par un installateur
qualifié, conformément aux instructions d'installation.
L'installation et l'entretien doivent être effectués par des
monteurs d'installations au gaz ou des techniciens de
maintenance qualiés.
• Ne tentez pas de réparer, de modier ni ne remplacer
les pièces de la cuisinière vous-même, sauf si le présent
manuel vous y autorise. Toute autre réparation devra
être effectuée par un technicien qualié.
• Utilisez toujours des connecteurs de exibles neufs lorsque vous installez un appareil à gaz.
N'utilisez pas d'anciens connecteurs de exibles.
• Assurez-vous que le dispositif anti-basculement est correctement installé sur la cuisinière.
Reportez-vous aux consignes d'installation pour plus d'informations.
Français canadien 11
NX58J7750S�_AA_AC_DG68-00623A-02_CFR.indd 11 2015-06-25 �� 10:19:07
Page 96

Consignes de sécurité importantes
• Compte tenu de la taille et du poids de la cuisinière, deux personnes ou plus sont
nécessaires pour la déplacer.
• Retirez toutes les bandes et les matériaux d'emballage.
• Retirez tous les accessoires de la table de cuisson, du four et/ou du tiroir inférieur. Les
grilles et les poêles sont lourdes. Soyez prudent lorsque vous les manipulez.
• Assurez-vous qu'aucune pièce ne se soit desserrée durant l'expédition.
Consignes de sécurité importantes
• Assurez-vous que votre cuisinière est correctement installée et réglée pour le type de gaz
que vous allez utiliser (naturel ou GPL) par un installateur qualié ou un technicien qualié.
Pour que votre cuisinière puisse fonctionner au GPL, l'installateur doit remplacer les 5
orices des brûleurs de surface et les 2 orices des brûleurs du four par le kit d'orices GPL
fourni et inverser l'adaptateur du potentiel de mise à la terre (GPR). Ces réglages doivent
être effectués par un technicien de maintenance qualié conformément aux consignes du
fabricant ainsi qu'à tous les codes et exigences requises par l'autorité compétente. L'agence
qualiée effectuant ces travaux assume la responsabilité de la conversion de gaz.
• L'installation de cette cuisinière doit être conforme aux codes locaux ou, en absence de
codes locaux, au National Fuel Gas Code (Code national de gaz combustible), ANSI Z223.1/
NFPA.54, dernière édition. Au Canada, l'installation doit être conforme au Natural Gas
Installation Code (Code d'installation du gaz naturel), CAN/CGA-B149.1, en vigueur, ou au
Propane Installation Code (Code d'installation du propane), CAN/CGA-B149.2, en vigueur,
ainsi qu'aux codes locaux qui s'appliquent. Cette cuisinière a été certiée par ETL selon ANSI
Z21.1, dernière édition, et par la Canadian Gas Association (l'Association canadienne du gaz)
selon CAN/CGA-1.1, dernière édition.
Sécurité de l'emplacement
AVERTISSEMENT
Pour réduire le risque d'incendie, de choc électrique, de blessures et/ou de mort, respectez les
précautions suivantes.
• Cette cuisinière est destinée à une utilisation domestique
uniquement à l'intérieur. N'installez pas la cuisinière
dans des zones exposées aux intempéries et/ou à l'eau.
• N'installez pas la cuisinière à un endroit où elle sera
exposée à de forts courants d'air.
• Sélectionnez un sol de niveau, bien construit et capable
de supporter le poids de la cuisinière. Des revêtements
synthétiques, tels que du linoléum, doivent supporter
des températures de 180 °F (82 °C) sans rétrécir, se
voiler ou se décolorer. N'installez pas la cuisinière
directement sur une moquette de cuisine, sauf si vous
placez une couche de contreplaqué de ¼ de pouce ou un
isolant similaire entre la cuisinière et la moquette.
12 Français canadien
NX58J7750S�_AA_AC_DG68-00623A-02_CFR.indd 12 2015-06-25 �� 10:19:07
Page 97

• Sélectionnez un emplacement où une prise murale à 3 broches reliée à la terre est
facilement accessible.
• Si la cuisinière est placée à proximité d'une fenêtre, n'accrochez pas de longs rideaux ou de
stores en papier sur cette fenêtre.
• Pour que la cuisinière soit correctement ventilée, assurez-vous que les orices de
ventilation ne sont pas obturés et qu'il y a sufsamment d'espace au-dessus, à l'arrière,
sur les côtés et sous la cuisinière. Les orices de ventilation permettent l'échappement
nécessaire à un fonctionnement et à une combustion corrects.
• Assurez-vous que les revêtements muraux situés à proximité de l'appareil peuvent résister
à la chaleur générée par celui-ci, pouvant aller jusqu'à 200 °F (93 °C).
• Un placard de rangement est à éviter au-dessus de la surface de la cuisinière. Si un placard
de rangement est nécessaire au-dessus de la cuisinière : laissez un minimum de 40 pouces
(102 cm) entre la surface de cuisson et le bas des placards ; ou installez une hotte d'aspiration
qui dépasse horizontalement d'au moins 5 pouces (12,7 cm) au-delà du fond des placards.
Sécurité liée à la table de cuisson
AVERTISSEMENT
Pour réduire le risque d'incendie, de choc électrique, de blessures et/ou de mort, respectez les
précautions suivantes.
• Assurez-vous que tous les brûleurs sont éteints
lorsqu'ils ne sont pas utilisés.
• N'utilisez pas de feuille d'aluminium pour revêtir les
grilles ou toute autre partie de la table de cuisson. Cela
peut causer une intoxication au monoxyde de carbone.
Les habillages au papier aluminium peuvent également
enfermer la chaleur et provoquer un incendie.
• Ne laissez pas les brûleurs sans surveillance lors de
réglages moyen ou élevé.
• Préalablement à l'allumage, assurez-vous que tous les
chapeaux de brûleurs sont correctement en place et que
tous les brûleurs sont de niveau.
• Utilisez toujours la position LITE (ALLUMAGE) pour allumer les brûleurs et assurez-vous
qu'ils sont allumés. Si l'allumage échoue, tournez le bouton sur OFF (ARRÊT) et attendez que
le gaz se dissipe.
• Lorsque vous réglez un brûleur sur mijotage, ne tournez pas le bouton rapidement. Assurezvous que la amme reste allumée.
• Ne placez aucun objet autre qu'un ustensile de cuisine sur la surface de cuisson.
• Cette surface de cuisson est conçue pour cuisiner avec un wok ou un anneau wok. Pour
faire amber des aliments, vous devez avoir une hotte d'aspiration. Lorsque vous faites
amber des aliments, la hotte doit être allumée.
Consignes de sécurité importantes
Français canadien 13
NX58J7750S�_AA_AC_DG68-00623A-02_CFR.indd 13 2015-06-25 �� 10:19:07
Page 98

Consignes de sécurité importantes
• Avant de retirer ou de changer d'ustensile de cuisson, éteignez les brûleurs.
• Retirez les aliments et les ustensiles de cuisson immédiatement après la cuisson.
• Avant de retirer des parties du brûleur pour le nettoyage, assurez-vous que la cuisinière est
éteinte et complètement froide.
• Après nettoyage du diffuseur du brûleur, assurez-vous qu'il est complètement sec avant de
le réassembler.
Consignes de sécurité importantes
• Assurez-vous que le repère de l'étincelle sur le diffuseur de brûleur double est placé à côté
de l'électrode lorsqu'il est assemblé.
• Pour éviter l'empoisonnement par monoxyde de carbone, ne versez pas d'eau sur la table
de cuisson lors du nettoyage.
• Sélectionnez des ustensiles qui sont conçus pour la cuisson en surface de la cuisinière.
Utilisez des ustensiles sufsamment grands pour couvrir la grille du brûleur. Ajustez les
ammes du brûleur de sorte qu'elles ne s'étendent pas au-delà du fond de l'ustensile.
• Pour éviter la décoloration des ustensiles, leur déformation et/ou l'empoisonnement par
monoxyde de carbone, n'utilisez pas d'ustensiles beaucoup plus grands que la grille.
• Assurez-vous que les manches d'ustensiles sont dirigées vers les côtés ou l'arrière de la
table de cuisson, et non au-dessus des brûleurs de surface.
• Tenez-vous éloigné de la cuisinière lorsque vous faites de la friture.
• Chauffez toujours lentement les huiles de friture et observez-les lorsqu'elles chauffent. Si
vous faites frire des aliments à température élevée, observez attentivement le processus de
cuisson. Si vous devez utiliser un mélange de graisses ou d'huiles pour frire, mélangez-les
avant de les chauffer.
• Utilisez un thermomètre à friture si possible. Cela évite que l'huile ou la graisse soit
chauffée au-delà du point de fumée.
• Employez une quantité minimale d'huile dans une poêle peu profonde ou une friteuse.
Évitez de faire cuire les aliments décongelés ou avec des quantités excessives de glace.
• Avant de déplacer les ustensiles pleins de graisse ou d'huile, assurez-vous qu'ils sont
complètement refroidis.
• Pour éviter une ébullition à retardement des liquides, laissez-les toujours reposer au moins
une vingtaine de secondes une fois le brûleur éteint, ceci an de permettre à la température
de se stabiliser. En cas d'accident, effectuez les gestes de premiers secours suivants :
1. Immergez la zone brûlée dans de l'eau froide ou tiède pendant au moins 10 minutes ;
2. N'appliquez aucune crème, huile ou lotion ;
3. Recouvrez-la d'un tissu propre et sec.
• Placez les récipients au centre de la grille. Ne placez pas
un récipient de plus de 9” de diamètre sur les brûleurs
arrière. Si vous placez un récipient trop grand dans la
mauvaise position, cela peut interrompre la circulation
nécessaire de l'air, faire crépiter la amme sur le brûleur
et altérer l'efcacité de la cuisson.
14 Français canadien
NX58J7750S�_AA_AC_DG68-00623A-02_CFR.indd 14 2015-06-25 �� 10:19:08
Page 99

Sécurité liée au four
AVERTISSEMENT
Pour réduire le risque d'incendie, de choc électrique, de blessures et/ou de mort, respectez les
précautions suivantes.
• N'utilisez pas le four pour un usage autre que la cuisson
tel que le séchage de vêtement ou le stockage. Utilisez
le four uniquement pour la cuisson.
• Assurez-vous que la partie intérieure de la grille en
deux parties du four est correctement positionnée sur la
grille extérieure.
• Assurez-vous que les grilles du four sont placées au
même niveau de chaque côté.
• N'endommagez, déplacez et nettoyez jamais le joint de
la porte.
• Ne vaporisez pas d'eau sur le verre du four lorsque le four est allumé ou juste après
l'avoir éteint.
• N'utilisez pas de papier aluminium ou de barquettes en aluminium dans le four. N'utilisez
pas de feuille d'aluminium ou de matériau semblable pour couvrir des orices ou
des passages au bas du four ou pour couvrir une grille du four. Cela peut causer une
intoxication au monoxyde de carbone. Les habillages au papier aluminium peuvent
également enfermer la chaleur et provoquer un incendie.
• Eloignez-vous du four lorsque vous en ouvrez la porte.
• Évitez l'accumulation de graisses dans le four.
• Pour repositionner les grilles du four, assurez-vous que le four est complètement refroidi.
• Utilisez uniquement des ustensiles recommandés pour une utilisation sûre dans des fours
à gaz.
• Pour éviter d'endommager les boutons de commande des brûleurs, cuisinez et/ou grillez
toujours avec la porte du four fermée.
• Évitez de griller de la viande trop près de la amme du brûleur. Retirez l'excès de gras sur
la viande avant de la faire cuire.
• Suivez toujours les recommandations du fabricant lorsque vous utilisez des sacs de
cuisson ou à rôtir dans le four.
• Ne couvrez JAMAIS les fentes, les orices ou passages sur le fond du four ou couvrez
une grille entière avec des matériaux tels que du papier aluminium. Sinon, la circulation
de l'air à travers le four sera bloquée pouvant causer une intoxication au monoxyde de
carbone. Les habillages au papier aluminium peuvent également enfermer la chaleur et
provoquer un incendie.
Consignes de sécurité importantes
Français canadien 15
NX58J7750S�_AA_AC_DG68-00623A-02_CFR.indd 15 2015-06-25 �� 10:19:08
Page 100

Consignes de sécurité importantes
Sécurité du tiroir de rangement
AVERTISSEMENT
Pour réduire le risque d'incendie, de choc électrique, de blessures et/ou de mort, respectez les
précautions suivantes.
Consignes de sécurité importantes
• Ne touchez pas les surfaces internes du tiroir ou les éléments chauffants.
• Pour éviter les brûlures de vapeur, soyez prudent en ouvrant le tiroir.
• N'utilisez pas de papier d'aluminium pour tapisser le tiroir.
• N'utilisez pas le tiroir dans le four. Ne mettez pas le tiroir dans le four pendant un cycle de
nettoyage automatique.
• Ne laissez jamais de récipients contenant de la graisse dans le tiroir ou à proximité de celui-ci.
• N'utilisez pas le tiroir pour un usage autre que la
cuisson tel que le séchage de vêtement ou le stockage.
Utilisez le tiroir uniquement pour la cuisson.
Sécurité liée à l'auto-nettoyage du four
AVERTISSEMENT
Pour réduire le risque d'incendie, de choc électrique, de blessures et/ou de mort, respectez les
précautions suivantes.
• La fonctionnalité d'auto-nettoyage porte le four à
des températures sufsamment élevées pour brûler
les résidus alimentaires dans le four. La cuisinière
est extrêmement chaude pendant un cycle d'autonettoyage. Ne touchez pas les surfaces de la cuisinière
pendant un cycle d'auto-nettoyage.
• Tenez les enfants éloignés du four pendant un cycle
d'auto-nettoyage.
• Avant de démarrer un cycle d'auto-nettoyage, retirez toutes les grilles et ustensiles du four.
Seules les grilles recouvertes de porcelaine peuvent rester dans le four pendant le cycle
d'auto-nettoyage.
• Avant de démarrer un cycle d'auto-nettoyage, essuyez la graisse et les résidus alimentaires
dans le four.
• Ne mettez pas le tiroir inférieur dans le four lorsque vous exécutez un cycle d'auto-nettoyage.
• Lors de l'ouverture de la porte après un cycle d'auto-nettoyage, tenez-vous éloigné du four.
• En cas de dysfonctionnement du cycle d'auto-nettoyage, éteignez le four, débranchez
l'alimentation et contactez un technicien de maintenance qualié.
16 Français canadien
NX58J7750S�_AA_AC_DG68-00623A-02_CFR.indd 16 2015-06-25 �� 10:19:09
 Loading...