

Manual
This manual describes how to use computer as well as information
on Windows, Internet, Upgrade, and Troubleshooting.
M50
The product images may differ from actual product appearance.

1. Getting Started
Introducing the Computer ..........................................................................1-2
Turning the Computer On and Off..............................................................1-5
Touchpad .................................................................................................1-7
Using the Keyboard ..................................................................................1-9
Status Indicators......................................................................................1-11
Adjusting LCD Brightness.........................................................................1-12
Adjusting the Volume ..............................................................................1-13
Using the Remote Control ........................................................................1-14
Proper Seating Posture During Computer Use ...........................................1-15
2. Introducing Windows
Windows XP Basics...................................................................................2-2
Document Operations................................................................................2-7
3. Using The Computer
Using the CD-Rom Drive............................................................................3-2
Enjoying Home Theater .............................................................................3-7
Using the Multi Card Slot...........................................................................3-9
Using the PCMCIA Card Slot ...................................................................3-11
Using EasyBox........................................................................................3-12
Using Samsung Theme ............................................................................3-14
Contents
The photographs used in this user manual may be somewhat different in shape and
color to those of your computer depending on the model of your computer.

Samsung Update Plus..............................................................................3-15
Using AVStation premium........................................................................3-17
Using AVStation now...............................................................................3-30
Using Samsung Command Center............................................................3-35
4. Connecting to the Internet
Connecting to the Internet..........................................................................4-2
Connecting to the Internet Using a Modem .................................................4-3
Configuring the Network Environment Settings for Wired LAN Connections
........4-4
Configuring the Network Environment Settings for Wireless LAN Network (WLAN)
..4-7
Using Samsung Network Manager...........................................................4-16
Using Network Service ............................................................................4-23
Using Bluetooth Devices...........................................................................4-29
5. System Management
Managing Power ......................................................................................5-2
Using the Battery ......................................................................................5-4
Upgrading Memory ..................................................................................5-8
Using the Security Lock............................................................................5-10
Traveling with the Computer.....................................................................5-11
6. Customizing your computer
Using System Setup...................................................................................6-2
Configuring the Password..........................................................................6-4
Changing Booting Priority..........................................................................6-6
Configuring Resolution and Color Depth.....................................................6-7
Using External Display Devices ..................................................................6-8
Checking for Viruses ...............................................................................6-11

7. Recovering the Computer
Restoring the System .................................................................................7-2
Reinstalling Software.................................................................................7-4
Re-Installing Windows...............................................................................7-6
Q&A........................................................................................................7-9
Appendix
System Specifications................................................................................A-2
Wireless LAN Specifications......................................................................A-3
Copyright.................................................................................................A-5
Safety Instructions.....................................................................................A-6
Samsung Notebook Computer Global Warranty

Getting Started
This chapter provides
basic information
for using this computer.
System overview and
methods for general
use are provided.
Chapter 1
Chapter 1
1-2
Manual
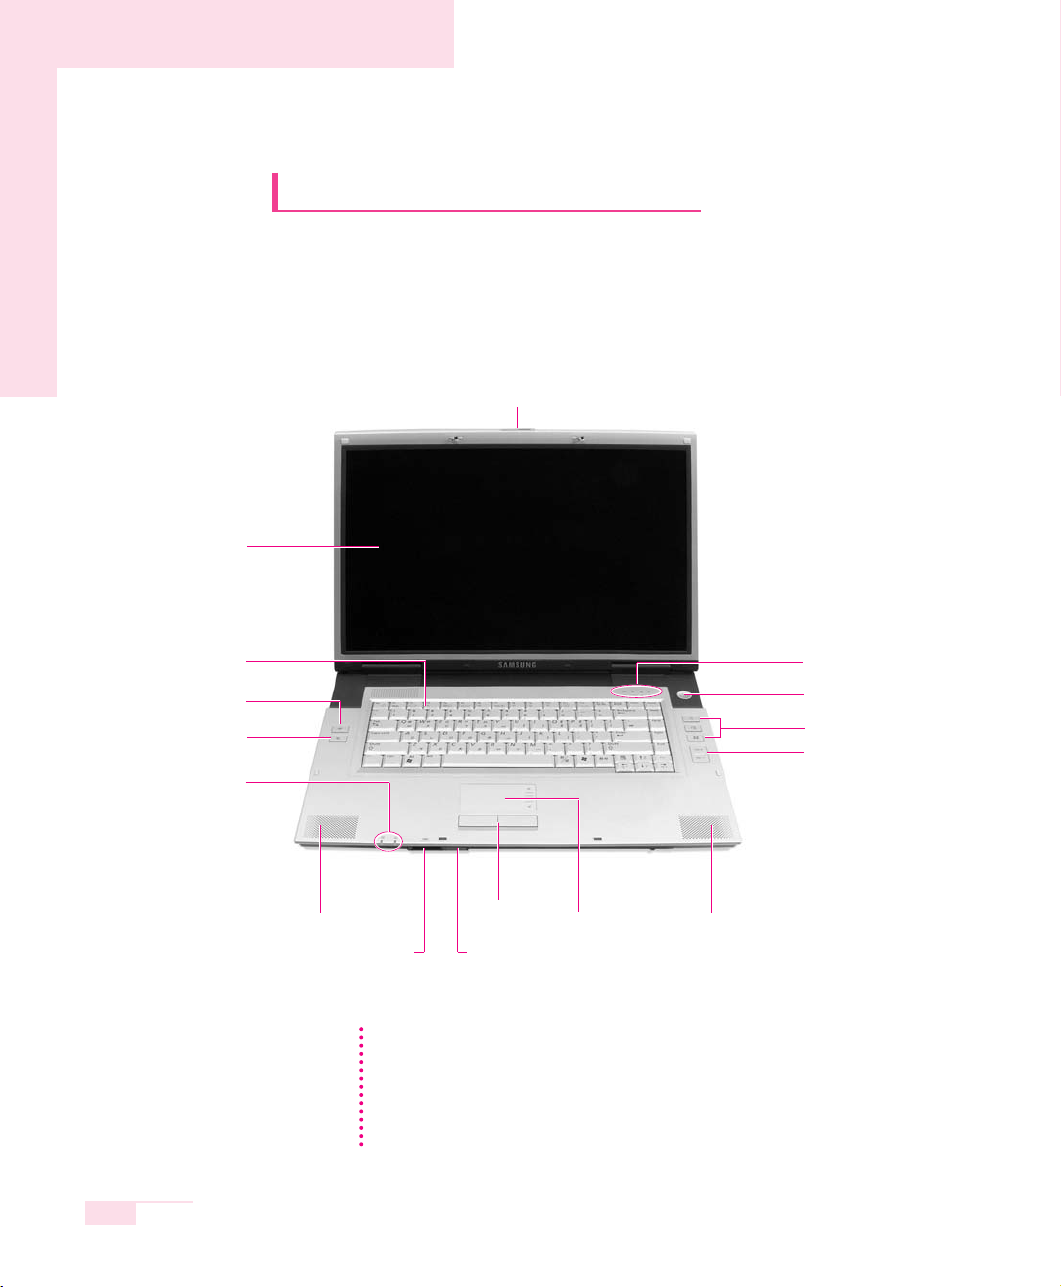
Introducing The Computer
Front View
LCD Panel
Keyboard (P. 1-9)
Status Indicators
(P. 1-11)
Multi Card Slot (P. 3-9)
Etiquette Mode Button
(P. 1-9)
Status Indicators (P. 1-11)
Speaker (L)
AVStation Buttons (P. 3-17, 3-30)
Power Button (P. 1-5)
Remote Control Sensor
(P. 1-14)
LCD Latch
Volume Control Buttons
Touchpad
Button
Speaker (R)Touchpad (P. 1-7)
Wireless LAN Button
(P. 4-7)
NNNNooootttteeee
AVStation Buttons
AVStation is a multimedia program that enables users to play MUSIC, PHOTO
and MOVIE files.
When the computer is turned off or in Hibernation, AVStation now is launched.
(P. 3-30)
When the computer is turned on, AVStation premium is launched. (P. 3-17)
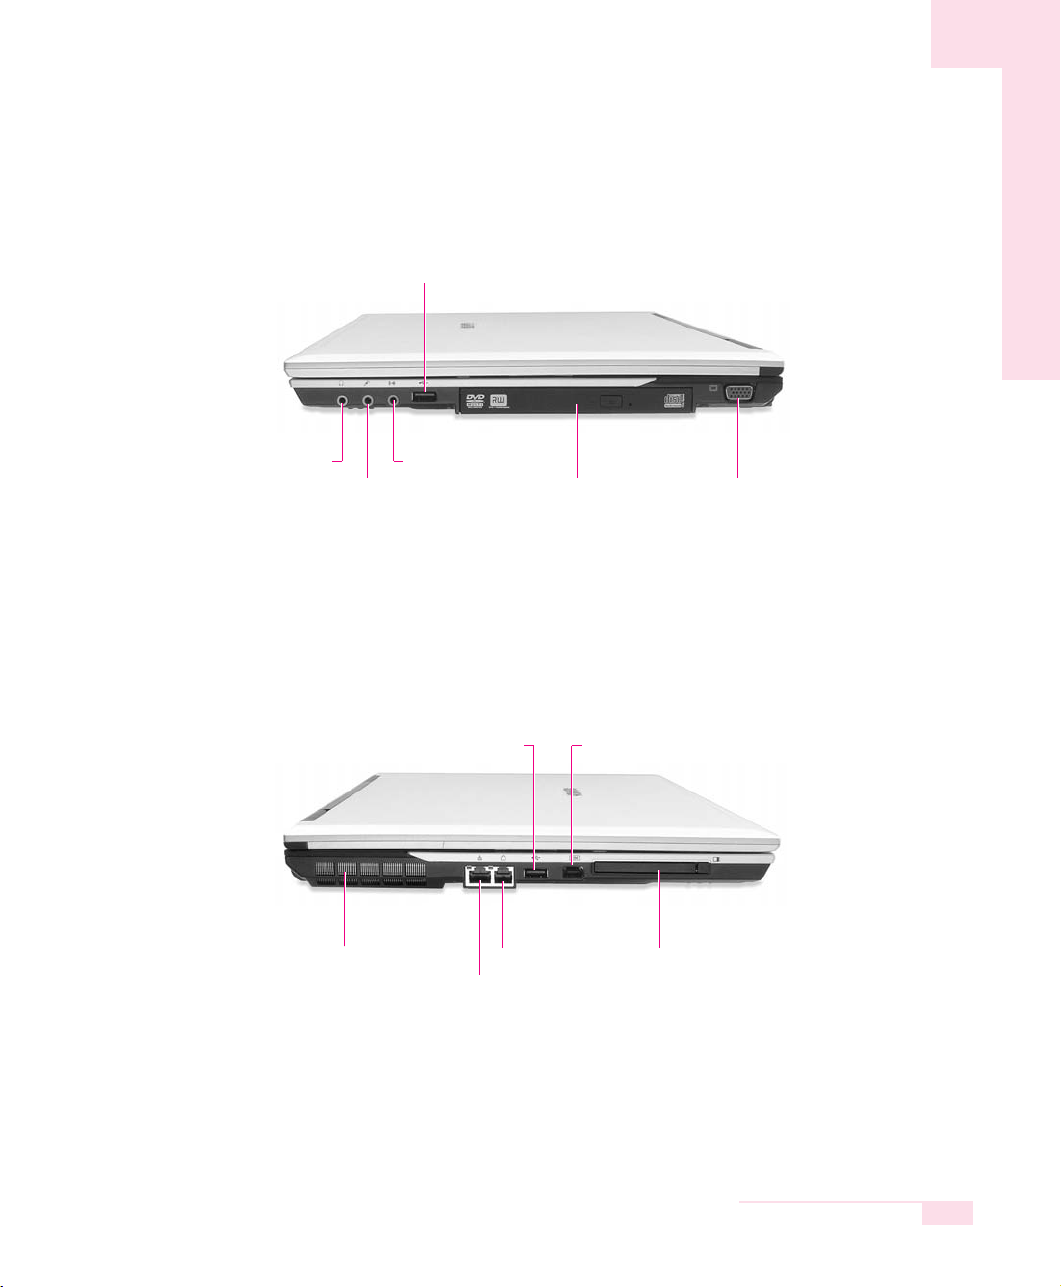
Right View
Left View
1-3
Chapter 1. Getting Started
CD Drive
(Optional, P. 3-2)
Microphone Jack Monitor Port
USB 2.0 Port
Network(LAN) Port
(P. 4-4)
Fan Vents Modem Port (P. 4-3) PCMCIA Card Slot
(P. 3-11)
Headphone Jack /
S/PDIF Jack
(Optical, P. 3-7)
Line-In Jack
USB 2.0 Port IEEE 1394 Port (6Pin)
CCCCaaaauuuuttttiiiioooonn
nn
Removing or disassembling the hard disk drive will void your warranty. To replace
the hard disk drive, please contact your nearest Samsung Service Centre.
1-4
Manual
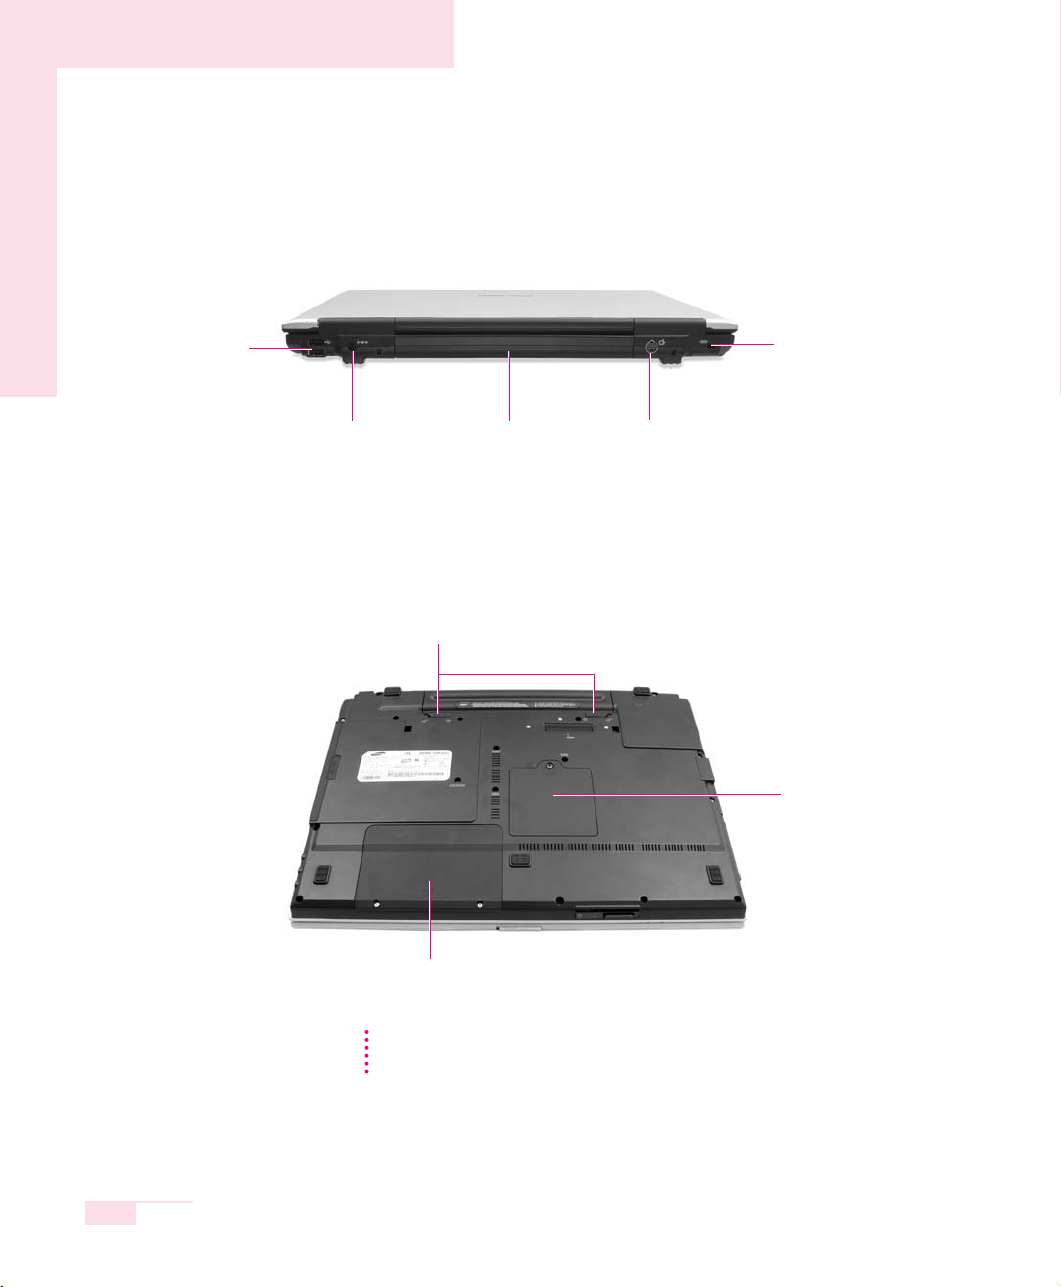
Rear View
Bottom View
TV Output Port
(S-Video, P. 6-8)
DC-In Port Battery (P. 5-4)
Battery Latches
USB 2.0 Port
Memory Compartment
(P. 5-8)
Security Lock Port (P. 5-10)
HDD Compartment
Turning the Computer On and Off
Turning On
1. Insert the battery and connect the power according to the supplied Installation
Guide.
2. Lift up the LCD panel and open it to a comfortable angle.
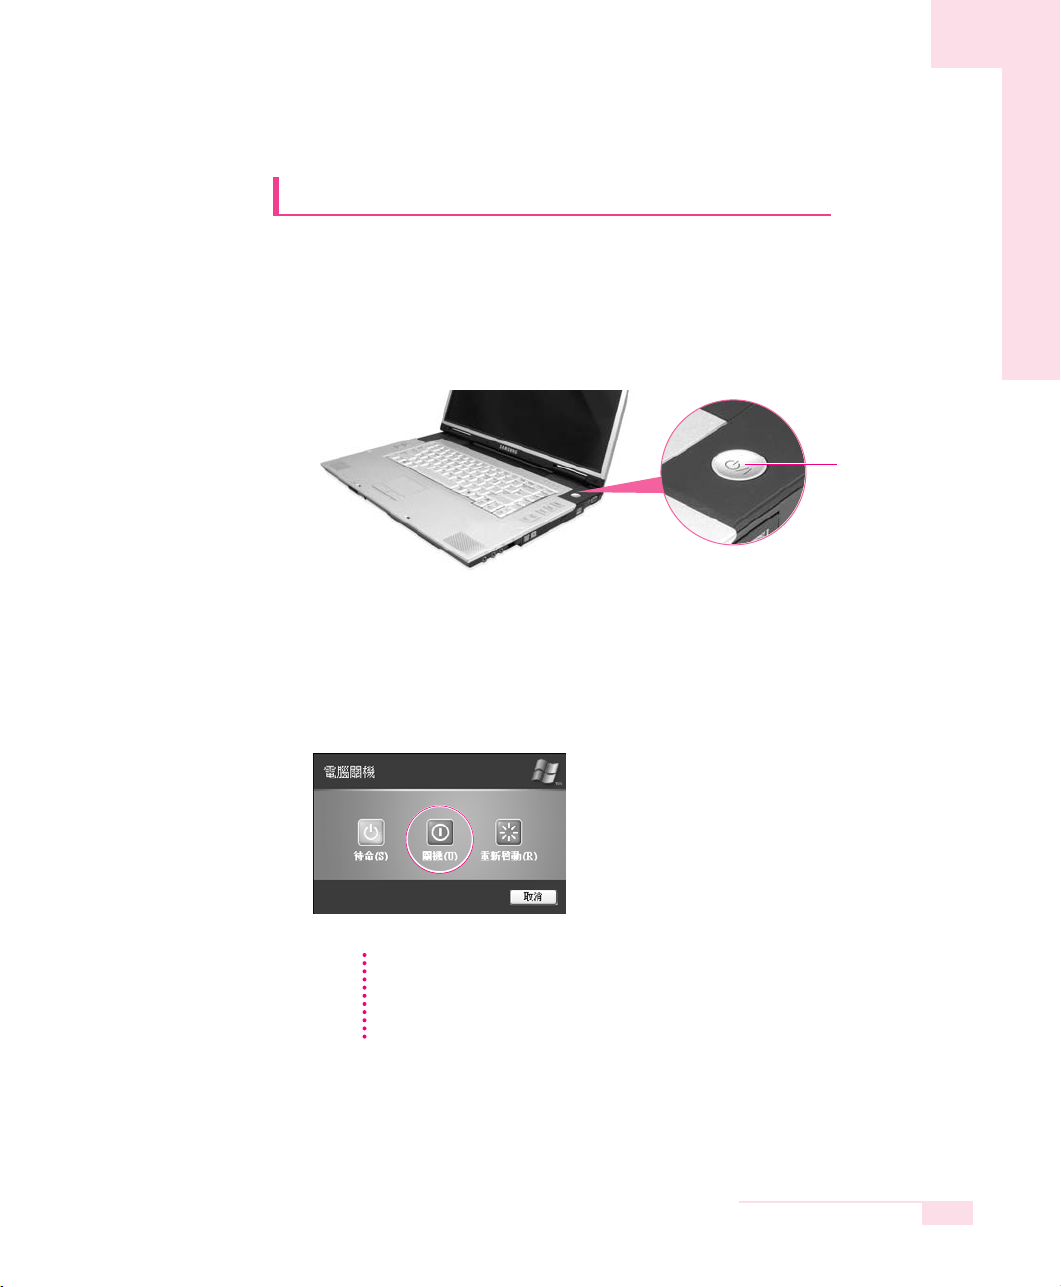
3. Press and then release the power button to turn the system on.
Turning Off
1. Click the Start button on the Taskbar.
2. Select Turn Off Computer.
3. Click Turn O ff from the [Turn Off Computer] window.
1-5
Chapter 1. Getting Started
CCCCaaaauuuuttttiiiioooonn
nn
If the computer has not turned off properly due to a system error, press and hold
the power button for more than 4 seconds to turn the system off. After doing so,
when you turn the system on, the system examination program is executed
automatically.
Power Button
1-6
Manual
Creating and Changing User Accounts
Multiple users can be registered in a single system so that each user may
use their own customized working environment. Procedures to register
and change user accounts are provided below.
■ Registering a new user
1. Click Start > Control Panel.
2. Click User Accounts > Create a new account.
3. Type a name for the new account, and click Next.
4. Select the account type and click Create Account.
The new user account has been created.
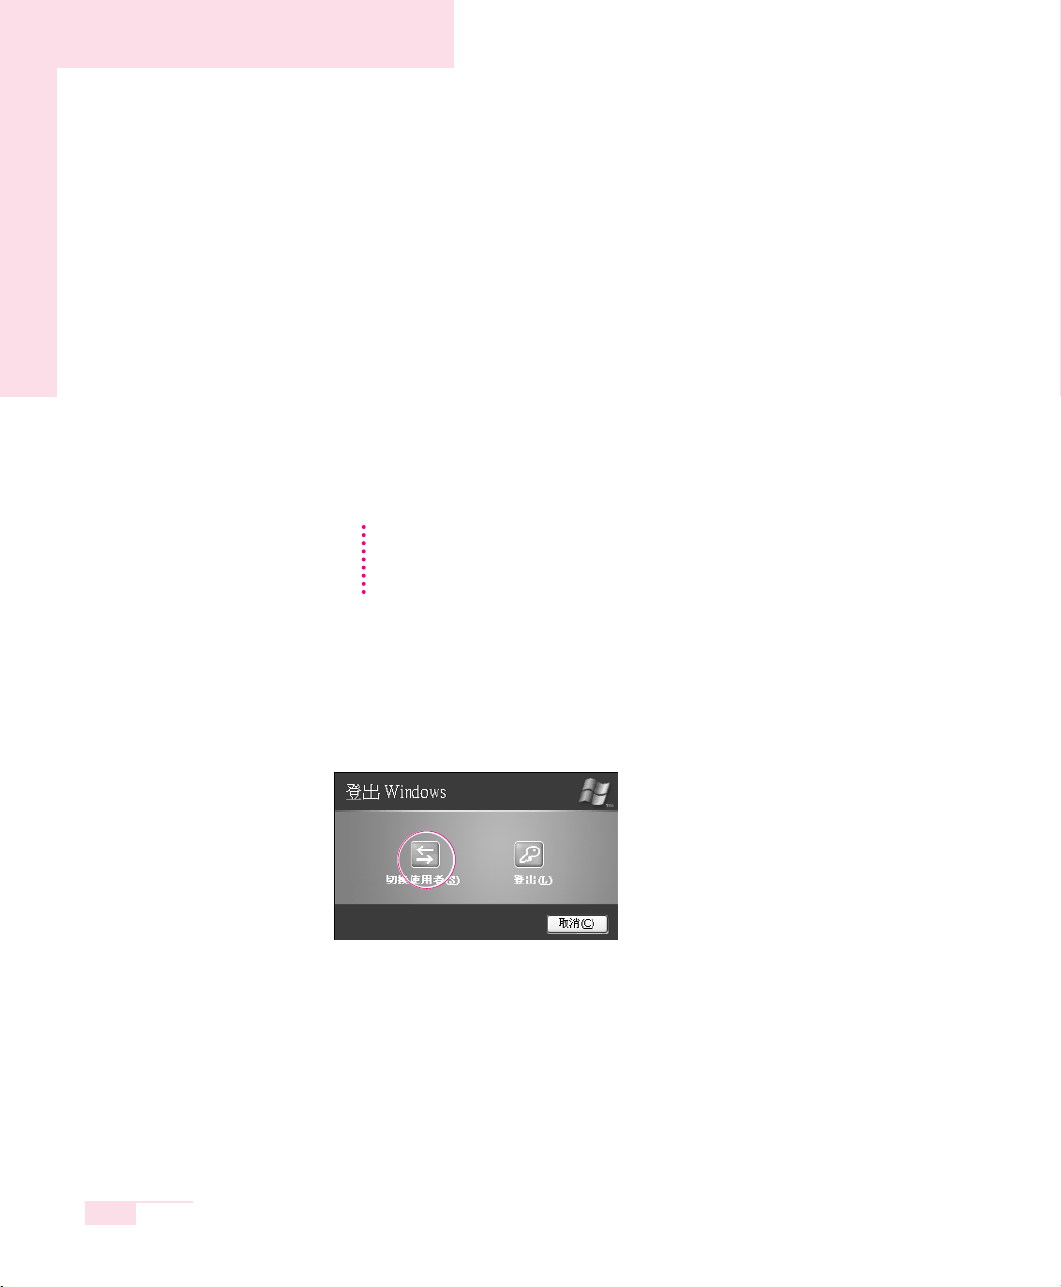
■ Changing users
1. Click Start > Log Off.
2. Click Switch User.
3. In the [Windows Log On] window, select the desired user name.
NNNNooootttteeee
To login with an Administrator Account To delete a user account
1. Click on a user account to delete and click Delete the account.
2. Select either Keep Files or Delete Files, and then click Delete Account.
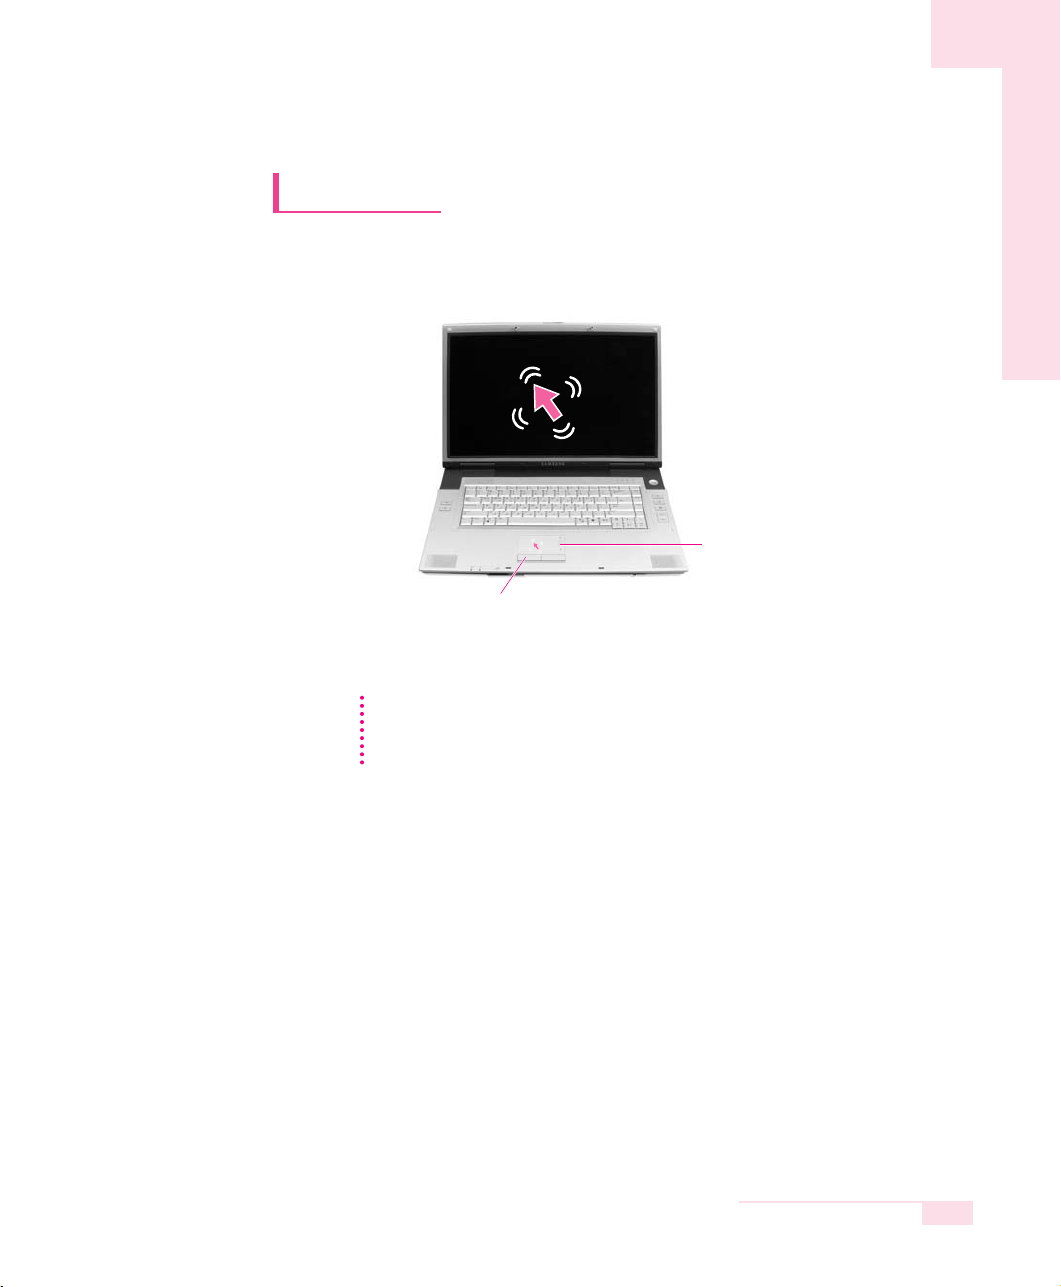
Touchpad
Movement of the pointer (arrow) on the screen will correspond to
movement made with a finger on the touchpad.
■ Click (Select Function)
Place a finger on the touchpad, move the pointer on the screen to the icon or
item to select, and tap the touchpad once. The click operation is also used to
move the ‘cursor’ during document operations.
■ Double-click (Run Function)
Place a finger on the touchpad, move the pointer on the screen to the item to
run, and quickly tap your finger on the touchpad twice.
Or double-click the left touchpad button.
1-7
Chapter 1. Getting Started
Touchpad buttons
the two buttons below the touchpad
provide identical functions to buttons
of a mouse.
Touchpad
NNNNooootttteeee
Locking the touchpad
You can lock the touchpad and use only the keyboard and mouse. To lock the
touchpad function, press the <Fn>+<F9> key combination.
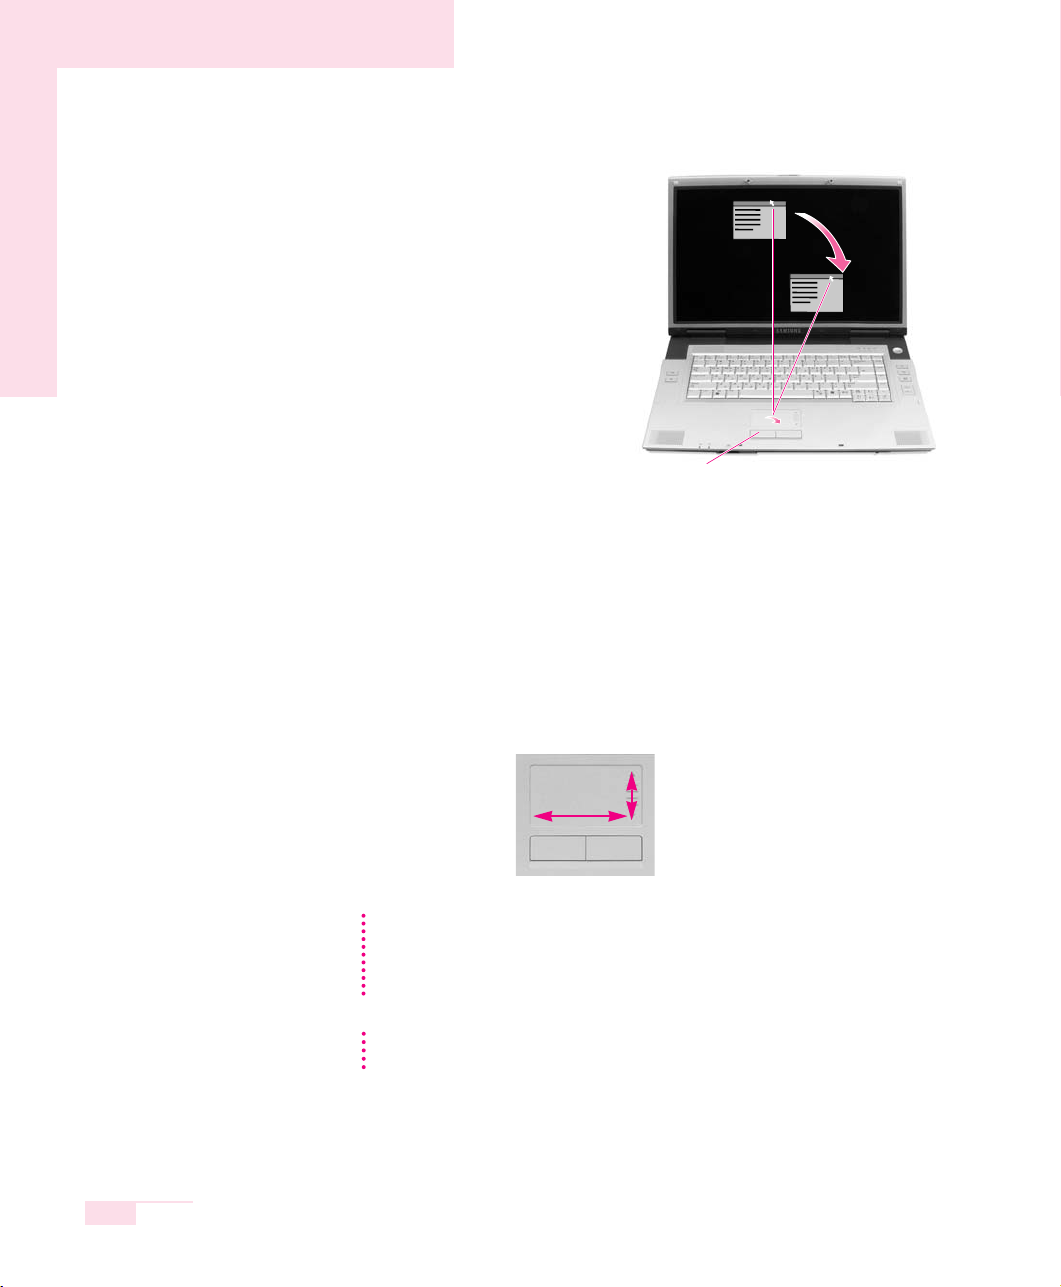
■ Using the Touchpad Scroll Function
The touchpad has a scroll function, which can be used like the wheel dial of a
wheel mouse. Move up and down along the right edge of the touch pad
(scrolling up and down) or left and right along the bottom edge of the touch pad
(scrolling left and right) to scroll the screen. However, this may not apply to some
programs.
1-8
Manual
■ Drag (Move / Select)
Drag and drop a part to the required
place.
CCCCaaaauuuuttttiiiioooonn
nn
Please use the touchpad only with your finger. Using sharp devices may damage
the touchpad.
Operating the touchpad or touchpad button while starting your system may
increase the time required for starting Windows.
To utilize the touchpad buttons for other more diverse functions, please refer to the
Mouse icon in the Control Panel.
NNNNooootttteeee
This button is held down
Place the touchpad pointer on the title bar of the
window.
1-9
Chapter 1. Getting Started
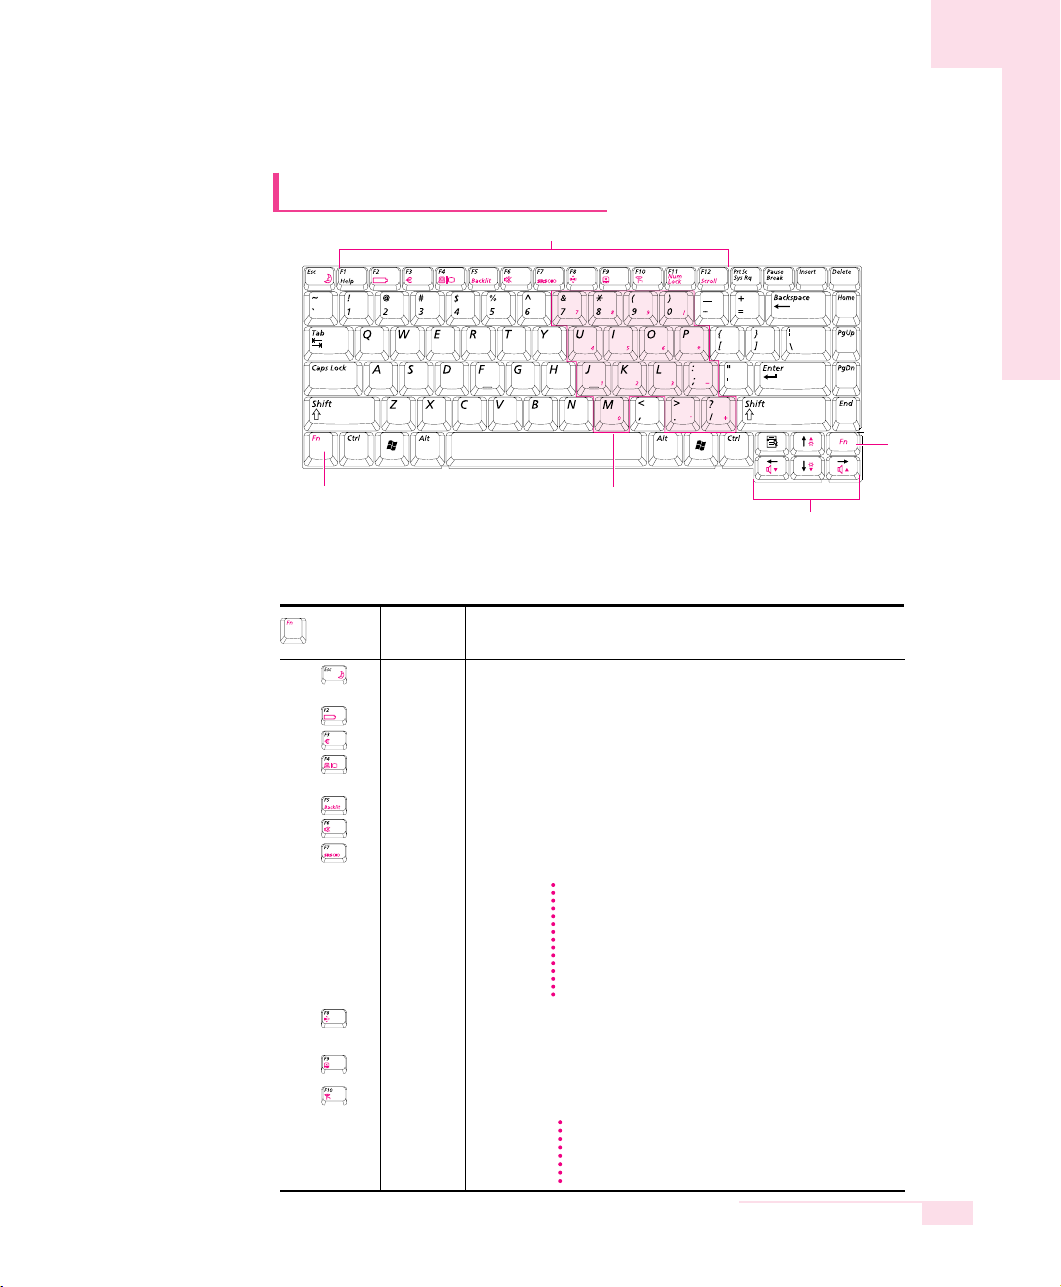
Using the Keyboard
Function Keys
<Fn> Key
<Fn> Key
Numeric Keypad
Screen Brightness and Volume
Adjustment / Direction Keys
■ Special Function Keys: The <Fn> key activates special functions
when
pressed in combination with other keys.
Puts the computer into suspended mode.To use the computer again,
press the power button.
Shows the current power source and the remaining battery charge.
Used to type the symbol for Euro currency.
Switches the display between the LCD and an external display
device when an external display device is connected. (P. 6-8)
Turns the LCD on and off.
Turns the audio output on and off.
This feature enables you to experience more stereophonic sound. You
can select one of the following modes by pressing the button.
Turns the wireless LAN service on and off for appropriate models.
Turns the touchpad function on and off.
You can select Etiquette Mode when you require a quiet operating
environment.
Function
REST
Gauge
Euro
CRT/LCD
Backlit
Mute
SRS
Wireless
LAN
Touchpad
Etiquette
Mode
Key
Name
Key Combinations
WOW XT ON Mode: Select to listen to music.
TruSurroung XT ON Mode: Select to watch a movie.
SRS OFF Mode: Switches off the SRS function.
The SRS function is only supported through the built-in
speaker of the computer and the headphones. It is not
supported through the S/PDIF port.
NNNNooootttteeee
CCCCaaaauuuuttttiiiioooonn
nn
In low-noise mode, the operational speed of a program may be slowed down because the CPU operates
at minimum speed, and the system may overheat
because the fan is rotating only at low speed.
1-10
Manual
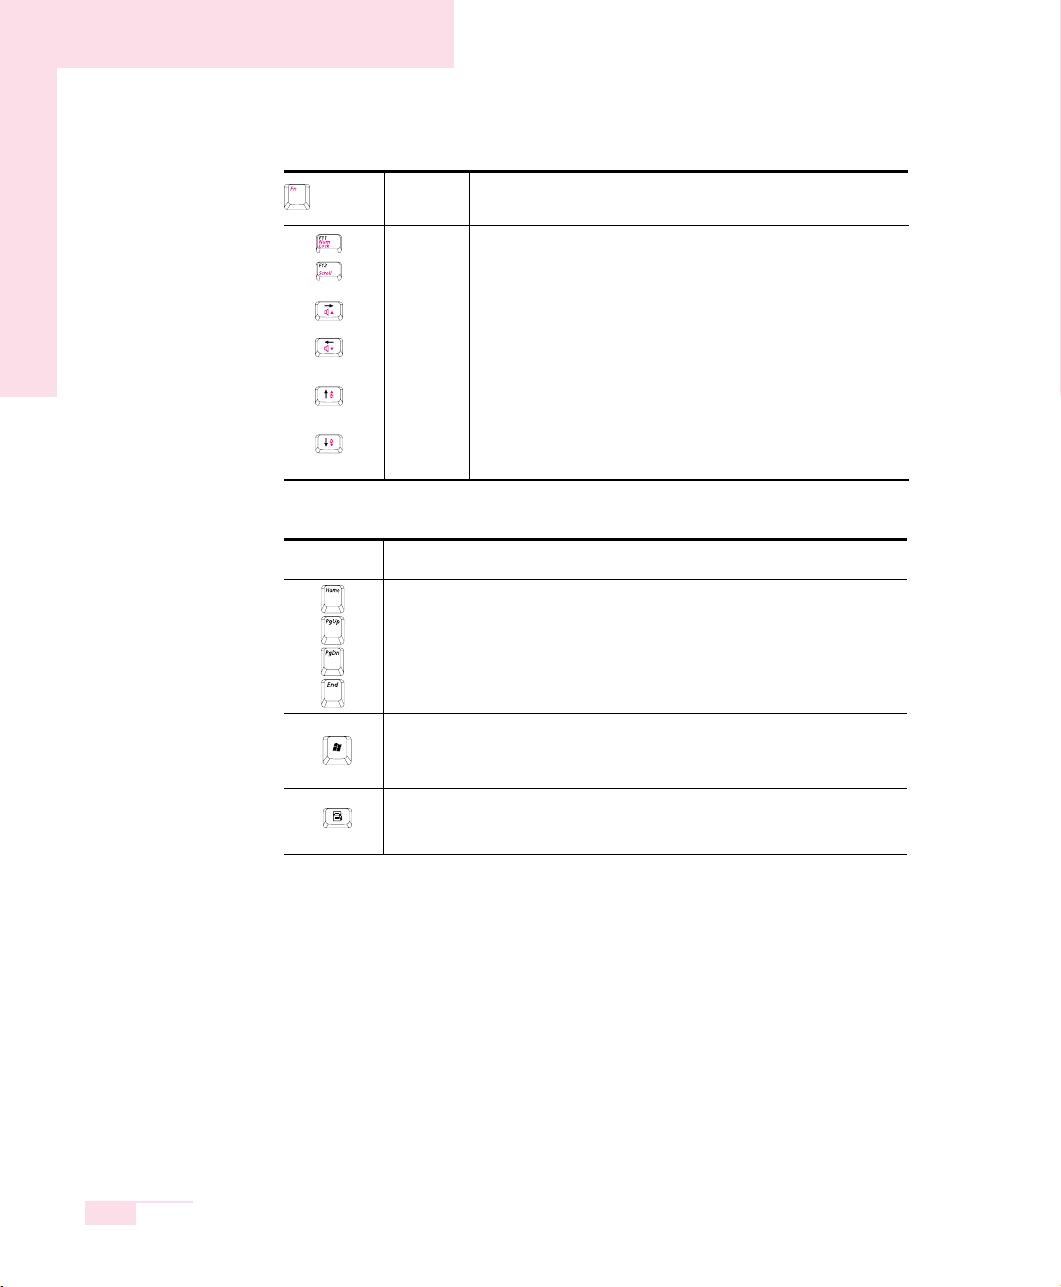
Application Key
Provides the right button function of the touchpad.
Windows key
Display start menu.
Screen Control Key
Moves to the screen above or below, or moves the cursor to the beginning or end
of the sentence.
Key
Function
Makes the keypad in the middle of keyboard available.
Scrolls the screen up and down while the cursor position
does not change in some applications.
Increases the audio volume.
Decreases the audio volume.
Turns the LCD screen brighter.
Turns the LCD screen dimmer.
Function
Num Lock
Scroll Lock
Volume Up
Volume
Down
Brightness
Up
Brightness
Down
Key
Name
Key Combinations

1-11
Chapter 1. Getting Started
Turns on when the numeric keypad is activated.
Turns on when all alphabet characters you type will be
Turns on when it is set to scroll the screen up and down
while the cursor position does not change in some applications.
Blinks when the hard disk drive or CD drive is in operation.
Turns on when wireless LAN function is enabled.
(This light does not operate for the models without wireless LAN.)
Blue - When the computer is operating on AC power and
the battery is fully charged
Amber - When the computer is operating on AC power and
the battery is being charged.
Off - When the computer is operating on battery power.
Turns on - when the computer is turned on.
Blinks - when the computer is in Standby mode.
Num Lock
Caps Lock
in upper case.
Scroll Lock
Hard Disk Drive /
CD Drive
Wireless LAN
Charger
Power
DescriptionNameIcon
Status
Indicators
Shows the operating status of the computer.
1-12
Manual
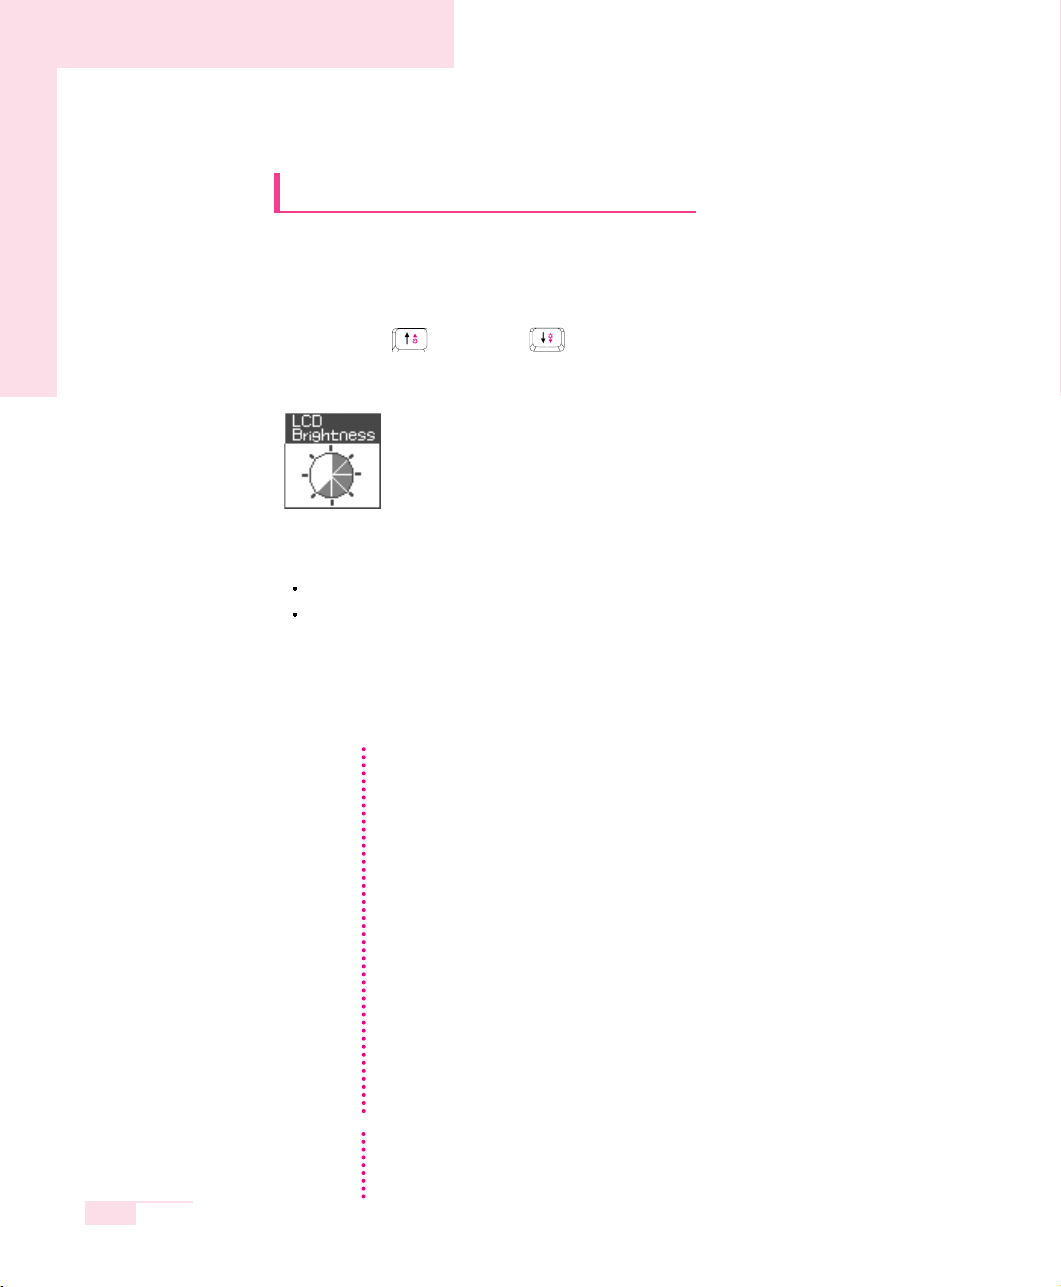
Adjusting LCD Brightness
There are 8 levels of LCD brightness (1:Dimmest~8:Brightest).
■
To adjust using keyboard
Press <Fn>+< > or <Fn>+< > keys from the keyboard to adjust LCD
brightness. When changed, the current LCD brightness is displayed on the top
left corner of the LCD screen for a few seconds.
Whenever you turn the system on or change the power source the brightness
level changes according to the settings.
when operating on AC power: Brightness Level 8
when operating on battery power: Brightness Level 1
■
Adjusting the brightness using the Battery Manager
You can adjust the screen brightness using the Battery Manager. (P. 5-6)
Maintaining your LCD brightness settings after turning the system
off and on
1. Turn the system on. When the Samsung Logo appears, press the <F2> key
to enter Setup.
2. In the Boot menu, change the Brightness Control Mode option to User
Control.
3. Save the settings and exit Setup.
When using the Battery Manager, only the screen brightness set in 'Custom
Mode' is maintained.
To save the battery charge
When your computer is operating on battery power, adjusting the LCD
brightness level to dimmer diminishes the battery power consumption.
Bad pixels in the LCD
The limits of the LCD manufacturing technology allow a maximum of 10
abnormal or bad pixels, which do not affect system performance. This system
may have the same level of abnormal or bad pixels as any other company’s
products.
NNNNooootttteeee
CCCCaaaauuuuttttiiiioooonn
nn
Maintenance Instructions
When cleaning the LCD panel, use only computer specific cleaners on a soft
cloth, and lightly wipe in one direction.
1-13
Chapter 1. Getting Started
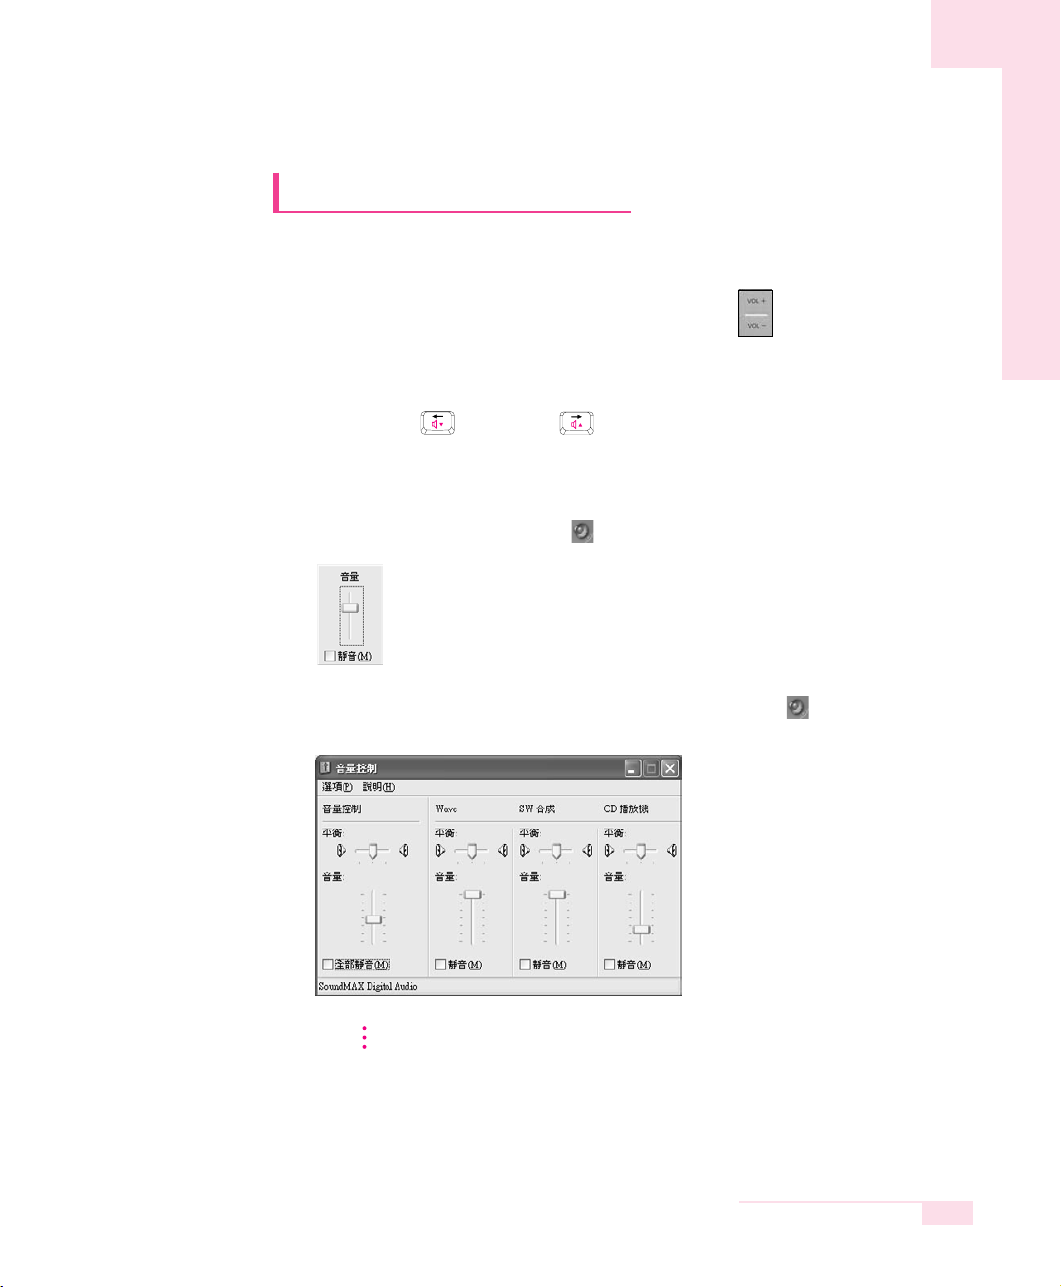
Adjusting the Volume
■
Adjusting the Volume using the Volume Control Button
Adjust the volume by using the Volume Control Button ().
■
To adjust using keyboard
Press <Fn>+< > or <Fn>+< > from the keyboard.
■ Using the Volume Control Program
On the taskbar, click the Volum e ( ) icon, and adjust the slide bars.
For advanced volume control options, double-click the Volume ( ) icon, and
adjust the settings in the [Master Volume] dialog.
CCCCaaaauuuuttttiiiioooonn
nn
When you turn the system on, a booting noise may occur.
1-14
Manual
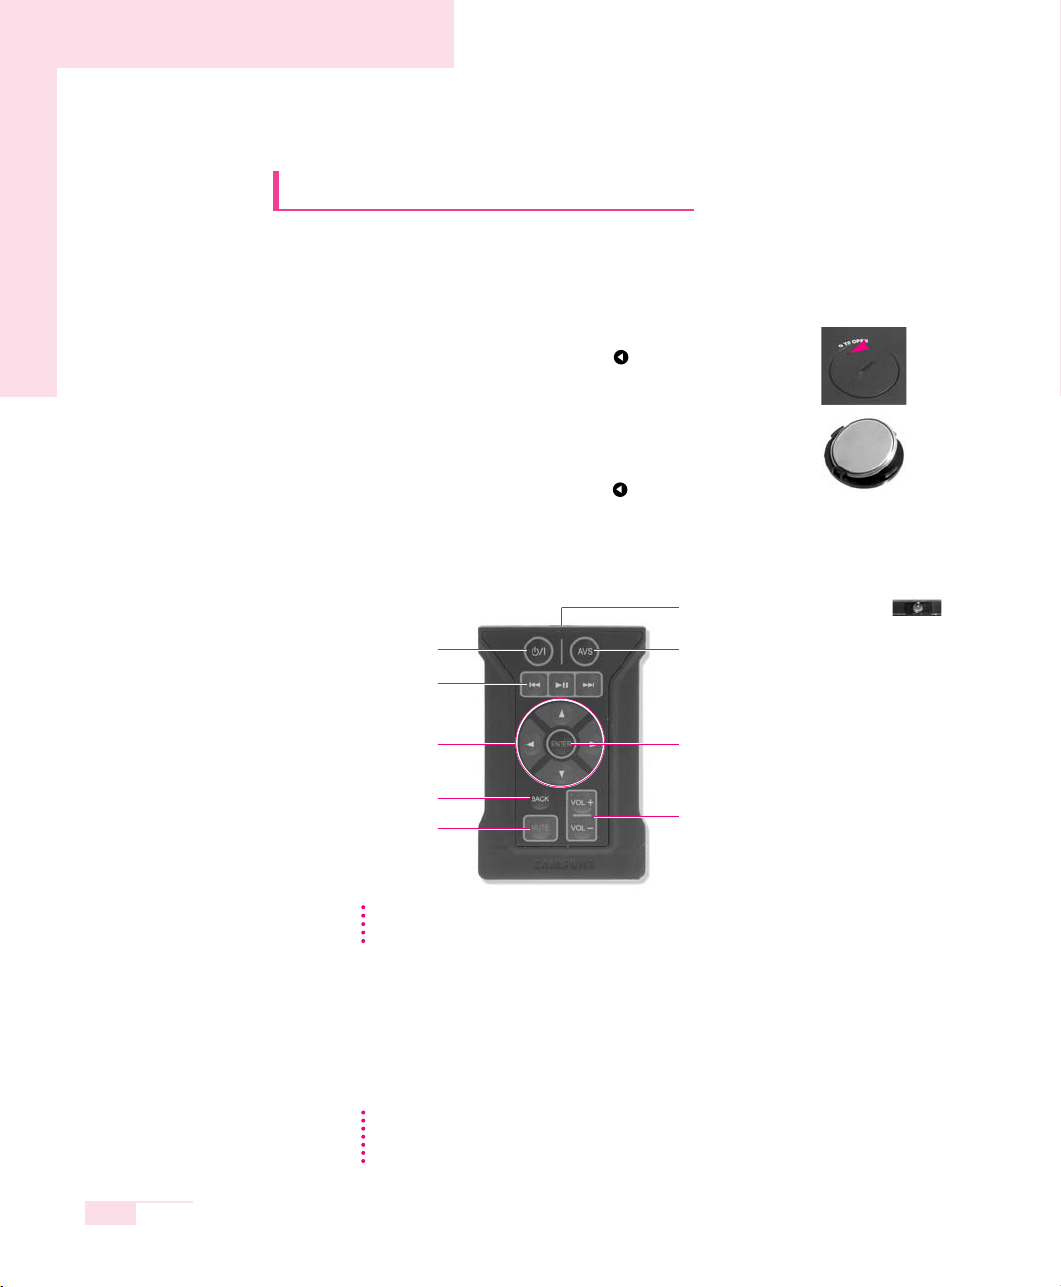
Using the Remote Control
Using the remote control for the computer is described below. To use the
remote control, install the supplied battery into the remote control first.
■ Installing Battery
Move the groove () on the cover to the position by using a
coin and open the battery cover. (To open the cover, turn it
counterclockwise.)
Insert the battery so that the positive pole (+) of the battery is
towards the inside of the cover.
Move the groove (
) on the cover to the position by using a
coin and open the battery cover by turning it clockwise.
■ Remote Control Buttons
■ Remote Control Operating Range
The valid distance for the remote control is determined by the user environment. It
is recommended to use the remote control within 3 meters and a 45 degree
angle from the remote control sensor on the device.
-
+
NNNNooootttteeee
When the remote control is not being used, keep the remote control in the
PCMCIA slot. To keep the remote control in the slot, insert the remote control
into the slot so that the Remote Control Signal Transmitter faces outward.
NNNNooootttteeee
Buttons indicated by (*) do not work in some applications. (e.g. Window
Mode of AVStation premium, etc.)
AVStation Button
- When the computer is turned off or in
Hibernation status, AVStation now is
launched. (P. 3-32)
- When the computer is turned on,
AVStation premium is launched. (P. 3-19)
Remote Control Signal Transmitter
Volume Control Button
ENTER Button
Press to execute the selected item.
Power Button
Press to turn the computer on
or to enter Hibernation.
Playback Control Button
Direction Button *
Press to move to an item.
BACK Button *
Press to return to the
previous step.
MUTE Button
Press to mute the sound.

1-15
Chapter 1. Getting Started
Proper Seating Posture During Computer Use
The proper seating posture during computer use is provided here.
Maintaining proper posture during computer use enhances performance
and prevents physical bodily harm.
Seating Posture
- Position the chair so that the eyes are slightly higher than the display
panel.
- Straighten the neck and back.
- Place the legs naturally.
- If necessary, use a cushion to provide extra back support.
- Avoid working postures that require twisting the body or neck.
Lighting
- Soft, indirect lighting is recommended.
- Position the display panel so that external light does not reflect off the
screen. Use curtains, if necessary.
Work Habits
- Take periodic breaks and stretch out stiff muscles regularly.
- Look outside the window or at distant objects frequently to relieve strain
on the eyes.
If necessary, use a footrest to raise the level of your knees
and ease the pressure on the thighs.

1-16
Manual

Introducing Windows
This chapter provides basic
information on using
the computer’s main
operating system
Windows.
Chapter 2
Chapter 2
SAMSUNG P10
2-2
Manual
Windows XP Basics
Windows is the computer’s main operating system, which needs to be
familiarized with in order for efficiently computer use.
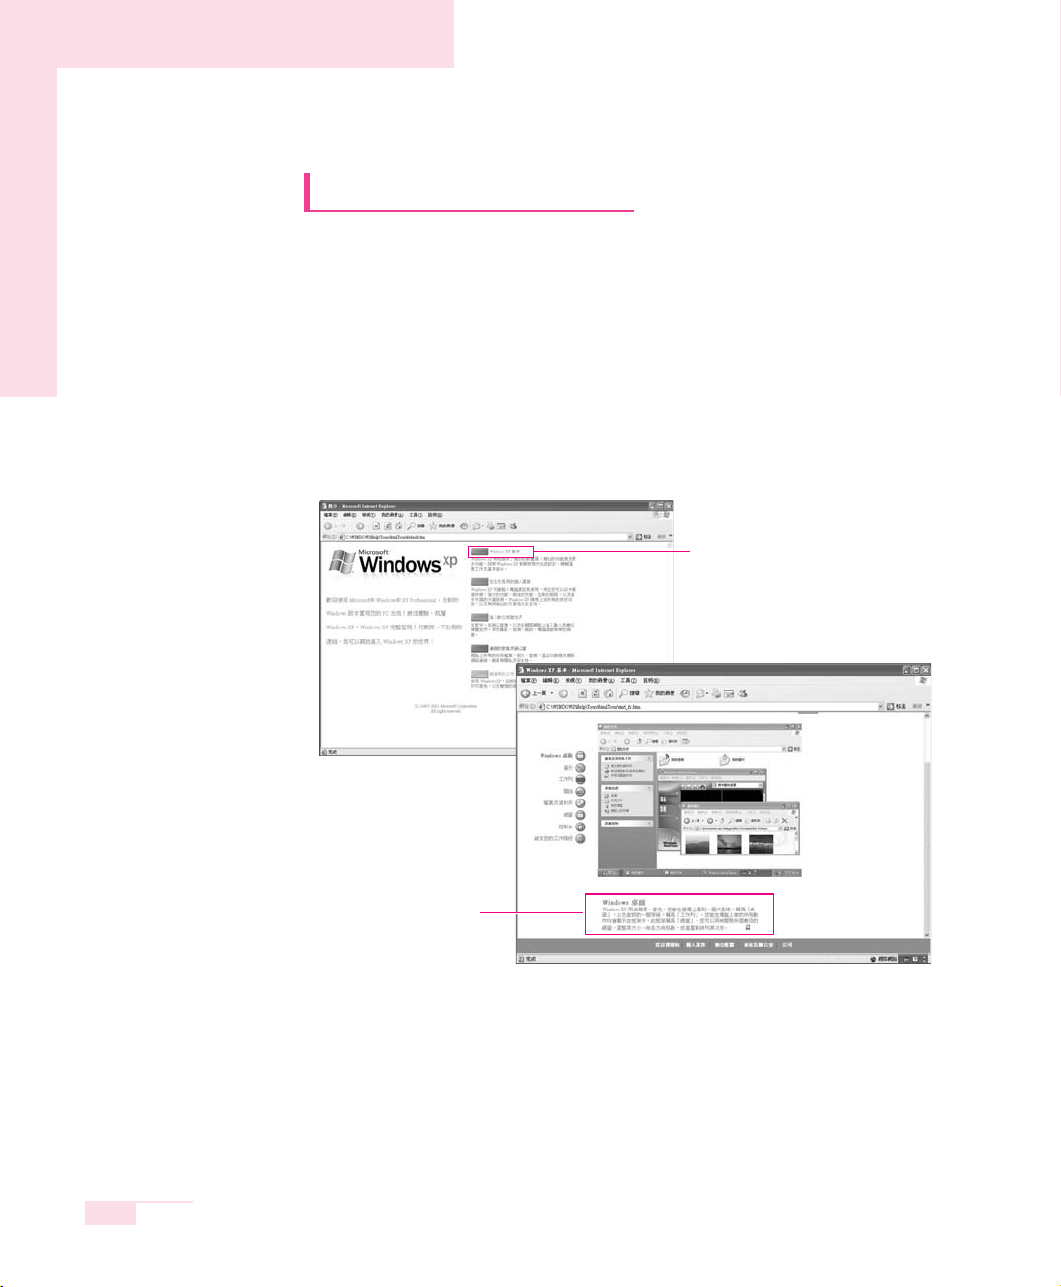
Windows XP Tour
A tour of the elementary functions provided by Windows XP.
Click Start > Tour Windows XP.
Or click Start > All Programs > Accessories > Tour Windows XP.
Click on the topics to find out about important functions of Windows XP.
Click the Title.
An explanation will appear
on the lower part of the screen.
2-3
Chapter 2. Introducing Windows
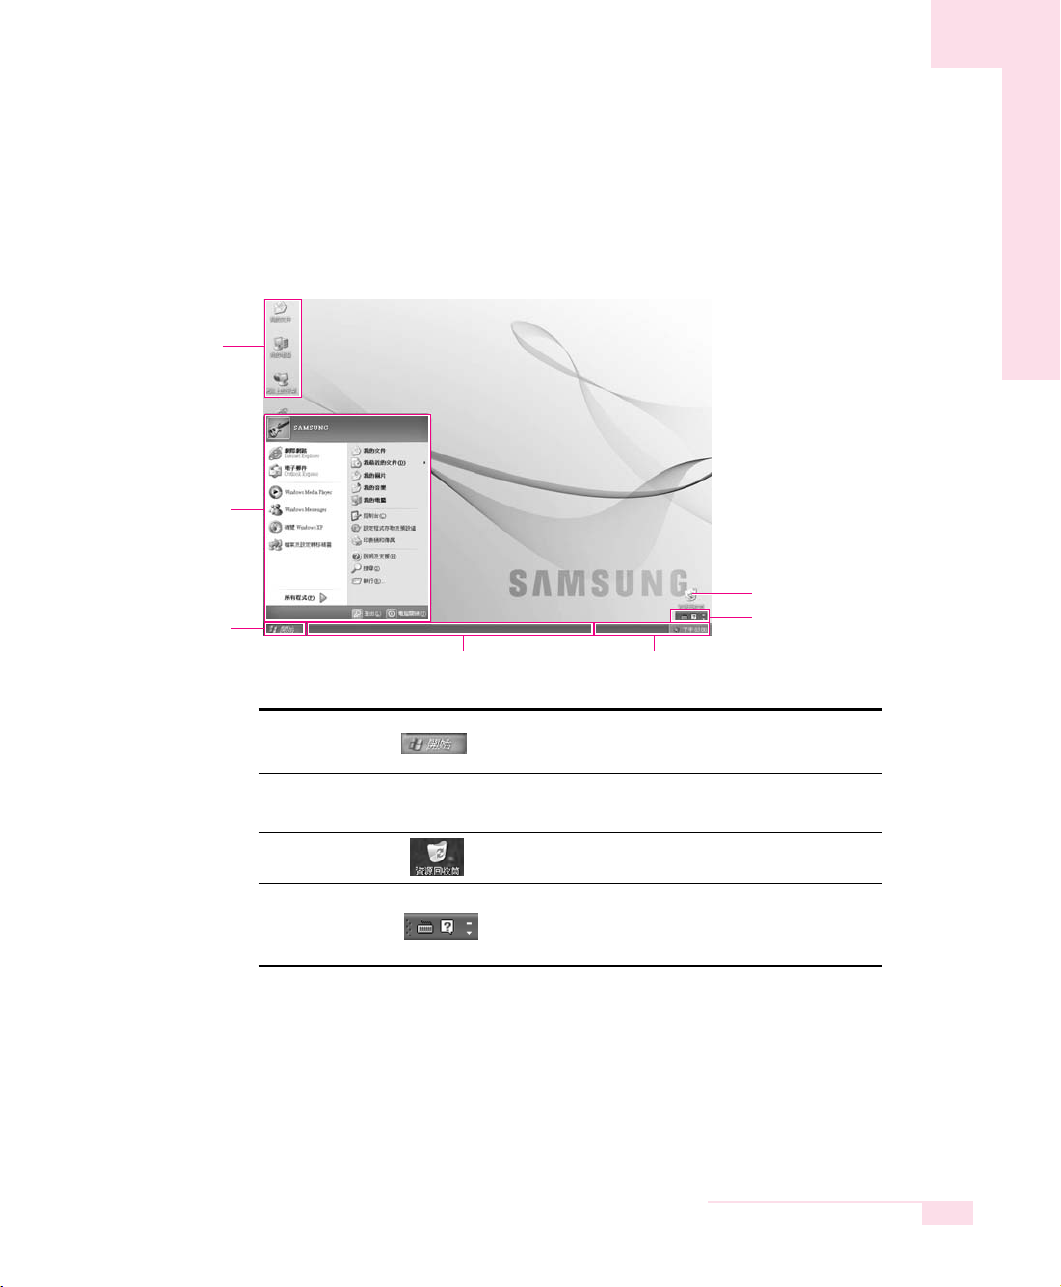
Understanding the Desktop
The Desktop is the working area on the computer. It consists of the large workspace,
which is more or less the entire the screen and a Taskbar at the bottom.
Start Button Opens the Start Menu.
Taskbar
Displays programs that are currently running.
Frequently used icons can be placed here.
Recycle Bin Deleted files or folders end up here.
Language Bar
Enables switching between English/other languages
text inputs and provides other text input services.
Start Menu
Start Button
Taskbar
System Tray with Clock
Language Bar
Recycle Bin
Desktop Icons
You can directly
launch a program.
2-4
Manual
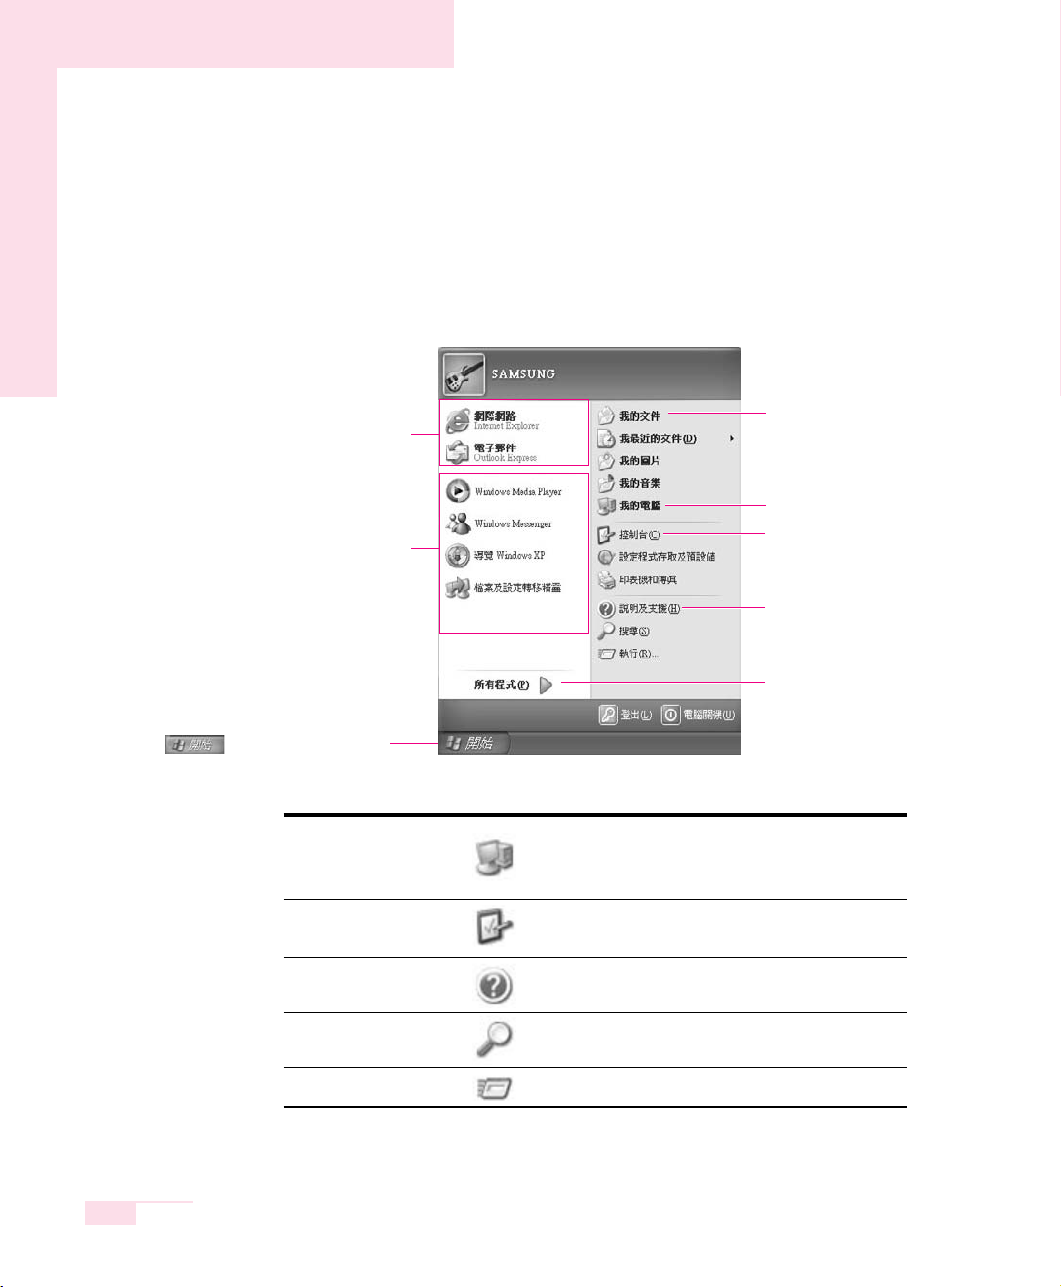
Understanding the Start Menu
The Start Menu includes everything that is required to start Windows.
From the Start Menu it is possible to run a program, open a file, assign system users
with the Control Panel, receive support by clicking Help and Support, and search
desired items from computer or Internet by clicking Search.
Displays the contents of the hard disk, the CD-ROM
drive, the network drive, and floppy disks. It can
also be used to search and open files and folders.
Enables users to configure settings on the
computer.
Provides on-line help, information on Windows
and troubleshooting.
Enables users to search for information in files
or the Internet.
Runs programs or documents.
My Computer
Control Panel
Help and Support
Search
Run
Fixed Items
Internet Browser
Electronic Mail Program
This Folder Stores
Personal Documents
My Computer
Control Panel
Help and Support
Includes All Programs
List of Programs Last Used
The program item and location
may be changed.
Click This Button
to View the Start Menu
2-5
Chapter 2. Introducing Windows
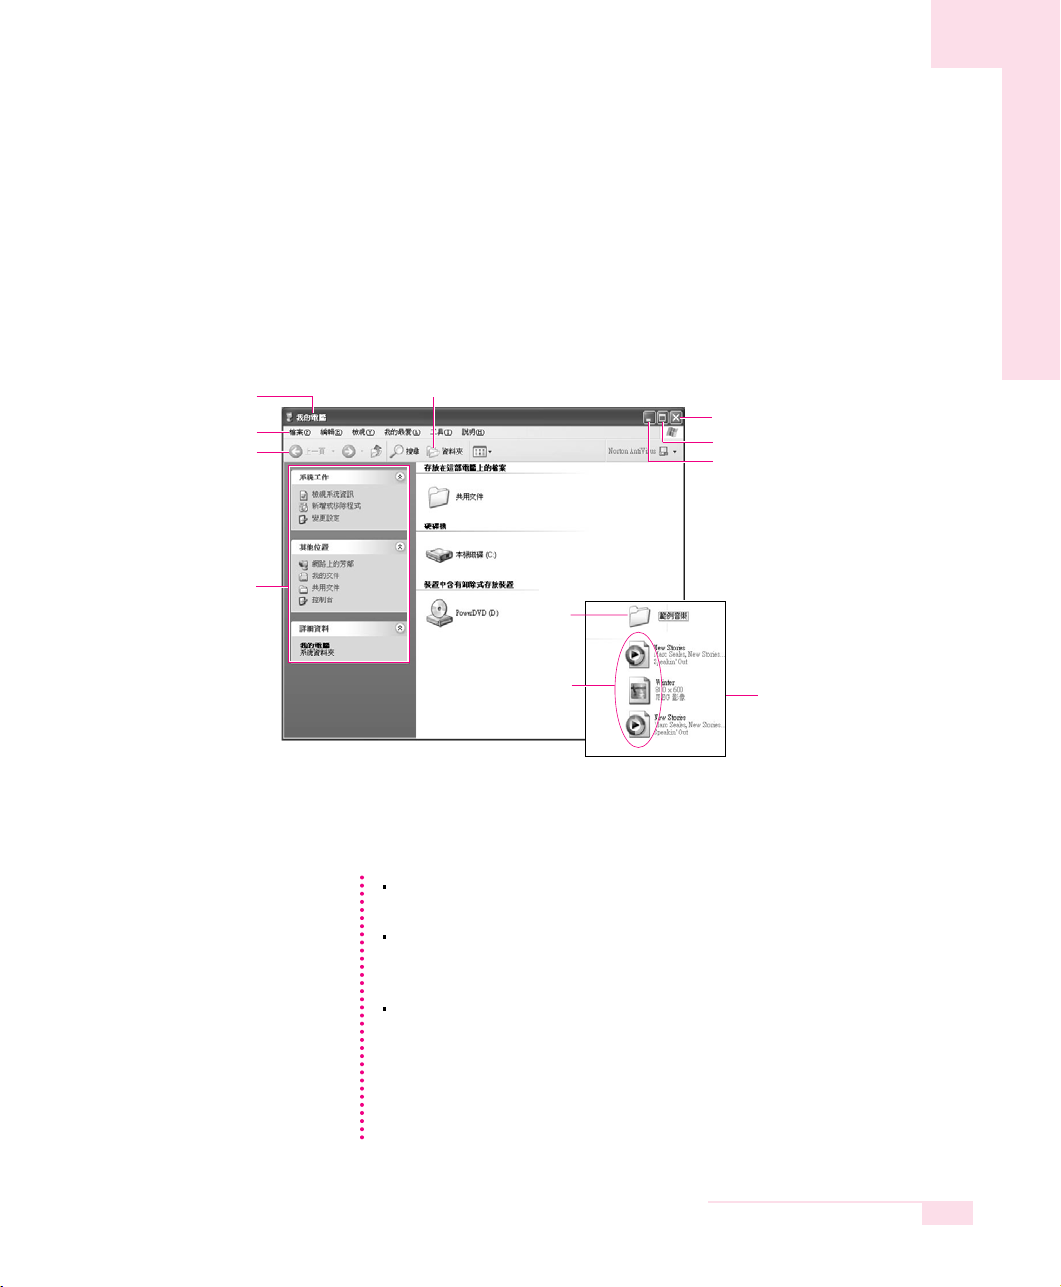
Understanding a Window
A window is the basic component in working with the computer. The My Computer
window, which is a window for the computer’s hard drive, will be used as an example here to show the basic composition of a window.
Click Start > My Computer.
Double-click the hard drive (local disk) to view internal folders and files stored in it. If
the contents do not appear, click Show Contents.
Title Bar
Menu Bar
Quick Task Window
Folder Icon
Close Window Button
Maximize Button
Minimize Button
Double-click a shared
document or a local disk
to view the folders and
files in it.
Folders
Files
What is a Drive? A storage device in which files and folders are
saved in, and read from.
What is a Folder? A folder is used to group and manage files
systematically, and may include files in sub-folders.
It is similar to a bookshelf.
What is a File? A file is a document or various kinds of material
that is generated as a result of program operation.
It is also called data.
To view the entire structure of the drive
Click the Folder Icon in the Toolbar to view the entire structure. Click again to
return to the Quick Task Window.
NNNNooootttteeee
Tool Bar
2-6
Manual
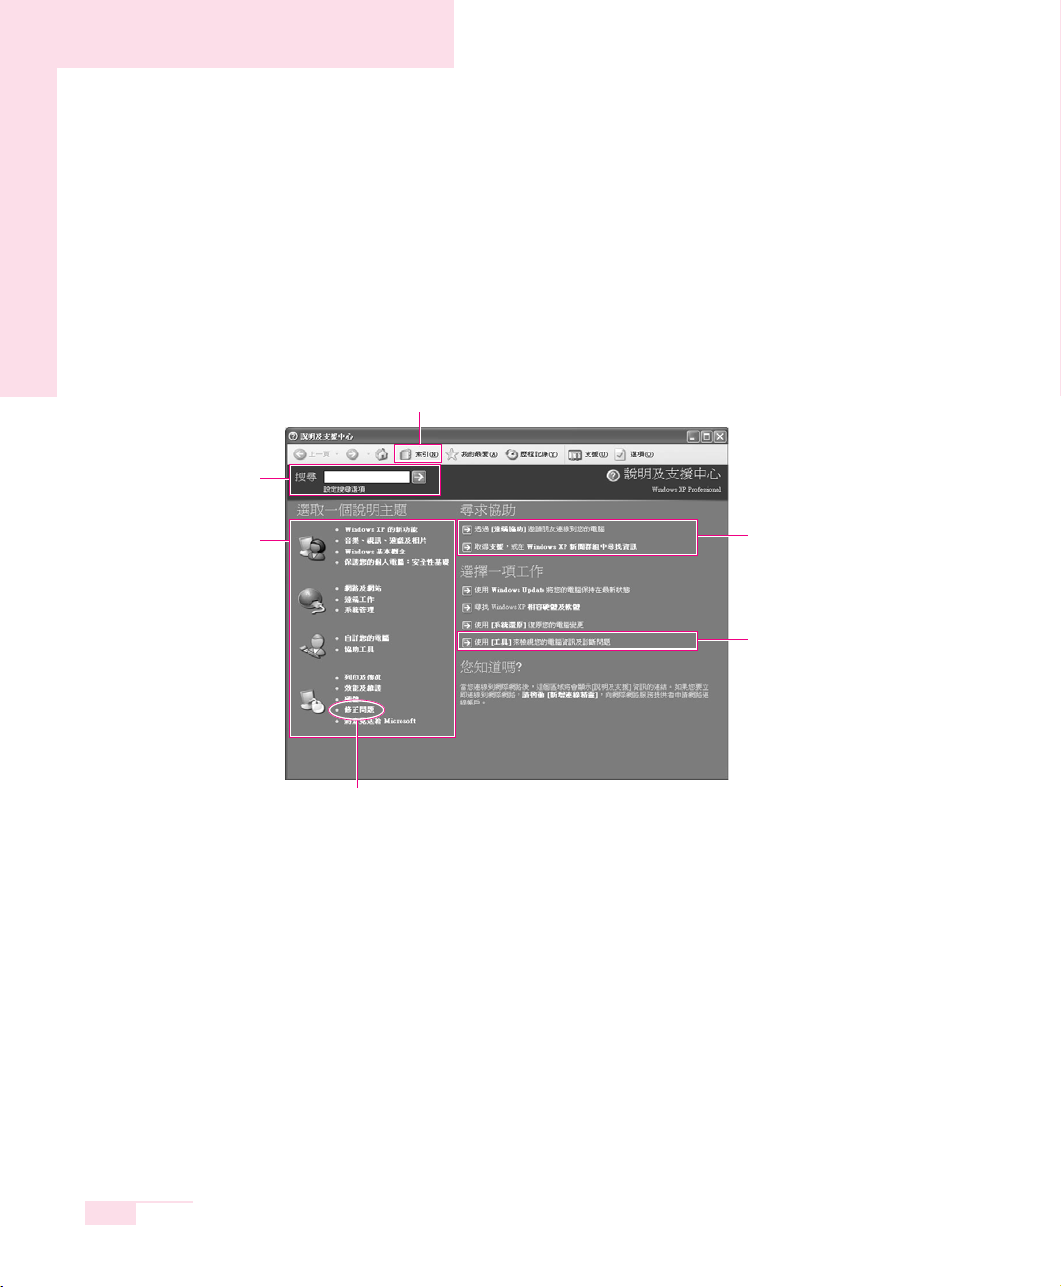
Help and Support Center
Help and Support Center provides references and troubleshooting information
regarding computer use.
Please refer to help and support centre before calling the Samsung helpline.
Click Start > Help and Support.
Related help information
appears when a search
keyword is entered.
Displays Help Index
Help Topics
Troubleshooting Information
Connect to Support Center.
The computer has to be
connected to the Internet
Computer information
can be viewed and
the problem can be
diagnosed.
2-7
Chapter 2. Introducing Windows
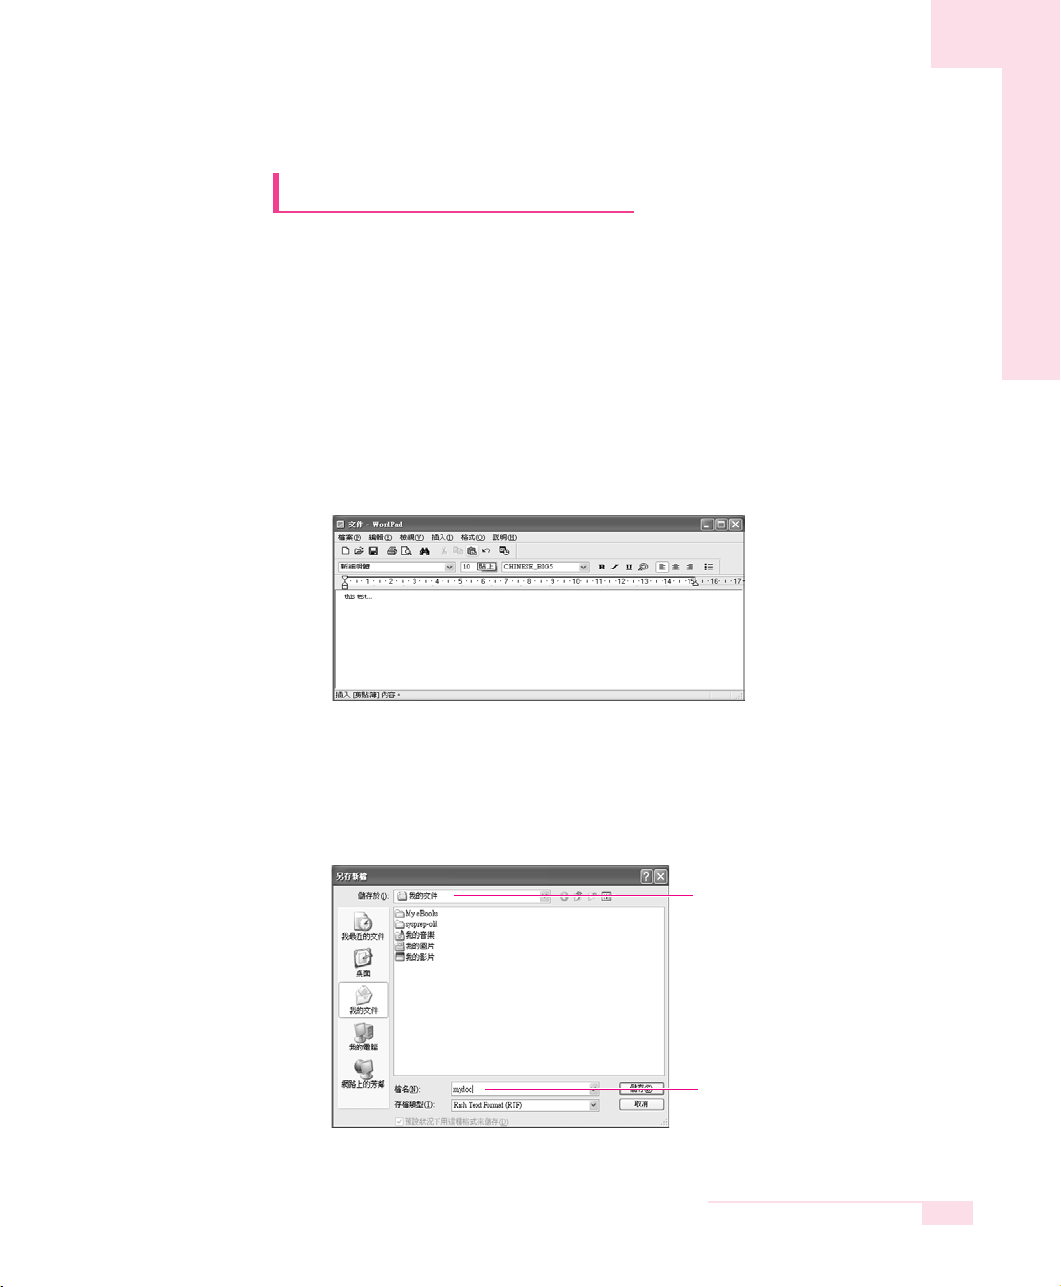
Document Operations
To create documents, WordPad or NotePad, which is included in
Windows, or a separate specialized word processor program can be
used, such as MS Word.
Instructions for creating documents using WordPad is provided here.
■ Creating a New Document
1. Click Start > All Programs > Accessories> WordPad
2. Create and edit your document. For more information about WordPad,
refer to on-line Help.
■ Saving a Document
1. Select File from the Menu, and click Save.
2. Click on the Save in field to specify a folder to save the file in, enter the name
of the file in the File Name field, and click Save.
Save Location
Enter File Name

2-8
Manual
■ Opening a Document
1. Click Start > All programs > Accessories > WordPad.
2. Select File From the Menu, and click Open.
3. Click on the Look in field and specify the folder in which the file is saved.
4. Select the file to open and click Open.
■ Printing a Document
To print a document, connect a printer to the computer.
For more information about connecting and configuring a printer, please refer to
the printer manual.
To print a WordPad document
1. Turn on the printer, and insert paper.
2. Open the WordPad file to print.
3. Select File from the Menu and select Print.
4. Click Properties, adjust the printer options accordingly, and click OK.
5. In Print window, click OK to print the document.

Using The Computer
This chapter investigates various
different functions of the computer
and provides information
on using the related application
programs for them.
Chapter 3
Chapter 3

Using the CD-ROM Drive
This computer has one of the following CD drives.
- CD-RW/DVD-ROM Read a CD/DVD, and writes data onto a CD.
Combo Drive
- DVD-Super Multi Drive
Reads CD/DVDs and writes data to CD/DVDs.
Supported DVD types include DVD±R, DVD±RW and
DVD-RAM.
1. Press the eject button on right side of the CD drive.
2. When the tray slides out, place a CD onto it and push down until it clicks.
3. Push the CD tray in gently. The CD will run automatically.
3-2
Manual
To eject a CD when the CD drive is out of order or the system is turned off, unfold
a paper clip, and insert the unfolded end of the clip into the hole ( ) and
press until the CD tray opens.
NNNNooootttteeee
A CD-ROM drive is optional. For more detailed product specifications, refer to the
product catalog.
NNNNooootttteeee
CCCCaaaauuuuttttiiiioooonn
nn
To clean a CD or DVD title, clean the disc with a soft clean cloth by wiping from the
center outwards.
Do not eject the CD while the Status Indicator is on.
Emergency Eject Hole
Eject Button
Status Indicator

3-3
Chapter 3.Using The Computer
Using the Windows Media Player
Window Media Player enables you to play and manage audio and video files.
Click Start > Windows Media Player.
Or click Start > All Programs > Accessories > Entertainment > Windows
Media Player.
Running the program the first time displays the set up screen. Define the settings
according to the instructions displayed on the screen.
When you complete the settings, the following screen appears.
Features
Playlist pane
Playback Controls area
To view detailed information on how to use Windows Media Player:
Run Windows Media Player and right-click over the Function Taskbar and select
Help > Windows Media Player Help
NNNNooootttteeee

3-4
Manual
To Play an Audio CD
1. Insert an audio CD into the CD drive, and a list of all available players is
displayed automatically.
2. Select Windows Media Player, and click OK to play the audio CD.
To Play a Video CD
1. Insert a video CD into the CD drive.
2. When a video window appears, double-click the MPEGAV folder.
3. Double-click the DAT file.
4. When a warning window appears, click the Open with button.
5. In the new window, click Select Program from List and click OK.
6. Select the Windows Media Player, and click OK.
The video will start playing.

3-5
Chapter 3.Using The Computer
To Write Data in CD
If your computer has CD-RW functionality, you can copy data to a blank CD or
create an audio CD.
1. Insert a blank CD into the CD-RW drive.
2. Click Open Writable CD Folder and click OK. The CD-ROM drive window
appears automatically.
3. Click Start > My Computer.
An additional CD writing program is supplied in an additional CD.
NNNNooootttteeee

4. Select, drag and drop folders or files to copy onto the CD-ROM drive window.
Click Write Files to CD in the CD-ROM drive window.
5. When the CD Write Wizard appears, enter the CD label, and click Next.
The data will begin copying.
6. When copying is completed, a ‘completed’ message will appear and the
CD-ROM drive will open automatically.
3-6
Manual
CD-ROM drive window
2. Click Write Files to CD
1. Drag and drop folders or files to copy
My Computer window
For more information on copying CDs
Click Start > Help and Support. Enter [CD copy] in the search field, and click the
Search button.
To Burn an Audio CD:
Run Windows Media Player and right-click over the Function Taskbar and select
Help > Windows Media Player Help from the popup menu.
Select Using the Player > Using CDs, DVDs and VCDs > Using CDs >
Burning your own CD > To burn your own CD to see detailed
information.
NNNNooootttteeee

3-7
Chapter 3.Using The Computer
Enjoying Home Theater
This product supports 5.1 channel output, which is a basic function
for home theater systems, and DVD drives. It provides 3D surrounding sound and vivid screen.
The following devices are required to enjoy a home theater system.
5.1 channel speaker system (amplifier, speakers, connection cables)
(Purchased separately)
DVD drive and DVD playing program on the computer
DVD title that supports 5.1 channel (Purchased separately)
■
Step 1. Connect 5.1 channel speaker system to your computer
1. Connect the S/PDIF jack of the system and a 5.1 channel amplifier.
2. Connect speakers to the amplifier. (See the User Manual for the Speakers)
3. To view through a TV, connect the TV and change the current display
device to TV in the Display Properties. (See ‘P. 6-8 Connecting to a TV’.)
Digital amp
Surround L speaker
Computer
Center speaker
TV
Front R speaker
Surround R speaker
Subwoofer
Front L speaker
Home theater system usually consists of a TV, DVD, 5.1 channel speaker, and
digital amp and provides a high-resolution screen (MPEG2) and 3D surrounding sound (Dolby 5.1 or DTS). With a home theater system, you can
enjoy a vivid screen and sound in your home as if you are in a movie theater.
NNNNooootttteeee

■
Step 2. Setting the Sound to Digital Sound Output on the Computer
Since the sound of the computer is set to Digital Output by default when purchasing the computer, additional settings are not required. You can confirm
the setting as follows.
1. Double-click the Volume ( ) icon in the notification area of the Taskbar
and select Options > Advanced Controls.
2. Click the Advanced button below the Master Volume and check if the 1
Disable Digital Output item is unselected.
The option must be unselected for sound to be output in digital format.
■
Step 3. Enable S/PDIF on the DVD program
When using 5.1 channel speakers, you need to install the Power DVD
program from the Power DVD Installation CD separately supplied
and then change the settings as directed in these steps:
1. Run Power DVD and click the Settings button.
2. On the Audio tab, set the Output setting to ‘Use SPDIF Output’.
Now, you can enjoy home theater using DVD titles.
3-8
Manual
CCCCaaaauuuuttttiiiioooonn
nn
To control volumes for your 5.1 channel speaker, use the control on the digital
amp. (Please, refer to the speaker manual.)

3-9
Chapter 3.Using The Computer
Using the Multi Card Slot
Using the Multi Card Slot, you can use memory cards such as a Memory
Stick, Memory Stick Pro, SD Card, MMC, or xD Card. A memory card is
used as a removable disk and is useful for exchanging data between a
computer and a digital device such as a digital camera.
■
To insert and use a memory card
1. Insert a memory card into the Multi Card Slot.
2. Click Start > My Computer. The inserted memory card is displayed.
CCCCaaaauuuuttttiiiioooonn
nn
Restrictions on Using Memory Cards
You can use memory cards for storing data only. Copyright protection function is not
supported.
Memory Stick Memory Stick Pro
SD Cord MMC xD Cord
CCCCaaaauuuuttttiiiioooonn
nn
Remove the Slot Protector first, before using
the Multi Card Slot.
Press the end of the Slot Protector lightly, and
remove the Slot Protector when it pops up.
( ex :
Memory Stick
)
( ex :
Memory Stick
)

3-10
Manual
3. You can write data to the memory card. If the memory card is not format-
ted yet, format the memory card before use.
To remove a memory card
1. Press the end of the memory card softly to pop it outward.
2. Remove the memory card.
To format a memory card
You can use a memory card after the format operation. The procedures to
format a memory card are described below.
1. Click Start > My computer.
2. Press the right touchpad button on the memory card drive, and select
Format from the pop-up menu.
3. Click Start to start the format operation.
CCCCaaaauuuuttttiiiioooonn
nn
Since the memory card may be easily mislaid when moving your computer, keep the
memory card separately.
CCCCaaaauuuuttttiiiioooonn
nn
Since format operation deletes all data in the memory card, please make sure that
there is no important data in the memory card before formatting.
To protect the data in the memory card
Set the write protection tab of the Memory Stick or SD memory card to the Lock
position.
NNNNooootttteeee
CCCCaaaauuuuttttiiiioooonn
nn
To use a memory card in both the computer and other digital device such as digital
camera, it is recommended to format the memory card in the digital device. If you format the memory card in the computer, you may have to format the memory card in
other digital device again to use the memory card in the digital device.

3-11
Chapter 3.Using The Computer
Using the PCMCIA Card Slot
Various different functions can be added by inserting PCMCIA cards into
the system. This system supports 16 / 32 bit, type I or II PCMCIA card
types.
1. Insert a card into the PCMCIA card slot on the side of the system.
2. When a card is inserted, Windows automatically installs the necessary driver for
the card. If no available driver can be found by Windows, the driver has to be
installed using the disk supplied with the card.
CCCCaaaauuuuttttiiiioooonn
nn
Before using the PCMCIA slot, remove
the slot protector.
Push the eject button of the PCMCIA card slot once
to pop it out. Push the button again
to eject the slot protector.
To remove PCMCIA card
a. Double-click Safely Remove Hardware icon ( ) in Taskbar.
b. Select the appropriate PCMCIA card and click Stop button.
c. When ‘Safe to remove Hardware’ window appears, click OK.
d. Press Eject button at PCMCIA card slot once, then the button pops out.
e. Press the projected button to eject the PCMCIA card.
NNNNooootttteeee
CCCCaaaauuuuttttiiiioooonn
nn
You cannot use a ZV card and a PCMCIA III card through the PCMCIA card slot of the
system.

3-12
Manual
Using EasyBox
Use EasyBox program to make use of Windows' complicated function
easily andconveniently.
Learn about EasyBox
Double-click the EasyBox( ) icon on the desktop.
(Or select Start > All Programs > Samsung > EasyBox > EasyBox.)
▶
System : System management features are available, including disk defrag-
menter, removing unnecessary files/folders, computer scheduling and
system recovery.
▶
BIOS : In windows-based mode, you can recover the BIOS defaults and
change the boot sequence.
▶
Desktop : Desktop management features include changing the font size, execut-
ing a magnifier function, the start menu settings and managing the
quick launch icons on the taskbar.
▶
Security : Here you can configure the security settings supported by Windows
XP SP2. You can also change the configuration of the firewall settings, Windows automatic updates and blocking pop-ups when connected to the Internet.
▶
Plus Tip : This is a collection of additional Windows functions that are useful for
system management. (Offering shortcut descriptions of Windows,
configuring network sharing and opening local folder sharing, etc.)

3-13
Chapter 3.Using The Computer
Using EasyBox
The security management function will be used as an example here to show the function of Easybox
■
Configuring Firewall
The Windows Firewall prevents unauthorized users from gaining access to
your system via the network or the Internet.
1. Click Start > All Programs > Samsung > EasyBox > EasyBox.
2. Click Security from the top menu bar.
3. Select Windows Firewall Settings from the Security menu on the
left.
4. Select a firewall level.
5. Click Apply.
Click the User Setting button for advanced features, including exceptions
and permissions.

3-14
Manual
Using Samsung Theme
Samsung Theme is a program that enables a user to easily switch a
theme (desktop, logon screen and sound effect).
Double-click the Samsung Theme ( ) icon on the desktop.
(Or select Start > All Programs > Samsung > Samsung Theme >
Samsung Theme.)
▶ Samsung Theme : Switches to Samsung Theme (desktop, logon screen and
sound effects on booting).
▶ Windows XP Theme : Switches to the Windows XP default Theme.
▶ Back : Restores the theme to its previous status.
Help button
Close button
Move the mouse pointer
over Samsung Theme
item, then the Samsung
Theme will be displayed
below.

3-15
Chapter 3.Using The Computer
Using Samsung Update Plus
Samsung Update Plus is software that examines and updates
Samsung software and drivers installed on your Samsung computer
to the latest version. To use Samsung Update Plus, your computer has
to be connected to the Internet.
■ To Update Samsung Software and Drivers
1. Select Start > All Programs > Samsung > Samsung Update
Plus > Samsung Update Plus.
2. Click Search for and Install Updates and click the Search for
Updates button.
3. If there are available software or driver updates for your computer, the
available updates will be listed. Select the required updates from the list
and click Install Update to start the update.
If this is the first time you are running the program, a window will appear
asking you if you agree to the agreement in the window.
Click Agree to use this software.
NNNNooootttteeee

3-16
Manual
(The update list on the screen may differ depending
on the computer model.)
Update List
Updates that must be installed separately.
If you select an update that must be installed separately, a message appears
informing you of this. Follow the instruction message to correctly install it.
Automatic update items display
By default, your computer is configured to automatically search for updates.
If there is a new update available, this is notified in the notification area.
Click the balloon help icon in the notification area. Here you will be able to
find the latest available updates.
To change the automatic update settings, click the Custom button in Figure 2
and change the settings.
: Samsung Update Plus does not provide updates for additionally installed
software and device drivers.
NNNNooootttteeee

3-17
Chapter 3.Using The Computer
Using AVStation premium
AVStation premium is an integrated multimedia program that allows you to
watch video (pictures, video and movies) and listen to music.
You can start AVStation premium as follows.
Method 1. Select Start > All Programs > Samsung > AVStation premium > AVStation
premium.
Method 2. Double-click the AVStation premium ( ) icon on the Desktop or Taskbar.
Method 3. Click the AVStation button.
Method 4. Click the AVS button on the remote control. (P. 1-14)
Using AVStation premium
■
AVStation premium Modes
AVStation premium provides 2 modes, Window and Play mode
s.
▶ Window mode :
You can use all AVStation premium functions.
▶ Play Mode : This provides an easier-to-use user interface than that of
Standard mode. In this mode, the Edit/Create function and
the MOVIE EDITOR menu are not supported (see P. 3-25).
Window mode Screen Play Mode Screen
This Manual mainly describes the procedures for using the Window mode of
AVStation premium.
The captured program screen shots in this manual may differ slightly from the actual
software depending on the version of the program.
For more detailed use procedures, refer to the on-line Help.
NNNNooootttteeee
AVStation premium is provided for some models.
NNNNooootttteeee
The function button on the remote control only works in AVStation premium
Play Mode. (P. 3-27)
NNNNooootttteeee
AVStation Button

3-18
Manual
■
AVStation premium Screen Layout and Menus
The AVStation premium Window mode screen has the following layout.
AVStation premium Window mode consists of the following 4 menus.
▶ MUSIC : Using this menu, you can play music files or audio CDs, copy
audio CDs to the computer as well as burn audio CDs.
▶ PHOTO : Using this menu, you can view or edit pictures (image), view
pictures through a Slide Show, create an album and burn an
album onto a CD.
▶ MOVIE : Using this menu, you can play a video (movie) file or a
DVD/VCD title. (You can only play a DVD title after installing
Power DVD or a DVD player program.)
▶ MOVIE EDITOR: Using this menu, you can edit a movie file.
■
Selecting the AVStation premium Menus
To select a menu, select the required menu from the Menu Selection Bar.
Menu Selection Bar
Library Window
Menu Bar
Category Window
To handle multimedia files conveniently, register the multimedia files to the
library. (See P. 3-26 'Registering a File'.)
To access a file not registered to the library, select File > Open File and
select the file.
NNNNooootttteeee

3-19
Chapter 3.Using The Computer
MUSIC
This section describes the procedures to play music files or audio CDs, to copy audio
CDs to the computer as well as burn audio CDs.
Select MUSIC from the Menu Selection Bar.
■
Playing a Music File
1. Double-click Music in the left category pane and double-click on All
musics.
2. Double-click the music file that appears at the bottom screen to play it.
- To play multiple music files, select the music files and click on
Add. The music files will be played in the added order.
■
Playing an Audio CD
1. Insert an audio CD into the CD-ROM drive.
2. When the Audio CD window appears, select using
Samsung AVStation premium and click OK.
Then the audio CD is played.
- To play an audio CD in the CD-ROM drive,
double-click CD from the Category and
double-click on Audio CD when Audio CD
appears in the bottom screen.
MUSIC
Menu
Repeat Button
Track, All Tracks,
Random
Library Window
Add Music
Music Category
Media Play Control Button
Audio CD window

3-20
Manual
■ Copying an audio CD to the Computer
1. Insert an audio CD into the CD-ROM drive.
2. When the Audio CD window appears, select using Samsung AVStation
premium and click OK.
3. Select a track to be copied to the library and then select Tools > Copy
from CD.
- To select multiple tracks, select the tracks while pressing the Shift or Ctrl key
on the keyboard.
4. The selected tracks are copied from the audio CD. When the copy operation
is completed, the Copy Completed message will appear.
The copied tracks are saved in the My Documents > AVStation premi-
um > Music > Music From CD folder.
■ Burning an Audio CD
1. Insert a blank CD into the CD-ROM drive. When the CD Drive window
appears, click Cancel.
2. Select Tools > Burn CD.
3. Select Burn Audio CD and click Next.
4. Double-click Music in the left title and double-click All musics.
5. Select music files from the list and click the Add files from my PC to the
CD burning list ( ) button to move the selected files to the right Burn
Audio CD window. When you have added all music files, click Next.
6. Select a CD Writer and click on Start. When the Burn CD window appears,
click OK to create the audio CD.
Select
Copy from
CD
Select the tracks to be
copied.
Select
Burn CD

3-21
Chapter 3.Using The Computer
■ Creating a Playlist
A Playlist is a list of selected music files that has been created by a user so that
the selected files can be played later.
1. Select the music files to be included in the Playlist from the music category
and click on Add.
2. When you have added all the music files you want, click on Save As
Playlist.
3. Register a new playlist name, and click OK.
4. When the completion message appears, click OK.
The created playlist is saved in the C:\Program Files
\Samsung\AVStation premium\My Playlist folder.
Playing a Playlist
1. Click on Load Playlist at the bottom of the Library window
2. Select a Playlist and click OK to start the playback.
NNNNooootttteeee

3-22
Manual
PHOTO
This section describes the procedures to view pictures (images), to view pictures
through a Slide Show, to edit a picture, to create an album, and to burn an album
onto a CD.
Click on PHOTO in the Menu Selection Bar.
■
Viewing and Editing a Picture
1. Double-click on Image in the left category pane and double-click on All
Images.
2. The image files are displayed in the right Image window. To zoom-in on an
image, double-click the image file.
PHOTO
Menu
Double-Click An Image File To
Zoom-In on The Image.
Image Window
Image Category
MUSIC
You can listen to the music files
in My Playlist or All musics
while editing an image.
Viewing the Image List
Select View Image List from the menu at the bottom of the zoomed image
screen.
Viewing an Image through the Slide Show or Full Screen
Select Slide Show or Full Screen from the menu at the bottom of the
zoomed-in on image screen.
To exit SlideShow or Full Screen, press the <Esc> key or right-click and then
select Exit SlideShow or Exit Full Screen.
Editing an Image
1. Select an image to edit and select the Edit Image tab.
2. Edit the image using the Shape/Edit/Effect tool and click on Save or
Save Copy.
NNNNooootttteeee

3-23
Chapter 3.Using The Computer
■
Creating an Album
1. Select the Create Album tab.
2. Select an album cover style and click Apply to apply the selected style to the
album cover.
3. Enter the title and contents of the album, insert an image and then click ▶
(Move to next page).
- To insert an image into an album cover, select a file in the All Image pane
on the left and then click the Insert button or double-click the file to be
inserted.
4. Create an album by adding images and image descriptions to the album.
5. When creating an album is complete, click on Save to create the album.
The created album is saved in the My Documents > AVStation premi-
um > Photo > Photo Album folder and will be displayed in the Album
category.
- To view an album, double-click on Image in the left category pane and
double-click on Album. Click on Slide Show in the Image window to view
the images within the album through the Slide Show.
■ Burning an Album onto a CD
1. Double-click on the album to be burnt to CD in the left Album category.
2. Insert a blank CD into the CD-RW drive. When the CD Drive window
appears, click on Cancel.
3. Select Send > Burn CD from the menu at the bottom of the Album window.
4. Enter the CD title in the Burn a CD window and then click OK to burn a CD
with the album.
Create Album Tab
▶
(Move to next page) Button
Enter the Title and
Contents of the Album
Save Button
Insert Button
Slide Show Button

3-24
Manual
MOVIE
This section describes the procedures to play a movie file or a DVD/VCD title.
Click on MOVIE in the Menu Selection Bar
■ Playing a Movie
1. Double-click on Movie in the left category pane and double-click All movies.
2. Double-click a movie file to play it.
MOVIE
Menu
Media Play Control Button
Movie Window
Movie Category
MUSIC
You can listen to the music
files in My Playlist or All
musics while working.
You can adjust the screen size in the View menu.
Playing a DVD Title
To play a DVD title, first install the DVD Power DVD player software.
1. Insert a DVD title into the DVD drive.
2. When the Select Work window appears, select using Samsung
AVStation premium and click OK to play the DVD title.
If the DVD does not automatically play or the DVD title is in the DVD drive,
double-click the Title of the DVD in the DVD / VCD category.
Playing a VCD Title
1. Insert a VCD title into the CD drive.
2. Double-click the Title of the VCD in the DVD / VCD category.
NNNNooootttteeee

3-25
Chapter 3.Using The Computer
Movie Editor (Editing a Movie)
This section describes the procedures for editing a movie.
Click on MOVIE EDITOR in the Menu Selection Bar.
■ Editing a Movie
The procedures for merging two movie files and for inserting transition effects
between movies are described below.
1. Click on MOVIE EDITOR. A new project will open.
2. Double-click Movie in the left category pane and double-click All movies.
3. Drag and drop a movie file to the Storyboard. When a Storyboard appears
in the right pane, drag and drop another movie file to the Storyboard.
▶ To Enter the Title : Click on Text Box from the Title tab, create a text
box by dragging the pointer and enter a title. Enter the title and then
click Apply. The title is inserted at the beginning of the Storyboard.
MOVIE EDITOR
Menu
Storyboard
Work Tab
Create Movie
Movie Category
Background Music
MUSIC
You can listen to the music
files in My Playlist or All
musics while working.
Apply
Title Tab
Applied Title

3-26
Manual
▶ Screen Effect : Select an effect from the Effect tab and drag and drop
the selected effect onto the movie in the Storyboard to
apply the effect.
▶ Transition : Select a Transition effect from the Transition tab and
drag and drop the selected effect onto the movie in the
Storyboard to apply the transition effect.
▶ Background Music : Click on Music and select a music file to apply
the background music to the movie file.
4. When finishing editing a movie, click on Create Movie and click OK
to create the edited movie as a movie file.
The edited movie is saved in the My Documents > AVStation pre-
mium > Movie > Edited Movie folder and will be displayed in the
My Movie category.
Registering a File
By registering multimedia files to the library, you can easily access and manage them
since they will be appear in the corresponding category of either the Music, Image,
Movie categories on the left-hand side of the screen.
The procedures to register an entire folder to the library will be used as an example
below.
1. Click on Register File at the bottom of the screen.
2.
Click on Add by folder, and select the folder to be registered and then click OK.
3. When the registration is completed, click OK.
The registered multimedia folder will be displayed in the music, image, or video
categories of the library.
Select a Transition Effect
and drag and drop it
onto the position to insert
the effect.
Position of the Transition
Effect
Transition
Ta b
To play a file not registered to a category, select File > Open File and
select the file.
NNNNooootttteeee

3-27
Chapter 3.Using The Computer
Using Play Mode
This section describes how to use the Play Mode of AVStation premium.
To use Play Mode, select Mode > Play Mode in the Window Mode Menu Bar.
Alternatively, click the AVS button on the remote control.
■ Play Mode Screen Layout
The initial screen of AVStation premium Play Mode has the following layout.
■ MUSIC
The procedures to play a music file or an audio CD will be described below.
Double-click MUSIC in the initial screen of Play Mode.
Exit Program
Minimize Screen
Menu
Move Bar
This appears only when the
mouse pointer is over it.
Move to the Initial Screen
of Play Mode
Switch to Window Mode
Operation Display Window
Library Window
Category Window
Repeat Button
Track, All Tracks,
Random
Media Play
Control Button
To switch to Window Mode, move the
mouse (or touchpad) and click the
Window icon from the toolbar at the
top of the window.
NNNNooootttteeee
For more remote control use procedures, refer to 'Using the Remote Control'.
(P. 1-14)
NNNNooootttteeee

3-28
Manual
■ PHOTO (Viewing a Picture)
he procedures for viewing pictures (images) and for viewing pictures through
the Slide Show will be described.
1. Double-click on PHOTO in the initial screen of Play Mode.
2. Double-click All Photo from the left category and double-click an image file
in the Library window.
Playing a Music File
1. Double-click a category from the left category window
2. Double-click a music file in the right library window. The music will be
played.
Playing an Audio CD
1. Insert an audio CD into the CD-ROM drive. Audio CD will be displayed
in the library window.
To play an audio CD in the CD-ROM drive, double-click on CD in the category.
2. Double-click Audio CD in the library window. The tracks of the CD will
be displayed.
3. Double-click a track to play it.
To Listen to All Tracks
Select Play All Tracks from the Media Play Control button.
NNNNooootttteeee
Library Window
Category Window
MUSIC
You can listen to the music
files in My Playlist or All
musics while working.
Viewing an Image through the Slide Show or Full Screen
Select Slide Show or Full Screen from the menu at the bottom of the zoomed
image screen
NNNNooootttteeee

3-29
Chapter 3.Using The Computer
■ MOVIE (Playing a Movie)
The procedures to play a movie file or a DVD/VCD title will be described below.
1. Double-click MOVIE in the initial screen of Play Mode.
2. Double-click All Movie from the left category and double-click a video file
in the right pane.
Library Window
Category Window
MUSIC
You can listen to the music
files in My Playlist or All
musics while working.
Playing a DVD Title
1. Insert a DVD title into the DVD drive.
2. When the Select Work window appears, select using Samsung
AVStation premium and click OK to play the DVD title.
If the DVD is not automatically played or the DVD title was in the DVD
drive, double-click the Title of the DVD in the DVD / VCD category.
Playing a VCD Title
1. Insert a VCD title into the CD drive.
2. Double-click the Title of the VCD in the DVD / VCD category.
NNNNooootttteeee

3-30
Manual
Using AVStation now
AVStation now is an integrated multimedia program that allows you to watch
video (pictures, video and movies) and listen to music without booting into
Windows.
Using AVStation now
How to launch AVStation now and the AVStation features will be described below.
■
Launching AVStation now
To launch AVStation now, click the AVStation button.
Alternatively, click the AVS button on the remote control.
■
Exiting AVStation now
1. Press the <Esc> key or right-click to move to the start screen of AVStation now.
2. In the start screen, press the <Esc> key or select Exit.
3. In the Exit window, select Exit.
The use procedures of AVStation now are similar to those of Play Mode of
AVStation premium.
AVStation now only supports the player and view functions. To register files to
the library, use the registration function of AVStation premium.
NNNNooootttteeee
You can only use AVStation now when your computer is turned off or it
is in maximum power saving mode (see P. 5-2)
NNNNooootttteeee
Booting and using the computer when using AVStation now
Select <Go Window> from the Exit window. Your computer will start.
NNNNooootttteeee
AVStation now is provided for some models.
NNNNooootttteeee
For more remote control use procedures, refer to 'Using the Remote
Control'. (P. 1-14)
NNNNooootttteeee
AVStation Button

3-31
Chapter 3.Using The Computer
■
AVStation now Menus
AVStation now consists of the following 3 menus.
▶ MUSIC : Using this menu, you can play a music file or an audio CD.
▶ PHOTO : Using this menu, you can view a picture (image) and view a
picture through the Slide Show.
▶ MOVIE : Using this menu, you can play a video (movie) file or a
DVD/VCD title.
Using AVStation now
The procedures for using AVStation now will be described below.
■
The To Move, Select and Run Menus
In AVStation now, you can use the keyboard, mouse, and remote control.
▶ Moving a Menu or an Item
Press the direction keys on the keyboard or move the mouse to move
the cursor to a menu or item and then click it. Or press the Direction
button on the remote control.
▶ Selecting or Running a menu or an Item
After you move to a menu or item, press the <Enter> key on the keyboard or double-click it. Or press the Enter button on the remote control.
▶ Returning to the Previous Screen
Press the <Esc> or <Backspace> key on the keyboard, or right-click it.
Or press the BACK button on the remote control.
Menu

3-32
Manual
■
MUSIC
The procedures for playing a music file or an audio CD will be described
below.
1. Select the MUSIC menu and select Category. For example, move to
All Music.
2. In the Library window, select a music file to be played.
■
PHOTO
The procedures for viewing pictures (images) and for viewing pictures through
the Slide Show will be described below.
1. Select the PHOTO menu and move to the All Photo category.
2. In the Library window, select an image to view.
Library Pane
Music File
All Music
Category Pane
Repeat Button
Track, All Tracks,
Random
Media Play
Control Button
Media Play Control Button
You can only use the Media Play Control button when a music file is being
played.
Playing Multiple Tracks
1. Play a music file.
2. Move the focus to the left Category pane, and select the Play All button.
Playing an Audio CD
1. Insert an audio CD into the CD-ROM drive, and select CD from the
Category pane.
2. In the right Library window, select a track to be played.
NNNNooootttteeee

3-33
Chapter 3.Using The Computer
■
MOVIE
In the Library window, select a video file to watch.
1. Select the MOVIE menu and select a category. For example, you can select
All Movies by using the direction keys.
2. In the Library window, select a video file to watch.
The selected movie file will be played.
Library Pane
Image Files
All Images
Category Pane
Media Play Control Button
MUSIC
You can listen to the music
files in My Playlist or All
Music while working.
Library Pane
Video Files
All Images
Category Pane
Viewing an Image through the Slide Show or Full Screen
In the lower menu of the zoomed-in image, select SlideShow or Full
Screen.
NNNNooootttteeee

3-34
Manual
■
Tips
▶ Using the Library (File)
AVStation Now can use the library of AVStation premium.
To use the library in AVStation Now, register the library in AVStation premium.
(See ‘Registering a File’ in AVStation premium.)
▶ HDD Category
You can play unregistered files on the hard disk drive in the HDD category of
each menu. (C drive is supported.)
■
Notice
▶ Do not remove the Recovery Solution Program.
Removing the Recovery Solution Program also removes AVStation Now. Once the
program is removed, you cannot reinstall it, therefore take care not to remove the
program.
▶ You cannot use an additionally created Playlist.
You cannot use an additionally created Playlist other than the Playlist
provided with AVStation premium in AVStation now.
▶ A movie file or a movie title not supported by AVStation Now
To play a movie file or a movie title not supported by AVStation Now, please use
AVStation Premium after booting your computer.
▶ For Cases where you cannot preview using the PHOTO/MOVIE
menu
1. When you did not create a Preview in AVStation Premium
(A Preview for a photo or a movie is created when you select the
PHOTO/MOVIE menu in AVStation Premium Full Screen Mode and view the
preview in the Library pane.)
2. When the format of the photo or movie is not supported by AVStation premium.
Playing a DVD/VCD title
Insert a DVD/VCD title into the DVD-ROM drive and select DVD/VCD from
the Category pane.
After a short while, the DVD/VCD title will be played
Using the DVD/VCD Play Control Button
To use the Play Control button while playing a DVD/VCD title, press a key or
move the mouse.
To play a DVD title for the first time using AVStation now, launch the DVD
player in Windows once before starting play.
The region code of a DVD title must be set to Windows status for AVStation
now to play the DVD title properly.
NNNNooootttteeee

3-35
Chapter 3.Using The Computer
Using Samsung Command Center
Samsung Command Center is a program that enables the easy management of software provided for a Samsung computer. You can
view brief descriptions of some programs and you can launch the
programs directly. Samsung Command Center is always hidden
automatically and it appears when you place the mouse cursor in the
right-most position.
Select Start > All Programs > Samsung > Samsung Command
Center > Samsung Command Center.
The Samsung Command Center screen consists of the following 4 areas.
▶ S/W Group Area : You can classify programs into 5 groups, these
being System, Utility, Network, Support, and
Entertainment and manage them.
You can add a file that can be launched directly
from the Desktop or Explorer (Files that have the
extension of .cmd, .bat, .pif, .scf, .exe, .com, .lnk, or
.scr ) by dragging and dropping them.
Clock
SW Group Area
SW List Area
AV Station Area
Samsung Update Plus Area

3-36
Manual
▶ S/W List Area : Shows software included in the S/W group.
You can add a file that can be launched directly from
the Desktop or Explorer by dragging and dropping it.
Some Samsung software is automatically added or
removed from the list when the software is installed or
removed. If you move the cursor over the software in
the list, you can view a brief description and the Run
button to launch.
▶ AV Station Area : This only appears when the AV Station program has
been installed.
You can easily launch the TV, music, movie or album
player of the AV Station program. Drag and drop a
media file from the Desktop or Explorer over any of
the buttons to launch the corresponding player.
▶ Samsung Update Plus Area : When there is new software or a new
driver, the Samsung Update Plus notification
window appears.
If you click on the notification window, Samsung
update Plus is launched and an update is performed
with a percentage number indicating the
progress status.

Connecting to the
Internet
This chapter provides
instructions on connecting
to the Internet.
Chapter 4
Chapter 4

4-2
Manual
Connecting to the Internet
The following options show many ways to connect to the Internet.
An appropriate option should be selected depending on the user’s
working environment and the user’s system specifications.
Option 1 Connecting using a modem and a telephone line.
Service has to be applied for and received from an Internet
Service Provider (ISP) through an Internet service account.
Option 2 Connecting using a High-speed communication
network service, such as ADSL and VDSL.
Service has to be applied for and received from a High-speed
communication network service provider. Receiving Internet
service may require support from specific devices.
Contact the service provider for details.
Option 3 Connecting using a wired LAN
Use a LAN cable that is already installed in your office or
building,
Option 4 Connecting using a wireless LAN
The Internet can be accessed without a telephone line or a LAN
cable if there is a Wireless LAN AP (Access Point) nearby.
My computer Internet Service
Provider
The Internet Provider
The Wireless LAN function is optional.
NNNNooootttteeee

4-3
Chapter 4. Connecting to the Internet
Connecting to the Internet Using a Modem
1. Connect the telephone line to the modem port. Do not use a digital
telephone line.
2. To connect the modem to the Internet, and use e-mail, you have to apply to an
Internet Service Provider (ISP) for an Internet service.
●
For more account information, please contact your ISP.
●
Ask your ISP about Internet fees and the disconnection procedure. If the Internet
connection is not disconnected properly, additional telephone charges may
incur.
NNNNooootttteeee

4-4
Manual
Configuring the Network Environment Settings for Wired LAN Connections
A wired LAN environment is an environment where you can connect to the
Internet using the company’s LAN or with a broadband modem.
1. Connect the network (LAN) cable to the LAN port of the system.
2. Click Start > Control Panel.
3. Select Network and Internet Connections in the [Control Panel] window.
4. Click Network Connections in the [Network and Internet Connections]
window.
5. In the [Network Connections] window, point the mouse pointer to Local Area
Network and click the right touchpad button. Select Properties from the popup
menu that appears.
6. In the General tab of the [Local Area Connection Properties] window, check that
the connecting device field includes the Broadcom BCM 5788 Integrated
driver.

7. In the “This connection uses the following items” field, select Internet Protocol
(TCP/IP), and click Properties.
8. Enter the system’s IP and DNS server addresses on the General tab of the
[Internet Protocol (TCP/IP) Properties] window. If DHCP is used, click “Obtain an
IP address automatically” and “Obtain DNS server address automatically” on the
General tab.
9. Once all of the information is entered in the [Internet Protocol (TCP/IP) Properties]
window, click OK to finish.
4-5
Chapter 4. Connecting to the Internet
①
Check the driver
②
Select “Internet Protocol (TCP/IP)”
③
Click Properties
In the above screen, necessary network components can be added by clicking the
Install button.
NNNNooootttteeee
IP addresses and other information necessary for configuration can be obtained
from the network administrator.
NNNNooootttteeee

4-6
Manual
Using Both DHCP and Static IP Simultaneously
When you are alternatively using networks with either DHCP or static IP addressing, you can use alternative settings that enable simultaneous configurations of
DHCP and static IP to use both of the network connections without reconfiguring.
1. Click Start > Control Panel > Network and Internet Connections >
Network Connections > Local Area Connection, press the right button
of the touchpad, and then select Properties.
2. Select the Internet Protocol (TCP/IP) item, and then click Properties.
3. In the Alternate Configuration tab, click User configured, and then enter
the appropriate values for the following:
(IP address, Subnet mask, Default gateway, Preferred and alternate DNS server,
Preferred and alternate WINS server)
4. When the configuration has been completed, click OK.
Now you can connect to both networks using DHCP and static IP respectively.
This function is provided only when your operating system is Windows XP.
NNNNooootttteeee

4-7
Chapter 4. Connecting to the Internet
Configuring the Network Environment Settings
for Wireless LAN Network
(WLAN)
A wireless network (Wireless LAN) environment is a network environment
that enables communication between multiple computers at home or a
small-size office through wireless LAN devices.
When a computer-to-computer network has been constructed, a computer
that is not connected to the Internet can share the Internet by accessing
another computer connected to the Internet.
(See P. '4-19. Sharing Internet Access')
Wireless network connections can be classified into two categories.
1) Access Point
You can connect to an AP to use the network. This is possible only in an environment equipped with an AP. (See P. 4-8, ‘Connecting to an Access Point (AP)’)
2) Computer–to-computer (ad hoc)
This is also called a peer-to-peer network.
In computer-to-computer wireless networks, you can wirelessly connect 2 or more
computers that have wireless LAN modules. (See P. 4-9, ‘Connecting to
computer-to-computer networks (peer-to-peer or ad hoc)’).
The description in this section refers to the Intel(R) PRO/Wireless 2200BG
Network Connection (hereafter referred to as an 802.11BG card) and the Intel(R)
PRO/Wireless 2915ABG Network Connection (hereafter referred to as an
802.11ABG card) device.
A wireless LAN card is optional. The model of the wireless LAN card is
determined by the relevant product.
To view the installed wireless LAN card, click Star t > Control Panel > Per formance
and Maintenance > System > Hardware tab > Device Manager.
The wireless LAN connection settings will be described on the basis of the
Windows XP Service Pack 2 installed computer.
It is recommended using the default settings provided by Windows XP for the
wireless LAN settings for Windows XP installed computers. To setup using the
software supplied by the wireless LAN card manufacturer, refer to p.4-13 ‘Using
a wireless Network with the Wireless LAN Setting Program’.
To use the wireless network, you have to tur n on the wireless LAN function by
using the Wireless LAN On/Off Button. (See P. 1-8)
NNNoottee
What is an Access Point (AP)?
An AP is a network device that bridges wired and wireless LANs, and
corresponds to a wireless hub in a wired network. You can connect multiple
wireless LAN installed computers to an AP.
NNoottee

4-8
Manual
Connecting to an Access Point (AP)
This section describes how to connect to an AP. You can use the network when you
are connected to an AP.
1. Right-click on the Wireless Network Connection ( ) icon on the taskbar,
and select View Available Wireless Networks.
2. Select an AP (E.g. Test) to connect to and click Connect.
If there is a configured network key for the AP to connect to, the Enter Network
Key window appears.
Enter the Network Key in the window and then click the Connect button.
Now when Connected in AP is displayed, and you can access the network.
For more detailed information such as the network key (encryption key), ask your
network administrator.
NNoottee
Checking the connection status.
Move the mouse pointer over the Wireless
Network Connection ( ) icon on
the taskbar, and the connection status is displayed.
NNoottee
NNoottee
When a network key is not
defined for a selected AP,
click on Link to display
the warning message box.
Then click Connect again in
the box.

4-9
Chapter 4. Connecting to the Internet
Connecting to computer-to-computer networks
(peer-to-peer or ad hoc)
In computer-to-computer wireless networks, you can wirelessly connect 2 or more
computers that have wireless LAN modules.
Using this method, a computer that is not connected to the Internet can share the
Internet by accessing another computer connected to the Internet.
(See P. 4-19. 'Sharing Internet Access')
You can connect by completing the following steps:
▶
Step 1. Set up a computer-to-computer network on a computer.
▶
Step 2. Connect to the configured computer from other computers.
O Step 1. Setting up a computer-to-computer network
1. Right-click on the Wireless Network Connection ( ) icon on the taskbar,
and select View Available Wireless Networks.
2. Click Change the order of Preferred Networks.

4-10
Manual
3. On the Wireless Networks tab, click Advanced.
4. Clear ‘Automatically connect to non-default network’ check box,
if it is selected.
Select ‘Computer-to-computer (ad hoc) networks only’,
and click Close.
5. In the Wireless Networks tab, click Add.
6. Enter the network name (e.g. samsung), and unselect ‘The key is provided
for me automatically’. Enter the encryption key in the Network key field,
and click OK.
To prevent a network connection from an unauthorized user, it would be better to
configure a network key (encryption key). A network key consists of 5 ~ 13
alphanumeric characters (e.g. magic), or of 10 ~ 26 hexadecimal numbers
(a hexadecimal number is represented by numbers ‘0’ to ‘9’ or letters ‘a’ to ‘f’).
NNoottee

4-11
Chapter 4. Connecting to the Internet
7. Check that the configured network name (e.g. samsung) is in the ‘Preferred
networks item’, and click OK.
Now your wireless network setup has been completed.

4-12
Manual
O
Step 2. Connecting to the configured computer
1. Right-click on the Wireless Network Connection ( ) icon on the taskbar,
and select View Available Wireless Networks.
2. Select the wireless network name (e.g. samsung) specified in “Connecting to
computer-to-computer networks (peer-to-peer or ad hoc)”, and click Connect.
3. Enter a cryptographic key in the network key box and click Connect.
When connected to the wireless network, the system displays Connected in the
selected network of the Network Connection window.
If the network key is not configured in “Connecting to computer-to-computer
networks (peer-to-peer or ad hoc)” on P. 4-9, just click Connect, without any
keystrokes.
NNoottee
Checking the connection status.
Move the mouse pointer over the Wireless Network Connection ( ) icon
on the taskbar, and the connection status is displayed.
NNoottee

4-13
Chapter 4. Connecting to the Internet
Wireless Network Setup Using the Wireless LAN SetupProgram
You can use a wireless LAN by using a wireless LAN configuration program (PROSet)
provided separately.
To use wireless network connection, complete the following procedures.
Step1. Install the wireless LAN configuration program (PROSet).
Step2. Configure wireless network settings through the wireless LAN configuration
program.
O Step 1. Installing the wireless LAN configuration
program (PROSet)
You can install the Wireless LAN Client Manager program by using the System
Software Media. Insert the System Software Media into the CD-ROM drive and
then install the Wireless LAN program.
O Step 2. Using the wireless LAN configuration
program (PROSet)
Double-click the wireless LAN program ( ) icon on the taskbar.
(Or, click Star t > All Programs > Intel PROSet Wireless > Intel
PROSet Wireless.)
Configure wireless network settings in PROSet following the procedures below.
To connect to an Access Point
To connect to an access point or existing computer-to-computer (Ad Hoc)
network, refer to the following procedures. (To create a new computer-to-computer
network, refer to the following P.4-15 To create computer-to-computer
(Ad Hoc) network section.)
In some languages, some buttons on the window may not be displayed. If this is
the case, resize the window to use the program.
NNoottee

4-14
Manual
1. In Available Networks, click on Refresh.
2. Select the name of desired access point or computer-to-computer network to
connect from the searched available networks list, and click Configure.
3. Enter Profile Name and click Next.
4. In the Search Security Settings window, the wireless network security search
message will appear. Click Next.
5. Enter the network authentication, data encryption (WEP),
encryption level, key index, and wireless security password
configured for the target access point or computer-to-computer network in the
Security Settings window, and click Next.
6. The Done window appears, click OK.
When a wireless connection to an access point is established, connection icon
( ) appears in front of the name of connected profile.
If your desired network does not appear, click Refresh.
An access point is represented by the ( ) icon, and a computer-to-computer
network is represented by the ( ) icon. An ( ) icon is displayed in front of an
access point or a computer-to-computer network with configured security settings.
NNoottee
The network authentication, data encryption (WEP), key index, and password of a
access point are configured in the access point management program. For information on the security information, check the security settings of the access point
or ask your wireless network administrator.
To connect to an existing computer-to-computer (Ad Hoc) network, enter the
password configured when creating the computer-to-computer network for the first
time. You do not need to enter network authentication or key index.
Security Settings
Network authentication : The network authentication option includes
Open System and Shared Key. When you select Open System, no authentication is applied (however, encryption is supported). When you select Shared
Key, a WEP key is used for authentication. The default setting is Open System
Data encryption (WEP) : The IEEE 802.11 WEP (Wired Equivalent Privacy)
standard defines two levels of encryption, a 64-bit key (this is sometimes
represented by 40bits) and a 128-bit key.
Key index : Select the current encryption key index used by the access point
out of 1 to 4.
To use encryption key : Click Use pass phrase to activate, and enter 5
(for 64-bit) ~ 13 (for 128-bit) alphanumeric characters (represented by 0-9,
a-z, or A-Z).
NNoottee

4-15
Chapter 4. Connecting to the Internet
To create a computer-to-computer (Ad Hoc) network
To create a new computer-to-computer (Ad Hoc) network or to connect to a
hidden access point (Stealth/Closed Mode), refer to the following procedures.
1. In Profiles, click on Add.
2. Enter Profile Name and Network name (SSID), select Operating
Mode, then click Next.
3. Configure password setting to be used for computer-to-computer network
connection in the Security Settings window.
To connect to an access point, enter the network authentication, data
encryption (WEP), encryption level, key index, and wireless security password configured in the access point.
4. When a profile creation is completed, the new created profile appears in the
profiles list. Select corresponding profile, and click Connect to connect to the
created profile.
When a wireless connection to the created profile is established, the connection
icon ( ) appears in front of the name of the connected profile.
A hidden access point is an access point that exists, but is configured not to be
detected by the scan operation to prevent access attempts from unauthorized
users.
NNoottee
What is a network name (SSID)?
Network name (SSID) is a name that a wireless adapter uses for identifying
connection. Enter the name of computer-to-computer network to create (e.g.,
samsung) or the name of access point to connect. The network name identifies
cases. (capital and lowercase) For the name of access point, check the settings of
the access point, or ask your wireless network administrator.
Operating Mode:
Network (Infrastructure) - Connect to an Access Point : Select to
connect to an access point.
Device to device (Ad hoc) - Connect directly to other computers :
Select to create a computer-to-computer
(Ad Hoc) network.
NNoottee
It is recommended to configure data encryption for security purposes when creating a computer-to-computer network connection profile. For more information on
security settings refer to the security settings in Connecting to AP or Help.
When you are creating a computer-to-computer network connection profile, the
network authentication setting is disabled.
NNoottee

4-16
Manual
Using Samsung Network Manager
Samsung Network Manager is a program that has been developed to enable users
to use the network easily.
Samsung Network Manager provides the following features.
You can easily set up the network and printer settings.
You can immediately use the network without defining new
network settings again after moving locations.
By setting the network settings (IP address, printer settings, etc.) for each
location, you can immediately access the network without following network
setting procedures each time regardless of your location.
You can easily share Internet Access.
You can share your Internet connection by setting up a computer with 2 LAN
interfaces (wired and wireless, or 2 wired LAN) as the sharing server. Then,
you can access the Internet on a sharing client by connecting to the sharing
server.
You can diagnose the network status.
You can diagnose the network status when the network is not properly
connected.
Using the Network
This section describes the procedures to connect to the Internet by setting up a
network. The setting up procedures include the procedures to add a printer to the
network.
▶ Setting Up a Network
1. To use a wired LAN, connect the LAN cable to the LAN port.
To use a wireless LAN, press the <Fn> and <F8> key combination simultaneously to enable a wireless LAN. When the wireless LAN is enabled, the
Wireless LAN Operation LED ( ) lights up.
2. Run Samsung Network Manager.
Select Start > All Programs > Samsung > Samsung Network
Manager > Samsung Network Manager or double click the
Samsung Network Manager ( ) icon on the Desktop.
3. Click the Add button.
4. Select a network location icon and enter the name of the location
(e.g. Home). Click the Next button.
The setting up procedures are different for wired and wireless LAN connections.
To use a wireless LAN, there should be a wireless LAN AP available nearby.
NNNNooootttteeee

4-17
Chapter 4. Connecting to the Internet
5. Select Internet direct connection and click the Next button.
6. Select the LAN device, setup the IP address and click the Next button.
7. When the Printer Setting window appears, click Finish.
To add a printer, click Add Printer. The Add Printer Wizard appears. Set
up the printer according to the instructions displayed on the screen.
When the printer has been added, click the Show printer button, select the
newly added printer and then click the Finish button.
Select Device
Setup IP Address
Select Device
Select a device to be connected to the Internet. Select either Wired LAN or Wireless
LAN.
Setting up the IP Address
To allocate an IP address automatically (DHCP), select Get IP Automatically.
To use a static IP address, unselect Get IP Automatically and enter an IP
address. For IP address information, ask your network administrator.
NNNNooootttteeee
To not add a printer, select No Default Printer and then click the Finish
button.
When the network setting is complete, the 'Do you want to move to
newly added location now?' message appears. If you select 'Yes', the
network settings for the added location are applied.
When the network settings for the added location are applied, the added
place and the corresponding network connection information is displayed in
The detailed Information for window.
NNNNooootttteeee

4-18
Manual
When the network setting is complete, an icon for the added location is created
within the Saved Locations window. Now you can use the Internet or add a new
network location.
Menu
Current Place
Information
Wireless LAN AP Connection Procedures
To use a wireless LAN, first connect to a wireless LAN AP and then you can
access the network even when moving location. Or moving location and then you
can access the network even when connecting to a wireless LAN AP.
1. Right-click over the Wireless Network Connection ( ) icon on the
Taskbar and click View Available Wireless Networks.
2. Select an available wireless network (e.g. SAMSUNG) and click the Connect
button. For information on available wireless LAN APs, ask your network
administrator.
3. The network key (security key) input window appears.
- If a network key has been set for the wireless LAN AP, enter the network key and
click the Connect button. For the network key information, ask your
network administrator.
- If no network key has been set for the wireless LAN AP, click the Connect
button without entering the network key.
4. When the computer is connected to the wireless LAN AP, the Connected
message will appear on the Wireless Network icon in the Taskbar.
NNNNooootttteeee
Saved Locations
Available AP
Connect

4-19
Chapter 4. Connecting to the Internet
▶ Using the network after moving location
By setting the network settings (IP address, printer setting, etc.) for each location,
you can immediately access the network without performing the network setting
procedures regardless of your location.
1.
Run Samsung Network Manager when connected to the
Internet.
2. Select an icon that represents the corresponding location from the Saved
Locations window and then click Move.
3. When the network settings of the selected location are applied, the new
location and the network connection information are displayed in the The
detailed Information for window.
Sharing Internet Access
This section describes the procedures to share Internet Access.
To share Internet Access, you first have to define a sharing server and a sharing
client. When the setup is complete, you can access the Internet from the sharing
client by connecting to the sharing server.
As an example, Internet sharing procedures for [Connection 1], which connect
the sharing server and the Internet through a wired LAN and connect the sharing
server and the sharing client through a wireless LAN, are described below.
Sharing Server : A computer with 2 LAN interfaces that provide a function to
share Internet Access.
Sharing Client : A computer that uses the Internet by
connecting to a sharing server without itself having a direct
connection to the Internet.
You can connect a sharing server and a sharing client as follows. (See Figure 5
on page 4-17.)
To connect a sharing server and a sharing client using a wired LAN, connect the
computers with a LAN cable first.
To connect through a wireless LAN, press the <Fn> and <F8> key combination
simultaneously to enable the wireless LAN. When the wireless LAN is enabled, the
Wireless LAN Operation LED ( ) lights up.
NNNNooootttteeee
Sharing Server
Sharing Client
External Internet
Client Device
Device
Connection 1 Wired LAN Wireless LAN
Connection 2 Wireless LAN Wired LAN
Connection 3 Wired LAN Wired LAN
Connect a sharing client
with the device that is the
same as the client device
of the sharing server.

4-20
Manual
▶ Setting Up a Sharing Server
1. Run Samsung Network Manager on the computer to be used as the
sharing server.
2. Click the Add button.
3. Select a network location icon and enter the name of the location
(e.g. Home). Click the Next button.
4. Select Internet direct Connection for sharing and click the Next button.
5. Set up the network device to be connected to the external Internet. Determine
whether to use a firewall and select a network device to be connected to the
external Internet (e.g. Wired LAN). Set the IP address and then click the Next
button.
6. Select a network device to connect to the sharing client (e.g. wireless LAN) and
click the Next button.
7. The setup information is displayed. Confirm the settings and click the Next
button.
8. When the Printer Setting window appears, click Finish.
For the printer setup procedures, refer to Setting Up a Network on page 4-17.
When the Shared Server setting is completed, set up the shared client.
Determine whether to use a firewall
Select a device
Set an IP address
·To protect against external intrusion attempts, using a firewall is recommended.
·For more information on selecting a device and setting the IP address, refer to
the description of item 6 of Setting Up a Network on page 4-16.
NNNNooootttteeee
To Share Internet Access through a Wireless LAN
·In the Select Device field, select Wireless.
·In the Wireless Connection Name (e.g. Samsung) field, enter the network name.
·To use the network key (security key), select the ‘Use Network Key,,,’option and
enter a network key. Remember the network key because you have to re-enter the key
on the sharing client to connect to the sharing server.
NNNNooootttteeee

4-21
Chapter 4. Connecting to the Internet
▶ Setting Up the Sharing Client
1. Run Samsung Network Manager on the computer to be used as a
sharing client.
2. Click the Add button.
3. Select a network location icon and enter the name of the location.
Click the Next button.
4. Select Internet Sharing and click the Next button.
5. Confirm the network device to be connected to the server and click the Next
button.
6. The setup information appears. Confirm the information and click the Next
button.
7. When the Printer Setting window appears, click Finish.
For the printer setup procedures, refer to Setting Up a Network on page 4-
17.
When the settings are completed, you can use the Internet on the shared
client.
·
To connect through a wireless LAN, select Internet Sharing - Wireless.
·To connect through a wired LAN, select Internet Sharing - Wired.
NNNNooootttteeee
·To connect through a wireless LAN, enter the wireless connection name
(e.g. Samsung) you entered in the sharing server. If you have set a network key
(security key) for the sharing server, enter the network key.
NNNNooootttteeee
·To access the Internet from the sharing client, the sharing server has to be on.
·To use the Internet on the sharing client, select a sharing client icon from the
Location List window and then click the Move button.
·If the connection is broken while using the Internet on the sharing client, click the
Ap Active from the Wireless menu to reestablish the connection.
NNNNooootttteeee

4-22
Manual
Network Status Diagnosis
You can diagnose the network status when the network is not properly connected.
1. Run Samsung Network Manager.
2. Select Diagnose Status from the Manage menu.
3. The Network Connections figure window appears. Click the Start button to
start the network diagnosis.
4. When the diagnosis is complete, out of order devices are marked by the
exclamation mark icon. For detailed device status, read the description in the
lower part of the window.

4-23
Chapter 4. Connecting to the Internet
Using Network Services
While the computer is connected to the network, you can use network
services to share files, folders, and printers.
Sharing files or folders
This section describes how to share files and folders between computers connected to
the network.
To share files, complete the following procedures:
▶
Step 1. Configuring the sharing of files and folders on a computer.
▶
Step 2. Accessing shared files and folders from another computer.
Network services are provided for the computers that are connected to the
network through wired or wireless network connections. (See Pages 4-3, 4-7,
Configuring Network Environment Settings)
NNNNooootttteeee
CCCCaaaauuuuttttiiiioooonn
nn
When a file or folder is shared, anyone connected to the network can open and delete
the shared file or folder.
Configure a file sharing network only when the network is secure, and do not share
important data.

4-24
Manual
■
Step 1. Configuring Sharing
1. Right-click the target file or folder to share in My Computer, and select
Sharing and Security.
2. Click ‘IF you understand the security risks but want to share files
without running the wizard, click here’.
3. Select ‘Just enable file sharing’, and click OK.
4. In the ‘Network sharing and security’ field, select ‘Share this folder on the
network’, enter the share name, and click OK.
The file and folder sharing configuration has been completed.
It has the same security effect as that of the ‘Network Setup Wizard’.
This screen does not appear if Internet Sharing Network Wizard has been
installed in the computer-to-computer wireless network environment.
NNNNooootttteeee
CCCCaaaauuuuttttiiiioooonn
nn
Be cautious when selecting ‘Allow network users to change my files’ since other network users can change the files in the shared folder.

4-25
Chapter 4. Connecting to the Internet
■
Step 2. Using Shared Files or Folders
This section describes how to access shared files or folders if your computer is a
member of the same workgroup.
1. Click Start > My Computer. Under Other Places, click My Network
Places in your computer.
2. Click ‘View workgroup computers’, and click the desired computer to
access the shared file.
If your computer is a member of another workgroup:
1. Click Other Places > Microsoft Windows Network.
2. Click the desired workgroup.
3. Click the desired computer to display the shared files or folders.
NNNNooootttteeee

4-26
Manual
Sharing Printers
This section describes how to share a printer between computers connected to a network.
To share a printer, complete the following procedures:
▶
Step 1. Configure printer sharing in the computer connected to the printer.
▶
Step 2. Add and use the shared printer in other computers on the network.
■
Step 1. Configuring Printer Sharing
1. From the computer connected to the printer, click Start > Printers and
Faxes.
2. Right-click the printer you want to share, and click Sharing.
3. Select ‘Share this printer’, enter a share name for the shared printer, and
click OK.

4-27
Chapter 4. Connecting to the Internet
4. In the Printers and Faxes window, you will find the printer icon has been changed
to another icon on a hand.
■
Step 2. Adding and Using a Shared Printer
1. From a different computer that wants to use the shared printer, click Start >
Printers and Faxes.
2. Click Add a printer.
3. In the Add Printer Wizard, click Next.
4. Select ‘A network printer, or a printer attached to another computer’,
and click Next.
5. Select ‘Browse for a printer’, and click Next.
6. Select the workgroup or computer, select the desired printer, and click Next.
If you cannot find the desired printer, try again after a while.

4-28
Manual
7. Read the warning about a shared printer, and click Ye s to install the shared
printer.
8. Select Yes for ‘Do you want to use this printer as a default printer?’, and click
Next.
9. Click Finish.
10. When the printer sharing configuration has been completed, the shared printer
appears in the Printers and Faxes window.
Now you can print using the shared printer even if your computer is not directly connected to a printer.

4-29
Chapter 4. Connecting to the Internet
Using Bluetooth Devices (Optional)
You can transfer files between Bluetooth devices, use the Internet, and construct a Personal Area Network. In addition, you can use a wireless keyboard, wireless mouse, and a wireless printer that have the Bluetooth function.
■ The following functions are provided by the
Bluetooth software.
▶
Transferring files
You can transfer files between Bluetooth devices such as computers, mobile
phones, PDAs (Personal Digital Assistant), etc.
For more detailed procedures on transferring files, refer to "Send and
Receive files to/from a Bluetooth device" of the Bluetooth On-line
help.
▶
Using the Internet via a mobile phone
You can connect to the Internet through your mobile phone after connecting it
to a computer which is connected to the Internet.
For more detailed procedures on using the Internet, refer to "Install a
Bluetooth mobile phone" and "Create a Bluetooth connection
to the Internet using a Bluetooth mobile phone" of the Bluetooth
On-line help.
▶
Using a wireless keyboard and mouse
You can use a wireless keyboard and mouse which have the Bluetooth
function.
For more detailed procedures on using a wireless keyboard and mouse, refer
to "Install a Bluetooth keyboard" and "Install a Bluetooth
mouse" of the Bluetooth On-line help.
▶
Using a wireless printer
You can use a wireless printer if the printer supports Bluetooth HCRP
(Hardcopy Cable Replacement Profile).
For more detailed procedures on using a wireless printer, refer to "Install a
Bluetooth printer" of the Bluetooth On-line help.
You can only use the Bluetooth communication function between devices (computers, mobile phones, PDAs, printers, etc.) which support Bluetooth.
Bluetooth Device On-line Help
For more detailed procedures on using the Bluetooth function, click Start > Help
and Support > Network and the Web > Networking > Wireless
networking > Bluetooth devices, and view the descriptions.
NNNNooootttteeee

4-30
Manual
▶
Using a Personal Area Network
You can exchange files between computers by connecting to the shared folder of another computer via a Personal Area Network.
For more detailed procedures on using the Personal Area Network, refer to
"Join a personal area network", "Provide a name for your
computer on a personal area network" and "Bluetooth person-
al area networking overview" of the Bluetooth On-line help.
▶
Sharing data with a Palm Hand-held PC or a Pocket PC
You can transfer data to and from a Palm Hand-held PC or Pocket PC.
For more detailed procedures on sharing data, refer to "Installing a Palm
handheld computer using Bluetooth technology" and "Installing
a Pocket PC using Bluetooth technology" of the Bluetooth On-line
help.
■ Precautions
▶
Please do not send files larger than 60MB when transferring files through a
File Transfer Function or Personal Area Network. Sending a file larger than
60MB may fail due to an unstable Bluetooth connection.
▶
When using the Personal Area Network function, other computers may not
appear in My Network Places. If you cannot see other computers after 5 minutes, click "Start > Search > Computers or people" and enter the
name of a computer and search for it.
For procedures to view the name of your computer, refer to "Provide a
name for your computer on a personal area network" of the
Bluetooth On-line help.

System Management
This chapter provides
information on efficient
computer management.
Chapter 5
Chapter 5

5-2
Manual
Managing Power
Use Power Options to save power consumption. You can switch Standby
Mode while you are not using your computer or configure the system
components to shut it down on a specified time.
Specifying Power Save Time
You can specify Turn Off Monitor, Turn Off Hard Disk, System Standby Mode,
and Maximum Power Save Mode.
Select Start > Control Panel > Performance and Maintenance >
Power Options > Power Schemes tab. Then specify time in each item and
click OK.
Monitor Off
The LCD display goes into Power-Saving
mode after the specified period of time.
Hard Disk Off
The Hard Disk goes into Power-Saving
mode after the specified period of time.
Standby Mode
If the computer is not used for the specified
period of time, the monitor and hard disk
drives are turned off to reduce power
consumption.
Hibernation Mode
Saves the current working status onto the
hard disk and turns the computer off.
Pressing the Power button restores the
computer to the previous working status.
Press Power button to use computer again in Standby Mode or Hibernation
Mode.
You can also reserve Tur ning Computer Off, Maximum Power Saving Mode, Hold
Mode, etc. by selecting System > Computer Scheduling in the EasyBox program.
(See P. 3-12.)
If you change the power settings in the Battery Manager program, the settings of
the 'Power Options Properties' window are automatically changed accordingly
(see P. 5-6).
NNNoottee
The Power Setting is set to BatteryMgr-Normal Mode. Batter yMgr-Normal Mode
extends the battery use time when using battery power, and optimizes the Intel
Speedstep feature. Since it automically optimizes the processing speed of the
system to minimize power consumption, you may experience slower operations
when using battery power than when using AC power. To use BatteryMgr-Normal
mode in the Windows system, please install the Battery Manager program by
using the System Software Media.
NNoottee

5-3
Chapter 5. System Management
Using the Power button
You can configure the function of the power button.
Click Start > Control Panel > Performance and Maintenance >
Power Options and select the Advanced tab.
Configure the Power button function.
Configuring the function of the <
fn
>+< >
key combination.
CCaauuttiioon
n
When the Power button is configured to put the system into Power-Saving Mode,
manually shutting down the computer requires the Power button to be pressed and
held for more than 4 seconds.

5-4
Manual
Using the Battery
Please refer to the following instructions when running the computer on
battery power without connecting the AC power.
This computer uses smart rechargeable Lithium-Ion (Li-Ion) battery.
Ejecting and Attaching Battery
1. Shutdown system and close LCD.
2. Put the computer upside down.
3. Pull the two battery latches outward
( ),
then remove the battery.
4. To install the batter y again, slide the battery into the system as below. The battery
latch moves inward, and fixes the battery automatically.
CCaauuttiioon
n
Please read the instructions on the battery before use.
Please refer to the system operation environment (Page A-2) of this manual and
operate and store the battery at room temperature.
battery latch

Monitoring the Battery Charge
You can view the batter y charge status by completing the following procedures.
■
Using the shortcut key to view
Press the <fn> + < > key combination on the keyboard and then the current
power source and the current remaining battery charge are displayed at the top
left of the screen.
■ To view on the battery
Click the PUSH button on the battery. The remaining battery charge (%) will be displayed.
■ To view through the Control Panel
Select Start > Control Panel > Performance and Maintenance > Power Option > Power
Measure tab.
Then you can view the current power source and the current remaining battery charge.
5-5
Chapter 5. System Management
Remaining Battery Charge
Power supply status
CCaauuttiioon
n
Using the battery
Battery is an expendable supply, so when you use it for a long time,
the capacity/battery life is shortened. If the batter y life time is reduced to under half of
the initial time, we recommend that you purchase a new battery to use.
Battery Warning
You will hear an alar m when the remaining batter y charge is under 10%. Connect
the power cable or turn off the computer and install a fully charged battery.
When the remaining battery charge is under 3%, the computer automatically
saves current work and turns off. This may be different according to the settings in
Control Panel > Performance and Maintenance > Power Options
> Alarms tab.
NNoottee
Slightly press PUSH button.

5-6
Manual
Extending the battery use time
■
Using the Battery Manager
Battery Manager is a power management program that enables using batter y
power efficiently.
You can easily change the power mode by selecting an optimized power mode
and manually optimizing the battery use time by setting each option.
Click on Start > All Programs > Samsung > Samsung Battery
Manager > Samsung Battery Manager
▶
Maximum Battery Saving Mode :
This mode is appropriate for cond
tions which require the maximum battery use time.
This may degrade the performance of the system.
▶
Normal Mode :
This mode is appropriate for normal conditions.
Both system performance and battery use time are
optimized.
▶
Maximum Performance Mode :
This mode is appropriate for
conditions that require maximum system performance.
Therefore, the battery usage time may be reduced in
this mode.
▶
Custom Mode : In this mode, a user can configure a detailed configuration to
save the battery usagetime.
You can adjust the LCD brightness, the system standby
time, the screen color quality, and the graphic mode
values.
■
Decreasing the LCD Brightness
Decreasing the LCD brightness by pressing the <Fn>+< > key combination
on the keyboard or adjusting the brightness in the
Battery Manager program extends the batter y use time.
Decreasing the LCD brightness by one level extends the battery use time by
3~5% (10~20 minutes). (The battery use time is determined by the
corresponding model.)
Select the Power Mode.
Power Saving Effects
You can only change the
detailed configuration in
Custom Mode.
 Loading...