

Page 1

quick guide
CONV ROAST BROIL
1. Press UPPER (Skip this step
in single mode).
2. Press CONV.ROAST. 2. Press BROIL.
1. Press UPPER (Skip this step
in single mode).
For full information, please refer to the User Manual.
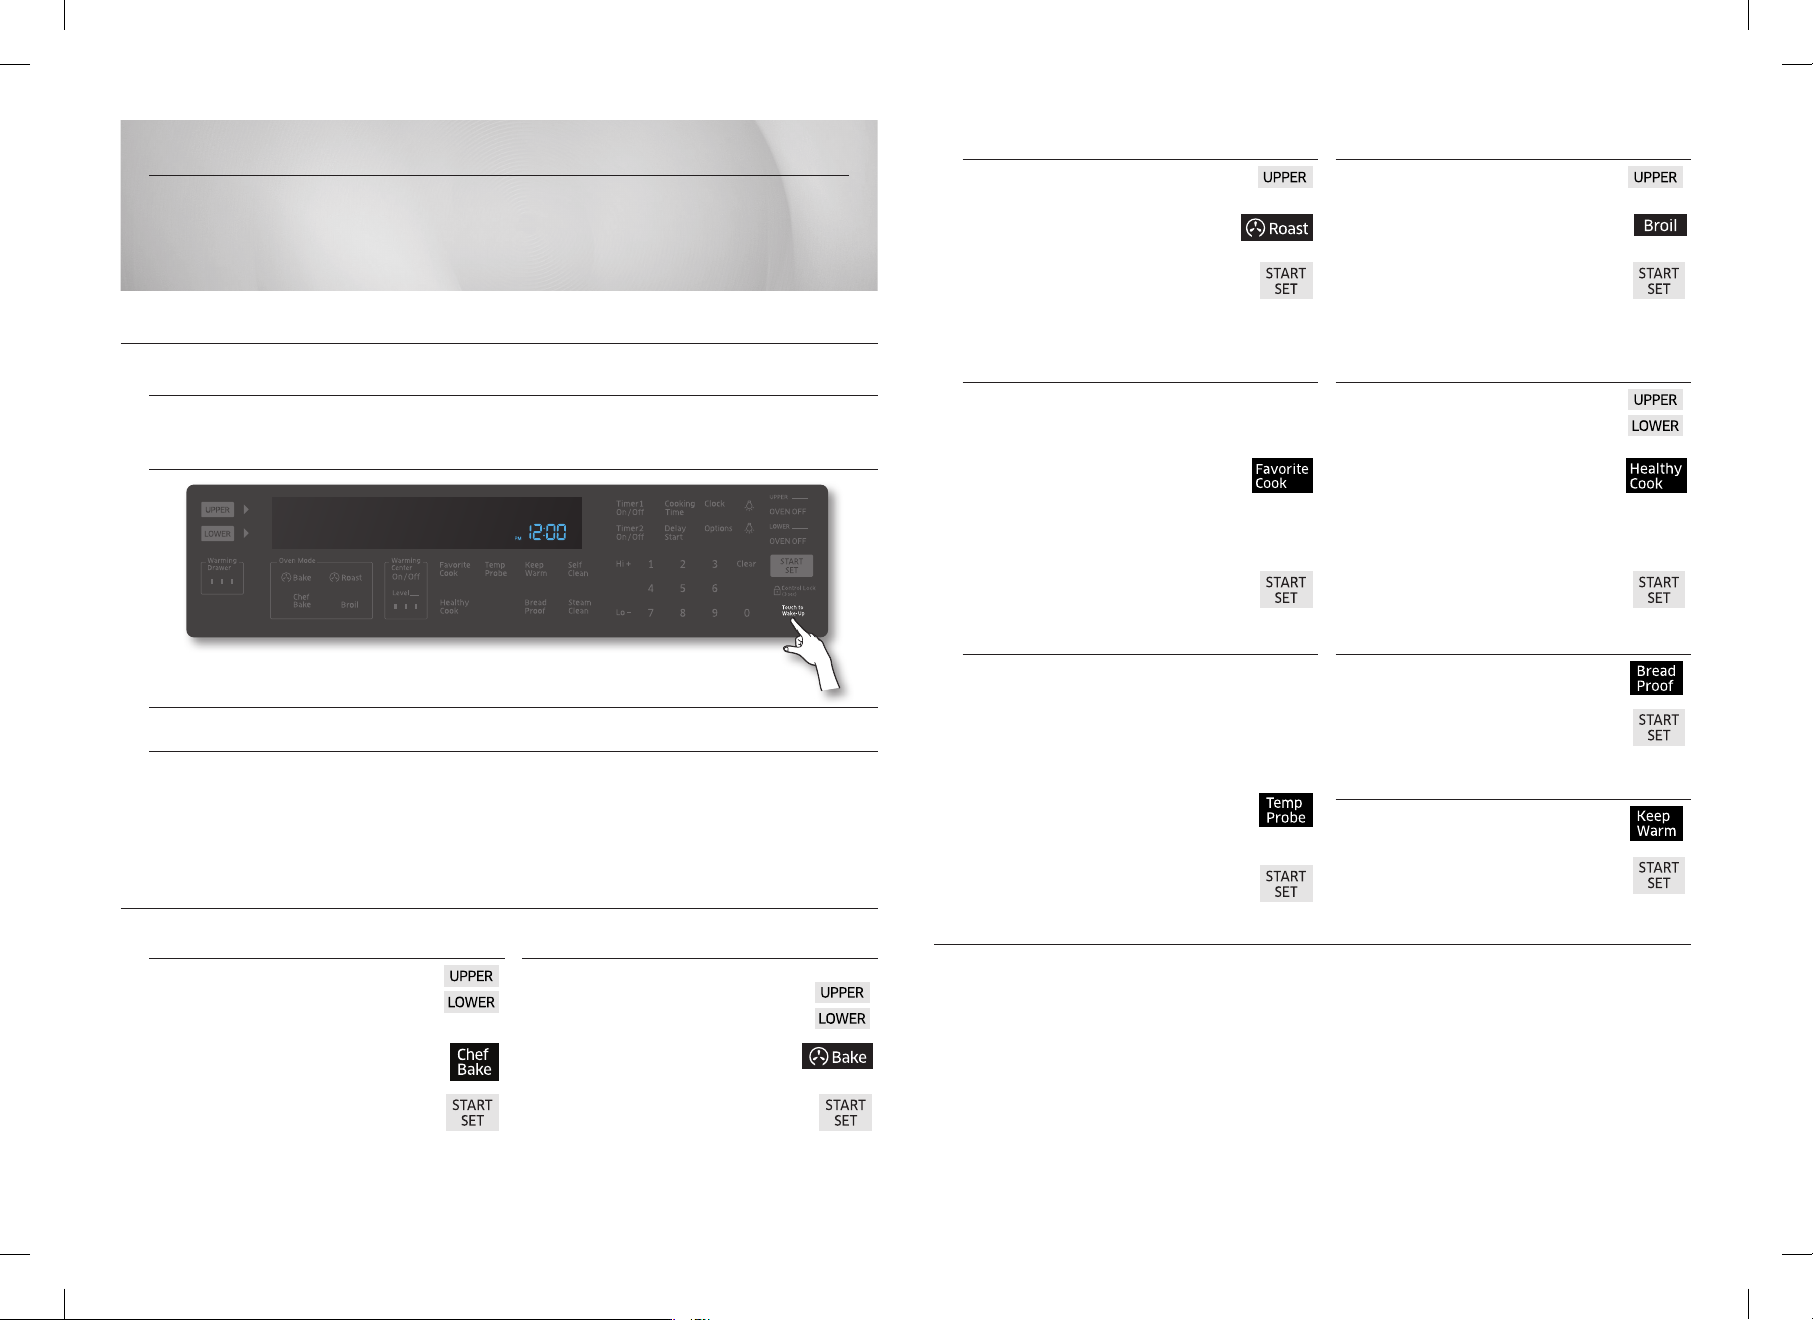
CONTROL PANEL DISPLAY MODES
Sleep Mode
Your control panel will remain in a sleep mode when not in use. Only the clock will display.
You will need to wake the control panel to begin any function.
Wake Mode
To wake the control panel, touch the wake-up key. After 2 minutes without activity (or one
minute when the oven is operating in standby mode), the control panel will return to Sleep
mode. User preferences are available in this mode as well as timers, the oven light, and the
control lock.
3. Press START SET. 3. Press START SET.
• The oven door must be closed
during broiling.
FAVORITE COOK HEALTHY COOK
1. Choose cooking mode and additional
option.
2.
Press FAVORITE COOK the
number of times that corresponds
to the position in which you want
to store the setting.
3. Press START SET. 4. Press START SET.
1.
Press UPPER or LOWER
(Skip this step in single mode).
2. Press HEALTHY COOK.
3. Press NUMBER PAD(1~5)
which you want to set.
TEMP PROBE BREAD PROOF
1.
1. Push the tip of the probe into food and
place in the oven.
2.
Insert the probe plug into socket.
3. Choose the desired cooking function
(Chef Bake, Conv.Bake, Conv.Roast).
4. Press TEMP PROBE.
5. Set the desired temperature.
6. Press START SET.
Press BREAD PROOF.
2. Press START SET.
KEEP WARM
1.
Press KEEP WARM.
2. Press START SET.
COOKING FEATURES
CHEF BAKE CONV BAKE
1.
Press UPPER or LOWER
(Skip this step in single mode).
2. Press CHEF BAKE. 2. Press CONV.BAKE.
3. Press START SET. 3. Press START SET.
Manual guide_NE58H9950WS_AA_AC_DG68-00530A-00_EN.indd 1 2014-02-11 �� 3:05:46
1.
Press UPPER or LOWER
(Skip this step in single mode).
USING THE OPTIONS FUNCTION
This function enables you to control various electronic control options. These options include temp
adjust, temp unit, auto conversion, 12 hour time of day or 24 hour time of day, 12 hour energy
saving, language, sound on/o, and demo mode.
The option menu is only available when the oven is not being used (not cooking).
1. Temp Adjust 5. 12 hour energy saving
2. Temp Unit 6. Language
3. Auto Conversion 7. Sound On/O
4. Time of Day 8. Demo mode
Page 2
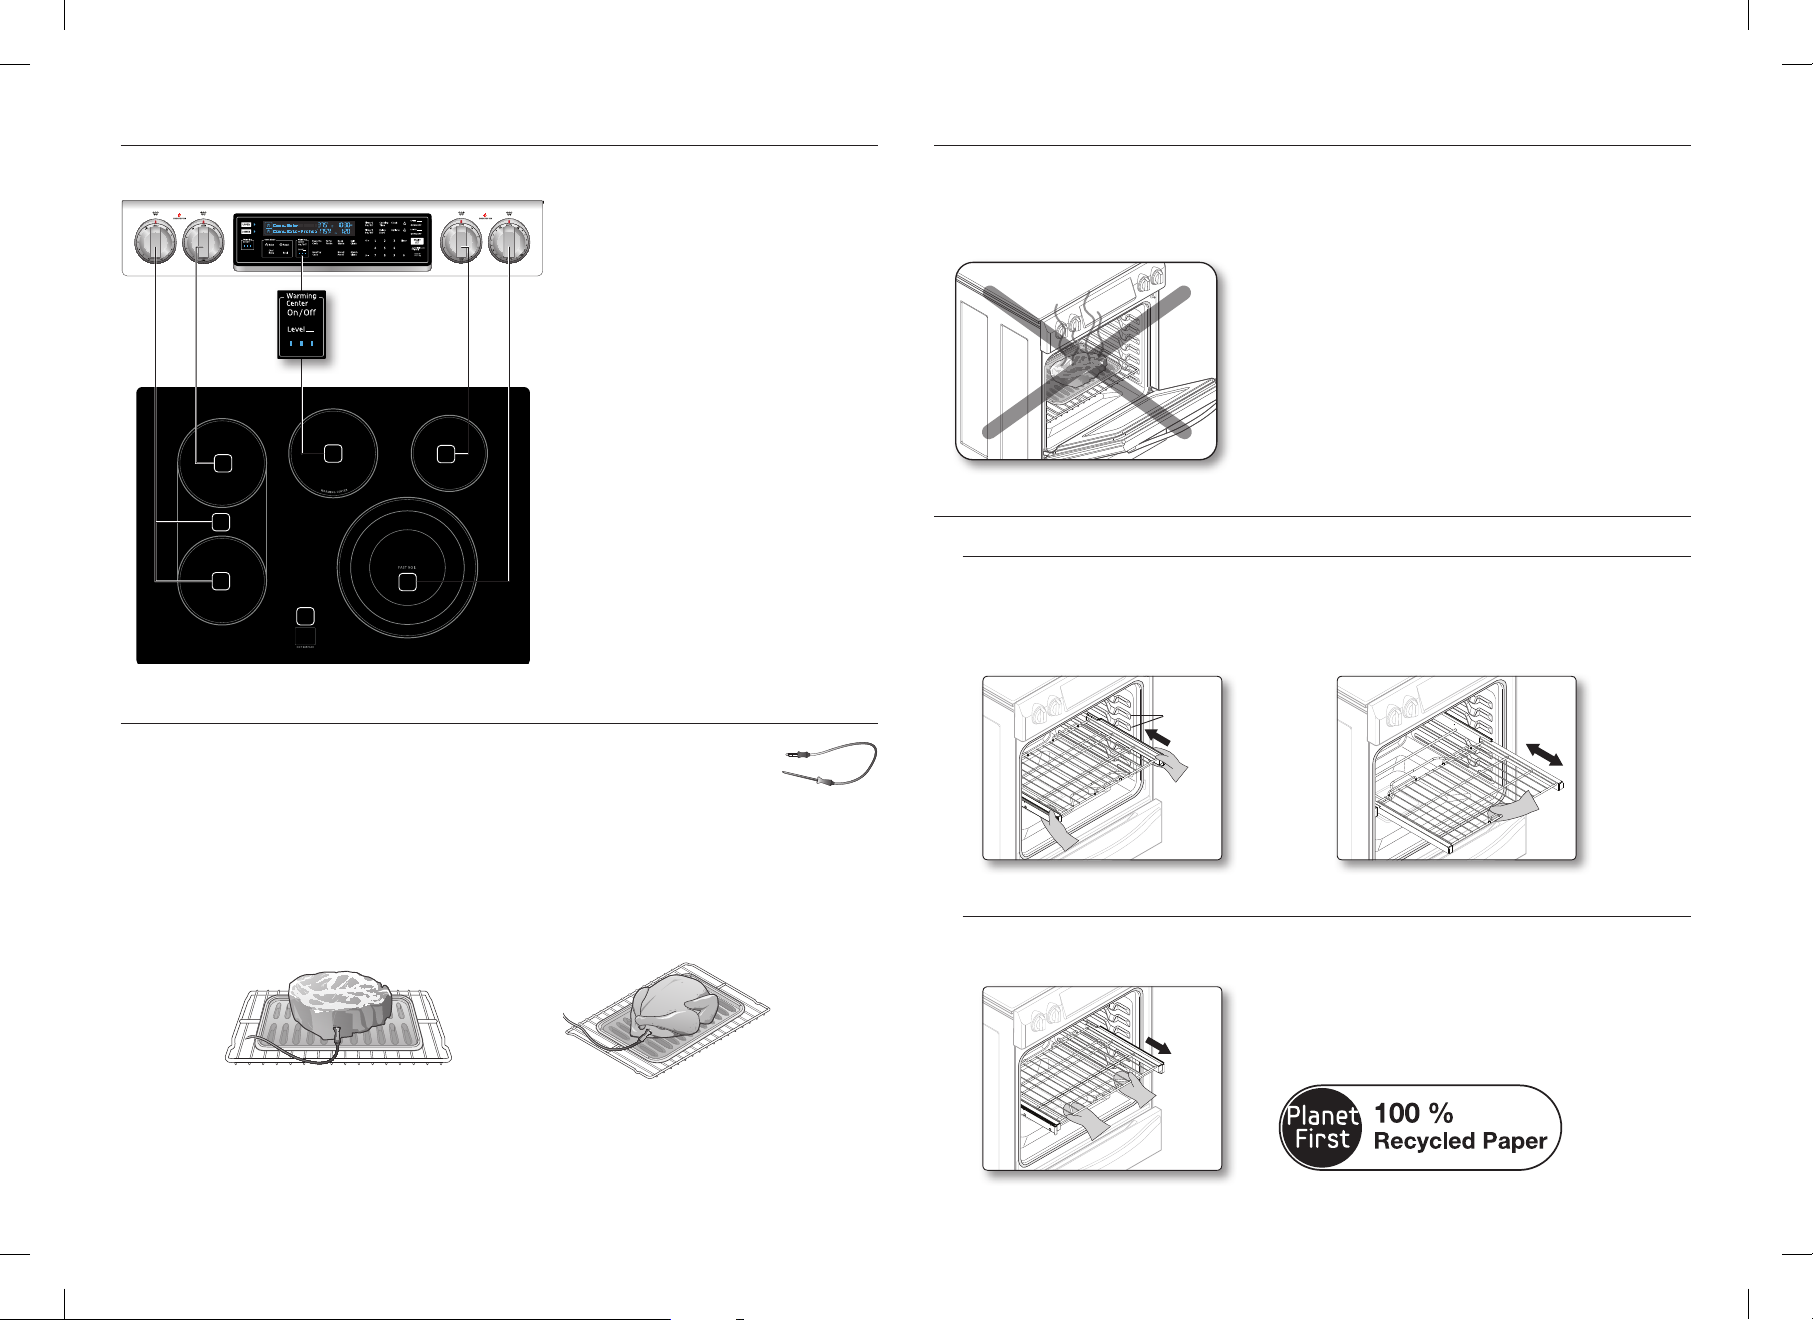
LOCATION OF THE RADIANT SURFACE ELEMENTS AND CONTROLS
The radiant control knobs operate the radiant surface elements on the cooktop as shown below.
BROILING
Broil mode is best for meats, fish, and poultry up to 1” thick. Broiling is a method of cooking tender
cuts of meat by direct heat under the broil element of the oven. The high heat cooks quickly and
gives a rich, brown outer appearance. Temp probe cannot be used with this mode.
• This oven is designed for CLOSE DOOR broiling. The oven door must be closed during broiling.
2
1
1
5
6
4
3
1. Left Front: 7”, 1,800 W
(Bridge 2,600 W)
2. Left Rear: 7”, 1,800 W
3. Right Front: 6”/9”/12”, 3,000 W
4. Right Rear: 6”, 1,200 W
5. Warming Center: 100 W
6. Hot surface indicator
USING THE TEMP PROBE
For many foods, especially roasts and poultry (beef, chicken, turkey, pork, lamb etc),
measuring the internal temperature is the best way to determine if the food is properly
cooked.
The temp probe lets you cook meat to the exact internal temperature you want, taking the guess
work out of determining whether a piece of meat is done or not.
This function can be used with Chef Bake, Convection Bake, or Convection Roast in Single mode.
After the internal temperature of the food reaches 100 °F, the increasing internal temperature will be
shown in the display.
• Push the tip of the temp probe into the meat as fully as possible, so that the tip is in the center
of the meat.
USING THE GLIDING RACK
Installing the Gliding rack
• With the Gliding rack in the “Closed” position and the oven o, carefully insert the Gliding
Rack between the guides until the rack reaches the back.
• When using the Gliding Rack in the oven, be sure to pull on the handle of the rack only to slide it
in and out. If you grasp the frame while using the rack, the entire Gliding Rack will be removed.
Rack
Guides
Removing the Gliding rack
• With the Sliding rack in the “Closed” position and the oven o and cool, grasp the rack and
frame and pull both forward to remove.
• Insert the probe completely into the meat as shown in the illustrations. It should not touch bone,
fat, or gristle.
• If you do not fully insert the probe into the meat, the Temp Probe function will not work correctly
because the probe will sense the oven temperature, not the temperature of the meat.
• Available temperature : 100 °F to 200 °F
Manual guide_NE58H9950WS_AA_AC_DG68-00530A-00_EN.indd 2 2014-02-11 �� 3:05:48
This manual is made with 100 % recycled paper.
Page 3
guía rápida
Para obtener información más completa, consulte el Manual del usuario.
MODOS DE PANTALLA DEL PANEL DE CONTROL
ASADO CONVECCIÓN ASADO PARRILLA
1. Presione UPPER (SUPERIOR)
(Omita este paso en modo simple).
2. Presione CONV.ROAST
(ASAR POR CONVECCIÓN).
3. Presione START SET
(INICIO HORNO).
1. Presione UPPER (SUPERIOR)
(Omita este paso en modo simple).
2. Presione BROIL
(ASAR A LA PARRILLA).
3. Presione START SET
(INICIO HORNO).
• La puerta del horno debe permanecer
cerrada durante el asado a la parrilla.
Modo de reposo
El panel de control permanecerá en modo de reposo cuando no esté en uso. Solo se
mostrará el reloj. Deberá activar el panel de control para iniciar cualquier función.
Modo de actividad
Para activar el panel de control, toque la tecla de activación. Después de 2 minutos de
inactividad (o un minuto cuando el horno está funcionando en modo de espera), el panel de
control regresará al modo de reposo. En este modo están disponibles las preferencias de
usuario así como los temporizadores, la luz del horno y el bloqueo de los controles.
FUNCIONES DE COCCIÓN
HORNEADO CHEF HORNEADO CONVECCIÓN
1. Presione UPPER (SUPERIOR) o
LOWER (INFERIOR) (Omita este
paso en modo simple).
2. Presione CHEF BAKE
(HORNEADO CHEF).
3. Presione START SET
(INICIO HORNO).
1. Presione UPPER (SUPERIOR) o
LOWER (INFERIOR) (Omita este
paso en modo simple).
2. Presione CONV.BAKE
(HORNEAR POR CONVECCIÓN) .
3. Presione START SET
(INICIO HORNO).
COCCIÓN FAVORITA COCCIÓN SALUDABLE
1. Seleccione el modo de cocción y la opción
adicional.
2. Presione FAVORITE COOK
(COCCIÓN FAVORITA) la cantidad
de veces que corresponda para la
posición en la que desea guardar la
configuración.
3. Presione START SET
(INICIO HORNO).
1. Presione UPPER (SUPERIOR) o
LOWER (INFERIOR) (Omita este
paso en modo simple).
2. Presione HEALTHY COOK
(COCCIÓN SALUDABLE).
3. Presione el TECLADO NUMÉRICO
(1~5) que desea configurar.
4. Presione START SET
(INICIO HORNO).
SONDA DE TEMPERATURA ENTIBIAR PAN PARA LEUDADO
1.
1. Introduzca la punta de la sonda en el alimento y
coloque en el horno.
2. Inserte el enchufe de la sonda en el tomacorriente.
3. Seleccione la función de cocción deseada
(Horneado chef, Hornear por convección, Asar
por convección).
4. Presione TEMP PROBE
(SONDA DE TEMPERATURA).
5. Configure la temperatura deseada.
6. Presione START SET
(INICIO HORNO).
Presione BREAD PROOF
(ENTIBIAR PAN PARA LEUDADO).
2. Presione START SET
(INICIO HORNO).
MANTENER CALIENTE
1. Presione KEEP WARM
(MANTENER CALIENTE).
2. Presione START SET
(INICIO HORNO).
USO DE LA FUNCIÓN OPCIONES
Esta función le permite controlar diversas opciones de control electrónico. Estas opciones incluyen
ajuste de temperatura, unidad de temperatura, autoconversión, horario del día de 12 horas, horario
del día de 24 horas, ahorro de energía transcurridas 12 horas, idioma, activar/desactivar señales
sonoras, y modo de demostración.
El menú de opciones solo está disponible cuando el horno no está en uso (no está realizando
ningún tipo de cocción).
1. Ajuste de temperatura 5. Ahorro de energía transcurridas 12 horas
2. Unidad de temperatura 6. Idioma
3. Autoconversión 7. Activar o desactivar señales sonoras
4. Horario del día 8. Modo de demostración
Manual guide_NE58H9950WS_AA_AC_DG68-00530A-00_MES.indd 1 2014-02-11 �� 3:07:04
Page 4

UBICACIÓN DE LOS ELEMENTOS RADIANTES DE LA SUPERFICIE Y
LOS CONTROLES
Las perillas controlan los elementos radiantes de la superficie de cocción tal como se indica a continuación.
ASAR A LA PARRILLA
El modo Asar a la parrilla es el mejor para carnes, pescados y aves de hasta 1” de grosor. Asar a la
parrilla es un método de cocinar cortes tiernos de carne mediante el calor directo bajo el elemento
radiante del horno. La elevada temperatura realiza una cocción rápida y deja el exterior con un
aspecto sabroso y dorado. La sonda de temperatura no puede utilizarse con este modo.
• Este horno está diseñado para asar con la PUERTA CERRADA. La puerta del horno debe
permanecer cerrada durante el asado a la parrilla.
2
1
1
5
6
4
3
1. Delantero izquierdo: 7”, 1800 W
(Puente 2600 W)
2. Posterior izquierdo: 7”, 1800 W
3. Delantero derecho: 6”/9”/12”, 3000 W
4. Posterior derecho: 6”, 1200 W
5. Warming Center
(Centro de calentamiento): 100 W
6. Indicador de superficie caliente
USO DE LA PARRILLA DESLIZANTE
USO DE LA SONDA DE TEMPERATURA
Para muchos tipos de alimentos, en especial carnes asadas y aves (res, pollo, pavo, cerdo, cordero,
etc.), medir la temperatura interna es la mejor manera de determinar si la cocción es adecuada.
La sonda de temperatura le permite cocinar la carne a la temperatura interna exacta que usted
desea, eliminando así el trabajo de adivinar si un trozo de carne está cocido o no.
Esta función se puede utilizar con Horneado chef, Hornear por convección o Asar por convección en modo
Simple.
Una vez que la temperatura interna del alimento alcanza los 100 °F, el aumento de la temperatura interna se
mostrará en la pantalla.
• Introduzca la punta de la sonda de temperatura en la carne tanto como sea posible de modo que quede en el
centro.
Instalación de la parrilla deslizante
• Con la parrilla deslizante en la posición “cerrada” y el horno apagado, inserte
cuidadosamente la parrilla entre las guías hasta que llegue a la parte posterior.
• Al utilizar la parrilla deslizante en el horno, asegúrese de tirar de la manija de la parrilla solo para
deslizarla hacia adentro y hacia afuera. Si sujeta el marco al utilizar la parrilla, quitará toda la
parrilla deslizante.
Guías de
la parrilla
Retirar la parrilla deslizante
• Con la parrilla deslizante en la posición “cerrada” y el horno apagado y frío, sujete la parrilla y el
marco y tire de ambos para retirarlos.
• Inserte la sonda por completo en la carne como se muestra en las ilustraciones. No debe estar en contacto con
huesos, grasa o cartílagos.
• Si la sonda no se inserta por completo en la carne, la función Sonda de temperatura no funcionará
correctamente dado que se detectará la temperatura del horno y no la temperatura de la carne.
• Temperatura disponible: 100 °F a 200 °F
Manual guide_NE58H9950WS_AA_AC_DG68-00530A-00_MES.indd 2 2014-02-11 �� 3:07:06
Este manual está impreso en papel 100 % reciclado.
Page 5

présentation rapide
Pour plus d'informations, reportez-vous au manuel d'utilisation.
MODES D'AFFICHAGE DU PANNEAU DE COMMANDE
Mode veille
Votre panneau de commande reste en mode veille lorsqu'il n'est pas en cours d'utilisation. Seule
l'horloge s'ache. Veuillez réveiller le panneau de commande avant de lancer une fonction.
Mode de réveil
Pour réveiller le panneau de commande, appuyez sur la touche de réveil. Après 2 minutes sans
activité (ou une minute lorsque le four est en cours de fonctionnement en mode veille), le panneau
de commande repasse en mode Veille. Les préférences de l'utilisateur sont disponibles dans ce
mode ainsi que les minuteries, l'éclairage du four et le verrouillage du panneau de commande.
FONCTIONS DE CUISSON
CUISSON DU CHEF CUISSON PAR CONVECTION
1.
Appuyez sur UPPER
(SUPÉRIEURE) ou LOWER
(INFÉRIEURE) (Ignorez cette
étape en mode unique).
2. Appuyez sur CHEF BAKE
(CUISSON DU CHEF).
3. Appuyez sur START SET
(DÉMARRAGE RÉGLAGE).
1.
Appuyez sur UPPER
(SUPÉRIEURE) ou LOWER
(INFÉRIEURE) (Ignorez cette
étape en mode unique).
2. Appuyez sur CONV.
BAKE (CUISSON PAR
CONVECTION).
3. Appuyez sur START SET
(DÉMARRAGE RÉGLAGE).
RÔTISSAGE PAR CONVECTION GRIL
1.
Appuyez sur UPPER (SUPÉRIEURE)
(Ignorez cette étape en mode unique).
2.
Appuyez sur CONV.ROAST
(RÔTISSAGE PAR CONVECTION).
3.
Appuyez sur START SET
(DÉMARRAGE RÉGLAGE).
1.
Appuyez sur UPPER (SUPÉRIEURE)
(Ignorez cette étape en mode unique).
2.
Appuyez sur BROIL (GRIL).
3.
Appuyez sur START SET
(DÉMARRAGE RÉGLAGE).
• La porte du four doit être fermée
pendant la cuisson au gril des aliments.
PLATS PRÉFÉRÉS CUISSON SAINE
1. Choisissez le mode de cuisson et l'option
supplémentaire.
2. Appuyez sur FAVORITE COOK
(PLATS PRÉFÉRÉS) autant de fois
que le nombre correspondant à la
position sur laquelle vous souhaitez
stocker le réglage.
3. Appuyez sur START SET
(DÉMARRAGE RÉGLAGE).
1.
Appuyez sur UPPER (SUPÉRIEURE)
ou LOWER (INFÉRIEURE)
(Ignorez cette étape en mode unique).
2. Appuyez sur HEALTHY COOK
(CUISSON SAINE).
3. Appuyez sur la TOUCHE
NUMÉRIQUE (1 à 5) que vous
souhaitez définir.
4. Appuyez sur START SET
(DÉMARRAGE RÉGLAGE).
SONDE THERMIQUE PAIN PRÉCUIT
1. Insérez la pointe de la sonde dans les aliments et
placez-les dans le four.
2. Insérez la fiche de la sonde dans la prise.
3. Choisissez la fonction de cuisson souhaitée
(Cuisson du chef, Cuisson par convection,
Rôtissage par convection).
4. Appuyez sur TEMP PROBE (SONDE
THERMIQUE).
5. Réglez la température souhaitée.
6. Appuyez sur START SET
(DÉMARRAGE RÉGLAGE).
1. Appuyez sur BREAD PROOF
(PAIN PRÉCUIT).
2. Appuyez sur START SET
(DÉMARRAGE RÉGLAGE).
MAINTIEN AU CHAUD
1. Appuyez sur KEEP WARM
(MAINTIEN AU CHAUD).
2. Appuyez sur START SET
(DÉMARRAGE RÉGLAGE).
UTILISATION DE LA FONCTION OPTIONS
Cette fonction vous permet de contrôler plusieurs options de commande électronique. Ces options
comprennent le réglage de la température, l'unité de température, la conversion automatique,
le format 12 heures ou le format 24 heures, l'économie d'énergie après 12 heures, la langue,
l'activation/la désactivation du son, et le mode de démonstration.
Le menu des options est disponible uniquement lorsque le four n'est pas en cours d'utilisation
(pas en cours de cuisson).
1. Réglage de la température 5. Économie d'énergie après 12heures
2. Unité de température 6. Langue
3. Conversion automatique 7. Activation/désactivation du son
4. Heure du jour 8. Mode de démonstration
Manual guide_NE58H9950WS_AA_AC_DG68-00530A-00_CFR.indd 1 2014-02-11 �� 3:08:22
Page 6

EMPLACEMENT DES FOYERS RADIANTS ET DES COMMANDES
Les boutons de commande permettent d'activer les foyers radiants de la table de cuisson comme
indiqué ci-dessous.
CUISSON AU GRIL
Le mode de cuisson au gril est le mode le plus adapté aux viandes, aux poissons et à la volaille d'une
épaisseur maximale de 1”. La cuisson au gril est une méthode de cuisson des morceaux de viande
tendres utilisant la chaleur directe sous le gril du four. La chaleur élevée permet de cuire plus rapidement
et permet de brunir les aliments. La sonde thermique ne peut pas être utilisée avec ce mode.
• Ce four est conçu pour la cuisson au gril avec PORTE FERMÉE. La porte du four doit être fermée
pendant la cuisson au gril des aliments.
2
1
1
5
6
4
3
1. Avant gauche: 7”, 1800W
(Transition 2600W)
2. Arrière gauche: 7”, 1800W
3. Avant droit: 6”/9”/12”, 3000W
4. Arrière droit: 6”, 1200W
5. Zone chaue-plat: 100W
6. Témoin de surface chaude
UTILISATION DE LA SONDE THERMIQUE
Pour de nombreux aliments, en particulier les rôtis et la volaille (bœuf, poulet, dinde,
porc, agneau, etc.), le meilleur moyen de déterminer si les aliments sont bien cuits,
c'est de mesurer la température interne.
La sonde thermique vous permet de faire cuire la viande à la température interne que vous souhaitez
et vous permet ainsi de déterminer plus facilement si la viande est cuite.
Cette fonction peut être utilisée avec la Cuisson du chef, la Cuisson par convection ou le Rôtissage
par convection en mode unique.
Une fois que la température interne des aliments atteint 100°F, l'augmentation de la température
interne sera achée à l'écran.
• Enfoncez la pointe de la sonde thermique dans la viande aussi loin que possible, de sorte
qu'elle soit bien au centre de la viande.
COMMENT UTILISER LA GRILLE COULISSANTE?
Installation de la grille coulissante
• Assurez-vous que la grille coulissante est en position fermée et que le four est éteint, puis
insérez-la entièrement le long des rails de guidage.
• N'utilisez que la poignée de la grille pour la faire sortir du four ou la faire rentrer. Si vous tirez sur
le cadre, vous risquez de retirer complètement la grille coulissante.
Glissières
de la grille
Retrait de la grille coulissante
• Assurez-vous que la grille coulissante est en position fermée et que le four est éteint et a refroidi,
puis tirez à la fois sur la grille et le cadre.
• Insérez la sonde complètement dans la viande comme indiqué dans les illustrations. Elle ne doit
pas toucher les os, le gras ou les cartilages.
• Si la sonde n'est pas complètement insérée dans la viande, la fonction Sonde thermique ne
fonctionne pas correctement car la sonde détecte la température du four, et non la température
de la viande.
• Température disponible: 100°F à 200°F
Manual guide_NE58H9950WS_AA_AC_DG68-00530A-00_CFR.indd 2 2014-02-11 �� 3:08:24
Ce manuel est en papier recyclé à 100 %.
Page 7

MEMO
Manual guide_NE58H9950WS_AA_AC_DG68-00530A-00_CFR.indd 3 2014-02-11 �� 3:08:24
Page 8

DG68-00530A-00
Manual guide_NE58H9950WS_AA_AC_DG68-00530A-00_CFR.indd 4 2014-02-11 �� 3:08:24
 Loading...