

SAMSUNG MU-PC500, MU-PC1T0, MU-PC2T0 User Manual [fr]

1
Samsung Portable SSD T7 Touch
User Manual
MU-PC500 MU-PC1T0 MU-PC2T0

2
DISCLAIMER
SAMSUNG ELECTRONICS RESERVES THE RIGHT TO CHANGE PRODUCTS, INFORMATION AND SPECIFICATIONS AT
ANY TIME WITHOUT NOTICE.
Information in this document is provided in connection with products of Samsung Electronics Co. Ltd.
(“Samsung”). Product descriptions and specifications contained in this document are for reference purposes
only. All information discussed in this document may change at any time, without notice, and is provided on an
“AS IS” basis, without warranties of any kind. This document and all information discussed in this document
remain the sole and exclusive property of Samsung. No license of any patent, copyright, mask work, trademark
or any other intellectual property right is granted by this document, express or implied, by estoppels or
otherwise. Except as provided in Samsung’s terms and conditions of sale for such products, Samsung disclaims
any express or implied warranty, relating to sale and/or use of Samsung products, including liability or
warranties relating to fitness for a particular purpose, merchantability, or infringement of any patent, copyright
or other intellectual property right. Samsung products are not intended for use in life support, critical care,
medical, safety equipment, or similar applications where product failure could result in loss of life or personal or
physical harm, or any military or defense application, or any governmental procurement to which special terms
or provisions may apply. For updates or additional information about Samsung products, contact your local
Samsung store or visit Samsung website (https://www.samsung.com). Samsung and Samsung logos are
registered trademarks of Samsung Electronics Co., Ltd. or its affiliates in the United States and other countries.
Other names and brands may be claimed as the property of others.
Copyright © 2020, Samsung Electronics Co., Ltd. All rights reserved.

3
Samsung Portable SSD T7 Touch
User Manual
Table of Contents
Introduction ..................................................................................................................... 4
Getting Started ................................................................................................................. 5
What’s In the Box ........................................................................................................................................... 5
How to Connect / Disconnect......................................................................................................................... 5
System Requirements ..................................................................................................................................... 6
Capacity of T7 Touch Displayed on the System .............................................................................................. 6
Using T7 Touch .................................................................................................................. 7
Connecting T7 Touch ...................................................................................................................................... 7
Disconnecting T7 Touch .................................................................................................................................. 7
Motion LED behavior by product status ......................................................................................................... 7
Installing Samsumg Portable SSD Software 1.0 .............................................................................................. 7
Caution ........................................................................................................................... 22
Back Up Important Data ............................................................................................................................... 22
Safeguard User Password ............................................................................................................................. 22
Connect to Certified Devices; Compliance with Safety Standards ............................................................... 22
Avoid Shock, Vibration ................................................................................................................................. 22
Do Not Disassemble, Damage, or Remove Label ......................................................................................... 22
Use Genuine Accessories ............................................................................................................................. 23
Use in Appropriate Temperature and Humidity ........................................................................................... 23
Use No Excessive Force in Unplugging the Cable ......................................................................................... 23
Perform Virus Scans and Updates ................................................................................................................ 23
Clean the Product ......................................................................................................................................... 23
Keep Away from Children, Infants and Animals ........................................................................................... 23
FAQ ................................................................................................................................ 24
Product Specifications and Certifications ......................................................................... 25
Product Specifications .................................................................................................................................. 25
Regulatory Compliance ................................................................................................................................ 25
KC (Korea Certification) ................................................................................................................................ 25
FCC (Federal Communication Commission) ................................................................................................. 26
CE (Conformity European) ............................................................................................................................ 26
WEEE (Waste Electrical and Electronic Equipment) ..................................................................................... 27

4
Introduction
Samsung T7 Touch is a superfast external storage device that has convenient data protection
with fingerprint recognition and a refined design with motion LED.
Transfer in a flash
Transfer massive files within seconds with the incredible speed of USB 3.2 Gen2 on the T7
Touch. The embedded PCIe NVMe technology facilitates sequential read/write speeds of up
to 1,050/1,000 MB/s, respectively.
Built strong and safe
SSD stands for Solid State Drive, which means it’s built with no moving parts. A sturdy metal
body encases the immobile hardware, keeping your data intact from falls of up to 2 meters.
And the T7 Touch is confidently backed by a 3-year limited warranty.
* The internal free fall shock test was conducted under controlled conditions.
Secure with a touch
Keep your private files secure without sacrificing convenience. The built-in security options on
the T7 Touch utilize the AES 256-bit encryption and give you the option of unlocking with a
touch of your finger or with a password.
Enlightening motion LED
T7 Touch features an LED square that illuminates to keep you informed of what your SSD is
doing at a glance. Choose from classic black or stylish silver, in three capacities to suit your
needs: 500GB, 1TB, or 2TB.
Sleek and compact style
Pocket-sized and slim, the lightweight body comes standard on the T7 Touch. Roughly the size
of a credit card and weighing in at 58 grams, the solid aluminum uni-body construction fits
comfortably in the palm of your hand.
Management software
The T7 Touch comes embedded with upgraded software for PCs and Macs to help you set up
a password and fingerprints and get the latest firmware updates. You can also download the
mobile app for Android smartphones and tablets.
Multi-device compatibility
Access your files anytime, anywhere. The T7 Touch is compatible with PC, Mac, Android
devices, gaming consoles, and more. Included in the box are USB Type C-to-C and Type C-to-A
cables for added convenience.
* Compatibility with host devices may vary. Please find the compatible devices list on www.samsung.com/support.
5
Getting Started
Before using the Samsung Portable SSD T7 Touch (referred to as “T7 Touch”), please read this
User Manual thoroughly so that you may know how to use the product in a safe and
appropriate manner.
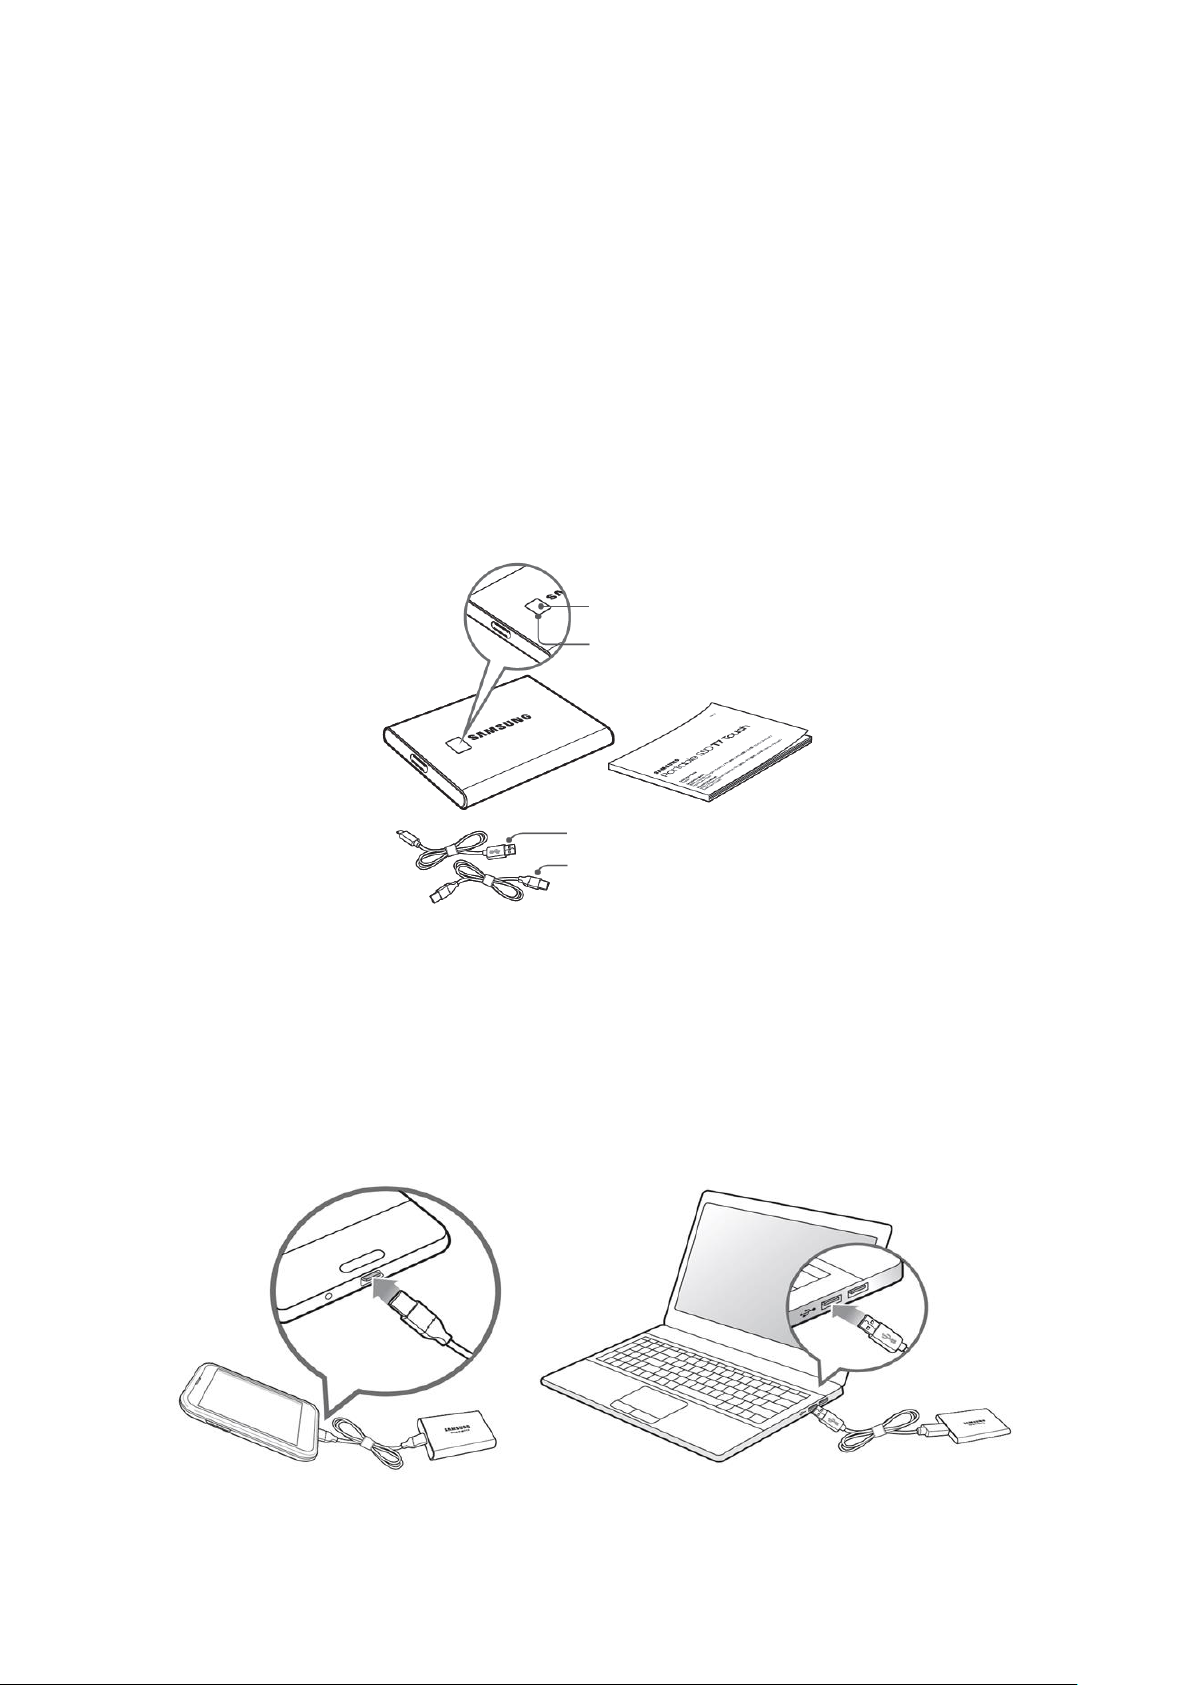
What’s In the Box
• Samsung Portable SSD T7 Touch
• USB 3.2 Gen 2 USB C to A cable
• USB 3.2 Gen 2 USB C to C cable
• Quick Start Guide & Warranty Statement
How to Connect / Disconnect
① Select the cable compatible with your device. Connect one end of the cable to the device
and the other end to the T7 Touch.
② Always use “Eject”, “Unmount” or “Safely Remove Hardware” when disconnecting the T7
Touch to protect your data.
Fingerprint Recognition Sensor
Motion LED
C to A Cable
C to C Cable
6
System Requirements
1. USB 3.2 Gen 2 (10 Gbps) Interface Support
USB (Universal Serial Bus) is a serial input/output interface standard for connecting various
devices. T7 Touch’s data transfer speed is optimal with USB 3.2 Gen 2 (10 Gbps) and using
lower versions such as USB 3.2 Gen 1 (5Gbps), USB 2.0 and 1.1 may result in lower
performances due to interface limitations inherent in such lower versions.
* Performance may vary depending on user’s system to which T7 Touch is connected. Even when using USB
3.2 Gen 2 connections, T7 Touch may not perform well if your system does not support UASP (USB Attached
SCSI Protocol). Please make sure that your system supports UASP.
2. Operating System Requirements
• Windows OS: Windows 7 or higher
• Mac OS: Mac OS X 10.10 or higher
• Android: Android Lollipop or higher
3. File Formats
T7 Touch is pre-formatted in using exFAT file system which is supported by Windows OS,
Mac OS, and Android operating systems. Whether data formatted to a certain format may
be read or written to your computer vary depending on the OS, as specified in the table
below. If you use T7 Touch on a single OS, it is recommended that you format the T7 Touch
using the appropriate file format for that OS. (e.g.) Read/write restrictions for file systems
by each operating system.
File Formats
Windows OS
Mac OS
exFAT
Both read and write
Both read and write
NTFS
Both read and write
Read only
HFS
Not recognizable
Both read and write
* When using exFAT across multiple operating systems, data writing may become locked and you may only
be able to read data. If such problem occurs, you can restore write access by following the instructions
below.
• Mac OS: Connect T7 Touch to your Mac again, and perform Eject.
• Windows OS: When the notice pops up saying that write access is disabled, click “Scan and fix” to perform
Check Disk (CHKDSK). If you did shut down the notice without performing Check Disk, you may do it by
selecting the drive → Right-click → Properties → Tools → click Check.
Capacity of T7 Touch Displayed on the System
The capacity reported by the system to which T7 Touch is connected may differ from the
labeled capacity, due to the difference between the decimal and binary systems of
measurement and other factors including the drive’s partitioning and blocking.
* e.g.: Windows OS: 1 GB = 1,024MB, Mac OS: 1GB = 1,000MB
Labeled capacity uses decimal system and is convertible as below:
1 GB=1,000,000,000 bytes, 1 TB=1,000,000,000,000 bytes
Lower capacity may be demonstrated by your computer due to use of a different measurement standard.
7
Using T7 Touch
Connecting T7 Touch
Select the cable compatible with your device. Connect one end of the cable to the device and
the other end to the T7 Touch.
Disconnecting T7 Touch
Be sure to use Safely Remove Hardware feature for every disconnection of T7 Touch.
Unplugging from computer without performing Safely Remove Hardware feature may cause
data losses or damages to the T7 Touch.
* Samsung shall not be liable for loss of user data or product damages caused by user’s failure to comply with
this instruction.
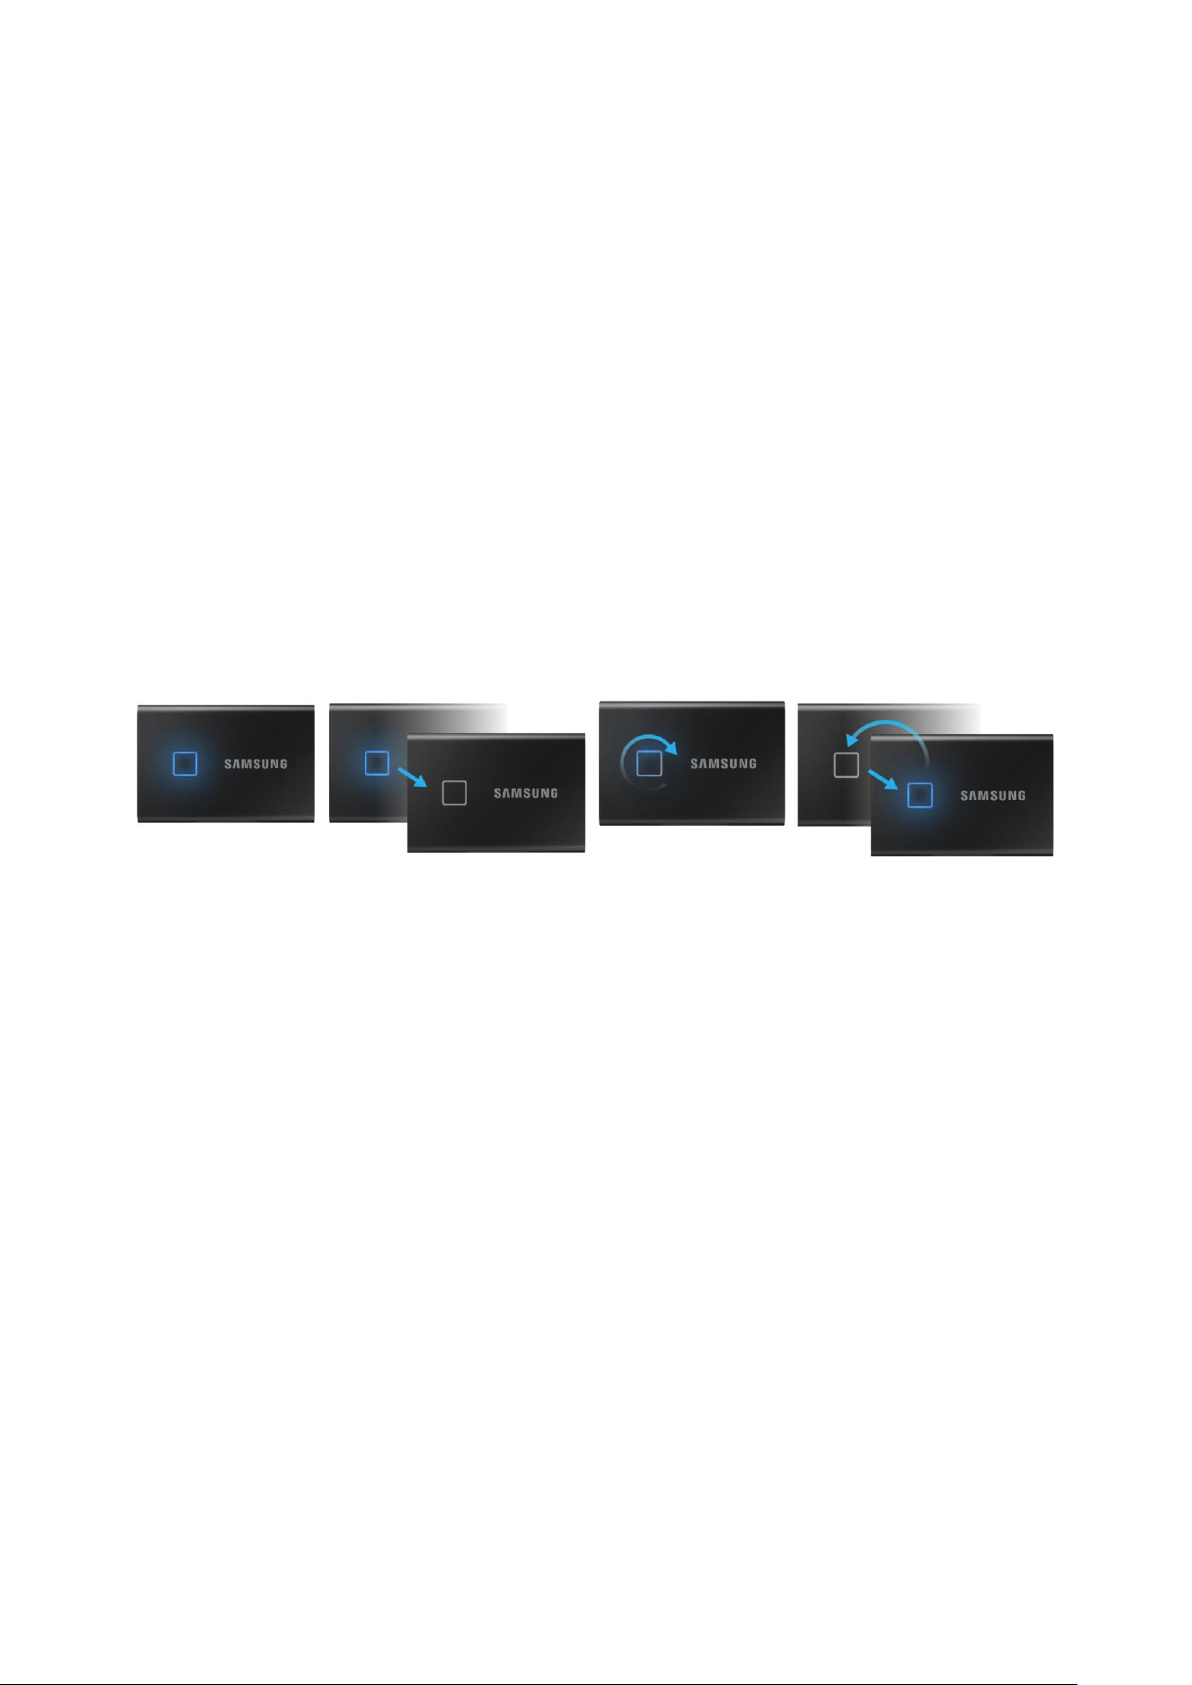
Motion LED behavior by product status
Installing Samsumg Portable SSD Software 1.0
(For Security Mode and Firmware update)
For PCs and Macs
In the Explorer (Windows OS) or Desktop (Mac OS), select the “Samsung Portable SSD”
application.
Windows OS: SamsungPortableSSD_Setup_Win_1.0.exe
Mac OS: SamsungPortableSSD_Setup_Mac_1.0.pkg
* If you format partition of the T7 Touch after purchase, Samsung Portable SSD Software stored in the drive will
be deleted. In such case, please download the “Samsung Portable SSD Software 1.0” application from Samsung
website (http://www.samsung.com/samsungssd).
* Samsung Portable SSD Software 1.0 is only for T7 Touch, so installation of Samsung Portable SSD Software 1.0
will not automatically remove Samsung Portable SSD Software (previous version), if remaining in your computer,
which was designed for T3, T5, X5.
Connect to Power
Idle
Data transfer
Standby for security unlock
8
1. Running Samsung Portable SSD Software 1.0
Select “Samsung Portable SSD Software 1.0” application icon on Desktop.
* In case of Mac OS, Samsung Portable SSD Software 1.0 may not operate without device (driver) enabled.
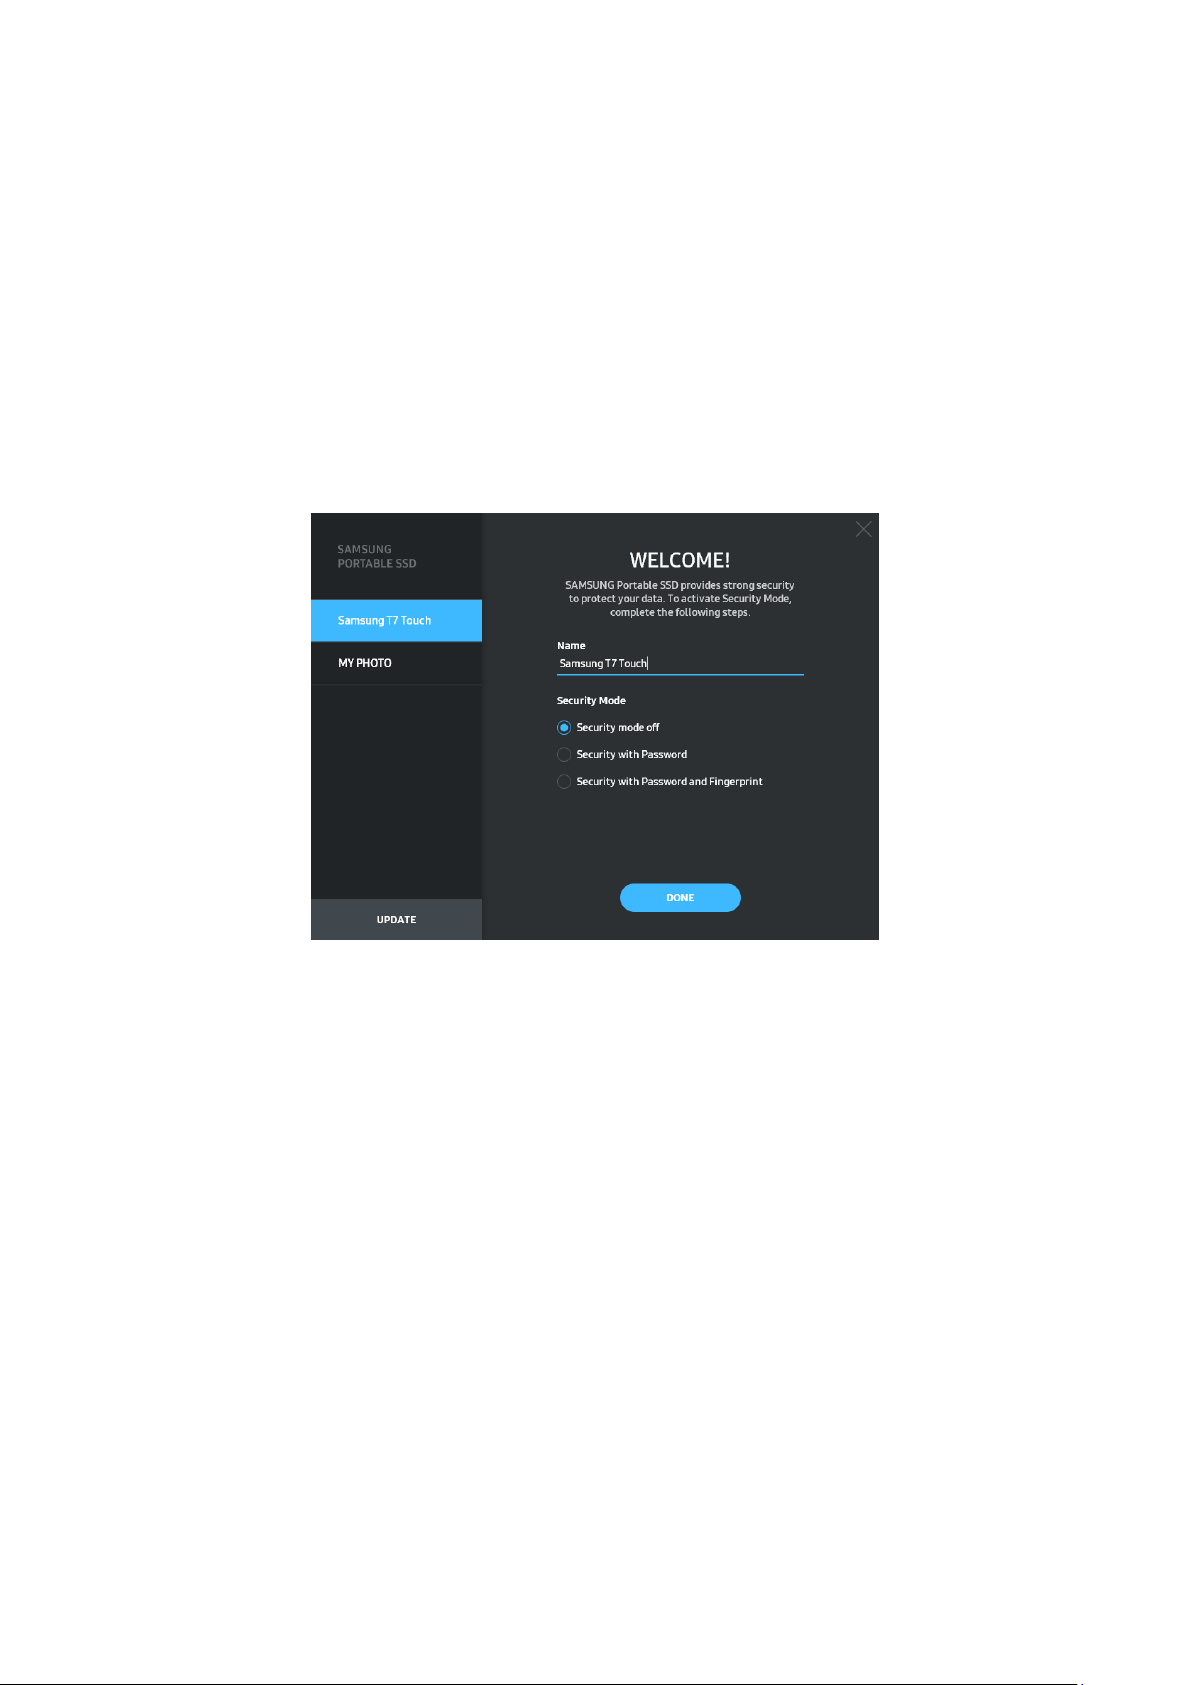
2. Setting Security Mode (Optional)
Security mode is optional. You may use T7 Touch without security/update feature enabled.
Please follow the instructions that appear on each screen of the Samsung Portable SSD
Software 1.0. Once you agree to the terms and conditions of the Samsung Portable SSD
Software 1.0 while it is being installed, you can set a password through the following steps.
(Certain elements of Samsung Portable SSD Software 1.0 will be installed on the user’s
computer for security mode.)
• Security mode off
You may use T7 Touch without security mode.
• Security with Password
You may enable security mode with password. use T7 Touch without security mode. If
the password is forgotten, you need to have T7 Touch to be restored to factory setting
through online service rendered by our customer service centers. Please keep it in mind
that all user data placed in T7 Touch will be lost by factory reset. Please be cautious not
to forget your password.

9
• Security with Password and Fingerprint
You may enable security mode with password and fingerprint. After you set up
password, you can use fingerprint security. If the password is forgotten, you need to
unlock T7 Touch with fingerprint, move all the stored data to safe place and need to
have T7 Touch to be restored to factory setting through online service rendered by our
customer service centers. You can enroll up to four fingerprints and If the password is
forgotten, you can not change or delete registered fingerprints.
* Samsung shall not be liable for loss of user data caused by forgotten or stolen passwords. In an effort to
keep the device as secure as possible, there is no password recovery option. If the password is forgotten,
users need to have T7 Touch to be restored to factory setting through online service rendered by our
customer service centers. Please keep it in mind that all user data placed in T7 Touch will be lost by
factory reset. Please be cautious not to forget your password or use security mode with fingerprint.
* Only Mac OS, “Samsung Portable SSD” driver is required for the security functionality. If the kernel
extension is not installed, complete the installation by following the sequence on the package installation.
Once installed, disconnect and reconnect X5 to confirm that the installation was successful.
* Only Mac OS, “Samsung Portable SSD” driver and some of 3rd party drivers, including SATSMARTDriver
are mutually exclusive. If you wish to work with SATSMARTDriver, please remove Samsung Portable SSD
driver and install SATSMARTDriver as following instruction.
* When both Samsung Portable SSD Driver and SATSMARTDriver are installed and conflict is detected, the
instructions like the following will be available:
How to remove Samsung Portable SSD Driver and install SATSMARTDriver
#sudo kextunload /Library/Extensions/SamsungPortableSSDDriver.kext
#sudo kextload /Library/Extensions/SATSMARTDriver.kext
How to remove SATSMARTDriver and install SamsungPortableSSDDriver
#sudo kextunload /System/Library/Extensions/SATSMARTDriver.kext
#sudo kextload /Library/Extensions/SamsungPortableSSDDriver.kext
 Loading...