

Samsung ML-6100N User Guide
Laser Printer
User’s Guide
MMLL--66110000 SSeerriieess

Copyright
This manual is provided for information purposes only. All information included herein is
subject to change without notice. Samsung Electronics is not responsible for any damages, direct
or indirect, arising from or related to use of this manual.
© 1999 Samsung Electronics Co., Ltd. All rights reserved.
Trademark Notices
•ML-6100, ML-6100N and Samsung logo are trademarks of Samsung Electronics Co., Ltd.
•Centronics is a registered trademark of Centronics Data Computer Corporation.
•HP, PCL5e, and PCL6 are registered trademarks of Hewlett-Packard Company.
•IBM, IBM PC, XT, AT, PS/2 are registered trademarks of International Business Machines
Corporation.
•Apple, AppleTalk, TrueType, Laser Writer, Macintosh, and LocalTalk are registered trademarks
of Apple Computer, Inc.
•Microsoft, MS-Windows, and MS-DOS are registered trademarks of Microsoft Corporation.
•PostScript, is a registered trademarks of Adobe Systems, Inc.
•CompuServe is a registered trademark of CompuServe Inc.
•All other brand or product names are trademarks or registered trademarks of their respective
companies or organizations.
I

EC Declaration of Conformity
We,
SAMSUNG ELECTRONICS CO., LTD.
#259, Gong Dan-Dong, Gumi-City, Kyung Buk, Korea
declare sole responsibility that the
ML-6100, ML-6100N Laser printer
meets the intent of Directive 89/336/EEC for Electromagnetic Compatibility and Low
Voltage Directive 73/23/EEC.
Compliance was demonstrated to the following specifications as listed in the official
journal of the European Communities:
EN 50081-Emissions:
EN 55022 Radiated, Class B
EN 55022 Conducted, Class B
EN 61000-3-2 Power Harmonics
EN 61000-3-3 Voltage Fluctuations and Flicker
EN 50082-Immunity:
IEC 801-2 Electrostatic Discharge
IEC 801-3 RF Radiated
IEC 801-4 Fast Transient/Burst
EN 60950-Safety
II
Laser Safety Statement
The printer is certified in the U.S. to conform to the requirements of DHHS 21 CFR,
chapter 1 Subchapter J for Class I(1) laser products, and elsewhere is certified as a Class I
laser product conforming to the requirements of IEC 825.
Class I laser products are not considered to be hazardous. The laser system and printer
are designed so there is never any human access to laser radiation above a Class I level
during normal operation, user maintenance, or prescribed service condition.
WARNING Never operate or service the printer with the protective cover removed from
Laser/Scanner assembly. The reflected beam, although invisible, can damage
your eyes.
CAUTION -INVISIBLE LASER RADIATION WHEN THIS COVER IS OPEN. DO
NOT OPEN THIS COVER
VORSICHT -UNSICHTBARE LASERSTRAHLUNG, WENN ABDECKUNG
GEÖFFNET. NICHT DEM STRAHL AUSSETZEN.
ATTENTION -RAYONNEMENT LASER INVISIBLE EN CAS D’OUVERTURE.
DANGEREUSE AU FAISCEAU.
ATTENZIONE -RADIAZIONE LASER INVISIBILE IN CASO DIAPERTURA.
EVITARE L’ESPOSIZIONE AL FASCIO.
PRECAUCION -RADIACION LASER IVISIBLE CUANDO SE ABRE. EVITAR EXPONERSE AL
RAYO.
ADVARSEL -USYNLIG LASERSTRÅLNING VED ÅBNING NÅR SIKKERHEDSBRYDERE ER
UDE AF FUNKTION UNDGÅ UDSAETTELSE FOR STRÅLNING.
ADVARSER -USYNLIG LASERSTRÅLNING NÅR DEKSEL ÅPNES. STIRR IKKE INN I
STRÅLEN. UNNGÅ EKSPONERING FOR STRÅLEN.
VARNING -OSYNLIG LASERSTRÅLNING NÄR DENNA DEL ÄR ÖPPAND OCH SPÄRREN ÅR
URKOPPLAD. BETRAKTAEJSTRÅLENSTRÅLENAR FARLIG.
VARO -AVATTAESSA JA SUOJALUKITUS OHITETTAESSA OLET ALTTIINA
NÄKYMÄTTÖMÄLLE LASERSÄTEILYLLE ÄLÄ KATSO SÄTEESEEN.
III
Safety Information
PRODUCT SAFETY
USA & CANADA UL 1950 Third Edition (C-UL LISTING)
EEC(Europe) EN 60950 (TÜV GS Certification)
CB IEC 60950
LASER SAFETY
EEC(Europe) EN 60825
USA 21 CFR, Chapter 1, Subchapter J (CDRH Certified)
Power Saver
This printer contains advanced energy conservation technology that reduces power consumption when it is not in active use.
When the printer does not receive data for an extended period of time, power consumption is automatically lowered. For potentially faster printing of the first page, you may turn
the power save off from the Remote Control Panel setting.
The energy star emblem does not represent EPA endorsement of any product or service.
IV

Contents
Chapter 1
Chapter 1
Chapter 2
Chapter 2
Introduction
Introduction . . . . . . . . . . . . . . . . . . . . . . . . . . . . . . . . . . . . . . . . 1.1
Printer Unpacking and Setup . . . . . . . . . . . . . . . . . . . . . . . . . . 1.1
Printer Components . . . . . . . . . . . . . . . . . . . . . . . . . . . . . . . . . 1.2
Front View . . . . . . . . . . . . . . . . . . . . . . . . . . . . . . . . . . . . . . . . . 1.2
Inside Front View . . . . . . . . . . . . . . . . . . . . . . . . . . . . . . . . . . . . 1.2
Rear View . . . . . . . . . . . . . . . . . . . . . . . . . . . . . . . . . . . . . . . . . 1.3
Understanding Control Panel . . . . . . . . . . . . . . . . . . . . . . . . . . 1.4
Control Panel Indicators . . . . . . . . . . . . . . . . . . . . . . . . . . . . . . 1.5
Printer Features . . . . . . . . . . . . . . . . . . . . . . . . . . . . . . . . . . . . . 1.6
Printer Documentation . . . . . . . . . . . . . . . . . . . . . . . . . . . . . . . 1.6
Caution and Warning Symbols . . . . . . . . . . . . . . . . . . . . . . . . . 1.7
Printer Setup
Installing the Toner Cartridge . . . . . . . . . . . . . . . . . . . . . . . . . . 2.1
Loading Paper into the Cassette . . . . . . . . . . . . . . . . . . . . . . . . 2.4
Connecting to the Computer . . . . . . . . . . . . . . . . . . . . . . . . . . . 2.7
Parallel Interface . . . . . . . . . . . . . . . . . . . . . . . . . . . . . . . . . . . . 2.8
USB Interface . . . . . . . . . . . . . . . . . . . . . . . . . . . . . . . . . . . . . . 2.8
Serial Interface . . . . . . . . . . . . . . . . . . . . . . . . . . . . . . . . . . . . . 2.9
LocalTalk Interface . . . . . . . . . . . . . . . . . . . . . . . . . . . . . . . . . . . 2.9
Network Interface. . . . . . . . . . . . . . . . . . . . . . . . . . . . . . . . . . . . 2.9
Attaching the Power Cord and Testing the Printer . . . . . . . . . . 2.10
Printer Driver Installation . . . . . . . . . . . . . . . . . . . . . . . . . . . . . 2.11
Windows 95/98/NT 4.0 . . . . . . . . . . . . . . . . . . . . . . . . . . . . . . . 2.11
Windows 3.1x . . . . . . . . . . . . . . . . . . . . . . . . . . . . . . . . . . . . . . 2.11
Printer Driver Features . . . . . . . . . . . . . . . . . . . . . . . . . . . . . . . 2.12
Software Utilities Installation . . . . . . . . . . . . . . . . . . . . . . . . . . 2.13
Installing the USB Port Driver (Windows 98) . . . . . . . . . . . . . . . 2.13
Installing the RCP and SM (Windows) . . . . . . . . . . . . . . . . . . . . 2.13
Installing the PostScript PPD . . . . . . . . . . . . . . . . . . . . . . . . . . 2.14
Making Installation Diskettes . . . . . . . . . . . . . . . . . . . . . . . . . . 2.17
PCL6 Printer Driver . . . . . . . . . . . . . . . . . . . . . . . . . . . . . . . . . . 2.17
RCP/SM . . . . . . . . . . . . . . . . . . . . . . . . . . . . . . . . . . . . . . . . . . 2.17
PCL5e Printer Driver . . . . . . . . . . . . . . . . . . . . . . . . . . . . . . . . . 2.18
USB Port Driver (Windows 98 only) . . . . . . . . . . . . . . . . . . . . . . 2.18
Installing Software from Diskette . . . . . . . . . . . . . . . . . . . . . . . 2.19
PCL Printer Drivers . . . . . . . . . . . . . . . . . . . . . . . . . . . . . . . . . . 2.19
RCP and SM . . . . . . . . . . . . . . . . . . . . . . . . . . . . . . . . . . . . . . . 2.20
USB Port Driver (Windows 98 only) . . . . . . . . . . . . . . . . . . . . . . 2.20
Uninstalling the Printer Driver. . . . . . . . . . . . . . . . . . . . . . . . . . 2.21
V

Chapter 3
Chapter 3
Print Media Information
Selecting Print Media. . . . . . . . . . . . . . . . . . . . . . . . . . . . . . . . . 3.1
Media Sizes and Capacities . . . . . . . . . . . . . . . . . . . . . . . . . . . . 3.1
Basic Guidelines . . . . . . . . . . . . . . . . . . . . . . . . . . . . . . . . . . . . 3.2
How to Adjust Paper Guides . . . . . . . . . . . . . . . . . . . . . . . . . . . 3.3
Using the MP(Multi-Purpose) Tray . . . . . . . . . . . . . . . . . . . . . . 3.5
MP Tray Guidelines . . . . . . . . . . . . . . . . . . . . . . . . . . . . . . . . . . 3.5
Loading Paper into the MP Tray . . . . . . . . . . . . . . . . . . . . . . . . . 3.6
Closing the Mp Tray. . . . . . . . . . . . . . . . . . . . . . . . . . . . . . . . . . 3.10
Using Rear Output Tray . . . . . . . . . . . . . . . . . . . . . . . . . . . . . . . 3.11
Chapter 4
Chapter 4
Chapter 5
Chapter 5
Printing
Printing in Windows . . . . . . . . . . . . . . . . . . . . . . . . . . . . . . . . . 4.1
Configuring the PCL Drivers . . . . . . . . . . . . . . . . . . . . . . . . . . . 4.2
Selecting Your Printer . . . . . . . . . . . . . . . . . . . . . . . . . . . . . . . . . 4.2
Setting Properties . . . . . . . . . . . . . . . . . . . . . . . . . . . . . . . . . . . 4.3
PCL6 Driver Features . . . . . . . . . . . . . . . . . . . . . . . . . . . . . . . . 4.4
Manual Duplex Printing . . . . . . . . . . . . . . . . . . . . . . . . . . . . . . . 4.5
Booklet Printing . . . . . . . . . . . . . . . . . . . . . . . . . . . . . . . . . . . . . 4.6
PostScript Driver Features . . . . . . . . . . . . . . . . . . . . . . . . . . . . 4.7
Using Printer Utilities . . . . . . . . . . . . . . . . . . . . . . . . . . . . . . . . 4.8
Remote Control Panel . . . . . . . . . . . . . . . . . . . . . . . . . . . . . . . . 4.8
Status Monitor . . . . . . . . . . . . . . . . . . . . . . . . . . . . . . . . . . . . . . 4.11
Requirements for Printing in Macintosh . . . . . . . . . . . . . . . . . 4.12
Printing a Document . . . . . . . . . . . . . . . . . . . . . . . . . . . . . . . . . 4.12
Troubleshooting
Cleaning the Printer . . . . . . . . . . . . . . . . . . . . . . . . . . . . . . . . . . 5.1
Cleaning the Outside . . . . . . . . . . . . . . . . . . . . . . . . . . . . . . . . . 5.1
Cleaning the Inside . . . . . . . . . . . . . . . . . . . . . . . . . . . . . . . . . . 5.1
Clearing Paper Jams . . . . . . . . . . . . . . . . . . . . . . . . . . . . . . . . . 5.2
Paper Jam in Output Area . . . . . . . . . . . . . . . . . . . . . . . . . . . . . 5.2
Paper Jam in Input Area . . . . . . . . . . . . . . . . . . . . . . . . . . . . . . 5.4
Paper Jam Inside Printer . . . . . . . . . . . . . . . . . . . . . . . . . . . . . . 5.5
Paper Jam in Option Cassette . . . . . . . . . . . . . . . . . . . . . . . . . . 5.6
Tips for Avoiding Paper Jams . . . . . . . . . . . . . . . . . . . . . . . . . . . 5.8
Solving Printing Problems . . . . . . . . . . . . . . . . . . . . . . . . . . . . 5.9
Solving Print Quality Problems . . . . . . . . . . . . . . . . . . . . . . . . . 5.12
Solving PostScript Problems . . . . . . . . . . . . . . . . . . . . . . . . . . 5.14
Obtaining Service . . . . . . . . . . . . . . . . . . . . . . . . . . . . . . . . . . . 5.15
VI

Chapter 6
Chapter 6
Printer Options
Introduction . . . . . . . . . . . . . . . . . . . . . . . . . . . . . . . . . . . . . . . . 6.1
Precautions . . . . . . . . . . . . . . . . . . . . . . . . . . . . . . . . . . . . . . . . 6.1
Memory SIMM. . . . . . . . . . . . . . . . . . . . . . . . . . . . . . . . . . . . . . . 6.2
Serial/LocalTalk Card or Network Card . . . . . . . . . . . . . . . . . . . 6.8
Option Cassette . . . . . . . . . . . . . . . . . . . . . . . . . . . . . . . . . . . . . 6.14
Chapter 7
Chapter 7
Printer Specifications
Printer Specification . . . . . . . . . . . . . . . . . . . . . . . . . . . . . . . . . 7.1
Language Codes . . . . . . . . . . . . . . . . . . . . . . . . . . . . . . . . . . . . 7.2
Paper Size. . . . . . . . . . . . . . . . . . . . . . . . . . . . . . . . . . . . . . . . . . 7.3
Index . . . . . . . . . . . . . . . . . . . . . . . . . . . . . . . . . . . . . . . . . . . . . 7.4
Replacing the fitted plug . . . . . . . . . . . . . . . . . . . . . . . . . . . . . . 7.7
VII

1
Introduction

Introduction
Thank you for purchasing this laser printer.
The ML-6100 is a desktop laser printer specially designed for the
demanding small office and home office users. It uses a highly innovative
printing technology, which provides all the performance and power you
need for your business, small workgroup and personal printing.
The ML-6100N comes standard with network card(PortThru).
Install the network printer driver(SyncThru) for network printing.
Printer Unpacking and Setup
1. Remove the printer and all accessories from the packing carton.
Save the carton and packing materials in case you need to repack the
printer for service or storage.
2. Make sure that your printer came packed with the following items:
• Toner cartridge
• Power cord
• Centronics-compatible parallel cable (IEEE 1284-compliant)
• User Guide (this book)
• Network Printer Card User Guide (ML-6100N only)
• Setup CD-ROM
Note: This CD-ROM contains the software required to operate your printer,
along with useful printer utilities. Should your computer not be equipped
with a CD-ROM drive, please refer to “Making Installation Diskettes”
(page 2.17) for detailed instructions for creating installation diskettes.
If any items are missing or damaged, notify your dealer immediately.
3. Carefully remove any shipping tapes from the printer.
4. Place the printer on a flat, stable surface near your workstation. Leave
at least 6 inches (15 cm) behind and on each side of the printer, and at
least 1 foot (30 cm) in front of the printer, so that you can operate it
properly and allow adequate air circulation.
Do not place the printer:
• In direct sunlight.
• Near heat sources or air conditioners. Place the printer where the
temperature is stable and set for comfort.
• In dusty or dirty environments. Dust accumulation may prevent the
printer from functioning properly.
• Near devices that contain magnets or generate magnetic fields (such
as loudspeakers or base units of cordless telephones).
Introduction
1. 1

Printer Components
Use Figures 1.1 through 1.3 to identify the main components of your
printer.
Front View
Face down
output stacker
Paper support
Multi-Purpose Tray
(MP Tray)
Cassette (250 sheet)
Option Cassette
(250 sheet)
Inside Front View
Control panel
Control board cover
(provides access to SIMM
slots for adding/removing
additional memory)
Paper level indicator
Figure 1.1
Top cover
1. 2
Toner cartridge
Top cover release
button
Figure 1.2
Introduction
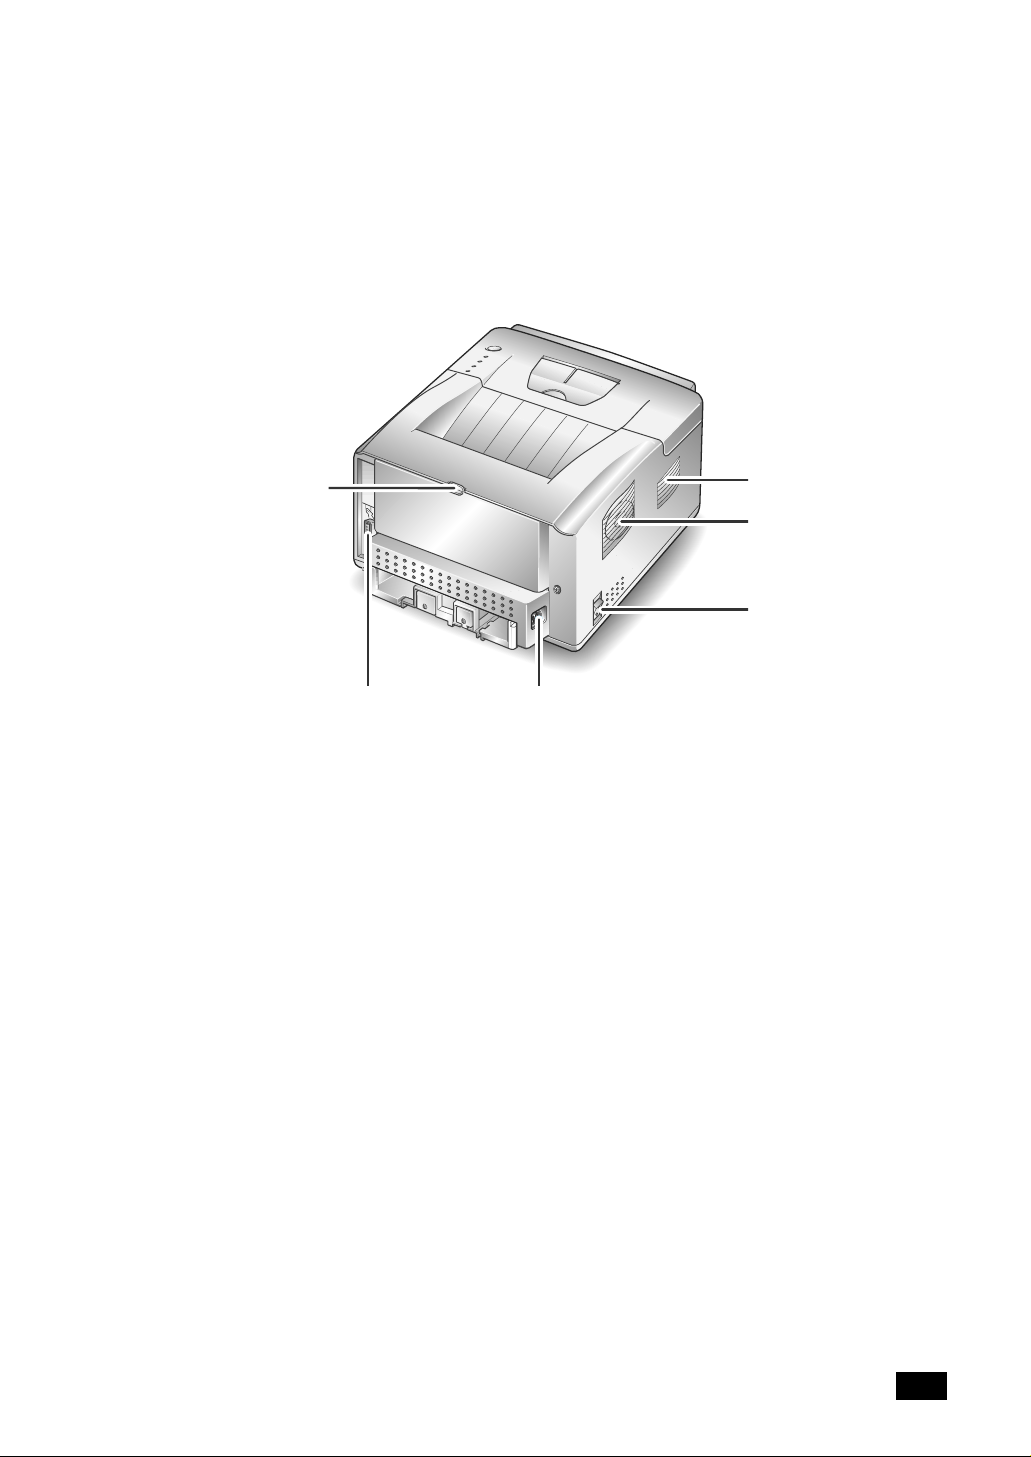
Rear View
Rear cover
(with face-up output
stacker inside)
Printer cable connector
Cooling vent
Exhaust fan
Power switch
Power cord connector
Figure 1.3
Introduction
1. 3
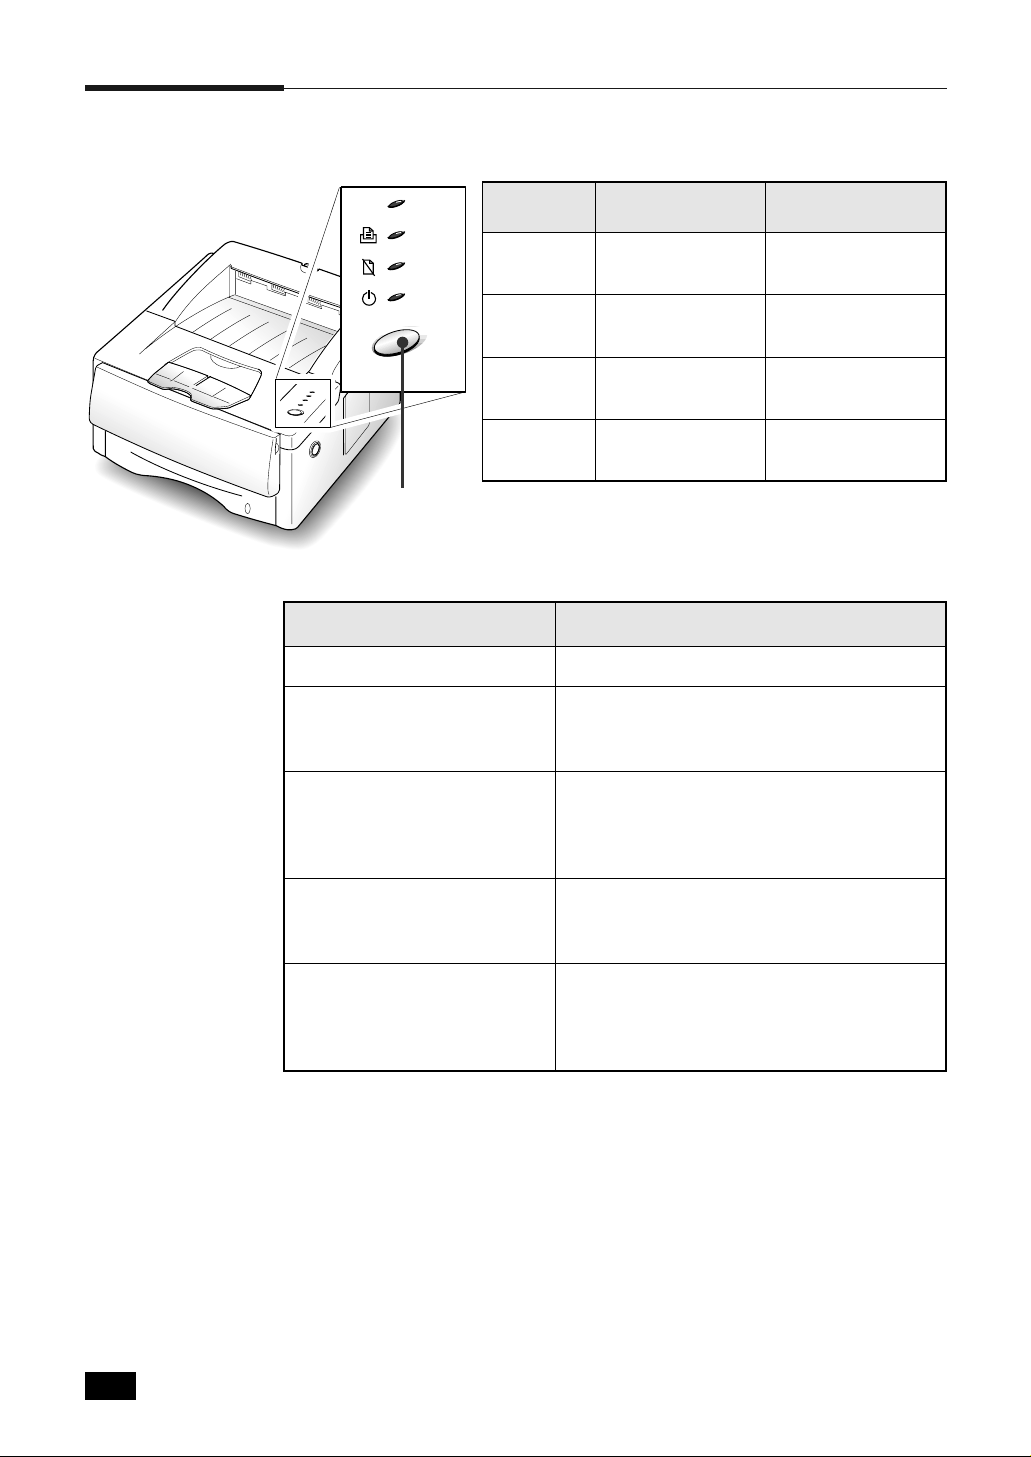
Understanding Control Panel
ERROR
MANUAL
PAPER
READY
Indicator
Light
ERROR
MANUAL
Error during
printing or standby.
Manual ready and
waiting.
On Off
PAPER Out of paper.
READY On-line and ready.
Control Button
Control Button Operation
Control Button Function
Toggle printer on-line/off-line. Briefly press button.
Reset printer.
Turn printer off-line (all lights off). Press and
hold button for about four seconds until all
lights blink briefly, then let go of button.
No active errors.
Manual is inactive.
Printer does not
need paper.
Off-line and not
ready.
Self test. Turn printer on-line (READY light on). Press
and hold button for about four seconds until
all lights blink briefly, then let go of button.
The configuration sheet will print.
Release unprinted data. If READY light is blinking slowly and printer
does not print, press and hold button for
about four seconds.
Adjust print quality. Press and hold button for about ten
seconds until all lights stay illuminated, then
let go of button. After cleaning printer, one
cleaning sheet will print.
1. 4
Introduction
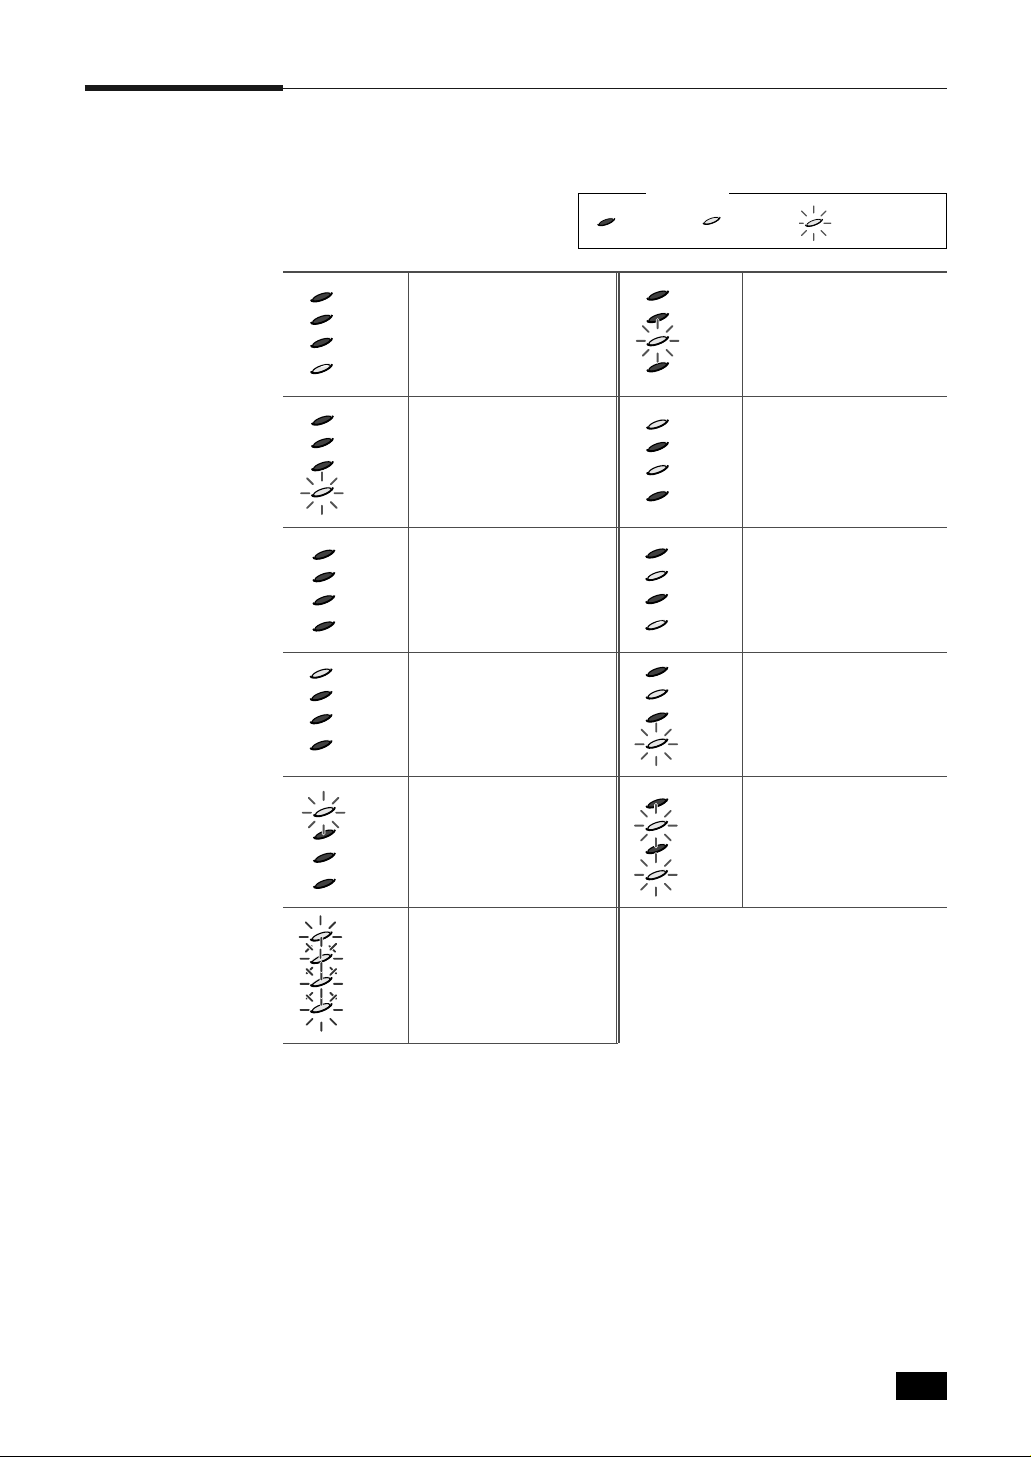
Control Panel Indicators
ERROR
MANUAL
PAPER
READY
ERROR
MANUAL
PAPER
READY
ERROR
MANUAL
PAPER
READY
ERROR
MANUAL
PAPER
READY
ERROR
MANUAL
PAPER
READY
ERROR
MANUAL
PAPER
READY
ERROR
MANUAL
PAPER
READY
ERROR
MANUAL
PAPER
READY
ERROR
MANUAL
PAPER
READY
ERROR
MANUAL
PAPER
READY
ERROR
MANUAL
PAPER
READY
Legend
BlinkingOnOff
On line
Receiving data
(slow blinking)
or
Printing (rapid blinking)
Off-line
Error:
• Printer cover open
or
• Toner cartridge not
installed
Insufficient memory
for the job
Out of paper
Paper jam
Manual feed mode
Printing with Manual
Waiting for paper to be
Manually fed
System error
Introduction
1. 5

Printer Features
Your ML-6100 is a compact, easy to use laser printer designed for the
small office environment. It is designed to provide years of high quality,
high performance printing.
This manual tells you how to set up, operate and maintain your new
printer, and contains advice on how you can get the best performance
from it. Please use this manual together with the documentation provided
with your computer hardware and software.
The maximum print speed for the ML-6100 is 12 pages per minute. It
offers true 600 x 600 dpi print resolution and 1200 dpi image quality. The
printer features one 250 sheet paper tray and a 100 sheet multi-purpose
tray. The printer understands PCL6, PCL5e and PostScript Level 2
Compatible* printer languages and options include a option cassette, and
a Serial/LocalTalk interface board for Apple Macintosh compatibility.
* Contains the PowerPage
Electronics for Imaging, Inc.
®
Level 2J interpreter from
Printer Documentation
Your ML-6100 is packaged with the following documentation and
information:
• This User Guide, which shows you how to set your printer up and
running, and provides you with all of the information you will need to
use, maintain, upgrade and troubleshoot your printer.
• The ML-6100 CD-ROM, which contains the following:
— Printer Drivers
— Remote Control Panel and Status Monitor
— USB Port Driver
— PostScript PPD Files
Note: For the printer drivers contained on the CD-ROM, the majority of
documentation is provided via the on-line Help included with the drivers.
Features and functionality of the drivers are discussed in Chapter 4:
Printing.
1. 6
Since the CD-ROM contains so much information of importance, please
ensure that you save it and keep it in a safe place.
Introduction

Caution and Warning Symbols
Throughout this User Guide, several symbols are used to emphasize
useful, important and critical information. They are as follows:
This symbol indicates a caution against performing any action that may
damage your printer or degrade performance.
This symbol indicates a warning against performing any action
that may lead to physical injury.
Introduction
1. 7

2
Printer Setup
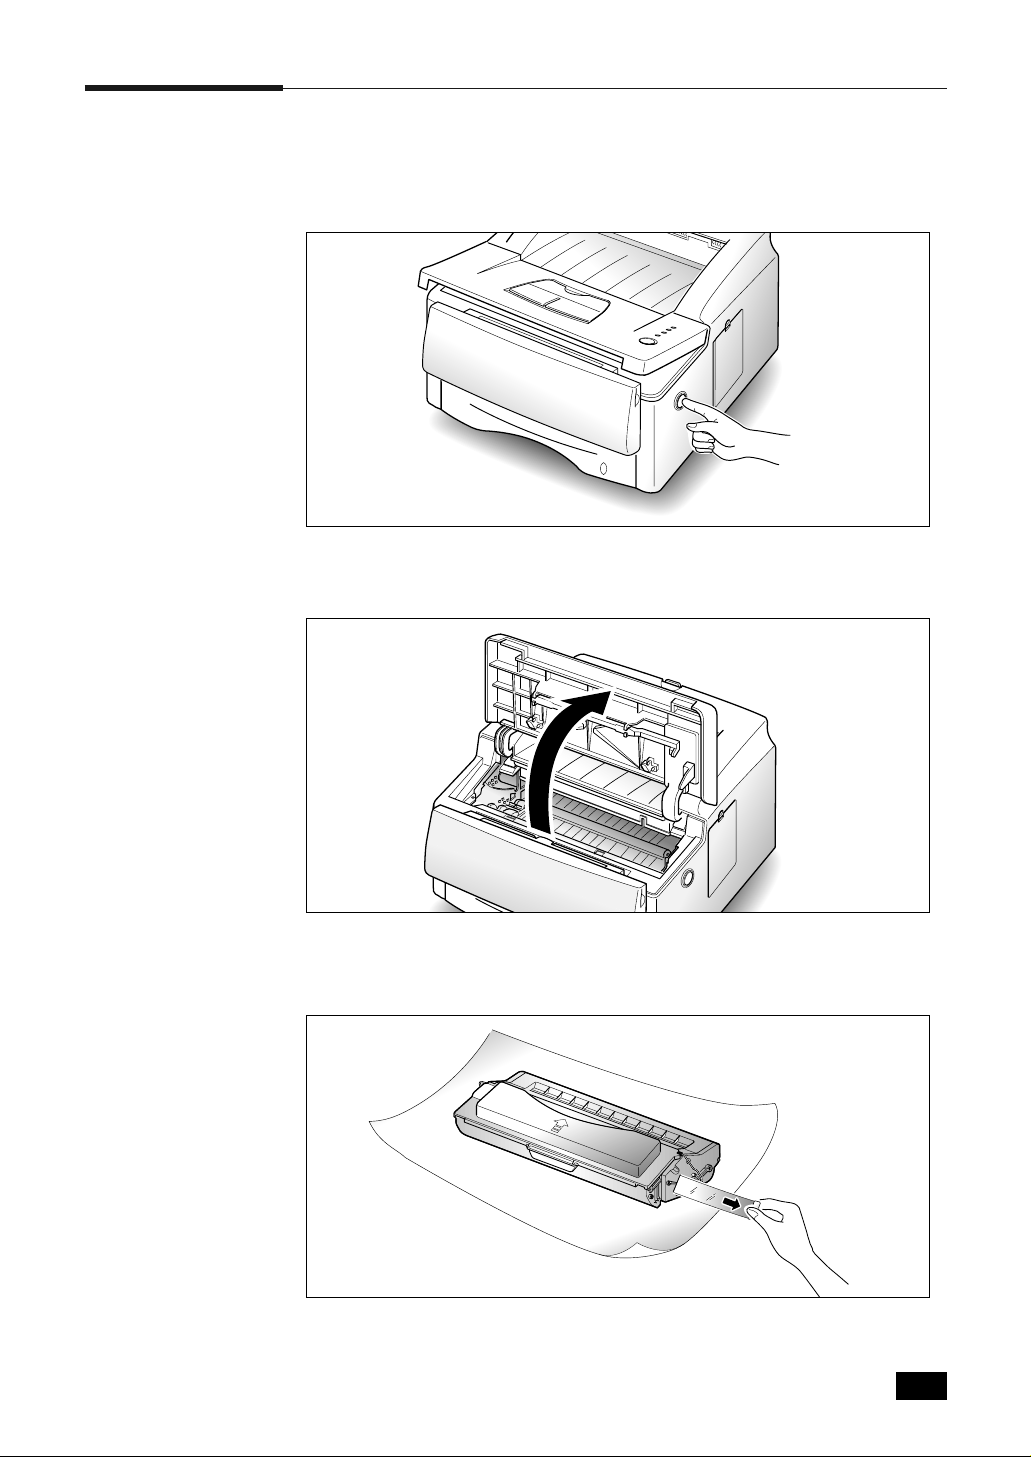
Installing the Toner Cartridge
1. Open the printer cover by pressing the cover release button.
2. Raise the printer cover.
3. Unpack the toner cartridge, and carefully pull the sealing tape
completely out of cartridge.
Printer Setup
2. 1
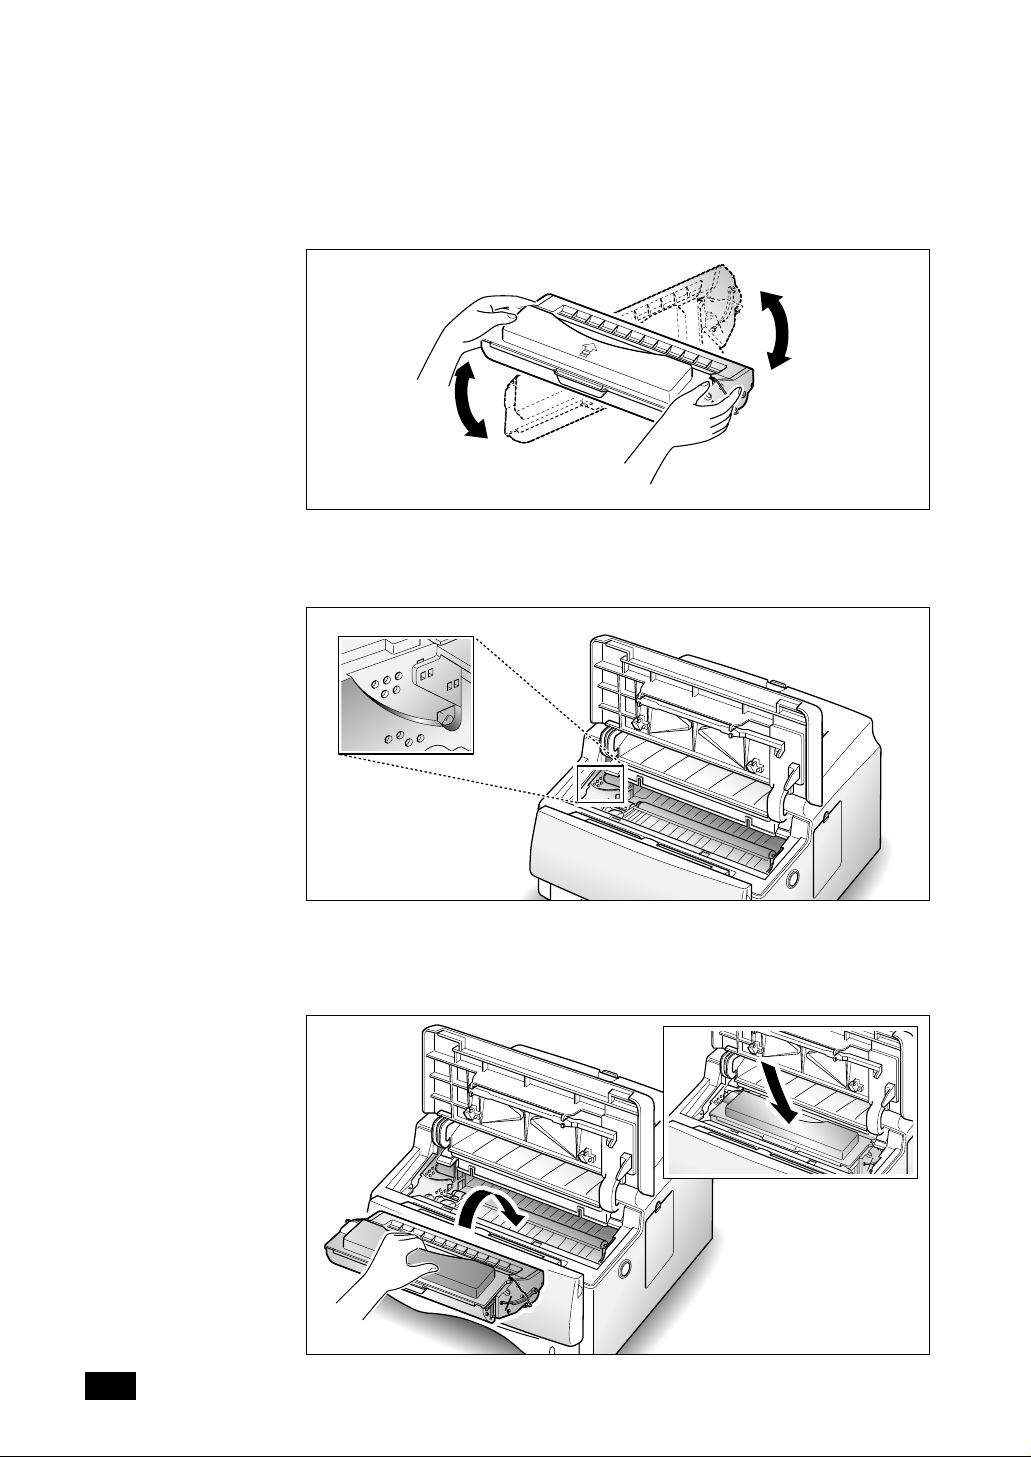
4. Gently shake the cartridge from side to side 5 or 6 times to distribute
the toner evenly inside the cartridge.
5. Find the cartridge slots inside the printer, one on each side.
2. 2
6. Grasp the handle and slide the cartridge down between the cartridge
slots, until it drops into place.
Printer Setup
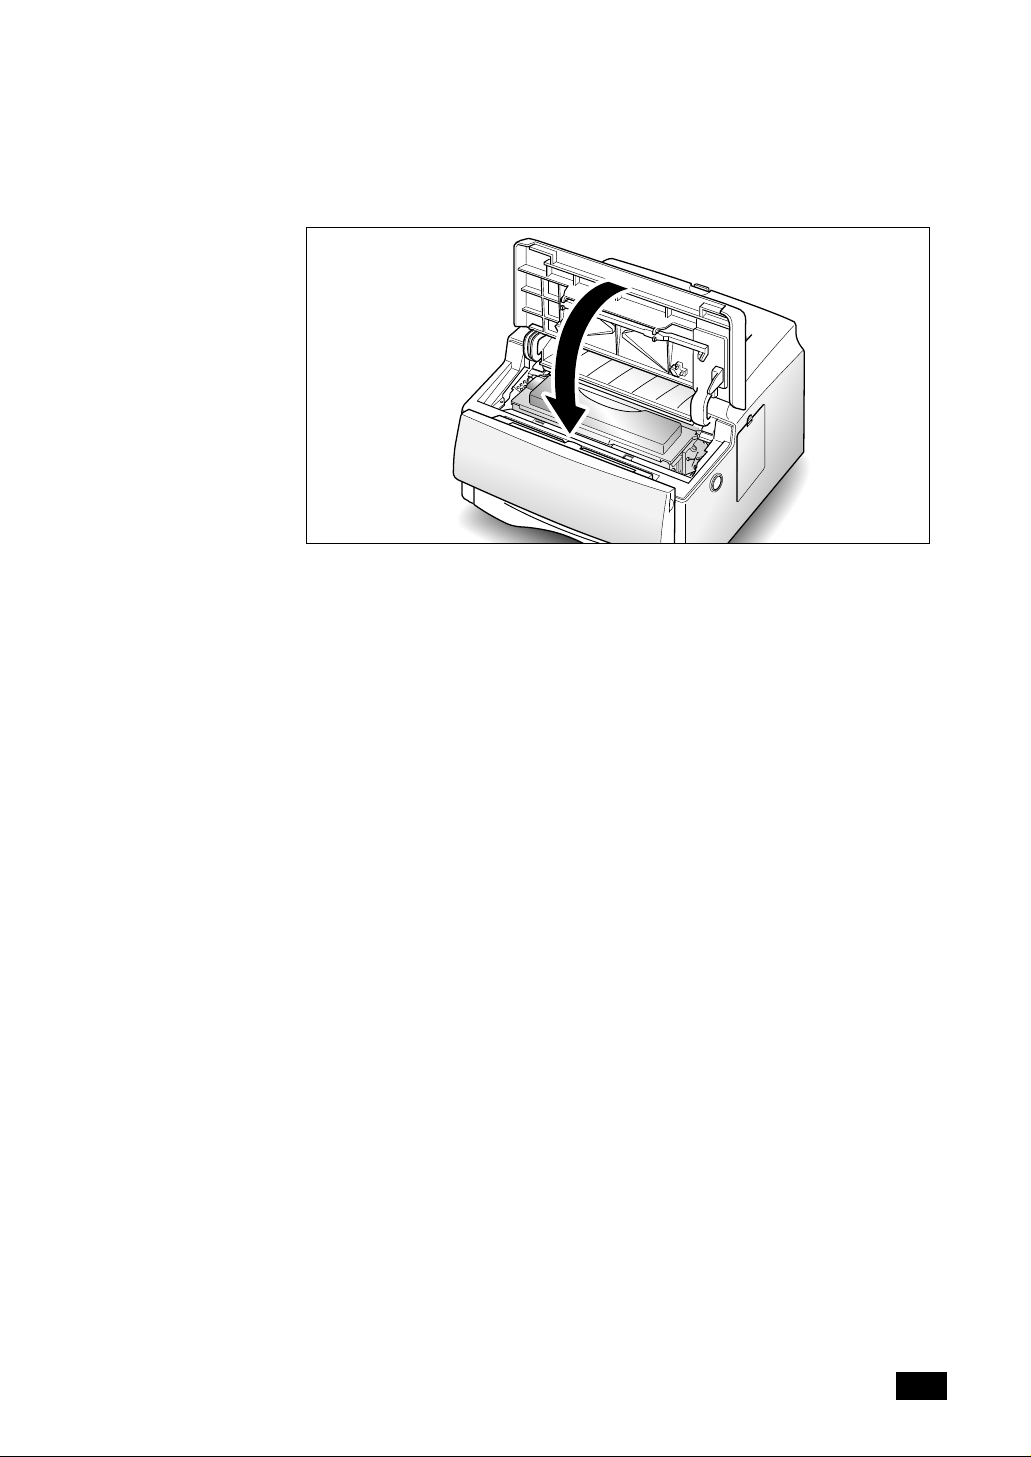
7. Close the printer cover. Make sure that the cover is securely closed.
Notes:
• Do not expose cartridge to direct sunlight or strong room light.
• To avoid damaging photo-sensitive drum, never open drum shutter.
• To avoid damaging cartridge, complete cartridge installation as quickly as possible.
• If toner gets on your clothing, wipe it off with a dry cloth and wash clothing in
cold water.
• When printing text at 5% coverage, you can expect a toner cartridge life of
approximately 6,000 pages.
Printer Setup
2. 3
Loading Paper into the Cassette
You can load approximately 250 sheets of paper in the paper cassette. If
you purchase an option cassette and attach it below the standard paper
cassette (see ‘Option Cassette’ on page 6.14), you can also load paper in
the option cassette.
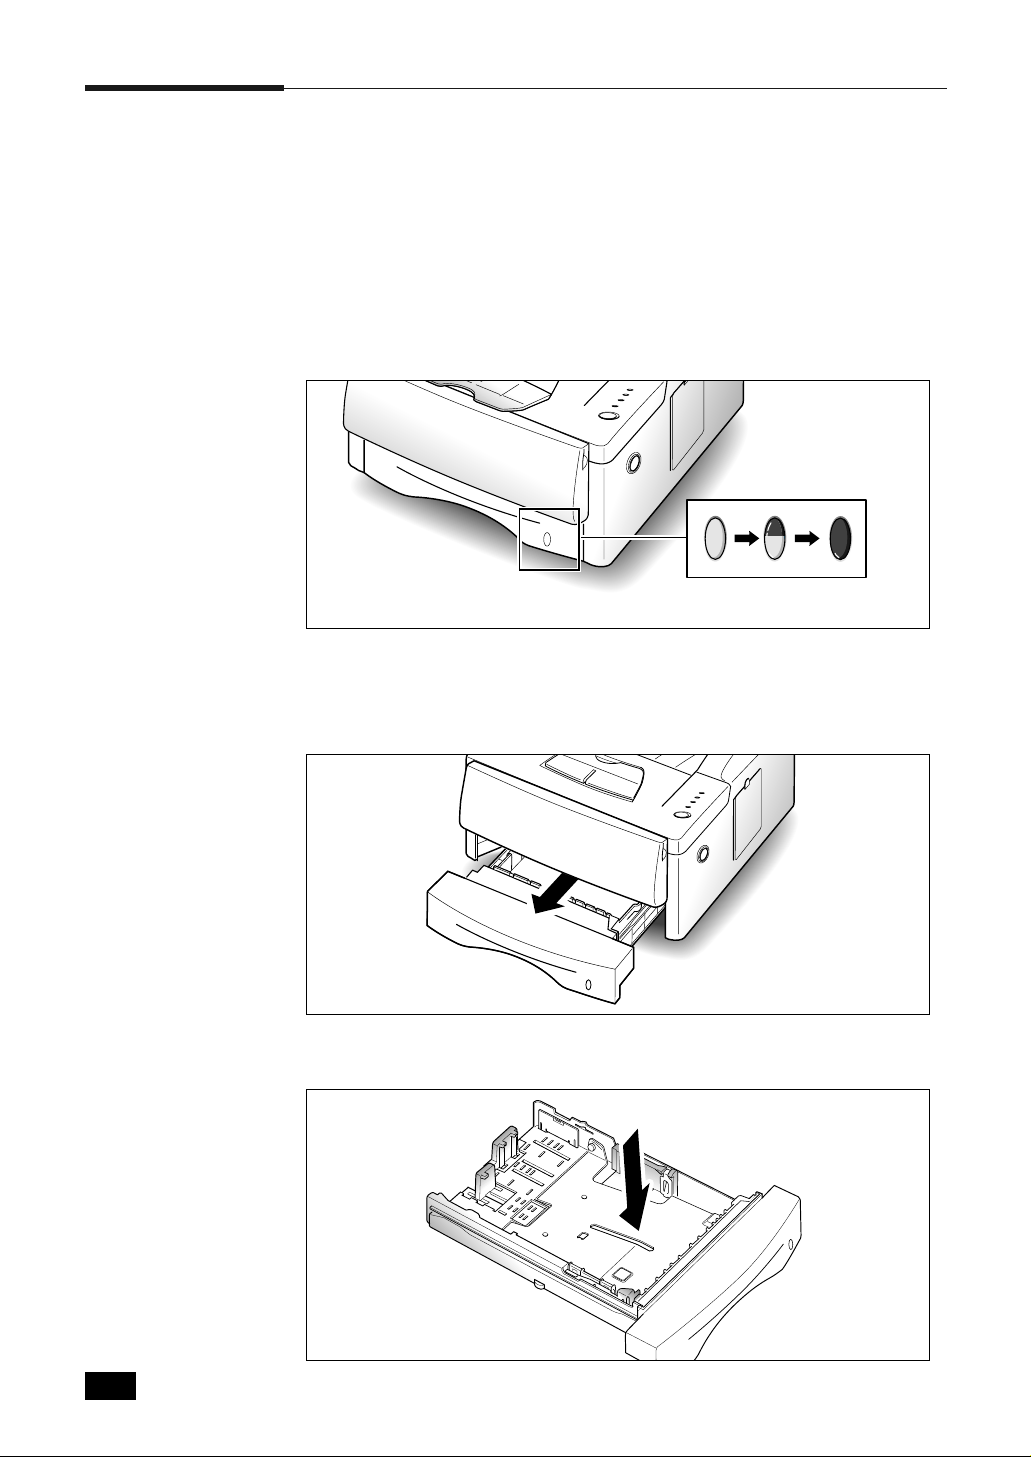
The window on the front of the paper cassette shows the amount of
paper currently left in the cassette. When the cassette becomes empty, the
window turns into red.
Paper full Paper empty
To load a stack of paper:
1. Remove the paper cassette by pulling it toward you.
2. Press the bottom plate until it locks into place.
2. 4
Printer Setup
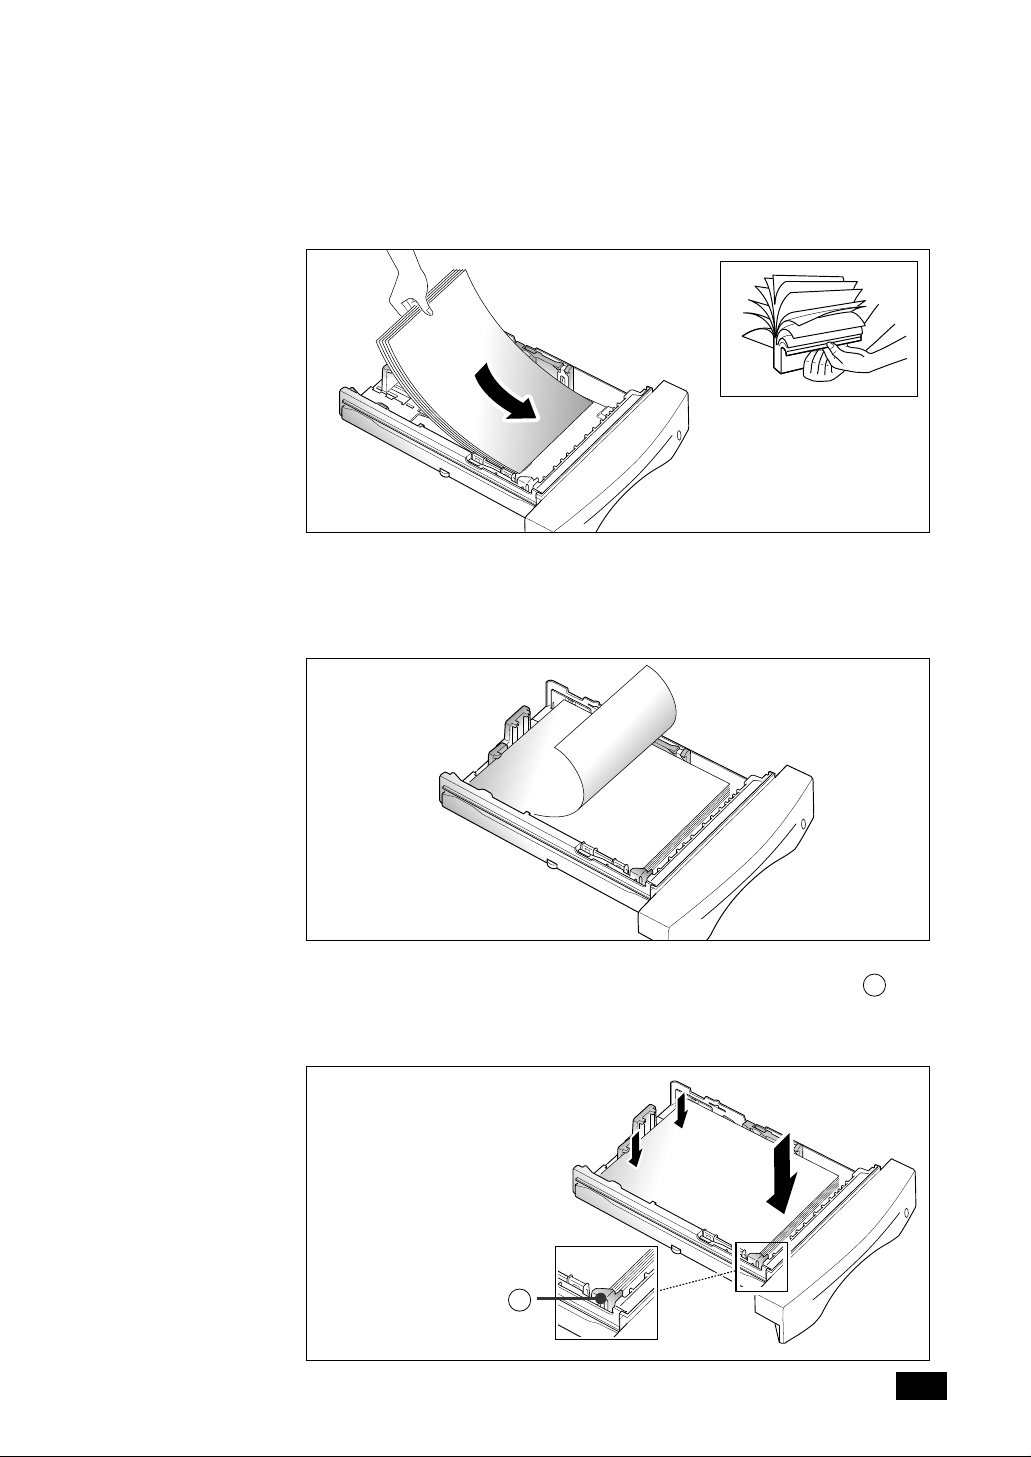
3. Fan the paper and load the paper in the cassette with the print side
XXXXXXXXXX
facing down. The print side is usually indicated on the paper package.
If you are using a preprinted stock, such as letterhead, place the printed
design side face down with the top edge of the page toward the front
of the cassette.
4. Make sure that the stack goes under the metal retaining clip and
A
the plastic tabs on the end guides. Paper overloading may cause paper
jams.
Make sure that paper is
under this metal clip.
A
Printer Setup
2. 5
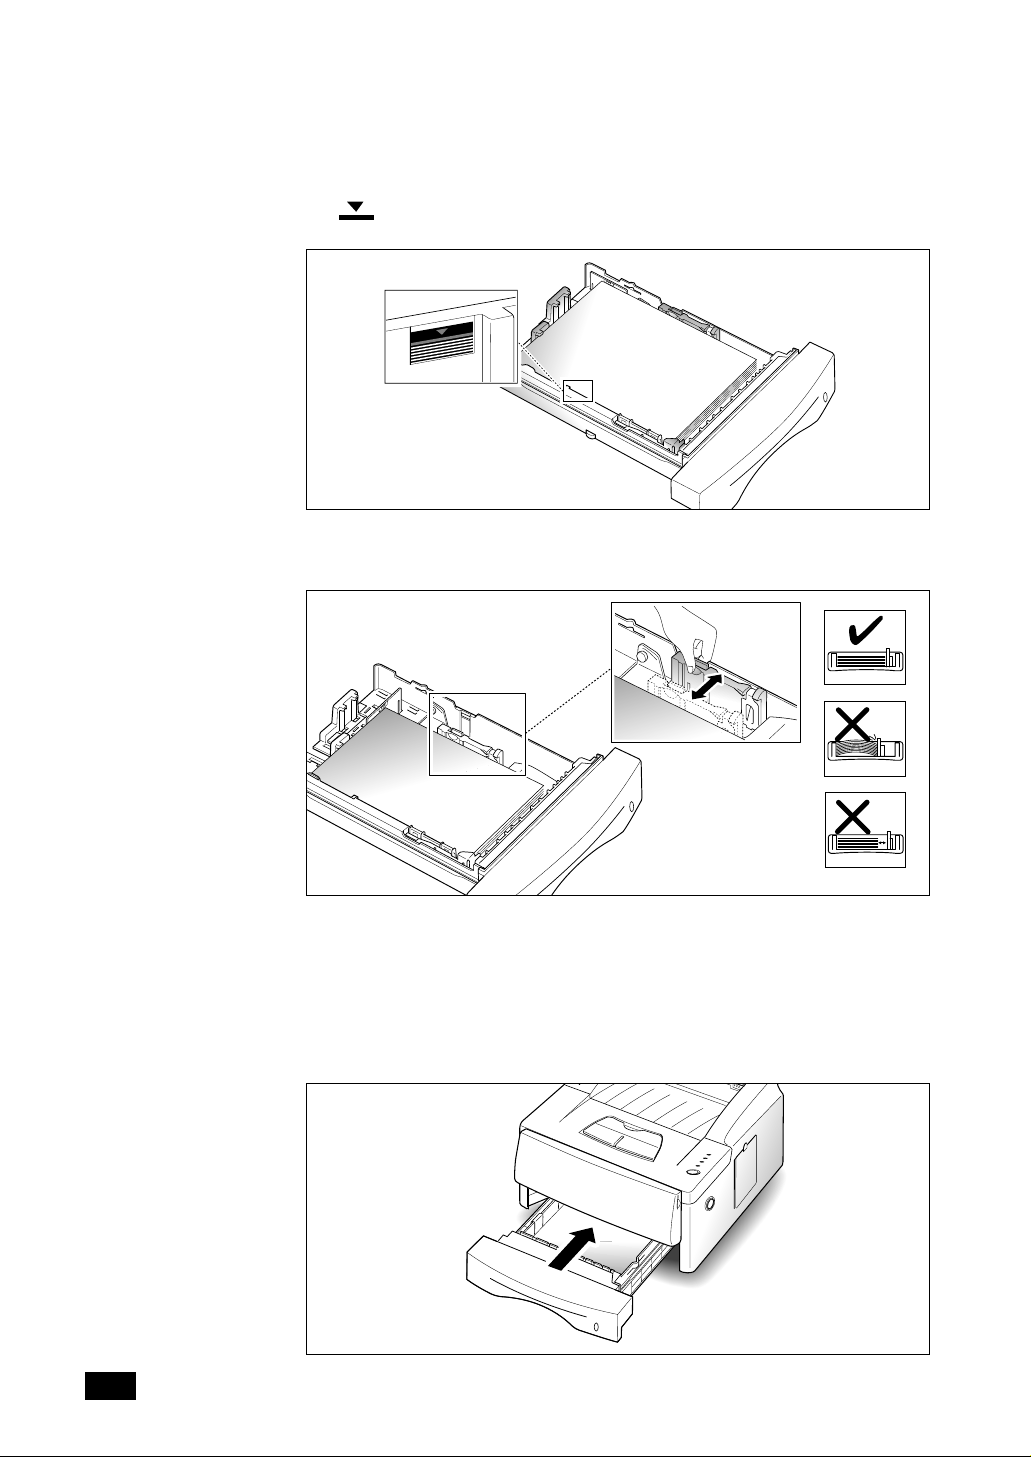
5. Make sure that the stack of paper does not exceed the line indicated
by mark on the left inside wall of the cassette.
6. Pinch side guide as shown below to adjust it to proper paper width.
2. 6
The paper cassette is preset to load A4 size paper. If you want to load
letter or legal size paper, adjust the cassette for the paper you want to
load. For details on how to adjust the paper cassette, see ‘How to Adjust
Paper Guides’ on page 3.3.
7. Insert the cassette back into the printer.
Printer Setup
Connecting to the Computer
Your printer can be connected to a Windows-based PC or to an Apple
Macintosh computer.
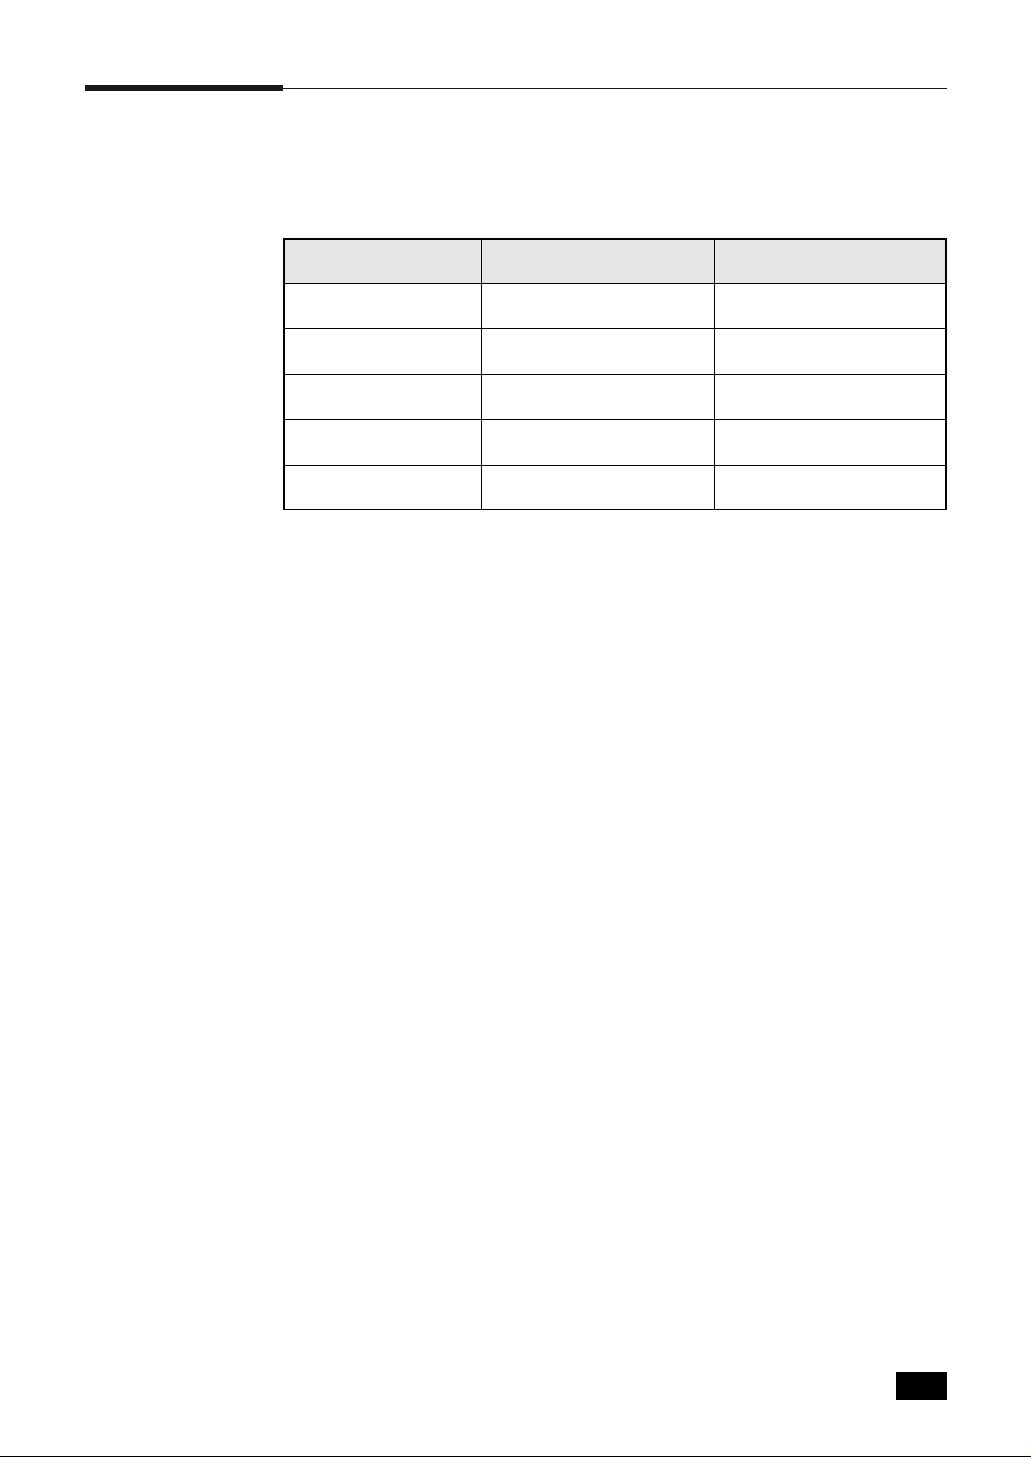
Interface Windows PC Macintosh
Parallel Yes Not available
USB Yes* Yes
†
Serial
LocalTalk
Network
* Windows 98 systems only.
†
Requires installation of the Serial/LocalTalk or Network interface option card. Refer to
“Printer Options”.
There are three interfaces for Apple Macintosh computer
†
†
Yes Not available
Not available
Yes
Yes
Yes
1. LocalTalk interface
Mininum System requirements for Macintosh
•Mac OS 7.0 or later
•LaserWriter 8
•Macintosh System with LocalTalk port
ML-6100 Option required
•Serial/LocalTalk Option
2. USB interface
Mininum System requirements for Macintosh
•Mac OS 8.6 or later
•Macintosh System with USB port
3. Network(Ethertalk) interface
Mininum System requirements for Macintosh
•Mac OS 7.0 or later
•LaserWriter 8
•Macintosh System with Network(Ethertalk) port
ML-6100 Option required
•Network card Option
If you do not have these option cards, contact your authorized Samsung
dealer. For more information about installation instructions, see “Printer
Options”.
Once you have installed the required options and connected your printer,
you will need to install the PostScript driver. This driver is provided on
the CD-ROM that came with your printer. For more information about
installation, see “Installing the PostScript PPD” on the page 2.14.
Printer Setup
2. 7
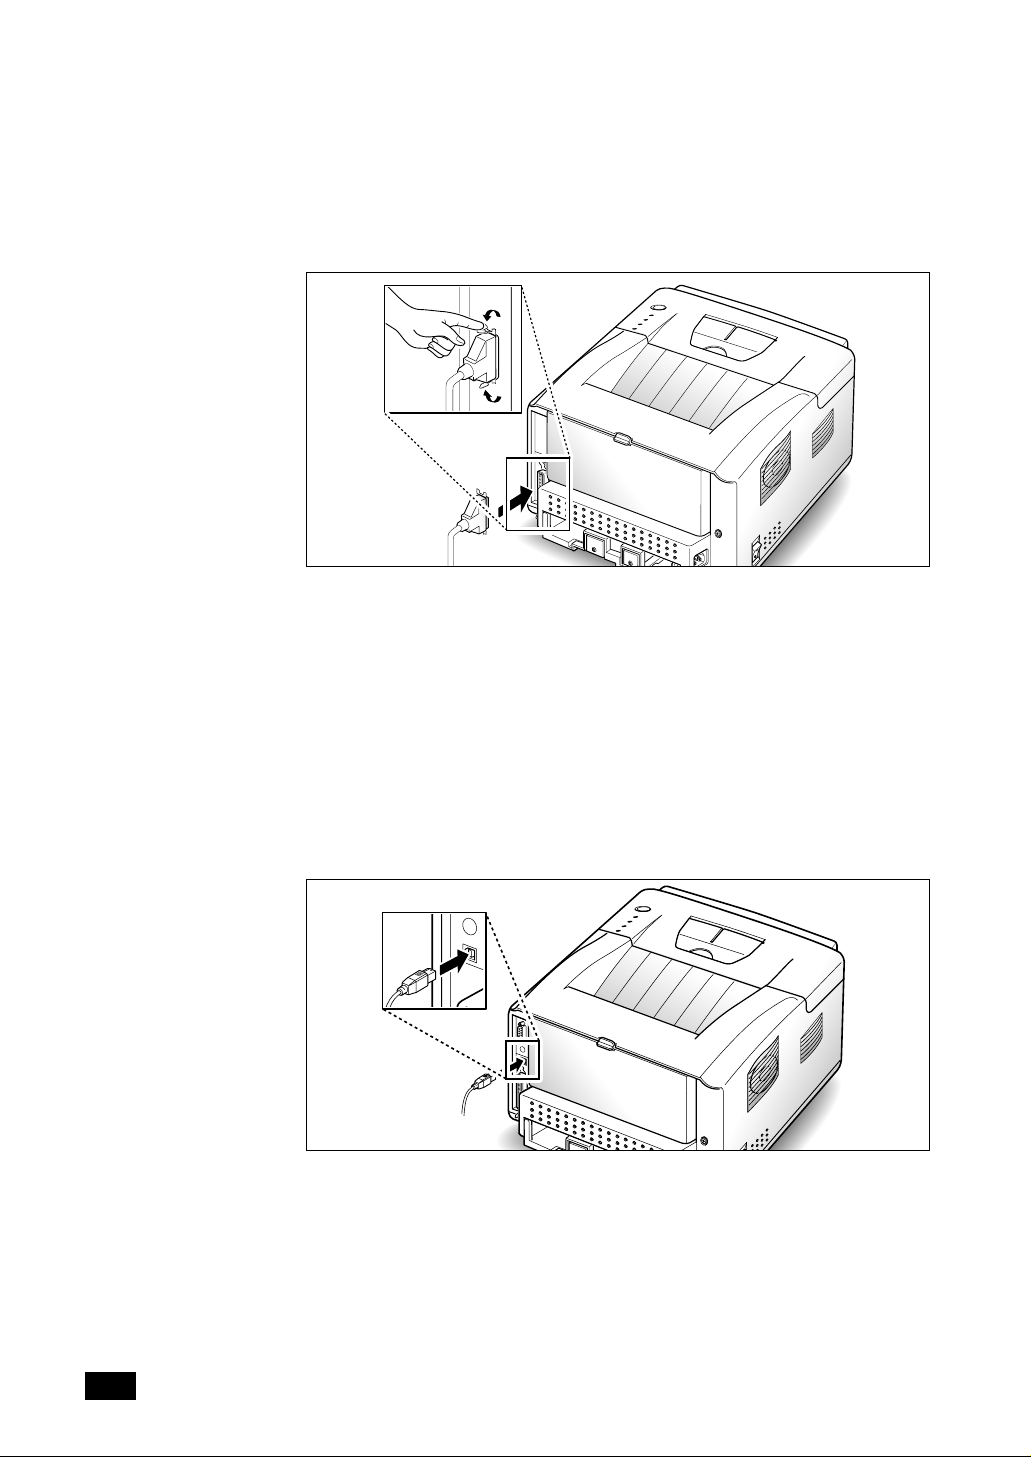
Parallel Interface
1. Make sure that both the printer and computer are turned off.
2. Plug the cable into the connector on the back of the printer. Push the
metal clips down to fit inside the notches on the cable plug.
3. Connect the other end of the cable to the parallel interface port on
your computer. See your computer documentation if you need help.
USB Interface
1. Make sure that both the printer and computer are turned off.
2. Plug the USB interface cable into the connector on the back of the
printer.
3. Connect the other end of the cable to the USB port on your computer.
See your computer documentation if you need help.
Note: To print using USB interface, you must install the USB driver.
See page 2.13.
2. 8
Printer Setup
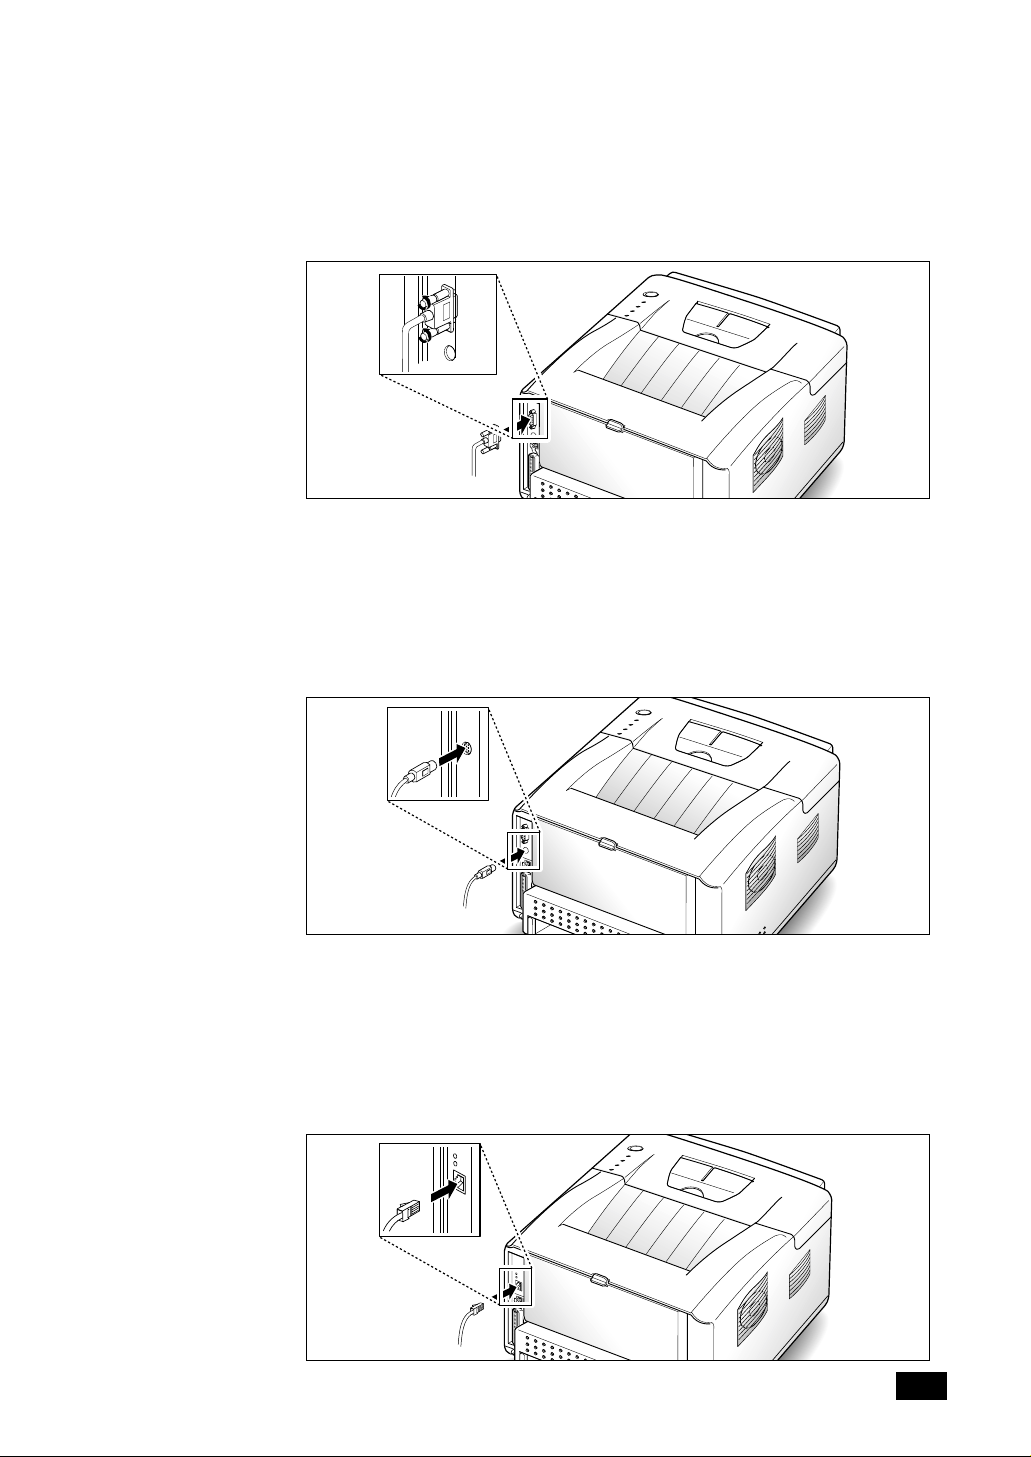
Serial Interface (Requires option: See page 6.8)
1. Make sure that both the printer and computer are turned off.
2. Plug the Serial interface cable into the connector on the back of the
printer.
LocalTalk Interface (Requires option: See page 6.8)
1. Make sure that both the printer and computer are turned off.
2. Plug the LocalTalk interface cable into the connector on the back of
the printer.
Network Interface (Requires option: See page 6.8)
1. Make sure that both the printer and computer are turned off.
2. Plug the Network interface cable into the connector on the back of
the printer.
Printer Setup
2. 9
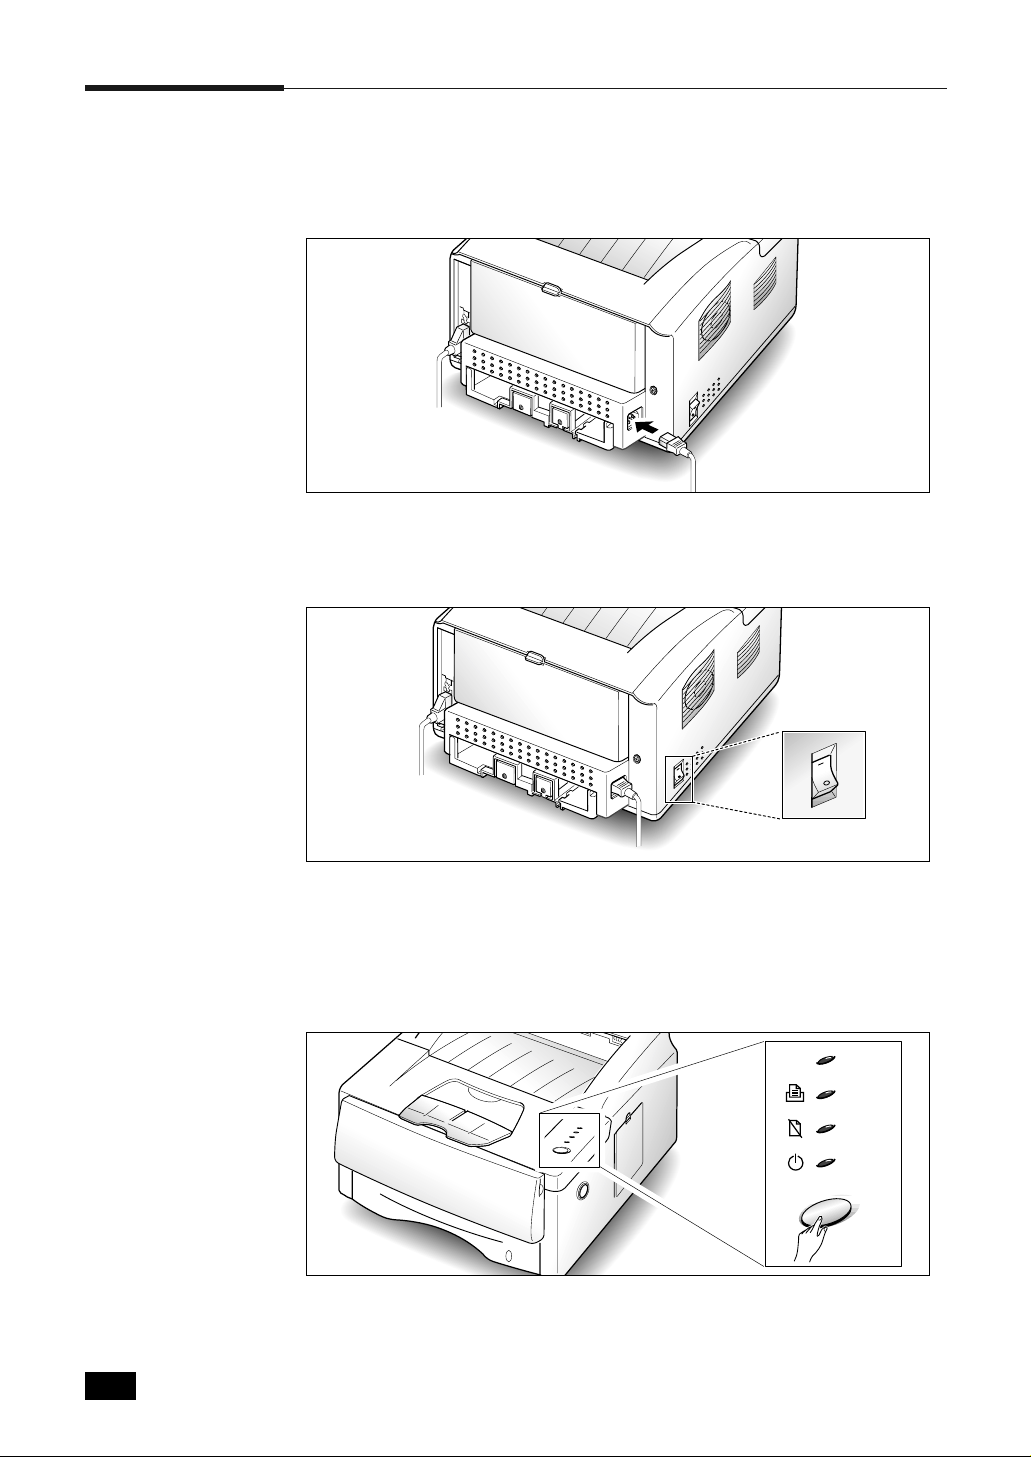
Attaching the Power Cord and Testing the
Printer
1. Plug one end of the power cord into the connector on the printer.
2. Plug the other end into a properly grounded AC outlet.
3. Turn the printer on.
2. 10
4. As the printer powers up, all operator panel lights turn on briefly.
When only the READY light is steadily on, press and hold the operator
panel button until all lights are blinking (approximately four seconds),
then release the button. Atest page should print out. If this does not
happen, re-check the installation.
ERROR
MANUAL
PAPER
READY
The test page lists your printer model and default settings along with the
data streams available for your printer model.
Printer Setup

Printer Driver Installation
Use the following instructions to install the PCL6 and/or PCL5e printer
drivers on a Windows-based PC. The printer driver enables you to
control the ML-6100’s features and capabilities (see the table on the next
page). Use the driver ’s on-line help for a complete description of its
functionality. If necessary, consult your Windows documentation for
instructions on accessing the driver.
For other software installation procedures, including printer utilities, see
the section “Software Utilities Installation” (page 2.13).
Before installing the software, verify the following:
• Your PC has at least 16 MB of RAM installed.
• There is at least 20 MB of free disk space on your PC.
• ALLAPPLICATIONS ARE CLOSED ON YOUR PC BEFORE
BEGINNING INSTALLATION. (A system reboot may be required after
the software is installed.)
Windows 95/98/NT 4.0
1. Insert the ML-6100 CD-ROM into your CD-ROM drive. If Windows
automatically runs the CD-ROM, skip to Step 4.
2. Select Run from the Start menu.
3. Type d:\setup.exe on the command line (where “d” is your CD-ROM
drive letter), then click OK.
4. Select the appropriate language.
5. Select Printer Driver and follow the on-screen instructions to
complete the installation.
For Windows 95/98, please reboot once you have completed installation.
Note: The manufacturer recommends the minimal installation of the PCL6
driver, which contains all the features described in the product description.
Advanced features include Manual Duplex, Multiple Images,
Watermarks, and Booklet Printing.
Windows 3.1x
1. Turn on the printer, then turn on the computer and start Windows.
2. Insert the ML-6100 CD-ROM into your CD-ROM drive.
3. Open the Program Manager and select Run from the File menu.
Printer Setup
2. 11
4. Type d:\setup16.exe on the command line (where “d” is your
CD-ROM drive letter), then click OK.
5. Select the appropriate language.
6. Select Printer Driver and follow the on-screen instructions to
complete the installation.
Printer Driver Features
Setting
Number of copies
Select 1-99 copies. * * *
Usage/Description PCL6 PCL5e PS
Page orientation Select Portrait or Landscape. * * *
Paper size Select from supported paper sizes (see 7.1) * * *
Paper source
Graphic quality
Graphic mode Select vector or raster mode. * *
TrueType fonts Select font printing. * *
EconoMode Select draft mode printing capability. *
Select printing from the cassette,
MP Tray or option cassette (if installed).
Select enhancement for graphical and/or
text printing.
***
***
2
2
2
*
Overlays Include overlays in printed documents. *
Manual duplex Print two-sided documents. *
Multiple images (N-Up) Select 1-16 images per physical page. *
1
4
*
3
*
Watermarks Create and use watermarks on documents. *
Booklet printing Create booklets from documents. *
1 PostScript
2 This setting is not available in the Windows NT 4.0 version of the PCL5e driver.
3 Select 1, 2, or 4 images per page in Windows 95/98. Select 1, 2, 4, 6, 9, or 16 images per page
in Macintosh. This setting is not available in Windows NT 4.0 of the PostScript driver.
4 This setting is not available in Macintosh.
2. 12
Printer Setup

Software Utilities Installation
Installing the USB Port Driver (Windows 98)
The USB port driver must be installed in order to print to the ML-6100 via
a USB connection. Currently, USB printing is only available through
Windows 98.
1. Insert the ML-6100 CD-ROM into your CD-ROM drive. If Windows
automatically runs the CD-ROM, skip to Step 3.
2. Select Run from the Start menu. Type d:\setup.exe on the command
line (where “d” is your CD-ROM drive letter), then click OK.
3. Select the appropriate language, then select USB Port Driver.
Installing the RCP and SM (Windows)
The RCP (Remote Control Panel) and the SM (Status Monitor) software
are Windows-based programs that allow the user to set default printer
values as well as monitor the status of the printer.
These two utilities can be used when the printer is connected via the
parallel and USB(Windows 98 only) interface.
1. Insert the ML-6100 CD-ROM into your CD-ROM drive. If Windows
automatically runs the CD-ROM, skip to Step 3.
2. For Windows 95/98/NT 4.0:
Select Run from the Start menu. Type d:\setup.exe on the command
line (where “d” is your CD-ROM drive letter), then click OK.
For Windows 3.1x:
Open the Program Manager and select Run from the File menu.
Type d:\setup16.exe on the command line (where “d” is your
CD-ROM drive letter), then click OK.
3. Select the appropriate language.
4. For Windows 3.1x, 95 and 98, select RCP and SM.
For Windows NT 4.0, select RCP.
Printer Setup
2. 13
 Loading...