

Samsung ML2252W Users Manual
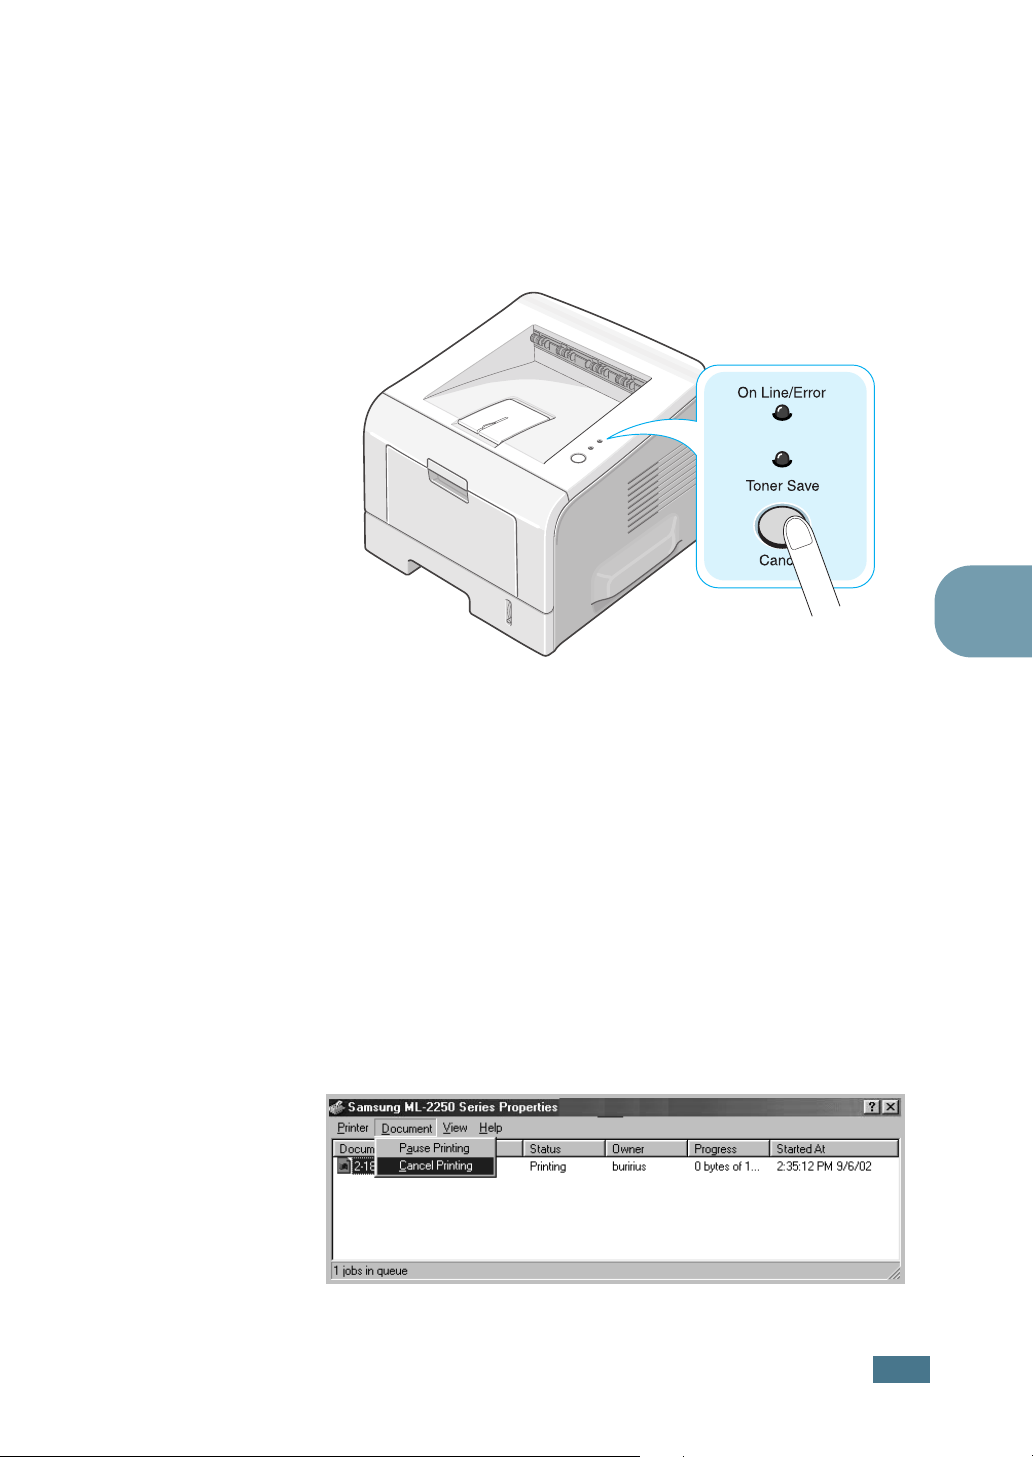
Cancelling a Print Job
There are two ways to cancel a print job.
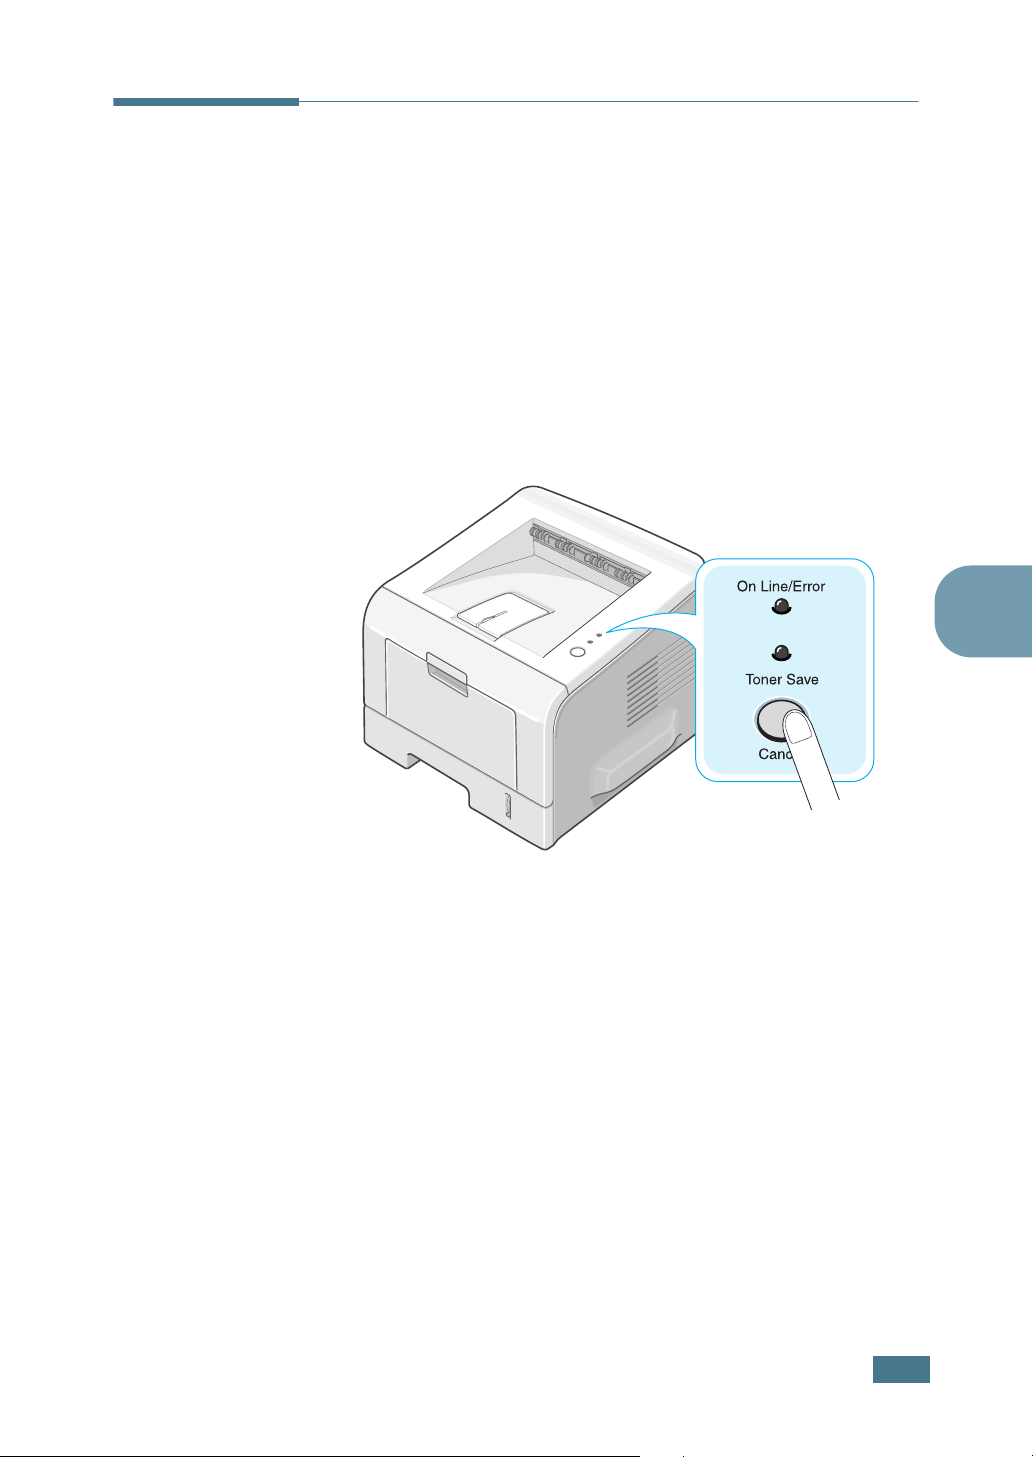
To stop a print job from the control panel:
Press the Cancel button on the control panel.
4
The printer will finish printing the page that is moving through
the printer and delete the rest of the print job. Pressing the
button cancels only the current job in the printer. If more than
one print job is in the printer memory, the button must be
pressed once for each job.
To stop a print job from the Printers folder:
1
From the Windows Start menu, select Settings.
2
Select Printers to open the Printers window, and
double-click the Samsung ML-2250 Series icon.
3
From the Document menu, select Cancel Printing
(Windows 9x/Me) or Cancel (Windows NT 4.0/2000/XP).
Windows 98
P
RINTING TASKS
4.5
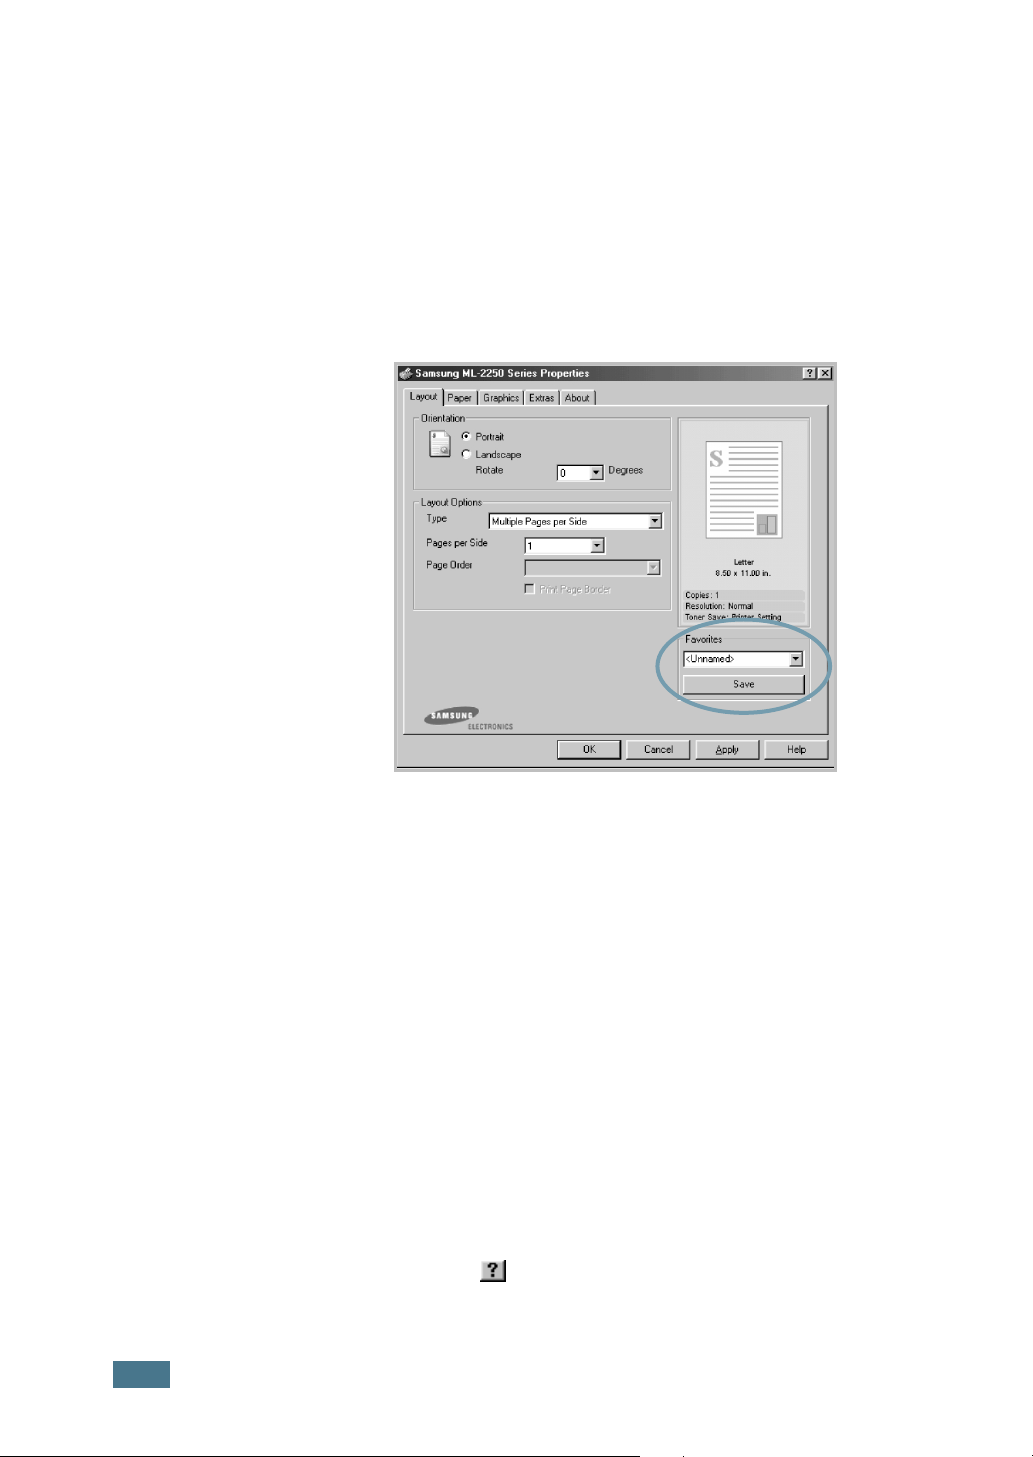
Using a Favorite Setting
The Favorites option, which is visible on each properties tab,
allows you to save the current properties settings for future use.
To save a Favorites item:
1
Change the settings as needed on each tab.
2
Enter a name for the item in the Favorites input box.
4.6
P
RINTING TASKS
3
Click Save.
To use a saved setting, just select the item from the Favorites
drop down list.
To delete a Favorites item, select it from the list and click
Delete.
You can also restore the printer driver’s default settings by
selecting <Printer Default> from the list.
Using Help
Your printer has a help screen that can be activated by the Help
button in the printer’s properties window. These help screens
give detailed information about the printer features provided by
the printer driver.
You can also click from the upper right hand corner, and then
click on any setting.
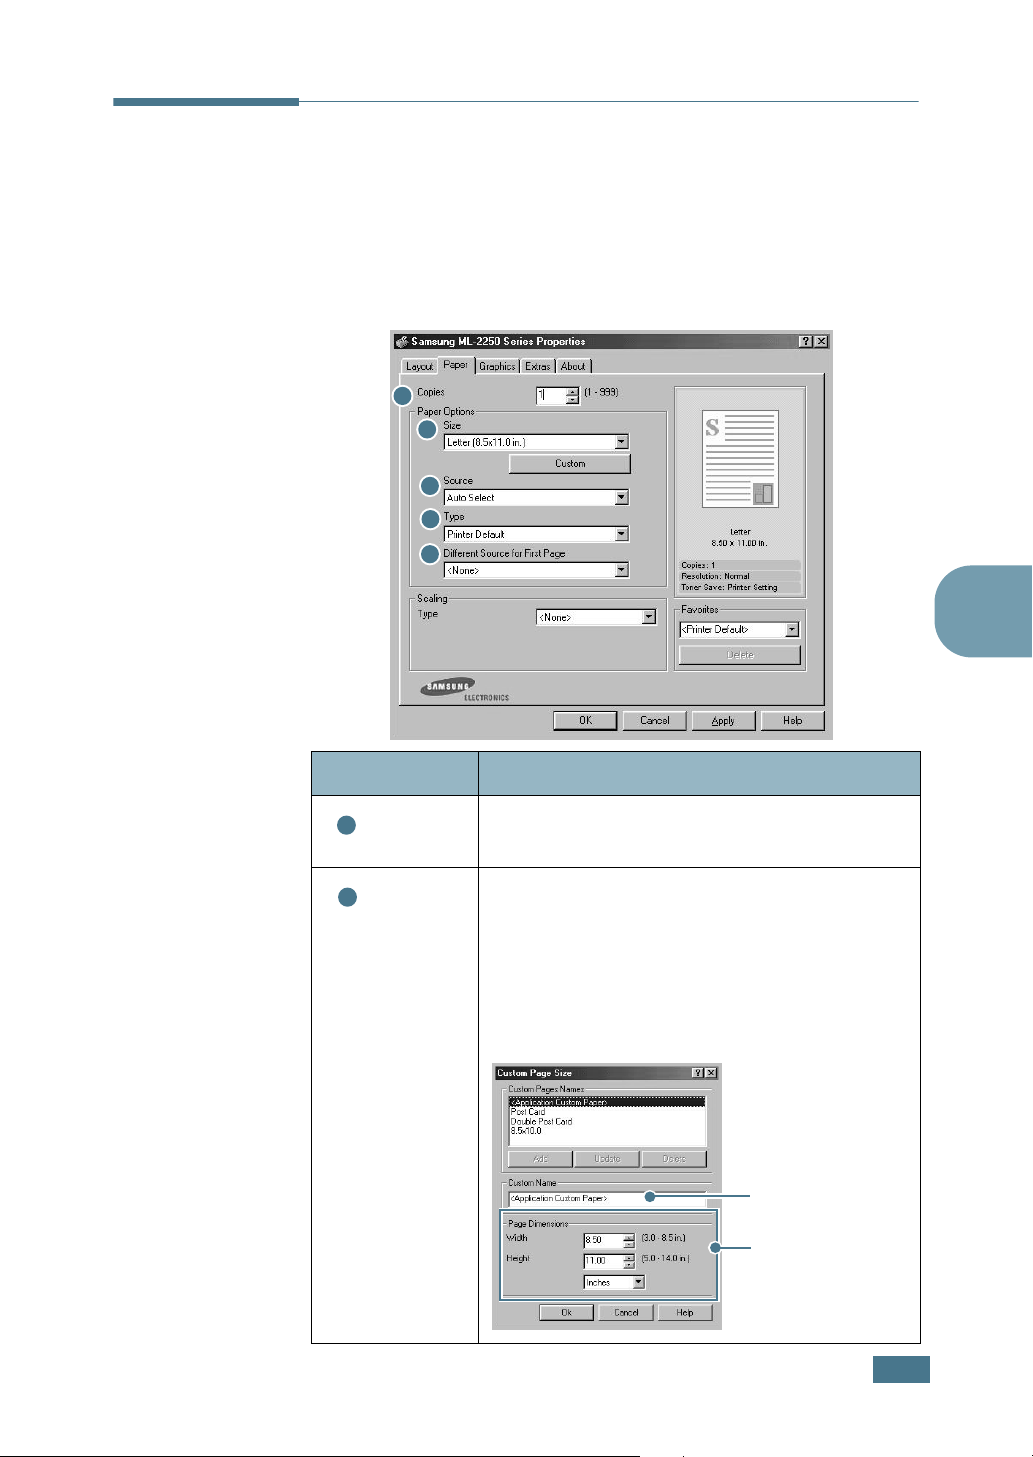
Setting Paper Properties
Use the following options to set the basic paper handling needs
when you access the printer properties. See page 4.2 for more
information about accessing printer properties.
Click the Paper tab to access various paper properties.
1
2
3
4
5
4
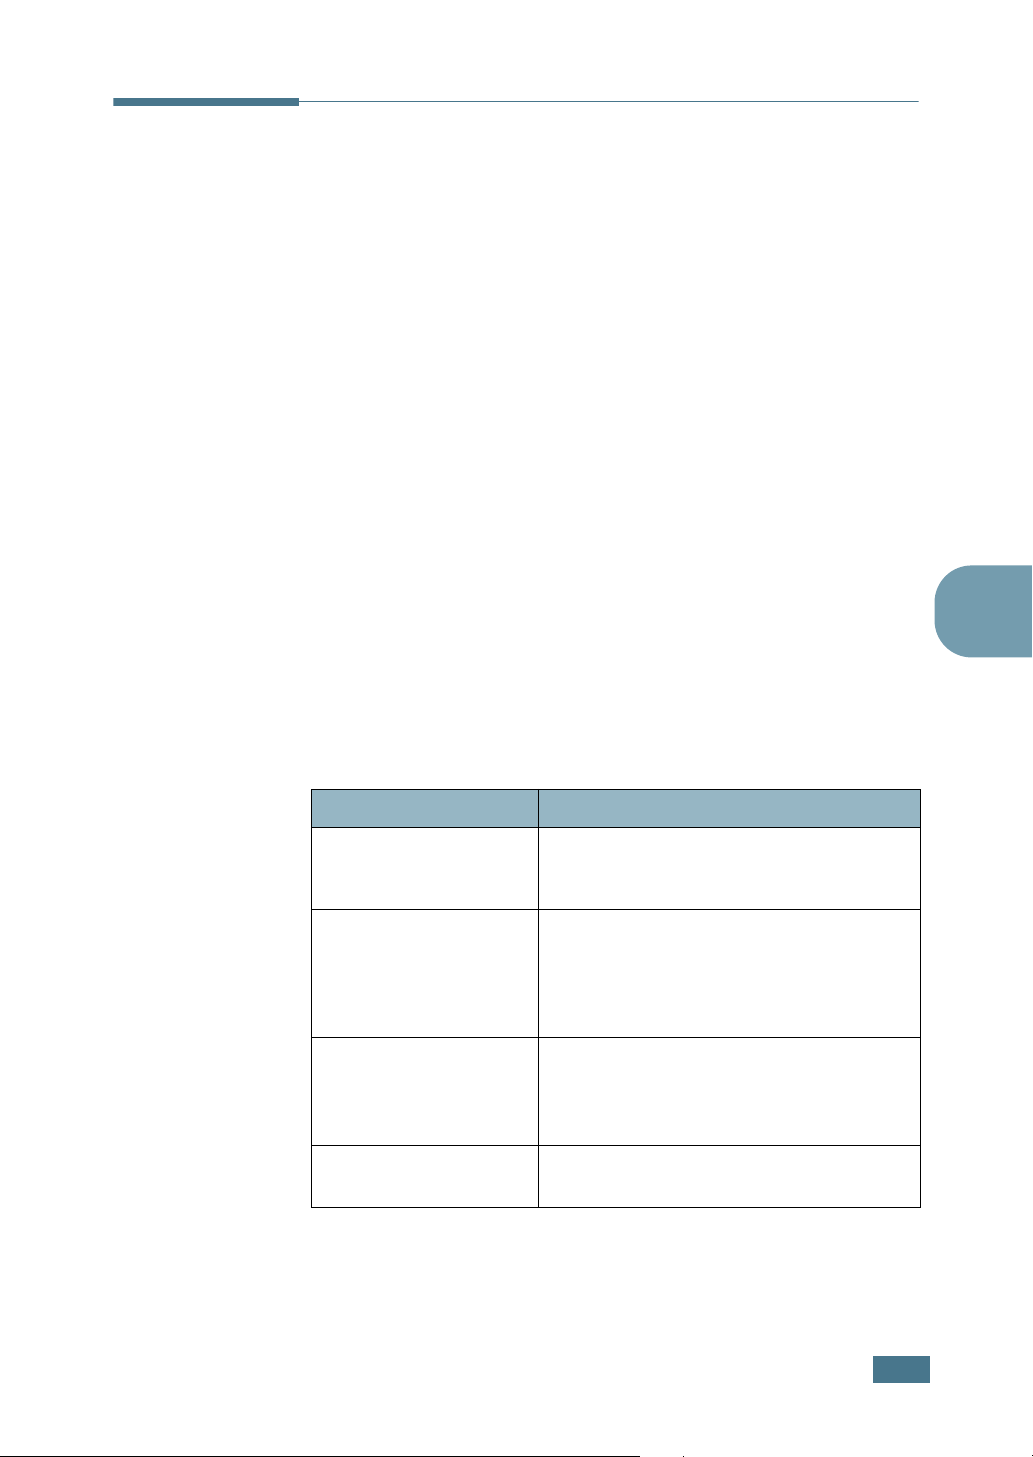
Property Description
1
2
Copies
Size
Copies
copies to be printed. You can enter up to 999.
The
of paper loaded in the tray.
allows you to choose the number of
Size
option allows you to choose the size
If the required size is not listed in the
box, click
Custom
. When the Custom Page
Size window appears, set the paper and click
Ok
. The size setting appears in the
so that you can select it.
Size
Size
list
Enter the custom
name you want to
use.
Enter the paper
size.
P
RINTING TASKS
4.7
Property Description
3
Source
4
Type
Make sure that
Source
is set to the
corresponding paper tray.
Manual Feed
The
source is used when
printing to special materials. You have to load
one sheet at a time into the Multi-Purpose
Tray. See page 3.12.
If the paper source is set to
Auto Select
,
the printer automatically picks up print
materials according to the following order:
Multi-Purpose Tray, Tray1, Optional Tray2.
Make sure that
Default
. If you load a different type of print
Type
is set to
Printer
materials, select the corresponding paper
type. For more information on print
materials, refer to Chapter 3, "Using Print
Materials."
If you use cotton paper, set the paper type to
Thick
for the best printing.
To use recycled paper, which weighs from
20lb to 24lb, or other colored paper, select
Color paper
.
5
Different
Source
for First
Page
This property allows you to print the first
page using a different paper type from the
rest of the document. You can select the
paper source for the first page.
For example, load thick stock for the first
page into the Multi-Purpose Tray, and plain
paper into the Tray1. Then, select
the
Source
Tray
Page
in the
option and
Multi-Purpose
Different Source for First
option.
Tray1
in
4.8
P
RINTING TASKS
Using the Toner Save Mode
Toner Save mode allows the printer to use less toner on each
page. Using this mode will extend the life of your toner cartridge
and reduce your cost per page, but will reduce the print quality.
This setting is not available with the 1200 dpi setting.
There are two ways to enable the Toner Save mode:
From the Control Panel
Press the Cancel button on the control panel. The printer must
be in Ready mode (On Line/Error green LED is on).
4
• If the Toner Save LED is on, the mode is enabled and the
printer uses less toner to print a page.
• If the Toner Save LED is off, the mode is disabled and the
printer prints in the normal mode.
P
RINTING TASKS
4.9
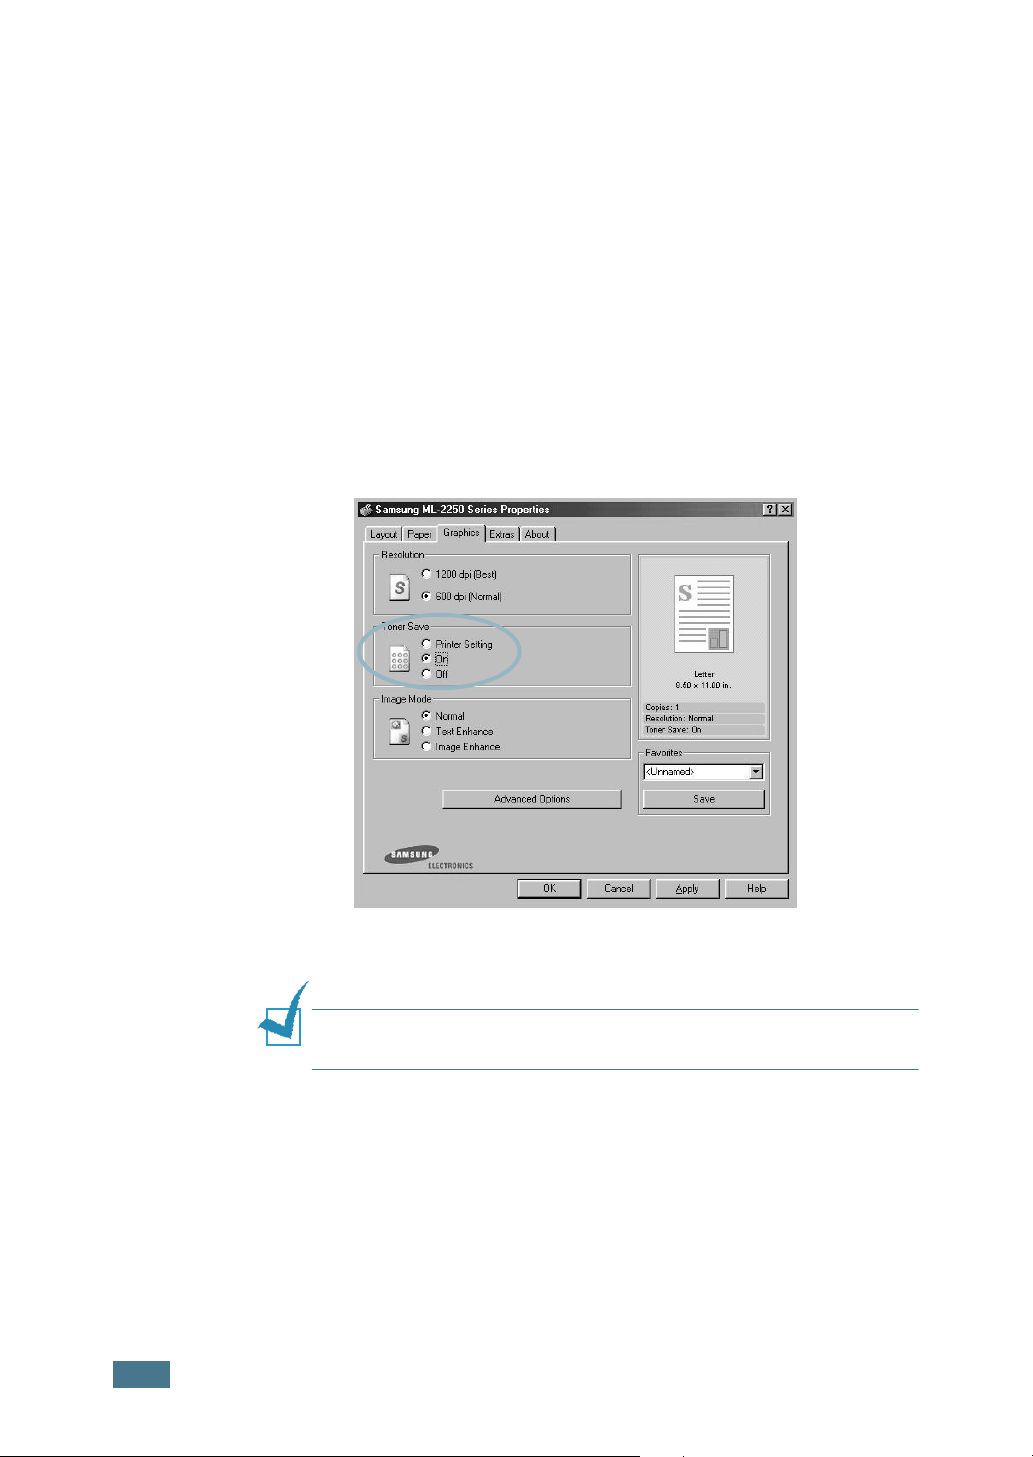
From the software application
1
When you change the print settings from your software
application, access the printer properties. See page 4.2.
2
Click the Graphics tab, and select the Toner Save option.
You can select from:
• Printer Setting: If you select this option, the Toner Save
feature is determined by the setting you’ve made on the
control panel of the printer.
• On: Select this option to allow the printer to use less
toner on each page.
• Off: If you don’t need to save toner to print a document,
select this option.
4.10
P
RINTING TASKS
3
Click OK.
N
OTE
:
The setting in the software application overrides that on
the control panel.
Printing Multiple Pages on One
1 2
3 4
Sheet of Paper
You can select the number of pages to print on a single sheet of
paper. To print more than one page per sheet, the pages will
appear decreased in size and arranged on the sheet. You can
print up to 16 pages on one sheet.
1
To change the print settings from your software application,
access the printer properties. See page 4.2.
2
From the Layout tab, choose Multiple Pages per Side in
the Type drop-down list.
3
Select the number of pages you want to print per sheet
(1, 2, 4, 9 or 16) in the Pages per Side drop-down list.
(N-Up Printing)
4
4
Select the page order in the Page Order drop-down list,
if necessary.
132
4
Right, Then
Down
Check Print Page Border to print a border around each
page on the sheet. Print Page Border is enabled only if
the pages per sheet is 2, 4, 9, or 16.
123
4
Down, Then
Right
241
3
Left, Then
Down
341
2
Down, Then
Left
P
RINTING TASKS
4.11
5
Click the Paper tab and select the paper source, size, and
type.
6
Click OK and print the document.
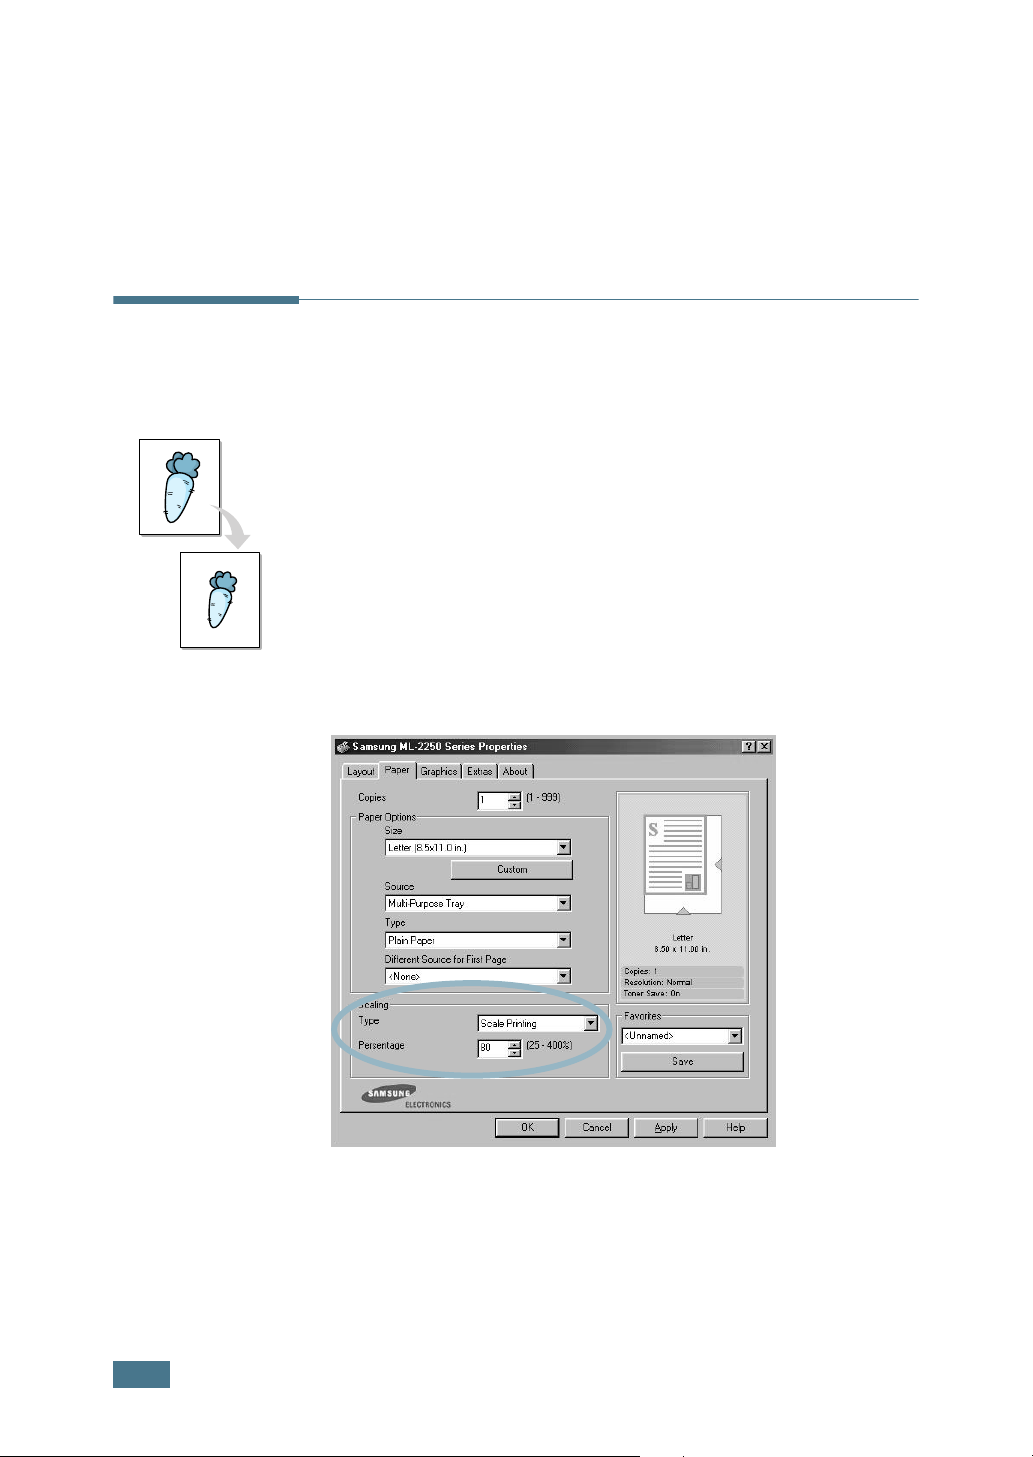
Printing a Reduced or Enlarged
Document
You can scale your print job on a page.
1
When you change the print settings from your software
application, access the printer properties. See page 4.2.
2
From the Paper tab, select Scale Printing in the Type
drop-down list.
3
Enter the desired scaling rate in the Percentage input box.
You can also click the
4
Select the paper source, size, and type.
5
Click OK and print the document.
or button.
4.12
P
RINTING TASKS
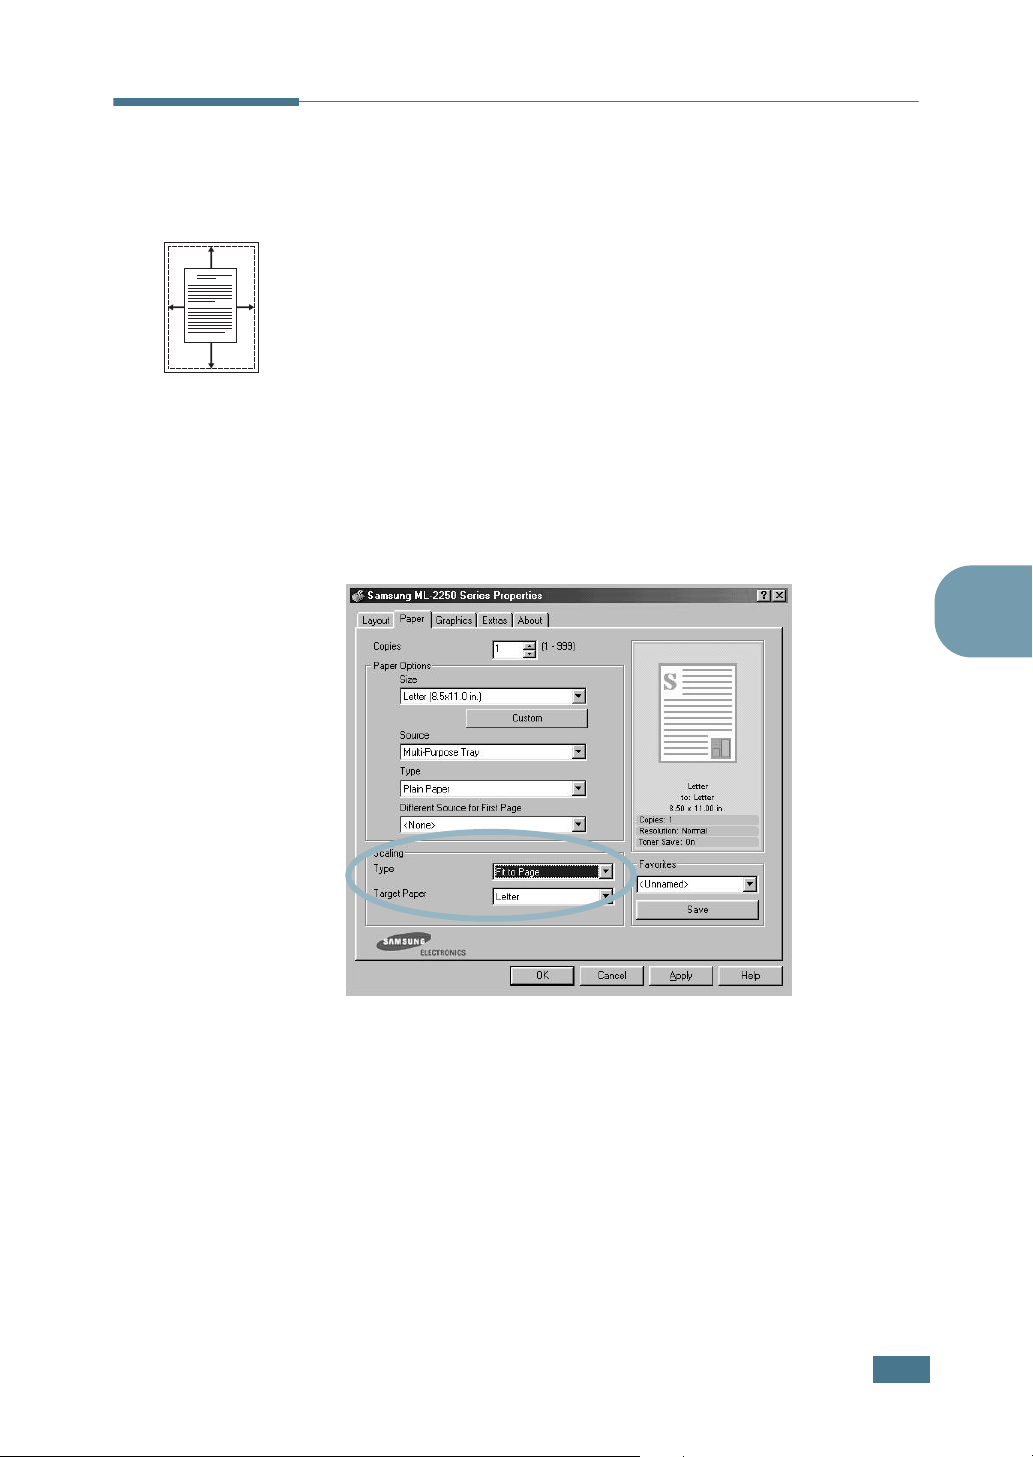
Fitting Your Document to a Selected
Paper Size
This printer feature allows you to scale your print job to any
A
selected paper size regardless of the digital document size. This
can be useful when you want to check fine details on a small
document.
1
To change the print settings from your software application,
access the printer properties. See page 4.2.
2
From the Paper tab, select Fit to Page in the Type
drop-down list.
3
Select the correct size from the Target Paper drop-down
list.
4
4
Select the paper source, size and type.
5
Click OK and print the document.
P
RINTING TASKS
4.13

Printing Posters
This feature allows you to print a single-page document onto 4,
9 or 16 sheets of paper, for the purpose of pasting the sheets
together to form one poster-size document.
1
To change the print settings from your software application,
access the printer properties. See page page 4.2.
2
From the Layout tab, select Poster in the Type drop-down
list.
4.14
P
RINTING TASKS
3
Configure the poster option:
You can select the page layout from 2x2, 3x3 or 4x4. If you
select 2x2, the output will be automatically stretched to
cover 4 physical pages.
2 x 2
3 x 3
Specify an overlap in millimeters or inches to make it easier
to reconstruct the resulting poster.
0.15 inches
4
Click the Paper tab and select the paper source, size and
type.
5
Click OK and print the document. You can complete the
poster by reconstructing the resulting pages.
0.15 inches
Using Watermarks
The Watermark option allows you to print text over an existing
document. For example, you may want to have large gray letters
reading “DRAFT” or “CONFIDENTIAL” printed diagonally across
the first page or all pages of a document.
There are several predefined watermarks that come with your
printer, and they can be modified or you can add new ones to
the list.
Using an Existing Watermark
1
To change the print settings from your software application,
access the printer properties. See page 4.2.
4
P
RINTING TASKS
4.15
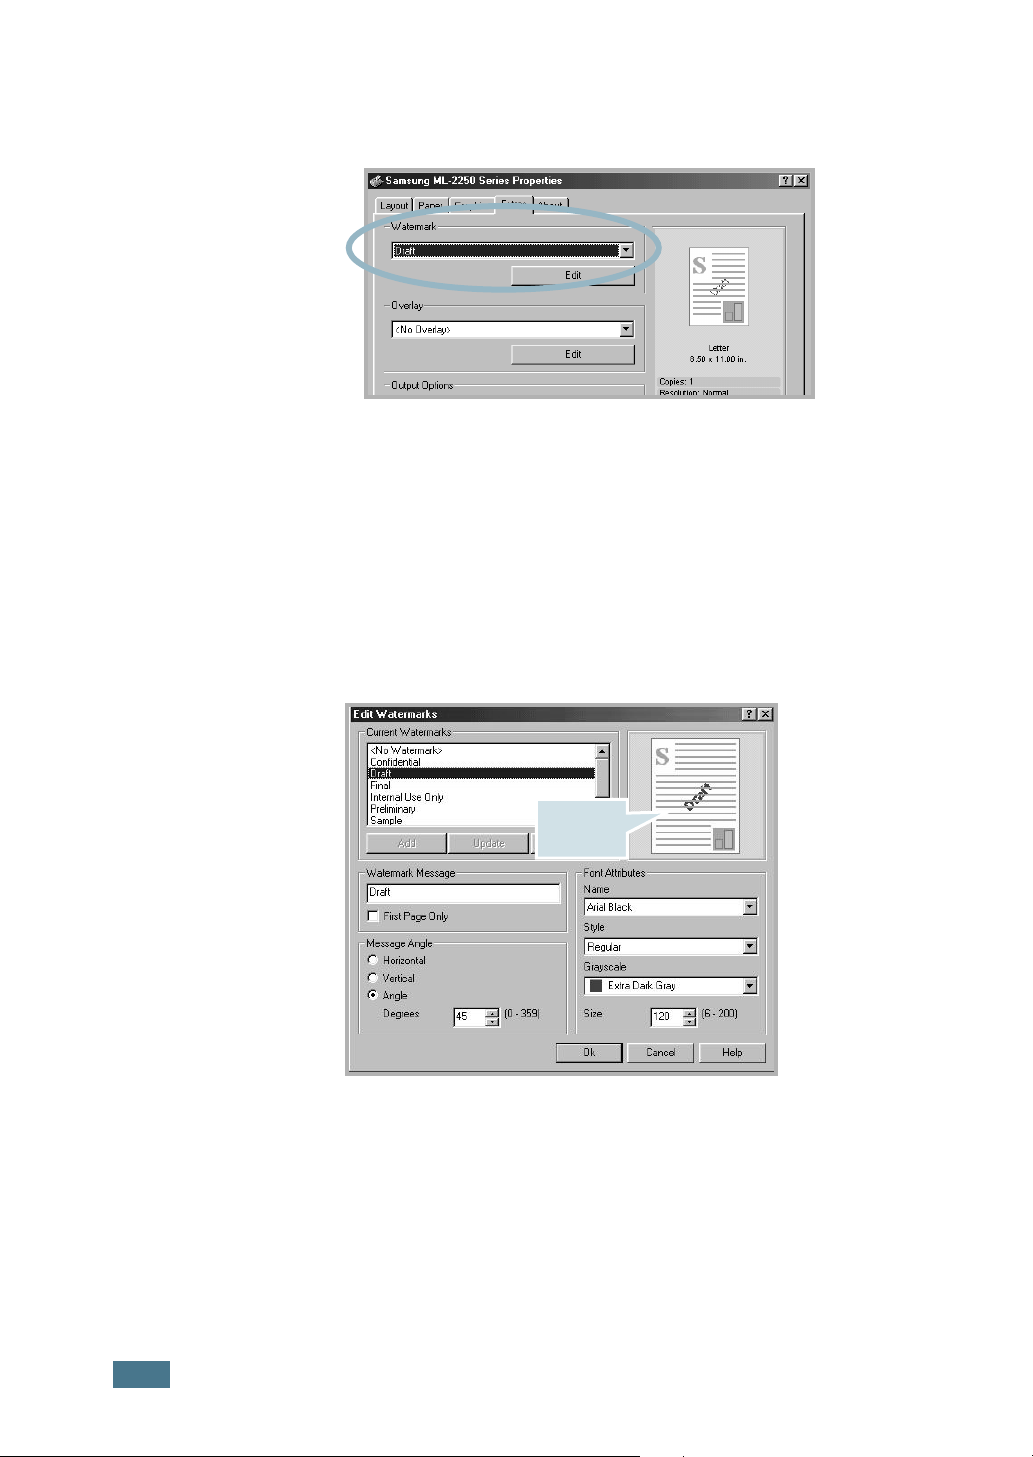
2
Click the Extras tab, and select the desired watermark in
the Watermark drop-down list. You will see the selected
watermark in the preview image.
Preview
image
Preview
image
3
Click OK and start printing.
Creating a Watermark
1
To change the print settings from your software application,
access the printer properties. See page 4.2.
2
Click the Extras tab, and click the Edit button in the
Watermark section. The Edit Watermarks window appears.
4.16
P
RINTING TASKS
Preview
image
3
Enter the desired text message in the Watermark
Message box.
This will be displayed in the preview window. The preview
image is provided so that you can see how the watermark
will appear on the printed page.
If the First Page Only box is checked, the watermark will
be printed on the
first page
only
.

4
Select the desired watermark options.
You can select the font name, style, and size, and grayscale
level from the Font Attributes section and set the angle of
the watermark from the Message Angle section.
5
Click Add to add a new watermark to the list.
6
When you finish editing, click Ok and start printing.
To stop printing the watermark, select <No Watermark> in the
Watermark drop-down list.
Editing a Watermark
1
To change the print settings from your software application,
access the printer properties. See page 4.2.
2
Click the Extras tab, and click the Edit button in the
Watermark section. The Edit Watermarks window appears.
3
Select the watermark you want to edit in the Current
Watermarks list, and change the watermark message and
the options. Refer to “Creating a Watermark” on page 4.16.
4
4
Click Update to save the changes.
5
Click Ok.
Deleting a Watermark
1
To change the print settings from your software application,
access the printer properties. See page 4.2.
2
From the Extras tab, click the Edit button in the
Watermark section. The Edit Watermarks window appears.
3
Select the watermark you want to delete in the Current
Watermarks list and click Delete.
4
Click Ok.
P
RINTING TASKS
4.17
Dear ABC
Regards
WORLD BEST
WORLD BEST
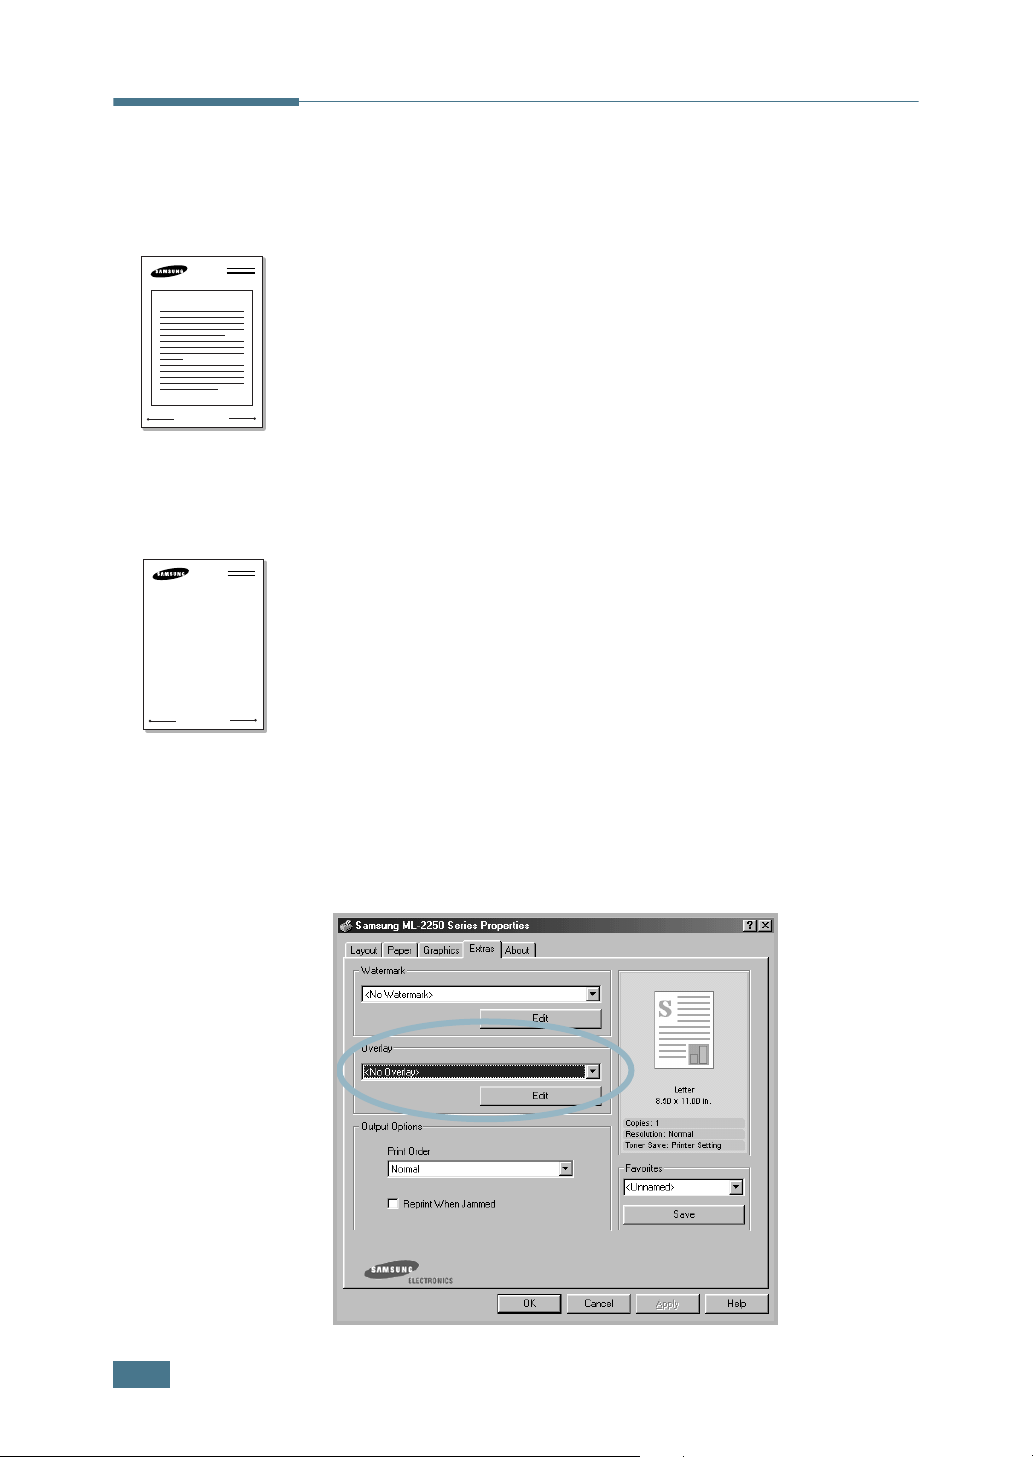
Using Overlays
What is an Overlay?
An overlay is text and/or images stored in the computer hard
disk drive (HDD) as a special file format that can be printed on
any document. Overlays are often used to take the place of
preprinted forms and letterhead paper. Rather than using
preprinted letterhead, you can create an overlay containing the
exact same information that is currently on your letterhead. To
print a letter with your company’s letterhead, you do not need
to load preprinted letterhead paper in the printer. You need only
tell the printer to print the letterhead overlay on your document.
Creating a New Page Overlay
To use a page overlay, you must create a new page overlay
containing your logo or image.
1
Create or open a document containing text or an image for
use in a new page overlay. Position the items exactly as you
wish them to appear when printed as an overlay. If needed,
save the file for later use.
2
To change the print settings from your software application,
access the printer properties. See page 4.2.
3
Click the Extras tab, and click Edit button in the Overlay
section.
4.18
P
RINTING TASKS
4
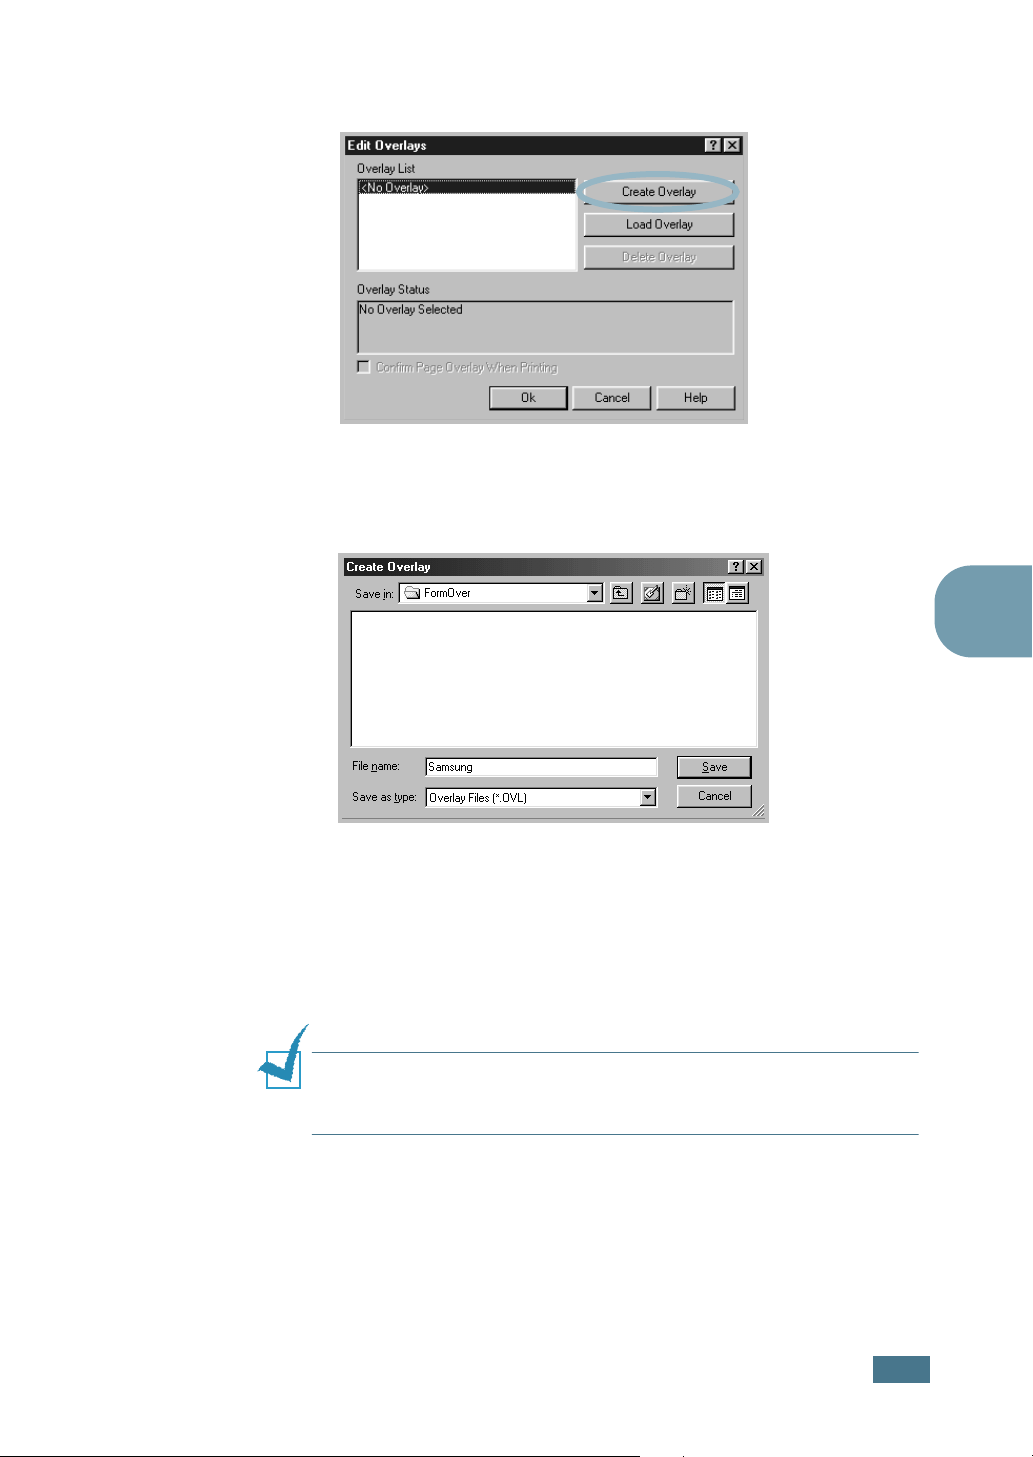
In the Edit Overlays window, click Create Overlay.
5
In the Create Overlay window, type a name of up to eight
characters in the File name box. Select the destination
path, if necessary. (The default is C:\FormOver).
4
6
Click Save. You will see the name in Overlay List.
7
Click OK or Yes until you complete creating.
The file is not printed out. Instead it will be stored on your
computer HDD disk.
N
OTE
: The overlay document size must be the same as
documents you will print with the overlay. Do not create an overlay
with a watermark.
P
RINTING TASKS
4.19
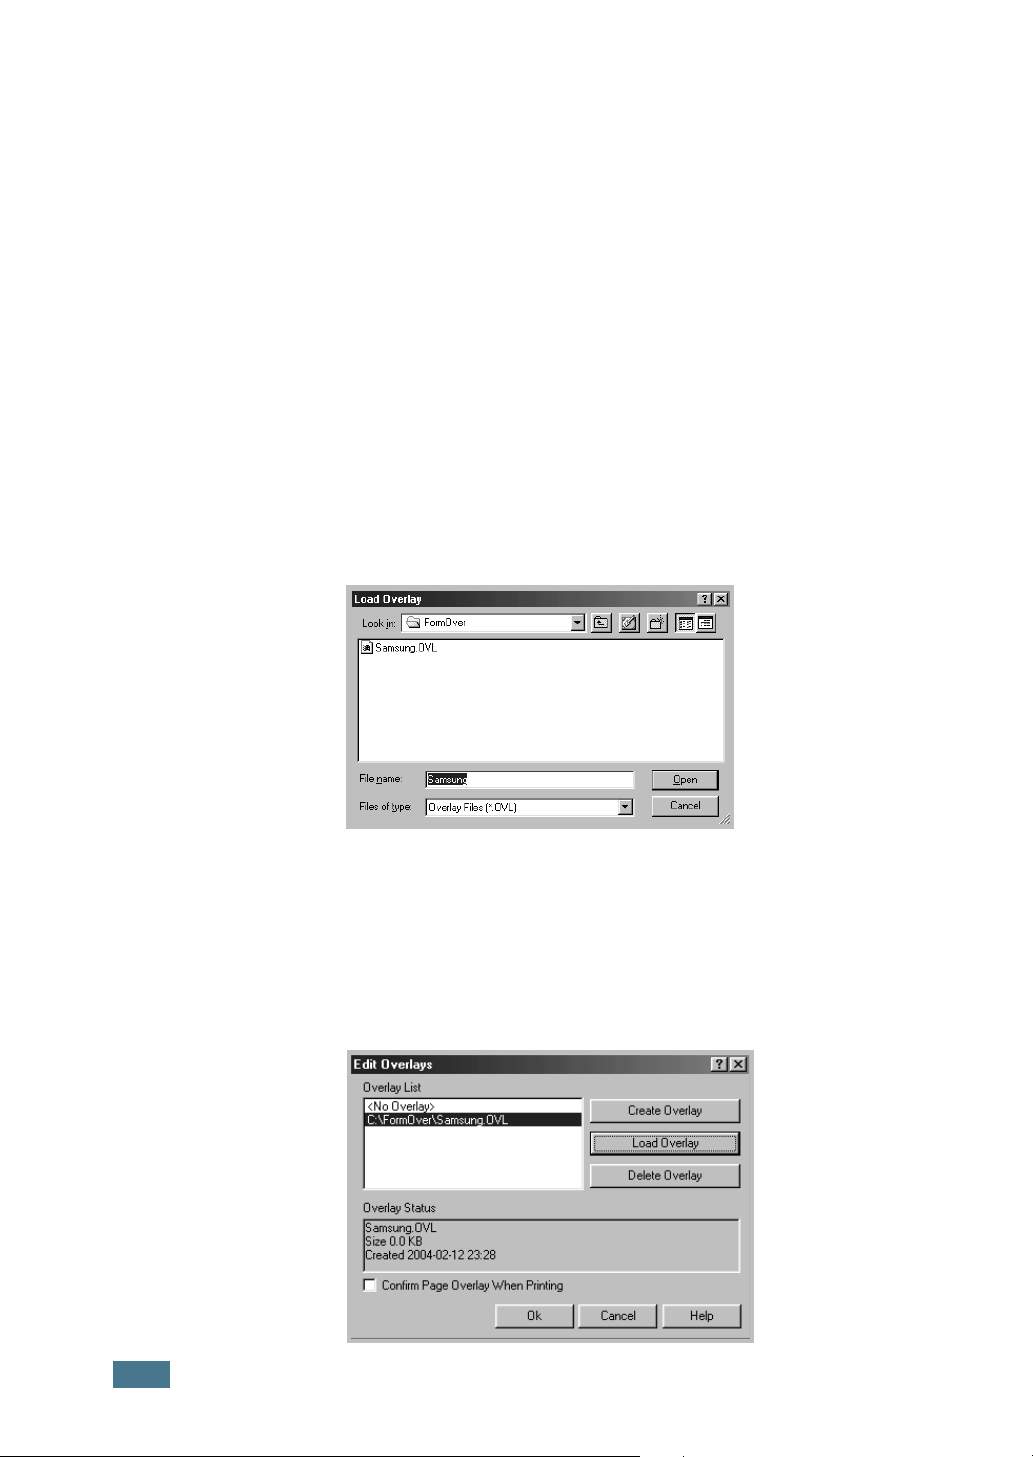
Using a Page Overlay
After an overlay has been created, it is ready to be printed with
your document. To print an overlay with a document:
1
Create or open the document you want to print.
2
To change the print settings from your software application,
access the printer properties. See page 4.2.
3
Click the Extras tab.
4
Select the desired overlay from the Overlay drop-down list
box.
5
If the desired overlay file does not appear in the Overlay
list, click the Edit button and Load Overlay, and select the
overlay file.
4.20
P
RINTING TASKS
If you have stored the overlay file you want to use into an
external source, you can also load the file when you access
this Load Overlay window.
After you select the file, click Open. The file is now shown
in the Overlay List box and is available for printing. Select
the overlay from the Overlay List box.

6
If necessary, click Confirm Page Overlay When Printing.
If this box is checked, a message window will appear each
time you submit a document for printing, asking you to
confirm your wish to print an overlay on your document.
Answering Yes to the window means that the selected
overlay will be printed with your document. Answering No
to the window cancels overlay printing.
If this box is empty and an overlay has been selected, the
overlay will be automatically printed with your document.
7
Click OK or Yes until the printing starts.
The selected overlay will be downloaded with your print job
and printed on your document.
N
OTE
: The resolution of the overlay document must be the same
as that of the document you will print with the overlay.
Deleting a Page Overlay
You can delete page overlays that are no longer used.
1
In the printer properties window, click the Extras tab.
2
Click Edit in the Overlay section.
3
Select the overlay you want to delete from the Overlay
List box.
4
Click Delete Overlay.
5
Click OK until you exit the Print window.
4
P
RINTING TASKS
4.21
Setting Graphic Properties
Use the following graphic options to adjust the print quality for
your specific printing needs. See page 4.2 for more information
about accessing printer properties.
Click the Graphics tab to display the properties shown below.
1
2
3
4
4.22
P
RINTING TASKS
Property Description
You can select the printing resolution by
choosing from 1200 dpi (Best) or
1
Resolution
600 dpi (Normal). The higher the setting,
the sharper the clarity of printed characters
and graphics. Higher settings may increase
the time it takes to print a document.
Selecting this option will extend the life of
your toner cartridge and reduce your cost
2
Toner Save
per page without a significant reduction in
the print quality. For detailed information
about this mode, see page 4.9.
Property Description
Some printed characters or images appear to
have jagged or uneven edges. Set this
3
Image
Mode
Image Mode
quality of your text and image, and make the
characters and images appear smoother.
The Image Mode option is only available
when you select
Resolution option.
• Normal: This setting prints images in the
normal mode.
• Text Enhance: This setting refines the
print quality of characters by smoothing
out jagged edges that can occur on the
angles and curves of each character.
• Image Enhance: This setting refines the
print quality of photo images.
You can set advanced settings by clicking
the
Advanced Options
option to improve the print
600 dpi (Normal)
button.
in the
4
4
Advanced
Options
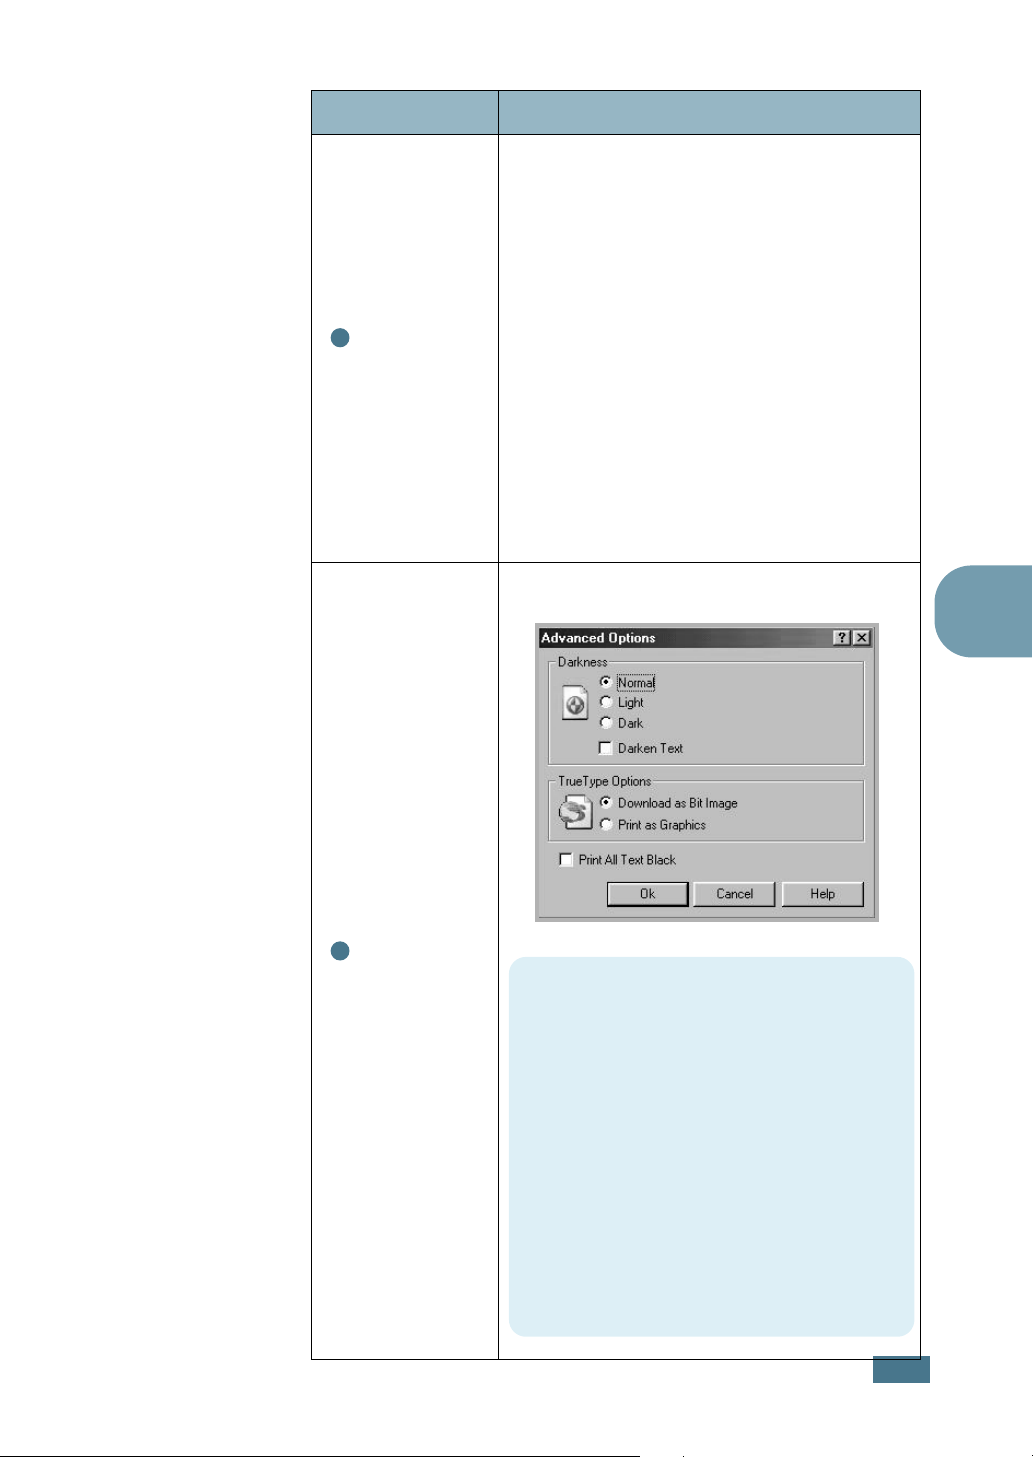
Darkness
Use this option to lighten or darken the
image appearance in your print.
• Normal: This setting is for normal
documents.
• Light: This setting is for bolder line
widths or darker gray-scale images.
• Dark: This setting is for finer line width,
higher definition in graphics, and lighter
gray-scale images.
When the
all text in your document is allowed to
print darker than a normal document.
Darken Text
option is checked,
P
RINTING TASKS
4.23
Property Description
True-Type Options
This option determines what the driver
tells the printer about how to image the
text in your document. Select the
appropriate setting according to the status
of your document.
• Download as Bit Image: When this
option is selected, the driver will
download the font data as bitmap
images. Documents with complicated
fonts, such as Korean or Chinese, or
various other fonts, will print faster in
this setting.
4
Advanced
Options
(continued)
• Print as Graphics: When this option is
selected, the driver will download any
fonts as graphics. When printing
documents with high graphic content and
relatively few TrueType fonts, printing
performance (speed) may be enhanced
in this setting.
Print All Text Black
When the
Print A
ll Text Black option is
checked, all text in your document is
allowed to print solid black, regardless of
the colour it appears on the screen. When
it is not checked, coloured text is allowed
to print in shades of gray.
4.24
P
RINTING TASKS
Using Output Options
You can select options for output of your document.
See page 4.2 for more information about accessing printer
properties.
Click the Extras tab to access the Output Options feature.
4
Option Description
You can set in what sequence the pages will
be printed. Select the required print order
from the drop-down list.
•
Print Order
Reprint When
Jammed
Normal
order.
•
Reverse All Pages
all pages in reversed order. This setting is
helpful when you are using the rear output
tray.
•
Print Odd Pages
only the odd pages of the document.
•
Print Even Pages
only the even pages of the document.
When this option is checked, the printer
keeps the image for a printed page until the
printer signals that the page has
successfully exited the printer. When a
paper jam occurs, the printer reprints the
last page after you clear the jam.
:Your printer prints in normal
:Your printer prints
:Your printer prints
:Your printer prints
P
RINTING TASKS
4.25
Using the Status Monitor
If an error occurs while printing, the Status Monitor window
appears, showing the error.
N
OTE
s:
• The Status Monitor program can only be used if you connect the
printer to your computer with the USB cable, or on the network.
• You can use the Status Monitor in Windows 98/Me/NT 4.0/2000/
XP.
Installing Status Monitor
1
Insert the supplied CD-ROM into your CD-ROM drive.
The CD-ROM should automatically run and an maintenance
window appears.
If the maintenance window does not appear, click Start and
then Run. Type X:\Setup.exe, replacing “X” with the
letter of your drive and click OK.
N
OTE
:
If your machine is not connected to the computer, the
following window will appear.
• After connecting the machine, click Next.
• If you want to skip the connection status, click Next, and No to
the following screen.
2
Click Custom.
If you have been installed the print driver before, click
Repair.
3
Click Status Monitor and then click Next.
4.26
P
RINTING TASKS
4
When the installation is completed, click Finish.

Reinstalling Status Monitor
1
From the Start menu, select Programs.
2
Select Samsung ML-2250 Series, and then
Maintenance.
3
Click Repair.
4
Click Status Monitor and then click Next.
5
When reinstallation is done, click Finish.
Removing Status Monitor
1
From the Start menu, select Programs.
2
Select Samsung ML-2250 Series, and then
Maintenance.
4
3
Check Remove.
4
Click Status Monitor and then click Next.
5
When removing is completed, click Finish.
Opening the Troubleshooting Guide
Double click the Status monitor icon on the Windows task bar.
Double click this icon.
Or, from
and Troubleshooting Guide.
Programs from Start,
Samsung ML-2250 Series,
P
RINTING TASKS
4.27
Changing the Status Monitor Program
Setting
The following window opens when you click the Status monitor
icon on the Windows task bar and select Option.
• Display when job is finished for network printer shows
the Status monitor balloon when your job is complete.
• Display when error occurs during printing the Status
monitor balloon appears when an error occurs while printing.
• Schedule an automatic status checking allows the
computer to update the printer status regularly. Setting the
value close to 1 second causes the computer to check the
printer status more frequently, thereby allowing a faster
response to any printer error.
N
OTE
:
When the Status monitor balloon appears to indicate an
error, you can cancel the current print job or see the corresponding
solution. If you select Cancel Printing, turn the printer off and
then click OK. It may take several minutes. Note that this will lose
data which is being sent to the printer via network.
4.28
P
RINTING TASKS
About Sharing the Printer on a
Network
If you work in a networked environment, you can connect your
printer to the network.
Locally-Shared Printer
You can connect the printer directly to a selected computer,
which is called the “host computer” on the network. The printer
can then be shared by other users on the network through a
Windows 9x/Me/XP/NT 4.0/2000 network printer connection.
Network-connected Printer
ML-2251N and ML-2252W printers have a built-in network
interface.
To use an ML-2250 printer as a network printer, you need to
install an optional network interface card in your printer. For an
ML-2251N printer, you can replace the network interface card to
one supporting the wireless LAN interface. See page D.7 for
information about installing the card.
Supported Operating Systems
Item Requirements
Network Interface 10/100 Base-TX (standard for ML-2251N
Network Operating
System
Network Protocols • Netware IPX/SPX
Dynamic Addressing
Server
and ML-2252W) or 802.11b Wireless LAN
(standard for ML-2252W)
• Novell NetWare 3.x, 4.x, 5.x
• Windows 95/98/Me/NT 4.0/2000/XP
• Unix AT&T, BSD4.3, HP-UX, SUN OS,
SOLARIS, SCO
• Various Linux OS
• TCP/IP, DLC/LLC on Windows
• Port9100 on Unix, Linux
• Apple EtherTalk (802.3)
• DHCP, BOOTP
4
• IPX/SPX: Internet Packet exchange/Sequenced Packet eXchange
• TCP/IP: Transmission Control Protocol/Internet Protocol
• DLC/LLC: Data Link Control/Logical Link Control
• DHCP: Dynamic Host Configuration Protocol
• BOOTP: Bootstrap Protocol
P
RINTING TASKS
4.29

Printing Across a Network
Whether the printer is locally connected or network-connected,
you need to install the ML-2250 series printer software on each
computer that will print documents to the printer.
Setting Up a Locally Shared Printer
In Windows 9x/Me
Setting Up the Host Computer
1
Start Windows.
2
From the Start menu, select Control Panel, and doubleclick on the Network icon.
3
Check the File and Print Sharing box, and click OK. Close
the window.
4
From the Start menu, select Printers from Settings and
double-click your printer name.
5
Select Properties in the Printer menu.
6
Click the Sharing tab and check the Shared As box. Fill in
the Shared Name field and click OK.
Setting Up the Client Computer
1
Right-click the Windows Start button and select Explorer.
2
Open your network folder in the left column.
3
Right-click the shared name and select Capture Printer
Port.
4
Select the port you want, check the Reconnect at log on
box, and click OK.
5
From the Start menu, select Settings and then Printers.
4.30
P
RINTING TASKS

6
Double-click your printer icon.
7
From the Printer menu, select Properties.
8
From the Details tab, select the printer port and click OK.
In Windows NT 4.0/2000/XP
Setting Up the Host Computer
1
Start Windows.
2
For Windows NT 4.0/2000, select Settings, and Printers
from the Start menu.
For Windows XP, select Printers and Faxes from the Start
menu.
3
Double-click your printer icon.
4
From the Printer menu, select Sharing.
4
5
For Windows NT 4.0, check the Shared box.
For Windows 2000, check the Shared As box.
For Windows XP, check the Share this printer box.
6
For Windows NT 4.0, fill in the Share Name field and click
OK.
For Windows 2000/XP, fill in the Shared Name field and
click OK.
Setting Up the Client Computer
1
Right-click the Windows Start button and select Explorer.
2
Open your network folder in the left column.
3
Click the shared name.
4
For Windows NT 4.0/2000, select Settings and Printers
from the Start menu.
For Windows XP, select Printers and Faxes from the Start
menu.
P
RINTING TASKS
4.31

5
Double-click your printer icon.
6
From the Printer menu, select Properties.
7
From the Ports tab, click Add Port.
8
Select Local port and click New Port.
9
Fill in the Enter a port name field, enter the shared name.
10
Click OK and click Close.
11
For Windows NT 4.0, click OK.
For Windows 2000/XP, click Apply and click OK.
4.32
P
RINTING TASKS

5
MAINTAINING YOUR PRINTER
This chapter provides suggestions for high-quality and
economical printing and information for maintaining the
toner cartridge and the printer.
This chapter includes:
• Maintaining the Toner Cartridge
• Cleaning the Printer
• Printing Configuration Pages
• Consumables and Replacement Parts

Maintaining the Toner Cartridge
Toner cartridge storage
To get the maximum results from the toner cartridge, keep the
following guidelines in mind.
• Do not remove the toner cartridge from its package until ready
for use.
• Do not refill the toner cartridge. The printer warranty does
not cover damage caused by using a refilled cartridge.
• Store toner cartridges in the same environment as the printer.
• To prevent damage to the toner cartridge, do not expose it to
light for more than a few minutes.
Toner cartridge life expectancy
The life of the toner cartridge depends on the amount of toner
that print jobs require. When printing text at 5% coverage, a
new toner cartridge lasts an average of 5,000 pages. (The
original toner cartridge supplied with the printer lasts an
average of 3,000 pages.)
Saving toner
To save toner, press the Cancel button on the printer control
panel. The button will be lit. You can also enable the Toner Save
in the printer properties. Refer to “Using the Toner Save Mode”
on page 4.9. Selecting this option will extend the life of the toner
cartridge and reduce your cost per page, but will reduce the
print quality.
5.2
M
AINTAINING YOUR PRINTER
 Loading...