

Page 1

Reprinting the Last Page
The Samsung ML-1200 Series printer’s memory always keeps
the last page of the last job. If you canceled a print job due to
a paper jam or other problems and you want to know which
page was printed last, reprint the last page.
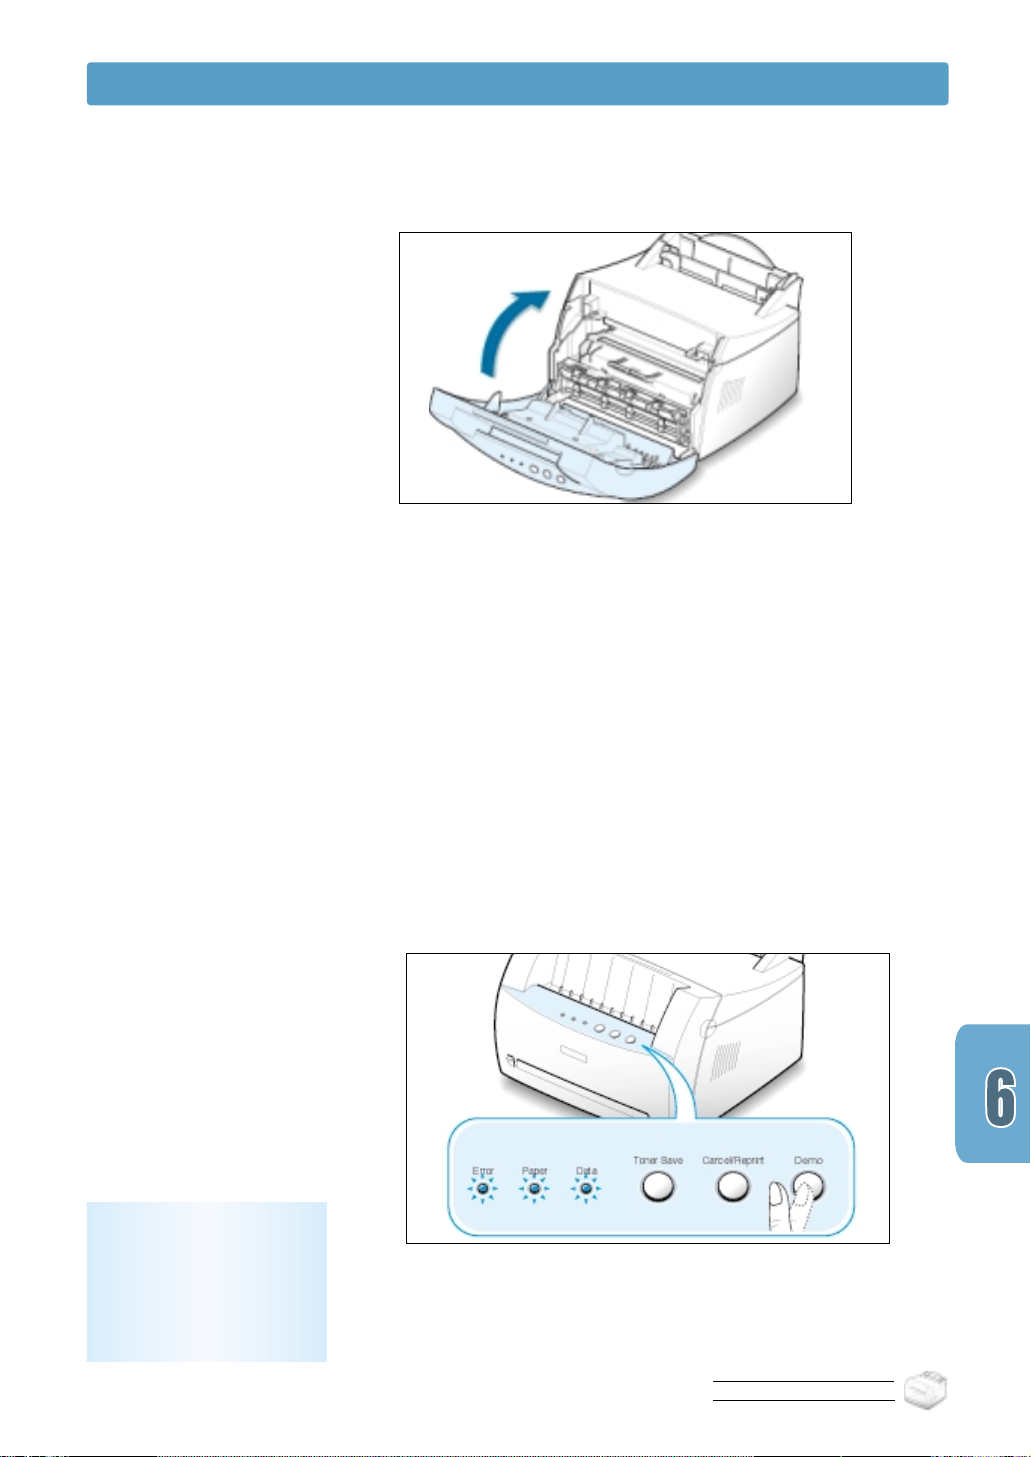
Press Cancel/Reprint briefly in Ready mode.
Note: If you want to prevent somebody from reprinting your document, you can turn the
Reprinting feature off in the printer’s properties dialog box. When you turn the feature
off in the printer’s properties, the
perform the reprinting operation.
CCaanncceell//RReepprriinntt
TToo ddiissaabbllee tthhiiss ffeeaattuurree::
1. From the
PPrriinntteerrss
2. Click the right mouse button on the
MMLL--11220000 SSeerriieess
open the properties window.
3. From the
drop-down list.
With this option Off, you cannot reprint the last page
from the control panel.
When you want to reprint the last page on the
control panel, you must select
4. Click
button on the control panel does not
OOKK
SSttaarrtt
.
GGrraapphhiicc
.
menu, select
printer icon and select
tab, Select
SSeettttiinnggss
OOffff
from the
OOnn
and then
SSaammssuunngg
PPrrooppeerrttiieess
RReepprriinntt
from the list.
to
5.20
PRINTING TASKS
Page 2

Printing on a Network Environment
If you work in a network environment, you can connect your
ML-1200 Series printer directly to a selected computer
(called the “host computer”) on the network. The printer can
then be shared by other users on the network through a
Windows 9x, Me, NT 4.0 or 2000 network printer connection.
Note: You need to install the Samsung ML-1200 Series printer
driver on each computer that will print documents to the
printer.
Setting Up Host Computer
Start Windows.
1
From the Start menu, select Control Panel, and
2
double-click on the Network icon.
Check the File and Print Sharing box, then click OK.
3
Close the window.
Click Start and select Printers from Settings, then
4
double-click your printer name.
Select Properties in the Printers menu.
5
Click the Sharing tab, then check the Shared As box.
6
Fill in the Shared Name field, then click OK.
PRINTING TASKS
5.21
Page 3

Setting Up Client PC
Printing on a Network Environment
Right-click Start, and select Explorer.
1
Open your network folder in the left column.
2
Right-click the shared name, and select Capture Printer
3
Port.
Select the port you want, check the Reconnect at log
4
on box, then click OK.
From the Start menu, select Settings, then Printers.
5
Double-click your printer icon.
6
From the Printers menu, select Properties.
7
Press the Details tab, select the printer port, then click
8
OK.
RINTING TASKS
P
5.22
Page 4
chapter
6
6
This chapter provides suggestions for high-quality and
economical printing and information for maintaining the toner
cartridge and the printer.
Topics included in this chapter are:
◆ Maintaining Toner Cartridge
◆ Cleaning the Printer
Page 5

Maintaining Toner Cartridge
Toner cartridge storage
Toner cartridge life
expectancy
To get the most from the toner cartridge, keep the following
guidelines in your mind.
• Do not remove the toner cartridge from its package until you
are ready to use.
• Do not refill toner cartridges. The printer warranty does not
cover damage caused by using a refilled cartridge.
• Store toner cartridges in the same environment as the printer.
• Do not remove a toner cartridge from the printer except to
replace it, clean it or clear a paper jam. Replace the cartridge
immediately.
• To prevent damage to the toner cartridge, do not expose it to
light for more than a few minute.
The life of the toner cartridge depends on the amount of the
toner that print jobs require. When printing text at 5 %
coverage, a new toner cartridge lasts an average of 2,500 pages.
(But, the toner cartridge supplied with the printer lasts an
average of 1,000 pages.)
Recycling toner
cartridge
Saving toner
After you install a new toner cartridge (see page 2.2), follow the
instructions included in the toner cartridge box to recycle the old
cartridge.
To save toner, press the Toner Save button on the printer
control panel. The button will be lit. You can also enable the
Toner Save Mode in your printer properties. Refer to “Using
Toner Save Mode” on page 5.6. Selecting this option will expend
the life of the toner cartridge and reduce your cost per page, but
will reduce print quality.
MAINTAINING YOUR PRINTER
6.1
Page 6

Toner Cartridge
Redistributing Toner
When toner is low, faded or light areas may appear on a printed page. You may be able to
temporarily improve print quality by redistributing the toner. The following procedures may
allow you to finish the current print job before replacing the toner cartridge.
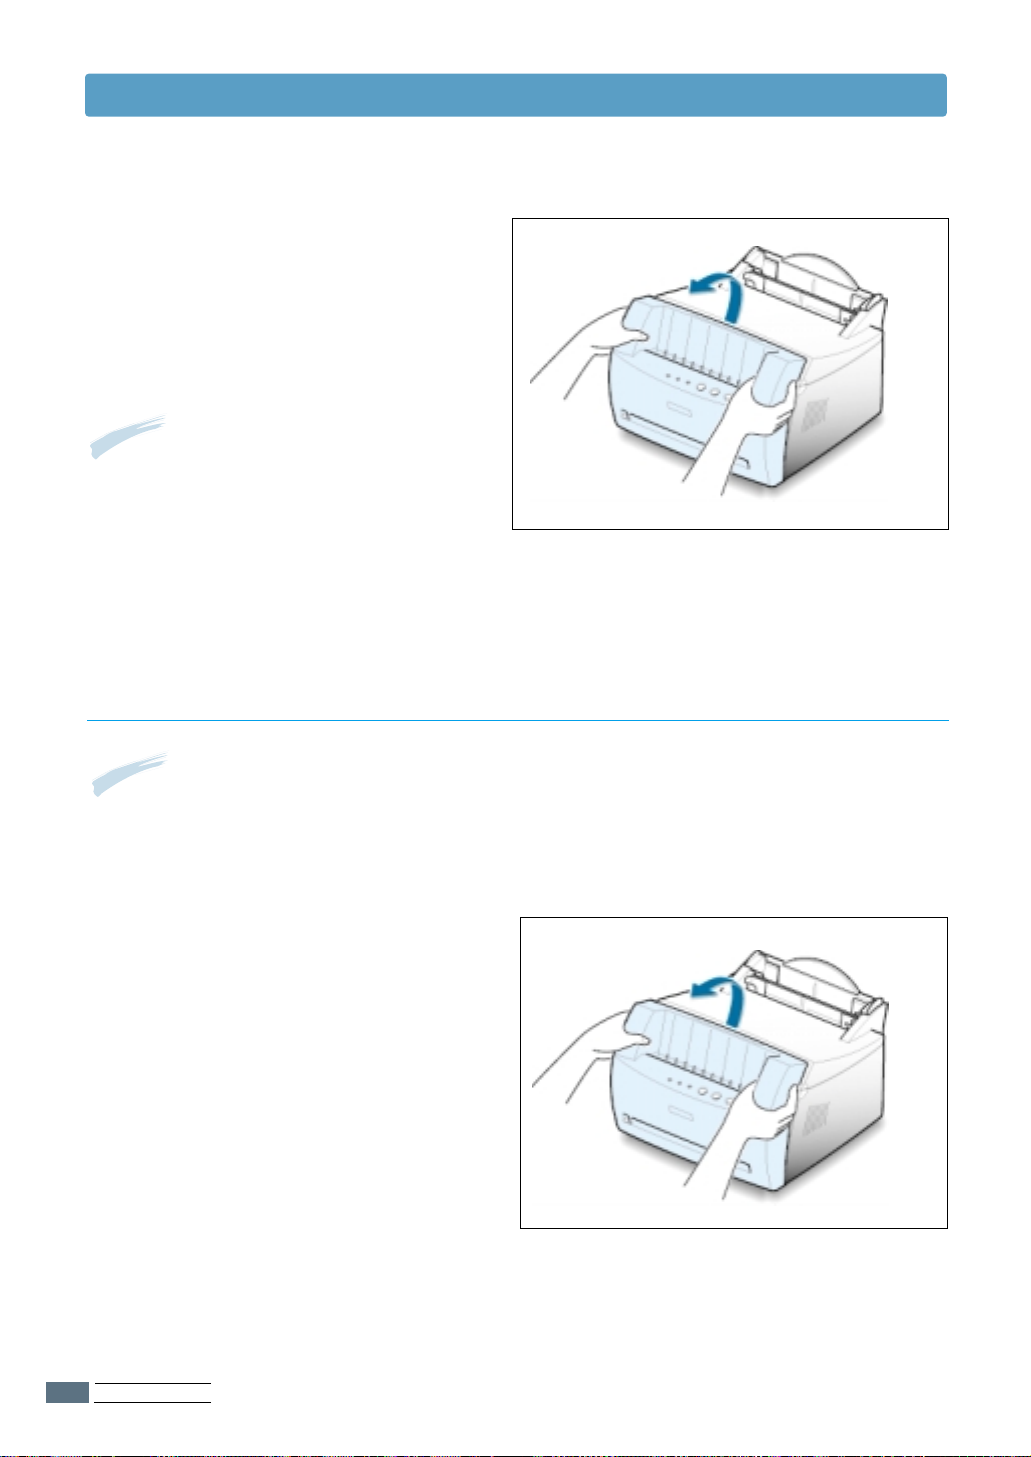
1
Grasp the front cover by both sides of
the cover and pull it toward you to
open.
2
Remove the toner cartridge from the
printer.
CAUTIONS:
• Avoid reaching too far into the
printer. The fusing area may be hot.
• To prevent damage to the toner
cartridge, do not expose it to light
for more than a few minute.
3
Gently shake the toner cartridge from
side to side 5 or 6 times to redistribute
the toner.
Note: If the toner gets on your
clothing, wipe it off with a dry cloth
and wash clothing in cold water. Hot
water sets toner into fabric.
MAINTAINING YOUR PRINTER
6.2
Page 7

4
Reinsert the toner cartridge into the
printer. Be sure that the toner cartridge
snaps in its place.
5
Firmly
close the cover.
Toner Cartridge
If the print remains light
Remove the old cartridge and install a
new toner cartridge. See “Install the
Toner Cartridge” on page 2.2.
ATTENTION: OPC Cleaning
• After every 500 page printing, your printer will automatically
clean the OPC drum inside the toner cartridge
and produce a OPC cleaning sheet with the toner debris.
MAINTAINING YOUR PRINTER
6.3
Page 8

Cleaning the Printer
To maintain print quality, follow the cleaning procedures below every time the toner cartridge
is replaced or whenever print quality problems occur. As much as possible, keep the printer
free from dust and debris.
Notes:
• Do not use ammonia-based cleaners or volatile solvents such as thinner, on or around the
printer. These can damage the printer.
• While cleaning the inside of the printer, be careful not to touch the transfer roller (located
underneath the toner cartridge ). The oil from your hands on the roller can cause print quality
problems.
Cleaning the Outside
Wipe the outside surface of the printer with a soft, clean, lintfree cloth. You can dampen the cloth slightly with water, but be
careful not to be let any water drip onto the printer or inside it.
Cleaning the Inside
Cleaning inside the printer
Note: To prevent
damage to the toner
cartridge, do not expose
it to light for more than a
few minute. Cover it with
a piece of paper, if
necessary. Also, do not
touch the black transfer
roller inside the printer.
By doing so, you can
damage the printer.
During the printing process, paper, toner, and dust particles
can accumulate inside the printer. Over time, this buildup can
cause print quality problems such as toner specks or smearing.
Cleaning inside the printer will eliminate or reduce these
problems.
Turn the printer off and unplug the power cord, then wait for
1
the printer to cool.
Open the front cover and remove the toner cartridge.
2
With a dry, lint-free cloth, wipe away any dust and spilled toner
3
from the toner cartridge area and the toner cartridge cavity.
MAINTAINING YOUR PRINTER
6.4
Page 9
Cleaning the Printer
Reinsert the toner cartridge and close the cover
4
Then, plug in the power cord, and turn the printer on.
5
Printing a cleaning sheet
Note: The cartridge
cleaning process takes
some time. To stop the
printing, turn the power
off.
Printing a cleaning sheet cleans the drum inside the toner
cartridge. Use this process if you are experiencing blurred,
faded or smeared printouts. This process will produce a page
with toner debris, which should be discarded.
Make sure the printer is turned on and in the Ready mode and
1
there is paper loaded in the automatic input tray.
Press and hold down Demo on the control panel for about 10
2
seconds until all control panel lights remain lit, then release
the button.
Your printer automatically picks up a sheet of paper from the
3
tray and prints out a cleaning sheet with the dust or toner
particles on it.
MAINTAINING YOUR PRINTER
6.5
Page 10

chapter
7
7
This chapter gives helpful information for what to do if you
encounter a printer error. It provides information on the
following topics:
◆ Troubleshooting Checklist
◆ Solving General Printing Problems
◆ Clearing Paper Jams
◆ Solving Print Quality Problems
◆ Troubleshooting Error Messages
◆ Common Windows Problems
Page 11

Troubleshooting Checklist
If the printer is not working properly, complete the following checklist in order. If the printer
does not pass a step, follow the corresponding troubleshooting suggestions.
Check
Make sure that the Data light on
the control panel is on.
Press the Demo button to print
a demo page to verify that the
printer is feeding paper correctly.
See page 2.7.
Check the demo page to see if it
is printed correctly.
Print a short document from a
software application to verify the
computer and printer are
connected and are
communicating correctly.
Solution
• If no lights are on, check the power cord connection
and the power switch. Check the power source by
plugging into another outlet.
• If other lights are on, go to “Troubleshooting Error
Messages” on page 7.17.
• If a demo page does not print, check the paper
supply in the input tray.
• If the paper jams in the printer, go to “ Clearing
Paper Jams” on page 7.6.
• If the Error indicator light is illuminated on the
control panel, go to “Troubleshooting Error
Messages” on page 7.17.
If there is a print quality problem, go to “Solving
Print Quality Problems” on page 7.11.
• If the page does not print, check the cable
connection between the printer and computer.
• Check the print queue or print spooler to see if the
printer has been paused.
• Check the software application to make sure you
are using the proper printer driver and
communication port. If the page is interrupted
during printing, go to “Solving General Printing
Problems” on page 7.2.
If completing the checklist did
not diagnose the problem with
the printer, check the following
troubleshooting sections.
• “Solving General Printing Problems” on page 7.2.
• “Troubleshooting Error Messages” on page 7.17.
• “Common Windows Problems” on page 7.19.
PROBLEM SOLVING
7.1
Page 12

Solving General Printing Problems
If you have any problems with the operation of your printer, refer to the table for suggested
solutions.
Problem
The printer does not
print.
Possible Cause
The printer is not
receiving power.
Your printer is not
selected as the default
printer.
Check the printer for
the following:
The printer may be in
manual feed mode and
out of paper. (The
Paper light is on.)
The connection cable
between the computer
and the printer is not
connected properly.
Solution
If no lights are on, check the power
cord connections. Check the power
switch and the power source.
Select Samsung ML-1200 Series
as your default printer.
• The printer cover is not closed.
• Paper is jammed.
• No paper is loaded.
• Toner cartridge is not installed.
• Printer system error occurs.
Contact a service representative.
Add paper to the manual input tray,
and press the Demo button on the
printer’s control panel to start
printing.
Disconnect the printer cable and
reconnect it.
PROBLEM SOLVING
7.2
The connection cable
between the computer
and the printer is
defective.
The port setting is
incorrect.
If possible, attach the cable to
another computer that is working
properly and print a job. You may
also try using a different printer
cable.
Check the Windows printer setting to
make sure that the print job is sent
to the correct port (for example,
LPT1). If the computer has more
than one port, make sure the printer
is attached to the correct one.
Page 13

Solving General Printing Problems
Problem
The printer does not
print. (continued)
Printer selects media
from the wrong
paper source.
Paper does not feed
into the printer.
Possible Cause
The printer may be
configured incorrectly.
The printer driver may
be incorrectly installed.
The printer is
malfunctioning.
The paper source
selection in the printer
properties may be
incorrect.
Paper has not been
loaded correctly.
There is too much paper
in the input tray.
Solution
Check the printer properties to make
sure that all print settings are correct.
Uninstall the printer driver, then
reinstall the printer driver. Try printing
a demo page.
Check the lights on the control panel to
determine if the printer is indicating a
system error.
For many software applications the
paper source selection is found under
the Paper tab within the printer
properties. Select the correct paper
source.
Remove paper from the input tray and
reload it correctly.
Remove excess paper from the input
tray.
Print job is extremely
slow.
The paper is too thick.
The job may be very
complex.
The maximum print
speed of the Samsung
ML-1200 Series printer is
12 pages per minute.
If using Windows 95, the
Spooling Setting may be
set incorrectly.
Use only paper that meets the
specifications required by the printer.
Reduce the complexity of the page or
try adjusting the print quality settings.
From the Start menu, and then choose
Settings and Printers. Right-click the
Samsung ML-1200 Series printer icon,
choose Properties, click the Details
tab, and then choose the Spool
Settings button. Select the desired
spool setting from the available
choices.
PROBLEM SOLVING
7.3
Page 14

Solving General Printing Problems
Problem
Half of the page is
blank.
The paper keeps
jamming.
Possible Cause
The page layout is too
complex.
The page orientation
setting may be
incorrect.
The paper size and the
paper size settings do
not match.
There is too much
paper in the paper tray.
An incorrect type of
paper is being used.
An incorrect output
method is being used.
Solution
Simplify the page layout and remove
any unnecessary graphics from the
document, if possible.
Change the page orientation in your
application.
Make sure that the paper size in the
print settings matches the paper in
the input tray.
Remove excess paper from the tray.
If printing special media, use the
manual input tray.
Use only paper that meets the
specifications required by the printer.
Media such as thick paper should not
be printed using the face-down output
tray. Use the face-up output slot
instead.
The printer prints,
but the text is
wrong, garbled, or
incomplete.
PROBLEM SOLVING
7.4
There may be debris
inside the machine.
The printer cable is
loose or defective.
The wrong printer driver
was selected.
Open the front cover and remove the
debris.
Disconnect the printer cable and
reconnect it. Try a print job that you
know works. If possible, attach the
cable and printer to another computer
and try a print job that you know
works. Finally, try a new printer cable.
Check the application’s printer
selection menu to make sure that your
printer is selected.
Page 15

Solving General Printing Problems
Problem
The printer prints, but
the text is wrong,
garbled, or incomplete.
(continued)
Pages print, but are
totally blank.
The illustrations print
wrong in Adobe
Illustrator.
Possible Cause
The software application
is malfunctioning.
The toner cartridge is
defective or out of toner.
The file may have blank
pages.
Some parts, such as the
controller, the board,
may be defective.
The setting in the
software application is
wrong.
Solution
Try printing a job from another
application.
Replace the toner cartridge.
Check the file to make sure that it
does not contain blank pages.
Contact a service representative.
Print the document with the Bitmap
Printing checkbox in the Print dialog
box empty.
ATTENTION: The lifetime of the transfer roller
If you have any printing problem after your printer prints about 28,000 pages,
you must contact the customer service to replace the transfer roller.
PROBLEM SOLVING
7.5
Page 16
Clearing Paper Jams
Occasionally, paper can become jammed during a print job. Some of the causes include:
• The paper tray is loaded improperly or overfilled.
• The paper tray has been pulled out during a print job.
• The top cover has been opened during a print job.
• Paper that does not meet paper specifications has been used. See “Paper Specifications” on
page A.2.
• Paper that is outside of the supported size range has been used. See “Paper Specifications”.
If a paper jam occurs, the Paper and the Error lights remain lit on the control panel. Find
and remove the jammed paper. If the location of the paper jam is not obvious, look first
inside the printer.
Output Area
Note: Paper jams in this area may result in loose toner on the page. If you get any toner on your
clothes, wash them in cold water because hot water will set the toner into the fabric.
1
Pull the jammed paper carefully out of
the output stacker.
PROBLEM SOLVING
7.6
Page 17
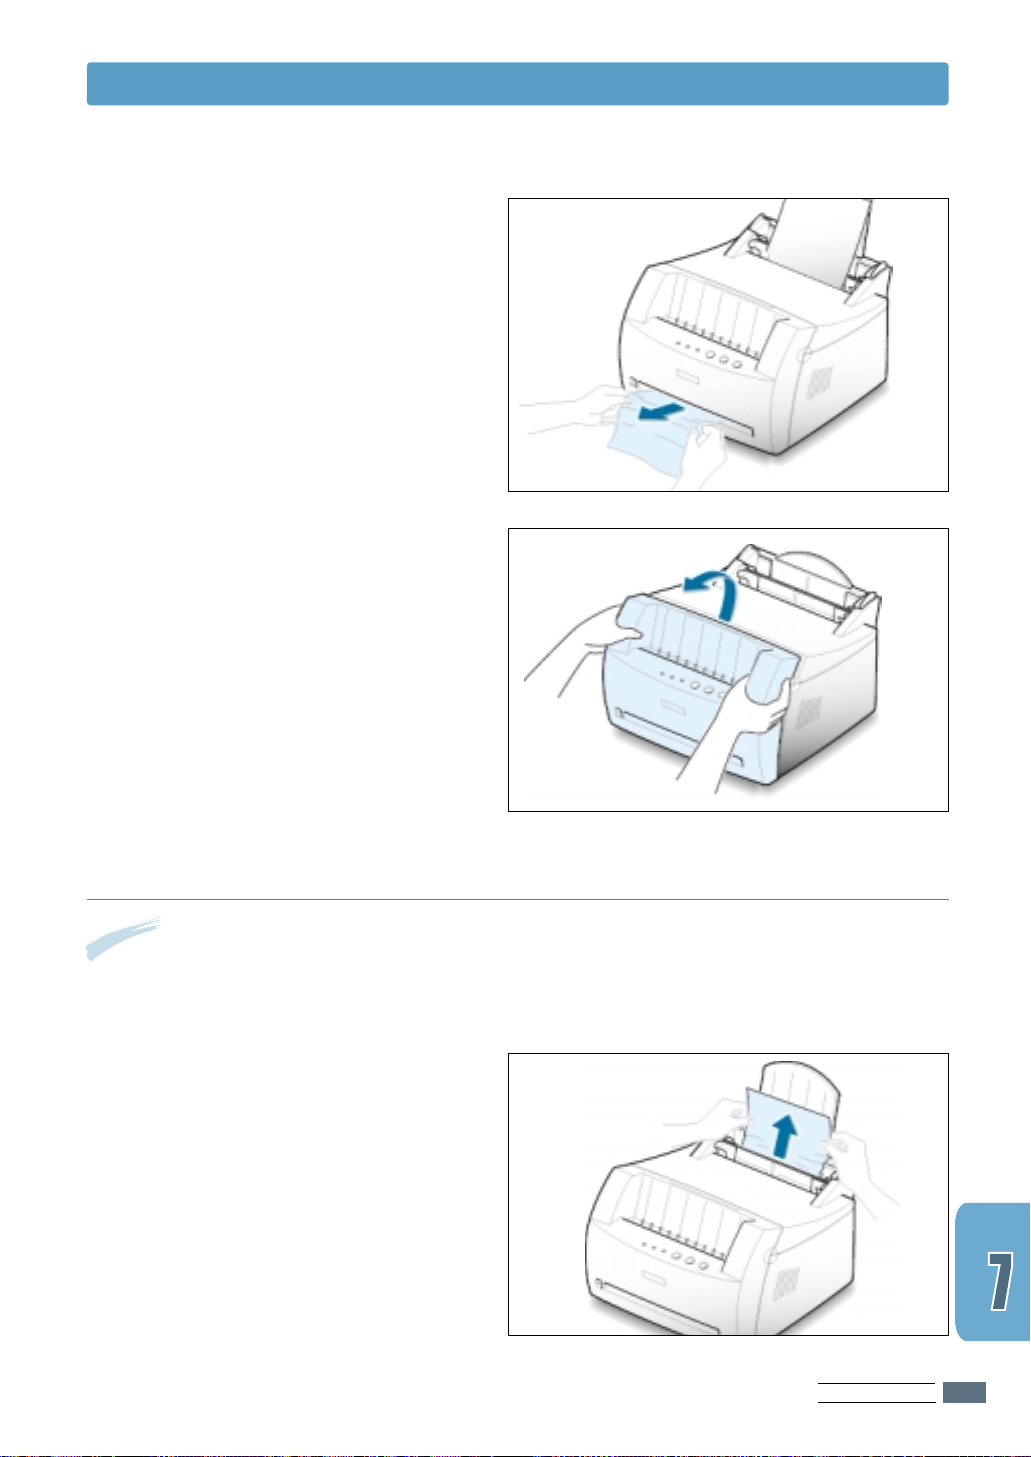
5
If paper is jammed in the face-up
output slot, carefully remove the paper
as shown.
5
Open and close the front cover.
Printing can be resumed.
Clearing Paper Jams
Input Area
Note: If paper has entered the toner cartridge area, follow the instructions on page 7.8. It is
easier to remove such jams from the inside of the printer than the paper input area.
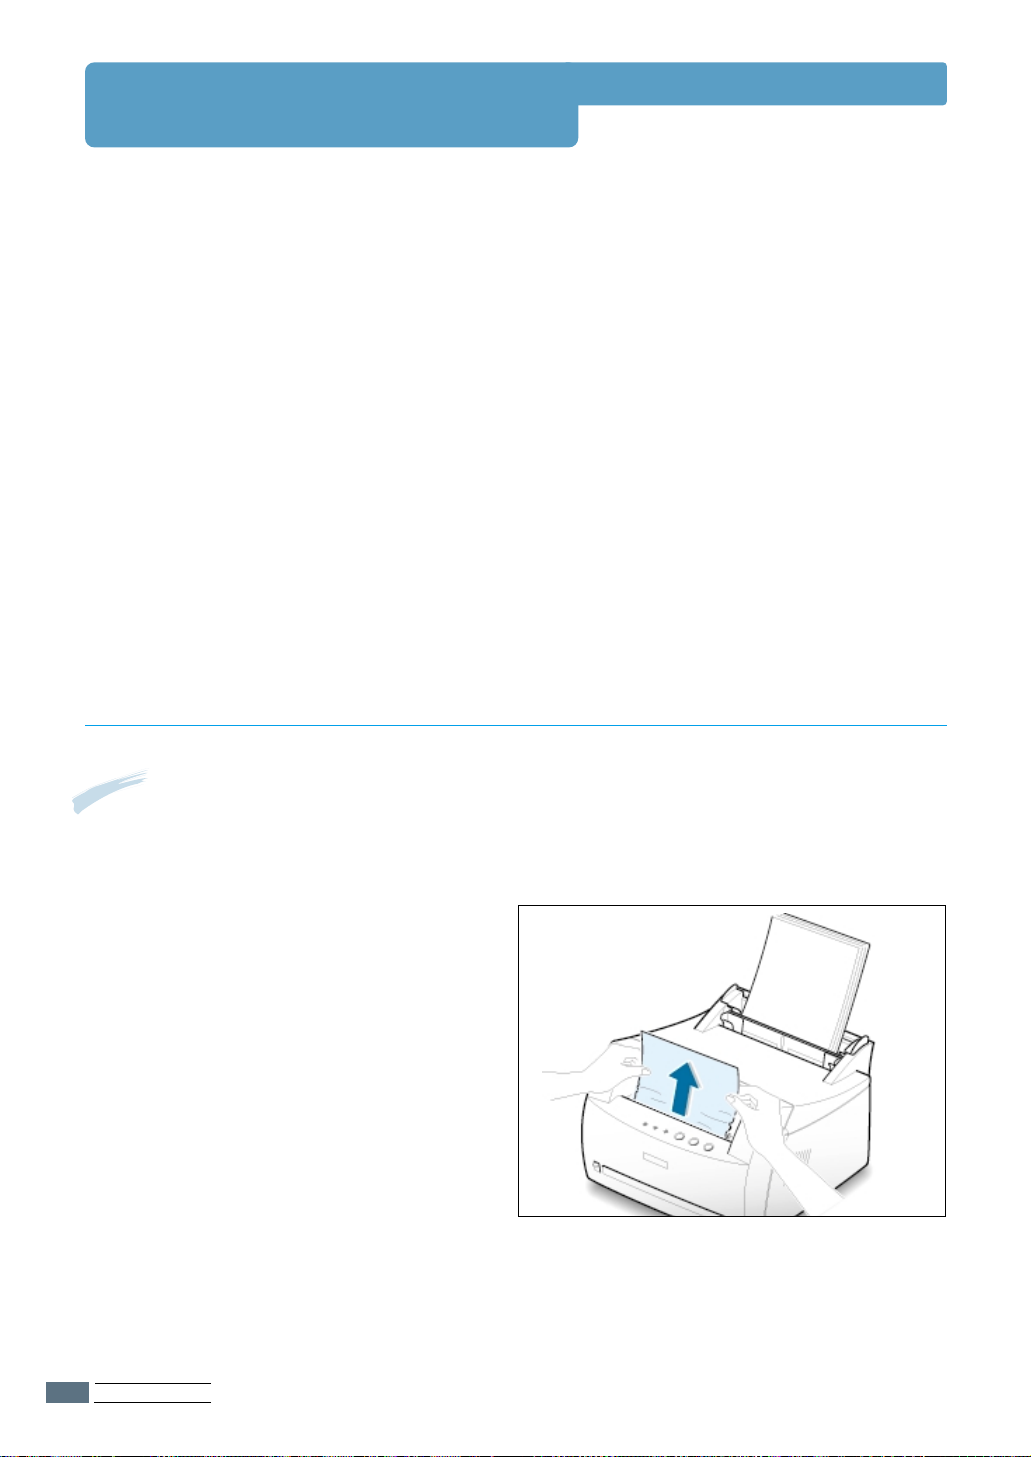
1
Carefully pull the jammed paper out of
the input tray.
PROBLEM SOLVING
7.7
Page 18
Clearing Paper Jams
2
Open and close the front cover to
resume printing.
Note: If the Paper and the Error lights
do not turn off, there is still jammed
paper inside the printer. Check the
inside of the printer.
Inside the Printer
Note: Paper jams in this area may result in loose toner on the page. If you get any toner on
your clothes, wash them in cold water because hot water will set the toner into the fabric.
1
Grasp the front cover by both sides of
the cover and pull it toward you to
open.
PROBLEM SOLVING
7.8
Page 19

2
Remove the toner cartridge.
CAUTION: To prevent damage to the
toner cartridge, do not expose it to
light for more than a few minutes.
Place a piece of paper over the top of
the toner cartridge to shield it while it
is out of the printer.
3
Gently pull the paper toward you to
remove it from the printer.
Clearing Paper Jams
Make sure that there is no paper
remaining inside the printer.
4
Reinsert the toner cartridge and close
the front cover. Printing can be
resumed.
PROBLEM SOLVING
7.9
Page 20

Clearing Paper Jams
Tips for Avoiding Paper Jams
By selecting correct paper types and loading them properly,
you should be able to avoid most paper jams. If paper jams
occurs, follow the steps outlined in “Clearing Paper Jams” on
page 7.6. If jams occur frequently, make sure you are
following these tips to avoid jams.
• Follow the procedures in “Load Paper” on page 2.4 to load
the paper properly. Make sure the adjustable guides are
positioned correctly.
• Do not overload the automatic input tray. Make sure the
paper is under the paper capacity mark on the inside of the
tray.
• Do not remove the paper from the input tray while print jobs
are in process.
• Flex, fan and straighten the paper before loading it.
• Do not load wrinkled, creased, damp or highly curled paper.
• Do not mix paper types in the input tray.
• Use only recommended print media. See “Paper
Specifications” on page A.2.
• Make sure that the recommended print side is facing up when
loading the paper into both input trays.
• Keep print media stored in an acceptable environment. See
“Printer and Paper Storage Environment” on page A.6.
7.10
PROBLEM SOLVING
Page 21

Solving Print Quality Problems
Print Quality Checklist
General print quality problems can be solved by following the checklist below.
• Redistribute the toner in the toner cartridge (see page 6.2).
• Clean the inside of the printer (see page 6.4).
• Adjust the print resolution from the printer properties (see page 5.11).
• Check to make sure that Toner Save Mode is off (see page 5.6).
• Troubleshoot general printing problems (see page 7.2).
• Install a new toner cartridge, then check print quality again (see page 2.2).
Solving Print Quality Problems
Problem
Light or faded print
Solution
If a vertical white streak or faded area appears on the page:
• The toner supply is low. You may be able to temporarily
extend the toner cartridge life. See “Redistributing the
Toner” on page 6.2. If this does not improve the print
quality, install a new toner cartridge.
• The paper may not meet paper specifications (for example,
the paper is too moist or too rough). See “Paper
Specifications” on page A.2.
• If the whole page is light, the print resolution setting is too
light or Toner Save Mode may be on. Adjust the print
resolution and Toner Save Mode within the printer
properties. See page 5.6 and 5.11 respectively.
• A combination of faded and smeared defects may indicate
that the toner cartridge needs cleaning. See “Cleaning the
Printer” on page 6.4.
• The surface of LSU part inside the printer may be dirty.
Clean the LSU. See “Cleaning the Printer”.
PROBLEM SOLVING
7.11
Page 22

Solving Print Quality Problems
Problem
Toner specks
Dropouts
Solution
• The paper may not meet paper specifications (for example,
the paper is too moist or too rough). See “Paper
Specifications” on page A.2.
• The transfer roller may be dirty. See “Cleaning the Inside”
on page 6.4.
• The paper path may need cleaning. See “Cleaning the
Inside”.
If faded areas, generally rounded, occur randomly on the
page:
• A single sheet of paper may be defective. Try reprinting the
job.
• The moisture content of the paper is uneven or the paper
has moist spots on its surface. Try a different kind or brand
of paper. See “Paper Specifications” on page A.2.
• The paper lot is bad. The manufacturing processes can
cause some areas to reject toner. Try a different kind or
brand of paper.
7.12
Vertical lines
PROBLEM SOLVING
• The toner cartridge may be defective. See “Vertical
repetitive defects” on the next page.
• If these steps do not correct the problems, contact a
service representative.
If black vertical streaks appear on the page:
• The photosensitive drum inside the toner cartridge has
probably been scratched. Install a new toner cartridge.
If white vertical streaks appear on the page:
• The surface of LSU part inside the printer may be dirty.
Clean the LSU (see page 6.4).
Page 23

Solving Print Quality Problems
Problem
Gray background
Toner smear
Solution
If the amount of background toner shading becomes
unacceptable, the procedures below may help to clear the
condition:
• Change the paper to a lighter basis weight. See “Paper
Specifications” on page A.2.
• Check the printer’s environment; very dry (low humidity)
or high humidity (higher than 80 % RH) conditions can
increase the amount of background shading.
• Install a new toner cartridge.
• Clean the inside of the printer. See “Cleaning the Inside”
on page 6.4.
• Check the paper type and quality. See “Paper
Specifications” on page A.2.
• Try installing a new toner cartridge.
Vertical repetitive defects
If marks repeatedly appear on the printed side of the page
at even intervals:
• The toner cartridge may be damaged. If a repetitive mark
occurs every 95 mm or 38 mm on the page, print a
cleaning sheet several times to clean the cartridge (see
page 6.5). After the printout, if you still have the same
problems, install a new toner cartridge.
• Parts in the printer may have toner on them. If the defects
occur on the back of the page, the problem will likely
correct itself after a few more pages.
• The fusing assembly may be damaged. Contact a service
representative.
PROBLEM SOLVING
7.13
Page 24

Solving Print Quality Problems
Problem
Background scatter
Misformed characters
Solution
Background scatter results from bits of toner distributed on
the printed page.
• The paper may be too damp. Try printing with a different
batch of paper. Do not open packages of paper until
necessary so that the paper does not absorb too much
moisture from the air.
• If background scatter occurs on an envelope, change your
printing layout to avoid printing over areas that have
overlapping seams on the reverse side. Printing on seams
can cause this problem.
• If background scatter covers the entire surface of a printed
page, adjust the print resolution through your software
application or the printer properties.
• If characters are improperly formed, producing hollow
images, the paper stock may be too slick. Try a different
paper. See “Paper Specifications” on page A.2.
• If characters are improperly formed, producing a wavy
effect, the scanner unit may need service. Verify that it
also occurs on a demo page by pressing the Demo button
on the control panel when printer is ready. If you need
service, contact a service representative.
7.14
Page skew
PROBLEM SOLVING
• Check the paper type and quality. See “Paper
Specifications” on page A.2.
• Make sure that the paper or other media is loaded
correctly and the guides are not too tight or too loose
against the paper stack.
Page 25

Solving Print Quality Problems
Problem
Curl or wave
Wrinkles or creases
Solution
• Check the paper type and quality. Both high temperature
and humidity will cause paper curl. See “Paper
Specifications” on page A.2.
• Turn over the stack of paper in the input tray. Also try
rotating the paper 180° in the input tray.
• Push the output lever and try printing to the face up output
slot.
• Make sure that paper is loaded properly.
• Check the paper type and quality. See “Paper
Specifications” on page A.2.
• Push the output lever and try printing to the face up output
slot.
• Turn over the stack of paper in the input tray. Also try
rotating the paper 180° in the feeder.
Back of printouts dirty
Black pages
• The transfer roller may be dirty. See “Cleaning the Inside”
on page 6.4.
• Check if the toner is leaking. Clean inside the printer.
• The toner cartridge may not be installed properly. Remove
the cartridge and reinsert it.
• The toner cartridge may be defective and need replacing.
Install a new toner cartridge.
• The printer may require repairs. Contact a service
representative.
PROBLEM SOLVING
7.15
Page 26

Solving Print Quality Problems
Problem
Loose toner
Character Voids
Solution
• Clean the inside of the printer.
• Check the paper type and quality. See “Paper
Specifications” on page A.2.
• Try installing a new toner cartridge.
• If the problem persists, the printer may require repairs.
Contact a service representative.
Character voids are white areas within the parts of
characters that should be solid black:
• If you are using transparencies when you experience this
problem, try another type of transparency. (Because of the
composition of transparency media, some character voids
are normal.)
• You may be printing on the wrong surface on the paper.
Remove the paper and turn it around.
• The paper may not meet paper specifications. See “Paper
Specifications” on page A.2.
7.16
Horizontal stripes
PROBLEM SOLVING
If horizontally aligned black streaks or smears appear:
• The toner cartridge may be installed improperly. Remove
the cartridge and reinsert it.
• The toner cartridge may be defective. Install a new toner
cartridge.
• If the problem persists, the printer may require repairs.
Contact a service representative.
Page 27

Troubleshooting Error Messages
Error
Paper
Data
Data
Error
Paper
Data
Error
Paper
When the printer experiences an error, the control panel will indicate error messages by the
indicator lights. Find the light pattern below that matches the printer light pattern and follow
the solutions to clear the error.
Printer Light Patterns
Light status legend
symbol for “light off”
symbol for “light on”
symbol for “light blinking”
Power off
• Check the power cord and the power switch if your printer does not generate a
response.
• Make sure that the printer is powered with the specified AC voltage.
Paper jam, or no toner cartridge
Paper is jammed inside the printer or the toner cartridge is not installed.
• Clear the paper jam. See “Clearing Paper Jams” on page 7.6.
• Make sure that the toner cartridge is correctly installed in the printer.
Paper out
The printer is out of paper in the input tray.
• Load paper into the tray. For the automatic input tray, loading paper will cancel
this message and allow you to continue with the print job.
tray, press the Demo button after loading paper.
For the manual input
PROBLEM SOLVING
7.17
Page 28

Troubleshooting Error Messages
Data
Error
Paper
Data
Error
Paper
Data
Paper
Error
Data
Error
Paper
Waiting the Demo button to be pressed
While printing in the manual feed mode, the printer is waiting the Demo
button to be pressed.
• Press the Demo button on the control panel to start printing. You must press the
button to print each page after loading paper into the manual input tray.
Door open
The printer front cover may be opened.
• Check that the printer front cover door is closed properly.
Canceling a job or memory out
While your printer is canceling a job (see page 5.5), the Error light blinks.
When canceling is completed, this message will automatically cleared.
Otherwise, the printer memory ran out of memory in the middle of a print job.
The page being printed may have been too complex for the memory capacity of
the printer. Press the Cancel/Reprint button to cancel the current job.
• Try to free some printer memory by removing any unnecessary fonts, macros, or
any data currently in printer memory.
• Simplify the image or print at a lower resolution.
System error - Fuser or LSU error
• Reset the printer by briefly turning the printer off and back on again.
• If the error persists, contact the service representative.
7.18
PROBLEM SOLVING
Page 29

Common Windows Problems
Problem
“File in Use” message
appears during installation.
“Error Writing to LPTx”
message appears.
“General Protection Fault”,
“Exception OE”, “Spool32”,
or “Illegal Operation”
messages appear.
Possible Cause and Solution
Quit all software application. Remove all software from the
StartUp Group, then restart Windows. Reinstall the printer
driver.
• Make sure the cables are connected correctly, the printer
is on, and the Data light on the control panel is on.
• If bi-directional communication is not turned on in the
driver, it will also cause this message.
• From the Start menu, select Settings, then Printers.
Right-click on the Samsung ML-1200 Series printer icon
and select Properties. From the Details tab, click on
Port Settings. Remove check from Check Port State
before Printing box and click OK. From Spool
Settings, select Print Directly to Printer and click OK.
Try printing again.
• Close all other applications, reboot Windows, and try
printing again.
• Delete all temp files from the Temp sub-directory. You
can determine the name of the directory by editing the
AUTOEXEC.BAT file and locking for the statement, “Set
Temp =”. The name after this statement is the temp
directory. It is usually C:\temp by default, but can be
redefined.
Note: Refer to Microsoft Windows 9x, Me, NT 4.0 or 2000 documentation that came with your PC
for further information on Windows error messages.
ROBLEM SOLVING
P
7.19
Page 30

This appendix provides information on the following topics:
◆
Printer Specifications
◆
Paper Specifications
◆
Using Your Printer with a USB cable
◆
Using Your Printer with Macintosh
◆
Linux Driver Installation
Page 31

Printer Specifications
Item
Print Speed
Resolution
First Printing Time
WarmUp Time
Power Rating
Power Consumption
Acoustic Noise
Toner Supply
Toner Cartridge Life
Duty Cycle
Weight
Package Weight
Specification and Description
12 PPM
600 dpi
Less than 12 seconds
30 seconds
AC 100 ~ 127 V (USA, Canada) / 220 ~ 240 V (Others), 50 / 60 Hz
250 W average during operation / Less than 10 W in sleep mode
Stand by: Less than 35 dB; Operating: Less than 47 dB
Single cartridge
2,500 pages (for starter, 1,000 pages), 5% area coverage
Monthly: 12,000 pages maximum
6.5 Kg / 13.4 lb.
Paper: 1.83 Kg
Plastic: 0.33 Kg
External Dimensions
(W x D x H)
Operating Environment
Emulation
Random Access
Memory (RAM)
Interface
329 x 355 x 231 mm / 12.95 x 13.98 x 9.09 in.
Temperature:10 ~ 32 °C / 50 ~ 90 °F; Humidity: 20 ~ 80 % RH
PrinThru
8 MB (nonexpandable)
IEEE 1284 Bidirectional Parallel
•
- Modes supported: Compatible, Nibble, Byte, ECP
•
USB Interface Standard
- USB 1.0 compliant
- 12 Mbps 1 port
APPENDIX
A.1
Page 32

Paper Specifications
Overview
This printer accepts a variety of media, such as cut-sheet
paper (including up to 100 % recycled fiber content paper),
envelopes, labels, transparencies and custom-size paper.
Properties such as weight, composition, grain and moisture
content are important factors affecting printer performance and
output quality. Paper that does not meet the guidelines
outlined in this manual can cause the following problems:
• Poor print quality
•
Increased paper jams
•
Premature wear on the printer, requiring repairs.
Notes:
• Some paper may meet all of the guidelines in this manual
and still not produce satisfactory results. This might be the
result of improper handling, unacceptable temperature and
humidity levels, or other variables over which Samsung has
no control.
• Before purchasing large quantities of paper, make sure that
the paper meets the requirements specified in this user
guide. Always test paper before buying large quantities.
A.2
CAUTION: Using paper that does not meet this
specifications may cause problems for the printer, requiring
repairs. This repair is not covered by the Samsung warranty
or service agreements.
APPENDIX
Page 33

Supported Sizes of Paper
Paper Specifications
Paper
Letter
A4
Executive
Legal
B5 (JIS)
Folio
Minimum Size
(custom)
Maximum Size (custom)
Transparency
b
Labels
Envelopes
Dimensions
8.5 ✕11 in. (
210 ✕297 mm (8.3 X 11.7 in.)
7.3 X 10.5 in. (191 X 267 mm)
8.5 ✕14 in. (
182 ✕257 mm
216 ✕330 mm
Automatic
Input Tray
Manual
Input Tray
216 ✕356 mm (8.5 X 14 in.)
Same minimum and
maximum paper sizes as
listed above.
216 ✕279 mm
216 ✕356 mm
(7.2 ✕10 in.)
(8.5 ✕13 in.)
76 X 127 mm
(3 X 5 in.)
76 X 127 mm
(3 X 5 in.)
)
)
Weight Capacity
• 150 sheets of 20 lb
Bond (75 g/m
paper for the
16 to 24 lb Bond
(60 to 105 g/m
60 to 163 g/m
Bond
(16 to 43 lb )
Thickness:
.10 X .14 mm
(0.0039 X
0.0055 in.)
up to 90 g/m
(16-24 lb)
automatic input
2
tray
)
• 1 sheet paper for
the manual input
tray
2
• 5 sheets of 20 lb
Bond (75 g/m
paper for the
automatic input
tray
• 1 sheet paper for
the manual input
tray
2
a
2
)
2
)
a. Capacity may vary depending on media weight and thickness, and environmental conditions.
b. Smoothness - 100 to 250 (Sheffield)
Note: You may experience some paper jams when using any media with a length of less than
127 mm (5 in.). For optimum performance, make sure you are storing and handling the paper
correctly. Please refer to “Printer and Paper Storage Environment” on page A.6.
APPENDIX
A.3
Page 34

Paper Specifications
Guidelines for Using Paper
For best results, use conventional 90 g/m2(24 lb) paper. Make sure the paper is of good
quality, and free of cuts, nicks, tears, spots, loose particles, dust, wrinkles, voids, and curled
or bent edges.
If you are unsure of what type of paper you are loading (such as bond or recycled), check the
label on the package of the paper.
The following problems with paper cause print quality deviations, jamming, or even damage
to the printer.
Symptom
Poor print quality or
toner adhesion
problems with feeding
Dropout, jamming,
curl
Increased gray
background shading
/printer wear
Excessive curl
problems with feeding
Jamming, damage to
printer
Problems with feeding
Problem with Paper
Too moist, too rough, too
smooth, or embossed;
faulty paper lot
Stored improperly
Too heavy
Too moist, wrong grain
direction or short-grain
construction
Cutouts or perforations
Ragged edges
Solution
Try another kind of paper,
between 100 ~ 250 Sheffield,
4 ~ 5 % moisture content.
Store paper flat in its moistureproof wrapping.
Use lighter paper, open the rear
output tray.
• Open the rear output tray.
• Use long-grain paper.
Do not use paper with cutouts or
perforations.
Use good quality paper
Notes:
• Do not use letterhead paper that is printed with low-temperature inks, such as those used in
some types of thermography.
• Do not use raised or embossed letterhead.
• The printer uses heat and pressure to fuse toner to the paper. Make sure that any colored
paper or preprinted forms use inks that are compatible with this fusing temperature (200 °C or
392 °F for 0.1 second).
APPENDIX
A.4
Page 35

Paper Specifications
Paper Specifications
Category
Acid Content
Caliper
Curl in Ream
Cut Edge Conditions
Fusing Compatibility
Grain
Moisture Content
Smoothness
Paper Output Capacity
Specifications
5.5 ~ 8.0 pH
.094 ~ .18 mm (3.0 ~ 7.0 mils)
Flat within 5 mm (.02 in.)
Cut with sharp blades with no visible fray.
Must not scorch, melt, offset, or release hazardous
emissions when heated to 200 °C (392 °F) for .1
second.
Long Grain
4 % ~ 6 % by weight
100 ~ 250 Sheffield
Output Tray
Face-down output tray
Face-up output slot
Capacity
100 sheets of 20 lb bond (75 g/m2) paper
1 sheet of 20 lb bond (75 g/m2) paper
APPENDIX
A.5
Page 36

Paper Specifications
Printer and Paper Storage Environment
Ideally, the printer and paper storage environment should be
at or near room temperature, and not too dry or humid.
Remember that paper is hygroscopic; it absorbs and loses
moisture rapidly.
Heat works with humidity to damage paper. Heat causes the
moisture in paper to evaporate, while cold causes it to
condense on the sheets. Heating systems and air conditioners
remove most of the humidity from a room. As paper is opened
and used, it loses moisture, causing streaks and smudging.
Humid weather or water coolers can cause the humidity to
increase in a room. As paper is opened and used it absorbs
any excess moisture, causing light print and dropouts. Also, as
paper loses and gains moisture it can distort. This can cause
paper jams.
As a result, paper storage and handling are as important as
the paper-making process itself. Paper storage environmental
conditions directly affect the feed operation.
Care should be taken not to purchase more paper than can be
easily used in a short time (about 3 months). Paper stored for
long periods may experience heat and moisture extremes,
which can cause damage. Planning is important to prevent
damage to large supply of paper.
Unopened paper in sealed reams can remain stable for several
months before use. Opened packages of paper have more
potential for environment damage, especially if they are not
wrapped with a moisture-proof barrier.
The paper storage environment should be properly maintained
to ensure optimum printer performance. The required condition
is 20 ° to 24 °C (68° to 75 °F), with a relative humidity of
45 % to 55 %. The following guidelines should be helpful when
evaluating the paper’s storage environment:
• Paper should be stored at or near room temperature.
• The air should not be too dry or too humid (due to the
hygroscopic properties of paper).
• The best way to store an opened ream of paper is to rewrap it
tightly in its moisture-proof wrapping. If the printer
environment is subject to extremes, unwrap only the amount
of paper to be used during the day’s operation to prevent
unwanted moisture changes.
A.6
APPENDIX
Page 37

Envelopes
Paper Specifications
Envelope construction is critical. Envelope fold lines can vary
considerably, not only between manufacturers, but also within
a box from the same manufacturer. Successful printing on
envelopes depends upon the quality of the envelopes. When
selecting envelopes, consider the following components:
• Weight: The weight of the envelope paper should not exceed
90 g/m
• Construction: Prior to printing, envelopes should lie flat with
less than 6 mm (0.25 in.) curl, and should not contain air.
• Condition: Envelopes should not be wrinkled, nicked, or
otherwise damaged.
• Temperature: You should use envelopes that are compatible
with the heat and pressure of the printer.
• Size: You should use only envelopes within the following size
ranges.
Manual input tray
2
(24 lbs), otherwise, jamming may occur.
Automatic input
tray
Minimum
76 X 127mm
(3 X 5 in.)
76 X 127 mm
(3 X 5 in.)
Maximum
216 X 356 mm
(8.5 X 14 in.)
Note: You may experience some paper jams when using any
media with a length of less than 127 mm (5 in.). This may be
caused by paper that has been affected by environmental
conditions. For optimum performance, make sure you are
storing and handling the paper correctly. Please refer to
“Printer and Paper Storage Environment” on page A.6.
APPENDIX
A.7
Page 38

Paper Specifications
Envelopes with Double
Side Seams
Envelopes with
Adhesive Strips or Flaps
Double side-seams construction has vertical seams at both ends
of the envelope rather than diagonal seams. This style may be
more likely to wrinkle. Be sure the seam extends all the way to
the corner of the envelope as illustrated below.
Correct
Incorrect
Envelopes with a peel-off adhesive strip or with more than one
flap that folds over to seal must use adhesives compatible with
the heat and pressure in the printer. The extra flaps and strips
might cause wrinkling, creasing, or even jams and may even
damage the fuser.
A.8
Envelope Margins
Envelope Storage
APPENDIX
The following gives typical address margins for a commercial
#10 or DL envelope.
Type of Address
Return address
Delivery address
Notes:
• For best print quality, position margins no closer than 15 mm
(0.6 in.) from the edges of the envelope.
• Avoid printing over the area where the envelope’s seams
meet.
Proper storage of envelopes helps contribute to print quality.
Envelopes should be stored flat. If air is trapped in an envelope,
creating an air bubble, then the envelope may wrinkle during
printing. See “Printing on Envelopes” on page 4.7.
Minimum
15 mm (0.6 in.)
51 mm (2 in.)
Maximum
15 mm (0.6 in.)
89 mm (3.5 in.)
Page 39

Labels
Paper Specifications
CAUTIONS:
• To avoid damaging the printer, use only labels
recommended for laser printers.
• To prevent serious jams, always use the face-up output slot.
• Never print on the same sheet of labels more than once or
print on a partial sheet of labels.
When selecting labels, consider the quality of each component:
• Adhesives: The adhesive material should be stable at
200 °C (392 °F), the printer’s fusing temperature.
• Arrangement: Only use labels with no exposed backing
between them. Labels can peel off sheets with spaces
between the labels, causing serious jams.
Transparencies
• Curl: Prior to printing, labels must lie flat with no more than
13 mm (.5 in.) of curl in any direction.
• Condition: Do not use labels with wrinkles, bubbles, or other
indications of separation.
See “Printing on Labels” on page 4.10.
Transparencies used in the printer must be able to withstand
200 °C (392 °F), the printer’s fusing temperature.
CAUTION: To avoid damaging the printer, use only
transparencies recommended for use in laser printers.
See “Printing on Transparencies” on page 4.11.
APPENDIX
A.9
Page 40

Using Your Printer with a USB Cable
If you have a USB (Universal Serial Bus) port enabled on
your computer, and if your computer is running Windows 98,
you can connect your ML-1200 Series printer to the USB
chain of devices.
Installing the Printer Software
If you have a USB (Universal Serial Bus) port enabled on your computer, and if your
computer is running Windows 98, you can connect your ML-1200 Series printer to the
USB chain of devices.
1. Install PrinThru driver
2. Connect printer with
USB cable and
install USB driver
To operate your printer with a Windows PC, you must install the
PrinThru printer driver. Place the CD-ROM in the CD-ROM drive
and perform the instructions on page 2.8.
Make sure that both the printer and computer are turned
1
ON.
Plug one end of the USB cable into the USB port on the
2
printer.
➜
To the USB port
on PC
A.10
APPENDIX
Page 41

Using Your Printer with a USB Cable
Plug the other end into the USB port on the computer.
3
The Add New Hardware Wizard dialog box appears. Click
4
Next.
Check Search for the best driver for your device and click
5
Next.
APPENDIX
A.11
Page 42

Using Your Printer with a USB Cable
Check CD-ROM drive and click Browse, then choose D:\USB
6
(where D is the drive letter for the CD-ROM drive).
Click Next. The USB driver will be installed.
7
Follow the instructions on the screen to complete the
8
installation.
A.12
APPENDIX
Page 43

Using Your Printer with a USB Cable
3. Set your PC printer
port
From the Start menu, select Settings, then select Printers.
1
Select the Samsung ML-1200 Series printer icon in the
2
Printers folder.
Select Properties from the File menu.
3
Click the Details tab. Select SSUSB: (ML-1210) in the
4
Print to the following port box. Click OK. The setup is
now completed.
APPENDIX
A.13
Page 44

Using Your Printer with a USB Cable
Frequently Asked Questions About USB
Q
What is USB?
Q
Universal Serial Bus (USB) makes it easy to connect devices to
A
A
your computer without having to open your PC. USB uses a
standard port and plug combination for connecting devices like
printers, modems, scanners, and digital cameras. It also offers
the benefit of being able to easily add, remove, and move
devices.
Because USB is a relatively new technology, we recommended
using a parallel printing connection. However, USB is an option
to customers who want to print from Windows 98 across the
USB cable. If your computer’s USB port is enabled and properly
setup, you can connect your printer to it or to a chain of USB
devices via a USB cable.
A.14
How can I determine if my computer’s USB port is enabled?
Q
Q
In Windows 98, select Start ➝ Settings ➝ Control Panel.
1
1
Double-click the System icon.
2
Click the Device Manager tab.
3
Click the plus (+) icon before the Universal Serial Bus
4
Controller item.
If you see a USB host controller and a USB root hub listed, USB
is properly enabled. If you have multiple hubs on the USB chain,
try connecting your printer to a different hub or to another USB
device. Also, make sure the cable connections are firm. (USB
hubs are hardware devices into which you can plug multiple USB
cables.)
If you do not see these devices listed, refer to your computer’s
documentation or contact the manufacturer for more
information on enabling and setting up USB. Remember, you can
always use a parallel cable to connect your printer’s parallel port
to your computer. (If you decide to switch to a parallel cable
connection, you may need to remove and reinstall the printer
software. )
APPENDIX
A
A
Page 45

Using Your Printer with a USB Cable
Can other users on my USB chain print to my ML-1200 Series
Q
Q
printer on the USB chain?
Yes. Windows 98 allows you to “share” your printer using
A
A
Q
After I install my printer, why isn’t my ML-1200 Series printer
Q
assigned to an LPT printer port in the Print dialog box of my
software application?
software settings on your computer. After others on the USB
chain have installed the printer software for your specific printer,
they can print to your shared printer.
A
A
How can I increase printing speed and quality?
Q
Q
A
A
USB uses a different naming convention for USB devices. After
the printer has been installed, you see SSUSB:(your printer
name) instead of LPT.
When operated on a USB chain, your printer may become
slower if other USB devices are being used while you’re printing.
For optimal print performance, avoid using other devices in the
USB chain while printing.
APPENDIX
A.15
Page 46

Using Your Printer with Macintosh
Your printer supports Macintosh system with a built-in USB
interface. When you print a file from Macintosh, you can use the
PrinThru driver to support your printer’s major printing features.
System Requirements
To use your ML-1200 Series printer and its software with a
Macintosh, your system should have:
Macintosh Hardware Requirement:
• One of the following Macintosh models:
-Power Macintosh series (with external network connection)
-Power Macintosh G3, G4
-iMac series
-PowerBook series
-iBook series
• USB interface
Macintosh System Requirement:
System 8.6 or later
Installing Software for Macintosh
Connecting to
Macintosh
You can connect the printer to your Macintosh using the USB
interface.
Turn off the printer and computer.
1
A.16
APPENDIX
Page 47

Using Your Printer with Macintosh
Hold the USB cable so the icon faces up and connect it to
2
your printer’s USB connector.
Connect the other end of the cable to an available USB port
3
on your Macintosh computer. If you have any connecting
problems, please refer to your computer documentation.
Installing Software
Note: If you are using a USB hub, connect the printer’s cable to
the first tier of the hub or the printer may malfunction. If
the printer doesn’t work with the hub, connect it directly to
the USB port.
Turn on your computer and printer.
1
Insert the CD-ROM which came with your printer into the CD-
2
ROM drive.
Double-click the Samsung ML-1200 Series on your
3
Macintosh desktop.
Select the correct language, then click Continue.
4
Click Install.
5
After installation is complete, click Quit.
6
APPENDIX
A.17
Page 48

Using Your Printer with Macintosh
From the Apple menu, select Chooser.
Choosing PrinThru
1
Driver
From the left pane of the Chooser window, click SAMSUNG
2
PrinThru. Then the Samsung printer name will appear in the
right pane of the Chooser window.
Click the Samsung PrinThru driver, and close the Chooser
3
window.
You see the message box indicating that you have changed
4
your current printer. Click OK.
Then you see the Samsung PrinThru printer icon is created as
5
a desktop printer.
Printing from a Macintosh
When you print with a Macintosh, you need to check the printer
software setting in each application you use. Follow these steps
to print from a Macintosh:
Open a Macintosh application and select a file you want to
1
print.
Open the File menu, and click Page Setup (Document
2
Setup in some applications). You see the Page Setup dialog
box.
A.18
APPENDIX
Page 49

Using Your Printer with Macintosh
Choose your paper size, orientation, paper type and other
3
options and click OK.
Choose Watermark if you want to add a watermark to each
page in your document to emphasize its purpose or indicate
how it should be handled. For details on the watermark
option, see page 5.13.
APPENDIX
A.19
Page 50

Using Your Printer with Macintosh
Now open the File menu and click Print. You see the main
4
printer settings dialog box.
Choose the number of copies and indicate which pages you
5
want to print. For advanced printing features, select the
desired option. For details, see page A.21.
A.20
APPENDIX
Select the desired option for
advanced printing features.
Click Print when you are finished checking your settings.
6
Page 51

Advanced Printing
Darkness/Quality
Using Your Printer with Macintosh
The Page Setup dialog box contains five categories of page
setup properties. Listed below is the name of each property.
-Darkness/Quality
-Layout
-Color
-Background Printing
-Paper Source
Figures below display each property in the Page Setup dialog
box.
Select print
darkness.
Layout
Select print
resolution.
Select the number of pages
you want to print on one
sheet of paper. The pages
will appear decreased in size
and arranged on the sheet.
APPENDIX
A.21
Page 52

Using Your Printer with Macintosh
Color
Background Printing
Turns background
printing on or off.
Select grayscale
mode.
Grayscale Black&White
Select a priority for your print job in
the queue of jobs waiting to print,
click one of the following:
• Normal to print in the order the
job is received.
• Urgent to print before any
Normal priority job.
• Print at: to print at the specific
time you enter in the day and
time in the fields to the right.
• Put document on hold to hold
the print job in the print queue
until you are ready to release it.
A.22
Paper Source
Select the corresponding paper
source. If Auto Select is set, the
printer automatically selects the
print media according to the
following order: Manual Tray, Auto
Tra y.
APPENDIX
Page 53

Linux Driver Installation
This Linux Configuration file is designed for PrinThru
compatible Samsung ML-1200 Series printer and supports
Linux RedHat 6.0 or higher, Mandrake, SuSE and etc. If you
want to know the detail installion method for non-RedHat
Linux, please refer to readme.txt file in Linux directory of
driver CD.
Linux Driver Configuration
• Configuration Setup File
a. /cdrom/linux/install/install.sh
b. /cdrom/linux/install/ssprt.db
c. /cdrom/linux/install/readme.txt
• Ghostscript Package file
a. /cdrom/linux/gs5.10/ghostscript-5.10-10.i386.rpm
b. /cdrom/linux/gs5.10/COPYING
c. /cdrom/linux/gs5.50/ghostscript-5.50-2.i386.rpm
d. /cdrom/linux/gs5.50/COPYING
Installation
1. Mount the CD-ROM
drive.
To install the driver, open the x terminal screen and take the
following steps:
Note: To mount the CD-ROMdrive, you must be a super user
or must be authorized to mount the CD-ROM by the super
user. If you fail to mount the CD-ROM drive, ask the system
administrator.
To mount the CD-ROM drive:
Insert the Samsung ML-1200 Series CD-ROM into the
1
CD-ROM drive.
Mount the CD-ROM drive under a directory like /mnt in
2
order to access the files on the CD-ROM:
>mount -t iso9660 /dev/cdrom /mnt/cdrom
APPENDIX
A.23
Page 54

Linux Driver Installation
2. Install the Ghostscript.
Note: Ghostscript may already be installed in your Linux
machine. To support Samsung printer PrinThru, you must
update the ghostscript. If you are not sure whether the
ghostscript is already installed in your machine, use the
command: >rpm -q ghostscript (You can see the version of the
ghostscript currently installed in your machine by this
command.)
To update the ghostscript:
Change to the directory where the ghostscript is in by
1
typing in:
>cd/mnt/cdrom/linux/gs5.XX (where /mnt/cdrom
is the CD-ROM directory you have mounted at step 1 and
XX is the version of the ghostscript to be installed, 10 or
50.)
Delete the ghostscript currently installed in your machine
2
by typing in:
/mnt/cdrom/linux/gs5.XX>rpm -e --nodeps
ghostscript
3. Install setup script.
Install the ghostscript which is supplied in the Samsung
3
ML-1200 Series CD-ROM by typing in:
/mnt/cdrom/linux/gs5.XX/rpm -ivh ghostscript -
5.XX-xx.i386.rpm
When # appears in the screen and the installation is
4
completed, the ghostscript is successfully updated. To
make sure, type in:
/mnt/cdrom/linux/gs5.XX/rpm -q ghostscript
If ‘ghostscript-5.XX-xx’ message appears, the installation
is successfully completed.
For details on installing the setup script, refer to the
/cdrom/linux/install/readme.txt file.
Add the driver to the printer list by typing in:
/cdrom/linux/install>install.sh (or)
/cdrom/linux/install>./install.sh (if the path of the
current working directly is not determined.)
A.24
APPENDIX
Page 55

Linux Driver Installation
4. Set up the printer filter.
To set up:
Run printtool at x terminal.
1
To add the printer driver, click the Add button.
2
In the Add a Printer Entry window, decide the printer
3
type you will use. Select Local Printer if you have a PC-
connected printer.
Click the OK button.
4
If the Info button appears, ignore it, then click the OK
5
button.
The Edit xxxx Entry window opens (where xxxx is the
6
printer type you have selected at step 3).
If you are not an advanced user, do not change the
Names/Spool Directory/File Limit in Kb/Printer
Device option.
Click the Select button in the Input Filter to access
7
filter setup.
Select Samsung Printer PrinThru Compatible for the
8
Printer Type item. Then select the default resolution and
paper size.
To save the setting, press the OK button.
9
In the Edit xxxx Entry window, press the OK button to
10
complete the printer driver installation.
You can find that the printer driver is added to the
11
driver window. Select Quit from the PrintTool menu.
GNU Ghostscript software, in directory /linux/gs5.10 and /linux/gs5.50 on this CD is
Copyright (C) 1999 Aladdin Enterprise, Menlo Park, California, and other authors as
indicated in its documentation.
This software is not subject to the End User License Agreement: your rights to this
software are given by the GNU License, which is in a file called COPYING in that
directory.
GNU Ghostscript should be available on all GNU site, such as ftp://ftp.gnu.org/pub/gnu/.
APPENDIX
A.25
Page 56

INDEX
A
automatic input tray
loading paper 4.5
paper source setting 5.3
C
cancel, print job 5.5
Cancel/Reprint button 3.2
cardstock, print 4.13
clean, printer 6.4
clean sheet, print 6.5
components 1.3
control panel
buttons 3.1
lights 3.3
D
Data light 3.3
Demo button 3.1
demo page, print 2.7
diskette, make, install software 2.13
driver
access 5.1
install 2.8
in Linux A.23
Macintosh A.16
remove 2.11
USB A.10
F
face-down output tray 4.4
face-up output slot 4.4
features 1.1
fitting to a selected paper size 5.8
G
graphic properties 5.11
I
install
Linux driver A.23
Macintosh driver A.16
printer software 2.8
software from diskette 2.13
toner cartridge 2.2
USB driver A.10
J
jam see paper jam
L
E
envelopes, print 4.7
Error light 7.17
error messages 7.17
INDEX
I
labels, print 4.10
letterhead, print 4.12
Linux A.23
load, paper
In the automatic input tray 2.4
in the manual input tray 4.5
Page 57

INDEX
M
Macintosh A.16
manual input tray
loading paper 4.5
paper source setting 5.3
multiple pages on one sheet, print 5.7
N
network, setup 5.21
n-up printing 5.7
O
orientation 5.3
output lever 4.4
output location, select 4.4
overlays, print 5.16
P
page overlays, print 5.16
paper
acceptable size and capacities 4.2, A.3
choose 4.1
guidelines 4.3, A.4
load 2.4, 4.5
specifications A.2
storage environment A.6
paper jam, clear
input area 7.6
inside the printer 7.8
output area 7.6
tips avoiding paper jams 7.10
Paper light 3.3
paper orientation, setting 5.3
paper out, indication 3.3, 7.17
paper size, setting 5.3
paper source, setting 5.3
paper type, setting 5.3
parallel, connection 2.6
posters, printing 5.9
power save mode 5.12
print media see paper
printer light patterns 3.3, 7.17
print quality problem, solving
back of printouts dirty 7.15
background scatter 7.14
black pages 7.15
character voids 7.16
checklist 7.11
curl or wave 7.15
dropouts 7.12
gray background 7.13
horizontal stripes 7.16
light print or fade 7.11
loose toner 7.16
misformed characters 7.14
page skew 7.14
toner smear 7.13
toner specks 7.12
vertical lines 7.12
vertical repetitive defects 7.13
wrinkles or creases 7.15
printer driver see driver
printer software, install 2.8
printing
cancel 5.5
cleaning sheet 6.5
demo page 2.7
fitting to a selected paper size 5.8
general problems, solving 7.2
help 5.5
multi pages on one sheet 5.7
on a network envirionment 5.21
page overlay 5.16
posters 5.9
quality problems, solving 7.11
watermarks 5.13
INDEX
II
Page 58

INDEX
problem, solving
checklist 7.1
common windows problems 7.19
error messages 7.17
general 7.2
paper jam 7.6
print quality 7.11
Q
quality, problems 7.11
R
reprint, last page 5.20
resolution 5.11
T
toner cartridge
clean 6.5
install 2.2
life expectancy 6.1
recycle 6.1
redistribute toner 6.2
save toner 5.6
storage 6.1
Toner Save button 3.2. 5.6
transparency, print 4.11
troubleshooting see problem, solving
U
uninstall, driver 2.11
unpack 2.1
USB cable, setup A.10
S
setup printer chapter 2
specifications
paper A.2
printer A.1
system error 7.18
INDEX
III
W
watermark, print 5.13
Page 59

Home
Visit us at:
http://www.samsungprinter.com
Rev.1.00
 Loading...