

Samsung LTP1745, LTP2045, LT-P1545 Owner’s Manual
..............-Owner's
Instructions
This device _sa Class B digital apparatus.
÷
I
®
2222222pdf 2004 04 10
2_ 3:36:43
÷
Contents. qxd. q
4/9/04 5:55 AM
Page 3
÷
Do not display a still image (such as on a vdeo game or when hooking up a DVD to this LCD TV} on the Coot
1F CD (thin Film [ransister Liquid Crysta Display) panel for a long time as it can cause screen image retention.
This image retention is also known as 'screen burn" .To avoid such image retention, educe the degree of brightness
and contrast of this screen when displaying a still image
Ne faites pes afficher par votre 6cran couleur 1FF LCD (6cran _ raatrice active a affichage 8 cfistaux liquides) dar@t
sur image (comme il peut y en avor dans des jeux vid6o ou Iors d'une connexion dun Eecteur de DVD a cette t6 6v sion LOD)
pendant trop Iongteraps car cea pour@it c@er un fantOrae d' raage _ I 6cran. Ce fantOme est ega eraent connu sous le nora
de "br@ure d'6cran". Pour eviter tout risque de fantOme, @d@sez le niveau de luminosit_ et de centraste de cet 6cren Iorsqu'il
affiche une image fixe.
® ÷
÷
@
Contents_qxd.q 4/8/04 4:43 AM Page 1
CONTENTS
Chapter 1 : Your New TV
List of Featm'es ............................................ i
List of Parts ............................................... 1
Familiarizing Yottrself with Yore New TV ....................... 2
Chapter 2- Installation
Connecting VHF and UHF Antennas ........................... 6
C@mecting Cable TV ....................................... 7
Connecting a VCR ......................................... i0
Connecting an S=VHS VCR ................................. i 1
C@mecting a DVD Player ................................... i2
Front Buttons ...................................... 2
Rear Panel Jacks .................................... 3
Remote Comrol ..................................... 4
h_stalling Batteries in the Remote Control ................ 5
If remote control doesn't work! ........................ 5
Antennas with 300=ohm Flat T'_xin Leads ................. 6
Antennas vxith 75=ohm Rotmd Leads .................... 7
Separate VHF and UHF Amemm s ...................... 7
Cable v, ithottt a Cable Box ............................ 7
Connecting to a Cable Box that Descrambles All Chalmels...8
Connecting to a Cable Box that Descrambles Some Channels . .8
Chapter 3" 8peoial Features
Tinting the TV On and Off .................................. i3
Changing Chmmels ........................................ 13
Using the Chalmel Bt_ttons ........................... i3
Using the PRE=CH Button to select the Previotts Chalmel .. i3
Adjusting the Volmne ...................................... i3
Using Mute ....................................... i3
Viewing the Display ....................................... i4
Viewing the Melms ........................................ i4
Chapter 4: Operation
Plug & Play Feature ........................................ 15
Memorizing @e Chalmels ................................... i6
Selecting the Video Signal=source ..................... i6
Storing Channels in Memory (Automatic Method) ........ i7
To check the cham_els stored in memory ................ i7
To select chfmnels over 100 .......................... i7
ADD and DEE Channels (Manual Method) .............. i8
To select the Ii_put Sottrce .................................. i9
To Edit @e Inpttt Sot_rce Name ............................... 20
Using At_tomatic Picture Set@_gs ............................. 21
Ctlstomizing the Pictme .................................... 22
( ONTEN-I $ J
Contents.qxd.q.q b/I/04 I:4U PM Page 2
I
CONTENTS
I
Using Automatic Sound Settings .............................. 23
To select the Sound option .................................. 24
Selecting a Menu Language ................................. 25
Setting the Blue Screen Mode ................................ 26
Adjusting the Color Tone ................................... 27
Automatic volmne control ................................... 28
Setting the Clock ......................................... 29
Option l: Setting the Clock Manually .................. 29
Option 2: Using the Local PBS Channel to Automatically
Set the TV Clock .......................... 30
Setting the On/Off Timer ................................... 32
Setting the Sleep Timer .................................... 34
Viewing Closed Captions ................................... 35
Using the V-Chip .......................................... 36
Setting Up Your Personal ID Number (PIN) ............. 36
How to Enable/Disable the V-Chip ..................... 37
How to Set up Restrictions Using the 'TV guidelines' . .... 38
How to Set up Restrictions Using the MPAA Ratings:
G, PG, PG-l 3, R, NC-l 7, X .......................... 40
How to Reset the TV afler the V-Chip
Blocks a Channel ('Emergency Escape') ................ 41
Chapter 5: PC Display
Using Your TV as a Computer (PC) Display ..................... 42
How to Set up Your PC Sotiware (Windows only) ........ 42
Adjusting the Screen Quality ......................... 43
Changing the Screen Position ......................... 44
To Initialize the Screen Position or Color Settings ......... 45
How to Auto Adjust ................................ 46
Using Automatic Picture Settings ...................... 47
Customizing the Picture ............................. 48
Adjusting the Color Tone ............................ 49
Customizing the color ............................... 50
Chapter 6: Troubleshooting
Identifying Problems ....................................... 51
Appendix
Using the Anti-Theft Kensington Lock ......................... 53
Relractable Stand .......................................... 54
Installing VESA compliant mounting devices .................... 55
Installing the Wall Mount Kit (sold separately) .................. 56
Cleaning and Maintaining Your TV ........................... 60
Using Your TV in Another Country ............................ 60
Display Mode ............................................ 61
Specifications ............................................ 62
CONTENTS 2
BN6_-00633A-06Eng l.qxd°q b/12/04 6:31 PM Page@
YOUR NEW TV
List of Features
Your TV was desif;ned with the latest tecl'mology.
This TV is a high-perik)rmance unit that includes the ikJlowing special features:
• Easy-to-use remote contro!
• Easy-to-use on-screen Fnenu system
oAutomatic timer to turn the TV on and oil"
oAc[justable picture and sound settings that can be stored in the TV's memory
oAutomatic channel tuning tk_rup to !94 channels.(Air :69 , STD : 125 )
• A special filter to reduce or eliminate reception problems
• Fine tuning control tk_rthe sharpest picture possible
oA built-in multi-channel sound decoder tk_rstereo and bilingual listening
oBuilt-ira dua! channel speakers
• Headphone .jack tbr private listening
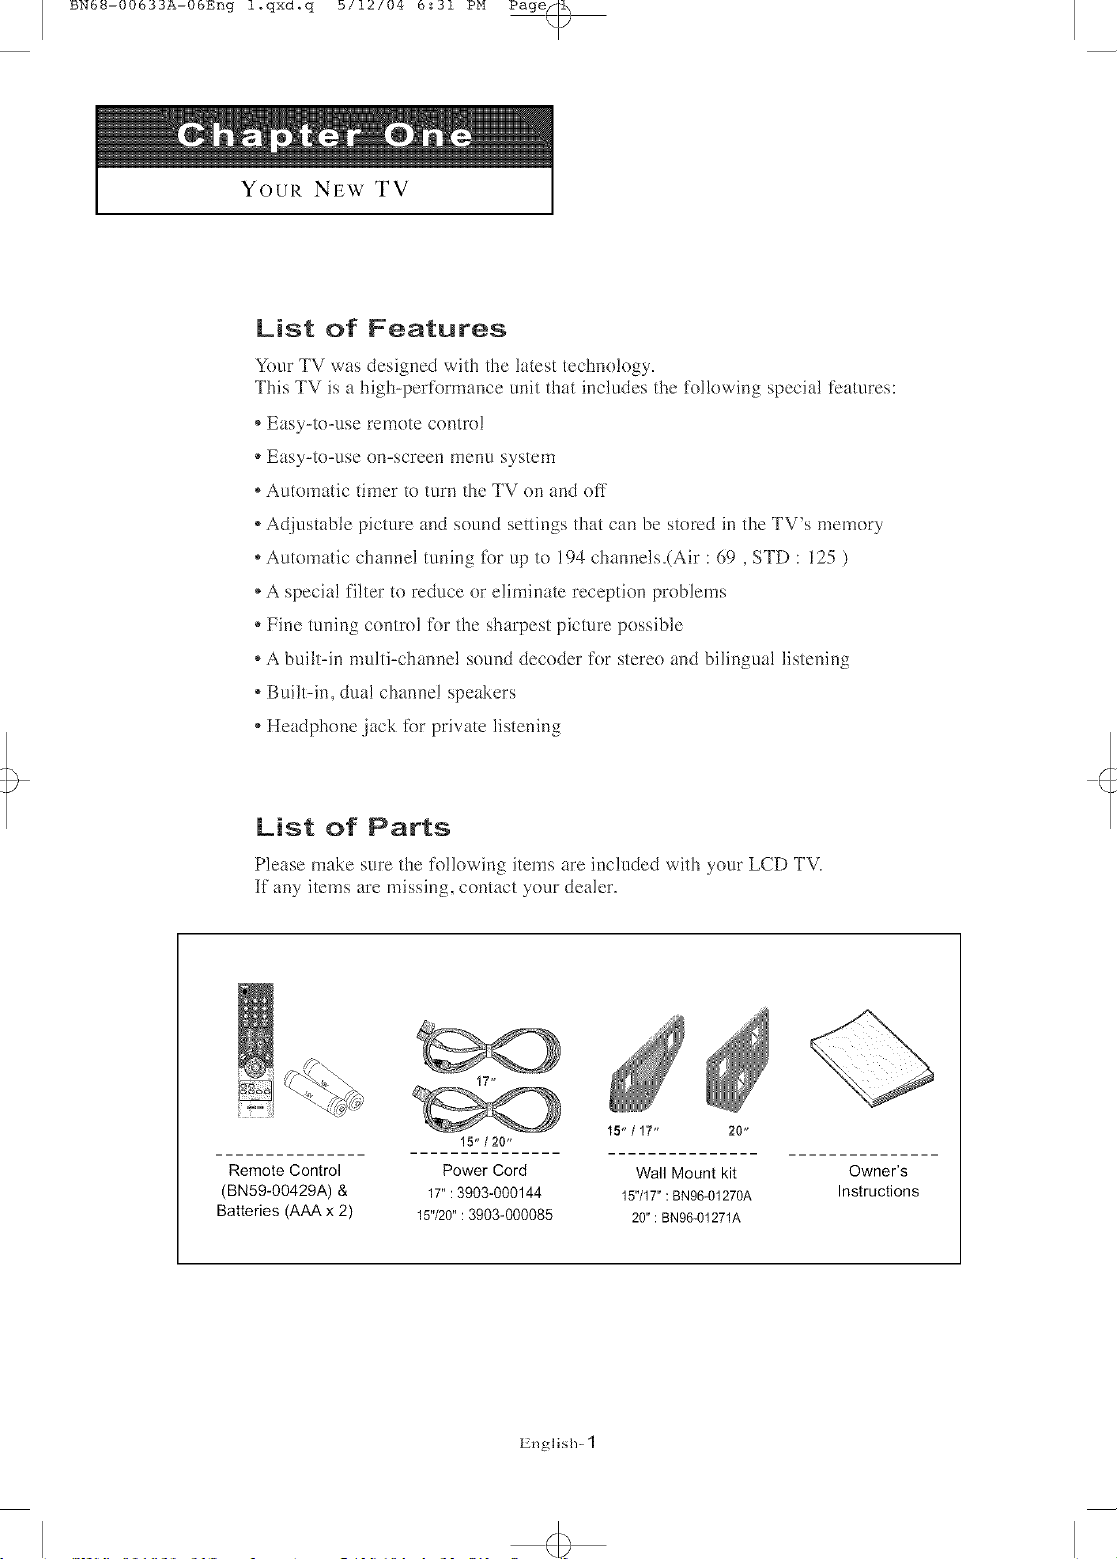
List of Parts
Please make sure the folk)wing items are included with your LCD TV.
If any items are missing, contact your dealer.
!5"/20"
Remote Control Power Cord Wall Mount kit
(BN59-00429A) & 17":3903-000144 15717": BN96-01270A
Batteries (AAA x 2) 15"/20": 3903-000085 20": BN96-01271A
15" / !7" 20"
Owner's
Instructions
English- 1
BN6_-00633A-06Eng l.qxd.q b/12/04 6:31 PM Page@
I
YOUR NEW TV
I
Familiarizing Yourself with Your New TV
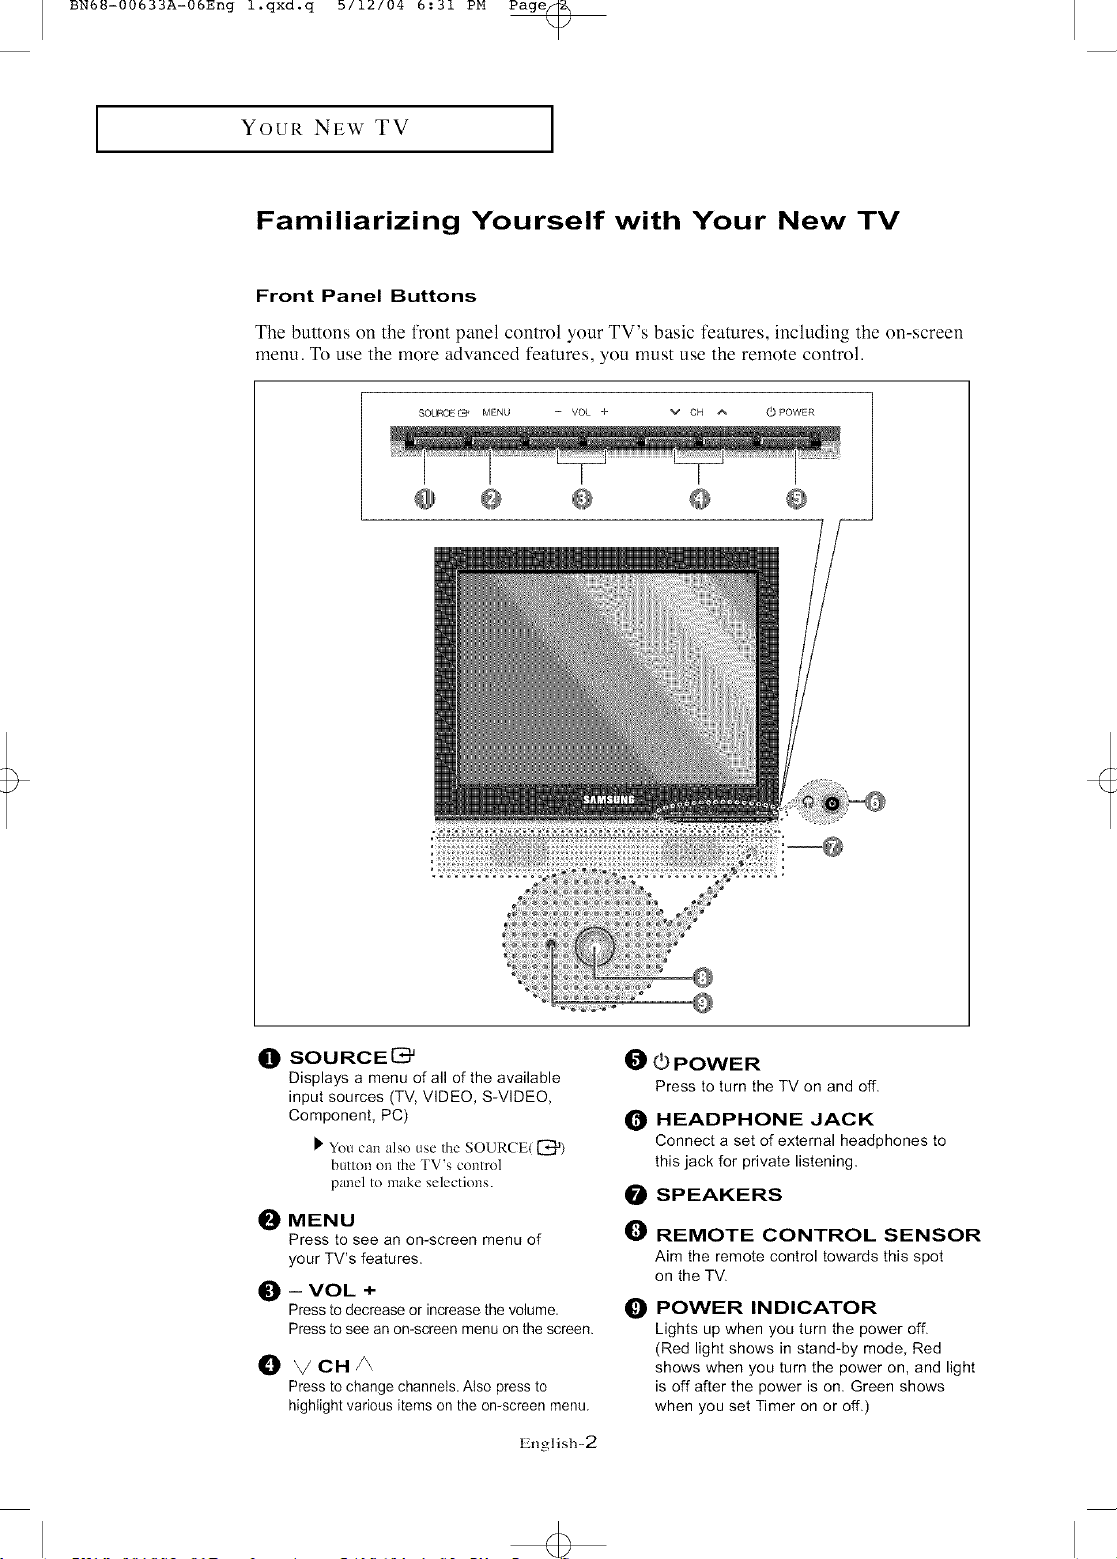
Front Panel Buttons
The buttons on the front panel control your TV's basic features, including the on-screen
menu. To use the more advanced features, you must use the remote control.
SOURCE [9 MENU -- VOL + v CH A (_ POWER
t_ SOURCE_
Displays a menu of all of the available
input sources (TV, VIDEO, S-VIDEO,
Component, PC)
_' You can also use the SOURCE({_a)
button on the TV's control
panel to make selections.
i_ MENU
Press to see an on-screen menu of
your TV's features.
_) -- VOL +
Press to decrease or increase the volume,
Press to see an on-screen menu on the screen.
i_ _/CHA
Press to change channeIs AIso press to
highlight various items on the on-screen menu.
English-2
i_ 0 POWER
Press to turn the TV on and off.
t_ HEADPHONE JACK
Connect a set of external headphones to
this jack for private listening.
i_ SPEAKERS
O
REMOTE CONTROL SENSOR
Aim the remote control towards this spot
on the TV.
POWER INDICATOR
O
Lights up when you turn the power off.
(Red light shows in stand-by mode, Red
shows when you turn the power on, and light
is off after the power is on. Green shows
when you set Timer on or off.)
BN6_-00633A-06Eng l.qxd.q b/12/04 6:31 PM Page_
YOUR NEW TV
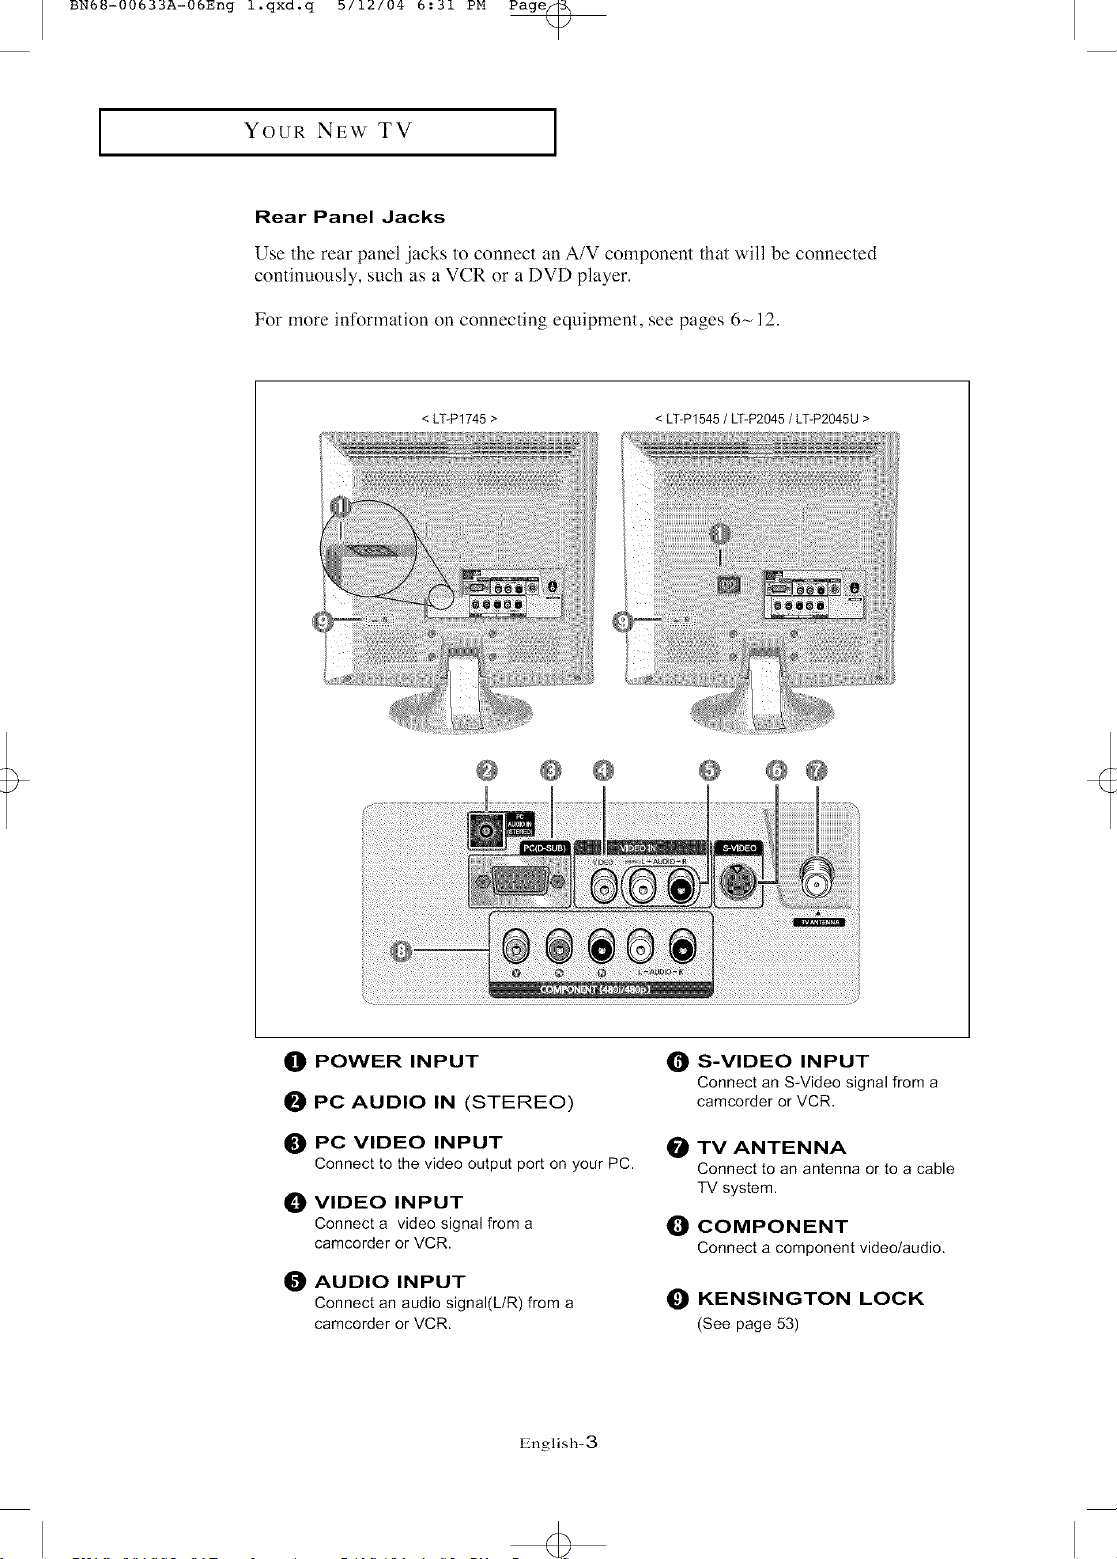
Rear Panel Jacks
Use the rear panel jacks to connect an A/V component that will be connected
continuously, such as a VCR or a DVD player.
For more information on connecting equipment, see pages 6~ 12.
< LT-P1745> < LT-P1545 / LT-P2045 / LT-P2045U >
!;!!! i;i
i!! i i'ii
@ POWER INPUT
O PC AUDIO IN (STEREO)
_]) PC VIDEO INPUT
Connect to the video output port on your PC.
_]) VIDEO INPUT
Connect a video signal from a
camcorder or VCR.
AUDIO INPUT
Connect an audio signal(L/R) from a
camcorder or VCR.
0@
O S-VIDEO INPUT
Connect an S-Video signal from a
camcorder or VCR,
@ TV ANTENNA
Connect to an antenna or to a cable
TV system.
_) COMPONENT
Connect a component video/audio.
_1 KENSINGTON LOCK
(See page 53)
English-3
BN6_-00633A-06Eng l.qxd.q b/12/04 6:31 PM Page@
Youk NEw TV
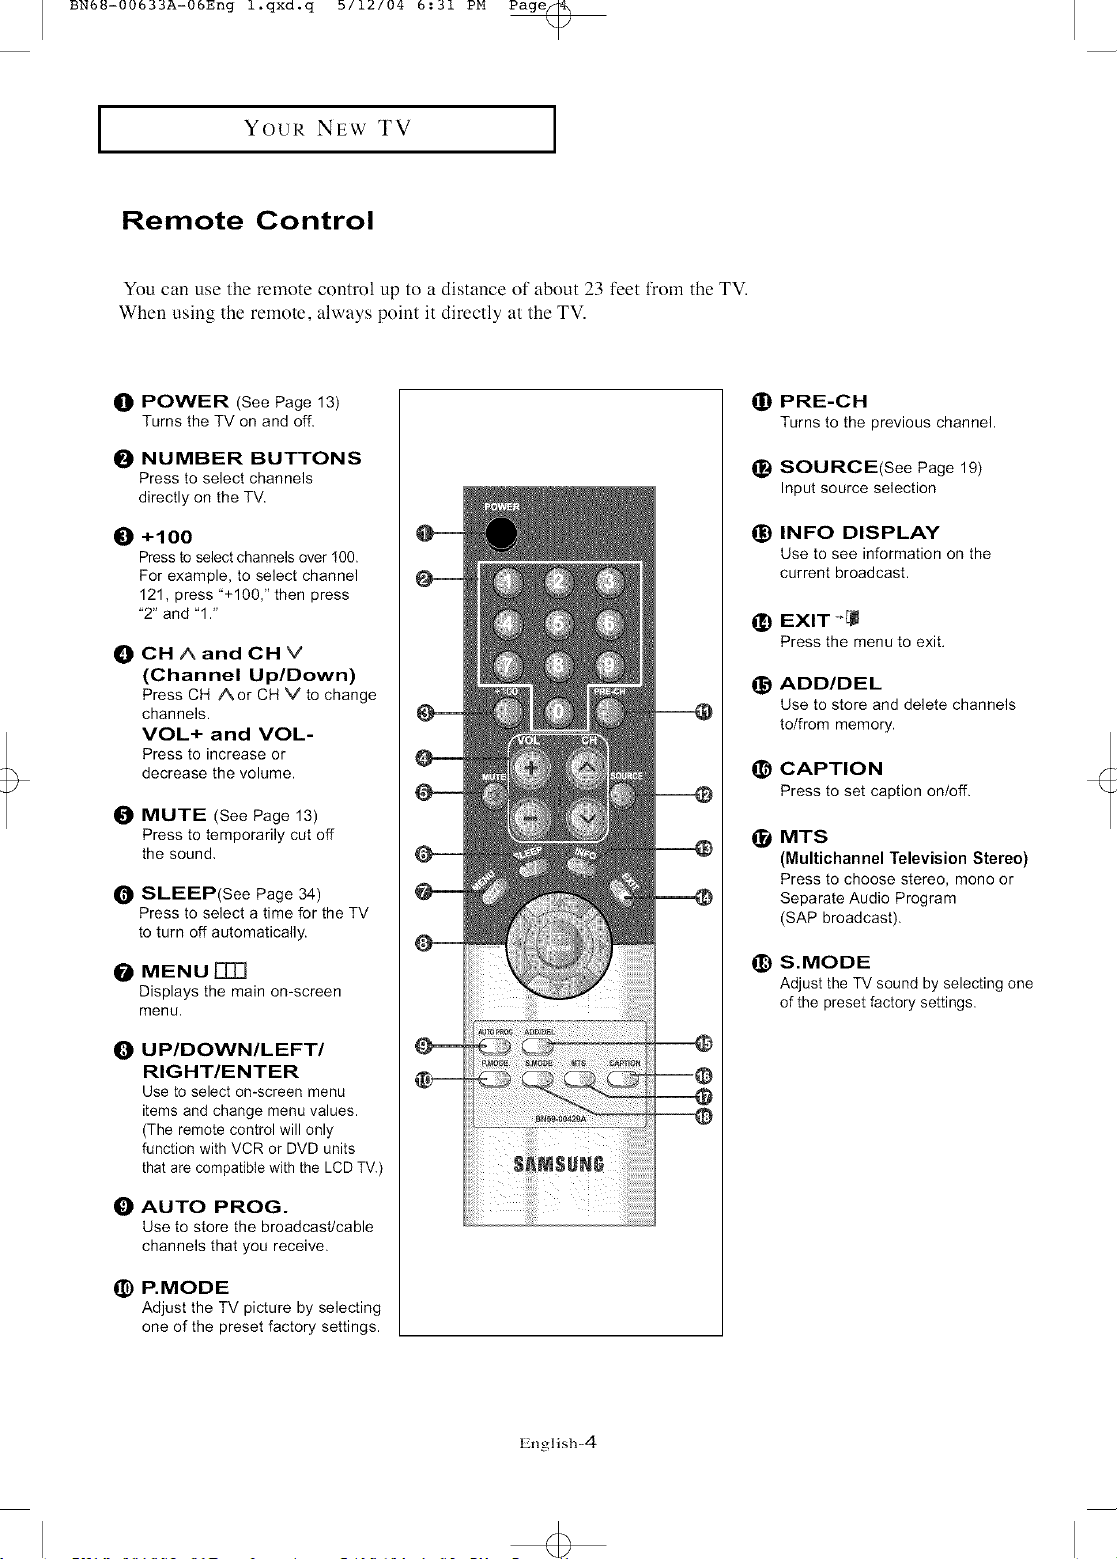
Remote Control
You can use the remote control up to a distance of about 23 feet from the TV.
When using the remote, always point it directly at the TV.
t1
POWER (See Page 13)
Turns the TV on and off.
NUMBER BUTTONS
O
Press to select channels
directly on the TV.
_) PRE-CH
Turns to the previous channel.
_) SOURCE(See Page 19)
Input source selection
+100
O
Press to select channels over I00.
For example, to select channel
121, press "+100," then press
"2" and '1."
CH A and CH V
O
(Channel Up/Down)
Press CH Aor CH V to change
channels.
VOL+ and VOL-
Press to increase or
decrease the volume.
O
MUTE (See Page 13)
Pressto temporarily cut off
the sound,
SLEEP(See Page 34)
O
Press to select a time for the TV
to turn off automatically.
MENU[][][]
@
Displays the main on-screen
menu.
UPIDOWNILEFTI
O
RIGHT/ENTER
Use to select on-screen menu
items and change menu values.
(The remote control will only
function with VCR or DVD units
that are compatible with the LCD TV.)
_) INFO DISPLAY
Use to see information on the
current broadcast.
_) EXIT-'[J
Press the menu to exit.
_) ADD/DEL
Use to store and delete channels
to/from memory.
_) CAPTION
Pressto set caption on/off.
MTS
O
(Multichannel Television Stereo)
Press to choose stereo, mono or
Separate Audio Program
(SAP broadcast).
_) S.MODE
Adjust the TV sound by selecting one
of the preset factory settings.
AUTO PROG.
O
Use to store the broadcast/cable
channels that you receive.
P.MODE
@
Adjust the TV picture by selecting
one of the preset factory settings.
English-4
<b
BN6_-00633A-06Eng l.qxd.q b/12/04 6:31 PM Page@
I
YOUR NEW TV
I
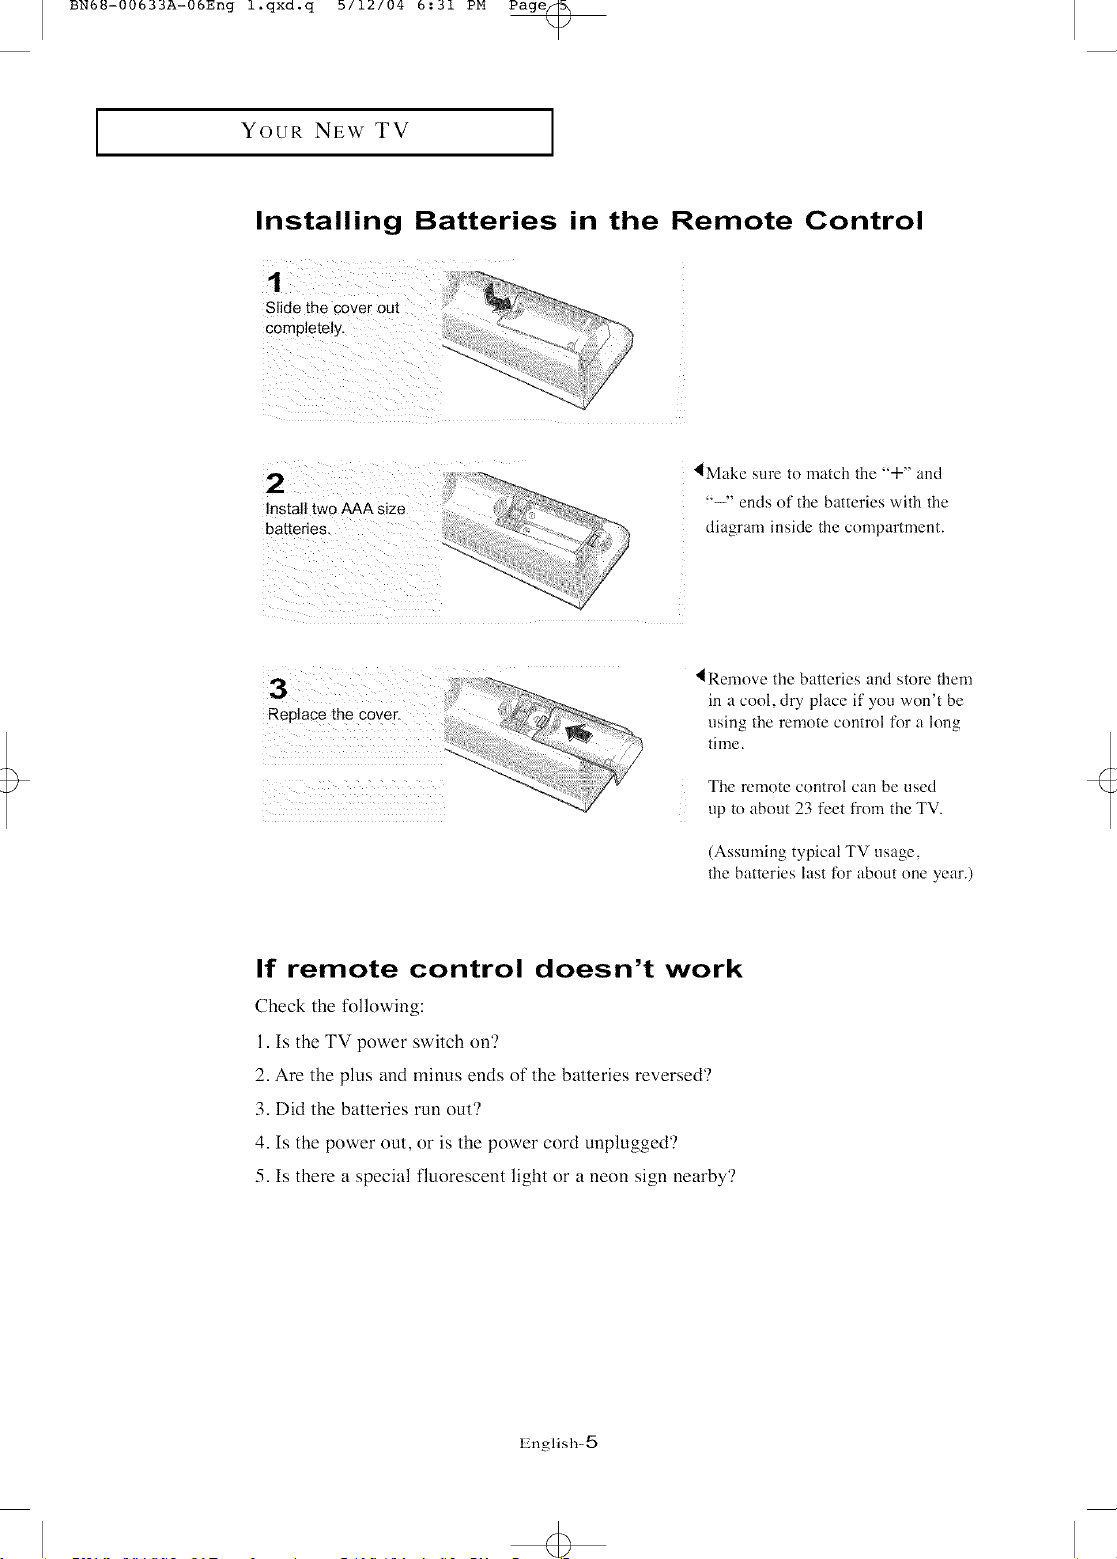
Installing Batteries in the Remote Control
Slide the cover out
lMake sure to match the "+" and
"--" ends of the batteries with the
_i i ii i i I
i i
i_iiiiIiiiii!ili!iii_ii_ii_i_i_
diagram inside the compartment.
Remove the batteries and store them
in a cool, dry place if you won't be
using the remote control for a long
time.
The remote control can be used
the batteries last for about one year.)
If remote control doesn't work
Check the iollowing:
1. Is the TV power switch on?
2. Are the plus and minus ends of the batteries reversed?
3. Did the batteries run out?
4. Is the power out, or is the power cord unplugged?
5. Is there a special fluorescent light or a neon sign nearby?
up to about 23 feet fl'om the TV.
(Assumi% t3pical TV usa=e,
Lnglish-5
BN6_-00633A-06Eng l.qxd.q b/12/04 6:31 PM Page@
INSTALLATION
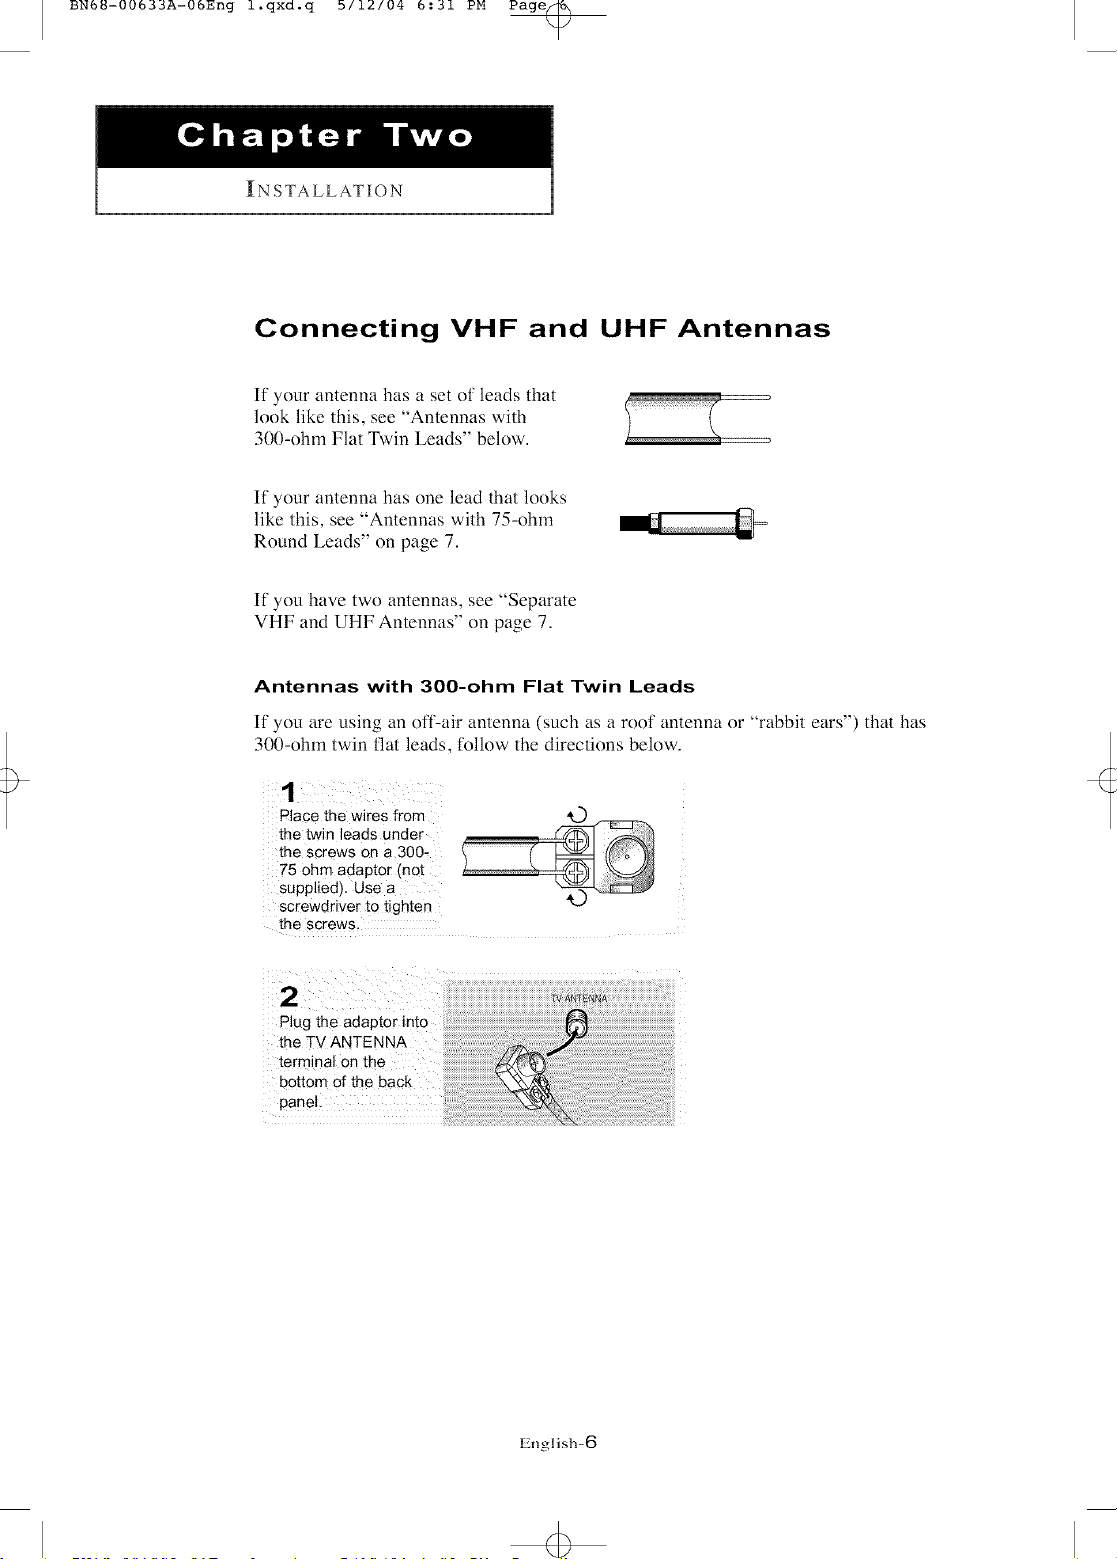
Connecting VHF and UHF Antennas
If your antenna has a set of leads that
look like lhis, see "Amennas wilh
300-ohm Flat Twin Leads" below.
If your antenna has one lead thal looks
like this, see _'Amennas with 75-ohm
Round Leads" on page 7.
ff you have two antennas, see "'Separate
VHF and UHF Amennas'" on page 7.
Antennas with 300-ohm Flat Twin Leads
If you are using an off-air antenna (such as a roof antenna or '*rabbit ears") that has
300-ohm twin fiat leads, folh)w the directions below.
1
=lace the wires from
the twin leads under
the screws on a 300-
75 ohm adaptor (not
supplied). Use a
screwdriver to tighten
the screws
Plug the adaptor into
the TV ANTENNA
terminal on the
bpOtntOLof the back
English-6
4>
BN6U-00633A-06Eng l.qxd.q b/12/04 6:31 PM Page@
I
INS TALLATION
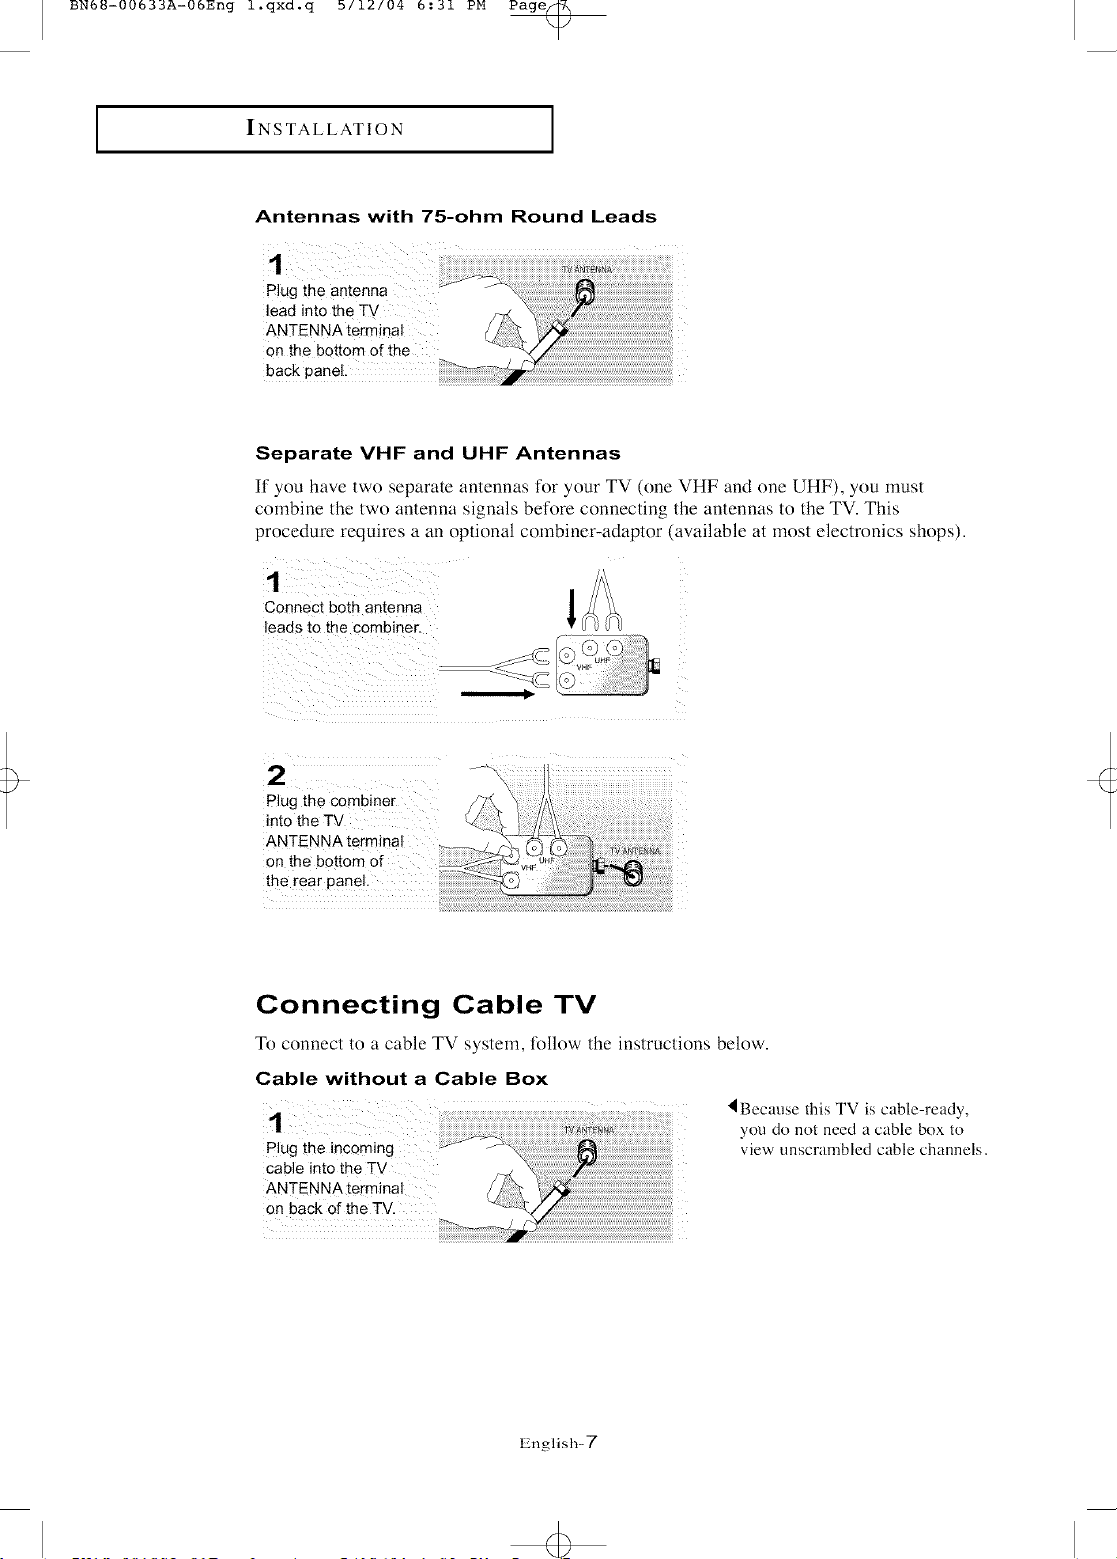
Antennas with 75-ohm Round Leads
I
1
Plug the antenna
lead into the TV
ANTENNA terminal
on the bottom of the
back panel.
Separate VHF and UHF Antennas
If you have two separate antennas for your TV (one VHF and one UHF), you must
combine the two antenna signals before connecting the antennas to the TV. This
procedure requires a an optional combiner-adaptor (available at most electronics shops).
Connect both antenna _ _/_(_j
leads to the combiner.
2
Plug the combiner
into the TV
ANTENN I
on the
the rear panel.
Connecting Cable TV
To connect to a cable TV system, follow the instructions below.
Cable without a Cable Box
you do not need a cable box to
Plug the incoming view unscrambled cable channels.
cable into the TV
ANTENNA terminal
on back of the TV.
Ignglish-7
BN6_-00633A-06Eng l.qxd.q b/12/04 6:31 PM Page@
I
IN STALLATION
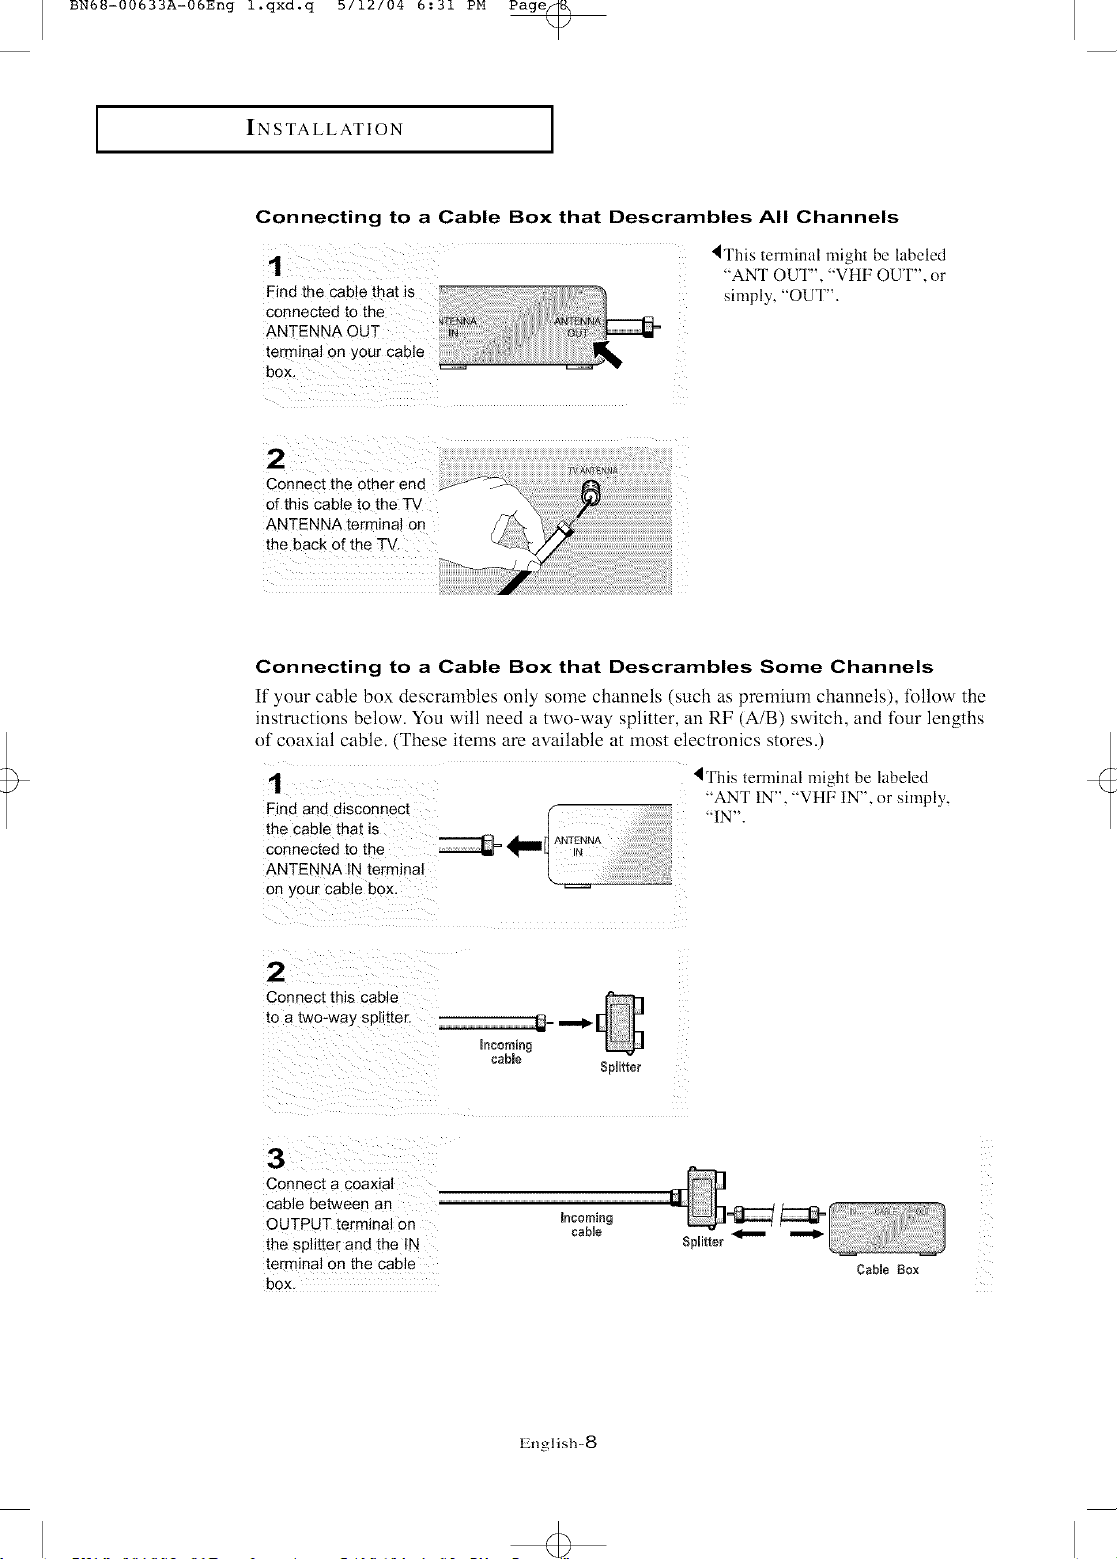
Connecting to a Cable Box that Descrambles All Channels
Find the cabJe that is
connected to the
ANTENNA OUT
termina! on your cable
Z I ZZZ /
Connect the other end
of this cable to the_
ANTENNA termina! on
the back o{ the Tv.
I
4This terminal might be labeled
"ANT OUT", "VHF OUT", or
simply, "OUT".
Connecting to a Cable Box that Descrambles Some Channels
If your cable box descrambles only some channels (such as premium channels), tollow the
instructions below. You will need a two-way splitter, an RF (A/B) switch, and four lengths
of coaxial cable. (These items are available at most eleclronics stores.)
1
Find and disconnect
the cable that is
connected to the
ANTENNA IN terminal
on },our cable box.
2
Connect this cable
to a two-way splitter.
3
Connect a coaxial
cable between an
OUTPUT terminal on
the splitter and the IN
terminal on the cable
box.
Incoming
cable
IThis terminal might be labeled
"ANT IN", "VHF IN", or simply,
"IN".
Cable Box
English-8
BN6_-00633A-06Eng l.qxd.q b/12/04 6:31 PM Page@
I
INSTALLA/I'ION
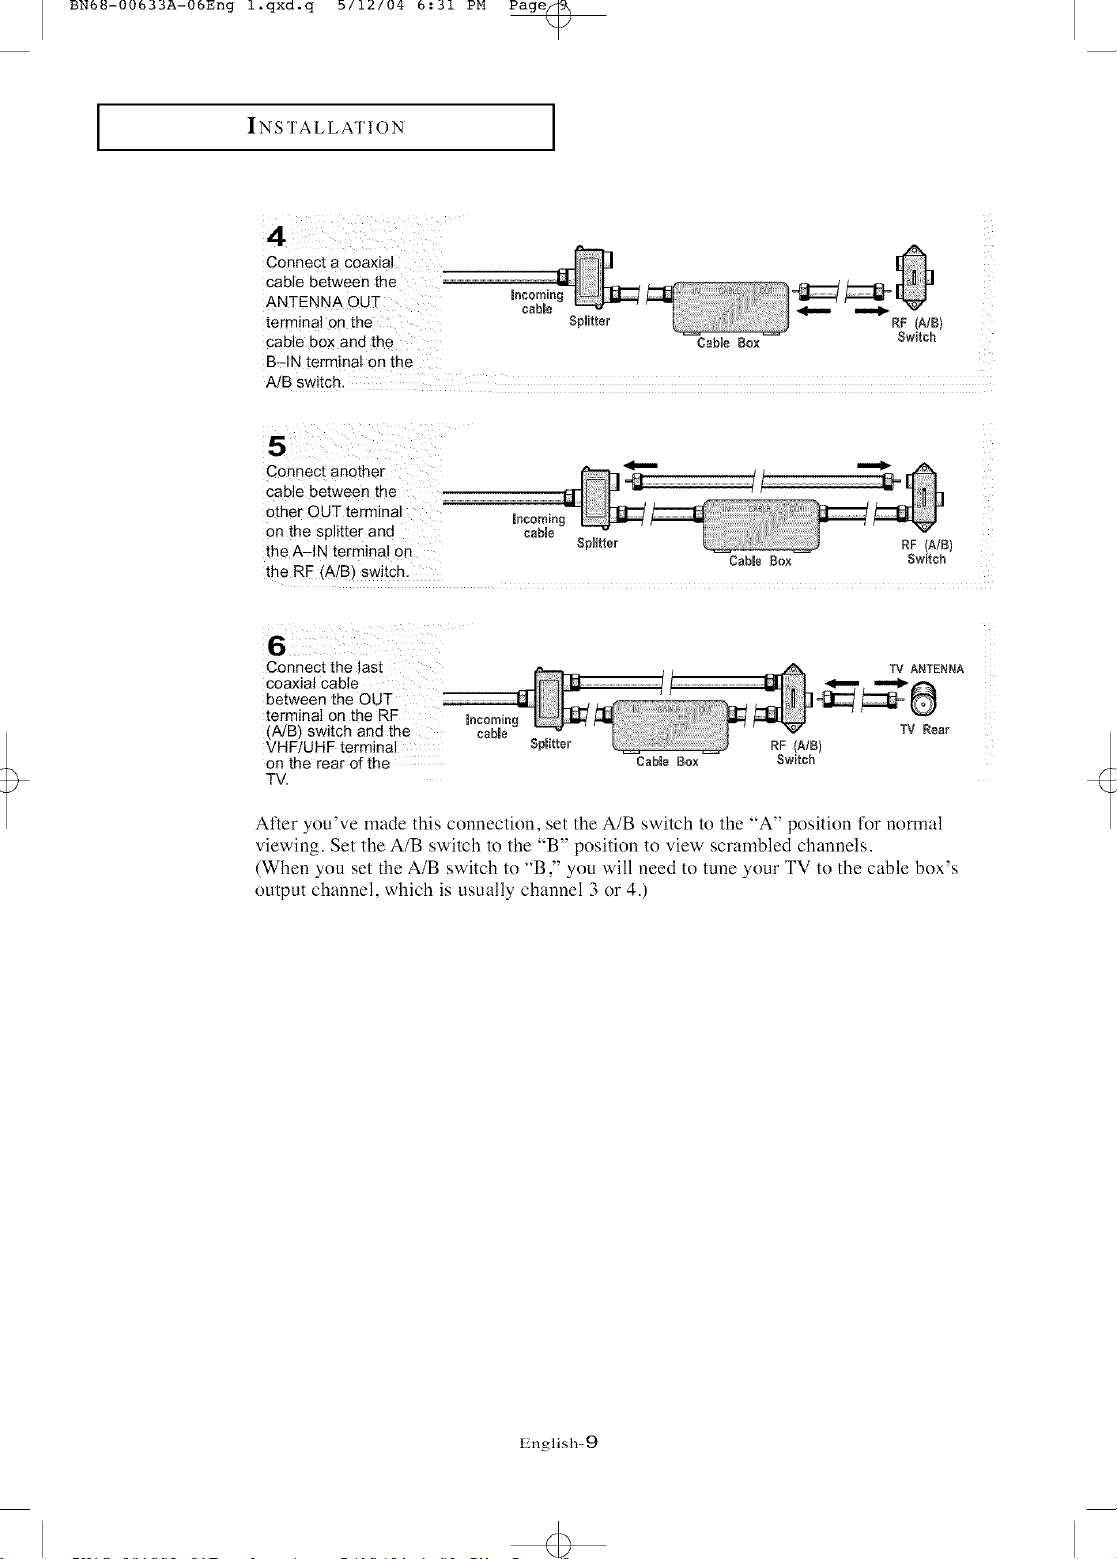
Connect a coaxial
Cable between the ..........................................................-M-41 I_
ANTENNA OUT n_ _
terminal on the SNifter RF (A/B)
cable box and the CaNe Box Switch
B=IN terminal on the
AIB switch.
Connect another _
cable between the
other OUT terminal Incoming
on th e sp!itter and cane
the A-IN terminal on SNitter RF (AIB)
the RF (A/B) switch.
Connect the last
coaxial cable
between the OUT
terminal on the RF macoming
(A/B) switch and the cane
VHF/UHF terminal
on the rear of the
TV.
Splitter
I
Cable Box
Cable Box Switch
TV ANTENNA
' _ TV Rear
RF (AIB)
Switch
After you've made this connection, set the A/B switch to the "A" position for normal
viewing. Set the A/B switch to the "B" position to view scrambled channels.
(When you set the A/B switch to "B ," you will need to tune your TV to the cable box's
output channel, which is usually channel 3 or 4.)
Ignglish-9
BN6U-00633A-06Eng l.qxd.q b/12/04 6:31 PM Page_0
I
IN STALLATION
I
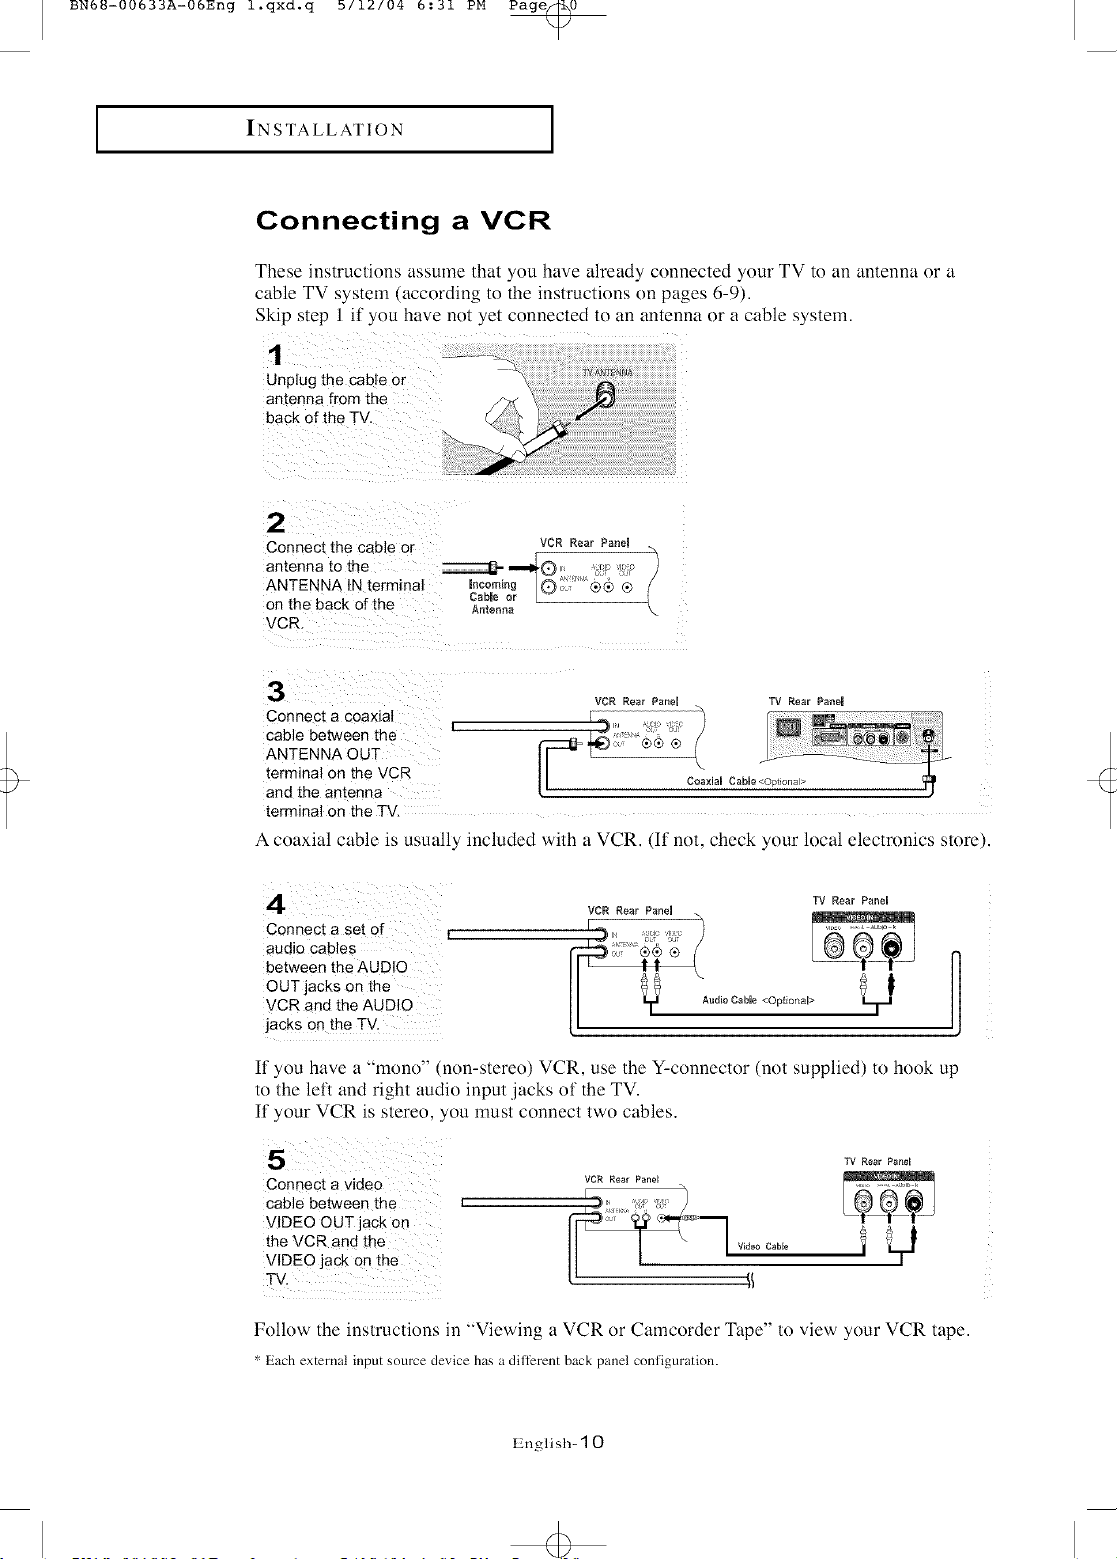
Connecting a VCR
These instructions assmne that you have already connected your TV to an antenna or a
cable TV system (according to the instructions on pages 6-9).
Skip step I if you have not yet connected to an antenna or a cable system.
1
Unplugthe cable or
antenna fromthe
back of the TV.
2
Connect the cable or VCR Rear Panel
amenna to the _ ""_0 . 'c:: ":__ )
ANTENNA IN terminal Incoming O_ "<®4) ® /
on the back of the Antenna
VCR.
3
Connect a coaxial
cable between the
ANTENNA OUT
terminal on the VCR
ane the amenna
terminal on the TV.
A coaxial cable is usually included with a VCR. (Ii not, check your local electronics store).
Cable or L
VCR Rear PaneU TV Rear Panel
Connect a set of L
audiocables L
between theAUDIO
OUT]acks on the
VCR and the AUDIO
jackson the TV,
If you have a "mono" (non-stereo) VCR, use the Y-connector (not supplied) to hook up
to the left and right audio input ,jacks of the TV.
If your VCR is stereo, you must connect two cables.
Connect a video
cable between the
VIDEO OUTjack on
the VCR an d the
VIDEO jack on the
TV,
Folk)w the instructions in "Viewing a VCR or Camcorder Tape" to view your VCR tape.
_:Each external input source device has a ditTerent back panel coniiguration.
English- 10
VCR Rear PaneU m .o,
F
TV Rear PaneH
TV Rear Panel
BN6U-00633A-06Eng l.qxd.q b/12/04 6:31 PM Page_l
I
INSTALLATION
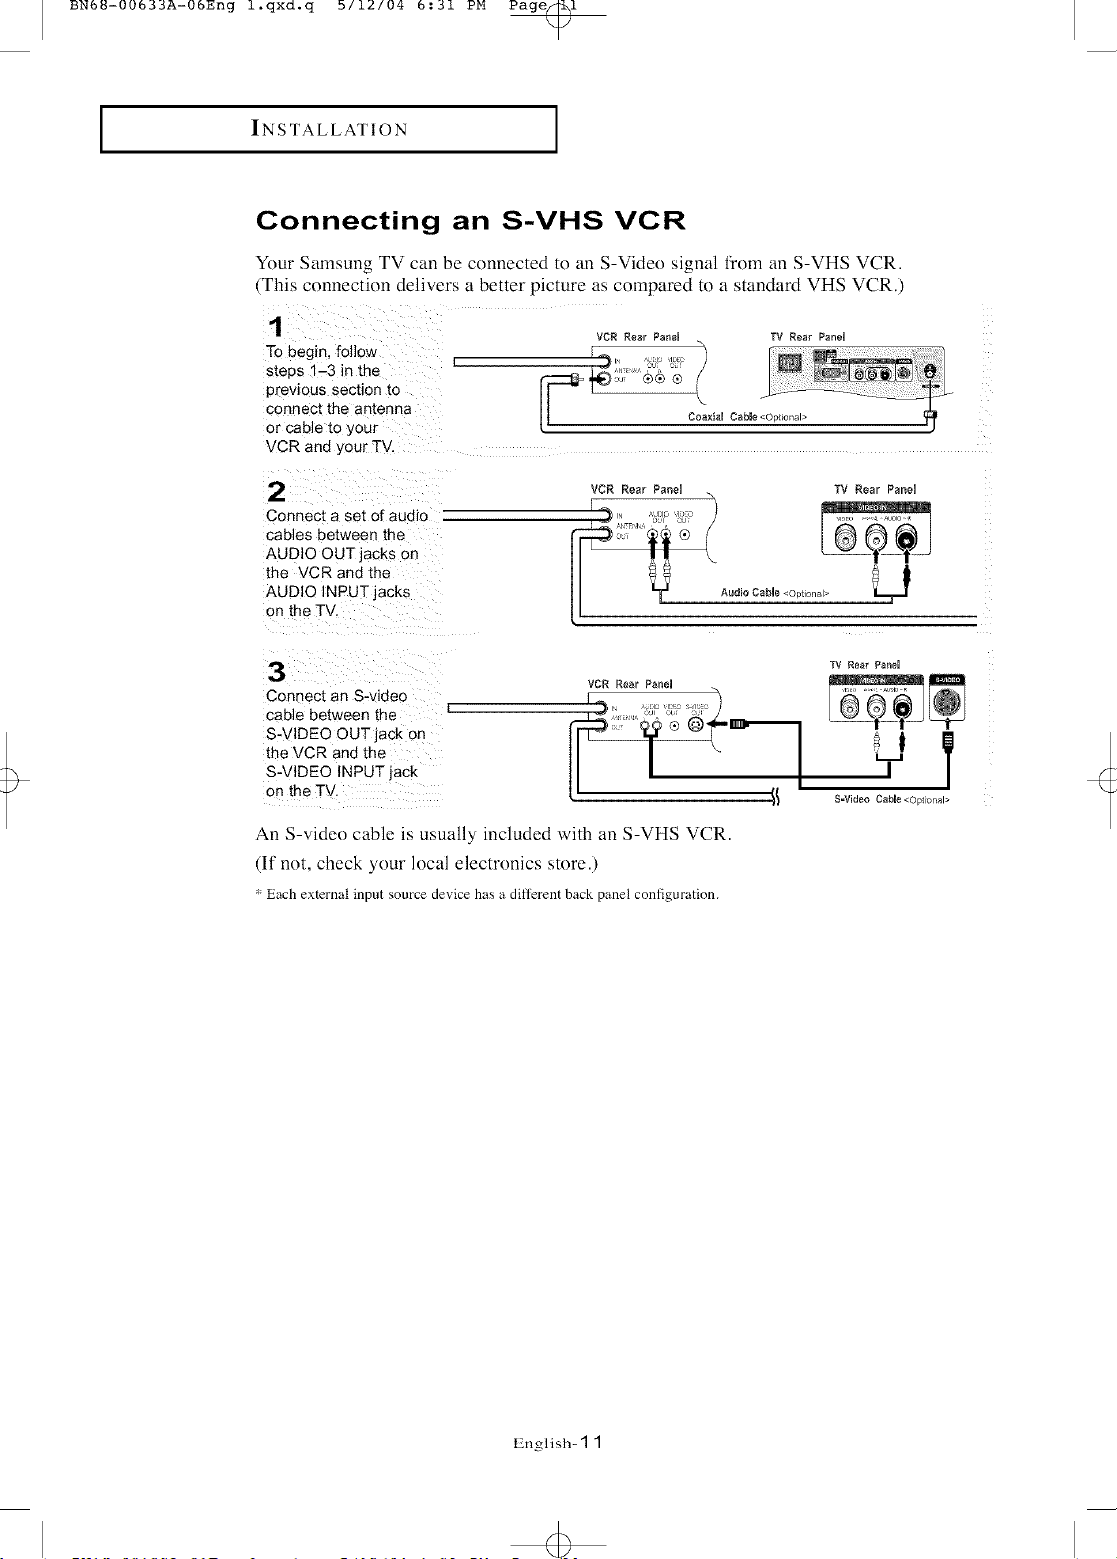
Connecting an S-VHS VCR
Your Samsung TV can be connected to an S-Video signal from an S-VHS VCR.
(This connection delivers a better picture as compared to a standard VHS VCR.)
1
To begin, follow
s[eps "-3 in the
previous secbon to
connect the antenna
or cable to your
VCR and your TV.
2
Connect a set of audio
cables between the
AUDIO OUT jacks on
the VCR and the
AUDIO INPUT jacks
on the TV
3
Connect an S-video
cable between the
S-V DEO OUT jack on
the VCR and the
S-VIDEO INPUTlack
on the TV,
VCR Rear PaneU TV Rear P_neU
!_,, ...... .,0E0
VCR Rear Panel TV Rear Panel
E J_ ol _'u
ii \
TV Rear I_anel
VCR Rear Panel
51
!_ S=Video CaNe <Optional>
/
I
?
An S-video cable is usually included with an S-VHS VCR.
(If not, check your local electronics store.)
Each external input source device has a dillerent back panel configuration.
IZnglish- 1 1
BN6U-00633A-06Eng l.qxd.q b/12/04 6:31 PM Page_2
I
IN STALLATION
I
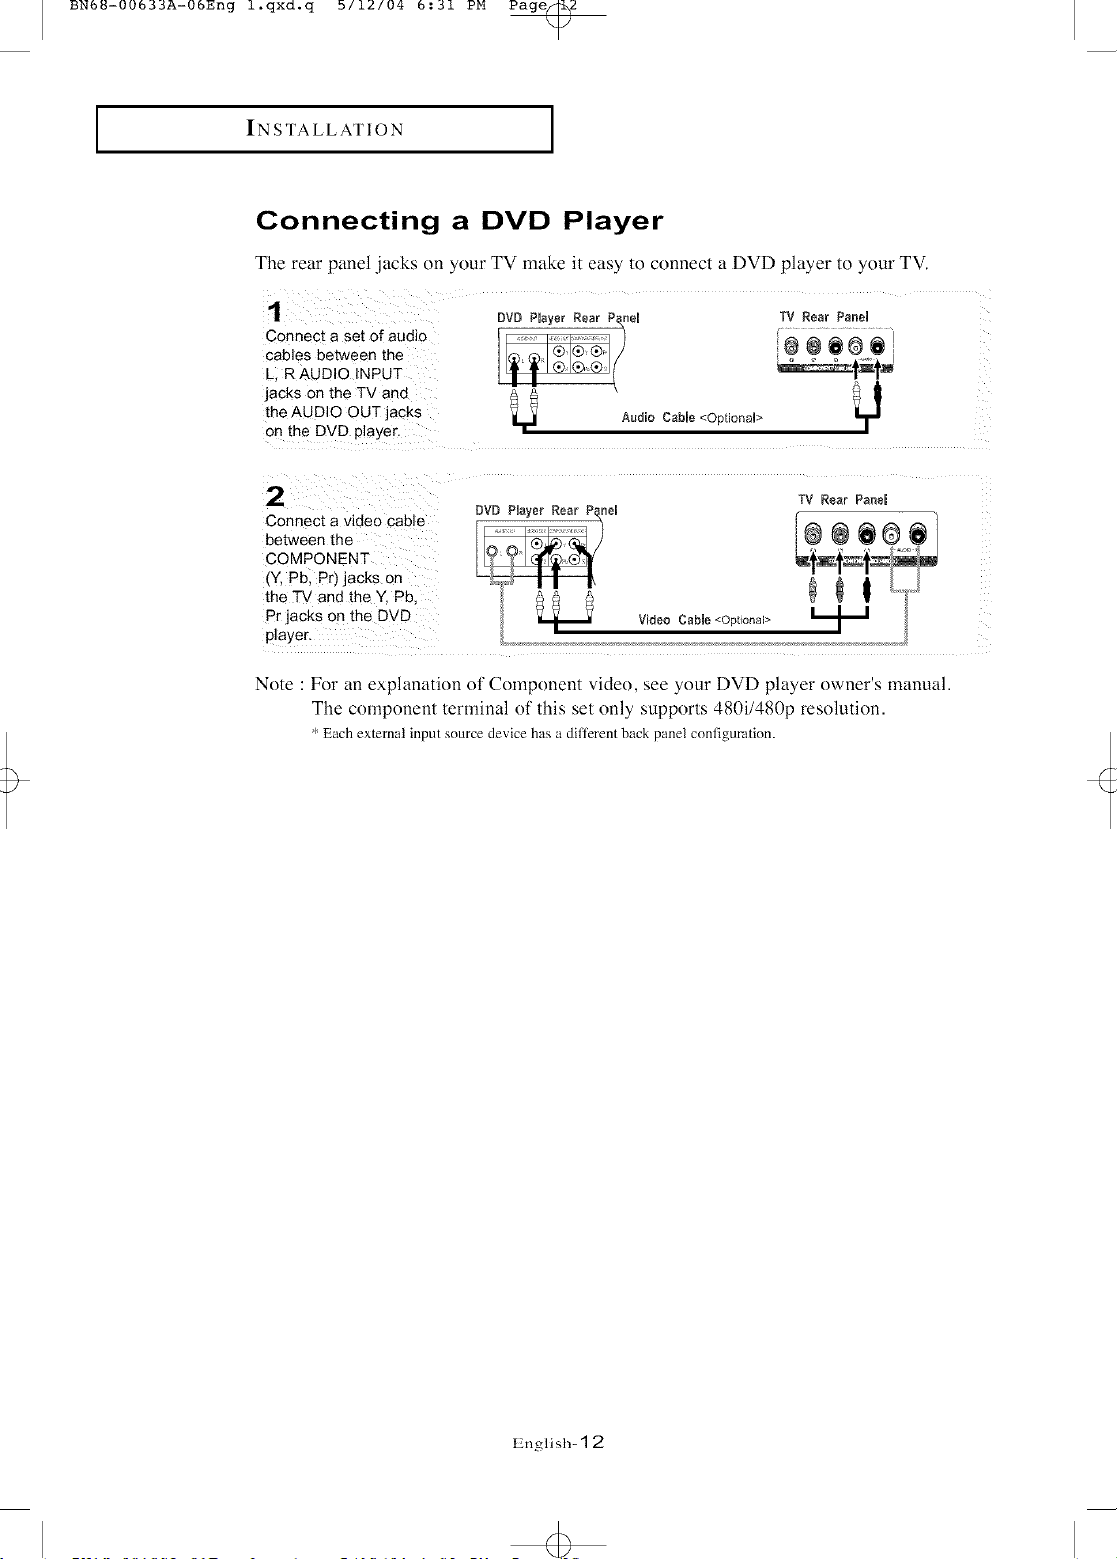
Connecting a DVD Player
The rear panel ,jacks on your TV make it easy to connect a DVD player to your TV.
1
Connect a set of audio
cables between me
_ :>.AUDIO INPUT
jacks on the TV and
the AUDIO OUT acks
on the DVD player.
the TV and lhe Y. Pb(Y'COMPONENTbetweenc°nnec'a videocablepb,pr)thejackson __I¢ ¢ '_' _"_']_ _ 1 _}],l
Pr jacks on the DVD Video Cabme<OptlonN>
player, n }
Note : For an explanation of Component vide(), see your DVD player owner's manual.
The component terminal of this set only supports 480i/480p resolution.
* Each external input source device has a different back panel configuration.
DVD Player Rear P_nN
Audio Cable <OptionN>
TV Rear Penn
®e6® l
TV Rear Panem
12,nglish- 12
BN6_-00633A-06Eng l.qxd.q b/12/04 6:31 PM Page_d
SPECIAL FEATURES
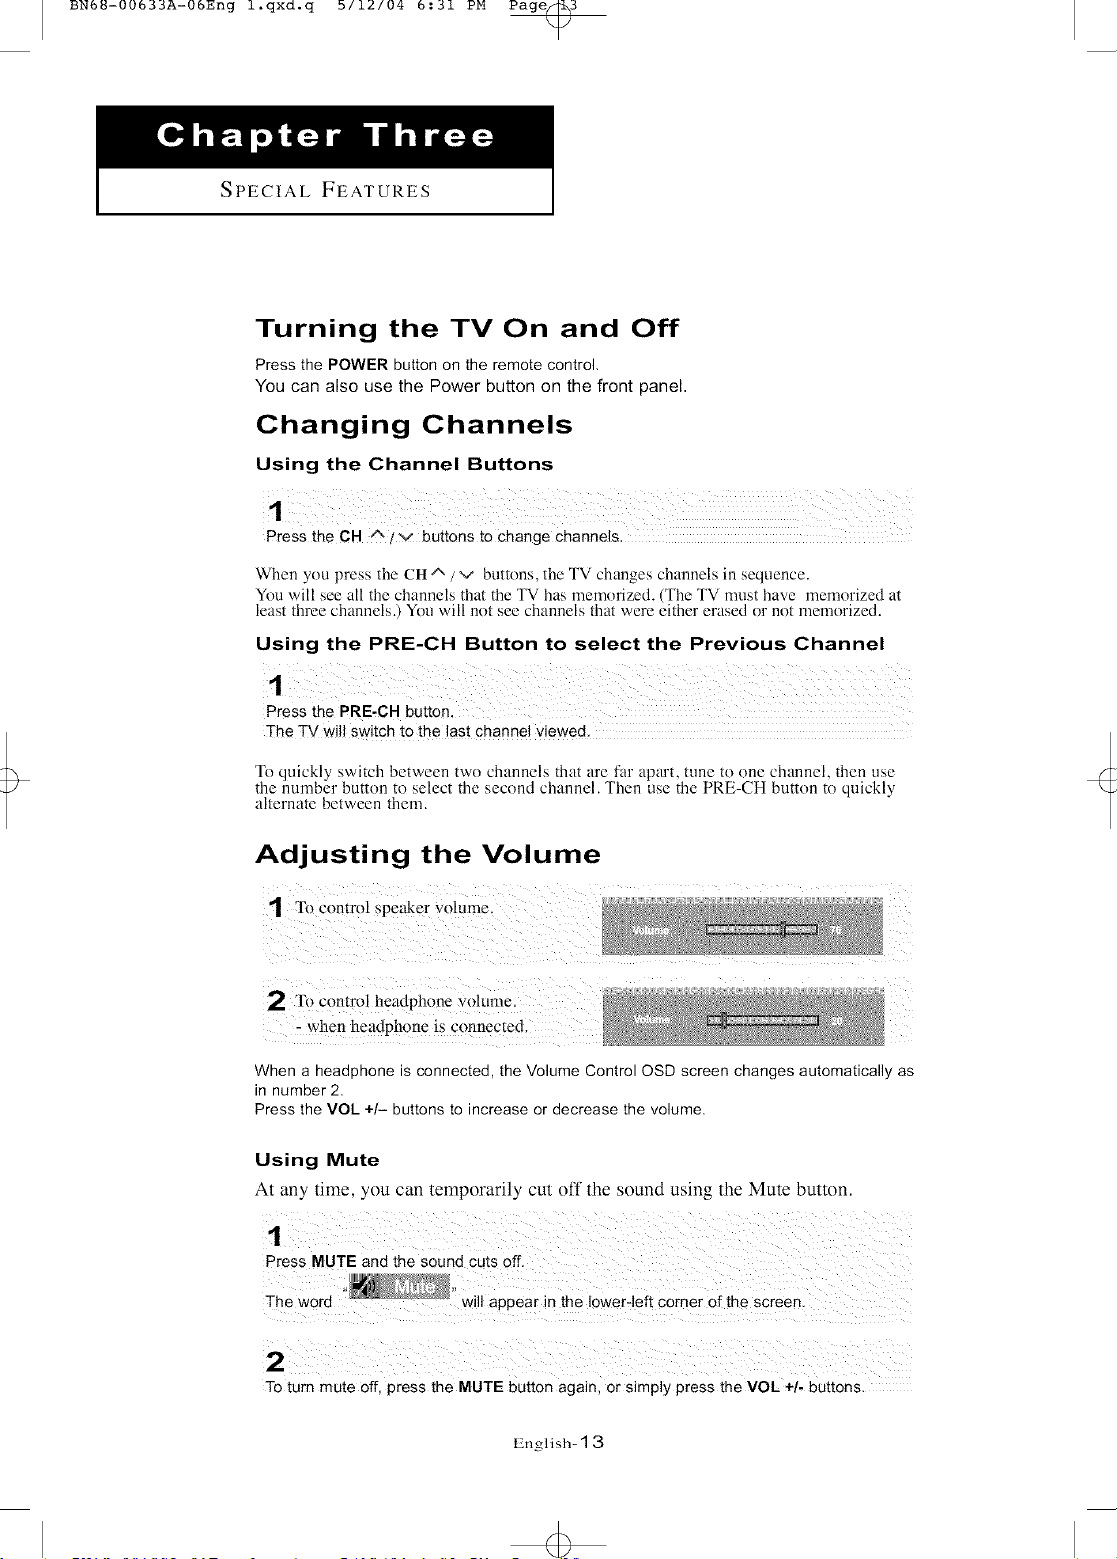
Turning the TV On and Off
Press the POWER button on the remote control,
You can also use the Power button on the front panel.
Changing Channels
Using the Channel Buttons
When you press the CH ^ / v buttons, the TV changes channels in sequence.
You will see all the channels that the TV has nlemorized. (The TV must have menlorized at
least three channels.) You will not see channels that were either erased or not memorized.
Using the PRE-CH Button to select the Previous Channel
The TV will switch to the last channel viewed.
To quickly switch between two channels that are far apart, tune to one channel, then use
the number button to select the second channel. Then use the PRE-CH button to quickly
alternate between them.
Adjusting the Volume
1 To Control Speaker votunie.
When a headphone is connected, the Volume Control OSD screen changes automatically as
in number 2.
Press the VOL +/- buttons to increase or decrease the volume.
Using Mute
At any time, you can temporarily cut off the sound using the Mute button.
To turn mute off, press the MUTE button again, or simply press the VOL +/. buttons.
English- 1 3
BN6_-00633A-06Eng l.qxd.q b/12/04 6:31 PM Page_4
I
SPECIAL FEATURES
I
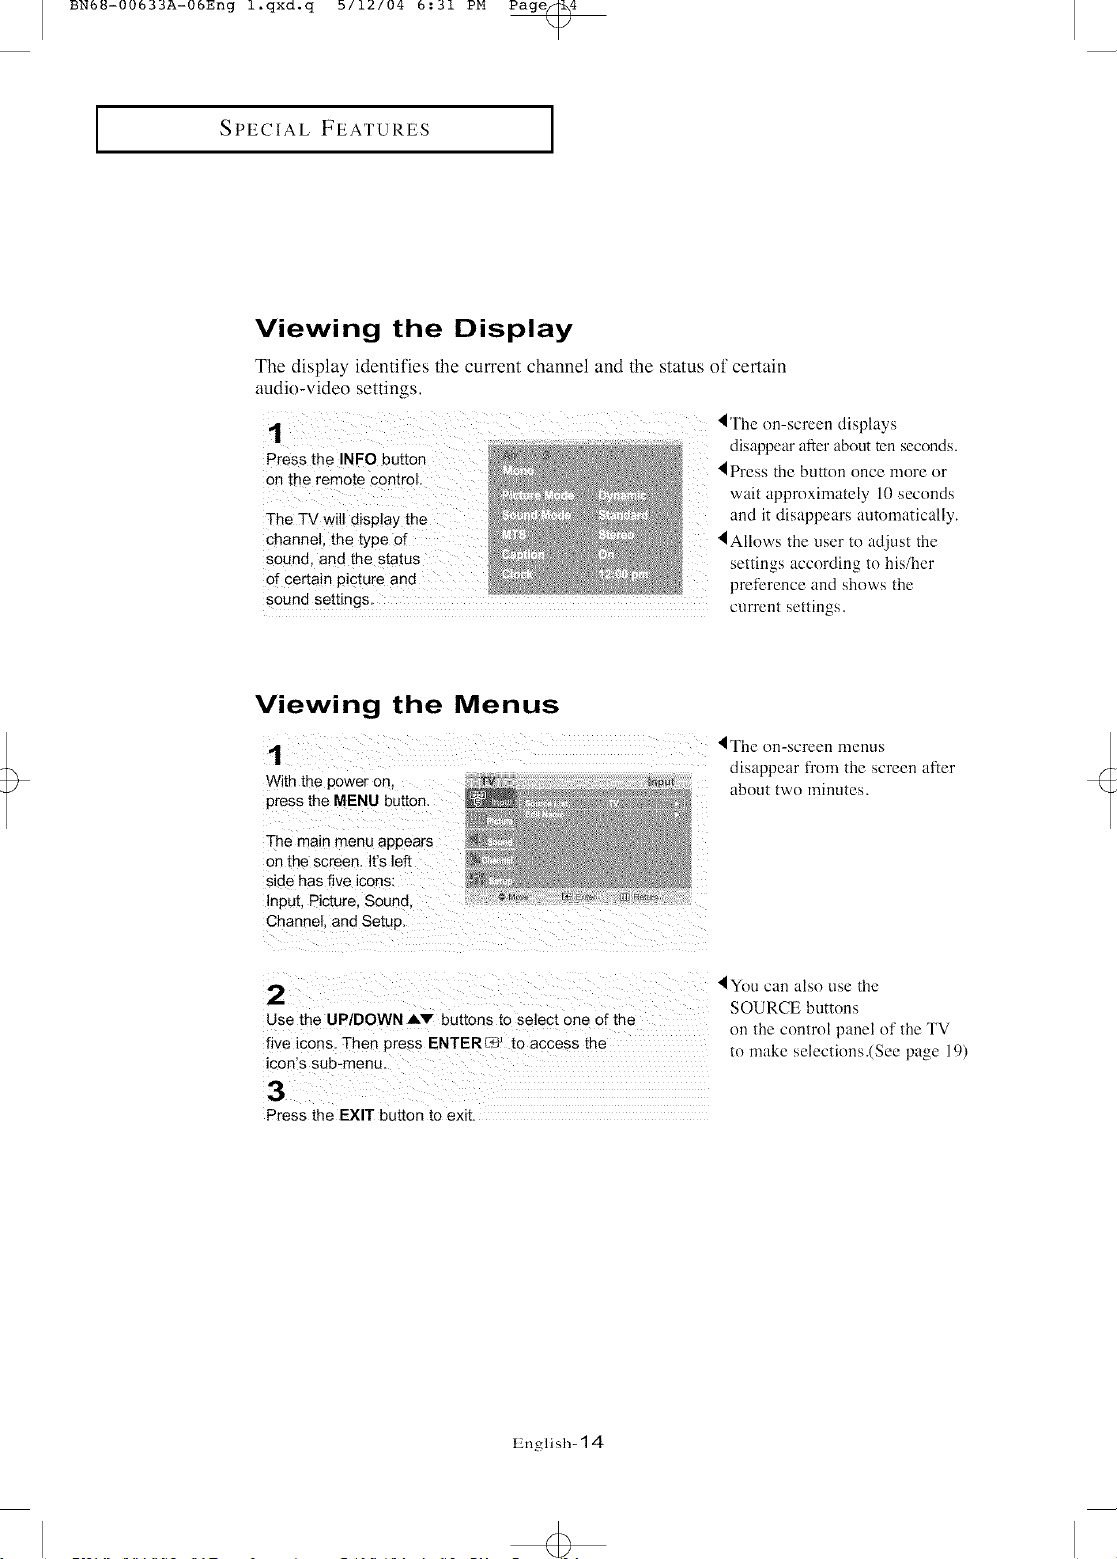
Viewing the Display
The display identifies the current channel and the status of certain
audio-video settings.
4 The on-screen displays
disappear after about ten seconds.
on the remote control.
i
TheTV Will display the
channel, the type of
sound, and the status
of certain picture an d
sound settings, current settings.
4Press the button once more or
wait approximately 10 seconds
and it disappears auton]atically.
IAllows the user to adjust the
settim,s_.accordin_ to his/her
preference and shows the
Viewing the Menus
With the power on, _ in_
press the MENU button, _:_
The main menu appears
on the screen, It's left
side has five icons:
Input, Picture, Sound _ '_ _ _.... _ _o_u
Channel, and Setup,
2
Use the UP/DOWN Aw buttons to select one of the
five icons, Then press ENTERL_ _ to access the
con s sub-menu.
3
Press the EXIT button to exit.
4The on-screen menus
disappear fl'om the screen after
about two minutes.
4You can also use the
SOURCE buttons
on the control panel of the TV
to make selections.(See page 19)
IZnglish- 14
BN6_=00633A=06Eng 2.qxdoq b/12/04 6:22 PM Page_
OPERATION
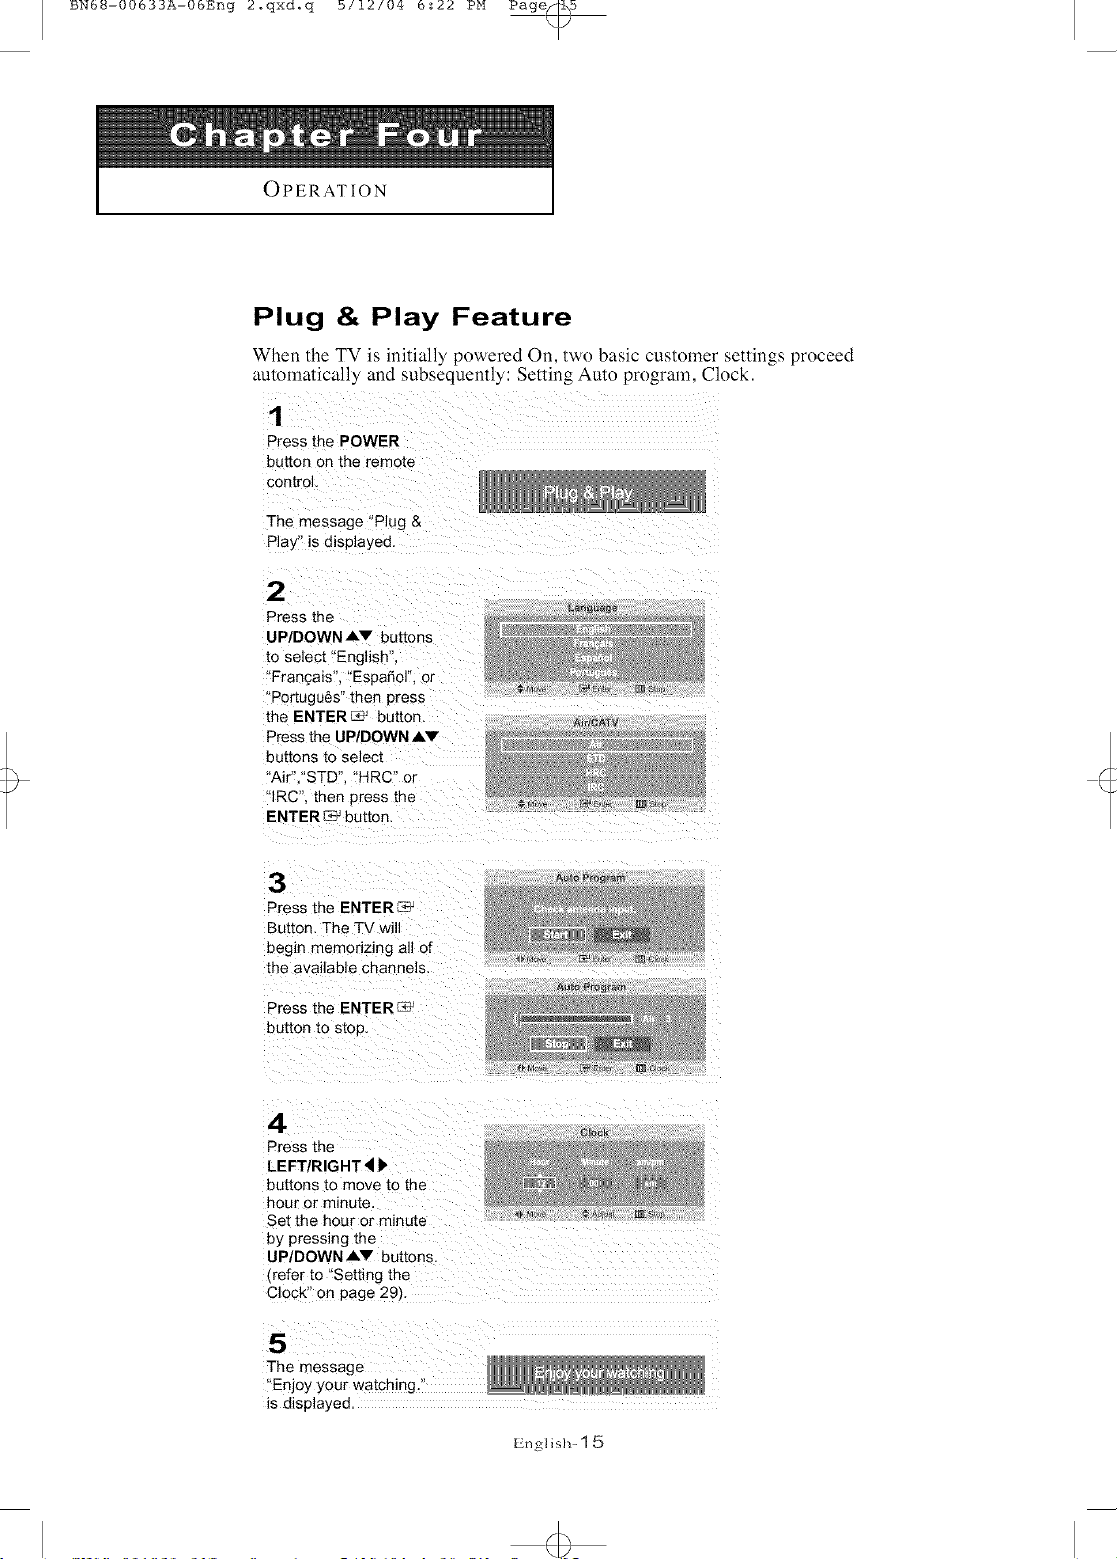
Plug & Play Feature
When lhc TV is initially powered On. two basic cuSlOlYler senings proceed
automalically and subsequently: Selling Auto prograln. Clock.
1
Press the POWER
button on the remote
control,
The message "Plug &
Play" is displayed
2
Press the
UP/DOWN AV buttons
to select "English",
'Frangais, "Espafiol". or
"Portugu6s" then press
the ENTER_ button.
Press the LIP/DOWN AV
buttons to select
"AiP,"STD", 'HRC" or
'IRC", then press the
ENTER _ button,
3
Press the ENTERK4;
Button, The TV will
begin memorizing all of
the available channels,
Press the ENTER
button to stop,
4
Press the
LEFT/RIGHT4
buttons to move to the
hour or minute,
Set the hour or minute
by pressing the
UP/DOWN AV buttons.
frefer to "Setting the
Clock" on page 29/,
La#9_aSe
[m a_u
A_o Pro#fa[#
_v r_
5
The message
"Enjoy your watching."
is displayed.
English- 1 5
BN6B-00633A-06Eng 2.qxd.q b/12/04 5:22 PM Page_6
I
OPERATION
I
Memorizing the Channels
Your TV can memorize and store all of the available channels lk)r both "off-air" (antenna)
and cable channels. A0er the available channels are memorized, use the CH/', and CH v
buttons to scan through the channels. This eliminates the need to change channels by
entering the channel digits. There are three steps for memorizing channels: selecting a
broadcast source, memorizing the channels (automatic) and adding and deleting channels
(manual).
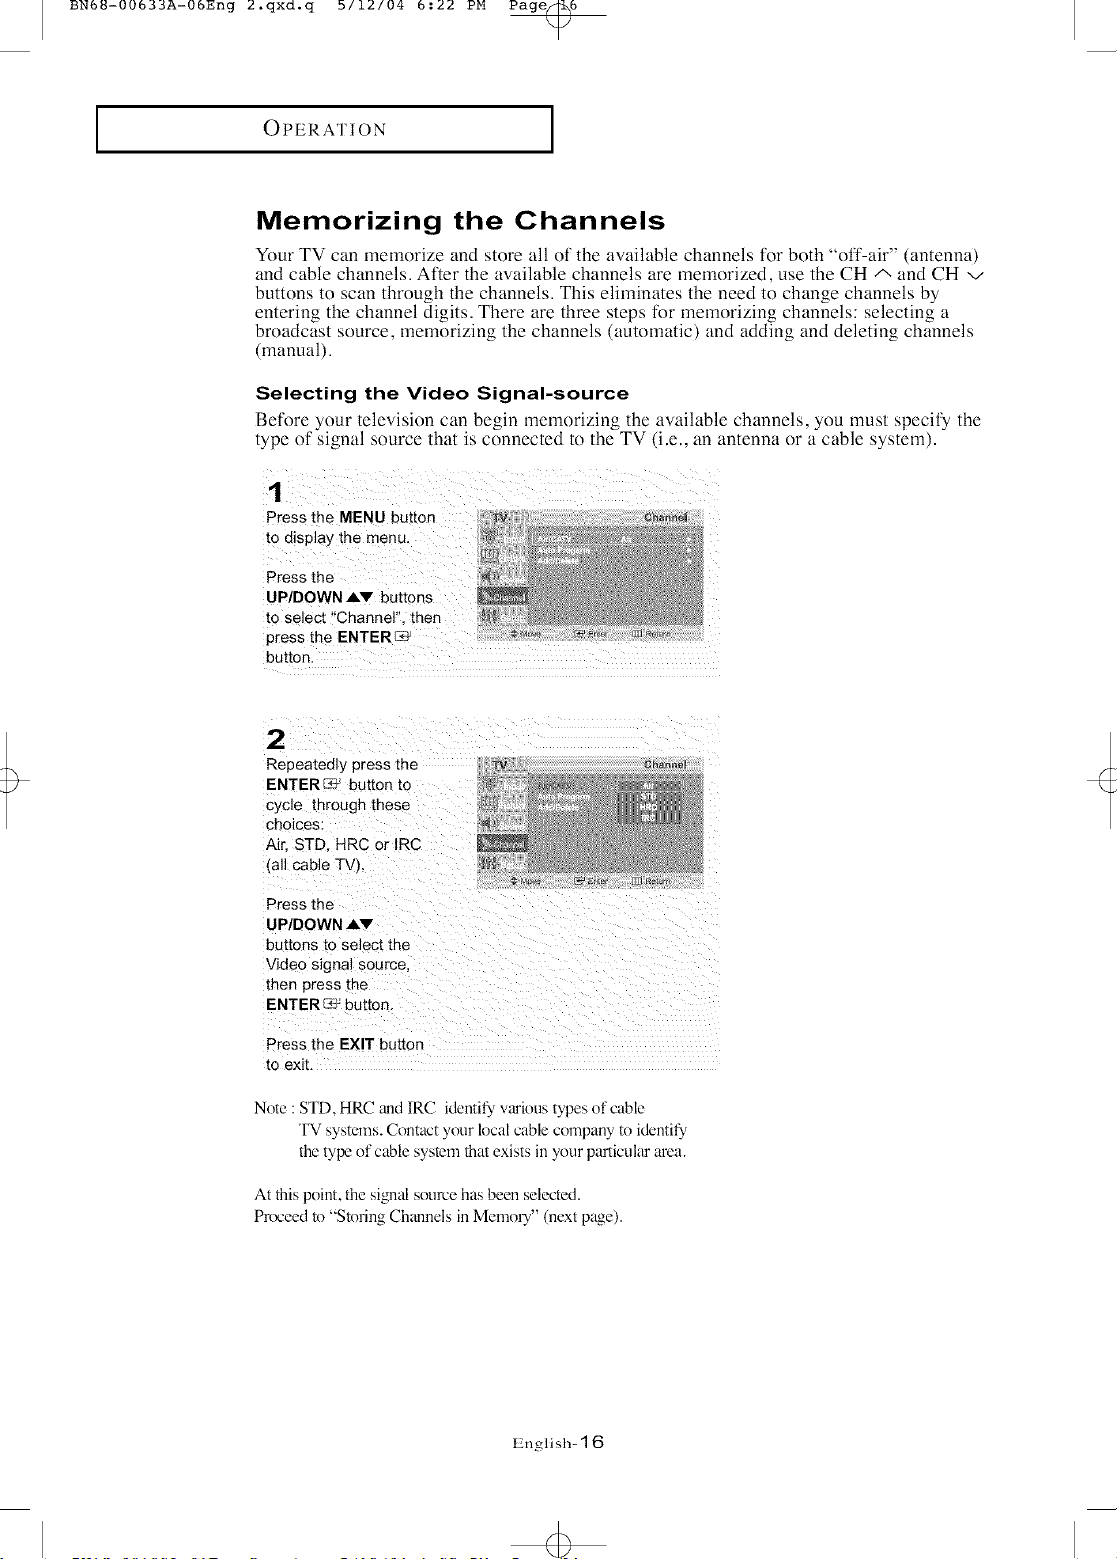
Selecting the Video Signal-source
Before your television can begin memorizing the awdlable channels, you must specify the
type ot signal source that is connected to the TV (i.e., an antenna or a cable system).
Press the MENU button
to display the men u`
Press the
UP/DOWN AV 5uttons
to select _'Channer', then
!i!iii
2
Repeatedly press the
ENTER_ button to
cycle through these
choices:
Air, STD. HRC or IRC
all cable TVL
Press the
UP/DOWN AV
buttons to select the
Video signal source,
then press the
ENTER_ button.
Press the EXIT button
to exit.
Note :STD, HRC _mdIRC identify,various types of cable
TV systems. Contact your local cable company to identify,
the type of cable system that exists in your particular area.
At this point, the signal source has been selected.
Pr(x:eed to "Storing Ch_mnels in Memou" (next page).
Ghanr_J
English- 16
4>
BN6_-00633A-06Eng 2.qxd.q b/12/04 5:22 PM Page@/
I
OPERATION
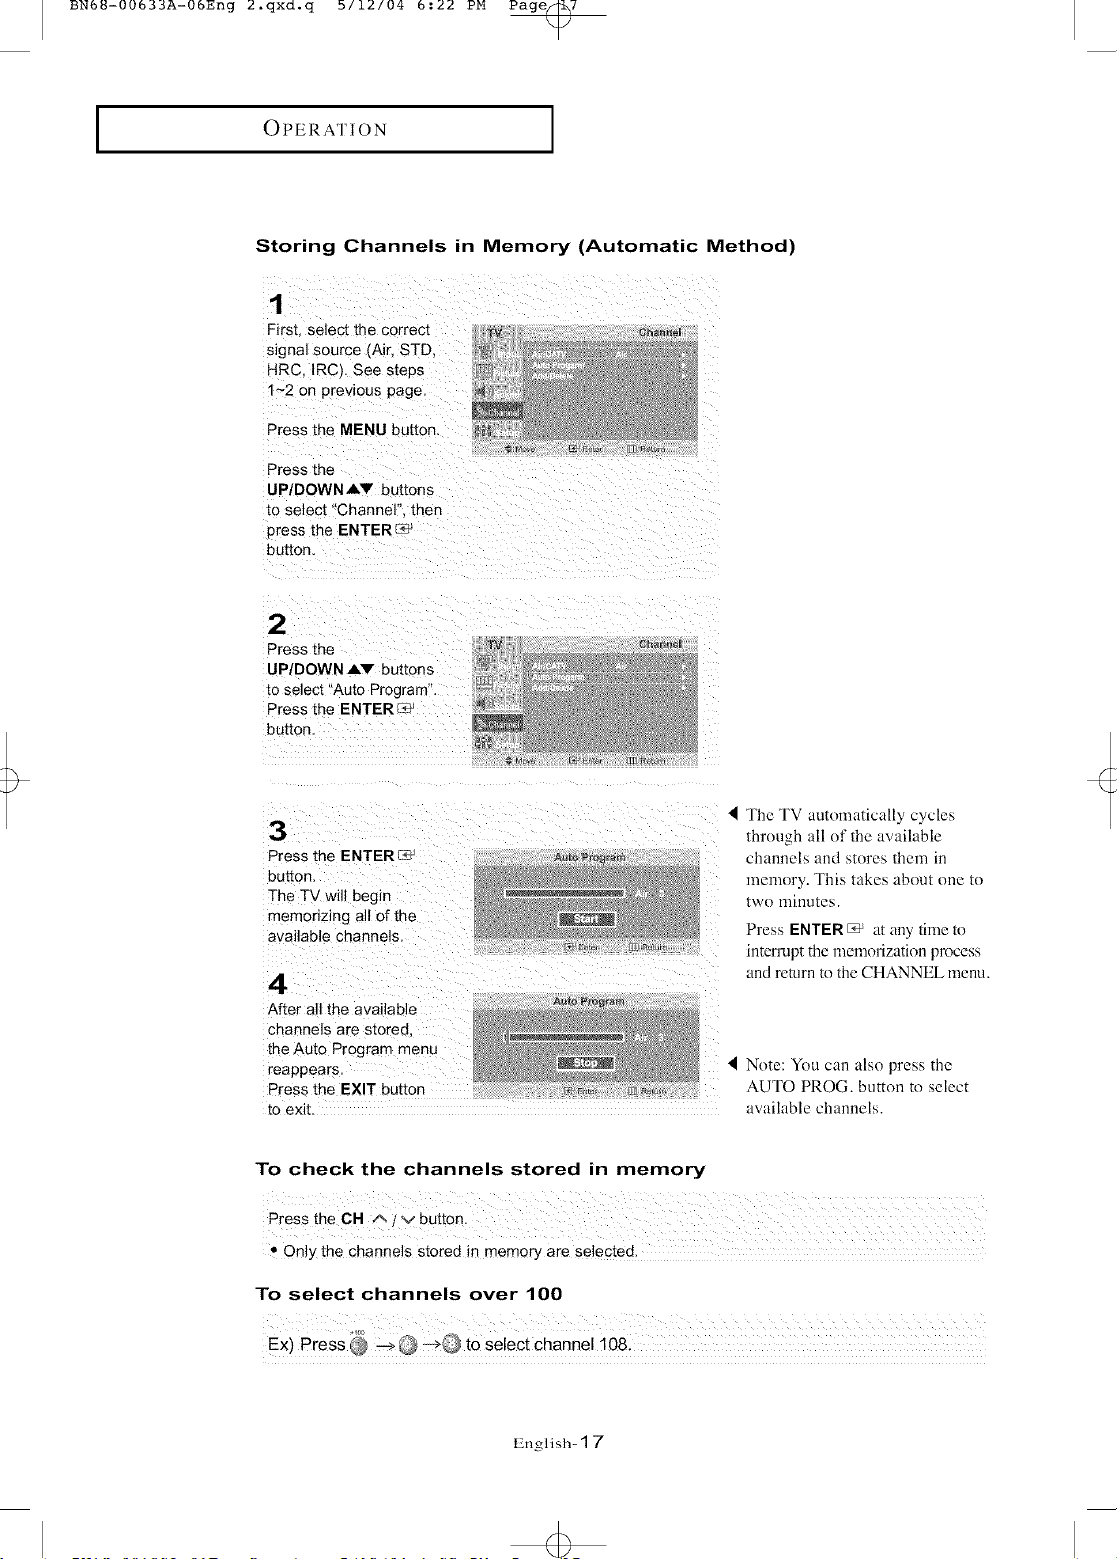
Storing Channels in Memory (Automatic Method)
I
1
First. select the correct W e{_an,e_
signal source (Air, STD, - !_
@
HRcIRC,Seesteps
1~2 on previous page
Press the MENU button
Press the
UP/DOWN AV buttons
to select "Channel". then
Dress the ENTER r_
bu[ton
UP/DOWN AV buttons
[o select "Auto Program".
Press the ENTER
button
3
Press the ENTERL_ j
button
The TV will begin
memonzing all of the
available channels
4
After all the available
channels are stored
the Auto Program menu
reappears
Press the EXIT button
to exit. available channels.
To check the channels stored in memory
" Only the channels stored in memory are selected.
To select channels over 100
4 The TV automatically cycles
through all of the awlilable
channels and stores them in
memory. This takes about one m
[WO llll nufes.
Press ENTER C_ a_ any rune _o
interrupt the memorization process
and return to the CHANNEL menu.
I Note: You can also press the
AUTO PROG. button u_ select
English- 1 7
 Loading...