

Page 1

Contact SAMSUNG WORLDWIDE
If you have any questions or comments relating to Samsung products, please contact the SAMSUNG customer care
center.
Contacte con SAMSUNG WORLD WIDE
Si tiene alguna pregunta o comentario referente a nuestros productos, por favor contacte con nuestro Servicio de Atención
al Cliente
Country
ARGENTINE 0800-333-3733 www.samsung.com
BRAZIL
CHILE 800-SAMSUNG(726-7864) www.samsung.com
COLOMBIA 01-8000112112 www.samsung.com
COSTA RICA 0-800-507-7267 www.samsung.com
ECUADOR 1-800-10-7267 www.samsung.com
EL SALVADOR 800-6225 www.samsung.com
GUATEMALA 1-800-299-0013 www.samsung.com
HONDURAS 800-7919267 www.samsung.com
JAMAICA 1-800-234-7267 www.samsung.com
MEXICO 01-800-SAMSUNG(726-7864) www.samsung.com
NICARAGUA 00-1800-5077267 www.samsung.com
PANAMA 800-7267 www.samsung.com
PUERTO RICO 1-800-682-3180 www.samsung.com
REP. DOMINICA 1-800-751-2676 www.samsung.com
TRINIDAD & TOBAGO 1-800-SAMSUNG(726-7864) www.samsung.com
VENEZUELA 0-800-100-5303 www.samsung.com
Customer Care Center
0800-124-421
4004-0000
www.samsung.com
Web Site
LCD TV
user manual
BN68-02817A-00
imagine the possibilities
Thank you for purchasing this Samsung
product. To receive more complete service,
please register your product at
www.samsung.com/register
Model Serial No.
Page 2

Figures and illustrations in this User Manual are provided for reference only and may differ from actual product appearance.
Product design and specifications may be changed without notice.
Important Warranty Information Regarding Television Format Viewing
See the warranty card for more information on warranty terms.
✎
Wide screen format LCD Displays (16:9, the aspect ratio of the screen width to height) are primarily designed to view wide screen format fullmotion video. The images displayed on them should primarily be in the wide screen 16:9 ratio format, or expanded to fill the screen if your model
offers this feature and the images are constantly moving. Displaying stationary graphics and images on screen, such as the dark sidebars on
nonexpanded standard format television video and programming, should be limited to no more than 5% of the total television viewing per week.
Additionally, viewing other stationary images and text such as stock market reports, video game displays, station logos, web sites or computer
graphics and patterns, should be limited as described above for all televisions. Displaying stationary images that exceed the above guidelines
can cause uneven aging of LCD Displays that leave subtle, but permanent burned-in ghost images in the LCD picture. To avoid this, vary the
programming and images, and primarily display full screen moving images, not stationary patterns or dark bars. On LCD models that offer picture
sizing features, use these controls to view different formats as a full screen picture.
Be careful in the selection and duration of television formats used for viewing. Uneven LCD aging as a result of format selection and use, as well as
burned-in images, are not covered by your Samsung limited warranty.
Still image warning
Avoid displaying still images (like jpeg picture files) or still image element (like TV Program logo, panorama or 4:3 image format, stock or news
bar at screen bottom etc.) on the screen. Constant displaying of still picture can cause uneven wear of screen phosphor, which will affect image
quality. To reduce risk of this effect, please follow below recommendations:
Avoid displaying the same TV channel for long periods.•
Always try do display any image on full screen, use TV set picture format menu for best possible match.•
Reduce brightness and contrast values to minimum required to achieve desired picture quality, exceeded values may speed up the burnout •
process.
Frequently use all TV features designed to reduce image retention and screen burnout, refer to proper user manual section for details.•
Securing the Installation Space
Keep the required distances between the product and other objects (e.g. walls) to ensure proper ventilation.
Failing to do so may result in fire or a problem with the product due to an increase in the internal temperature of the product.
When using a stand or wall-mount, use parts provided by Samsung Electronics only.
✎
If you use parts provided by another manufacturer, it may result in a problem with the product or an injury due to the product falling.
x
The appearance may differ depending on the product.
✎
Installation with a stand. Installation with a wall-mount.
4 inches
4 inches
4 inches
© 2010 Samsung Electronics Co., Ltd. All rights reserved.
English
2
4 inches
4 inches
4 inches
4 inches
Page 3

3
Contents
English
ENGLISH
P . MODES.MODEP . SIZE
Getting Started
List of Features y ......................................................... 4
Accessories y .............................................................. 4
Viewing the Control Panel y ......................................... 4
Viewing the Remote Control y ...................................... 5
Connecting to an Antenna y ........................................ 6
Plug & Play (Initial Setup) y ........................................... 6
Connections
Connecting to an AV Device (LN26C350 / LN32C350) y 7
Connecting to an Audio Device (LN26C350 / y
LN32C350) ............................................................... 8
Connecting to a PC (LN26C350 / LN32C350) y .......... 8
Connecting to an AV Device y
(LN19C350 / LN22C350) ......................................... 9
Connecting to an Audio Device (LN19C350 / y
LN22C350) ............................................................. 10
Connecting to a PC (LN19C350 / LN22C350) y ........ 10
Changing the Input source y ...................................... 11
Basic Features
How to Navigate Menus y .......................................... 12
Channel Menu y ........................................................ 12
Memorizing channels 12
Other Features 13
Picture Menu y .......................................................... 13
Changing the Preset Picture Mode 13
Adjusting picture settings 13
Changing the Picture Options 13
Setting up the TV with your PC 15
Sound Menu y ........................................................... 16
Changing the Preset Sound Mode 16
Adjusting sound settings 16
Sound Systems, Etc. 16
Setup Menu y ............................................................ 16
Setting the Time 16
Using the Sleep Timer 16
Setting the On/Off Time 17
Locking Programs 17
Other Features 17
Picture In Picture (PIP) 18
Advanced Features
Media Play y .............................................................. 19
Connecting a USB Device 19
Other Information
Installing the Wall Mount y ......................................... 23
To avoid the TV from falling 24
Anti-theft Kensington Lock y ...................................... 24
Troubleshooting y ......................................................25
Specifications y ......................................................... 28
License 28
Index y ...................................................................... 29
Check the Symbol!
t
This function can be used by pressing the
TOOLS button on the remote control.
✎
Note:
Important information
Informs you how to access the menu.
O
Step by step guide:
Page 4
Getting Started
List of Features
Excellent Digital Interface & Networking: With a built-in HD digital tuner, nonsubscription HD broadcasts can be viewed y
without a cable box / STB (Set-Top-Box) satellite receiver.
Media Play y : Allows you to play some music files, pictures, and movies saved on a USB device. (P. 19)
Accessories
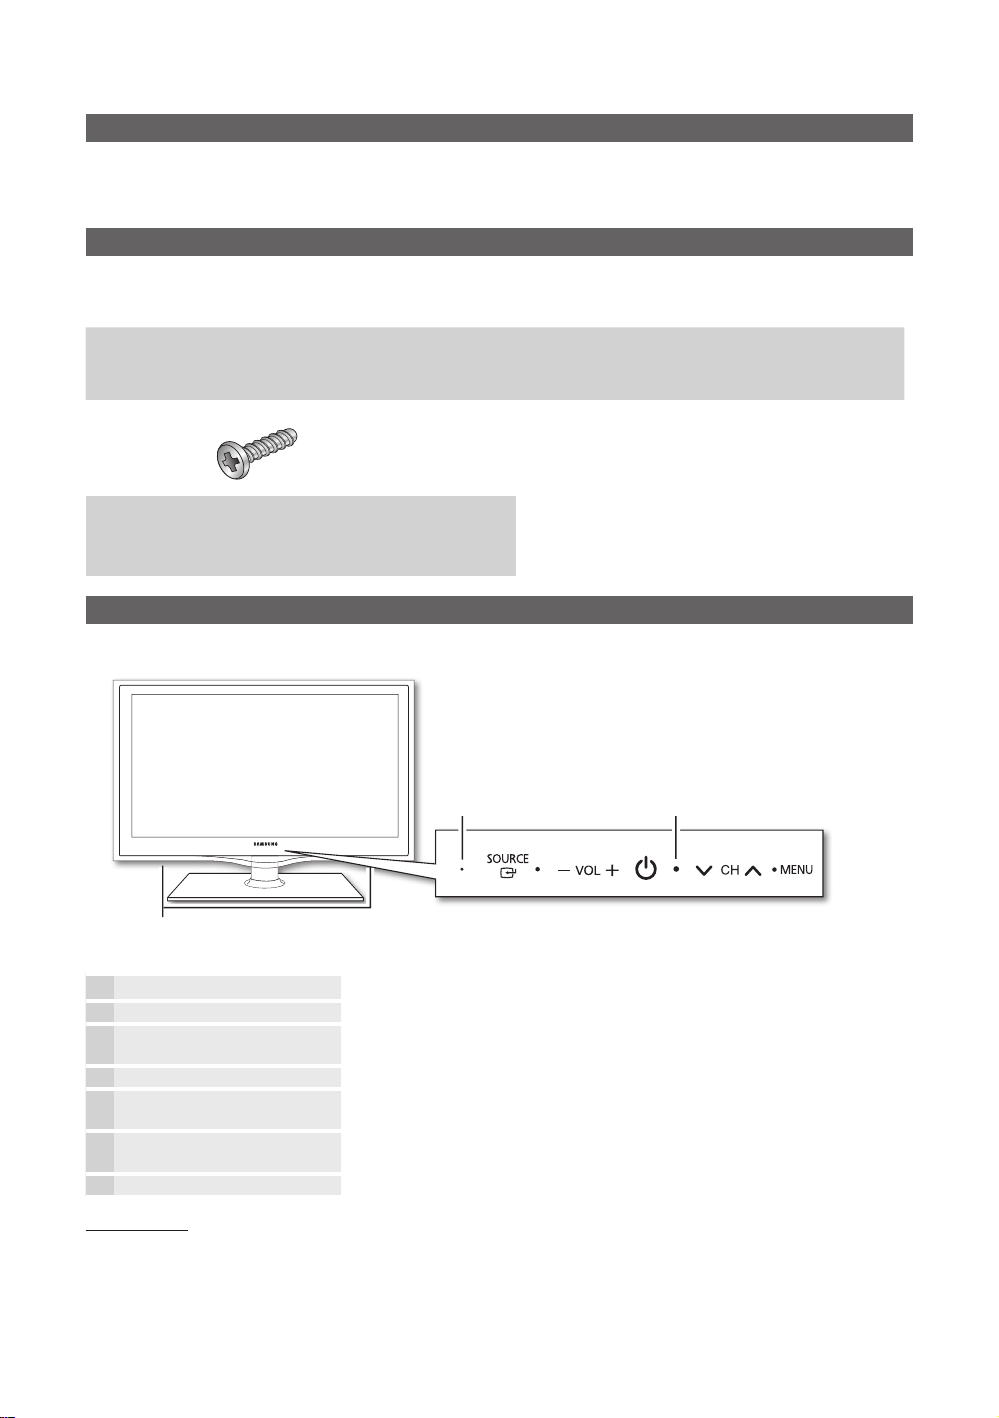
Please make sure the following items are included with your LCD TV. If any items are missing, contact your dealer.
✎
The items' colors and shapes may vary depending on the models.
✎
Remote Control & Batteries (AAA x 2) (Not available in some locations.) y
Owner’s Instructions y
Warranty Card / Safety Guide (Not available in some locations.) y
(M4 X L16)
Screws LN19C350 / LN22C350 : 2EA y
LN26C350 / LN32C350 : 3EA
For more detailed information, please refer to stand guide.
✎
Viewing the Control Panel
The product color and shape may vary depending on the model.
✎
Cleaning Cloth y
Power Cord (LN19C350 / LN22C350) y
Power IndicatorRemote control sensor
Speakers
P
(Power)
Remote control sensor Aim the remote control towards this spot on the TV.
SOURCE
E
MENU Displays an on-screen menu, the OSD (on screen display), of your TV’s features.
y
z
Power Indicator Blinks and turns off when the power is on and lights up in standby mode.
Standby mode
Do not leave your TV in standby mode for long periods of time (when you are away on a holiday, for example). A small amount
of electric power is still consumed even when the power button is turned off. It is best to unplug the power code.
English
4
Turns the TV on or off.
Toggles between all the available input sources. In the on-screen menu, use this
button as you would use the ENTERE button on the remote control.
Adjusts the volume. In the OSD, use the
◄ and ► buttons on the remote control.
Changes the channels. In the OSD, use the
▼ and ▲ buttons on the remote control.
y
z
buttons as you would use the
buttons as you would use the
Page 5

5
01 Getting Started
English
Viewing the Remote Control
ABC D
Turn the TV on and off.
Press to directly access to channels.
Not available.
Adjust the volume.
Displays channel list on the screen. (P. 12)
Views Media Play. (P. 19)
Quickly select frequently used functions.
Selects the on-screen menu items and
change menu values.
Returns to the previous menu.
Displays and selects the available video
sources. (P. 11)
Returns to the previous channel.
Cuts off the sound temporarily.
Changes channels.
Display the main on-screen menu.
Select the HDMI mode directly.
Press to display information on the TV screen.
Exits the menu.
Buttons in Media Play menu, etc.
FAV.CH: Display Favorite Channel Lists on the
screen. (Not available)
P.SIZE: Choose the picture size. (P. 14)
P.MODE: Select picture mode. (P. 13)
Installing batteries (Battery size: AAA)
NOTE
✎
Use the remote control within 23 feet from the TV.
x
Bright light may affect the performance of the remote
x
control. Avoid using nearby special fluorescent light or neon
signs.
The color and shape may vary depending on the model.
x
Page 6
Getting Started
P
POWER
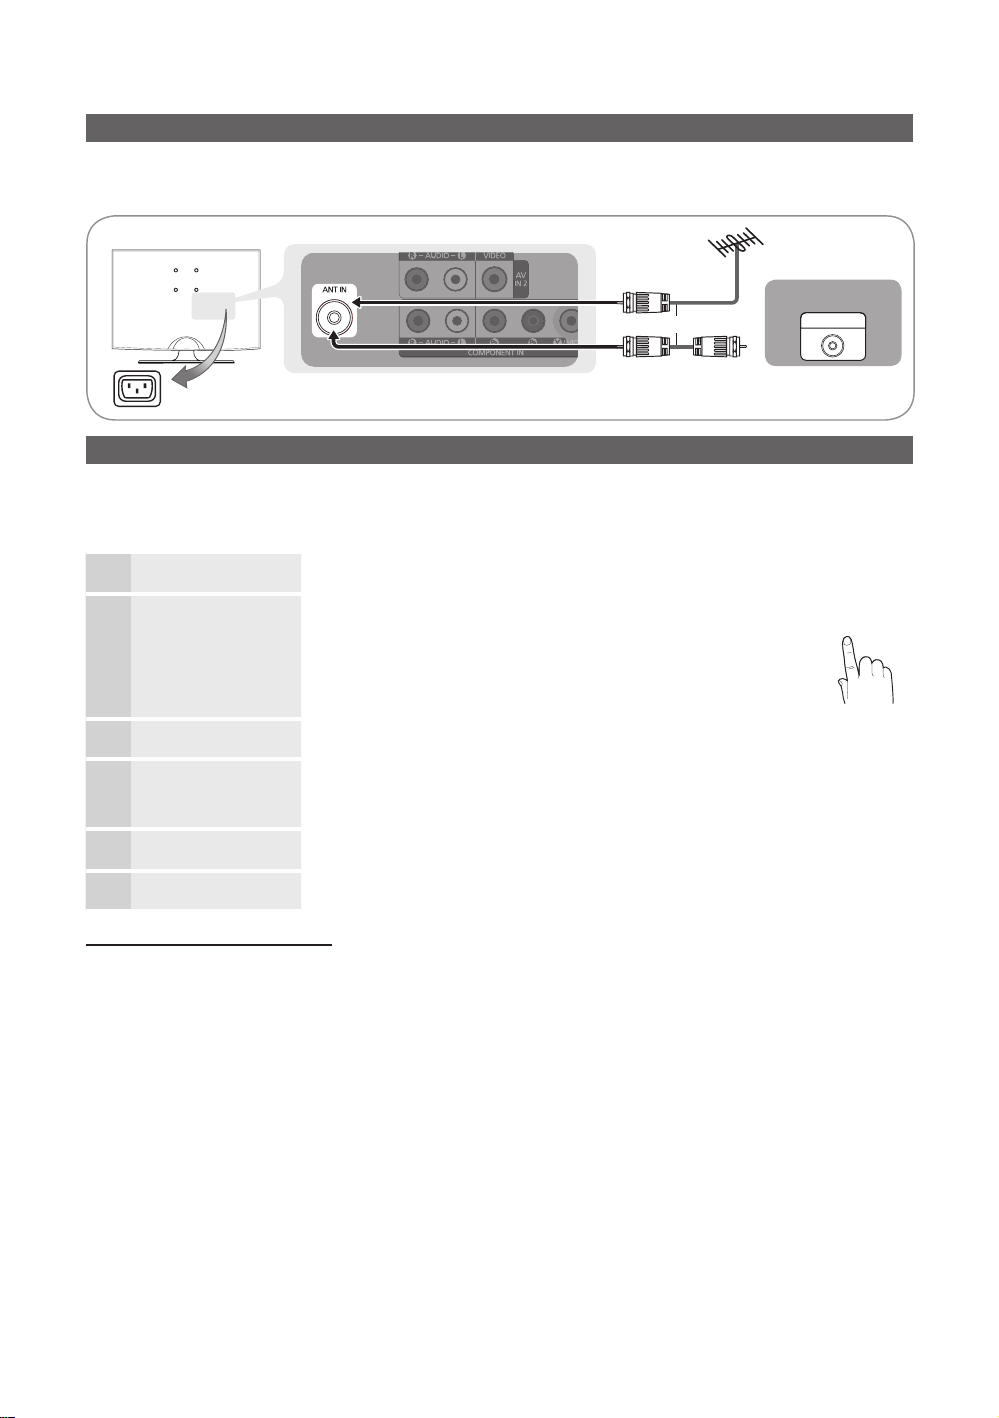
Connecting to an Antenna
When the TV is initially powered on, basic settings proceed automatically.
Connecting the power cord and antenna.
✎
VHF/UHF Antenna
Cable
or
Power Input
Plug & Play (Initial Setup)
When the TV is initially powered on, a sequence of on-screen prompts will assist in configuring basic settings. Press the
POWERP button. Plug & Play is available only when the Input source is set to TV.
To return previous step, press the red button.
✎
Selecting a language
1
Selecting Store Demo
2
or Home Use
Selecting an antenna
Press the ▲ or ▼ button, then press the ENTERE button.
Select the desired OSD (On Screen Display) language.
Press the ◄ or ► button, then press the ENTERE button.
Select the y Home Use mode. Store Demo Mode is for retail
environments.
Return the unit’s settings from y Store Demo to Home Use
(standard): Press the volume button on the TV. When you see the
volume in the OSD, press and hold MENU for 5 sec.
Press the ▲ or ▼ button, then press the ENTERE button. Select Air, STD, HRC or IRC.
ANT OUT
3
Selecting a channel
4
Setting the clock
5
Enjoy your TV.
Press the ENTERE button to select Start. The channel search will start automatically.
For more information, refer to Channel → Auto Program. (p.13)
Press the ✎ENTERE button at any time to interrupt the memorization process.
Press the ◄ or ► button to select Day, Month, Year, Hour, Minute or am/pm.
Set these by pressing the ▲ or ▼ button.
Press the ENTERE button.
6
If You Want to Reset This Feature...
O m
6
MENU
English
→ Setup → Plug & Play → ENTER
E
Page 7
Connections
W W
BGRRWY
P
R PB Y
R-AUDIO-L
P
R PB Y
R-AUDIO-L
P
R PB Y
W
Y
R
R
R
B
B
W
WRR
W
G
G
R
Y
W
R
W W
BGRR
R-AUDIO-L
P
R PB Y
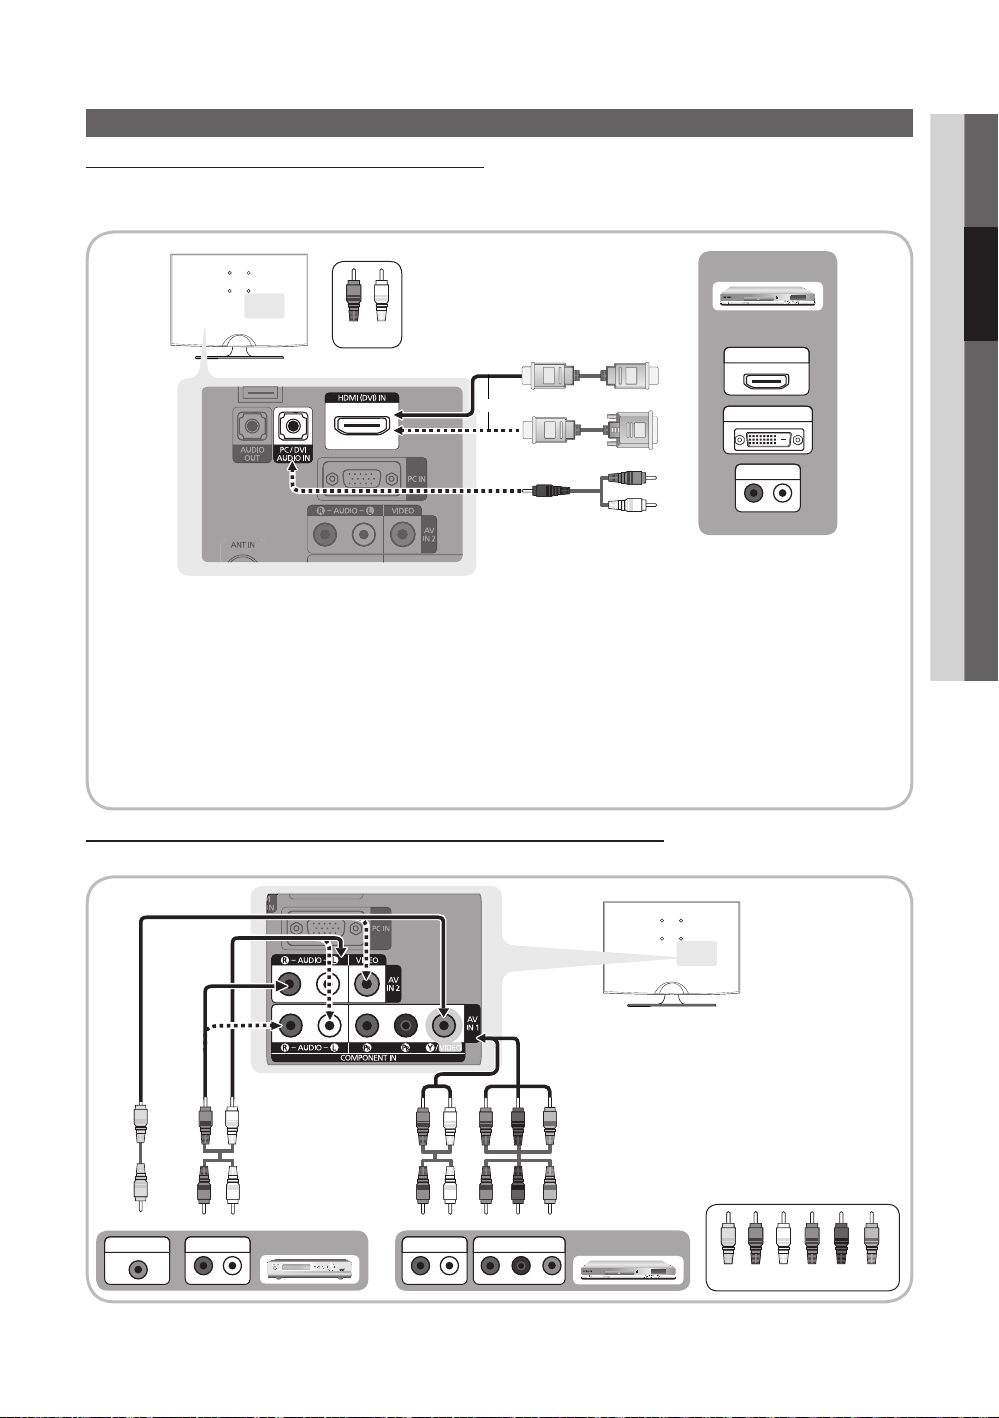
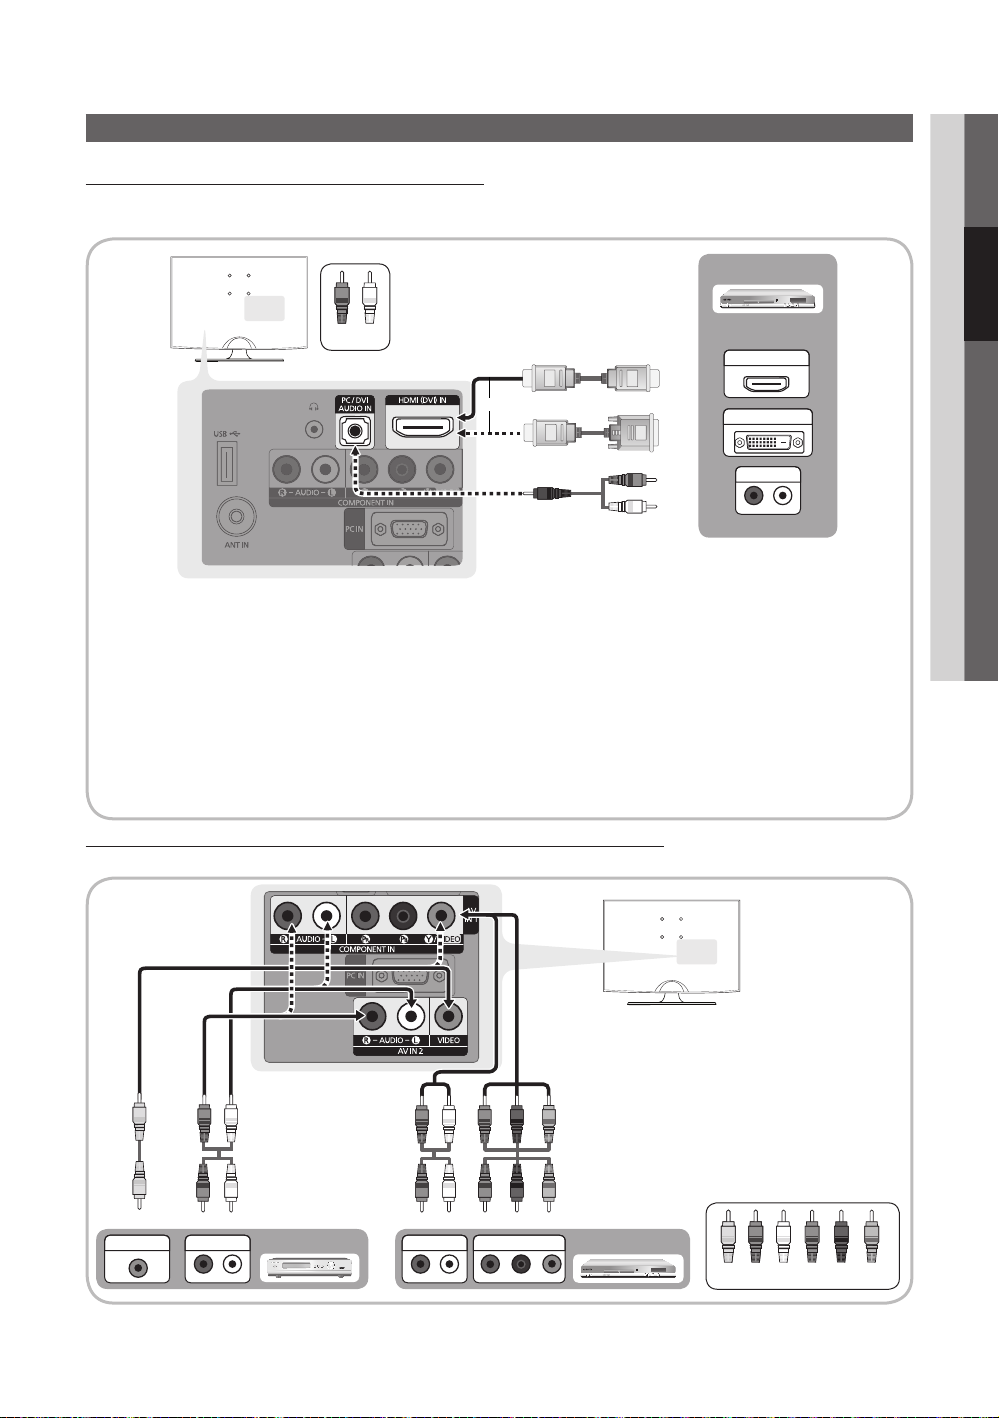
Connecting to an AV Device (LN26C350 / LN32C350)
Using an HDMI / DVI Cable: HD connection (up to 1080p)
We recommend using the HDMI connection for the best quality HD picture. Available devices: DVD, Blu-ray player, HD cable
box, HD satellite receiver (STB).
DVD
Red White
HDMI OUT
02 Connections
or
HDMI(DVI )IN ✎/ PC/DVI AUDIO IN
When using an HDMI/DVI cable connection, you must use the xHDMI DVI (IN) jack for video. A DVD, Blu-ray
player, HD cable box, HD STB satellite receiver, cable box, or STB satellite receiver may require a DVI-HDMI (DVI
to HDMI) cable or DVI-HDMI (DVI to HDMI) adapter. The PC/DVI AUDIO IN jack is required for audio.
If an external device such as a DVD / Blu-ray player / cable box / satellite receiver (Set-Top Box) supporting a
x
HDMI versions older than 1.3 is connected, the TV may operate abnormally (e.g. no screen display / no sound /
annoying flicker abnormal Color).
If there is no sound after connecting an HDMI cable, check the HDMI version of the external device. If you
x
suspect the version is older than 1.3, contact the provider of the corresponding device to confirm the HDMI
version and request an upgrade.
It is recommended you purchase an HDMI-certified cable. Otherwise, the screen may appear blank or a
x
connection error may occur.
Using a Component Cable: (up to 1080p), Using an Audio / Video Cable: (480i only)
Available devices: VCR, DVD, Blu-ray player, cable box, STB satellite receiver
DVI OUT
AUDIO OUT
VIDEO OUT
When connecting to AV IN 1, the
✎
color of the AV IN 1 [Y/VIDEO] jack
(Green) does not match the color of
the video cable (Yellow).
For better picture quality, the
✎
Component connection is
recommended over the A/V
connection.
AUDIO OUT
VCR
AUDIO OUT
COMPONENT OUT
Blu-ray player
Yellow Red White Red Blue Green
English
7
Page 8
Connections
W R
R-AUDIO-L
P
R PB Y
W W
BGRR
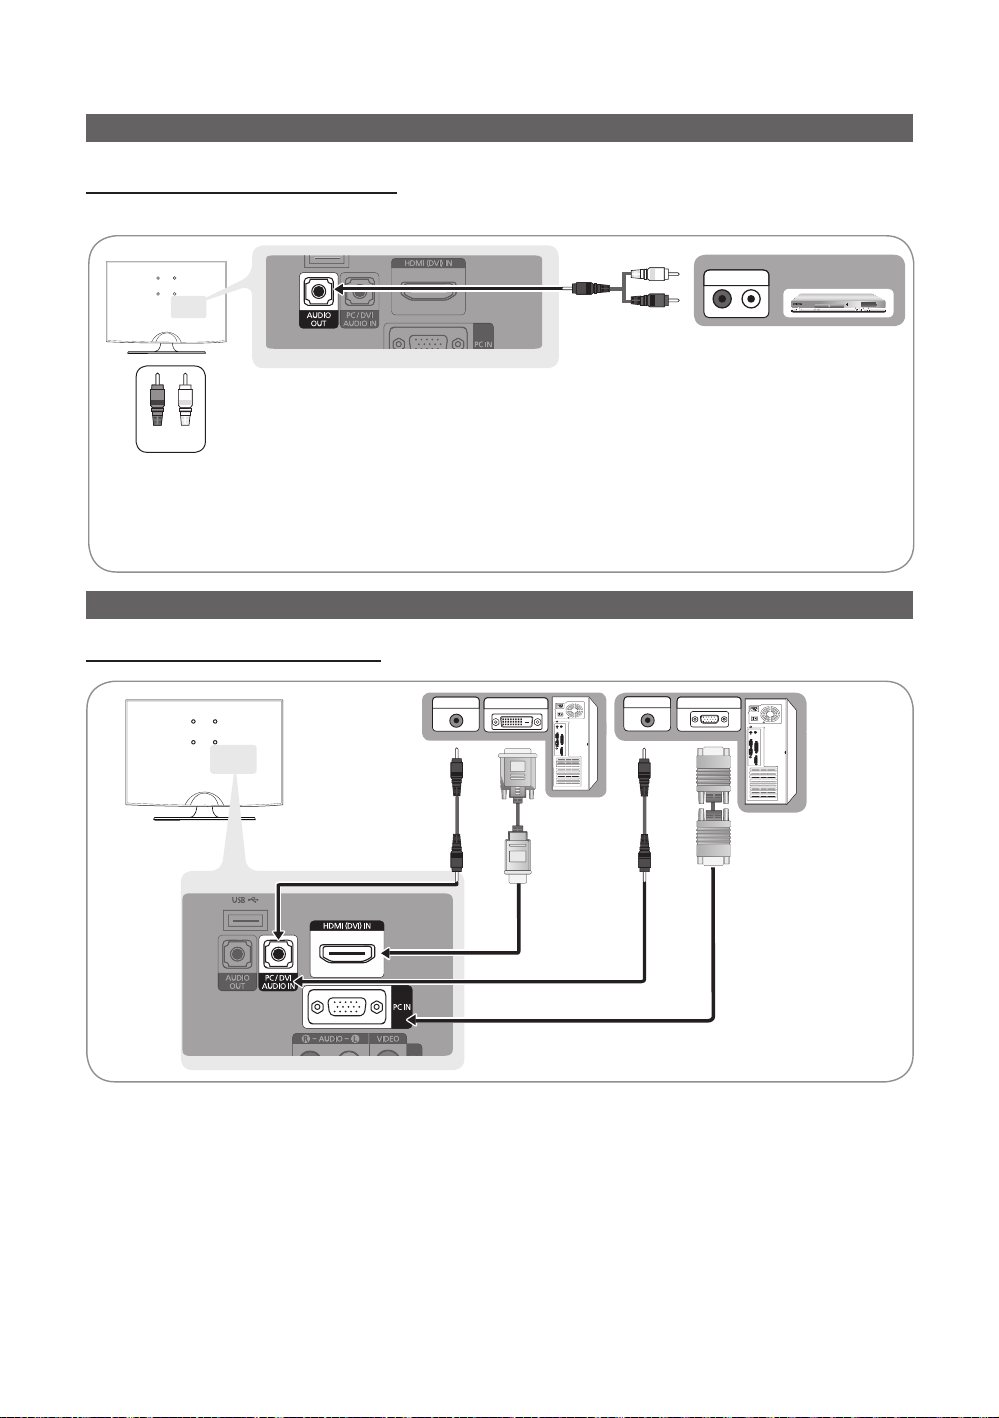
Connecting to an Audio Device (LN26C350 / LN32C350)
Using Audio (Analog) Cable Connection
Available devices: amplifier, DVD home theater
AUDIO IN
Red White
AUDIO OUT ✎: Connects to the audio input jacks on your amplifier/home theater.
When connecting, use the appropriate connector (sold separately).
x
When an audio amplifier is connected to the xAUDIO OUT jacks: Decrease the volume of the TV and adjust the
volume level with the amplifier’s volume control.
Connecting to a PC (LN26C350 / LN32C350)
Using an HDMI/DVI Cable / a D-sub Cable
AUDIO OUT
DVI OUT
AUDIO OUT
PC OUT
DVD home theater
8
English
Page 9
9
English
02 Connections
Connecting to an AV Device (LN19C350 / LN22C350)
W W
BGRRWY
P
R PB Y
R-AUDIO-L
P
R PB Y
R-AUDIO-L
P
R PB Y
W
Y
R
R
R
B
B
W
WRR
G
G
Y
R
W
R
W
R-AUDIO-L
P
R PB Y
W W
BGRR
Using an HDMI / DVI Cable: HD connection (up to 1080p)
We recommend using the HDMI connection for the best quality HD picture. Available devices: DVD, Blu-ray player, HD cable
box, HD satellite receiver (STB).
Devices
Red White
HDMI OUT
or
HDMI(DVI )IN ✎/ PC/DVI AUDIO IN
When using an HDMI/DVI cable connection, you must use the xHDMI DVI (IN) jack for video. A DVD, Blu-ray
player, HD cable box, HD STB satellite receiver, cable box, or STB satellite receiver may require a DVI-HDMI (DVI
to HDMI) cable or DVI-HDMI (DVI to HDMI) adapter. The PC/DVI AUDIO IN jack is required for audio.
If an external device such as a DVD / Blu-ray player / cable box / satellite receiver (Set-Top Box) supporting a
x
HDMI versions older than 1.3 is connected, the TV may operate abnormally (e.g. no screen display / no sound /
annoying flicker abnormal Color).
If there is no sound after connecting an HDMI cable, check the HDMI version of the external device. If you
x
suspect the version is older than 1.3, contact the provider of the corresponding device to confirm the HDMI
version and request an upgrade.
It is recommended you purchase an HDMI-certified cable. Otherwise, the screen may appear blank or a
x
connection error may occur.
Using a Component Cable: (up to 1080p), Using an Audio / Video Cable: (480i only)
Available devices: VCR, DVD, Blu-ray player, cable box, STB satellite receiver
DVI OUT
AUDIO OUT
VIDEO OUT
When connecting to AV IN 1, the
✎
color of the AV IN 1 [Y/VIDEO] jack
(Green) does not match the color of
the video cable (Yellow).
For better picture quality, the
✎
Component connection is
recommended over the A/V
connection.
AUDIO OUT
VCR
AUDIO OUT
COMPONENT OUT
Blu-ray player
Yellow Red White Red Blue Green
Page 10

Connections
Connecting to an Audio Device (LN19C350 / LN22C350)
Using Audio (Analog) Cable Connection
Available devices: amplifier, DVD home theater
Headphones ✎ H:
Headphones may be connected to the headphones output on your set. While the headphones are connected,
the sound from the built-in speakers will be disabled.
The available sound function can be restricted when connecting headphones to the TV.
x
The headphone volume and TV volume are adjusted separately.
x
Connecting to a PC (LN19C350 / LN22C350)
Using an HDMI/DVI Cable / a D-sub Cable
Headphones
AUDIO OUT
DVI OUT
AUDIO OUT
PC OUT
10
English
Page 11

11
English
02 Connections
Display Modes (D-Sub and HDMI/DVI Input)
P . MODES.MODEP . SIZE
Optimal resolution is 1360 x 768@60Hz.
Mode Resolution
IBM
MAC
VESA DMT
VESA CVT
VESA GTF 1280 x 720 52.500 70.000 89.040 - / +
NOTE
✎✎
For HDMI/DVI cable connection, you must use the xHDMI(DVI )IN jack.
The interlace mode is not supported.
x
The set might operate abnormally if a non-standard video format is selected.
x
Separate and Composite modes are supported. SOG (Sync On Green) is not supported.
x
Input Cables (Sold Separately)
640 x 350 31.469 70.086 25.175 + / 720 x 400 31.469 70.087 28.322 - / +
640 x 480 35.000 66.667 30.240 - / 832 x 624 49.726 74.551 57.284 - / -
640 x 480
800 x 600
1024 x 768
1280 x 720 45.000 60.000 74.250 + / +
1360 x 768 47.712 60.015 85.500 + / +
720 x 576 35.910 59.950 32.750 - / +
1280 x 720 56.456 74.777 95.750 - / +
Horizontal Frequency
(KHz)
31.469 59.940 25.175 - / -
37.861 72.809 31.500 - / -
37.500 75.000 31.500 - / -
37.879 60.317 40.000 + / +
48.077 72.188 50.000 + / +
46.875 75.000 49.500 + / +
48.363 60.004 65.000 - / -
56.476 70.069 75.000 - / -
60.023 75.029 78.750 + / +
Vertical Frequency
(Hz)
Pixel Clock Frequency
(MHz)
Sync Polarity
(H/V)
HDMI HDMI-DVI Component Composite (AV) Coaxial (RF) VGA
Changing the Input source
Source List
MENU
O m
Use to select TV or an external input sources
such as a DVD / Blu-ray player / cable box /
STB satellite receiver.
TV / AV1 / AV2 / Component / PC / ■
HDMI/DVI
→ Input → Source List → ENTER
You can only choose external
✎
devices that are connected to the
TV. In the Source List, connected
inputs will be highlighted.
PC always stay activated.
✎
E
Edit Name
MENU
O m
VCR / DVD / Cable STB / Satellite STB / PVR STB ■
/ AV Receiver / Game / Camcorder / PC / DVI PC /
DVI / TV / IPTV / Blu-Ray / HD DVD / DMA: Name the
device connected to the input jacks to make your input
source selection easier.
When connecting an HDMI/DVI cable to the
✎
HDMI(DVI )IN port, you should set to DVI PC or DVI
Devices mode under Edit Name.
→ Input → Edit Name → ENTER
E
Page 12
Basic Features
How to Navigate Menus
Before using the TV, follow the steps below to learn how to
navigate the menu and select and adjust different functions.
1
2
3
1 MENU button: Displays the main on-screen menu.
2 ENTERE / Direction button: Move the cursor and
select an item. Confirm the setting.
3 RETURN button: Returns to the previous menu.
4 EXIT button: Exits the on-screen menu.
How to Operate the OSD (On Screen Display)
The access step may differ depending on the selected menu.
MENU
m
1
▲ / ▼ Select an icon with the ▲ or ▼
2
ENTER
E
3
▲ / ▼
4
◄ / ►
5
ENTER
E
6
EXIT
e
The main menu options appears on
the screen:
Picture, Sound, Channel, Setup,
Input.
button.
Press ENTERE to access the
sub-menu.
Select the desired submenu with
the ▲ or ▼ button.
Adjust the value of an item with the
◄ or ► button. The adjustment in
the OSD may differ depending on
the selected menu.
Press ENTERE to complete the
configuration.
Press EXIT.
4
7
Channel Menu
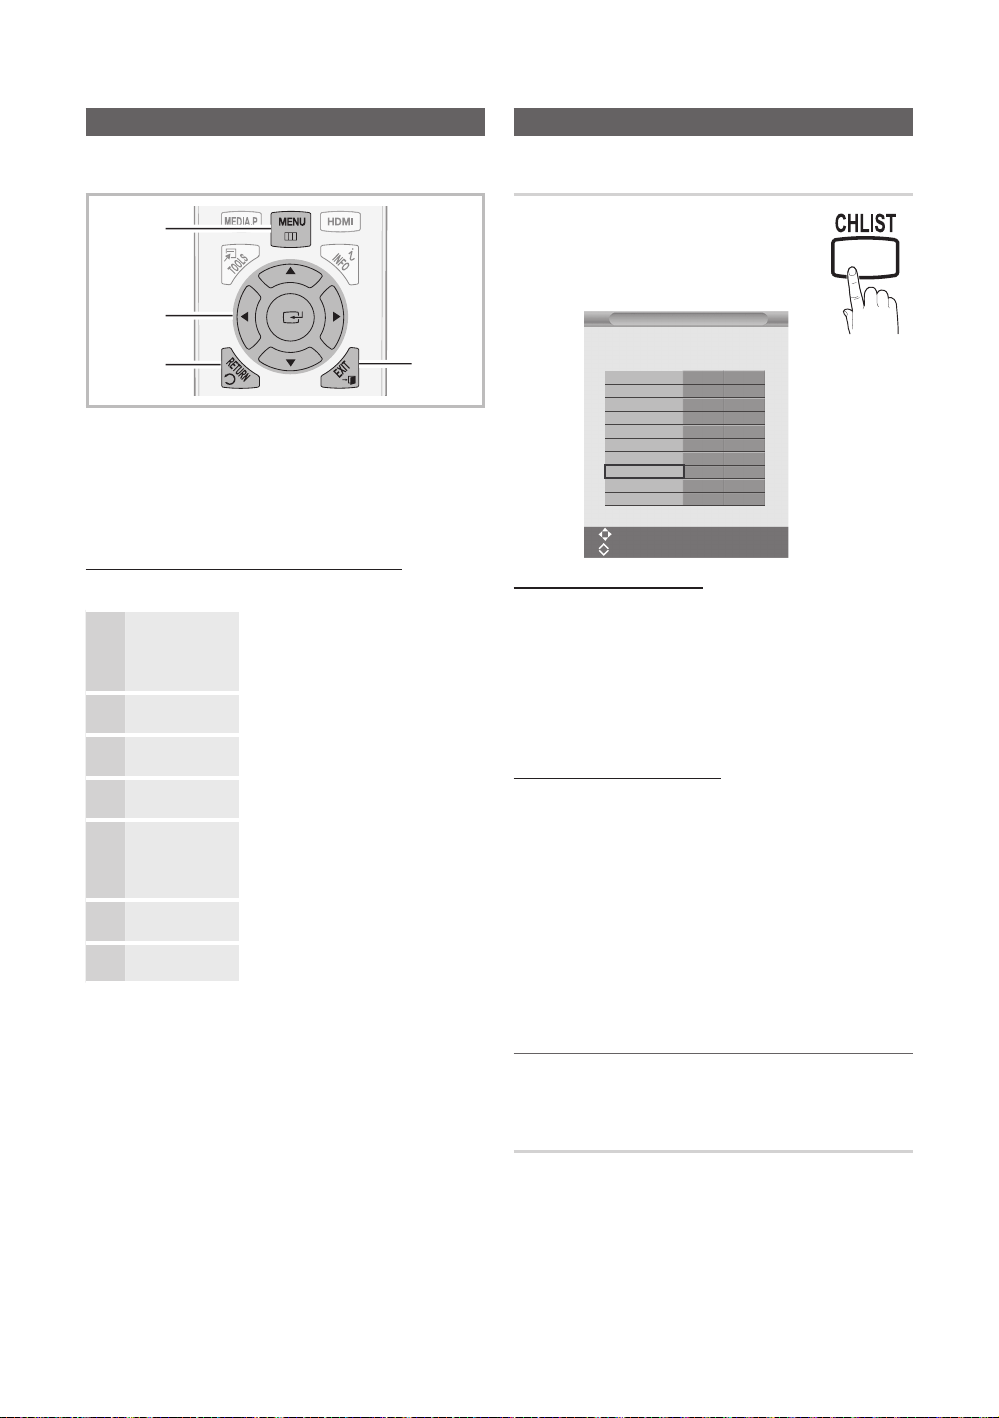
Channel List
MENU
O m
List → ENTER
Using the Channel List, you can conveniently
add/delete or lock/unlock channels.
Adding / Deleting channels
You can add or delete channels.
Move to the # field by pressing the
◄ / ►buttons, select a channel to be added, and press the
ENTERE button to add the channel.
If you press the ✎ENTERE button again, the c
symbol next to the channel disappears and the channel
is not added.
Locking / Unlocking channels
This feature allows you to prevent unauthorized users, such
as children, from watching unsuitable programmes by muting
out video and audio.
Move to the \ field by pressing the ◄ / ►buttons,
select a channel to be locked, and press the ENTERE
button.
This function is available only when the Child Lock is
✎
set to on.
The PIN number input screen appears. Enter your 4
✎
digit PIN number.
→ Channel → Channel
E
Channel List
Air 59
Ch.
Air 52
Air 53
Air 54
Air 55
Air 56
Air 57
Air 58
Air 59
Air 60
Air 61
# Add
Move
CH
Page
6 / 7
# \
c
\ Lock
E Enter
R
Return
12
English
Memorizing channels ¦
MENU
O m
→ Channel → ENTER
E
Air / Cable (Air / STD / HRC / IRC)
Before your television can begin memorizing the available
channels, you must specify the type of signal source that is
connected to the TV (i.e. an Air or a Cable system).
STD, HRC ✎ and IRC identify various types of cable TV
systems. Contact your local cable company to identify
the type of cable system that exists in your particular
area. At this point the signal source has been selected.
Page 13
13
English
03 Basic Features
Auto Program
P . MODES.MODEP . SIZE
The TV will begin memorizing all of the available channels.
NOTE ✎
All available channels are automatically stored in
x
memory. It takes approximately 3 to 10 minutes to
memorize channels.
If you want to stop Auto Programming, press the
x
ENTERE button.
Other Features ¦
MENU
O m
→ Channel
Fine Tune
If the reception is clear, you do not have to fine tune the
channel, as this is done automatically during the search and
store operation. If the signal is weak or distorted, fine tune
the channel manually.
Select xFine Tune in the Channel menu.
Fine tuned channels that have been saved are marked
✎
with an asterisk “*” on the right-hand side of the
channel number in the channel banner.
To reset the fine-tuning, select ✎Reset.
Color System (Auto / PAL-M / PAL-N /
NTSC)
Normally the TV can receive image and sound with good
quality in Auto mode. This mode detects the color signal
sources automatically. If the color implementation is
unsatisfactory, select any of PAL-M, PAL-N or NTSC.
Picture Menu
Changing the Preset Picture Mode ¦
MENU
O m
→ Picture → Mode → ENTER
E
Adjusting picture settings ¦
MENU
O m
→ Picture → Backlight → ENTER
E
Backlight / Contrast / Brightness /
Sharpness / Color / Tint (G/R)
Your television has several setting options for picture quality
control.
NOTE
✎
When you make changes to xBacklight, Contrast,
Brightness, Sharpness, Color or Tint (G/R) the
OSD will be adjusted accordingly.
In PC mode, you can only make changes to
x
Backlight, Contrast and Brightness.
Settings can be adjusted and stored for each
x
external device connected to the TV.
Changing the Picture Options ¦
Advanced Settings
MENU
O m
ENTER
(available in Standard / Movie mode)
Compared to previous models, new Samsung TVs have
more precise pictures.
In PC mode, you can only make changes to ✎Gamma
and White Balance.
→ Picture → Advanced Settings →
E
T V
Picture
Sound
Channel
Setup
Input
Advanced Settings
Black Tone : Off
Dynamic Contrast : Medium
Gamma : 0
Color Space : Native
White Balance :
Flesh Tone : 0
Edge Enhancement : On
U Move E Enter R Return
Mode
Select your preferred picture type by
pressing the P.MODE button.
t
Dynamic ■ : Suitable for a bright room.
Standard ■ : Suitable for a normal
environment.
Movie ■ : Suitable for watching movies in
a dark room.
Black Tone (Off / Dark / Darker / Darkest) ■ : Select the
black level to adjust the screen depth.
Dynamic Contrast (Off / Low / Medium / High) ■ :
Adjust the screen contrast.
Gamma ■ : Adjust the primary color intensity.
Color Space (Auto / Native) ■ : Adjust the range of colors
available to create the image.
Page 14
Basic Features
P
POWER
P . MODES.MODEP . SIZE
White Balance ■ : Adjust the color temperature for a more
natural picture.
R-Offset / G-Offset / B-Offset: Adjust each color's
(red, green, blue) darkness.
R-Gain / G-Gain / B-Gain : Adjust each color's (red,
green, blue) brightness.
Reset: Resets the White Balance to it's default
settings.
Flesh Tone ■ : Emphasize pink "flesh tone".
Edge Enhancement (Off / On) ■ : Emphasize object
boundaries.
Picture Options
MENU
O m
ENTER
In PC mode, you can only make changes to the ✎Color
Ton e and Size.
Color Tone (Cool / Normal / Warm1 / Warm2) ■
Warm1 ✎ or Warm2 is only activated when the picture
mode is Movie.
Settings can be adjusted and stored for each external
✎
device connected to an input on the TV.
Size ■ : Your cable box/satellite receiver
may have its own set of screen sizes as
well. However, we highly recommend
you use 16:9 mode most of the time.
16:9: Sets the picture to 16:9 wide
mode.
Wide Zoom: Magnifies the picture size
more than 4:3.
Zoom: Magnifies the 16:9 wide
4:3: Sets the picture to basic (4:3) mode.
→ Picture → Picture Options →
E
T V
Picture
Sound
Channel
Setup
Input
Adjusts the Position by using ✎▲,▼ buttons.
Adjusts the Position or Size by using ✎▲,▼ button.
Do not watch in 4:3 format for a long time. Traces
✎
of borders displayed on the left, right and center
of the screen may cause image retention (screen
burn) which are not covered by the warranty.
Picture Options
Color Tone : Normal
Size : 16:9
Digital Noise Filter : Off
HDMI Black Level : Normal
Film Mode : Off
U Move E Enter R Return
Screen Fit: Displays the full image without any cut-off
when HDMI (720p / 1080i / 1080p) or Component
(1080i / 1080p) signals are inputted.
NOTE
✎
Depending on the input source, the picture size
x
options may vary.
The available items may differ depending on the
x
selected mode.
In PC Mode, only 16:9 and 4:3 modes can be
x
adjusted.
Settings can be adjusted and stored for each
x
external device connected to an input of the TV.
After selecting xScreen Fit in HDMI (1080i / 1080p)
or Component (1080i / 1080p) mode: Adjusts the
Position or Size by using ▲, ▼, ◄, ► button.
If you use the xScreen Fit function with HDMI 720p
input, 1 line will be cut at the top, bottom, left and
right as in the overscan function.
When Double ( xŒ, À
(Picture-in-Picture), the Picture Size cannot be set.
Input Source Picture Size
TV, AV,
Component (480i, 480p)
Component (1080i, 1080p),
HDMI (720p, 1080i, 1080p)
PC 16:9, 4:3
Digital Noise Filter (Off / Low / Medium / High / ■
Auto): If the broadcast signal received by your TV is
weak, you can activate the Digital Noise Filter feature
to reduce any static and ghosting that may appear on
the screen.
When the signal is weak, try other options until the
✎
best picture is displayed.
HDMI Black Level (Normal / Low) ■ : Selects the black
level on the screen to adjust the screen depth.
Available only in HDMI mode (RGB signals).
✎
Film Mode (Off / Auto) ■ : Sets the TV to automatically
sense and process film signals from all sources and
adjust the picture for optimum quality.
Available in TV, AV, COMPONENT (480i / 1080i)
✎
and HDMI (480i / 1080i).
) mode has been set in PIP
16:9, Wide Zoom,
Zoom, 4:3
16:9, Wide Zoom,
Zoom, 4:3, Screen
Fit
14
English
Page 15

15
English
03 Basic Features
Reset (OK / Cancel)
Resets your current picture mode to it's default settings.
Setting up the TV with your PC ¦
Set the input source to PC.
Auto Adjustment
MENU
O m
ENTER
Adjust frequency values/positions and fine tune the settings
automatically.
Not available when connecting through HDMI/DVI
✎
cable.
→Picture → Auto Adjustment →
E
t
Screen
Coarse / Fine ■ : Removes or reduces picture noise. If the
noise is not removed by Fine-tuning alone, then adjust
the frequency as best as possible (Coarse) and Finetune again. After the noise has been reduced, readjust
the picture so that it is aligned to the center of screen.
PC Position ■ : Adjust the PC’s screen positioning if it
does not fit the TV screen. Press the ▲ or ▼ button to
adjust the Vertical-Position. Press the ◄ or ► button to
adjust the Horizontal-Position.
Image Reset ■ : Resets the image to default settings.
Using Your TV as a Computer (PC) Display
Setting Up Your PC Software (Based on Windows XP)
Depending on the version of Windows and the video card,
the actual screens on your PC may differ in which case the
same basic set-up information will almost always be applied.
(If not, contact your computer manufacturer or Samsung
Dealer.)
1. Click on “Control Panel” on the Windows start menu.
2. Click on “Appearance and Themes” in the “Control
Panel” window and a display dialog-box will appear.
3. Click on “Display” and a display dialog box will appear.
4. Navigate to the “Settings” tab on the display dialog-box.
The correct size setting (resolution) [Optimum: 1360 x y
768 pixels]
If a vertical-frequency option exists on your display y
settings dialog box, the correct value is ‘60’ or ‘60 Hz’.
Otherwise, just click ‘OK’ and exit the dialog box.
Page 16

Basic Features
Sound Menu
Changing the Preset Sound Mode ¦
MENU
O m
Mode
Standard ■ : Selects the normal sound mode.
Music ■ : Emphasizes music over voices.
Movie ■ : Provides the best sound for movies.
Clear Voice ■ : Emphasizes voices over other sounds.
Custom ■ : Recalls your customized sound settings.
→ Sound → Mode → ENTER
t
E
Adjusting sound settings ¦
MENU
O m
→ Sound → Equalizer → ENTER
E
Equalizer
Adjusts the sound mode.
Balance L/R ■ : Adjusts the balance between the right and
left speaker.
100Hz / 300Hz / 1KHz / 3KHz / 10KHz ■ (Bandwidth
Adjustment): Adjusts the level of specific bandwidth
frequencies.
Sound Systems, Etc. ¦
SRS TruSurround HD (Off / On)
This feature allows you to experience deep and full surround
sound as if you are sitting in a movie theater or concert hall.
Select this when you are listening to a DVD or to music.
Multi-Track Sound (MTS)
(Analog channels only)
Mono ■ : Choose for channels that are broadcasting in
mono or if you are having difficulty receiving a stereo
signal.
Stereo ■ : Choose for channels that are broadcasting in
stereo.
SAP ■ : Choose to listen to the Separate Audio Program,
which is usually a foreign-language translation.
Depending on the particular program being
✎
broadcasted, you can listen to Mono, Stereo or SAP.
t
t
Auto Volume (Off / On)
To equalize the volume level on each channel, set to Normal.
Speaker Select
(External Speaker / TV Speaker)
A sound echo may occur due to a difference in decoding
speed between the main speaker and the audio receiver. In
this case, set the TV to External Speaker.
When ✎Speaker Select is set to External Speaker, the
volume and MUTE buttons will not operate and the
sound settings will be limited.
When the ✎Speaker Select is set to External Speaker.
TV speaker: Off, External speaker: On
x
When the ✎Speaker Select is set to TV Speaker.
TV speaker: On, External speaker: On
x
If there is no video signal, both speakers will be mute.
✎
Setup Menu
Setting the Time ¦
MENU
O m
→ Setup → Time → ENTER
E
Time
Clock ■ : Setting the clock is for using various timer
features of the TV
The current time will appear every time you press
O
the INFO button.
If you disconnect the power cord, you have to set
✎
the clock again
You can set the ✎Month, Day, Year, Hour or
Minute directly by pressing the number buttons on
the remote control.
Using the Sleep Timer ¦
MENU
O m
ENTER
Sleep Timer ■ : Automatically shuts off the TV after a
preset period of time. (30, 60, 90, 120, 150 and 180
minutes).
→ Setup → Time → Sleep Timer →
E
To cancel the ✎Sleep Timer, select Off.
t
16
English
Page 17
17
English
03 Basic Features
Setting the On/Off Time ¦
MENU
O m
ENTER
Timer 1 / Timer 2 / Timer 3 ■ : Three different on / off
timer settings can be made. You must set the clock first.
On Time / Off Time: Set the hour, minute, am / pm,
and activate / inactivate. (To activate the timer with the
setting you’ve chosen, set to Activate.)
Repeat: Select Once, Everyday, Mon~Fri, Mon~Sat,
Sat~Sun to set at you convenience.
Volume: Set the desired volume level.
Channel: Select the desired channel.
Auto Power Off (available only when the TV is turned
✎
on by the Timer): The TV will be automatically turned off
after 3 hours of being left idle to prevent overheating.
→ Setup → Time → Timer 1 →
E
T V
On Time
▲
Picture
▼
Off Time
Sound
12
Channel
Repeat
Once
Setup
Volume Channel
10 03Air
Input
Timer 1
:
:
00 am Inactivate
Move U Adjust R Return
Inactivate0000 am00
Locking Programs ¦
MENU
O m
→ Setup → ENTER
E
Child Lock (Off / On)
Lock channels in Channel List, to prevent unauthorized
users, such as children, from watching unsuitable program.
Available only when the ✎Input source is set to TV.
Change PIN
The Change PIN screen will appear. Choose any 4 digits
for your PIN and enter them. As soon as the 4 digits are
entered, the Confirm New PIN screen appears. Re-enter the
same 4 digits. When the Confirm screen disappears, your
PIN has been memorized.
If you forget the PIN, press the remote-control buttons
✎
in the following sequence, which resets the pin to
“0-0-0-0” : POWER (off) → MUTE → 8 → 2 → 4 →
POWER (on).
Other Features ¦
MENU
O m
→ Setup → ENTER
E
Language
Set the menu language.
Caption
(On-Screen Text Messages)
Caption (Off / On) ■ : You can switch the caption function
on or off. If captions are not available, they will not be
displayed on the screen.
The Caption feature doesn’t work in Component,
✎
HDMI or PC modes.
Mode ■ : You can select the desired caption mode.
Channel ■ : You can select the desired channel.
Field ■ : You can select the desired field.
The availability of captions depends on the program
✎
being broadcasted.
Game Mode (Off / On)
When connecting to a game console such as PlayStation™
or Xbox™, you can enjoy a more realistic gaming experience
by selecting game mode.
NOTE
✎
Precautions and limitations for game mode
x
To disconnect the game console and connect –
another external device, set Game Mode to Off in
the setup menu.
If you display the TV menu in – Game Mode, the
screen shakes slightly.
Game Mode x is not available when the input source
is set to TV or PC.
After connecting the game console, set xGame
Mode to On. Unfortunately, you may notice reduced
picture quality.
If xGame Mode is On:
Picture – mode is set to Standard and Sound mode
is set to Movie.
Equalizer – is not available.
Page 18
Basic Features
Melody (Off / Low / Medium / High)
Set so that a melody plays when the TV is turned on or off.
NOTE
✎
Only available when the Input source is set to TV.
x
To turn the melody off, set Melody to Off.
The Melody does not play.
x
When no sound is output from the TV because the –
MUTE button has been pressed.
When no sound is output from the TV because the –
volume has been reduced to minimum with the
VOL – button.
When the TV is turned off by – Sleep Timer function.
Energy Saving (Off / Low / Medium / High
/ Auto)
This feature adjusts the brightness of the TV in order to
reduce power consumption. When watching TV at night,
set the Energy Saving mode option to High to reduce eye
fatigue as well as power consumption.
t
AV Color System ( Auto / PAL-M / PAL-N
/ NTSC )
Normally the TV can receive image and sound with good
quality when in the mode Auto. This mode detects the
signal color system automatically. In case of some signal
reception with color unsatisfactory, select the AV Color
System Mode to PAL-M, PAL-N or NTSC.
This function is available only in AV mode.
✎
Picture In Picture (PIP) ¦
t
PIP
MENU
O m
Watches simultaneously the TV tuner and one external video
source. PIP (Picture-in-Picture) does not function in the same
mode.
NOTE
✎
If you turn the TV off while watching in PIP mode, the
x
PIP window will disappear.
You may notice that the picture in the PIP window
x
becomes slightly unnatural when you use the main
screen to view a game or karaoke.
PIP Settings
x
PIP (Off / On) ■ : Activate or deactivate the PIP function.
Source (TV / AV1 / AV2) ■ : Select a source of the sub-
picture.
Size ( ■
If main picture is in HDMI mode, ✎Size is available.
Position ( ■
sub-picture.
In Double (
✎ Œ
selected.
Channel ■ : Select the channel for the sub-screen.
Sound Select (Main / Sub) ■ : You can choose the
desired sound (Main or Sub) in PIP mode.
→ Setup → PIP → ENTER
Main picture Sub picture
Component TV, AV2
HDMI/DVI, PC TV, AV1, AV2
T V
PIP : On
Picture
Source : TV
Size :
Sound
Position :
Channel :
Channel
Sound Select : Main
Setup
Input
U Move E Enter R Return
Õ
/ Œ, À): Select a size for the sub-picture.
Ã
/ – / — / œ): Select a position for the
PIP
, À) mode, Position cannot be
E
18
English
Page 19

Advanced Features
MEDIA.P
POWER
USB
Photo
PhotoMusic Setup
SUM
307.2MB/973.7MB
Music
PhotoMusic Setup
SUM
307.2MB/973.7MB
USB
Enjoy photos and/or music files saved on a USB
Mass Storage Class (MSC) device.
O m
MENU
→ ENTER
Connecting a USB Device ¦
→ Input → Media Play (USB)
E
Media Play
Device Name
SUM
315.0MB/495.0MB Free
E
Enter e Exit
04 Advanced Features
1. Turn on your TV.
2. Connect a USB device containing photo and/or music files to the USB jack on the
rear of the TV.
3. When the Input selection screen is displayed, press the ► button to select Media
Play (USB), then press the ENTERE button.
USB Drive
TV Rear Panel
Using the Media Play Menu
Viewing a Photo (or Slide Show)
1. Press the MENU button. Press the ▲ or ▼ button to select Input,
then press the ENTERE button.
2. Press the ▲or ▼button to select Media Play (USB), then press the
ENTERE button.
3. Press the ▲or ▼ button to select the corresponding USB Memory
Device, then press the ENTERE button.
The Media Play menu differs depending on the USB Memory
✎
Device connected to TV.
Some devices may not be supported due to compatibility
✎
problems.
4. Press the ◄ or ► button to select an icon (Photo, Music, Setup),
then press the ENTERE button.
It might not work properly with unlicensed multimedia files.
✎
Need-to-Know List before using ✎Media Play (USB)
Only alphanumeric characters must be used as a folder name or file name (photo, music).
x
The file system only supports FAT16/32 (The NTFS file system is not supported) Certain types of USB Digital camera
x
and audio devices may not be compatible with this TV.
Media Play (USB) only supports the USB Mass Storage Class device (MSC). MSC is a Mass Storage Class Bulk-
x
Only Transport device. Examples of MSC are Thumb drives and Flash Card Readers (Both USB and HUB are not
supported.)
Before connecting your device to the TV, please back up your files to prevent them from damage or loss of data.
x
SAMSUNG is not responsible for any data file damage or data loss.
Please connect directly to the xUSB port of your TV. If you are using a separate cable connection, there may be a USB
Compatibility problem.
Only MP3 and JPEG file formats are supported.
x
The Media Play (USB) mp3 format only supports music files with a high sampling frequency (32 kHz, 44.1 kHz, or 48
x
kHz).
We recommend the sequential jpeg format.
x
Do not disconnect the USB device while it is loading.
x
L
Move E Enter R Return
English
19
Page 20

Advanced Features
Photo
PhotoMusic Setup
SUM
307.2MB/973.7MB
Music
PhotoMusic Setup
SUM
307.2MB/973.7MB
DSC_0558.JPG
580
440
78.0KB
03 / 14
SUM
*
Photo
307.2MB/973.7MB
File.....jpg
File.....jpg File.....jpg
File.....jpg File.....jpg File.....jpg
File.....jpg File.....jpg
File.....jpg File.....jpg
File.....jpg File.....jpg File.....jpg
USB
MSC supports MP3 and JPEG files, and the PTP device supports JPEG files only.
x
MTP (Media Transfer Protocol) is not supported.
x
The playing duration of an mp3 file may be displayed as “00:00:00” if its playing time information is not found at the
x
start of the file.
The higher the resolution of the image, the longer it takes to display on the screen.
x
The Photo or Music List displays up to 300 folders or files.
x
Loading may take some time depending on the size of the file.
x
MP3 files with DRM that have been downloaded from a non-free site cannot be played.
x
Digital Rights Management (DRM) is a technology that supports the creation, distribution and management of of the
x
content in an integrated and comprehensive way, including the protection of the rights and interests of the content
providers, the prevention of the illegal copying of contents, as well as managing billings and settlements.
If a USB extension cable is used, the USB device may not be recognized or the files on the device may not be read.
x
If a USB device connected to the TV is not recognized, the list of files on the device is corrupted or a file in the list is
x
not played, connect the USB device to the PC, format the device and check the connection.
If a file deleted from the PC is still found when Media Play is run, use the “Empty the Recycle Bin” function on the PC
x
to permanently delete the file.
Photo
Viewing a Photo (or Slide Show)
1. Press the INFO button to display the option Start Slide Show,
Select All, Deselect All.
2. Press the ▲or ▼button to select Start Slide Show then press the
ENTERE button.
During the slide show, files are displayed in order from the
✎
Jan 7, 2010
Upper Fold... Folder
currently shown file.
MP3 files can be automatically played during the Slide Show
✎
if the Default Background Music is set to On. To enable this
function, MP3 files and other photo files must be located in the
'
Free
Select
n
Move E Enter I Option R Return
same folder on the USB Memory Device.
Press the ✎INFO button during the slide show to set the following options Slide Show Speed, Background Music,
Background Music Setting, List. Press the ▲or ▼button to select the option, then press the ENTERE button.
After setting the option press the – ENTERE button to make a change.
Press the ✎INFO button during the photo view to set the following options Start Slide Show, Zoom, Rotate, List. Press
the ▲or ▼button to select the option, then press the ENTERE button.
After setting the option press the – ENTERE button to make a change.
1/1 Page
English
20
Page 21

21
English
04 Advanced Features
Music
Music
PhotoMusic Setup
SUM
307.2MB/973.7MB
Photo
PhotoMusic Setup
SUM
307.2MB/973.7MB
Music
PhotoMusic Setup
SUM
307.2MB/973.7MB
DSC_0558.JPG
580
440
78.0KB
03 / 14
SUM
*
Photo
307.2MB/973.7MB
File.....jpg File.....jpg File.....jpg
File.....jpg File.....jpg File.....jpg
File.....jpg File.....jpg
File.....jpg File.....jpg
File.....jpg File.....jpg File.....jpg
Music
4.3MB
2 / 31
06-I Will Carry You.mp3 00:00:00
01-The Way.mp3 00:03:25
02-Run To Me.mp3 00:03:25
03-No More Sad Songs.mp3 00:03:25
04-Interference-gold.mp3 00:03:25
05-marketa_irglova-The_hill.mp3 00:03:25
06-I Will Carry You.mp3 00:03:25
07-marketa_irglova.mp3 00:03:25
08-Super World.mp3 00:03:25
SUM
307.2MB/973.7MB
USB
Using the MP3 List
Folder icon
Music list icon
Move to the previous folder stage icon
The selected file is displayed on the top with its playing time.
✎
1. To select all files or a file, press the INFO button to display the Music
menus.
Press the ENTERE button to select Play, Repeat Music,
Select All or Deselect All.
2. Press the ▲or ▼button to move to an icon, then press the
ENTERE button.
Pressing the ENTERE button over a musical note icon immediately
plays the music file.
Pressing the ENTERE button over a folder icon shows the music
files included in the folder.
Play ■ : Select to play MP3 files.
This menu only shows files with the MP3 file extension. Files with other file extensions are not displayed, even if
✎
they are saved on the same USB device.
To adjust the music volume, press the
✎ y
M
Repeat Music (On / Off) ■ : Select to repeatedly play MP3 files in the current folder.
MUTE button on the remote control.
button on the remote control. To mute the sound, press the
Jan 7, 2010
Play
Repeat Music : Off
Select All
Deselect All
I
Exit
' Select
L
Move E Enter R Return
Upper Folder
Folder
r
n
Move I Option E Play R Return
1/4 Page
Playing Music
Only displays files with the MP3 file extension. Other file extensions are not displayed, even if they are saved on the same y
USB device.
If the sound is strange when playing MP3 files, adjust the y Equalizer and SRS TruSurround HD in the Sound menu. (An
over-modulated MP3 file may cause a sound problem.)
Music function information icons y
Repeat Mode is On.
Repeat Mode is Off.
Page 22

Advanced Features
Photo
PhotoMusic Setup
SUM
307.2MB/973.7MB
Music
PhotoMusic Setup
SUM
307.2MB/973.7MB
DSC_0558.JPG
580
440
78.0KB
03 / 14
SUM
*
Photo
307.2MB/973.7MB
File.....jpg File.....jpg File.....jpg
File.....jpg File.....jpg File.....jpg
File.....jpg File.....jpg
File.....jpg File.....jpg
File.....jpg File.....jpg File.....jpg
Music
4.3MB
2 / 31
06-I Will Carry You.mp3 00:00:00
01-The Way.mp3 00:03:25
02-Run To Me.mp3 00:03:25
03-No More Sad Songs.mp3 00:03:25
04-Interference-gold.mp3 00:03:25
05-marketa_irglova-The_hill.mp3 00:03:25
06-I Will Carry You.mp3 00:03:25
07-marketa_irglova.mp3 00:03:25
08-Super World.mp3 00:03:25
SUM
307.2MB/973.7MB
Setup
USB
Setup
Using the Setup Menu
Slide Show Speed ■ : Select to control the slide show speed. You can
select Fast, Normal or Slow.
Background Music ■ : Select to determine whether to play an MP3 file
during a slide show. You can select Music On or Music Off.
Background Music Setting ■ : While a slide show is in progress, use
the Background Music Setting to select a music file to listen to.
Select an MP3 file as the background music.
Repeat Music ■ : Select to determine whether to repeat playing the
music when all MP3 files in the current folder have been played.
Screen Saver ■ : Select to set the waiting time before the screen saver appears. The screensaver will appear when no
button is pressed for 4 hours, 8 hours, 10 hours.
Playing the selected photos / music files
Press the Yellow button. y
Repeat the above operation to select desired photos / music files. y
Selected photos or files are marked with the symbol
✎ c
Press the y ENTERE button to play the selected photos or files.
Slide show Speed : Fast
Background Music : On
Background Music Setting
Repeat Music : On
Screen Saver : 4 hours
. To cancel a selection, press the Yellow button again.
U
Move E Enter R Return
22
English
Page 23

Other Information
Installing the Wall Mount
Installing the Wall Mount Kit
The wall mount kit (sold separately) allows you to mount the TV on the wall.
For detailed information on installing the wall mount, see the instructions provided with the wall mount items. Contact a
technician for assistance when installing the wall mount bracket. Samsung Electronics is not responsible for any damage to the
product or injury to yourself or others if you elect to install the TV on your own.
Wall Mount Kit Specifications (VESA)
The wall mount kit is not supplied, but sold separately.
✎
Install your wall mount on a solid wall perpendicular to the floor. When attaching to other building materials, please contact
your nearest dealer. If installed on a ceiling or slanted wall, it may fall and result in severe personal injury.
NOTE
✎
Standard dimensions for wall mount kits are shown in the table below.
x
When purchasing our wall mount kit, a detailed installation manual and all parts necessary for assembly are provided.
x
Do not use screws that do not comply with the VESA standard screw specifications.
x
Do not use screws that are longer than the standard dimension or do not comply with the VESA standard screw
x
specifications. Screws that are too long may cause damage to the inside of the TV set.
For wall mounts that do not comply with the VESA standard screw specifications, the length of the screws may differ
x
depending on the wall mount specifications.
Do not fasten the screws too strongly; this may damage the product or cause the product to fall, leading to personal
x
injury. Samsung is not liable for these kinds of accidents.
Samsung is not liable for product damage or personal injury when a non-VESA or non-specified wall mount is used or
x
the consumer fails to follow the product installation instructions.
Do not mount the TV at more than a 15 degree tilt.
x
Always use two people to mount the TV to a wall.
x
05 Other Information
Product Family inches VESA Spec. (A * B) Standard Screw Quantity
75 X 75
100 X 100
M4
4
M8
LCD-TV
19~22
23~29 200 X 100
30~40 200 X 200 M6
46~55 400 X 400
57~65 600 X 400
70~80 800 X 400
80~ 1400 X 800
Do not install your Wall Mount Kit while your TV is turned on. It may result in personal injury due to
electric shock.
English
23
Page 24

Other Information
1
2
3
Securing the TV to the Wall
Caution: Pulling, pushing, or climbing onto the TV may cause the TV to fall. In particular, ensure that your
children do not hang over or destabilize the TV; doing so may cause the TV to tip over, resulting in serious
injuries or death. Follow all safety precautions provided on the included Safety Flyer. For added stability, install
the anti-fall device for safety purposes, as follows.
To avoid the TV from falling ¦
Since the necessary clamps, screws, and string are not supplied, ✎
please purchase these additionally.
1. Drive the screws into the clamps and firmly fasten them onto the
wall. Make sure the screws are firmly fixed into the wall.
Screw Specifications ✎
For a 17 ~ 29 Inch LCD TV: M4 y
For a 32 ~ 40 Inch LCD TV: M6 y
2. Remove the screws from the center back of the TV, put the
screws into the clamps, and then fasten the screws onto the TV
again.
3. Connect the clamps fixed onto the TV and the clamps fixed onto
the wall with a strong string and then tie the string tightly.
Verify all connections are properly secured. Periodically check ✎
connections for any sign of fatigue for failure. If you have
any doubt about the security of your connections, contact a
professional installer.
Install the TV near to the wall so that it does not fall backwards. ✎
It is safe to connect the string so that the clamps fixed on the wall are ✎
equal to or lower than the clamps fixed on the TV.
Untie the string before moving the TV. ✎
Wall
Anti-theft Kensington Lock
The Kensington Lock is not supplied by Samsung. It is a device used to
physically fix the system when using it in a public place. The appearance and
locking method may differ from the illustration depending on the manufacturer.
Refer to the manual provided with the Kensington Lock for additional
information on proper use.
Please find a “ ✎K” icon on the rear of the TV.
A kensington slot is beside the “K” icon.
1. Insert the locking device into the Kensington slot 1 on the LCD TV and
turn it as shown 2.
2. Connect the Kensington Lock cable 3.
3. Fix the Kensington Lock to a desk or a heavy stationary object.
The locking device has to be purchased separately.
✎
The location of the Kensington slot may be different depending on the TV model.
✎
24
English
<Optional>
Page 25

25
English
05 Other Information
Troubleshooting
If the TV seems to have a problem, first try this list of possible problems and solutions. If none of these troubleshooting tips
apply, visit samsung.com, then click on Support, or call Samsung customer service.
Issues
Poor picture
The TV image does not look as good as
it did in the store.
The picture is distorted: macroblock
error, small block, dots, pixelization.
Color is wrong or missing. If you’re using a component connection, make sure the component cables are connected to •
There is poor color or brightness. Adjust the Picture options in the TV menu. •
There is a dotted line on the edge of
the screen.
The picture is black and white. If you are using an AV composite input, connect the video cable (yellow) to the Green jack of •
When changing channels, the picture
freezes or is distorted or delayed.
Sound Problem
There is no sound or the sound is too
low at maximum volume.
The picture is good but there is no
sound.
The speakers are making an
inappropriate noise.
Solutions and Explanations
If you have an analog cable/satellite box, upgrade to a digital set top box. Use HDMI or •
Component cables to deliver HD (high definition) picture quality.
Cable/Satellite subscribers: Try HD stations from the channel line up.•
Air/Cable Antenna connection: Try HD stations after performing Auto program.•
Many HD channels are upscaled from SD(Standard Definition) contents.
✎
Adjust the Cable/Sat box video output resolution to 1080i or 720p.•
Compression of video contents may cause picture distortion especially in fast moving pictures •
such as sports and action movies.
Low signal level can cause picture distortion. This is not a TV problem.•
the correct jacks. Incorrect or loose connections may cause color problems or a blank screen.
(Go to Picture mode / Color / Brightness / Sharpness) (P. 13)
Adjust • Energy Saving option in the Setup menu. (P. 18)
Try resetting the picture to view the default picture setting. •
(Go to MENU - Picture - Reset) (P. 15)
If the picture size is set to Screen Fit, change it to 16:9.•
Change cable/satellite box resolution.•
component input 1 on the TV.
If connected with cable box, please try to reset cable box. (reconnect AC cord and wait until •
cable box reboots. It may take up to 20 minutes)
Set output resolution of cable box to 1080i or 720p.•
Please check the volume the of device (Cable/Sat Box, DVD, Blu-ray etc) connected to your TV. •
Set the • Speaker Select option to TV speaker in the sound menu. (P. 16)
If you are using an external device, check the device’s audio output option (ex. you may need to •
change your cable box’s audio option to HDMI when you have a HDMI connected to your TV).
If you are using a DVI to HDMI cable, a separate audio cable is required.•
Reboot the connected device by reconnecting the device’s power cable.•
Check a cable connections. Make sure a video cable is not connected to an audio input.•
For Antenna or Cable connections, check the signal information. Low signal level may cause •
sound distortion.
Perform the Sound Test as explained above.•
Page 26

Other Information
Issues
No Picture, No Video
The TV won’t turn on. Make sure the AC power cord is securely plugged in to the wall outlet and the TV.•
The TV turns off automatically. Ensure the • Sleep Timer is set to Off in the Setup menu. (P. 16)
There is no picture/Video. Check cable connections. (remove and reconnect all cables connected to the TV and external •
RF(Cable/Antenna) Connection
The TV is not receiving all channels. Make sure the coaxial cable is connected securely.•
No Caption on digital channels. Some channels may not have caption data.•
The picture is distorted: macroblock,
error, small block, dots, pixelization.
PC Connection
A “Not Supported Mode” message
appears.
“PC” is always shown on the source list,
even if a PC is not connected.
The video is OK but there is no audio. If you are using a HDMI connection, check the audio output setting on your PC.•
Solutions and Explanations
Make sure the wall outlet is working.•
Try pressing the • POWER button on the TV to make sure the problem is not the remote.
If the TV turns on, refer to ‘Remote control does not work’ below.
If your PC is connected to the TV, check your PC power settings.•
Make sure the AC power cord is plugged in securely to the wall outlet and the TV.•
When watching TV from an antenna or cable connection, the TV will turn off after 10 - 15 •
minutes if there is no signal.
devices).
Set your external devis’ (Cable/Sat Box, DVD, Blu-ray etc) video outputs to match the •
connections to the TV input. For example, if an external device’s output is : HDMI, it should be
connect to an HDMI input on the TV.
Make sure your connected devics are powered on.•
Be sure to select the TV’s correct source by pressing the • SOURCE button on the remote
control.
Reboot the connected device by reconnecting the device’s power cable.•
Please try • Auto Program to add available channels to the channel list. Go to MENU - Channel
- Auto program then select Auto and make sure correct Cable TV signal type is set in the
menu. (P. 13)
Verify the Antenna is positioned correctly.•
Compression of video contents may cause picture distortion. especially on fast moving pictures •
such as sports and action movies.
A low signal can cause picture distortion. This is not a TV problem.•
Set your PC’s output resolution so they match the resolutions supported by the TV.•
This is normal; “PC” is always shown on the source list, regardless of whether a PC is •
connected.
26
English
Page 27

27
English
05 Other Information
Issues
Others
Purple/green rolling horizontal bars and
buzzing noise from the TV speakers
with Component cable connection.
Picture is not shown in full screen. Black bars on each side will be shown on HD channels when displaying upscaled SD (4:3) •
Remote control does not work. Replace the remote control batteries with correct polarity (+/–).•
Can not control TV power or volume
with Cable/Sat box remote control.
‘Not Supported Mode’ message. Check the supported resolution of the TV and adjust the external device’s output resolution •
Caption on TV menu is greyed out. Caption• can not be selected in the TV menu when connected via HDMI or Component.
There is a plastic smell the from TV. This smell is normal and will dissipate over time.•
TV is tilted to right or left side. Remove the stand base from TV and reassemble.•
Can not assemble stand base. Make sure TV is placed on flat surface. If can not remove screws from TV, please use •
Channel menu is grey out (unavailable). Channel• menu is only available when TV source is selected (Antenna or Cable).
Your settings are lost after 30 minutes
or every time TV is turned off.
Intermittent loss of audio or video. Check cable connections and reconnect.•
You may see small particles if you
look closely at the edge of the bezel
surrounding the TV screen.
POP (TV’s internal banner ad) appears
on the screen.
Solutions and Explanations
Remove the left and right audio connections from the set-top-box. If the buzzing stops, this •
indicates that the set-top-box has a grounding issue. Replace the Component video cables
with an HDMI connection.
contents.
Black bars on Top & Bottom will be shown on movies that have aspect ratios different from your •
T V.
Adjust picture size option on your external device or TV to full screen.•
Clean the transmission window located on the top of the remote.•
Try pointing the remote directly at the TV from 5~6 feet away.•
Program the Cable/Sat remote control to operate the TV. Refer to Cable/Sat user manual for •
SAMSUNG TV code.
accordingly. Refer to resolution settings in this manual.
Caption• must be activated on the external device.
magnetized screw driver.
If TV is in the • Store Demo mode, it will reset audio and picture settings every 30 minutes.
Please change from Store Demo mode to Home Use mode in the Plug & Play procedure.
Press the SOURCE button to select TV mode, go to MENU → Setup → Plug & Play →
ENTERE.
Can be caused by using overly rigid or thick cables. Make sure the cables are flexible enough •
for long term use. If wall mounting, we recommend using cables with 90 degree connectors.
This is part of the product’s design and is not a defect.•
Select Home Use under Plug & Play mode. •
For details, refer to Plug & Play (Initial Setup). (P. 6)
This TFT LCD panel uses a panel consisting of sub pixels which require sophisticated technology to produce. However,
✎
there may be a few bright or dark pixels on the screen. These pixels will have no impact on the performance of the
product.
Page 28

Other Information
PC Resolution
(Optimum)
Environmental
Considerations
Operating Temperature
Operating Humidity
Storage Temperature
Storage Humidity
Stand Swivel
(Left / Right)
Model Name
LN19C350 LN22C350 LN26C350 LN32C350
Specifications
1360 x 768 @ 60 Hz
10°C to 40°C
(50°F to 104°F)
10% to 80%, non-condensing
-20°C to 45°C
(-4°F to 113°F)
5% to 95%, non-condensing
0˚
Screen Size
Sound
Output
Dimensions (WxDxH)
Body
With stand
Weight
Without Stand
With Stand
Design and specifications are subject to change without prior notice.
✎
For information about power supply, and more about power consumption, refer to the label attached to the product.
✎
19 inches 22 inches 26 inches 32 inches
3W x 2 3W x 2 5W x 2 5W x 2
18.2 X 2.3 X 12.7 inches
(461.2 X 59.5 X 322.2 (mm))
18.2 X 6.3 X 14.3 inches
(461.2 X 161 X 364 (mm))
8.6 Ibs (3.9 kg)
9.0 Ibs (4.1 kg)
21.1 X 3.2 X 14.4 inches
(535.9 X 82.2 X 365.8 (mm))
21.1 X 6.8 X 16.6 inches
(535.9 X 171.8 X 420.9 (mm))
8.6 Ibs (3.9 kg)
9.3 Ibs (4.2 kg)
26.5 X 2.6 X 18 inches
(673.3 X 65.6 X 456.0 (mm))
26.5 X 8.7 X 20.2 inches
(673.3 X 222.2 X 513.4 (mm))
12.7 Ibs (5.7 kg)
13.4 Ibs (6.1 kg)
(795.3 X 65.6 X 525.8 (mm))
(795.3 X 247.2 X 585.3 (mm))
31.3 X 2.6 X 20.7 inches
31.3 X 9.7 X 23 inches
15.7 Ibs (7.1 kg)
16.8 Ibs (7.6 kg)
License ¦
TruSurround HD, SRS and symbol are trademarks of SRS Labs, Inc.
TruSurround HD technology is incorporated under license from SRS Labs, Inc.
Manufactured under license from Dolby Laboratories. Dolby and the double-D symbol are
trademarks of Dolby Laboratories.
Open source license notice
In the case of using open source software, Open Source Licenses are available on the product menu.
28
English
Page 29

29
English
05 Other Information
Index
A
Antenna 6
Audio Out jack 7, 9
Auto Adjustment 15
Auto Program 13
B
Balance 16
C
Cables 11
Caption 17
Clear Voice 16
Component 7, 9
Composite 11
D
Digital Audio out 10
D-sub 8, 10
DVD Home theater 8, 10
Dynamic Contrast 13
E
Energy Saving 18
Equalizer 16
External Speaker 16
I
Input Source 11
L
Language 17
License 28
M
Media Play 19
Melody 18
MP3 Play 21
MTS 16
O
Optimal resolution 11
P
Photo view 20
PIN number 17
PIP 18
Power Indicator 4
R
Remote Control 5
Reset 15
S
Screen Fit 14
Sleep Timer 16
Slide Show 20
Source List 11
Speaker Select 16
Standby mode 4
T
Timer 17
V
Volume 4, 5, 17
W
Wall Mount 23
White Balance 14
H
HDMI 7, 9
Page 30

Las figuras y las ilustraciones de este Manual del usuario se proporcionan como referencia solamente y pueden ser
diferentes del aspecto real del producto. El diseño y las especificaciones del producto están sujetos a cambios sin previo
aviso.
Información importante sobre la garantía relativa al formato de visualización del televisor
Para obtener más información sobre los términos de la garantía, consulte la tarjeta de garantía.
✎
Las pantallas LCD con formato de pantalla panorámica (16:9, la relación de aspecto ancho:alto de la pantalla) están diseñadas principalmente para
visualizar vídeos de movimiento de formato panorámico. Las imágenes deben estar principalmente en el formato panorámico de relación 16:9, o
ampliadas para llenar la pantalla si el modelo tiene esta opción y las imágenes están en movimiento constante. La visualización de imágenes y gráficos
estáticos en la pantalla, como las barras oscuras laterales en programación y vídeos de televisión en formato estándar no ampliados, debe limitarse a no
más del 5% del tiempo total de visualización del televisor por semana.
Asimismo, la visualización de otras imágenes estáticas y de texto, como informes bursátiles, pantallas de videojuegos, logotipos comerciales, sitios web
o gráficos y patrones de ordenador, se debe limitar en todos los televisores al tiempo especificado más arriba. La visualización de imágenes estáticas que
supere los límites de las instrucciones anteriores puede producir un envejecimiento desigual de las pantallas LCD, lo que provocará una reproducción
superpuesta sutil pero permanente de la imagen de la LCD. Para evitarlo, varíe la programación y las imágenes y, sobre todo, visualice imágenes en
movimiento a toda pantalla, no gráficos estáticos ni barras oscuras. En modelos de LCD que ofrezcan opciones para el tamaño de la imagen, utilice estos
controles para ver los distintos formatos como imagen a toda pantalla.
Tenga cuidado en la selección y duración de los formatos de televisión utilizados para la visualización. La garantía limitada de Samsung no cubre el
envejecimiento desigual de la LCD como resultado de la selección y el uso de formatos, así como otras imágenes retenidas.
Advertencia sobre las imágenes fijas
Evite mostrar en la pantalla imágenes fijas (como archivos de imágenes jpeg) o elementos con imágenes fijas (como logotipos de los programas de
televisión o con formato de imagen 4:3, barras de cotizaciones o de noticias en la parte inferior de la pantalla, etc). Una visualización continuada de
imágenes fijas puede causar un desgaste desigual del fósforo de la pantalla, lo que afectará a la calidad de la imagen. Para reducir este riesgo, siga estas
recomendaciones:
Evite mostrar el mismo canal de televisión durante largos periodos de tiempo.•
Intente ver siempre las imágenes en pantalla completa, utilice el menú del formato de imagen del televisor para obtener la mejor coincidencia.•
Reduzca los valores del brillo y el contraste al mínimo necesario para conseguir la calidad de imagen deseada, ya que los valores superiores pueden •
acelerar la velocidad del proceso de quemado.
Utilice con frecuencia todas las funciones del televisor diseñadas para reducir la retención de la imagen y el desgaste de la pantalla; consulte el •
apartado adecuado del manual del usuario para obtener más información.
Seguridad en el espacio de instalación
Mantenga la distancia requerida entre el producto y otros objetos (por ejemplo, paredes) para asegurar la ventilación adecuada.
En caso contrario, se podría producir un incendio por un incremento de la temperatura interna del producto.
Cuando utilice un soporte o un montaje mural, use sólo las piezas proporcionadas por Samsung Electronics.
✎
Si utiliza piezas proporcionadas por otros fabricantes, podría tener problemas con el producto o éste se podría caer con el riesgo de causar
x
lesiones personales.
El aspecto puede variar según el producto.
✎
Instalación con un soporte Instalación con un montaje mural
4pulgadas
4pulgadas
4pulgadas
4pulgadas
4pulgadas
4pulgadas
4pulgadas
© 2010 Samsung Electronics Co., Ltd. All rights reserved.
Español
2
Page 31

Contenido
ESPAÑOL
Español
3
MEDIA.P
P
POWER
P. M O D E
S . M O D E
SLE EP
Introducción
Listado de características y .........................................4
Accesorios y ................................................................ 4
Aspecto general del panel de control y ........................ 4
Aspecto general del mando a distancia y ..................... 5
Conexión de una antena y ........................................... 6
Plug & Play (configuración inicial) y ............................... 6
Conexiones
Conexión a un dispositivo AV y
(LN26C350, LN32C350) ........................................... 7
Conexión a un dispositivo de audio (LN26C350, y
LN32C350) ............................................................... 8
Conexión a un PC (LN26C350, LN32C350) y .............. 8
Conexión a un dispositivo AV y
(LN19C350 / LN22C350) .......................................... 9
Conexión a un dispositivo de audio y
(LN19C350 / LN22C350) ....................................... 10
Conexión a un PC (LN19C350 / LN22C350) y ........... 10
Cambio de la fuente de entrada y .............................. 11
Funciones básicas
Cómo desplazarse por los menús y ........................... 12
Menú de canales y .................................................... 12
Memorización de canales 12
Otras funciones 13
Menú de la imagen y .................................................13
Cambio del modo de imagen preseleccionado 13
Ajuste de la configuración de la imagen 13
Cambio de las opciones de la imagen 13
Ajuste del televisor con el ordenador 15
Menú del sonido y ..................................................... 16
Cambio del modo de sonido preseleccionado 16
Ajuste de la configuración del sonido 16
Configuración del sonido 16
Menú de configuración y ........................................... 16
Configuración de la hora 16
Uso del temporizador de desconexión 16
Activación y desactivación del temporizador 17
Programas de bloqueo 17
Otras funciones 17
Imagen sobre imagen (PIP) 18
Funciones avanzadas
Media Play (USB) y .................................................... 19
Conexión de un dispositivo USB 19
Información adicional
Instalación del montaje mural y ..................................23
Fijación del televisor a la pared y ................................ 24
Bloqueo antirrobo Kensington y ................................. 24
Solución de problemas y ...........................................25
Especificaciones y ..................................................... 28
Licencia 28
Índice y ...................................................................... 29
¡Compruebe este símbolo!
t
Esta función se puede utilizar pulsando el
botón TOOLS del mando a distancia.
✎
Nota:
Información importante
O
Guía paso a paso :
Explica cómo acceder al
menú.
Page 32

Introducción
Listado de características
Excelente interfaz digital y capacidad de trabajo en red: El sintonizador digital HD incorporado permite ver las emisiones HD que y
no exigen una suscripción sin que sea necesario disponer de un receptor de televisión por cable / satélite (decodificador).
Reproductor multimedia y : Permite reproducir archivos de música, imágenes y películas guardados en un dispositivo USB o en el
PC. (pág. 19)
Accesorios
Asegúrese de que los siguientes elementos se incluyen con el televisor de pantalla LCD. Si falta alguno, póngase en contacto
✎
con su distribuidor.
El color y la forma de los componentes pueden variar según los modelos.
✎
Mando a distancia y pilas (2 x AAA) (No está disponible en algunas ubicaciones.) y
Manual del usuario y
Tarjeta de garantía / Guía de seguridad (No está disponible en algunas ubicaciones.) y
(M4 X L16)
Screws LN19C350 / LN22C350 : 2EA y
LN26C350 / LN32C350 : 3EA
Si desea más detalles, consulte la guía del soporte.
✎
Aspecto general del panel de control
Paño de limpieza y
Cable de alimentación y
(LN19C350 / LN22C350)
El color y la forma del producto pueden variar según el modelo.
✎
Indicador de encendidoSensor del mando a distancia
Altavoces
P
(interruptor de encendido /
apagado)
Sensor del mando a distancia El mando a distancia debe dirigirse hacia este punto del televisor.
SOURCE
E
MENU Muestra un menú en pantalla, la OSD (visualización en pantalla), de las funciones del TV.
y
z
Indicador de encendido Parpadea y se apaga cuando se enciende el aparato y se ilumina en el modo en espera.
Modo de espera
No deje el televisor en modo de espera durante períodos largos de tiempo (cuando está de vacaciones, por ejemplo). Aunque esté
apagado continúa consumiendo una pequeña cantidad de energía. Se recomienda desenchufar el cable de alimentación.
Español
4
Enciende o apaga el televisor.
Cambia entre todas las fuentes de entrada disponibles. En el menú en pantalla, utilice este
botón como lo haría con el botón ENTERE del mando a distancia.
Ajusta el volumen. En la OSD, utilice estos botones
botones ◄ y ► del mando a distancia.
Cambian los canales. En la OSD, utilice estos botones
botones ▼ y ▲ del mando a distancia.
y
de igual modo que los
z
de igual modo que los
Page 33

01 Introducción
Español
5
Aspecto general del mando a distancia
ABC D
Enciende y apaga el televisor.
Acceso directo a los canales.
No disponible.
Ajusta el volumen.
Muestra la lista de canales en la pantalla.
Permite ver Media Play (
Seleccionar rápidamente las funciones que
se usan con mayor frecuencia.
Selecciona los elementos del menú en
pantalla y cambia los valores que aparecen
Vuelve al menú anterior.
(pág. 12)
pág
. 19)
en el menú.
Muestra y selecciona las fuentes de vídeo
disponibles. (pág. 11)
Vuelve al canal anterior.
Corta temporalmente el sonido.
Cambia los canales.
Mostrar el menú de pantalla principal.
Seleccionar directamente el modo HDMI.
Púlselo para mostrar información en la pantalla
del televisor.
Sale del menú.
Botones que se utilizan en los menús
Media Play, etc.
FAV.CH: Muestra la lista de canales favoritos en la
pantalla. (No disponible)
P.SIZE: Selecciona el tamaño de imagen (pág. 14)
P.MODE: Seleccionar el modo de imagen (pág. 13)
Instalación de las pilas (tamaño de las pilas: AAA)
NOTA
✎
Utilice el mando a distancia a menos de 7 metros (23 pies)
x
del televisor.
Una luz muy brillante puede afectar al funcionamiento del
x
mando a distancia. No lo utilice cerca de luces fluorescentes
o de neón.
El color y la forma pueden variar según el modelo.
x
Page 34

Introducción
P
POWER
CHLIST
INFO
Conexión de una antena
Cuando el televisor se enciende por primera vez, los valores se inician de forma automática.
Conexión del cable de alimentación y la antena.
✎
Antena VHF/UHF
Cable
o
Entrada de alimentación
Plug & Play (configuración inicial)
Cuando el televisor se enciende por primera vez, una secuencia de indicaciones en pantalla permite configurar los parámetros
básicos. Pulse el interruptor de encendido/apagado P. Plug & Play sólo está disponible cuando la fuente Entrada está
configurada como TV.
Para volver al paso anterior, pulse el botón rojo.
✎
Selección de un idioma
1
Selección de Demo
2
comercio o Uso
domiciliario
Selección de una antena
3
Selección de un canal
4
Configuración del Reloj
5
Disfrute del TV.
Pulse los botones ▲ o ▼ y a continuación pulse el botón ENTERE.
Seleccione el idioma deseado para la OSD (presentación en pantalla).
Pulse los botones ◄ o ► y, a continuación, pulse el botón ENTERE.
Seleccione el modo y Uso domiciliario. El modo Demo comercio
se utiliza en los entornos comerciales.
Recupere la configuración de la unidad desde y Demo comercio
a Uso domiciliario (estándar): Pulse el botón del volumen del
televisor. Cuando vea el volumen en la OSD, mantenga pulsado el
botón MENU durante 5 segundos.
Pulse los botones ▲ o ▼ y a continuación pulse el botón ENTERE. Permite seleccionar Aire, STD,
HRC o IRC.
Pulse el botón ENTERE para seleccionar Iniciar. La búsqueda de canales se iniciará
automáticamente.
Para obtener más información, consulte Canal → Prog. Auto. (
Pulse el botón ✎ENTERE en cualquier momento para interrumpir el proceso de memorización.
Pulse los botones◄ o ► para desplazarse a Día, Mes, Año, Hora, Minuto o am/pm.
Ajústelos pulsando los botones ▲ o ▼.
Pulse el botón ENTERE.
pág
. 13)
ANT OUT
6
Si desea reiniciar esta función...
O m
6
MENU
Español
→ Configuration → Plug & Play → ENTERE
Page 35

Español
7
Conexiones
W
R
W W
BGRR
R-AUDIO-L
P
R PB Y
W W
BGRRWY
P
R PB Y
R-AUDIO-L
P
R PB Y
R-AUDIO-L
P
R PB Y
W
Y
R
R
R
B
B
W
WRR
W
G
G
R
Y
Conexión a un dispositivo AV (LN26C350, LN32C350)
Uso de un cable HDMI / DVI: Conexión HD (hasta 1080p)
Para conseguir una mejor calidad de imagen HD es aconsejable utilizar una conexión HDMI. Dispositivos disponibles:
Reproductor de DVD / Blu-ray, receptor por cable HD / satélite HD (decodificador).
Dispositivo
Rojo Blanco
HDMI OUT
02 Conexiones
or
DVI OUT
AUDIO OUT
HDMI (DVI) IN ✎/ PC/DVI AUDIO IN
Cuando se usa una conexión de cable HDMI / DVI, se debe conectar en el terminal xHDMI DVI (IN) para vídeo. Es posible que
un reproductor de DVD, Blu-ray, receptor por cable HD, receptor por satélite HD STB, decodificador o receptor por satélite STB
necesite un cable DVI-HDMI (de DVI a HDMI) o un adaptador DVI-HDMI (de DVI a HDMI). Se necesita el terminal PC/DVI AUDIO
IN para el sonido.
Si se conecta un dispositivo externo como un reproductor DVD / Blu-ray / decodificador de cable / receptor por satélite
x
(decodificador) que admita versiones HDMI anteriores a 1.3, el televisor quizás no funcione normalmente (por ejemplo, no se
muestre la pantalla / no haya sonido / parpadeos molestos / colores anormales).
Si el dispositivo externo se conecta al cable HDMI, es posible que el televisor no funcione correctamente. En este caso, póngase
x
en contacto con el proveedor del dispositivo para confirmar la versión HDMI y solicitar una actualización.
Es aconsejable adquirir un cable certificado HDMI. De lo contrario, la pantalla puede aparecer vacía o producirse un error de
x
conexión.
Mediante un cable de componentes: (hasta 1080p), mediante cables de audio / vídeo: (sólo 480i)
Dispositivos disponibles: Reproductor DVD y Blu-ray, decodificador por cable, receptor por satélite STB, aparato de vídeo VCR
VIDEO OUT
Cuando se conecta a ✎AV IN 1, el
color (verde) del terminal AV IN [Y/
VIDEO] no coincide con el cable de
vídeo (amarillo).
Para obtener la mejor calidad de
✎
imagen, se recomienda la conexión
de componentes antes que la
conexión A/V.
AUDIO OUT
Aparato de vídeo
AUDIO OUT
COMPONENT OUT
Reproductor Blu-ray
Amarillo Rojo Blanco Rojo Azul Verde
Page 36

Conexiones
W R
R-AUDIO-L
P
R PB Y
W W
BGRR
Conexión a un dispositivo de audio (LN26C350, LN32C350)
Uso de una conexión de cable de audio (analógico)
Dispositivos disponibles: amplificador, sistema Home Theater
Rojo Blanco
AUDIO OUT ✎: Permite conectar los terminales de la entrada de audio del amplificador/sistema Home Theater.
En la conexión, utilice el conector apropiado (se vende por separado).
x
Cuando un amplificador de audio se conecta a los terminales xAUDIO OUT: Reduzca el volumen del televisor y ajuste
el volumen con el control de volumen del amplificador.
Conexión a un PC (LN26C350, LN32C350)
Uso de cables HDMI/DVI/D-sub
AUDIO OUT
DVI OUT
AUDIO OUT
PC OUT
AUDIO IN
DVD home theater
8
Español
Page 37

Español
9
02 Conexiones
Conexión a un dispositivo AV (LN19C350 / LN22C350)
W W
BGRRWY
R
W
R-AUDIO-L
P
R PB Y
W W
BGRR
P
R PB Y
R-AUDIO-L
P
R PB Y
R-AUDIO-L
P
R PB Y
W
Y
R
R
R
B
B
W
WRR
G
G
Y
R
W
Uso de un cable HDMI / DVI: Conexión HD (hasta 1080p)
Para conseguir una mejor calidad de imagen HD es aconsejable utilizar una conexión HDMI. Dispositivos disponibles:
Reproductor de DVD / Blu-ray, receptor por cable HD / satélite HD (decodificador).
Dispositivo
Rojo Blanco
HDMI OUT
or
DVI OUT
AUDIO OUT
HDMI (DVI) IN ✎/ PC/DVI AUDIO IN
Cuando se usa una conexión de cable HDMI / DVI, se debe conectar en el terminal xHDMI (DVI) IN para vídeo. Es posible que
un reproductor de DVD, Blu-ray, receptor por cable HD, receptor por satélite HD STB, decodificador o receptor por satélite
STB necesite un cable DVI-HDMI (de DVI a HDMI) o un adaptador DVI-HDMI (de DVI a HDMI). Se necesita el terminal PC/DVI
AUDIO IN para el sonido.
Si se conecta un dispositivo externo como un reproductor DVD / Blu-ray / decodificador de cable / receptor por satélite
x
(decodificador) que admita versiones HDMI anteriores a 1.3, el televisor quizás no funcione normalmente (por ejemplo, no se
muestre la pantalla / no haya sonido / parpadeos molestos / colores anormales).
Si el dispositivo externo se conecta al cable HDMI, es posible que el televisor no funcione correctamente. En xxeste caso,
x
póngase en contacto con el proveedor del dispositivo para confirmar la versión HDMI y solicitar una actualización.
Es aconsejable adquirir un cable certificado HDMI. De lo contrario, la pantalla puede aparecer vacía o producirse un error de
x
conexión.
Mediante un cable de componentes: (hasta 1080p), mediante cables de audio / vídeo: (sólo 480i)
Dispositivos disponibles: Reproductor DVD y Blu-ray, decodificador por cable, receptor por satélite STB, aparato de vídeo VCR
VIDEO OUT
Cuando se conecta a ✎AV IN 1, el
color (verde) del terminal AV IN 1 [Y/
VIDEO] no coincide con el cable de
vídeo (amarillo).
Para obtener la mejor calidad de
✎
imagen, se recomienda la conexión
de componentes antes que la
conexión A/V.
AUDIO OUT
Aparato de vídeo
AUDIO OUT
COMPONENT OUT
Reproductor Blu-ray
Amarillo Rojo Blanco Rojo Azul Verde
Page 38

Conexiones
Conexión a un dispositivo de audio (LN19C350 / LN22C350)
Uso de una conexión de audio (analógico)
Dispositivos disponibles: amplificador, sistema Home Theater
Auriculares ✎H
Los auriculares pueden estar conectados a la salida de auriculares del aparato. Cuando están conectados los
auriculares, el sonido de los altavoces integrados se desconecta.
La función de sonido disponible puede estar restringido cuando se conectan auriculares al televisor.
x
El volumen de los auriculares y el del televisor se ajustan por separado.
x
Conexión a un PC (LN19C350 / LN22C350)
Uso de cables HDMI/DVI/D-sub
Auriculares
AUDIO OUT
DVI OUT
AUDIO OUT
PC OUT
10
Español
Page 39

Español
11
02 Conexiones
Modos de visualización (entradas D-Sub y HDMI/DVI)
P . MODES.MODEP . SIZE
La resolución óptima es 1360x768@60Hz.
Mode
IBM
MAC
VESA DMT
VESA CVT
VESA GTF 1280 x 720 52.500 70.000 89.040 - / +
NOTA
✎✎
En una conexión de cable HDMI/DVI, se debe utilizar el terminal xHDMI DVI(IN).
No se admite el modo entrelazado.
x
El aparato puede funcionar incorrectamente si se selecciona un formato de vídeo que no sea estándar.
x
Los modos Independiente y Compuesto no se admiten. SOG (Sincronización en verde) no se admite.
x
Cables de entrada (se venden por separado)
Resolución
640 x 350 31.469 70.086 25.175 + / 720 x 400 31.469 70.087 28.322 - / +
640 x 480 35.000 66.667 30.240 - / 832 x 624 49.726 74.551 57.284 - / -
640 x 480
800 x 600
1024 x 768
1280 x 720 45.000 60.000 74.250 + / +
1360 x 768 47.712 60.015 85.500 + / +
720 x 576 35.910 59.950 32.750 - / +
1280 x 720 56.456 74.777 95.750 - / +
Frecuencia horizontal
(kHz)
31.469 59.940 25.175 - / -
37.861 72.809 31.500 - / -
37.500 75.000 31.500 - / -
37.879 60.317 40.000 + / +
48.077 72.188 50.000 + / +
46.875 75.000 49.500 + / +
48.363 60.004 65.000 - / -
56.476 70.069 75.000 - / -
60.023 75.029 78.750 + / +
Frecuencia vertical (Hz)
Frecuencia de reloj de
píxeles (MHz)
sincronización (H/V)
Polaridad de
HDMI HDMI/DVI Componente Compuesto (AV) Coaxial (RF) VGA
Cambio de la fuente de entrada
Lista de fuentes
MENU
O m
Entradas → ENTER
Se utiliza para seleccionar TV u otras fuentes
de entrada externas como reproductores de
DVD/Blu-ray/decodificadores o receptores
por satélite STB.
TV / AV1 / AV2 / Component / PC / ■
HDMI/DVI
→ Entrada → Lista de
Puede elegir solamente dispositivos externos
✎
que estén conectados al televisor. En Lista de
Entradas, se resaltan las entradas conectadas.
PC siempre está activado.
✎
E
Edición del nombre
MENU
O m
ENTER
Vídeo / DVD / Cable STB / Satélite STB / PVR STB / ■
Receptor AV / Juego / Filmadora / PC / DVI PC / DVI
/ TV / IPTV / Blu-Ray / HD DVD / DMA: Dé un nombre
al dispositivo conectado en las tomas de entrada; de
esta manera será más fácil seleccionar el dispositivo de
entrada.
Cuando se conecta un cable HDMI/DVI al puerto
✎
HDMI (DVI)IN, se debe configurar el puerto en el modo
DVI PC o Dispositivos DVI en Editar Nombre.
→ Entrada → Editar Nombre →
E
Page 40

Funciones básicas
Cómo desplazarse por los menús
Antes de usar el televisor, siga los pasos siguientes para
conocer cómo explorar el menú y seleccionar y ajustar las
diversas funciones.
1
2
3
1 Botón MENU: Muestra el menú principal en pantalla.
2 Botones ENTERE / direccionales: Mueva el cursor y
seleccione una opción. Confirme la configuración.
3 Botón RETURN: Vuelve al menú anterior.
4 Botón EXIT: Sale del menú en pantalla.
Funcionamiento de la OSD (presentación en pantalla)
El paso de acceso puede variar según el menú
seleccionado.
1
2
3
4
5
6
MENU
▲ / ▼
ENTER
▲ / ▼
◄ / ►
ENTER
EXIT
m
E
E
e
Las opciones del menú principal se
muestran en la pantalla:
Imagen, Sonido, Canal,
Configuración, Entrada.
Seleccione un icono con los
botones ▲ o ▼.
Pulse ENTERE para acceder al
menú secundario.
Seleccione un menú secundario
con los botones ▲ o ▼.
Ajuste el valor de un elemento con
los botones ◄ o ►. El ajuste de
la visualización en pantalla puede
variar según el menú seleccionado.
Pulse ENTERE para confirmar
una selección
Pulse EXIT
4
7
Menú de canales
Lista de canales
MENU
O m
canales → ENTER
En la lista de canales puede añadir/borrar o
bloquear/desbloquear los canales fácilmente.
Agregación / supresión de canales
Puede añadir o eliminar los canales.
Desplácese al campo # pulsando los botones ◄ / ►,
seleccione el canal que desee añadir y pulse el botón
ENTERE.
Si vuelve a pulsar el botón ✎ENTERE, el símbolo c
que aparece junto al canal desaparece y éste no se
añade.
Bloqueo/desbloqueo de canales
Esta función permite bloquear el vídeo y el audio para evitar
que los usuarios no autorizados (por ejemplo, los niños)
puedan ver programas poco recomendables.
Desplácese al campo \ pulsando los botones ◄ / ►,
seleccione el canal que desee bloquear y pulse el botón
ENTERE.
Está función está disponible sólo cuando está activada
✎
la función de bloqueo.
Aparece la pantalla para la introducción del número PIN.
✎
Escriba su código PIN de 4 dígitos.
→ Canal → Lista de
Aire 59
Ch.
Aire 52
Aire 53
Aire 54
Aire 55
Aire 56
Aire 57
Aire 58
Aire 59
Aire 60
Aire 61
# Añadir
Mover
CH
Página
E
Lista de canales
# \
c
\ Bloquear
E Entrar
R
Regresar
6 / 7
12
Memorización de canales ¦
MENU O m → Canal → ENTERE
Aire / Cable (Aire / STD / HRC / IRC)
Antes de empezar a memorizar los canales disponibles,
debe indicar el tipo de origen de la señal conectada al
televisor (es decir, aérea o sistema de cable).
STD ✎, HRC e IRC identifican los distintos tipos de
sistemas de TV por cable. Póngase en contacto con su
proveedor de cable para averiguar el tipo de sistema de
cable existente en su zona. En este momento ya se ha
seleccionado el origen de la señal.
Español
Page 41

Español
13
03 Funciones básicas
Prog. Auto
P . MODES.MODEP . SIZE
El televisor empezará a memorizar todos los canales
disponibles.
NOTA ✎
Todos los canales disponibles se almacenan
x
automáticamente en la memoria. Se tarda de 3 a 10
minutos en memorizar los canales.
Si desea detener la programación automática, pulse
x
el botón ENTERE.
Otras funciones ¦
MENU O m → Canal
Sintonía Fina
Si la recepción es clara, no tiene que realizar la sintonización fina
del canal, ya que esta operación se hace de forma automática
durante la búsqueda y la memorización. Si la señal es débil o está
distorsionada, realice manualmente la sintonización fina del canal.
Seleccione y Sintonía fina en el menú Canal.
Los canales que se han ajustado con la sintonización fina
✎
se marcan con un asterisco “*” a la derecha del número de
canal en la banda del canal.
Para reiniciar la sintonía fina, seleccione ✎ Reiniciar.
de la imagen
Menú
Sistema de color
(Automático / PAL-M / PAL-N / NTSC)
Normalmente el televisor puede recibir imagen y sonido de
buena calidad en el modo Automático. Este modo detecta
automáticamente las fuentes de la señal del color. Si la
implementación del color no es satisfactoria, elija entre
PAL-M, PAL-N o NTSC.
Menú de la imagen
Cambio del modo de imagen preseleccionado ¦
Ajuste de la configuración de la imagen ¦
MENU
O m
→ Imagen → Luz de fondo → ENTER
E
Luz de fondo / Contraste / Brillo /
Definición / Color / Tinte (V/R)
El televisor tiene diferentes opciones de configuración para
controlar la calidad de la imagen.
NOTA
✎
Cuando haga cambios en xLuz de fondo, Contraste,
Brillo, Definición, Color o Tinte (V/R), la OSD
también se ajustará.
En el modo PC, sólo se pueden realizar cambios en
x
las opciones Luz de fondo, Contraste y Brillo.
La configuración de cada dispositivo externo
x
conectado al televisor se puede ajustar y guardar.
Cambio de las opciones de la imagen ¦
Configuración avanzada
MENU
O m
ENTER
(disponible en los modos Normal / Cine)
Si se comparan con los modelos anteriores, los nuevos
televisores de Samsung muestran imágenes más precisas.
En el modo PC, sólo se pueden cambiar ✎Gamma y
Balance de blanco.
→ Imagen → Configuración avanzada →
E
T V
Imagen
Sonido
Canal
Config.
Entrada
Configuración avanzada
Tono del negro : Apagado
Contraste Dinám. : Medio
Gamma : 0
Espacio de color : Native
Balance de blanco :
Tono Piel : 0
Mejora de perfiles : Encendido
U
Mover
E
Entrar
R
Regresar
MENU
O m
Modo
Seleccione el tipo de imagen preferido
pulsando el botón P.MODE.
Dinámico ■ : Adecuado para un entorno
iluminado.
Normal ■ : Adecuado para un entorno
normal.
Cine ■ : Adecuado para ver películas en un entorno
oscuro.
→ Imagen → Modo → ENTER
t
E
Tono del negro (Apagado / Oscuro / Más oscuro / ■
El más oscuro): Seleccione el nivel de negro para
ajustar la profundidad de la pantalla.
Contraste Dinám. (Apagado / Bajo / Medio / Alto) ■ :
Ajuste el contraste de la pantalla.
Gamma ■ : Ajuste la intensidad del color primario.
Espacio de color (Auto / Nativo) ■ :
Ajuste la gama de colores disponibles para crear la
imagen.
Page 42

Funciones básicas
P
POWER
P . MODES.MODEP . SIZE
Balance de blanco ■ : Ajuste la temperatura del color
para obtener una imagen más natural.
Bal. Rojo / Bal. Verde / Bal. Azul: Ajuste la intensidad
de cada color (rojo, verde, azul).
Gan. Rojo / Gan. Verde / Gan. Azul: Ajuste el brillo de
cada color (rojo, verde, azul).
Reiniciar: Restablece los valores predeterminados de
Balance de blanco.
Tono Piel ■ : Mejore el tono rosado de “tono piel”.
Mejora de perfiles (Apagado / Encendido) ■ : Mejora los
bordes del objeto.
Opciones de imagen
MENU
O m
ENTER
En el modo PC sólo se pueden cambiar ✎Tono Color y
Tamaño.
Tono Color (Frío / Normal / Tibio1 / Tibio2) ■
Tibio1 ✎ o Tibio2 sólo están disponibles cuando el modo
de imagen está configurado en Cine.
La configuración de cada dispositivo externo
✎
conectado a una entrada del televisor se puede ajustar
y guardar.
Tamaño ■ : Es posible que el receptor
de satélite o cable tenga también su
propia gama de tamaños de pantalla. Sin
embargo, es muy aconsejable utilizar el
modo 16:9 la mayoría de las veces.
16:9: Ajusta la imagen al modo
panorámico 16:9.
Zoom ancho: Aumenta el tamaño de la imagen más
que 4:3.
Zoom: Amplía el formato 16:9.
4:3: Ajusta la imagen al modo básico (4:3).
→ Imagen → Opciones de imagen →
E
T V
Imagen
Sonido
Canal
Config
Entrada
Ajusta la posición mediante los botones ✎▲,▼.
Ajuste la posición utilizando los botones ✎▲,▼.
No vea la televisión en formato 4:3 durante largos
✎
periodos de tiempo. Los rastros de bordes a
la izquierda, derecha o centro de la pantalla
pueden provocar un desgaste de la pantalla por la
retención de la imagen que no está cubierto por
la garantía.
Opciones de imagen
Tono Color : Normal
Tamaño : 16:9
Filtro de ruido digital : Apagado
Nivel de negro HDMI : Normal
Modo película : Apagado
U
Mover
E
Entrar
R
Regresar
Ajuste pantalla: Muestra la imagen completa sin
cortes cuando la entrada de la señal es HDMI
(720p/1080i/1080p) o Componente (1080i/1080p).
NOTA
✎
Según la fuente de entrada, las opciones de tamaño
x
de la imagen pueden variar.
Los elementos disponibles pueden diferir según el
x
modelo seleccionado.
En el modo PC, sólo se pueden ajustar los modos
x
16:9 y 4:3.
La configuración de cada dispositivo externo
x
conectado a una entrada del televisor se puede
ajustar y guardar.
Después de seleccionar Ajuste pantalla en los
x
modos HDMI (1080i/1080p) o Componente
(1080i/1080p): Ajuste la posición utilizando los
botones ▲, ▼, ◄, ►.
Si se usa la función xAjuste pantalla con la entrada
HDMI 720p, en los laterales superior, inferior, derecho
e izquierdo de la pantalla se cortará una línea como
en la función de sobreexploración.
Si se ha seleccionado el modo doble ( xŒ, À
el menú PIP (Imagen en imagen), el tamaño de la
imagen no se puede definir.
Fuente de entrada Tamaño de imagen
TV, AV,
Componente (480i, 480p)
Componente (1080i,
1080p), HDMI (720p, 1080i,
1080p)
PC 16:9, 4:3
Filtro de ruido digital (Apagado / Bajo / Medio / Alto ■
/Auto): Si la señal de emisión que recibe el televisor es
débil, puede activarse la función Filtro de ruido digital
para reducir la estática y las imágenes superpuestas que
pueden aparecer en la pantalla.
Cuando la señal sea débil, intente otras opciones
✎
hasta que se vea una imagen de mejor calidad.
Nivel de negro HDMI (Normal / Bajo) ■ : Selecciona el
nivel de negro en la pantalla para ajustar la profundidad
de ésta.
Disponible sólo en el modo HDMI (señales RGB).
✎
Modo película (Apagado / Auto) ■ : Configura el televisor
para detectar automáticamente y procesar las señales
de las películas procedentes de todas las fuentes y
ajustar la imagen para conseguir una calidad óptima.
Disponible en TV, AV, COMPONENT (480i / 1080i)
✎
y HDMI(480i / 1080i).
16:9, Zoom ancho,
Zoom, 4:3
16:9, 4:3, Zoom
ancho, Zoom,
Ajuste pantalla
) en
14
Español
Page 43

Español
15
03 Funciones básicas
Reiniciar (Aceptar / Cancelar)
Restablece la configuración predeterminada del modo de la
imagen actual.
Ajuste del televisor con el ordenador ¦
Defina la fuente de entrada al PC.
Ajuste automático
MENU
O m
ENTER
Ajuste automáticamente los valores y las posiciones de la
frecuencia y afine la configuración.
No disponible en las conexiones a través del cable
✎
HDMI/DVI.
→Imagen → Ajuste automático →
E
t
Pantalla
Grueso / Fino ■ : Elimina o reduce el ruido de la imagen.
Si el ruido no desaparece sólo con la sintonización
fina, realice los ajustes de frecuencia hasta el máximo
(Grueso) y vuelva a realizar la sintonización fina.
Después de reducir el ruido, vuelva a ajustar la imagen
para que quede alineada en el centro de la pantalla.
PC Position ■ : Ajuste la posición de la pantalla del PC si
no se acopla a la pantalla del TV. Pulse los botones ▲ o
▼ para ajustar la posición vertical. Pulse los botones ◄
o ► para ajustar la posición horizontal.
Reiniciar Imagen ■ : Restablece la configuración
predeterminada de la imagen.
Uso del televisor como una pantalla de ordenador (PC)
Configuración del software del PC (basado en Windows XP)
Según la versión de Windows y la tarjeta de vídeo, las
pantallas reales del PC pueden ser diferentes, pero se
aplicará casi siempre la misma información de configuración
básica. (En caso contrario, póngase en contacto con el
fabricante del ordenador o con el distribuidor de Samsung.)
1. Haga clic en “Panel de control” en el menú de inicio de
Windows.
2. Haga clic en “Apariencia y temas” en la ventana “Panel
de control” y aparecerá un cuadro de diálogo.
3. Haga clic en “Pantalla” y aparecerá una cuadro de
diálogo sobre la pantalla.
4. Vaya a la pestaña “Configuración” en el cuadro de
diálogo.
Configuración correcta del tamaño (resolución) [Óptima: y
1360 x 768 píxeles]
Si existe una opción de frecuencia vertical en el cuadro y
de diálogo de configuración de la pantalla, el valor
correcto es “60” o “60 Hz”. Si no, haga clic en “Aceptar”
y salga del cuadro de diálogo.
Page 44

Funciones básicas
Menú del sonido
Cambio del modo de sonido preseleccionado ¦
MENU
O m
Modo
Normal ■ : Selecciona el modo de sonido normal.
Música ■ : Refuerza la música por encima de las voces.
Cine ■ : Ofrece el mejor sonido para películas.
Voz clara ■ : Realza las voces respecto de los sonidos.
Favorito ■ : Mantiene los valores personalizados del
sonido.
→ Sonido → Modo → ENTER
t
E
Ajuste de la configuración del sonido ¦
MENU
O m
→ Sonido → Ecualizador → ENTER
E
Ecualizador
Ajuste el modo de sonido (sólo modo de sonido estándar).
Balance I/D ■ : Ajusta el balance entre los altavoces
izquierdo y derecho.
100Hz / 300Hz / 1KHz / 3KHz / 10KHz ■ (ajuste
de ancho de banda): Ajusta el nivel de frecuencias
específicas de ancho de banda.
Vol.Auto (Apagado / Encendido)
Para equilibrar el nivel del volumen de cada canal, se ha de
configurar como Normal.
Seleccionar altavoz
(Altavoz externo / Altavoz de TV)
Debido a las diferencias en la velocidad de decodificación
entre el altavoz principal y el receptor de audio se puede
originar un eco. En tales casos, establezca TV como Altavoz
externo.
Cuando ✎Seleccionar altavoz está establecido como
Altavoz externo, los botones de volumen y MUTE no
funcionan y se limita la configuración del sonido.
Cuando ✎Seleccionar altavoz está establecido como
Altavoz externo, se debe utilizar esta configuración.
Altavoz de TV: Apagado, Altavoz externo:
x
Encendido
Cuando ✎Seleccionar altavoz está establecido como
TV Altavoz de TV, se debe utilizar esta configuración.
Altavoz de TV: Encendido, Altavoz externo:
x
Encendido
Si no hay señal de vídeo, ambos altavoces se silencian.
✎
Menú de configuración
Configuración de la hora ¦
Configuración del sonido ¦
SRS TruSurround HD (Apagado /
Encendido)
Esta función permite experimentar un sonido profundo y
completo como si se estuviera en una sala de cine o de
conciertos. Selecciónela para oír DVD o música.
Sonid Multi-track (MTS)
(sólo canales analógicos)
Mono ■ : Elija para canales que emiten en monoaural o si
tiene dificultades con la recepción de señales estéreo.
Estéreo ■ : Elija para canales que emiten en estéreo.
SAP ■ : Elija esta opción para escuchar el programa
de audio independiente, que normalmente es una
traducción de otro idioma.
En función del programa concreto emitido, puede
✎
escuchar en modo Mono, Estéreo o SAP.
t
t
MENU
O m
→ Configuración → Hora → ENTER
Hora
Reloj ■ : La configuración del reloj se utiliza en diferentes
funciones del temporizador del televisor.
La hora actual aparecerá siempre que se pulse el
O
botón INFO.
Si desconecta el cable de alimentación, debe
✎
configurar el reloj de nuevo.
Puede ajustar ✎el mes, el día, el año, la hora y
el minuto directamente pulsando los botones
numéricos del mando a distancia.
Uso del temporizador de desconexión ¦
t
MENU Om → Configuración → Hora → Temporizador
→ ENTERE
Temporizador ■ : Apaga automáticamente el televisor tras
un periodo de tiempo establecido. (30, 60, 90, 120, 150
y 180 minutos).
Para cancelar ✎Temporizador seleccione
Apagado.
E
16
Español
Page 45

Español
17
03 Funciones básicas
Activación y desactivación del temporizador ¦
Otras funciones ¦
MENU Om → Configuración → Hora → Temporizador 1
→ ENTERE
Temporizador 1 / Temporizador 2 / Temporizador ■
3: La activación y desactivación del temporizador se
puede configurar de tres maneras. Debe ajustar el reloj
en primer lugar.
T V
Imagen
Sonido
Canal
Config.
Entrada
Hora de encendido / Hora de apagado: Ajuste la
hora, los minutos, am/pm y activar/desactivar. (Para
activar el temporizador con la configuración deseada,
establézcalo en Activar.)
Repeat: Seleccione Una vez, Cada día, Lun~Vie,
Lun~Sáb, Sáb~Dom para configurarlo como más le
convenga.
Volumen: Configure el nivel de volumen deseado.
Canal: Permite seleccionar el canal deseado.
Apagado automático (sólo disponible cuando el
✎
televisor se ha encendido con el temporizador): El
televisor se apagará automáticamente 3 horas después
de que se haya dejado inactivo para prevenir un
sobrecalentamiento.
Temporizador 1
Hora de encendido
▲
:
▼
Hora de apagado
:
12
00 am Inactivo
Repetir
Una vez
Volumen Canal
10 03Aire
Mover
U Ajustar R
Inactivo0000 am00
Regresar
Programas de bloqueo ¦
MENU
O m
→ Configuración → ENTER
E
Bloqueo (Apagado / Encendido)
Bloquee los canales en la lista de canales para impedir que
los usuarios no autorizados, como los niños, accedan a
programas inadecuados para ellos.
Sólo disponible cuando la fuente de ✎Eentrada se
configura como TV.
MENU Om → Configuración → ENTERE
Idioma
Ajuste el idioma de los menus.
Subtítulos
(Mensajes de texto en pantalla)
Subtítulo (Apagado / Encendido) ■ : Puede activar o
desactivar la función de subtítulos. Si los subtítulos no
están disponibles, no se mostrarán en la pantalla.
La función de subtítulos no está disponible en los
✎
modos Componente, HDMI ni PC.
Modo ■ : Puede seleccionar el modo de subtítulo deseado.
Canal ■ : Puede seleccionar el canal deseado.
Campo ■ : Puede seleccionar el campo deseado.
La disponibilidad de los subtítulos depende del
✎
programa que se esté emitiendo.
Modo Juego (Apagado / Encendido)
Cuando se conecta una videoconsola como PlayStation™ o
Xbox™, se puede experimentar una sensación más realista
al seleccionar el modo de juegos.
NOTA
✎
Precauciones y limitaciones del modo de juego
x
Si desea desconectarse de la consola de videojuegos –
y conectarse a otro dispositivo externo, ajuste la
opción Modo Juego como Apagado en el menú de
configuración.
Si visualiza el menú de TV en el – Modo Juego, la
pantalla tiembla ligeramente.
Modo Juego xno está disponible cuando la fuente de
entrada está en el modo TV o PC.
Tras conectar la consola de videojuegos, configure
x
Modo Juego como Encendido. Desgraciadamente,
puede que advierta una reducción en la calidad de la
imagen.
Si xModo Juego está Encendido
El modo – Imagen se configura como Normal y el de
Sonido como Cine.
Ecualizador – no está disponible.
Cambiar Código
Aparecerá la pantalla para cambiar el código. Escriba un
nuevo código PIN de 4 dígitos. En cuanto introduzca los 4
dígitos, aparecerá la pantalla Confirmar Nuevo Código.
Vuelva a escribir los 4 dígitos. Cuando desaparezca la
pantalla de confirmación, el código quedará memorizado.
Si olvida su código PIN, pulse los botones del mando
✎
a distancia siguiendo la secuencia siguiente, que
restablece el código a “0-0-0-0”: POWER (apagar) →
MUTE → 8 → 2 → 4 → POWER (encender).
Page 46

Funciones básicas
Melodía (Apagado / Bajo / Medio / Alto)
Establezca que una melodía se oiga cuando el televisor se
encienda o se apague.
NO TA
✎
Sólo disponible cuando la fuente de entrada se configura
x
como TV.
Para apagar la melodía, establezca Melodía como
Apagado.
La melodía no se reproduce.
x
Cuando no hay salida de sonido desde el televisor –
porque se ha activado el botón MUTE.
Cuando no hay salida de sonido desde el televisor –
porque el volumen se ha reducido al mínimo con el
botón VOL -.
Cuando la función – Temporizador ha apagado el
televisor.
Ahorro energía (ApagadoBajo / Medio /
Alto / Auto)
Esta función ajusta el brillo del televisor, lo cual reduce el
consumo de energía. Si desea ver la televisión por la noche,
ajuste la opción del modo Ahorro energía en Alto; sus
ojos se lo agradecerán y, además, reducirá el consumo de
energía.
t
Sistema de color AV (Automático / PAL-M /
PAL-N / NTSC)
Normalmente el televisor puede recibir imagen y sonido
de buena calidad en el modo AUTO. Este modo detecta
automáticamente el sistema de color de la señal. Si recibe un
sistema de señal con un color insatisfactorio, seleccione un
modo del sistema de color AV como PAL-M, PAL-N o NTSC.
Esta función sólo está disponible en el modo AV.
✎
Imagen sobre imagen (PIP) ¦
t
PIP
MENU Om → Configuración → PIP → ENTERE
Puede ver simultáneamente el sintonizador de televisión y otra
fuente de vídeo externa. PIP, imagen sobre imagen, no se admite
en el mismo modo.
NO TA
✎
Si apaga el televisor mientras mira la televisión en el
x
modo PIP, la ventana PIP desaparecerá.
Puede notar que la imagen de la ventana PIP llega a ser
x
ligeramente artificial cuando utiliza la pantalla principal
para visualizar juegos o karaoke.
Configuración de PIP
x
Imagen principal
Component TV, AV2
HDMI/DVI, PC TV, AV1, AV2
T V
PIP : Encendido
Imagen
Origen : TV
Tamaño :
Sonido
Posición :
Canal :
Canal
Sel. Sonido : Principal
Config.
Entrada
U
PIP (Apagado / Encendido) ■ : Active o desactive la función
PIP.
Origen (TV / AV1 / AV2) ■ : Seleccione un origen de la
imagen secundaria.
Tamaño ( ■ Õ / Œ, À): Seleccione un tamaño para la
imagen secundaria.
Si la imagen principal está en modo HDMI, la opción
✎
Tamaño está disponible.
Posición ( ■ à / – / — / œ): Seleccione una posición
para la imagen secundaria.
En el modo doble (
✎ Œ
seleccionar.
Canal ■ : Seleccione el canal de la pantalla secundaria.
Sel. Sonido (Principal / Sub) ■ : Puede elegir el sonido que
desee (Principal / Sub) en el modo PIP.
PIP
Mover
E Entrar R
, À), Posición no se puede
Imagen secundaria
Regresar
18
Español
Page 47

Español
19
MEDIA.P
POWER
Funciones avanzadas
USB
Photo
PhotoMusic Setup
SUM
307.2MB/973.7MB
Music
PhotoMusic Setup
SUM
307.2MB/973.7MB
USB
Media Play (USB)
Disfrute de archivos de fotos, música y películas
almacenados en un dispositivo de clase de
almacenamiento masivo (MSC) USB.
MENU
O
m → Input → Media Play (USB)
→ ENTER
Conexión de un dispositivo USB ¦
E
Device Name
SUM
315.0MB/495.0MB Free
E
Enter e Exit
04 Funciones avanzadas
1. Encienda el televisor.
2. Conecte un dispositivo USB que contenga archivos de fotos, música o películas al
terminal USB que se encuentra en la parte posterior del televisor.
3. Cuando se muestre la pantalla de selección Input, pulse el botón ► para seleccionar
Media Play (USB) y, posteriormente, pulse el botón ENTERE.
Unidad USB
Panel lateral del TV
Uso del menú Media Play
Visualización de una foto (o una presentación)
1. Pulse el botón MENU. Pulse los botones ▲ o ▼ para seleccionar
Entrada y, a continuación, pulse el botón ENTERE.
2. Pulse los botones ▲ o ▼ para seleccionar Media Play (USB) y, a
continuación, pulse el botón ENTERE.
3. Pulse los botones ▲ o ▼ para seleccionar el dispositivo de memoria
USB correspondiente y pulse el botón ENTERE.
El menú Media Play varía según el dispositivo de memoria USB
✎
conectado al televisor.
Algunos dispositivos quizás no se admitan por problemas de
✎
compatibilidad.
4. Pulse los botones ◄ o ► para seleccionar un icono (Photo, Music,
Setup) y, a continuación, pulse el botón ENTERE.
✎
Puede que no funcione correctamente con archivos multimedia sin licencia.
Lista de lo que debe saber antes de utilizar ✎Media Play (USB)
En un nombre de carpeta o de archivo (foto, música) sólo se deben utilizar caracteres alfanuméricos.
x
El sistema de archivos sólo admite el FAT16/32. (No se admite el sistema de archivo NTFS.) Algunos tipos de
x
dispositivos de audio y cámaras digitales USB pueden no ser compatibles con este televisor.
El reproductor multimedia (USB) sólo admite el dispositivo de clase de almacenamiento masivo (MSC) USB. MSC es
x
un dispositivo de clase de almacenamiento masivo sólo de transporte de gran capacidad. Ejemplos de MSC son las
unidades de almacenamiento en miniatura y los lectores de tarjetas Flash. (No se admite ni el HUB ni el USB.)
Antes de conectar el dispositivo al televisor, haga una copia de seguridad de sus archivos para evitar daños o
x
pérdidas de datos.
SAMSUNG no se hace responsable por cualquier daño en los archivos o pérdida de datos.
Conecte directamente al puerto
x
problemas de compatibilidad con el USB.
Sólo se admiten los formatos de archivo mp3 y jpeg.
x
El formato mp3 del reproductor multimedia (USB) sólo admite archivos de música con una frecuencia de muestreo
x
alta (32 kHz, 44,1 kHz o 48 kHz).
Se recomienda el formato jpeg secuencial.
x
No desconecte el dispositivo USB mientras se esté cargando.
x
USB del televisor. Si utiliza una conexión con un cable independiente, puede haber
L
Move E Enter R Return
Page 48

Funciones avanzadas
Photo
PhotoMusic Setup
SUM
307.2MB/973.7MB
Music
PhotoMusic Setup
SUM
307.2MB/973.7MB
DSC_0558.JPG
580
440
78.0KB
03 / 14
SUM
*
Photo
307.2MB/973.7MB
File.....jpg
File.....jpg File.....jpg
File.....jpg File.....jpg File.....jpg
File.....jpg File.....jpg
File.....jpg File.....jpg
File.....jpg File.....jpg File.....jpg
USB
MSC admite archivos MP3 y JPEG, y el dispositivo PTP sólo admite archivos JPEG.
x
MTP (Protocolo de transferencia de recursos) no se admite.
x
La duración de la reproducción de un archivo mp3 puede visualizarse como ‘00:00:00’ si la información del tiempo
x
de reproducción no se encuentra en el inicio del archivo.
Cuanto mayor sea la resolución de la imagen, más tiempo tardará en visualizarse en la pantalla.
x
Las listas de fotos o música muestran hasta 300 carpetas o archivos.
x
Según el tamaño del archivo, el proceso de carga puede requerir cierto tiempo.
x
Los archivos MP3 con DRM descargados desde un sitio de pago no se pueden reproducir.
x
La tecnología Gestión de derechos digitales (DRM) admite la creación de contenidos, la distribución y gestión de
x
éstos de modo integrado y general, incluida la protección de los derechos e intereses de los proveedores de los
contenidos, la prevención de copias ilegales de los contenidos, así como la gestión de cobros y acuerdos.
Si se utiliza un cable de extensión USB, es posible que el dispositivo USB no se reconozca o que los archivos del
x
dispositivo no se puedan leer.
Si no se reconoce un dispositivo USB conectado al televisor, la lista de archivos del dispositivo está dañada o un
x
archivo de la lista no se reproduce, conecte el dispositivo USB al ordenador, formatee el dispositivo y compruebe la
conexión.
Si un archivo eliminado del ordenador se puede encontrar todavía cuando se ejecuta Media Play, utilice la función
x
“Vaciar papelera de reciclaje” del ordenador para eliminarlo permanentemente.
Photo
Visualización de una foto (o una presentación)
1. Pulse el botón INFO para mostrar la opción Start Slide Show,
Select All, Deselect All.
2. Pulse los botones ▲ o ▼ para seleccionar Start Slide Show y, a
continuación, pulse el botón ENTERE.
En la presentación, los archivos se muestran en orden a partir
✎
del archivo que se muestra en este momento.
Los archivos MP3 se pueden reproducir automáticamente
✎
durante la presentación si la opción de la Background
Music predeterminada está establecida en On. Para que
esta función sea posible, los archivos MP3 y otros archivos
de fotos deben estar en la misma carpeta del dispositivo de
memoria USB.
Pu ✎lse el botón INFO durante la presentación para configurar las opciones Slide Show Speed, Background
Music, Background Music Setting, List. Pulse los botones ▲ o ▼ para seleccionar la opción y, a continuación,
pulse el botón ENTERE.
Después de configurar la opción, pulse el botón – ENTERE para realizar un cambio.
Pulse el botón ✎INFO durante la visualización de la foto para configurar las opciones Start Slide Show, Zoom,
Rotate, List. Pulse los botones ▲ o ▼ para seleccionar la opción y, a continuación, pulse el botón ENTERE.
Una vez configurada la opción pulse el botón – ENTERE para realizar el cambio.
Jan 7, 2010
'
Free
Select
Upper Fold... Folder
n
Move E Enter I Option R Return
1/1 Page
Español
20
Page 49

Español
21
04 Funciones avanzadas
Music
Music
PhotoMusic Setup
SUM
307.2MB/973.7MB
Photo
PhotoMusic Setup
SUM
307.2MB/973.7MB
Music
PhotoMusic Setup
SUM
307.2MB/973.7MB
DSC_0558.JPG
580
440
78.0KB
03 / 14
SUM
*
Photo
307.2MB/973.7MB
File.....jpg File.....jpg File.....jpg
File.....jpg File.....jpg File.....jpg
File.....jpg File.....jpg
File.....jpg File.....jpg
File.....jpg File.....jpg File.....jpg
Music
4.3MB
2 / 31
06-I Will Carry You.mp3 00:00:00
01-The Way.mp3 00:03:25
02-Run To Me.mp3 00:03:25
03-No More Sad Songs.mp3 00:03:25
04-Interference-gold.mp3 00:03:25
05-marketa_irglova-The_hill.mp3 00:03:25
06-I Will Carry You.mp3 00:03:25
07-marketa_irglova.mp3 00:03:25
08-Super World.mp3 00:03:25
SUM
307.2MB/973.7MB
USB
Uso de la lista MP3
Icono de carpeta
Icono de la lista de música
Icono para desplazarse a carpeta de nivel anterior
El archivo seleccionado se visualiza en la parte superior con su
✎
tiempo de reproducción.
1. Para seleccionar uno o todos los archivos, pulse el botón INFO para
visualizar los menús de Music.
Pulse el botón ENTERE para seleccionar Play, Repeat Music,
Select All or Deselect All.
2. Pulse los botones
el botón ENTERE.
Si pulsa el botón ENTERE sobre un icono de nota musical,
inmediatamente se reproduce el archivo de música.
Si pulsa el botón ENTERE sobre el icono de una carpeta se
muestra los archivos de música incluidos en dicha carpeta.
Play ■ : Seleccionar para reproducir archivos MP3.
Este menú sólo muestra archivos con la extensión MP3. Los
✎
▲ o ▼
para ir a un icono y, a continuación, pulse
Jan 7, 2010
Play
Repeat Music : Off
Select All
Deselect All
I
Exit
' Select
r
n
archivos con otras extensiones no se muestran, aunque se
hayan guardado en el mismo dispositivo USB.
Para ajustar el volumen de la música, pulse los botones ✎y del mando a distancia. Para silenciar el sonido,
pulse el botón MMUTE del mando a distancia.
Repeat Music (On / Off) ■ : Seleccione para reproducir repetidamente todos los archivos MP3 de la carpeta actual.
L
Move E Enter R Return
Upper Folder
Folder
Move I Option E Play R Return
1/4 Page
Reproducción de música
Sólo se muestran los archivos con la extensión MP3. Los archivos con otras extensiones no se muestran, aunque se y
hayan guardado en el mismo dispositivo USB.
Si, al reproducir archivos MP3, el sonido no se oye correctamente, ajuste y Equalizer y SRS TruSurround HD en el menú
Sound. (Un archivo MP3 demasiado modulado puede ocasionar problemas de sonido.)
Iconos de información de la función de la música y
Repeat Mode está establecido en On.
Repeat Mode está establecido en Off.
Page 50

Funciones avanzadas
Photo
PhotoMusic Setup
SUM
307.2MB/973.7MB
Music
PhotoMusic Setup
SUM
307.2MB/973.7MB
DSC_0558.JPG
580
440
78.0KB
03 / 14
SUM
*
Photo
307.2MB/973.7MB
File.....jpg File.....jpg File.....jpg
File.....jpg File.....jpg File.....jpg
File.....jpg File.....jpg
File.....jpg File.....jpg
File.....jpg File.....jpg File.....jpg
Music
4.3MB
2 / 31
06-I Will Carry You.mp3 00:00:00
01-The Way.mp3 00:03:25
02-Run To Me.mp3 00:03:25
03-No More Sad Songs.mp3 00:03:25
04-Interference-gold.mp3 00:03:25
05-marketa_irglova-The_hill.mp3 00:03:25
06-I Will Carry You.mp3 00:03:25
07-marketa_irglova.mp3 00:03:25
08-Super World.mp3 00:03:25
SUM
307.2MB/973.7MB
Setup
USB
Setup
Uso del menú de configuración
Slide Show Speed ■ :
Puede seleccionar
Background Music ■ : Se selecciona para determinar si se desea
reproducir un archivo MP3 durante el visionado automático. Puede
establecer la opción en On o Off.
Background Music Setting ■ : Cuando se está realizando una
presentación, se puede cambiar a Background Music Setting para
seleccionar un archivo de música y escucharlo.
Seleccione un archivo MP3 como música de fondo.
Repeat Music ■ : Se selecciona para determinar si se desea repetir
la reproducción de la música cuando se han reproducido todos los
archivos MP3 de esta carpeta.
Screen Saver ■ : Puede configurar el tiempo de espera necesario para que se ejecute el salvapantallas. El salvapantallas
aparecerá si no se pulsa ningún botón durante 4 hours, 8 hours, 10 hours.
Reproducción de archivos de fotos / música seleccionados
Pulsar el botón amarillo. y
Repita el proceso anterior para seleccionar los archivos de fotos/música que desee. y
Las fotos o los archivos seleccionados se marcan con un símbolo
✎ c
el botón amarillo.
Pulse los botones y ENTERE para reproducir fotos o archivos seleccionados.
Puede seleccionar la velocidad de la presentación.
Fast, Normal
o
Slow
.
Slide show Speed : Fast
Background Music : On
Background Music Setting
Repeat Music : On
Screen Saver : 4 hours
U
Move E Enter R Return
. Para cancelar la selección, pulse de nuevo
22
Español
Page 51

Español
23
Información adicional
Instalación del montaje mural
Instalación del equipo de montaje mural
El kit de montaje mural (se vende por separado) permite instalar el televisor en una pared.
Si desea más información sobre la instalación de los componentes para el montaje mural, consulte las instrucciones que
se facilitan con dichos elementos. Si necesita ayuda con la instalación del soporte mural, póngase en contacto con un
técnico. Samsung Electronics no se hace responsable de los daños causados al producto o al usuario si éste ha efectuado la
instalación del televisor.
Especificaciones del equipo de montaje mural (VESA)
El kit de montaje mural se vende por separado.
✎
Instale el montaje mural en una pared sólida, perpendicular al suelo. Para colocarlo en otros materiales de construcción,
póngase en contacto con el distribuidor más cercano. Si se instala en el techo o en una pared inclinada, puede caerse y
causar graves lesiones personales.
NOTA
✎
Las dimensiones estándar de los equipos de montaje mural se muestran en la tabla siguiente.
x
Al adquirir el equipo de montaje mural, también se distribuye un manual de instalación detallado y todas las piezas
x
necesarias para el montaje.
No use tornillos que no cumplan las especificaciones de tornillos estándar VESA.
x
No use tornillos con una longitud superior a la medida estándar o que no cumplan con especificaciones de tornillos
x
estándar VESA. Los tornillos que sean demasiado largos pueden causar daños en el interior del televisor.
Para montajes murales que no cumplen las especificaciones de tornillos estándar VESA, la longitud de éstos puede
x
variar dependiendo de las especificaciones del montaje mural.
No apriete excesivamente los tornillos, ya que podría dañar el producto o provocar la caída de éste con riesgo de
x
causar lesiones personales. Samsung no se hace responsable de este tipo de accidentes.
Samsung no se hace responsable de daños o lesiones personales cuando se usa un montaje mural que no cumple
x
las especificaciones VESA o si el cliente no sigue las instrucciones de instalación del producto.
No monte el televisor con una inclinación de más de 15 grados.
x
Siempre son necesarias dos personas para montar el televisor en la pared.
x
05 Información adicional
Familia de
producto
LCD-TV
pulgadas
19~22
23~29 200 x 100
30~40 200 x 200 M6
46~55 400 x 400
57~65 600 x 400
70~80 800 x 400
80~ 1400 x 800
No instale el equipo de montaje mural mientras el televisor está encendido. Se podría producir una
descarga eléctrica con riesgo de causar lesiones personales.
Especificaciones
VESA (A * B)
75 x 75
100 x 100
Tornillo estándar Cantidad
M4
4
M8
Page 52

Información adicional
1
2
3
Fijación del televisor a la pared
Precaución: Tirar del televisor, empujarlo o colgarse de él puede provocar su caída. En especial, procure que
los niños no se cuelguen del televisor ni lo desestabilicen; éste podría caerse sobre ellos y causarles lesiones
graves o incluso la muerte. Siga las precauciones de seguridad del folleto de seguridad incluido con el producto.
Para mejorar la estabilidad instale un dispositivo antivuelco, como se explica a continuación.
Para impedir que el televisor se caiga
Las grapas, los tornillos y la cadena no se suministran con el
✎
producto; deberá adquirirlos por separado.
1. Apriete firmemente las grapas sobre la pared con los tornillos.
Asegúrese de que los tornillos estén bien fijados en la pared.
Especificaciones de los tornillos
✎
Televisores LCD de 17-29 pulgadas: M4
x
Televisores LCD de 32~40 pulgadas: M6
x
2. Quite los tornillos de la parte central posterior del televisor y con
ellos monte las grapas en el televisor.
3. Monte una cadena fuerte entre las grapas del televisor y de la
pared de manera que quede bien tensada.
Compruebe que todas las conexiones estén bien aseguradas.
✎
Compruébelas periódicamente para detectar cualquier signo de
fatiga o de fallo. Si tiene dudas sobre la seguridad de la instalación,
póngase en contacto con un instalador profesional.
Instale el televisor cerca de la pared para evitar que caiga hacia
✎
atrás.
Las grapas de la pared han de estar a la misma o a menor altura que las grapas del televisor.
✎
Cuando desee mover el televisor deberá aflojar la cadena.
✎
Pared
Bloqueo antirrobo Kensington
Samsung no suministra el bloqueo antirrobo Kensington. Es un dispositivo que se utiliza para fijar físicamente el sistema
cuando se utiliza en un sitio público. El aspecto y el método de bloqueo pueden ser diferentes a los que se muestran en la
ilustración según el fabricante. Consulte el manual proporcionado con el bloqueo Kensington para obtener más información
sobre el uso correcto.
Busque un icono “
✎ K
Junto al icono "K" hay una ranura Kensington. hay una ranura
Kensington.
1. Introduzca el dispositivo de bloqueo en la ranura Kensington del TV LCD
1 y gírelo como se muestra en 2.
2. Conecte el cable del bloqueo Kensington 3.
3. Fije el bloqueo Kensington a la mesa o a un objeto estático pesado.
El dispositivo de bloqueo debe adquirirse por separado.
✎
La ubicación de la ranura Kensington puede variar según el televisor.
✎
Español
24
” en la parte posterior del televisor.
<Opcional>
Page 53

Español
25
05 Información adicional
Solución de problemas
Si cree que el televisor tiene un problema, compruebe primero esta lista de posibles problemas y soluciones. Si ninguno de los
consejos funciona, visite “www.samsung.com” y haga clic en Support o llame al centro de atención al cliente de Samsung.
Problemas Soluciones y explicaciones
Imagen deficiente
La imagen del televisor no se ve tan bien
como en la tienda.
La imagen se ve distorsionada: error de
macrobloques, microbloques, puntos,
pixelización.
El color es de mala calidad o falta. Si utiliza una conexión de componentes, compruebe que los cables de los componentes estén •
El color o el brillo es de mala calidad. Ajuste las opciones de Picture (Imagen) en el menú del televisor •
Hay una línea de puntos en el borde la
pantalla.
La imagen se ve sólo en blanco y negro. Si está utilizando una entrada compuesta AV, conecte el cable de vídeo (amarillo) en el terminal verde •
Al cambiar de canal, la imagen se congela,
se ve distorsionada o aparece con retraso.
Problemas del sonido
No hay sonido o se oye demasiado bajo
con el volumen al máximo.
La imagen es buena pero no hay sonido. Configure la opción • Seleccionar altavoz como Altavoz de TV en el menú de sonido (pág. 16).
Los altavoces hacen un ruido inapropiado. Compruebe las conexiones de los cables. Compruebe que no haya un cable de vídeo conectado a •
Si tiene un decodificador/cable analógico, cambie a un decodificador de alta definición (HD) digital. •
Utilice cables HDMI o de componentes para conseguir la mejor calidad de imagen de alta definición
(HD).
Suscriptores de cable/satélite: Pruebe con estaciones de alta definición (HD) en la oferta de canales.•
Conexión de antena: Pruebe con emisoras de alta definición (HD) después de ejecutar la •
programación automática.
Muchos canales de alta definición (HD) mejoran los contenidos SD (definición estándar).
✎
Ajuste la resolución de la salida de vídeo del decodificador de cable o satélite en 1080i o 720p.•
La compresión de los contenidos de vídeo puede causar imágenes distorsionadas especialmente en •
las escenas de movimiento rápido, como en los deportes y las películas de acción.
Un nivel de señal débil puede causar imágenes distorsionadas. No es un problema del televisor.•
conectados en los terminales correctos. Las conexiones incorrectas o sueltas pueden originar
problemas en el color o que la pantalla se quede en blanco.
(Vaya a modo Imagen / Color / Brillo / Definición) (pág. 13).
Ajuste la opción • Ahorro energía en el menú Configuración. (pág. 18)
Intente reiniciar la imagen para ver la configuración de imagen predeterminada •
(Vaya a MENU - Imagen - Reiniciar) (pág. 15).
Si el tamaño de la imagen está establecido en • Ajuste pantalla, cámbielo a 16:9
Cambie la resolución del decodificador de cable/satélite.•
de la entrada 1 de componentes del televisor.
Si está conectado al receptor de cable, reinicie éste. (Vuelva a conectar el cable de alimentación y •
espere a que el decodificador se reinicie. Puede tardar unos 20 minutos.)
Establezca la resolución de salida del decodificador de cable en 1080i o 720p.•
Compruebe el volumen del dispositivo (decodificador de cable / satélite, DVD, Blu-ray, etc.) •
conectado al televisor.
Si utiliza un dispositivo externo, compruebe que la opción de salida de audio del dispositivo (por •
ejemplo, quizás deba cambiar la opción de audio del decodificador de cable a HDMI si tiene
conectado HDMI al televisor).
Si se utiliza un cable DVI a HDMI, se necesita un cable de audio independiente.•
Reinicie el dispositivo conectado volviendo a conectar el cable de alimentación del dispositivo.•
una entrada de audio.
Para la conexión de la antena o el cable, compruebe la potencia de señal. Un nivel de señal débil •
puede causar distorsiones en el sonido.
Ejecute la • Prueba de sonido como se ha explicado anteriormente.
Page 54

Información adicional
Problemas Soluciones y explicaciones
No hay imagen, no hay vídeo
El televisor no se enciende. Compruebe que el cable de alimentación CA esté bien conectado en la toma de la pared y en el •
El televisor se apaga automáticamente. Compruebe si la opción • Temporizador está establecida en Apagado en el menú Configuración
No hay imagen ni vídeo. Compruebe las conexiones de los cables. (Desconecte y vuelva a conectar todos los cables del •
Conexión RF (Cable / Antena)
El televisor no recibe todos los canales. Compruebe que el cable coaxial esté firmemente conectado.•
No hay subtítulos en los canales digitales. Algunos can ales no tienen datos de subtítulos.•
La imagen se ve distorsionada: error de
macrobloques, microbloques, puntos,
pixelización.
Conexión de PC
Aparece un mensaje de "Modo no
compatible".
“PC” siempre aparece en la lista de fuentes
aunque el PC no esté conectado.
La imagen es buena pero no hay sonido. Si utiliza una conexión HDMI, compruebe la configuración del audio del PC.•
televisor.
Compruebe que la toma de la pared funcione.•
Intente pulsar el botón • POWER del televisor para asegurarse de que el problema no está en el
mando a distancia. Si el televisor se enciende, consulte “El mando a distancia no funciona” a
continuación.
(pág. 16).
Si el televisor está conectado a un PC, compruebe la configuración de la alimentación de éste.•
Compruebe que el cable de alimentación CA esté bien conectado en la toma de la pared y en el •
televisor.
Cuando se ve la televisión con una conexión de antena o cable, el televisor se apaga tras 10-15 •
minutos si no hay señal.
televisor y de los dispositivos externos)
Establezca la salida de vídeo del dispositivo externo (decodificador de cable / satélite, DVD, Blu-ray, •
etc.) de modo que coincida con las conexiones de la entrada de TV. Por ejemplo, si la salida de un
dispositivo externo es HDMI, se debe conectar a una entrada HDMI en el televisor.
Compruebe que los dispositivos externos estén encendidos.•
Asegúrese de seleccionar la fuente correcta del TV pulsando el botón • SOURCE del mando a
distancia.
Reinicie el dispositivo conectado volviendo a conectar el cable de alimentación del dispositivo.•
Ejecute • Prog. Auto para añadir los canales disponibles a la lista de canales. Vaya a MENU - Canal -
Prog. Auto, seleccione Auto y asegúrese de que en el menú está establecido el tipo de señal de TV
por cable correcto. Hay 3 opciones. (pág. 13)
Compruebe la posición de la antena.•
La compresión de los contenidos de vídeo puede causar imágenes distorsionadas especialmente en •
las escenas de movimiento rápido, como en los deportes y las películas de acción.
Un nivel de señal débil puede causar imágenes distorsionadas. No es un problema del televisor.•
Establezca la resolución de salida del PC de modo que coincida con la resolución admitida por el •
televisor.
Esto es normal; “PC” siempre aparece en la lista de fuentes aunque no haya ningún PC conectado.•
26
Español
Page 55

Español
27
05 Información adicional
Problemas Soluciones y explicaciones
Otros
Barras horizontales rodantes de color
púrpura/verde y zumbidos en los altavoces
del televisor con la conexión del cable de
componentes.
La imagen no se muestra en pantalla
completa.
El mando a distancia no funciona. Cambie las pilas del mando a distancia; haga coincidir los polos (+/–).•
El mando a distancia del cable /
decodificador no enciende ni apaga el
televisor ni ajusta el volumen.
Aparece un mensaje de “Modo no
compatible”.
Subtítulo en el menú del televisor aparece
atenuado.
Se advierte un olor a plástico que proviene
del televisor.
El televisor está inclinado hacia un lado. Retire la base del soporte de televisor y vuelva a montarla.•
Cuesta montar la base del soporte. Compruebe que el televisor esté instalado sobre una superficie plana. Si no puede quitar los tornillos •
No se puede montar la base del soporte Compruebe que el televisor esté instalado sobre una superficie plana. Si no puede quitar los tornillos •
El menú del canal se ve atenuado (no
disponible)
La configuración se pierde después de
30 minutos o cada vez que se apaga el
televisor.
Pérdida intermitente de audio o vídeo. Compruebe las conexiones de los cables y vuelva a conectarlos.•
Puede ver pequeñas partículas si mira de
cerca el borde del marco del televisor
Aparece en la pantalla POP (anuncio de
rótulo interno del televisor).
Desconecte los terminales de audio izquierdo y derecho del decodificador. Si los zumbidos cesan, •
esto indica que el decodificador tiene un problema en la conexión a tierra. Sustituya los cables de
vídeo de componentes por una conexión HDMI.
En cada lado se muestran barras negras en los canales de alta definición (HD) cuando se muestran •
contenidos SD mejorados (4:3).
Barras negras en las partes inferior y superior cuando se ven películas que tienen diferentes formatos •
que el televisor.
Ajuste la opción del tamaño de imagen del dispositivo externo o del televisor al modo de pantalla •
completa.
Limpie la ventana de transmisión del sensor del mando a distancia.•
Apunte con el mando a distancia directamente al televisor desde una distancia de 1,5 -2 metros.•
Programe el mando a distancia del decodificador de cable / satélite para que haga funcionar el •
televisor. Consulte el manual del decodificador de cable / satélite para conocer el código del TV
SAMSUNG.
Compruebe la resolución que admite el televisor y ajuste en consecuencia la resolución de salida del •
dispositivo externo. Consulte cómo configurar la resolución en la página 9 de este manual.
No se puede seleccionar • Subtítulo en el menú del televisor cuando está conectado a través de HDMI
o Component.
Se debe activar • Subtítulo en el dispositivo externo.
Este olor es normal y desaparece con el tiempo.•
del televisor, utilice un destornillador magnetizado.
del televisor, utilice un destornillador magnetizado.
El menú • Canal sólo está disponible cuando está seleccionada la fuente TV.
Si el televisor está en el modo • Demo comercio, la configuración del audio y la imagen se
restablecerá cada 30 minutos. Cambie la configuración del modo Demo comercio al modo Uso
domiciliario en el procedimiento Plug & Play. Pulse el botón SOURCE para seleccionar el modo TV;
vaya a MENU → Configuración → Plug & Play → ENTERE.
La pérdida de audio o vídeo se puede deber a que los cables son demasiado rígidos o gruesos. •
Asegúrese de que los cables queden lo suficientemente flexibles para un uso prolongado. En un
montaje mural del televisor es aconsejable utilizar cables con conectores de 90 grados.
Esto es una particularidad del diseño del producto y no es un defecto.•
Seleccione el modo • Uso domiciliario en el modo Plug & Play. Para obtener información, consulte la
función Plug & Play (pág. 6).
El panel LCD TFT utiliza un panel que consta de píxeles de ínfimo tamaño que requieren de una tecnología altamente
✎
sofisticada para su fabricación. No obstante, puede que existan unos cuantos píxeles brillantes u oscuros en la pantalla.
Estos píxeles no influirán en el rendimiento del aparato.
Page 56

Información adicional
Especificaciones
Panel nativo
(Óptima) 1360 x 768 @ 60 Hz
Consideraciones medioambientales
Temperatura de funcionamiento
Humedad de funcionamiento
Temperatura de almacenamiento
Humedad de almacenamiento
Giro del soporte
(izquierda/derecha) 0˚
Nombre del modelo LN19C350 LN22C350 LN26C350 LN32C350
Tamaño de pantalla 19 pulgadas 22 pulgadas 26 pulgadas 32 pulgadas
Sonido
(salida) 3W x 2 3W x 2 5W x 2 5W x 2
Dimensiones (An x Pr x Al)
Cuerpo principal
Con el soporte
Peso
Sin el soporte
Con el soporte
El diseño y las especificaciones pueden cambiar sin previo aviso.
✎
Para obtener más información sobre la fuente de alimentación y el consumo de energía, consulte la etiqueta adherida al
✎
18.2 X 2.3 X 12.7
(461.2 X 59.5 X 322.2 (mm))
18.2 X 6.3 X 14.3
(461.2 X 161 X 364 (mm))
8.6 Ibs (3.9 kg)
9.0 Ibs (4.1 kg)
pulgadas
pulgadas
21.1 X 3.2 X 14.4 pulgadas
(535.9 X 82.2 X 365.8 (mm))
21.1 X 6.8 X 16.6 pulgadas
(535.9 X 171.8 X 420.9 (mm))
producto.
10°C a 40°C (50°F a 104°F)
10% a 80%, sin condensación
-20°C a 45°C (-4°F a 113°F)
5% a 95%, sin condensación
(673.3 X 222.2 X 513.4 (mm))
8.6 Ibs (3.9 kg)
9.3 Ibs (4.2 kg)
26.5 X 2.6 X 18 pulgadas
(673.3 X 65.6 X 456.0 (mm))
26.5 X 8.7 X 20.2 pulgadas
(795.3 X 247.2 X 585.3 (mm))
12.7 Ibs (5.7 kg)
13.4 Ibs (6.1 kg)
31.3 X 2.6 X 20.7
(795.3 X 65.6 X 525.8 (mm))
31.3 X 9.7 X 23
15.7 Ibs (7.1 kg)
16.8 Ibs (7.6 kg)
pulgadas
pulgadas
Licencia ¦
TruSurround HD, SRS and symbol are trademarks of SRS Labs, Inc.
TruSurround HD technology is incorporated under license from SRS Labs, Inc.
Fabricado bajo licencia de Dolby Laboratories. Dolby y el símbolo de la doble D son marcas
comerciales de Dolby Laboratories.
28
Español
Page 57

Español
29
05 Información adicional
Índice
A
Antena 6
Ahorro energía 18
Ajuste pantalla 14
Ajuste automático 15
Altavoz externo 16
B
Balance 16
Balance de blanco 14
C
Componente 7, 9
Compuesto 11
Contraste Dinám. 13
D
D-sub 8, 10
DVD para Tome Theater 8, 10
E
Ecualizador 16
F
Fuente entrada 6
H
HDMI 7, 9
I
Idioma 17
Indicador de encendido 4
L
Licencia 28
Lista de fuentes 11
M
Mando a distancia 5
Melodía 18
Montaje mural 23
MTS 16
N
N.º PIN 17
P
PIP 18
Prog. Auto 13
R
Reiniciar 15
Reproducción de MP3 21
Reproductor multimedia 19
Resolución óptima 11
S
Salida de audio digital 10
Secuencia 19
Seleccionar altavoz 16
Modo de espera 4
Subtítulo 17
T
Temporizador 17
Temporizador de desconexión 16
V
Visualización de fotos 20
Volumen 4, 5, 17
Voz clara 16
 Loading...