

Page 1

LCD TV
user manual
imagine the possibilities
Thank you for purchasing a Samsung product.
To receive a more complete service, please
register your product at
www.samsung.com/global/register
Model Serial No.
Page 2
Important Warranty Information Regarding Television Format Viewing
Wide screen format LCD Displays (16:9, the aspect ratio of the screen width to height) are primarily designed to view wide screen format
full-motion video. The images displayed on them should primarily be in the wide screen 16:9 ratio format, or expanded to fill the screen
if your model offers this feature and the images are constantly moving. Displaying stationary graphics and images on screen, such as
the dark side-bars on nonexpanded standard format television video and programming, should be limited to no more than 5% of the total
television viewing per week.
Additionally, viewing other stationary images and text such as stock market reports, video game displays, station logos, web sites or
computer graphics and patterns, should be limited as described above for all televisions. Displaying stationary images that exceed the
above guidelines can cause uneven aging of LCD Displays that leave subtle, but permanent burned-in ghost images in the LCD picture. To
avoid this, vary the programming and images, and primarily display full screen moving images, not stationary patterns or dark bars.
On LCD models that offer picture sizing features, use these controls to view different formats as a full screen picture.
Be careful in the selection and duration of television formats used for viewing. Uneven LCD aging as a result of format selection and use,
as well as burned-in images, are not covered by your Samsung limited warranty.
U.S.A Only
The product unit accompanying this user manual is licensed under certain intellectual property rights of certain third parties. In particular,
this product is licensed under the following US patents: 5,991,715, 5,740,317, 4,972,484, 5,214,678, 5,323,396, 5,539,829, 5,606,618,
5,530,655, 5,777,992, 6,289,308, 5,610,985, 5,481,643, 5,544,247, 5,960,037, 6,023,490, 5,878,080, and under US Published Patent
Application No. 2001-44713-A1.
This license is limited to private non-commercial use by end-user consumers for licensed contents. No rights are granted for commercial
use. The license does not cover any product unit other than this product unit and the license does not extend to any unlicensed product
unit or process conforming to ISO/IEC 11172-3 or ISO/IEC 13818-3 used or sold in combination with this product unit. The license only
covers the use of this product unit to encode and/or decode audio files conforming to the ISO/IEC 11172-3 or ISO/IEC 13818-3. No rights
are granted under this license for product features or functions that do not conform to the ISO/IEC 11172-3 or ISO/IEC 13818-3.
Other countries
The product unit accompanying this user manual is licensed under certain intellectual property rights of certain third parties. This license is
limited to private non-commercial use by end-user consumers for licensed contents. No rights are granted for commercial use. The license
does not cover any product unit other than this product unit and the license does not extend to any unlicensed product unit or process
conforming to ISO/IEC 11172-3 or ISO/IEC 13818-3 used or sold in combination with this product unit. The license only covers the use of
this product unit to encode and/or decode audio files conforming to the ISO/IEC 11172-3 or ISO/IEC 13818-3. No rights are granted under
this license for product features or functions that do not conform to the ISO/IEC 11172-3 or ISO/IEC 13818-3.
SAMSUNG ELECTRONICS NORTH AMERICAN LIMITED WARRANTY STATEMENT
Subject to the requirements, conditions, exclusions and limitations of the original Limited Warranty supplied with Samsung Electronics
(SAMSUNG) products, and the requirements, conditions, exclusions and limitations contained herein, SAMSUNG will additionally provide
Warranty Repair Service in the United States on SAMSUNG products purchased in Canada, and in Canada on SAMSUNG products purchased
in the United States, for the warranty period originally specified, and to the Original Purchaser only.
The above described warranty repairs must be performed by a SAMSUNG Authorized Service Center. Along with this Statement, the Original
Limited Warranty Statement and a dated Bill of Sale as Proof of Purchase must be presented to the Service Center. Transportation to and from
the Service Center is the responsibility of the purchaser.
Conditions covered are limited only to manufacturing defects in material or workmanship, and only those encountered in normal use of the
product.
Excluded, but not limited to, are any originally specified provisions for, in-home or on-site services, minimum or maximum repair times,
exchanges or replacements, accessories, options, upgrades, or consumables.
For the location of a SAMSUNG Authorized Service Center, please call toll-free:
In the United States : 1-800-SAMSUNG (1-800-726-7864) In Canada : 1-800-SAMSUNG
See the warranty card for more information on warranty terms.
°
Precautions When Displaying a Still Image
A still image may cause permanent damage to the TV screen
• Do not display a still image on the LCD panel for more than 2 hours as it can cause screen image retention. This image retention is also
known as "screen burn". To avoid such image retention, reduce the degree of brightness and contrast of the screen when displaying a still
image.
• Watching the LCD TV in 4:3 format for a long period of time may leave traces of borders displayed on the left, right and
• Displaying still images from Video games and PC for longer than a certain period of time may produce partial after-images.
To prevent this effect, reduce the ‘brightness’ and ‘contrast’ when displaying still images.
© 2008 Samsung Electronics Co., Ltd. All rights reserved.
center of the screen caused by the difference of light emission on the screen.
Playing a DVD or a game console may cause a similar effect to the screen.
Damages caused by the above effect are not covered by the Warranty.
Page 3

Contents
English
GENERAL INFORMATION
List of Features ............................................................................. 2
Accessories .................................................................................
Viewing the Control Panel ...........................................................3
Viewing the Connection Panel ....................................................4
Remote Control ............................................................................ 5
Installing Batteries in the Remote Control ....................................6
CONNECTIONS
Connecting VHF and UHF Antennas ............................................6
Connecting Cable TV ................................................................... 7
Connecting a DVD Player or Cable Box/Satellite receiver
(Set-Top Box) via HDMI ................................................................ 8
Connecting a DVD Player or Cable Box/Satellite receiver
(Set-Top Box) via DVI ................................................................... 8
Connecting a DVD Player or Cable Box/Satellite receiver
(Set-Top Box) via Component cables ........................................... 9
Connecting a Camcorder ............................................................9
Connecting a VCR ...................................................................... 10
Connecting a Digital Audio System ............................................ 11
Connecting an Amplier/DVD Home Theater ............................. 11
Connecting a PC ........................................................................ 12
OPERATION
Turning the TV On and Off .........................................................13
Plug & Play Feature ...................................................................13
Changing Channels .................................................................... 14
Adjusting the Volume ..................................................................15
Viewing the Display ....................................................................15
Viewing the Menus .....................................................................15
Using the TOOLS Button ............................................................ 16
Memorizing the Channels ........................................................... 16
To Select the Source .................................................................. 18
To Edit the Input Source Name ..................................................18
PICTURE CONTROL
Changing the Picture Standard .................................................. 19
Customizing the Picture Settings ...............................................19
Conguring Picture Options .......................................................20
Resetting the Picture Settings to the Factory Defaults ............... 23
PC DISPLAY
Using Your TV as a Computer (PC) Display ............................... 34
Display Modes ............................................................................ 34
Setting up the TV with your PC .................................................. 35
TIME SETTING
Setting the Clock ........................................................................ 37
FUNCTION DESCRIPTION
Selecting a Menu Language ....................................................... 40
Using the V-Chip ........................................................................ 41
Viewing Closed Captions (On-Screen Text Messages)
- Analog ......................................................................................48
Viewing Closed Captions (On-Screen Text Messages)
- Digital ....................................................................................... 49
Adjusting the TV On/Off Melody Sound......................................50
Using the Energy Saving Feature ..............................................50
Upgrading the Software .............................................................. 51
APPENDIX
Troubleshooting .......................................................................... 52
How to Adjust the Stand (LN19A450C1D, LN19A451C1D) .......54
How to Adjust the Angle of the TV
(LN19A450C1D, LN19A451C1D) ............................................... 54
Installing the Wall Mount Kit
(LN19A450C1D, LN19A451C1D) ............................................... 54
Installing VESA Compliant Mounting Devices
(LN19A450C1D, LN19A451C1D) ............................................... 54
Using the Decoration Covers
(LN19A450C1D, LN19A451C1D) ............................................... 54
Installing the Stand ..................................................................... 55
Disconnecting the Stand ............................................................55
Wall Mount Kit Specications (VESA) ........................................56
Using the Anti-Theft Kensington Lock ........................................57
Specications ............................................................................. 58
SOUND CONTROL
Changing the Sound Standard ...................................................24
Customizing the Sound .............................................................. 24
Setting the TruSurround XT ........................................................25
Choosing a Multi-Channel Sound (MTS) track - Digital ............. 25
Choosing a Multi-Channel Sound (MTS) track - Analog ............26
Automatic Volume Control .......................................................... 26
Setting the TV Speakers On/Off ................................................. 27
Connecting Headphones (Sold separately) ................................
CHANNEL CONTROL
Clearing Scrambled Channels - Digital ......................................28
Adding and Erasing Channels .................................................... 29
To Set-Up Your Favorite Channels ............................................. 30
Viewing the Channel Lists ..........................................................31
Labeling Channels ...................................................................... 32
Fine Tuning Analog Channels .................................................... 33
Checking the Digital-Signal Strength .......................................... 33
27
Symbol Press Note One-Touch
Button
English - 1
Page 4
General Information
List of Features
Adjustable picture settings that can be stored in the TV’s memory.
Automatic timer to turn the TV on and off.
A special sleep timer.
Excellent Digital Interface & Networking :
With a built-in HD digital tuner, non-subscription HD broadcasts can be viewed with no Cable Box/Satellite receiver
(Set-Top Box) needed.
HDMI/DVI connection of your PC to this TV.
Excellent Picture Quality
SRS TruSurround XT
- SRS TruSurround XT provides a virtual surround system.
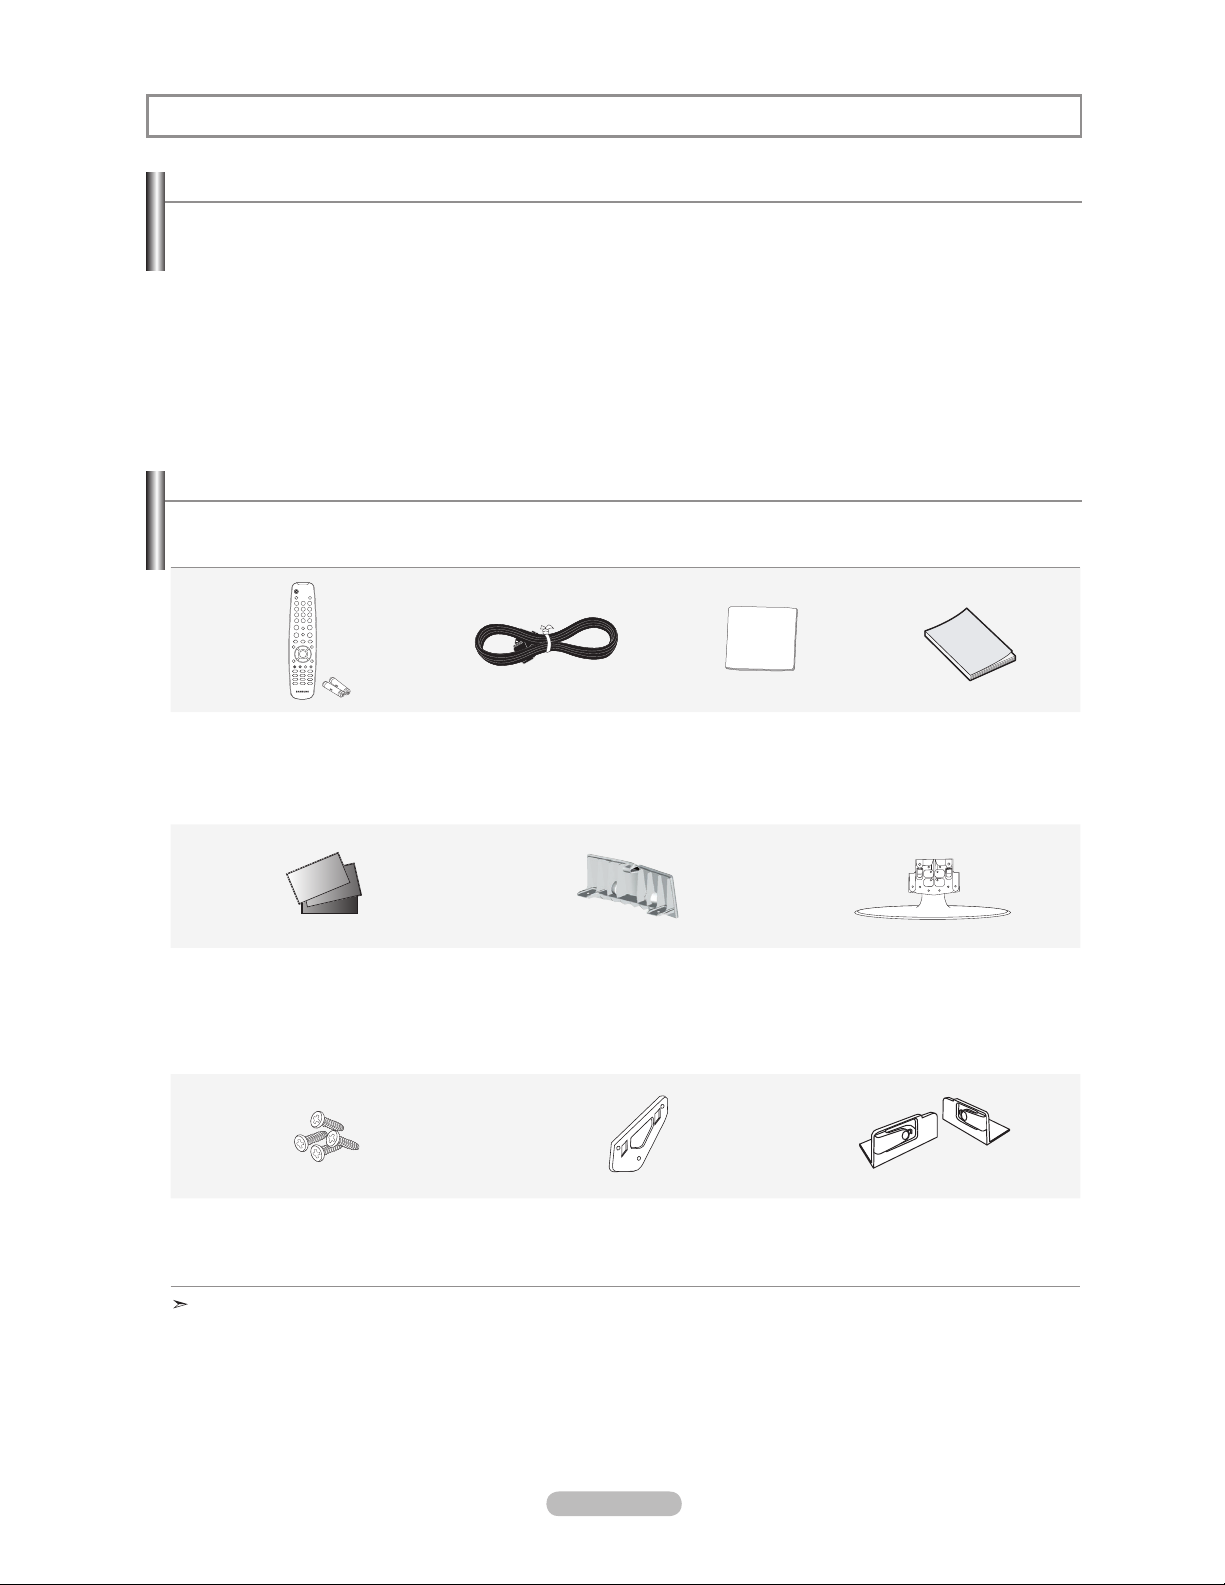
Accessories
Please make sure the following items are included with your LCD TV.
If any items are missing, contact your dealer.
Remote Control & Batteries (AAA x 2)
(LN19A450C1D: BN59-00678A)
(LN19A451C1D: BN59-00678B)
(LN22A450C1D: BN59-00678A)
(LN22A451C1D: BN59-00678B)
Warranty Card / Registration Card /
Safety Guide Manual
(Not available in all locations)
Stand Screw(M4XL16)
(LN22A450C1D: 6002-001294)
(LN22A451C1D: 6003-001324)
The items color and shape may vary depending on the model.
Power Cord
(3903-000144)
Cover-Bottom
(LN22A450C1D: BN63-04269A)
(LN22A451C1D: BN63-04269D)
Wall Mount kit
(LN19A450C1D: BN96-04960A)
(LN19A451C1D: BN96-04960A)
Cleaning Cloth
(BN63-01798A)
’s Instructions
Owner
Stand
(LN19A450C1D: BN96-04794A)
(LN19A451C1D: BN96-04794B)
(LN22A450C1D: BN96-06463A)
(LN22A451C1D: BN96-06463B)
LN19A450C1D: Right - BN63-04242A
LN19A451C1D: Right - BN63-04242B
Decoration Cover
Left - BN63-04254A
Left - BN63-04254B
English - 2
Page 5
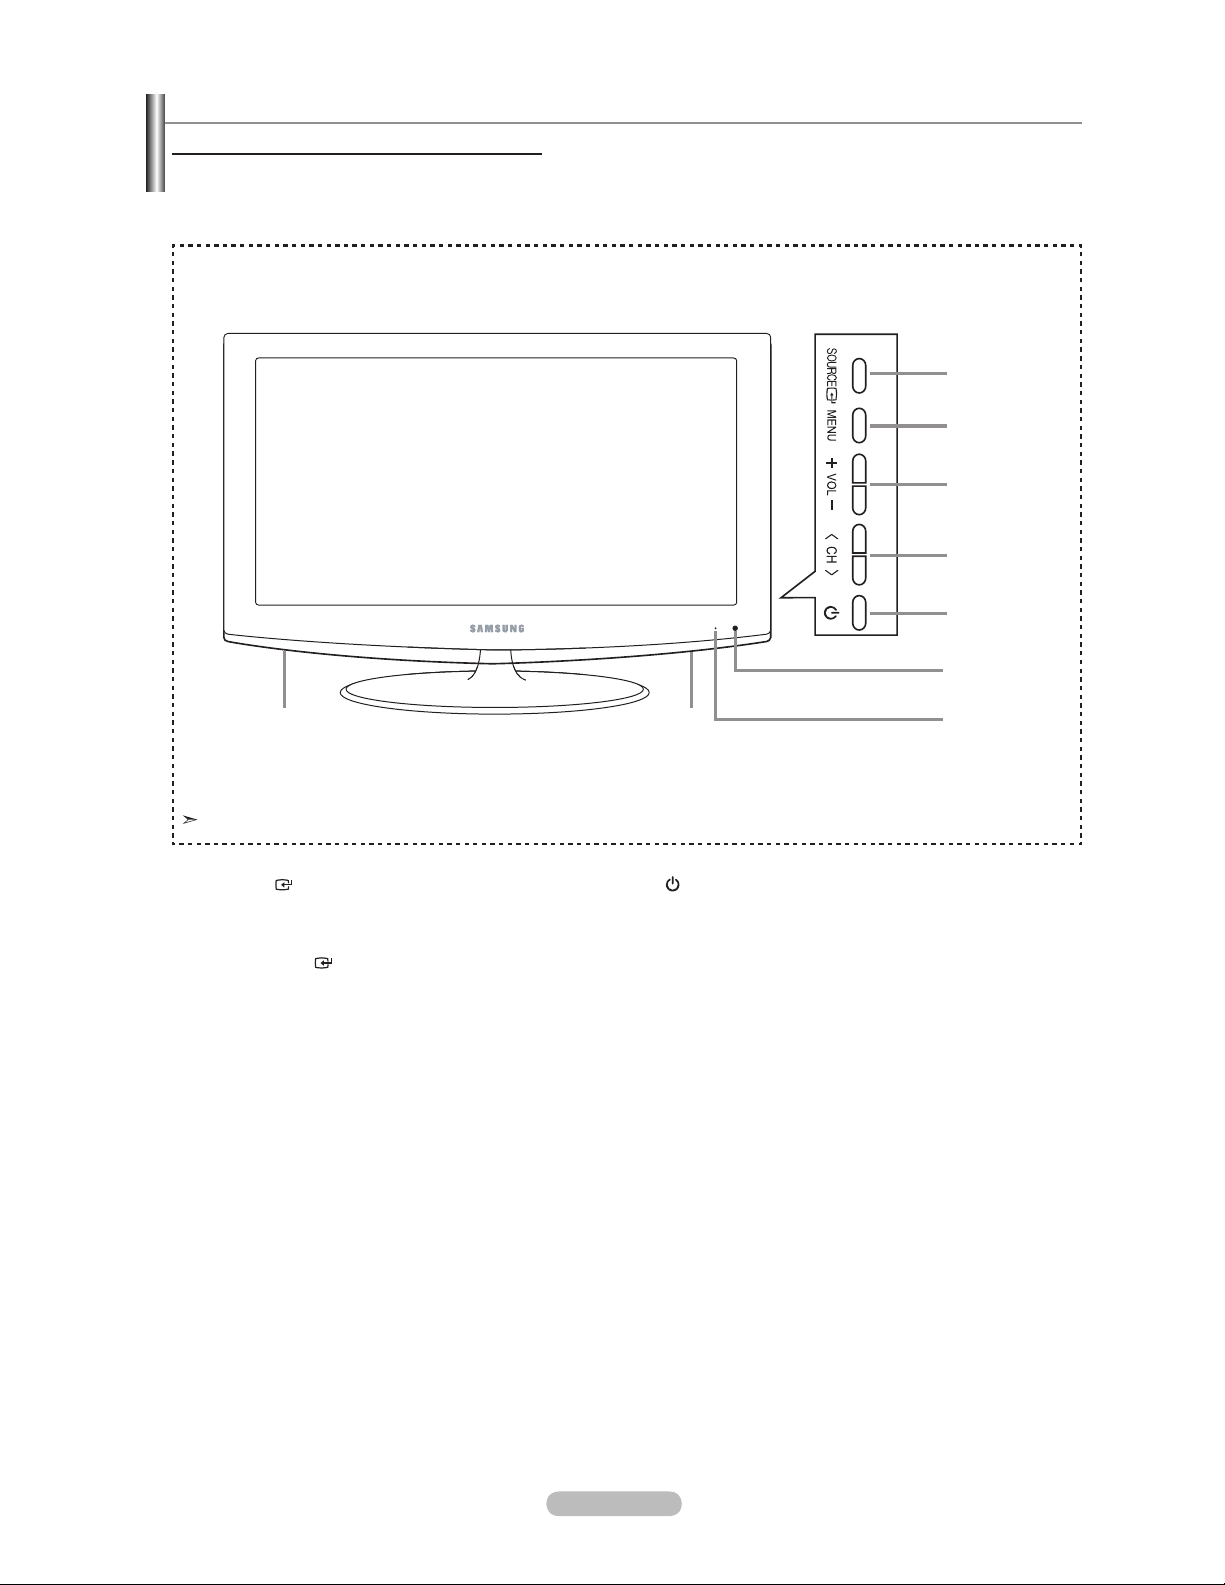
Viewing the Control Panel
Buttons on the Lower-Right Part of the Panel
The buttons on the lower-right panel control your TV’s basic features, including the on-screen menu.
To use the more advanced features, you must use the remote control.
Side Panel buttons
1
2
3
4
5
6
The product color and shape may vary depending on the model.
1
SOURCE
Toggles between all the available input sources
(TV, AV, S-Video, Component, PC, HDMI).
In the on-screen menu, use this button as you would
use the
ENTER
2
MENU
Press to see an on-screen menu of your TV’s features.
3
+ VOL -
Press to increase or decrease the volume.
In the on-screen menu, use the + VOL - buttons as you
would use the and buttons on the remote control.
4 < CH >
Press to change channels.
In the on-screen menu, use the
would use the and buttons on the remote control.
button on the remote control.
< CH >
buttons as you
88
5
(POWER)
Press to turn the TV on and off.
6
REMOTE CONTROL SENSOR
Aim the remote control towards this spot on the TV.
7
POWER INDICATOR
Blinks and turns off when the power is on and
lights up in stand-by mode.
8
SPEAKERS
7
English - 3
Page 6
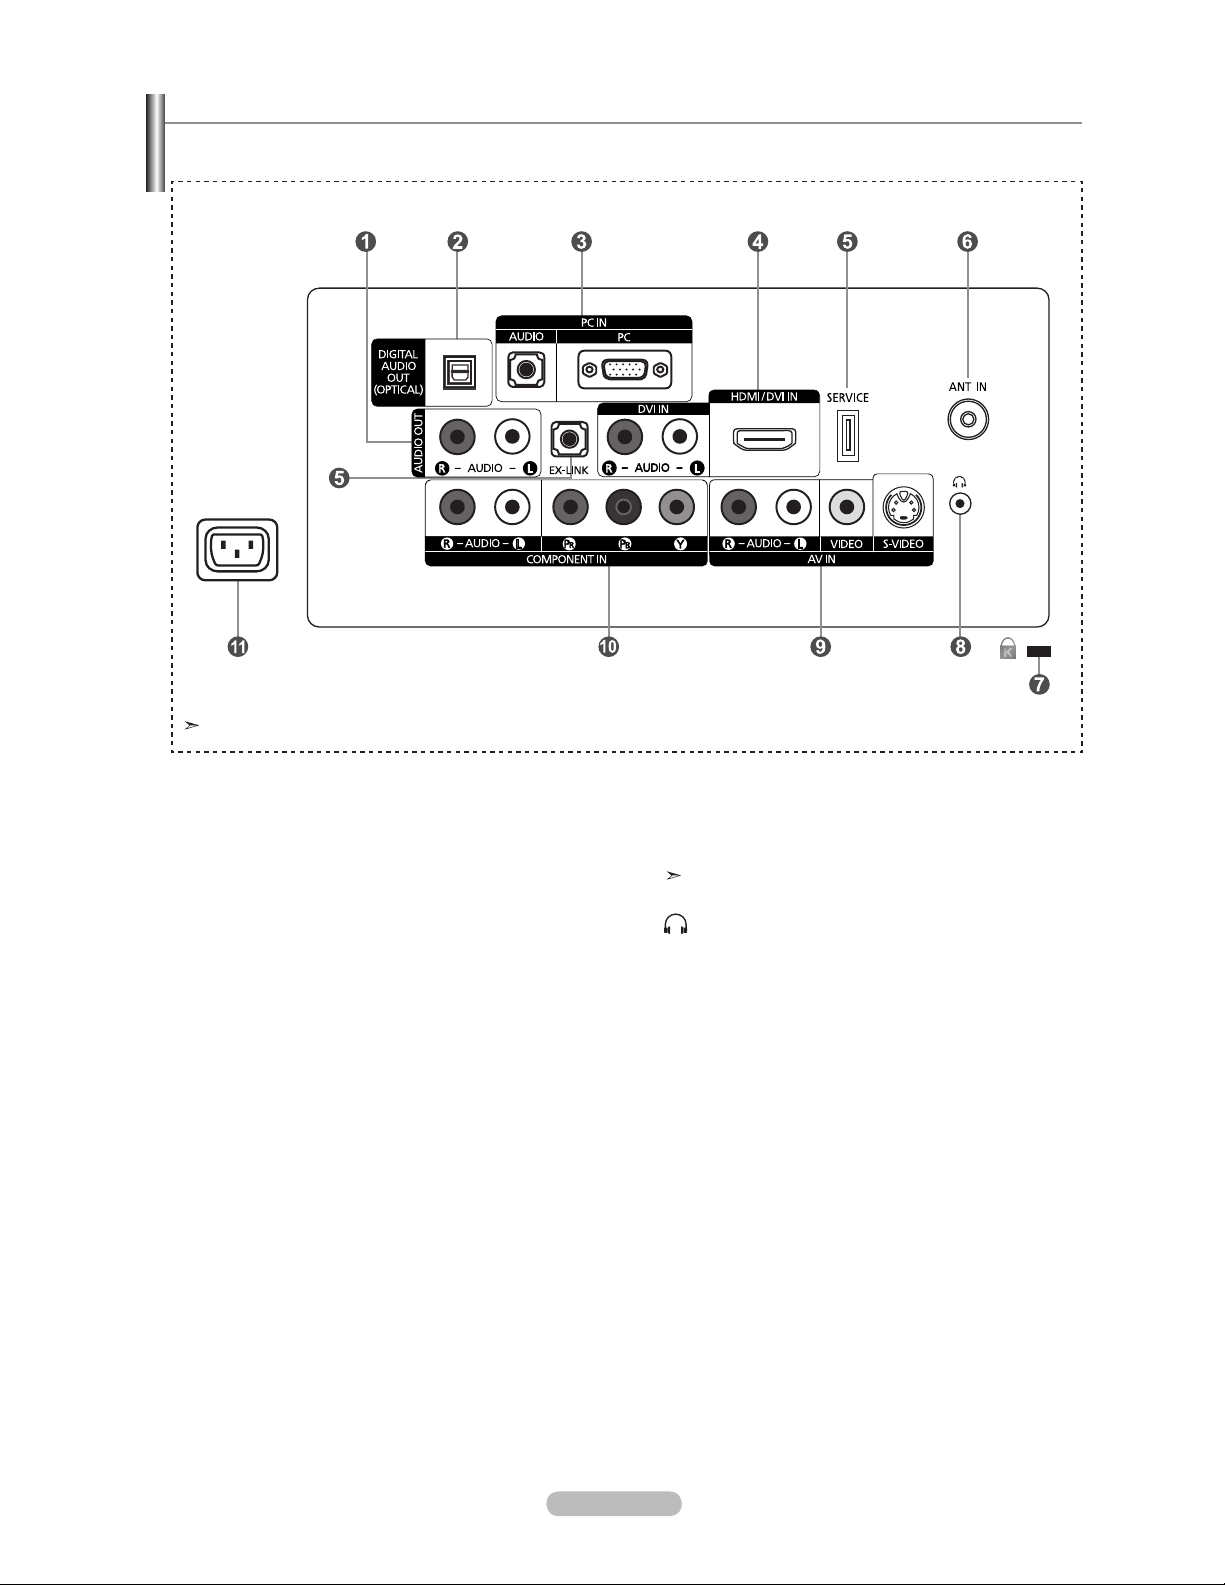
Viewing the Connection Panel
Use the connection panel jacks to connect A/V components that will be connected continuously, such as DVD players or a VCR.
For more information on connecting equipment, see pages 6~12.
The product color and shape may vary depending on the model.
1
AUDIO OUT
Connects to the audio input jacks on your Amplifier/
Home theater.
2 DIGITAL AUDIO OUT (OPTICAL)
Connects to a Digital Audio component.
3 PC IN [PC] / [AUDIO]
Connects to the video and audio output jacks on your
PC.
4 HDMI/DVI IN / DVI IN [R-AUDIO-L]
Connects to the HDMI jack of a device with an HDMI
- No sound connection is needed for an HDMI to HDMI
- When using an HDMI/DVI cable connection, you must use
5
Connector for SERVICE only.
6 ANT IN
Connects to an antenna or cable TV system.
output.
Use the HDMI/DVI IN jack for DVI connection to an
external device.
Use a DVI to HDMI cable or DVI-HDMI adapter (DVI to
HDMI) for video connection and the DVI IN [R-AUDIO-L]
jacks for audio.
connection.
the HDMI/DVI IN jack.
SERVICE, EX-LINK
7
KENSINGTON LOCK
The Kensington Lock (optional) is a device used to
physically fix the system when used in a public place.
If you want to use a locking device, contact the dealer
where you purchased the TV.
The location of the Kensington Lock may be different
depending on its model.
8
(HEADPHONE)
Connects a set of external headphones for private
listening.
9 AV I N
Video and audio inputs for external devices, such as a
camcorder or VCR.
S-VIDEO
Connects an S-Video signal from a camcorder or VCR.
0
COMPONENT IN
The COMPONENT IN jack is also used as the AV IN
jack.
POWER INPUT
!
Connects the supplied power cord.
English - 4
Page 7
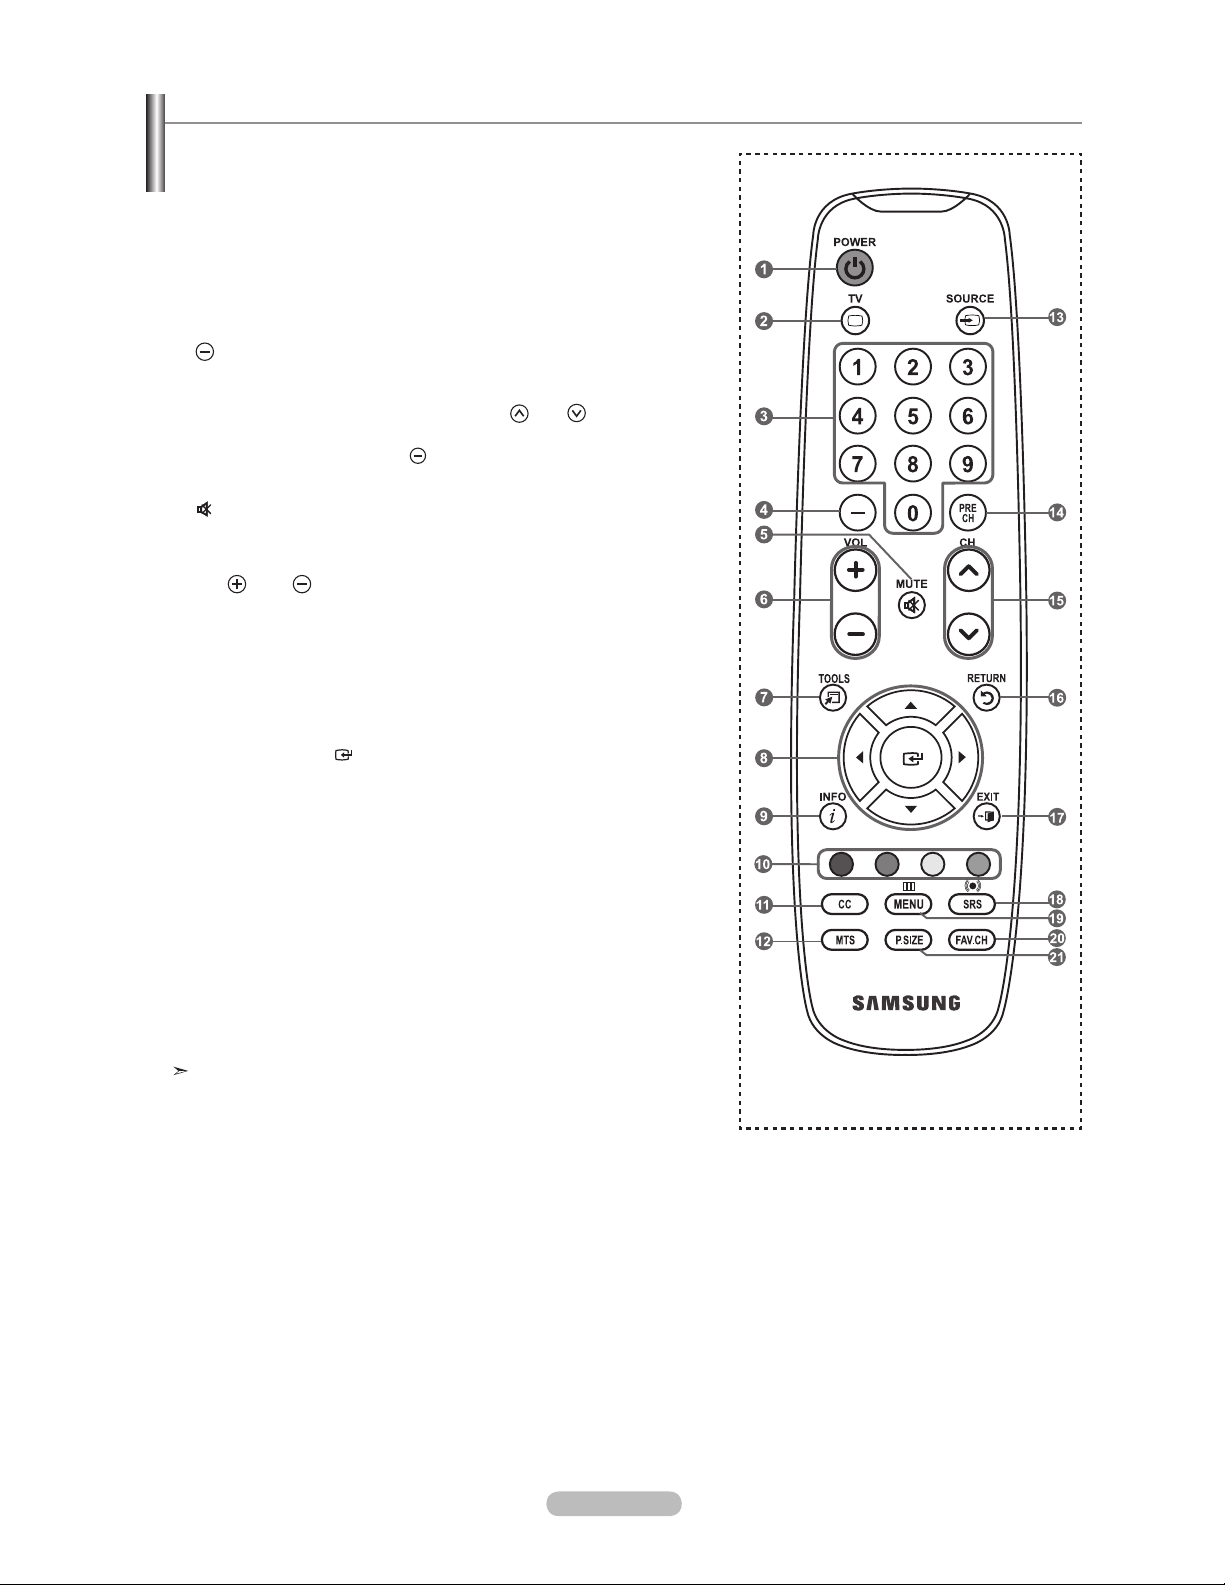
Remote Control
You can use the remote control up to a distance of about 23 feet from the TV.
1
POWER
Turns the TV on and off.
2
TV
Selects the TV mode directly.
3
NUMERIC BUTTONS
Press to change the channel.
4
Press to select additional
channels(digital and analog) being
broadcast by the same station.
For example, to select channel
“54-3”, press “54”, then press “ ”
and “3”.
5 (
MUTE)
Press to temporarily cut off the
sound.
6
VOL / VOL
Press to increase or decrease
the volume.
7
TOOLS
Use to quickly select frequently
used functions.
UP / DOWN / LEFT /
8
RIGHT / ENTER
Use to select on-screen menu
items and change menu values.
9
INFO
Press to display information on
the TV screen.
0
COLOR BUTTONS
Use these buttons in the
Channel list, etc.
!
CC
Controls the caption decoder.
@
MTS
Press to choose stereo, mono
or Separate Audio Program
(SAP broadcast).
#
SOURCE
Press to display and select the
available video sources.
$
PRE CH
Tunes to the previous channel.
%
Press to change channels.
^
Returns to the previous menu.
&
Press to exit the menu.
*
Selects SRS TruSurround XT
(
Displays the main on-screen
)
a P.SIZE
Picture size selection.
/ CH
CH
RETURN
EXIT
SRS
mode.
MENU
menu.
FAV.CH
Press to switch to your favorite
channels.
The performance of the remote control may be affected by bright light.
English - 5
Page 8
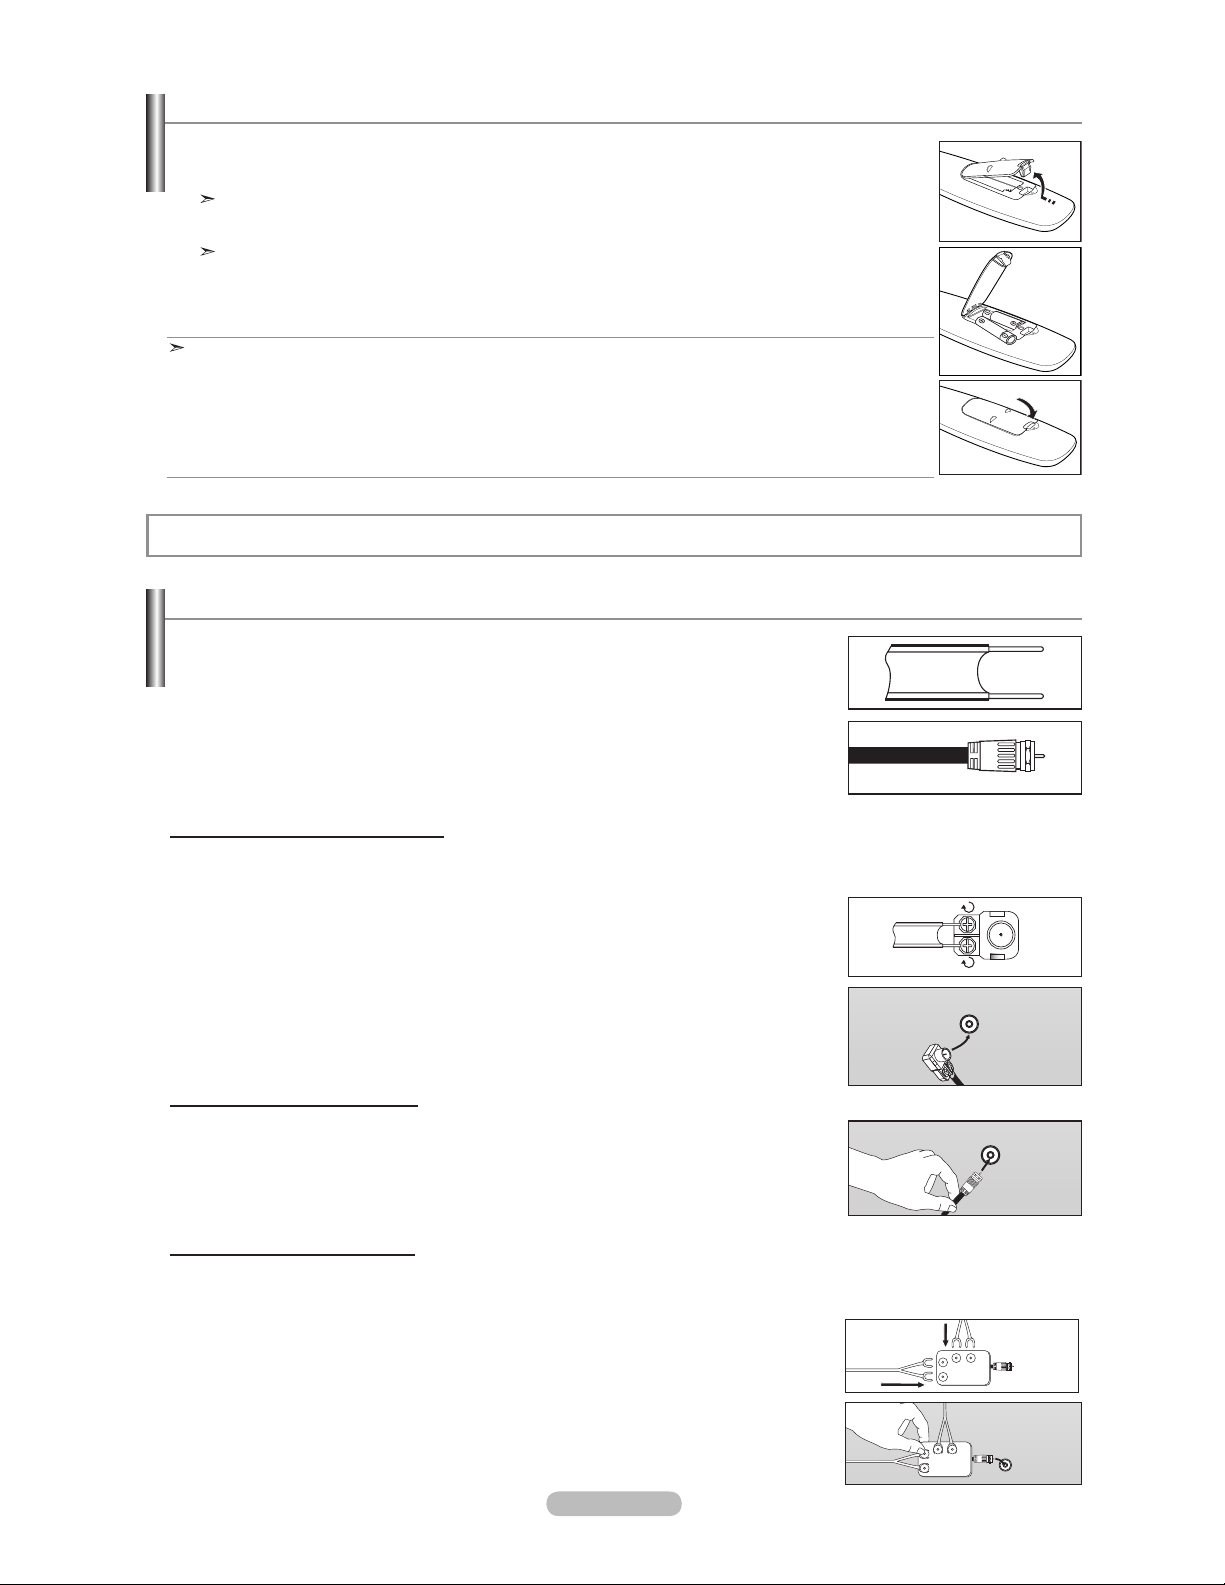
Installing Batteries in the Remote Control
1. Lift the cover at the back of the remote control upward as shown in the figure.
2. Install two AAA size batteries.
Make sure to match the "+" and "–" ends of the batteries with the diagram inside the compartment.
3. Replace the cover.
Remove the batteries and store them in a cool, dry place if you won’t be using the remote control for a
long time.
The remote control can be used up to about 23 feet from the TV.
(Assuming typical TV usage, the batteries should last for about one year.)
If the remote control doesn’t work, check the following:
1. Is the TV power on?
2. Are the plus and minus ends of the batteries reversed?
3. Are the batteries drained?
4. Is there a power outage or is the power cord unplugged?
5. Is there a special fluorescent light or neon sign nearby?
Connections
Connecting VHF and UHF Antennas
If your antenna has a set of leads that look like the diagram to the right, see "Antennas with
300 Flat Twin Leads" below.
If your antenna has one lead that looks like the diagram to the right, see "Antennas with 75
Round Leads".
If you have two antennas, see "Separate VHF and UHF Antennas".
Antennas with 300 Flat Twin Leads
If you are using an off-air antenna (such as a roof antenna or "rabbit ears") that has 300 twin at leads, follow the directions
below.
1. Place the wires from the twin leads under the screws on a 300-75 adapter
(not supplied).
Use a screwdriver to tighten the screws.
2. Plug the adaptor into the ANT IN terminal on the back of the TV.
ANT IN
Antennas with 75 Round Leads
1. Plug the antenna lead into the ANT IN terminal on the back of the TV.
ANT IN
Separate VHF and UHF Antennas
If you have two separate antennas for your TV (one VHF and one UHF), you must combine the two antenna signals before
connecting the antennas to the TV. This procedure requires an optional combiner-adaptor (available at most electronics shops).
1. Connect both antenna leads to the combiner.
2. Plug the combiner into the ANT IN terminal on the bottom of the rear panel.
English - 6
UHF
VHF
ANT IN
UHF
VHF
Page 9
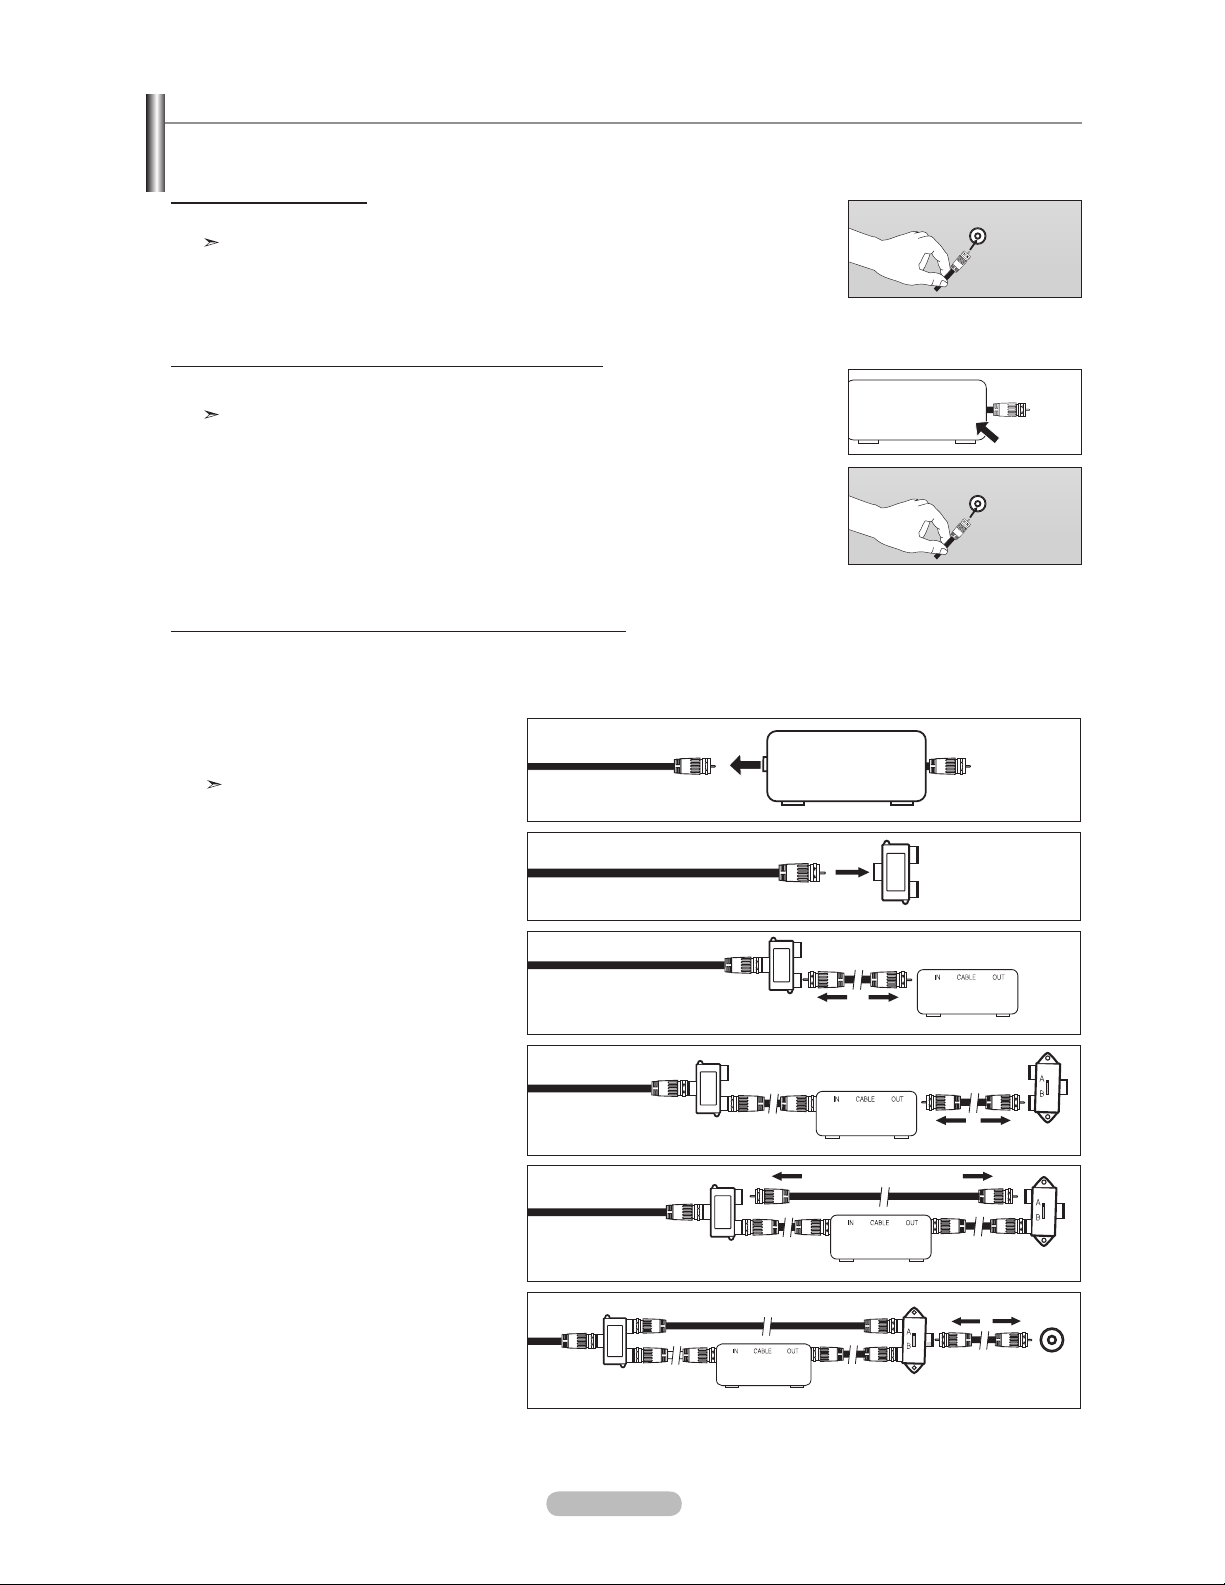
Connecting Cable TV
To connect to a cable TV system, follow the instructions below.
Cable without a Cable Box
1. Plug the incoming cable into the ANT IN terminal on the back of the TV.
Because this TV is cable-ready, you do not need a cable box to view unscrambled cable channels.
ANT IN
Connecting to a Cable Box that Descrambles All Channels
1. Find the cable that is connected to the ANT OUT terminal on your cable box.
This terminal might be labeled "ANT OUT", "VHF OUT" or simply, "OUT".
ANT IN
ANT OUT
2. Connect the other end of this cable to the ANT IN terminal on the back of the TV.
ANT IN
Connecting to a Cable Box that Descrambles Some Channels
If your cable box descrambles only some channels (such as premium channels), follow the instructions below. You will need a twoway splitter, an RF (A/B) switch and four lengths of RF cable. (These items are available at most electronics stores.)
1. Find and disconnect the cable that is
connected to the ANT IN terminal on your
cable box.
This terminal might be labeled "ANT IN",
"VHF IN" or simply, "IN".
ANT IN
2. Connect this cable to a two-way splitter.
Incoming
cable
Splitter
3. Connect an RF cable between the OUTPUT
terminal on the splitter and the IN terminal
on the cable box.
4. Connect
an RF cable between the
ANT OUT terminal on the cable box and
the B–IN terminal on the RF(A/B) switch.
5. Connect
another cable between the other
OUT terminal on the splitter and the A–IN
terminal on the RF (A/B) switch.
Incoming
cable
Incoming
cable
Incoming
cable
Splitter
Splitter
Splitter
Cable Box
Cable Box
Cable Box
RF (A/B)
Switch
RF (A/B)
Switch
6. Connect the last RF cable between the
OUT terminal on the RF (A/B) switch and
ANT IN
the ANT IN terminal on the rear of the TV.
Incoming
cable
Splitter
Cable Box
RF (A/B)
Switch
TV Rear
After you have made this connection, set the A/B switch to the "A" position for normal viewing. Set the A/B switch to the "B" position to
view scrambled channels. (When you set the A/B switch to "B", you will need to tune your TV to the cable box’s output channel, which is
usually channel 3 or 4.)
English - 7
Page 10
Connecting a DVD Player or Cable Box/Satellite receiver (Set-Top Box) via HDMI
This connection can only be made if there is an HDMI Output connector on the external device.
1. Connect an HDMI Cable
between the HDMI/DVI IN jack
TV and the HDMI jack
on the
on the DVD Player or Cable
Box/Satellite receiver (Set-Top
Box).
DVD Player or Cable Box/Satellite receiver
(Set-Top Box) Rear Panel
HDMI Cable (Not supplied)
What is HDMI?
TV Rear Panel
• HDMI(High-Definition Multimedia Interface), is an interface that enables the
transmission of digital audio and video signals using a single cable.
• The difference between HDMI and DVI is that the HDMI device is smaller in
size and has the HDCP (High Bandwidth Digital Copy Protection) coding feature
installed.
Each DVD Player or Cable Box/Satellite receiver (Set-Top Box) has a different back
panel configuration.
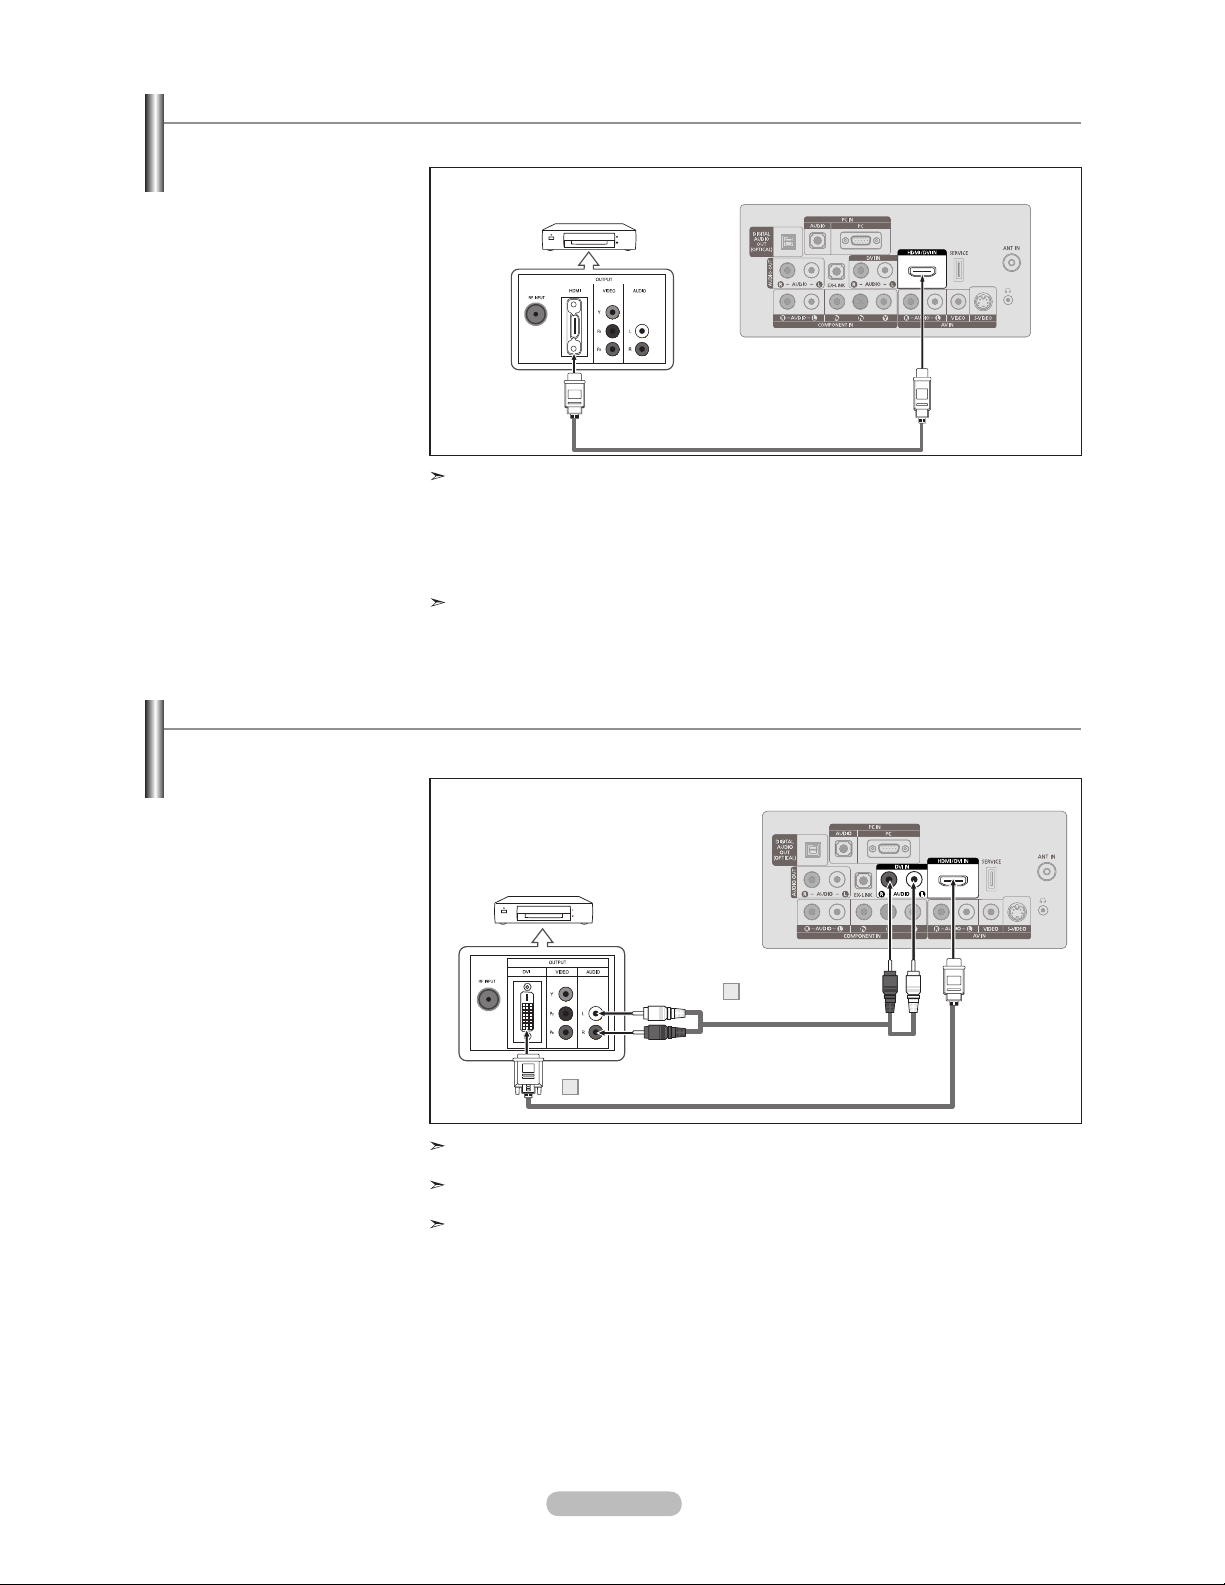
Connecting a DVD Player or Cable Box/Satellite receiver (Set-Top Box) via DVI
This connection can only be made if there is a DVI Output connector on the external device.
1. Connect a DVI to HDMI Cable
or DVI-HDMI Adapter between
the HDMI/DVI IN jack on
TV and the DVI jack on
the
the DVD Player or Cable
Box/Satellite receiver (Set-Top
Box).
2. Connect Audio Cables
between the DVI IN
[R-AUDIO-L] jack on the TV
and the DVD Player or Cable
Box/Satellite receiver (Set-Top
Box).
DVD Player or Cable Box/
Satellite receiver (Set-Top Box)
Audio Cable
2
(Not supplied)
DVI to HDMI Cable (Not supplied)1
Each DVD Player or Cable Box/Satellite receiver (Set-Top Box) has a different back
panel configuration.
When connecting a DVD Player or Cable Box/Satellite receiver (Set-Top Box), match
the color of the connection terminal to the cable.
When using an HDMI/DVI cable connection, you must use the HDMI/DVI IN jack.
TV Rear Panel
English - 8
Page 11
Connecting a DVD Player or Cable Box/Satellite receiver (Set-Top Box) via Component cables
The rear panel jacks on your TV make it easy to connect a DVD Player or Cable Box/Satellite receiver (Set-Top Box) to your TV.
1. Connect a Component Cable
between the COMPONENT
B
IN [Y, P
and the COMPONENT [Y, P
P
, PR] jacks on the TV
R
] jacks on the DVD Player
B
,
or Cable Box/Satellite receiver
(Set-Top Box).
2. Connect Audio Cables between
the COMPONENT IN
[R-AUDIO-L] jacks on the
TV
and the AUDIO OUT jacks
on the DVD Player or Cable
Box/Satellite receiver (Set-Top
Box).
DVD Player or Cable Box /
Satellite receiver (Set-Top Box)
Audio Cable (Not supplied)
2
Component Cable (Not supplied)
1
Component video separates the video into Y (Luminance (brightness)), Pb (Blue) and
Pr (Red) for enhanced video quality.
Be sure to match the component video and audio connections.
For example, if connecting a Component video cable to COMPONENT IN, connect the
audio cable to COMPONENT
IN also.
Each DVD Player or Cable Box/Satellite receiver (Set-Top Box) has a different back panel
configuration.
When connecting a DVD Player or Cable Box/Satellite receiver (Set-Top Box), match the
color of the connection terminal to the cable.
TV Rear Panel
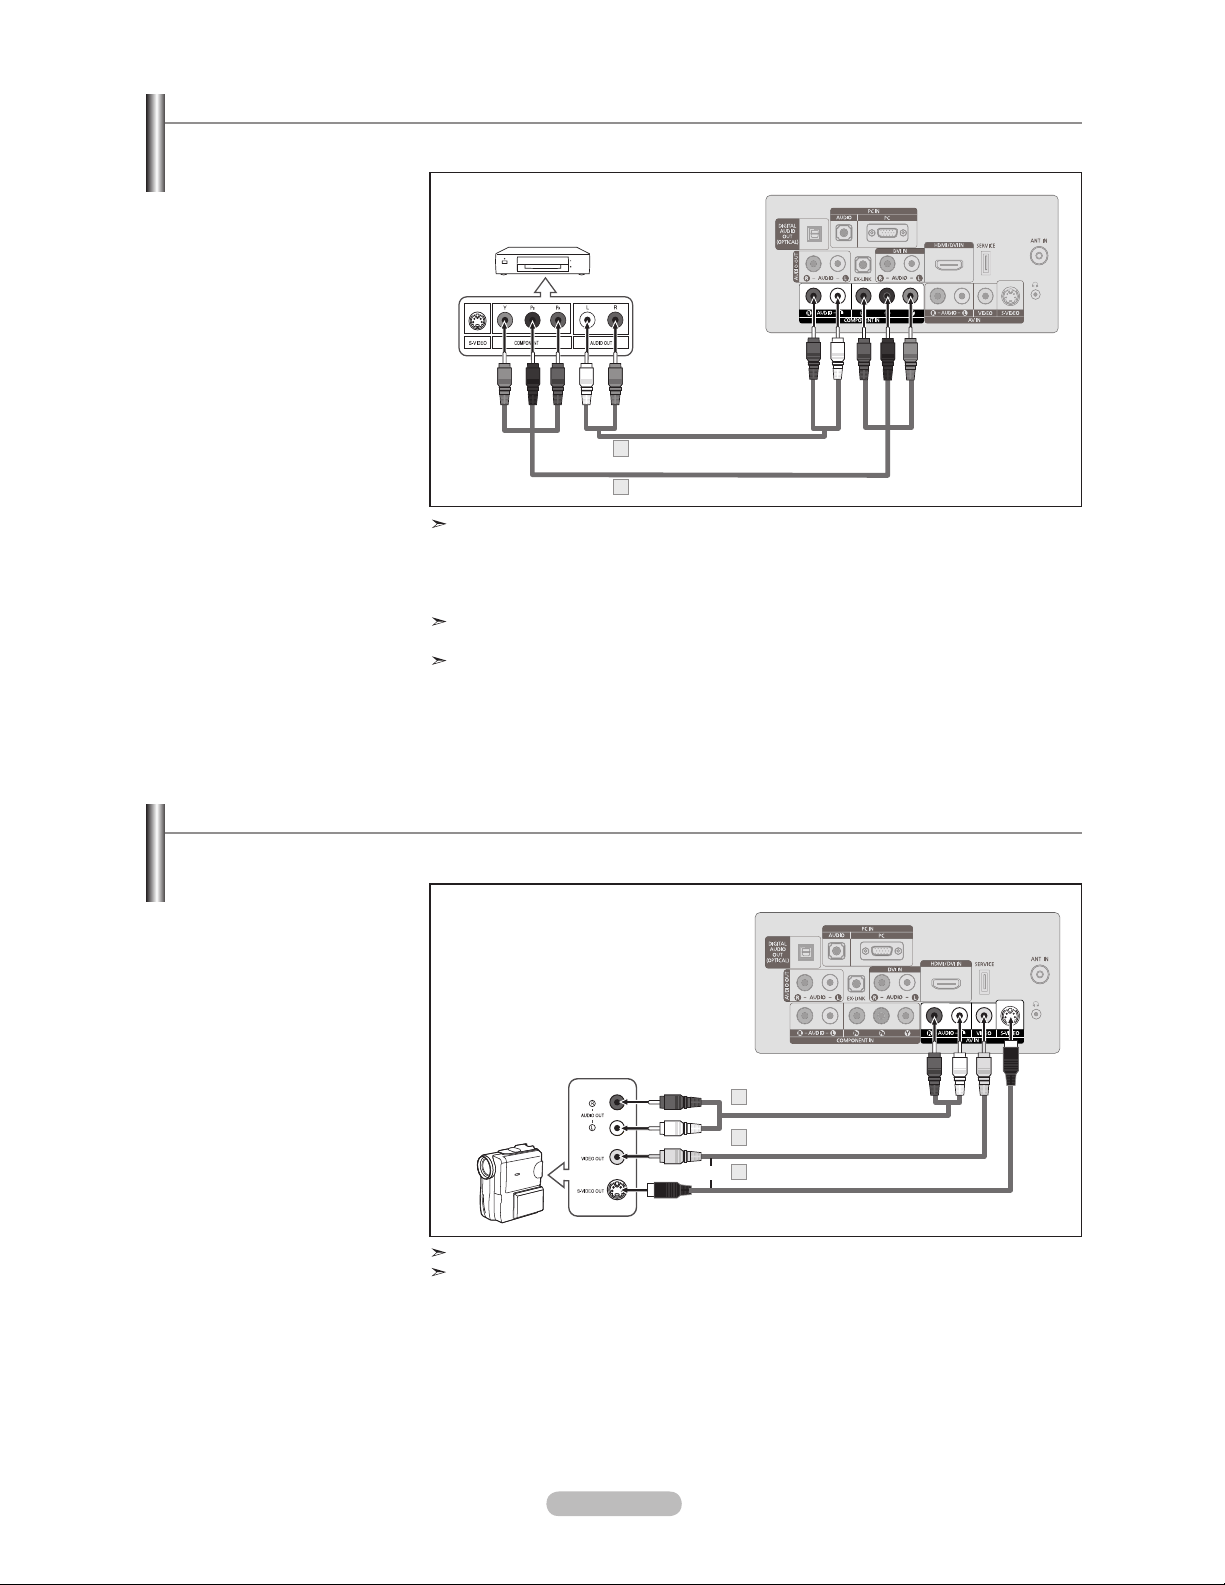
Connecting a Camcorder
They allow you to view the camcorder tapes without using a VCR.
1. Connect a Video Cable
(or S-Video Cable) between
the AV IN [VIDEO] (or
S-VIDEO) jack on the
and the VIDEO OUT jack on
the camcorder.
Connect Audio Cables
2.
between the AV IN
[R-AUDIO-L] jacks on the
and the AUDIO OUT jacks
on the camcorder.
TV
TV
Camcorder
Each Camcorder has a different back panel configuration.
When connecting a Camcorder, match the color of the connection terminal to the cable.
Audio Cable (Not supplied)
2
Video Cable (Not supplied)
1
S-Video Cable (Not supplied)
1
or
TV Rear Panel
English - 9
Page 12
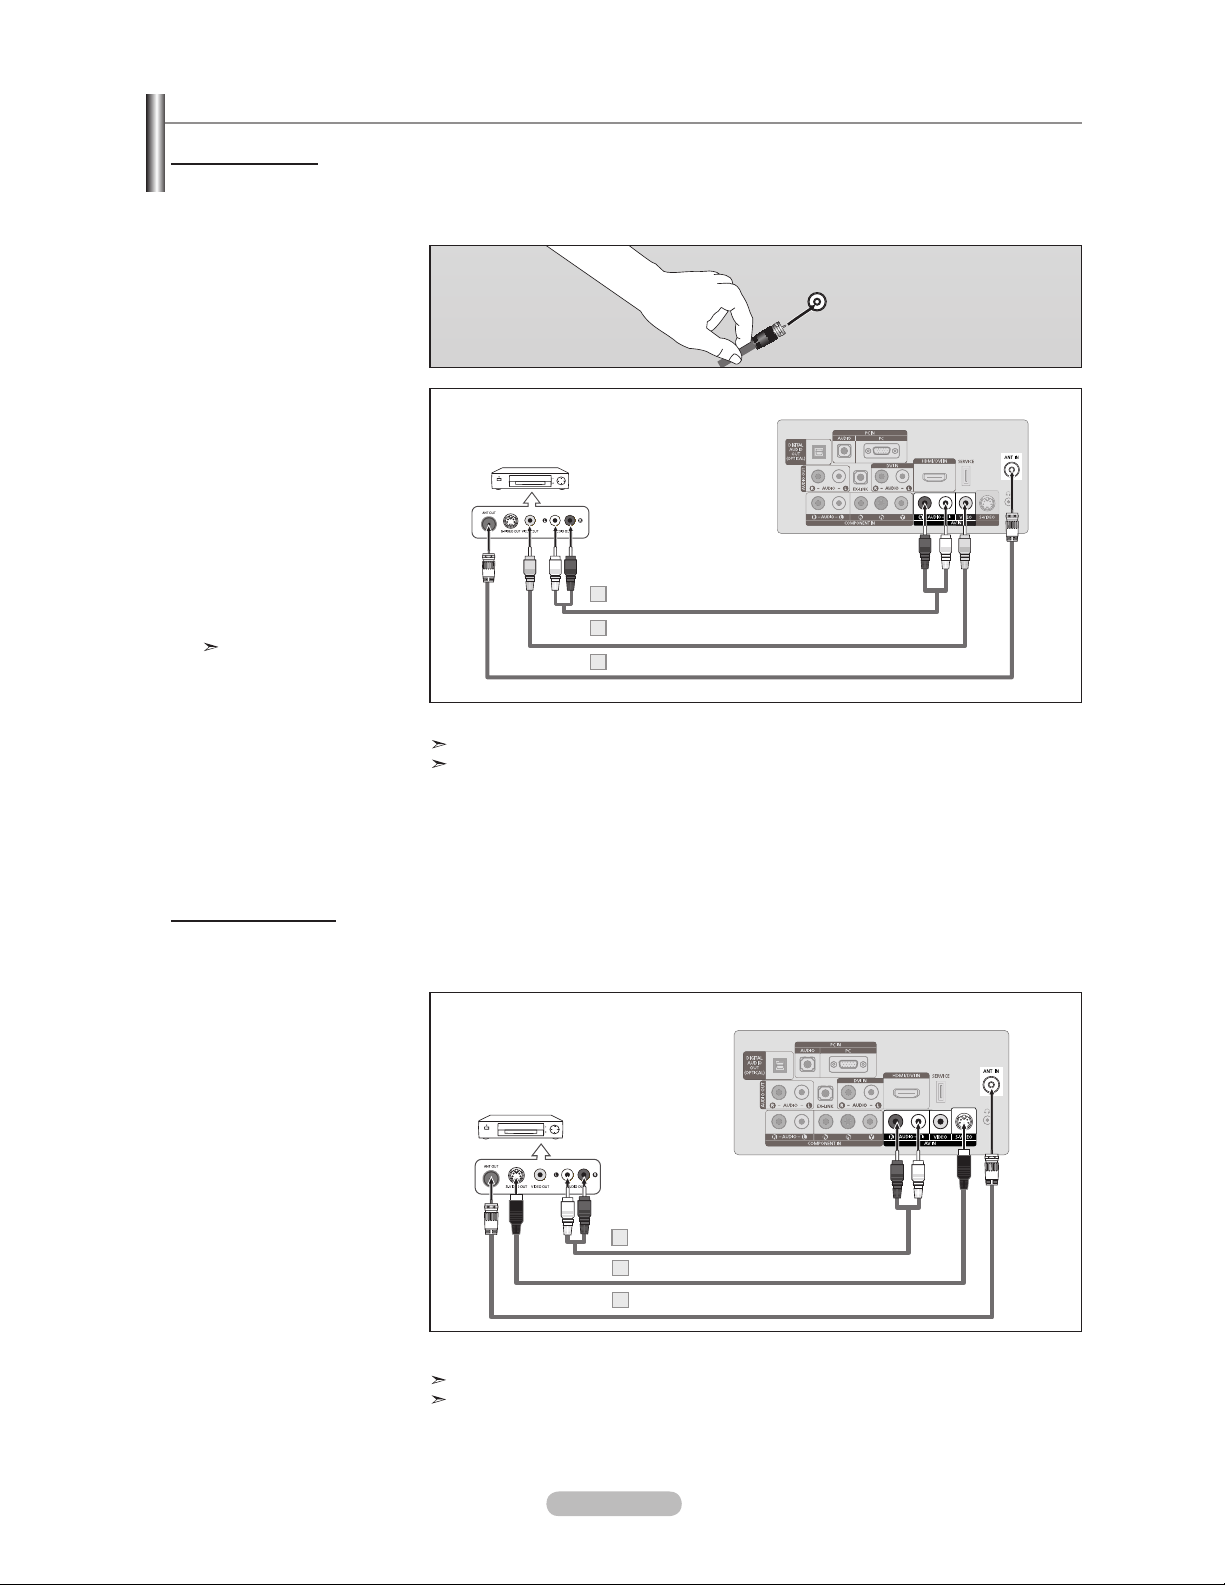
Connecting a VCR
Video Connection
These instructions assume that you have already connected your TV to an antenna or a cable TV system (according to the
instructions on pages 6~7). Skip step 1 if you have not yet connected to an antenna or a cable system.
1. Unplug the cable or antenna
from the back of the
2.
Connect the cable or antenna to
TV.
the ANT IN terminal on the back
of the VCR.
Connect an RF Cable between
3.
the ANT OUT terminal on the
VCR and the ANT IN terminal
on the TV.
4.
Connect a Video Cable
between the VIDEO OUT jack
on the VCR and the AV IN
[VIDEO] jack on the TV.
5. Connect Audio Cables
between the AUDIO OUT
jacks on the VCR and the
AV I N [R-AUDIO-L] jacks on
.
the TV
If you have a “mono”
(non-stereo) VCR, use a
Y-connector (not supplied)
to hook up to the right and
left audio input jacks of the
TV. If your VCRis stereo,
you mustm connect two
cables.
VCR Rear Panel
Audio Cable (Not supplied)
5
4
Video Cable (Not supplied)
RF Cable (Not supplied)3
Follow the instructions in “Viewing a VCR or Camcorder Tape” to view your VCR tape.
Each VCR has a different back panel configuration.
When connecting a VCR, match the color of the connection terminal to the cable.
ANT IN
TV Rear Panel
S-Video Connection
Your Samsung TV can be connected to an S-Video jack on a VCR.
(This connection delivers a better picture when compared to the regular Video connection above.)
1. To begin, follow steps 1–3
in the previous section to
TV Rear Panel
connect the antenna or
cable to your VCR and your
TV.
Connect an S-Video Cable
2.
VCR Rear Panel
between the S-VIDEO OUT
jack on the VCR and the
AV I N [S-VIDEO] jack on
the TV
.
Connect Audio Cables
3.
between the AUDIO OUT
jacks on the VCR and the
AV I N [R-AUDIO-L] jacks on
.
the TV
Audio Cable (Not supplied)
3
S-Video Cable (Not supplied)
2
RF Cable (Not supplied)
1
An S-Video cable may be included with a VCR. (If not, check your local electronics store.)
Each VCR has a different back panel configuration.
When connecting a VCR, match the color of the connection terminal to the cable.
English - 10
Page 13

Connecting a Digital Audio System
The rear panel jacks on your TV make it easy to connect a Digital Audio System (Home theater/Receiver) to your TV.
1. Connect an Optical Cable
between the “DIGITAL AUDIO
OUT (OPTICAL)” jacks on the
TV and the Digital Audio Input
jacks on the Digital Audio
System.
When a Digital Audio System
is connected to the “DIGITAL
AUDIO OUT (OPTICAL)” jack:
Decrease the volume of the
TV and adjust the volume
level with the system’s volume
control.
5.1CH audio is possible when the TV is connected to an external device supporting 5.1CH.
Each Digital Audio System has a different back panel configuration.
When the receiver (home theater) is set to On, you can hear sound output from the TV’s
Optical jack. When the TV is displaying a DTV(air) signal, the TV will send out 5.1 channel sound to the Home theater receiver. When the source is a digital component such as
a DVD and is connected to the TV via HDMI, only 2 channel sound will be heard from the
Home Theater receiver. If you want to hear 5.1 channel audio, connect the DIGITAL AUDIO
OUT (OPTICAL) jack on the DVD player or Cable/Satellite Box directly to an Amplifier or
Home Theater, not the TV.
Digital Audio System
TV Rear Panel
Optical Cable (Not supplied)
Connecting an Amplier/DVD Home Theater
1. Connect Audio Cables
between the AUDIO OUT
[R-AUDIO-L] jacks on the TV
and AUDIO IN [R-AUDIO-L]
jacks on the Amplifier/DVD
Home Theater.
When an audio amplifier is
connected to the "AUDIO OUT
[R-AUDIO-L]" jacks: Decrease
the volume of the TV and
adjust the volume level with
the Amplifier’s volume control.
terminal to the cable.
Amplier/DVD Home Theater
Audio Cable (Not supplied)
Each Amplifier/DVD Home Theater has a different back panel configuration.
When connecting an Amplifier/DVD Home Theater, match the color of the connection
TV Rear Panel
English - 11
Page 14

Connecting a PC
Using the D-Sub Cable
1. Connect a D-Sub Cable
between PC IN [PC]
connector on the TV and the
PC output connector on your
computer.
Connect a PC Audio Cable
2.
between the PC IN [AUDIO]
jack on the TV and the Audio
Out jack of the sound card on
your computer.
Using the HDMI/DVI Cable
1. Connect a HDMI/DVI cable
between the HDMI/DVI IN
jack on the TV and the PC
output jack on your computer.
Connect a 3.5 mm Stereo
2.
mini-plug/2RCA Cable
between the DVI IN
[R-AUDIO-L] jack on the TV
and the Audio Out jack of the
sound card on your computer.
PC
PC Audio Cable (Not supplied)2
D-Sub Cable (Not supplied)
1
PC
TV Rear Panel
TV Rear Panel
3.5 mm Stereo mini-plug/2RCA Cable (Not supplied)
2
HDMI/DVI Cable (Not supplied)1
Each PC has a different back panel configuration.
When connecting a PC, match the color of the connection terminal to the cable.
When using an HDMI/DVI cable connection, you must use the HDMI/DVI IN jack.
English - 12
Page 15
Operation
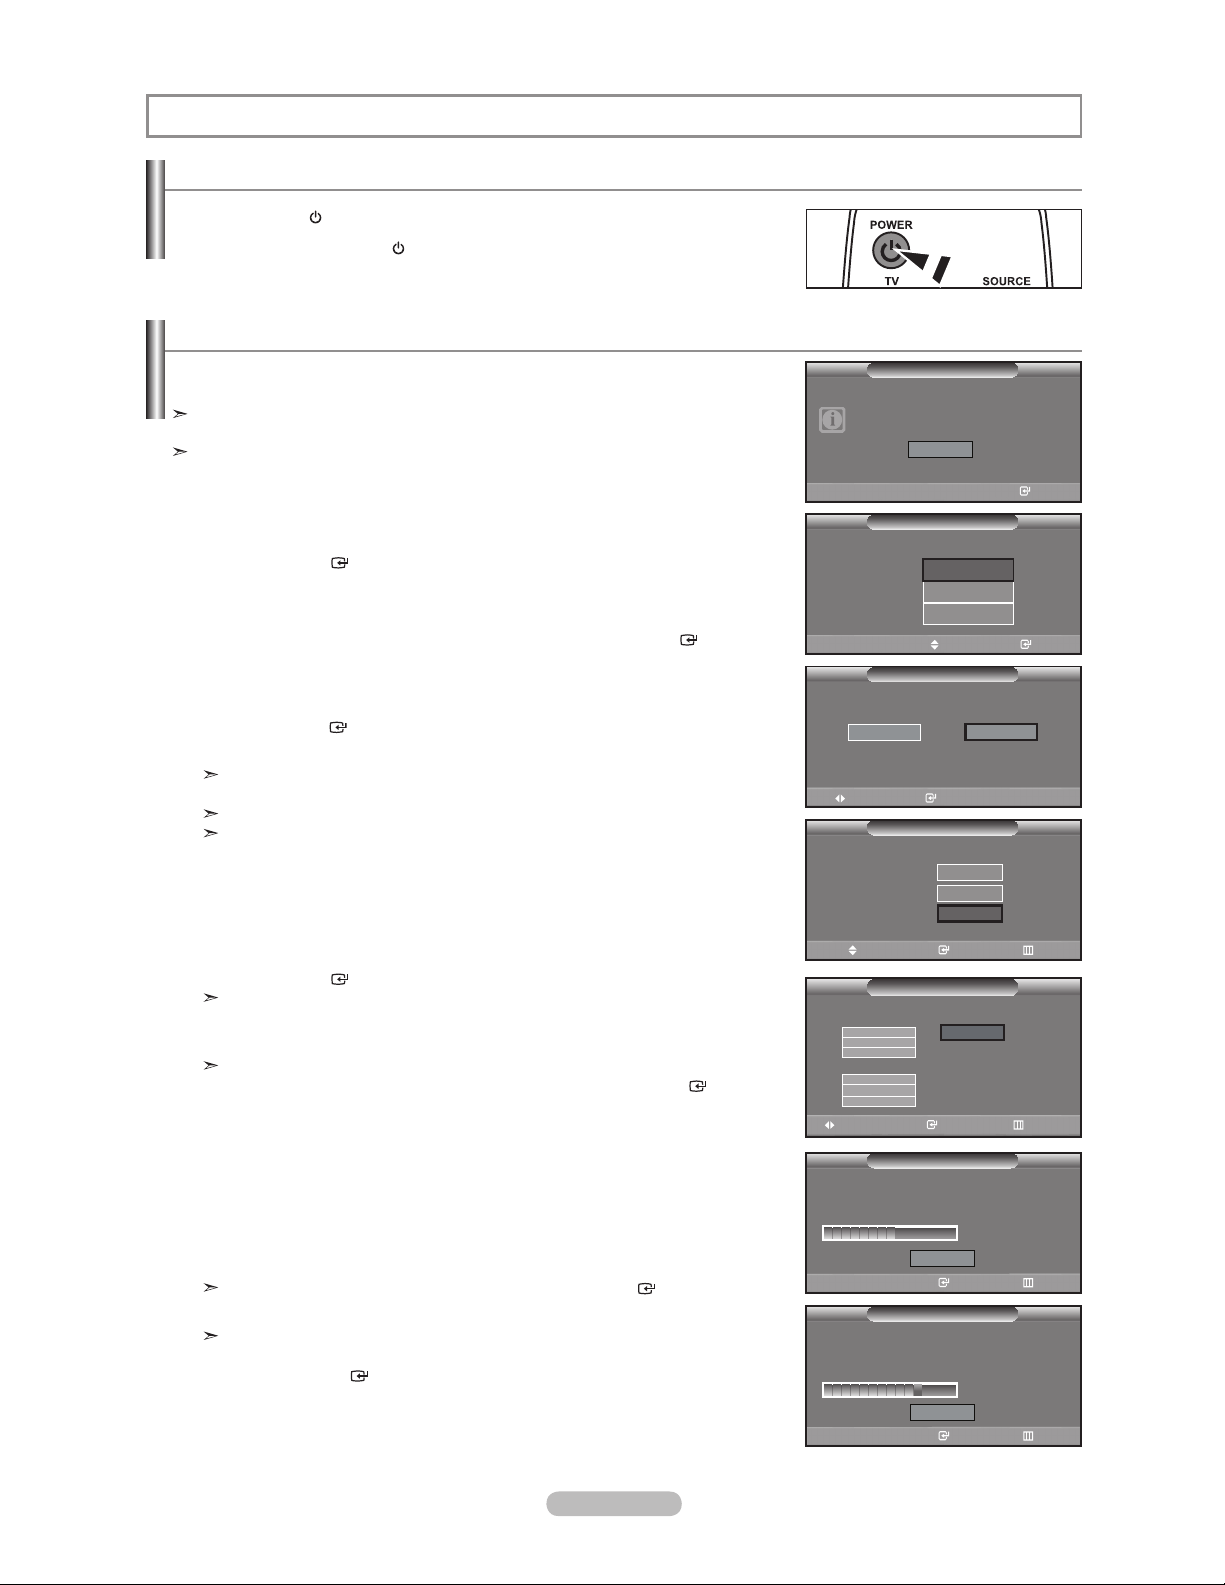
Turning the TV On and Off
Press the POWER button on the remote control.
You can also use the POWER
button on the TV.
Plug & Play Feature
When the TV is initially powered on, basic settings proceed automatically and
subsequently.
The Screen Saver is activated if there is no remote control key input for longer than 1
minute while “Plug & Play” is running.
The Screen Saver is activated if there is no operating signal for longer than 15
minutes.
1. Press the POWER button on the remote control.
The message “Menu Language, Store Demo, Channels and Time will be set.” is
displayed.
Press
the ENTER
is automatically displayed.
2. Press the or button to select language, then press the ENTER
The message “Select ‘Home Use’ when installing this TV in your home.” is
displayed.
3. Press the or button to select “Store Demo” or “Home Use”, then
press
the ENTER
The message “Select the antennas to memorize.” is displayed.
We recommend setting the TV to “Home Use” mode for the best picture in your
home environment.
“Store Demo” mode is only intended for use in retail environments.
If the unit is accidentally set to “Store Demo” mode and you want to return to
“Home Use” (Standard): Press the Volume button on the TV. When the volume
OSD is displayed, press and hold the MENU button on the TV for 5 seconds.
button, then “Select the language of the OSD” menu
button.
button.
Plug & Play
Menu Language, Store Demo,
Channels and Time will be set.
Start
Enter
Plug & Play
Select the language of the OSD.
Language :
Select ‘Home Use’ when installing this TV in your
home.
Store Demo
Move Enter
Select the antennas to memorize.
Air
Cable
Auto
English
Español
Français
Move Enter
Plug & Play
Home Use
Plug & Play
Start
Start
Start
4. Press the or button to memorize the channels of the selected connection.
Press
the ENTER
button to select “Start”.
Air: “Air” antenna signal.
Cable: “Cable” antenna signal.
Auto: “Air” and “Cable” antenna signals.
In Cable mode, you can select the correct signal source among STD, HRC, and
IRC by pressing the , , or button, then press the ENTER
button.
If you have Digital cable, select the cable system signal source for both Analog
and Digital. Contact your local cable company to identify the type of cable
system that exists in your particular area.
5. The
TV will begin memorizing all of the available channels.
To stop the search before it has finished, press the ENTER button with “Stop”
selected.
After all the available channels are stored, it starts to remove scrambled
channels (see page 28). The Auto program menu then reappears.
Press the ENTER
button when channel memorization is complete. The
message “Set the Clock Mode.” is displayed.
English - 13
Move Enter Skip
Analog
Digital
Plug & Play
Start
Plug & Play
Auto Program
Stop
Plug & Play
Auto Program
Stop
Cable 50
50 %
DTV Cable 41
77 %
Selects a cable signal type for your location.
STD
HRC
IRC
STD
HRC
IRC
Move Enter Skip
Auto Program in Progress.
DTV Air : 02 Air : 11
DTV Cable : 23 Cable : 21
Enter Skip
Removing scrambled channel.
Enter Skip
Page 16
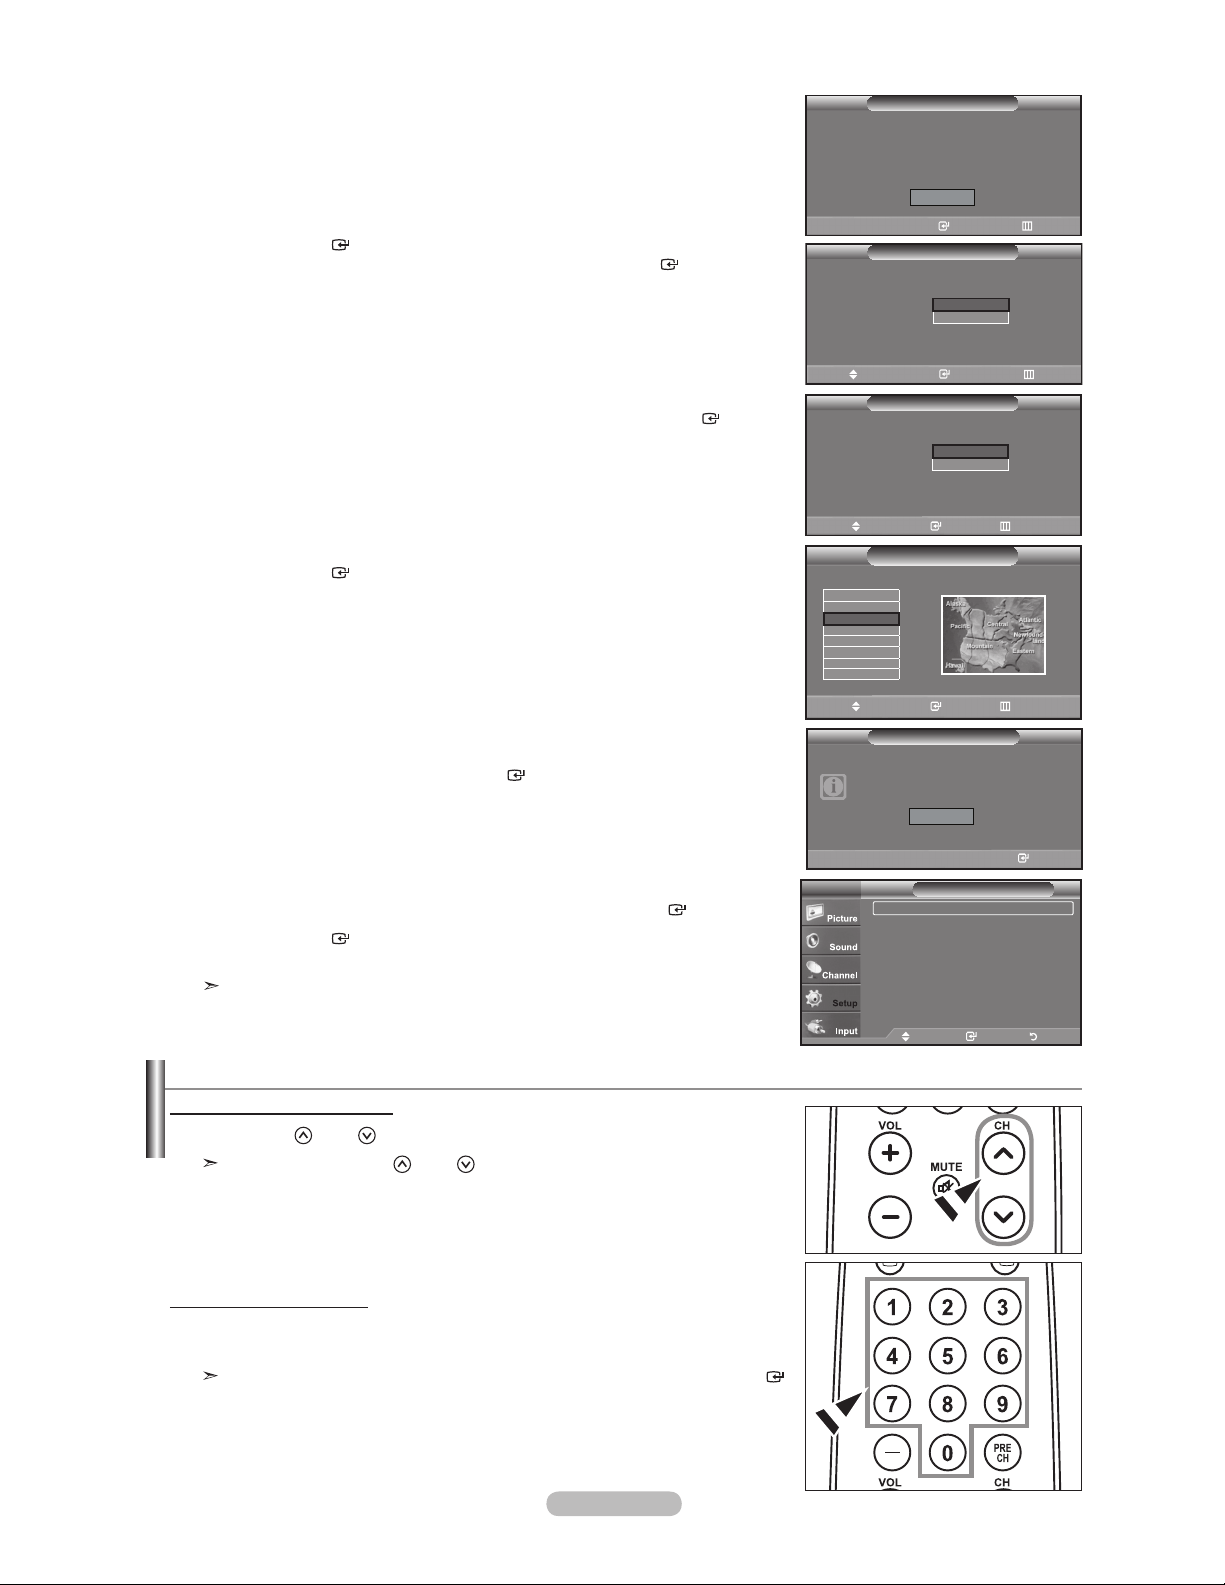
6. Press the ENTER button.
Press the or button to select “Auto”, then Press the ENTER
button.
The message “Set to daylight saving time.” is displayed.
If you select “Manual”, “Enter the current date and time.” is displayed.
(See page 37)
7. Press the or button to select “Off” or “On”, then press the ENTER
button.
The message “Select the time zone in which you live.” is displayed.
8. Press the or button to highlight the time zone for your local area.
Press the ENTER
button. If you have received a digital signal, the time will be
set automatically.
If not, see page 37 to set the clock.
9. The message “Enjoy your watching.” is displayed.
When you have finished, press the ENTER
button.
Auto Program
Plug & Play
Auto Program is completed.
75 Channels are memorized.
DTV Air : 24 Air : 1
DTV Cable : 17 Cable : 33
OK
Enter Skip
Plug & Play
Set the Clock Mode.
Clock Mode :
Move Enter Skip
Set to daylight saving time.
DST :
Move Enter Skip
Select the time zone in which you live.
Newfoundland
Atlantic
Eastern
Central
Mountain
Pacific
Alaska
Hawaii
Move Enter Skip
Auto
Manual
Plug & Play
Off
On
Plug & Play
Plug & Play
Enjoy your watching.
OK
If you want to reset this feature...
1.
Press the MENU button to display the menu.
Press
2. Press the ENTER
the or button to select "Setup", then press the ENTER
button again to select “Plug & Play”.
button.
For further details on setting up options, refer to the pages 13~14.
The “Plug & Play” feature is only available in the TV mode.
Changing Channels
Using the Channel Buttons
1. Press the CH
When you press the CH
sequence.
You will see all the channels that the TV has memorized (The TV must have
memorized at least three channels). You will not see channels that were either
erased or not memorized. See page 16 to memorize channels.
Using the Number Buttons
Press the number buttons to go directly to a channel. For example, to select
1.
channel 27, press 2, then 7.
For quick channel change, press the number buttons, then press the ENTER
button.
or CH button to change channels.
or CH button, the TV changes channels in
Enter
TV
Plug & Play
Language : English
Time
V-Ch ip
Caption
Melody : Medium
Energy Saving : Off
SW Upgrade
Move Enter Return
Setup
English - 14
Page 17
Using the Button
The
button is used to select stations that broadcast a digital signal.
1.
For example, for Channel 7-1, press 7, then
HD indicates the TV is receiving a Digital High Definition signal. SD indicates
, then 1.
the TV is receiving a Standard Definition signal.
For quick channel change, press the number buttons, then press the ENTER
button.
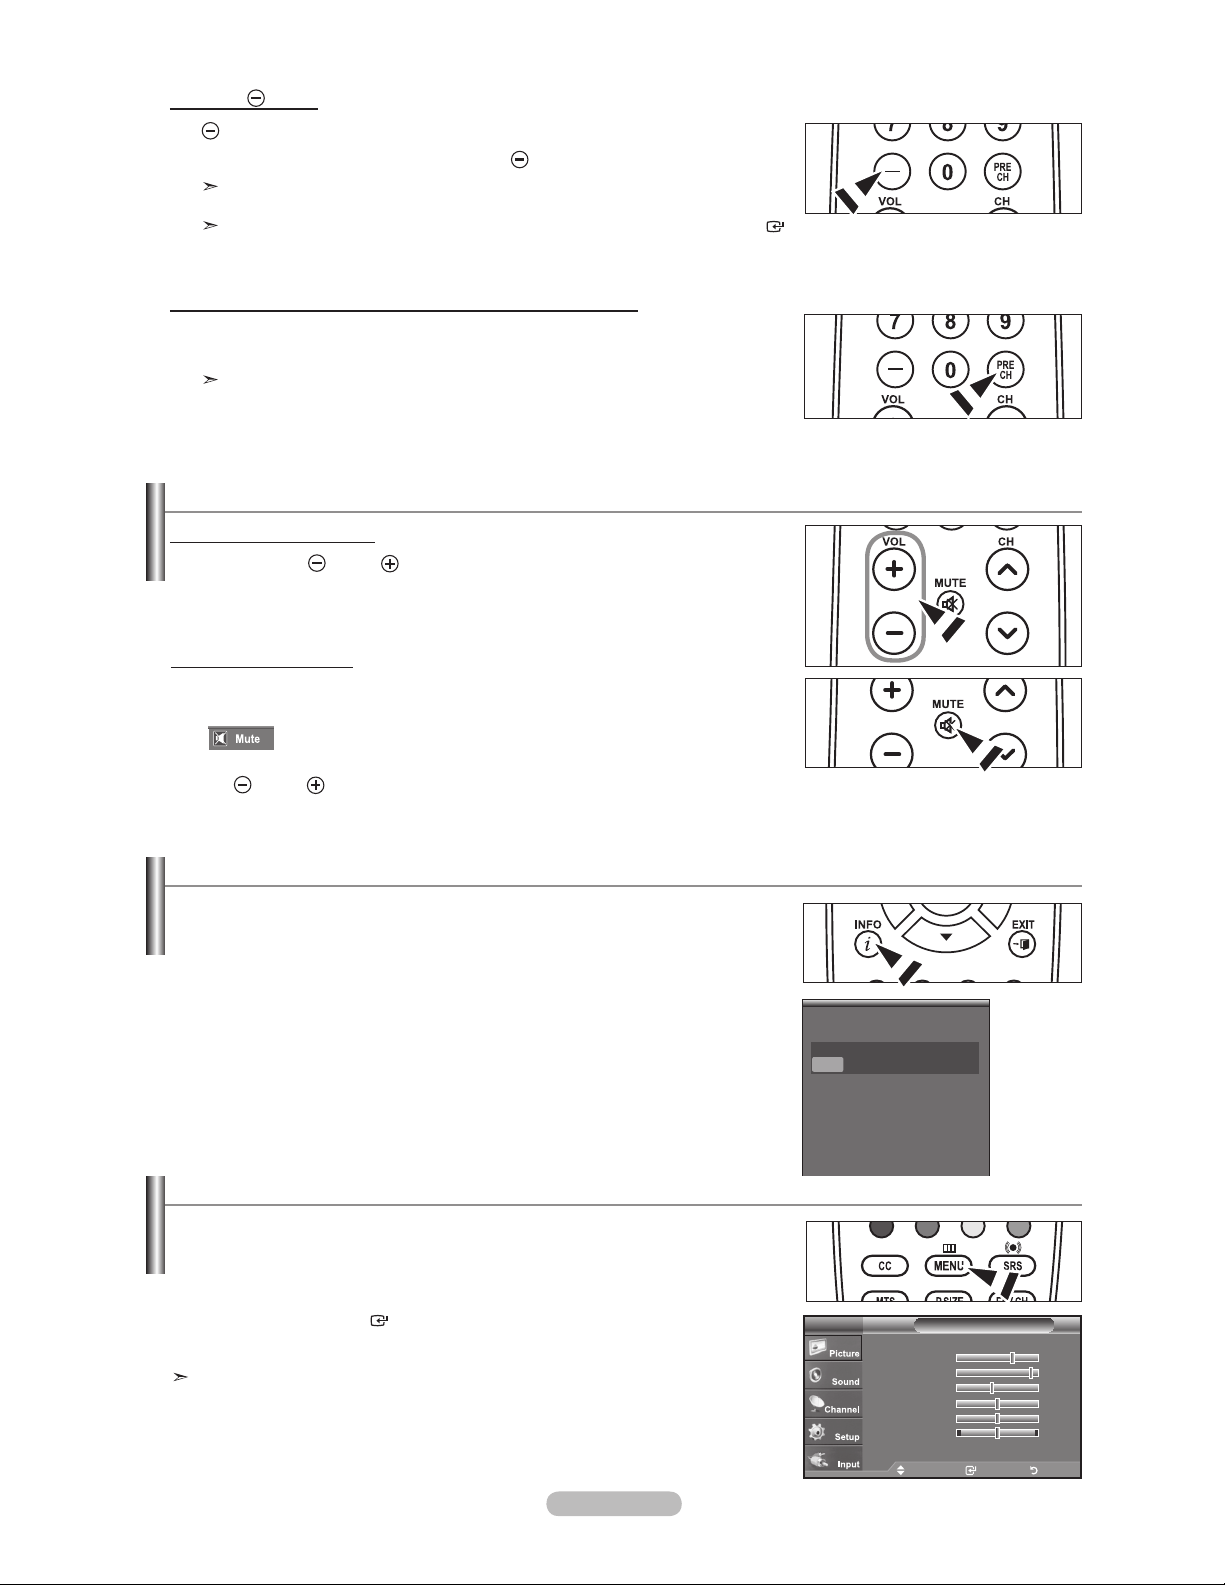
Using the PRE CH Button to select the Previous Channel
1. Press the PRE CH button.
The TV will switch to the last channel viewed.
To quickly switch between two channels that are far apart, tune to one
channel, then use the number button to select the second channel. Then
use the PRE CH button to quickly alternate between them.
Adjusting the Volume
Using the Volume Buttons
1. Press the
Using the MUTE button
At any time, you can cut off the sound using the MUTE button.
1. Press MUTE button and the sound cuts off.
"
2. To turn mute off, press the MUTE button again or simply press the
VOL or VOL button.
VOL or VOL button to increase or decrease the volume.
" is displayed on the screen.
Viewing the Display
The display identies the current channel and the status of certain audio-video settings.
1. Press the INFO button on the remote control.
The TV will display the channel, the type of sound,
and the status of certain picture and sound settings.
°
Press the INFO button once more or wait approximately 10 seconds and the
display disappears automatically.
Air 7
Mono
Picture Mode : Standard
Sound Mode : Custom
MTS : Stereo
V-Chip : Off
Caption : Off
5 : 54 pm
Viewing the Menus
1. With the power on, press the MENU button.
The main menu appears on the screen. The menu’s left side has icons:
Picture, Sound, Channel, Setup, Input.
2. Press the or button to select one of the icons.
Then press the ENTER
3. Press the E
XIT button to exit.
The on-screen menus disappear from the screen after about one minute.
button to access the icon’s sub-menu.
Mode : Standard
Backlight 7
Contrast 95
Brightness 45
Sharpness 50
Color 50
Tint G 50 R 50
More
PictureTV
Move Enter Exit
English - 15
Page 18
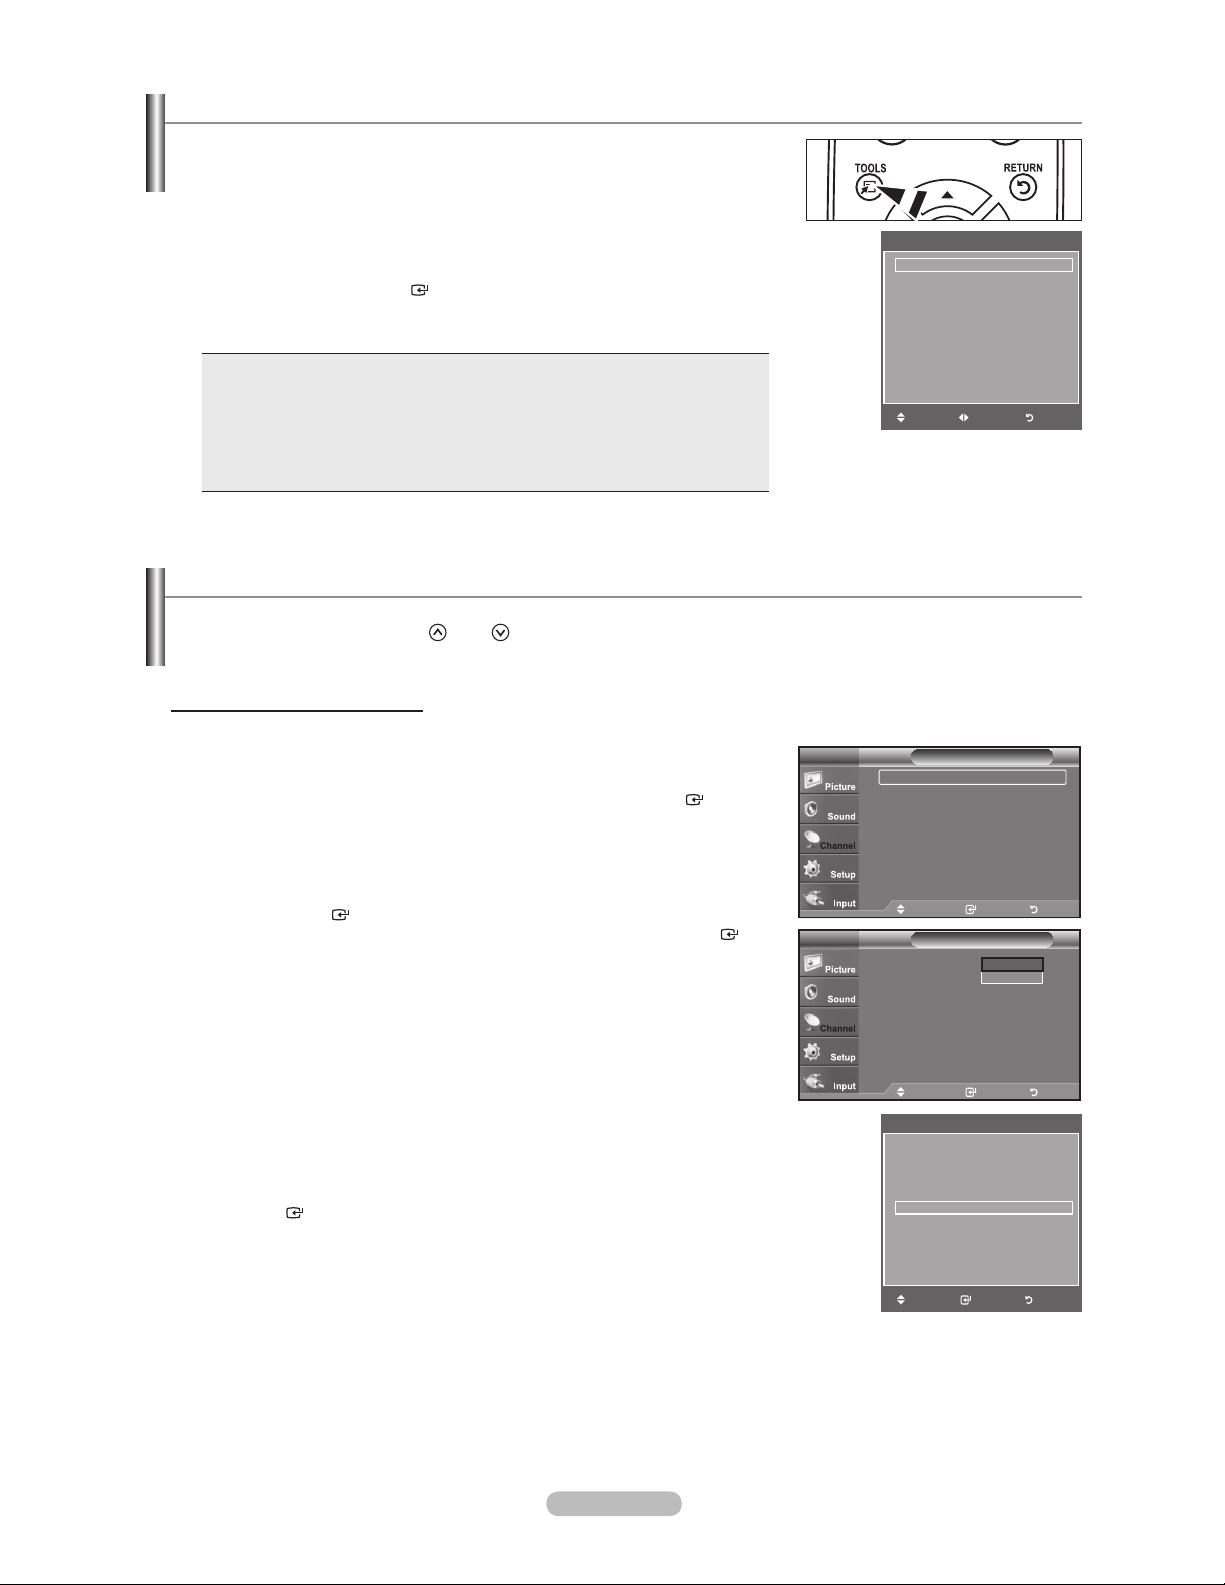
Using the TOOLS Button
You can use the TOOLS button to select your frequently used functions quickly and
easily. The “Tools” menu changes depending on which external input mode you are
viewing.
Press the TOOLS button.
1.
The “Tools” menu will appear.
2. Press the or button to select a menu.
3. Press the ////ENTER
buttons to display, change, or use the selected
items.For a more detailed description of each function, refer to the corresponding
page.
Picture Mode Standard
Sound Mode : Custom
Sleep Timer : Off
Add to Favorite
Switch to Air
Too ls
• Picture Mode, see page 19
• Sound Mode, see page 24
• Sleep Timer, see page 39
Move Adjust Exit
• Add to Favorite, see page 30
• Switch to Air, see page 16
• Auto Adjustment, see page 35
Memorizing the Channels
Your TV can memorize and store all of the available channels for both "off-air" (Air) and "Cable" channels. After the available
channels are memorized, use the CH
by entering the channel digits. There are three steps for memorizing channels: selecting a broadcast source, memorizing the
channels (automatic) and adding or deleting channels (Channel Lists).
Selecting the Video Signal-source
Before your television can begin memorizing the available channels, you must specify the
type of signal source that is connected to the TV (i.e. an Air or a Cable system).
1. Press the MENU button to display the menu.
Press the or button to select "Channel", then press the ENTER
or CH button to scan through the channels. This eliminates the need to change channels
Channel
button.
TV
Antenna : Air
Auto Program
Clear Scrambled Channel
Channel List
Name
Fine Tune
Signal Strength
2. Press the ENTER
button to select “Antenna”.
Press the or button to select “Air” or “Cable”, then press the ENTER
Press the EXIT button to exit.
Easy Setting
1.
Press the TOOLS button on the remote control.
Press the or button to select “Switch to Air” (or “Switch to Cable”), then press
2.
the ENTER
button.
button.
Move Enter Return
TV
Antenna : Air
Auto Program
Clear Scrambled Channel
Channel List
Name
Fine Tune
Signal Strength
Move Enter Return
Picture Mode : Standard
Sound Mode : Custom
Sleep Timer Off
Add to Favorite
Switch to Air
Move Enter Exit
Channel
Air
Cable
Too ls
English - 16
Page 19
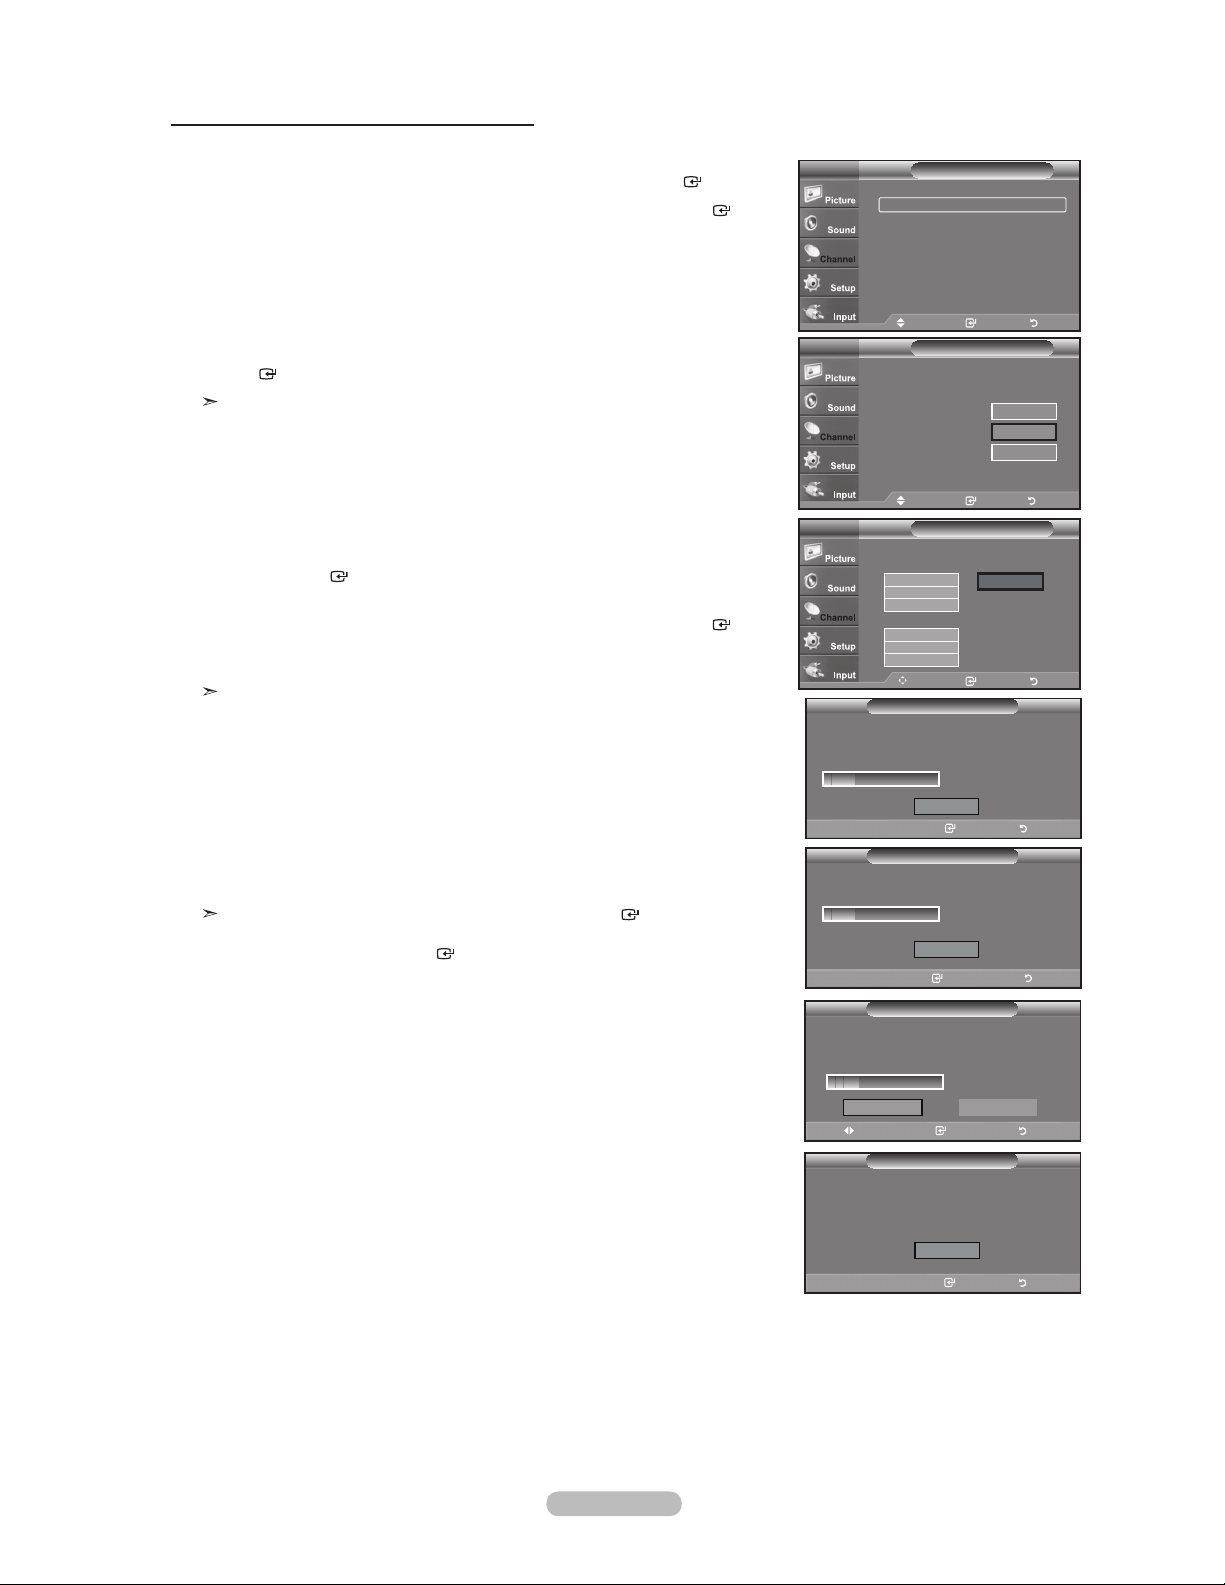
Storing Channels in Memory (Automatic Method)
1. Press the MENU button to display the menu.
Press the or button to select “Channel”, then press the ENTER
2. Press the or button to select "Auto Program", then press the ENTER
button.
button.
3. Press the or button to select the antenna connection, then press the
ENTER
Air: “Air” antenna signal.
button.
TV
TV
Cable: “Cable” antenna signal.
Auto: “Air” and “Cable” antenna signals.
TV
4. When selecting the Cable TV system:
Press the ENTER
button to start the auto program.
Press the or button, then press the or to select the correct analog signal
cable system source among “STD”, “HRC”, and “IRC”. Press the ENTER
button.
If you have Digital cable TV, select the cable system signal source for both Analog
and Digital.
STD, HRC and IRC identify various types of cable TV systems. Contact your
local cable company to identify the type of cable system that exists in your
particular area. At this point the signal source has been selected.
Auto Program in Progress.
DTV Cable : -- Cable : 11
5. The TV begins memorizing all available stations.
After all the available channels are stored, it start to remove scrambled
channels(see page 28).
If you want to stop Auto Programming, press the ENTER button. The “Stop
Removing scrambled channel.
Auto Program?” message will be displayed. Select “Yes” by pressing the or
button, then press the ENTER
Press the EXIT
button to exit.
button.
Enter Return
Stop Auto Program?
DTV Cable : -- Cable : 11
Antenna : Air
Auto Program
Clear Scrambled Channel
Channel List
Name
Fine Tune
Signal Strength
Selects the antenna to execute the Auto
Program function.
Air
Cable
Auto
Move Enter Return
Selects a cable signal type for your location.
STD
HRC
IRC
STD
HRC
IRC
Move Enter Return
Enter Return
Channel
Move Enter Return
Auto Program
Start
Start
Start
Move Enter Return
Auto Program
Analog
Digital
Move Enter Return
Auto Program
Plug & Play
Auto Program
Stop
Plug & Play
Auto Program
Stop
Auto Program
Start
Cable 50
11 %
DTV Cable 40
11 %
English - 17
Yes
Move Enter Return
Auto Program is completed.
99 Channels are memorized.
DTV Cable : 65, Cable : 34
Enter Return
Auto Program
No
OK
11 %
Page 20
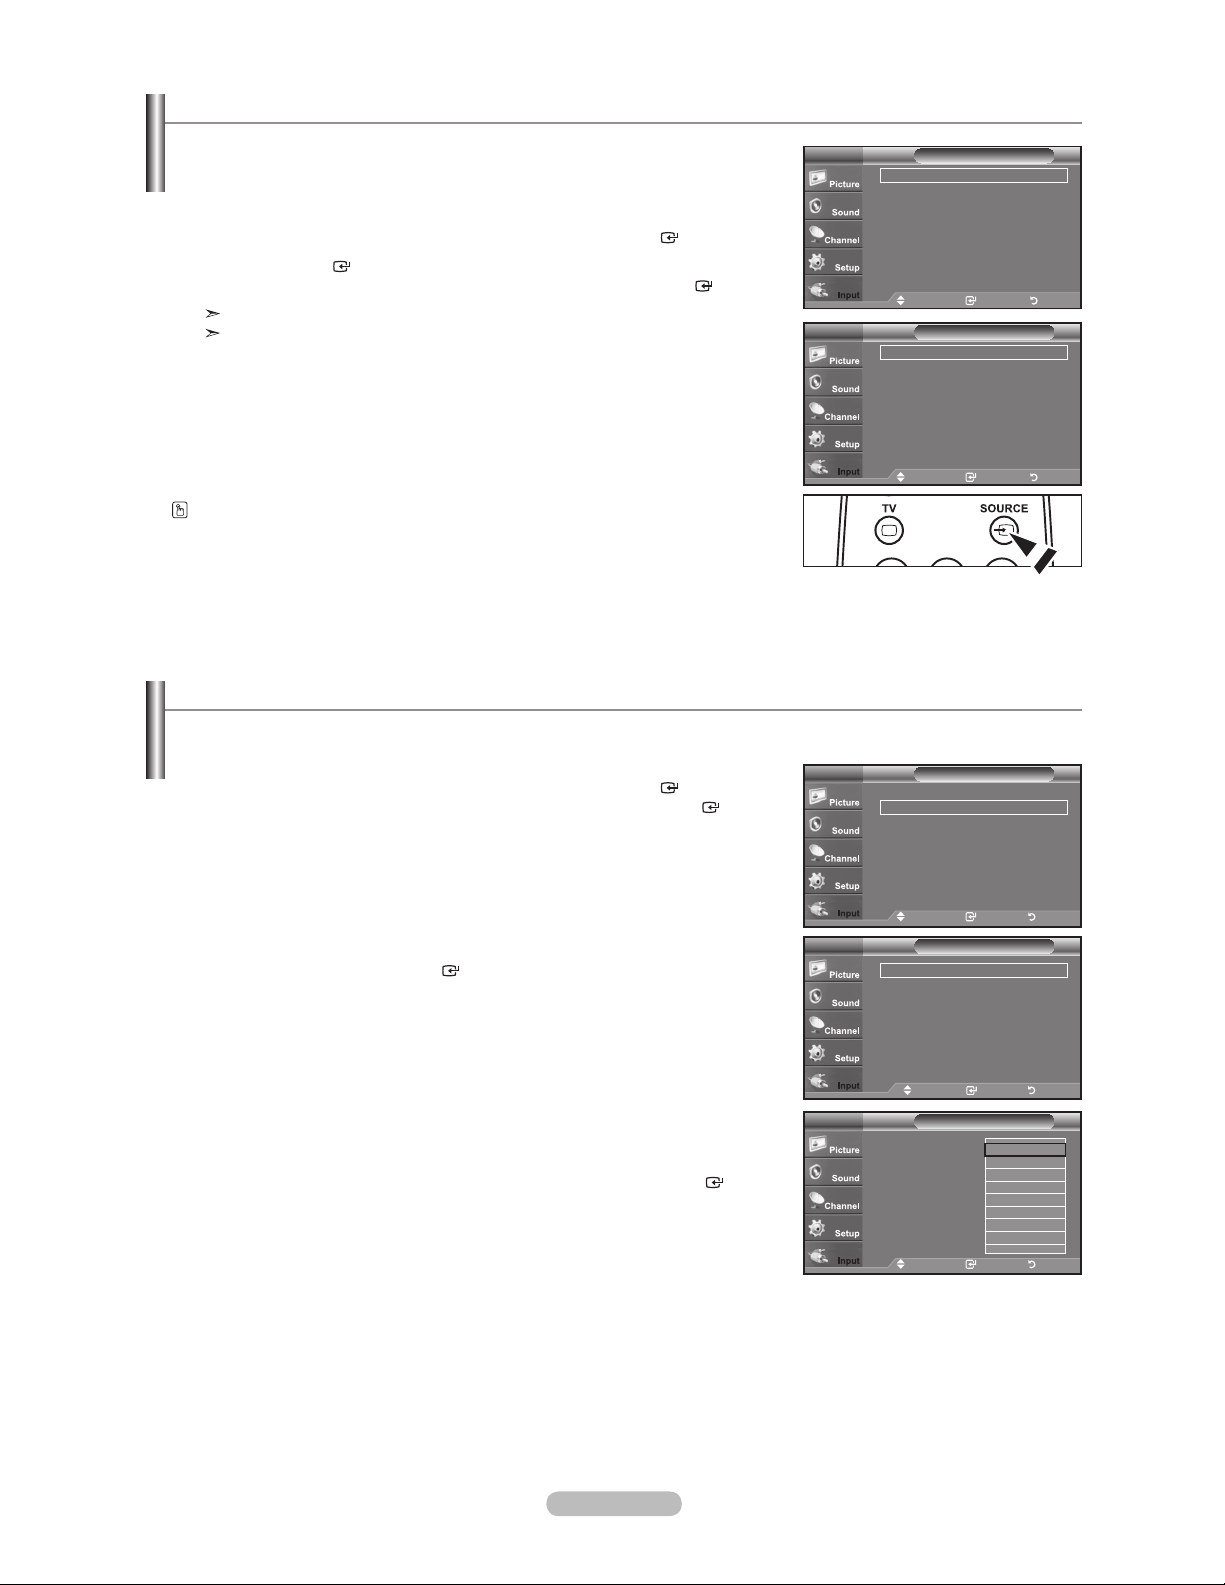
To Select the Source
Use to select TV or other external input sources such as DVD players or Cable Box/
Satellite receivers (Set-Top Box) connected to the TV. Use to select the input source
of your choice.
1. Press the MENU button to display the menu.
Press the or button to select “Input”, then press the ENTER
2. Press the ENTER
button to select "Source List".
Press the or button to select signal source, then press the ENTER
Available signal sources: TV, AV, S-Video, Component, PC, HDMI.
You can choose only those external devices that are connected to the TV.
Press the SOURCE button on the remote control to view an external signal source.
button.
button.
To Edit the Input Source Name
TV
Source List : TV
Edit Name
Move Enter Return
TV
AV : ---S-Video : ---Component : ---PC : ---HDMI : ----
Move Enter Return
Input
Source ListTV
Name the device connected to the input jacks to make your input source selection easier.
1. Press the MENU button to display the menu.
Press the or button to select “Input”, then press the ENTER
Press the or button to select "Edit Name", then press the ENTER
button.
button.
2. Press the or button to select "AV”, "S-Video", "Component”, "PC", "HDMI”
input jack, then press the ENTER
button.
3. Press the or button to select “VCR”, “DVD”, “Cable STB”, “Satellite STB”,
“PVR STB”, “AV Receiver”, “Game”, “Camcorder”, “PC”, “TV”, “IPTV”, “Blu-Ray”,
“HD DVD”, “Digital Media Adapter” input source, then press the ENTER
button.
Press the EXIT button to exit.
TV
Source List : TV
Edit Name
Move Enter Return
AV : ----
S-Video : ----
Component : ----
PC : ----
HDMI : ----
Move Enter Return
AV : ----
S-Video : ----
Component :
PC : ----
HDMI : ----
Move Enter Return
Input
Edit NameTV
Edit NameTV
----
VCR
----
DVD
Cable STB
Satellite STB
PVR STB
AV Receiver
Game
English - 18
Page 21

Picture Control
Changing the Picture Standard
You can activate either Dynamic, Standard, Movie by making a selection from the menu.
1. Press the MENU button to display the menu.
Press the ENTER
2. Press the ENTER
button, to select “Picture”.
button to select "Mode".
Press the or button to select the “Dynamic”, “Standard” or “Movie”.
Dynamic: Selects the picture for high-denition in a bright room.
Standard: Selects the picture for the optimum display in a normal environment.
Movie: Selects the picture for viewing movies in a dark room.
3. Press the EXIT button to exit.
Easy Setting
1. Press
2. Press
3. Press
4. Press
the T
OOLS button on the remote control.
the or button to select “Picture Mode”.
the or button to select the required option.
the EXIT or TOOLS button to exit.
Mode : Standard
Backlight 7
Contrast 95
Brightness 45
Sharpness 50
Color 50
Tint G 50 R 50
More
Mode : Standard
Backlight 7
Contrast 95
Brightness 45
Sharpness 50
Color 50
Tint G 50 R 50
More
Picture Mode Standard
Sound Mode : Custom
Sleep Timer : Off
Add to Favorite
Switch to Air
PictureTV
Move Enter Return
PictureTV
Dynamic
Standard
Movie
Move Enter Return
Too ls
Move Adjust Exit
Customizing the Picture Settings
Your television has several setting options that allow you to control the picture quality.
1.
To select the desired picture mode, follow the “Changing the Picture Standard”
instructions numbers 1 and 2.
Press the or button to select “Backlight”, “Contrast”, “Brightness”,
2.
“Sharpness”, “Color” or “Tint”, then press the ENTER
3. Press the or button to decrease or increase the value of a particular item.
Press the ENTER
Press the EXIT
When you make changes to “Backlight”, “Contrast”, “Brightness”, “Sharpness”,
°
button.
button to exit.
“Color” or “Tint”, the OSD will be adjusted accordingly.
In PC mode, you can only make changes to “Backlight”, “Contrast” and
°
“Brightness”.
Settings can be adjusted and stored for each external device you have
°
connected to an input of the TV.
Backlight: Adjusts the brightness of LCD back light.
•
Contrast: Adjusts the contrast level of the picture.
•
Brightness: Adjusts the brightness level of the picture.
•
Sharpness: Adjusts the edge definition of the picture.
•
Color: Adjusts color saturation of the picture.
•
Tint: Adjusts
•
the color tint of the picture.
button.
Mode : Standard
Backlight 7
Contrast 95
Brightness 45
Sharpness 50
Color 50
Tint G 50 R 50
More
Move Enter Return
Backlight
Move Adjust Return
PictureTV
7
English - 19
Page 22
Conguring Picture Options
Activating Picture Options
1. Press the MENU button to display the menu.
Press
2.
the ENTER button, to select “Picture”.
Press the or button to select "Picture Options", then press the ENTER
button.
Press the or button to select a particular item. Press the ENTER button.
When you are satisfied with your setting, press the ENTER button.
In PC mode, you can only make changes to the “Color Tone” and “Size” from
among the items in “Picture Options”.
More
Picture Options
Reset : OK
PictureTV
Move Enter Return
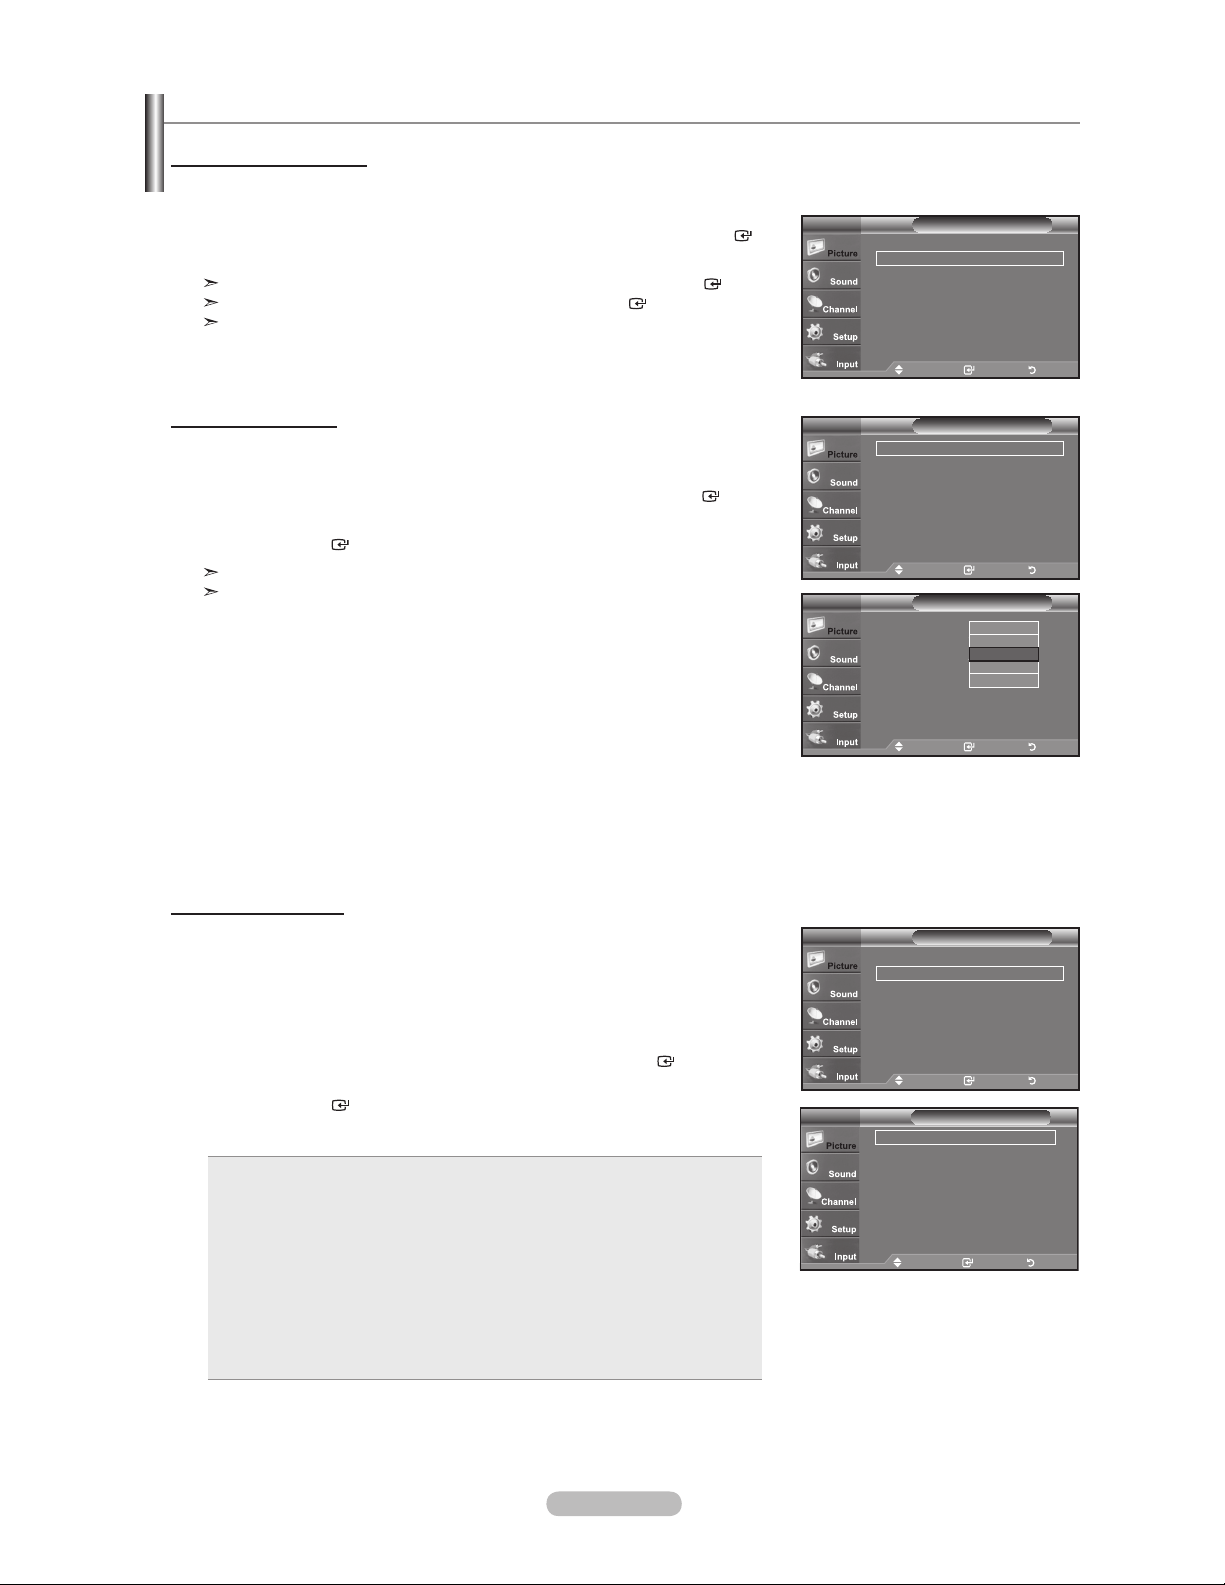
Setting the Color Tone
1. Follow the “Activating Picture Options” instructions numbers 1 and 2. (Refer to
page 20)
2. Press the or button to select “Color Tone”, then press the ENTER
button.
3. Press the or button to select “Cool2”, “Cool1”, “Normal”, “Warm1” or “Warm2”.
Press
the ENTER
“Warm1” or “Warm2” is only activated when the picture mode is “Movie”.
Settings can be adjusted and stored for each external device you have connected
button.
to an input of the TV.
Setting the Screen Size
Occasionally, you may want to change the size of the image on your screen. Your TV
comes with six screen size options, each designed to work best with specific types of
video input. Your cable box or satellite receiver may have its own set of screen sizes as
well. In general, though, you should view the TV in 16:9 mode as much as possible.
Follow the “Activating Picture Options” instructions numbers 1 and 2.
1.
(Refer to page 20)
2. Press
3. Press
the or button to select “Size”, then press the ENTER
the or button to select the screen format you want.
Press the ENTER
Press the EXIT
Wide: Adjusts the picture size to Wide appropriate for DVDs or wide
•
button to exit.
button.
button.
broadcasting.
16:9: Sets the picture to 16:9 wide mode.
•
Zoom1: Magnifies the size of the picture on the screen.
•
Zoom2: Magnifies the size of the picture more than “Zoom1”.
•
ide Fit: Enlarges the aspect ratio of the picture to fit the entire screen.
W
•
4:
•
3: Sets the picture to 4:3 normal mode.
•
Just Scan: Use
the function to see the full image without any cutoff when
HDMI (720p/1080i), Component (1080i) or DTV (1080i) signals
are input.
Picture OptionsTV
Color Tone : Normal
Size : Wide
Digital NR : Auto
HDMI Black Level : Normal
Film Mode : Off
Move Enter Return
Picture OptionsTV
Color Tone : Cool1
Size : Wide
Digital NR
HDMI Black Level : Normal
Film Mode : Off
Move Enter Return
Color Tone : Normal
Size : Wide
Digital NR : Auto
HDMI Black Level : Normal
Film Mode : Off
Move Enter Return
Wide
16 : 9
Zoom1
Zoom2
Wide Fit
4 : 3
Just Scan
Move Enter Return
Cool2
Cool1
Normal
: Auto
Warm1
arm2
W
Picture OptionsTV
SizeTV
English - 20
Page 23
°
Temporary image retention may occur when viewing a static image on the set
for more than two hours.
°
After selecting “Zoom1”, “Zoom2” or “Wide Fit”:
Press the or button to select “Position”, then press the ENTER
button. Press the or button to move the picture up and down.
Reset: Press the or button to select “Reset”, then press the ENTER
button. You can initialize the setting.
After selecting “Just Scan” in HDMI (1080i) or Component (1080i) mode:
°
Press the or button to select “H-Position” or “V-Position”, then press the
ENTER button.
Press the or button to adjust the screen Position. Press the
ENTER
Reset: Press the or button to select “Reset”, then press the ENTER
button. You can initialize the setting.
HD (High Definition)
°
16:9
°
Settings can be adjusted and stored for each external device you have connected to an input of the TV.
button.
- 1080i (1920x1080), 720p (1280x720)
Wide
16 :
9
Zoom1
Zoom2
Wide Fit
4 : 3
Just Scan
Adjust Enter Return
H-Position 0
V-Position 0
Reset
Move Enter Return
Input Source Picture Size
TV, Video, S-Video, Component (480i, 480p) Wide, 16:9, Zoom1, Zoom2, 4:3
DTV(1080i), Component (1080i), HDMI (720p, 1080i) Wide, 16:9, 4:3, Wide Fit, Just Scan
PC Wide, 16:9, 4:3
SizeTV
Position Reset
Just ScanTV
Alternately
O
, you can press the P.SIZE button on the remote control repeatedly to
change the picture size.
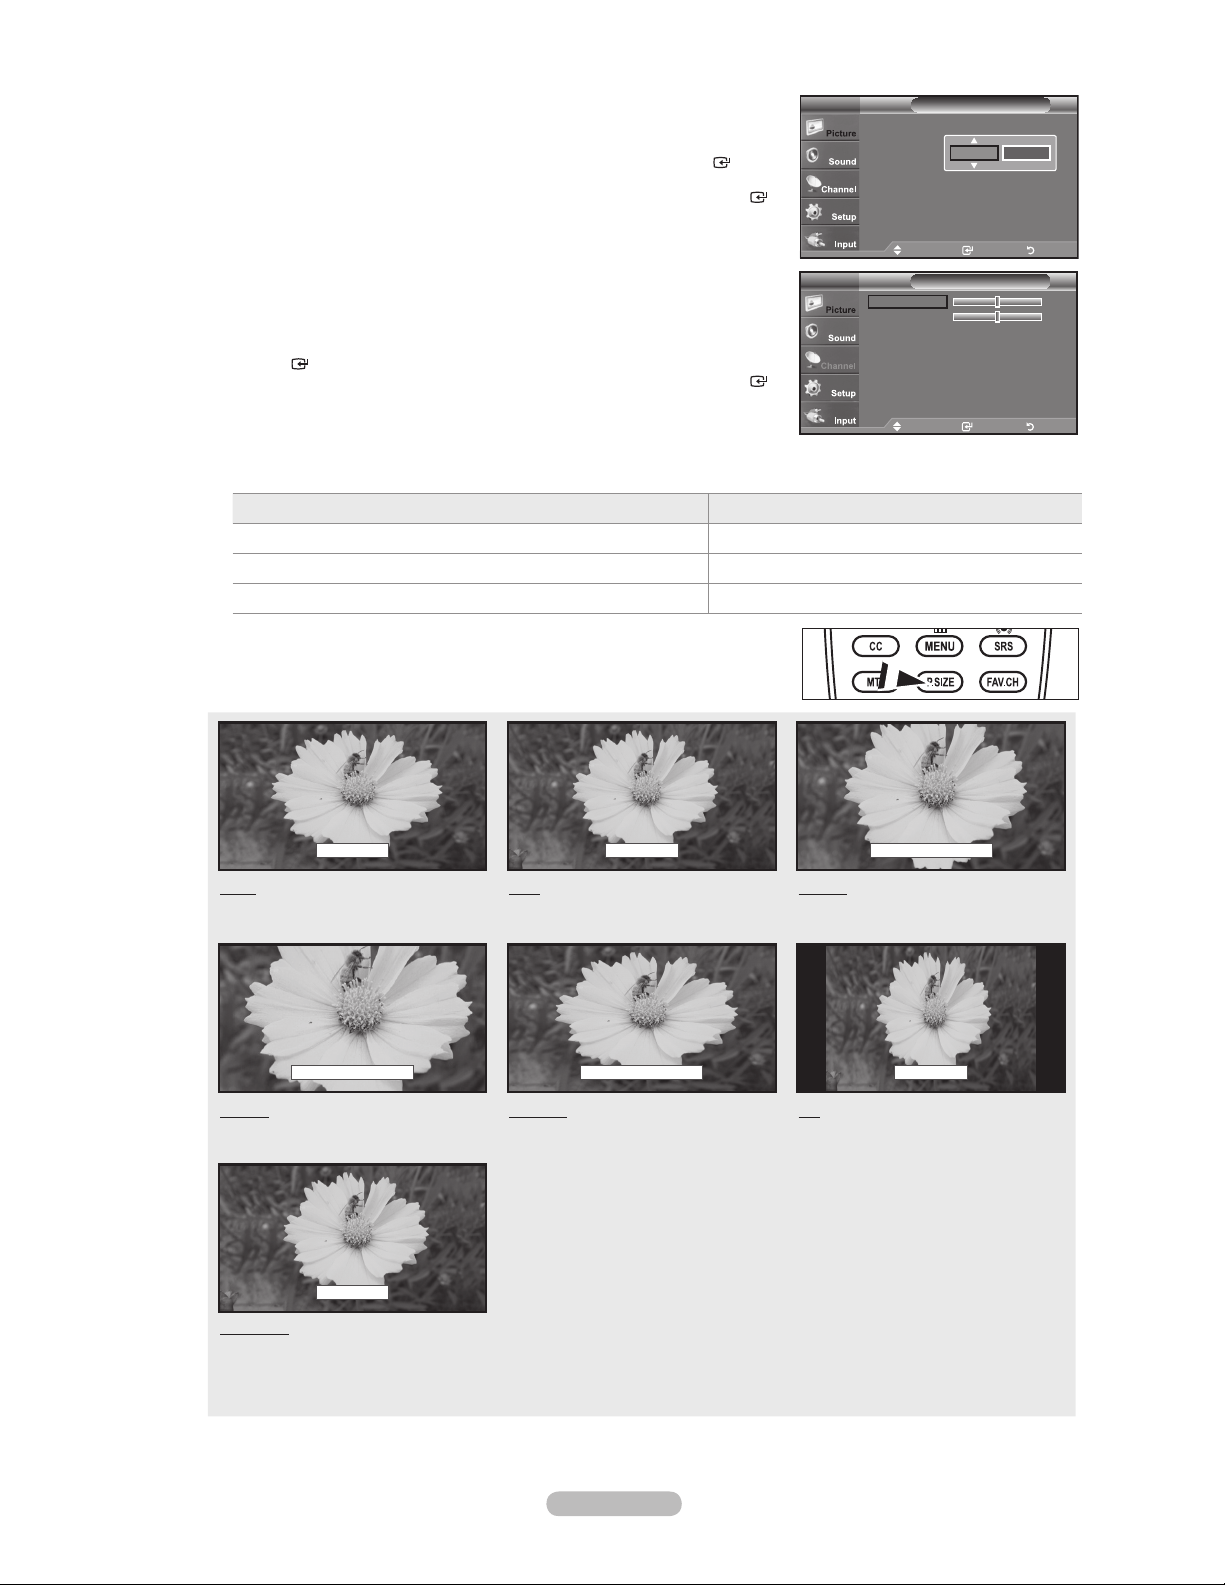
Wide 16:9
Wide
Adjusts the picture size to Wide appropriate
for DVDs or wide broadcasting.
Zoom2 U Move
Zoom2
Magnifies the size of the picture more
than “Zoom1”.
16:9
Sets the picture to 16:9 wide mode.
Wide Fit U Move
Wide Fit
Enlarges the aspect ratio of the picture
to fit the entire screen.
Zoom1 U Move
Zoom1
Magnifies the size of the picture on the
screen.
4:3
4:3
Sets the picture to 4:3 normal mode.
Just Scan
Just Scan
Use the function to see the full
image without any cutoff when HDMI
(720p/1080i), Component (1080i) or
DTV (1080i) signals are input.
English - 21
Page 24
Setting the Digital Noise Reduction
If the broadcast signal received by your TV is weak, you can activate the Digital Noise
Reduction feature to help reduce any static and ghosting that may appear on the screen.
1. Follow the “Activating Picture Options” instructions numbers 1 and 2.
(Refer to page 20)
2. Press
3.
the or button to select "Digital NR", then press the ENTER
Press the or button to select "Off", "Low", "Medium", "High" or "Auto".
Press the ENTER
button.
button.
Picture OptionsTV
Color Tone : Normal
Size : Wide
Digital NR : Auto
HDMI Black Level : Normal
Film Mode : Off
Move Enter Return
Off: Turns the screen noise reduction function off.
Low: Reduces screen noise at a low level.
Medium: Reduces screen noise at a medium level.
High: Reduces screen noise at a high level.
Auto: Automatically recognizes and reduces screen noise.
Press the EXIT button to exit.
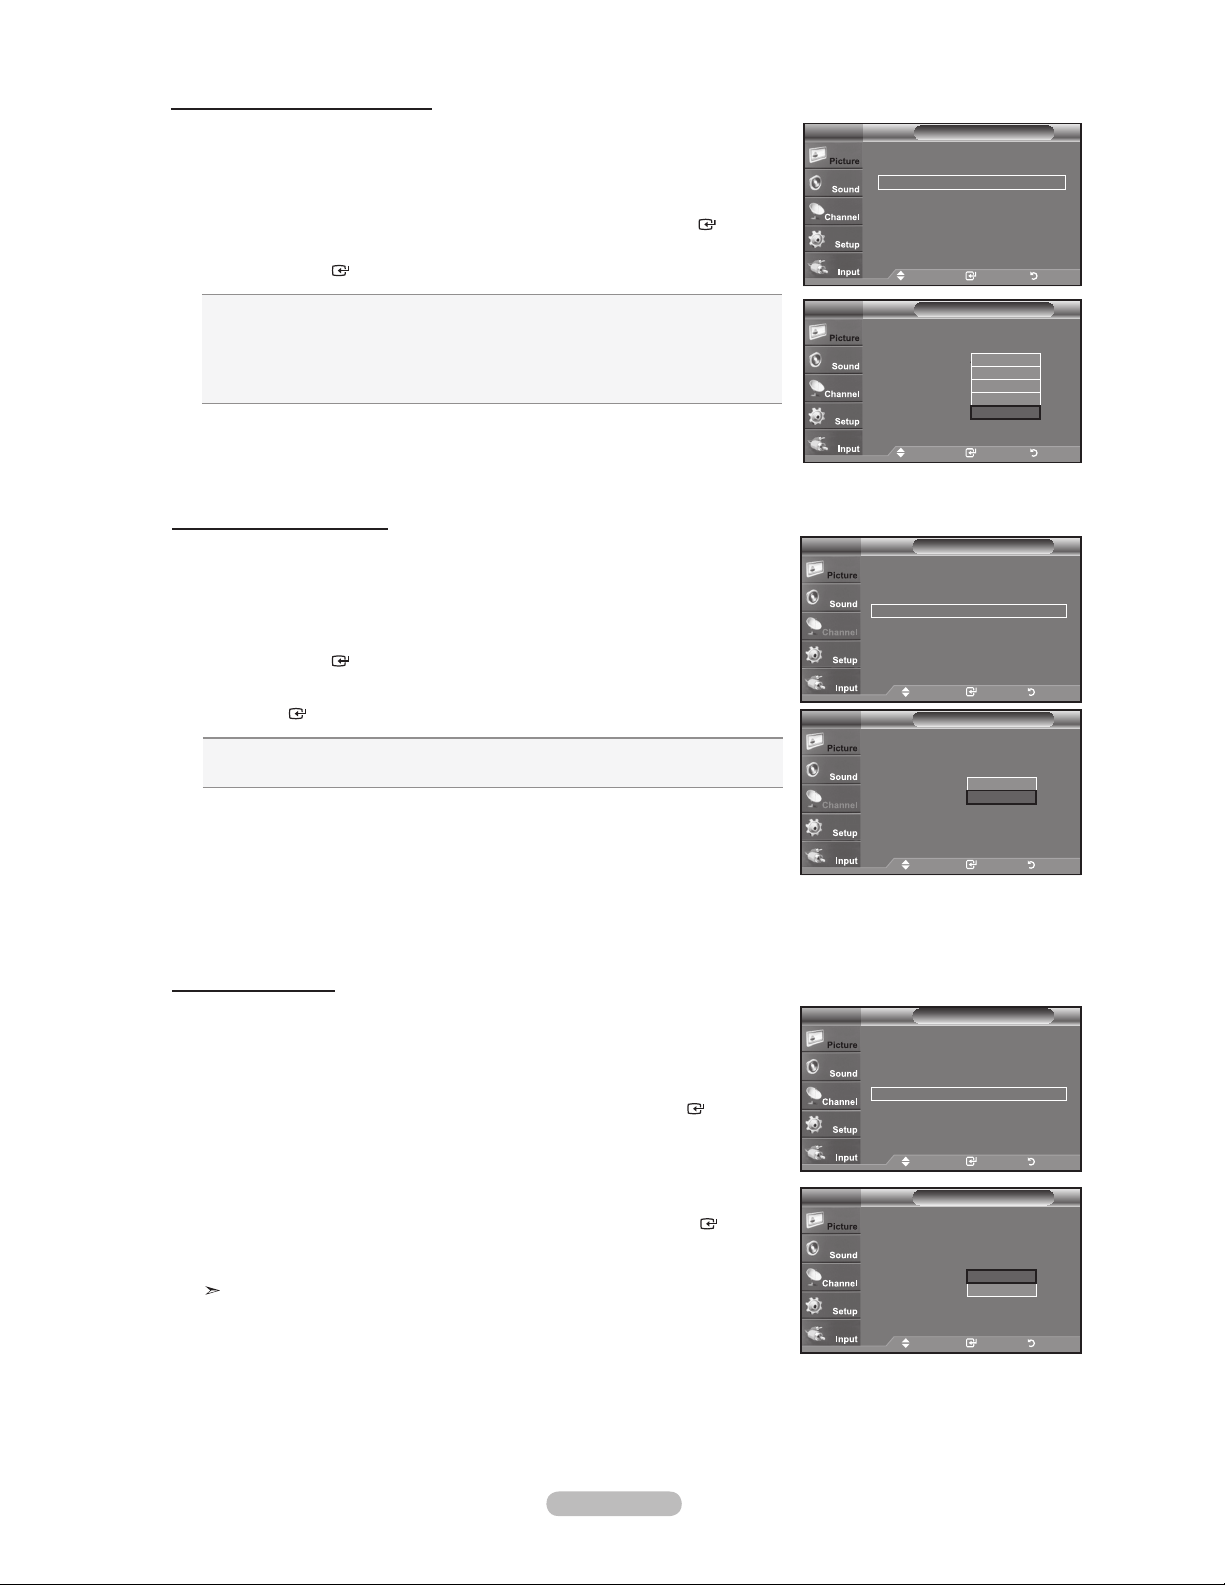
Setting the HDMI Black Level
You can select the black level on the screen to adjust the screen depth.
1. Follow the “Activating Picture Options” instructions numbers 1 and 2.
(Refer to page 20)
2. Press the
press the ENTER
3. Press the
the ENTER
or
button to select “HDMI Black Level”, then
button.
or
button to select “Normal” or “Low”, then press
button.
• Normal: The screen gets brighter.
• Low: The screen gets darker.
°
This function is active only when an external device is connected to the TV via
HDMI. “HDMI Black Level” function may not be compatible with all external
devices.
Press the EXIT button to exit.
Color Tone : Normal
Size : Wide
Digital NR : Auto
HDMI Black Level : Normal
Film Mode :
Move Enter Return
TV
Color Tone : Normal
Size : Wide
Digital NR : Auto
HDMI Black Level : Low
Film Mode : Off
Move Enter Return
TV
Color Tone : Normal
Size : Wide
Digital NR : Auto
HDMI Black Level : Normal
Film Mode : Off
Move Enter Return
Picture OptionsTV
Off
Low
Medium
Off
High
Auto
Picture Options
Picture Options
Normal
Low
Setting the Film Mode
The TV can be set to automatically sense and process lm signals from all sources and
TV
adjust the picture for optimum quality.
1. Follow the “Activating Picture Options” instructions numbers 1 and 2.
(Refer to page 20)
2. Press the or button to select "Film Mode", then press the ENTER
3. Press the or button to select "Off" or "Auto", then press the ENTER
Press the E
XIT button to exit.
button.
button.
TV
" Film mode" is supported in TV, VIDEO, S-VIDEO, COMPONENT(480i / 1080i)
and HDMI(480i / 1080i).
English - 22
Color Tone : Normal
Size : Wide
Digital NR : Auto
HDMI Black Level : Normal
Film Mode : Off
Color Tone : Normal
Size : Wide
Digital NR : Auto
HDMI Black Level : Normal
Film Mode : Off
Picture Options
Move Enter Return
Picture Options
Off
Auto
Move Enter Return
Page 25

Resetting the Picture Settings to the Factory Defaults
1. Press the MENU button to display the menu.
Press the ENTER button, to select “Picture”.
2.
Press the or button to select "Reset", then press the ENTER
Press the or button to select “OK” or “Cancel” then press the ENTER
button.
Press the EXIT
Each mode can be reset.
button to exit.
button.
More
Picture Options
Reset : OK
PictureTV
OK
Cancel
Move Enter Return
English - 23
Page 26
Sound Control
Changing the Sound Standard
You can select the sound mode to best suit the programming you’re watching.
1. Press the MENU button to display the menu.
Press the
or
button to select "Sound", then press the ENTER
button.
Mode : Custom
Equalizer
SRS TruSurround XT : Off
Multi-Track Options
Auto Volume : Off
TV Speaker : On
SoundTV
2. Press the ENTER
button to select "Mode".
Press the or button to select “Standard”, “Music”, “Movie”, “Speech”, or
“Custom” sound setting, then press the ENTER
button.
Press the EXIT button to exit.
• Standard: selects the normal sound mode.
• Music: emphasizes music over voices.
• Movie: provides the best sound for movies
• Speech: emphasizes voice over other sounds.
• Custom: recalls your customized sound settings.
(see “Customizing the Sound”)
Easy Setting
1. Press
2. Press
3. Press
4. Press
OOLS button on the remote control.
the T
the or button to select “Sound Mode”.
the or button to select the required option.
the EXIT or TOOLS button to exit.
Customizing the Sound
The sound settings can be adjusted to suit your personal preference.
Move Enter Return
Mode : Custom
Equalizer
SRS T
Multi-Track Options
Auto Volume : Off
TV Speaker : On
Picture Mode : Standard
Sound Mode Custom
Sleep Timer : Off
Add to Favorite
Switch to Air
SoundTV
Standard
Too ls
Music
Movie
Speech
Custom
ruSurround XT : Off
Move Enter Return
Move Adjust Exit
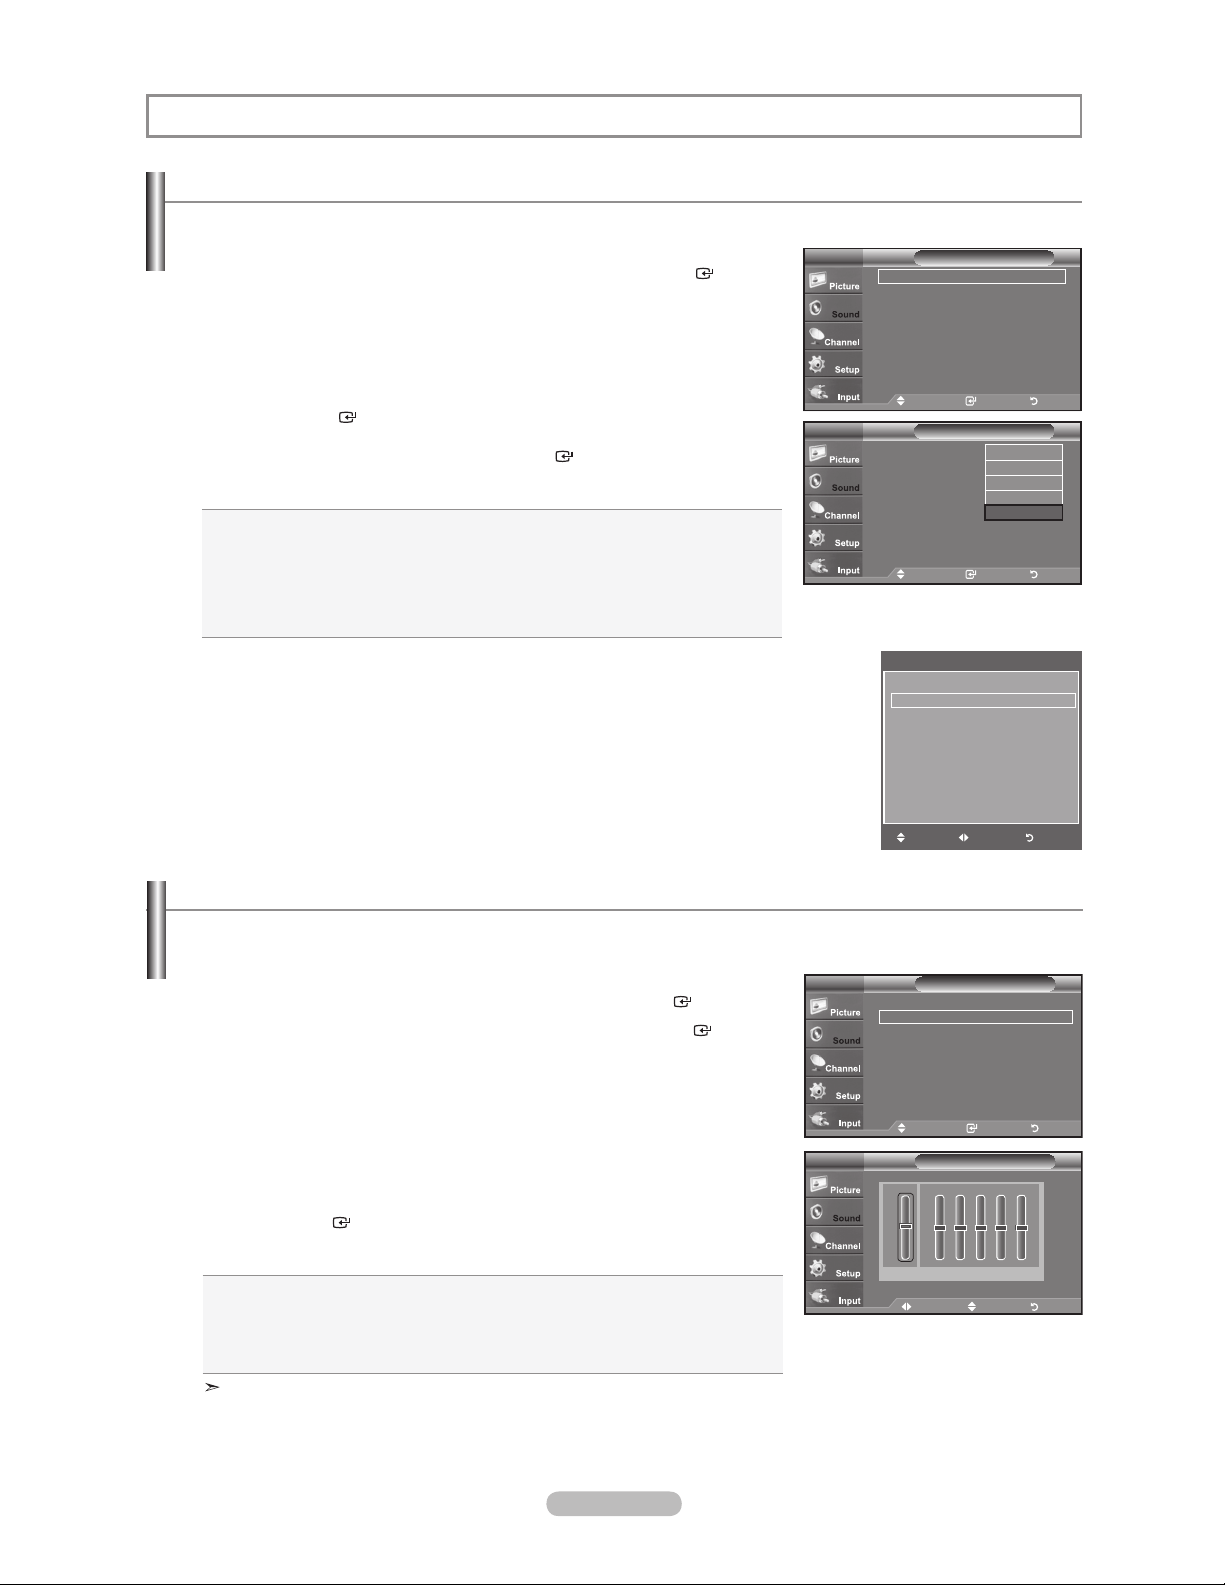
1. Press the MENU button to display the menu.
Press the or button to select "Sound", then press the ENTER
2. Press the or button to select "Equalizer", then press the ENTER
button.
button.
3. Press the or button to select a particular frequency to adjust.
Press the or button to increase or decrease the level of the particular frequency.
Press the
ENTER
Press the EXIT
button.
button to exit.
• L/R Sound Balance Adjustment: To adjust the sound balance of the L/R
speakers.
• Bandwidth Adjustment (100Hz, 300Hz, 1KHz, 3KHz, 10KHz):
To adjust the
level of different bandwidth frequencies.
If you make any changes to the "Equalizer" settings, the sound mode is
automatically switched to the "Custom" mode.
English - 24
Mode : Custom
Equalizer
SRS TruSurround XT : Off
Multi-Track Options
Auto Volume : Off
TV Speaker : On
R
L
Move Adjust Return
SoundTV
Move Enter Return
EqualizerTV
+
0
-
100Hz
300Hz 1KHz 3KHz 10KHzBalance
Page 27
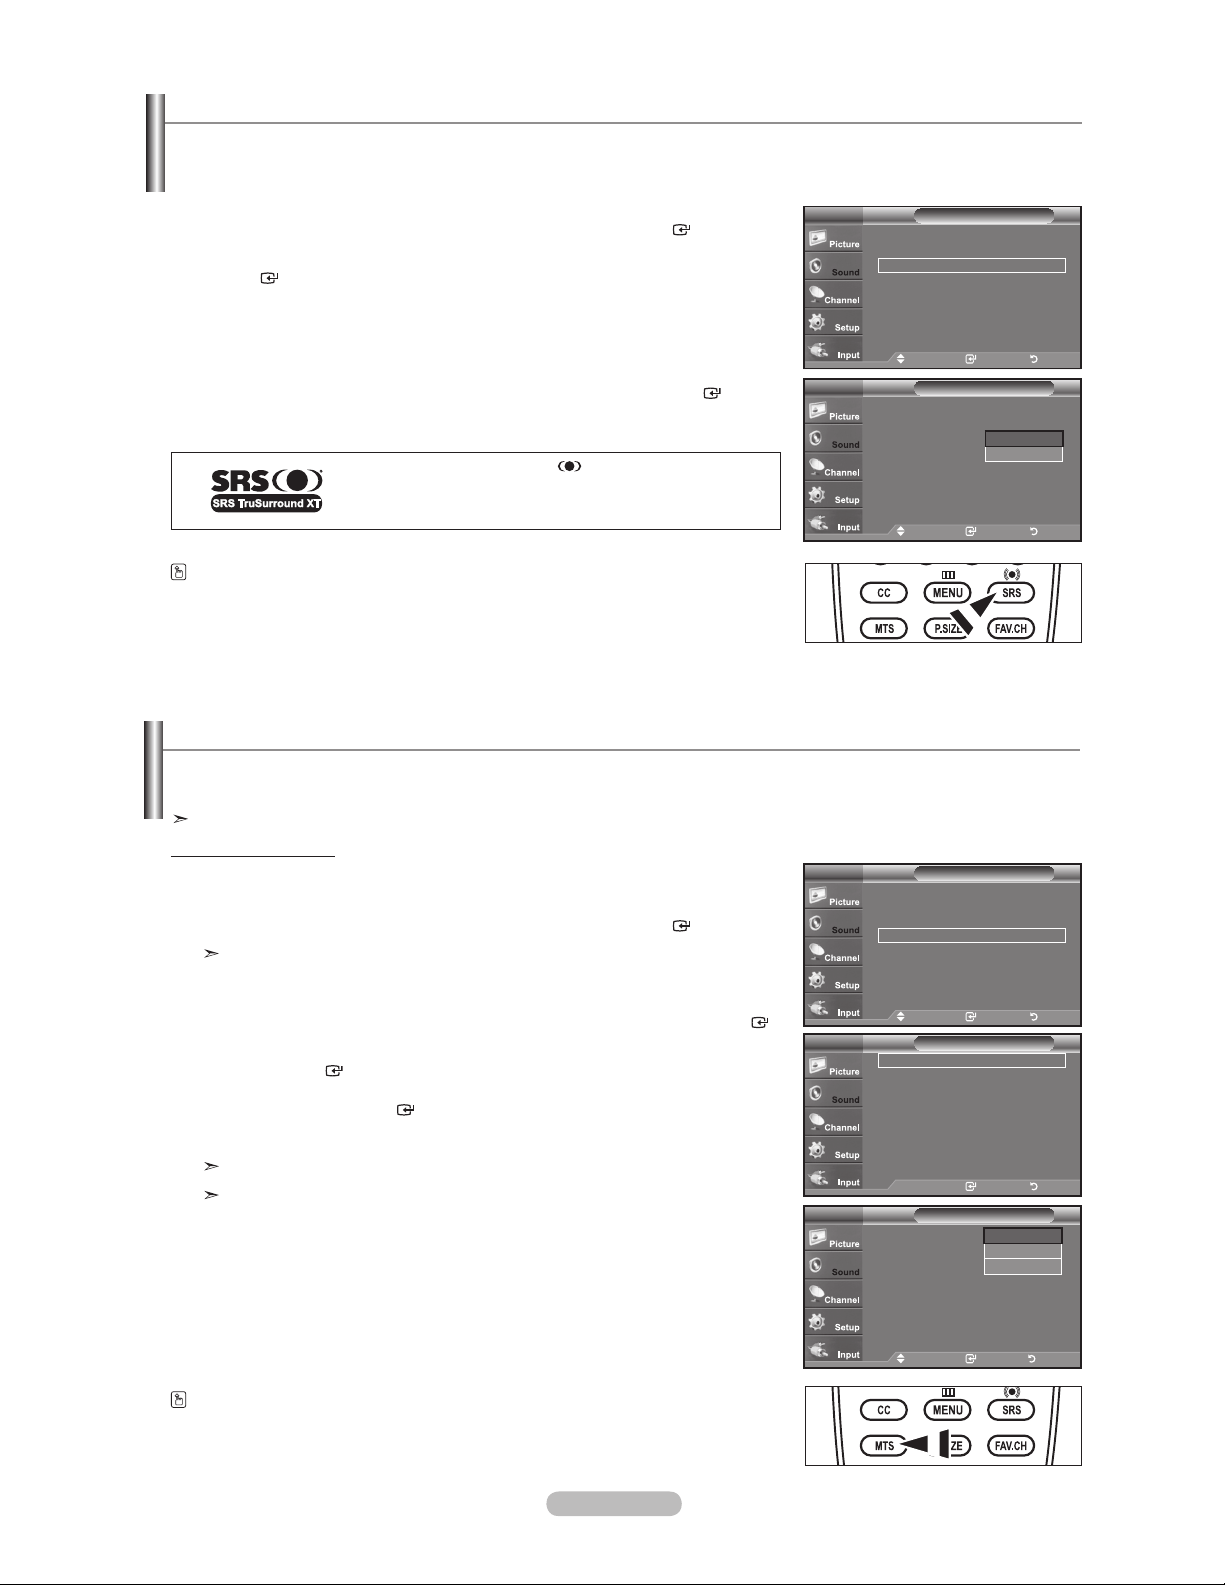
Setting the TruSurround XT
TruSurround XT is a patented SRS technology that solves the problem of playing 5.1 multichannel content over two speakers.
TruSurround delivers a compelling, virtual surround sound experience through any two-speaker playback system, including internal
television speakers. It is fully compatible with all multichannel formats.
1. Press the MENU button to display the menu.
Press the or button to select "Sound", then press the ENTER
button.
2. Press the or button to select "SRS TruSurround XT", then press the
ENTER
3. Press the or button to select "Off" or "On", then press the ENTER
button.
button.
Press the EXIT button to exit.
TruSurround XT, SRS and Symbol are trademarks of
SRS Labs, Inc.
TruSurround XT technology is incorporated under license
from SRS Labs, Inc.
Press the SRS button on the remote control to select "Off" or "On".
Mode : Custom
Equalizer
SRS TruSurround XT : Off
Multi-Track Options
Auto Volume : Off
TV Speaker : On
Mode : Custom
Equalizer
SRS TruSurround XT : Off
Multi-Track Options
Auto Volume
TV Speaker : On
SoundTV
Move Enter Return
SoundTV
Off
On
: Off
Move Enter Return
Choosing a Multi-Channel Sound (MTS) track - Digital
The digital-TV transmission system is capable of simultaneous transmission of many audio tracks (for example, simultaneous
translations of the program into foreign languages). The availability of these additional “multitracks” depends upon the program.
"Multi-Track Options" is available only in TV mode.
Preferred Language
SoundTV
Move Enter Return
Multi-Track OptionsTV
: English
Multi-Track OptionsTV
: English
English
Spanish
French
1. Press the MENU button to display the menu.
Press the or button to select "Sound", then press the ENTER
Quick way to access the MTS menu: Just press the “MTS” button on the remote
button.
control. You can listen in a language other than your chosen language by
pressing the MTS button.
2. Press the or button to select “Multi-Track Options", then press the ENTER
button.
3. Press the ENTER
button to select “Preferred Language”.
Press the or button to choose the language (English, Spanish or French) you
want, then press the ENTER
Press the EXIT
“Preferred Language” is available only in Digital TV mode.
You can only select the language from among the actual languages being broadcast.
button to exit.
button.
Mode : Custom
Equalizer
SRS TruSurround XT : Off
Multi-Track Options
Auto Volume : Off
TV Speaker : On
Preferred Language
Multi-Track Sound : Stereo
Enter Return
Preferred Language
Multi-Track Sound : Stereo
You can listen in a language other than the Preferred language by pressing
the MTS button on the remote control.
English - 25
Move Enter Return
Page 28

Choosing a Multi-Channel Sound (MTS) track - Analog
Multi-Track Sound
1. Press the MENU button to display the menu.
Press the or button to select "Sound", then press the ENTER
2. Press the or button to select "Multi-Track Options", then press the
ENTER
button.
3. Press the or button to select “Multi-Track Sound”, then press the ENTER
button.
Press the or button to select a setting you want, then press the ENTER
button.
Press the EXIT button to exit.
button.
Multi-Track OptionsTV
Preferred Language
Multi-Track Sound : Stereo
Enter Return
Preferred Language
Multi-Track Sound : Stereo
: English
Multi-Track OptionsTV
: English
Mono
Stereo
SAP
• Mono: Choose for channels that are broadcasting in mono or if you are having
difficulty receiving a stereo signal.
• Stereo: Choose for channels that are broadcasting in stereo.
• SAP: Choose to listen to the Separate Audio Program, which is usually a
foreign-language translation.
“Multi-Track Sound” is available only in Analog TV mode.
Depending on the particular program being broadcast, you can listen to “Mono”,
“Stereo” or “SAP”.
Press the MTS buttons on the remote control repeatedly to select “Mono”,
“Stereo” or “SAP”.
Automatic Volume Control
Reduces the differences in volume level among broadcasters.
1. Press the MENU button to display the menu.
Press the or button to select "Sound", then press the ENTER
2. Press the or button to select "Auto Volume", then press the ENTER
button.
button.
Move Enter Return
Mode : Custom
Equalizer
SRS TruSurround XT : Off
Multi-Track Options
Auto Volume : Off
TV Speaker : On
SoundTV
3. Press the or button to set Auto Volume "Off" or "On" then press the
ENTER
Press the EXIT
button.
button to exit.
English - 26
Move Enter Return
Mode : Custom
Equalizer
SRS TruSurround XT : Off
Multi-Track Options
Auto Volume : Off
TV Speaker : On
SoundTV
Off
On
Move Enter Return
Page 29

Setting the TV Speakers On/Off
Sound output from the
TV speakers is muted.
1. Press the MENU button to display the menu.
Press the or button to select "Sound", then press the ENTER
2. Press the or button to select "TV Speaker", then press the ENTER
3. Press the or button to select “Off”, then press the ENTER
Press the EXIT
When “TV Speaker” is set to “Off”, Sound menus except “Multi-Track Options”
button to exit.
cannot be adjusted.
The VOL , VOL and MUTE buttons do not operate when the "TV Speaker"
is set to “Off”.
TV's Internal Speakers Audio Out (Optical, L/R Out) to Sound System
TV Speaker On
TV Speaker Off
Video No Signal
RF AV, S-Video
Speaker Output Speaker Output Speaker Output Sound Output Sound Output Sound Output
Mute Mute Mute Sound Output Sound Output Sound Output
Mute Mute Mute Mute Mute Mute
Component, PC, HDMI
Manufactured under license from Dolby Laboratories. Dolby and the double-D symbol are trademarks
of Dolby Laboratories.
button.
button.
button.
RF AV, S-Video
Mode : Custom
Equalizer
SRS TruSurround XT : Off
Multi-Track Options
Auto Volume : Off
TV Speaker : On
Mode : Custom
Equalizer
SRS TruSurround XT : Off
Multi-Track Options
Auto Volume : Off
TV Speaker : On
SoundTV
Move Enter Return
SoundTV
Off
On
Move Enter Return
Component, PC, HDMI
Connecting Headphones (Sold separately)
You can connect a set of headphones to your set if you wish to watch a TV program without disturbing other people in the room.
When you insert the headphone’s plug into the headphone jack, you cannot operate
“TV Speaker” in Sound menu.
Prolonged use of headphones at a high volume may damage your hearing.
You will not hear sound from the speakers when you connect headphones to the TV.
TV Rear Panel
English - 27
Page 30

Channel Control
Clearing Scrambled Channels - Digital
The Clear Scrambled Channel function is used to lter out scrambled channels after Auto Program is completed.
This process may take up to 20~30 minutes.
1. Press the MENU button to display the menu.
Press the or button to select "Channel", then press the ENTER
2. Press
ENTER
the or button to select "Clear Scrambled Channel", then press the
button.
button.
It searches scrambled channels, which are to be removed from the list.
To stop searching scrambled channels:
Press the ENTER
Press the button to select "Yes", then press the ENTER
3. When the scrambled channel searching is completed, press the ENTER
button to select Stop.
button.
button.
Press the EXIT
This function is only available in “Cable” mode.
button to exit.
TV
Antenna : Cable
Auto Program
Clear Scrambled Channel
Channel List
Name
Fine Tune
Signal Strength
Clear Scrambled Channel
Removing scrambled channel.
Enter Return
Channel
Move Enter Return
Plug & Play
DTV Cable 40
35 %
Stop
English - 28
Page 31

Adding and Erasing Channels
Using this menu, you can Add/Delete or set Favorite channels and use the program guide for digital broadcasts.
To use the Channel List function, rst run “Auto Program” (see page 17).
1. Press the MENU button to display the menu.
Press the or button to select "Channel", then press the ENTER
button.
2. Press the or button to select "Channel List", then press the
ENTER
3. Press the ENTER
button.
button to select “All”.
4. Press the , , or button to select a channel to delete, then press the
ENTER
Press the or button to select “Delete”, then press the
button.
ENTER
button
to delete the channel.
The
mark will disappear.
5. Press the , , or button to select a channel to add, then press the
ENTER
Press the or button to select “Add”, then press the
button.
ENTER
button to
add the channel.
The
Press the EXIT
mark will appear and the channel will be added.
button to exit.
All selected channels will be shown on “Added" menu.
• Red button: Press repeatedly to select “All”, “Added” or “Favorite”.
• Green button: Press to add all deleted channels.
ellow button: Press to delete all memorized channels.
• Y
TV
Antenna : Cable
Auto Program
Clear Scrambled Channel
Channel List
Name
Fine Tune
Signal Strength
TV
All
Added
Favorite
Air 5
DTV Air 2-1
Air3
Air4
Air 5
Air 6
Air 7
DTV Air 7-1
Air 8
List Mode Delete AllAdd All
Move Enter Return
Air 5
DTV Air 2-1
Air3
Air4
Air 5
Air 6
Air 7
DTV Air 7-1
Air 8
List Mode
Move Enter Page Return
Air 5
DTV Air 2-1
Air3
Air4
5
Air
Air 6
Air 7
DTV Air 7-1
Air 8
List Mode
Move Enter Return
Air 5
DTV Air 2-1
Air3
Air4
Air 5
Air 6
Air 7
DTV Air 7-1
Air 8
List Mode
Move Enter Page Return
Channel List / All
9
Air
Air 10
DTV Air 10-1
DTV Air 10-2
Watch
Add
Air 10-3
DTV
Delete
DTV Air 10-1
Favorite
DTV Air 10-2
DTV Air 10-3
Channel List / All
9
Air
Air 10
DTV Air 10-1
DTV Air 10-2
Air 10-3
DTV
DTV Air 10-1
DTV Air 10-2
DTV Air 10-3
Channel List / All
9
Air
Air 10
DTV Air 10-1
Watch
DTV Air 10-2
Add
Air 10-3
DTV
Delete
DTV Air 10-1
Favorite
DTV Air 10-2
DTV Air 10-3
Channel List / All
9
Air
Air 10
DTV Air 10-1
DTV Air 10-2
Air 10-3
DTV
DTV Air 10-1
DTV Air 10-2
DTV Air 10-3
Channel
Move Enter Return
Channel List
Move Enter Return
DTV Air 10-1
DTV Air 10-2
DTV Air 10-3
Air 12
DTV Air 13-1
DTV Air 13-2
DTV Air 13-3
DTV Air 13-4
DTV Air 10-1
DTV Air 10-2
DTV Air 10-3
Air 12
DTV Air 13-1
DTV Air 13-2
DTV Air 13-3
DTV Air 13-4
Delete AllAdd All
DTV Air 10-1
DTV Air 10-2
DTV Air 10-3
Air 12
DTV Air 13-1
DTV Air 13-2
DTV Air 13-3
DTV Air 13-4
Delete AllAdd All
DTV Air 10-1
DTV Air 10-2
DTV Air 10-3
Air 12
DTV Air 13-1
DTV Air 13-2
DTV Air 13-3
DTV Air 13-4
Delete AllAdd All
1 / 2
1 / 2
1 / 2
1 / 2
English - 29
Page 32

To Set-Up Your Favorite Channels
You can set channels you watch frequently as favorites.
1. Press the MENU button to display the menu.
Press the or button to select "Channel", then press the ENTER
2. Press the or button to select "Channel List", then press the ENTER
button.
3. Press the or button to select "All" or "Added", then press the ENTER
4. Press the , , or button to select your favorite channels to watch
among the labeled channels. Then press the ENTER
Press the or button to select “Favorite”, then press the
button.
The "
" symbol will be highlighted and the channel will be set as a Favorite.
To cancel your Favorite channel selection, press the ENTER
" symbol is no longer highlighted.
the "
Press the EXIT
Only memorized channels can be set as favorite channels.
All favorite channels will be shown in the “Favorite” menu.
button to exit.
button.
ENTER
button until
button.
button.
TV
Antenna : Cable
Auto Program
Clear Scrambled Channel
Channel List
Name
Fine Tune
Signal Strength
TV
All
Added
Favorite
Air 5
DTV Air 2-1
Air3
Air4
Air 5
Air 6
Air 7
DTV Air 7-1
Air 8
List Mode Delete All
Move Enter Return
Air 5
DTV Air 2-1
Air3
Air4
Air 5
Air 6
Air 7
DTV Air 7-1
Air 8
List Mode
Move Enter Page Return
Channel List / Added
9
Air
Air 10
DTV Air 10-1
DTV Air 10-2
Watch
Add
Air 10-3
DTV
Delete
DTV Air 10-1
Favorite
DTV Air 10-2
DTV Air 10-3
Channel List / Added
9
Air
Air 10
DTV Air 10-1
DTV Air 10-2
Air 10-3
DTV
DTV Air 10-1
DTV Air 10-2
DTV Air 10-3
Channel
Move Enter Return
Channel List
Move Enter Return
DTV Air 10-1
DTV Air 10-2
DTV Air 10-3
Air 12
DTV Air 13-1
DTV Air 13-2
DTV Air 13-3
DTV Air 13-4
DTV Air 10-1
DTV Air 10-2
DTV Air 10-3
Air 12
DTV Air 13-1
DTV Air 13-2
DTV Air 13-3
DTV Air 13-4
Delete All
1 / 2
1 / 2
To select the favorite channels you have set up, press the FAV.CH button
on the remote control.
Easy Setting
1. Press the TOOLS button on the remote control.
2. Press the or button to select “Add to Favorite” (or “Delete from Favorite”), then press the
ENTER
The current channel is added to (or deleted from) Favorites.
button.
English - 30
Picture Mode : Standard
Sound Mode : Custom
Sleep Timer : Off
Add to Favorite
Switch to Air
Too ls
Move Enter Exit
Page 33

Viewing the Channel Lists
You can display a list of all channels, added channels or your favorite channels.
1. Press the MENU button to display the menu.
Press the or button to select "Channel", then press the ENTER
2. Press the or button to select "Channel List", then press the
ENTER
button.
3. Press the or button to select “All”, “Added” or “Favorite”, then press the
ENTER
4. Press the or button to select “Channel”, then press the ENTER
button.
button.
To toggle between your all channels, add channels or favorite channels,
use the Red button on the remote control.
• Red button: Press repeatedly to select “All”, “Added” or “Favorite”
button.
TV
Antenna : Cable
Auto Program
Clear Scrambled Channel
Channel List
Name
Fine Tune
Signal Strength
Move Enter Return
TV
All
Added
Favorite
Air 5
DTV Air 2-1
Air3
Air4
Air 5
Air 6
Air 7
DTV Air 7-1
Air 8
List Mode Delete AllAdd All
Move Enter Page Return
Channel List / All
Air
Air 10
DTV Air 10-1
DTV Air 10-2
DTV
DTV Air 10-1
DTV Air 10-2
DTV Air 10-3
Channel List
Move Enter Return
9
Air 10-3
Channel
DTV Air 10-1
DTV Air 10-2
DTV Air 10-3
Air 12
DTV Air 13-1
DTV Air 13-2
DTV Air 13-3
DTV Air 13-4
1 / 2
English - 31
Page 34

Labeling Channels
Channels can be labeled so that their call letters appear whenever the channel is selected.
1. Press the MENU button to display the menu.
Press the or button to select “Channel”, then press the ENTER
Press the or button to select “Name”, then press the ENTER
button.
button.
TV
Antenna : Air
Auto Program
Clear Scrambled Channel
Channel List
Name
Fine Tune
Signal Strength
Channel
Move Enter Return
2. Press the or button to select the channel to be assigned a new name,
then press the ENTER
button.
Press the or button to select a letter, a number or a blank (Results in this
sequence: A...Z, 0...9, +, -, *, /, blank).
Press the button to switch to the next field, which will be selected.
Select a second letter or digit by pressing the or button, as above.
Repeat the process to select the last three digits. When you have finished,
press the ENTER
button to assign the new name.
To erase the assigned new name, select "Clear" by pressing the or button,
then press the ENTER
Press the EXIT
°
The names of digital broadcasting channels are automatically assigned and
button to exit.
button.
cannot be labelled.
TV
Air 2
Air 3
Air 4
Air 5
Air 6
Move Enter Return
TV
Air 2
Air 3
Air 4
Air 5
Air 6
Move Adjust Return
Name
Clear
Clear
Clear
Clear
Clear
Name
A
Clear
Clear
Clear
Clear
Clear
English - 32
Page 35

Fine Tuning Analog Channels
Use ne tuning to manually adjust a particular channel for optimal reception.
1. Press the MENU button to display the menu.
Press the or button to select "Channel", then press the ENTER
2. Press the or button to select "Fine Tune", then press the ENTER
3. Press the or button to adjust the fine tuning.
To store the fine tuning setting in the TV’s memory, press the ENTER
If you do not store the fine-tuned channel in memory, adjustments are not saved.
4. To reset the fine tuning setting, press the button to select "Reset",
then press the ENTER
Press the EXIT
"*" will appear next to the name of fine-tuned channels.
Only analog TV channels can be fine tuned.
button to exit.
button.
button.
button.
button.
TV
Antenna : Air
Auto Program
Clear Scrambled Channel
Channel List
Name
Fine Tune
Signal Strength
Air 24
Adjust Save Return
Air 24 *
Adjust Save Return
Air 24
Channel
Move Enter Return
Fine Tune
0
Reset
Fine Tune
Fine Tuned
+3
Reset
Fine Tune
0
Reset
Move Enter Return
Checking the Digital-Signal Strength
Unlike analog channels, which can vary in reception quality from “snowy” to clear, digital (HDTV) channels have either perfect
reception quality or you will not receive them at all. So, unlike analog channels, you cannot ne tune a digital channel.
however, adjust your antenna to improve the reception of available digital channels.
1. Press the MENU button to display the menu.
Press the or button to select “Channel”, then press the ENTER
2. Press the or button to select “Signal Strength”, then press the ENTER
button.
button.
If the signal strength meter indicates that the signal is weak, physically adjust your
antenna to increase the signal strength.
TV
Antenna : Cable
Auto Program
Clear Scrambled Channel
Channel List
Name
Fine Tune
Signal Strength
Continue to adjust the antenna until you find the best position with the strongest
signal.
Press the EXIT
button to exit.
TV
Move Enter Return
You can,
Channel
Signal Strength
English - 33
OK
Enter Return
Page 36

PC Display
Using Your TV as a Computer (PC) Display
Setting Up Your PC Software (Based on Windows XP)
The Windows display-settings for a typical computer are shown below. The actual screens on your PC will probably be different,
depending upon your particular version of Windows and your particular video card. However, even if your actual screens look
different, the same basic set-up information will apply in almost all cases. (If not, contact your computer manufacturer or Samsung
Dealer.)
1. First, click on "Control Panel" on the Windows start menu.
2. When the control panel window appears, click on "Appearance and Themes" and a
display dialog-box will appear.
3. When
the control panel window appears, click on "Display" and a display dialog-box
will appear.
4. Navigate to the "Settings" tab on the display dialog-box.
The correct size setting (resolution)
Optimum:
LN19A450C1D, LN19A451C1D-1440 X 900 pixels
LN22A450C1D, LN22A451C1D-1680 X 1050 pixels
a vertical-frequency option exists on your display settings dialog box,
If
the correct value is "60" or "60 Hz". Otherwise, just click "OK" and exit the dialog box.
Display Modes
If the signal from the system equals the standard signal mode, the screen is adjusted automatically. If the signal from the system
doesn’t equal the standard signal mode, adjust the mode by referring to your videocard user guide; otherwise there may be no
video. For the display modes listed below, the screen image has been optimized during manufacturing.
D-Sub Input
Mode Resolution
IBM
VESA
VESA
(only LN19A450C1D,
LN19A451C1D model)
VESA
(only LN22A450C1D,
LN22A451C1D model)
Horizontal
Frequency (kHz)
640 x 350
720 x 400
640 x 480
640 x 480
640 x 480
800 x 600
800 x 600
800 x 600
1024 x 768
1024 x 768
1024 x 768
1280 x 1024
1280 x 1024
1360 x 768
1440 x 900
1440 x 900
1680 x 1050RB 64.674 59.883 119.000 +/-
31.469
31.469
31.469
37.861
37.500
37.879
48.077
46.875
48.363
56.476
60.023
63.981
79.976
47.712
55.935
70.635
Vertical
Frequency (Hz)
70.086
70.087
59.940
72.809
75.000
60.317
72.188
75.000
60.004
70.069
75.029
60.020
75.025
60.015
59.887
74.984
Pixel Clock
Frequency (MHz)
25.175
28.322
25.175
31.500
31.500
40.000
50.000
49.500
65.000
75.000
78.750
108.000
135.000
85.500
106.500
136.750
Sync Polarity
(H/V)
+/-
-/+
-/-
-/-
-/+/+
+/+
+/+
-/-
-/+/+
+/+
+/+
+/+
-/+
-/+
HDMI/DVI Input
Mode Resolution
VESA
VESA
(only LN19A450C1D,
LN19A451C1D model)
VESA
(only LN22A450C1D,
LN22A451C1D model)
Horizontal
Frequency (kHz)
640 x 480
800 x 600
1024 x 768
1280 x 1024
1360 x 768
1440 x 900 55.935 59.887 106.500 -/+
1680 x 1050RB 64.674 59.883 119.000 +/-
31.469
37.879
48.363
63.981
47.712
Vertical
Frequency (Hz)
59.940
60.317
60.004
60.020
60.015
Pixel Clock
Frequency (MHz)
25.175
40.000
65.000
108.000
85.500
Sync Polarity
(H/V)
-/-
+/+
-/+/+
+/+
English - 34
Page 37

Setting up the TV with your PC
How to Auto Adjust
Use the Auto Adjust function to have the TV set automatically adjust the video signals it receives.
The function also automatically ne-tunes the settings and adjusts the frequency values and positions.
This function does not work in DVI-Digital mode.
Preset: Press the SOURCE button to select PC mode.
1. Press the MENU button to display the menu.
Press the or button to select “Picture”, then press the ENTER
2. Press the or button to select "Auto Adjustment", then press the ENTER
Press the EXIT
button to exit.
Easy Setting
1. Press the TOOLS button on the remote control.
2. Press
the or button to select “Auto
Adjustment
”, then press the
ENTER button.
button.
button.
Picture Mode : Standard
Sound Mode : Custom
Sleep Timer : Off
Auto Adjustment
Mode : Standard
Backlight 7
Contrast 95
Brightness 45
Sharpness 50
Auto Adjustment
Screen
More
Move Enter Return
Tools
Move Enter Exit
Auto Adjustment in progress.
Please wait.
PictureTV
Adjusting the Screen Quality
The purpose of the picture quality adjustment is to remove or reduce picture noise. If the noise is not removed by fine tuning
alone, then make the vertical frequency adjustments on your PC and fine tune again. After the noise has been reduced,
re-adjust the picture so that it is aligned on the center of the screen.
Preset: Press the SOURCE button to select PC mode.
1. Press the MENU button to display the menu.
Press the or button to select "Picture", then press the ENTER
Press the or button to select "Screen", then press the ENTER
2. Press the ENTER
button to select "Image Lock".
3. Press the or button to select "Coarse" or "Fine", then press the ENTER
Press the or button to adjust the screen quality.
Vertical stripes may appear or the picture may be blurry.
Press the ENTER
Press the EXIT
button.
button to exit.
button.
button.
button.
Mode : Standard
Backlight 7
Contrast 95
Brightness 45
Sharpness 50
Auto Adjustment
Screen
More
Image Lock
Position
Image Reset
Resolution : 1360x768 @60Hz
Coarse 50
Fine 34
PictureTV
Move Enter Return
ScreenPC
Move Enter Return
Image LockPC
English - 35
Move Enter Return
Coarse
Move Adjust Return
50
Page 38

Changing the Screen Position
Adjust the PC’s screen positioning if it does not fit the TV screen.
Preset: Press the SOURCE button to select PC mode.
1. Press the MENU button to display the menu.
Press the or button to select "Picture", then press the ENTER
Press the or button to select "Screen", then press the ENTER
button.
button.
Image Lock
Position
Image Reset
Resolution : 1360x768 @60Hz
ScreenPC
2. Press the or button to select "Position", then press the ENTER
3. Press the or button to adjust the V-Position.
Press the or button to adjust the H-Position.
Press the ENTER
button.
Press the EXIT button to exit.
Initializing the Screen Position, Coarse and Fine
You can replace all image settings with the factory default values.
Preset: Press the SOURCE button to select PC mode.
1. Press the MENU button to display the menu.
Press the or button to select "Picture", then press the ENTER
Press the or button to select "Screen", then press the ENTER
2. Press the or button to select "Image Reset", then press the ENTER
button.
Press the EXIT
button to exit.
button.
button.
button.
Move Enter Return
TV
Move Enter Return
Image Lock
Position
Image Reset
Resolution : 1360x768 @60Hz
Image Reset is completed.
Position
ScreenPC
Move Enter Return
Viewing the Resolution
You can confirm the resolution configured for the PC.
English - 36
Image Lock
Position
Image Reset
Resolution : 1360x768 @60Hz
ScreenPC
Move Enter Return
Page 39

Time Setting
Setting the Clock
Setting the clock is necessary in order to use the various timer features of the TV.
Also, you can check the time while watching the TV. (Just press the INFO button.)
Option 1: Setting the Clock Manually
1. Press the MENU button to display the menu.
Press the
Press the
2. Press the ENTER
3. Press the ENTER
Press the
or
button to select "Setup", then press the ENTER
or
button to select "Time", then press the ENTER
button to select "Clock".
button to select “Clock Mode”.
or
button to select “Manual”, then press the ENTER
button.
button.
button.
TV
Plug & Play
Language : English
Time
V-Ch ip
Caption
Melody : Medium
Energy Saving : Off
SW Upgrade
Move Enter Return
TV
- - / - - / - - - - / - - : - - - -
Clock
Sleep Timer : Off
Timer 1 : Inactivated
Timer 2 : Inactivated
Timer 3 : Inactivated
Move Enter Return
TV
Clock Mode : Manual
Clock Set
Time Zone
DST : Off
Setup
Time
Clock
Auto
Manual
4. Press the
or
button to select “Clock Set”, then press the ENTER
button.
5. Press the or button to move to “Month”, “Day”, “Year”, “Hour”, “Minute”,
or “am/pm”. Set the date and time you want by pressing the
then press the ENTER
Press the EXIT
The current time will appear every time you press the INFO button.
You can set the month, day, year, hour and minute directly by pressing the
button to exit.
button.
or
button,
number buttons on the remote control.
Move Enter Return
TV
Clock Mode : Manual
Clock Set
Time Zone
DST : Off
Move Enter Return
TV
Enter the current date and time.
Month
Hour Minute am/pm
Move Adjust Return
Enter the current date and time.
Month
01 01 2008
Hour Minute am/pm
12 00
Move Adjust Return
Clock
Clock Set
Day Year
Clock SetTV
Day Year
am
English - 37
Page 40

Option 2: Setting the Clock Automatically
The Clock can be set automatically if you are receiving a digital signal.
1. Press the MENU button to display the menu.
or
Press the
Press the
button to select "Setup", then press the ENTER
or
button to select "Time", then press the ENTER
button.
button.
TV
Plug & Play
Language : English
Time
V-Ch ip
Caption
Melody : Medium
Energy Saving : Off
SW Upgrade
Move Enter Return
Setup
2. Press the ENTER
3. Press the ENTER
Press the
4. Press the
or
or
button to select "Clock".
button to select “Clock Mode”.
button to select “Auto”, then press the ENTER
button.
button to select “Time Zone”, then press the ENTER
5. Press the or button to highlight the time zone for your local area,
then press the ENTER
button.
button.
TV
- - / - - / - - - - / - - : - - - -
Clock
Sleep Timer : Off
Timer 1 : Inactivated
Timer 2 : Inactivated
Timer 3 : Inactivated
Move Enter Return
TV
Clock Mode : Manual
Clock Set
ime Zone
T
DST
: Off
Move Enter Return
TV
Clock Mode : Auto
Clock Set
Time Zone
DST
: Off
Move Enter Return
Select the time zone in which you live.
Newfoundland
Atlantic
Eastern
Central
Mountain
Pacific
Alaska
Hawaii
Time
Clock
Auto
Manual
Clock
Time Zone
6. Press the
Press the
or
button to select “DST”, then press the ENTER
or
button to select “Off” or “On”, then press the ENTER
Press the EXIT button to exit.
Depending on the broadcast station and signal, the auto time may not be
set correctly. If this occurs, set the time manually.
The Antenna or cable must be connected in order to set the time automatically.
English - 38
button.
button.
Move Enter Return
TV
Clock Mode : Auto
Clock Set
Time Zone
DST : Off
Move Enter Return
TV
Clock Mode : Auto
Clock Set
Time Zone
DST : Off
Move Enter Return
Clock
Clock
Off
On
Page 41

Setting the Sleep Timer
The sleep timer automatically shuts off the TV after a preset time (30, 60, 90, 120, 150 and 180 minutes).
1. Press the MENU button to display the menu.
Press the or button to select "Setup", then press the ENTER
Press the or button to select "Time", then press the ENTER
button.
button.
2. Press the or button to select "Sleep Timer", then press the ENTER
button.
TV
1/ 1/2008 12 : 00 am
Clock
Sleep Timer : Off
Timer 1 : Inactivated
Timer 2 : Inactivated
Timer 3 : Inactivated
Time
3. Press the or button to adjust “Minute”, then press the ENTER
Setting the Timer sets the “Activation” to “On” automatically.
To cancel the set sleep timer :
Press the or button to select “Activation”.
Press the or button to select “Off”, then press the ENTER
Press the EXIT button to exit.
Easy Setting
1. Press the TOOLS button on the remote control.
2. Press the or button to select “Sleep Timer”.
3. Press the or button to select the minute.
4. Press the EXIT or TOOLS button to exit.
button.
button.
Move Enter Return
TV
TV
Sleep Timer
Sets the Seelp Timer options.
Minute
Activation
Off
Move Adjust Return
Sleep Timer
Sets the Seelp Timer options.
Minute
Activation
On
30
Move Adjust Return
Too ls
Picture Mode : Standard
Sound Mode : Custom
Sleep Timer Off
Add to Favorite
Switch to Air
Move Adjust Exit
English - 39
Page 42

Setting the On/Off Timer
1. Press the MENU button to display the menu.
Press the or button to select "Setup", then press the ENTER
Press the or button to select "Time", then press the ENTER
button.
button.
2. Three different On/Off Timer Settings can be made. Press the or button to
select “Timer 1”, “Timer 2” or “Timer 3”, then press the ENTER
3.
Press the or button to select the desired item below
.
button.
Press the or button to adjust the setting.
On Time: Set the Hour, Minute, am/pm, and Activation/Inactivation.
•
(To activate timer with the setting you’ve chosen, set to
“Activate”.)
•
Off Time: Set the Hour, Minute, am/pm, and Activation/Inactivation.
o activate timer with the setting you’ve chosen, set to
(T
“Activate”.)
•
V
olume: Set the required volume level.
•
Channel: Select the desired channel.
•
Repeat: Select
“Once”, “Everyday”, “Mon~Fri”, “Mon~Sat”, “Sat~Sun”, or
“Manual”.
°
When “Manual” is selected, press the button to select the desired
day of the week. Press the ENTER
and the mark will appear.
button over the desired day
Press the EXIT button to exit.
°
You can set the hour, minute and channel by pressing the number buttons on
the remote control.
°
Power Off
Auto
When you set the timer On, the television will eventually turn off, if no controls
are operated for 3 hours after the TV was turned on by the timer. This function
is only available in timer On mode and prevents overheating, which may occur
if a
TV is on for too long time.
TV
1/ 1/2008 12 : 00 am
Clock
Sleep Timer : Off
Timer 1 : Inactivated
Timer 2 : Inactivated
Timer 3 : Inactivated
Move Enter Return
Timer 1
On Time
Off Time
Volume
Repeat
Once
12 00
:
12 00
:
10
Sun Mon Tu e Wed Thu Fri Sat
Move Adjust Return
Time
am
am
Channel
Inactivate
Inactivate
Air 3
Function Description
Selecting a Menu Language
1. Press the MENU button to display the menu.
Press the or button to select "Setup", then press the ENTER
Press the or button to select "Language", then press the ENTER
2. Press the or button to select “English”, “Español” or “Français”.
Press the ENTER
Press the EXIT
button.
button to exit.
English - 40
button.
button.
TV
Plug & Play
Language : English
Time
V-Chip
Caption
Melody : Medium
Energy Saving : Off
SW Upgrade
Move Enter Return
TV
Plug & Play
Language : English
Time
-Chip
V
Caption
Melody : Medium
Energy Saving : Off
SW Upgrade
Move Enter Return
Setup
Setup
English
Español
Français
Page 43

Using the V-Chip
The V-Chip feature automatically locks out programs that are deemed inappropriate for children. The user must enter a PIN
(personal ID number) before any of the V-Chip restrictions are set up or changed.
“V-Chip” function is not available in HDMI, component or PC mode.
The Screen Saver is activated if there is no remote control key input for longer than 1 minute while setting up the “V-Chip”.
U.S.A Only
This product is covered by the following U.S.patents : US4,930,158,US4,930,160
Setting Up Your Personal ID Number (PIN)
1. Press the MENU button to display the menu.
Press the
2. Press the
or
button to select "Setup", then press the ENTER
or
button to select “V-Chip”, then press the ENTER
button.
button.
The message “Enter PIN” will appear. Enter your 4 digit PIN number.
The default PIN number of a new TV set is “0-0-0-0”.
3. The “V-Chip” screen will appear.
Press the or button to select “Change PIN”, then press the ENTER
button.
The Change PIN screen will appear. Choose any 4 digits for your PIN and enter
them. As soon as the 4 digits are entered, the “Confirm Password” screen appears.
Re-enter the same 4 digits. When the Confirm screen disappears, your PIN has
been memorized.
Press the EXIT
If you forget the PIN, press the remote-control buttons in the following
button to exit.
sequence, which resets the pin to 0-0-0-0 : Power Off. Mute 8 2
4 Power On.
TV
Plug & Play
Language : English
Time
V-Ch ip
Caption
Melody : Medium
Energy Saving : Off
SW Upgrade
Move Enter Return
TV
Enter PIN
* * *
Enter PIN Return
m..v
V-Chip Lock : Off
TV Parental Guidelines
MPAA Rating
Canadian English
Canadian French
Downloadable U.S. Rating
Change PIN
Move Enter Return
Enter new PIN.
Confirm Password
Setup
V-Chip
V-ChipTV
Change PINTV
English - 41
Enter PIN Return
m..v
Page 44

How to Enable/Disable the V-Chip
1. Press the MENU button to display the menu.
Press the
2. Press the
or
button to select "Setup", then press the ENTER
or
button to select “V-Chip”, then press the ENTER
button.
button.
The message “Enter PIN” will appear. Enter your 4 digit PIN number.
3. The “V-Chip” screen will appear.
To enable the V-Chip feature, press the ENTER
button so that the “V-Chip Lock”
field is “On”. (Pressing the or button will alternate between “On” and “Off”.)
Press the
Press the EXIT button to exit.
ENTER button.
TV
Plug & Play
Language : English
Time
V-Ch ip
Caption
Melody : Medium
Energy Saving : Off
SW Upgrade
Move Enter Return
TV
Enter PIN
* * *
Enter PIN Return
m..v
V-Chip Lock : Off
TV Parental Guidelines
MP
AA Rating
Canadian English
Canadian French
Downloadable U.S. Rating
Change PIN
Move Enter Return
V-Chip Lock : off
TV Parental Guidelines
MPAA
Rating
Canadian English
Canadian French
Downloadable U.S. Rating
Change PIN
Move Enter Return
Setup
V-Chip
V-ChipTV
V-ChipTV
Off
On
How to Set up Restrictions Using the “TV Parental Guidelines”
First, set up a personal identification number (PIN) and enable the V-Chip. (See previous
section.)
Parental restrictions can be set up using either of two methods: The TV guidelines or the
MPAA rating.
1. Press the MENU button to display the menu.
Press the
2. Press the
or
button to select “Setup”, then press the ENTER
or
button to select “V-Chip”, then press the ENTER
button.
button.
The message “Enter PIN” will appear. Enter your 4 digit PIN number.
English - 42
TV
Plug & Play
Language : English
Time
V-Ch ip
Caption
Melody : Medium
Energy Saving : Off
SW Upgrade
Move Enter Return
TV
Enter PIN
* * *
Enter PIN Return
m..v
Setup
V-Chip
Page 45

3. The “V-Chip” screen will appear. Press the
Guidelines”, then press the ENTER
button.
or
button to select “TV Parental
4. The “TV Parental Guidelines” screen will appear.
Press the
or
button to select one of the six aged based categories:
• TV-Y: Young children
• TV-Y7: Children 7 and over
• TV-G: General audience
• TV-PG: Parental guidance
• TV-14: Viewers 14 and over
• TV-MA: Mature audience
5. At this point, one of the TV-Ratings is selected.
Press the ENTER
button. Depending on your existing setup, the “
will be selected. (Blank = Unblocked,
While “
” is selected, press the ENTER
= Blocked)
button to block or unblock the
” symbol
category.
To select a different TV-Rating, press the
or
button and then repeat the
process.
Allow all: Press to unlock all TV ratings. / Block all: Press to lock all TV ratings.
The TV-Y, TV-Y7, TV-G, TV-PG, TV-14 and TV-MA have additional options.
See the next step to change any of the following sub-ratings:
FV: Fantasy violence / D: Sexually Suggestive Dialog / L: Adult Language /
S: Sexual situation / V: Violence
The V-Chip will automatically block certain categories that are “more
restrictive”. For example, if you block “TV-Y” category, then TV-Y7 will
automatically be blocked. Similarly, if you block the TV-G category, then all the
categories in the “young adult” group will be blocked (TV-G, TV-PG, TV-14 and
TV-MA). The sub-ratings (D, L, S, V) work together similarly.(See next section.)
6. How to set the FV, D, L, S and V sub-ratings.
First, select one of these TV-Ratings: TV-Y, TV-Y7, TV-G, TV-PG, TV-14 or TV-MA
(See Step 4) and press the
button. The “ ” symbol will be displayed for each
sub-rating.
While “
” is selected, press the ENTER
Press ENTER
or
button and then repeat the process.
to block the sub rating. To select a different TV-Rating, press the
button to go to a sub rating.
V-Chip Lock : On
TV Parental Guidelines
MP
AA Rating
Canadian English
Canadian French
Downloadable U.S. Rating
Change PIN
TV-Y
TV-Y7
TV-G
TV-PG
TV-14
TV-MA
Move Enter Return
TV-Y
TV-Y7
TV-G
TV-PG
TV-14
TV-MA
Move Enter Return
V-ChipTV
Move Enter Return
TV Parental GuidelinesTV
ALL FV V S L D
TV Parental GuidelinesTV
ALL FV V S L D
Allow All
Block All
Allow All
Block All
• ALL: Lock all TV ratings.
• FV: Fantasy violence
• V: Violence
• S: Sexual situation
• L: Adult Language
• D: Sexually Suggestive Dialog
The V-chip will automatically block certain categories that are “More restrictive”.
For example, if you block “L” sub-rating in TV-PG, then the “L” sub-ratings in
TV-14 and TV-MA will automatically be blocked.
7. Press the EXIT button to clear all the screens. (Or proceed to the next section,
and set up additional restrictions based on the MPAA codes.)
These categories consist of two separate groups: TV-Y and TV-Y7 (young
children through age 7) and TV-G through TV-MA (everybody else).
The restrictions for these two groups work independently: If a household
includes very young children as well as young adults, the TV guidelines must
be set up separately for each age group. (See next step.)
English - 43
Page 46

How to Set up Restrictions Using the MPAA Ratings: G, PG, PG-13, R, NC-17, X, NR
The MPAA rating system uses the Motion Picture Association of America (MPAA) system and its main application is for movies.
When the V-Chip lock is on, the TV will automatically block any programs that are coded with objectionable ratings
(either MPAA or TV-Ratings).
1. Press the MENU button to display the menu.
Press the
2. Press the
or
button to select “Setup”, then press the ENTER
or
button to select “V-Chip”, then press the ENTER
button.
button.
The message “Enter PIN” will appear. Enter your 4 digit PIN number.
3. The “V-Chip” screen will appear. Press the
“MPAA Rating”, then press the ENTER
4. The “MPAA Rating” screen will appear. Repeatedly press the
select a particular MPAA category. Pressing the
or
button.
or
button to select
or
button to
button will cycle through
the MPAA categories:
• G: General audience (no restrictions).
• PG: Parental guidance suggested.
• PG-13: Parents strongly cautioned.
• R: Restricted. Children under 17 should be accompanied by an adult.
• NC-17: No children under age 17.
• X: Adults only.
• NR: Not rated.
Allow all: Press to unlock all TV ratings.
Block all: Press to lock all TV ratings.
While a particular category is selected, press the ENTER button to activate it.
The “
” symbol will be displayed. Press the ENTER button to block or
unblock the category.
The V-Chip will automatically block any category that is “more restrictive”.
For example, if you block the “PG-13” category, then “R”, “NC-17” and “X” will
automatically be blocked also.
Press the EXIT button to exit.
TV
Plug & Play
Language : English
Time
V-Ch ip
Caption
Melody : Medium
Energy Saving : Off
SW Upgrade
Move Enter Return
TV
Enter PIN
* * *
Enter PIN Return
m..v
V-Chip Lock : On
TV Parental Guidelines
MPAA Rating
Canadian English
Canadian French
Downloadable U.S. Rating
Change PIN
Move Enter Return
Block
G
PG
PG-13
R
NC-17
X
NR
Move Enter Return
Block
G
PG
PG-13
R
NC-17
X
NR
Move Enter Return
MPAA RatingTV
MPAA RatingTV
Setup
V-Chip
V-ChipTV
Block All
Allow All
Allow All
Block All
English - 44
Page 47

How to Set up Restrictions Using the ‘Canadian English’
1. Press the MENU button to display the menu.
Press the
2. Press the
or
button to select “Setup”, then press the ENTER
or
button to select “V-Chip”, then press the ENTER
button.
button.
The message “Enter PIN” will appear. Enter your 4 digit PIN number.
3. The “V-Chip” screen will appear. Press the
“Canadian English”, then press the ENTER
4. Press the
Press the ENTER
or
button to select a appropriate restriction.
button to activate the restriction selected. The “
or
button.
button to select
” symbol is
indicated.
Press the EXIT button to exit.
Allow all: Press to unlock all TV ratings.
Block all: Press to lock all TV ratings.
• C: Programming intended for children under age 8.
• C8+: Programming generally considered acceptable for children 8 years and
over to watch on their own.
• G: General programming, suitable for all audiences.
• PG: Parental Guidance.
• 14+: Programming contains themes or content which may not be suitable for
viewers under the age of 14.
• 18+: Adult programming.
The V-Chip will automatically block any category that is “more restrictive”.
For example, if you block G category, then PG, 14+ and 18+ will automatically
be blocked also.
TV
Plug & Play
Language : English
Time
V-Ch ip
Caption
Melody : Medium
Energy Saving : Off
SW Upgrade
Move Enter Return
TV
Enter PIN
* * *
Enter PIN Return
m..v
V-Chip Lock : On
TV Parental Guidelines
MPAA Rating
Canadian English
Canadian French
Downloadable U.S. Rating
Change PIN
Move Enter Return
Canadian EnglishTV
Block
C
C8+
G
PG
14+
18+
Move Enter Return
Canadian EnglishTV
Block
C
C8+
G
PG
14+
18+
Move Enter Return
Setup
V-Chip
V-ChipTV
Allow All
Block All
Allow All
Block All
English - 45
Page 48

How to Set up Restrictions Using the ‘Canadian French’
1. Press the MENU button to display the menu.
or
Press the
2. Press the
button to select “Setup”, then press the ENTER
or
button to select “V-Chip”, then press the ENTER
The message “Enter PIN” will appear. Enter your 4 digit PIN number.
3. The “V-Chip” screen will appear. Press the
“Canadian French”, then press the ENTER
or
button.
button to select
button.
button.
TV
Plug & Play
Language : English
Time
V-Ch ip
Caption
Melody : Medium
Energy Saving : Off
SW Upgrade
Move Enter Return
TV
Enter PIN
* * *
Enter PIN Return
m..v
V-Chip Lock : On
TV Parental Guidelines
MAPP
Rating
Canadian English
Canadian French
Downloadable U.S. Rating
Change PIN
Move Enter Return
Setup
V-Chip
V-ChipTV
4. Press the
Press the ENTER
or
button to select an appropriate restriction.
button to activate the restriction selected. The “
” symbol is
indicated.
Press the EXIT button to exit.
Allow all: Press to unlock all TV ratings.
Block all: Press to lock all TV ratings.
• G: General
• 8 ans+: Programming generally considered acceptable for children 8 years
and over to watch on their own.
• 13 ans+: Programming may not be suitable for children under the age of 13.
• 16 ans+: Programming is not suitable for children under the age of 16.
• 18 ans+: Programming restricted to adults.
The V-Chip will automatically block any category that is “more restrictive”.
For example, if you block 8 ans+ category, then 13 ans+, 16 ans+ and 18 ans+
will automatically be blocked also.
Canadian FrenchTV
Block
Canadian FrenchTV
Block
Allow All
Block All
Allow All
Block All
G
8 ans+
13 ans+
16 ans+
18 ans+
Move Enter Return
G
8 ans+
13 ans+
16 ans+
18 ans+
Move Enter Return
English - 46
Page 49

Using the V-Chip for Digital channels
Parental restriction information can be used while watching DTV channels.
1. Press the MENU button to display the menu.
Press the
2. Press the
or
button to select “Setup”, then press the ENTER
or
button to select “V-Chip”, then press the ENTER
button.
button.
The message “Enter PIN” will appear. Enter your 4 digit PIN number.
3. The “V-Chip” screen will appear. Press the
“Downloadable U.S. Rating”, then press the ENTER
If information is not downloaded from the broadcasting station, the
or
button to select
button.
Downloadable U.S. rating menu is deactivated.
Parental restriction information is automatically downloaded while watching
DTV channels. It may take several seconds.
The Downloadable U.S. rating menu is available for use after information is
downloaded from the broadcasting station. However, depending on the infor
mation from the broadcasting station, it may not be available for use.
4. Press the
Press the ENTER
or
button to select a appropriate restriction.
button to activate the restriction selected. The “
” symbol is
indicated.
Press the EXIT
Allow all: Press to unlock all TV ratings. / Block all: Press to lock all TV ratings.
Parental restriction levels differ depending on the broadcasting station.
The default menu name and Downloadable US rating changes depending on
button to exit.
the downloaded information.
Even if you set the On-screen display to your desired language, the
"Downloadable U.S. Rating" menu will appear in English only.
The rating will automatically block certain categories that are more restrictive.
The rating titles(For example: Humor Level.,etc) and TV ratings (For example:
DH, MH, H., etc) may differ depending on the broadcasting station.
TV
Plug & Play
Language : English
Time
V-Ch ip
Caption
Melody : Medium
Energy Saving : Off
SW Upgrade
Move Enter Return
TV
Enter PIN
* * *
m..v
V-Chip Lock : On
TV Parental Guidelines
MP
AA Rating
Canadian English
Canadian French
Downloadable U.S. Rating
Change PIN
Move Enter Return
Rating title
TV
Humor Level
DH
MH
H
VH
EH
Move Enter Return
Setup
V-Chip
Enter PIN Return
V-ChipTV
The number of
current rating title
Downloadable U.S. Rating
1/2
Allow All
Block All
The number of
all rating title
How to Reset the TV after the V-Chip Blocks a Channel (“Emergency Escape”)
If the TV is tuned to a restricted channel, the V-Chip will block it. The screen
will go blank and the following message will appear:
1. Enter your PIN.
To resume normal viewing, tune to a different channel using CH
or CH
button. Under certain conditions (depending on the rating of the local TV
programs) the V-Chip might lock out all the channels. In this case, use the
V-Chip function for an “emergency escape”:
Press the MENU button. Press the or button to select "Setup", then press
2.
the ENTER
Press the or button to select "V-Chip", then press the ENTER
3.
Enter your PIN, then press the ENTER
4.
button.
button.
button and press the or button to
temporarily disable the V-Chip Lock.
If you forget the PIN, press the remote-control buttons in the following
sequence, which resets the pin to 0-0-0-0 : Power Off. MUTE 8
2 4 Power On.
English - 47
Channel Is Locked by
TV-PG [ S ]
Use the NUMBER buttons to enter your
pin number to unlock all channels.
Press EXIT to clear PIN.
Press MENU for main menu.
Channel Is Locked by
TV-PG [ L ]
Use the NUMBER buttons to enter your
pin number to unlock all channels.
Press EXIT to clear PIN.
Press MENU for main menu.
Page 50

Viewing Closed Captions (On-Screen Text Messages) - Analog
The Analog Caption function operates in either analog TV channel mode or when a signal is supplied from an external device to
TV. (Depending on the broadcasting signal, the Analog Caption function may operate on digital channels.)
1. Press the MENU button to display the menu.
Press the or button to select “Setup”, then press the ENTER
2. Press the or button to select “Caption”, then press the ENTER
3. Press the ENTER
button to select “Caption”.
Press the or button to select “On”, then press the ENTER
button.
button.
button.
TV
Plug & Play
Language : English
Time
V-Ch ip
Caption
Melody : Medium
Energy Saving : Off
SW Upgrade
Move Enter Return
TV
Caption : Off
Caption Mode : Default
Caption Options
Enter Return
TV
Caption : Off
Caption Mode : Default
Caption Options
Move Enter Return
TV
Caption : On
Caption Mode : Default
Caption Options
Setup
Caption
Caption
Off
On
Caption
4. Press the or button to select “Caption Mode”, then press the ENTER
button.
Press the or button to select submenu (Default, CC1~CC4 or Text1~Text4)
you want, the press the ENTER
Press the EXIT
button to exit.
button.
• The default is “CC1”.
• CC1: The Primary Synchronous Caption Service. These are captions in the
primary language that must be in sync with the sound, preferably
matched to a specific frame.
• CC2: The Special Non-Synchronous Use Captions.
This channel carries data that is intended to augment information carried
in the program.
• CC3: Secondary Synchronous Caption Service.
Alternate program-related caption data, typically second language
captions.
• CC4: Special Non-Synchronous Use Captions. Similar to CC2.
• Text1: First Text Service. This may be various non-program related data.
• Text2: Second Text Service. Additional data, usually not program related.
• Text3/Text4: Third and Fourth Text Services.
These data channels should be used only if Text1 and Text2 are
not sufficient.
The Caption feature doesn’t work in Component, HDMI or PC modes.
The availability of captions depends on the program being broadcast.
Press the CC button on the remote control to turn the Caption “On” or “Off”.
Move Enter Return
TV
Caption : On
Caption Mode : Default
Caption Options
Move Enter Return
Caption
Default
CC1
CC2
CC3
CC4
Tex t1
Tex t2
Text3
Tex t4
English - 48
Page 51

Viewing Closed Captions (On-Screen Text Messages) - Digital
The Digital Captions function operates on digital channels.
1. Press the MENU button to display the menu.
Press the or button to select “Setup”, then press the ENTER
2. Press the or button to select “Caption”, then press the ENTER
3. Press the ENTER
button to select “Caption”.
Press the or button to select “On”, then press the ENTER
button.
button.
button.
TV
Caption : Off
Caption Mode : Default
Caption Options
Caption
Off
On
4. Press the or button to select “Caption Mode”, then press the ENTER
button.
Press the or button to select submenu (Default, Service1~Service6,CC1~CC4
or Text1~Text4) you want, then press the ENTER
5. Press the or button to select “Caption Options”, then press the ENTER
button.
button.
“Caption Options” are available only when “Default” and “Service 1~Service 6”
can be selected in “Caption Mode”.
Service1~6 in digital caption mode may not be available depending on the
broadcast.
6. Press the or button to select “Size”, then press the ENTER
button.
Press the or button to select the desired Caption option, then press the
ENTER
button.
Press the or button to select the desired sub-menu options
(see options below), then press ENTER
button.
Press the EXIT button to exit.
The availability of captions depends on the program being broadcast.
“Default” means to follow the standard set by the broadcaster.
Foreground and Background cannot be set to have the same color.
“Foreground Opacity” and “Background Opacity” cannot be both set to
Transparent.
Move Enter Return
TV
Caption : On
Caption Mode : Default
Caption Options
Move Enter Return
TV
Caption : On
Caption Mode : Default
Caption Options
Move Enter Return
TV
Caption : On
Caption Mode : Service1
Caption Options
Move Enter Return
TV
Size : Default
Font Style : Default
Foreground Color : Default
Background Color : Default
Foreground Opacity : Default
Background Opacity : Default
Return to Default
Caption Options
Move Enter Return
Caption
Caption
Default
Service1
Service2
Service3
Service4
Service5
Service6
CC1
Caption
• Size: This option consists of “Default”, “Small”, “Standard” and “Large”. The
default is “Standard”.
• Font Style: This option consists of “Default”, “Style0 ~ Style 7”. You can
change the font you want. The default is “Style 0”.
• Foreground Color: This option consists of “Default”, “White”, “Black”, “Red”,
“Green”, “Blue”, “Yellow”, “Magenta” and “Cyan”. You can
change the color of the letter. The default is “White”.
• Background Color: This option consists of “Default”, “White”, “Black”, “Red”,
“Green”, “Blue”, “Yellow”, “Magenta” and “Cyan”. You can
change the background color of the caption. The default is
“Black”.
• Foreground Opacity: This option consists of “Default”, “Transparent”,
“Translucent”, “Solid” and “Flashing”. You can change
the opacity of the letter.
• Background Opacity: This option consists of “Default”, “Transparent”,
“Translucent”, “Solid”,and “Flashing”. You can change
the background opacity of the caption.
• Return to Default: This option sets each of “Size”, “Font Style”, “Foreground
Color”, “Background Color”, “Foreground Opacity” and
“Background Opacity” to its default.
English - 49
Press the CC button on the remote
control to turn the Caption “On” or
“Of
f”.
Page 52

Adjusting the TV On/Off Melody Sound
A melody sound can be set to come on when the TV is powered On or Off.
1. Press the MENU button to display the menu.
Press the or button to select "Setup", then press the ENTER
2. Press the
or button to select "Melody", then press the ENTER
button.
button.
3. Press the or button to select “Off”, “Low”, “Medium” or “High”, then press
the ENTER
button.
• Off : Turns off the melody function.
• Low : Sets the melody volume to low.
• Medium : Sets the melody volume to medium.
• High : Sets the melody volume to high.
Press the EXIT button to exit.
°
The Melody does not play
- When
no sound is output from the TV because the MUTE button has been
pressed.
- When no sound is output from the TV because the Volume has been reduced
to minimum with the VOL- button.
-
When the
TV is turned off by Timer function.
TV
Plug & Play
Language : English
Time
V-Chip
Caption
Melody : Medium
Energy Saving : Off
SW Upgrade
Move Enter Return
TV
Plug & Play
Language : English
Time
V-Chip
Caption
Melody : Medium
Energy Saving : Off
SW Upgrade
Move Enter Return
Setup
Setup
Off
Low
Medium
High
Using the Energy Saving Feature
This feature adjusts the brightness of the TV in order to reduce power consumption. When watching TV at night, set the
"Energy Saving" mode option to "High" to reduce eye fatigue as well as power consumption.
1. Press the MENU button to display the menu.
Press the or button to select "Setup", then press the ENTER
2. Press the or button to select "Energy Saving", then press the ENTER
Select the required option (“Off”, “Low”, “Medium”, “High”) by pressing the or button.
Press the ENTER
button.
button.
button.
• Off: Turns off the energy saving function.
• Low: Sets the TV to low energy saving mode.
• Medium: Sets the TV to medium energy saving mode.
• High: Sets the TV to high energy saving mode.
Press the EXIT button to exit.
TV
Plug & Play
Language : English
Time
V-Ch ip
Caption
Melody : Medium
Energy Saving : Off
SW Upgrade
Move Enter Return
TV
Plug & Play
Language : English
Time
V-Chip
Caption
Melody : Medium
Energy Saving : Off
Move Enter Return
SW Upgrade
Setup
Setup
Off
Low
Medium
High
Move Enter Return
English - 50
Page 53

Upgrading the Software
Samsung may offer upgrades for TV's firmware in the future. Please contact the Samsung call center at 1-800-SAMSUNG
(726-7864) to receive information about downloading upgrades and using a USB drive. Upgrades will be possible by connecting a
USB drive to the USB port located on your TV.
1. Insert a USB drive containing the firmware upgrade into the SERVICE port on
the rear of the TV.
TV Rear Panel
USB Drive
2. Press
Press the or button to select “Setup”, then press the ENTER
the MENU button to display the menu.
button.
3. Press the or button to select “SW upgrade”, then press the ENTER
button.
4. Press the ENTER
button.
The message “Scanning for USB... It may take up to 30 seconds.” is displayed.
5. The message “Upgrade version XXXX to version XXXX The system would be reset
after upgrade.” is displayed.
Press the or to select the “Yes”, then press the ENTER
button.
Please be careful to not disconnect the power or remove the USB drive while
upgrades are being applied. The TV will turn off and turn on automatically after
completing the firmware upgrade. Please check the firmware version after the
upgrades are complete. When software is upgraded, video and audio settings you
have made will return to their default (factory) settings. We recommend you write
down your settings so that you can easily reset them after the upgrade.
TV
Plug & Play
Language : English
Time
V-Ch ip
Caption
Melody : Medium
Energy Saving : Off
SW Upgrade
Move Enter Return
USB Software Upgrade
Scanning for USB...
It may take up to 30 seconds
Setup
USB Software Upgrade
Upgrade version XXXX to version XXXX
The system would be reset after upgrade.
Yes No
English - 51
Page 54

Appendix
Troubleshooting
If the TV seems to have a problem, rst try this list of possible problems and solutions.
If none of these troubleshooting tips apply, call your nearest Samsung service center.
Problem Possible Solution
Poor picture Try another channel.
Poor sound quality. Try another channel.
No picture or sound. Try another channel.
No sound or sound is too low at
maximum volume.
Picture rolls vertically. Check all wire connections.
The TV operates erratically. Unplug the TV for 30 seconds, then try operating it again.
The TV won’t turn on. Make sure the wall outlet is working.
Remote control malfunctions Replace the remote control batteries.
“Check signal cable” message. Ensure that the signal cable is firmly connected to the PC source.
“Not Supported Mode” message. Check the maximum resolution and connected device’s Video frequency.
Digital broadcasting screen
problem.
Adjust the antenna.
Check all wire connections.
Adjust the antenna.
Press the SOURCE button.
Make sure the TV is plugged in.
Check the antenna connections.
First, check the volume of units connected to your TV (digital broadcasting receiver, DVD,
cable broadcasting receiver, VCR, etc.). Then, adjust the TV volume accordingly.
Clean the upper edge of the remote control (transmission window).
Check the battery terminals.
Compare these values with the data in the Display Modes.
Please check the digital signal strength and input antenna.
The image is too light or too dark. Adjust the Brightness and Contrast.
Black bars on the screen. Make sure the broadcast you’re receiving is High Definition (HD).
Picture has a Red/Green or
Pink tint.
Closed Captioning not working. If you are using a Cable/Satellite box, you must set Closed Captioning on the box,
Snowy picture Your cable box may need a firmware upgrade. Please contact your Cable company.
Ghosting on picture This is sometimes caused by compatibility issues with your cable box.
Adjust the Fine tuning.
HD channels sometimes broadcast Standard Definition (SD) programming, which can
cause black bars.
Set your cable/satellite box to stretch or widescreen mode to eliminate the bars.
Make sure the Component cables are connected to the correct jacks.
not your TV.
Try connecting Component cables instead.
English - 52
Page 55

Problem Possible Solution
Horizontal bars appear to flicker,
Adjust the Coarse tuning and then adjust the Fine tuning.
jitter or shimmer on the image.
Vertical bars appear to flicker,
Adjust the Coarse tuning and then adjust the Fine tuning.
jitter or shimmer on the image.
Screen is black and power
indicator light blinks steadily.
On your computer check: Power, Signal Cable.
The TV is using its power management system.
Move the computer's mouse or press any key on the keyboard.
Image is not stable and may
appear to vibrate when you have
a computer connected to the PC
input.
If the setting is not correct, use your computer utility program to change the display settings.
Your TV supports multiscan display functions within the following frequency domain:
Horizontal frequency (kHz)
30~60
Vertical frequency (Hz) 60~75
Image is not centered on the
screen.
The picture appears distorted in the
corner of the screen.
The “Resets all settings to the default
values” message appears.
Adjust the horizontal and vertical position.
The screen position must be adjusted on the output source (i.e. STB) with a digital signal.
If "Just Scan" is selected with some external devices, the picture may appear distorted in the
corner of the screen. This symptom is caused by the external devices, not TV.
This appears when you press and hold the EXIT button for a while. The product
settings are reset to the factory defaults.
PC Maximum refresh rate
(at 60 Hz)
LN19A450C1D, LN19A451C1D: 1440 X 900
LN22A450C1D, LN22A451C1D: 1680 X1050
This TFT LCD panel uses a panel consisting of sub pixels (LN19A450C1D, LN19A451C1D: 3 888 000 / LN22A450C1D,
LN22A451C1D: 5 292 000) which require sophisticated technology to produce. However, there may be few bright or dark
pixels on the screen.
These pixels will have no impact on the performance of the product.
English - 53
Page 56

How to Adjust the Stand (LN19A450C1D, LN19A451C1D)
1. Place the front of the TV onto a soft cloth or
Button
( 1 ) ( 2 )
cushion on a table as in Figure (1).
- Align the TV bottom along the table edge.
2. Press on the center of the TV back.
Adjust the stand as in Figure (2) while
pressing the button on the back of the stand.
3. Place the TV on the table so that the TV sits
safely on the table.
How to Adjust the Angle of the TV (LN19A450C1D, LN19A451C1D)
( 1 ) Angle adjustment when using the
TV on its stand.
When you adjust the stand, press the button on the back of the stand.
1. Figure (1) shows the adjustment angle (-2°~14°) when you use the LCD on its stand.
Excessive tilting can turn the LCD TV over which may cause damage.
2. Figure (2) shows the adjustment angle (14°~80°) when you convert the LCD from stand-based use to wall-mount.
3. Figure (3) shows the adjustment angle (0°~10°) when you mount the LCD TV to a wall.
You will hear a “Click” sound when changing the angle from 1 to 2 or 3 to 2.
( 2 ) Angle adjustment when converting from
Stand to Wall mount (13, 31)
( 3 ) Angle adjustment when LCD
TV is wall-mounted
Installing the Wall Mount Kit (LN19A450C1D, LN19A451C1D)
Wall mount items (sold separately) allow you to mount the TV on the wall. For the detailed information on installing the Wall
Mount, see the instruction in the Wall Mount items. Contact a technician for installing the wall bracket. Samsung Electronics is not
responsible for any damage to the product or injury to yourself or others if you choose to install the TV on your own.
Installing VESA Compliant Mounting Devices (LN19A450C1D, LN19A451C1D)
Button
Mounting pad
(Sold separately)
( 1 ) ( 2 )
1. Place the TV face down on a soft cloth or cushion
on a table.
2. Adjust the stand, pressing the button on the back
of the stand.
3. Align the mounting interface pad (not supplied)
with the holes in the stand bottom and secure it
with the four screws that come with the arm-type
base, wall mount hanger or other bases (not
supplied).
Using the Decoration Covers (LN19A450C1D, LN19A451C1D)
1. When installing the TV on the wall without using
the stand, insert decoration covers into the holes
as described in the picture (1).
2. After inserting the decoration covers, fasten them
with 4 screws as described in the picture (2).
( 1 ) ( 2 )
English - 54
Page 57

Installing the Stand
2
1
1. Connect your LCD TV and the stand.
Two or more people should carry the TV.
°
Make sure to distinguish between the front and back of the stand when assembling them.
°
To make sure the TV is installed on the stand at a proper level, do not apply excess downward pressure to the upper left
°
of right sides of the TV.
2. Fasten two screws at position 1 and then fasten two screw at position 2.
Stand the product up and fasten the screws. If you fasten the screws with the LCD TV placed down, it may lean to
°
one side.
Disconnecting the Stand
1. Remove four screws from the back of the TV.
2. Separate the stand from the TV.
Two or more people should carry the TV.
°
3. Cover the bottom hole with the cover.
English - 55
Page 58

Wall Mount Kit Specifications (VESA)
Install your wall mount on a solid wall perpendicular to the oor.
When attaching to other building materials, please contact your nearest dealer.
If installed on a ceiling or slanted wall, it may fall and result in severe personal injury.
Product Family
LCD-TV
PDP-TV
Standard dimensions for wall mount kits are shown in the table above.
When purchasing our wall mount kit, a detailed installation manual and all parts necessary for assembly are provided.
Do not use screws longer than the standard dimension, as they may cause damage to the inside of the TV set.
For wall mounts that do not comply with the VESA standard screw specifications, the length of the screws may differ
depending on their specifications.
Do not use screws that do not comply with the VESA standard screw specifications.
D
o not use fasten the screws too strongly, this may damage the product or cause the product to fall, leading to personal injury.
Samsung is not liable for these kinds of accidents.
Samsung is not liable for product damage or personal injury when a non-VESA or non-specified wall mount is used or the
consumer fails to follow the product installation instructions.
Do not exceed 15 degrees tilt when mounting this TV.
inches VESA Spec. (A * B) Standard Screw Quantity
23~ 26 200 * 100 M4
32 ~ 40 200 * 200 M6
46 ~ 52 600 * 400
57
57 ~ 70 800 * 400
80 ~ 1400 * 800
42 ~ 50 600 * 400
55 ~ 70 800 * 400
63 No VESA 6
80 ~ 1400 * 800 4
700 * 400
(No VESA)
M8
M8
4
4
Do not install your Wall Mount Kit while your TV is turned on.
It may result in personal injury due to electric shock.
English - 56
Page 59

Using the Anti-Theft Kensington Lock
The Kensington Lock is a device used to physically x the system when using it in a public place. The locking device
has to be purchased separately. The appearance and locking method may differ from the illustration depending on the
manufacturer. Refer to the manual provided with the Kensington Lock for proper use. The locking device has to be
purchased separately.
Cable
Figure 2
Figure 1
<Optional>
The location of the Kensington Lock may be different depending on its model.
1. Insert the locking device into the Kensington slot on the LCD TV (Figure 1) and turn it in the locking direction (Figure 2).
2. Connect the Kensington Lock cable.
3. Fix the Kensington Lock to a desk or a heavy stationary object.
English - 57
Page 60

Specications
Model Name LN19A450C1D, LN19A451C1D LN22A450C1D, LN22A451C1D
Screen Size (Diagonal) 19 inches 22 inches
PC Resolution 1440 x 900 @ 60 Hz
Sound
Output
Dimensions (WxDxH)
Body
With stand
Weight
With Stand
Without stand
Environmental
Considerations
Operating T
Operating Humidity
Storage Temperature
Storage Humidity
Stand Swivel
(Left / Right)
emperature
18.8 X 2.3 X 13.7 inches
(477.1 X 57.5 X 348.6 mm)
18.8 X 7.1 X 15.2 inches
(477.1 X 180.2 X 387 mm)
50 °F to 104 °F (10 °C to 40 °C)
10% to 80%, non-condensing
-4 °F to 113 °F (-20 °C to 45 °C)
5% to 95%, non-condensing
3W x 2
1
1.5lbs (5.2 kg)
10.4lbs (4.7 kg)
-0 ~ 0 -0 ~ 0
Design and specifications are subject to change without prior notice.
This device is a Class B digital apparatus.
For the power supply and Power Consumption, refer to the label attached to the product.
1680 x 1050 @ 60 Hz
3W x 2
22.0 X 2.6 X 16.0 inches
(557.8 X 66.5 X 406.9 mm)
22.0 X 8.5 X 17.8 inches
(557.8 X 216 X 452.9 mm)
16.1lbs (7.3 kg)
13.0lbs (5.9 kg)
50 °F to 104 °F (10 °C to 40 °C)
10% to 80%, non-condensing
-4 °F to 113 °F (-20 °C to 45 °C)
5% to 95%, non-condensing
English - 58
Page 61

This page is intentionally
left blank.
Page 62

Contact SAMSUNG WORLDWIDE
If you have any questions or comments relating to Samsung products, please contact the SAMSUNG
customer care center.
Contacte con SAMSUNG WORLDWIDE
Si tiene alguna pregunta o comentario referente a nuestros productos, por favor contacte con nuestro Servicio de Atención al
Cliente.
Country
CANADA 1-800-SAMSUNG(726-7864) www.samsung.com/ca
U.S.A 1-800-SAMSUNG(726-7864) www.samsung.com
Customer Care Center
Web Site Address
Samsung Electronics Canada Inc., Customer
Service 55 Standish Court Mississauga,
Ontario L5R 4B2 Canada
Samsung Electronique Canada Inc.,
Service à la Clientèle 55 Standish Court
Mississauga, Ontario L5R 4B2 Canada
Samsung Electronics America, Inc.
105 Challenger Road
Ridgefield Park, NJ 07660-0511
BN68-01395B-00
Page 63

1-800-SAMSUNG (7267864)
Samsung Electronics America, Inc.
105 Challenger Road Ridgefield Park, NJ 07660-0511
Samsung Electronics Canada Inc., Customer Service
55 Standish Court Mississauga, Ontario L5R 4B2
Call center hours of operation (Mon-Sun 9AM-12AM EST).
To register this product please visit
www.samsung.com/global/register.
Rear Panel / Side Panel Jacks
LN19A450C1D/LN19A451C1D/
LN22A450C1D/LN22A451C1D
1 AUDIO OUT
2 DIGITAL AUDIO OUT (OPTICAL)
3 PC IN [PC] / [AUDIO]
4 DVI IN[R-AUDIO-L]
/ HDMI/DVI IN
5 SERVICE, EX-LINK
6 ANT IN
7 KENSINGTON LOCK
Video Input Performance Comparison
/
/
HDMI/DVI
PC/COMPONENT
S-VIDEO
VIDEO
Best
Better
Good
Normal
English-1
8 HEADPHONE
9 AV IN / S-VIDEO
0 COMPONENT IN
! POWER INPUT
Audio Output Performance Comparison
OPTICAL (Digital)
AUDIO (Analog)
Best
Normal
Page 64

Remote Control
See “Remote Control” in the owner’s instructions for details.
1
POWER
Turns the TV on and off.
2
TV
Selects the TV mode directly.
3
NUMERIC BUTTONS
Press to change the channel.
4
Press to select additional
channels(digital and analog) being
broadcast by the same station.
For example, to select channel
“54-3”, press “54”, then press “
and “3”.
5 (
MUTE)
Press to temporarily cut off the
sound.
6
VOL / VOL
Press to increase or decrease
the volume.
7
TOOLS
Use to quickly select frequently
used functions.
UP / DOWN / LEFT /
8
RIGHT / ENTER
Use to select on-screen menu
items and change menu values.
INFO
9
Press to display information on
the TV screen.
0
COLOR BUTTONS
Use these buttons in the
Channel list, etc.
!
CC
Controls the caption decoder.
MTS
@
Press to choose stereo, mono
or Separate Audio Program
(SAP broadcast).
#
SOURCE
Press to display and select the
available video sources.
$
PRE CH
Tunes to the previous channel.
CH
%
Press to change channels.
”
^
Returns to the previous menu.
&
Press to exit the menu.
*
Selects SRS TruSurround XT
(
Displays the main on-screen
)
a P.SIZE
Picture size selection.
/ CH
RETURN
EXIT
SRS
mode.
MENU
menu.
FAV.CH
Press to switch to your favorite
channels.
English-2
Page 65

Connections
Connecting a DVD Player or Cable Box/Satellite receiver (Set-Top Box) via HDMI
Connect an HDMI Cable between
DVD Player or Cable Box/
Satellite receiver
(Set-Top Box)
HDMI Cable (Not supplied)
1
Each DVD Player or Cable Box/Satellite receiver (Set-Top Box) has a different
°
back panel configuration.
TV Rear Panel
the HDMI/DVI IN jack on the TV
1
and the HDMI jack on the DVD
Player or Cable Box/Satellite
receiver (Set-Top Box).
What is HDMI?
•
HDMI(High-Definition Multimedia
Interface), is an interface that enables the
transmission of digital audio and video
signals using a single cable.
•
The difference between HDMI and DVI
is that the HDMI device is smaller in
size and has the HDCP (High Bandwidth
Digital Copy Protection) coding feature
installed.
Connecting a DVD Player or Cable Box/Satellite receiver (Set-Top Box) via DVI
TV Rear Panel
DVD Player or Cable Box/
Satellite receiver (Set-Top Box)
Audio Cable
2
(Not supplied)
DVI to HDMI Cable (Not supplied)
1
Each DVD Player or Cable Box/Satellite receiver (Set-Top Box) has a different
°
back panel configuration.
When connecting a DVD Player or Cable Box/Satellite receiver (Set-Top Box),
°
match the color of the connection terminal to the cable.
When using an HDMI/DVI cable connection, you must use the HDMI/DVI IN
°
jack.
Connect a DVI to HDMI Cable or
DVI-HDMI Adapter between the
1
HDMI/DVI IN jack on the TV and the
DVI jack on the DVD Player or Cable
Box/Satellite receiver (Set-Top Box).
Connect Audio Cables between the
DVI IN [R-AUDIO-L] jack on the TV
2
and the DVD Player or Cable Box/
Satellite receiver (Set-Top Box).
English-3
Page 66

Connecting a DVD Player or Cable Box/Satellite receiver (Set-Top Box)
via Component cables
TV Rear Panel
1
2
DVD Player or Cable Box /
Satellite receiver (Set-Top Box)
Component Cable (Not supplied)
Audio Cable (Not supplied)
Connect a Component Cable between
the COMPONENT IN [Y, P
1
on the TV and the COMPONENT [Y,
B
, PR] jacks on the DVD Player or
P
Cable Box/Satellite receiver (Set-Top
Box).
Connect Audio Cables between the
COMPONENT IN [R-AUDIO-L] jacks
2
on the TV and the AUDIO OUT jacks
on the DVD Player or Cable Box/
Satellite receiver (Set-Top Box).
°
Component video separates the video
Y (Luminance (brightness)), Pb
into
(Blue) and Pr (Red) for enhanced video
quality.
Be sure to match the component video
and audio connections.
For example, if connecting
a Component video cable to
COMPONENT IN, connect the audio
cable to COMPONENT IN also.
Each DVD Player or Cable Box/
°
Satellite receiver (Set-Top Box) has a
different back panel configuration.
When connecting a DVD Player or
°
Cable Box/Satellite receiver (Set-Top
Box), match the color of the connection
terminal to the cable.
B
, PR] jacks
Connecting a Camcorder
Audio cable (Not supplied)
Camcoder
2
Video Cable (Not supplied)
1
or
S-Video Cable (Not supplied)
1
TV Side Panel
English-4
Connect a Video Cable (or S-Video
Cable) between the AV IN [VIDEO]
1
(or S-VIDEO) jack on the TV and the
VIDEO OUT jack on the camcorder.
Connect Audio Cables between the
AV IN [R-AUDIO-L] jacks on the TV
2
and the AUDIO OUT jacks on the
camcorder.
Each Camcorder has a different back
°
panel configuration.
When connecting a Camcorder
°
the color of the connection terminal to
the cable.
, match
Page 67

Connecting a VCR
Video Connection
TV Rear Panel
VCR Rear Panel
Audio Cable (Not supplied)
5
Video Cable (Not supplied)
4
RF Cable
3
Follow the instructions in “Viewing a VCR or Camcorder Tape” to view your VCR tape.
°
Each VCR has a different back panel configuration.
°
When connecting a VCR, match the color of the connection terminal to the cable.
(Not supplied)
Unplug the cable or antenna
from the back of the TV.
1
Connect the cable or antenna
to the ANT IN terminal on the
2
back of the VCR.
Connect an RF Cable between
the ANT OUT terminal on the
3
VCR and the ANT IN terminal
on the TV.
Connect a Video Cable between
the VIDEO OUT jack on the
4
VCR and the AV IN [VIDEO] jack
on the TV.
Connect Audio Cables between
the AUDIO OUT jacks on the
5
VCR and the AV IN [R-AUDIO-L]
jacks on the TV.
If you have a “mono” (non-stereo)
°
VCR, use a Y-connector (not
supplied) to hook up to the right
and left audio input jacks of the
TV. If your VCR is stereo, you
must connect two cables.
S-Video Connection
VCR Rear Panel
Audio Cable (Not supplied)
3
S-Video Cable (Not supplied)
2
RF Cable
1
(Not supplied)
TV Rear Panel
English-5
To begin, follow steps 1–3 in
the previous section to connect
1
the antenna or cable to your
VCR and your TV.
Connect an S-Video Cable
between the S-VIDEO OUT jack
2
on the VCR and the AV IN
[S-VIDEO] jack on the TV.
Connect Audio Cables between
the AUDIO OUT jacks on the
3
VCR and the AV IN [R-AUDIO-L]
jacks on the TV.
An S-Video cable may be included
with a VCR. (If not, check your local
electronics store.)
°
Each VCR has a dif
panel configuration.
°
When connecting a VCR, match
the color of the connection
terminal to the cable.
ferent back
Page 68

Connecting a Digital Audio System
TV Rear Panel
Optical Cable (Not supplied)
1
Digital Audio System
Connect an Optical Cable between
the “DIGITAL AUDIO OUT
1
(OPTICAL)” jacks on the TV and
the Digital Audio Input jacks on the
Digital Audio System.
When a Digital Audio System is
connected to the “DIGITAL AUDIO
OUT (OPTICAL)” jack: Decrease
the volume of the TV and adjust
the volume level with the system’s
volume control.
5.1CH audio is possible when the TV
°
is connected to an external device
supporting 5.1CH.
Each Digital Audio System has a
°
different back panel configuration.
When the receiver (home theater) is
°
set to On, you can hear sound output
from the TV’s Optical jack. When the TV
is displaying a DTV(air) signal, the TV
will send out 5.1 channel sound to the
Home theater receiver. When the source
is a digital component such as a DVD
and is connected to the TV via HDMI,
only 2 channel sound will be heard from
the Home Theater receiver. If you want
to hear 5.1 channel audio, connect the
DIGITAL AUDIO OUT (OPTICAL) jack
on the DVD player or Cable/Satellite
Box directly to an Amplifier or Home
Theater, not the TV.
Connecting an Amplifier/DVD Home Theater
TV Rear Panel
Audio Cable (Not supplied)
1
Amplifier/DVD Home Theater
English-6
Connect Audio Cables between the
AUDIO OUT [R-AUDIO-L] jacks on
1
the TV and AUDIO IN [R-AUDIO-L]
jacks on the Amplifier/DVD Home
Theater.
When an audio amplifier is
connected to the "AUDIO OUT
[R-AUDIO-L]" jacks: Decrease the
volume of the TV and adjust the
volume level with the Amplifier’s
volume control.
°
Each Amplifier/DVD Home Theater has
ferent back panel configuration.
a dif
When connecting an Amplifier/DVD
°
Home Theater, match the color of the
connection terminal to the cable.
Page 69

Connecting a PC
TV Rear Panel
D-Sub Cable (Not supplied)
1
PC Audio Cable (Not supplied)
2
PC
Using the D-Sub Cable
Connect a D-Sub Cable between
PC IN [PC] connector on the TV
1
and the PC output connector on
your computer.
Connect a PC Audio Cable
between the PC IN [AUDIO] jack
2
on the TV and the Audio Out jack of
the sound card on your computer.
TV Rear Panel
3.5 mm Stereo mini-plug/2RCA Cable (Not supplied)
2
HDMI/DVI Cable (Not supplied)
1
PC
Using the HDMI/DVI Cable
Connect a HDMI/DVI cable
between the
1
the TV and the PC output jack on
your computer.
Connect a 3.5 mm Stereo mini-plug/
2RCA Cable between the DVI IN
2
[R-AUDIO-L] jack on the TV and the
Audio Out jack of the sound card on
your computer.
Each PC has a different back panel
°
configuration.
When connecting a PC, match the
°
color of the connection terminal to the
cable.
When using an HDMI/DVI cable
°
connection, you must use the
HDMI/DVI IN
HDMI/DVI IN
jack.
jack on
English-7
Page 70

Turning the TV On and Off
Press the POWER button on the remote control.
You can also use the POWER
button on the TV.
Viewing the Menus
With the power on, press the MENU button.
The main menu appears on the screen.
1
The menu’s left side has icons: Picture, Sound,
Channel, Setup, Input.
Press the or button to select one of the icons.
Then press the ENTER
2
button to access the
icon’s sub-menu. Press the EXIT button to exit.
The on-screen menus disappear from the
°
screen after about one minute.
Storing Channels in Memory
(Automatic Method)
The TV begins memorizing all available stations.
After all the available channels are stored, it start to
5
remove scrambled channels.
Press the EXIT button to exit.
Auto Program
Plug & Play
Auto Program
Auto Program in Progress.
DTV Cable : -- Cable : 11
Cable 24
11 %
Stop
Enter Return
Auto Program
Plug & Play
Auto Program
Removing scrambled channel.
DTV Cable 55
80 %
Stop
Enter Return
Press the MENU button to display the menu.
Press the or button to select “Channel”, then
1
press the ENTER
button.
Press the or button to select “Auto Program”,
then press the ENTER
2
button.
Press the or button to select the antenna
Start
Start
Start
button.
connection, then press the ENTER
3
TV
Selects the antenna to execute the Auto
Program function.
Air
Cable
Auto
Auto Program
Move Enter Return
Move Enter Return
When selecting the Cable TV system:
Press the ENTER
4
program.
button to start the auto
Press the or button, then press the or to
select the correct analog signal cable system source
among “STD”, “HRC”, and “IRC”.
Press the ENTER
button.
If you have Digital cable TV, select the cable system
signal source for both Analog and Digital.
TV
Selects a cable signal type for your location.
Auto Program
Analog
STD
HRC
IRC
Digital
STD
HRC
IRC
Move Enter Return
Move Enter Return
Start
English-8
To Stop the Auto Program Function
Press the MENU button while the Auto Program function is
being executed. You can also press the ENTER
to stop the setup.
Checking to see if Channels were Stored in Memory
Press the CH button. Only the channels stored in memory
will be selected (in order).
button
Selecting the antennas
• Air: “Air” antenna signal.
• Cable: “Cable” antenna signal.
• Auto: “Air” and “Cable” antenna signals.
Page 71

Setting the Channel List
Picture Mode
Using this menu, you can Add/Delete or set Favorite
channels and use the program guide for digital broadcasts.
To use the Channel List function, first run “Auto Program”.
Press the MENU button. Press the or button to
select “Channel”, then press the ENTER
1
Press the or button to select “Channel List”,
then press the ENTER
Press the ENTER button to select “All”.
2
button.
button.
Press the , , or button to select a channel
to delete, then press the ENTER
3
Press the or button to select “Delete”, then
press the ENTER
button to delete the channel.
button.
Press the , , or button to select a channel
to add, then press the ENTER
4
Press the or button to select “Add”, then press
the ENTER
Air 5 1 / 2
DTV Air 2-1
Air3
Air4
Air 5
Air 6
Air 7
DTV Air 7-1
Air 8
List Mode
Move Enter Return
button to add the channel.
Channel List / All
Air 9
Air 10
DTV Air 10-1
DTV Air 10-2
Watch
Add
DTV Air 10-3
Delete
DTV Air 10-1
Favorite
DTV Air 10-2
DTV Air 10-3
DTV Air 10-1
DTV Air 10-2
DTV Air 10-3
Air 12
DTV Air 13-1
DTV Air 13-2
DTV Air 13-3
DTV Air 13-4
button.
Delete AllAdd All
• Dynamic: Selects the picture for high-definition in a bright
room.
• Standard: Selects the picture for the optimum display in a
normal environment.
• Movie: Selects the picture for viewing movies in a dark
room.
Customizing the Picture Settings
Your television has several setting options that allow you to
control the picture quality.
To select the desired picture mode, follow the
“Changing the Picture Standard” instructions
1
numbers 1 and 2.
Press the or button to select “Backlight”,
“Contrast”, “Brightness”, “Sharpness”, “Color” or
2
“Tint”, then press the ENTER
Press the or button to decrease or increase
the value of a particular item. Press the EXIT button
3
to exit.
When you make changes to “Backlight”,
°
“Contrast”, “Brightness”, “Sharpness”, “Color”
or “T
int”, the OSD will be adjusted accordingly.
°
In PC mode, you can only make changes to
“Backlight”, “Contrast” and “Brightness”.
°
Settings can be adjusted and stored for each
external device you have connected to an input
of the TV.
button.
Changing the Picture Standard
You can activate either Dynamic, Standard, Movie by
making a selection from the menu.
Press the MENU button to display the menu.
Press the ENTER
1
Press the ENTER button to select “Mode”.
Press the or button to select “Dynamic”,
2
“Standard” or “Movie”.
Press the ENTER
Mode : Dynamic
Backlight 7
Contrast
Brightness 45
Sharpness 50
Color 50
Tint G 50 R 50
More
button, to select “Picture”.
button.
PictureTV
Dynamic
Standard
Movie
95
Move Enter Return
Mode : Standard
Backlight 7
Contrast 95
Brightness 45
Sharpness 50
Color 50
Tint G 50 R 50
More
Backlight
Move Adjust Return
PictureTV
Move Enter Return
7
Picture Adjustment
• Backlight: Adjusts the brightness of LCD back light.
• Contrast: Adjusts the contrast level of the picture.
• Brightness: Adjusts the brightness level of the picture.
• Sharpness: Adjusts the edge definition of the picture.
• Color: Adjusts color saturation of the picture.
• Tint: Adjusts the color tint of the picture.
English-9
Page 72

To Select the Source
TV
AV : ---S-Video : ---Component : ---PC : ---HDMI : ----
Source ListTV
Move Enter Return
Press the SOURCE button on the Remote Control
You can select the TV mode or an input source connected to the TV set. Use this button to choose an input source that you
would like to watch.
°
Available signal sources: TV, AV, S-Video, Component, PC, HDMI.
°
You can choose only those external devices that are connected to the TV.
English-10
Page 73

Troubleshooting
If the TV seems to have a problem, first try this list of possible problems and solutions.
If none of these troubleshooting tips apply, call your nearest Samsung service center.
Problem Possible Solution
Poor picture Try another channel. / Adjust the antenna. / Check all wire connections.
Poor sound quality. Try another channel. / Adjust the antenna.
No picture or sound. Try another channel. / Press the SOURCE button. /
Make sure the TV is plugged in. / Check the antenna connections.
No sound or sound is too low at maximum
volume.
Picture rolls vertically. Check all wire connections.
The TV operates erratically. Unplug the TV for 30 seconds, then try operating it again.
The TV won’t turn on. Make sure the wall outlet is working.
Remote control malfunctions Replace the remote control batteries.
“Check signal cable” message. Ensure that the signal cable is rmly connected to the PC source.
“Not Supported Mode” message. Check the maximum resolution and connected device’s Video frequency.
Digital broadcasting screen problem. Please check the digital signal strength and input antenna.
The image is too light or too dark. Adjust the Brightness and Contrast. / Adjust the Fine tuning.
Black bars on the screen. Make sure the broadcast you’re receiving is High Denition (HD).
Picture has a Red/Green or Pink tint. Make sure the Component cables are connected to the correct jacks.
Closed Captioning not working. If you are using a Cable/Satellite box, you must set Closed Captioning on the box,
Snowy picture. Your cable box may need a rmware upgrade. Please contact your Cable
Ghosting on picture This is sometimes caused by compatibility issues with your cable box.
Horizontal bars appear to icker, jitter or
shimmer on the image.
Vertical bars appear to icker, jitter or
shimmer on the image.
Screen is black and power indicator light
blinks steadily.
Image is not centered on the screen. Adjust the horizontal and vertical position.
The picture appears distorted in the
corner of the screen.
The “Resets all settings to the default
values” message appears.
First, check the volume of units connected to your TV (digital broadcasting
receiver, DVD, cable broadcasting receiver, VCR, etc.). Then, adjust the TV
volume accordingly.
Clean the upper edge of the remote control (transmission window).
Check the battery terminals.
Compare these values with the data in the Display Modes.
HD channels sometimes broadcast Standard Denition (SD) programming, which
can cause black bars.
Set your cable/satellite box to stretch or widescreen mode to eliminate the bars.
not your TV.
company.
Try connecting Component cables instead.
Adjust the Coarse tuning and then adjust the Fine tuning.
Adjust the Coarse tuning and then adjust the Fine tuning.
On your computer check: Power, Signal Cable.
The TV is using its power management system.
Move the computer's mouse or press any key on the keyboard.
The screen position must be adjusted on the output source (i.e. STB) with a
digital signal.
If "Just Scan" is selected with some external devices, the picture may appear
distorted in the corner of the screen. This symptom is caused by the external
devices, not TV.
This appears when you press and hold the EXIT button for a while. The product
settings are reset to the factory defaults.
English-11
Page 74

Contact SAMSUNG WORLDWIDE
If you have any questions or comments relating to Samsung products, please contact the SAMSUNG
customer care center.
Contacte con SAMSUNG WORLDWIDE
Si tiene alguna pregunta o comentario referente a nuestros productos, por favor contacte con nuestro Servicio de Atención al
Cliente.
Country
CANADA 1-800-SAMSUNG(726-7864) www.samsung.com/ca
U.S.A 1-800-SAMSUNG(726-7864) www.samsung.com
Customer Care Center
Web Site Address
Samsung Electronics Canada Inc., Customer
Service 55 Standish Court Mississauga,
Ontario L5R 4B2 Canada
Samsung Electronique Canada Inc.,
Service à la Clientèle 55 Standish Court
Mississauga, Ontario L5R 4B2 Canada
Samsung Electronics America, Inc.
105 Challenger Road
Ridgefield Park, NJ 07660-0511
BN68-01396B-00
Page 75

Page 76

This
installation is tobeused
When
Components
Installing
attachingtoother
the
when
attaching
building materials, please
Wall
the
wall
Mount
mount
contact
bracket
your
Kit
to a concrete wall.
nearest
dealer.
Please
JW
use
Bracket
to
attach
provided
the
components
Wall
Mount
to install
Anchors:3EA
Brackettothe
1 e Mark the location of the 3 holes
o Drill 35mm-depth-holes
Note: Drill a hole into a concrete wall using a hammer drillsothat the depth
the hole is equal to the lengthofthe plastic anchor.
hole, use
anchor.Ifthe diameterofthe
will not enter into the hole easily.Ifthe diameterofthe
the anchor, the anchor will easily come loose from the hole.
a drill
on
the marked locations using a 5.D-diameter drill.
bit
whose diameter is
o Insert the plastic anchor into
•
Place
the
wall
mountonthe
o Tighten the screw until
Note:Ifthe bracket is
wall
it
fits into the plastic anchor.
not
firmly
the
Wall
Mount
Screws:
wall
on
the wall using the installation
the
sameasthatofthe plastic
bit
is smaller than the anchor, the anchor
the
drilled hole.
and
drive
the
screw
through
fixed to the wall, the LCD TV
Kit.
When
bit
the
3EA
gUide.
drilling the
is bigger than
wall
mount.
may
fall.
of
..
Installation
....
Guide
G
(1
) (2)
2
You
must adjust the angle of the
the wall bracket.
• Place the front of
- Align
o Press
Adjust the stand
Note: When
I
TP
LCD
TV's standasin
the
TV onto a soft cloth or cushionona tableasin
theTVbottom along the table edge.
on
the center of the TV back.
asinFigure (2) while pressing
you
adjust
(1
the stand,
)
press
(2)
[5---
(3) (4) (5)
the
the
buttononthe
8;-
Figure (3)tomake it readytobe
Figure (1) .
buttononthe back of the stand.
backofthe stand.
Push button
(3)
~
mounted
to
Page 77

How to attach the TV to the Wall Mount Bracket
3 Attach LCD TV to the hook on the bracket and move in the direction
completely fixed to the bracket.
....... ' .
..
i
..
~)
",
..........
(1) When bracket is attached to (2) Hang the TV on the
the wall bracket's hook completed
"
::
/~
".
...............
O~
.
jJ'
..
....
T
.
,
of
the arrow (Left) so that LCD TV is
~
(3) When installation is
4 Remove Installation GUide after mounting he LCD TV on the wall.
Note:Ifyou
How to Adjust the Angle of the TV
wanttoremove
theTVfrom
the
bracket,
push
the
LCDTVup
and
shift ittothe
1 0 Figure (1) shows the adjustment angle (_2°_14°) when you use the LCD on its stand.
Excessive tilting can turn the LCD TV over which may cause damage.
o Figure
(2J
wall-mount.
shows the adjustment angle (14°-80°) when you convert the LCD from stand-based use to
8 Figure (3) shows the adjustment angle (0°-10°) when you mount the LCD TV to a wall.
You
will
Note:
hear a "Click· sound
when
changing
the
angle
from1to
2 or 3to2.
.......
righttodetach
T
-
,
j
it.
(1) Angle adjustment when
using the TV on its stand.
Using the Decoration Covers
(2) Angle adjustment when
converting from Stand to
Wall mount
(1-
3,3-1)
1.
2.
(3) Angle adjustment when LCD
TV is wall-mounted
When installing the TV on the wall without
using the stand, insert decoration covers into
the holes as described
After inserting the decoration covers,
fasten them with 4 screws
picture
(2).
in
the picture (1).
as
describedinthe
BN68-00850H-00
Page 78

Page 79

---
---
---------
---
---
...
...
...
...
...
'"
'"
'"
'"
'"
/
/
/
/
I
I
I
I
I
I
I
I
I
,
I
I
I
,
,
\
\
I
I
I
,
I
I
,
,
\
\
\
\
\
\
\
\
\
\
\
\
\
\
,
,
,
e
\
,
,
,
,
...
...
"-
...
"-
....
"-
"-
"-
....
"-
....
....
....
...
0
---
---------
---
---
.....
.....
.....
.....
.....
....
.....
....
....
....
....
"-
"-
....
"-
'"
'"
"-
"-
"-
...
...
...
...
...
...
~
.,
,
,
,
\
\
/
/
\
\
I
\
\
I
\
\
\
\
I
\
\
I
\
\
\
\
,
,
,
I
I
,
I
,
,
I
I
I
I
I
I
I
I
I
I
,
....
....
'"
'"
'"
.....
.....
.....
0
...
'"
...
.....
---
---
---
- -
--
- - -
--
---
--
e-------
---
---
Page 80

This
symhol
This
symhol
insid~.
Itisdangeroustomake
insid~.
Itisdangeroustomake
"'jth
any
"'jth
internal partorthis
any
internal partorthis
indicates
indicates
that high
that high
voltageispresent
voltageispresent
any
kinuorcontact
any
kinuorcontact
product.
product.
l".'\LTIO'<: TO
l".'\LTIO'<: TO
i{E~10\"E
i{E~10\"E
I'Ai{TS
I'Ai{TS
o The slots and openings
o The slots and openings
operation
operation
Do
Do
-
-
Do
Do
-
-
Do
Do
-
-
- Give your product
- Give your product
o
Do
not
o
Do
not
o
Do
not
o
Do
not
o
Do
not
o
Do
not
o
Do
not
o
Do
not
basement.ornear a s\\imming
basement.ornear a s\\imming
immediately. Make sure
immediately. Make sure
o This appratus
o This appratus
under environmental considerations. Please contact your local authorities
under environmental considerations. Please contact your local authorities
o
Do
not
o
Do
not
o PO\\'er-supply cords should
o PO\\'er-supply cords should
paying particular attention
paying particular attention
o
To
protect this apparatus
o
To
protect this apparatus
the
wall
the
wall
This \Iill prevent damage
This \Iill prevent damage
o Before connecting
o Before connecting
to
the
to
the
o Never insert anything metallic into
o Never insert anything metallic into
o
To
avoid electric shock. never touch
o
To
avoid electric shock. never touch
o
Make
o
Make
when
when
o If this appratus does not operate normally -
o If this appratus does not operate normally -
- unplugitimmediately and contactanauthorized dealer or service center.
- unplugitimmediately and contactanauthorized dealer or service center.
o
Be
suretopull the power plug outofthe outlet if
o
Be
suretopull the power plug outofthe outlet if
period
period
- Accumulated dust
- Accumulated dust
heatorthe
heatorthe
o
Be
suretocontactanauthorized service center. when installing your setina location with heavy dust, highorlow
o
Be
suretocontactanauthorized service center. when installing your setina location with heavy dust, highorlow
high
high
Failure
Failure
o
Use
o
Use
An
An
-
-
o
To
disconnect the apparatus
o
To
disconnect the apparatus
be
readily operable.
be
readily operable.
o
Do
not
o
Do
not
o Store the accessories (battery, etc.)
o Store the accessories (battery, etc.)
o
Do
not
o
Do
not
o
Do
not
o
Do
not
i{EDLLE
i{EDLLE
LOVER
LOVER
I:\SID[
I:\SID[
of
of
not
cover
not
cover
not
block
not
block
not
place this apparatusina contined space. suchasa bookcase.orbuilt-in cabinet. unless proper ventilationisprovided.
not
place this apparatusina contined space. suchasa bookcase.orbuilt-in cabinet. unless proper ventilationisprovided.
place this apparatus near or over a radiator or heat resistor, or whereitis
place this apparatus near or over a radiator or heat resistor, or whereitis
place
place
place a water containing vesselonthis apparatus.asthis
place a water containing vesselonthis apparatus.asthis
expose this apparatustorainorplaceitnear water(near a bathtub. washbowl. kitchen sink, or laundry tub,ina
expose this apparatustorainorplaceitnear water(near a bathtub. washbowl. kitchen sink, or laundry tub,ina
overload
overload
outlet and disconnect the antenna or cable system.
outlet and disconnect the antenna or cable system.
local
electrical supply.
local
electrical supply.
suretoplug
suretoplug
pulling the plug
pulling the plug
of
time (especially "'hen children. elderlyordisabled people willbeleft aloneinthe house).
of
time (especially "'hen children. elderlyordisabled people willbeleft aloneinthe house).
humidity, chemical substances and whereitoperates
humidity, chemical substances and whereitoperates
todoso
todoso
only a properly grounded plug and receptacle.
only a properly grounded plug and receptacle.
improper ground
improper ground
allow childrentohang onto
allow childrentohang onto
install the productinan
install the productinan
drop or impart any shocktothe product. If the productisdamaged, disconnect the power cord and contact a service center.
drop or impart any shocktothe product. If the productisdamaged, disconnect the power cord and contact a service center.
THE RISK 01'
THE RISK 01'
lOR 1l.'\CK) THERE ARE :'-,0
lOR 1l.'\CK) THERE ARE :'-,0
i{EFER
ALL
i{EFER
this apparatus. andtoprotectitfrom
this apparatus. andtoprotectitfrom
heat
heat
use
use
insulationtodeteriorate.
insulationtodeteriorate.
SERVIClc.JeiTO()L,\L1FIED
ALL
SERVIClc.JeiTO()L,\L1FIED
in
in
the
slots
the
slots
the
slots
the
slots
10cm(4
10cm(4
generating items suchascandles. ashtrays. incense, tlammable gas or explosive materials near
generating items suchascandles. ashtrays. incense, tlammable gas or explosive materials near
batteries.Inyour community there mightberegulations that require
batteries.Inyour community there mightberegulations that require
wall
outlets. extension cords or adaptors beyond their capacity. since this can resultinlire or electric shock.
wall
outlets. extension cords or adaptors beyond their capacity. since this can resultinlire or electric shock.
theACpower cordtotheDCadaptor outlet. make sure the voltage designationoftheDCadaptor corrsponds
theACpower cordtotheDCadaptor outlet. make sure the voltage designationoftheDCadaptor corrsponds
the
power cordinuntilitis
the
power cordinuntilitis
from
from
can
can
may cause serious damagetoyour set.
may cause serious damagetoyour set.
may
may
EU:CTRIC
EU:CTRIC
the
cabinet andinthe backorbottom are provided
the
cabinet andinthe backorbottom are provided
and
openings
and
openings
and
openingsbyplacing this apparatusona
and
openingsbyplacing this apparatusona
inch) clearance
inch) clearance
pool
pool
to
pullout
to
pullout
be
routedsothat they are
be
routedsothat they are
to
cordsatplug end, adaptors and
to
cordsatplug end, adaptors and
from
a lightning storm. or whenitis
from
a lightning storm. or whenitis
to
the set duetolightning and power
to
the set duetolightning and power
the
outlet.Donot touch the power cord with wet hands.
the
outlet.Donot touch the power cord with wet hands.
causeanelectric shock,anelectric leakage or a tirebycausing the power cordtogenerate sparks
causeanelectric shock,anelectric leakage or a tirebycausing the power cordtogenerate sparks
cause electric shock or equipment damage. (Class I Equipment only.)
cause electric shock or equipment damage. (Class I Equipment only.)
from
the mains. the plug
from
the mains. the plug
unstable location suchasa shaky
unstable location suchasa shaky
SHOCK. DO
SHOCK. DO
LSEi{
LSEi{
with
a clothorother materials.
with
a clothorother materials.
etc.). If this appratus accidentally gets wet. unplugitand contactanauthorized dealer
etc.). If this appratus accidentally gets wet. unplugitand contactanauthorized dealer
the
power cord
the
power cord
the
open partsofthis apparatus. Doingsomany create a dangerofelectric shock.
the
open partsofthis apparatus. Doingsomany create a dangerofelectric shock.
the
insideofthis apparatus. Only a qualified technician should open this apparatus.
the
insideofthis apparatus. Only a qualified technician should open this apparatus.
in
in
the
product.
the
product.
in
a location safely outofthe
in
a location safely outofthe
~O
I
~O
I
SERVILL-\IlLE
SERVILL-\IlLE
PFRSOJ\NEL.
PFRSOJ\NEL.
overheating. these slots and openings
overheating. these slots and openings
bed.
sofa.
bed.
sofa.
from
the wall.
from
the wall.
can
resultina
can
resultina
li'om
the
li'om
firmly inserted.
firmly inserted.
particular, if there are any unusual sounds or smells coming
particular, if there are any unusual sounds or smells coming
theTVistoremain unused orifyou
theTVistoremain unused orifyou
outlet before cleaning.
the
outlet before cleaning.
for
for
not
likelytobe
not
likelytobe
the
the
for24hours suchasthe airport,
for24hours suchasthe airport,
mustbepulled out
mustbepulled out
walkedonor pinchedbyitems placed
walkedonor pinchedbyitems placed
point where they exit
point where they exit
left unattended and unused
left unattended and unused
line
surges.
line
surges.
When
removing
When
removing
from
from
reachofchildren.
reachofchildren.
selt~
a slanted floor or a location exposedtovibration.
selt~
a slanted floor or a location exposedtovibration.
This
symhol
alerts
This
symhol
com:crning
com:crning
incluued
"ith
incluued
"ith
for
necessary ventilation.Toensure reliable
for
necessary ventilation.Toensure reliable
must
must
rugorother similar surface.
rugorother similar surface.
exposedtodirect sunlight.
exposedtodirect sunlight.
riskoffireorelectric shock.
riskoffireorelectric shock.
youtodisposeofthese batteries properly
youtodisposeofthese batteries properly
disposal or recycling information.
disposal or recycling information.
from
from
for
for
the
power cord, make suretohold the power plug
the
power cord, make suretohold the power plug
aretoleave the house
aretoleave the house
the
the
the mains socket, therefore the mains plug shall
the mains socket, therefore the mains plug shall
you
alerts
you
0pl".'ration
0pl".'ration
this
prouuct.
this
prouuct.
neverbeblockedorcovered.
neverbeblockedorcovered.
the appliance.
the appliance.
long periodsoftime. unplugitII'om
long periodsoftime. unplugitII'om
train station etc.
train station etc.
and
and
Ihat
important
Ihat
important
mainlcllal1('1".'
mainlcllal1('1".'
from
from
literature
literature
has
has
the
product.
the
product.
uponoragainst them,
uponoragainst them,
it
it
foranextended
foranextended
temperatures.
temperatures.
\vet
\vet
hl".'cl1
hl".'cl1
and
and
WARNING - TO PREVENTTHE SPREAD
WARNING - TO PREVENTTHE SPREAD
.Gb)
.Gb)
CANDLES
CANDLES
PRODUCT
PRODUCT
OR
OTHER
OR
OTHER
AT
ALLTIMES.
AT
ALLTIMES.
OPEN FLAMES
OPEN FLAMES
-1-
-1-
OF
OF
AWAY
AWAY
FIRE, KEEP
FIRE, KEEP
FROM
FROM
THIS
THIS
Page 81

ATTENTION
ATTENTION
. .
. .
ATTENTION;
POUR
ATTENTION;
POUR
RETIREZ
PASLECAPOT
RETIREZ
PASLECAPOT
L'APPAREIL.
AVeUNE
L'APPAREIL.
AVeUNE
POUR
TOUT
DEPANNAGE.
POUR
TOUT
DEPANNAGE.
•
Les
fentesetles
•
Les
fentesetles
demier.
AfindegarantirIebon
demier.
AfindegarantirIebon
etreoiobstruccsoicouvertes.
etreoiobstruccsoicouvertes.
-Necouvrez
-Necouvrez
-Neles
obstruez
-Neles
obstruez
-Neplacez
-Neplacez
-
-
oNe
oNe
exposeala
exposeala
•Neplacez
•Neplacez
explosives
explosives
•Neplacez
•Neplacez
• N'exposez
• N'exposez
evier,unbacdelavage,unsous-sol
evier,unbacdelavage,unsous-sol
contactez
contactez
•
eel
•
eel
peut-etre
peut-etre
d'obtenir
d'obtenir
o
Evitezdesurcharger
o
Evitezdesurcharger
electrique.
electrique.
o
Les
o
Les
Accordez
Accordez
En
En
o
o
celui-cidela
celui-cidela
Ces
Ces
o
AvantderaccorderIecordon d'alimentationCAalaprisedeI'adaptateur
o
AvantderaccorderIecordon d'alimentationCAalaprisedeI'adaptateur
demier correspond
demier correspond
• N'inserez
• N'inserez
Afm
Afm
•
•
Seuluntechnicien qualitie
Seuluntechnicien qualitie
Assurez-vousdebien
Assurez-vousdebien
•
•
Ne
Ne
Si
Si
•
•
immediaternentetcontactezunrevendeurauun
immediaternentetcontactezunrevendeurauun
•
Veillezabien
•
Veillezabien
pendant
pendant
rester
rester
-
-
•
Veillez
•
Veillez
humide,
humide,
exemple
exemple
•
Utiliser
•
Utiliser
-Un
-Un
•
Pour
•
Pour
secteur
secteur
• Utiliser
• Utiliser
•
Rangez
•
Rangez
N'installez
N'installez
o
o
vibrations.
vibrations.
oNe
oNe
centredeservices.
centredeservices.
.~
.~
pas
pas
adequate
est
adequate
est
Placez
volre
Placez
volre
placez
pas
placez
pas
lumiere
lumiere
aucun
aucun
a proximiteduproduit.
a proximiteduproduit.
aucun
aucun
pas
pas
immediatementunrevendeur
immediatementunrevendeur
appareil
peut
appareil
peut
des
mesures
des
mesures
des
des
cordons
d'alimentation doivent etre
cordons
d'alimentation doivent etre
une
une
cas
d'orage,oubien
cas
d'orage,oubien
prise
prise
precautions
precautions
aucun
aucun
d'eviter
tout
d'eviter
tout
touchezenaucune
touchezenaucune
I'appareilnefonctionnepas
I'appareilnefonctionnepas
une
periode
une
periode
seulavotre
seulavotre
L'accumulationdepoussieres
L'accumulationdepoussieres
d'alimentation,
d'alimentation,
a contacteruncentredeservices
a contacteruncentredeservices
exposeades
exposeades
dans
dans
uniquement
uniquement
sol
inadapte
sol
inadapte
deconnecter
deconnecter
doit
etreenetatdemarche.
doit
etreenetatdemarche.
uniquement
uniquement
les
accessoires (batterie, etc.)
les
accessoires (batterie, etc.)
pasIeproduit sur
pasIeproduit sur
faitesnitomber,nisubirdechocauproduit.SiIe
faitesnitomber,nisubirdechocauproduit.SiIe
AVERTISSEMENT - POUl{ EVITER TOUT RISQUE
AVERTISSEMENT - POUl{ EVITER TOUT RISQUE
D'INCENDIE, VEILLEZ A GARDER CE PRODUIT LOIN
D'INCENDIE, VEILLEZ A GARDER CE PRODUIT LOIN
DE BOUGIES OU D'AUTRES SOURCES DE FEU.
DE BOUGIES OU D'AUTRES SOURCES DE FEU.
-.
-.
REOUIRE
LES
REOUIRE
pas
pas
I'appareil
I'appareil
prevue.
prevue.
produita10emdu
produita10emdu
I'appareil a proximiteouau-dessus
I'appareil a proximiteouau-dessus
I'appareil alapluieetneIeplacez
I'appareil alapluieetneIeplacez
informations surlamiseaurebutouIe
informations surlamiseaurebutouIe
attention
attention
eviteront
eviteront
debrancherIecordon
debrancherIecordon
les
les
RJSQUES
LES
RJSQUES
(NlLEPANNEAU
(NlLEPANNEAU
PIECE
1'E
PElIT
PIECE
1'E
PElIT
ADRESSEZ·VQUSAUN
ADRESSEZ·VQUSAUN
ouvertures
menagees
ouvertures
menagees
les
fentesetles
les
fentesetles
pas
non
plus
pas
non
plus
dansunenvironnement
dansunenvironnement
directedusolei
directedusolei
element
thermogene
element
thermogene
recipient d'eau
recipient d'eau
fonctionner
fonctionner
specifiquesderecuperation
specifiquesderecuperation
les
prises
les
prises
particuliere
particuliere
lorsque
lorsque
muraleetdebranchez
muraleetdebranchez
que
que
bienala
tension delivree parIereseau
bienala
objet
objet
du
du
tension delivree parIereseau
metallique
metallique
risque
d'electrocution,nemettez
risque
d'electrocution,nemettez
est
est
brancherIecordon
brancherIecordon
circonSlanceIecordon
circonSlanceIecordon
assez
longue
assez
longue
domicile).
domicile).
a
des
variationsdetension,
a
des
variationsdetension,
temperatures eleveesoufaiblesoua
temperatures eleveesoufaiblesoua
aeroports,
les
aeroports,
les
des
prises
des
prises
peut
causerunchoc
peut
causerunchoc
I'appareildusecteur,laprise
I'appareildusecteur,laprise
des
prises correctemenl reliees alaterre.
des
prises correctemenl reliees alaterre.
une
une
-,
-,
.
.
-- avec
•
•
O'ELECTROCUTION,
O'ELECTROCUTION,
ARRIERE).AL'INTERlEUR
ARRIERE).AL'INTERlEUR
EYRE
REPAREE
EYRE
REPAREE
dansIeboitier
dansIeboitier
fonctionnementdel'appareileteviter
fonctionnementdel'appareileteviter
ouvertures
ouvertures
en
pla~ant
en
pla~ant
mur.
mur.
I.
I.
tel
tel
sur
I'appareil
sur
I'appareil
humide,
humide,
sur
piles.
sur
piles.
murales,
murales,
aux
aux
vous
vous
vous
vous
I'appareilDesoit
I'appareilDesoit
dans
dans
habilite a ouvrirIeboitierdeI'appareil.
habilite a ouvrirIeboitierdeI'appareil.
normalement,enpaniculier s'il
normalement,enpaniculier s'il
d'alimentationsila
d'alimentationsila
(et
plus
(et
plus
peut
provoquer
peut
provoquer
gares,
etc.SivousneIe
gares,
etc.SivousneIe
correctement
correctement
eJectriqueouun
eJectriqueouun
dansunendroit
dansunendroit
surface
surface
-- avec
NE
NE
DE
PAR
PAR
SPECIALISTE.
SPECIALISTE.
I'appareil
I'appareil
que
que
agree.
agree.
Dansunsoucidepreservationdel'environnement,13reglementation
Dansunsoucidepreservationdel'environnement,13reglementation
les
rallongesetles
les
rallongesetles
deroulesdesorte
deroulesdesorte
cordonsauniveau
cordonsauniveau
absentezoun'utilisez
absentezoun'utilisez
egalementIecable d'antenneouIe
egalementIecable d'antenneouIe
les
ouverturesdeI'appareil.
les
ouverturesdeI'appareil.
d'alimentation.
d'alimentation.
specialementsides
specialementsides
homologue
homologue
instable
instable
DE
L'UTILISATEUR.
L'UTILISATEUR.
ainsi
qu'a
I'arriereetau-dessousdeI'appareil
ainsi
qu'a
I'arriereetau-dessousdeI'appareil
avecunmorceaudetissuoutout
avecunmorceaudetissuoutout
surunlit,uncanape,untapisoutoute
surunlit,uncanape,untapisoutoute
clos
tel
qu'une bibliolhequeouune
clos
tel
qu'une bibliolhequeouune
d'un radiateuroud'une
d'un radiateuroud'une
des
bougies,
des
des
bougies,
car
cela
car
cela
pas
pas
une
piscine,
une
piscine,
Assurez-vous
Assurez-vous
des
des
endommage
endommage
d'alimentation
d'alimentation
centrededepannage
centrededepannage
une
une
une
une
relieesa1a
relieesa1a
doit
doit
telle
telle
cendriers,deI'encens,
des
cendriers,deI'encens,
representeunrisque
representeunrisque
a proximite d'une
a proximite d'une
etc.SiI'app
etc.SiI'app
queIecordon
queIecordon
piles
usagees.Veuillez
piles
usagees.Veuillez
recyclage
des
recyclage
des
prises
prises
qu'aucun
qu'aucun
des
fiches,
des
fiches,
pas
pas
parlafourleeoupar
parlafourleeoupar
electrique
electrique
jamais
les
doiglS
jamais
les
doiglS
Assurez-vousdebien
Assurez-vousdebien
avec
avec
emet
emet
television
television
enfants,
enfants,
electrocution,
electrocution,
surchautfeouune
surchautfeouune
lorsque
vous
lorsque
vous
des
produits chimiques,ous'il
des
produits chimiques,ous'il
faites
pas,
faites
pas,
terre.
terre.
incendie.
(AppareilsdeCLASSEIuniquement.)
incendie.
etre
etre
(AppareilsdeCLASSEIuniquement.)
debrancheedela
debrancheedela
sur,
horsdela
sur,
horsdela
qu'une
etagere
qu'une
etagere
produit
est
endommage, deconnectezIecordon
produit
est
endommage, deconnectezIecordon
piles.
piles.
mult
mult
objet
objet
vous
vous
les
les
doit
doit
une
une
installez
installez
vous
vous
Ce
symbole
Ce
symbole
presente a
presente a
nne
piece
nne
Lh
Lh
&
&
les
risquesdesurchauffe,
les
risquesdesurchauffe,
autre
autre
bouche
bouche
d'incendieoude
d'incendieoude
source
d'eau,
source
d'eau,
areil
vient
areil
vient
d'alimentation
d'alimentation
done
done
iples
car
iples
car
place
suroucontre
place
suroucontre
des
prisesetdelasortiedeI'appareil.
des
prisesetdelasortiedeI'appareil.
votre appareil pendant
votre appareil pendant
cordondeconnexionaureseau
cordondeconnexionaureseau
CC,
veritiez
CC,
veritiez
local.
local.
risqueriezderecevoir
risqueriezderecevoir
a I'interieurdeI'appareil.
a I'interieurdeI'appareil.
tenirlapriseenmain
tenirlapriseenmain
mains
mouillees.
mains
mouillees.
des
odeurs
des
odeurs
agree.
agree.
restee inulilisee,aulorsque
restee inulilisee,aulorsque
des
personnes .geesoudes
des
personnes .geesoudes
perte
d'energie,auun
perte
d'energie,auun
deteriorationdel'isolation.
deteriorationdel'isolation.
votre
votre
risquez d'endommager
risquez d'endommager
prise electriquedusecleur.
prise electriquedusecleur.
portee
des
enfants.
portee
des
enfants.
chancelante,unsol
chancelante,unsol
piece
est
dangereux.
est
dangereux.
Ce
symbole
Ce
symbole
importante
importante
I"entretien
I"entretien
objet.
objet.
autre
autre
armoire
armoire
d'air
chaud,dememe
d'air
chaud,dememe
des
gazinflammablesaudes
des
gazinflammablesaudes
par
exemple
par
exemple
a etre
mouille
a etre
mouille
est
debranche
est
debranche
contacter
contacter
cela
entraineunrisque
cela
entraineunrisque
une
une
des
surtensions.
des
surtensions.
quelatension
quelatension
oudes
sons
oudes
sons
televiseur
dansunendroit
televiseur
dansunendroit
fonctionne
fonctionne
non
non
indiquc
qu'une
indiquc
I'intcricurdeI'appareil.
I'intcricurdeI'appareil.
vans
vans
relativeaufonctionnemcnt
relativeaufonctionnemcnt
est
est
ces
ces
encastree, saufsiune
encastree, saufsiune
decharge
decharge
les
autorites
les
autorites
euxneles
euxneles
une
une
anormaux,
anormaux,
incendie
incendie
horizontalouun
horizontalouun
tcnsion
qu'une
tcnsion
situee
a
('interieur
situee
previent
previent
foumie
foumie
assuren!laventilationdece
assuren!laventilationdece
feotesetouverturesoedoivent
feotesetouverturesoedoivent
surface
surface
une
une
par
accident,
par
accident,
longue
longue
decharge
decharge
lorsque
lorsque
vous
vous
majeurs
majeurs
gravement
gravement
Par
Par
d'alimentationetcontactez
d'alimentationetcontactez
de
a
('interieur
de
qu'une
documentation
qu'une
documentation
avecIeproduit.
avecIeproduit.
apparentee.
apparentee.
que
dansunendroit
que
dansunendroit
electrique.
electrique.
baignoire,unlavabo,
baignoire,unlavabo,
debranchez-Ie
debranchez-Ie
avantdenettoyerIeproduit.
avantdenettoyerIeproduit.
locale
locale
comperentes
comperentes
d'incendieoude
d'incendieoude
chevaucheoules
chevaucheoules
periode,
debranchez
periode,
debranchez
cable.
cable.
indiquee
sur
indiquee
sur
electrique.
electrique.
vousladebranchez.
vousladebranchez.
debranchez-Ie
debranchez-Ie
quittez
votre
quittez
votre
incapables
incapables
induit
parIecordon
induit
parIecordon
tres
poussiereux,
tres
poussiereux,
sans
interruption,
sans
interruption,
votre
televiseur.
votre
televiseur.
consequent,laprise
consequent,laprise
endroit
endroit
clevCc
clevCc
Tout
contact
Tout
contact
eet
eet
ct
ct
ventilation
ventilation
matieres
matieres
preVail
preVail
afin
afin
ce
ce
domicile,
domicile,
soumisades
soumisades
est
est
apparcil
apparcil
it
it
decharge
decharge
pince.
pince.
doivent
doivent
par
par
Este
simbolo
PRECAUCION
PRECAUCION
,-
.
..
.
..
PRECAUCION;PARA
PRECAUCION;PARA
ELECTRlCA,NORETIRELACUBIERTA.NOHAY
ELECTRlCA,NORETIRELACUBIERTA.NOHAY
INTERIOR
QUE
INTERIOR
QUE
CONSUt.TEAL
CONSUt.TEAL
•
Las
•
Las
necesaria.
necesaria.
aberturas
aberturas
-Nocubra
-Nocubra
-Nobloquee
-Nobloquee
-Nocoloque
-Nocoloque
venti
venti
-
SeparceIproducto10emdela
-
SeparceIproducto10emdela
•Nocoloque
•Nocoloque
•Nocoloquee]producto
•Nocoloquee]producto
explosivos.
explosivos.
•Nocoloque
•Nocoloque
No
No
•
un
un
et
et
du
du
un
un
•
humedonicercadeuna
humedonicercadeuna
inmediatamente
inmediatamente
•
Este
•
Este
forma
forma
Pongaseencontacto
Pongaseencontacto
•Nosobrecargue
•Nosobrecargue
puede
puede
Los
Los
o
o
o
contra
o
contra
el
que
el
que
Para
Para
•
•
delatomadela
delatomadela
tensiondela
tensiondela
AntesdeconectarelcabledealimentaciondeCAala
AntesdeconectarelcabledealimentaciondeCAala
•
•
adaptadordeCC
adaptadordeCC
•
Nunca
•
Nunca
Para
Para
•
•
aparato.
aparato.
•
Cuando
•
Cuando
sujetelo
sujetelo
•Sieste
•Sieste
inmediatamente
inmediatamente
•
Aseguresededesconectarelenchufedealimentaciondela
•
Aseguresededesconectarelenchufedealimentaciondela
casa,
casa,
incapacitadas).
incapacitadas).
EI
EI
-
-
chispasycalor,
chispasycalor,
•
Pongaseencontacto
•
Pongaseencontacto
de
de
del
del
•
Cuando
•
Cuando
•
Use
•
Use
-
Una
-
Una
•
Para
•
Para
estar
estar
No
No
•
•
•
Guarde
•
Guarde
•Nocoloqueelproductoenun
•Nocoloqueelproductoenun
o
No10deje
o
No10deje
centrodeservicio.
centrodeservicio.
· PROPAGUE, MANTENGA LAS VELAS U OTRAS LLAMAS
· PROPAGUE, MANTENGA LAS VELAS U OTRAS LLAMAS
~
~
PERSONAL
PERSONAL
ranuras
y aberturas existentesenla
ranuras
y aberturas existentesenla
Para
Para
nunca
nunca
las
las
las
las
este
este
lac
ion
correcta.
lac
ion
correcta.
esle
esle
recipientes
recipientes
exponga
este
exponga
este
aparato
utiliza
aparato
utiliza
adecuada
adecuada
generar incendios 0
generar incendios 0
cablesdealimentacion y proteccion
cablesdealimentacion y proteccion
elias, poniendo
elias, poniendo
salen
del
salen
del
proteger
este
proteger
este
linea
linea
insene
nada
insene
nada
evitar descarga electrica,notoque
evitar descarga electrica,notoque
conecleelcabledealimentacion
conecleelcabledealimentacion
porelenchufeytiredeeste
porelenchufeytiredeeste
aparatonofunciona
aparatonofunciona
duranteunlargo
duranteunlargo
polvo
acumulado
polvo
acumulado
polvo,
temperaturas
polvo,
temperaturas
dia,
como
aeropuertos, estaciones,
dia,
como
aeropuertos, estaciones,
instaleelequipo,
instaleelequipo,
solamente
solamente
conexiona tierra
conexiona tierra
desconectarelaparatodela
desconectarelaparatodela
siempre
facilmente
siempre
facilmente
permita
que
permita
que
los
accesorios (pilas, etc.)enun
los
accesorios (pilas, etc.)enun
caerniIedegolpes.Siel
caerniIedegolpes.Siel
ADVERTENCIA - PARA IMPEDIR QUE EL FUEGO SE
ADVERTENCIA - PARA IMPEDIR QUE EL FUEGO SE
EXPUESTAS SIEMPRE ALEJADAS DE ESTE PRODUCTO.
EXPUESTAS SIEMPRE ALEJADAS DE ESTE PRODUCTO.
,-
.
.
REDUCIRELPELIGRODEDESCARGA
REDUCIRELPELIGRODEDESCARGA
PUEDA
REPARARELUSUARlO.
PUEDA
REPARARELUSUARlO.
CALIFICAOODESERVICIO
CALIFICAOODESERVICIO
garantizarelfuncionamiento
garantizarelfuncionamiento
deben
bloquearsenicubrirse.
deben
bloquearsenicubrirse.
raDurasyaberturas
raDurasyaberturas
ranurasniaberturas
ranurasniaberturas
aparatoenun
aparatoenun
aparato cerca 0
aparato cerca 0
aparato alalIuvia
aparato alalIuvia
conuntecnico
conuntecnico
baterias.Ensu
baterias.Ensu
bajo
consideraciones
bajo
consideraciones
con
con
las
tomas
las
tomas
aparato.
aparato.
aparato durante
aparato durante
pared
y desconectelaantena0el
pared
y desconectelaantena0el
electrica.
electrica.
corresponde alafuente
corresponde alafuente
metalicoenlas
metalicoenlas
y pongaseencontacto
y pongaseencontacto
periododetiempo
periododetiempo
pllede
pllede
0 deteriorando
0 deteriorando
conuncentrodeservicio
conuncentrodeservicio
conectores y
conectores y
los
ninos
los
ninos
conunpano0con
conunpano0con
espacio
espacio
pared.
pared.
sobreunradiador0una
sobreunradiador0una
cercadeelementos
cercadeelementos
con
agua
sobre
con
agua
sobre
piscina
0 similar).
piscina
0 similar).
autorizado.
autorizado.
las
autoridades
las
autoridades
murales,
murales,
descargas
descargas
especial
atencionenlos
especial
atencionenlos
una
una
para
para
normalmente,
normalmente,
provocar
provocar
la
la
extremas,
alto
extremas,
alto
procure
guardaruna distanciademasde10emdesdelapared
procure
guardaruna distanciademasde10emdesdelapared
recept3culos
recept3culos
inapropiada
inapropiada
corriente,
corriente,
accesible.
accesible.
jueguen
conelproducto.
jueguen
conelproducto.
lugar
lugar
..:
..
..:
..
PIEZASENEL
PIEZASENEL
TECNICO.
TECNICO.
unidadyenlaparte
unidadyenlaparte
fiabledeesle
fiabledeesle
colocando
colocando
cerrado,
cerrado,
que
que
este
aparato,yaque
este
aparato,yaque
ni10coloqlle
ni10coloqlle
Si
este
Si
este
AntesdeIimpiarelproducto desconecteelcabledealimentaciondela
AntesdeIimpiarelproducto desconecteelcabledealimentaciondela
comunidad
puede
comunidad
puede
ambientales.
ambientales.
locales
locales
los
alargadoresnilos
los
alargadoresnilos
electricas.
electricas.
deben
deben
tormenta
tormenta
electrica
electrica
aberturas
del
aberturas
del
nuncaelinteriordeeste
nuncaelinteriordeeste
compruebe
compruebe
sacarlodela
sacarlodela
en
concreto,siemite
en
concreto,siemite
coneldistribuidor autorizado 0elcentrodeservicio
coneldistribuidor autorizado 0elcentrodeservicio
(especialmente
(especialmente
una
descarga
una
descarga
funda
protectora.
funda
protectora.
tecnico
tecnico
niveldehumedadyproductos
niveldehumedadyproductos
etc.EIincumplimientodeestas
etc.EIincumplimientodeestas
apropiados
apropiados
podria
causar
podria
causar
debe
debe
lugar
seguro
lugar
seguro
inestable,
inclinado0expuestoavibraciones.
inestable,
inclinado0expuestoavibraciones.
productoseestropea,
productoseestropea,
aparato, y
aparato, y
cua1quier
cua1quier
este
aparato
este
aparato
como
una
como
una
rejilladeaire
rejilladeaire
generen
calor,
generen
calor,
cercadeagua
cercadeagua
aparato
accidentalmentesemoja,
aparato
accidentalmentesemoja,
que
existan
que
existan
para
obtener informacion
para
obtener informacion
receptaculos correspondientes
receptaculos correspondientes
colocarsedeforma
colocarsedeforma
cables
cerca
cables
cerca
electrica 0
electrica 0
cable
del
cable
del
toma
toma
local.
local.
aparato.
Hacerlo
aparato.
Hacerlo
queelenchufe
queelenchufe
tomadecorriente.
tomadecorriente.
tomadecorrientesilaTVha
tomadecorrientesilaTVha
cuando
cuando
electrica,uncortocircuito 0unfuego,
electrica,uncortocircuito 0unfuego,
autorizado
autorizado
para
hacerlaconexionalierra.
para
hacerlaconexionalierra.
una
descarga
una
descarga
desenchufarelcabledela
desenchufarelcabledela
fuera
del
fuera
del
desenchufeelcabledealimentacion y
desenchufeelcabledealimentacion y
Lh
Lh
&
&
trasera 0 inferiorsefacilitan
trasera 0 inferiorsefacilitan
para
para
otm
material.
otm
material.
sabrelacama,
sabrelacama,
libreria,0un
libreria,0un
caliente, aenlugares
caliente, aenlugares
como
vel
como
vel
podria
representar
podria
representar
(cercadeuna
(cercadeuna
normativas
normativas
quenopuedan
quenopuedan
del
enchufe,
del
enchufe,
cuando
no
10 utilice
cuando
no
10 utilice
sistema.
Esto
sistema.
Esto
del
adaptadordeCC,
del
adaptadordeCC,
asi
puede
asi
puede
aparato.
aparato.
este
firrnemente
este
firrnemente
Nunca
Nunca
sonidos
sonidos
sea
necesario
sea
necesario
cuando
cuando
quimicos,yen
quimicos,yen
indicaciones
indicaciones
electrica 0
electrica 0
aleancedelos
aleancedelos
Este
el
el
cualquier
cualquier
Este
Este
incluye
incluye
funcionamientoymantenimiento.
funcionamientoymantenimiento.
protegerlo
protegerlo
sofa,
alfombra0superficie
sofa,
alfombra0superficie
armario
empotrado,arnenos
armario
empotrado,arnenos
as,
ceniceros,
as,
ceniceros,
riesgodeincendio0descarga
riesgodeincendio0descarga
banera,
banera,
que
requieranladisposici6ndeestas
que
requieranladisposici6ndeestas
sobre
desechoyreciclaje.
sobre
desechoyreciclaje.
pisarseniquedar
pisarseniquedar
los
recepraculosdelos
los
recepraculosdelos
durante
durante
evitara
queelequiposedane
evitara
queelequiposedane
aseguresedequeladesignacion
aseguresedequeladesignacion
crear peligrosdedescarga
crear peligrosdedescarga
Solountecnico
Solountecnico
insertado.
insertado.
toqueelcabledealimentacion
toqueelcabledealimentacion
extraiios0desprende
extraiios0desprende
dejar
dejar
instaleelaparatoenun
instaleelaparatoenun
puede
puede
una
averiaenel
una
averiaenel
toma
principal,
toma
principal,
ninos.
ninos.
indicalapresenciadealto
simbolo
indicalapresenciadealto
interior.Espeligroso
interior.Espeligroso
pieza
pieza
simboloIealertadeque
simboloIealertadeque
documentaci6n
documentaci6n
para
para
frente
a sobrecalentamiento,
frente
a sobrecalentamiento,
incensarios,
incensarios,
lavabo,
lavabo,
desenchUfeloypongaseencontacto .
desenchUfeloypongaseencontacto .
por
encimadesu
por
encimadesu
largos
largos
caliticado
caliticado
Para
Para
dejadodeutilizarse,0desea
dejadodeutilizarse,0desea
solosencasaaninos,
solosencasaaninos,
haciendo
haciendo
lugares
dondesevaya
lugares
dondesevaya
causar
causar
para
para
equipo.
equipo.
por10queelenchufe
por10queelenchufe
cntrarenconlacto
cntrarenconlacto
interiordeeste
interiordeeste
imponante
imponante
proporcionarlaventilacion
proporcionarlaventilacion
similar.
similar.
queseproporcione
queseproporcione
expuestosaluz
expuestosaluz
aparatosdegas0rnatcriales
aparatosdegas0rnatcriales
fregadero0lavadero,enun
fregadero0lavadero,enun
capacidad,yaque
capacidad,yaque
atrapados
atrapados
electrodomesticos yelpunto
electrodomesticos yelpunto
periodosdetiempo,
periodosdetiempo,
por
por
electrica.
electrica.
debe
abrirelalojamiento
debe
abrirelalojamiento
desenchufarelcabledealimentacion,
desenchufarelcabledealimentacion,
con
olores
olores
tecnico.
tecnico.
facilitarlaventilacion.
facilitarlaventilacion.
con
desdeelinterior,
desdeelinterior,
queelcable
queelcable
lugar
expuestoagran
lugar
expuestoagran
serios
dcsperfectosenel
serios
dcsperfectosenel
(Solo
equipodeClase
(Solo
equipodeClase
pongaseencontacto
pongaseencontacto
voltaje
voltaje
con
con
producto.
producto.
con
este
producto
con
este
producto
correspondiente
correspondiente
estas
ranuras
estas
ranuras
una
una
solar
direcla.
solar
direcla.
electrica.
electrica.
por
por
rayos0picos
rayos0picos
las
las
ancianos0personas
ancianos0personas
a utilizar
a utilizar
sotano
sotano
tomadecorriente.
tomadecorriente.
baterias
de
baterias
de
objetos
encima
objetos
encima
desenchUfelo
desenchUfelo
de
de
del
voltaje
del
voltaje
manos
mojadas.
manos
mojadas.
desenchufelo
desenchufelo
salir
de
salir
de
electrico
genere
electrico
genere
cantidad
cantidad
las24horas
las24horas
aparato.
aparato.
I.)
I.)
principal
debe
principal
debe
con
un
con
un
en
en
se
se
esto
esto
al
al
y
y
en
en
del
del
del
.:;
del
.:;
,.
,.
-2-
-2-
-3-
-3-
Page 82

CUIDADQ:PARA
CUIDADQ:PARA
A
TAMPA
(NEMAPARTE
A
TAMPA
(NEMAPARTE
EXISTEM
PECAS
EXISTEM
PECAS
AssrSTENClA
AssrSTENClA
ATENCAo
ATENCAo
-.
-.
REDUZIR0RISCODECHOQUE
REDUZIR0RISCODECHOQUE
TRASEIRA).NOINTERIORDOTELEVISOR
TRASEIRA).NOINTERIORDOTELEVISOR
QUE
POSSAM
SER
POSSAM
SER
SER
REPARADAS
SER
REPARADAS
EFECTUADA
EFECTUADA
PaR TECNICOS
PaR TECNICOS
QUE
s6
PODE
s6
PODE
•
•
ELECTRICO.
NAo
ELECTRICO.
NAo
PELOUTILlZAOOR.
PELOUTILlZAOOR.
QUALlFICADOS
QUALlFICADOS
RETIRE
RETIRE
NAo
NAo
A
A
it
it
Lh
Lh
Este simbolo indica a existencia de alta
Este simbolo indica a existencia de alta
tensao no interiordotelevisor. Eperigoso toear em
tensao no interiordotelevisor. Eperigoso toear em
qualquer
partenointeriordoproduto.
qualquer
partenointeriordoproduto.
Este simbolo infonna-o de que este produto
Este simbolo infonna-o de que este produto
inclui literaturaimportante sobrc 0 respcctivo
inclui literaturaimportante sobrc 0 respcctivo
funcionamcntoemanutcncrao.
funcionamcntoemanutcncrao.
Regulatory Compliance Statements
Regulatory Compliance Statements
- Federal Communications Commission (FCC) - USA
- Federal Communications Commission (FCC) - USA
- Industry Canada Equipment Standard for Digital Equipment (ICES-003) -
- Industry Canada Equipment Standard for Digital Equipment (ICES-003) -
- Voluntary Control Council for Interference
- Voluntary Control Council for Interference
- BureauofStandards Metrology
- BureauofStandards Metrology
-
-
MinistryofInformation
MinistryofInformation
- Italian
- Italian
Post
Ministry (Homologation) - haly
Post
Ministry (Homologation) - haly
and
Communication
and
Communication
and
and
(VCCI)-Japan
(VCCI)-Japan
Inspection
Inspection
(BSMI)
(BSMI)
(MIC)
- RepublicofKorea
(MIC)
- RepublicofKorea
- Taiwan
- Taiwan
Canada
Canada
•Asranhuras e aberturasnacaixaena
•Asranhuras e aberturasnacaixaena
correcto do aparelho e para 0 proteger do sobreaquecimento, nunca deve bloquearoutapar
correcto do aparelho e para 0 proteger do sobreaquecimento, nunca deve bloquearoutapar
-
Nao
tapeasranhuras e aberturas
-
Nao
tapeasranhuras e aberturas
- Nao bloqueieasranhuras e aberturas colocando 0 aparelho numa cama, sofa, tapeteououtra superficie semelhante.
- Nao bloqueieasranhuras e aberturas colocando 0 aparelho numa cama, sofa, tapeteououtra superficie semelhante.
- Nao coloque
- Nao coloque
adequada.
adequada.
- Deixe uma distancia
- Deixe uma distancia
• Nao coloque
• Nao coloque
aincidencia directa
aincidencia directa
• Nao coloque objectos
• Nao coloque objectos
• Nao coloque recipientes com
• Nao coloque recipientes com
• Nao exponha
• Nao exponha
da
maquina de lavar a
da
maquina de lavar a
ficha e contacte de imediato 0 revendedor autorizado. Retire sempre 0 cabo de
ficha e contacte de imediato 0 revendedor autorizado. Retire sempre 0 cabo de
•
•
Este
Este
Contacte
Contacte
• Nao sobrecarregue tomadas
• Nao sobrecarregue tomadas
• Deve colocar
• Deve colocar
cabos ligados a fichas, a receptaculos eaopontodeondeoscabos
cabos ligados a fichas, a receptaculos eaopontodeondeoscabos
•
•
Para
Para
tomadadeparede e desligue a antena
tomadadeparede e desligue a antena
Deste modo,
Deste modo,
• Antes
• Antes
transformador
transformador
• Nunca introduza objectos mellilicos
• Nunca introduza objectos mellilicos
•
•
Para
Para
A caixa do aparelho
A caixa do aparelho
• Introduza
• Introduza
pela ficha quando puxar a mesma
pela ficha quando puxar a mesma
•
Se
0 aparelho nao funcionar nonnalmente -
•
Se
0 aparelho nao funcionar nonnalmente -
de
imediato e contacte 0 revendedor autorizadooucentrodeassistencia tecnica.
de
imediato e contacte 0 revendedor autorizadooucentrodeassistencia tecnica.
• Certifique-sedeque
• Certifique-sedeque
estiveremcasa
estiveremcasa
deixadas sozinhas em casal.
deixadas sozinhas em casal.
- Poeira acumulada pode provocar um choque electrico, uma fuga electrica
- Poeira acumulada pode provocar um choque electrico, uma fuga electrica
produza faiscas e
produza faiscas e
• Contacte um centro autorizado
• Contacte um centro autorizado
sujeitos a temperaturas altasoubaixas,
sujeitos a temperaturas altasoubaixas,
monitor esteja a funcionar 24 horas
monitor esteja a funcionar 24 horas
Se
nao 0 fizer, pode provocar serios
Se
nao 0 fizer, pode provocar serios
•
•
Utilize
Utilize
-
-
Uma
Uma
• Deve puxar a fichadatomada
• Deve puxar a fichadatomada
•
Nao
•
Nao
• Guardeosacessorios (bateria, etc.) num local seguro fora do aleance
• Guardeosacessorios (bateria, etc.) num local seguro fora do aleance
• Nao instale 0 produto num local instavel, como uma prateleira inclinada, um chao desnivelado ou um local exposto a
• Nao instale 0 produto num local instavel, como uma prateleira inclinada, um chao desnivelado ou um local exposto a
• Nao deixe cairouprovoque qualquer embate no produto.
• Nao deixe cairouprovoque qualquer embate no produto.
contacte
contacte
·
(l)
·
(l)
este
aparelho num
este
aparelho num
de10em
de10em
este
aparelho pertoaupor cimadeurn radiador, sistemadeaquecimentoounum local em
este
aparelho pertoaupor cimadeurn radiador, sistemadeaquecimentoounum local em
dos
raias
dos
raias
geradoresdecalor, tais como, velas, cinzeiros, incenso,
geradoresdecalor, tais como, velas, cinzeiros, incenso,
0 aparelho
iI
0 aparelho
iI
loi~a,
loi~a,
aparelho tem pilhas. Deite foraaspilhas adequadamente de acordo com
aparelho tem pilhas. Deite foraaspilhas adequadamente de acordo com
as
autoridades locais para obter
as
autoridades locais para obter
os
cabos
de
os
proteger 0 aparelhodetrovoadas, ou quando nao for utiliza-Io durante longos periodosdetempo, desligue 0 aparelho
proteger 0 aparelhodetrovoadas, ou quando nao for utiliza-Io durante longos periodosdetempo, desligue 0 aparelho
0 aparelho nao sofre eventuais danos provocados
0 aparelho nao sofre eventuais danos provocados
de
ligar 0 cabo
de
ligar 0 cabo
de
de
evitar choques electricos, nunca toque no interior do aparelho.
evitar choques electricos, nunca toque no interior do aparelho.
0 cabo de
0 cabo de
uma ficha e uma tomada devidamente ligadasiIterra.
uma ficha e uma tomada devidamente ligadasiIterra.
liga~ao
de terra deficiente pode causar choque electrico ou danos no equipamento. (So equipamentodeelasse
liga~ao
de terra deficiente pode causar choque electrico ou danos no equipamento. (So equipamentodeelasse
deixeascriany3s
deixeascriany3s
urn
centrodeassistencia.
urn
centrodeassistencia.
AVISO - PARA EVITAR 0 ALASTRAR DE UM INCENDIO,
AVISO - PARA EVITAR 0 ALASTRAR DE UM INCENDIO,
MANTENHA SEMPRE AS VELAS OU OUTRO
MANTENHA SEMPRE AS VELAS OU OUTRO
CHAMA LONGE DESTE PRODUTO.
CHAMA LONGE DESTE PRODUTO.
alimenta~ao
cabos
de
alimenta~ao
de
alimenta~ao
de
alimenta~ao
CC corresponde
CC corresponde
so
deve
so
deve
alimenta~ao
alimenta~ao
retira a fichadealimentayaodatomada
retira a fichadealimentayaodatomada
durante um periododetempo longo (especialmente quando
durante um periododetempo longo (especialmente quando
aque~a
aque~a
mexernoproduto.
mexernoproduto.
parte
posteriorauinferior pennitem a
parte
posteriorauinferior pennitem a
com
panos
au outros materiais.
com
panos
au outros materiais.
espa~o
fechado, como uma estanteouum armario embutido, a menos
espa~o
fechado, como uma estanteouum armario embutido, a menos
entre 0 produto e a parede.
entre 0 produto e a parede.
solares.
solares.
aguaemcima do aparelho, porque pode provocar um incendio ou choque electrico.
aguaemcima do aparelho, porque pode provocar um incendio ou choque electrico.
chuva nem coloqueemlocais pertodeagua (perto de uma banheira, lavatorio,
chuva nem coloqueemlocais pertodeagua (perto de uma banheira, lavatorio,
piscina ou numa cave com humidade).Semolhar acidentalmente 0 aparelho, desligue-o
piscina ou numa cave com humidade).Semolhar acidentalmente 0 aparelho, desligue-o
informa~oes
de
de
ser
ser
ou
ou
informa~oes
parede, extensoes nem receptaculos, porque pode provocar um incendio ou choque electrico.
parede, extensoes nem receptaculos, porque pode provocar um incendio ou choque electrico.
de
forma a nao
de
forma a nao
ou
0 sistema
ou
0 sistema
de
CAiItomada do transformadordeCC, certifique-sedeque a
de
CAiItomada do transformadordeCC, certifique-sedeque a
iI
alimenta~ao
iI
alimenta~ao
nas
aberturas do aparelho.
nas
aberturas do aparelho.
aberta
por
aberta
por
completamente
completamente
da
tomada. Nao toque no cabo
da
tomada. Nao toque no cabo
deteriore 0 isolamento.
deteriore 0 isolamento.
de
assistencia tecnica quando instalar 0 produtoemlocais sujeitos a poeiras excessivas, locais
de
assistencia tecnica quando instalar 0 produtoemlocais sujeitos a poeiras excessivas, locais
locais
locais
por
dia comoemaeroportos,
por
dia comoemaeroportos,
danos
no produto.
danos
no produto.
para
desligar 0 aparelhodacorrente, de forma a deixar a ficha pronta a ser utilizada.
para
desligar 0 aparelhodacorrente, de forma a deixar a ficha pronta a ser utilizada.
sobre a
destrui~ao
sobre a
destrui~ao
serem
pisados nem entalados por objectos, tendo em especial
serem
pisados nem entalados por objectos, tendo em especial
de
televisao
de
electrica local.
electrica local.
tecnicvs qualificados.
tecnicvs qualificados.
ateaofim. Quando retirar 0 cabo
ateaofim. Quando retirar 0 cabo
em
particular,
em
particular,
com
muita humidade,
com
muita humidade,
por
televisao
por
por
por
Se
Se
se
0 aparelho emitir
se
0 aparelho emitir
se
0 aparelho
se
0 aparelho
Se
0 produto estiver danificado, desligue 0 cabo
Se
0 produto estiver danificado, desligue 0 cabo
ventilac;ao
necessaria.
ventilac;ao
necessaria.
gas
innamaveloumateriais explosivos pertodoproduto.
gas
innamaveloumateriais explosivos pertodoproduto.
alimenta~ao
alimenta~ao
as
considera~oes
as
considera~oes
ou
recielagemdepilhas.
ou
recielagemdepilhas.
saem
do aparelho.
saem
do aparelho.
cabo.
cabo.
raios e
descargasemcabosdeaha
raios e
descargasemcabosdeaha
0 fizer, pode provocar choques electricos.
0 fizer, pode provocar choques electricos.
de
alimenta~ao,
de
de
aJimenta~ao
de
aJimenta~ao
locais
locais
esta~oes
esta~oes
das
crian~as.
das
crian~as.
alimenta~ao,
comasmaos molhadas.
comasmaos molhadas.
JUidasoucheiros invulgares - desligue 0 aparelho
JUidasoucheiros invulgares - desligue 0 aparelho
de
televisao
de
televisao
crian~as,
idosos ou
crian~as,
idosos ou
ou
um incendio, fazendo com que 0
ou
um incendio, fazendo com que 0
oodeseutilizem
oodeseutilizem
de
comboio, etc.
de
comboio, etc.
Para
Para
estas
ranhuras e aberturas.
estas
ranhuras e aberturas.
da
tomada
da
tomada
ambientais existentes no
ambientais existentes no
tensao.
tensao.
designa~ao
designa~ao
certifique-se de que 0 segura
certifique-se de que 0 segura
naD
for
utilizadoouse
naD
for
utilizadoouse
pessoas
pessoas
substancias quirnicas e locais
substancias quirnicas e locais
garantir 0 funcionamento
garantir 0 funcionamento
que
tenha
que
tenha
que
esteja exposto
que
esteja exposto
lava-Ioi~a,
lava-Ioi~a,
antesdelim
antesdelim
0 utilizador
0 utilizador
com deficiencias forem
com deficiencias forem
de
alimenta~ao
de
alimenta~ao
TIPO
TIPO
fio
fio
ventila~ao
ventila~ao
tubo
tubo
da
da
par 0 produto.
par 0 produto.
seu
pais.
seu
pais.
aten~ao
os
aten~ao
os
da
da
de
tensao do
de
tensao do
nao
nao
de
alimenta~ao
de
alimenta~ao
oode
0
oode
0
I.)
I.)
vibra~ao.
vibra~ao.
e
e
DE
DE
FCC Class A Notice
FCC Class A Notice
This device complies with
This device complies with
1.
This device may not cause harmful interference, and
1.
This device may not cause harmful interference, and
2.
This device must accept any interference received, including interference that may cause undesired operation.
2.
This device must accept any interference received, including interference that may cause undesired operation.
NOTE:
NOTE:
This equipment has been tested and found to comply with the limits for a Class A digital device, pursuant to Part 15
This equipment has been tested and found to comply with the limits for a Class A digital device, pursuant to Part 15
Rules. These limits are designed to proVide reasonable protection against harmful interference when the equipment is operated
Rules. These limits are designed to proVide reasonable protection against harmful interference when the equipment is operated
in a commercial environment. This equipment generates, uses, and can radiate radio frequency energy and, if not installed and
in a commercial environment. This equipment generates, uses, and can radiate radio frequency energy and, if not installed and
used in accordance with the instruction manuat, may cause harmful interference to radio communications.
used in accordance with the instruction manuat, may cause harmful interference to radio communications.
of
this equipment in a residential area is likely to cause harmlul interference in which case the user will be required to
of
Operation
Operation
correct the interference at his own expense.
correct the interference at his own expense.
FCC Class 8 Notice
FCC Class 8 Notice
This device complies with
This device complies with
2. This device must accept any interference received, induding interference that may cause undesired operation.
2. This device must accept any interference received, induding interference that may cause undesired operation.
NOTE:
NOTE:
This equipment has been tested and found to comply with the limits for a Class B digital device, pursuant to Part 15ofthe FCC
This equipment has been tested and found to comply with the limits for a Class B digital device, pursuant to Part 15ofthe FCC
Rules. These limits are designed to provide reasonable protection against harmful interference
Rules. These limits are designed to provide reasonable protection against harmful interference
equipment generates, uses and can radiate radio frequency energy and, if not installed and used in accordance with the
equipment generates, uses and can radiate radio frequency energy and, if not installed and used in accordance with the
instructions, may cause harmful interference to radio communications. However, there is no guarantee that interference will not
instructions, may cause harmful interference to radio communications. However, there is no guarantee that interference will not
occur in a particular installation. If this equipment does cause harmful interference to radio
occur in a particular installation. If this equipment does cause harmful interference to radio
determined by turning the equipment off and on, the user is encouraged to try to correct the interference by one or more of the
determined by turning the equipment off and on, the user is encouraged to try to correct the interference by one or more of the
following measures:
following measures:
-- Reorient
-- Reorient
-- Increase the separation between the equipment and receiver.
-- Increase the separation between the equipment and receiver.
-- Connect the equipment into
-- Connect the equipment into
-- Consult the dealer
-- Consult the dealer
User Information
User Information
Changesormodifications not expressly approved by the party responsible for compliance could void the
Changesormodifications not expressly approved by the party responsible for compliance could void the
operate the equipment. If necessary, consull with your dealer
operate the equipment. If necessary, consull with your dealer
suggestions.
suggestions.
This booklet was prepared by the Federal Communications Commission.
This booklet was prepared by the Federal Communications Commission.
Washington, DC 20402, Stock Number 004-000-00345-4.
Washington, DC 20402, Stock Number 004-000-00345-4.
The
The
SAMSUNG ELECTRONICS CO.,
SAMSUNG ELECTRONICS CO.,
AmericaQALabofSamsung
AmericaQALabofSamsung
3351 Michelson Drive
3351 Michelson Drive
Suite #290, Irvine, CA92612 USA
Suite #290, Irvine, CA92612 USA
User must use shielded signal interface cables to maintain FCC compliance for the product.
User must use shielded signal interface cables to maintain FCC compliance for the product.
Provided with this monitor is a detachable power supply cord with IEC320 style terminations.
Provided with this monitor is a detachable power supply cord with IEC320 style terminations.
It may be suitable for connection to any UL Listed personal computer with similar configuration.
It may be suitable for connection to any UL Listed personal computer with similar configuration.
Before making the connection, make sure the voltage rating
Before making the connection, make sure the voltage rating
that the ampere rating
that the ampere rating
For 120 Volt applications, use only UL Listed detachable power cord with NEMA configuration 5-15P type(parallel blades) plug
For 120 Volt applications, use only UL Listed detachable power cord with NEMA configuration 5-15P type(parallel blades) plug
cap. For 240 Volt applications use only UL Listed detachable power supply cord with NEMA configuration 6015P type
cap. For 240 Volt applications use only UL Listed detachable power supply cord with NEMA configuration 6015P type
(tandem blades) plug cap.
(tandem blades) plug cap.
This television receiver provides display
This television receiver provides display
(TV broadcast receivers with picture screens 13 inches
(TV broadcast receivers with picture screens 13 inches
this equipment in a residential area is likely to cause harmlul interference in which case the user will be required to
1. This device may not cause harmful interference, and
1. This device may not cause harmful interference, and
or
relocate the receiving antenna.
or
relocate the receiving antenna.
You
You
party
responsible for product compliance:
party
responsible for product compliance:
part15of
part15of
part15of
part15of
or
an experienced radiofTV technician for help.
or
an experienced radiofTV technician for help.
may find the booklet called How to Identify and Resolve RadiolTV Interference Problems helpful.
may find the booklet called How to Identify and Resolve RadiolTV Interference Problems helpful.
of
the computer convenience outlet is equalorexceeds the monitor voltage rating.
of
the computer convenience outlet is equalorexceeds the monitor voltage rating.
the
FCC
Rules. Operation is subject to the following two
the
FCC
Rules. Operation is subject to the following two
the FCC Rules. Operation is
the FCC Rules. Operation is
an
outlet on a circuit different from that to which the receiver is connected.
an
outlet on a circuit different from that to which the receiver is connected.
LTD.
LTD.
of
television closed captioning in accordance with Section 15.119ofthe FCC rules.
of
television closed captioning in accordance with Section 15.119ofthe FCC rules.
or
larger in diameter models only)
or
larger in diameter models only)
subject
to the following two
subject
to the following two
in
in
or
television reception, which can be
or
television reception, which can be
or
an experienced radio/television technician for additiona
or
an experienced radio/television technician for additiona
It is avaitable from the U.S. Government Printing Office.
It is avaitable from the U.S. Government Printing Office.
of
the computer convenience outiet is the same as the monitor and
of
the computer convenience outiet is the same as the monitor and
conditions:
conditions:
conditions:
conditions:
a residential installation. This
a residential installation. This
use~s
use~s
of
the FCC
of
the FCC
authority to
authority to
-4-
-4-
-5-
-5-
Page 83

Important Safety Instructions(UL Only)
Important Safety Instructions(UL Only)
ICES-003 Class A Notice -
ICES-003 Class A Notice -
This Class A digital apparatus complies with Canadian ICES-003.
This Class A digital apparatus complies with Canadian ICES-003.
Cet appareil numerique
Cet appareil numerique
ICES-003 Class B Notice -
ICES-003 Class B Notice -
This Class B digital apparatus complies with Canadian ICES-003.
This Class B digital apparatus complies with Canadian ICES-003.
Cet appareil numerique
Cet appareil numerique
VCCI Class A Notice
VCCI Class A Notice
;:
(1)~~I;j:,
;:
(1)~~I;j:,
;:(1)~ii~~Ii!r.lt.l1:'~mT
;:(1)~ii~~Ii!r.lt.l1:'~mT
;:(1)lI;~I::I;j:~m~fJ(iit;JJt,;:~*~~9''@J::?
;:(1)lI;~I::I;j:~m~fJ(iit;JJt,;:~*~~9''@J::?
VCCI Class B Notice
VCCI Class B Notice
;:
(1)~iril;j:,
;:
(1)~iril;j:,
;:(1)~iI'l;j:,
;:(1)~iI'l;j:,
~m~:n~c':,
~m~:n~c':,
1[1l!J/(iilPJl.,::Vt
1[1l!J/(iilPJl.,::Vt
BSMI Class A Notice
BSMI Class A Notice
The
The
compliance label.
compliance label.
%'a(Je,E!J%l
%'a(Je,E!J%l
i§~Ej3'J&!~~f\~fj@'£
i§~Ej3'J&!~~f\~fj@'£
~ffl~~~~*~~~~~~~fi~o
~ffl~~~~*~~~~~~~fi~o
(
(
Compliance with these directives implies conformity
Compliance with these directives implies conformity
- EN55022: Radio Frequency Interference
- EN55022: Radio Frequency Interference
- EN55024: Electromagnetic Immunity of Information Technology Equipment
- EN55024: Electromagnetic Immunity of Information Technology Equipment
- EN61000-3-2: Power Line Harmonics
- EN61000-3-2: Power Line Harmonics
- EN61000-3-3: Voltage Fluctuations
- EN61000-3-3: Voltage Fluctuations
- EN55013: Radio disturbance characteristics of broadcast receivers
- EN55013: Radio disturbance characteristics of broadcast receivers
- EN55020: Electromagnetic immunity of broadcast receivers and associated equipments
- EN55020: Electromagnetic immunity of broadcast receivers and associated equipments
European Class A Warning
European Class A Warning
Thisisa class A product.Ina domestic environment this product
Thisisa class A product.Ina domestic environment this product
user may
user may
~.!i!.~-;2I7/7/
~.!i!.~-;2I7/7/
.---..
.---..
4M/~
4M/~
~.!i!.~-;2I7/7/
~.!i!.~-;2I7/7/
01
01
Italian Homologation Notice
Italian Homologation Notice
Questo apparecchio e fabbricatoinconformitaalD.M.28.08.95 n.548
Questo apparecchio e fabbricatoinconformitaalD.M.28.08.95 n.548
edinparticolare a quanto specificato nell Art.2, comma
edinparticolare a quanto specificato nell Art.2, comma
Questo apparecchio e fabbricato nella U.E.inconformitaalD.M.28.08.95 n.548
Questo apparecchio e fabbricato nella U.E.inconformitaalD.M.28.08.95 n.548
Art.2, comma 1
Art.2, comma 1
-.
For products producedincountries except European Community
-.
For products producedincountries except European Community
Questo apparecchio e fabbricato
Questo apparecchio e fabbricato
edinparticolare a quanto specificato nell Art.2, comma
edinparticolare a quanto specificato nell Art.2, comma
-.
For products producedinEuropean Community
-.
For products producedinEuropean Community
Questo apparecchio e fabbricato nella U.E.
Questo apparecchio e fabbricato nella U.E.
Art.2, comma 1
Art.2, comma 1
!1UIB!lIl~iiW'ili;llill!~13
!1UIB!lIl~iiW'ili;llill!~13
!1i~9lJ,II~~W'iIi;llill!'i'
!1i~9lJ,II~~W'iIi;llill!'i'
~1i!!l1l1:'~m'9~;:
~1i!!l1l1:'~m'9~;:
:'it~lI!iH51~~;:T;:c':fJ(~L);I':To
:'it~lI!iH51~~;:T;:c':fJ(~L);I':To
-::>
-C:iE
-::>
-C:iE
following statementisapplicabletoproducts shippedtoTaiwan
following statementisapplicabletoproducts shippedtoTaiwan
:
:
'
'
European Notice(Europe Only)
European Notice(Europe Only)
Products with theCEmarking comply with the
Products with theCEmarking comply with the
(93/68/EEC)
(93/68/EEC)
E
E
Community.
Community.
be
requiredtotake adequate measures.(Class A product only)
be
requiredtotake adequate measures.(Class A product only)
AiP/7/
AiP/7/
01
7171~
01
7171~
'2J'"f
'2J'"f
8;;;7/7/ (MIC Class 8
7171~
7171~
8;;;7/7/ (MIC Class 8
71~~££
71~~££
edalD.M.26.03.92
edalD.M.26.03.92
edalD.M.26.03.92
edalD.M.26.03.92
Avis
NMB-003, Classe A
Avis
NMB-003, Classe A
delaclasse A est conforme alanorme NMB-003duCanada.
delaclasse A est conforme alanorme NMB-003duCanada.
Avis
NMB-003, Classe B
Avis
NMB-003, Classe B
delaclasse
delaclasse
L
~
'Ill!
L
~
'Ill!
.f:[~i::lJ"'tJt'!'f9"jfWi
.f:[~i::lJ"'tJt'!'f9"jfWi
'E:i.!f.~££
'E:i.!f.~££
~""
~""
{jAfjIf"l~§~~
{jAfjIf"l~§~~
Best
conforme alanorme NMB-003duCanada.
Best
conforme alanorme NMB-003duCanada.
±~UI"~~
~
~
'H!'lL
'H!'lL
and
and
(MIC Class A
(MIC Class A
EfDH
EfDH
±~UI"~~
c':'iIi;lliM~gl
c':'iIi;lliM~gl
13±~Jl.iMt~iti
13±~Jl.iMt~iti
c':
H:lB'-Jc':Ln\;I':TfJ(,
c':
H:lB'-Jc':Ln\;I':TfJ(,
\~L
-c
\~L
-c
the Low Voltage Directive(73/23/EEC) issued by
the Low Voltage Directive(73/23/EEC) issued by
{jAfjIf"l~§~~
{jAfjIf"l~§~~
EE~
""~WtJ.~
EE~
""~WtJ.~
Art.1
Art.1
in
conformitaalD.M.28.08.95 n.548
in
conformitaalD.M.28.08.95 n.548
Art.1
Art.1
(VCC!)
(1)~qol::~-j
(VCC!)
~~;:
~~;:
~*
~*
l'
~
~
l'
~
~
'
DJIiE~~&IHiijjil1'tf
'
DJIiE~~&IHiijjil1'tf
Notice)
Notice)
Notice)
Notice)
E!
7171£Ai
E!
7171£Ai
in
conformitaalD.M.28.08.95 n.548
in
conformitaalD.M.28.08.95 n.548
(1)~qol::~-j
T;:
c':
fJ(~
T;:
~:n.@;:
~:n.@;:
(VCC!)
(VCC!)
\0
\0
to
the following European Norms:
to
the following European Norms:
E!
E!
U!l0I1~
U!l0I1~
L);I':T 0
c':
fJ(~
L);I':T 0
c':
fJ(~
c':
fJ(~
(1)£iJl::lI-j
(1)£iJl::lI-j
;:(1)~iI'fJ(7,,:t~T
;:(1)~iI'fJ(7,,:t~T
'
'
EMC
EMC
may
may
7171012.'-1
7171012.'-1
7f~~££
7f~~££
-';'-7iAI'2'i0lIAi~
-';'-7iAI'2'i0lIAi~
1.
1.
1.
1.
<
'7
TAAffl~aj;f.j~iI'1:'T
<
'7
TAAffl~aj;f.j~iI'1:'T
L);I':'9
0
L);I':'9
0
<
'7
TAB!j!j~11j;f.j~jl1:'T
<
'7
TAB!j!j~11j;f.j~jl1:'T
and
markedasClass Aonthe product
and
markedasClass Aonthe product
.f:[i§fi·IJ1f;5l-r
.f:[i§fi·IJ1f;5l-r
Directive(89/336/EEC), (92/31/EEC),
Directive(89/336/EEC), (92/31/EEC),
and
associated equipments
and
associated equipments
cause radio interferenceinwhich case the
cause radio interferenceinwhich case the
EfDHAf
EE~
EfDHAf
EE~
iJI.~'6'fAI71
iJI.~'6'fAI71
~-E
£.§AI'2'iOlIAi
~-E
£.§AI'2'iOlIAi
t..-t'" 3
t..-t'" 3
'
'
the
the
Af%A~01~~
Af%A~01~~
~f'EfLlef.
~f'EfLlef.
0
0
0
0
:..-:'iti~III::i!iltL-C
:..-:'iti~III::i!iltL-C
Commission of the European
Commission of the European
Af~~
Af~~
-';'-9.I'6'fAI71
-';'-9.I'6'fAI71
""
""
~f"-fDj
~f"-fDj
VELlel.
VELlel.
I)
Read
these
I)
Read
2) Keep
2) Keep
3) Heed all warnings.
3) Heed all warnings.
4)
4)
Follow
Follow
5) Do not
5) Do not
6) Clean only with dry cloth.
6) Clean only with dry cloth.
7)
Do not block any ventilation openings, Install in accordance with
7)
Do not block any ventilation openings, Install in accordance with
manufacturer's instructions.
manufacturer's instructions.
8)Donot install near any
8)Donot install near any
or other apparatus (including amplifiers) that produce
or other apparatus (including amplifiers) that produce
9)Donot defeat
9)Donot defeat
blades with one wider
blades with one wider
The wide blade
The wide blade
consult
consult
10)
Protect
10)
Protect
point where they exit from
point where they exit from
II)
Only
II)
Only
12)
Use
12)
Use
When a cart is
When a cart is
13)
Unplug this apparatus during lightning stormsorwhen unused for long periodsoftime.
13)
Unplug this apparatus during lightning stormsorwhen unused for long periodsoftime.
14) Refer all servicing
14) Refer all servicing
any way,
any way,
apparatus,
apparatus,
•
Optional.
•
Optional.
1.Donot
1.Donot
you've
you've
2.Ifyou
2.Ifyou
you've
you've
This
monitor
This
monitor
• EPA applied modelonly
• EPA applied modelonly
AsanENERGY
AsanENERGY
or product
or product
@l
LAMP(S)
@l
LAMP(S)
DISPOSEDOFACCORDINGTOLOCAL,
DISPOSEDOFACCORDINGTOLOCAL,
For
details
For
details
instructions.
these
instructions.
these
instructions.
these
instructions.
all instructions.
all instructions.
use
this apparatus ncar water.
use
this apparatus ncar water.
the
the
heat
sources
heat
the
safety purposeofthe
the
safety purposeofthe
than
than
or
the
third prong
or
the
an
electrician for replacementofthe obsolete outlet.
an
electrician for replacementofthe obsolete outlet.
the
power cord from being walked on or pinched particularlyatplugs, convenience receptacles,
the
power cord from being walked on or pinched particularlyatplugs, convenience receptacles,
use
attachments/accessories specified by the manufacturer.
use
attachments/accessories specified by the manufacturer.
only with cart, stand, tripod, bracket,ortable specified by
only with cart, stand, tripod, bracket,ortable specified by
suchaspower-supply cordorplug is damaged, liquid
suchaspower-supply cordorplug is damaged, liquid
the
the
WARNING:Toprevent damage which may resultinfireorelectric
WARNING:Toprevent damage which may resultinfireorelectric
place the
place the
followed
followed
place
the
place
the
followed the
followed the
complies
complies
models
models
INSIDE
INSIDE
see
see
third prong
used,
use
caution when moving
used,
use
caution when moving
to
qualified service personnel. Servicingisrequired when
to
qualified service personnel. Servicingisrequired when
apparatus
has
apparatus
has
shock hazard, do not expose this appliance to rain
shock hazard, do not expose this appliance to rain
apparatus
apparatus
that
manufacturer's
that
manufacturer's
apparatus
apparatus
manufacturer's
manufacturer's
with
SWEDAC(MPR
with
SWEDAC(MPR
STAR
Partner,Samsung
STAR
Partner,Samsung
meets
meets
THIS
THIS
lamprecycie.org, eiae.org,orcall
lamprecycie.org, eiae.org,orcall
suchasradiators,
sources
suchasradiators,
polarizedorgrounding-type plug. A polarized plug
the
the
the
the
been
been
in a
in a
in a
in a
theENERG'y',STAR guidelines for
theENERG'y',STAR guidelines for
PRODUCT
PRODUCT
polarizedorgrounding-type plug. A polarized plug
other. A grounding type plug
other. A grounding type plug
are
provided for your safety.Ifthe
are
provided for your safety.Ifthe
apparatus.
apparatus.
exposed to rainormoisture,
exposed to rainormoisture,
rackorbookcase.
rackorbookcase.
instructions
instructions
rackorbookcase,
rackorbookcase,
instructions.
instructions.
II)
II)
CONTAIN
CONTAIN
STATEORFEDERAL
STATEORFEDERAL
heat
registers, stoves,
heat
registers, stoves,
heat.
heat.
has
two blades
has
two blades
provided plug
provided plug
the
manufacturer, or sold with
the
the
cart/apparatus combination to avoid injury from tip-over.
the
cart/apparatus combination to avoid injury from tip-over.
Ensure
Ensure
for
mounting.
for
mounting.
ensure
ensure
recommendations
recommendations
has
determined that
has
determined that
MERCURY
MERCURY
1-800-Samsung
1-800-Samsung
manufacturer, or sold with
has
been
spilledorobjects have fallen into
has
been
does
does
that
that
that
that
spilledorobjects have fallen into
not operate normally,orhas
not operate normally,orhas
thereisadequate
thereisadequate
(For
PDPorProjectionTVapparatus)
(For
PDPorProjectionTVapparatus)
thereisadequate
thereisadequate
for
reduced
for
reduced
this
this
energy
energy
AND
MUST BE
AND
MUST BE
LAWS
LAWS
has
does
not
does
not
apparatus
apparatus
or
moisture.
or
moisture.
ventilation
ventilation
ventilation
ventilation
and
and
RECYCLED
RECYCLED
has
has
has
fit
fit
and
a third grounding prong.
and
a third grounding prong.
the
the
electric
electric
product .
product .
efficiency,'
efficiency,'
two
two
into your outlet,
into your outlet,
and
and
the
apparatus.
the
apparatus.
been
damaged in
been
damaged in
been
dropped.
been
dropped.
and
and
and
that
and
that
magnetic
magnetic
~
..
~
..
, ;r,
, ;r,
Imim'&miI
Imim'&miI
~
~
•
•
OR
OR
the
the
the
the
that
that
fields.
fields.
-6-
-6-
-7-
-7-
Page 84

PrintedinMexico
PrintedinMexico
AA68-03242L-01
AA68-03242L-01
Page 85

Page 86

Page 87

SAMSUNG
SAMSUNG
COLOR
COLOR
TELEVISION & PROJECTION TELEVISION
TELEVISION & PROJECTION TELEVISION
LIMITED
LIMITED
This
SAMSUNG
This
SAMSUNG
consumer purchaser,
consumer purchaser,
period
period
of:
of:
This
limited warranty beginsonthe
This
limited warranty beginsonthe
To
receive
To
receive
service
can
service
can
request
request
SAMSUNG
SAMSUNG
or
productsiffoundtobe
or
productsiffoundtobe
propertyofSAMSUNG
propertyofSAMSUNG
or
ninety
or
ninety
For
26"
For
26"
to
availability
to
availability
product mustbeunobstructed and
product mustbeunobstructed and
necessarytoremove,
necessarytoremove,
for
transportationofour
for
transportationofour
transportation
transportation
This
limited warranty
This
limited warranty
otherwise
otherwise
but
but
not
not
intended; altered product
intended; altered product
other
other
actsofnature;
actsofnature;
repairs, external wiring
repairs, external wiring
problems; incorrect electrical
problems; incorrect electrical
cleaning, maintenance and environmental instructions that
cleaning, maintenance and environmental instructions that
and distortion related
and distortion related
related
related
to
to
brand product,assupplied and distributedbySAMSUNG
brand product,assupplied and distributedbySAMSUNG
is
warrantedbySAMSUNG
is
warrantedbySAMSUNG
Color Television: One (1)
Color Television: One (1)
Projection Television: One
Projection Television: One
DLP
DLP
warranty
warranty
as
proofofpurchasetoSAMSUNGorSAMSUNG's
as
proofofpurchasetoSAMSUNGorSAMSUNG's
will
will
(90)
(90)
and
and
expressly
expressly
limited
limited
normal
normal
service,
service,
onlybeperformedbya
onlybeperformedbya
days,
days,
larger
larger
within
within
to
to
to:
to:
repair or
repair or
replace
replace
and mustbereturnedtoSAMSUNG.
and mustbereturnedtoSAMSUNG.
whicheverislonger.
whicheverislonger.
televisionsCfor
televisionsCfor
the
the
repair and return
repair and return
choicetoand
choicetoand
and
from
and
from
covers
covers
provided
proVided
damage
damage
useofproducts, equipment,
useofproducts, equipment,
or
or
to
noise,
to
noise,
aging,
or burned-in
aging,
or burned-in
for Picture Tube
for Picture Tube
LCD
TV:
LCD
Plasma Display:
Plasma Display:
defective
defective
contiguous United
contiguous United
the
the
which occursinshipment;
which occursinshipment;
or
or
TV:
Projection
Projection
original
original
the
purchaser must contact
the
purchaser must contact
SAMSUNG
SAMSUNG
this product,atour option andatno
this product,atour option andatno
during
during
LCD
LCD
accessibletoservice
accessibletoservice
SAMSUNG
SAMSUNG
manufacturing
manufacturing
forinthis statement, noncommercial
forinthis statement, noncommercial
serial
numbers; cosmetic
serial
numbers; cosmetic
connectors not suppliedorauthorizedbySAMSUNG
connectors not suppliedorauthorizedbySAMSUNG
line
voltage,
line
voltage,
echo,
interference or other
echo,
interference or other
WARRANTYTOORIGINAL
WARRANTYTOORIGINAL
against
against
Year
Parts and Labor, except
Year
Parts and Labor, except
(CRT)*
(CRT)*
(1)
Year
(1)
One (1)
One (1)
TV:
TV:
(*90
(*90
dateofpurchase, andisvalid
dateofpurchase, andisvalid
the
the
TV,
32"
TV,
32"
the
product. If in-home
the
product. If in-home
fromaSAMSUNG
fromaSAMSUNG
authorized
authorized
defectsinmaterials and workmanship encounteredinnormal, and excepttothe
defectsinmaterials and workmanship encounteredinnormal, and excepttothe
fluctuations and
fluctuations and
images.
images.
Year
Year
Year
Two
(2)
Two
Days
Days
Year
(2)
Year
One (1)
One (1)
Parts and Labor for Commercial Use)
Parts and Labor for Commercial Use)
authorized
authorized
limited warranty period specified
limited warranty period specified
and
larger),
and
larger),
States.
In-home
States.
In-home
service
service
delivery
delivery
damage
damage
systems,
systems,
SAMSUNG
SAMSUNG
PURCHASER
PURCHASER
and delivered
manufacturing
manufacturing
only on Analog Color Televisions
only on Analog Color Televisions
Parts and Labor, including Picture Tubes
Parts and Labor, including Picture Tubes
Parts and Labor, including Display Panels
Parts and Labor, including Display Panels
Parts and Labor, including Display Panels
Parts and Labor, including Display Panels
Year
Parts and Labor, including Display Panels
Year
Parts and Labor, including Display Panels
SAMSUNG
SAMSUNG
service
service
authorized
authorized
Replacement
Replacement
in-home
in-home
serviceisnot
serviceisnot
personnel.Ifduring in-home
personnel.Ifduring in-home
serviceisunavailable,
serviceisunavailable,
authorized
authorized
centeristhe
centeristhe
useofthis product, and
useofthis product, and
and installation; applications and
and installation; applications and
or exterior
or exterior
utilities,
utilities,
surges;
customer adjustments and
surges;
customer adjustments and
are
covered
are
covered
signal
transmission and
Signal
transmission and
does
not
does
not
and delivered
defectsinmaterials and workmanship
defectsinmaterials and workmanship
onlyonproducts purchased and usedinthe
onlyonproducts purchased and usedinthe
for
problem determination and
for
problem determination and
center.
The
center.
service
service
chargeasstipulated herein,
chargeasstipulated herein,
service
service
service
service
services,
services,
warrant uninterrupted or
warrant uninterrupted or
original dated
The
original dated
center.
center.
parts and products
parts and products
willbeprovided during
willbeprovided during
availableinall
availableinall
center.
center.
responsibilityofthe
responsibilityofthe
finish;
finish;
parts, supplies,
parts, supplies,
and prescribedinthe
and prescribedinthe
new,inthe
new,inthe
Two
(2)
Two
above.
above.
Years
(2)
Years
All
replaced parts and products
All
replaced parts and products
assume
assume
areasToreceive
areasToreceive
service
repair
service
repair
SAMSUNG
SAMSUNG
Otherwise, and
Otherwise, and
shall
shall
accidents, abuse,
accidents, abuse,
which
which
delivery
delivery
accessories,
accessories,
damage
damage
failuretofollow
failuretofollow
problems; picture tube
problems; picture tube
error-free
error-free
Parts Warranty
Parts Warranty
billofsale
billofsale
may
may
purchaser.
purchaser.
not
not
uses
uses
instruction book; reception problems
instruction book; reception problems
original cartontothe
original cartontothe
for
a limited warranty
for
a limited warranty
(CRT)*
(CRT)*
service
procedures. Warranty
service
procedures. Warranty
mustbepresented upon
mustbepresented upon
with
new
with
the
the
can
can
applytothe
applytothe
neglect,
neglect,
this product or resultinservice
this product or resultinservice
or reconditioned parts
new
or reconditioned parts
the
remaining original
the
remaining original
warranty labor period subject
warranty labor period subject
in-home
in-home
notbecompleted,itmay
notbecompleted,itmay
elect,atour option,toprovide
elect,atour option,toprovide
for
25"
and smaller televisions,
for
25"
and smaller televisions,
following,
for
for
following,
which this product
which this product
fire,
water,
fire,
water,
applications, installations,
applications, installations,
operating instructions,
operating instructions,
(CRT)
operationofthe
operationofthe
(CRT)
original
original
United
United
become
become
warranty,
warranty,
service,
service,
including,
including,
was
was
lightning or
lightning or
brightness
brightness
product.
product.
States.
States.
the
the
the
the
extent
extent
not
not
be
be
THERE
ARENOEXPRESS
THERE
ARENOEXPRESS
WHETHER
WHETHER
OR
OR
NO
NO
PRODUCT
PRODUCT
FAILURETOREALIZE
FAILURETOREALIZE
DAMAGES
DAMAGES
WHICH
WHICH
SHALL
SHALL
PRODUCT
PRODUCT
PURCHASER
PURCHASER
PROPERTY
PROPERTY
PRODUCT
PRODUCT
SHALL
SHALL
AND
AND
Some
Some
consequential
consequential
you
you
To
To
EXPRESSORIMPLIED,
EXPRESSORIMPLIED,
FITNESS
FITNESS
OTHER
OTHER
obtain warranty
obtain warranty
FORAPARTICULAR
FORAPARTICULAR
EXPRESS
EXPRESS
SHALLBEBINDINGONSAMSUNG.
SHALLBEBINDINGONSAMSUNG.
CAUSEDBYTHE
CAUSEDBYTHE
THE
THE
RECOVERYOFANY
RECOVERYOFANY
SOLDBYSAMSUNG
SOLDBYSAMSUNG
ANDTOOTHERS
ANDTOOTHERS
SOLDBYSAMSUNG
SOLDBYSAMSUNG
NOT
NOT
STATES
STATES
statesdonot
statesdonot
may
also
may
also
WARRANTYORGUARANTY
WARRANTYORGUARANTY
CLAIMISBASED,
CLAIMISBASED,
ASSUMES
ASSUMES
EXTENDTOANYONE
EXTENDTOANYONE
YOUR
EXCLUSIVE
YOUR
EXCLUSIVE
allow
allow
damages,sothe
damages,sothe
have
other rights which
have
other rights which
service,
service,
WARRANTIES
WARRANTIES
SAVINGSOROTHER
SAVINGSOROTHER
USE,
USE,
AND
AND
KIND
KIND
ALL
RISK
ALL
RISK
AND
AND
NOT
NOT
REMEDY
REMEDY
limitationsonhow
limitationsonhow
above
above
please
contact
please
contact
OTHER
OTHER
INCLUDING,
INCLUDING,
PURPOSE,
PURPOSE,
MISUSEORINABILITYTOUSE
MISUSEORINABILITYTOUSE
EVENIFSAMSUNG
EVENIFSAMSUNG
AGAINST
AGAINST
AND
CAUSING
AND
CAUSING
AND
LIABILITY
AND
LIABILITY
THEIR
THEIR
CAUSED
CAUSED
OTHER
THAN
OTHER
THAN
limitationsorexclusions
limitationsorexclusions
vary
from
vary
from
SAMSUNG
SAMSUNG
1-800-SAMSUNG
1-800-SAMSUNG
THAN
THOSE
LISTED
THAN
BUT
BUT
SHALL
SHALL
BENEFITS,ORANY
BENEFITS,ORANY
SAMSUNGBEGREATERINAMOUNT
SAMSUNGBEGREATERINAMOUNT
PROPERTY
PROPERTY
DIRECTLYBYTHE
DIRECTLYBYTHE
longanimplied warranty
longanimplied warranty
statetostate.
statetostate.
Samsung Electronics America, Inc.
Samsung Electronics America, Inc.
Ridgefield Park,NJ07660-0511
Ridgefield Park,NJ07660-0511
THOSE
NOT
LIMITED
NOT
LIMITED
APPLY
AFTER
APPLY
GIVENBYANY
GIVENBYANY
SAMSUNG
SAMSUNG
AFTER
PERSON,
PERSON,
SHALL
SHALL
HAS
BEEN
HAS
BEEN
THE
ALLEGED
THE
ALLEGED
FOR
LOSS,
FOR
THE
THE
at:
at:
105 Challenger
105 Challenger
DAMAGEORINJURYTOPURCHASER
LOSS,
DAMAGEORINJURYTOPURCHASER
ARISING
ARISING
ORIGINAL
ORIGINAL
may
not applytoyou
may
not applytoyou
(7267864) - www.samsung.com
(7267864) - www.samsung.com
AND
LISTED
AND
TO,
ANY
TO,
THE
THE
NOTBELIABLE
NOTBELIABLE
THIS
THIS
ADVISEDOFTHE
ADVISEDOFTHE
OUTOFTHE
OUTOFTHE
NEGLIGENCEOFSAMSUNG.
NEGLIGENCEOFSAMSUNG.
PURCHASEROFTHIS
PURCHASEROFTHIS
Road
Road
IMPLIED
ANY
IMPLIED
EXPRESS
EXPRESS
FIRMORCORPORATION
FIRMORCORPORATION
OTHER
OTHER
SPECIAL,
SPECIAL,
PRODUCT,
PRODUCT,
DAMAGE.
DAMAGE.
lasts,orthe
lasts,orthe
DESCRIBED
DESCRIBED
WARRANTY
WARRANTY
REGARDLESSOFTHE
REGARDLESSOFTHE
WITHOUT
WITHOUT
USE,
USE,
This
This
ABOVE,
ABOVE,
WARRANTIESOFMERCHANTABILITY
WARRANTIESOFMERCHANTABILITY
FOR
LOSSOFREVENUEORPROFITS,
FOR
LOSSOFREVENUEORPROFITS,
INCIDENTALORCONSEQUENTIAL
INCIDENTALORCONSEQUENTIAL
POSSIBILITYOFSUCH
POSSIBILITYOFSUCH
THAN
THE
THAN
THE
MISUSEORINABILITYTOUSE
MISUSEORINABILITYTOUSE
PRODUCT,ISNONTRANSFERABLE
PRODUCT,ISNONTRANSFERABLE
exclusionorlimitationofincidental
exclusionorlimitationofincidental
warranty
warranty
ANDNOWARRANTIES
ANDNOWARRANTIES
PERIODS
PERIODS
LIMITING
LIMITING
gives
gives
STATED
STATED
WITH
RESPECTTOTHIS
WITH
RESPECTTOTHIS
LEGAL
LEGAL
PURCHASE
PURCHASE
THE
THE
AND
AND
THIS
LIMITED
THIS
LIMITED
you
specific
you
speCific
DAMAGES.
DAMAGES.
PRICEOFTHE
PRICEOFTHE
legal
legal
ABOVE,
AND
ABOVE,
AND
THEORY
THEORY
FOREGOING,
FOREGOING,
PURCHASER'S
PURCHASER'S
ON
ON
NOR
NOR
THIS
THIS
WARRANTY
WARRANTY
or
or
rights, and
rights, and
Page 88

IMPORTANT
IMPORTANT
Standard screen format televisions (4:3, the aspect ratio of the screen widthtoheight) are primarily designedtoview
Standard screen format televisions (4:3, the aspect ratio of the screen widthtoheight) are primarily designedtoview
standard format full-motion video.
standard format full-motion video.
constantly
constantly
pictures), shouldbelimitedtono
pictures), shouldbelimitedtono
moving.
moving.
WARRANTY
WARRANTY
Displaying
Displaying
stationary graphics
stationary graphics
INFORMATION
INFORMATION
The
images
The
images
more
than
than
15%ofthe
15%ofthe
more
REGARDING
REGARDING
displayedonthem
displayedonthem
and
imagesonscreen,
and
imagesonscreen,
total
television
total
television
TELEVISION
TELEVISION
should primarilybein
should primarilybein
suchasthe
suchasthe
viewing
viewing
per
per
dark
dark
week.
week.
top
top
and
and
FORMAT
FORMAT
the
standard43ratio
the
standard43ratio
bottom letterbox
bottom letterbox
VIEWING
VIEWING
format
format
bars
(wide
bars
(wide
and
and
screen
screen
Wide screen format televisions
Wide screen format televisions
screen format full-motion video.
screen format full-motion video.
expandedtofill
expandedtofill
screen,
screen,
than
15%ofthe
than
15%ofthe
Additionally,
Additionally,
computer graphics and patterns, shouldbelimitedasdescribed
computer graphics and patterns, shouldbelimitedasdescribed
the
above
the
above
burned-in
burned-in
moving
moving
the
different
the
different
Be
careful in the selection and duration of television formats used
Be
careful in the selection and duration of television formats used
as
a result of format selection and use,aswellasother burned-in images, is not coveredbyyour
as
a result of format selection and use,aswellasother burned-in images, is not coveredbyyour
suchasthe
suchasthe
viewing
viewing
guidelines
guidelines
ghost
ghost
images,
images,
formatsasa
formatsasa
the
screenifyour
the
screenifyour
dark
side-barsonnon-expanded standard
dark
side-barsonnon-expanded standard
total
television
total
television
other stationary
other stationary
can
can
imagesinthe
imagesinthe
not
stationary patternsordark
not
stationary patternsordark
cause
cause
full
full
06:9,
06:9,
viewing
viewing
uneven
uneven
television
television
screen
screen
the aspect ratio of the screen widthtoheight) are primarily designedtoview
the aspect ratio of the screen widthtoheight) are primarily designedtoview
The
images
The
images
model
offers
model
offers
per
per
images
images
agingofpicture
agingofpicture
picture.Toavoid
picture.Toavoid
picture.
picture.
displayedonthem
displayedonthem
this
feature,
this
feature,
week.
week.
and
text
suchasstock
and
text
suchasstock
tubes
tubes
bars.Ontelevision
bars.Ontelevision
this,
this,
should
should
and
constantly
and
constantly
format
television
format
television
market
market
above
for
above
for
(CRTs)orPlasma
(CRTs)orPlasma
vary
the
programming
vary
the
programming
models
models
for
for
primarilybein
primarilybein
moving.
Displaying
moving.
Displaying
video
and
video
and
repons,
video
repons,
televisions
televisions
Display
Display
offer
picture
offer
picture
video
and
and
all
all
that
that
viewing. Uneven
viewing. Uneven
the
the
programming, shouldbelimitedtono
programming, shouldbelimitedtono
game
game
Displaying
Displaying
Panels
Panels
images,
images,
sizing
sizing
CRT
CRT
wide
screen
16:9
ratio
wide
screen
stationary graphics
stationary graphics
displays,
displays,
any
any
that
that
and
and
features,
features,
or Plasma Display Panels aging
or Plasma Display Panels aging
16:9
station
station
stationary
stationary
leave
subtle, but permanent
leave
subtle, but permanent
primarily
primarily
use
these
use
these
Sam
sung limited warranty.
Sam
sung limited warranty.
format,
ratio
format,
and
images
and
images
logos,
web
logos,
web
images
that
images
that
display
full
display
full
controlstoview
controlstoview
sites
sites
wide
wide
on
on
more
more
exceed
exceed
screen
screen
or
or
or
or
AA68-00371C-06
AA68-00371C-06
 Loading...