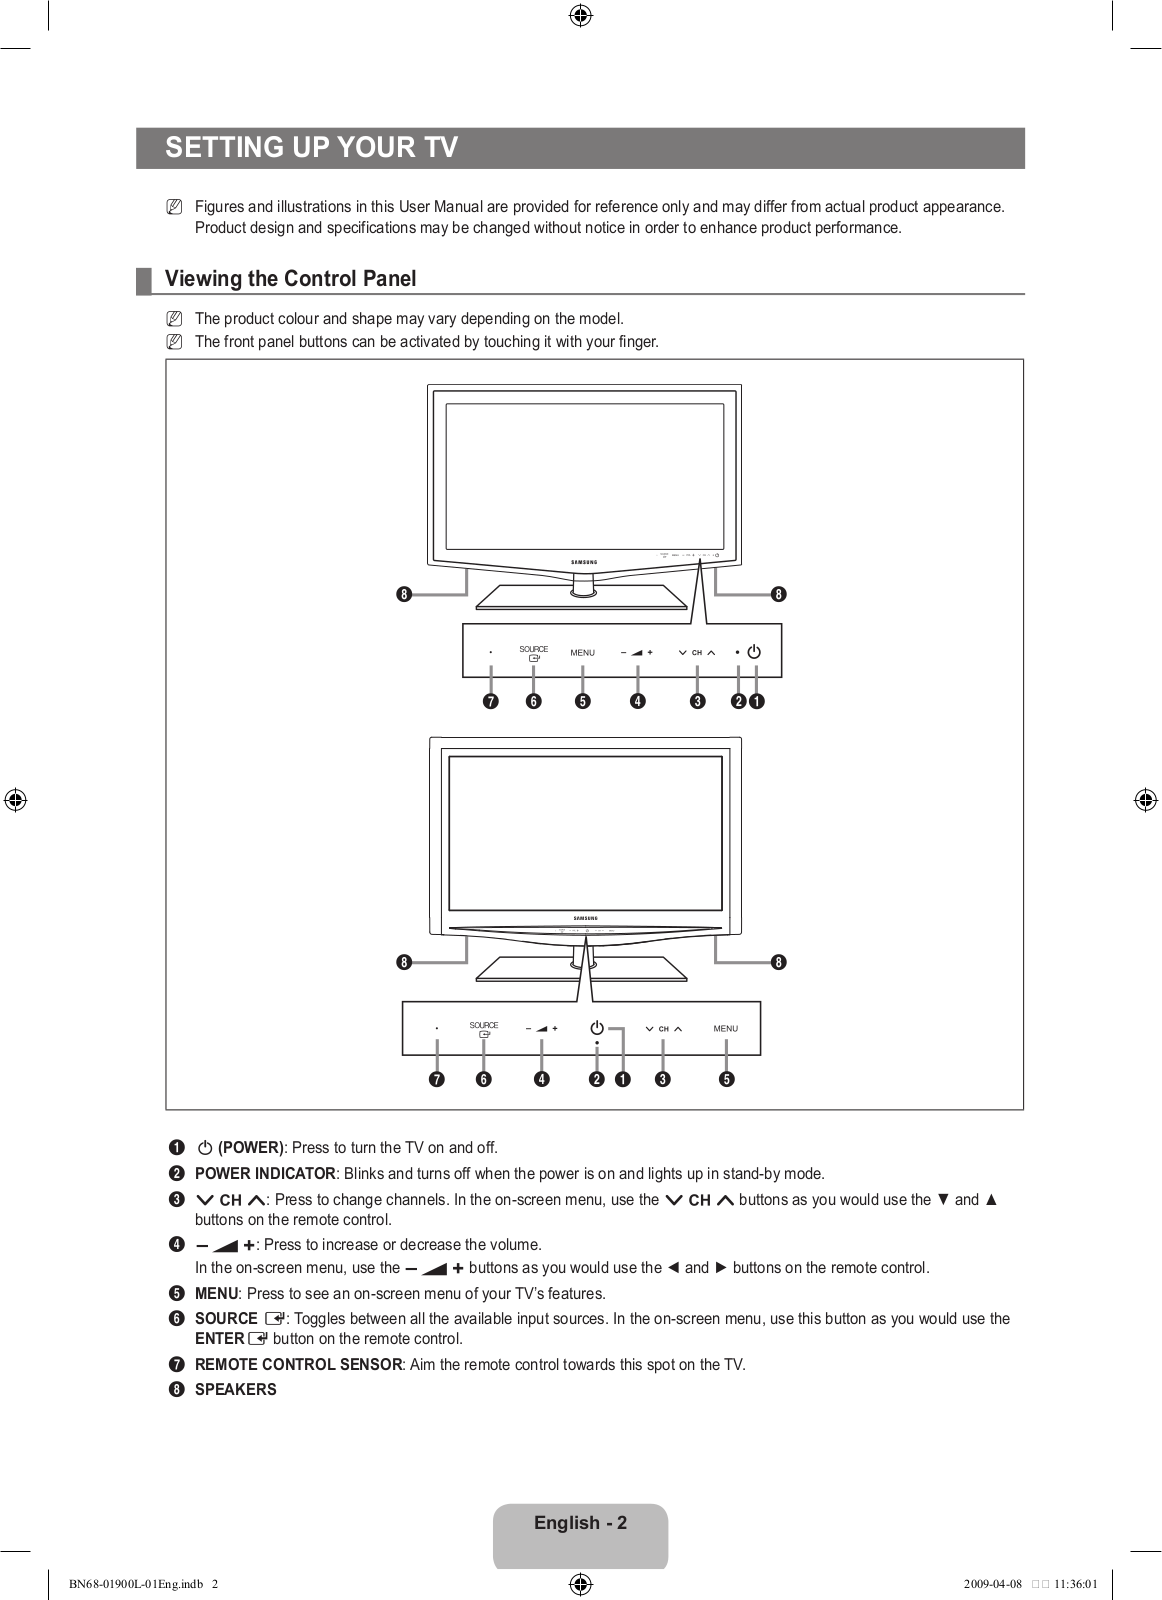
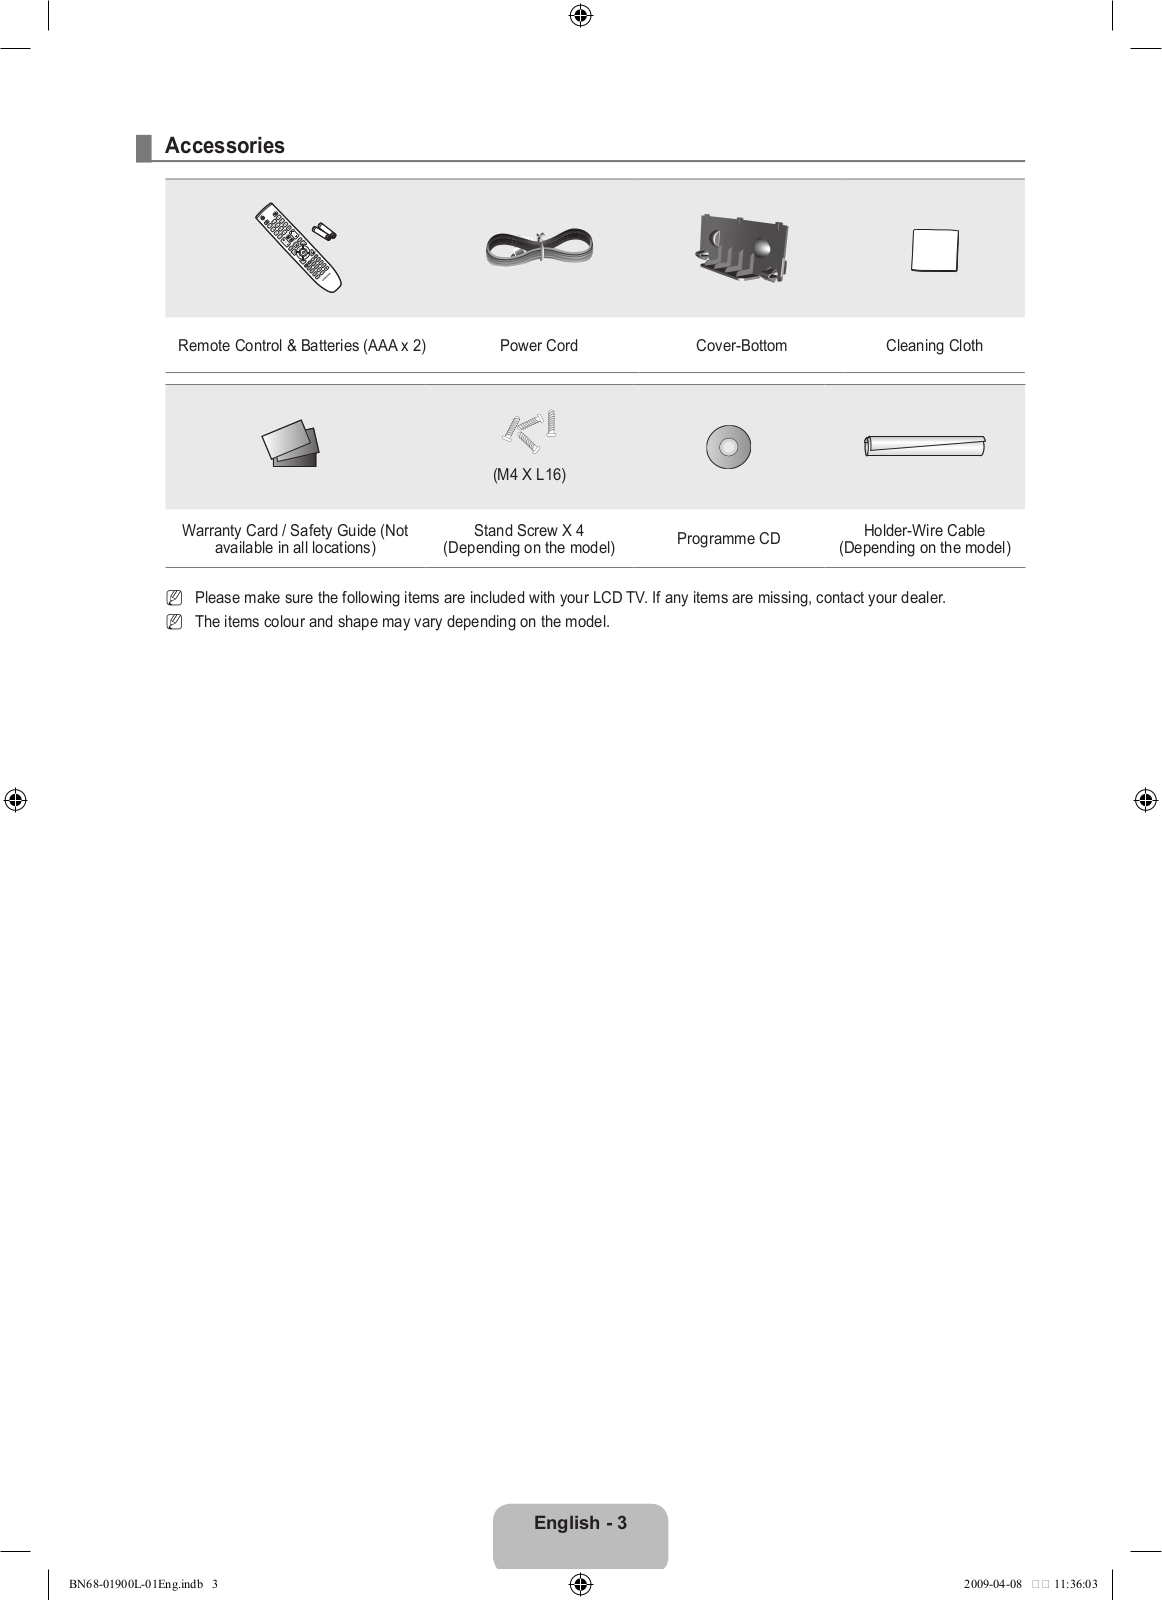
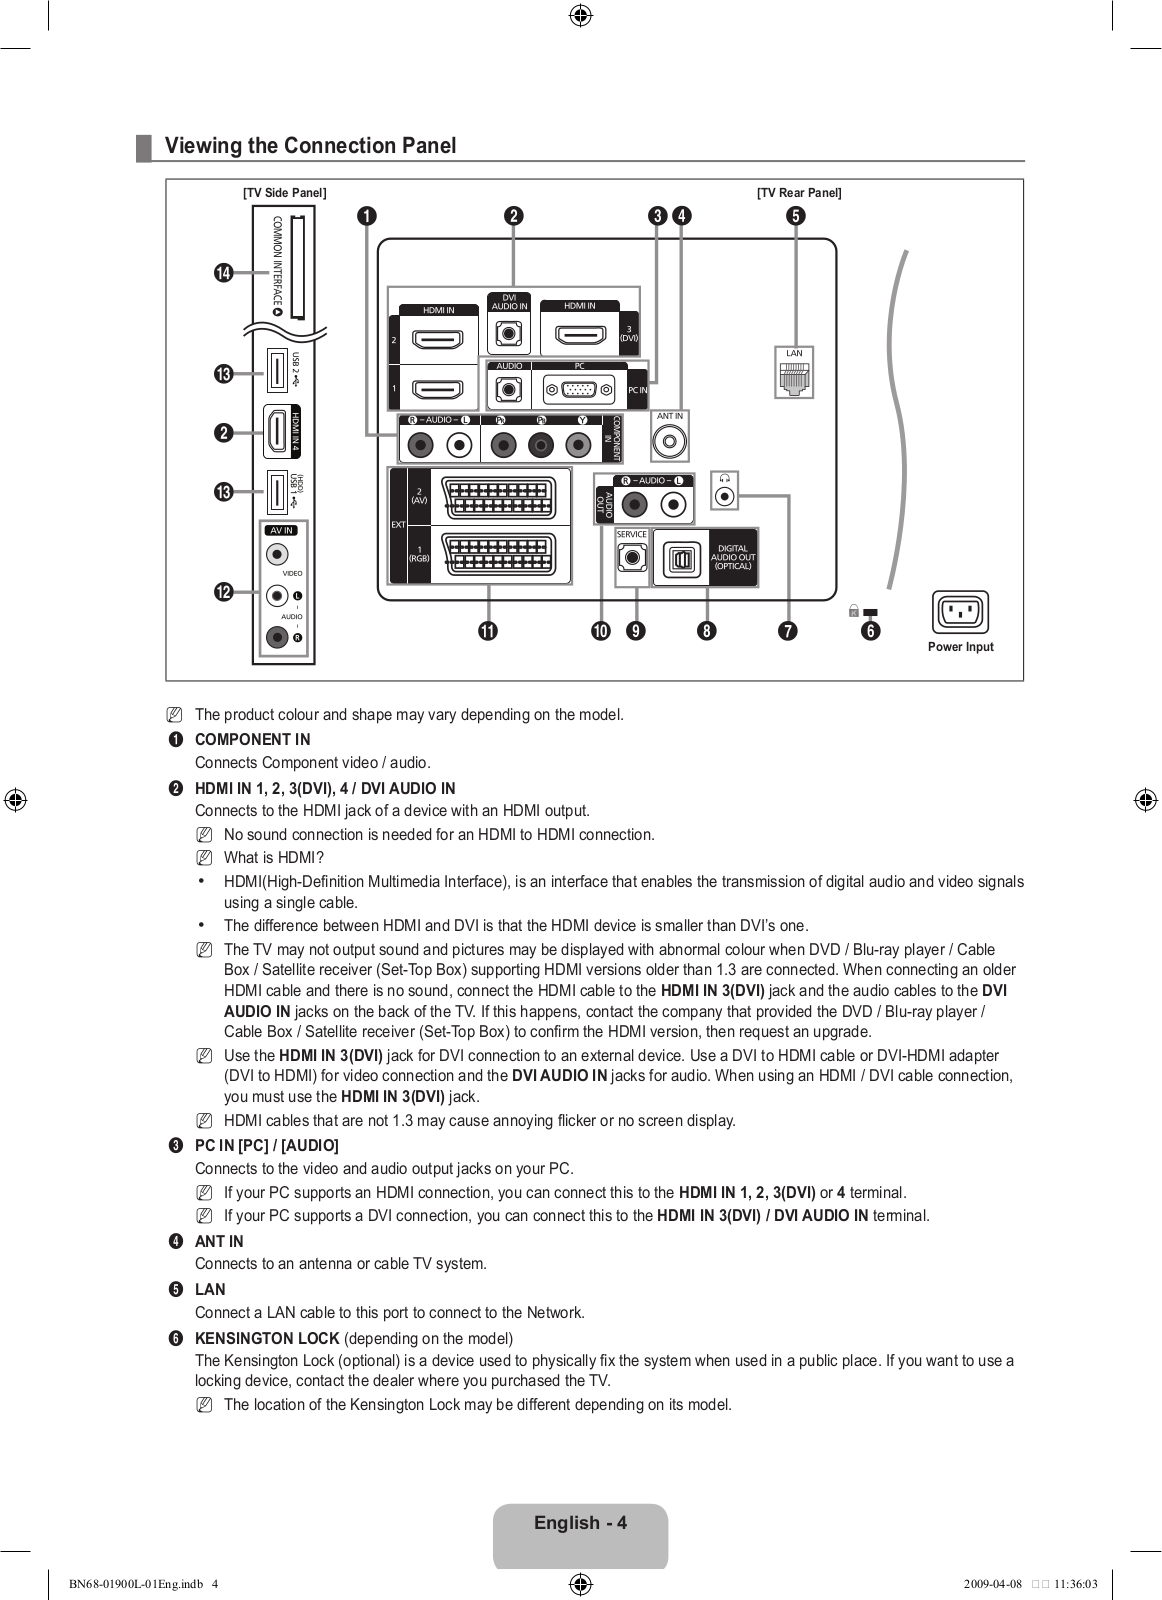
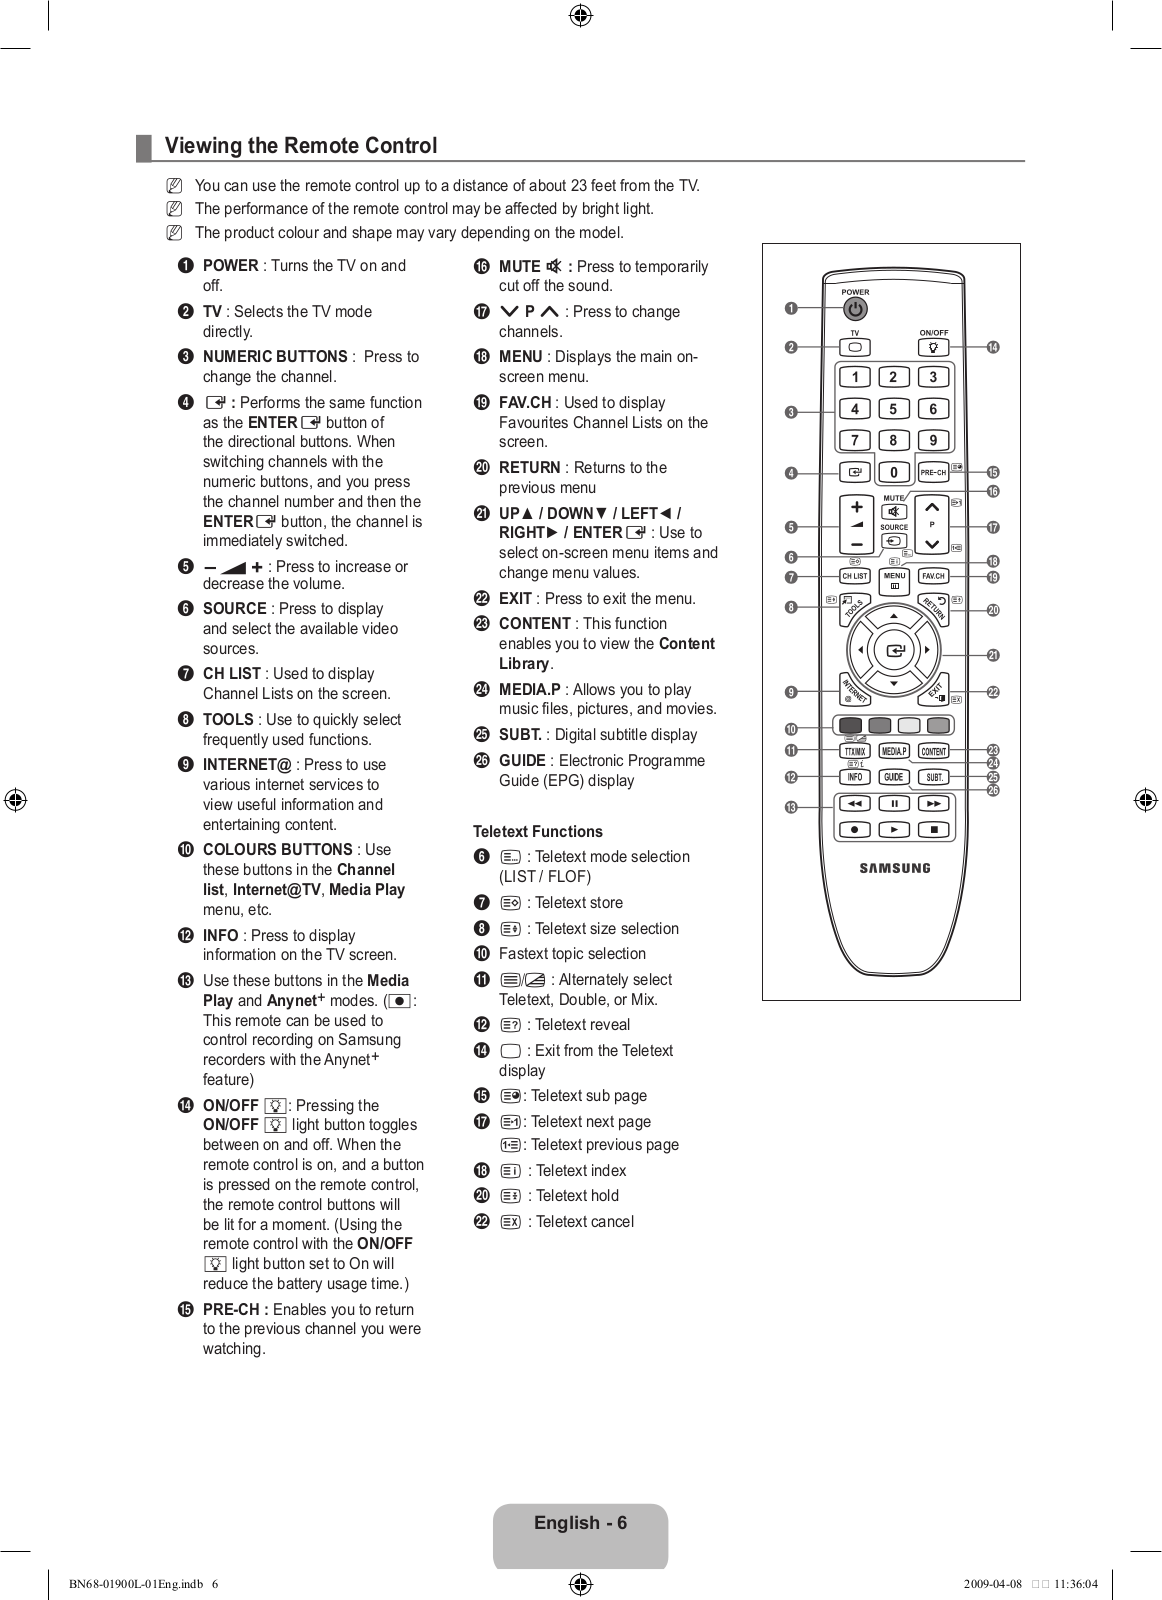
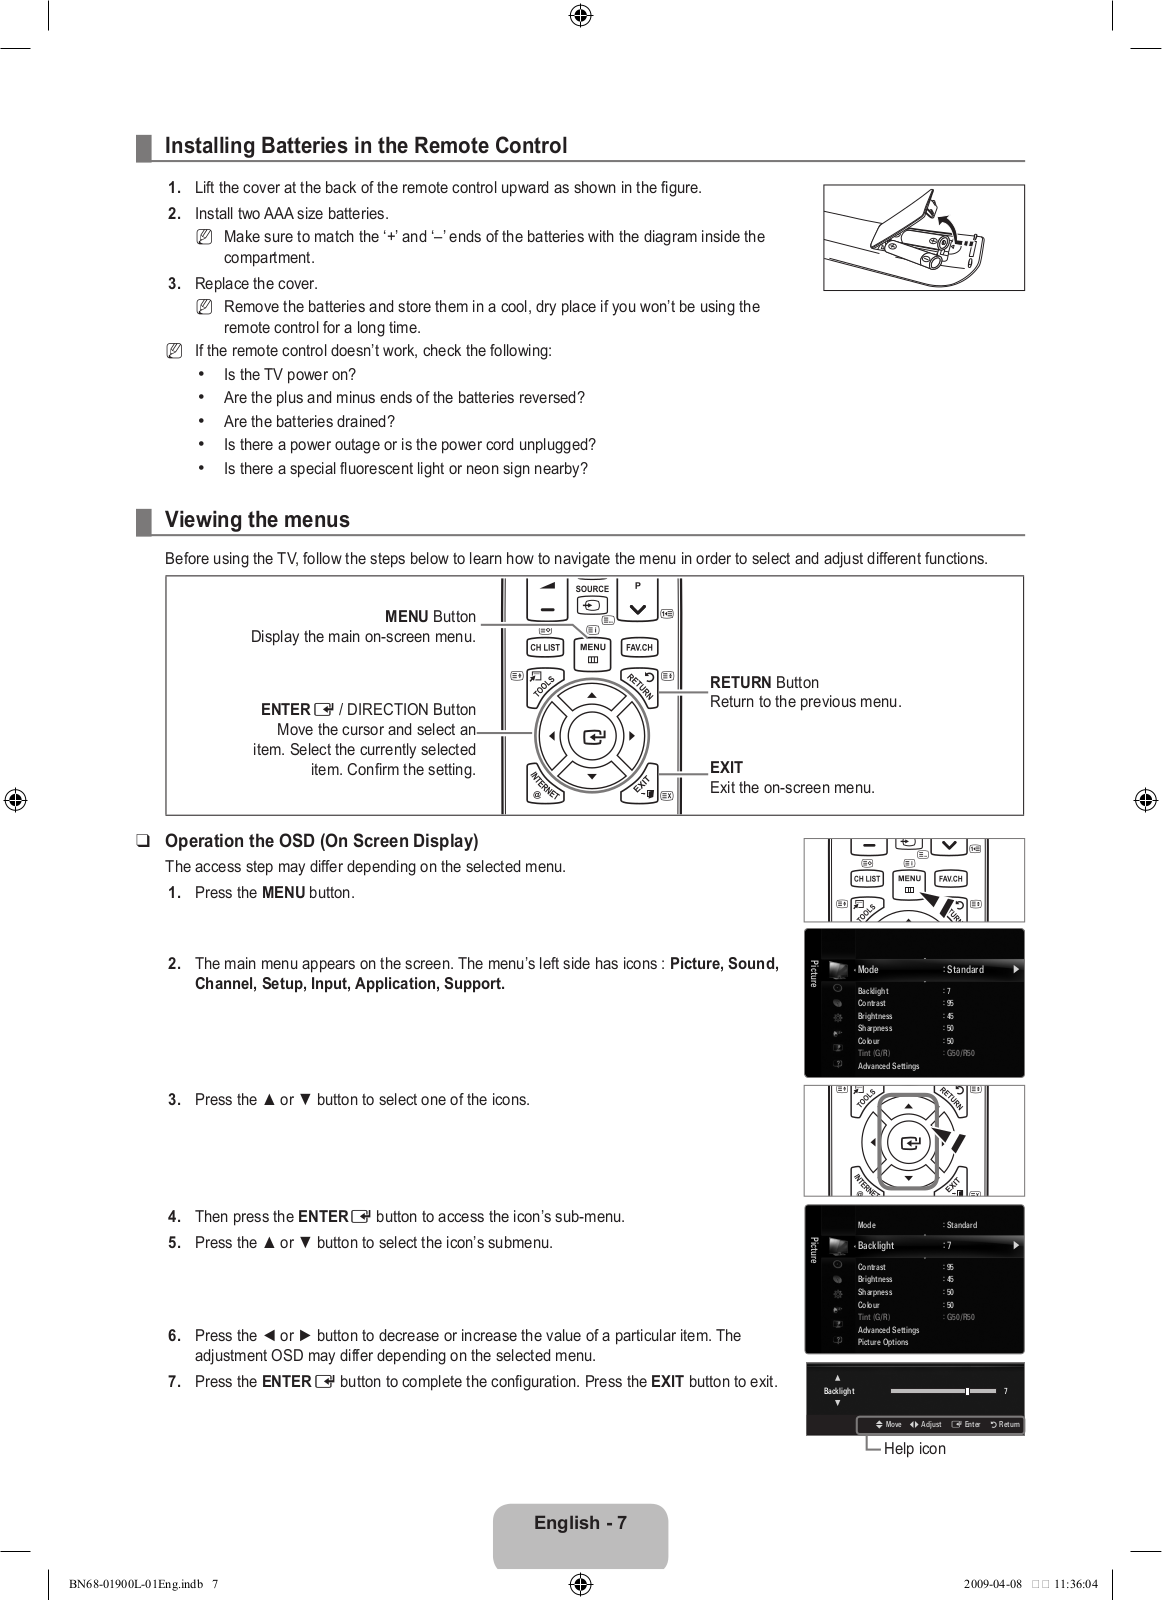
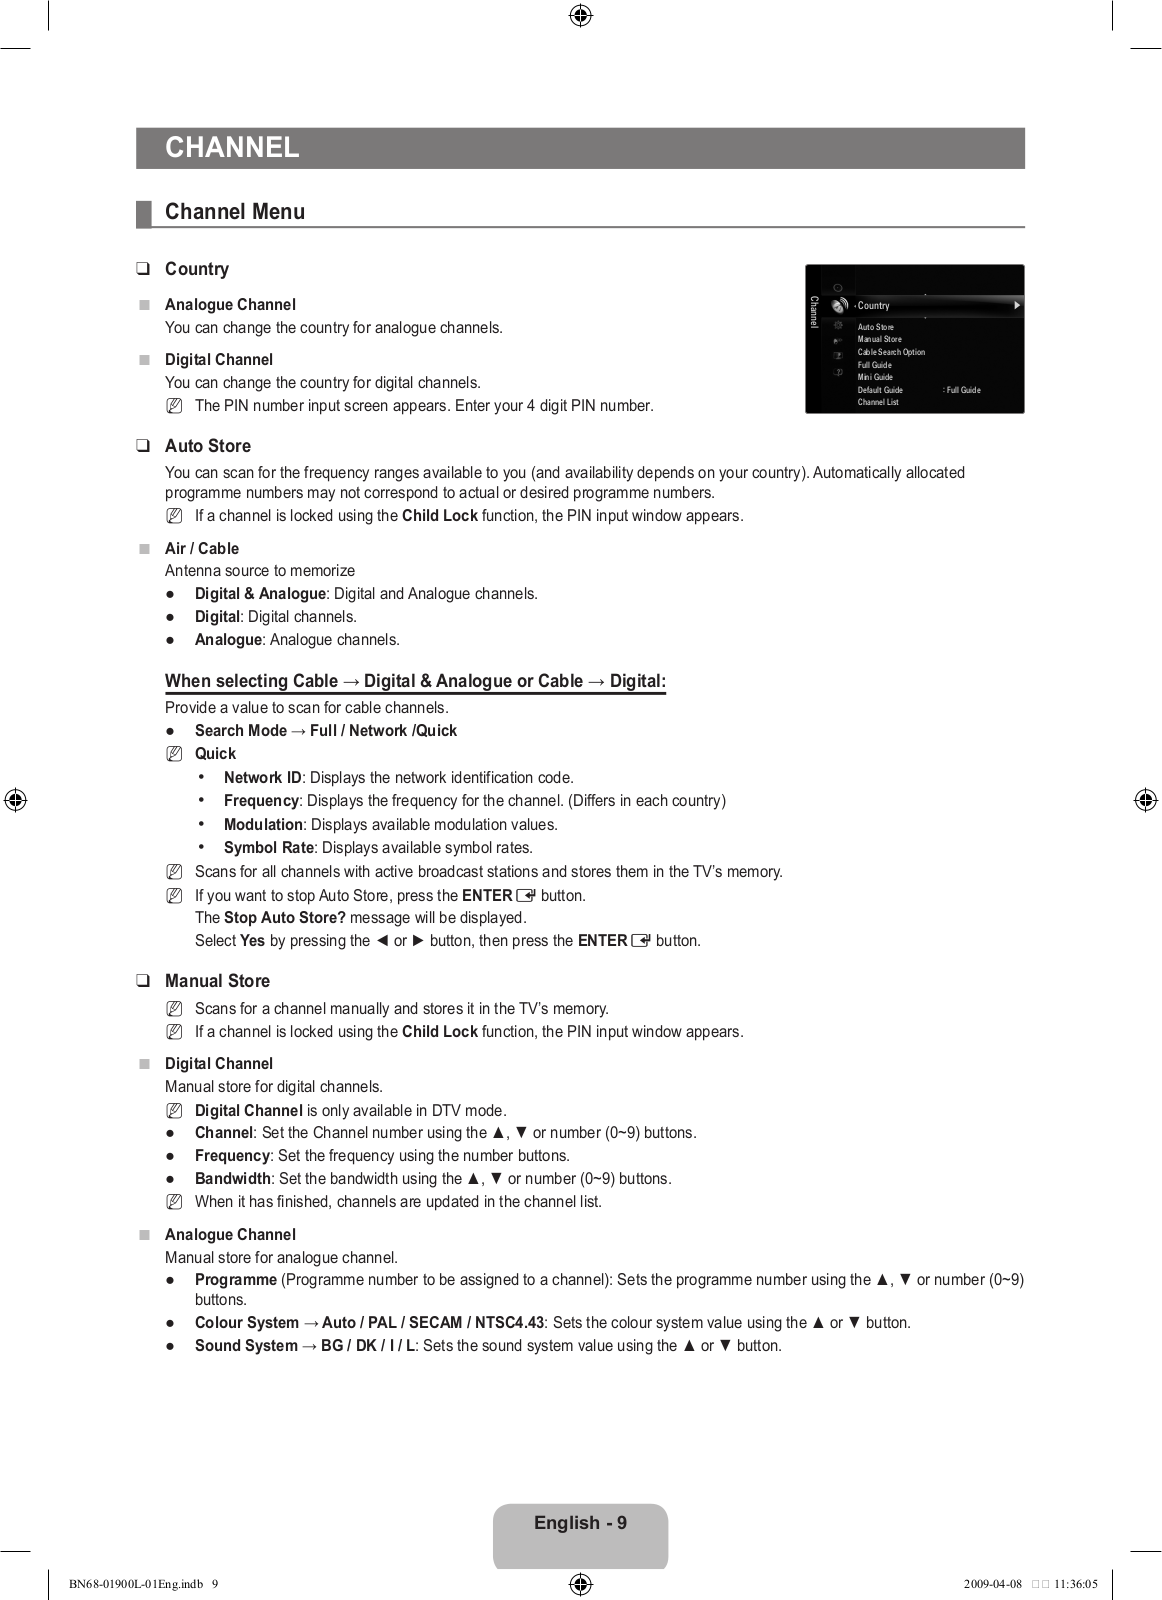
Contact SAMSUNG WORLDWIDE
If you have any questions or comments relating to Samsung products, please contact the SAMSUNG customer care centre.
Country |
Customer Care Centre |
Web Site |
|
AUSTRIA |
0810 - SAMSUNG (7267864, € 0.07/min) |
www.samsung.com/at |
|
BELGIUM |
02 201 2418 |
www.samsung.com/be |
|
|
www.samsung.com/be_fr |
||
|
|
||
|
800 - SAMSUNG (800-726786) |
www.samsung.com/cz |
|
CZECH REPUBLIC |
Distributor pro Českou republiku: |
|
|
|
Samsung Zrt., česká organizační složka, Oasis Florenc, Sokolovská394/17, 180 00, Praha 8 |
||
DENMARK |
8 - SAMSUNG (7267864) |
www.samsung.com/dk |
|
EIRE |
0818 717 100 |
www.samsung.com/ie |
|
FINLAND |
30 - 6227 515 |
www.samsung.com/fi |
|
FRANCE |
01 4863 0000 |
www.samsung.com/fr |
|
GERMANY |
01805 - SAMSUNG (7267864, € 0.14/Min) |
www.samsung.de |
|
HUNGARY |
06 - 80 - SAMSUNG (7267864) |
www.samsung.com/hu |
|
ITALIA |
800 - SAMSUNG (7267864) |
www.samsung.com/it |
|
LUXEMBURG |
02 261 03 710 |
www.samsung.com/lu |
|
NETHERLANDS |
0900-SAMSUNG (0900-7267864) (€ 0,10/Min) |
www.samsung.com/nl |
|
NORWAY |
3 - SAMSUNG (7267864) |
www.samsung.com/no |
|
POLAND |
0 801 1SAMSUNG(172678) |
www.samsung.com/pl |
|
022 - 607 - 93 - 33 |
|||
|
|
||
PORTUGAL |
808 20 - SAMSUNG (7267864) |
www.samsung.com/pt |
|
SLOVAKIA |
0800 - SAMSUNG (7267864) |
www.samsung.com/sk |
|
SPAIN |
902 - 1 - SAMSUNG (902 172 678) |
www.samsung.com/es |
|
SWEDEN |
075 - SAMSUNG (726 78 64) |
www.samsung.com/se |
|
SWITZERLAND |
0848 - SAMSUNG (7267864, CHF 0.08/min) |
www.samsung.com/ch |
|
U.K |
0845 SAMSUNG (7267864) |
www.samsung.com/uk |
|
TURKEY |
444 77 11 |
www.samsung.com/tr |
|
ESTONIA |
800-7267 |
www.samsung.com/ee |
|
LATVIA |
8000-7267 |
www.samsung.com/lv |
|
LITHUANIA |
8-800-77777 |
www.samsung.com/lt |
|
KAZAHSTAN |
8-10-800-500-55-500 |
www.samsung.com/kz_ru |
|
KYRGYZSTAN |
00-800-500-55-500 |
- |
|
RUSSIA |
8-800-555-55-55 |
www.samsung.ru |
|
TADJIKISTAN |
8-10-800-500-55-500 |
- |
|
UKRAINE |
8-800-502-0000 |
www.samsung.ua |
|
UZBEKISTAN |
8-10-800-500-55-500 |
www.samsung.com/kz_ru |
LCD TV
user manual
imagine the possibilities
Thank you for purchasing this Samsung product. To receive more complete service, please register your product at
www.samsung.com/register
Model |
|
Serial No. |
BN68-01900L-01
Digital TV Notice
1.Functionalities related to Digital TV(DVB) are only available in countries/areas where DVB-T (MPEG2 and MPEG4 AVC) digital terrestrial signals are broadcasted or where you are able to access to a compatible DVB-C(MPEG2 and MPEG4 AAC) cableTV service. Please check with your local dealer the possibility to receive DVB-T or DVB-C signal.
2.DVB-T is the DVB European consortium standard for the broadcast transmission of digital terrestrial television and DVB- C is that for the broadcast transmission of digital TV over cable. However, some differentiated features like EPG (Electric
Programme Guide), VOD (Video on Demand) and so on, are not included in this specification. So, they cannot be workable at this moment.
3.Although this TV set meets the latest DVB-T and DVB-C standards, as of [August, 2008], the compatibility with future DVB-T digital terrestrial and DVB-C digital cable broadcasts cannot be guaranteed.
4.Depending on the countries/areas where this TV set is used some cable-TV providers may charge an additional fee for such a service and you may be required to agree to terms and conditions of their business.
5.Some Digital TV functions might be unavailable in some countries or regions and DVB-C might not work correctly with some cable service providers.
6.For more information, please contact your local Samsung customer care centre.
Precautions When Displaying a Still Image
A still image may cause permanent damage to the TV screen
●Do not display still image and partially still on the LCD panel for more than 2 hours as it can cause screen image retention.
This image retention is also known as screen burn. To avoid such image retention, reduce the degree of brightness and contrast of the screen when displaying a still image.
●Watching the LCD TV in 4:3 format for a long period of time may leave traces of borders displayed on the left, right and centre of the screen caused by the difference of light emission on the screen. Playing a DVD or a game console may cause a similar effect to the screen. Damages caused by the above effect are not covered by the Warranty.
●Displaying still images from Video games and PC for longer than a certain period of time may produce partial after-images. To prevent this effect, reduce the ‘brightness’ and ‘contrast’ when displaying still images.
© 2009 Samsung Electronics Co., Ltd. All rights reserved.
Contents |
|
Setting up Your TV |
|
■Viewing the Control Panel.................................................................. |
2 |
■Accessories........................................................................................ |
3 |
■Viewing the Connection Panel........................................................... |
4 |
■Viewing the Remote Control............................................................... |
6 |
■Installing Batteries in the Remote Control.......................................... |
7 |
■Viewing the menus............................................................................. |
7 |
■Placing Your Television in Standby Mode........................................... |
8 |
■Plug & Play Feature........................................................................... |
8 |
CHANNEL |
|
■Channel Menu.................................................................................... |
9 |
■Managing Channels ........................................................................ |
12 |
PICTURE |
|
■Configuring the Picture Menu........................................................... |
14 |
■Viewing Picture-in-Picture................................................................ |
18 |
■Using Your TV as a Computer (PC) Display..................................... |
19 |
■Setting up the TV with your PC........................................................ |
20 |
SOUND |
|
■Configuring the Sound Menu........................................................... |
20 |
■Selecting the Sound Mode............................................................... |
22 |
SETUP |
|
■Configuring the Setup Menu............................................................ |
22 |
■Setting the Time............................................................................... |
24 |
■Network Connection......................................................................... |
26 |
■Setting the Network.......................................................................... |
29 |
INPUT / SUPPORT |
|
■Input Menu....................................................................................... |
32 |
■Support Menu................................................................................... |
32 |
Media Play (USB & DLNA) |
|
■Connecting a USB Device................................................................ |
35 |
■Media Play Function......................................................................... |
36 |
■Sorting the Photo List....................................................................... |
37 |
■Photo List Option Menu.................................................................... |
38 |
■Viewing a Photo or Slide Show........................................................ |
39 |
■Slide Show Option Menu.................................................................. |
40 |
■Sorting the Music List....................................................................... |
41 |
■Music List Option Menu.................................................................... |
42 |
■Playing a Music................................................................................ |
43 |
■Music Play option Menu................................................................... |
44 |
■Sorting the Movie List....................................................................... |
44 |
■Movie List Option Menu................................................................... |
45 |
■Playing a Movie File......................................................................... |
45 |
■Movie Play Option Menu.................................................................. |
47 |
■Using the Setup Menu...................................................................... |
48 |
Media Play-DLNA |
|
■Setting the DLNA Network............................................................... |
49 |
■Installing the DLNA Application........................................................ |
50 |
■Using the DLNA Application............................................................. |
51 |
■Using the DLNA Function................................................................. |
53 |
ANYNET+ |
|
■Connecting Anynet+ Devices........................................................... |
54 |
■Setting Up Anynet+.......................................................................... |
55 |
■Switching between Anynet+ Devices............................................... |
55 |
■Recording......................................................................................... |
56 |
■Listening through a Receiver (Home theatre).................................. |
56 |
■Troubleshooting for Anynet+............................................................ |
57 |
Content Library |
|
■Using the Content Library................................................................ |
58 |
■Using the Contents........................................................................... |
59 |
■Using the Content Management...................................................... |
60 |
Internet@TV |
|
■Getting Started with Internet@TV.................................................... |
61 |
■Editing Snippets in the Dock............................................................ |
64 |
■Using the Profile Widget................................................................... |
64 |
■Using the Yahoo!® Widget Gallery................................................... |
66 |
■Using the Yahoo!® Weather Widget................................................. |
67 |
■Using the Yahoo!® News Widget..................................................... |
67 |
■Using the Yahoo!® Flickr Widget...................................................... |
68 |
■Using the Yahoo!® Finance Widget................................................. |
69 |
■Troubleshooting for internet@TV..................................................... |
69 |
Internet@TV |
|
■Getting Started with Internet@TV.................................................... |
70 |
■Setting up Internet@TV.................................................................... |
70 |
■Using the Internet@TV service........................................................ |
71 |
■Troubleshooting for internet@TV..................................................... |
72 |
■Help Website.................................................................................... |
72 |
Home Network Centre |
|
■Home Network Centre...................................................................... |
73 |
■Setting Up the Home Network Centre.............................................. |
74 |
■Using the Message Function............................................................ |
75 |
■Using the Media Function................................................................ |
76 |
RECOMMENDATIONS |
|
■Teletext Feature............................................................................... |
77 |
■Installing the Stand........................................................................... |
78 |
■Disconnecting the Stand.................................................................. |
79 |
■Installing the Wall Mount Kit............................................................. |
79 |
■Assembling the Cables.................................................................... |
79 |
■Anti-Theft Kensington Lock.............................................................. |
79 |
■Securing the Installation Space........................................................ |
80 |
■Securing the TV to the Wall.............................................................. |
80 |
■Troubleshooting: Before Contacting Service Personnel................... |
81 |
■Specifications................................................................................... |
82 |
■GNU GENERAL PUBLIC LICENSE |
|
■END OF TERMS AND CONDITIONS |
|
■GNU Lesser General Public License (LGPL) |
|
■END OF TERMS AND CONDITIONS |
|
■LICENSE ISSUES |
|
License
TruSurround HD, SRS and symbol are trademarks of SRS Labs, Inc. TruSurround HD technology is incorporated under license from SRS Labs, Inc.
Manufactured under license from Dolby Laboratories. Dolby and the double-D symbol are trademarks of
Dolby Laboratories.
DivX® Certified to play DivX® video, including premium content.
Symbol
N |
O |
T |
|
Note |
One-Touch Button |
TOOL Button |
Press |
English
English -
Setting up Your TV
NFigures and illustrations in this User Manual are provided for reference only and may differ from actual product appearance. Product design and specifications may be changed without notice in order to enhance product performance.
¦Viewing the Control Panel
NThe product colour and shape may vary depending on the model.
N The front panel buttons can be activated by touching it with your finger.
8
7 6 5 4 3 21
8
7 |
6 |
4 |
2 1 |
3 |
5 |
1P(POWER): Press to turn the TV on and off.
2POWER INDICATOR: Blinks and turns off when the power is on and lights up in stand-by mode.
3z: Press to change channels. In the on-screen menu, use the zbuttons as you would use the ▼ and ▲ buttons on the remote control.
4Y: Press to increase or decrease the volume.
In the on-screen menu, use the Ybuttons as you would use the ◄ and ► buttons on the remote control.
5MENU: Press to see an on-screen menu of your TV’s features.
6SOURCE E: Toggles between all the available input sources. In the on-screen menu, use this button as you would use the
ENTEREbutton on the remote control.
7REMOTE CONTROL SENSOR: Aim the remote control towards this spot on the TV.
8SPEAKERS
English -
¦ Accessories
Remote Control & Batteries (AAA x 2) |
Power Cord |
Cover-Bottom |
Cleaning Cloth |
|
|
|
|
|
|
|
|
|
|
|
(M4 X L16) |
|
|
|
|
|
|
|
|
|
|
|
|
||
|
|
|
|
|
|
|
||
Warranty Card / Safety Guide (Not |
Stand Screw X 4 |
Programme CD |
Holder-Wire Cable |
|||||
available in all locations) |
(Depending on the model) |
||||||
|
|
|
||||||
|
|
|
|
|
|
|
|
N Please make sure the following items are included with your LCD TV. If any items are missing, contact your dealer. N The items colour and shape may vary depending on the model.
English -
¦ Viewing the Connection Panel
[TV Side Panel] |
|
|
|
[TV Rear Panel] |
|
1 |
2 |
34 |
|
5 |
|
$ |
|
|
|
|
|
# |
|
|
|
|
|
2 |
|
|
|
|
|
# |
|
|
|
|
|
@ |
|
|
|
|
|
|
! |
0 9 |
8 |
7 |
6 |
|
|
|
|
|
Power Input |
NThe product colour and shape may vary depending on the model.
1COMPONENT IN
Connects Component video / audio.
2HDMI IN 1, 2, 3(DVI), 4 / DVI AUDIO IN
Connects to the HDMI jack of a device with an HDMI output.
N No sound connection is needed for an HDMI to HDMI connection. N What is HDMI?
•HDMI(High-Definition Multimedia Interface), is an interface that enables the transmission of digital audio and video signals using a single cable.
•The difference between HDMI and DVI is that the HDMI device is smaller than DVI’s one.
NThe TV may not output sound and pictures may be displayed with abnormal colour when DVD / Blu-ray player / Cable Box / Satellite receiver (Set-Top Box) supporting HDMI versions older than 1.3 are connected. When connecting an older HDMI cable and there is no sound, connect the HDMI cable to the HDMI IN 3(DVI) jack and the audio cables to the DVI AUDIO IN jacks on the back of the TV. If this happens, contact the company that provided the DVD / Blu-ray player / Cable Box / Satellite receiver (Set-Top Box) to confirm the HDMI version, then request an upgrade.
NUse the HDMI IN 3(DVI) jack for DVI connection to an external device. Use a DVI to HDMI cable or DVI-HDMI adapter
(DVI to HDMI) for video connection and the DVI AUDIO IN jacks for audio. When using an HDMI / DVI cable connection, you must use the HDMI IN 3(DVI) jack.
N HDMI cables that are not 1.3 may cause annoying flicker or no screen display.
3PC IN [PC] / [AUDIO]
Connects to the video and audio output jacks on your PC.
N If your PC supports an HDMI connection, you can connect this to the HDMI IN 1, 2, 3(DVI) or 4 terminal.
N If your PC supports a DVI connection, you can connect this to the HDMI IN 3(DVI) / DVI AUDIO IN terminal.
4ANT IN
Connects to an antenna or cable TV system.
5LAN
Connect a LAN cable to this port to connect to the Network.
6KENSINGTON LOCK (depending on the model)
The Kensington Lock (optional) is a device used to physically fix the system when used in a public place. If you want to use a locking device, contact the dealer where you purchased the TV.
N The location of the Kensington Lock may be different depending on its model.
English -
7H(HEADPHONE)
Headphone may be connected to the headphone output on your set. While the head phone is connected, the sound from the built-in speakers will be disabled.
N Using the sound function is restricted when connecting headphones to the TV. N Prolonged use of headphones at a high volume may damage your hearing.
N You will not hear sound from the speakers when you connect headphones to the TV. N The headphone volume and TV volume are adjusted separately.
8DIGITAL AUDIO OUT (OPTICAL)
Connects to a Digital Audio component such as a Home theatre receiver.
N When a Digital Audio System is connected to the DIGITAL AUDIO OUT (OPTICAL) jack: Decrease the volume of the TV and adjust the volume level with the system’s volume control.
N 5.1CH audio is possible when the TV is connected to an external device supporting 5.1CH.
N When the receiver (home theatre) is set to On, you can hear sound output from the TV’s Optical jack. When the TV is displaying a DTV(air) signal, the TV will send out 5.1 channel sound to the Home theatre receiver. When the source is a digital component such as a DVD / Blu-ray player / Cable Box / Satellite receiver (Set-Top Box) and is connected to the TV via HDMI, only 2 channel sound will be heard from the Home Theatre receiver. If you want to hear 5.1 channel audio, connect the digital audio out jack on DVD / Blu-ray player / Cable Box / Satellite receiver (Set-Top Box) directly to an Amplifier or Home Theatre, not the TV.
9SERVICE
Connector for service only.
0AUDIO OUT [R-AUDIO-L]
Connects to the audio input jacks on your Amplifier/Home theatre.
When an audio amplifier is connected to the AUDIO OUT [R-AUDIO-L] jacks: Decrease the volume of the TV and adjust the volume level with the Amplifier’s volume control.
!EXT1, 2
Inputs or outputs for external devices, such as VCR, DVD, video game device or video disc players.
N In EXT Mode, DTV Out supports MPEG SD Video and Audio only.
Input/Output Specification
Connector |
|
Input |
|
Output |
|
Video |
Audio (L / R) |
RGB |
Video + Audio (L / R) |
||
|
|||||
EXT 1 |
O |
O |
O |
Only TV or DTV output is available. |
|
EXT 2 |
O |
O |
X |
Output you can choose. |
@AV IN [VIDEO] / [R-AUDIO-L]
Video and audio inputs for external devices, such as a camcorder or VCR.
#USB1(HDD) / USB2
Connector for software upgrades and Media Play, etc.
You can connect to Samsung’s network wirelessly using the ‘Samsung Wireless LAN Adapter’ (Sold separately). N For USB HDD, use the USB1 (HDD) port.
$ COMMON INTERFACE Slot
When not inserting ‘CI CARD’ in some channels, ‘Scrambled Signal’ is displayed on the screen.
The pairing information containing a telephone number, CI CARD ID, Host ID and other information will be displayed in about 2~3 minutes. If an error message is displayed, please contact your service provider.
When the channel information configuration has finished, the message ‘Updating Completed’ is displayed, indicating that the channel list is now updated.
NYou must obtain a CI CARD from a local cable service provider. Remove the CI CARD by carefully pulling it out with your hands since dropping the CI CARD may cause damage to it.
N Insert the CI-Card in the direction marked on it.
N The place of the COMMON INTERFACE Slot may be different depending on its model.
N CAM is not supported in some countries and regions, check with your authorized dealer.
NThe CI+ function is only applicable to LE********P model.
If you have some problems, please contact to service provider.
English -
¦ Viewing the Remote Control
N You can use the remote control up to a distance of about 23 feet from the TV.
N The performance of the remote control may be affected by bright light. N The product colour and shape may vary depending on the model.
1POWER : Turns the TV on and off.
2TV : Selects the TV mode directly.
3NUMERIC BUTTONS : Press to change the channel.
4E: Performs the same function as the ENTEREbutton of
the directional buttons. When switching channels with the numeric buttons, and you press the channel number and then the
ENTEREbutton, the channel is immediately switched.
5Y: Press to increase or decrease the volume.
6SOURCE : Press to display and select the available video sources.
7CH LIST : Used to display
Channel Lists on the screen.
8TOOLS : Use to quickly select frequently used functions.
9INTERNET@ : Press to use various internet services to view useful information and entertaining content.
0COLOURS BUTTONS : Use these buttons in the Channel list, Internet@TV, Media Play menu, etc.
@INFO : Press to display information on the TV screen.
#Use these buttons in the Media Play and Anynet+ modes. (∏:
This remote can be used to
control recording on Samsung recorders with the Anynet+ feature)
$ ON/OFF @: Pressing the ON/OFF @light button toggles between on and off. When the remote control is on, and a button is pressed on the remote control, the remote control buttons will be lit for a moment. (Using the remote control with the ON/OFF @light button set to On will reduce the battery usage time.)
%PRE-CH : Enables you to return to the previous channel you were watching.
^ MUTE M: Press to temporarily |
|
|
|
cut off the sound. |
|
|
|
& >P <: Press to change |
1 |
|
|
channels. |
2 |
$ |
|
* MENU : Displays the main on- |
|||
|
|
||
screen menu. |
|
|
|
( FAV.CH : Used to display |
3 |
|
|
Favourites Channel Lists on the |
|
||
|
|
||
screen. |
|
|
|
) RETURN : Returns to the |
4 |
% |
|
previous menu |
|
^ |
|
a UP▲ / DOWN▼ / LEFT◄ / |
5 |
& |
|
RIGHT► / ENTERE: Use to |
|||
|
|
||
select on-screen menu items and |
6 |
* |
|
change menu values. |
|
||
7 |
( |
||
b EXIT : Press to exit the menu. |
8 |
) |
|
c CONTENT : This function |
|||
|
|||
|
|
||
enables you to view the Content |
|
a |
|
Library. |
|
||
|
|
||
d MEDIA.P : Allows you to play |
9 |
b |
|
music files, pictures, and movies. |
|
|
|
e SUBT. : Digital subtitle display |
0 |
|
|
! |
c |
||
f GUIDE : Electronic Programme |
|||
|
d |
||
Guide (EPG) display |
@ |
e |
|
|
|
f |
|
|
# |
|
|
Teletext Functions |
|
|
|
6 0: Teletext mode selection |
|
|
|
(LIST / FLOF) |
|
|
|
7 8: Teletext store |
|
|
|
8 4: Teletext size selection |
|
|
|
0 Fastext topic selection |
|
|
|
! /: Alternately select |
|
|
|
Teletext, Double, or Mix. |
|
|
@ 5: Teletext reveal
$ :: Exit from the Teletext display
% 1: Teletext sub page
&2: Teletext next page
3: Teletext previous page
* 6: Teletext index ) 9: Teletext hold b 7: Teletext cancel
English -
¦ Installing Batteries in the Remote Control
1. Lift the cover at the back of the remote control upward as shown in the figure.
2. Install two AAA size batteries.
N Make sure to match the ‘+’ and ‘–’ ends of the batteries with the diagram inside the compartment.
3.Replace the cover.
N Remove the batteries and store them in a cool, dry place if you won’t be using the remote control for a long time.
NIf the remote control doesn’t work, check the following:
•Is the TV power on?
•Are the plus and minus ends of the batteries reversed?
•Are the batteries drained?
•Is there a power outage or is the power cord unplugged?
•Is there a special fluorescent light or neon sign nearby?OPERATION
¦Viewing the menus
Before using the TV, follow the steps below to learn how to navigate the menu in order to select and adjust different functions.
MENU Button
Display the main on-screen menu.
ENTERE/ DIRECTION Button
Move the cursor and select an item. Select the currently selected
item. Confirm the setting.
Operation the OSD (On Screen Display)
The access step may differ depending on the selected menu.
1.Press the MENU button.
RETURN Button
Return to the previous menu.
EXIT
Exit the on-screen menu.
2.The main menu appears on the screen. The menu’s left side has icons : Picture, Sound,
Channel, Setup, Input, Application, Support.
3.Press the ▲ or ▼ button to select one of the icons.
Picture
Mode |
:Standard |
|
Backlight |
: 7 |
|
Contrast |
: 95 |
|
Brightness |
: 45 |
|
Sharpness |
: 50 |
|
Colour |
: 50 |
|
Tint (G/R) |
: G50/R50 |
|
AdvancedSettings |
|
|
4.Then press the ENTEREbutton to access the icon’s sub-menu.
5.Press the ▲ or ▼ button to select the icon’s submenu.
6.Press the ◄ or ► button to decrease or increase the value of a particular item. The adjustment OSD may differ depending on the selected menu.
7.Press the ENTEREbutton to complete the configuration. Press the EXIT button to exit.
Picture
Mode |
: Standard |
|
Backlight |
:7 |
|
Contrast |
: 95 |
|
Brightness |
: 45 |
|
Sharpness |
: 50 |
|
Colour |
: 50 |
|
Tint (G/R) |
: G50/R50 |
|
AdvancedSettings |
|
|
Picture Options |
|
|
▲
Backlight 7
▼
UMove LAdjust EEnter RReturn
Help icon
English -
¦ Placing Your Television in Standby Mode
Your set can be placed in standby mode in order to reduce the power consumption. The standby mode can be useful when you wish to interrupt viewing temporarily (during a meal, for example).
1.Press the POWERPbutton on the remote control.
N The screen is turned off and a standby indicator appears on you set.
2.To switch your set back on, simply press the POWERPbutton again.
N Do not leave your set in standby mode for long periods of time (when you are away on holiday, for example). It is best to unplug the set from the mains and aerial.
¦Plug & Play Feature
When the TV is initially powered on, basic settings proceed automatically and subsequently.
1.Press the POWER button on the remote control.
N You can also use the POWERPbutton on the TV.
N The message Select the OSD Language. is displayed.
2.Press the ENTEREbutton. Select the appropriate language by pressing the ▲ or ▼ button. Press the ENTEREbutton to confirm your choice.
3.Press the ◄ or ► button to select Store Demo or Home Use, then the ENTEREbutton.
N We recommend setting the TV to Home Use mode for the best picture in your home environment.
N Store Demo mode is only intended for use in retail environments.
Plug& Play
Selectthe OSDLanguage.
Menu Language |
:English |
|
EEnter
NIf the unit is accidentally set to Store Demo mode and you want to return to Home Use (Standard): Press the volume button on the TV. When the volume OSD is displayed, press and hold the MENU button on the TV for 5 seconds.
4.Press the ENTEREbutton. Select the appropriate country by pressing the ▲ or ▼ button. Press the ENTEREbutton to confirm your choice.
5.Press the ▲ or ▼ button to select Air or Cable, then press the ENTEREbutton.
NAir: Air antenna signal.
NCable: Cable antenna signal.
6.Press the ▲ or ▼ button to select the channel source to memorize. Press the ENTEREbutton to select Start.
NWhen setting the antenna source to Cable, a step appears allowing you to set a value for the digital channel search. For more information, refer to Channel → Auto Store.
NDigital & Analogue: Digital and Analogue channels. Digital: Digital channels.
Analogue: Analogue channels.
N The channel search will start and end automatically.
N Press the ENTEREbutton at any time to interrupt the memorization process.
NAfter all the available channels are stored, the message Set the Clock Mode. is displayed.
7.Press the ENTEREbutton. Press the ▲ or ▼ button to select Auto, then Press the ENTEREbutton.
NIf you select Manual, Set current date and time is displayed.
N If you have received a digital signal, the time will be set automatically. If not, select Manual to set the clock.
8.The description for the connection method providing the best HD screen quality is displayed. Check the description and press the ENTEREbutton.
9.Press the ◄ or ► button to select See Product Guide or Watch TV. Press the ENTEREbutton.
•See Product Guide: You are moved to the Product Guide where you can view the introduction to the main functions of your new HDTV.
•Watch TV: You can watch the memorized channels.
If you want to reset this feature...
1.Press the MENU button to display the menu. Press the ▲ or ▼ button to select Setup, then press the ENTEREbutton.
2.Press the ENTEREbutton again to select Plug & Play.
3.Enter your 4 digit PIN number. The default PIN number of a new TV set is ‘0-0-0-0’. N If you want to change PIN number, use the Change PIN function.
N The Plug & Play feature is only available in the TV mode.
Setup
Plug &Play |
|
Language |
: English |
Time |
|
Game Mode |
: Off |
BD Wise |
: On |
Network Type |
: Cable |
Network Setup |
|
Child Lock |
: On |
English -
CHANNEL
¦ Channel Menu
Country
■Analogue Channel
You can change the country for analogue channels.
■Digital Channel
You can change the country for digital channels.
N The PIN number input screen appears. Enter your 4 digit PIN number.
Channel
Country |
|
Auto Store
Manual Store
Cable Search Option
Full Guide
Mini Guide
Default Guide : Full Guide
Channel List
Auto Store
You can scan for the frequency ranges available to you (and availability depends on your country). Automatically allocated programme numbers may not correspond to actual or desired programme numbers.
N If a channel is locked using the Child Lock function, the PIN input window appears.
■Air / Cable
Antenna source to memorize
●Digital & Analogue: Digital and Analogue channels.
●Digital: Digital channels.
●Analogue: Analogue channels.
When selecting Cable → Digital & Analogue or Cable → Digital:
Provide a value to scan for cable channels.
● Search Mode → Full / Network /Quick
NQuick
•Network ID: Displays the network identification code.
•Frequency: Displays the frequency for the channel. (Differs in each country)
•Modulation: Displays available modulation values.
•Symbol Rate: Displays available symbol rates.
NScans for all channels with active broadcast stations and stores them in the TV’s memory.
NIf you want to stop Auto Store, press the ENTEREbutton.
The Stop Auto Store? message will be displayed.
Select Yes by pressing the ◄ or ► button, then press the ENTEREbutton.
Manual Store
NScans for a channel manually and stores it in the TV’s memory.
NIf a channel is locked using the Child Lock function, the PIN input window appears.
■Digital Channel
Manual store for digital channels.
NDigital Channel is only available in DTV mode.
●Channel: Set the Channel number using the ▲, ▼ or number (0~9) buttons.
●Frequency: Set the frequency using the number buttons.
●Bandwidth: Set the bandwidth using the ▲, ▼ or number (0~9) buttons.
N When it has finished, channels are updated in the channel list.
■Analogue Channel
Manual store for analogue channel.
●Programme (Programme number to be assigned to a channel): Sets the programme number using the ▲, ▼ or number (0~9) buttons.
●Colour System → Auto / PAL / SECAM / NTSC4.43: Sets the colour system value using the ▲ or ▼ button.
●Sound System → BG / DK / I / L: Sets the sound system value using the ▲ or ▼ button.
English -
●Channel (When you know the number of the channel to be stored): Press the ▲ or ▼ button to select C (Air channel) or S
(Cable channel). Press the ► button, then press the ▲, ▼ or number (0~9) buttons to select the required number.
N You can also select the channel number directly by pressing the number (0~9) buttons. N If there is abnormal sound or no sound, reselect the sound standard required.
N Search (When you do not know the channel numbers): Press the ▲ or ▼ button to start the search. The tuner scans the frequency range until the first channel or the channel that you selected is received on the screen.
●Store (When you store the channel and associated programme number): Set to OK by pressing the ENTEREbutton. N Channel mode
P (Programme mode): When completing tuning, the broadcasting stations in your area have been assigned to position numbers from P00 to P99. You can select a channel by entering the position number in this mode.
C (Air channel mode): You can select a channel by entering the assigned number to each air broadcasting station in this mode.
S (Cable channel mode): You can select a channel by entering the assigned number for each cable channel in this mode.
Cable Search Option (depending on the country)
Sets additional search options such as the frequency and symbol rate for cable network searches.
●Freq.Start (Frequency Start): Set the start frequency (Differs in each country)
●Freq.Stop (Frequency Stop): Set the stop frequency (Differs in each country)
●Modulation: Displays available modulation values.
●Symbol Rate: Displays available symbol rates.
Full Guide / Mini Guide
The EPG (Electronic Programme Guide) information is provided by the broadcasters. Programme entries may appear blank or out of date as a result of the information broadcast on a given channel. The display will dynamically update as soon as new information becomes available.
O You can also display the guide menu simply by pressing the GUIDE button. (To configure the Default Guide, refer to the descriptions.)
■Full Guide
Displays the programme information as time ordered One hour segments. Two hours of programme information is displayed which may be scrolled forwards or backwards in time.
■Mini Guide
The information of each programme is displayed by each line on the current channel Mini Guide screen from the current programme onwards according to the programme starting time order.
Default Guide → Mini Guide / Full Guide
You can decide whether to display either the Mini Guide or the Full Guide when the GUIDE button on the remote control is pressed.
Channel List
For detailed procedures on using the Channel List, refer to the Managing Channels instructions. O You can select these options by simply pressing the CH LIST button on the remote control.
Channel Mode
When press the P >/<button, Channels will be switched within the selected channel list.
■Added Ch.
Channels will be switched within the memorized channel list.
■Favourite Ch.
Channels will be switched within the favourite channel list.
English - 10
Fine Tune
If the reception is clear, you do not have to fine tune the channel, as this is done automatically during the search and store operation. If the signal is weak or distorted, you may have to fine tune the channel manually.
N Fine tuned channels that have been saved are marked with an asterisk “*” on the right-hand side of the channel number in the channel banner.
N To reset the fine-tuning, select Reset by pressing the ▲ or ▼ button and then press the ENTEREbutton.
N Only Analogue TV channels can be fine tuned.
Using the Full / Mini Guide
Full Guide
|
|
|
DTV Cable 900 f tn |
|
|
2:10Tue 1 Jun |
|
|
||||
|
|
|
Freshmen On Campus |
|
|
|
|
|
||||
|
|
2:00 - 2:30 |
|
|
|
|
|
|
|
|||
900 |
|
|
No Detailed Information |
|
|
|
||||||
|
Today |
|
|
|
2:00-3:00 |
|
|
|
3:00-4:00 |
|
|
|
900 |
f tn |
|
Freshmen O.. |
|
Street Hypn.. |
|
No Information |
|
|
|||
901 |
ITV Play |
|
Mint Extra |
|
|
|
|
|
|
|
|
|
902 |
Kerrang! |
|
Loaded |
|
|
|
|
|
No Information |
|
|
|
903 |
Kiss |
|
40 with Dynamite MC |
|
Kisstory |
|
|
|||||
|
|
|
|
|
|
|
|
|
|
|
||
904 |
oneword |
|
The Distillery |
|
|
|
|
No Information |
|
|
||
|
|
|
|
|
|
|
|
|
|
|||
▼ 905 |
Hits |
|
Smash Hits! Sunday |
|
|
|
|
|
||||
|
|
EWatch |
Information |
|
Mini Guide |
+24 Hours |
Exit |
|
||||
|
|
|
|
MiniGuide |
DTVCable 900 f tn |
|
|
|
|
2:00 |
Freshmen On Campus |
|
|
||
2:30 |
Street Hypnosis |
|
|
|
|
▼ 5:00 |
Booze Britain |
|
|
|
|
EWatch |
Information |
|
Full Guide |
Next Page |
Exit |
|
To... |
Then... |
Watch a programme in the EPG list |
Select a programme by pressing the ▲, ▼, ◄, ► button. |
Exit the guide |
Press the blue button |
If the next programme is selected, it is scheduled with the clock icon displayed. If the ENTEREbutton is pressed again, press the ◄, ► button to select Cancel Schedules, the scheduling is cancelled with the clock icon gone.
View programme information |
Select a programme of your choice by pressing the ▲, ▼, ◄, ► button. |
|
Then press the INFO button when the programme of your choice is |
|
highlighted. |
|
The programme title is on the upper part of the screen centre. |
Please click on INFO button for the detailed information. Channel Number, Running Time, Status Bar, Parental Level, Video Quality
Information (HD / SD), Sound Modes, Subtitle or Teletext, languages of Subtitle or Teletext and brief summary of the highlighted programme are included on the detailed information. “...” will be appeared if the summary is long.
Toggle between the Mini Guide and Full Guide |
Press the red button repeatedly. |
In Full Guide |
|
Scrolls backwards quickly (24 hours). |
Press the Green button repeatedly. |
Scrolls forwards quickly (24 hours). |
Press the Yellow button repeatedly. |
In Mini Guide |
|
Display previous page quickly. |
Press the Green button. |
Display next page quickly. |
Press the Yellow button. |
English - 11
¦ Managing Channels
Using this menu, you can add / delete or set favourites channels and use the programme guide for digital broadcasts.
■All Channels
Shows all currently available channels.
■Added Channels
Shows all added channels.
■Favourites
Shows all favourite channels.
AddedChannels
All
824 UKTV Gold
825 UKTV style
|
A1 |
|
C -- |
||
|
A2 |
|
C -- |
||
|
A3 |
|
C -- |
||
|
A4 |
|
C -- |
||
|
A5 |
|
C -- |
||
|
A6 |
|
C -- |
||
|
A7 |
|
C -- |
||
|
A8 |
|
C -- |
||
|
Channel Type |
|
Zoom |
|
Select TTools |
|
|
|
OTo select the favourites channels you have set up, press the FAV.CH button on the remote control.
■Programmed
Shows all current reserved programmes.
NSelect a channel in the All Channels, Added Channels or Favourites screen by pressing the ▲ / ▼ buttons, and pressing the ENTEREbutton. Then you can watch the selected channel.
NUsing the Colour buttons with the Channel List
Red (Channel Type): Toggle between your TV, Radio, Data / Other and All.
Green (Zoom): Enlarges or shrinks a channel number.
Yellow (Select): Selects multiple channel lists. You can perform the add/delete or add to favourites/delete from favourites function for multiple channels at the same time. Select the required channels and press the Yellow button to set all the selected channels at the same time. The cmark appears to the left of the selected channels.
TOOLS (Tools): Displays the Delete (or Add), Add to Favourite (or Delete from Favourite), Lock (or Unlock), Timer Viewing, Edit Channel Name, Edit Channel Number, Sort, Select All (or Deselect All), Auto Store menu. (The Options menus may differ depending on the situation.)
NChannel Status Display Icons
•A: An Analogue channel.
•c: A channel selected by pressing the Yellow button.
•*: A channel set as a Favourite.
•(: A programme currently being broadcast.
•\: A locked channel.
•): A reserved programme
Channel List Option Menu (in All Channels / Added Channels / Favourites)
N Press the TOOLS button to use the option menu.
NOption menu items may differ depending on the channel status.
■Add / Delete
You can delete or add a channel to display the channels you want.
NAll deleted channels will be shown on All Channels menu.
N A gray-coloured channel indicates the channel has been deleted.
N The Add menu only appears for deleted channels.
NYou can also delete a channel to the Added Channels or Favourites menu in the same manner.
ChannelsAll
All
824 |
|
UKTVGold |
|
|
|
|||
825 |
|
UKTVstyle |
|
|
|
|||
|
A1 |
|
C-- |
|
|
|
||
|
|
|
|
|
||||
|
|
|
Delete |
|
||||
|
A2 |
|
C-- |
|
Add toFavourite |
|
||
|
|
|
Lock |
|
||||
|
A3 |
|
C-- |
|
||||
|
|
|
Timer Viewing |
|||||
|
A4 |
|
C -- |
|
||||
|
|
|
Edit Channel Name |
|
||||
|
A5 |
|
C-- |
|
Sort |
|
||
|
A6 |
|
C -- |
|
|
|
||
|
A7 |
|
C-- |
|
|
|
||
|
A8 |
|
C -- |
|
|
|
||
|
Channel Type |
|
Zoom |
|
Select |
TTools |
||
|
|
|
■ Add to Favourite / Delete from Favourite
You can set channels you watch frequently as favourites.
T Press the TOOLS button to display the Tools menu. You can also set the add to (or delete from) Favourite by selecting Tools
→ Add to Favourite (or Delete from Favourite).
N The “*” symbol will be displayed and the channel will be set as a favourite. N All favourite channels will be shown on Favourites menu.
English - 12
■Lock / Unlock
You can lock a channel so that the channel cannot be selected and viewed. N This function is available only when the Child Lock is set to On.
N The PIN number input screen appears. Enter your 4 digit PIN number.
N The default PIN number of a new TV set is “0-0-0-0”. You can change the PIN, by selecting Change PIN from the menu. N The “\” symbol will be displayed and the channel will be locked.
■Timer Viewing
If you reserve a programme you want to watch, the channel is automatically switched to the reserved channel in the Channel List; even when you are watching another channel. To reserve a programme, set the current time first.
N Only memorized channels can be reserved.
N You can set the channel, day, month, year, hour and minute directly by pressing the number buttons on the remote control. N Reserving a programme will be shown in the Programmed menu.
N Digital Programme Guide and Viewing Reservation
When a digital channel is selected, and you press the ► button, the Programme Guide for the channel appears. You can reserve a programme according to the procedures described above.
■Edit Channel Name (analogue channels only)
Channels can labelled so that their call letters appear whenever the channel is selected.
N The names of digital broadcasting channels are automatically assigned and cannot be renamed.
■Edit Channel Number (digital channels only)
You can also edit the channel number by pressing the number buttons on the remote control.
■Sort (analogue channels only)
This operation allows you to change the programme numbers of the stored channels. This operation may be necessary after using the auto store.
■Select All / Deselect All
●Select All: You can select all the channels in the channel list.
●Deselect All: You can deselect all the selected channels.
NYou can only select Deselect All when there is a selected channel.
■Auto Store
NFor detailed procedures on setting up options, refer to the ‘Channel Menu’ instructions.
NIf a channel is locked using the Child Lock function, the PIN input window appears.
Channel List Option Menu (in Programmed)
You can view, modify or delete a reservation.
N Press the TOOLS button to use the option menu.
■Change Info
Select to change a viewing reservation.
■Cancel Schedules
Select to cancel a viewin`g reservation.
■Information
Select to view a viewing reservation.
(You can also change the reservation information.)
■Select All
Select all reserved programmes.
Programmed |
1 / 1/ 2008 |
|
|
Cancel Schedules |
|||||
|
|
|
|
|
|||||
|
13:59 |
5 TV1 |
|
|
|
||||
|
) |
|
|
||||||
|
Change Info |
|
|||||||
|
18:59 |
2 |
TV3 |
) |
|
|
|||
|
Information |
||||||||
|
20:59 |
2 |
TV3 |
) |
Select All |
|
|||
|
21:59 |
2 |
TV3 |
) |
M.Spillane’s mike |
||||
All |
|
Zoom |
|
Select |
TTools |
EInformation |
|||
|
|
English - 13
PICTURE
¦ Configuring the Picture Menu
Mode
You can select the type of picture which best corresponds to your viewing requirements.
TPress the TOOLS button to display the Tools menu. You can also set the picture mode by selecting Tools → Picture Mode.
■Dynamic
Selects the picture for increased definition in a bright room.
■Standard
Selects the picture for the optimum display in a normal environment.
■Natural
Selects the picture for an optimum and eye-comfortable display.
NThis function is not available in PC mode.
■Movie
Selects the picture for viewing movies in a dark room.
Backlight / Contrast / Brightness / Sharpness / Colour / Tint(G/R)
Your television has several setting options that allow you to control the picture quality.
●Backlight: Adjusts the brightness of LCD back light.
●Contrast: Adjusts the contrast level of the picture.
●Brightness: Adjusts the brightness level of the picture
●Sharpness: Adjusts the edge definition of the picture.
●Colour: Adjusts colour saturation of the picture.
●Tint(G/R): Adjusts the colour tint of the picture.
N In analogue TV, Ext., AV modes of the PAL system, you cannot use the Tint(G/R) Function.
Picture |
Mode |
:Standard |
|
|
|||
|
Backlight |
: 7 |
|
|
Contrast |
: 95 |
|
|
Brightness |
: 45 |
|
|
Sharpness |
: 50 |
|
|
Colour |
: 50 |
|
|
Tint (G/R) |
: G50/R50 |
|
|
Advanced Settings |
|
|
▲
Backlight 7
▼
UMove LAdjust EEnter RReturn
NWhen you make changes to Backlight, Contrast, Brightness, Sharpness, Colour or Tint(G/R) the OSD will be adjusted accordingly.
N In PC mode, you can only make changes to Backlight, Contrast and Brightness.
N Settings can be adjusted and stored for each external device you have connected to an input of the TV.
NThe energy consumed during use can be significantly reduced if the brightness level of the picture is lowered, which will reduce the overall running cost.
Advanced Settings
Samsung’s new TVs allow you to make even more precise picture settings than previous models.
N Advanced Settings is available in Standard or Movie mode.
NIn PC mode, you can only make changes to Dynamic Contrast, Gamma and White Balance from among the Advanced Settings items.
■Black Tone → Off / Dark / Darker / Darkest
You can select the black level on the screen to adjust the screen depth.
■Dynamic Contrast → Off / Low / Medium / High
You can adjust the screen contrast so that the optimal contrast is provided.
■Gamma
You can adjust the primary colour (red, green, blue) intensity.
AdvancedSettings
BlackTone |
:Off |
|
DynamicContrast |
:Medium |
|
Gamma |
:0 |
|
ColourSpace |
:Native |
|
WhiteBalance |
|
|
Flesh Tone |
:0 |
|
Edge Enhancement |
:On |
|
|
UMove EEnter |
RReturn |
English - 14
■Colour Space
Colour space is a colour matrix composed of red, green and blue colours. Select your favourites colour space to experience the most natural colour.
●Auto: Auto Colour Space automatically adjusts to the most natural colour tone based on program sources.
●Native: Native Colour Space offers deep and rich colour tone.
●Custom: Adjusts the colour range to suit your preference.
N Changing the adjustment value will refresh the adjusted screen.
N Settings can be adjusted and stored for each external device you have connected to an input of the TV. For example, if you have a DVD player connected to HDMI 1 and it is currently selected, settings and adjustments will be saved for the DVD player.
Colour: Red, Green, Blue, Yellow, Cyan or Magenta
N Colour is available when Colour Space is set to Custom.
N In Colour, you can adjust the RGB values for the selected colour. N To reset the adjusted RGB value, select Reset.
Red: Adjusts the red saturation level of the selected colour.
Green: Adjusts the green saturation level of the selected colour.
Blue: Adjusts the blue saturation level of the selected colour.
Reset: Resets the colour space to the default values.
■White Balance
You can adjust the colour temperature for more natural picture colours.
●R-Offset: Adjusts the red colour darkness.
●G-Offset: Adjusts the green colour darkness.
●B-Offset: Adjusts the blue colour darkness.
●R-Gain: Adjusts the red colour brightness.
●G-Gain: Adjusts the green colour brightness.
●B-Gain: Adjusts the blue colour brightness.
●Reset: The previously adjusted white balance will be reset to the factory defaults.
■Flesh Tone
You can emphasize the pink ‘flesh tone’ in the picture.
N Changing the adjustment value will refresh the adjusted screen.
■Edge Enhancement → Off / On
You can emphasize object boundaries in the picture.
■xvYCC → Off / On
Setting the xvYCC mode to on increases detail and colour space when watching movies from an external device (ie. DVD player) connected to the HDMI or Component IN jacks.
N xvYCC is available when the picture mode is set to Movie, and the external input is set to HDMI or Component mode.
N This function may not be supported depending on your external device.
English - 15
Picture Options
NIn PC mode, you can only make changes to the Colour Tone and Size from among the items in Picture Options.
■Colour Tone → Cool / Normal / Warm1 / Warm2 / Warm3
NWarm1, Warm2 or Warm3 is only activated when the picture mode is Movie.
NSettings can be adjusted and stored for each external device you have connected to an input of the TV.
Picture Options
ColourTone |
: Normal |
|
Size |
: Auto Wide |
|
Screen Mode |
: 16:9 |
|
Digital NR |
: Auto |
|
HDMI Black Level |
: Normal |
|
FilmMode |
: Off |
|
100Hz Motion Plus |
: Standard |
|
|
▼ |
|
UMove EEnter RReturn
■Size
Occasionally, you may want to change the size of the image on your screen. Your TV comes
with several screen size options, each designed to work best with specific types of video input. Your cable box/satellite receiver may have its own set of screen sizes as well. In general, though, you should view the TV in 16:9 mode as much as possible.
T Press the TOOLS button to display the Tools menu. You can also set the size by selecting Tools → Picture Size.
●Auto Wide: Automatically adjusts the picture size to the 16:9 aspect ratio.
●16:9: Adjusts the picture size to 16:9 appropriate for DVDs or wide broadcasting.
●Wide Zoom: Magnify the size of the picture more than 4:3.
●Zoom: Magnifies the 16:9 wide picture (in the vertical direction) to fit the screen size.
●4:3: This is the default setting for a video movie or normal broadcasting.
●Screen Fit: Use the function to see the full image without any cut-off when HDMI (720p / 1080i / 1080p) or Component (1080i
/ 1080p) signals are input.
N Depending on the input source, the picture size options may vary. N The items available may differ depending on the selected mode.
N In PC Mode, only 16:9 and 4:3 mode can be adjusted.
N Settings can be adjusted and stored for each external device you have connected to an input of the TV. N Temporary image retention may occur when viewing a static image on the set for more than two hours.
NWide Zoom: Press the ► button to Select Position, then press the ENTEREbutton. Press the ▲ or ▼ button to move the picture up / down. Then press the ENTEREbutton.
NZoom: Press the ► button to Select Position, then press the ENTEREbutton. Press the ▲ or ▼ button to move the picture up and down. Then press the ENTEREbutton. Press the ► button to Select Size, then press the ENTEREbutton. Press the ▲ or ▼ button to magnify or reduce the picture size in the vertical direction. Then press the ENTEREbutton.
NAfter selecting Screen Fit in HDMI (1080i / 1080p) or Component (1080i / 1080p) mode: Select Position by pressing the ◄ or ► button. Use the ▲, ▼, ◄ or ► button to move the picture.
Reset: Press the ◄ or ► button to select Reset, then press the ENTEREbutton. You can initialize the setting.
NIf you use the Screen Fit function with HDMI 720p input, 1 line will be cut at the top, bottom, left and right as in the Overscan function.
NWhen Double (À, Œ) mode has been set in PIP, the Picture Size cannot be set.
■Screen Mode → 16:9 / Wide Zoom / Zoom / 4:3
When setting the picture size to Auto Wide in a 16:9 wide TV, you can determine the picture size you want to see the 4:3 WSS
(Wide Screen Service) image or nothing. Each individual European country requires different picture size so this function is intended for users to select it.
● 16:9: Sets the picture to 16:9 wide mode.
● Wide Zoom: Magnify the size of the picture more than 4:3. ● Zoom: Magnify the size of the picture vertically on screen.
● 4:3: Sets the picture to 4:3 normal mode.
NThis function is available in Auto Wide mode.
NThis function is not available in PC, Component or HDMI mode.
■Digital NR → Off / Low / Medium / High / Auto
If the broadcast signal received by your TV is weak, you can activate the Digital Noise Reduction feature to help reduce any static and ghosting that may appear on the screen.
NWhen the signal is weak, select one of the other options until the best picture is displayed.
■HDMI Black Level → Normal / Low
You can select the black level on the screen to adjust the screen depth.
NThis function is active only when an external device is connected to the TV via HDMI (RGB signals).
English - 16
■Film Mode → Off / Auto1 / Auto2
The TV can be set to automatically sense and process film signals from all sources and adjust the picture for optimum quality. N Film Mode is supported in TV, AV, COMPONENT(480i / 1080i) and HDMI(480i / 1080i).
●Off: Turn the Film Mode function off.
●Auto1: Automatically adjusts the picture for the best quality when watching a film.
●Auto2: Automatically optimizes the video text on the screen (not including closed captions) when watching a film.
■100Hz Motion Plus → Off / Clear / Standard / Smooth / Custom / Demo
Removes drag from fast scenes with a lot of movement to provide a clearer picture.
N If you enable 100 Hz Motion Plus, noise may appear on the screen. If this occurs, set 100Hz Motion Plus to Off.
●Off: Switches 100Hz Motion Plus off.
●Clear: Sets 100Hz Motion Plus to minimum.
●Standard: Sets 100Hz Motion Plus to medium.
●Smooth: Sets 100Hz Motion Plus to maximum.
●Custom: Adjusts the blur and judder reduction level to suit your preference.
Blur Reduction: Adjusts the blur reduction level from video sources.
Judder Reduction: Adjusts the judder reduction level from video sources when playing films.
Reset: Reset the custom settings.
●Demo: Displays the difference between 100Hz Motion Plus on and off modes.
■Blue Only Mode → Off / On
This function is for AV device measurement experts. This function displays the blue signal only by removing the red and green signals from the video signal so as to provide a Blue Filter effect that is used to adjust the Colour and Tint of video equipment such as DVD players, Home Theatres, etc. Using this function, you can adjust the Colour and Tint to preferred values appropriate to the signal level of each video device using the Red / Green / Blue / Cyan / Magenta / Yellow Colour Bar Patterns, without using an additional Blue Filter.
N Blue Only Mode is available when the picture mode is set to Movie or Standard.
Picture Reset → Reset Picture Mode / Cancel
Resets all picture settings to the default values.
N Reset Picture Mode: Current picture values return to default settings.
English - 17
¦ Viewing Picture-in-Picture
You can use the PIP feature to simultaneously watch the TV tuner and one external video source. This product has one built-in tuner, which does not allow PIP to function in the same mode. Please see ‘PIP Settings’ below for details.
TPress the TOOLS button to display the Tools menu. You can also configure PIP related settings by selecting Tools → PIP.
N If you select the PIP picture sound, refer to the ‘Configuring the Sound Menu’ instructions.
N PIP Settings
Main picture |
Sub picture |
Component |
|
HDMI1, HDMI2, HDMI3/DVI, HDMI4 |
TV |
PC |
|
Setup
Melody |
: Medium |
Energy Saving |
: Off |
PIP |
|
Common Interface |
|
N If you turn the TV off while watching in PIP mode and turn it on again, the PIP window will disappear.
NYou may notice that the picture in the PIP window becomes slightly unnatural when you use the main screen to view a game or karaoke.
NWhile Internet@TV is in operation, the PIP function cannot be used.
PIP → Off / On
You can activate or deactivate the PIP function.
Size → Õ/ Ã/ À/ Œ
You can select a size of the sub-picture.
Position → Ã/ –/ —/ œ
You can select a position of the sub-picture.
NIn Double (Œ, À) mode, Position cannot be selected.
Channel
You can select the channel for the sub-screen.
PIP
PIP |
: On |
|
Size |
:Õ |
|
Position |
:Ã |
|
Channel |
: ATV 4 |
|
|
UMove EEnter |
RReturn |
English - 18
¦ Using Your TV as a Computer (PC) Display
Setting Up Your PC Software (Based on Windows XP)
The Windows display-settings for a typical computer are shown below. The actual screens on your PC will probably be different, depending upon your particular version of Windows and your particular video card. However, even if your actual screens look different, the same basic set-up information will apply in almost all cases. (If not, contact your computer manufacturer or Samsung Dealer.)
1.First, click on ‘Control Panel’ on the Windows start menu.
2.When the control panel window appears, click on ‘Appearance and Themes’ and a display dialog-box will appear.
3.When the control panel window appears, click on ‘Display’ and a display dialogbox will appear.
4.Navigate to the ‘Settings’ tab on the display dialog-box.
•The correct size setting (resolution) - Optimum: 1920 X 1080 pixels
•If a vertical-frequency option exists on your display settings dialog box, the correct value is ‘60’ or ‘60 Hz’. Otherwise, just click ‘OK’ and exit the dialog box.
Display Modes
If the signal from the system equals the standard signal mode, the screen is adjusted automatically. If the signal from the system doesn’t equal the standard signal mode, adjust the mode by referring to your videocard user guide; otherwise there may be no video. For the display modes listed on the next page, the screen image has been optimized during manufacturing.
■ D-Sub and HDMI/DVI Input |
|
|
|
|
||
|
|
|
|
|
|
|
|
Mode |
Resolution |
Horizontal Frequency |
Vertical Frequency |
Pixel Clock Frequency |
Sync Polarity |
|
(KHz) |
(Hz) |
(MHz) |
(H / V) |
||
|
|
|
||||
|
IBM |
640 x 350 |
31.469 |
70.086 |
25.175 |
+/- |
|
720 x 400 |
31.469 |
70.087 |
28.322 |
-/+ |
|
|
MAC |
640 x 480 |
35.000 |
66.667 |
30.240 |
-/- |
|
832 x 624 |
49.726 |
74.551 |
57.284 |
-/- |
|
|
|
1152 x 870 |
68.681 |
75.062 |
100.000 |
-/- |
|
|
720 x 576 |
35.910 |
59.950 |
32.750 |
-/+ |
|
VESA CVT |
1152 x 864 |
53.783 |
59.959 |
81.750 |
-/+ |
|
1280 x 720 |
44.772 |
59.855 |
74.500 |
-/+ |
|
|
|
1280 x 720 |
56.456 |
74.777 |
95.750 |
-/+ |
|
|
1280 x 960 |
75.231 |
74.857 |
130.000 |
-/+ |
|
|
640 x 480 |
31.469 |
59.940 |
25.175 |
-/- |
|
|
640 x 480 |
37.861 |
72.809 |
31.500 |
-/- |
|
|
640 x 480 |
37.500 |
75.000 |
31.500 |
-/- |
|
|
800 x 600 |
37.879 |
60.317 |
40.000 |
+/+ |
|
|
800 x 600 |
48.077 |
72.188 |
50.000 |
+/+ |
|
|
800 x 600 |
46.875 |
75.000 |
49.500 |
+/+ |
|
|
1024 x 768 |
48.363 |
60.004 |
65.000 |
-/- |
|
|
1024 x 768 |
56.476 |
70.069 |
75.000 |
-/- |
|
VESA DMT |
1024 x 768 |
60.023 |
75.029 |
78.750 |
+/+ |
|
1152 x 864 |
67.500 |
75.000 |
108.000 |
+/+ |
|
|
|
1280 x 1024 |
63.981 |
60.020 |
108.000 |
+/+ |
|
|
1280 x 1024 |
79.976 |
75.025 |
135.000 |
+/+ |
|
|
1280 x 800 |
49.702 |
59.810 |
83.500 |
-/+ |
|
|
1280 x 800 |
62.795 |
74.934 |
106.500 |
-/+ |
|
|
1280 x 960 |
60.000 |
60.000 |
108.000 |
+/+ |
|
|
1360 x 768 |
47.712 |
60.015 |
85.500 |
+/+ |
|
|
1440 x 900 |
55.935 |
59.887 |
106.500 |
-/+ |
|
|
1440 x 900 |
70.635 |
74.984 |
136.750 |
-/+ |
|
|
1680 x 1050 |
65.290 |
59.954 |
146.250 |
-/+ |
|
VESA GTF |
1280 x 720 |
52.500 |
70.000 |
89.040 |
-/+ |
|
1280 x 1024 |
74.620 |
70.000 |
128.943 |
-/- |
|
|
VESA DMT / |
1920 x 1080p |
67.500 |
60.000 |
148.500 |
+/+ |
|
DTV CEA |
|||||
|
|
|
|
|
|
N When using an HDMI / DVI cable connection, you must use the HDMI IN 3(DVI) jack.
N The interlace mode is not supported.
N The set might operate abnormally if a non-standard video format is selected.
N Separate and Composite modes are supported. SOG is not supported.
N Too long or low quality VGA cable can cause picture noise at high resolution modes (1920x1080).
English - 19
¦ Setting up the TV with your PC
NPreset: Press the SOURCE button to select PC mode.
Auto Adjustment
Use the Auto Adjust function to have the TV automatically adjust the video signals it receives.
The function also automatically fine-tunes the settings and adjusts the frequency values and positions.
TPress the TOOLS button to display the Tools menu. You can also set the Auto Adjustment by selecting Tools → Auto Adjustment.
N This function does not work in DVI-HDMI mode.
Screen
■Coarse / Fine
The purpose of picture quality adjustment is to remove or reduce picture noise. If the noise is not removed by Fine-tuning alone, then adjust the frequency as best as possible (Coarse) and
Fine-tune again. After the noise has been reduced, readjust the picture so that it is aligned on the centre of screen.
■PC Position
Adjust the PC’s screen positioning if it does not fit the TV screen.
Press the ▲ or ▼ button to adjusting the Vertical-Position. Press the ◄ or ► button to adjust the Horizontal-Position.
■Image Reset
You can replace all image settings with the factory default values.
|
Brightness |
: 45 |
|
Picture |
Sharpness |
: 50 |
|
AutoAdjustment |
|
||
|
Screen
AdvancedSettings
Picture Options
Picture Reset
Screen
Coarse |
|
|
|
|
50 |
|
|
|
|||
Fine |
|
|
0 |
||
|
|
||||
PC Position |
|
|
|
||
Image Reset |
|
|
|
||
|
|
UMove |
|
EEnter RReturn |
SOUND
¦ Configuring the Sound Menu
Mode → Standard / Music / Movie / Clear Voice / Custom
TPress the TOOLS button to display the Tools menu. You can also set the sound mode by selecting Tools → Sound Mode.
●Standard: Selects the normal sound mode.
●Music: Emphasizes music over voices.
●Movie: Provides the best sound for movies.
●Clear Voice: Emphasizes voice over other sounds.
Sound
Mode |
: Custom |
|
Equalizer |
|
|
SRS TruSurroundHD |
: Off |
|
Audio Language |
: ---- |
|
Audio Format |
: ---- |
|
Audio Description |
|
|
Auto Volume |
: Off |
|
Speaker Select |
: TV Speaker |
|
●Custom: Recalls your customized sound settings.
Equalizer
The sound settings can be adjusted to suit your personal preferences.
●Mode: Selects the sound mode among the predefined settings.
●Balance L/R: Adjusts the balance between the right and left speaker.
●100Hz / 300Hz / 1KHz / 3KHz / 10KHz (Bandwidth Adjustment): To adjust the level of different bandwidth frequencies.
●Reset: Resets the equalizer settings to the default values.
SRS TruSurround HD → Off / On
SRS TruSurround HD is a patented SRS technology that solves the problem of playing 5.1 multichannel content over two speakers. TruSurround delivers a compelling, virtual surround sound experience through any two-speaker playback system, including internal television speakers. It is fully compatible with all multichannel formats.
TPress the TOOLS button to display the Tools menu. You can also set the SRS TruSurround HD by selecting Tools → SRS TS
HD.
English - 20
Audio Language
You can change the default value for audio languages. Displays the language information for the incoming stream. N While viewing a digital channel, this function can be selected.
N You can only select the language among the actual languages being broadcast.
Audio Format → MPEG / Dolby Digital
When sound is emitted from both the main speaker and the audio receiver, a sound echo may occur due to the decoding speed difference between the main speaker and the audio receiver. In this case, use the TV Speaker function.
N While viewing a digital channel, this function can be selected. N The Audio Format appears according to the broadcasting signal.
Audio Description
This is an auxiliary audio function that provides an additional audio track for visually challenged persons. This function handles the
Audio Stream for the AD (Audio Description), when it is sent along with the Main audio from the broadcaster. Users can turn the
Audio Description On or Off and control the volume.
■Audio Description → Off / On
Turn the audio description function on or off.
■Volume
You can adjust the audio description volume.
N Volume is active when Audio Description is set to On.
NWhile viewing a Digital channel, this function can be selected.
Auto Volume → Off / On
Each broadcasting station has its own signal conditions, and so it is not easy to adjust the volume every time the channel is changed. This feature lets you automatically adjust the volume of the desired channel by lowering the sound output when the modulation signal is high or by raising the sound output when the modulation signal is low.
Speaker Select
When you watch TV with it connecting to a Home theatre, turn the TV speakers off so you can listen to sound from the Home theatre’s (external) speakers.
● External Speaker: Used to listen to the sound of the External (Home Theatre) Speakers. ● TV Speaker: Used to listen to the sound of the TV Speakers.
NThe volume and MUTE buttons do not operate when the Speaker Select is set to External Speaker.
N If you select External Speaker in the Speaker Select menu, the sound settings will be limited
|
TV’s Internal Speakers |
Audio Out (Optical, L/R Out) to Sound System |
|
RF / AV / Component / PC / HDMI |
TV Speaker |
Sound Output |
Sound Output |
External Speaker |
Mute |
Sound Output |
Video No Signal |
Mute |
Mute |
Sound Select → Main / Sub
When the PIP feature is activated, you can listen to the sound of the sub (PIP) picture. N You can select this option when PIP is set to On.
TPress the TOOLS button to display the Tools menu. You can also set the sound of the sub picture by selecting Tools → PIP → Sound Select.
Sound Reset → Reset All / Reset Sound Mode / Cancel
You can restore the Sound settings to the factory defaults.
N Reset Sound Mode: Current sound values return to default settings.
Sound Reset
Cancel sound reset.
ResetAll |
ResetSoundMode |
Cancel |
|
|
|
|
LMove |
EEnter RReturn |
|
|
|
English - 21
¦ Selecting the Sound Mode
You can set the sound mode in the Tools menu. When you set to Dual l ll, the current sound mode is displayed on the screen.
|
Audio Type |
|
|
|
Dual 1 / 2 |
Default |
|||
|
Mono |
|
|
|
MONO |
Automatic change |
|||
A2 Stereo |
Stereo |
|
|
STEREO ↔ MONO |
|||||
|
|
|
|||||||
|
Dual |
|
|
DUAL 1 ↔ DUAL 2 |
DUAL 1 |
||||
|
Mono |
|
|
|
MONO |
Automatic change |
|||
NICAM |
Stereo |
|
|
MONO ↔ STEREO |
|||||
|
|
|
|||||||
Stereo |
|
|
|
|
|
|
|
|
|
|
|
|
|
|
|
|
|
|
|
|
Dual |
|
|
MONO ↔ DUAL 1 |
|
DUAL 1 |
|||
|
|
|
|
DUAL 2 |
|
|
|
||
|
|
|
|
|
|
|
|
|
N If the stereo signal is weak and an automatic switching occurs, then switch to the mono.
N This function is only activated in stereo sound signal. It is deactivated in mono sound signal.
N This function is only available in TV mode.
SETUP
¦ Configuring the Setup Menu
Language
You can set the menu language.
Time
For detailed procedures on setting up options, refer to the ‘Setting the Time’ instructions.
Game Mode → Off / On
When connecting to a game console such as PlayStation™ or Xbox™, you can enjoy a more realistic gaming experience by selecting game menu.
Setup
Plug& Play |
|
|
Language |
: English |
|
Time |
|
|
Game Mode |
: Off |
|
BD Wise |
: On |
|
Network Type |
: Cable |
|
Network Setup |
|
|
Child Lock |
: On |
|
Change PIN |
|
|
NRestrictions on game mode (Caution)
To disconnect the game console and connect another external device, set Game Mode to Off in the setup menu.
If you display the TV menu in Game Mode, the screen shakes slightly.
N Game Mode is not available in regular TV, PC and Ext mode.
N While PIP is in operation, the Game Mode function cannot be used.
NIf the picture is poor when external device is connected to TV, check if Game Mode is On. Set Game Mode to Off and connect external devices.
NIf Game Mode is On:
Picture mode is automatically changed to Standard and cannot be changed.
Sound mode is automatically changed to Custom and cannot be changed. Adjust the sound using the equalizer.
The Reset Sound function is activated. Selecting the Reset function after setting the equalizer resets the equalizer settings to the factory defaults.
BD Wise → Off / On
Provides the optimal picture quality for SAMSUNG DVD, Blu-ray and Home Theatre products which support BD Wise. You can enjoy a richer picture when using them connected to this Samsung TV.
NConnect SAMSUNG products that have BD Wise using an HDMI cable.
N When the BD Wise set to On, the picture mode is automatically changed to the optimal resolution.
N BD Wise is available in HDMI mode.
Network Type / Network Setup
For detailed procedures on setting up options, refer to the ‘Setting the Network’ instructions.
English - 22
Child Lock → Off / On
This feature allows you to prevent unauthorized users, such as children, from watching unsuitable programme by muting out video and audio.
N Before the setup screen appears, the PIN number input screen appears. Enter your 4 digit PIN number.
N The default PIN number of a new TV set is 0-0-0-0. You can change the PIN by selecting Change PIN from the menu. N You can lock some channels in Channel List.
N Child Lock is available only in TV mode.
Change PIN
You can change your personal ID number that is required to set up the TV.
N Before the setup screen appears, the PIN number input screen appears. Enter your 4 digit PIN number. N The default PIN number of a new TV set is 0-0-0-0.
N If you forget the PIN code, press the remote control buttons in the following sequence, which resets the PIN to 0-0-0-0:
POWER (Off) → MUTE → 8 → 2 → 4 → POWER (On).
Parental Lock → Parental Rating
This feature allows you to prevent unauthorized users, such as children, from watching unsuitable programme by a 4-digit PIN (Personal Identification Number) code that is defined by the user.
N The Parental Rating item differs depending on the country.
N Before the setup screen appears, the PIN number input screen appears. Enter your 4 digit PIN number.
N The default PIN number of a new TV set is ‘0-0-0-0’. You can change the PIN by selecting Change PIN from the menu.
N When the parental ratings are set, the ‘\’ symbol is displayed. N Allow All: Press to unlock all TV ratings.
Block All: Press to lock all TV ratings.
Subtitle
You can activate and deactivate the subtitles. Use this menu to set the Subtitle Mode. Normal under the menu is the basic subtitle and Hard of hearing is the subtitle for a hearing-impaired person.
■Subtitle → Off / On
Switches subtitles on or off.
■Mode → Normal / Hard of hearing
Sets the subtitle mode.
■Subtitle Language
Set the subtitle language.
N If the programme you are watching does not support the Hard of hearing function, Normal automatically activates even though Hard of hearing mode is selected.
N English is the default in cases where the selected language is unavailable in the broadcast. O You can select these options simply by pressing the SUBT. button on the remote control.
Teletext Language
You can set the Teletext language by selecting the language type.
N English is the default in cases where the selected language is unavailable in the broadcast.
Preference
■Primary Audio Language / Secondary Audio Language / Primary Subtitle Language / Secondary Subtitle Language / Primary Teletext Language / Secondary Teletext Language
Using this feature, users can select one of the languages. The language selected here is the default when the user selects a channel.
If you change the language setting, the Subtitle Language, Audio Language, and the Teletext Language of the Language menu are automatically changed to the selected language.
The Subtitle Language, Audio Language, and the Teletext Language of the Language menu show a list of languages supported by the current channel and the selection is highlighted. If you change this language setting, the new selection is only valid for the current channel. The changed setting does not change the setting of the Primary Subtitle Language, Primary Audio Language, or the Primary Teletext Language of the Preference menu.
English - 23
Digital Text → Disable / Enable (UK only)
If the programme is broadcast with digital text, this feature is enabled.
N MHEG (Multimedia and Hypermedia Information Coding Experts Group)
An International standard for data encoding systems used in multimedia and hypermedia. This is at a higher level than the MPEG system which includes data-linking hypermedia such as still images, character service, animation, graphic and video files as well as multimedia data. MHEG is user runtime interaction technology and is being applied to various fields including VOD (Video-On-Demand), ITV (Interactive TV), EC (Electronic Commerce), tele-education, tele-conferencing, digital libraries and network games.
Melody → Off / Low / Medium / High
A melody sound can be set to come on when the TV is powered On or Off. N The Melody does not play
When no sound is output from the TV because the MUTE button has been pressed.
When no sound is output from the TV because the volume has been reduced to minimum with the volum (-) button.
When the TV is turned off by Sleep Timer function.
Energy Saving → Off / Low / Medium / High / Auto
This feature adjusts the brightness of the TV in order to reduce power consumption. When watching TV at night, set the Energy Saving mode option to High to reduce eye fatigue as well as power consumption.
TPress the TOOLS button to display the Tools menu. You can also set the Energy Saving option by selecting Tools →
Energy Saving.
PIP
For detailed procedures on setting up options, refer to the ‘Viewing Picture-in- Picture’ instructions.
Common Interface
■CI Menu
This enables the user to select from the CAM-provided menu. Select the CI Menu based on the menu PC Card.
■Application Info.
This contains information on CAM inserted in the CI slot and displays it. The Application Info inserting is about the CI CARD. You can install the CAM anytime whether the TV is ON or OFF.
1.Purchase the CI CAM module by visiting your nearest dealer or by phone.
2.Insert the CI CARD into the CAM in the direction of the arrow until it fits.
3.Insert the CAM with the CI CARD installed into the common interface slot.
(Insert the CAM in the direction of the arrow, right up to the end so that it is parallel with the slot.)
4.Check if you can see a picture on a scrambled signal channel.
¦Setting the Time
Clock
Setting the clock is necessary in order to use the various timer features of the TV.
O The current time will appear every time you press the INFO button. N If you disconnect the power cord, you have to set the clock again.
■Clock Mode
You can set up the current time manually or automatically.
●Auto: Set the current time automatically using the time from the digital broadcast.
●Manual: Set the current time to a manually specified time.
NDepending on the broadcast station and signal, the auto time may not be set correctly. If this occurs, set the time manually.
N The Antenna or cable must be connected in order to set the time automatically.
|
Plug & Play |
|
|
Setup |
Language |
: English |
|
Time |
|
|
|
|
|
||
|
Game Mode |
: Off |
|
|
BD Wise |
: On |
|
|
Network Type |
: Cable |
|
|
Network Setup |
|
|
|
Child Lock |
: On |
|
|
Change PIN |
|
|
|
Parental Lock |
|
|
|
|
Time |
|
Clock |
|
: -- : -- |
|
Sleep Timer |
|
: Off |
|
Timer 1 |
|
: Inactivated |
|
Timer 2 |
|
: Inactivated |
|
Timer 3 |
|
: Inactivated |
|
UMove EEnter RReturn
English - 24
■Clock Set
You can set the current time manually.
N This function is only available when Clock Mode is set to Manual.
N You can set the day, month, year, hour and minute directly by pressing the number buttons on the remote control.
Sleep Timer
The sleep timer automatically shuts off the TV after a preset time (30, 60, 90, 120, 150 and 180 minutes).
T Press the TOOLS button to display the Tools menu. You can also set the sleep timer by selecting Tools → Sleep Timer. N To cancel the Sleep Timer function, select Off.
Timer 1 / Timer 2 / Timer 3
Three different on / off timer settings can be made.
You must set the clock first.
■On Time
Set the hour, minute, and activate / inactivate.
(To activate timer with the setting you’ve chosen, set to Activate.)
■Off Time
Set the hour, minute, and activate / inactivate.
(To activate timer with the setting you’ve chosen, set to Activate.)
Timer 1
OnTime
00 |
|
00 |
|
|
|
|
|
Inactivate |
||||||||
OffTime |
|
|
|
|
|
|
|
|
|
|
|
|
|
|
|
|
00 |
00 |
|
|
|
|
|
Inactivate |
|||||||||
Volume |
Source |
Antenna |
|
Channel |
||||||||||||
10 |
|
|
TV |
|
ATV |
|
|
|
0 |
|
|
|||||
|
|
|
|
|
|
|
|
|
|
|
|
|
|
|
|
|
Repeat |
|
Sun Mon |
Tue Wed |
Thu Fri |
Sat |
|||||||||||
Once |
|
|
|
|
|
|
|
|
|
|
|
|
|
|
|
|
|
|
LMove UAdjust EEnter |
RReturn |
■Volume
Set the desired volume level.
■Source → TV / USB
You can select the TV or USB device content to be played when the TV turns on automatically. Select TV or USB. (Make sure that an USB device is connected to your TV.)
N When there is only one photo file in the USB, the Slide Show will not play.
■Antenna (when Source is set to TV)
Select ATV or DTV.
■Channel (when Source is set to TV)
Select the desired channel.
■Contents (when Source is set to USB)
You can select a folder on the USB Device with music or photo files to be played when the TV turns on automatically.
N If the folder name is too long, the folder can not be selected.
N If you are using two of the same type USB device, be sure the folder names are different so the correct USB is read.
■Repeat
Select Once, Everyday, Mon~Fri, Mon~Sat, Sat~Sun or Manual.
N When Manual is selected, press the ► button to select the desired day of the week. Press the ENTEREbutton over the desired day and the cmark will appear.
N You can set the hour, minute and channel by pressing the number buttons on the remote control.
N Auto Power Off
When you set the timer on, the television will eventually turn off, if no controls are operated for 3 hours after the TV was turned on by the timer. This function is only available in timer on mode and prevents overheating, which may occur if a TV is on for too long time.
English - 25
¦ Network Connection
You can set up the Internet Protocol so that you can communicate with various connected networks.
Network Connection - Cable
■LAN Connection for a DHCP Environment
The procedures to set up the network using Dynamic Host Configuration Protocol (DHCP) are described below. Since an IP address, subnet mask, gateway, and DNS are automatically allocated when DHCP is selected, you do not have to enter them manually.
1.Connect the LAN port on the rear panel of the TV and the external modem with a LAN Cable.
2.Connect the Modem port on the wall and the external modem with a Modem Cable.
The Modem Port on the Wall |
External Modem |
TV Rear Panel |
|
(ADSL / VDSL / Cable TV) |
|
2 Modem Cable |
|
1 LAN Cable |
You can connect the LAN via a Sharer (Router).
The Modem Port on the Wall |
External Modem |
TV Rear Panel |
(ADSL / VDSL / Cable TV) |
IP Sharer |
|
Modem Cable |
LAN Cable |
LAN Cable |
You can connect the LAN port and the TV directly depending on your network status.
The LAN Port on the Wall |
TV Rear Panel |
|
|
|
LAN Cable |
N The terminals (the position of the port and the type) of the external device may differ depending on the manufacturer.
NIf the IP address allocation by the DHCP server has failed, turn the external modem off, turn it on again after at least 10 seconds and then try again.
NFor the connections between the external modem and the Sharer (Router), refer to the owner’s manual of the corresponding product.
N You can connect the TV to the LAN directly without connecting it through a Sharer (Router)
NYou cannot use a manual-connection-type ADSL modem because it does not support DHCP. You have to use an automatic- connection-type ADSL modem.
English - 26
■LAN Connection for Static IP Environment
The procedures to set up the network using a static IP address are described below. You have to manually enter the IP address, subnet mask, gateway, and DNS that are provided by your Internet Service Provider (ISP).
1.Connect the LAN port on the rear panel of the TV and the LAN port on the wall using the LAN cable.
The LAN Port on the Wall |
TV Rear Panel |
|
|
|
1 LAN Cable |
You can connect the LAN via a Sharer (Router).
The LAN Port on the Wall |
|
|
|
|
|
|
|
|
|
|
|
TV Rear Panel |
|
|
IP Sharer |
||||||||||
|
|
|
|
|
|
|
|
|
|
|
|
|
|
|
|
|
|
|
|
|
|
|
|
|
|
|
|
|
|
|
|
|
|
|
|
|
|
|
|
|
|
|
|
|
|
|
|
|
|
|
|
LAN Cable |
LAN Cable |
N The terminals (the position of the port and the type) of the external device may differ depending on the manufacturer.
NIf you are using a static IP address, your ISP will inform you of the IP address, subnet mask, gateway, and DNS. You must enter these values to complete the network settings. If you do not know the values, ask your network administrator.
NFor the information on how to configure and connect a Sharer (Router), refer to the owner’s manual for the corresponding product.
N You can connect the TV to the LAN directly without connecting it through a Sharer (Router).
N If you use an IP Sharer (IP Router) that supports DHCP, you can set up the device as either DHCP or static IP. N For the procedures to use a static IP address, ask your Internet Service Provider.
English - 27
Network Connection - Wireless
You can connect to the network wirelessly through a wireless IP sharer.
TV Side Panel
The LAN Port on |
Wireless IP sharer |
|
||
|
||||
the Wall |
|
|
|
|
|
|
|
|
|
Samsung Wireless |
or |
LAN Adapter |
LAN Cable
1.Connect the ‘Samsung Wireless LAN Adapter’ into the USB1(HDD) or USB2 terminal of the TV. N You must use the ‘Samsung Wireless LAN Adapter’(WIS09ABGN) to use a wireless network.
N Samsung’s Wireless LAN adapter is sold separately. The WIS09ABGN Wireless LAN adapter is offered by select retailers, Ecommerce sites and Samsungparts.com.
N To use a wireless network, your TV must be connected to a wireless IP sharer. If the wireless IP sharer supports DHCP, your TV can use a DHCP or static IP address to connect to the wireless network.
N Samsung’s Wireless LAN adapter supports IEEE 802.11A, IEEE 802.11B, IEEE 802.11G, IEEE 802.11N. When you play
DLNA video over IEEE 802.11B/G connection, the video may not be played smoothly. N If the wireless IP sharer allows you to turn the Ping connection function on/off, turn it on.
N Select a channel for the wireless IP sharer that is not currently being used. If the channel set for the wireless IP sharer is currently being used by another device nearby, this will result in interference and communications may fail.
N If you apply a security system other than the systems listed blow, it will not work with the TV.
When applying the security key for the AP (wireless IP sharer), only the following is supported.
1)Authentication Mode : OPEN, SHARED, WPAPSK, WPA2PSK
2)Encryption Type : WEP, TKIP, AES
When applying the security key for the Ad-hoc mode, only the following is supported.
1)Authentication Mode : SHARED, WPANONE
2)Encryption Type : WEP, TKIP, AES
NIf your AP supports WPS(Wi-Fi Protected Setup), you can connect to the network via PBC (Push Button Configuration) or PIN (Personal Indentification Number). WPS will automatically configure the SSID and WPA key in either mode.
N If the device isn’t certified, it may not connect to the TV via the ‘Samsung Wireless LAN Adapter’.
English - 28