

Page 1

Contact SAMSUNG WORLDWIDE
If you have any questions or comments relating to Samsung products, please contact the SAMSUNG customer care centre.
Country
ARMENIA 0-800-05-555 -
AUSTRIA 0810 - SAMSUNG (7267864, € 0.07/min) www.samsung.com/at
AZERBAIJAN 088-55-55-555 -
BELARUS 810-800-500-55-500 -
BELGIUM 02-201-24-18
CZECH
DENMARK
800-7267 www.samsung.com
FINLAND
FRANCE www.samsung.com/fr
GERMANY 01805 - SAMSUNG(726-7864 € 0,14/Min) www.samsung.com/de
8-800-555-555 -
HUNGARY 06-80-SAMSUNG(726-7864) www.samsung.com/hu
EIRE 0818 717100 www.samsung.com/ie
ITALIA 800-SAMSUNG(726-7864) www.samsung.com/it
KAZAKHSTAN 8-10-800-500-55-500 -
KYRGYZSTAN 00-800-500-55-500 www.samsung.com
LATVIA 8000-7267 www.samsung.com
LITHUANIA 8-800-77777 www.samsung.com
LUXEMBURG www.samsung.com/lu
00-800-500-55-500 NETHERLANDS www.samsung.com/nl
815-56 480 www.samsung.com/no
80820-SAMSUNG(726-7864) www.samsung.com/pt
RUSSIA 8-800-555-55-55 www.samsung.com
0800-SAMSUNG(726-7864)
www.samsung.com/es
0771 726 7864 (SAMSUNG) www.samsung.com/se
0848 - SAMSUNG(7267864, CHF 0.08/min)
TADJIKISTAN 8-10-800-500-55-500 www.samsung.com
U.K 0845 SAMSUNG (7267864)
UKRAINE 0-800-502-000
UZBEKISTAN 8-10-800-500-55-500 www.samsung.com
Customer Care Centre
800 - SAMSUNG (800-726786) www.samsung.com/cz
0 801 1SAMSUNG(172678)
Web Site
www.samsung.com/be (Dutch)
www.samsung.com/be_fr (French)
www.samsung.com/pl
www.samsung.com/ch
www.samsung.com/ch_fr/(French)
www.samsung.ua
www.samsung.com/ua_ru
LCD TV user manual
LCD TV
user manual
imagine the possibilities
Thank you for purchasing this Samsung product.
To receive more complete service, please register
your product at
www.samsung.com/register
Model _____________ Serial No. _____________
© 2010 Samsung Electronics Co., Ltd. All rights reserved.
Page 2
Figures and illustrations in this User Manual are provided for reference only and may differ from actual product appearance.
Product design and specifications may be changed without notice.
Digital TV notice
1. Functionalities related to Digital TV (DVB) are only available in countries/areas where DVB-T (MPEG2 and MPEG4 AVC) digital terrestrial signals are
broadcasted or where you are able to access to a compatible DVB-C (MPEG2 and MPEG4 AAC) cable-TV service. Please check with your local
dealer the possibility to receive DVB-T or DVB-C signal.
2. DVB-T is the DVB European consortium standard for the broadcast transmission of digital terrestrial television and DVB-C is that for the broadcast
transmission of digital TV over cable. However, some differentiated features like EPG (Electric Programme Guide), VOD (Video On Demand) and so
on, are not included in this specification. So, they cannot be workable at this moment.
3. Although this TV set meets the latest DVB-T and DVB-C standards, as of [August, 2008], the compatibility with future DVB-T digital terrestrial and
DVB-C digital cable broadcasts cannot be guaranteed.
4. Depending on the countries/areas where this TV set is used some cable-TV providers may charge an additional fee for such a service and you may
be required to agree to terms and conditions of their business.
5. Some Digital TV functions might be unavailable in some countries or regions and DVB-C might not work correctly with some cable service providers.
6. For more information, please contact your local Samsung customer care centre.
The reception quality of TV may be affected due to differences in broadcasting method between the countries. Please check the TV performance in
✎
the local SAMSUNG Authorized Dealer, or the Samsung Call Centre whether it can be improved by reconfiguring TV setting or not.
Still image warning
Avoid displaying still images (like jpeg picture files) or still image element (like TV programme logo, panorama or 4:3 image format, stock or news bar at
screen bottom etc.) on the screen. Constant displaying of still picture can cause ghosting of LCD screen, which will affect image quality. To reduce risk of
this effect, please follow below recommendations:
Avoid displaying the same TV channel for long periods.•
Always try do display any image on full screen, use TV set picture format menu for best possible match.•
Reduce brightness and contrast values to minimum required to achieve desired picture quality, exceeded values may speed up the burnout process.•
Frequently use all TV features designed to reduce image retention and screen burnout, refer to proper user manual section for details.•
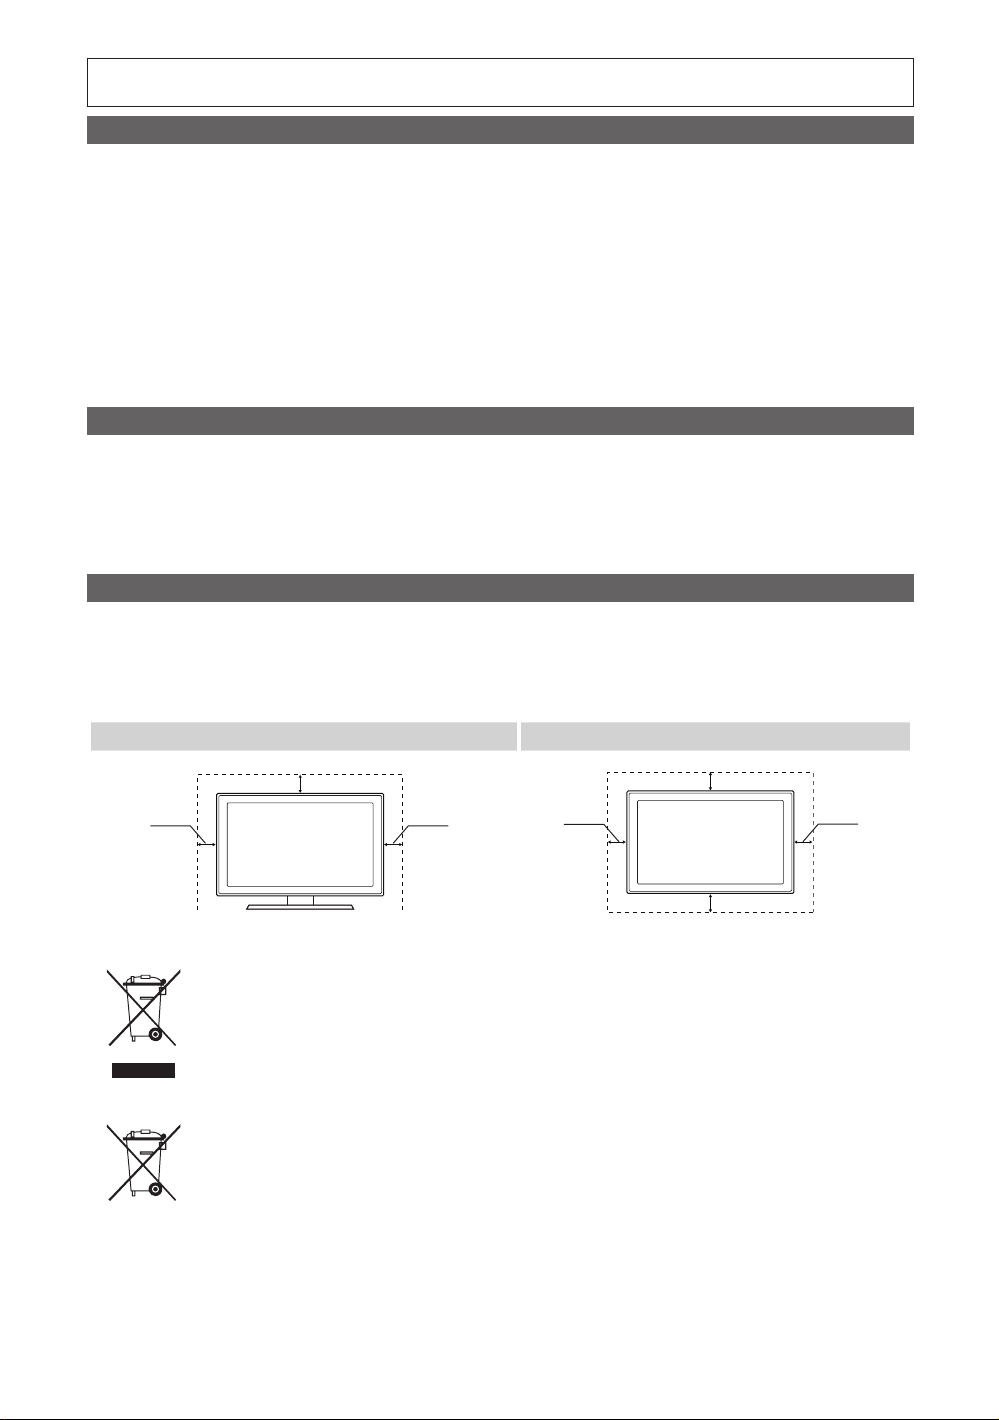
Securing the Installation Space
Keep the required distances between the product and other objects (e.g. walls) to ensure proper ventilation.
Failing to do so may result in fire or a problem with the product due to an increase in the internal temperature of the product.
When using a stand or wall-mount, use parts provided by Samsung Electronics only.
✎
If you use parts provided by another manufacturer, it may result in a problem with the produ ct or an injury due to the product falling.
x
The appearance may differ depending on the product.
✎
Installation with a stand. Installation with a wall-mount.
2
10 cm
English
10 cm
10 cm
Correct Disposal of This Product (Waste Electrical & Electronic Equipment)
(Applicable in the European Union and other European countries with separate collection systems)
This marking on the product, accessories or literature indicates that the product and its electronic accessories (e.g. charger,
headset, USB cable) should not be disposed of with other household waste at the end of their working life. To prevent possible
harm to the environment or human health from uncontrolled waste disposal, please separate these items from other types of waste
and recycle them responsibly to promote the sustainable reuse of material resources. Household users should contact either the
retailer where they purchased this product, or their local government office, for details of where and how they can take these items
for environmentally safe recycling. Business users should contact their supplier and check the terms and conditions of the purchase
contract. This product and its electronic accessories should not be mixed with other commercial wastes for disposal.
Correct disposal of batteries in this product
(Applicable in the European Union and other European countries with separate battery return systems)
This marking on the battery, manual or packaging indicates that the batteries in this product should not be disposed of with other
household waste at the end of their working life. Where marked, the chemical symbols Hg, Cd or Pb indicate that the battery
contains mercury, cadmium or lead above the reference levels in EC Directive 2006/66. If batteries are not properly disposed of,
these substances can cause harm to human health or the environment. To protect natural resources and to promote material
reuse, please separate batteries from other types of waste and recycle them through your local, free battery return system.
10 cm
10 cm
10 cm
10 cm
Page 3

3
English
Contents
Getting Started
4
Connections
7
Basic Features
10
Advanced Features
4 Accessories
4 Viewing the Control Panel
5 Viewing the Remote Control
6 Connecting to an Antenna
6 Plug & Play (Initial Setup)
7 Connecting to an AV Device
8 Connecting to an Audio Device
8 Connecting to a PC
10 Changing the Input Source
10 How to Navigate Menus
11 Using the INFO button (Now & Next guide)
11 Planning Your Viewing
12 Channel Menu
14 Picture Menu
17 Sound Menu
19 Setup Menu
21 Support Menu
22 Media Play
22
Other Information
26
Check the Symbol!
t
This function can be used by
pressing the TOOLS button on
the remote control.
26 Analogue Channel Teletext Feature
27 Installing the Wall Mount
28 Anti-Theft Kensington Lock
28 Securing the TV to the Wall
29 Troubleshooting
32 Specifications
33 Index
Note One-Touch Button
Page 4

Getting Started
Accessories
Please make sure the following items are included with your LCD TV. If any items are missing, contact your dealer.
✎
The items’ colours and shapes may vary depending on the models.
✎
Remote Control & Batteries (AAA x 2) y
Owner’s Instructions y
See separate guide for installing the stand.
1 EA
Stand (1EA) y Stand Screws (3EA) y
Viewing the Control Panel
The product colour and shape may vary depending on the model.
✎
Cleaning Cloth y
Warranty Card / Safety Guide (Not available in some locations) y
(M4 X L16)
Power IndicatorRemote control sensor
Speakers
P
(Power)
Power Indicator Blinks and turns off when the power is on and lights up in standby mode.
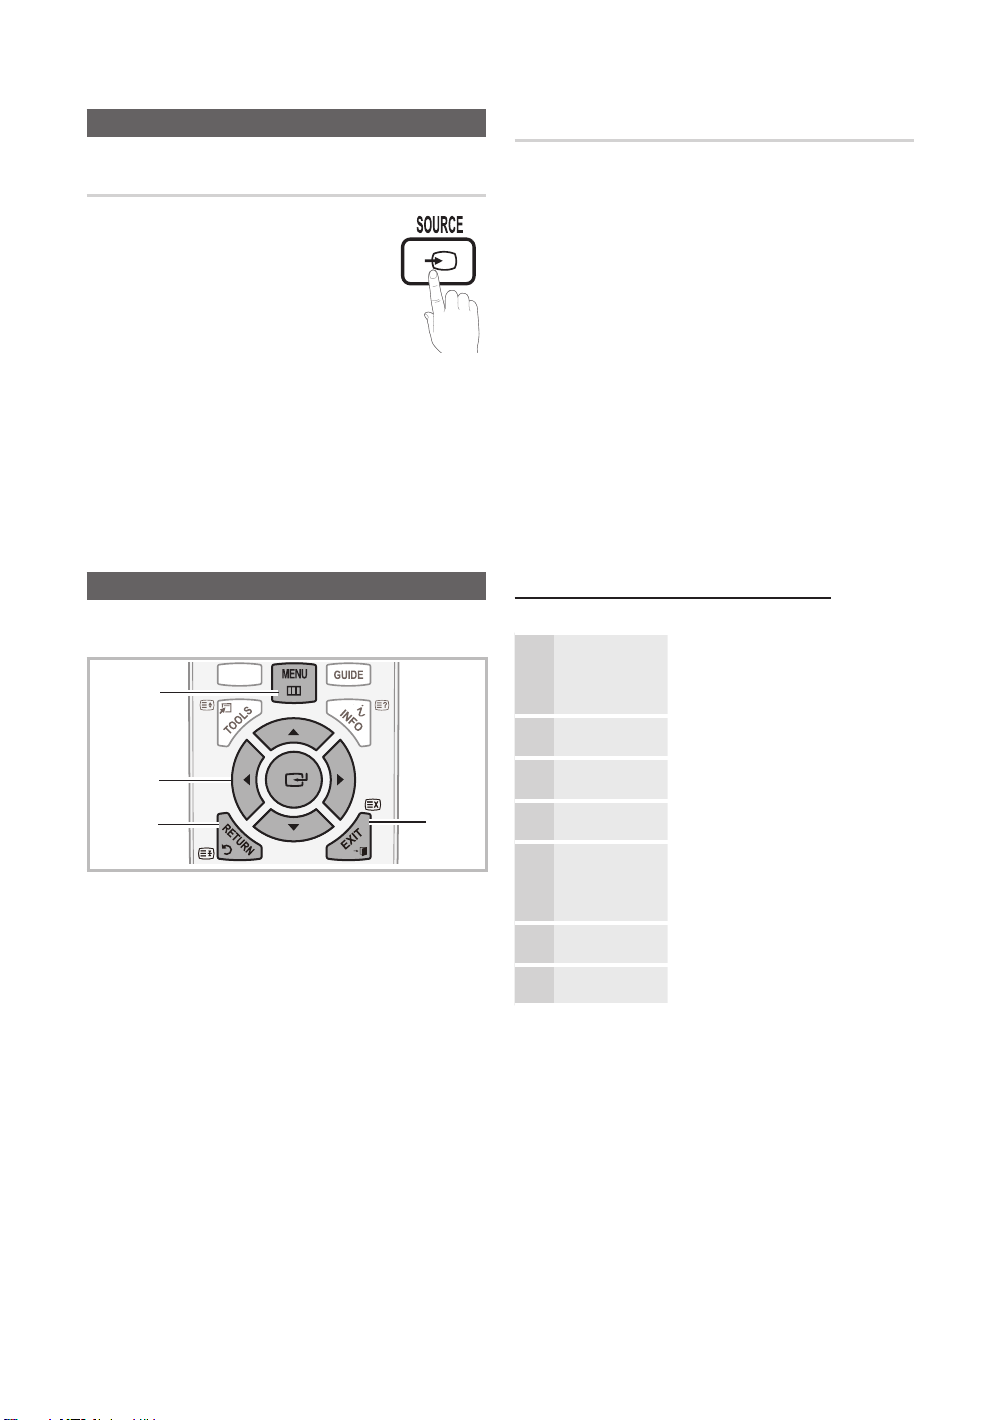
SOURCE
MENU Displays an on-screen menu, the OSD (on screen display), of your TV’s features.
Y
z
Remote control sensor Aim the remote control towards this spot on the TV.
Standby mode
Do not leave your TV in standby mode for long periods of time (when you are away on a holiday, for example). A small amount
of electric power is still consumed even when the power button is turned off. It is best to unplug the power code.
4
E
English
Turns the TV on or off.
Toggles between all the available input sources. In the on-screen menu, use this
button as you would use the ENTERE button on the remote control.
Adjusts the volume. In the OSD, use the
and buttons on the remote control.
Changes the channels. In the OSD, use the
and buttons on the remote control.
Y
buttons as you would use the
z
buttons as you would use the
Page 5

5
01 Getting Started
English
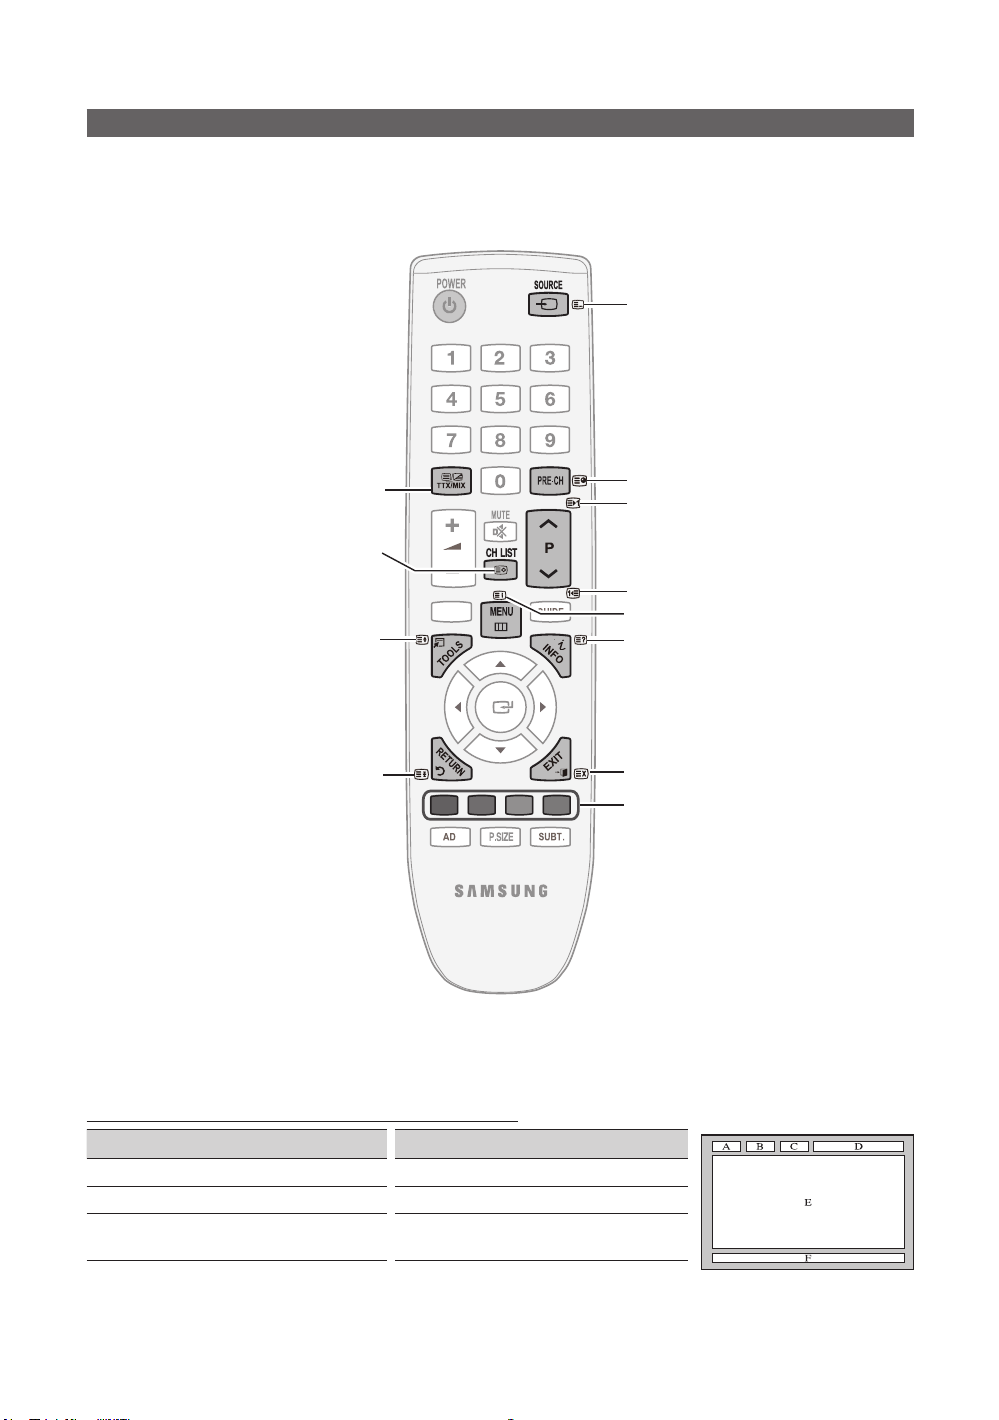
Viewing the Remote Control
MEDIA.P
ABCD
Turn the TV on and off. (P. 6)
Change the channel.
Alternately select Teletext,
Double or MiX.
Adjust the volume.
Display the main on-screen menu.
(P. 10)
View the Media play.
Quickly select frequently used
functions.
Select on-screen menu items and
change menu values.
Return to the previous menu. (P. 10)
Display and select the available video
sources. (P. 10)
Return to the previous channel.
Cut off the sound temporarily.
Change channels.
Display Channel Lists on the
screen. (P. 14)
Display the EPG (Electronic Programme
Guide). (P. 11)
Display information on the
TV screen.
Exit the menu. (P. 10)
Buttons in the Channel Manager,
Media Play menu, etc.
Installing batteries (Battery size: AAA)
AD: Audio Description selection. (Not
available in some locations) (P. 18)
P.SIZE: Choose the picture size. (P. 16)
SUBT.: Digital subtitle display (P. 20)
NOTE
✎
Use the remote control within 23 feet from the TV.
x
Bright light may affect the performance of the remote
x
control. Avoid using nearby special fluorescent light or neon
signs.
The colour and shape may vary depending on the model.
x
Page 6

Getting Started
P
POWER
Connecting to an Antenna
When the TV is initially powered on, basic settings proceed automatically.
✎
Preset: Connecting the mains and antenna.
VHF/UHF Antenna
or
Power Input
Plug & Play (Initial Setup)
When the TV is initially powered on, a sequence of on-screen prompts will assist in confi guring basic settings. Press the
POWERP button. Plug & Play is available only when the Input source is set to TV.
Selecting a language
1
Selecting Store Demo
2
or Home Use
Selecting a country
3
Selecting an antenna
4
Selecting a channel
5
Setting the Clock
6
Mode
Viewing the HD
7
Connection Guide.
Enjoy your TV.
Press the or button, then press the ENTER
Select the desired OSD (On Screen Display) language.
Press the or button, then press the ENTERE button.
Select the y Home Use mode. Store Demo Mode is for retail
environments.
Return the unit’s settings from y Store Demo to Home Use
(standard): Press the volume button on the TV. When the OSD
volume is displayed, press and hold MENU for 5 sec.
Press the or button, then press the ENTER
Select the appropriate country. If the desired country does not exist on the menu, select
Others.
✎
After selecting the country in the
additional option to setup the pin number.
✎
When you input the PIN number,
Press the or button, then press the ENTER
Select Air or Cable.
Press the or button, then press the ENTERE button.
Select the channel source to memorise. When setting the antenna source to Cable, a step
appears allowing you to assign numerical values (channel frequencies) to the channels. For
more information, refer to Channel Auto Store. (P. 13)
✎
Press the
Set the Clock Mode automatically or manually.
Press the or button to select Auto, then press the ENTER
The connection method for the best HD screen quality is displayed.
Press the ENTER
ENTERE button at any time to interrupt the memorisation process.
E
button.
Country menu, some models may proceed with an
0-0-0-0 is not available.
E
E
E
button.
button.
button.
E
button.
Cable
ANT OUT
8
If You Want to Reset This Feature...
Select Setup - Plug & Play (Initial Setup). Enter your 4 digit PIN number. The default PIN number is “0-0-0-0.” If you want to
change the PIN number, use the Change PIN function.
6
English
Page 7
Connexions
W
W
W
W W
Y
W
Y
B
B
G
G
RR
R R
R
R
P
R PB Y
R-AUDIO-L
P
R PB Y
R-AUDIO-L
P
R PB Y
W W
BGRRWY
BGRR
R-AUDIO-L
P
R PB Y
W
W
R
WW
G
W
R
W
R
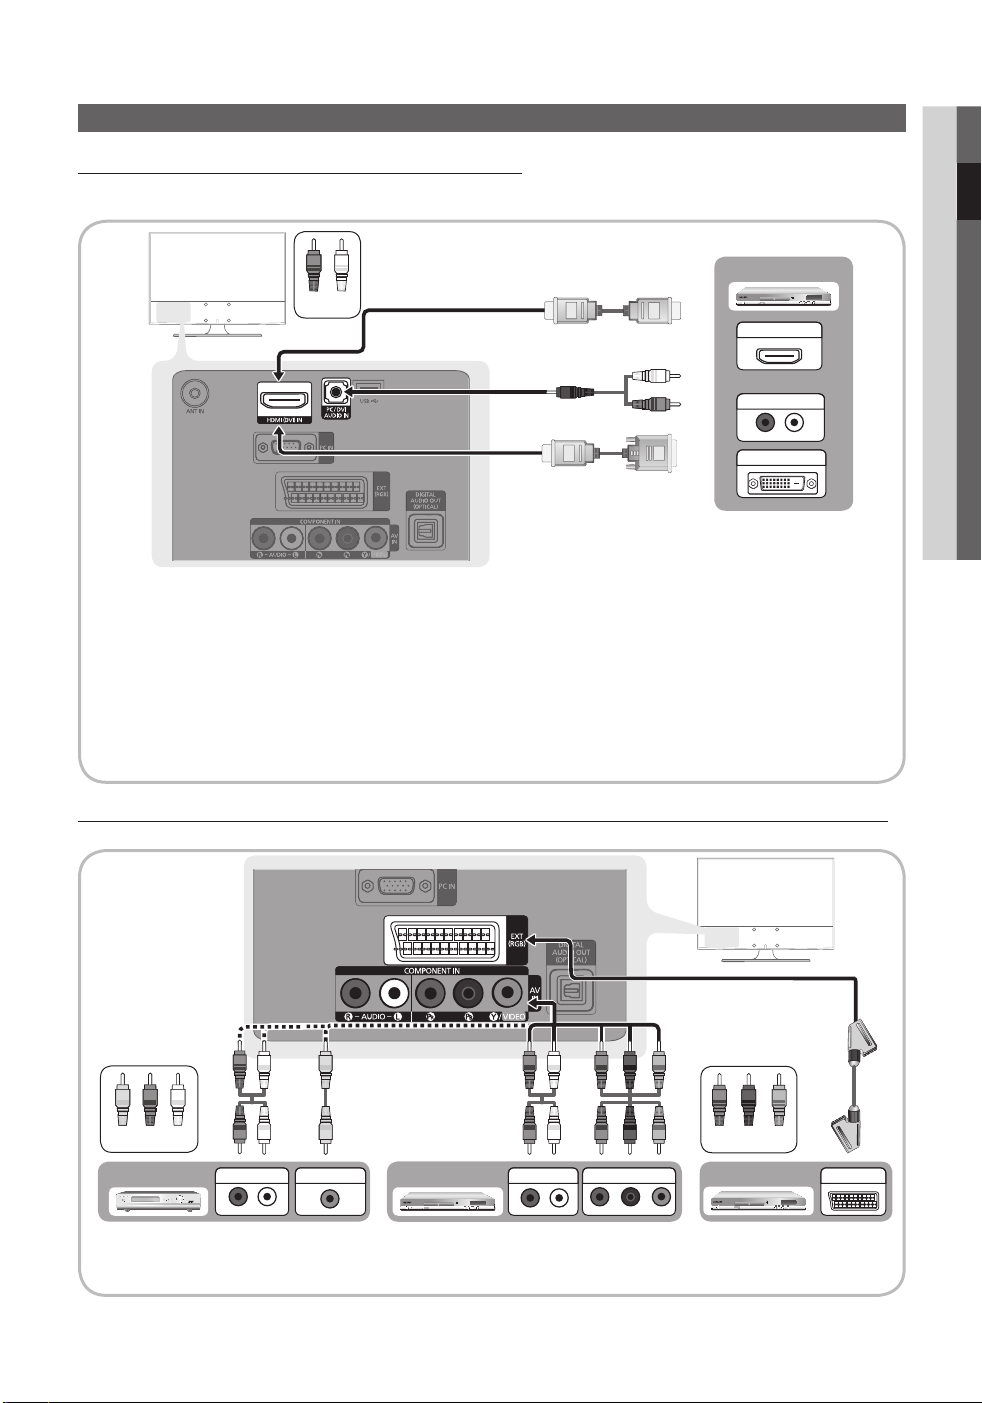
Connexion à un périphérique AV
Utilisation d’un câble HDMI/DVI : connexion HD (jusqu’à 1080p)
Périphériques disponibles : lecteur DVD, lecteur Blu-ray, décodeur câble HD, décodeur HD, récepteur satellite, décodeur
câble, récepteur satellite (décodeur)
DVD
Rouge Blancs
HDMI OUT
AUDIO OUT
DVI OUT
HDMI (DVI) IN / PC/DVI AUDIO IN
✎
Lorsque vous utilisez une connexion avec câble HDMI/DVI, vous devez utiliser la prise HDMI (DVI) IN. Dans
le cas d’une connexion avec câble DVI, utilisez un câble DVI vers HDMI ou un adaptateur DVI-HDMI (DVI vers
HDMI) pour la connexion vidéo et les prises PC / DVI AUDIO IN pour le son.
Si vous connectez un dispositif externe, tel qu’un lecteur DVD / un lecteur Blu-ray / un décodeur câble / un
décodeur satellite prenant en charge une version HDMI antérieure à 1.3, il se peut que le téléviseur ne fonctionne
pas correctement (par exemple : absence d’image / absence de son / scintillement / couleurs anormales).
Si aucun son n’est émis après la connexion d’un câble HDMI, vérifiez la version HDMI du dispositif externe.
Si vous pensez qu’il utilise peut-être une version HDMI antérieure à 1.3, contactez le fabricant pour en avoir la
confirmation et demander une mise à niveau.
Il est conseillé d'acheter un câble certifi é HDMI. Dans le cas contraire, il se peut que l'écran n'affi che aucune
image ou qu'une erreur de connexion se produise.
02 Connexions
Utilisation d’un câble Composante (jusqu’à 1080p) ou Audio/Vidéo (480i uniquement) et utilisation d’un câble Péritel
Périphériques disponibles : magnétoscope, lecteur DVD, lecteur Blu-ray, décodeur câble, récepteur décodeur
Jaune Rouge Blancs
AUDIO OUT
En mode
✎
Pour obtenir une qualité d’image optimale, il est préférable d’opter pour la connexion Composante (plutôt que la
✎
connexion A/V).
Ext., la sortie DTV prend uniquement en charge les signaux audio et vidéo MPEG SD.
VIDEO OUT
Lecteur Blu-ray DVDVCR
AUDIO OUT
COMPONENT OUT
Rouge Bleu Vert
DVD
EXT
Français
7
Page 8
7
English
Connections
R-AUDIO-L
P
R PB Y
W
R
R
G
B W R
W
R
G
R
W RY
B
YR W
P
R PB Y
R-AUDIO-L
P
R PB Y
R-AUDIO-L
P
R PB Y
W W
BGRRWY
BGRR
W W
BGRR
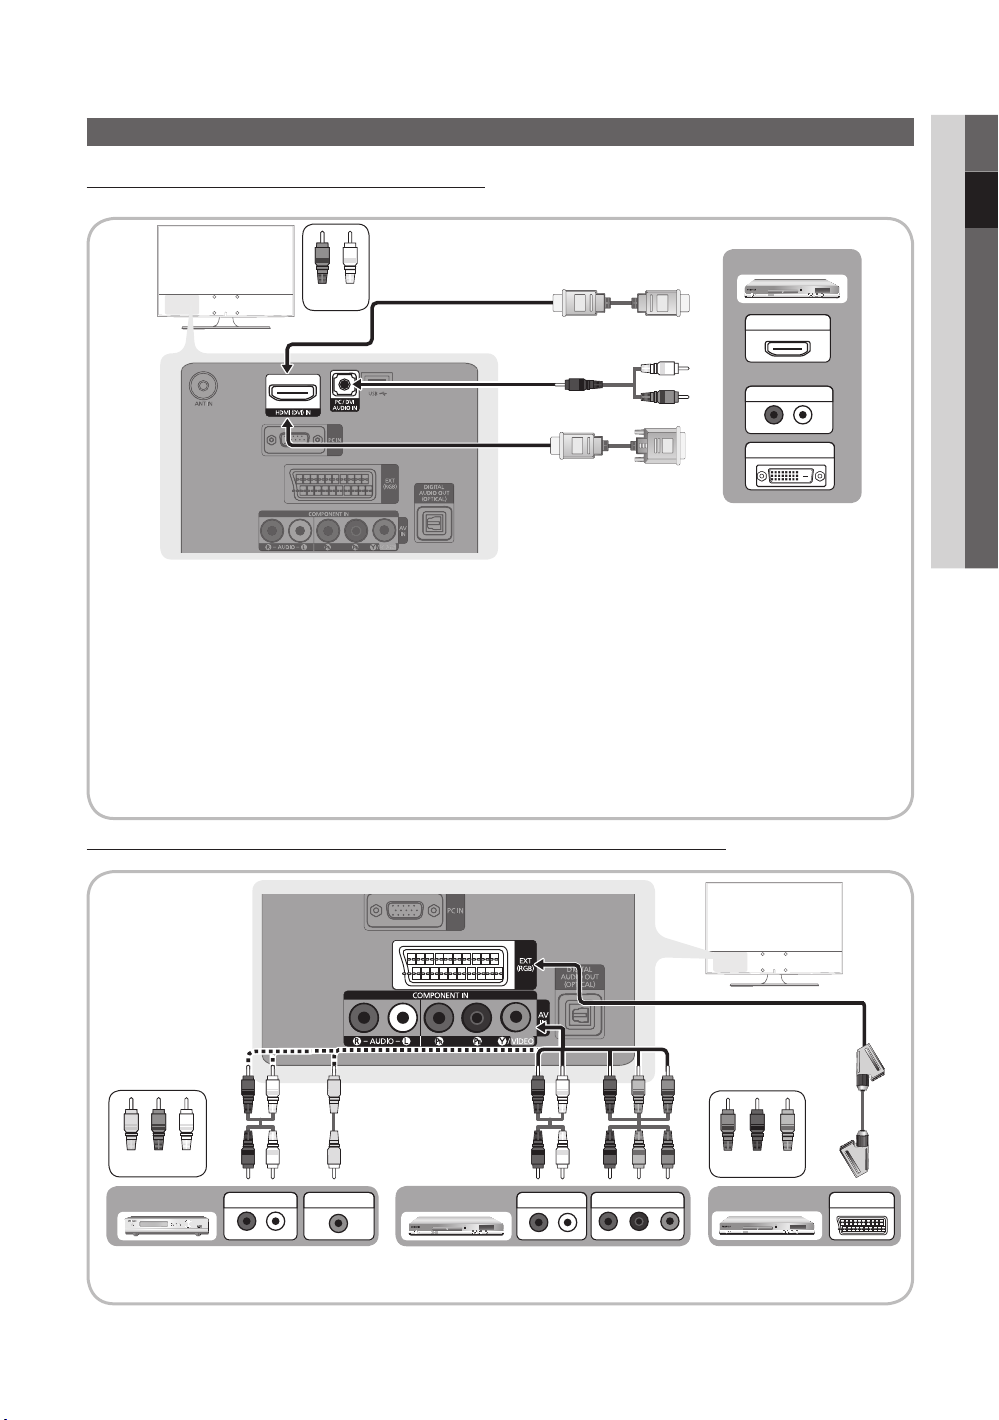
Connecting to an AV Device
Using an HDMI / DVI Cable: HD connection (up to 1080p)
Available devices: DVD, Blu-ray player, HD cable box, HD STB (Set-Top-Box) satellite receiver, cable box, satellite receiver (STB)
DVD
Red White
HDMI OUT
AUDIO OUT
DVI OUT
HDMI (DVI) IN / PC/DVI AUDIO IN
✎
When using an HDMI/DVI cable connection, you must use the xHDMI (DVI) IN jack. For the DVI cable
connection, use a DVI to HDMI cable or DVI-HDMI (DVI to HDMI) adapter for video connection and the PC/DVI
AUDIO IN jacks for audio.
If an external device such as a DVD / Blu-ray player / cable box /
x
versions older than 1.3 is connected, the TV may operate abnormally (e.g. no screen display / no sound /
annoying flicker / abnormal colour).
If there is no sound after connecting an HDMI cable, check the HDMI version of the external device. If you
x
suspect the version is older than 1.3, contact the provider of the device to confirm the HDMI version and
request an upgrade.
It is recommended you purchase an HDMI-certified cable. Otherwise, the screen may appear blank or a
x
connection error may occur.
Using a Component (up to 1080p) or Audio/Video (480i only) Cable and Using a Scart Cable
Available devices: VCR, DVD, Blu-ray player, cable box, STB satellite receiver
STB satellite receiver supporting a HDMI
02 Connections
Yellow Red White
AUDIO OUT
In
✎
Ext. mode, DTV Out supports MPEG SD Video and Audio only.
✎
To obtain the best picture quality, the Component connection is recommended over the A/V connection.
VIDEO OUT
Blu-ray player DVDVCR
AUDIO OUT
COMPONENT OUT
Red Blue Green
EXT
Page 9

Connections
Connecting to an Audio Device
Using an Optical or Audio Cable Connection
Available devices: digital audio system, amplifi er, DVD home theatre
✎
DIGITAL AUDIO OUT (OPTICAL)
When a digital audio system is connected to the xDIGITAL AUDIO OUT (OPTICAL) jack, decrease the volume
of both the TV and the system.
5.1 CH (channel) audio is available when the TV is connected to an external device supporting 5.1 CH.
x
When the receiver (home theatre) is set to on, you can hear sound output from the TV’s xoptical jack. When the
TV is receiving a DTV signal, the TV will send 5.1 CH sound to the home theatre receiver. When the source is
a digital component such as a DVD / Blu-ray player / cable box / STB (Set-Top-Box) satellite receiver and is
connected to the TV via HDMI, only 2 CH audio will be heard from the home theatre receiver. If you want to
hear 5.1 CH audio, connect the digital audio out jack from your DVD / Blu-ray player / cable box / STB satellite
receiver directly to an amplifier or home theatre.
OPTICAL
Digital Audio
System
Using an HDMI/DVI Cable / a D-sub Cable
Connecting to a PC
DVI OUT
AUDIO OUT
AUDIO OUT
PC OUT
8
English
Page 10
9
English
02 Connections
Display Modes (D-Sub and HDMI/DVI Input)
Optimal resolution is 1360 X 768 @ 60 Hz.1920X1080@60Hz.
Mode Resolution
IBM
MAC
VESA DMT
VESA GTF
VESA GTF 1280 x 720 52.500 70.000 89.040 +/+
NOTE
✎
For HDMI/DVI cable connection, you must use the xHDMI (DVI) IN jack.
The interlace mode is not supported.
x
The set might operate abnormally if a non-standard video format is selected.
x
Separate and Composite modes are supported. SOG(Sync On Green) is not supported.
x
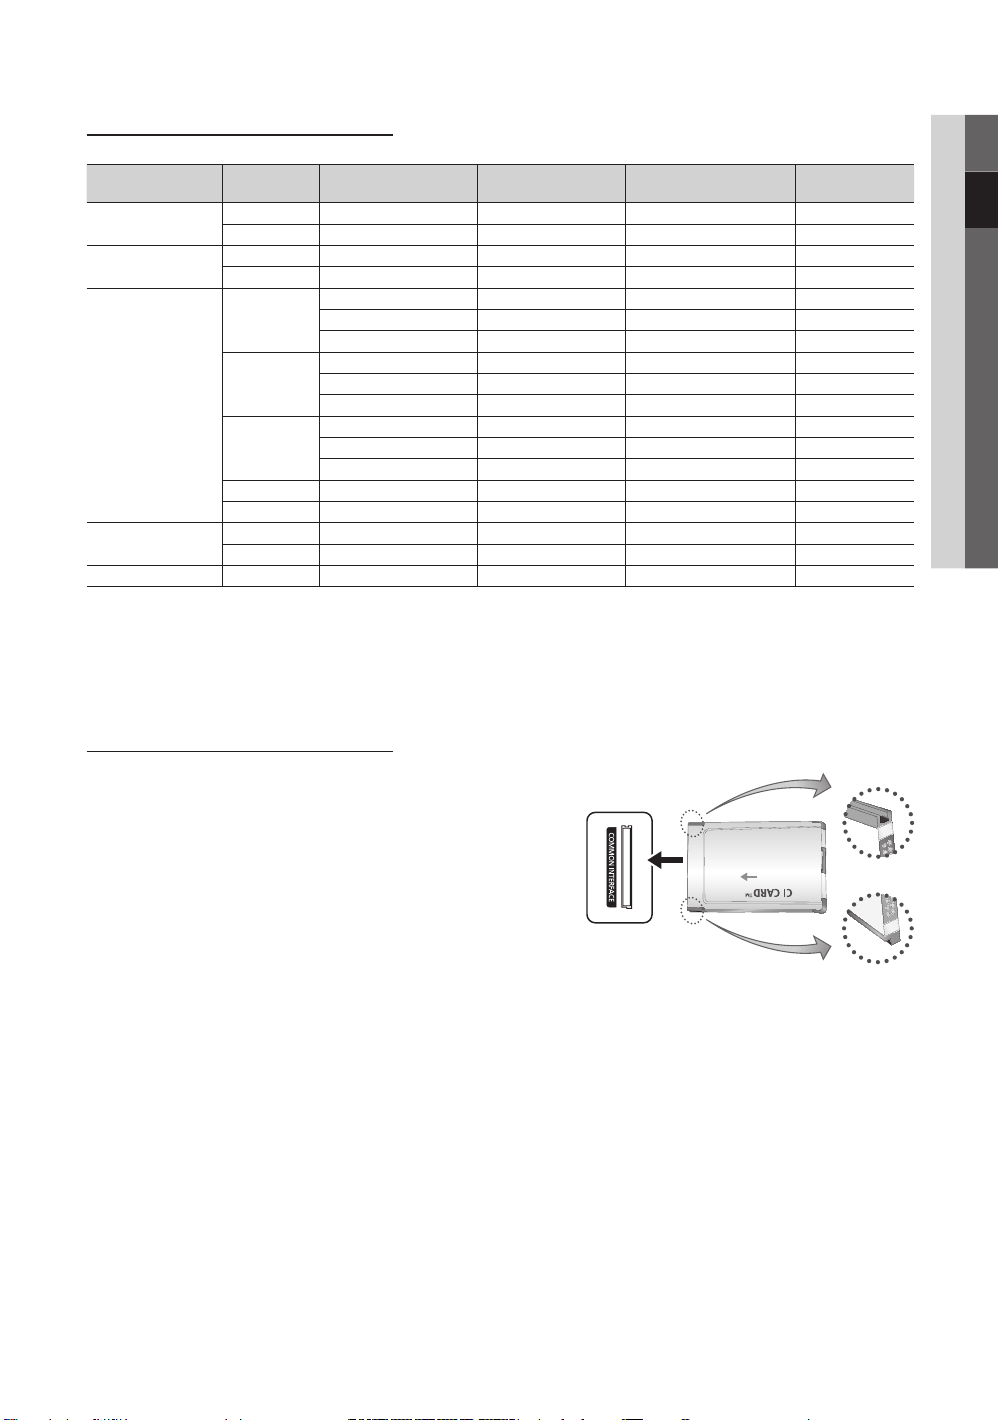
CONNECTIONS COMMON INTERFACE Slot
640 x 350 31.469 70.086 25.175 +/720 x 400 31.469 70.087 28.322 -/+
640 x 480 35.000 66.667 30.240 -/832 x 624 49.726 74.551 57.284 -/-
640 x 480
800 x 600
1024 x 768
1280 x 720 45.000 60.000 74.250 +/+
1360 x 768 47.712 60.015 85.500 +/+
720 x 576 35.910 59.950 32.750 -/+
1280 x 720 56.456 74.777 97.750 -/-
Horizontal Frequency
(KHz)
31.469 59.940 25.175 -/-
37.861 72.809 31.500 -/-
37.500 75.000 31.500 -/-
37.879 60.317 40.000 +/+
48.077 72.188 50.000 +/+
46.875 75.000 49.500 +/+
48.363 60.004 65.000 -/-
56.476 70.069 75.000 -/-
60.023 75.029 78.750 +/+
Vertical Frequency (Hz)
Pixel Clock Frequency
(MHz)
Sync Polarity
(H / V)
To watch paid channels, the “CI or CI+ CARD” must be inserted.
If you don’t insert the “CI or CI+ CARD,” some channels will y
display the message “Scrambled Signal”.
The pairing information containing a telephone number, the “CI or y
CI+ CARD” ID the Host ID and other information will be displayed
in about 2~3 minutes. If an error message is displayed, please
contact your service provider.
When the configuration of channel information has finished, the y
message “Updating Completed” is displayed, indicating the
channel list is updated.
NOTE
✎
You must obtain a “CI or CI+ CARD” from a local cable service provider.
x
When removing the “CI or CI+ CARD”, carefully pull it out with your hands since dropping the “CI or CI+ CARD” may
x
cause damage to it.
Insert the “CI or CI+ CARD” in the direction marked on the card.
x
The location of the xCOMMON INTERFACE slot may be different depending on the model.
“CI or CI+ CARD” is not supported in some countries and regions; check with your authorized dealer.
x
If you have any problems, please contact a service provider.
x
Page 11
Connections
MEDIA.P
Changing the Input Source
Source List
Use to select TV or other external input
sources such as DVD / Blu-ray players /
cable box / STB satellite receiver connected
to the TV.
TV / Ext. / AV / Component / PC / ■
HDMI/DVI / USB
In the
✎
Source List, connected
inputs will be highlighted.
Ext.
✎
and PC always stay activated.
Basic Features
How to Navigate Menus
Before using the TV, follow the steps below to learn how to
navigate the menu and select and adjust different functions.
1
2
3
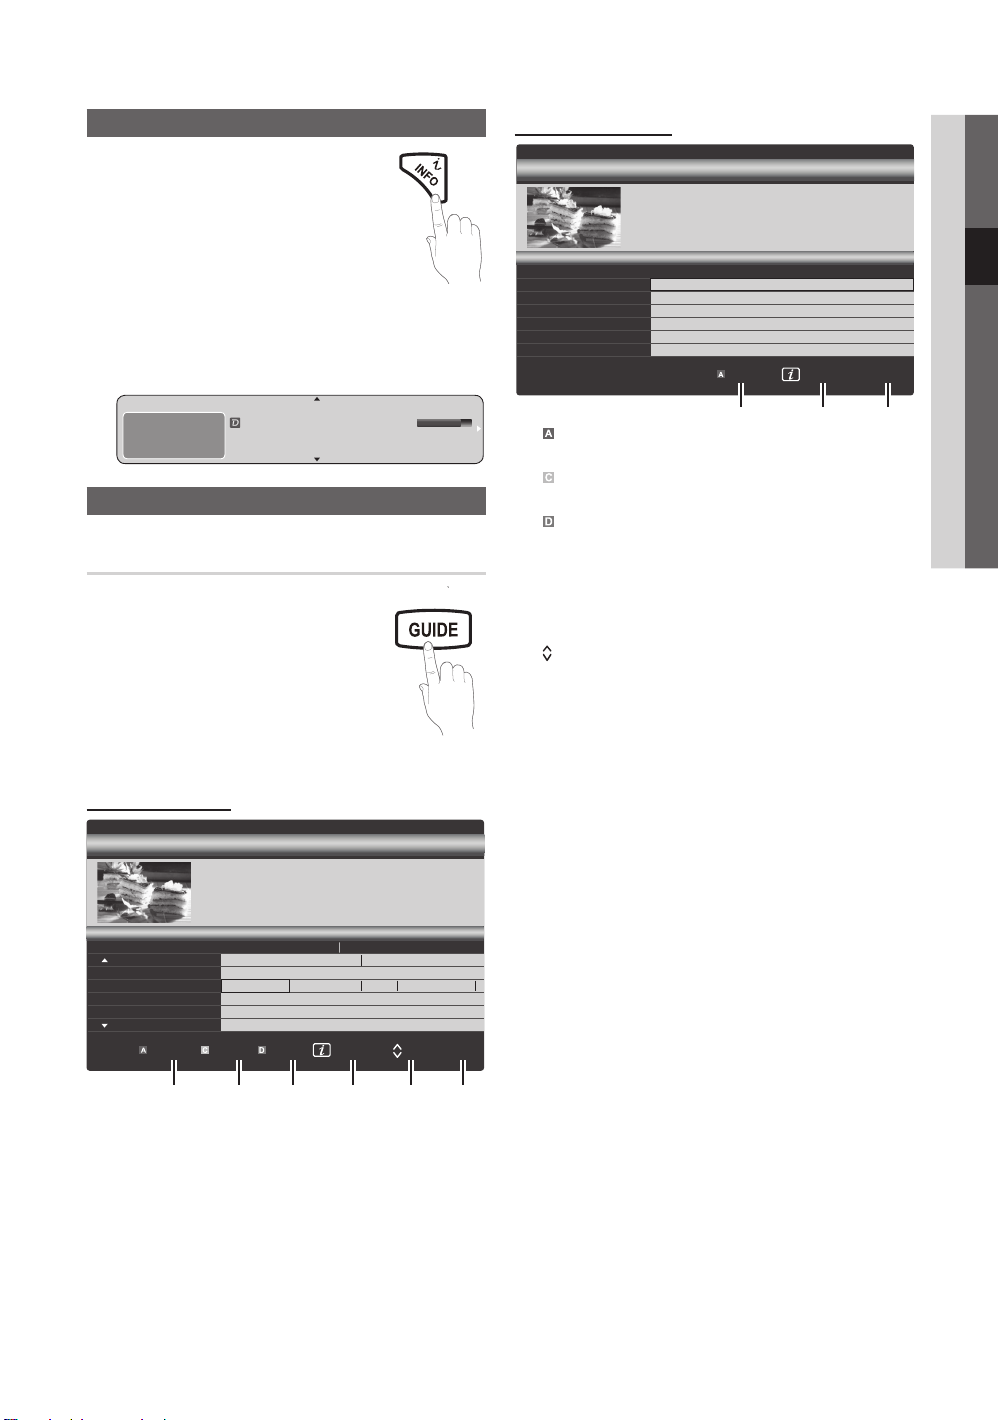
1 MENU button: Displays the main on-screen menu.
2 ENTER
3 RETURN button: Returns to the previous menu.
4 EXIT button: Exits the on-screen menu.
E
select an item. Confi rm the setting.
/ Direction button: Move the cursor and
4
Edit Name
VCR / DVD / Cable STB / Satellite STB / PVR STB / ■
AV Receiver / Game / Camcorder / PC / DVI PC / DVI
Devices / TV / IPTV / Blu-ray / HD DVD / DMA: Name
the device connected to the input jacks to make your
input source selection easier.
When connecting an HDMI/DVI cable to the
✎
(DVI) IN port, you should set the port to
HDMI/DVI mode under Edit Name.
How to Operate the OSD (On Screen Display)
The access step may differ depending on the selected menu.
The main menu options appears on
1
2
3
4
5
6
7
MENU
▲ / ▼
ENTER
▲ / ▼
◄ / ►
ENTER
EXIT
the screen:
m
Picture, Sound, Channel, Setup,
Input, Application, Support.
Select an icon with the ▲ or ▼
button.
Press ENTERE to access the
E
sub-menu.
Select the desired submenu with
the ▲ or ▼ button.
Adjust the value of an item with the
◄ or ► button. The adjustment in
the OSD may differ depending on
the selected menu.
Press ENTERE to complete the
E
confi guration.
Press EXIT.
e
HDMI
10
English
Page 12
11
English
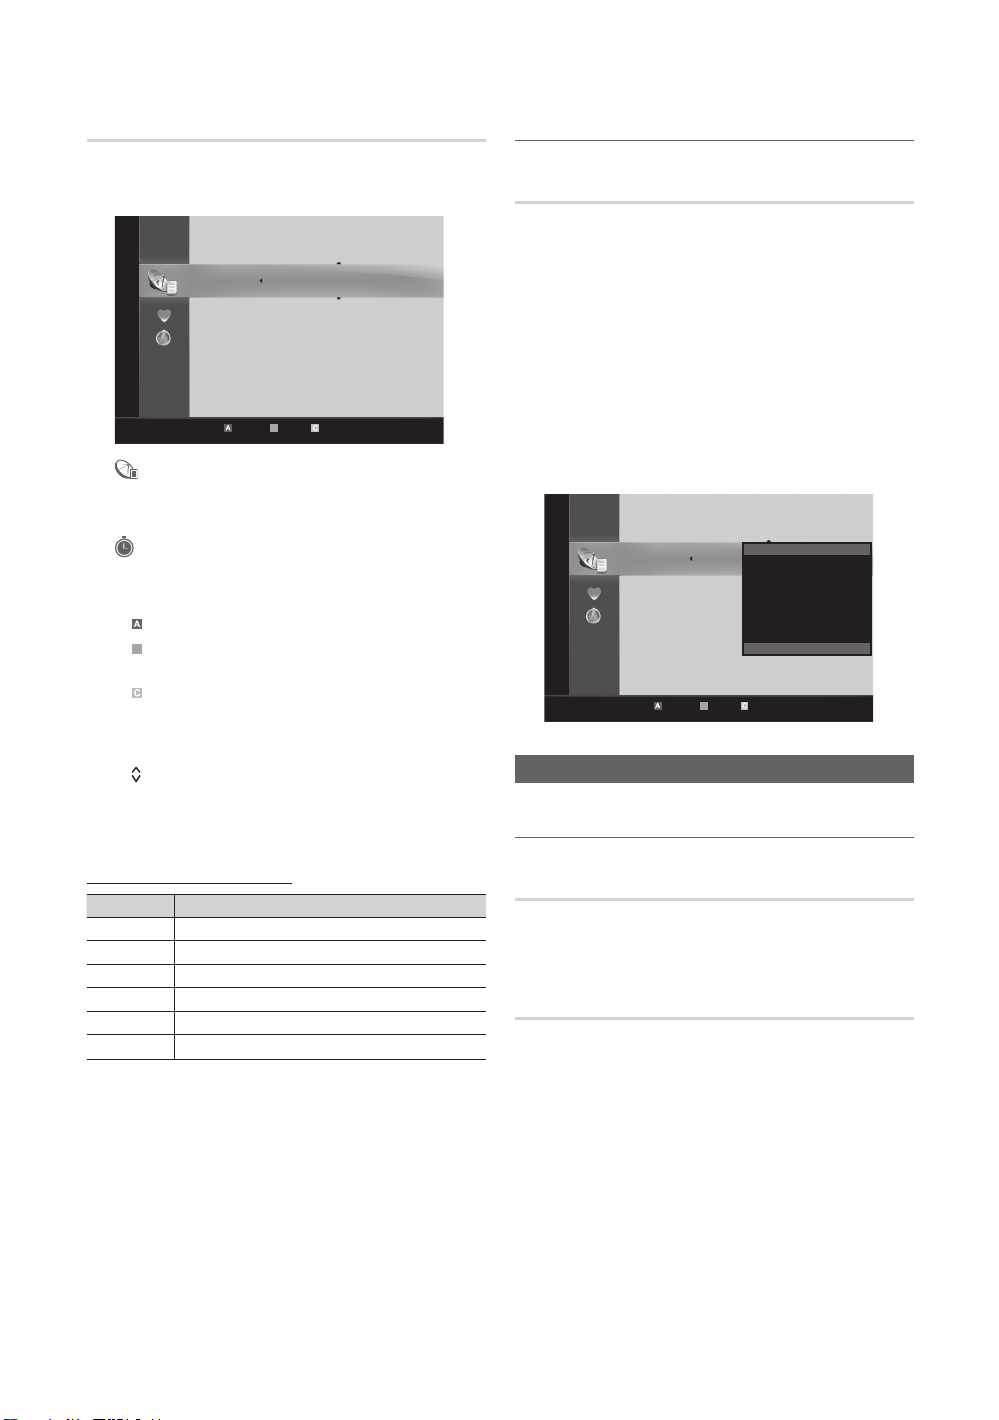
Using the INFO button (Now & Next guide)
MEDIA.P
P . MODE
MTS
DTV Air 800 five
Family Affairs
18:00 - 18:30
Drama
Tanya confesses all to a stunned Babs. Conrad is anxious to hear...
18:30
19:15
Today
Today
)
Family Affairs
)
Dark Angel
800
800
five
five
800 five
DTV Air 800 five
Home and Away
18:00 - 18:30
Drama
Dani is devastated when scott makes clear his views on marriage...
27
28
800
24
16
6
Discovery
DiscoveryH&L
five
price-drop.tv
QVC
R4DTT
American Chopper
Programmes resume at 06:00
Home and...
No Information
QVC Selection
No Information
Tine Team
Fiv...
Today 18:00 - 19:00 19:00 - 20:00
)
Family Affairs
)
Dark Angel
800 five
The display identifies the current channel
and the status of certain audio-video
settings.
The Now & Next guide shows daily TV
programme information for each channel
according to the broadcasting time.
Scroll y , to view information for a
desired programme while watching the
current channel.
Scroll y , to view information for other channels. If you
want to move to the currently selected channel, press
the ENTER
abc1
DTV Air
15
E
button.
Unclassified
No Detaild In formation
Planning Your Viewing
Guide
The EPG (Electronic Programme Guide)
information is provided by broadcasters.
Using programme schedules provided
by broadcasters, you can specify
programmes you want to watch in
advance so that the channel automatically
changes to the selected programme
channel at the specified time. Programme
entries may appear blank or out of date
depending on a channel status.
Using Channel View
Guide
18:00 ~ 6:00
18:11 Thu 6 Jan
E
' Information
2:10 Tue 1 Jun
Using Scheduled View
Guide
Scheduled View
View Mode
Information
1 4 6
1
Red (View Mode): View the list of programmes that
are playing now or coming up.
2
Yellow (+24 hours): Viewing the list of programmes to
be broadcasted after 24 hours.
3
Blue (Ch.Mode): Select the type of channels you want
to display on the Channel View window.
The Ch. Mode differs according to the antenna –
source.
4 Information: Displays details of the selected
programme.
(Page): Moves to the previous / next page.
5
6 ENTER
E
button
When selecting the current programme, you can –
watch the selected programme.
When selecting the future programme, you can –
reserve to watch the selected programme. To cancel
E
the schedule, press the ENTER
button again and
select Cancel Schedules.
2:10 Tue 1 Jun
E
Cancel
03 Basic Features
Channel View - TV
View Mode
+24 Hours Ch. Mode
1 2 3 4 5 6
Information k
E
Page 13
Basic Features
B
c 1 1futech
c 2 * 24ore.tv
15 abc1
3 BBC World
23 bid-up.tv
33 Boonerang
32 Cartoon Nwk
5 Class News
4 \ Coming Soon
27 Discovery
All
TV
Radio
Data/Other
Analogue
r
c 1 1futech
c 2 * 24ore.tv
15 abc1
3 BBC World
23 bid-up.tv
33 Boonerang
32 Cartoon Nwk
5 Class News
4 \ Coming Soon
27 Discovery
All
TV
Radio
Data/Other
Analogue
r
Channel Manager
Delete or set favourites channels and use the programme
guide for digital broadcasts. Select a channel in the
Channels, My Channels or Scheduled screen.
Channels
Air Antena B Zoom Select kT Tools
■ Channels: Shows the channel list according to
channel type.
*
■
My Channels: Shows the group of the channel.
■ Scheduled: Shows all the currently reserved
✎
Using the colour buttons with the
Red (Antenna): Toggle among Air or Cable.
x
Green (Zoom): Enlarges or shrinks a channel
x
number.
Yellow (Select): Select desired channels and press
x
the Yellow button to set all the selected channels at
the same time. The c mark appears to the left of
the selected channels.
(Page): Move to next or previous page.
x
T x (Tools): Displays the Channel Manager option
menu. (The Options menus may differ depending on
the situation.)
Channel Status Display Icons
Icons Operations
A
c
*
(
\
)
programmes.
Channel Manager
An Analogue channel.
A channel selected.
A channel set as a Favourite.
A programme currently being broadcast.
A locked channel.
A reserved programme.
Using Favourite Channels ¦
*
My Channels
(in Channel Manager)
Shows all favourite channels.
Edit My Channels ■
channels to desired my channels group.
✎ *
” symbol will be displayed and the channel will
The “
be set as a my channel.
1. Select a channel and press the TOOLS button.
2. Add or delete a channel in the my channel groups
you want among 1, 2, 3 and 4.
One or more groups can be selected.
x
3. After you have changed the settings, the channel list
for each group can be viewed in My Channels.
t
: You can set the selected
Channels
Edit My Channels
Delete
Deselect All
Select All
Air Antena B Zoom Select kT Tools
Channel Menu
Retuning channels ¦
Antenna (Air / Cable)
Before your television can begin memorizing the available
channels, you must specify the type of signal source that is
connected to the TV (i.e. an Air or a Cable system).
Country
The PIN input screen appears. Enter your 4 digit PIN number.
Digital Channel ■ : Change the country for digital
channels.
Analogue Channel ■ : Change the country for analogue
channels.
12
English
Page 14

13
English
03 Basic Features
Auto Store
Scans for a channel automatically and stores in the TV.
Automatically allocated programme numbers may not
✎
correspond to actual or desired programme numbers. If
a channel is locked using the Child Lock function, the
PIN input window appears.
Antenna Source (Air / Cable) ■ : Select the antenna
source to memorise.
Channel Source (Digital & Analogue / Digital / ■
Analogue): Select the channel source to memorise.
When selecting Cable Digital & Analogue or Digital:
Provide a value to scan for cable channels.
Search Mode (Full / Network / Quick): Scans for all
channels with active broadcast stations and stores them
in the TV.
If you set
✎
Network ID, Frequency, Modulation, Symbol
Rate manually by press the button on the remote
control.
Network (Auto / Manual): Selects the Network ID
setting mode among Auto or Manual.
Network ID: When Network is Manual, you can set up
Network ID using the numeric buttons.
Frequency: Displays the frequency for the channel.
(differs in each country)
Modulation: Displays available modulation values.
Symbol Rate: Displays available symbol rates.
Quick, you can set up Network,
Manual Store
Scans for a channel manually and stores in the TV.
If a channel is locked using the
✎
the PIN input window appears.
Digital Channel (Channel, Frequency, Bandwidth) ■ :
When scanning has finished, channels are updated in
the channel list.
When selecting ✎Antenna Air: Channel, Frequency,
Bandwidth
✎
When selecting
Modulation, Symbol Rate
Analogue Channel (Programme, Colour System, ■
Sound System, Channel, Search): If there is abnormal
sound or no sound, reselect the sound standard
required.
Channel mode
✎
P x (programme mode): When tuning is complete,
the broadcasting stations in your area have been
assigned to position numbers from P0 to P99. You
can select a channel by entering the position number
in this mode.
C
(aerial channel mode) / S (cable channel mode):
x
These two modes allow you to select a channel
by entering the assigned number for each aerial
broadcasting station or cable channel.
Editing channels ¦
Channel Manager Option Menu
(in Channel Manager)
1. Select a channel and press the TOOLS button.
2. Edit the channel name or number using the Edit
Channel Name or Edit Channel Number menu.
Edit Channel Name ■ (analogue channels only): Assign
your own channel name.
Edit Channel Number ■ (digital channels only): Edit the
number by pressing the number buttons desired.
Antenna Cable: Frequency,
Child Lock function,
Other Features ¦
Cable Search Option
(depending on the country)
Sets additional search options such as the frequency and
symbol rate for a cable network search.
Freq.Start / Freq.Stop ■ : Set the start or stop frequency
(differs in each country)
Modulation ■ : Displays available modulation values.
Symbol Rate ■ : Displays available symbol rates.
Page 15

Basic Features
Channel Manager Option Menu
(in Channel Manager)
Set each channel using the Channel Manager menu options
(Lock / Unlock, Timer Viewing, Sort, Delete, Select All /
Deselect All). Option menu items may differ depending on
the channel status.
1. Select a channel and press the TOOLS button.
2. Select a function and change its settings.
Lock / Unlock ■ : Lock a channel so that the channel
cannot be selected and viewed.
NOTE
✎
This function is available only when the xChild Lock
is set to On.
The PIN input screen appears. Enter your 4-digit PIN,
x
the default of which is “0-0-0-0”. Change the PIN
using the Change PIN option.
Timer Viewing ■ : You can set a desired channel to be
displayed automatically at the intended time. Set the
current time first to use this function.
When a digital channel is selected, press the
✎
button to view the digital Programme.
Sort ■ (analogue channels only): This operation allows
you to change the programme numbers of the stored
channels. This operation may be necessary after using
the auto store.
Delete: ■ You can delete a channel to display the channels
you want.
Select All / Deselect All ■ : Select all the channels
or deselect all the selected channels in the channel
manager.
Scheduled
(in Channel Manager)
You can view, modify or delete a a show you have reserved
to watch.
Change Info ■ : Change a a show you have reserved to
watch.
Cancel Schedules ■ : Cancel a show you have reserved
to watch.
Information ■ : Display a show you have reserved
to watch. (You can also change the reservation
information.)
Select All / Deselect All ■ : Select or deselect all reserved
programmes.
Channel List
You can see all the channels searched.
Channel List Transfer
Imports or exports the channel map. You should connect a
USB storage to use this function.
The PIN number input screen appears. Enter your 4
✎
digit PIN number.
✎
The default PIN number of a new TV set is ‘0-0-0-0’.
Import from USB: ■ Import channel list from USB.
Export to USB: ■ Export channel list to USB.
Fine Tune
(analogue channels only)
If the signal is weak or distorted, fine tune the channel
manually.
✎
Fine tuned channels are marked with an asterisk “*”.
To reset the fine-tuning, select ✎ Reset.
Picture Menu
Changing the Preset Picture Mode ¦
Mode
Select your preferred picture type.
t
Dynamic ■ : Suitable for a bright room.
Standard ■ : Suitable for a normal environment.
Movie ■ : Suitable for watching movies in a dark room.
Adjusting picture settings ¦
Backlight / Contrast / Brightness /
Sharpness / Colour / Tint (G/R)
Your television has several setting options for picture quality
control.
✎
NOTE
In analogue xTV, Ext., AV modes of the PAL system,
the Tint (G/R) function is not available.
In PC mode, you can only make changes to
x
Backlight, Contrast and Brightness.
Settings can be adjusted and stored for each
x
external device connected to the TV.
Lowering picture brightness reduces power
x
consumption.
14
English
Page 16

15
English
03 Basic Features
Economical Solutions ¦
ECO Solution
Energy Saving (Off / Low / Medium / High / Picture ■
Off / Auto)
in order to reduce power consumption. If you select
Picture Off, the screen is turned off, but the sound
remains on. Press any button to turn on the screen again.
No Signal Power Off (Off / 15 min / 30 min / 60 min) ■ :
Activates the Stand-by mode, in the case of “No Signal”
or “Check Signal Cable” status for a certain period of
time defined by the user.
Changing the Picture Options ¦
t
Disabled when the PC is in power saving mode.
✎
: Adjust the brightness of the TV
Advanced Settings
(available in Standard / Movie mode)
You can adjust the detailed setting for the screen including
colour and contrast.
✎
In PC mode, you can only make changes to
Contrast, Gamma and White Balance.
Advanced Settings
Dynamic Contrast : Medium
Shadow Detail : 0
Gamma : 0
Colour Space : Native
Black Tone (Off / Dark / Darker / Darkest) ■ : Select the
black level to adjust the screen depth.
Dynamic Contrast (Off / Low / Medium / High) ■ : Adjust
the screen contrast.
U Move E Enter R Return
Dynamic
Shadow Detail (-2~+2) ■ : Increase the brightness of dark
images.
Disabled under PC mode.
✎
Gamma ■ : Adjust the primary colour intensity.
RGB Only Mode (Off / Red / Green / Blue) ■ : You can
adjust Colour or Tint of Red, Green or Blue for the
picture from an external device (DVD player, home
theatre, etc.).
Colour Space (Auto / Native) ■ : Adjust the range of
colours available to create the image.
White Balance ■ : Adjust the colour temperature for a
more natural picture.
R-Offset / G-Offset / B-Offset: Adjust each colour’s
(red, green, blue) darkness.
R-Gain/G-Gain/B-Gain: Adjust each colour’s
(red, green, blue) brightness.
Reset: Resets the White Balance to it’s default settings.
Flesh Tone ■ : Emphasize pink “Flesh Tone.”
Edge Enhancement (Off / On) ■ : Emphasize object
boundaries.
Picture Options
In PC mode, you can only make changes to the ✎Colour
Tone, Size and Auto Protection Time..
Picture Options
Digital NR : Auto
Colour Tone (Cool / Normal / Warm1 / Warm2) ■
Warm1
✎
✎
or Warm2 will be deactivated when the
picture mode is Dynamic.
Settings can be adjusted and stored for each
external device connected to an input on the TV.
U Move E Enter R Return
Page 17

Basic Features
Size ■ : Your cable box/satellite receiver
may have its own set of screen
sizes as well. However, we highly
recommend you use 16:9 mode most
of the time.
Auto Wide: Automatically adjusts the
picture size to the 16:9 aspect ratio.
16:9 : Adjusts the picture size to 16:9 for DVDs or wide
broadcasting.
Wide Zoom: Magnifies the picture size more than 4:3.
Adjusts the Position by using
✎
Zoom: Magnifies the 16:9 wide pictures vertically to fit
the screen size.
Adjusts the Position or Size by using
✎
4:3 : The default setting for a movie or normal
broadcasting.
Do not watch in 4:3 format for a long time. Traces
✎
of borders displayed on the left, right and centre
of the screen may cause image retention(screen
burn) which are not covered by the warranty.
Screen Fit: Displays the full image without any cut-off
when HDMI (720p / 1080i / 1080p) or Component
(1080i / 1080p) signals are inputted.
✎
NOTE
After selecting xScreen Fit in HDMI (1080i/1080p) or
Component (1080i/1080p) mode, you may need to
centre the picture:
1. Press the or button to select Position.
2. Press the ENTER
3. Press the or button to move the
picture.
Depending on the input source, the picture size
x
options may vary.
The available items may differ depending on the
x
selected mode.
In PC mode, only
x
adjusted.
Settings can be adjusted and stored for each
x
external device connected to an input of the TV.
If you use the
x
input, 1 line will be cut at the top, bottom, left and
right as in the overscan function.
E
16:9 and 4:3 modes can be
Screen Fit function with HDMI 720p
, buttons.
, button.
button.
Screen Mode (16:9 / Wide Zoom / Zoom / 4:3) ■ :
Available only when picture size is set to Auto Wide.
You can determine the desired picture size at the 4:3
WSS (Wide Screen Service) size or the original size.
Each European country requires different picture size.
Not available in PC, Component or HDMI mode.
✎
Digital Noise Filter (Off / Low / Medium / High / Auto ■
/ Auto Visualisation): When the broadcast signal is
weak, some static and ghosting may appear. Select one
of the options until the best picture is displayed.
Auto Visualisation: When changing analogue channels,
displays signal strength.
Only available for analogue channels.
✎
When bar is green, you are receiving the best
✎
possible signal.
MPEG Noise Filter (Off / Low / Medium / High / ■
Auto): Reduces MPEG noise to provide an improved
picture quality.
✎
Disabled under PC mode.
HDMI Black Level (Normal / Low) ■ : Selects the black
level on the screen to adjust the screen depth.
Available only in HDMI mode (RGB signals).
✎
Film Mode (Off / Auto1 / Auto2) ■ : Sets the TV to
automatically sense and process film signals from all
sources and adjust the picture for optimum quality.
Available in TV, AV, COMPONENT (480i / 1080i)
✎
and HDMI (480i / 1080i).
Auto Protection Time (2 hours/4 hours/8 hours/10 ■
hours/ Off) : If the same image remains on the screen,
Auto Screen Burn Protector will work.
Picture Reset (OK / Cancel)
Resets your current picture mode to its default settings.
16
English
Page 18

17
English
03 Basic Features
Setting up the TV with Your PC ¦
Set the input source to PC.
Auto Adjustment
Adjust frequency values/positions and fine tune the settings
automatically.
✎
Not available when connecting through HDMI/DVI
cable.
t
Screen
Coarse / Fine ■ : Removes or reduces picture noise. If the
noise is not removed by Fine-tuning alone, then adjust
the frequency as best as possible (Coarse) and Finetune again. After the noise has been reduced, readjust
the picture so that it is aligned to the centre of screen.
Position ■ : Adjust the PC screen position with direction
button ( / / / ).
Image Reset ■ : Resets the image to default settings.
Using Your TV as a Computer (PC) Display
Setting Up Your PC Software (Based on Windows XP)
Depending on the version of Windows and the video card,
the actual screens on your PC may differ in which case the
same basic set-up information will almost always be applied.
(If not, contact your computer manufacturer or Samsung
Dealer.)
1. Click on “Control Panel” on the Windows start menu.
2. Click on “Appearance and Themes” in the “Control
Panel” window and a display dialog-box will appear.
3. Click on “Display” and a display dialog box will appear.
4. Navigate to the “Settings” tab on the display dialog-box.
The correct size setting (resolution) [Optimum: 1360 X y
768 pixels]
If a vertical-frequency option exists on your display y
settings dialog box, the correct value is “60” or “60 Hz”.
Otherwise, just click “OK” and exit the dialog box.
Sound Menu
Changing the Preset Sound Mode ¦
Mode
t
Standard ■ : Selects the normal sound mode.
Music ■ : Emphasizes music over voices.
Movie ■ : Provides the best sound for movies.
Clear Voice ■ : Emphasizes voices over other sounds.
Amplify ■ : Increase the intensity of high-frequency sound
to allow a better listening experience for the hearing
impaired.
Adjusting sound settings ¦
Equalizer
Adjusts the sound mode.
Balance L/R ■ : Adjusts the balance between the right and
left speaker.
100Hz / 300Hz / 1KHz / 3KHz / 10KHz ■ (Bandwidth
Adjustment): Adjusts the level of specific bandwidth
frequencies.
Reset ■ : Resets the equalizer to its default settings.
Sound Systems, Etc. ¦
Virtual Surround (Off / On)
This function provides a virtual 5.1 channel surround sound
experience through a pair of speakers or headphones using
HRTF (Head Related Transfer Function) technology.
If
✎
Speaker Select is set to External Speaker, Virtual
Surround is disabled.
Dialog Clarity (Off / On)
This function allows you to increase the intensity of a voice
over background music or sound effects so that dialog can
be heard more clearly when viewing a show.
Audio Language
(digital channels only)
Change the default value for audio languages.
The available language may differ depending on the
✎
broadcast.
Audio Format (MPEG / Dolby Digital 5.1)
(digital channels only)
When sound is emitted from both the main speaker and the
audio receiver, a sound echo may occur due to the decoding
speed difference between the main speaker and the audio
receiver. In this case, use the TV Speaker function.
Audio Format
✎
broadcast. 5.1ch Dolby digital sound is only available
when connecting an external speaker through an
optical cable.
option may differ depending on the
Page 19
Basic Features
MEDIA.P
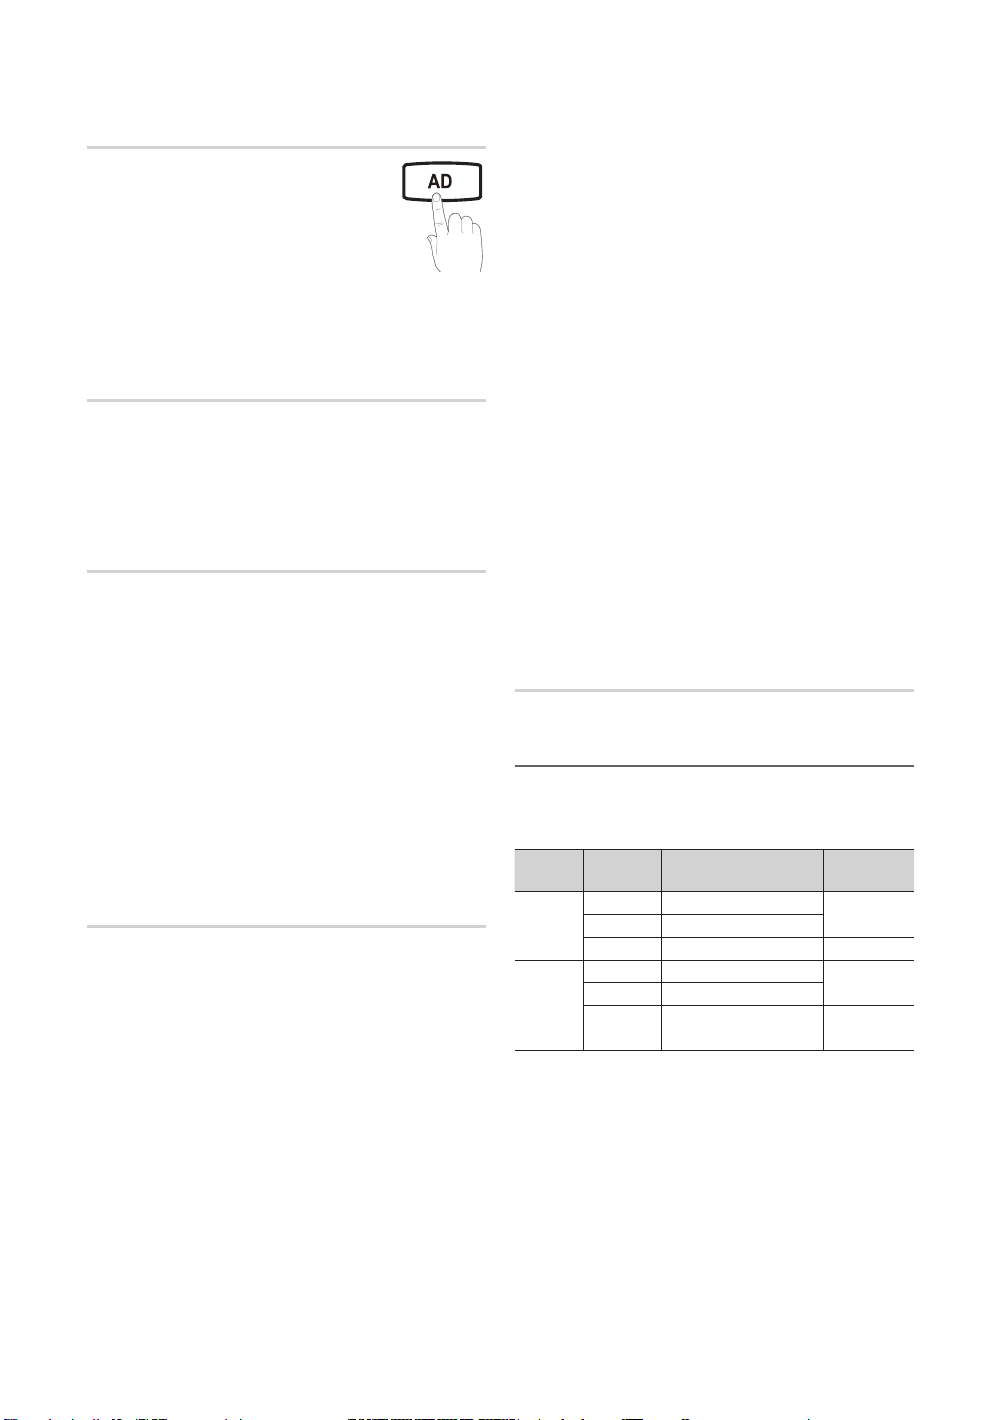
Audio Description
(not available in all locations)
(digital channels only)
This function handles the Audio Stream
for the AD (Audio Description) which is
sent along with the Main audio from the
broadcaster.
Audio Description (Off / On) ■ : Turn the audio description
function on or off.
Volume ■ : Adjust the audio description volume.
Auto Volume (Off / Normal / Night)
To equalize the volume level on each channel, set to Normal.
Night ■ : This mode provides an improved sound
experience compared to Normal mode, making almost
no noise. It is useful at night.
Speaker Select (External speaker / TV
speaker)
A sound echo may occur due to a difference in decoding
speed between the main speaker and the audio receiver. In
this case, set the TV to External Speaker.
✎
Speaker Select is set to External Speaker, the
When
volume and MUTE buttons will not operate and the
sound settings will be limited.
✎
Speaker Select is set to External Speaker, you
When
should use these settings.
TV Speaker: Off , External
x
When
✎
Speaker Select is set to TV Speaker, you
should use these settings.
TV
Speaker: On , External Speaker: On
x
If there is no video signal, both speakers will be mute.
✎
Speaker: On
Additional Setting
(digital channels only)
DTV Audio Level (MPEG / HE-AAC) ■ : This function
allows you to reduce the disparity of a voice signal
(which is one of the signals received during a digital TV
broadcast) to a desired level.
According to the type of broadcast signal,
✎
/ HE-AAC can be adjusted between -10dB and
0dB.
To increase or decrease the volume, adjust
✎
between the range 0 and -10 respectively.
MPEG
SPDIF Output ■ : SPDIF (Sony Philips Digital InterFace)
is used to provide digital sound, reducing interference
going to speakers and various digital devices such as a
DVD player.
Audio Format: During the reception of a digital TV
broadcast, you can select the Digital Audio output
(SPDIF) format from the options PCM, Dolby Digital or
DTS.
✎
By connecting to 5.1ch speakers in a Dolby
Digital setup, maximize your interactive 3D sound
experience.
Audio Delay: Correct audio-video mismatch, when
watching TV or video, and listening to digital audio
output using an external device such as an AV receiver.
Dolby Digital Comp (Line / RF) ■ : This function minimizes
signal disparity between a dolby digital signal and a
voice signal (i.e. MPEG Audio, HE-AAC, ATV Sound).
Select
✎
Line to obtain dynamic sound, and RF
to reduce the difference between loud and soft
sounds at night time.
Line: Set the output level for signals greater or less than
-31dB (reference) to either -20dB or -31dB.
RF: Set the output level for signals greater or less than
-20dB (reference) to either -10dB or -20dB.
Sound Reset (OK / Cancel)
Reset all sound settings to the factory defaults.
Selecting the Sound Mode ¦
When you set to Dual l ll, the current sound mode is
displayed on the screen.
Audio
Type
A2
Stereo
NICAM
Stereo
✎
✎
Mono MONO
Stereo
Dual
Mono Mono
Stereo
Dual
If the stereo signal is weak and an automatic switching,
occurs, then switch to the mono.
Only activated in stereo sound signal.
Only available when the ✎Input source is set to TV.
t
Dual l ll Default
Stereo mono
Dual l Dual ll
Mono stereo
Mono Dual l
Dual ll
Automatic
change
Dual l
Automatic
change
Dual l
18
English
Page 20

19
English
03 Basic Features
10 TV ATV2
00 00
▲
▼
00 00
▲
▼
Setup Menu
Setting the Time ¦
Time
Clock ■ : Setting the clock is for using various timer
features of the TV.
The current time will appear every time you press
the INFO button.
If you disconnect the power cord, you have to set
✎
the clock again.
Clock Mode (Auto / Manual)
Depending on the broadcast station and signal,
✎
the auto time set up may not be correct. In this
case, set the time manually.
The antenna must be connected in order to set
✎
the time automatically.
Clock Set: Set the Day, Month, Year, Hour and Minute
manually.
✎
Available only when
Manual.
Using the Sleep Timer ¦
To cancel
t
Sleep Timer, select Off.
Sleep Timer ■
after a preset period of time. (30, 60, 90, 120, 150 and
180 minutes).
✎
Setting the On/Off Timer ¦
Timer 1 / Timer 2 / Timer 3 ■ : Three different on / off
timer settings can be made. You must set the clock first.
Inactivate
Inactivate
Volume
Repeat
Source Antenna Channel
Sun Mon Tue Thu Fri Sat
Clock Mode is set to
: Automatically shuts off the TV
Timer 1
L
Move
U Adjust E
Enter R Return
On Time / Off Time: Set the hour, minute, and activate
/ inactivate. (To activate timer with the setting you’ve
chosen, set to Activate.)
Volume: Set the desired volume level.
Source: Select TV or USB content to be played when
the TV is turned on automatically. (USB can be selected
only when a USB device is connected to the TV)
Antenna (when the Source is set to TV): Select ATV or
DTV.
Channel (when the Source is set to TV): Select the
desired channel.
Contents (when the Source is set to USB): Select a
folder in the USB device containing music or photo files
to be played when the TV is turned on automatically.
✎
If there is no music file on the USB device or the
folder containing a music file is not selected, the
Timer function does not operate correctly.
When there is only one photo file in the USB
✎
device, the Slide Show will not play.
If a folder name is too long, the folder cannot be
✎
selected.
Each USB you use is assigned its own folder.
✎
When using more than one of the same type of
USB, make sure the folders assigned to each USB
have different names.
Repeat: Select Once, Everyday, Mon~Fri, Mon~Sat,
Sat~Sun or Manual to set at you convenience. If you
select Manual, you can set up the day you want to
activate the timer.
✎ c
✎
Auto Power Off (available only when the TV is turned on
by Timer): The TV will be automatically turned off after 3
hours of being left idle to prevent overheating.
mark indicates the day is selected.
The
Locking Programs ¦
Security
The PIN input screen appears before the setup screen.
✎
Enter your 4-digit PIN, the default of which is “0-0-0-0”.
✎
Change the PIN using the Change PIN option.
Child Lock (Off / On) ■ : Lock channels in Channel
Manager, to prevent unauthorized users, such as
children, from watching unsuitable programme.
Available only when the
✎
Parental Lock (Parental Rating) ■ : Prevent unauthorized
users, such as children, from watching unsuitable
programme with a user-defined 4-digit PIN code.
Allow All: Unlock all TV ratings.
✎
The items of
the country.
Parental Lock differs depending on
Input source is set to TV.
Page 21

Basic Features
P
POWER
MEDIA.P
FAV . CH
P . MODE
DUAL
MTS
Change PIN ■ : Change your personal ID number required
to set up the TV.
If you forget the PIN code, press the remote
✎
control buttons in the following sequence, which
resets the PIN to “0-0-0-0”: POWER (off) →
MUTE → 8 → 2 → 4 → POWER (on).
Other Features ¦
Language
Menu Language ■ : Set the menu language.
Teletext Language ■ : Set a desired language for teletext.
English is the default in cases where the selected
✎
language is unavailable in the broadcast.
Preference (Primary Audio Language / Secondary ■
Audio Language / Primary Subtitle Language /
Secondary Subtitle Language / Primary Teletext
Language / Secondary Teletext Language): Select
a language, which will be the default language when a
channel is selected.
Subtitle
Use this menu to set the Subtitle mode.
The subtitle feature doesn’t work in
✎
Component or HDMI modes.
Subtitle (Off / On) ■ : Switches subtitles
on or off.
Mode (Normal / Hearing Impaired) ■ :
Sets the subtitle mode.
Subtitle Language ■ : Sets the subtitle language.
If the programme you are watching does not
✎
support the Hearing Impaired function, Normal
automatically activates even if the Hearing
Impaired mode is selected.
English is the default in cases where the selected
✎
language is unavailable in the broadcast.
Digital Text (Disable / Enable) (UK only)
If the programme broadcasts with digital text, this feature is
enabled.
General
Game Mode (Off / On) ■ : When connecting to a game
console such as PlayStation™ or Xbox™, you can enjoy
a more realistic gaming experience by selecting game
mode.
✎
NOTE
Precautions and limitations for x game mode
To disconnect the game console and connect –
another external device, set Game Mode to Off
in the setup menu.
If you display the TV menu in – Game Mode, the
screen shakes slightly.
Game Mode
x
After connecting
x
to On to prevent poor picture quality.
If
Game Mode is On: Picture mode is set to
x
Standard and Sound mode is set to Movie.
Menu Transparency (Bright / Dark) ■ : Se t the
Transparency of the menu.
Melody (Off / Low / Medium / High) ■ : Set so that a
melody plays when the TV is turned on or off.
is not available in TV and PC mode.
the game console, set Game Mode
Common Interface
CI Menu ■ : This enables the user to select from the CAM-
provided menu. Select the CI Menu based on the menu
PC Card.
Application Info. ■ : View information on the CAM inserted
into the CI slot and on the “CI or CI+ CARD” which is
inserted into the CAM. You can install the CAM anytime
whether the TV is on or off.
1. Purchase a CI CAM module at your nearest dealer or by
phone.
2. Firmly insert the “CI or CI+ CARD” into the CAM in the
direction of the arrow.
3. Insert the CAM with the “CI or CI+ CARD” into the
common interface slot, in the direction of the arrow so
that it aligns parallel with the slot.
4. Check if you can see a picture on a scrambled signal
channel.
20
English
Page 22
21
English
03 Basic Features
Support Menu
Self Diagnosis
Self Diagnostic might take few seconds, this is part of the
normal operation of the TV.
Picture Test (Yes / No) ■ : Use to check for picture
problems and if the problem continues to occur check
the colour pattern.
Sound Test (Yes / No) ■ : Use the built-in melody sound to
check for sound problems.
If you hear no sound from the TV’s speakers,
✎
before performing the sound test, make sure
Speaker Select is set to TV speaker in the
Sound menu.
The melody will be heard during the test even if
✎
Speaker Select is set to External Speaker or the
sound is muted by pressing the MUTE button.
Signal Information ■ : (digital channels only) HDTV
channel’s reception quality is either perfect or the
channels are unavailable. Adjust your antenna to
increase signal strength.
Trouble Shooting ■ : If the TV seems to have a problem,
refer to this description.
If none of these trouble troubleshooting tips apply,
✎
contact the Samsung customer service centre.
Software Upgrade
Software Upgrade can be performed via a broadcasting
signal or by downloading the latest firmware from samsung.
com to a USB memory device.
Current Version the software already installed in the TV.
✎
Software is represented as “Year/Month/Day_Version”.
Installing the Latsted Version
By USB ■ : Insert a USB drive
containing the firmware
upgrade file, downloaded
from www.samsung.com,
into the TV. Please be careful
not to disconnect the power
or remove the USB drive
until upgrades are complete.
The TV will be turned off
and on automatically after
completing the firmware
upgrade. When software is upgraded, video and audio
settings you have made will return to their default
settings. We advise you to to write down your settings
so that you can easily reset them after the upgrade.
By Channel ■ : Upgrade the software using the
broadcasting signal.
If the function is selected during the software
✎
transmission period, software will be automatically
searched and downloaded.
The time required to download the software is
✎
determined by the signal status.
Standby Mode Upgrade ■ : A manual upgrade will be
automatically performed at selected time. Since the
power of the unit is turned on internally, the screen
may be turned on slightly for the LCD product. This
phenomenon may continue for more than 1 hour until
the software upgrade is complete.
Alternative ■ Software (backup): If there is an issue with
the new firmware and it is affecting operation, you can
change the software to the previous version.
If the software was changed, existing software is
✎
displayed.
TV Rear Panel
USB Drive
Software Upgrade
Current Version 2010/01/18_000001
By Channel
Standby Mode Upgrade 2 Hours Later
Alternative Software
U Move E Enter R Return
HD Connection Guide
Refer to this information when connecting external devices
to the TV.
Contact Samsung
View this information when your TV does not work properly
or when you want to upgrade the software. You can find
information regarding our call centres, and how to download
products and software.
Page 23
Advanced Features
MEDIA.P
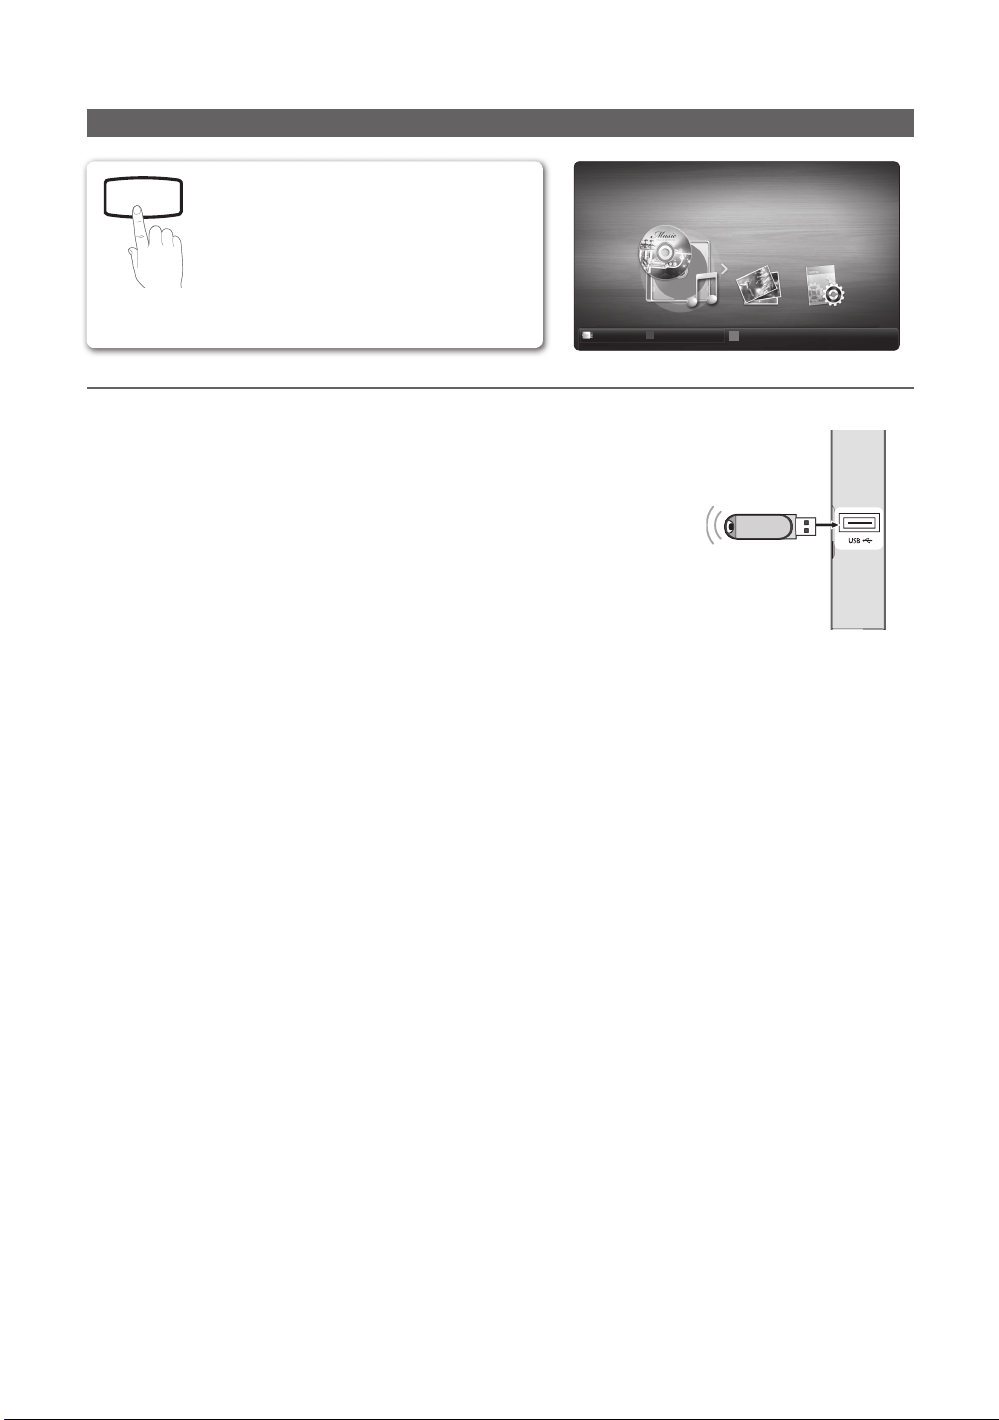
Media Play
Enjoy photos and/or music fi les saved on a USB
Mass Storage Class (MSC) device.
Media
Devicename
Music
Music
A
Change Device
D
Device Mode
E
Connecting a USB Device ¦
1. Turn on your TV.
2. Connect a USB device containing photo and/or music fi les to the USB jack on the
rear of the TV.
3. When USB is connected to the TV, popup window appears. Then you can select
Media Play.
USB Drive
✎
It might not work properly with unlicensed multimedia files.
Need-to-Know List before using ✎Media Play
MTP (Media Transfer Protocol) is not supported.
x
The file system supports FAT16, FAT32 and NTFS.
x
Certain types of USB Digital camera and audio devices may not be compatible with this TV.
x
Media Play only supports USB Mass Storage Class (MSC) devices. MSC is a Mass Storage Class Bulk-Only
x
Transport device. Examples of MSC are Thumb drives, Flash Card Readers and USB HDD (USB HUB are not
supported). Devices should be connected directly to the TV’s USB port.
Before connecting your device to the TV, please back up your files to prevent them from damage or loss of data.
x
SAMSUNG is not responsible for any data file damage or data loss.
Do not disconnect the USB device while it is loading.
x
The higher the resolution of the image, the longer it takes to display on the screen.
x
The maximum supported JPEG resolution is 15360X8640 pixels.
x
For unsupported or corrupted files, the “Not Supported File Format” message is displayed.
x
If the files are sorted by Basic View, up to 1000 files can be displayed in each folder.
x
MP3 files with DRM that have been downloaded from a non-free site cannot be played. Digital Rights Management
x
(DRM) is a technology that supports the creation, distribution and management of the content in an integrated and
comprehensive way, including the protection of the rights and interests of the content providers, the prevention of the
illegal copying of contents, as well as managing billings and settlements.
If more than 2 PTP devices are connected, you can only use one at a time.
x
If more than two MSC devices are connected, some of them may not be recognized. A USB device that requires high
x
power (more than 500mA or 5V) may not be supported.
If an over-power warning message is displayed while you are connecting or using a USB device, the device may not
x
be recognized or may malfunction.
If the TV has been no input during time set in
x
The power-saving mode of some external hard disk drives may be released automatically when connected to the TV.
x
If a USB extension cable is used, the USB device may not be recognized or the files on the device may not be read.
x
If a USB device connected to the TV is not recognized, the list of files on the device is corrupted or a file in the list is
x
not played, connect the USB device to the PC, format the device and check the connection.
If a file deleted from the PC is still found when Media Play is run, use the “Empty the Recycle Bin” function on the PC
x
to permanently delete the file.
English
22
Auto Protection Time, the Screensaver will run.
Enter
R
Return
TV rear Panel
Page 24
23
English
04 Advanced Features
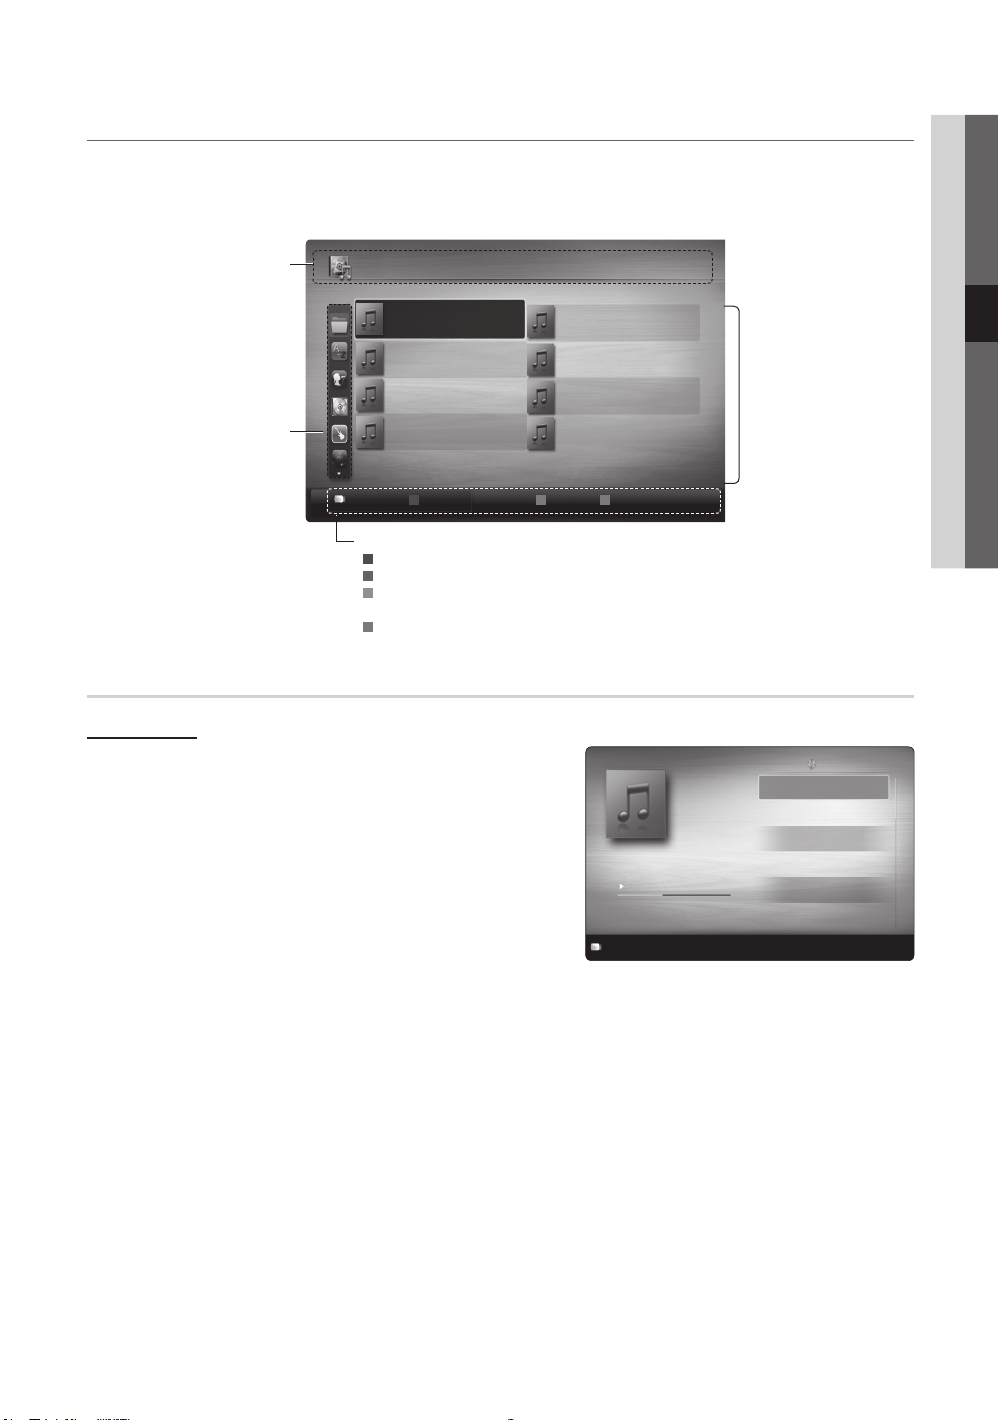
Screen Display ¦
Move to the file you desired using the up/down/right/left buttons and then press the ENTERE button. The file is played.
✎
Supports the
Device Mode and Contents Mode in Media Play homepage.
You can ascertain the selected file
Information :
name and the number of files and
page.
Sort List Section :
Displays the sorting standard.
The sorting standard is
✎
different depending on the
contents.
Devicename
/Music 01.mp3 1/2
Music
c
Music 01 2010
no singer other
c
Music 03 2010
no singer other
Music 05 2010
no singer other
c
Music 07 2010
no singer other
A
Change Device
Operation Button
A
Red (Change Device): Selects a connected device.
B
Green (Preference): Sets the file preference. (not supported in Basic view)
C
Yellow (Select): Selects multiple files from file list. Selected files are marked
with a symbol.
D
Blue (Sorting): Selects the sort list.
T
Tools: Displays the option menu.
Music
Playing a Music
1. Press the ◄ or ► button to select Music, then press the ENTER
button in the Media Play menu.
2.
Press the ◄/►/▲/▼ button to select the desired Music in the file list.
3. Press the ENTERE button.
During music playback, you can search using – ◄ and ► button.
✎
Only displays files with the MP3 file extension. Other file extensions
are not displayed, even if they are saved on the same USB device.
✎
If the sound is strange when playing MP3 files, adjust the
in the Sound menu. (An over-modulated MP3 file may cause a
sound problem.)
Equalizer
Music 02 2010
no singer other
Music 04 2010
no singer other
Music 06 2010
no singer other
Music 08 2010
no singer other
C
Select D Sorting T Tools
E
Devicename
Only you
Jason
1st Album
Pop
2010
4.2MB
01:10 / 04:02
E Pause L Jump T Tools R Return
File List Section :
You can confirm the files and
groups that are sorted by each
category.
Playlist
Only you
Jason
Music 1
No Singer
Music 2
No Singer
Music 3
No Singer
Music 4
No Singer
Music 5
No Singer
3/15
Page 25

Advanced Features
Photos
Viewing a Photo (or Slide Show)
1. Press the ◄ or ► button to select Photos, then press the
ENTER
E
button in the Media Play menu.
2. Press the ◄/►/▲/▼ button to select the desired photo in the file list.
3. Press the ENTER
While a photo list is displayed, press – ENTER
remote control to start slide show.
All files in the file list section will be displayed in the slide show. –
During the slide show, files are displayed in order from currently –
being shown.
Music files can be automatically played during the Slide Show if the
✎
Background Music is set to On.
The
✎
BGM Mode cannot be changed until the BGM has finished
loading.
Playing the multiple files ¦
Playing the selected music/photo files
1. Press the Yellow button in the file list to select the desired file.
2. Repeat the above operation to select multiple files.
NOTE
✎
The xc
To cancel a selection, press the yellow button again.
x
To deselect all selected files, press the xTOOLS button and
select Deselect All.
3. Press the TOOLS button and select Play Selected Contents.
E
button.
E
button on the
mark appears to the left of the selected files.
Normal
Image1024.jpg
Devicename E Pause L Previous/Next T Tools R Return
/Music 01.mp3 1/2
Music
c
Music 01 2010
no singer other
c
Music 03 2010
no singer other
Music 05 2010
no singer other
c
Music 07 2010
no singer other
1024x768
Music 02 2010
no singer other
Music 04 2010
no singer other
Music 06 2010
no singer other
Music 08 2010
no singer other
2010/2/1
3/15
Playing the music/photo file group
1. While a file list is displayed, move to the any file in desired group.
2. Press the TOOLS button and select Play Current Group.
English
24
Devicename
A
Change Device
C
Select
D
Sorting
T Tools
Page 26
25
English
04 Advanced Features
Media Play Additional Function ¦
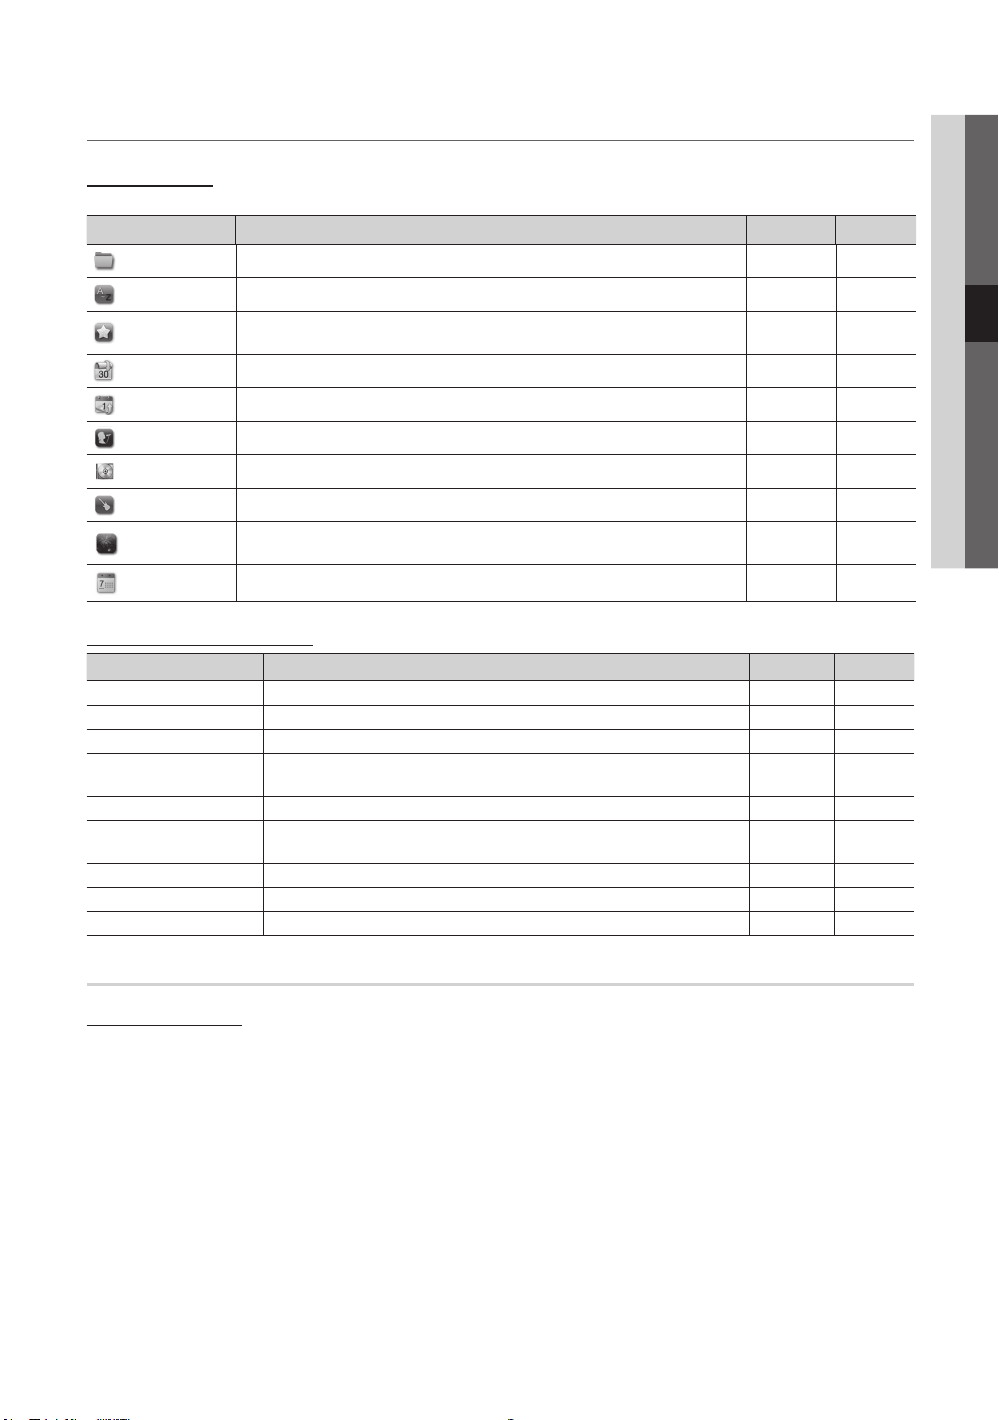
Sorting the file list
Press the blue button in the file list to sort the files.
Category Operations Music Photos
Basic View Displays the whole folder. You can view the photo by selecting the folder.
Title Sorts and displays the file title in Symbol/Number/Alphabet/Special order.
Preference
Latest Date Sorts and shows files by the latest date.
Earliest Date Sorts and shows files by the earliest date.
Artist Sorts the music file by artist in alphabetical order.
Album Sorts the music file by album in alphabetical order.
Genre Sorts music files by the genre.
Mood
Monthly Sorts and shows photo files by month.
Music/Photos Play Option menu
Option menu Operations Music Photos
Repeat Mode You can play movie and music files repeatedly.
Picture Setting You can adjust the picture setting. (P. 14, 15, 16)
Sound Setting You can adjust the sound setting. (P. 17, 18)
Stop Slide Show / Start
Slide Show
Slide Show Speed You can select the slide show speed during the slide show.
Background Music
Zoom
Rotate You can rotate images in full screen mode.
Information You can see detailed information about the played file.
Sorts and displays the file by preference. You can change the file preference
in the file list section using the Green button.
Sorts music files by the mood. You can change the music mood
information.
You can start or stop a Slide Show.
Show.
You can zoom into images in full screen mode.
✓ ✓
✓ ✓
✓ ✓
✓
✓
✓
✓
✓
✓ ✓
✓ ✓
✓
✓
✓
✓
✓
✓
✓
✓
✓
Settings
Using the Setup Menu
Information ■ : Select to view information about the connected device.
Page 27
Other Information
MEDIA.P
A
BCD
ABCD
Other Information
Analogue Channel Teletext Feature
The index page of the Teletext service gives you information on how to use the service. For Teletext information to be displayed
correctly, channel reception must be stable. Otherwise, information may be missing or some pages may not be displayed.
You can change Teletext pages by pressing the numeric buttons on the remote control.
✎
1
/ (Teletext on/mix):
Activate the Teletext mode after
selecting the channel providing the
Teletext service. Press it twice to
overlap the Teletext mode with the
current broadcasting screen.
2
8 (store): Store the Teletext
pages.
3
4 (size): Display the double-
size letters on the upper half of the
screen. For the lower half of the
screen, press it again. To display
the normal screen, press it once
again.
4
9 (hold): Hold the display
on a given page if the selected
page is linked with several
secondary pages which follow on
automatically. To resume, press it
again
5
0 (mode): Select the Teletext
mode (LIST/ FLOF).
If you press this button in the LIST
mode, the mode is switched into
the List save mode. In the List save
mode, you can save a Teletext
page into list using the 8(store)
button.
6
1 (sub-page): Display the
available sub-page.
2
1
3
4
2 (page up): Display the next
5
Teletext page.
3 (page down): Display the
previous Teletext page.
6 (index): Display the index
(contents) page at any time while
you are viewing Teletext.
5 (reveal): Display the hidden
text (answers to quiz games, for
6
example). To display the normal
7
screen, press it again.
7 (cancel): Display the current
broadcast when searching for a
8
9
0
!
@
Colour buttons (red/green/
yellow/blue): If the FASTEXT
system is used by a broadcasting
company, the different topics
covered on a Teletext page are
colour-coded and can be selected
by pressing the coloured buttons.
Press one of them corresponding
to the required. The page is
displayed with other coloured
information that can be selected
in the same way. To display the
previous or next page, press the
corresponding coloured button.
7
8
9
0
!
page.
@
The Teletext pages are organized according to six categories:
Part Contents Part Contents
A Selected page number. D Date and time.
B Broadcasting channel identity. E Text.
C
English
26
Current page number or
search indications.
Status information. FASTEXT
F
information.
Page 28

27
English
05 Other Information
Installing the Wall Mount
45mm
Installing the Wall Mount Kit ¦
Wall mount items (sold separately) allow you to mount the TV on the wall.
For detailed information on installing the wall mount, see the instructions provided with the Wall Mount items. Contact a
technician for assistance when installing the wall mount bracket.
Samsung Electronics is not responsible for any damage to the product or injury to yourself or others if you elect to install the
TV on your own.
Wall Mount Kit Specifications (VESA)
Wall mount kit is not supplied but sold separately.
✎
Install your wall mount on a solid wall perpendicular to the floor. When attaching to other building materials, please contact
your nearest dealer. If installed on a ceiling or slanted wall, it may fall and result in severe personal injury.
✎
NOTE
Standard dimensions for wall mount kits are shown in the table below.
x
When purchasing our wall mount kit, a detailed installation manual and all parts necessary for assembly are provided.
x
Do not use screws longer than the standard dimension, as they may cause damage to the inside of the TV set.
x
For wall mounts that do not comply with the VESA standard screw specifications, the length of the screws may differ
x
depending on their specifications.
Do not use screws that do not comply with the VESA standard screw specifications.
x
Do not fasten the screws too strongly, this may damage the product or cause the product to fall, leading to personal
x
injury. Samsung is not liable for these kinds of accidents.
Samsung is not liable for product damage or personal injury when a non-VESA or non-specified wall mount is used or
x
the consumer fails to follow the product installation instructions.
Do not exceed 15 degrees tilt when mounting this TV.
x
Product
Family
LCD-TV
inches VESA Spec. (A * B) Standard Screw Quantity
19~22
23~29 200 X 100
30~40 200 X 200 M6
46~55 400 X 400
57~65 600 X 400
70~80 800 X 400
80~ 1400 X 800
“If the length of the USB device is equal to or longer than 45 mm when used with 26” or 32” models
installed with a wall mount, the USB device may touch the wall. Therefore, using a short type USB device is
recommended.”
Do not install your Wall Mount Kit while your TV is turned on. It may result in personal injury due to electric
shock.
75 X 75
100 X 100
M4
M8
4
Page 29
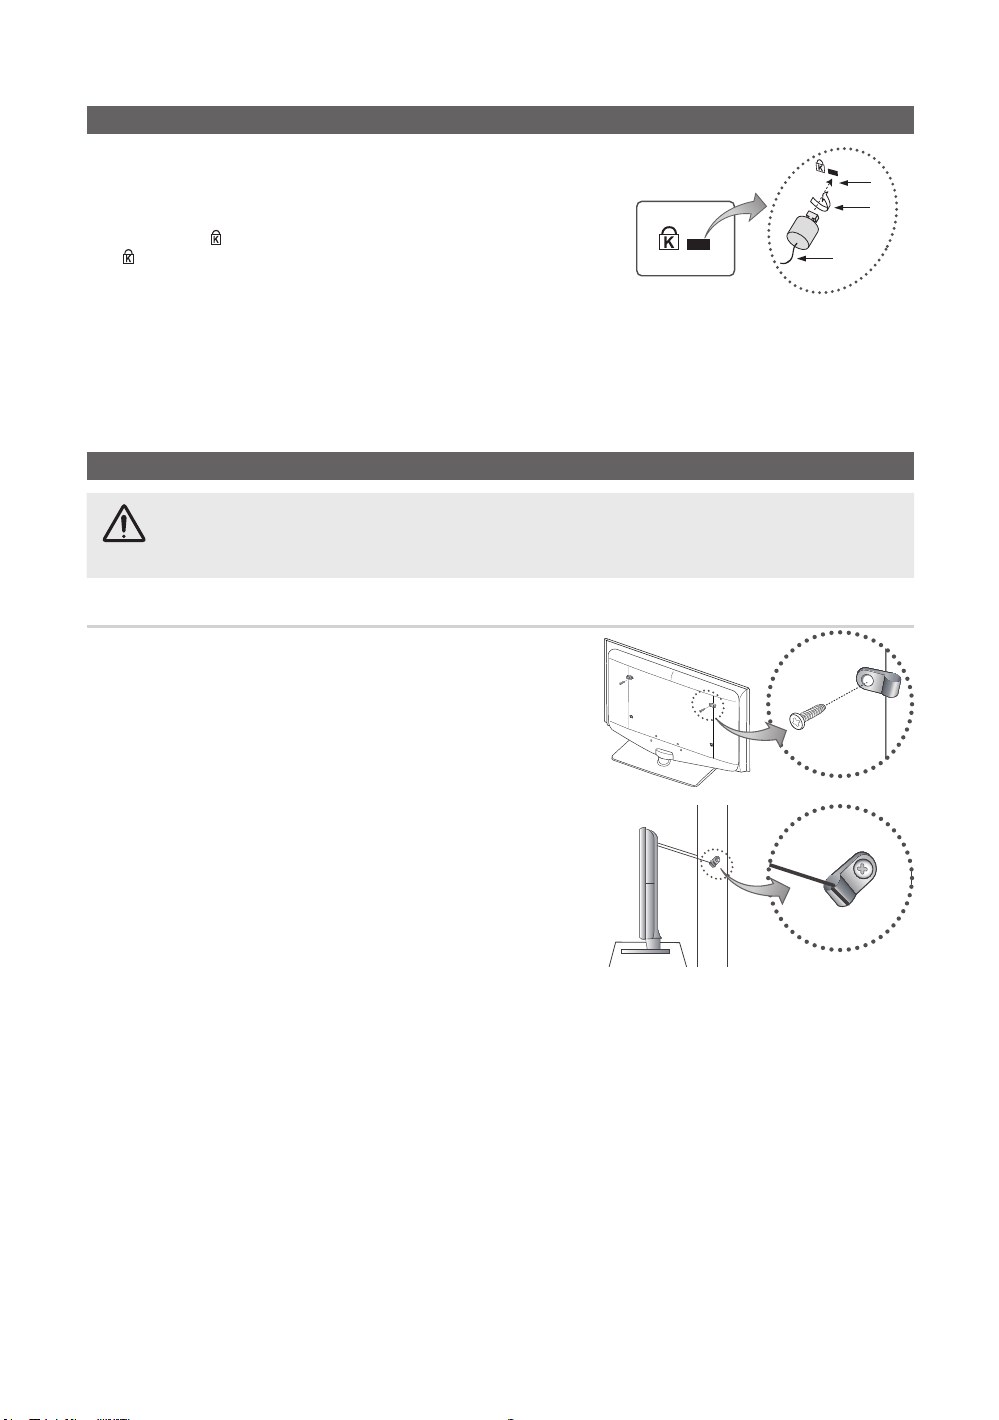
Other Information
1
2
1
2
1
2
3
Anti-Theft Kensington Lock
The Kensington Lock is a device used to physically fix the system when using
it in a public place. The appearance and locking method may differ from the
illustration depending on the manufacturer. Refer to the manual provided with the
Kensington Lock for proper use.
✎
Please find a “
“
” icon.
1. Insert the locking device into the Kensington slot on the LCD TV 1 and turn
it in the locking direction 2.
2. Connect the Kensington Lock cable 3.
3. Fix the Kensington Lock to a desk or a heavy stationary object.
The locking device has to be purchased separately.
✎
The location of the Kensington Lock may be different depending on its
✎
model.
” icon on the rear of the TV. A kensington slot is beside the
Securing the TV to the Wall
Caution: Pulling, pushing, or climbing onto the TV may cause the TV to fall. In particular, ensure that your
children do not hang over or destabilize the TV; doing so may cause the TV to tip over, resulting in serious
injuries or death. Follow all safety precautions provided on the included Safety Flyer. For added stability, install
the anti-fall device for safety purposes, as follows.
To avoid the TV from falling
Since the necessary clamps, screws, and string are not supplied,
✎
please purchase these additionally.
1. Drive the screws into the clamps and firmly fasten them onto the
wall. Make sure the screws are firmly fixed into the wall.
Screw Specifications
✎
For a 17 ~ 29 Inch LCD TV: M4
x
For a 32 ~ 40 Inch LCD TV: M6
x
2. Remove the screws from the centre back of the TV, put the
screws into the clamps, and then fasten the screws onto the TV
again.
3. Connect the clamps fixed onto the TV and the clamps fixed onto
the wall with a strong string and then tie the string tightly.
✎
Verify all connections are properly secured. Periodically check
connections for any sign of fatigue for failure. If you have
any doubt about the security of your connections, contact a
professional installer.
✎
Install the TV near to the wall so that it does not fall backwards.
It is safe to connect the string so that the clamps fixed on the wall are equal to or lower than the clamps fixed on the TV.
✎
Untie the string before moving the TV.
✎
TV Rear
<Optional>
Wall
28
English
Page 30

29
English
05 Other Information
Troubleshooting
If you have any questions about the TV, first refer to this list. If none of these troubleshooting tips apply, please visit “www.
samsung.com,” then click on Support, or contact the call centre listed on the back-cover of this manual.
Issues Solutions and Explanations
Picture Quality First of all, please perform the Picture Test and confirm that your TV is properly displaying test image.
The TV image does not look as good as it
did in the store.
The picture is distorted: macroblock error,
small block, dots, pixelization
Colour is wrong or missing. If you’re using a component connection, make sure the component cables are connected to the •
There is poor colour or brightness. Adjust the • Picture options in the TV menu. (go to Picture mode / Colour / Brightness / Sharpness)
There is a dotted line on the edge of the
screen.
The picture is black and white. If you are using an AV composite input, connect the video cable (yellow) to the Green jack of •
When changing channels, the picture
freezes or is distorted or delayed.
Sound Quality First of all, please perform the Sound Test to confirm that your TV audio is properly operating.
There is no sound or the sound is too low
at maximum volume.
The picture is good but there is no sound. Set the • Speaker Select option to TV speaker in the sound menu. (P. 18)
The speakers are making an inappropriate
noise.
(go to MENU - Support - Self Diagnosis - Picture Test) (P. 21)
If the test image is properly displayed, the poor picture may caused by the source or signal.
If you have an analogue cable/set top box, upgrade to a digital set top box. Use HDMI or Component •
cables to deliver HD (high definition) picture quality.
Cable/Satellite subscribers: Try HD stations from the channel line up.•
Antenna connection: Try HD stations after performing Auto programme.•
Many HD channels are upscaled from SD(Standard Definition) contents.
✎
Adjust the Cable/Set top box video output resolution to 1080i or 720p.•
Make sure you are watching the TV at the minimum recommended distance based on the size and •
definition of the signal.
Compression of video contents may cause picture distortion especially in fast moving pictures such •
as sports and action movies.
Low signal level or bad quality can cause picture distortion. This is not a TV issue.•
correct jacks. Incorrect or loose connections may cause colour problems or a blank screen.
Adjust • Energy Saving option in the TV menu. (go to MENU - Picture - ECO solution - Energy
Saving)
Try resetting the picture to view the default picture settings. (go to MENU - • Picture - Picture Reset)
If the picture size is set to • Screen Fit, change it to 16:9. (P. 16)
Change cable/set top box resolution.•
component input 1 on the TV.
If connected with a cable box, please try to reset the cable box. Reconnect the AC cord and wait until •
the cable box reboots. It may take up to 20 minutes.
Set the output resolution of the cable box to 1080i or 720p.•
(go to MENU - Support - Self Diagnosis - Sound Test) (P. 21)
If the audio is OK, the sound problem may caused by the source or signal.
Please check the volume the of external device connected to your TV.•
If you are using an external device, make sure the audio cables are connected to the correct audio •
input jacks on the TV.
If you are using an external device, check the device’s audio output option (ex. you may need to •
change your cable box’s audio option to HDMI when you have a HDMI connected to your TV).
If you are using a DVI to HDMI cable, a separate audio cable is required.•
If your TV has a headphone jack, make sure there is nothing plugged into it.•
Check the cable connections. Make sure a video cable is not connected to an audio input.•
For antenna or cable connections, check the signal strength. Low signal level may cause sound •
distortion.
Page 31

Other Information
Issues Solutions and Explanations
No Picture, No Video
The TV won’t turn on. Make sure the AC power cord is securely plugged in to the wall outlet and the TV.•
The TV turns off automatically. Ensure the • Sleep Timer is set to Off in the Setup menu. (P. 19)
There is picture/Video. Check cable connections (remove and reconnect all cables connected to the TV and external •
RF(Cable/Antenna) Connection
The TV is not receiving all channels. Make sure the Antenna cable is connected securely.•
The picture is distorted: macroblock error
small block, dots, pixelization
PC Connection
A “Not Supported Mode” message
appears.
“PC” is always shown on the source list,
even if a PC is not connected.
The video is OK but there is no audio. If you are using a HDMI connection, check the audio output setting on your PC.•
Make sure the wall outlet is working.•
Try pressing the POWER button on the TV to make sure the problem is not the remote. If the TV turns •
on, refer to “The remote control does not work” below.
If your PC is connected to the TV, check your PC power settings.•
Make sure the AC power cord is plugged in securely to the wall outlet and the TV.•
When watching TV from an antenna or cable connection, the TV will turn off after 10 ~ 15 minutes if •
there is no signal.
devices).
Set your external devices’ (Cable/Set top Box, DVD, Blu-ray etc) video outputs to match the •
connections to the TV input. For example, if an external device’s output is HDMI, it should be connect
to an HDMI input on the TV.
Make sure your connected devices are powered on.•
Be sure to select the TV’s correct source by pressing the SOURCE button on the TV remote.•
Please try • Plug & Play (Initial setup) to add available channels to the channel list. Go to MENU -
Setup - Plug & Play (Initial setup) and wait for all available channels to be stored.
Verify the Antenna is positioned correctly.•
Compression of video contents may cause picture distortion, especially with fast moving pictures •
such as sports and action movies.
A low signal can cause picture distortion. This is not a TV issue.•
Set your PC’s output resolution and frequency so they match the resolutions supported by the TV. (P. •
9)
This is normal; “PC” is always shown on the source list, regardless of whether a PC is connected.•
Others
The picture won’t display in full screen. HD channels will have black bars on either side of the screen when displaying upscaled SD (4:3) •
The remote control does not work. Replace the remote control batteries with the poles (+/–) in the right direction.•
The cable/set top box remote control
doesn’t turn the TV on or off, or adjust the
volume.
A “Not Supported Mode” message
appears.
There is a plastic smell from the TV. This smell is normal and will dissipate over time.•
The TV Signal Information is unavailable
in the Self Diagnostic Test menu.
The TV is tilted to the side. Remove the base stand from the TV and reassemble it.•
There are difficulties assembling the stand
base.
The channel menu is greyed out.
(unavailable)
contents.
Black bars on the top and bottom will appear during movies that have aspect ratios different from •
your TV.
Adjust the picture size options on your external device or TV to full screen.•
Clean the sensor’s transmission window on the remote.•
Try pointing the remote directly at the TV from 5~6 feet away.•
Programme the Cable/Set top box remote control to operate the TV. Refer to the Cable/Set user •
manual for the SAMSUNG TV code.
Check the supported resolution of the TV, and adjust the external device’s output resolution •
accordingly. Refer to the resolution settings on page 9 of this manual.
This function is only available with digital channels from an Antenna / RF/Coax connection. (P. 21)•
Make sure the TV is placed on a flat surface. If you can not remove the screws from the TV, •
unnecessary use a magnetized screw driver.
The • Channel menu is only available when the TV source is selected.
30
English
Page 32

31
English
05 Other Information
Issues Solutions and Explanations
Your settings are lost after 30 minutes or
every time the TV is turned off.
You have intermittent loss of audio or
video.
You see small particles when you look
closely at the edge of the frame of the TV.
The message “Scramble signal” or “Weak
Signal/No Signal” appears.
You turned the TV off 45 minutes ago, and
it turned on again.
There are recurrent picture/sound issues. Check and change the signal/source.•
A reaction may occur between the rubber
cushion pads on the base stand and the
top finish of some furniture.
This TFT LCD panel uses a panel consisting of sub pixels which require sophisticated technology to produce. However,
✎
If the TV is in the • Store Demo mode, it will reset audio and picture settings every 30 minutes. Change
the settings from Store Demo mode to Home Use mode in the Plug & Play (Initial setup) procedure.
Press the SOURCE button to select TV mode, and go to MENU Setup Plug & Play (Initial
setup) ENTERE.
Check the cable connections and reconnect them. •
Loss of audio or video can be caused by using overly rigid or thick cables. Make sure the cables are •
flexible enough for long term use. If mounting the TV to the wall, we recommend using cables with 90
degree connectors.
This is part of the product’s design and is not a defect.•
If you are using a CAM CARD (CI/CI+), check that it is installed into the common interface slot.•
If there is still a problem, pull the CAM CARD out of the TV and insert it into the slot again.•
It is normal. The TV operates the OTA (Over The Aerial) function itself to upgrade firmware •
downloaded whilst your watching TV.
To prevent this, use felt pads on any surface of the TV that comes in direct contact with furniture.•
there may be a few bright or dark pixels on the screen. These pixels will have no impact on the performance of the
product.
Licence ¦
Manufactured under license from Dolby Laboratories.
Open source license notice
In the case of using open source software, Open Source Licenses are available on the product menu.
Page 33

Other Information
Specifications
Panel native 1360 x 768 @ 60 Hz
Environmental Considerations
Operating Temperature
Operating Humidity
Storage Temperature
Storage Humidity
TV System Analogue : Depending on your country selection
Colour/video system Analogue : PAL, SECAM, NTSC-4.43, NTSC-3.58, PAL60
Sound System BG. OK NICAM. MPEGl
HDMI IN Video : 1080/24p, 1080p, 1080i, 720p, 576p, 576i, 480p, 480i
Stand Swivel
(Left / Right) 0˚
Model Name LE26C350 LE32C350
Screen Size
(Diagonal) 26 inch 32 inch
Sound
Output 5W X 2 5W X 2
Dimensions (WxDxH)
Body
With stand
Weight
With Stand
Digital : MPEG-2 MP@ML, MPEG-4, H.264/AVC MP@L3, MP@L4.0, HP@L4.0
Audio : Two Channel Linear PCM 32/44.1/48 kHz, 16/20/24bits
673.3 x 84.0 x 456.0 mm
673.3 x 222.2 x 513.4 mm
5.7 kg
6.1 kg
10°C to 40°C (50°F to 104°F)
10% to 80%, non-condensing
-20°C to 45°C (-4°F to 113°F)
5% to 95%, non-condensing
Digital : DVB-T/DVB-C
Analogue audio input (HDMI IN only)
PC Input
795.3 x 84.0 x 525.8 mm
795.3 x 247.2 x 585.3 mm
7.1 kg
7.6 kg
Design and specifications are subject to change without prior notice.
✎
For the power supply and power consumption, refer to the label attached to the product.
✎
32
English
Page 34

33
English
05 Other Information
Index
A
Amplify 17
Antenna 12
Auto Adjustment 17
Auto Volume 18
B
Background Music 25
Balance L/R 17
Basic View 24
Batteries 5
Black Tone 15
Brightness 14
C
Change PIN 20
Channel Manager 12
Clock 19
Colour Tone 15
Component 7
Connecting to a PC 8
Connecting to an Audio Device 8
D
Digital Audio out 8
D-sub 8
Dynamic 14
Dynamic Contrast 15
E
Edit Name 10
Editing channels 13
Energy Saving 15
EPG 11
Equalizer 17
External Speaker 18
F
Favourites Channel 12
Film Mode 15
Fine Tune 14
Flesh Tone 15
Frequency 12
H
HDMI 7
I
Installation Space 2
L
Language 20
Licence 31
Lock 14
M
Media Play 22
Melody 20
Menu Transparency 20
Music 23
N
Navigate 10
Now & Next guide 11
O
ON/OFF button 5
Optimal resolution 9
P
Photos 24
Picture Size 16
Plug & Play 6
Power Indicator 4
R
Remote Control 5
Repeat Mode 25
RGB Only Mode 15
Rotate 25
S
Select All 14
Self Diagnosis 21
Sharpness 14
Signal Information 21
Sleep Timer 19
Slide Show 24
Software Upgrade 21
Source List 10
Speaker Select 18
Specifications 32
Standby mode 4
Subtitle 20
T
Timer 19
Title 34
Tools 3
Troubleshooting 29
TV Speaker 18
U
USB 21, 22
Using Channel View 11
Using Scheduled View 11
Using the Favourite Channels 12
V
VCR 10
Volume 4, 5
W
Wall Mount 27
White Balance 15
Page 35

This page is intention-
ally left blank.
Page 36

Les figures et illustrations contenues dans ce mode d’emploi sont fournies pour référence uniquement. Elles peuvent différer
de l’aspect réel du produit. La conception et les spécifications du produit sont susceptibles d’être modifiées sans préavis.
Avis concernant le téléviseur numérique
1. Les fonctions relatives à la télévision numérique (DVB) ne sont disponibles que dans les pays ou régions où des signaux terrestres numériques de
type DVB-T (MPEG2 et MPEG4 AVC) sont diffusés ou dans lesquels vous avez accès à un service de télévision par câble compatible DVB-C (MPEG2
et MPEG4 AAC). Consultez votre distributeur local pour connaître les possibilités en matière de réception des signaux DVB-T ou DVB-C.
2. DVB-T est la norme du consortium européen DVB pour la diffusion de signaux terrestres de télévision numérique. La norme DVB-C est, quant à
elle, prévue pour la diffusion des signaux de télévision numérique par câble. Certaines fonctions particulières, telles que le guide électronique des
programmes (Electric Program Guide - EPG) ou encore la vidéo à la demande (Video On Demand - VOD), ne sont toutefois pas incluses dans cette
spécification. Dès lors, elles ne seront pas traitées pour l’instant.
3. Bien que ce téléviseur soit conforme aux dernières normes DVB-T et DVB-C (août 2008), il n’est pas garanti qu’il soit compatible avec les futures
diffusions de signaux numériques terrestres DVB-T et par câble DVB-C.
4. En fonction du pays ou de la région où vous vous trouvez, certains opérateurs de télévision par câble peuvent facturer des frais supplémentaires pour
un tel service. Il se peut également que vous deviez accepter les termes et conditions de ces sociétés.
5. Il se peut que certaines fonctions de TV numérique ne soient pas disponibles dans certains pays ou certaines régions et que la réception des signaux
DVB-C ne soit pas correcte avec tous les opérateurs.
6. Pour plus d’informations, contactez votre service client Samsung.
Les différentes méthodes de diffusion adoptées en fonction des pays peuvent affecter la qualité de réception du téléviseur. Vérifiez le fonctionnement
✎
du téléviseur chez votre revendeur agréé SAMSUNG ou contactez le centre d’appel de Samsung pour savoir s’il est possible d’en améliorer les
performances en reconfigurant les réglages.
Avertissement d’image fixe
Evitez d’afficher sur l’écran des images fixes (telles que des photos au format JPEG) ou des éléments d’images fixes (tels que des logos de programmes
TV, un format d’image 4:3 ou panoramique, bandeaux d’actualités ou d’informations boursières au bas de l’écran, etc.). L’affichage permanent d’images
fixes risque, en effet, d’entraîner une usure irrégulière du phosphore d’écran, ce qui peut se traduire par une dégradation de la qualité d’image.
Pour atténuer les risques, suivez scrupuleusement les recommandations suivantes :
Evitez d’afficher le même canal de télévision pendant de longues périodes.•
Essayez toujours d’afficher l’image en plein écran ; pour obtenir une correspondance optimale, utilisez le menu de format d’image du téléviseur.•
Réduisez les valeurs de luminosité et de contraste sur le minimum requis pour obtenir la qualité d’image souhaitée. L’utilisation de valeurs trop •
élevées risque d’accélérer le processus de brûlure.
Utilisez fréquemment toutes les fonctions du téléviseur conçues pour réduire le phénomène de rémanence et la brûlure d’écran. Pour plus •
d’informations à ce sujet, consultez la section appropriée du mode d’emploi.
Sécurisation de l’espace d’installation
Maintenez les distances requises entre le produit et les autres objets (par exemple, les murs) afin de garantir une ventilation adaptée.
Le non-respect de ces distances peut provoquer un incendie ou un problème au produit en raison d’une augmentation de la température interne de celui-ci.
Lors de l’utilisation d’un pied ou d’un support mural, utilisez uniquement les pièces fournies par Samsung Electronics.
✎
L’utilisation de pièces fournies par un autre fabricant peut occasionner un problème au niveau du produit ou la chute de celui-ci, ce qui pourrait
x
vous blesser.
L’aspect peut varier en fonction du produit.
✎
Installation avec un pied. Installation avec un support de montage mural.
2
10 cm
Français
10 cm
10 cm
Instructions de mise au rebut de ce produit (Déchets d'équipements électriques et électroniques)
(
Applicable dans les pays de l'Union Européenne et dans d'autres pays européens pratiquant la collecte sélective de déchets)
Ce symbole sur le produit, ses accessoires ou sa documentation indique que ni le produit, ni ses accessoires électroniques usagés
(chargeur, casque audio, câble USB, etc.) ne peuvent être jetés avec les autres déchets ménagers. La mise au rebut incontrôlée
des déchets présentant des risques pour l'environnement et la santé publique, veuillez séparer vos produits et accessoires usagés
des autres déchets. Vous favoriserez ainsi le recyclage de la matière qui les compose dans le cadre d'un développement durable.
Les particuliers sont invités à contacter le magasin leur ayant vendu le produit ou à se renseigner auprès des autorités locales pour
connaître les procédures et les points de collecte de ces produits en vue de leur recyclage. Les utilisateurs professionnels doivent
contacter leur fournisseur et consulter les conditions générales du contrat d'achat. Ce produit et ses accessoires ne peuvent être
jetés avec les autres déchets professionnels et commerciaux.
Élimination des batteries de ce produit
(Applicable aux pays de l'Union européenne et aux autres pays européens dans lesquels des systèmes de collecte
sélective sont mis en place.)
Le symbole sur la pile, le manuel ou l'emballage indique que les batteries de ce produit ne doivent pas être éliminées en fin
de vie avec les autres déchets ménagers. L'indication éventuelle des symboles chimiques Hg, Cd ou Pb signifie que la pile ou
l'accumulateur contient des quantités de mercure, de cadmium ou de plomb supérieures aux niveaux de référence stipulés dans la
directive CE 2006/66. Si les piles ne sont pas correctement éliminées, ces substances peuvent porter préjudice à la santé humaine
ou à l'environnement. Afin de protéger les ressources naturelles et de favoriser la réutilisation du matériel, veillez à séparer les
batteries des autres types de déchets et à les recycler via votre système local de collecte gratuite des piles et accumulateurs.
10 cm
10 cm
10 cm
10 cm
Page 37

Sommaire
P . MODES.MODEP . SIZE
Mise en route
4
Connexions
7
Fonctions de base
10
Fonctions avancées
22
4 Accessoires
4 Présentation du panneau de commande
5 Présentation de la télécommande
6 Raccordement à une antenne
6 Plug & Play (configuration initiale)
7 Connexion à un périphérique AV
8 Connexion à un système audio
8 Connexion à un ordinateur
10 Changement de la source d’entrée
10 Navigation dans les menus
11 Utilisation du bouton INFO (Guide Now & Next)
11 Planification des émissions à regarder
12 Menus Chaîne
14 Menu Image
17 Menu Son
19 Menu Configuration
21 Menu Assistance
22 Media Play
Informations supplémentaires
26
Vérifiez la présence du symbole !
t
Vous pouvez utiliser cette fonction en
appuyant sur le bouton TOOLS de la
télécommande.
26 Fonction Télétexte de chaîne analogique
27 Installation du support mural
28 Verrou antivol Kensington
28 Fixation du téléviseur au mur
39 Dépannage
32 Caractéristiques techniques
33 Index
Remarque Guide étape par étape
Français
3
Page 38

Mise en route
MEDIA.P
ABCD
Accessories
Vérifiez que les éléments suivants sont inclus avec votre téléviseur LCD. S’il manque des éléments, contactez votre
✎
re vend eur.
✎
La couleur et la forme des éléments peuvent varier en fonction du modèle.
Télécommande et piles (AAA x 2) y
Instructions d’utilisation y
Pour installer le pied, consultez le guide approprié.
1 EA
Pied (1EA) y Vis (3EA) y
Présentation du panneau de commande
La couleur et la forme du produit peuvent varier en fonction du modèle.
✎
Chiffon de nettoyage y
Carte de garantie / Manuel de sécurité (non y
disponible dans certains pays)
(M4 X L16)
Capteur de la
télécommande
Haut-parleurs
P
(Alimentation)
Témoin d’alimentation Clignote, puis s'arrête lorsque le téléviseur est allumé. S'allume en mode Veille.
SOURCE
MENU Affi che un menu à l'écran (ou OSD) reprenant les fonctions de votre téléviseur.
Y
z
Capteur de la télécommande Dirigez la télécommande vers ce point du téléviseur.
Mode Veille
Ne laissez pas le téléviseur en mode Veille pendant de longues périodes (lorsque vous partez en vacances, par exemple).
L’appareil consomme toujours une petite quantité d’énergie, même lorsque le bouton marche/arrêt est en position Off. Il est
préférable de débrancher le cordon d’alimentation.
E
Permet d’allumer ou d’éteindre le téléviseur.
Bascule entre toutes les sources d'entrée disponibles. Dans le menu à l'écran, utilisez
ce bouton de la même façon que le bouton ENTERE de la télécommande.
Règle le volume. Dans le menu à l'écran, utilisez les boutons
façon que les boutons ◄ et ► de la télécommande.
Permet de modifi er les chaînes. Dans le menu à l'écran, utilisez les boutons z
de la même façon que les boutons ▼ et ▲ de la télécommande.
Capteur de la télécommande
Y
de la même
4
Français
Page 39

Présentation de la télécommande
MEDIA.P
ABCD
01 Mise en route
Permet d’allumer et éteindre la télévision. (P. 6)
Permet de changer de chaîne.
Permet de choisir Télétexte,
Permet de régler le volume.
Permet d’affi cher le menu principal à l’écran.
permet d’affi cher l’application Media Play.
Permettent de sélectionner des éléments de menu
à l’écran et de modifi er les valeurs des menus.
Permet de sélectionner rapidement les
fonctions fréquemment utilisées.
Permet de revenir au menu précédent.
Boutons des menus Gestion chaînes,
Double ou Mixte.
(P. 10)
(P. 10)
Media Play, etc.
Permet d’affi cher et de sélectionner les sources
vidéo disponibles. (P. 10)
Permet de couper temporairement le son.
Permet de couper temporairement le son.
Permet de changer de chaîne.
Affi che la liste des chaînes à l’écran. (P. 14)
Permet d’affi cher le Guide électronique des
programmes (EPG). (P. 11)
Permet d’affi cher des informations sur l’écran
du téléviseur.
Permet de quitter le menu.
AD: sélection de la description audio.
(Non disponible dans certains pays) (P. 18)
P.SIZE: permet de choisir la taille d’image. (P. 16)
SUBT.: affi chage numérique des sous-titres (P. 20)
(P. 10)
Installation des piles (type de pile : AAA)
REMARQUE
✎
Utilisez la télécommande à une distance maximale de
x
7 mètres du téléviseur.
Une lumière intense peut affecter le bon fonctionnement de
x
la télécommande. Evitez de l’utiliser à proximité d’une lampe
fluorescente spéciale ou d’une enseigne au néon.
La couleur et la forme peuvent varier en fonction du modèle.
x
Français
5
Page 40

Mise en route
P
POWER
Raccordement à une antenne
Lorsque vous allumez le téléviseur pour la première fois, des réglages de base s’effectuent de manière automatique.
✎
Préréglage : connexion du câble d’alimentation et de l’antenne.
Antenne VHF/UHF
ou
Prise D'alimentation
Plug & Play (confi guration initiale)
Lorsque le téléviseur est allumé pour la première fois, plusieurs invites s’affi chent pour vous aider à confi gurer les réglages de
base. Appuyez sur le bouton POWERP. Plug & Play est disponible uniquement si la source Entrée est défi nie sur TV.
Choix d’une langue
1
Sélection du mode
2
Démo. magasin ou
Util. domicile
Sélection d'un pays
3
Sélection d'une antenne
4
Sélection d'une chaîne
5
Réglage du Mode
6
Horloge
Affi chage du Guide de
7
connexion HD
Profi tez de votre
8
téléviseur.
Si vous souhaitez réinitialiser cette fonction...
Sélectionnez Confi guration - Plug & Play (Confi guration initiale). Entrez votre code PIN à quatre chiffres. Le code PIN par
défaut est "0-0-0-0". Si vous souhaitez modifi er le code PIN, utilisez la fonction Modifi er PIN.
Appuyez sur le bouton ▲ ou ▼, puis sur ENTER
Sélectionnez la langue de votre choix pour le menu à l'écran.
Appuyez sur le bouton ◄ ou ►, puis sur ENTER
Sélectionnez le mode y Util. domicile. Le mode Démo. magasin est
prévu pour un usage en magasin.
Rétablissez les paramètres du téléviseur de y Démo. magasin
sur Util. domicile (standard) : appuyez sur le bouton Volume du
téléviseur. Lorsque le menu du volume s'affi che, appuyez pendant
5 secondes sur le bouton MENU.
Appuyez sur le bouton ▲ ou ▼, puis sur ENTER
Sélectionnez le pays de votre choix. Si le pays ne fi gure pas dans le menu, sélectionnez
Autre.
✎
Après la sélection du pays dans le menu
plus, le code PIN.
✎
Lors de l'entrée du code PIN,
Appuyez sur le bouton ▲ ou ▼, puis sur ENTER
Sélectionnez Hertzien ou Câble.
Appuyez sur le bouton ▲ ou ▼, puis sur ENTERE.
Sélectionnez la source de la chaîne à mémoriser. Lors du réglage de la source d'antenne
sur Câble, une fenêtre s'affi che pour vous permettre d'attribuer des valeurs numériques
(fréquences de station) aux chaînes.
Pour plus d'informations, reportez-vous au menu Chaîne → Mémorisation Auto (P. 12).
Appuyez sur le bouton
✎
Réglez le Mode Horloge automatiquement ou manuellement.
Appuyez sur le bouton ▲ ou ▼ pour sélectionner Auto., puis appuyez sur le bouton
ENTER
E
.
La méthode de connexion assurant la meilleure qualité d'image en HD s'affi che à l'écran.
Appuyez sur le bouton ENTER
0-0-0-0 n'est pas disponible.
ENTERE à tout moment pour interrompre la mémorisation.
E
.
E
.
E
.
E
.
Pays, certains modèles peuvent demander, en
E
.
Câble
ANT OUT
6
Français
Page 41

Connexions
R
G
B W R
W
R
G
R
W RY
B
YR W
P
R PB Y
R-AUDIO-L
P
R PB Y
R-AUDIO-L
P
R PB Y
W W
BGRRWY
BGRR
R-AUDIO-L
P
R PB Y
W
R
W W
BGRR
Connexion à un périphérique AV
Utilisation d’un câble HDMI/DVI : connexion HD (jusqu’à 1080p)
Périphériques disponibles : lecteur DVD, lecteur Blu-ray, décodeur câble HD, décodeur HD, récepteur satellite, décodeur
câble, récepteur satellite (décodeur)
DVD
Rouge Blancs
HDMI OUT
AUDIO OUT
DVI OUT
HDMI (DVI) IN / PC/DVI AUDIO IN
✎
Lorsque vous utilisez une connexion avec câble HDMI/DVI, vous devez utiliser la prise xHDMI (DVI) IN. Dans
le cas d’une connexion avec câble DVI, utilisez un câble DVI vers HDMI ou un adaptateur DVI-HDMI (DVI vers
HDMI) pour la connexion vidéo et les prises PC / DVI AUDIO IN pour le son.
Si vous connectez un dispositif externe, tel qu’un lecteur DVD / un lecteur Blu-ray / un décodeur câble / un
x
décodeur satellite prenant en charge une version HDMI antérieure à 1.3, il se peut que le téléviseur ne fonctionne
pas correctement (par exemple : absence d’image / absence de son / scintillement / couleurs anormales).
Si aucun son n’est émis après la connexion d’un câble HDMI, vérifiez la version HDMI du dispositif externe.
x
Si vous pensez qu’il utilise peut-être une version HDMI antérieure à 1.3, contactez le fabricant pour en avoir la
confirmation et demander une mise à niveau.
Il est conseillé d'acheter un câble certifi é HDMI. Dans le cas contraire, il se peut que l'écran n'affi che aucune
x
image ou qu'une erreur de connexion se produise.
02 Connexions
Utilisation d’un câble Composante (jusqu’à 1080p) ou Audio/Vidéo (480i uniquement) et utilisation d’un câble Péritel
Périphériques disponibles : magnétoscope, lecteur DVD, lecteur Blu-ray, décodeur câble, récepteur décodeur
Jaune Rouge Blancs
AUDIO OUT
En mode
✎
Pour obtenir une qualité d’image optimale, il est préférable d’opter pour la connexion Composante (plutôt que la
✎
connexion A/V).
Ext., la sortie DTV prend uniquement en charge les signaux audio et vidéo MPEG SD.
VIDEO OUT
Lecteur Blu-ray DVDVCR
AUDIO OUT
COMPONENT OUT
Rouge Bleu Vert
DVD
EXT
Français
7
Page 42

Connexions
Connexion à un système audio
Utilisation d’une connexion par câble audio ou optique
Périphériques disponibles : système audio numérique, amplifi cateur, système home cinéma DVD
DIGITAL AUDIO OUT (OPTICAL)
✎
Lorsqu’un système audio numérique est connecté à la prise xDIGITAL AUDIO OUT (OPTICAL), diminuez le
volume du téléviseur et du système.
Le mode audio 5.1 est disponible uniquement si le téléviseur est relié à un dispositif externe prenant en charge
x
ce mode.
Lorsque le récepteur (home cinéma) est activé, vous pouvez écouter le son sortant de la prise
x
téléviseur. Lorsque le téléviseur reçoit un signal DTV, il envoie du son 5.1 canaux au récepteur du système
home cinéma. Si la source est un composant numérique (par exemple, un lecteur DVD, un lecteur Blu-ray, un
décodeur câble ou un récepteur satellite) connecté au téléviseur en HDMI, le récepteur home cinéma émet
uniquement du son sur 2 canaux. Pour obtenir du son en mode 5.1 canaux, connectez directement la prise de
sortie audio numérique du lecteur DVD, du lecteur Blu-Ray, du décodeur câble ou du décodeur satellite à un
amplificateur ou un système home cinéma.
OPTICAL
Système audio
numérique
optique du
Utilisation d’un câble HDMI/DVI / D-Sub
Français
8
Connexion à un ordinateur
DVI OUT
AUDIO OUT
AUDIO OUT
PC OUT
Page 43

Modes d’affichage (Entrées D-Sub et HDMI/DVI)
La résolution optimale est de 1360 x 768 @ 60 Hz.
Mode Résolution
IBM
MAC
VESA DMT
VESA CVT
VESA GTF 1280 x 720 52.500 70.000 89.040 - / +
REMARQUE
✎✎
Dans le cas d’une connexion avec câble HDMI/DVI, vous devez utiliser la prise xHDMI (DVI) IN.
Le mode entrelacé n’est pas pris en charge.
x
Le téléviseur peut fonctionner de façon anormale si le format vidéo sélectionné n’est pas standard.
x
Les modes Séparé et Composite sont pris en charge. Le mode SOG (Sync On Green) n’est pas pris en charge.
x
Emplacement COMMON INTERFACE pour les connexions
640 x 350 31.469 70.086 25.175 + / 720 x 400 31.469 70.087 28.322 - / +
640 x 480 35.000 66.667 30.240 - / 832 x 624 49.726 74.551 57.284 - / -
640 x 480
800 x 600
1024 x 768
1280 x 720 45.000 60.000 74.250 + / +
1360 x 768 47.712 60.015 85.500 + / +
720 x 576 35.910 59.950 32.750 - / +
1280 x 720 56.456 74.777 95.750 - / +
Fréquence horizontale
(kHz)
31.469 59.940 25.175 - / -
37.861 72.809 31.500 - / -
37.500 75.000 31.500 - / -
37.879 60.317 40.000 + / +
48.077 72.188 50.000 + / +
46.875 75.000 49.500 + / +
48.363 60.004 65.000 - / -
56.476 70.069 75.000 - / -
60.023 75.029 78.750 + / +
Fréquence verticale (kHz)
Fréquence d'horloge pixels
(MHz)
02 Connexions
Polarité de
synchronisation
(H/V)
Pour regarder des chaînes cryptées, vous devez insérer la "CARTE CI
ou CI+".
Si vous n’insérez pas la "CARTE CI ou CI+", le message "Signal y
brouillé’’ sera affiché pour certaines chaînes.
Les informations de pairage contenant un numéro de téléphone, y
l’ID de la "CARTE CI ou CI+", l’ID hôte, ainsi que d’autres
informations, s’afficheront après environ 2 ou 3 minutes. Si un
message d’erreur s’affiche, contactez votre prestataire de service.
Lorsque la configuration des informations sur les canaux est y
terminée, le message "Mise à jour terminée" s’affiche, indiquant
que la liste des chaînes est désormais à jour.
REMARQUE
✎
Vous devez vous procurer une "Carte CI ou CI+" auprès d’un câblo-opérateur local.
x
Lorsque vous sortez la "Carte CI ou CI+", tirez-la délicatement avec vos doigts. Une chute pourrait l’endommager.
x
Insérez la "Carte CI ou CI+" dans le sens indiqué sur celle-ci.
x
L’emplacement de la fente xCOMMON INTERFACE peut varier en fonction du modèle.
La "Carte CI ou CI+" n’est pas prise en charge dans certains pays et certaines régions ; vérifiez auprès de votre
x
revendeur agréé.
Si vous rencontrez des problèmes, contactez le prestataire de service.
x
Français
9
Page 44

Connexions
MEDIA.P
Changement de la source d’entrée
Liste Source
Permet de sélectionner le téléviseur ou
d’autres sources d’entrée externes (telles
qu’un lecteur DVD, un lecteur Blu-ray, un
décodeur câble ou un récepteur décodeur)
connectées au téléviseur.
TV / Ext. / AV / Composant / PC / ■
HDMI/DVI / USB
Les entrées connectées sont
✎
mises en surbrillance dans la Liste Source.
Les options
✎
Ext. et PC sont toujours activées.
Fonctions de base
Navigation dans les menus
Avant d’utiliser le téléviseur, procédez comme suit pour
apprendre à naviguer dans le menu afi n de sélectionner et de
régler les différentes fonctions.
1
2
3
1 Bouton MENU : affi che le menu principal à l’écran.
E
2 Bouton ENTER
le curseur pour sélectionner un élément. Confi rmez le
réglage.
3 Bouton RETURN : revient au menu précédent.
4 Bouton EXIT : ferme le menu affi ché à l’écran.
/ Bouton directionnel : déplacez
4
Modif. nom
VCR / DVD / Décodeur Câble / Décodeur satellite / ■
Décodeur PVR / Récepteur AV / Jeux / Caméscope
/ PC / DVI PC / Périph. DVI / TV / IPTV / Blu-ray / HD
DVD / DMA Nommez le périphérique connecté aux
prises d’entrée pour faciliter la sélection de la source
d’entrée.
Lorsque vous connectez un câble HDMI/DVI au
✎
port HDMI (DVI) IN , vous devez régler le port en
mode DVI PC ou Périph. DVI sous Modif. Nom.
Utilisation de l’affi chage à l’écran (OSD)
La méthode d’accès peut varier en fonction du menu
sélectionné.
Les options du menu principal
s'affi chent sur l'écran :
MENU
m
1
2
3
4
5
6
7
▲ / ▼
ENTER
▲ / ▼
◄ / ►
ENTER
EXIT
Image, Son, Chaîne,
Confi guration, Entrée,
Application et Assistance.
Sélectionnez une icône à l'aide du
bouton ▲ ou ▼.
Appuyez sur ENTERE pour
E
accéder au sous-menu.
Sélectionnez le sous-menu de votre
choix à l'aide du bouton ▲ ou ▼.
Réglez la valeur d'un élément à
l'aide du bouton ◄ ou ►. Les
informations de réglage affi chées à
l'écran peuvent varier en fonction
du menu sélectionné.
Appuyez sur le bouton ENTERE
E
pour terminer la confi guration.
Appuyez sur EXIT.
e
10
Français
Page 45

Utilisation du bouton INFO (Guide Now & Next)
DTV Air 800 five
Family Affairs
18:00 - 18:30
Drama
Tanya confesses all to a stunned Babs. Conrad is anxious to hear...
18:30
19:15
Today
Today
)
Family Affairs
)
Dark Angel
800
800
five
five
800 five
DTV Air 800 five
Home and Away
18:00 - 18:30
Drama
Dani is devastated when scott makes clear his views on marriage...
27
28
800
24
16
6
Discovery
DiscoveryH&L
five
price-drop.tv
QVC
R4DTT
American Chopper
Programmes resume at 06:00
Home and...
No Information
QVC Selection
No Information
Tine Team
Fiv...
Today 18:00 - 19:00 19:00 - 20:00
)
Family Affairs
)
Dark Angel
800 five
MEDIA.P
P . MODE
MTS
L’affichage identifie la chaîne en cours et
l’état de certains paramètres audio et vidéo.
Le Guide Now & Next affiche des
informations quotidiennes sur les
programmes de télévision en fonction de
l’heure de diffusion.
Faites défiler à l’aide des boutons y ◄,
►
pour afficher des informations sur le programme
de votre choix, tout en regardant la chaîne actuelle.
Faites défiler à l’aide des boutons y ▲, ▼ pour afficher
des informations sur d’autres chaînes. Pour accéder à la
chaîne actuellement sélectionnée, appuyez sur le bouton
ENTER
E
.
abc1
DTV Air
15
Life On Venus Avenue
Unclassified
No Detaild In formation
18:00 ~ 6:00
Planification des émissions à regarder
Guide
Les informations du Guide électronique
des programmes (EPG) sont fournies par
les diffuseurs. Les programmes planifiés
fournis par les diffuseurs vous permettent
de planifier les émissions que vous
souhaitez regarder, de telle sorte que le
téléviseur change automatiquement de
chaîne à l’heure indiquée. Des entrées
de programmes peuvent être vides ou ne pas être à jour en
raison de l’état d’une chaîne.
Utilisation de la Vue chaînes
18:11 Thu 6 Jan
E Watch
' Information
Utilisation de l’option Diffusion programmée
Information
2:10 Mar 1 Jui
E
Annuler
Guide
Diffusion programmée
Mode aff.
1 4 6
1
Rouge (Mode aff.) : affiche la liste des programmes en
cours de diffusion ou à venir.
2
Jaune (+24 heures) : affiche la liste des programmes
qui seront diffusés dans plus de 24 heures.
3
Bleu (Mode CH.): Sélectionnez le type des chaînes à
afficher dans la fenêtre Vue chaînes.
Le Mode CH varie en fonction de la source d'antenne. –
4 Information : affiche des détails sur le programme
sélectionné.
5
(Page) : permet d’accéder à la page
précédente / suivante.
6 Bouton ENTER
E
Si vous sélectionnez le programme en cours, vous –
pouvez le regarder.
Si vous sélectionnez un programme à venir, vous –
pouvez le réserver. Pour annuler la programmation,
appuyez à nouveau sur la touche ENTER
E
et
sélectionnez Annuler progr..
03 Fonctions de base
Guide
Vue chaînes - TV
Mode aff.
+24 heures Mode Ch.
1 2 3 4 5 6
Information k Page
2:10 Mar 1 Jui
E
Regarder
Français
11
Page 46

Fonctions de base
c 1 1futech
c 2 * 24ore.tv
15 abc1
3 BBC World
23 bid-up.tv
33 Boonerang
32 Cartoon Nwk
5 Class News
4 \ Coming Soon
27 Discovery
All
TV
Radio
Data/Other
Analogue
r
B
c 1 1futech
c 2 * 24ore.tv
15 abc1
3 BBC World
23 bid-up.tv
33 Boonerang
32 Cartoon Nwk
5 Class News
4 \ Coming Soon
27 Discovery
All
TV
Radio
Data/Other
Analogue
r
Gestionnaire de chaînes
Utilisation des chaînes favorites ¦
Supprimez ou définissez des chaînes favorites et utilisez
le guide des programmes pour les émissions numériques.
Sélectionnez une chaîne dans l’écran Chaînes, Mes
chaînes ou Programmé.
*
Mes chaînes
(dans Gestion chaînes)
Affiche toutes les chaînes favorites.
Chaînes
Modifier mes chaînes ■
les chaînes sélectionnées dans le groupe Mes chaînes
t
: vous pouvez définir
souhaité.
✎ *
Le symbole "
" s’affiche et la chaîne est définie en tant
que Ma chaîne.
1. Sélectionnez une chaîne et appuyez sur le bouton
TOOLS.
2. Ajoutez ou supprimez une chaîne dans les groupes
Hertzien
Antenne
B
Zoom
Sélectionner
Page T Outils
■ Chaînes : affiche la liste des chaînes selon le type
de chaîne.
*
■
Mes chaînes : affiche le groupe de la chaîne.
Ma chaîne de votre choix : 1, 2, 3 ou 4.
Vous pouvez sélectionner un ou plusieurs
x
groupes.
3. Après avoir modifié les réglages, vous pouvez
afficher la liste des chaînes de chaque groupe dans
Mes chaînes.
■ Programmé : affiche tous les programmes réservés
actuellement.
✎
Utilisation des boutons de couleur avec la fonction
Gestion chaînes
Rouge (Antenne) : permet de basculer entre
x
Hertzien et Câble.
Vert (Zoom) : agrandit ou réduit un numéro de
x
Chaînes
Modier mes chaînes
Verrouil.
Supprimer
Désélect. Tout
Choisir tout
chaîne.
Jaune (Sélectionner) : Sélectionnez les chaînes
x
voulues, puis appuyez sur le bouton jaune pour
Hertzien
Antenne
B
Zoom
Sélectionner
traiter toutes les chaînes sélectionnées en même
Page T Outils
temps. La marque c s’affiche à gauche des
chaînes sélectionnées.
(Page) : PERMET d’accéder à la page suivante/
x
Menu Chaîne
précédente.
T x (Outils) : affiche le menu d’options Gestion
chaînes. (Les menus Options peuvent varier en
Nouvelle syntonisation des chaînes ¦
fonction de la situation.)
Icônes d’état des chaînes
Icônes Opération
Chaîne analogique.
A
c
Chaîne sélectionnée.
Chaîne définie comme favorite.
*
Programme en cours de diffusion.
(
Chaîne verrouillée.
\
Programme réservé.
)
Antenne (Hertzien / Câble)
Avant que votre téléviseur ne puisse commencer à
mémoriser les chaînes disponibles, vous devez spécifier le
type de la source du signal reliée au téléviseur (c’est-à-dire :
soit une antenne, soit le câble).
Pays
L’écran de saisie du code PIN apparaît. Entrez votre code
PIN à quatre chiffres.
Chaîne numérique ■ : permet de changer de pays pour
12
Français
les chaînes numériques.
Chaîne analogique ■ : permet de changer de pays pour
les chaînes analogiques.
Page 47

Mémorisation Auto
Recherche automatiquement une chaîne et la mémorise
dans le téléviseur.
✎
Il est possible que les numéros de programme attribués
automatiquement ne correspondent pas aux numéros
de programme souhaités ou réels. Si une chaîne est
verrouillée par la fonction Verrouillage Parental, la
fenêtre de saisie du code PIN s’affiche.
Antennes Source (Hertzien / Câble) Sélectionnez la ■
source d’antenne à mémoriser.
Source des chaînes (Numérique et Analogique / ■
Numérique / Analogique) : sélectionnez la source des
chaînes à mémoriser.
Lors de la sélection de Câble → Numérique et
Analogique ou Numérique : Fournissez une valeur à
rechercher pour les chaînes câblées.
Mode de recherche (Complet / Réseau / Rapide) :
recherche toutes les chaînes avec des stations de diffusion
actives et les enregistre dans la mémoire du téléviseur.
Si vous choisissez le mode ✎Rapide, vous pouvez
configurer Réseau, ID réseau, Fréquence,
Modulation, Taux de symbole manuellement en
appuyant sur le bouton de la télécommande.
Réseau (Auto / Manuel) : sélectionnez le mode de
réglage NID réseau Auto ou Manuel.
ID réseau : si Réseau est défini sur Manuel, vous
pouvez configurer un ID réseau à l’aide des boutons
numériques.
Fréquence : affiche la fréquence correspondant à la
chaîne (varie d’un pays à l’autre).
Modulation : affiche les valeurs de modulation disponibles.
Taux de symbole : affiche les taux de symboles
disponibles.
Mémorisation Manuelle
Recherche manuellement une chaîne et la mémorise dans le
téléviseur.
✎
Si une chaîne est verrouillée par la fonction
Parental, la fenêtre de saisie du code PIN s’affiche.
Chaîne numérique ( ■
passante
terminée, les chaînes de la liste sont mises à jour.
Lorsque vous sélectionnez ✎Antenne → Hertzien :
Chaîne, Fréquence, Bande passante.
✎
Lorsque vous sélectionnez
Fréquence, Modulation, Taux de symbole.
Chaîne analogique (Programme, Système de ■
Couleur, Système Sonore, Chaîne, Rechercher) :
Si aucun son ne sort ou si le son produit est anormal,
sélectionnez de nouveau la norme son requise.
✎
Mode Canal
): (disponible en mode DTV) Une fois la recherche
P x (mode Programme) : à la fin du réglage, des
numéros de position compris entre P00 et P99 sont
attribués aux stations de radiodiffusion de votre
région. Dans ce mode, vous pouvez sélectionner une
chaîne en saisissant son numéro de position.
C
(Mode canal Hertzien) / S (Mode canal Câble) : ces
x
deux modes vous permettent de sélectionner une
chaîne en entrant le numéro attribué à chaque chaîne
câblée ou station de radiodiffusion hertzienne.
Chaîne, Fréquence, Bande
Antenne → Câble :
Modification des chaînes ¦
Menu d’options Gestion chaînes
(dans Gestion chaînes)
1. Sélectionnez une chaîne et appuyez sur le bouton TOOLS.
2. Modifiez le nom ou le numéro de la chaîne à l’aide du
menu Modif. nom chaîne ou Modif. num. chaîne.
Modif. nom chaîne ■ (chaînes analogiques uniquement) :
attribuez le nom de votre choix à la chaîne.
Modif. num. chaîne ■ (chaînes numériques uniquement) :
modifiez le numéro en appuyant sur les boutons
numériques appropriés.
Verrouillage
03 Fonctions de base
Autres fonctionnalités ¦
Option de recherche du câble
(en fonction du pays)
Définit des options de recherche supplémentaires, telles que
la fréquence et le taux de symbole pour une recherche sur
un réseau câblé.
Fréq. début / Fréq. fin ■ : définit la fréquence dé début
ou de fin (différente dans chaque pays).
Modulation ■ : affiche les valeurs de modulation disponibles.
Taux de symbole ■ : affiche les taux de symboles disponibles.
Français
13
Page 48

Fonctions de base
Menu d’options Gestion chaînes
(dans Gestion chaînes)
Définissez chaque chaîne à l’aide des options du menu Gestion
chaînes (Verrouiller / Déverrouiller, Rappel programme, Tri des
canaux, Supprimer, Sélectionner tout / Désélectionner tout).
Les options de menu peuvent varier selon l’état de la chaîne.
1. Sélectionnez une chaîne et appuyez sur le bouton TOOLS.
2. Sélectionnez une fonction et modifiez ses réglages.
Verrouiller / Déverrouiller ■ : vous pouvez verrouiller une chaîne
afin qu’elle ne puisse pas être sélectionnée ni visualisée.
✎
REMARQUE
Cette fonction n’est disponible que si l’option
x
Verrouillage Parental est définie sur Activé
L’écran de saisie du code PIN apparaît. Entrez votre
x
code PIN à 4 chiffres ; "par défaut "0-0-0-0". Modifiez le
code PIN à l’aide de l’option Modifier PIN.
Rappel programme ■ : vous pouvez programmer l’affichage
automatique d’une chaîne déterminée à l’heure prévue.
Avant d’utiliser cette fonction, vous devez régler l’heure.
Lorsqu’une chaîne numérique est sélectionnée, appuyez
✎
sur le bouton ► pour afficher le programme numérique.
Tri des canaux ■ (chaînes analogiques uniquement) :
cette opération vous permet de changer les numéros de
programme des chaînes mémorisées. Cela peut s’avérer
nécessaire après avoir utilisé la mémorisation automatique.
Supprimer ■ : Vous pouvez supprimer une chaîne afin
d'afficher les chaînes de votre choix.
Sélectionner tout / Désélectionner tout ■ : permet de
sélectionner toutes les chaînes ou de désélectionner celles
sélectionnées dans le gestionnaire de chaînes.
Programmé
(dans Gestion chaînes)
Vous pouvez visualiser, modifier ou supprimer une émission dont
vous avez réservé l’affichage.
Infos modif. ■ : permet de modifier une émission dont vous
avez réservé l’affichage.
Annuler progr. ■ : permet d’annuler une émission dont vous
avez réservé l’affichage.
Information ■ : permet d’afficher une émission dont vous
avez réservé l’affichage (et d’en modifier les informations de
réservation).
Sélectionner tout / Désélectionner tout ■ : sélectionne ou
désélectionne tous les programmes réservés.
Liste des chaînes
Vous pouvez afficher toutes les chaînes
recherchées.
Transfert liste chaînes
Importe ou exporte la carte des chaînes. Vous devez
connecter un périphérique de stockage USB pour utiliser
cette fonction.
L'écran de saisie du code PIN apparaît. Entrez votre
✎
code PIN à quatre chiffres.
✎
Le code PIN par défaut d'un nouveau téléviseur est
"0-0-0-0".
Importer depuis le périphérique USB ■ : permet
d'importer une liste de chaînes depuis un périphérique
USB.
■ Exporter vers le périphérique USB : permet d'exporter
une liste de chaînes vers un périphérique USB.
Réglage fin
(Chaînes analogiques uniquement)
Si le signal est faible ou déformé, vous pouvez effectuer
manuellement un réglage fin du canal.
Les chaînes qui ont fait l’objet d’un réglage fin sont
✎
indiquées par un astérisque "*".
Pour réinitialiser le réglage précis, sélectionnez
✎
Réinit..
Menu Image
Changement du mode Image prédéfini ¦
Mode
Sélectionnez le type d’image que vous préférez.
t
Dynamique ■ : adapté à un environnement lumineux.
Standard ■ : adapté à un environnement normal.
Cinéma ■ : convient au visionnage de films dans une
pièce sombre.
Réglages des paramètres de l’image ¦
Rétroéclairage / Contraste / Luminosité /
Netteté / Couleur / Teinte (V/R)
Votre téléviseur dispose de plusieurs options de réglage pour
le contrôle de la qualité d’image.
✎
REMARQUE
La fonction xTeinte (V/R) n’est pas disponible dans les
modes TV, Ext., AV analogiques du système PAL.
En mode PC, vous ne pouvez modifier que les
x
options Rétroéclairage, Contraste et Luminosité.
Les paramètres peuvent être réglés et mémorisés
x
pour chaque dispositif externe connecté au
téléviseur.
La réduction de la luminosité de l’image se traduit
x
par une consommation d’énergie moindre.
14
Français
Page 49

Solutions économiques ¦
Solution Eco
Mode éco. (Arrêt / Bas / Moyen / Elevé / Image ■
désactivée / Auto.)
luminosité du téléviseur afin de réduire la consommation
d’énergie. Si vous sélectionnez Image désactivée,
l’écran est éteint, mais le son reste actif. Appuyez sur
n'importe quel bouton, excepté celui du volume, pour
allumer l'écran.
Pas signal veille (Arrêt / 15 min / 30 min / 60 min) ■ :
active le mode Veille si l’état "Absence de signal" ou
"Vérifier le signal du câble" reste actif pendant une
période définie par l’utilisateur.
✎
Il est désactivé lorsque le PC est en mode
d’économie d’énergie.
Modification des options d’image ¦
t
: permet de régler la
Paramètres avancés
(Disponible en mode Standard / Cinéma)
Vous pouvez régler les paramètres avancés de votre écran,
notamment la couleur et le contraste.
En mode PC, vous ne pouvez modifier que les options
✎
Contraste Dynamique, Gamma et Balance blancs.
Paramètres avancés
Nuance de noir : Arrêt ►
Contraste Dynamique : Moyen
Réglage Luminosité : 0
Gamma : 0
RVB uniquement : Arrêt
Espace de couleur : Natif
Balance blancs
Nuance de noir (Arrêt / Sombre / Plus sombre / Le ■
plus sombre) : sélectionnez le niveau de noir afin de
régler la profondeur d’écran.
Contraste Dynamique (Arrêt / Bas / Moyen / Elevé) ■ :
permet de régler le contraste de l’écran.
▼
U Déplacer E Entrer R Retour
Réglage Luminosité (-2~+2) ■ : permet d’augmenter la
luminosité des images sombres.
Désactivé en mode PC.
✎
Gamma ■ : permet de régler l’intensité des couleurs
primaires.
RVB uniquement (Arrêt / Rouge / Vert / Bleu) ■ : vous
pouvez régler la Couleur ou la Teinte du Rouge, Vert ou
Bleu pour l’image d’un dispositif externe (lecteur DVD,
système home cinéma, etc.).
Espace de couleur (Auto / Natif ) ■ : Permet de régler la
gamme des couleurs disponibles pour créer l'image.
Balance blancs ■ : permet de régler la température des
couleurs afin d’obtenir une image plus naturelle.
Aj. Rouge / Aj. Vert / Aj. Bleu : permet de régler la
profondeur de chaque couleur (rouge, vert, bleu).
Régl. Rouge / Régl. vert / Régl. bleu : permet de régler
la luminosité de chaque couleur (rouge, vert, bleu).
Réinit. : rétablit les paramètres par défaut de l’option
Balance blancs.
Ton chair ■ : accentue le "Ton chair" rose.
Netteté des contours (Arrêt / Activé) ■ : fait ressortir les
contours des objets.
Options d’image
En mode PC, vous pouvez uniquement apporter des
✎
modifications aux options Nuance Coul. et Taille et
Temps Protection auto.
Options d’image
Nuance Coul. : Normal ►
Taille : 16:9
Mode écran : 16:9
Filtre Bruit num. : Auto.
MPEG Nosie Filter : Auto.
Niv. noir HDMI : Normal
Mode Film : Arrêt
Nuance Coul. (Froide / Normal / Chaude1 / Chaude2) ■
Les options
✎
désactivées lorsque le mode d’image est
Dynamique.
Les paramètres peuvent être réglés et mémorisés
✎
pour chaque dispositif externe connecté à une
entrée du téléviseur.
▼
U Déplacer E Entrer R Retour
Chaude1 ou Chaude2 sont
03 Fonctions de base
Français
15
Page 50

Fonctions de base
P
POWER
P . MODES.MODEP . SIZE
Taille ■ : il se peut que votre décodeur
câble / récepteur satellite dispose de
son propre jeu de tailles d’écran. Il est
toutefois vivement conseillé d’utiliser le
mode 16:9.
16:9 Auto : règle automatiquement la
taille de l’image sur le format 16:9.
16:9 : règle la taille de l’image sur 16:9 pour les DVD ou
la diffusion au format grand écran.
Zoom large : agrandit l’image à une taille supérieure à 4:3.
Réglez la position à l’aide des boutons ✎▲, ▼.
Zoom : agrandit l’image en 16:9 (dans le sens vertical)
pour l’adapter à la taille de l’écran.
✎
Réglez la position ou la taille à l’aide des boutons
▲, ▼.
4:3 : il s’agit du paramètre par défaut pour un film ou
une diffusion normale.
Ne regardez pas un film au format 4:3 pendant une
✎
période prolongée. Les traces de bordures situées
sur la gauche, sur la droite et au centre de l’écran
peuvent donner lieu au phénomène de rémanence
(brûlure d’écran) non couvert par la garantie.
Adapter écran : affiche l’intégralité de l’image sans
coupure lors de l’entrée de signaux HDMI (720p / 1080i
/ 1080p) ou Composant (1080i / 1080p).
✎
REMARQUE
Après avoir sélectionné xAdapter écran en mode HDMI
(720p / 1080i / 1080p) ou Composant (1080i/1080p), il
se peut que vous deviez centrer l’image :
1. Appuyez sur le bouton ◄ ou ► pour sélectionner
Position.
2. Appuyez sur le bouton ENTER
3. Appuyez sur le bouton ▲, ▼, ◄ ou ► pour
déplacer l’image.
Les options de taille de l’image peuvent varier en
x
fonction de la source d’entrée.
Les options disponibles peuvent varier en fonction
x
du mode sélectionné.
En mode PC, seuls les modes
x
être réglés.
Les paramètres peuvent être réglés et mémorisés
x
pour chaque dispositif externe connecté à une
entrée du téléviseur.
Si vous utilisez la fonction
x
l’entrée HDMI 720p, une ligne sera coupée en haut,
en bas, à gauche et à droite, comme c’est le cas
avec la fonction Overscan.
E
.
16:9 et 4:3 peuvent
Adapter écran avec
Mode écran (16:9 / Zoom large / Zoom / 4:3) ■ :
disponible uniquement lorsque la taille d’image est
définie sur 16:9 Auto. Vous pouvez déterminer la taille
d’image souhaitée sur 4:3 WSS (Wide Screen Service)
ou sur la taille d’origine. Chaque pays européen impose
une taille d’image différente.
Non disponible en mode PC, Composant et HDMI.
✎
Filtre Bruit num. (Arrêt / Bas / Moyen / Elevé / Auto ■
/ Visualisation auto.) : lorsque le signal de diffusion est
faible, des bruits parasites ou une impression fantôme
peuvent apparaître. Sélectionnez l’une des options
jusqu’à l’obtention d’une image de qualité optimale.
Visualisation auto. : Lors du changement des chaînes
analogiques, il affiche l'intensité du signal.
Disponible uniquement pour les chaînes analogiques.
✎
Lorsque la barre est verte, vous recevez le meilleur
✎
signal possible.
Filtre Bruit MPEG (Arrêt / Bas / Moyen / Elevé / ■
Auto.) : réduit le bruit MPEG afin d’offrir une meilleure
qualité d’image.
Désactivé en mode PC.
✎
Niv. noir HDMI (Normal / Bas) ■ : permet de choisir le
niveau de noir pour régler la profondeur de l’écran.
Disponible uniquement en mode HDMI (signaux
✎
RVB).
Mode Film (Arrêt / Auto.1 / Auto.2) ■ : règle le téléviseur
de sorte qu’il détecte et traite automatiquement les
signaux de cinéma en provenance de toutes les sources
et adapte l’image afin d’obtenir une qualité optimale.
✎
Disponible en modes TV, AV, COMPOSANT (480i
/ 1080i) et HDMI (480i / 1080i).
Temps protection auto (2 heures / 4 heures / 8 ■
heures / 10 heures / Arrêt) : si la même image reste
affichée à l'écran, le dispositif de protection automatique
contre les brûlures d'écran sera activé.
Réinitialisation de l’image (OK / Annuler)
Rétablit les paramètres par défaut du mode d’image actuel.
16
Français
Page 51

Configuration du téléviseur avec le PC ¦
Réglez le mode d’entrée sur PC.
Réglage Automatique
Cette option permet de régler les positions/valeurs de
fréquence et d’affiner automatiquement les paramètres.
✎
Non disponible en cas de connexion à l’aide d’un câble
HDMI/DVI.
t
Ecran
Régl. Base / Regl. Préc ■ : élimine ou réduit les parasites
visuels. Si vous ne pouvez pas éliminer ces parasites
au moyen d’un réglage précis uniquement, réglez
la fréquence (Régl. Base) au mieux, puis effectuez
de nouveau un réglage précis. Une fois les parasites
réduits, effectuez un nouveau réglage de l’image pour
l’aligner au centre de l’écran.
Position ■ : réglez la position de l’écran du PC à l’aide
des boutons directionnels (▲ / ▼ / ◄ / ►).
Réinitialiser Image ■ : rétablit les paramètres d’image par
défaut.
Utilisation de votre téléviseur comme écran d’ordinateur (PC)
Configuration de votre logiciel PC (instructions basées sur
Windows XP)
En fonction de la version de Windows et de la carte
graphique utilisées, les écrans affichés sur votre PC peuvent
être différents. Cependant, les mêmes informations de
configuration de base seront généralement appliquées. Dans
le cas contraire, contactez le fabricant de votre ordinateur ou
votre revendeur Samsung.
1. Cliquez sur "Panneau de configuration" dans le menu
Démarrer de Windows.
2. Cliquez sur "Apparence et thèmes" dans la fenêtre
"Panneau de configuration". Une boîte de dialogue
s’ouvre alors.
3. Cliquez sur "Affichage" pour ouvrir une autre boîte de
dialogue.
4. Accédez à l’onglet "Paramètres" dans la boîte de
dialogue Propriétés de l’Affichage.
Réglage correct de la taille (résolution) [Optimal : 1360 x y
768 pixels]
S’il existe une option de fréquence verticale dans la y
boîte de dialogue des paramètres d’affichage, la valeur
correcte est "60" ou "60 Hz". Sinon, cliquez sur "OK" et
quittez la boîte de dialogue.
Menu Son
Changement du mode Son prédéfini ¦
Mode
t
Standard ■ : sélectionne le mode son normal.
Musique ■ : accentue la musique par rapport aux voix.
Cinéma ■ : offre le meilleur son pour les films.
Voix claire ■ : accentue les voix par rapport aux autres
sons.
Amplifier ■ : augmente l’intensité du son aigu pour
garantir une meilleure écoute aux personnes
malentendantes.
Réglage des paramètres sonores ¦
Egaliseur
Règle le mode Son.
Balance G/D ■ : règle la balance entre les haut-parleurs
droit et gauche.
100Hz / 300Hz / 1kHz / 3kHz / 10kHz ■ (Réglage de la
bande passante) : règle le niveau des fréquences de
bande passante spécifiques.
Réinit. ■ : rétablit les paramètres par défaut de l’égaliseur.
Systèmes sonores, etc. ¦
Virtual Surround (Arrêt / Activé)
Cette fonction garantit un son surround virtuel 5.1 canaux
par le biais de deux haut-parleurs ou d’un casque grâce
à la technologie HRTF (Head Related Transfer Function Fonction de transfert asservie aux mouvements de la tête).
✎
Si l’option
Ht-parl ext, Virtual Surround est désactivé.
Sélection Haut-parleur est définie sur
Clarté Dialogues (Arrêt / Activé)
Cette fonction permet d’accentuer l’intensité d’une voix par
rapport au fond musical ou aux effets sonores, de manière
à rendre les dialogues plus clairs lorsque vous regardez une
émission.
Langue Audio
(chaînes numériques uniquement)
Permet de modifier la valeur par défaut des langues audio.
La langue disponible peut varier en fonction de
✎
l’émission.
Format Audio (MPEG / Dolby Digital 5.1)
(chaînes numériques uniquement)
Lorsque le son est émis à la fois par le haut-parleur principal
et le récepteur audio, un effet d’écho peut se produire en
raison de la différence de vitesse de décodage entre le hautparleur principal et le récepteur audio. Dans ce cas, utilisez la
fonction Haut-parleur TV.
L’option Audio Format
✎
l’émission. Le son Dolby Digital 5.1 est disponible
uniquement en cas de connexion d’un haut parleur
externe au moyen d’un câble optique.
peut varier en fonction de
03 Fonctions de base
Français
17
Page 52

Fonctions de base
ADGUIDE
MEDIA.P
P . MODES.MODEP . SIZE
Description audio
(non disponible dans tous les pays)
(chaînes numériques uniquement)
Cette fonction traite le flux audio relatif à la
description audio (AD) lorsqu’il est envoyé
avec le son principal par le radiodiffuseur.
Description audio (Arrêt / Activé) ■ :
active ou désactive la fonction de description audio.
Volume ■ : permet de régler le volume de description
audio.
Volume auto (Arrêt / Normal / Nuit)
Pour équilibrer le niveau de volume sur chaque canal,
définissez cette option sur Normal.
Nuit ■ : ce mode garantit un environnement sonore
de meilleure qualité que le mode Normal, avec une
absence pratiquement totale de parasites. Il s’avère
particulièrement utile pendant la nuit.
Sélection Haut-parleur
(Ht-parl ext / Haut-parleur TV)
Un effet d’écho peut se produire en raison de la différence
de vitesse de décodage entre le haut-parleur principal et le
récepteur audio. Dans ce cas, réglez le téléviseur sur Ht-parl
ext.
✎
Lorsque l’option
sur Ht-parl ext, les boutons de volume et MUTE ne
sont pas opérationnels et les paramètres sonores sont
limités.
✎
Lorsque l’option
sur Ht-parl ext, vous devez utiliser les paramètres
suivants :
Haut-parleur TV : Arrêt, Ht-parl ext : Activé
x
Lorsque l’option ✎Sélection Haut-parleur est définie
sur Haut-parleur TV, vous devez utiliser les paramètres
suivants :
Haut-parleur TV : Activé, Ht-parl ext : Activé
x
En l’absence de signal vidéo, les deux haut-parleurs
✎
sont coupés.
Sélection Haut-parleur est définie
Sélection Haut-parleur est définie
Paramètre supp.
(chaînes numériques uniquement)
Niveau Audio DTV (MPEG / HE-AAC) ■ : cette fonction
vous permet de réduire la disparité d’un signal vocal
(à savoir l’un des signaux reçus lors d’une émission de
télévision numérique) sur le niveau souhaité.
En fonction du type de signal de radiodiffusion, les
✎
options MPEG / HE-AA) peuvent être réglées sur
une valeur comprise entre -10 dB et 0 dB.
Pour augmenter ou diminuer le volume, réglez ces
✎
valeurs entre 0 et -10, respectivement.
Sortie SPDIF ■ : le format SPDIF (Sony Philips Digital
InterFace) est utilisé pour fournir du son numérique,
en réduisant les interférences vers les haut-parleurs et
divers dispositifs numériques, tels qu’un lecteur DVD.
Format Audio : lors de la réception d’une émission
de télévision numérique, vous avez le choix entre les
options PCM, Dolby Digital ou DTS. pour le format de
sortie audio numérique (SPDIF).
La connexion de haut-parleurs 5.1 canaux dans un
✎
environnement Dolby Digital vous permet d’optimiser
votre environnement sonore 3D interactif.
Retard Audio : cette option permet de corriger le
décalage audio/vidéo lorsque vous regardez la télévision
ou une vidéo et diffusez la sortie audio numérique sur un
dispositif externe tel qu’un récepteur AV.
Comp Dolby Digital (Ligne / RF) ■ : cette fonction réduit
la disparité entre un signal Dolby Digital et un signal
vocal (à savoir, Audio MPEG, HE-AAC, Son ATV).
✎
Sélectionnez
dynamique et RF pour réduire la différence entre
les sons forts et faibles pendant la nuit.
Ligne : permet de définir le niveau de sortie des signaux
supérieurs ou inférieurs à -31 dB (référence) sur -20 dB
ou -31 dB.
RF : permet de définir le niveau de sortie des signaux
supérieurs ou inférieurs à -20 dB (référence) sur -10 dB
ou -20 dB.
Ligne pour obtenir un son
Réinitialisation du son (OK / Annuler)
Rétablit les paramètres sonores par défaut définis en usine.
Sélection du mode Son ¦
Lorsque vous définissez Dual I-II, le mode Son actuel est
affiché à l’écran.
Stéréo
A2
NICAM
Stéréo
Si le signal stéréo est faible et qu’une commutation
✎
automatique se produit, passez alors en Mono.
Cette fonction n’est activée qu’avec un signal sonore stéréo.
✎
Disponible uniquement lorsque la source ✎Entrée est
définie sur TV.
t
Type
d’audio
Mono Mono
Stereo
Dual
Mono Mono
Stereo
Dual
Dual I-II Default
Stereo ↔ Mono
Dual I ↔ Dual II
Mono ↔ Stereo
Mono → Dual I
Dual II
Changement
automatique
Dual I
Changement
automatique
Dual I
18
Français
Page 53

Menu Configuration
10 TV ATV0
00 00
▲
▼
00 00
▲
▼
Réglage de l’heure ¦
Heure
Horloge ■ : le réglage de l’heure est nécessaire pour
utiliser différentes fonctions de minuterie du téléviseur.
O
L’heure actuelle s’affiche à chaque fois que vous
appuyez sur le bouton INFO.
Si vous débranchez le cordon d’alimentation, vous
✎
devez régler de nouveau l’horloge.
Mode Horloge (Auto. / Manuel)
En fonction du signal et de la station de diffusion,
✎
il se peut que la configuration automatique de
l’heure soit incorrecte. Dans ce cas, réglez l’heure
manuellement.
L’antenne doit être connectée pour permettre le
✎
réglage automatique de l’heure.
Réglage Horloge : Définissez manuellement les
paramètres Jour, Mois, Année, Heure et Minute.
✎
Disponible uniquement lorsque l’option
Horloge est définie sur Manuel.
Utilisation de la veille ¦
t
Veille ■
après une période déterminée (30, 60, 90, 120, 150 ou
180 minutes).
Pour annuler la fonction
✎
: éteint automatiquement le téléviseur
Veille, sélectionnez Arrêt.
Réglage de la minuterie de mise en
marche / arrêt
Mode
Antenne (lorsque Source est réglé sur TV) : sélectionnez
ATV ou DTV.
Chaîne (lorsque Source est réglé sur TV) : sélectionnez la
chaîne de votre choix.
Contenu (lorsque Source est réglé sur USB) : sélectionnez
un dossier de la clé USB contenant les fichiers de musique
ou les photos qui doivent être lus lors de la mise sous
tension automatique du téléviseur.
✎
Si la clé USB ne contient aucun fichier musical ou
si le dossier contenant un fichier musical n’est pas
sélectionné, la fonction de veille ne fonctionne pas
correctement.
Si le
✎
périphérique USB ne contient qu’une seule
photo, la fonction Diaporama ne démarre pas.
Les dossiers dont le nom est trop long ne peuvent
✎
pas être sélectionnés.
Chaque périphérique USB utilisé se voit attribuer son
✎
propre dossier. Si vous utilisez plusieurs périphériques
USB du même type, assurez-vous que les dossiers
affectés à chacun d’eux portent des noms différents.
Répétition : Sélectionnez Une fois, Quotid., Lun~Ven,
Lun~Sam, Sam~Dim ou Manuel pour définir l'option
suivant vos besoins. Si vous sélectionnez Manuel, vous
pouvez choisir le jour d'activation de la minuterie.
Le symbole
✎ c
✎
Mise hors tension auto. (disponible uniquement lorsque
le téléviseur est allumé par le minuteur) : le téléviseur
est mis hors tension automatiquement après trois
heures d’inactivité pour éviter toute surchauffe.
indique le jour sélectionné.
Verrouillage des programmes ¦
03 Fonctions de base
Minuteur 1 / Minuteur 2 / Minuteur 3 ■ : vous pouvez
définir trois réglages de mise en marche/arrêt différents.
Vous devez, au préalable, régler l’horloge.
Minuteur 1
Période d’activation
Désactiver
Période de désactivation
Désactiver
Volume
Répétition
Période d’activation / Période de désactivation :
sélectionnez l’heure, les minutes et l’action Activer /
Désactiver. (Pour activer le minuteur selon les réglages
définis, choisissez Activer.
Volume : sélectionnez le niveau de volume désiré.
Source : sélectionnez le contenu TV ou USB à lire lors de la
mise sous tension automatique du téléviseur. (L’option USB
peut uniquement être sélectionnée lorsqu’un périphérique
USB est connecté au téléviseur.)
Source Antenne Canal
Une fois
Dim Lun Mar Mer Jeu Ven Sam
L
Déplacer
U Régler E
)
Entrer R Retour
Sécurité
L’écran de saisie du code PIN s’affiche après l’écran de
✎
configuration.
Entrez votre code PIN à 4 chiffres ; "par défaut "0-0-0-0".
✎
Modifiez le code PIN à l’aide de l’option Modifier PIN.
Verrouillage Parental (Arrêt / Activé) ■ Vous pouvez
verrouiller des chaînes dans la fonction Gestion chaînes
afin d’empêcher certains utilisateurs, tels que des enfants,
de regarder des émissions qui ne leur sont pas destinées.
Disponible uniquement lorsque la source ✎Entrée
est définie sur TV.
Verrouillage parental (Niveau parental) ■ Cette fonction
permet d’empêcher certains utilisateurs, tels que des
enfants, de regarder des émissions qui ne leur sont pas
destinées, à l’aide d’un code PIN à 4 chiffres défini par
l’utilisateur.
Autor. tout : déverrouille toutes les évaluations TV.
✎
Les options du menu
diffèrent selon les pays.
Verrouillage parental
Français
19
Page 54

Fonctions de base
P
POWER
ADGUIDE
MEDIA.P
SUBT.
DUAL
I-II
P . MODES.MODEP . SIZE
Modifier PIN ■ : permet de modifier le code personnel
demandé pour pouvoir configurer le téléviseur.
Si vous avez oublié le code PIN, appuyez sur les
✎
boutons de la télécommande dans l’ordre suivant,
ce qui a pour effet de le réinitialiser sur "0-0-0-0" :
POWER (Arrêt) → MUTE → 8 → 2 → 4 → POWER
(Marche).
Autres fonctionnalités ¦
Langue
Langue des menus ■ : définissez la langue des menus.
Langue du télétexte ■ : sélectionnez la langue de votre
choix pour le télétexte.
L’anglais est utilisé par défaut si la langue
✎
sélectionnée n’est pas diffusée.
Préférence (Langue Audio principale / Langue Audio ■
secondaire / Langue princ. sous-titres / Langue sec.
sous-titres / Langue Télétexte principale / Langue
Télétexte secondaire) : sélectionnez la langue qui sera
utilisée par défaut lors de la sélection d’une chaîne.
Sous-titres
Utilisez ce menu pour définir le mode
Sous-titres.
✎
La fonctionnalité sous-titres n'est
pas opérationnelle avec les modes
Composant, ou HDMI.
Sous-titres (Arrêt / Activé) ■ : active ou
désactive les sous-titres.
Mode (Normal / Malentendant) ■ : configure le mode
des sous-titres.
Langue des sous-titres ■ : définit la langue des sous-
titres.
Si le programme visionné ne prend pas en charge
✎
la fonction Malentendant, le mode Normal
est automatiquement activé, même si le mode
Malentendant est sélectionné.
L’anglais est utilisé par défaut si la langue
✎
sélectionnée n’est pas diffusée.
Texte numérique (Désactiver / Activer)
(Royaume-Uni uniquement)
Si le programme diffuse du texte numérique, cette fonction
est activée.
Général
Mode Jeu (Arrêt / Activé) ■ : lorsque vous connectez une
console de jeux, telle qu’une PlayStation™ ou Xbox™,
vous pouvez bénéficier d’une expérience ludique encore
plus réaliste en sélectionnant le mode Jeu.
✎
REMARQUE
Précautions et restrictions x du mode Jeu
Pour déconnecter la console de jeux et connecter –
un autre périphérique externe, définissez Mode jeu
sur Arrêt dans le menu de configuration.
Si vous affichez le menu du téléviseur en – Mode
Jeu, l’écran tremble légèrement.
L'option
x
x
x
Transparence menu (Lumineux / Sombre) ■ : permet de
définir la transparence du menu.
Mélodie (Arrêt / Bas / Moyen / Elevé) ■ : cette option
permet de définir la lecture d’une mélodie lors de la mise
en marche ou l’arrêt du téléviseur.
Mode Jeu n'est pas disponible dans les
modes TV et PC.
Après avoir connecté
Mode Jeu sur Activé pour disposer d’une bonne
qualité d’image.
Si
Mode Jeu est défini sur Activé : le mode Image
est défini sur Standard et le mode Son, sur Cinéma.
la console de jeux, définissez
Interface commune
CI Menu ■ : permet à l’utilisateur d’opérer une sélection
dans le menu du module CAM. Sélectionnez le menu CI
en fonction du menu PC Card.
Infos sur l’application ■ : affiche des informations sur
le module CAM inséré dans l’emplacement CI et sur la
"CARTE CI ou CI+" insérée dans le module CAM. Vous
pouvez installer le module CAM, que le téléviseur soit
allumé ou éteint.
1. Vous pouvez acheter un module CI CAM chez le
revendeur le plus proche ou le commander par
téléphone.
2. Insérez fermement la "CARTE CI ou CI+" dans le module
CAM en suivant le sens de la flèche.
3.
Insérez le module CAM avec la "CARTE CI ou CI+" dans
la fente de l’interface commune (dans le sens de la flèche),
de telle sorte qu’il soit aligné parallèlement à la fente.
4. Vérifiez si une image est visible sur une chaîne à signal
brouillé.
20
Français
Page 55

Incrustation d’image (PIP) ¦
Assistance
Diagnostic automatique
Le diagnostic automatique peut prendre quelques secondes;
ce phénomène est normal.
Test de l’image (Oui / Non) ■ : utilisez cette option pour
rechercher d’éventuels problèmes d’image et, si les
problèmes persistent, vérifier la mire de couleur.
Test du son (Oui / Non) ■ : utilisez la mélodie intégrée
pour rechercher d’éventuels problèmes sonores.
Si les haut-parleurs du téléviseur restent muets,
✎
avant d’effectuer le test du son, vérifiez que
l’option Sélection Haut-parleur est réglée sur
Haut-parleur TV dans le menu Son.
La mélodie est diffusée pendant le test, même si
✎
l’option Sélection Haut-parleur est réglée sur
Ht-parl ext. ou si le son a été désactivé en
appuyant sur le bouton MUTE.
Informations de signal ■ : (chaînes numériques
uniquement) soit la qualité de réception des chaînes
HDTV est parfaite, soit les chaînes ne sont pas
disponibles. Réglez votre antenne afin d’augmenter
l’intensité du signal.
Résolution des problèmes ■ : consultez cette description
s’il vous semble que le téléviseur rencontre un problème.
Si aucun des conseils de dépannage ne
✎
s’applique au problème rencontré, contactez le
service clientèle de Samsung.
Mise à niveau du logiciel
Une Mise à niveau du logiciel peut être effectuée
via un signal de radiodiffusion ou en téléchargeant le
microprogramme le plus récent sur une clé USB à partir du
site Web samsung.com.
Version actuelle indique que le logiciel est déjà installé sur
votre téléviseur.
✎
Le numéro de version est affiché au format suivant :
"année/mois/jour_version".
Mise à niveau du logiciel
Version actuelle 2010/01/18_000001
Installation de la version la plus récente
USB ■ : insérez la clé USB
contenant le fichier de mise à
niveau du microprogramme
téléchargé sur www.samsung.
com dans le téléviseur. Veillez
à ne pas couper l’alimentation,
ni retirer la clé USB tant que
les mises à niveau ne sont pas
terminées. Une fois la mise à
niveau du microprogramme
terminée, le téléviseur se met
automatiquement hors tension, puis se rallume. Lorsque
la mise à niveau du logiciel est terminée, les paramètres
vidéo et audio par défaut sont réinitialisés. Il est conseillé
de prendre note des paramètres afin de pouvoir les rétablir
facilement après la mise à niveau.
Canal ■ : met à niveau le logiciel en utilisant le signal de
radiodiffusion.
✎
Si la fonction est sélectionnée pendant la période
de transmission du logiciel, ce dernier est
automatiquement recherché et téléchargé.
Le temps nécessaire au téléchargement du
✎
logiciel dépend de l’état du signal.
Mise à niveau en mode veille ■ : une mise à niveau
manuelle est automatiquement effectuée à l’heure
indiquée. Etant donné que la mise sous tension
s’effectue de façon interne, il se peut que l’écran LCD
s’allume légèrement. Le phénomène peut se poursuivre
pendant plus d’une heure jusqu’à ce que la mise à jour
du logiciel soit terminée.
Autre logiciel ■ (sauvegarde) : En cas problème avec le
nouveau microprogramme (si, par exemple, le téléviseur
ne fonctionne plus correctement), vous pouvez revenir à
la version précédente.
Si le logiciel a été modifié, la version existante
✎
s’affiche.
Panneau arrière du téléviseur
Clé USB
Guide de connexion HD
Consultez ces informations lors de la connexion de
périphériques externes au téléviseur.
Contacter Samsung
Consultez ces informations si le téléviseur ne fonctionne pas
correctement ou si vous voulez mettre à niveau le logiciel.
Vous y trouverez des informations concernant nos centres
d’appel, ainsi que le téléchargement de nos produits et
logiciels.
03 Fonctions de base
USB ►
Canal
Mise à niveau en mode veille Arrêt
Autre logiciel ----/--/--/--_------
U Déplacer E Entrer R Retour
Français
21
Page 56

Fonctions avancées
MEDIA.P
P . MODES.MODEP . SIZE
Media Play
Vous pouvez lire les photos, la musique et/ou les
fi lms enregistrés sur un périphérique USB de type
MSC.
MediaPlay
Devicename
Music
Music
A
Changer pér.
D
Mode Périphérique
E
Entrer
R
Retour
Connexion d’un périphérique USB ¦
1. Allumez votre téléviseur.
2. Connectez un périphérique USB contenant des fi chiers photo, de la musique et/ou
des fi lms à la prise USB (HDD) située sur le côté du téléviseur.
3. Lorsqu’un périphérique USB est connecté au téléviseur, une fenêtre contextuelle
s’ouvre. Vous pouvez alors sélectionner Media Play.
Il se peut que le fonctionnement ne soit pas correct avec des fichiers multimédia
✎
sans licence.
✎
Ce qu’il faut savoir avant d’utiliser la fonction
Le protocole MTP (Media Transfer Protocol) n’est pas pris en charge.
x
Le système de fichiers prend en charge les formats FAT16, FAT32 et NTFS.
x
Il est possible que certains types d’appareils photo numériques et de périphériques audio
x
USB ne soient pas compatibles avec ce téléviseur.
Media Play ne prend en charge que les périphériques de stockage de masse USB de la catégorie MSC. Cette dernière
x
est dédiée aux périphériques de transport de masse uniquement. Il s’agit notamment des clés USB, lecteurs de cartes
Flash et disques durs USB (les concentrateurs USB ne sont pas pris en charge). Les périphériques doivent être connectés
directement au port USB du téléviseur.
Avant de connecter l’appareil au téléviseur, sauvegardez vos fichiers afin d’éviter qu’ils ne soient endommagés ou que des
x
données ne soient perdues. SAMSUNG ne saurait, en aucun cas, être tenue responsable de la perte de données ou de
l’endommagement d’un fichier de données.
Ne déconnectez pas le périphérique USB en cours de chargement.
x
Plus la résolution de l’image est élevée, plus le temps d’affichage à l’écran sera long.
x
La résolution JPEG maximale prise en charge est de 15 360 x 8 640 pixels.
x
Pour les fichiers non pris en charge ou endommagés, le message «Format de fichier non compatible» s’affiche.
x
Si le critère de tri est défini sur Aff. de base, il est possible d’afficher jusqu’à 1 000 fichiers dans chaque dossier.
x
Les fichiers MP3 avec gestion des droits numériques (DRM) téléchargés à partir d’un site payant ne peuvent pas être lus.
x
La technologie gestion numérique des droits (DRM) prend en charge la création de contenu, la distribution et la gestion du
contenu de manière intégrée et complète (par exemple, la protection des droits et des intérêts des fournisseurs de contenu,
la prévention de la copie illégale du contenu), ainsi que la gestion de la facturation et des règlements.
Si plusieurs périphériques PTP sont connectés, vous ne pouvez en utiliser qu’un à la fois.
x
Si plusieurs périphériques MSC sont connectés, il se peut que certains d’entre eux ne soient pas reconnus. Un périphérique
x
USB nécessitant beaucoup de puissance (plus de 500 mA ou 5 V) ne sera peut-être pas pris en charge.
Si un message d’avertissement de surcharge s’affiche lorsque vous connectez ou utilisez un périphérique USB, il se peut
x
que le périphérique ne soit pas reconnu ou qu’il fonctionne mal.
Si aucune entrée n’a été reçue au cours de la période définie dans le paramètre xTemps protection auto,
l’économiseur d’écran s’active.
Si un câble d’extension USB est utilisé, il se peut que le périphérique USB ne soit pas reconnu ou que les fichiers qui
x
y sont stockés ne soient pas lus.
Si un périphérique USB connecté au téléviseur n’est pas reconnu, si la liste des fichiers qui y sont stockés est
x
corrompue ou si un fichier de la liste est illisible, connectez le périphérique en question à l’ordinateur, formatez le
périphérique et vérifiez la connexion.
S’il s’avère qu’un fichier supprimé de l’ordinateur est encore présent lors de l’exécution de Media Play, utilisez la
x
fonction «Vider la Corbeille» de l’ordinateur pour le supprimer définitivement.
Media Play
Panneau latéral du téléviseur
Clé USB
22
Français
Page 57

Affichage ¦
Accédez au fichier de votre choix à l’aide des boutons haut/bas/droite/gauche et appuyez ensuite sur le bouton ENTERE.
La lecture du fichier commence.
✎
Prise en charge de
Vous pouvez vérifier le nom du
fichier sélectionné, le nombre de
fichiers, ainsi que la page.
Section Liste de tri :
Affiche l’ordre de tri standard.
Cet ordre de tri varie en
✎
fonction du contenu.
Mode Périphérique et Mode Contenu dans la page d’accueil Media Play.
Informations :
Devicename
/Music 01.mp3 1/2
Music
c
Music 01 2010
no singer other
c
Music 03 2010
no singer other
Music 05 2010
no singer other
c
Music 07 2010
no singer other
A
Changer pér.
Boutons d’opérations
A
Rouge (Changer périph) : sélectionne un appareil connecté.
B
Vert (Préférence) : définit la préférence du fichier (non pris en charge en mode
C
Jaune (Sélectionner) : sélectionne plusieurs fichiers dans la liste. Les fichiers
D
Bleu (Tri ) : sélectionne la liste de tri.
T
Outils : affiche le menu d’options.
Aff. de base).
sélectionnés sont marqués à l’aide d’un symbole.
Music 02 2010
no singer other
Music 04 2010
no singer other
Music 06 2010
no singer other
Music 08 2010
no singer other
C
Sélectionner D Tri T Outils
Section Liste des fichiers :
Vous pouvez vérifier les
fichiers et groupes classés par
catégorie.
04 Fonctions avancées
Musique
Lecture de musique
1. Appuyez sur le bouton ◄ ou ► pour sélectionner Musique et
appuyez ensuite sur ENTER
2. Appuyez sur le bouton ◄/►/▲/▼ pour sélectionner le fichier musical
(Music) de votre choix dans la liste des fichiers.
3. Appuyez sur le bouton ENTER
Pendant la lecture d’un fichier audio, vous pouvez effectuer une –
recherche à l’aide des boutons ◄ et ►.
Seuls les fichiers portant l’extension MP3 sont affichés. Les fichiers
✎
portant d’autres extensions ne s’affichent pas, même s’ils sont
enregistrés sur le même périphérique USB.
✎
Si le son est déformé lors de la lecture de fichiers MP3, réglez
l’option Egaliseur dans le menu Son. (Un fichier MP3 surmodulé
peut être à l’origine d’un problème sonore.)
E
dans le menu Media Play.
E
.
Only you
Jason
1st Album
Pop
2010
4.2MB
01:10 / 04:02
Devicename E Pause L Passer T Outils R Retour
Only you
Jason
Music 1
No Singer
Music 2
No Singer
Music 3
No Singer
Music 4
No Singer
Music 5
No Singer
Liste éc.
Français
23
3/15
Page 58

Fonctions avancées
Photos
Visualisation d’une photo (ou d’un diaporama)
1. Appuyez sur le bouton ◄ ou ► pour sélectionner Photo et appuyez
ensuite sur ENTERE dans le menu Media Play.
2. Appuyez sur le bouton ◄/►/▲/▼ pour sélectionner la photo de votre
choix dans la liste des fichiers.
3. Appuyez sur le bouton ENTERE.
Lorsqu’une liste de photos est affichée, appuyez sur le – ENTERE de
la télécommande pour lancer le diaporama.
Tous les fichiers de la section Liste des fichiers seront affichés dans le –
diaporama.
Pendant le diaporama, les fichiers apparaissent dans l’ordre, à partir –
de celui en cours d’affichage.
Des fichiers musicaux peuvent être lus automatiquement pendant le
✎
diaporama, si l’option Fond musical est définie sur Activé.
Il n’est pas possible de changer le ✎Mode mus. de fond tant que le
chargement de BGM n’est pas terminé.
Lecture de plusieurs fichiers ¦
Normal
Image1024.jpg
Devicename E Pause L Préc./Suivant T Outils R Retour
1024x768
2010/2/1
3/15
Lecture des fichiers musicaux / vidéos / photos sélectionnés
1. Appuyez sur le bouton jaune dans la liste des fichiers pour sélectionner
le fichier de votre choix.
2. Répétez l’opération ci-dessus pour sélectionner plusieurs fichiers.
REMARQUE
✎
La marque ( xc) s’affiche à gauche des fichiers sélectionnés.
Pour annuler une sélection, appuyez à nouveau sur le bouton
x
jaune.
Pour désélectionner tous les fichiers, appuyez sur le bouton
x
TOOLS et sélectionnez Désélectionner tout.
3. Appuyez sur le bouton TOOLS et sélectionnez ensuite Lire contenu
sélectionné.
Lecture du groupe de fichiers musicaux / vidéos / photos
1. Lorsqu’une liste de fichiers est affichée, vous pouvez accéder à n’importe
quel fichier dans le groupe de votre choix.
2.
Appuyez sur le bouton TOOLS et sélectionnez ensuite Lire le groupe
actuel.
/Music 01.mp3 1/2
Music
c
Music 01 2010
no singer other
c
Music 03 2010
no singer other
Music 05 2010
no singer other
c
Music 07 2010
no singer other
Devicename
A Changer pér.
Music 02 2010
no singer other
Music 04 2010
no singer other
Music 06 2010
no singer other
Music 08 2010
no singer other
Sélectionner Tri T Outils
24
Français
Page 59

Fonctions supplémentaires de Media Play ¦
Tri de la liste des fichiers
Appuyez sur le bouton bleu dans la liste pour trier les fichiers.
Catégorie Opérations
Aff. de base
Titre
Préférence
Le plus récent
Le plus ancien
Artiste
Album
Genre
Humeur
Mensuel
Menu des options de lecture de musique / photos
Menu d’options Opérations Music Photos
Mode de répétition
Réglage de l'image
Réglage du son
Arrêter le diaporama /
Lancer le diaporama
Effet du diaporama
Zoom Vous pouvez zoomer sur les images lorsque vous êtes en mode Plein écran.
Arr.-plan Acc.
Information Vous pouvez afficher des informations détaillées sur le fichier lu.
Affiche le dossier complet. Pour regarder les photos, sélectionnez le dossier.
Les titres des fichiers sont triés et affichés par symbole / numéro / ordre alphabétique /ordre
spécial.
Les fichiers sont triés et affichés par préférence. Les préférences d'un fichier peuvent être
modifiées dans la section Liste de fichiers à l'aide du bouton vert.
Trie et affiche les fichiers selon la date la plus récente.
Trie et affiche les fichiers selon la date la plus ancienne.
Les fichiers musicaux sont triés par artiste dans l'ordre alphabétique.
Trie les fichiers musicaux par album et par ordre alphabétique.
Trie les fichiers musicaux par genre.
Trie les fichiers musicaux par ambiance. Vous pouvez modifier les informations d'ambiance
de la musique.
Trie et affiche les photos par mois.
Vous pouvez lire des fichiers musicaux, vidéo et en boucle.
Vous pouvez régler les paramètres d'image. (p. 14, 15, 16)
Vous pouvez régler les paramètres sonores. (p. 17, 18)
Vous pouvez lancer ou arrêter un diaporama.
Vous pouvez définir l'effet utilisé lors du changement d'image dans le
diaporama.
Vous pouvez faire pivoter les images lorsque vous êtes en mode Plein écran.
Musique
✓ ✓
✓ ✓
✓ ✓
✓
✓
✓
✓
✓
✓ ✓
✓ ✓
04 Fonctions avancées
Photos
✓
✓
✓
✓
✓
✓
✓
✓
Paramètres
Utilisation du menu Configuration
Information ■ : sélectionnez cette option pour afficher des informations sur le périphérique connecté.
Français
25
Page 60

Informations supplémentaires
MEDIA.P
C
ABCD
Informations supplémentaires
Fonction Télétexte de chaîne analogique
La page d’index du télétexte contient des instructions sur l’utilisation du service. Pour que les informations du télétexte
s’affi chent correctement, la réception des chaînes doit être stable. Autrement, des informations pourraient manquer ou
certaines pages ne pas s’affi cher.
Vous pouvez changer de page de télétexte en appuyant sur les boutons numériques de la télécommande.
✎
1
/ (Télétexte actif / Mixte) :
permet d'activer le mode Télétexte
après avoir choisi la chaîne
diffusant le service. Appuyez deux
fois sur ce bouton pour superposer
le mode Télétexte à l'émission en
cours de diffusion.
2
8 (mémoriser) : stocke les
pages du télétexte.
3
4 (taille) : permet d'affi cher la
moitié supérieure de l'écran en
caractères deux fois plus grands.
Pour affi cher la moitié inférieure de
l'écran au même format, appuyez
une nouvelle fois sur ce bouton.
Appuyez à nouveau pour rétablir le
mode d'affi chage normal.
4
9 (maintenir) : permet de
bloquer l'affi chage sur une page
précise, si celle-ci est reliée à
plusieurs pages secondaires
qui s'affi chent automatiquement
les unes après les autres. Pour
reprendre l'affi chage des autres
pages, appuyez à nouveau sur ce
bouton.
5
0 (mode) : permet de
sélectionner le mode Télétexte
(LIST/FLOF).
si vous appuyez sur ce bouton
en mode LISTE, vous accédez
au mode d'enregistrement de
liste. Dans ce mode, vous pouvez
enregistrer une page télétexte dans
une liste à l'aide du bouton 8
(mémoriser).
2
4
1
3
2 (page suivante) : affi che la
page suivante du télétexte.
5
3 (page précédente) : affi che la
page précédente du télétexte.
6 (index) : affi che, à tout
moment, la page d'index
(sommaire) du télétexte.
5 (révéler) : affi che le texte
masqué (les réponses à un
6
7
questionnaire, par exemple).
Appuyez à nouveau sur ce bouton
pour rétablir le mode d'affi chage
7 (annuler) : affi che le
programme en cours pendant la
8
9
0
vert / jaune / bleu) : si la société
de radiodiffusion utilise le système
peuvent être sélectionnés à l'aide
!
@
bouton dont la couleur correspond
à celle de la rubrique souhaitée. La
page affi che d'autres informations
sélectionner de la même manière.
Pour affi cher la page précédente
ou suivante, appuyez sur le bouton
recherche d'une page
Boutons de couleur (rouge /
FASTEXT, les différents sujets
traités dans la page télétexte
disposent d'un code couleur et
des boutons de couleur de la
télécommande. Appuyez sur le
en couleur que vous pouvez
de la couleur correspondante.
7
8
9
0
normal.
!
@
6
1 (sous-page) : affi che la sous-
page disponible.
Les pages de télétexte sont organisées en six catégories :
Catégorie Contenu Catégorie Contenu
Numéro de la page
A
sélectionnée.
B Identité de la chaîne émettrice. E Texte.
Numéro de la page actuelle
C
ou indications de recherche.
Français
26
D Date et heure
Informations sur l'état.
F
Informations FASTEXT.
Page 61

Installation du support mural
45mm
Installation du kit de montage mural ¦
Les éléments du support mural (vendus séparément) permettent de fixer le téléviseur au mur.
Pour plus d’informations sur l’installation du support mural, reportez-vous aux instructions fournies avec les éléments du
support mural. Faites appel à un technicien pour installer la fixation murale.
Si vous choisissez d’effectuer vous-même l’installation murale, Samsung Electronics ne saurait être tenue responsable des
éventuels dommages matériels ou des éventuelles blessures dont vous, ou d’autres personnes, pourriez être victimes.
Caractéristiques du kit de fixation murale (VESA) ¦
Le kit de fixation murale est vendu séparément.
✎
Installez votre fixation murale sur un mur solide perpendiculaire au sol. Si vous souhaitez la fixer sur d’autres matériaux de
construction, veuillez prendre contact avec votre revendeur le plus proche. Si vous l’installez au plafond ou sur un mur non
droit, la fixation risque de tomber et de provoquer de graves blessures.
✎
REMARQUE
Samsung Electronics ne saurait être tenu responsable de tout dommage sur le produit ni de toute blessure subie par vous
x
ou par d’autres personnes si vous choisissez d’effectuer l’installation murale.
Les dimensions standard pour tous les kits de fixation murale sont indiquées dans le tableau ci-dessous.
x
Le kit de fixation murale s’accompagne d’un manuel d’installation détaillé et de toutes les pièces nécessaires au montage.
x
N’utilisez pas de vis plus longues que la dimension standard, car elles pourraient endommager l’intérieur du téléviseur.
x
Pour les fixations murales non conformes aux spécifications des vis VESA standard, la longueur des vis peut varier, selon
x
leurs caractéristiques.
N’utilisez pas de vis non conformes aux spécifications des vis VESA standard.
x
Ne serrez pas trop les vis ; cela pourrait, en effet, endommager le produit ou provoquer sa chute, entraînant des blessures.
x
Samsung ne peut être tenue responsable de ce type d’accident.
Samsung ne peut être tenue responsable de tout dommage au produit ou toute blessure corporelle dans le cas de
x
l’utilisation d’une fixation murale non-VESA ou non spécifiée, ou si l’utilisateur ne suit pas les instructions d’installation du
produit.
Lors du montage, l’inclinaison du téléviseur ne doit pas dépasser 15 degrés.
x
Famille de
produits
TELEVISEUR LCD
pouces Spéc. VESA (A * B) Vis standard Quantité
19~22
23~29 200 X 100
30~40 200 X 200 M6
46~55 400 X 400
57~65 600 X 400
70~80 800 X 400
80~ 1400 X 800
75 X 75
100 X 100
M4
4
M8
05 Informations supplémentaires
Un périphérique USB d’une longueur égale ou supérieure à 45 mm peut toucher le mur lorsqu’il est
connecté à un modèle 26” ou 32” installé sur un support mural. Il est donc recommandé d’utiliser un
périphérique USB de plus petite taille.
N’installez pas votre kit de fixation murale lorsque le téléviseur est allumé. Vous risqueriez de vous
électrocuter.
Français
27
Page 62

Informations supplémentaires
1
2
1
2
1
2
3
Verrou antivol Kensington
L’antivol Kensington est un dispositif utilisé pour fixer physiquement le système
lorsqu’il est utilisé dans un endroit public. L’aspect et la méthode de verrouillage
peuvent différer de l’illustration en fonction du fabricant. Consultez le manuel
fourni avec le verrou Kensington pour obtenir des instructions d’utilisation.
Une icône “
✎
Un verrou Kensington se trouve à côté de l’icône “
1.
Insérez le dispositif de verrouillage dans la fente Kensington du
téléviseur LCD 1, puis tournez-le dans le sens de verrouillage 2.
2. Branchez le câble du verrou Kensington 3.
3. Fixez le verrou Kensington à un bureau ou tout autre objet lourd
inamovible.
✎
Le dispositif de verrouillage est vendu séparément.
L’emplacement du verrou Kensington peut varier en fonction du modèle.
✎
Pour éviter toute chute du téléviseur ¦
Les colliers, vis et chaînettes n’étant pas fournis, vous devez les
✎
acheter séparément.
1. Faites passer les vis dans les colliers et fixez-les fermement au
mur. Assurez-vous que les vis sont bien fixées.
✎
2.
Retirez les vis situées sur la partie centrale arrière du téléviseur,
placez-les dans les colliers, puis fixez-les à nouveau sur le téléviseur.
3. Reliez les colliers fixés au téléviseur et ceux fixés sur le mur à
l’aide de chaînettes, puis attachez-les fermement.
✎
Vérifiez que toutes les connexions sont fixées correctement.
Vérifiez régulièrement que les connexions ne présentent aucun
signe d’usure. Si vous avez un doute quant à la sécurité des
connexions, contactez un installateur professionnel.
✎
Placez le téléviseur à proximité du mur afin qu’il ne bascule pas
vers l’arrière.
Il est recommandé de placer la chaînette de façon à ce que les colliers fixés au mur soient placés à la même hauteur ou
✎
plus bas que ceux fixés au téléviseur.
✎
Détachez la chaînette avant de déplacer le téléviseur.
” est présente à l’arrière du téléviseur.
”.
<Optionnel>
Fixation du téléviseur au mur
Attention : si vous tirez ou poussez le téléviseur ou si vous grimpez dessus, il risque de tomber. Veillez notamment
à ce que vos enfants ne se suspendent pas au téléviseur, ni ne le déséquilibrent, car cela pourrait le faire basculer et
occasionner des blessures graves, voire entraîner la mort. Respectez toutes les précautions de sécurité indiquées dans
la brochure relative à la sécurité. Pour une stabilité accrue, installez le dispositif antichute comme indiqué ci-après.
Caractéristiques des vis
Pour un téléviseur LCD de 23 à 29 pouces : M4
x
Pour un téléviseur LCD de 30 à 40 pouces : M6
x
Mur
28
Français
Page 63

Dépannage
Si vous avez des questions sur le téléviseur, commencez par consulter la liste ci-dessous. Si aucune de ces astuces de
dépannage ne s’applique à votre problème, rendez-vous sur le site "www.samsung.com", puis cliquez sur Service ou
contactez le centre d’appel dont les coordonnées figurent sur la couverture arrière du présent manuel.
Problèmes Solutions et explications
Qualité de l'image Exécutez tout d'abord le Test de l'image pour vérifier que votre téléviseur affiche correctement l'image de
La qualité de l'image affichée par le
téléviseur n'est pas aussi bonne que dans
le magasin.
L'image est déformée : macrobloc, petit
bloc, points, pixellisation
Couleur incorrecte ou manquante. Si vous utilisez une connexion Composant, assurez-vous que les câbles Composant sont raccordés •
La couleur ou la luminosité est de
mauvaise qualité.
Il y a une ligne pointillée sur les bords de
l'écran.
L'image est en noir et blanc. Si vous utilisez une entrée composite AV, connectez le câble vidéo (jaune) au connecteur vert de •
Lors d'un changement de chaîne, l'image
se bloque, est déformée ou s'affiche avec
un léger décalage.
Qualité sonore Exécutez tout d'abord le Test du son pour vérifier que le système audio de votre téléviseur fonctionne
Il n'y a aucun son ou celui-ci est trop faible
au volume maximum.
La qualité d'image est bonne, mais aucun
son n'est émis.
Les haut-parleurs émettent un son
inhabituel.
test.
(Accédez à MENU - Assistance - Diagnostic automatique - Test de l'image) (P. 21)
Si l'image de test s'affiche correctement, sa qualité médiocre peut être due à la source ou au signal.
Si vous possédez un décodeur câble / boîtier décodeur analogique, passez à un décodeur numérique. •
Utilisez des câbles HDMI ou Composant pour fournir une qualité d'image HD (haute définition).
Abonnés câble / satellite : essayez les chaînes HD dans la liste des canaux.•
Connexion de l'antenne : essayez les chaînes HD après avoir effectué une mémorisation automatique.•
De nombreuses chaînes HD sont mises à niveau par rapport à du contenu SD (définition
✎
standard).
Réglez la résolution de sortie vidéo du décodeur câble/boîtier décodeur sur 1080i ou 720p.•
Veillez à respecter la distance minimale recommandée entre vous et le téléviseur (distance basée sur •
la taille et la définition du signal).
La compression de contenu vidéo peut engendrer une déformation de l'image, en particulier pour les •
mouvements rapides comme le sport et les films d'action.
Un niveau de signal faible ou de mauvaise qualité peut déformer l'image. Il ne s'agit pas d'un •
problème lié au téléviseur.
aux prises appropriées. Des raccordements desserrés ou incorrects peuvent engendrer des
problèmes au niveau de la couleur ou un écran vide.
Réglez les options • Image dans le menu du téléviseur (accédez au mode Image / Couleur /
Luminosité / Netteté)
Réglez l'option • Mode éco. dans le menu du téléviseur (accédez à MENU - Image - Solution Eco -
Mode éco.)
Essayez de réinitialiser l'image pour en afficher les paramètres par défaut (accédez à • MENU - Image
- Réinitialisation de l'image)
Si la taille de l'image est définie sur • Adapter écran, réglez le paramètre sur 16:9. (P. 16)
Changez la résolution du décodeur câble/boîtier décodeur.•
l'entrée composant 1 du téléviseur.
En cas de raccordement à un décodeur câble, essayez de réinitialiser ce dernier. Rebranchez le •
cordon d'alimentation secteur et patientez jusqu'au redémarrage du décodeur câble. Cette opération
peut prendre jusqu'à 20 minutes.
Réglez la résolution de sortie du décodeur câble sur 1080i ou 720p.•
correctement.
(Accédez à MENU - Assistance - Diagnostic automatique - Test du son) (P. 21)
Si le système audio fonctionne correctement, le problème lié au son peut provenir de la source ou du
signal.
Vérifiez le volume de l'appareil externe connecté à votre téléviseur.•
Réglez l'option • Sélection Haut-parleur sur Haut-parleur TV dans le menu Son. (P. 18)
Si vous utilisez un appareil externe, assurez-vous que les câbles audio sont raccordés aux prises •
d'entrée audio appropriées du téléviseur.
Si vous utilisez un appareil externe, vérifiez l'option de sortie audio de l'appareil connecté (il se peut, •
par exemple, que vous deviez définir l'option audio de votre décodeur câble sur HDMI si vous utilisez
une connexion HDMI).
Si vous utilisez un câble DVI-HDMI, un câble audio distinct est requis.•
Si votre téléviseur est équipé d'une prise casque, assurez-vous que rien n'y est connecté.•
Vérifiez les connexions des câbles. Vérifiez qu'aucun câble vidéo n'est raccordé à une entrée audio.•
Pour les connexions de télédistribution ou antenne, vérifiez l'intensité du signal. Un niveau de signal •
faible peut provoquer une distorsion sonore.
05 Informations supplémentaires
Français
29
Page 64

Informations supplémentaires
Problèmes Solutions et explications
Aucune image, aucune vidéo
Le téléviseur ne s'allume pas. Vérifiez que le cordon d'alimentation secteur est branché correctement sur la prise murale et sur le •
Le téléviseur s'éteint automatiquement. Vérifiez que la fonction • Veille est réglée sur Arrêt dans le menu Configuration. (P. 19)
Aucune image / vidéo n’est affichée. Vérifiez le raccordement des câbles (retirez tous les câbles connectés au téléviseur et aux appareils •
Connexion RF (câble/antenne)
Le téléviseur ne reçoit pas toutes les
chaînes.
L'image est déformée : macrobloc, petit
bloc, points, pixellisation
Connexion PC
Le message "Mode non pris en charge"
est affiché.
"PC" reste affiché dans la liste Source,
même si aucun ordinateur n'est connecté.
La qualité de la vidéo est bonne, mais
aucun son n'est émis.
Autres
L'image ne s'affiche pas en mode plein
écran.
La télécommande ne fonctionne pas. Remplacez les piles de la télécommande en respectant la polarité (+/-).•
La télécommande du décodeur câble/
boîtier décodeur ne permet pas d'allumer
ou d'éteindre le téléviseur, ni de régler le
volume.
Le message "Mode non pris en charge"
est affiché.
Une odeur de plastique se dégage du
téléviseur.
L'option Informations de signal du
téléviseur n'est pas disponible dans le
menu de test du diagnostic automatique.
Le téléviseur penche sur le côté. Retirez le support de base du téléviseur et réassemblez-le.•
L'assemblage du support de base
s'effectue difficilement.
Le menu des chaînes est grisé
(indisponible).
téléviseur.
Vérifiez que la prise murale est opérationnelle.•
Essayez d'appuyer sur le bouton • POWER du téléviseur pour vous assurer que le problème n'est pas
dû à la télécommande. Si le téléviseur s'allume, reportez-vous au problème "La télécommande ne
fonctionne pas" ci-après.
Si votre PC est connecté au téléviseur, vérifiez les paramètres d'alimentation de votre PC.•
Vérifiez que le cordon d'alimentation secteur est branché correctement sur la prise murale et sur le •
téléviseur.
Lorsque vous regardez la télévision sur une connexion de télédistribution ou antenne, le téléviseur •
s'éteint après 10 à 15 minutes en l'absence de signal.
externes, puis rebranchez-les).
Réglez les sorties vidéo de vos périphériques externes (décodeur câble / boîtier décodeur, lecteur •
DVD, lecteur Blu-ray, etc.) pour faire correspondre les connexions à l'entrée du téléviseur. Par
exemple, si la sortie d'un périphérique externe est HDMI, vous devez établir une connexion avec une
entrée HDMI du téléviseur.
Vérifiez que les appareils connectés sont sous tension.•
Veillez à sélectionner la source appropriée du téléviseur en appuyant sur le bouton • SOURCE de la
télécommande du téléviseur.
Vérifiez que le câble de l'antenne est raccordé correctement.•
Essayez la fonction • Plug & Play (configuration initiale) pour ajouter des chaînes disponibles à la liste.
Accédez à MENU - Configuration - Plug & Play (configuration initiale) et attendez que toutes les
chaînes disponibles soient mémorisées.
Vérifiez que l'antenne est positionnée correctement.•
La compression de contenu vidéo peut provoquer une déformation de l'image, en particulier pour les •
mouvements rapides comme le sport et les films d'action.
Un niveau de signal faible peut déformer l'image. Il ne s'agit pas d'un problème lié au téléviseur.•
Réglez la fréquence et la résolution de sortie de votre PC, de telle sorte que ces paramètres •
correspondent aux résolutions prises en charge par le téléviseur. (P. 22)
Cela est tout à fait normal ; la mention "PC" apparaît toujours dans la liste Source.•
Si vous utilisez une connexion HDMI, vérifiez le paramètre de sortie audio sur votre PC.•
Des barres noires s'affichent de chaque côté des chaînes HD lors de l'affichage de contenu SD (4:3) •
mis à niveau.
Des barres noires s'affichent en haut et en bas des films dont le format d'image est différent de celui •
de votre téléviseur.
Définissez les options de taille de l'image de votre appareil externe ou téléviseur sur Plein écran.•
Nettoyez la lentille de la télécommande.•
Essayez de diriger directement la télécommande vers le téléviseur à une distance de 1,5 à 1,8 m.•
Programmez la télécommande du décodeur câble/boîtier décodeur de telle sorte qu'elle puisse •
commander le téléviseur. Consultez le mode d'emploi du décodeur câble/boîtier décodeur pour
obtenir le code du téléviseur SAMSUNG.
Vérifiez la résolution prise en charge par le téléviseur et réglez la résolution de sortie du périphérique •
externe en conséquence. Reportez-vous aux paramètres de résolution à la page 9 du présent manuel.
Cette odeur est normale et s'atténuera avec le temps.•
Cette fonction n'est disponible qu'avec des chaînes numériques diffusées sur une connexion •
d'antenne / RF/coaxiale. (P. 21)
Veillez à placer le téléviseur sur une surface plane. Si vous ne parvenez pas à retirer les vis du •
téléviseur, utilisez un tournevis aimanté.
Le menu • Chaîne n'est disponible que si la source TV est sélectionnée.
30
Français
Page 65

Problèmes Solutions et explications
Vos paramètres sont perdus après
30 minutes ou à chaque mise hors tension
du téléviseur.
Perte intermittente du signal audio ou
vidéo.
Des petites particules sont visibles lorsque
vous observez de près le bord du cadre
du téléviseur.
Le menu PIP n'est pas disponible. La fonctionnalité• PIP n'est disponible que lorsque vous utilisez une source HDMI, PC ou
Le message "Signal brouillé" ou "Signal
faible/Aucun signal" s'affiche.
Le téléviseur s'est rallumé 45 minutes
après sa mise hors tension.
Problèmes récurrents liés à l'image/au son. Vérifiez et modifiez le signal/la source.•
Il peut y avoir une réaction entre les
coussinets en caoutchouc situés sur le
support de base et la finition de certains
meubles.
Ce téléviseur LCD TFT est équipé d’un écran constitué de sous-pixels dont la fabrication nécessite une technologie
✎
Si le téléviseur est en mode • Démo. magasin, les paramètres audio et vidéo sont réinitialisés toutes
les 30 minutes. Remplacez le mode Démo. magasin par le mode Util. domicile dans la procédure
Plug & Play (configuration initiale). Appuyez sur le bouton SOURCE pour sélectionner le mode TV et
accédez à MENU → Configuration → Plug & Play (configuration initiale) → ENTER
Vérifiez le raccordement des câbles ; rebranchez-les au besoin. •
Une perte de l'image ou du son peut être provoquée par l'utilisation de câbles trop rigides ou épais. •
Veillez à ce que les câbles soient suffisamment souples pour une utilisation à long terme. En cas
d'installation du téléviseur en position murale, nous vous recommandons d'utiliser des câbles avec
des connecteurs de 90 °degrés.
Elles font partie de la conception du produit et ne constituent pas un défaut.•
Composant.
Si vous utilisez une CARTE CAM (CI/CI+), vérifiez qu'elle est installée dans la fente de l'interface •
commune.
Si le problème persiste, retirez la CARTE CAM du téléviseur et réintroduisez-la dans la fente.•
Cela est tout à fait normal. Le téléviseur exécute, en effet, la fonction de liaison radio (OTA) pour •
mettre à niveau le microprogramme téléchargé au cours de son utilisation.
Pour éviter que cela ne se produise, utilisez des coussinets de feutre sur toute surface du téléviseur •
en contact direct avec un meuble.
E
sophistiquée. Il se peut toutefois que quelques points clairs ou sombres apparaissent à l’écran. Ils n’ont aucune
incidence sur la performance du produit.
Licence ¦
05 Informations supplémentaires
Manufactured under license from Dolby Laboratories.
Dolby and the double-D symbol are trademarks of Dolby Laboratories.
Français
31
Page 66

Informations supplémentaires
Caractéristiques techniques
Résolution native du panneau 1360 X 768 @ 60 Hz
Conditions ambiantes
Température en service
Humidité en fonctionnement
Température de stockage
Humidité sur le lieu de stockage
Système TV Analogique : en fonction du pays sélectionné
Système de couleur/vidéo Analogique : PAL, SECAM, NTSC-4.43, NTSC-3.58, PAL60
Sound System BG. OK NICAM. MPEGl
HDMI IN Vidéo : 1080/24p, 1080p, 1080i, 720p, 576p, 576i, 480p, 480i
Socle orientable
(Gauche / droite) 0˚
Nom du modèle LE26C350 LE32C350
Taille de l'écran
(Diagonale) 26 pouces 32 pouces
Son
Sortie 5W X 2 5W X 2
Dimensions (L x P x H)
Corps
Avec socle
Poids
Corps
Avec socle
Numérique : MPEG-2 MP@ML, MPEG-4, H.264/AVC MP@L3, MP@L4.0, HP@L4.0
Audio : PCM linéaire sur deux voies 32/44.1/48 kHz, 16/20/24bits
673.3 x 84.0 x 456.0 mm
673.3 x 222.2 x 513.4 mm
5.7 kg
6.1 kg
10°C à 40°C (50°F à 104°F)
10% à 80%, sans condensation
-20°C à 45°C (-4°F à 113°F)
5% à 95%, sans condensation
Numérique : DVB-T/DVB-C
Entrée audio analogique (HDMI IN uniquement)
Entrée PC
795.3 x 84.0 x 525.8 mm
795.3 x 247.2 x 585.3 mm
7.1 kg
7.6 kg
La conception et les spécifications peuvent être modifiées sans préavis.
✎
Pour en savoir plus sur l’alimentation et la consommation électrique, consultez l’étiquette apposée sur le produit.
✎
32
Français
Page 67

Index
05 Informations supplémentaires
A
Aff. de base 25
Amplifier 17
Antenne 12
Arr.-plan Acc. 25
B
Balance 17
Balance blancs 15
C
Caractéristiques techniques 32
Chaîne favorite 12
Composant 7
Connexion à un ordinateur 8
Connexion à un système audio 8
Contraste Dynamique 15
D
Diagnostic automatique 21
Diaporama 24
D-sub 8
Dynamique 14
E
Egaliseur 17
EPG 11
F
Fond musical 25
Format de l’image 16
Fréquence 12
G
Gestion chaînes 12
Guide Now & Next 11
H
Haut-parleur TV 18
HDMI 7
Horloge 19
Ht-parl ext. 18
I
Informations de signal 21
L
L’espace d’installation 2
Langue 20
Licens 31
Liste Source 10
Luminosité 14
M
Magnétoscope 10
Media Play 22
Mélodie 20
Minuteur 19
Mise à niveau du logiciel 21
Mode de répétition 25
Mode éco. 15
Mode Film 15
Mode Veille 4
Modif. Nom 10
Modifier PIN 20
Musique 23
N
Navigation 10
Netteté 14
Nouvelle syntonisation des chaînes
Nuance Coul. 15
Nuance de noir 15
13
O
ON/OFF, bouton 5
Outils 3
P
Photos 24
Piles 5
Plug & Play 6
R
Réglage Automatique 17
Réglage fin 14
Résolution des problèmes 29
Résolution optimale 9
RVB 15
S
Sélection Haut-parleur 18
Sélectionner tout 14
Sortie audio numérique 8
Sous-titres 20
Support mural 27
T
Télécommande 5
Témoin d’alimentation 4
Titre 25
Ton chair 15
Transparence menu 20
U
USB 21, 22
Utilisation de l’option Diffusion
programmée 11
Utilisation de la Vue chaînes 11
Utilisation des chaînes favorites 12
V
Veille 19
Verrouiller 14
Volume 4, 5
Volume auto 18
Français
33
Page 68

Cette page est laissée
intentionnellement
vierge.
Page 69

Las figuras y las ilustraciones de este Manual del usuario se proporcionan como referencia solamente y pueden ser diferentes
del aspecto real del producto. El diseño y las especificaciones del producto están sujetos a cambios sin previo aviso.
Nota sobre la TV digital
1. Las funciones relacionadas con la TV digital (DVB) sólo están disponibles en países o regiones donde se emitan señales terrestres digitales DVB-T
(MPEG2 y MPEG4 AVC) o donde se tenga acceso a servicios de televisión por cable compatibles con DVB-C (MPEG2 y MPEG4 AAC). Póngase en
contacto con su distribuidor para conocer si puede recibir señales DVB-T o DVB-C.
2. DVB-T es una norma del consorcio europeo para la transmisión de la televisión digital terrestre y DVB-C lo es para la transmisión de la televisión digital
por cable. Sin embargo, en esta especificación no se incluyen algunas funciones diferenciadas, como EPG (Guía electrónica de programas), VOD (Vídeo
a la carta) y otras. Por ello, en estos momentos aún no están disponibles.
3. Este equipo de televisión cumple las más actuales normas de DVB-T y DVB-C, de [agosto de 2008], pero no se garantiza la compatibilidad con futuras
emisiones de televisión digital terrestre DVB-T y por cable DVB-C.
4. Según los países o regiones donde se utilice este equipo de TV, algunos proveedores de la televisión por cable pueden cobrar un pago adicional por
este servicio y pueden exigir al usuario su aceptación de los términos y condiciones de su empresa.
5. Algunas funciones de televisión digital pueden no estar disponibles en algunos países o regiones y DVB-C puede no funcionar correctamente con
algunos proveedores del servicio de cable.
6. Para obtener más información, póngase en contacto con su centro de atención al cliente de Samsung.
La calidad de la recepción de la televisión puede resultar afectada por las diferencias de los métodos de transmisión entre los países. Compruebe el
✎
funcionamiento del televisor en un distribuidor local de SAMSUNG autorizado o el centro de llamadas de Samsung tanto si se puede mejorar volviendo a
configurar el TV como si no.
Advertencia sobre las imágenes fijas
Evite mostrar en la pantalla imágenes fijas (como archivos de imágenes jpeg) o elementos con imágenes fijas (como logotipos de los programas de televisión
o con formato de imagen 4:3, barras de cotizaciones o de noticias en la parte inferior de la pantalla, etc). Una visualización continuada de una imagen fija
puede causar un desgaste desigual del fósforo de la pantalla, lo que afectará a la calidad de la imagen. Para reducir este riesgo, siga estas recomendaciones:
Evite mostrar el mismo canal de televisión durante largos periodos de tiempo.•
Intente ver siempre las imágenes en pantalla completa, utilice el menú del formato de imagen del televisor para obtener la mejor coincidencia.•
Reduzca los valores del brillo y el contraste al mínimo necesario para conseguir la calidad de imagen deseada, ya que los valores superiores pueden •
acelerar la velocidad del proceso de quemado.
Utilice con frecuencia todas las funciones del televisor diseñadas para reducir la retención de la imagen y el desgaste de la pantalla; consulte el apartado •
adecuado del manual del usuario para obtener más información.
Seguridad en el espacio de instalación
Mantenga la distancia requerida entre el producto y otros objetos (por ejemplo, paredes) para asegurar la ventilación adecuada.
En caso contrario, se podría producir un incendio por un incremento de la temperatura interna del producto.
Cuando utilice un soporte o un montaje mural, use sólo las piezas proporcionadas por Samsung Electronics.
✎
Si utiliza piezas proporcionadas por otros fabricantes, podría tener problemas con el producto o éste se podría caer con el riesgo de causar lesiones
x
personales.
El aspecto puede variar según el producto.
✎
Instalación con un soporte Instalación con un montaje mural
2
10 cm
Español
10 cm
10 cm
Correcta eliminación del producto (desechos eléctricos y electrónicos).
(Aplicable en la Unión Europea y otros países de Europa con sistemas de recogida selectiva)
Esta marca en el producto, los accesorios o la documentación indica que el producto y los accesorios electrónicos (como
cargador, auricular, cable USB) no se deben desechar junto al resto de la basura doméstica. Para prevenir posibles daños al
entorno ambiental o a las personas por una eliminación incontrolada, cuando decida desprenderse del aparato debe acudir a un
centro de reciclaje donde se promueve la reutilización sostenible de los recursos materiales. Los usuarios particulares pueden
ponerse en contacto con el centro donde adquirieron el aparato o con alguna oficina municipal donde le informarán dónde debe
depositar el electrodoméstico para su reciclaje. Los comerciantes deben ponerse en contacto con el distribuidor y comprobar los
términos y las condiciones del contrato de compra. Este producto y sus accesorios electrónicos no se deben mezclar con otros
deshechos comerciales para su eliminación.
Correcta eliminación de las pilas de este producto
(Aplicable en la Unión Europea y otros países de Europa con sistemas de recogida de pilas)
Esta marca en las pilas, el manual o el embalaje indica que las pilas de este producto no se deben desechar junto con la
basura doméstica al término de su vida útil. Cuando está indicado, los símbolos químicos Hg, Cd o Pb indican que las pilas
contienen mercurio, cadmio o plomo que superan los niveles de referencia de la directiva EC 2006/66. Si las pilas no se eliminan
adecuadamente estas sustancias pueden causar daños a la salud humana y al medio ambiente. Para proteger los recursos
naturales y promover la reutilización de los materiales, separe la pilas de otros tipos de basura doméstica y recíclelas en su sistema
local de recogida gratuita de pilas.
10 cm
10 cm
10 cm
10 cm
Page 70

Contenido
P . MODES.MODEP . SIZE
Introducción
4
Conexiones
7
Funciones básicas
10
Funciones avanzadas
22
4 Accesorios
4 Aspecto general del panel de control
5 Aspecto general del mando a distancia
6 Conexión de una antena
6 Plug & Play (configuración inicial)
7 Conexión a un dispositivo AV
8 Conexión a un dispositivo de audio
8 Conexión a un PC
10 Cambio de la fuente de entrada
10 Cómo desplazarse por los menús
11 Uso del botón INFO (Guía actual y próxima)
11 Planificación de la televisión
12 Menú de canales
14 Menú de la imagen
17 Menú del sonido
19 Menú de configuración
21 Menú de asistencia técnica
22 Media Play
Información adicional
26
¡Compruebe este símbolo!
t
Esta función se puede utilizar
pulsando el botón TOOLS del
mando a distancia.
26 Función de teletexto de los canales analógicos
27 Instalación del montaje en la pared
28 Bloqueo antirrobo Kensington
28 Fijación del televisor a la pared
29 Solución de problemas
32 Especificaciones
33 Índice
O
Nota Guía paso a paso
Español
3
Page 71

Introducción
Accesorios
Asegúrese de que los siguientes elementos se incluyen con el televisor de pantalla LCD. Si falta alguno, póngase en
✎
contacto con su distribuidor.
El color y la forma de los componentes pueden variar según los modelos.
✎
Mando a distancia y 2 pilas AAA y
Manual del usuario y
Consulte la guía para instalar el soporte.
1 EA
Paño de limpieza y
Tarjeta de garantía / Guía de seguridad (no y
disponible en algunos lugares)
(M4 X L16)
Soporte (1unidad) y
Tornillos (3 unidades) y
Aspecto general del panel de control
El color y la forma del producto pueden variar según el modelo.
✎
Indicador de encendidoSensor del mando a distancia
Altavoces
P
(Power)
Indicador de encendido
SOURCE
MENU
Y
z
Sensor del mando a distancia El mando a distancia debe dirigirse hacia este punto del televisor.
Modo de espera
No deje el televisor en modo de espera durante períodos largos de tiempo (cuando está de vacaciones, por ejemplo). Aunque
esté apagado continúa consumiendo una pequeña cantidad de energía. Se recomienda desenchufar el cable de alimentación.
E
Enciende y apaga el televisor.
Parpadea y se apaga cuando se enciende el aparato y se ilumina en el modo en
espera.
Cambia entre todas las fuentes de entrada disponibles. En el menú de la pantalla,
utilice este botón del mismo modo que haría con el botón ENTERE del mando a
distancia.
Muestra un menú en pantalla , la OSD (visualización en pantalla), de las funciones del
T V.
Ajusta el volumen. En la OSD, utilice estos botones Y de igual modo que los
botones ◄ y ► del mando a distancia.
Cambian los canales En la OSD, utilice estos botones z de igual modo que
los botones ▼ y ▲ del mando a distancia.
4
Español
Page 72

Aspecto general del mando a distancia
MEDIA.P
ABCD
01 Introducción
Encender y apagar el televisor. (pág. 6)
Cambiar de canal.
Seleccionar alternativamente
Teletext, Double o Mix.
Ajustar el volumen.
Mostrar el menú de pantalla principal. (pág. 10)
Ver el reproductor multimedia.
Seleccionar rápidamente las funciones que se
usan con mayor frecuencia.
Seleccionar los elementos del menú en pantalla
y cambiar los valores del menú.
Volver al menú anterior.
Botones en los menús Admin. de canales,
Media Play, etc.
(
pág.
10)
Mostrar y seleccionar las fuentes de vídeo
disponibles. (pág. 10)
Volver al canal anterior.
Cortar temporalmente el sonido.
Cambiar de canal.
Muestra la lista de canales en la pantalla. (pág. 14)
Visualizar la información de la Guía electrónica de
programas (EPG). (pág. 11)
Mostrar información en la pantalla del televisor.
(
pág.
Salir del menú.
AD: Selección de la descripción de audio.
(No disponible en algunos lugares) (pág. 18)
P.SIZE: Elegir el tamaño de imagen. (pág. 16)
SUBT.: Visualizar subtítulos digitales (pág. 20)
10)
Instalación de las pilas (tamaño de las pilas: AAA)
NOTA
✎
Utilice el mando a distancia a menos de 7 metros del
x
televisor.
Una luz muy brillante puede afectar al funcionamiento del
x
mando a distancia. No lo utilice cerca de luces fluorescentes
o de neón.
El color y la forma pueden variar según el modelo.
x
Español
5
Page 73

Introducción
P
POWER
Conexión de una antena
Cuando el televisor se enciende por primera vez, los valores se inician de forma automática.
✎
Preparación: Conexión del cable de alimentación y la antena.
Antena VHF/UHF
o
Entrada de Alimentación
Plug & Play (confi guración inicial)
Cuando el televisor se enciende por primera vez, una secuencia de indicaciones en pantalla permite confi gurar los parámetros
básicos. Pulse el botón POWERP. Plug & Play sólo está disponible cuando la fuente Entrada está confi gurada como TV.
Selección de un idioma
1
Selección de Demo
2
tienda o Uso
doméstico
Selección de un país
3
Selección de una
4
antena
Selección de un canal
5
Confi guración del
6
Modo de reloj
Visualización de la Guía
7
de conexión HD.
Disfrute de su
8
televisor.
Si desea reiniciar esta función...
Seleccione Confi guración - Plug & Play (confi guración inicial). Escriba su código PIN de 4 dígitos. El número PIN
predeterminado es “0-0-0-0.” Si desea cambiar el número PIN, utilice la función Cambiar PIN.
Pulse los botones ▲ o ▼ y a continuación pulse el botón ENTER
Seleccione el idioma deseado para la OSD (presentación en pantalla).
Pulse los botones ◄ o ► y a continuación pulse el botón ENTER
Seleccione el modo y Uso doméstico. El modo Demo tienda se
utiliza en los entornos comerciales.
Recupere la confi guración de la unidad desde y Demo tienda a Uso
doméstico (estándar): Pulse el botón del volumen del televisor.
Cuando se muestra la OSD del volumen, mantenga pulsado el
botón MENU durante 5 segundos.
Pulse los botones ▲ o ▼ y a continuación pulse el botón ENTER
Seleccione el país que desee. Si no existe el país que desea en el menú, seleccione Otros.
Después de seleccionar el país en el menú del
✎
presentar una opción adicional para confi gurar el código PIN.
✎
Para introducir el código PIN,
Pulse los botones ▲ o ▼ y a continuación pulse el botón ENTER
Permite seleccionar Aérea o Cable.
Pulse los botones ▲ o ▼ y a continuación pulse el botón ENTERE.
Seleccione la fuente del canal que desee memorizar. Al confi gurar la fuente de la antena
en Cable, se muestra un paso que le permite asignar valores numéricos (frecuencias de
los canales) a los canales. Para obtener más información, consulte Canal → Auto Store
(Almacenamiento automático). (pág. 12)
Pulse el botón
✎
memorización.
Confi gure el Modo de reloj automática o manualmente.
Pulse los botones ▲ o ▼ para seleccionar Auto y a continuación pulse el botón
ENTER
E
Se muestra el modo de conexión para obtener una mejor calidad de pantalla HD.
Pulse el botón ENTERE.
ENTERE en cualquier momento para interrumpir el proceso de
.
0-0-0-0 no está disponible.
país, algunos modelos pueden
E
E
E
E
Cable
ANT OUT
.
.
.
.
6
Español
Page 74

Conexiones
R-AUDIO-L
P
R PB Y
W
W
R
WW
G
W
R
W
R
W
W
W
W W
Y
W
Y
B
B
G
G
RR
R R
R
R
P
R PB Y
R-AUDIO-L
P
R PB Y
R-AUDIO-L
P
R PB Y
W W
BGRRWY
BGRR
Conexión a un dispositivo AV
Uso de un cable HDMI/DVI: Conexión HD (hasta 1080p)
Dispositivos disponibles: DVD, reproductor Blu-ray, receptor por cable HD, receptor por satélite HD STB (decodifi cador),
decodifi cador, receptor por satélite (STB)
DVD
Rojo Blanco
HDMI OUT
AUDIO OUT
DVI OUT
HDMI (DVI) IN / PC / DVI AUDIO IN
✎
Cuando se usa una conexión de cable HDMI/DVI, se debe conectar en el terminal HDMI (DVI) IN. Para
la conexión del cable DVI, use un cable de DVI a HDMI o un adaptador de DVI-HDMI (DVI a HDMI) para la
conexión del vídeo y los terminales PC / DVI AUDIO IN para el audio.
Si se conecta un dispositivo externo como un reproductor DVD/Blu-ray/decodificador/receptor por satélite
STB que admita versiones HDMI anteriores a 1.3, el televisor quizás no funcione normalmente (por ejemplo,
no se muestre la pantalla/no haya sonido/parpadeos molestos/colores anormales).
Si tras conectar un cable HMDI no hay sonido, compruebe la versión HDMI del dispositivo externo.
Si sospecha que es una versión anterior a 1.3, póngase en contacto con el proveedor del dispositivo
para confirmar la versión de HDMI y solicitar una actualización.
Es aconsejable adquirir un cable certificado HDMI. De lo contrario, la pantalla puede aparecer vacía o
producirse un error de conexión.
02 Conexiones
Uso de un cable de componentes (hasta 1080p) o audio / vídeo (sólo 480i) y de un cable euroconector (Scart)
Dispositivos disponibles: Reproductor VCR, DVD, Blu-ray, decodifi cador, receptor por satélite STB
Amarillo Rojo Blanco
AUDIO OUT
✎
En el modo
Para obtener la mejor calidad de imagen, se recomienda la conexión de componentes antes que la conexión A/V.
✎
Ext., la salida DTV sólo admite vídeo y audio MPEG SD.
VIDEO OUT
Reproductor Blu-ray
AUDIO OUT
COMPONENT OUT
Rojo Azul Verde
DVDVCR
Español
EXT
7
Page 75

Conexiones
Conexión a un dispositivo de audio
Uso de una conexión de cable óptico o de audio
Dispositivos disponibles: sistema de audio digital, amplifi cador, sistema Home Theatre DVD
DIGITAL AUDIO OUT (OPTICAL)
✎
Cuando un sistema de audio digital se conecta al terminal xDIGITAL AUDIO OUT (OPTICAL), se reduce el
volumen del televisor y del sistema.
El audio de 5.1 canales está disponible cuando el televisor se conecta a un dispositivo externo que admite
x
audio de 5.1 canales.
Cuando el receptor (sistema Home Theatre) está activado, se puede oír la salida de sonido desde el terminal
x
óptico del televisor. Cuando el televisor recibe una señal DTV, envía el sonido de 5.1 canales al receptor del
sistema Home Theatre. Cuando la fuente es un componente digital, como un reproductor DVD / Blu-Ray /
receptor de cable o satélite (decodificador), y está conectada al televisor a través de HDMI, sólo se oye el
sonido de 2 canales del receptor del sistema Home Theatre. Si desea oír el audio de 5.1 canales, conecte el
terminal de la salida de audio digital del reproductor DVD / Blu-ray / decodificador / receptor por satélite STB
directamente al amplificador o al sistema Home Theatre.
OPTICAL
Sistema de audio
digital
Uso de cables HDMI/DVI / D-sub
Español
8
Conexión a un PC
DVI OUT
AUDIO OUT
AUDIO OUT
PC OUT
Page 76

Modos de visualización (entradas D-Sub y HDMI/DVI)
La resolución óptima es 1360 X 768 @ 60 Hz.
Mode Resolución Frecuencia horizontal (kHz) Frecuencia vertical (Hz)
IBM
MAC
VESA DMT
VESA CVT
VESA GTF 1280 x 720 52.500 70.000 89.040 - / +
NOTA
✎✎
En una conexión de cable HDMI/DVI, se debe conectar en el terminal xHDMI (DVI) IN.
No se admite el modo entrelazado.
x
El aparato puede funcionar incorrectamente si se selecciona un formato de vídeo que no sea estándar.
x
Los modos Independiente y Compuesto no se admiten. SOG (Sincr. en verde) no se admite.
x
640 x 350 31.469 70.086 25.175 + / 720 x 400 31.469 70.087 28.322 - / +
640 x 480 35.000 66.667 30.240 - / 832 x 624 49.726 74.551 57.284 - / -
31.469 59.940 25.175 - / -
640 x 480
800 x 600
1024 x 768
1280 x 720 45.000 60.000 74.250 + / +
1360 x 768 47.712 60.015 85.500 + / +
720 x 576 35.910 59.950 32.750 - / +
1280 x 720 56.456 74.777 95.750 - / +
37.861 72.809 31.500 - / -
37.500 75.000 31.500 - / -
37.879 60.317 40.000 + / +
48.077 72.188 50.000 + / +
46.875 75.000 49.500 + / +
48.363 60.004 65.000 - / -
56.476 70.069 75.000 - / -
60.023 75.029 78.750 + / +
Frecuencia de reloj de
píxeles (MHz)
02 Conexiones
Polaridad de
sincronización
(H / V)
Ranura de las CONEXIONES COMMON INTERFACE
Para ver canales de pago se debe insertar una “TARJETA CI o CI+”.
Si no se inserta una “TARJETA CI o CI+” algunos canales y
mostrarán el mensaje de “Scrambled Signal (Señal codificada)”.
En 2 o 3 minutos aparecerá en la pantalla la información del y
enlace que contiene un número telefónico, un identificador
de ‘TARJETA CI o CI+’, un identificador del sistema y demás
información. Si aparece un mensaje de error, póngase en
contacto con su proveedor de servicios.
Si ha terminado la configuración de la información del canal, y
aparecerá el mensaje “Updating Completed (Actualiz. completa)”,
indicando que la lista de canales ya se ha actualizado.
NOTA
✎
Debe obtener una “TARJETA CI o CI+” en un proveedor local de servicios.
x
Para retirar la “TARJETA CI o CI+”, extráigala cuidadosamente con las manos, puesto que si cae al suelo se puede
x
dañar.
Inserte la “TARJETA CI o CI+” en la dirección marcada sobre ella.
x
La ubicación de la ranura xCOMMON INTERFACE puede variar según los modelos.
La “TARJETA CI o CI+” no se admite en algunos países o zonas; consulte a su distribuidor local.
x
Si tiene cualquier problema, póngase en contacto con un proveedor del servicio.
x
Español
9
Page 77

Conexiones
MEDIA.P
Cambio de la fuente de entrada
Lista de fuentes
Úselo para seleccionar TV u otras fuentes
de entrada externas como reproductores
de DVD/Blu-ray/decodifi cadores/receptores
por satélite STB conectados al televisor.
TV / Ext. / AV / Component / PC / ■
HDMI/DVI / USB
En
✎
Fuentes, se resaltan las
entradas conectadas.
Ext.
✎
y PC siempre están activados.
Funciones básicas
Cómo desplazarse por los menús
Antes de usar el televisor, siga los pasos siguientes para
conocer cómo explorar el menú y seleccionar y ajustar las
diversas funciones.
1
2
3
1 Botón MENU: Muestra el menú principal de la pantalla.
E
2 Botones ENTER
seleccione una opción. Confi rme la confi guración.
3 Botón RETURN: Vuelve al menú anterior.
4 Botón EXIT: Sale del menú en pantalla.
/ direccionales: Mueva el cursor y
4
Editar nombre
VCR / DVD / Cable STB / Satélite STB / PVR STB / ■
Receptor AV / Juego / Videocámara / PC / DVI PC
/ Dispositivos DVI / TV / IPTV / Blu-ray / HD DVD
/ DMA: Dé un nombre al dispositivo conectado en
las tomas de entrada; de esta manera será más fácil
seleccionar el dispositivo de entrada.
Cuando se conecta un cable HDMI/DVI al puerto
✎
HDMI (DVI) IN, se debe configurar los modos
DVI PC o Dispositivos DVI en Editar nombre.
Funcionamiento de la OSD (presentación en pantalla)
El paso de acceso puede variar según el menú
seleccionado.
Las opciones del menú principal se
muestran en la pantalla:
MENU
m
1
2
3
4
5
6
7
▲ / ▼
ENTER
▲ / ▼
◄ / ►
ENTER
EXIT
Imagen, Sonido, Canal,
Confi guración, Entrada,
Aplicación, Asistencia técnica.
Seleccione un icono con los
botones ▲ o ▼.
Pulse ENTERE para acceder al
E
menú secundario.
Seleccione un menú secundario
con los botones ▲ o ▼.
Ajuste el valor de un elemento con
los botones ◄ o ►. El ajuste de
la visualización en pantalla puede
variar según el menú seleccionado.
Pulse el botón ENTERE para
E
completar la confi guración.
Pulse EXIT.
e
10
Español
Page 78

Uso del botón INFO (Guía actual y próxima)
DTV Air 800 five
Home and Away
18:00 - 18:30
Drama
Dani is devastated when scott makes clear his views on marriage...
27
28
800
24
16
6
Discovery
DiscoveryH&L
five
price-drop.tv
QVC
R4DTT
American Chopper
Programmes resume at 06:00
Home and...
No Information
QVC Selection
No Information
Tine Team
Fiv...
Today 18:00 - 19:00 19:00 - 20:00
)
Family Affairs
)
Dark Angel
800 five
MEDIA.P
P . MODE
MTS
DTV Air 800 five
Family Affairs
18:00 - 18:30
Drama
Tanya confesses all to a stunned Babs. Conrad is anxious to hear...
18:30
19:15
Today
Today
)
Family Affairs
)
Dark Angel
800
800
five
five
800 five
La pantalla identifica el canal actual y el
estado de algunos ajustes de audio-vídeo.
La Now & Next guide (Guía actual y próxima)
muestra la información de la programación
diaria de cada canal de televisión de
acuerdo con la hora de emisión.
Desplácese con y ◄, ► para ver la
información de un programa mientras
ve un canal.
Desplácese con y ▲, ▼ para ver la información de otros
canales. Si desea ir al canal actualmente seleccionado,
pulse el botón ENTER
abc1
DTV Air
15
E
.
Life On Venus Avenue
Unclassified
No Detaild In formation
Planificación de la televisión
Guía
La información de la Guía electrónica
de programas (EPG) la proporcionan
las emisoras. Mediante la planificación
de la programación proporcionada por
las emisoras, se puede especificar por
adelantado el programa que se desea ver
de modo que a la hora especificada el
televisor cambie automáticamente al canal
del programa seleccionado. Las entradas
de los programas pueden aparecer vacías o desfasadas
según el estado del canal.
Uso de la vista del canal
18:00 ~ 6:00
18:11 Thu 6 Jan
EWatch
' Información
Uso de la vista planificada
Información
2:10 Mar 1 Jun
E
Guía
Vista programada
Modo Vista
1 4 6
Rojo (Modo Vista): Ver la lista de programas que se
1
están emitiendo o se van a emitir.
2
Amarillo (+24 horas): Ver la lista de los programas que
se van a emitir al cabo de 24 horas.
3
Azul
(Modo can): Seleccione el tipo de canales que
desee ver en la ventana Vista can..
El modo del canal varía según el origen de la antena. –
4 (Información): Muestra detalles del programa
seleccionado.
5
(Página): Permite ir a la página anterior/siguiente.
6 Botón ENTER
E
Cuando se selecciona el programa actual, se puede –
ver el programa seleccionado.
Cuando se selecciona un programa futuro, se puede –
reservar el programa seleccionado. Para cancelar una
programación, vuelva a pulsar el botón ENTER
seleccione Cancelar programaciones.
Cancelar
E
y
03 Funciones básicas
Guía
Vista can. - TV
Modo Vista
+24 Horas Modo can
1 2 3 4 5 6
Información
k
Página
2:10 Mar 1 Jun
E
Ver
Español
11
Page 79

Funciones básicas
B
c 1 1futech
c 2 * 24ore.tv
15 abc1
3 BBC World
23 bid-up.tv
33 Boonerang
32 Cartoon Nwk
5 Class News
4 \ Coming Soon
27 Discovery
All
TV
Radio
Data/Other
Analogue
r
c 1 1futech
c 2 * 24ore.tv
15 abc1
3 BBC World
23 bid-up.tv
33 Boonerang
32 Cartoon Nwk
5 Class News
4 \ Coming Soon
27 Discovery
All
TV
Radio
Data/Other
Analogue
r
Administrador de canales
Borrar o establecer los canales favoritos y usar la guía de
programas de las emisiones digitales. Seleccione un canal
en las pantallas Canales, Mis canales o Programado.
Canales
Aérea Antena B Zoom Seleccionar
■ Canales: Muestra la lista de canales según el tipo
*
■
Mis canales: Muestra el grupo del canal.
■ Programado: Muestra todos los programas
✎
Uso de los botones de colores con el
canales
x
x
del canal.
x
que desee y pulse el botón amarillo para configurar
todos los canales seleccionados al mismo tiempo.
La marca c aparece a la izquierda de los canales
seleccionados.
(Página): Vaya a la página anterior o siguiente.
x
T x (Herramientas): Muestra el menú de opciones
Admin. de canales. (Los menús de las opciones
pueden cambiar, dependiendo de la situación.)
Iconos de la pantalla de estado del canal
Iconos Función
A
c
*
(
\
)
Español
12
de canal.
reservados actualmente.
Rojo (Antenna): Elija entre Aérea o Cable.
Verde (Zoom): Aumenta o disminuye el número
Amarillo (Seleccionar): Seleccione los canales
Canal analógico.
Canal seleccionado.
Canal configurado como favorito.
Programa que se está emitiendo.
Canal bloqueado.
Programa reservado.
Pagina T Herramientas
Admin. de
Uso de los canales favoritos ¦
*
Mis canales
(Admin. de canales)
Muestra todos los canales favoritos.
Editar mis canales ■
canales seleccionados que desee agrupar como canales
favoritos.
✎ *
Se mostrará el símbolo “
como favorito.
1. Seleccione un canal y pulse el botón TOOLS.
2. Añada o borre un canal del grupo de canales que
desee entre 1, 2, 3 y 4.
Es posible seleccionar uno o más grupos.
x
3. Después de cambiar la configuración, la lista
de canales de cada grupo se puede ver en Mis
canales.
t
: Puede establecer los
” y el canal se configurará
Canales
Editar Mis canales
Bloquear
Borrar
Deseleccionar todo
Seleccionar todos
Aérea Antena B Zoom Seleccionar Pagina T Herramientas
Menú de canales
Sintonización de los canales ¦
Antena (Aérea / Cable)
Antes de empezar a memorizar los canales disponibles,
debe indicar el tipo de origen de la señal conectada al
televisor (es decir, aérea o sistema de cable).
País
Aparece la pantalla para la introducción del número PIN.
Escriba su código PIN de 4 dígitos.
Canal digital ■ : Cambie el país de los canales digitales.
Canal analógico ■ : Cambie el país de los canales
analógicos.
Page 80

Almacenamiento automático
Busca un canal automáticamente y lo guarda en el televisor.
Puede que los números de programa asignados
✎
automáticamente no correspondan a los números
de programa reales o deseados. Si el canal está
bloqueado con la función Bloqueo niños aparece la
ventana para la introducción del código PIN.
Fuente de la antena (aérea / cable) ■ : Seleccione la
fuente de antena que desee memorizar.
Fuente del canal (digital y analógico / digital / ■
analógico): Seleccione la fuente del canal que desea
memorizar.
Cuando seleccione Cable → Digital y Analógico o
Digital: Proporcione un valor para explorar los canales
de cable.
Modo de búsqueda (completa / red / rápida): Busca
todos los canales de las emisoras activas y los guarda
en el televisor.
Si se establece
✎
manualmente Red, ID red, Frecuencia,
Modulación, Velocidad símbolos pulsando el
botón del mando a distancia.
Red (auto / manual): Selecciona el modo de
configuración de ID red entre Auto o Manual.
ID de red: Cuando Red está establecido en Manual, se
puede configurar ID Red con los botones numéricos.
Frecuencia: Muestra la frecuencia del canal. (es
diferente en cada país)
Modulación: Muestra los valores de modulación
disponibles.
Velocidad símbolos: Muestra las velocidades de
símbolo disponibles.
Rápida, se puede configurar
Almacenamiento manual
Busca un canal manualmente y lo guarda en el televisor.
Si el canal está bloqueado con la función
✎
niños aparece la ventana para la introducción del
código PIN.
Canal digital (Canal, Frecuencia, Ancho de banda) ■ :
(disponible en el modo DTV) Cuando la búsqueda ha
finalizado, los canales se actualizan en la lista de canales.
Al seleccionar ✎Antena → Aérea: Canal, Frecuencia,
Ancho de banda.
Cuando se selecciona
✎
Modulación, Velocidad símbolos.
Canal analógico (programa, sistema de color, ■
sistema de sonido, canal, buscar): Si se produce
un sonido anormal o no se produce sonido, vuelva a
seleccionar el estándar de sonido adecuado.
Modo de canal
✎
P x (modo de programa): Al finalizar la sintonización,
las estaciones de emisión de su zona se habrán
asignado a los números de posición comprendidos
entre P0 y P99. Puede seleccionar un canal
introduciendo el número de posición en este modo.
C
(modo de canal aéreo)/S (modo de canal por
x
cable): Estos dos modos permiten seleccionar un
canal introduciendo el número asignado a cada
emisora aérea o por cable.
Edición de canales ¦
Menú de opciones del administrador de canales
(Admin. de canales)
1. Seleccione un canal y pulse el botón TOOLS.
2. Edite el nombre o el número del canal mediante los
menús Editar nombre canal o Editar número canal.
Editar nombre canal ■ (sólo canales analógicos): Asigne
un nombre de canal personal.
Editar número canal ■ (sólo canales digitales): Edite el
número pulsando los botones numéricos.
Antena → Cable: Frecuencia,
Bloqueo
03 Funciones básicas
Otras funciones ¦
Opciones de búsqueda de cable
(según el país)
Establece opciones adicionales de búsqueda, como la
frecuencia y la velocidad de símbolos para la búsqueda de
red por cable.
Frecuencia inicio/Frecuencia parada ■ : Configure la
frecuencia de inicio o de parada (es diferente en cada
país)
Modulación ■ : Muestra los valores de modulación
disponibles.
Velocidad símbolos ■ : Muestra las velocidades de
símbolo disponibles.
Español
13
Page 81

Funciones básicas
Menú de opciones del administrador de canales
(Admin. de canales)
Establezca cada canal mediante las opciones del menú
Admin. de canales (Bloquear / Desbloquear, Visual. con
temp, Ordenar, Borrar, Seleccionar todos / Deseleccionar
todos). Los elementos del menú de opciones pueden variar
según el estado del canal.
1. Seleccione un canal y pulse el botón TOOLS.
2. Seleccione una función y cambie la configuración.
Bloquear / Desbloquear ■ : Se puede bloquear un canal
para que no se pueda seleccionar ni visualizar.
NOTA
✎
Está función está disponible sólo cuando xBloqueo
niños está configurado como Activado.
Aparece la pantalla para la introducción del
x
número PIN. Escriba un número de 4 dígitos,
el predeterminado es “0-0-0-0”. Cambie el PIN
mediante la opción Cambiar PIN
Visual. con temp ■ : Se puede establecer que el canal
que se desee se muestre automáticamente a una hora
determinada. Para utilizar esta función, en primer lugar
configure la hora actual.
Cuando se ha seleccionado un canal digital, pulse
✎
el botón ► para ver el programa digital.
Ordenar ■ (sólo canales analógicos): Esta operación
permite cambiar los números de programa de los
canales memorizados. Puede que sea necesario
realizarla después de la memorización automática.
Borrar ■ : Puede suprimir un canal para que se muestren
los canales que desee.
Seleccionar todos / Deseleccionar todos ■ : Seleccione
o deseleccione todos los canales seleccionados en el
administrador de canales.
Programado
(Admin. de canales)
Puede ver, modificar o borrar un programa que haya
reservado para ver.
Cambiar información ■ : Cambie un programa que haya
reservado para ver.
Cancelar programaciones ■ : Cancele un programa que
haya reservado para ver.
Información ■ : Muestre un programa que haya reservado
para ver. (También puede cambiar la información de la
reserva.)
Seleccionar todos / Deseleccionar todos ■ : Seleccione
o deseleccione todos los programas reservados.
Lista de canales
Puede ver todos los canales encontrados.
Transfer. lista canales
Importa o exporta la asignación del canal. Para utilizar esta
función se debe conectar un dispositivo USB.
Aparece la pantalla para la introducción del número
✎
PIN. Escriba su código PIN de 4 dígitos.
El código PIN predeterminado para un televisor nuevo
✎
es ‘0-0-0-0’.
Importar de USB ■ : Importar la lista de canales del USB.
Exportar a USB ■ : Exportar la lista de canales a USB.
Sintonización fina
(sólo canales analógicos)
Si la señal es débil o está distorsionada, realice manualmente
la sintonización fina del canal.
Los canales bien sintonizados están marcados con un
✎
asterisco “*”.
Para reiniciar la sintonización fina, seleccione
✎
Restab..
Menú de la imagen
Cambio del modo de imagen
preseleccionado
Modo
Seleccione el tipo de imagen preferido.
t
Dinámico ■ : Adecuado para un entorno iluminado.
Estándar ■ : Adecuado para un entorno normal.
Película ■ : Adecuado para ver películas en un entorno
oscuro.
Ajuste de la configuración de la imagen ¦
Luz de fondo / Contraste / Brillo / Nitidez
/ Color / Matiz (V/R)
El televisor tiene diferentes opciones de configuración para
controlar la calidad de la imagen.
✎
NOTA
En los modos analógicos xTV, Ext., AV del sistema
PAL, no se puede usar la función Matiz (V/R).
En el modo PC, sólo se pueden realizar cambios en
x
las opciones Luz de fondo, Contraste y Brillo.
La configuración de cada dispositivo externo
x
conectado al televisor se puede ajustar y guardar.
Si se disminuye el brillo de la imagen se reduce el
x
consuno de energía.
14
Español
Page 82

Soluciones económicas ¦
Solución ECO
Ahorro de energía (Desactivado / Bajo / Medio / Alto ■
/ Imagen desact. / Automático)
brillo del televisor para reducir el consumo de energía.
Si se selecciona Imagen desact., la pantalla se apaga,
pero se oye el sonido. Pulse cualquier botón, excepto el
del volumen, para encender la pantalla.
Espera sin señal (Desactivado / 15 min / 30 min / ■
60 min): Activa el modo de espera, tras un estado
de “Sin señal” o “Comprobar cable señal” durante
un periodo de tiempo especificado por el usuario.
✎
Deshabilitado cuando el PC está en el modo de
ahorro de energía.
Cambio de las opciones de la imagen ¦
t
: Ajuste el
Configuración avanzada
(disponible en los modos Estándar / Película
Se puede ajustar detalladamente la configuración de la
pantalla, incluidos el color y el contraste.
✎
En el modo PC, sólo se pueden cambiar
dinámico, Gamma y Balance de blanco.
Conguración avanzada
Tono del negro : Desactivado ►
Contraste dinámico : Medio
Detalle de sombras : 0
Gamma : 0
Sólo modo RGB : Desactivado
Gama de colores : Nativo
Balance de blanco
Tono del negro (Desactivado / Oscuro / Más oscuro ■
/ El más oscuro): Seleccione el nivel de negro para
ajustar la profundidad de la pantalla.
Contraste dinámico (Desactivado / Bajo / Medio / ■
Alto): Ajuste el contraste de la pantalla.
▼
U Mover E Entrar R Volver
Contraste
Detalle de sombras (-2~+2) ■ : Aumente el brillo de las
imágenes oscuras.
Inhabilitado en el modo PC.
✎
Gamma ■ : Ajuste la intensidad del color primario.
Sólo modo RGB (Desactivado / Rojo / Verde / Azul) ■ :
Se puede ajustar Color o Matiz del Rojo, Verde o Azul
de la imagen de un dispositivo externo (reproductor
DVD, sistema Home Theatre, etc.).
Gama de colores (Automático / Nativo) ■ : Ajuste la
gama de colores disponibles para crear la imagen.
Balance de blanco ■ : Ajuste la temperatura del color
para obtener una imagen más natural.
Rojo - / Verde - / Azul -: Ajuste la intensidad de cada
Rojo + / Verde + /Azul +: Ajuste la luminosidad de cada
Restab.: Restablece los valores predeterminados de
Balance de blanco.
Tono de piel ■ : Mejore el tono rosado de “Tono de piel.”
Mejora del borde (Desactivado / Activado) ■ : Mejora los
bordes del objeto.
color (rojo, verde, azul).
color (rojo, verde, azul).
Opciones de imagen
En el modo PC sólo se pueden cambiar ✎Tono color,
Tamaño y Tiempo protec. autom.
Opciones de imagen
Tono color : Normal ►
Tamaño : 16:9
Modo Pantalla : 16:9
Filtro ruido digit. : Automático
Filtro ruido MPEG : Automático
N.neg HDMI : Normal
Modo de película : Desactivado
Tono color (Frío / Normal / Cálido1 / Cálido2) ■
Cálido1
✎
de imagen es Dinámico.
La configuración de cada dispositivo externo
✎
conectado a una entrada del televisor se puede
ajustar y guardar.
▼
U Mover E Entrar R Volver
o Cálido2 se desactivan cuando el modo
03 Funciones básicas
Español
15
Page 83

Funciones básicas
P
POWER
P . MODES.MODEP . SIZE
Tamaño ■ : Es posible que el receptor de
satélite o cable tenga también su propia
gama de tamaños de pantalla. Sin
embargo, es muy aconsejable utilizar el
modo 16:9 la mayoría de las veces.
Ancho automático: Ajusta
automáticamente el tamaño de la imagen a la relación de
aspecto de la pantalla 16:9.
16:9 : Ajusta el tamaño de la imagen a 16:9, para ver los
DVD o las emisiones en formato ancho.
Zoom ancho: Aumenta el tamaño de la imagen más que
4:3.
Ajusta la posición mediante los botones
✎
Zoom: Amplía la imagen ancha de 16:9 en sentido vertical
para que la imagen ocupe el tamaño de la pantalla.
Ajusta la posición o el tamaño mediante los botones
✎
▲, ▼.
4:3 : Configuración predeterminada para una película o
una emisión normal.
No vea la televisión en formato 4:3 durante largos
✎
periodos de tiempo. Los rastros de bordes a la
izquierda, derecha o centro de la pantalla pueden
provocar un desgaste de la pantalla por la retención
de la imagen que no está cubierto por la garantía.
Ajuste pantalla: Muestra la imagen completa sin cortes
cuando la entrada de la señal es HDMI (720p / 1080i /
1080p) o Componente (1080i / 1080p).
NOTA
✎
Después de seleccionar Ajuste pantalla en HDMI
x
(720p / 1080i / 1080p) o Componente (1080i / 1080p)
quizás deba centrar la imagen:
1. Pulse los botones ◄ o ► para seleccionar Posición.
2. Pulse el botón ENTERE.
3. Pulse los botones ▲, ▼, ◄ o ► para mover la imagen.
Según la fuente de entrada, las opciones de tamaño
x
de la imagen pueden variar.
Los elementos disponibles pueden diferir según el
x
modelo seleccionado.
En el modo PC sólo se pueden ajustar los modos
x
y 4:3.
La configuración de cada dispositivo externo
x
conectado a una entrada del televisor se puede ajustar
y guardar.
Si se usa la función
x
HDMI 720p, en los laterales superior, inferior, derecho
e izquierdo de la pantalla se cortará 1 línea como en la
función de sobreexploración.
Ajuste pantalla con la entrada
▲, ▼.
Modo Pantalla (16:9 / Zoom ancho / Zoom / 4:3) ■ : Sólo
disponible cuando la imagen está configurada como
Ancho automático. Se puede determinar el tamaño de
imagen deseado en el tamaño de imagen panorámica 4:3
WSS o el original. Cada país europeo requiere un tamaño
de imagen diferente.
No disponible en los modos PC, Componente o
✎
HDMI.
Filtro ruido digit. (Desactivado / Bajo / Medio / Alto ■
/ Automático / Visualización automática): Cuando la
señal de emisión es débil pueden aparecer imágenes
fantasmas o estáticas. Seleccione una de estas opciones
hasta que vea la imagen de mejor calidad.
Visualización automática: Cuando se cambian los
canales analógicos, muestra la intensidad de la señal.
Sólo disponible en los canales analógicos.
✎
Una barra verde indica que se está recibiendo la
✎
mejor señal posible.
Filtro ruido MPEG (Desactivado / Bajo / Medio / Alto ■
/ Automático): Reduce el ruido MPEG para proporcionar
una mejor calidad de imagen.
Inhabilitado en el modo PC.
✎
N.neg HDMI (Normal / Bajo) ■ : Selecciona el nivel de
negro en la pantalla para ajustar la profundidad de ésta.
Disponible sólo en el modo HDMI (señales RGB).
✎
Modo de película (Desactivado / Auto1 / Auto2) ■ :
Configura el televisor para detectar automáticamente
y procesar las señales de las películas procedentes de
todas las fuentes y ajustar la imagen para conseguir una
calidad óptima.
Disponible en TV, AV, COMPONENT (480i / 1080i) y
✎
HDMI (480i / 1080i).
Tiempo protec. autom. (2 horas / 4 horas / 8 horas ■
/ 10 horas / Desactivado) : Si la misma imagen se
mantiene en la pantalla, actuará el protector automático
de desgaste de pantalla.
Reinicio de la imagen (Aceptar / Cancelar)
16:9
Restablece la configuración predeterminada del modo de la
imagen actual.
16
Español
Page 84

Ajuste del televisor con el ordenador ¦
Defina la fuente de entrada al PC.
Ajuste automático
Ajusta automáticamente los valores y las posiciones de la
frecuencia y afina la configuración.
✎
No disponible en las conexiones a través del cable
HDMI/DVI.
t
Pantalla
Grueso / Fino ■ : Elimina o reduce el ruido de la imagen.
Si el ruido no desaparece sólo con la sintonización
fina, realice los ajustes de frecuencia hasta el máximo
(Grueso) y vuelva a realizar la sintonización fina.
Después de reducir el ruido, vuelva a ajustar la imagen
para que quede alineada en el centro de la pantalla.
Position ■ : Ajuste la posición de la pantalla del PC con los
botones direccionales (▲ / ▼ / ◄ / ►).
Restablecer imagen ■ : Restablece la configuración
predeterminada de la imagen.
Uso del televisor como una pantalla de ordenador (PC)
Configuración del software del PC (basado en Windows XP)
Según la versión de Windows y la tarjeta de vídeo, las
pantallas reales del PC pueden ser diferentes, en cuyo
caso se aplicará casi siempre la misma información de
configuración básica (En caso contrario, póngase en
contacto con el fabricante del ordenador o con el distribuidor
de Samsung.)
1. Haga clic en “Panel de control” en el menú de inicio de
Windows.
2. Haga clic en “Apariencia y temas” en la ventana “Panel
de control” y aparecerá un cuadro de diálogo.
3. Haga clic en “Pantalla” y aparecerá una cuadro de
diálogo sobre la pantalla.
4. Vaya a la pestaña “Configuración” en el cuadro de diálogo.
Configuración correcta del tamaño (resolución) [Óptima: y
1360 x 768 píxeles]
Si existe una opción de frecuencia vertical en el cuadro y
de diálogo de configuración de la pantalla, el valor
correcto es “60” o “60 Hz”. Si no, haga clic en “Aceptar”
y salga del cuadro de diálogo.
Menú del sonido
Cambio del modo de sonido
preseleccionado
Modo
t
Estándar ■ : Selecciona el modo de sonido normal.
Música ■ : Refuerza la música por encima de las voces.
Película ■ : Ofrece el mejor sonido para películas.
Voz clara ■ : Realza las voces respecto de los sonidos.
Amplificar ■ : Aumenta la intensidad del sonido de
alta frecuencia para permitir una mejor audición a las
personas con problemas de audición.
Ajuste de la configuración del sonido ¦
Ecualizador
Ajusta el modo de sonido.
Balance I/D ■ : Ajusta el balance entre los altavoces
izquierdo y derecho.
100Hz / 300Hz / 1kHz / 3kHz / 10kHz ■ (ajuste de ancho
de banda): Ajusta el nivel de frecuencias específicas de
ancho de banda.
Restab. ■ : Restablece la configuración del ecualizador.
Sistemas de sonido, etc. ¦
Virtual Surround (Desactivado / Activado)
Esta función proporciona una sensación de sonido surround
virtual de 5.1 canales a través del par de altavoces o de
los auriculares mediante la tecnología HRTF (función de
transferencia relativa a la cabeza).
Si
✎
Seleccionar altavoz está establecido como Altavoz
externo, Virtual Surround está deshabilitado.
Claridad diálogo (Desactivado / Activado)
Esta función permite aumentar la intensidad de las voces por
encima de la música de fondo y los efectos de sonido a fin
de que el diálogo se pueda oír más claramente durante la
visualización de un programa.
Idioma de audio
(sólo canales digitales)
Cambie los valores predeterminados para los idiomas del
audio.
El idioma disponible puede variar según la emisión.
✎
Formato de audio (MPEG / Dolby
Digital 5.1)
(sólo canales digitales)
Cuando el sonido se emite desde un altavoz principal y
un receptor de audio, se puede originar un sonido de eco
debido a las diferencias en la velocidad de decodificación
entre el altavoz principal y el receptor de audio. En tales
casos, use la función Altavoz de TV.
La opción del
✎
la emisora. El sonido Dolby Digital de 5.1 canales sólo
está disponible cuando se conecta un altavoz externo
mediante un cable óptico.
Formato de Audio puede variar según
03 Funciones básicas
Español
17
Page 85

Funciones básicas
ADGUIDE
MEDIA.P
P . MODES.MODEP . SIZE
Descripción de audio
(no está disponible en todas las
localidades) (sólo canales digitales)
Esta función maneja el flujo de audio de
AD (Descripción de audio) cuando ésta
se envía desde el emisor con el audio
Principal.
Descripción de audio (Desactivado / Activado) ■ :
Activa y desactiva la función de descripción de audio.
Volumen ■ : Ajuste el volumen de la descripción del audio.
Volumen automático (Desactivado /
Normal / Nocturno)
Para equilibrar el nivel del volumen de cada canal, se ha de
configurar como Normal.
Nocturno ■ : Este modo proporciona una sensación de
sonido mejorada en comparación al modo Normal, ya
que casi no se produce ruido. Es útil por la noche.
Seleccionar altavoz (Altavoz externo /
Altavoz TV)
Debido a las diferencias en la velocidad de decodificación
entre el altavoz principal y el receptor de audio se puede
originar un eco. En tales casos, establezca TV como Altavoz
externo.
✎
✎
✎
✎
Seleccionar altavoz está establecido como
Cuando
Altavoz externo, los botones de volumen y MUTE no
funcionan y se limita la configuración del sonido.
Cuando
Seleccionar altavoz está establecido como
Altavoz externo, se debe utilizar esta configuración.
Altavoz TV: Desactivado, Altavoz externo:
x
Activado
Seleccionar altavoz está establecido como
Cuando
Altavoz de TV, se debe utilizar esta configuración.
Altavoz TV: Activado, Altavoz externo: Activado
x
Si no hay señal de vídeo, ambos altavoces se silencian.
Configuración adicional
(sólo canales digitales)
Nivel de audio DTV (MPEG/HE-AAC) ■ : Esta función
permite reducir la disparidad de una señal de voz (que
es una de las señales recibidas durante las emisiones de
TV digital) al nivel deseado.
Según el tipo de señal de emisión,
✎
HE-AAC se pueden ajustar entre -10dB y 0dB.
Para subir o bajar el volumen, ajuste entre un
✎
rango de 0 y -10 respectivamente.
MPEG /
Salida SPDIF ■ : SPDIF (Interfaz digital de Sony Philips)
se utiliza para proporcionar sonido digital, reduciendo
las interferencias entre los altavoces y los distintos
dispositivos digitales, como un reproductor DVD.
Formato audio: Durante la recepción de una emisión
de TV digital se puede seleccionar el formato de salida
de audio digital (SPDIF) entre las opciones PCM, Dolby
Digital o DTS.
✎
Si se conectan altavoces de 5.1 canales en una
configuración Doby Digital, se mejora la sensación
de sonido 3D interactivo.
Retardo de audio: Corrija las discordancias entre audio
y vídeo, cuando vea la televisión o un vídeo, y escuche
un salida de audio digital mediante un dispositivo
externo, como un receptor AV.
Dolby Digital Comp (Line/RF) ■ : Este función minimiza
la disparidad de señal entre una señal Doby Digital y
una de voz (por ejemplo, audio MPEG, HE-AAC, sonido
ATV).
✎
Seleccione
y RF para reducir la diferencia entre los sonidos
fuertes y suaves durante la noche.
Line: Establezca el nivel de salida de las señales
superiores o inferiores a -31dB (referencia) en -20dB o
-31dB.
RF: Establezca el nivel de salida de las señales
superiores o inferiores a -20dB (referencia) en -10dB o
-20dB.
Line para obtener un sonido dinámico
Reinicio del sonido (OK / Cancelar)
Restablece todas las configuraciones de sonido
predeterminadas de fábrica.
Selección del modo de sonido ¦
Cuando se configura Dual I-II, el modo de sonido actual se
muestra en la pantalla.
Tipo de
audio
Mono Mono
A2
estéreo
NICAM
Estéreo
Estéreo
Dual
Mono Mono
Estéreo
Dual
Si la señal de estéreo es débil y el modo cambia de
✎
forma automática, cambie a mono.
Sólo se activa en la señal de sonido estéreo.
✎
Sólo disponible cuando la fuente de ✎Entrada se
configura como TV.
t
Dual I-II Predeterminado
Cambio
Estéreo ↔ Mono
Dual I ↔ Dual II
Mono ↔ Estéreo
Mono → Dual I
Dual II
automático
Cambio
automático
Dual I
Dual I
18
Español
Page 86

Menú de configuración
10 TV ATV0
00 00
▲
▼
00 00
▲
▼
Configuración de la hora ¦
Hora
Reloj ■ : La configuración del reloj se utiliza en diferentes
funciones del temporizador del televisor.
La hora actual aparecerá siempre que se pulse el
O
botón INFO.
✎
Si desconecta el cable de alimentación, debe
configurar el reloj de nuevo.
Modo de reloj (automático/manual)
✎
Según la emisora y la señal, la hora automática
no se puede ajustar correctamente. En este caso,
ajuste la hora manualmente.
La antena debe estar conectada para poder
✎
ajustar la hora automáticamente.
Ajustar hora: Establezca Día, Mes, Año, Hora y
Minuto manualmente.
Sólo disponible si
✎
como Manual.
Uso del temporizador de desconexión ¦
Temp. de desc. ■
televisor tras un periodo de tiempo establecido. (30, 60,
90, 120, 150 y 180 minutos).
Para cancelar
✎
Desactivado.
Activación y desactivación del
temporizador
Temporizador 1 / Temporizador 2 / Temporizador 3 ■ :
La activación y desactivación del temporizador se puede
configurar de tres maneras. Debe ajustar el reloj en
primer lugar.
Hora encendido
Desactivar
Hora apagado
Desactivar
Volumen
Repetir
Fuente Antena Canal
Una vez
Modo de reloj está configurado
t
: Apaga automáticamente el
Temp. de desc. seleccione
Temporizador 1
Dom Lun Mar Mié Jue Vie Sáb
L
Mover
U
Ajustar
E
Entrar R Volver
Hora encendido / Hora apagado: Puede configurar la
hora y los minutos y activar o desactivar el temporizador.
(Para activar el temporizador con la configuración
elegida, establézcalo en Activar.)
Volumen: Configure el nivel de volumen deseado.
Fuente: Seleccione el contenido TV o USB que se
ha de reproducir cuando el televisor se encienda
automáticamente. (USB se puede seleccionar sólo
cuando el dispositivo USB está conectado al televisor)
Antena (cuando Fuente está configurado como TV):
Seleccione ATV o DTV.
Canal (cuando Fuente está configurado como TV):
Permite seleccionar el canal deseado.
Contenido (cuando Fuente está configurado como
USB): Seleccione una carpeta en el dispositivo USB
que contenga archivos de música o de fotos que se
han de reproducir cuando el televisor se encienda
automáticamente.
Si no hay archivos de música en el dispositivo
✎
USB o no se ha seleccionado la carpeta que
contenga los archivos de música, el temporizador
no funciona correctamente.
Si sólo hay un archivo de fotos en el dispositivo
✎
USB, la presentación no se reproducirá.
✎
Si el nombre de la carpeta es demasiado largo,
ésta no se seleccionará.
✎
Cada USB que se utiliza está asignado a su propia
carpeta. Cuando se utiliza más de un mismo tipo
de USB, asegúrese de que la carpeta asignada a
cada dispositivo USB tenga un nombre diferente.
Repetir: Seleccione Una vez, Todos, Lun~Vie, Lun~Sáb,
Sáb~Dom o Manual para configurarlo como más le
convenga. Si selecciona Manual, puede configurar el día
en que desee activar el temporizador.
La marca
✎ c
✎
Apagado automático (sólo disponible cuando el
televisor se ha encendido con el temporizador):
El televisor se apagará automáticamente 3 horas
después de que se haya dejado inactivo para prevenir
un sobrecalentamiento.
indica que se ha seleccionado el día.
Programas de bloqueo ¦
Seguridad
La pantalla de la entrada del PIN aparece antes que la
✎
pantalla de configuración.
Escriba un número de 4 dígitos, el predeterminado es
✎
“0-0-0-0”. Cambie el PIN mediante la opción Cambiar PIN.
Bloqueo niños (Desactivado / Activado) ■ : Bloquee los
canales en el Admin. de canales para impedir que los
usuarios no autorizados, como los niños, accedan a
programas inadecuados para ellos.
Sólo disponible cuando la fuente de
✎
configura como TV.
Bloqueo paterno (clasificación paterna) ■ : Impida que
los usuarios no autorizados, como los niños, accedan a
programas inadecuados para ellos con un código PIN de
4 dígitos establecido por el usuario.
Perm. todo: Desbloquea todas las clasificaciones de TV.
✎
Los elementos de
según el país.
Entrada se
Bloqueo paterno difieren
03 Funciones básicas
Español
19
Page 87

Funciones básicas
P
POWER
ADGUIDE
MEDIA.P
SUBT.
DUAL
I-II
P . MODES.MODEP . SIZE
Cambiar código ■ : Cambie su número ID personal
necesario para configurar el televisor.
Si ha olvidado el código PIN, pulse los botones del
✎
mando a distancia en la siguiente secuencia para
reiniciar el PIN a “0-0-0-0”: POWER (desactivar)
→ MUTE → 8 → 2 → 4 → POWER (activar).
Otras funciones ¦
Idioma
Idioma del menú ■ : Ajuste el idioma de los menús.
Idioma del teletexto ■ : Establezca el idioma que desee
para el teletexto.
El inglés es el idioma predeterminado cuando en
✎
una emisión no está disponible la selección de
idiomas.
Preferencias (Idioma principal audio / Idioma ■
secundario audio / Idioma princ. subtítulos / Idioma
sec. subtítulos / Idioma principal del teletexto
/ Idioma secundario del teletexto): Seleccione
un idioma, que será el predeterminado cuando se
seleccione un canal.
Subtítulos
Use este menú para configurar el modo de
Subtítulos.
✎
La función de subtítulos no
está disponible en los modos
Componente o HDMI.
Subtítulos (Desactivado / Activado) ■ :
Activa o desactiva los subtítulos.
Modo (Normal / Discap. auditivos) ■ : Ajusta el modo de
la función de subtítulos.
Idioma de los subtítulos ■ : Establece el idioma de los
subtítulos.
Si el programa que se está viendo no admite la
✎
opción Discap. auditivos, automáticamente se
activa Normal aunque se seleccione Discap.
auditivos.
El inglés es el idioma predeterminado cuando en
✎
una emisión no está disponible la selección de
idiomas.
General
Modo Juego (Desactivado / Activado) ■ : Cuando
se conecta una videoconsola como PlayStation™ o
Xbox™, se puede experimentar una sensación más
realista al seleccionar el modo de juegos.
✎
NOTA
Precauciones y limitaciones del x modo de juego
Si desea desconectarse de la consola de –
videojuegos y conectarse a otro dispositivo
externo, ajuste la opción Modo Juego como
Desactivado en el menú de configuración.
Si visualiza el menú de TV en el – Modo Juego,
la pantalla tiembla ligeramente.
Modo Juego xno está disponible en el modo TV y PC.
Tras conectar xla consola de videojuegos, configure
Modo Juego como Activado para prevenir una
mala calidad de imagen.
Si
Modo Juego se configura como Activado: El
x
modo Imagen se configura como Estándar y el de
Sonido como Película.
Transpar. de menú (Brillo/Oscuro) ■ : Establezca la
transparencia del menú.
Melodía (Desactivado/Bajo/Medio/Alto) ■ : Establezca
que una melodía se oiga cuando el televisor se encienda
o se apague.
Interfaz común
Menú CI ■ : Permite al usuario realizar selecciones en
el menú CAM proporcionado. Seleccione el menú CI
según el menú de la tarjeta PC.
Info. sobre la aplicación ■ : Vea la información sobre el
CAM insertado en la ranura CI y sobre la “TARJETA CI o
CI+” insertada en el CAM. La instalación del CAM puede
efectuarse con el televisor encendido o apagado.
1. Puede adquirir el módulo del CAM de CI por teléfono o
en el distribuidor más cercano a su domicilio.
2. Inserte firmemente la “TARJETA CI o CI+” en el CAM en
la dirección de la flecha.
3. Inserte el CAM con la “TARJETA CI o CI+” en la ranura
de la interfaz común en la dirección de la flecha de
modo que quede paralela a la ranura.
4. Compruebe si se ven imágenes en un canal de señal
codificada.
Texto digital (Inhabilitar / Habilitar)
(solo Reino Unido)
Si el programa se emite con texto digital, esta opción está
activada.
20
Español
Page 88

Imagen sobre imagen (PIP) ¦
Menú de asistencia técnica
Autodiagnóstico
El autodiagnóstico puede tardar unos segundos; es parte del
funcionamiento normal del televisor.
Prueba de imagen (Sí / No) ■ : Se utiliza para comprobar
si hay problemas con la imagen y si éstos continúan tras
comprobar el patrón de color.
Prueba de sonido (Sí / No) ■ : Utilice el sonido de la
melodía incorporada para comprobar si hay problemas
con el sonido.
Si no oye sonido en los altavoces del televisor,
✎
antes de realizar la prueba de sonido, asegúrese
de que Seleccionar altavoz esté configurado
como Altavoz de TV en el menú Sonido.
La melodía se oirá durante la prueba aunque
✎
Seleccionar altavoz esté establecido como
Altavoz externo o se haya silenciado el sonido con
el botón MUTE.
Información de señal ■ : (sólo canales digitales) La
calidad de la recepción del canal HDTV es perfecta o
los canales no están disponibles. Ajuste la antena para
aumentar la intensidad de la señal.
Solución de problemas ■ : Si parece que hay problemas
en el televisor, consulte este apartado.
Si no se puede aplicar ninguno de los consejos
✎
para solucionar los errores, póngase en contacto
con un centro de asistencia de Samsung.
Actualización del software
La Actualización del software se puede realizar a través
de una señal de emisión o descargando el último firmware
desde samsung.com en el dispositivo de memoria USB.
Versión actual es el software ya instalado en el televisor.
✎
El software se representa como “Año/Mes/Fecha_
Versión”.
Actualización del software
Versión actual 2010/01/18_000001
Por USB ►
Por canal
Modo suspensión Desactivado
Software alternativo ----/--/--/--_------
Instalación de la versión más actual
Por USB ■ : Inserte la unidad
USB que contenga el archivo
de la actualización del
firmware descargado desde
www.samsung.com, en le
televisor. No desconecte
la alimentación ni extraiga
la unidad USB antes de
finalizar las actualizaciones.
El televisor se apagará y se
encenderá automáticamente
después de completar la actualización del firmware.
Cuando se actualiza el software, la configuración del
vídeo y del audio que se haya efectuado vuelve a la
configuración predeterminada. Le aconsejamos que
anote la configuración para recuperarla fácilmente
después de la actualización.
Por canal ■ : Actualice el software a través de una señal
de emisión.
Si selecciona esta función durante la fase
✎
de transmisión del software, éste se busca
automáticamente y se descarga.
El tiempo necesario para la descarga del software
✎
lo determina el estado de la señal.
Actualización del modo de suspensión ■ : A la
hora seleccionada se ejecuta automáticamente una
actualización manual. Dado que la alimentación de la
unidad está activada internamente, la pantalla LCD
puede encenderse ligeramente. Este fenómeno puede
durar más de 1 hora mientras la actualización del
software se completa.
Software alternativo (copia de seguridad) ■ : Si hay
problemas con el nuevo firmware que afecten al
funcionamiento, puede cambiar el software a la versión
anterior.
Si se ha cambiado el software, se muestra el
✎
software existente.
Panel posterior del TV
Unidad USB
Guía de conexión HD
Consulte esta información cuando conecte dispositivos
externos al televisor.
Contacto con Samsung
Consulte esta información si el televisor no funciona
adecuadamente o si desea actualizar el software. Puede
buscar información relacionada con nuestro centro de
llamadas, para descargar los productos y el software.
03 Funciones básicas
U Mover E Entrar R Volver
Español
21
Page 89

Funciones avanzadas
MEDIA.P
P . MODES.MODEP . SIZE
Media Play
Disfrute de archivos de fotos, música y películas
almacenados en un dispositivo de clase de
almacenamiento masivo (MSC) USB o en su PC
MediaPlay
Devicename
Music
Music
A
Cambiar disp.
D
Modo dispositivo
E
Entrar
R
Volver
Conexión de un dispositivo USB ¦
1. Encienda el televisor.
2. Conecte un dispositivo USB que contenga archivos de fotos o música al terminal
USB del lateral del televisor.
3. Cuando USB está conectado al televisor, aparece una ventana emergente.
A continuación puede seleccionar Media Play.
Puede que no funcione correctamente con archivos multimedia sin licencia.
✎
Lista de lo que debe saber antes de utilizar ✎Media Play
MTP (Protocolo de transferencia de recursos) no se admite.
x
El sistema de archivos admite FAT16, FAT32 y NTFS.
x
Ciertos tipos de cámara digital USB y dispositivos de audio quizás no sean
x
compatibles con este televisor.
Media Play sólo admite dispositivos USB de clase de almacenamiento masivo (MSC). MSC es un dispositivo de
x
clase de almacenamiento masivo sólo de transporte de gran capacidad. Ejemplos de MSC son las unidades de
almacenamiento en miniatura, los lectores de tarjetas Flash (no se admiten concentradores de USB). Los dispositivos
se deben conectar directamente al puerto USB del televisor.
Antes de conectar el dispositivo al televisor, haga una copia de seguridad de sus archivos para evitar daños o
x
pérdidas de datos. SAMSUNG no se hace responsable por cualquier daño en los archivos o pérdida de datos.
No desconecte el dispositivo USB mientras se esté cargando.
x
Cuanto mayor sea la resolución de la imagen, más tiempo tardará en visualizarse en la pantalla.
x
La resolución JPEG máxima admitida es 15360 x 8640 píxeles.
x
Con archivos dañados o que no se admiten, se muestra el mensaje “Formato de archivo no admitido”.
x
Si los archivos están ordenados por la vista básica, se pueden mostrar hasta 1000 archivos en cada carpeta.
x
Los archivos MP3 con DRM descargados desde un sitio de pago no se pueden reproducir. La tecnología Gestión
x
de derechos digitales (DRM) admite la creación de contenidos, la distribución y gestión de éstos de modo integrado
y general, incluida la protección de los derechos e intereses de los proveedores de los contenidos, la prevención de
copias ilegales de los contenidos, así como la gestión de cobros y acuerdos.
Si hay más de 2 dispositivos PTP conectados, sólo se mostrará uno.
x
Si se ha conectado más dos dispositivos MSC, alguno de ellos puede que no se reconozca. Un dispositivo que exija
x
mucha energía (más de 500mA o 5 V), quizás no se admita.
Si se muestra un mensaje de advertencia de sobrealimentación al conectar o usar un dispositivo USB, es posible
x
que el dispositivo no se reconozca o que funcione incorrectamente.
Si el televisor no recibe señal de entrada durante el tiempo establecido en
x
salvapantallas.
Si se utiliza un cable de extensión USB, es posible que el dispositivo USB no se reconozca o que los archivos del
x
dispositivo no se puedan leer.
Si no se reconoce un dispositivo USB conectado al televisor, la lista de archivos del dispositivo está dañada o un
x
archivo de la lista no se reproduce, conecte el dispositivo USB al ordenador, formatee el dispositivo y compruebe la
conexión.
Si un archivo eliminado del ordenador se puede encontrar todavía cuando se ejecuta Media Play, utilice la función
x
“Vaciar papelera de reciclaje” del ordenador para eliminarlo permanentemente.
Tiempo protec. autom., se iniciará el
Panel posterior del TV
Unidad USB
22
Español
Page 90

Pantalla de visualización ¦
Vaya al archivo que desee mediante los botones arriba/abajo/derecha/izquierda y, a continuación, pulse los botones
ENTERE. El archivo se reproduce.
✎
Es compatible con el
Modo dispositivo y Método contenido en la página de inicio de Media Play.
04 Funciones avanzadas
Puede confirmar el nombre del
Información:
archivo seleccionado y el número de
archivos y páginas.
Sección de la lista de clasificación:
Muestra la norma de clasificación.
La norma de clasificación es
✎
diferente según los contenidos.
Devicename
/Music 01.mp3 1/2
Music
c
Music 01 2010
no singer other
c
Music 03 2010
no singer other
Music 05 2010
no singer other
c
Music 07 2010
no singer other
A
Cambiar disp.
Funcionamiento de los botones
A
Rojo (Cambiar disp.): Selecciona un dispositivo conectado.
B
Verde (Preferencia): Establece la preferencia del archivo (no se admite en la vista
C
Amarillo (Se leccionar): Selecciona varios archivos de la lista de archivos. Los archivos
D
Azul (Clasif.): Seleccione la lista de clasificación.
T
Herramientas: Muestra el menú de opciones.
C Seleccionar D Clasif. T Herramientas
básica)
seleccionados se marcan con un símbolo.
Música
Reproducción de música
1. Pulse los botones ◄ o ► para seleccionar Música y, a continuación,
pulse el botón ENTER
2. Pulse los botones ◄/►/▲/▼ para seleccionar el archivo que desee
en la lista.
3. Pulse los botones ENTER
Durante la reproducción de música, puede realizar búsquedas con –
los botones ◄ y ►.
Sólo se muestran los arch ivos con la extensión MP3 y PCM. Los
✎
archivos con otras extensiones no se muestran, aunque se hayan
guardado en el mismo dispositivo USB.
✎
Si, al reproducir archivos MP3, el sonido no se oye correctamente,
ajuste Ecualizador en el menú Sonido. (Un archivo MP3
demasiado modulado puede ocasionar problemas de sonido.)
E
en el menú Media Play.
E
.
Music 02 2010
no singer other
Music 04 2010
no singer other
Music 06 2010
no singer other
Music 08 2010
no singer other
Only you
Jason
1st Album
Pop
2010
4.2MB
01:10 / 04:02
Devicename E Pausa L Saltar T Herramientas R Volver
Sección de la lista de archivos:
Puede confirmar los archivos y
grupos que se han ordenado
por cada categoría.
Only you
Jason
Music 1
No Singer
Music 2
No Singer
Music 3
No Singer
Music 4
No Singer
Music 5
No Singer
Lis. rep.
3/15
Español
23
Page 91

Funciones avanzadas
Fotos
Visualización de una foto (o una presentación)
1. Pulse los botones ◄ o ► para seleccionar Fotos y, a continuación, pulse el
botón ENTERE en el menú Media Play.
2. Pulse los botones ◄/►/▲/▼ para seleccionar el archivo que desee en la lista.
3. Pulse los botones ENTERE.
Mientras se muestra una lista de fotos, pulse los – ENTERE del mando a
distancia para iniciar la presentación.
En la presentación se usan todos los archivos de la sección de la lista de –
archivos.
Durante la presentación, los archivos se muestran en orden a partir del –
archivo que se muestra en este momento.
Los archivos de música se pueden reproducir automáticamente durante la
✎
presentación si Música de fondo está configurado como Activado.
El ✎Modo BGM
carga de BGM.
Reproducción de varios archivos ¦
Reproducción de archivos grabados / vídeo / música / fotos seleccionados
1. Pulse el botón amarillo en la lista de archivos para seleccionar el archivo
que desee.
2. Repita el proceso anterior para seleccionar varios archivos.
✎
3. Pulse el botón TOOLS y seleccione Reproducir conten. selec..
Reproducción de grupos de archivos vídeo / música / fotos
1. Cuando se muestre una lista de archivos, vaya a cualquier archivo del grupo
deseado.
2. Pulse el botón TOOLS y seleccione Rep. gr. act..
no se puede cambiar hasta que no haya finalizado la
NOTA
La marca ( xc) aparece a la izquierda de los archivos seleccionados.
Para cancelar la selección, pulse de nuevo el botón amarillo.
x
Para cancelar la selección de los archivos, pulse el botón xTOOLS
y seleccione Deseleccionar todo.
Normal
Image1024.jpg
Devicename E Pausa L Anterior/Siguiente T Herramientas R Volver
/Music 01.mp3 1/2
Music
c
Music 01 2010
no singer other
c
Music 03 2010
no singer other
Music 05 2010
no singer other
c
Music 07 2010
no singer other
Devicename
A
Cambiar disp. C Seleccionar D Clasif. T Herramientas
1024x768
Music 02 2010
no singer other
Music 04 2010
no singer other
Music 06 2010
no singer other
Music 08 2010
no singer other
2010/2/1
3/15
24
Español
Page 92

Funciones adicionales del reproductor multimedia ¦
Clasificación de la lista de archivos
Pulse el botón azul en la lista de archivos para ordenarlos.
Categorías Función Música Fotos
Vista básica Muestra toda la carpeta. Puede ver una foto seleccionando la carpeta.
Título Ordena y muestra los títulos de archivos por símbolo / número / orden alfabético / especial.
Preferencia
Fecha última Ordena y muestra los archivos por la fecha más reciente.
Fecha primera Ordena y muestra los archivos por la fecha más antigua.
Artista Ordena los archivos de música por artista y en orden alfabético.
Álbum Ordena los archivos de música por álbum y en orden alfabético.
Género Ordena los archivos de música por género.
Ánimo
Mensual Ordena y muestra los archivos de fotos por meses.
Ordena y muestra los archivos por preferencias. Puede cambiar la preferencia del archivo en la
sección de la lista de archivos con el botón verde.
Ordena los archivos de música por el tipo de estado de ánimo. Puede cambiar la información del
tipo de música.
Menú de opciones de reproducción música / fotos
Categorías Función Música Fotos
Modo de repetición Puede reproducir archivos de películas o de música repetidamente.
Configuración de la
imagen
Configuración del
sonido
Detener presentación
/ Iniciar visionado
automático
Vel. secuencia Puede seleccionar la velocidad de presentación durante la misma.
Zoom Puede ampliar las imágenes en el modo de pantalla completa.
Girar Puede girar las imágenes en el modo de pantalla completa.
Información Puede ver información detallada acerca del archivo reproducido.
Puede ajustar la configuración de la imagen. (pág. 14, 15, 16)
Puede ajustar la configuración del sonido. (pág. 17, 18)
Se puede iniciar o detener una presentación.
✓ ✓
✓ ✓
✓ ✓
✓
✓
✓
✓
✓
✓ ✓
✓ ✓
04 Funciones avanzadas
✓
✓
✓
✓
✓
✓
✓
✓
Config.
Uso del menú de configuración
Información ■ : Seleccione esta opción para ver la información del dispositivo conectado.
Español
25
Page 93

Información adicional
MEDIA.P
A
BCD
ABCD
Información adicional
Función de teletexto de los canales analógicos
La página de índice de dicho servicio proporciona información sobre el uso de éste. Para que la información del teletexto se
visualice correctamente, la recepción del canal debe ser estable. En caso contrario, puede perderse información o algunas
páginas pueden no visualizarse.
Puede cambiar páginas de teletexto pulsando los botones numéricos del mando a distancia.
✎
1
/ (activar teletexto/
mezcla): Active el modo de
teletexto tras seleccionar el canal
que proporciona el servicio de
teletexto. Pulse dos veces para
superponer el modo de teletexto a
la pantalla de emisión actual.
2
8 (guardar): Guarde las páginas
del teletexto.
3
4 (tamaño): Se utiliza para
mostrar caracteres de doble
tamaño en la parte superior de
la pantalla. Si desea mostrarlos
también en la parte inferior, vuelva
a pulsar el botón. Púlselo de
nuevo una vez para volver a la
presentación normal.
4
9 (retener) Retenga la
presentación en una página
determinada si ésta está enlazada
con varias páginas secundarias
que se muestran automáticamente.
Para reanudar, vuelva a pulsar el
botón.
5
0 (modo): Seleccione el modo
de teletexto (LIST/FLOF).
Si lo pulsa en el modo LIST,
cambia al modo de guardar lista.
En dicho modo se puede guardar
la página de teletexto en la lista
mediante el botón 8 (guardar).
2
4
1
3
2 (avanzar página): Muestre la
siguiente página del teletexto.
5
3 (retroceder página): Muestre
la página anterior del teletexto.
6 (índice): Muestre la página
de índice (contenido) en cualquier
momento durante la visualización
5 (mostrar): Muestre el texto
6
oculto (respuestas a juegos, por
7
ejemplo). Púlselo de nuevo para
volver a la presentación normal.
de teletexto.
7 (cancelar): Muestre la emisión
actual mientras se está buscando
8
9
0
Botones de colores (rojo/verde/
amarillo/azul): Si una emisora
utiliza el sistema FASTEXT, los
distintos temas cubiertos en una
página de teletexto se codifi carán
en color y podrá seleccionarlos
!
@
pulsando los botones de color.
Pulse el correspondiente al tema
deseado. La página muestra otra
información con código de color
que se puede seleccionar de la
misma forma. Pulse el botón del
color correspondiente para ver la
página anterior o la siguiente.
una página.
7
8
9
0
!
@
6
1 (página secundaria): Muestre
la página secundaria disponible.
Las páginas de teletexto se organizan en seis categorías:
Parte Contenido Parte Contenido
Número de página
A
seleccionado.
Identidad del canal.
B
Número de página actual o
C
indicaciones de la búsqueda.
Español
26
Fecha y hora.
D
Texto.
E
Información de estado.
F
Información FASTEXT.
Page 94

Instalación del montaje en la pared
45mm
Instalación del equipo de montaje mural ¦
Los elementos del montaje mural (se venden por separado) permiten instalar el televisor en una pared.
Si desea más información sobre la instalación de los componentes para el montaje mural, consulte las instrucciones que se
facilitan con dichos elementos. Si necesita ayuda con la instalación del soporte mural, póngase en contacto con un técnico.
Samsung Electronics no se hace responsable de los daños causados al producto o al usuario si éste ha efectuado la
instalación del televisor.
Especificaciones del equipo de montaje mural (VESA) ¦
El montaje mural se vende por separado.
✎
Instale el montaje mural en una pared sólida, perpendicular al suelo. Para colocarlo en otros materiales de construcción,
póngase en contacto con el distribuidor más cercano. Si se instala en el techo o en una pared inclinada, puede caerse y
causar graves lesiones personales.
NO TA
✎
Samsung Electronics no se hace responsable de los daños causados al producto o al usuario si éste ha efectuado la
x
instalación del televisor.
Las dimensiones estándar de los equipos de montaje mural se muestran en la tabla siguiente.
x
Al adquirir el equipo de montaje en la pared, también se distribuye un manual de instalación detallado y todas las
x
piezas necesarias para el montaje.
No use tornillos con un tamaño superior al estándar, ya que pueden causar daños en el interior del televisor.
x
Para montajes murales que no cumplen las especificaciones de tornillos estándar VESA, la longitud de éstos puede
x
variar dependiendo de las especificaciones.
No use tornillos que no cumplan las especificaciones de tornillos estándar VESA.
x
No apriete excesivamente los tornillos, ya que podría dañar el producto o provocar la caída de éste con riesgo de
x
causar lesiones personales. Samsung no se hace responsable de este tipo de accidentes.
Samsung no se hace responsable de daños o lesiones personales cuando se usa un montaje mural que no cumple
x
las especificaciones VESA o si el cliente no sigue las instrucciones de instalación del producto.
No supere los 15 grados de inclinación cuando monte este televisor.
x
05 Información adicional
Familia de
producto
LCD-TV
pulgadas
19~22
23~29 200 x 100
30~40 200 x 200 M6
46~55 400 x 400
Especificaciones VESA
(A * B)
75 X 75
100 x 100
80~ 1400 x 800
Si el dispositivo USB mide una longitud igual o superior a 45 mm, puede tocar la pared si se utiliza
con modelos de 26” o 32” instalados en un montaje mural. Por consiguiente, se recomienda utilizar
un dispositivo USB más corto.
No instale el equipo de montaje mural mientras el televisor está encendido. Se podría producir una
descarga eléctrica con riesgo de causar lesiones personales.
Tornillo estándar Cantidad
M4
4
M857~70 800 x 400
Español
27
Page 95

Información adicional
1
2
1
2
1
2
3
Bloqueo antirrobo Kensington
El bloqueo Kensington es un dispositivo que se utiliza para fijar
físicamente el sistema cuando se utiliza en un sitio público. El aspecto
y el método de bloqueo pueden ser diferentes a los que se muestran
en la ilustración según el fabricante. Consulte el manual proporcionado
con el bloqueo Kensington para utilizarlo correctamente.
Busque el icono “
✎
icono “
1. Introduzca el dispositivo de bloqueo en la ranura Kensington del
TV LCD 1 y gírelo en la dirección de bloqueo 2.
2. Conecte el cable del bloqueo Kensington 3.
3. Fije el bloqueo Kensington a la mesa o a un objeto estático
pesado.
El dispositivo de bloqueo debe adquirirse por separado.
✎
La ubicación del bloqueo Kensington puede variar según los
✎
modelos.
Para impedir que el televisor se caiga ¦
Las grapas, los tornillos y la cadena no se suministran con el
✎
producto; deberá adquirirlos por separado.
1. Apriete firmemente las grapas sobre la pared con los tornillos.
Asegúrese de que los tornillos estén bien fijados en la pared.
2. Quite los tornillos de la parte central posterior del televisor y con
ellos monte las grapas en el televisor.
3. Monte una cadena fuerte entre las grapas del televisor y de la
pared de manera que quede bien tensada.
Compruebe que todas las conexiones estén bien aseguradas.
✎
Compruébelas periódicamente para detectar cualquier signo
de fatiga o de fallo. Si tiene dudas sobre la seguridad de la
instalación, póngase en contacto con un instalador profesional.
Instale el televisor cerca de la pared para evitar que caiga hacia
✎
atrás.
Las grapas de la pared han de estar a la misma o a menor altura que las grapas del televisor.
✎
Cuando desee mover el televisor deberá aflojar la cadena.
✎
” hay una ranura Kensington.
Precaución: Tirar del televisor, empujarlo o colgarse de él puede provocar su caída. En especial, procure que
los niños no se cuelguen del televisor ni lo desestabilicen; éste podría caerse sobre ellos y causarles lesiones
graves o incluso la muerte. Siga las precauciones de seguridad del folleto de seguridad incluido con el producto.
Para mejorar la estabilidad instale un dispositivo antivuelco, como se explica a continuación.
Especificaciones de los tornillos
✎
Televisores LCD de 23-29 pulgadas: M4
x
Televisores LCD de 30~40 pulgadas: M6
x
” en la parte posterior del televisor. Junto al
Fijación del televisor a la pared
<Opcional>
Pared
28
Español
Page 96

Solución de problemas
Si tiene algún problema con el televisor, consulte esta lista en primer lugar. Si ninguno de los consejos funciona, visite
“www.samsung.com” y haga clic en Asistencia técnica o llame al centro de atención al cliente que encontrará en la lista
de la última página
Problemas Soluciones y explicaciones
En primer lugar, ejecute la Prueba de imagen para confirmar que el televisor muestra correctamente la
Calidad de la imagen
La imagen del televisor no se ve tan bien
como en la tienda.
La imagen se ve distorsionada: error de
macrobloques, microbloques, puntos,
pixelización
El color es de mala calidad o falta.
El color o el brillo es de mala calidad.
Hay una línea de puntos en el borde la
pantalla.
La imagen se ve sólo en blanco y negro.
Al cambiar de canal, la imagen se congela,
se ve distorsionada o aparece con retraso.
Calidad del sonido
No hay sonido o se oye demasiado bajo
con el volumen al máximo.
La imagen es buena pero no hay sonido.
Los altavoces hacen un ruido inapropiado.
imagen de prueba.
(Vaya a MENU - Asistencia técnica - Autodiagnóstico- Prueba de imagen) (pág. 21)
Si la imagen de la prueba se muestra correctamente, la imagen deficiente puede provenir de la fuente o la
señal.
Si tiene un decodificador por cable analógico, actualícelo a digital. Utilice un cable HDMI o de •
componentes para conseguir una calidad de imagen de alta definición (HD).
Suscriptores de cable/satélite: Pruebe con estaciones de alta definición (HD) en la oferta de canales.•
Conexión de antena: Pruebe con emisoras de alta definición (HD) después de ejecutar la •
programación automática.
Muchos canales de alta definición (HD) mejoran los contenidos SD (definición estándar).
✎
Ajuste la resolución de la salida de vídeo del receptor de cable/decodificador en 1080i o 720p.•
Compruebe que está viendo la televisión a la distancia mínima recomendada según el tamaño y la •
definición de la señal.
La compresión de los contenidos de vídeo puede causar imágenes distorsionadas especialmente en •
las escenas de movimiento rápido, como en los deportes y las películas de acción.
Un nivel de señal débil o de mala calidad puede causar imágenes distorsionadas. No es un problema •
del televisor.
Si utiliza una conexión de componentes, compruebe que los cables de los componentes estén •
conectados en los terminales correctos. Las conexiones incorrectas o sueltas pueden originar
problemas en el color o que la pantalla se quede en blanco.
Ajuste las opciones de • Imagen en el menú del TV. (vaya a los modos Imagen / Color / Brillo /
Nitidez)
Ajuste las opciones de • Ahorro de energía en el menú del TV. (vaya a MENU - Imagen - Solución
económica - Ahorro de energía)
Intente reiniciar la imagen para ver la configuración de imagen predeterminada. (vaya a • MENU -
Imagen - Reinicio de la imagen)
Si el tamaño de la imagen está establecido en • Ajuste pantalla, cámbielo a 16:9. (P 16)
Cambie la resolución del receptor de cable/decodificador.•
Si está utilizando una entrada compuesta AV, conecte el cable de vídeo (amarillo) en el terminal verde •
de la entrada 1 de componentes del televisor.
Si está conectado al receptor de cable, reinicie éste Vuelva a conectar el cable de alimentación y •
espere a que el decodificador se reinicie. Puede tardar hasta 20 minutos.
Establezca la resolución de salida del decodificador de cable en 1080i o 720p.•
En primer lugar, ejecute la Prueba de sonido para confirmar que el audio del televisor funciona
correctamente.
(vaya a MENU - Asistencia técnica - Autodiagnóstico - Prueba de sonido) (pág. 21)
Si el audio es correcto, el problema del sonido puede provenir de la fuente o la señal.
Compruebe el volumen del dispositivo externo conectado al televisor.•
Configure la opción • Seleccionar altavoz como Altavoz de TV en el menú de sonido. (pág. 18)
Si utiliza un dispositivo externo, compruebe que los cables de audio estén conectados a los •
terminales de entrada de audio correctos del televisor.
Si utiliza un dispositivo externo, compruebe que la opción de salida de audio del dispositivo (por •
ejemplo, quizás deba cambiar la opción de audio del decodificador de cable a HDMI si tiene
conectado HDMI al televisor).
Si se utiliza un cable DVI a HDMI, se necesita un cable de audio independiente.•
Si el televisor tiene un terminal de auriculares, asegúrese de que éstos no estén conectados.•
Compruebe las conexiones de los cables. Compruebe que no haya un cable de vídeo conectado a •
una entrada de audio.
Para la conexión antena/cable, compruebe la potencia de señal. Un nivel de señal débil puede causar •
distorsiones en el sonido.
05 Información adicional
Español
29
Page 97

Información adicional
Problemas Soluciones y explicaciones
No hay imagen, no hay vídeo
Compruebe que el cable de alimentación esté bien conectado en la toma de la pared y en el televisor.•
El televisor no se enciende.
El televisor se apaga automáticamente.
No hay imagen/vídeo.
Conexión RF (Cable/Antena)
El televisor no recibe todos los canales.
La imagen se ve distorsionada: error de
macrobloques, microbloques, puntos,
pixelización
Conexión de PC
Aparece un mensaje de "Modo no
compatible".
“PC” siempre aparece en la lista de fuentes
aunque el PC no esté conectado.
La imagen es buena pero no hay sonido.
Otros
La imagen no se muestra en pantalla
completa.
El mando a distancia no funciona.
El mando a distancia del cable/
decodificador no enciende ni apaga el
televisor ni ajusta el volumen.
Aparece un mensaje de "Modo no
compatible".
Se advierte un olor a plástico que proviene
del televisor.
La Información de señal del televisor no
está disponible en el menú de prueba de
autodiagnóstico.
El televisor está inclinado hacia un lado. Retire la base del soporte de televisor y vuelva a montarla.•
Cuesta montar la base del soporte.
Compruebe que la toma de la pared funciona.•
Intente pulsar el botón • POWER del televisor para asegurarse de que el problema no está en el
mando a distancia. Si el televisor se enciende, consulte “El mando a distancia no funciona” a
continuación.
Compruebe si la opción • Temp. de desc. está establecida en Desactivado en el menú
Configuración. (P 19)
Si el televisor está conectado a un PC, compruebe la configuración de la alimentación de éste.•
Compruebe que el cable de alimentación esté bien conectado en la toma de la pared y en el televisor.•
Cuando se ve la televisión con una conexión de antena o cable, el televisor se apaga tras 10~15 si •
no hay señal.
Compruebe las conexiones de los cables (desconecte y vuelva a conectar todos los cables del •
televisor y de los dispositivos externos).
Establezca la salida de vídeo de los dispositivos externos (receptor de cable/decodificador, DVD, Blu-•
ray, etc.) de modo que coincida con las conexiones de la entrada de TV. Por ejemplo, si la salida de
un dispositivo externo es HDMI, se debe conectar a una entrada HDMI en el televisor.
Compruebe que los dispositivos externos estén encendidos.•
Asegúrese de seleccionar la fuente correcta del TV pulsando el botón • SOURCE del mando a
distancia del televisor.
Compruebe que el cable de antena esté firmemente conectado.•
Ejecute • Plug & Play (configuración inicial) para añadir los canales disponibles a la lista de canales.
Vaya a MENU - Configuración - Plug & Play (configuración inicial) y espere a que todos los canales
disponibles se guarden.
Compruebe la posición de la antena.•
La compresión de los contenidos de vídeo puede causar imágenes distorsionadas especialmente en •
las escenas de movimiento rápido, como en los deportes y las películas de acción.
Un nivel de señal débil puede causar imágenes distorsionadas. No es un problema del televisor.•
Establezca la frecuencia y la resolución de salida del PC de modo que coincida con la resolución •
admitida por el televisor. (P 22)
Esto es normal; “PC” siempre aparece en la lista de fuentes aunque no haya ningún PC conectado.•
Si utiliza una conexión HDMI, compruebe la configuración del audio del PC.•
En cada lado se muestran barras negras en los canales de alta definición (HD) cuando se muestran •
contenidos SD mejorados (4:3).
Barras negras en las partes inferior y superior cuando se ven películas que tienen diferentes formatos •
que el televisor.
Ajuste la opción del tamaño de imagen del dispositivo externo o del televisor al modo de pantalla •
completa.
Cambie las pilas del mando a distancia; haga coincidir los polos (+/–).•
Limpie la ventana de transmisión del sensor del mando a distancia.•
Apunte con el mando a distancia directamente al televisor desde una distancia de 1,5 -2 metros.•
Programe el mando a distancia del mando a distancia de cable/decodificador para que haga •
funcionar el televisor. Consulte el manual del decodificador de cable/satélite para conocer el código
del TV SAMSUNG.
Compruebe la resolución que admite el televisor y ajuste en consecuencia la resolución de salida del •
dispositivo externo. Consulte cómo configurar la resolución en la página 9 de este manual.
Este olor es normal y desaparece con el tiempo.•
Esta función sólo está disponible en los canales digitales con las conexiones de antena (RF/coaxial). •
(P 21)
Compruebe que el televisor esté instalado sobre una superficie plana. Si no puede quitar los tornillos •
del televisor, utilice un destornillador magnetizado.
30
Español
Page 98

Problemas Soluciones y explicaciones
El menú del canal se ve de color gris (no
disponible)
La configuración se pierde después de
30 minutos o cada vez que se apaga el
televisor.
Pérdida intermitente de audio o vídeo.
Puede ver pequeñas partículas si mira de
cerca el borde del marco del televisor
El menú PIP no está disponible. La función• PIP sólo está disponible cuando se utiliza una fuente HDMI, PC o de componentes.
Aparece el mensaje“Señal codificada” o
“No hay señal / Señal débil”.
Ha apagado el televisor hace 45 minutos y
se ha vuelto a encender.
Hay problemas de imagen/sonido
recurrentes.
Puede haber una reacción entre las
almohadillas de amortiguación de caucho
de la base del soporte y el acabado del
mueble.
El panel LCD TFT utiliza un panel que consta de píxeles de ínfimo tamaño que requieren de una tecnología altamente
✎
El menú • Canal sólo está disponible cuando está seleccionada la fuente TV.
Si el televisor está en el modo • Demo tienda, la configuración del audio y la imagen se restablecerá
cada 30 minutos. Cambie el modo de la configuración de Demo tienda a Uso doméstico en el
procedimiento Plug & Play (configuración inicial). Pulse el botón SOURCE para seleccionar el modo
TV, vaya a MENU → Configuración → Plug & Play (configuración inicial) → ENTER
Compruebe las conexiones de los cables y vuelva a conectarlos. •
La pérdida de audio o vídeo se puede deber a que los cables son demasiado rígidos o gruesos. •
Debe asegurarse de que los cables sean lo suficientemente flexibles para un largo periodo de uso.
En un montaje mural del televisor, es aconsejable utilizar cables con conectores de 90 grados.
Esto es una particularidad del diseño del producto y no es un defecto.•
Si utiliza una TARJETA (CI/CI+) en CAM compruebe que esté correctamente insertada en la ranura.•
Si persiste el problema, saque la TARJETA CAM del televisor y vuelva a insertarla.•
Esto es normal. El televisor ejecuta la función OTA (en el aire) por sí solo a fin de actualizar el firmware •
descargado mientras se veía la televisión.
Compruebe y cambie la señal/fuente.•
Para prevenir esto, utilice almohadillas de fieltro en cualquier superficie del televisor que entre en •
contacto con el mueble.
E
.
sofisticada para su fabricación. No obstante, puede que existan unos cuantos píxeles brillantes u oscuros en la pantalla.
Estos píxeles no influirán en el rendimiento del aparato.
Licencia ¦
05 Información adicional
Manufactured under license from Dolby Laboratories.
Dolby and the double-D symbol are trademarks of Dolby Laboratories.
Español
31
Page 99

Información adicional
Especificaciones
Panel nativo 1360 X 768 @ 60 Hz
Consideraciones medioambientales
Temperatura de funcionamiento
Humedad de funcionamiento
Temperatura de almacenamiento
Humedad de almacenamiento
Sistema de televisión Analógico: Según la selección del país
Sistema de color/vídeo Analógico: PAL, SECAM, NTSC-4.43, NTSC-3.58, PAL60
Sistema de sonido BG. OK NICAM. MPEGl
HDMI IN Vídeo: 1080/24p, 1080p, 1080i, 720p, 576p, 576i, 480p, 480i
Soporte giratorio
(Izquierda/derecha) 0˚
Nombre del modelo LE26C350 LE32C350
Tamaño de pantalla
(Diagonal) 26 pulgadas 32 pulgadas
Sonido
Salida 5W X 2 5W X 2
Dimensiones (An x Pr x Al)
Cuerpo principal
Con el soporte
Peso
Cuerpo principal
Con el soporte
Digital: MPEG-2 MP@ML, MPEG-4, H.264/AVC MP@L3, MP@L4.0, HP@L4.0
Audio: Lineal de dos canales PCM 32/44.1/48 kHz, 16/20/24bits
673.3 x 84.0 x 456.0 mm
673.3 x 222.2 x 513.4 mm
5.7 kg
6.1 kg
10°C a 40°C (50°F a 104°F)
10% al 80%, sin condensación
-20°C a 45°C (-4°F a 113°F)
5% al 95%, sin condensación
Digital: DVB-T/DVB-C
Entrada de audio analógico (sólo HDMI IN)
Entrada de PC
795.3 x 84.0 x 525.8 mm
795.3 x 247.2 x 585.3 mm
7.1 kg
7.6 kg
El diseño y las especificaciones pueden cambiar sin previo aviso.
✎
Para conocer la fuente de alimentación y el consumo de energía, consulte la etiqueta adherida al producto.
✎
32
Español
Page 100

Índice
05 Información adicional
A
Actualización del software 21
Administrador de canales 12
Ahorro de energia 15
Ajuste automático 17
Altavoz de TV 18
Altavoz externo 18
Amplificar 17
Antena 12
Autodiagnóstico 21
B
Balance 17
Balance de blanco 15
Bloquear 14
Botón ON/OFF 5
Brillo 14
C
Cambiar PIN 20
Canal favorito 12
Componente 7
Conexión a un dispositivo de audio 8
Conexión a un PC 8
Contraste dinámico 15
D
Dinámico 14
D-sub 8
E
Ecualizador 17
Edición de canales 13
Editar nombre 10
EPG 11
Espacio de instalación 2
Especificaciones 32
G
Guía actual y próxima 11
H
HDMI 7
Herramientas 3
I
Idioma 20
Indicador de encendido 4
Información de señal 21
L
Licencia 31
Lista de fuentes 10
M
Mando a distancia 5
Media Play 22
Melodía 20
Modo de espera 4
Modo de película 15
Modo de repetición 25
Montaje mural 27
Música de fondo 25
Música 23
N
Navigate 10
Nitidez 14
P
Pilas 5
Plug & Play 6
Presentación 24
R
Reloj 19
Reproductor VCR 10
Resolución óptima 9
RGB 15
S
Salida de audio digital 8
Seleccionar altavoz 18
Seleccionar todos 14
Sintonización fina 14
Solución de problemas 29
Subtítulos 20
T
Tamaño de imagen 16
Temporizador de desconexión 19
Temporizador 19
Título 25
Tono color 15
Tono de piel 15
Tono del negro 15
Transpar. de menú 20
U
USB 21, 22
Uso de la vista del canal 11
Uso de la vista planificada 11
Uso de los canales favoritos 12
V
Vista básica 25
Volumen automático 18
Volumen 4, 5
F
Fondo de inicio 25
Fotos 24
Frecuencia 12
Español
33
 Loading...