

Page 1

E-MANUAL
Contact SAMSUNG WORLDWIDE
If you have any questions or comments relating to Samsung products, please contact the SAMSUNG customer care centre.
Country
NIGERIA 0800-726-7864 www.samsung.com
Ghana 0800-10077
Cote D’ Ivoire 8000 0077 www.samsung.com
Senegal 800-00-0077 www.samsung.com
Cameroon 7095-0077 www.samsung.com
KENYA 0800 724 000 www.samsung.com
UGANDA 0800 300 300 www.samsung.com
TANZANIA 0685 88 99 00 www.samsung.com
SOUTH AFRICA 0860-SAMSUNG (726-7864) www.samsung.com
Botswana 0800-726-000 www.samsung.com
Namibia 8197267864 www.samsung.com
Angola 91-726-7864 www.samsung.com
Zambia 211350370 www.samsung.com
Customer Care Centre
0302-200077
Web Site
www.samsung.com
LCD TV
user manual
© 2012 Samsung Electronics Co., Ltd. All rights reserved.
Thank you for purchasing this Samsung product.
To receive more complete service, please register
your product at
www.samsung.com/register
Model _____________Serial No. _____________
BN68-04217K-01
Page 2
For more information on how to use e-Manual (P. 8)
Figures and illustrations in this User Manual are provided for reference only and may differ from actual product appearance. Product
design and specifications may be changed without notice.
Important Warranty Information Regarding Television Format Viewing
1. Functionalities related to Digital TV (DVB) are only available in countries/areas where DVB-T (MPEG2 and MPEG4 AVC) digital terrestrial
signals are broadcasted or where you are able to access to a compatible DVB-C (MPEG2 and MPEG4 AAC) cable-TV service. Please
check with your local dealer the possibility to receive DVB-T or DVB-C signal.
2. DVB-T is the DVB European consortium standard for the broadcast transmission of digital terrestrial television and DVB-C is that for the
broadcast transmission of digital TV over cable. However, some differentiated features like EPG (Electric Programme Guide), VOD (Video On
Demand) and so on, are not included in this specification. So, they cannot be workable at this moment.
3. Although this TV set meets the latest DVB-T and DVB-C standards, as of [August, 2008], the compatibility with future DVB-T digital terrestrial
and DVB-C digital cable broadcasts cannot be guaranteed.
4. Depending on the countries/areas where this TV set is used some cable-TV providers may charge an additional fee for such a service and
you may be required to agree to terms and conditions of their business.
5. Some Digital TV functions might be unavailable in some countries or regions and DVB-C might not work correctly with some cable service
providers.
6. For more information, please contact your local Samsung customer care centre.
The reception quality of TV may be affected due to differences in broadcasting method between the countries. Please check the TV
✎
performance in the local SAMSUNG Authorized Dealer, or the Samsung Call Centre whether it can be improved by reconfiguring TV setting or
not.
Still image warning
Avoid displaying still images (like jpeg picture files) or still image element (like TV programme logo, panorama or 4:3 image format, stock or news
bar at screen bottom etc.) on the screen. Constant displaying of still picture can cause ghosting of LCD screen, which will affect image quality.
To reduce risk of this effect, please follow below recommendations:
• Avoid displaying the same TV channel for long periods.
• Always try do display any image on full screen, use TV set picture format menu for best possible match.
• Reduce brightness and contrast values to minimum required to achieve desired picture quality, exceeded values may speed up the burnout
process.
• Frequently use all TV features designed to reduce image retention and screen burnout, refer to proper user manual section for details.
Securing the Installation Space
Keep the required distances between the product and other objects (e.g. walls) to ensure proper ventilation.
Failing to do so may result in fire or a problem with the product due to an increase in the internal temperature of the product.
When using a stand or wall-mount, use parts provided by Samsung Electronics only.
✎
• If you use parts provided by another manufacturer, it may result in a problem with the product or an injury due to the product falling.
The appearance may differ depending on the product.
✎
Be careful when you contact the TV because some parts can be somewhat hot.
✎
Installation with a stand. Installation with a wall-mount.
10 cm
10 cm10 cm
10 cm
10 cm
10 cm
10 cm
English - 2
Page 3
Accessories
✎
Please make sure the following items are included with your TV. If any items are missing, contact your dealer.
✎
The items’ colours and shapes may vary depending on the models.
✎
Cables not included in the package contents can be purchased separately.
y Remote Control & Batteries (AAA x 2)
y Warranty Card / Safety Guide (Not available in some locations)
✎
An administration fee may be charged if either
(a) an engineer is called out at your request and there is no defect in the product
(i.e. where you have failed to read this user manual)
(b) you bring the unit to a repair centre and there is no defect in the product
(i.e. where you have failed to read this user manual)
✎
The amount of such administration charge will be advised to you before any work or home visit is carried out.
y Power Cord
y Owner’s Instructions
Viewing the Control Panel
✎
The product colour and shape may vary depending on the model.
Control Panel
Remote control sensor Aim the remote control towards this spot on the TV.
Power Indicator Blinks and turns off when the power is on and lights up in standby mode.
SOURCE
E
MENU Displays an on-screen menu, the OSD (on screen display) of your TV’s features.
Y
z
P
(Power)
Standby mode
Do not leave your TV in standby mode for long periods of time (when you are away on a holiday, for example). A small amount of
electric power is still consumed even when the power button is turned off. It is best to unplug the power cord.
Toggles between all the available input sources. In the on-screen menu, use this button as
you would use the ENTERE button on the remote control.
Adjusts the volume. In the OSD, use the
buttons on the remote control.
Changes the channels. In the OSD, use the
and ▲ buttons on the remote control.
Turns the TV on or off.
Y
buttons as you would use the ◄ and ►
z
buttons as you would use the ▼
English - 3
Page 4

Viewing the Remote Control
✎
This is a special remote control for the visually impaired persons and has Braille points on the Power, Channel, and Volume
buttons.
Turns the TV on and off.
Alternately select Teletext ON, Double, Mix or
OFF.
Adjusts the volume.
Displays the main on-screen menu.
Views the Contents Home.
Quickly select frequently used functions.
Selects the on-screen menu items and
changes the values seen on the menu.
Returns to the previous menu.
E-MANUAL: Displays the e-Manual
guide. (p. 8)
P.SIZE: Selects the picture size.
AD/SUBT.: Audio Description selection.
(Not available in some locations) / Displays
digital subtitles.
CONTENT
A B C D
E-MANUAL
P.SIZE
AD/SUBT.
Displays and selects the available video
sources.
Press to directly access to channels.
Returns to the previous channel.
Cuts off the sound temporarily.
Changes channels.
Displays channel lists on the screen.
Displays the EPG (Electronic Programme
Guide).
Displays information on the TV screen.
Exits the menu.
Use these buttons according to the direction
on screen.
Use these buttons in a specific feature.
For details, refer to the e-Manual.
Installing batteries (Battery size: AAA)
English - 4
Page 5

Initial Setup
When the TV is initially powered on, a sequence of on-screen prompts will assist in configuring basic settings. Press the POWERP
button. Setup is available only when the source is set to TV.
1. Menu Language: Selecting a menu language
Press the ▲ or ▼ button, then press the ENTERE button.
Select the desired OSD (On Screen Display) language.
2. Use Mode: Selecting Store Demo or Home Use
Press the ▲ or ▼ button, then press the ENTERE button.
Select the Home Use mode. Store Demo mode is for retail environments.
To return the unit’s settings from Store Demo to Home Use (standard): Press the volume button on the TV. When the OSD volume is
displayed, press and hold MENU for 5 sec.
✎
Store Demo is only for shop display. If you select it, several functions are not able to use. Please select Home Use when you
watch at home.
3. Country (Depending on the country): Selecting a country
Press the ▲ or ▼ button, then press the ENTERE button.
Select the appropriate country.
✎
After selecting the country in the country menu, some models may proceed with an additional option to setup the pin number.
4. Auto Tuning (Step 1): Selecting how you watch your TV
Let’s find and store channels on your TV. Do you need to search for channels?
• Yes, I need to.: Memorises all of the available channels using RF cable.
• No, I don’t need to.: You don’t need to use Auto Tuning to find channels.
5. Auto Tuning (Step 2): Selecting a search options
Select the desired broadcasting signal and antenna source. Press the ▲/▼/◄/► button, then press the ENTERE button.
When setting the antenna source to Cable, a step appears allowing you to assign numerical values (channel frequencies) to the
channels. For more information, refer to Channel → Auto Tuning.
✎
Some channel may not be transmitted to this television. It depends on Broadcasting signal gain or specification.
✎
Press the ENTERE button at any time to interrupt the memorisation process.
✎
See e-Manual chapter “Retuning Channels > Auto Tuning”
6. Clock: Setting the Clock Mode
• Auto: Set the current time automatically.
• Manual: Allows you to manually set the current date and time.
7. Time Zone (Depending on the country): Setting your Time Zone
This step is only available when the clock mode is set to Auto.
• Auto: Set the time zone automatically.
• Manual: Set the time zone manually.
✎
If you selected Manual, you can select whether to turn DST (Daylight Savings Time) On or Off. (Depending on the
country)
8. Setup Complete
Press the ENTERE button.
✎
The completed settings are displayed.
If You Want to Reset This Feature...
Select System - Setup (Initial Setup). Enter your 4 digit PIN number. The default PIN number is “0-0-0-0”. If you want to change the
PIN number, use the Change PIN function.
You should do Setup (MENU → System) again at home although you did in shop.
✎
If you forget the PIN code, press the remote control buttons in the following sequence in Standby mode, which resets the PIN to
“0-0-0-0”: MUTE → 8 → 2 → 4 → POWER (on).
English - 5
Page 6
Connections
HDMI, HDMI/DVI connection SCART connection
BD Player / PC
DVI OUTHDMI OUT
VCR or DVD
EXT
SERVICE
HDMI IN
USB
(5V 0.5A)
USB
1 (DVI)2
ANT IN
EXT (RGB)
VHF/UHF Antenna
TV Rear Panel
or
✎
The position of port may differ
depending on the model.
Headphone connection
Cable
English - 6
Page 7

Display Modes (HDMI/DVI Input)
Optimal resolution is 1366 X 768 @ 60 Hz. See specification page for full available resolution.
SERVICE
SERVICE
✎✎
NOTE
• For HDMI/DVI cable connection, you must use the HDMI IN 1(DVI) port.
• If an HDMI to DVI cable is connected to the HDMI IN 1(DVI) port, the audio does not work.
• The interlace mode is not supported.
• The set might operate abnormally if a non-standard video format is selected.
• PC(D-Sub) and PC/DVI AUDIO IN input are not supported.
• COMPONENT/AV IN input is not supported.
• DIGITAL AUDIO OUT(OPTICAL) is not supported.
• Connecting through the HDMI cable may not be supported depending on the PC.
• The headphone jack supports only the 3 conductor tip-ring-sleeve (TRS) type.
Connector for service only.
Connecting to a COMMON INTERFACE slot
(Your TV viewing Card Slot)
To watch paid channels, the “CI or CI+ CARD” must be inserted.
• If you do not insert the “CI or CI+ CARD”, some channels will display
the message “Scrambled Signal”.
• The pairing information containing a telephone number, the “CI or
CI+ CARD” ID the Host ID and other information will be displayed in
about 2~3 minutes. If an error message is displayed, please contact
your service provider.
• When the configuration of channel information has finished, the
message “Updating Completed” is displayed, indicating the channel
list is updated.
y The image may differ depending on the model.
Changing the Input Source
Source
TV / Ext. / HDMI1/DVI / HDMI2
Use to select TV or other external input sources such as DVD / Blu-ray players / cable box / STB satellite receiver connected to the TV.
✎
In the displaying Source list, connected inputs will be highlighted.
✎
PC(D-Sub) input is not supported. If you want to connect PC to the TV, use HDMI1/DVI input.
✎
Ext. always stays activated.
✎
Press the TOOLS button.
• Edit Name
You can set an external input sources name you want.
– When connecting a PC to the HDMI IN 1(DVI) port with HDMI cable, you should set the TV to PC mode under Edit Name.
– When connecting a PC to the HDMI IN 1(DVI) port with HDMI to DVI cable, you should set the TV to DVI PC mode under
Edit Name.
– When connecting an AV devices to the HDMI IN 1(DVI) port with HDMI to DVI cable, you should set the TV to DVI Devices
mode under Edit Name.
• Information
You can see detailed information about the connected external device.
English - 7
Page 8
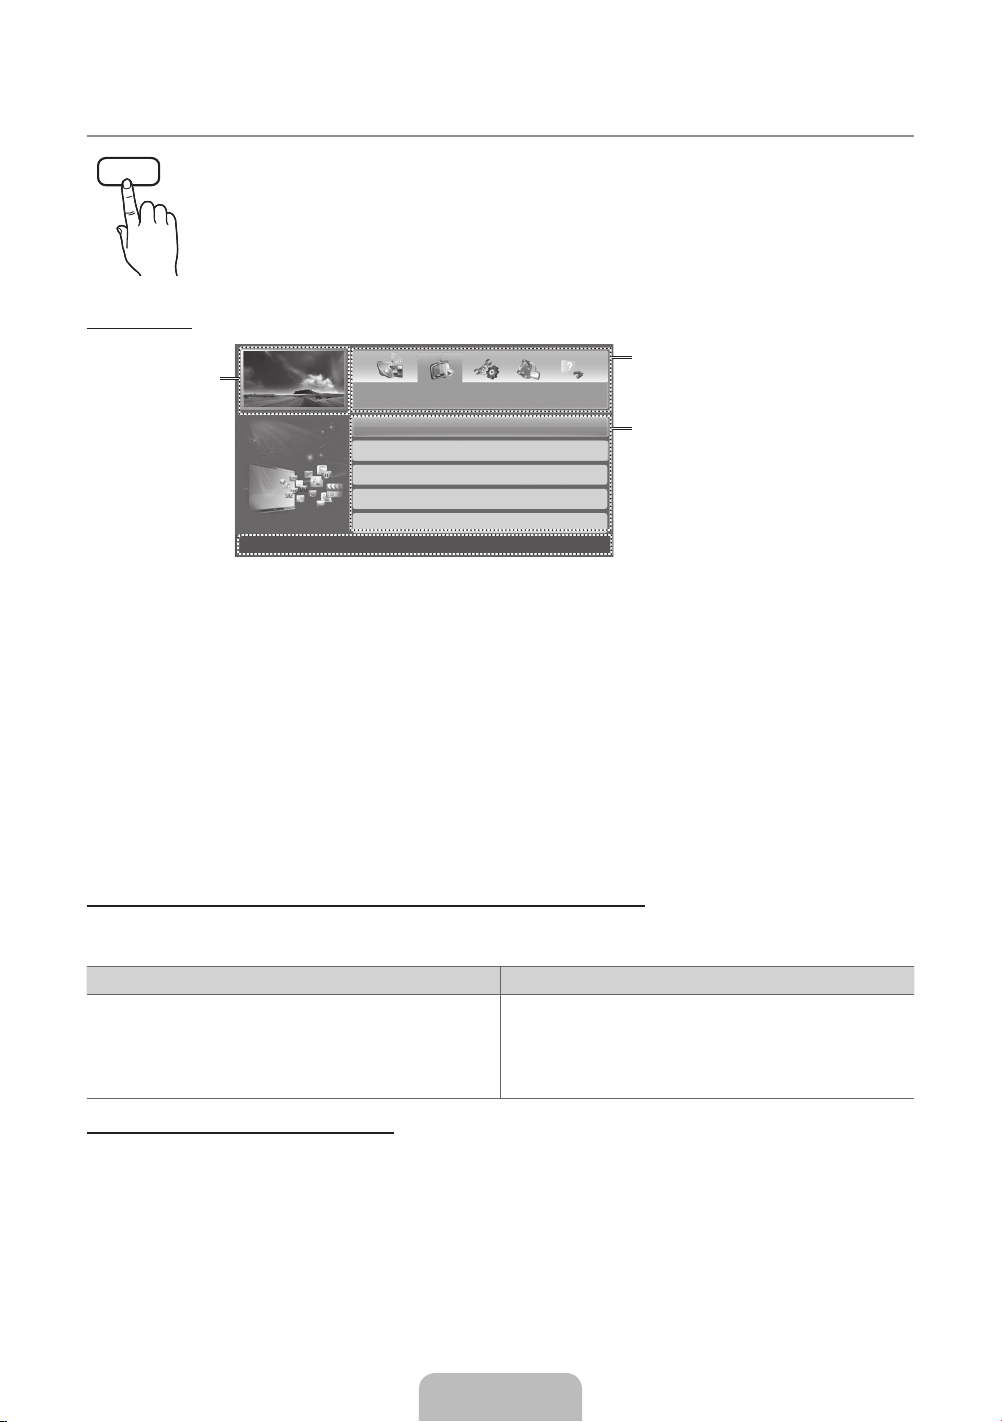
How to use the e-Manual
E-MANUAL
Screen Display
Currently displayed
video, TV
Programme, etc.
You can find instructions about your TV’s features in the e-Manual in your TV. To use, press the E-MANUAL button
on your remote. Move the cursor using the up/down/right/left buttons to highlight a category, then a topic, and then
press the ENTERE button. The e-Manual displays the page you want to see.
You can also access it through the menu:
MENUm → Support → e-Manual → ENTERE
O
✎
To return to the e-Manual main menu, press the E-MANUAL button on the remote.
The category list. Press ◄ or ► button to
Basic Features
Changing the Preset Picture Mode
Adjusting Picture Settings
Changing the Picture Options
Changing the Preset Sound Mode
Adjusting Sound Settings
}
Index E Enter e Exit
Operation Buttons
}
Index: Displays the index screen.
E
Enter: Selects a category or sub-menu.
e
Exit: Exit the e-Manual.
<Viewing the Contents>
a
Try now: Displays the OSD menu that corresponds to the topic. To return to the e-Manual screen, press
the E-MANUAL button.
b
Home: Moves to the e-Manual home screen.
L
Page: Moves to previous or next page.
{ Zoom: Magnifies a screen.
– Press the { (Zoom) button to magnify the screen. You can scroll through the magnified screen
by using the ▲ or ▼ buttons. To return to the screen to normal size, press the RETURN button.
select the category you want.
Displays the sub-menu list. Use the arrow
buttons on your remote to move the cursor.
Press ENTER
menu you want.
E
button to select the sub-
How to toggle between an e-Manual topic and the corresponding OSD menu(s).
✎
This function is not enabled in some menus.
✎
You can not use the Tr y n ow function if the menu is not activated.
Method 1 Method 2
1. If you want to use the menu that corresponds to an
e-Manual topic, press the red button to select Try now.
2. To return to the e-Manual screen, press the E-MANUAL
button.
1. Press the ENTERE button when a topic is displayed.
“Are you sure?” appears. Select Yes , and then press the
ENTERE button. The OSD window appears.
2. To return to the e-Manual screen, press the E-MANUAL
button.
How to search for a topic on the index page
✎
This function may not be supported depending on the language.
1. If you want to search a keyword, press the blue button to select Index.
2. Press the ◄ or ► button to select a character order you want.
3. Press the ▲ or ▼ button to select a keyword you want to see, and then press the ENTERE button.
4. You can view the corresponding e-Manual instruction screen.
✎
To close the Index screen, press the RETURN button.
English - 8
Page 9
Installing the Wall Mount
The wall mount kit (sold separately) allows you to mount the TV
on the wall. For detailed information on installing the wall mount,
see the instructions provided with the wall mount. Contact a
technician for assistance when installing the wall mount bracket.
We do not advice you to do it yourself.
Samsung Electronics is not responsible for any damage to the
product or injury to yourself or others if you elect to install the TV
on your own.
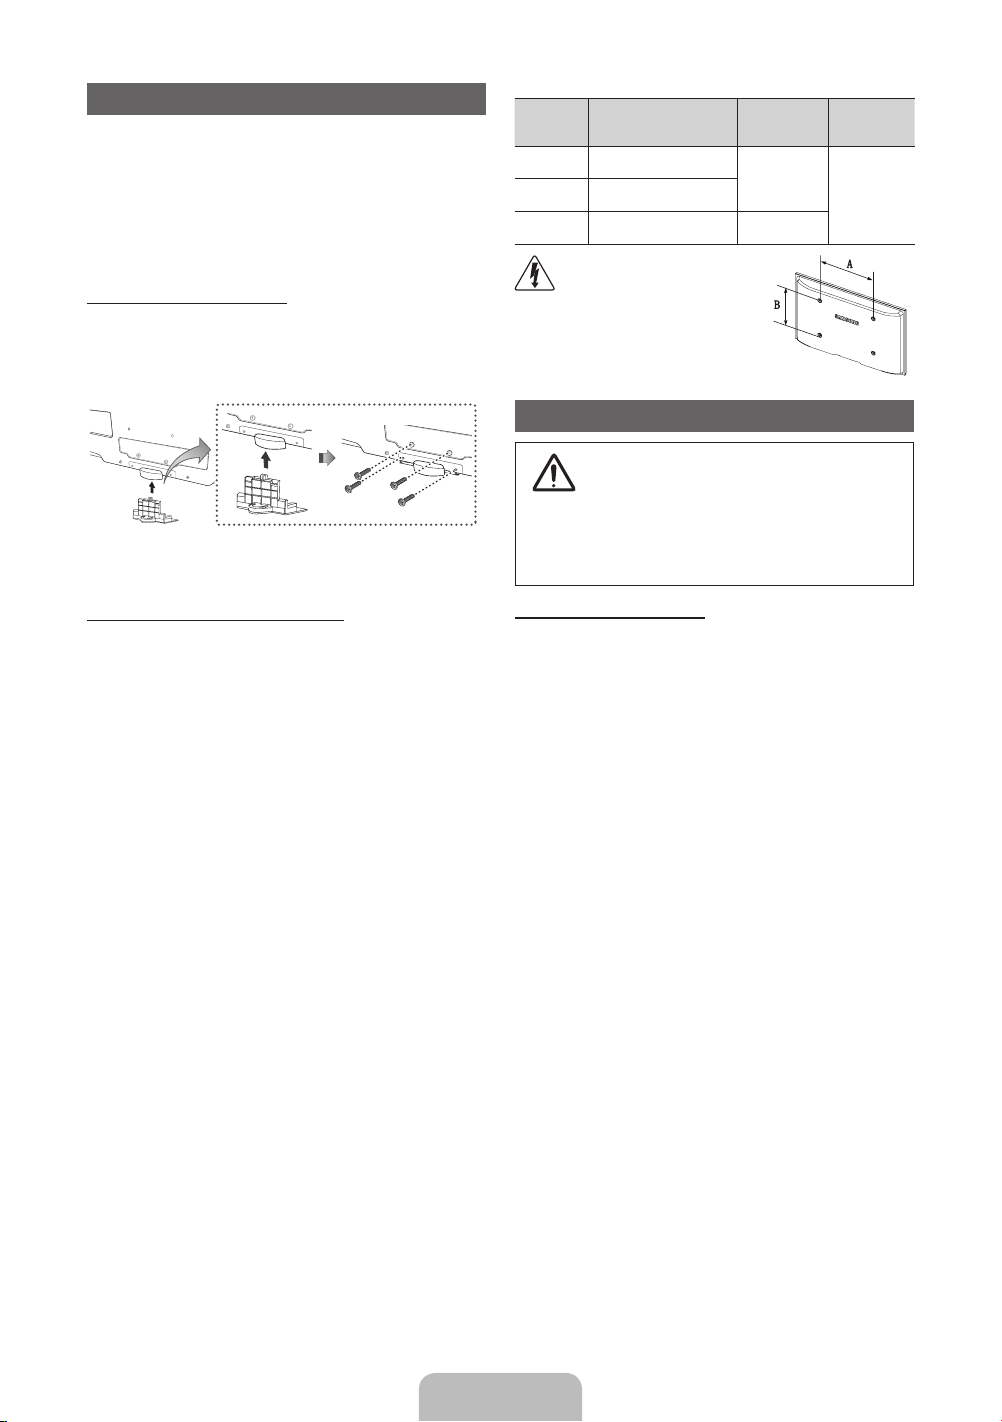
Assembling the Guide Stand
When installing the TV onto a wall, attach the Guide Stand as
shown.
✎
Use only the Guide Stand provided as an accessory. (The
Guide Stand may differ depending on the model.)
Guide Stand
inches VESA Spec. (A * B)
22 75 X 75
32 200 X 200 M6
Do not install your Wall Mount
Kit while your TV is turned on.
It may result in personal injury
due to electric shock.
Securing the TV to the Wall
Caution: Pulling, pushing, or climbing onto the TV
may cause the TV to fall. In particular, ensure that
your children do not hang over or destabilize the TV;
doing so may cause the TV to tip over, resulting in
serious injuries or death. Follow all safety precautions
provided on the included Safety Flyer. For added
stability, install the anti-fall device for safety
purposes, as follows.
Standard
Screw
M4
Quantity
426 200 X 100
Wall Mount Kit Specifications (VESA)
✎
Wall mount kit is not supplied but sold separately.
Install your wall mount on a solid wall perpendicular to the floor.
When attaching to other building materials, please contact your
nearest dealer. If installed on a ceiling or slanted wall, it may fall
and result in severe personal injury.
✎
NOTE
Standard dimensions for wall mount kits are shown in
x
the table below.
When purchasing our wall mount kit, a detailed
x
installation manual and all parts necessary for assembly
are provided.
Do not use screws that do not comply with the VESA
x
standard screw specifications.
Do not use screws longer than the standard dimension,
x
as they may cause damage to the inside of the TV set.
For wall mounts that do not comply with the VESA
x
standard screw specifications, the length of the screws
may differ depending on their specifications.
Do not fasten the screws too strongly, this may damage
x
the product or cause the product to fall, leading to
personal injury. Samsung is not liable for these kinds of
accidents.
Samsung is not liable for product damage or personal
x
injury when a non-VESA or non-specified wall mount
is used or the consumer fails to follow the product
installation instructions.
Do not exceed 15 degrees tilt when mounting this TV.
x
To avoid the TV from falling
1. Put the screws into the clamps and firmly fasten them onto
the wall. Confirm that the screws have been firmly installed
onto the wall.
✎
You may need additional material such as an anchor
depending on the type of wall.
✎
Since the necessary clamps, screws, and string are
not supplied, please purchase these additionally.
2. Remove the screws from the centre back of the TV, put the
screws into the clamps, and then fasten the screws onto the
TV again.
✎
Screws may not be supplied with the product. In this
case, please purchase the screws of the following
specifications.
3. Connect the clamps fixed onto the TV and the clamps fixed
onto the wall with a strong string and then tie the string
tightly.
✎
NOTE
• Install the TV near to the wall so that it does not fall
backwards.
• It is safe to connect the string so that the clamps
fixed on the wall are equal to or lower than the
clamps fixed on the TV.
• Untie the string before moving the TV.
4. Verify all connections are properly secured. Periodically
check connections for any sign of fatigue for failure. If you
have any doubt about the security of your connections,
contact a professional installer.
English - 9
Page 10
Troubleshooting
If the TV seems to have a problem, first try this list of possible problems and solutions. If none of these troubleshooting tips
apply, visit “www.samsung.com”, then click on Support, or call Samsung customer service centre.
Issues
• Make sure the AC power cord is securely plugged in to the wall outlet and the TV.
• Make sure the wall outlet is working.
• Try pressing the POWER button on the TV to make sure the problem is not the remote. If the TV turns on, refer to
“Remote control does not work” below.
Issues
• Check cable connections (remove and reconnect all cables connected to the TV and external devices).
• Set your external device’s (Cable/Set top Box, DVD, Blu-ray etc) video outputs to match the connections to the TV input.
For example, if an external device’s output is HDMI, it should be connected to an HDMI input on the TV.
• Make sure your connected devices are powered on.
• Be sure to select the TV’s correct source by pressing the SOURCE button on the remote control.
• Reboot the connected device by reconnecting the device’s power cable.
Issues
• Replace the remote control batteries with the poles (+/–) in the right direction.
• Clean the sensor’s transmission window on the remote.
• Try pointing the remote directly at the TV from 5~6 feet away.
Issues
• Program the Cable/Set top box remote control to operate the TV. Refer to the Cable/Set user manual for the SAMSUNG
TV code.
The TV will not turn on.
There is no picture/video.
The remote control does not work.
The cable/set top box remote control doesn’t turn the TV on or off, or adjust the volume.
✎
You can keep your TV as optimum condition to upgrade the latest firmware on web site (www.samsung.com → Support
→ Downloads) by USB.
✎
This TFT LCD panel uses a panel consisting of sub pixels which require sophisticated technology to produce. However,
there may be a few bright or dark pixels on the screen. These pixels will have no impact on the performance of the
product.
English - 10
Page 11
Specifications
10°C 40°C 50°F 104°F
10°C 40°C 50°F 104°F
-20°C 45°C -4°F 113°F
Display Resolution 1366 x 768
Environmental Considerations
Operating Temperature
Operating Humidity
Storage Temperature
Storage Humidity
to
to
(
(
10% to 80%, non-condensing
5% to 95%, non-condensing
to
to
)
)
TV System Analogue: B/G, D/K, L, I (Depending on your country selection)
Colour/Video System Analogue: PAL, SECAM, NTSC-4.43, NTSC-3.58, PAL60
Sound System BG, DK, L, NICAM, MPEG1, DD, DD+, HEAAC
HDMI IN Video: 1080 24p, 1080p, 1080i, 720p, 576p, 480p
Model Name LA32E420
Screen Size
Sound (Output) 5W X 2
Dimensions (WxDxH)
Body
With stand
Weight
Without Stand
With Stand
✎
Design and specifications are subject to change without prior notice.
✎
For information about power supply, and more about power consumption, refer to the label attached to the product.
✎
Typical power consumption is measured according to IEC 62087 Ed.2
Digital: MPEG-2 MP@ML, MPEG-4, H.264/AVC MP@L3, MP@L4.0, HP@L4.0
Audio: 2Ch Linear PCM 32/44.1/48kHz, 16/20/24bits.
Digital: DVB-T/DVB-C
inches
784.4 X 98.1 X 502.9 (mm)
784.4 X 182.4 X 545.3 (mm)
7.7 kg
8.7 kg
English - 11
Page 12
Supported Video Formats
File Extention Container Video Codec Resolution Frame rate (fps) Bit rate (Mbps) Audio Codec
*.avi
*.mkv
*.asf
*.wmv
*.mp4
*.3gp
*.vro
*.mpg
*.mpeg
*.ts
*.tp
*.trp
*.mov
*.flv
*.vob
*.svi
*.m2ts
*.mts
*.divx
AVI
MKV
ASF
MP4
3GP
VRO
VOB
PS
TS
DivX 3.11/4.x/5.x/6.x
MPEG4 SP/ASP
H.264 BP/MP/HP
Motion JPEG 640 x 480 8
Window Media Video v9
MPEG2
MPEG1
1920 x 1080
6~30
1920 x 1080 30
30
AC3
LPCM
ADPCM
(IMA, MS)
AAC
HE-AAC
WMA
DD+
MPEG
(MP3)
DTS Core
G.711(A-Law,
μ-Law)
Full available resolution: 1366 X 768 @ 60 Hz
Mode Resolution
IBM
MAC
VESA DMT
640 x 350 31.469 70.086 25.175 +/720 x 400 31.469 70.087 28.322 -/+
640 x 480 35.000 66.667 30.240 -/832 x 624 49.726 74.551 57.284 -/640 x 480 31.469 59.940 25.175 -/640 x 480 37.861 72.809 31.500 -/640 x 480 37.500 75.000 31.500 -/800 x 600 37.879 60.317 40.000 +/+
800 x 600 48.077 72.188 50.000 +/+
800 x 600 46.875 75.000 49.500 +/+
1024 x 768 48.363 60.004 65.000 -/1024 x 768 56.476 70.069 75.000 -/1024 x 768 60.023 75.029 78.750 +/+
1280 x 720 45.000 60.000 74.250 +/+
1366 x 768 47.712 59.790 85.500 +/+
Horizontal Frequency
(KHz)
Vertical Frequency
(Hz)
Pixel Clock Frequency
(MHz)
Sync Polarity
(H / V)
English - 12
Page 13
Licence
Storage and Maintenance
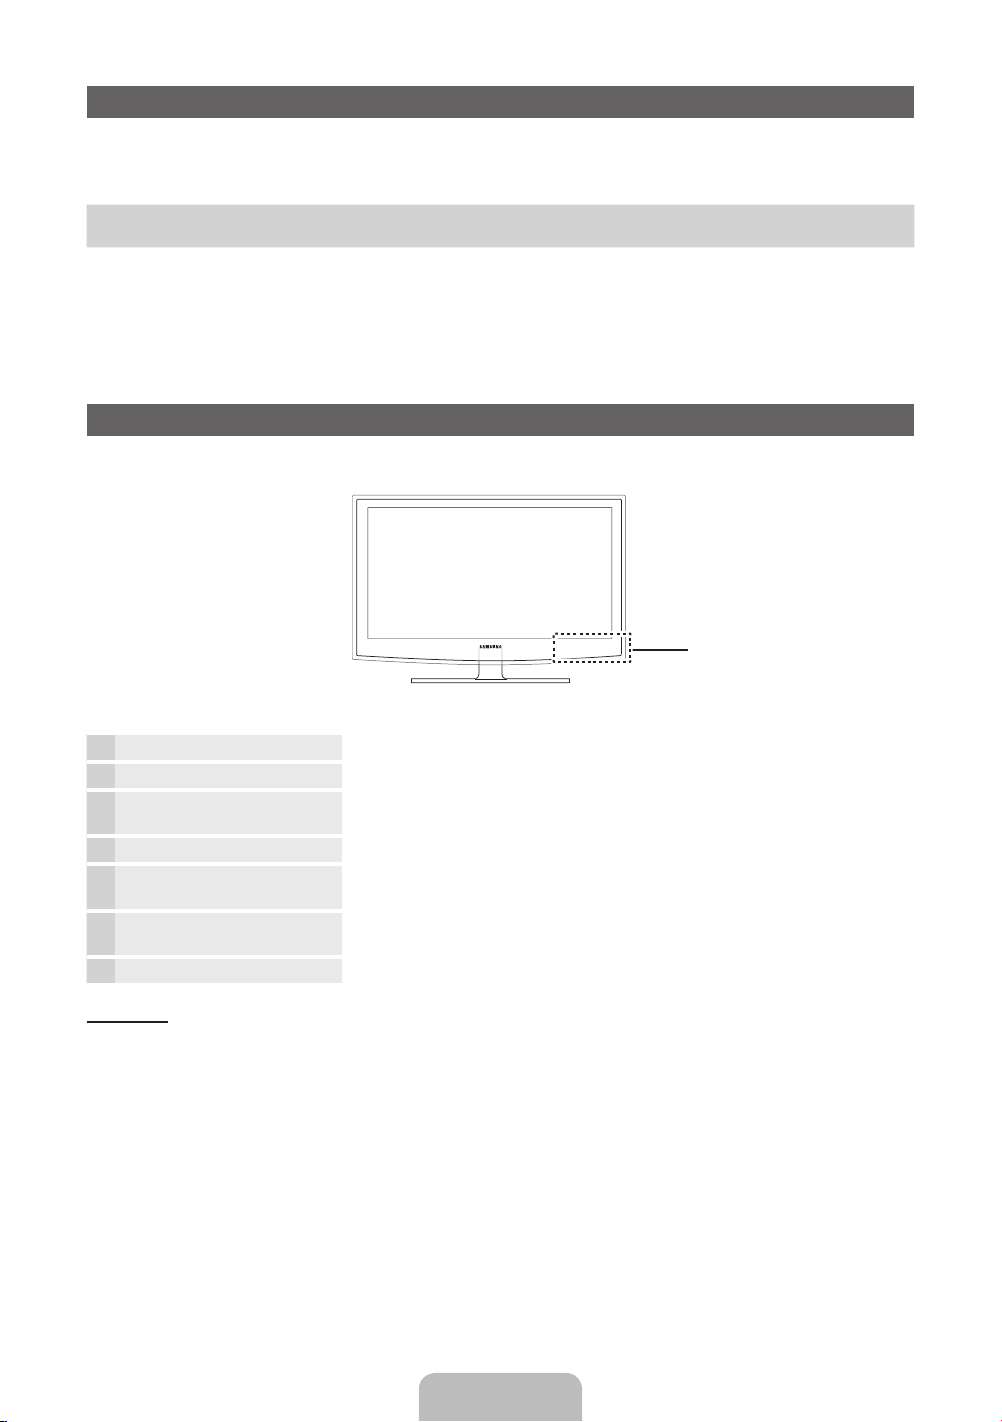
✎
If you remove the attached sticker on the TV screen, clean the residues and then watch TV.
✎
The exterior and screen of the product can get scratched during cleaning. Be sure to wipe the exterior and screen carefully
using a soft cloth to prevent scratches.
Do not spray water directly onto the product. Any liquid that goes
into the product may cause a failure, fire, or electric shock.
Clean the product with a soft cloth dapped in a small amount of
water. Do not use a flammable liquid (e.g. benzene, thinners) or a
cleaning agent.
English - 13
Page 14

Pour plus d'informations sur l'utilisation du manuel électronique (P. 8)
Les figures et illustrations contenues dans ce mode d’emploi sont fournies pour référence uniquement. Elles peuvent différer de
l’aspect réel du produit. La conception et les spécifications du produit sont susceptibles d’être modifiées sans préavis.
Informations importantes relatives à la garantie de votre téléviseur (format d'affichage)
1. Les fonctions relatives à la télévision numérique (DVB) ne sont disponibles que dans les pays ou régions où des signaux terrestres
numériques de type DVB-T (MPEG2 et MPEG4 AVC) sont diffusés ou dans lesquels vous avez accès à un service de télévision par câble
compatible DVB-C (MPEG2 et MPEG4 AAC). Consultez votre distributeur local pour connaître les possibilités en matière de réception des
signaux DVB-T ou DVB-C.
2. DVB-T est la norme du consortium européen DVB pour la diffusion des signaux terrestres de télévision numérique. La norme DVB-C est,
quant à elle, prévue pour la diffusion des signaux de télévision numérique par câble. Certaines fonctions particulières, telles que le guide
électronique des programmes (Electric Program Guide - EPG) ou encore la vidéo à la demande (Video On Demand - VOD), ne sont
toutefois pas incluses dans cette spécification. Dès lors, elles ne seront pas traitées pour l’instant.
3. Bien que ce téléviseur soit conforme aux dernières normes DVB-T et DVB-C (août 2008), il n’est pas garanti qu’il soit compatible avec les
futures diffusions de signaux numériques terrestres DVB-T et par câble DVB-C.
4. En fonction du pays ou de la région où vous vous trouvez, certains opérateurs de télévision par câble peuvent facturer des frais
supplémentaires pour un tel service. Il se peut également que vous deviez accepter les termes et conditions de ces sociétés.
5. Il se peut que certaines fonctions de TV numérique ne soient pas disponibles dans certains pays ou certaines régions et que la réception
des signaux DVB-C ne soit pas correcte avec tous les opérateurs.
6. Pour plus d’informations, contactez votre service client Samsung.
Les différentes méthodes de diffusion adoptées en fonction des pays peuvent affecter la qualité de réception du téléviseur. Vérifiez le
✎
fonctionnement du téléviseur chez votre revendeur agréé SAMSUNG ou contactez le centre d’appel de Samsung pour savoir s’il est possible
d’en améliorer les performances en reconfigurant les réglages.
Avertissement d’image fixe
Evitez d'afficher sur l'écran des images fixes (telles que des photos au format JPEG) ou des éléments d'images fixes (tels que des logos de
programmes TV, un format d'image 4:3 ou panoramique, des bandeaux d'actualités ou d'informations boursières au bas de l'écran, etc.).
L’affichage permanent d’images fixes risque, en effet, d’entraîner une usure irrégulière du phosphore d’écran, ce qui peut se traduire par une
dégradation de la qualité d’image. Pour atténuer les risques, suivez scrupuleusement les recommandations suivantes :
• Evitez d’afficher le même canal de télévision pendant de longues périodes.
• Essayez toujours d’afficher l’image en plein écran ; pour obtenir une correspondance optimale, utilisez le menu de format d’image du
téléviseur.
• Réduisez les valeurs de luminosité et de contraste sur le minimum requis pour obtenir la qualité d’image souhaitée. L’utilisation de valeurs
trop élevées risque d’accélérer le processus de brûlure.
• Utilisez fréquemment toutes les fonctions du téléviseur conçues pour réduire le phénomène de rémanence et la brûlure d’écran. Pour plus
d’informations à ce sujet, consultez la section appropriée du mode d’emploi.
Sécurisation de l’espace d’installation
Maintenez les distances requises entre le produit et les autres objets (par exemple, les murs) afin de garantir une ventilation adaptée.
Le non-respect de ces distances peut provoquer un incendie ou un problème au produit en raison d’une augmentation de la température interne
de celui-ci.
Lors de l’utilisation d’un pied ou d’un support mural, utilisez uniquement les pièces fournies par Samsung Electronics.
✎
• L’utilisation de pièces fournies par un autre fabricant peut occasionner un problème au niveau du produit ou la chute de celui-ci, ce
qui pourrait vous blesser.
L’aspect peut varier en fonction du produit.
✎
Soyez prudent lorsque vous touchez le téléviseur, car certaines parties peuvent être brûlantes.
✎
Installation avec un pied. Installation avec un support de montage mural.
10 cm
10 cm10 cm
10 cm
10 cm
10 cm
10 cm
Français - 2
Page 15
Accessoires
✎
Vérifiez que les éléments suivants sont inclus avec votre téléviseur. S’il manque des éléments, contactez votre revendeur.
✎
La couleur et la forme des éléments peuvent varier en fonction du modèle.
✎
Les câbles qui ne se trouvent pas dans le contenu de l'emballage peuvent être achetés séparément.
y Télécommande et piles (AAA x 2)
y Carte de garantie / Manuel de sécurité (non disponible dans certains pays)
✎
Des frais d'administration peuvent vous être facturés si :
(a) un technicien intervient à votre demande et que le produit ne comporte aucun défaut
(c.-à-d; si vous n'avez pas pris la peine de lire le présent manuel d'utilisation)
(b) vous amenez le produit dans un centre de réparation alors qu'il ne comporte aucun défaut
(c.-à-d; si vous n'avez pas pris la peine de lire le présent manuel d'utilisation)
✎
Le montant de ces frais d'administration vous sera signifié avant la réalisation de toute prestation ou visite à domicile.
y Câble d'alimentation
y Instructions d’utilisation
Présentation du panneau de commande
✎
La couleur et la forme du produit peuvent varier en fonction du modèle.
Panneau de configuration
Capteur de la télécommande Dirigez la télécommande vers ce point du téléviseur.
Témoin d’alimentation Clignote, puis s'arrête lorsque le téléviseur est allumé. S'allume en mode Veille.
SOURCE
E
MENU Affiche un menu à l'écran (ou OSD) reprenant les fonctions de votre téléviseur.
Y
z
P
(Alimentation)
Mode Veille
Ne laissez pas le téléviseur en mode Veille pendant de longues périodes (lorsque vous partez en vacances, par exemple). L’appareil
consomme toujours une petite quantité d’énergie, même lorsque le bouton marche/arrêt est en position Off. Il est préférable de
débrancher le cordon d’alimentation.
Bascule entre toutes les sources d'entrée disponibles. Dans le menu à l'écran, utilisez ce
bouton de la même façon que le bouton ENTERE de la télécommande.
Permet de régler le volume. Dans le menu à l'écran, utilisez les boutons
même façon que les boutons ◄ et ► de la télécommande.
Permet de modifier les chaînes. Dans le menu à l'écran, utilisez les boutons
la même façon que les boutons ▼ et ▲ de la télécommande.
Permet d’allumer et éteindre la télévision.
Y
z
de la
de
Français - 3
Page 16

Présentation de la télécommande
✎
Ceci est une télécommande spéciale destinée aux malvoyants. Elle dispose de points Braille sur les boutons Power, Channel et
Volume.
Permet d’allumer et éteindre la télévision.
Choisissez Teletext Activé, Double, Mix ou
ARRET.
Permet de régler le volume.
Permet d’afficher le menu principal à l’écran.
Affiche l'Accueil contenu.
Permet de sélectionner rapidement les
fonctions fréquemment utilisées.
Permettent de sélectionner des éléments de
menu à l’écran et de modifier les valeurs des
menus.
Permet de revenir au menu précédent.
E-MANUAL: affiche le Guide e-Manual.
(p. 8)
P.SIZE: permet de sélectionner le format
de l'image.
AD/SUBT.: Sélection de la description
audio. (Non disponible dans tous les
pays) / permet d'afficher les sous-titres
numériques.
CONTENT
A B C D
E-MANUAL
P.SIZE
AD/SUBT.
Permet d’afficher et de sélectionner les
sources vidéo disponibles.
Appuyez pour atteindre les chaînes
directement.
Permet de revenir à la chaîne précédente.
Permet de couper temporairement le son.
Permet de changer de chaîne.
Affiche la liste des chaînes à l’écran.
Permet d’afficher le Guide électronique des
programmes (EPG).
Permet d’afficher des informations sur l’écran
du téléviseur.
Permet de quitter le menu.
Utilisez ces boutons conformément aux
instructions affichées à l'écran.
Ces boutons ont des fonctions spécifiques.
Pour plus d’informations, reportez-vous au
manuel électronique.
Installation des piles (type de pile : AAA)
Français - 4
Page 17

Configuration initiale
Lorsque le téléviseur est allumé pour la première fois, plusieurs invites s'affichent pour vous aider à configurer les réglages de base.
Appuyez sur le bouton POWERP. Configuration n'est disponible que lorsque la source est définie sur TV.
1. Langue des menus: Sélection de la langue des menus
Appuyez sur le bouton ▲ ou ▼, puis sur ENTERE.
Sélectionnez la langue de votre choix pour l'affichage à l'écran.
2. Mode Utilisation: Sélection du mode Util.magasin ou Util. domicile
Appuyez sur le bouton ▲ ou ▼, puis sur ENTERE.
Sélectionnez le mode Util. domicile. Le mode Util.magasin est prévu pour un usage en magasin.
Pour rétablir les paramètres du téléviseur de Util.magasin à Util. domicile (standard): appuyez sur le bouton Volume du téléviseur.
Lorsque le menu OSD du volume s'affiche, appuyez pendant 5 secondes sur le bouton MENU.
✎
Util.magasin est disponible uniquement pour une exposition en magasin. Si vous sélectionnez cette option, plusieurs
fonctions ne sont pas disponibles. Sélectionnez Util. domicile lorsque vous regardez le téléviseur à la maison.
3. Pays (en fonction du pays): Sélection d'un pays
Appuyez sur le bouton ▲ ou ▼, puis sur ENTERE.
Sélectionnez le pays de votre choix.
✎
Après la sélection du pays dans le menu Pays, certains modèles peuvent demander, en plus, le code PIN.
4. Recherche automatique (Etape1): sélection du mode de visionnage du téléviseur
Trouvons et mémorisons les chaînes sur votre TV. Avez-vous besoin de rechercher les chaînes ?
• Oui, j’en ai besoin.: mémorise toutes les chaînes disponibles à l'aide d'un câbleRF.
• Non, je n’en ai pas besoin.: Il est inutile d'utiliser la fonction de recherche automatique pour trouver des chaînes.
5. Recherche automatique (Etape2): sélection d'une option de recherche
Sélectionnez le signal de diffusion et la source d'antenne de votre choix. Appuyez sur le bouton ▲/▼/◄/► et appuyez ensuite sur
ENTERE.
Lors du réglage de la source d'antenne sur Câble, une fenêtre s'affiche pour vous permettre d'attribuer des valeurs numériques
(fréquences) aux chaînes. Pour plus d'informations, reportez-vous à Canal → Recherche automatique.
✎
Certaines chaines peuvent ne pas être transmise à ce téléviseur. Cela dépend du signal de radiodiffusion ou de specification.
✎
Appuyez sur le bouton ENTERE à tout moment pour interrompre la mémorisation.
✎
Reportez-vous à l’e-Manual, sous «Nouvelle recherche des chaînes > Recherche automatique»
6. Horloge: réglage du mode Horloge
• Auto: permet de régler l'heure actuelle automatiquement.
• Manuel: permet de définir manuellement la date et l'heure actuelles.
7. Fuseau Horaire (en fonction du pays): définition de votre fuseau horaire
Cette étape n'est disponible que lorsque le mode Horloge est défini sur Auto.
• Auto: définit le fuseau horaire automatiquement.
• Manuel: définit le fuseau horaire manuellement.
✎
Si vous avez sélectionné Manuel, vous pouvez choisir de définir la fonction Heure d'été sur Activé ou sur Arrêt. (en
fonction du pays)
8. Configuration terminée
Appuyez sur le bouton ENTERE.
✎
Les paramètres terminés s'affichent.
Si vous souhaitez réinitialiser cette fonction...
Sélectionnez Système - Configuration (Configuration initiale). Entrez votre code PIN à quatre chiffres. Le code PIN par défaut est "0-00-0". Si vous souhaitez modifier le code PIN, utilisez la fonction Modifier PIN.
Vous devez de nouveau sélectionner Configuration (MENU → Système) chez vous, bien que vous l'ayez déjà fait en magasin.
✎
Si vous avez oublié le code PIN, appuyez sur les boutons de la télécommande dans l'ordre suivant en mode veille, ce qui
redéfinit le code sur "0-0-0-0": MUTE → 8 → 2 → 4 → POWER (activé).
Français - 5
Page 18

Connexions
Connexion HDMI, HDMI/DVI Connexion SCART
Lecteur BD / PC Magnétoscope ou lecteur DVD
DVI OUTHDMI OUT
EXT
SERVICE
HDMI IN
USB
(5V 0.5A)
USB
1 (DVI)2
ANT IN
EXT (RGB)
Antenne VHF/UHF
Panneau arrière du téléviseur
ou
✎
L'emplacement du port peut varier
en fonction du modèle.
Connexion de Casque
Câble
Français - 6
Page 19

Modes d'affichage (entrée HDMI/DVI)
La resolution optimale est de 1366 X 768 a 60 Hz. Reportez-vous à la page des caractéristiques techniques pour accéder à la
résolution complète.
SERVICE
SERVICE
✎✎
REMARQUE
• Vous devez utiliser le port HDMI IN 1(DVI) pour connecter un câble HDMI/DVI.
• Si un câble HDMI vers DVI est connecté au port HDMI IN 1(DVI), le son ne fonctionne pas.
• Le mode entrelacé n’est pas pris en charge.
• Le téléviseur peut fonctionner de façon anormale si le format vidéo sélectionné n’est pas standard.
• Les entrées PC(D-Sub) et PC/DVI AUDIO IN ne sont pas prises en charge.
• L'entrée COMPOSANT/AVIN (ENTREE AV) n'est pas prise en charge.
• La sortie DIGITAL AUDIO OUT (OPTICAL) (SORTIE AUDIO NUMERIQUE (OPTIQUE)) n'est pas prise en charge.
• En fonction du PC, la connexion à l'aide du câble HDMI peut ne pas être prise en charge.
• La prise casque ne prend en charge que le type TRS (tip-ring-sleeve) à 3 conducteurs.
Prise pour tests uniquement.
Connexion à une fente pour INTERFACE COMMUNE
(fente pour carte de visualisation de programmes télévisés)
Pour regarder les chaînes payantes, la carte CI ou CI+ doit être insérée.
• Si vous ne l'insérez pas, certaines chaînes afficheront le message
"Signal brouillé".
• Les informations de pairage contenant un numéro de téléphone,
l'ID de la carte CI ou CI+, l'ID de l'hôte et d'autres informations
s'afficheront après 2 ou 3 minutes. Si un message d'erreur s'affiche,
contactez votre fournisseur de service.
• Lorsque la configuration des informations sur les canaux est
terminée, le message "Mise à jour terminée" s'affiche, indiquant que
la liste des chaînes est mise à jour.
y L'image peut varier en fonction du modèle.
Changement de la source d'entrée
Source
TV / Ext. / HDMI1/DVI / HDMI2
Permet de sélectionner le téléviseur ou d’autres sources d’entrée externes (telles qu’un lecteur DVD, un lecteur Blu-ray, un décodeur
câble ou un récepteur décodeur) connectées au téléviseur.
✎
Les entrées connectées sont mises en surbrillance dans la liste Source qui s'affiche.
✎
L’entrée PC(D-Sub) n’est pas prise en charge. Pour connecter un PC au téléviseur, utilisez l’entrée HDMI1/DVI.
✎
L’option Ext. reste activée en permanence.
✎
Appuyez sur le bouton TOOLS.
• Modif. Nom
Vous pouvez définir le nom de la source d'entrée externe de votre choix.
– Lorsque vous connectez un PC au port HDMI IN 1(DVI) avec un câble HDMI, vous devez définir le téléviseur en mode PC
sous Modif. Nom.
– Lorsque vous connectez un PC au port HDMI IN 1(DVI) avec un câble HDMI vers DVI, vous devez définir le téléviseur en
mode DVI PC sous Modif. Nom.
– Lorsque vous connectez un périphérique AV au port HDMI IN 1(DVI) avec un câble HDMI vers DVI, vous devez définir le
téléviseur en mode Périph. DVI sous Modif. Nom.
• Information
Vous pouvez afficher des informations détaillées sur le périphérique externe connecté.
Français - 7
Page 20

Consultation du e-Manual
E-MANUAL
Affichage
Vidéo, programme
télévisé, etc
actuellement
affiché.
Vous trouverez des instructions sur les caractéristiques de votre téléviseur dans le e-Manual de ce dernier. Pour
l'utiliser, appuyez sur le bouton E-MANUAL de votre télécommande. Déplacez le curseur à l'aide des boutons
Haut/Bas/Gauche/Droite afin de mettre en surbrillance une catégorie, puis une rubrique. Appuyez ensuite sur le
bouton ENTERE. Le e-Manual affiche la page souhaitée.
Vous pouvez également y accéder via le menu :
MENUm → Assistance → e-Manual → ENTERE
O
✎
Pour revenir au menu principal du e-Manual, appuyez sur le bouton E-MANUAL de la télécommande.
Liste des catégories. Appuyez sur le bouton
Fonctions de base
Changement du mode Image prédéni
Réglages des paramètres de l’image
Modication des options d’image
Changement du mode Son prédéni
Réglage des paramètres sonores
}
Index E Entrer e Quitter
Boutons de fonctionnement
}
Index: affiche l'écran d'index.
E
Entrer: sélectionne une catégorie ou un sous-menu.
e
Quitter: permet de quitter le manuel électronique.
<Affichage du contenu>
a
Essayer: affiche le menu à l'écran correspondant à la rubrique. Pour revenir à l'écran du manuel
électronique, appuyez sur le bouton E-MANUAL.
b
Accueil: permet d'accéder à l'écran d'accueil du manuel électronique.
L
Page: permet de passer à la page précédente ou suivante.
{ Zoom: agrandit l'écran.
– Appuyez sur le bouton { (Zoom) pour agrandir l’écran. Pour parcourir l'écran agrandi, utilisez le
bouton ▲ ou ▼. Pour revenir à un affichage normal de l'écran, appuyez sur le bouton RETURN.
◄ ou ► pour sélectionner la catégorie de
votre choix.
Affiche la liste des sous-menus. Utilisez les
touches fléchées de votre télécommande
pour déplacer le curseur. Appuyez sur le
bouton ENTER
sous-menu de votre choix.
E
pour sélectionner le
Comment basculer entre une rubrique du e-Manual et le(s) menu(s) correspondant(s) affiché(s) à l'écran
✎
Cette fonction n’est pas disponible dans certains menus.
✎
Vous ne pouvez pas utiliser la fonction Essayer si le menu n’est pas activé.
Méthode1 Méthode2
1. Si vous souhaitez utiliser le menu correspondant à une
rubrique de l'e-Manual, appuyez sur le bouton rouge afin de
sélectionner l'option Essayer.
2. Pour revenir à l'écran du e-Manual, appuyez sur le bouton
E-MANUAL.
1. Appuyez sur le bouton ENTERE lorsqu'une rubrique
s'affiche. Le message "Exécuter?" s'affiche. Sélectionnez
Oui, puis appuyez sur le bouton ENTERE. La fenêtre des
menus à l'écran s'affiche.
2. Pour revenir à l'écran du e-Manual, appuyez sur le bouton
E-MANUAL.
Recherche d’une rubrique dans la page d’index
✎
Cette fonction n’est peut-être pas prise en charge dans cette langue.
1. Si vous souhaitez rechercher un mot-clé, appuyez sur le bouton bleu afin d'ouvrir l'écran Index.
2. Appuyez sur le bouton ◄ ou ► pour sélectionner l'ordre des caractères de votre choix.
3. Appuyez sur le bouton ▲ ou ▼ pour sélectionner le mot-clé à afficher et appuyez ensuite sur ENTERE.
4. Vous accédez alors à l'écran d'instructions correspondant du manuel électronique.
✎
Pour fermer l’écran Index, appuyez sur le bouton RETURN.
Français - 8
Page 21

Installation du support mural
Les éléments du support mural (vendus séparément) permettent
de fixer le téléviseur au mur. Pour plus d’informations sur
l’installation du support mural, reportez-vous aux instructions
fournies avec les éléments du support mural. Faites appel à
un technicien pour installer la fixation murale. Nous ne vous
conseillons pas de le faire vous-même.
Si vous choisissez d’effectuer vous-même l’installation murale,
Samsung Electronics ne saurait être tenue responsable des
éventuels dommages matériels ou des éventuelles blessures
dont vous, ou d’autres personnes, pourriez être victimes.
Assemblage du support de guidage
Si vous fixez le téléviseur à un mur, attachez le support de
guidage de la manière indiquée sur le dessin.
✎
Utilisez uniquement le support de guidage fourni comme
accessoire. (Le support de guidage peut varier en fonction
du modèle.)
Support de guidage
Caractéristiques du kit de fixation murale (VESA)
✎
Le kit de fixation murale est vendu séparément.
Installez votre fixation murale sur un mur solide perpendiculaire
au sol. Si vous souhaitez la fixer sur d’autres matériaux de
construction, veuillez prendre contact avec votre revendeur le
plus proche. Si vous l’installez au plafond ou sur un mur non
droit, la fixation risque de tomber et de provoquer de graves
blessures.
✎
REMARQUE
Les dimensions standard pour tous les kits de fixation
x
murale sont indiquées dans le tableau ci-dessous.
Le kit de fixation murale s’accompagne d’un manuel
x
d’installation détaillé et de toutes les pièces nécessaires
au montage.
N’utilisez pas de vis plus longues que la dimension
x
standard, car elles pourraient endommager l’intérieur du
téléviseur.
N’utilisez pas de vis non conformes aux spécifications
x
des vis VESA standard.
Pour les fixations murales non conformes aux
x
spécifications des vis VESA standard, la longueur des
vis peut varier, selon leurs caractéristiques.
Ne serrez pas trop les vis ; cela pourrait, en effet,
x
endommager le produit ou provoquer sa chute,
entraînant des blessures. Samsung ne peut être tenue
responsable de ce type d’accident.
Samsung ne peut être tenue responsable de tout
x
dommage au produit ou toute blessure corporelle
dans le cas de l’utilisation d’une fixation murale nonVESA ou non spécifiée, ou si l’utilisateur ne suit pas les
instructions d’installation du produit.
Lors du montage, l’inclinaison du téléviseur ne doit pas
x
dépasser 15 degrés.
pouces Spéc. VESA (A * B) Vis standard Quantité
22 75 X 75
32 200 X 200 M6
N’installez pas votre kit de
fixation murale lorsque le
téléviseur est allumé. Vous
risqueriez de vous électrocuter.
M4
426 200 X 100
Fixation du téléviseur au mur
Attention: si vous tirez ou poussez le téléviseur ou
si vous grimpez dessus, il risque de tomber. Veillez
notamment à ce que vos enfants ne se suspendent
pas au téléviseur, ni ne le déséquilibrent, car
cela pourrait le faire basculer et occasionner des
blessures graves, voire entraîner la mort. Respectez
toutes les précautions de sécurité indiquées dans
la brochure relative à la sécurité. Pour une stabilité
accrue, installez le dispositif antichute comme
indiqué ci-après.
Pour éviter toute chute du téléviseur
1. Placez les vis dans les colliers et fixez-les fermement au mur.
Assurez-vous que les vis ont été fermement fixées au mur.
✎
En fonction du type de mur, il est possible que vous
ayez besoin de matériel supplémentaire, tel que des
chevilles.
✎
Les colliers, vis et chaînettes n’étant pas fournis, vous
devez les acheter séparément.
2. Retirez les vis situées sur la partie centrale arrière du
téléviseur, placez-les dans les colliers, puis fixez-les à
nouveau sur le téléviseur.
✎
Il se peut que les vis ne soient pas fournies avec le
produit. Dans ce cas, achetez des vis présentant les
caractéristiques suivantes.
3. Reliez les colliers fixés au téléviseur et ceux fixés sur le mur à
l’aide de chaînettes, puis attachez-les fermement.
✎
REMARQUE
• Placez le téléviseur à proximité du mur afin qu’il ne
bascule pas vers l’arrière.
• Il est recommandé de placer la chaînette de façon
à ce que les colliers fixés au mur soient placés à
la même hauteur ou plus bas que ceux fixés au
téléviseur.
• Détachez la chaînette avant de déplacer le téléviseur.
4. Vérifiez que toutes les connexions sont fixées correctement.
Vérifiez régulièrement que les connexions ne présentent
aucun signe d’usure. Si vous avez un doute quant à
la sécurité des connexions, contactez un installateur
professionnel.
Français - 9
Page 22

Résolution des problèmes
En cas de problème, consultez d’abord la liste des problèmes potentiels et des solutions. Si aucune de ces astuces de
dépannage ne s’applique à votre problème, rendez-vous sur le site www.samsung.com, puis cliquez sur Assistance ou
contactez le service clientèle de Samsung.
Problèmes
• Vérifiez que le cordon d'alimentation secteur est branché correctement sur la prise murale et sur le téléviseur.
• Vérifiez que la prise murale est opérationnelle.
• Essayez d'appuyer sur le bouton POWER du téléviseur pour vous assurer que le problème n'est pas dû à la
télécommande. Si le téléviseur s'allume, reportez-vous au problème "La télécommande ne fonctionne pas" ci-après.
Problèmes
• Vérifiez le raccordement des câbles (retirez tous les câbles connectés au téléviseur et aux appareils externes, puis
rebranchez-les).
• Réglez les sorties vidéo de votre périphérique externe (décodeur câble/boîtier décodeur, DVD, Blu-ray, etc.) pour faire
correspondre les connexions à l'entrée du téléviseur. Par exemple, si la sortie d'un périphérique externe est HDMI, vous
devez établir une connexion avec une entrée HDMI du téléviseur.
• Vérifiez que les appareils connectés sont sous tension.
• Veillez à sélectionner la source appropriée du téléviseur en appuyant sur la touche SOURCE de la télécommande.
• Redémarrez le périphérique connecté en rebranchant le câble d'alimentation du périphérique.
Problèmes
• Vérifiez que la polarité (+/–) des piles de la télécommande est respectée.
• Nettoyez la lentille de la télécommande.
• Essayez de diriger directement la télécommande vers le téléviseur à une distance de 1,5 à 1,8 m.
Problèmes
Le téléviseur ne s'allume pas.
Aucune image/vidéo n'est affichée.
La télécommande ne fonctionne pas.
La télécommande du décodeur câble /boîtier décodeur ne permet pas d'allumer ou d'éteindre le
téléviseur, ni de régler le volume.
• Programmez la télécommande du décodeur câble/boîtier décodeur de telle sorte qu'elle puisse commander le téléviseur.
Consultez le mode d'emploi du décodeur câble/boîtier décodeur pour obtenir le code du téléviseur SAMSUNG.
✎
Vous pouvez maintenir votre téléviseur dans des conditions optimales en le mettant à niveau avec le dernier
micrologiciel (www.samsung.com → Assistance → Téléchargements) par le biais d'un périphérique USB.
✎
Ce téléviseur LCD TFT est équipé d’un écran constitué de sous-pixels dont la fabrication nécessite une technologie
sophistiquée. Il se peut toutefois que quelques points clairs ou sombres apparaissent à l'écran. Ils n'ont aucune
incidence sur la performance du produit.
Français - 10
Page 23

Specifications
10°C 40°C 50°F 104°F
10°C 40°C 50°F 104°F
-20°C 45°C -4°F 113°F
Résolution de l’affichage 1366 x 768
Conditions ambiantes
Température en service
Humidité en fonctionnement
Température de stockage
Humidité sur le lieu de stockage
à
à
(
(
10% à 80%, sans condensation
5% à 95%, sans condensation
à
à
)
)
Système TV Analogique : B/G, D/K, L, I (en fonction du pays sélectionné)
Système de couleur/vidéo Analogique : PAL, SECAM, NTSC-4.43, NTSC-3.58, PAL60
Système Sonore BG, DK, L, NICAM, MPEG1, DD, DD+, HEAAC
HDMI IN Vidéo: 1080 24p, 1080p, 1080i, 720p, 576p, 480p
Nom du modèle LA32E420
Taille de l’écran
Son (Sortie) 5W X 2
Dimensions (L x P x H)
Corps
Avec socle
Poids
Sans socle
Avec socle
✎
La conception et les spécifications peuvent être modifiées sans préavis.
✎
Pour plus d’informations sur les caractéristiques d’alimentation et de consommation électrique, reportez-vous à l’étiquette fixée
au produit.
✎
La consommation électrique typique est mesurée selon la norme CEI 62087 Ed.2
Numérique: MPEG-2 MP@ML, MPEG-4, H.264/AVC MP@L3, MP@L4.0, HP@L4.0
Audio: PCM linéaire sur deux voies 32/44.1/48kHz, 16/20/24bits.
Numérique: DVB-T/DVB-C
pouces
784,4 X 98,1 X 502,9 (mm)
784,4 X 182,4 X 545,3 (mm)
7,7 kg
8,7 kg
Français - 11
Page 24

Formats vidéo pris en charge
Extension de
fichier
*.avi
*.mkv
*.asf
*.wmv
*.mp4
*.3gp
*.vro
*.mpg
*.mpeg
*.ts
*.tp
*.trp
*.mov
*.flv
*.vob
*.svi
*.m2ts
*.mts
*.divx
Conteneur Codec vidéo Résolution
DivX 3.11/4.x/5.x/6.x
MPEG4 SP/ASP
AVI
MKV
ASF
MP4
3GP
VRO
VOB
PS
TS
H.264 BP/MP/HP
Motion JPEG 640 x 480 8
Window Media Video v9
MPEG2
MPEG1
Résolution complète disponible: 1366 X 768 @ 60Hz
Mode Résolution
IBM
MAC
VESA DMT
640 x 350 31.469 70.086 25.175 +/720 x 400 31.469 70.087 28.322 -/+
640 x 480 35.000 66.667 30.240 -/832 x 624 49.726 74.551 57.284 -/640 x 480 31.469 59.940 25.175 -/640 x 480 37.861 72.809 31.500 -/640 x 480 37.500 75.000 31.500 -/800 x 600 37.879 60.317 40.000 +/+
800 x 600 48.077 72.188 50.000 +/+
800 x 600 46.875 75.000 49.500 +/+
1024 x 768 48.363 60.004 65.000 -/1024 x 768 56.476 70.069 75.000 -/1024 x 768 60.023 75.029 78.750 +/+
1280 x 720 45.000 60.000 74.250 +/+
1366 x 768 47.712 59.790 85.500 +/+
Fréquence horizontale
(kHz)
Fréquence
d'images (i/s)
1920 x 1080
6~30
1920 x 1080 30
Fréquence verticale
(Hz)
Fréquence d'horloge pixels
Débit binaire
(Mbit/s)
(MHz)
Codec audio
30
AC3
LPCM
ADPCM
(IMA, MS)
AAC
HE-AAC
WMA
DD+
MPEG
(MP3)
DTS Core
G.711(A-Law,
μ-Law)
Polarité de
synchronisation
(H/V)
Français - 12
Page 25

License
Stockage et entretien
✎
Si vous enlevez l'autocollant appliqué sur l'écran du téléviseur, éliminez les traces puis nettoyez le téléviseur.
✎
Le nettoyage peut rayer le coffret et l’écran du produit. Veillez à les nettoyer avec précaution à l’aide d’un chiffon doux pour
éviter les rayures.
Ne projetez pas directement de l’eau sur l'appareil. Tout liquide
qui entre dans le produit peut engendrer une défaillance, un
incendie ou une électrocution.
Nettoyez le produit à l'aide d'un chiffon doux imprégné d'une
petite quantité d'eau. N'utilisez aucune substance inflammable (p.
ex. benzène ou dissolvant) ni aucun agent nettoyant.
Français - 13
Page 26

Para obtener más información sobre cómo utilizar el manual electrónico (P. 8)
Las figuras y las ilustraciones de este Manual del usuario se proporcionan como referencia solamente y pueden ser diferentes del
aspecto real del producto. El diseño y las especificaciones del producto están sujetos a cambios sin previo aviso.
Nota sobre la TV digital
1. Las funciones relacionadas con la TV digital (DVB) sólo están disponibles en países o regiones donde se emitan señales terrestres digitales
DVB-T (MPEG2 y MPEG4 AVC) o donde se tenga acceso a servicios de televisión por cable compatibles con DVB-C (MPEG2 y MPEG4
AAC). Póngase en contacto con su distribuidor para conocer si puede recibir señales DVB-T o DVB-C.
2. DVB-T es una norma del consorcio europeo para la transmisión de la televisión digital terrestre y DVB-C lo es para la transmisión de la
televisión digital por cable. Sin embargo, en esta especificación no se incluyen algunas funciones diferenciadas, como EPG (Guía electrónica
de programas), VOD (Vídeo a la carta) y otras. Por ello, en estos momentos aún no están disponibles.
3. Este equipo de televisión cumple las más actuales normas de DVB-T y DVB-C, de [agosto de 2008], pero no se garantiza la compatibilidad
con futuras emisiones de televisión digital terrestre DVB-T y por cable DVB-C.
4. Según los países o regiones donde se utilice este equipo de TV, algunos proveedores de la televisión por cable pueden cobrar un pago
adicional por este servicio y pueden exigir al usuario su aceptación de los términos y condiciones de su empresa.
5. Algunas funciones de televisión digital pueden no estar disponibles en algunos países o regiones y DVB-C puede no funcionar
correctamente con algunos proveedores del servicio de cable.
6. Para obtener más información, póngase en contacto con su centro de atención al cliente de Samsung.
La calidad de la recepción de la televisión puede resultar afectada por las diferencias de los métodos de transmisión entre los países.
✎
Compruebe el funcionamiento del televisor en un distribuidor local de SAMSUNG autorizado o el centro de llamadas de Samsung tanto si se
puede mejorar volviendo a configurar el TV como si no.
Advertencia sobre las imágenes fijas
Evite mostrar en la pantalla imágenes fijas (como archivos de imágenes jpeg) o elementos con imágenes fijas (como logotipos de los programas
de televisión o con formato de imagen 4:3, barras de cotizaciones o de noticias en la parte inferior de la pantalla, etc). Una visualización
continuada de una imagen fija puede causar un desgaste desigual del fósforo de la pantalla, lo que afectará a la calidad de la imagen. Para
reducir este riesgo, siga estas recomendaciones:
• Evite mostrar el mismo canal de televisión durante largos periodos de tiempo.
• Intente ver siempre las imágenes en pantalla completa, utilice el menú del formato de imagen del televisor para obtener la mejor
coincidencia.
• Reduzca los valores del brillo y el contraste al mínimo necesario para conseguir la calidad de imagen deseada, ya que los valores superiores
pueden acelerar la velocidad del proceso de quemado.
• Utilice con frecuencia todas las funciones del televisor diseñadas para reducir la retención de la imagen y el desgaste de la pantalla; consulte
el apartado adecuado del manual del usuario para obtener más información.
Seguridad en el espacio de instalación
Mantenga la distancia requerida entre el producto y otros objetos (por ejemplo, paredes) para asegurar la ventilación adecuada.
En caso contrario, se podría producir un incendio por un incremento de la temperatura interna del producto.
Cuando utilice un soporte o un montaje mural, use sólo las piezas proporcionadas por Samsung Electronics.
✎
• Si utiliza piezas proporcionadas por otros fabricantes, podría tener problemas con el producto o éste se podría caer con el riesgo de
causar lesiones personales.
El aspecto puede variar según el producto.
✎
Tanga cuidado al tocar el televisor porque algunas partes pueden estar calientes.
✎
Instalación con un soporte. Instalación con un montaje mural.
10 cm
10 cm10 cm
10 cm
10 cm
10 cm
10 cm
Español - 2
Page 27

Accesorios
✎
Asegúrese de que los siguientes elementos se incluyen con el televisor de pantalla. Si falta alguno, póngase en contacto con
su distribuidor.
✎
El color y la forma de los componentes pueden variar según los modelos.
✎
Los cables que no se incluyen en el contenido del paquete se pueden adquirir por separado.
y Mando a distancia y 2 pilas AAA
y Tarjeta de garantía / Guía de seguridad (no disponible en algunos lugares)
✎
Se puede cobrar una tarifa administrativa si:
(a) el usuario solicita un técnico y el producto no tiene ningún defecto
(es decir, si el usuario no se ha leído este manual del producto)
(b) el usuario lleva el producto a reparar a un centro de servicio y el producto no tiene ningún defecto
(es decir, si el usuario no se ha leído este manual del producto)
✎
Antes de realizar cualquier trabajo o efectuar la visita al usuario se le comunicará a éste el monto de la tarifa administrativa.
y Cable de alimentación
y Manual del usuario
Aspecto general del panel de control
✎
El color y la forma del producto pueden variar según el modelo.
Panel de control
Sensor del mando a distancia El mando a distancia debe dirigirse hacia este punto del televisor.
Indicador de encendido Parpadea y se apaga cuando se enciende el aparato y se ilumina en el modo en espera.
SOURCE
E
MENU Muestra un menú en pantalla , la OSD (visualización en pantalla), de las funciones del TV.
Y
z
P
(Power)
Modo de espera
No deje el televisor en modo de espera durante períodos largos de tiempo (cuando está de vacaciones, por ejemplo). Aunque esté
apagado continúa consumiendo una pequeña cantidad de energía. Se recomienda desenchufar el cable de alimentación.
Cambia entre todas las fuentes de entrada disponibles. En el menú de la pantalla, utilice
este botón del mismo modo que haría con el botón ENTERE del mando a distancia.
Ajustar el volumen. En la OSD, utilice estos botones
botones ◄ y ► del mando a distancia.
Cambian los canales. En la OSD, utilice estos botones
botones ▼ y ▲ del mando a distancia.
Encender y apagar el televisor.
Y
de igual modo que los
z
de igual modo que los
Español - 3
Page 28

Aspecto general del mando a distancia
✎
Este mando a distancia es especial para personas con discapacidades visuales y presenta puntos Braille en los botones de
encendido, de canales y del volumen.
Encender y apagar el televisor.
Seleccionar alternativamente activar teletexto,
doble, mezcla o desactivar teletexto.
Ajustar el volumen.
Mostrar el menú de pantalla principal.
Visualización de Pág. inicio de cont..
Seleccionar rápidamente las funciones que se
usan con mayor frecuencia.
Seleccionar los elementos del menú en pantalla
y cambiar los valores del menú.
Volver al menú anterior.
E-MANUAL: Muestra la guía del manual
electrónico. (pág. 8)
P.SIZE: Selecciona el tamaño de la
imagen.
AD/SUBT.: Selección de la descripción
de audio. (No está disponible en algunos
lugares) / Muestra los subtítulos digitales.
CONTENT
A B C D
E-MANUAL
P.SIZE
AD/SUBT.
Mostrar y seleccionar las fuentes de vídeo
disponibles.
Pulse para acceder directamente a los
canales.
Volver al canal anterior.
Cortar temporalmente el sonido.
Cambiar de canal.
Muestra la lista de canales en la pantalla.
Visualizar la información de la Guía electrónica
de programas (EPG).
Mostrar información en la pantalla del televisor.
Salir del menú.
Utilice estos botones siguiendo las
instrucciones de la pantalla.
Utilice estos botones en una función
específica.
Si desea información más detallada, consulte
el manual electrónico.
Instalación de las pilas (tamaño de las pilas: AAA)
Español - 4
Page 29

Configuración inicial
Cuando el televisor se enciende por primera vez, una secuencia de indicaciones en pantalla permite configurar los parámetros básicos.
Pulse el botón POWERP. Configuración sólo disponible cuando la fuente se establece como TV.
1. Idioma del menú: Selección del idioma de los menús
Pulse los botones ▲ o ▼ y a continuación pulse el botón ENTERE.
Seleccione el idioma deseado para la OSD (presentación en pantalla).
2. Modo de uso: Selección de Demo tienda o Uso doméstico
Pulse los botones ▲ o ▼ y a continuación pulse el botón ENTERE.
Seleccione el modo Uso doméstico. El modo Demo tienda se utiliza en los entornos comerciales.
Recupere la configuración de la unidad desde Demo tienda a Uso doméstico (estándar): Pulse el botón del volumen del televisor.
Cuando se muestra la OSD del volumen, mantenga pulsado el botón MENU durante 5 segundos.
✎
Demo tienda sólo está destinado a los entornos comerciales. Si selecciona esta opción, algunas funciones no estarán
disponibles. Seleccione Uso doméstico en el hogar.
3. País (según el país): Selección de un país
Pulse los botones ▲ o ▼ y a continuación pulse el botón ENTERE.
Seleccione el país que desee.
✎
Después de seleccionar el país en el menú de países, algunos modelos pueden presentar una opción adicional para
establecer el código PIN.
4. Sintonización automática (Paso 1): Selección de cómo ver el televisor
Procedamos a buscar y almacenar los canales en tu televisión. ¿Necesitas hacer una búsqueda de canales?
• Sí, necesito hacerlo: Memoriza todos los canales disponibles mediante el cable RF.
• No, necesito hacerlo: No es necesario realizar la sintonización automática para buscar canales.
5. Sintonización automática (Paso 2): Selección de las opciones de búsqueda
Seleccione la señal de emisión y la fuente de antena deseadas. Pulse los botones ▲/▼/◄/► y, a continuación, pulse el botón
ENTERE.
Al configurar la fuente de la antena en Cable, se muestra un paso que le permite asignar valores numéricos (frecuencias de los
canales) a los canales. Para obtener más información, consulte Canal → Sintonización automática.
✎
Algunos canales quizás no se puedan transmitir en este televisor. Depende de la ganancia o las especificaciones de la señal
de la emisión.
✎
Pulse el botón ENTERE en cualquier momento para interrumpir el proceso de memorización.
✎
Consulte en el e-Manual el capítulo “Sintonización de los canales > Sintonización automática”
6. Reloj: Configuración del Modo de reloj
• Automático: Establezca la hora actual automáticamente.
• Manual: Permite configurar manualmente la hora y la fecha actuales.
7. Zona horaria (según el país): Configuración de la zona horaria
Este paso sólo está disponible si el Modo de reloj está establecido como Automático.
• Automático: Establezca la zona horaria automáticamente.
• Manual: Establezca la zona horaria manualmente.
✎
Si selecciona Manual, puede configurar DST (horario de verano) como Activado o Desactivado. (según el país)
8. Configuración completada
Pulse el botón ENTERE.
✎
Se muestra la configuración completada.
Si desea reiniciar esta función...
Seleccione Sistema - Configuración (configuración inicial). Escriba su código PIN de 4 dígitos. El número PIN predeterminado es “00-0-0”. Si desea cambiar el número PIN, utilice la función Cambiar PIN.
Aunque haya ejecutado Configuración (MENU → Sistema) en el comercio, deberá hacerlo de nuevo en su domicilio.
✎
Si ha olvidado el código PIN, pulse los botones del mando a distancia en la siguiente secuencia en el modo de espera para
reiniciar el PIN a “0-0-0-0”: MUTE → 8 → 2 → 4 → POWER (encender).
Español - 5
Page 30

Conexiones
Conexión HDMI, HDMI/DVI Conexión con Euroconector
Reproductor BD / PC VCR o DVD
DVI OUTHDMI OUT
EXT
SERVICE
HDMI IN
USB
(5V 0.5A)
USB
1 (DVI)2
ANT IN
EXT (RGB)
Antena VHF/UHF
Panel posterior del TV
o
✎
La posición del puerto puede diferir
según el modelo.
Conexión de auriculares
Cable
Español - 6
Page 31

Modos de visualización (entrada HDMI/DVI)
La resolución óptima es 1366 x 768 a 60 Hz. Consulte la página de especificaciones para ver la resolución completa
disponible.
SERVICE
SERVICE
✎✎
NOTA
• En una conexión de cable HDMI/DVI, se debe utilizar el puerto HDMI IN 1(DVI).
• Si hay un cable HDMI a DVI conectado al puerto HDMI IN 1(DVI), el audio no funciona.
• No se admite el modo entrelazado.
• El aparato puede funcionar incorrectamente si se selecciona un formato de vídeo que no sea estándar.
• Las entradas PC(D-Sub) y PC/DVI AUDIO IN no se admiten.
• La entrada COMPONENT/AV IN no es compatible.
• DIGITAL AUDIO OUT(OPTICAL) no es compatible.
• La conexión mediante el cable HDMI quizás no se admita según el PC.
• El terminal del auricular sólo admite el conector TRS (punta-anillo-manguito) de 3 clavijas.
Conector sólo para servicio
Conexión en la ranura COMMON INTERFACE
(Ranura de la tarjeta para ver la televisión)
Para ver canales de pago se debe insertar una “TARJETA CI o CI+”.
• Si no se inserta una “TARJETA CI o CI+” algunos canales mostrarán
el mensaje “Señal codificada”.
• Al cabo de 2 o 3 minutos aparecerá en la pantalla la información
del enlace que contiene un número telefónico, un identificador
de ‘TARJETA CI o CI+’, un identificador del sistema y demás
información. Si aparece un mensaje de error, póngase en contacto
con su proveedor de servicios.
• Si ha terminado la configuración de la información del canal,
aparecerá el mensaje “Actualización finalizada”, indicando que la lista
de canales ya se ha actualizado.
y La imagen puede variar según el modelo.
Cambio de la fuente de entrada
Fuente
TV / Ext. / HDMI1/DVI / HDMI2
Úselo para seleccionar TV u otras fuentes de entrada externas como reproductores de DVD/Blu-ray/decodificadores/receptores por
satélite STB conectados al televisor.
✎
En la lista de visualización Fuente, se resaltan las entradas conectadas.
✎
La entrada PC (D-Sub) no se admite. Si desea conectar el PC al televisor, utilice la entrada HDMI1/DVI.
✎
Ext. siempre está activado.
✎
Pulse el botón TOOLS.
• Editar nombre
Puede establecer los nombres que desee para las fuentes de entrada externa.
– Cuando se conecta un PC al puerto HDMI IN 1(DVI) con un cable HDMI, se debe configurar TV como modo PC en Editar
nombre.
– Cuando se conecta un PC al puerto HDMI IN 1(DVI) con un cable HDMI a DVI, se debe configurar TV como modo DVI PC
en Editar nombre.
– Cuando se conecta un dispositivo AV al puerto HDMI IN 1(DVI) con un cable HDMI a DVI, se debe configurar TV como
modo Dispositivos DVI en Editar nombre.
• Información
Puede ver información detallada acerca del dispositivo externo conectado.
Español - 7
Page 32

Uso del e-Manual
E-MANUAL
Puede encontrar las instrucciones sobre las funciones del televisor en el e-Manual del televisor. Para utilizarlo,
pulse el botón E-MANUAL del mando a distancia. Mueva el cursor mediante los botones arriba/abajo/derecha/
izquierda para resaltar una categoría y después un tema, y a continuación pulse el botón ENTERE. e-Manual
muestra la página que desea ver.
También puede acceder mediante el menú:
MENUm → Asistencia técnica → e-Manual → ENTERE
O
✎
Para volver al menú principal del e-Manual, pulse el botón E-MANUAL del mando a distancia.
Pantalla de visualización
Vídeo que aparece
actualmente en la
pantalla, programa
de televisión, etc.
Funcionamiento de los botones
}
E
e
<Visualización de los contenidos>
a
b
L
{ Zoom: Amplía una pantalla.
Lista de categorías. Pulse los botones ◄ o
Funciones básicas
Cambio del modo de imagen preseleccionado
Ajuste de la conguración de la imagen
Cambio de las opciones de la imagen
Cambio del modo de sonido preseleccionado
Ajuste de la conguración del sonido
}
Índice E Entrar e Salir
Índice: Muestra la pantalla del índice.
Entrar: Selecciona una categoría o un submenú.
Salir: Salir del manual electrónico.
Inténtelo: Muestra el menú de la OSD correspondiente al tema. Para volver a la pantalla del manual
Inicio: Va a la pantalla de inicio del manual electrónico.
Página: Va a la página anterior o siguiente.
electrónico, pulse el botón E-MANUAL.
– Pulse el botón { (Zoom) para agrandar la pantalla. Se puede desplazar por la pantalla
agrandada con los botones ▲ o ▼. Para restaurar el tamaño normal de la pantalla, pulse el
botón RETURN.
► para seleccionar la categoría que desee.
Muestra la lista de menús secundarios.
Utilice los botones de flecha del mando
a distancia para mover el cursor. Pulse
E
ENTER
secundario que desee.
para seleccionar el menú
Cómo conmutar entre un tema del e-Manual y los menús OSD correspondientes.
✎
Esta función no está habilitada en algunos menús.
✎
No puede utilizar la función Inténtelo si el menú no está activado.
Método 1 Método 2
1. Si desea utilizar el menú que corresponda a un tema del
e-Manual, pulse el botón rojo para seleccionar Inténtelo.
2. Para volver a la pantalla del e-Manual, pulse el botón
E-MANUAL.
1. Pulse el botón ENTERE cuando se muestre un tema. Se
muestra “¿Desea ejecutarlo?”. Seleccione Sí y pulse el
botón ENTERE. Aparece la ventana de la OSD.
2. Para volver a la pantalla del e-Manual, pulse el botón
E-MANUAL.
Como buscar una palabra clave mediante la pagina de indice
✎
Es posible que esta función no se admita, según el idioma.
1. Si desea buscar una palabra clave, pulse el botón azul para seleccionar Índice.
2. Pulse los botones ◄ o ► para seleccionar el orden de caracteres que desee.
3. Pulse los botones ▲ o ▼ para seleccionar la palabra clave que desee ver y, a continuación, pulse el botón ENTERE.
4. Puede ver la pantalla de instrucciones correspondiente del e-Manual.
✎
Pour fermer l’écran Índice, appuyez sur le bouton RETURN.
Español - 8
Page 33

Instalación del montaje en la pared
Los elementos del montaje mural (se venden por separado)
permiten instalar el televisor en una pared. Si desea más
información sobre la instalación de los componentes para el
montaje mural, consulte las instrucciones que se facilitan con
dichos elementos. Si necesita ayuda con la instalación del
soporte mural, póngase en contacto con un técnico. No es
aconsejable que lo haga usted mismo.
Samsung Electronics no se hace responsable de los daños
causados al producto o al usuario si éste ha efectuado la
instalación del televisor.
Montaje del soporte de la guía
Al instalar el televisor en una pared, coloque el soporte de la guía
como se indica.
✎
Utilice sólo el soporte de la guía que se suministra como
accesorio. (El soporte de la guía puede variar según el
modelo.)
Soporte de la guía
Especificaciones del equipo de montaje mural (VESA)
✎
El montaje mural se vende por separado.
El montaje mural se vende por separado. Para colocarlo en
otros materiales de construcción, póngase en contacto con
el distribuidor más cercano. Si se instala en el techo o en
una pared inclinada, puede caerse y causar graves lesiones
personales.
✎
NOTA
Las dimensiones estándar de los equipos de montaje
x
mural se muestran en la tabla siguiente.
Al adquirir el equipo de montaje en la pared, también se
x
distribuye un manual de instalación detallado y todas las
piezas necesarias para el montaje.
No use tornillos con un tamaño superior al estándar, ya
x
que pueden causar daños en el interior del televisor.
Para montajes murales que no cumplen las
x
especificaciones de tornillos estándar VESA, la
longitud de éstos puede variar dependiendo de las
especificaciones.
No use tornillos que no cumplan las especificaciones de
x
tornillos estándar VESA.
No apriete excesivamente los tornillos, ya que podría
x
dañar el producto o provocar la caída de éste con
riesgo de causar lesiones personales. Samsung no se
hace responsable de este tipo de accidentes.
Samsung no se hace responsable de daños o lesiones
x
personales cuando se usa un montaje mural que no
cumple las especificaciones VESA o si el cliente no
sigue las instrucciones de instalación del producto.
No supere los 15 grados de inclinación cuando monte
x
este televisor.
pulgadas
22 75 x 75
32 200 x 200 M6
Especificaciones
VESA (A * B)
No instale el equipo de
montaje mural mientras el
televisor está encendido. Se
podría producir una descarga
eléctrica con riesgo de causar
lesiones personales.
Tornillo
estándar
M4
Cantidad
426 200 x 100
Fijación del televisor a la pared
Precaución: Tirar del televisor, empujarlo o colgarse
de él puede provocar su caída. En especial, procure
que los niños no se cuelguen del televisor ni lo
desestabilicen; éste podría caerse sobre ellos y
causarles lesiones graves o incluso la muerte.
Siga las precauciones de seguridad del folleto de
seguridad incluido con el producto. Para mejorar la
estabilidad instale un dispositivo antivuelco, como se
explica a continuación.
Para impedir que el televisor se caiga
1. Apriete firmemente las grapas sobre la pared con los
tornillos. Asegúrese de que los tornillos estén bien afirmados
en la pared.
✎
Según el tipo de pared quizás necesite algún material
adicional para el anclaje.
✎
Las grapas, los tornillos y la cadena no se suministran
con el producto; deberá adquirirlos por separado.
2. Quite los tornillos de la parte central posterior del televisor y
con ellos monte las grapas en el televisor.
✎
Quizás con el televisor no vayan incluidos los tornillos.
En tal caso debe adquirirlos por separado con estas
especificaciones.
3. Monte una cadena fuerte entre las grapas del televisor y de
la pared de manera que quede bien tensada.
✎
NOTA
• Instale el televisor cerca de la pared para evitar que
caiga hacia atrás.
• Las grapas de la pared han de estar a la misma o a
menor altura que las grapas del televisor.
• Cuando desee mover el televisor deberá aflojar la
4. Compruebe que todas las conexiones estén bien
cadena.
aseguradas. Compruébelas periódicamente para detectar
cualquier signo de fatiga o de fallo. Si tiene dudas sobre la
seguridad de la instalación, póngase en contacto con un
instalador profesional.
Español - 9
Page 34

Solución de problemas
Si cree que el televisor tiene un problema, compruebe primero esta lista de posibles problemas y soluciones. Si ninguno de los
consejos funciona, visite “www.samsung.com” y haga clic en Asistencia Técnica o llame a un centro de atención al cliente de
Samsung.
Problemas
• Compruebe que el cable de alimentación CA esté bien conectado en la toma de la pared y en el televisor.
• Compruebe que la toma de la pared funcione.
• Intente pulsar el botón POWER del televisor para asegurarse de que el problema no está en el mando a distancia. Si el
televisor se enciende, consulte “El mando a distancia no funciona” a continuación.
Problemas
• Compruebe las conexiones de los cables (desconecte y vuelva a conectar todos los cables del televisor y de los
dispositivos externos).
• Establezca las salidas de vídeo de los dispositivos externos (receptor de cable/decodificador, DVD, Blu-ray, etc.) de
modo que coincidan con las conexiones de la entrada de TV. Por ejemplo, si la salida de un dispositivo externo es HDMI,
se debe conectar a una entrada HDMI en el televisor.
• Compruebe que los dispositivos externos estén encendidos.
• Asegúrese de seleccionar la fuente correcta del TV pulsando el botón SOURCE del mando a distancia.
• Reinicie el dispositivo conectado volviendo a conectar el cable de alimentación del dispositivo.
Problemas
• Cambie las pilas del mando a distancia; haga coincidir los polos (+/–).
• Limpie la ventana de transmisión del sensor del mando a distancia.
• Apunte con el mando a distancia directamente al televisor desde una distancia de 5~6 pies (1,5 ~2 metros).
Problemas
El televisor no se enciende.
No hay imagen ni vídeo.
El mando a distancia no funciona.
El mando a distancia del cable/decodificador no enciende ni apaga el televisor ni ajusta el
volumen.
• Programe el mando a distancia del cable/decodificador para que haga funcionar el televisor. Consulte el manual del
decodificador de cable/satélite para conocer el código del TV SAMSUNG.
✎
Puede mantener su televisor en un estado óptimo actualizando el último firmware en la página web (www.samsung.
com → Atención Al Cliente → Centro De Descarga) por USB.
✎
El panel LCD TFT utiliza un panel que consta de píxeles de ínfimo tamaño que requieren de una tecnología altamente
sofisticada para su fabricación. No obstante, puede que existan algunos píxeles brillantes u oscuros en la pantalla.
Estos píxeles no influirán en el rendimiento del aparato.
Español - 10
Page 35

Especificaciones
10°C 40°C 50°F 104°F
10°C 40°C 50°F 104°F
-20°C 45°C -4°F 113°F
Resolución de pantalla 1366 x 768
Consideraciones medioambientales
Temperatura de funcionamiento
Humedad de funcionamiento
Temperatura de almacenamiento
Humedad de almacenamiento
a
a
(
(
10% a 80%, sin condensación
5% a 95%, sin condensación
a
a
)
)
Sistema de televisión Analógico: B/G, D/K, L, I (Según la selección del país)
Sistema de color/vídeo Analógico: PAL, SECAM, NTSC-4.43, NTSC-3.58, PAL60
Sistema de sonido BG, DK, L, NICAM, MPEG1, DD, DD+, HEAAC
HDMI IN Vídeo: 1080 24p, 1080p, 1080i, 720p, 576p, 480p
Nombre del modelo LA32E420
Tamaño de pantalla
Sonido (salida) 5W X 2
Dimensiones (An x Pr x Al)
Cuerpo principal
Con el soporte
Peso
Sin el soporte
Con el soporte
✎
El diseño y las especificaciones pueden cambiar sin previo aviso.
✎
Para conocer la fuente de alimentación y el consumo de energía, consulte la etiqueta adherida al producto.
✎
El consumo de energía normal se mide de acuerdo con IEC 62087 Ed.2
Digital: MPEG-2 MP@ML, MPEG-4, H.264/AVC MP@L3, MP@L4.0, HP@L4.0
Audio: Lineal de dos canales PCM 32/44.1/48kHz, 16/20/24bits.
Digital: DVB-T/DVB-C
pulgadas
784,4 X 98,1 X 502,9 (mm)
784,4 X 182,4 X 545,3 (mm)
7,7 kg
8,7 kg
Español - 11
Page 36

Formatos de vídeo admitidos
Extensión del
archivo
*.avi
*.mkv
*.asf
*.wmv
*.mp4
*.3gp
*.vro
*.mpg
*.mpeg
*.ts
*.tp
*.trp
*.mov
*.flv
*.vob
*.svi
*.m2ts
*.mts
*.divx
Contenedor Códec de vídeo Resolución
DivX 3.11/4.x/5.x/6.x
MPEG4 SP/ASP
AVI
MKV
ASF
MP4
3GP
VRO
VOB
PS
TS
H.264 BP/MP/HP
Motion JPEG 640 x 480 8
Window Media Video v9
MPEG2
MPEG1
Resolución completa disponible: 1366 x 768 a 60 Hz
Modo Resolución
IBM
MAC
VESA DMT
640 x 350 31.469 70.086 25.175 +/720 x 400 31.469 70.087 28.322 -/+
640 x 480 35.000 66.667 30.240 -/832 x 624 49.726 74.551 57.284 -/640 x 480 31.469 59.940 25.175 -/640 x 480 37.861 72.809 31.500 -/640 x 480 37.500 75.000 31.500 -/800 x 600 37.879 60.317 40.000 +/+
800 x 600 48.077 72.188 50.000 +/+
800 x 600 46.875 75.000 49.500 +/+
1024 x 768 48.363 60.004 65.000 -/1024 x 768 56.476 70.069 75.000 -/1024 x 768 60.023 75.029 78.750 +/+
1280 x 720 45.000 60.000 74.250 +/+
1366 x 768 47.712 59.790 85.500 +/+
Frecuencia horizontal
(kHz)
Velocidad de
transferencia (fps)
1920 x 1080
6~30
1920 x 1080 30
Frecuencia vertical
(Hz)
Velocidad en
bits (Mbps)
Frecuencia de reloj de
píxeles (MHz)
Códec de audio
30
AC3
LPCM
ADPCM
(IMA, MS)
AAC
HE-AAC
WMA
DD+
MPEG
(MP3)
DTS Core
G.711(A-Law,
μ-Law)
Polaridad de
sincronización
(H/V)
Español - 12
Page 37

Licencia
Almacenamiento y mantenimiento
✎
Cuando quite las pegatinas adheridas a la pantalla del televisor, limpie los residuos antes de ver la televisión.
✎
Durante la limpieza se puede rayar el exterior y la pantalla del producto. Limpie cuidadosamente la parte exterior y la pantalla
con un paño suave para evitar que se raye.
No rocíe agua directamente sobre el producto. Si penetra
líquido en el producto se puede originar un problema en el
funcionamiento, un incendio o una descarga eléctrica.
Limpie el producto con un paño suave ligeramente humedecido
con agua. No utilice líquido inflamable (por ejemplo, benceno,
disolventes) ni agentes de limpieza.
Español - 13
Page 38

Para obter mais informações sobre como utilizar o e-Manual (P. 8)
As imagens e ilustrações neste Manual do utilizador servem apenas de referência e podem ser diferentes do produto real. O design
e as características técnicas do produto podem ser alterados sem aviso prévio.
Informações importantes sobre a garantia relativamente ao formato de
visualização do televisor
1. As funcionalidades relacionadas com a televisão digital (DVB) só estão disponíveis em países/áreas onde os sinais digitais terrestres DVB-T
(MPEG2 e MPEG4 AVC) sejam transmitidos, ou onde consiga aceder a um serviço de televisão por cabo compatível com DVB-C (MPEG2
e MPEG4 AAC). Verifique com o revendedor local a possibilidade de receber sinais DVB-T ou DVB-C.
2. DVB-T é o consórcio padrão europeu para a transmissão de emissão de televisão digital terrestre, enquanto DVB-C é o de transmissão de
emissão de televisão digital por cabo. Existem, contudo, algumas funcionalidades diferenciadas, como o EPG (Electric Programme Guide Guia electrónico de programação), o VOD (Video On Demand - Vídeo a pedido), entre outras, que não estão incluídas nesta especificação.
Por esse motivo, não são suportadas de momento.
3. Embora este televisor cumpra as mais recentes normas DVB-T e DVB-C [Agosto de 2008], não é possível garantir a compatibilidade com
as futuras transmissões digitais terrestres DVB-T e transmissões digitais por cabo DVB-C.
4. Consoante o país/área onde este televisor é utilizado, alguns fornecedores de televisão por cabo podem cobrar uma taxa adicional por
esses serviços e poderá ser necessário concordar com os termos e condições dos seus negócios.
5. Algumas funções da televisão digital podem estar indisponíveis em alguns países ou regiões e o DVB-C poderá não funcionar
correctamente com alguns fornecedores de serviços por cabo.
6. Para obter mais informações, contacte o centro local de apoio ao cliente da Samsung.
A qualidade da recepção do televisor pode ser afectada devido a diferenças no método de emissão entre países. Pergunte ao revendedor
✎
autorizado local da SAMSUNG ou ao centro de atendimento da Samsung se o desempenho do televisor pode ser melhorado através da
respectiva reconfiguração.
Aviso de imagem fixa
Evite visualizar imagens fixas (como ficheiros de imagem jpeg) ou elementos de imagens fixas (como logótipos de programas televisivos,
imagens panorâmicas ou imagens de formato 4:3, barras de notícias ou de informações sobre a bolsa na parte inferior do ecrã, etc.) no ecrã.
A visualização constante de imagens fixas pode levar a um desgaste desigual do fósforo do ecrã, o que afecta a qualidade da imagem. Para
reduzir o risco de ocorrência deste efeito, siga as recomendações abaixo:
• Evite visualizar o mesmo canal de televisão durante longos períodos.
• Tente sempre visualizar as imagens em ecrã inteiro, utilize o menu de formatos de imagem do televisor para escolher o mais adequado.
• Reduza os valores do brilho e do contraste para o mínimo necessário para alcançar a qualidade de imagem pretendida; os valores muito
elevados podem acelerar o processo de desgaste.
• Utilize com frequência todas as funcionalidades do televisor destinadas a reduzir a retenção da imagem e o desgaste do ecrã; consulte a
secção que trata este assunto no manual do utilizador para obter mais informações.
Manutenção de um espaço de instalação seguro
Mantenha as distâncias recomendadas entre o produto e outros objectos (por exemplo, uma parede) para garantir a ventilação adequada.
Caso contrário, pode provocar um incêndio ou danificar o produto devido ao aumento de temperatura no interior do mesmo.
Se utilizar uma base ou suporte de montagem na parede, utilize apenas as peças fornecidas pela Samsung Electronics.
✎
• Se utilizar peças fornecidas por outro fabricante, pode provocar danos materiais ou ferimentos em caso de queda do produto.
O aspecto exterior pode variar consoante o produto.
✎
Tenha atenção ao ligar o televisor, porque algumas partes podem estar um pouco quentes.
✎
Instalação com uma base. Instalação com um suporte de montagem na parede.
10 cm
10 cm10 cm
10 cm
10 cm
10 cm
10 cm
Português - 2
Page 39

Acessórios
✎
Certifique-se de que os itens seguintes são fornecidos com o seu televisor. Se faltar algum acessório, contacte o seu
revendedor.
✎
A cor e a forma dos itens podem variar consoante os modelos.
✎
Os cabos não incluídos no conteúdo da embalagem podem ser adquiridos em separado.
y Telecomando e pilhas (2 pilhas AAA)
y Cartão de garantia / Manual de segurança (não estão disponíveis em alguns locais)
✎
Será cobrada uma taxa administrativa se
(a) requisitar um técnico e o produto não tiver qualquer defeito
(isto é, se não tiver lido este manual do utilizador)
(b) levar a unidade a um centro de reparação e o produto não tiver qualquer defeito
(isto é, se não tiver lido este manual do utilizador)
✎
O valor dessa taxa administrativa ser-lhe-á comunicado antes de ser realizada qualquer reparação ou visita ao domicílio.
y Cabo de alimentação
y Manual do utilizador
Apresentação do painel de controlo
✎
A cor e a forma do produto podem variar consoante o modelo.
Painel de contr olo
Sensor do telecomando Aponte o telecomando para este ponto no televisor.
Indicador de corrente Pisca e apaga-se quando o televisor está ligado; acende-se quando está no modo de
SOURCE
E
MENU Apresenta um menu no ecrã, o OSD (on screen display - indicações no ecrã), das
Y
z
P
(Power)
Modo de espera
Não deixe o televisor no modo de espera durante longos períodos de tempo (por exemplo, quando vai de férias). O televisor continua
a consumir uma pequena quantidade de energia eléctrica mesmo quando o botão de alimentação está desligado. É aconselhável
desligar o cabo de alimentação.
espera.
Alterna entre todas as fontes de entrada disponíveis. No menu no ecrã, utilize este botão
tal como utiliza o botão ENTERE do telecomando.
funcionalidades do seu televisor.
Regula o volume. No OSD, utilize os botões
telecomando.
Muda de canal. No OSD, utilize os botões
telecomando.
Liga ou desliga o televisor.
Y
z
tal como utiliza os botões ◄ e ► do
tal como utiliza os botões ▼ e ▲ do
Português - 3
Page 40

Apresentação do telecomando
✎
Este é um telecomando especial para indivíduos com deficiência visual e tem pontos de Braille no botão de alimentação, nos
botões de canais e nos botões de volume.
Liga e desliga o televisor.
Selecciona alternadamente teletexto Ligado,
Duplo, Sobrepor ou Desligado
Regula o volume.
Apresenta o menu principal no ecrã.
Apresenta a Conteúdo Pág. Princ..
Selecciona rapidamente as funções mais
utilizadas.
Selecciona as opções de menu no ecrã e
altera os respectivos valores.
Volta ao menu anterior
E-MANUAL: apresenta o guia e-Manual.
(p. 8)
P.SIZE: selecciona o tamanho da
imagem.
AD/SUBT.: Selecção da descrição de
áudio. (Não disponível em alguns locais)/
apresenta legendas digitais.
CONTENT
A B C D
E-MANUAL
P.SIZE
AD/SUBT.
Apresenta e selecciona as fontes de vídeo
disponíveis.
Carregue para aceder directamente aos
canais.
Volta ao canal anterior.
Corta o som temporariamente.
Muda de canal.
Apresenta a lista de canais no ecrã.
Apresenta o EPG (Electronic Programme
Guide - Guia de programação electrónico).
Apresenta informações sobre o ecrã do
televisor.
Sai do menu.
Utilize estes botões de acordo com as
instruções no ecrã.
Utilize estes botões para uma funcionalidade
específica.
Para mais informações consulte o manual
electrónico.
Introdução das pilhas (Tamanho da pilha: AAA)
Português - 4
Page 41

Configuração inicial
Quando ligar o televisor pela primeira vez, uma sequência de avisos no ecrã ajuda-o a configurar as definições básicas. Carregue no
botão POWERP. Configurar apenas está disponível se a fonte estiver definida para TV.
1. Idioma do Menu: seleccionar o idioma do menu
Carregue no botão ▲ ou ▼ e, em seguida, no botão ENTERE.
Seleccione o idioma pretendido para o OSD (On Screen Display – menu digital).
2. Modo Utilização: seleccionar Demons. Loja ou Util. Domés.
Carregue no botão ▲ ou ▼ e, em seguida, no botão ENTERE.
Seleccione o modo Util. Domés.. O modo Demons. Loja destina-se a locais de venda a retalho.
Para repor as definições da unidade de Demons. Loja para Util. Domés. (padrão): carregue no botão de volume do televisor.
Quando o OSD de volume aparecer, carregue sem soltar em MENU durante 5 seg.
✎
Demons. Loja destina-se apenas a utilização numa loja. Se seleccionar esta opção, não vai poder utilizar diversas funções.
Para ver televisão em casa, seleccione Util. Domés..
3. País (consoante o país): seleccionar um país
Carregue no botão ▲ ou ▼ e, em seguida, no botão ENTERE.
Seleccione o país pretendido.
✎
Depois de seleccionar o país no menu correspondente, alguns modelos permitem avançar para uma opção adicional para
definir o número PIN.
4. Sintonização automática (Passo 1): seleccionar a forma como vê televisão
Vamos procurar e memorizar os canais na sua TV. Voçê precisa procurar os canais?
• Sim, eu preciso.: memoriza todos os canais disponíveis utilizando um cabo RF.
• Não, eu não preciso.: Não é necessário utilizar Sintonização Automática para encontrar canais.
5. Sintonização automática (Passo 2): seleccionar opções de procura
Seleccione o sinal de transmissão e a fonte de antena pretendidos. Carregue no botão ▲/▼/◄/► e, em seguida, no botão
ENTERE.
Se definir a fonte de antena para Cabo, torna-se possível atribuir valores numéricos (frequências de canal) aos canais. Para obter
mais informações, consulte Canal → Sintonização automática.
✎
Alguns canais podem não ser transmitidos para este televisor. Depende da especificação ou aumento do sinal de
transmissão.
✎
Carregue no botão ENTERE em qualquer altura para interromper o processo de memorização.
✎
No e-Manual, consulte o capítulo “Sintonizar novamente os canais > Sintonização automática”
6. Relógio: definir o modo relógio
• Auto: define a hora actual automaticamente.
• Manual: permite-lhe definir a data e a hora actuais manualmente.
7. Fuso Horário (consoante o país): definição do Fuso Horário
Esta função só está disponível quando o modo relógio está definido para Auto.
• Auto: define o fuso horário automaticamente.
• Manual: define o fuso horário manualmente.
✎
Se seleccionou Manual, pode seleccionar se quer o DST (Hora de Verão) Ligado ou Desligado. (consoante o país)
8. Conclusão da configuração
Carregue no botão ENTERE.
✎
As definições concluídas são apresentadas.
Se pretender repor esta funcionalidade...
Seleccione Sistema - Configurar (Configuração inicial). Introduza o número PIN de 4 dígitos. O número PIN predefinido é “0-0-0-0”.
Se pretender alterar o número PIN, utilize a função Alterar PIN.
Mesmo que tenha executado o procedimento Configurar (MENU → Sistema) na loja, deverá repetir a operação em casa.
✎
Caso se esqueça do código PIN, carregue nos botões do telecomando pela seguinte sequência, no modo de espera, repondo
o PIN para “0-0-0-0”: MUTE → 8 → 2 → 4 → POWER (ligar).
Português - 5
Page 42

Ligações
Ligação HDMI, HDMI/DVI Ligação SCART
Leitor de BD / PC VCR ou DVD
DVI OUTHDMI OUT
EXT
SERVICE
HDMI IN
USB
(5V 0.5A)
USB
1 (DVI)2
ANT IN
EXT (RGB)
Antena VHF/UHF
Painel posterior do televisor
ou
✎
A posição da porta pode ser
diferente consoante o modelo.
Ligação de Auscultadores
Cabo
Português - 6
Page 43

Modos de visualização (entrada HDMI/DVI)
A resolução ideal é 1366 X 768 @ 60 Hz. Consulte a página de especificações para saber qual a resolução máxima disponível.
SERVICE
SERVICE
✎✎
NOTA
• Se efectuar uma ligação através de um cabo HDMI/DVI, tem de utilizar a tomada HDMI IN 1(DVI).
• Se um cabo HDMI para DVI estiver ligado à porta HDMI IN 1(DVI), o som não funciona.
• O modo entrelaçado não é suportado.
• O televisor pode não funcionar correctamente se for seleccionado um formato de vídeo não padrão.
• As entradas PC(D-Sub) e PC/DVI AUDIO IN não são suportadas.
• A entrada COMPONENT/AV IN não é suportada.
• A saída DIGITAL AUDIO OUT(OPTICAL) não é suportada.
• A ligação através do cabo HDMI pode não ser suportada, dependendo do PC.
• A tomada dos auscultadores suporta apenas conectores TRS (tip-ring-sleeve – ponta-anel-capa) com 3 condutores.
Conector apenas para assistência
técnica.
Ligação a uma ranhura COMMON INTERFACE
(A ranhura para cartões de visualização do televisor)
Para poder ver canais pagos, tem de introduzir o “CI ou CI+ CARD”.
• Se não introduzir o “CI ou CI+ CARD”, alguns canais apresentam a
mensagem “Sinal Codificado”.
• As informações de emparelhamento, incluindo um número de
telefone, a ID do “CI ou CI+ CARD”, a ID do anfitrião e outras
informações são apresentadas cerca de 2 a 3 minutos depois. Se
for apresentada uma mensagem de erro, contacte o seu fornecedor
de serviços.
• Assim que concluir a configuração das informações dos canais,
aparece uma mensagem a informar que a actualização foi concluída,
indicando que a lista de canais já está actualizada.
y A imagem pode variar consoante o modelo.
Alteração da fonte de entrada
Fonte
TV / Ext. / HDMI1/DVI / HDMI2
Utilize esta opção para seleccionar o televisor ou outras fontes de entrada externa, como leitores de DVD/leitores de Blu-ray/caixa de
televisão por cabo/receptor de satélite STB, ligadas ao televisor.
✎
Na lista Fonte apresentada, as entradas ligadas são realçadas.
✎
A entrada PC (D-Sub) não é suportada. Se pretende ligar o PC ao televisor, utilize a entrada HDMI1/DVI.
✎
Ext. está sempre activado.
✎
Carregue no botão TOOLS.
• Editar Nome
Pode definir o nome que quiser para a fonte de entrada externa.
– Se ligar um PC à porta HDMI IN 1(DVI) utilizando um cabo HDMI, deve definir o televisor para o modo PC em Editar
Nome.
– Se ligar um PC à porta HDMI IN 1(DVI) utilizando um cabo HDMI a DVI, deve definir o televisor para o modo DVI PC em
Editar Nome.
– Se ligar um dispositivo AV à porta HDMI IN 1(DVI) utilizando um cabo HDMI a DVI, deve definir o televisor para o modo
Dispositivos DVI em Editar Nome.
• Informação
Pode ver informações detalhadas sobre o dispositivo externo ligado.
Português - 7
Page 44

Como consultar o e-Manual
E-MANUAL
Pode consultar instruções sobre as funcionalidades do seu televisor no respectivo e-Manual. Para utilizá-lo,
carregue no botão E-MANUAL do telecomando. Movimente o cursor utilizando os botões para cima/para baixo/
para a direita/para a esquerda para realçar uma categoria, depois um tópico e, em seguida, carregue no botão
ENTERE. O e-Manual apresenta a página que pretende ver.
Também pode aceder ao manual electrónico através do menu:
O
✎
Para volver al menú principal del e-Manual, pulse el botón E-MANUAL del mando a distancia.
Apresentação do ecrã
Vídeo, programa
de televisão,
etc., actualmente
visualizado.
MENUm → Assistência → e-Manual → ENTERE
A lista de categorias. Carregue no botão
Funcionalidades básicas
Alteração do modo de imagem predenido
Ajuste das denições da imagem
Alterar as opções da imagem
Alteração do modo de som predenido
Ajustar as denições de som
}
Índice E Enter e Sair
Botões de funcionamento
}
Índice: apresenta o ecrã de índice remissivo.
E
Enter: selecciona uma categoria ou submenu.
e
Sair: sai do e-Manual.
<Visualizar os conteúdos>
a
Tentar Ag.: apresenta o menu OSD que corresponde ao tópico. Para volver a la pantalla del e-Manual,
b
Página Principal: passa para o ecrã inicial do e-Manual.
L
Página: passa para a página anterior ou seguinte.
{ Zoom: amplia um ecrã.
pulse el botón E-MANUAL.
– Carregue no botão { (Zoom) para ampliar o ecrã. Pode deslocar-se pelo ecrã ampliado
utilizando os botões ▲ ou ▼. Para voltar ao ecrã de tamanho normal, carregue no botão
RETURN.
◄ ou ► para seleccionar a categoria
pretendida.
Apresenta a lista de submenu. Utilize
os botões das setas do telecomando
para mover o cursor. Carregue no botão
E
ENTER
pretendido.
para seleccionar o submenu
Como alternar entre um tópico do e-Manual e o(s) menu(s) OSD correspondente(s).
✎
Esta função não está disponível em alguns menus.
✎
Não pode utilizar a função Tentar Ag. se o menu não estiver activado.
Método 1 Método 2
1. Si desea utilizar el menú que corresponda a un tema del
e-Manual, pulse el botón rojo para seleccionar Tentar Ag..
2. Para voltar ao ecrã do e-Manual, carregue no botão
E-MANUAL.
1. Carregue no botão ENTERE quando aparecer um tópico.
“Pretende executar este proc.?” aparece. Seleccione Sí y
pulse el botón ENTERE. Aparece la ventana de la OSD.
2. Para voltar ao ecrã do e-Manual, carregue no botão
E-MANUAL.
Como procurar um tópico na página de índice
✎
Dependendo do idioma, esta função pode não ser suportada.
1. Se quiser procurar uma palavra-chave, carregue no botão azul para seleccionar Índice.
2. Carregue no botão ◄ ou ► para seleccionar uma ordem de caracteres pretendida.
3. Carregue no botão ▲ ou ▼ para seleccionar uma palavra-chave que pretenda visualizar e, em seguida, carregue no botão
ENTERE.
4. Pode visualizar o ecrã de instruções do e-Manual correspondente.
✎
Para fechar o ecrã Índice, carregue no botão RETURN.
Português - 8
Page 45

Instalação do suporte de montagem na
parede
Os acessórios de montagem na parede (vendidos em
separado) permitem montar o televisor na parede. Para obter
mais informações sobre este tipo de montagem, consulte as
instruções fornecidas com os acessórios de montagem na
parede. A instalação do suporte para montagem na parede tem
de ser feita por um técnico. Não é recomendável que seja feita
pelo utilizador.
Se a instalação do televisor for feita pelo cliente, a Samsung
Electronics não se responsabiliza por quaisquer danos no
produto nem por ferimentos sofridos pelo cliente ou por outras
pessoas.
Montar a base guia
Quando instalar o televisor numa parede, fixe a base guia
conforme indicado.
✎
Utilize apenas a base guia fornecida como acessório. (A
base guia pode variar consoante o modelo.)
Base guia
Especificações do kit de montagem na parede (VESA)
✎
O kit de montagemna parede não é fornecido, mas sim
vendido em separado.
Instale o suporte de montagem na parede numa parede sólida
perpendicular ao chão. Se montar noutros materiais, contacte o
revendedor mais próximo. Se efectuar a instalação no tecto ou
numa parede inclinada, o aparelho pode cair e provocar lesões
graves.
✎
NOTA
As dimensões padrão para kits de montagem na parede
x
são apresentadas na tabela abaixo.
Quando adquirir o nosso kit de montagem na parede,
x
são fornecidos um manual de instalação detalhado e
todas as peças necessárias para a montagem.
Não utilize parafusos que não respeitem as
x
especificações VESA para parafusos padrão.
Não utilize parafusos com uma medida superior à
x
padrão, pois podem danificar o interior do televisor.
No que se refere aos suportes de montagem na parede
x
que não respeitem as especificações VESA para
parafusos padrão, o comprimento dos parafusos pode
variar consoante as respectivas especificações.
Não aperte de mais os parafusos, pois pode danificar
x
o monitor ou fazer com que caia e provocar ferimentos
em alguém. A Samsung não se responsabiliza por este
tipo de acidentes.
A Samsung não se responsabiliza por danos no produto
x
ou ferimentos, no caso de ser utilizado um suporte de
montagem na parede que não seja VESA ou de um tipo
não especificado, ou se o consumidor não respeitar as
instruções de instalação do produto.
Não exceda uma inclinação de 15 graus quando montar
x
este televisor.
polegadas Espec. VESA (A * B)
22 75 X 75
32 200 X 200 M6
Não instale o kit de montagem
na parede com o televisor
ligado. Pode resultar em
ferimentos pessoais devido a
choques eléctricos.
Parafuso
padrão
M4
Quantidade
426 200 X 100
Fixação do televisor à parede
Cuidado: puxar, empurrar ou subir para cima do
televisor pode provocar a queda do mesmo. Em
especial, certifique-se de que as crianças não se
penduram nem desestabilizam o televisor, o que
poderia provocar a queda do mesmo e resultar
em acidentes graves ou morte. Siga todas as
precauções de segurança fornecidas no folheto de
segurança incluído. Para uma maior estabilidade,
instale o dispositivo antiqueda por razões de
segurança, como descrito em seguida.
Para evitar a queda do televisor
1. Introduza os parafusos nos grampos e aparafuse-os
com firmeza à parede. Verifique se os parafusos foram
aparafusados com firmeza à parede.
✎
Pode necessitar de material adicional, tal como uma
bucha, consoante o tipo de parede.
✎
Uma vez que os grampos, parafusos e fios
necessarios nao sao fornecidos, adquira-os em
separado.
2. Retire os parafusos da parte central traseira do televisor,
introduza os parafusos nos grampos e, em seguida,
aparafuse os parafusos ao televisor novamente.
✎
Os parafusos podem não ser fornecidos com o
produto. Se for esse o caso, adquira os parafusos
com as seguintes especificações.
3. Ligue os grampos fixados ao televisor e os grampos fixados
à parede com um fio forte e, em seguida, aperte bem o fio.
✎
NOTA
• Instale o televisor perto da parede para que este não
caia para trás.
• É mais seguro ligar o fio de modo a que os grampos
fixados à parede estejam ao mesmo nível ou abaixo
dos grampos fixados ao televisor.
• Desaperte o fio antes de transportar o televisor.
4. Verifique se todas as ligações estão devidamente presas.
Verifique regularmente as ligações para evitar qualquer sinal
de gasto ou falha. Se tiver alguma dúvida sobre a segurança
das suas ligações, contacte um instalador profissional.
Português - 9
Page 46

Resolução de problemas
Se o televisor aparentar ter um problema, tente, primeiro, consultar esta lista de possíveis problemas e soluções. Se nenhuma
das sugestões de resolução de problemas for aplicável, visite o site “www.samsung.com” e clique em Suporte, ou contacte
um Centro de assistência ao cliente da Samsung.
Problemas
• Certifique-se de que o cabo de alimentação de CA está ligado correctamente à tomada de parede e ao televisor.
• Verifique se a tomada de parede está a funcionar devidamente.
• Experimente carregar no botão POWER do televisor para se certificar de que o problema não é causado pelo
telecomando. Se o televisor se ligar, consulte a secção “O telecomando não funciona” abaixo.
Problemas
• Verifique as ligações dos cabos (retire e ligue novamente todos os cabos ligados ao televisor e a dispositivos externos).
• Defina as saídas de vídeo do seu dispositivo externo (caixa de televisão por cabo/set top box, DVD, Blu-ray etc) para
corresponderem às ligações de entrada do televisor. Por exemplo, se a saída de um dispositivo externo for HDMI, deve
ligá-lo a uma entrada HDMI no televisor.
• Certifique-se de que os dispositivos estão ligados.
• Certifique-se de que selecciona a fonte correcta do televisor, carregando no botão SOURCE do telecomando.
• Ligue novamente o cabo de alimentação do dispositivo ligado para o reiniciar.
Problemas
• Substitua as pilhas do telecomando com os pólos (+/–) na direcção correcta.
• Limpe a janela de transmissão do sensor do telecomando.
• Experimente apontar o telecomando directamente para o televisor a uma distância de 1,5 a 1,8 m.
Problemas
• Programe o telecomando da caixa de televisão por cabo/set top box para funcionar com o televisor. Consulte o manual
do utilizador da caixa de televisão por cabo/set top box para identificar o código do televisor SAMSUNG.
Não é possível ligar o televisor.
Não se vê imagem/vídeo.
O telecomando não funciona.
O telecomando da caixa de televisão por cabo/set top box não liga nem desliga o televisor, nem
regula o volume.
✎
Pode obter sempre o melhor desempenho possível do seu televisor ao actualizar o firmware mais recente, através do
web site (www.samsung.com → Suporte → Centro De Downloads), utilizando um dispositivo USB.
✎
O LCD TFT utiliza um painel composto por pixels secundários que requerem tecnologia sofisticada para serem
reproduzidos. No entanto, podem existir alguns pixels brilhantes ou escuros no ecrã. Estes pixels não afectam o
desempenho do produto.
Português - 10
Page 47

Características técnicas
10°C 40°C 50°F 104°F
10°C 40°C 50°F 104°F
-20°C 45°C -4°F 113°F
Resoluçao do ecrã 1366 x 768
Considerações ambientais
Temperatura de funcionamento
Humidade de funcionamento
Temperatura de armazenamento
Humidade de armazenamento
a
a
(
(
10% a 80%, sem condensação
5% a 95%, sem condensação
a
a
)
)
Sistema de televisão Analógico: B/G, D/K, L, I (consoante a selecção do país)
Sistema de cores/vídeo Analógico: PAL, SECAM, NTSC-4.43, NTSC-3.58, PAL60
Sistema de som BG, DK, L, NICAM, MPEG1, DD, DD+, HEAAC
HDMI IN Vídeo: 1080 24p, 1080p, 1080i, 720p, 576p, 480p
Nome do modelo LA32E420
Tamanho do ecrã
Som (saída) 5W X 2
Dimensões (L x P x A)
Caixa
Com base
Peso
Sem base
Com base
✎
O design e as características técnicas estão sujeitos a alterações sem aviso prévio.
✎
Para obter informações sobre a fonte de alimentação e o consumo de energia, consulte a etiqueta colada ao produto.
✎
O consumo energético típico é medido de acordo com a norma IEC 62087 Ed.2
Digital: MPEG-2 MP@ML, MPEG-4, H.264/AVC MP@L3, MP@L4.0, HP@L4.0
Áudio: PCM linear de dois canais 32/44.1/48kHz, 16/20/24bits.
Digital: DVB-T/DVB-C
polegadas
784,4 X 98,1 X 502,9 (mm)
784,4 X 182,4 X 545,3 (mm)
7,7 kg
8,7 kg
Português - 11
Page 48

Formatos de vídeo suportados
Extensão do
ficheiro
*.avi
*.mkv
*.asf
*.wmv
*.mp4
*.3gp
*.vro
*.mpg
*.mpeg
*.ts
*.tp
*.trp
*.mov
*.flv
*.vob
*.svi
*.m2ts
*.mts
*.divx
Categoria Codec de vídeo Resolução
DivX 3.11/4.x/5.x/6.x
MPEG4 SP/ASP
AVI
MKV
ASF
MP4
3GP
VRO
VOB
PS
TS
H.264 BP/MP/HP
Motion JPEG 640 x 480 8
Window Media Video v9
MPEG2
MPEG1
Resolução máxima disponível: 1366 X 768 a 60 Hz
Modo Resolução
IBM
MAC
VESA DMT
640 x 350 31.469 70.086 25.175 +/720 x 400 31.469 70.087 28.322 -/+
640 x 480 35.000 66.667 30.240 -/832 x 624 49.726 74.551 57.284 -/640 x 480 31.469 59.940 25.175 -/640 x 480 37.861 72.809 31.500 -/640 x 480 37.500 75.000 31.500 -/800 x 600 37.879 60.317 40.000 +/+
800 x 600 48.077 72.188 50.000 +/+
800 x 600 46.875 75.000 49.500 +/+
1024 x 768 48.363 60.004 65.000 -/1024 x 768 56.476 70.069 75.000 -/1024 x 768 60.023 75.029 78.750 +/+
1280 x 720 45.000 60.000 74.250 +/+
1366 x 768 47.712 59.790 85.500 +/+
Frequência horizontal
(KHz)
Taxa de
fotogramas (fps)
1920 x 1080
6~30
1920 x 1080 30
Frequência vertical
(Hz)
Frequência do relógio em
Taxa de bits
(Mbps)
pixels (MHz)
Codec de áudio
30
AC3
LPCM
ADPCM
(IMA, MS)
AAC
HE-AAC
WMA
DD+
MPEG
(MP3)
DTS Core
G.711(A-Law,
μ-Law)
Polaridade de
sincronização
(H/V)
Português - 12
Page 49

Licença
Armazenamento e manutenção
✎
Se remover o autocolante colado ao ecrã do televisor, limpe as marcas que possam existir para ver televisão.
✎
A parte exterior e o ecrã do produto podem ficar riscados durante a limpeza. Limpe a parte exterior e o ecrã
cuidadosamente, utilizando um pano macio para evitar riscos.
Não pulverize o equipamento directamente com água. Qualquer
contacto do equipamento com líquidos pode provocar uma
avaria, um incêndio ou um choque eléctrico.
Limpe o equipamento utilizando um pano macio humedecido
com um pouco de água. Não utilize líquidos inflamáveis (por
exemplo, benzeno e diluentes) nem produtos de limpeza.
Português - 13
 Loading...