

Page 1

FULL MANUAL
HW-T450
Imagine the possibilities
Thank you fo r purchasing this Samsung product.
To receive more complete s ervice, please register
your product at www.samsung.com/register
Page 2
SAFETY INFORMATION
SAFETY WARNINGS
TO REDUCE THE RISK OF ELECTRIC SHOCK, DO
NOT REMOVE THE COVER (OR BACK).
NO USER-SERVICEABLE PARTS ARE INSIDE.
REFER SERVICING TO QUALIFIED SERVICE
PERSONNEL.
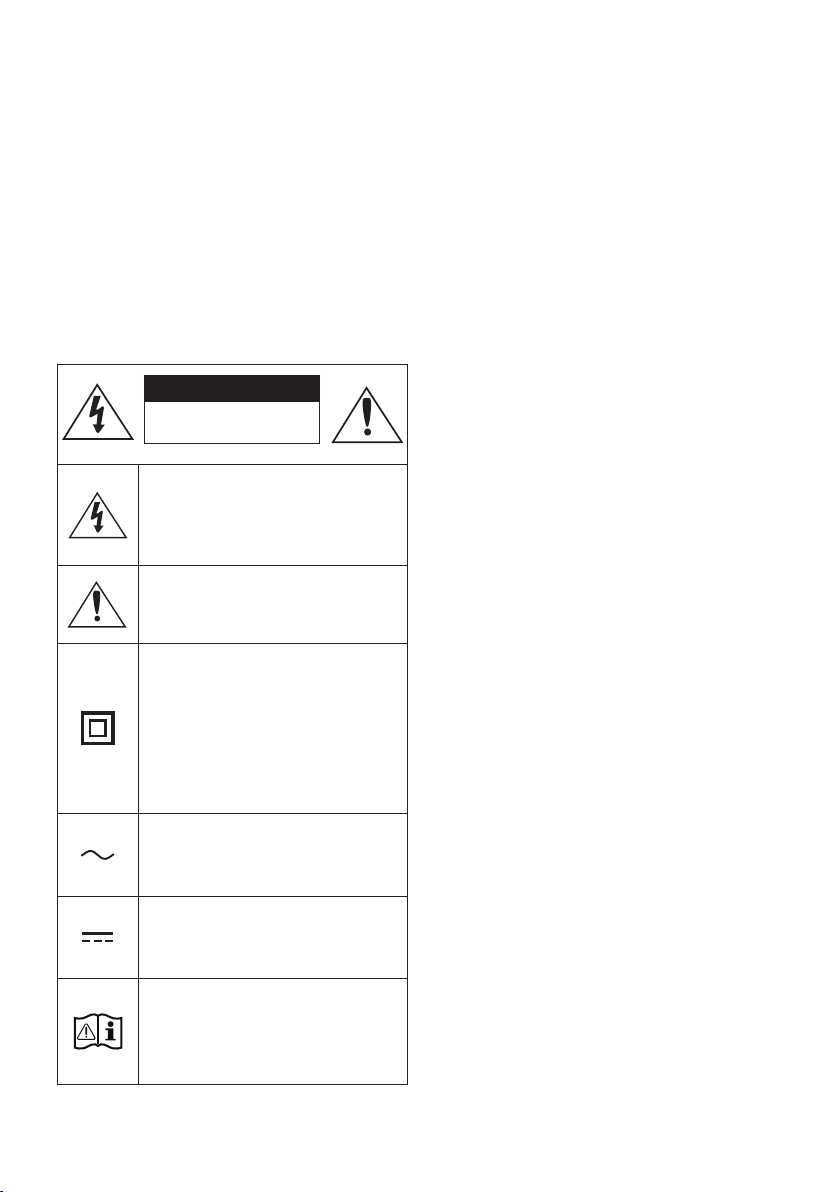
Refer to the table below for an explanation of
symbols which may be on your Samsung product.
CAUTION
RISK OF E LECTRIC S HOCK.
DO NOT OP EN.
This symbol indicates that high voltage
is present inside. It is dangerous to
make any kind of contact with any
internal part of this product.
This symbol indicates that this product
has included important literature
concerning operation and maintenance.
Class II product : This symbol indicates
that it does not require a safety
connection to electrical ear th (ground).
If this symbol is not present on a
product with a power cord, the produc t
MUST have a reliable connection to
protective ear th (ground).
WARNING
• To reduce the risk of re or electric shock, do
not expose this appliance to rain or moisture.
CAUTION
• TO PREVENT ELECTRIC SHOCK, MATCH WIDE
BLADE OF PLUG TO WIDE SLOT, FULLY INSERT.
• This apparatus shall always be connected to a
AC outlet with a protective grounding
connection.
• To disconnect the apparatus from the mains,
the plug must be pulled out from the mains
socket, therefore the mains plug shall be
readily operable.
• Do not expose this apparatus to dripping or
splashing. Do not put objects lled with
liquids, such as vases on the apparatus.
• To turn this apparatus of f completely, you
must pull the power plug out of the wall
socket. Consequently, the power plug must
be easily and readily accessible at all times.
AC voltage : This symbol indicates that
the rated voltage marked with the
symbol is AC voltage.
DC voltage : This symbol indicates that
the rated voltage marked with the
symbol is DC voltage.
Caution, Consult instructions for use :
This symbol instructs the user to
consult the user manual for further
safety related information.
ENG - ii
Page 3
PRECAUTIONS
1. Ensure that the AC power supply in your
house complies with the power
requirements listed on the identication
sticker located on the bottom of your
product. Install your product horizontally, on
a suitable base (furniture), with enough
space around it for ventilation (7~10 cm).
Make sure the ventilation slots are not
covered. Do not place the unit on ampliers
or other equipment which may become hot.
This unit is designed for continuous use. To
fully turn off the unit, disconnect the AC plug
from the wall outlet. Unplug the unit if you
intend to leave it unused for a long period of
time.
2. During thunderstorms, disconnect the AC
plug from the wall outlet. Voltage peaks due
to lightning could damage the unit.
3. Do not expose the unit to direct sunlight or
other heat sources. This could lead to
overheating and cause the unit to
malfunction.
4. Protect the product from moisture (i.e.
vases), and excess heat (e.g. a replace) or
equipment creating strong magnetic or
electric elds. Unplug the power cable from
the AC wall socket if the unit malfunctions.
Your product is not intended for industrial
use. It is for personal use only. Condensation
may occur if your product has been stored in
cold temperatures. If transporting the unit
during the winter, wait approximately
2 hours until the unit has reached room
temperature before using.
5. The battery used with this product contains
chemicals that are harmful to the
environment. Do not dispose of the battery
in the general household trash. Do not
expose the battery to excess heat, direct
sunlight, or re. Do not short circuit,
disassemble, or overheat the battery.
Danger of explosion if the battery is replaced
incorrectly. Replace only with the same or
equivalent type.
ABOUT THIS MANUAL
The user manual has two parts: this simple paper
USER MANUAL and a detailed FULL MANUAL you
can download.
USER MANUAL
See this manual for safety instructions,
product installation, components,
connections, and product specications.
FULL MANUAL
You can access the FULL MANUAL on
Samsung’s on-line customer support centre by
scanning the QR code. To see the manual on
your PC or mobile device, download the
manual in document format from Samsung’s
website. (http://www.samsung.com/support)
Design and specications are subject to change
without prior notice.
ENG - iii
Page 4

CONTENTS
01 Checking the Components 2
Inserting Batteries before using the Remote Control (AA batteries X 2) ------------------------- 2
02 Product Overview 3
Front Panel / Top Panel of the Soundbar ------------------------- 3
Bottom Panel of the Soundbar ------------------------- 4
03 Connecting the Soundbar 5
Connecting Electrical Power
Connecting the Soundbar to the Subwoofer
– Automatic connection between the Subwoofer and the Soundbar
– Manually connecting the Subwoofer if automatic connection fails
Connecting an SWA-8500S (Sold Separately) to your Soundbar
-------------------------
-------------------------
-------------------------
-------------------------
-------------------------
04 Connecting to your TV 10
Method 1. Connecting with a Cable
– Connecting using an Optical Cable
Method 2. Connecting Wirelessly
– Connecting a TV via Bluetooth
-------------------------
-------------------------
-------------------------
-------------------------
05 Connecting an External Device 13
Connecting using an Optical Cable
-------------------------
06 Connecting a USB Storage Device 14
07 Connecting a Mobile Device 16
Connecting via Bluetooth
-------------------------
5
6
6
7
8
10
10
11
11
13
16
ENG - iv
Page 5

08 Using the Remote Control 19
How to Use the Remote Control
Adjusting the Soundbar volume with a TV remote control
Using the Hidden Buttons (Buttons with more than one function)
Output specications for the different sound effect modes
-------------------------
-------------------------
-------------------------
-------------------------
09 Installing the Wall Mount 24
Installation Precautions
Wallmount Components
-------------------------
-------------------------
10 Software Update 26
Update Procedure
If UPDATE is not displayed
-------------------------
-------------------------
11 Troubleshooting 28
12 Licence 29
13 Open Source Licence Notice 29
19
22
23
23
24
24
27
27
14 Important Notes About Service 29
15 SpecicationsandGuide 30
Specications
-------------------------
ENG - v
30
Page 6
01 CHECKING THE COMPONENTS
Soundbar Main Unit Subwoofer Remote Control / Batteries
x 2
PAIR
SOUND
MODE
VOL WOOFER
SOUNDBAR
Power Cord
Optic al Cable Wall Mount Guide
(Subwoofer, Soundbar)
x 2
Holder-Screw Screw
x 2
Bracket-Wall Mount
x 2
• For more information about the power supply and power consumption, refer to the label attached
to the product. (Label: Bottom of the Soundbar Main Unit)
• To purchase additional components or optional cables, contact a Samsung Service Centre or
Samsung Customer Care.
• The appearance of the accessories may differ slightly from the illustrations above.
Inserting Batteries before using the Remote Control (AA batteries X 2)
Slide the back cover in the direction of the arrow
until it is completely removed. Insert 2 AA batteries
(1.5V) oriented so that their polarity is correct. Slide
the back cover back into position.
ENG - 2
Page 7
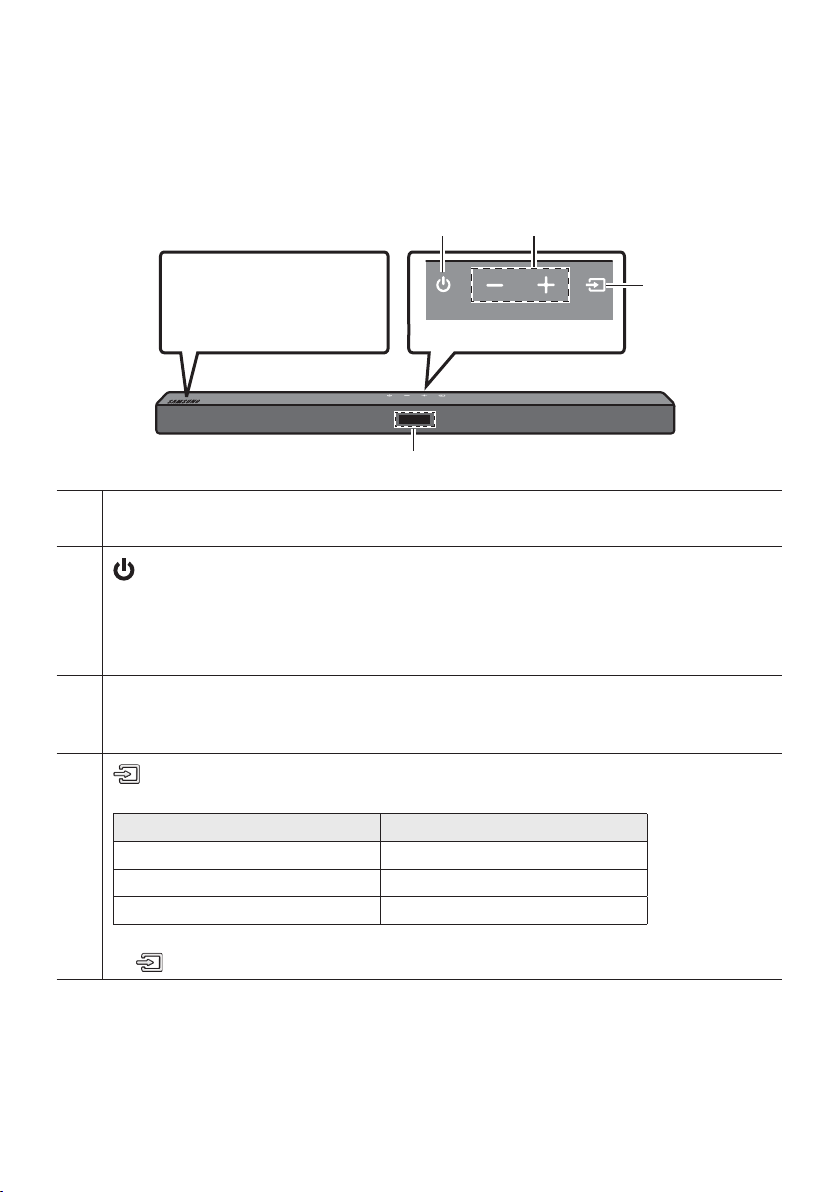
02 PRODUCT OVERVIEW
Front Panel / Top Panel of the Soundbar
Position the product so that
the SAMSUNG logo is
located on the top.
Top Panel
Display
Displays the product’s status and current mode.
(Power) Button
Turns the power on and off.
• Auto Power Down Function
The unit turns off automatically in the following situations:
– In D.IN / BT / USB Mode : If there is no audio signal for 18 minutes.
-/+ (Volume) But ton
Adjusts the volume.
• When adjusted, the volume level appears on the Soundbar ’s front display.
(Source) But ton
Selects the source input mode.
Input mode Display
Optical Digital input D.IN
BLUETOOTH mode BT
USB mode USB
• To turn on “BT PAIRING” mode, change the source to “BT” mode, and then press and hold the
(Source) button for more than 5 seconds.
• When you plug in the AC cord, the power button will begin working in 4 to 6 seconds.
• When you turn on this unit, there will be a 4 to 5 second delay before it produces sound.
• If you want to enjoy sound only from the Soundbar, you must turn off the TV’s speakers in the Audio
Setup menu of your TV. Refer to the owner ’s manual supplied with your TV.
ENG - 3
Page 8
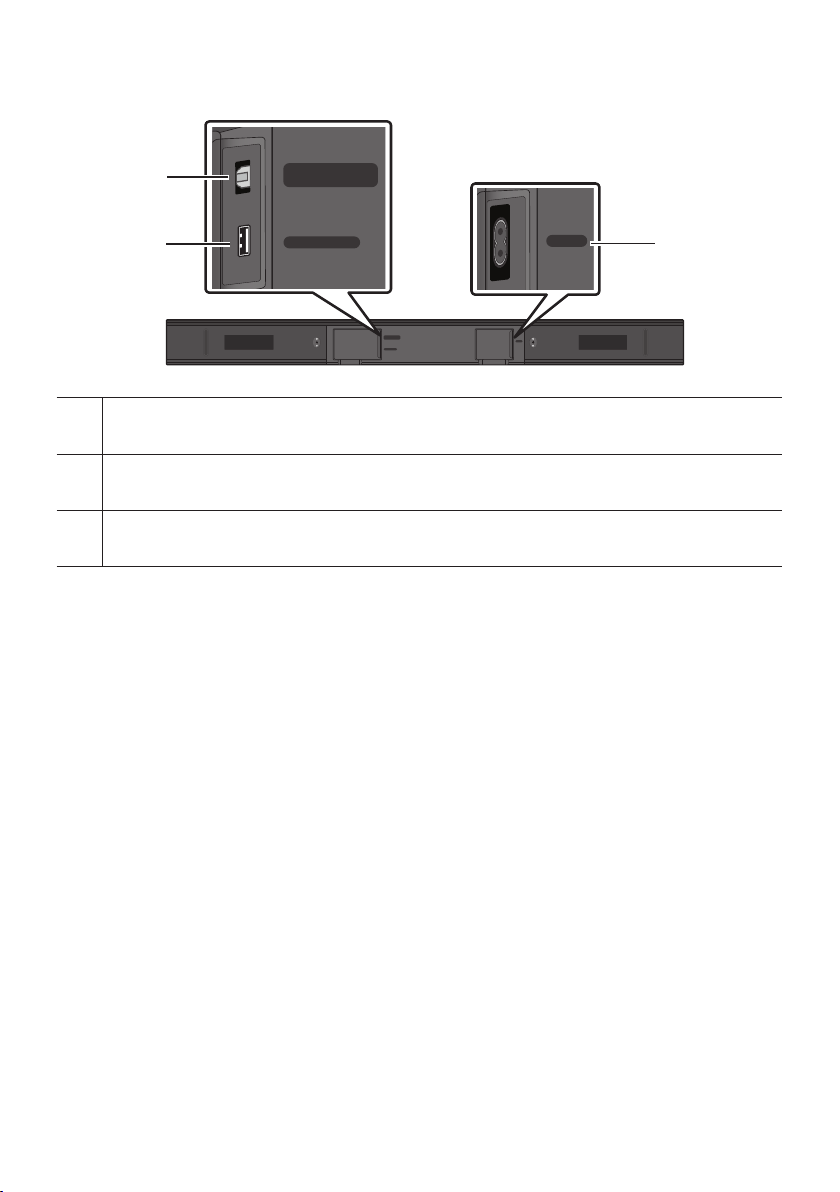
Bottom Panel of the Soundbar
DIGITAL AUDIO IN
(OPTICAL)
DIGITAL AUD IO IN (OPTIC AL)
Connect to the digital (optical) output of an ex ternal device.
USB (5V 0. 5A)
Connect a USB device here to play music les stored on the USB device through the Soundbar.
POWER
Connect the Soundbar's AC power cable.
USB (5V 0.5A)
DIGITAL AUDIO IN
(OPTICAL)
USB (5V 0.5A)
POWER
POWER
• When disconnecting the power cord from a wall outlet, pull the plug. Do not pull the cable.
• Do not connect this unit or other components to an AC outlet until all connections between
components are complete.
ENG - 4
Page 9
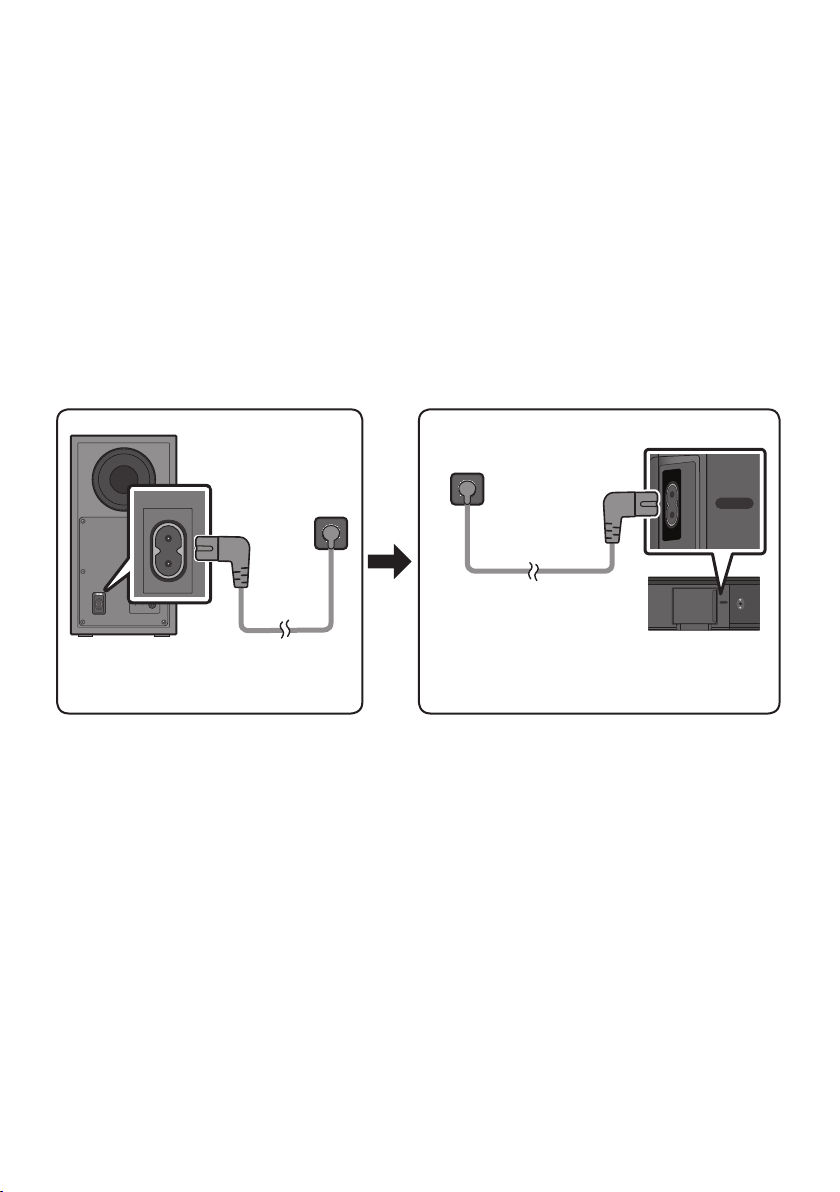
03 CONNECTING THE SOUNDBAR
Connecting Electrical Power
Use the power components to connect the Subwoofer and Soundbar to an electrical outlet in the following
order:
1. Connect the power cord to the Subwoofer.
2. Connect the power cord to the Soundbar.
See the illustrations below.
• For more information about the required electrical power and power consumption, refer to the
label attached to the product. (Label: Bottom of the Soundbar Main Unit)
Power Cord
POWER
Rear of Subwoofer
Power Cord
Connecting
Electric al Power
Connecting Electrical
Power
POWER
POWER
Bott om of the
Soundbar Main Unit
ENG - 5
Page 10

Connecting the Soundbar to the Subwoofer
When the subwoofer is connected, you can enjoy rich bass sound.
Automatic connection between the Subwoofer and the Soundbar
When you turn the power on after connecting the power cables to the Soundbar and subwoofer, the
subwoofer is automatically connected to the Soundbar.
• When auto pairing is complete, the blue indicators at the rear of the subwoofer turn on.
LED Indicator Lights on the Rear of Subwoofer
LED Status Description Resolution
Successfully connected
(normal operation)
Standby (with the Soundbar
main unit turned off)
Connection failed
-
Check if the power cable attached to the
main Soundbar unit is connected properly
or wait about 5 minutes. If blinking persists,
try manually connecting the subwoofer.
See page 7.
Check if the power cable attached to the
main Soundbar unit is connected properly.
Connect again. See the instructions for
manual connection on page 7.
See the contact information for the
Samsung Service Centre in this manual.
Blue
Red On
Red and
blue
On
Blinking Recovering the connection
Blinking Malfunction
ENG - 6
Page 11
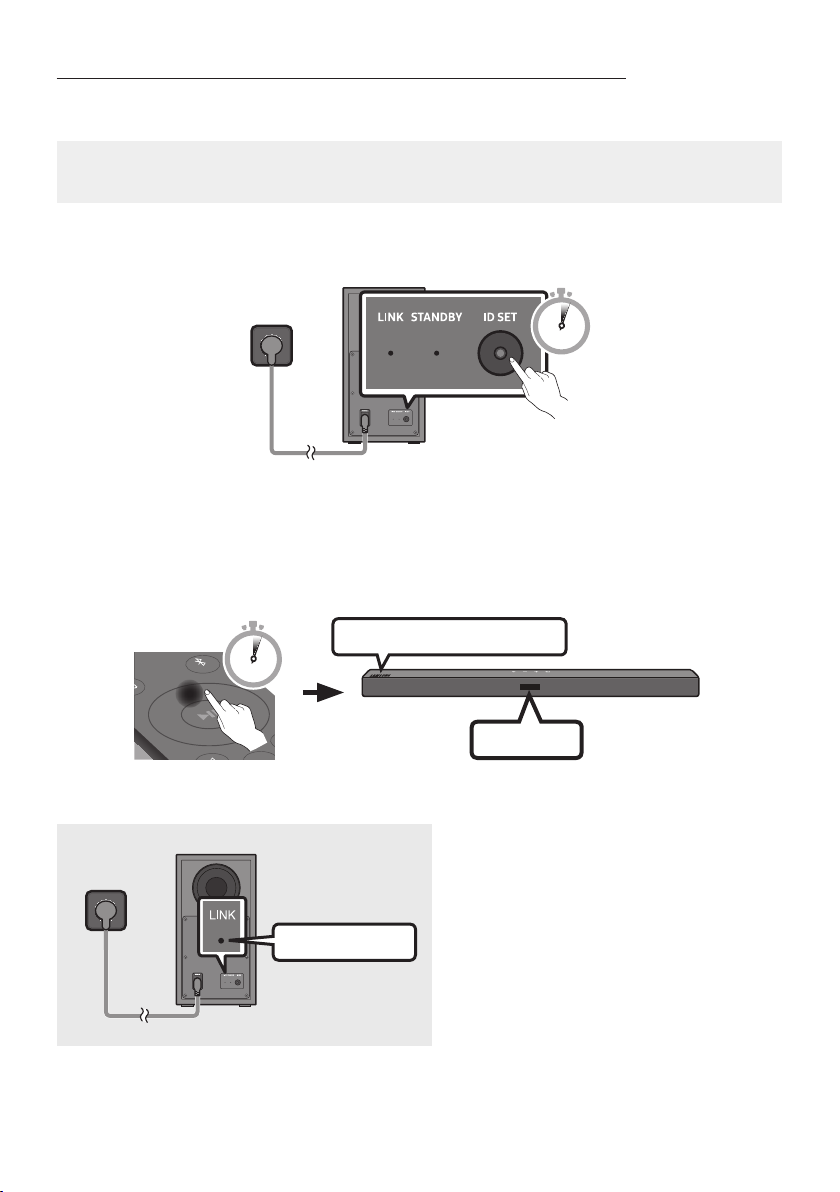
Manually connecting the Subwoofer if automatic connection fails
Before per forming the manual connection procedure below:
• Check whether the power cables for the Soundbar and subwoofer are connected properly.
• Make sure that the Soundbar is turned on.
1. Press and hold ID SET on the rear of the subwoofer for at least 5 seconds.
• The red indicator on the rear of the subwoofer turns off and the blue indicator blinks.
5 Sec
Rear of Subwoofer
2. Press and hold the Up button on the remote control for at least 5 seconds.
• The ID SET message appears on the display of the Soundbar for a moment, and then it
disappears.
• The Soundbar will automatically power on when ID SET is complete.
SAMSU NG logo is on the top
PAIR
5 Sec
3. Check if the LINK LED is solid blue (connection complete).
The LINK LED indicator stops blinking and
glows a solid blue when a connection is
established between the Soundbar and the
Wireless Subwoofer.
Blue is On
ENG - 7
ID SET
Page 12

NOTES
L
R
• Do not connect the power cord of this product or your TV to a wall outlet until all connections
between components are complete.
• Before moving or installing this product, be sure to turn off the power and disconnect the power cord.
• If the main unit is powered off, the wireless subwoofer will go into stand-by mode and the
STANDBY LED on the rear of the sub-woofer will turn red after blinking in blue several times.
• If you use a device that uses the same frequency (5.8GHz) as the Soundbar near the Soundbar,
interference may cause some sound interruption.
• The maximum transmission distance of the main unit’s wireless signal is about 10 m, but may vary
depending on your operating environment. If a steel-concrete or metallic wall is between the main
unit and the wireless subwoofer, the system may not operate at all because the wireless signal
cannot penetrate metal.
PRECAUTIONS
• Wireless receiving antennas are built into the wireless subwoofer. Keep the unit away from water
and moisture.
• For optimal listening performance, make sure that the area around the wireless subwoofer and the
Wireless Receiver Module (sold separately) is clear of any obstructions.
Connecting an SWA-8500S (Sold Separately) to your Soundbar
Expand to true wireless surround sound by connecting the Samsung Wireless Rear Speaker Kit
(SWA-8500S, sold separately) to your Soundbar.
1. Connect the Wireless Receiver Module to 2 Surround Speakers.
– The speaker cables are colour coded.
L
R
SURROUND SPEAKERS OUT
SPEAKER IMPEDANCE : 3Ω
SURROUND-LEFT SURROUND-RIGHT
SURROUND-LEFT
ID SET
ENG - 8
SURROUND-RIGHT
POWER
Page 13

2. Check the standby status of the Wireless Receiver Module after plugging it into an electrical outlet.
POWER
ID SET
LINK
LINK
• The LINK LED indicator (blue LED) on the Wireless Receiver Module blinks. If the LED does not
blink, press the ID SET button on the back of the Wireless Receiver Module with a pen tip for
5~6 seconds until the LINK LED indicator blinks (in Blue). For more about the LED, please refer
to the SWA-8500S user manual.
L
SURROUND SPEAKERS OUT
SPEAKER IMPEDANCE : 3Ω
R
ID SET
5 Sec
STANDBY
LINK
Blue blinking
POWER
3. Press and hold the Up button on the remote control for at least 5 seconds.
• The ID SET message appears on the display of the Soundbar for a moment, and then it
disappears.
• The Soundbar will automatically power on when ID SET is complete.
SAMSU NG logo is on the top
PAIR
5 Sec
CAUTION
• If your Soundbar was playing music when it connects to the SWA-8500S, you may hear some
stuttering from the woofer as the connection nalises.
4. Check if the LINK LED is solid blue (connection complete).
The LINK LED indicator stops blinking and
STANDBY
LINK
glows a solid blue when a connection is
established between the Soundbar and the
Wireless Receiver Module.
Blue is On
5. If the SWA-8500S is not connected, repeat the procedure from Step 2.
ENG - 9
ID SET
Page 14

04 CONNECTING TO YOUR TV
Hear TV sound from your Soundbar through wired or wireless connections.
• When the Soundbar is connected to selected Samsung TVs, the Soundbar can be controlled using
the TV’s remote control.
– This feature is supported by 2017 and later Samsung Smart TVs that support Bluetooth when
you connect the Soundbar to the TV using an optical cable.
– This function also allows you to use the TV menu to adjust the sound eld and various settings
as well as the volume and mute.
Method 1. Connecting with a Cable
When the audio in a broadcast is encoded in Dolby Digital and the “Digital Output Audio Format ” on
your TV is set to PCM, we recommend that you change the setting to Dolby Digital. When the setting on
the TV is changed, you will experience better sound quality. (The TV menu may use different words for
Dolby Digital and PCM depending on the TV manufacturer.)
Connecting using an Optical Cable
Bott om of the Soundba r
DIGITAL AUDIO IN
(OPTICAL)
USB (5V 0.5A)
OPTICAL OUT
Optic al Cable
Top of the Soun dbar
D.IN
1. Connect the DIGITAL AUDIO IN (OPTICAL) jack on the Soundbar to the OPTICAL OUT jack of the TV
with a digital optical cable.
2. Press the (Source) button on the top panel or remote control, and then select the “D.IN” mode.
ENG - 10
Page 15

Method 2. Connecting Wirelessly
Connecting a TV via Bluetooth
When a TV is connected using Bluetooth, you can hear stereo sound without the hassle of cabling.
• Only one TV can be connected at a time.
PAIR
OR
The initial connection
1. Press the PAIR button on the remote control to enter the “BT PAIRING” mode.
(OR)
a. Press the (Source) button on the top panel and then select “BT”.
“BT” changes to “BT PAIRING” in a few seconds automatically or changes to “BT READY” if
there is a connect record.
b. When “BT READY” appears, press and hold the (Source) button on the top panel of the
Soundbar for more than 5 seconds to display “BT PAIRING”.
2. Select Bluetooth mode on the TV. (For more information, see the TV’s manual.)
3. Select “[AV] Samsung Soundbar T4-Series” from the list on TV’s screen.
An available Soundbar is indicated with “Need Pairing” or “Paired” on the TV’s Bluetooth device
list. To connect the TV to the Soundbar, select the message, and then establish a connection.
• When the TV is connected, [TV Name] → “BT” appears on the Soundbar’s front display.
4. You can now hear TV sound from the Soundbar.
If the device fails to connect
• If a previously connected Soundbar listing (e.g. “[ AV] Samsung Soundbar T4-Series ”) appears in the
list, delete it.
• Then repeat steps 1 through 3.
NOTE
• After you have connected the Soundbar to your TV the rst time, use the “BT READY” mode to
reconnect.
ENG - 11
Page 16

Disconnecting the Soundbar from the TV
Press the (Source) button on the top panel or on the remote control and switch to any mode but “BT”.
• Disconnecting takes time because the TV must receive a response from the Soundbar.
(The time required may differ, depending on the TV model.)
• To cancel the automatic Bluetooth connection between the Soundbar and TV, press the
on the remote control for 5 seconds with the Soundbar in “BT READY” status. (Toggle On → Off)
Left button
What is the difference between BT READY and BT PAIRING?
• BT READY : In this mode, you can search for previously connected TVs or connect a previously
connected mobile device to the Soundbar.
• BT PAIRING : In this mode, you can connect a new device to the Soundbar. (Press the PAIR button
on the remote control or press and hold the (Source) button on the top of the Soundbar for
more than 5 seconds while the Soundbar is in “BT” mode.)
NOTES
• If asked for a PIN code when connecting a Bluetooth device, enter <0000>.
• In Bluetooth connection mode, the Bluetooth connection will be lost if the distance between the
Soundbar and the Bluetooth device exceeds 10 m.
• The Soundbar automatically turns off after 18 minutes in the Ready state.
• The Soundbar may not perform Bluetooth search or connection correctly under the following
circumstances:
– If there is a strong electrical eld around the Soundbar.
– If several Bluetooth devices are simultaneously paired with the Soundbar.
– If the Bluetooth device is turned off, not in place, or malfunctions.
• Electronic devices may cause radio interference. Devices that generate electromagnetic waves
must be kept away from the Soundbar main unit - e.g., microwaves, wireless LAN devices, etc.
ENG - 12
Page 17

05 CONNECTING AN EXTERNAL DEVICE
Connect to an external device via a wired connection or Bluetooth connection to play the external
device’s sound through the Soundbar.
Connecting using an Optical Cable
Bott om of the Soundba r
DIGITAL AUDIO IN
(OPTICAL)
USB (5V 0.5A)
BD / DVD play er /
Set-top b ox /
Game cons ole
OPTICAL OUT
Optic al Cable
Top of the Soun dbar
D.IN
1. Connect DIGITAL AUDIO IN (OP TICAL) on the main unit to the OPTICAL OUT jack of the Source
Device using a digital optical cable.
2. Select “D.IN” mode by pressing the (Source) button on the top panel or on the remote control.
ENG - 13
Page 18

06 CONNECTING A USB STORAGE DEVICE
DIGITAL AUDIO IN
(OPTICAL)
You can play music les located on USB storage devices through the Soundbar.
USB por t
DIGITAL AUDIO IN
(OPTICAL)
USB (5V 0.5A)
1. Connect the USB device to the USB port on the bottom of the product.
2. Press the (Source) button on the top panel or on the remote control, and then select “USB”.
3. “USB” appears in the display screen.
4. Play music les from the USB storage device through the Soundbar.
• The Soundbar automatically turns off (Auto Power Down) if no USB device has been connected
for more than 18 minutes.
POWER
USB (5V 0.5A)
USB
ENG - 14
Page 19

File Format Type Compatibility list
Extension Codec Sampling Rate Bit Rate
*.m p3 MPEG 1 Layer2 32kHz ~ 48kHz 32kbps~320kbps
MPEG 1 Layer3 32kHz ~ 48kHz 32kbps~320kbps
MPEG 2 Layer3 16kHz ~ 24kHz 8kbps~160kbps
MPEG 2.5 Layer3 8kHz ~ 12kHz 8kbps~160kbps
*.wma WMA7/8/9/STD 8kHz ~ 48kHz 32kbps~320kbps
*.a ac AAC
A A C-L C
HE-AAC
*.o gg Vorbis codec (8, 16, 22.05, 32, 4 4.1, 48)kHz
*. ac - 8kHz ~ 192kHz < 5Mbps
*.wav
*.AI FF
PCM/LPCM/IMA_
ADPCM/MPEG/MULAW
Compression type:
alwa, ulaw, sow t
8kHz ~ 96kHz < 1728kbps
unsupport ogg:
1. block size 0 < 256, block
size 0 > 1024
2. block size 1 < 512, block
size 1 > 4096
3. codebook counter > 64
4. codebook entr y > 640
5. oor counter > 2
6. oor type 0
7. residua counter > 2
8. dimension != 2
9. mapping counter > 2
10. mode couter > 2
11. residue t ype != channel
number
8kHz ~ 192kHz < 5Mbps
(8, 16, 22.05, 32, 4 4.1, 48, 96, 192)kHz
2 channels
< 5Mbps
• If there are too many folders and les stored on the USB device, it may take the Soundbar some
time to access and play les.
ENG - 15
Page 20

07 CONNECTING A MOBILE DEVICE
Connecting via Bluetooth
When a mobile device is connected using Bluetooth, you can hear stereo sound without the hassle of
cabling.
• You cannot connect more than one Bluetooth device at a time.
PAIR
OR
Bluetooth device
The initial connection
1. Press the PAIR button on the remote control to enter the “BT PAIRING” mode.
(OR)
a. Press the (Source) button on the top panel and then select “BT”.
“BT” changes to “BT PAIRING” in a few seconds automatically or changes to “BT READY” if
there is a connect record.
b. When “BT READY” appears, press and hold the (Source) button on the top panel of the
Soundbar for more than 5 seconds to display “BT PAIRING”.
2. On your device, select “[ AV] Samsung Soundbar T4-Series” from the list that appears.
• When the Soundbar is connected to the Bluetooth device, [Bluetooth Device Name] → “BT”
appears in the front display.
3. Play music les from the device connected via Bluetooth through the Soundbar.
If the device fails to connect
• If a previously connected Soundbar listing (e.g. “[ AV] Samsung Soundbar T4-Series ”) appears in the
list, delete it.
• Then repeat steps 1 and 2.
NOTE
• After you have connected the Soundbar to your mobile device the rst time, use the “BT READY”
mode to reconnect.
ENG - 16
Page 21

What is the difference between BT READY and BT PAIRING?
• BT READY : In this mode, you can search for previously connected TVs or connect a previously
connected mobile device to the Soundbar.
• BT PAIRING : In this mode, you can connect a new device to the Soundbar. (Press the PAIR button
on the remote control or press and hold the (Source) button on the top of the Soundbar for
more than 5 seconds while the Soundbar is in “BT” mode.)
NOTES
• If asked for a PIN code when connecting a Bluetooth device, enter <0000>.
• In Bluetooth connection mode, the Bluetooth connection will be lost if the distance between the
Soundbar and the Bluetooth device exceeds 10 m.
• The Soundbar automatically turns off after 18 minutes in the Ready state.
• The Soundbar may not perform Bluetooth search or connection correctly under the following
circumstances:
– If there is a strong electrical eld around the Soundbar.
– If several Bluetooth devices are simultaneously paired with the Soundbar.
– If the Bluetooth device is turned off, not in place, or malfunctions.
• Electronic devices may cause radio interference. Devices that generate electromagnetic waves
must be kept away from the Soundbar main unit - e.g., microwaves, wireless LAN devices, etc.
• The Soundbar supports SBC data (44.1kHz, 48kHz).
• Connect only to a Bluetooth device that supports the A2DP (AV) function.
• You cannot connect the Soundbar to a Bluetooth device that supports only the HF (Hands Free)
function.
• Once you have paired the Soundbar to a Bluetooth device, selecting “[ AV] Samsung Soundbar
T4-Series” from the device’s scanned devices list will automatically change the Soundbar to “BT”
mode.
– Available only if the Soundbar is listed among the Bluetooth device’s paired devices.
(The Bluetooth device and the Soundbar must have been previously paired at least once.)
• The Soundbar will appear in the Bluetooth device’s searched devices list only when the Soundbar is
displaying “BT READY”.
• The Soundbar cannot be paired to another Bluetooth device if already in Bluetooth mode and
paired to a Bluetooth device.
Bluetooth Power On (SOUND MODE)
If a previously paired Bluetooth device tries to pair with the Soundbar when the Bluetooth Power On
function is on and the Soundbar is turned off, the Soundbar turns on automatically.
1. Press and hold the SOUND MODE button for more than 5 seconds on the remote while the
Soundbar is turned on.
2. “ON-BLUETOOTH POWER ” appears on the Soundbar’s display.
ENG - 17
Page 22

Disconnecting the Bluetooth device from a Soundbar
You can disconnect a Bluetooth device from the Soundbar. For instructions, see the Bluetooth device’s
user manual.
• The Soundbar will be disconnected.
• When the Soundbar is disconnected from the Bluetooth device, the Soundbar will display
“BT DISCONNECTED” on the front display.
Disconnecting the Soundbar from the Bluetooth device
Press the (Source) button on the top panel or on the remote control, and then change to any mode
except “BT”.
• Disconnecting takes time because the Bluetooth device must receive a response from the
Soundbar. (Disconnection time may differ, depending on the Bluetooth device)
• When the Soundbar is disconnected from the Bluetooth device, the Soundbar will display
“BT DISCONNECTED” on the front display.
NOTES
• In Bluetooth connection mode, the Bluetooth connection will be lost if the distance between the
Soundbar and the Bluetooth device exceeds 10 m.
• The Soundbar automatically turns off after 18 minutes in the Ready state.
More About Bluetooth
Bluetooth is a technology that enables Bluetooth-compliant devices to interconnect easily with each
other using a short wireless connection.
• A Bluetooth device may cause noise or malfunction, depending on usage, if:
– A part of your body is in contact with the receiving/transmitting system of the Bluetooth
device or the Soundbar.
– It is subject to electrical variation from obstructions caused by a wall, corner, or ofce partition.
– It is exposed to electrical interference from same frequency-band devices including medical
equipment, microwave ovens, and wireless LANs.
• Pair the Soundbar with the Bluetooth device while they are close together.
• The further the distance between the Soundbar and Bluetooth device, the worse the quality is.
If the distance exceeds the Bluetooth operational range, the connection is lost.
• In poor reception areas, the Bluetooth connection may not work properly.
• The Bluetooth connection only works when it is close to the unit. The connection will be
automatically cut off if the Bluetooth device is out of range. Even within range, the sound quality
may be degraded by obstacles such as walls or doors.
• This wireless device may cause electric interference during its operation.
ENG - 18
Page 23

08 USING THE REMOTE CONTROL
PAIR
PAIR
How to Use the Remote Control
PAIR
SOUND
MODE
VOL WOOFER
SOUNDBAR
SOUND MODE
Power
Source
Mute
SOUND
MODE
Turns the Soundbar on and off.
Press to select a source connected to the
Soundbar.
Press the (Mute) button to mute the sound.
Press it again to unmute the sound.
You can selec t the desired sound effect by
choosing STANDARD, SURROUND SOUND,
GAME, or SMART.
– STANDARD
Outputs the original sound.
– SURROUND SOUND
Provides a wider sound eld than standard.
– GAME
Provides stereoscopic sound to immerse
you in the action while gaming.
– SMART
Analyzes the content in real time and
automatically provides the optimal sound
eld based on the characteristics of the
content.
• DRC (Dynamic Rang e Control)
Lets you apply dynamic range control to
Dolby Digital tracks. Press and hold the
SOUND MODE button while the Soundbar is
powered off to turn DRC (Dynamic Range
Control) on or off. With the DRC turned on,
loud sound is reduced. (The sound may be
distorted.)
ENG - 19
Page 24

• Bluetooth Power
This feature automatically turns the Soundbar on when it receives a connection
request from a previously connected TV or Bluetooth device. The setting is On by
default.
– Press and hold the SOUND MODE button for more than 5 seconds to turn off the
Bluetooth Power function.
PAIR
Bluetooth
PAIR
Play / Pau se
Up/Down/
Left/Right
Press the PAIR button. “BT PAIRING” appears in the Soundbar’s display.
You can connec t the Soundbar to a new Bluetooth device in this mode by selecting the
Soundbar from the Bluetooth device's search list.
Press the p button to pause a music le temporarily.
When you press the but ton again, the music le plays.
Press the indicated areas to select Up/Down/Left/Right.
Press Up/Down/Left /Right on the button to select or set functions.
• Repeat
To use the Repeat function in “USB” mode, press the Up but ton.
• Music Skip
Press the Right button to select the next music le. Press the Left button to select the
previous music le.
• ID SET
Press and hold the Up button for 5 seconds to complete ID SET (when connec ting to an
accessary item).
• Volume Restriction function
To protect your hearing, the Volume Restric tion function restricts the volume to 20 if
you turn on the Soundbar when the volume is set higher than 20.
– The default value for the Volume Restric tion function is Off. You must turn it on to
activate it.
– When turned on, the Volume Restric tion function stays on even when the power is
turned off.
– To turn Volume Restric tion on or off, press and hold the Down button on the
remote control for 5 seconds in standby mode. With Volume Restriction of f,
“V FREE ” appears on the front display. With the function on, “V LOCK ” appears.
ENG - 20
Page 25

PAIR
SOUNDBAR
SOUNDBAR
SOUND
MODE
PAIR
SOUND
MODE
VOL
WOOFER
SOUNDBAR
SOUND
MODE
VOL
WOOFER
SOUNDBAR
SOUNDBAR
SOUNDBAR
Sound Control
You can selec t TREBLE, BASS, or AUDIO SYNC.
• To control the volume of the treble or bass sound, press the Sound Control but ton to
select TREBLE or BASS and then adjust the volume between -6~+6 by using the Up/
Down buttons.
• Press and hold the (Sound Control) but ton for about 5 seconds to adjust the sound
for each frequency band. 150Hz, 300Hz, 600Hz, 1. 2kHz, 2.5kHz, 5kHz, and 10kHz are
selectable using the Left/Right buttons and each can be adjusted to a setting between
-6 to +6 using the Up/Down buttons.
• If the video on the T V and audio from the Soundbar are not synchronised, press the
Sound Control but ton to select AUDIO SYNC and then
0~300 milliseconds
by using the Up/Down buttons. (Not available in “ USB” mode.)
set the audio delay between
• AUDIO SYNC is only suppor ted for some functions.
WOOFER
VOL
SOUND
MODE
WOOFER
VOL
SOUND
MODE
WOOFER
VOL
Rock the WOOFER but ton forward or backward to adjust the volume of the subwoofer to
-12 or between -6 to +6. To set the subwoofer volume level to 0, press the button in.
SOUND
MODE
WOOFER
VOL
SOUND
MODE
WOOFER
VOL
Rock the VOL button forward or backward to adjust the volume.
• Mute
Press the VOL but ton in to mute the sound. Press it in again to unmute the sound.
ENG - 21
Page 26

Adjusting the Soundbar volume
SOUNDBAR
SOUNDBAR
SOUNDBAR
with a TV remote control
If you have a Samsung TV, you can adjust
the Soundbar’s volume using the IR remote
control that came with your Samsung TV.
First use the TV menu to set the TV audio on your
Samsung TV to external speakers, then use your
Samsung remote to control the Soundbar’s
volume. For more information, see the TV’s user
manual. The default mode for this function is
control by a Samsung TV remote. If your TV is not
a Samsung TV, follow the directions below to
change the settings of this function.
1. Turn Off the Soundbar.
OFF
2. If you do not want to use this function, push
up and hold the WOOFER button for
5 seconds repeatedly until “OFF-TV
REMOTE” appears in the display.
4. If you want to return the Soundbar to the
default mode (control by a Samsung TV
remote), push up and hold the WOOFER
button for 5 seconds repeatedly until
“SAMSUNG-TV REMOTE” appears in the
displ ay.
SOUND
MODE
5 Sec
WOOFER
VOL
SAMSUNG-TV REMOTE
(Default mode)
– Each time you push the WOOFER button
up and hold it for 5 seconds, the mode
switches in the following order:
“SAMSUNG-TV REMOTE” (Default mode)
→ “OFF‑TV REMOTE” → “ALL‑TV REMOTE”.
– This function may not be available,
depending on the remote control.
– Manufacturers supporting this function:
VIZIO, LG, Sony, Sharp, PHILIPS,
PANASONIC, TOSHIBA, Hisense, RCA
SOUND
MODE
5 Sec
WOOFER
VOL
OFF-TV REMOTE
3. If you want to control the Soundbar with
your TV’s remote, push up and hold the
WOOFER button for 5 seconds repeatedly
until “ALL-TV REMOTE” appears in the
display. Then, use your TV’s menu to select
external speakers.
5 Sec
WOOFER
VOL
ALL-TV REMOTE
SOUND
MODE
ENG - 22
Page 27

Using the Hidden Buttons (Buttons with more than one function)
Bluetooth
POWER
Hidden Button
Remote Control Button Function
WOOFER (Up) TV remote control On/Off (Standby) page 22
p (Play / Pause) Initialise (Standby) page 27
Left TV Auto connect On/Of f (BT Ready) page 12
Up ID SET (Standby) page 20
Down Volume Restriction On/Off (Standby) page 20
(Sound Control)
SOUND MODE
7 Band EQ page 21
DRC ON/OFF (Standby) page 19
Bluetooth Power page 20
Reference page
Outputspecicationsforthedifferentsoundeffectmodes
Output
SOUND
MODE
SOUND MODE
Effect Input
STANDARD
SURROUND
SOUND
GAME
SMART
2.0 ch
5.1 ch 2.1 ch 4.1 ch
2.0 ch
5.1 ch 2.1 ch 4.1 ch
2.0 ch
5.1 ch 2.1 ch 4.1 ch
2.0 ch
5.1 ch 2.1 ch 4.1 ch
Without Wireless Rear
Spea ker Kit
2.1 ch 4.1 ch
2.1 ch 4.1 ch
2.1 ch 4.1 ch
2.1 ch 4.1 ch
With Wireless Rear
Spea ker Kit
• The Samsung Wireless Rear Speaker Kit can be purchased separately. To purchase a Kit, contact the
vendor you purchased the Soundbar from.
ENG - 23
Page 28

09 INSTALLING THE
WALL MOUNT
Wallmount Components
Wall Mount Guide
Installation Precautions
• Install on a vertical wall only.
• Do not install in a place with high
temperature or humidity.
• Verify whether the wall is strong enough to
support the product’s weight. If not, reinforce
the wall or choose another installation point.
• Purchase and use the xing screws or
anchors appropriate for the kind of wall you
have (plaster board, iron board, wood, etc.). If
possible, x the support screws into wall
studs.
• Purchase wall mounting screws according to
the type and thickness of the wall you want to
mount the Soundbar on.
– Diameter: M5
– Length: 35 mm or longer recommended.
• Connect cables from the unit to external
devices before you install the Soundbar on
the wall.
• Make sure the unit is turned off and
unplugged before you install it. Otherwise, it
may cause an electric shock.
x 2
Holder-Screw Screw
x 2
Bracket-Wall Mount
1. Place the Wall Mount Guide against the wall
surface.
• The Wall Mount Guide must be level.
• If your TV is mounted on the wall, install
the Soundbar at least 5 cm below the TV.
5 cm or more
x 2
ENG - 24
Page 29

2. Align the Wall Mount Guide’s Centre Line
with the centre of your TV (if you are
mounting the Soundbar below your TV), and
then x the Wall Mount Guide to the wall
using tape.
• If you are not mounting below a TV, place
the Centre Line in the centre of the
installation area.
Centre Line
3. Push a pen tip or sharpened pencil tip
through the centre of the B-TYPE images on
each end of the Guide to mark the holes for
the supporting screws, and then remove the
Wall Mount Guide.
4. Using an appropriately sized drill bit, drill a
hole in the wall at each marking.
• If the markings do not correspond to the
positions of studs, make sure you insert
appropriate anchors or mollies into the
holes before you insert the support
screws. If you use anchors or mollies,
make sure the holes you drill are large
enough for the anchors or mollies you
use.
5. Push a screw (not supplied) through each
Holder-Screw, and then screw each screw
rmly into a support screw hole.
6. Install the 2 Bracket-Wall Mounts in the
correct orientation on the bottom of the
Soundbar using 2 Screws.
• When assembling, make sure the hanger
part of the Bracket-Wall Mounts are
located behind the rear of the Soundbar.
Rear of S oundbar
Right end o f Soundbar
ENG - 25
Page 30

7. Install the Soundbar with the attached
DIGITAL AUDIO IN
(OPTICAL)
Bracket-Wall Mounts by hanging the
Bracket-Wall Mounts on the Holder-Screws
on the wall.
10 SOFTWARE
UPDATE
Samsung may offer updates for the Soundbar’s
systemrmwareinthefuture.
USB por t
DIGITAL AUDIO IN
(OPTICAL)
USB (5V 0.5A)
POWER
8. Slide the Soundbar down as shown below so
that the Bracket-Wall Mounts rest securely
on the Holder-Screws.
• Insert the Holder-Screws into the wide
(bottom) part of the Bracket-Wall
Mounts, and then slide the Bracket-Wall
Mounts down so that the Bracket-Wall
Mounts rest securely on the
Holder-Screws.
USB (5V 0.5A)
If an update is offered, you can update the
rmware by connecting a USB device with the
rmware update stored on it to the USB port on
your Soundbar. For more information about how
to download update les, go to the Samsung
Electronics website at
www.samsung.comSupport.
Then, select the product type or enter the model
number of your Soundbar, select the Software &
Apps option, and then Downloads. Note that the
option names can vary.
ENG - 26
Page 31

Update Procedure
If UPDATE is not displayed
Important: The updating function erases all user
settings. We recommend you write down your
settings so that you can easily reset them after
the update. Note that updating the rmware
resets the subwoofer connection too.
1. Connect a USB thumb drive to the USB port
on your computer.
Important: Make sure there are no music
les on the USB thumb drive. This may cause
the rmware update to fail.
2. Go to the Samsung website
(samsung.com) select Enter Model
Number and enter the model of your
Soundbar. Select manuals and downloads
and download the latest software le.
3. Save the downloaded software to a USB
stick and select “Extract Here” to unzip the
folder.
4. Turn off the Soundbar and connect the USB
stick containing the software update to the
USB port.
5. Turn on the Soundbar and source change to
“USB” mode. Within 3 minutes, “UPDATE ” is
displayed and updating begins.
6. When the update nishes, the Soundbar
turns off (or turns off by press the (Power)
button).
Press the p button on the remote
control for 5 seconds. “INIT” appears on the
display and then the Soundbar turns off.
The update is complete.
• This product has a DUAL BOOT function.
If the rmware fails to update, you can
update the rmware again.
7. Restore your settings on the Soundbar.
1. Turn off the Soundbar, disconnect and then
reconnect the USB storage device that
contains the update les to the Soundbar’s
USB port.
2. Disconnect the Soundbar’s power cord,
reconnect it, and then turn on the Soundbar.
NOTES
• The rmware update may not work properly
if audio les supported by the Soundbar are
stored in the USB storage device.
• Do not disconnect the power or remove the
USB device while updates are being applied.
• After the update is completed, the user setup
in the Soundbar is initialised so you can reset
your settings. We recommend you write
down your settings so that you can easily
reset them after the update. Note that
updating rmware resets the subwoofer
connection too.
If the connection to the subwoofer is not
re-established automatically after the
update, refer to page 6.
If the software update fails, check if the USB
stick is defective.
• Mac OS users should use MS-DOS (FAT) as the
USB format.
• Updating via USB may not be available,
depending on the USB storage device
manufacturer.
ENG - 27
Page 32

11 TROUBLESHOOTING
Before seeking assistance, check the following.
The unit will not turn on.
Isthepowercordrmlypluggedintothewalloutlet?
; Unplug and reconnect the power cord to the wall outlet to make sure the connection is secure.
A function does not work when the button is pressed.
Is there static electricity in the air?
; Disconnect the power plug and connect it again.
Sound dropouts occur in BT mode.
; See the Bluetooth connection sections on pages 11 and 16.
Sound is not produced.
Is the Mute function on?
; Press the (Mute) button to cancel the mute function.
Is the volume set to minimum?
; Adjust the Volume.
The remote control does not work.
Are the batteries drained?
; Replace with new batteries.
Is the distance between the remote control and Soundbar main unit too far?
; Move the remote control closer to the Soundbar main unit.
The red LED on the subwoofer blinks and the subwoofer is not producing sound.
This issue can occur if the subwoofer is not connected to the Soundbar main unit.
; Try to connect your subwoofer again. (See page 6.)
The subwoofer drones and vibrates noticeably.
Try to adjust the vibration of your subwoofer.
; Rock the WOOFER button on your remote control forward or backward to adjust the subwoofer
level. (to -12, or between -6 ~ +6).
ENG - 28
Page 33

12 LICENCE
13 OPEN SOURCE
LICENCE NOTICE
Manufactured under license from Dolby
Laboratories. Dolby, Dolby Audio, and the
double-D symbol are trademarks of Dolby
Laboratories.
For DTS patents, see http://patents.dts.com.
Manufactured under license from DTS
Licensing Limited. DTS, the Symbol, DTS in
combination with the Symbol, and DTS 2.0
Channel are registered trademarks or
trademarks of DTS, Inc. in the United States
and/or other countries. © DTS, Inc. All Rights
Reserved.
The Bluetooth® word mark and logos are
registered trademarks owned by the Bluetooth
SIG, Inc. and any use of such marks by Samsung
Electronics Co., Ltd. is under license. Other
trademarks and trade names are those of their
respective owners.
To send inquiries and requests regarding open
sources, contact Samsung via Email
(oss.request@samsung.com).
14 IMPORTANT
NOTES ABOUT
SERVICE
Figures and illustrations in this User Manual are
provided for reference only and may differ from
actual product appearance.
ENG - 29
Page 34

15 SPECIFICATIONS AND GUIDE
Specications
Model Name HW-T450
USB 5V/ 0.5A
Weight 1.5 kg
Dimensions (W x H x D) 860.0 x 54.0 x 74.0 mm
Operating Temperature Range +5°C to +35°C
Operating Humidity Range 10 % ~ 75 %
AMPLIFIER
Rated Output power 35W x 2, 6 ohm
Supported play formats
(DTS 2.0 sound is played in DTS format.)
Subwoofer Name PS-WT45 T
Weight 4.3 kg
Dimensions (W x H x D) 181.5 x 343.0 x 272.0 mm
AMPLIFIER
Rated Output power 130W
LPCM 2ch, Dolby Audio™
(supporting Dolby® Digital), DTS
NOTES
• Samsung Electronics Co., Ltd reserves the right to change the specications without notice.
• Weight and dimensions are approximate.
• For India Only
“This product is RoHS compliant”
ENG - 30
Page 35

© 2020 Sams ung Electronics Co., Ltd. All ri ghts reser ved.
Contact SAMSUNG WORLD WIDE
If you h ave any question s or comments rel ating to Samsun g products , please contact the S AMSUNG customer
care Centre.
Country /Area Contact Centre
`
Asia Pacifi c
CHINA 400-810-5858 www.samsung.com/cn/support
TAIWAN
HONG KONG 3698 4698
MACAU 0800 333
SINGAPORE 1800 7 267864 | 180 0-SAMSU NG ww w.samsung.com/sg/support
AUSTRALIA 1 300 362 603 www.samsung.com/au/support
NEW ZEALAND 0800 7 26 786 www.samsung.com/nz/support
VIETNAM 1 800 588 88 9 www.samsung.com/vn/support
THAILAND
MYANMAR +95-1-2399-888 www.samsung.com/mm/support
CAMBODIA
LAOS +856-214-17333
MALAYSIA
INDONESIA
PHILIPPINES
INDIA 1800 5 SA MSUNG (180 0 5 726786 4) (Toll-Free) www.samsung.com/in/suppor t
NEPAL
BANGLADESH
SRI LA NKA 011 SAMSUN G (011 726786 4)
0800-329-999
0809 -00-52 37 ( B2B / Deal er)
0-2689-3232
1800 -29-3232 (Tol l free)
+855-23-993232
1800-20-3232 (Toll free)
1800-88-9999
+603-7 713 7420 (Over seas cont act)
021-5699-7777
0800-112-8888 (Toll Free)
1-80 0-10-726 -7864 [ PLDT Toll Fr ee ]
1-80 0-8-726 -7864 [ Glo be Landlin e and Mobile ]
02-42 2-2111 [ Standar d Landline ]
16600 172667 (Tol l Free for NTC Only)
98015 72667 (Toll Fre e for Ncell us ers)
09612300300
08000300300 (Toll free)
Web Site
www.samsung.com/tw/support
www.samsung .com/hk/support (Chinese)
www.samsung.com/hk_en/support (English)
www.samsung.com/th/support
www.samsung.com/th/support
www.samsung.com/my/support
www.samsung.com/id/support
www.samsung.com/ph/support
www.samsung.com/support
 Loading...