

Page 1

FULL MANUAL
HW-S60T / S61T
Imagine the possibilities
Thank you fo r purchasing this Samsung product.
To receive more complete service, please register
your product at www.samsung.com/register
Page 2

SAFETY INFORMATION
SAFETY WARNINGS
TO REDUCE THE RISK OF ELECTRIC SHOCK, DO
NOT REMOVE THE COVER (OR BACK).
NO USER-SERVICEABLE PARTS ARE INSIDE.
REFER SERVICING TO QUALIFIED SERVICE
PERSONNEL.
Refer to the table below for an explanation of
symbols which may be on your Samsung product.
CAUTION
RISK OF E LECTRIC S HOCK.
DO NOT OP EN.
This symbol indicates that high voltage
is present inside. It is dangerous to
make any kind of contact with any
internal part of this product.
This symbol indicates that this product
has included important literature
concerning operation and maintenance.
Class II product : This symbol indicates
that it does not require a safety
connection to electrical earth (ground).
If this symbol is not present on a
product with a power cord, the product
MUST have a reliable connection to
protective ear th (ground).
AC voltage : This symbol indicates that
the rated voltage marked with the
symbol is AC voltage.
DC voltage : This symbol indicates that
the rated voltage marked with the
symbol is DC voltage.
Caution, Consult ins tructions for use :
This symbol instructs the user to
consult the user manual for further
safety related information.
WARNING
• To reduce the risk of re or electric shock, do
not expose this appliance to rain or moisture.
CAUTION
• TO PREVENT ELECTRIC SHOCK, MATCH WIDE
BLADE OF PLUG TO WIDE SLOT, FULLY INSERT.
• This apparatus shall always be connected to a
AC outlet with a protective grounding
connection.
• To disconnect the apparatus from the mains,
the plug must be pulled out from the mains
socket, therefore the mains plug shall be
readily operable.
• Do not expose this apparatus to dripping or
splashing. Do not put objects lled with
liquids, such as vases on the apparatus.
• To turn this apparatus of f completely, you
must pull the power plug out of the wall
socket. Consequently, the power plug must
be easily and readily accessible at all times.
Wiring the Main Power Supply
Plug (UK Only)
IMPORTANT NOTICE
The mains lead on this equipment is supplied with
a moulded plug incorporating a fuse. The value of
the fuse is indicated on the pin face of the plug
and if it requires replacing, a fuse approved to
BS1362 of the same rating must be used.
Never use the plug with the fuse cover removed.
If the cover is detachable and a replacement is
required, it must be of the same colour as the fuse
tted in the plug. Replacement covers are
available from your dealer. If the tted plug is not
suitable for the power points in your house or the
cable is not long enough to reach a power point,
you should obtain a suitable safety approved
extension lead or consult your dealer for assistance.
ENG - 2
Page 3

However, if there is no alternative to cutting off the
plug, remove the fuse and then safely dispose of
the plug. Do not connect the plug to a mains
socket as there is a risk of shock hazard from the
bared exible cord. Never attempt to insert bare
wires directly into a mains socket. A plug and fuse
must be used at all times.
IMPORTANT
The wires in the mains lead are coloured in
accordance with the following code:– BLUE =
NEUTRAL BROWN = LIVE As these colours may not
correspond to the coloured markings identifying
the terminals in your plug, proceed as follows:– The
wire coloured BLUE must be connected to the
terminal marked with the letter N or coloured
BLUE or BLACK. The wire coloured BROWN must
be connected to the terminal marked with the
letter L or coloured BROWN or RED.
WARNING : DO NOT CONNECT EITHER WIRE TO
THE EARTH TERMINAL WHICH IS MARKED WITH
THE LET TER E OR BY THE EARTH SYMBOL ,
OR COLOURED GREEN OR GREEN AND YELLOW.
PRECAUTIONS
1. Ensure that the AC power supply in your
house complies with the power requirements
listed on the identication sticker located on
the bottom of your product. Install your
product horizontally, on a suitable base
(furniture), with enough space around it for
ventilation (7~10 cm). Make sure the
ventilation slots are not covered. Do not place
the unit on ampliers or other equipment
which may become hot. This unit is designed
for continuous use. To fully turn off the unit,
disconnect the AC plug from the wall outlet.
Unplug the unit if you intend to leave it
unused for a long period of time.
2. During thunderstorms, disconnect the AC
plug from the wall outlet. Voltage peaks due
to lightning could damage the unit.
3. Do not expose the unit to direct sunlight or
other heat sources. This could lead to
overheating and cause the unit to
malfunction.
4. Protect the product from moisture (i.e.
vases), and excess heat (e.g. a replace) or
equipment creating strong magnetic or
electric elds. Unplug the power cable from
the AC wall socket if the unit malfunctions.
Your product is not intended for industrial
use. It is for personal use only. Condensation
may occur if your product has been stored in
cold temperatures. If transporting the unit
during the winter, wait approximately
2 hours until the unit has reached room
temperature before using.
5. The battery used with this product contains
chemicals that are harmful to the
environment. Do not dispose of the battery
in the general household trash. Do not
expose the battery to excess heat, direct
sunlight, or re. Do not short circuit,
disassemble, or overheat the battery.
Danger of explosion if the battery is replaced
incorrectly. Replace only with the same or
equivalent type.
ENG - 3
Page 4

Fabric cleaning
Remove any dirt or stain on the product surface
immediately.
Removing and cleaning can be less effective for
some substances or if left for a prolonged time.
CAUTION
• Use a vacuum cleaner or an adhesive lint
roller to remove dust, handprints, and the
likes.
– Some cleaning brushes may damage the
product, depending on the materials they
contain.
– Towels and cleaning clothes may leave
lint or dirt on the product.
• Do not use a nail or other tools to scratch the
dirt off. It may damage the fabric.
• To remove oil or liquid stains, use a clean
white cloth moist with water. If the stain
persists, wipe it with a mixture of water and
neutral detergent (such as dishwashing
soaps) and a cloth.
– A non-neutral detergent or cleaner may
cause discolouration or fabric damage.
– After cleaning, use a dry cloth or
hairdryer to dry the area.
– Do not use excessive force to avoid
discolouration or fabric damage.
ENG - 4
Page 5

CONTENTS
01 Checking the Components 7
Inserting Batteries before using the Remote Control (AA batteries X 2) ------------------------- 7
02 Product Overview 8
Top Panel of the Soundbar ------------------------- 8
Bottom Panel of the Soundbar ------------------------- 10
03 Using the Remote Control 11
How to Use the Remote Control
Output specications for the different sound effect modes
Adjusting the Soundbar volume with a TV remote control ------------------------- 15
-------------------------
-------------------------
04 Connecting the Soundbar 16
Connecting Electrical Power
Connecting an SWA-8500S (Sold Separately) to your Soundbar
Connecting an SWA-W500 (Sold Separately) to your Soundbar
-------------------------
-------------------------
-------------------------
05 Using a wired connection to the TV 21
Method 1. Connecting with HDMI
Method 2. Connecting using an Optical Cable
-------------------------
-------------------------
23
06 Using a wireless connection to the TV 24
Connecting via Bluetooth
-------------------------
24
07 Connecting an External Device 26
Connecting using an Optical Cable
-------------------------
26
11
14
16
17
19
21
ENG - 5
Page 6

08 Connecting a Mobile Device 27
Method 1. Connecting via Bluetooth
Method 2. Connecting via Wi-Fi (Wireless Network)
Conguring Amazon Alexa
Using the Tap Sound
-------------------------
-------------------------
-------------------------
-------------------------
27
30
34
09 Installing the Wall Mount 35
Installation Precautions
Wallmount Components
-------------------------
-------------------------
35
35
10 Installing the Soundbar in front of TV 37
11 Software Update 38
Auto Update
USB Update
Initialisation
-------------------------
-------------------------
-------------------------
38
38
39
12 Troubleshooting 40
13 Licence 42
31
14 Open Source Licence Notice 42
15 Important Notes About Service 42
16 SpecicationsandGuide 43
Specications
-------------------------
ENG - 6
43
Page 7

01 CHECKING THE COMPONENTS
PAIR
SOUND
MODE
VOL WOOFER
SOUNDBAR
Soundbar Main Unit Soundbar Remote Control / Bat teries
AC/DC Adapter
(Soundbar)
x 2
Power Cord
(Soundbar)
Wall Mount Guide
x 2
x 2
(M4 x L10)
Holder-Screw Bracket-Wall Mount Screw
• For more information about the power supply and power consumption, refer to the label attached
to the product. (Label: Bottom of the Soundbar Main Unit)
• To purchase additional components or optional cables, contact a Samsung Service Centre or
Samsung Customer Care.
• For more information about the wallmount see page 35.
• Design, specications, and App screen are subject to change without prior notice.
• The appearance of the accessories may differ slightly from the illustrations above.
Inserting Batteries before using the Remote Control (AA batteries X 2)
Slide the back cover in the direction of the arrow
until it is completely removed. Insert 2 AA batteries
(1.5V) oriented so that their polarity is correct. Slide
the back cover back into position.
ENG - 7
Page 8
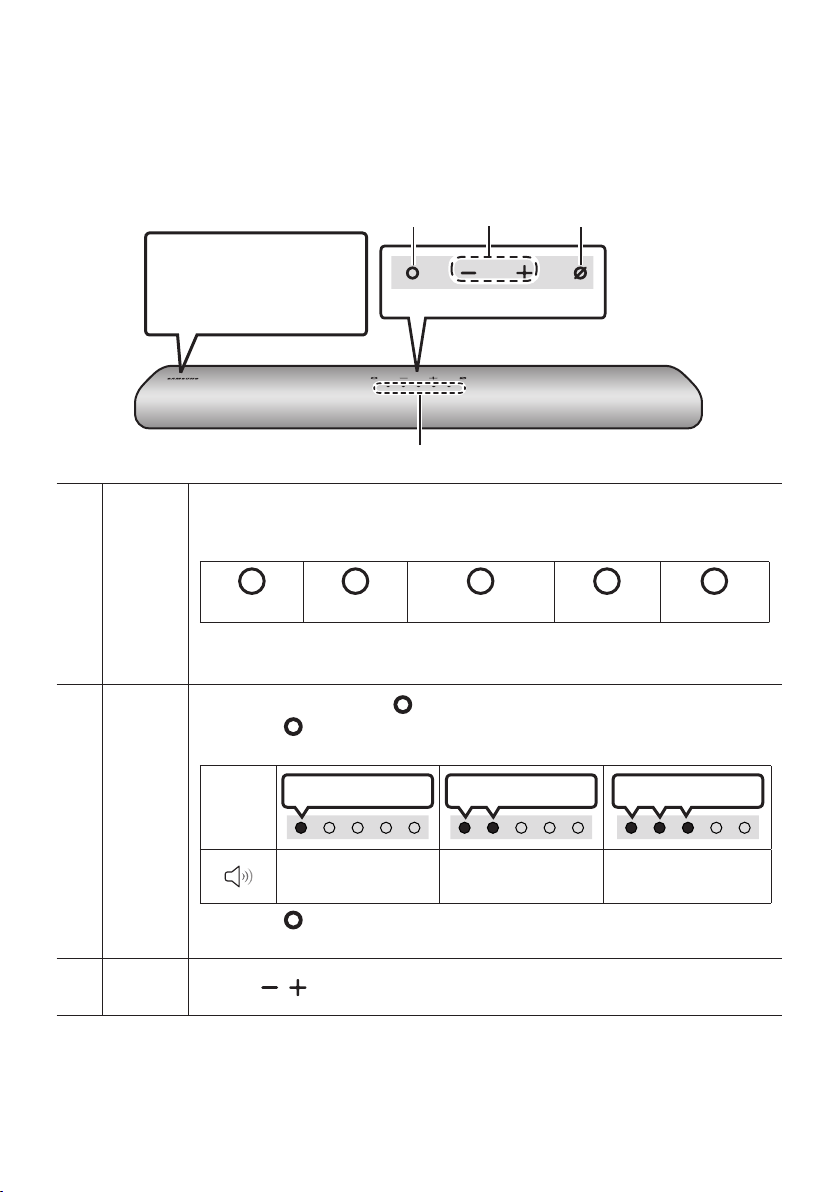
02 PRODUCT OVERVIEW
Top Panel of the Soundbar
Position the product so that
the SAMSUNG logo is
located on the top.
The LED Indicator ashes, glows, or changes colour depending on the Soundbar's current
mode or status. The colour of the LED indicator and the number of lights indicate the active
mode as described below.
LED
indicator
W
White LED
• The Multicolour LED changes to White, Cyan, Green, Red, and Blue depending on the
mode or status.
W
White LED
Multicolour LED
Top P ane l
M
W
White LED
W
White LED
Multi
Function
Button
Volume
Button
• In standby mode, press the (Multi Function) button to turn on the Soundbar.
• Press the (Multi Function) button to change the mode. Each time you change the
mode, the LED lights in white and then turns of f.
LED
Indicator
• Press the (Multi Function) button for 3 seconds to call Alexa. Say with the but ton
pressed to enable voice recognition.
Press the ( Volume) button to adjust the volume.
White On -> O ff White On -> O ff Whi te On -> Off
“Digital Audio In” or
“TV A RC”
“Wi-Fi” “Bluetooth”
ENG - 8
Page 9

Press the (Mic On/Off) button to turn on or off the microphone.
Red On
Mic
On/Of f
Button
LED Indicator
“Mic Off” “Mic On”
• When you plug in the AC cord, the power button will begin working in 4 to 6 seconds.
• When you turn on this unit, there will be a 4 to 5 second delay before it produces sound.
• If you hear sounds from both the TV and Soundbar, go to the Settings menu for the TV audio and
change the TV speaker to External Speaker.
ENG - 9
Page 10
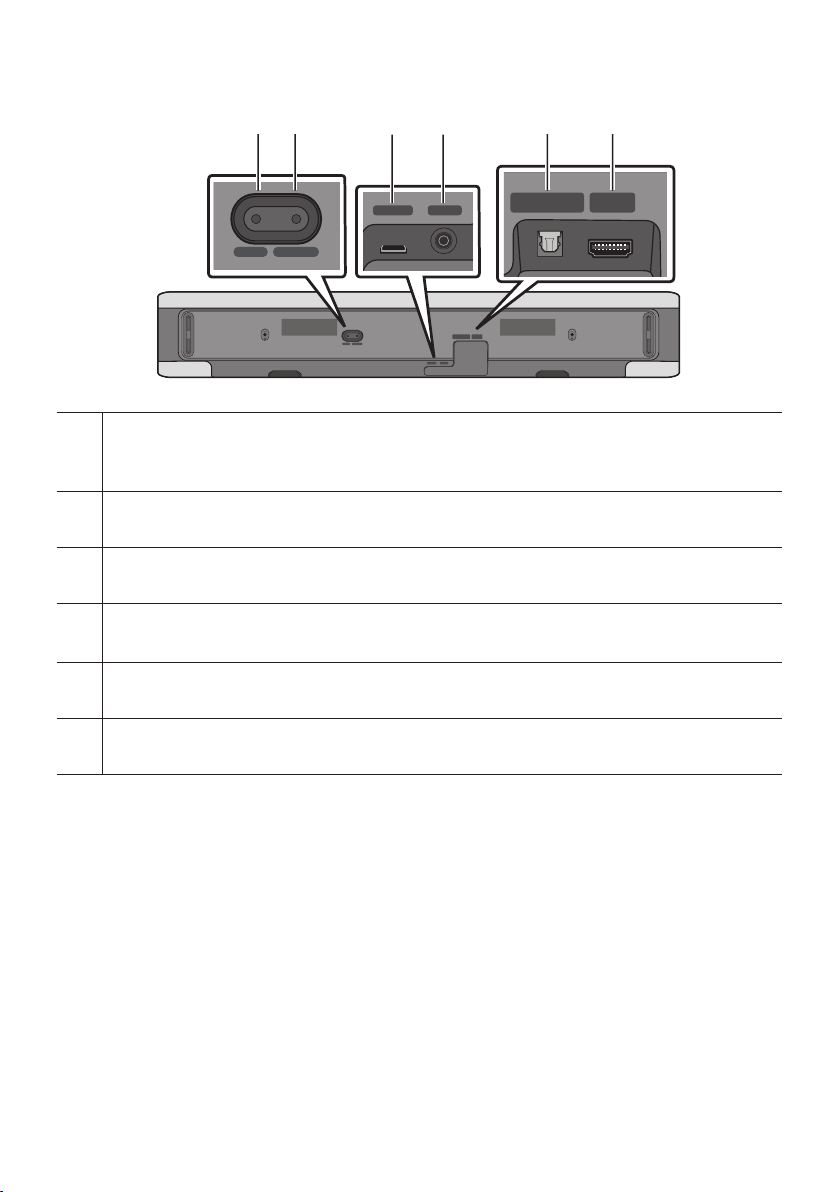
Bottom Panel of the Soundbar
HDMI OUT
(TV-ARC)
(OPTICAL)
DIGITAL AUDIO IN
(OPTICAL)
SERVICE DC 19V
HDMI
(ARC)
DIGITAL AUDIO IN
(OPTICAL)
ID SET NETWORK
HDMI
(ARC)
DIGITAL AUDIO IN
(OPTICAL)
SERVICE DC 19V
HDMI OUT
(TV-ARC)
DIGITAL AUDIO IN
(OPTICAL)
DIGITAL AUDIO IN
(OPTICAL)
SERVICE DC 19V
HDMI
(ARC)
DIGITAL AUDIO IN
(OPTICAL)
ID SET NETWORK
HDMI
(ARC)
DIGITAL AUDIO IN
(OPTICAL)
HDMI OUT
(TV-ARC)
DIGITAL AUDIO IN
(OPTICAL)
DIGITAL AUDIO IN
(OPTICAL)
DIGITAL AUDIO IN
(OPTICAL)
HDMI
(ARC)
DIGITAL AUDIO IN
SERVICE DC 19V
ID SET NETWORK
ID SET NETWORK
SERVICE DC 19V
ID SET
Press to connect the Soundbar to Surround speakers and a subwoofer wirelessly.
(The surround speaker, subwoofer are sold separately.)
NETWORK
Press to connect to a wireless network (Wi-Fi) via the SmartThings app.
SERVICE
Connect a USB storage device to upgrade the product's soft ware.
DC 19V (Powe r Supply In)
Connect the AC/DC power adapter. (See page 16)
DIGITAL AUD IO IN (OPTIC AL)
Connect to the digital (optical) output of an external device. (See page 26)
HDMI (ARC)
Connect to the HDMI jack on a TV. (See page 21)
(OPTICAL)
HDMI
(ARC)
• When disconnecting the power cable of the AC/DC power adaptor from a wall outlet, pull the plug.
Do not pull the cable.
• Do not connect this unit or other components to an AC outlet until all connections between
components are complete.
ENG - 10
Page 11
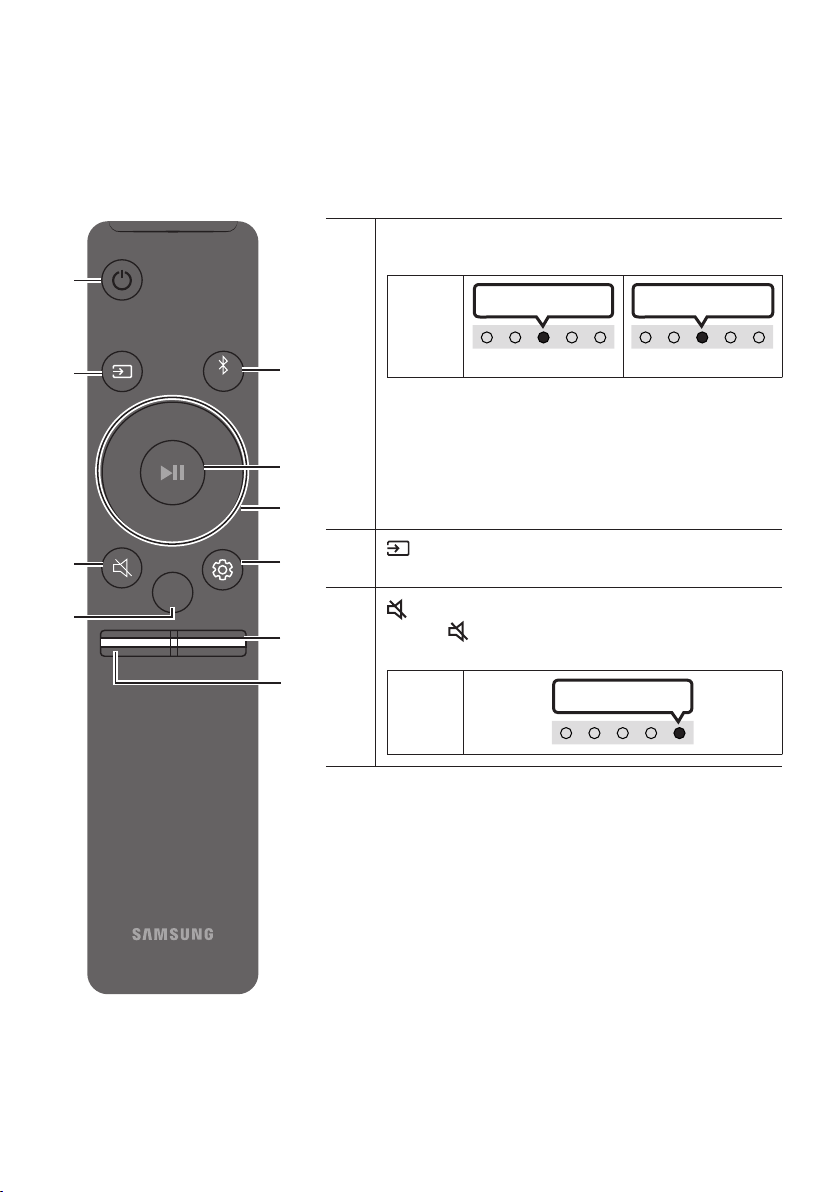
03 USING THE REMOTE CONTROL
How to Use the Remote Control
Power
Turns the Soundbar on and off.
PAIR
LED
Indicator
• Auto Power Down Function
The unit turns off automatically in the following
situations:
– In “Digital Audio In” or “T V ARC” / “Wi-Fi” /
Cyan Blink s X1
On
“Bluetooth” mode if there is no audio signal for
18 minutes.
Red Blink s X3
Off
SOUND
MODE
VOL WOOFER
SOUNDBAR
(Source)
Press to select a source connected to the Soundbar.
(Mute)
Press the (Mute) button to mute the sound.
Press it again to unmute the sound.
LED
Indicator
Blinks X R epeatly
ENG - 11
Page 12
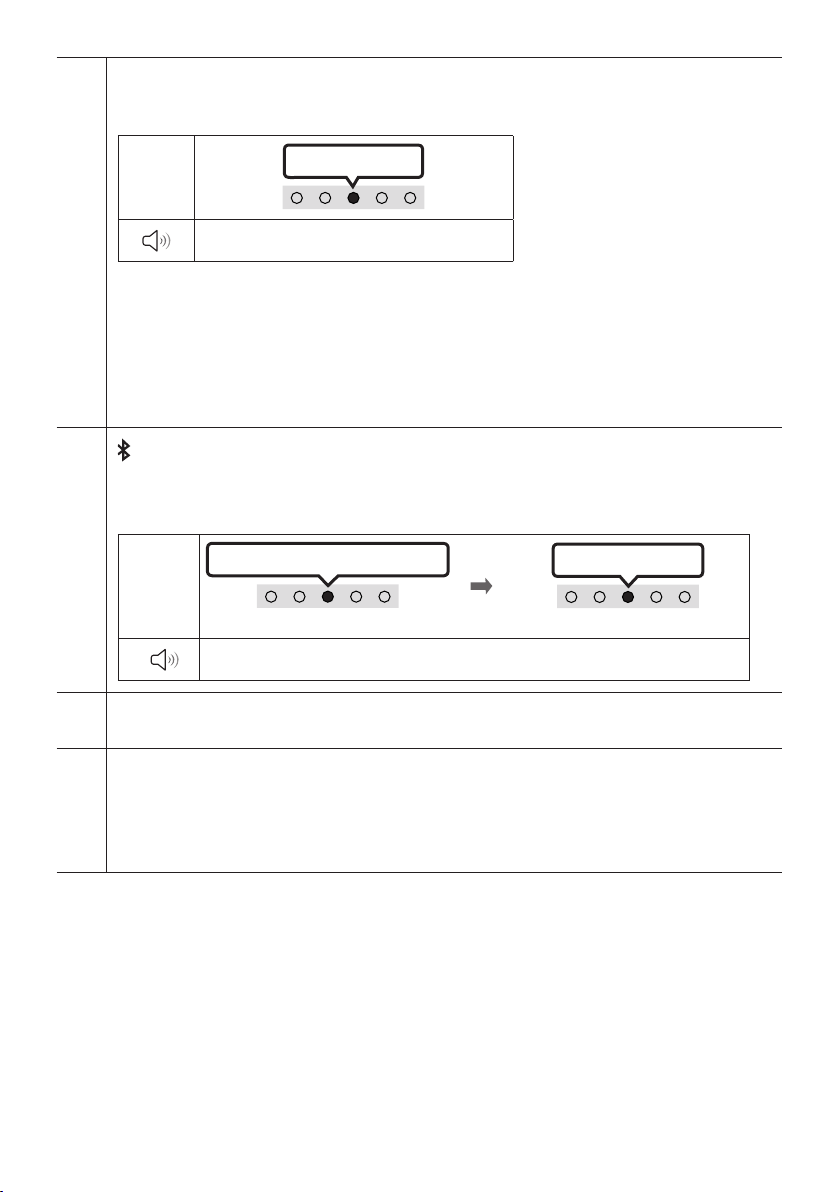
SOUND MODE
By pressing the but ton, you can selec t the desired audio mode. Each time the mode changes, the
Multicolour LED blinks in white.
LED
Indicator
“Standard” “Music” “Adaptive Sound”
• Standard
Outputs the original sound.
• Music
Provides more natural and room lling sound for music content.
• Adaptive Sound
Analyzes the content in real time and automatically provides the optimal sound eld based on the
characteristics of the content.
Bluetooth PAIR
Switch the Soundbar to Bluetooth pairing mode.
When you press the button, the LED display changes as shown below.
• Until pairing is complete, the Multicolour LED changes as Red → Green → Blue in turn.
LED
Indicator
p (Play / Pause)
You can also play or pause music by pressing the button.
Red → Green → Blue Blinks
“Ready to connect via Bluetooth.”
White Bli nks X1
Pairing
Cyan Blinks X 3
Connection is complete
Up/Down/Left/Right
Press Up/Down/Left/Right on the button to select or set functions.
• Music Skip
Press the Right button to select the next music le. Press the Left button to select the previous
music le.
ENG - 12
Page 13
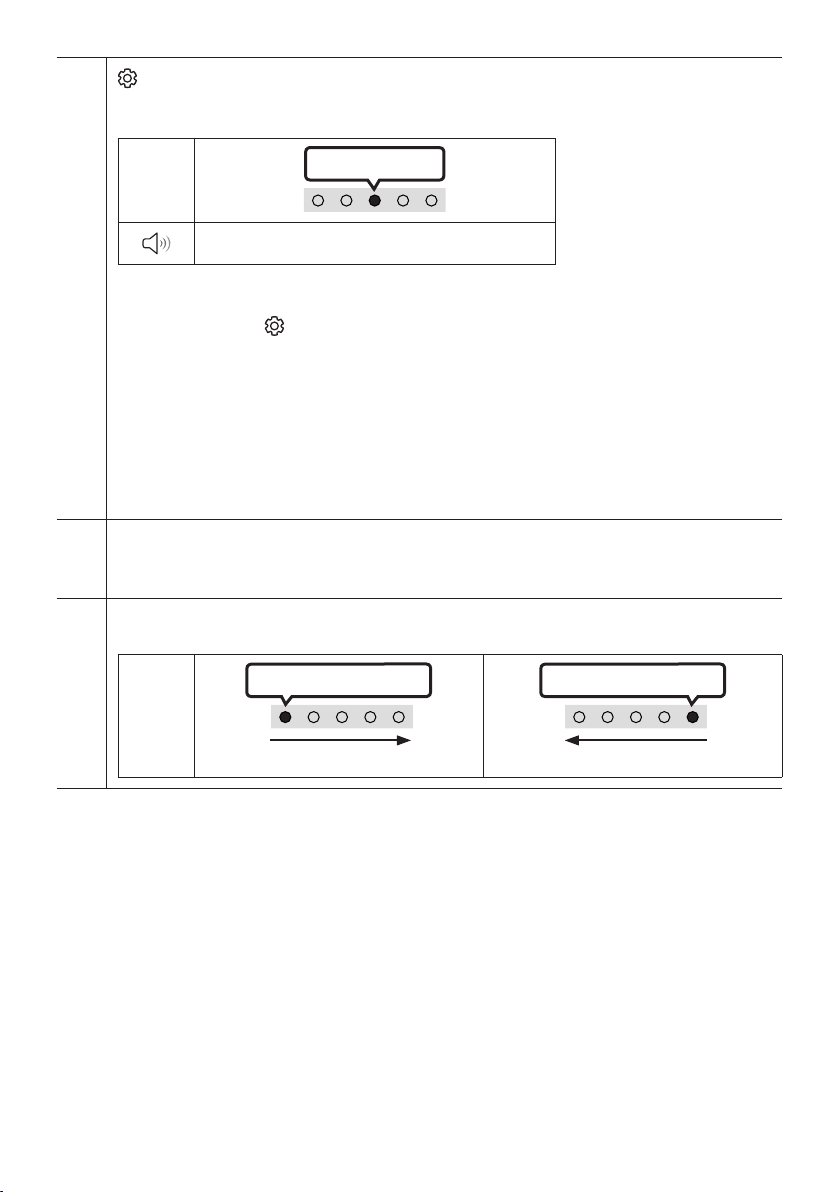
(Sound Control)
By pressing the but ton, you can selec t the desired audio mode. The desired item can be adjusted using
the Up/Down buttons. Each time the mode changes, the Multicolour LED blinks in white.
LED
Indicator
“Tre ble” “Bass” “Sync” “Side Level”
– To control the volume of the treble or bass sound, select “ Treble” or “Bass” in Sound Settings, and
then adjus t the volume between -6~+6 by using the Up/Down buttons.
– Press and hold the (Sound Control) button for about 5 seconds to adjust the sound for each
frequency band. 150Hz, 300Hz, 600Hz, 1.2kHz, 2.5kHz, 5kHz, and 10kHz are selectable using the
Left/Right buttons and each can be adjusted to a setting between -6 to +6 using the Up/Down
buttons. (Make sure the Sound mode is set to “ Standard”.)
– To control the volume of the each speaker select “Side Level” in Sound Settings, and then adjust the
volume bet ween -6~+6 by using the Up/Down buttons.
– If the video on the TV and audio from the Soundbar are not synchronised, select “Sync” in Sound
Control, and then set the audio delay between 0~300 milliseconds by using the Up/Down buttons.
– “Sync ” is only supported for some functions.
WOOFER ( BASS) LEVE L
Push the button up or down to adjust the level of the woofer (bass) to -12 or between -6 to +6. To set the
woofer (bass) volume level to 0 (Default), press the button.
VOLUME
Push the button up or down to adjust the volume.
White move s to right X1
LED
Indicator
White Bli nks X1
Volume Up
White move s to left X1
Volume Down
ENG - 13
Page 14

Outputspecicationsforthedifferentsoundeffectmodes
Output
Effect Input
Standard
Music
Adaptive Sound
2.0 ch 2.1 ch 2.1 ch
5.1 ch 2.1 ch 4.1 ch
2.0 ch 4.1 ch 6.1 ch
5.1 ch 4.1 ch 6.1 ch
2.0 ch 4.1 ch 6.1 ch
5.1 ch 4.1 ch 6.1 ch
With Subwoofer Only
• The Samsung Wireless Rear Speaker Kit, and Subwoofer can be purchased separately.
To purchase a Kit or the Subwoofer, contact the vendor you purchased the Soundbar from.
With Subw oofer & Wireles s
Rear Spe aker Kit
ENG - 14
Page 15
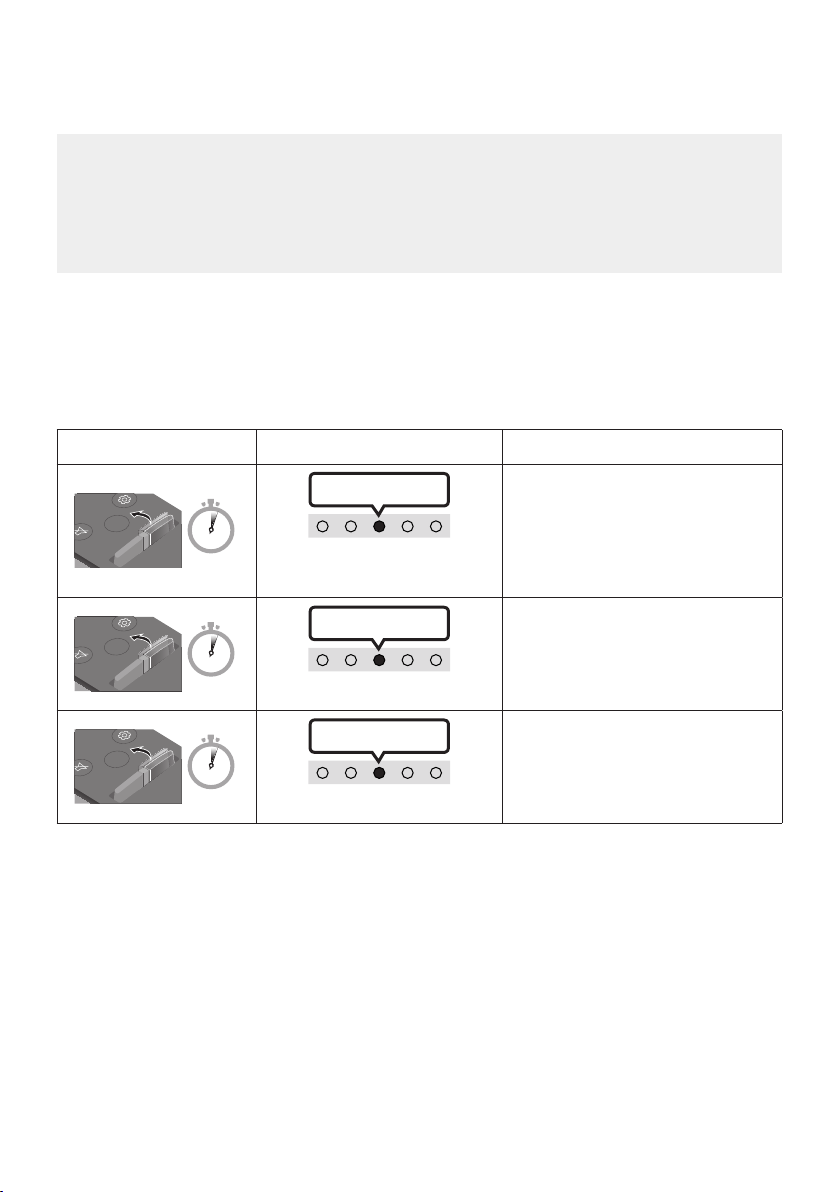
Adjusting the Soundbar volume with a TV remote control
VOL
WOOFER
WOOFER
VOL
WOOFER
Adjust the Soundbar volume using the TV’s remote control.
• This function can be used with IR remote controls only. Bluetooth remote controls (remote
controls that require pairing) are not supported.
• Set the TV speaker to External Speaker to use this function.
• Manufacturers supporting this function:
VIZIO, LG, Sony, Sharp, PHILIPS, PANASONIC, TOSHIBA, Hisense, RCA
1. Turn Off the Soundbar.
2. Push up and hold the WOOFER button for 5 seconds.
Each time you push the WOOFER button up and hold it for 5 seconds, the mode switches in the
following order: “Samsung-TV Remote” (Default mode), “Off-TV Remote”, “All-TV Remote”.
The LED indicator status changes each time the mode is changed, as shown below.
Remote Control Button LED Indicator Status
Cyan Blink s X1
SOUND
MODE
5 Sec
"Samsung-TV Remote"
(Default mode)
Red Blink s X1
SOUND
MODE
5 Sec
VOL
"Off-TV Remote"
Enable a Samsung TV’s IR remote
control.
Disable the TV remote control.
Blue Blink s X1
SOUND
MODE
5 Sec
Enable a third-party TV’s IR remote
control.
"All-TV Remote"
ENG - 15
Page 16
04 CONNECTING THE SOUNDBAR
HDMI
(ARC)
DIGITAL AUDIO IN
SERVICE DC 19V
HDMI
(ARC)
DIGITAL AUDIO IN
(OPTICAL)
HDMI
(ARC)
DIGITAL AUDIO IN
(OPTICAL)
HDMI OUT
(TV-ARC)
DIGITAL AUDIO IN
(OPTICAL)
DIGITAL AUDIO IN
(OPTICAL)
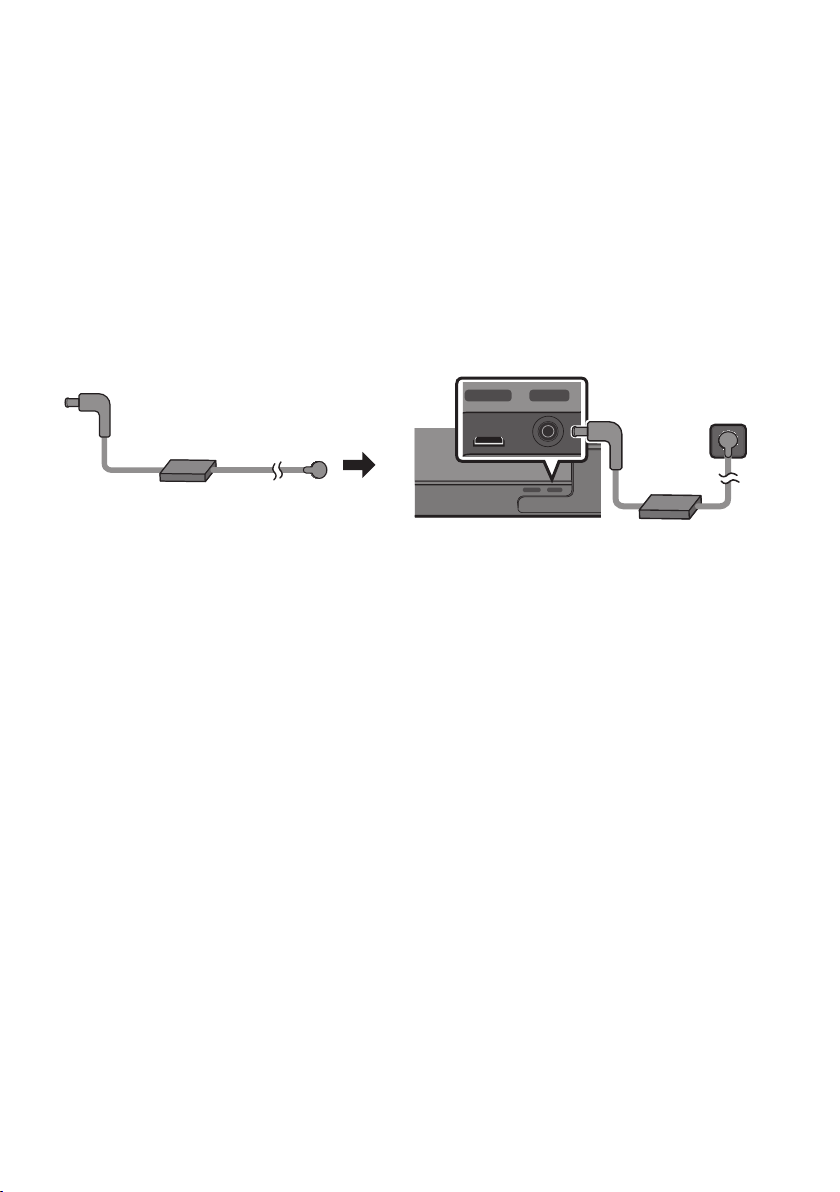
Connecting Electrical Power
Use the power components to connect the Soundbar to an electrical outlet in the following order:
• For more information about the required electrical power and power consumption, refer to the
label attached to the product. (Label: Bottom of the Soundbar Main Unit)
1. First connect the power cable to the AC/DC adapter.
Connect the AC/DC adapter (with the power cable) to the Soundbar.
2. Connect the power cord to a wall socket.
SERVICE DC 19V
AC/DC Adapter
(OPTICAL)
SERVICE DC 19V
Power Cord
Bott om of the Soundba r Main Unit
NOTES
• If you unplug and reconnect the power cord when the product is turned on, the Soundbar turns on
automatically.
• Make sure to rest the AC/DC Adapter at on a table or the oor. If you place the AC/DC Adapter so
that it is hanging with the AC cord input facing upwards, water or other foreign substances could
enter the Adapter and cause the Adapter to malfunction.
ENG - 16
Page 17
Connecting an SWA-8500S (Sold Separately) to your Soundbar
L
R
POWER
ID SET
LINK
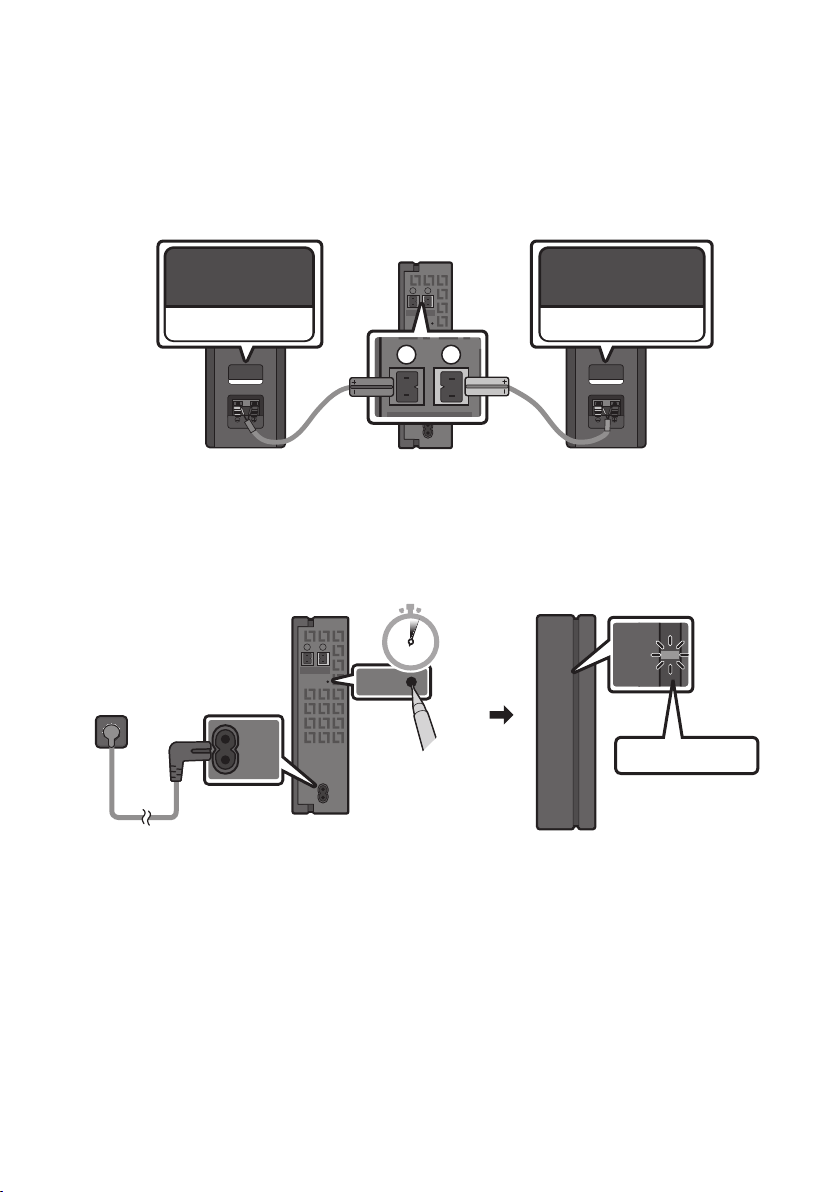
Expand to true wireless surround sound by connecting the Samsung Wireless Rear Speaker Kit
(SWA-8500S, sold separately) to your Soundbar.
1. Connect the Wireless Receiver Module to 2 Surround Speakers.
– The speaker cables are colour coded.
L
R
SURROUND SPEAKERS OUT
SPEAKER IMPEDANCE : 3Ω
SURROUND-LEFT SURROUND-RIGHT
ID SET
SURROUND-LEFT
POWER
SURROUND-RIGHT
2. Check the standby status of the Wireless Receiver Module after plugging it into an electrical outlet.
• The LINK LED indicator (blue) on the Wireless Receiver Module should be blinking. If the
indicator does not blink, use a narrow pin to press and hold the ID SET button for 5 seconds or
longer. See the SWA-8500S user guide for more details.
L
SURROUND SPEAKERS OUT
SPEAKER IMPEDANCE : 3Ω
R
ID SET
POWER
5 Sec
STANDBY
LINK
Blue blinking
ENG - 17
Page 18
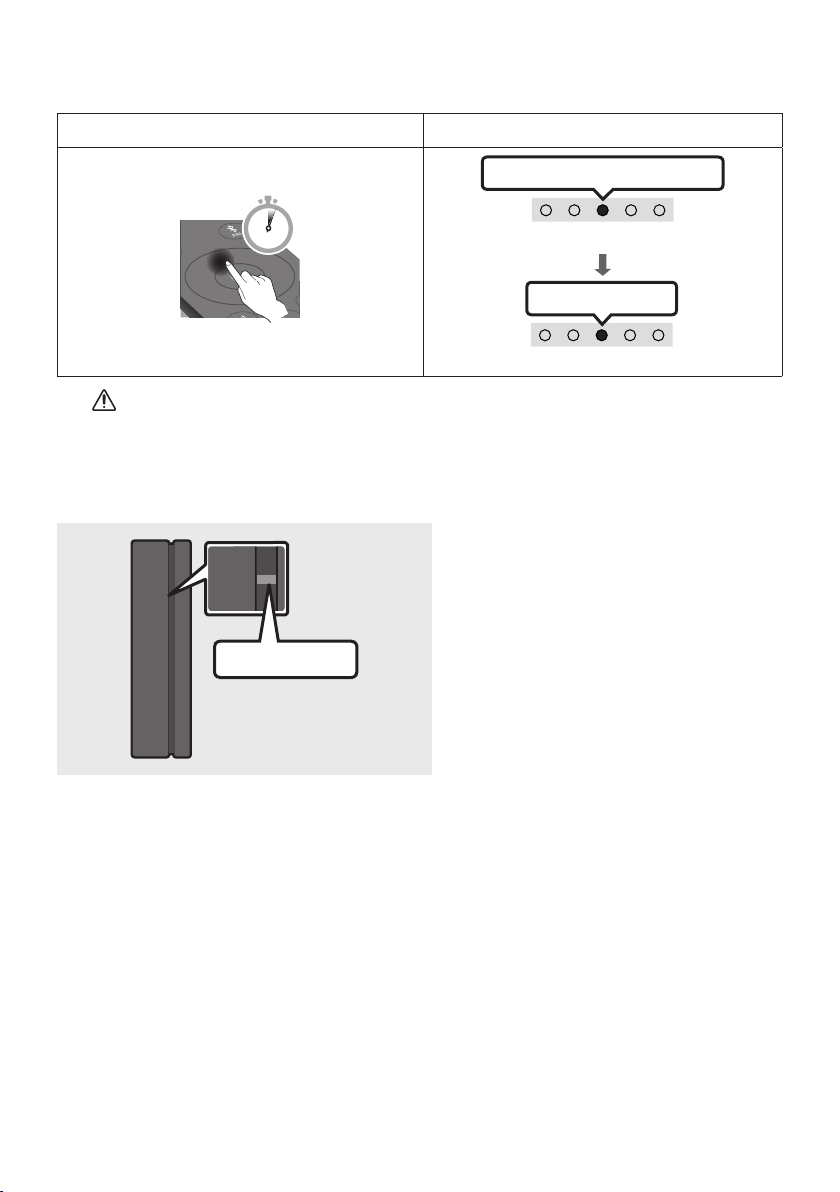
3. Press the Up button on the remote control for 5 seconds.
LINK
• Until pairing is complete, the Multicolour LED changes as Red → Green → Blue in turn.
Rear Spe aker, Woofer P airing button LED Indicator
Red → Green → Blue Blinks
PAIR
5 Sec
Pairing
Cyan Blinks X 3
Connection is complete
CAUTION
• If your Soundbar was playing music when it connects to the SWA-8500S, you may hear some
stuttering from the woofer as the connection nalises.
4. Check if the LINK LED is solid blue (connection complete).
The LINK LED indicator stops blinking and
glows a solid blue when a connection is
STANDBY
LINK
established between the Soundbar and the
Wireless Receiver Module.
Blue is On
5. If the SWA-8500S is not connected, repeat the procedure from Step 2.
ENG - 18
Page 19
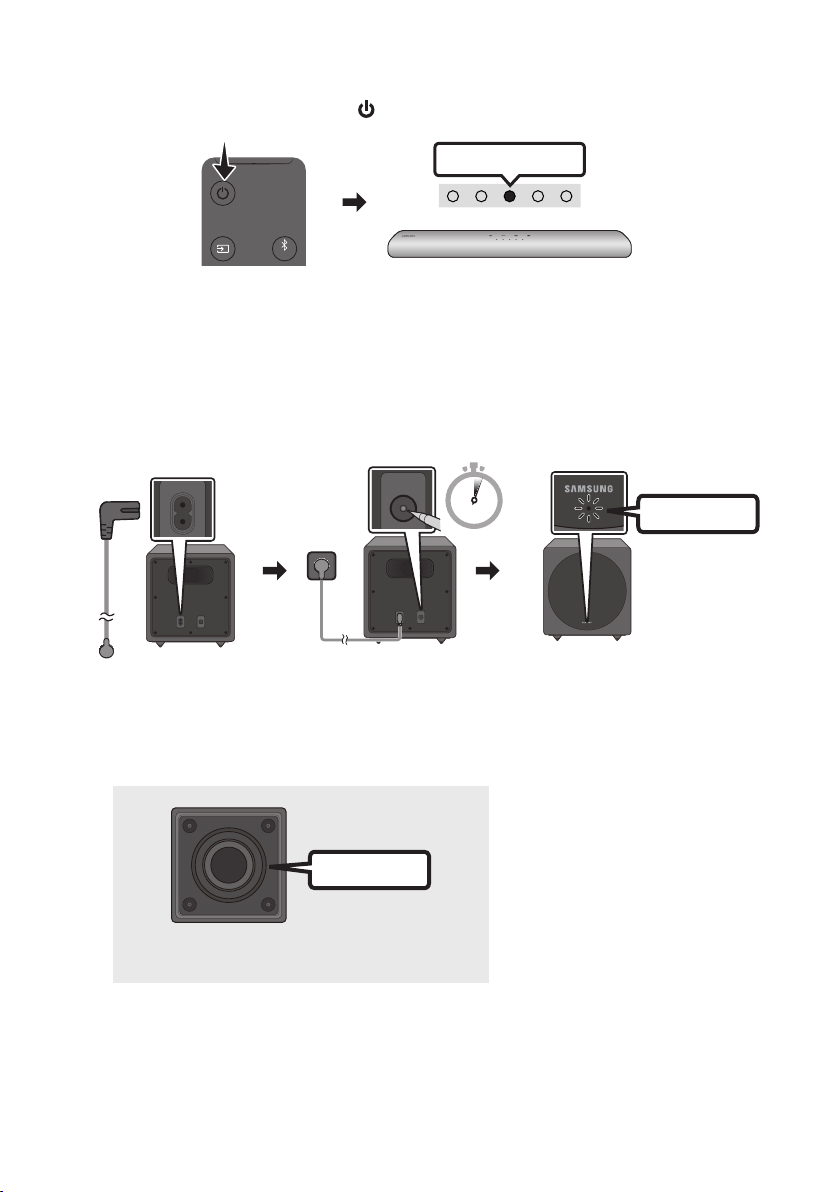
Connecting an SWA-W500 (Sold Separately) to your Soundbar
POWER ID SET
1. Turn off the Soundbar by pressing the (Power) button on the remote control.
Red Blinks X 3
PAIR
2. Plug in the Wireless Subwoofer, and then check its standby status.
• Plug the Wireless Subwoofer power cord into an electrical outlet and into the Wireless
Subwoofer to turn on the Wireless Subwoofer. The LINK LED indicator (blue LED) on the
Wireless Subwoofer blinks. If the LED does not blink, press the ID SET button on the rear of the
Wireless Subwoofer with a pen tip for 5~6 seconds until the LINK LED indicator blinks (in Blue).
For more about the LED, please refer to the SWA-W500 user manual.
ID SET
5 Sec
Blue blinking
• The main unit is heavy. Be careful not to pinch your ngers when pressing the ID SET button or
connecting the power cord to the rear of the unit.
• The upper par t of the subwoofer is prone to scratches. Handle it carefully.
POWER ID SET
Rear of th e Wireless Subwo ofer
Spea ker Unit
Bott om of the Wireles s Subwoofer
POWER ID SET
Front of th e Wireless Subwo ofer
• Do not press on or strike the
Speaker Unit on the bottom of
the body. You can deform or
damage the speaker.
ENG - 19
Page 20
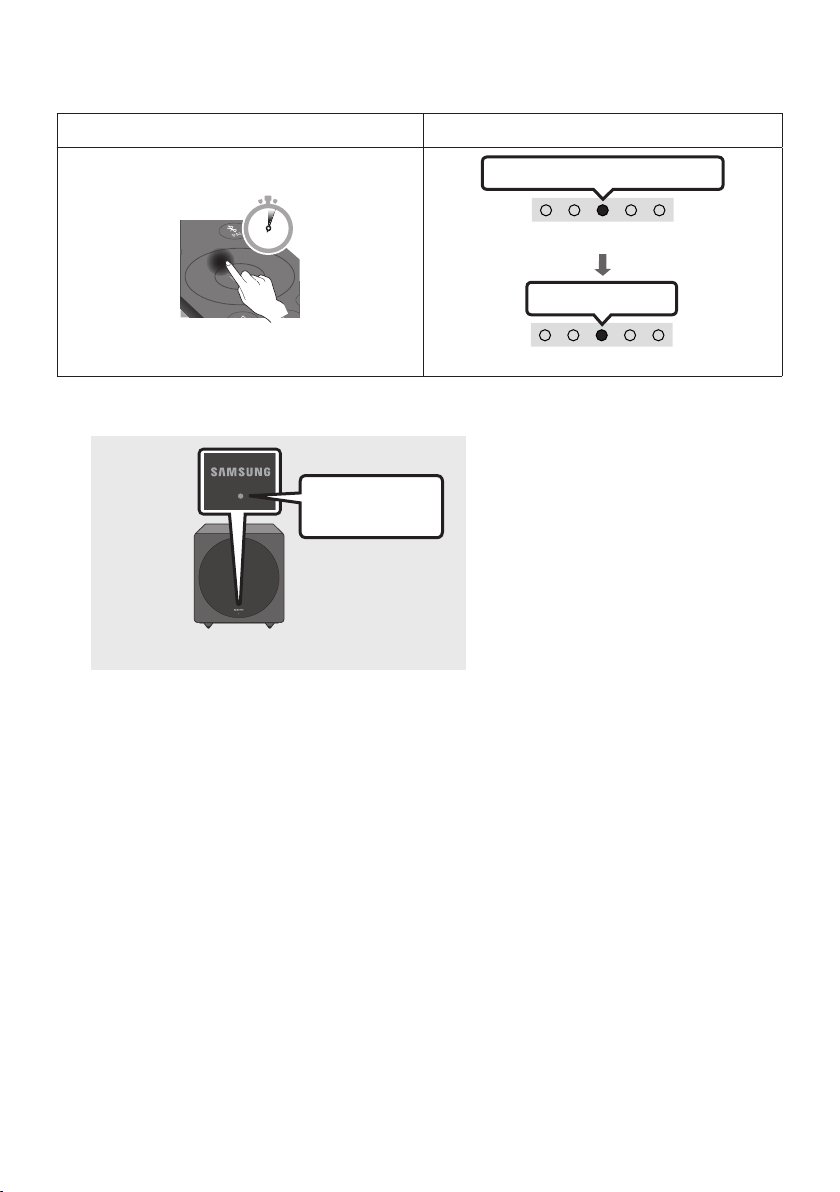
3. Press the Up button on the remote control for 5 seconds.
• Until pairing is complete, the Multicolour LED changes as Red → Green → Blue in turn.
Rear Spe aker, Woofer P airing button LED Indicator
Red → Green → Blue Blinks
PAIR
5 Sec
Pairing
Cyan Blinks X 3
Connection is complete
4. Check if the LINK LED is solid blue (connection complete).
The LINK LED indicator stops blinking
Stops blinking.
Glows blue.
and glows a solid blue when a
connection is established between the
Soundbar and the Wireless Subwoofer.
Front of th e Wireless Subwo ofer
NOTES
– Do not connect the power cord of this product or your TV to a wall outlet until all connections
between components are complete.
– Before moving or installing this product, be sure to turn off the power and disconnect the power cord.
– The maximum transmission distance of the wireless signal of the main unit is about 10 m, but may
vary depending on your operating environment. If a steel-concrete or metallic wall is between the
main unit and the wireless subwoofer, the system may not operate at all, because the wireless
signal cannot penetrate metal.
PRECAUTIONS
– Wireless receiving antennas are built into the wireless subwoofer. Keep the units away from water
and moisture.
– For optimal listening performance, make sure that the area around the wireless subwoofer and
Wireless Receiver Module (Sold separately) is clear of any obstructions.
ENG - 20
Page 21

05 USING A WIRED CONNECTION TO THE TV
HDMI
Method 1. Connecting with HDMI
CAUTION
• When both the HDMI cable and optical cable are connected, the HDMI signal is received rst.
• To connect the HDMI cable between the TV and Soundbar, be sure to connect the terminals
marked ARC. Otherwise, the TV sound may not be output.
• Be sure to use the cable with the premium HDMI certication logo. In addition, make sure that
the cable is a certied Type A, high-speed HDMI Ethernet cable. (HIGH SPEED HDMI CABLE
WITH ETHERNET)
Connecting the TV that supports HDMI ARC (Audio Return Channel)
Connec t to the HDMI IN
(ARC) p ort of your T V.
HDMI IN
(ARC)
Top of the Soun dbar
LED
Indicator
1. With the Soundbar and TV turned off, connect the HDMI cable (not supplied) as shown in the
gure.
2. Turn on the Soundbar and TV.
3. TV sound is output from the Soundbar.
White On -> O ff
HDMI Cable
(not supplied)
Connec t to the HDMI (AR C) port of the
Soundbar main unit.
(ARC)
Bott om of the
Soundbar
“Digital Audio In”
ENG - 21
Page 22

• When the TV sound is not output, press the (Multi Func tion) button at the top of the
Soundbar or the (Source) button on the remote control to select the “Digital Audio In”
mode.
• When the sound is not output, check the HDMI Cable (not supplied) connection again.
• Use the volume buttons on the TV’s remote control to change the volume on the Soundbar.
NOTES
• When you connect the TV that supports the HDMI ARC (Audio Return Channel) to the Soundbar
with an HDMI cable, you can transmit the digital video and audio data without connecting a
separate optical cable.
• We recommend you use a coreless HDMI cable if possible. If you use a cored HDMI cable, use one
whose diameter is less than 14 mm.
• This function is not available if the HDMI cable does not support ARC.
• When the audio in a broadcast is encoded in Dolby Digital and the “Digital Output Audio Format” on
your TV is set to PCM, we recommend that you change the setting to Dolby Digital. When the
setting on the TV is changed, you will experience better sound quality. (The TV menu may use
different words for Dolby Digital and PCM depending on the TV manufacturer.)
ENG - 22
Page 23
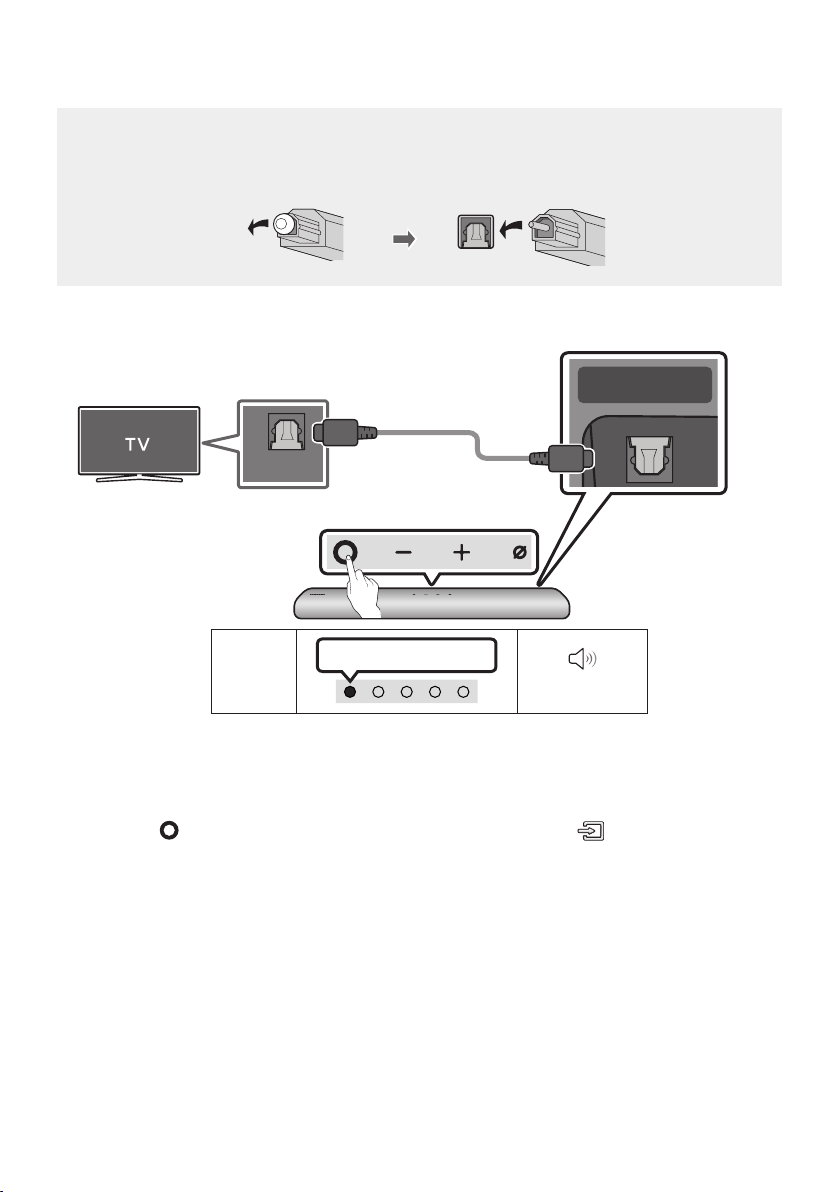
Method 2. Connecting using an Optical Cable
HDMI OUT
(TV-ARC)
DIGITAL AUDIO IN
Pre-connection Checklist
• When both the HDMI cable and optical cable are connected, the HDMI signal is received rst.
• When you use an optical cable and the terminals have covers, be sure to remove the covers.
Bott om of the Soundba r
Optic al Cable
(not supplied)
OPTICAL OUT
Top of the Soun dbar
(OPTICAL)
LED
Indicator
White On -> O ff
“Digital Audio In”
1. With the TV and Soundbar turned off, connect the DIGITAL AUDIO IN (OPTICAL) port on the
Soundbar and the OPTICAL output port on the TV with the optical cable, as shown in the gure.
2. Turn on the Soundbar and TV.
3. Press the (Multi Function) button at the top of the Soundbar or the (Source) button on the
remote control and then select the “Digital Audio In” mode. Then the announcement, “Digital
Audio In” is output.
4. The TV sound is output from the Soundbar.
ENG - 23
Page 24
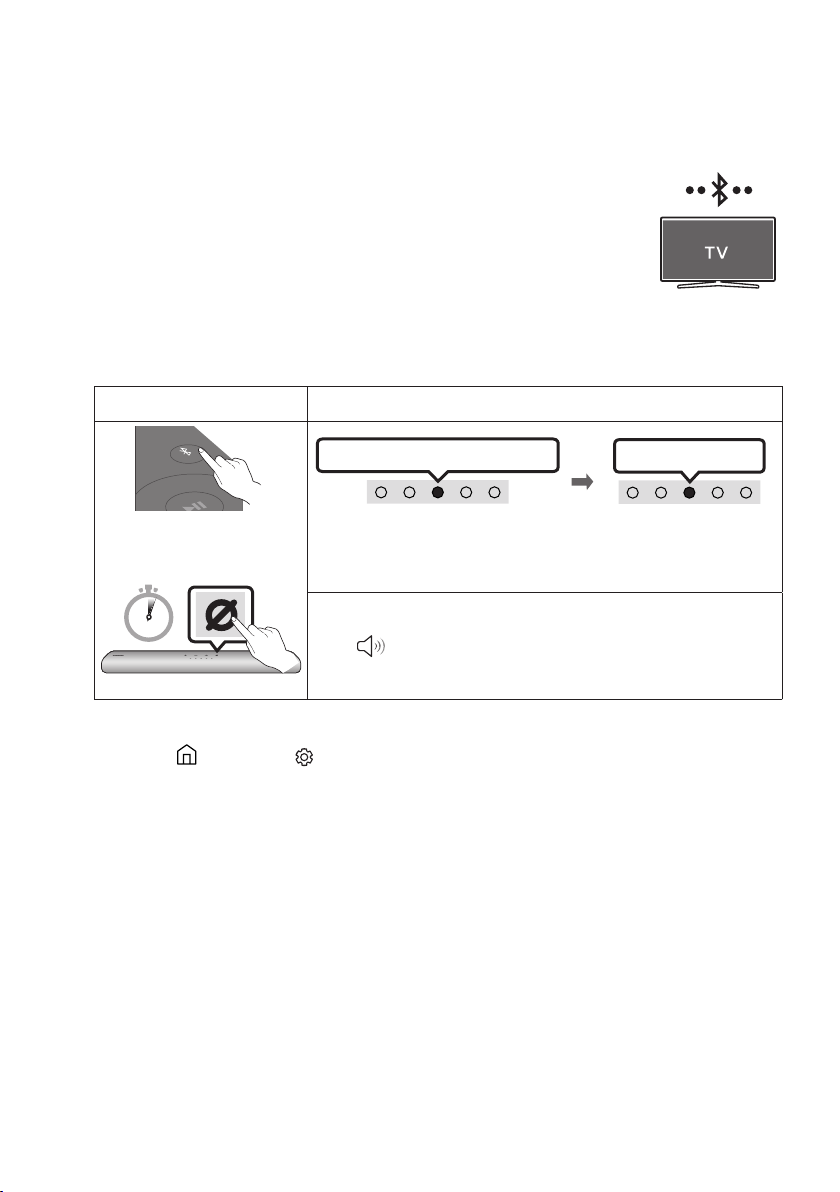
06 USING A WIRELESS CONNECTION TO THE TV
Connecting via Bluetooth
When a Samsung TV is connected using Bluetooth, you can hear stereo sound
without the hassle of cabling.
• Only one Samsung TV can be connected at a time.
• Samsung TV that supports Bluetooth can be connected. Check the
specications of your TV.
The initial connection
1.
Bluetooth Pairing button LED Indicator
PAIR
OR
When in “Bluetooth” mode
5 Sec
Red → Green → Blue Blinks
Pairing
• Until pairing is complete, the Multicolour LED changes as Red →
Green → Blue in turn.
“Ready to connect via Bluetooth.”
Cyan Blinks X 3
Connection is complete
2. Select Bluetooth mode on the Samsung TV.
(e.g. Home ( ) Settings ( ) Sound Sound Output Bluetooth Speaker List
[AV] Samsung Soundbar S60T / [AV] Samsung Soundbar S61T (Bluetooth))
3. Select “[AV] Samsung Soundbar S60T / [AV] Samsung Soundbar S61T” from the list on TV’s
screen.
An available Soundbar is indicated with “Need Pairing” or “Paired” on the TV’s Bluetooth device
list. To connect the Samsung TV to the Soundbar, select the message, and then establish a
connection.
4. You can now hear Samsung TV sound from the Soundbar.
• If there is a connection log between the Soundbar and Samsung TV, the Soundbar is
automatically connected by changing its mode to “Bluetooth”.
ENG - 24
Page 25

If the device fails to connect
• If you have an existing Soundbar (e.g., [ AV] Samsung Soundbar S60T / [ AV] Samsung Soundbar
S61T) on the list of speakers on the Samsung TV, delete it.
• Then repeat steps 1 through 3.
Disconnecting the Soundbar from the Samsung TV
Press the (Multi Function) button at the top of the Soundbar or the (Source) button on the
remote control to select the mode other than “Bluetooth”.
• Disconnecting takes time because the Samsung TV must receive a response from the Soundbar.
(The time required may differ, depending on the Samsung TV model.)
Notes on Bluetooth connection
• Locate a new device within 1 m to connect via Bluetooth communication.
• If asked for a PIN code when connecting a Bluetooth device, enter <0000>.
• The Soundbar automatically turns off after 18 minutes in the Ready state.
• The Soundbar may not perform Bluetooth search or connection correctly under the following
circumstances:
– If there is a strong electrical eld around the Soundbar.
– If several Bluetooth devices are simultaneously paired with the Soundbar.
– If the Bluetooth device is turned off, not in place, or malfunctions.
• Electronic devices may cause radio interference. Devices that generate electromagnetic waves
must be kept away from the Soundbar main unit - e.g., microwaves, wireless LAN devices, etc.
ENG - 25
Page 26

07 CONNECTING AN EXTERNAL DEVICE
HDMI OUT
(TV-ARC)
DIGITAL AUDIO IN
Connecting using an Optical Cable
Bott om of the Soundba r
(OPTICAL)
“Digital Audio In”
LED
Optic al Cable
(not supplied)
Top of the Soun dbar
White On -> O ff
BD / DVD playe r / Set-top
box / Game con sole
OPTICAL OUT
Indicator
1. With the external device and Soundbar turned off, connect the DIGITAL AUDIO IN (OPTICAL) port
on the Soundbar and the OPTICAL output port on the external device with the optical cable, as
shown in the gure.
2. Turn on the Soundbar and external device.
3. Press the (Multi Function) button at the top of the Soundbar or the (Source) button on the
remote control and then select the “Digital Audio In” mode. Then the announcement, “Digital
Audio In” is output.
4. The external device sound is output from the Soundbar.
ENG - 26
Page 27
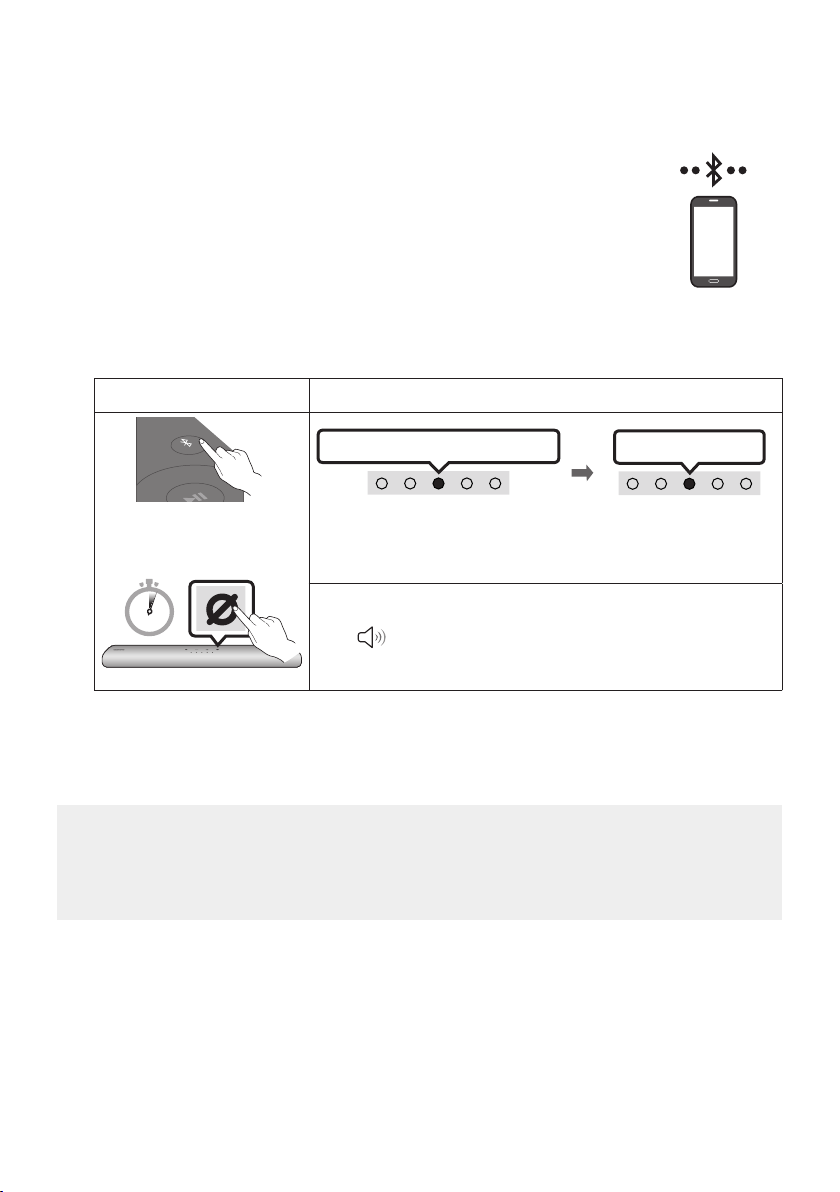
08 CONNECTING A MOBILE DEVICE
Method 1. Connecting via Bluetooth
When a mobile device is connected using Bluetooth, you can hear stereo sound
without the hassle of cabling.
• When you connect a paired Bluetooth device with the Soundbar off, the
Soundbar automatically turns on.
The initial connection
• When connecting to a new Bluetooth device, make sure the device is within 1 m distance.
1.
Bluetooth Pairing button LED Indicator
mobile device
PAIR
OR
When in “Bluetooth” mode
5 Sec
Red → Green → Blue Blinks
Pairing
• Until pairing is complete, the Multicolour LED changes as Red →
Green → Blue in turn.
“Ready to connect via Bluetooth.”
Cyan Blinks X 3
Connection is complete
2. On your device, select “[ AV] Samsung Soundbar S60T / [AV] Samsung Soundbar S61T” from the
list that appears.
3. Play music les from the device connected via Bluetooth through the Soundbar.
If the device fails to connect
• If you have an existing Soundbar (e.g., [ AV] Samsung Soundbar S60T / [ AV] Samsung Soundbar
S61T) on the list of speakers on the Mobile device, delete it.
• Then repeat steps 1 and 2.
ENG - 27
Page 28

Notes on Bluetooth connection
• Locate a new device within 1 m to connect via Bluetooth communication.
• If asked for a PIN code when connecting a Bluetooth device, enter <0000>.
• The Soundbar automatically turns off after 18 minutes in the Ready state.
• The Soundbar may not perform Bluetooth search or connection correctly under the following
circumstances:
– If there is a strong electrical eld around the Soundbar.
– If several Bluetooth devices are simultaneously paired with the Soundbar.
– If the Bluetooth device is turned off, not in place, or malfunctions.
• Electronic devices may cause radio interference. Devices that generate electromagnetic waves
must be kept away from the Soundbar main unit - e.g., microwaves, wireless LAN devices, etc.
• The Soundbar supports SBC data (44.1kHz, 48kHz).
• Connect only to a Bluetooth device that supports the A2DP (AV) function.
• You cannot connect the Soundbar to a Bluetooth device that supports only the HF (Hands Free)
function.
• When connecting the Soundbar to a Bluetooth device, place them as close to each other as possible.
• The farther the Soundbar and Bluetooth device are from each other, the lower the sound quality
will become.
The Bluetooth connection may break when the devices are out of the effective range.
• The Bluetooth connection may not function as intended in areas with poor reception.
• A Bluetooth device may experience noise or malfunction under in the following conditions:
– When the body is in contact with the signal transceiver on the Bluetooth device or Soundbar
– In corners or when there is an obstacle in proximity, such as a wall or partition, where electrical
changes may occur.
– When exposed to radio interferences by other products operating on the same frequency
ranges, such as medical equipment, microwave ovens, and wireless LAN devices.
– Obstacles such as doors and walls may still impact the sound quality even when the devices
are within the effective range.
• Note that your Soundbar cannot be paired with other Bluetooth devices while using the Bluetooth
option.
• This wireless device may cause electrical interference during operation.
ENG - 28
Page 29

Disconnecting the Bluetooth device from a Soundbar
You can disconnect a Bluetooth device from the Soundbar. For instructions, see the Bluetooth device’s
user manual.
• The Soundbar will be disconnected.
• If the Soundbar is disconnected from the Bluetooth device, the multicolour LED indicator on the
Soundbar blinks "Red” three times.
Disconnecting the Soundbar from the Bluetooth device
Press the (Multi Function) button at the top of the Soundbar or the (Source) button on the
remote control to select the mode other than “Bluetooth”.
• Disconnecting takes time because the Bluetooth device must receive a response from the
Soundbar. (Disconnection time may differ, depending on the Bluetooth device)
• If the Soundbar is disconnected from the Bluetooth device, the multicolour LED indicator on the
Soundbar blinks "Red” three times.
ENG - 29
Page 30
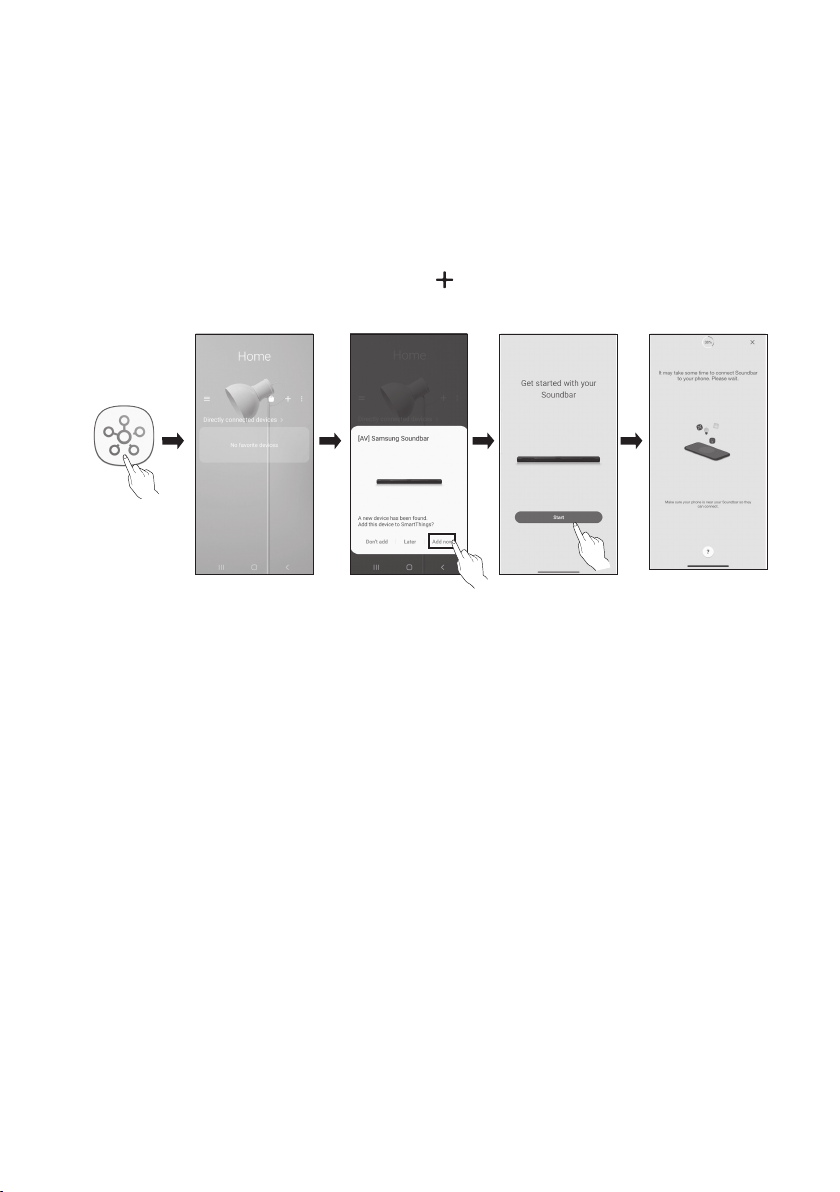
Method 2. Connecting via Wi-Fi (Wireless Network)
To connect a Soundbar to a mobile device via a wireless network (Wi-Fi), the SmartThings app is
required.
The initial connection
1. Install and launch the SmartThings app from your mobile device (smartphone or tablet).
2. On the app, follow the screen instructions to add the Soundbar.
• The automatic pop-up (the second screenshot below) may not show on some devices.
If the pop-up window does not appear, press “ ” on the Home screen. The Soundbar is added
to the app.
SmartThings
App
Launch App Add deviceAuto pop-up
ENG - 30
Page 31
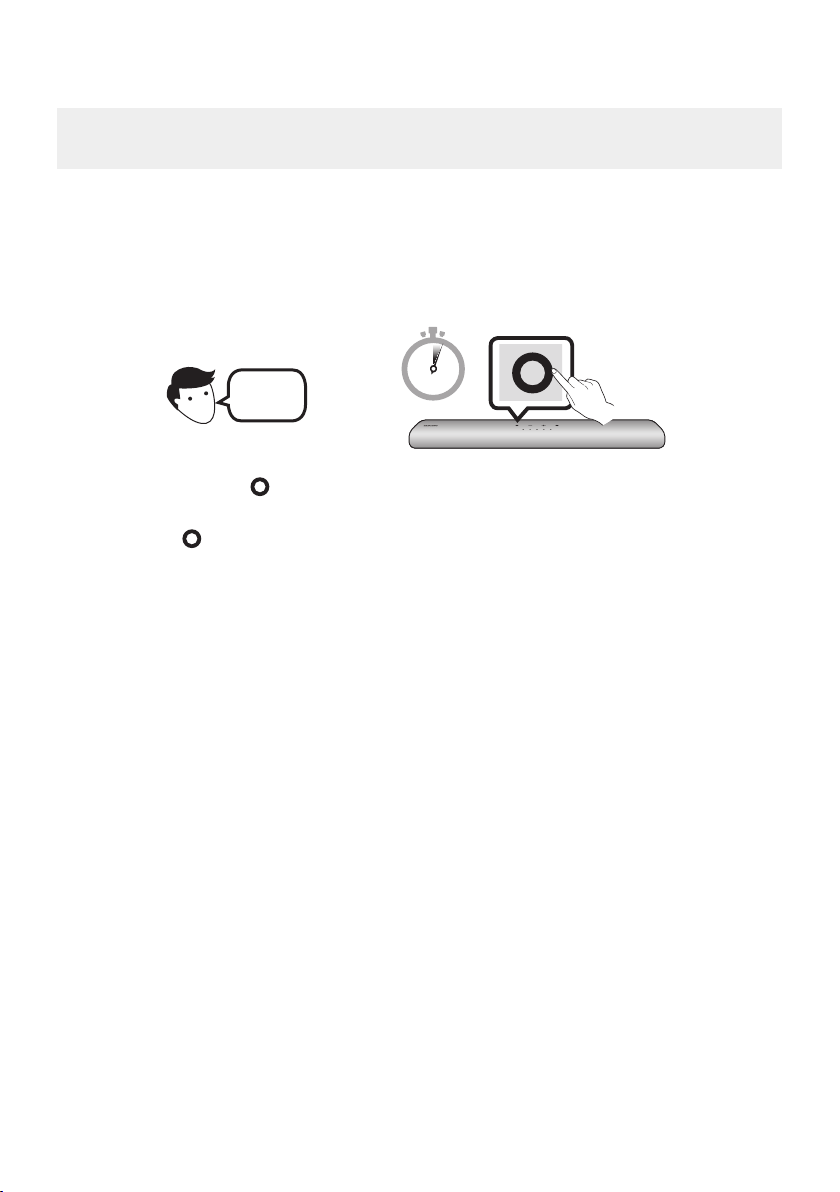
ConguringAmazonAlexa
• Amazon Alexa is a service provided by Amazon.
• This service is available only in some languages but not in other countries or regions.
Using Alexa, you can play music, listen to news, see weather forecasts, and control home appliances.
To use Amazon Alexa, an Amazon account is required to connect the Soundbar over the network.
1. Install the SmartThings app on your mobile device and then launch it.
2. Enter the Alexa account by following the instructions on the app and then log in the service.
Top of the Soun dbar
"Alexa"
3. Call Alexa or press the (Multi Func tion) button on the Soundbar for 3 seconds to use the Alexa
service.
• Press the (Multi Function) button for 3 seconds to call Alexa. Say with the button pressed to
enable voice recognition.
• The LED indicator status on the Soundbar changes depending on the Alexa status. See page
33 for details.
OR
3 Sec
ENG - 31
Page 32
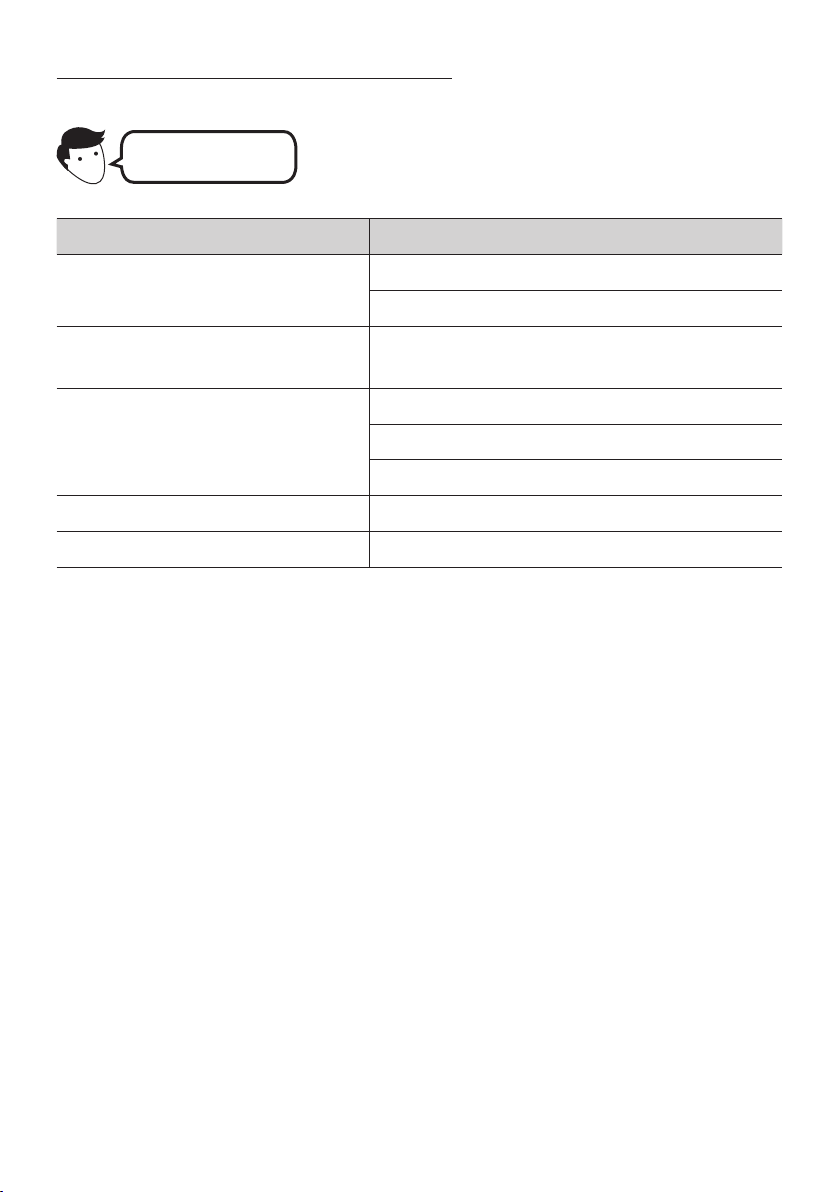
Use voice commands to control the Soundbar
Trigger + Command
Things to tr y Example of what to say
Volume control
Listening to streaming content from
Amazon Music
Playback control
Weather information "Alexa, what’s the weather? "
Timer scheduling “Alexa, set a timer for 10 minutes.”
"Alexa, turn up the volume."
“Alexa, turn down the volume”
"Alexa,playsomejazzmusic"
"Alexa, play nex t song."
“Alexa, stop the music.”
“Alexa, what is this song?”
ENG - 32
Page 33
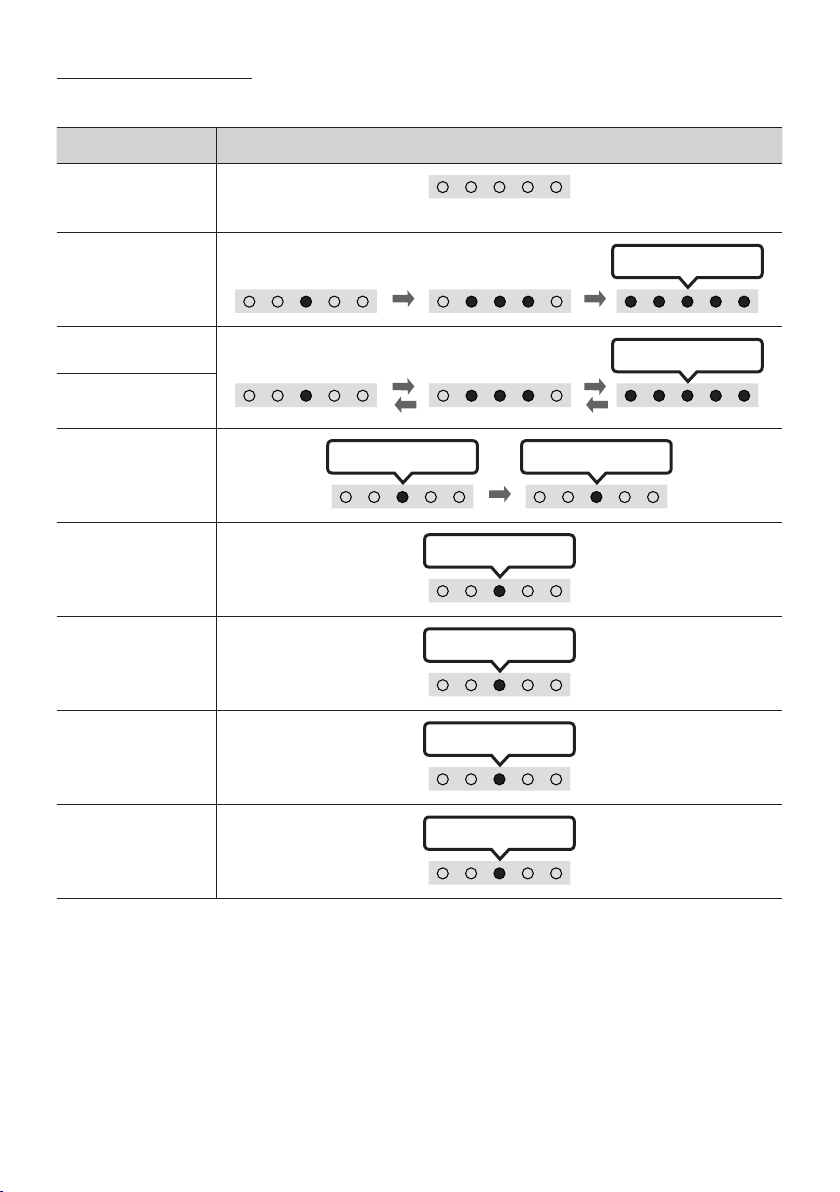
Alexa indicator status
The LED indicator status on the Soundbar changes depending on the Alexa status, as shown below.
Alexa status LED indicator on Soundbar
Idle
Listening
Thinking
Speaking
Timer Alarms and
Reminders
Notication
Alexa ser vice
unavailable
Network
disconnected
Off
Cyan On
Cyan Blinks X1
Cyan Blinks X 2 Blue Blinks X 2
Yellow Blinks X2
Red Blink s X3
Red Blink s X3
Mic Off
Red On
ENG - 33
Page 34
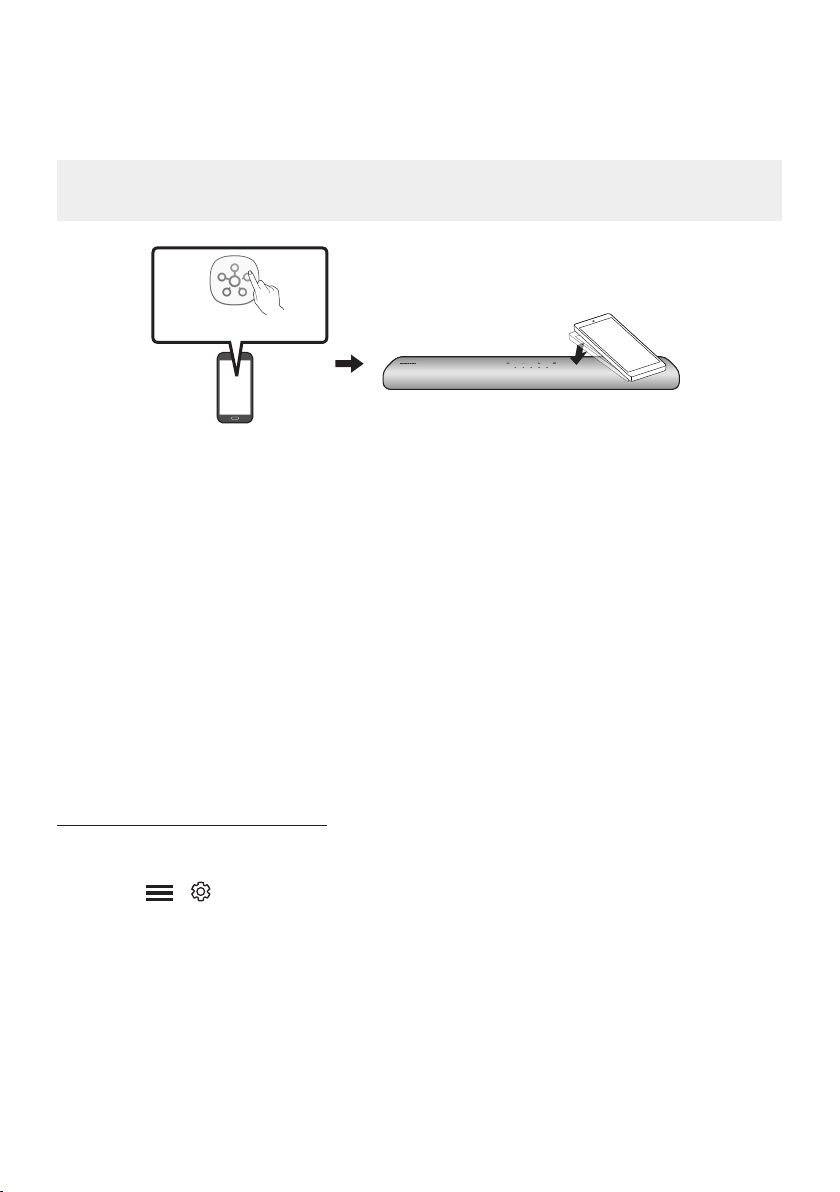
Using the Tap Sound
Tap the Soundbar with your mobile device to play the sound of content on the mobile device through
the Soundbar.
• This function may not be supported, depending on the mobile device.
• This function is only compatible with Samsung mobile devices with Android 8.1 or later.
SmartThings App
Mobile device
1. Turn on the Ta p So und function on your mobile device.
• For details on how to turn on the function, refer to “Setting the Tap Sound function” below.
2. Tap the Soundbar with the mobile device. Select “St art now” in the displayed message window.
A connection is established between the mobile device and Soundbar via Bluetooth.
3. Play the sound of content on the mobile device through the Soundbar.
• This function connects a mobile device to the Soundbar via Bluetooth by detecting vibration
that occurs when the device touches the Soundbar.
• Make sure the mobile device does not tap a sharp corner of the Soundbar. The Soundbar or
mobile device may become scratched or damaged.
• It is recommended that the mobile device be covered with a case. Lightly tap the wide area in
the upper por tion of the Soundbar, without using excessive force.
• To use this function, update the SmartThings app to the latest version.
The function may not be supported, depending on the app version.
Top of the Soun dbar
Setting the Tap Sound function
Use the SmartThings app to turn on the Tap View, Tap Sound function.
1. On the mobile device, run the SmartThings app.
2. Select ( → ) in the SmartThings app screen displayed on the mobile device.
3. Set “Tap View, Tap Sound” to On to allow the function to work when a mobile device moves close to
the Soundbar. The function is turned on.
NOTES
• When the mobile device is in power-saving mode, the Tap Sou nd function does not work.
• The Tap So und function may not work if there are devices near the Soundbar that cause radio
interference such as electric devices. Make sure devices that may cause radio interference are
placed at a sufcient distance away from the Soundbar.
ENG - 34
Page 35
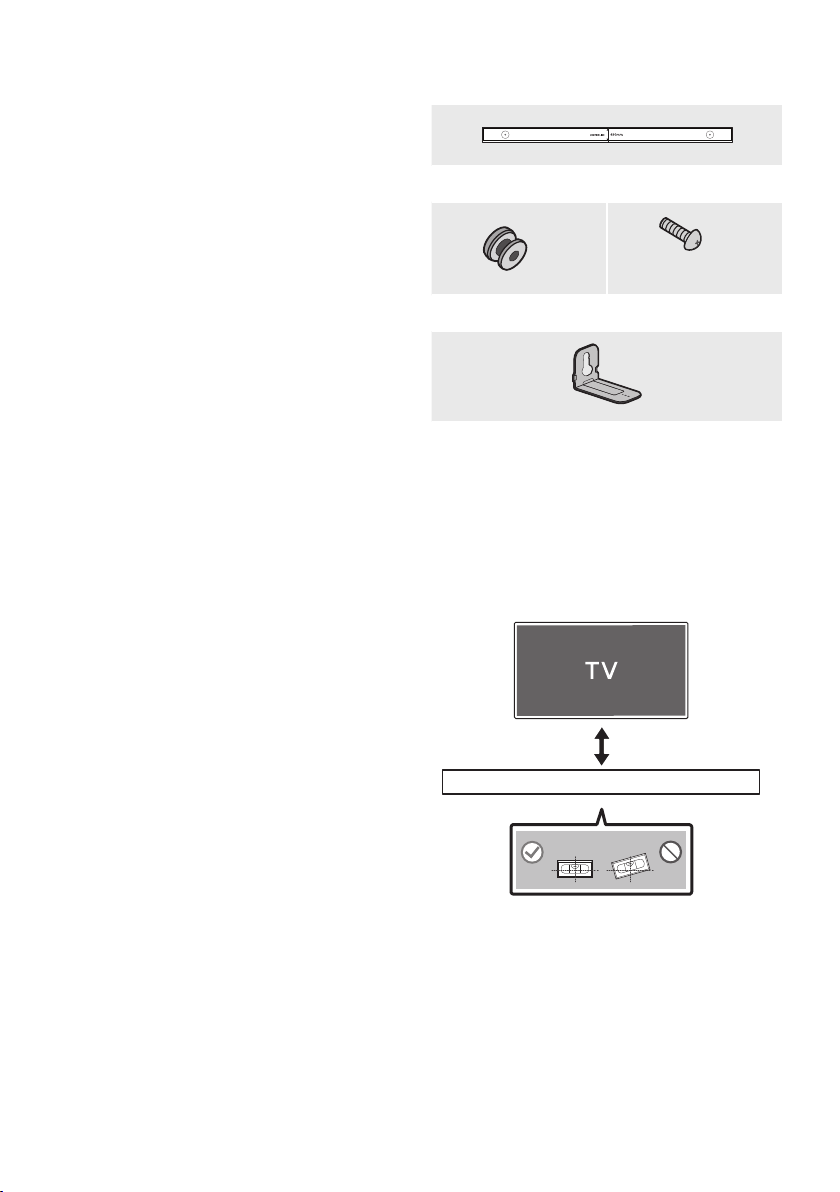
09 INSTALLING THE
WALL MOUNT
Wallmount Components
Installation Precautions
• Install on a vertical wall only.
• Do not install in a place with high
temperature or humidity.
• Verify whether the wall is strong enough to
support the product’s weight. If not, reinforce
the wall or choose another installation point.
• Purchase and use the xing screws or
anchors appropriate for the kind of wall you
have (plaster board, iron board, wood, etc.). If
possible, x the support screws into wall
studs.
• Purchase wall mounting screws according to
the type and thickness of the wall you want to
mount the Soundbar on.
– Diameter: M5
– Length: 35 mm or longer recommended.
• Connect cables from the unit to external
devices before you install the Soundbar on
the wall.
• Make sure the unit is turned off and
unplugged before you install it. Otherwise, it
may cause an electric shock.
Wall Mount Guide
x 2
Holder-Screw Screw
x 2
Bracket-Wall Mount
1. Place the Wall Mount Guide against the wall
surface.
• The Wall Mount Guide must be level.
• If your TV is mounted on the wall, install
the Soundbar at least 5 cm below the TV.
5 cm or more
x 2
(M4 x L10)
ENG - 35
Page 36
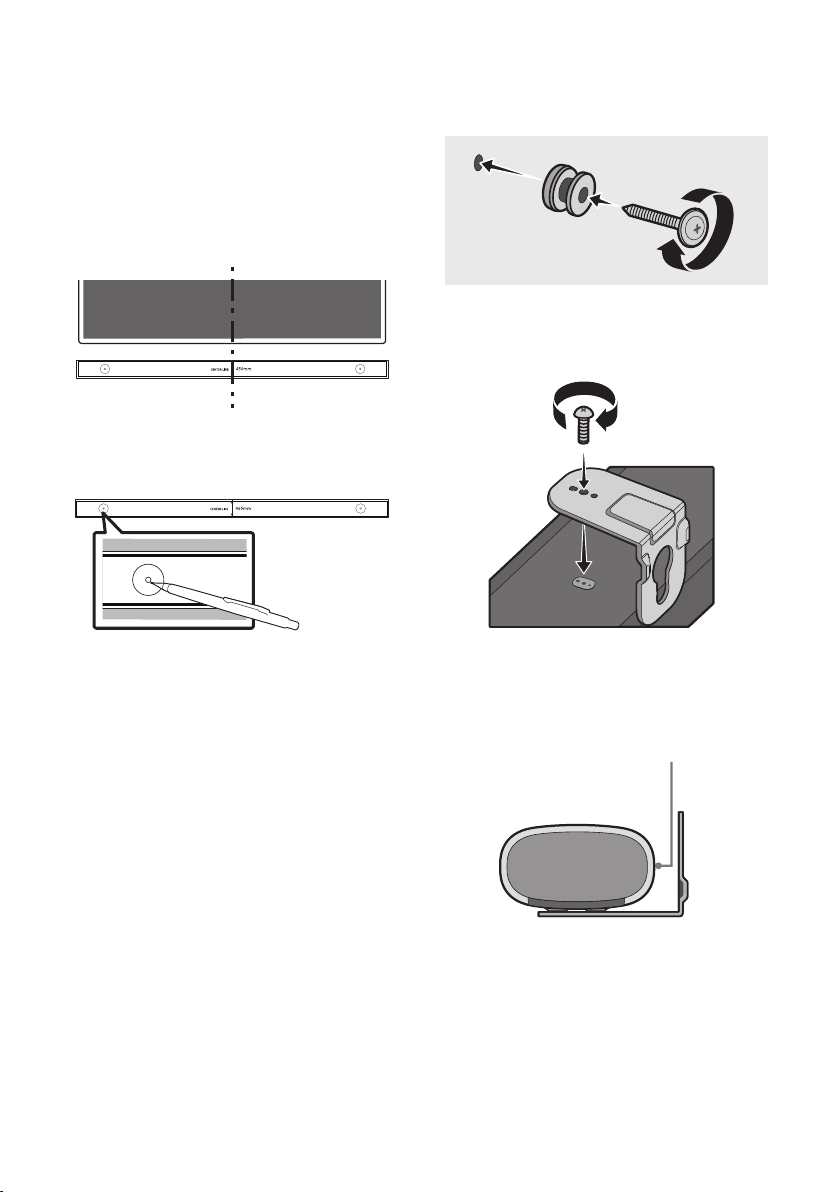
2. Align the Wall Mount Guide’s Centre Line
with the centre of your TV (if you are
mounting the Soundbar below your TV), and
then x the Wall Mount Guide to the wall
using tape.
• If you are not mounting below a TV, place
the Centre Line in the centre of the
installation area.
Centre Line
3. Use a pen to mark the positions of the holes
and remove the Wall Mount Guide.
5. Push a screw (not supplied) through each
Holder-Screw, and then screw each screw
rmly into a support screw hole.
6. Install the 2 Bracket-Wall Mounts in the
correct orientation on the bottom of the
Soundbar using 2 Screws.
4. Using an appropriately sized drill bit, drill a
hole in the wall at each marking.
• If the markings do not correspond to the
positions of studs, make sure you insert
appropriate anchors or mollies into the
holes before you insert the support
screws. If you use anchors or mollies,
make sure the holes you drill are large
enough for the anchors or mollies you
use.
• When assembling, make sure the hanger
part of the Bracket-Wall Mounts are
located behind the rear of the Soundbar.
Rear of S oundbar
Right end o f Soundbar
ENG - 36
Page 37
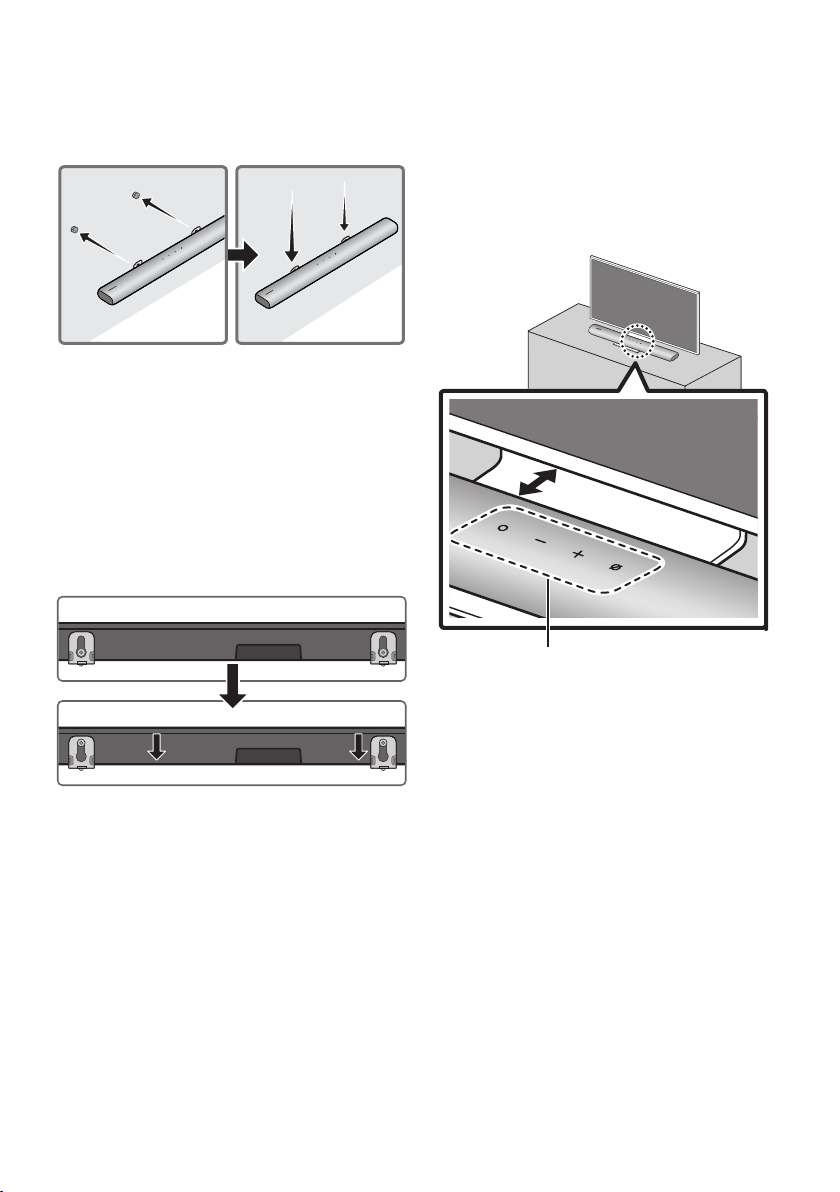
7. Install the Soundbar with the attached
Bracket-Wall Mounts by hanging the
Bracket-Wall Mounts on the Holder-Screws
on the wall.
8. Slide the Soundbar down as shown below so
that the Bracket-Wall Mounts rest securely
on the Holder-Screws.
• Insert the Holder-Screws into the wide
(bottom) part of the Bracket-Wall
Mounts, and then slide the Bracket-Wall
Mounts down so that the Bracket-Wall
Mounts rest securely on the
Holder-Screws.
10 INSTALLING THE
SOUNDBAR IN
FRONT OF TV
3cm or more
Microphone
Installing the centre of the Soundbar to the centre
of the TV as illustrated in the image.
At this time, place the Soundbar at least 3cm
away from the TV so that there is no interference
with voice recognition.
NOTES
• Make sure the Soundbar is placed on a at
and solid surface.
• Insufcient gap from the TV may cause voice
recognition and acoustic problems.
ENG - 37
Page 38
11 SOFTWARE
DC 19V
UPDATE
Auto Update
When the Soundbar is connected to the Internet,
software updates automatically occur even when
the Soundbar is turned off.
• To use the Auto Update function, the
Soundbar must be connected to the Internet.
The Wi-Fi connection to the Soundbar will be
terminated if the Soundbar’s power cord is
disconnected or the power is cut off. If the
power is cut off, when the power comes back
on or you reconnect the power cord, turn on
the Soundbar, and then reconnect it to the
Internet.
1. Go to the Samsung website
(www.samsung.com) → search for the model
name from the customer support menu
option.
• For more information about update, refer
to Upgrade Guide.
2. Download the upgrade le (USB type).
3. Unzip the le to create a folder with the le
name.
4. Store the created folder in a USB and then
connect it to the Soundbar.
5. Turn on the Soundbar. Then the product is
updated within 3 minutes.
White move s from left to ri ght
LED
Indicator
and right t o left
Software update star t :
“Star t the softwa re update.”
Software update end :
“The so ftware upda te is complete.”
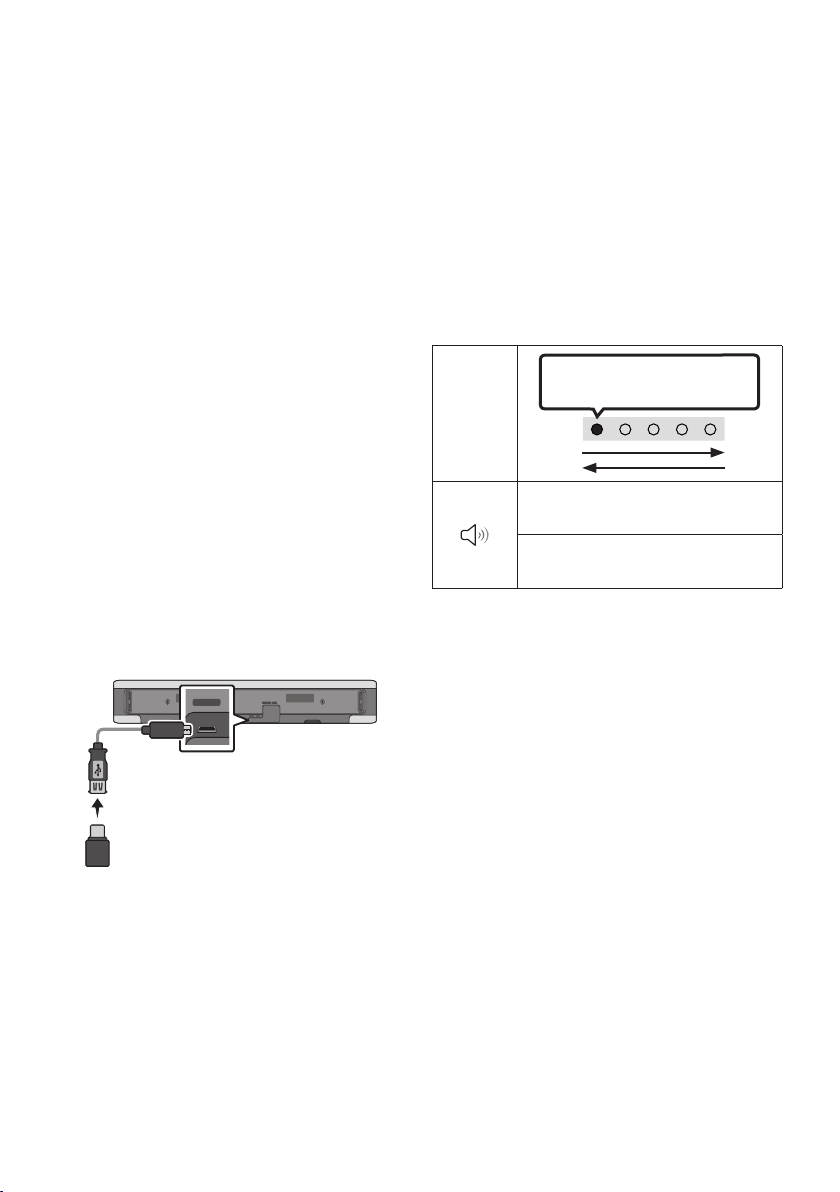
USB Update
Bott om of the Soundba r
HDMI
DIGITAL AUDIO IN
(ARC)
SERVICE
Micro USB t o
USB adap ter Cable
(not supplied)
Samsung may offer updates for the Soundbar ’s
systemrmwareinthefuture.
When an update is available, you can update the
Soundbar by connecting the USB drive that
contains the update rmware to the SERVICE
port of the Soundbar.
(OPTICAL)
ID SET NETWORK
SERVICE DC 19V
• During update, do not turn it off or
remove the USB.
• If update does not proceed, reconnect the
Soundbar power cord.
• When the latest version is installed, no
update is performed.
• Depending on the USB type, update may
not be supported.
ENG - 38
Page 39
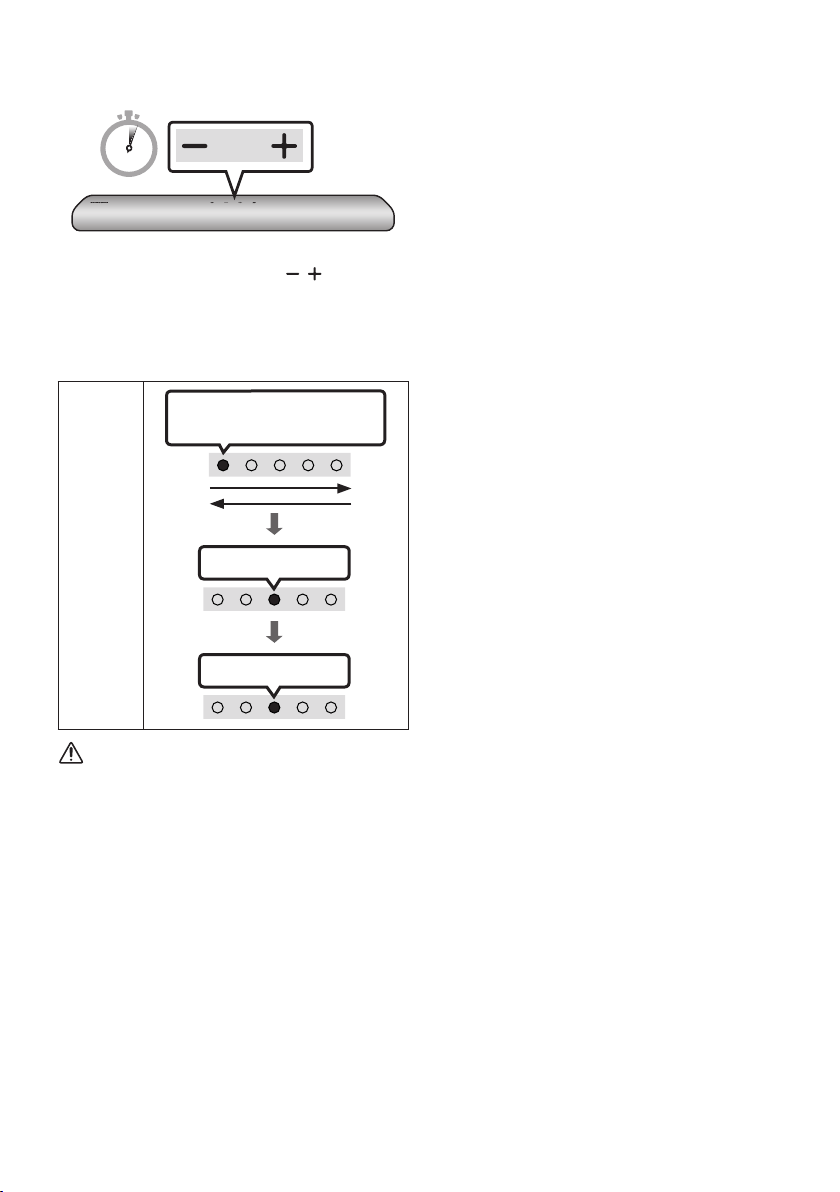
Initialisation
5 Sec
With the Soundbar on, press the (Volume)
buttons on the body at the same time for at least
5 seconds. The LED display changes as shown
below and then the Soundbar is initialised.
White move s from left to ri ght
and right t o left
LED
Indicator
CAUTION
Cyan Blink s X3
Red Blink s → Off
• All the settings of the Soundbar are
initialised. Be sure to perform this only when
initialisation is required.
ENG - 39
Page 40
12 TROUBLESHOOTING
Refer to the instructions below if this product does not function properly.
In case the power is not turned on
; Check whether the power cord of the
Soundbar is correctly inserted into the
outlet.
In case the functions do not work properly
; After removing the power cord, insert it
again.
; Remote the power cord from the external
device and try again.
; If there is no signal, the Soundbar
automatically turns off after a certain
period of time. Turn on the power. (See
page 11.)
In case the remote control does not work
; Operate the remote control noting the
Soundbar closely.
; Replace the batteries with new ones.
In case the Soundbar sound is not output
; The volume of the Soundbar is too low or
muted. Adjust the volume.
; When any external device (STB, Bluetooth
device, mobile device, etc.) is connected,
adjust the volume of the external device.
; For sound output of the TV, select
Soundbar. (Samsung TV: Home ( ) →
Settings ( ) → Sound → Sound Output →
Select Soundbar)
; The cable connection to the Soundbar may
not be loose. Remove the cable and
connect again.
; Remove the power cord completely,
reconnect, and turn the power on.
; Initialise the product and try again.
(See page 39.)
In case the TV is not connected via HDMI
(ARC)
; Check whether the HDMI cable is correctly
connected to the ARC terminal.
(See page21)
; Connection may not be possible due to the
connected external device (set-top box,
game machine, etc.). Directly connect the
Soundbar.
; HDMI-CEC may not be activated on the TV.
Turn on the CEC on the TV menu. (Samsung
TV: Home ( ) → Settings ( ) → General
→ External Device Manager → Anynet+
(HDMI-CEC) ON)
There is no sound in when connecting to the
TV in HDMI (ARC) mode
; Your device is unable to play the input
signal. Change the TV’s audio output to
PCM or Dolby Digital.
(For a Samsung TV: Home ( ) → Settings
( ) → Sound → Expert Settings → Digital
Output Audio Format)
ENG - 40
Page 41

In case Bluetooth connection is not possible
In case Wi-Fi connection is not possible
; When connecting a new device, switch to
Bluetooth Pairing for connection. (Press the
PAIR button on the remote control or
press the (Mic On/Off) button on the
body for at least 5 seconds.)
; If the Soundbar is connected to another
device, disconnect that device rst to
switch the device.
; Reconnect it after removing the Bluetooth
speaker list on the device to connect.
(Samsung TV: Home ( ) → Settings ( )
→ Sound → Sound Output → Bluetooth
Speaker List)
; Remove and reconnect the power plug,
then try again.
; Initialise the product and try again.
(See page 39.)
In case Bluetooth sound breaking occurs
; Sounds may be breaking due to
interference by radio frequency or
electronic devices nearby. Keep such
devices away from the Soundbar to avoid
radio interference. Example: microwave
ovens.
; Because the device to connect is far away
from the Soundbar, sound breaking may
occur. Move the device near the Soundbar.
; If a part of your body is in contact with the
Bluetooth transceiver or the product is
installed on metal furniture, sound
breaking may occur. Check the installation
environment and conditions for use.
; Check whether your wireless router is on.
; Turn off the router, turn it back on, and then
try again.
; When the signal of the wireless router is
too weak, connection may not be possible.
Move the router near the Soundbar or
adjust the installed position with no
obstacles.
; If your wireless router is new, you will need
to recongure the speaker’s network
settings.
In case Alexa does not respond
When the microphone is turned off or its
reception is poor
; When the Red LED lights on the Soundbar,
press the (Mic On/Off) button to enable
the microphone.
; Voice recognition may be unavailable due
to ambient noise. Reduce the noise and try
again.
When the network is disconnected
; When the Red LED blinks on the Soundbar,
the network may be disconnected.
Recongure the network. (See page 30)
WhenAlexaisnotconguredcorrectly
; Using the SmartThings app, recongure
Alexa. (See page 31)
; Check the Alexa suppor ted countries at the
Amazon website. The service is unavailable
in those countries.
In case the Soundbar is not turned on as soon
as the TV is turned on
ENG - 41
; When you turn off the Soundbar while
watching TV, power synchronization with
the TV is disabled. First turn off the TV.
Page 42
13 LICENCE
14 OPEN SOURCE
LICENCE NOTICE
Manufactured under license from Dolby
Laboratories. Dolby, Dolby Audio, Pro Logic, and
the double-D symbol are trademarks of Dolby
Laboratories.
For DTS patents, see http://patents.dts.com.
Manufactured under license from DTS
Licensing Limited. DTS, the Symbol, DTS in
combination with the Symbol, and DTS Digital
Surround are registered trademarks or
trademarks of DTS, Inc. in the United States
and/or other countries. © DTS, Inc. All Rights
Reserved.
The terms HDMI and HDMI High-Denition
Multimedia Interface, and the HDMI Logo are
trademarks or registered trademarks of HDMI
Licensing LLC in the United States and other
countries.
To send inquiries and requests for questions
regarding open sources, contact Samsung Open
Source (http://opensource.samsung.com)
15 IMPORTANT
NOTES ABOUT
SERVICE
• Figures and illustrations in this User Manual
are provided for reference only and may differ
from actual product appearance.
• An administration fee may be charged if
either
(a) an engineer is called out at your request
and there is no defect with the product (i.e.
where the user manual has not been read).
(b) you bring the unit to a repair centre and
there is no defect with the product (i.e.
where the user manual has not been read).
• You will be informed of the administration fee
amount before a technician visits.
• The Spotify Software is subject to third
party licences found here :
www.spotify.com/connect/third-partylicenses.
• For more information about Spotify
Connect, please visit www.spotify.com/
connect
ENG - 42
Page 43
16 SPECIFICATIONS AND GUIDE
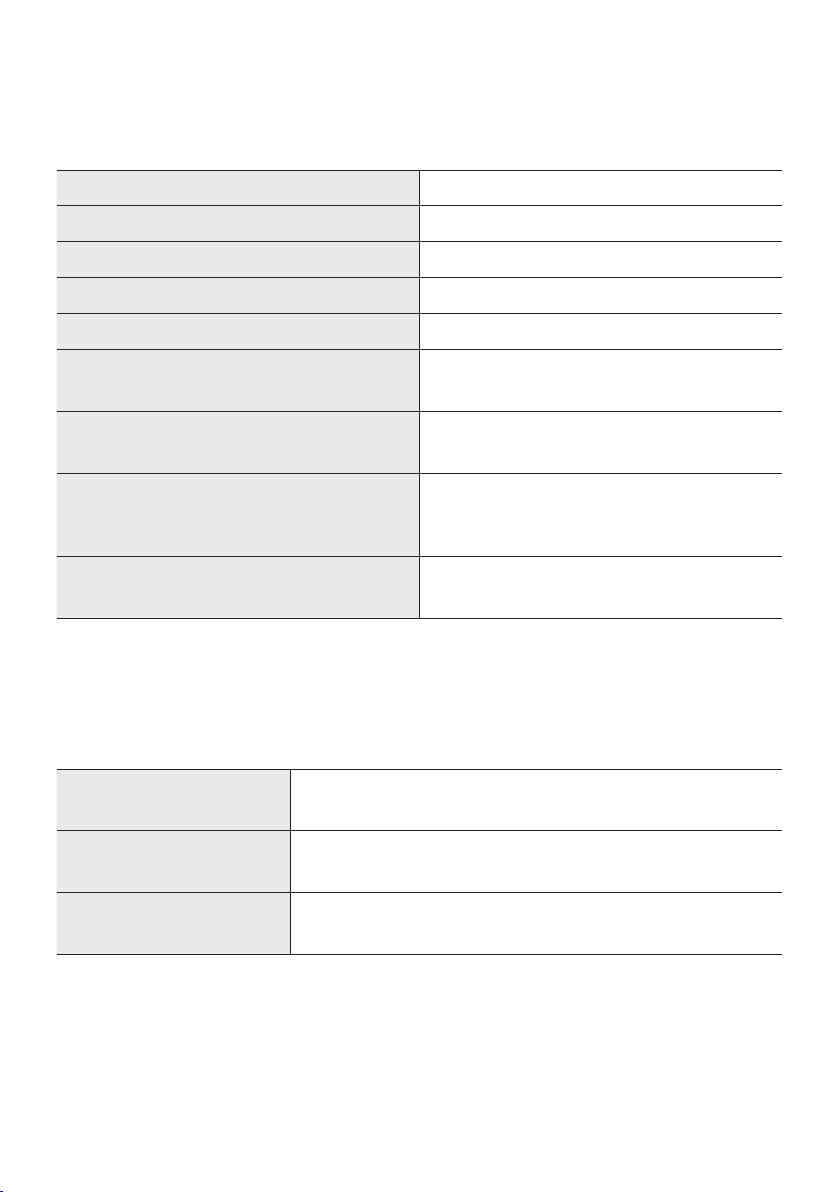
Specications
Model Name HW-S60T / S61T
Weight 2.9 kg
Dimensions (W x H x D) 764.0 x 68.0 x 125.0 mm
Operating Temperature Range +5°C to +35°C
Operating Humidity Range 10 % ~ 75 %
AMPLIFIER
Rated Output power (30W x 2) + (30W x 2) + (30W x 2)
Supported play formats
WIRELESS DEVICE OUTPUT POWER
Wi-Fi max transmitter power
WIRELESS DEVICE OUTPUT POWER
BT max transmitter power
NOTES
• Samsung Electronics Co., Ltd reserves the right to change the specications without notice.
• Weight and dimensions are approximate.
100mW at 2.4GHz – 2.4835GHz, 200mW at
LPCM 2ch, Dolby Audio™
(supporting Dolby® Digital), DTS
5.15GHz – 5.25GHz, 100mW at 5.25GHz –
5.35GHz & 5.47GHz – 5.725GHz
100mW at 2.4GHz – 2.4835GHz
Precaution : The Soundbar will restart automatically if you turn on/turn off Wi-Fi.
Overall Standby Power
Consumption (W)
Wi-Fi
Port deactivation method
Bluetooth
Port deactivation method
Press the ID SET button on the bottom panel of the Soundbar for
30 seconds to turn Wi-Fi On / Off.
Press the NETWORK button on the bottom panel of the Soundbar
for 30 seconds to turn Bluetooth On / Off.
5.2W
ENG - 43
Page 44

• Hereby, Samsung, declares that this equipment is in compliance with Directive
2014/53/EU.
The full text of the EU declaration of conformity is available at the following internet
address: http://www.samsung.com go to Support > Search Product Support and
enter the model name.
This equipment may be operated in all EU countries.
The 5GHz WLAN(Wi-Fi or SRD) function of this equipment may only be operated
indoors.
[Correct disposal of batteries in this product]
(Applicable in countries with s eparate collection systems)
This marking on the battery, manual or packaging indicates that the batteries in this product should not be
disposed of with other household waste at the end of their working life. Where marked, the chemical
symbols Hg, Cd or Pb indicate that the battery contains mercury, cadmium or lead above the reference
levels in EC Directive 2006/66.
If batteries are not properly disposed of, these substances can cause harm to human health or the
environment.
To protect natural resources and to promote material reuse, please separate bat teries from other types of
waste and recycle them through your local, free battery return system.
Correc t Disposal of This Produc t
(Waste Electrical & Electronic Equipment)
(Applicable in countries with s eparate collection systems)
This marking on the product, accessories or literature indicates that the product and its electronic
accessories (e.g. charger, headset, USB cable) should not be disposed of with other household waste at the
end of their working life. To prevent possible harm to the environment or human health from uncontrolled
waste disposal, please separate these items from other types of waste and recycle them responsibly to
promote the sustainable reuse of material resources.
Household users should contact either the retailer where they purchased this product, or their local
government ofce, for details of where and how they can take these items for environmentally safe
recycling.
Business users should contact their supplier and check the terms and conditions of the purchase contract.
This product and its electronic accessories should not be mixed with other commercial wastes for disposal.
For information on Samsung’s environmental commitments and product specic regulatory obligations
e.g. REACH, WEEE, Batteries, visit:
http://www.samsung.com/uk/aboutsamsung/samsungelectronics/corporatecitizenship/data_corner.html
COMMISSION REGULATION (EU) 2019/1782
Ecodesign requirements for external power supplies :
www.samsung.com/global/ecodesign_component
ENG - 44
Page 45

UNITED KINGDOM
EIRE
EIRE
EIRE
This Samsung product is warranted for the period of
twelve (12) months from the original date of purchase,
against defective materials and workmanship. In the
event that warranty service is required, you should return
the product to the retailer from whom it was purchased.
However, Samsung Authorised Dealers and Authorised
Service Centres in other EC Countries will comply with
the warranty on the terms issued to purchasers in the
country concerned. In case of difculty, details of our
Authorised Service Centres are available from:
Samsung Electronics U.K. Ltd
Samsung Customer Support Centre
Selectapost38,Shefeld,S973FJ
United Kingdom
United Kingdom
Tel : 0333 000 0333
www.samsung.com/uk/support
EIRE
Tel : 0818 717100
www.samsung.com/ie/support
@ WARRANTY CONDITIONS
1. The warranty is only valid if, when warranty
service is required, the warranty card is fully
and properly completed and is presented with
the original invoice or sales slip or conrmation,
and the serial number on the product has not
been defaced.
2. Samsung’s obligations are limited to the repair
or, at its discretion, replacement of the product
or the defective part.
3. Warranty repairs must be carried out by
Authorised Samsung Dealers or Authorised
Service Centres. No re-imbursement will be
made for repairs carried out by non Samsung
Dealers and, any such repair work and damage
to the products caused by such repair work will
not be covered by this warranty.
4. This product is not considered to be defective
in materials nor workmanship by reason that it
requires adaptation in order to conform to
national or local technical or safety standards
in force in any Countr y other than the one for
which the product was originally designed and
anufactured.
re-imbursement will be made for such adaptation
nor any damage which may result
5. This warranty covers none of the following:
a)
Periodic check ups, maintenance and repair or
replacement of parts due to normal wear and
tear.
b) Cost relating to transport, removal or
installation of the product.
c) Misuse, including the failure to use this
product for its normal purposes or incorrect
installation.
d) Damage caused by Lightning, Water, Fire,
Acts of God, War, Public Disturbances,
incorrect mains voltage, improper
ventilation or any other cause beyond the
control of Samsung.
6. This warranty is valid for any person who
legally acquired possession of the product
during the warranty period.
7. The consumers statutory rights in any
applicable national legislation whether against
the retailer arising from the purchase contract
or otherwise are not affected by this warranty.
Unless there is national legislation to the
contrary, the rights under this warranty are the
consumers sole rights and Samsung, its
subsidiaries and distributors shall not be liable
for indirect or consequential loss or any
damage to records, compact discs, videos or
audio taper or any other related equipment or
material.
This warranty will not cover, and no
.
SAMSUNG ELECTRONICS (U.K.) LTD.
Page 46
© 2020 Sams ung Electron ics Co., Ltd. All ri ghts reser ved.
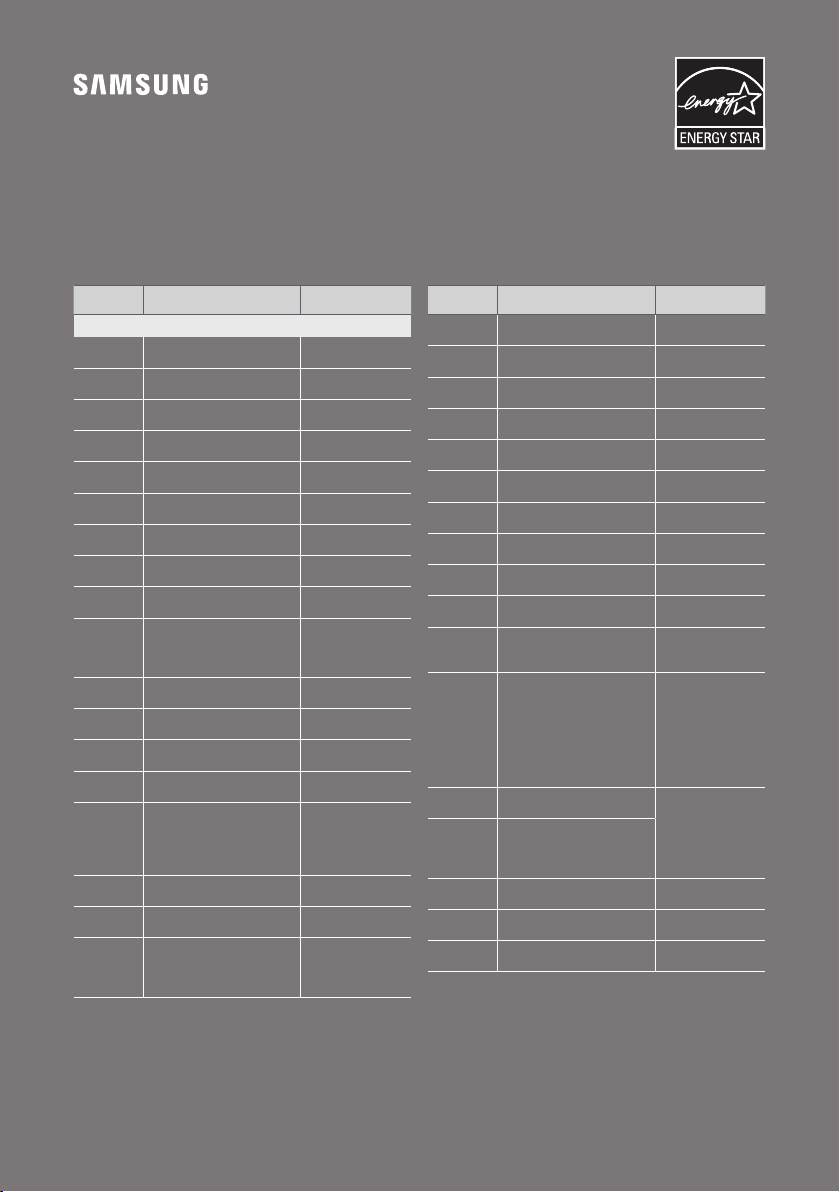
Contact SAMSUNG WORLD WIDE
If you have a ny questions or c omments relating to Sa msung products, ple ase contact t he SAMSUNG customer
care Centre.
Area Contact Centre
`
Europe
UK 0333 000 0333
IRELAND (EIRE) 0818 71710 0
GERMANY 06196 7 7 555 77
FRANCE 0 1 48 63 00 00
ITALIA 800-SAMSUNG (800.7267864)
SPAIN 91 175 00 1 5
PORTUGAL 808 207 267
LUXEMBURG 261 03 7 10
NETHERLANDS 08 8 90 90 100
BELGIUM 0 2-201-24-18
NO RWAY 21629099
DENMARK 707 019 70
FINLAND 030 -6227 5 15
SWEDEN 07 71 726 78 6
801-17 2-678* lub +4 8 22 607-93-3 3*
POLAND
HUNGARY 0680SAMSUNG (0680-726-7864)
AUSTRI A 0 800 72 67 86 4 (0800-S AMSUNG)
SWITZERLAND 0800 72 6 786
Specj alistycz na infol inia do obsługi
zapy tań dotycz ących telefon ów
komórkow ych: 801-672-678*
* (opłat a wedłu g tar yfy operatora)
Web Site
www.samsung .com/uk/
support
www.samsung.com/ie/
support
www.samsung.com/de/
support
www.samsung.com/fr/
support
www.samsung.com/it/
support
www.samsung.com/es/
support
www.samsung.com/pt/
support
www.samsung.com/be_
fr/support
www.samsung.com/nl/
support
www.samsung.com/be/
suppor t (Dutch)
www.samsung.com/
be_fr/support (French)
www.samsung.com/no/
support
www.samsung .com/dk/
support
www.samsung.com/fi /
support
www.samsung.com/se/
support
http://www.samsung.com/
pl/support/
www.samsung.com/hu/
support
www.samsung.com/at/
support
www.samsung.com/ch/
suppo rt (Germa n)
www.samsung.com/
ch_fr/support (French)
Area Contact Centre
CZECH 800 - S AMSUNG (800 -726786)
SLOVA KIA 0800 - S AMSUNG (08 00-726 78 6)
CROATIA 07 2 726 786
BOSNIA 055 233 9 99
NORTH
MACEDONIA
MONTENEGRO 020 405 888
SLOVENIA 08 0 697 267 (brezplačn a štev ilka)
SERBIA 011 321 6 899
KOSOVO 0 800 10 10 1
ALBANIA 045 620 20 2
BULGARIA
ROMANIA
CYPRUS
GREECE
LITHUANIA 8-800-77777
LAT VIA 8000-7267
ESTONIA 800 -7267
023 207 7 77
*3000 Цен а на един гр адски раз говор
0800 111 31 Бе зплатен за всички
оператори
*8000 ( apel in retea)
08008-726-78-64 (08008-SAMSUNG)
Apel GRATUIT
Atenţi e: Dacă ef ectuaţi ape lul din
reţea ua Digi (RC S/RDS), vă rugăm să
ne conta ctaţi formâ nd număr ul
Telverde făr ă ultimel e două cifre,
astfel: 0800872678.
8009 4 000 only from l andline, tol l
free
80111- SAMSUNG (80 111 726 786 4) only
from land line
(+30) 210 689 7691 from mob ile and
land lin e
Web Site
www.samsung.com/cz/
support
www.samsung.com/sk/
support
www.samsung.com/hr/
support
www.samsung.com/
support
www.samsung.com/mk/
support
www.samsung.com/
support
www.samsung.com/si/
support
www.samsung.com/rs/
support
www.samsung.com/
support
www.samsung.com/al/
support
www.samsung.com/bg/
support
www.samsung.com/ro/
support
www.samsung .com/gr/
support
www.samsung.com/lt/
support
www.samsung.com/lv/
support
www.samsung.com/ee/
support
 Loading...