

Page 1
FULL MANUAL
HW-S40T / S41T
Imagine the possibilities
Thank you fo r purchasing this Samsung product.
To receive more complete s ervice, please register
your product at www.samsung.com/register
Page 2
SAFETY INFORMATION
SAFETY WARNINGS
TO REDUCE THE RISK OF ELECTRIC SHOCK, DO
NOT REMOVE THE COVER (OR BACK).
NO USER-SERVICEABLE PARTS ARE INSIDE.
REFER SERVICING TO QUALIFIED SERVICE
PERSONNEL.
Refer to the table below for an explanation of
symbols which may be on your Samsung product.
CAUTION
RISK OF E LECTRIC S HOCK.
DO NOT OP EN.
This symbol indicates that high voltage
is present inside. It is dangerous to
make any kind of contact with any
internal part of this product.
This symbol indicates that this product
has included important literature
concerning operation and maintenance.
Class II product : This symbol indicates
that it does not require a safety
connection to electrical ear th (ground).
If this symbol is not present on a
product with a power cord, the produc t
MUST have a reliable connection to
protective ear th (ground).
WARNING
• To reduce the risk of re or electric shock, do
not expose this appliance to rain or moisture.
CAUTION
• TO PREVENT ELECTRIC SHOCK, MATCH WIDE
BLADE OF PLUG TO WIDE SLOT, FULLY INSERT.
• This apparatus shall always be connected to a
AC outlet with a protective grounding
connection.
• To disconnect the apparatus from the mains,
the plug must be pulled out from the mains
socket, therefore the mains plug shall be
readily operable.
• Do not expose this apparatus to dripping or
splashing. Do not put objects lled with
liquids, such as vases on the apparatus.
• To turn this apparatus off completely, you
must pull the power plug out of the wall
socket. Consequently, the power plug must
be easily and readily accessible at all times.
AC voltage : This symbol indicates that
the rated voltage marked with the
symbol is AC voltage.
DC voltage : This symbol indicates that
the rated voltage marked with the
symbol is DC voltage.
Caution, Consult instructions for use :
This symbol instruct s the user to
consult the user manual for further
safety related information.
ENG - 2
Page 3

PRECAUTIONS
1. Ensure that the AC power supply in your
house complies with the power
requirements listed on the identication
sticker located on the bottom of your
product. Install your product horizontally, on
a suitable base (furniture), with enough
space around it for ventilation (7~10 cm).
Make sure the ventilation slots are not
covered. Do not place the unit on ampliers
or other equipment which may become hot.
This unit is designed for continuous use. To
fully turn off the unit, disconnect the AC plug
from the wall outlet. Unplug the unit if you
intend to leave it unused for a long period of
time.
2. During thunderstorms, disconnect the AC
plug from the wall outlet. Voltage peaks due
to lightning could damage the unit.
3. Do not expose the unit to direct sunlight or
other heat sources. This could lead to
overheating and cause the unit to
malfunction.
4. Protect the product from moisture (i.e.
vases), and excess heat (e.g. a replace) or
equipment creating strong magnetic or
electric elds. Unplug the power cable from
the AC wall socket if the unit malfunctions.
Your product is not intended for industrial
use. It is for personal use only. Condensation
may occur if your product has been stored in
cold temperatures. If transporting the unit
during the winter, wait approximately
2 hours until the unit has reached room
temperature before using.
5. The battery used with this product contains
chemicals that are harmful to the
environment. Do not dispose of the battery
in the general household trash. Do not
expose the battery to excess heat, direct
sunlight, or re. Do not short circuit,
disassemble, or overheat the battery.
Danger of explosion if the battery is replaced
incorrectly. Replace only with the same or
equivalent type.
ENG - 3
Page 4

Fabric cleaning
Remove any dirt or stain on the product surface
immediately.
Removing and cleaning can be less effective for
some substances or if left for a prolonged time.
CAUTION
• Use a vacuum cleaner or an adhesive lint
roller to remove dust, handprints, and the
likes.
– Some cleaning brushes may damage the
product, depending on the materials they
contain.
– Towels and cleaning clothes may leave
lint or dirt on the product.
• Do not use a nail or other tools to scratch the
dirt off. It may damage the fabric.
• To remove oil or liquid stains, use a clean
white cloth moist with water. If the stain
persists, wipe it with a mixture of water and
neutral detergent (such as dishwashing
soaps) and a cloth.
– A non-neutral detergent or cleaner may
cause discolouration or fabric damage.
– After cleaning, use a dry cloth or
hairdryer to dry the area.
– Do not use excessive force to avoid
discolouration or fabric damage.
ENG - 4
Page 5

CONTENTS
01 Checking the Components 7
Inserting Batteries before using the Remote Control (AA batteries X 2) ------------------------- 7
02 Product Overview 8
Top Panel of the Soundbar ------------------------- 8
Bottom Panel of the Soundbar ------------------------- 9
03 Using the Remote Control 10
How to Use the Remote Control
Adjusting the Soundbar volume with a TV remote control ------------------------- 13
-------------------------
04 Connecting the Soundbar 14
Connecting Electrical Power
-------------------------
05 Using a wired connection to the TV 15
Connecting using an Optical Cable
-------------------------
06 Using a wireless connection to the TV 16
Connecting via Bluetooth
-------------------------
07 Connecting an External Device 18
Connecting using an Optical Cable
-------------------------
10
14
15
16
18
ENG - 5
Page 6

08 Connecting a Mobile Device 19
Connecting via Bluetooth
Using the Tap Sound
-------------------------
-------------------------
09 Installing on a wall 24
10 Installing the Soundbar in front of TV 24
11 Software Update 25
Initialization
-------------------------
12 Troubleshooting 27
13 Licence 28
14 Open Source Licence Notice 29
15 Important Notes About Service 29
16 SpecicationsandGuide 30
Specications
-------------------------
30
19
23
26
ENG - 6
Page 7
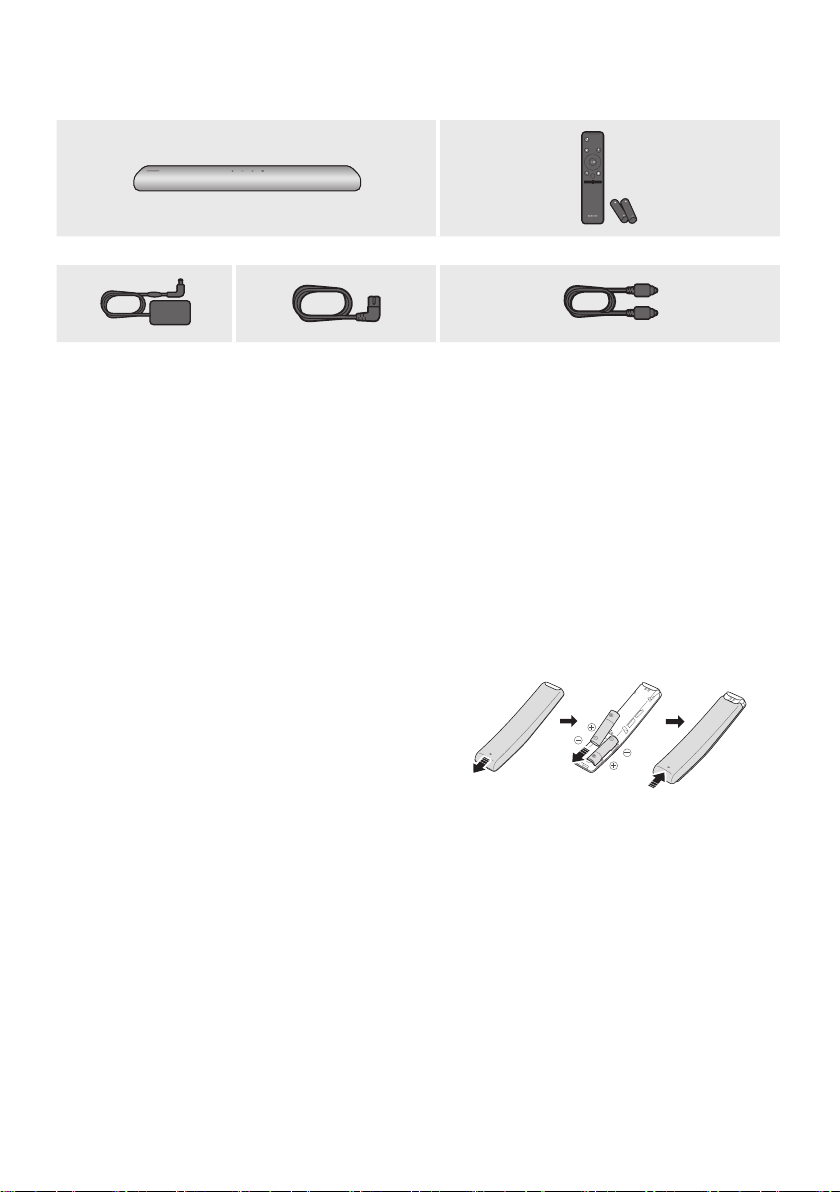
01 CHECKING THE COMPONENTS
Soundbar Main Unit Soundbar Remote Control / Bat teries
PAIR
SOUND
MODE
VOL WOOFER
SOUNDBAR
AC/DC Adapter
(Soundbar)
Power Cord
(Soundbar)
Optic al Cable
• For more information about the power supply and power consumption, refer to the label attached
to the product. (Label: Bottom of the Soundbar Main Unit)
• To purchase additional components or optional cables, contact a Samsung Service Centre or
Samsung Customer Care.
• There are two wall mount holes (M4 size) at the bottom of the Soundbar. Individually purchase a
compatible bracket and mount the Soundbar on a wall to suit your preferences.
• Design, specications are subject to change without prior notice.
• The appearance of the accessories may differ slightly from the illustrations above.
Inserting Batteries before using the Remote Control (AA batteries X 2)
Slide the back cover in the direction of the arrow
until it is completely removed. Insert 2 AA batteries
(1.5V) oriented so that their polarity is correct. Slide
the back cover back into position.
ENG - 7
Page 8
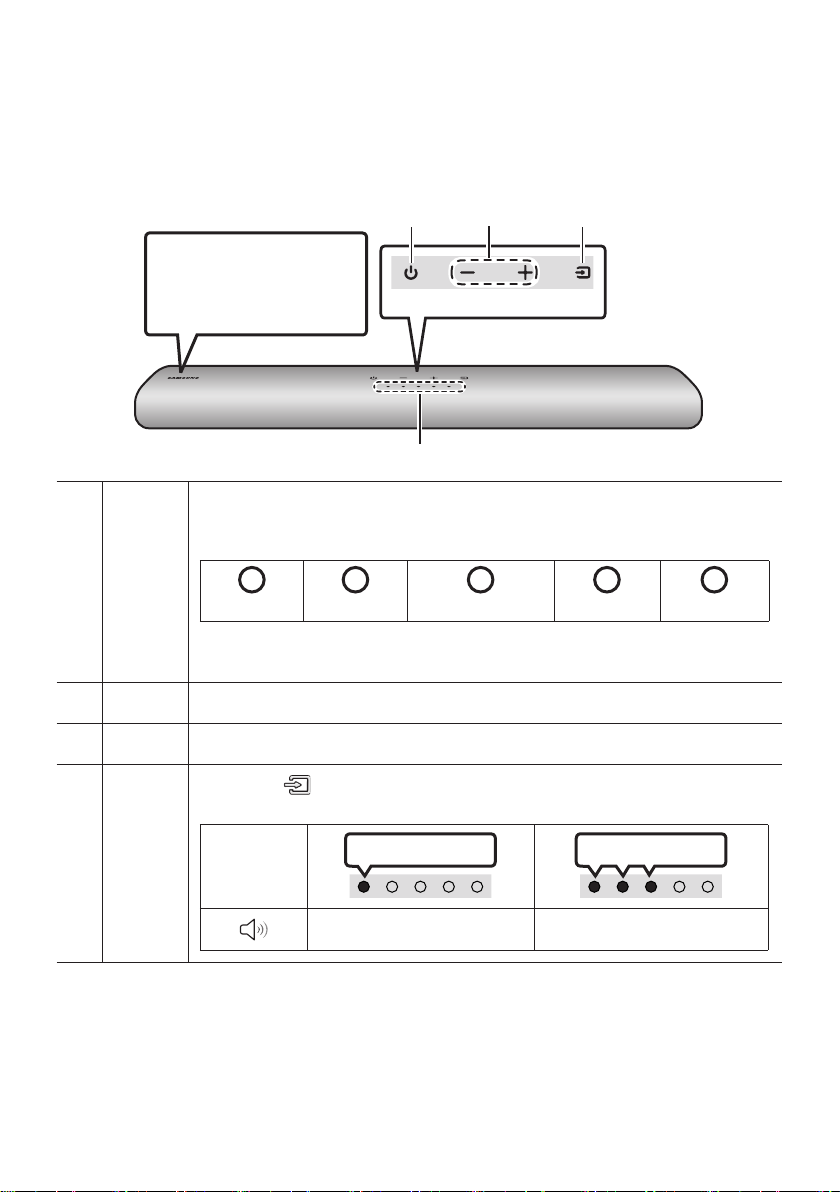
02 PRODUCT OVERVIEW
Top Panel of the Soundbar
Position the product so that
the SAMSUNG logo is
located on the top.
The LED Indicator ashes, glows, or changes colour depending on the Soundbar's current
mode or status. The colour of the LED indicator and the number of lights indicate the active
mode as described below.
LED
indicator
W
White LED
• The Multicolour LED changes to White, Cyan, Green, Red, Yellow, Orange, Purple and
Blue depending on the mode or status.
W
White LED
Multicolour LED
Top P ane l
M
W
White LED
W
White LED
Power Turns the power on and off.
Volume Adjusts the volume.
• Press the (Source) button to change the mode. Each time you change the mode,
the LED lights in white and then turns off.
Source
• When you plug in the AC cord, the power button will begin working in 4 to 6 seconds.
• When you turn on this unit, there will be a 4 to 5 second delay before it produces sound.
• If you hear sounds from both the TV and Soundbar, go to the Settings menu for the TV audio and
change the TV speaker to External Speaker.
LED Indicator
White On -> O ff White On -> O ff
“Digital Audio In” “Bluetooth”
ENG - 8
Page 9

Bottom Panel of the Soundbar
SERVICE
(OPTICAL)
SERVICE
DC 24V
DIGITAL AUDIO IN
(OPTICAL)
SERVICE
DIGITAL AUDIO IN
(OPTICAL)
SERVICE
DIGITAL AUDIO IN
(OPTICAL)
DIGITAL AUDIO IN
(OPTICAL)
DC 24V
DIGITAL AUDIO IN
(OPTICAL)
SERVICE
DC 24V
DC 24V (P ower Supply In)
Connect the AC/DC power adapter.
DIGITAL AUD IO IN (OPTIC AL)
Connect to the digital (optical) output of an ex ternal device.
SERVICE
Connect a USB storage device to upgrade the product's software.
• When disconnecting the power cable of the AC/DC power adaptor from a wall outlet, pull the plug.
Do not pull the cable.
• Do not connect this unit or other components to an AC outlet until all connections between
components are complete.
SERVICE
ENG - 9
Page 10
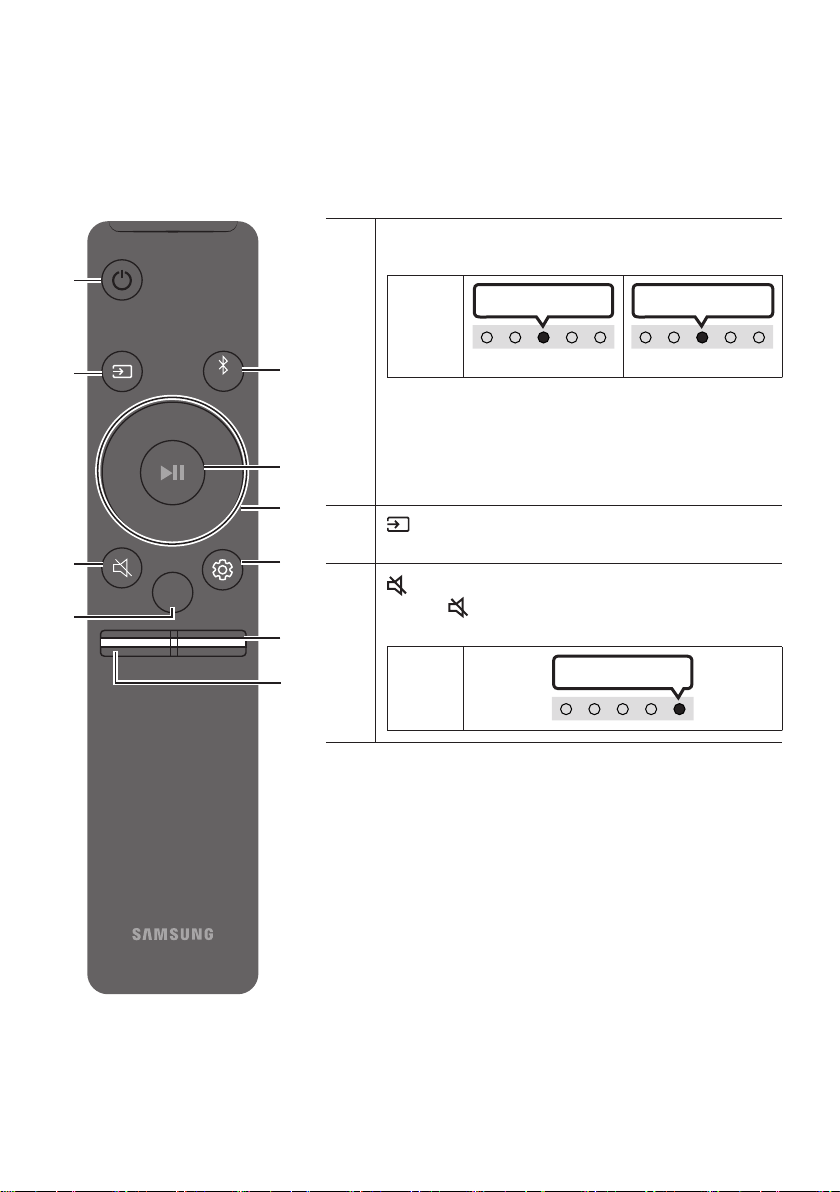
03 USING THE REMOTE CONTROL
How to Use the Remote Control
Power
Turns the Soundbar on and off.
PAIR
SOUND
MODE
VOL WOOFER
SOUNDBAR
LED
Indicator
• Auto Power Down Function
The unit turns off automatically in the following
situations:
– In “Digital Audio In” / “Bluetooth” mode if there is no
audio signal for 20 minutes.
(Source)
Press to select a source connected to the Soundbar.
(Mute)
Press the (Mute) button to mute the sound.
Press it again to unmute the sound.
LED
Indicator
Cyan Blink s X1
On
Blinks X R epeatly
Red Blink s X3
Off
ENG - 10
Page 11
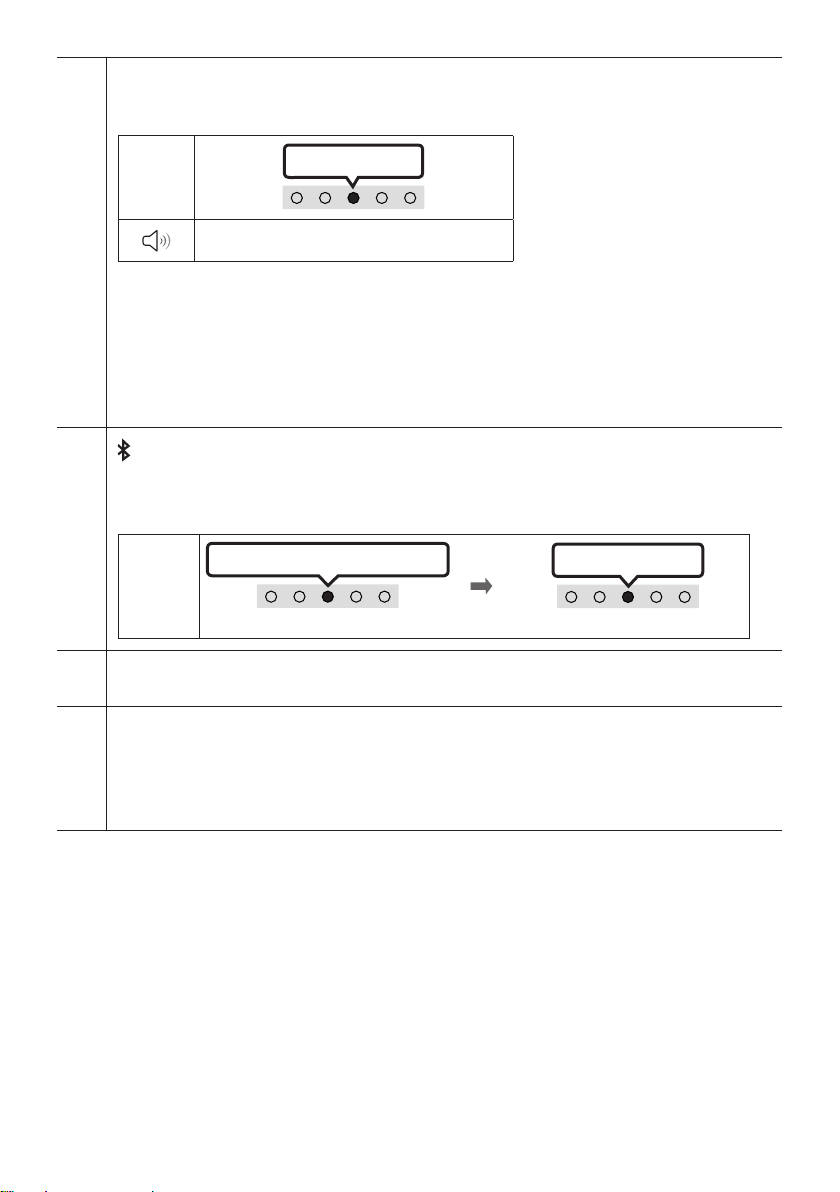
SOUND MODE
By pressing the button, you can select the desired audio mode. Each time the mode changes, the
Multicolour LED blinks in white.
LED
Indicator
• Standard
Outputs the original sound.
• Smart
Analyzes the content in real time and automatically provides the optimal sound eld based on the
characteristics of the content.
• Music
Provides more natural and room lling sound for music content.
Bluetooth PAIR
Switch the Soundbar to Bluetooth pairing mode.
When you press the button, the LED display changes as shown below.
• Until pairing is complete, the Multicolour LED changes as Red → Green → Blue in turn.
LED
Indicator
p (Play / Pause)
You can also play or pause music by pressing the button.
Up/Down/Left/Right
Press Up/Down/Left/Right on the button to select or set functions.
• Music Skip
Press the Right button to select the next music le. Press the Left button to select the previous
music le.
Red → Green → Blue Blinks
White Bli nks X1
“Standard” “Smart” “Music”
Pairing
Cyan Blinks X 3
Connection is complete
ENG - 11
Page 12
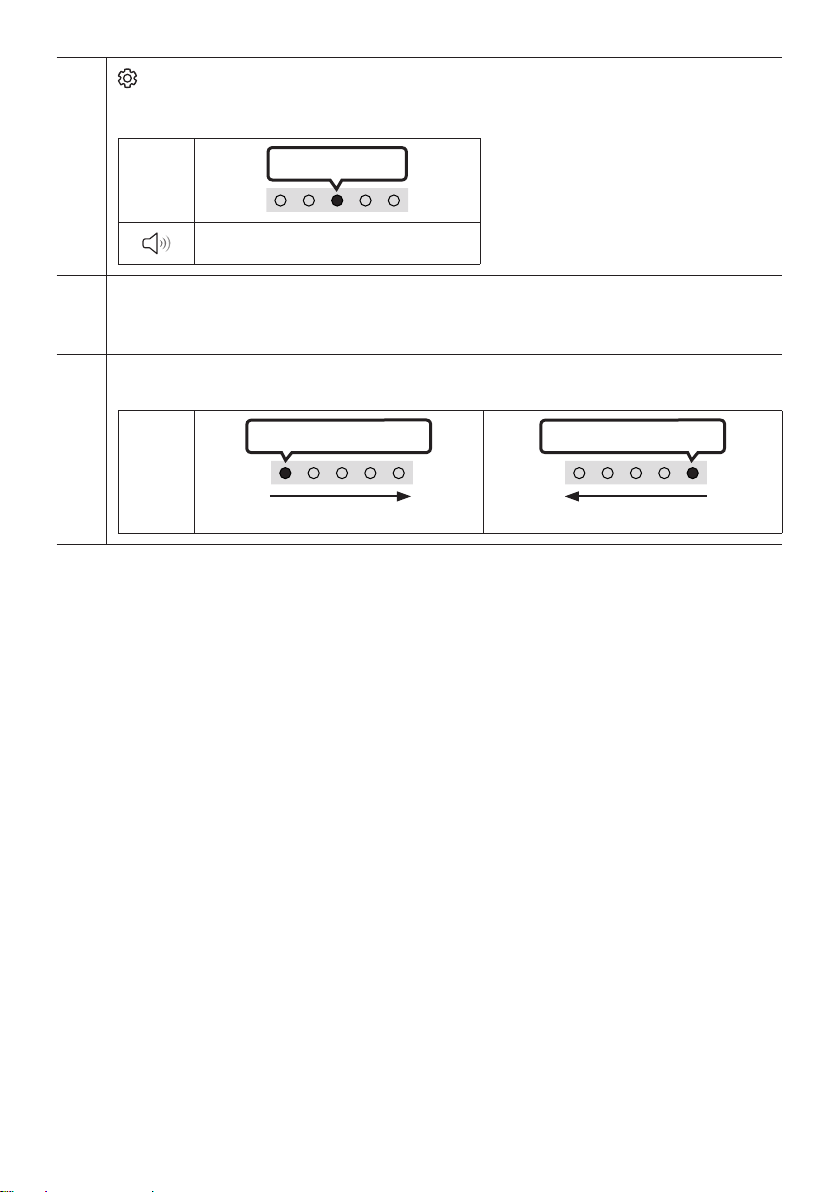
(Sound Control)
By pressing the button, you can select the desired audio mode. The desired item can be adjusted using
the Up/Down buttons. Each time the mode changes, the Multicolour LED blinks in white.
LED
Indicator
WOOFER ( BASS) LEVE L
Push the button up or down to adjust the woofer (bass) between -6 to +6. To set the woofer (bass)
volume level to 0 (Default), press the button.
VOLUME
Push the button up or down to adjust the volume.
LED
Indicator
White Bli nks X1
“Tre ble” “Bass” “Sync”
White move s to right X1
Volume Up
White move s to left X1
Volume Down
ENG - 12
Page 13
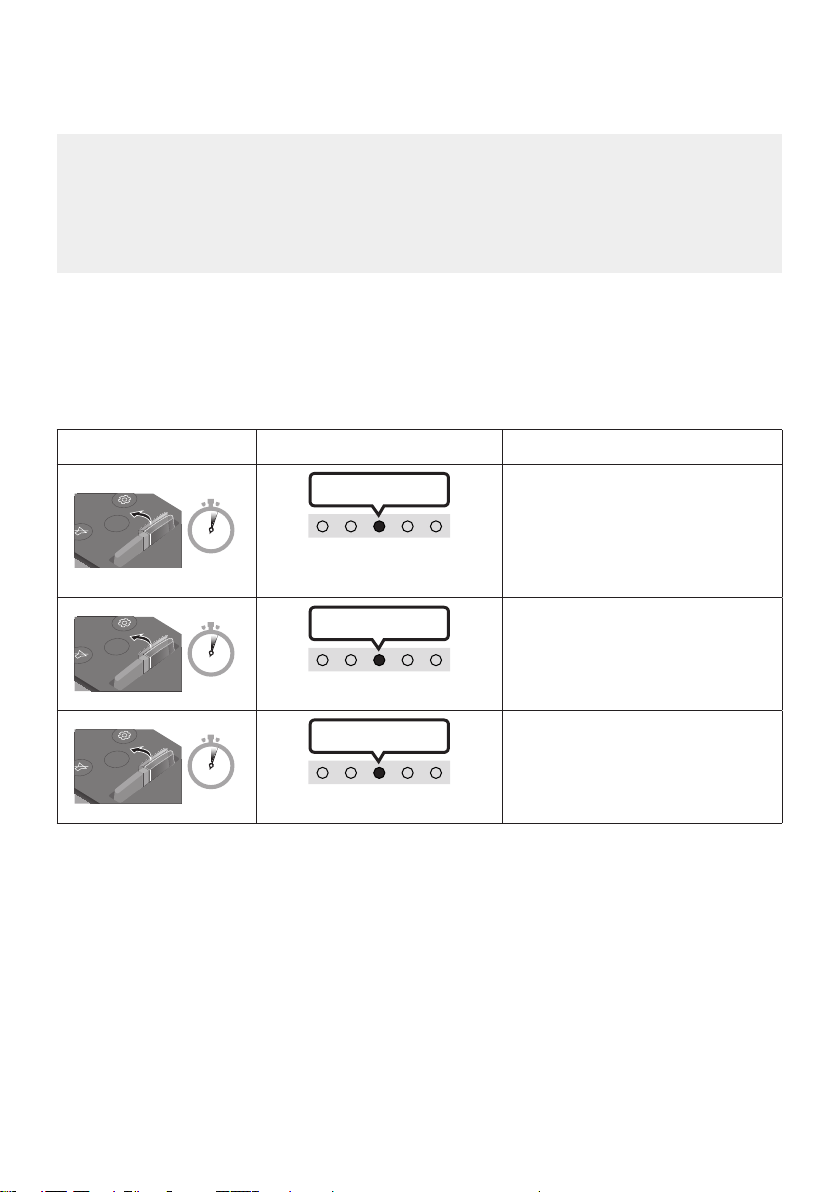
Adjusting the Soundbar volume with a TV remote control
VOL
WOOFER
WOOFER
VOL
WOOFER
Adjust the Soundbar volume using the TV’s remote control.
• This function can be used with IR remote controls only. Bluetooth remote controls (remote
controls that require pairing) are not supported.
• Set the TV speaker to External Speaker to use this function.
• Manufacturers supporting this function:
VIZIO, LG, Sony, Sharp, PHILIPS, PANASONIC, TOSHIBA, Hisense, RCA
1. Turn Off the Soundbar.
2. Push up and hold the WOOFER button for 5 seconds.
Each time you push the WOOFER button up and hold it for 5 seconds, the mode switches in the
following order: “Samsung-TV Remote” (Default mode), “Off-TV Remote”, “All-TV Remote”.
The LED indicator status changes each time the mode is changed, as shown below.
Remote Control Button LED Indicator Status
Blue Blink s X1
SOUND
MODE
5 Sec
"Samsung-TV Remote"
(Default mode)
Red Blink s X1
SOUND
MODE
5 Sec
VOL
"Off-TV Remote"
Enable a Samsung TV’s IR remote
control.
Disable the TV remote control.
Green B links X1
SOUND
MODE
5 Sec
Enable a third-party TV’s IR remote
control.
"All-TV Remote"
ENG - 13
Page 14
04 CONNECTING THE SOUNDBAR
SERVICE
DIGITAL AUDIO IN
SERVICE
DC 24V
DIGITAL AUDIO IN
(OPTICAL)
SERVICE
DIGITAL AUDIO IN
(OPTICAL)
SERVICE
DIGITAL AUDIO IN
(OPTICAL)
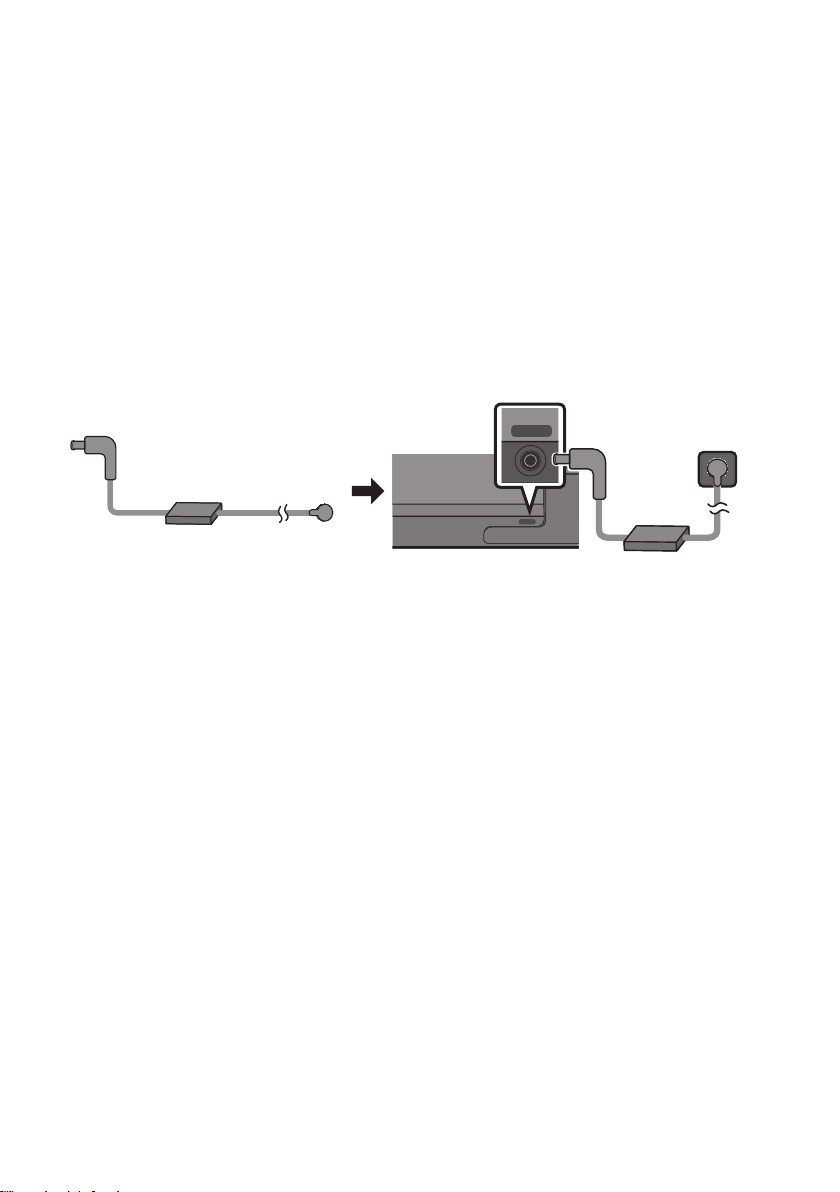
Connecting Electrical Power
Use the power components to connect the Soundbar to an electrical outlet in the following order:
• For more information about the required electrical power and power consumption, refer to the
label attached to the product. (Label: Bottom of the Soundbar Main Unit)
1. First connect the power cable to the AC/DC adapter.
Connect the AC/DC adapter (with the power cable) to the Soundbar.
2. Connect the power cord to a wall socket.
DC 24V
AC/DC Adapter
(OPTICAL)
DC 24V
Power Cord
Bott om of the Soundba r Main Unit
NOTES
• If you unplug and reconnect the power cord when the product is turned on, the Soundbar turns on
automatically.
• Make sure to rest the AC/DC Adapter at on a table or the oor. If you place the AC/DC Adapter so
that it is hanging with the AC cord input facing upwards, water or other foreign substances could
enter the Adapter and cause the Adapter to malfunction.
ENG - 14
Page 15
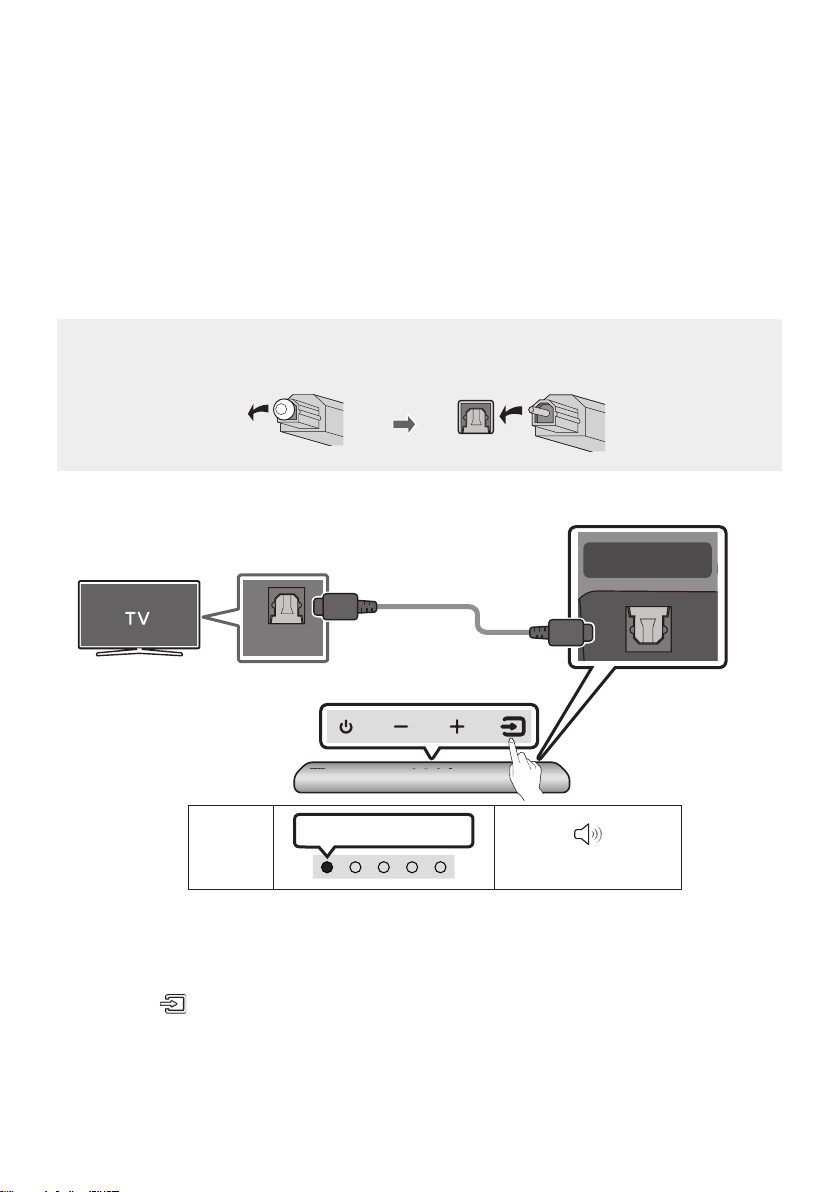
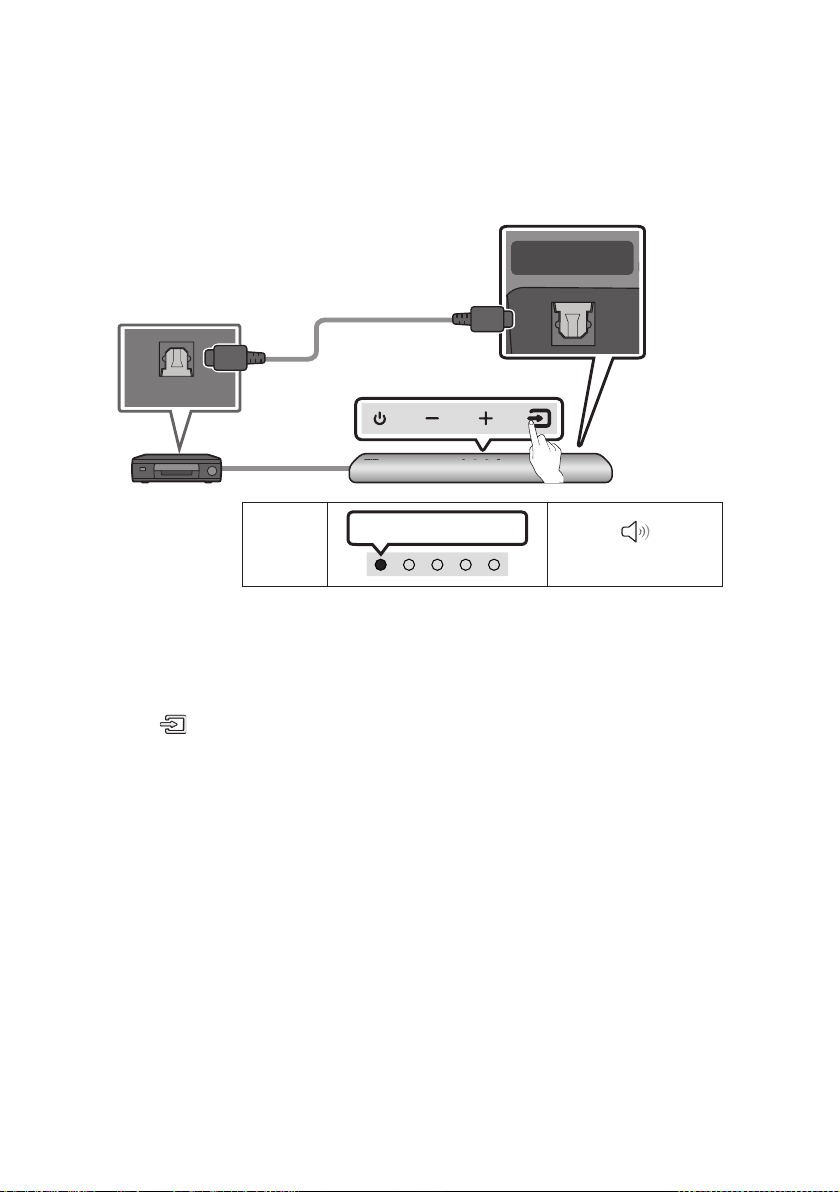
05 USING A WIRED CONNECTION TO THE TV
SERVICE
DIGITAL AUDIO IN
Connecting using an Optical Cable
When the audio in a broadcast is encoded in Dolby Digital and the “Digital Output Audio Format ” on
your TV is set to PCM, we recommend that you change the setting to Dolby Digital. When the setting on
the TV is changed, you will experience better sound quality. (The TV menu may use different words for
Dolby Digital and PCM depending on the TV manufacturer.)
Pre-connection Checklist
• When you use an optical cable and the terminals have covers, be sure to remove the covers.
Bott om of the Soundba r
1. With the TV and Soundbar turned off, connect the DIGITAL AUDIO IN (OPTICAL) port on the
Soundbar and the OPTICAL output port on the TV with the optical cable, as shown in the gure.
2. Turn on the Soundbar and TV.
3. Press the (Source) button on the top panel or remote control, and then select the “Digital
Audio In” mode.
4. The TV sound is output from the Soundbar.
LED
Indicator
OPTICAL OUT
Optic al Cable
Top of the Soun dbar
White On -> O ff
ENG - 15
(OPTICAL)
“Digital Audio In”
Page 16
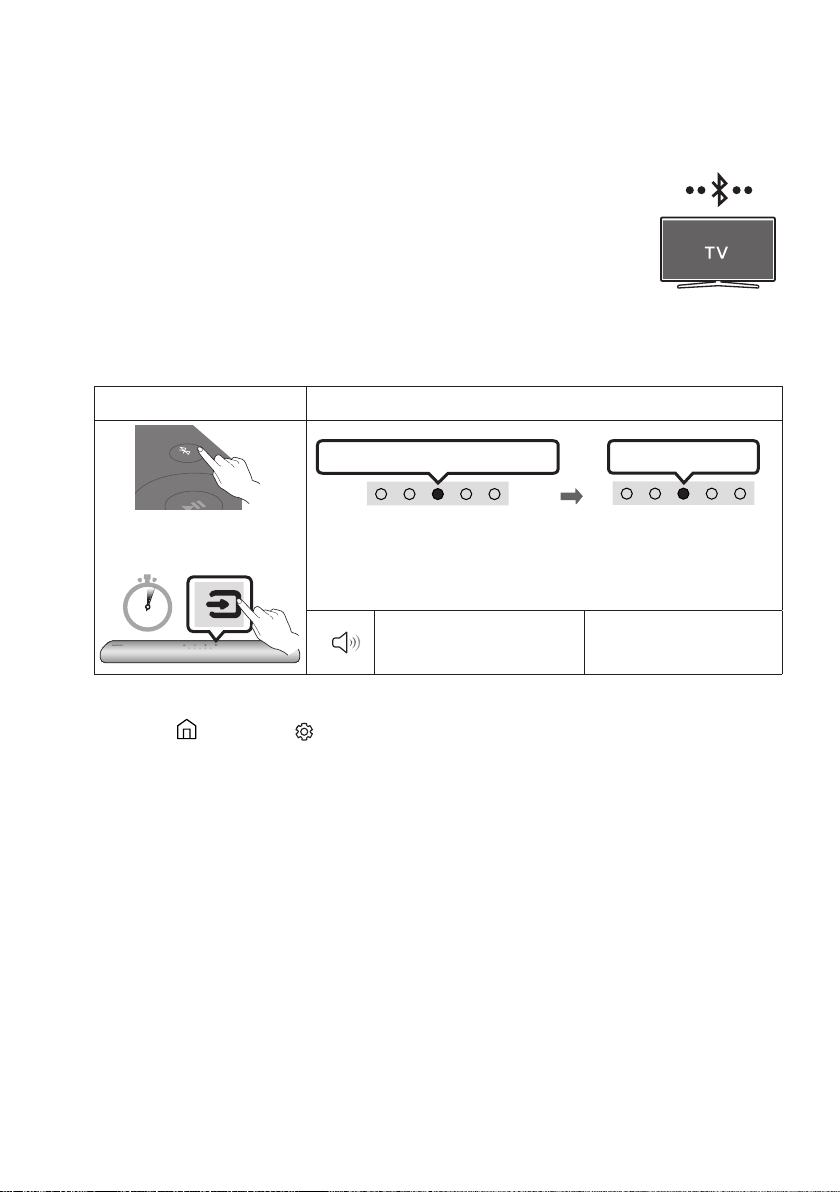
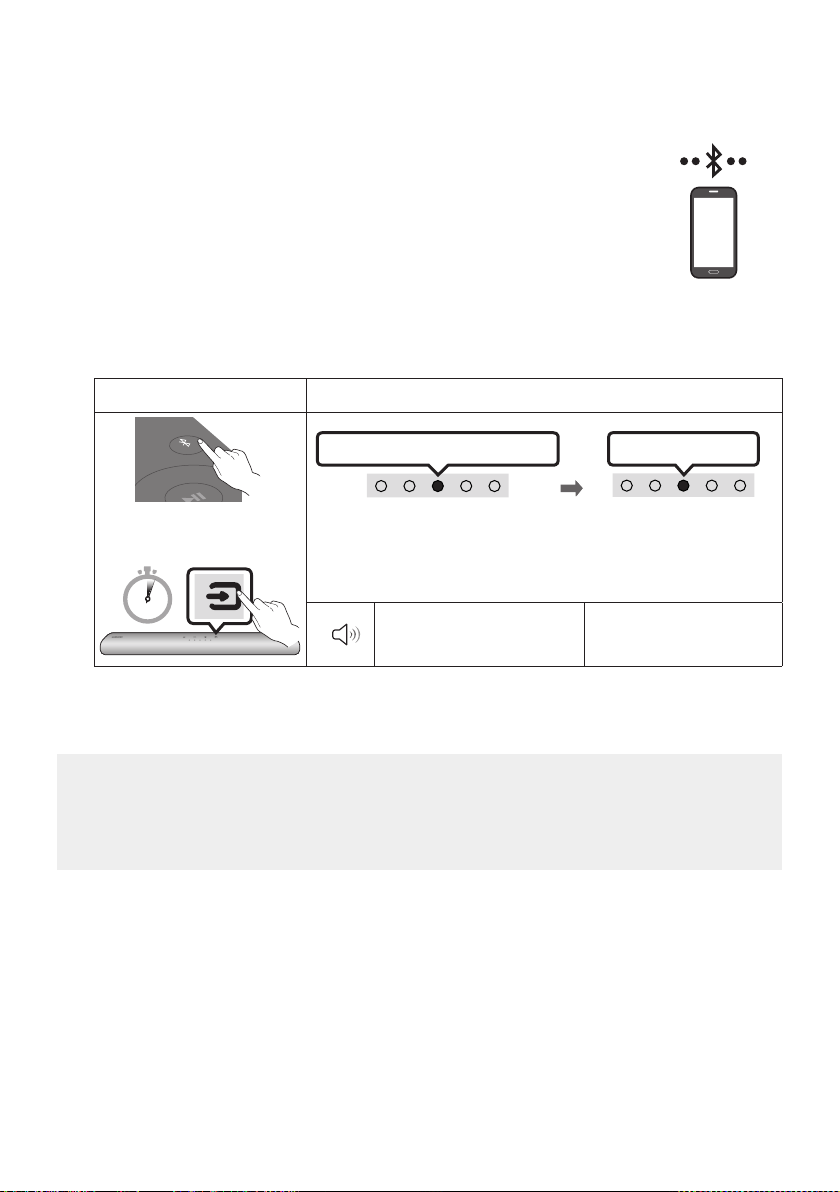
06 USING A WIRELESS CONNECTION TO THE TV
Connecting via Bluetooth
When a Samsung TV is connected using Bluetooth, you can hear stereo sound
without the hassle of cables.
• Only one Samsung TV can be connected at a time.
• Samsung TV that supports Bluetooth can be connected.
Check the specications of your TV.
The initial connection
1.
Bluetooth Pairing button LED Indicator
PAIR
OR
When in “Bluetooth” mode
5 Sec
Red → Green → Blue Blinks
Pairing
• Until pairing is complete, the Multicolor LED changes as Red → Green
→ Blue in turn.
“Ready to c onnect via
Bluetooth.”
Cyan Blinks X 3
Connection is complete
“Ding” Short Sound.
2. Select Bluetooth mode on the Samsung TV.
(e.g. Home ( ) Settings ( ) Sound Sound Output Bluetooth Speaker List
[AV] Samsung Soundbar S4T-Series (Bluetooth))
3. Select “[AV] Samsung Soundbar S4T-Series” from the list on TV’s screen.
An available Soundbar is indicated with “Need Pairing” or “Paired” on the TV’s Bluetooth device
list. To connect the Samsung TV to the Soundbar, select the message, and then establish a
connection.
4. You can now hear Samsung TV sound from the Soundbar.
• If there is a connection log between the Soundbar and Samsung TV, the Soundbar is
automatically connected by changing its mode to “Bluetooth”.
ENG - 16
Page 17
If the device fails to connect
• If you have an existing Soundbar (e.g., [AV] Samsung Soundbar S4T-Series) on the list of
speakers on the Samsung TV, delete it.
• Then repeat steps 1 through 3.
Disconnecting the Soundbar from the Samsung TV
Press the (Source)
“Bluetooth”.
• Disconnecting takes time because the Samsung TV must receive a response from the Soundbar.
(The time required may differ, depending on the Samsung TV model.)
button on the top panel or on the remote control to select the mode other than
Notes on Bluetooth connection
• Locate a new device within 1 m to connect via Bluetooth communication.
• If asked for a PIN code when connecting a Bluetooth device, enter <0000>.
• The Soundbar automatically turns off after 20 minutes in the Ready state.
• The Soundbar may not perform Bluetooth search or connection correctly under the following
circumstances:
– If there is a strong electrical eld around the Soundbar.
– If several Bluetooth devices are simultaneously paired with the Soundbar.
– If the Bluetooth device is turned off, not in place, or malfunctions.
• Electronic devices may cause radio interference. Devices that generate electromagnetic waves
must be kept away from the Soundbar main unit - e.g., microwaves, wireless LAN devices, etc.
ENG - 17
Page 18
07 CONNECTING AN EXTERNAL DEVICE
SERVICE
DIGITAL AUDIO IN
Connecting using an Optical Cable
Bott om of the Soundba r
BD / DVD playe r / Set-top
box / Game con sole
OPTICAL OUT
LED
Indicator
1. With the external device and Soundbar turned off, connect the DIGITAL AUDIO IN (OPTICAL) port
on the Soundbar and the OPTICAL output port on the external device with the optical cable, as
shown in the gure.
2. Turn on the Soundbar and external device.
3. Press the (Source) button on the top panel or remote control, and then select the “Digital
Audio In” mode.
4. The external device sound is output from the Soundbar.
Optic al Cable
Top of the Soun dbar
White On -> O ff
(OPTICAL)
“Digital Audio In”
ENG - 18
Page 19
08 CONNECTING A MOBILE DEVICE
Connecting via Bluetooth
When a mobile device is connected using Bluetooth, you can hear stereo sound
without the hassle of cables.
• When you connect a paired Bluetooth device with the Soundbar off, the
Soundbar automatically turns on.
The initial connection
• When connecting to a new Bluetooth device, make sure the device is within 1 m distance.
1.
Bluetooth Pairing button LED Indicator
mobile device
PAIR
OR
When in “Bluetooth” mode
5 Sec
Red → Green → Blue Blinks
Pairing
• Until pairing is complete, the Multicolor LED changes as Red → Green
→ Blue in turn.
“Ready to c onnect via
Bluetooth.”
Cyan Blinks X 3
Connection is complete
“Ding” Short Sound.
2. On your device, select “[ AV] Samsung Soundbar S4T-Series” from the list that appears.
3. Play music les from the device connected via Bluetooth through the Soundbar.
If the device fails to connect
• If you have an existing Soundbar (e.g., [AV] Samsung Soundbar S4T-Series) on the list of
speakers on the Mobile device, delete it.
• Then repeat steps 1 and 2.
ENG - 19
Page 20

Notes on Bluetooth connection
• Locate a new device within 1 m to connect via Bluetooth communication.
• If asked for a PIN code when connecting a Bluetooth device, enter <0000>.
• The Soundbar automatically turns off after 20 minutes in the Ready state.
• The Soundbar may not perform Bluetooth search or connection correctly under the following
circumstances:
– If there is a strong electrical eld around the Soundbar.
– If several Bluetooth devices are simultaneously paired with the Soundbar.
– If the Bluetooth device is turned off, not in place, or malfunctions.
• Electronic devices may cause radio interference. Devices that generate electromagnetic waves
must be kept away from the Soundbar main unit - e.g., microwaves, wireless LAN devices, etc.
• The Soundbar supports SBC data (44.1kHz, 48kHz).
• Connect only to a Bluetooth device that supports the A2DP (AV) function.
• You cannot connect the Soundbar to a Bluetooth device that supports only the HF (Hands Free)
function.
• When connecting the Soundbar to a Bluetooth device, place them as close to each other as possible.
• The farther the Soundbar and Bluetooth device are from each other, the lower the sound quality
will become.
The Bluetooth connection may break when the devices are out of the effective range.
• The Bluetooth connection may not function as intended in areas with poor reception.
• A Bluetooth device may experience noise or malfunction under in the following conditions:
– When the body is in contact with the signal transceiver on the Bluetooth device or Soundbar
– In corners or when there is an obstacle in proximity, such as a wall or partition, where electrical
changes may occur.
– When exposed to radio interferences by other products operating on the same frequency
ranges, such as medical equipment, microwave ovens, and wireless LAN devices.
– Obstacles such as doors and walls may still impact the sound quality even when the devices
are within the effective range.
• Note that your Soundbar cannot be paired with other Bluetooth devices while using the Bluetooth
option.
• This wireless device may cause electrical interference during operation.
ENG - 20
Page 21
Disconnecting the Bluetooth device from a Soundbar
You can disconnect a Bluetooth device from the Soundbar. For instructions, see the Bluetooth device’s
user manual.
• The Soundbar will be disconnected.
• If the Soundbar is disconnected from the Bluetooth device, the multicolour LED indicator on the
Soundbar blinks "Red” three times.
Disconnecting the Soundbar from the Bluetooth device
Press the (Source)
“Bluetooth”.
• Disconnecting takes time because the Bluetooth device must receive a response from the
Soundbar. (Disconnection time may differ, depending on the Bluetooth device)
• If the Soundbar is disconnected from the Bluetooth device, the multicolour LED indicator on the
Soundbar blinks "Red” three times.
button on the top panel or on the remote control to select the mode other than
ENG - 21
Page 22
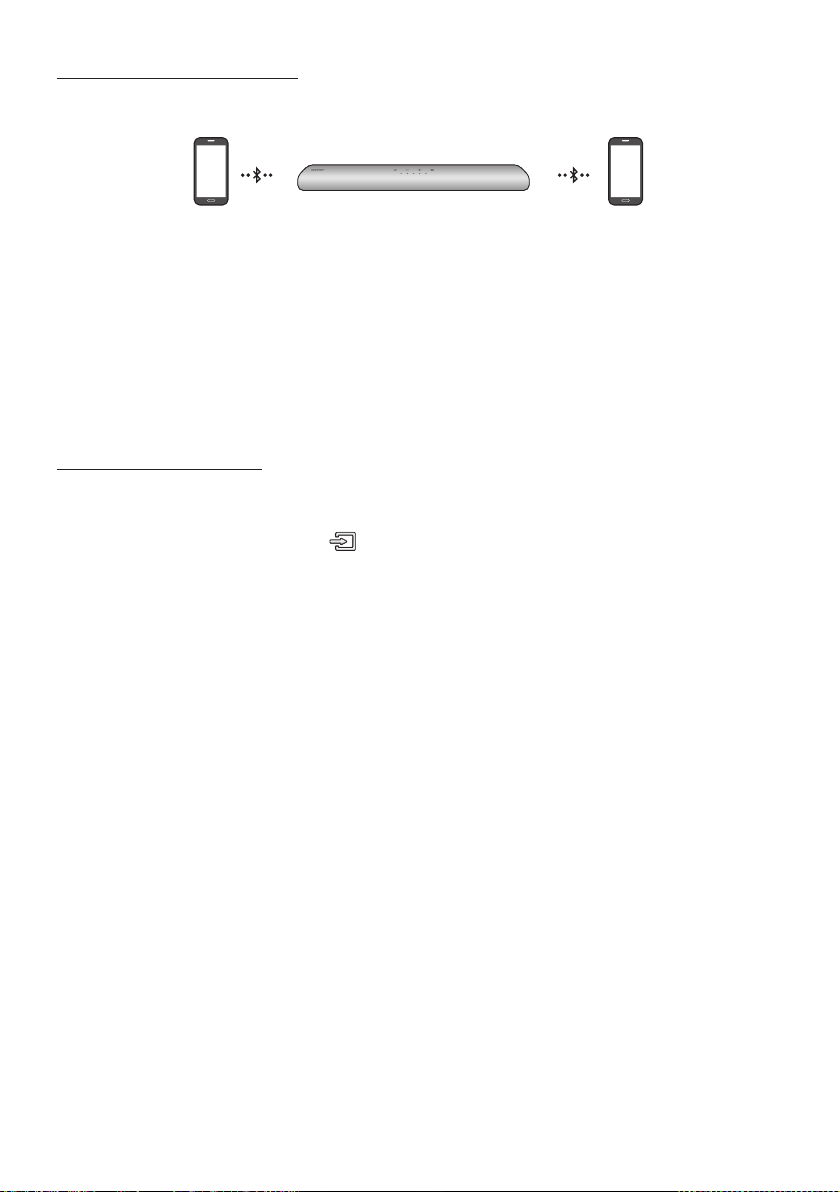
Bluetooth Multi connection
The Soundbar can be connected to 2 Bluetooth devices at the same time.
Bluetooth device A Bluetooth device B
1. Connect the Soundbar to up to two Bluetooth devices. (See page 19)
2. Play music from one of the connected Bluetooth devices while two devices are connected.
3. To play music from the Bluetooth device “B” while playing from the device “A”, pause or stop
playback on the device “A” and then start playing on the device “B”.
• The device won’t switch if playing music from the device “B” without pausing or stopping the
device “A” rst.
Bluetooth Multi Pairing
How to pair multiple devices to the Soundbar
1. Turn on the Soundbar.
2. On any source, press and hold the (Source) button on the top of the Soundbar for more than
5 seconds for the Soundbar to go into “Bluetooth Pairing” mode, then on the Bluetooth device side,
switch Bluetooth on, and select the Soundbar from the list of available devices, the Soundbar will
automatically connect to the Bluetooth device.
3. A 2nd Bluetooth device can be paired and connected to the Soundbar using the same method.
If you attempt to connect a 3rd device, a connected device that is not playing audio will lose its
Bluetooth connection, but will still be paired with the Soundbar.
4. Using the same method, you can pair up to 8 Bluetooth devices, but only the last 2 will stay
connected to the Soundbar at the same time.
NOTES
• Only 1 Samsung TV, or 2 Bluetooth devices can be connected to the Soundbar at one time.
• The Soundbar will be disconnected from Bluetooth devices when it receives a connection request
from a Samsung TV.
ENG - 22
Page 23
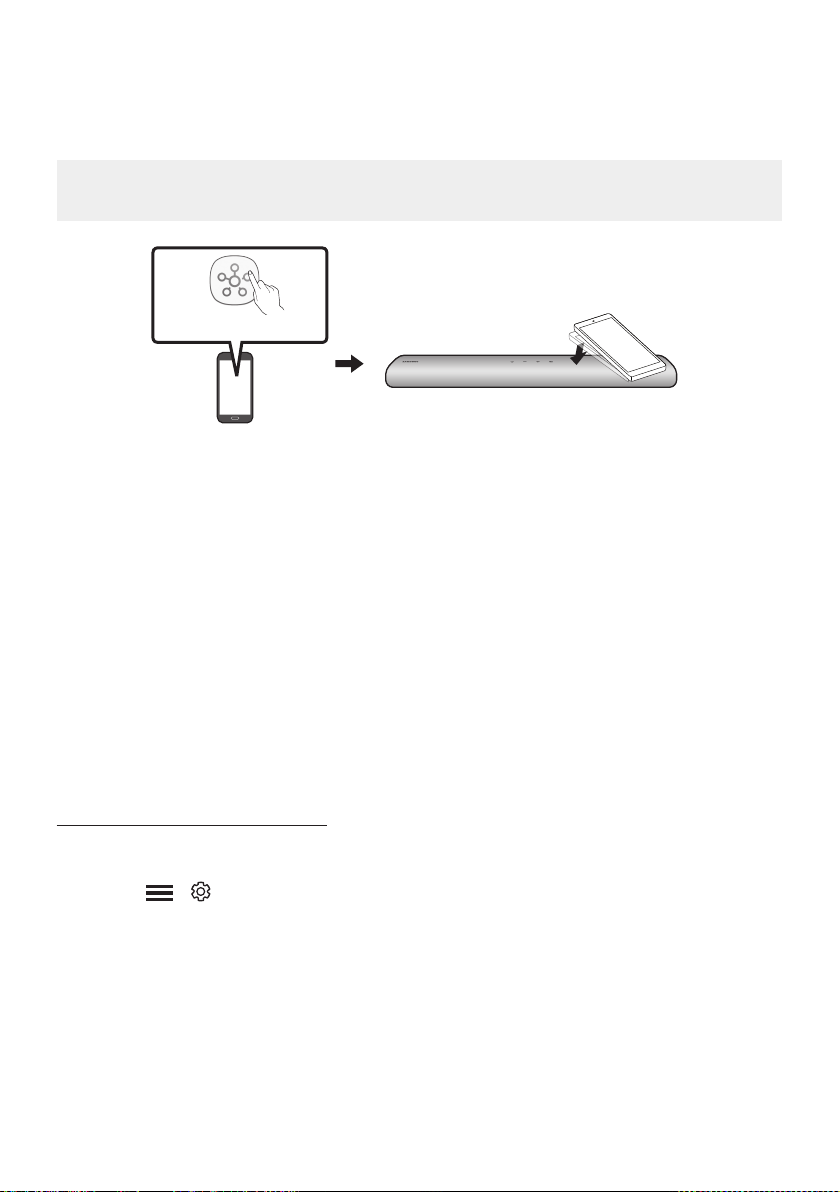
Using the Tap Sound
Tap the Soundbar with your mobile device to play the sound of content on the mobile device through
the Soundbar.
• This function may not be supported, depending on the mobile device.
• This function is only compatible with Samsung mobile devices with Android 8.1 or later.
SmartThings App
Mobile device
1. Turn on the Ta p So und function on your mobile device.
• For details on how to turn on the function, refer to “Setting the Tap Sound function” below.
2. Tap the Soundbar with the mobile device. Select “Start now” in the displayed message window.
A connection is established between the mobile device and Soundbar via Bluetooth.
3. Play the sound of content on the mobile device through the Soundbar.
• This function connects a mobile device to the Soundbar via Bluetooth by detecting vibration
that occurs when the device touches the Soundbar.
• Make sure the mobile device does not tap a sharp corner of the Soundbar. The Soundbar or
mobile device may become scratched or damaged.
• It is recommended that the mobile device be covered with a case. Lightly tap the wide area in
the upper portion of the Soundbar, without using excessive force.
• To use this function, update the SmartThings app to the latest version.
The function may not be supported, depending on the app version.
Top of the Soun dbar
Setting the Tap Sound function
Use the SmartThings app to turn on the Tap View, Tap Sound function.
1. On the mobile device, run the SmartThings app.
2. Select ( → ) in the SmartThings app screen displayed on the mobile device.
3. Set “Tap View, Tap Sound” to On to allow the function to work when a mobile device moves close to
the Soundbar. The function is turned on.
NOTES
• When the mobile device is in power-saving mode, the Tap S oun d function does not work.
• The Tap So und function may not work if there are devices near the Soundbar that cause radio
interference such as electric devices. Make sure devices that may cause radio interference are
placed at a sufcient distance away from the Soundbar.
ENG - 23
Page 24
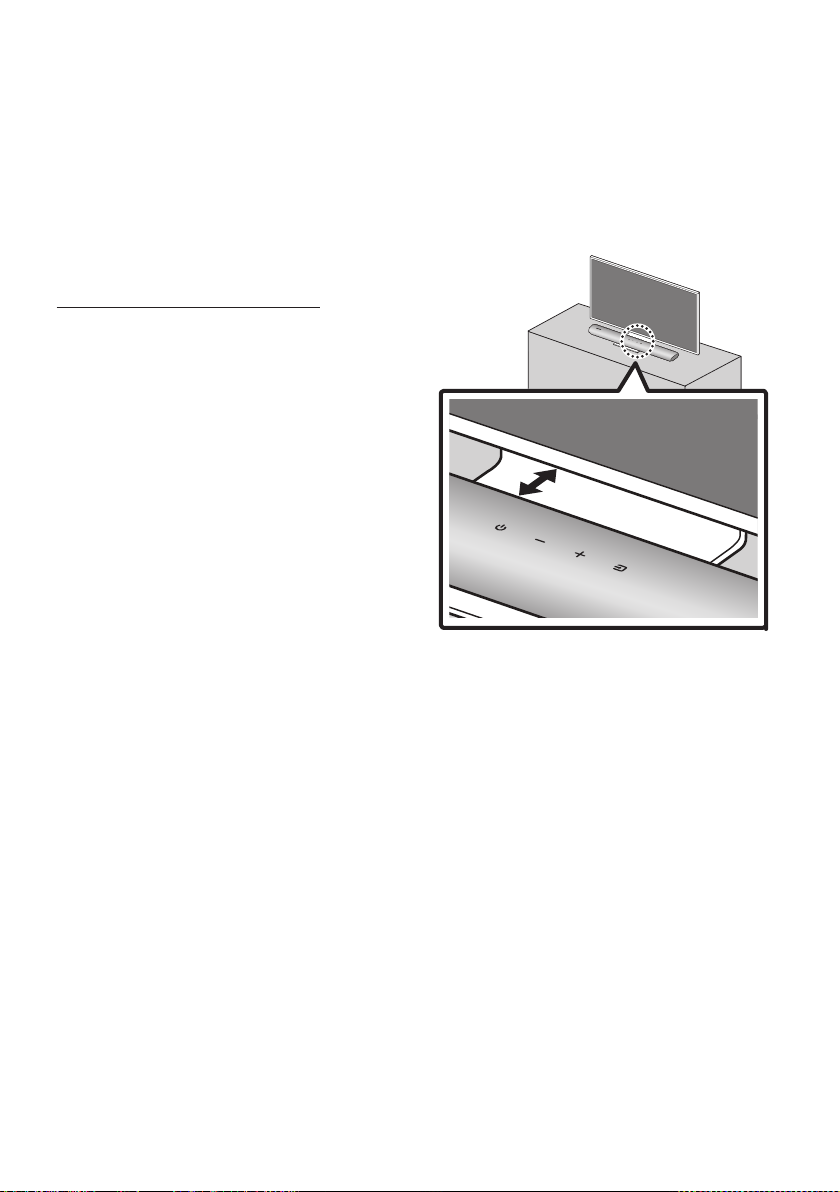
09 INSTALLING ON A
10 INSTALLING THE
WALL
Samsung do not support the wall mount.
You can purchase a wall mount separately to
install the speaker on a wall if you want.
Considerations for purchasing
• Endurable load : Above 7.6 kg
• Hole size : M4 - 10 threaded insert
NOTES
• Since Wall-mount installation is optional, you
must purchase the corresponding accessories
separately.
• Check the strength of the wall before you
install the Wall Mount Bracket. If the strength
is insufcient,make sure to reinforce the wall
before installing the Wall Mount Bracket and
the speaker on the wall.
• Samsung is not liable for any damage to the
product due to the product being installed
inappropriately.
• Please beware not to install the speaker
being laid down or turned upside down.
SOUNDBAR IN
FRONT OF TV
3cm or more
Align the centre of the Soundbar to the centre of
the TV as illustrated in the image.
Place the Soundbar at least 3cm away from the
TV.
NOTES
ENG - 24
• Make sure the Soundbar is placed on a at
and solid surface.
• Insufcient gap from the TV may cause
acoustic problems.
Page 25
11 SOFTWARE
UPDATE
Important: The update function erases all user
settings. We recommend you write down your
settings so that you can easily reset them after
the update.
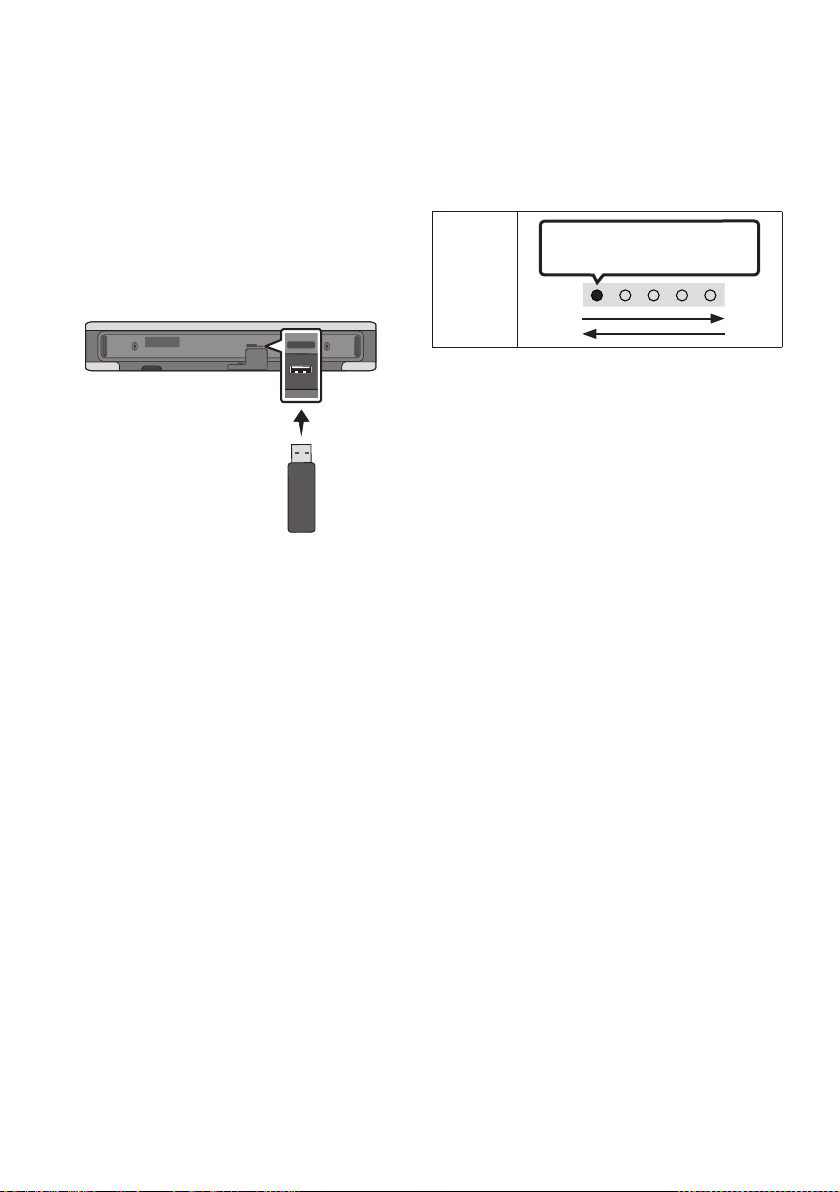
Bott om of the Soundba r
DIGITAL AUDIO IN
(OPTICAL)
SERVICE
SERVICE
DC 24V
1. Connect a USB thumb drive to your
computer.
Important: Make sure there are no music
les on the USB thumb drive. This may cause
the rmware update to fail.
2. Go to the Samsung website at
(samsung.com) select Enter Model
Number and enter the model of your
Soundbar. Select manuals and downloads
and download the latest software le.
3. Save the downloaded software to a USB
stick and select “Extract Here” to unzip the
folder.
4. Turn on the Soundbar and connect the USB
stick containing the software update to the
SERVICE port.
5. Turn on the Soundbar Within 3 minutes, the
5 led cycle sequence ashing and updating
begins. Then the 5 leds all is white, then 5 led
cycle sequence ashing again, When the
update is complete, the Soundbar will
automatically restart.
White move s from left to ri ght
LED
Indicator
and right t o left
• This product has a DUAL BOOT function.
If the rmware fails to update, you can
update the rmware again.
ENG - 25
Page 26
IfLEDsequenceashingisnot
displayed
1. Turn off the Soundbar, disconnect and then
reconnect the USB storage device that
contains the update les to the Soundbar’s
SERVICE port.
2. Disconnect the Soundbar’s power cord,
reconnect it, and then turn on the Soundbar.
NOTES
• The rmware update may not work properly
if audio les supported by the Soundbar are
stored in the USB storage device.
• Do not disconnect the power or remove the
USB device while updates are being applied.
The main unit will turn off automatically after
completing the rmware update.
• After the update is completed, the user setup
in the Soundbar is initialised so you can reset
your settings. We recommend you write
down your settings so that you can easily
reset them after the update. If the software
update fails, check if the USB stick is
defective.
• Mac OS users should use MS-DOS (FAT) as the
USB format.
• Updating via USB may not be available,
depending on the USB storage device
manufacturer.
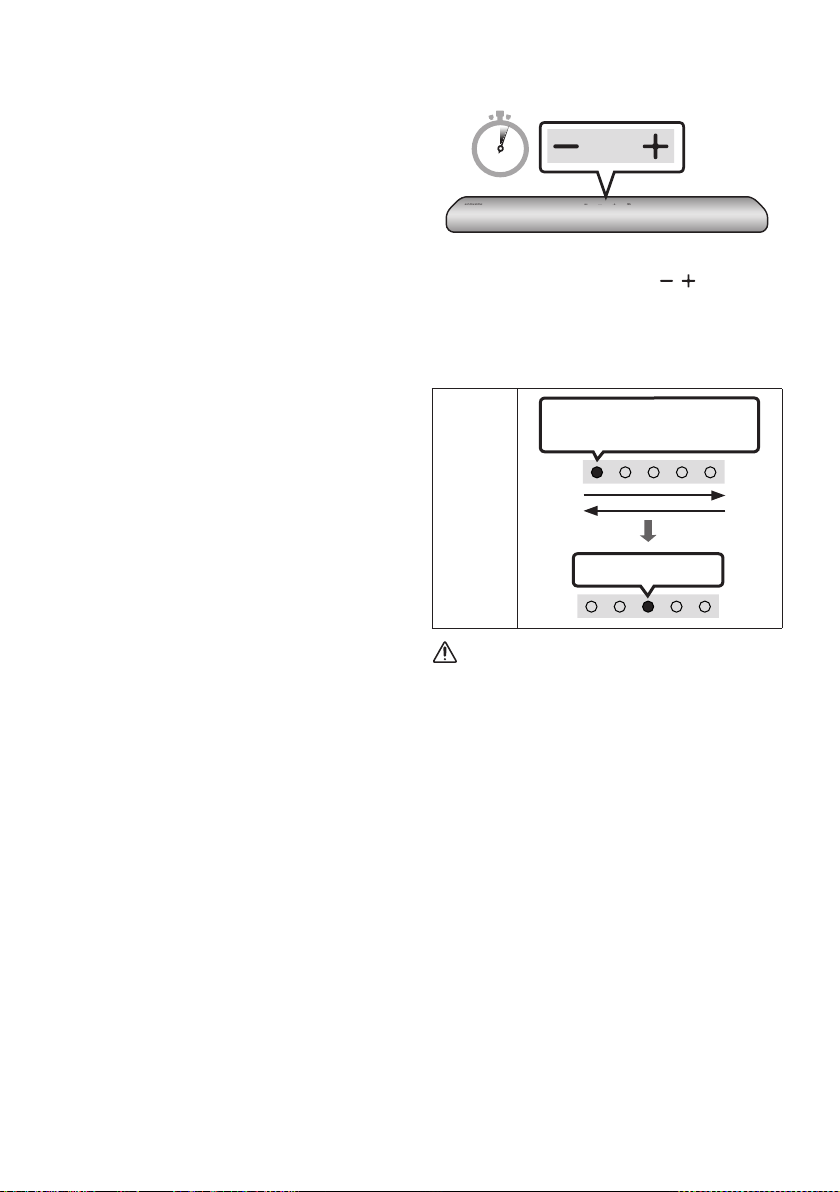
Initialization
5 Sec
With the Soundbar on, press the (Volume)
buttons on the body at the same time for at least
5 seconds. The LED display changes as shown
below and then the Soundbar is initialised.
White move s from left to ri ght
and right t o left
LED
Indicator
Cyan Blink s X3
CAUTION
• All the settings of the Soundbar are
initialised. Be sure to perform this only when
initialization is required.
ENG - 26
Page 27
12 TROUBLESHOOTING
Refer to the instructions below if this product does not function properly.
In case the power is not turned on
; Make sure the power cord of the Soundbar
is correctly inserted into the outlet.
In case the functions do not work properly
; After removing the power cord, insert it
again.
; Remote the power cord from the external
device and try again.
; If there is no signal, the Soundbar
automatically turns off after a certain
period of time. Turn on the power.
In case the remote control does not work
; Make sure the remote is within range of the
soundbar.
; Replace the batteries with new ones.
In case the Soundbar sound is not output
; The volume of the Soundbar is too low or
muted. Adjust the volume.
; When any external device (STB, Bluetooth
device, mobile device, etc.) is connected,
adjust the volume of the external device.
; For sound output of the TV, select
Soundbar. (Samsung TV: Home ( ) →
Settings ( ) → Sound → Sound Output →
Select Soundbar)
; The cable connection to the Soundbar may
not be loose. Remove the cable and
connect again.
; Remove the power cord completely,
reconnect, and turn the power on.
; Initialise the product and try again.
(See page 26.)
In case Bluetooth connection is not possible
; When connecting a new device, switch to
Bluetooth Pairing for connection. (Press the
PAIR button on the remote control or
press the (Source) button on the body
for at least 5 seconds.)
; If the Soundbar is connected to another
device, disconnect that device rst to
switch the device.
; Reconnect it after removing the Bluetooth
speaker list on the device to connect.
(Samsung TV: Home ( ) → Settings ( )
→ Sound → Sound Output → Bluetooth
Speaker List)
; Remove and reconnect the power plug,
then try again.
; Initialise the product and try again.
(See page 26.)
ENG - 27
Page 28
In case Bluetooth sound breaking occurs
; Sounds may be breaking due to
interference by radio frequency or
electronic devices nearby. Keep such
devices away from the Soundbar to avoid
radio interference. Example: microwave
ovens.
; Because the device to connect is far away
from the Soundbar, sound breaking may
occur. Move the device near the Soundbar.
; If a part of your body is in contact with the
Bluetooth transceiver or the product is
installed on metal furniture, sound
breaking may occur. Check the installation
environment and conditions for use.
In case the Soundbar is not turned on as soon
as the TV is turned on
; When you turn off the Soundbar while
watching TV, power synchronization with
the TV is disabled. First turn off the TV.
13 LICENCE
Manufactured under license from Dolby
Laboratories. Dolby, Dolby Audio, and the
double-D symbol are trademarks of Dolby
Laboratories.
For DTS patents, see http://patents.dts.com.
Manufactured under license from DTS, Inc. DTS,
the Symbol, DTS in combination with the
Symbol, and DTS 2.0 Channel are registered
trademarks or trademarks of DTS, Inc. in the
United States and/orother countries. DTS, Inc.
All Rights Reserved.
The Bluetooth® word mark and logos are
registered trademarks owned by the Bluetooth
SIG, Inc. and any use of such marks by Samsung
Electronics Co., Ltd. is under license. Other
trademarks and trade names are those of their
respective owners.
ENG - 28
Page 29

14 OPEN SOURCE
LICENCE NOTICE
To send inquiries and requests for questions
regarding open sources, contact Samsung Open
Source (http://opensource.samsung.com)
15 IMPORTANT
NOTES ABOUT
SERVICE
• Figures and illustrations in this User Manual
are provided for reference only and may differ
from actual product appearance.
• An administration fee may be charged if
either
(a) an engineer is called out at your request
and there is no defect with the product (i.e.
where the user manual has not been read).
(b) you bring the unit to a repair centre and
there is no defect with the product (i.e.
where the user manual has not been read).
• You will be informed of the administration fee
amount before a technician visits.
ENG - 29
Page 30
16 SPECIFICATIONS AND GUIDE
Specications
Model Name HW-S40T / S41T
Weight 1.9 kg
Dimensions (W x H x D) 680.0 x 68.0 x 115.0 mm
Operating Temperature Range +5°C to +35°C
Operating Humidity Range 10 % ~ 75 %
AMPLIFIER
Rated Output power (25W x 2) + (25W x 2)
Supported play formats
(DTS 2.0 sound is played in DTS format.)
WIRELESS DEVICE OUTPUT POWER
BT max transmitter power
Overall Standby Power Consumption (W) 2.0W
Bluetooth
Port deactivation method
NOTES
• Samsung Electronics Co., Ltd reserves the right to change the specications without notice.
• Weight and dimensions are approximate.
Press and hold the SOUND MODE button for
more than 5 seconds to turn off Bluetooth Power
LPCM 2ch, Dolby Audio™
(supporting Dolby® Digital), DTS
100mW at 2.4GHz – 2.4835GHz
function.
ENG - 30
Page 31

• Hereby, Samsung, declares that this equipment is in compliance with Directive
2014/53/EU.
The full text of the EU declaration of conformity is available at the following
internet address: http://www.samsung.com go to Support > Search Product
Support and enter the model name.
This equipment may be operated in all EU countries.
[Correct disposal of bat teries in this product]
(Applicable in countries with separate collec tion systems)
This marking on the battery, manual or packaging indicates that the batteries in this product should not be
disposed of with other household waste at the end of their working life. Where marked, the chemical
symbols Hg, Cd or Pb indicate that the battery contains mercury, cadmium or lead above the reference
levels in EC Directive 2006/66.
If batteries are not properly disposed of, these substances can cause harm to human health or the
environment.
To protect natural resources and to promote material reuse, please separate batteries from other types of
waste and recycle them through your local, free battery return system.
Correc t Disposal of This Produc t
(Waste Electrical & Electronic Equipment)
(Applicable in countries with separate collec tion systems)
This marking on the product, accessories or literature indicates that the product and its electronic
accessories (e.g. charger, headset, USB cable) should not be disposed of with other household waste at the
end of their working life. To prevent possible harm to the environment or human health from uncontrolled
waste disposal, please separate these items from other types of waste and recycle them responsibly to
promote the sustainable reuse of material resources.
Household users should contac t either the retailer where they purchased this product, or their local
government ofce, for details of where and how they can take these items for environmentally safe
recycling.
Business users should contact their supplier and check the terms and conditions of the purchase contract.
This product and its electronic accessories should not be mixed with other commercial wastes for disposal.
For information on Samsung’s environmental commitments and product specic regulatory obligations
e.g. REACH, WEEE, Batteries, visit:
http://www.samsung.com/uk/aboutsamsung/samsungelectronics/corporatecitizenship/data_corner.html
COMMISSION REGULATION (EU) 2019/1782
Ecodesign requirements for external power supplies :
www.samsung.com/global/ecodesign_component
ENG - 31
Page 32

ИНФОРМАЦИЯ ЗА БЕЗОПАСНОСТ
МЕРКИ ЗА БЕЗОПАСНОСТ
ЗА ДА НАМАЛИТЕ РИСКА ОТ ТОКОВ УДАР, НЕ
СВАЛЯЙТЕ КАПАКА (ИЛИ ЗАДНИЯ КАПАК).
ВЪТРЕ НЯМА ЧАСТИ, ПРЕДНАЗНАЧЕНИ ЗА
ОБСЛУЖВАНЕ ОТ ПОТРЕБИТЕЛЯ. ЗА
СЕРВИЗНО ОБСЛУЖВАНЕ СЕ ОБРЪЩАЙТЕ
КЪМ КВАЛИФИЦИРАН СЕРВИЗЕН ПЕРСОНАЛ.
Вижте таблицата по-долу за обяснение на
символите, които може да са на вашия продукт
Samsung.
ВНИМАНИЕ
РИСК ОТ ТОКОВ УДАР ДА
НЕ СЕ ОТВАРЯ
Този символ показва, че вътре има
високо напрежение. Опасно е да
осъществявате какъвто и да е било
контакт с вътрешната част на продукта.
Този символ показва, че в продукта е
включена важна документация за
работата и поддръжката.
Продукт от клас II: Този символ показва,
че не е необходима връзка за
безопасност към земята (заземяване).
Ако този символ не присъства на
продукт със захранващ кабел,
продуктът ТРЯБВА да бъде надеждно
свързан към защитно заземяване.
AC напрежение: Този символ показва,
че номиналното напрежение,
маркирано с този символ, е AC
напрежение.
DC напрежение: Този символ показва,
че номиналното напрежение,
маркирано с този символ, е DC
напрежение.
Внимание, направете справка в
инструкциите за използване: Този
символ инструктира потребителя да
направи справка в ръководството на
потребителя за допълнителна
информация за безопасността.
ПРЕДУПРЕЖДЕНИЕ
• За да намалите риска от пожар или
електрически шок, не излагайте
апаратурата на дъжд или влага.
ВНИМАНИЕ
• ЗА ДА ИЗБЕГНЕТЕ ТОКОВ УДАР,
ПОСТАВЕТЕ ЩЕПСЕЛА В ПОДХОДЯЩ
КОНТАКТ, КАТО ГО ВКЛЮЧИТЕ ДОКРАЙ.
• Апаратурата трябва винаги да бъде
свързана към променливотоков източник
на захранване със защитна заземителна
връзка.
• За да изключите прибора от захранването,
издърпайте щепсела от контакта. Поради
тази причина, контактът трябва да бъде
удобен.
• Апаратът не бива да бъде излаган на
капене или пръски. Не поставяйте
предмети, пълни с течности, напр. вази,
върху уреда.
• За да изключите напълно уреда, трябва да
извадите щепсела на захранващия кабел
от контакта. Следователно щепселът на
захранващия кабел трябва да бъде лесно
достъпен по всяко време.
BUL - 2
Page 33

ПРЕДПАЗНИ МЕРКИ
1. Уверете се, че AC захранването в дома ви
съответства на изискванията за
електрозахранване, изброени върху
идентификационния стикер, разположен
от долната страна на продукта.
Инсталирайте своя продукт хоризонтално,
върху подходяща основа (мебел), с
достатъчно място около него за
вентилация 7~10 см. Внимавайте да не
бъдат покрити вентилационните отвори.
Не поставяйте устройството върху
усилватели или друго оборудване, което
може да се нагорещи. Устройството е
предназначено за непрекъсната
употреба. За да изключите напълно
устройството, извадете адаптера за
променлив ток от стенния контакт.
Извадете щепсела на устройството от
контакта, ако възнамерявате да не го
използвате дълъг период от време.
2. По време на гръмотевични бури
изваждайте щепсела на
електрозахранването от контакта. Пикове
на напрежение, дължащи се на мълнии,
могат да повредят уреда.
3. Не излагайте уреда на пряка слънчева
светлина или други източници на топлина.
Това може да доведе до прегряване и
неизправност на уреда.
4. Пазете уреда от влага (напр. вази) и
прекомерна топлина (напр. камина), или
оборудване, което създава силни
магнитни или електрически полета.
Извадете щепсела от контакта на
електрозахранването. Продуктът не е
предназначен за промишлена употреба.
Използвайте този продукт само за лично
ползване. Ако продуктът или дискът са
били съхранявани на студено, възможно е
да се образува конденз. Ако
транспортирате уреда през зимата,
изчакайте приблизително 2 часа докато
уредът достигне стайна температура,
преди да го използвате.
5. Батериите, които се използват в този
продукт, съдържат химикали, които са
вредни за околната среда. Не изхвърляйте
батериите с общите домакински отпадъци.
Не изхвърляйте батериите в огън. Не
създавайте късо напрежение, не
разглобявайте и не прегрявайте батериите.
Ако батериите не се сменят правилно, има
опасност от експлозия. Сменяйте само със
същия тип или еквивалентни.
BUL - 3
Page 34

Почистване на корпуса
Отстранявайте незабавно всички
замърсявания или петна от повърхността на
продукта.
Отстраняването и почистването може да бъде
по-малко ефективно за някои вещества, или
ако същите останат за продължителен период
от време.
ВНИМАНИЕ
• Използвайте прахосмукачка или ролка за
почистване на мъхове с лепяща лента, за
да отстранявате прах, отпечатъци от
пръсти и други подобни.
– Някои четки за почистване може да
повредят продукта в зависимост от
материала, от който са изработени.
– Хавлии и кърпи за почистване може
да оставят мъхове или замърсявания
по продукта.
• Не използвайте нокът или други
инструменти за изстъргване на
замърсяванията. Това може да повреди
корпуса.
• За да отстраните петна от масло или
течности, използвайте чиста бяла кърпа,
напоена с вода. Ако петната са упорити,
изтрийте ги с разтворен във вода
неутрален почистващ препарат (например
препарати за миене на съдове) и кърпа.
– Почистващ препарат, който не е
неутрален, или химическо средство за
почистване може да доведе до
обезцветяване или повреда на корпуса.
– След почистване използвайте суха
кърпа или сешоар за изсушаване на
повърхността.
– Не прилагайте прекомерна сила, за да
избегнете обезцветяване или повреда
на корпуса.
BUL - 4
Page 35

СЪДЪРЖАНИЕ
01 Проверканакомпонентите 7
Поставяне на батериите преди използване на дистанционното
управление (2 батерии размер AA)
02 Описаниенапродукта 8
Горен панел на Soundbar ------------------------- 8
------------------------- 7
Долен панел на Soundbar
------------------------- 9
03 Използваненадистанционнотоуправление 10
Начин на работа с дистанционното управление
Регулиране на силата на звука на Soundbar с дистанционното
управление на телевизора
------------------------- 13
-------------------------
04 СвързваненаSoundbar 14
Свързване на електрическото захранване
-------------------------
05 Използваненакабелнавръзкакъм
телевизора 15
Свързване с помощта на оптичен кабел
-------------------------
06 Използваненабезжичнавръзкакъм
телевизора 1
Свързване през Bluetooth
-------------------------
07 Свързванекъмвъншноустройство 18
10
14
15
6
16
Свързване с помощта на оптичен кабел
BUL - 5
-------------------------
18
Page 36

08 Свързване към мобилно устройство 19
Свързване през Bluetooth
Използване на Tap Sound
-------------------------
-------------------------
23
09 Монтиране на стена 24
10 Инсталиране на Soundbar пред телевизор 24
11 Актуализация на софтуер 25
Инициализация
-------------------------
12 Отстраняване на неизправности 27
13 Лиценз 28
14 Бележка за лиценза за отворен код 29
15 Важни бележки за обслужването 29
16 Спецификации и ръководство 30
Спецификация
-------------------------
30
19
26
BUL - 6
Page 37

01 ПРОВЕРКА НА КОМПОНЕНТИТЕ
PAIR
SOUND
MODE
VOL WOOFER
SOUNDBAR
Основно устройс тво на Soundbar Дистанционно управление/батерии за Soundbar
AC/DC ад аптер
(Soundbar)
Захранващ кабел
(Soundbar)
Оптичен кабел
• За допълнителна информация относно захранването и потреблението на електроенергия
направете справка с етикета, поставен на продукта. (Етикет: долна страна на основното
устройство на Soundbar)
• За да закупите допълнителни компоненти или незадължителни кабели, свържете се с
Център за обслужване на Samsung или с Център за обслужване на клиенти на Samsung.
• От долната страна на Soundbar има два отвора за монтаж на стена (размер M4). Купете
отделно съвместима скоба и монтирайте Soundbar на стена според вашите предпочитания.
• Дизайнът и спецификациите подлежат на промяна без предизвестие.
• Видът на аксесоарите може да се различава от представения на илюстрациите по-горе.
Поставяне на батериите преди използване на дистанционното управление (2 батерии размер AA)
Плъзнете задния капак по посока на стрелката,
докато не го свалите изцяло. Поставете 2
батерии AA (1,5 V), като ги ориентирате така, че
поляритетът им да е правилен. Плъзнете задния
капак отново на мястото му.
BUL - 7
Page 38

02 ОПИСАНИЕ НА ПРОДУКТА
Горен панел на Soundbar
Позиционирайте продукта
така, че логото SAMSUNG
Горен панел
M
Многоцветен светодиод
да е разположено отгоре.
Светодиоден
индикатор
Светодиодният индикатор мига, свети или променя цвета си в зависимост от
настоящия режим или състояние на Soundbar. Цветът на светодиодния индикатор и
броят на светлините показват активния режим, както е описано по-долу.
W
Бял светодиод
• Многоцветният светодиод се променя в Бяло, Циан, Зелено, Червено, Жълто,
Оранжево, Виолетово и Синьо в зависимост от режима или състоянието.
W
Бял светодиод
W
Бял светодиод
W
Бял светодиод
Включване/
изключване
Сила на
звука
Източник
• Когато включите AC кабела, бутонът за захранването ще заработи след 4 до 6 секунди.
• Когато включите това устройство, ще минат 4 до 5 секунди, преди то да издаде звук.
• Ако се чува звук както от телевизора, така и от Soundbar, отидете на меню Настройки, за да
регулирате звука на телевизора и да подмените високоговорителя на телевизора с Външ.
висок..
Включва и изключва захранването.
Регулира силата на звука.
• Натиснете бутона (Източник), за да промените режима. При всяка промяна на
режима светодиодът светва в бяло и след това угасва.
Светодиоден
индикатор
Бяло Вкл. -> Изкл. Бяло Вкл. -> Изкл.
„Digital Audio In“ „Bluetooth“
BUL - 8
Page 39

Долен панел на Soundbar
SERVICE
(OPTICAL)
SERVICE
DC 24V
DIGITAL AUDIO IN
(OPTICAL)
SERVICE
DIGITAL AUDIO IN
(OPTICAL)
SERVICE
DIGITAL AUDIO IN
(OPTICAL)
DIGITAL AUDIO IN
(OPTICAL)
DC 24V
DIGITAL AUDIO IN
(OPTICAL)
SERVICE
DC 24V
DC 24V (Вход на захранване)
Свържете AC/DC адаптера.
DIGITAL AUDIO IN (OPTICAL)
Свържете към цифровия (оптичен) изход на външно устройство.
SERVICE
Свържете USB памет за актуализиране на софтуера на продукта.
• Когато изключвате захранващия кабел на AC/DC адаптера от стенния контакт, хващайте
щепсела. Не дърпайте кабела.
• Свържете това устройство или други компоненти към променливотоков контакт само след като
са установени всички връзки между компонентите.
SERVICE
BUL - 9
Page 40

03 ИЗПОЛЗВАНЕ НА ДИСТАНЦИОННОТО
УПРАВЛЕНИЕ
Начин на работа с дистанционното управление
Включване/изключване
Включва и изключва Soundbar.
PAIR
SOUND
MODE
VOL WOOFER
SOUNDBAR
Светодиоден
индикатор
• Функция Auto Power Down
Устройството се изключва автоматично в следните
ситуации:
(Източник)
Натиснете, за да изберете източник, свързан към
Soundbar.
(Заглушаване)
Натиснете бутона (Заглушаване), за да заглушите
звука. Натиснете го отново, за да отмените
заглушаването.
Светодиоден
индикатор
Мига в цианово X1
Включен
– В режими „Digital Audio In“ / „Bluetooth“, ако в
продължение на 20 минути няма аудио сигнал.
Мига в червено X3
Изключен
Мига
непрекъснато Х
BUL - 10
Page 41

SOUND MODE
С натискането на бутона може да изберете желания аудио режим. При всяка промяна на режима
многоцветният светодиод премигва в бяло.
Светодиоден
индикатор
• Standard
Извежда оригиналния звук.
• Smart
Анализира съдържанието в реално време и автоматично предоставя оптимално звуково поле
в зависимост от характеристиките на съдържанието.
• Music
Осигурява по-естествен, изпълващ помещението звук за музикално съдържание.
Bluetooth PAIR
Включете Soundbar в режим за сдвояване през Bluetooth.
Когато натиснете бутона, светодиодният дисплей се променя, както е показано по-долу.
• Докато се извършва сдвояването, многоцветният светодиод се променя последователно в
Червено → Зелено → Синьо.
Светодиоден
индикатор
p (Възпроизвеждане/Пауза)
Можете също да възпроизвеждате или да поставяте музика на пауза с натискането на бутона.
Мига в бяло X1
„Standard“ „Smart“ „Music“
Мига в червено → зелено → синьо
Сдвояване
Мига в цианово X3
Връзката е осъществена
Нагоре/Надолу/Наляво/Надясно
Натиснете Нагоре/Надолу/Наляво/Надясно на бутона, за да изберете или настроите функции.
• Прескачане на музика
Натиснете бутона Надясно, за да изберете следващия музикален файл. Натиснете бутона
Наляво, за да изберете с предходния музикален файл.
BUL - 11
Page 42

(Контрол на звука)
С натискането на бутона може да изберете желания аудио режим. Желаният елемент може да се
регулира с помощта на бутоните Нагоре/Надолу. При всяка промяна на режима многоцветният
светодиод премигва в бяло.
Светодиоден
индикатор
НИВО НА WOOFER (БАСИТЕ)
Натиснете бутона нагоре или надолу, за да регулирате уфера (басовите тонове) от -6 до +6. За да
зададете ниво 0 (по подразбиране) за силата на звука на уфера (басите), натиснете бутона.
СИЛА НА ЗВУК А
Натиснете бутона нагоре или надолу, за да регулирате силата на звука.
Светодиоден
индикатор
Увеличаване на силата на звука
Мига в бяло X1
„Treble“ „Bass“ „Sync“
Бялото се придвижва
надясно Х1
Бялото се придвижва
наляв о Х1
Намаляване на силата на звука
BUL - 12
Page 43

Регулиране на силата на звука на Soundbar с дистанционното
VOL
WOOFER
WOOFER
VOL
WOOFER
управление на телевизора
Регулирайте силата на звука на Soundbar с дистанционното управление на телевизора.
• Тази функция може да се използва само с ИЧ дистанционно управление. Bluetooth
дистанционни управления (дистанционни управления, при които се изисква сдвояване)
не се поддържат.
• Задайте за високоговорителя на телевизора настройка Външ. висок., за да използвате
тази функция.
• Производители, които поддържат тази функция:
VIZIO, LG, Sony, Sharp, PHILIPS, PANASONIC, TOSHIBA, Hisense, RCA
1. Изключете Soundbar.
2. Натиснете и задръжте бутона WOOFER за 5 секунди.
При всяко натискане и задържане на бутона WOOFER за 5 секунди режимът се променя, като
последователността е следната: „Samsung-TV Remote“ (Режим по подразбиране),
„Off-TV Remote“, „All-TV Remote“.
Състоянието на светодиодния индикатор се променя при всяка промяна на режима, както е
показано по-долу.
Бутон на дистанционното
управление
SOUND
MODE
SOUND
MODE
SOUND
MODE
5 Sec
5 Sec
VOL
5 Sec
Светодиоден индикатор Статус
Мига в синьо Х1
Активирайте ИЧ дистанционно
управление на телевизора
„Samsung-TV Remote“
Samsung.
(Режим по подразбиране)
Мига в червено X1
Деактивирайте дистанционното
управление на телевизора.
„Off-TV Remote“
Мига в зелено X1
Активирайте ИЧ дистанционно
управление на телевизора на трета
„All-TV Remote“
страна.
BUL - 13
Page 44

04 СВЪРЗВАНЕ НА SOUNDBAR
SERVICE
DIGITAL AUDIO IN
SERVICE
DC 24V
DIGITAL AUDIO IN
(OPTICAL)
SERVICE
DIGITAL AUDIO IN
(OPTICAL)
SERVICE
DIGITAL AUDIO IN
(OPTICAL)
Свързване на електрическото захранване
Използвайте захранващите компоненти, за да свържете Soundbar към електрически контакт в
следния ред:
• За допълнителна информация относно захранването и потреблението на електроенергия
направете справка с етикета, поставен на продукта. (Етикет: долна страна на основното
устройство на Soundbar)
1. Първо включете захранващия кабел към AC/DC адаптера.
Включете AC/DC адаптера (със захранващия кабел) към Soundbar.
2. Включете захранващия кабел в стенен контакт.
DC 24V
AC/DC ад аптер
Захранващ кабел
Долна страна на основното
устройство на Soundbar
(OPTICAL)
DC 24V
БЕЛЕЖКИ
• Ако извадите и поставите отново захранващия кабел в контакта, докато продуктът е
включен, Soundbar се включва автоматично.
• Уверете се, че AC/DC адаптерът е поставен да лежи върху маса или на пода. Ако поставите
AC/DC адаптера така, че да виси с входа за AC кабела ориентиран нагоре, в адаптера може да
влязат вода или други чужди частици и това да причини неизправност на адаптера.
BUL - 14
Page 45

05 ИЗПОЛЗВАНЕ НА КАБЕЛНА ВРЪЗКА
SERVICE
DIGITAL AUDIO IN
КЪМ ТЕЛЕВИЗОРА
Свързване с помощта на оптичен кабел
Когато звукът на предаването е кодиран в Dolby Digital и „Формат за цифров аудио изход“ на
вашия телевизор е зададен на PCM, препоръчваме да промените настройката на Dolby Digital.
Когато настройката на телевизора се промени, качеството на звука ще се повиши.
(Телевизионното меню може да използва различни думи за Dolby Digital и PCM в зависимост от
производителя на телевизора.)
Контролен списък за проверка преди свързване
• Когато използвате оптичен кабел и клемите имат покритие, уверете се, че сте премахнали
покритията.
Долна страна на Soundbar
1. При изключени телевизор и Soundbar свържете порта на Soundbar DIGITAL AUDIO IN
(OPTICAL) и порта OPTICAL на телевизора с оптичния кабел, както е показано на фигурата.
2. Включете Soundbar и телевизора.
3. Натиснете бутона (Източник) на горния панел или на дистанционното управление, след
това изберете режим „Digital Audio In“.
4. Звукът от телевизора се възпроизвежда от Soundbar.
Светодиоден
индикатор
OPTICAL OUT
Бяло Вкл. -> Изкл.
Оптичен кабел
Горна страна на Soundbar
„Digital Audio In“
BUL - 15
(OPTICAL)
Page 46

06 ИЗПОЛЗВАНЕ НА БЕЗЖИЧНА ВРЪЗКА
КЪМ ТЕЛЕВИЗОРА
Свързване през Bluetooth
Когато телевизор Samsung е свързан през Bluetooth, можете да чуете стерео
звука, без при това да се нуждаете от кабел.
• Може да се свърже само по един телевизор Samsung.
• Може да се свърже телевизор на Samsung, който поддържа Bluetooth.
Проверете спецификациите на вашия телевизор.
Първоначално свързване
1.
Бутон за Bluetooth сдвояване Светодиоден индикатор
PAIR
ИЛИ
При режим „Bluetooth“
5 Sec
2. Изберете режим Bluetooth на телевизора Samsung.
(например Начало ( ) Настройки ( ) Звук Звуков изход Списък на Bluetooth
високоговорители [AV] Samsung Soundbar S4T-Series (Bluetooth))
3. Изберете „[AV] Samsung Soundbar S4T-Series“ от списъка на екрана на телевизора.
Наличен Soundbar е показан с „Необходимост от сдвояване“ или „Сдвоен“ на списъка с
Bluetooth устройства. За свързване на телевизор Samsung със Soundbar изберете
съобщението и след това установете връзка.
4. А сега можете да чуете звука на телевизора Samsung през Soundbar.
• Ако има регистър на свързването между Soundbar и телевизор Samsung, Soundbar
автоматично се свързва чрез промяна на режима си на „Bluetooth“.
Мига в червено → зелено → синьо
Сдвояване
• Докато се извършва сдвояването, многоцветният светодиод се
променя последователно в Червено → Зелено → Синьо.
„Ready to connec t via
Bluetooth.“
Мига в цианово X3
Връзката е осъществена
Кратък звуков сигнал
„Иззвъняване“.
BUL - 16
Page 47

Ако устройството не успее да се свърже
• Ако имате съществуващ Soundbar (например [AV] Samsung Soundbar S4T-Series) в
списъка с високоговорители на телевизора Samsung, изтрийте го.
• След това повторете стъпки от 1 до 3.
Прекъсване на връзката на Soundbar към телевизора Samsung
Натиснете бутона
изберете режим, различен от „Bluetooth“.
• Прекъсването на връзката отнема време, тъй като телевизорът Samsung трябва да получи
отговор от Soundbar.
(Необходимото време може да се различава в зависимост от модела телевизор Samsung.)
(Източник)
на горния панел или на дистанционното управление, за да
Бележки относно свързване през Bluetooth
• Разположете ново устройство в диаметър от 1 m, за да установите връзка през Bluetooth.
• Ако ви бъде поискан ПИН код при свързване с Bluetooth устройство, въведете <0000>.
• Soundbar автоматично се изключва след 20 минути в състояние на готовност.
• Soundbar може да не извършва правилно търсене на Bluetooth или свързване при следните
обстоятелства:
– Ако около Soundbar има силно електрическо поле.
– Ако няколко Bluetooth устройства едновременно са сдвоени със Soundbar.
– Ако Bluetooth устройството е изключено, не е на мястото си или е в неизправност.
• Електронните устройства може да предизвикат радиосмущения. Устройствата, които
създават електромагнитни вълни, например микровълнови фурни, безжични LAN
устройства и др., трябва да бъдат държани далеч от основното устройство на Soundbar.
BUL - 17
Page 48

07 СВЪРЗВАНЕ КЪМ ВЪНШНО
SERVICE
DIGITAL AUDIO IN
УСТРОЙСТВО
Свързване с помощта на оптичен кабел
Долна страна на Soundbar
BD/DVD плейър/
декодер за телевизия/
Игрова конзола
OPTICAL OUT
Светодиоден
индикатор
1. При изключени външно устройство и Soundbar свържете порта на Soundbar DIGITAL AUDIO
IN (OPTICAL) и изходящия порт OPTICAL на външното устройство с оптичния кабел, както е
показано на фигурата.
2. Включете Soundbar и външното устройство.
3. Изберете режим „Digital Audio In“, като натиснете бутона (Източник) на горния панел
или на дистанционното управление.
4. Звукът от външното устройство се възпроизвежда от Soundbar.
Оптичен кабел
Горна страна на Soundbar
Бяло Вкл. -> Изкл.
(OPTICAL)
„Digital Audio In“
BUL - 18
Page 49

08 СВЪРЗВАНЕ КЪМ МОБИЛНО
УСТРОЙСТВО
Свързване през Bluetooth
Когато мобилно устройство е свързано през Bluetooth, можете да чуете
стерео звука, без при това да се нуждаете от кабел.
• Когато свържете сдвоено Bluetooth устройство при изключен Soundbar,
последният се изключва автоматично.
Първоначално свързване
• Когато се свържете към ново Bluetooth устройство, уверете се, че устройството е на
разстояние от 1 m.
1.
Бутон за Bluetooth сдвояване Светодиоден индикатор
Мобилно
устройство
PAIR
ИЛИ
При режим „Bluetooth“
5 Sec
2. На вашето устройство изберете „
появява.
3. Възпроизвеждайте музикални файлове от устройството, свързано през Bluetooth към
Soundbar.
Мига в червено → зелено → синьо
Сдвояване
• Докато се извършва сдвояването, многоцветният светодиод се
променя последователно в Червено → Зелено → Синьо.
„Ready to connec t via
Bluetooth.“
[AV] Samsung Soundbar S4T-Series
Мига в цианово X3
Връзката е осъществена
Кратък звуков сигнал
„Иззвъняване“.
“ от списъка, който се
Ако устройството не успее да се свърже
• Ако имате съществуващ Soundbar (например [AV] Samsung Soundbar S4T-Series) в
списъка с високоговорители на мобилното устройство, го изтрийте.
• Повторете стъпки 1 и 2.
BUL - 19
Page 50

Бележки относно свързване през Bluetooth
• Разположете ново устройство в диаметър от 1 m, за да установите връзка през Bluetooth.
• Ако ви бъде поискан ПИН код при свързване с Bluetooth устройство, въведете <0000>.
• Soundbar автоматично се изключва след 20 минути в състояние на готовност.
• Soundbar може да не извършва правилно търсене на Bluetooth или свързване при следните
обстоятелства:
– Ако около Soundbar има силно електрическо поле.
– Ако няколко Bluetooth устройства едновременно са сдвоени със Soundbar.
– Ако Bluetooth устройството е изключено, не е на мястото си или е в неизправност.
• Електронните устройства може да предизвикат радиосмущения. Устройствата, които
създават електромагнитни вълни, например микровълнови фурни, безжични LAN
устройства и др., трябва да бъдат държани далеч от основното устройство на Soundbar.
• Soundbar поддържа SBC данни (44,1kHz, 48kHz).
• вържете само към Bluetooth устройство, което поддържа функцията A2DP (AV).
• Не можете да свързвате Soundbar към Bluetooth устройство, което поддържа само функцията
HF (хендсфри).
• Когато свързвате Soundbar към Bluetooth устройство, разположете устройствата възможно
най-близо едно до друго.
• Колкото по-далеч се намира Soundbar от Bluetooth устройството, толкова по-лошо ще е
качеството на звука. Bluetooth връзката може да бъде прекъсната, когато устройствата са
извън ефективния обхват.
• Bluetooth връзката може и да не функционира според предназначението в зони със слаб
сигнал.
• Bluetooth устройство може да излъчи шум или да не функционира правилно в следните
условия:
– Когато корпусът е в контакт с приемника на сигнала на Bluetooth устройството или
Soundbar.
– По ъгли или в близост до препятствие, като например стена или преграда, при което
може да настъпят промени в електрическия сигнал.
– Когато е изложено на радиосмущения поради факта, че в същите честотни диапазони
работят и други продукти, като медицинско оборудване, микровълнови печки и
безжични LAN устройства.
– Препятствия, като например врати и стени, може да повлияят на качеството на звука,
дори когато устройствата се намират в пределите на ефективния обхват.
• Имайте предвид, че вашият Soundbar няма да може да бъде сдвоен с други Bluetooth
устройства, докато се използва опцията Bluetooth.
• Това безжично устройство може да предизвика електрически смущения по време на
работата си.
BUL - 20
Page 51

Разкачете Bluetooth устройството от Soundbar
Можете да прекъснете връзката на Bluetooth устройството с Soundbar. За инструкции, проверете
ръководството за потребителя на Bluetooth устройството.
• Връзката с Soundbar ще бъде прекъсната.
• Ако връзката между Soundbar и Bluetooth устройството бъде прекъсната, многоцветният
светодиоден индикатор на Soundbar ще премигне три пъти в „Червено”.
Прекъсване на връзката на Soundbar към Bluetooth устройството
Натиснете бутона
изберете режим, различен от „Bluetooth“.
• Разкачването отнема време, защото Bluetooth устройството трябва да получи отговор от
Soundbar. (Времето за разкачване може да е различно в зависимост от Bluetooth
устройството)
• Ако връзката между Soundbar и Bluetooth устройството бъде прекъсната, многоцветният
светодиоден индикатор на Soundbar ще премигне три пъти в „Червено”.
(Източник)
на горния панел или на дистанционното управление, за да
BUL - 21
Page 52

Свързване с няколко Bluetooth устройства
Soundbar може да бъде свързан с до 2 Bluetooth устройства едновременно.
Bluetooth устройс тво A Bluetooth устройс тво B
1. Свържете Soundbar с до две Bluetooth устройства. (Вижте страница 19)
2. Възпроизвеждайте музика от едно от свързаните Bluetooth устройства при свързани две
устройства.
3. За да възпроизвеждате музика от Bluetooth устройството „B“, докато възпроизвеждате от
устройството „A“, поставете на пауза или спрете възпроизвеждането от устройството „A“, и
след това започнете възпроизвеждането от устройството „B“.
• Устройството няма да превключи, ако възпроизвеждате музика от устройството „B“, без
да сте поставили на пауза или спрели възпроизвеждането от устройството „A“.
Сдвояване на няколко Bluetooth устройства
Как да сдвоите няколко устройства към Soundbar
1. Включете Soundbar.
2. На който и да е източник натиснете и задръжте бутона (Източник) на горната страна на
Soundbar за повече от 5 секунди, докато Soundbar не влезе в режим „Bluetooth сдвояване“,
след това от страна на Bluetooth устройството включете Bluetooth и изберете Soundbar от
списъка с достъпни устройства и Soundbar автоматично ще се свърже към Bluetooth
устройството.
3. Второ Bluetooth устройство може да бъде сдвоено и свързано към Soundbar с помощта на
същия метод.
Ако се опитате да свържете трето устройство, свързано устройство, което не възпроизвежда
аудио съдържание, ще изгуби Bluetooth връзката, но ще остане сдвоено със Soundbar.
4. С помощта на същия метод можете да сдвоите до 8 Bluetooth устройства, но само
последните 2 ще могат да останат свързани към Soundbar по едно и също време.
БЕЛЕЖКИ
• Само 1 телевизор Samsung или 2 Bluetooth устройства могат да бъдат свързани към Soundbar
по едно и също време.
• Soundbar ще бъде изключен от Bluetooth устройствата, когато получи искане за свързване от
телевизор Samsung.
BUL - 22
Page 53

Използване на Tap Sound
Докоснете Soundbar с мобилното си устройство, за да се възпроизведе звукът на съдържанието
на мобилното устройство през Soundbar.
• В зависимост от мобилното устройство тази функция може да не се поддържа.
• Тази функция е съвместима само с мобилни устройства Samsung с Android 8.1 или по-нова версия.
Приложение
SmartThings
Мобилно устройство
1. Включете функцията Tap Sound на мобилното устройство.
• За подробности относно включването на функцията вижте „Настройка на функцията Tap
Sound“ по-долу.
2. Докоснете Soundbar с мобилното устройство. Изберете „Започни сега“ в изведения
прозорец със съобщение.
Чрез Bluetooth се установява връзка между мобилното устройство и Soundbar.
3. Възпроизвеждайте звука на съдържанието на мобилното устройство през Soundbar.
• Тази функция свързва чрез Bluetooth мобилно устройство към Soundbar чрез
разпознаване на вибрацията, която възниква при контакт на устройството със Soundbar.
• Уверете се, че мобилното устройство не докосва остър ъгъл на Soundbar. Soundbar или
мобилното устройство може да се надраскат или повредят.
• Препоръчва се мобилното устройство да бъде покрито с калъф. Леко натиснете широката
площ в горната част на Soundbar, без да прилагате прекомерна сила.
• За да използвате тази функция, актуализирайте приложението SmartThings до най-новата
версия. В зависимост от версията на приложението функцията може да не се поддържа.
Настройка на функцията Tap Sound
Използвайте приложението SmartThings, за да включите функцията Tap View, Tap Sound.
1. On the mobile device, run the SmartThings app.
2. Изберете ( → ) от екрана на приложението SmartThings, отворен на мобилното устройство.
3. За „Tap View, Tap Sound“ задайте Вкл., за да работи функцията, когато до Soundbar се
приближи мобилно устройство. Функцията е включена.
БЕЛЕЖКИ
• Когато мобилното устройство е в енергоспестяващ режим, функцията Tap Sound не работи.
• Функцията Tap Sound може да не работи, ако в близост до Soundbar има устройства, които
причиняват радиосмущения, например електрически устройства. Устройствата, които причиняват
радиосмущения, трябва да бъдат поставяни на достатъчно разстояние от Soundbar.
Горна страна на Soundbar
BUL - 23
Page 54

09 МОНТИРАНЕ НА
10 ИНСТАЛИРАНЕ
СТЕНА
Samsung не поддържа монтажа на стена.
Можете да закупите стенна конзола
допълнително, за да монтирате
високоговорителя на стена, ако искате.
Съображения при закупуване
• Поносим товар : Над 7,6 кг
• Размер на отвора : M4 - 10 резбован отвор
БЕЛЕЖКИ
• Тъй като монтирането на стенна конзола е
по избор, трябва да закупите отделно
съответните аксесоари.
• Проверете здравината на стената, преди
да монтирате стенната конзола. Ако
здравината не е достатъчна, опитайте се да
подсилите стената, преди да монтирате
стенната конзола и високоговорителя на
стената.
• Samsung не отговаря за никакви повреди
на продукта, произлизащи от неправилно
монтиране.
• Внимавайте при монтиране да не
поставяте високоговорителя легнал или
преобърнат.
НА SOUNDBAR
ПРЕД
ТЕЛЕВИЗОР
3 cm или повече
Разположете Soundbar така, че да е центриран
спрямо телевизора, както е посочено на
изображението.
Поставете Soundbar на разстояние от поне 3 см
от телевизора.
БЕЛЕЖКИ
BUL - 24
• Уверете се, че Soundbar е поставен върху
хоризонтална и стабилна повърхност.
• Недостатъчното разстояние от телевизора
може да причини проблеми от акустичен
характер.
Page 55

11 АКТУАЛИЗАЦИЯ
НА СОФТУЕР
Важно: Функцията за актуализация изтрива
всички потребителски настройки.
Препоръчваме да запишете някъде вашите
настройки, така че да можете лесно да ги
възстановите след актуализацията.
Долна страна на Soundbar
DIGITAL AUDIO IN
(OPTICAL)
SERVICE
SERVICE
DC 24V
1. Свържете USB памет към компютъра.
Важно: Уверете се, че в USB флаш паметта
няма музикални файлове. Това може да
попречи на актуализирането на
фърмуера.
2. Посетете уеб сайта на Samsung
(samsung.com) Изберете Въведете
номер на модела и въведете модела на
вашия Soundbar. Изберете ръководства и
изтегляния и изтеглете най-новия файл
със софтуер.
3. Запаметете изтегления софтуер в USB
стик и изберете „Извличане тук“, за да
разархивирате папката.
4. Включете Soundbar и свържете USB флаш
паметта, съдържаща актуализация на
софтуера, към порта SERVICE.
5. Включете Soundbar; в рамките на 3
минути 5-те бели светодиода мигат
последователно и циклично и
актуализацията започва. След това
всички 5 светодиода ще засветят в бяло,
след това 5-те светодиода отново ще
мигат последователно и циклично. Когато
актуализацията приключи, Soundbar ще
се рестартира автоматично.
Бялото се мести от ляво
Светодиоден
индикатор
надясно и от дясно наляво
• Този продукт има функция DUAL BOOT.
Ако фърмуерът не успее да се
актуализира, можете да го
актуализирате отново.
BUL - 25
Page 56

Ако не се показват
последователно мигащи LED
1. Изключете Soundbar, извадете и свържете
отново USB стика, който съдържа
файловете с актуализации, към SERVICE
порта на Soundbar.
2. Изключете захранващия кабел на
Soundbar, след това го свържете отново и
включете Soundbar.
БЕЛЕЖКИ
• Актуализирането на фърмуера може да не
работи правилно, ако аудиофайловете
поддържани от Soundbar, са съхранени с
USB стика.
• Не изключвайте захранването и не
отстранявайте USB устройството, докато се
актуализациите се прилагат. Основният
модул ще се изключи автоматично след
завършване на актуализацията на
фърмуера.
• След като актуализацията е приключила,
потребителската настройка в Soundbar е
инициализирана, така че можете да
възстановите вашите настройки.
Препоръчваме да запишете някъде
вашите настройки, така че да можете
лесно да ги възстановите след
актуализацията. Ако актуализацията на
софтуера е неуспешна, проверете дали
USB паметта не е дефектна.
• Потребителите на Mac OS трябва да
използват MS-DOS (FAT) като USB формат.
• Актуализирането чрез USB може да не е
налично в зависимост от производителя на
USB стика.
Инициализация
5 Sec
При включен Soundbar натиснете
едновременно бутоните (Сила на звука)
на устройството за поне 5 секунди.
Светодиодният дисплей се променя, както е
показано отдолу, и след това Soundbar се
инициализира.
Бялото се мести от ляво
надясно и от дясно наляво
Светодиоден
индикатор
Мига в цианово X3
ВНИМАНИЕ
• Всички настройки на Soundbar са
инициализирани. Уверете се, че сте
извършили това само ако се налага
инициализация.
BUL - 26
Page 57

12 ОТСТРАНЯВАНЕ НА НЕИЗПРАВНОСТИ
Преди да потърсите помощ, проверете следното.
В случай че не се включва
; Проверете дали захранващият кабел на
Soundbar е поставен правилно в контакта.
Ако функциите не работят правилно
; Извадете захранващия кабел и го
поставете отново.
; Извадете захранващия кабел от
външното устройство и опитайте отново.
; Ако няма сигнал, Soundbar автоматично
се изключва след определен период от
време. Включете го от бутона за
включване/изключване.
В случай че дистанционното управление
не работи
; Уверете се, че дистанционното
управление е в обхвата на Soundbar.
; Подменете батериите с нови.
В случай че Soundbar не възпроизвежда
звука
; Звукът от Soundbar е прекалено слаб или
заглушен. Регулирайте силата на звука.
; Когато е свързано външно устройство
(декодер за телевизия, Bluetooth
устройство, мобилно устройство и т.н.),
регулирайте силата на звука на
външното устройство.
; За изходящ звук от телевизора изберете
Soundbar. (Телевизор Samsung:
Начало ( ) → Настройки ( ) → Звук →
Звуков изход → Изберете Soundbar)
; Свързването на кабела към Soundbar не
бива да е хлабаво. Извадете кабела и го
свържете отново.
; Извадете захранващия кабел изцяло,
свържете отново и включете
захранването.
; Стартирайте продукта и опитайте
отново. (Вижте страница 26.)
В случай че не е възможно да се установи
връзка през Bluetooth
; Когато се свързва ново устройство, за
установяване на връзка включете
Сдвояване през Bluetooth. (Натиснете
бутона PAIR на дистанционното
управление или натиснете бутона
(Източник)
5 секунди.)
; Ако Soundbar е свързан към друго
устройство, първо прекъснете връзката
на това устройство, за да смените
устройството.
; Свържете го отново, като за да
установите връзка трябва да премахнете
списъка с високоговорители, свързани
през Bluetooth. (Телевизор Samsung:
Начало ( ) → Настройки ( ) → Звук →
Звуков изход → Списък на Bluetooth
високоговорители)
; Извадете щепсела и го поставете отново,
след това опитайте пак.
; Стартирайте продукта и опитайте
отново. (Вижте страница 26.)
на устройството поне за
BUL - 27
Page 58

В случай на накъсване на звука, предаван
през Bluetooth
; Звукът може да се накъсва поради
смущения, предизвикани от радио
честоти или електронни устройства,
намиращи се наблизо. Такива
устройства трябва да се намират далеч
от Soundbar, за да се избегнат
радиосмущения. Пример: микровълнови
печки.
; Тъй като устройството, което е свързано, се
намира далеч от Soundbar, звукът може да
се накъса. Преместете устройството близо
до Soundbar.
; Ако част от вашето тяло е в контакт с
Bluetooth предавател или продуктът е
монтиран на метална повърхност,
възможно е звукът да се накъса. Проверете
монтажната среда и условията за употреба.
В случай че Soundbar не се включи веднага
след включването на телевизора
; Когато изключите Soundbar, докато
гледате телевизия, се деактивира
синхронизирането на захранването с
телевизора. Първо изключете телевизора.
13 ЛИЦЕНЗ
Manufactured under license from Dolby
Laboratories. Dolby, Dolby Audio, and the
double-D symbol are trademarks of Dolby
Laboratories.
For DTS patents, see http://patents.dts.com.
Manufactured under license from DTS, Inc. DTS,
the Symbol, DTS in combination with the
Symbol, and DTS 2.0 Channel are registered
trademarks or trademarks of DTS, Inc. in the
United States and/orother countries. DTS, Inc.
All Rights Reserved.
The Bluetooth® word mark and logos are
registered trademarks owned by the Bluetooth
SIG, Inc. and any use of such marks by Samsung
Electronics Co., Ltd. is under license. Other
trademarks and trade names are those of their
respective owners.
BUL - 28
Page 59

14 БЕЛЕЖКА ЗА
ЛИЦЕНЗА ЗА
ОТВОРЕН КОД
За да изпратите запитвания и заявки по
въпроси, свързани с отворените кодове,
свържете се със Samsung Open Source
(http://opensource.samsung.com)
15 ВАЖНИ
БЕЛЕЖКИ ЗА
ОБСЛУЖВАНЕТО
• Цифрите и илюстрациите в това
ръководство за потребителя са
предоставени само за справка и могат да
се различават от действителния изглед на
изделието.
• Може да се начисли такса за
администриране, ако:
(a) е извикан техник по ваше настояване и
няма дефект в продукта (т.е. не сте
прочели ръководството за потребителя)
(b) занесете уреда в сервизен център и
няма дефект в продукта (т.е. не сте
прочели ръководството за
потребителя).
• Сумата за тази такса за администриране
ще ви бъде съобщена, преди да се
извърши каквато и да е било работа или
посещение вкъщи.
BUL - 29
Page 60

16 СПЕЦИФИКАЦИИ И РЪКОВОДСТВО
Спецификация
Наименование на модела HW-S40T / S41T
Тегло 1,9 кг
Размери (Ш x В x Д) 680,0 x 68,0 x 115,0 мм
Диапазон на работна температура +5 °C до +35 °C
Диапазон на работна влажност 10 % до 75 %
УСИЛВАТЕ Л
Изходяща мощност
(25W x 2) + (25W x 2)
Поддържани формати за възпроизвеждане
(DTS 2.0 звук се възпроизвежда в DTS формат.)
ИЗХОДНА МОЩНОСТ НА БЕЗЖИЧНОТО УСТРОЙСТВО
Макс. мощност на предавателя при BT връзка
Обща консумация на енергия в режим на готовност (W)
Bluetooth
Метод за деактивиране на порт
БЕЛЕЖКИ
• Samsung Electronics Co., Ltd си запазва правото да променя спецификацията без
предизвестие.
• Теглото и размерите са приблизителни.
LPCM 2ch, Dolby Audio™
(поддържа Dolby® Digital), DTS
100 mW при 2,4 GHz – 2,4835 GHz
2,0W
Натиснете и задръжте бутона SOUND
MODE за повече от 5 секунди, за да
изключите функцията Bluetooth Power.
BUL - 30
Page 61

• С настоящото Samsung декларира, че това оборудване съответства на Директива
2014/53/EС. Пълният текст на ЕС декларацията за съответствие можете да намерите
на следния интернет адрес: http://www.samsung.com – отворете Поддръжка >
Търсене в „Поддръжка на продуктите“ и въведете името на модела. С това
оборудване може да се работи във всички държави от ЕС.
[Правилно изхвърляне на батериите в този продукт]
(Налично в страни със системи за разделно сметосъбиране)
Това обозначение върху батерията, ръководството или опаковката, показва, че батериите в този
продукт не бива да се изхвърлят с другите битови отпадъци в края на техния полезен живот. Където
са маркирани, химическите символи Hg, Cd или Pb показват, че батерията съдържа живак, кадмий
или олово над контролните нива в Директива 2006/66 на ЕО.
Ако батериите не се изхвърлят правилно, тези вещества могат да предизвикат увреждане на
човешкото здраве или на околната среда.
За да предпазите природните ресурси и за да съдействате за многократната употреба на
материалните ресурси, моля отделяйте батериите от другите видове отпадъчни продукти и ги
рециклирайте посредством Вашата локална система за безплатно връщане на батерии.
Правилно третиране на изделието след края на експлоатационния му живот
(Отпадъци, представляващи електрическо и електронно оборудване)
(Налично в страни със системи за разделно сметосъбиране)
Tози знак, поставен върху изделието, негови принадлежности или печатни материали, означава, че
продуктът и принадлежностите (например зарядно устройство, слушалки, USB кабел) не бива да се
изхвърлят заедно с другите битови отпадъци, когато изтече експлоатационният му живот. Отделяйте
тези устройства от другите видови отпадъци и ги предавайте за рециклиране. Спазвайки това
правило не излагате на опасност здравето на други хора и предпазвате околната среда от
замърсяване, предизвикано от безконтролно изхвърляне на отпадъци. Освен това, подобно
отговорно поведение създава възможност за повторно (екологично съобразно) използване на
материалните ресурси.
Домашните потребители трябва да се свържат с търговеца на дребно, от когото са закупили
изделието, или със съответната местна държавна агенция, за да получат подробни инструкции къде
и кога могат да занесат тези устройства за рециклиране, безопасно за околната среда.
Корпоративните потребители следва да се свържат с доставчика си и да проверят условията на
договора за покупка. Това изделие и неговите електронни принадлежности не бива да се сместват с
другите отпадъци на търговското предприятие.
За информация относно ангажиментите на Samsung по отношение на околната среда и
специфичните за продукта регулаторни задължения, например REACH, WEEE, батерии, посетете:
http://www.samsung.com/uk/aboutsamsung/samsungelectronics/corporatecitizenship/data_corner.html
РЕГЛАМЕНТ (ЕС) 2019/1782 НА КОМИСИЯТА
Изисквания за екопроектиране за външни електрозахранващи устройства :
www.samsung.com/global/ecodesign_component
BUL - 31
Page 62

SIGURNOSNE INFORMACIJE
SIGURNOSNA UPOZORENJA
DA BISTE SMANJILI OPASNOST OD ELEKTRIČNOG
UDARA, NE ODSTRANJUJTE POKLOPAC (ILI
POLEĐINU).
U UNUTRAŠNJOSTI NEMA DIJELOVA KOJE MOŽE
SERVISIRATI KORISNIK. PREPUSTITE
SERVISIRANJE KVALIFICIRANOM SERVISNOM
OSOBLJU.
Objašnjenje simbola koji se mogu nalaziti na vašem
proizvodu Samsung potražite u donjoj tablici.
OPREZ
OPASNOST OD
ELEK TRIČNOG UDAR A NE
OTVARAJTE
Ovaj simbol znači da je struja u
unutrašnjosti visokog napona. Opasno je
dolaziti u bilo kakav doticaj s unutarnjim
sklopovima proizvoda.
Ovaj simbol naznačuje da je uz uređaj
priložena važna dokumentacija o
njegovom radu i održavanju.
Proizvod II. razreda: Ovaj simbol
označava da nije potrebna sigurnosna
veza s uzemljenjem. Ako se taj simbol ne
nalazi na proizvodu s kabelom za
napajanje, proizvod MORA imati
pouzdan spoj na zaštitno uzemljenje.
UPOZORENJE
• Da biste smanjili opasnost od požara ili
električnog udara, ne izlažite uređaj kiši ili
vlazi.
OPREZ
• DA BISTE SPRIJEČILI ELEKTRIČNI UDAR,
NAMJESTITE ŠIROKE KONTAKTE UTIKAČA U
ŠIROK UTOR, UMETNUT DO KRAJA.
• Ovaj uređaj treba uvijek biti spojen na utičnicu
izmjenične struje sa zaštitnim uzemljenjem.
• Da biste isključili uređaj iz struje, morate
izvući utikač iz strujne utičnice. Stoga strujni
utikač treba biti spreman za rad.
• Ne izlažite ovaj uređaj kapanju ili prskanju
tekućina. Ne stavljajte predmete pune
tekućine, poput vaza, na uređaj.
• Da biste potpuno isključili ovaj uređaj, morate
izvući utikač za napajanje iz zidne utičnice.
Stoga utikač mora uvijek biti lako dostupan.
AC napon: Ovaj simbol označava da
nazivni napon označen navedenim
simbolom predstavlja AC napon.
DC napon: Ovaj simbol označava da
nazivni napon označen navedenim
simbolom predstavlja DC napon.
Oprez, pogledajte upute za upotrebu:
Ovaj simbol upućuje korisnika da potraži
dodatne informacije u pogledu
sigurnosti u korisničkom priručniku.
CRO - 2
Page 63

MJERE OPREZA
1. Osigurajte da napajanje izmjeničnom strujom
u kući bude kompatibilno sa zahtjevima
napajanja navedenim na identikacijskoj
naljepnici na dnu proizvoda. Proizvod
postavite vodoravno na prikladnu površinu
(namještaj) s dovoljno prostora za ventilaciju
7~10 cm. Pobrinite se da ventilacijski otvori
ne budu prekriveni. Ne postavljajte jedinicu
na pojačala ili drugu opremu koja se grije.
Ova jedinica dizajnirana je za neprekidnu
uporabu. Za potpuno isključivanje jedinice
izvucite strujni utikač iz zidne utičnice. Ako
ne namjeravate upotrebljavati jedinicu dulje
vrijeme, izvucite utikač.
2. Za vrijeme olujnog nevremena izvucite
utikač za napajanje izmjeničnom strujom iz
zidne utičnice. Vršni naponi zbog munja
mogu oštetiti uređaj.
3. Ne izlažite uređaj izravnoj sunčevoj svjetlosti
ili drugim izvorima topline. To može dovesti
do pregrijavanja i kvara uređaja.
4. Zaštitite proizvod od vlage (npr. vaze) i
prekomjerne topline (npr. kamin) ili od
opreme koja stvara jaka magnetska ili
električna polja. Isključite kabel za napajanje
iz izvora napajanja izmjeničnom strujom ako
jedinica neispravno radi. Proizvod nije
namijenjen za industrijsku uporabu. On je
namijenjen samo za osobnu uporabu. Ako su
proizvod ili disk pohranjeni na niskim
temperaturama, može doći do kondenzacije.
Ako tijekom zime prenosite jedinicu,
pričekajte oko 2 sata kako bi jedinica prije
uporabe dosegnula sobnu temperaturu.
5. Baterije korištene s ovim proizvodom
sadržavaju kemikalije koje su štetne za
okoliš. Ne odlažite baterije s otpadom
kućanstva. Baterije nemojte bacati u vatru.
Nemojte kratko spajati, rastavljati, ili
pregrijavati baterije. U slučaju zamjene
neodgovarajućim baterijama postoji
opasnost od eksplozije. Baterije mijenjajte
samo baterijama iste ili ekvivalentne vrste.
CRO - 3
Page 64

Čišćenje tkanine
Odmah uklonite prljavštinu ili mrlju s površine
proizvoda.
Uklanjanje i čišćenje će možda biti manje
djelotvorno za neke tvari ili ako se nečistoće
ostave dulje vrijeme.
OPREZ
• Koristite se usisivačem ili ljepljivim valjkom za
uklanjanje vlakana kako biste uklonili prašinu,
otiske šaka i slično.
– Neke četke za čišćenje mogu oštetiti
proizvod, ovisno o materijalima koje
sadržavaju.
– Ručnici i odjeća za čišćenje mogu ostaviti
vlakna ili prljavštinu na proizvodu.
• Nemojte se koristiti čavlom ili drugim alatima
kako biste prljavštinu uklonili struganjem. To
može oštetiti tkaninu.
• Kako biste uklonili mrlje od ulja ili tekućine,
upotrijebite čistu bijelu krpu navlaženu
vodom. Ako je mrlja i dalje prisutna, obrišite je
mješavinom vode i neutralnog deterdženta
(kao što su sredstva za pranje posuđa) i
krpom.
– Deterdžent ili sredstvo za čišćenje koje
nije neutralno može prouzročiti blijeđenje
boje ili oštećenje tkanine.
– Nakon čišćenja, upotrijebite suhu krpu ili
sušilo za kosu kako biste osušili to
područje.
– Nemojte primijeniti prekomjernu silu
kako biste izbjegli blijeđenje boje ili
oštećenje tkanine.
CRO - 4
Page 65

SADRŽAJ
01 Provjeravanje sastavnih dijelova 7
Umetanje baterija prije upotrebe daljinskog upravljača
(AA baterije X 2) ------------------------- 7
02 Prikaz proizvoda 8
Gornja ploča Soundbar sustava ------------------------- 8
Donja ploča sustava Soundbar ------------------------- 9
03 Upotreba daljinskog upravljača 10
Način upotrebe daljinskog upravljača
Podešavanje glasnoće sustava Soundbar s pomoću daljinskog
upravljača televizora ------------------------- 13
-------------------------
04 Povezivanje sustava Soundbar 14
Povezivanje napajanja
-------------------------
05 Žično povezivanje s televizorom 15
Povezivanje s pomoću optičkog kabela
-------------------------
06 Bežično povezivanje s televizorom 16
Povezivanje putem Bluetooth veze
-------------------------
07 Povezivanje vanjskog uređaja 18
Povezivanje s pomoću optičkog kabela
-------------------------
10
14
15
16
18
CRO - 5
Page 66

08 Povezivanje s mobilnim uređajem 19
Povezivanje putem Bluetooth veze
Upotreba funkcije Tap Sound
-------------------------
-------------------------
23
09 Instaliranje na zid 24
10
Postavljanje Soundbar sustava ispred televizora
24
11 Ažuriranje softvera 25
Inicijalizacija
-------------------------
12 Rješavanje problema 27
13 Licenca 28
14 Obavijest o Licenci za Uporabu Softvera
Otvorenog Koda 29
15 Važna Napomena Vezana uz Servis 29
16 Tehnički Podaci i Vodič 30
19
26
Tehnički podaci
-------------------------
CRO - 6
30
Page 67

01 PROVJERAVANJE SASTAVNIH DIJELOVA
PAIR
SOUND
MODE
VOL WOOFER
SOUNDBAR
Glavna jedinica sustava Soundbar Daljinski upravljač / baterije sustava Soundbar
Prilagodnik AC/DC
napajanja
(Soundbar)
Kabel napajanja
(Soundbar)
Optički kabel
• Trebate li više informacija o napajanju i potrošnji energije, pogledajte naljepnicu na proizvodu.
(Naljepnica: donja strana glavne jedinice sustava Soundbar)
• Kako biste kupili dodatne sastavne dijelove ili opcijske kabele, obratite se Servisnom centru
Samsung ili Korisničkoj podršci Samsung.
• Na donjem dijelu sustava Soundbar nalaze se dva otvora (veličine M4) namijenjena zidnom nosaču.
Zasebno kupite kompatibilni nosač i montirajte sustav Soundbar na zid prema svojim potrebama.
• Dizajn i specikacije mogu se promijeniti bez prethodne najave.
• Izgled dodataka može se neznatno razlikovati od izgleda na prethodnim ilustracijama.
Umetanje baterija prije upotrebe daljinskog upravljača (AA baterije X 2)
Gurnite stražnji poklopac u smjeru strelice dok se
potpuno ne ukloni. Umetnite 2 AA baterije (1,5 V)
usmjerene tako da im je polaritet ispravan. Vratite
stražnji poklopac natrag na mjesto.
CRO - 7
Page 68

02 PRIKAZ PROIZVODA
Gornja ploča Soundbar sustava
Namjestite proizvod tako
da logotip SAMSUNG bude
na vrhu.
LED indikator bljeska, postojano svijetli ili mijenja boju ovisno o trenutačnom načinu rada ili
statusu Soundbar sustava. Boja LED indikatora i broj lampica označuju aktivan način rada
kao što je opisano u nastavku.
Gornja ploča
LED
indikator
Napajanje Uključuje i isključuje napajanje.
Glasnoća Podešava glasnoću.
Izvor
• Kad priključite AC kabel, gumb napajanja počet će raditi za četiri do šest sekundi.
• Kad uključite ovaj uređaj, nastupit će odgoda od četiri do pet sekundi prije nego što se emitira zvuk.
• Ako se zvuk emitira i iz televizora i iz sustava Soundbar, idite na izbornik Postavke za zvuk televizora
i promijenite zvučnik televizora u Vanjski zvučnik.
W
Bijela LED
lampica
• Višebojna LED lampica mijenja se u Bijelo, Tirkizno, Zeleno, Crveno, Žuto, Narančasto,
Ljubičasto i Plavo ovisno o načinu rada ili statusu.
• Pritisnite gumb (Izvor) kako biste promijenili način rada. Svaki put kada promijenite
način rada, LED lampica zasvijetli u bijeloj boji, a zatim se isključi.
LED indikator
W
Bijela LED
lampica
Bijelo uključeno -> isključeno Bijelo uključeno -> isključeno
„Digital Audio In” „Bluetooth”
CRO - 8
M
Višebojna LED
lampica
W
Bijela LED
lampica
W
Bijela LED
lampica
Page 69

Donja ploča sustava Soundbar
SERVICE
(OPTICAL)
SERVICE
DC 24V
DIGITAL AUDIO IN
(OPTICAL)
SERVICE
DIGITAL AUDIO IN
(OPTICAL)
SERVICE
DIGITAL AUDIO IN
(OPTICAL)
DIGITAL AUDIO IN
(OPTICAL)
DC 24V
DIGITAL AUDIO IN
(OPTICAL)
SERVICE
DC 24V
DC 24V (Ulaz napajanja)
Povežite prilagodnik AC/DC napajanja.
DIGITAL AUDIO IN (OPTICAL)
Povežite sa digitalnim (optičkim) izlazom vanjskog uređaja.
SERVICE
Povežite s USB uređajem za pohranu kako biste nadogradili softver proizvoda.
• Prilikom isključivanja kabela za napajanje prilagodnika AC/DC napajanja iz zidne utičnice, povucite
utikač. Ne povlačite kabel.
• Ne spajajte ovaj uređaj ili druge komponente u AC utičnicu dok ne povežete sve komponente.
SERVICE
CRO - 9
Page 70

03 UPOTREBA DALJINSKOG UPRAVLJAČA
Način upotrebe daljinskog upravljača
Napajanje
Uključuje i isključuje sustav Soundbar.
PAIR
SOUND
MODE
VOL WOOFER
SOUNDBAR
LED
indikator
• Funkcija Auto Power Down
Jedinica se isključuje automatski u sljedećim situacijama:
– U načinu rada „Digital Audio In” / „Bluetooth ” ako
(Izvor)
Pritisnite za odabir izvora povezanog sa sustavom Soundbar.
(Prigušivanje)
Za isključivanje zvuka pritisnite gumb (Prigušivanje).
Za uključivanje zvuka pritisnite ga ponovo.
LED
indikator
Treperi u tirkiznoj
boji X1
Uključeno
nema audiosignala 20 minuta.
Treperi X uzastopno
Treperi u crvenoj
boji X3
Isključeno
CRO - 10
Page 71

SOUND MODE
Pritiskom gumba možete odabrati željeni način rada zvuka. Svaki put kada se promijeni način rada,
višebojna LED lampica treperi u bijeloj boji.
LED
indikator
• Standard
Reproducira izvorni zvuk.
• Smart
Analizira sadržaj u stvarnom vremenu i automatski pruža optimalno zvučno polje na temelju
sadržaja.
• Music
Za glazbene sadržaje pruža prirodniji zvuk, zvuk koji ispunjava prostor.
Bluetooth PAIR
Prebacite Soundbar sustav na način rada za uparivanje Bluetooth uređaja.
Kad pritisnete gumb, LED zaslon mijenja se kao što je prikazano u nastavku.
• Dok se uparivanje ne završi, višebojna LED lampica naizmjenice se mijenja u Crveno → Zeleno →
Plavo.
LED
indikator
p (Reprodukcija/Pauza)
Pritiskom tog gumba možete reproducirati ili pauzirati glazbu.
Treperi u bijeloj boji X1
„Standard” „Smart” „Music”
Treperi u sljedećim bojama:
Crveno → Zeleno → Plavo
Uparivanje
Treperi u tirkiznoj
boji X3
Povezivanje je završeno
Gore/Dolje/Lijevo/Desno
Pritisnite Gore/Dolje/Lijevo/Desno na gumbu kako biste odabrali ili postavili funkcije.
• Preskakanje glazbe
Pritisnite gumb Desno za odabir sljedeće glazbene datoteke. Pritisnite gumb Lijevo za odabir
prethodne glazbene datoteke.
CRO - 11
Page 72

(Upravljanje zvukom)
Pritiskom gumba možete odabrati željeni način rada zvuka. Željena stavka može se prilagoditi pomoću
gumba Gore/Dolje. Svaki put kada se promijeni način rada, višebojna LED lampica treperi u bijeloj boji.
LED
indikator
RAZINA WOOFER (BAS) ZVUČNIK A
Kako biste podesili woofer (bas) od -6 do +6, gurnite gumb prema gore ili prema dolje. Za postavljanje
razine glasnoće woofer (bas) zvučnika na 0 (zadana vrijednost), pritisnite gumb.
GLASNOĆA
Gurnite gumb prema dolje ili prema gore kako bistre prilagodili glasnoću.
LED
indikator
Treperi u bijeloj boji X1
„Treble” „Bass” „Sync”
Bijelo se pomiče nadesno X1
Povećavanje glasnoće
Bijelo se pomiče nalijevo X1
Smanjivanje glasnoće
CRO - 12
Page 73

Podešavanje glasnoće sustava Soundbar s pomoću daljinskog
WOOFER
VOL
WOOFER
WOOFER
upravljača televizora
Podesite glasnoću sustava Soundbar s pomoću daljinskog upravljača televizora.
• Ova se funkcija može upotrebljavati samo uz IC daljinski upravljač. Daljinski upravljači s
tehnologijom Bluetooth (daljinski upravljači koji zahtijevaju uparivanje) nisu podržani.
• Postavite zvučnik televizora na Vanjski zvučnik kako biste upotrijebili ovu funkciju.
• Proizvođači koji imaju podržanu ovu funkciju:
VIZIO, LG, Sony, Sharp, PHILIPS, PANASONIC, TOSHIBA, Hisense, RCA
1. Isključite sustav Soundbar.
2. Pritisnite i zadržite gumb WOOFER pet sekundi.
Svaki put kad gurnete gumb WOOFER prema gore i zadržite ga pet sekundi, način rada mijenja se
sljedećim redoslijedom: „Samsung-TV Remote” (zadani način rada), „Off-TV Remote”,
„All-TV Remote”.
Status LED indikatora mijenja se svaki put kad se promijeni način rada, kao što je prikazano ispod.
Gumb daljinskog upravljača LED indikator Status
Treperi u plavoj boji
X1
SOUND
MODE
5 Sec
VOL
„Samsung-TV Remote”
(zadani način rada)
Omogućite IC daljinski upravljač
Samsung TV-a.
Treperi u crvenoj
SOUND
MODE
5 Sec
boji X1
Onemogućite daljinski upravljač
televizora.
„Off-TV Remote”
Treperi u zelenoj
SOUND
MODE
5 Sec
VOL
boji X1
„All-TV Remote”
Omogućite IC daljinski upravljač treće
strane.
CRO - 13
Page 74

04 POVEZIVANJE SUSTAVA SOUNDBAR
SERVICE
DIGITAL AUDIO IN
SERVICE
DC 24V
DIGITAL AUDIO IN
(OPTICAL)
SERVICE
DIGITAL AUDIO IN
(OPTICAL)
SERVICE
DIGITAL AUDIO IN
(OPTICAL)
Povezivanje napajanja
Upotrijebite komponente napajanja kako biste priključili sustav Soundbar u mrežnu utičnicu sljedećim
redoslijedom:
• Trebate li više informacija o potrebnom napajanju i potrošnji električne energije, pogledajte
naljepnicu na proizvodu. (Naljepnica: donja strana glavne jedinice sustava Soundbar)
1. Najprije povežite kabel za napajanje s AC/DC prilagodnikom.
Povežite AC/DC prilagodnik (s kabelom za napajanje) sa Soundbar sustavom.
2. Priključite kabel za napajanje u zidnu utičnicu.
DC 24V
Prilagodnik AC/DC
napajanja
Kabel napajanja
Podnožje glavne jedinice Soundbar
NAPOMENE
• Ako isključite i ponovno uključite kabel za napajanje kad je proizvod uključen, Soundbar se
automatski uključuje.
• Prilagodnik AC/DC napajanja mora biti vodoravno položen na stol ili pod. Ako prilagodnik AC/DC
napajanja postavite tako da visi s ulazom AC kabela usmjerenim prema gore, voda ili drugi strani
predmeti mogu ući u prilagodnik i uzrokovati kvar.
(OPTICAL)
DC 24V
CRO - 14
Page 75

05 ŽIČNO POVEZIVANJE S TELEVIZOROM
SERVICE
DIGITAL AUDIO IN
Povezivanje s pomoću optičkog kabela
Kad je emitirani zvuk kodiran kao Dolby Digital, a „Audio format digitalnog izlaza” na vašem televizoru
postavljen je na PCM, preporučujemo promjenu ove opcije u Dolby Digital. Kad se opcije na televizoru
promijene, doživjet ćete bolju kvalitetu zvuka. (Izbornik televizora može upotrebljavati različite riječi za
Dolby Digital i PCM, ovisno o proizvođaču televizora.)
Popis za provjeru prije povezivanja
• Ako upotrebljavate optički kabel, a priključci imaju štitnike, obavezno uklonite štitnike.
Donji dio sustava Soundbar
1. Kad su televizor i Soundbar isključeni, povežite ulaz DIGITAL AUDIO IN (OPTICAL) na sustavu
Soundbar i izlazni priključak OPTICAL na televizoru s pomoću optičkog kabela, kao što je prikazano
na slici.
2. Uključite Soundbar i televizor.
3. Pritisnite gumb (Izvor) na gornjoj ploči ili na daljinskom upravljaču, a zatim odaberite način
„Digital Audio In”.
4. Zvuk televizora se čuje iz Soundbar sustava.
OPTICAL OUT
LED
indikator
Optički kabel
Gornji dio sustava Soundbar
Bijelo uključeno -> isključeno
CRO - 15
(OPTICAL)
„Digital Audio In”
Page 76

06 BEŽIČNO POVEZIVANJE S TELEVIZOROM
Povezivanje putem Bluetooth veze
Kad je Samsung TV povezan putem Bluetooth veze, možete čuti stereo zvuk bez
prethodnog mučenja s kabelima.
• Istodobno se može spojiti samo jedan Samsung TV.
• Može se povezati Samsung TV koji podržava Bluetooth. Provjerite specikacije
svojeg televizora.
Početno povezivanje
1.
Gumb za uparivanje Bluetooth
uređaja
LED indikator
PAIR
ILI
Kad je u načinu rada
„Bluetooth”
5 Sec
Treperi u sljedećim bojama:
Crveno → Zeleno → Plavo
Uparivanje
• Dok se uparivanje ne završi, višebojna LED lampica naizmjenice se
mijenja u Crveno → Zeleno → Plavo.
„Ready to connec t via
Bluetooth.”
Treperi u tirkiznoj
boji X3
Povezivanje je završeno
Kratki zvuk „Ding”.
2. Odaberite način rada Bluetooth na Samsung TV-u.
(Npr. Početna ( ) Postavke ( ) Zvuk Izlaz zvuka Popis Bluetooth zvučnika
[AV] Samsung Soundbar S4T-Series (Bluetooth))
3. Odaberite „[AV] Samsung Soundbar S4T-Series” s popisa na zaslonu televizora.
Dostupni sustav Soundbar označen je s „Potrebno je uparivanje” ili „Upareno je” na popisu
Bluetooth uređaja televizora. Za povezivanje Samsung TV-a sa sustavom Soundbar odaberite
poruku i uspostavite vezu.
• Kad je Samsung TV povezan, na prednjem zaslonu sustava Soundbar pojavit će se [Naziv
televizora] → „BT”.
4. Sada možete čuti zvuk sa Samsung TV-a na sustavu Soundbar.
• Ako postoji zapisnik povezivanja između Soundbar sustava i Samsung televizora, Soundbar
sustav automatski se povezuje mijenjanjem načina rada „Bluetooth.”
CRO - 16
Page 77

Ako se uređaj ne uspije povezati
• Ako postojeći Soundbar (npr. [AV] Samsung Soundbar S4T-Series) imate na popisu zvučnika na
Samsung TV-u, obrišite ga.
• Zatim ponovite korake od 1 do 3.
Prekidanje veze između sustava Soundbar i Samsung TV-a
Pritisnite gumb
načina osim načina „Bluetooth”.
• Za prekidanje veze potrebno je nešto vremena, jer Samsung TV mora dobiti odgovor od sustava
Soundbar. (Potrebno vrijeme može se razlikovati, ovisno o modelu Samsung TV-a.)
(Izvor)
na gornjoj ploči ili na daljinskom upravljaču kako biste odabrali neki od
Napomene o Bluetooth vezi
• Putem Bluetooth veze pronađite novi uređaj koji ćete povezati i koji udaljen najviše 1 m.
• Ako je prilikom povezivanja Bluetooth uređaja potreban PIN kod, unesite <0000>.
• Soundbar se automatski isključuje nakon 20 minuta u stanju Spreman.
• U sljedećim okolnostima Soundbar možda neće ispravno izvesti Bluetooth pretraživanje ili se neće
ispravno povezati:
– Ako je oko sustava Soundbar snažno električno polje.
– Ako je nekoliko Bluetooth uređaja upareno sa sustavom Soundbar.
– Ako je Bluetooth uređaj isključen, nije na mjestu ili ima kvar.
• Elektronički uređaji mogu prouzročiti radijske smetnje. Uređaji koji proizvode elektromagnetske
valove moraju se držati podalje od glavne jedinice sustava Soundbar – npr. mikrovalne pećnice,
bežični LAN uređaji itd.
CRO - 17
Page 78

07 POVEZIVANJE VANJSKOG UREĐAJA
SERVICE
DIGITAL AUDIO IN
Povezivanje s pomoću optičkog kabela
Donji dio sustava Soundbar
BD / DVD reproduktor /
pretvarač signala /
igraća konzola
OPTICAL OUT
LED
indikator
1. Kad su vanjski uređaj i Soundbar isključeni, povežite priključak DIGITAL AUDIO IN (OPTICAL) na
sustavu Soundbar i izlazni priključak OPTICAL na vanjskom uređaju pomoću optičkog kabela kao
što je prikazano na slici.
2. Uključite Soundbar i vanjski uređaj.
3. Odaberite način „Digital Audio In” pritiskom na gumb (Izvor) na gornjoj ploči ili na daljinskom
upravljaču.
4. Zvuk vanjskog uređaja emitira se iz sustava Soundbar.
Optički kabel
Gornji dio sustava Soundbar
Bijelo uključeno -> isključeno
(OPTICAL)
„Digital Audio In”
CRO - 18
Page 79

08 POVEZIVANJE S MOBILNIM UREĐAJEM
Povezivanje putem Bluetooth veze
Ako je mobilni uređaj povezan putem Bluetooth veze, možete čuti stereo zvuk bez
prethodnog mučenja s kabelima.
• Kad povežete upareni Bluetooth uređaj dok je sustav Soundbar isključen,
Soundbar se automatski uključuje.
Mobilni uređaj
Početno povezivanje
• Kad povezujete s novim Bluetooth uređajem, provjerite je li uređaj udaljen 1 m.
1.
Gumb za uparivanje Bluetooth
uređaja
LED indikator
PAIR
ILI
Kad je u načinu rada
„Bluetooth”
5 Sec
Treperi u sljedećim bojama:
Crveno → Zeleno → Plavo
Uparivanje
• Dok se uparivanje ne završi, višebojna LED lampica naizmjenice se
mijenja u Crveno → Zeleno → Plavo.
„Ready to connec t via
Bluetooth.”
Treperi u tirkiznoj
boji X3
Povezivanje je završeno
Kratki zvuk „Ding”.
2. S popisa koji se pojavi na vašem uređaju odaberite „[AV] Samsung Soundbar S4T-Series”.
3. Preko sustava Soundbar reproducirajte glazbene datoteke s uređaja povezanog Bluetooth vezom.
U slučaju neuspješnog povezivanja uređaja
• Ako postojeći Soundbar (npr. „[AV] Samsung Soundbar S4T-Series”) imate na popisu zvučnika
na mobilnom uređaju, izbrišite ga.
• Ponovite korake 1 i 2.
CRO - 19
Page 80

Napomene o Bluetooth vezi
• Putem Bluetooth veze pronađite novi uređaj koji ćete povezati i koji udaljen najviše 1 m.
• Ako je prilikom povezivanja Bluetooth uređaja potreban PIN kod, unesite <0000>.
• Soundbar se automatski isključuje nakon 20 minuta u stanju Spreman.
• U sljedećim okolnostima Soundbar možda neće ispravno izvesti Bluetooth pretraživanje ili se neće
ispravno povezati:
– Ako je oko sustava Soundbar snažno električno polje.
– Ako je nekoliko Bluetooth uređaja upareno sa sustavom Soundbar.
– Ako je Bluetooth uređaj isključen, nije na mjestu ili ima kvar.
• Elektronički uređaji mogu prouzročiti radijske smetnje. Uređaji koji proizvode elektromagnetske
valove moraju se držati podalje od glavne jedinice sustava Soundbar – npr. mikrovalne pećnice,
bežični LAN uređaji itd.
• Soundbar podržava SBC podatke (44,1 kHz, 48 kHz).
• Povežite samo na Bluetooth uređaj koji podržava funkciju A2DP (AV).
• Soundbar ne možete povezati s Bluetooth uređajem koji podržava samo HF (Hands Free) funkciju.
• Kad Soundbar povezujete s Bluetooth uređajem, postavite ih što bliže.
• Što su Soundbar i Bluetooth uređaj udaljeniji jedan od drugog, to će kvaliteta zvuka biti lošija.
Bluetooth veza može se prekinuti ako uređaji nisu u efektivnom rasponu.
• Bluetooth veza možda neće raditi kako treba u područjima s lošim prijemom.
• Na Bluetooth uređaju može doći do smetnji ili kvara u sljedećim uvjetima:
– kad je tijelo u kontaktu s primopredajnikom signala na Bluetooth uređaju ili sustavu Soundbar.
– u kutovima ili kada postoji prepreka u blizini, poput zida ili pregrade, gdje se mogu dogoditi
promjene napona.
– kad su izloženi radiosmetnjama koje uzrokuju drugi proizvodi koji rade na istim frekvencijskim
rasponima, kao što su medicinska oprema, mikrovalne pećnice i bežični LAN uređaji.
– prepreke poput vrata i zidova i dalje mogu utjecati na kvalitetu zvuka čak i kad su uređaji
unutar efektivnog raspona.
• Napominjemo da se vaš Soundbar ne može upariti s drugim Bluetooth uređajima dok se
upotrebljava opcija Bluetooth.
• Ovaj bežični uređaj može uzrokovati električne smetnje tijekom rada.
CRO - 20
Page 81

Odspajanje Bluetooth uređaja od sustava Soundbar
Uređaj Bluetooth možete odvojiti od sustava Soundbar. Upute potražite u korisničkom priručniku za
uređaj Bluetooth.
• Sustav Soundbar će se odvojiti.
• Ako Soundbar nije povezan s Bluetooth uređajem, višebojni LED indikator na sustavu Soundbar
treperi „Crveno” tri puta.
Prekidanje veze između uređaja Soundbar i Bluetooth uređaja
Pritisnite gumb
načina osim načina „Bluetooth”.
• Prekidanje veze traje jer uređaj Bluetooth mora primiti odgovor od uređaja Soundbar.
(Potrebno vrijeme je različito, ovisno o modelu uređaja Bluetooth.)
• Ako Soundbar nije povezan s Bluetooth uređajem, višebojni LED indikator na sustavu Soundbar
treperi „Crveno” tri puta.
(Izvor)
na gornjoj ploči ili na daljinskom upravljaču kako biste odabrali neki od
CRO - 21
Page 82

Veza Bluetooth Multi
Sustav Soundbar može se povezati s 2 (dva) Bluetooth uređaja istodobno.
Bluetooth uređaj A Bluetooth uređaj B
1. Povežite sustav Soundbar najviše s dva Bluetooth uređaja. (Pogledajte stranicu 19.)
2. Reproducirajte glazbu s jednog od povezanih Bluetooth uređaja dok su povezana dva uređaja.
3. Kako biste reproducirali glazbu s Bluetooth uređaja „B” dok reproducirate s uređaja „A”, pauzirajte
ili zaustavite reprodukciju na uređaju „A”, a zatim pokrenite reprodukciju na uređaju „B”.
• Uređaj se neće prebaciti kad reproducirate glazbu s uređaja „B” ako prethodno ne pauzirate ili
zaustavite uređaj „A”.
Uparivanje više Bluetooth uređaja
Kako upariti više uređaja sa sustavom Soundbar
1. Uključite Soundbar.
2. Na bilo kojem izvoru pritisnite i zadržite gumb (Izvor) više od pet sekundi kako bi Soundbar
prešao u način „Uparivanje Bluetooth uređaja”, zatim na Bluetooth uređaju uključite Bluetooth te
odaberite Soundbar na popisu dostupnih uređaja. Soundbar će se automatski povezati s Bluetooth
uređajem.
3. Istom metodom može se upariti i povezati sa sustavom Soundbar i drugi Bluetooth uređaj.
Ako pokušate povezati treći uređaj, povezani uređaj koji ne reproducira zvuk izgubit će Bluetooth
vezu, ali će ipak ostati uparen sa sustavom Soundbar.
4. Istom metodom možete upariti najviše osam Bluetooth uređaja, ali samo dva zadnja mogu
istodobno ostati povezana sa sustavom Soundbar.
NAPOMENE
• Samo jedan Samsung TV ili dva Bluetooth uređaja mogu istodobno biti povezana sa sustavom
Soundbar.
• Sustav Soundbar prekinut će vezu s Bluetooth uređajima kad primi zahtjev za povezivanje od
Samsung TV-a.
CRO - 22
Page 83

Upotreba funkcije Tap Sound
Dodirnite sustav Soundbar pomoću mobilnog uređaja kako biste reproducirali zvuk sadržaja na
mobilnom uređaju putem sustava Soundbar.
• Ovisno o mobilnom uređaju, ta funkcija možda neće biti podržana.
• Ta funkcija je kompatibilna samo sa Samsung mobilnim uređajima koji imaju sustav Android 8.1 ili noviji.
Aplikacija SmartThings
Mobilni uređaj
1. Uključite funkciju Tap Sound na mobilnom uređaju.
• U nastavku, pogledajte odjeljak „Postavljanje funkcije Tap Sound” kako biste saznali više o
tome kako uključiti tu funkciju.
2. Dodirnite sustav Soundbar pomoću mobilnog uređaja. U prikazanom prozoru poruke odaberite „Pokreni
sada”. Uspostavlja se veza između mobilnog uređaja i sustava Soundbar putem Bluetooth veze.
3. Reproducirajte zvuk sadržaja sa mobilnog uređaja putem sustava Soundbar.
• Tom se funkcijom mobilni uređaj povezuje sa sustavom Soundbar putem Bluetooth veze
otkrivanjem vibracije do koje dolazi kada uređaj dodirne sustav Soundbar.
• Pobrinite se da mobilni uređaj ne udari o oštri kut sustava Soundbar. Može doći do pojave
ogrebotina ili oštećenja na sustavu Soundbar ili mobilnom uređaju.
• Preporučuje se da mobilni uređaj bude zaštićen maskom. Lagano dodirnite široku površinu u
gornjem dijelu sustava Soundbar bez upotrebe prevelike sile.
• Da biste se koristili tom funkcijom, ažurirajte aplikaciju SmartThings na najnoviju verziju.
Ovisno o verziji aplikacije, ta funkcija možda neće biti podržana.
Gornji dio sustava Soundbar
Postavljanje funkcije Tap Sound
Upotrijebite aplikaciju SmartThings da biste uključili funkciju Tap View, Tap Sound.
1. Pokrenite aplikaciju SmartThings na mobilnom uređaju.
2. Odaberite ( → ) na zaslonu aplikacije SmartThings koji je prikazan na mobilnom uređaju.
3. Postavite funkciju „Tap View, Tap Sound” na uklj. da biste funkciji omogućili rad kada se mobilni
uređaj približi sustavu Soundbar. Funkcija je uključena.
NAPOMENE
• Kada je mobilni uređaj u načinu uštede energije, funkcija Tap Sound ne radi.
• Funkcija Tap Sound možda neće raditi ako se u blizini sustava Soundbar nalaze uređaji koji
prouzrokuju radiofrekvencijske smetnje, kao što su električni uređaji. Pobrinite se da su uređaji koji
mogu prouzročiti radiofrekvencijske smetnje dovoljno udaljeni od sustava Soundbar.
CRO - 23
Page 84

09 INSTALIRANJE
10 POSTAVLJANJE
NA ZID
Samsung ne podržava zidni nosač.
Ako želite, dodatno možete kupiti zidni nosač i
postaviti zvučnik na zid.
Razmatranja u vezi s kupnjom
• Nosivost : Preko 7,6 Kg
• Veličina rupe : M4 - 10, navojni umetak
NAPOMENE
• S obzirom da je postavljanje na zid dodatna
opcija, odgovarajući pribor morate kupite
posebno.
• Prije postavljanja zidnog nosača provjerite
nosivost zida. Ako nosivost zida nije
dovoljna, ojačajte ga prije postavljanja
zidnog nosača i zvučnika na zid.
• Tvrtka Samsung nije odgovorna za
oštećenje proizvoda nastalo uslijed
neodgovarajućeg postavljanja proizvoda.
• Pazite da zvučnik ne instalirati položen ili
naopako.
SOUNDBAR
SUSTAVA ISPRED
TELEVIZORA
3 cm ili više
Postavljanje sredine Soundbar sustava na sredinu
televizora kao što je naznačeno na slici.
Postavite sustav Soundbar najmanje 3 cm dalje
od televizora.
NAPOMENE
CRO - 24
• Vodite računa da sustav Soundbar postavite
na ravnu i čvrstu površinu.
• Nedovoljna udaljenost od televizora može
uzrokovati probleme s akustikom.
Page 85

11 AŽURIRANJE
SOFTVERA
Važno: Funkcijom ažuriranja brišu se sve
korisničke postavke. Preporučujemo da zapišete
sve svoje postavke kako biste ih mogli
jednostavno ponovno postaviti nakon ažuriranja.
Donji dio sustava Soundbar
DIGITAL AUDIO IN
(OPTICAL)
SERVICE
SERVICE
DC 24V
1. Povežite USB štapić s računalom.
Važno: Vodite računa da na USB štapiću
nema glazbenih datoteka. To može
uzrokovati neuspješno ažuriranje rmvera.
2. Idite na mrežno mjesto Samsung na adresi
(samsung.com) odaberite opciju Unesite
broj modela, a zatim unesite model sustava
Soundbar. Odaberite opciju Priručnici i
preuzimanja i preuzmite najnoviju softversku
datoteku.
3. Spremite preuzeti softver na USB uređaj za
pohranu podataka i odaberite „Izdvojiti
ovdje” kako biste raspakirali mapu.
4. Uključite sustav Soundbar i u priključak
SERVICE umetnite USB štapić koji sadržava
ažuriranje softvera.
5. Nakon što uključite sustav Soundbar u roku
od tri minute, započet će ažuriranje i ciklus
treperenja pet led indikatora utvrđenim
redoslijedom. Tada će svih 5 led lampica
svijetliti u bijeloj boji, a zatim će ciklus
treperenja 5 led lampica ponovo započeti.
Kada se ažuriranje završi, sustav Soundbar će
se automatski ponovo pokrenuti.
Bijela se kreće slijeva udesno i
LED
indikator
zdesna ulijevo
• Ovaj proizvod ima funkciju DUAL BOOT.
Ako se rmver ne ažurira, možete ga
ažurirati ponovno.
CRO - 25
Page 86

Ako LED indikatori ne trepere
utvrđenim redoslijedom
1. Isključite Soundbar, isključite i zatim ponovno
priključite USB uređaj za pohranu podataka
na kojem se nalaze datoteke za ažuriranje u
SERVICE priključak na sustavu Soundbar.
2. Isključite kabel napajanja sustava Soundbar,
ponovo ga uključite, zatim uključite
Soundbar.
NAPOMENE
• Ažuriranje rmvera možda neće uspjeti ako
su audiodatoteke koje podržava sustav
Soundbar pohranjene na USB uređaju za
pohranu podataka.
• Nemojte isključivati napajanje ili uklanjati
USB uređaj tijekom primjene ažuriranja.
Glavna će se jedinica automatski isključiti po
završetku ažuriranja rmvera.
• Nakon dovršetka ažuriranja pokreće se
korisničko postavljanje u sustavu Soundbar
kako biste mogli ponovno postaviti svoje
postavke. Preporučujemo da zapišete sve
svoje postavke kako biste ih mogli
jednostavno ponovno postaviti nakon
ažuriranja. Ako se softver ne uspje ažurirati,
provjerite je li USB štapić oštećen.
• Korisnici operativnog sustava Mac kao oblik
USB-a moraju upotrijebiti MS-DOS (FAT).
• Ažuriranje putem USB-a možda neće biti
dostupno, što ovisi o proizvođaču USB uređaja
za pohranu podataka.
Inicijalizacija
5 Sec
Kad je Soundbar uključen, istodobno pritisnite
gumbe (Glasnoća) na kućištu i držite ih tako
najmanje pet sekundi. LED zaslon mijenja se kao
što je prikazano u nastavku, a zatim se Soundbar
sustav pokreće.
Bijela se kreće slijeva udesno i
zdesna ulijevo
LED
indikator
Treperi u tirkiznoj boji X3
OPREZ
• Sve su postavke na sustavu Soundbar
inicijalizirane. Ovo izvedite samo ako je
potrebna inicijalizacija.
CRO - 26
Page 87

12 RJEŠAVANJE PROBLEMA
Prije traženja pomoći provjerite sljedeće.
U slučaju isključenja napajanja
; Provjerite je li kabel napajanja sustava
Soundbar ispravno umetnut u utičnicu.
U slučaju nepravilnog rada funkcija
; Nakon što isključite kabel napajanja iz
utičnice, umetnite ga ponovo.
; Uklonite kabel za napajanje s vanjskog
uređaja i pokušajte ponovno.
; Ako nema signala, Soundbar se automatski
isključuje nakon nekog vremena. Uključite
napajanje.
U slučaju kvara daljinskog upravljača
; Provjerite je li daljinski upravljač unutar
dometa sustava Soundbar.
; Zamijenite baterije novim.
U slučaju ako sustav Soundbar ne emitira zvuk
; Glasnoća sustava Soundbar suviše je nisko
ili je prigušen zvuk. Prilagodite glasnoću.
; Kad je povezan vanjski uređaji (STB,
Bluetooth uređaj, mobilni uređaj itd.),
prilagodite glasnoću vanjskog uređaja.
; Za emitiranje zvuka iz televizora odaberite
Soundbar. (Samsung TV: Početna ( ) →
Postavke ( ) → Zvuk → Izlaz zvuka →
Odaberite Soundbar)
; Veza kabela sa sustavom Soundbar možda
nije labava. Uklonite kabel i povežite ga
ponovno.
; Uklonite kabel za napajanje u potpunosti,
ponovno ga povežite i uključite napajanje.
; Pokrenite proizvod i pokušajte ponovno.
(pogledajte stranicu 26).
U slučaju nemogućnosti uspostavljanja
Bluetooth veze
; Prilikom povezivanja novog uređaja,
prebacite na Bluetooth uparivanje radi
povezivanja. (Pritisnite gumb PAIR na
daljinskom upravljaču ili pritisnite gumb
(Izvor) na kućištu najmanje pet
sekundi.)
; Ako je Soundbar povezan s drugim
uređajem, najprije prekinite vezu s tim
uređajem kako biste promijenili uređaj.
; Ponovo ga povežite nakon brisanja popisa
Bluetooth zvučnika s uređaja. (Samsung
TV: Početna ( ) → Postavke ( ) → Zvuk
→ Izlaz zvuka → Popis Bluetooth zvučnika)
; Uklonite i ponovno povežite utikač, zatim
pokušajte ponovno.
; Pokrenite proizvod i pokušajte ponovno.
(pogledajte stranicu 26).
CRO - 27
Page 88

U slučaju prekida emitiranja zvuka s
Bluetooth uređaja
; Zvuk se može prekinuti zbog smetnji koje
uzrokuju druge radijske frekvencije ili
elektronički uređaji u blizini. Takve uređaje
držite podalje od sustava Soundbar kako
biste izbjegli radiosmetnje. Primjer:
mikrovalne pećnice.
; Zvuk se može prekinuti jer je uređaj za
povezivanje daleko od sustava Soundbar.
Približite uređaj sustavu Soundbar.
; Do prekida zvuka može doći ako je dio
vašega tijela u dodiru s Bluetooth
primopredajnikom ili je proizvod postavljen
na metalnom namještaju. Provjerite
okruženje i uvjete upotrebe.
U slučaju da se Soundbar ne uključi čim se
uključi televizor
; Kad isključite Soundbar dok gledate
televizor, onemogućena je sinkronizacija
napajanja s televizorom. Najprije isključite
televizor.
13 LICENCA
Manufactured under license from Dolby
Laboratories. Dolby, Dolby Audio, and the
double-D symbol are trademarks of Dolby
Laboratories.
For DTS patents, see http://patents.dts.com.
Manufactured under license from DTS, Inc. DTS,
the Symbol, DTS in combination with the
Symbol, and DTS 2.0 Channel are registered
trademarks or trademarks of DTS, Inc. in the
United States and/orother countries. DTS, Inc.
All Rights Reserved.
The Bluetooth® word mark and logos are
registered trademarks owned by the Bluetooth
SIG, Inc. and any use of such marks by Samsung
Electronics Co., Ltd. is under license. Other
trademarks and trade names are those of their
respective owners.
CRO - 28
Page 89

14 OBAVIJEST O
LICENCI ZA
UPORABU
SOFTVERA
OTVORENOG
KODA
Želite li poslati upite i zahtjeve u vezi sa softverom
otvorenog koda, obratite se grupi Samsung Open
Source (http://opensource.samsung.com)
15 VAŽNA
NAPOMENA
VEZANA UZ
SERVIS
• Slike u ovom korisničkom priručniku služe kao
samo kao referenca i mogu se razlikovati od
stvarnog izgleda proizvoda.
• Moguća je naplata administrativne pristojbe u
slučaju
(a) poziva inženjera na vaš zahtjev, a nema
oštećenja na proizvodu (tj. ako niste
pročitali korisnički priručnik)
(b) da donesete jedinicu na popravak u servis,
a nema oštećenja na proizvodu (tj. ako
niste pročitali korisnički priručnik)
• S visinom administrativne pristojbe bit ćete
upoznati prije poduzimanja bilo kakvih radnji
ili kućnog posjeta.
CRO - 29
Page 90

16 TEHNIČKI PODACI I VODIČ
Tehnički podaci
Naziv modela HW-S40T / S41T
Težina 1,9 kg
Dimenzije (Š x V x D) 680,0 x 68,0 x 115,0 mm
Raspon radne temperature +5°C do +35°C
Raspon vlažnosti 10 % ~ 75 %
POJAČALO
Nazivna izlazna snaga
(25W x 2) + (25W x 2)
Podržani formati za reprodukciju
(Zvuk sustava DTS 2.0 reproducira se u DTS
formatu.)
IZLAZNA SNAGA BEŽIČNOG UREĐAJA
Maks. snaga BT odašiljača
Ukupna potrošnja energije u stanju mirovanja (W)
Bluetooth
Način isključivanja ulaza
NAPOMENE
• Samsung Electronics Co., Ltd pridržava pravo promjene specikacija bez prethodne obavijesti.
• Težina i dimenzije su približni.
Pritisnite i držite gumb SOUND MODE dulje od
5 sekundi da biste isključili funkciju Bluetooth
LPCM 2ch, Dolby Audio™
(podržava Dolby® Digital), DTS
100mW
pri
2,4GHz – 2,4835GHz
2,0W
Power.
CRO - 30
Page 91

• Tvrtka Samsung ovime izjavljuje da je ovaj proizvod usklađen sa zahtjevima Direktive
2014/53/EU.
Potpuni tekst Izjave o usklađenosti sa zahtjevima EU-a dostupan je na sljedećoj
web-adresi: http://www.samsung.com, idite na Podrška > Pretraživanje podrške za
proizvod i unesite naziv modela.
Ova oprema smije se upotrebljavati u svim zemljama EU-a.
[Ispravno odlaganje baterija iz ovog proizvoda]
(Primjenjivo Primjenjuje se u zemljama s posebnim sustavima za prikupljanje otpada)
Ova oznaka na bateriji, priručniku ili pakiranju ukazuje na to da se istrošene baterije iz ovog proizvoda ne
smiju odlagati s ostalim kućanskim otpadom. Kemijski simboli Hg, Cd ili Pb označuju da baterija sadrži živu,
kadmij ili olovo u količinama višim od referentnih razina navedenih u dokumentu Europske unije “EC
Directive 2006/66”. Ukoliko baterije nisu ispravno odložene, navedene tvari mogu narušiti zdravlje ljudi ili
naštetiti okolišu.
Radi zaštite prirodnih resursa i promicanja ponovne upotrebe materijala, molimo vas da odvojite baterije od
ostalih vrsta otpada i reciklirajte ih putem lokalnog, besplatnog sustava za odlaganje baterija.
Ispravno odlaganje proizvoda
(Električni i elektronički otpad)
(Primjenjivo Primjenjuje se u zemljama s posebnim sustavima za prikupljanje otpada)
Ova oznaka na proizvodu, dodatnoj opremi ili u literaturi ukazuje na to da se proizvod i njegova elektronička
oprema (npr., punjač, slušalice, USB kabel) ne bi trebali odlagati s ostalim kućanskim otpadom na kraju
radnog vijeka. Da biste spriječili moguću štetu za okoliš ili ljudsko zdravlje nekontroliranim odlaganjem
otpada, odvojite ovaj predmet od ostalih vrsta otpada i odgovorno reciklirajte kako biste promicali održivu
ponovnu upotrebu materijalnih resursa.
Korisnici u kućanstvima trebali bi kontaktirati prodavača kod kojega su kupili proizvod ili ured lokalne vlasti
za pojedinosti o tome gdje i kako se ovaj predmetmože odnijeti kako bi recikliranje bilo sigurno za okoliš.
Korisnici u tvrtkama trebaju kontaktirati dobavljača i provjeriti uvjete i odredbe kupovnog ugovora. Ovaj
proizvod i njegova elektronička oprema ne smije se miješati s drugim komercijalnim otpadom.
Informacije o obvezama tvrtke Samsung u pogledu zaštite okoliša i određenim zakonskim obvezama u vezi
s proizvodom, npr. REACH, WEEE, baterije, možete potražiti na adresi:
http://www.samsung.com/uk/aboutsamsung/samsungelectronics/corporatecitizenship/data_corner.html
UREDBA KOMISIJE (EU) 2019/1782
Zahtjevi za ekološki dizajn za vanjska napajanja :
www.samsung.com/global/ecodesign_component
CRO - 31
Page 92

BEZPEČNOSTNÍ INFORMACE
BEZPEČNOSTNÍ VAROVÁNÍ
ABYSTE PŘEDEŠLI RIZIKU ÚRAZU ELEKTRICKÝM
PROUDEM, NEODNÍMEJTE ZADNÍ KRYT
PŘÍSTROJE.
UVNITŘ PŘÍSTROJE NEJSOU ŽÁDNÁ SERVISNÍ
MÍSTA. OPRAVU SVĚŘTE KVALIFIKOVANÉMU
SERVISNÍMU TECHNIKOVI.
Popis symbolů, které se mohou vyskytovat na
vašem produktu Samsung, najdete v níže
uvedené tabulce.
VÝSTRAHA
RIZIKO ÚR AZU ELEKTRICK ÝM
PROUDEM. NEOTEVÍREJTE!
Tento symbol znamená, že součásti
uvnitř jsou pod vysokým napětím.
Jakýkoli kontakt svnitřní částí přístroje
je nebezpečný.
Tento symbol označuje, že ktomuto
přístroji byla přiložena důležitá
dokumentace týkající se provozu
aúdržby.
Výrobek třídyII: Tento symbol indikuje,
že zařízení nevyžaduje ochranné
elektrické uzemnění.
Nenachází-li se na produktu s napájecím
kabelem tento symbol, MUSÍ být
produkt spolehlivě uzemněn.
VAROVÁNÍ
• Tento přístroj musí být vždy připojen k síťové
zásuvce, která je řádně uzemněna.
VÝSTRAHA
• ABYSTE PŘEDEŠLI RIZIKU ÚRAZU
ELEKTRICKÝM PROUDEM, ZASUŇTE
ŠIROKOU ČÁST VIDLICE SÍŤOVÉ ZÁSTRČKY
DO ŠIROKÉHO VÝŘEZU AŽ NA DORAZ.
• Tento přístroj musí být vždy připojen k síťové
zásuvce, která je řádně uzemněna.
• Pro odpojování přístroje od sítě je třeba
odpojit síťový napájecí kabel ze síťové
zástrčky, a z tohoto důvodu musí být tato
zástrčka snadno přístupná.
• Nevystavujte tento přístroj kapající nebo
stříkající vodě. Neumisťujte na přístroj nádoby
naplněné kapalinou, například vázy.
• Pro úplné vypnutí přístroje je nutné
vytáhnout napájecí zásuvku ze zástrčky.
Napájecí zásuvka proto musí být vždy dobře
přístupná.
Střídavé napětí (AC): Tento symbol
indikuje, že jmenovité napětí označené
tímto symbolem je střídavé napětí.
Stejnosměrné napětí (DC): Tento symbol
indikuje, že jmenovité napětí označené
tímto symbolem je stejnosměrné napětí.
Upozornění, nahlédněte do pokynů
kpoužití: Tento symbol radí uživateli,
aby nahlédl do uživatelské příručky, kde
najde další informace související
sbezpečností.
CZE - 2
Page 93

BEZPEČNOSTNÍ
OPATŘENÍ
1. Ujistěte se, že zdroj napětí AC ve vašem
domě odpovídá požadavkům napájení
uvedeným na identikačním štítku
nalepeném na spodní straně produktu.
Přístroj instalujte ve vodorovné poloze na
vhodný podklad (např. nábytek) s
dostatečným prostorem okolo pro větrání 7
– 10 cm. Neblokujte ventilační otvory.
Neumisťujte přístroj na zesilovače ani jiná
zařízení, která se mohou zahřívat. Přístroj je
navržen pro nepřetržité používání.
Pro úplné vypnutí přístroje odpojte napájecí
zástrčku od zásuvky. Pokud se chystáte
přístroj delší dobu nepoužívat, odpojte jej od
zásuvky.
2. Během bouřky odpojte zástrčku napájecího
kabelu ze zásuvky elektrorozvodné sítě.
Napěťové špičky způsobené blesky by mohly
přístroj poškodit.
3. Přístroj nevystavujte přímému slunečnímu
světlu nebo jiným zdrojům tepla. Hrozí
přehřátí a následná porucha přístroje.
4. Přístroj chraňte před vlhkostí (např. vázy) a
horkem (např. krb) a neumisťujte jej do
blízkosti zdrojů silných magnetických nebo
elektrických polí. V případě poruchy přístroje
odpojte napájecí kabel od elektrorozvodné
sítě. Přístroj není určen k průmyslovému
využití. Používejte jej pouze pro osobní účely.
Pokud byl přístroj uložen v chladném
prostředí, může dojít ke kondenzaci. Při
přepravě přístroje v zimním období počkejte
před jeho opětovným použitím přibližně 2
hodiny, než získá pokojovou teplotu.
5. Baterie používaná v tomto přístroji obsahuje
chemikálie, které mohou poškodit životní
prostředí. Nevyhazujte použité baterie do
běžného domovního odpadu. Nevyhazujte
baterie do ohně. Nezkratujte, nerozebírejte
nebo nepřehřívejte baterie. V případě
nesprávné výměny baterie hrozí riziko
výbuchu. Baterii vyměňujte pouze za baterii
stejného typu.
CZE - 3
Page 94

Čištění tkaniny
Odstraňte neprodleně z povrchu produktu
veškeré nečistoty nebo skvrny.
Odstraňování a čištění může být méně účinné v
případě některých látek nebo po delší době.
VÝSTRAHA
• Pro odstranění prachu, otisků prstů a
obdobných nečistot použijte vysavač nebo
lepicí váleček.
– Některé čisticí kartáče mohou produkt
poškodit díky materiálům, které obsahují.
– Utěrky a čisticí textilie mohou na
produktu zanechávat vlákna nebo
nečistoty.
• Pro odstranění nečistot nepoužívejte nehet
ani jiné nástroje. Může dojít k poškození
tkaniny.
• Chcete-li odstranit skvrny od oleje nebo
kapaliny, použijte čistou bílou utěrku
navlhčenou vodou. Pokud skvrna zůstane,
otřete ji roztokem neutrálního čisticího
prostředku (například na mytí nádobí) ve
vodě a utěrkou.
– Čisticí prostředek nebo přípravek, který
není neutrální, může způsobit změnu
zabarvení nebo poškození tkaniny.
– Po očištění místo osušte suchou utěrkou
nebo vysoušečem na vlasy.
– Abyste zabránili změně barvy nebo
poškození tkaniny, nepoužívejte
nadměrnou sílu.
CZE - 4
Page 95

OBSAH
01 Kontrola komponent 7
Vložení baterií před používáním dálkového ovladače (2baterie AA) ------------------------- 7
02 Přehledproduktu 8
Horní panel zařízení Soundbar ------------------------- 8
Dolní panel zařízení Soundbar
------------------------- 9
03 Používánídálkovéhoovladače 10
Jak používat dálkový ovladač
Nastavení hlasitosti zařízení Soundbar pomocí dálkového
ovladače televizoru
------------------------- 13
-------------------------
04 PřipojenízařízeníSoundbar 14
Zapojení do elektřiny
-------------------------
05 Používáníkabelovéhopřipojeníktelevizoru 15
Připojení pomocí optického kabelu
-------------------------
06 Používáníbezdrátovéhopřipojeníktelevizoru 16
Připojení přes Bluetooth
-------------------------
07 Připojeníexterníhozařízení 18
Připojení pomocí optického kabelu
-------------------------
10
14
15
16
18
CZE - 5
Page 96

08 Připojení mobilního zařízení 19
Připojení přes Bluetooth
Používání Tap Sound
-------------------------
-------------------------
23
09 Instalace na stěnu 24
10 Instalace zařízení Soundbar před televizorem 24
11 Aktualizace softwaru 25
Inicializace
-------------------------
12 Odstraňování potíží 27
13 Licence 28
14 Poznámka k licenci otevřeného softwaru 29
15 Důležité upozornění k servisu 29
16 Technické údaje a další informace 30
Technické údaje
-------------------------
30
19
26
CZE - 6
Page 97

01 KONTROLA KOMPONENT
Hlavní jednotka zařízení Soundbar Dálkový ovladač / baterie kzařízení Soundbar
PAIR
SOUND
MODE
VOL WOOFER
SOUNDBAR
Adaptér AC/DC
(Soundbar)
Napájecí kabel
(Soundbar)
Optick ý kabel
• Další informace týkající se napájecího zdroje aspotřeby energie najdete na štítku produktu. (Štítek:
spodní strana hlavní jednotky zařízení Soundbar)
• Chcete-li zakoupit další nebo volitelné kabely, kontaktujte servisní středisko společnosti Samsung
nebo oddělení péče ozákazníky společnosti Samsung.
• Ve spodní části zařízení Soundbar jsou dva otvory pro montáž na stěnu (velikost M4). Samostatně
zakupte kompatibilní držák a proveďte montáž zařízení Soundbar na stěnu podle svých potřeb.
• Změny konstrukce a specikace bez předchozího upozornění jsou vyhrazeny.
• Vzhled příslušenství se může oproti uvedeným obrázkům nepatrně lišit.
Vložení baterií před používáním dálkového ovladače (2baterie AA)
Posouvejte zadním krytem ve směru šipky, dokud
jej zcela nesejmete. Do ovladače vložte 2 baterie
AA (1,5 V) s ohledem na správnou polaritu. Zasuňte
zadní kryt zpět na místo.
CZE - 7
Page 98

02 PŘEHLED PRODUKTU
Horní panel zařízení Soundbar
Výrobek postavte tak, aby
bylo logo SAMSUNG nahoře.
Kontrolka LED bliká, svítí nebo mění barvu podle aktuálního režimu nebo stavu zařízení
Soundbar. Barva kontrolky LED a počet světel označují aktivní režim podle popisu níže.
Kontrolka
LED
Napájení Zapíná a vypíná zařízení.
Hlasitost Slouží k úpravě hlasitosti.
Zdroj
W
Bílá kontrolka
LED
• Vícebarevná kontrolka LED může měnit barvu na Bílou, Azurovou, Zelenou, Červenou,
Žlutá, Oranžová, Nachová a Modrou v závislosti na režimu nebo stavu.
• Režim změníte stisknutím tlačítka (Zdroj). Při každé změně režimu bude kontrolka
LED svítit bíle a poté se vypne.
Kontrolka LED
Horní panel
W
Bílá kontrolka
LED
Bílá kontrolka zap -> vyp Bílá kontrolka zap -> vyp
M
Vícebarevná
kontrolka LED
W
Bílá kontrolka
LED
W
Bílá kontrolka
LED
„Digital Audio In“ „Bluetooth“
• Tlačítko napájení začne fungovat do 4–6 s od zapojení do sítě.
• Po zapnutí zařízení se po 4–5 s ozve akustický signál.
• Pokud uslyšíte zvuk z televizoru i ze zařízení Soundbar, přejděte do nabídky Nastavení a u
zvukového zdroje televizoru změňte reproduktor na možnost Ext. reproduktor.
CZE - 8
Page 99

Dolní panel zařízení Soundbar
SERVICE
(OPTICAL)
SERVICE
DC 24V
DIGITAL AUDIO IN
(OPTICAL)
SERVICE
DIGITAL AUDIO IN
(OPTICAL)
SERVICE
DIGITAL AUDIO IN
(OPTICAL)
DIGITAL AUDIO IN
(OPTICAL)
DC 24V
DIGITAL AUDIO IN
(OPTICAL)
SERVICE
DC 24V
DC24V (Napájecí zdroj)
Zapojte napájecí adaptér AC/DC.
DIGITAL AUDIO IN (OPTICAL)
Zapojte digitální (optický) výstup k externímu zařízení.
SERVICE
Připojte paměťové zařízení USB a upgradujte software produktu.
• Při odpojování napájecího kabelu napájecího adaptéru AC/DC z elektrické zásuvky držte kabel za
zástrčku, nikoli za kabel.
• Zařízení ani žádné další komponenty nepřipojujte do síťové zásuvky, dokud nebudou všechny
komponenty řádně propojeny.
SERVICE
CZE - 9
Page 100

03 POUŽÍVÁNÍ DÁLKOVÉHO OVLADAČE
Jak používat dálkový ovladač
Napájení
Zapíná avypíná zařízení Soundbar.
PAIR
SOUND
MODE
VOL WOOFER
SOUNDBAR
Kontrolka
LED
• Funkci Auto Power Down
Jednotka se automaticky vypne v následujících případech:
– V režimu „Digital Audio In“ / „Bluetooth“, pokud po
(Zdroj)
Stisknutím vyberte zdroj připojený kzařízení Soundbar.
(Ztlumit)
Stisknutím tlačítka (Ztlumit) ztlumíte zvuk.
Opětovným stisknutím tlačítka zvuk opět zapnete.
Kontrolka
LED
Azurová kontrolka
zabliká 1×
Zap
dobu 20 minut není k dispozici zvukový signál.
Bliká X opakovaně
Červená kontrolka
zabliká 3×
Vyp
CZE - 10
 Loading...