

Page 1

USER MANUAL
HW-Q900T
You can acces s the FULL MANUA L on Samsung’s on- line customer suppor t
centre by scanning the QR code. To see the manual on your P C or mobile
device, download the manual in document format from Samsung’s web site.
(http://www.samsung.com/support)
Page 2
SAFETY INFORMATION
SAFETY WARNINGS
TO REDUCE THE RISK OF ELECTRIC SHOCK, DO
NOT REMOVE THE COVER (OR BACK).
NO USER-SERVICEABLE PARTS ARE INSIDE.
REFER SERVICING TO QUALIFIED SERVICE
PERSONNEL.
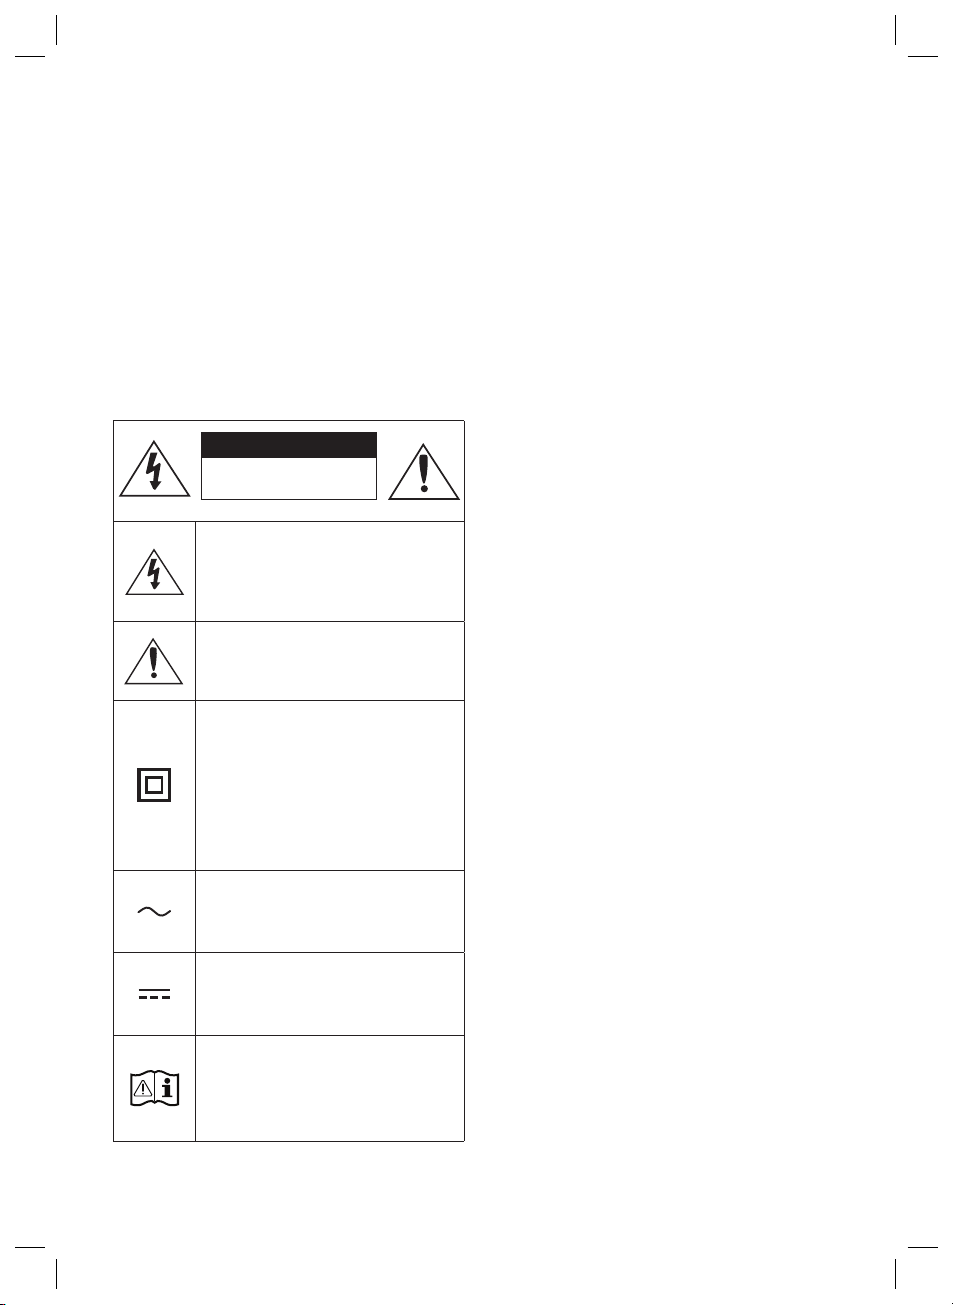
Refer to the table below for an explanation of
symbols which may be on your Samsung product.
CAUTION
RISK OF E LECTRIC S HOCK.
DO NOT OP EN.
This symbol indicates that high voltage
is present inside. It is dangerous to
make any kind of contact with any
internal part of this product.
This symbol indicates that this product
has included important literature
concerning operation and maintenance.
Class II product : This symbol indicates
that it does not require a safety
connection to electrical ear th (ground).
If this symbol is not present on a
product with a power cord, the produc t
MUST have a reliable connection to
protective ear th (ground).
WARNING
• To reduce the risk of re or electric shock, do
not expose this appliance to rain or moisture.
CAUTION
• TO PREVENT ELECTRIC SHOCK, MATCH WIDE
BLADE OF PLUG TO WIDE SLOT, FULLY INSERT.
• This apparatus shall always be connected to a
AC outlet with a protective grounding
connection.
• To disconnect the apparatus from the mains,
the plug must be pulled out from the mains
socket, therefore the mains plug shall be
readily operable.
• Do not expose this apparatus to dripping or
splashing. Do not put objects lled with
liquids, such as vases on the apparatus.
• To turn this apparatus off completely, you
must pull the power plug out of the wall
socket. Consequently, the power plug must
be easily and readily accessible at all times.
AC voltage : This symbol indicates that
the rated voltage marked with the
symbol is AC voltage.
DC voltage : This symbol indicates that
the rated voltage marked with the
symbol is DC voltage.
Caution, Consult instructions for use :
This symbol instruct s the user to
consult the user manual for further
safety related information.
ENG - 2
Page 3

PRECAUTIONS
1. Ensure that the AC power supply in your
house complies with the power
requirements listed on the identication
sticker located on the bottom of your
product. Install your product horizontally, on
a suitable base (furniture), with enough
space around it for ventilation (7~10 cm).
Make sure the ventilation slots are not
covered. Do not place the unit on ampliers
or other equipment which may become hot.
This unit is designed for continuous use. To
fully turn off the unit, disconnect the AC plug
from the wall outlet. Unplug the unit if you
intend to leave it unused for a long period of
time.
2. During thunderstorms, disconnect the AC
plug from the wall outlet. Voltage peaks due
to lightning could damage the unit.
3. Do not expose the unit to direct sunlight or
other heat sources. This could lead to
overheating and cause the unit to
malfunction.
4. Protect the product from moisture (i.e.
vases), and excess heat (e.g. a replace) or
equipment creating strong magnetic or
electric elds. Unplug the power cable from
the AC wall socket if the unit malfunctions.
Your product is not intended for industrial
use. It is for personal use only. Condensation
may occur if your product has been stored in
cold temperatures. If transporting the unit
during the winter, wait approximately
2 hours until the unit has reached room
temperature before using.
5. The battery used with this product contains
chemicals that are harmful to the
environment. Do not dispose of the battery
in the general household trash. Do not
expose the battery to excess heat, direct
sunlight, or re. Do not short circuit,
disassemble, or overheat the battery.
Danger of explosion if the battery is replaced
incorrectly. Replace only with the same or
equivalent type.
Fabric cleaning
Remove any dirt or stain on the product surface
immediately.
Removing and cleaning can be less effective for
some substances or if left for a prolonged time.
CAUTION
• Use a vacuum cleaner or an adhesive lint
roller to remove dust, handprints, and the
likes.
– Some cleaning brushes may damage the
product, depending on the materials they
contain.
– Towels and cleaning clothes may leave
lint or dirt on the product.
• Do not use a nail or other tools to scratch the
dirt off. It may damage the fabric.
• To remove oil or liquid stains, use a clean
white cloth moist with water. If the stain
persists, wipe it with a mixture of water and
neutral detergent (such as dishwashing
soaps) and a cloth.
– A non-neutral detergent or cleaner may
cause discolouration or fabric damage.
– After cleaning, use a dry cloth or
hairdryer to dry the area.
– Do not use excessive force to avoid
discolouration or fabric damage.
ENG - 3
Page 4

CONTENTS
01 Checking the Components 5
02 Product Overview 6
03 Using the Remote Control 7
04 Connecting the Soundbar 8
05 Using a wired connection to the TV 11
06 Using a wireless connection to the TV 14
07 Connecting an External Device 16
08 Connecting a Mobile Device 17
09 Installing the Wall Mount 20
10 Installing the Soundbar above a TV Stand 21
11 Software Update 22
12 Troubleshooting 24
13 Licence 26
14 Open Source Licence Notice 26
15 Important Notes About Service 26
16 SpecicationsandGuide 27
ENG - 4
Page 5
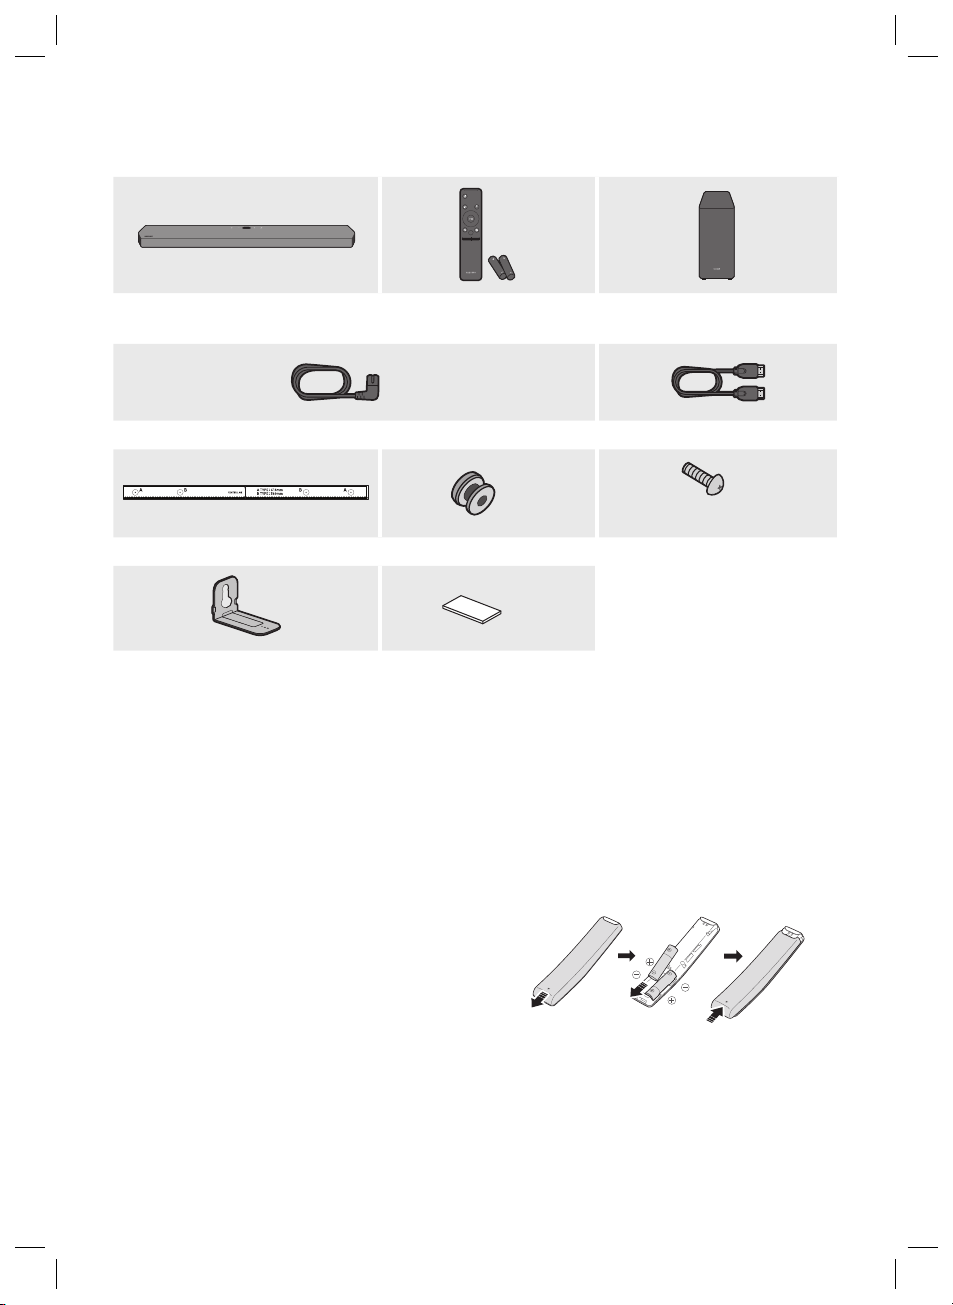
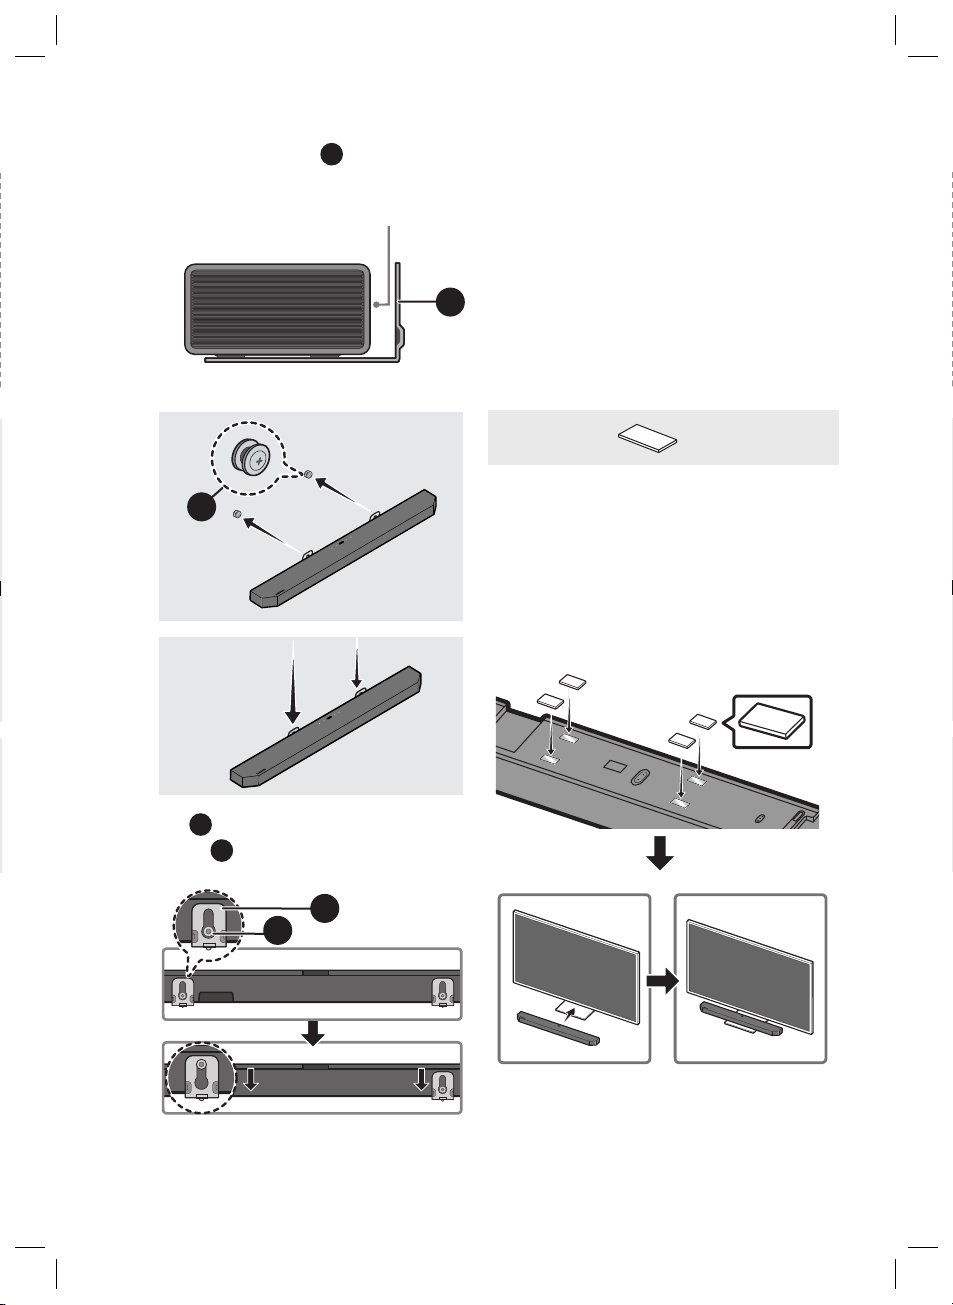
01 CHECKING THE COMPONENTS
PAIR
SOUND
MODE
VOL WOOFER
SOUNDBAR
Soundbar Main Unit Soundbar Remote Control /
Subwoofer
Batteries
x 2
Power Cord (Subwoofer, Soundbar) HDMI Cable
x 2
x 2
(M4 x L10)
Wall Mount Guide Holder-Screw Screw
x 2
x 4
Bracket-Wall Mount Rubber-Foot
• For more information about the power supply and power consumption, refer to the label attached
to the product. (Label: Bottom of the Soundbar Main Unit)
• To purchase additional components or optional cables, contact a Samsung Service Centre or
Samsung Customer Care.
• For more information about the wallmount or rubber-foot, see pages 20~21.
• Design, specications, and App screen are subject to change without prior notice.
Inserting Batteries before using the Remote Control (AA batteries X 2)
Slide the back cover in the direction of the arrow
until it is completely removed. Insert 2 AA batteries
(1.5V) oriented so that their polarity is correct. Slide
the back cover back into position.
ENG - 5
Page 6
02 PRODUCT OVERVIEW
ID SET
HDMI IN 1
HDMI IN 2
NETWORK
SERVICE
DIGITAL AUDIO IN
(OPTICAL)
HDMI TO TV
(eARC/ARC)
HDMI 2
HDMI 1
ID SET
(WOOFER/REAR)
ID SET
DIGITAL AUDIO IN
(OPTICAL)
HDMI TO TV
HDMI 2
HDMI 1
ID SET
HDMI IN 1
HDMI IN 2
POWER
NETWORK
SERVICE
DIGITAL AUDIO IN
(OPTICAL)
HDMI TO TV
(eARC/ARC)
HDMI 2
HDMI 1
ID SET
(WOOFER/REAR)
ID SET
NETWORK
SERVICE
ID SET
(WOOFER/REAR)
DIGITAL AUDIO IN
(OPTICAL)
HDMI TO TV
(eARC/ARC)
HDMI 2
HDMI 1
Top Panel of the Soundbar
Position the product
so that the
SAMSUNG logo is
located on the top.
Bottom Panel of the Soundbar
POWER
(Multi Function) But ton
• In standby mode, press the (Multi
Function) button to turn on the Soundbar.
• Press the (Multi Function) button to
change the input source.
• Press the (Multi Function) button for
3 seconds to call Alexa. Say with the button
pressed to enable voice recognition.
POWER
Connect the Soundbar's AC power cable.
ID SET (WOOFER/REAR)
Press to connect the Soundbar to surround
speakers and a subwoofer wirelessly.
(The surround speaker is sold separately.)
POWER
ID SET
(WOOFER/REAR)
NETWORK
Display Mic On/O ff
Volume
DIGITAL AUDIO IN
(OPTICAL)
SERVICE
DIGITAL AUDIO IN
ID SET
SERVICE
ID SET
(WOOFER/REAR)
NETWORK
(OPTICAL)
HDMI IN 1
HDMI 2
HDMI IN 2
HDMI 1
HDMI TO TV
(eARC/ARC)
HDMI 2
HDMI 1
HDMI TO TV
(eARC/ARC)
SERVICE
Connect a USB storage device to upgrade the
product's sof tware.
DIGITAL AUD IO IN (OPTIC AL)
Connect to the digital (optical) output of an
external device.
HDMI 1 / HDM I 2
Inputs digital video and audio signals
simultaneously using an HDMI cable.
Connect to the HDMI output of an external
device.
HDMI TO T V (eARC/ARC)
Connect to the HDMI jack on a T V.
NETWORK
Press to connect to a wireless network (Wi-Fi)
via the SmartThings app.
ENG - 6
Page 7
03 USING THE REMOTE CONTROL
How to Use the Remote Control
Power
Turns the Soundbar on and off.
PAIR
• Auto Power Down Function
The unit turns off automatically in the following situations:
– In D.IN / HDMI / Wi-Fi / BT mode if there is no audio
signal for 18 minutes.
(Source)
Press to select a source connected to the Soundbar.
SOUND
MODE
VOL WOOFER
SOUNDBAR
Up/Down/Left/Right
Press Up/Down/Left /Right on the button to select or set functions.
(Sound Control)
When pressed, the setting items such as TREBLE, BASS, SYNC, CENTER LEVEL, SIDE LEVEL, FRONT TOP
LEVEL, REAR LEVEL, REA R TOP LEVEL, and VIRTUAL ON/OFF are displayed in sequence. The desired item
can be adjusted using the Up/Down buttons.
WOOFER ( BASS) LEVE L
Push the button up or down to adjust the level of the woofer (bass) to -12 or between -6 to +6. To set the
woofer (bass) volume level to 0 (Default), press the button.
VOLUME
Push the button up or down to adjust the volume.
(Mute)
Press the (Mute) button to mute the sound.
Press it again to unmute the sound.
SOUND MODE
You can selec t the desired sound mode by choosing
STANDARD, SURROUND, GAME PR O, or ADAPTIVE SOUND.
Bluetooth PAIR
Switch the Soundbar to Bluetooth pairing mode. Press the
button and wait for the “BT PAIRING” screen to connect to a
new Bluetooth device.
p (Play / Pause)
You can also play or pause music by pressing the button.
ENG - 7
Page 8
04 CONNECTING THE SOUNDBAR
POWER
POWER
HDMI IN 1
HDMI IN 2
ID SET
(WOOFER, REAR)
POWER
NETWORK
SERVICE
DIGITAL AUDIO IN
(OPTICAL)
HDMI TO TV
(eARC/ARC)
HDMI 1
HDMI 2
ID SET
POWER
HDMI IN 1
HDMI IN 2
ID SET
(WOOFER, REAR)
NETWORK
SERVICE
DIGITAL AUDIO IN
(OPTICAL)
HDMI TO TV
(eARC/ARC)
HDMI 1
HDMI 2
ID SET
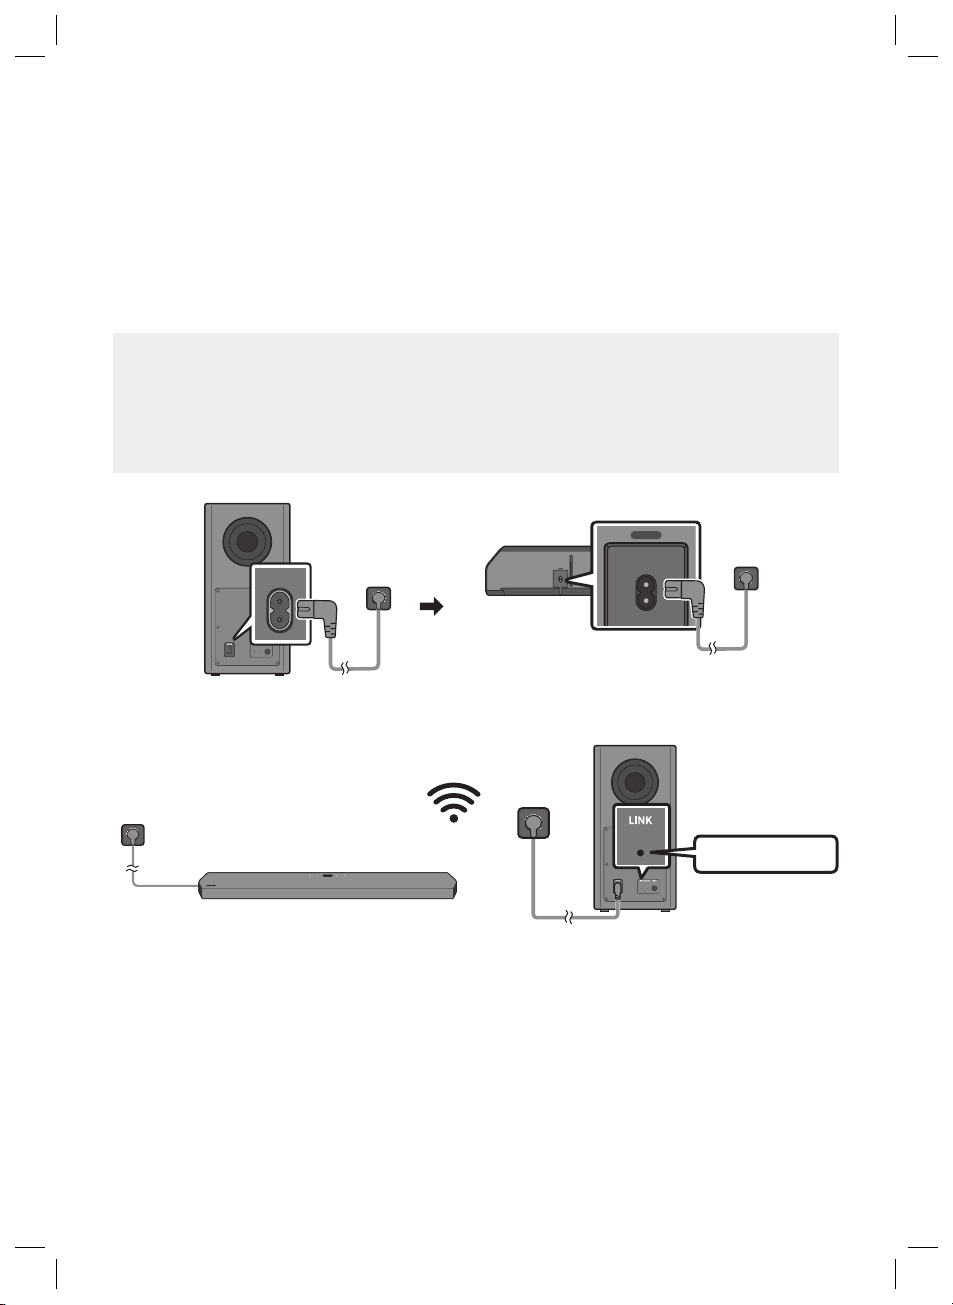
Connecting Electrical Power and Subwoofer
Use the Power cord to connect the Subwoofer and Soundbar to an electrical outlet in the following order:
• For more information about the required electrical power and power consumption, refer to the
label attached to the product. (Label: Bottom of the Soundbar Main Unit)
NOTES
• Connect the Subwoofer power before connecting to the Soundbar.
The Subwoofer will be automatically connected when turning on the Soundbar.
• If you unplug and reconnect the power cord when the product is turned on, the Soundbar turns
on automatically.
POWER
POWER
POWER
Bott om of the Soundba r
Main Unit
Rear of Subwoofer
The connection is
complete.
Blue is On
ENG - 8
Page 9
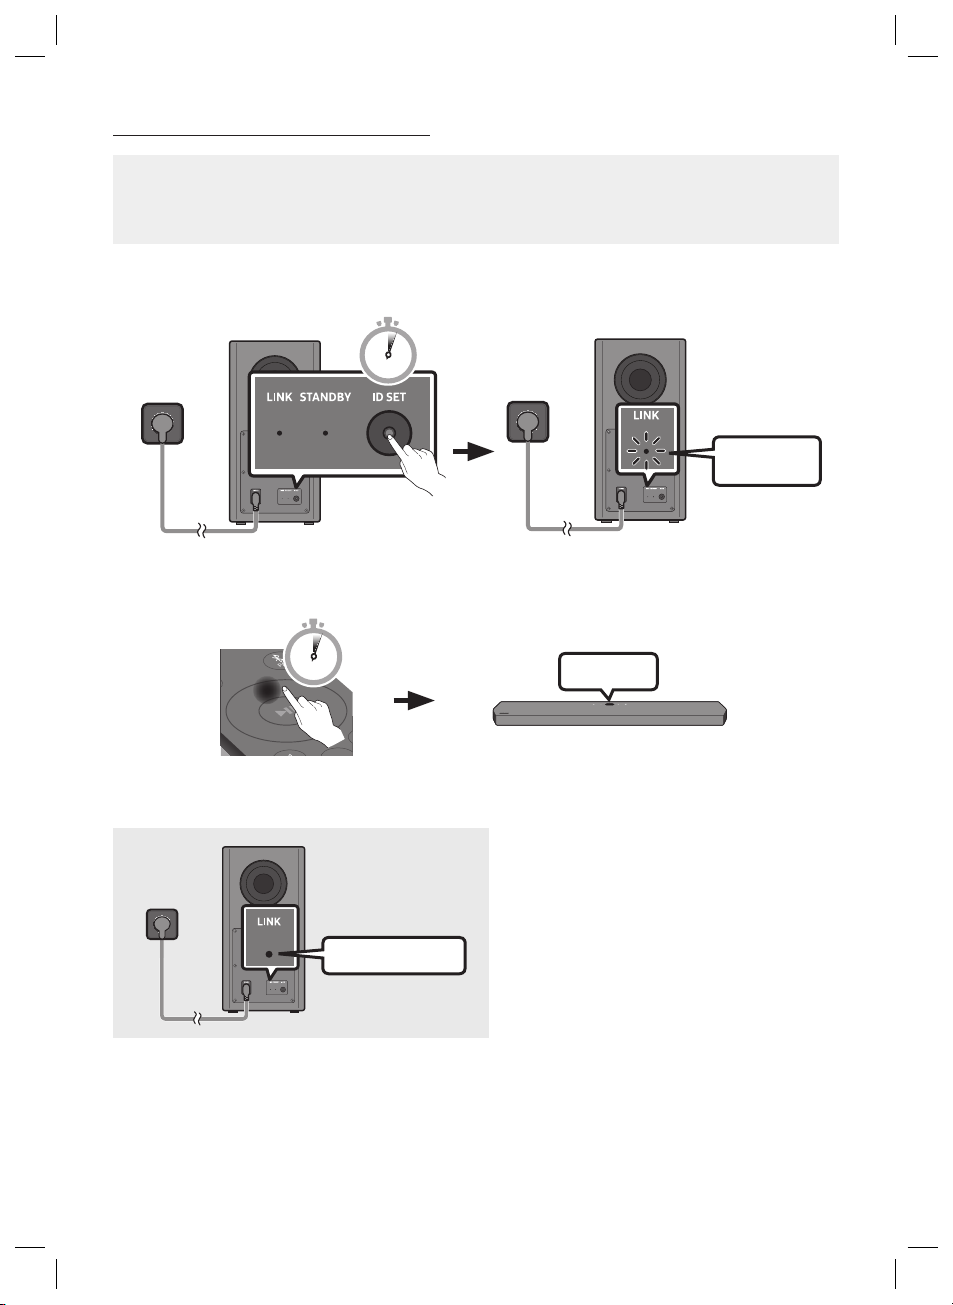
Manually connecting the Subwoofer
Before per forming the manual connection procedure below:
• Check whether the power cables for the Soundbar and subwoofer are connected properly.
• Make sure that the Soundbar is turned off.
1. Turn off the Soundbar main.
2. Press and hold ID SET on the rear of the subwoofer for at least 5 seconds.
5 Sec
Rear of Subwoofer Rear of Subwoofer
3. Press the Up button on the remote control for 5 seconds.
PAIR
5 Sec
ID SET
Blinking blue
fast
4. Check if the LINK LED is solid blue (connection complete).
The LINK LED indicator stops blinking and
glows a solid blue when a connection is
established between the Soundbar and the
Wireless Subwoofer.
Blue is On
ENG - 9
Page 10
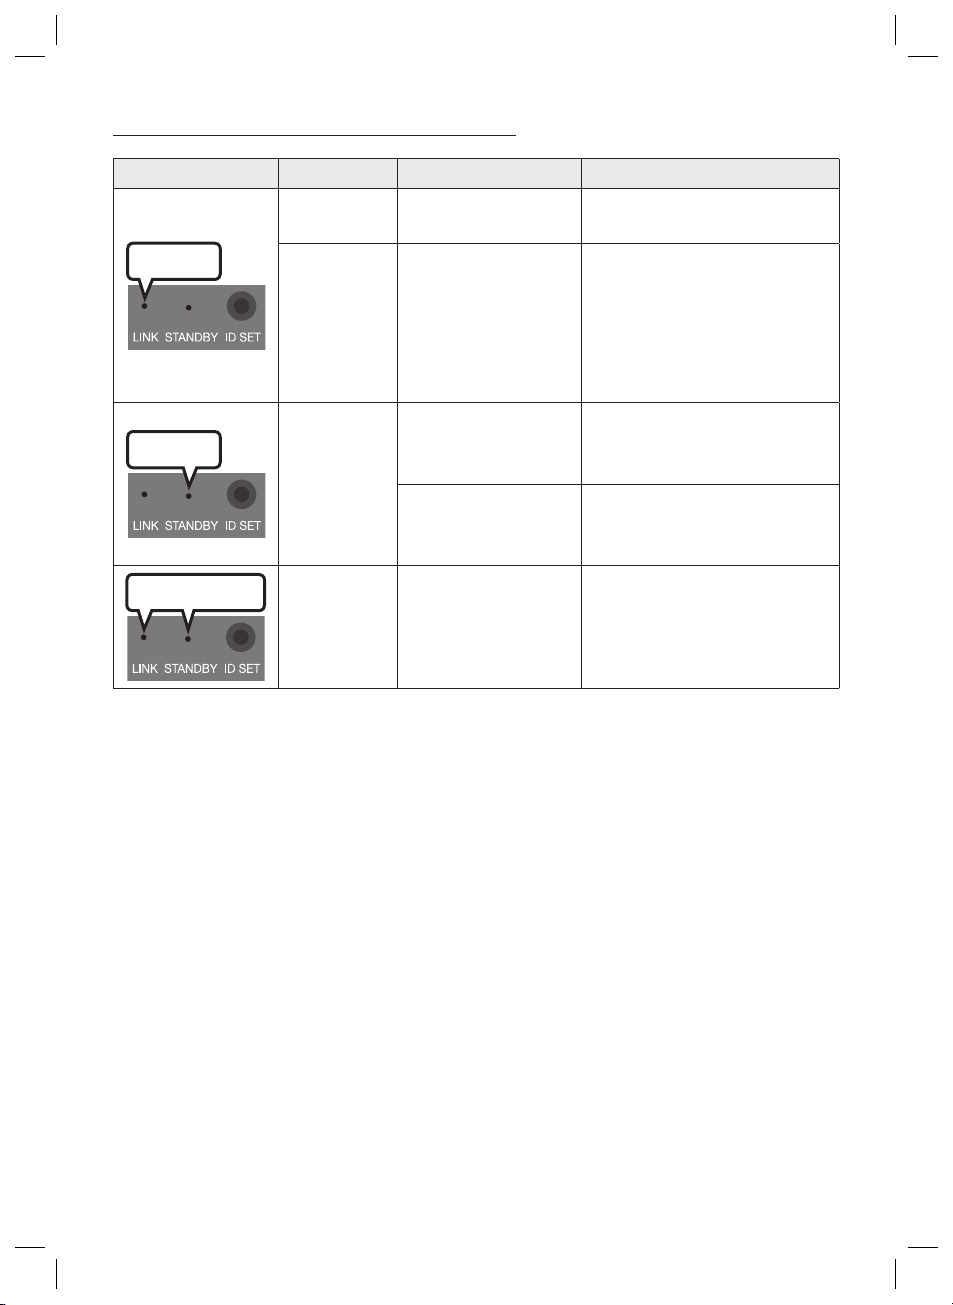
LED Indicator Lights on the Rear of Subwoofer
LED Status Description Resolution
On
Blue
Blinking
Red
On
Successfully connected
(normal operation)
Recovering the
connection
Standby (with the
Soundbar main unit
turned off)
Connection failed
-
Check if the power cable attached
to the main Soundbar unit is
connected properly or wait about
5 minutes. If blinking persists, try
manually connecting the
subwoofer. See page 9.
Check if the power cable attached
to the main Soundbar unit is
connected properly.
Connect again. See the
instructions for manual
connection on page 9.
Red and blue
Blinking Malfunction
See the contact information for
the Samsung Service Centre in
this manual.
ENG - 10
Page 11

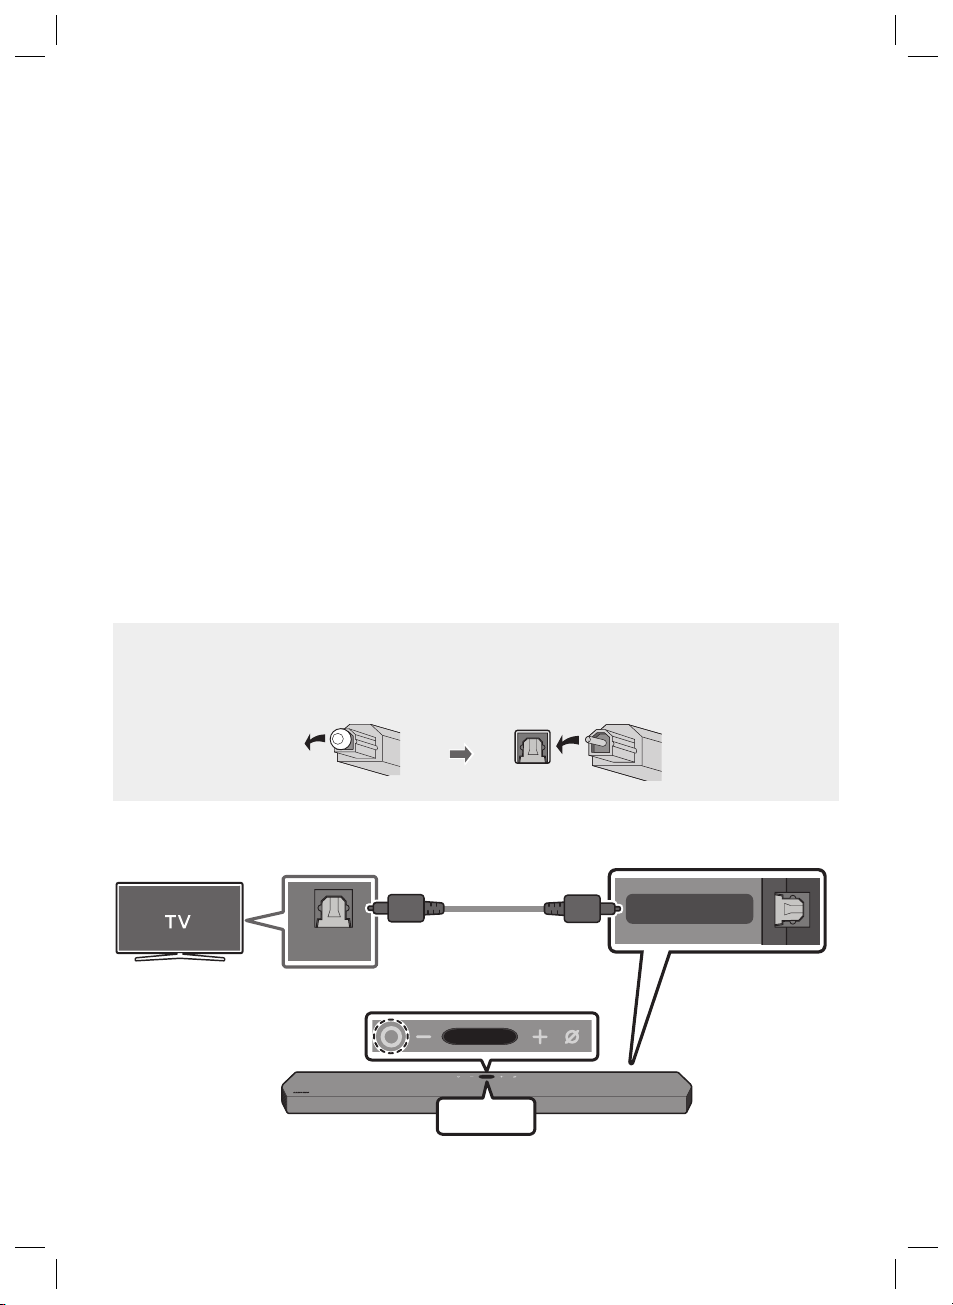
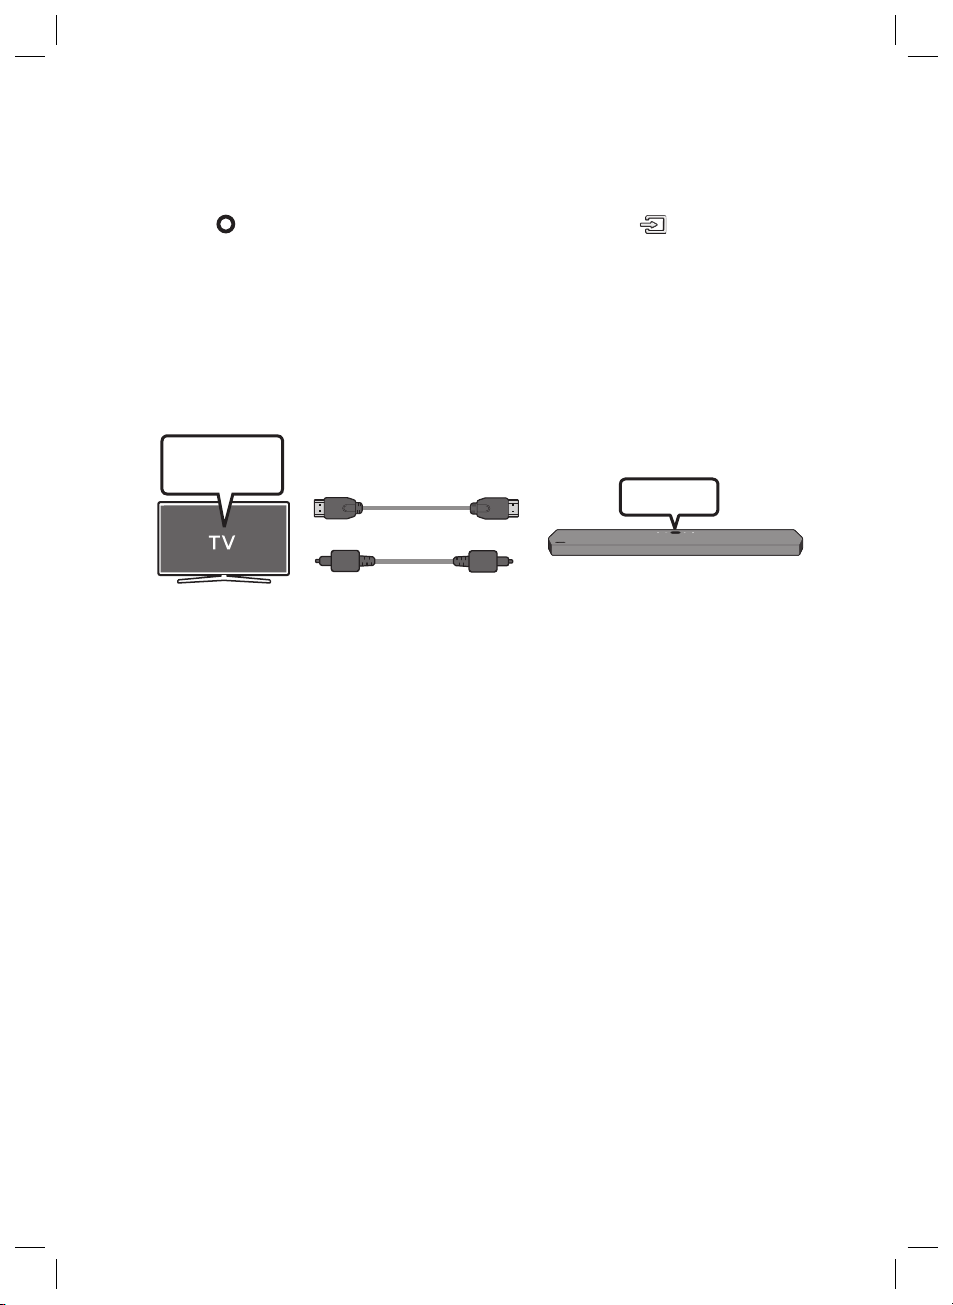
05 USING A WIRED CONNECTION TO THE TV
Method 1. Connecting with HDMI
CAUTION
• When both the HDMI cable and optical cable are connected, the HDMI signal is received rst.
• To connect the HDMI cable between the TV and Soundbar, be sure to connect the terminals
marked ARC. Otherwise, the TV sound may not be output.
• Be sure to use the cable with the premium HDMI certication logo. In addition, make sure that
the cable is a certied Type A, high-speed HDMI Ethernet cable. (HIGH SPEED HDMI CABLE
WITH ETHERNET)
Connecting the TV that supports HDMI ARC (Audio Return Channel)
Connec t to the HDMI TO T V
Connec t to the HDMI IN
(ARC) p ort of your T V.
(eARC/ARC ) port of the
Soundbar main unit.
HDMI IN
(ARC)
HDMI Cable
Top of the Soun dbar
HDMI TO TV
(eARC/ARC)
Bott om of the Soundba r
TV ARC
1. With the Soundbar and TV turned off, connect the HDMI cable as shown in the gure.
2. Turn on the Soundbar and TV.
3. “TV ARC ” appears in the display window of the Soundbar main unit and the Soundbar plays TV
sound.
• When the TV sound is not output, press the (Multi Function) button at the top of the
Soundbar or the (Source) button on the remote control to select the “D.IN” mode. The
screen displays “D.IN” and “ TV ARC” in sequence, and TV sound is played.
ENG - 11
Page 12
• When connecting a Samsung TV that supports the eARC function, “eARC” appears on the
display and the sound is heard.
• If “T V ARC” does not appear in the display window of the Soundbar main unit, conrm that the
HDMI cable is connected to the correct port.
• Use the volume buttons on the TV’s remote control to change the volume on the Soundbar.
NOTES
• When you connect the TV that supports the HDMI ARC (Audio Return Channel) to the Soundbar
with an HDMI cable, you can transmit the digital video and audio data without connecting a
separate optical cable.
• We recommend you use a coreless HDMI cable if possible. If you use a cored HDMI cable, use one
whose diameter is less than 14 mm.
• This function is not available if the HDMI cable does not support ARC.
• When the audio in a broadcast is encoded in Dolby Digital and the “Digital Output Audio Format ” on
your TV is set to PCM, we recommend that you change the setting to Dolby Digital. When the
setting on the TV is changed, you will experience better sound quality. (The TV menu may use
different words for Dolby Digital and PCM depending on the TV manufacturer.)
Method 2. Connecting using an Optical Cable
Pre-connection Checklist
• When both the HDMI cable and optical cable are connected, the HDMI signal is received rst.
• When you use an optical cable and the terminals have covers, be sure to remove the covers.
OPTICAL OUT
Optic al Cable
(not supplied)
Top of the Soun dbar
D.IN
ENG - 12
Bott om of the Soundba r
DIGITAL AUDIO IN
(OPTICAL)
Page 13
1. With the TV and Soundbar turned off, connect the DIGITAL AUDIO IN (OPTICAL) port on the
Soundbar and the OPTICAL output port on the TV with the optical cable (not supplied), as shown in
the gure.
2. Turn on the Soundbar and TV.
3. Press the (Multi Function) button at the top of the Soundbar or the (Source) button on the
remote control to select the “D.IN” mode.
4. The TV sound is output from the Soundbar.
Using the Q-Symphony Function
For Q-Symphony, the Soundbar syncs with a Samsung TV to output sound through two devices for
optimum surround effect. When the Soundbar is connected, the menu, “TV+Soundbar” appears under
the Sound Output menu of the TV. Select the corresponding menu.
TV menu
HDMI Cable
OR
Optical Cable (not supplied)
• TV menu example: TV + [ AV] Soundbar series name (HDMI)
NOTES
• It can operate according to the Codec supported by TV.
• This function is supported only when the HDMI Cable or Optical Cable (not supplied) is connected.
• This function is available in Samsung TVs released in 2020 and some Soundbar models.
• When using Q-Symphony, you can only choose GAME PRO or ADAPTIVE SOUND.
D.IN
ENG - 13
Page 14
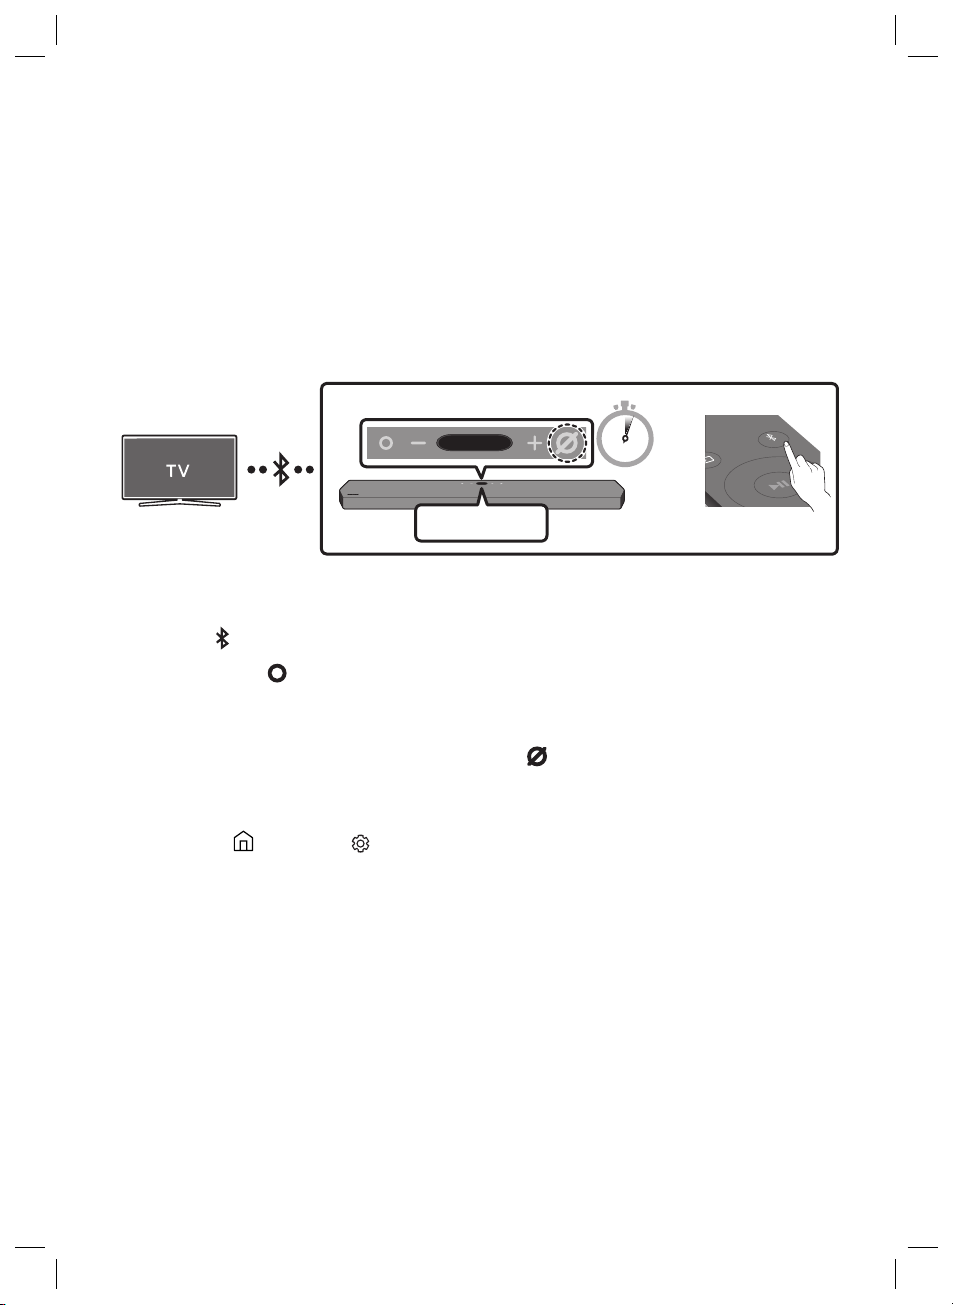
06 USING A WIRELESS CONNECTION TO THE TV
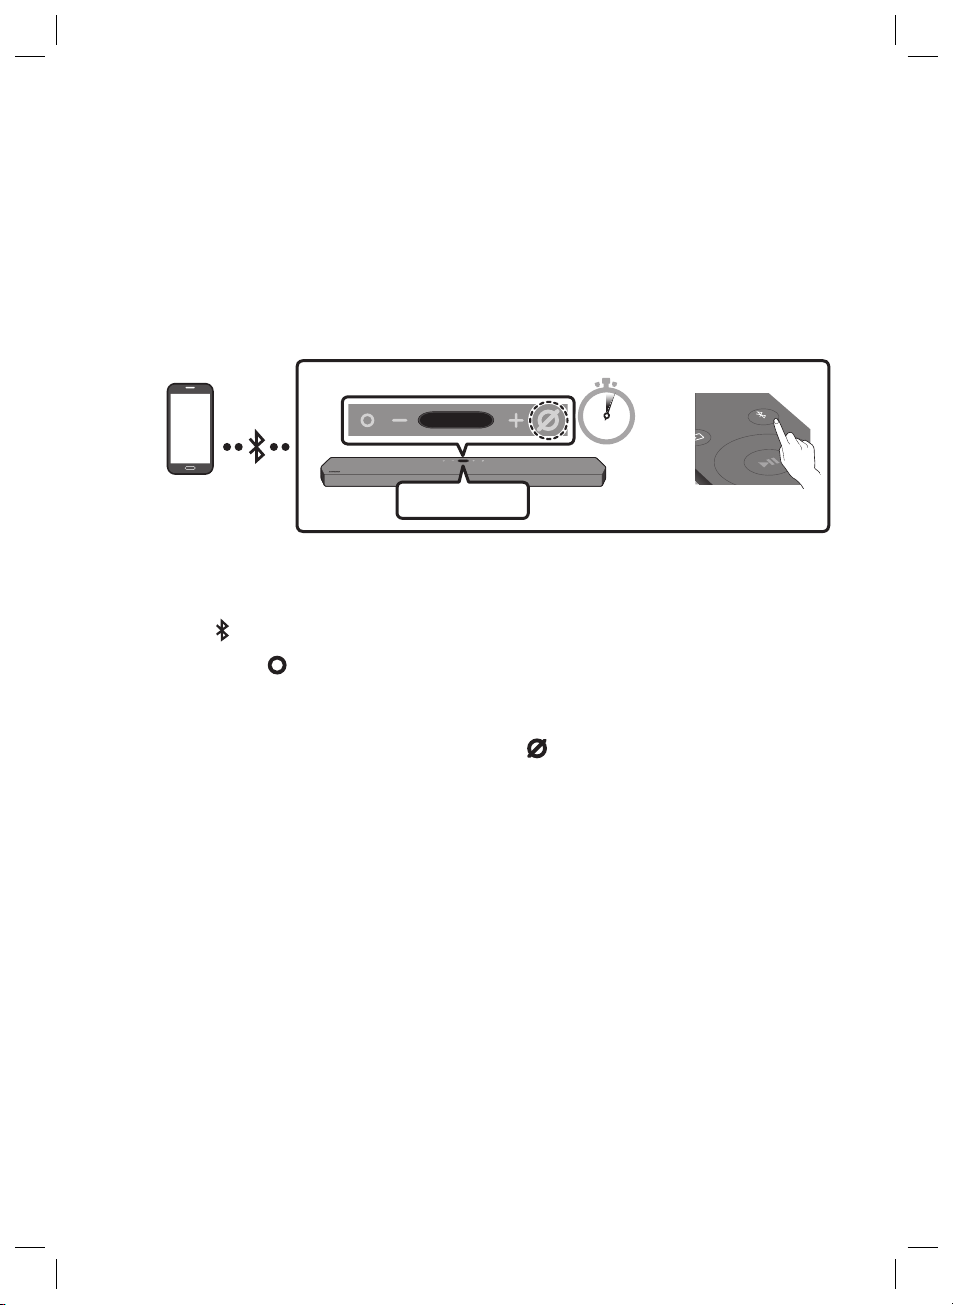
Connecting via Bluetooth
When a Samsung TV is connected using Bluetooth, you can hear stereo sound without the hassle of
cabling.
• Only one Samsung TV can be connected at a time.
• Samsung TV that supports Bluetooth can be connected. Check the specications of your TV.
Top of the Soun dbar
5 Sec
OR
BT PAIRING
The initial connection
1. Press the PAIR button on the Soundbar remote control to enter the “BT PAIRING” mode.
(OR)
a. Press the (Multi Func tion) button on the top panel and then select “BT”.
“BT” changes to “BT PAIRING” in a few seconds automatically or changes to “BT READY” if
there is a connect record.
b. When “BT READY” appears, press and hold the (Mic On/Off) button on the top panel of
the Soundbar for more than 5 seconds to display “BT PAIRING”.
2. Select Bluetooth mode on the Samsung TV.
(e.g. Home ( ) Settings ( ) Sound Sound Output Bluetooth Speaker List
[AV] Samsung Soundbar Q900T (Bluetooth))
3. Select “[AV] Samsung Soundbar Q900T” from the list on TV’s screen.
An available Soundbar is indicated with “Need Pairing” or “Paired” on the TV’s Bluetooth device
list. To connect the Samsung TV to the Soundbar, select the message, and then establish a
connection.
• When the Samsung TV is connected, [T V Name] → “BT” appears on the Soundbar’s top display.
4. You can now hear Samsung TV sound from the Soundbar.
• After you have connected the Soundbar to your Samsung TV the rst time, use the “BT READY”
mode to reconnect.
PAIR
ENG - 14
Page 15
If the device fails to connect
• If you have an existing Soundbar (e.g., [AV] Samsung Soundbar Q900T) on the list of speakers
on the Samsung TV, delete it.
• Then repeat steps 1 through 3.
Disconnecting the Soundbar from the Samsung TV
Press the (Multi Func tion) button at the top of the Soundbar or the (Source) button on the
remote control to select the mode other than “BT”.
• Disconnecting takes time because the Samsung TV must receive a response from the Soundbar.
(The time required may differ, depending on the Samsung TV model.)
What is the difference between BT READY and BT PAIRING?
• BT READY : In this mode, you can reconnect any Samsung TV or mobile device that was
connected before.
• BT PAIRING : In this mode, you can connect a new device to the Soundbar.
(Press the PAIR button on the Soundbar remote control or press and hold the (Mic On/Off)
button on the top of the Soundbar for more than 5 seconds while the Soundbar is in “BT” mode.)
Notes on Bluetooth connection
• Locate a new device within 1 m to connect via Bluetooth communication.
• If asked for a PIN code when connecting a Bluetooth device, enter <0000>.
• The Soundbar automatically turns off after 18 minutes in the Ready state.
• The Soundbar may not perform Bluetooth search or connection correctly under the following
circumstances:
– If there is a strong electrical eld around the Soundbar.
– If several Bluetooth devices are simultaneously paired with the Soundbar.
– If the Bluetooth device is turned off, not in place, or malfunctions.
• Electronic devices may cause radio interference. Devices that generate electromagnetic waves
must be kept away from the Soundbar main unit - e.g., microwaves, wireless LAN devices, etc.
ENG - 15
Page 16
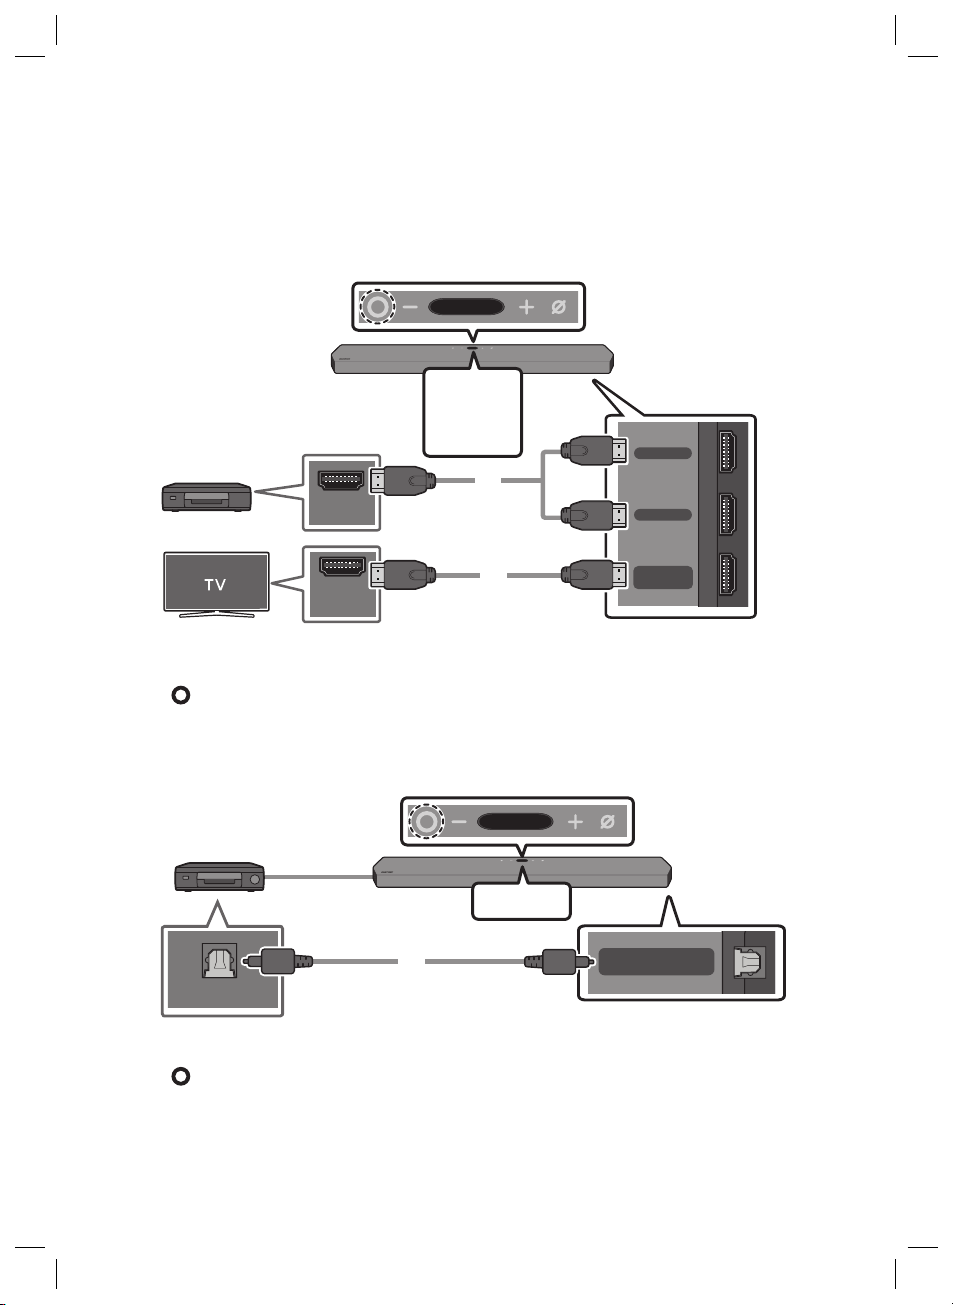
07 CONNECTING AN EXTERNAL DEVICE
(OPTICAL)
Method 1. Connecting using an HDMI Cable (Capable of Dolby
Atmos decoding and playback)
Top of the Soun dbar
HDMI 1
OR
External Dev ice
HDMI OUT
HDMI 2
HDMI Cable
OR
HDMI 2
HDMI 1
HDMI TO TV
(eARC/ARC)
Bott om of the Soundba r
HDMI IN
(ARC)
HDMI Cable
• Connect the HDMI cable → Turn on the Soundbar, External Device, and TV
(Multi Function) → Select the “HDMI 1” or “HDMI 2” mode
Method 2. Connecting using an Optical Cable
Top of the Soun dbar
BD / DVD playe r / Set-top
box / Game con sole
OPTICAL OUT
• Connect the optical cable → Turn on the Soundbar and External Device →
(Multi Function) → Select the “D.IN” mode
NOTE
• For more information about the external device connection, refer to the Soundbar’s User Guide on
the Samsung website (www.samsung.com/support).
Optic al Cable
(not supplied)
ENG - 16
D.IN
DIGITAL AUDIO IN
(OPTICAL)
Bott om of the Soundba r
Page 17
08 CONNECTING A MOBILE DEVICE
Method 1. Connecting via Bluetooth
When a mobile device is connected using Bluetooth, you can hear stereo sound without the hassle of
cabling.
• When you connect a paired Bluetooth device with the Soundbar off, the Soundbar automatically
turns on.
Top of the Soun dbar
PAIR
Mobile device
5 Sec
OR
BT PAIRING
The initial connection
• When connecting to a new Bluetooth device, make sure the device is within 1 m distance.
1. Press the PAIR button on the Soundbar remote control to enter the “BT PAIRING” mode.
(OR)
a. Press the (Multi Func tion) button on the top panel and then select “BT”.
“BT” changes to “BT PAIRING” in a few seconds automatically or changes to “BT READY” if
there is a connect record.
b. When “BT READY” appears, press and hold the (Mic On/Off) button on the top panel of
the Soundbar for more than 5 seconds to display “BT PAIRING”.
2. On your device, select “[ AV] Samsung Soundbar Q900T ” from the list that appears.
• When the Soundbar is connected to the Mobile device, [Mobile Device Name] → “BT” appears in
the top display.
3. Play music les from the device connected via Bluetooth through the Soundbar.
• After you have connected the Soundbar to your mobile device the rst time, use the “BT
READY” mode to reconnect.
For more information about Bluetooth connections, refer to “Connecting via Bluetooth” on
page 14.
ENG - 17
Page 18
Method 2. Connecting via Wi-Fi
(Wireless Network)
To connect a Soundbar to a mobile device via a
wireless network (Wi-Fi), the SmartThings app is
required.
SmartThings App
1. Connect your mobile device (smartphone,
tablet, etc.) to the Wi-Fi network the TV is
connected to.
2. Install and launch the SmartThings app on
your mobile device (smartphone, tablet, etc.).
3. Follow the instructions in the app screen on
the mobile device to connect the Soundbar
to your Wi-Fi network.
ConguringAmazonAlexa
Using Alexa, you can play music, listen to news,
see weather forecasts, and control home
appliances.
To use Amazon Alexa, an Amazon account is
required to connect the Soundbar over the
network.
1. Install the SmartThings app on your mobile
device and then launch it.
2. Enter the Alexa account by following the
instructions on the app and then log in the
service.
3. Call Alexa or press the (Multi Function)
button on the Soundbar for 3 seconds to use
the Alexa service.
• Press the (Multi Func tion) button for
3seconds to call Alexa. Say with the
button pressed to enable voice
recognition.
CAUTION
• Amazon Alexa is a service provided by
Amazon.
• This service is available only in some
languages but not in other countries or
regions.
NOTE
• To learn about using the SmartThings app
and connecting to other devices (from
Amazon, Wireless Rear Speaker Kit
(SWA-9000S - Sold separately), etc), refer to
the FULL MANUAL for your Soundbar on the
Samsung web site
(www.samsung.com/support).
ENG - 18
Page 19
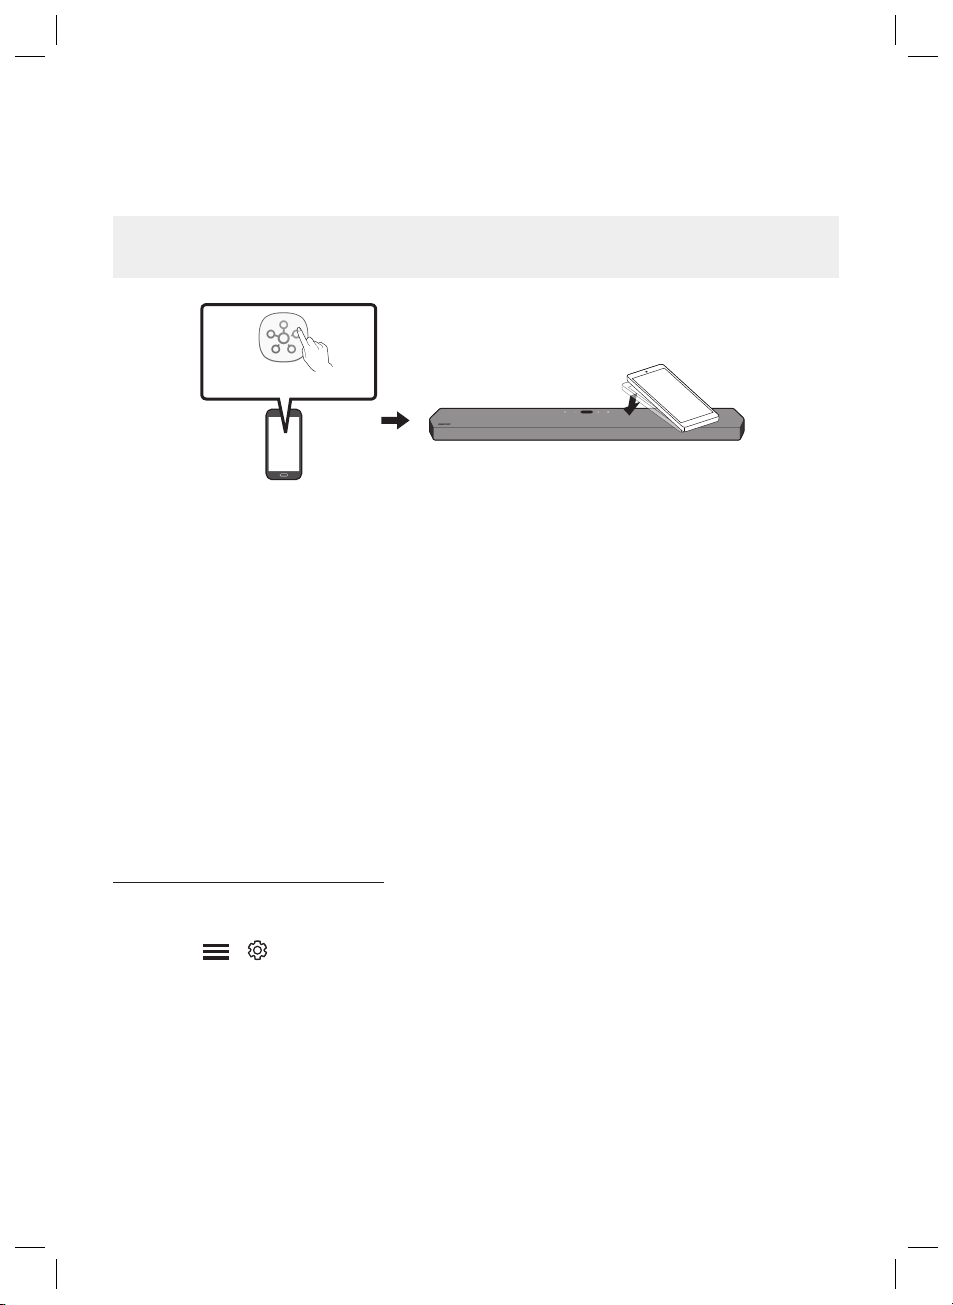
Using the Tap Sound
Tap the Soundbar with your mobile device to play the sound of content on the mobile device through
the Soundbar.
• This function may not be supported, depending on the mobile device.
• This function is only compatible with Samsung mobile devices with Android 8.1 or later.
SmartThings App
Mobile device
1. Turn on the Ta p So und function on your mobile device.
• For details on how to turn on the function, refer to “Setting the Tap Sound function” below.
2. Tap the Soundbar with the mobile device. Select “Start now” in the displayed message window.
A connection is established between the mobile device and Soundbar via Bluetooth.
3. Play the sound of content on the mobile device through the Soundbar.
• This function connects a mobile device to the Soundbar via Bluetooth by detecting vibration
that occurs when the device touches the Soundbar.
• Make sure the mobile device does not tap a sharp corner of the Soundbar. The Soundbar or
mobile device may become scratched or damaged.
• It is recommended that the mobile device be covered with a case. Lightly tap the wide area in
the upper portion of the Soundbar, without using excessive force.
• To use this function, update the SmartThings app to the latest version.
The function may not be supported, depending on the app version.
Top of the Soun dbar
Setting the Tap Sound function
Use the SmartThings app to turn on the Tap View, Tap Sound function.
1. On the mobile device, run the SmartThings app.
2. Select ( → ) in the SmartThings app screen displayed on the mobile device.
3. Set “Tap View, Tap Sound” to On to allow the function to work when a mobile device moves close to
the Soundbar. The function is turned on.
NOTES
• When the mobile device is in power-saving mode, the Tap S oun d function does not work.
• The Tap So und function may not work if there are devices near the Soundbar that cause radio
interference such as electric devices. Make sure devices that may cause radio interference are
placed at a sufcient distance away from the Soundbar.
ENG - 19
Page 20
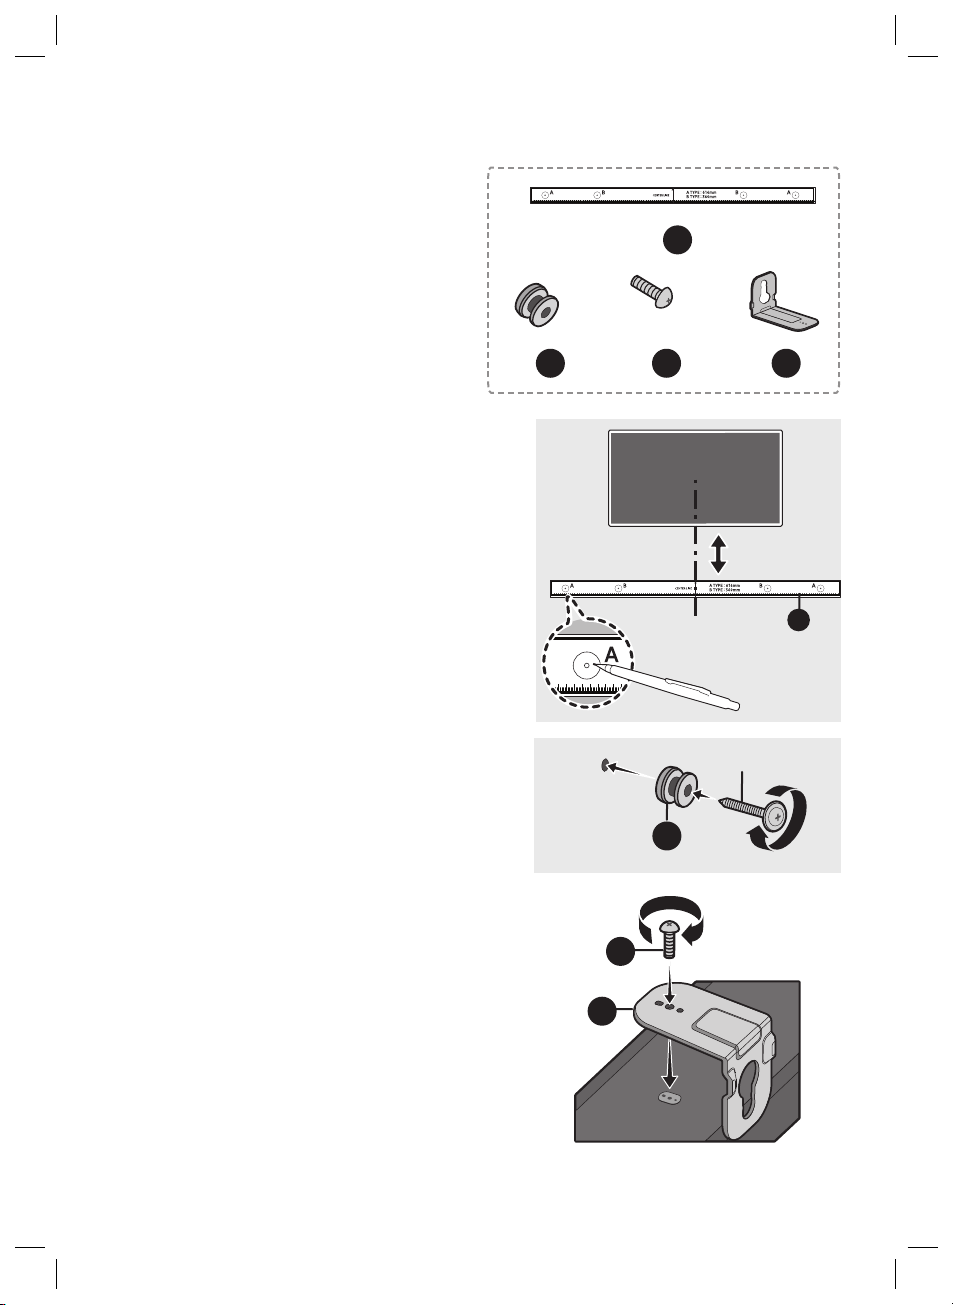
09 INSTALLING THE
B C D
C D
D
B C D
C D
D
WALL MOUNT
Wallmount Components
Installation Precautions
• Install on a vertical wall only.
• Do not install in a place with high
temperature or humidity.
• Verify whether the wall is strong enough to
support the product’s weight. If not, reinforce
the wall or choose another installation point.
• Purchase and use the xing screws or
anchors appropriate for the kind of wall you
have (plaster board, iron board, wood, etc.). If
possible, x the support screws into wall
studs.
• Purchase wall mounting screws according to
the type and thickness of the wall you want to
mount the Soundbar on.
– Diameter: M5
– Length: 35 mm or longer recommended.
• Connect cables from the unit to external
devices before you install the Soundbar on
the wall.
• Make sure the unit is turned off and
unplugged before you install it. Otherwise, it
may cause an electric shock.
1.
2.
A
x 2
B
x 2
(M4 x L10)
C
Centre Line
(not supplied)
x 2
D
5 cm or more
A
B
3.
C
D
ENG - 20
Page 21
• When assembling, make sure the
C D
C D
C D
hanger part of the D are located
behind the rear of the Soundbar.
Rear of S oundbar
10 INSTALLING THE
SOUNDBAR
ABOVE A TV
STAND
D
Right end o f Soundbar
4.
B
•D is inserted down to be installed
B
on
.
B
Component
x 4
Rubber-Foot
To install, attach the Rubber-Feet to the bottom
of the Soundbar before placing it in position
above the TV stand. Make sure you attach the
Rubber-Feet so that they are beyond the outside
edges of the TV stand. Refer to the gure below.
Rubber-Foot
D
ENG - 21
Page 22
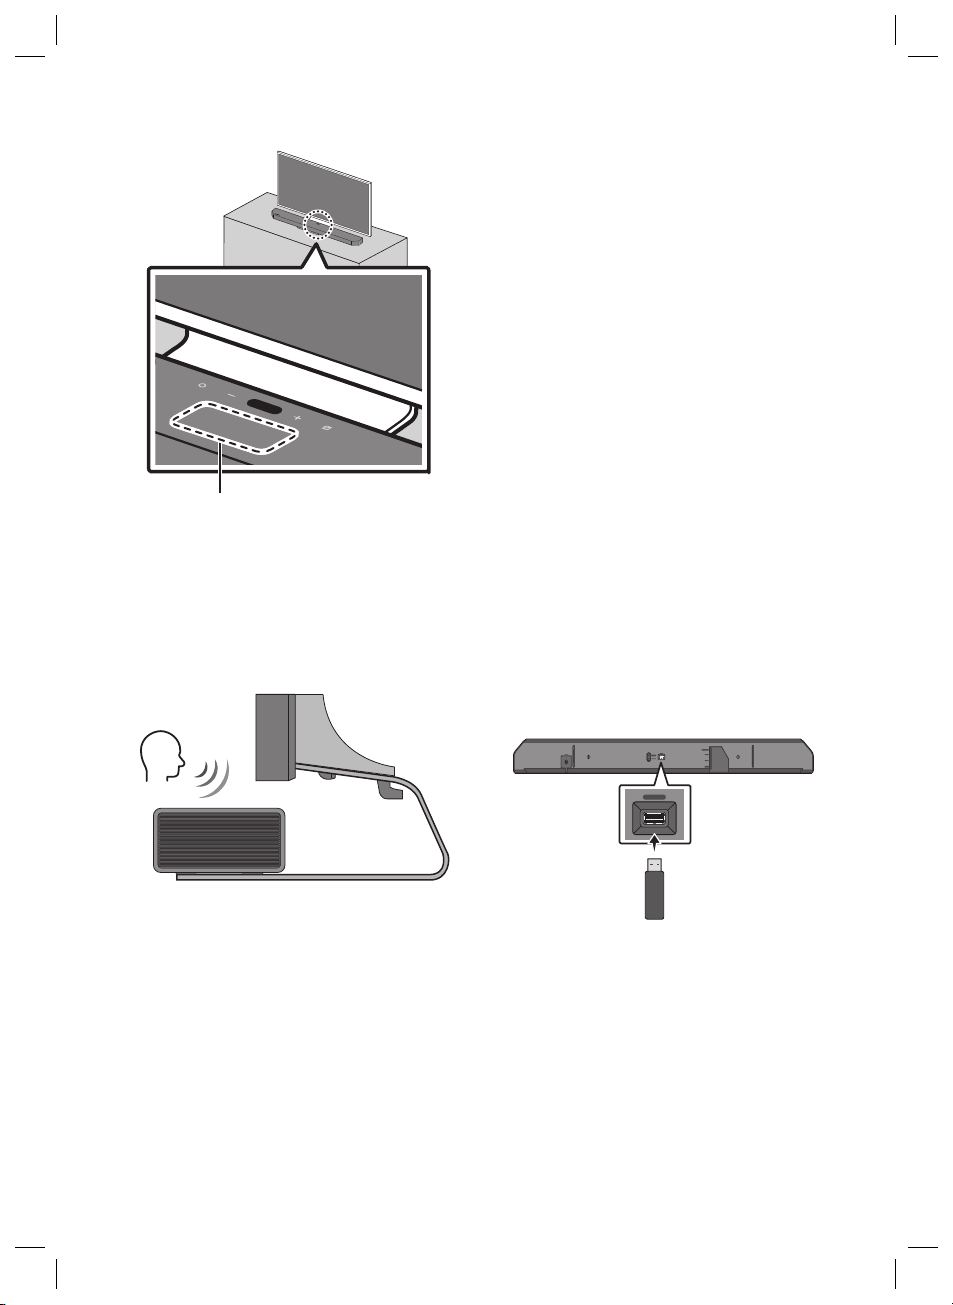
Place the Soundbar on a TV stand.
Microphone
As illustrated in the image, align the centre of the
Soundbar with the centre of the TV, carefully
place the Soundbar onto the TV stand.
At this time, place the microphone at the front of
the stand not to interfere with voice recognition.
TV
11 SOFTWARE
UPDATE
Auto Update
When the Soundbar is connected to the Internet,
software updates automatically occur even when
the Soundbar is turned off.
• To use the Auto Update function, the
Soundbar must be connected to the Internet.
The Wi-Fi connection to the Soundbar will be
terminated if the Soundbar ’s power cord is
disconnected or the power is cut off. If the
power is cut off, when the power comes back
on or you reconnect the power cord, turn on
the Soundbar, and then reconnect it to the
Internet.
USB Update
Right end o f Soundbar
NOTES
• Make sure the Soundbar is placed on a at
and solid surface.
• Insufcient gap from the TV may cause voice
recognition and acoustic problems.
Bott om of the Soundba r
DIGITAL AUDIO IN
(OPTICAL)
ID SET
SERVICE
HDMI IN 1
SERVICE
HDMI 2
ID SET
(WOOFER/REAR)
NETWORK
HDMI 1
HDMI IN 2
HDMI TO TV
(eARC/ARC)
POWER
Samsung may offer updates for the Soundbar’s
systemrmwareinthefuture.
When an update is available, you can update the
Soundbar by connecting the USB drive that
contains the update rmware to the SERVICE
port of the Soundbar.
ENG - 22
Page 23
For more information about how to download
update les and upgrade the version, go to the
Samsung website (www.samsung.com) → search
for the model name from the customer support
menu option.
Initialisation
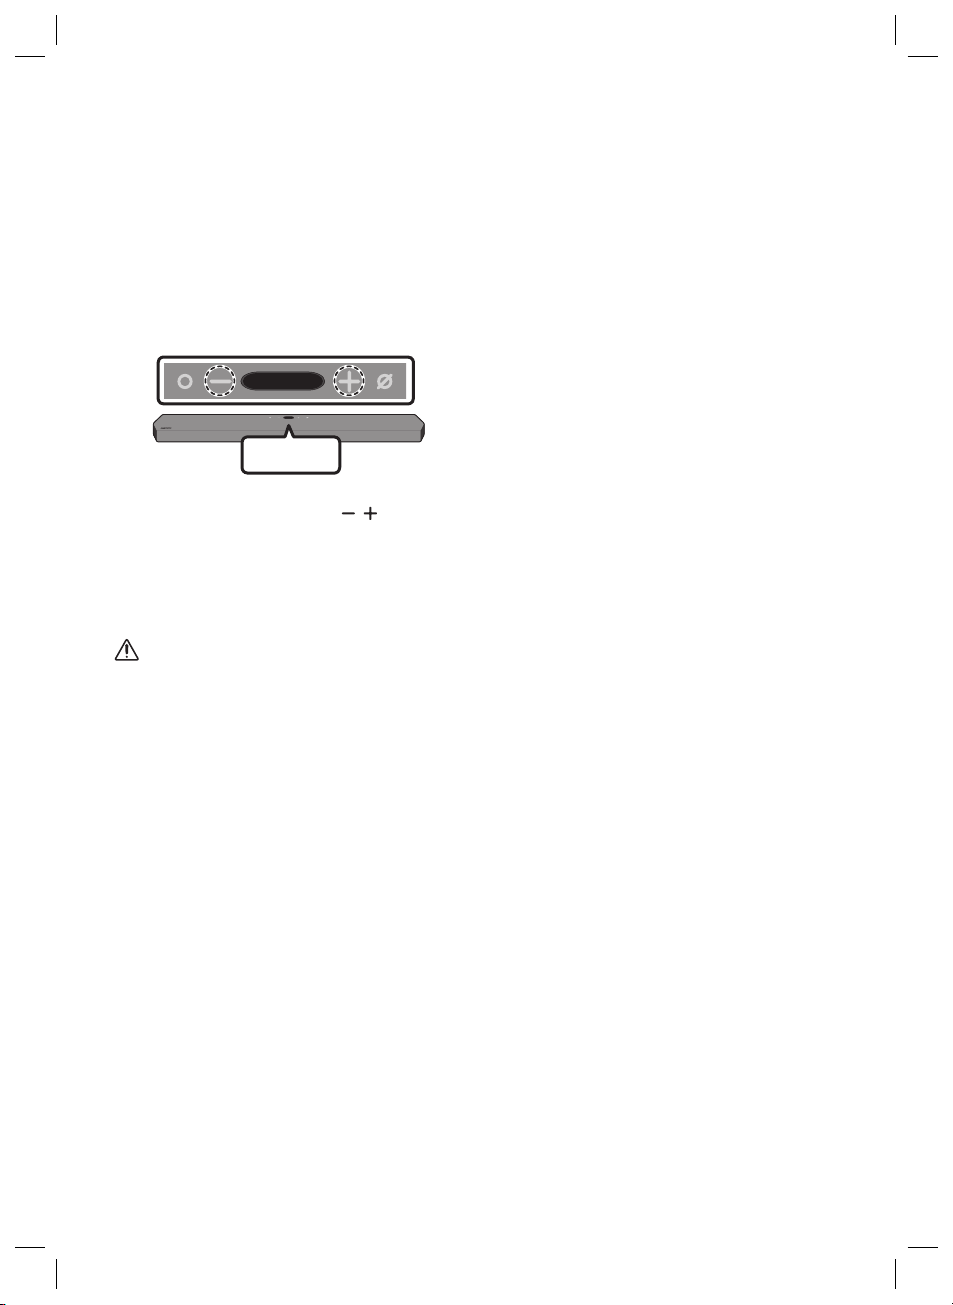
Top of the Soun dbar
INIT
With the Soundbar on, press the (Volume)
buttons on the body at the same time for at least
5 seconds. “INIT” appears on the display and then
the Soundbar is initialised.
CAUTION
• All the settings of the Soundbar are
initialised. Be sure to perform this only when
initialisation is required.
ENG - 23
Page 24
12 TROUBLESHOOTING
Before seeking assistance, check the following.
In case the power is not turned on
; Check whether the power cord of the
Soundbar is correctly inserted into the
outlet.
In case the functions do not work properly
; After removing the power cord, insert it
again.
; Try again after initialising the product.
(See page 23)
; If there is no signal, the Soundbar
automatically turns off after a certain
period of time. Turn on the power.
(See page 7)
In case the remote control does not work
; Operate the remote control noting the
Soundbar closely.
; Replace the batteries with new ones.
In case the Soundbar sound is not output
; The volume of the Soundbar is too low or
muted. Adjust the volume.
; When any external device (STB, Bluetooth
device, mobile device, etc.) is connected,
adjust the volume of the external device.
; For sound output of the TV, select
Soundbar. (Samsung TV: Home ( ) →
Settings ( ) → Sound → Sound Output →
Select Soundbar)
; Remove the cable from the Soundbar and
then reconnect it.
In case the sound of the Subwoofer speaker is
not output
; Check whether the LED on the rear of the
Subwoofer lights in blue. Reconnect it
when the blue LED blinks or the red LED
lights. (See page 9)
In case the TV is not connected via HDMI TO
TV(eARC/ARC)
; Check whether the HDMI cable is correctly
connected to the ARC terminal.
(See page11)
; Connection may not be possible due to the
connected external device (set-top box,
game console, etc.). Directly connect the
Soundbar.
; HDMI-CEC may not be activated on the TV.
Turn on the CEC on the TV menu. (Samsung
TV: Home ( ) → Settings ( ) → General
→ External Device Manager → Anynet+
(HDMI-CEC) ON)
In case Bluetooth connection is not possible
; When connecting a new device, switch to
“BT PAIRING” for connection. (Press the
PAIR button on the remote control or
press the (Mic On/Off) button on the
body for at least 5 seconds.)
; Reconnect it after removing the Bluetooth
speaker list on the device to connect.
(Samsung TV: Home ( ) → Settings ( )
→ Sound → Sound Output → Bluetooth
Speaker List)
ENG - 24
Page 25
In case Bluetooth sound breaking occurs
; Keep your device away from the Soundbar
because it may cause radio interference.
e.g. microwave, wireless router, etc.
; Because the device to connect is far away
from the Soundbar, sound breaking may
occur. Move the device near the Soundbar.
; If a part of your body is in contact with the
Bluetooth transceiver or the product is
installed on metal furniture, sound
breaking may occur. Check the installation
environment and conditions for use.
In case Wi-Fi connection is not possible
; Make sure the wireless router is turned on
and then reconnect the wireless router
after rebooting.
; When the signal of the wireless router is
too weak, connection may not be possible.
Move the router near the Soundbar or
adjust the installed position with no
obstacles.
In case Alexa does not respond
In case the Soundbar is not turned on as soon
as the TV is turned on
; When you turn off the Soundbar while
watching TV, power synchronization with
the TV is disabled. First turn off the TV.
When the microphone is turned off or its
reception is poor
; Press the (Mic On/Off) button at the top
of the Soundbar to enable the microphone.
; Voice recognition may be unavailable due
to ambient noise. Reduce the noise and try
again.
When the network is disconnected
; The network may be unavailable.
Recongure the network. (See page 18)
WhenAlexaisnotconguredcorrectly
; Using the SmartThings app, recongure
Alexa. (See page 18)
; Check the Alexa supported countries at the
Amazon website. The service is unavailable
in those countries.
ENG - 25
Page 26

13 LICENCE
Manufactured under license from Dolby
Laboratories. Dolby, Dolby Atmos, Dolby Audio,
Dolby Digital Plus, Pro Logic, and the double-D
symbol are trademarks of Dolby Laboratories.
14 OPEN SOURCE
LICENCE NOTICE
To send inquiries and requests for questions
regarding open sources, contact Samsung Open
Source (http://opensource.samsung.com)
15 IMPORTANT
NOTES ABOUT
For DTS patents, see http://patents.dts.com.
Manufactured under license from DTS Licensing
Limited. DTS, the Symbol, & DTS and the Symbol
together, DTS:X, and the DTS:X logo are
registered trademarks and/or trademarks of
DTS, Inc. in the United States and/or other
countries. © DTS, Inc. All Rights Reserved.
The terms HDMI and HDMI High-Denition
Multimedia Interface, and the HDMI Logo are
trademarks or registered trademarks of HDMI
Licensing LLC in the United States and other
countries.
• The Spotify Software is subject to third
party licenses found here :
www.spotify.com/connect/third-partylicenses.
• For more information about Spotify
Connect, please visit www.spotify.com/
connect
SERVICE
• Figures and illustrations in this User Manual
are provided for reference only and may differ
from actual product appearance.
• An administration fee may be charged if
either
(a) an engineer is called out at your request
and there is no defect with the product (i.e.
where the user manual has not been read).
(b) you bring the unit to a repair centre and
there is no defect with the product (i.e.
where the user manual has not been read).
• You will be informed of the administration fee
amount before a technician visits.
ENG - 26
Page 27
16 SPECIFICATIONS AND GUIDE
Specications
Model Name HW-Q900T
Weight 7.1 kg
Dimensions (W x H x D) 1232.0 x 69.5 x 138.0 mm
Operating Temperature Range +5°C to +35°C
Operating Humidity Range 10 % ~ 75 %
AMPLIFIER
Rated Output power (18W x 6) + (10W x 3) + (18W x 6) + 160W
Supported play formats
WIRELESS DEVICE OUTPUT POWER
Wi-Fi max transmitter power
WIRELESS DEVICE OUTPUT POWER
BT max transmitter power
WIRELESS DEVICE OUTPUT POWER
SRD max transmitter power
Subwoofer Name PS-WR75BK
Weight 9.8 kg
Dimensions (W x H x D) 210.0 x 403.0 x 403.0 mm
AMPLIFIER
Rated Output power 160W
WIRELESS DEVICE OUTPUT POWER
SRD max transmitter power
Dolby Atmos (True HD / Digital Plus), Dolby Digital,
DTS Master Audio, DTS:X, DTS
100mW at 2.4GHz – 2.4835GHz, 200mW at 5.15GHz
– 5.25GHz, 100mW at 5.25GHz – 5.35GHz & 5.47GHz
– 5.725GHz
100mW at 2.4GHz – 2.4835GHz
25mW at 5.725GHz – 5.825GHz
25mW at 5.725GHz – 5.825GHz
ENG - 27
Page 28
NOTES
• Samsung Electronics Co., Ltd reserves the right to change the specications without notice.
• Weight and dimensions are approximate.
Precaution : The Soundbar will restart automatically if you turn on/turn off Wi-Fi.
Overall Standby Power
Consumption (W)
Wi-Fi
Port deactivation method
Bluetooth
Port deactivation method
• Hereby, Samsung, declares that this equipment is in compliance with Directive
2014/53/EU.
The full text of the EU declaration of conformity is available at the following
internet address: http://www.samsung.com go to Support > Search Product
Support and enter the model name.
This equipment may be operated in all EU countries.
The 5GHz WLAN(Wi-Fi or SRD) function of this equipment may only be operated
indoors.
Press the ID SET button on the bottom panel of the Soundbar for
30 seconds to turn Wi-Fi On / Off.
Press the NETWORK button on the bottom panel of the Soundbar
for 30 seconds to turn Bluetooth On / Off.
5.2W
ENG - 28
Page 29
[Correct disposal of bat teries in this product]
(Applicable in countries with separate collec tion systems)
This marking on the battery, manual or packaging indicates that the batteries in this product should not be
disposed of with other household waste at the end of their working life. Where marked, the chemical
symbols Hg, Cd or Pb indicate that the battery contains mercury, cadmium or lead above the reference
levels in EC Directive 2006/66.
If batteries are not properly disposed of, these substances can cause harm to human health or the
environment.
To protect natural resources and to promote material reuse, please separate batteries from other types of
waste and recycle them through your local, free battery return system.
Correc t Disposal of This Produc t
(Waste Electrical & Electronic Equipment)
(Applicable in countries with separate collec tion systems)
This marking on the product, accessories or literature indicates that the product and its electronic
accessories (e.g. charger, headset, USB cable) should not be disposed of with other household waste at the
end of their working life. To prevent possible harm to the environment or human health from uncontrolled
waste disposal, please separate these items from other types of waste and recycle them responsibly to
promote the sustainable reuse of material resources.
Household users should contac t either the retailer where they purchased this product, or their local
government ofce, for details of where and how they can take these items for environmentally safe
recycling.
Business users should contact their supplier and check the terms and conditions of the purchase contract.
This product and its electronic accessories should not be mixed with other commercial wastes for disposal.
For information on Samsung’s environmental commitments and product specic regulatory obligations
e.g. REACH, WEEE, Batteries, visit:
http://www.samsung.com/uk/aboutsamsung/samsungelectronics/corporatecitizenship/data_corner.html
ENG - 29
Page 30

SICHERHEITSINFORMATIONEN
HINWEISE ZUR SICHERHEIT
ZUR VERMEIDUNG VON STROMSCHLÄGEN DARF
DIESES GERÄT NICHT GEÖFFNET WERDEN.
ES ENTHÄLT KEINE BAUTEILE, DIE VOM
BENUTZER GEWARTET ODER REPARIERT
WERDEN KÖNNEN. WARTUNGS- UND
REPARATURARBEITEN DÜRFEN NUR VON
FACHPERSONAL AUSGEFÜHRT WERDEN.
In der nachstehenden Tabelle nden Sie eine
Erklärung zu Symbolen, die sich möglicherweise
auf Ihrem Samsung-Produkt benden.
ACHTUNG
GEFAHR ELEKTRISCHER
SCHL ÄGE! GERÄT NIC HT
ÖFFNEN!
Dieses Symbol zeigt an, dass im Inneren
Hochspannung vorhanden ist. Es ist
gefährlich, Teile im Inneren dieses
Bildschirms zu berühren.
Dieses Symbol weist darauf hin, dass
diesem Gerät wichtige Anweisungen zum
Betrieb und zur Wartung beigefügt sind.
Produkt der Klasse-II: Dieses Symbol
zeigt an, dass das Gerät keinen
elektrischen Erdungsanschluss (Masse)
benötigt. Wenn dieses Symbol bei einem
Produkt mit Netzkabel nicht vorhanden
ist, MUSS das Produkt zuverlässig mit
einem Schutzleiter (Erde) verbunden sein.
Wechselspannung: Dieses Symbol zeigt
an, dass es sich bei der mit diesem
Symbol gekennzeichneten
Nennspannung um eine
Wechselspannung handelt.
Gleichspannung: Dieses Symbol zeigt an,
dass es sich bei der mit diesem Symbol
gekennzeichneten Nennspannung um
eine Gleichspannung handelt.
Achtung! Gebrauchsanweisung
beachten: Dieses Symbol weist den
Benutzer an, weitere
sicherheitsrelevante Informationen der
Gebrauchsanweisung zu entnehmen.
DEU - 2
WARNUNG
• Setzen Sie das Gerät nicht Nässe oder
Feuchtigkeit aus, um die Gefahr eines
Brandes bzw. eines elektrischen Schlags zu
vermeiden.
ACHTUNG
• UM ELEKTRISCHE SCHLÄGE ZU VERMEIDEN,
RICHTEN SIE DEN BREITEN KONTAKTSTIFT
DES STECKERS AN DEM BREITEN
STECKPLATZ AUS, UND STECKEN SIE DEN
STECKER VOLL EIN.
• Dieses Gerät darf nur an eine Netzsteckdose
mit Schutzerdung angeschlossen werden.
• Um das Gerät vom Netzbetrieb zu trennen,
muss der Stecker aus der Netzsteckdose
gezogen werden. Deshalb sollte der
Netzstecker jederzeit zugänglich und leicht
trennbar sein.
• Das Gerät keinem Spritz- oder Tropfwasser
aussetzen. Keine mit Flüssigkeit gefüllten
Behälter, wie Vasen auf das Gerät stellen.
• Um das Gerät vollständig auszuschalten,
muss der Netzstecker aus der Steckdose
gezogen werden. Somit muss der Netzstecker
immer bequem erreichbar sein.
Page 31

HINWEISE
1. Stellen Sie sicher, dass die Stromversorgung
in Ihrem Haushalt den auf dem Etikett auf
der Unterseite des Geräts angegebenen
Anforderungen entspricht. Stellen Sie Ihr
Produkt horizontal auf einer geeigneten
Unterlage (Möbel) auf, so dass rundherum
ausreichend Platz 7~10 cm zur Belüftung
bleibt. Achten Sie darauf, dass die
Belüftungsöffnungen nicht abgedeckt sind.
Stellen Sie das Gerät nicht auf Verstärker
oder andere Geräte, die heiß werden können.
Das Gerät ist für Dauerbetrieb eingerichtet.
Um das Gerät vollständig auszuschalten, den
Stecker aus der Steckdose ziehen. Ziehen Sie
den Netzstecker des Geräts wenn Sie
beabsichtigen, es für längere Zeit nicht zu
nutzen.
2. Ziehen Sie bei Gewittern das Stromkabel aus
der Steckdose. Durch Blitze verursachte
Spannungsspitzen können zur Beschädigung
des Geräts führen.
3. Halten Sie das Gerät von direkter
Sonneneinstrahlung oder anderen
Wärmequellen fern. Dies kann zu einer
Überhitzung führen und zu einer
Fehlfunktion des Geräts führen.
4. Schützen Sie das Produkt vor Feuchtigkeit
(z. B. Vasen), übermäßiger Hitze (z. B.
Kamine) oder Geräten, die starke
magnetische oder ele trische Felder
erzeugen. Trennen Sie das Netzkabel bei
Fehlfunktionen des Geräts von der
Stromversorgung. Ihr Produkt ist nicht für
den gewerblichen Einsatz vorgesehen.
Verwenden Sie dieses Produkt nur für den
privaten Bereich. Wenn Ihr Produkt oder die
CD bei kalten Temperaturen aufbewahrt
wurden, kann Kondensation auftreten. Wenn
Sie das Gerät bei kaltenTemperaturen
transportiert haben, warten Sie mit der
Inbetriebnahme circa 2 Stunden, bis das
Gerät Raumtemperatur erreicht hat.
5. Die in diesem Produkt verwendeten Batterien
enthalten umweltschädliche Chemikalien.
Entsorgen Sie die Batterien nicht im Hausmüll.
Entsorgen Sie Batterien niemals in einem Feuer.
Schließen Sie die Batterien nicht kurz, zerlegen
und überhitzen Sie sie nicht.
Bei unsachgemäßem Austausch von Batterien
besteht Explosionsgefahr. Setzen Sie nur Batterien
des gleichen oder eines gleichwertigen Typs ein.
Reinigung des Gewebes
Entfernen Sie jeden Schmutz oder Fleck auf der
Produktoberäche sofort.
Das Entfernen und Reinigen kann bei einigen
Substanzen oder bei längerer Einwirkzeit weniger
effektiv sein.
ACHTUNG
• Verwenden Sie einen Staubsauger oder eine
Klebefusselrolle, um Staub, Handabdrücke
und Ähnliches zu entfernen.
– Einige Reinigungsbürsten können je nach
den darin enthaltenen Materialien das
Produkt beschädigen.
– Handtücher und Reinigungstücher
können Fusseln oder Schmutz auf dem
Produkt hinterlassen.
• Kratzen Sie den Schmutz nicht mit Nägeln
oder sonstigen Werkzeugen ab. Das Gewebe
könnte dadurch beschädigt werden.
• Um Öl- oder Flüssigkeitsecken zu entfernen,
verwenden Sie ein sauberes, weißes, mit Wasser
angefeuchtetes Tuch. Bleibt der Fleck bestehen,
wischen Sie ihn mit einer Mischung aus Wasser
und neutralem Reinigungsmittel (wie z. B.
Geschirrspülseife) und einem Tuch ab.
– Ein nicht neutrales Wasch- oder
Reinigungsmittel kann zu Verfärbungen
oder Gewebeschäden führen.
– Verwenden Sie nach der Reinigung ein
trockenes Tuch oder einen Föhn, um den
Bereich zu trocknen.
– Wenden Sie keine übermäßige Gewalt an,
um Verfärbungen oder Beschädigungen
des Gewebes zu vermeiden.
DEU - 3
Page 32

INHALT
01 Überprüfen der Komponenten 5
02 Produktübersicht 6
03 Verwendung der Fernbedienung 7
04 Verbinden der Soundbar 8
05 Verwendung einer Kabelverbindung mit dem Fernseher 11
06 Verwendung einer drahtlosen Verbindung mit dem
Fernseher 14
07 Verbinden eines externen Geräts 16
08 Verbinden eines Mobilgeräts 17
09 Installieren der Wandhalterung 20
10 Installieren der Soundbar über einem TV-Standfuß 21
11 Software-Update 22
12 Fehlerbehebung 24
13 Lizenz 26
14 Bekanntmachung zu Open Source Lizenzen 26
15 Wichtige Hinweise zum Kundendienst 26
16 Spezikationen und Leitfaden 27
DEU - 4
Page 33

01 ÜBERPRÜFEN DER KOMPONENTEN
PAIR
SOUND
MODE
VOL WOOFER
SOUNDBAR
Soundbar-Hauptgerät Soundbar-F ernbedienung /
Batterien
Subwoofer
x 2
Stromkabel (Subwoofe r, Soundb ar) HDMI-Kabel
x 2
x 2
(M4 x L10)
Wandhalterungsführung Aufhängungsschraube Schraube
x 2
x 4
Wandhalterung Gummifuß
• Weitere Informationen zur Stromversorgung und zum Stromverbrauch nden Sie auf dem
Aufkleber am Gerät. (Aufkleber: Unterer Teil des Soundbar-Hauptgeräts)
• Um zusätzliche Komponenten oder optionale Kabel zu erwerben, wenden Sie sich an ein
Servicezentrum oder den Kundendienst von Samsung.
• Weitere Informationen über die Wandhalterung oder den Gummifuß nden Sie auf den Seiten
20~21.
• Design, Spezikationen und App-Bildschirm können sich ohne vorherige Ankündigung ändern.
Einlegen der Batterien vor der Verwendung der Fernbedienung
(AA-Batterien X 2)
Schieben Sie die rückseitige Abdeckung in
Pfeilrichtung, bis sie vollständig entfernt ist.
Legen Sie 2 AA-Batterien (1,5V) so ausgerichtet ein,
dass ihre Polarität richtig ist. Schieben Sie die
rückseitige Abdeckung wieder vollständig zurück.
DEU - 5
Page 34

02 PRODUKTÜBERSICHT
ID SET
HDMI IN 1
HDMI IN 2
NETWORK
SERVICE
DIGITAL AUDIO IN
(OPTICAL)
HDMI TO TV
(eARC/ARC)
HDMI 2
HDMI 1
ID SET
(WOOFER/REAR)
ID SET
DIGITAL AUDIO IN
(OPTICAL)
HDMI TO TV
HDMI 2
HDMI 1
ID SET
HDMI IN 1
HDMI IN 2
POWER
NETWORK
SERVICE
DIGITAL AUDIO IN
(OPTICAL)
HDMI TO TV
(eARC/ARC)
HDMI 2
HDMI 1
ID SET
(WOOFER/REAR)
ID SET
NETWORK
SERVICE
ID SET
(WOOFER/REAR)
DIGITAL AUDIO IN
(OPTICAL)
HDMI TO TV
(eARC/ARC)
HDMI 2
HDMI 1
Obere Platte der Soundbar
Positionieren Sie das
Produkt so, dass sich
das SAMSUNG Logo auf
der Oberseite bendet.
Unteres Bedienfeld der Soundbar
POWER
(Multi-Funktion)-Taste
• Drücken Sie im Standby-Modus die
(Multi-Funktion)-Taste, um die
Soundbar einzuschalten.
• Drücken Sie die (Multi-Funktion)-Tas te,
um die Eingangsquelle zu ändern.
• Drücken Sie die (Multi-Funktion)-Tas te
3 Sekunden lang, um Alexa aufzurufen.
Sprechen Sie bei gedrückter Taste, um die
Spracherkennung zu aktivieren.
POWER
Schließen Sie das Wechselstromnetzkabel der
Soundbar an.
ID SET (WOOFER/REAR)
Drücken Sie hier, um die Soundbar drahtlos mit
den Surround-Lautsprechern und einem
Subwoofer zu verbinden.
(Der Surroundlautsprecher ist separat erhältlich.)
NETWORK
Drücken Sie hier, um über die SmartThings-App
eine Verbindung zu einem drahtlosen Netzwerk
(Wi-Fi) herzustellen.
POWER
ID SET
(WOOFER/REAR)
NETWORK
DEU - 6
Anzeige Mikrof on Ein/Aus
Lautstärke
DIGITAL AUDIO IN
(OPTICAL)
SERVICE
DIGITAL AUDIO IN
ID SET
SERVICE
ID SET
(WOOFER/REAR)
NETWORK
(OPTICAL)
HDMI IN 1
HDMI 2
HDMI IN 2
HDMI 1
HDMI TO TV
(eARC/ARC)
HDMI 2
HDMI 1
HDMI TO TV
(eARC/ARC)
SERVICE
Schließen Sie ein USB-Speichergerät an, um die
Software des Produkts zu aktualisieren.
DIGITAL AUD IO IN (OPTIC AL)
Anschluss an den digitalen (optischen) Ausgang
eines externen Gerätes.
HDMI 1 / HDM I 2
Gibt digitale Video- und Audiosignale
gleichzeitig über ein HDMI-Kabel ein.
Für die Verbindung mit dem HDMI-Ausgang
eines externen Gerätes.
HDMI TO T V (eARC/ARC)
Verbindung mit dem HDMI-Anschluss eines
Fernsehers.
Page 35

03 VERWENDUNG DER FERNBEDIENUNG
So verwenden Sie die Fernbedienung
Strom
PAIR
SOUND
MODE
VOL WOOFER
SOUNDBAR
Schaltet die Soundbar ein und aus.
• Auto Power Down-Funktion
Das Gerät schaltet sich in den folgenden Situationen
automatisch aus:
– Im D.IN / HDMI / Wi-Fi / BT-Modus, wenn es
18 Minuten lang kein Audiosignal gibt.
(Quelle)
Drücken Sie hier, um eine quelle, die mit der Soundbar
verbunden ist, auszuwählen.
(Stummschaltung)
Drücken Sie die Taste (Stummschaltung), um den Strom
stumm zu schalten.
Drücken Sie sie erneut, um den Ton wieder einzuschalten.
SOUND MODE
Sie können den gewünschten Sound-Modus auswählen, indem
Sie STANDARD, SURROUND, GAME PRO oder ADAPTIVE
SOUND auswählen.
Bluetooth PAIR
Schalten Sie die Soundbar in den Bluetooth-Kopplungs-Modus.
Drücken Sie die Taste und warten Sie auf den „BT PAIRING“-
Bildschirm, um ein neues Bluetooth-Gerät zu verbinden.
p (Wiederg abe / Pause)
Sie können die Musik auch durch Drücken der Taste
wiedergeben oder pausieren.
Oben/Unten/Links/Rechts
Drücken Sie Oben/Unten/Links/Rechts auf der Taste zum Auswählen oder Einstellen von Funktionen.
(Soundsteuerung)
Wenn Sie diese Taste drücken, werden die Einstelloptionen wie TREBLE, BASS, SYNC, CENTER LEVEL, SIDE
LEVEL, FRONT TOP LEVEL, REAR LEVEL, REAR TOP L EVEL und VIRTUAL ON/OFF nacheinander angezeigt.
Die gewünschte Option kann mit den Tasten Oben/Unten eingestellt werden.
WOOFER (BASS)-LAUTSTÄRKE
Drücken Sie die Taste nach oben oder unten, um die Lautstärke des Woofers (Bass) auf -12 oder auf -6 bis
+6 einzustellen. Um die Woofer (Bass)-Lautstärkestufe auf 0 (Standard) einzustellen, drücken Sie die Taste.
LAUTSTÄRKE
Drücken Sie die Taste nach oben oder unten, um die Lautstärke einzustellen.
DEU - 7
Page 36

04 VERBINDEN DER SOUNDBAR
POWER
POWER
HDMI IN 1
HDMI IN 2
ID SET
(WOOFER, REAR)
POWER
NETWORK
SERVICE
DIGITAL AUDIO IN
(OPTICAL)
HDMI TO TV
(eARC/ARC)
HDMI 1
HDMI 2
ID SET
POWER
HDMI IN 1
HDMI IN 2
ID SET
(WOOFER, REAR)
NETWORK
SERVICE
DIGITAL AUDIO IN
(OPTICAL)
HDMI TO TV
(eARC/ARC)
HDMI 1
HDMI 2
ID SET
Verbinden der Stromversorgung und des Subwoofers
Schließen Sie den Subwoofer und die Soundbar mit dem Netzkabel in folgender Reihenfolge an eine
Stromversorgung an.
• Weitere Informationen zur benötigten Stromversorgung und zum Stromverbrauch nden Sie auf
dem Aufkleber am Gerät. (Aufkleber: Unterer Teil des Soundbar-Hauptgeräts)
HINWEISE
• Schließen Sie den Subwoofer an die Stromversorgung an, bevor Sie ihn an die Soundbar
anschließen. Der Subwoofer wird beim Einschalten der Soundbar automatisch angeschlossen.
• Wenn Sie das Stromkabel beim Einschalten des Geräts aus- und wieder einstecken, schaltet sich
die Soundbar automatisch ein.
POWER
POWER
Untere r Teil d es Soundbar-
Rückseite des
Subwoofers
POWER
Hauptgeräts
Die Verbindung ist
abgeschlossen.
Blau is t eingeschalte t
DEU - 8
Page 37

Manuelles Anschließen des Subwoofers
Bevor Sie den nachfolgenden manuellen Anschlussvorgang durchführen:
• Überprüfen Sie, ob die Stromkabel für die Soundbar und den Subwoofer richtig angeschlossen sind.
• Stellen Sie sicher, dass die Soundbar ausgeschaltet ist.
1. Schalten Sie das Soundbar-Hauptgerät aus.
2. Halten Sie ID SET auf der Rückseite des Subwoofers mindestens 5 Sekunden lang gedrückt.
5 Sec
Blinkt schnell
in blau
Rückseite des Subwoofers Rückseite des Subwoofers
3. Drücken Sie die Taste Oben auf der Fernbedienung 5 Sekunden lang.
PAIR
5 Sec
ID SET
4. Prüfen Sie, ob die LINK-LED dauerhaft blau leuchtet (Verbindung abgeschlossen).
Die LED-Verbindungsanzeige LINK hört auf
zu blinken und leuchtet dauerhaft blau,
wenn eine Verbindung zwischen der
Soundbar und dem drahtlosen Subwoofer
Blau is t eingeschalte t
hergestellt ist.
DEU - 9
Page 38

LED-Anzeigeleuchten auf der Rückseite des Subwoofers
LED Status Beschreibung Auösung
Ein
Blau
Blinken
Rot
Ein
Erfolgreich verbunden
(normaler Betrieb)
Wiederherstellen der
Verbindung
Standby (bei
ausgeschaltetem
Hauptgerät der
Soundbar)
Verbindung
fehlgeschlagen
-
Überprüfen Sie, ob das an der
Soundbar-Haupteinheit
angeschlossene Stromkabel
richtig angeschlossen ist oder
warten Sie etwa 5 Minuten. Wenn
das Blinken anhält, versuchen Sie,
den Subwoofer manuell
anzuschließen. Weitere
Informationen nden Sie auf
Seite9.
Überprüfen Sie, ob das an der
Soundbar-Haupteinheit
angeschlossene Stromkabel
richtig angeschlossen ist.
Erneut verbinden. Anweisungen
für einen manuellen Anschluss
nden Sie auf der Seite 9.
Rot und blau
Blinken Störung
Beachten Sie die
Kontaktinformationen in diesem
Handbuch für das Samsung
Servicezentrum.
DEU - 10
Page 39

05 VERWENDUNG EINER KABELVERBINDUNG
MIT DEM FERNSEHER
Methode 1. Verbindung mit HDMI
ACHTUNG
• Wenn sowohl das HDMI-Kabel als auch das optische Kabel angeschlossen sind, wird zuerst das
HDMI-Signal empfangen.
• Um das HDMI-Kabel zwischen dem Fernseher und der Soundbar anzuschließen, vergewissern
Sie sich, dass Sie die mit ARC gekennzeichneten Anschlüsse anschließen. Andernfalls wird der
Ton des Fernsehers möglicherweise nicht ausgegeben.
• Stellen Sie sicher, dass Sie ein Kabel mit dem Premium HDMI-Zertizierungslogo verwenden.
Stellen Sie außerdem sicher, dass das Kabel ein zertiziertes Hochgeschwindigkeits-HDMIEthernet-Kabel vom Typ A ist. (HOCHGESCHWINDIGKEITS-HDMI-KABEL MIT ETHERNET)
Anschließen des Fernsehgeräts, welches HDMI ARC (Audio Return Channel) unterstützt
Mit dem HD MI IN (ARC)-
Anschluss Ihres Fernsehgeräts
verbinden.
HDMI IN
(ARC)
HDMI-Kabel
Oberseite der Soundbar
Verbinden m it dem HDMI TO TV
(eARC/ARC)-Anschluss am
Soundbar-Hauptgerät.
HDMI TO TV
(eARC/ARC)
Unterseite der Soundbar
TV ARC
1. Schließen Sie bei ausgeschalteter Soundbar und ausgeschaltetem Fernseher das HDMI-Kabel wie
in der Abbildung gezeigt an.
2. Schalten Sie die Soundbar und den Fernseher ein.
3. Das Displayfenster des Soundbar-Hauptgeräts zeigt „TV ARC“ an und der Ton des Fernsehers wird
von der Soundbar ausgegeben.
• Wenn der Ton des Fernsehers nicht zu hören ist, drücken Sie die (Multi-Funktion)-Taste auf
der Oberseite der Soundbar oder die (Quelle)-Taste auf der Fernbedienung, um den
„D.IN“-Modus auszuwählen. Der Bildschirm zeigt nacheinander „D.IN“ und „TV ARC“ an und der
Ton des Fernsehers wird abgespielt.
DEU - 11
Page 40

• Beim Verbinden eines Samsung TV, der die eARC-Funktion unterstützt, wird „eARC“ auf dem
Display angezeigt und der Ton ist zu hören.
• Wenn im Displayfenster des Soundbar-Hauptgeräts nicht „T V ARC“ angezeigt wird, stellen Sie
sicher, dass das HDMI-Kabel an den korrekten Port angeschlossen ist.
• Verwenden Sie die Lautstärketasten auf der Fernbedienung des Fernsehers, um die Lautstärke
der Soundbar zu ändern.
HINWEISE
• Wenn Sie einen Fernseher, welcher HDMI ARC (Audio Return Channel) unterstützt, über ein HDMIKabel an die Soundbar anschließen, können Sie die digitalen Video- und Audiodaten übertragen,
ohne ein separates optisches Kabel anzuschließen.
• Wir empfehlen Ihnen, wenn möglich ein HDMI-Kabel ohne Kern zu verwenden. Wenn Sie ein HDMIKabel mit Kern verwenden, verwenden Sie ein Kabel mit einem Durchmesser von weniger als 14 mm.
• Diese Funktion ist nicht verfügbar, wenn das HDMI-Kabel ARC nicht unterstützt.
• Wenn der Ton einer Sendung in Dolby Digital kodiert ist und das „Format des digitalen
Audioausgangs“ an Ihrem Fernsehgerät auf PCM eingestellt ist, empfehlen wir Ihnen, die
Einstellung auf Dolby Digital zu ändern. Wenn die Einstellung am Fernseher geändert ist, werden
Sie eine bessere Tonqualität feststellen. (Das Menü des Fernsehers kann je nach Hersteller des
Fernsehers unterschiedliche Begriffe für Dolby Digital und PCM verwenden.)
Methode 2. Verbindung mit einem optischen Kabel
Checkliste vor dem Verbinden
• Wenn sowohl das HDMI-Kabel als auch das optische Kabel angeschlossen sind, wird zuerst das
HDMI-Signal empfangen.
• Wenn Sie ein optisches Kabel verwenden und die Anschlüsse über Abdeckungen verfügen,
müssen Sie die Abdeckungen unbedingt entfernen.
OPTICAL OUT
Optisches Kabel
(nicht mitgeliefe rt)
Oberseite der Soundbar
D.IN
DEU - 12
Unterseite der Soundbar
DIGITAL AUDIO IN
(OPTICAL)
Page 41

1. Schalten Sie Fernseher und Soundbar aus und verbinden Sie den Anschluss DIGITAL AUDIO IN
(OPTICAL) an der Soundbar und den OPTICAL-Ausgangsanschluss am Fernseher mit dem
optischen Kabel (nicht mitgeliefert), wie in der Abbildung gezeigt.
2. Schalten Sie die Soundbar und den Fernseher ein.
3. Drücken Sie die (Multi-Funktion)-Taste an der Oberseite der Soundbar oder die (Quelle)Taste auf der Fernbedienung, um den „D.IN“-Modus auszuwählen.
4. Der Ton des Fernsehers wird über die Soundbar ausgegeben.
Verwenden der Q-Symphony-Funktion
Bei der Q-Symphony wird die Soundbar mit einem Samsung Fernsehgerät synchronisiert, um Ton aus
zwei Geräten für einen optimalen Surround-Effekt zu erzielen. Wenn die Soundbar verbunden ist,
erscheint das Menü „TV+Soundbar“ unter dem Tonausgabe-Menü des Fernsehgeräts. Wählen Sie das
entsprechende Menü aus.
Menü des
Fernsehgeräts
• Beispiel für Menü des Fernsehgeräts: TV + [AV ] Soundbar Seri enbezeichnung (H DMI)
HDMI-Kabel
ODER
Optisches Kabel
(nicht mitgeliefe rt)
D.IN
HINWEISE
• Kann entsprechend des von dem Fernsehgerät unterstützten Codecs betrieben werden.
• Diese Funktion wird nur unterstützt, wenn das HDMI-Kabel oder das optische Kabel (nicht
mitgeliefert) verbunden ist.
• Diese Funktion ist bei Samsung Fernsehgeräten verfügbar, die 2020 veröffentlicht wurden, sowie
bei einigen Soundbar-Modellen.
• Wenn Sie Q-Symphony verwenden, können Sie nur GAME PRO oder ADAPTIVE SOUND auswählen.
DEU - 13
Page 42

06 VERWENDUNG EINER DRAHTLOSEN
VERBINDUNG MIT DEM FERNSEHER
Verbindung per Bluetooth
Wenn ein Samsung-TV über Bluetooth verbunden ist, können Sie Stereoton ohne störende Verkabelung
hören.
• Es kann nur ein Samsung-TV gleichzeitig verbunden werden.
• Es kann ein Samsung-TV mit Bluetooth-Unterstützung angeschlossen werden. Prüfen Sie die
Spezikation Ihres Fernsehgeräts.
Oberseite der Soundbar
5 Sec
ODER
PAIR
BT PAIRING
Die erste Verbindung
1. Drücken Sie die Taste PAIR auf der Fernbedienung der Soundbar, um in den „BT PAIRING“-Modus
zu gelangen.
(ODER)
2. Bluetooth-Modus am Samsung-TV auswählen.
3. Wählen Sie „[AV] Samsung Soundbar Q900T“ aus der Liste auf dem Fernsehbildschirm aus.
4. Sie können jetzt den Ton des Samsung-TV über die Soundbar hören.
a. Drücken Sie die Taste (Multi-Funktion) auf dem Bedienfeld der Oberseite und
wählen Sie dann „BT“ aus.
„BT“ wechselt automatisch innerhalb weniger Sekunden zu „BT PAIRING“ oder
wechselt zu „BT READY“, falls eine Verbindung bereits verzeichnet wurde.
b. Sobald „BT READY“ erscheint, halten Sie die
Bedienfeld auf der Oberseite der Soundbar länger als 5 Sekunden gedrückt, um „BT
PAIRING“ anzuzeigen.
(z.B. Home ( ) Einstellung ( ) Ton Tonausgabe Bluetooth-Lautsprecherliste
[AV] Samsung Soundbar Q900T (Bluetooth))
Eine verfügbare Soundbar wird mit „Muss gekoppelt werden“ oder „Gekoppelt“ auf der Liste der
Bluetooth-Geräte angezeigt. Um den Samsung-TV mit der Soundbar zu verbinden, wählen Sie die
Meldung aus und stellen Sie dann eine Verbindung her.
• Wenn das Samsung TV angeschlossen ist, [TV-Name] → wird „BT“ im oberen Display der
Soundbar angezeigt.
• Nachdem Sie die Soundbar zum ersten Mal mit Ihrem Samsung-TV verbunden haben,
verwenden Sie zum erneuten Verbinden den Modus „BT READY“.
(Mikrofon Ein/Aus)
-Taste auf dem
DEU - 14
Page 43

Falls das Gerät nicht verbunden werden kann
• Falls Sie in der Liste mit Lautsprechern am Samsung-TV eine vorhandene Soundbar
(z.B. [AV] Samsung Soundbar Q900T) haben, löschen Sie diese.
• Wiederholen Sie dann die Schritte 1 bis 3.
Trennen der Soundbar vom Samsung-TV
Drücken Sie die (Multi-Funktion)-Taste an der Oberseite der Soundbar oder die (Quelle)-Taste
auf der Fernbedienung, um einen anderen Modus als „BT“ auszuwählen.
• Das Trennen dauert einige Zeit, denn der Samsung-TV muss eine Antwort von der Soundbar
erhalten. (Die erforderliche Zeit kann je nach dem Modell des Samsung-TV unterschiedlich sein.)
Was ist der Unterschied zwischen BT READY und BT PAIRING?
• BT READY: In diesem Modus können Sie einen beliebigen Samsung-TV oder ein Mobilgerät
verbinden, der/das bereits zuvor verbunden wurde.
• BT PAIRING: In diesem Modus können Sie ein neues Gerät mit der Soundbar verbinden.
(Drücken Sie die Taste PAIR auf der Fernbedienung oder halten Sie die Taste (Mikrofon Ein/
Aus) auf der Oberseite der Soundbar für mehr als 5 Sekunden gedrückt, während die Soundbar
im „BT“-Modus ist.)
Hinweise zur Bluetooth-Verbindung
• Suchen Sie ein neues Gerät im Umkreis von 1 m, um eine Verbindung per BluetoothKommunikation herzustellen.
• Wenn Sie bei der Verbindung mit einem Bluetooth-Gerät nach einem PIN-Code gefragt werden,
geben Sie <0000> ein.
• Die Soundbar schaltet sich nach 18 Minuten im Bereitschaftszustand automatisch aus.
• Die Soundbar führt die Bluetooth-Suche oder -Verbindung unter den folgenden Umständen
möglicherweise nicht korrekt aus:
– Wenn rund um die Soundbar ein starkes elektrisches Feld vorhanden ist.
– Wenn mehrere Bluetooth-Geräte gleichzeitig mit der Soundbar gekoppelt sind.
– Wenn das Bluetooth-Gerät ausgeschaltet ist, nicht an seinem Platz ist oder Fehlfunktionen
aufweist.
• Elektronische Geräte können Funkstörungen verursachen. Elektromagnetische Wellen erzeugende
Geräte müssen vom Soundbar-Hauptgerät ferngehalten werden - z. B. Mikrowellen, WLAN-Geräte
etc.
DEU - 15
Page 44

07 VERBINDEN EINES EXTERNEN GERÄTS
(OPTICAL)
Methode 1. Verbindung über ein HDMI-Kabel (mit Unterstützung
der Dekodierung und Wiedergabe von Dolby Atmos)
Oberseite der Soundbar
HDMI 1
ODER
Externes Gerät
HDMI OUT
HDMI 2
HDMI-Kabel
ODER
HDMI 2
HDMI 1
HDMI TO TV
(eARC/ARC)
Unterseite der Soundbar
HDMI IN
(ARC)
HDMI-Kabel
• HDMI-Kabel verbinden → Soundbar, Externes Gerät und Fernsehgerät einschalten
(Multi-Funktion) → Den „HDMI 1“ oder „HDMI 2“-Modus wählen
Methode 2. Verbindung mit einem optischen Kabel
Oberseite der Soundbar
BD / DVD- Player / Set topBox / Spiele konsole
OPTICAL OUT
• Das optische Kabel verbinden → Schalten Sie die Soundbar und das Externe Gerät ein →
(Multi-Funktion) → Den „D.IN“-Modus wählen
HINWEIS
• Weitere Informationen über den Anschluss externer Geräte nden Sie im Benutzerhandbuch der
Soundbar auf der Samsung-Website (www.samsung.com/support).
Optisches Kabel
(nicht mitgeliefe rt)
D.IN
DIGITAL AUDIO IN
(OPTICAL)
Unterseite der Soundbar
DEU - 16
Page 45

08 VERBINDEN EINES MOBILGERÄTS
Methode 1. Verbindung per Bluetooth
Wenn ein Mobilgerät über Bluetooth verbunden ist, können Sie Stereoton ohne störende Verkabelung
hören.
• Wenn Sie ein gekoppeltes Bluetooth-Gerät mit der ausgeschalteten Soundbar verbinden, schaltet
sich die Soundbar automatisch ein.
Oberseite der Soundbar
PAIR
Mobilgerät
5 Sec
ODER
BT PAIRING
Die erste Verbindung
• Achten Sie beim Verbinden mit einem neuen Bluetooth-Gerät darauf, dass sich das Gerät innerhalb
einer Entfernung von 1 m bendet.
1. Drücken Sie die Taste PAIR auf der Fernbedienung der Soundbar, um in den „BT PAIRING“-
Modus zu gelangen.
(ODER)
2. Wählen Sie an Ihrem Gerät in der angezeigten Geräteliste „[AV] Samsung Soundbar Q900T“.
3. Spielen Sie Musikdateien von dem über Bluetooth verbundenen Gerät über die Soundbar ab.
a. Drücken Sie die Taste (Multi-Funktion) auf dem Bedienfeld der Oberseite und
wählen Sie dann „BT“ aus.
„BT“ wechselt automatisch innerhalb weniger Sekunden zu „BT PAIRING“ oder
wechselt zu „BT READY“, falls eine Verbindung bereits verzeichnet wurde.
b. Sobald „BT READY“ erscheint, halten Sie die
Bedienfeld auf der Oberseite der Soundbar länger als 5 Sekunden gedrückt, um „BT
PAIRING“ anzuzeigen.
• Wenn die Soundbar mit dem Mobilgerät verbunden ist, [Name des mobilen Geräts] → wird „BT“
im oberen Display angezeigt.
• Nachdem Sie die Soundbar zum ersten Mal mit Ihrem Mobilgerät verbunden haben, verwenden
Sie zum erneuten Verbinden den Modus „BT READY“.
(Mikrofon Ein/Aus)
-Taste auf dem
Weitere Informationen über Bluetooth-Verbindungen nden Sie unter „Verbindung per
Bluetooth“ auf den Seiten 14.
DEU - 17
Page 46

Methode 2. Verbinden per Wi-Fi
(Drahtloses Netzwerk)
Zum Verbinden einer Soundbar mit einem
Mobilgerät über ein drahtloses Netzwerk (Wi-Fi)
ist die SmartThings-App erforderlich.
SmartThings-App
1. Verbinden Sie Ihr Mobilgerät (Smartphone,
Tablet, etc.) mit dem Wi-Fi-Netzwerk, mit
dem das Fernsehgerät verbunden ist.
2. Installieren und starten Sie die SmartThingsApp auf Ihrem Mobilgerät (Smartphone,
Tablet, etc.).
3. Befolgen Sie die Anweisungen auf dem
App-Bildschirm auf dem Mobilgerät, um die
Soundbar mit Ihrem Wi-Fi-Netzwerk zu
verbinden.
Kongurieren von Amazon Alexa
Mit Alexa können Sie Musik wiedergeben,
Nachrichten hören, Wetterberichte erhalten und
Haushaltsgeräte steuern.
Zum Verwenden von Amazon Alexa wird ein
Amazon-Konto benötigt, um über das Netzwerk
eine Verbindung mit der Soundbar herzustellen.
1. Installieren Sie die SmartThings-App auf
Ihrem Mobilgerät und starten Sie sie dann.
2. Rufen Sie das Alexa-Konto auf, indem Sie die
Anweisungen in der App befolgen, und
melden Sie sich dann bei dem Dienst an.
3. Rufen Sie Alexa auf oder drücken Sie die
(Multi-Funktion)-Taste an der Soundbar
3Sekunden lang, um den Alexa-Dienst zu
nutzen.
• Drücken Sie die (Multi-Funktion)-Tas te
3 Sekunden lang, um Alexa aufzurufen.
Sprechen Sie bei gedrückter Taste, um die
Spracherkennung zu aktivieren.
ACHTUNG
• Amazon Alexa ist ein von Amazon
bereitgestellter Dienst.
• Dieser Dienst ist nur in einigen Sprachen
verfügbar, aber nicht in anderen Ländern oder
Regionen.
HINWEIS
• Um mehr über die Verwendung der
SmartThings-App und das Verbinden mit
anderen Geräten (von Amazon, drahtloses
Rücklautsprecherkit (SWA-9000S - separat,
erhältlich), etc) zu erfahren, siehe das
VOLLSTÄNDIGE HANDBUCH für Ihre
Soundbar auf der Website von Samsung
(www.samsung.com/support).
DEU - 18
Page 47

Verwendung von Tap Sound
Tippen Sie die Soundbar mit Ihrem Mobilgerät an, um den Ton des Inhalts auf dem Mobilgerät über die
Soundbar wiederzugeben.
• Diese Funktion wird je nach dem Mobilgerät eventuell nicht unterstützt.
• Diese Funktion ist nur mit Samsung Mobilgeräten mit Android 8.1 oder höher kompatibel.
SmartThings-App
Mobilgerät
1. Aktivieren Sie die Tap S ound-Funktion an Ihrem Mobilgerät.
• Details zum Aktivieren der Funktion nden Sie nachfolgend unter „Einstellen der Tap Sound-
Funktion“.
2. Tippen Sie die Soundbar mit dem Mobilgerät an. Wählen Sie „Jetzt starten“ in dem angezeigten
Nachrichtenfenster.
Eine Verbindung wird zwischen dem Mobilgerät und der Soundbar über Bluetooth hergestellt.
3. Geben Sie den Ton des Inhalts auf dem Mobilgerät über die Soundbar wieder.
• Diese Funktion verbindet ein Mobilgerät per Bluetooth mit der Soundbar, indem die Vibration
erkannt wird, die auftritt, wenn das Gerät die Soundbar berührt.
• Achten Sie darauf, mit dem Mobilgerät nicht eine Ecke der Soundbar anzutippen. Die Soundbar
oder das Mobilgerät könnten dadurch zerkratzt oder beschädigt werden.
• Es wird empfohlen, das mobile Gerät mit einer Schutzhülle abzudecken. Tippen Sie leicht den
breiten Bereich auf der Oberseite der Soundbar an, ohne dabei übermäßige Kraft anzuwenden.
• Zum Verwenden dieser Funktion aktualisieren Sie die SmartThings-Anwendung auf die
neueste Funktion. Die Funktion wird je nach der Version der App eventuell nicht unterstützt.
Oberseite der Soundbar
Einstellen der Tap Sound-Funktion
Verwenden Sie die SmartThings-App zum Aktivieren der Tap View, Tap Sound-Funktion.
1. Führen Sie auf dem Mobilgerät die SmartThings-App aus.
2. Wählen Sie ( → ) in dem SmartThings-App-Bildschirm, der auf dem Mobilgerät angezeigt
wird.
3. Aktivieren Sie „Tap View, Tap Sound“, damit die Funktion funktioniert, wenn ein Mobilgerät in die
Nähe der Soundbar bewegt wird. Die Funktion wird eingeschaltet.
HINWEISE
• Wenn sich das Mobilgerät im Energiesparmodus bendet, funktioniert die Tap S ound-Funktion nicht.
• Die Tap S oun d-Funktion funktioniert möglicherweise nicht, wenn sich in der Nähe der Soundbar Geräte
benden, die Funkstörungen verursachen, wie z.B. elektrische Geräte. Stellen Sie sicher, dass Geräte, die
Funkstörungen verursachen können, in ausreichender Entfernung von der Soundbar platziert werden.
DEU - 19
Page 48

09 INSTALLIEREN DER
B C D
C D
D
B C D
C D
D
WANDHALTERUNG
Komponenten der Wandhalterung
Vorsichtsmaßnahmen bei der
Installation
• Die Installation darf nur an einer vertikalen
Wand erfolgen.
• Installieren Sie nicht an einem Ort mit hohen
Temperaturen oder hoher Luftfeuchtigkeit.
• Prüfen Sie, ob die Wand stark genug ist, um
das Gewicht des Produkts zu tragen. Wenn
nicht, verstärken Sie die Wand oder wählen
Sie einen anderen Installationsort.
• Kaufen und verwenden Sie die
Befestigungsschrauben oder Dübel, die für
die Art Ihrer Wand geeignet sind (Gipsplatte,
Eisenplatte, Holz, etc.). Wenn möglich
befestigen Sie die Stützschrauben an
Wandpfosten.
• Kaufen Sie Wandmontageschrauben
entsprechend der Art und Dicke der Wand, an
der Sie die Soundbar befestigen möchten.
– Durchmesser: M5
– Länge: 35 mm oder länger werden
empfohlen.
• Schließen Sie die Kabel vom Gerät an die
externen Geräte an, bevor Sie die Soundbar
an der Wand installieren.
• Vergewissern Sie sich, dass das Gerät
ausgeschaltet und vom Stromnetz getrennt
ist, bevor Sie es installieren. Andernfalls kann
es zu einem elektrischen Schlag kommen.
1.
2.
3.
A
x 2
B
x 2
(M4 x L10)
C
Mittellinie
(nicht mitgeliefert)
x 2
D
5 cm oder me hr
A
B
C
D
DEU - 20
Page 49

• Achten Sie beim Zusammenbau
C D
C D
C D
darauf, dass sich der Aufhängungsteil
von D hinter der Rückseite der
Soundbar bendet.
Rückseite der Soundbar
10 INSTALLIEREN
DER SOUNDBAR
ÜBER EINEM TVSTANDFUSS
D
Bestandteil
Rechtes Ende der Soundbar
4.
B
•D wird nach unten zur Installation
B
an
eingesetzt.
D
B
x 4
Gummifuß
Zum Installieren bringen Sie die Gummifüße an
der Unterseite der Soundbar an, bevor Sie sie über
dem TV-Standfuß positionieren. Achten Sie
darauf, die Gummifüße so anzubringen, dass sie
über die Ränder des TV-Standfußes
hinausreichen. Siehe die folgende Abbildung.
Gummifuß
DEU - 21
Page 50

Platzieren Sie die Soundbar auf einen TV-Ständer.
Mikrofon
Richten Sie wie auf der Abbildung dargestellt die
Mitte der Soundbar auf die Mitte des Fernsehers
aus und positionieren Sie die Soundbar vorsichtig
auf dem Fernsehständer. Positionieren Sie das
Mikrofon zu diesem Zeitpunkt an der Vorderseite
des Standfußes, um die Spracherkennung nicht zu
beeinträchtigen.
TV
11 SOFTWARE-
UPDATE
Automatisches Update
Wenn die Soundbar mit dem Internet verbunden
ist, werden Software-Updates automatisch
durchgeführt, auch wenn die Soundbar
ausgeschaltet ist.
• Zum Verwenden der Funktion des
Automatischen Updates muss die Soundbar
mit dem Internet verbunden sein.
Die Wi-Fi-Verbindung zur Soundbar wird
beendet, wenn das Stromkabel der Soundbar
getrennt oder der Strom abgeschaltet wird.
Wenn der Strom abgeschaltet wird, wenn der
Strom wieder eingeschaltet wird oder Sie das
Stromkabel wieder anschließen, schalten Sie
die Soundbar ein und verbinden Sie sie wieder
mit dem Internet.
USB-Update
Rechtes Ende der Soundbar
HINWEISE
• Achten Sie darauf, dass die Soundbar auf
einer achen und stabilen Oberäche
platziert ist.
• Ein unzureichender Abstand von dem
Fernsehgerät könnte Probleme bei
Spracherkennung und Akustik verursachen.
Unterseite der Soundbar
DIGITAL AUDIO IN
(OPTICAL)
ID SET
SERVICE
HDMI IN 1
SERVICE
HDMI 2
ID SET
(WOOFER/REAR)
NETWORK
HDMI 1
HDMI IN 2
HDMI TO TV
(eARC/ARC)
POWER
Samsung wird möglicherweise in Zukunft
Updates für die System-Firmware der Soundbar
anbieten.
Wenn ein Update verfügbar ist, können Sie die
Soundbar aktualisieren, indem Sie das USBLaufwerk, das die Update-Firmware enthält, an den
SERVICE-Anschluss der Soundbar anschließen.
DEU - 22
Page 51

Weitere Informationen zum Herunterladen von
Update-Dateien und zum Aktualisieren der
Version nden Sie auf der Samsung Website
(www.samsung.com) → suchen Sie nach dem
Modellnamen im Kundenbetreuungsmenü.
Initialisierung
Oberseite der Soundbar
INIT
Drücken Sie bei eingeschalteter Soundbar
gleichzeitig die Tasten (Lautstärke) an dem
Gehäuse für mindestens 5 Sekunden. „INIT“ wird
in der Anzeige angezeigt und die Soundbar wird
initialisiert.
ACHTUNG
• Alle Einstellungen der Soundbar werden
initialisiert. Achten Sie darauf, dies nur
auszuführen, wenn die Initialisierung
erforderlich ist.
DEU - 23
Page 52

12 FEHLERBEHEBUNG
Überprüfen Sie Folgendes, bevor Sie den Kundendienst informieren.
Falls der Strom nicht eingeschaltet wird
; Überprüfen Sie, ob das Stromkabel der
Soundbar korrekt in die Steckdose
eingesteckt ist.
Falls die Funktionen nicht richtig
funktionieren
; Nachdem Sie das Stromkabel entfernt
haben setzen Sie es erneut ein.
; Versuchen Sie es nach der Initialisierung
des Produkts erneut. (siehe Seite 23).
; Wenn kein Signal vorhanden ist, schaltet
sich die Soundbar nach einer bestimmten
Zeitspanne automatisch aus. Schalten Sie
die Stromversorgung ein. (siehe Seite 7).
Falls die Fernbedienung nicht funktioniert
; Bedienen Sie die Fernbedienung unter
genauer Beobachtung der Soundbar.
; Ersetzen Sie die Batterien durch neue.
Falls kein Ton aus der Soundbar ausgegeben
wird
; Die Lautstärke der Soundbar ist zu gering
oder stummgeschaltet. Passen Sie die
Lautstärke an.
; Wenn ein externes Gerät (STB, Bluetooth-
Gerät, Mobilgerät usw.) angeschlossen ist,
passen Sie die Lautstärke des externen
Geräts an.
; Wählen Sie für die Tonausgabe des
Fernsehgeräts die Soundbar aus.
(Samsung-TV: Home ( ) → Einstellung
( ) → Ton → Tonausgabe → Soundbar
wählen)
; Entfernen Sie das Kabel von der Soundbar
und schließen Sie es dann wieder an.
Falls aus dem Subwoofer-Lautsprecher kein
Ton ausgegeben wird
; Prüfen Sie, ob die LED auf der Rückseite
des Subwoofers blau leuchtet. Schließen
Sie ihn wieder an, wenn die blaue LED
blinkt oder wenn die rote LED aueuchtet.
(Siehe Seite 9)
Falls das Fernsehgerät nicht per HDMI TO TV
(eARC/ARC) verbunden ist
; Prüfen Sie, ob das HDMI-Kabel korrekt an
den ARC-Anschluss angeschlossen ist.
(Siehe Seite11)
; Der Anschluss ist möglicherweise aufgrund
des angeschlossenen externen Geräts
(Set-Top-Box, Spielgerät, etc.) nicht
möglich. Verbinden Sie die Soundbar direkt.
; HDMI-CEC ist eventuell nicht an dem
Fernsehgerät aktiviert. Schalten Sie das
CEC im Menü des Fernsehgeräts ein.
(Samsung-TV: Home ( ) → Einstellung
( ) → Allgemein → Externe
Geräteverwaltung → Anynet+ (HDMI-CEC)
EIN)
Falls die Bluetooth-Verbindung nicht möglich
ist
; Wechseln Sie beim Verbinden eines neuen
Geräts für die Verbindung zu „BT PAIRING“.
(Drücken Sie die Taste PAIR auf der
Fernbedienung oder drücken Sie die Taste
(Mikrofon Ein/Aus) am Gehäuse
mindestens 5 Sekunden lang.)
; Stellen Sie die Verbindung wieder her,
nachdem Sie die BluetoothLautsprecherliste des zu verbindenden
Geräts entfernt haben. (Samsung-TV:
Home ( ) → Einstellung ( ) → Ton →
Tonausgabe → Bluetooth-Lautsprecherliste)
DEU - 24
Page 53

Falls es zu Unterbrechungen des BluetoothTons kommt
; Halten Sie Ihr Gerät ( z.B. Mikrowellen,
Wireless-Router, etc.) von der Soundbar fern,
da es Funkstörungen verursachen kann.
; Da das zu verbindende Gerät weit von der
Soundbar entfernt ist, kann es zu
Tonunterbrechungen kommen. Bewegen
Sie das Gerät in die Nähe der Soundbar.
; Wenn ein Teil Ihres Körpers mit dem
Bluetooth-Sender/Empfänger in Kontakt
kommt oder wenn das Produkt auf Möbeln
aus Metall installiert wird, könnte es zu
Tonunterbrechungen kommen. Überprüfen
Sie die Installationsumgebung und die
Einsatzbedingungen.
Falls die Wi-Fi-Verbindung nicht möglich ist
; Achten Sie darauf, dass der Wireless-
Router eingeschaltet ist und schließen Sie
ihn nach dem Neustart wieder an.
; Wenn das Signal des Wireless-Routers zu
schwach ist, ist die Verbindung eventuell
nicht möglich. Bewegen Sie den Router in
die Nähe der Soundbar oder passen Sie die
Einbauposition so an, dass es keine
Hindernisse gibt.
Falls Alexa nicht antwor tet
Wenn das Mikrofon ausgeschaltet is t oder
sein Empfang schlecht ist
; Drücken Sie die (Mikrofon Ein/Aus)-
Taste an der Oberseite der Soundbar, um
das Mikrofon zu aktivieren.
; Die Spracherkennung könnte aufgrund der
Umgebungsgeräusche nicht verfügbar
sein. Reduzieren Sie die Geräusche und
versuchen Sie es erneut.
Wenn das Netzwerk getrennt is t
; Das Netzwerk ist eventuell nicht verfügbar.
Kongurieren Sie das Netzwerk neu. (Siehe
Seite 18)
Wenn Alexa nicht korrekt konguriert ist
; Kongurieren Sie Alexa mit der
SmartThings-App neu. (Siehe Seite 18)
; Prüfen Sie auf der Website von Amazon die
Länder, in denen Alexa unterstützt wird. Der
Dienst ist in diesen Ländern nicht verfügbar.
Falls die Soundbar nicht sofort nach dem
Einschalten des Fernsehgeräts eingeschaltet
wird
; Wenn Sie die Soundbar während des
Fernsehens ausschalten, wird die
Synchronisation der Stromversorgung mit
dem Fernseher deaktiviert. Schalten Sie
zuerst das Fernsehgerät aus.
DEU - 25
Page 54

13 LIZENZ
14 BEKANNTMACHUNG
ZU OPEN SOURCE
LIZENZEN
Manufactured under license from Dolby
Laboratories. Dolby, Dolby Atmos, Dolby Audio,
Dolby Digital Plus, Pro Logic, and the double-D
symbol are trademarks of Dolby Laboratories.
For DTS patents, see http://patents.dts.com.
Manufactured under license from DTS
Licensing Limited. DTS, the Symbol, & DTS and
the Symbol together, DTS:X, and the DTS:X logo
are registered trademarks and/or trademarks
of DTS, Inc. in the United States and/or other
countries. © DTS, Inc. All Rights Reserved.
The terms HDMI and HDMI High-Denition
Multimedia Interface, and the HDMI Logo are
trademarks or registered trademarks of HDMI
Licensing LLC in the United States and other
countries.
• Die Spotify Software ist Gegenstand einer
Drittanbieter Lizenz, die Sie unter folgender
Adresse nden:
www.spotify.com/connect/third-partylicenses.
• Weitere Informationen über Spotify
Connect nden Sie auf
www.spotify.com/connect
Zum Senden von Anfragen und Anliegen
betreffend Open Source kontaktieren Sie
Samsung Open Source
(http://opensource.samsung.com)
15 WICHTIGE
HINWEISE ZUM
KUNDENDIENST
• Die Abbildungen in dieser Anleitung dienen
nur als Referenz und können sich vom
aktuellen Produkt unterscheiden.
• Es kann eine Gebühr erhoben werden, wenn:
(a) Ein Techniker auf Ihre Anfrage bestellt
wird und am Gerät kein Defekt vorliegt
(z. B. weil Sie diese Bedienungsanleitung
nicht gelesen haben).
(b) Sie das Gerät in einer Reparaturwerkstatt
abgegeben haben und am Gerät kein
Defekt vorliegt
(z. B. weil Sie diese Bedienungsanleitung
nicht gelesen haben).
• Die Höhe dieser Gebühr wird Ihnen mitgeteilt,
bevor irgendwelche Arbeiten durchgeführt
werden oder der Hausbesuch erfolgt.
DEU - 26
Page 55

16 SPEZIFIKATIONEN UND LEITFADEN
Technische daten
Modellname HW-Q900T
Gewicht 7,1 kg
Abmessungen (B × H × T) 1232,0 x 69,5 x 138,0 mm
Betriebstemperatur +5°C bis +35°C
Zulässige Luftfeuchtigkeit 10 % ~ 75 %
VERSTÄRKER
Nennausgangsleistung
(18W x 6) + (10W x 3) + (18W x 6) + 160W
Unterstützte Wiedergabeformate
AUSGANGSLEISTUNG DES DRAHTLOSGERÄTS
Wi-Fi max. Transmitterleistung
AUSGANGSLEISTUNG DES DRAHTLOSGERÄTS
BT max. Transmitterleistung
AUSGANGSLEISTUNG DES DRAHTLOSGERÄTS
SRD max. Transmitterleistung
Subwoofername PS-WR75BK
Gewicht 9,8 kg
Abmessungen (B × H × T) 210,0 x 403,0 x 403,0 mm
VERSTÄRKER
Nennausgangsleistung 160W
AUSGANGSLEISTUNG DES DRAHTLOSGERÄTS
SRD max. Transmitterleistung
Dolby Atmos (True HD / Digital Plus), Dolby
Digital, DTS Master Audio, DTS:X, DTS
100mW bei 2,4GHz – 2,4835GHz, 200mW bei
5,15GHz – 5,25GHz, 100mW bei 5,25GHz –
5,35GHz & 5,47GHz – 5,725GHz
100mW bei 2,4GHz – 2,4835GHz
25mW bei 5,725GHz – 5,825GHz
25mW bei 5,725GHz – 5,825GHz
DEU - 27
Page 56

HINWEISE
• Samsung Electronics Co., Ltd behält sich das Recht auf unangekündigte Änderungen vor.
• Gewicht und Abmessungen können von den Angaben abweichen.
Vorsicht: Die Soundbar wird automatisch neu gestartet, wenn Sie das Wi-Fi aus-/einschalten.
Gesamtstromverbrauch im
Bereitschaftszustand (W)
Wi-Fi
Anschlussdeaktivierungsmethode
Bluetooth
Anschlussdeaktivierungsmethode
• Samsung erklärt hiermit, dass dieses Gerät der Richtlinie 2014/53/EU
entspricht. Der vollständige Text der EU-Konformitätserklärung ist unter
folgender Internetadresse abrufbar: http://www.samsung.com. Geben Sie unter
Support > Produktsupport suchen den Modellnamen ein. Dieses Gerät kann in
allen EU-Ländern betrieben werden. Die 5GHz WLAN(Wi-Fi oder SRD)-Funktion
dieses Geräts kann nur in Innenräumen betrieben werden.
Halten Sie die Taste ID SET auf der Unterseite der Soundbar
30 Sekunden lang gedrückt, um das Wi-Fi ein-/auszuschalten.
Halten Sie die Taste NETWORK auf der Unterseite der
Soundbar 30 Sekunden lang gedrückt, um das Bluetooth
5,2W
ein-/auszuschalten.
DEU - 28
Page 57

[Korrek te Entsorgung d er Batterien dieses Produkt s]
(Gilt für Länder mit Abfalltrennsystemen)
Die Kennzeichnung auf der Batterie bzw. auf der dazugehörigen Dokumentation oder Verpackung gibt an,
dass die Batterie zu diesem Produkt nach seiner Lebensdauer nicht zusammen mit dem normalen
Haushaltsmüll entsorgt werden darf. Wenn die Batterie mit den chemischen Symbolen Hg, Cd oder Pb
gekennzeichnet ist, liegt der Quecksilber-, Cadmium- oder Blei-Gehalt der Batterie über den in der EGRichtlinie 2006/66 festgelegten Referenzwerten. Wenn Batterien nicht ordnungsgemäß entsorgt werden,
können sie der menschlichen Gesundheit bzw. der Umwelt schaden.
Bitte helfen Sie, die natürlichen Ressourcen zu schützen und die nachhaltige Wiederverwertung von
stofichen Ressourcen zu fördern, indem Sie die Batterien von anderen Abfällen getrennt über Ihr örtliches
kostenloses Altbatterie- Rücknahmesystem entsorgen.
Korrekte Entsorgung von Altgeräten
(Elektroschrott)
(Gilt für Länder mit Abfalltrennsystemen)
Die Kennzeichnung auf dem Produkt, Zubehörteilen bzw. auf der dazugehörigen Dokumentation gibt an,
dass das Produkt und Zubehörteile (z. B. Ladegerät,Kopfhörer, USB-Kabel) nach ihrer Lebensdauer nicht
zusammen mit dem normalen Haushaltsmüll entsorgt werden dürfen. Entsorgen Sie dieses Gerät und
Zubehörteile bitte getrennt von anderen Abfällen, um der Umwelt bzw. der menschlichen Gesundheit nicht
durch unkontrollierte Müllbeseitigung zu schaden. Helfen Sie mit, das Altgerät und Zubehörteile
fachgerecht zu entsorgen, um die nachhaltige Wiederverwertung von stofichen Ressourcen zu fördern.
Private Nutzer wenden sich an den Händler, bei dem das Produkt gekauft wurde, oder kontaktieren die
zuständigen Behörden, um in Erfahrung zu bringen, wo Sie das Altgerät bzw. Zubehörteile für eine
umweltfreundliche Entsorgung abgeben können.
Gewerbliche Nutzer wenden sich an ihren Lieferanten und gehen nach den Bedingungen des
Verkaufsvertrags vor. Dieses Produkt und elektronische Zubehörteile dürfen nicht zusammen mit anderem
Gewerbemüll entsorgt werden.
Für Informationen über die Umweltverpichtungen und produktspezischen regulatorischen
Verpichtungen von Samsung wie z. B. REACH, WEEE, Batterien, besuchen Sie:
http://www.samsung.com/uk/aboutsamsung/samsungelectronics/corporatecitizenship/data_corner.html
DEU - 29
Page 58

VEILIGHEIDSINFORMATIE
VEILIGHEIDSINSTRUCTIES
OPEN NOOIT DE BEHUIZING VAN DIT APPARAAT,
WANT DAN LOOPT U HET GEVAAR EEN
ELEKTRISCHE SCHOK TE KRIJGEN. DE
BEHUIZING BEVAT GEEN ONDERDELEN DIE U
ZELF KUNT REPAREREN. LAAT ONDERHOUD
OVER AAN DE VAKHANDEL.
Zie onderstaande tabel voor een verklaring van
symbolen die zich op uw Samsung-product
kunnen bevinden.
LET OP
GEVAAR OP ELEKTRISCHE
SCHOKKEN. NIET OPENEN.
Dit symbool geeft aan dat de spanning
binnen in het apparaat hoog is.
Elk contact met onderdelen binnen in
het product is gevaarlijk.
Dit symbool geeft aan dat er
belangrijke informatie over het
gebruik en onderhoud is meegeleverd
met dit product.
Klasse II-product: Dit symbool geeft
aan dat voor dit toestel geen
veiligheidsaansluiting op aarde
(massa) is vereist. Als dit symbool niet
aanwezig is op een product met een
netsnoer, dan MOET het product een
betrouwbare aardingsaansluiting
hebben.
Wisselspanning: Dit symbool geeft aan
dat de nominale spanning
wisselspanning is.
Gelijkspanning: Dit symbool geeft aan
dat de nominale spanning
gelijkspanning is.
Voorzichtig, raadpleeg de instructies
voor gebruik: Dit symbool geeft aan
dat de gebruiker de handleiding moet
raadplegen voor meer informatie over
de veiligheid.
WAARSCHUWING
• Om het gevaar voor een elektrische schok te
vermijden dient u dit apparaat niet aan regen
of vocht bloot te stellen.
LET OP
• OM EEN ELEKTRISCHE SCHOK TE
VOORKOMEN, ZORGT U DAT HET BREDE
UITEINDE VAN DE STEKKER IN DE BREDE
OPENING ZIT EN VOLLEDIG IS INGESTOKEN.
• Dit apparaat moet altijd aangesloten worden
op een stroomingang met een geaard
stopcontact.
• Om het apparaat los te koppelen van de
stroomtoevoer, moet de stekker uit de
stopcontact getrokken worden, daarom moet
de stroomstekker gemakkelijk bereikbaar
zijn.
• Stel dit apparaat niet bloot aan druppels of
spatten. Plaats geen objecten op het
apparaat die gevuld zijn met water (zoals een
vaas).
• Als u dit apparaat volledig wilt uitschakelen,
moet u de stekker uit het stopcontact
trekken. Vervolgens moet de stekker altijd
onder handbereik zijn.
DUT - 2
Page 59

VOORZORGSMAATREGELEN
1. Zorg ervoor dat de wisselstroomvoorziening
in uw huis voldoet aan de stroomvereisten
die zijn vermeld op het identicatie-etiket op
de onderkant van het product. Plaats de
speler horizontaal op een geschikte
ondergrond (meubelstuk) met genoeg
ruimte er omheen voor ventilatie
7 -10 cm. Zorg dat de ventilatieopeningen
niet worden geblokkeerd. Plaats het
apparaat niet op versterkers of andere
apparaten die warm kunnen worden. Dit
apparaat is bedoeld voor continu gebruik.
Om het toestel volledig uit te schakelen,
trekt u de stekker uit het stopcontact. Haal
de stekker van het toestel uit het
stopcontact als u het een lange tijd niet gaat
gebruiken.
2. Haal bij onweer de stekker uit het
stopcontact. Bliksem kan spanningspieken
veroorzaken waardoor het apparaat
beschadigd kan raken.
3. Stel het apparaat niet bloot aan direct
zonlicht of andere warmtebronnen. Dit kan
oververhitting veroorzaken en ertoe leiden
dat het apparaat niet goed functioneert.
4. Bescherm het product tegen vocht (bijv.
vazen) en overmatige warmte (bijv. een open
haard) of tegen apparatuur die sterke
magnetische of elektrische velden
veroorzaakt. Haal de stekker uit het
stopcontact wanneer het apparaat niet goed
functioneert. Dit product is niet bedoeld voor
industrieel gebruik. Dit product is uitsluitend
bestemd voor particulier gebruik. Wanneer
het product of een schijf bij een lage
temperatuur wordt bewaard, kan
condensatie optreden. Als u het apparaat in
de winter verplaatst, wacht u ongeveer 2 uur
totdat het apparaat weer op
kamertemperatuur is voordat u deze gaat
gebruiken.
5. De batterijen die in dit product worden
gebruikt, bevatten chemicaliën die schadelijk
zijn voor het milieu. Gooi batterijen niet met
het gewone huisvuil weg. Werp de batterijen
niet in het vuur. De batterijen mogen niet
worden kortgesloten, gedemonteerd of
oververhit. Bij incorrecte plaatsing van de
batterijen bestaat ontplofngsgevaar.
Vervang batterijen alleen door andere van
hetzelfde type.
Schoonmaken van stof
Verwijderen vuil of vlekken op het
productoppervlak onmiddellijk.
Het verwijderen en schoonmaken kan minder
doeltreffend zijn voor enkele stoffen of als die er
langdurig worden opgelaten.
LET OP
• Gebruik een stofzuiger of een kleefroller om
stof, handafdrukken en dergelijke te
verwijderen.
– Sommige schoonmaakborstels kunnen
het product beschadigen, afhankelijk van
het materiaal dat ze bevatten.
– Handdoeken en schoonmaakdoeken
kunnen pluizen of vuil op het product
laten.
• Gebruik geen nagel of ander gereedschap om
het vuil eraf te krabben. Dit kan de stof
beschadigen.
• Om olie of vloeibare vlekken te verwijderen,
gebruikt u een schone witte doek die met
water is bevochtigd. Als de vlekken blijven,
veeg ze dan met een mengsel van water en
neutraal reinigingsmiddel (zoals
afwasmiddelen) en een doek.
– Een niet-neutraal reinigingsmiddel of
schoonmaakmiddel kan verkleuring of
schade aan de stof veroorzaken.
– Gebruik na het schoonmaken een droge
doek of haardroger om de zone te
drogen.
– Gebruik geen buitensporige kracht om
verkleuring of schade aan de stof te
voorkomen.
DUT - 3
Page 60

INHOUD
01 De componenten controleren 5
02 Productoverzicht 6
03 De afstandsbediening gebruiken 7
04 De Soundbar aansluiten 8
05 Een bedrade verbinding naar de tv gebruiken 11
06 Een draadloze verbinding naar de tv gebruiken 14
07 Een extern apparaat verbinden 16
08 Een mobiel apparaat verbinden 17
09 De wandmontage installeren 20
10 De Soundbar installeren boven een tv-voet 21
11 Software-update 22
12 Probleemoplossing 24
13 Licentie 26
14 Kennisgeving Open Source-Licentie 26
15 Belangrijke Opmerking over Service 26
16 SpecicatiesenHandleiding 27
DUT - 4
Page 61

01 DE COMPONENTEN CONTROLEREN
PAIR
SOUND
MODE
VOL WOOFER
SOUNDBAR
Hoofd eenheid van de Sou ndbar Afstandsbediening/batterijen
van de Soun dbar
Subwoofer
x 2
Stroomkabel (Subwoof er, Soun dbar) HDMI-kabel
x 2
x 2
(M4 x L10)
Wandmontagegids Schroefhouder Schroef
x 2
x 4
Steun wandmontage Rubberen voet
• Voor meer informatie over de stroomvoorziening en het stroomverbruik, raadpleeg het etiket op
het product. (Etiket: onderkant van de hoofdeenheid van de Soundbar)
• Om extra componenten of optionele kabels te kopen, neemt u contact op met een servicecentrum
van Samsung of de klantenservice van Samsung.
• Meer informatie over de wandmontage of rubberen voet vindt u op pagina's 20~21.
• Afbeeldingen, specicaties en het scherm van de app zijn onderhevig aan wijzigingen zonder
voorafgaande kennisgeving.
Batterijen plaatsen vóór het gebruik van de afstandsbediening
(AA-batterijen X 2)
Schuif de achterklep in de richting van de pijl tot
deze volledig is verwijderd. Plaats 2 AA-batterijen
(1,5 V) op de juiste manier zodat hun polariteit
correct is. Schuif de achterklep terug op zijn plaats.
DUT - 5
Page 62

02 PRODUCTOVERZICHT
ID SET
HDMI IN 1
HDMI IN 2
NETWORK
SERVICE
DIGITAL AUDIO IN
(OPTICAL)
HDMI TO TV
(eARC/ARC)
HDMI 2
HDMI 1
ID SET
(WOOFER/REAR)
ID SET
DIGITAL AUDIO IN
(OPTICAL)
HDMI TO TV
HDMI 2
HDMI 1
ID SET
HDMI IN 1
HDMI IN 2
POWER
NETWORK
SERVICE
DIGITAL AUDIO IN
(OPTICAL)
HDMI TO TV
(eARC/ARC)
HDMI 2
HDMI 1
ID SET
(WOOFER/REAR)
ID SET
NETWORK
SERVICE
ID SET
(WOOFER/REAR)
DIGITAL AUDIO IN
(OPTICAL)
HDMI TO TV
(eARC/ARC)
HDMI 2
HDMI 1
Bovenpaneel van de Soundbar
Plaats het product zodat
het logo van SAMSUNG
bovenaan staat.
Onderpaneel van de Soundbar
POWER
Knop (Multifunctioneel)
• Druk in de standby-modus op de knop
(Multifunctioneel) om de Soundbar in te
schakelen.
• Druk op de knop (Multifunctioneel) om
de invoerbron te wijzigen.
• Druk gedurende 3 seconden op de knop
(Multifunctioneel) om Alexa te roepen.
Zeg iets met de knop ingedrukt om
spraakherkenning in te schakelen.
POWER
Sluit de stroomkabel van de Soundbar aan.
ID SET (WOOFER/REAR)
Druk om de Soundbar draadloos te verbinden
met de surround-luidprekers en een subwoofer.
(De surroundluidspreker is afzonderlijk
verkrijgbaar.)
Scherm Mic aan/uit
Volume
DIGITAL AUDIO IN
(OPTICAL)
ID SET
POWER
(WOOFER/REAR)
NETWORK
SERVICE
DIGITAL AUDIO IN
ID SET
SERVICE
ID SET
(WOOFER/REAR)
NETWORK
(OPTICAL)
HDMI IN 1
HDMI 2
HDMI IN 2
HDMI 1
HDMI TO TV
(eARC/ARC)
HDMI 2
HDMI 1
HDMI TO TV
(eARC/ARC)
NETWORK
Druk om verbinding te maken met een
draadloos netwerk (Wi-Fi) via de SmartThingsapp.
SERVICE
Sluit een USB-opslagapparaat aan om de
soft ware van het product bij te werken.
DIGITAL AUD IO IN (OPTIC AL)
Sluit aan op de digitale (optische) uitgang van
een extern apparaat.
HDMI 1 / HDM I 2
Voert tegelijkertijd digitale video- en
audiosignalen in met een HDMI-kabel.
Sluit aan op de HDMI-uitgang van een extern
apparaat.
HDMI TO T V (eARC/ARC)
Sluit aan op de HDMI-aansluiting van een tv.
DUT - 6
Page 63

03 DE AFSTANDSBEDIENING GEBRUIKEN
Hoe de afstandsbediening gebruiken
Stroom
Hiermee schakelt u de Soundbar in en uit.
PAIR
SOUND
MODE
VOL WOOFER
SOUNDBAR
• Functie Auto Power D own
Het toestel wordt automatisch uitgeschakeld in de volgende
situaties:
– In D.IN- / HDMI -/ Wi-Fi- / BT-modus als er gedurende
18 minuten geen audiosignaal is.
(Bron)
Druk hierop om een met de Soundbar verbonden bron te
selecteren.
(Dempen)
Druk op de (Dempen)-knop om het geluid te dempen.
Druk opnieuw op de knop om het geluid niet meer te dempen.
SOUND MODE
U kunt de gewenste geluidsmodus selecteren door STANDARD,
SURROUND, GAME PRO of ADAPTIVE SOUND te kiezen.
Bluetooth PAIR
Schakel de Soundbar naar de Bluetooth-koppelingsmodus.
Druk op de knop en wacht op het scherm “BT PAIRING” om een
nieuw Bluetooth-apparaat te koppelen.
p (Afspelen / Onderbreken)
U kunt muziek ook afspelen of onderbreken door op de knop te
drukken.
Omhoog/Omlaag/Links/Rechts
Druk op Omhoog/Omlaag/Links/Rechts op de knop om functies te selecteren of in te stellen.
(Geluidsregeling)
Wanneer dit is ingedruk t, worden instelitems als TREBLE, BASS, SYNC, CENTER LEVEL, SIDE LEVEL,
FRONT TOP LEVEL, REAR LEVEL, REAR TOP LE VEL en VIRTUAL ON/OFF in volgorde weergegeven. Het
gewenste item kan worden aangepast met de knoppen Omhoog/Omlaag.
NIVEAU WOOFER (BAS)
Druk op de knop omhoog of omlaag om het niveau van de woofer (bas) te regelen op -12 of tussen -6 en +6.
Druk op de knop om het volume van de woofer (bas) op 0 (Standaard) in te stellen.
VOLUME
Druk op de knop omhoog of omlaag om het volume te regelen.
DUT - 7
Page 64

04 DE SOUNDBAR AANSLUITEN
POWER
POWER
HDMI IN 1
HDMI IN 2
ID SET
(WOOFER, REAR)
POWER
NETWORK
SERVICE
DIGITAL AUDIO IN
(OPTICAL)
HDMI TO TV
(eARC/ARC)
HDMI 1
HDMI 2
ID SET
POWER
HDMI IN 1
HDMI IN 2
ID SET
(WOOFER, REAR)
NETWORK
SERVICE
DIGITAL AUDIO IN
(OPTICAL)
HDMI TO TV
(eARC/ARC)
HDMI 1
HDMI 2
ID SET
De elektriciteit en subwoofer aansluiten
Sluit de subwoofer en de Soundbar aan met de stroomkabel op het stopcontact in deze volgorde:
• Meer informatie over de vereiste elektriciteit en het stroomverbruik vindt u op het etiket op het
product. (Etiket: onderkant van de hoofdeenheid van de Soundbar)
OPMERKINGEN
• Schakel de subwoofer in voordat u de Soundbar aansluit.
De subwoofer wordt automatisch verbonden wanneer u de Soundbar inschakelt.
• Als u de stroomkabel uit het stopcontact haalt en er opnieuw insteekt wanneer het product
ingeschakeld is, wordt de Soundbar automatisch ingeschakeld.
POWER
POWER
Onderkant van de hoofdeenheid
Achterkant van Subwoofer
POWER
van de Soun dbar
De verbinding is
voltooid.
Blauw i s Aan
DUT - 8
Page 65

De subwoofer handmatig verbinden
Voordat u onderstaande procedure voor de handmatige verbinding uitvoert:
• Controleer of de stroomkabels voor de Soundbar en subwoofer goed zijn aangesloten.
• Zorg ervoor dat de Soundbar uitgeschakeld is.
1. Schakel de hoofdeenheid van de Soundbar uit.
2. Houd ID SET aan de achterkant van de subwoofer minstens 5 seconden ingedrukt.
5 Sec
Achterkant van Subwoofer Achterkant van Subwoofer
3. Houd de Omhoog-knop op de afstandsbediening 5 seconden ingedrukt.
PAIR
5 Sec
ID SET
Snel blauw
knipperend
4. Controleer of de LINK LED vast blauw is (verbinding voltooid).
Het indicatielampje LINK LED stopt met
knipperen en licht vast blauw op wanneer
een verbinding tot stand is gebracht tussen
de Soundbar en de draadloze Subwoofer.
Blauw i s Aan
DUT - 9
Page 66

Led-indicatielampjes achteraan de subwoofer
Led Status Beschrijving Resolutie
Aan
Blauw
Knipperend
Rood
Aan
Met succes aangesloten
(normale werking)
De verbinding
herstellen
Stand-by (met de
hoofdeenheid van de
Soundbar
uitgeschakeld)
Verbinding mislukt
-
Controleer of het netsnoer dat is
aangesloten op de hoofdeenheid
van de Soundbar goed is
aangesloten of wacht ongeveer
5 minuten. Als het knipperen
aanhoudt, probeer de subwoofer
dan handmatig te verbinden. Zie
pagina 9.
Controleer of de stroomkabel aan
de hoofdeenheid van de Soundbar
goed is aangesloten.
Maak opnieuw verbinding.
Raadpleeg de instructies voor
handmatig verbinden op
pagina9.
Rood en blauw
Knipperend Storing
Raadpleeg de contactgegevens
van het Samsung Servicecenter in
deze handleiding.
DUT - 10
Page 67

05 EEN BEDRADE VERBINDING NAAR DE TV
GEBRUIKEN
Methode 1. Verbinden met een HDMI
LET OP
• Wanneer zowel de HDMI-kabel als de optische kabel zijn aangesloten, wordt eerst het HDMI-
signaal ontvangen.
• Om de HDMI-kabel te verbinden tussen de tv en de Soundbar, moet u ervoor zorgen de met ARC
gemarkeerde aansluitingen te verbinden. Anders wordt het tv-geluid mogelijk niet uitgevoerd.
• Zorg ervoor dat u de kabel met het premium HDMI-certicatielogo gebruikt. Zorg er daarnaast
voor dat de kabel een Type A gecerticeerde, uiterst snelle HDMI Ethernet-kabel is. (HDMI-
KABEL VOOR HOGE SNELHEID MET ETHERNET)
De tv verbinden die HDMI ARC (Audio Return Channel) ondersteunt
Maak verb inding met de HDMI
Maak verb inding met de
HDMI IN ( ARC)-poo rt van uw tv.
TO TV (eA RC/ARC)-poo rt van de
hoofdeenheid van de Soundbar.
HDMI IN
(ARC)
HDMI-kabel
Bovenka nt van de Soundbar
HDMI TO TV
(eARC/ARC)
Onderkant van de
Soundbar
TV ARC
1. Als de Soundbar en tv uitgeschakeld zijn, sluit dan de HDMI-kabel aan zoals getoond in de afbeelding.
2. Schakel de Soundbar en tv in.
3. "TV ARC" verschijnt op het scherm van de hoofdeenheid van de Soundbar en de Soundbar speelt
het tv-geluid af.
• Wanneer het TV-geluid niet wordt uitgevoerd, drukt u op de knop (Multifunctioneel) op de
bovenkant van de Soundbar of op de knop (Bron) op de afstandsbediening om de "D.IN"modus te selecteren. Het scherm geeft "D.IN" en "T V ARC" in volgorde weer en het tv-geluid
wordt afgespeeld.
DUT - 11
Page 68

• Wanneer u een Samsung tv met de functie eARC verbindt, wordt “eARC” weergegeven op het
scherm en is het geluid hoorbaar.
• Als "TV ARC " niet verschijnt op het scherm van de hoofdeenheid van de Soundbar, gaat u na of
de HDMI-kabel is aangesloten op de juiste poort.
• Gebruik de volumeknoppen op de afstandsbediening van de tv om het volume van de Soundbar
te wijzigen.
OPMERKINGEN
• Wanneer u de tv die HDMI ARC (Audio Return Channel) ondersteunt met de HDMI-kabel aansluit op
de Soundbar, kunt u de digitale video- en audiogegevens doorsturen zonder een afzonderlijke
optische kabel aan te sluiten.
• We bevelen u aan om indien mogelijk een kernloze HDMI-kabel te gebruiken. Als u een HDMI-kabel
met kern gebruikt, gebruik er dan een met een diameter van minder dan 14 mm.
• Deze functie is niet beschikbaar als de HDMI-kabel ARC niet ondersteunt.
• Wanneer de audio in een uitzending gecodeerd is in Dolby Digital en de "Formaat van digitale
geluidsuitvoer" op uw tv op PCM is ingesteld, raden we aan om de instelling in Dolby Digital te
wijzigen. Wanneer de instelling op de tv is gewijzigd, zult u genieten van een betere
geluidskwaliteit. (Het tv-menu kan andere woorden gebruiken voor Dolby Digital en PCM,
afhankelijk van de tv-fabrikant.)
Methode 2. Verbinden met een optische kabel
Controlelijst vóór aansluiting
• Wanneer zowel de HDMI-kabel als de optische kabel zijn aangesloten, wordt eerst het HDMI-
signaal ontvangen.
• Wanneer u een optische kabel gebruikt en de aansluitingen klepjes hebben, verwijder de klepjes
dan eerst.
OPTICAL OUT
Optische kabel
(niet meegeleverd)
Bovenka nt van de Soundbar
D.IN
DUT - 12
Onderkant van de Soundbar
DIGITAL AUDIO IN
(OPTICAL)
Page 69

1. Als de tv en Soundbar uitgeschakeld zijn, sluit dan de DIGITAL AUDIO IN (OPTICAL)-poort op de
Soundbar en de OPTICAL-uitvoerpoort op de tv aan met de optische kabel (niet meegeleverd),
zoals op de afbeelding getoond.
2. Schakel de Soundbar en tv in.
3. Drukt op de knop (Multifunctioneel) op de bovenkant van de Soundbar of op de knop
(Bron) op de afstandsbediening om de "D.IN"-modus te selecteren.
4. Het tv-geluid wordt uitgezonden vanaf de Soundbar.
De functie Q-Symphony gebruiken
Voor Q-Symphony synchroniseert de Soundbar met een Samsung-tv om geluid via twee apparaten uit
te voeren voor een optimaal surroundeffect. Wanneer de Soundbar is aangesloten, verschijnt het menu
‘TV+Soundbar’ onder het menu Geluidsuitvoer van de tv. Selecteer het overeenstemmende menu.
Tv-menu
HDMI-kabel
OF
Optische kabel
(niet meegeleverd)
• Voorbeeld tv-menu: TV + [AV] Soundbar Naam serie (HDMI)
D.IN
OPMERKINGEN
• Het kan werken met de codec die wordt ondersteund door de tv.
• Deze functie wordt alleen ondersteund wanneer de HDMI-kabel of Optische kabel (niet
meegeleverd) is aangesloten.
• Deze functie is beschikbaar in Samsung-tv’s die zijn uitgebracht in 2020 en in sommige Soundbar-
modellen.
• Als er Q-Symphony wordt gebruikt, kunt u alleen GAME PRO of ADAPTIVE SOUND kiezen.
DUT - 13
Page 70

06 EEN DRAADLOZE VERBINDING NAAR DE TV
GEBRUIKEN
Verbinden via Bluetooth
Wanneer een Samsung-tv met Bluetooth is verbonden, kunt u stereogeluid beluisteren zonder gedoe
met kabels.
• Er kan slechts één Samsung-tv tegelijkertijd worden aangesloten.
• Een Samsung-tv die Bluetooth ondersteunt, kan worden aangesloten. Controleer de specicaties
van uw tv.
Bovenka nt van de Soundbar
5 Sec
OF
BT PAIRING
De eerste verbinding
1. Druk op de knop PAIR op de afstandsbediening van de Soundbar om naar de "BT PAIRING"-
modus te gaan.
(OF)
a. Druk op de knop (Multifunctioneel) op het bovenpaneel en selecteer vervolgens "BT”.
“BT” wijzigt na enkele seconden automatisch in "BT PAIRING" of wijzigt in “BT READY” als
er een verbindingsrecord is.
b. Als “BT READY” verschijnt, houd dan de knop
Soundbar gedurende meer dan 5 seconden ingedrukt zodat "BT PAIRING" wordt
weergegeven.
2. Selecteer Bluetooth-modus op de Samsung-tv.
(vb. Start ( ) Instellingen ( ) Geluid Geluidsuitvoer Lijst met Bluetooth-luidsprekers
[AV] Samsung Soundbar Q900T (Bluetooth))
3. Selecteer "[AV] Samsung Soundbar Q900T " in de lijst op het scherm van de tv.
Een beschikbare Soundbar wordt met "Koppelen vereist" of "Gekoppeld" op de lijst met
Bluetooth-apparaten van de tv vermeld. Om de Samsung-tv met de Soundbar te verbinden,
selecteert u het bericht en brengt u vervolgens een verbinding tot stand.
• Als de Samsung-tv is aangesloten, wordt de [Naam tv] → "BT" weergegeven in de display aan
de bovenkant van de Soundbar.
4. U hoort nu het geluid van de Samsung-tv via de Soundbar.
• Nadat u de Soundbar voor het eerst met uw Samsung-tv hebt verbonden, gebruikt u de "BT
READY"-modus om opnieuw te verbinden.
(Mic aan/uit)
op het bovenpaneel van de
PAIR
DUT - 14
Page 71

Als het apparaat geen verbinding tot stand kan brengen
• Als er een bestaande Soundbar (vb. [AV] Samsung Soundbar Q900T) in de lijst van luidsprekers
op de Samsung-tv staat, wis die dan.
• Herhaal vervolgens de stappen 1 tot en met 3.
De Soundbar van de Samsung-tv loskoppelen
Druk op de knop (Multifunctioneel) op de bovenkant van de Soundbar of op de knop (Bron) op
de afstandsbediening om een andere dan de "BT"-modus te selecteren.
• Loskoppelen duurt een tijdje omdat de Samsung-tv een respons van de Soundbar moet krijgen.
(De vereiste tijd kan verschillen afhankelijk van het model van de Samsung-tv.)
Wat is het verschil tussen BT READY BT PAIRING?
• BT READY: In deze modus kunt u elke eerder verbonden Samsung-tv of mobiel apparaat
opnieuw verbinden.
• BT PAIRING: In deze modus kunt u een nieuw apparaat met de Soundbar verbinden.
(Druk op de knop PAIR op de afstandsbediening van de Soundbar of houd de knop (Mic
aan/uit) aan de bovenkant van de Soundbar gedurende meer dan 5 seconden ingedrukt
wanneer de Soundbar in "BT"-modus is.)
Opmerkingen over een Bluetooth-verbinding
• Plaats een nieuw apparaat binnen 1 m om een verbinding via Bluetooth-communicatie tot stand te
brengen.
• Als u bij het verbinden met een Bluetooth-apparaat een pincode wordt gevraagd, voer dan <0000>
in.
• In de Gereedstatus schakelt de Soundbar automatisch uit na 18 minuten.
• De Soundbar zoekt mogelijk niet naar Bluetooth of verbindt mogelijk niet correct in de volgende
omstandigheden:
– Als er zich een sterk elektrisch veld in de buurt van de Soundbar bevindt.
– Als diverse Bluetooth-apparaten gelijktijdig met de Soundbar zijn gekoppeld.
– Als het Bluetooth-apparaat is uitgeschakeld, niet op zijn plaats is of bij storingen.
• Elektronische apparaten kunnen radiostoring veroorzaken. Apparaten die elektromagnetische
golven genereren houdt u uit de buurt van de hoofdeenheid van de Soundbar, bijv. magnetrons,
draadloze LAN-apparaten, enz.
DUT - 15
Page 72

07 EEN EXTERN APPARAAT VERBINDEN
(OPTICAL)
Methode 1. Verbinding maken met behulp van een HDMI-kabel (in
staat om Dolby Atmos te decoderen en af te spelen)
Bovenka nt van de Soundbar
HDMI 1
OF
Extern appara at
HDMI OUT
HDMI 2
HDMI-kabel
OF
HDMI 2
HDMI 1
HDMI TO TV
(eARC/ARC)
Onderkant van de Soundbar
HDMI IN
(ARC)
HDMI-kabel
• Sluit de HDMI-kabel aan → Schakel Soundbar, Extern apparaat en tv in
(Multifunctioneel) → Selecteer de “HDMI 1” of “HDMI 2”-modus
Methode 2. Verbinden met een optische kabel
Bovenka nt van de Soundbar
BD/Dvd-speler/
Settopbox/Gameconsole
OPTICAL OUT
• Sluit de optische kabel aan → Schakel de Soundbar en het Externe apparaat in
(
Multifunctione
OPMERKING
• Raadpleeg de gebruikershandleiding van de Soundbar op de website van Samsung
(www.samsung.com/support) voor meer informatie over het verbinden van een extern apparaat.
el) → Selecteer de “D.IN”-modus
Optische kabel
(niet meegeleverd)
DUT - 16
D.IN
DIGITAL AUDIO IN
(OPTICAL)
Onderkant van de Soundbar
→
Page 73

08 EEN MOBIEL APPARAAT VERBINDEN
Methode 1. Verbinden via Bluetooth
Wanneer een mobiel apparaat met Bluetooth is verbonden, kunt u stereogeluid beluisteren zonder
gedoe met kabels.
• Wanneer u een gekoppeld Bluetooth-apparaat verbindt met de uitgeschakelde Soundbar, wordt de
Soundbar automatisch ingeschakeld.
Bovenka nt van de Soundbar
PAIR
Mobiel apparaat
5 Sec
OF
BT PAIRING
De eerste verbinding
• Zorg er bij het verbinden op een nieuw Bluetooth-apparaat voor dat het apparaat zich binnen een
afstand van 1 m bevindt.
1. Druk op de knop PAIR op de afstandsbediening van de Soundbar om naar de "BT PAIRING"modus te gaan.
(OF)
a. Druk op de knop (Multifunctioneel) op het bovenpaneel en selecteer vervolgens “BT”.
“BT” wijzigt na enkele seconden automatisch in “BT PAIRING” of wijzigt in “BT READY” als
er een verbindingsrecord is.
b. Als “BT READY” verschijnt, houd dan de knop
Soundbar gedurende meer dan 5 seconden ingedrukt zodat “BT PAIRING” wordt
weergegeven.
2. Selecteer op uw apparaat "[AV] Samsung Soundbar Q900T" in de lijst die verschijnt.
• Als de Soundbar is aangesloten op het mobiele apparaat, wordt de [Naam van het mobiele
apparaat] → “BT” weergegeven in de display aan de bovenkant.
3. Speel via de Soundbar muziekbestanden af vanaf het apparaat dat via Bluetooth verbonden is.
• Nadat u de Soundbar voor het eerst met uw mobiel apparaat hebt verbonden, gebruikt u de "BT
READY"-modus om opnieuw te verbinden.
(Mic aan/uit)
op het bovenpaneel van de
Meer informatie over Bluetooth-verbindingen vindt u in “Verbinden via Bluetooth” op
pagina's 14.
DUT - 17
Page 74

Methode 2. Verbinden via Wi-Fi
(draadloos netwerk)
Om een Soundbar te verbinden met een mobiel
apparaat via een draadloos netwerk (Wi-Fi), is de
SmartThings-app vereist.
SmartThings-app
1. Verbind uw mobiele apparaat (smartphone,
tablet enz.) met het Wi-Fi-netwerk waarmee
de tv is verbonden.
2. Installeer en start de SmartThings-app op
uw mobiele apparaat (smartphone, tablet
enz.).
3. Volg de instructies op het scherm van de app
op het mobiele apparaat om de Soundbar te
verbinden met uw Wi-Fi-netwerk.
AmazonAlexacongureren
Met Alexa kunt u muziek spelen, naar nieuws
luisteren, weersvoorspellingen bekijken en
huishoudelijke apparaten bedienen.
Als u Amazon Alexa wilt gebruiken, hebt u een
Amazon-account nodig om de Soundbar via het
netwerk te verbinden.
1. Installeer de SmartThings-app op uw
mobiele apparaat en start de app.
2. Voer het Alexa-account in door de instructies
in de app te volgen en meld u vervolgens aan
bij de service.
3. Roep Alexa of druk gedurende 3 seconden
op de knop (Multifunctioneel) op de
Soundbar om de Alexa-service te gebruiken.
• Druk gedurende 3 seconden op de knop
(Multifunctioneel) om Alexa te roepen.
Zeg iets met de knop ingedrukt om
spraakherkenning in te schakelen.
LET OP
• Amazon Alexa is een service van Amazon.
• Deze service is alleen beschikbaar in
sommige talen, maar niet in andere landen of
regio’s.
OPMERKING
• Om meer te leren over het gebruik van de
SmartThings-app en het verbinden met
andere apparaten (van Amazon, bijv. een kit
met draadloze achterluidspreker (SWA9000S - afzonderlijk verkrijgbaar)),
raadpleegt u de VOLLEDIGE HANDLEIDING
voor uw Soundbar op de website van
Samsung (www.samsung.com/support).
DUT - 18
Page 75

Tap Sound gebruiken
Tik met uw mobiele apparaat op de Soundbar om het geluid van inhoud op uw mobiele apparaat af te
spelen via de Soundbar.
• Afhankelijk van het mobiele apparaat wordt deze functie mogelijk niet ondersteund.
• Deze functie is alleen compatibel met mobiele Samsung-apparaten met Android 8.1 of nieuwer.
SmartThings-app
Mobiel apparaat
1. Schakel de functie Tap S oun d in op uw mobiele apparaat.
• Zie “De functie Tap Sound ins tellen” hieronder voor meer informatie over hoe u de functie
inschakelt.
2. Tik met het mobiele apparaat op de Soundbar. Selecteer “Nu starten” in het weergegeven
berichtvenster. Via Bluetooth wordt een verbinding tot stand gebracht tussen het mobiele
apparaat en de Soundbar.
3. Speel het geluid van inhoud op uw mobiele apparaat af via de Soundbar.
• Deze functie verbindt een mobiel apparaat via Bluetooth met de Soundbar door trillingen te
detecteren die optreden wanneer het apparaat de Soundbar aanraakt.
• Tik met uw mobiele apparaat niet op een scherpe hoek van de Soundbar. De Soundbar of uw
mobiele apparaat kan bekrast of beschadigd raken.
• Het wordt aanbevolen om een hoesje te gebruiken voor uw mobiele apparaat. Tik zacht op het
brede gebied van het bovenste deel van de Soundbar, zonder te veel kracht te gebruiken.
• Update de SmartThings-app naar de nieuwste versie om deze functie te gebruiken.
Afhankelijk van het versie van de app wordt de functie mogelijk niet ondersteund.
Bovenka nt van de Soundbar
De functie Tap Sound instellen
Gebruik de SmartThings-app om de functie Tap View, Tap Sound in te schakelen.
1. Open de SmartThings-app op het mobiele apparaat.
2. Selecteer ( → ) op het scherm van de SmartThings-app op het mobiele apparaat.
3. Stel “Tap View, Tap Sound” in op Aan zodat de functie werkt wanneer een mobiel apparaat in de
buurt van de Soundbar komt. De functie is ingeschakeld.
OPMERKINGEN
• Wanneer het mobiele apparaat in de energiebesparende modus staat, werkt de functie Ta p So und
niet.
• De functie Tap Sou nd werkt mogelijk niet als er apparaten in de buurt van de Soundbar zijn die
radiostoring veroorzaken, zoals elektrische apparaten. Zorg ervoor dat apparaten die radiostoring
kunnen veroorzaken op voldoende afstand van de Soundbar worden geplaatst.
DUT - 19
Page 76

09 DE
B C D
C D
D
B C D
C D
D
WANDMONTAGE
Componenten voor wandmontage
INSTALLEREN
Voorzorgsmaatregelen bij de
installatie
• Installeer uitsluitend op een verticale wand.
• Installeer niet op een plaats met hoge
temperaturen en een hoge
luchtvochtigheidsgraad.
• Controleer of de wand voldoende sterk is om
het gewicht van het product te ondersteunen.
Als dat niet het geval is, versterk de wand dan
of kies een andere installatieplaats.
• Koop en gebruik de bevestigingsschroeven of
verankeringen die geschikt zijn voor uw type
wand (gipsplaat, ijzeren wand, hout enz.).
Bevestig indien mogelijk de
ondersteuningsschroeven in muurtapeinden.
• Koop wandmontageschroeven volgens het
type en de dikte van de wand waarop u de
Soundbar wilt monteren.
– Diameter: M5
– Lengte: 35 mm of langer aanbevolen.
• Sluit kabels van het toestel op externe
apparaten aan voordat u de Soundbar aan de
wand monteert.
• Zorg ervoor dat het toestel is uitgeschakeld
en de stekker uit het stopcontact is voordat u
het installeert. Anders kan dit leiden tot een
elektrische schok.
1.
2.
3.
A
x 2
B
x 2
(M4 x L10)
C
Centrale lijn
(niet meegeleverd)
x 2
D
5 cm of mee r
A
B
C
D
DUT - 20
Page 77

• Bij het monteren moet u ervoor
C D
C D
C D
zorgen dat het ophangingsonderdeel
van de D zich achter de achterkant
van de Soundbar bevindt.
Achter kant van de Soundb ar
10 DE SOUNDBAR
INSTALLEREN
BOVEN EEN TVVOET
D
Onderdeel
Rechteruiteinde van de Soundbar
4.
B
•D is omlaag ingevoegd om op
geïnstalleerd te worden.
B
x 4
Rubberen voet
Om te installeren bevestigt u de Rubberen
voeten aan de onderkant van de Soundbar
voordat u deze boven de tv-voet plaatst. Zorg
ervoor dat u de Rubberen voeten bevestigt zodat
ze zich buiten de buitenranden van de tv-voet
bevinden. Raadpleeg onderstaande afbeelding.
Rubberen voet
B
D
DUT - 21
Page 78

Plaats de Soundbar op een tv-voet.
Microfoon
Zoals de afbeelding laat zien, moet u het midden
van de Soundbar uitlijnen met het midden van de
tv en de Soundbar voorzichtig op de tv-voet
plaatsen. Plaats nu de microfoon aan de voorkant
van de standaard om spraakherkenning niet te
verstoren.
TV
11 SOFTWARE-
UPDATE
Automatische update
Wanneer de Soundbar met het internet is
verbonden, gebeuren software-updates
automatisch, zelfs wanneer de Soundbar
uitgeschakeld is.
• Om de functie Automatische update te
gebruiken, moet de Soundbar verbonden zijn
met het internet. De Wi-Fi-verbinding met de
Soundbar wordt beëindigd als de stroomkabel
van de Soundbar uit het stopcontact is gehaald
of de stroom wordt losgekoppeld. Als de
stroom uitstaat en de stroom opnieuw wordt
ingeschakeld of u het netsnoer opnieuw in het
stopcontact steekt, schakel de Soundbar in en
verbind hem opnieuw met het internet.
USB-update
Rechteruiteinde van de Soundbar
OPMERKINGEN
• Zorg ervoor dat de Soundbar op een vlakke
en stevige ondergrond staat.
• Onvoldoende afstand tot de tv kan leiden tot
problemen met spraakherkenning en het
geluid.
Onderkant van de Soundbar
DIGITAL AUDIO IN
(OPTICAL)
ID SET
SERVICE
HDMI IN 1
SERVICE
HDMI 2
ID SET
(WOOFER/REAR)
NETWORK
HDMI 1
HDMI IN 2
HDMI TO TV
(eARC/ARC)
POWER
Samsung kan in de toekomst updates bieden
voordesysteemrmwarevandeSoundbar.
Wanneer een update beschikbaar is, kunt u de
Soundbar bijwerken door de USB-schijf die de
update-rmware aan te sluiten op de SERVICE-
poort van de Soundbar.
DUT - 22
Page 79

Voor meer informatie over het downloaden van
updatebestanden en het bijwerken van de versie,
gaat u naar de website van Samsung
(www.samsung.com) → zoekt u op de naam van
het model via de menuoptie voor
klantondersteuning.
Initialisatie
Bovenka nt van de Soundbar
INIT
Druk met de Soundbar ten minste 5 seconden op
beide (Volume)-knoppen tegelijk. "INIT"
verschijnt op het scherm en de Soundbar wordt
geïnitialiseerd.
LET OP
• Alle instellingen van de Soundbar worden
geïnitialiseerd. Voer dit alleen uit wanneer
initialisatie vereist is.
DUT - 23
Page 80

12 PROBLEEMOPLOSSING
Alvorens assistentie te zoeken, controleer het volgende.
Als de stroom niet is ingeschakeld
; Controleer of de stroomkabel van de
Soundbar goed in het stopcontact zit.
Als de func ties niet goed werken
; Steek de stroomkabel opnieuw in het
stopcontact nadat u hem eruit hebt
gehaald.
; Probeer opnieuw na initialisatie van het
product. (zie pagina 23).
; Als er geen signaal is, schakelt de Soundbar
automatisch uit na een bepaalde
tijdsperiode. Schakel het toestel in. (zie
pagina 7).
Als de afstandsbediening niet werkt
; Bedien de afstandsbediening en let goed
op de Soundbar.
; Vervang de batterijen door nieuwe.
Als het geluid van de Soundbar niet wordt
uitgevoerd
; Het volume van de Soundbar is te laag of
gedempt. Pas het volume aan.
; Als een extern apparaat (STB, Bluetooth-
apparaat, mobiel apparaat enz.)
aangesloten is, pas dan het volume van het
externe apparaat aan.
; Selecteer Soundbar voor de geluidsuitvoer
van de tv. (Samsung-tv: Start ( ) →
Instellingen ( ) → Geluid → Geluidsuitvoer
→ Soundbar selecteren)
; Verwijder de kabel uit de Soundbar en
steek er hem dan weer in.
Als het geluid van de subwooferluidspreker
niet wordt uitgevoerd
; Controleer of de led op de achterkant van
de subwoofer blauw oplicht. Verbind hem
opnieuw wanneer de blauwe led knippert
of de rode led oplicht. (Zie pagina 9)
Als de tv niet via HDMI TO TV (eARC/ARC) is
verbonden
; Controleer of de HDMI-kabel correct op de
ARC-aansluiting is aangesloten.
(Zie pagina 11)
; De verbinding is misschien niet mogelijk
wegens het aangesloten externe apparaat
(settopbox, gamemachine enz.). Verbind de
Soundbar rechtstreeks.
; HDMI-CEC wordt mogelijk niet geactiveerd
op de tv. Schakel de CEC op het tv-menu in.
(Samsung-tv: Start ( ) → Instellingen
( ) → Algemeen → Beheer externe
apparaten → Anynet+ (HDMI-CEC) AAN)
Als een Bluetooth-verbinding niet mogelijk is
; Schakel bij het verbinden met een nieuw
apparaat naar "BT PAIRING" voor een
verbinding. (Druk op de knop PAIR op de
afstandsbediening of druk gedurende ten
minste 5 seconden op de knop (Mic aan/
uit) op de behuizing.)
; Verbind opnieuw nadat u de lijst met
Bluetooth-luidsprekers hebt verwijderd op
het te verbinden apparaat. (Samsung-tv:
Start ( ) → Instellingen ( ) → Geluid →
Geluidsuitvoer → Lijst met Bluetooth-
luidsprekers)
DUT - 24
Page 81

Als het Bluetooth-geluid wordt onderbroken
; Houd uw apparaat weg van de Soundbar
want het kan radio-interferentie
veroorzaken. Vb. magnetron, draadloze
router enz.
; Het geluid kan worden onderbroken omdat
het te verbinden apparaat zich ver van de
Soundbar bevindt. Verplaats het apparaat
dichter bij de Soundbar.
; Als een deel van uw lichaam in contact is
met de Bluetooth-zendontvanger of het
product geïnstalleerd is op een metalen
meubel, dan kan het geluid worden
onderbroken. Controleer de
installatieomgeving en
gebruiksomstandigheden.
Als een Wi-Fi-verbinding niet mogelijk is
; Zorg ervoor dat de draadloze router
ingeschakeld is en verbind de draadloze
router opnieuw na heropstarten.
; Wanneer het signaal van de draadloze
router te zwak is, kan een verbinding
onmogelijk zijn. Verplaats de router dichter
bij de Soundbar of pas de geïnstalleerde
positie aan zonder obstakels.
Als Alexa niet reageert
Wanneer de microfoon is uitgeschakeld of de
ontvangst slecht is
; Druk op de knop (Mic aan/uit) bovenop
de Soundbar om de microfoon in te
schakelen.
; Spraakherkenning is mogelijk niet
beschikbaar vanwege omgevingsgeluid.
Verminder het omgevingsgeluid en
probeer het opnieuw.
Wanneer de verbinding met het netwerk is
verbroken
; Het netwerk is mogelijk niet beschikbaar.
Congureer het netwerk opnieuw. (Zie
pagina 18)
WanneerAlexanietcorrectisgecongureerd
; Congureer Alexa opnieuw met de
SmartThings-app. (Zie pagina 18)
; Bekijk de door Alexa ondersteunde landen
op de Amazon-website. De service is niet
beschikbaar in die landen.
Als de Soundbar niet wordt ingeschakeld
zodra de tv wordt ingeschakeld
; Als u de Soundbar uitschakelt tijdens het
kijken naar de tv, wordt de
stroomsynchronsatie met de tv
uitgeschakeld. Schakel eerst de tv uit.
DUT - 25
Page 82

13 LICENTIE
14 KENNISGEVING
OPEN SOURCELICENTIE
Manufactured under license from Dolby
Laboratories. Dolby, Dolby Atmos, Dolby Audio,
Dolby Digital Plus, Pro Logic, and the double-D
symbol are trademarks of Dolby Laboratories.
For DTS patents, see http://patents.dts.com.
Manufactured under license from DTS
Licensing Limited. DTS, the Symbol, & DTS and
the Symbol together, DTS:X, and the DTS:X logo
are registered trademarks and/or trademarks
of DTS, Inc. in the United States and/or other
countries. © DTS, Inc. All Rights Reserved.
The terms HDMI and HDMI High-Denition
Multimedia Interface, and the HDMI Logo are
trademarks or registered trademarks of HDMI
Licensing LLC in the United States and other
countries.
• De Spotify-software is onderworpen aan
licenties van derden :
www.spotify.com/connect/third-partylicenses.
• Ga naar www.spotify.com/connect voor
meer informatie over Spotify Connect
Neem contact op met Samsung Open Source
(http://opensource.samsung.com) voor vragen en
verzoeken over open source
15 BELANGRIJKE
OPMERKING
OVER SERVICE
• De afbeeldingen en illustraties in deze
gebruiksaanwijzing dienen slechts te
referentie en kunnen afwijken van hoe het
apparaat er in werkelijkheid uitziet.
• In de volgende gevallen kunnen
administratiekosten in rekening worden
gebracht:
(a) een technicus komt bij u langs maar de
speler vertoont geen gebreken (u hebt
blijkbaar deze gebruiksaanwijzing niet
gelezen).
(b) u brengt het product naar een
reparatiecentrum maar het product
vertoont geen gebreken (u hebt blijkbaar
deze gebruiksaanwijzing niet gelezen).
• U wordt op de hoogte gesteld van deze
administratiekosten voordat een dergelijke
reparatie of bezoek wordt uitgevoerd.
DUT - 26
Page 83

16 SPECIFICATIES EN HANDLEIDING
Specicaties
Modelnaam HW-Q900T
Gewicht 7,1 kg
Afmetingen (B X H X D) 1232,0 x 69,5 x 138,0 mm
Temperatuurbereik voor gebruik +5°C - +35°C
Vochtigheidspercentage voor gebruik 10 % - 75 %
VERSTERKER
Uitvoervermogen (18W x 6) + (10W x 3) + (18W x 6) + 160W
Ondersteunde speelindelingen
UITGANGSVERMOGEN DRAADLOOS APPARAAT
Wi-Fi max. zendvermogen
UITGANGSVERMOGEN DRAADLOOS APPARAAT
BT max. zendvermogen
UITGANGSVERMOGEN DRAADLOOS APPARAAT
SRD max. zendvermogen
Naam van subwoofer PS-WR75BK
Gewicht 9,8 kg
Afmetingen (B X H X D) 210,0 x 403,0 x 403,0 mm
VERSTERKER
Uitvoervermogen 160W
UITGANGSVERMOGEN DRAADLOOS APPARAAT
SRD max. zendvermogen
Dolby Atmos (True HD / Digital Plus), Dolby
Digital, DTS Master Audio, DTS:X, DTS
100 mW op 2,4 GHz – 2,4835 GHz, 200 mW op
5,15 GHz – 5,25 GHz, 100 mW op 5,25 GHz –
5,35GHz & 5,47 GHz – 5,725 GHz
100 mW op 2,4 GHz – 2,4835 GHz
25 mW op 5,725 GHz – 5,825 GHz
25 mW op 5,725 GHz – 5,825 GHz
DUT - 27
Page 84

OPMERKINGEN
• Samsung Electronics Co., Ltd behoudt zich het recht voor de specicaties zonder voorafgaande
waarschuwing te wijzigen.
• Gewicht en afmetingen zijn bij benadering.
Voorzorgsmaatregel: De Soundbar start automatisch opnieuw op als u Wi-Fi inschakelt/
uitschakelt.
Algemeen elektriciteitsverbruik in de
stand-by-stand (W)
Wi-Fi
Manier om poort te deactiveren
Bluetooth
Manier om poort te deactiveren
• Samsung verklaart hierbij dat deze apparatuur voldoet aan Richtlijn 2014/53/EU.
De volledige tekst van de EU-Conformiteitsverklaring vindt u op deze website:
http://www.samsung.com ga naar Support > Product Zoeken Support en voer
de modelnaam in. Deze apparatuur mag in alle EU-landen worden gebruikt.
De 5 GHz WLAN-functie (Wi-Fi of SRD) van deze apparatuur mag alleen
binnenshuis worden gebruikt.
Druk gedurende 30 seconden op de knop ID SET op het
onderpaneel van de Soundbar om Wi-Fi in/uit te
Druk gedurende 30 seconden op de knop NETWORK op
het onderpaneel van de Soundbar om Bluetooth in/uit
5,2W
schakelen.
te schakelen.
DUT - 28
Page 85

[Correct e behandeling van een gebruik te accu uit dit produc t]
(Van toepassing in l anden waar afval gescheiden wordt ingezameld)
Dit merkteken op de accu, handleiding of verpakking geeft aan dat de accu in dit product aan het einde van
de levensduur niet samen met ander huishoudelijk afval mag worden weggegooid. De chemische
symbolen Hg, Cd of Pb geven aan dat het kwik-, cadmium- of loodgehalte in de accu hoger is dan de
referentieniveaus in de Richtlijn 2006/66/EC.
Indien de gebruikte accu niet op de juiste wijze wordt behandeld, kunnen deze stoffen schadelijk zijn voor
de gezondheid van mensen of het milieu.
Ter bescherming van de natuurlijke hulpbronnen en ter bevordering van het hergebruik van materialen,
verzoeken wij u afgedankte accu’s en batterijen te scheiden van andere soorten afval en voor recycling aan
te bieden bij het gratis inzamelingssysteem voor accu’s en batterijen in uw omgeving.
Correcte verwijdering van dit product
(elektrische & elektronische afvalapparatuur)
(Van toepassing in l anden waar afval gescheiden wordt ingezameld)
Dit merkteken op het product, de accessoires of het informatiemateriaal duidt erop dat het product en zijn
elektronische accessoires (bv. lader, headset, USB-kabel) niet met ander huishoudelijk afval verwijderd
mogen worden aan het einde van hun gebruiksduur. Om mogelijke schade aan het milieu of de menselijke
gezondheid door ongecontroleerde afvalverwijdering te voorkomen, moet u deze artikelen van andere
soorten afval scheiden en op een verantwoorde manier recyclen, zodat het duurzame hergebruik van
materiaalbronnen wordt bevorderd.
Huishoudelijke gebruikers moeten contact opnemen met de winkel waar ze dit product hebben gekocht of
met de gemeente waar ze wonen om te vernemen waar en hoe ze deze artikelen milieuvriendelijk kunnen
laten recyclen.
Zakelijke gebruikers moeten contact opnemen met hun leverancier en de algemene voorwaarden van de
koopovereenkomst nalezen. Dit product en zijn elektronische accessoires mogen niet met ander
bedrijfsafval voor verwijdering worden gemengd.
Meer informatie over de milieuverplichtingen van Samsung en productspecieke regelgevende
verplichtingen zoals REACH, WEEE, batterijen, vindt u op:
http://www.samsung.com/uk/aboutsamsung/samsungelectronics/corporatecitizenship/data_corner.html
DUT - 29
Page 86

INFORMATIONS RELATIVES À LA SÉCURITÉ
AVERTISSEMENTS
POUR ÉVITER LES RISQUES DE CHOC
ÉLECTRIQUE, NE DÉMONTEZ PAS LE CAPOT.
L’APPAREIL NE CONTIENT PAS DE PIÈCES
RÉPARABLES PAR L’UTILISATEUR ; S’ADRESSER
À UN SERVICE APRÈS-VENTE QUALIFIÉ.
Reportez-vous au tableau ci-dessous pour une
explication des symboles pouvant gurer sur
votre produit Samsung.
ATTENTION
RISQU E DE CHOC
ÉLEC TRIQUE. N E PAS
OUVRIR
Ce symbole indique que ce produit est
alimenté par haute tension. Il es t
dangereux de toucher la moindre pièce
située à l'intérieur de ce produit.
Ce symbole indique qu'une
documentation importante relative au
fonctionnement et à l'entretien est
fournie avec le produit .
Produit de classeII: ce symbole indique
qu'aucun branchement de sécurité à la
terre (prise de terre) n'est requis.
Si ce symbole n'est pas présent sur un
produit avec un cordon d'alimentation,
le produit DOIT avoir une connexion de
protection able à la terre.
Tension CA: ce symbole indique que la
tension nominale indiquée par le
symbole est une tension CA.
Tension CC: ce symbole indique que la
tension nominale indiquée par le
symbole est une tension CC.
Mise en garde, Consulter le mode
d'emploi: ce symbole avertit l'utilisateur
qu'il doit consulter le manuel
d'utilis ation pour en savoir plus sur les
informations relatives à la sécurité.
AVERTISSEMENT
• An de diminuer les risques d’incendie ou de
choc électrique, n’exposez pas cet appareil à
la pluie ou à l’ humidité.
ATTENTION
• POUR PRÉVENIR LES CHOCS ÉLECTRIQUES,
BRANCHEZ LA FICHE AU FOND, EN
PRENANT SOIN D’INSÉRER LA TIGE LARGE
DANS LA FENTE LARGE.
• Cet appareil doit toujours être branché à une
prise terre.
• Pour déconnecter l’appareil du circuit
principal, la prise doit être débranchée de la
prise principale ; il est de ce fait nécessaire
que la prise principale soit facile d’accès.
• Évitez toute projection d’eau sur l’appareil.
Ne posez jamais d’objet contenant un liquide
(ex : un vase) dessus.
• Pour éteindre complètement l’appareil, vous
devez retirer le cordon d’alimentation de la
prise murale. Par conséquent, le cordon
d’alimentation doit être facilement accessible
à tout moment.
FRA - 2
Page 87

PRÉCAUTIONS
1. Vériez que l’alimentation électrique CA de
votre domicile respecte les conditions en
matière d’alimentation répertoriées sur
l’étiquette d’identication située au bas de
votre produit. Posez votre produit à plat sur
un meuble stable en veillant à laisser un
espace de 7 à 10 cm autour de l’appareil an
d’assurer une ventilation correcte de celui-ci.
Faites attention à ne pas obstruer les orices
de ventilation. Ne posez pas l’ensemble sur
un amplicateur ou un autre appareil
susceptible de chauffer. Cet ensemble est
conçu pour une utilisation en continu. Pour
entièrement éteindre l’appareil, débranchez
la che CA de la prise murale. Débranchez
l’appareil si vous envisagez de ne pas l’utiliser
durant une longue période.
2. En cas d’orage, débranchez la che de
l’appareil de la prise murale. Les surtensions
occasionnées par l’orage pourraient
endommager votre appareil.
3. N’exposez pas l’ensemble aux rayons directs
du soleil ou à toute autre source de chaleur.
Ceci pourrait entraîner une surchauffe et un
dysfonctionnement de l’appareil.
4. Protégez le produit de l’humidité (comme les
vases) et d’une chaleur excessive (comme
une cheminée) ou de tout équipement
capable de créer des champs magnétiques
ou électriques. Débranchez le câble
d’alimentation en cas de dysfonctionnement.
Votre produit n’est pas prévu pour un usage
industriel. Ce produit ne peut être utilisé qu’à
des ns personnelles. Une condensation
peut se former si le produit ou un disque a
été stocké à basse température.
Si vous devez transporter l’ensemble
pendant l’hiver, attendez environ 2 heures
que l’appareil ait atteint la température de la
pièce avant de l’utiliser.
5. Les piles utilisées dans ce produit peuvent
contenir des produits ch miques dangereux
pour l’environnement. Ne jetez pas les piles
dans votre poubelle habituelle. Ne vous
débarrassez pas des piles en les faisant brûler.
Ne court-circuitez pas, ne désassemblez pas ni
ne faites pas surchauffer les batteries. Le
remplacement incorrect de la batterie entraîne
un risque d’explosion. Ne la remplacez que par
une batterie du même type.
Nettoyage de la structure
Enlevez immédiatement toute saleté ou tache à
la surface du produit.
L’élimination et le nettoyage peuvent être moins
efcaces pour certaines substances ou si elles
sont laissées pendant une longue période.
ATTENTION
• Utilisez un aspirateur ou un rouleau à
peluches adhésif pour enlever la poussière,
les empreintes de mains, etc.
– Certaines brosses de nettoyage peuvent
endommager le produit, en fonction des
matériaux qu’elles contiennent.
– Les serviettes et les tissus de nettoyage
peuvent laisser des peluches ou des
saletés sur le produit.
• N’utilisez pas de clous ou d’autres outils pour
gratter la saleté. Cela peut endommager le tissu.
• Pour éliminer les taches d’huile ou de liquide,
utilisez un chiffon blanc propre et humide. Si
la tache persiste, essuyez-la avec un mélange
d’eau et de détergent neutre (comme du
liquide vaisselle) et un chiffon.
– Un détergent ou un nettoyant non neutre
peut provoquer une décoloration ou des
dommages à la structure.
– Après le nettoyage, utilisez un chiffon sec
ou un sèche-cheveux pour sécher la zone.
– N’utilisez pas de force excessive pour
éviter la décoloration ou les dommages à
la structure.
FRA - 3
Page 88

SOMMAIRE
01 Véricationdescomposants 5
02 Vue d'ensemble du produit 6
03 Utilisation de la télécommande 7
04 Connexion de la Soundbar 8
05 Connexionlaireavecletéléviseur 11
06 Connexionsanslavecletéléviseur 14
07 Connexion d'un appareil externe 16
08 Connexion d'un appareil mobile 17
09 Installationdelaxationmurale 20
10 Installation de la Soundbar au-dessus d'un socle de
téléviseur 21
11 Mise à jour du logiciel 22
12 Dépannage 24
13 Licence 26
14 Avis de Licence Libre 26
15 Remarque Importante à Propos du Service 26
16 SpécicationsetGuide 27
FRA - 4
Page 89

01 VÉRIFICATION DES COMPOSANTS
PAIR
SOUND
MODE
VOL WOOFER
SOUNDBAR
Unité principale Soundb ar Télécommande/
Piles de l a Soundbar
Subwoofer
x 2
Cordon d’alimentation (Subwoofer, So undbar) Câble HDMI
x 2
x 2
(M4 x L10)
Guidedexationmurale Visdexation Vis
x 2
x 4
Supportdexationmurale Pied en caoutchouc
• Pour plus d'informations sur l'alimentation et la consommation électriques, reportez-vous à
l'étiquette collée sur le produit. (Étiquette: située au bas de l'unité principale Soundbar)
• Pour acheter des câbles en option ou des composants supplémentaires, contactez un Centre de
service Samsung ou le Service client de Samsung.
• Pour plus d'informations au sujet de la xation murale ou du pied en caoutchouc, consultez les
pages 20 à 21.
• La conception, les spécications et l'écran de l'application sont sujets à changement sans préavis.
Insertion des piles avant l'utilisation de la télécommande (2 piles AA)
Faites glisser le couvercle arrière dans la direction
de la èche jusqu’à ce qu’il soit complètement
retiré. Insérez 2 piles AA (1,5 V) orientées de sorte
que la polarité soit correcte. Remettez le couvercle
arrière en le faisant glisser dans sa position.
FRA - 5
Page 90

02 VUE D'ENSEMBLE DU PRODUIT
ID SET
HDMI IN 1
HDMI IN 2
NETWORK
SERVICE
DIGITAL AUDIO IN
(OPTICAL)
HDMI TO TV
(eARC/ARC)
HDMI 2
HDMI 1
ID SET
(WOOFER/REAR)
ID SET
DIGITAL AUDIO IN
(OPTICAL)
HDMI TO TV
HDMI 2
HDMI 1
ID SET
HDMI IN 1
HDMI IN 2
POWER
NETWORK
SERVICE
DIGITAL AUDIO IN
(OPTICAL)
HDMI TO TV
(eARC/ARC)
HDMI 2
HDMI 1
ID SET
(WOOFER/REAR)
ID SET
NETWORK
SERVICE
ID SET
(WOOFER/REAR)
DIGITAL AUDIO IN
(OPTICAL)
HDMI TO TV
(eARC/ARC)
HDMI 2
HDMI 1
Panneau supérieur de la Soundbar
Placez le produit de
sorte que le logo
SAMSUNG
se trouve
sur le dessus.
Panneau inférieur de la Soundbar
POWER
Bouton (Multifonction)
• En mode veille, appuyez sur la touche
(Multifonction) pour activer la Soundbar.
• Appuyez sur la touche (Multifonction)
pour changer la source d’entrée.
• Appuyez sur la touche (Multifonction)
pendant 3 secondes pour appeler Alexa.
Parlez avec la touche enfoncée pour activer
la reconnaissance vocale.
POWER
Branchez le cordon d'alimentation de la
Soundbar.
ID SET (WOOFER/REAR)
Appuyez pour établir une connexion sans l
entre la Soundbar et des enceintes surround et
un subwoofer.
(L'enceinte surround est vendue séparément).
POWER
ID SET
(WOOFER/REAR)
NETWORK
Écran
désactivé
Volume
Micro activé/
DIGITAL AUDIO IN
(OPTICAL)
SERVICE
DIGITAL AUDIO IN
ID SET
SERVICE
ID SET
(WOOFER/REAR)
NETWORK
(OPTICAL)
HDMI IN 1
HDMI 2
HDMI IN 2
HDMI 1
HDMI TO TV
(eARC/ARC)
HDMI 2
HDMI 1
HDMI TO TV
(eARC/ARC)
NETWORK
Appuyez pour établir la connexion à un réseau
sans l (Wi-Fi) via l'application SmartThings.
SERVICE
Connectez un appareil de stockage USB pour
mettre à jour le logiciel du produit.
DIGITALAUDIOIN(OPTICAL)
Connectez la sortie (optique) numérique d'un
appareil externe.
HDMI 1 / HDM I 2
Permet l'entrée simultanée de signaux audio et
vidéo par l'intermédiaire d'un câble HDMI.
Connectez ce port à la sortie HDMI d'un appareil
externe.
HDMI TO T V (eARC/ARC)
Connectez ce port à la prise jack HDMI d'un
téléviseur.
FRA - 6
Page 91

03 UTILISATION DE LA TÉLÉCOMMANDE
Comment utiliser la télécommande
Alimentation
Active ou désactive la Soundbar.
PAIR
• Fonction Auto Power Down
L'unité s'éteint automatiquement dans les situations
suivantes:
– En mode D.IN / HDMI / Wi-Fi / BT, en l'absence de
signal audio pendant 18minutes.
(Source)
Appuyez pour sélectionner une source connectée à la Soundbar.
SOUND
MODE
VOL WOOFER
SOUNDBAR
Haut/Bas/Gauche/Droite
Appuyez sur Haut/Bas/Gauche/Droite sur la touche pour sélectionner ou paramétrer les fonctions.
(Réglages audio)
Lorsque vous appuyez sur ce bouton, les éléments de réglage comme TREBLE, BASS, SYNC, CENTER
LEVEL, SIDE LEVEL, FRONT TOP LEVEL, REAR LEVEL, REAR TOP L EVEL et VIRTUAL ON/OFF s'afchent
successivement. Il est possible de régler l'élément souhaité à l'aide des touches Haut/Bas.
NIVEAUDEWOOFER(GRAVES)
Appuyez sur les touches haut ou bas pour régler le niveau du woofer (graves) sur -12 ou de -6 à +6. Pour
dénir le niveau de volume du woofer (graves) sur 0 (Défaut), appuyez sur la touche.
(Sourdine)
Appuyez sur la touche (Sourdine) pour mettre le son en
sourdine.
Appuyez de nouveau sur cette touche pour réactiver le son.
SOUND MODE
Vous pouvez sélectionner le mode de son souhaité en
choisissant STANDARD, SURROUND, GAMEPRO ou ADAPTIVE
SOUND.
Bluetooth PAIR
Faites passer la Soundbar en mode Jumelage Bluetooth.
Appuyez sur la touche et attendez que l'écran «BTPAIRING»
se connecte à un nouveau dispositif Bluetooth.
p (Lecture / P ause)
Vous pouvez également lire ou mettre en pause la musique en
appuyant sur cette touche.
VOLUME
Appuyez sur les touches haut ou bas pour régler le volume.
FRA - 7
Page 92

04 CONNEXION DE LA SOUNDBAR
POWER
POWER
HDMI IN 1
HDMI IN 2
ID SET
(WOOFER, REAR)
POWER
NETWORK
SERVICE
DIGITAL AUDIO IN
(OPTICAL)
HDMI TO TV
(eARC/ARC)
HDMI 1
HDMI 2
ID SET
POWER
HDMI IN 1
HDMI IN 2
ID SET
(WOOFER, REAR)
NETWORK
SERVICE
DIGITAL AUDIO IN
(OPTICAL)
HDMI TO TV
(eARC/ARC)
HDMI 1
HDMI 2
ID SET
Connexion de l'alimentation électrique et du subwoofer
Utilisez le cordon d’alimentation pour brancher le caisson de basse et la Soundbar à une prise électrique,
dans l’ordre suivant:
• Pour plus d'informations sur l'alimentation électrique requise et la consommation d'énergie, reportezvous à l'étiquette collée sur le produit. (Étiquette: située au bas de l'unité principale Soundbar)
REMARQUES
• Connectez l'alimentation du subwoofer avant d'établir la connexion avec la Soundbar.
Le subwoofer est connecté automatiquement à la Soundbar au moment où celle-ci est allumée.
• Si vous débranchez, puis rebranchez le cordon d'alimentation alors que le produit est allumé, la
Soundbar s'allume automatiquement.
POWER
POWER
Arrière du subwoofer
POWER
Bas de l’unité principale
Soundbar
La connexion est
terminée.
Voyant bleu al lumé
FRA - 8
Page 93

Connexion manuelle du subwoofer
Avantderéaliserlaprocéduredeconnexionmanuelledusubwooferdécriteci-dessous:
• Vériez que les câbles d'alimentation de la Soundbar et du subwoofer sont correctement
connectés.
• Vériez que la Soundbar est éteinte.
1. Éteignez l'unité principale de la Soundbar.
2. Maintenez la touche ID SET située à l'arrière du subwoofer enfoncée pendant au moins 5 secondes.
5 Sec
Clignotement
rapide en bleu
Arrière du subwoofer Arrière du subwoofer
3. Appuyez sur la touche Haut de la télécommande pendant 5 secondes.
PAIR
5 Sec
ID SET
4. Vériez que le témoin LED LINK brille en bleu de manière stable (connexion terminée).
Le voyant LED LINK arrête de clignoter et
s'éclaire en bleu de manière stable
lorsqu'une connexion est établie entre la
Soundbar et le subwoofer sans l.
Voyant bleu al lumé
FRA - 9
Page 94

Voyants LED situés à l'arrière du subwoofer
LED État Description Résolution
Connexion réussie
Allumé
Bleu
Clignotement
Rouge
Allumé
(fonctionnement à
l'état normal)
Récupération de la
connexion en cours
Veille (lorsque l'unité
principale Soundbar est
éteinte)
Échec de la connexion
-
Vériez que le câble
d'alimentation xé à l'unité
principale Soundbar est connecté
correctement ou attendez environ
5 minutes. Si le clignotement
persiste, essayez de connecter
manuellement le subwoofer. Voir
page 9.
Vériez que le câble
d'alimentation xé à l'unité
principale Soundbar est connecté
correctement.
Rétablissez la connexion.
Consultez les instructions
relatives à la connexion manuelle
page 9.
Rouge et bleu
Clignotement Dysfonctionnement
FRA - 10
Consultez les coordonnées du
Centre de service Samsung
présentes dans ce manuel.
Page 95

05 CONNEXION FILAIRE AVEC LE TÉLÉVISEUR
Méthode 1. Connexion par HDMI
ATTENTION
• Lorsqu'un câble HDMI et un câble optique sont connectés simultanément, le signal HDMI est
reçu en priorité.
• Pour raccorder le téléviseur et la Soundbar à l'aide du câble HDMI, veillez à utiliser les bornes
marquées ARC. Dans le cas contraire, le son du téléviseur ne sera pas émis.
• Veillez à utiliser le câble marqué du logo de certication HDMI premium. De plus, vériez que le
câble est certié de type A, Ethernet HDMI haute vitesse. (CÂBLE HDMI HAUTE VITESSE AVEC
CONNEXION ETHERNET)
Connexion à un téléviseur qui prend en charge HDMI ARC (Canal de retour audio)
Connec tez au port HD MI TO TV
ConnectezauportHDMIIN
(ARC) de votre téléviseur.
(eARC/ARC) sur l'unité principale
Soundbar.
HDMI IN
(ARC)
Câble HDMI
Part ie supérieure de l a Soundbar
HDMI TO TV
(eARC/ARC)
Part ie inférieure de l a
Soundbar
TV ARC
1. Vériez que le téléviseur et la Soundbar sont éteints, plus connectez le câble HDMI comme indiqué
sur la gure.
2. Allumez la Soundbar et le téléviseur.
3. «TV ARC» apparaît sur la fenêtre d'afchage de l'unité principale Soundbar et le son du téléviseur
est émis.
• Si le son du téléviseur n'est pas émis, appuyez sur la touche (Multifonction) située sur le
haut de la Soundbar ou sur la touche (Source) de la télécommande pour sélectionner le
mode «D.IN». Dans la fenêtre d'afchage, «D.IN» et «TV ARC» apparaissent successivement
et le son du téléviseur est émis.
FRA - 11
Page 96

• Lors de la connexion d’un téléviseur Samsung qui prend en charge la fonction eARC, « eARC »
s’afche à l’écran, et le son est émis.
• Si «TV ARC» n'apparaît pas dans la fenêtre d'afchage de l'unité principale Soundbar, vériez
que le câble HDMI est connecté au bon port.
• Utilisez les touches de volume de la télécommande du téléviseur pour changer le volume de la
Soundbar.
REMARQUES
• Lorsque vous connectez le téléviseur qui prend en charge HDMI ARC (Canal de retour audio) à la
Soundbar à l'aide d'un câble HDMI, vous pouvez transmettre les données vidéo et audio numériques
sans qu'il ne soit nécessaire de connecter un câble optique séparé.
• Nous recommandons l'utilisation d'un câble HDMI sans noyau, si possible. Si vous utilisez un câble
avec un noyau, choisissez-en un de diamètre inférieur à 14mm.
• Cette fonction n'est pas disponible si le câble HDMI ne prend pas en charge ARC.
• Lorsque le son d'un canal de diffusion est encodé en Dolby Digital et que le format audio de la sortie
numérique «Format de sortie audio numérique» de votre téléviseur est réglé sur PCM, nous vous
recommandons d'ajuster le réglage sur Dolby Digital. Modier ce réglage sur le téléviseur vous
permettra d'obtenir un son de meilleure qualité. (Il est possible que le menu TV utilise différents
mots pour Dolby Digital et PCM en fonction du fabricant du téléviseur.)
Méthode 2. Connexion à l'aide d'un câble optique
Listedevéricationspréalablesàlaconnexion
• Lorsqu'un câble HDMI et un câble optique sont connectés simultanément, le signal HDMI est
reçu en priorité.
• Lorsque vous utilisez un câble optique et que les bornes sont dotées d'un cache, veillez à retirer
les caches.
OPTICAL OUT
Câble optique
(non fourni)
Part ie supérieure de l a Soundbar
D.IN
FRA - 12
Part ie inférieure de l a Soundbar
DIGITAL AUDIO IN
(OPTICAL)
Page 97

1. Vériez que le téléviseur et la Soundbar sont éteints, puis connectez le port DIGITALAUDIOIN
(OPTICAL) et le port de sortie OPTICAL du téléviseur à l'aide du câble optique (non fourni), comme
indiqué sur la gure.
2. Allumez la Soundbar et le téléviseur.
3. Appuyez sur la touche (Multifonction) située sur le haut de la Soundbar ou sur le la touche
(Source) de la télécommande pour sélectionner le mode «D.IN».
4. Le son du téléviseur est émis par la Soundbar.
Utilisation de la fonction Q-Symphony
Pour Q-Symphony, la Soundbar se synchronise avec un téléviseur Samsung pour diffuser le son via
deux périphériques pour un effet surround optimal. Quand la Soundbar est connectée, le menu
«TV+Soundbar» apparaît dans le menu Sortie son du téléviseur. Sélectionnez le menu correspondant.
Menu T V
Câble HDMI
OU
Câble op tique (non fourni)
• Exemple de menu TV : TV + [AV] So undbar Nom de séri e (HDMI)
REMARQUES
• Il peut fonctionner selon le codec pris en charge par le téléviseur.
• Cette fonction n’est prise en charge que lorsque le câble HDMI ou le câble optique (non fourni) est
connecté.
• Cette fonction est disponible sur les téléviseurs Samsung sortis en 2020 et sur certains modèles de
Soundbar.
• Si vous utilisez Q-Symphony, vous ne pouvez choisir que GAMEPRO ou ADAPTIVE SOUND.
D.IN
FRA - 13
Page 98

06 CONNEXION SANS FIL AVEC LE TÉLÉVISEUR
Connexion via Bluetooth
Lorsqu'un téléviseur Samsung TV est connecté via Bluetooth, vous pouvez proter d'un son stéréo sans
le casse-tête du câblage.
• Seul un téléviseur Samsung TV peut être connecté à la fois.
• Seul un téléviseur Samsung TV prenant en charge la fonction Bluetooth peut être connecté. Vériez
les spécications de votre téléviseur.
Part ie supérieure de l a Soundbar
5 Sec
OU
BTPAIRING
Connexion initiale
1. Appuyez sur la touche PAIR de la télécommande de la Soundbar pour passer en mode «BT
PAIRING».
(OU)
a. Appuyez sur la touche (
«BT».
«BT» passe automatiquement sur «BTPAIRING» en quelques secondes ou sur «BT
READY» si une connexion est déjà enregistrée.
b. Lorsque «BT READY» apparaît, maintenez la touche (Micro activé/désactivé) située
sur le panneau supérieur de la Soundbar enfoncée pendant plus de 5 secondes jusqu'à ce
que le message «BTPAIRING» apparaisse.
2. Sélectionnez le mode Bluetooth sur le téléviseur Samsung TV.
(p. ex. Accueil ( ) Paramètres ( ) Son Sortie son Liste des haut-parleurs Bluetooth
[AV] Samsung Soundbar Q900T (Bluetooth))
3. Sélectionnez «[AV] Samsung Soundbar Q900T» à partir de la liste présente sur l'écran du
téléviseur.
Pour toute Soundbar disponible, le message «Appariement nécessaire» ou «Apparié» apparaît
sur la liste des appareils Bluetooth du téléviseur. Pour connecter le téléviseur Samsung TV à la
Soundbar, sélectionnez le message, puis établissez une connexion.
• Lorsque la TVSamsung est connectée, [Nom du téléviseur]→ « BT » s’afche sur l’écran
supérieur de la Soundbar.
4. Vous pouvez à présent proter du son du téléviseur Samsung TV à partir de la Soundbar.
• Une fois que vous avez connecté votre Soundbar à votre téléviseur Samsung TV pour la
première fois, utilisez le mode «BT READY» pour vous reconnecter.
Multifonction)
située sur le panneau supérieur, puis sélectionnez
PAIR
FRA - 14
Page 99

Si la connexion avec l'appareil échoue
• Si vous possédez une Soundbar (p.ex., une [AV] Samsung Soundbar Q900T) déjà présente dans
la liste des enceintes du téléviseur Samsung TV, supprimez-la.
• Ensuite, répétez les étapes 1 à 3.
Déconnexion de la Soundbar et du téléviseur Samsung TV
Appuyez sur la touche (Multifonction) située sur le haut de la Soundbar ou sur la touche
(Source) de la télécommande pour sélectionner un mode autre que «BT».
• La déconnexion prend un certain temps, car le téléviseur Samsung TV doit recevoir une réponse de
la part de la Soundbar.
(Le temps requis peut varier selon le modèle du téléviseur Samsung TV.)
QuelleestladifférenceentrelesmodesBTREADYetBTPAIRING?
• BT READY: Dans ce mode, vous pouvez reconnecter n'importe quel téléviseur Samsung TV ou
appareil mobile qui a déjà été connecté par le passé.
• BTPAIRING: Dans ce mode, vous pouvez connecter un nouvel appareil à la Soundbar.
(Appuyez sur la touche PAIR de la télécommande ou maintenez la touche (Micro activé/
désactivé) située sur la partie supérieure de la Soundbar enfoncée pendant plus de 5 secondes
lorsque la Soundbar est en mode «BT».)
Remarques concernant la connexion Bluetooth
• Placez un nouvel appareil à une distance inférieure à 1m de la Soundbar pour établir la connexion
par le biais de la communication Bluetooth.
• Si un code d'identication personnel vous est demandé lors de la connexion d'un nouvel appareil
Bluetooth, saisissez <0000>.
• La Soundbar s'éteint automatiquement après 18minutes passées en mode Prêt.
• Il est possible que la Soundbar n'effectue aucune recherche Bluetooth ou n'établisse aucune
connexion sous certaines circonstances:
– En présence d'un fort champ électromagnétique autour de la Soundbar.
– Si plusieurs appareils Bluetooth ou plus sont jumelés simultanément avec la Soundbar.
– Si l'appareil Bluetooth est éteint, déplacé ou qu'un dysfonctionnement survient.
• Les appareils électroniques peuvent causer des interférences radio. Les appareils qui génèrent des
ondes électromagnétiques doivent être conservés à distance de l'unité principale Soundbar (par ex.
des micro-ondes, des appareils LAN sans l, etc.).
FRA - 15
Page 100

07 CONNEXION D'UN APPAREIL EXTERNE
(OPTICAL)
Méthode 1. Connexion à l'aide d'un câble HDMI (prise en charge du
décodage et de la lecture Dolby Atmos)
Part ie supérieure de l a Soundbar
HDMI 1
OU
Appareil externe
HDMI OUT
HDMI 2
Câble HDMI
OU
HDMI 2
HDMI 1
HDMI TO TV
(eARC/ARC)
Part ie inférieure de l a Soundbar
HDMI IN
(ARC)
Câble HDMI
• Connectez le câble HDMI → Activez la Soundbar, l'appareil externe et le téléviseur
(Multifonction) → Sélectionnez le mode «HDMI 1» ou «HDMI 2»
Méthode 2. Connexion à l'aide d'un câble optique
Part ie supérieure de l a Soundbar
Lect eur BD / DVD /
décode ur / console de jeu
OPTICAL OUT
• Connectez le câble optique → Allumez la Soundbar et l’appareil externe →
(Multifonction) → Sélectionnez le mode «D.IN»
REMARQUE
• Pour plus d'informations concernant la connexion d'un appareil externe, reportez-vous au guide de
l'utilisateur de la Soundbar sur le site web de Samsung (www.samsung.com/support).
Câble optique
(non fourni)
D.IN
DIGITAL AUDIO IN
(OPTICAL)
Part ie inférieure de l a Soundbar
FRA - 16
 Loading...