

Samsung HW-J450/ZA-ZZ01 Owner’s Manual

Imagine the possibilities
HWoJ450
Thank you for purchasing this Samsung product
To receive more complete service, please register your product at
wwwosamsu r]gocom/register
'This Nanum Gothic Ecofont is provided by NAVER'
rdSoundConnect
TVSoundConnectletsyoutistentoaudiofromyourTVonyourSoundbarviaaBtuetoothconnectionandlets
youcontrotthesound,
NDMI
HDMttransmitsvideoandaudiosignalssimultaneously,andprovidesadearerpicture,
TheunitisatsoequippedwiththeARCfunctionwhichletsyoulistentosoundfromyourTVthroughthe
SoundbarviaanHDMtcable,ThisfunctionisonlyavaitaUeifyouconnecttheunittoanARCcompliantTkL
SURROUNDSOUND
TheSURROUNDSOUNDfeatureaddsdepthandspaciousnesstoyourlisteningexperience,
WirelessSubwoofer
Samsung'swirelessmoduledoesawaywithcablesrunningbetweenthemainunitandthesubwoofer_
tnstead_thesubwooferconnectstoacompactwirelessmodulethatcommunicateswiththemainunit,
SpecialSoundEffects
YoucanselectdifferentSoundEffects-STANDARD(OriginalSound)/MUSIC/ VOICE/ SPORTS/ CINEMA /
NIGHT MODE- depending on the type of content you want to enjoy,
Multi-function Remote Control
You can use the supplied remote control to control various operations with the simple pressof a button,
USB Host Support
You can connect and play music files from external USBstorage devices such as MP3 players, USBflash
memo,5,, etc, using the Soundbar's USBHOSTfunction,
Btuetooth Function
You can connect a BhJetooth device to the Soundbar and enjoy music with high quality stereo sound, all
without wires!
Using Samsung Audio Remote App
Tocontrol the product with your Sma_ Device via the Samsung Audio Remote app, download the Samsung
Audio Remote App by accessingthe app through Google Playstore,
r'_ DOLBY_
DiGiTAL
Manufactured under licensefrom Dotby Laboratories, Dotby and the doubte-D symbol are trademarks of
Dolby Laboratories,
2.0 Channel
For DTSpatents, see http:iipatents,dts,com, Manufactured under ticensefrom DTSLicensing Limited, DTS,
the Symbol, & DTSand the Symbol together are registered trademarks, and DTS2,0 Channel isa trademark of
DTS,tnc, @DTS,tnc, A1tRights Rese_,ed,
l--I_m|
The terms HDMt and HDMt HigMDefinition Multimedia Interface, and the HDMt Logo are trademarks or
registered trademarks of HDMt Licensing LLCin the United States and other countries,
2
SAFELY INFORI?AT ON
SAFETY INFORMATION
SAFETY WARNINGS
TO REDUCE THE RtSK OF ELECTRtCSHOCK, DO NOT REMOVE THE COVER (OR BACK).
NO USER-SERVICEABLEPARTSARE INSIDE. REFER SER\.,'tCtNGTO QUALIFIED SERVICEPERSONNEL.
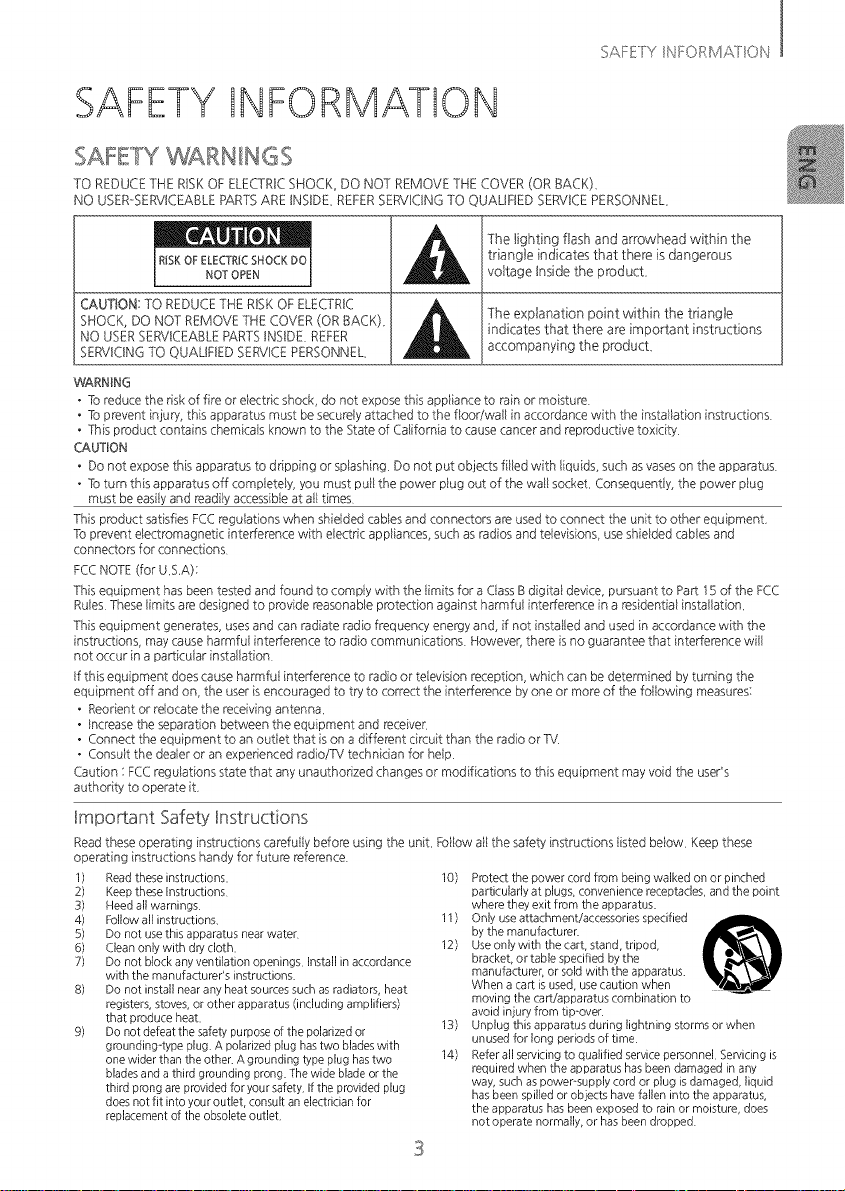
The lighting flash and arrowhead within the
RISKOFELECTRICSHOCKDO
NOTOPEN
CAUTION: TO REDUCETHE RISKOF ELECTRIC
SHOCK, DO NOT REMOVE THE COVER (OR BACK).
NO USER SERVICEABLERARTSINSIDE. REFER
SERVICINGTO QUALIFIED SERVICEPERSONNEL.
WARNING
• To reduce the risk of fire or eiectric shock, do not expose this appiiance to rain or moisture
• To prevent injury, this apparatus must be secureiy attached to the flooffwail in accordance with the instaiiation instructions
• This product contains chemicais known to the State of California to cause cancer and reproductive toxicity
CAUTION
• Do not expose this apparatus to dripping or splashing Do not put objects fiiled with liquids, such asvaseson the apparatus
• Toturn this apparatus off compietely, you must puil the power piug out of the wall socket, Consequentiy, the power piug
must be easiiyand read@accessibleat ail times
This product satisfiesFCCregulations when shieided cablesand connectors are usedto connect the unit to other equipment,
To prevent electromagnetic inter[erence with eiectric appiiances, such as radios and teievisions, use shieided cabies and
connectors for connections
FCCNOTE(for U,S,A):
This equipment has been tested and found to compiy with the iimits for a CiassBdigitai device, pursuant to Pad: 15of the FCC
Ruies These iimits are designed to provide reasonable protection against harmfui intederence in a residentiai instailation,
This equipment generates, usesand can radiate radio frequency energy and, if not instailed and used in accordance with the
instructions, may cause harmfui inted:erence to radio communications Noweve_, there is no guarantee that intederence wiil
not occur in a pad:icuiar installation
If this equipment does cause harmfui inter[erence to radio or television reception, which can be determined by turning the
equipment off and on, the user is encouraged to try to correct the intederence byone or moreof the foilowing measures:
• Reorient or reiocate the receiving antenna,
• Increase the separation between the equipment and receiver
• Connect the equipment to an outiet that is on a different circuit than the radio or?v'
•Consuit the dealer or an experienced radio/TV technician for heip
Caution : FCCregulations state that anyunauthorized changes or modifications to this equipment may void the user's
authority to operate it,
Important Safety Instructions
Readthese operating instructions carefuily before using the unit, Foilow
operating instructions handy for future reference
1) Readthese instructions. 10)
2) Keepthese Instructions
3) Heedall warnings.
4) Followall instructions. 11)
5) Do not usethis apparatusnearwater
6) Cleanonly with drycloth. 12)
7) Do not blockanyventilationopenings Installin accordance
with the manufacturer'sinstructions.
8) Do not install nearany heatsourcessuchasradiators,heat
registers,stoves,or other apparatus(including amplifiers)
that produce heat. 13)
9) Do notdefeatthe safetypurposeofthe polarizedor
grounding.typeplug. A polarizedplug hastwo bladeswith
onewiderthan the other.Agroundingtypeplug hastwo 14)
bladesanda third groundingprong.Thewidebladeor the
third prongareprovidedforyoursafety.Ifthe provided plug
doesnot fit into youroutlet, consult anelectricianfor
replacementof the obsoleteoutlet.
3
triangle indicates that there is dangerous
voltage Inside the product.
The explanation point within the triangle
indicates that there are important instructions
accompanying the product.
ail the safety instructions iisted beiow Keep these
Protect the power cord from being walked on or pinched
particularly at plugs, convenience receptacles, and the point
where they exit from the apparatus.
Only use attachment!accessories specified
by the manufacturer
Use only with the cart, stand, tripod,
bracket, or table specified by the
manufacturer or sold with the apparatus.
When a cart is used, use caution when
moving the cart!apparatus combination to
avoid injury from tip over
Unplug this apparatus during lightning storms or when
unused for long periods of time
Refer all servicing to qualified service personnel. Servicing is
required when the apparatus has been damaged in any
way, such as power-supply cord or plug is damaged, liquid
has been spilled or objects have fallen into the apparatus,
the apparatus has been exposed to rain or moisture, does
not operate normally, or has been dropped
SAFEFY _,_O k,_,_, 0 _
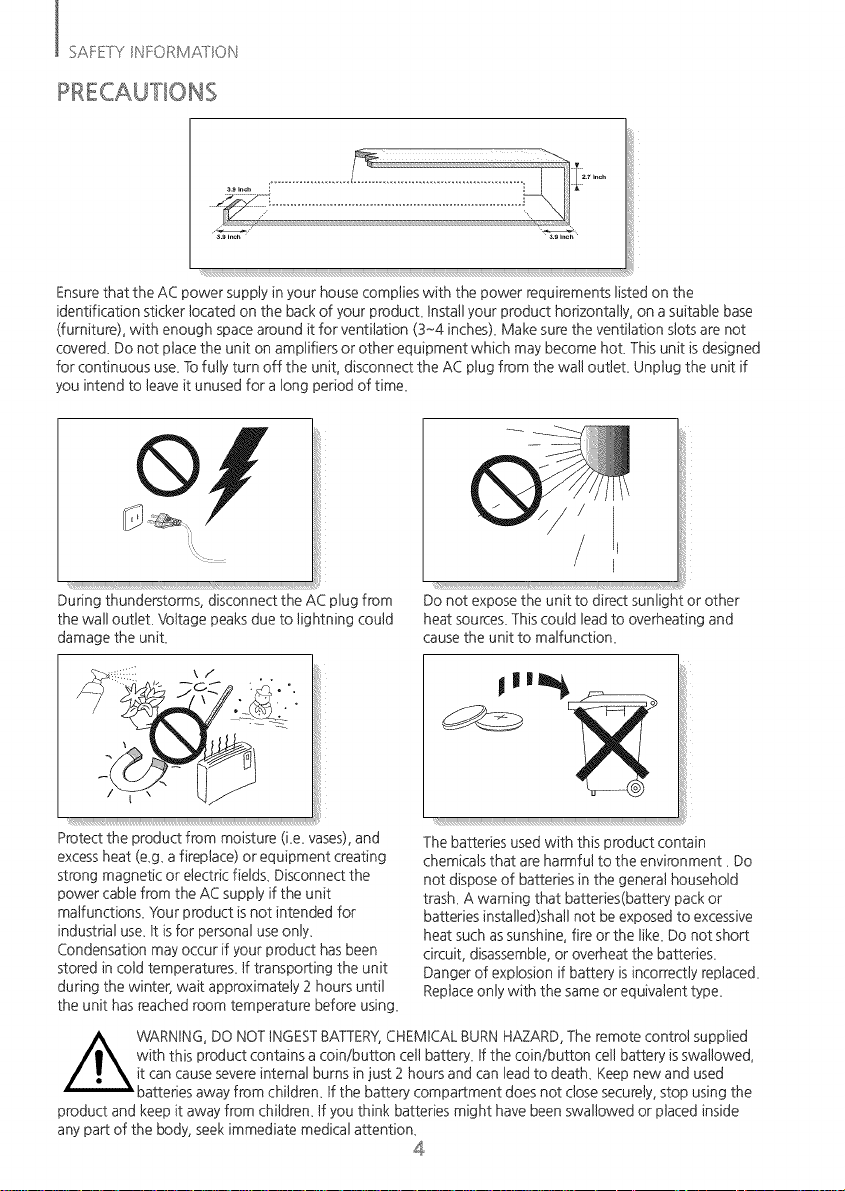
Ensurethat the AC power supply in your house complies with the power requirements listed on the
identification sticker located on the backof your product_ Install your product horizontally, on a suitable base
(furniture), with enough spacearound it for ventilation (3~4 inches)_Make sure the ventilation slots are not
covered_Do not place the unit on amplifiers or other equipment which may become hot_ This unit is designed
for continuous use_Tofully turn off the unit, disconnect the AC plug from the wall outJet_Unplug the unit if
you intend to leave it unused for a long period of time_
During thunderstorms, disconnect the AC plug from
the wall outtet_ Voltage peaks due to lightning could
damage the unit_
Protect the product from moisture (ke_vases),and
excessheat (eg_ afireplace) or equipment creating
strong magnetic or electric fields_Disconnect the
power cable from the AC supply if the unit
malfunctions_ Your product is not intended for
industrial use_It isfor personal use only_
Condensation may occur if your product has been
stored in cold temperatu_s_ If transporting the unit
during the winter, wait approximately 2 hours until
the unit has reached room temperature before using_
product and keep it away from children_ If you think batteries might have been swallowed or placed inside
any part of the body, seekimmediate medical attention_
Do not expose the unit to direct sunlight or other
heat sources_Thiscould lead to overheating and
cause the unit to malfunction_
The batteries used with this product contain
chemicals that are harmful to the environment _Do
not dispose of batteries in the general household
trash_ A warning that batteries(battery pack or
batteries installed)shall not be exposed to excessive
heat such assunshine, fire or the like_Do not short
circuit, disassemble,or overheat the batteries_
Danger of explosion if batter}, is incorrectly replaced_
Replaceonly with the same or equivalent type_
4
CONTENTS
2 Licenses
3 SAFETY INFORMATION
3 Safety Warnings
4 Precautions
6 GETTING STARTED
6 Before reading the User's Manual
6 What's hduded
7 lop/Front Panel
8 Rear Panel
9 REMOTE CONTROL
9 Remote Control Buttons and Functions
11
ii
hstalling the Wall Mount
i2
Detaching the Wall Mount
i2
hstalling the bracket without referring
to the Wall mount Bnstallation Guide
i3
Connecting the Wireless Subwoofer
i5
Connecting an External Device using an
HDMB cable
i6
Connecting an External Device using
Audio (analog) cable or Optical (digital)
cable
17
i7 Input mode
i7 ARC (HDMI OUT)
i8 Bluetooth
20 Using Samsung Audio Remote App
2i TV SoundConnect
22 USB
23 Software Update
24 TROUBLffSNOOTIN6
25 APPENDIX
25 Specifications
iFiguresand illustrations in this User Manual are
{provided for reference orfly and may differ from
actual productappearance_
I G/!]TNG;:__?_,_:_]t!D
GETTING STARTED
BEFORE READING THE USER'S MANUAL
Note the following terms before reading the user manual
icons used in this manual
Safety instructions and Troubleshooting
1) Besure to familiarize yourself with the Safety Instructions before using this pioduct_ (Seepage 3)
2) Ifa problem occurs, check Troubleshooting_ (Seepage 24)
Copyright
@2015 Samsung Electronics Co.Ltd_
All rights reserved; no part of this user'smanual may be reproduced or copied without the prior written
permission of Samsung Electronics Co.Ltd_
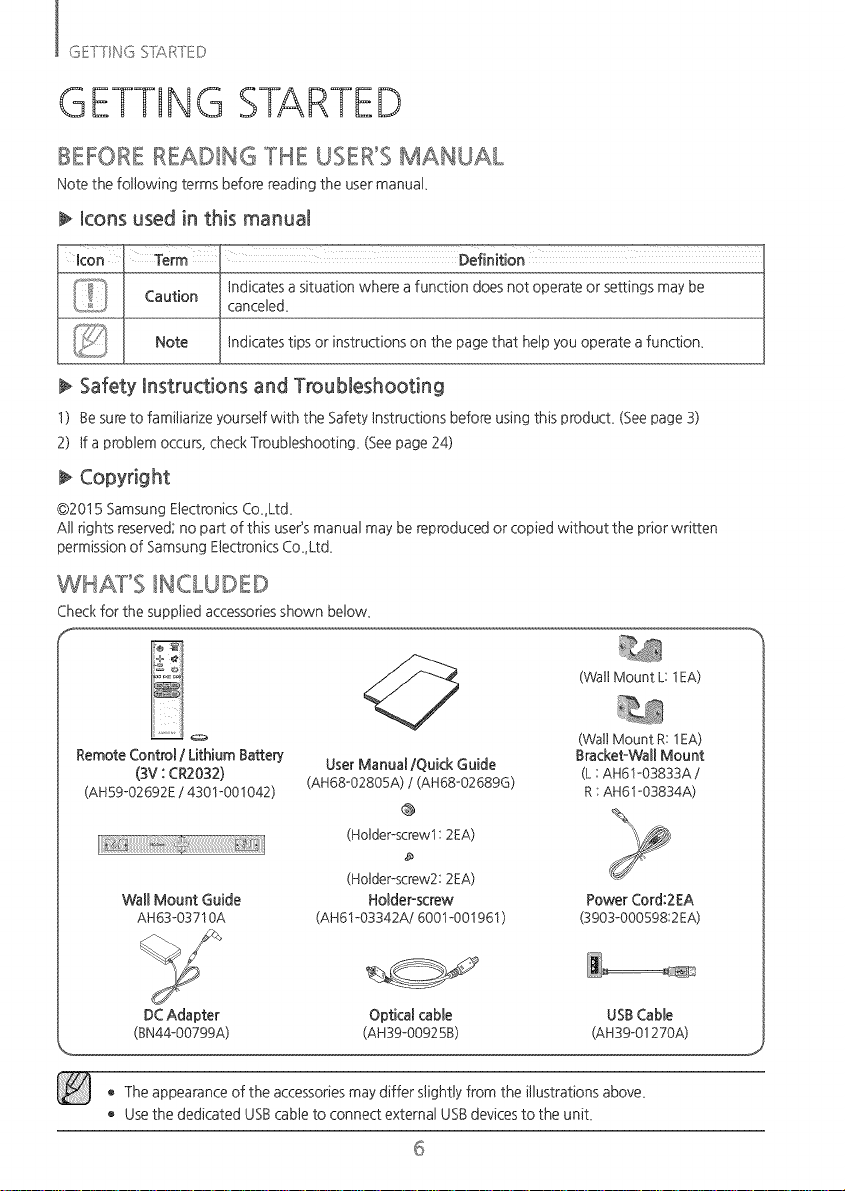
WHAT'S iNCLUDED
Checkfor the supplied accessoriesshown below.
(Wall Mount L: lEA)
(WallMount R:lEA)
Remote Control / Lithium Battery UserManual/Quick Guide Bracket-Wall Mount
(3V : CR2032) (AH68-02805A) / (AH68-02689G) (L:AH61-03833A/
(AH59-02692E/ 4301-001042) R:AH61-03834A)
Wall Mount Guide Holder-screw Power Cord:2EA
AH63-03710A (AH61-03342A/600I -00I 96I ) (3903-000598:2EA)
DCAdapter Optical cable USBCable
(BN44-00799A) (AH39-00925B) (AH39-01270A)
o The appearance of the accessoriesmay differ slightly from the illustrations above,
Use the dedicated USBcable to connect external USBdevicesto the unit,
@
(Holder-screw1: 2EA)
(Holder-screw2:2EA)
6
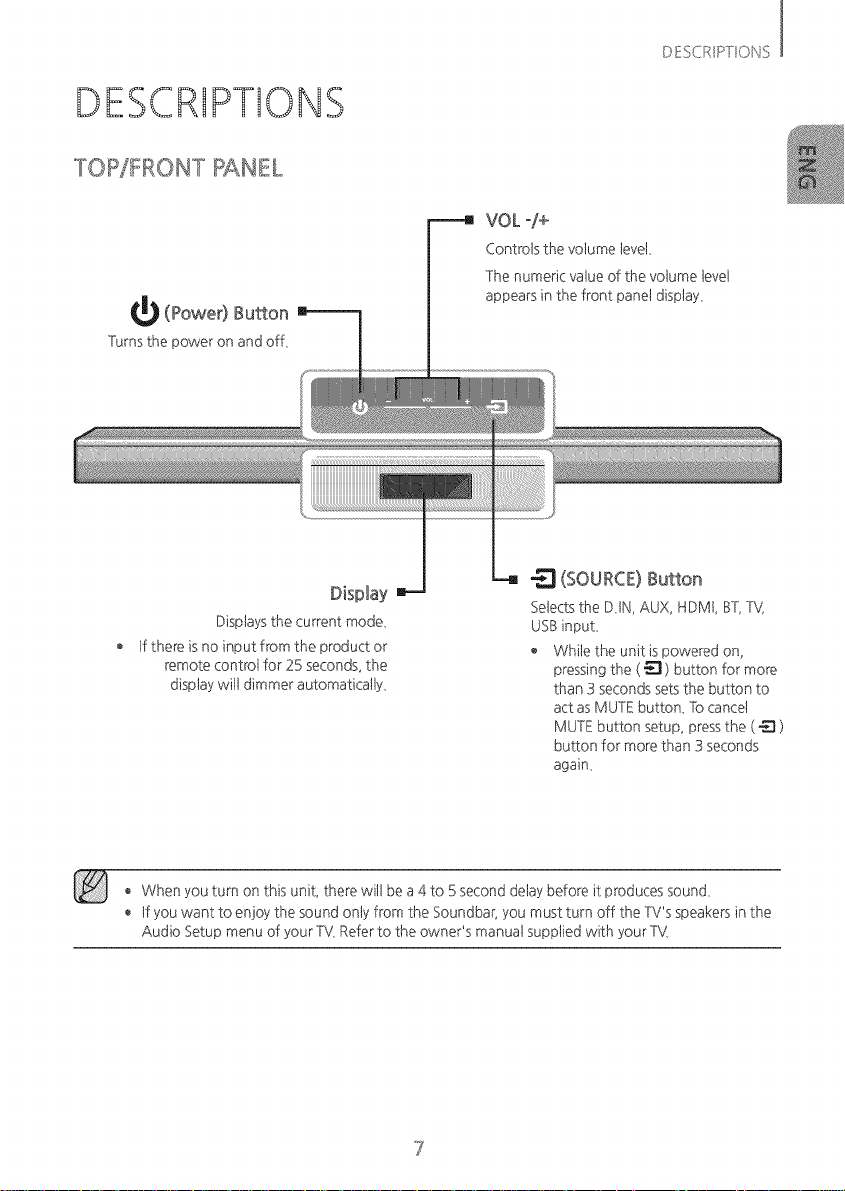
DESCRIPTIONS
TOP/FRONT PANEL
(Power) Button
Turnsthe poweron andoff,
Displaysthe current mode,
tf there is no input from the product or
remote controt for 25 seconds, the
displaywit1 dimmer automatically,
Controts the votume tevel,
The numeric vatue of the vohJme tevel
y VOL-/+
appears in the front panel display,
(SOURCE) Button
Selectsthe DiN, AUX, HDMt, BT,TV,
USBinput,
White the unit is powered on,
pressing the ( _ ) button for more
than 3 secondssets the button to
act as MUTE button_ To cancel
MUTE button setup, pressthe ( _ )
button for more than 3seconds
again,
E ONS
, When you turn on this unit, there wit1be a 4 to 5 second delaybefore it produces sound,
, tf you want to enjoy the sound only from the Soundbar, you must turn off the TV's speakers in the
Audio Setup memJof your TV,Referto the owner's mamJatsupplied with your T'_(
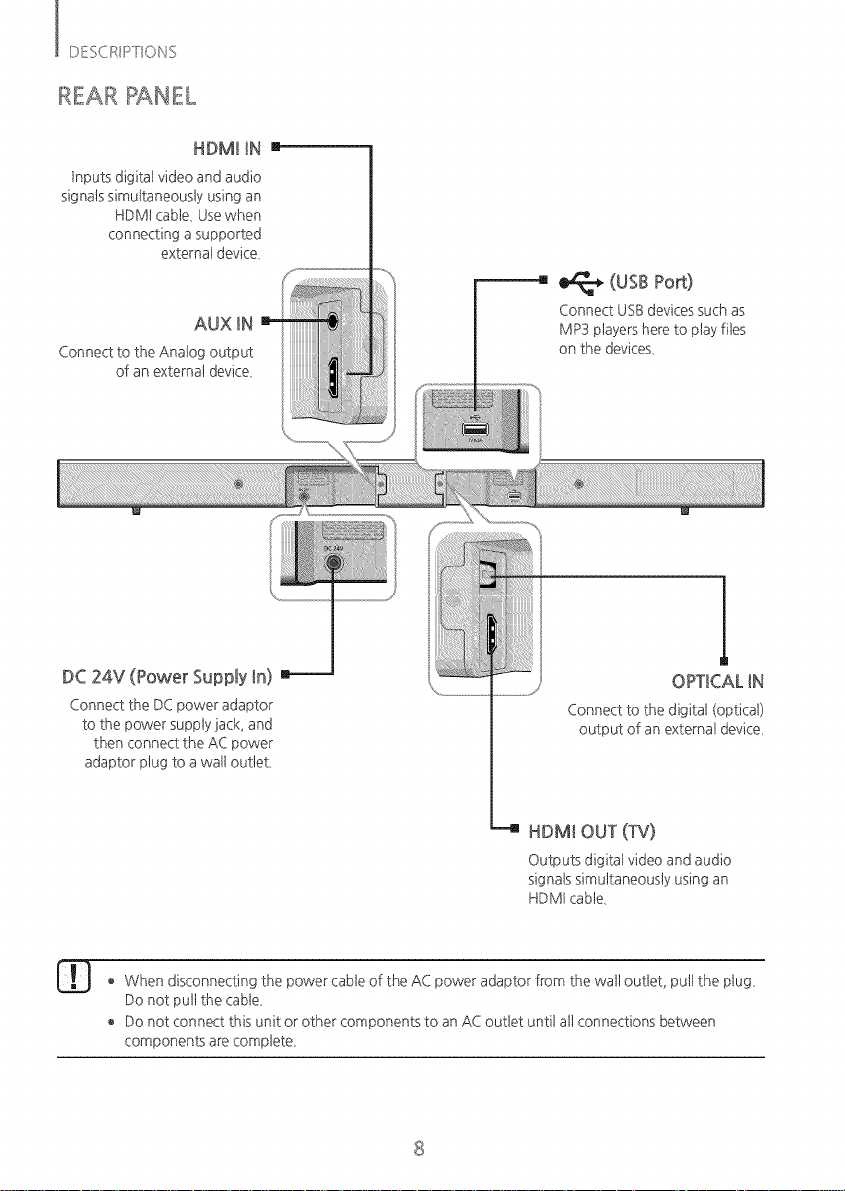
HDMI IN I
inputsdigitalvideoand audio
signalssimultaneouslyusingan
HDMI cable,Usewhen
connecting a supported
external device,
AUX IN
Connect to the Anatog output
of an externat device,
DC 24V (Power Supply In)
Connect the DCpower adaptor
to the power supply jack, and
then connect the ACpower
adaptor ph_gto a wall outlet
(usBPort)
Connect USBdevicessuch as
MP3 ptayers here to playflies
on the devices,
I|
OPTICALIN
Connect to the digital (optical)
output of an external device,
HDM[ OUT (TV)
Outputs digitat video and audio
signalssimultaneouslyusingan
HDMt cable,
@ When disconnecting the power cable of the AC power adaptor from the watt outlet, pull the plug,
Do not pull the cable,
o Do not connect this unit or other components to an AC outlet untit att connections between
components are complete,
8
REMOTE CONTROL
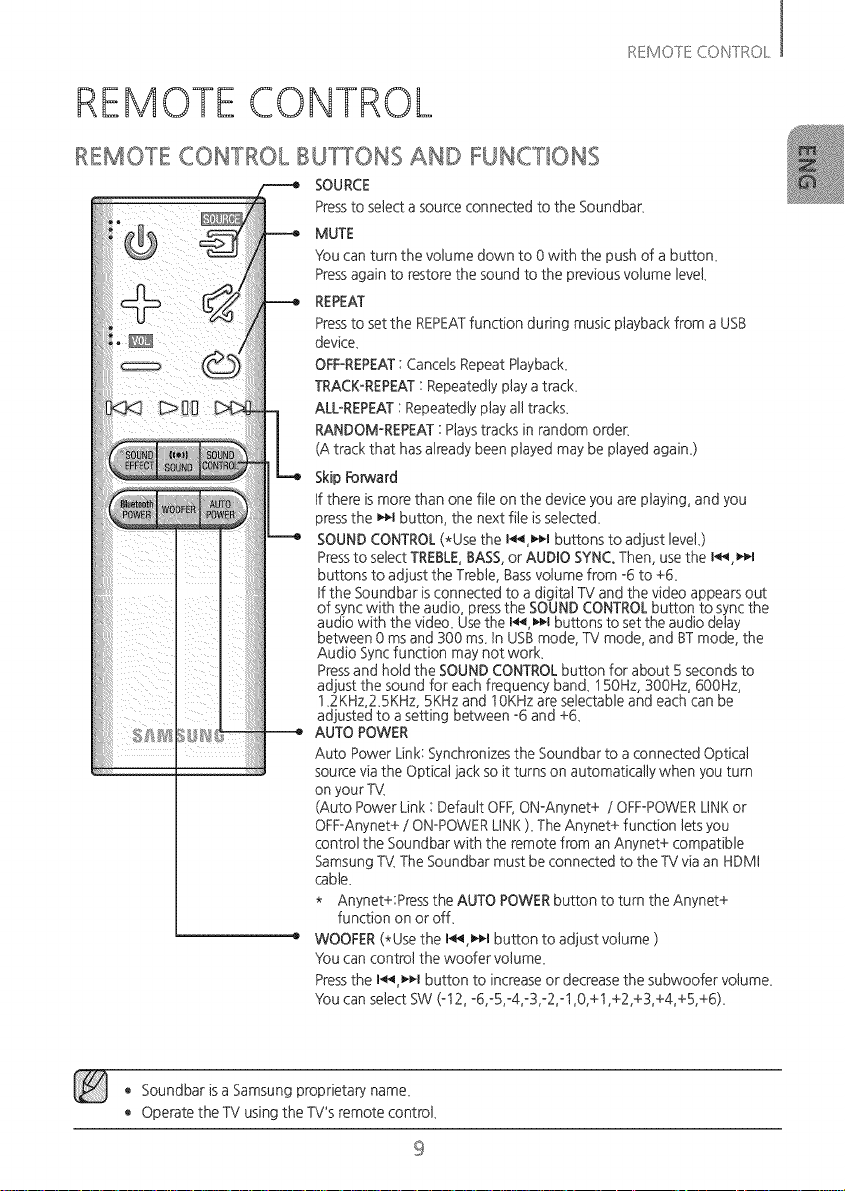
REMOTE CONTROL BUTTONS AND FUNCTIONS
SOURCE
Pressto select a source connected to the Soundbar_
MUTE
You can turn the volume down to 0 with the push of a button_
Pressagain to restore the sound to the previous volume level_
REPEAT
Pressto set the REPEATfunction during music playback from a USB
device_
OFF-REPEAT: Cancels Repeat Playback_
TRACK-REPEAT: Repeatedly playa track_
ALUREPEAT: Repeatedly play all track£
RANDOM-REPEAT: Playstracks in random order_
(Atrack that hasalready been played may be played again_)
Skip Forward
If there is more than one file on the device you are playing, and you
pressthe _1 button, the next file isselecte&
SOUNDCONTROL(*Use the I_l buttons to adjust level}
Pressto select TREBLE,BASS,or AUDIO SYNC,Then, usethe I_*1
buttons to adjust the Treble, Bassvolume from -6 to +6_
tfthe Soundbar is connected to a digital TV and the video appears out
of sync with the audio, pressthe SOUNDCONTROLbutton to sync the
audio with the video_ Usethe I_ _1 buttons to set the audio delay
between 0 ms and 300 m£ tn USBmode, TV mode, and BT mode, the
Audio Syncfunction may not work_
Pressand hold the SOUNDCONTROLbutton for about 5 seconds to
adjust the sound for each frequency ban& 150Hz, 300Hz, 600Hz,
12KHz,2_SKHz, 5KHz and 10KHzare selectable and each can be
adjusted to asetting between -6 and +6_
AUTO POWER
Auto Power Link: Synchronizesthe Soundbar to a connected Optical
source viathe Optical jack so it turns on automatically when you turn
on your TV_
(Auto Power Link : Default OFF,ON-Anynet+ / OFF@OWERLINKor
OFF-Anynet+ / ON@OWERLINK). The Anynet+ function letsyou
control the Soundbar with the remote from an Anynet+ compatible
SamsungTV.The Soundbar must be connected to the TV viaan HDMI
cable.
* Anynet+:Press the AUTO POWERbutton to turn the Anynet+
function on or of£
WOOFER (*Use the I_l button to adjust volume )
You can control the woofer volume.
Pressthe I_ _1 button to increase or decrease the subwoofer volume.
You can select SW (-12, -6,-5,-4,-3,-2,q ,0,+1,+2,+3,+4,+5,+6).
/:</-!lVdT/:!Cd NTI:_d:L
o Soundbar isa Samsung proprietary name_
o Operate the TV using the TV's remote controk
9
 Loading...