

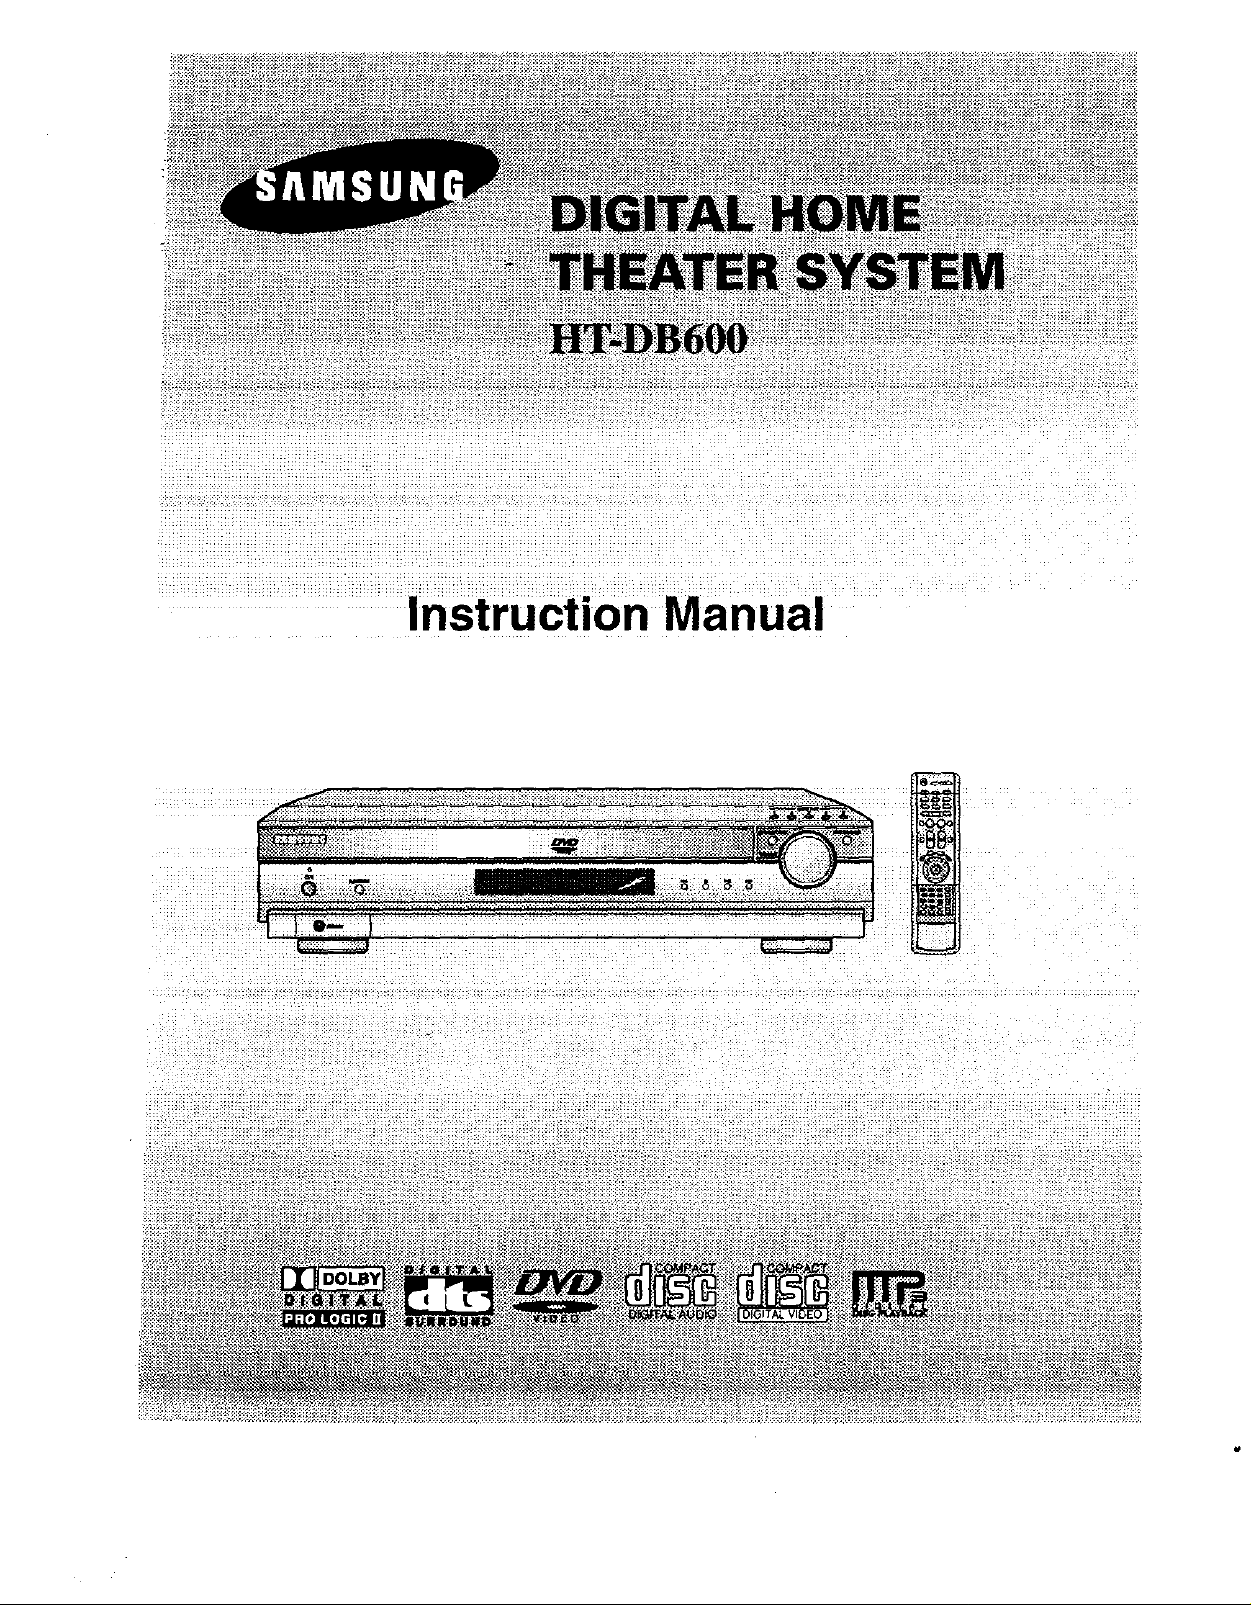
Samsung HT-DB600 Owner’s Manual

Warnings
CLASS 1 LASER PRODUCT
KLASSE1 LASER PRODUKT
LUOKAN 1 LASER LAITE
KLASS 1 LASER APPARAT
PRODUCTO LASER CLASE 1
CAUTION:
TO REDUCE THE RISK OF ELECTRIC
SHOCK, DO NOT REMOVE REAR COVER.
NO USER SERVICEABLE PARTS INSIDE.
REFER SERVICING TO QUALIFIED
SERVICE PERSONNEL,
Note to CATV system installer :
This reminder is provided to call the CATV system
installer's attention to Section 820~40 of the NEC
which provides guidelines for proper grounding and,
in particular, specifies that the cable ground shall be
connected to the grounding system of the building,
as close to the point of cable entry as practical
CLASS 1 LASER PRODUCT
This Compact Discplayeris classified as aCLASS 1
LASERproduct.
Use of controls, adjustments or performance of
procedures other than those specified herein may result
in hazardous radiation exposure.
CAUTION-INVISIBLE LASER RADIATION WHEN OPEN
AND INTERLOCKS DEFEATED, AVOID
EXPOSURE TO BEAM.
Ensure that the AC power supply in your house complies with the identification sticker located on the back of your player. Install your
player horizontally, on a suitable base (furniture), with enough space around itforventilation (3~4inches). Make sure the ventilation slots
are not covered. Do not stackanything on topof the player. Do not placethe player on amplifiers orother equipment which may become
hot. Before moving the player, ensure the disc tray is empty. This player is designed for continuous use, Switching off the DVD player to
the stand-by mode does not disconnect the electrical supply, In order to disconnect the player completely from the powersupply,
remove the main plugfrom the wall outlet, especially when left unused fora long period of time.
Iii
i I
This symbol indicates thatdangerous voltage which can cause electric shock is present inside
this unit.
This symbol alerts you to important operating and maintenance instructions accompanying
the unit.
WARNING: To reduce the risk of fire or electric shock, do notexpose thisapplianceto rainor moisture.
CAUTION: TO PREVENT ELECTRIC SHOCK, MATCH WIDE BLADEOF PLUG TO WIDE SLOT, FULLY
INSERT.
Duringthunderstorms, disconnect AC main plugfrom the
wall ouUet.
Voltage peaks due to lightning could damage the unit.
Protecttheplayerfrommoist_re(Le,vases), end excess
heet(e.g.fireplace)or equipmentcreatingstrongmagneticor electric
fields (Le.speakers..<)<Disconnectthe powercablefromthe ACsupply
the playermalfunctions.Yourplayerisnotintendedforindustrialuse.
Useof this productisfor personaluseonly.
Condensationmayoccurifyourplayerordischavebeenstoredincold
temperatures.
Iftransportingtheplayerdudngthewinter,waitapproximately2 hours
untiltheunithasreachedroomtemperaturebeforeusing.
Do notexpose the unit to direct sunlight or other heat
sources.
This could lead to overheating and malfunction of the unit.
The battery used with this product contain chemicals that
are harmful to the environment.
Do notdispose of batteries in the general household trash.
Instructions
READ INSTRUCTIONS
All the safety and operating instructions should be
read before the appliance is operated.
RETAIN INSTRUCTIONS
The safety and operating instructions should be
retained for future reference.
HEED WARNINGS
All warnings on the appliance and in the operating
instructions should be adhered to.
FOLLOW INSTRUCTIONS
All operating and use instructions should be
followed.
WATER AND MOISTURE
DO not use this video product near water-
forexample, near a bathtub, wash bowl,
kitchen sink, or laundry tub, in a wet basement,
or near a swimming pool, and the like.
OVERLOADING
Do not overload wall outlets and extension cords as
this can result in the risk of fire
or electric shock.
VENTILATION
Slots and openings in the cabinet are provided
for ventilation and to ensure reliable operation of the
video product and to protect it from overheating
these openings must not be blocked or covered.
The openings should never be blocked
by placing the video product on a bed, sofa, rug, or
other similar surface. This video product
should never be placed near or over a radiator or
heat register.
This video product should not be placed
in a built-in installation such as a bookcase
or rack unless proper ventilation is provided
or the manufacturer's instructions have been
followed.
POWER CORD PROTECTION
Power-supply cords should be routed so that
they are not likely to be walked on or pinched
by items placed upon or against them paying
particular attention to cords at plugs,
convenience receptacles, and the point where
they exit from the appliance.
CLEANING
Unplug this video product from the wall outlet
before cleaning. Do not use liquid cleaners
or aerosolcleaners. Usea damp cloth for cleaning.
LIGHTNING
For added protection of this video product
receiver during a lightning storm, or when
it is left unattended and unused for long
periods of time, unplug it from the wall outlet
and disconnect the antenna or cable system.
This will prevent damage to the video product
due to lightning and power-line surges.
OBJECT AND LIQUID ENTRY
Never push objects of any kind into this
product through openings as they may touch
dangerous voltage points or shod-out parts
that could result in a fire or electric shock.
Never spill liquid of any kind on the video
product.
ACCESSORIES
Do not place this video product on an unstable cart,
stand, tripod, bracket, or table.
The video product may fall, causing serious injury to
a child or adult, and serious damage
to the appliance.
Use only with a cart, stand, tripod, bracket,
or table recommended by the manufacturer,
or sold with the video product. Any mounting
of the appliance should follow the manufacturer's
instructions and should use a mounting accessory
recommended by the manufacturer.
CART
An appliance and cart combination should be moved
with care. Quick stops, excessive force, and uneven
surfaces may cause the appliance and cart
combination to overturn.
POWER SOURCES
This video product should be operated only from the
type of power source indicated
on the marking label. If you are not sure
of the type of supply to your home, consult your
appliance dealer or local power company.
For video products intended to be operated from
battery power, or other sources, refer
to the operating instructions.
POWER LINES
An outside antenna system should not be located in
the vicinity of overhead power lines or other electric
light or power circuits,
or where it can fall into such power lines
or circuits. When installing an outside antenna
system, extreme care should be taken to keep from
touching such power lines or circuits as contact with
them might be fatal.
POLARIZATION
This video product is equipped with a polarized
alternating current line plug (a plug having one blade
wider than the other.) This plug will fit into the power
outlet only one way.
This is a safety feature. Ifyou are unable
to insert the plug fully into the outlet, try reversing the
plug. If the plug should still fail to fit, contact your
electrician to replace your obsolete outlet. Do not
defeat the safety purpose of the polarized plug.
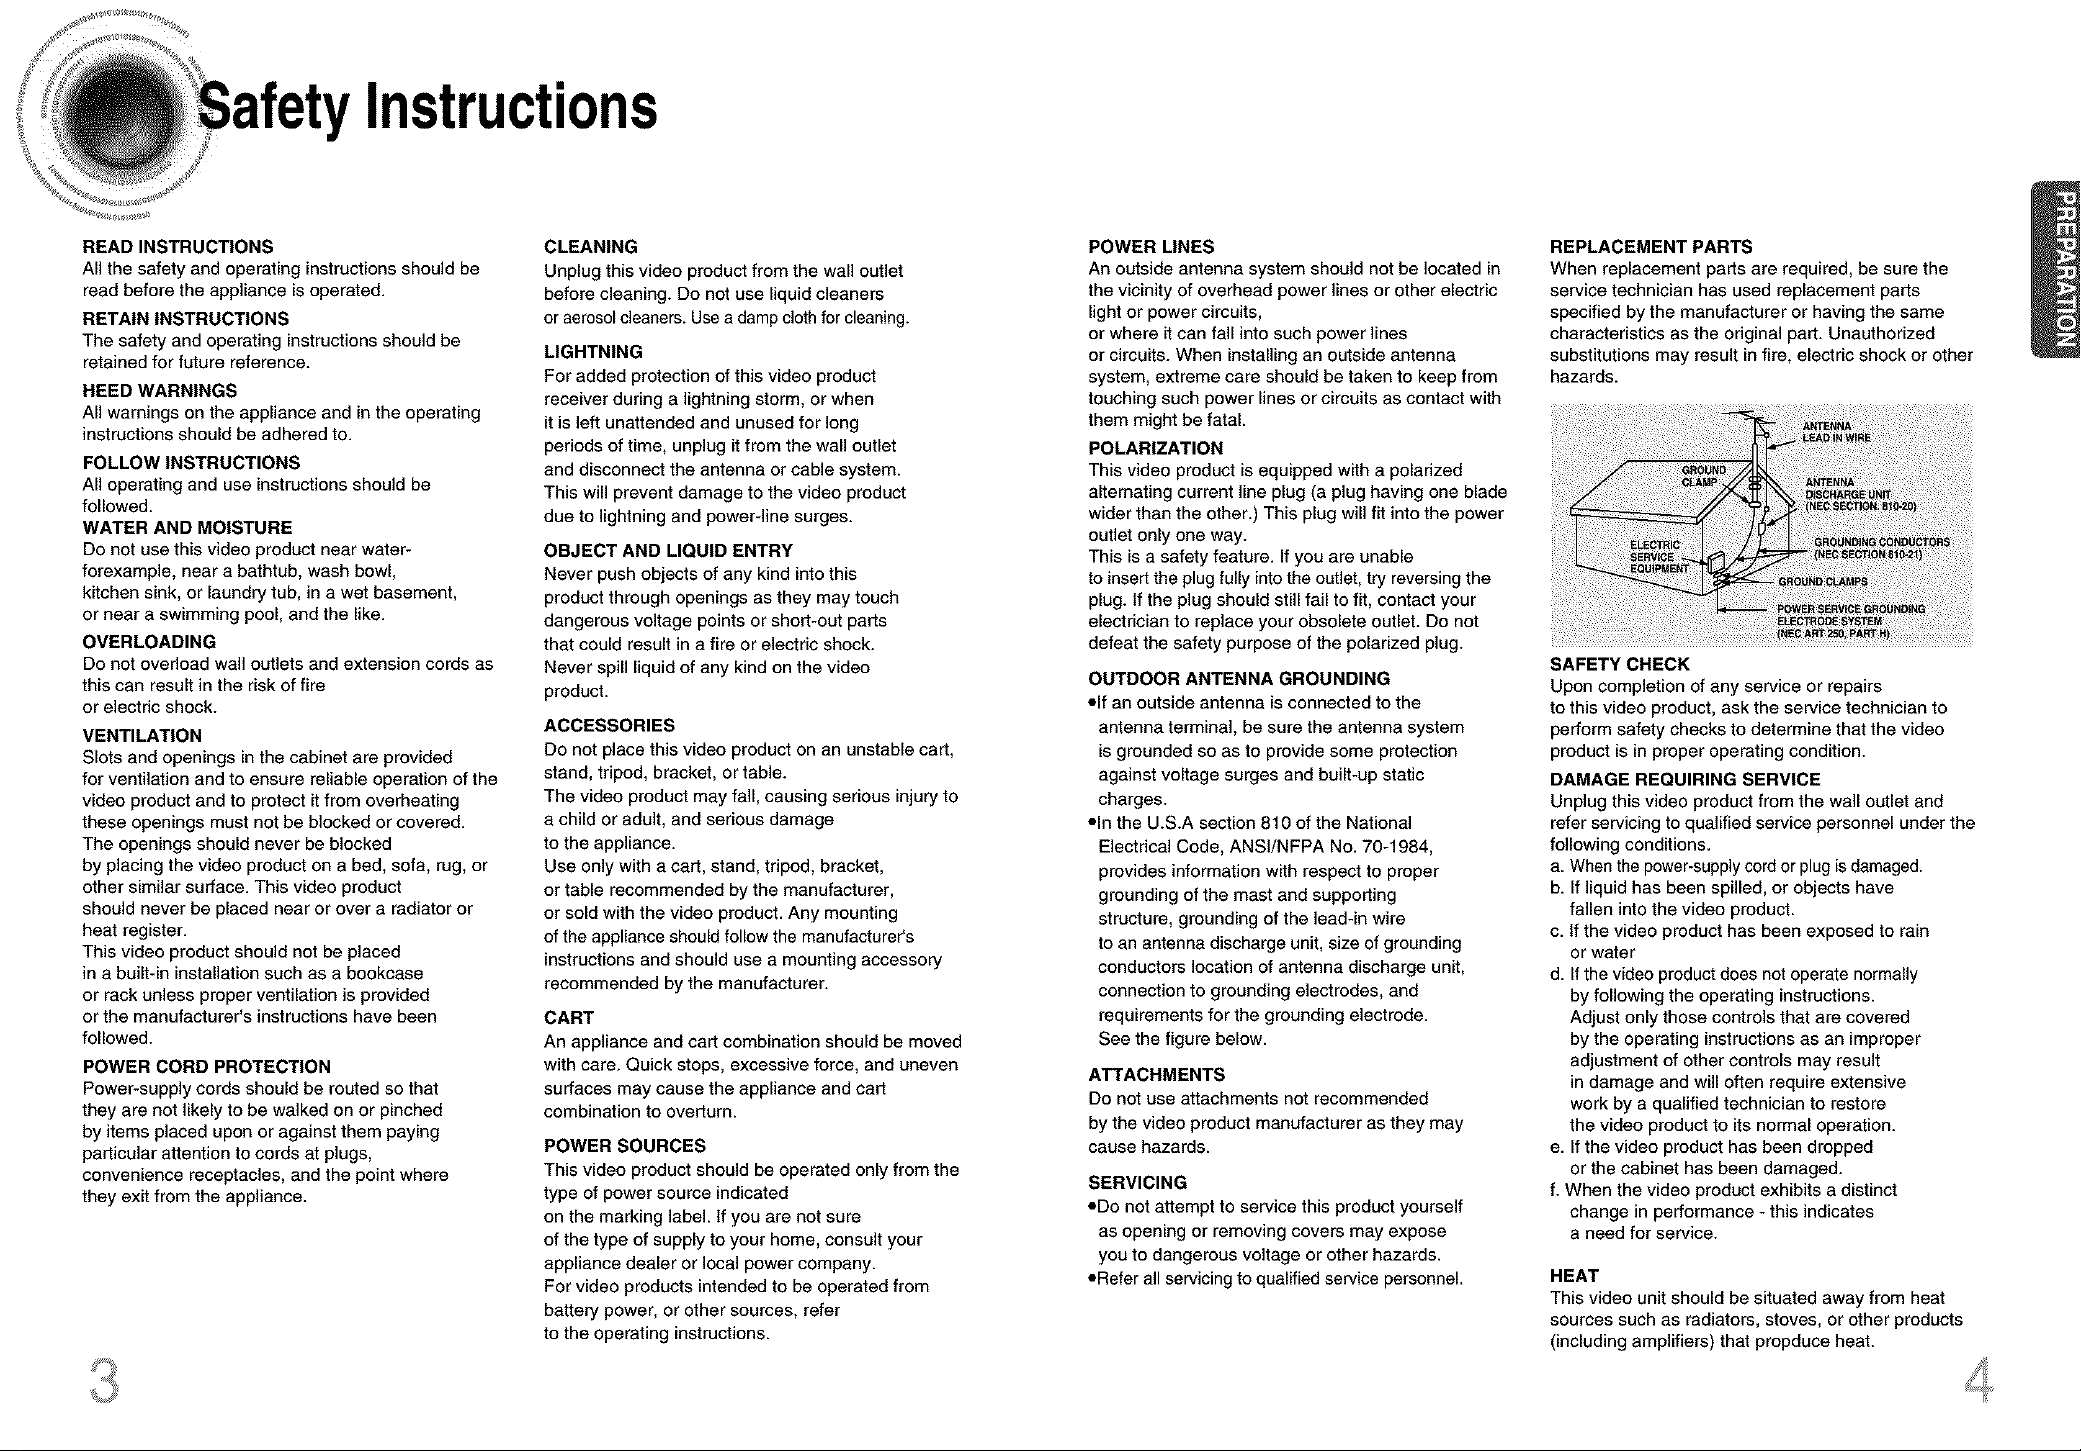
OUTDOOR ANTENNA GROUNDING
olf an outside antenna is connected to the
antenna terminal, be sure the antenna system
is grounded so as to provide some protection
against voltage surges and built-up static
charges.
oln the U.S.A section 810 of the National
Electrical Code, ANSI/NFPA No. 70-1984,
provides information with respect to proper
grounding of the mast and supporting
structure, grounding of the lead-in wire
to an antenna discharge unit, size of grounding
conductors location of antenna discharge unit,
connection to grounding electrodes, and
requirements for the grounding electrode.
See the figure below.
ATTACHMENTS
Do not use attachments not recommended
by the video product manufacturer as they may
cause hazards.
SERVICING
oDo not attempt to service this product yourself
as opening or removing covers may expose
you to dangerous voltage or other hazards.
oRefer all servicing to qualified service personnel.
REPLACEMENT PARTS
When replacement parts are required, be sure the
service technician has used replacement parts
specified by the manufacturer or having the same
characteristics as the original part. Unauthorized
substitutions may result in fire, electric shock or other
hazards.
SAFETY CHECK
Upon completion of any service or repairs
to this video product, ask the service technician to
perform safety checks to determine that the video
product is in proper operating condition.
DAMAGE REQUIRING SERVICE
Unplug this video product from the wall outlet and
refer servicing to qualified service personnel under the
following conditions.
a. Whenthe power-supply cordor plug is damaged.
b. If liquid has been spilled, or objects have
fallen into the video product.
c. If the video product has been exposed to rain
or water
d. If the video product does not operate normally
by following the operating instructions.
Adjust only those controls that are covered
by the operating instructions as an improper
adjustment of other controls may result
in damage and will often require extensive
work by a qualified technician to restore
the video product 1oits normal operation.
e. If the video product has been dropped
or the cabinet has been damaged.
f. When the video product exhibits a distinct
change in performance - this indicates
a need for service.
HEAT
This video unit should be situated away from heat
sources such as radiators, stoves, or other products
(including amplifiers) that propduce heat.
OMulti-Disc Playback & AM/FM Tuner
The HT-DB600combinestheconvenienceofmulti-disc
includingDVD,VCD,CD, MP3-CD
sophisticatedAM/FM tuner,all in a singleplayer.
<,,,_Built-in5.1-Channel Amplifier
....... @
!!i Safel
The HT-DB600 comes with a bun
-channel amplifier,
allowing you to enjoy
Dolby Pro Logic II ::
Dolby Pro Logic II is a new fo£r
signal decoding technology tha
Dolby Pro Logic.
0 DTS (Digital Theater
DTS isan audio compression
Systems Inc. Itdelivers full-free
,,nei
}0_ existidg
ped by Digital Theater
annel sound.
OTV Screen Saver Function
The HT-DB600 automatically brightens and darkens the brightness of
the TV screen after 2 minutes in the stop or pause mode,
The HT-DB600 automatically switches itself intothe power saving mode
after 20 minutes in the screen saver mode.
C_Power Saving Function
The HT-DB600automaticallyshuts itselfoffafter20 minutes
in the stop or pause mode.
...................................... 24
26
.......................................... 29
..................................... 30
......31
32
33
34
............................... 35
38
................................................................................................................................. 39
TV Screen type................................................................................................................................................... 41
Setting Parental Cont[ols (Rating Leve ............................................................................................................................ 43
Setting the Password .......................................................................................................................................................... _.5
Setting the Wallpaper.......................................................................................................................................................... 47
Setting the Speaker Mode .................................................................................................................................................. 49
Setting the Test Tone.......................................................................................................................................................... 50
Setting the Delay Time ........................................................................................................................................................ 51
Settingthe Audio Quality........................................................................................................................................................................53
Setting the DRC (Dynamic Range Compression) ............................................................................................................... 55
Sound Field(DSP)/EQ Function ......................................................................................................................................... 56
Selby Pro Logic II Mode...................................................................................................................................................... 57
Selby Pro Logic II Effect ..................................................................................................................................................... 58
_o,,Customized TV Screen Display
The HT-DB600 allows you to select your favorite image during JPEG,
DVD, or VCD playback and set it as your background wallpaper.
......Listening to Radio ............................................................................................................................................................... 59
Prese_ing Stations .............................................................................................................................................................. 60
Convenient Functions ......................................................................................................................................................... 61
Operating the TV with the Remote Control ......................................................................................................................... 63
Before Calling for Service................................................................................................................................................... 65
Cautions on Handling and Storing Discs ............................................................................................................................ 67
Specifications ...................................................................................................................................................................... 68
Notes on Terminology ......................................................................................................................................................... 69
Warranty ............................................................................................................................................................................. 70
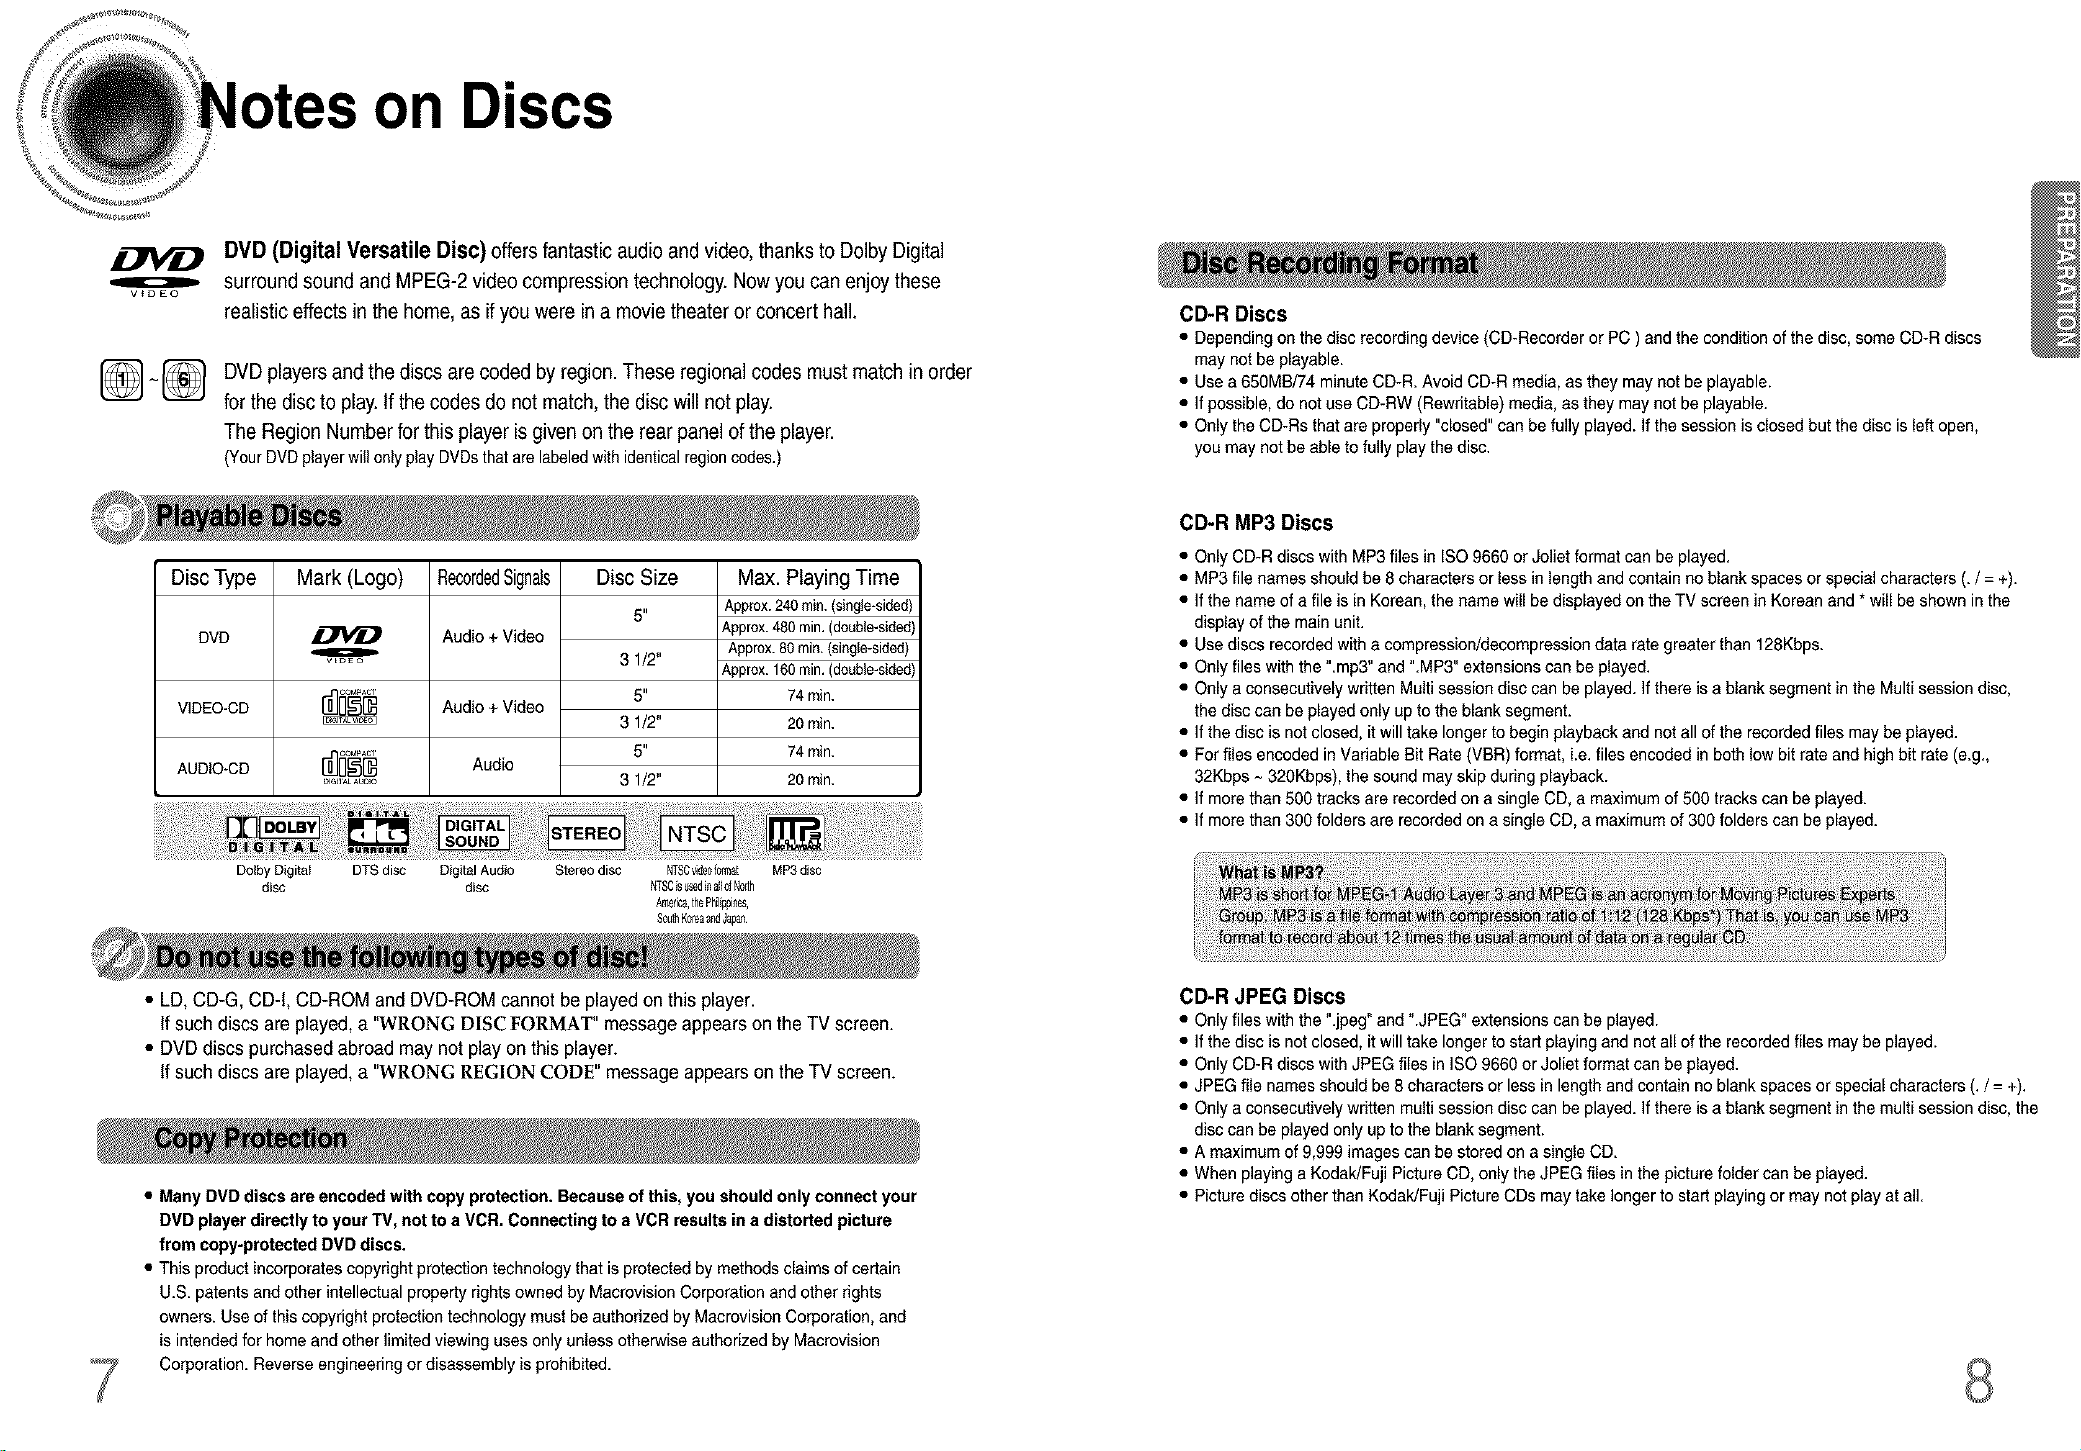
on Discs
DVD (Digital Versatile Disc) offers fantastic audio and video,thanks to Dolby Digital
o
V_DEO
[_ ~_] DVD playersand the discs are coded by region. These regional codes must match in order
surround sound and MPEG-2 video compression technology. Now you can enjoy these
realistic effects in the home, as ifyou were in a movie theater or concert hall.
for the discto play.If the codes do not match, the disc will not play.
The Region Number for this playeris given on the rear panel of the player.
(YourDVDplayerwil only play DVDsthatarelabeledwithidenticalregioncodes.)
CD-R Discs
• Depending on the disc recording device (CD-Recorder or PC ) and the condition of the disc, some CD-R discs
may not be playable.
• Use a 650MB/74 minute CD-R. Avoid CD-R media, as they maynot be playable.
• If possible, do not use CD-RW (Rewritable) media,as they maynot be playable.
• Only the CD-Rs that are properly "closed" can be fully played. Ifthe session is closed but the disc is left open,
you may notbe able to fully play the disc.
CD-R MP3 Discs
Disc Type
DVD
VIDEO-CD
AUDIO*CD
Dolby Digital DTS disc Digital Audio Stereo disc NTSOvi@010rmat MP3disc
Mark (Logo)
O
w_Eo
_I_I_AL AUO_O
disc disc NTSCisusedi_a_loiNorth
RecordedSignals
Audio+Video
Audio + Video
Audio
Disc Size
6"
3 1/2"
6 ,I
31/2"
6"
31/2"
America,thePhilippine,
S0ut_Korea_ndJa0an
Max. Playing Time
Approx.240min.(single-sided)
Approx.480min.(double-sided)
Approx.80min.(single-sided)
Approx.160min.(double-sided)
74min.
20 min.
74 min.
20 min.
• LD,CD-G, CD-I, CD-ROM and DVD-ROM cannot be played on this player.
If such discs are played,a "WRONG DISC FORMAT" message appears on the TV screen.
• DVDdiscs purchased abroad may not play on this player.
If such discs are played,a "WRONG REGION CODE" message appearson the TV screen.
• Many DVD discsare encoded with copy protection. Because of this, you should only connect your
DVD player directly to your TV, not to a VCR. Connecting to a VCR results in a distorted picture
from copy-protected DVD discs.
• This product incorporates copyright protection technology that is protected by methods claims of certain
U.S. patents and other intellectual property rights owned by Macrovision Corporation and other rights
owners. Use of thiscopyright protection technology must beauthorized by Macrovision Corporation, and
is intendedfor home and otherlimited viewing uses only unlessotherwise authorized by Macrovision
Corporation. Reverse engineering or disassembly is prohibited.
• Only CD-R discs with MP3files in ISO 9660 or Joliet format can be played.
• MP3 file names should be 8 characters or less in length and contain no blank spaces or special characters (. / = +).
• If the name of a file is in Korean, the name will be displayed on the TVscreen in Korean and *will be shown in the
display of the main unit.
• Use discs recorded with acompression/decompression data rate greater than 128Kbps.
• Only files with the ".mp3" and ".MP3" extensions canbe played.
• Only a consecutively written Multisession disc can be played. If there is a blank segment inthe Multi session disc,
the disc can be played only up to theblank segment.
• If the disc is not closed, it will take longerto begin playback and not all of the recorded files may be played.
• For files encoded in Vadable BitRate (VBR) format, i.e. files encoded in both lowbit rate and highbit rate (e.g.,
32Kbps ~ 320Kbps), the sound may skip during playback.
• If morethan 500 tracks are recorded on a single CD, a maximum of 500 tracks can be played.
• If morethan 300 folders are recordedon asingle CD, a maximum of 300 folders can be played.
CD-R JPEG Discs
• Only files with the".jpeg" and ".JPEG" extensions can be played.
• If the disc is not closed, it will take longerto start playing and not all of the recorded files maybe played.
• Only CD-R discs with JPEG files in ISO 9660 or Joliet format can be played.
• JPEG file names should be 6 characters or less in length and contain no blank spaces or special characters (. / = +).
• Only a consecutively written multisession disc can be played. If there is a blank segment inthe multi session disc, the
disc can be played only up to the blanksegment.
• A maximum of 9,999 images can be stored on a single CD.
• When playing a Kodak/Fuji PictureCD, only theJPEG files in the picture folder can be played.
• Picture discs other than Kodak/Fuji Picture CDs may take longer to start playing or may not play at all.
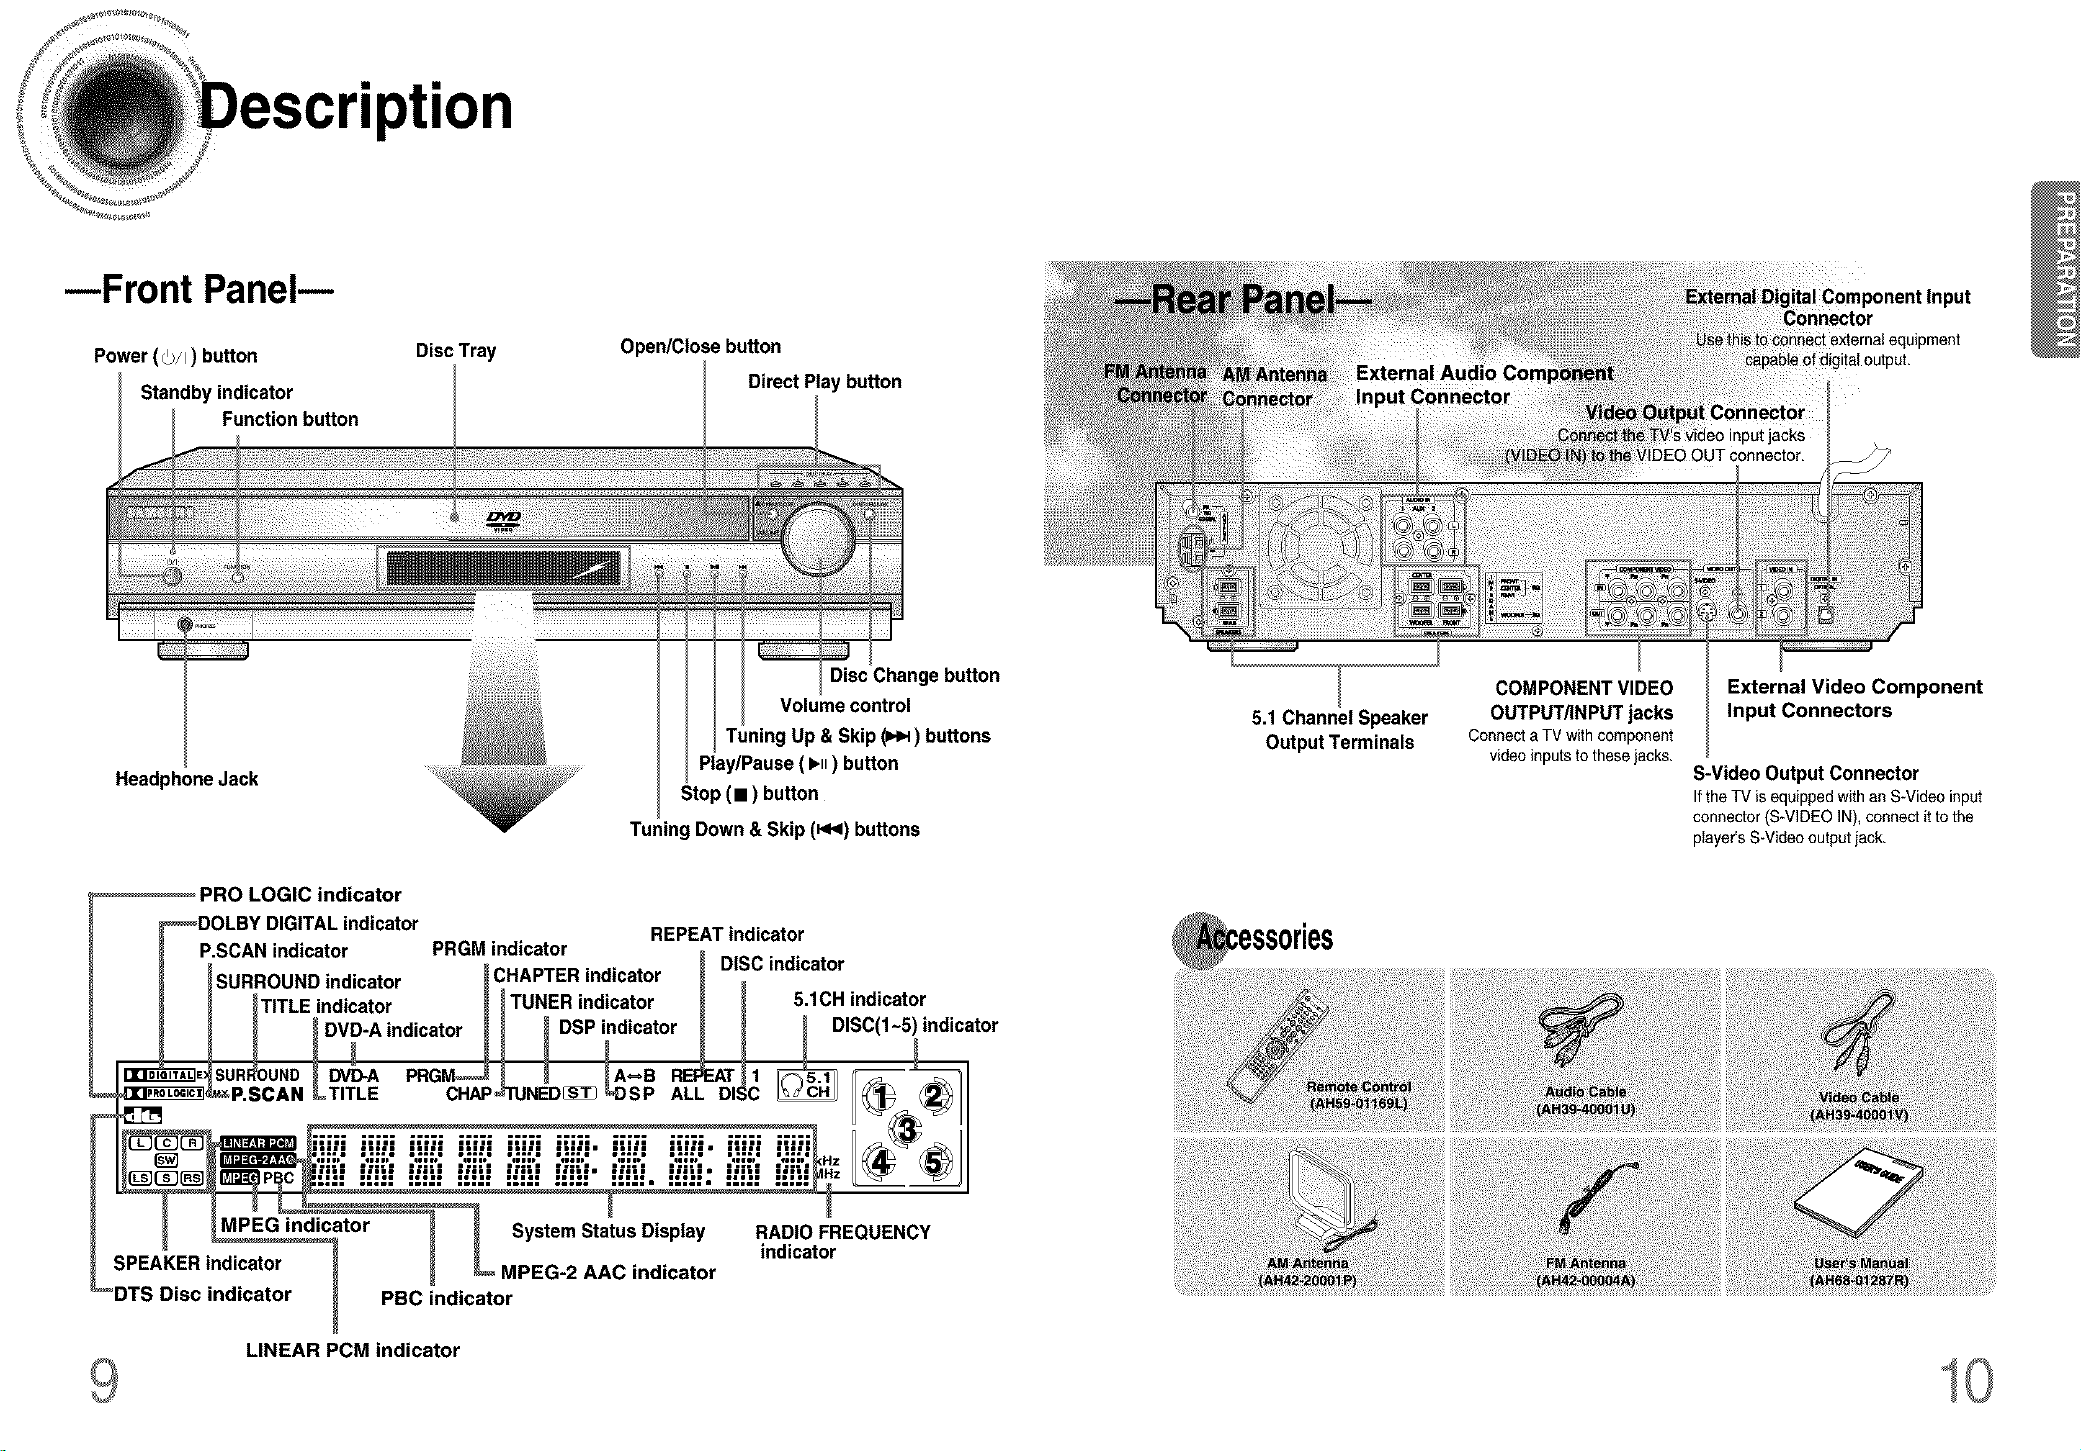
--Front Panel--
Component Input
Power (_/I) button
Standby indicator
Function button
Headphone Jack
PRO LOGIC indicator
DiscTray
Open/Close button
Direct Play button
Disc Change button
Volume control
Tuning Up & Skip (_) buttons
Play/Pause ( I_ll) button
Stop (m) button
Tuning Down & Skip (_4<)buttons
5.1 Channel Speaker
Output Terminals
COMPONENT VIDEO
OUTPUT/INPUT jacks
Connecte TV with component
video inputstothesejacks,
External Video Component
Input Connectors
S-Video Output Connector
Ifthe TV isequippedwithan S-Videoinput
connector(S-VIDEOIN),connectit tothe
player'sS-Videooutput iack,
_DOLBY DIGITAL indicator REPEAT indicator
P.SCAN indicator PRGM indicator o
SURROUND indicator _t;NAeP'H malcator _
I _TITLE indicator _ ITUNER indicator _ _ 5.1CH indicator
_ _DVD-A indicator H _ DSP indicator _ _ _ DISC(I-5)indicator
__ Sattus Display RADIO FREQUENCY
.... _....... _ _ _ indicator
_ indicator ........
DTS Disc indicator PBC indicator
LINEAR PCM indicator
_........... _ DISC indicator
a%
10
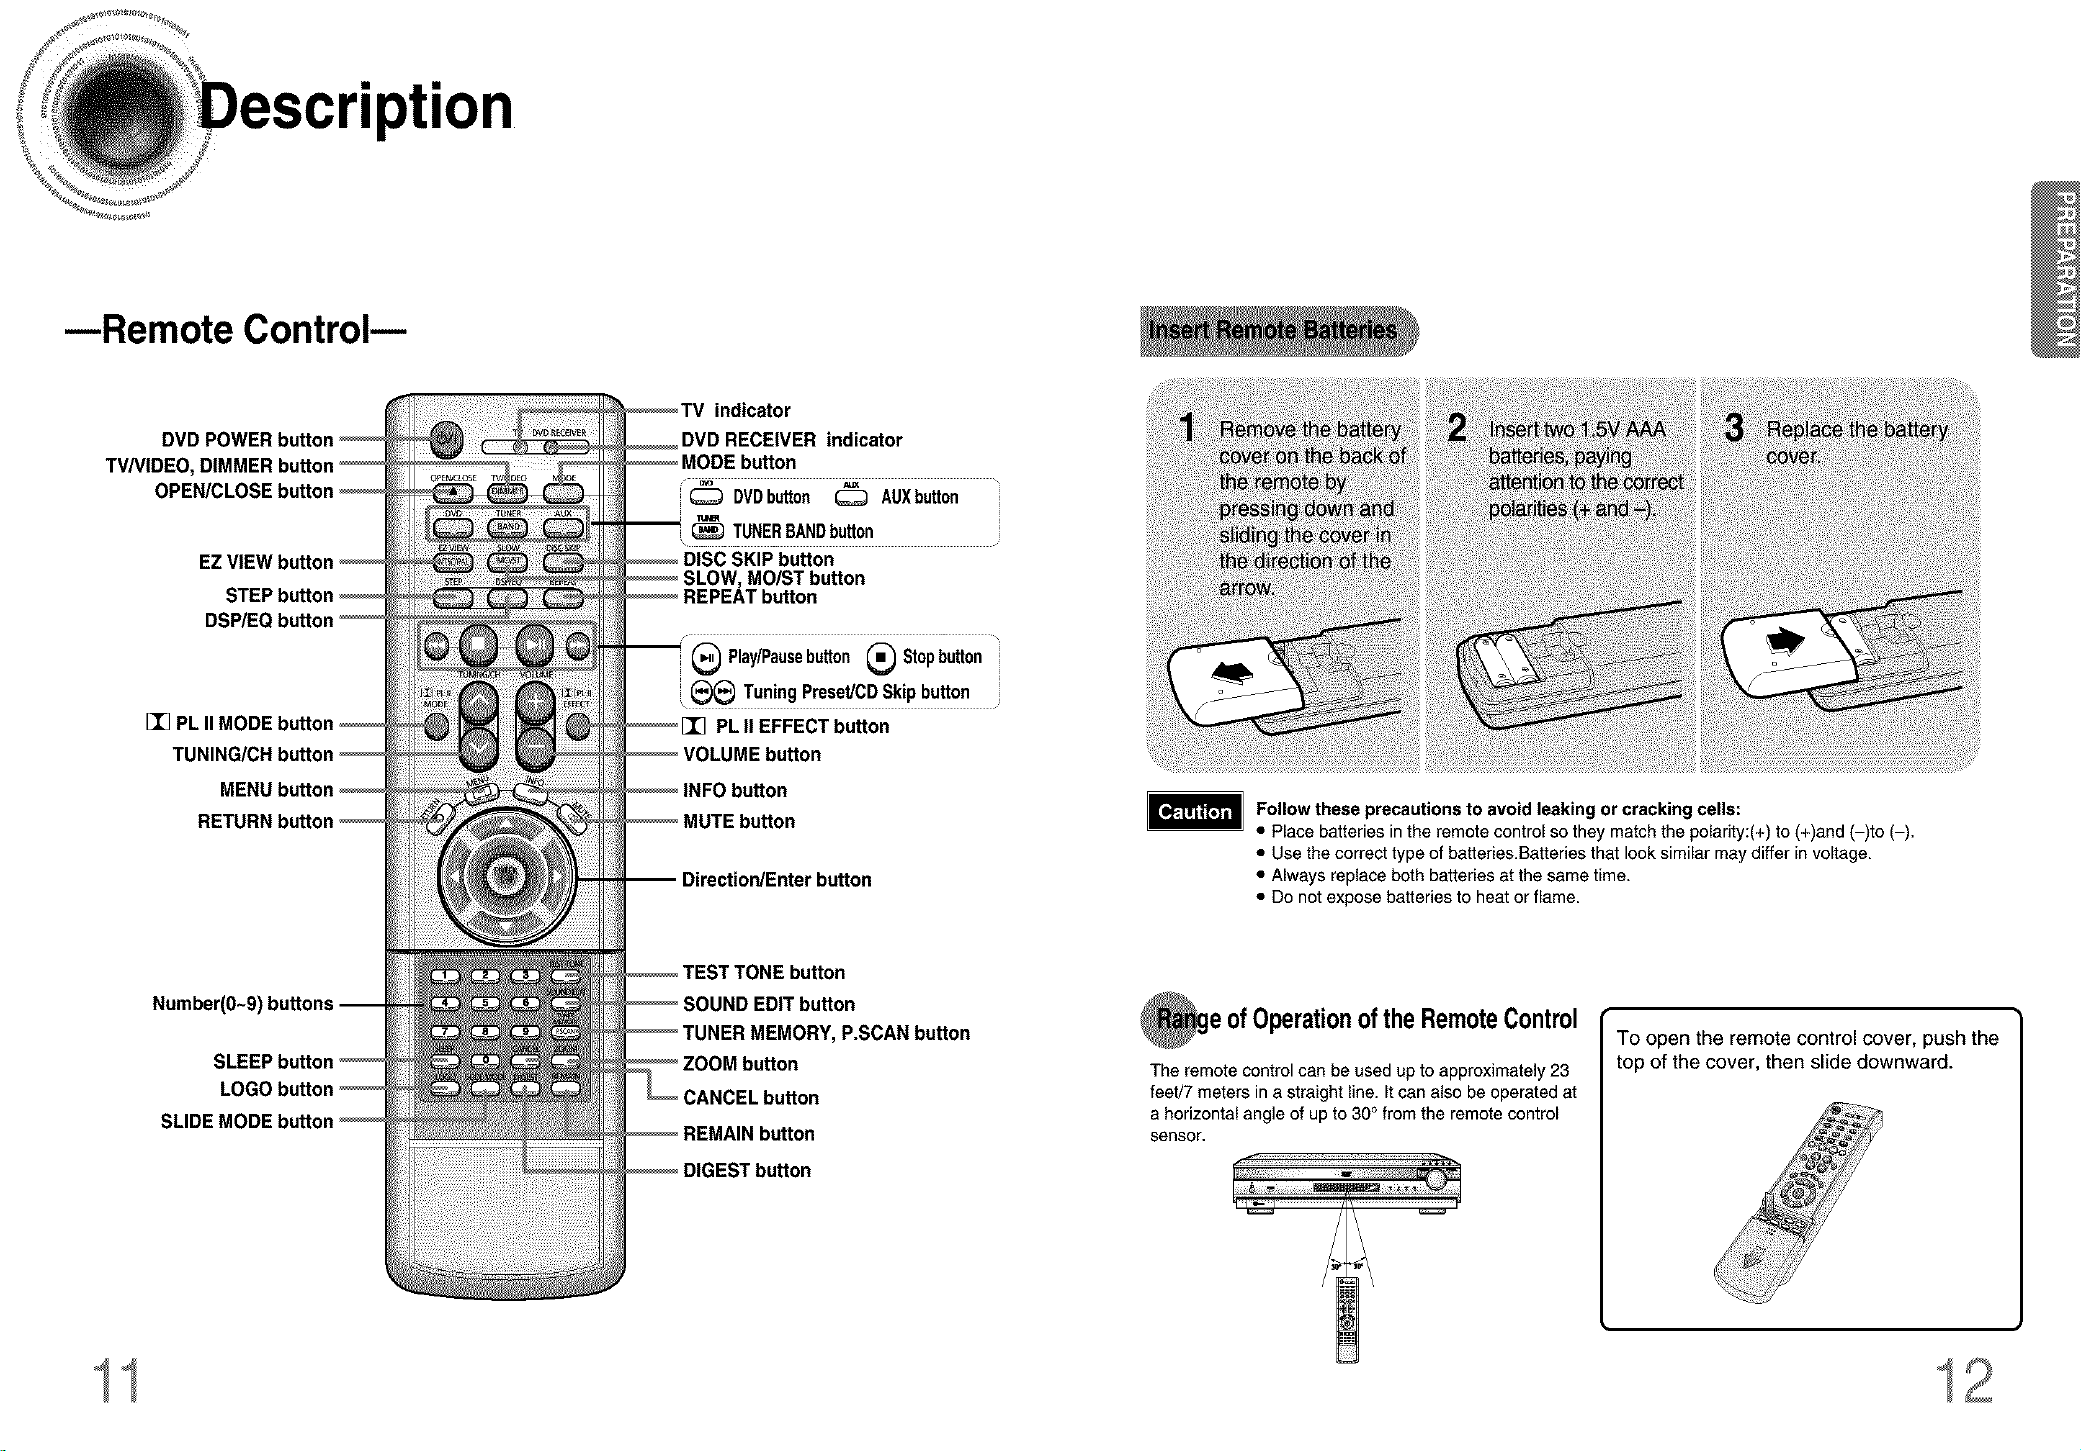
--Remote Control--
DVD POWER button
TV/VIDEO, DIMMER bu
EZ VIEW [
I_ PL II
indicator
DVD RECEIVER indicator
DVDbutton _ AUXbutton
TUNERBANDbutton
\
SKIP button
MOIST button
/ •
(_ Play/Pausebutton _ Stopbutton
, (_ Tuning Preset/CD Skip button
PL II EFFECT button
MENt
Number(O~9)
SLIDE
button
ection/Enter button
button
INDEDIT button
INER MEMORY, P.SCAN button
Follow these precautions to avoid leaking or cracking cells:
• Place batteries in the remote controlso they match the polarity:(+) to (+)and (-)to (-).
• Use the correcttype ofbatteries.Batteries that looksimilar may differinvoltage.
• Always replace both battedes at the same time.
• Do not expose batteries to heat or flame.
ofOperationoftheRemoteControl
The remote control can be used up to approximately 23
feet/7 meters in a straight line, It can also be operated at
a horizontal angle of up to 30° from the remote control
sensor.
To open the remote control cover, push the
top of the cover, then slide downward.
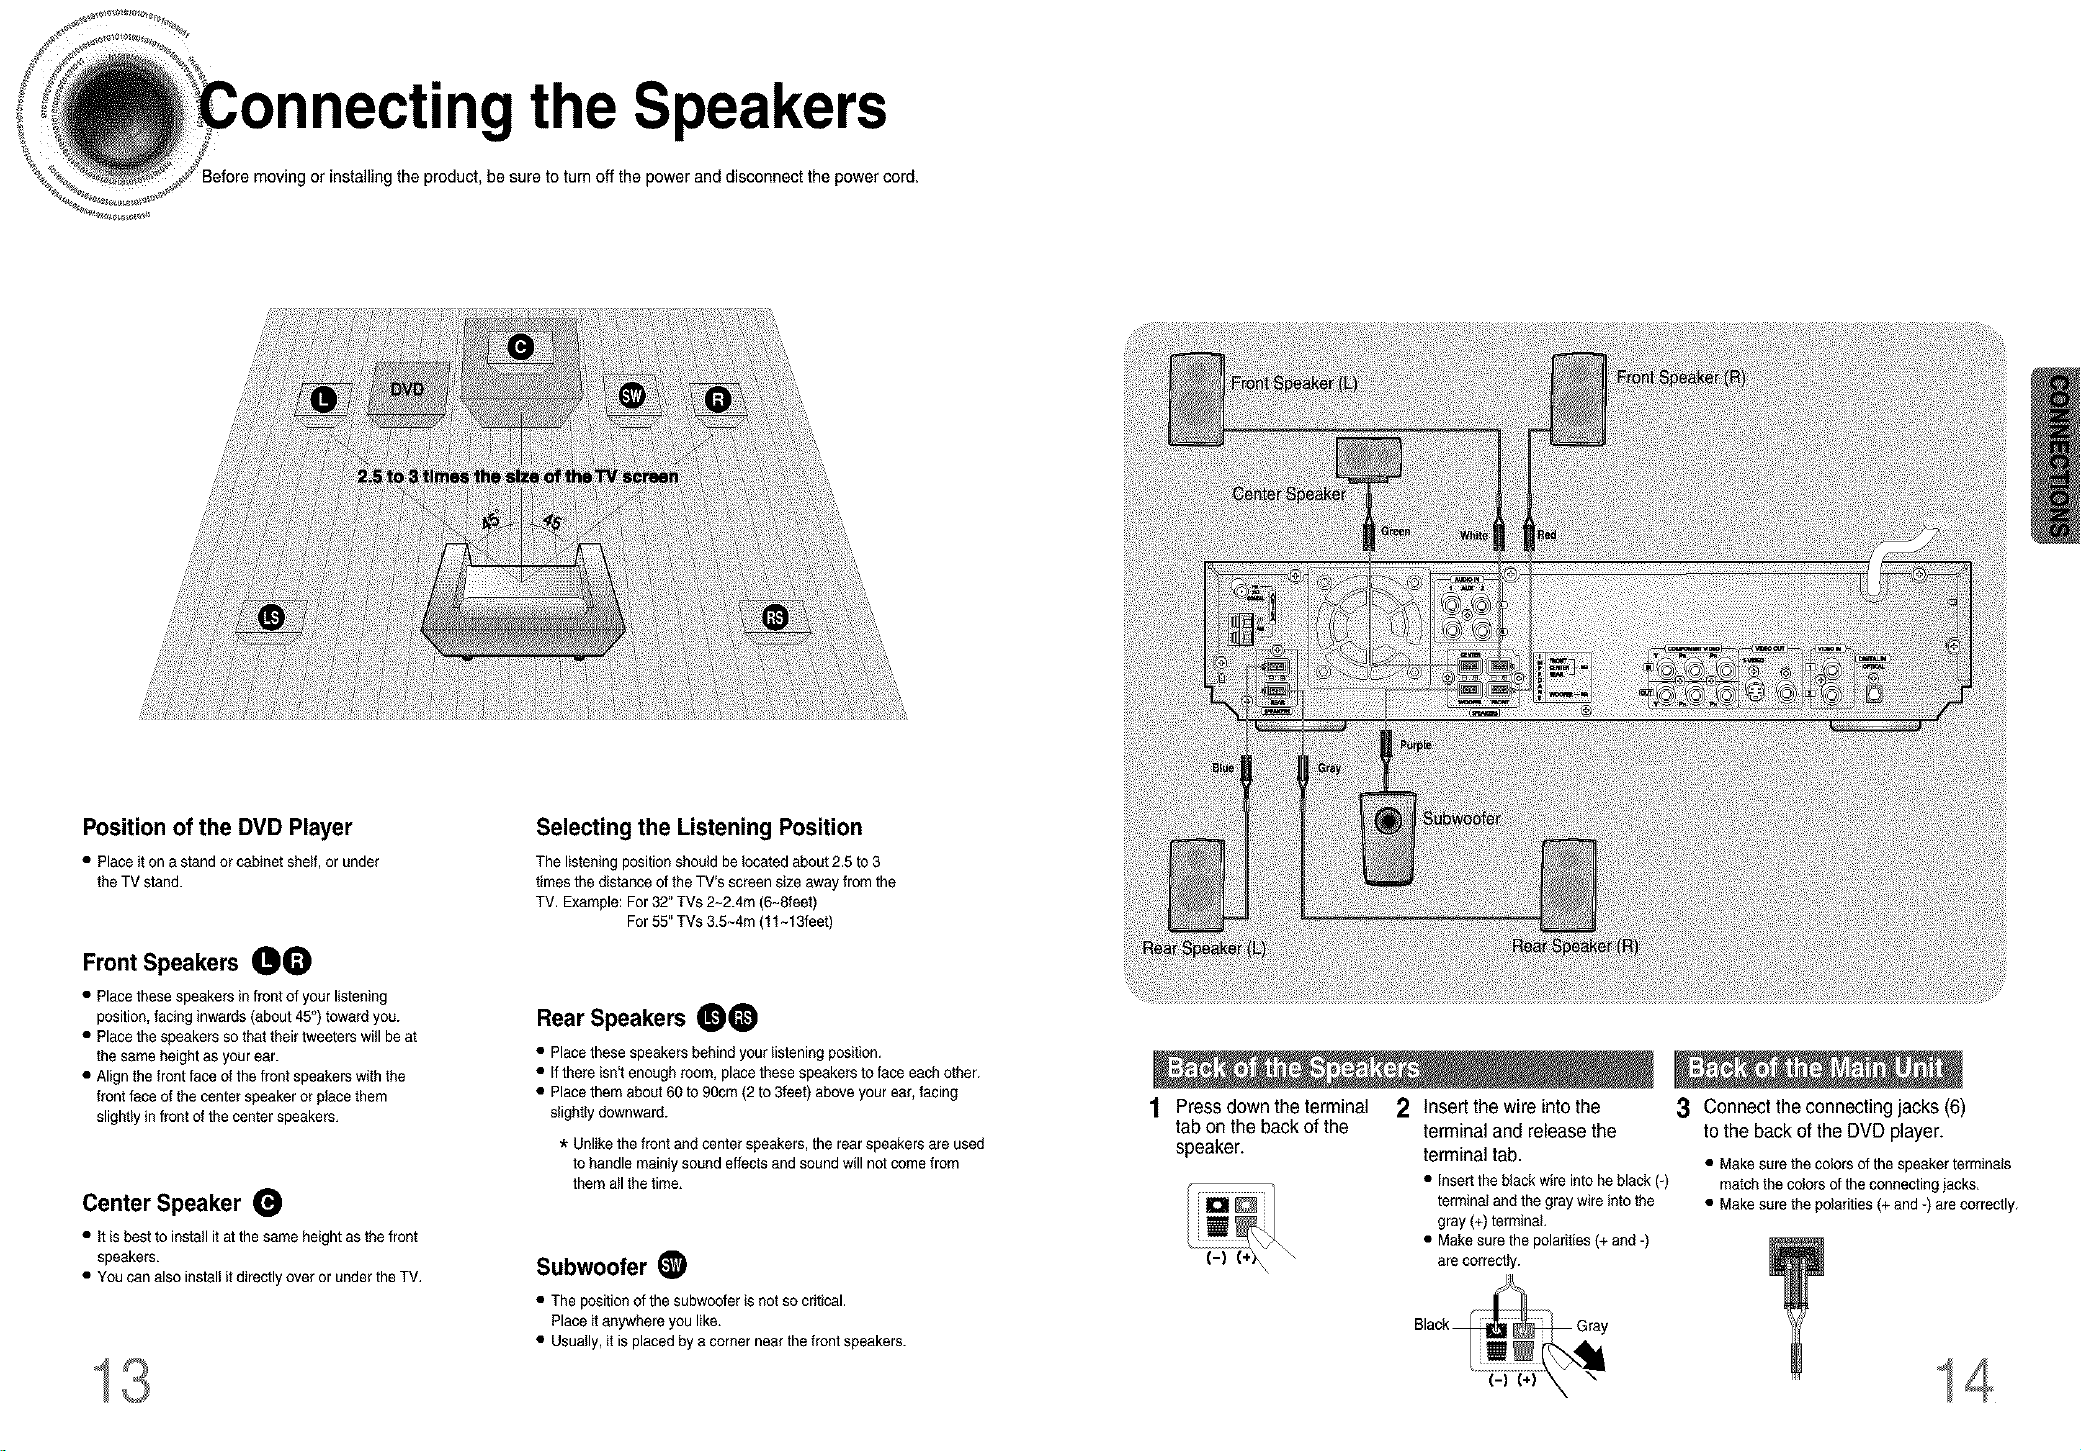
nectingthe Speakers
or installing the product,be sure to turn off thepower and disconnect the power cord.
Position of the DVD Player
• Place it on a stand or cabinet shelf, or under
the TV stand.
Front Speakers 00
• Place these speakers infront of your listening
position, facing inwards(about 45°) toward you.
• Place the speakers sothat their tweeters will be at
the same height as your ear.
• Align the front face of the frontspeakers with the
front face of the center speaker or placethem
slightly infront of the center speakers.
Center Speaker
• It isbest to install it at the same heightas the front
speakers.
• You can also install itdirectly over or under the TV.
13
Selecting the Listening Position
The listening position should be located about 2.5 to 3
times the distance of the TV's screen size away from the
TV. Example: For32" TVs 2~2.4m (6-Sleet)
For 55" TVs 3.5-4m (11-13feet)
Rear Speakers 00
• Place these speakers behind your _isteningposition.
• If there isn'tenough room, place these speakers to face each other.
• Place them about 60 to 90cm (2 to 3feet) above your ear, facing
slightly downward.
* Unlike the front and center speakers, the rearspeakers are used
to handle mainly sound effects and sound will not come from
them all the time.
Subwoofer (_
• The position of the subwoofer is not so critical.
Place it anywhere you like.
• Usually, it is placed by a corner near the front speakers.
Press downthe terminal
tab on the backof the
speaker.
\
\
2 Insert the wire into the
terminal and release the
terminal tab.
• Inserttheblackwireintoheblack(-)
termicalandthegraywireintothe
gray(+)terminal.
• Makesurethepolarities(+and-)
arecorrectly.
3 Connect the connecting jacks (6)
to the back ofthe DVD player.
• Make sure the colors of the speaker terminals
match the colors of the connecting jacks.
• Make sure the polarities (+and -) are correctly.
14
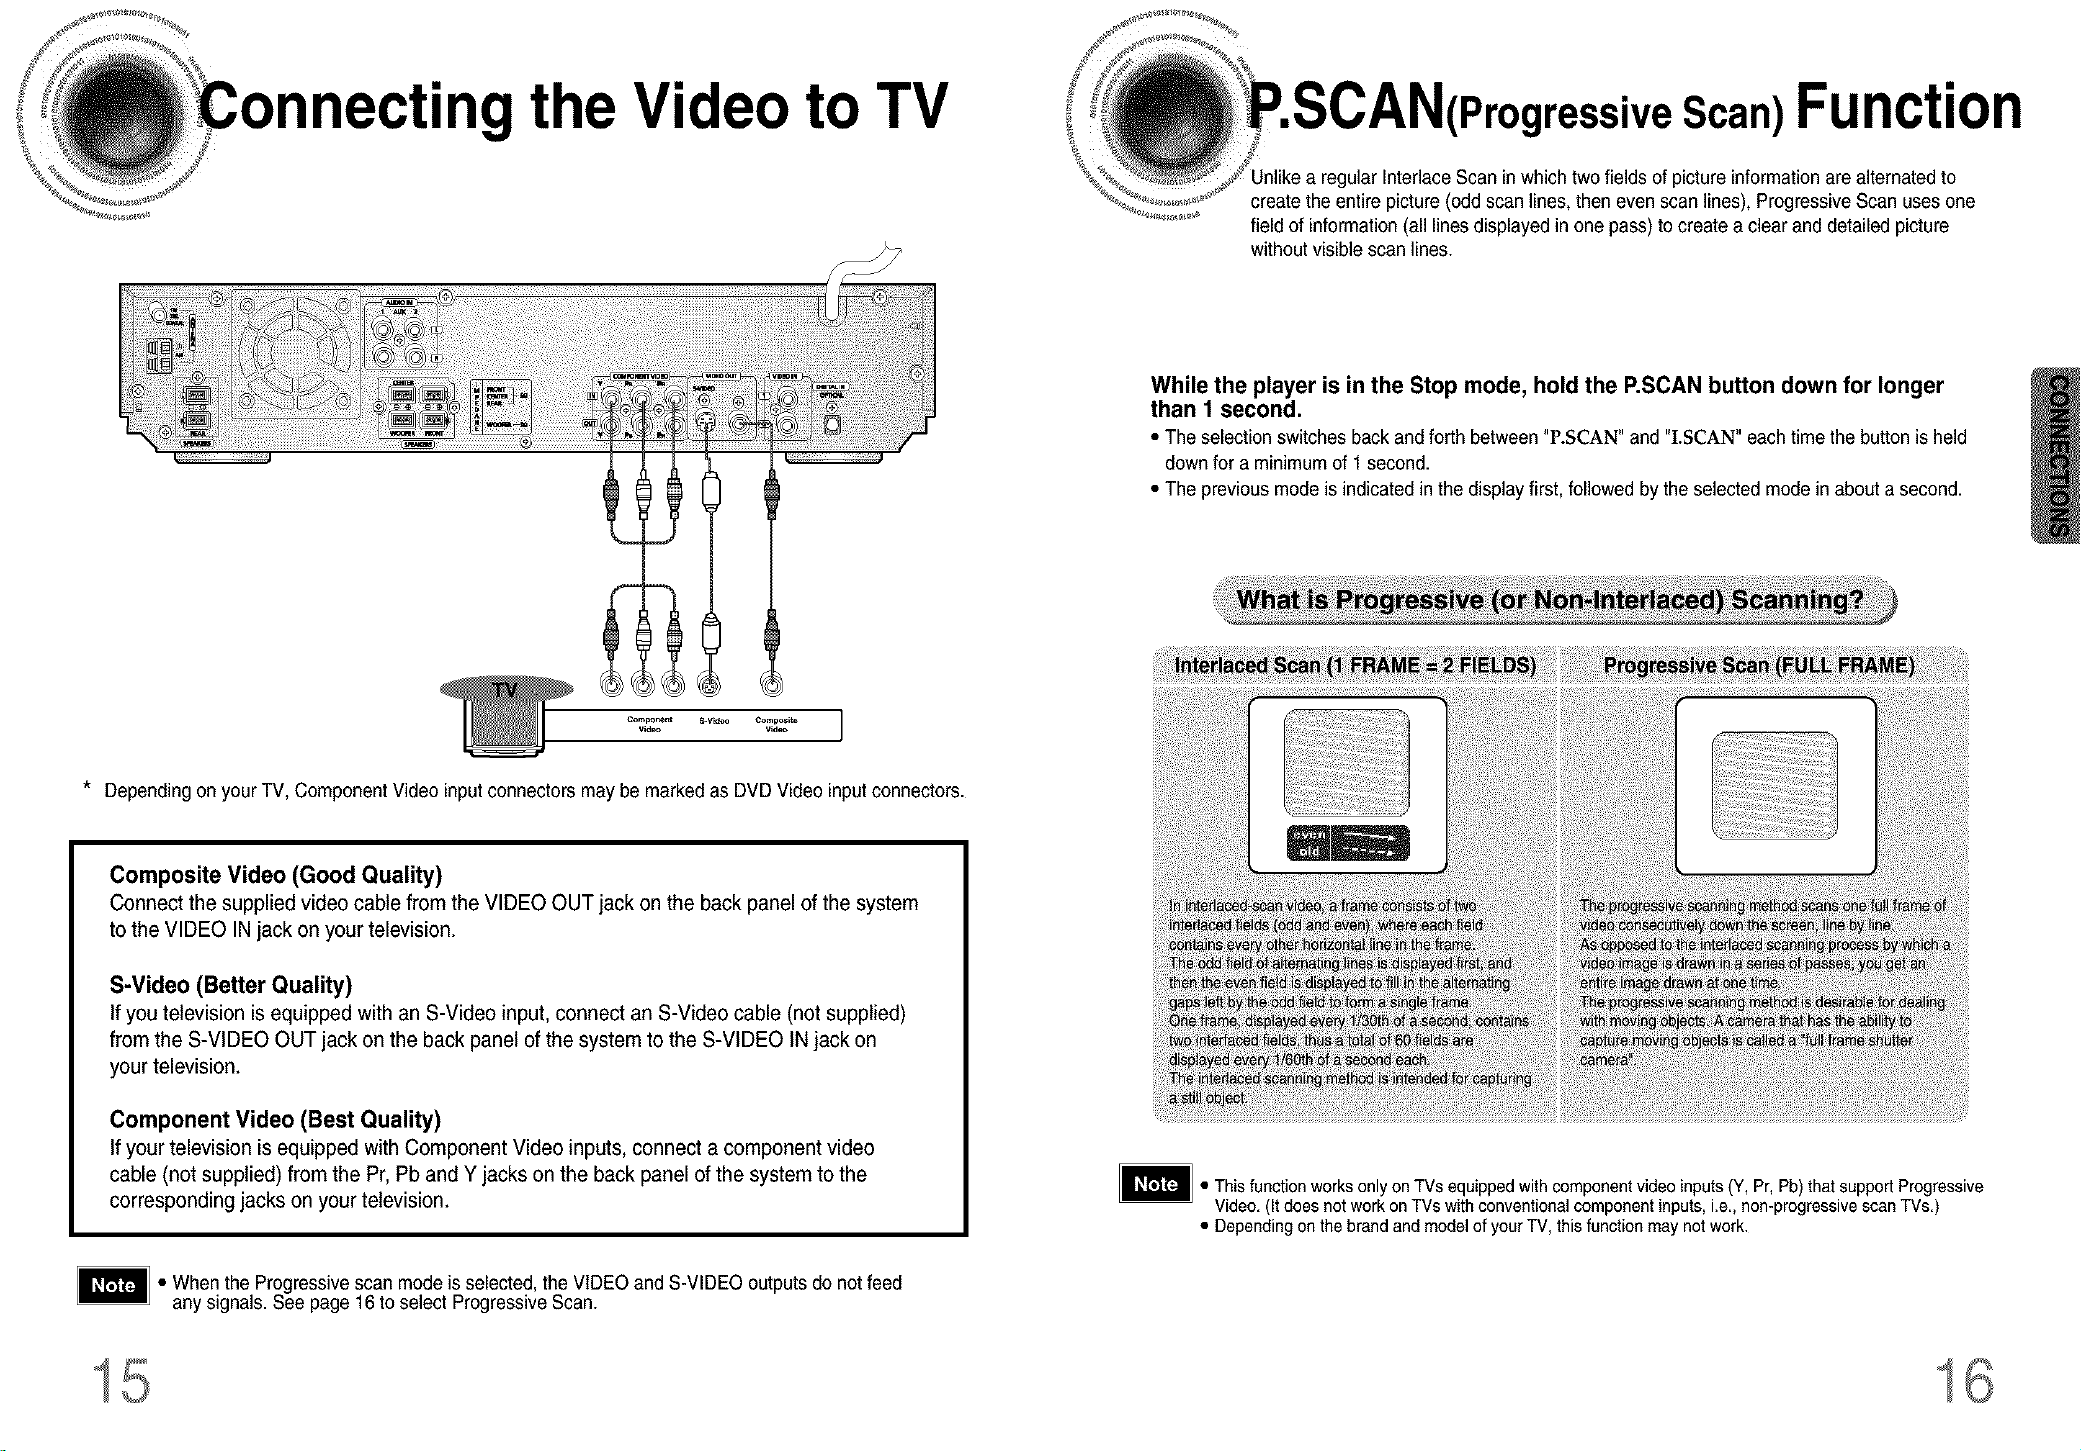
nectingthe Video to TV
;IressiveScan)Function
gular InterlaceScan inwhich two fields of picture informationare alternated to
create the entire picture (odd scan lines, then even scan lines), ProgressiveScan uses one
field of information(all lines displayed in one pass)to create aclear and detailed picture
without visible scan lines.
While the player is in the Stop mode, hold the P,SCAN button down for longer
than 1 second.
• The selection switches back and forth between "P.SCAN" and "I.SCAN" eachtime the button is held
down for a minimum of 1second.
• The previous mode is indicated in the display first, followed by the selected mode in about a second.
vleeo Vld_
Component 8.V_O Composits ]
* Depending on your TV, Component Video inputconnectors maybe marked as DVD Video inputconnectors.
Composite Video (Good Quality)
Connect the supplied video cable from the VIDEO OUT jack on the back panel of the system
to the VIDEO IN jack on yourtelevision.
S-Video (Better Quality)
If you television is equipped with an S-Video input, connect an S-Video cable (not supplied)
from the S-VIDEO OUT jack on the back panel of the system to the S-VIDEO IN jack on
your television.
Component Video (Best Quality)
If yourtelevision is equipped with Component Video inputs, connect a component video
cable (not supplied) from the Pr, Pb and Y jacks on the back panel ofthe system to the
corresponding jacks on your television.
• When the Progressive scan mode is selected, the VIDEO and S-VIDEO outputs do not feed
any signals. See page16 to select Progressive Scan.
• This function works only on TVs equipped with component video inputs(Y, Pr, Pb)that support Progressive
Video. (It does not workon TVs with conventional component inputs,i.e., non-progressive scan TVs.)
• Depending on the brand and model of yourTV, this function may not work.
15 16

ngExternalComponents
Example: Digitalsignal components such as a DVD or CD Recorder.
Example: Analogsignal components such as a VCR, Camcorder, and TV.
1 Connect Video Out on the DVD player to Video In on the TV.
2 Connect the Digital Input (OPTICAL) to the Digital Output on the external
digital component.
3 Press AUX on the remote control to select 'DIGITAL IN'.
• Eachtimethebuttonispressed,the selectionchangesasfollows:DIGITALIN_ AUX1 _ AUX2.
• YoucanalsousetheFUNCTIONbuttononthemainunit.
Themodeswitchesas follows:DVD/CD_ DIGITALIN_ AUX1_ AUX2_ FM_ AM.
17
1
Connect Video Out on the DVD player to Video
In on the TV.
2
Connect Video In on the DVD player to Video
Out on the external analog component.
3
Connect Audio In on the DVD player to Audio Out
on the external analog component.
• Besuretomatchconnectorcolors.
4
Press AUX on the remote control to select AUX 1
or AUX 2.
• Each time the button is pressed, the selection changes as
follows: DIGITAL IN AUX 1 AUX 2.
• You can also use the FUNCTION button on the main unit.
The mode switches as follows: DVD/CD _ DIGITAL IN _,
AUX1 _ AUX2_, FM_ AM.
• Ifyou have connected an external digital
component and Video In (1,2) at the
same time, there willbe video from AUX 1
even when you select DIGITAL IN.
• If you have connected Audio In (L, R)to
1,connect Video In to 1 as well, and if
you haveconnected Audio In (L, R)to 2,
connect Video In to 2 also.
18
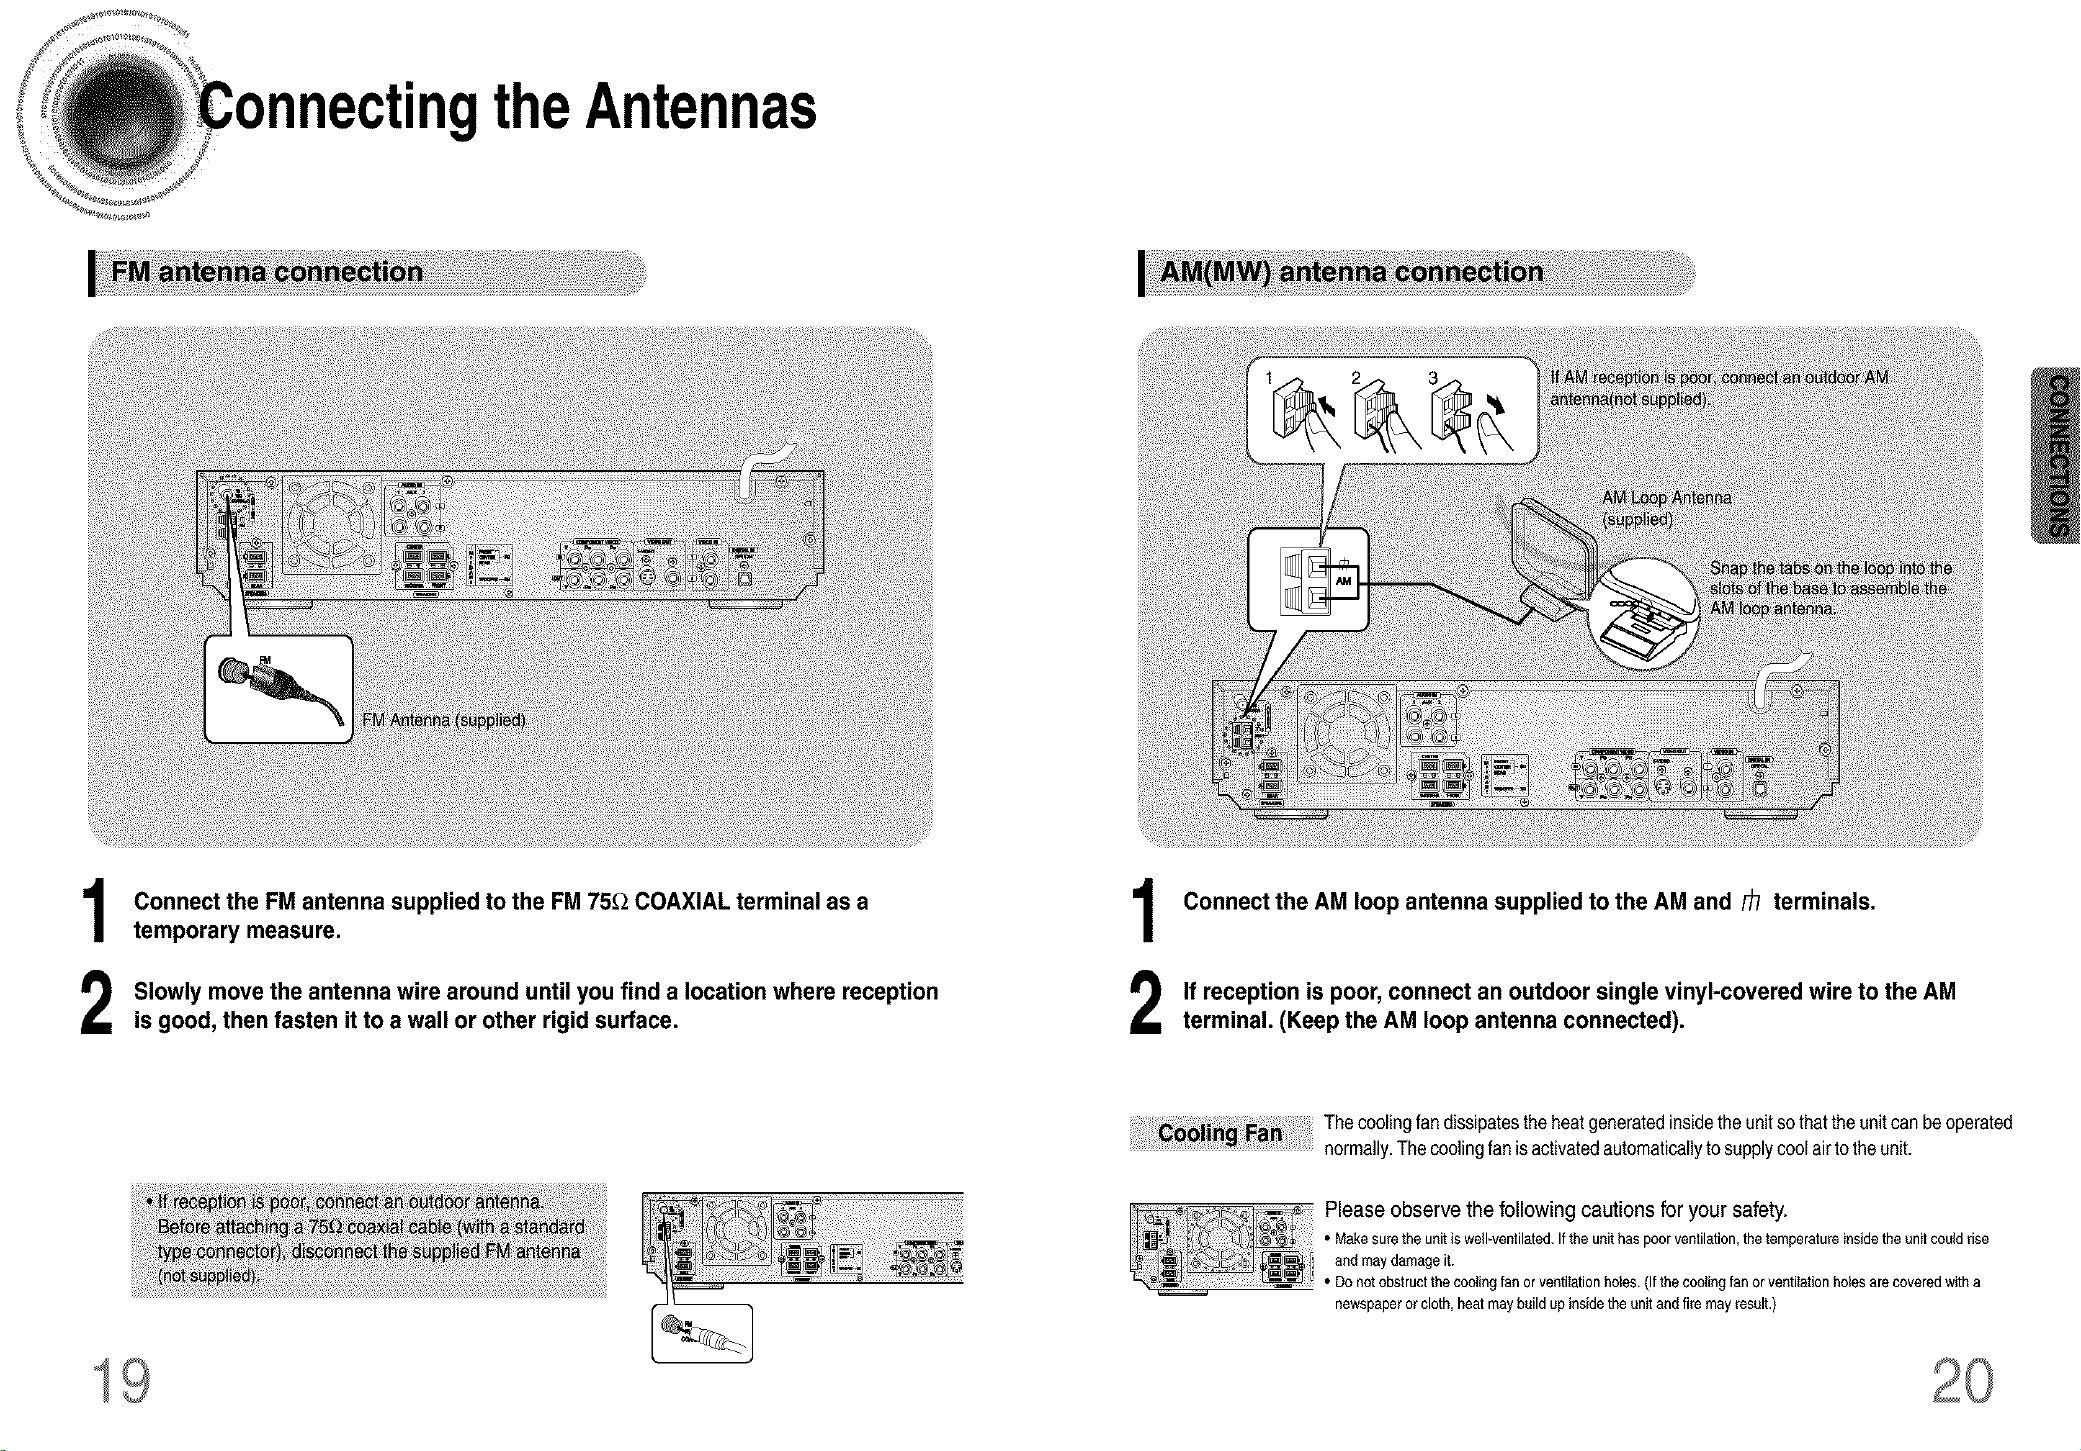
nectingtheAnten
Connect the FM antenna supplied to the FM 75£_COAXIAL terminal as a
1
temporary measure.
Slowly move the antenna wire around until you find a location where reception
2
is good, then fasten it to a wall or other rigid surface,
19
Connect the AM loop antenna supplied to the AM and _ terminals.
1
If reception is poor, connect an outdoor single vinyl-covered wire to the AM
2
terminal. (Keep the AM loop antenna connected).
: COOii_ Fa_ The coolingfandissipatestheheatgeneratedinsidethe unitsothatthe unitcan beoperated
...................................................normally.Thecoolingfan isactivatedautomaticallytosupplycoolairto theunit.
Please observethe following cautionsfor your safety.
• Make sure the unitiswell-ventilated. Iftheunit has poorventilation,thetemperature insidethe unitcould rise
andmay damageit.
• Do not obstructthe coolingfan orventilationholes,(If thecooling fanor ventilationholes are covered with a
newspaperorcloth,heat may build up insidethe unitand fire mayresult.)
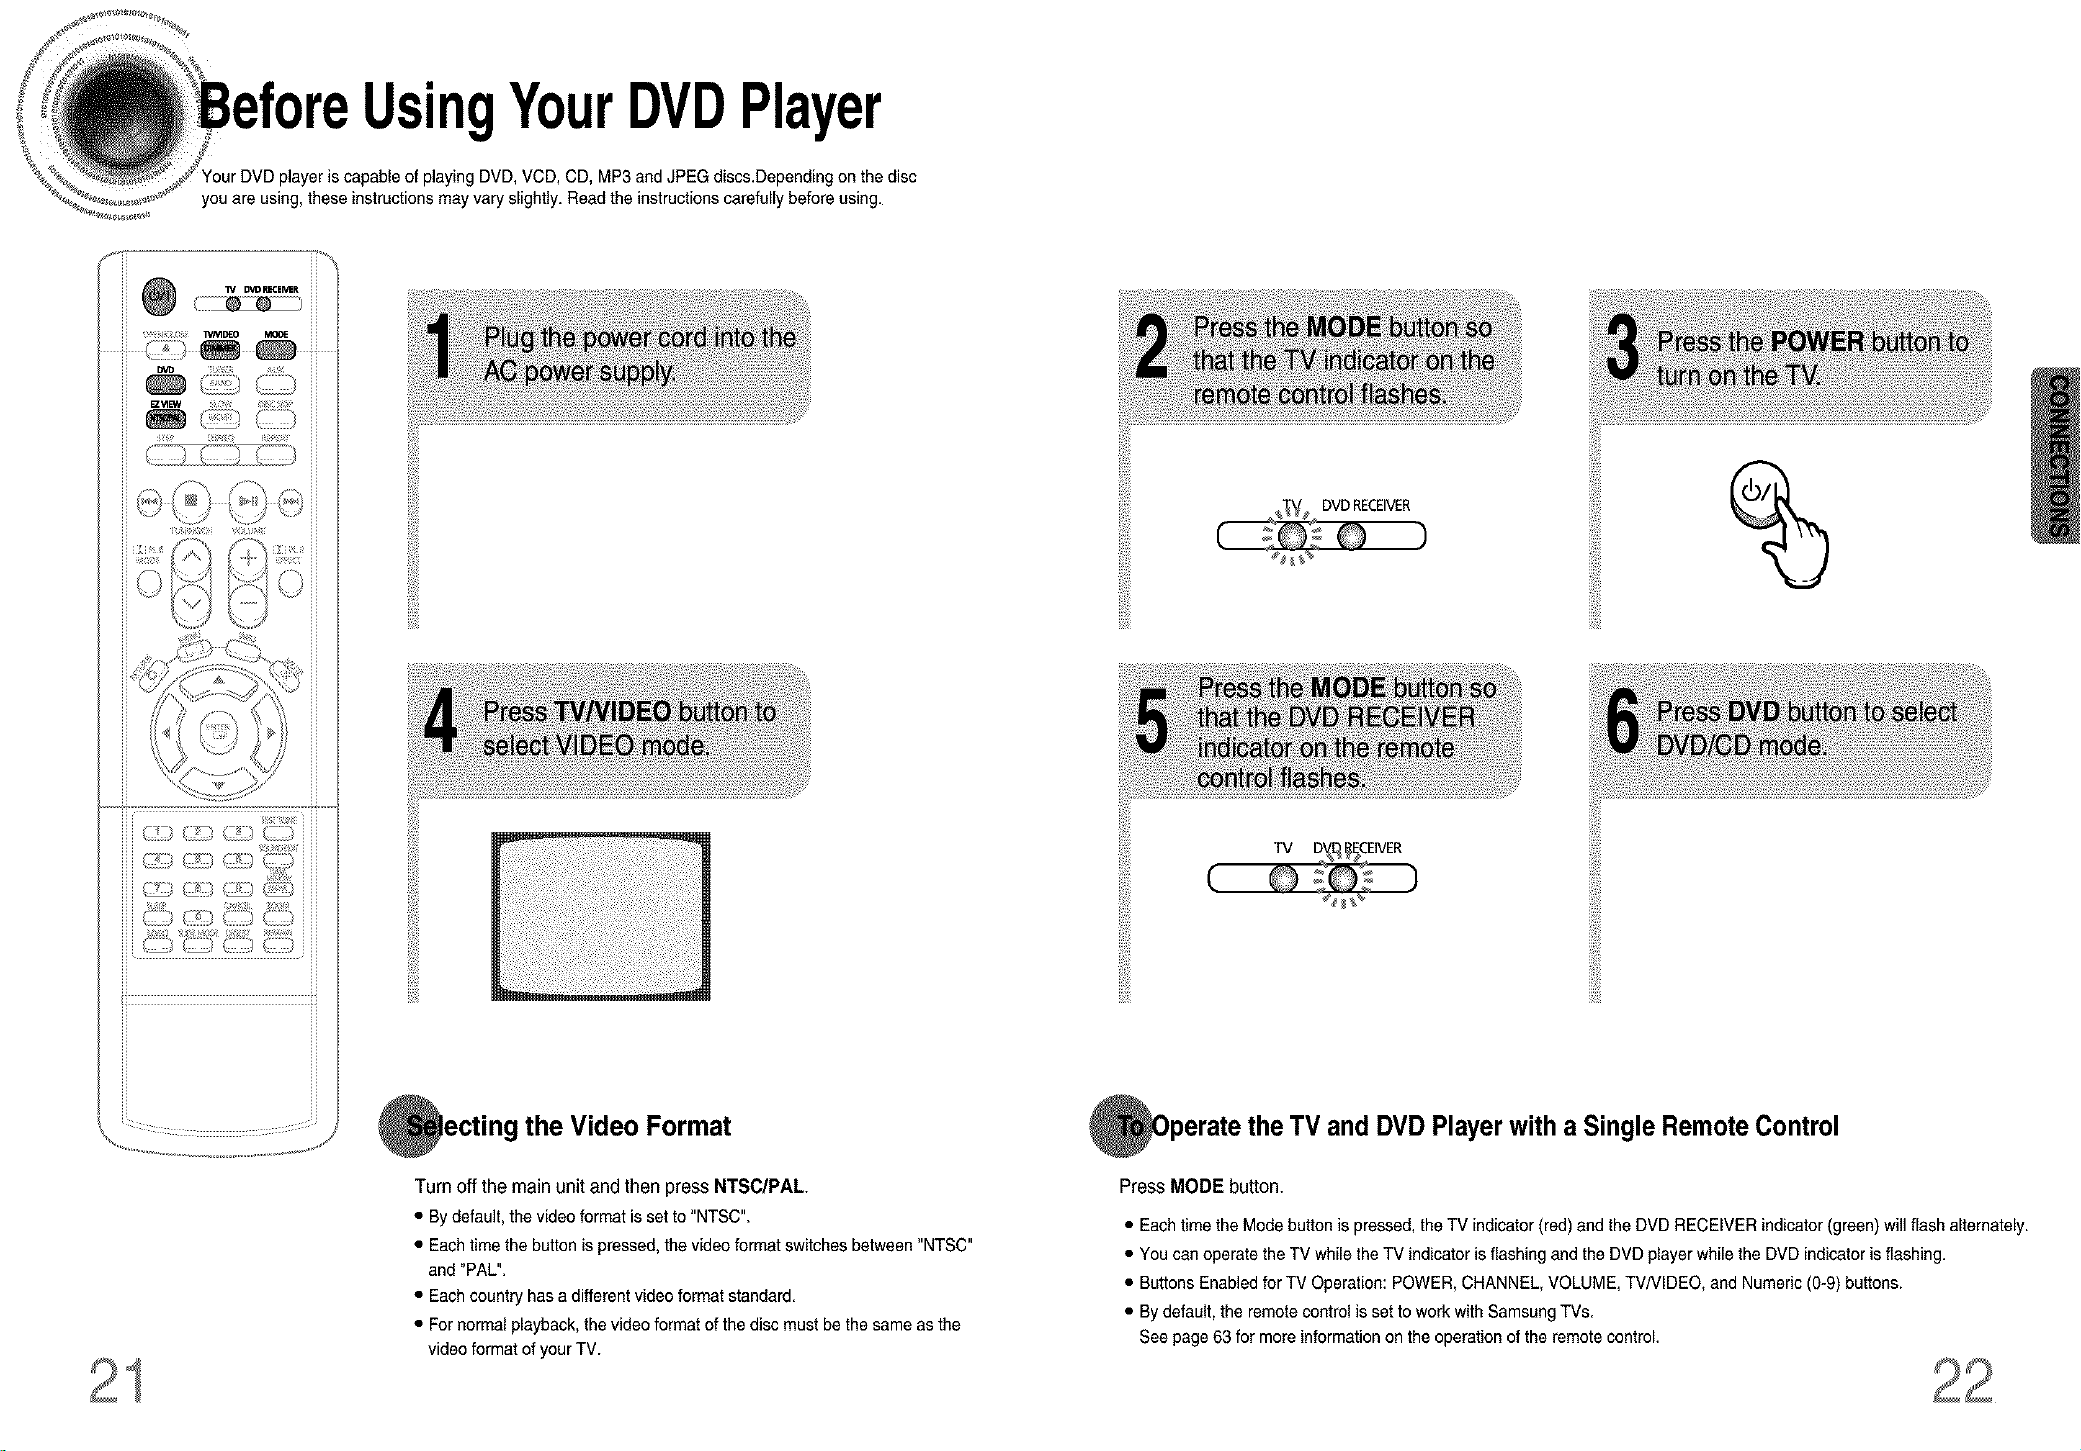
UsingYourDVDPlayer
player is capable of playing DVD, VCD, CD, MP3 and JPEG discs.Dependingon the disc
you are using, these instructions may vary slightly. Read the instructions carefully before using.
%
¢: : d
C_ ::.) CZ:) CZ:)
the Video Format
Turn off the main unit and then press NTSC/PAL
• By default, the video format is set to "NTSC".
• Each time the buttonis pressed, the video format switches between "NTSC"
and "PAL".
• Each country has adifferent video format standard.
• For normal playback, the video format of the disc must bethe same asthe
video format ofyour TV.
and DVD Playerwith a Single Remote Control
Press MODE button.
• Each time the Mode button is pressed, the TV indicator (red) and the DVD RECEIVER indicator (green) will flash alternately.
• You can operate the TV while the TV indicatoris flashing andthe DVD player while the DVD indicator is flashing.
• Buttons Enabled forTV Operation: POWER, CHANNEL, VOLUME, TV/VlDEO, and Numeric (0-9) buttons.
• By default,the remote control is set to work with Samsung TVs.
See page 63 for more information on the operation of the remote control.
 Loading...