

Page 1

5.1CH Blu-ray™
Home Entertainment System
user manual
imagine the possibilities
Thank you for purchasing this Samsung product.
To receive more complete service,
please register your product at
www.samsung.com/register
HT-D6500
HT-D6500_ELS_1226.indd 1HT-D6500_ELS_1226.indd 1 2011-12-26 3:20:352011-12-26 3:20:35
Page 2

2 English
Safety Information
Safety Warnings
TO REDUCE THE RISK OF ELECTRIC SHOCK, DO NOT REMOVE THE COVER(OR BACK).
NO USER-SERVICEABLE PARTS ARE INSIDE. REFER SERVICING TO QUALIFIED SERVICE PERSONNEL.
CAUTION
RISK OF ELECTRIC SHOCK
DO NOT OPEN
This symbol indicates “dangerous
voltage” inside the product that presents
a risk of electric shock or personal injury.
CAUTION :
TO PREVENT ELECTRIC
SHOCK, MATCH WIDE BLADE OF PLUG
TO WIDE SLOT, FULLY INSERT.
This symbol indicates important
instructions accompanying the
product.
WARNING
To reduce the risk of fi re or electric shock, do
not expose this appliance to rain or moisture.
CAUTION
Apparatus shall not be exposed to dripping or splashing
and no objects fi lled with liquids, such as vases, shall be
placed on the apparatus.
The Mains plug is used as a disconnect device and shall
stay readily operable at any time.
This apparatus shall always be connected to a AC outlet
with a protective grounding connection.
To disconnect the apparatus from the mains, the plug
must be pulled out from the mains socket, therefore the
mains plug shall be readily operable.
•
•
•
•
•
CLASS 1 LASER PRODUCT
KLASSE 1 LASER PRODUKT
LUOKAN 1 LASER LAITE
KLASS 1 LASER APPARAT
PRODUCTO LÁSER CLASE 1
CLASS 1 LASER PRODUCT
This Compact Disc player is classifi ed as a
CLASS 1 LASER product.
Use of controls, adjustments or performance of
procedures other than those specifi ed herein
may result in hazardous radiation exposure.
CAUTION
INVISIBLE LASER RADIATION WHEN OPEN AND
INTERLOCKS DEFEATED, AVOID EXPOSURE TO BEAM.
•
Wiring the Main Power Supply Plug (UK Only)
IMPORTANT NOTICE
The mains lead on this equipment is supplied with a moulded plug incorporating a fuse. The value of the fuse is indicated
on the pin face of the plug and if it requires replacing, a fuse approved to BS1362 of the same rating must be used.
Never use the plug with the fuse cover removed. If the cover is detachable and a replacement is required, it must be of
the same colour as the fuse fitted in the plug. Replacement covers are available from your dealer. If the fitted plug is not
suitable for the power points in your house or the cable is not long enough to reach a power point, you should obtain a
suitable safety approved extension lead or consult your dealer for assistance. However, if there is no alternative to cutting
off the plug, remove the fuse and then safely dispose of the plug. Do not connect the plug to a mains socket as there is
a risk of shock hazard from the bared flexible cord. Never attempt to insert bare wires directly into a mains socket. A
plug and fuse must be used at all times.
IMPORTANT
The wires in the mains lead are coloured in accordance with the following code:– BLUE = NEUTRAL BROWN
= LIVE As these colours may not correspond to the coloured markings identifying the terminals in your plug,
proceed as follows:–The wire coloured BLUE must be connected to the terminal marked with the letter N or
coloured BLUE or BLACK. The wire coloured BROWN must be connected to the terminal marked with the letter L or coloured BROWN or RED.
WARNING :
DO NOT CONNECT EITHER WIRE TO THE EARTH TERMINAL WHICH IS MARKED WITH LETTER E OR
BY THE EARTH SYMBOL , OR COLOURED GREEN OR GREEN AND YELLOW.
HT-D6500_ELS_1226.indd 2HT-D6500_ELS_1226.indd 2 2011-12-26 3:21:302011-12-26 3:21:30
Page 3

English 3
Precautions
Ensure that the AC power supply in your house complies with the identifi cation sticker located on the back of
your product.
Install your product horizontally, on a suitable base (furniture), with enough space around it for ventilation
(7.5~10cm).
Do not place the product on amplifi ers or other equipment which may become hot.
Make sure the ventilation slots are not covered.
Do not stack anything on top of the product.
Before moving the product, ensure the Disc Insert Hole is empty.
To disconnect the product completely from the power supply, remove the mains plug from the wall outlet.
- If you leave the product unused for a long period of time, disconnect the plug from the wall outlet.
During thunderstorms, disconnect the AC plug from the wall outlet. Voltage peaks due to lightning could damage
the product.
Do not expose the product to direct sunlight or other heat sources. This could lead to overheating and
malfunction of the product.
Protect the product from moisture, excess heat, and equipment creating strong magnetic or electric fi elds (i.e.
speakers.).
Disconnect the power cable from the AC supply if the product malfunctions.
Your product is not intended for industrial use. Use of this product is for personal use only.
Condensation may occur if you store your product or a disc in cold temperatures. If transporting the product
during the winter, wait approximately 2 hours until the product has reached room temperature before using.
The batteries used with this product contain chemicals that are harmful to the environment.
Do not dispose of batteries in the general household trash.
Viewing TV using the 3D function
IMPORTANT HEALTH AND SAFETY INFORMATION FOR 3D PICTURES. Read and
understand the following safety information before using the TV’s 3D function.
WARNING
Some viewers may experience discomfort while viewing 3D TV such as dizziness, nausea and headaches. If you
experience any such symptom, stop viewing 3D TV, remove the 3D Active Glasses, and rest.
Watching 3D images for an extended period of time may cause eye strain. If you feel eye strain, stop viewing 3D
TV, remove your 3D Active Glasses, and rest.
A responsible adult should frequently check on children who are using the 3D function. If there are any reports of
tired eyes, headaches, dizziness, or nausea, have the child stop viewing 3D TV and rest.
Do not use the 3D Active Glasses for other purposes (such as general eyeglasses, sunglasses, protective
goggles, etc.)
Do not use the 3D function or 3D Active Glasses while walking or moving around. Using the 3D function or 3D
Active Glasses while moving around may result in injuries caused by running into objects, tripping, and/or falling.
•
•
•
•
•
•
•
•
•
•
•
•
•
•
•
•
•
•
HT-D6500_ELS_1226.indd 3HT-D6500_ELS_1226.indd 3 2011-12-26 3:21:312011-12-26 3:21:31
Page 4
4 English
Cautions on Handling and Storing Discs
Small scratches on the disc may reduce sound
and picture quality or cause skipping.
Be especially careful not to scratch discs when
handling them.
Holding discs
Do not touch the playback side of the disc.
Hold the disc by the edges so that
fi ngerprints will not get on the surface.
Do not stick paper or tape on the disc.
Disc Storage
Do not keep in direct sunlight
Keep in a cool ventilated area
Keep in a clean Protection jacket.
Store vertically.
NOTE
Do not allow the discs to become contaminated with
dirt.
Do not load cracked or scratched discs.
Handling and Storing Discs
If you get fingerprints or dirt on the disc, clean it with a
mild detergent diluted in water and wipe with a soft cloth.
When cleaning, wipe gently from the inside to
the outside of the disc
NOTE
Condensation may form if warm air comes into
contact with cold parts inside the product. When
condensation forms inside the product, it may not
operate correctly. If this occurs, remove the disc
and let the product stand for 1 or 2 hours with the
power on.
•
•
•
•
•
•
✎
•
✎
Licence
Dolby and the double-D symbol are registered trademarks of Dolby
Laboratories.
"ABOUT DIVX VIDEO: DivX® is a digital video format
created by DivX, Inc. This is an offi cial DivX
Certifi ed® device that plays DivX video. Visit www.divx.com for more
information and software tools to convert your fi les into DivX video.
ABOUT DIVX VIDEO-ON-DEMAND: This DivX Certifi ed® device must be
registered in order to play purchased DivX Video-on-Demand (VOD)
movies. To obtain your registration code, locate the DivX VOD section in
your device setup menu. Go to vod.divx.com for more information on
how to complete your registration.
DivX Certifi ed® to play DivX® video up to HD 1080p, including
premium content.
DivX®, DivX Certifi ed® and associated logos are trademarks of DivX,
Inc. and are used under licence."
Covered by one or more of the following U.S. patents : 7,295,673;
7,460,668; 7,515,710; 7,519,274
Oracle and Java are registered trademarks of Oracle and/or its
affi liates. Other names may be trademarks of their respective owners.
This item incorporates copy protection technology that is protected by
U.S. patents and other intellectual property rights of Rovi Corporation.
Reverse engineering and disassembly are prohibited.
Blu-ray Disc™, Blu-ray™, and the logos are trademarks of Blu-ray
Disc Association.
iPod is a trademark of Apple Inc.,
registered in the U.S. and other
countries. iPhone is a trademark of
Apple Inc.
< Open Source Licence Notice >
In the case of using open source software, Open Source
Licenses are available on the product menu.
Copyright
© 2011 Samsung Electronics Co., Ltd. All rights reserved.
•
•
•
•
•
•
•
•
Safety Information
HT-D6500_ELS_1226.indd 4HT-D6500_ELS_1226.indd 4 2011-12-26 3:21:312011-12-26 3:21:31
The terms HDMI and HDMI High-Definition
Multimedia Interface, and the HDMI Logo are
trademarks or registered trademarks of HDMI
Licensing LLC in the United States and other
countries.
Page 5

English 5
Contents
SAFETY INFORMATION
2
2 Safety Warnings
3 Precautions
4 Cautions on Handling and Storing Discs
4 Licence
4 Copyright
GETTING STARTED
7
7 Icons that will be used in manual
8 Disc Types and Characteristics
12 Accessories
13 Description
13 Front Panel
14 Rear Panel
15 Remote Control
CONNECTIONS
17
17 Connecting the Speakers
19 Connecting the Optional Wireless Receiver Module
21 Attaching the Toroidal Ferrite Core to the Power Cord of
the Main Unit
21 Connecting External Devices/your TV via HDMI
22 Connecting the FM Antenna
24 Connecting Audio from External Components
25 Connecting to the Network
SETUP
27
27 Initial Settings
28 Accessing the Settings Menu
29 Display
29 3D Settings
30 TV Aspect
30 Smart Hub Screen Size
30 BD Wise (Samsung Products only)
30 Resolution
32 HDMI Colour Format
32 Movie Frame (24 Fs)
32 HDMI Deep Colour
32 Still Mode
32 Progressive Mode
33 Audio
33 Speaker Settings
34 Musical Auto Calibration
34 User EQ
35 HDMI Audio
35 Audio Return Channel
35 Digital Output
36 Dynamic Range Control
37 Audio Sync
37 Network
37 Network Settings
40 Network Status
40 BD-LIVE Internet Connection
41 System
41 Initial Settings
41 Anynet+ (HDMI-CEC)
41 BD Data Management
41 Time Zone
41 DivX® Video On Demand
42 Reset
42 Language
ENGLISH
HT-D6500_ELS_1226.indd 5HT-D6500_ELS_1226.indd 5 2011-12-26 3:21:312011-12-26 3:21:31
Page 6

6 English
SETUP
42
42 Security
42 BD Parental Rating
42 DVD Parental Rating
42 Change Password
42 General
42 Front Display
42 Network Remote Control
43 Support
43 Software Upgrade
44 Contact Samsung
BASIC FUNCTIONS
45
45 Playing a Disc
45 Using the Disc menu / Title menu / Popup menu
46 Playing the Title List
46 Using the Search and Skip Functions
47 Slow Motion Play/Step Motion Play
47 Repeat Playback
48 Using the TOOLS button
50 Listening to Music
52 Sound Mode
53 Playing back a Picture
54 Playing back a USB Storage Device
55 Listening to Radio
57 Connecting iPod/iPhone Using the USB Cable
57 Connecting iPod/iPhone Using the Dock
58 Use iPod/iPhone with a Wireless Dock Cradle (sold
separately) for iPod/iPhone
59 iPod/iPhone Models You Can Use with This Product
60 How to Link the Wireless Transmitter with the Main Unit
NETWORK SERVICES
61
61 Using Smart Hub
68 Samsung Apps
70 Using vTuner Function
70 BD-LIVE™
70 Using the AllShare Function
OTHER INFORMATION
71
71 Troubleshooting
74 Specifi cations
Figures and illustrations in this User Manual are provided for reference only and may differ from actual product
appearance.
An administration fee may be charged if either
an engineer is called out at your request and there is no defect in the product
(i.e. where you have failed to read this user manual)
you bring the unit to a repair centre and there is no defect in the product
(i.e. where you have failed to read this user manual).
The amount of such administration charge will be advised to you before any work or home visit is carried out.
•
•
a.
b.
•
Contents
HT-D6500_ELS_1226.indd 6HT-D6500_ELS_1226.indd 6 2011-12-26 3:21:312011-12-26 3:21:31
Page 7
English 7
01 Getting Started
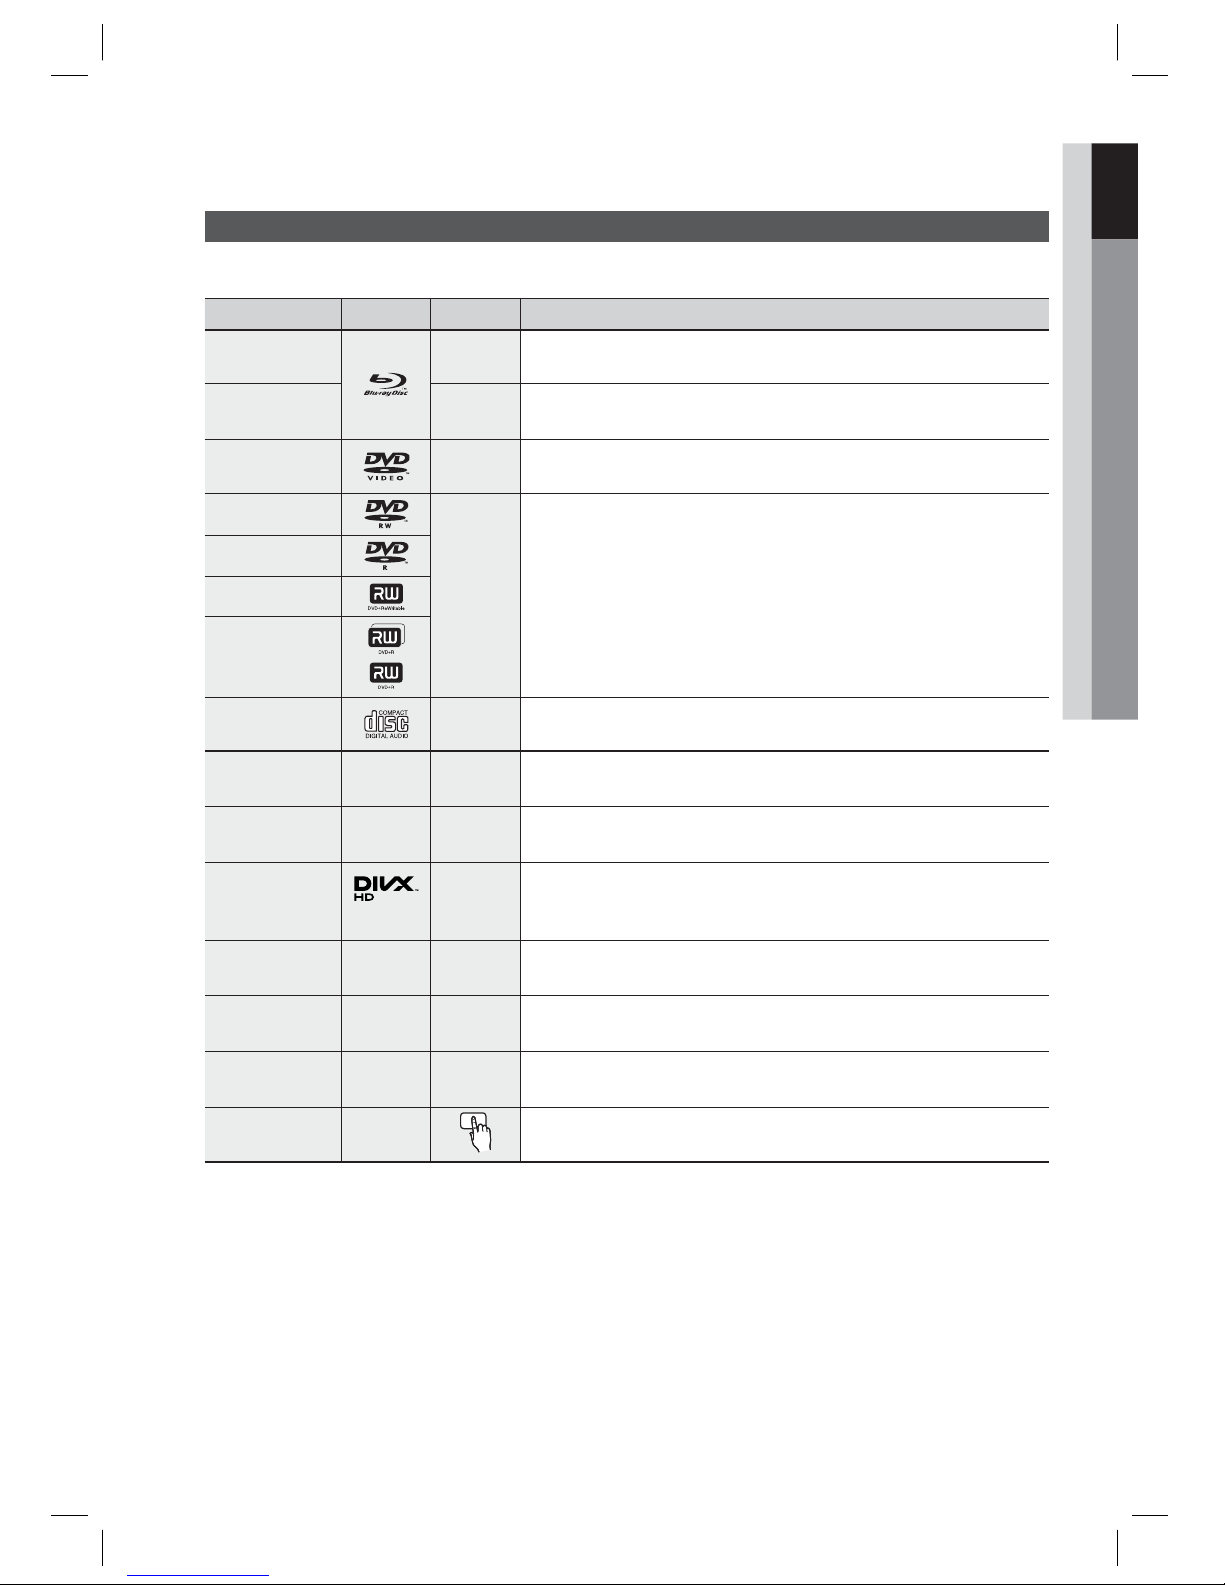
Icons that will be used in manual
Make sure to check the following terms before reading the user manual.
Term Logo Icon Definition
BD-ROM
h
This involves a function available on a BD-ROM.
BD-RE/-R
z
This involves a function available on a BD-RE/-R disc recorded in the
BD-RE format.
DVD-VIDEO
Z
This involves a function available on a DVD-VIDEO.
DVD-RW(V)
y
This involves a function available on recorded DVD+RW or DVD-RW(V)/
DVD-R/+R discs that have been recorded and fi nalized.
DVD-R
DVD+RW
DVD+R
Audio CD
o
This involves a function available on an audio CD-RW/-R (CD-DA format).
MP3
WMA
-
w
This involves a function available in a CD-RW/-R, DVD-RW/-R disc or a
USB storage media containing MP3 or WMA contents.
JPEG
-
G
This involves a function available in a CD-RW/-R, DVD-RW/-R disc or a
USB storage media containing JPEG contents.
DivX
MKV
MP4
DivX
x
This involves a function available in a CD-RW/-R, DVD-RW/-R disc or a
USB storage media containing DivX contents.
USB storage
device
-
F
This involves a function available on a USB storage device.
CAUTION
-
!
This involves a situation where a function does not operate or settings may
be cancelled.
NOTE
-
✎
This involves tips or instructions on the page that help each function
operate.
Shortcut Key
-
This function provides direct and easy access pressing the button on
the remote control.
This product is compatible with the PAL colour system only.
NTSC discs will not play.
•
•
Getting Started
HT-D6500_ELS_1226.indd 7HT-D6500_ELS_1226.indd 7 2011-12-26 3:21:312011-12-26 3:21:31
Page 8
8 English
Getting Started
Disc Types and Characteristics
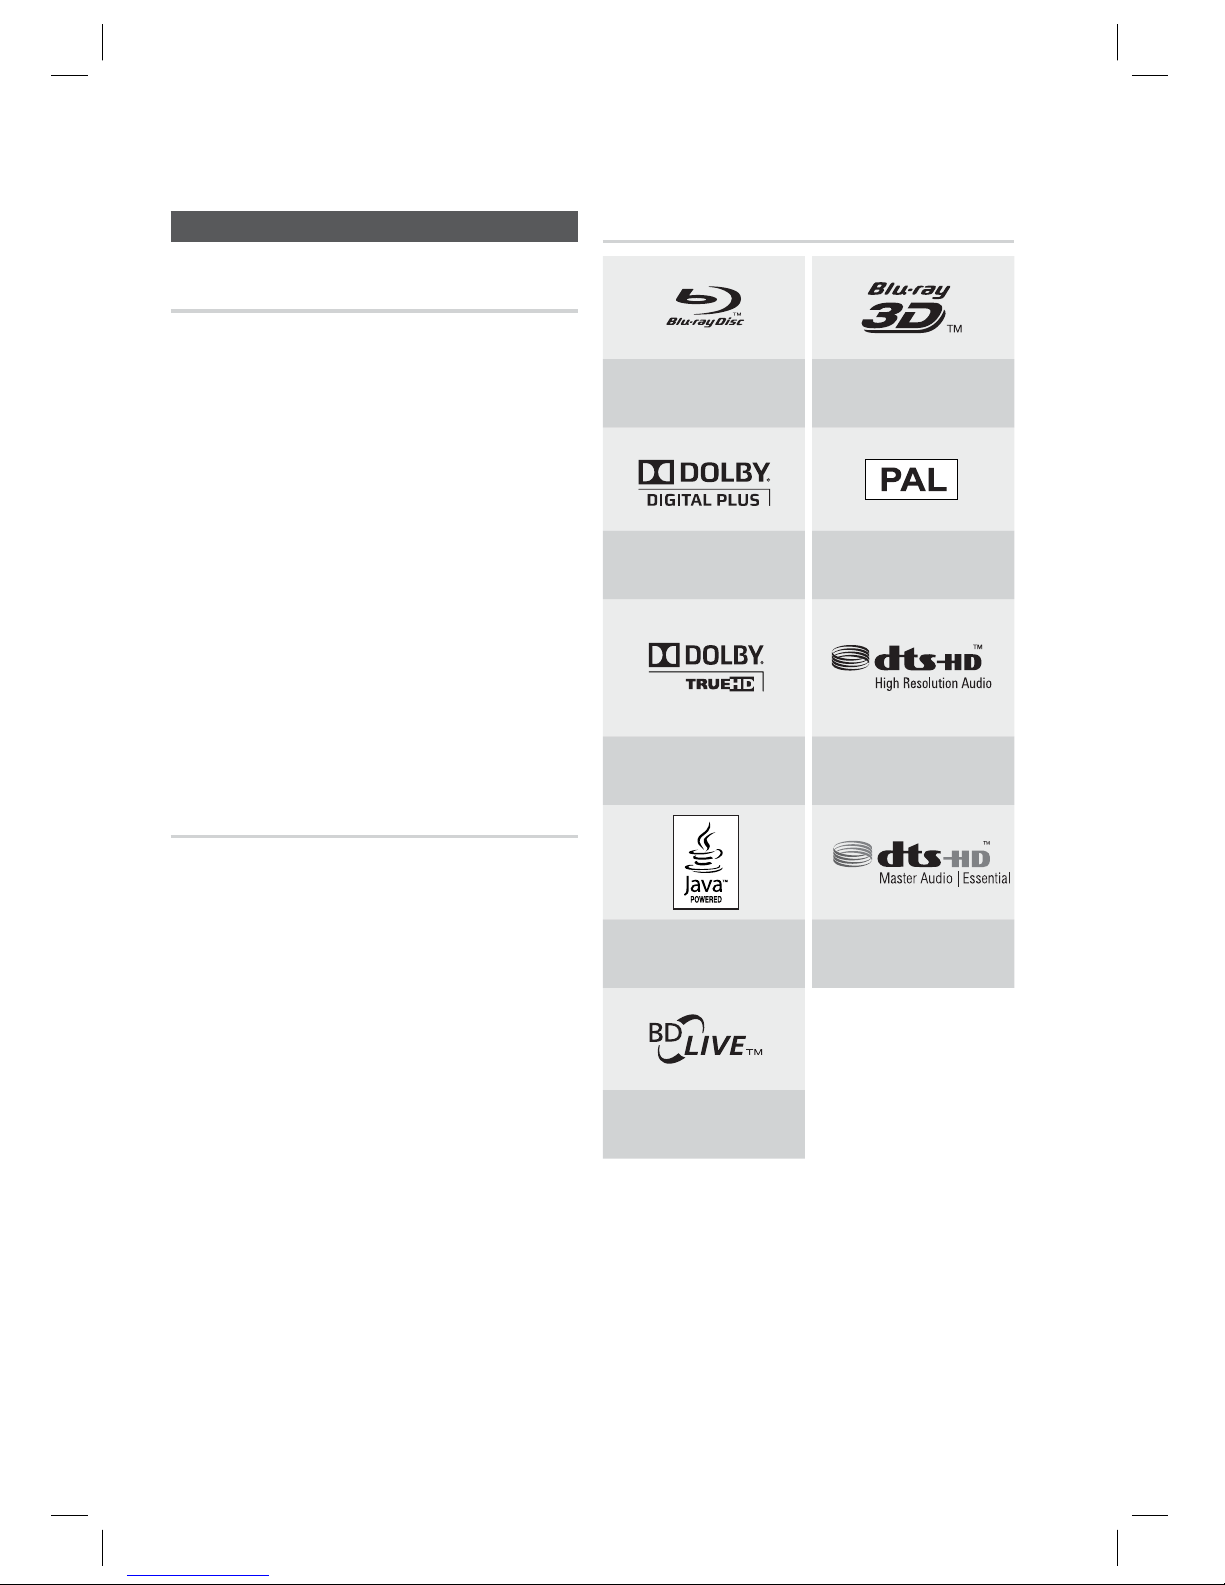
Blu-ray Disc Compatibility
Blu-ray is a new and evolving format. Accordingly, disc
compatibility issues are possible. Not all discs are
compatible and not every disc will play back. For
additional information, refer to the Disc Types and
Characteristics section of this Manual.
NOTE
Playback may not work for some types of discs, or
when specifi c operations, such as angle change
and aspect ratio adjustment, are being performed.
Information about the discs is written in detail on
the box. Please refer to this if necessary.
Do not allow the disc to become dirty or scratched.
Fingerprints, dirt, dust, scratches or deposits of
cigarette smoke on the recording surface may
make it impossible to use the disc for playback.
When a BD-Java title is played, loading may take
longer than a normal title, or some functions may
perform slowly.
Discs that cannot be played
HD DVD Disc
DVD-RAM
3.9 GB DVD-R Disc for Authoring.
DVD-RW(VR mode)
Super Audio CD(except CD layer)
DVD-ROM/PD/MV-Disc, etc CVD/CD-ROM/
CDV/CD-G/CD-I/LD
CDGs play audio only, not graphics.
NOTE
Some commercial discs and DVD discs purchased
outside your region may not be playable with this
product.
If a DVD-R/-RW disc has not been recorded properly
in DVD video format, it will not be playable.
✎
•
•
•
•
•
•
•
✎
Logos of Discs that can be played
Blu-ray Disc 3D Blu-ray Disc
Dolby Digital Plus
PAL broadcast system in
U.K, France, Germany, etc.
Dolby TrueHD
DTS-HD High Resolution
Audio
Java
DTS-HD Master Audio |
Essential
BD-LIVE
HT-D6500_ELS_1226.indd 8HT-D6500_ELS_1226.indd 8 2011-12-26 3:21:332011-12-26 3:21:33
Page 9

English 9
01 Getting Started
Region Code
Both the product and the discs are coded by
region. These regional codes must match in
order to play the disc. If the codes do not match,
the disc will not play.
Disc Type
Region
Code
Area
Blu-ray
A
North America, Central America,
South America, Korea, Japan,
Taiwan, Hong Kong and South
East Asia.
B
Europe, Greenland, French
territories, Middle East, Africa,
Australia and New Zealand.
C
India, China, Russia, Central and
South Asia.
DVD-VIDEO
1
The U.S., U.S. territories and
Canada
2
Europe, Japan, the Middle East,
Egypt, South Africa, Greenland
3
Taiwan, Korea, the Philippines,
Indonesia, Hong Kong
4
Mexico, South America, Central
America, Australia, New Zealand,
Pacifi c Islands, Caribbean
5
Russia, Eastern Europe, India,
most of Africa, North Korea,
Mongolia
6
China
Disc Types
BD-ROM
This Blu-ray disc can only be played back.
This product can play back pre-recorded
commercial BD-ROM discs.
BD-RE/-R
This Blu-ray disc can be recorded and played back.
This product can play back a BD-RE/-R disc
recorded by other compatible Blu-ray disc
recorders.
DVD-VIDEO
This product can play back pre-recorded commercial
DVD discs (DVD-VIDEO discs) with movies.
When switching from the fi rst layer to the second
layer of a dual-layered DVD-VIDEO disc, there
may be momentary distortion in the image and
sound. This is not a malfunction of the
product
.
DVD-RW/-R/+R
This
product
can play back a DVD-RW/-R/+R disc
recorded and fi nalized with a DVD video recorder.
Ability to play back may depend on recording
conditions.
DVD+RW
This product can play back a DVD+RW disc
recorded with a DVD Video recorder. Ability to
play back may depend on recording conditions.
Audio CD (CD-DA)
This
product
can play back CD-DA format audio
CD-RW/-R discs.
The product may not be able to play some CD-
RW/-R discs due to the condition of the
recording.
CD-RW/-R
Use a 700MB(80 minutes) CD-RW/-R disc.
If possible, do not use a 800MB(90 minutes) or
above disc, as the disc may not play back.
If the CD-RW/-R disc was not recorded as a
closed session, you may experience delays when
playing back the beginning of the disc or all
recorded fi les may not play.
Some CD-RW/-R discs may not be playable with
this product, depending on the device which was
used to burn them. For contents recorded on CDRW/-R media from CDs for your personal use,
playability may vary depending on contents and
discs.
•
•
•
•
•
•
•
•
HT-D6500_ELS_1226.indd 9HT-D6500_ELS_1226.indd 9 2011-12-26 3:21:342011-12-26 3:21:34
Page 10

10 English
Getting Started
Disc Format
Using JPEG disc
CD-R/-RW, DVD-RW/-R recorded with UDF or JOLIET format can be played back.
Only JPEG fi les with the ".jpg", ".JPG", ".jpeg" or "JPEG" extension can be displayed.
Progressive JPEG is supported.
DVD-RW/-R (V)
This is a format that is used for recording data on a DVD-RW or DVD-R disc. The disc can be played by this
product once it has been fi nalized.
If a disc that has been recorded in Video Mode by a different maker’s recorder but has not been fi nalized, it
cannot be played by this product.
•
•
•
•
•
Supported File Formats
Video File Support
File Extension Container Video Codec Audio Codec Resolution
*.avi
AVI
DivX 3.11/4.x/5.1/6.0
MP3
AC3
LPCM
ADPCM
DTS Core
1920x1080
H.264 BP/MP/HP
1920x1080
MPEG4 SP/ASP
1920x1080
Motion JPEG
1920x1080
*.mkv
MKV
DivX 3.11/4.x/5.1/6.0
MP3
AC3
LPCM
ADPCM
DTS Core
1920x1080
H.264 BP/MP/HP
1920x1080
MPEG4 SP/ASP
1920x1080
Motion JPEG
1920x1080
*.asf
ASF
DivX 3.11/4.x/5.1/6.0
MP3
AC3
LPCM
ADPCM
WMA
1920x1080
H.264 BP/MP/HP
1920x1080
MPEG4 SP/ASP
1920x1080
Motion JPEG
1920x1080
*.wmv
ASF Window Media Video v9
WMA 1920x1080
*.mp4
MP4
H.264 BP/MP/HP
MP3
ADPCM
AAC
1920x1080
MPEG4 SP/ASP
1920x1080
*.3gp
3GPP
H.264 BP/MP/HP
ADPCM
AAC
HE-AAC
1920x1080
MPEG4 SP/ASP
1920x1080
HT-D6500_ELS_1226.indd 10HT-D6500_ELS_1226.indd 10 2011-12-26 3:21:352011-12-26 3:21:35
Page 11
English 11
01 Getting Started
File Extension Container Video Codec Audio Codec Resolution
*.vro
VRO
VOB
MPEG2
AC3
MPEG
LPCM
1920x1080
MPEG1
352x288
*.mpg
*.mpeg
PS
MPEG1
AC3
MPEG
LPCM
AAC
352x288
MPEG2
1920x1080
H.264
1920x1080
*.ts
*.tp
*.trp
TS
MPEG2
AC3
AAC
MP3
DD+
HE-AAC
1920x1080
H.264
1920x1080
VC1
1920x1080
Restrictions
Some of the Codecs above listed are not supported if having a problem with the contents.
Video source with incorrect container information or if corrupt will not be played properly.
AV source with more than the standard bit rate or frame rate may not be played properly.
If the index table is corrupt, the Seek (Jump) function will not be supported.
If you play a video via the network, it may not be played properly depending on the network status.
Video decoder
Up to H.264 Level 4.1 supported.
H.264 FMO/ASO/RS, VC1 SP/MP/AP L4, AVCHD not supported.
MPEG4 SP, ASP :
- Below 1280 x 720: 60 frame max
- Above 1280 x 720: 30 frame max
GMC 2 or higher not supported.
Audio decoder
Up to WMA 7,8,9 supported.
WMA 9 PRO with more than two channels (multi-channel) not supported.
WMA 9 Lossless, Voice not supported.
WMA sampling rate at 22050Hz mono not supported.
Music File Support
File Extension Container Audio Codec Support Range
*.mp3
MP3
MP3 -
*.wma
WMA
WMA
Compliant with WMA version 10
* Sampling rates (in kHz) - 8, 11, 16, 22, 32,
44.1, 48
* Bit rates - All bit-rates in the range 5kbps to
384kbps
•
•
•
•
•
•
•
•
•
•
•
•
•
HT-D6500_ELS_1226.indd 11HT-D6500_ELS_1226.indd 11 2011-12-26 3:21:352011-12-26 3:21:35
Page 12

12 English
Getting Started
Accessories
Check for the supplied accessories below.
Video Cable FM Antenna iPod Dock User's Manual
FUNCTION
TV SOURCE
POWER
DISC MENU MENU TITLE MENU
MUTE
SFE MODE
VOL
TUNING
/CH
TOOLS
RETURN
EXIT
INFO
AB
HUB
CD
TUNER
MEMORY
S/W LEVEL
DĺD
MO/ST
D SOUND
DSP
PL
vTuner
SMART SEARCH
REPEATFULL SCREEN
123
456
7809
POPUP
TV
BD
RECEIVER SLEEP
TARDS DISPLAY
PTY- PTY SEARCH PTY+
iPod SYNC
(For Power cord)
Remote Control/
Batteries (AAA size)
ASC Microphone Soft Cloth Toroidal Ferrite Core
Notes on USB connection
Supported devices:
USB storage media, MP3 player, digital camera,
USB card reader
Does not support if a folder or fi le name is
longer than 125 characters.
A subtitle fi le bigger than 300 KB may not be
properly displayed.
A certain USB/digital camera device may not
be compatible with the product.
FAT16 and FAT32 fi le systems are
supported.
Photo (JPEG), music (MP3) and video fi le
should have their names in Korean or English.
Otherwise, the fi le may not played.
1)
2)
3)
4)
5)
Connect directly to the product's USB port.
Connecting through another cable may raise
problems with USB compatibility.
Inserting more than one memory device to a
multi-card reader may not operate properly.
PTP protocol for digital camera is not
supported.
Do not disconnect USB device during a
"loading" process.
Bigger the image resolution, the longer the
delay to displaying.
DRM applied MP3 fi les downloaded from a
commercial site are not played back.
6)
7)
8)
9)
10)
11)
HT-D6500_ELS_1226.indd 12HT-D6500_ELS_1226.indd 12 2011-12-26 3:21:352011-12-26 3:21:35
Page 13
English 13
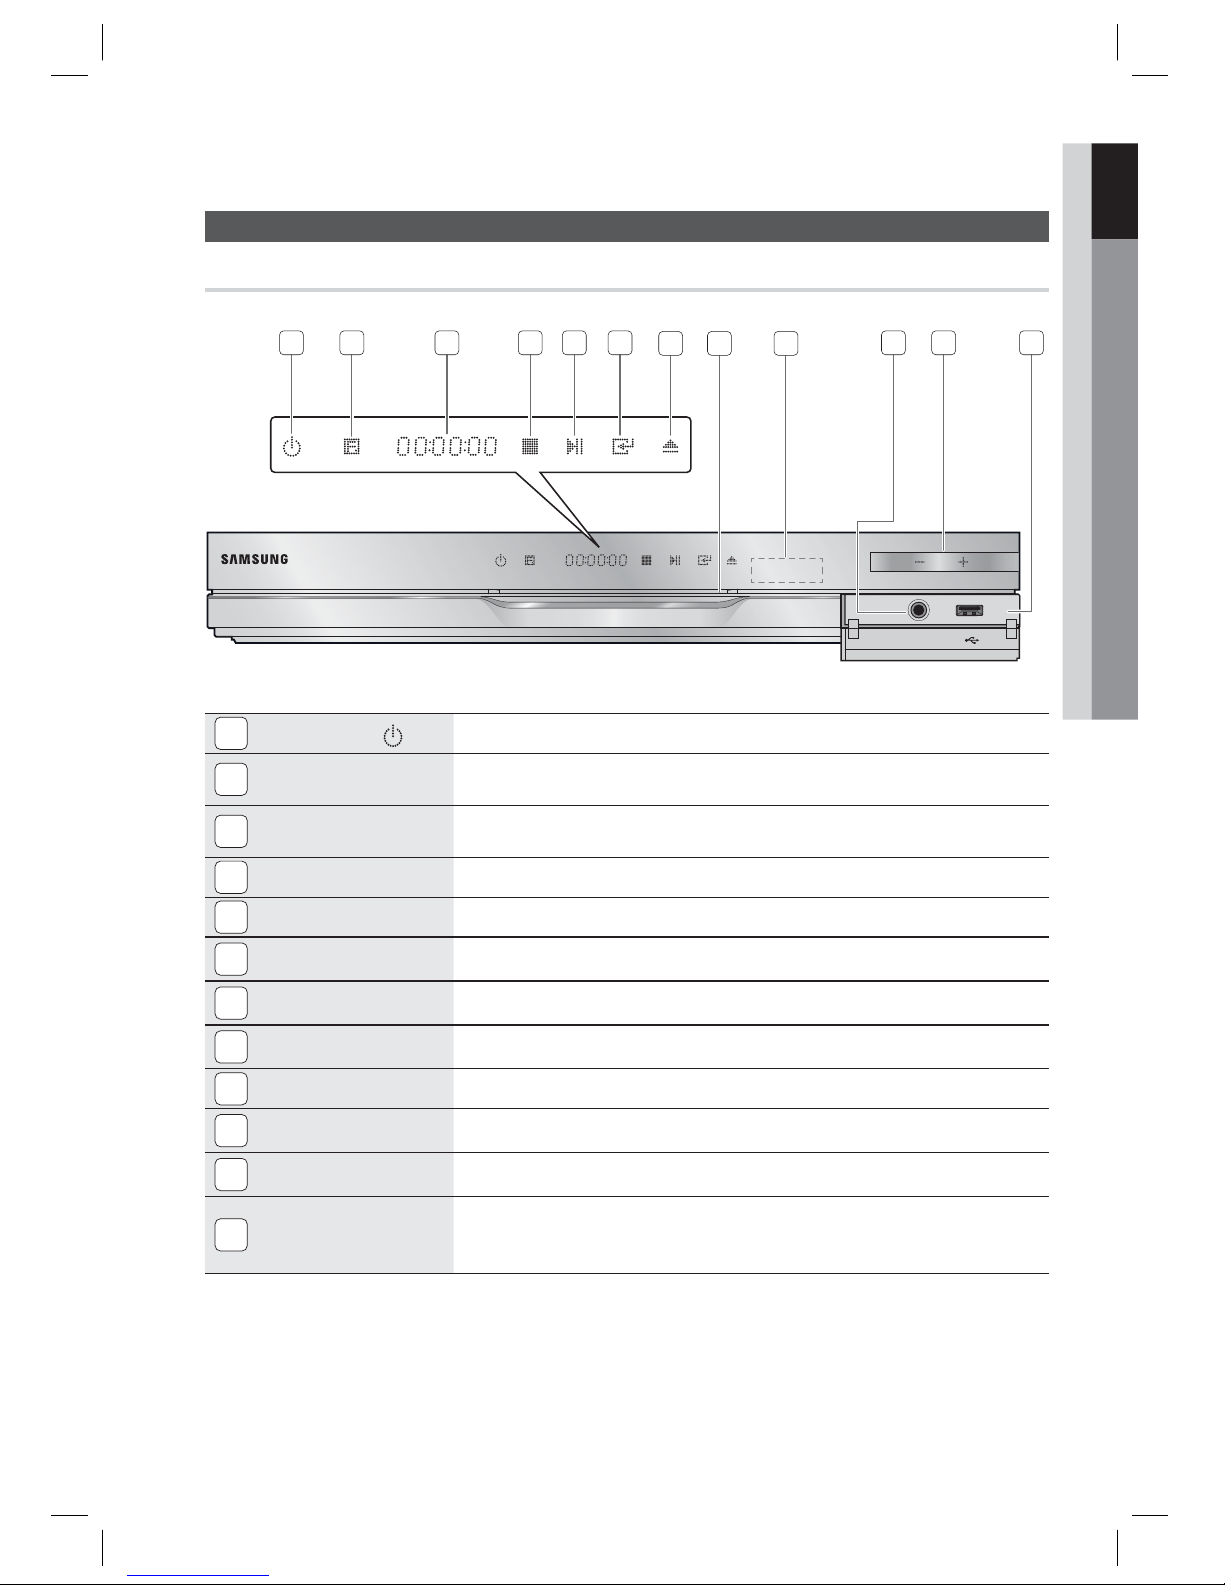
01 Getting Started
Description
Front Panel
1
POWER BUTTON ( )
Turns the product on and off.
2
FUNCTION BUTTON
The mode switches as follows :
BD/DVD D. IN AUX R. IPOD W. IPOD H. IN1 H. IN2 FM
3
DISPLAY
Displays the playing status, time, etc.
4
STOP BUTTON
Stops disc playback.
5
PLAY/PAUSE BUTTON
Plays a disc or pauses playback.
6
ENTER BUTTON
Selects menu items or starts a Blu-ray disc. (It will not start a DVD disc.)
7
EJECT BUTTON
Ejects a Disc.
8
DISC SLOT
Insert disc here.
9
REMOTE CONTROL SENSOR
Detects signals from the remote control.
10
ASC IN JACK
Used to connect the ASC Microphone for setting up MAC (Musical Auto Calibration).
11
VOLUME CONTROL
Volume adjustment.
12
USB PORT
You can connect a USB memory fl ash stick here and use it as storage when the product is
connected to BD-LIVE. You can also use the USB Host for software upgrades and MP3/JPEG/
DivX/MKV/MP4 playback. And also it is possible to use R. IPOD when iPod is connected.
NOTE
You can perform software upgrades using the USB Host jack with a USB memory fl ash stick only.
When the product displays the Blu-ray disc menu, you cannot start the movie by pressing the PLAY button on the
product or the remote. To play the movie, you must select Play Movie or Start in the disc menu, and then press the
ENTER button.
✎
ASC IN
5V
500mA
1 32 4 5
10 11
6
7128 9
HT-D6500_ELS_1226.indd 13HT-D6500_ELS_1226.indd 13 2011-12-26 3:21:362011-12-26 3:21:36
Page 14
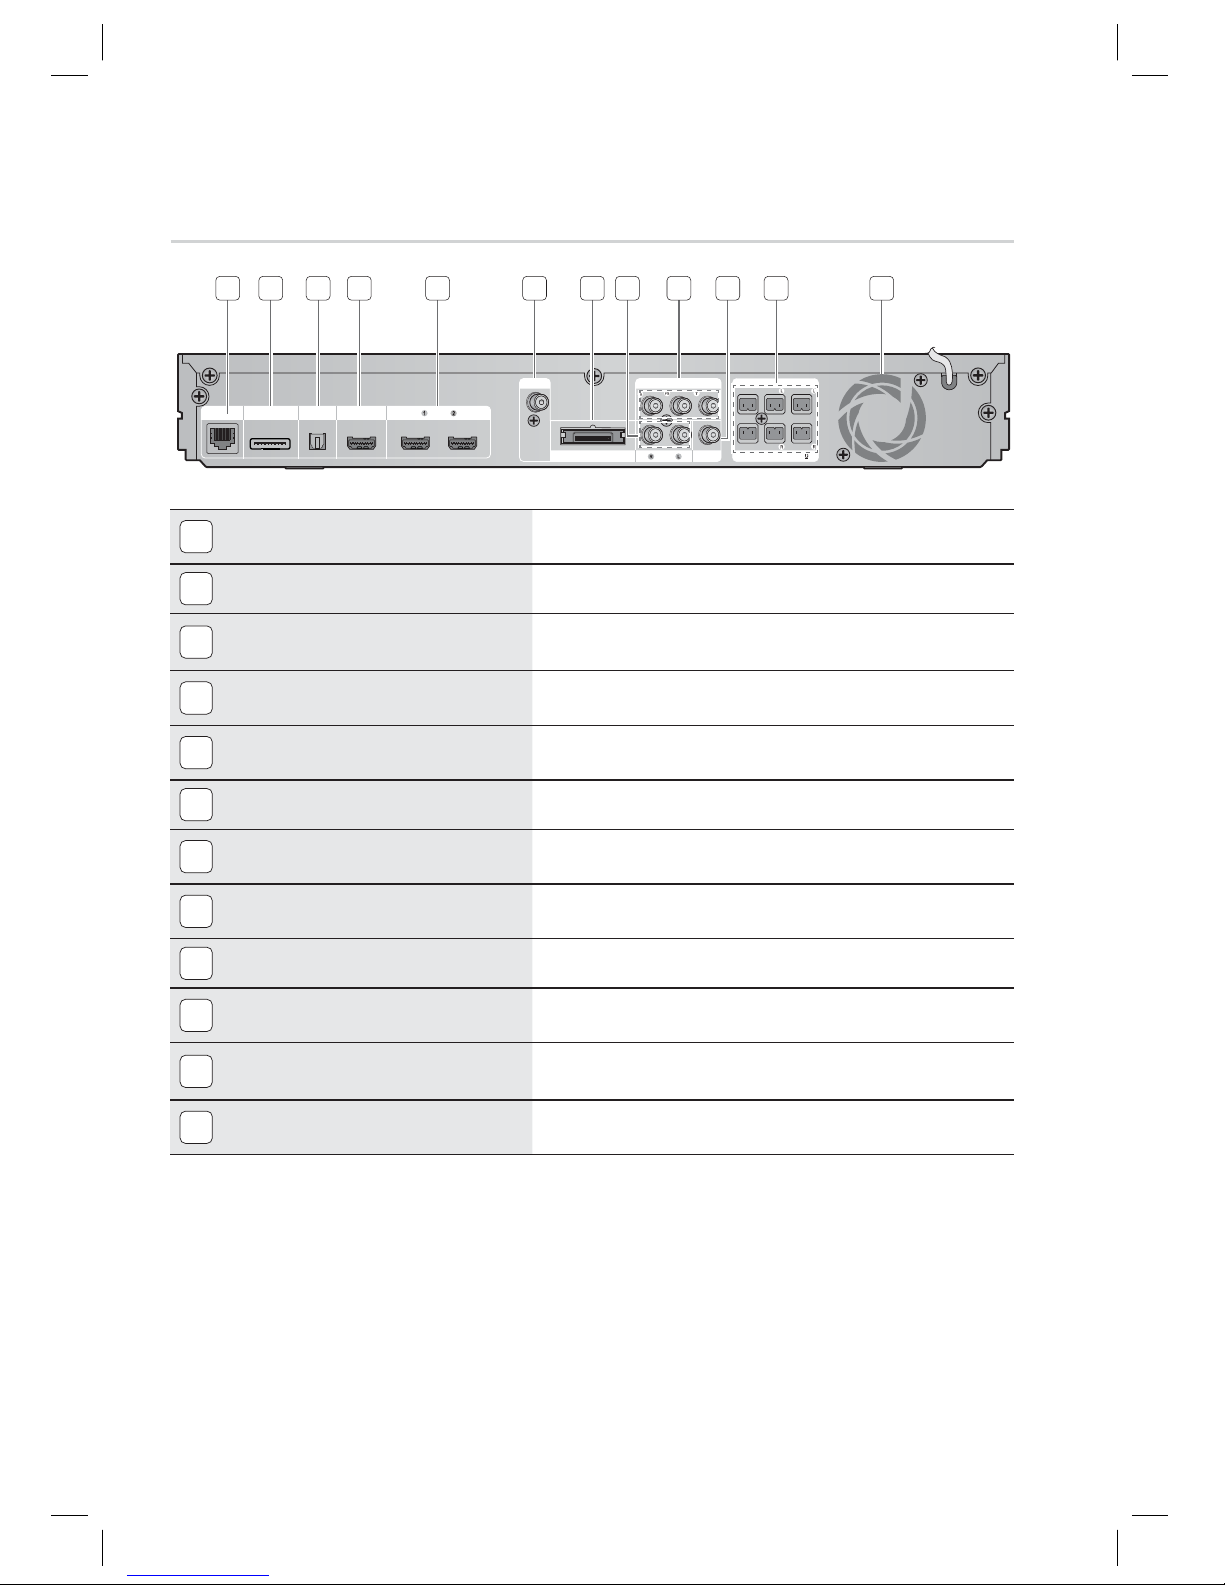
14 English
Getting Started
1
LAN TERMINAL
Can be used for network based services (see pages 61~70),
BD-LIVE and software upgrade under the network connection.
2
iPod JACK
Connect the iPod dock connector here.
3
EXTERNAL DIGITAL AUDIO IN JACK
(OPTICAL)
Use this to connect external equipment capable of digital output.
4
HDMI OUT JACK
Use an HDMI cable, connect this HDMI output terminal to the HDMI
input terminal on your TV for the best quality picture.
5
HDMI IN JACKS
Receives digital video and audio signals simultaneously using an
HDMI cable.
6
FM ANTENNA JACK
Connect the FM antenna.
7
TX CARD CONNECTION (WIRELESS)
The TX card enables communication between the product and the
optional wireless receiver module.
8
AUX IN JACKS
Connect to the 2CH analogue output of an external device
(such as a VCR)
9
COMPONENT VIDEO OUT JACKS
Connect a TV with Component video inputs to these jacks.
10
VIDEO OUT JACK
Connect your TV's Video Input jack (VIDEO IN) to the VIDEO OUT
Jack on this product.
11
5.1 CHANNEL SPEAKER OUTPUT
CONNECTORS
Connect the front, centre, surround, subwoofer speakers.
12
COOLING FAN
The cooling fan supplies cool air to the product to prevent overheating
and always revolves when the power is on.
CAUTION
Ensure a minimum of 10 cm of clear space on all sides of the cooling fan when installing the product.
Do not obstruct the cooling fan or ventilation holes.
!
Rear Panel
FM ANT
WIRELESS
VIDEO OUTAUX IN
LAN iPod HDMI OUT
DIGITAL
AUDIO IN
OPTICAL
COMPONENT OUT
HDMI IN
FRONT
SPEAKERS OUT
SPEAKER IMPEDANCE : 3
SURROUND
SUBWOOFER
CENTER FRONT
SURROUND
1 2 3 4 5 6 7 8
9 10 11 12
HT-D6500_ELS_1226.indd 14HT-D6500_ELS_1226.indd 14 2011-12-26 3:21:382011-12-26 3:21:38
Page 15
English 15
01 Getting Started
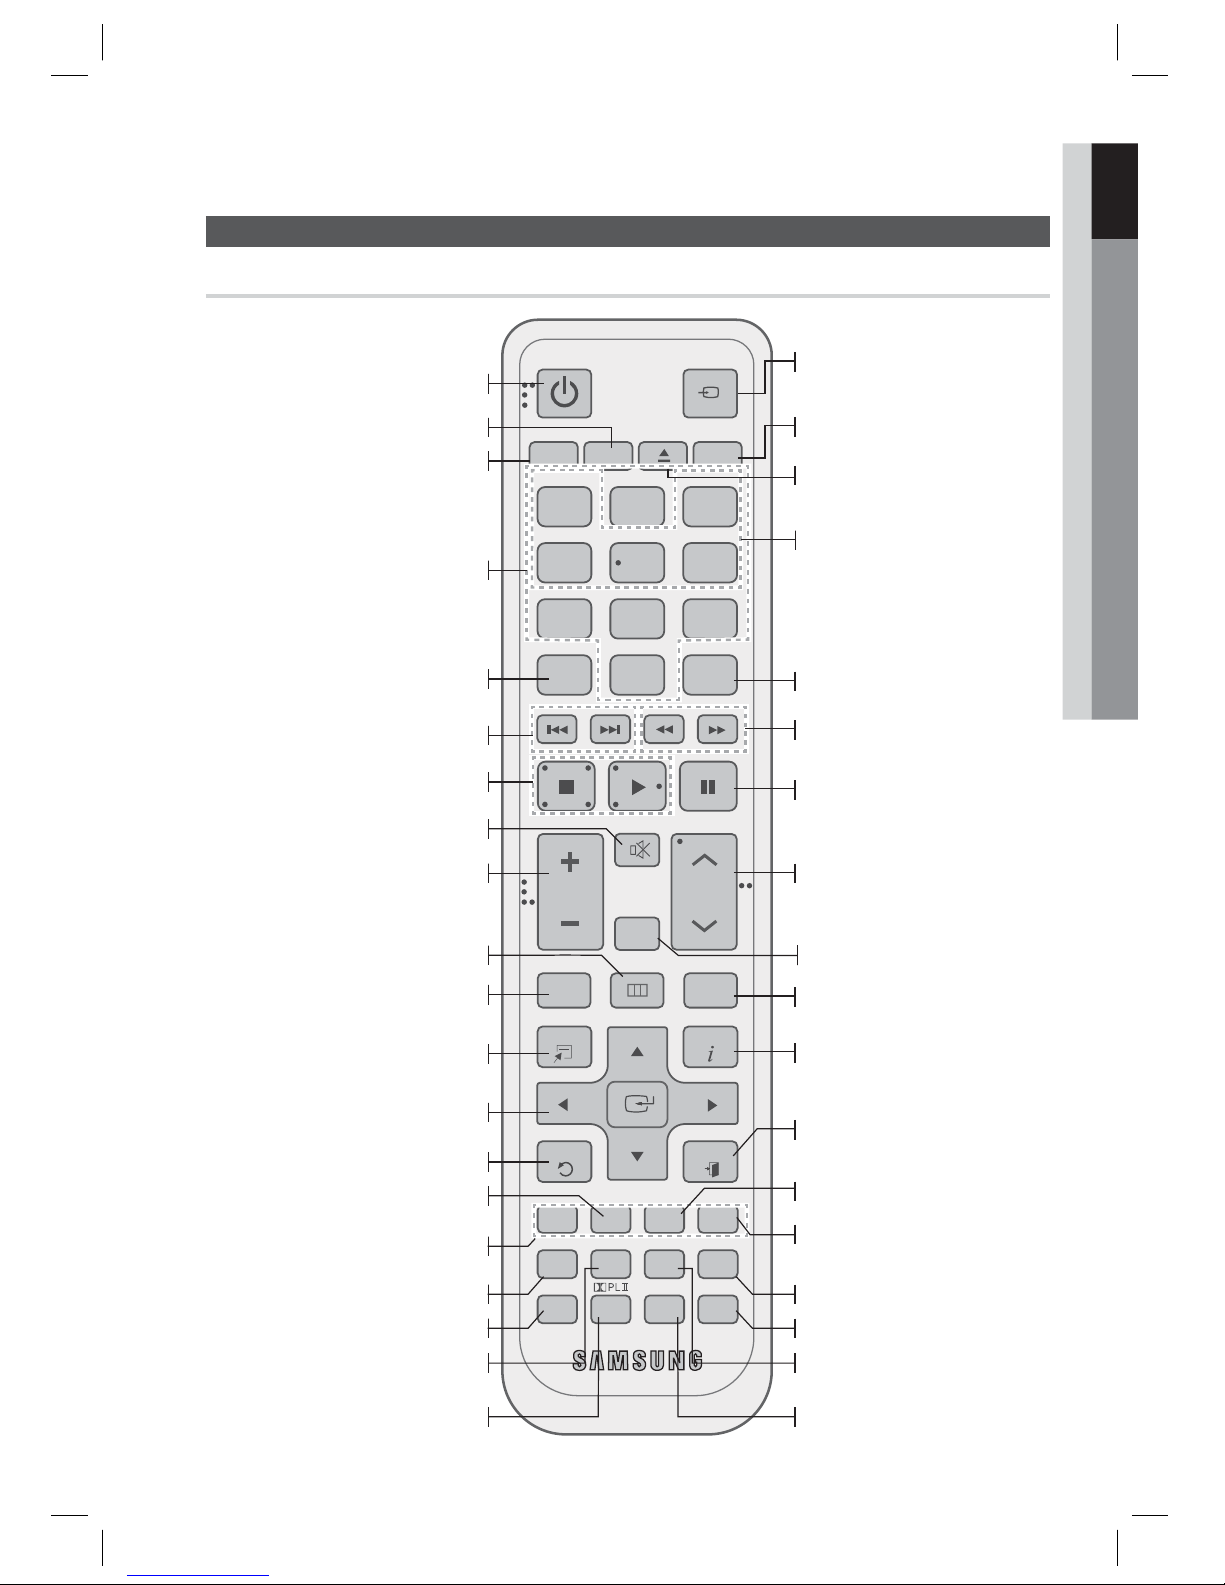
Remote Control
Tour of the Remote Control
FUNCTION
TV SOURCE
POWER
DISC MENU MENU TITLE MENU
MUTE
SFE MODE
VOL
TUNING
/CH
TOOLS
RETURN
EXIT
INFO
AB
HUB
CD
MO/ST
DĺDSMART SEARCH
iPod SYNC
vTunerD SOUND
REPEATFULL SCREEN
12
456
7809
POPUP
RECEIVER SLEEP
BD TV
TUNER
MEMORY
DSP
RDS DISPLAY
TA
PTY+PTY SEARCHPTY-
S/W LEVEL
Turn the product on and off.
If you want to change to Home Cinema,
press the BD button.
Press numeric buttons to operate options.
Set a Sleep time to shut off the
product.
This is mode selection button.
or
Press to select TV's video mode.
Select MONO or STEREO for radio
broadcasting.
Press to skip backwards or forwards.
Press to search backwards or
forwards.
Press to pause a disc.
Adjust the volume.
Search for active FM stations and
change channels.
Cut off the sound temporarily.
You can set the SFE(Sound Field
Effect) mode best suited for the
type of music you are listening to.
Press to view the disc menu.
Press this to move to the home menu.
Select on-screen menu items and
change menu value.
Return to the previous menu.
Allows you to repeat a title, chapter,
track or disc.
Press this to exit the menu.
Use this to display the playback
information when playing
a Blu-ray/DVD disc.
Used to set a preset radio frequency.
These buttons are used both for menus
on the product and also several
Blu-ray Disc functions.
Use this to enter the popup
menu/title menu.
Press this to see the full screen on a TV.
Press this to use the Tools menu.
Press this to use the Smart Hub.
Select the desired Dolby Pro
Logic II audio mode.
If you want to change to TV mode,
press the TV button.
Press to stop/play a disc.
Correct the audio synchronization
when playing the iPod video content.
Press this to search a contents.
Used to adjust the level of the
subwoofer.
Regulate and stabilize the volume
level. (Digital Signal Processor)
Press to apply 3D Sound effect.
Press to enjoy an ordinary 2D video
in 3D mode.
Press this to use the vTuner.
Use the RDS function to receive
FM stations.
To eject the disc.
HT-D6500_ELS_1226.indd 15HT-D6500_ELS_1226.indd 15 2011-12-26 3:21:392011-12-26 3:21:39
Page 16
16 English
Getting Started
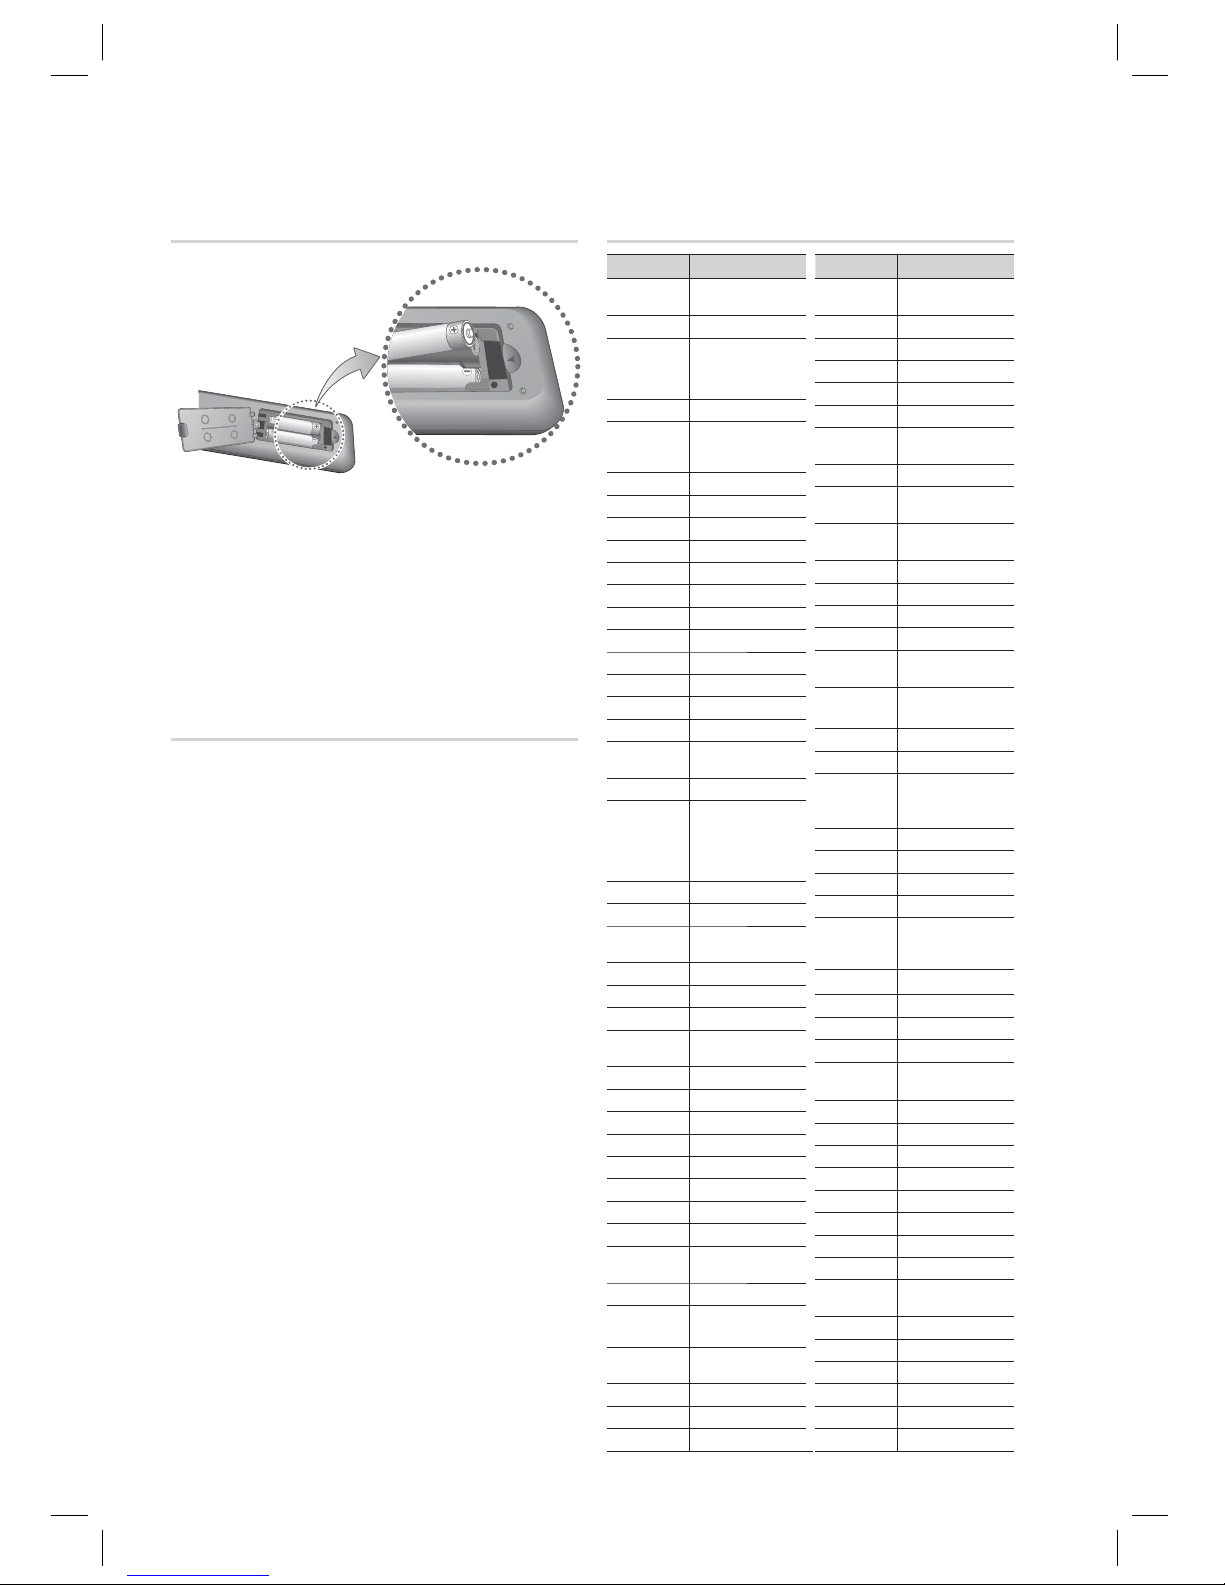
Installing batteries in the Remote Control
NOTE
Make sure to match the “+” and “–” ends of
the batteries with the diagram inside the
compartment.
Assuming typical TV usage, the batteries last
for about one year.
The remote control can be used up to
approximately 7 meters in a straight line.
Setting the Remote Control
You can control certain functions of your TV with
this remote control.
When operating a TV with the remote control
Press the TV button to set the remote control
to TV mode.
Press the POWER button to turn on the TV.
While holding down the POWER button, enter
the code corresponding to your brand of TV.
If there is more than one code listed for
your TV in the table, enter one at a time to
determine which code works.
Example : For a Samsung TV
While holding down the POWER button, use the
number buttons to enter 00, 15, 16, 17 and 40.
If the TV turns off, the setting is complete.
You can use the TV POWER, VOLUME,
CHANNEL, and Numeric buttons (0~9).
NOTE
The remote control may not work on some
brands of TV's. Also, some operations may not
be possible, depending on your brand of TV.
The remote control will work with Samsung TVs
by default.
✎
1.
2.
3.
•
•
4.
•
✎
TV Brand Code List
* Battery size: AAA
Brand Code
Admiral
(M.Wards)
56, 57, 58
A Mark
01, 15
Anam
01, 02, 03, 04, 05,
06, 07, 08, 09, 10,
11, 12, 13, 14
AOC
01, 18, 40, 48
Bell &
Howell
(M.Wards)
57, 58, 81
Brocsonic
59, 60
Candle
18
Cetronic
03
Citizen
03, 18, 25
Cinema
97
Classic
03
Concerto
18
Contec
46
Coronado
15
Craig
03, 05, 61, 82, 83, 84
Croslex
62
Crown
03
Curtis
Mates
59, 61, 63
CXC
03
Daewoo
02, 03, 04, 15, 16,
17, 18, 19, 20, 21,
22, 23, 24, 25, 26,
27, 28, 29, 30, 32,
34, 35, 36, 48, 59, 90
Daytron
40
Dynasty
03
Emerson
03, 15, 40, 46, 59, 61,
64, 82, 83, 84, 85
Fisher
19, 65
Funai
03
Futuretech
03
General
Electric (GE)
06, 40, 56, 59,
66, 67, 68
Hall Mark
40
Hitachi
15, 18, 50, 59, 69
Inkel
45
JC Penny
56, 59, 67, 86
JVC
70
KTV
59, 61, 87, 88
KEC
03, 15, 40
KMC
15
LG
(Goldstar)
01, 15, 16, 17, 37, 38,
39, 40, 41, 42, 43, 44
Luxman
18
LXI
(Sears)
19, 54, 56, 59,
60, 62, 63, 65, 71
Magnavox
15, 17, 18, 48, 54,
59, 60, 62, 72, 89
Marantz
40, 54
Matsui
54
MGA
18, 40
Brand Code
Mitsubishi/
MGA
18, 40, 59, 60, 75
MTC
18
NEC
18, 19, 20, 40, 59, 60
Nikei
03
Onking
03
Onwa
03
Panasonic
06, 07, 08, 09, 54,
66, 67, 73, 74
Penney
18
Philco
03, 15, 17, 18, 48,
54, 59, 62, 69, 90
Philips
15, 17, 18, 40,
48, 54, 62, 72
Pioneer
63, 66, 80, 91
Portland
15, 18, 59
Proton
40
Quasar
06, 66, 67
Radio
Shack
17, 48, 56, 60,
61, 75
RCA/
Proscan
18, 59, 67, 76, 77,
78, 92, 93, 94
Realistic
03, 19
Sampo
40
Samsung
00, 15, 16, 17, 40,
43, 46, 47, 48, 49,
59, 60, 98
Sanyo
19, 61, 65
Scott
03, 40, 60, 61
Sears
15, 18, 19
Sharp
15, 57, 64
Signature
2000
(M.Wards)
57, 58
Sony
50, 51, 52, 53, 55
Soundesign
03, 40
Spectricon
01
SSS
18
Sylvania
18, 40, 48, 54,
59, 60, 62
Symphonic
61, 95, 96
Tatung
06
Techwood
18
Teknika
03, 15, 18, 25
TMK
18, 40
Toshiba
19, 57, 63, 71
Vidtech
18
Videch
59, 60, 69
Wards
15, 17, 18, 40,
48, 54, 60, 64
Yamaha
18
York
40
Yupiteru
03
Zenith
58, 79
Zonda
01
Dongyang
03, 54
HT-D6500_ELS_1226.indd 16HT-D6500_ELS_1226.indd 16 2011-12-26 3:21:392011-12-26 3:21:39
Page 17
English 17
02 Connections
Connections
This section involves various methods of connecting the product to other external components.
Before moving or installing the product, be sure to turn off the power and disconnect the power cord.
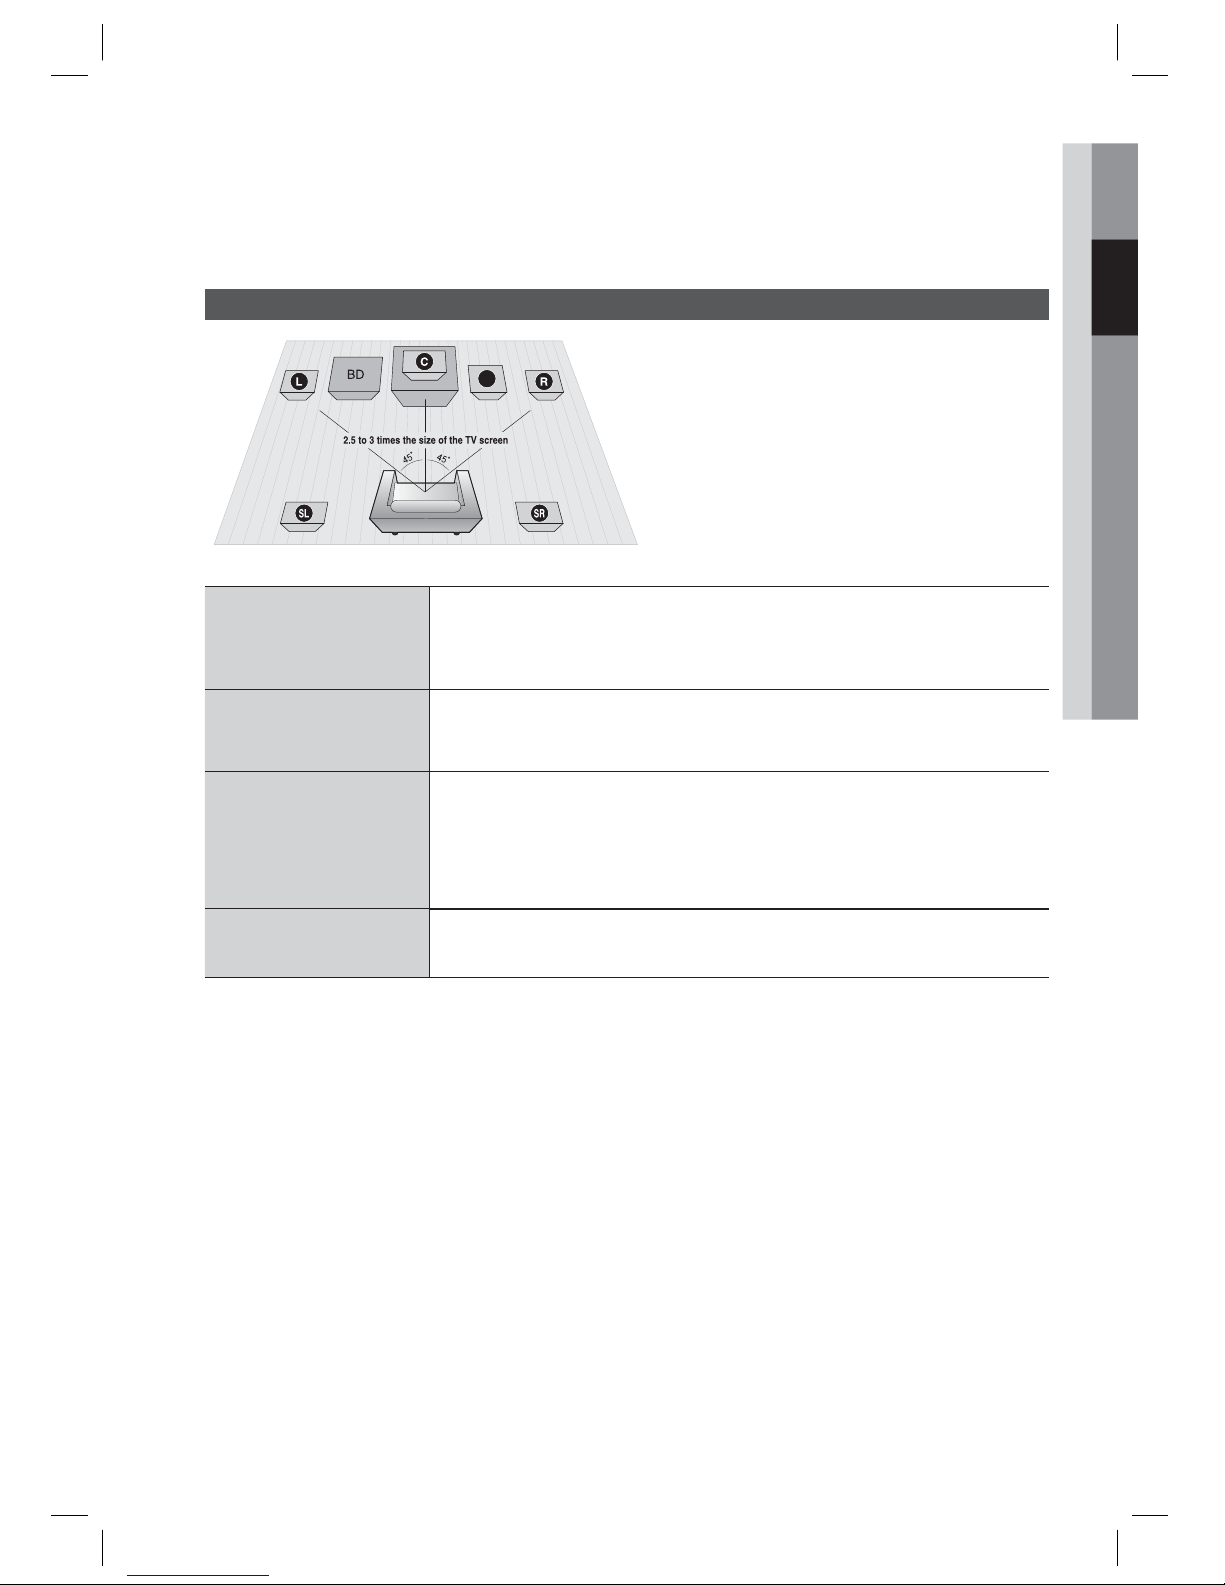
Connecting the Speakers
Front Speakers
ei
Place these speakers in front of your listening position, facing inwards (about 45°)
toward you. Place the speakers so that their tweeters will be at the same height
as your ear. Align the front face of the front speakers with the front face of the
centre speaker or place them slightly in front of the centre speakers.
Centre Speaker
f
It is best to install it at the same height as the front speakers. You can also install it
directly over or under the TV.
Surround Speakershj
Place these speakers to the side of your listening position.
If there isn't enough
room, place these speakers so they face each other. Place them about 60 to
90cm above your ear, facing slightly downward.
*
Unlike the front and centre speakers, the surround speakers are used to
handle mainly sound effects and sound will not come from them all the time.
Subwoofer
g
The position of the subwoofer is not so critical. Place it anywhere you like.
Position of the product
Place it on a stand or cabinet shelf, or under the TV
stand.
Selecting the Listening Position
The listening position should be located about 2.5 to 3
times the distance of the TV's screen size away from
the TV.
Example : For 32" TV's 2~2.4m
For 55" TV's 3.5~4m
SW
NOTE
If you place a speaker near your TV set, screen colour may be distorted because of the magnetic fi eld generated by the
speaker. If this occurs, place the speaker away from your TV set.
✎
CAUTION
Do not let children play with or near the speakers. They could get hurt if a speaker falls.
When connecting the speaker wires to the speakers, make sure that the polarity (+/ –) is correct.
Keep the subwoofer speaker out of reach of children so as to prevent children from inserting their hands or alien substances
into the duct (hole) of the subwoofer speaker.
Do not hang the subwoofer on the wall through the duct (hole).
!
HT-D6500_ELS_1226.indd 17HT-D6500_ELS_1226.indd 17 2011-12-26 3:21:402011-12-26 3:21:40
Page 18

18 English
Connections
FRONT
SPEAKERS OUT
SPEAKER IMPEDANCE : 3
VIDEO OUT
SURROUND
SUBWOOFER
CENTER FRONT
SURROUND
ONENT OUT
VIDEO OUT
NT OUT
FRONT
SPEAKERS OUT
SPEAKER IMPEDANCE : 3
SURROUND
SUBWOOFER
CENTER FRONT
SURROUND
Centre Speaker
Front Speaker (R)
Subwoofer
Surround Speaker (R)
Front Speaker (L)
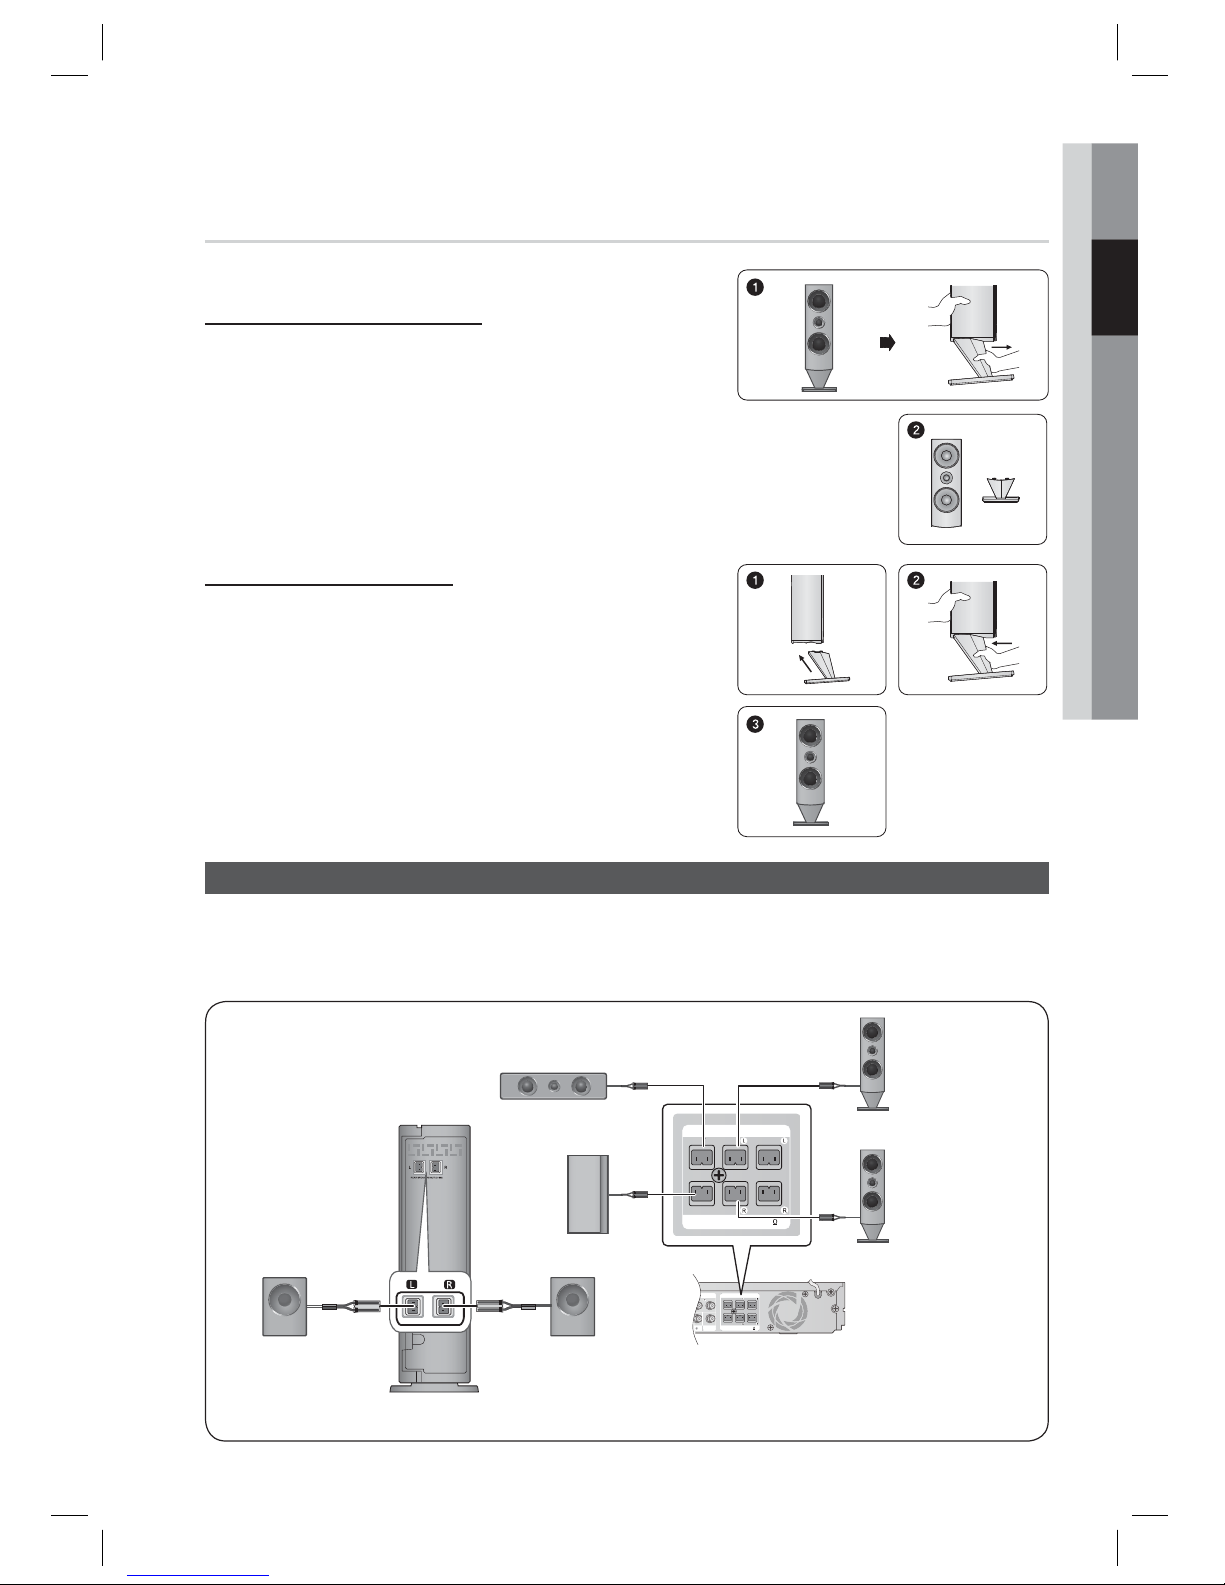
Connecting The Speakers
Press down the terminal tab on the back of the speaker.
Insert the black wire into the black terminal (–) and the red wire into the
red terminal (+), and then release the tab.
Connect the connecting plugs to the back of the product by matching the
colours of the speaker plugs to the speaker jacks.
1.
2.
3.
Black
Red
Surround Speaker (L)
Speaker Components
FRONT
SURROUND
CENTRE
SUBWOOFER
SPEAKER CABLE
(L)
(L) (R)
(R)
HT-D6500_ELS_1226.indd 18HT-D6500_ELS_1226.indd 18 2011-12-26 3:21:412011-12-26 3:21:41
Page 19
English 19
02 Connections
Connecting the Optional Wireless Receiver Module
To connect the surround speakers wirelessly, you have to purchase the wireless receiver module and
TX card from your Samsung retailer.
This product should be connected with the SWA-5000 only.
•
FRONT
SPEAKERS OUT
SPEAKER IMPEDANCE : 3
VIDEO OUT
SURROUND
SUBWOOFER
CENTER FRONT
SURROUND
ONENT OUT
VIDEO OUT
NT OUT
FRONT
SPEAKERS OUT
SPEAKER IMPEDANCE : 3
SURROUND
SUBWOOFER
CENTER FRONT
SURROUND
Front Speaker (R)
Subwoofer
Centre Speaker
Wireless Receiver Module
Surround
Speaker (L)
Front Speaker (L)
Surround
Speaker (R)
How to install the speaker
Connect the stand in the arrow direction so that it fi ts the
corresponding holes (x4) on the speaker.
Fully insert the stand in the arrow direction as shown.
This is the appearance after the speaker unit is installed.
1.
2.
3.
Removing/Installing the speaker on the stand
* Front Speakers only
How to remove the speaker
If you attach the speaker on the wall, remove the stand
before using it.
Pull out the stand in the arrow direction as shown.
Be careful not to put excessive force when removing it.
Otherwise, it can be damaged.
This is the appearance after the stand is removed.
1.
•
2.
HT-D6500_ELS_1226.indd 19HT-D6500_ELS_1226.indd 19 2011-12-26 3:21:462011-12-26 3:21:46
Page 20
20 English
Connections
CAUTION
Do not insert any other card except the TX card dedicated to
the product.
If a different TX card is used, the product may be damaged or
the card may not be removed easily.
Do not insert the TX card upside down or in the reverse direction.
Insert the TX card when the product is turned off. Inserting the card when it is turned on may
cause a problem.
The wireless receiving antenna is built into the wireless receiver module. Keep it away from water
and moisture.
For optimal listening performance, make sure that the area around the wireless receiver module
location is clear of any obstructions.
If no sound is heard from the wireless surround speakers, switch the mode to Dolby Pro
Logic II.
In 2-CH mode, no sound will be heard from the wireless surround speakers.
NOTE
Place the wireless receiver module at the rear of the listening position. If the wireless receiver module is
too close to the product, some sound interruption may be heard due to interference.
If you use a device such as a microwave oven, wireless LAN Card or any other device that uses
the same frequency (2.4/5.8GHz) near the product, some sound interruption may be heard due
to interference.
The transmission distance from the product to the wireless receiver module is about 10m, but may
vary depending on your operating environment. If a steel-concrete wall or metallic wall is between
the product and the wireless receiver module, the system may not operate at all, because the radio
wave cannot penetrate metal.
If the product doesn't make wireless connection, the system needs ID Setting between the
product and wireless receiver module.
With the main unit turned off, press the remote control's
"0""1""3""5" number buttons and then turn on the unit.
With the wireless receiver module
turned on, press "ID SET" button on the back of the wireless receiver module for 5 seconds.
And then power on the product (HT-D6500).
!
✎
Wireless Receiver Module (SWA-5000)
Press down the terminal tab on the back of the speaker.
Insert the black wire into the black terminal (–) and the red wire into the
red terminal (+), and then release the tab.
Connect the connecting plugs to the back of the product by matching the
colours of the speaker plugs to the speaker jacks.
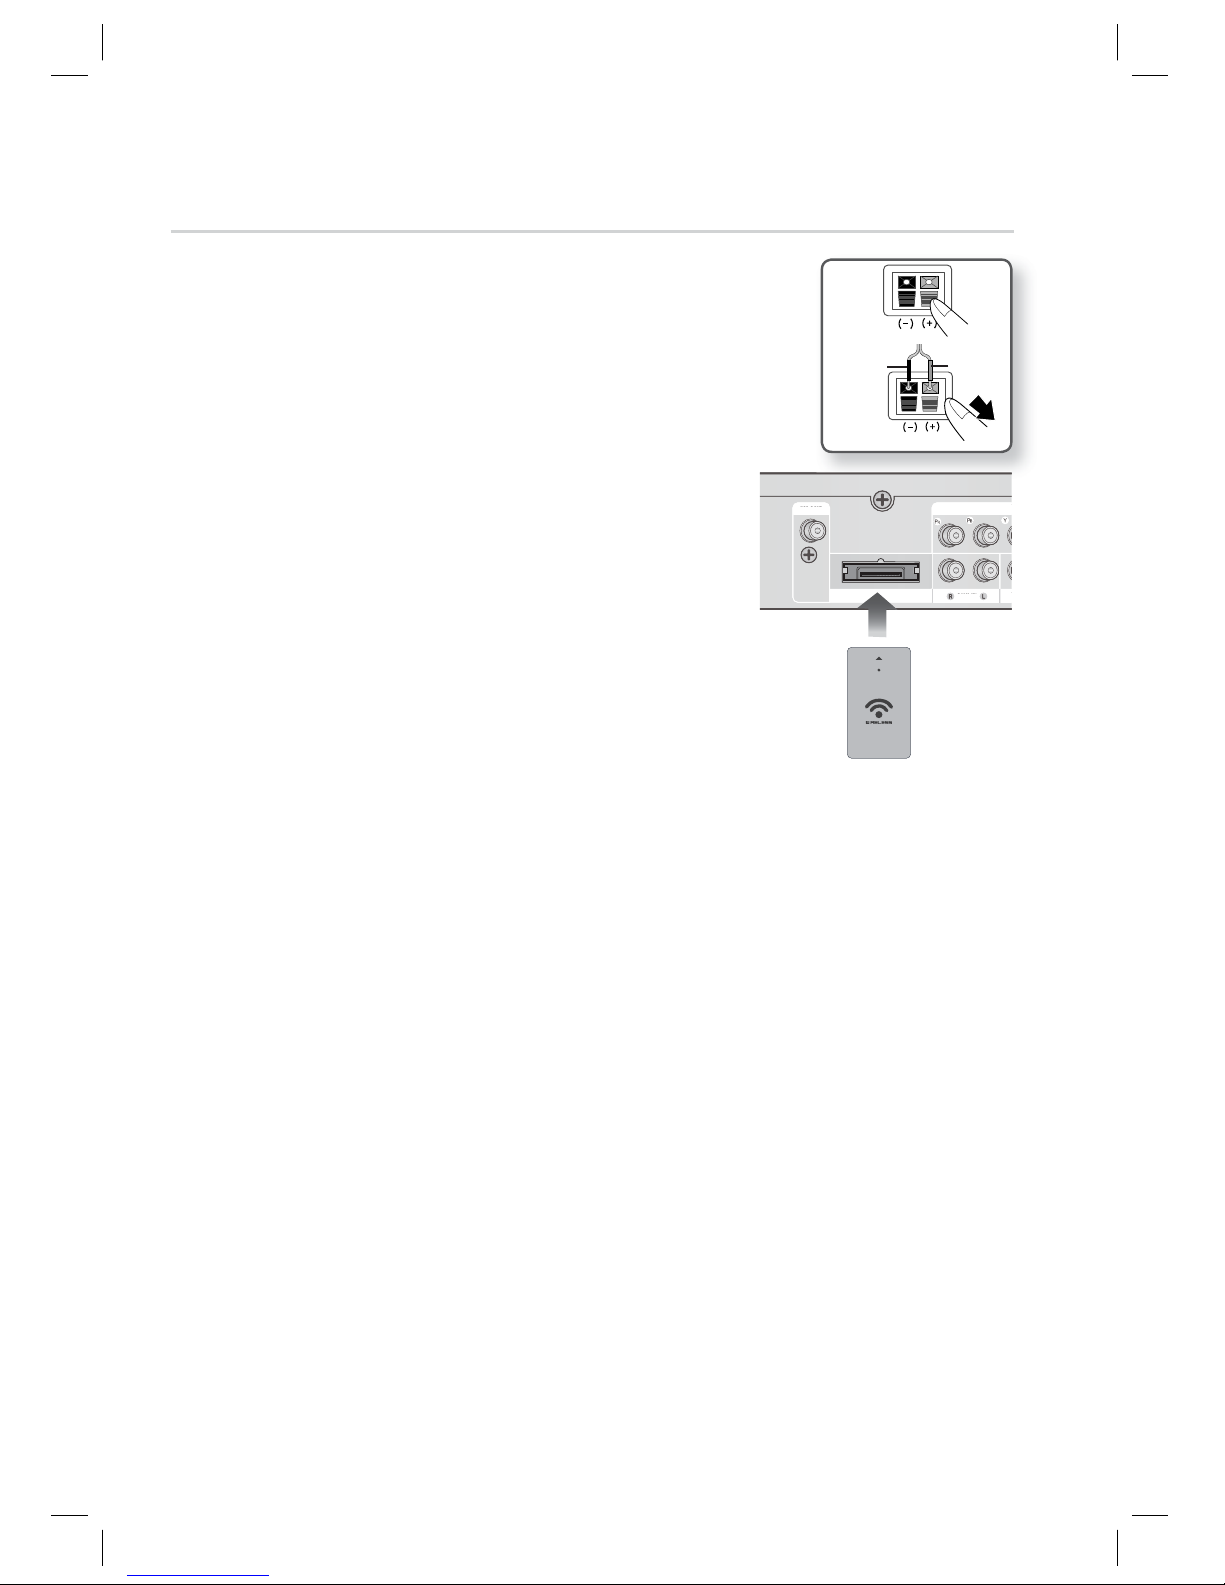
With the product turned off, insert the TX card into the
TX Card Connection (WIRELESS) on the back of the product.
Hold the TX card so that the label "WIRELESS" faces upward
and insert the card into the port.
The TX card enables communication between the product and
the wireless receiver module.
Connect the left and right surround speakers to the wireless Receiver
module.
Plug the power cord of the wireless Receiver module in the wall
outlet .
1.
2.
3.
4.
•
•
5.
6.
Black
Red
FM ANT
WIRELESS
VID
E
AUX IN
COMPONENT OU
T
VIDE
AUX IN
COMPONENT OU
T
TX card
HT-D6500_ELS_1226.indd 20HT-D6500_ELS_1226.indd 20 2011-12-26 3:21:522011-12-26 3:21:52
Page 21
English 21
02 Connections
Connecting External Devices/your TV via HDMI
HDMI is the standard digital interface for connecting to devices such as a TV, projector, DVD player,
Blu-ray player, set top box, and more.
Because HDMI is all digital, you'll enjoy digital quality video and sound as it was originally created,
without the distortions that can be caused when digital content is converted to analogue.
FM ANT
WIRELESS
VIDEO OUTAUX IN
LAN iPod HDMI OUT
DIGITAL
AUDIO IN
OPTICAL
COMPONENT OUT
HDMI IN
FRONT
SPEAKERS OUT
SPEAKER IMPEDANCE : 3
SURROUND
SUBWOOFER
CENTER FRONT
SURROUND
FM AN
T
W
IRELES
S
V
IDEO OU
T
AUX IN
LAN
iPod
D
IGITA
L
AUDIO IN
COMPO
NENT OUT
S
PEAKERS OUT
S
PEAKER IMPEDANCE :
3
HDMI OUT
HDMI IN
DVD or Blu-ray Player SAT(Satellite/Set top box)
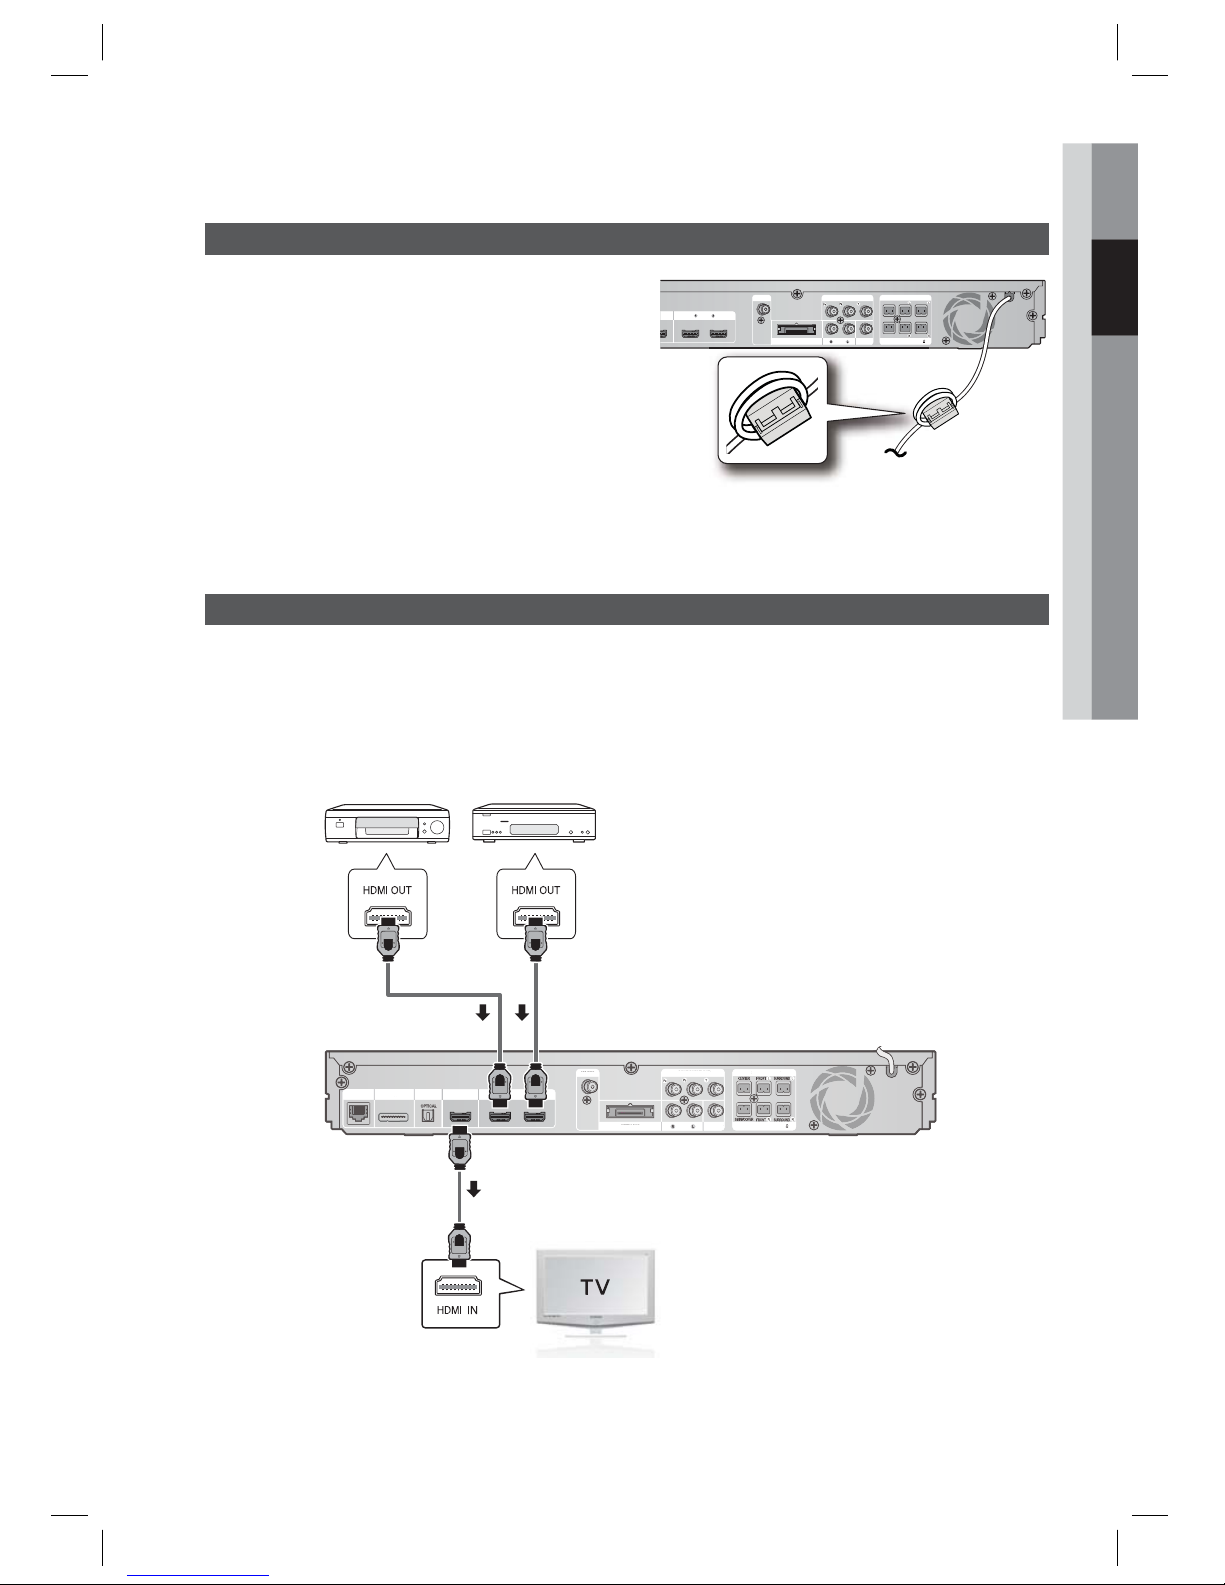
Attaching the Toroidal Ferrite Core to the Power Cord of the Main Unit
If you attach a Toroidal ferrite core to the power
cord of the man unit, it will help to prevent RF
interference from radio signals.
Pull the fi xing tab of the Toroidal ferrite core to
open it.
Make a loop twice in the main unit power cord.
Attach the Toroidal ferrite core to the main unit power
cord as the fi gure shows and press it until it clicks.
1.
2.
3.
FM ANT
WIRELESS
VIDEO OUTAUX IN
UT
COMPONENT OUT
HDMI IN
FRONT
SPEAKERS OUT
SPEAKER IMPEDANCE : 3
SURROUND
SUBWOOFER
CENTER FRONT
SURROUND
HT-D6500_ELS_1226.indd 21HT-D6500_ELS_1226.indd 21 2011-12-26 3:21:532011-12-26 3:21:53
Page 22

22 English
Connections
HDMI OUT :
Connecting to a TV with an HDMI Cable (BEST QUALITY)
Connect an HDMI cable (not supplied) from the HDMI OUT jack on the back of the product to the
HDMI IN jack on your TV.
NOTE
Certain HDMI output resolutions may not work, depending on your TV.
After making the video connection, set the Video input source on your TV to match the
corresponding Video output (HDMI, Component or Composite) on your product.
See your TV owner's manual for more information on how to select the TV's Video Input source.
If you have set the product's remote control to operate your TV, press the TV SOURCE button
on the remote control and select HDMI as the external source of the TV.
You must have an HDMI connection to enjoy videos with 3D technology.
A long HDMI cable may cause a screen noise. If this is the case, set Deep Colour to Off in the menu.
HDMI IN :
Connecting to an External Component with an HDMI Cable
Connect an HDMI cable (not supplied) from the HDMI IN jack on the back of the product to the
HDMI OUT jack on your digital device.
Press the FUNCTION button to select H. IN1 or H. IN2 input.
The mode switches as follows : BD/DVD D. IN AUX R. IPOD W. IPOD H. IN1 H. IN2 FM
HDMI Auto Detection Function
If you have connected your home cinema by HDMI cable, the home cinema's video output automatically
switches to the HDMI mode when you turn it on. For available HDMI video resolutions, see page 30.
This function is not available if the HDMI cable does not support CEC.
HDMI connection description
- HDMI outputs only a pure digital signal to the TV.
- If your TV does not support HDCP, random noise appears on the screen.
What is the HDCP?
HDCP (High-band width Digital Content Protection) is a system for preventing BD/DVD content
outputted via HDMI from being copied. It provides a secure digital link between a video source (PC,
DVD. etc) and a display device (TV, projector. etc). Content is encrypted at the source device to
prevent unauthorized copies from being made.
CAUTION
The Anynet+ function is supported only when an HDMI Cable is connected to the HDMI OUT of
the product.
✎
1.
2.
•
•
•
!
Connecting the FM Antenna
Connect the FM antenna supplied to the FM
ANTENNA Jack.
Slowly move the antenna wire around until you
fi nd a location where reception is good, then
fasten it to a wall or other rigid surface.
NOTE
This product does not receive AM broadcasts.
1.
2.
✎
FM ANT
WIRWI
R
FM Antenna (supplied)
HT-D6500_ELS_1226.indd 22HT-D6500_ELS_1226.indd 22 2011-12-26 3:21:562011-12-26 3:21:56
Page 23
English 23
02 Connections
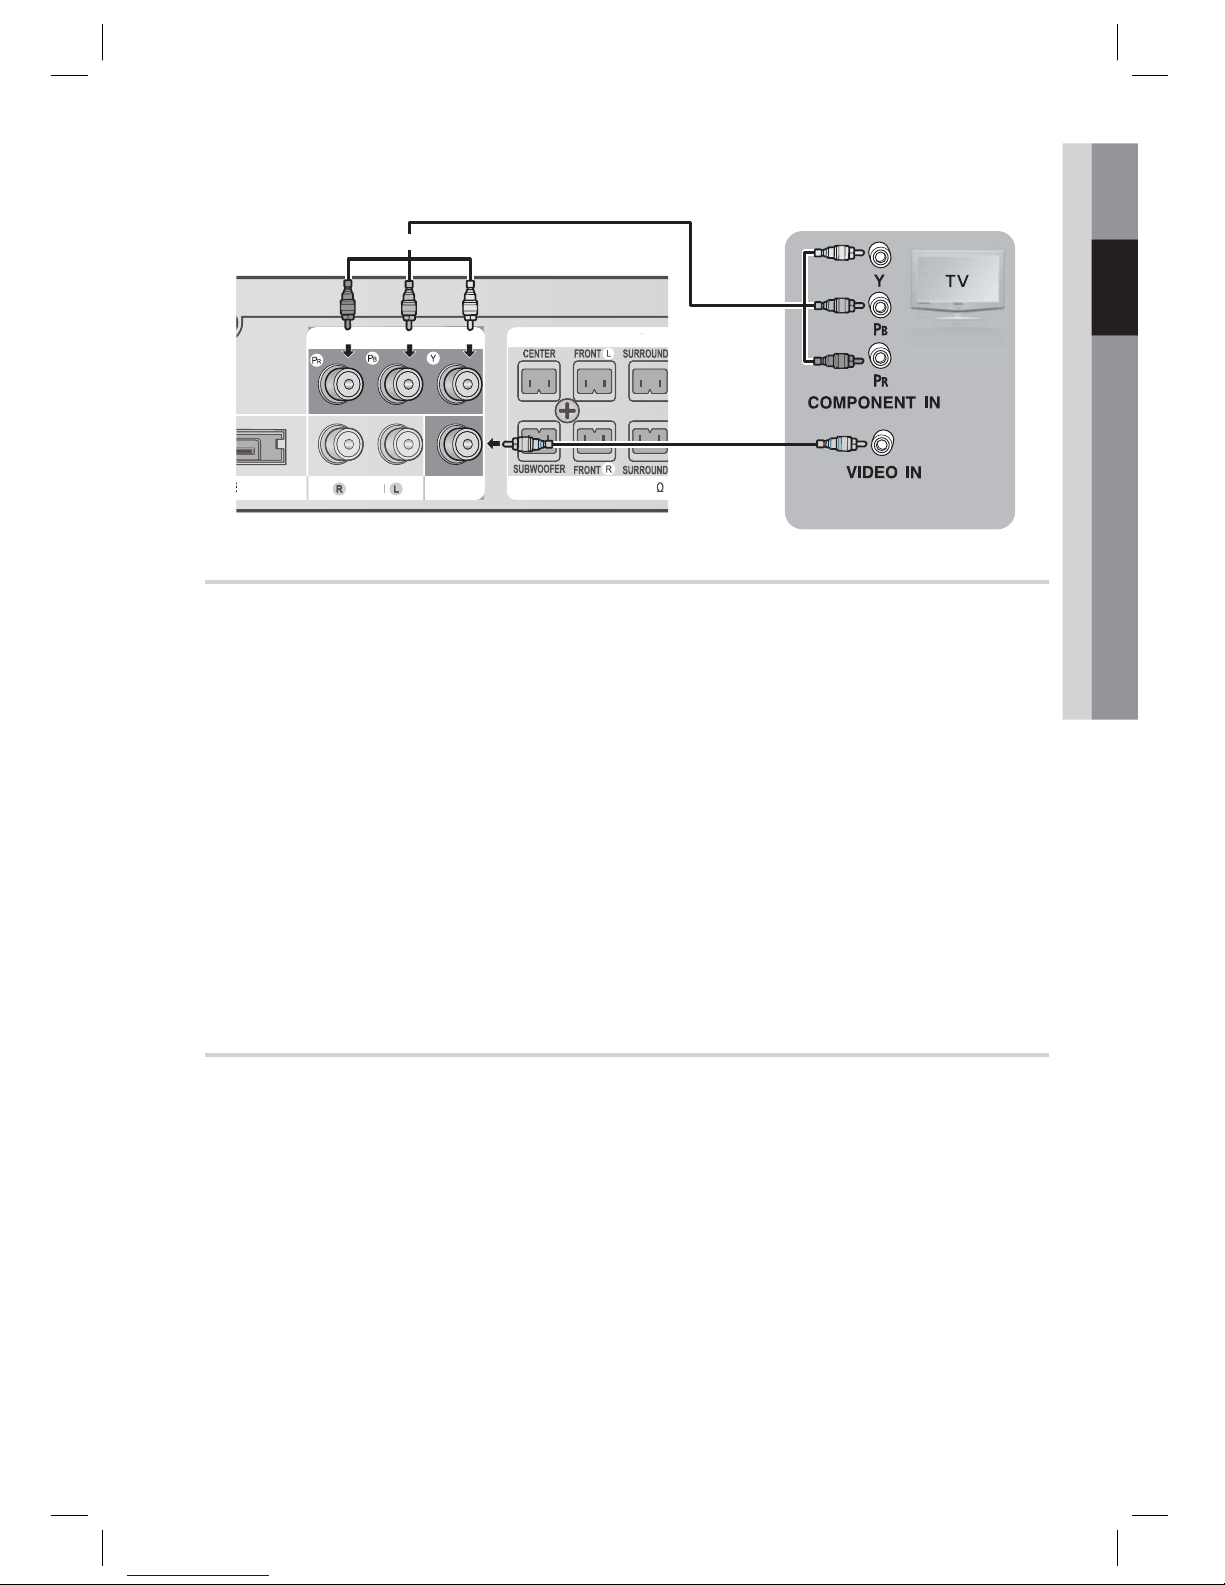
METHOD 1 : Component Video (BETTER QUALITY)
If your television is equipped with Component Video inputs, connect a Component video cable (not
supplied) from the Component Video Output (P
R, PB and Y) Jacks on the back of the product to the
Component Video Input Jacks on your TV.
NOTE
You can select from a variety of resolution settings such as 1080i, 720p, 576p/480p and 576i/480i,
depending on the disc type. (See page 30)
The actual resolution may differ from the setting in the Setup menu if both Component and HDMI
cables are connected. The resolution may also be different depending on the disc. (See page 30)
After making the video connection, set the Video input source on your TV to match the corresponding
Video output (HDMI, Component or Composite) on your product.
See your TV owner's manual for more information on how to select the TV's Video Input source.
If you have set the product's remote control to operate your TV, press the TV SOURCE button on the
remote control and select COMPONENT as the external source of the TV.
In DVD playback, if both HDMI and Component jacks are connected and you select the Component
1080p, 1080i, 720p or 576p/480p mode, the Display Setup menu will show the output resolution as
1080p, 1080i, 720p or 576p/480p in the menu. The resolution is actually 576i/480i.
METHOD 2 : Composite Video
(GOOD QUALITY)
Connect the supplied Video cable from the VIDEO OUT jack on the back of the product to the VIDEO
IN jack on your TV.
NOTE
The VIDEO source is always output in 576i/480i resolution regardless of the resolution set in the Setup
menu. (See page 30)
After making the video connection, set the Video input source on your TV to match the corresponding
Video output (HDMI, Component or Composite) on your product.
See your TV owner's manual for more information on how to select the TV's Video Input source.
If you have set the product's remote control to operate your TV, press the TV SOURCE button on the
remote control and select VIDEO as the external source of the TV.
CAUTION
Do not connect the unit through a VCR. Video signals fed through VCRs may be affected by
copyright protection systems and the picture will be distorted on the television.
✎
✎
!
FRONT
SPEAKERS OUT
SPEAKER IMPEDANCE : 3
VIDEO OUTAUX IN
SURROUND
SUBWOOFER
CENTER FRONT
SURROUND
COMPONENT OUT
SPEAKERS OU
T
PEAKER IMPEDANCE :
3
AUX IN
Red
Yellow
METHOD 2
Blue
Green
METHOD 1
HT-D6500_ELS_1226.indd 23HT-D6500_ELS_1226.indd 23 2011-12-26 3:21:572011-12-26 3:21:57
Page 24

24 English
Connections
Connecting Audio from External Components
OPTICAL : Connecting an External Digital Component
Digital signal components such as a Cable Box/Satellite receiver (Set-Top Box).
Connect the Digital Input (OPTICAL) on the product to the Digital Output of the external digital
component.
Press the FUNCTION button to select D. IN input.
The mode switches as follows :
BD/DVD D. IN AUX R. IPOD W. IPOD H. IN1 H. IN2 FM
NOTE
To see video from your Cable Box/Satellite receiver, you must connect it's video output to a TV.
This system supports Digital sampling frequencies of 32 kHz of higher from external digital components.
This system supports Digital sampling frequencies of 32 kHz of higher from external digital components.
This system supports only DTS and Dolby Digital audio, MPEG audio which is bitstream cannot be supported.
AUX : Connecting an External Analogue Component
Analogue signal components such as a VCR.
Connect AUX IN (Audio) on the product to the Audio Out of the external analogue component.
Be sure to match connector colours.
Press the FUNCTION button to select AUX input.
The mode switches as follows :
BD/DVD D. IN AUX R. IPOD W. IPOD H. IN1 H. IN2 FM
NOTE
You can connect the Video Output jack of your VCR to the TV, and connect the Audio Output jacks of
the VCR to this product.
1.
2.
•
✎
1.
•
2.
•
✎
FM ANT
WIRELESS
VIDEO OU
AUX IN
HDMI OUT
DIGITAL
AUDIO IN
OPTICAL
COMPONENT OUT
HDMI IN
V
IDEO O
U
WIRELES
S
M AN
T
DMI
OUT
COMPONENT OU
T
DMI I
N
Optical Cable
(not supplied)
Audio Cable
(not supplied)
If the external analogue
component has only one
Audio Out, connect either
left or right.
Set-Top Box
VCR
WhiteRed
OPTICAL
AUX
HT-D6500_ELS_1226.indd 24HT-D6500_ELS_1226.indd 24 2011-12-26 3:21:582011-12-26 3:21:58
Page 25

English 25
02 Connections
Connecting to the Network
This product enables you to view network based services (See pages 61~70) such as Smart Hub and
BD-LIVE, as well as receive software upgrades when a network connection is made. We recommend
using an Wireless router or IP router for the connection.
For more information on router connection, refer to the user manual of the router or contact the router
manufacturer for technical assistance.
Cable Network
Using the Direct LAN Cable (UTP cable), connect the LAN terminal of the product to the LAN
terminal of your modem.
Set the network options. (See page 37)
NOTE
Internet access to Samsung’s software update server may not be allowed, depending on the router
you use or the ISP’s policy. For more information, contact your ISP (Internet Service Provider).
For DSL users, please use a router to make a network connection.
For the AllShare function, a PC must be connected in the network as shown in the fi gure.
1.
2.
✎
LAN iPod HDMI OUT
DIGITAL
AUDIO IN
OPTICAL
HDMI IN
HDMI OUT
DIGITA
L
AUDIO IN
o
d
Router
Broadband modem
Broadband
service
Or
Broadband modem
(with integrated router)
Broadband
service
Networking with PC for
AllShare function
(See page 70)
HT-D6500_ELS_1226.indd 25HT-D6500_ELS_1226.indd 25 2011-12-26 3:21:592011-12-26 3:21:59
Page 26
26 English
Connections
Wireless Network
You can connect to your network with a Wireless IP sharer. A wireless AP/IP router is required to make
a wireless network connection. To set the network confi guration options. see page 37.
NOTE
To use a wireless network, your product must be connected to a wireless IP sharer. If the wireless IP
sharer supports DHCP, your product can use a DHCP (dynamic) or static IP address to connect to the
wireless network.
This product supports IEEE 802.11b,g and n. We recommend using IEEE 802.11n. When you play
video over a IEEE 802.11b or g connection, the video may not play smoothly.
Select a channel for the wireless IP sharer that is not currently being used. If the channel set for the
wireless IP sharer is currently being used by another device nearby, this will result in interference and
communication failure.
If you select the Pure High-throughput (Greenfi eld) 802.11n mode and set your AP's Security
Encryption type to WEP, TKIP or TKIPAES (WPS2Mixed), your Samsung home cinema will not support
the connection in compliance with new Wi-Fi certifi cation specifi cations.
If your AP supports WPS (Wi-Fi Protected Setup), you can connect to the network via PBC (Push
Button Confi guration) or PIN (Personal Identifi cation Number). WPS will automatically confi gure the
SSID and WPA key in either mode.
Connection Methods : You can setup the wireless network connection 3 ways:
- WPS(PBC)
- Auto Setup (Using the Auto Network Search function)
- Manual Setup
Wireless LAN, by its nature, may cause interference, depending on the operating conditions.
(AP performance, distance, obstacles, interference by other radio devices, etc).
Set the wireless IP sharer to Infrastructure mode. Ad-hoc mode is not supported.
When applying the security key for the AP (wireless IP sharer), only the following security protocols are
supported:
Authentication Mode : WEP, WPAPSK, WPA2PSK
Encryption Type : WEP, AES
To use the AllShare function, you must connect your PC to your network as shown in the fi gure.
The connection can be wired or wireless.
✎
1)
2)
ASC IN
5V
500mA
Wireless IP sharer
Networking with PC for
AllShare function
(See page 70)
PC
Broadband
service
HT-D6500_ELS_1226.indd 26HT-D6500_ELS_1226.indd 26 2011-12-26 3:22:012011-12-26 3:22:01
Page 27
English 27
03 Setup
Initial Settings
Turn on your TV after connecting the product.
When you connect and turn on the product to a
TV for the fi rst time, the Initial Settings screen
appears.
Initial Settings | On-Screen Language
m
Move " Enter
Select a language for the on-screen displays.
Български Hrvatski Čeština
Dansk Nederlands English
Eesti Suomi Français
Deutsch
Ελληνικά Magyar
Indonesia Italiano
한국어
Press the ▲▼◄► buttons to select the desired
language, and then press the ENTER button.
Press the ENTER button to select Start.
Press the ▲▼ buttons to select the desired TV
Aspect Ratio, and then press the ENTER button.
(See page 30)
Musical Auto Calibration screen will be displayed.
Plug the ASC microphone into the ASC IN jack
on the product. (See page 34)
Press the ENTER button to select Start button.
Setting the Musical Auto Calibration function
takes about 3 minutes.
Press the ▲▼ buttons to select the desired
Network Settings : Wired, Wireless
(General), WPS(PBC) or One Foot
Connection, and then press the ENTER
button. If you do not know the details of your
Network Settings, press the BLUE (D) button
on your remote instead to skip Network
Settings here, fi nish the Initial Settings, and
go to the Home menu.
If you selected a Network Settings, go to
pages 37~40 for more information about the
Network settings. When done, go to Step 8.
The Home menu appears. (For more
information about the Home menu, please
see page 28.)
1.
2.
3.
4.
5.
6.
7.
8.
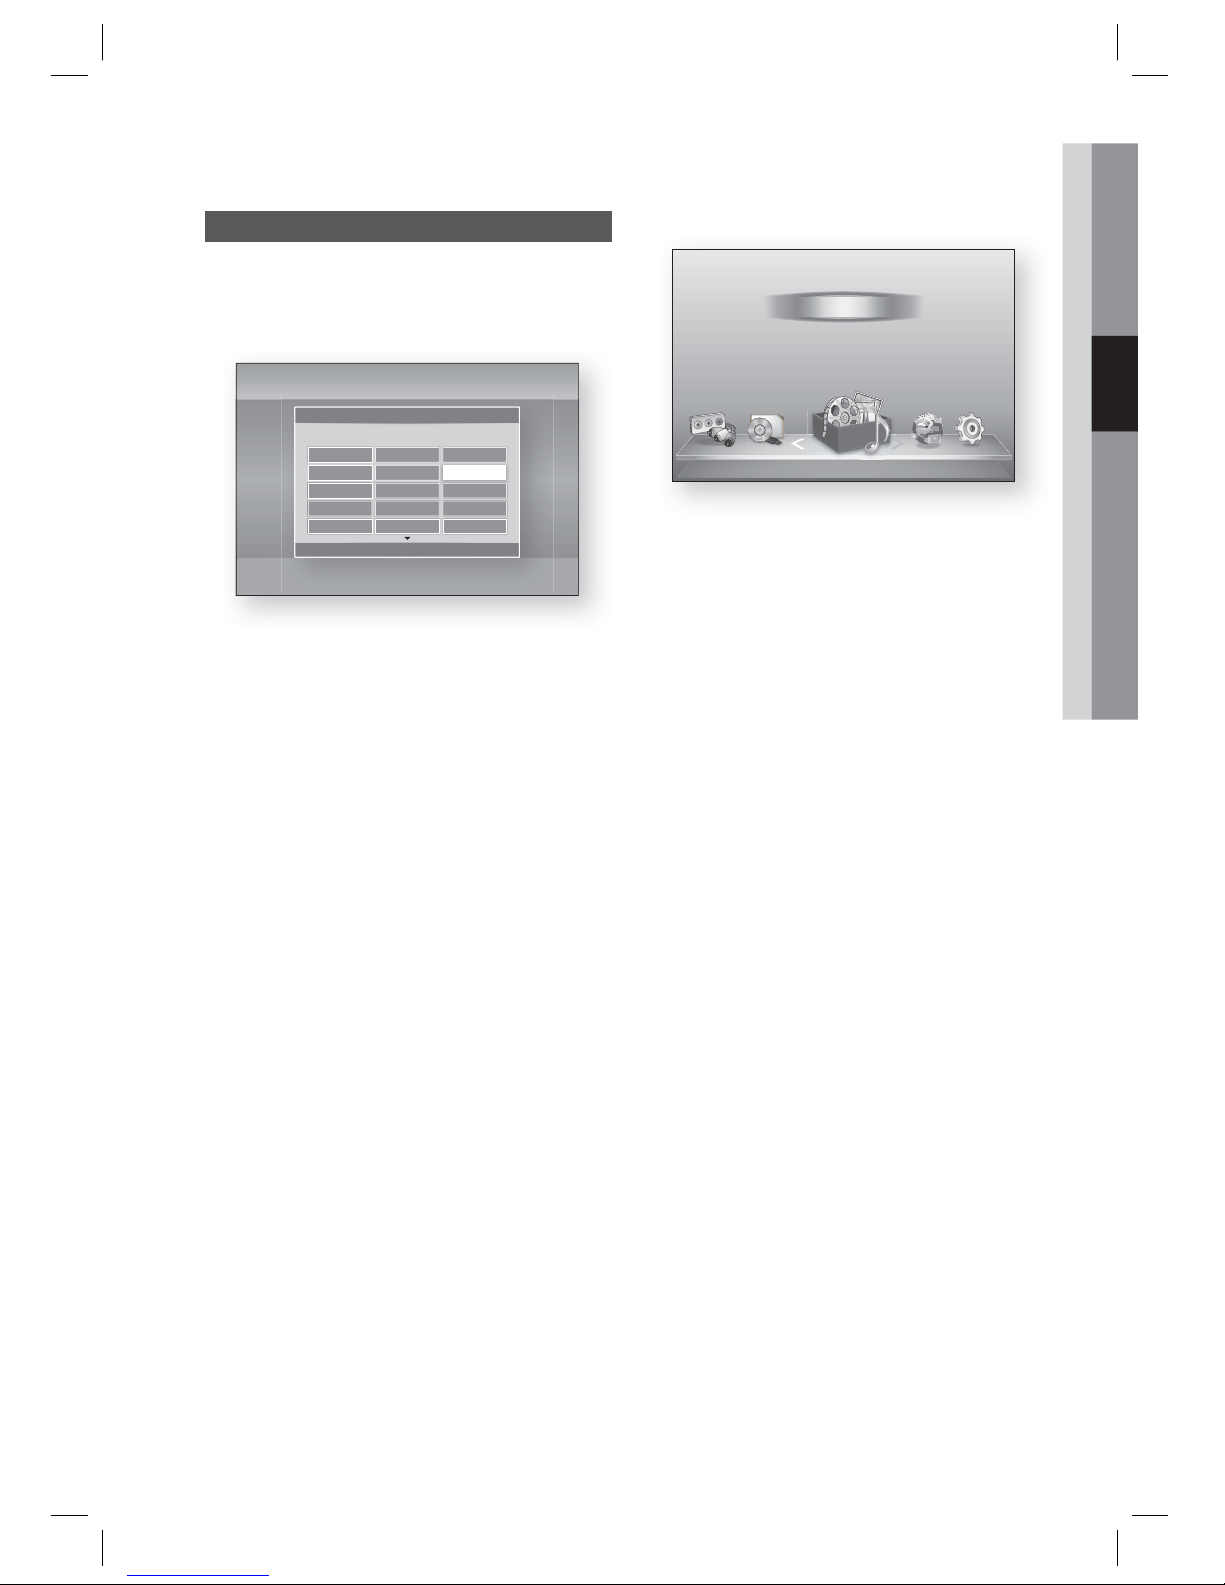
Home Menu
d WPS(PBC)
My Devices Internet Settings
Videos
Photos
Music
My Contents
Function
NOTE
The Home menu will not appear if you do not
confi gure the initial settings except as noted
below.
If you press the BLUE (D) button during the
Musical Auto Calibration/network setup, you
can access the Home menu even if the
network setup is not completed yet.
If you want to display the Initial Setting screen
again to make changes, select the Initial
Settings. (See page 41)
If you use an HDMI cable to connect the
product to an Anynet+ (HDMI-CEC)compliant Samsung TV and 1.) You have set
the Anynet+ (HDMI-CEC) feature to On in
both the TV and the product and 2.) You have
set the TV to a language supported by the
product, the product will select that language
as the preferred language automatically.
If you leave the product in the stop mode for
more than 5 minutes without using it, a screen
saver will appear on your TV. If the product is
left in the screen saver mode for more than 20
minutes, the power will automatically turn off.
•
✎
Setup
HT-D6500_ELS_1226.indd 27HT-D6500_ELS_1226.indd 27 2011-12-26 3:22:032011-12-26 3:22:03
Page 28
28 English
Setup
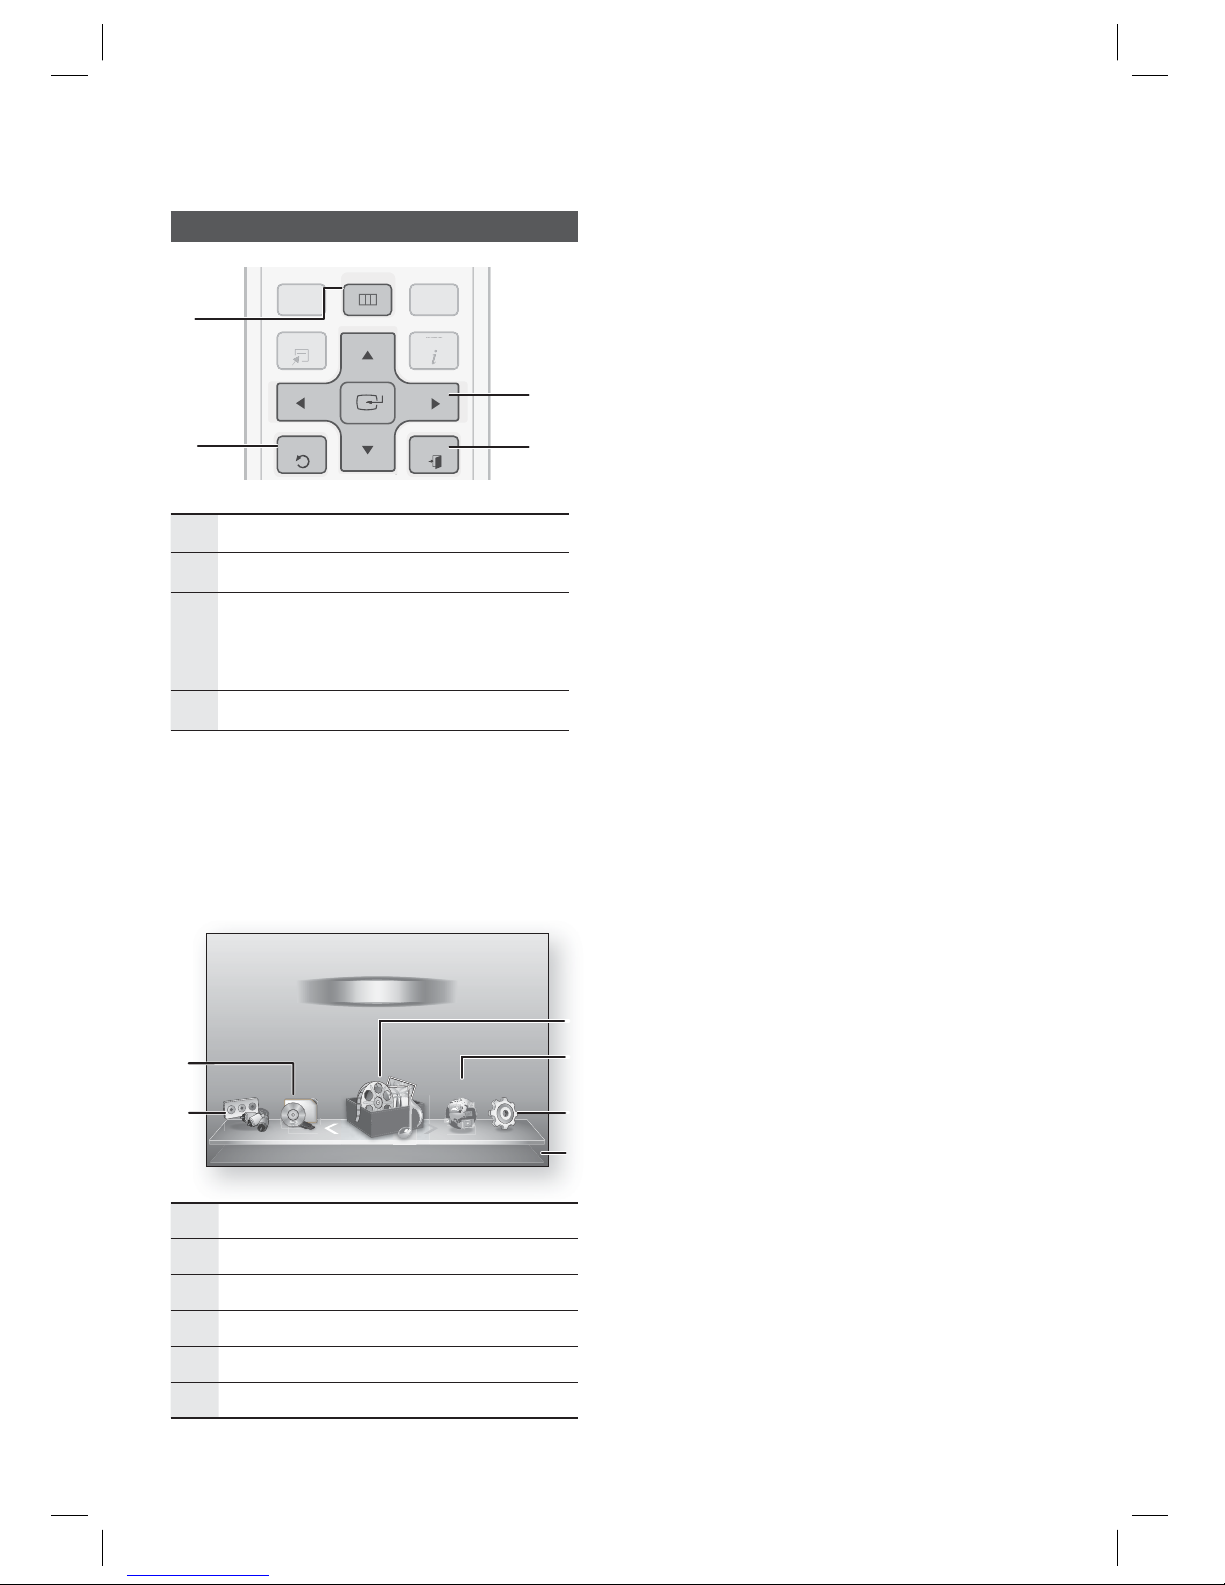
Accessing the Settings Menu
DISC MENU MENU TITLE MENU
TOOLS
RETURN
EXIT
INFO
POPUP
DISC MEN
U
TITLE MEN
U
OOL
S
NF
O
PUP
1
2
4
3
1
MENU Button : Press to move to the Home menu.
2
RETURN Button : Return to the previous menu.
3
ENTER / DIRECTION Button :
Move the cursor or select an item.
Activate the currently selected item.
Confi rm a setting.
4
EXIT Button : Press to exit the current menu.
To access the Settings menu and sub-menus,
follow these steps:
Press the POWER button.
The Home Menu appears.
Home Menu
d
WPS(PBC)
My Devices Internet Settings
Videos
Photos
Music
My Contents
5
6
2
4
3
Function
1
1
Selects My Devices.
2
Selects Function.
3
Selects My Contents.
4
Selects Internet.
5
Selects Settings.
6
Displays the buttons available.
1.
•
Press the ◄► buttons to select Settings,
and then press the ENTER button.
Press the ▲▼ buttons to select the desired
submenu, and then press the ENTER
button.
Press the ▲▼ buttons to select the desired
item, and then press the ENTER button.
Press the EXIT button to exit the menu.
NOTE
When the product is connected to a network,
select Internet from the Home menu.
Download the desired content from Samsung
Apps. (See pages 68~70)
The access steps may differ depending on the
menu you selected.
The OSD (On Screen Display) may change in
this product after you upgrade the software
version.
2.
3.
4.
5.
✎
HT-D6500_ELS_1226.indd 28HT-D6500_ELS_1226.indd 28 2011-12-26 3:22:062011-12-26 3:22:06
Page 29
English 29
03 Setup
Display
You can confi gure various display options such as
the TV Aspect Ratio, Resolution, etc.
3D Settings
Select whether to play a Blu-ray Disc with 3D
contents in 3D Mode.
Settings
Display
Audio
Network
System
Language
Security
General
Support
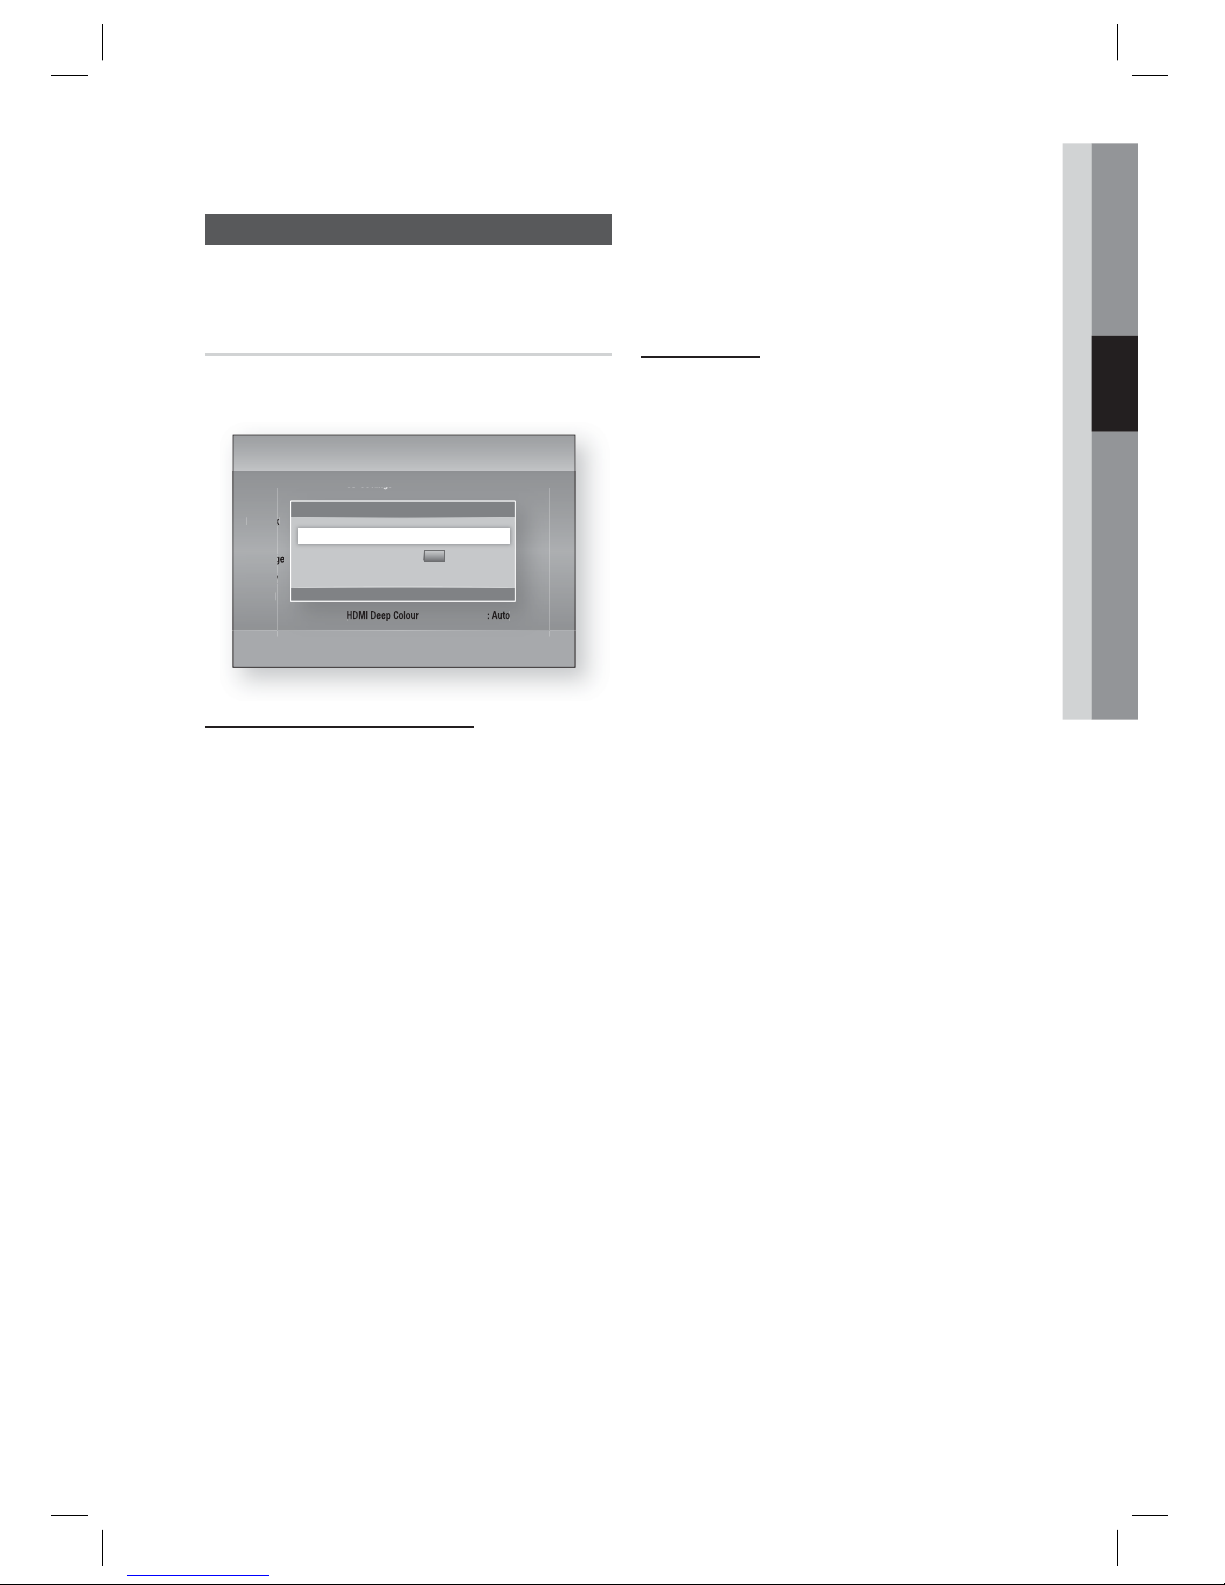
3D Settings
HDMI Deep Colour : Auto
3D Settings
>
Move " Enter ' Return
3D Blu-ray Playback Mode : Auto
Screen Size :
55
inch
3D Blu-ray Playback Mode
3D Blu-ray Discs are available in two formats:
Blu-ray 3D and 3D only. You can choose to
watch a Blu-ray 3D disc in 3D or 2D mode before
playing the disc.
Auto : Automatically detect if a connected TV has
3D capability and play a Blu-ray 3D disc in 3D or
2D accordingly or a 3D only disc in 3D if the TV
supports 3D. 3D only discs will not be played if
your TV does not support 3D.
3D 3D : Play 3D only and Blu-ray 3D discs in
3D mode at all times.
3D 2D : Play Blu-ray 3D discs in 2D mode at all
times. 3D only discs will not be played.
NOTE
To stop a movie during 3D playback, press the
STOP
()
button once. The movie stops and the
3D mode option is de-activated.
To change a 3D option selection when you are
playing a 3D movie, press the STOP
()
button
once. The Blu-ray menu appears. Press the
STOP
() button again, then select 3D
Settings in the Blu-ray menu.
•
•
•
✎
Depending on the content and the position of
the picture on your TV screen, you may see
vertical black bars on the left side, right side, or
both sides.
Screen Size
Lets you enter the actual screen size of your TV so
that the product can adjust the image according to
the screen size and display an optimal 3D image.
(The maximum allowed screen size is 116 inches for
this product.)
CAUTION
If you want to enjoy 3D content, connect a
3D device (3D compliant AV receiver or TV)
to the product’s HDMI OUT port using a
high-speed HDMI cable. Put on 3D glasses
before playing the 3D content.
The product outputs 3D signals only through
HDMI cable connected to the HDMI OUT
port.
As the video resolution in 3D play mode is
fi xed according to the resolution of the
original 3D video, you can not change the
resolution to your preference.
Some functions such as BD Wise, screen
size adjustment, and resolution adjustment
may not operate properly in 3D play mode.
Stay at least three times the width of the
screen from the TV when watching 3D
images. For example, if you have a 46 inch
screen, stay 138 inches (3.5 meters) from
the screen.
- Place the 3D video screen at eye level for
the best 3D picture.
When the product is connected to some 3D
devices, the 3D effect may not function
properly.
!
HT-D6500_ELS_1226.indd 29HT-D6500_ELS_1226.indd 29 2011-12-26 3:22:082011-12-26 3:22:08
Page 30

30 English
Setup
TV Aspect
Depending on the type of television you have, you
may want to adjust the screen size setting.
16:9 Original : Select when you connect the
product to a 16:9 TV screen. The product will
display all content in its original aspect ratio.
Content formatted in 4:3 will be displayed with
black bars on the left and right.
16:9 Full : Select when you connect the product
to a 16:9 TV screen. All content will fi ll the full
screen. Content formatted in 4:3 will be stretched.
4:3 Letter Box : Select when you connect the
product to a 4:3 TV screen. The product will
display all content in its original aspect ratio.
Content formatted in 16:9 will be displayed with
black bars on the top and bottom.
4:3 Pan-Scan : Select when you connect the
product to a 4:3 TV screen. 16:9 content will have
the extreme left and right portions cut off.
NOTE
Depending on the disc type, some aspect ratios
may not be available.
If you select an aspect ratio and option which is
different than the aspect ratio of your TV screen,
then the picture might appear to be distorted.
If you select the 16:9 Original, your TV may
display 4:3 Pillarbox (black bars on sides of
picture).
Smart Hub Screen Size
Set the Smart Hub Screen to the optimal size.
Size 1 : Smart Hub screen size will be smaller than
default. You may see some black on sides of
screen.
Size 2 : This is the default setting for Smart Hub.
The product displays the normal Smart Hub
screen size.
Size 3 : This will display a larger Smart Hub screen
size. The image may be too large for your TV
screen.
•
•
•
•
✎
•
•
•
BD Wise (Samsung Products only)
BD Wise is Samsung’s latest inter-connectivity
feature.
When you connect a Samsung product and a
Samsung TV with BD Wise to each other via HDMI,
and BD Wise is on in both the product and TV, the
product outputs video at the video resolution and
frame rate of the BD/DVD disc.
Off : The output resolution stays fi xed at the
resolution you set previously in the Resolution
menu, regardless of the resolution of the disc.
See Resolution below.
On : The product outputs video at the original
resolution and frame rate of the BD/DVD disc.
NOTE
When BD Wise is on, the Resolution setting
automatically defaults to BD Wise and BD
Wise appears in the Resolution menu.
If the product is connected to a device that
does not support BD Wise, you can not use
the BD Wise function.
For proper operation of BD Wise, set the BD
Wise menu of both the product and the TV to On.
Resolution
Lets you set the output resolution of the
Component and HDMI video signal to Auto,
1080p, 1080i, 720p, 576p/480p, or 576i/480i.
The number indicates the number of lines of
video per frame. The i and p indicate interlaced
and progressive scan, respectively. The more
lines, the higher the quality.
Auto : Automatically sets the output resolution
to the connected TV’s maximum resolution.
BD Wise : Automatically sets the resolution to
the resolution of the BD/DVD disc if you have
connected the product via HDMI to a TV with
the BD Wise feature. (The BD Wise menu item
appears only if BD Wise is set to On. See BD
Wise above.)
1080p : Outputs 1080 lines of progressive
video. (HDMI only)
1080i : Outputs 1080 lines of interlaced video.
720p : Outputs 720 lines of progressive video.
576p/480p : Outputs 576/480 lines of
progressive video.
576i/480i : Outputs 576/480 lines of interlaced
video. (VIDEO only)
•
•
✎
•
•
•
•
•
•
•
HT-D6500_ELS_1226.indd 30HT-D6500_ELS_1226.indd 30 2011-12-26 3:22:092011-12-26 3:22:09
Page 31

English 31
03 Setup
Resolution according to the output mode
Blu-ray Disc/E-contents/Digital Contents playback
Output
Setup
HDMI / connected HDMI / not connected
HDMI Mode
Component/
VIDEO Mode
Component Mode
VIDEO Mode
Blu-ray Disc
E-contents/
Digital
contents
Blu-ray Disc
E-contents/
Digital
contents
BD Wise
Resolution of
Blu-ray Disc
1080p@60F 576i/480i - - -
Auto
Max.
Resolution of
TV input
Max.
Resolution of
TV input
576i/480i - - -
1080p@60F 1080p@60F 1080p@60F 576i/480i - - -
Movie Frame :
Auto (24Fs)
1080p@24F 1080p@24F 576i/480i - - -
1080i 1080i 1080i 576i/480i 576i/480i 1080i 576i/480i
720p 720p 720p 576i/480i 576i/480i 720p 576i/480i
576p/480p 576p/480p 576p/480p 576i/480i 576i/480i 576p/480p 576i/480i
576i/480i - - - 576i/480i 576i/480i 576i/480i
DVD playback
Output
Setup
HDMI / connected HDMI / not connected
HDMI Mode
Component/VIDEO
Mode
Component Mode VIDEO Mode
BD Wise 576i/480i 576i/480i - -
Auto
Max. Resolution of
TV input
576i/480i - -
1080p@60F 1080p@60F 576i/480i - -
1080i 1080i 576i/480i 576p/480p 576i/480i
720p 720p 576i/480i 576p/480p 576i/480i
576p/480p 576p/480p 576i/480i 576p/480p 576i/480i
576i/480i - - 576i/480i 576i/480i
•
•
HT-D6500_ELS_1226.indd 31HT-D6500_ELS_1226.indd 31 2011-12-26 3:22:092011-12-26 3:22:09
Page 32

32 English
Setup
NOTE
If the TV you connected to the product does
not support Movie Frame or the resolution you
selected, the message “If no pictures are
shown after the selection, please wait for 15
seconds. And then, the resolution will be
reverted to the previous value automatically.
Would you like to make a selection?” appears.
If you select Yes, the TV’s screen will go blank
for 15 seconds, and then the resolution will
revert to the previous resolution automatically.
If the screen stays blank after you have
changed the resolution, remove all discs, and
then press and hold the STOP () button on
the front of the product for more than 5
seconds. All settings are restored to the
factory default. Follow the steps on the
previous page to access each mode and
select the Display Setup that your TV will
support.
When the factory default settings are restored,
all stored user BD data is deleted.
The Blu-ray Disc must have the 24 frame
feature for the product to use the Movie Frame
(24Fs) mode.
If both HDMI and Component jacks are
connected and you are currently viewing
Component output, the resolution is fi xed to
576i/480i.
HDMI Colour Format
Lets you set the colour space format for HDMI
output to match the capabilities of the connected
device (TV, monitor, etc).
Auto : Automatically sets the product to the
optimum format supported by your device.
YCbCr (4:4:4) : If your TV supports the YCbCr
colour space via HDMI, select this to output the
normal YCbCr colour gamut.
RGB (Standard) : Select this to output the
normal RGB colour gamut.
RGB (Enhanced) : If you have connected the
product to a DVI display device such as a
monitor, select this to output the enhanced
RGB colour gamut.
✎
•
•
•
•
Movie Frame (24 Fs)
Setting the Movie Frame (24Fs) feature to Auto
allows you to adjust the product’s HDMI output to
24 frames per second for improved picture quality.
You can enjoy the Movie Frame (24Fs) feature only
on a TV supporting this frame rate. You can select
Movie Frame only when the product is in the HDMI
1080i or 1080p output resolution modes.
Auto : Movie Frame (24Fs) functions work.
Off :
Movie Frame (24Fs) functions are off.
HDMI Deep Colour
Lets you output video from the HDMI OUT jack
with Deep Colour. Deep Colour provides more
accurate colour reproduction with greater colour
depth.
Auto: The product outputs video with Deep
Colour to a connected TV which supports
HDMI Deep Colour.
Off : The picture is output without Deep
Colour.
Still Mode
Lets you set the type of picture the product
displays when you pause DVD playback.
Auto: Automatically shows the best still picture
depending on the content.
Frame : Select when pausing a scene with a
little action.
Field : Select when pausing a scene with a lot
of action.
Progressive Mode
Lets you improve picture quality when viewing DVDs.
Auto : Select to have the product automatically
select the best picture quality for the DVD
you’re watching.
Video : Select for the best picture quality from
concert or TV show DVDs.
•
•
•
•
•
•
•
•
•
HT-D6500_ELS_1226.indd 32HT-D6500_ELS_1226.indd 32 2011-12-26 3:22:092011-12-26 3:22:09
Page 33

English 33
03 Setup
Distance
If the speakers cannot be placed at equal
distances from the listening position, you can
adjust the delay time of the audio signals from the
front, centre, surround and subwoofer speakers.
You can set the Speaker Distance between
1ft(0.3m) and 30ft(9.0m).
Settings
Display
Audio
Network
System
Language
Security
General
Support
Distance
>
Move < Change ' Return
Front L
◄
10(ft) 3.0(m) |
Front R : 10(ft) 3.0(m)
Center : 10(ft) 3.0(m)
Surround L : 10(ft) 3.0(m)
Surround R : 10(ft) 3.0(m)
Subwoofer : 10(ft) 3.0(m)
Test Tone : Off
Test Tone
Use the Test Tone feature to check the speaker
connections.
Press the ◄, ► buttons to select ON.
A test tone will be sent to Front L Center
Front R Surround R Surround L
Subwoofer in order so you can make sure the
speakers are set up correctly.
To stop the test tone, press the ◄, ► buttons to
select Off.
Settings
Display
Audio
Network
System
Language
Security
General
Support
Speaker Settings
>
Move " Enter ' Return
Level
Distance
Test Tone ◄ On
|
NOTE
When HDMI Audio is ON (audio is produced
through TV speakers), the Test Tone
function is not available.
•
•
✎
Audio
Speaker Settings
Settings
Display
Audio
Network
System
Language
Security
General
Support
Speaker Settings
>
Move " Enter ' Return
Level |
Distance
Test Tone : Off
Level
You can adjust the balance and level for each
speaker.
Adjusting Front/Centre/Surround/Subwoofer
Speaker Level
• The volume level can be adjusted in steps from
-6dB to +6dB.
• The sound gets louder as you move closer to
+6dB and quieter as you get closer to -6dB.
Settings
Display
Audio
Network
System
Language
Security
General
Support
Level
>
Move < Change ' Return
Front L
◄
0 dB |
Front R :
0 dB
Center :
0 dB
Surround L : 0 dB
Surround R :
0 dB
Subwoofer :
0 dB
Test Tone :
Off
HT-D6500_ELS_1226.indd 33HT-D6500_ELS_1226.indd 33 2011-12-26 3:22:092011-12-26 3:22:09
Page 34

34 English
Setup
Musical Auto Calibration
By setting the Musical Auto Calibration (MAC)
function just once when you relocate or install the
product, you can have the product automatically
recognize the distance between speakers, levels
between channels, and frequency characteristics
to create a 5.1-channel sound fi eld optimized for
your environment.
ASC IN
ASC IN
50
5
0
0
m
A
ASC
microphone
Musical Auto Calibration Mode
You will hear either the Musical Auto Calibration
mode or the User Speaker Settings.
Off: You will hear sound in the the Speaker
Setting value.
On: You will hear sound in the Musical Auto
Calibration mode.
Measurement
Plug the ASC microphone into the ASC IN jack.
Place the ASC microphone at the listening position.
Musical Auto Calibration will be automatically
set up in the following sequence:
Front L Center Front R Surround
R Surround L Subwoofer
Press the RETURN button to cancel the
Musical Auto Calibration Setting.
•
•
1.
2.
•
•
NOTE
Setting the Musical Auto Calibration function
takes about 3 minutes.
The Musical Auto Calibration setup can be made
when there is no disc in the product.
If the ASC microphone is disconnected during the
Musical Auto Calibration setup, the setup will be
cancelled.
When the Musical Auto Calibration function is
activated, the DSP, Dolby Pro Logic ll and SFE
Mode will not work.
If the product is connected to external devices or
other components (such as an iPod, AUX, D. IN),
the Musical Auto Calibration Setup may not work
properly.
Noise may result in wrong measurement. So
please proceed with the measurement in a quiet
room to obtain proper calibration.
Place the microphone on the main listening
position.
Nothing should get in the way between speakers
and microphone.
Note that the test tone of the speaker may be
loud when conducting the test.
Do not place the microphone behind the furniture
or too close to the wall. Otherwise, it can produce
an incorrect test result.
User EQ
You can confi gure the equalizer settings manually
to your preference.
Settings
Display
Audio
Network
System
Language
Security
General
Support
User EQ
Reset > Adjust < Move ' Return
6
·
·
·
·
·
0
·
·
·
·
·
-6
0
250Hz0600Hz01kHz03kHz06kHz010kHz015kHz
A
✎
HT-D6500_ELS_1226.indd 34HT-D6500_ELS_1226.indd 34 2011-12-26 3:22:132011-12-26 3:22:13
Page 35

English 35
03 Setup
HDMI Audio
The audio signals transmitted over the HDMI
Cable can be toggled On/Off.
Off : Video is transmitted over the HDMI
connection cable only, and audio is output
through your product speakers only.
On :
Both video and audio signals are transmitted
over the HDMI connection cable, and audio is
output through your TV speakers only.
NOTE
HDMI Audio is automatically down-mixed to
2ch for TV speakers.
Audio Return Channel
You can enjoy TV sound from the Home Cinema
speakers by using just one HDMI cable.
Auto : Listen to TV sound from the Home
Cinema speakers if your TV is compatible with
the Audio Return Channel function.
Off : Turn the Audio Return Channel function
off.
NOTE
When Anynet+ (HDMI-CEC) is Off, the Audio
Return Channel function is not available.
Using an ARC (Audio Return Channel)uncertifi ed HDMI cable may cause a
problem in compatibility.
ARC function is only available if an ARCcompliant TV is connected.
Digital Output
You set the Digital Output to match the
capabilities of the AV receiver you’ve connected
to the product :
PCM : Choose if you have connected an HDMI
supported AV receiver.
Bitstream (Unprocessed) : Select if you have
connected an HDMI supported AV receiver
with Dolby TrueHD and DTS-HD Master Audio
decoding capabilities.
Bitstream (Re-encoded DTS) : Choose if you
have connected an AV receiver using a Digital
Optical input that can decode DTS.
•
•
✎
•
•
✎
•
•
•
Bitstream (Re-encoded Dolby D) : Select if
you don’t have an HDMI supported AV
receiver, but have an AV receiver with Dolby
Digital decoding capabilities.
For more details, please refer to the digital output
selection table. (See page 36)
Blu-ray Discs may include three audio streams :
- Main Feature Audio : The audio soundtrack of
the main feature.
-
BONUSVIEW audio : An additional
soundtrack such as the director or actor’s
commentary.
- Navigation Sound Effects : When you choose
some menu navigation, Navigation Sound
Effects may sound. Navigation Sound Effects
are different on each Blu-ray Disc.
NOTE
It can be activated when HDMI Audio is ON.
Be sure to select the correct Digital Output or
you will hear no sound or just loud noise.
If the HDMI device (AV receiver, TV) is not
compatible with compressed formats (Dolby
digital, DTS), the audio signal outputs as PCM.
Regular DVDs do not have BONUSVIEW audio
and Navigation Sound Effects.
Some Blu-ray Discs do not have BONUSVIEW
audio and Navigation Sound Effects.
This Digital Output setup does not effect the
analogue (L/R) audio or HDMI audio output to
your TV.
It effects the optical and HDMI audio output
when your product is connected to an AV
receiver.
If you play MPEG audio soundtracks, the audio
signal outputs as PCM regardless of your
Digital Output selections (PCM or Bitstream).
•
✎
HT-D6500_ELS_1226.indd 35HT-D6500_ELS_1226.indd 35 2011-12-26 3:22:152011-12-26 3:22:15
Page 36

36 English
Setup
Digital Output Selection
Setup PCM
Bitstream
(Unprocessed)
Bitstream
(Re-encoded
DTS)
Bitstream
(Re-encoded
Dolby D)
Connection
HDMI supported
AV receiver
HDMI supported
AV receiver
HDMI supported
AV receiver
HDMI supported
AV receiver
Audio Stream on
Blu-ray Disc
PCM Up to 7.1ch PCM DTS re-encoded
Re-encoded
Dolby Digital *
Dolby Digital Up to 7.1ch Dolby Digital DTS re-encoded
Re-encoded
Dolby Digital *
Dolby Digital Plus Up to 7.1ch Dolby Digital Plus DTS re-encoded
Re-encoded
Dolby Digital *
Dolby TrueHD Up to 7.1ch Dolby TrueHD DTS re-encoded
Re-encoded
Dolby Digital *
DTS Up to 6.1ch DTS DTS re-encoded
Re-encoded
Dolby Digital *
DTS-HD HRA Up to 7.1ch DTS-HD HRA DTS re-encoded
Re-encoded
Dolby Digital *
DTS-HD MA Up to 7.1ch DTS-HD MA DTS re-encoded
Re-encoded
Dolby Digital *
Audio Stream
on DVD
PCM PCM 2ch PCM 2ch PCM 2ch PCM 2ch
Dolby Digital Up to 5.1ch Dolby Digital Dolby Digital Dolby Digital
DTS Up to 6.1ch DTS DTS DTS
Defi nition for
Blu-ray Disc
Any
Decodes the main
feature audio and
BONUSVIEW audio
stream together
into PCM audio and
adds Navigation
Sound Effects.
Outputs only the
main feature audio
stream so that your
AV receiver can
decode the audio
bitstream.
You will not hear
BONUSVIEW
audio or Navigation
Sound Effects.
Decodes the main
feature audio and
BONUSVIEW audio
stream together
into PCM audio and
adds Navigation
Sound Effects, then
re-encodes the
PCM audio into DTS
bitstream.
Decodes the main
feature audio and
BONUSVIEW audio
stream together into
PCM audio and adds
Navigation Sound
Effects, then re-
encodes the PCM
audio into Dolby digital
bitstream or PCM.
* If the Source Stream is 2ch, “Re-encoded Dolby D” Setting are not applied. Ouput will be LPCM 2ch.
Dynamic Range Control
You can listen at low volumes, but still hear dialog
clearly. This is only active if your product detects
a Dolby Digital signal.
Auto : The Dynamic Range Control will be set
automatically based on the information
provided by the Dolby TrueHD Soundtrack.
•
Off : You can enjoy the movie with the
standard Dynamic Range.
On : When Movie soundtracks are played at
low volume or through smaller speakers, the
system can apply appropriate compression to
make low-level content more intelligible and
prevent dramatic passages from getting too
loud.
•
•
HT-D6500_ELS_1226.indd 36HT-D6500_ELS_1226.indd 36 2011-12-26 3:22:152011-12-26 3:22:15
Page 37

English 37
03 Setup
Audio Sync
Video may look slower than the audio when the
product is connected to a digital TV. If this
occurs, adjust the audio delay time to match the
video.
You can set the audio delay time between
0 msec and 300 msec. Set it to the optimal
status.
Network
Before you begin, contact your ISP to fi nd out if
your IP address is static or dynamic. If it is
dynamic, and you are using a wired or wireless
connection, we recommend using the Auto
procedures. If you are using a wireless
connection and your router has the capability,
you can use WPS(PBC) or One Foot Connection.
If your IP address is static, you must use the
manual set up procedure for both wired and
wireless connections.
Network Settings
To begin setting up the network connection for
your product, follow these steps:
In the Home menu, press the ◄► buttons to
select Settings, and then press the ENTER
button.
Press the ▲▼ buttons to select Network, and
then press the ENTER button.
Press the ▲▼ buttons to select Network
Settings, and then press the ENTER button.
Press the ▲▼ buttons to select Wired, Wireless
(General), WPS(PBC) or One Foot Connection,
and then press the ENTER button.
If you have a wired network, go to Wired Network
below. If you have a wireless network, go to
Wireless Network on pages 38~40.
•
1.
2.
3.
4.
5.
Wired Network
Setting Up a Wired Connection - Auto
Press the ▲▼ buttons to select Wired.
Settings
Display
Audio
Network
System
Language
Security
General
Support
Network Settings
>
Move " Enter ' Return
Select a network connection type.
Wired
Wireless
(General)
WPS(PBC)
One Foot
Connection
Connect to the network using LAN cable. Please make
sure that the LAN cable is connected.
Press the ENTER button.
The Network Status screen appears. The
product connects to the network after the
network connection is verifi ed.
Setting Up a Wired Connection - Manual
If you have a static IP address or the Auto Setting
does not work, you’ll need to set the Network
Settings values manually.
To view your Network Settings values on most
Windows computers, follow these steps:
Right click the Network icon on the bottom
right of the Windows desktop.
In the pop-up menu, click Status.
On the dialog that appears, click the Support
tab.
On the Support tab, click the Details button.
The Network settings are displayed.
1.
2.
1.
2.
3.
4.
HT-D6500_ELS_1226.indd 37HT-D6500_ELS_1226.indd 37 2011-12-26 3:22:152011-12-26 3:22:15
Page 38

38 English
Setup
To enter the Network settings into your product,
follow these steps:
Press the ▲▼ buttons to select Wired, and
then press the ENTER button.
Press the ◄► buttons to select IP Settings,
and then press the ENTER button.
Settings
Display
Audio
Network
System
Language
Security
General
Support
IP Settings
m
Move Number " Enter ' Return
IP Mode Manual
IP Address
0.0.0.0
Subnet Mask
0.0.0.0
Gateway
0.0.0.0
DNS Mode Manual
DNS Server
0.0.0.0
OK
Press the ENTER button to select IP Mode.
Press the ▲▼ buttons to select Manual,
and then press the ENTER button.
Press the ▼ button to go to the fi rst entry
fi eld (IP Address).
Use the number buttons on your remote to
enter numbers.
When done with each fi eld, press the ►
button to move successively to the next fi eld.
You can also use the other arrow buttons to
move up, down, and back.
Enter the IP Address, Subnet Mask, and
Gateway values.
Press the ▼ button to go to DNS Mode.
Press the ▼ button to go to the fi rst DNS
entry fi eld. Enter the numbers as above.
Press the ENTER button to select OK.
The Network Status screen appears. The
product connects to the network after the
network connection is verifi ed.
1.
2.
3.
4.
5.
6.
7.
8.
9.
10.
11.
Wireless Network
You can setup a wireless network three ways:
Wireless (General)
Using WPS(PBC).
One Foot Connection
Wireless (General) includes both Automatic and
Manual setup procedures.
Setting Up the Wireless Network Connection
- Auto
Most wireless networks have an optional security
system that requires devices that access the
network to transmit an encrypted security code
called an Access or Security Key. The Security
Key is based on a Pass Phrase, typically a word
or a series of letters and numbers of a specifi ed
length you were asked to enter when you set up
security for your wireless network. If you use this
method of setting up the network connection,
and have a Security Key for your wireless
network, you will have to enter the Pass Phrase
during the Auto setup process.
Press the ▲▼ buttons to select Wireless
(General).
Settings
Display
Audio
Network
System
Language
Security
General
Support
Network Settings
>
Move " Enter ' Return
Wireless
(General)
One Foot
Connection
WPS(PBC)
Wired
Select a network connection type.
Set up wireless network by selecting your Wireless
Router. You may need to enter security key depending
on the setting of the Wireless Router.
Press the ENTER button.
When done, it displays a list of the available
networks.
Press the ▲▼ buttons to select the desired
network, and then press the ENTER button.
The Security screen appears.
•
•
•
1.
2.
3.
HT-D6500_ELS_1226.indd 38HT-D6500_ELS_1226.indd 38 2011-12-26 3:22:172011-12-26 3:22:17
Page 39

English 39
03 Setup
On the Security screen, enter your network’s
Pass Phrase. Enter numbers directly using
your remote control.
To select a letter, press the ▲▼◄► buttons
to move the cursor, then press the ENTER
button.
Settings
Display
Audio
Network
System
Language
Security
General
Support
Network Settings
a
Previous m Move " Enter ' Return
a
g
m
s
a/A * Delete Space Done
t u v w x y z 0
n o p q r 7 8 9
h i j k l 4 5 6
b c d e f 1 2 3
Enter security key. 0 entered
NOTE
You should be able to fi nd the Pass Phrase on
one of the set up screens you used to set up
your router or modem.
When done, press the ▲▼◄► buttons to
move the cursor to Done, and then press the
ENTER button.
The Network Status screen appears. The
product connects to the network after the
network connection is verifi ed.
Setting Up the Wireless Network Connection
- Manual
If the Auto Setting does not work, you need to
enter the Network settings values manually.
To view the Network Settings values on most
Windows computers, follow these steps:
Right click the Network icon on the bottom
right of the screen.
In the pop-up menu, click Status.
On the dialog that appears, click the Support
tab.
On the Support tab, click the Details button.
The Network settings are displayed.
4.
✎
5.
1.
2.
3.
4.
To enter the Network settings into your product,
follow these steps:
Follow Steps 1 through 5 in the ‘Setting Up
the Wireless Network Connection - Auto’
procedure.
When done, press the ▲▼◄► buttons to
move the cursor to Done, and then press the
ENTER button. The Network Status screen
appears.
Settings
Display
Audio
Network
System
Language
Security
General
Support
IP Settings
>
Move " Enter ' Return
IP Mode Manual
IP Address
0.0.0.0
Subnet Mask
0.0.0.0
Gateway
0.0.0.0
DNS Mode Manual
DNS Server
0.0.0.0
OK
On the Network Status screen, select
Cancel, and then press Enter.
Press the ◄► buttons to select IP Settings,
and then press the ENTER button.
Press the ENTER button to select IP Mode.
Press the ▲▼ buttons to select Manual,
and then press the ENTER button.
Press the ▼ button to go to the fi rst entry
fi eld (IP Address).
Use the number buttons to enter numbers.
When done with each fi eld, press the ►
button to move successively to the next fi eld.
You can also use the other arrow buttons to
move up, down, and back.
Enter the IP Address, Subnet Mask, and
Gateway values.
Press the ▼ to go to DNS Mode.
Press the ▼ button to go to the fi rst DNS
entry fi eld. Enter the numbers as above.
The Network Status screen appears. The
product connects to the network after the
network connection is verifi ed.
1.
2.
3.
4.
5.
6.
7.
8.
9.
10.
11.
12.
13.
HT-D6500_ELS_1226.indd 39HT-D6500_ELS_1226.indd 39 2011-12-26 3:22:192011-12-26 3:22:19
Page 40

40 English
Setup
WPS(PBC)
The easiest way to set up the wireless network
connection is using the WPS(PBC) function or the
One Foot Connection function.
If your wireless router has a WPS(PBC) button,
follow these steps:
Press the ▲▼ buttons to select WPS(PBC).
Settings
Display
Audio
Network
System
Language
Security
General
Support
Network Settings
>
Move " Enter ' Return
One Foot
Connection
Wireless
(General)
Wired
Select a network connection type.
Connect to the Access Point easily by pressing the
WPS(PBC) button. Choose this if your Access Point
supports Push Button Confi guration(PBC).
WPS(PBC)
Press the ENTER button.
Press the WPS(PBC) button on your router
within two minutes. Your product displays
the Network Selection Screen, and
automatically acquires all the network
settings values it needs and connects to your
network. When it is done, it displays an OK
button. Press the ENTER button on your
remote.
One Foot Connection
You can set up the wireless connection
automatically if you have a Samsung Wireless
Router which supports One Foot Connection. To
connect using the One Foot Connection function,
follow these steps:
Press the ▲▼ buttons to select One Foot
Connection.
Settings
Display
Audio
Network
System
Language
Security
General
Support
Network Settings
>
Move " Enter ' Return
Wireless
(General)
Wired
Select a network connection type.
Connect to your wireless network automatically if your
Wireless Router supports One Foot Connection. Select
this connection type after placing the Wireless Router
within 10 inches(25cm) of Samsung Wireless LAN Adapter.
One Foot
Connection
WPS(PBC)
1.
2.
3.
1.
Press the ENTER button.
Place the Samsung Wireless Router within
25 cm (10 inches) of Samsung Wireless LAN
Adapter to connect.
Wait until the connection is automatically
established.
Network Status
Check whether a connection to the network and
the Internet have been established.
Settings
Display
Audio
Network
System
Language
Security
General
Support
Network Status
< Move " Enter ' Return
MAC Address XX:XX:XX:XX:XX:XX
IP Address 0.0.0.0
Subnet Mask 0.0.0.0
Gateway 0.0.0.0
DNS Server 0.0.0.0
Internet is connected successfully.
If you have a problem using any Internet services, contact your Internet service
provider.
KT_WLAN
IP Settings Retry OKNetwork Settings
BD-LIVE Internet Connection
Set to allow or prohibit an Internet connection
when you use the BD-LIVE service.
Allow (All) : The Internet connection is allowed
for all BD-LIVE contents.
Allow (Valid Only) : The Internet connection is
allowed only for BD-LIVE contents containing a
valid certifi cate.
Prohibit : No Internet connection is allowed for
any BD-LIVE content.
NOTE
What is a valid certifi cate?
When the product uses BD-LIVE to send the
disc data and a request to the server to certify
the disc, the server uses the transmitted data
to check if the disc is valid and sends the
certifi cate back to the product.
The Internet connection may be restricted
while you are using BD-LIVE contents.
2.
3.
4.
•
•
•
✎
HT-D6500_ELS_1226.indd 40HT-D6500_ELS_1226.indd 40 2011-12-26 3:22:202011-12-26 3:22:20
Page 41

English 41
03 Setup
System
Initial Settings
By using the Initial Settings function, you can set
the language, Musical Auto Calibration, Network
Settings, etc.
For more information about the Initial Settings
function, refer to the Initial Settings section of this
user manual. (See page 27)
Anynet+ (HDMI-CEC)
Anynet+ is a convenient function that offers linked
operations with other Samsung products that
have the Anynet+ feature.
To operate this function, connect this product to
a Samsung TV with an HDMI cable.
With Anynet+ on, you can operate this product
using a Samsung TV remote control and start
disc playback simply by pressing the PLAY (►)
button on the TV’s remote control. For more
information, please see the TV user manual.
Off : Anynet+ functions will not work.
On : Anynet+ functions will work.
NOTE
This function is not available if the HDMI cable
does not support CEC.
If your Samsung TV has an Anynet+ logo, then
it supports the Anynet+ function.
Depending on your TV, certain HDMI output
resolutions may not work.
Please refer to the user manual of your TV.
BD Data Management
Lets you manage the downloaded contents you
accessed through a Blu-ray Disc that supports
the BD-LIVE service and stored on an attached
Flash memory device.
You can check the device’s information including
the storage size, delete the BD data, or change
the Flash memory device.
BD Data Management Screen Information :
Current Device : Display the selected device.
Total Size : Total memory size of the device.
•
•
✎
•
•
Available Size : Available memory in the
device.
Delete BD Data : Delete all BD data in the
storage.
Select Device : Change location of desired
memory to store BD data.
NOTE
In the external memory mode, disc playback
may be stopped if you disconnect the USB
device in the middle of playback.
Only those USB devices formatted in FAT fi le
system (DOS 8.3 volume label) are supported.
We recommend you use USB devices that
support USB 2.0 protocol with 4 MB/sec or
faster read/write speed.
The Resume Play function may not work after
you format the storage device.
The total memory available to BD Data
Management may differ, depending on the
conditions.
Time Zone
You can specify the time zone that is applicable
to your area.
Settings
Display
Audio
Network
System
Language
Security
General
Support
Time Zone
<
Change " Save ' Return
GMT + 00:00
London, Lisbon, Casablanca
DivX® Video On Demand
Shows the registration code authorized for the
product. If you connect to the DivX web site and
register using that code, you can download the VOD
registration fi le. If you activate the VOD registration
using My Contents, the registration is completed.
NOTE
For more information about DivX(R) VOD, visit
“http://vod.divx.com”.
•
•
•
✎
✎
HT-D6500_ELS_1226.indd 41HT-D6500_ELS_1226.indd 41 2011-12-26 3:22:242011-12-26 3:22:24
Page 42

42 English
Setup
Reset
All settings will revert to the default except for the
network and Smart Hub settings. You need enter
the password for this function.
NOTE
The default password is 0000.
Language
You can select the language you prefer for the
Home menu, disc menu, etc.
On-Screen Menu : Select the language for the
on-screen displays.
Disc Menu : Select the language for the disc
menu displays.
Audio : Select the language for disc audio.
Subtitle : Select the language for disc subtitles.
NOTE
The selected language will only appear if
it is supported on the disc.
Security
This function works in conjunction with Blu-ray
and DVD discs that have been assigned an age
rating or numeric rating that indicates the maturity
level of the content. These numbers help you
control the types of Blu-ray and/DVD discs that
your family can watch.
When you access this function for the fi rst time,
the password setup screen appears. Enter a
desired 4-digit password using the number
buttons. (The default password is 0000.)
After you have set your password, select an age
rating you want to set for the BD Parental Rating
and a rating level you want to set for the DVD
Parental Rating. The product will only play Blu-ray
discs rated at or below the age rating and DVD
discs rated below the numeric rating unless the
password is entered.
Larger numbers indicate more mature content.
BD Parental Rating
This will prohibit playback of Blu-ray disc rated
above Parental Rating.
DVD Parental Rating
Prevent playback of DVD discs with specifi c
numerical ratings unless a password is entered.
✎
•
•
•
•
✎
Change Password
Change the 4-digit password used to access
security functions.
If you forgot your password
Remove the disc.
Press and hold the STOP () button on the
front panel for 5 seconds or more.
All settings will revert to the factory settings.
NOTE
When the factory default settings are restored,
all the user stored BD data will be deleted.
General
Front Display
Change the brightness display of the front panel.
Auto : Dim during playback.
Dim : Dim the display window.
Bright : Brighten the display window.
NOTE
The Power button and the Function button are
not possible to change the Brightness.
Network Remote Control
The Network Remote Control function lets you
control your Blu-ray Home Cinema from a remote
device such as a smart phone through a wireless
connection to your local area network.
To use the Network Remote Control function, follow
these steps:
Select On in the Network Remote Control
menu.
Install the Samsung network remote control
application to control your product on your
compatible portable device.
Make sure your portable device and your
product are connected to the same wireless
router.
Start the application on your portable device.
The application should fi nd your product and
display it on a list.
Select the product.
1.
2.
✎
•
•
•
✎
1.
2.
3.
4.
5.
HT-D6500_ELS_1226.indd 42HT-D6500_ELS_1226.indd 42 2011-12-26 3:22:252011-12-26 3:22:25
Page 43

English 43
03 Setup
If this is the fi rst time you are using the
function, it will ask you to allow or deny
remote control of the product. Select Allow.
Follow the instructions that came with the
application to control the product.
Support
Software Upgrade
The Software Upgrade menu allows you to
upgrade the product’s software for performance
improvements or additional services. You can
upgrade in four ways:
By Internet
By USB
By Disc
Via download (File)
The four methods are explained below.
By Internet
To upgrade by Internet, follow these steps:
Select By Internet, and then press the
ENTER button. The Connecting to Server
message appears.
If there is a download available, the
Download pop-up appears with a progress
bar and the download starts.
When the download is complete, the
Upgrade Query window appears with three
choices: Upgrade Now, Upgrade Later, or
Don’t Upgrade.
If you select Upgrade Now, the product
upgrades the software, turns off, and then
turns on automatically.
If you do not make a selection in one minute
or select Upgrade Later, the product stores
the new upgrade software. You can upgrade
the software later using the Via download
function.
If you select Don’t Upgrade, the product
cancels the upgrade.
6.
7.
•
•
•
•
1.
2.
3.
4.
5.
6.
NOTE
Your product must be connected to the
Internet to use the By Internet function.
The upgrade is complete when the product
turns off, and then turns on again by itself.
Never turn the product off or back on
manually during the update process.
Samsung Electronics shall take no legal
responsibility for product malfunction
caused by an unstable Internet connection
or consumer negligence during a software
upgrade.
If you want to cancel the upgrade while the
upgrade software is downloading, press the
ENTER button.
By USB
To upgrade by USB, follow these steps:
Visit www.samsung.com/bluraysupport
Download the latest USB software upgrade
zip archive to your computer.
Unzip the zip archive to your computer. You
should have a single folder with the same
name as the zip fi le.
Copy the folder to a USB fl ash drive.
Make sure the disc tray is empty, and then
insert the USB fl ash drive into the USB port
of the product.
In the product’s menu, go to Settings >
Support > Software Upgrade.
Select By USB.
NOTE
The disc tray must be empty when you
upgrade the software using the USB Host
jack.
When the software upgrade is done, check
the software details in the software Upgrade
menu.
Do not turn off the product during the
software upgrade. It may cause the product
to malfunction.
Software upgrades using the USB Host jack
must be performed with a USB memory
fl ash stick only.
✎
1.
2.
3.
4.
5.
6.
7.
✎
HT-D6500_ELS_1226.indd 43HT-D6500_ELS_1226.indd 43 2011-12-26 3:22:252011-12-26 3:22:25
Page 44

44 English
Setup
By Disc
To upgrade by Disc, follow these steps:
Visit www.samsung.com/bluraysupport.
Download the latest disc software upgrade
zip archive to your computer.
Unzip the zip archive to your computer. You
should have a single folder with the same
name as the zip fi le.
Write the folder onto a disc. We recommend
a CD-R or DVD-R.
Finalise the disc before you remove it from
your computer.
Insert the disc into product.
In the product’s menu, go to Settings >
Support > Software upgrade.
Select By Disc.
NOTE
When the system upgrade is done, check the
software details in the software Upgrade menu.
Do not turn off the product during the Software
Upgrade. It may cause the product malfunction.
Via download
The Via download option lets you upgrade using a
fi le the product downloaded earlier but you
decided not to install immediately or a fi le
downloaded by the product in Standby Mode (See
Download in Standby Mode below).
To upgrade Via download, follow these steps:
If upgrade software has been downloaded,
you will see the software version number to
the right of Via download.
Select Via download, and then press the
ENTER button.
The product displays a message asking if
you want to upgrade. Select Yes. The
product begins the upgrade.
When the update is complete, the product
turns off automatically, and then turns on.
1.
2.
3.
4.
5.
6.
7.
8.
✎
1.
2.
3.
4.
NOTE
When the system upgrade is done, check the
software details in the software Upgrade
menu.
Do not turn off the product during the software
Upgrade. It may cause the product to
malfunction.
To use the Via download function, your
product must be connected to the Internet.
Download in Standby Mode
You can set the Download in Standby Mode
function so that the product downloads new
upgrade software when it is in Standby mode. In
Standby mode, the product is off, but its Internet
connection is active. This allows the product to
download upgrade software automatically, when
you are not using it.
To set Download in Standby Mode, follow these
steps:
Press the ▲▼ buttons to select Download
in Standby Mode, and then press the
ENTER button.
Select On or Off.
Off : If you select Off, the product will notify
you with a pop up message when new
upgrade software is available.
On : If you select On, the product will
automatically download new upgrade
software when it is in Standby mode with
the power off. If it downloads new upgrade
software, the product will ask you if you
want to install it when you turn the product
on.
NOTE
To use the Download in Standby Mode
function, your product must be connected to
the Internet.
Contact Samsung
Provides contact information for assistance with
your product.
✎
1.
2.
•
•
✎
HT-D6500_ELS_1226.indd 44HT-D6500_ELS_1226.indd 44 2011-12-26 3:22:262011-12-26 3:22:26
Page 45

English 45
04 Basic Functions
Playing a Disc
Playback
Insert a disc into the disc slot with the disc's
label facing up.
Press the PLAY (►) button.
Playback related buttons
PLAY ( ►)
Starts playback.
STOP ( )
Stops playback.
If you press the button
once : The stop position is
memorized.
If you press the button twice
: The stop position is not
memorized.
•
•
PAUSE ( )
Pauses playback.
NOTE
For some discs, pressing the STOP ( )
button once may not memorize the stop
position.
Video fi les with high bit rates of 20Mbps or
more strain the product’s capabilities and
may stop playing during play back.
Disc Structure
The content of discs are usually divided as shown
below.
Blu-ray Disc, DVD-VIDEO
title 1 title 2
chapter 1 chapter 2 chapter 1 chapter 2 chapter 3
1.
2.
✎
•
Audio CD (CD-DA)
track 1 track 2 track 3 track 4 track 5
MP3, WMA, DivX, MKV and MP4
folder (group) 1 folder (group) 2
fi le 1 fi le 2 fi le 1 fi le 2 fi le 3
Playing a 2D video in 3D mode
hZ
You can enjoy an ordinary 2D video in
3D mode.
NOTE
If you move to the Home or Smart
Hub Home menu in 3D mode, it will switch
to 2D automatically.
Using the Disc menu/Title menu/
Popup menu
Using the Disc Menu
hZ
During playback, press the DISC
MENU button on the remote
control.
Press the
◄ ►
buttons to make
a selection, and then press the
ENTER button.
NOTE
Depending on the disc, the menu items may
differ and this menu may not be available.
•
•
✎
1.
2.
✎
DISC MENU
Basic Functions
HT-D6500_ELS_1226.indd 45HT-D6500_ELS_1226.indd 45 2011-12-26 3:22:262011-12-26 3:22:26
Page 46

46 English
Basic Functions
Using the Title Menu
Z
During playback, press the TITLE
MENU button on the remote
control.
Press the
◄ ►
buttons to
make the desired selection, then
press the ENTER button.
NOTE
Depending on the disc, the menu items may
differ and this menu may not be available.
The Title Menu will only be displayed if there
are at least two titles on the disc.
Using the Popup Menu
h
During playback, press the POPUP
button on the remote control.
Press the
◄ ►
buttons or
ENTER button to select the desired
menu.
NOTE
Depending on the disc, the menu items may
differ and this menu may not be available.
Playing the Title List
z
During playback, press the DISC
MENU or TITLE MENU button.
Press the
buttons to select
an entry you want to play from
Title List, then press the ENTER
button.
1.
2.
✎
1.
2.
✎
1.
2.
Using the Search and Skip Functions
During playback, you can search quickly through
a chapter or track, and use the skip function to
jump to the next selection.
Searching for a Desired Scene
hzZyx
During playback, press the SEARCH ()
button.
Each time you press the
SEARCH (
)
button, the playback speed will change as
follows.
BD-ROM,
BD-RE/-R,
DVD-RW/-R,
DVD+RW/+R,
DVD-VIDEO
)
1
)
2 ) 3
)
4
)
5 ) 6 ) 7
(
1
(
2 ( 3
(
4
(
5 ( 6 ( 7
DivX, MKV, MP4
)
1
)
2 ) 3
(
1
(
2 ( 3
To return to normal speed playback, press the
PLAY (►) button.
NOTE
No sound is heard during search mode.
If you press the or button too quickly
this product might think you are just holding
the button down. This will lead to improper
operation, be sure to not press these buttons
too rapidly.
Skipping Chapters
hzZyx
During playback, press the SKIP (#$)
button.
If you press the SKIP ($) button, it moves to
the next chapter.
If you press the SKIP (#) button, it moves to
the beginning of the chapter. One more press
makes it move to the beginning of the previous
chapter.
•
•
✎
•
TITLE MENU
POPUP
TITLE MENU
POPUP
DISC MENU
TITLE MENU
POPUP
HT-D6500_ELS_1226.indd 46HT-D6500_ELS_1226.indd 46 2011-12-26 3:22:272011-12-26 3:22:27
Page 47

English 47
04 Basic Functions
Slow Motion Play/Step Motion Play
Slow Motion Play
hzZyx
In pause ( ) mode, press the SEARCH ()
button.
If you press the SEARCH () button, the
playback speed is reduced to
* 1/8 * 1/4 * 1/2
To return to normal speed playback, press the
PLAY (► ) button.
NOTE
No sound is heard during slow mode.
Slow motion operates only in the forward
direction.
Step Motion Play
hzZyx
In pause mode, press the PAUSE ( ) button.
Each time the PAUSE ( ) button is pressed, a
new frame will be appear.
To return to normal speed playback, press the
PLAY ( ► ) button.
NOTE
No sound is heard during step mode.
Step motion operates only in the forward
direction.
Repeat Playback
Repeat the Title or Chapter
hzZyx
Repeat the disc title or chapter.
During playback, press the REPEAT
button on the remote control.
Press the ▲▼ buttons to select
Chapter or Title, then press the
ENTER button.
•
•
✎
•
•
✎
1.
2.
Repeat > Off
To return to normal play, press the REPEAT
button again.
Press the ▲▼ buttons to select Off, the
press the ENTER button.
NOTE
Depending on the disc, the Repeat function
may not be available.
Repeat the Section
hzZy
During playback, press the REPEAT
button on the remote control.
Press the ▲▼ buttons to select
REPEAT A-B.
Repeat > Repeat A-B : Off " Mark A
Press the ENTER button at the point where
you want repeat play to start (A).
Press the ENTER button at the point where
you want repeat play to stop (B).
To return to normal play, press the REPEAT
button again.
Press the ENTER button.
NOTE
If you set point (B) before 5 seconds has
lapsed, the prohibition message will appear.
Depending on the disc, the Repeat function
may not be available.
3.
4.
✎
1.
2.
3.
4.
5.
6.
✎
REPEAT
REPEAT
HT-D6500_ELS_1226.indd 47HT-D6500_ELS_1226.indd 47 2011-12-26 3:22:292011-12-26 3:22:29
Page 48

48 English
Basic Functions
Using the TOOLS button
During playback, you can operate disc
menu by pressing the
TOOLS
button.
TOOLS Menu Screen
Tools
<
Change "
Enter ' Return
Title Search 1/2
Chapter Search : 1/20
Time Search : 00:00:13/01:34:37
Picture Settings : Normal
Audio : 1/4 ENG Multi CH
User EQ
Subtitle : 0/7 Off
Angle : 1/1
NOTE
Depending on the disc, the TOOLS menu
may differ.
Moving to a Desired Scene Directly
hzZy
During playback, press the TOOLS button.
Press the ▲▼ buttons to select Title
Search, Chapter Search or Time Search.
Enter the desired Title, Chapter or Playing
Time using the number buttons, then press
the ENTER button.
Selecting the Audio Language
hzZx
During playback, press the TOOLS button.
Press the ▲▼ buttons to select Audio.
Press the ENTER button.
Press the
▲▼
buttons to select the audio
language you want.
NOTE
The ◄► indicator will not be displayed on the
screen if the BONUSVIEW section does not
contain any BONUSVIEW audio settings.
•
✎
▪
1.
2.
3.
1.
2.
3.
4.
✎
Information about the primary / secondary
mode will be also displayed if the Blu-ray Disc
has a BONUSVIEW section.
Use the ◄► button to switch between
primary and secondary audio modes.
This function depends on what audio
languages are encoded on the disc and may
not be available.
Some Blu-ray Discs may allow you to select
either the multi-channel LPCM or Dolby digital
audio soundtrack in English.
Selecting the Subtitle Language
hZx
During playback, press the TOOLS button.
Press the ▲▼ buttons to select Subtitle.
Press the ◄► buttons to select the desired
subtitle language.
NOTE
Depending on the Blu-ray Disc / DVD, you may
be able to change the desired subtitle in the
Disc Menu.
Press the DISC MENU button.
This function depends on what subtitles are
encoded on the disc and may not be available
on all Blu-ray Discs/DVDs.
Information about the primary / secondary
mode will also be displayed if the Blu-ray Disc
has a BONUSVIEW section.
This function changes both the primary and
secondary subtitles at the same time.
The total number of subtitles is the sum of the
primary and secondary ones.
1.
2.
3.
✎
TOOLS
HT-D6500_ELS_1226.indd 48HT-D6500_ELS_1226.indd 48 2011-12-26 3:22:352011-12-26 3:22:35
Page 49

English 49
04 Basic Functions
Caption Function
x
You must have some experience with video
extraction and editing in order to use this
feature properly.
To use the caption function, save the caption
fi le (*.smi) in the same fi le name as that of the
DivX media f le (*.avi) within the same folder.
Example. Root Samsung_007CD1.avi
Samsung_007CD1.smi
Up to 60 alphanumeric characters or 30 East Asian
characters (2 byte characters such as Korean and
Chinese) for the fi le name.
Changing the Camera Angle
hZ
When a Blu-ray Disc/DVD contains multiple
angles of a particular scene, you can use the
ANGLE function.
During playback, press the TOOLS button.
Press the ▲▼ buttons to select Angle.
Press the ◄► buttons to select the desired
Angle.
Selecting the Picture Settings
hzZy
This function enables you to adjust video quality.
During playback, press the TOOLS button.
Press the ▲▼ buttons to select Picture
Settings, then press the ENTER button.
Press the ◄► buttons to select the desired
Mode.
Dynamic : Choose this setting to increase
Sharpness.
Normal : Choose this setting for most
viewing applications.
Movie : This is the best setting for watching
movies.
•
•
•
1.
2.
3.
1.
2.
3.
•
•
•
User : The user can adjust the Sharpness,
Noise reduction, Contrast, Brightness,
Color, Tint function respectively.
NOTE
If the system is connected to a BD Wisecompliant TV that has set BD Wise to On, the
picture setting menu will not appear.
Setting the BONUSVIEW
h
The BONUSVIEW feature allows you to view
additional content (such as commentaries) in a
small screen window while the movie is playing.
This function is only available if the disc has the
bonusview feature.
Primary a audio/video
Secondary a audio/video
During playback, press the TOOLS button.
Press the ▲▼ buttons to select BONUSVIEW
Video or BONUSVIEW Audio.
Press the ◄► buttons to select the desired
bonusview.
NOTE
If you switch from BONUSVIEW Video,
BONUSVIEW Audio will change automatically
in accordance with BONUSVIEW Video.
Tools
BONUSVIEW Video Off
BONUSVIEW Audio : 0/1 Off
Picture Settings
< Change "
Enter
•
✎
1.
2.
3.
✎
HT-D6500_ELS_1226.indd 49HT-D6500_ELS_1226.indd 49 2011-12-26 3:22:372011-12-26 3:22:37
Page 50

50 English
Basic Functions
Listening to Music
ow
Buttons on the Remote Control
used for Music Playback
REPEATFULL SCREEN
12
456
7809
RDS DISPLAY
TA
PTY+PTY SEARCHPTY-
ULL SCREEN
DISPLAY
2
3
1
0
!
9
@
TOOLS
RETURN
EXIT
INFO
AB
HUB
CD
MO/ST
2DĺDSMART SEARCH
iPod SYNC
TUNER
MEMORY
S/W LEVEL
TOOLS
INFO
A
B
HUB
Dĺ
D
MART
EARC
H
iPod SYN
C
TUNE
R
EMORY
/W LEVE
L
4
6
7
5
8
1
REPEAT button : Selects the play mode in the
Playlist.
2
SEARCH buttons :
Audio CD (CD-DA) - Fast Play.
MP3 - Jump Play. (10 seconds)
3
PAUSE button : Pauses playback.
4
PLAY button : Plays the currently selected track.
5
▲▼ buttons : Selects a track in the Music List
or Playlist.
6
YELLOW(C) button : Select Edit Mode or Play
Mode.
7
ENTER button : Plays the selected track.
8
► button : During playback, moves to the next
page in the Music List or moves to the next track
in the Playlist.
◄
button : During playback, moves to the
previous page in the Music List or moves to the
previous track in the Playlist.
9
STOP button :
Stops a
track
.
0
$
button : Plays the
next track.
!
#
button : Plays the previous track.
If you press this button after three seconds of
playback in the Playlist, the current track will be
replayed from the beginning. But, if you press this
button within three seconds after playback starts
in the Playlist, the previous track will be played.
@
NUMBER button : During the Playlist playback,
press the desired track number. The selected
track will be played. (only Audio CD(CD-DA))
HT-D6500_ELS_1226.indd 50HT-D6500_ELS_1226.indd 50 2011-12-26 3:22:382011-12-26 3:22:38
Page 51

English 51
04 Basic Functions
Playing an Audio CD (CD-DA)/MP3
Insert an Audio CD (CD-DA) or an MP3 Disc
into the disc slot.
For an Audio CD (CD-DA), the fi rst track will
be played automatically.
For an MP3 disc, press the ◄► buttons to
select Music, then press the ENTER
button.
Audio CD (CD-DA)/MP3 Screen Elements
Audio CD
5
2
4
7
6
13
"
Enter < Page Tools ' Return
TRACK 001
1/13
Music
TRACK 001
00:43
TRACK 002
03:56
TRACK 003
04:41
TRACK 004
04:02
+
00:13 / 00:43
1
Displays the music information.
2
Displays the playlist.
3
Shows the current track/total tracks.
4
Displays buttons available.
5
Shows the current play time/total play time.
6
Displays the current playback status.
7
Displays the repeated playback status.
Press the ▲▼ buttons to select the track
you want to play, and then press the ENTER
button.
1.
•
•
2.
Repeat an Audio CD (CD-DA)/MP3
During the Playlist playback, press
the REPEAT button.
Select the desired play mode by
pressing the REPEAT button repeatedly.
Off
Audio CD
(CD-DA)/MP3
Tracks on a disc are played
in the order in which they
were recorded on the disc.
(
) One
Song
Audio CD
(CD-DA)/MP3
Current track is repeated.
(
) All
Audio CD
(CD-DA)/MP3
All tracks are repeated.
NOTE
During playback, press the TOOLS button and
set Shuffl e Mode to On. You can play the
tracks in the random order.
Playlist
Insert an Audio CD (CD-DA) or an MP3 Disc
into the disc slot.
For an Audio CD (CD-DA), the fi rst track will
be played automatically.
For an MP3 disc, press the ◄► buttons to
select Music, then press the ENTER
button.
To move to the Music List, press the STOP ()
or RETURN button.
The Music List screen is displayed.
Press the YELLOW(C) button to switch to
Edit Mode.
Press
▲▼◄►
to select a desired track.
Then, press ENTER. Repeat this procedure
to select additional tracks.
The selected fi le will be checked.
To cancel your selection, press ENTER
again to uncheck the track.
1.
2.
✎
1.
•
•
2.
3.
4.
•
•
REPEAT
HT-D6500_ELS_1226.indd 51HT-D6500_ELS_1226.indd 51 2011-12-26 3:22:392011-12-26 3:22:39
Page 52

52 English
Basic Functions
TRACK 002
03:56
TRACK 004
04:02
TRACK 006
03:40
TRACK 008
03:52
1/2 Page
Audio CD | Music
Close Edit Mode
( )
Page Tools " Select ' Return
TRACK 001
00:43
TRACK 003
04:41
TRACK 005
03:43
TRACK 007
04:06
Selected Items : 3
Select a desired track and press the TOOLS
button.
To play the selected track(s), select Play
Selected in the Tools menu and press
ENTER.
+
00:13 / 00:43
TRACK 001
Audio CD
"
Enter Tools ' Return
TRACK 001
00:43
TRACK 002
03:56
TRACK 003
04:41
1/3
Music
To return to the Edit Mode, press STOP or
RETURN.
To exit Edit Mode, press the YELLOW(C)
button.
NOTE
You can create a playlist with up to 99 tracks
on Audio CD (CD-DA).
Sound Mode
DSP(Digital Signal Processor) Function
You can select mode to optimize the sound for
sound based on your tastes.
Press the DSP button.
SMART SOUND MP3 ENHANCER
POWER BASS VIRTUAL 7.1
USER EQ DSPOFF
5.
6.
7.
8.
✎
• SMART SOUND : This will regulate and
stabilize the volume level against a drastic
volume change when changing channels or
during a scene transition.
• MP3 ENHANCER : This also helps enhance
your sound experience (ex. mp3 music). You
can upscale your MP3 level sound(24 kHz,
8bit) to CD level sound(44.1 kHz, 16bit).
• POWER BASS : This function stresses low
tones providing thudding sound effects.
• VIRTUAL 7.1 : Applies the 7.1 CH sound
effect using the 5.1 CH speaker system.
• USER EQ : You can confi gure the equalizer
settings manually to your preference.
SFE(Sound Field Effect) MODE
You can set the SFE mode best suited
for the type of music you are listening
to.
Press the SFE MODE button.
Symphony
Hall in Boston
(Hall 1)
Provides a clear vocal as if
listening in a concert hall.
Phillharmonic
Hall in
Bratislava
(Hall 2)
Provides also a clear vocal as if
listening in a concert hall but,
less powerful than HALL1.
Jazz Club in
Seoul B
Recommended setting for Jazz.
Church in
Seoul
Gives the feel of being in a
grand church.
Amphitheater
(Rock)
Recommended setting for
Rock.
Off
Select this for normal listening.
DSP
SFE MODE
HT-D6500_ELS_1226.indd 52HT-D6500_ELS_1226.indd 52 2011-12-26 3:22:412011-12-26 3:22:41
Page 53

English 53
04 Basic Functions
Dolby Pro Logic II Mode
You can select the desired Dolby Pro
Logic II audio mode.
Press the
PL II button.
MUSIC
When listening to music, you can
experience sound effects as if you
are listening to the actual
performance.
MOVIE
Adds realism to the movie
soundtrack.
PROLOGIC
You can listen to a 2CH sound source
in 5.1CH surround sound with all
speakers active.
- A specifi c speaker(s) may not be
output depending on the input
signal.
MATRIX
You will hear multi channel surround
sound.
STEREO
Select this to listen to sound from
the front left and right speakers and
the subwoofer only.
NOTE
When selecting Dolby Pro Logic II mode,
connect your external device to the AUDIO
INPUT jacks (L and R) on the product. If you
connect to only one of the inputs (L or R), you
cannot listen to surround sound.
iPod SYNC
If you insert your iPod player in the iPod Dock
that has already been connected to the system,
the video fi les in your iPod player can be played
through the connected TV.
If the video signal does not synchronize
properly with the audio signal, press
iPod SYNC on the remote control to
correct the synchronization.
NOTE
Before you can play the video fi les in iPod player,
the Audio/Video terminals of the TV should be
connected using the Composite cable.
✎
✎
Models below support lip sync settings.
Press iPod SYNC on the remote control to
change audio delay.
Supported Models : classic/3G nano/4G
nano/120GB classic/160GB Classic/5G nano
3D Sound
You can enjoy much natural and vivid
surround sound with enriched tones of
sound. You can adjust the depth of
sound using the level options.
Off High Medium Low.
NOTE
It is not available in FM or W. IPOD mode.
S/W LEVEL
You can adjust the subwoofer's level.
Playing back a Picture
G
Viewing Photo Files
Connect a USB memory that contains JPEG
fi les or insert a disc that contains JPEG fi les.
Press the ◄► buttons to select the My
Contents, and then press the ENTER button
after press the ▲▼ buttons to select the
Photos.
Press the ▲▼◄► buttons to select the
folder you want to play, and then press the
ENTER button.
Press the ▲▼◄► buttons to select the
photo you want to play, and then press the
ENTER button.
NOTE
You can’t enlarge PG graphic in the full screen
mode.
✎
1.
2.
3.
4.
✎
B
S/W LEVEL
HT-D6500_ELS_1226.indd 53HT-D6500_ELS_1226.indd 53 2011-12-26 3:22:452011-12-26 3:22:45
Page 54

54 English
Basic Functions
Using the TOOLS button
During the slide show playback, you
can use various function by pressing
the TOOLS button.
Pause Slide Show
Slide Show Speed : Normal
Slide Show Effect : Blind
Background Music : Off
Background Music Setting
Zoom
Rotate
Picture Settings
Information
"
Enter ' Return
Tools
Pause Slide Show : Select this if you want to
pause the slide show.
Slide Show Speed : Select to adjust the slide
show speed.
Slide Show Effect : Select set the slide show
effect.
Background Music : Select this if you want to
listen to music while viewing a picture.
Background Music Setting : Select this if you
want to set the background music setting.
Zoom : Select this if you want to enlarge the
current picture. (Enlarged up to 4 times)
Rotate : Select this if you to rotate the picture.
(This will rotate the picture either clockwise or
counter clockwise.)
Picture Settings : Select this if you want to
adjust the picture quality.
Information : Shows the picture information
including the name and size, etc.
NOTE
If the system is connected to a BD Wise
compliant TV that has set BD Wise to On, the
Picture Settings menu will not appear.
Before you can enable the background music
function, the photo fi le should exist in the same
storage media with the music fi le. However,
the sound quality can be affected by the bit
rate of the MP3 fi le, the size of the photo and
the encoding method.
High bit rate of 20Mbps or more video fi les can
be stopped during the playback.
•
•
•
•
•
•
•
•
•
✎
Playing back a USB Storage Device
F
You can use the USB connection to play multimedia
fi les (MP3, JPEG, DivX, etc) downloaded from the
USB storage device.
Move to the home menu.
d WPS(PBC)
My Devices Internet Settings
Videos
Photos
Music
My Contents
Function
In Stop mode, connect the USB storage
device to the USB port on the front panel of
the product.
Safely Remove USB d WPS(PBC)
My Devices Internet Settings
Videos
Photos
Music
My Contents
USB
Connected Device
"
Enter ' Return
Function
Press the ENTER button.
Press the ▲▼◄► buttons to select the
desired Videos, Music or Photos, then press
the ENTER button.
For playing back Video, Music or Photo fi les,
refer to pages 45~54.
NOTE
You must remove the USB storage device safely
(by performing the “Safely Remove USB” function)
in order to prevent a possible damage to the USB
memory. Press the MENU button to move to the
home menu, and select the YELLOW(C) button
and press the ENTER button.
If you insert the disc when playing USB storage
device, the device mode is changed to “BD/DVD”
automatically.
1.
2.
3.
4.
5.
✎
TOOLS
HT-D6500_ELS_1226.indd 54HT-D6500_ELS_1226.indd 54 2011-12-26 3:22:462011-12-26 3:22:46
Page 55

English 55
04 Basic Functions
Listening to Radio
Using buttons on the Remote Control
Press the FUNCTION button to select FM.
Tune in to the desired station.
Preset Tuning 1 : You must fi rst add a desired
frequency as a preset. Press the STOP ()
button to select PRESET and then press the
TUNING/CH (
) button to select the preset
station.
Manual Tuning : Press the STOP () button to
select MANUAL and then press the TUNING/
CH (
) button to tune in to a lower or higher
frequency.
Automatic Tuning : Press the STOP () button
to select MANUAL and then press and hold the
TUNING/CH (
) button to automatically
search the band.
Setting Mono/Stereo
Press the MO/ST button.
Each time the button is pressed, the
sound switches between STEREO and
MONO.
In a poor reception area, select MONO
for a clear, interference-free broadcast.
Presetting Stations
Example : Presetting FM 89.10 into memory
Press the FUNCTION button to select FM.
Press the
TUNING/CH
(
) button to select
<89.10>.
Press the TUNER MEMORY button.
NUMBER fl ashes on the display.
Press the TUNER MEMORY button
again.
Press the TUNER MEMORY button
before
NUMBER
disappears from the
display.
NUMBER
disappears from the display and
the station is stored in memory.
To preset another station, repeat steps 2 to 4.
To tune in to a preset station, press the
TUNING/CH ( )
button to select a
channel.
1.
2.
•
•
•
•
•
1.
2.
3.
•
4.
•
•
5.
•
C
TUNER
MEMORY
About RDS broadcasting
Using the RDS (Radio Data System) to
receive FM stations
RDS allows FM stations to send an additional
signal along with their regular program signals.
For example, the stations send their station
names, as well as information about what type of
program they broadcast, such as sports or
music, etc.
When tuned to an FM station which provides the
RDS service, the RDS indicator lights up on the
display.
Description on RDS function
PTY (Program Type) : Displays the type of
program currently being broadcast.
PS NAME (Program Service Name) : Indicates
the name of broadcasting station and is
composed of 8 characters.
RT (Radio Text) : Decodes the text broadcast
by a station (if any) and is composed of
maximum 64 characters.
CT (Clock Time) : Decodes the real time clock
from the FM frequency. Some stations may not
transmit PTY, RT or CT information therefore
this may not be displayed in all cases.
TA (Traffi c Announcement) : TA ON/OFF it
shows that the traffi c announcement is in
progress.
NOTE
RDS may not operate correctly if the station
tuned is not transmitting RDS signal properly
or if the signal strength is weak.
•
•
•
•
•
✎
HT-D6500_ELS_1226.indd 55HT-D6500_ELS_1226.indd 55 2011-12-26 3:22:522011-12-26 3:22:52
Page 56

56 English
Basic Functions
To show the RDS signals
You can see the RDS signals the station sends
on the display.
Press the RDS DISPLAY button while
listening to an FM station.
Each time you press the button, the
display change to show you the
following information : PS NAME
RT CT Frequency
PS
(Program
Service)
While searching, <PS NAME>
appears and then the station
names will be displayed. <NO
PS> appears if no signal is sent.
RT
(RadioText)
While searching, <RT> appears
and then text messages the
station sends will be displayed.
<NO RT> appears if no signal is
sent.
Frequency
Station frequency (non-RDS
service)
About characters shown in the display
When the display shows PS,or RT signals,the
following characters are used.
The display window cannot differentiate upper
case and lower case letters and always uses
upper case letters.
The display window cannot show accented
letters, <A,> for instance, may stands for
accented <A’s> like <À, Â, Ä, Á, Å and Ã.>
PTY (Program Type) indication and
PTY-SEARCH function
One of the advantages of the RDS service is
that you can locate a particular kind of program
from the preset channels by specifying the PTY
codes.
•
•
•
To search for a program using the PTY
codes
Before you start!
The PTY Search is only applicable to preset
stations.
To stop searching any time during the process,
press
STOP ()
button while searching.
There is a time limit in doing the following
steps.
If the setting is cancelled before you fi nish,
start from step 1 again.
When pressing the buttons on the primary
remote control, make sure that you have
selected the FM station using the primary
remote control.
㪈㪉㪊
㪋㪌㪍
RDS DISPLAY TA
PTY- PTY SEARCH PTY+
Press the PTY SEARCH button while
listening to an FM station.
Press the PTY- or PTY+ button until the PTY
code you want appears on the display.
The display gives you the PTY codes
described to the right.
Press the PTY SEARCH button again, while
the PTY code selected in the previous step is
still on the display.
The centre unit searches 15 preset FM
stations, stops when it fi nds the one you
have selected, and tunes in that station.
•
•
•
•
1.
2.
•
3.
•
1
RDS DISPLAY
HT-D6500_ELS_1226.indd 56HT-D6500_ELS_1226.indd 56 2011-12-26 3:22:542011-12-26 3:22:54
Page 57

English 57
04 Basic Functions
Connecting iPod/iPhone Using the USB Cable
If the system is connected to iPod/iPhone, you
can play music in iPod/iPhone using the system.
ASC IN
5V
500mA
ASC I
N
50
Connect iPod/iPhone using the USB cable to
the front USB port.
Your iPod is automatically turned on.
“iPod” message appears on the TV
screen.
Press the ENTER button.
Select the music fi le to play.
-
You can use the remote control or the
product to control simple playback functions
such as the PLAY, PAUSE, STOP, # /$
and /buttons. (See page 15.)
NOTE
Playing a video is possible only when the iPod
Dock is used.
If you want to return to the iPod menus with
iPod player connected using the USB cable,
press FUNCTION on the remote control or
press on the front panel of the system and
select R. IPOD. The FUNCTION mode
switches as follows: BD/DVD D. IN AUX
R. IPOD W. IPOD H. IN1 H. IN2 FM
1.
•
•
2.
3.
✎
Connecting iPod/iPhone Using the Dock
If the system is connected to the iPod/iPhone
specifi c dock, you can play videos or music in
iPod/iPhone using the system.
WIRELESS
LAN iPod HDMI OUT
DIGITAL
AUDIO IN
OPTICAL
HDMI IN
W
IRELE
SS
HDMI OU
T
IGITA
L
AUDIO I
N
iPod
d
WPS(PBC)
My Devices Internet Settings
Videos
Photos
Music
My Contents
iPod
Connected Device
"
Enter ' Return
Function
Connect the iPod dock connector to the iPod
Jack on the rear panel of the product.
Place the iPod in the supplied iPod Dock.
Your iPod is automatically turned on.
“iPod” message appears on the TV
screen.
Press the ENTER button.
Press the ◄▲▼ buttons to select Music,
then press the ENTER button.
Select the music fi le to play.
- You can use the remote control or product
to control simple playback functions such
as the PLAY, PAUSE, STOP, #/ $, /
and REPEAT buttons. See page 15.
NOTE
Adjust the volume to a moderate level before
you connect your iPod and product.
When the product is powered on and you
connect an iPod, the product will charge
your iPod's battery.
Make sure to connect the dock connector
so that the label “” faces upward.
1.
2.
•
•
3.
4.
5.
✎
HT-D6500_ELS_1226.indd 57HT-D6500_ELS_1226.indd 57 2011-12-26 3:22:552011-12-26 3:22:55
Page 58

58 English
Basic Functions
Watching a Movie
You can play video fi les stored in the iPod player
by connecting it to the product.
Connect the iPod dock connector to the iPod
Jack on the rear panel of the product.
In the iPod screen, move to Videos >
Settings, then set the TV Out option and the
TV signal.
Place the iPod in the supplied iPod Dock.
“iPod” message appears on the TV
screen.
Press the ENTER button.
Press the ◄▲▼ buttons to select Video, then
press the ENTER button.
Select the video fi le to play.
-
You can use the remote control or the
product to control simple playback functions
such as the PLAY, PAUSE, STOP,
#
/$
and /buttons. (See page 15.)
NOTE
You must have the VIDEO output
(Composite) connected to your TV to view
iPod video (See page 23).
If you want to iPod video via VIDEO output,
set Anynet+ (HDMI-CEC) to off.
No other screen than the playback one will
appear on the TV screen. Check other
screens on the iPod player.
If the connected iPod does not support
video playback, the "Playing video fi les is not
supported on this iPod model." message
appears when you select the Video menu.
If you want to return to the iPod menus with
iPod player connected using the dock, press
FUNCTION on the remote control or press
on the front panel of the system and
select R. IPOD. The FUNCTION mode
switches as follows :
BD/DVD D. IN AUX
R. IPOD W. IPOD H. IN1 H. IN2 FM
1.
2.
3.
•
4.
5.
6.
✎
Use iPod/iPhone with a Wireless Dock
Cradle (sold separately) for iPod/iPhone
You can enjoy fi ner quality music through the
speakers by transmitting an iPod/iPhone’s audio
signal using a Wireless Transmitter.
To connect the main unit when the product is
used for the fi rst time, you have to set the Linking
ID manually. (see page 60)
After fi rst setting of the main unit, it will be
connected to Wireless Transmitter automtically
when turn on.
Turn on the main unit and connect the iPod/
iPhone to the Wireless transmitter.
Then, press the
button on the product to
select "W. IPOD" mode.
The FUNCTION mode of the main unit switches
as follows : BD/DVD D. IN AUX R. IPOD
W. IPOD H. IN1 H. IN2 FM ( See page 13)
How to charge the Wireless Transmitter
STANDB
Y
LINK
CHARGE
CHARGE
STANDBY
Connect the Wireless Transmitter to the
Charging Cradle.
Connect the DC power adapter to a wall
socket.
The charging indicator lights and charging
starts. After the battery is fully charged, the
charging indicator turns Green.
1.
2.
•
HT-D6500_ELS_1226.indd 58HT-D6500_ELS_1226.indd 58 2011-12-26 3:22:592011-12-26 3:22:59
Page 59

English 59
04 Basic Functions
Operation status of the charging
cradle's LED
Display Function
GREEN LED ON
Power on /Charging
completed
RED LED ON
Charging.
NOTE
The LED indicates the charging state of the
built-in battery in the wireless iPod transmitter.
Check the charging state of iPod/iPhone by
checking the charging indication of its battery.
CAUTION
It links to Wireless Dock Cradle when
SWA-5000 is used.
Only Samsung wireless transmitter that is
compliant with the system can be
recharged.
iPod/iPhone Models You Can Use with
This Product
iPod touch (3rd generation)
iPod touch (2nd generation)
iPod touch (1st generation)
iPod classic
iPod with video
iPod with dock connector
iPod with Click Wheel
iPod nano (5th generation)
iPod nano (4th generation)
iPod nano (3rd generation)
iPod nano (2nd generation)
iPod nano (1st generation)
iPhone 4
iPhone 3GS
iPhone 3G
iPhone
✎
!
NOTE
“Made for iPod” means
that an electronic
accessory has been
designed to connect specifi cally to iPod and
has been certifi ed by the developer to meet
Apple performance standards.
“Made for iPhone” means that an electronic
accessory has been designed to connect
specifi cally to iPhone and has been certifi ed
by the developer to meet Apple
performance standards.
Apple is not responsible for the operation of
this device or its compliance with safety and
regulatory standards.
The volume control may not operated
normally with iPod and iPhone models not
listed above. If you have a problem with any
of the models listed above, please update
the software of the iPod/iPhone to the
lastest version.
Depending on the software version of the
iPod, control problems may occur. This is
not a malfunction of the Home Cinema.
Depending on the software version or the
type of the iPod, some operations may
differ. Install the latest iPod software.
(recommended)
Some actions like iPod SYNC may depend
on video sources or the iPod model you
have.
You can enjoy music or videos through the
BD/DVD function and enjoy music, videos or
photos through the Remote iPod function.
You need to use iPod Dock to enjoy videos
or photos.
Playback of applications' contents through
the product may not be guaranteed. We
recommend playing contents downloaded
on the iPod.
If you have a problem using iPod, please
visit www.apple.com/support/ipod
✎
HT-D6500_ELS_1226.indd 59HT-D6500_ELS_1226.indd 59 2011-12-26 3:23:002011-12-26 3:23:00
Page 60

60 English
Basic Functions
How to Link the Wireless Transmitter
with the Main Unit
Turn off your Home Cinema.
Press the 4, 7, 6, 3 buttons on the remote
control in order.
The Power LED blinks once.
Connect the iPod/iPhone to the Wireless
transmitter.
STANDBY
LINK
CHARGE
Turn on the iPod/iPhone. Press the "ID SET"
button on the back of the Wireless
transmitter for 5 seconds. The link light on
the wireless transmitter blinks rapidly.
Turn on your product.
To listen to music from iPod/iPhone over the
product, press the button to select
"W. IPOD" mode.
After you select "W. IPOD" mode, turn the
volume of the product down to avoid hearing
damage.
You can control the speaker volume of iPod/
iPhone with a volume wheel or a volume bar.
When iPod/iPhone is stopped or in a power
saving mode, the Wireless transmitter enters
Sleep Mode.
When iPod/iPhone is set to Deep Sleep
Mode, the Wireless transmitter turns off.
1.
2.
•
3.
4.
5.
•
•
•
•
Operation status of the wireless
transmitter's LED
CHARGE
STANDBY
LIN
K
STANDBY
LINK
Display
Function
LINK
(Blue LED)
STANDBY
(Red LED)
LED ON
Pairing
successfully
completed
STANDBY
LED BLINK
(Long blink)
Processing iPod/
iPhone
LOW BATTERY
LED BLINK
(Short blink)
Processing
pairing
Pairing failed
CAUTION
If you use the main unit near a wireless device
such as a laptop computer, an AP, or Wifi , an
unstable operation error can occur.
Do not pair the SWA-5000 and iPod/iPhone at
the same time. If you pair them at the same
time, the iPod/iPhone and SWA-5000 may not
connect to the product.
The transmission distance from the product to
the wireless transmitter is about 5 meters, but
may vary depending on your operation
environment.
The audio signal may be weakened or even
lost where there is an obstacle such as a wall
or partition between the product and wireless
transmitter. You can also weaken or lose signal
if you move the wireless transmitter around.
!
HT-D6500_ELS_1226.indd 60HT-D6500_ELS_1226.indd 60 2011-12-26 3:23:012011-12-26 3:23:01
Page 61

English 61
05 Network Services
You can enjoy various network services such as
Smart Hub or BD-LIVE by connecting the
product to your network.
Read the following instructions before using
any network service.
Connect the product to the network.
(see pages 25~26)
Confi gure the network settings.
(see pages 37~40)
1.
2.
Using Smart Hub
Using Smart Hub, you can stream movies,
videos, and music from the Internet, access
various for pay or free-of-charge applications and
view them on your TV. Application content
includes news, sports, weather forecasts, stock
market quotes, maps, photos, and games.
You can also start this function by
pressing the SMART HUB button
on the remote control.
Starting Smart Hub the First Time
To start Smart Hub for the fi rst time, follow these
steps :
Go to the Home menu.
Safely Remove USB d WPS(PBC)
My Devices Internet Settings
Videos
Photos
Music
My Contents
Function
Press the ◄► buttons to select Internet,
and press the ENTER button.
1.
2.
The Smart Hub screen appears.
NOTE
Certain applications are available only in certain
countries.
The Terms of Service Agreement screen
appears.
If you want to agree, press the ◄► buttons to
select Agree, then press the ENTER button.
NOTE
Screens can take a few seconds to appear.
The Service Update screen appears and
installs a number of services and applications.
When done, it closes. The applications and
services downloaded are displayed on the
Smart Hub screen. This may take some time.
NOTE
Smart Hub may close momentarily during the
installation process.
A number of screens may appear after
installation. You can press the ENTER button
to close them or let them close on their own.
To start an application, press the ▲▼◄►
buttons to highlight an application, then
press the ENTER button.
3.
✎
4.
✎
5.
✎
6.
Network Services
HT-D6500_ELS_1226.indd 61HT-D6500_ELS_1226.indd 61 2011-12-26 3:23:062011-12-26 3:23:06
Page 62

62 English
Network Services
Smart Hub at a Glance
xxxxxxxx
Contents 1
xxxxxxxx
Contents 6
xxxxxxxx
Contents 5
xxxxxxxx
Contents 4
xxxxxxxx
Contents 3
xxxxxxxx
Contents 2
xxxxxxxx
Contents 7
xxxxxxxx
Contents 8
xxxxxxxx
Contents 9
xxxxxxxx
Contents 10
xxxxxxxx
Contents 11
xxxxxxxx
Contents 12
xxxxxxxx
Contents 13
xxxxxxxx
Contents 1
xxxxxxxx
Contents 2
xxxxxxxx
Contents 3
xxxxxxxx
Contents 4
xxxxxxxx
Contents 5
xxxxxxxx
Contents 6
Contents 1 Contents 2 Contents 3 Contents 4
1 2 3 5
7 6
Search
4
Your Video
Recommended
Samsung Apps
a
Login b Sort by Edit Mode d Settings
1
Commercial : Displays the Smart Hub Guide,
an introduction to the product, and new
application introductions.
2
Your Video : Provides recommendations for
videos based on your tastes.
Lets you see movie recommendations
based on your previous preferences.
Lets you select a movie, displays a list of
VOD (Video on Demand) providers that
have the movie, and then lets you choose
a provider for streaming. (Streaming is
unavailable in some areas.)
For instructions to use Your Video, please
visit www.samsung.com.
This feature is limited to certain regions.
•
•
•
•
3
Search : Provides an integrated search of
your video providers and connected AllShare
devices.
Usable while using Smart Hub (except
when you are watching a Blu-ray Disc).
For easy access, use the SEARCH button
on the remote control.
For instructions to use search function,
please visit www.samsung.com.
•
•
•
4
Samsung Apps : You can download various for
pay or free-of-charge application services.
5
Recommended : Displays recommended
contents managed by Samsung.
6
Navigation Help : Displays the remote control
buttons you can use to navigate in Smart Hub.
RED (A) : To log in to Smart Hub.
GREEN (B) : To sort the applications.
YELLOW (C) : To edit the applications.
BLUE (D) : To change the settings of Smart
Hub.
•
•
•
•
7
My Applications : Displays your personal gallery
of applications which you can add to, modify, and
delete.
NOTE
Samsung Electronics takes no legal
responsibility for any interruption of the Smart
Hub service caused by the service provider for
any reason.
The Smart Hub service downloads and
processes data via the Internet so that you can
enjoy the Internet contents on your TV screen.
If the Internet connection is unstable, the
service may be delayed or interrupted.
Furthermore, the product may turn off
automatically in response to conditions on the
Internet.
If this occurs, check the Internet connection
and try again.
Application services may be provided in
English only and the contents available may
vary, depending on your area.
For more information about a Smart Hub
service, visit the web site of the applicable
service provider.
The services provided are subject to change
by the Smart Hub service provider without
notice.
The Smart Hub service contents may differ
depending on the product’s fi rmware version.
For pay DivX contents with copy protection
can only be played through an HDMI cable.
✎
HT-D6500_ELS_1226.indd 62HT-D6500_ELS_1226.indd 62 2011-12-26 3:23:082011-12-26 3:23:08
Page 63

English 63
05 Network Services
Using the Keypad
Through your remote, you can use the OnScreen Keypad to enter letters, numbers, and
symbols.
. , –
abc def
123
ghi jkl mno
456
pqrs tuv wxyz
789
Shift Delete
0
b
Input Method / Language: English
T9
ab Ab AB 1
1
4 5
2
6
3
1
The current keypad.
Use to enter letters, numbers, and symbols.
2
Press the FULL SCREEN button on the remote
control to shift the input mode.
: ab, Ab, AB, numbers or icons.
3
Displays the current input mode.
4
Press the GREEN (B) button on the remote
control to change the input method. (T9 or ABC)
5
Press the TOOLS button on the remote control
to change the language.
6
Press the REPEAT button on the remote control
to delete a character.
Entering Text, Numbers and Symbols
To enter text, press the number button on the
remote that corresponds to the letter you want to
enter. Press the button rapidly to enter a letter
that is not the fi rst letter listed on the On-Screen
keypad button. For example, if you want to enter
the letter b, press the 2 button on your remote
rapidly twice. To enter the fi rst letter listed on a
button, press, release, and then wait.
To move within the text, use the Arrow buttons.
To delete text, move the cursor to the right of the
character you want to delete, and then press the
REPEAT button. To change case or enter
numbers or punctuation, press the FULL
SCREEN button.
Creating an Account
To establish your own, exclusive, confi guration of
Smart Hub, create your own Smart TV Account.
To create an account, follow these steps:
Press the RED (A) button on your remote
control. The Login screen appears.
xxxxxxxx
Contents 1
xxxxxxxx
Contents 6
xxxxxxxx
Contents 5
xxxxxxxx
Contents 4
xxxxxxxx
Contents 3
xxxxxxxx
Contents 2
xxxxxxxx
Contents 7
xxxxxxxx
Contents 8
xxxxxxxx
Contents 9
xxxxxxxx
Contents 10
xxxxxxxx
Contents 11
xxxxxxxx
Contents 12
xxxxxxxx
Contents 1
xxxxxxxx
Contents 2
xxxxxxxx
Contents 3
xxxxxxxx
Contents 4
xxxxxxxx
Contents 5
Contents 1 Contents 2 Contents 3 Contents 4
a
Login b Sort by Edit Mode d Settings
Search
Your Video
Recommended
Samsung Apps
Login
Login Cancel
Create Account Forgot Password
Remember my Smart TV ID and password
%
Smart TV ID
Password
Press [Enter]
Press [Enter]
Press the ▲▼◄► buttons to select Create
Account, and then press the ENTER
button.
On the next screen, select Smart TV ID, and
then press the ENTER button. An entry
screen and keypad appear.
Use the keypad to enter your e-mail
address. This will serve as your ID.
NOTE
The keypad works like the keypad on a cell
phone.
When done, press the ENTER button to
select OK, and then press the ENTER
button again. The Create Account screen reappears.
Select Password, and then press the
ENTER button. The Password screen and a
keypad appear.
Use the keypad to enter a password.
The password can be any combination of
letters, numbers, and symbols.
NOTE
Press the RED (A) button on your remote to
show or hide the password as you enter it.
1.
2.
3.
4.
✎
5.
6.
7.
✎
HT-D6500_ELS_1226.indd 63HT-D6500_ELS_1226.indd 63 2011-12-26 3:23:092011-12-26 3:23:09
Page 64

64 English
Network Services
When done, press the ENTER button to
select OK, and then press the ENTER
button again. The Login screen re-appears.
Select Confi rm password, and then press
the ENTER button.
Repeat Steps 7 and 8.
When the Login screen re-appears, select
Create Account, and then press the
ENTER button. The Confi rmation window
appears.
Select OK, and then press the ENTER
button. The Continue to Register Service
window appears.
Select Go Register, and then press the
ENTER button.
The Register Service Account Window
appears.
If you have existing accounts with any of
the listed providers, you can associate the
provider account and the provider account
password with your Smart TV Account.
Registration makes it easier to access
the providers web site. For registration
instructions, go to Step 2 in Account
Management under the Settings Menu.
If you don’t have existing provider accounts
or do not want to register existing accounts
at this time, select Register Later, and then
press the ENTER button. You can also let the
window close on its own in about a minute.
NOTE
You must use an e-mail address as an ID.
You can register up to 10 User Accounts.
You do not need an account to use Smart
Hub.
Account Log In
To log in to your Smart TV Account, follow these
steps:
With the Smart Hub main screen displayed
on your TV, press the RED (A) button on
your remote. The Login screen appears.
8.
9.
10.
11.
12.
13.
14.
•
•
✎
1.
Select the Down Arrow next to the Smart
TV ID fi eld, and then press the ENTER
button.
Select your ID from the list that appears, and
then press the ENTER button. The Login
screen re-appears.
Select Password, and then press the
ENTER button. The Password window and
a keypad appears.
Using the keypad and your remote, enter
your password. When done, press the
ENTER button, select OK, and then press
the ENTER button again.
NOTE
If you want Smart Hub to enter your password
automatically, select Remember my Smart TV
ID and password after you have entered your
password, and then press the ENTER button.
A check appears. Smart Hub will now enter
your password automatically when you select
or enter your ID.
The Settings Menu - BLUE (D)
The Settings Menu Screen gives you access to
account management, account reset, and
account properties functions.
To access the Settings Menu, and then select a
menu item, follow these steps:
Press the BLUE (D) button on your remote.
Press the ▲▼ to select a menu item, and
then press the ENTER button.
The functions on the Settings Menu screen are
described below.
NOTE
The Service Manager item listed in the Settings
Menu is not available for Blu-ray Home
Cinema.
Account Management
The Account Management Menu contains
functions that let you register your service
provider accounts, change your Smart Hub
password, and delete or deactivate your Smart
TV Account.
2.
3.
4.
5.
✎
1.
2.
✎
HT-D6500_ELS_1226.indd 64HT-D6500_ELS_1226.indd 64 2011-12-26 3:23:132011-12-26 3:23:13
Page 65

English 65
05 Network Services
Register Service Account
If you have existing accounts with any of the
providers listed by the Register Service Account
function, you can associate the provider account
and the provider account password with your
Smart TV Account. If you associate the account,
you will be able to log onto the account through
Smart Hub easily, without entering your account
name or password.
To use the Register Service Account function,
follow these steps:
In the Settings menu, select Register Service
Account, and then press the ENTER button.
The Register Service Account Window
appears.
Press the ▲▼ arrow buttons to select a
Service Provider you want to associate with
your Smart TV Account, and then press the
ENTER button.
NOTE
If you have a Samsung account and you want
to use the Samsung Apps function in Smart
Hub, you must register your Samsung Apps
account here. See page 68 for more
information.
Using your remote and the on-screen
Keypad, enter your site ID and password.
When done, press the ENTER button.
NOTE
This is the ID and password you normally use
to access your account on this site.
If you have entered the ID and password
correctly, the Registered Successfully
message appears.
If you pressed ENTER, repeat Steps 2
through 4 to associate another Service
Provider.
When you are done, press the RETURN
button.
1.
2.
✎
3.
✎
4.
5.
6.
Change Password
The Change Password function lets you change
your Smart Hub password. To change the
password, follow these steps:
Select Change Password, and then press
the ENTER button.
Enter your current password. The next
screen appears.
On the next screen, enter a new password
on the fi rst line. Enter it again on the second
line to confi rm.
The Changing Password Complete message
screen appears. Press the ENTER button or
wait for the screen to close - about 5
seconds.
Remove from TV Account List
The Remove from TV Account List function
cancels all your current registered Service
Accounts that you registered on the Register
Service Account screen.
Deactivate Account
The Deactivate Account function deactivates your
Smart TV Account and deletes it and all your
account settings entirely from Smart Hub.
Service Manager
This menu is for setting the service of the special
application. (Application-related is like AP
New,Ticker etc.)
NOTE
This function operates only when special
application is installed.
Reset
The Reset function initializes all downloaded
application, erases all user accounts and settings
from the product, and resets all Smart Hub
settings to the factory default settings. It then
restarts Smart Hub as if it were starting for the
fi rst time. Your account, however, remains on the
Smart Hub server. To log into your account, enter
your ID and password on the Create Account
screen.
1.
2.
3.
4.
✎
HT-D6500_ELS_1226.indd 65HT-D6500_ELS_1226.indd 65 2011-12-26 3:23:132011-12-26 3:23:13
Page 66

66 English
Network Services
To use the Reset function, follow these steps:
In the Account Management menu, select
Reset, and then press the ENTER button.
The Reset screen appears.
Enter the your Security password. This is the
password you entered if you set up a BD or
DVD Parental rating (See page 42). If you did
not, enter 0000.
After a few moments, Smart Hub
automatically resets. The screen may go
black, then Smart Hub re-appears. In a few
moments, it starts the re-initialization
procedure.
To complete the re-initialization, go to Step 4
in Starting Smart Hub for the First Time. (See
page 61)
NOTE
If you forgot your password, press the STOP
( ) button on the front panel of the product
for more than 5 seconds with no disc inserted.
Properties
The Properties menu item lists three functions
that display information about Smart Hub :
Detail
Lists information about Smart Hub including
version number, the number of services installed,
memory usage, and the unique product ID.
Terms of Service Agreement
Displays the Terms of Service Agreement.
1.
2.
3.
4.
✎
The Edit Mode Menu - YELLOW (C)
The functions in the Edit Mode menu let you
manipulate the application in the My Applications
section of the Smart Hub screen. Using these
functions, you can lock and unlock access to
some application, New Folder and move
application to them, rename folders, delete
application, and change the position of
application on the screen.
To access the Edit Mode Menu, and then select
a menu item, follow these steps:
Press the YELLOW (C) button on your
remote. The Edit Mode menu bar appears
on the bottom of the screen.
Press the ▲▼◄► to select a menu item,
and then press the ENTER button.
The functions in the Edit Mode Menu bar are
described below.
NOTE
Some menu items may not appear on the
screen. To see these items, press the ◄► to
move to the screen edge, and then press one
more time to reveal the items.
You can close the bar by highlighting the X on
the bottom right side, and then pressing the
ENTER button.
Move
The Move function lets you change the screen
position of a application. To use the Move
function, follow these steps:
Press the YELLOW (C) button on your
remote.
Select a application, and then press the
ENTER button. A check appears above the
application.
Press the ▲▼◄► to select Move, and
then press the ENTER button. A position
change icon appears above the application.
Press the ▲▼◄► to move the icon. Press
the ENTER button when the icon is in the
position of your choice. The application
moves to its new location.
1.
2.
✎
1.
2.
3.
4.
HT-D6500_ELS_1226.indd 66HT-D6500_ELS_1226.indd 66 2011-12-26 3:23:142011-12-26 3:23:14
Page 67

English 67
05 Network Services
New Folder
The New Folder function lets you create and
name new folders. Once you have created a
folder, you can move application into it. To use
the New Folder function, follow these steps:
Press the YELLOW (C) button on your
remote.
Press the ▲▼◄► to move the cursor to
New Folder, and then press the ENTER
button. The New Folder window and a
keypad appear.
Use the keypad to enter the name of the
folder, and then press the ENTER button.
The New Folder screen closes and the New
Folder appears on the Smart Hub screen.
Move to Folder
The Move to Folder function lets you move a
application to a folder. To use the Move to Folder
function, follow these steps:
Press the YELLOW (C) button on your
remote.
Select a application, and then press the
ENTER button.
Press the ▲▼◄► to select Move to Folder,
and then press the ENTER button. The
Move to Folder window opens.
Press the ▲▼◄► to select a folder, and
then press the ENTER button. The Moved to
Folder message appears, and then closes.
The application has been moved to the
folder.
To Access Application in a Folder
Close the Edit Mode menu.
In My Applications, press the ▲▼◄► to
select a folder, and then press the ENTER
button. The folder opens.
Select a application, and then press the
ENTER button. The application’s application
or service starts.
1.
2.
3.
1.
2.
3.
4.
1.
2.
3.
To Edit Items in a Folder
Select a folder, and then press the ENTER
button. The folder opens.
Press the YELLOW (C) button on your remote.
The Edit buttons appear at the bottom of the
screen.
These buttons work the same as the Edit Mode
menu buttons on the main screen. For example,
to move a application back to the My
Applications main screen:
Select the application.
Select Move to Folder, and then press the
ENTER button. The Move to Folder window
appears.
Select My Apps, and then press the ENTER
button. The Move to Folder window closes
and the application returns to the main My
Applications screen.
Rename Folder
The Rename Folder function lets you rename
folders. To use the Rename Folder function,
follow these steps:
Press the YELLOW (C) button on your
remote.
Press the ▲▼◄► to select a folder, and
then press the ENTER button.
Press the ▲▼◄► to select Rename a
Folder, and then press the ENTER button.
The Folder Rename window and a keyboard
appears.
Use the key board to enter a new name, and
then press the ENTER button. The Rename
window closes and the new name appears
below the folder.
Lock
The Lock function lets you lock some application
in My Applications so they can not be opened
without entering the Parental Security Code.
1.
2.
3.
1.
2.
3.
4.
HT-D6500_ELS_1226.indd 67HT-D6500_ELS_1226.indd 67 2011-12-26 3:23:142011-12-26 3:23:14
Page 68

68 English
Network Services
To use the Lock function, follow these steps:
Press the YELLOW (C) button on your
remote.
Press the ▲▼◄► to select a application,
and then press the ENTER button. If the
application can be locked, the Lock menu
item is enabled.
Press the ▲▼◄► to select Lock, and then
press the ENTER button. The Security
window appears.
Enter your Parental Security Code (See page
42). If you have not created a Parental
Security Code, enter 0000.
Press the ENTER button. The Lock Service
window appears confi rming the lock, and
then closes. A lock symbol appears next to
the application.
Unlock
Press the YELLOW (C) button on your
remote.
Press the ▲▼◄► to select a locked
application, and then press the ENTER
button.
Press the ▲▼◄► to select Unlock, and
then press the ENTER button. The Security
window appears.
Enter the Parental Security Code (See page
42). If you have not created a Parental
Security Code, enter 0000.
Press the ENTER button. The Lock Service
Released window appears confi rming the
lock has been release, and then closes.
Delete
The Delete function lets you delete application
from My Applications. To use the Delete function,
follow these steps:
Press the YELLOW (C) button on your
remote.
Press the ▲▼◄► to select a application,
and then press the ENTER button.
1.
2.
3.
4.
5.
1.
2.
3.
4.
5.
1.
2.
Press the ▲▼◄► to select Delete, and
then press the ENTER button. The
message, "Do you want to delete the
selected item(s)?" appears.
Select Yes, and then press the ENTER
button. The application is deleted.
The Sort by Menu - GREEN (B)
The functions in the Sort Menu let you sort the
application in My Applications by Default, Name,
Date, Frequency, Category, User Defi ned. If you
manually change the position of a application, the
Sort Menu automatically highlights User Defi ned
when you start it.
To sort the application in My Applications, follow
these steps:
Press the GREEN (B) button on your
remote.
Press the ◄► to select a sorting method,
and then press the ENTER button. Smart
Hub sorts the application by the method you
have chosen.
Samsung Apps
Samsung Apps lets you download for pay or
free-of-charge applications and services to your
Blu-ray Home Cinema and view or use them on
your TV.
These applications and services include videos,
music, photos, games, news, sports, etc.
Application for the new apps appear in My
Applications.
Additional applications and services are added
regularly.
For Pay Apps
To download for pay apps, you need to create a
Samsung Account and add a credit card to the
account.
To create a Samsung account, please visit www.
samsung.com
NOTE
This service may not provided in some
countries.
3.
4.
1.
2.
✎
HT-D6500_ELS_1226.indd 68HT-D6500_ELS_1226.indd 68 2011-12-26 3:23:142011-12-26 3:23:14
Page 69

English 69
05 Network Services
Accessing the Samsung Apps Screen
To access Samsung Apps, press the ▲▼◄►
buttons to navigate to the Samsung Apps area
on the Smart Hub main screen, and then press
the ENTER button. The Samsung Apps screen
appears.
NOTE
If this is the fi rst time you are accessing this
screen, the terms of service window appears.
Select Agree, and then press the ENTER
button.
Using the Samsung Apps Screen
To use the Samsung Apps screen, follow these
steps:
Press the ◄► buttons to move to the
category list on the left.
Press the ▲▼ to highlight a category. In a
few seconds, the Samsung Apps screen
displays the applications in that category.
The Sort tabs appear across the top.
Press the ► button to move to the displayed
applications or services.
Press the ▲▼◄► buttons to select an
application or service, and then press the
ENTER button. The Application Details
screen appears describing the service or
application.
Select Download Now, and then press the
ENTER button. If the application or service is
free, it downloads and runs. If not, and there
is a fee, follow the directions on the screen
to complete the download.
NOTE
Some apps are free to download, but require
registration with the provider or a paid account
with the provider to use.
Application for applications and services you
have downloaded from Samsung Apps appear
in My Applications.
✎
1.
2.
3.
4.
5.
✎
Sort By Tabs
You can access the Sort By tabs on the top of
the screen using the ▲▼◄► buttons. Each tab
displays the services or applications in the
category you chose, sorted by the criteria on the
tab (Recommended, Most Downloaded, Most
Recent, Name).
You can also use the BLUE (D) button on your
remote to access the Sort By tabs. Each time
you press the BLUE (D) button, you change the
display from one sort tab to the next.
Samsung Apps by category
The following categories are available:
What’s New? : Displays newly registered
applications.
Video : Displays various video media such as
movies, TV shows, and short length videos.
Game : Displays various games such as sudoku
and chess.
Sports : Displays various sports media services
such as match information, images, and short
length videos.
Lifestyle : Includes various lifestyle media services
such as music, personal photo management
tools, and social networking such as Facebook
and Twitter.
Information : Includes various information services
such as news, stocks, and weather.
Other : Includes other miscellaneous services.
My Account
My Account gives you access to your Samsung
Apps order and download history, and to the My
Apps Cash screen. You must have a Samsung
account to access this information.
•
•
•
•
•
•
•
HT-D6500_ELS_1226.indd 69HT-D6500_ELS_1226.indd 69 2011-12-26 3:23:152011-12-26 3:23:15
Page 70

70 English
Network Services
Help
If you have questions about Samsung Apps,
check Help fi rst. If none of the tips apply, please
visit www.samsung.com.
To use the Help function, follow these steps:
Press the ▲▼◄► buttons to select Help,
and then press the ENTER button.
Press the ◄► to enter Help after it appears.
Press the ▲▼ to scroll the Help text.
Press the ◄ to exit Help.
Using the coloured buttons on your
remote with Samsung Apps
RED (A) (Login) : To log into your Smart TV
Account.
GREEN (B) (Thumbnail/List View) : To toggle
applications between Thumbnail and List view.
BLUE (D) (Sort By) : To sort the applications in a
category by Recommended, Most Downloaded,
Most Recent, or Name.
Return : To return to the previous menu.
NOTE
The Internet contents services may be added
or deleted by providers without notice.
For instructions to use Your Video or Search
Function, please visit www.samsung.com
Using vTuner Function
vTuner is the fuction of the listening a
radio. If you press the vTuner button,
you can move to vTuner application.
Press the vTuner button.
NOTE
You can use the vTuner Function after
download the vTuner application from
Samung Apps.
1.
2.
3.
4.
•
•
•
•
✎
✎
BD-LIVE™
Once the product is connected to the network,
you can enjoy various movie-related service
contents using a BD-LIVE compliant disc.
Attach a USB memory stick to the USB jack
on the front of the product, and then check
its remaining memory. The memory device
must have at least 1GB of free space to
accommodate the BD-LIVE services.
Insert a Blu-ray disc that supports BD-LIVE.
Select an item from various BD-LIVE service
contents provided by the disc manufacturer.
NOTE
The way you use BD-LIVE and the provided
contents may differ, depending on the disc
manufacturer.
Using the AllShare Function
AllShare lets you play music, video, and photo fi les
located in your PC or your DLNA compatible mobile
phone or NAS on the product.
To use AllShare with your product, you must
connect the product to your network (See pages
25~26).
To use AllShare with your PC, you must install
AllShare software on your PC.
If you have a DLNA compatible mobile phone or
NAS, you can use AllShare without any additional
software.
You can download the PC software and get detailed
instructions for using AllShare from the Samsung.
com web site.
1.
2.
3.
✎
HT-D6500_ELS_1226.indd 70HT-D6500_ELS_1226.indd 70 2011-12-26 3:23:152011-12-26 3:23:15
Page 71

English 71
06 Other Information
Troubleshooting
Refer to the chart below when this product does not function properly. If the problem you are experiencing is
not listed below or if the instruction below does not help, turn off the product, disconnect the power cord
and contact the nearest authorized dealer or Samsung Electronics Service Centre.
Symptom Check/Remedy
I cannot eject the disc.
• Is the power cord plugged securely into the outlet?
• Turn off the power and then turn it back on.
The iPod fails to connect.
• Check the condition of the iPod connector and Dock.
• Keep the iPod S/W version up to date.
Playback does not start.
• Check the region number of the BD/DVD.
BD/DVD discs purchased from abroad may not be playable.
• CD-ROMs and DVD-ROMs cannot be played on this product.
• Make sure that the rating level is correct.
Playback does not start
immediately when the
Play/Pause button is pressed.
• Are you using a deformed disc or a disc with scratches on the surface?
• Wipe the disc clean.
Sound is not produced.
•
No sound is heard during fast playback, slow playback, and step motion playback.
•
Are the speakers connected properly? Is the speaker setup correctly customized?
• Is the disc severely damaged?
Sound can be heard only from a
few speakers and not all 6.
• On certain BD/DVD discs, sound is output from the front speakers only.
• Check if the speakers are connected properly.
• Adjust the volume.
• When listening to a CD, radio or TV, sound is output to the front speakers only.
Select "PRO LOGIC
II
" by pressing PL II (Dolby Pro Logic II) on the remote
control to use all six speakers.
Dolby Digital 5.1 CH Surround
Sound is not produced.
•
Is there "Dolby Digital 5.1 CH" mark on the disc? Dolby Digital 5.1 CH Surround Sound is
produced only if the disc is recorded with 5.1 channel sound.
• Is the audio language correctly set to Dolby Digital 5.1-CH in the information
display?
The remote control does not work.
•
Is the remote control being operated within its operation range of angle and distance?
• Are the batteries drained?
•
Have you selected the mode(TV/BD) functions of the remote control (TV or BD) correctly?
• Disc is rotating but no
picture is produced.
• Picture quality is poor and
picture is shaking.
• Is the TV power on?
• Are the video cables connected properly?
• Is the disc dirty or damaged?
• A poorly manufactured disc may not be playable.
Audio language and subtitles do
not work.
•
Audio language and subtitles will not work if the disc does not contain them.
Menu screen does not appear
even when the menu function is
selected.
• Are you using a disc that does not contain menus?
Other Information
HT-D6500_ELS_1226.indd 71HT-D6500_ELS_1226.indd 71 2011-12-26 3:23:152011-12-26 3:23:15
Page 72

72 English
Other Information
Symptom Check/Remedy
Aspect ratio cannot be changed.
• You can play 16:9 BD/DVDs in 16:9 Wide mode, 4:3 Letter Box mode, or 4:3
Pan - Scan mode, but 4:3 BD/DVDs can be seen in 4:3 ratio only. Refer to the
Blu-ray Disc jacket and then select the appropriate function.
• The product is not working.
(Example: The power goes out
or a strange noise is heard.)
•
The Product is not working
normally.
• Press and hold the romote control's STOP ( ) button for 5 seconds in
STANDBY mode.
- Using the RESET function will erase all stored settings.
Do not use this unless necessary.
The rating level password has
been forgotten.
• With no disc in the product, press and hold the product's STOP ( ) button for
longer than 5 seconds. INIT appears on the display and all settings will return
to the default values.
And then press the POWER button.
- Using the RESET function will erase all stored settings.
Do not use this unless necessary.
Can't receive radio broadcasts.
• Is the antenna connected properly?
• If the antenna's input signal is weak, install an external FM antenna in an area
with good reception.
While listening to TV audio
through the Product, no sound is
heard.
•
If the EJECT ( ) button is pressed while listening to TV audio using the D. IN or
AUX functions, the BD/DVD functions are turned on and the TV audio is muted.
"Not Available" appears on
screen.
• The features or action cannot be completed at this time because:
1. The BD/DVD’s software restricts it.
2. The BD/DVD’s software doesn’t support the feature (e.g., angles)
3. The feature is not available at the moment.
4.
You’ve requested a title or chapter number or search time that is out of range.
If the HDMI output is set to a
resolution your TV cannot support
(for example, 1080p), you may not
see a picture on your TV.
• Press and hold the STOP ( ) button on front panel for more than 5 seconds
with no disc inserted. All settings will revert to the factory settings.
No HDMI output.
• Check the connection between the TV and the HDMI jack of the product.
• Check if your TV supports 576p/480p/720p/1080i/1080p HDMI input
resolution.
Abnormal HDMI output screen.
• If random noise appears on the screen, it means that TV does not support
HDCP (High-bandwidth Digital Content Protection).
HT-D6500_ELS_1226.indd 72HT-D6500_ELS_1226.indd 72 2011-12-26 3:23:162011-12-26 3:23:16
Page 73

English 73
06 Other Information
Symptom Check/Remedy
PC Share Manager function
I can see folders shared through
the PC Share Manager, but I
cannot see the fi les.
• Since it shows only fi les corresponding to the Image, Music, and Movie
categories, fi les that do not correspond to these categories may not be
displayed.
AllShare function
Video is played intermittently.
• Check if the network is stable.
• Check if the network cable is properly connected and if the network is not
overloaded.
• Wireless connection between the server and the product is unstable.
Check the connection.
AllShare connection between TV
and PC is unstable.
•
IP address under the same subnetwork should be unique, otherwise IP collision
can results in such a phenomenon.
•
Check if you have a fi rewall enabled.
If so, disable the fi rewall function.
BD-LIVE
I cannot connect to the BD-LIVE
server.
• Check whether the network connection is successful or not by using Network
Test menu.
• Check whether the USB memory device is connected with product or not.
• The memory device must have at least 1GB of free space to accommodate the
BD-LIVE service.
You can check the available size in BD Data Management. (See page 41)
• Please check whether the BD-LIVE Internet Connection menu is set to
Allow(All).
• If all above fails, contact the contents provider or update the latest fi rmware.
When using the BD-LIVE service,
an error occurs.
•
The memory device must have at least 1GB of free space to accommodate the
BD-LIVE service.
You can check the available size in BD Data Management. (See page 41)
NOTE
When the factory default settings are restored, all the user data stored in the BD data will be deleted.
[ Recommendation ]- EU Only
Hereby, Samsung Electronics, declares that this Home Cinema System is in compliance with the
essential requirements and other relevant provisions of Directive 1999/5/EC.
The offi cial Declaration of Conformity may be found at http://www.samsung.com, go to Support >
Search Product Support and enter the model name.
This equipment may only be used indoors.
This equipment may be operated in all EU countries.
✎
HT-D6500_ELS_1226.indd 73HT-D6500_ELS_1226.indd 73 2011-12-26 3:23:162011-12-26 3:23:16
Page 74

74 English
Other Information
Specifi cations
General
Weight 3.5 kg
Dimensions 429.3 (W) x 58.4 (H) x 325.1 (D) mm
Operating Temperature Range +5°C to +35°C
Operating Humidity Range 10 % to 75 %
FM Tuner
Signal/noise ratio
55 dB
Usable sensitivity 12 dB
Total harmonic distortion
0.5 %
Disc
BD (Blu-ray Disc) Reading Speed : 9.834 m/sec
DVD (Digital Versatile Disc)
Reading Speed : 6.98 ~ 7.68 m/sec.
Approx. Play Time (Single Sided, Single Layer Disc) : 135 min.
CD : 12cm (COMPACT DISC)
Reading Speed : 4.8 ~ 5.6 m/sec.
Maximum Play Time : 74 min.
CD : 8cm (COMPACT DISC)
Reading Speed : 4.8 ~ 5.6 m/sec.
Maximum Play Time : 20 min.
Video Output
Composite Video
1 channel : 1.0 Vp-p (75 Ω load)
Blu-ray Disc : 576i/480i DVD : 576i/480i
Component Video
Y : 1.0 Vp-p (75 Ω load)
Pr : 0.70 Vp-p (75 Ω load)
Pb : 0.70 Vp-p (75 Ω load)
BD : 576i/480i
DVD : 576p/480p, 576i/480i
Video/Audio
HDMI
1080p, 1080i, 720p, 576p/480p
PCM multichannel audio, Bitstream audio, PCM audio
Amplifier
Front speaker output 165W x 2(3Ω)
Centre speaker output 170W(3
Ω
)
Surround speaker output 165W x 2(3
Ω
)
Subwoofer speaker output 170W(3
Ω
)
Frequency response
Analogue input 20Hz~20kHz (±3dB)
Digital input 20Hz~40kHz (±-4dB)
S/N Ratio 70dB
Channel separation 60dB
Input sensitivity (AUX)500mV
HT-D6500_ELS_1226.indd 74HT-D6500_ELS_1226.indd 74 2011-12-26 3:23:162011-12-26 3:23:16
Page 75

English 75
06 Other Information
Speaker
Speaker system
5.1ch speaker system
Front Surround Centre Subwoofer
Impedance 3 Ω 3 Ω 3 Ω 3 Ω
Frequency range 140Hz~20kHz 140Hz~20kHz 140Hz~20kHz 40Hz ~ 160Hz
Output sound pressure level 86dB/W/M 86dB/W/M 86dB/W/M 88dB/W/M
Rated input 165W 165W 170W 170W
Maximum input 330W 330W 340W 340W
Dimensions (W x H x D)
Front : 90 x 334.5 x 68.5 mm (Stand base : 109 x 98 mm)
Surround : 90 x 141.5 x 68.5 mm
Centre : 360 x 74.5 x 68.5 mm
Subwoofer : 200 x 390 x 350 mm
Weights
Front : 0.89 kg, Surround : 0.58 kg
Centre : 0.98 kg, Subwoofer : 5.70 kg
*: Nominal specifi cation
- Samsung Electronics Co., Ltd reserves the right to change the specifi cations without notice.
- Weight and dimensions are approximate.
- Design and specifi cations are subject to change without prior notice.
- For the power supply and Power Consumption, refer to the label attached to the product.
HT-D6500_ELS_1226.indd 75HT-D6500_ELS_1226.indd 75 2011-12-26 3:23:172011-12-26 3:23:17
Page 76

Area Contact Centre
Web Site
`
North America
Canada 1-800-SAMSUNG (726-7864) www.samsung.com
Mexico 01-800-SAMSUNG (726-7864) www.samsung.com
U.S.A 1-800-SAMSUNG (726-7864) www.samsung.com
`
Latin America
Argentine 0800-333-3733 www.samsung.com
Brazil 0800-124-421 / 4004-0000 www.samsung.com
Chile 800-SAMSUNG (726-7864) www.samsung.com
Colombia 01-8000112112 www.samsung.com
Costa Rica 0-800-507-7267 www.samsung.com
Dominica 1-800-751-2676 www.samsung.com
Ecuador 1-800-10-7267 www.samsung.com
El Salvador 800-6225 www.samsung.com
Guatemala 1-800-299-0013 www.samsung.com
Honduras 800-7919267 www.samsung.com
Jamaica 1-800-234-7267 www.samsung.com
Nicaragua 00-1800-5077267 www.samsung.com
Panama 800-7267 www.samsung.com
Peru 0-800-777-08 www.samsung.com
Puerto Rico 1-800-682-3180 www.samsung.com
Trinidad &
Tobago
1-800-SAMSUNG (726-7864) www.samsung.com
Venezuela 0-800-100-5303 www.samsung.com
`
Europe
Albania 42 27 5755 -
Austria
0810 - SAMSUNG (7267864,
€ 0.07/min)
www.samsung.com
Belgium 02-201-24-18
www.samsung.com/
be (Dutch)
www.samsung.com/
be_fr (French)
Bosnia 05 133 1999 Bulgaria 07001 33 11 www.samsung.com
Croatia 062 SAMSUNG (062 726 7864) www.samsung.com
Czech
800-SAMSUNG (800-726786)
www.samsung.com
Samsung Zrt., česká organizační
složka, Oasis Florenc, Soko-
lovská394/17, 180 00, Praha 8
Denmark 70 70 19 70 www.samsung.com
Finland 030 - 6227 515 www.samsung.com
France 01 48 63 00 00 www.samsung.com
Germany
01805 - SAMSUNG (726-7864
€ 0,14/Min)
www.samsung.com
Hungary 06-80-SAMSUNG (726-7864) www.samsung.com
Italia 800-SAMSUNG (726-7864) www.samsung.com
Kosovo +381 0113216899 Luxemburg 261 03 710 www.samsung.com
Macedonia 023 207 777 Montenegro 020 405 888 -
Netherlands
0900-SAMSUNG
(0900-7267864) (€ 0,10/Min)
www.samsung.com
Norway 815-56 480 www.samsung.com
Poland
0 801 1SAMSUNG (172678)
/ 022-607-93-33
www.samsung.com
Portugal 80820-SAMSUNG (726-7864) www.samsung.com
Rumania
1. 08010 SAMSUNG (72678) doar din reţeaua Romtelecom,
tarif local
2. 021.206.01.10 - din orice
reţea, tarif normal
www.samsung.com
Area Contact Centre
Web Site
Serbia
0700 Samsung (0700 726
7864)
www.samsung.com
Slovakia 0800-SAMSUNG (726-7864) www.samsung.com
Spain 902-1-SAMSUNG (902 172 678) www.samsung.com
Sweden 0771 726 7864 (SAMSUNG) www.samsung.com
Switzerland
0848-SAMSUNG (7267864,
CHF 0.08/min)
www.samsung.com/ch
www.samsung.com/
ch_fr/(French)
U.K 0330 SAMSUNG (7267864) www.samsung.com
Eire 0818 717100 www.samsung.com
Lithuania 8-800-77777 www.samsung.com
Latvia 8000-7267 www.samsung.com
Estonia 800-7267 www.samsung.com
`
CIS
Russia 8-800-555-55-55 www.samsung.com
Georgia 8-800-555-555 Armenia 0-800-05-555 Azerbaijan 088-55-55-555 -
Kazakhstan
8-10-800-500-55-500
(GSM: 7799)
www.samsung.com
Uzbekistan 8-10-800-500-55-500 www.samsung.com
Kyrgyzstan 00-800-500-55-500 www.samsung.com
Tadjikistan 8-10-800-500-55-500 www.samsung.com
Ukraine 0-800-502-000
www.samsung.ua
www.samsung.com/
ua_ru
Belarus 810-800-500-55-500 Moldova 00-800-500-55-500 -
`
Asia Pacifi c
Australia 1300 362 603 www.samsung.com
New Zealand
0800 SAMSUNG (0800 726 786)
www.samsung.com
China
400-810-5858 / 010-6475 1880
www.samsung.com
Hong Kong (852) 3698 4698
www.samsung.com/hk
www.samsung.com/
hk_en/
India
3030 8282 / 1800 110011 /
1800 3000 8282 / 1800 266 8282
www.samsung.com
Indonesia
0800-112-8888 /
021-5699-7777
www.samsung.com
Japan 0120-327-527 www.samsung.com
Malaysia 1800-88-9999 www.samsung.com
Philippines
1-800-10-SAMSUNG(726-7864) /
1-800-3-SAMSUNG(726-7864) /
1-800-8-SAMSUNG(726-7864) /
02-5805777
www.samsung.com
Singapore 1800-SAMSUNG (726-7864) www.samsung.com
Thailand 1800-29-3232 / 02-689-3232 www.samsung.com
Taiwan 0800-329-999 www.samsung.com
Vietnam 1 800 588 889 www.samsung.com
`
Middle East
Bahrain 8000-4726 www.samsung.com
Egypt 08000-726786 www.samsung.com
Jordan 800-22273 www.samsung.com
Morocco 080 100 2255 www.samsung.com
Oman 800-SAMSUNG (726-7864) www.samsung.com
Saudi Arabia 9200-21230 www.samsung.com
Turkey 444 77 11 www.samsung.com
U.A.E 800-SAMSUNG (726-7864) www.samsung.com
`
Africa
Nigeria 0800-SAMSUNG (726-7864) www.samsung.com
South Africa 0860-SAMSUNG (726-7864 ) www.samsung.com
Contact SAMSUNG WORLD WIDE
If you have any questions or comments relating to Samsung products, please contact the SAMSUNG
customer care centre.
HT-D6500_ELS_1226.indd 76HT-D6500_ELS_1226.indd 76 2011-12-26 3:23:172011-12-26 3:23:17
Page 77

Correct Disposal of This Product (Waste Electrical & Electronic
Equipment)
(Applicable in the European Union and other European countries with separate collection systems)
This marking on the product, accessories or literature indicates that the product and its electronic accessories (e.g.
charger, headset, USB cable) should not be disposed of with other household waste at the end of their working life. To
prevent possible harm to the environment or human health from uncontrolled waste disposal, please separate these
items from other types of waste and recycle them responsibly to promote the sustainable reuse of material resources.
Household users should contact either the retailer where they purchased this product, or their local government office,
for details of where and how they can take these items for environmentally safe recycling.
Business users should contact their supplier and check the terms and conditions of the purchase contract.
This product and its electronic accessories should not be mixed with other commercial wastes for disposal.
Correct disposal of batteries in this product
(Applicable in the European Union and other European countries with separate battery return systems.)
This marking on the battery, manual or packaging indicates that the batteries in this product should not
be disposed of with other household waste at the end of their working life. Where marked, the chemical
symbols Hg, Cd or Pb indicate that the battery contains mercury, cadmium or lead above the reference
levels in EC Directive 2006/66. If batteries are not properly disposed of, these substances can cause harm
to human health or the environment.
To protect natural resources and to promote material reuse, please separate batteries from other types of
waste and recycle them through your local, free battery return system.
HT-D6500_ELS_1226.indd 77HT-D6500_ELS_1226.indd 77 2011-12-26 3:23:172011-12-26 3:23:17
Page 78

Système Home Entertainment
Blu-ray™ 5,1 canaux
Manuel d'utilisation
imaginez les possibilités
Merci d'avoir acheté ce produit Samsung.
Pour obtenir notre service complet, veuillez
enregistrer votre produit sur
www.samsung.com/register
HT-D6500
HT-D6500_FRA_1226.indd 1HT-D6500_FRA_1226.indd 1 2011-12-26 3:28:482011-12-26 3:28:48
Page 79

2 Français
Consignes de sécurité
Avertissements de sécurité
POUR RÉDUIRE LES RISQUES D’ÉLECTROCUTION, NE RETIREZ JAMAIS LE CAPOT (NI L’ARRIÈRE).
LES PIÈCES DE CE PRODUIT NE SONT PAS RÉPARABLES PAR L’UTILISATEUR. VEUILLEZ CONTACTER UN
TECHNICIEN QUALIFIÉ POUR TOUTE RÉPARATION.
ATTENTION
RISQUE D’ÉLECTROCUTION
NE PAS OUVRIR
Ce symbole indique la présence d’une
tension dangereuse dans l’appareil,
présentant un risque d’électrocution ou
de blessures.
ATTENTION :
POUR ÉVITER TOUT
RISQUE D’ÉLECTROCUTION, LA BROCHE
LA PLUS LARGE DE LA FICHE DOIT ÊTRE
TOTALEMENT INSÉRÉE DANS LE TROU
PLUS LARGE.
Ce symbole indique les directives
importantes qui accompagnent le
produit.
AVERTISSEMENT
Afi n de réduire tout risque d’incendie ou
d’électrocution, n’exposez jamais cet appareil
à la pluie ou à l’humidité.
ATTENTION
Évitez toute projection d’eau sur l’appareil et ne posez
jamais d’objet contenant un liquide dessus (ex : un vase).
La fi che permet de débrancher l’appareil et doit toujours
être facilement accessible.
Cet appareil doit toujours être branché à une prise de
courant alternatif reliée à la terre.
Pour débrancher l'appareil, il convient de retirer la fi che de
la prise murale, il faut donc que cette dernière soit
facilement accessible.
•
•
•
•
•
CLASS 1 LASER PRODUCT
KLASSE 1 LASER PRODUKT
LUOKAN 1 LASER LAITE
KLASS 1 LASER APPARAT
PRODUCTO LÁSER CLASE 1
PRODUIT LASER DE CLASSE 1
Le lecteur de disque compact est homologué
comme produit LASER DE CLASSE 1.
L'utilisation des commandes, les réglages ou
l'exécution de procédures autres que celles
spécifi ées ci-dessus peuvent conduire à une
exposition à des radiations dangereuses.
ATTENTION
DES RAYONS LASER INVISIBLES SONT PRÉSENTS
LORSQUE L'APPAREIL EST OUVERT OU QUE LES
DISPOSITIFS DE VERROUILLAGE SONT CIRCONVENUS.
ÉVITEZ L'EXPOSITION AUX RAYONS.
•
HT-D6500_FRA_1226.indd 2HT-D6500_FRA_1226.indd 2 2011-12-26 3:28:552011-12-26 3:28:55
Page 80

Français 3
Précautions
Assurez-vous que l'alimentation en c.a. de votre habitation est conforme à la plaque d'identifi cation située au dos
de votre appareil.
Posez votre appareil à plat sur un meuble stable en veillant à laisser un espace de 7,5 à 10 cm autour de
l'appareil afi n d’assurer sa ventilation correcte.
Ne le posez pas sur des amplifi cateurs ou autre appareil qui risque de chauffer.
Veillez à ne pas obstruer les orifi ces de ventilation.
Ne posez rien sur l’appareil.
Avant de déplacer l’appareil, assurez-vous que le compartiment du disque est vide.
Pour couper complètement l’alimentation, débranchez la fi che du produit de la prise murale.
-
Si vous n’avez pas l’intention d’utiliser le produit sur une période prolongée, débranchez sa fi che de la prise murale.
Pendant les orages, retirez la fi che principale alimentée par le c.a. de la prise murale. Les pointes de tension
dues aux éclairs pourraient endommager l’appareil.
N’exposez pas l’appareil à la lumière directe du soleil ni à d’autres sources de chaleur. L’appareil pourrait
surchauffer et mal fonctionner.
N’exposez pas l’appareil à l’humidité ni à aucune source de chaleur excessive et éloignez-le des appareils
générant des ondes magnétiques ou des champs électriques intenses (ex. : haut-parleurs).
Débranchez le câble d’alimentation de l’alimentation en c.a. en cas de dysfonctionnement.
Cet appareil n’est pas conçu pour un usage industriel. Il est uniquement réservé à un usage privé.
De la condensation peut se former si votre appareil ou votre disque a été entreposé dans un endroit exposé à
des températures basses. Si l’appareil doit être transporté pendant l’hiver, attendez environ 2 heures pour qu’il
s’adapte à la température de la pièce avant de l’utiliser.
Les piles utilisées avec cet appareil contiennent des produits chimiques dangereux pour l’environnement.
Ne les jetez pas avec les ordures ménagères.
Regarder la télévision en 3D
INFORMATIONS DE SECURITE ET DE SANTE IMPORTANTES CONCERNANT LES
IMAGES 3D Lisez et assurez-vous de comprendre les informations de sécurité suivantes
avant d'utiliser la fonction 3D de votre téléviseur.
AVERTISSEMENT
Certaines personnes peuvent être victimes de vertiges, nausées et maux de tête lorsqu'elles regardent la
télévision en 3D. Si vous présentez des symptômes de ce type, arrêtez de regarder la télévision en 3D, retirez les
lunettes 3D actives et reposez-vous.
Le fait de regarder des images 3D pendant une période prolongée peut causer une fatigue oculaire. Si vous
présentez ce type de symptôme, arrêtez de regarder la télévision en 3D, retirez les lunettes 3D actives et
reposez-vous.
Un adulte responsable est censé vérifi er régulièrement que tout se passe bien pour les enfants qui utilisent la
fonction 3D. Si un enfant vous dit qu'il a les yeux fatigués ou qu'il est victime de maux de tête, de vertiges ou de
nausées, demandez-lui d'arrêter de regarder la télévision en 3D et dites-lui de se reposer.
N'utilisez pas les lunettes 3D actives à d'autres fi ns (p. ex. comme lunettes de vue, de soleil ou de protection).
N'utilisez pas la fonction 3D ou les lunettes 3D actives lorsque vous marchez ou vous déplacez. Si vous utilisez la
fonction 3D ou les lunettes 3D actives lorsque vous vous déplacez, vous pouvez vous occasionner des blessures
en trébuchant, en chutant et/ou en percutant des objets.
•
•
•
•
•
•
•
•
•
•
•
•
•
•
•
•
•
•
HT-D6500_FRA_1226.indd 3HT-D6500_FRA_1226.indd 3 2011-12-26 3:28:552011-12-26 3:28:55
Page 81

4 Français
Manipulation et rangement des disques - Précautions
De petites érafl ures sur un disque risquent de
réduire la qualité du son et de l’image ou de les
faire sauter.
Prenez garde à ne pas rayer les disques lorsque
vous les manipulez.
Manipulation des disques
Ne touchez pas la face de lecture du disque.
Tenez le disque par les tranches afi n de
ne pas laisser de traces de doigts sur la
surface.
Ne collez pas de papier ou de ruban adhésif sur le
disque.
Rangement des disques
N’exposez pas les disques à la lumière directe
du soleil.
Rangez-les dans un endroit frais et aéré.
Rangez-les dans des pochettes propres.
Positionnez-les verticalement.
REMARQUE
Évitez les salissures sur les disques.
N’insérez jamais de disques fendus ou rayés.
Manipulation et rangement des disques
Si un disque présente des traces de doigts, nettoyez-le à
l’aide d’un peu de nettoyant doux dilué dans de l’eau et
essuyez avec un chiffon doux.
Lors du nettoyage, essuyez doucement de
l’intérieur vers l’extérieur du disque.
REMARQUE
De la condensation peut de former lorsque de l’air
chaud entre en contact avec des parties froides
situées à l’intérieur de l’appareil. En cas de
condensation à l’intérieur de l’appareil, celui-ci
risque de ne pas fonctionner correctement. Si cela
se produit, retirez le disque et attendez une à deux
heures en laissant l’appareil sous tension.
•
•
•
•
•
•
✎
•
✎
Licence
Dolby et le symbole du double « D » sont des marques déposées de
Dolby Laboratories.
« À PROPOS DE VIDÉO DIVX : DivX® est un format
vidéo numérique créé par DivX, Inc. Ceci est un
appareil DivX Certifi ed® qui lit les vidéos au format DivX. Reportezvous au site Web à l'adresse www.divx.com pour obtenir plus
d’informations et consulter les outils logiciels permettant de convertir
les fi chiers au format de vidéo DivX.
À PROPOS DE LA VIDÉO À LA DEMANDE DIVX : Cet appareil DivX
Certifi ed® doit être enregistré pour lire les fi lms vidéo à la demande
(VOD) DivX disponibles dans le commerce. Pour générer le code
d’enregistrement, il faut accéder à la section DivX VOD dans le menu
de confi guration de l’appareil. Consultez le site Web vod.divx.com afi n
d’obtenir de plus amples informations sur les étapes à suivre pour
terminer la procédure.
Le format DivX Certifi ed® permet de lire des vidéos DivX® dans une
résolution HD allant jusqu'à 1080p, y compris en ce qui concerne les
programmes d'appel.
DivX®, DivX Certifi ed® et les logos qui y sont associés sont des
marques commerciales de DivX, Inc. exploitées sous licence. »
Ce format est couvert par un ou plusieurs des brevets américains
suivants : 7,295,673 ; 7,460,668 ; 7,515,710 ; 7,519,274
Oracle et Java sont des marques déposées d'Oracle et/ou de ses
sociétés affi liées. D'autres noms cités peuvent être des marques
commerciales de leurs propriétaires respectifs.
Ce produit intègre la technologie de protection contre la copie qui est
protégée par les brevets américains et d’autres droits de la propriété
intellectuelle détenus par Rovi Corporation. Il est interdit de procéder à
l’ingénierie inverse ou au désassemblage de l’appareil.
Blu-ray Disc™, Blu-ray™ et les logos qui y sont associés sont des
marques commerciales de Blu-ray Disc Association.
iPod est une marque de commerce
d’Apple Inc., déposée aux États-Unis
et dans d’autres pays. iPhone est une
marque de commerce d’Apple Inc.
< Avis de licence libre >
En cas d'utilisation de logiciels libres, les licences libres sont
disponibles dans le menu du produit.
Droit d’auteur
© 2011 Samsung Electronics Co., Ltd. Tous droits réservés.
•
•
•
•
•
•
•
•
Consignes de sécurité
HT-D6500_FRA_1226.indd 4HT-D6500_FRA_1226.indd 4 2011-12-26 3:28:552011-12-26 3:28:55
The terms HDMI and HDMI High-Definition
Multimedia Interface, and the HDMI Logo are
trademarks or registered trademarks of HDMI
Licensing LLC in the United States and other
countries.
Page 82

Français 5
FRANÇAIS
Table des matières
CONSIGNES DE SÉCURITÉ
2
2 Avertissements de sécurité
3 Précautions
4 Manipulation et rangement des disques - Précautions
4 Licence
4 Droit d’auteur
PRISE EN MAIN
7
7 Icônes utilisées dans ce guide
8 Types de disques et caractéristiques
12 Accessoires
13 Description
13 Panneau avant
14 Panneau arrière
15 Télécommande
BRANCHEMENTS
17
17 Connexion des enceintes
19 Connexion du module récepteur sans fi l proposé en
option
21 Fixation du noyau torique en ferrite au cordon
d’alimentation de l’unité principale.
21 Connexion de périphériques externes et du téléviseur via
l’interface HDMI
22 Connexion de l’antenne FM
24
Connexion audio de composants externes
25 Connexion au réseau
CONFIGURATION
27
27 Paramètre initial
28 Pour accéder au menu Paramètres
29 Affi chage
29 Paramètres 3D
30 Format écran
30 Taille écran Smart Hub
30 BD Wise (Produits Samsung uniquement)
30 Résolution
32 Format couleurs HDMI
32 Trame vidéo (24Fs)
32 Couleurs profondes HDMI
32 Mode image fi xe
32 Mode progressif
33 Audio
33 Param. haut-parleur
34 Étalonnage auto pour la musique
34 Eg. util
35 Audio HDMI
35 Fonct. Retour Audio
35 Sortie numérique
36 Contrôle de la dynamique
37 Sync. audio
37 Réseau
37 Paramètres réseau
40 État du réseau
40 Connexion internet BD-LIVE
41 Système
41 Paramètre initial
41 Anynet+ (HDMI-CEC)
41 Gestion données BD
41 Fuseau Horaire
41 DivX® Vidéo à la demande
42 Réinitialisation
42 Langue
HT-D6500_FRA_1226.indd 5HT-D6500_FRA_1226.indd 5 2011-12-26 3:28:562011-12-26 3:28:56
Page 83

6 Français
Table des matières
CONFIGURATION
42
42 Sécurité
42 Contrôle parent. BD
42 Contrôle parent. DVD
42 Modif. mot de passe
42 Général
42 Affi chage du lecture
42 Télécommande réseau
43 Assistance
43 Mise à jour du logiciel
44 Contacter Samsung
FONCTIONS DE BASE
45
45 Lecture d’une vidéo
45 Utilisation du Menu du disque/Menu de titres/Menu
contextuel
46 Lecture de Liste de titres
46 Utilisation des fonctions Recherche et Saut
47 Lecture au ralenti / Lecture pas à pas
47 Répétition de la lecture
48 Utilisation du bouton TOOLS
50 Écouter de la musique
52 Mode Son
53 Lecture d’image
54 Lecture de contenu à partir d’un périphérique de
stockage USB
55 Écoute de la radio
57 Connexion d’un iPod/iPhone à l’aide d’un câble USB
57 Connexion d’un iPod/iPhone via la station d’accueil dock
58 Utilisation de l’iPod/iPhone avec une station d’accueil
dock sans fi l (vendue séparément) pour iPod/iPhone
59 Modèles iPod/iPhone susceptibles d’être utilisés avec ce
produit
60 Liaison de l’émetteur sans fi l avec l’unité principale
SERVICES RÉSEAU
61
61 Utilisation de Smart Hub
68 Applications Samsung
70 Utilisation de la fonction vTuner
70 BD-LIVE™
70 Utilisation de la fonction AllShare
AUTRES INFORMATIONS
71
71 Dépannage
74 Caractéristiques
Les fi gures et illustrations de ce manuel d’utilisation sont fournies à titre de référence et peuvent différer de
l’apparence réelle de l’appareil.
Des frais d'administration peuvent vous être facturés si
un technicien intervient à votre demande et que le produit ne comporte aucun défaut
(c.-à-d; si vous n'avez pas pris la peine de lire le présent manuel d'utilisation)
vous amenez le produit dans un centre de réparation alors qu'il ne comporte aucun défaut
(c.-à-d; si vous n'avez pas pris la peine de lire le présent manuel d'utilisation).
Le montant de ces frais d'administration vous sera signifi é avant la réalisation de toute prestation ou visite à domicile.
•
•
a.
b.
•
HT-D6500_FRA_1226.indd 6HT-D6500_FRA_1226.indd 6 2011-12-26 3:28:562011-12-26 3:28:56
Page 84

Français 7
01 Prise en main
Icônes utilisées dans ce guide
Assurez-vous de consulter les défi nitions des termes suivants avant de lire le guide d’utilisation.
Terme Logo Icône Définition
BD-ROM
h
Indique une fonction disponible sur les BD-ROM.
BD-RE/-R
z
Indique une fonction disponible sur les BD-RE/-R enregistrés au format
BD-RE.
DVD-VIDEO
Z
Indique une fonction disponible sur les DVD vidéo.
DVD-RW(V)
y
Indique une fonction disponible sur les DVD+RW ou DVD-RW(V)/DVD-R/+R
enregistrés et fi nalisés.
DVD-R
DVD+RW
DVD+R
Audio CD
o
Indique une fonction disponible sur un CD-RW/-R audio
(format CD-DA).
MP3
WMA
-
w
Indique une fonction disponible sur les CD-RW/-R, les DVD-RW/-R et les
périphériques de stockage USB avec des contenus MP3 ou WMA.
JPEG
-
G
Indique une fonction disponible sur les CD-RW/-R, les DVD-RW/-R et les
périphériques de stockage USB avec des contenus JPEG.
DivX
MKV
MP4
DivX
x
Indique une fonction disponible sur les CD-RW/-R, les DVD-RW/-R et les
périphériques de stockage USB avec des contenus DivX.
Périphérique de
stockage USB
-
F
Ceci implique une fonction disponible sur un périphérique de stockage
USB.
ATTENTION
-
!
Ceci indique une situation où une fonction ne peut pas être exécutée ou
des réglages pourraient être annulés.
REMARQUE
-
✎
Conseils ou instructions fournis pour vous aider à exécuter chaque fonction.
Touche de
raccourci
-
Permet d’accéder directement et facilement à une fonction via la
simple pression du bouton de la télécommande spécifi é.
Cet appareil est compatible uniquement avec le système de couleurs PAL.
Les disques NTSC ne sont pas lus.
•
•
Prise en main
HT-D6500_FRA_1226.indd 7HT-D6500_FRA_1226.indd 7 2011-12-26 3:28:562011-12-26 3:28:56
Page 85

8 Français
Prise en main
Types de disques et caractéristiques
Compatibilité des disques Blu-ray
Le disque Blu-ray est un nouveau format, en constante
évolution. Par conséquent, il existe des problèmes de
compatibilité qui y sont associés. Tous les disques ne
sont pas uniformément compatibles et la lecture de
certains de ces supports peut s’avérer être impossible.
Pour obtenir de plus amples renseignements à ce sujet,
reportez-vous aux détails fournis dans la présente
section « Types et caractéristiques des disques ».
REMARQUE
La lecture de certains types de disques peut ne
pas fonctionner, ou lorsque des opérations
spécifi ques sont effectuées, telles qu'un
changement d'angle et un ajustement du format
d’écran. Les informations concernant les disques
sont mentionnées sur l’emballage. Veuillez vous y
référer si nécessaire.
Évitez les salissures ou les rayures sur les disques.
Les empreintes digitales, les salissures, la
poussière, les rayures ou les dépôts de fumée de
cigarettes sur la surface d'enregistrement peuvent
rendre le disque illisible.
Lorsqu'un titre de BD-Java est lu, le chargement
peut prendre plus de temps qu'un titre normal, ou
certaines fonctions peuvent s'exécuter lentement.
Les disques qui ne peuvent pas être lus
Disque DVD HD
DVD-RAM
Disque DVD-R 3,9 Go pour Système auteur.
DVD-RW (mode VR)
CD super audio (à l’exception de la couche CD)
Disques DVD-ROM/PD/MV, etc CVD/
CD-ROM/CDV/CD-G/CD-I/LD
Disques CDG audio uniquement, non graphiques.
REMARQUE
Il se peut que certains disques et DVD commerciaux
achetés en dehors de votre région ne puissent pas
être reproduits sur cet appareil.
Si un disque DVD-R/-RW n'a pas été enregistré
correctement au format vidéo DVD, il ne pourra pas
être lu.
✎
•
•
•
•
•
•
•
✎
Logos des disques pouvant être lus
Disque Blu-ray Disque Blu-ray 3D
Système Dolby Digital Plus
Système d’émission PAL
au Royaume-Uni, en
France, Allemagne, etc.
Système Dolby TrueHD
Disque DTS-HD haute
résolution audio
Java
DTS-HD Master Audio |
Essential
BD-LIVE
HT-D6500_FRA_1226.indd 8HT-D6500_FRA_1226.indd 8 2011-12-26 3:28:582011-12-26 3:28:58
Page 86

Français 9
01 Prise en main
Code régional
L’appareil et les disques possèdent des codes
régionaux. Ces codes régionaux doivent
correspondre pour pouvoir lire un disque. S’ils
sont différents, le disque ne peut pas être lu.
Type de
disque
Code
régional
Zone
Blu-ray
A
Amérique du Nord, Amérique
centrale, Amérique du Sud,
Corée, Japon, Taïwan, Hong
Kong et Asie du Sud-Est.
B
Europe, Groenland, Territoires
français, Moyen-Orient, Afrique,
Australie et Nouvelle- Zélande.
C
Inde, Chine, Russie, Asie
centrale et du Sud.
DVD Vidéo
1
États-Unis, territoires américains
et Canada
2
Europe, Japon, Moyen-Orient,
Égypte, Afrique du Sud, Groenland
3
Taïwan, Corée, Philippines,
Indonésie, Hong Kong
4
Mexique, Amérique du Sud,
Amérique centrale, Australie,
Nouvelle-Zélande, Îles du
Pacifi que, Caraïbe
5
Russie, Europe de l’Est, Inde,
majorité de l’Afrique, Corée du
Nord, Mongolie
6
Chine
Type de disque
BD-ROM
Les disques Blu-ray ROM peuvent être uniquement
lus.
Ce produit peut lire des disques BD-ROM
préenregistrés disponibles dans le commerce.
BD-RE/-R
Les disques Blu-ray RE/-R peuvent être lus et
enregistrés.
Ce produit peut lire un disque BD-RE/-R enregistré
sur d'autres enregistreurs de disques Blu-ray
compatibles.
DVD-VIDEO
Ce produit peut lire des DVD préenregistrés
disponibles dans le commerce (disques DVD VIDÉO)
comportant des fi lms.
Lorsque vous passez de la première à la
deuxième couche d’un DVD VIDÉO double
couche, des déformations visuelles et sonores
peuvent se produire. Il ne s’agit pas d’un
dysfonctionnement.
DVD-RW/-R/+R
Ce produit peut lire des disques DVD-RW/-R/+R
enregistrés et fi nalisés à l'aide d'un enregistreur de
DVD vidéo. La capacité à lire un disque peut dépendre
des conditions d'enregistrement de ce dernier.
DVD+RW
Ce produit peut lire un disque DVD+RW
enregistré sur un enregistreur de DVD vidéo. La
capacité à lire un disque peut dépendre des
conditions d'enregistrement de ce dernier.
CD Audio (CD-DA)
Ce produit peut lire les disques CD-RW/-R au format
audio CD-DA.
Il se peut que cet appareil ne lise pas certains
disques CD-RW/-R pour des raisons liées aux
conditions d’enregistrement.
CD-RW/-R
Optez pour les disques CD-RW/-R de 700 Mo
(80 minutes).
Dans la mesure du possible, évitez d'utiliser des
disques de 800 Mo (90 minutes) ou de capacité
supérieure car le lecteur pourrait ne pas les lire.
Si le disque CD-RW/-R n’a pas été enregistré en
session fermée, vous pourrez rencontrer des
retards en début de lecture ou ne pas pouvoir lire
la totalité des fi chiers enregistrés.
Il se peut que certains CD-RW/-R ne puissent pas
être lus sur ce produit ; cela dépend de l’appareil
avec lequel ils ont été gravés. Concernant les
contenus enregistrés sur un support CD-RW/-R à
partir d'un CD et destinés à un usage personnel,
la capacité à lire le disque peut varier selon le
disque et le contenu.
•
•
•
•
•
•
•
•
HT-D6500_FRA_1226.indd 9HT-D6500_FRA_1226.indd 9 2011-12-26 3:28:592011-12-26 3:28:59
Page 87

10 Français
Prise en main
Format du disque
Utilisation d'un disque JPEG
Les CD-R/-RW, DVD-RW/-R enregistrés au format UDF ou JOLIET peuvent être lus.
Seuls les fi chiers ayant les extensions « .jpg », « .JPG », « .jpeg » ou « JPEG » peuvent être affi chés.
Le JPEG progressif est pris en charge.
DVD-RW/-R (V)
Il s’agit d’un format utilisé pour l’enregistrement de données sur un disque DVD-RW ou DVD-R ; une
fois fi nalisé, le disque peut être lu par l'appareil.
Si un disque a été enregistré en mode Video (Vidéo) par un enregistreur d’un autre fabricant mais n’a
pas été fi nalisé, il ne pourra pas être lu par cet appareil.
•
•
•
•
•
Formats de fi chiers pris en charge
Prise en charge des fi chiers vidéo
Extension de fichier
Conteneur Codec vidéo Codec audio Résolution
*.avi
AVI
DivX 3.11/4.x/5.1/6.0
MP3
AC3
LPCM
ADPCM
Noyau DTS
1920x1080
H.264 BP/MP/HP
1920x1080
MPEG4 SP/ASP
1920x1080
Motion JPEG
1920x1080
*.mkv
MKV
DivX 3.11/4.x/5.1/6.0
MP3
AC3
LPCM
ADPCM
Noyau DTS
1920x1080
H.264 BP/MP/HP
1920x1080
MPEG4 SP/ASP
1920x1080
Motion JPEG
1920x1080
*.asf
ASF
DivX 3.11/4.x/5.1/6.0
MP3
AC3
LPCM
ADPCM
WMA
1920x1080
H.264 BP/MP/HP
1920x1080
MPEG4 SP/ASP
1920x1080
Motion JPEG
1920x1080
*.wmv
ASF Window Media Video v9
WMA 1920x1080
*.mp4
MP4
H.264 BP/MP/HP
MP3
ADPCM
AAC
1920x1080
MPEG4 SP/ASP
1920x1080
*.3gp
3GPP
H.264 BP/MP/HP
ADPCM
AAC
HE-AAC
1920x1080
MPEG4 SP/ASP
1920x1080
HT-D6500_FRA_1226.indd 10HT-D6500_FRA_1226.indd 10 2011-12-26 3:29:002011-12-26 3:29:00
Page 88

Français 11
01 Prise en main
Extension de fichier
Conteneur Codec vidéo Codec audio Résolution
*.vro
VRO
VOB
MPEG2
AC3
MPEG
LPCM
1920x1080
MPEG1
352x288
*.mpg
*.mpeg
PS
MPEG1
AC3
MPEG
LPCM
AAC
352x288
MPEG2
1920x1080
H.264
1920x1080
*.ts
*.tp
*.trp
TS
MPEG2
AC3
AAC
MP3
DD+
HE-AAC
1920x1080
H.264
1920x1080
VC1
1920x1080
Restrictions
Certains codecs répertoriés ci-dessus ne sont pas pris en charge en cas de problème liés aux contenus.
Les sources vidéo contenant des informations incorrectes ou corrompues ne sont pas lues correctement.
Les sources AV dotées d’un débit binaire ou d’une vitesse de défi lement supérieur(e) à la normale
peuvent ne pas être lues correctement.
Si la table d’indexation est corrompue, la fonction Positionner (Saut) ne sera pas prise en charge.
Si vous lisez une vidéo via le réseau, celle-ci risque de ne pas s’exécuter correctement, selon l’état
du réseau.
Décodeur vidéo
Norme H.264 Level 4.1 prise en charge.
Formats H.264 FMO/ASO/RS, VC1 SP/MP/AP L4, AVCHD non pris en charge.
MPEG4 SP, ASP :
- Résolution inférieure à 1280 x 720 : 60 images maxi
- Résolution supérieure à 1280 x 720 : 30 images maxi
Format GMC 2 ou supérieur non pris en charge.
Décodeur audio
Formats WMA 7, 8, 9 pris en charge.
Format WMA 9 PRO avec plus de deux canaux (multicanaux) non pris en charge.
Format WMA 9 Lossless et voix non pris en charge.
Taux d’échantillonnage WMA 22050 Hz mono non pris en charge.
Prise en charge des fi chiers musicaux
Extension de fichier Conteneur Codec audio Plage de prise en charge
*.mp3
MP3
MP3 -
*.wma
WMA
WMA
Compatibilité avec le format WMA version 10
* Taux d'échantillonnage (en kHz) - 8, 11,
16, 22, 32, 44,1, 48
* Débits binaires - Tous les débits binaires
dans la plage allant de 5 kbps à 384 kbps
•
•
•
•
•
•
•
•
•
•
•
•
•
HT-D6500_FRA_1226.indd 11HT-D6500_FRA_1226.indd 11 2011-12-26 3:29:002011-12-26 3:29:00
Page 89

12 Français
Prise en main
Notes sur la connexion USB
Périphériques pris en charge:
Support de stockage USB, lecteur MP3, caméra
numérique, lecteur de carte USB
Prise en charge non assurée pour les
dossiers ou fi chiers dont le nom excède 125
caractères.
Un fi chier de sous-titre supérieur à 300 Ko ne
peut pas s’affi cher correctement.
Le produit n’est pas compatible avec tous les
périphériques de caméra numérique / USB.
Les systèmes de fi chiers FAT16 et FAT32 ne
sont pas pris en charge.
Les fi chiers photo (JPEG), musique (MP3) et
vidéo doivent porter des noms en coréen ou
en anglais. Autrement, le fi chier risque de ne
pas être lu.
1)
2)
3)
4)
5)
Effectuez la connexion directement au port
USB du produit. La connexion via un autre
câble peut provoquer des problèmes de
compatibilité USB.
L’insertion de plusieurs périphériques de
mémoire dans un lecteur multicarte peut
entraîner un dysfonctionnement.
Le protocole PTP pour caméras numériques
n’est pas pris en charge.
Ne déconnectez pas le périphérique USB
durant un processus de « chargement ».
Plus la résolution de l’image est élevée, plus
lent le délai d'affi chage de l'image.
Les fi chiers MP3 de type DRM téléchargés
depuis un site commercial ne sont pas lus
par l’appareil.
6)
7)
8)
9)
10)
11)
Accessoires
Vérifi ez que vous disposez bien des accessoires suivants.
Câble vidéo Antenne FM
Station d’accueil
dock pour iPod
Guide de l’utilisateur
FUNCTION
TV SOURCE
POWER
DISC MENU MENU TITLE MENU
MUTE
SFE MODE
VOL
TUNING
/CH
TOOLS
RETURN
EXIT
INFO
AB
HUB
CD
TUNER
MEMORY
S/W LEVEL
DĺD
MO/ST
D SOUND
DSP
PL
vTuner
SMART SEARCH
REPEATFULL SCREEN
123
456
7809
POPUP
TV
BD
RECEIVER SLEEP
TARDS DISPLAY
PTY- PTY SEARCH PTY+
iPod SYNC
( Pour le cordon
d’alimentation)
Télécommande/
Piles (AAA)
Microphone ASC Chiffon doux
Noyau torique en ferrite
HT-D6500_FRA_1226.indd 12HT-D6500_FRA_1226.indd 12 2011-12-26 3:29:002011-12-26 3:29:00
Page 90

Français 13
01 Prise en main
Description
Panneau avant
1
TOUCHE DE MISE EN MARCHE/ARRÊT (
)
Pour allumer ou éteindre le produit.
2
TOUCHES DE FONCTION
Le mode change dans l’ordre suivant :
BD/DVD D. IN AUX R. IPOD W. IPOD H. IN1 H. IN2 FM
3
ÉCRAN D’AFFICHAGE
Permet d’affi cher l’état de la lecture, l’heure, etc.
4
BOUTON ARRÊT
Permet d’interrompre la lecture du disque.
5
BOUTON LECTURE/PAUSE
Permet de lire un disque ou de suspendre la lecture.
6
BOUTON ENTRÉE
Permet de sélectionner les éléments de menu ou de lancer un disque
Blu-ray (mais pas un disque DVD).
7
BOUTON ÉJECTER
Permet d’éjecter un disque.
8
LOGEMENT DE DISQUE
Permet d'insérer le disque.
9
CAPTEUR DE LA TÉLÉCOMMANDE
Détecte les signaux provenant de la télécommande.
10
PRISE ENTRÉE ASC
Permet de connecter le microphone ASC afi n de confi gurer la fonctionnalité
MAC (Étalonnage auto pour la musique).
11
COMMANDE DE VOLUME
Réglage du volume.
12
PORT USB
Vous pouvez connecter une carte mémoire fl ash USB et l'utiliser comme un
support de stockage lorsque le produit est connecté au service BD-LIVE. Vous
avez également la possibilité d'utiliser l'Hôte USB pour les mises à niveau
logicielles et la lecture des fi chiers MP3/JPEG/DivX/MKV/MP4. Il est
également possible d’utiliser R. IPOD lorsque l’iPod est connecté.
REMARQUE
Les mises à niveau logicielles à l’aide du Port USB doivent être effectuées uniquement à l’aide d’une
mémoire fl ash USB.
Lorsque le produit affi che le menu du disque Blu-ray, vous ne pouvez pas lancer la vidéo en appuyant sur le bouton
LECTURE situé sur le produit ou sur la télécommande. Pour lire la vidéo, sélectionnez Lire la vidéo ou (Démarrer
dans le menu du disque puis appuyez sur le bouton ENTRÉE.
✎
ASC IN
5V
500mA
1 32 4 5
10 11
6
7128 9
HT-D6500_FRA_1226.indd 13HT-D6500_FRA_1226.indd 13 2011-12-26 3:29:022011-12-26 3:29:02
Page 91

14 Français
Prise en main
Panneau arrière
1
BORNE LAN
Permet d’accéder aux services réseau (voir pages 61~70), à la
fonctionnalité BD-LIVE et aux mises à niveau logicielles via la connexion
réseau.
2
PRISE iPod
Permet de connecter la station d'accueil dock de l'iPod.
3
PRISE EXTERNE ENTRÉE AUDIO
NUMÉRIQUE (OPTIQUE)
Permet de connecter un équipement externe capable d’émettre une sortie
numérique.
4
PRISE SORTIE HDMI
À l'aide du câble HDMI, reliez cette borne de sortie HDMI à la borne
d'entrée HDMI du téléviseur pour obtenir une qualité d'image optimale.
5
PRISES ENTRÉE HDMI
Reçoivent les signaux vidéo et audio numériques simultanément au moyen
d’un câble HDMI.
6
PRISE ANTENNE FM
Permet de connecter l'antenne FM.
7
CONNEXION DE CARTE DE
TRANSMISSION (SANS FIL)
La carte émettrice autorise la communication entre le produit et le module
récepteur sans fi l proposé en option.
8
PRISES ENTRÉE AUX
Permettent la connexion à la sortie analogique 2 canaux d'un appareil
externe (un magnétoscope par exemple).
9
PRISES SORTIE COMPOSANTE et
SORTIE VIDÉO
Permettent la connexion d’un téléviseur muni d’entrées vidéo en
composante.
10
PRISE SORTIE VIDÉO
Reliez la prise ENTRÉE VIDÉO du téléviseur à la prise SORTIE VIDÉO de ce
produit.
11
CONNECTEURS DE SORTIE
D’ENCEINTE 5,1 CANAUX
Permettent de connecter les enceintes avant, centrale, ambiophoniques et
le caisson de graves.
12
VENTILATEUR
Le ventilateur fournit de l’air frais au produit pour empêcher sa surchauffe
et s’active dès que l’alimentation est branchée.
ATTENTION
Prévoyez un espace libre de 10 cm au minimum tout autour du ventilateur lorsque vous installez le
produit.
N'obstruez pas le ventilateur ou les orifi ces de ventilation.
!
FM ANT
WIRELESS
VIDEO OUTAUX IN
LAN iPod HDMI OUT
DIGITAL
AUDIO IN
OPTICAL
COMPONENT OUT
HDMI IN
FRONT
SPEAKERS OUT
SPEAKER IMPEDANCE : 3
SURROUND
SUBWOOFER
CENTER FRONT
SURROUND
1 2 3 4 5 6 7 8
9 10 11 12
HT-D6500_FRA_1226.indd 14HT-D6500_FRA_1226.indd 14 2011-12-26 3:29:022011-12-26 3:29:02
Page 92

Français 15
01 Prise en main
Télécommande
Boîtier de la télécommande
FUNCTION
TV SOURCE
POWER
DISC MENU MENU TITLE MENU
MUTE
SFE MODE
VOL
TUNING
/CH
TOOLS
RETURN
EXIT
INFO
AB
HUB
CD
MO/ST
DĺDSMART SEARCH
iPod SYNC
vTunerD SOUND
REPEATFULL SCREEN
12
456
7809
POPUP
RECEIVER SLEEP
BD TV
TUNER
MEMORY
DSP
RDS DISPLAY
TA
PTY+PTY SEARCHPTY-
S/W LEVEL
Permet de mettre l’appareil sous et
hors tension.
Si vous souhaitez passer au Home
cinéma, appuyez sur le bouton BD.
Appuyez sur les touches numériques pour
activer les options.
Il s’agit d’une touche de sélection
de mode.
ou
Appuyez pour sélectionner le mode
vidéo du téléviseur.
Permet de revenir à la piste précédente ou
de passer à la suivante.
Permet de revenir en arrière ou
d’avancer.
Permet d’interrompre momentanément
la lecture d'un disque.
Permet de régler le volume.
Permet de rechercher les stations FM
actives et de changer de canaux.
Permet de couper momentanément le son.
Vous pouvez régler l'effet du champ
acoustique SFE le plus approprié
pour le genre de musique que vous
écoutez.
Permet d’accéder à l'écran de
menu d'accueil.
Appuyez sur ce bouton pour accéder au
menu d’accueil.
Permet de sélectionner les options de
menu affichées à l’écran et de changer
les valeurs de menu.
Permet de revenir au menu précédent.
Permet de répéter la lecture d’un
titre, d’un chapitre, d’une plage ou
d’un disque.
Permet de quitter le menu.
Permet d’afficher les informations
de lecture lors de la lecture d'un
disque Blu-ray/DVD.
Permet de définir une fréquence radio
prédéfinie.
Ces touches permettent l’accès aux
menus de l'appareil ainsi qu’à plusieurs
fonctions des disques Blu-ray.
Permet d’accéder au menu
incrusté ou au menu de titre.
Appuyez ici pour un affichage plein écran
sur un téléviseur.
Permet d’utiliser le menu Outils.
Permet de régler l'heure de mise
en veille de l'appareil.
Si vous souhaitez passer en mode TV,
appuyez sur le bouton TV.
Permet d'arrêter/de démarrer la
lecture d'un disque.
Permet d'éjecter le disque.
Utilisez la fonction RDS pour la
réception des stations FM.
Appuyez sur ce bouton pour
utiliser Smart Hub.
Permet de sélectionner le mode
Dolby Pro Logic II audio souhaité.
Ce bouton n’est pas disponible.
Permet de régler le niveau du
caisson de graves.
Régulez et stabilisez le niveau de
volume. (Processeur de signal
numérique)
Appuyez sur ce bouton pour
appliquer l’effet sonore 3D.
Appuyez sur ce bouton pour bénéficier
du visionnage d’une vidéo 2D en
mode 3D.
Appuyez sur ce bouton pour utiliser
vTuner.
Permet de corriger la synchronisation audio
en cours de lecture de contenu vidéo iPod.
Permet de sélectionner MONO ou
STÉRÉO pour la diffusion de la radio.
HT-D6500_FRA_1226.indd 15HT-D6500_FRA_1226.indd 15 2011-12-26 3:29:032011-12-26 3:29:03
Page 93

16 Français
Prise en main
Installation des piles dans la télécommande
REMARQUE
Assurez-vous que la position des extrémités
« + » et « – » des piles correspond à la position
illustrée dans le compartiment.
Pour une utilisation normale du téléviseur, les
piles devraient durer environ un an.
La portée de la télécommande est d'environ 7
mètres en ligne droite.
Réglage de la télécommande
Vous pouvez contrôler certaines fonctions de
votre téléviseur à l’aide de cette télécommande.
Pour contrôler un téléviseur à l’aide de la
télécommande
Appuyez sur la touche TV pour régler la
télécommande sur le mode TV.
Appuyez sur la touche de MARCHE/ARRÊT
pour allumer le téléviseur.
Tout en maintenant la touche MARCHE/
ARRÊT enfoncée, saisissez le code
correspondant à la marque de votre téléviseur.
Si plusieurs codes correspondant à votre
téléviseur fi gurent dans le tableau,
saisissez-les les uns après les autres pour
trouver le code approprié.
Exemple : Pour un téléviseur Samsung
Tout en maintenant le bouton MARCHE/ARRÊT
enfoncé, utilisez les touches numériques pour
entrer 00, 15, 16, 17 et 40.
Si le téléviseur s’éteint, cela signifi e que le
réglage est terminé.
Vous pouvez utiliser les touches MARCHE/
ARRÊT TV, VOLUME, CHAÎNE, ainsi que
les touches numériques (0 à 9).
REMARQUE
Il est possible que la télécommande ne
fonctionne pas avec certaines marques de
téléviseur. Il se peut également que certaines
fonctions ne soient pas disponibles en fonction
de la marque de votre téléviseur.
Par défaut, la télécommande fonctionne avec les
téléviseurs Samsung.
✎
1.
2.
3.
•
•
4.
•
✎
Liste des codes par marque de téléviseur
* Type de piles : AAA
Marque Code
Admiral
(M.Wards)
56, 57, 58
A Mark
01, 15
Anam
01, 02, 03, 04, 05,
06, 07, 08, 09, 10,
11, 12, 13, 14
AOC
01, 18, 40, 48
Bell &
Howell
(M.Wards)
57, 58, 81
Brocsonic
59, 60
Candle
18
Cetronic
03
Citizen
03, 18, 25
Cinema
97
Classic
03
Concerto
18
Contec
46
Coronado
15
Craig
03, 05, 61, 82, 83, 84
Croslex
62
Crown
03
Curtis
Mates
59, 61, 63
CXC
03
Daewoo
02, 03, 04, 15, 16,
17, 18, 19, 20, 21,
22, 23, 24, 25, 26,
27, 28, 29, 30, 32,
34, 35, 36, 48, 59, 90
Daytron
40
Dynasty
03
Emerson
03, 15, 40, 46, 59, 61,
64, 82, 83, 84, 85
Fisher
19, 65
Funai
03
Futuretech
03
General
Electric (GE)
06, 40, 56, 59,
66, 67, 68
Hall Mark
40
Hitachi
15, 18, 50, 59, 69
Inkel
45
JC Penny
56, 59, 67, 86
JVC
70
KTV
59, 61, 87, 88
KEC
03, 15, 40
KMC
15
LG
(Goldstar)
01, 15, 16, 17, 37, 38,
39, 40, 41, 42, 43, 44
Luxman
18
LXI
(Sears)
19, 54, 56, 59,
60, 62, 63, 65, 71
Magnavox
15, 17, 18, 48, 54,
59, 60, 62, 72, 89
Marantz
40, 54
Matsui
54
MGA
18, 40
Marque Code
Mitsubishi/
MGA
18, 40, 59, 60, 75
MTC
18
NEC
18, 19, 20, 40, 59, 60
Nikei
03
Onking
03
Onwa
03
Panasonic
06, 07, 08, 09, 54,
66, 67, 73, 74
Penney
18
Philco
03, 15, 17, 18, 48,
54, 59, 62, 69, 90
Philips
15, 17, 18, 40,
48, 54, 62, 72
Pioneer
63, 66, 80, 91
Portland
15, 18, 59
Proton
40
Quasar
06, 66, 67
Radio
Shack
17, 48, 56, 60,
61, 75
RCA/
Proscan
18, 59, 67, 76, 77,
78, 92, 93, 94
Realistic
03, 19
Sampo
40
Samsung
00, 15, 16, 17, 40,
43, 46, 47, 48, 49,
59, 60, 98
Sanyo
19, 61, 65
Scott
03, 40, 60, 61
Sears
15, 18, 19
Sharp
15, 57, 64
Signature
2000
(M.Wards)
57, 58
Sony
50, 51, 52, 53, 55
Soundesign
03, 40
Spectricon
01
SSS
18
Sylvania
18, 40, 48, 54,
59, 60, 62
Symphonic
61, 95, 96
Tatung
06
Techwood
18
Teknika
03, 15, 18, 25
TMK
18, 40
Toshiba
19, 57, 63, 71
Vidtech
18
Videch
59, 60, 69
Wards
15, 17, 18, 40,
48, 54, 60, 64
Yamaha
18
York
40
Yupiteru
03
Zenith
58, 79
Zonda
01
Dongyang
03, 54
HT-D6500_FRA_1226.indd 16HT-D6500_FRA_1226.indd 16 2011-12-26 3:29:032011-12-26 3:29:03
Page 94

Français 17
02 Branchements
Cette section décrit différentes méthodes de connexion de l’appareil aux autres périphériques externes.
Avant de déplacer ou d'installer l'appareil, assurez-vous de le mettre hors tension et de débrancher le cordon
d'alimentation.
Connexion des enceintes
Branchements
Position de l’appareil
Placez-le sur un pied, sur la tablette d'un
meuble, ou sous le support du téléviseur.
Choix de la position d'écoute
La position d'écoute (distance entre
l'utilisateur et le téléviseur) doit être située
à environ 2,5 à 3 fois la taille de l'écran du
téléviseur.
Exemple : Téléviseurs 32" : 2 à 2,4 m
Téléviseurs 55" : 3,5 à 4 m
SW
2,5 à 3 fois la taille de l’écran du téléviseur
Enceintes avant
ei
Disposez ces enceintes face à votre position d’écoute, orientées vers vous selon
un angle de 45° environ. Placez les enceintes de sorte que les haut-parleurs
d’aigus se trouvent à hauteur de vos oreilles. Alignez la face avant des enceintes avant
sur la face avant de l'enceinte centrale ou placez-les légèrement à l'avant de l’enceinte centrale.
Enceinte centrale
f
Il est préférable de l'installer à la même hauteur que les enceintes avant/avant
supérieure. Vous pouvez aussi l'installer directement sur ou sous le téléviseur.
Enceintes
ambiophoniques
hj
Placez ces enceintes de part et d’autre de votre position d'écoute. Si vous
manquez d’espace, placez-les face à face. Placez-les à environ 60 à 90 cm au
dessus de la hauteur des oreilles, face légèrement orientée vers le bas.
*
* Contrairement aux enceintes avant/avant supérieure et centrale, les
enceintes ambiophoniques sont utilisées essentiellement pour les effets
sonores; elles ne reproduisent pas de son en permanence.
Caisson de graves
g
Son emplacement n’est pas d’une importance cruciale. Vous pouvez le placer où
vous voulez.
REMARQUE
Si vous placez une enceinte près du téléviseur, la couleur de l’écran pourrait s’altérer en raison du
champ magnétique généré par l’enceinte. Dans ce cas, éloignez l’enceinte du téléviseur.
✎
ATTENTION
Ne laissez pas les enfants jouer avec les enceintes ou à proximité. Ils pourraient se blesser si une
enceinte venait à tomber.
Lorsque vous connectez les fi ls aux enceintes, assurez-vous de respecter le sens de la polarité (+/-).
Conservez le caisson de graves hors de portée des enfants afi n d'éviter qu'ils ne mettent les mains ou
n’insèrent des substances étrangères dans l’évent (orifi ce) du caisson.
Ne suspendez pas le caisson de basses au mur par l’évent (orifi ce).
!
HT-D6500_FRA_1226.indd 17HT-D6500_FRA_1226.indd 17 2011-12-26 3:29:052011-12-26 3:29:05
Page 95

18 Français
Branchements
Composants des enceintes
FRONT
SPEAKERS OUT
SPEAKER IMPEDANCE : 3
VIDEO OUT
SURROUND
SUBWOOFER
CENTER FRONT
SURROUND
ONENT OUT
VIDEO OUT
FRONT
SPEAKERS OUT
SPEAKER IMPEDANCE : 3
SURROUND
SUBWOOFER
CENTER FRONT
SURROUND
Enceinte centrale
Avant supérieure (D)
Caisson de graves
Enceinte ambiophonique de
gauche (D)
Avant supérieure (G)
Connexion des enceintes
Appuyez sur la languette de la borne située à l’arrière de l'enceinte.
Insérez le fi l noir dans la borne noire (–) et le fi l rouge dans la borne rouge
(+), puis relâchez la languette.
Branchez les fi ches de connexion situées à l’arrière du produit en
faisant concorder les couleurs des fi ches et des prises d’enceinte.
1.
2.
3.
Noir
Rouge
Enceinte ambiophonique
de gauche (G)
AVANT AMBIOPHONIQUE
CENTRE
CAISSON DE GRAVES
CÂBLE D’ENCEINTE
(G)
(G) (D)
(D)
HT-D6500_FRA_1226.indd 18HT-D6500_FRA_1226.indd 18 2011-12-26 3:29:052011-12-26 3:29:05
Page 96

Français 19
02 Branchements
Installation de l’enceinte
Connectez le support en direction de la fl èche afi n de
l'aligner sur les trous correspondants (x4) sur l'enceinte.
Introduisez complètement le support en direction de la
fl èche, tel qu’indiqué.
Voici comment se présente le dispositif après l’installation
de l’unité de l'enceinte.
1.
2.
3.
Retrait/Installation de l’enceinte de/sur le support
* Enceintes avant uniquement
Comment retirer l’enceinte
Lorsque vous fixez l'enceinte au mur, il faut d’abord retirer le
support.
Tirez le support en direction de la fl èche, tel qu’indiqué.
Veillez à ne pas appliquer de force excessive lors du retrait
du support. Vous risqueriez de l'endommager.
Voici comment se présente le dispositif après le retrait du
support.
1.
•
2.
Connexion du module récepteur sans fi l proposé en option
Pour raccorder les enceintes ambiophoniques sans fi l, vous devez vous procurer le module récepteur
sans fi l et la carte émettrice auprès de votre revendeur Samsung.
Ce produit devrait être uniquement connecté au système SWA-5000.
•
FRONT
SPEAKERS OUT
SPEAKER IMPEDANCE : 3
VIDEO OUT
SURROUND
SUBWOOFER
CENTER FRONT
SURROUND
ONENT OUT
VIDEO OUT
FRONT
SPEAKERS OUT
SPEAKER IMPEDANCE : 3
SURROUND
SUBWOOFER
CENTER FRONT
SURROUND
Avant supérieure (D)
Caisson de graves
Enceinte centrale
Module récepteur sans fil
Enceinte
ambiophonique
de gauche (G)
Avant supérieure (G)
Enceinte
ambiophonique
de gauche (D)
HT-D6500_FRA_1226.indd 19HT-D6500_FRA_1226.indd 19 2011-12-26 3:29:102011-12-26 3:29:10
Page 97

20 Français
Branchements
ATTENTION
N’insérez jamais d’autre carte de transmission que celle qui a été
spécifi quement conçue pour le produit.
Toute autre carte de transmission que celle qui vous a été fournie pourrait endommager le produit ou
s’avérer diffi cile à retirer.
N’insérez pas la carte de transmission à l’envers ou en sens inverse.
Insérez la carte de transmission tandis que le produit est éteint. L’insertion de la carte alors qu’il est
allumé pourrait causer des problèmes.
L’antenne de réception sans fi l est intégrée au module récepteur sans fi l. N’exposez pas l’appareil à
l’eau ou à l’humidité.
Pour une performance d’écoute optimale, assurez-vous que la zone autour du module récepteur sans
fi l n’est pas obstruée.
Si aucun son n’est émis à partir des enceintes ambiophoniques sans fi l, faites basculer le
produit en mode Dolby Pro Logic II.
En mode 2-CH (2 canaux), les enceintes ambiophoniques sans fi l ne génèrent pas de son.
REMARQUE
Placez le module récepteur sans fi l à l’arrière de la position d’écoute. Si le module récepteur sans fi l est
trop proche du produit, du brouillage pourrait se produire et entraîner des interruptions de son.
Si vous utilisez un appareil tel qu’un four micro-onde ou une carte LAN sans fi l ou tout autre dispositif
utilisant la même fréquence (2,4/5,8 GHz) à proximité du système, des interférences pourraient se
produire et entraîner des interruptions de son.
La distance de transmission des ondes radio entre le produit et le module récepteur sans fi l est
d’environ 10 m ; toutefois, elle varie en fonction de votre environnement d'exploitation. Un mur
métallique ou en béton armé situé entre l'unité principale et le module récepteur sans fi l peut provoquer
un arrêt complet du système en raison des ondes radio qui ne peuvent pas pénétrer le métal.
Si le produit n’établit pas la connexion sans fi l, il sera nécessaire de paramétrer l'ID du système entre le
produit et le module récepteur sans fi l. Éteignez l’unité principale, appuyez sur les boutons numériques « 0
»« 1 »« 3 »« 5 » de la télécommande, puis allumez l’unité. Tandis que le module récepteur sans fi l est
sous tension, appuyez pendant 5 secondes sur le bouton « ID SET » situé à l’arrière du module.
Mettez ensuite le produit (HT-D6500) sous tension.
!
✎
Module récepteur sans fi l (SWA-5000)
Appuyez sur la languette de la borne située à l’arrière de l'enceinte.
Insérez le fi l noir dans la borne noire (–) et le fi l rouge dans la borne
rouge (+), puis relâchez la languette.
Branchez les fi ches de connexion situées à l’arrière du produit en
faisant concorder les couleurs des fi ches et des prises d’enceinte.
Tandis que le produit est hors tension, insérez la carte émettrice
dans le port de connexion de la carte émettrice (WIRELESS)
(SANS FIL) situé à l’arrière du produit.
Tenez la carte émettrice de façon à ce que l’étiquette
« WIRELESS » soit dirigée vers le haut et insérez la carte
dans le port.
La carte émettrice autorise la communication entre le produit
et le module récepteur sans fi l.
Raccordez les enceintes ambiophoniques gauche et droite au
module récepteur sans fi l.
Branchez le cordon d’alimentation du module récepteur sans fi l
dans la prise murale
.
1.
2.
3.
4.
•
•
5.
6.
Noir
Rouge
FM ANT
WIRELESS
VID
E
AUX IN
COMPONENT OU
T
VIDE
AUX IN
COMPONENT OU
T
Carte
émettrice
HT-D6500_FRA_1226.indd 20HT-D6500_FRA_1226.indd 20 2011-12-26 3:29:142011-12-26 3:29:14
Page 98

Français 21
02 Branchements
Connexion de périphériques externes et du téléviseur via l’interface HDMI
HDMI est une interface numérique standard qui permet de connecter des appareils tels qu’un téléviseur, un
projecteur, un lecteur de DVD, un lecteur Blu-ray, un boîtier décodeur et bien plus encore.
L’interface HDMI étant tout-numérique, vous pouvez bénéfi cier d’une qualité vidéo et audio identique à celle
du support d’origine, sans aucun distorsion causée par la conversion du contenu numérique en analogique.
FM ANT
WIRELESS
VIDEO OUTAUX IN
LAN iPod HDMI OUT
DIGITAL
AUDIO IN
OPTICAL
COMPONENT OUT
HDMI IN
FRONT
SPEAKERS OUT
SPEAKER IMPEDANCE : 3
SURROUND
SUBWOOFER
CENTER FRONT
SURROUND
FM AN
T
W
IRELES
S
V
IDEO OU
T
AUX IN
o
d
IGITA
L
AUDIO IN
MPONENT OUT
PEAKERS OUT
PEAKER IMPEDANCE :
3
ENTRÉE HDMI
SORTIE HDMI
Lecteur de DVD ou Blu-ray SAT (Satellite/Boîtier décodeur)
Fixation du noyau torique en ferrite au cordon d’alimentation de l’unité principale.
Pour empêcher les interférences de
radiofréquence générées par les signaux radio,
vous pouvez fixer un noyau torique en ferrite au
cordon d’alimentation de l’unité principale.
Tirez sur la languette de fi xation du noyau torique
en ferrite pour l’ouvrir.
Enroulez le cordon d’alimentation de l’unité
principale en deux boucles.
Fixez le noyau torique en ferrite au cordon
d’alimentation de l’unité principale tel qu’illustré et
appuyez sur le noyau jusqu’à ce qu’il s’encliquette.
1.
2.
3.
FM ANT
WIRELESS
VIDEO OUTAUX IN
UT
COMPONENT OUT
HDMI IN
FRONT
SPEAKERS OUT
SPEAKER IMPEDANCE : 3
SURROUND
SUBWOOFER
CENTER FRONT
SURROUND
HT-D6500_FRA_1226.indd 21HT-D6500_FRA_1226.indd 21 2011-12-26 3:29:152011-12-26 3:29:15
Page 99

22 Français
Branchements
HDMI OUT (SORTIE HDMI) : Connexion d’un téléviseur via un câble HDMI (QUALITÉ OPTIMALE)
Utilisez un câble HDMI (non fourni) pour connecter la prise HDMI OUT (SORTIE HDMI) située à l'arrière
du produit à la prise HDMI IN (ENTRÉE HDMI) du téléviseur.
REMARQUE
Selon votre téléviseur, il est possible que certaines résolutions de sortie HDMI soient inopérantes.
Après avoir terminé la connexion vidéo, réglez la source d’entrée vidéo de votre téléviseur de sorte
qu’elle corresponde à la sortie vidéo (HDMI, composante ou composite) du produit.
Reportez-vous au manuel d’utilisation du téléviseur pour de plus amples informations sur la méthode
de sélection de la source d’entrée vidéo du téléviseur.
Si vous avez réglé la télécommande du produit de manière à ce qu'elle fonctionne avec le téléviseur, appuyez
sur le bouton TV SOURCE de la télécommande et sélectionnez HDMI comme source externe du téléviseur.
Vous devez disposer d’une connexion HDMI pour visionner les vidéos en 3D.
Un câble HDMI trop long peut causer du bruit à l’écran. Si tel est le cas, réglez l’option Deep Colour
(Couleurs profondes) sur Off (Désact.) dans le menu.
HDMI IN (ENTRÉE HDMI) : Connexion à un composant externe via un câble HDMI
Servez-vous d’un câble HDMI (non fourni) pour relier la prise HDMI IN (ENTRÉE HDMI) située à
l’arrière du produit à la prise HDMI OUT (SORTIE HDMI) de l’appareil numérique.
Appuyez sur le bouton FUNCTION pour sélectionner l’entrée H. IN1 ou H. IN2.
Le mode change dans l’ordre suivant : BD/DVD D. IN AUX R. IPOD W. IPOD H. IN1 H. IN2 FM
Fonction Détection auto HDMI
Si vous avez connecté le Home cinéma via un câble HDMI, la sortie vidéo du Home cinéma basculera
automatiquement en mode HDMI à la mise sous tension du produit.
Reportez-vous à la page 30 pour la liste des résolutions HDMI vidéo disponibles.
Cette fonction sera indisponible si le câble HDMI ne prend pas en charge le format CEC.
Description de la connexion HDMI
- La sortie HDMI ne transmet qu'un signal numérique pur au téléviseur.
- Si votre téléviseur ne prend pas en charge la protection HDCP (Système de protection des contenus
numériques en haute défi nition), un bruit aléatoire sera transmis à l'écran.
Qu'est-ce que le système HDCP ?
Le système HDCP (Système de protection des contenus numériques en haute défi nition) vise à protéger les
données BD/DVD émises par le biais de la technologie HDMI contre la copie. Il assure une liaison numérique
sûre entre une source vidéo (ordinateur, DVD, etc.) et un dispositif d’écran (téléviseur, projecteur, etc.). Les
données sont codées au niveau de la source afi n d’empêcher les copies non autorisées.
ATTENTION
La fonction Anynet+ sera prise en charge seulement si un câble HDMI est connecté à la sortie HDMI
OUT du produit.
✎
1.
2.
•
•
•
!
Connexion de l’antenne FM
Branchez l’antenne FM fournie à la prise
ANTENNE FM.
Déplacez progressivement le fi l de l’antenne
jusqu’à trouver une position dans laquelle la
réception est acceptable, ensuite fi xez le fi l
solidement à un mur ou une autre surface rigide.
REMARQUE
Ce produit ne reçoit pas les émissions AM.
1.
2.
✎
FM ANT
WIRWI
R
Antenne FM (fournie)
HT-D6500_FRA_1226.indd 22HT-D6500_FRA_1226.indd 22 2011-12-26 3:29:172011-12-26 3:29:17
Page 100

Français 23
02 Branchements
MÉTHODE 1 : Vidéo en composante (BONNE QUALITÉ)
Si votre téléviseur est doté de prises d'entrée vidéo en composante, branchez les fi ches d’une des
extrémités d’un câble vidéo en composante (non compris) aux prises de sortie vidéo en composante
(P
R, PB et Y) situées à l’arrière du produit, puis branchez les fi ches de l’autre extrémité aux prises
d'entrée vidéo en composante de votre téléviseur.
REMARQUE
Selon le type de disque, vous avez le choix entre une variété de réglages de résolution, comme 1080i, 720p,
576p/480p et 576i/480i. (Voir page
30
)
La résolution actuelle peut varier de celle qui est confi gurée dans le menu de confi guration si vous avez raccordé à
la fois les câbles composante et HDMI. La résolution peut varier selon le type de disque. (Voir page
30
)
Après avoir effectué la connexion vidéo, réglez la source d’entrée vidéo du téléviseur de sorte qu’elle corresponde à
la sortie vidéo (HDMI, composante ou composite) du produit.
Reportez-vous au guide d'utilisation de votre téléviseur pour plus de détails concernant le choix de la source
d'entrée vidéo du téléviseur.
Si vous avez réglé la télécommande de sorte qu’elle commande le téléviseur, appuyez sur le bouton TV SOURCE de
la télécommande et sélectionnez COMPONENT (Composant) comme source externe du téléviseur.
Pour la lecture de DVD, si les prises HDMI et Composant sont connectées et que vous sélectionnez le composant
1080p, 1080i, 720p ou le mode 576p/480p, le menu Display Setup (Confi guration de l’affi chage) affi chera la
résolution de sortie 1080p, 1080i, 720p ou 576p/480p dans le menu. En fait, la résolution est de 576i/480i.
MÉTHODE 2 : Vidéo composite (BONNE QUALITÉ)
Branchez le câble vidéo fourni pour relier la prise VIDEO OUT (SORTIE VIDÉO) située à l’arrière du
produit à la prise d’entrée vidéo VIDEO IN (ENTRÉE VIDÉO) de votre téléviseur.
REMARQUE
La source VIDEO est toujours émise en une résolution de 576i/480i, quelle que soit la valeur de la résolution réglée
dans le menu de confi guration. (Voir page
30
)
Après avoir effectué la connexion vidéo, réglez la source d’entrée vidéo du téléviseur de sorte qu’elle corresponde à
la sortie vidéo (HDMI, composante ou composite) du produit.
Reportez-vous au manuel d’utilisation du téléviseur pour de plus amples informations sur la méthode de sélection
de la source d’entrée vidéo du téléviseur.
Si vous avez réglé la télécommande du produit de manière à ce qu'elle fonctionne avec le téléviseur, appuyez sur le
bouton TV SOURCE de la télécommande et sélectionnez VIDEO (VIDÉO) comme source externe du téléviseur.
ATTENTION
Ne connectez pas l’unité via un magnétoscope. Les signaux vidéo alimentés via les magnétoscopes peuvent être
soumis à des systèmes de protection du droit d'auteur, et l'image pourra de ce fait paraître déformée sur le téléviseur.
✎
✎
!
FRONT
SPEAKERS OUT
SPEAKER IMPEDANCE : 3
VIDEO OUTAUX IN
SURROUND
SUBWOOFER
CENTER FRONT
SURROUND
COMPONENT OUT
SPEAKERS OU
T
PEAKER IMPEDANCE : 3
A
UX I
N
Rouge
Jaune
MÉTHODE 2
Bleu
Vert
MÉTHODE 1
HT-D6500_FRA_1226.indd 23HT-D6500_FRA_1226.indd 23 2011-12-26 3:29:182011-12-26 3:29:18
 Loading...