

Samsung GS-S7560M User Manual

GS-S7560M
4G LTE SMARTPHONE

Intellectual Property
All Intellectual Property, as defined below, owned by or which is otherwise the property of Sa msung or its respective suppliers
relating to the SAMSUNG Phone, including but not limited to, accessories , parts, or software relating there to (the “Phone System”),
is proprietary to Samsung and protected under federal laws, state laws, and international treaty provisions. Intellectual Property
includes, but is not limited to, inventions (patentable or unpatentable), patents, trade secrets, copyrights, software, compute r
programs, and related documentation and other works of authorship. You may not infringe or otherwise violate the rights secured by
the Intellectual Property. Moreover, you agree that you will not (and will not attempt to) modify, prepare derivative works of, reverse
engineer, decompile, disassemble, or otherwise attempt to create so urce code from the software. No title to or ownership in the

REQUIREMENTS OF ANY LAW, RULE, SPECIFICATION OR CONTRACT PERTAINING THERETO. NOTHING CONTAINED IN
THE INSTRUCTION MANUAL SHALL BE CONSTRUED TO CREATE AN EXPRESS OR IMPLIED WARRANTY OF ANY KIND
WHA TSOEVER WITH RESPECT TO THE PRODUCT. IN ADDITION, SAMSUNG SHALL NOT BE LIABLE FOR ANY DAMAGES
OF ANY KIND RESULTING FROM THE PURCHASE OR USE OF THE PRODUCT OR ARISING FROM THE BREACH OF THE
EXPRESS WARRANTY, IN CLUDING INCIDENTAL, SPECIAL OR CONSEQUENTIAL DAMAGES, OR LOSS OF ANTICIPATED
PROFITS OR BENEFITS.
SAMSUNG IS NOT LIABLE FOR PERFORMANCE ISSUES OR INCOMPATIBILITIES CAUSED BY YOUR EDITING OF
REGISTRY SETTINGS, OR YOUR MODIFICATION OF OPERATING SYSTEM SOFTWARE.

is solely the responsibility of the software provider, solution provider or user. For complete statement of limited warranty, please refer
to
www.samsu ng.com/u s/safe
, available on the web and where Samsung smartphone and Galaxy Tab™ dev ices are sold.
©2012 Samsung Electronics Canada, Inc.
SAMSUNG is a registered trademark of Samsung Electronics Co., Ltd. and its related entities.
Nuance
®
, VSuite™, T9® Text Input, and the Nuance lo go are tra demarks or reg iste red trade mark s of Nua nce Communica tions, I nc .,

ABOUT DIVX VIDEO-ON-DEMAND: This DivX Certified® device must be registered in order to play purchased DivX Video-onDemand (VOD) movies. To obtain your registration code, locate the DivX VOD section in your device setup menu (tap
Apps >
Settings > About device > Legal information > License settings > DivX® VOD > Register
). Go to
vod.divx.com
for more information on
how to complete your registration.
Google, the Google logo, Android, the Android logo, Google Play, Gmail, Google Mail, Google Maps, Google Music, Google Talk,
Picasa, YouTube and other marks are trade marks of Google Inc.
Wi-Fi is a registered trademark of the Wireless Fidelity Alliance, Inc.
Swype and the Swype logos are trademarks of Swype, Inc.
©
2010 Swype, Inc. All rights reserved.

IC Notice
This Class B digital apparatus complies with Canadian ICES-003.
This device complies with Industry Canada licence-ex empt RSS standard(s). Operation is subject to the following two conditions:
(1) this device may not cause interference, and (2) this device must ac cept any interference, including interference that may cause
undesired operation of the device.

Table of Contents
Section 1: Getting Started ..............................1
Setting Up Your Phone . . . . . . . . . . . . . . . . . . . . . 1
Charging a Battery . . . . . . . . . . . . . . . . . . . . . . . . . 4
Switching the Phone On or Off . . . . . . . . . . . . . . . 6
Locking and Unlocking the Touch Screen . . . . . . . 6
Section 3: Call Functions ..............................3 3
Displaying Your Phone Number . . . . . . . . . . . . . 33
Making a Call . . . . . . . . . . . . . . . . . . . . . . . . . . . 33
Making Emergency Calls . . . . . . . . . . . . . . . . . . 34
Making a Call Using Speed Dial . . . . . . . . . . . . . 35

Using the Google Voice Typing Feature . . . . . . . 53
Section 5: Contacts and Your Address Book 54
Adding a New Contact . . . . . . . . . . . . . . . . . . . . 54
Editing an Existing Contact . . . . . . . . . . . . . . . . . 56
Using Contacts . . . . . . . . . . . . . . . . . . . . . . . . . . 57
Joining Contacts . . . . . . . . . . . . . . . . . . . . . . . . . 58
Synchronizing Accounts . . . . . . . . . . . . . . . . . . . 59
Types of Messages . . . . . . . . . . . . . . . . . . . . . . .79
Creating and Sending Messages . . . . . . . . . . . . .79
Message Options . . . . . . . . . . . . . . . . . . . . . . . . .80
Viewing New Received Messages . . . . . . . . . . . .82
Deleting Messages . . . . . . . . . . . . . . . . . . . . . . .83
Message Search . . . . . . . . . . . . . . . . . . . . . . . . .83
Messaging Settings . . . . . . . . . . . . . . . . . . . . . . .84

Power Saving . . . . . . . . . . . . . . . . . . . . . . . . . . 100
Storage . . . . . . . . . . . . . . . . . . . . . . . . . . . . . . . 101
Battery . . . . . . . . . . . . . . . . . . . . . . . . . . . . . . . . 101
Applications manager . . . . . . . . . . . . . . . . . . . . 102
Accounts and Sync . . . . . . . . . . . . . . . . . . . . . . 103
Location Services . . . . . . . . . . . . . . . . . . . . . . . 104
Security . . . . . . . . . . . . . . . . . . . . . . . . . . . . . . . 104
ChatON . . . . . . . . . . . . . . . . . . . . . . . . . . . . . . . 135
Clock . . . . . . . . . . . . . . . . . . . . . . . . . . . . . . . . . 135
Contacts . . . . . . . . . . . . . . . . . . . . . . . . . . . . . . 138
Downloads . . . . . . . . . . . . . . . . . . . . . . . . . . . . 138
Email . . . . . . . . . . . . . . . . . . . . . . . . . . . . . . . . . 138
Flipboard . . . . . . . . . . . . . . . . . . . . . . . . . . . . . . 138
Gallery . . . . . . . . . . . . . . . . . . . . . . . . . . . . . . . 139

Play Store . . . . . . . . . . . . . . . . . . . . . . . . . . . . . 147
S Planner . . . . . . . . . . . . . . . . . . . . . . . . . . . . . 148
Samsung Apps . . . . . . . . . . . . . . . . . . . . . . . . . 149
Search . . . . . . . . . . . . . . . . . . . . . . . . . . . . . . . 150
Settings . . . . . . . . . . . . . . . . . . . . . . . . . . . . . . . 150
Talk . . . . . . . . . . . . . . . . . . . . . . . . . . . . . . . . . . 150
Video Player . . . . . . . . . . . . . . . . . . . . . . . . . . . 150

Section 1: Getting Started
This section explains how to start using your phone by first
configuring your hardware, activating your service, and then
setting up your voice mail.
Setting Up Your Phone
Prior to use it is necessary to install both the battery and SIM
Installing the SIM Card
When you subscribe to a cellular network, you are provided
with a plug-in SIM card loaded with your subscription details,
such as your PIN, available optional services, and many
others features.
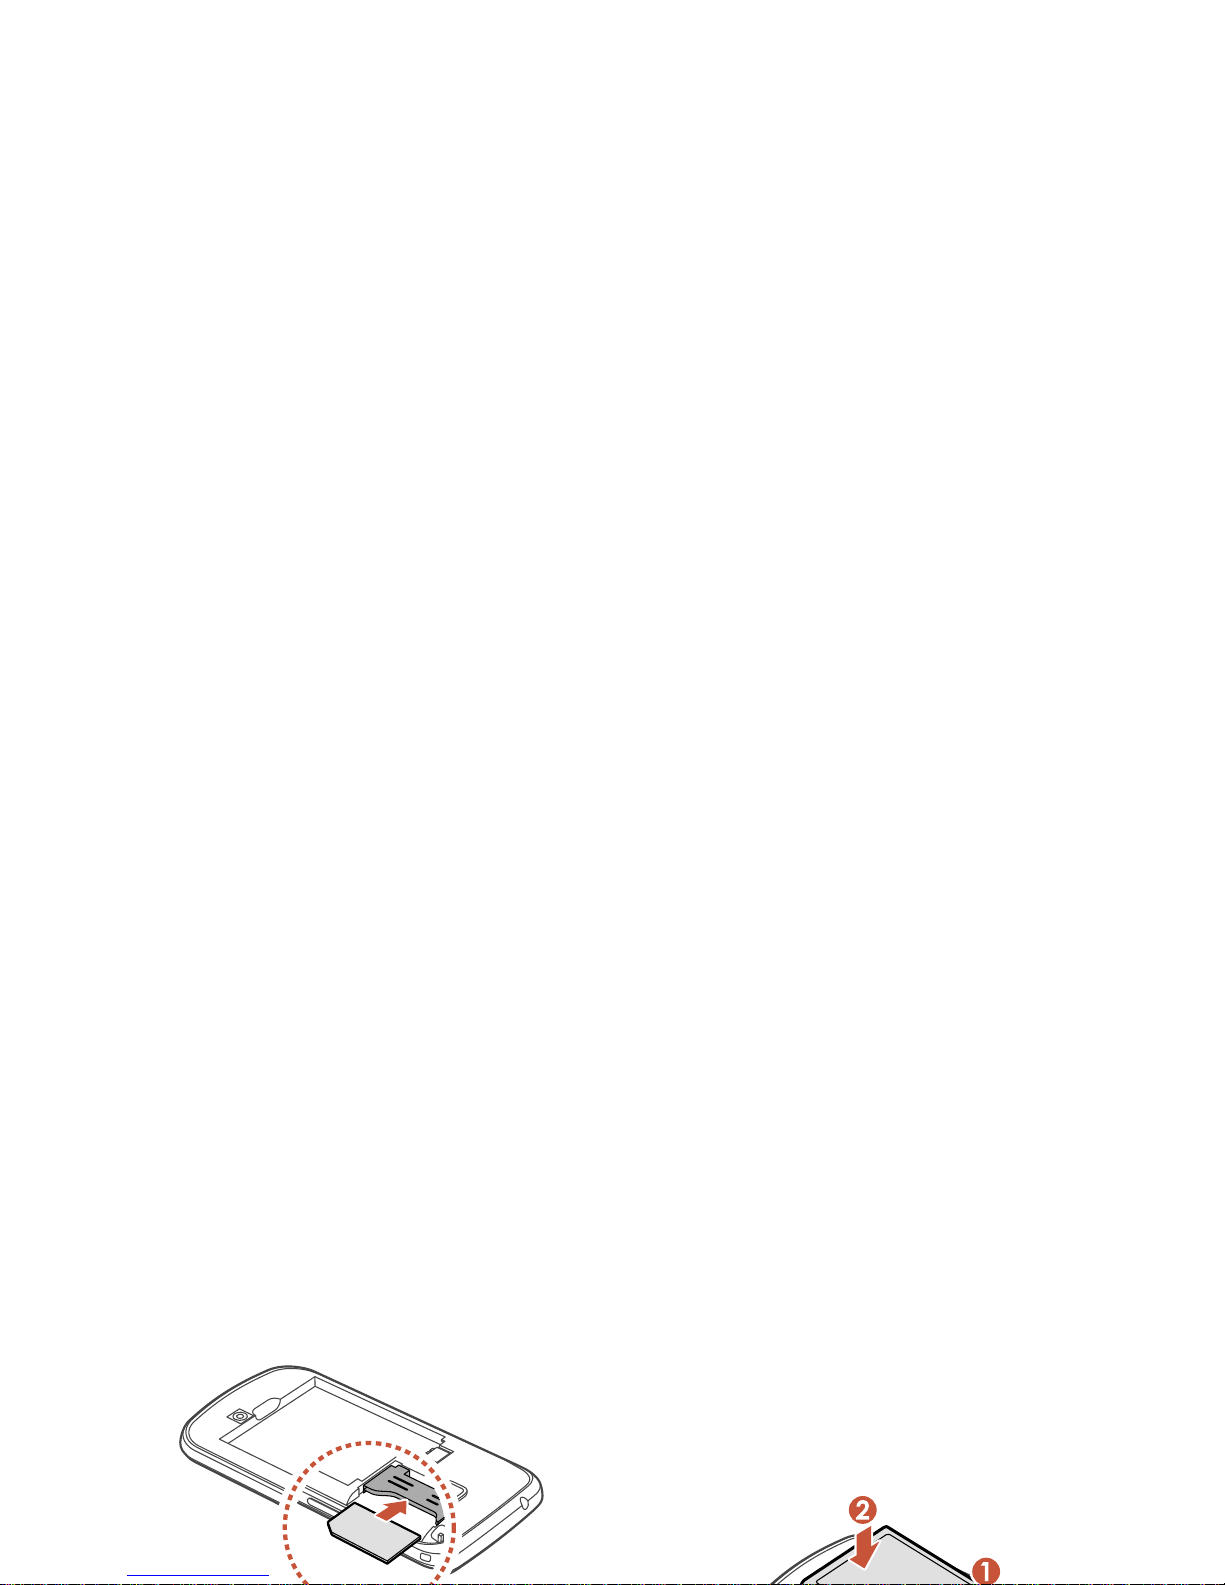
Installing the Battery
1. Insert the battery into the opening on the back of the
phone, making sure the connectors align (1).
2. Gently press down to secure the battery (2).

Removing and Installing a Memory Card
You can use a microSD (SD) or microSDHC card to
expand available memory space if you desire. This secure
digital card enables you to exchange images, music, and data
between SD-compatible devices. This type of memory card is
designed for use with this mobile phone and other devices.
Note:
Your phone has been tested to support up to a 32GB

Installing the Back Cover
1. Place the battery cover onto the back of the phone (1)
and press down (2).
2. Press along the edge of the back cover (3) until you
have a secure seal.
Note:
Make sure the battery is properly installed before
switching on the phone.
Charging a Battery
Your device is powered by a rechargeable Li-ion battery. The
Travel Charger that is used to charge the battery, is included
with your device. Use only Samsung-approved batteries and

Using the Travel Charger
Important!
Verify that the han dset battery is installed prior to
connection. If the battery is not properly installed
and the wall charger is connected, the hands et may
power off and on continuously, preventing proper
operation.
2. Plug the other end into a standard AC wall outlet.
3. When charging is finished, remove the flat end from the
interface connector jack on the phone.
Warning!
A touch screen responds best t o a light t ouch from t he
pad of your finger . Us ing excessive forc e or a metallic
object when pressing on the touch screen may
damage the tempered glass surface and void the

When the battery level becomes too low, the phone
automatically turns off.
Switching the Phone On or Off
1. Press and hold until the phone switches on.
2. Sweep your finger across the screen to unlock the
phone.
Locking and Unlocking the Touch
Screen
1. Press to lock the touch screen.
2. Press again to display the main screen then
sweep your finger across the screen to unlock.
Configuring your Phone
When you first turn on your phone, you will need to set up a

4. To access an existing Samsung account, tap Sign in,
enter your Email address and Password, and tap Sign
in.
To create a new Samsung account, tap Create new
account. Tap
Terms and conditions
to read them, tap
OK
and tap the
I accept all the terms above
checkbox.
Tap
Privacy policy
, read the policy and tap OK, then Tap
Note:
In order to utilize your device to the fullest extent, you will
need to create a Google™ Account when you first use
your device. With a Google Account, you will have access
to more Google applications and applications will always
be in sync between your phone and computer.
6. At the
Use Google location
screen, a blue checkmark

Creating a Samsung Account
An active Samsung account is required to begin accessing
applications such as ChatON and AllShare Play.To create a
Samsung account at any time:
1. From any Home screen, tap ➔
Settings
.
– or –
From any Home screen, press
➔
Settings
.
Creating a New Google Account
In order to utilize your device to the fullest extent, you will
need to link it to a Google™ Account. With a Google Account,
Google applications will always be in sync between your
phone and computer.
If you did not link your device to a Google account during the
setup procedure when you first turned your phone on, follow

Retrieving your Google Account
Password
A Google account password is required for Google
applications. If you misplace or forget your Google Account
password, follow these instructions to retrieve it:
1. From your computer, use an Internet browser and
navigate to
http://google.com/accounts.
You may be prompted to enter a password.
2. When connected, follow the voice prompts from the
voice mail center.
Accessing Y our V oice Ma il From Another Phone
1. Dial your wireless phone number.
2. When you hear your voicemail greeting, press the
asterisk (*) key on the phone you are using.

Section 2: Understanding Your Phone
This section outlines some key features of your phone and
describes the screen and the icons that appear when the
phone is in use. It also shows how to navigate through the
phone and provides information on using a memory card.
Features of Your Phone
•
5 Megapixel camera and camcorder with 1.3 Megapixel Front
Facing camera
•
GPS Navigation functionality provide s re al- time navigation
•
HSDP+ 21 mbps high speed downlo ad capability
•
8 GB built-in memory (on-board)

Front View of Your Phone
3.
Proximity sensor
: uses the ambient light level to adjust
keypad access during a call. If the light path is blocked
by holding the phone clo se to your ear, the touch screen
will turn off.
4.
V olu me k eys
: allow you to adjust the ringer volume while
in standby mode or adjust the voice volume during a
call. When receiving an incoming call, briefly press

8. Display screen: The orientation of the display screen
rotates with the device as you turn it. You can turn this
feature on and off (see “Display Settings” on page100).
9. Back key : allows you step backwards when navigating
a menu or web page.
10.
Microphone
: allows callers to hear you when you are
speaking to them. It also used for the Speakerphone.
Rear View

13.
External speaker
: allows you to hear when the
Speakerphone is turned on.
14.
Memory card slot:
install a memory card for fil e sto rage (see
“Installing the Memory Card”
on page 3
).
15.
GPS antenna
16.
Camera lens
: is used to take pictures and shoot videos.
17.
Flash
: is used to provide extra light when taking pictures
Display Layout
Y our dis play screen provides a wealth of inf ormation about the
phone’s status and options, as well as providing access to
application icons.
Primary Shortcuts
There are five non-movable Application Shortcuts that appear
at the bottom of all Home screens. The default shortcuts are:

Indicator Icons
This list identifies the symbols you’ll see on your phone’s
display and Indicator area:
Displays your current signal strength. The greater
the number of bars, the stronger the signal.
Indicates that the Flight Mode is active. Y ou cannot
send or receive any calls or access online
Displays when a call has been missed.
Displays when a call has been muted.
Displays when Call forwarding is set to Always
forward. For more information, refer to “Call
forwarding” on page 46.

Displays when your phone is communicating with
the EDGE network.
Displays when your connection t o a UTMS network
is active.
Displays when your phone is communicating with
the UTMS network.
3G
3G
Displays when the phone is tethered via a sup ported
USB cable connection.
Displays when a new text or multimedia message is
received.
Displays when a new voice mail is received.
Displays when Email is received.

For more details on configuring your phone’s settings, see
“Changing Your Settings” on page91.
Application Icons
The Apps menu provides quick access to the items you us e
Displays when Wi-Fi is connected, active, and
communicating with a Wireless Access Point
(WAP).
Displays when Wi-Fi is active but there is a
communication issue with the target Wireless
Access Point (WAP).
Displays when Wi-Fi Direct is active.
Displays when an emergency call is taking place.

Calculator
: Using this feature you can use the phone as
a calculator. The calculator provides the basic
arithmetic functions; addition, subtraction,
multiplication, and division. You can also use this as a
scientific calculator . For more information, refer to
“Calculator” on page 134.
Calendar
: With the Calendar application, you can
Contacts
: You can manage your daily contacts by
storing their name and number in your Address Book.
Address Book entries can be sorted by name, entry , or
group. For more information, refer to “Contacts and
Your Address Book” on page 54.
Downloads
: The Downloads application allows you to
manage all of your downloads from the Play Store and

Game Hub: Game Hub is a premium game service that
lets you play, connect and share games on Samsung
Android devices.For more information, refer to “Game
Hub” on page 139.
Gmail
: Gmail is a web-based email service. Gmail is
configured when you first set up your phone. Depending
on your synchronization settings, Gmail can
Internet
: Open the web browser to start surfing t he web.
The browser is fully optimized and comes with
advanced functionality to enhance the Int ernet
browsing feature on your phone. For more info rmation,
refer to “Internet” on page 120.
Latitude
: With Google Latitude, you can see the location
of all of your friends on a map or on a list. Y ou c an also

Memo
: This feature allows you t o create a memo. For
more information, refer to “Memo” on page 143.
Messaging
: Y ou can send and receive dif ferent types of
messages. For more information, ref er to “Messaging”
on page 79.
Messenger
: Messenger allows you to bring groups of
friends together into a simple group conversation. When
Navigation
: Navigation is an internet-connected GPS
navigation system with voice guidance. Y ou can type or
speak your destination. For more information, refer to
“Navigation” on page 145.
Phone
: Allows you to access t he dialer keypad, call logs,
and favorites. For more information, refer to “Call
Functions” on page 33.

Samsung Apps: Samsung Apps allows you to easily
download an abundance of useful applications to your
phone.
Search
: The Search application is the same on-scree n
Internet search engine that is on the Google Search Bar
on your main Home screen. For more information, see
“Google Search Bar” on page20.
Voice Recorder
: The Voice Recorder allows you to
record an audio file up to one minute long and then
immediately send it as a message. For more
information, refer to “Voice Recorder” on page 150.
YouTube
: Y ouTube is a video sharing website on which
users can upload and share videos, and vie w th em in
MPEG-4 format. For more information, refer to
 Loading...