

Page 1

4G LTE SMARTPHONE
User Manual
Please read this manual before operating your
phone, and keep it for future reference.
Page 2

Intellectual Property
All Intellectual Property, as defined below, owned by or which is otherwise the property of Samsung or its respectiv e suppliers
relating to the SAMSUNG Phone, including but not limited to, accessories, parts, or software relating there to (the “Phone System”),
is proprietary to Samsung and protected under federal laws, state laws, and international treaty provisions. Intellectual Property
includes, but is not limited to, inventions (patentable or unpatentable), patents, trade secrets, copyrights, software, computer
programs, and related documentation and other works of authors hip. You may not infringe or otherwise violate the rights secured by
the Intellectual Property. Moreover, you agree that you will not (and will not attempt to) modify, prepare derivative works of, reverse
engineer, decompile, disass emble, or otherwise attempt to create source code from the software. No title to or ownership in the
Intellectual Property is transferred to you. All applicable rights of the In tellectual Property shall remain with SAMSUNG and its
suppliers.
Open Source Software
Some software components of this product incorporate source code covered under GNU General Public License (GPL), GNU
Lesser General Public License (LGPL), OpenSSL License, BSD License and other open source licenses. To obtain the so urce code
covered under the open source licenses, please visit:
http://opensource.samsung.com
.
Disclaimer of Warranties; Exclusion of Liability
EXCEPT AS SET FORTH IN THE EXPRESS WARRANTY CONTAINED ON THE WARRANTY PAGE ENCLOSED WITH THE
PRODUCT, THE PURCHASER TAKES THE PRODUCT "AS IS", AND SAMSUNG MAKES NO EXPRESS OR IMPLIED
WARRANTY OF ANY KIND WHATSOEVER WITH RESPECT TO THE PRODUCT, INCLUDING BUT NOT LIMITED TO THE
MERCHANTABILITY OF THE PRODUCT OR ITS FITNESS FOR ANY PARTICULAR PURPOSE OR USE; THE DESIGN,
CONDITION OR QUALITY OF THE PRODUCT; THE PERFORMANCE OF THE PRODUCT; THE WORKMANSHIP OF THE
PRODUCT OR THE COMPONENTS CONTAINED THEREIN; OR COMPLIANCE OF THE PRODUCT WITH THE
Page 3

REQUIREMENTS OF ANY LAW, RULE , SPECIFICATION OR CONTRACT PERTAINING THERETO. NOTHING CONTAINED IN
THE INSTRUCTION MANUAL SHALL BE CONSTRUED TO CREATE AN EXPRESS OR IMPLIED WARRANTY OF ANY KIND
WHATSOEVER WITH RESPECT TO THE PRODUCT. IN ADDITION, SAMSUNG SHALL NOT BE LIABLE FOR ANY DAMAGES
OF ANY KIND RESULTING FROM THE PURCHASE OR USE OF THE PRODUCT OR ARISING FROM THE BREACH OF THE
EXPRESS WARRANTY, INCLUDING INCIDENTAL, SPECIAL OR CONSEQUENTIAL DAMAGES, OR LOSS OF ANTICIPAT ED
PROFITS OR BENEFITS.
Modification of Software
SAMSUNG IS NOT LIABLE FOR PERFORMANCE ISSUES OR INCOMPATIBILITIES CAUSED BY YOUR EDITING OF
REGISTRY SETTINGS, OR YOUR MODIFICATION OF OPERATING SYSTEM SOFTWARE.
USING CUSTOM OPERATING SYSTEM SOFTWARE MAY CAUSE YOUR DEVICE AND APPLICATIONS TO WORK
IMPROPERLY. YOUR CARRIER MAY NOT PERMIT USERS TO DOWNLOAD CERTAIN SOFTWARE, SUCH AS CUSTOM OS.
IF YOUR CARRIER PROHIBITS THIS, IF YOU ATTEMPT TO DOWNLOAD SOFTWARE ONTO THE DEVICE WITHOUT
AUTHORIZATION, YOU WILL BE NOTIFIED ON THE SCREEN THAT UNAUTHORIZED SOFTWARE HAS BEEN DETECTED.
YOU SHOULD THEN POWER DOWN THE DEVICE AND CONTACT YOUR CARRIER TO RESTORE THE DEVICE TO THE
CARRIER AUTHORIZED SETTINGS.
SAFE™ (Samsung Approved For Enterprise)
SAFE™: "SAFE™" (Samsung for Enterprise) is a mark for a Samsung device which has been tested against Samsung's own
internal criteria for interoperability with certain third party security-related solutions fo r MDM and VPN. The testing includes field
testing with local network connection and menu tree testing which tests functionality of the solut ions in conjunction with the Samsung
device. During the testing, the device is tested with the security soluti ons to see if t he solutions work with the device as de scribed by
the third party security solution providers. The testing, for example, includes field testing with local network connection and menu
tree testing which tests functionality of the solutions in co nj uncti on with the Sa msun g devic e. For more inf ormation abo ut Samsung's
SAFE™ program, please refer to
www.samsung.com/us/safe
.
Page 4

Disclaimer of Warranties: EXCEPT AS OTHERWISE PROVIDED IN THEIR STANDARD END USER LICENSE AND WARRANTY,
TO THE FULL EXTENT PERMITTED BY LAW SAMSUNG ELECTRONICS CO., LTD., SAMSUNG TELECOMMUNICATIONS
AMERICA, LLC, AND THEIR AFFILIATES (COLLECTIVELY REFERRED TO HEREIN AS THE "SAMSUNG ENTITIES")
EXPRESSLY DISCLAIM ANY AND ALL WARRANTIES, EXPRESS OR IMPLIED, INCLUDING ANY WARRANTY OF
MERCHANTABILITY, FITNESS FOR A PARTICULAR PURPOSE, INTEROPERABILITY OR NON-INFRINGEMENT, WITH
RESPECT TO INFORMATION TECHNOLOGY SECURITY PROTECTION, SAFE™ DEVICES AND APPLICATIONS TESTED
WITH SAFE™ DEVICES. IN NO EVENT SHALL THE SAMSUNG ENTITIES BE LIABLE FOR ANY DIRECT, INDIRECT,
INCIDENTAL, PUNITIVE, OR CONSEQUENTIAL DAMAGES OF ANY KIND WHATSOEVER WITH RESPECT TO INFORMATION
TECHNOLOGY SECURITY PROTECTION, SAFE™ DEVICES OR APPLICATIONS TESTED WITH SAFE™ DEVICES. In addition,
information technology security protection will be affected by features or functionality associated with, among other things the e-mail
platform, master data management, and v irt ual privat e network solutions s elected by the software provider, solution provider or user.
Choice of an e-mail, master data management, and virtual private network solution is at the sole discretion of the software provider,
solution provider or user and any associated effect on information technology security protection is solely the responsibility of the
software provider, solution provider or user. For complete statement of limited warranty, please refer to
www.samsung.com/us/safe
,
available on the web and where Samsung smartphones and mobile devices are sold. [051214]
©2014 Samsung Electronics Canada, Inc.
SAMSUNG is a registered trademark of Samsung Electronics Co., Ltd. and its related entities.
The actual available capacity of the internal memory is less than the specified capacity because the operating system and default
applications occupy part of the memory. The available capacity may change when you upgrade the device.
®
Nuance
, VSuite™, T9® T e xt In put , and t he Nua nce logo are t rademarks or regis tered trade marks of Nua nce Communica tions , Inc .,
or its affiliates in the United States and/or other countries.
Page 5

The Bluetooth® word mark, figure mark (stylized “B Design”), and combination mark (Bluetooth word mark and “B Design”) are
registered trademarks and are wholly owned by the Bluetooth SIG.
microSD™ and the microSD logo are Trademarks of the SD Card Association.
®
Openwave
is a registered Trademark of Openwave, Inc.
LTE is a trademark of ETSI.
and are trademarks of SRS Labs, Inc. CS Headphone and WOW HD technologies are incorporated under license
from SRS Labs, Inc.
Google, the Google logo, Android, the Android logo, Google Play, Gmail, Google Mail, Google Maps, Google Music, Google
Hangouts, Picasa, YouTube and other marks are trademarks of Google Inc.
Wi-Fi is a registered trademark of the Wireless Fidelity Alliance, Inc.
©
Swype and the Swype logos are trademarks of Swype, Inc.
2010 Swype, Inc. All rights reserved.
Your phone features earSmart™, an intelligent voice processor that delivers a clear voice experience, allowing you to
heard
™ in nearly any environment. earSmart technology uses the science of human hearing to distinguish sounds, identify your
hear and be
voice and suppress surrounding noise, for clear conversations just about anywhere.
How Does It Work?
•
The earSmart voice processor in your phone captures your voice and all the sound s arou nd you.
•
Working like the human ear , it processes an d distinguishes the se sounds, isolates yo ur voice conversa tion, and removes ba ckground noise - from
both ends of a call.
Page 6

•
It also automatically equalizes and adjusts voice volume so you can hear and talk naturally, even in the noisiest places.
•
With earSmart technology, you can talk whe re you w ant, and h ave clear conve rsation s for mobi le call s, vide o chats, ev en spe aker pho ne cal ls,
without worrying about surrounding noise.
IC Notice
This device complies with Industry Canada licence-exempt RSS standard(s). Operation is subject to the following two conditions:
(1) this device may not cause interference, and
(2) this device must accept any interference, including interference that may cause undesired operation of the device.
Page 7

Table of Contents
Section 1: Getting Started ............................. .. 1
Setting Up Your Phone . . . . . . . . . . . . . . . . . . . . . . .1
Charging the Battery . . . . . . . . . . . . . . . . . . . . . . . . .4
Extending Your Battery Life . . . . . . . . . . . . . . . . . . .5
Switching the Device On or Off . . . . . . . . . . . . . . . . .6
Configuring your Phone . . . . . . . . . . . . . . . . . . . . . .6
Maintaining water and dust resistance . . . . . . . . . . .6
Locking and Unlocking the Touch Screen . . . . . . . . .7
Creating a New Google Account . . . . . . . . . . . . . . . .7
Creating a Samsung Account . . . . . . . . . . . . . . . . . .8
Setting Up Your Voice Mail . . . . . . . . . . . . . . . . . . . .8
Section 2: Understanding Your Phone ........... 9
Features of Your Phone . . . . . . . . . . . . . . . . . . . . . .9
Front View . . . . . . . . . . . . . . . . . . . . . . . . . . . . . . . .10
Back View . . . . . . . . . . . . . . . . . . . . . . . . . . . . . . . .12
Status Bar . . . . . . . . . . . . . . . . . . . . . . . . . . . . . . . .12
Menu Navigation . . . . . . . . . . . . . . . . . . . . . . . . . . .16
Using the Multi Window . . . . . . . . . . . . . . . . . . . . . .19
Customizing Your Home Screen . . . . . . . . . . . . . . .23
Notification Panel . . . . . . . . . . . . . . . . . . . . . . . . . .29
Entering Text . . . . . . . . . . . . . . . . . . . . . . . . . . . . .30
Using Google Voice Typing . . . . . . . . . . . . . . . . . .31
Using the Samsung Keyboard . . . . . . . . . . . . . . . .31
Section 3: Call Functions . .. ............................36
Displaying Your Phone Number . . . . . . . . . . . . . . .36
Making a Call . . . . . . . . . . . . . . . . . . . . . . . . . . . . .36
Ending a Call . . . . . . . . . . . . . . . . . . . . . . . . . . . . .38
Answering a Call . . . . . . . . . . . . . . . . . . . . . . . . . . .38
Making Emergency Calls . . . . . . . . . . . . . . . . . . . .39
Making a Call Using Speed Dial . . . . . . . . . . . . . . .39
Dialing Options . . . . . . . . . . . . . . . . . . . . . . . . . . . .40
Call Log . . . . . . . . . . . . . . . . . . . . . . . . . . . . . . . . . .40
Call Duration . . . . . . . . . . . . . . . . . . . . . . . . . . . . . .42
Options During a Call . . . . . . . . . . . . . . . . . . . . . . .43
Call Settings . . . . . . . . . . . . . . . . . . . . . . . . . . . . . .48
Section 4: Contacts and Your Address Book 49
Adding a New Contact . . . . . . . . . . . . . . . . . . . . . .49
Editing an Existing Contact . . . . . . . . . . . . . . . . . . .51
Using Contacts . . . . . . . . . . . . . . . . . . . . . . . . . . . .51
Linking Contacts . . . . . . . . . . . . . . . . . . . . . . . . . . .52
i
Page 8

Synchronizing Accounts . . . . . . . . . . . . . . . . . . . . . 53
Address Book Options . . . . . . . . . . . . . . . . . . . . . . 54
Groups . . . . . . . . . . . . . . . . . . . . . . . . . . . . . . . . . . 55
Address Book Favourites . . . . . . . . . . . . . . . . . . . . 57
Managing Address Book Contacts . . . . . . . . . . . . . 58
Section 5: Messaging .....................................60
Types of Messages . . . . . . . . . . . . . . . . . . . . . . . . 60
Creating and Sending Messages . . . . . . . . . . . . . . 60
Message Options . . . . . . . . . . . . . . . . . . . . . . . . . . 61
Viewing New Received Messages . . . . . . . . . . . . . 63
Deleting Messages . . . . . . . . . . . . . . . . . . . . . . . . . 65
Message Search . . . . . . . . . . . . . . . . . . . . . . . . . . 65
Messaging Settings . . . . . . . . . . . . . . . . . . . . . . . . 65
Section 6: Changing Your Settings ...............68
Accessing Settings . . . . . . . . . . . . . . . . . . . . . . . . . 68
Wi-Fi Settings . . . . . . . . . . . . . . . . . . . . . . . . . . . . . 69
Download Booster . . . . . . . . . . . . . . . . . . . . . . . . . 70
Bluetooth . . . . . . . . . . . . . . . . . . . . . . . . . . . . . . . . 70
Tethering and Mobile hotspot . . . . . . . . . . . . . . . . . 71
Flight mode . . . . . . . . . . . . . . . . . . . . . . . . . . . . . . 72
Data Usage . . . . . . . . . . . . . . . . . . . . . . . . . . . . . . 72
Location . . . . . . . . . . . . . . . . . . . . . . . . . . . . . . . . . 73
More networks . . . . . . . . . . . . . . . . . . . . . . . . . . . . 73
ii
NFC . . . . . . . . . . . . . . . . . . . . . . . . . . . . . . . . . . . . 76
Nearby devices . . . . . . . . . . . . . . . . . . . . . . . . . . . 77
Printing . . . . . . . . . . . . . . . . . . . . . . . . . . . . . . . . . . 78
Screen Mirroring . . . . . . . . . . . . . . . . . . . . . . . . . . 78
Sound . . . . . . . . . . . . . . . . . . . . . . . . . . . . . . . . . . . 78
Display . . . . . . . . . . . . . . . . . . . . . . . . . . . . . . . . . . 81
Wallpaper . . . . . . . . . . . . . . . . . . . . . . . . . . . . . . . . 81
Lock screen . . . . . . . . . . . . . . . . . . . . . . . . . . . . . . 82
Multi window . . . . . . . . . . . . . . . . . . . . . . . . . . . . . 83
Notification panel . . . . . . . . . . . . . . . . . . . . . . . . . . 83
Toolbox . . . . . . . . . . . . . . . . . . . . . . . . . . . . . . . . . 84
One-handed operation . . . . . . . . . . . . . . . . . . . . . . 85
Easy Mode . . . . . . . . . . . . . . . . . . . . . . . . . . . . . . . 85
Accessibility . . . . . . . . . . . . . . . . . . . . . . . . . . . . . . 85
Blocking Mode . . . . . . . . . . . . . . . . . . . . . . . . . . . . 88
Private Mode . . . . . . . . . . . . . . . . . . . . . . . . . . . . . 88
Active key . . . . . . . . . . . . . . . . . . . . . . . . . . . . . . . . 89
Motions and gestures . . . . . . . . . . . . . . . . . . . . . . . 89
Air view . . . . . . . . . . . . . . . . . . . . . . . . . . . . . . . . . 91
Accounts . . . . . . . . . . . . . . . . . . . . . . . . . . . . . . . . 91
Cloud . . . . . . . . . . . . . . . . . . . . . . . . . . . . . . . . . . . 92
Back up and reset . . . . . . . . . . . . . . . . . . . . . . . . . 92
Language and input . . . . . . . . . . . . . . . . . . . . . . . . 93
Page 9

Date and time . . . . . . . . . . . . . . . . . . . . . . . . . . . . .98
Safety assistance . . . . . . . . . . . . . . . . . . . . . . . . . .98
Accessories . . . . . . . . . . . . . . . . . . . . . . . . . . . . . . .99
Battery . . . . . . . . . . . . . . . . . . . . . . . . . . . . . . . . . . .99
Power saving . . . . . . . . . . . . . . . . . . . . . . . . . . . . .100
Storage . . . . . . . . . . . . . . . . . . . . . . . . . . . . . . . . .100
Security . . . . . . . . . . . . . . . . . . . . . . . . . . . . . . . . .100
Help . . . . . . . . . . . . . . . . . . . . . . . . . . . . . . . . . . . .105
About Device . . . . . . . . . . . . . . . . . . . . . . . . . . . . .105
Application Manager . . . . . . . . . . . . . . . . . . . . . . .107
Default applications . . . . . . . . . . . . . . . . . . . . . . . .109
Call . . . . . . . . . . . . . . . . . . . . . . . . . . . . . . . . . . . .109
Internet Calling . . . . . . . . . . . . . . . . . . . . . . . . . . .114
Contacts . . . . . . . . . . . . . . . . . . . . . . . . . . . . . . . .114
Email . . . . . . . . . . . . . . . . . . . . . . . . . . . . . . . . . . .115
Gallery . . . . . . . . . . . . . . . . . . . . . . . . . . . . . . . . . .116
Internet . . . . . . . . . . . . . . . . . . . . . . . . . . . . . . . . .116
Messages . . . . . . . . . . . . . . . . . . . . . . . . . . . . . . .118
S Planner . . . . . . . . . . . . . . . . . . . . . . . . . . . . . . .120
S Voice . . . . . . . . . . . . . . . . . . . . . . . . . . . . . . . . .121
Section 7: Connections ...............................123
PC Connections . . . . . . . . . . . . . . . . . . . . . . . . . .123
Wi-Fi . . . . . . . . . . . . . . . . . . . . . . . . . . . . . . . . . . .124
NFC . . . . . . . . . . . . . . . . . . . . . . . . . . . . . . . . . . .128
Bluetooth . . . . . . . . . . . . . . . . . . . . . . . . . . . . . . . .128
USB Tethering . . . . . . . . . . . . . . . . . . . . . . . . . . .131
Mobile Hotspot . . . . . . . . . . . . . . . . . . . . . . . . . . .132
Section 8: Applications ....................... .........135
Activity Zone . . . . . . . . . . . . . . . . . . . . . . . . . . . . .135
Calculator . . . . . . . . . . . . . . . . . . . . . . . . . . . . . . .136
Scientific Calculator . . . . . . . . . . . . . . . . . . . . . . .136
Camera . . . . . . . . . . . . . . . . . . . . . . . . . . . . . . . . .136
Chrome . . . . . . . . . . . . . . . . . . . . . . . . . . . . . . . . .142
Clock . . . . . . . . . . . . . . . . . . . . . . . . . . . . . . . . . . .142
Contacts . . . . . . . . . . . . . . . . . . . . . . . . . . . . . . . .144
Drive . . . . . . . . . . . . . . . . . . . . . . . . . . . . . . . . . . .144
Dropbox . . . . . . . . . . . . . . . . . . . . . . . . . . . . . . . .145
Email . . . . . . . . . . . . . . . . . . . . . . . . . . . . . . . . . . .145
Flipboard . . . . . . . . . . . . . . . . . . . . . . . . . . . . . . . .147
Gallery . . . . . . . . . . . . . . . . . . . . . . . . . . . . . . . . .147
Gmail . . . . . . . . . . . . . . . . . . . . . . . . . . . . . . . . . .151
Google . . . . . . . . . . . . . . . . . . . . . . . . . . . . . . . . .152
Google Settings . . . . . . . . . . . . . . . . . . . . . . . . . .152
Google + . . . . . . . . . . . . . . . . . . . . . . . . . . . . . . . .152
Hangouts . . . . . . . . . . . . . . . . . . . . . . . . . . . . . . .153
Internet . . . . . . . . . . . . . . . . . . . . . . . . . . . . . . . . .153
iii
Page 10

Maps . . . . . . . . . . . . . . . . . . . . . . . . . . . . . . . . . . 155
Memo . . . . . . . . . . . . . . . . . . . . . . . . . . . . . . . . . . 156
Messaging . . . . . . . . . . . . . . . . . . . . . . . . . . . . . . 156
Music . . . . . . . . . . . . . . . . . . . . . . . . . . . . . . . . . . 156
My Files . . . . . . . . . . . . . . . . . . . . . . . . . . . . . . . . 159
Phone . . . . . . . . . . . . . . . . . . . . . . . . . . . . . . . . . . 160
Photos . . . . . . . . . . . . . . . . . . . . . . . . . . . . . . . . . 160
Play Books . . . . . . . . . . . . . . . . . . . . . . . . . . . . . . 160
Play Games . . . . . . . . . . . . . . . . . . . . . . . . . . . . . 160
Play Movies . . . . . . . . . . . . . . . . . . . . . . . . . . . . . 161
Play Music . . . . . . . . . . . . . . . . . . . . . . . . . . . . . . 161
Play Newsstand . . . . . . . . . . . . . . . . . . . . . . . . . . 161
Play Store . . . . . . . . . . . . . . . . . . . . . . . . . . . . . . . 162
POLARIS Office 5 . . . . . . . . . . . . . . . . . . . . . . . . 162
S Health . . . . . . . . . . . . . . . . . . . . . . . . . . . . . . . . 162
S Planner . . . . . . . . . . . . . . . . . . . . . . . . . . . . . . . 164
S Voice . . . . . . . . . . . . . . . . . . . . . . . . . . . . . . . . . 165
Samsung Apps . . . . . . . . . . . . . . . . . . . . . . . . . . . 165
Settings . . . . . . . . . . . . . . . . . . . . . . . . . . . . . . . . 166
Smart Remote . . . . . . . . . . . . . . . . . . . . . . . . . . . 166
Video . . . . . . . . . . . . . . . . . . . . . . . . . . . . . . . . . . 170
Voice Recorder . . . . . . . . . . . . . . . . . . . . . . . . . . 171
Voice Search . . . . . . . . . . . . . . . . . . . . . . . . . . . . 171
iv
YouTube . . . . . . . . . . . . . . . . . . . . . . . . . . . . . . . 172
Section 9: Health and Safety .......................173
Getting the Most Out of Your Reception . . . . . . . 173
Maintaining Safe Use of and Access to Your Phone 17 3
Caring for the Battery . . . . . . . . . . . . . . . . . . . . . . 175
Acknowledging Special Precautions and Industry
Canada Notice . . . . . . . . . . . . . . . . . . . . . . . . . 176
Owner’s Record . . . . . . . . . . . . . . . . . . . . . . . . . . 178
Index ...................... ......................................... 179
Page 11
Section 1: Getting Started
This section explains how to start using your phone by first
configuring your hardware, activating your service, and then
setting up your voice mail.
Setting Up Your Phone
Prior to use it is necessary to install both the battery and SIM
into their corresponding internal compartments. The
microSD™ card slot is also located in this same internal area.
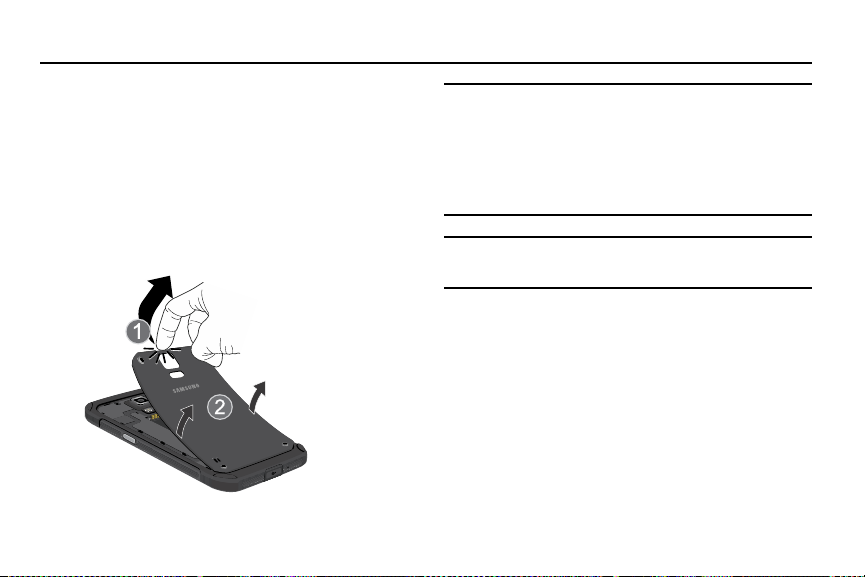
1. Remove the back cover by inserting a fingernail into the
slot on the top of your phone (1).
2. Lift the cover up (2) and away from the phone.
Caution!
Do not remove the rubber seal from the inside of the
back cover. Doing so can cause wate r damage to the
device if it gets wet.
Do not bend or twist the back cover exce ssively. Doing
so may damage the cover.
Caution!
Do not bend or twist the back cover ex cessively. Doing
so may damage the cover.
Installing the SIM Card
When you subscribe to a cellular network, you are provided
with a plug-in SIM card loaded with your subscription details,
such as your PIN, available optional services, and many
others features.
Getting Started 1
Page 12
Important!
Note:
The plug-in SIM card information and its contacts
can be easily damaged by scratching or bending, so
be careful when handling, inserting, or removing the
card. Keep all SIM cards out of reach of small
children.
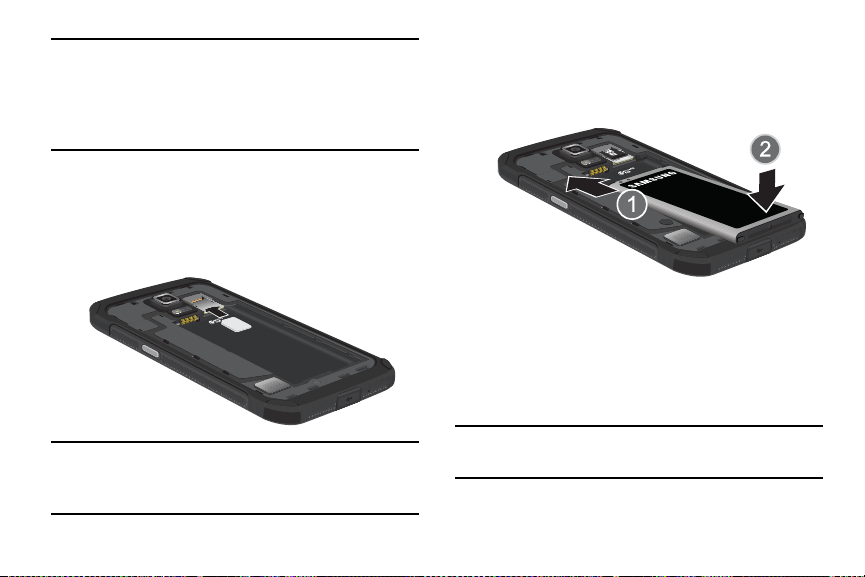
Carefully slide the SIM card in to the SIM card socket (as
shown) until the card locks into place.
•
Make sure that the card’s gold contacts face into the phone
and that the upper-left angled corner of the card is positioned
as shown.
If the card is not inserted correctly, the phone will not
detect the SIM card. Re-orient the card back into the slot
if the SIM is not detected.
2
Installing the Battery
1. Insert the battery into the opening on the back of the
phone, making sure the connectors align (1).
2. Gently press down to secure the battery (2).
Removing and Installing the Memory Card
You can use a microSD (SD) or microSDHC car d to
expand available memory space if you desire. This secure
digital card enables you to exchange images, music, and data
between SD-compatible devices. This type of memory card is
designed for use with this mobile phone and other devices.
Note:
Your phone has been tested to support up to a 128GB
memory card.
Page 13
Installing the Memory Card
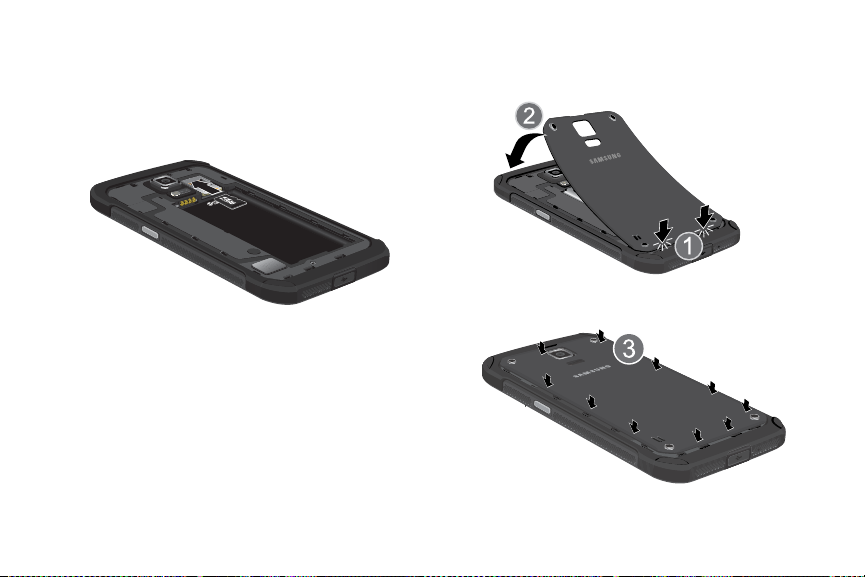
Push the microSD card into the slot until it clicks (as
shown). The microSD card will fit on top of the SIM card.
•
Make sure the microSD’s gold contact pins face downward
and the card is securely inserted.
For more information on Memory Cards, see “Storage” on
page 100.
Removing the Memory Card
1. Push on the memory card until it clicks and is released.
2. Grasp the memory card and remove it from the phone.
Installing the Back Co ver
1. Place the battery cover onto the back of the phone (1)
and press down (2).
2. Press along the edge of the back cover (3) until you
have a secure seal.
Getting Started 3
Page 14
3. To avoid water damage, ensure that the back cover is
completely closed by pressing in the centre until you
hear a click.
Note:
Make sure the battery is properly installed before
switching on the phone.
Charging the Battery
You r device is powered by a rechargeable Li-ion battery. A
wall charger, which is used for charging the battery, is included
with your device. Use only approved batteries and chargers.
Ask your local Samsung dealer for further details.
Note:
You must fully charge the battery before using your
phone for the first time. A discharged battery recharges
fully in approximately 4 hours. Although you can use the
phone while the battery is charging, doing so will require
additional charging time.
4
Important!
Verify that the battery is insta lled prior to connecting
the wall charger. If both the wall charger is
connected and the battery is not installed, the
handset will power cycle continuously and prevent
proper operation. Failure to unplug the wall charger
before you remove the battery, can cause damage
to the phone.
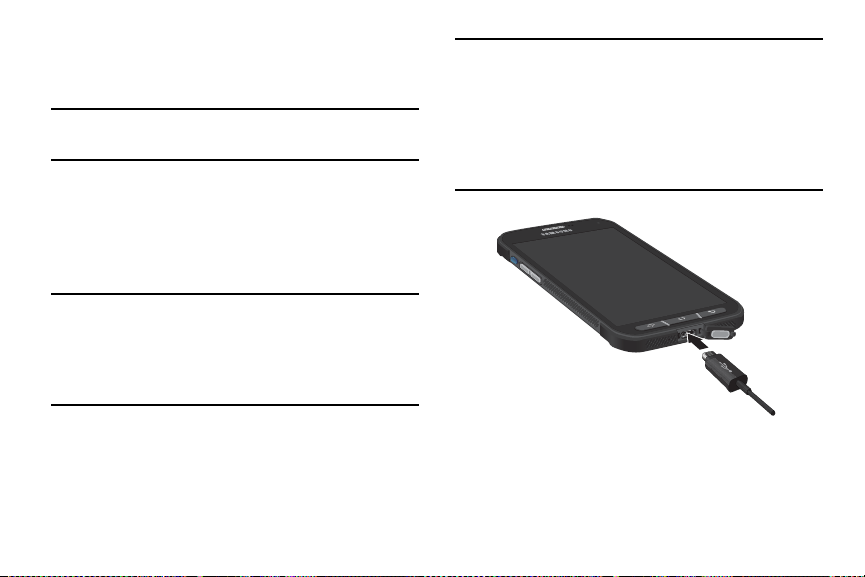
1. Connect the USB cable to the charging head.
2. Lift up on the Charger/Accessory jack cover that covers
the port on the bottom of your phone and swing it open.
Page 15
3. Insert the USB cable into the device’s Charger/
Accessory jack.
4. Plug the charging head into a standard AC power outlet.
The device turns on with the screen locked and
indicates both its charge state and percent of charge.
5. When charging is finished, remove the flat end from the
interface connector jack on the phone.
Important!
Important!
Before closing the Charger/Accessory jack cover,
check to see if there is any foreign substance such
as dust or sand on the rubber seal.
6. Tightly close the multipurpose jack cover when you are
finished so that no water can enter the port.
Your touch screen responds best to a light touch
from the pad of your finger or a non-metallic stylus.
Using excessive force or a metallic object when
pressing on the touch screen may damage the
tempered glass surface and void the warranty. For
more information, refer to the “Standard Limited
Warranty” in your in-box guide.
Low Battery Indicator
When the battery is weak and only a few minutes of talk time
remain, the battery icon ( ) blinks and the device sounds a
warning tone at regular intervals. In this condition, your phone
conserves its remaining battery power, not by turning off the
backlight, but by entering the dimming mode. For a quick
check of your battery level, glance at the battery charge
indicator located in the upper-right corner of your device’s
display. Solid color ( ) indicates a full charge.
When the battery level becomes too low, t he phone
automatically turns off.
Extending Your Battery Life
Active applications, light levels, Bluetooth usage, and GPS
functionality all act to drain your battery. The following is a list
of helpful tips that can help conserve your battery power:
•
Reduce the time your backlight stays on.
•
Turn Bluetooth off when not in use.
•
Turn Wi-Fi off when not in use.
•
Deactivate the GPS when not needed. Most applications using this
function will periodically query th e GP S s atell ites for your current
location; each query drains your battery.
Getting Started 5
Page 16

•
Do not wait until your battery is completely depleted before charging
your device. Repeating this process of a complete discharge and
recharge can over time reduce the storage capacity of any battery.
•
Use the Power Saving feature to deactivate some hardware and
interface functions.
•
Check the Battery use screen to review what features or functions
have been consuming your battery resources.
•
Check the Running Services and close any unnecessary
applications.
•
Use the Task Manager feature to end/shutdown background
applications that are still running. These m inimized applications
can, over time, cause your device to slow down.
•
Animated wallpapers use processing power , memory, and more
power. Change your Live Wallpaper to a non-animated Wallpaper
gallery or Gallery image.
Switching the Device On or Off
Once the device has been configured, you will not be
prompted with setup screens again.
To turn the device on:
1. Press and hold
switches on.
6
Power/End
until the device
The device searches for your network and after finding
it, you can make or receive calls.
2. Swipe your finger across the screen to unlock the
phone.
To turn the device off:
1. Press and hold
options screen appears.
2. Tap
3. At the
Power off
Power off
prompt, tap OK.
Power/End
.
until the Device
Configuring your Phone
When you first turn on your phone, you will need to set up a
few things.
1. As each screen is displayed, follow the instructions on
each screen to set up that particular feature.
2. Tap
Next
or
Skip
to progress to the next page.
Finish
3. At the last screen, tap
, to finish your setup.
Maintaining water and dust resistance
This device is rated IP67 using the Ingress Protection rating
system. The dust rating is 6 (highest level of protection), and
the water resistance rating is 7 (water resistant up to 1 meter
Page 17

for up to 30 minutes). Despite this classification, your device is
not impervious to water damage in any situation. It is
important that all compartments are closed tightly.
Follow these tips carefully to prevent damage to the device.
•
Whenever your device gets wet, dry it thoroughly with a clean, soft
cloth.
•
Do not expose the device to salt water or ionized water, or to water
over 1 meter deep for more than 30 minutes. If your device is
exposed to salt water, wash the device with fresh water then dry
thoroughly with a clean, soft cloth. Otherwise, when it dries, salt
may accumulate and block the microphone, earpiece, and spea ker.
•
When drying off your device, be sure to pat the earpiece (top fron t of
phone), microphone (bottom of phone), and speaker (rear of
phone) with a clean, soft cloth to remove as much water as
possible.
•
When making a call immediately after your device is wet, the
microphone may have water in it which may lower the volume that
the other person will hear. After drying off the device, allow the
device to air-dry before making a call.
•
The back and multipurpose jack covers may be loosened slightly if
the device is dropped or receives an impact. Ensure that all the
covers are properly aligned and tightly closed. Otherwise , they may
not provide protection from water and dust.
•
Always keep the multipurpose jack cover clean and be careful to
avoid damaging it.
Note:
The touch screen may not be active in water.
Locking and Unlocking the Touch Screen
1. Press to lock the touch screen.
2. Press again to display the lock screen then
swipe your finger across the screen to unlock.
Note:
Swipe is the default screen locking method. To change
your screen lock, see “Lock screen” on page82.
Creating a New Google Account
In order to utilize your device to the fullest extent, you will
need to create a Google™ Account when you first use your
device. With a Google Account, Google applications will
always be in sync between your phone and computer.
If you did not create a new account during the setup
procedure when you first turned your phone on, follow these
steps:
1. From the Home screen, tap ➔
Gmail
Getting Started 7
.
Page 18
Add a Google Account
The
New
2. Tap
3. Follow the on-screen instructions to add a Google
Note:
to create a new Google account.
– or –
If you already have a Google account, tap
sign in and add the account to your phone.
Account.
Once you have created a Google account, you only need
to sign in.
screen displays.
Existing
Creating a Samsung Account
An active Samsung account is required to begin accessing
applications such as ChatON and Samsung Hub. If you did
not create a Samsung account when you first set up your
phone, follow these steps:
1. From the home screen, tap ➔
Accounts ➔ Add account
2. Tap
3. Tap
8
Samsung account
Create new account
.
Settings
.
.
➔
to
4. Follow the on-screen instructions to create and activate
your account.
Setting Up Your Voice Mail
1. From the Home screen, tap , then tap .
2. Follow the tutorial to create a password, record a
greeting, and record your name.
Note:
These steps may be different depending on y our network.
Accessing Your Voice M ail
1. From the Home screen, tap , then tap .
You may be prompted to enter a password.
2. When connected, follow the voice prompts from the
voice mail center.
Accessing Y our V oice Mail From Another Phone
1. Dial your wireless phone number.
2. When you hear your voicemail greeting, press the
asterisk key on the phone you are using.
3. Enter your password and you are connected to your
Voice Mail.
Page 19

Section 2: Understanding Your Phone
This section outlines some key features of your phone and
describes the screen and the icons that appear when the
phone is in use. It also shows how to navigate through the
phone and provides information on using a memory card.
Features of Your Phone
Your phone is lightweight, easy-to-use and offers many useful
features. The following list outlines a few of the features
included in your phone.
•
Android v 4.4.2, KitKat platform
•
Brilliant 5.1” Full HD Super AMOLE D® (1920 x 1080) display
•
Quad-core processor
•
Water and Dust resistant (IP67) with rugged de sign
•
Wi-Fi ® Capability (802.11 a/b/g/n/ac ) at both 2.4G Hz and 5GHz
•
Delivers data faster using 4G LTE and High Speed Packet Access
Plus (HSPA+)
•
Galaxy Gear™ compliant. For more information, please visit:
www.samsung.com/us/galaxygearsuppo rt
•
Smart Switch™ compliant. For m or e infor m ation, see
www.samsungsmartswitch.com
•
Ready access to the Internet
•
Built-in Bluetooth and advanced Wi-Fi® technology
•
Mobile Hotspot and USB Teth eri ng c ap a b ility
•
16 Megapixel camera and camcorder with Front Facing camera
•
Smart Remote control using Smart Remote
•
GPS navigation functionality provides real- tim e navig ation
•
Expandable memory slot
•
Corporate and personal email
•
Sync and update social network applications
•
Thousands of apps available to download via Google Play Store™
and Samsung Hub
•
Full Integration of Google Mobile™ Services (Gmail, YouTube,
Google Maps, Google Voice Search)
•
Multiple messaging options: Text/Picture/Video Messaging, and
Instant Messaging with Google Hangouts™
•
Video with Full HD 1080p recording and playback
•
Samsung Link to share your media content across certain certified
devices
Understanding Your Phone 9
Page 20
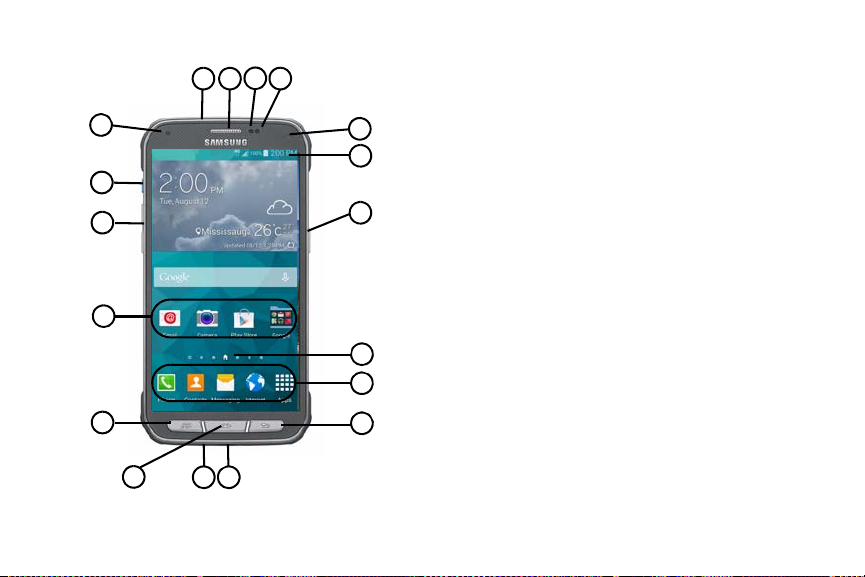
Front View
9
11
12
13
16
6
5
17
7 8
1
18
2
4
10
3
14
15
1.
Indicator light
and flashing patterns to indicate different notifications
and statuses. Events include Charging, Low battery , and
Missed event:
•
Powering on and Missed Notification (Call or Messaging)-
blue
•
Battery Charging -
•
Low Battery or Charging Error-
•
Battery Fully Charged -
2.
Active key
applications with one touch.
3.
Volume key
standby mode (with the phone open) or adjust the voice
volume during a call.
•
Pressing the volume key down mutes the ring tone.
4.
Application icons
applications on the Home screen.
Recent key
5.
provides access to the Task Manager.
illuminates with a series of distinct colors
blinks/animates
red
remains on
red
blinks/animates
green
remains on.
lets you quickly launch features or
allows you to adjust the ringer volume in
When receiving an incoming call:
are shortcuts to your favorite
displays a list of recently opened apps and
10
Page 21
6.
Home
key displays the Home screen when pressed.
Press and hold to display Google Search. Double-press
to activate S Voice.
Microphone - bottom
7.
allow other callers to hear you clearly when you are
speaking to them.
USB Power/Accessory connector
8.
power cable or optional accessories such as a USB/
data cable.
9.
Back key
re-displays the previous screen or clears
entries.
Primary Shortcuts
10.
features such as Phone, Contacts, Messag in g, Inte rne t,
and Apps.
11.
Home screen indicator
presently displayed.
Power/End key
12.
phone off and on. Press and hold for two seconds to:
•
Access the audio modes for the device. Tap an on-screen
selection (Mute, Vibrate, or Sound).
•
Turn the device On or Off ( )
is used during phone calls and
allows you to connect a
allow quick access to important
shows which Home screen is
ends a call or switches the
•
Restart the device ( ).
•
Enable Flight mode ( ).
•
Enable Emergency mode ( ).
13.
Indicator icons
your phone, such as the received signal strength, phone
battery level, time, unread Emails, missed calls, etc.
Front Facing Camera
14.
facing the screen and allows you to video conference.
Gestures Sensor
15.
motions.
Proximity Sensor
16.
surface of the screen. This is typically used to detect
when your face is pressed up against the screen, such
as during a phone call.
•
While talking on the phone, the sensor detects talk activity
and locks the keypad to prevent accidental key presses.
17.
Receiver
Microphone - top
18.
speakerphone mode and assists in noise cancellatio n (2
microphone solution).
shows the information needed to operate
allows you to take pictures while
used to detect Air View and Air Gesture
detects how close an object is to the
allows you to hear the other caller.
used while an active call is in the
Understanding Your Phone 11
Page 22
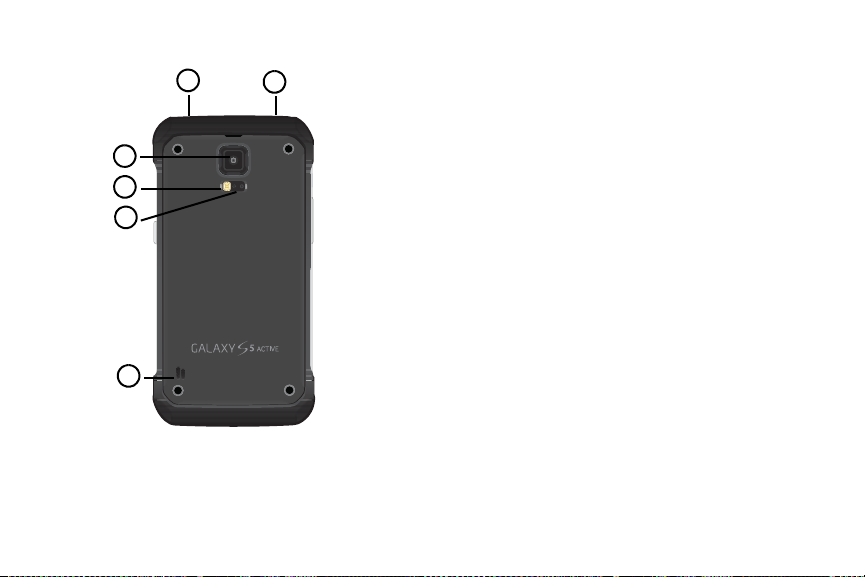
Back View
5
6
4
1
2
3
12
1.
Camera lens
Flash
2.
Heart Rate Sensors
3.
sensors measure your heart rate via your fingertip. For
information on the S Health app, see “S Health” on
page 162.
External speaker
4.
other sounds offered by your phone.
Headset jack
5.
headset so you can listen to music.
IR Transmitter
6.
controlling external devices. For more information, refer
to “Smart Remote” on page 166.
is used to take photos.
is used to take photos in low-light conditions.
, when using the S Health app, these
allows you to hear ringers, music, and
allows you to connect a hands-free
used to emit infrared signals used for
Status Bar
The Status Bar shows information about the connection
status, signal strength, battery level, and time, and displays
additional notifications information.
This list identifies the icons you see on your device’s display
screen:
Page 23
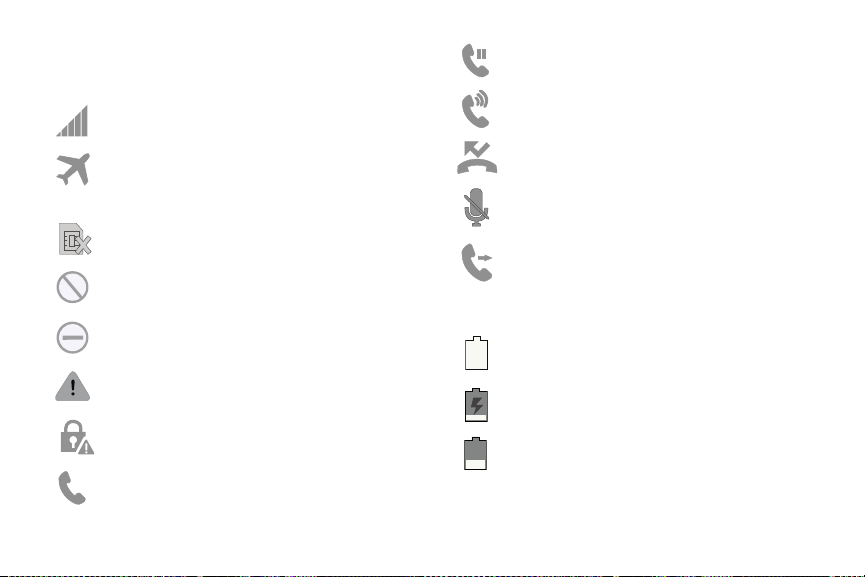
Indicator Icons
This list identifies the symbols you’ll see on your phone’s
display and Indicator area:
Displays your current signal strength. The greater
the number of bars, the stronger the signal.
Indicates that the Flight Mode is active. You cannot
send or receive any calls or access online
information.
Displays when there is no SIM card in the phone.
Displays when there is no network available.
Displays when a call is on hold.
Displays when the speakerphone is on.
Displays when a call has been missed.
Displays when a call has been muted.
Displays when Call forwarding is set to Always
forward. For more information, refer to “Call
forwarding” on page 48.
Displays when your phone is in Blocking mode.
Displays when there is a system error or alert.
Displays to indicate a security warning. You are
prompted to set a screen lock password.
Displays when a call is in progress.
Displays your battery charge level. Icon shown is
fully charged.
Displays when your battery is charging. Also
displays battery charge level.
Device Power Low – Shows your current battery
charge level.
Understanding Your Phone 13
Page 24
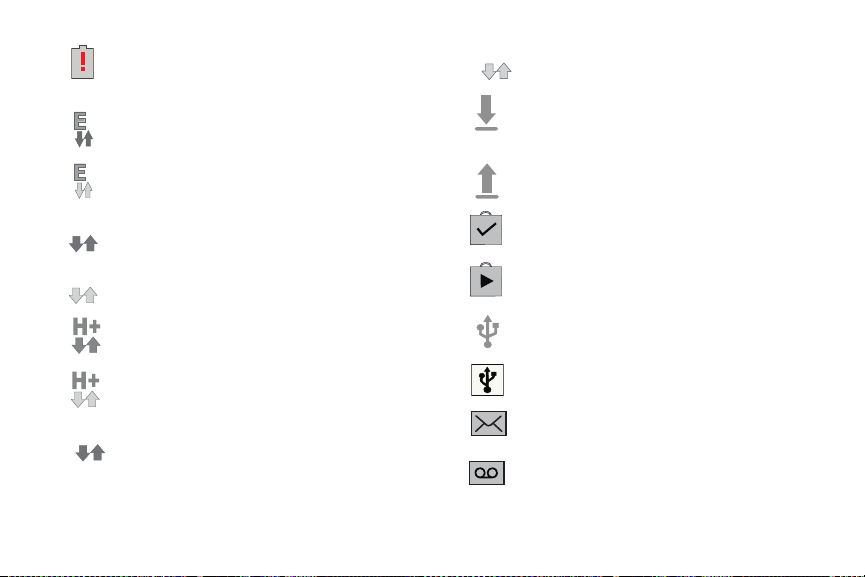
Device Power Critical – Shows your current battery
3G
3G
LTE
LTE
only has less than 5 percent power remaining and
will soon shutdown.
Displays when your connection to an EDGE network
is active.
Displays when your phone is communicating with
the EDGE network.
Displays when your connection to a UTMS network
is active.
Displays when your phone is communicating with a
UTMS network.
Displays when your phone is communicating with a
4G LTE network.
Displays when your phone is downloading or has
downloaded a file. It will blink green when it is
installing.
Displays when the an outbound file transfer is in
progress.
Displays when a Play Store download has
completed.
Displays when updates are available for download.
Displays when your connection to an HSDPA,
HSPA, or HSPA+ network is active.
Displays when your phone is communicating with
the HSDPA, HSPA, or HSPA+ network.
Displays when your connection to a 4G L TE network
is active.
14
Displays when the phone is connected to a computer
via a supported USB cable connection.
Displays when the phone is tethered via a suppo rted
USB cable connection.
Displays when a new text or multimedia message is
received.
Displays when a new voice mail is received.
Page 25
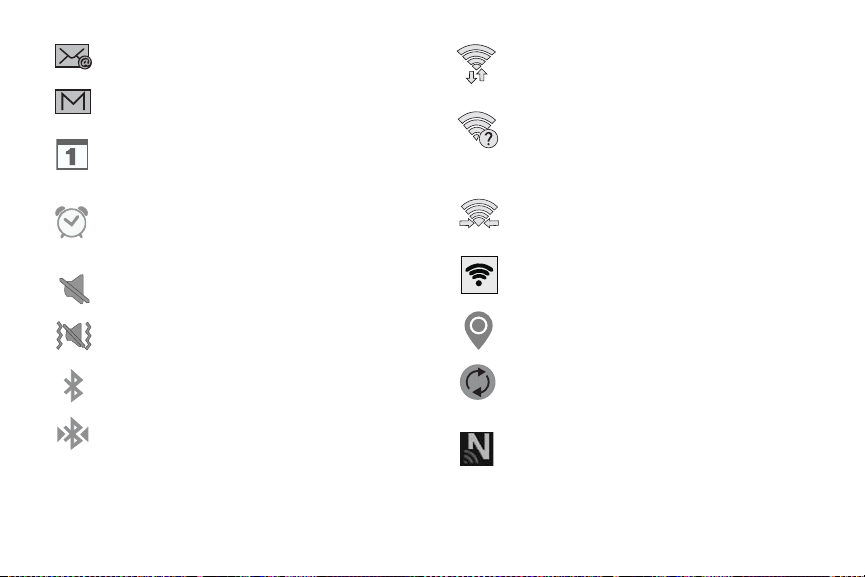
Displays when Email is received.
Displays in the notifications window when there is a
new Gmail message.
Displays when the time and date for a Calendar Event
has arrived. For more information, refer to “S Planner”
on page 164.
Displays when you set an alarm to ring at a specified
time. For more information, refer to “Alarm” on page
142.
Displays when the Sound profile is set to Mute.
Displays when Wi-Fi is connected, active, and
communicating with a Wireless Access Point
(WAP).
Displays when there is a Wi-Fi access point availab le
but you are not connected to it. May also display if
there is a communication issue with the target
Wireless Access Point (WAP).
Displays when Wi-Fi Direct is active and your phone
is connected to another device.
Displays when your phone as been configured as a
portable Wi-Fi hotspot.
Displays when the Sound profile is set to Vibrate.
Displays when Bluetooth is activated.
Displays when a Bluetooth device has been paired
with the phone.
Displays when the Location feature is active and
acquiring a signal.
Displays when data synchronization and application
sync is active and synchronization is in progress for
Gmail, Calendar, and Contacts.
Displays when Near Field Communication (NFC)
has been activated.
Understanding Your Phone 15
Page 26
Displays when your device is currently sharing/
streaming media to a paired device using the
Samsung Link application.
Displays when a screen capture has been taken.
Displays when the keypad is active.
For more details on configuring your phone’s settings, see
“Changing Your Settings” on page68.
16
Locking and Unlocking the Phone
To unlock your phone:
1. Press the lock button located on the upper
right side of your phone.
2. The lock screen will display with
displayed at the bottom of the screen.
3. Swipe the touch screen in any direction.
4. The Home screen will be displayed.
Note:
There are several additional ways you can lock your
screen. For more information, refer to “Lock screen” on
page 82.
Swipe screen to unlock
Menu Navigation
You can tailor the phone’s range of functions to fit your needs
using both menus and widgets. Menus, sub-menus, and
features can be accessed by scrolling through the available
on-screen menus. Your phone originally has three home
screens but you can expand up to seven home screens.
Page 27

Command Keys
Recent Key
Press Recent
Home Key
Press
and hold to display access the Google Search feature.
Back Key
Press
step.
to display a list of recently opened apps.
Home
to display the main Home screen. Press
Back
to return to the previous screen, option or
Terms used in this user manual
Tap
Lightly touch items to select or launch them. For example:
•
Tap the on screen keyboard to enter characters or text.
•
Tap a menu item to select it.
•
Tap an application’s icon to launch the application.
Touch and Hold
Activate on-screen items by a touch and hold gesture. For
example:
•
Touch and hold a widget on the home screen to move it.
•
Touch and hold on a field to display a pop-up menu of options.
Swipe and Palm Swipe
To swipe, lightly drag your finger vertically or horizontally
across the screen. Use swipe when:
•
Unlocking the screen
•
Scrolling through the Home screen or a menu
To palm swipe, swipe the side of your hand horizontally
across the screen. Use palm swipe when:
•
Capturing the screen
Turn over
Turn your phone over so that the screen faces downward. For
example:
•
Mute incoming calls and playing sounds by turning your phone over.
Home Screen Overview
The main home screen is the starting point for many
applications and functions, and it allows you to add items like
application icons, shortcuts, folders, or Google widge ts t o g ive
you instant access to information and applications. This is the
default page and accessible from any menu by pressing
.
Understanding Your Phone 17
Page 28
Navigating Through the Home Screens
Your phone originally has six home screens but you can
expand up to seven home screens. If you like, you can place
different applications on each of the home screens.
From the main Home screen, sweep the screen with
your finger in either direction. The main Home Screen is
located in the middle with a Home screen on each side.
Navigating Through the Application Men us
You r phone initially has three Application Menus available.
Follow these steps to navigate through the Application Menus:
1. At the Home screen, tap . The first Application Menu
will be displayed.
2. Sweep the screen left or right to access the other
menus.
3. Tap one of the application icons.
Note:
As you add applications, the number of Application
menus that you have available will increase.
18
Navigating Using Sub-Menus
Sub-menus are available when you are at any Home screen
or have selected a feature or application such as Phone,
Contacts, Messaging, or Internet.
To access a sub-menu:
1. Press
A sub-menu will appear at the bottom of the phone
screen.
2. Tap an option.
.
Accessing Recently-Used Apps
1. Press from any screen to open the recently-used
applications window.
2. Tap an icon to open the selected application.
– or –
to go to the Task manager.
Tap
– or –
Tap to delete the record of all recently used
applications.
Page 29
Using the Multi Window
This feature allows you to run multiple applications on the
current screen at the same time.
Note:
Only applications found within the Multi window panel can
be active atop another current application on the screen.
Activating and Deactivating Multi window
There are two different ways you can activate and deactivate
the Multi window feature:
To activate Multi window via the Notification screen:
1. In a single motion, touch the Status bar to reveal the
Notifications tab, and then drag it to the bottom of the
screen to open the Notifications screen.
2. Swipe the row of icons to the left until the
Multi window icon is displayed.
3. Tap the
4. Tap
5. T ap the tab to open the application panel showing all
Multi window
icon turns green when active.
Home
to return to the Home screen.
the available Multi window apps.
entry to activate the feature. The
Note:
Once you have turned the Multi window option on in step
3, you only need to press and hold the
re-activate the Multi window feature.
To activate Multi window via the Settings menu:
1. From the Home screen, tap ➔
Multi window
2. Tap the ON/OFF slider, located to the right of the Multi
window field, to turn the feature on .
3. Tap
4. T ap t he tab to open the application panel showing all
the available Multi window apps.
To deactivate Multi window:
Press and hold the
the Multi window tab from view.
.
Home
to return to the Home screen.
Back
key ( ). This action hides
Back
Settings
key ( ) to
➔
Repositioning the Multi Window
The Multi window contains two components: tab and apps
panel. The tab can be manually moved across the screen. The
apps panel (containing the scrollable apps) can be relocated
to lock onto either side of the screen (left or right).
Understanding Your Phone 19
Page 30
To move the tab:
1. Activate the Multi window feature.
2. In a single motion, touch and hold the tab for
approximately one-second, then slowly drag it to its new
location
along the current
Note:
This is a quick way to get the tab out of the way if you
can’t get to a button or option behind it.
To relocate the Multi window apps panel:
1. Activate the Multi window feature.
2. Tap the tab to display the apps panel (containing the
scrollable apps).
3. In a single motion, touch and hold the tab for
approximately one-second to detach it from the screen,
then slowly drag it to its new location along either side.
20
screen edge.
Customizing the Multi Window apps
The applications found within the apps panel of the Multi
window can be organized by either being rearranged or
removed.
To rearrange the Multi window applications:
1. Activate the Multi window feature.
2. Tap the tab to display the apps panel (containing the
scrollable apps).
3. In a single motion, touch and hold a desired app until it
detaches from the panel, then carefully drag it to a new
location in the list of apps. Lift your finger or stylus off
the screen to let go of the app and drop it into its new
location.
To edit a Multi window application:
1. Activate the Multi window feature.
2. Tap the tab to display the apps panel (containing the
scrollable apps).
More
➔
Edit
3. Tap
the list) to reveal a staging area (on the right) that can
house any removed applications from the Multi window
panel.
(located at the bottom of
Page 31

4. Tap
Done
once you have completed the removal
process.
To remove a Multi window application:
1. Activate the Multi window feature.
2. Tap the tab to display the apps panel (containing the
scrollable apps).
More
➔
Edit
3. Tap
bottom of the list) to reveal a staging area that can
house any removed applications from the Multi window
panel.
Done
4. Tap
To restore a Multi window application:
1. Activate the Multi window feature.
2. Tap the tab to display the apps panel (containing the
3. Tap
4. Locate the desired application.
once you have completed the removal
process.
scrollable apps).
More
➔
the list) to reveal the staging area containing any
previously removed apps.
button (located at the
Edit
located at the bottom of
5. In a single motion, touch and hold a desired app until it
detaches from the staging area, then carefully drag it to
a new location in the current list of apps.
Using Multi Window to run multiple apps on the
same screen
Any of the apps found within the Multi window panel can be
run at the same time as a current on-screen app.
Once multiple apps are running on the same screen, you can
then choose to either swap their positions or maximize a
desired app.
Note:
Only applications found within the Multi-window panel
can be active atop another current application on the
screen.
When launching applications that contain multimedia files
(music/video), audio from both files will be played
simultaneously.
In the following example, we will be launching both the
Messaging and Internet applications.
1. Launch an application such as Messaging.
2. Activate the Multi window feature.
3. Tap the tab to display the apps panel.
Understanding Your Phone 21
Page 32
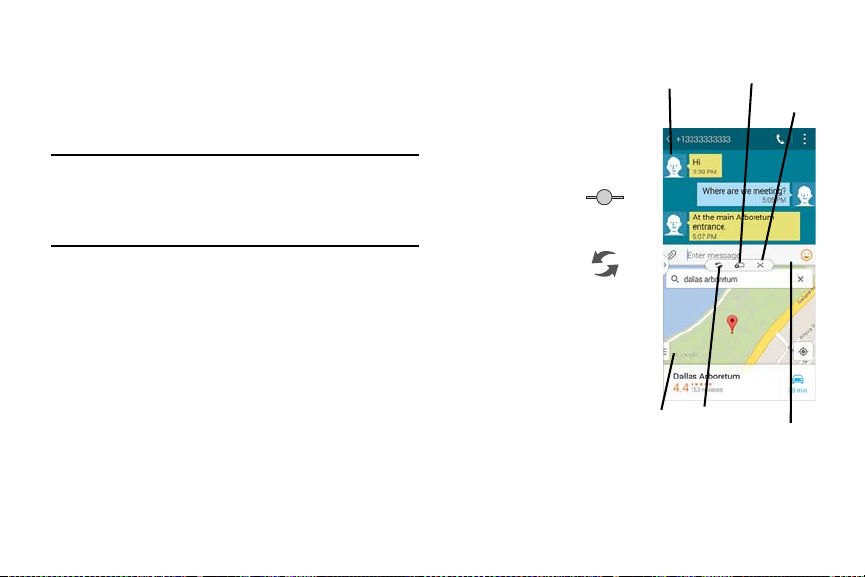
App #1
Drag/Drop Content
App
Border Bar
Switch
Window
Close
#2
4. T ouch and hold the desired app, such as Int ernet, until it
detaches from the panel.
5. In a single motion, drag it over the current app and drop
the new Multi window app over either the top or bottom
area of the current on-screen app.
Note:
Once two applications are running, the device displays a
split screen view containing both the initial app and the
new Multi window app. Each application is still
independent of the other.
To switch the arrangement of the applications:
1. Tap the desired
application area (top or
bottom).
2. With the two
applications shown in a
split screen, tap the
Border button
to show the on-screen
functions.
3. Locate and tap
Switch Window
current apps are
switched.
To increase the size of a
desired application window:
1. With the two
applications shown in a
split screen, locate the
Border bar indicating
the edge of the app window.
. The
22
Page 33
2. In a single motion, touch and hold the Border bar then
drag it to resize the desired window.
To close a sele cted application:
1. With the two applications shown in a split screen, tap
one of the two on-screen apps to select it.
2. Tap the Border bar to show the on-screen icons.
3. Locate and tap
is closed and the remaining app is maximized.
To add text or image to app:
Dragging and dropping a paragraph of text or a screen shot
image is now possible with Multi Window.
1. Drag the Gallery app onto one of the available onscreen windows. Open an image folder.
2. With the two applications shown in a split screen, tap
the Border button .
3. Locate and tap
4. Drag and drop a paragraph of text or an image from one
window into the other.
Note:
Not all apps support this feature.
Close Application
Drag and Drop Content
. The current app
.
Creating a Customized Multi Window Preset
1. Arrange the Multi window view as desired (a pp lo cat ion,
height of windows, etc.)
More
➔
Create
1. Once configured, tap
2. Use the on-screen keyboard to name the new preset of
paired windows.
OK
3. Tap
4. Later, just tap the new preset to activate.
. The new preset then appears at the top of the
Multi window list of apps.
).
Customizing Your Home Screen
Y ou can customize your Home screen by doing the following:
•
Customizing the Toolbox
•
Creating Shortcuts
•
Adding and Removing Primary Shortcuts
•
Adding and Removing Widgets
•
Moving Icons in the Apps Menu
•
Creating Application Folders
•
Managing Wallpapers
•
Adding and Deleting Home Screens
•
Moving Home Screens
Understanding Your Phone 23
Page 34
Customizing the Toolbox
For more information, refer to “Toolbox” on page 84.
Activating the Toolbox feature displays an on-screen button
that provides quick access to a set of five user-defined
applications.
Important!
There can only be at most five applic ations ass igned
to the quick access Toolbox button.
Creating Shortcuts
Shortcuts are different than the current Home screen Widgets
that only launch an application. Shortcuts activate a feature,
action, or launch an application.
Note:
To move a shortcut from one screen to another, it must
first be deleted from its current screen. Navigate to the
new screen, then add the shortcut.
To activate the Toolbox feature:
1. From the Home screen, tap
Settings
➔
2. In a single motion touch and slide the
the right to turn it on .
To customize the Toolbox applications:
1. From the active Toolbox screen, tap
2. Place a checkmark alongside up to five applications.
These will be quickly accessible via the on-screen
button.
Save
3. Tap
24
once you have completed the assignment of
your applications.
Toolbox
Apps
.
➔
Toolbox
Edit
.
slider to
Adding a shortcut from the Apps Menu
1. Press to activate the main Home screen.
2. Navigate to the desired Home Page.
3. Tap to display your applications.
4. Scroll through the list and locate your desired
application.
5. Touch and hold the application icon. This creates an
immediate shortcut of the selected icon and closes the
Apps
tab.
6. While still holding the on-screen icon, position it on the
current page. Once complete, release the screen to lock
the new shortcut into its new position on the current
screen.
Page 35
Adding a shortcut via the Add to Home screen
1. Press to activate the main Home screen.
2. Navigate to the desired Home Page.
3. Touch and hold on an empty area of the Home screen.
Wallpapers, Widgets
4. Tap
5. Press and hold a shortcut from the available list and
position it on the current screen.
Deleting a shortcut
1. Press to activate the main Home screen.
2. Touch and hold the desired shortcut. This unlocks it
from its location on the current screen.
3. Drag the icon over the
As you place the shortcut into the T r ash, both items turn
red.
Note:
This action does not delete the short cut, it jus t remove s it
from the current screen.
, or
Home screen settings
Remove
icon and release it.
Adding and Removing Primary Shortcuts
Y ou can change any of your primary shortcuts with the
exception of the
1. Press to activate the main Home screen.
.
2. Touch and hold the primary shortcut you want to
replace, then drag it to an empty space on any Home
screen.
3. Scroll through the App menu to find the shortcut you
want to add as the new primary short cut.
4. Touch and hold the new shortcut, then drag it to the
empty space in the row of primary shortcuts.
The new primary shortcut will now appear on all Home
screens.
Apps
shortcut.
Adding and Removing Widgets
Widgets are self-contained applications that reside in either
your Widgets tab or on the main or extended Home screens.
Unlike a shortcut, the Widget appears as an on-screen
application.
Adding a Widget
1. Press to activate the main Home screen.
2. Navigate to the desired Home Page.
Understanding Your Phone 25
Page 36
3. Touch and hold on an empty area of the screen.
Widgets
4. Tap
5. Press and hold an available Widget to position it on the
current screen, then release the Widget.
Removing a Widget
1. Touch and hold a Widget until you can move it around
on the screen.
2. Drag the Widget up to the
it.
As you place the Widget into the Trash, both item s turn
red.
Note:
This action does not actually delete the Widget, it just
removes it from the current Home screen.
26
at the bottom of the screen.
Remove
icon and release
Moving Icons in the Ap ps M enu
1. Press to activate the main Home screen.
2. Tap to display your current applications.
and tap
View as
Edit
.
.
3. Tap
Custom
4. Tap
option.
5. Tap
6. Scroll through the list and locate the icon you wish to
move.
7. Touch and drag the icon to the position that you want.
T o mov e to a different page, drag the icon to the e dge of
the page until the page scrolls to the desired page.
8. Tap
9. Press to return to the Home screen.
. A green circle will appear next to the
and tap
Save
.
Page 37
Creating Application Folders
You can create application folders to hold similar applications
if you wish.
To create a folder follow these steps:
1. Press to activate the main Home screen.
2. Tap to display your current applications.
and tap
Edit
3. Tap
4. Touch and hold the first application that you would like
to move to a folder.
5. Drag the icon up to the
6. Enter a folder name and tap
A folder is displayed in the original place of the
application icon with the application icon displayed on
top of it. You can now drag other Apps into the folder.
7. To view information on an App, drag the App icon up to
the App info
application.
Save
8. Tap
.
.
Create folder
OK
icon.
.
icon to view information on the
Managing Wallpapers
Wallpapers consist of either Gallery images (user taken),
Static Wallpaper gallery images (default wallpapers), or Live
wallpapers (animated backgrounds).
Note:
Selecting animated Live wallpapers will require additional
battery power.
To change the current Home screen wallpaper:
1. Navigate to an available screen containing an open
area.
Recent
2. Press and hold
Screen Options page.
Wallpapers ➔ Home screen
3. Tap
4. Scroll across the available wallpaper images and select
a Wallpaper type:
•
Tap
More images
camera image gallery, crop the image, and tap
•
Tap a
background, once done tap
to select from a user image stored in the
Live wallpapers
to launch the Home
.
Done
.
to select from an available animated
Set wallpaper
Understanding Your Phone 27
.
Page 38
Note:
Wallpapers supports the following image types: JPEG,
PNG, GIF, BMP, and WBMP.
To change Wallpapers from Settings Menu:
1. From the Home screen, tap
Settings
➔
2. Choose from
lock screens
Note:
The
Home and lock screens
change both screens at the same time.
3. Select a wallpaper image and tap
For more information, refer to “Wallpaper” on page 81.
To change the current Lock screen wallpape r:
1. From the Home screen, tap
2. Select a wallpaper image and tap
28
Home screen, Lock screen
.
Settings
➔
Apps
➔
Wallpaper
.
, or
Home and
is an option that allows you to
Done or Set wallpaper
Apps
➔
Wallpaper
➔
Lock screen
Done or Set wallpaper
Adding and Deleting Screens
You r device can have up to seven Home screens. You can
add or delete screens as required.
Note:
These screens can be deleted and re-arranged.
Important!
.
.
.
Your dev ice can only contain at most sev en scree ns
and at least one screen.
To add a screen:
1. Navigate to an available screen containing an open
area, then press and hold
Home screen option page appears.
2. Scroll to the far right of the available screens and tap
Add screen
the last page.
3. Press to return to the main Home screen.
. The newly added screen appears as
Recent
until the Edit
Page 39
To delete a screen:
1. Navigate to an available screen containing an open
area, then press and hold
Home screen option displays.
2. Scroll across the available screens, then drag the
undesired screen up to the
Home
3. Press
to return to the main Home screen.
Recent
Remove
until the Edit
tab.
Rearranging the Screens
1. Navigate to the Edit Home screen option page.
2. Touch and hold a screen and then drag it left or right
into its new location. Left most is screen position #1 and
right most is screen last screen.
Assigning a New Main Home Screen
1. Navigate to the Edit Home screen option page displays.
2. T ap to assign an existing screen as the new Main
Home screen. The screen is highlighted and indicates
the
screen.
Home screen
icon at the top of the selected
Notification Panel
The Notification panel includes a pull-down list to show
information about processes that are running, recent
notifications, and alerts. To display the Status indicator:
1. On the Home screen, touch and hold the Notification
panel until the pull-down displays, then drag down
vertically.
2. Tap a notification entry to open the associated
application.
Note:
S Finder and Quick connect can quickly be accessed
from the top area of the main Notifications screen.
Clearing Notifications
To clear all notifications from the Notification panel:
1. From the Home screen, touch and hold the Notification
panel until the pull-down displays, then drag down
vertically.
Clear
2. Tap the
The notifications are cleared and the panel closes.
button.
Understanding Your Phone 29
Page 40
Accessing Additional Panel Functions
In addition to notifications, the Notification panel also provid es
quick and ready access to separate device functions. These
can be quickly activated or deactivated by toggling them on or
off. You can choose the functions that will be displayed.
1. From the notification panel, tap to display additional
options.
The following functions (default) are located in the top
two rows and can either be activated (green) or
deactivated (light blue): Wi-Fi, Location, Sound, Screen
rotation, Bluetooth, U. Power saving, Multi window,
Toolbox, Mobile hotspot and Flight mode.
2. Tap then locate the Notifications panel area
located at the bottom of the Notifications panel screen.
3. In a single motion, touch and hold a desired function
from the bottom two rows and then drag it to the top two
rows. Additional functions are NFC, Sync, Smart stay,
Smart pause, Power saving, Blocking mode, Private
mode, Touch sensitivity and Screen mirroring.
4. Tap to display only your primary functions.
30
Entering Text
You r dev ice comes equipped with an orientation detector that
can tell if the phone is being held in an upright (Portrait) or
sideways (Landscape) orientation. This is useful when
entering text.
You r device also provid es severa l on-sc reen k eypad text entry
options to make the task of text entry that much easier.
Text Input Methods
There are three text input methods available:
•
Google voice typing
•
Samsung keyboard (default)
keypad that can be used in both portrait and landscape
orientation.
•
Swype
: a new way to enter text on touch screens. Instead of
tapping each key, use your finger to trace over each letter of
a word.
To change the input method, see “Keyboards and Input
Methods” on page94.
The on-screen QWERTY keypad works the same in both
portrait and landscape mode.
: allows you to enter text by speaking.
: Samsung’s on-screen QWERTY
Page 41
Selecting the Text Input Method
The T ext Input Method c an be ass igned from within one of two
locations:
Settings Menu:
From the Home screen, tap (
Settings
➔
Language and input ➔ Default
and select an input method.
Text Input field:
1. From a screen where you can enter text, in a single
motion, touch and drag the Status bar down to the
bottom of the screen to open the Notifications screen.
Choose input method
2. Tap
method.
Apps)
➔
and select an available input
Using Google Voice Typing
This feature uses Google voice recognition to convert your
spoken words into on-screen text.
You can use your voice to enter text using the Google Voice
typing feature.
1. From the keyboard, touch the top of the screen and drag
it down to display your notification panel.
2. Tap
Choose input method
➔
Google voice typing
.
3. At the Listening prompt (
clearly and distinctly into the microphone.
The text is displayed in the message as you are
speaking.
For more detailed information on configuring Google V oice
Typing settings, see “Google voice typing settings” on
page 96.
4. Tap (
– or –
Tap (
Note:
The feature works best when you break your message
down into smaller segments.
Done
) when you are finished.
Resume
) to resume recognition.
Speak now
Using the Samsung Keyboard
This device has a built-in, QWERTY keypad (portrait mode) or
keyboard (landscape mode). Using the QWERTY keypad/
keyboard, you can type letter, numbers, punctuation, and
other characters.
To use the Samsung keyboard you must first configure the
settings to default to the Samsung keyboard.
Understanding Your Phone 31
), speak
Page 42
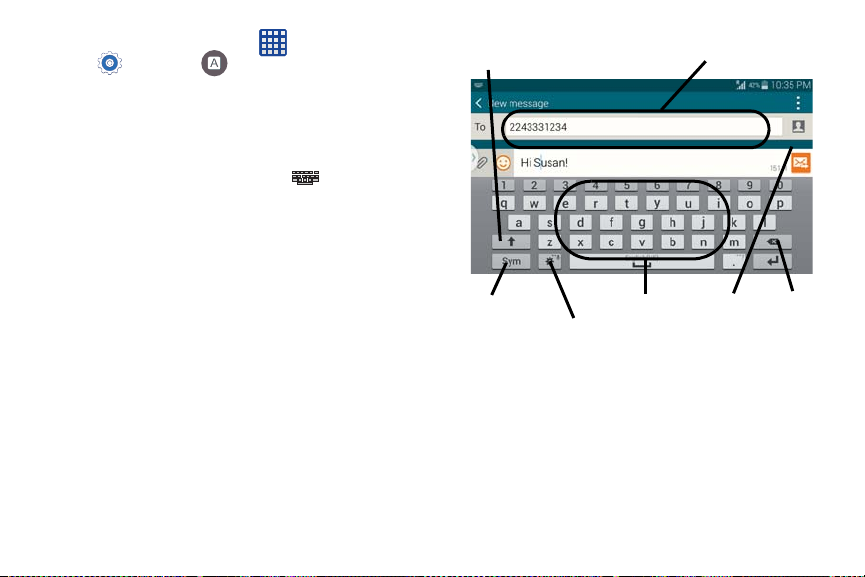
Text input field
Input Mode
Input Options
DeleteCurrent Mode
Indicator
Send
/Settings
Shift key
Apps)
1. From the Home screen, tap (
Settings
➔
Language and input ➔ Default
➔
Samsung keyboard
.
➔
– or –
From a screen where you can enter text, in a single
motion, touch and drag the Status bar down to the
bottom of the screen, then select (
method
)
➔ Samsung keyboard
Choose input
.
2. The virtual keyboard is then assigned to the Samsung
keyboard configuration for all subsequent text input.
For more detailed information on configuring Samsung
Keyboard settings, see “Samsung Keyboard settings” on
page 94.
32
Page 43
Entering Text using Different Input Options
Although the default text input method with the Samsung
keyboard is to use the on-screen keys you have other options.
Note:
To access settings, touch and hold the
button , then tap (
the available options.
1. From within an active message, tap the text input field to
reveal the on-screen keyboard.
2. Tap (
typing input method to convert your spoken words to onscreen text.
– or –
Touch and hold to select from other input
methods such as:
• Voice to text
• Handwriting
Input Methods
to launch the device’s Google Voice typing
application to covert spoken words into on-screen text.
to launch an on-screen handwriting area that
can be used to convert on-screen patterns (text) to text.
) to use the default Voice
Settings
) then select it from
Input Methods
• Clipboard
•Settings
•Emoticons
• Keyboard alignment
to launch the device’s clipboard area from where
you can select a current clipboard item to place in your
current message.
to access the Samsung keyboard settings menu.
to access the available Emoticons pages.
to detach the on-screen keyboard so
that you can manually dock it anywhere on the current text
entry screen. Selecting the feature again re-docks the
keyboard into its original location using the original size.
Changing the Text Input Mode in Keyboard
1. From a screen where you can enter text, tap the text
input field to reveal the on-screen keyboard.
2. With Samsung keyboard as your text entry method,
select one of the following text mode options:
ABC
•Abc
keyboard. In this mode, the text mode button displays
: to use alphabetic characters from the on-screen
ABC
Sym
.
Understanding Your Phone 33
Page 44
Sym
ABC
ABC
Sym
• Symbol/Numeric
numbers selecting them on the on-screen keyboard. In this
mode, the text mode button displays .
There are up to 2 available pages of numeric symbols
available by tapping .
Note:
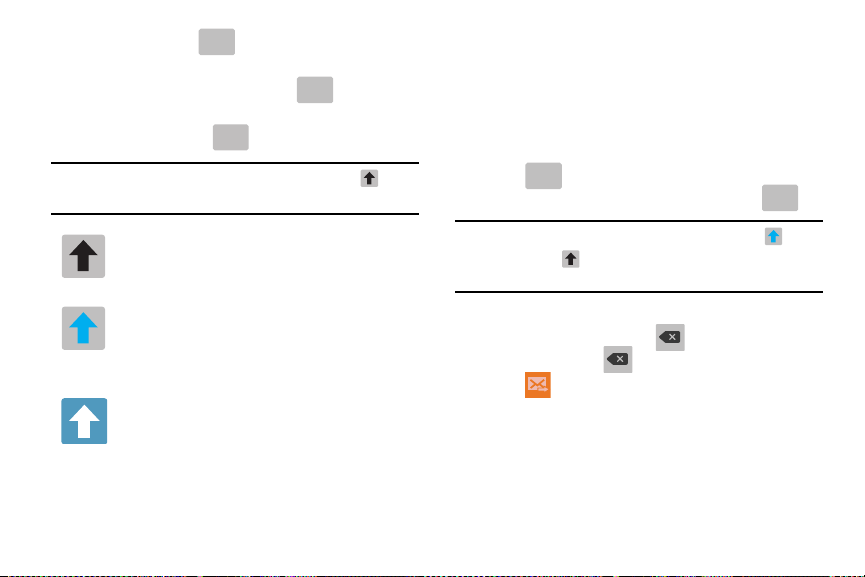
After typing an initial uppercase character, tap to
toggle capitalization.
All lowercase
Displays when the next character is entered in
lowercase.
Initial Uppercase
Displays when the first character of each word is
entered as uppercase but all subsequent characters
are lowercase.
All Uppercase
Displays when all characters will be entered as
uppercase characters.
34
: to enter numbers by pressing the
1/2
By default, the first letter of a new entry is capitalized and the
following letters are lower-cased. After a character is entered,
the cursor automatically advances to the next space.
Using ABC Mode in Samsung Keyboard
1. From a screen where you can enter text, tap the text
input field to reveal the on-screen keyboard.
ABC
2. Tap to configure the keyboard for ABC mode.
ABC
Once in this mode, the text input type shows .
Note:
After typing an initial uppercase character, the key
changes to and all letters that follow are in lower
case.
3. Enter your text using the on-screen keyboard.
–
If you make a mistake, tap to erase a single character.
T ouch and hold to erase an entire word.
4. Tap (
Send
) to deliver the message.
Page 45

Using Symbol/Numeric Mode
ABC
ABC
ABC
ABC
ABC
ABC
Use the Symbol/Numeric Mode to add numbers, symbols,
or emoticons. While in this mode, the text mode key
displays .
1. From a screen where you can enter text, tap the text
input field to reveal the on-screen keyboard. Rotate the
phone counterclockwise to a landscape orientation, if
desired.
Sym
2. T ap to configure the keyboard for Symbol mode.
Once in this mode, the text input type shows .
3. Tap a number, symbol, or emoticon character.
4. Tap to return to ABC mode.
To enter symbols:
Sym
1. Tap to configure the keyboard for Symbol mode.
2. Tap the appropriate symbol key.
– or –
Tap button to cycle through additional pages.
1/2
•
The first number on this key indicates which page (1 or 2) of
additional characters is active.
•
Understanding Your Phone 35
Page 46
Section 3: Call Functions
This section describes how to make or answer a call. It also
includes the features and functionality associated with mak ing
or answering a call.
Displaying Your Phone Number
Tap ➔
Status
number
Settings ➔ About device
. Your phon e number is display ed in the
field.
➔
My phone
Making a Call
1. From the Home screen, tap and use the on-screen
keypad to enter the number you wish to dial.
2. Tap to make the call.
Note:
When you activate the
menu, the phone will automatically redial up to 10 times
when the person does not answer the call or is already on
the phone. For more information, refer to “Call Settings”
on page 48.
36
Auto redial
option in the Voice Call
Quick Dialing a Number from the Contacts List
1. From the Home screen, tap
2. Locate a contact from the list.
3. In a single motion, touch and drag your finger over the
number by going to the right. This action places a call to
the recipient.
➔ Contacts
.
Running a Call in the Background
If you exit the current call screen and return to the Home
screen, you are visually notified that you are still on an active
call by the phone icon within the Status bar.
This is the best way to stay on your current call and do
something else (multi-task) such as access the Contacts list,
view a recent email, locate a picture, and so forth.
Page 47
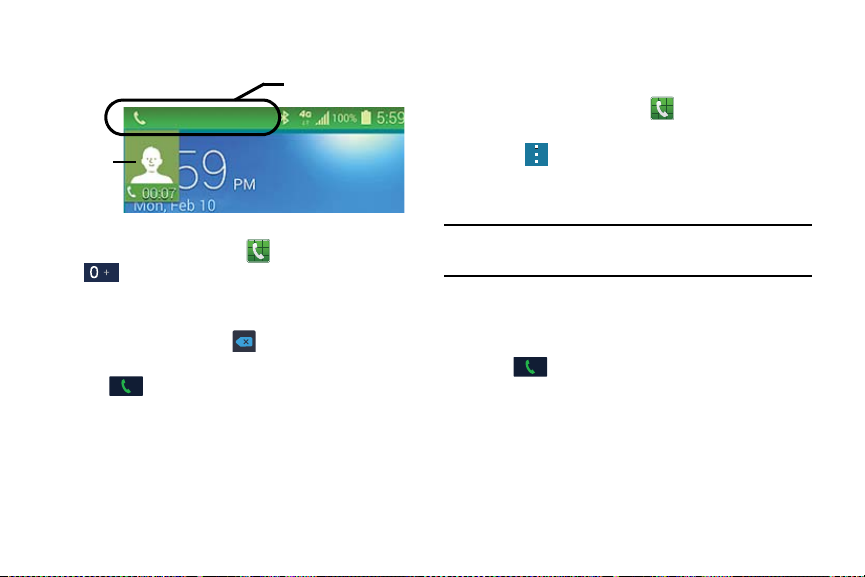
In Call Notification
Reactivate
Call
Tap the on-screen reactivate button to return to the
currently active call.
Making an International Call
1. From the Home screen, tap , then touch and hold
. The + character appears.
2. Use the on-screen keypad to enter the country code,
area code, and phone number.
•
If you make a mistake, tap until the desired numb ers
have been deleted.
3. Tap to make the call.
Manual Pause Dialing
To manually call a number with pause(s) without storing it in
your Contacts list:
1. From the Home screen, tap
keypad to enter the phone number.
2. Press to display the dialer sub-menu.
Add 2-sec pause
3. Tap
use the keypad to enter the additional numbers.
Tip:
You can create pauses longer than two seconds by
entering multiple two second pauses.
4. Select
5. Tap
For more information, refer to “Adding Pauses to Contact
Numbers” on page 50.
Add wait
calling sequence until you enter a number or press a
key.
to add a two second pause, and
to add a wait. A wait will pause the
to make the call.
and use the on-screen
Call Functions 37
Page 48
Correcting an Entered Number
Use the following steps to correct a mis-typed entry when
dialing.
After entering a number using the keypad:
•
If you make a mistake, tap to erase a single character.
•
Press and hold to erase the entire string of numbers.
Dialing a Recent Number
All incoming, outgoing and missed calls are recorded in the
Call log. If the number or caller is listed in your Address Book,
the associated name is also displayed.
1. From the Home screen, tap .
2. Tap the Logs tab.
A list of recent calls is displayed.
Details
3. Tap the desired Contact to enter the
tap
to make a call.
page, then
Ending a Call
When you are ready to end your call, tap the key.
38
Ending a Call from the Status Bar
1. From an active call, you can launch a separate
application or return to the Home screen. The current
call is kept active in the background.
2. Tap the Status bar to reveal the Notifications tab, and
then drag the tab to the bottom of the screen to open the
Notifications panel.
End
3. Tap
to end the currently active call.
Answering a Call
When a call is received the phone rings and displays the
caller’s phone number, or name if stored in the Address Book.
1. At the incoming call screen:
•
T ouch and drag
•
T ouch and drag
and send it to your voicemail.
2. Tap
Note:
to end the call.
You can answer a call while using the Address Book or
other menu feature. After ending the call, the phone
returns to the previously active function screen.
in any direction to answer the call.
in any direction to reject the call
Page 49
Making Emergency Calls
If you do not have a SIM card installed the first time you turn
on the phone, the
displays and an animated tutorial shows you how to install the
SIM card.
Without a SIM card, you can only make an emergency call
with the phone; normal cell phone service is not available.
Making an Emergency Call without a SIM card
1. Tap
an emergency call.
2. Enter 9-1-1 and tap . Complete your call. During
this type of call, you will have access to the Speaker
mode, Keypad, and End Call features.
3. Tap to exit this calling mode.
Making an Emergency Call with a SIM card
The Emergency calling mode makes redialing an emergency
number a 1-tap process. Before you can resume normal
calling operations, you should first exit this mode.
1. From the Home screen, tap .
2. Enter the emergency number (example: 911) and then
tap
Insert SIM card to make calls
Emergency call
from the on-screen display to make
.
message
3. Complete your call. During this type of call, you will h ave
access to the Speaker mode, Keypad, and End Call
features.
Note:
This mode can drain your battery power more rapidly
than normal calling mode.
Making a Call Using Speed Dial
You can assign a short cut number to a phone number in you r
Contacts List for speed dialing.
1. From the Home screen, tap
your Contacts List.
2. Press to display the Contacts List sub-menu.
Speed dial
3. Tap
4. The
through 100. The number 1 is reserved for Voicemail.
5. Tap an unused number and the
6. Tap a contact to assign to the number. The selected
contact number will display in the speed dial number
box.
7. To remove a speed dial number, tap located next
to the speed dial contact.
.
Speed dial
screen displays showing the numbers 1
Contacts
to display
contact screen displays.
Call Functions 39
Page 50
The speed dial number is removed from the speed dial
list.
➔
8. To make a call using Speed Dial, tap
and from the Dialer, touch and hold the speed dial
number. If the speed dial number is more than 1 digit
long, enter the first digits, then hold the last digit.
Keypad
Dialing Options
From the Home screen and Application menus, you have the
option to access the Dialer and initiate a call by tapping
➔
Keypad
following tabs are located at the top of your scree n :
•
Keypad
keypad.
•
Logs
•
Favourites
Favourites.
•
Contacts
contact to call.
After you begin to enter numbers, the
appears so you can save the Contact if needed.
40
. From the Dialer and the Contacts screen, the
: dials the current number entered using the on-screen
: displays a list of all dialed, received, and missed calls.
: displays your contacts that you have marked as
: takes you to your Address Book where you can select a
Add to contacts
option
Call Log
The phone stores the numbers of the calls you’ve dialed,
received, or missed in the Call log. The Call log displays the
details of the call.
1. From the Home screen, tap .
2. Tap the Logs tab.
A list of recent calls is displayed. If the number or caller
is listed in your Address Book, the associated name is
displayed.
All calls made, received, and missed are listed. Types of calls
are identified by the following icons:
•
Incoming Calls
•
Outgoing Calls
•
Missed Calls
•
Rejected Calls
•
Auto Rejected Calls
:
:
:
:
:
Page 51
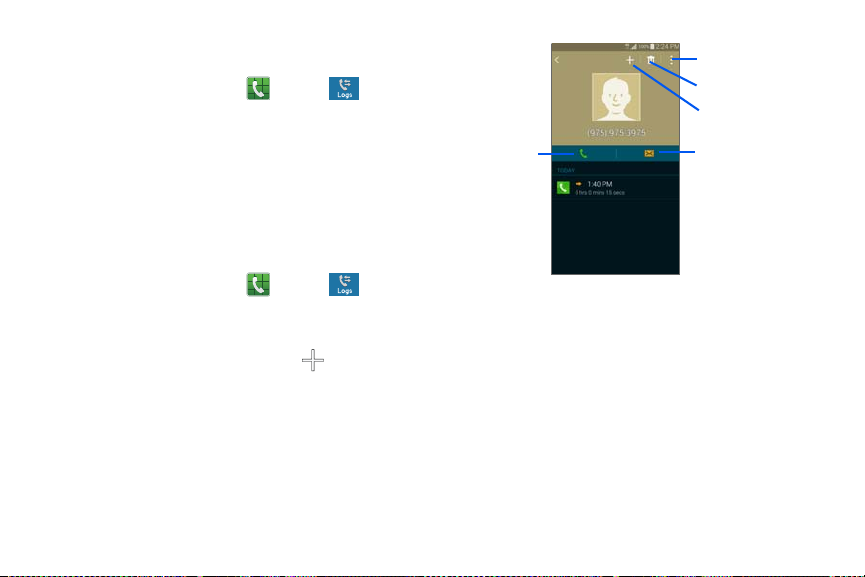
Calling Back a Missed Call
Menu options
Call the number
Send a message
Delete log entry
Add Contact
To call back a missed call number:
1. From the Home screen, tap ➔ Logs .
A list of recent calls is displayed. If the number or caller
is listed in your Address Book, the associated name is
displayed.
2. Swipe the desired missed call to the right to call.
– or –
Swipe the desired missed call to the left to message.
Saving a Recent Call to your Address Book
1. From the Home screen, tap ➔ Logs .
A list of recent calls is displayed.
2. Tap the call you want to save to your Address Book.
3. The call detail page is displayed. Tap
contact)
to add the call to your Address Book.
4. Tap
Create contact
– or –
If you want to replace the number for an existing
contact, tap
to add the call to your Address Book.
Update existing
.
(
Create
5. Enter information into the various fields using the
keypad.
6. Tap
Save
to save when you are finished.
For further details about the Address Book feature, see
“Adding a New Contact” on page49.
Call Functions 41
Page 52
Sending a Message to a Recent Call
1. From the Home screen, tap ➔ Logs .
A list of recent calls is displayed.
2. Swipe the entry you want to message to the left.
3. At the Message screen, tap the empty text field and use
the on-screen keypad to type in a message.
4. When you are done with your message, tap to
send.
For more information, refer to “Creating and Sending
Messages” on page 60.
Deleting a Call from the Call Log
1. From the Home screen, tap ➔ Logs .
A list of recent calls is displayed.
2. Touch and hold the call you want to delete from the Call
log.
3. The Call log will display with the contact checked.
4. Tap .
Delete log
5. At the
The call is deleted from the Call log.
42
prompt, tap OK.
Adding a Call to the Reject List
1. From the Home screen, tap ➔ Logs .
A list of recent calls is displayed.
2. Touch and hold the call you want to add to the Reject
List.
3. Tap Add to reject list.
OK
4. At the Add to reject list prompt, tap
Future calls from this number will be rejected and sent
to your voicemail.
.
Call Duration
1. From the Home screen, tap ➔ Logs .
➔
2. Press
3. The following times are displayed for Voic e and Data:
• Last call
• Dialed calls
• Received calls
received.
• All calls
received.
Call duration
: shows the length of time for the last call.
: shows the total length of time for all calls made.
: shows the total length of time for all calls
: shows the total length of time for all calls made and
.
Page 53

4. You may reset t hese times to zero by pressing then
Reset
tapping
.
Options During a Call
Your phone provides a number of control functions that you
can use during a call.
Adjusting the Call Volume
During a call, to adjust the volume, use the
the left side of the phone.
Press the Up volume key to increase the volume level
and press the
level.
– or –
Quickly add more volume to the incoming audio by
tapping
From the Home screen, you can also adjust the ringer volume
using these same keys.
Down
volume key to decrease the volume
➔
Extra volume.
In-Call Options
During an active call there are several funct ions available by
tapping a corresponding on-screen button.
•
Add call
: displays the dialer so you can call another person.
Volume
keys on
•
Keypad
: displays the on-screen keypad, where you can enter
number using DTMF (Dual Tone Multi-Frequency).
•
End call
: terminates the call.
•
Speaker
: routes the phone’s audio through either the speaker or
through the earpiece.
–
Tap
Speaker
to route the audio through the speaker . (You can
adjust the speaker volume using the volume keys.) A green line
will appear under the Speaker button.
–
Tap
Speaker
again to use the phone’s earpiece (see
Speakerphone During an Active Call”
green line will disappear when Speaker is not activated.
•
Mute/Unmute
–
–
turn the onboard microphone either on or off.
Tap
Mute
during a call to mute the microphone. A green line will
appear under the Mute button.
Tap
Mute
again to unmute the microphone. T he green line will
disappear when Mute is not activated.
on page 46). The
Call Functions 43
“Using the
Page 54
•
Bluetooth
connects to a Bluetooth headset.
–
Tap
Bluetooth
green line will appear under the Headset bu tto n.
–
Tap
green line will disappear when the He adset is not activated.
•
Press for more options:
–
Hold: place the current active call on hold.
–
Contacts
–
Memo
–
Messages
–
Personalize call sound
incoming call by selecting a n audio equalizer setting for the
current call.
–
Extra volume
a noisy setting.
–
Settings
during a call to activate a Bluetooth headset. A
Bluetooth
again to de-activate the Bluetooth headset. The
: allows you to go to your Contact list.
: allows you to write a memo.
: allows you to write a message during a call.
: allows you to adjust the sound of the
: allows you to turn up the volume when you are in
: allows you to access your Call settings.
Personalizing the Call Sound Setting
During a call it may be necessary to adjust the sound of the
incoming call by selecting an audio equalizer sett ing for the
current call.
1. From the currently active call, tap
Personalize call sound
44
.
Menu
➔
Note:
If prompted to enable the feature via the Call settings
menu, go to
sound
2. Select an available option. Choose from: Adapt sound,
Soft sound, Clear sound, and Off.
Settings ➔ Call settings
.
➔
Personalize call
Placing a Call on Hold
You can place the current call on hold whenever you want. If
your network supports this servic e, you can also mak e another
call while a call is in progress.
To place a call on hold:
1. From the currently active call, tap
place the current call on hold.
2. From the currently active call, tap
call
to activate the call that is on hold.
To make a new call while a call is in progress:
1. From the currently active call, tap
second call.
2. Dial the new phone number and tap
Menu ➔ Hold
Menu ➔ Resume
Add call
to dial the
Call
.
to
Page 55
To switch between the two calls:
Tap the on-screen previous
Swap
Swap
Swap
select
On hold
number entry and
. The previous In call number turns
gray and displays On hold. The new active call displays
a green background behind the number.
Switching Betw een Calls
When you have an active call and a call on hold, you may
switch between the two calls, changing the one on hold to
active and placing the other on hold.
1. Tap Swap.
The current call (caller #2) is placed on hold and the
previous call on hold (caller #1) is then reactivated so
that you can continue conversing with that person. The
active call will appear in a green box.
2. Tap to end the currently active call.
To end a specific call:
1. Tap
Swap
until the call you want to end appears in a
green box.
2. Tap to end the specific call.
3. Tap to end the remaining call.
To answer a call while you have a call in progress:
You can answer another call while you have a call in progress
if you have activated your Call waiting feature. Otherwise, the
other call will go to your Voic email box. For more information,
refer to “More settings” on page 111.
1. Tap and slide to the right to answer another call.
2. Tap
Put "Name/Number" on hold
to put the first call on
hold.
– or –
Tap
End call with "Name/Number"
to end the first call.
3. To switch between the two calls, tap Swap.
•Swap
: Places the current call on hold and then activates the
previous call. The active call will appear in a green box. Tap
Swap
again to switch back.
To end a call on hold:
1. Tap to disconnect the active call.
2. The call on hold will now become the active call. Tap
to end the call.
Call Functions 45
Page 56
3-Way Calling (Multi-Party Calling)
Speaker
Speaker
Speaker
The 3-Way or Multi-Party feature allows you to answer a
series of incoming calls and place them on hold. If this serv ic e
is supported by the network, all calls can be joined together.
You are notified of an incoming call by a call waiting tone.
Note:
The Merge option combines all of the calls you have
established with your phone (both active and on hold).
Swap places the current call on hold and then activates
the previous call.
This feature joins all of the calls you have established with
your phone (both active and on hold) into a multi-party call.
1. Tap and slide to the right to answer the call.
2. Tap and slide to the right to answer the next call.
Put "Name/Number" on hold
3. Tap
hold.
4. Join the first two callers into a single multi-party call by
tapping Merge .
Merge
5. To temporarily leave the conference call, tap
➔
Hold
.
To rejoin the conference call tap
46
to put the first call on
Resume call
6. Tap to end the call.
Using the Speakerphone During an Active Call
While in an active call, it is possible to enable the
speakerphone feature.
Speaker
1. Tap
The
Speaker
speakerphone is activated.
2. Use the
phone) to adjust the volume.
3. To deactivate the speakerphone, tap
Menu
.
.
button now appears as and the
Volume
keys (located on the left side of your
Speaker
.
Page 57
Switching off the Microphone (Mute)
Mute
Headset
You can temporarily switch your phone’s microphone off, so
that the other person cannot hear you.
Example:
You wis h to say some thing to person in the ro om, but
do not want the person on the phone to hear you.
1. Tap Mute .
The
Mute
Mute
button now appears as and Mute is
Mute
activated.
2. Tap Mute
to deactivate the Mute function and
reactivate the microphone.
Bluetooth headset
1. Tap Headset .
2. The phone will scan for your Bluetooth headset. When
found, connect to the headset.
Headset
The
Bluetooth headset is activated.
3. Tap Headset to deactivate the Bluetooth headset
and reactivate the phone speaker.
Headset
button now appears as and the
Headset
Searching for a Number in Address Book
1. During the active call, press then tap
2. Tap the Address Book entry.
For further details about the Address Book feature, see
“Finding an Address Book Entry” on page51.
Contacts
Call waiting
You can answer an incoming call while you have a call in
progress, if this service is supported by the network and you
have previously set the Call waiting option to
You are notified of an incoming call by a call waiting tone.
To answer a new call while you have a call in progress:
1. In a single motion, touch and slide it in any direction
to answer the new incoming call.
2. Tap an option from the Accept call after menu:
• Put "Name/Number" on hold
hold while you answer the new incoming call.
• End call with "Name/Number"
answer the new call.
Activate
.
to place the previous caller on
to end the previous call and
Call Functions 47
.
Page 58
Note:
Swap
Swap
Important!
Call forwarding
The new caller appears at the top of the list. The previous
caller is placed on hold and appears at the bottom of the
list.
On hold
3. Tap the on-screen previous
select
Swap
to switch between the two calls. This
number entry and
places the new caller on hold and activates the previous
call.
The currently active call is displayed with a green
background.
Swap
4. Tap
Swap
Swap
1. From the Home screen, tap ➔ ➔
Call ➔ Additional settings ➔ Call forwarding
again to switch back.
Settings
.
2. Tap one of the following options:
• Always forward
• Forward when busy
: allows you to forward all voic e calls.
allows you to forward voice calls to a
designated number instead of your voice mail number if you
are on another phone call.
48
Call Settings
To access the Call settings menu:
➔
For detailed information on all of the call settings, see “Call” on
page 109.
• Forward when unanswered
: allows you to forward voice calls
to a designated number instead of your voicemail number
when there is no answer on your phone. You can also select
the amount of time that the phone delays before forwarding.
• Forward when unreachable
: allows you to forward voice calls
to a designated number instead of your voicemail number
when you are not in an area covered by your service provider
or when your phone is switched off.
From the Home screen, tap ➔ ➔
Call
.
– or –
From the Home screen, tap
➔
Call
.
Apps
➔
Settings
Settings
➔
Page 59
Section 4: Contacts and Your Address Book
This section allows you to manage your daily contacts by
storing their name and number in your Address Book. Address
Book entries can be sorted by name, entry, or group.
Adding a New Contact
Use the following procedure to add a new contact to your
Address Book.
Saving a Number from the Home screen
1. From the Home screen, tap
2. At the
3. Tap the image icon and assign a picture to the new
Save contact to
Account name.
entry by choosing one of three options:
•Image
: retrieve a previously stored image from your Gallery or
from your My files folder and assign it to this entry. Tap an
image to assign the image to the contact, then tap
• Tagged p ictur es
your Gallery.
• Take picture
assign it to this entry, then tap
: retrieve a previously tagged image from
: use the camera to take a new picture and
Contacts
prompt, tap on
Done
.
➔ .
Device, SIM
, or
Done
•Remove
: deletes any previously assigned image on an
existing contact.
4. Tap the
5. Tap the
.
6. Enter the phone number.
7. Tap
Name
field and use the on-screen keypad to
enter the full name. For more information, refer to
“Entering Text” on page 30.
– or –
Tap
name fields.
The numerical keypad is displayed.
The
Phone number
that is not a mobile number, tap the
select from the other phone number types.
Tap
to delete a field.
next to the
Phone number
Mobile
button initially displays next to the
Name
field to display additional
field.
field. If you want to add a phone number
Mobile
button and
to add another Phone number field or tap
Email address
.
Contacts and Your Address Book 49
Page 60
Home
The keyboard is displayed.
Home
The
Email
not a Home email address, tap the
button initially displays next to the
field. If you want to add an Email address that is
Home
button and
select another Email address type.
8. Enter the Email address.
to add another Email address field or tap
Tap
to delete a field.
9. Tap any of the following fields that you want to add to
your new contact:
•Groups
: assign the contact to Not assigned, Favorites, ICE -
emergency contacts, Co-workers, Family, or Friends.
•Ringtone
: adds a field used to assign a message tone that
will sound when messages are received from this contact.
• Add another field: tap this button to add additional fields.
10. Tap
Save
to save the new contact.
50
Adding Pauses to Contact Numbers
When you call automated systems, you are often required to
enter a password or account number. Inste ad of manually
entering the numbers each time, you can store the numbers in
your Contacts along with special characters called pauses an d
waits. A pause will stop the calling sequence for two seconds
and a wait will pause the calling sequence until you enter a
number or press a key.
To add a pause or a wait to an existing Contact:
1. From the Home screen, tap
the name or number to open the Contact.
2. Tap to edit.
3. Tap the phone number field.
4. Tap the screen at the position where the pause or wait
needs to be added.
5. Tap .
Pause
6. Tap
to add a two-second pause or tap
a wait, and use the keypad to enter the additional
numbers. A pause will be displayed as a comma (,) and
a wait will be displayed as a semi-colon (;).
Save
7. Tap
to save your changes, or tap
discard.
Contacts
, and then tap
Wait
Cancel
to
to add
Page 61
Editing an Existing Contact
When editing an existing contact, you can tap a field and
change or delete the information, or you can add additional
fields to the contact’s list of information.
1. From the Home screen, tap
2. Tap the Contact that you want to edit.
3. Tap to edit.
4. Tap any of the fields to add, change, or delete
information.
Save
5. Tap
to save the edited information.
Contacts
.
Using Contacts
Dialing or Messaging from Address Book
Once you have stored phone numbers in the Address Book,
you can dial them easily and quickly by either using their SIM
card location number or by using the Search field to locate the
entry.
From the Address book, you can also send messages.
Finding an Address Book Entry
You ca n st ore phone n umbers and t heir correspo nding names
onto your SIM card and phone’s onboard memory. The two
locations are physically separate but are used as a single
entity, called th e Address Book.
Depending on your particular SIM card, the maximum number
of phone numbers the SIM card can store and how they are
stored may differ.
1. From the Home screen, tap
2. Within the Contacts list (sorted alphabetically), tap a
letter on the right side of the display to q uickly jump to
the contacts beginning with that letter.
3. Tap the contact you wish to call or message.
4. Tap the phone icon to make a phone call or tap the
message icon to send a message.
For more information, refer to “Creating and Sending
Messages” on page 60.
Tip:
From the Contact list, sweep right over a listing to make a
call. Sweep left over a listing to send a message.
Contacts and Your Address Book 51
Contacts
.
Page 62
Linking Contacts
Linking Contact Information
Many people now maintain multiple email accounts, social
networking logins, and other similar accoun t information. For
example, a Facebook account login name might differ from a
corporate email account login because they are maintained
separately and for different groups of people.
This device can synchronize with multiple accounts such as
Facebook, Twitter, MySpace, Corporate email, and Google.
When you synchronize your phone with these accounts, each
account creates a separate contact entry in the Contacts list.
If one of your contacts (Amy Smith, for example) has a regular
email account that you maintain in Gmail, but also has a
Facebook account under her maiden and married name, as
well as a Yahoo! chat account, when you merge these
accounts into your Contacts list you can link all of her entries
and view the information in one record.
The next time you synchronize your phone with your account s,
any updates that contacts make to email account names,
email addresses, etc. automatically update in your contacts
list.
For more information about synchronizing accounts, see
“Synchronizing Accounts” on page53.
52
1. From the Home screen, tap
2. Tap a contact name (the name you want to link to
another entry).
with a different name or account information.
3. Press ➔
The contact list is displayed.
Note:
Only contacts stored on your phone can be linked.
4. Tap the second contact entry (the entry in which to link)
to create a checkmark.
Done
5. Tap
The second contact is now linked with the first and the
account information is merged into one screen.
Note:
The information is still maintained in both entries, but
displays in one record for easier viewing when you link
the contacts.
Note
Link contacts
.
Contacts
: typically this is the same contact
.
.
Page 63
6. Tap the link icon to view the contact information
you joined. The contacts and information displays with
an icon next to the contact name to indicate what type of
account information is contained in the entry.
Unlinking a Contact
1. From the Home screen, tap
2. Tap a contact name (the account name from which you
want to unlink an entry).
contact with a different name or account information.
3. Tap the link icon .
4. Tap the minus sign
to unjoin.
5. At the
Separate contact
The contact is now separated and no longer displays in
the merged record screen.
Contacts
Note
: typically this is the same
.
next to entry in which you want
prompt, tap OK.
Marking a Contact as Default
When you use messaging type applications, the application
needs to know which information is primary (default) in a
contact entry list. For example, you may have three different
contact records for John Smith, so the application will be
looking for the “default” number or entry.
1. From the Home screen, tap
2. Tap a Contact name.
3. Press ➔
screen displays radio buttons next to t he cont act names
or phone numbers of all the linked contacts. The radio
button next to the default contact will be green.
4. To change the default contact, tap the radio button next
to another entry that you want to be the default. The
radio button will turn green, then tap
Mark as default
Contacts
. The Mark as default
Save
.
.
Synchronizing Accounts
From the Accounts menu you decide if you want applications
to synchronize, send, and receive data at any given time, or if
you want the applications to synchronize automatically. After
determining how you want the accounts to synchronize,
indicate which account to synchronize with your Contacts list.
1. From the Home screen, tap
Contacts and Your Address Book 53
Contacts
.
Page 64
2. Press ➔
3. Tap an account that you would like to synchronize.
4. At the
would like to synchronize for that account.
5. Tap
The account is synchronized.
6. Press to return to the Contacts list.
Note:
You can also synchronize your accounts using the
Settings menu. For more information, refer to
“Synchronizing Accounts” on page 92.
Settings ➔ Contacts
Sync settings
Sync now
screen, tap the options that you
to synchronize the account.
then tap
Accounts
Address Book Options
You can access Address Book options while at the main
Address Book page or while in the details page for a specific
entry.
Options in Address Book
1. From the Home screen, tap
.
2. The following options are displayed:
54
Contacts
then press
.
• Select
: allows you to select entries by placing a check mark
alongside a desired entry.
• Delete
: allows you to delete one or more of your selected
contacts.
• Business cards
access previously photographed business cards.
–
Tap
a new business card. This process automatically imports that
information and updates either an existing contact or creates a
new one.
• Merge accounts
with your Samsung or Google account contacts.
• Speed dial
• Send message or email
message or an email using your Google account.
• Link contacts
another current contact. Similar to a “see also” feature. If you
can’t remember a contact’s information, linking entries can
help you find the person you are looking for.
• Settings
Call or Contacts se ttings .
: allows you to create new business cards or
➔
to begin framing and then photographing
: allows you to merge your contacts together
: allows you to set up speed-dialing.
: allows you to send a text /picture
: allows you to link the current contact to
: allows you to configure where you access either
Page 65

–
Call
: provides quick access to the Phone settings menu.
–
Contacts
: provides access to Contacts options such as
Import/Export, Contacts to display, etc.
•Help
: provides an on-screen Help file that covers most high
level topics for Contacts.
Options at Selected Contact Screen
1. From the Home screen, tap
2. T ap a conta ct and at the conta ct’s display screen, press
Contacts
.
.
3. The following options are displayed:
•Delete
: allows you to delete the currently active entry.
• Link contacts
another current contact.
• Unlink contacts
linked. This option only appears if the contact has been
linked.
• Mark as default
record to use as the default. For more information, refer to
“Marking a Contact as Default”
: allows you to link the current contact to
: allows you to unlink contacts that have been
: allows you to mark one entry in a contact
on page 53.
• Speed dial
• Share name card
• Send contact informati on
• Add to reject list
• Add shortcut to home screen
: allows you to assign this contact to your speed
dial list. For more information, refer to
Speed Dial”
an attachment using various applications.
elements of an existing contact (name, Mobile number, email,
etc.) and send them to a recipient via a text message. This
option does not send the entire Contact entry but only
selected elements.
reject list.
Contacts entry to an available screen location.
on page 39.
: allows you to send contact information as
: allows you to add an entry’s number to the
“Making a Call Using
: allows you select specific
: adds a shortcut to the current
Groups
Adding a Contact to a Group
1. From the Home screen, tap
2. Tap the Contact that you want to add to a group.
3. Tap to edit.
Groups
4. Tap
.
Contacts and Your Address Book 55
Contacts
.
Page 66
5. Tap the group that you would like to add the contact to.
You may select as many groups as you like.
Save
6. Tap
7. After returning to the main edit screen, tap
.
Save
The contact is added to the group.
Removing a Contact From a Group
1. From the Home screen, tap
(
Groups)
.
2. Tap a group entry.
Done
.
Remove from group
3. Press ➔
4. Tap all of the contacts you want to remove from this
group. A green checkmark will appear next to their
name.
5. Tap
The contacts are now removed from the group.
Contacts
.
➔
Creating a New Group
1. From the Home screen, tap
Groups)
➔ (
(
56
Contacts
Create group)
➔
.
again.
2. Tap the
3. Tap
4. Tap
5. Tap
6. Tap
7. Tap each contact you want to add to create a
8. Tap
9. Tap
Group name
to enter a new group name. For more information, refer
to “Entering Text” on page 30.
Group ringtone
to this new group. Tap a ringtone to hear how it sounds,
OK
then tap
– or –
Tap
Add
to select a ringtone from your music files.
Group message tone
assignment to this new group, then tap
Group vibration pattern
file for assignment to this new group, then tap
– or –
Tap
Create
create your own vibration pattern.
Add member
checkmark. You can also tap
Done
Save
to save the new Group category.
field and use the on-screen keypad
to choose a ringtone for assignment
.
to choose an alert tone for
OK
.
to choose a vibration audio
and follow the on-screen instructions to
to add contacts to the new group.
Select all
.
.
OK
.
Page 67
Editing a Caller Group
Favourites
Favourites
To edit a Group entry, there must be at least one member as
part of the selected group.
1. From the Home screen, tap
Groups)
.
(
Contacts
2. Tap a group entry.
3. Press ➔
Edit group
4. Make modifications to the
Group message tone
Add member
5. Tap
Done
6. Tap
7. Tap
.
Save
to save the edited Group category.
.
Group name, Group ringtone
, or
Group vibration pattern
to add more contacts to this group.
Address Book Favourites
Once you have stored phone numbers in the Address Book,
you can add them to your Favourites list.
To view your Favourites list:
From the Home screen, tap
Favourites
.
Contacts
➔
fields.
➔
Adding Favourites to your Address Book
1. From the Home screen, tap
Favourites
2. Press
.
(
Add to favourites)
3. When the Contacts list is displayed, tap a contact that
you want to add to your favourites list. You may select
Contacts
.
more than one.
,
4. Tap
Done
.
5. A gold star will appear next to the contact image in the
Address Book.
Removing Favourites from your Address Book
1. From the Home screen, tap
2. Within the Contacts list, tap a contact that you want to
remove from your favourites list. Contacts in your
Favourites list will have a gold star.
3. Tap the gold star on the top of the display.
4. The gold star will change to a white star and the contact
is removed from your Favourites list. The gold star will
no longer appear next to the contact image in the
Address Book.
Contacts and Your Address Book 57
Contacts
➔
.
Page 68
Managing Address Book Contacts
You can copy, delete, and view t he memory status for the
Phone and SIM contacts on your phone.
Copying Contacts to the SIM Card
Note:
When storing an Address Book entry into the SIM card,
only the name, phone number, and email address are
available as fields. Also, if you move the SIM card to
another phone that does not support additional fields on
the SIM card, this additional information may not be
available.
1. From the Home screen, tap
SIM Management
Copy contacts to SIM
2. Tap
The phone then displays a list of your current phone
contacts.
3. T ap the conta cts to place a checkma rk adjacent to thos e
entries you wish to have copied to the SIM card.
•
Repeat this step for all individual entries you wish copied to
the SIM or tap
entries.
58
.
Select all
Contacts
..
to place a checkmark alongside all
➔ ➔
4. Tap
Done
to copy.
5. At the
Copy to SIM
The selected numbers are copied to the SIM card.
display, tap OK.
Copying Contacts to the Phone
1. From the Home screen, tap
SIM Management
Copy contacts from SIM
2. Tap
3. At the
Device
the contact to.
The phone then displays a list of your current contacts
stored on your SIM card.
4. T ap the con tacts to place a che ckmark adjacent to t hose
entries you wish to have copied to your phone.
•
Repeat this step for all individual entries you wish copied to
your phone or tap
all entries.
5. Tap
Done
The selected numbers are copied.
.
Create contact under account
or an account name that you would like to copy
to copy.
Contacts
.
Select all
to place a checkmark alongside
➔ ➔
prompt, tap on
Page 69

Deleting Contacts from the SIM card
To delete contacts from your SIM card, follow these steps:
1. From the Home screen, tap
SIM Management
Delete contacts from SIM
2. Tap
The phone then displays a list of your current SIM
contacts.
3. T ap the contacts t o place a checkmark ad jacent to those
entries you wish to have deleted from the SIM card.
•
Repeat this step for all individual entries you wish copied to
the SIM or tap
entries.
4. Tap
Delete
5. At the
The selected numbers are deleted from the SIM card.
.
Select all
.
Delete Contacts from SIM
Contacts
.
to place a checkmark alongside all
➔ ➔
prompt, tap OK.
Deleting Address Book Entries from the Phone
You can delete Phone or SIM entries from your phone’s
memory.
1. From the Home screen, tap
2. Within the Contacts list, touch and hold a contact that
you want to delete.
Contacts
.
3. Tap
4. At the
Cancel
Delete
on the displayed list.
Delete
prompt, tap OK to delete the contact or
to exit.
Contacts and Your Address Book 59
Page 70
Section 5: Messaging
This section describes how to send and receive different
messages using the default Messaging app on your phone.
Types of Messages
Your default Messaging app provides the following message
types:
•
Text Messages
•
Multimedia (Picture, Video, and Audio) Messages
The Short Message Service (SMS) lets you send and receive
text messages to and from other mobile phones or email
addresses. To use this feature, you may need to subscribe to
your service provider’s message service.
The Multimedia Messaging Service (MMS) lets you send and
receive multimedia messages (such as picture, video, and
audio messages) to and from other mobile phones or email
addresses. To use this feature, you may need to subscribe to
your service provider’s multimedia message service.
60
Important!
When creating a message, adding an image, a
sound file, or a video clip to a text message
changes the message from a text message to a
multimedia message.
Messaging icons are displayed at the top of the screen and
indicate when messages are received and their ty pe. For more
information, refer to “Indicator Icons” on page 13.
Creating and Sending Messages
This section describes how to create a send a message using
the Messaging app.
1. From the main Home screen, tap
Compose
.
Note:
The main Home screen initially contains the
icon. If you delete it, or if you want to access
Messaging from another Home screen, you must tap
Apps
➔
Messaging
Messaging
➔
Messaging
.
Page 71
2. Tap on the
recipient or tap to select a recipient from your
Contacts. You can also select the recipient based on
Groups, Favorites, or Logs.
3. If adding a recipient from your Contacts, tap the contact
to place a checkmark then tap
The contact will be placed in the recipient field.
Note:
For the Group option, if the number of recipients is less
than 10, all members in the group will be added. You will
need to delete any unnecessary members in the list by
selecting the trash can icon and deleting unwanted
entries.
Note:
Enter additional recipients by separating each entry with
a semicolon (;) then using the previous procedure.
4. Tap the
keypad to enter a message. For more information, refer
to “Entering Text” on page 30.
5. Add more recipients by tapping the recipient field.
Enter recipients
Enter message
field to manually enter a
Done
.
field and use the on-screen
6. Tap
7. Review your message and tap
Note:
If you exit a message before you send it, it will be
automatically saved as a draft.
Add emoticons
emoticon from an on-screen list and then add it into your
message (at the cursor location) if desired.
to choose an available
Send
.
Message Options
Options before composing a message
1. From the main Home screen, tap
2. Before composing a message, press to reveal
additional messaging options:
• Select
: allows you to select desired messages.
•Delete
: deletes the entire message and its bubbles.
• Draft messages
contents.
• Locked messages
its contents.
• Scheduled messages
folder and its contents.
: displays the draft messages folder and its
: displays the locked messages folder and
: displays the scheduled messages
Messaging
Messaging 61
.
Page 72
• Spam messages
contents.
•Font size
your Messages application.
•Settings
information, refer to
•Help
: allows you to get online help .
: displays the spam messages folder and its
: allows you to configure the font size in use within
: allows you to access Messaging settings. For more
“Messaging Settings”
on page 65.
Options while composing a message
1. While composing a message, press to reveal
additional messaging options.
• View contact
option only displays if the message sender is in your contacts
list.
• Add to contacts
Contacts entry. This option only displays if the recipient is not
already in your Contacts list.
• Quick responses
message reply templates.
• Add recipient
message.
62
: displays the Contact’s Overview page. This
: allows you to add the recipient as a new
: displays your available preset text
: allows you to add another recipient to the
• Insert smiley
images (emoticons).
•Preview
MMS message prior to delivery.
• Add slide
(Multimedia) message and allows you to attach an existing
slideshow.
• Schedule message
current message to be delivered.
• Duration (5 sec) (only in MMS): allows you to change the
duration of the image slid eshow.
• Layout (bottom) (only in MMS): allows you to change the
layout.
Note:
Priority senders appear at the top of the main Messages
screen.
• Add to priority senders
priority sender. The recipient will then appear on the priority
sender bar.
: allows you to add insert smiley icons
(only in MMS): allows you to add preview the
: converts an SMS message into an MMS
: allows you to schedule a time for the
: allows you to add the recipient as a
Page 73

• Add to spam numbers
so that messages from this number will be directly delivered
to your spam folde r .
•Discard
: closes the current open message.
•Font size
: allows you to configure the font size in use within
your Messages application.
: allows you to tag a number as spam
Adding attachments to a message
To add an attachment to your message, tap and select
one of the following options:
•S Planner
•Image
• Take picture
•Video
• Record video
: allows you to add an event from your calendar.
: allows you to tap an existing image from your Pictures
list to add it to your message.
: allows you to temporarily exit the message,
take a photo with phone’s camera, and then add it to your
Save
message by tapping
: allows you to choose an existing video from the
Videos list, then add it to your message.
: allows you to temporarily exit the message,
record a video clip using the phone’s camera, and then add it
to your message by tapping
.
Save
.
•Audio
: allows you to choose an existing audio file from the
Audio list, then add it to your message by tapping the circle to
the right of the audio so that it turns green, then tapping
• Record audio
and record an audio clip using the phone’s microphone. It is
then automatically attached to the message.
•Memo
• My location
location indicating your cur rent lo catio n.
•Maps
maps url link about your current location.
• Contacts
entry, then add it to your message by tapping
: allows you to temporarily exit the message
: allows you to add a memo that you have created.
: allows you to attach a Goog le Maps UR L
: allows you to attach both a thumbnail and Google
: allows you to tap on an existing Address Book
Done
.
Viewing New Received Messages
1. When you receive a new message, the new message
icon will appear at the top of your screen.
2. Open the Notification Bar and select the message. For
more information, refer to “Notification Panel” on page
29.
– or –
Messaging 63
Done
.
Page 74
From the main Home screen, tap
tap the new message to view it.
The selected message appears in the display .
3. To play a multimedia message, tap
•
T o pau se playba ck of the m ultimed ia messa ge, tap .
4. To scroll through the message (if additional text pages
have been added), touch the screen and in a single
motion, scroll up or down the page.
Messaging
then
.
Message Threads
Sent and received text and picture messages are grouped int o
message threads. Threaded messages allow you to see all
the messages exchanged (similar to a chat program) and
displays a contact on the screen. Message threads are listed
in the order in which they were received, with the latest
message displayed at the top.
To access message thread options:
From the main Messaging screen, touch and hold the
message to display the following options:
• Add to spam numbers
list. ny new texts from this sender are automatically blocked.
• Delete
: deletes the currently selected message thread.
64
: adds the current sender to a spam
To access additional Bubble options:
Touch and hold the message bubble within an active
message conversation to display the following options:
• Delete
: deletes any currently selected message bubble from
the thread.
• Copy text
•Forward
• Lock/Unlock
•Copy to SIM
•Share
• View message details
• Report as SPAM
: copies the currently selected message bubble
from the thread.
: allows you to forward the cur rently se lected
message bubble to an external recipient.
: locks or unlocks the currently sele cted
message bubble from being accidentally deleted.
: copies the currently selected message bubble
as a single text message with in the SIM car d.
: allows you to share the message with others using
various apps.
: displays details for the currently
selected message bubble.
: allows you to register the number as
spam.
Page 75
Deleting Messages
To delete your messages, follow these steps:
1. From the main Home screen, tap
2. Press ➔
3. Tap each message you want to delete or tap
A checkmark will appear beside each message you
select.
4. Tap
5. At the
Cancel
Delete
Done
.
Delete conversation
to cancel.
.
Messaging
prompt, tap OK to delete or
.
Select all
Message Search
You can search through your messages by using the Message
Search feature.
1. From the main Home screen, tap
2. Tap .
3. Use the on-screen keypad to enter a word or phrase to
search for, then tap
4. All messages that contain the search string you entered
are displayed.
Messaging
.
.
Messaging Settings
To configure the settings for text messages, multimedia
messages, Voice mails, and Push messages.
1. From the main Home screen, tap
➔
Settings
.
2. The following Messaging settings are available:
• Default messaging app
application.
•Display
–
Bubble style
for your messages. Bubbles are the rounded boxes that
surround each message.
–
Background style
background styles for your messages.
–
Change font size
the up or down volume keys.
• Quick responses
responses to use in your messaging.
• Text messages
–
Manage SIM card messages
messages stored on the SIM card.
.
field to set your default messaging
alters the display properties for Messages.
: allows you to choose from several bubble styles
: allows you to choose from several
: allows you to change the text size by using
: allows you to edit or add new quick
alters the SMS settings.
Messaging
: allows you to manage the
➔
Messaging 65
Page 76

–
Input mode
: allows you to set the input mode for your text
messages. Choose from: GSM Alphabet, Unicode, or
Automatic.
–
Message center
message center where your messages reside while the
system is attempting to deliver them.
• Multimedia messages
–
Group conversation
to multiple recipients.
–
Delivery reports
informs you whether or not your message was delivered.
–
Read reports
informs you whether or not when your message is opened.
–
Auto retrieve
retrieve messages.
–
Roaming auto retrieve
automatically retrieve messages while roa ming.
66
: allows you to enter the number of your
alters the MMS setting s.
: allows you to send a single message
: when this option is activated, the network
: when this option is activated, the n etwork
: allows the message system to automatically
: allows the message system to
–
Set restrictions
choose from
messages with content belonging to the Core MM Content
Domain),
messages that you are creating a multimedia message which
does not fit the Core MM Content D omain),
add any content to the message.)
–
MMS alert
from an SMS (text) to MMS (multimedia) mode.
• Delete old messages
reached, rather than overwriting them.
• Priority senders
feature.
• Push messages
the network.
• Notifications
your status bar.
•Signature
the slider to the right to turn it on .
–
Edit signature
your message.
: allows you to select the creation mode .
Restricted
(you can only create and submit
Warning
(the device will warn you via pop up
Free
(you may
: alerts you when the messaging modes changes
: deletes old messages when the limit is
: activates or deactivates the priority sender
: allows you to receive push messages from
: allows you to see message notifications on
configures message signatures. Touch and slide
: allows you to enter a desired signature for
Page 77

• Spam filter
• Delay message sending
•Safe mode
: when enabled, allows you to configure available
spam settings such as:
–
Add to spam numbers
assign a phone number as being sent from a spam source.
–
Add to spam phrases
phrase as belonging to a spam message. Ex: Dear friend.
–
Block unknown senders
incoming messages from unknown sources or blocked
numbers.
that determines how long the messages are held until they
are sent. This can allow you to cancel the delivery of a recent
message.
: allows you to set security p aramete rs for
Messages. Choose from Allow access to all links and
Potential
: allows you to manually enter and
: allows you to assign a specific text
: when active, automatically blocks
: allows you to set a time delay limit
Messaging 67
Page 78
Section 6: Changing Your Settings
This section explains the settings used for customizing your
device.
Accessing Settings
From any Home screen, tap
Settings Categ or ies
The Settings are divided into 9 main categories. When the
Settings screen displays, the following 9 category headings
are listed. Scroll down to view all of the headings:
•
Quick settings
average person. You can modify your Quick settings so your most
frequently used settings are at the top of the list. For more
information, refer to
•
Network connections
of your device to external sources.
•
Connect and share
information with other devices.
•
Sound and display
colours, display appearance, and notifications on your phone.
68
: are the most frequently used settings by the
“Quick Settings” on page 69.
: all of the settings related to the connection
: all of the settings t hat are related to sharing
: these settings are related to the sounds,
Apps
➔
Settings
•
.
Personalization
like it.
•
Motion
you can use to make using your phone easier.
•
User and backup
your phone, and resetting your phone.
•
System
your phone.
•
Applications
Note:
The settings for your device are described in this section
in the order that they appear within the Settings menu
with the exception of the Quick settings.
: allows you to customize your phone the way you
: these settings are for the different motions and gestures
: all of the settings used for accounts, backing up
: these settings are concerned with setting up the system on
: the settings used for managing your applications.
Searching the Settings
If you are not sure exactly where to find a certain setting, you
can use the Setting search feature.
1. From the main Settings screen, tap
2. Enter a word or words in the Search box. As you type,
settings that match will appear on the screen.
.
Page 79
3. Tap an entry to go to that setting.
Note:
If the word you entered does not find any matches,
results found
will be displayed.
No
Quick Settings
Quick settings are all of the settings that you most frequently
use. When you first access the Settings menu, the Quick
settings are set to a default list of settings. To modify the
Quick settings display with your most frequently used settings,
follow these steps:
1. From the main Settings screen, tap ➔
settings
.
2. Scroll thru all of the settings and tap the settings icons
that you want in your Quick settings menu. The settings
that are already in the Quick settings menu are
highlighted. Tap a highlighted item to remove it f r om the
Quick settings menu.
Save
3. Tap
to save your new Quick settings menu.
Edit quick
Wi-Fi Settings
This section describes the Wi-Fi settings. For information on
how to use Wi-Fi, see “Wi-Fi” on page 124.
Smart network switch
Smart network switch allows your device to automatically
switch between a Wi-Fi network and a mobile network.
1. From the main Settings screen, tap
Smart network switch
2. Tap
activate the feature.
to create a checkmark and
Wi-Fi
.
Activating Wi-Fi
1. From the main Settings screen, tap
2. Tap the ON/OFF slider, loc ated to the right of the Wi-Fi
field, to turn Wi-Fi ON .
3. Your phone will automatically scan for available Wi-Fi
networks. For more information, refer to “Connect to a
Wi-Fi Network” on page 124.
Wi-Fi
.
Activating Wi-Fi Direct
Wi-Fi Direct allows device-to-device connections so you can
transfer large amounts of data over a Wi-Fi connection.
1. From the main Settings screen, tap
2. Tap the ON/OFF slider, loc ated to the right of the Wi-Fi
field, to turn Wi-Fi ON .
3. Tap ➔
Wi-Fi Direct
.
Changing Y our Settings 69
Wi-Fi
.
Page 80
For more information, refer to “Wi-Fi Direct” on page
127.
Advanced Wi-Fi Settings
The advanced Wi-Fi settings allow you to set up and manage
wireless access points.
Wi-Fi
1. From the main Settings screen, tap
Advanced
2. Tap ➔
The following options are available:
• Network notification
available.
• Passpoint
• Sort by
• Keep Wi-Fi on during sleep
• Always allow scanning
• Install certificates
70
: allows you to connect to passpoint-enabled Wi-Fi
Access Points automatically.
: allows you to sort by Alphabet or Signal strength.
disconnect from Wi-Fi.
and other apps to scan for networks, even when Wi-Fi is
turned off.
that you have on a MicroSD card.
.
: alerts you when a new WAP is
: allows you to specify when to
: allows the Google location service
: allows you to install security ce rtificates
.
• MAC address
when connecting to some secured networks (not
configurable).
• IP address
: view your device’s MAC address, required
: view your device’s IP address.
Download Booster
Set the device to download files via both Wi-Fi and mobile
networks at the same time.
1. From the main Settings screen, tap
.
booster
2. Tap the ON/OFF slider to turn Download booster
ON .
The following options are available:
•
Do not show speed info
transfer speed in a popup window while using download booster
mode.
: Set the device to not display the data
Download
Bluetooth
In this menu you can activate Bluetoo th, view or assign a
device name, activate your phone so other Bluetooth devices
can discover it, or scan for other, available Bluetooth devices
with which to pair.
Page 81
Activating Bluetooth
1. From the main Settings screen, tap
2. Tap the ON/OFF slider, located to the right of the
Bluetooth field, to turn Bluetooth ON .
The Bluetooth icon
3. Your phone automat ically scans for nearby discoverable
devices. After scanning, tap a device to pair with it. For
more information, refer to “Pairing Bluetooth Devices”
on page 130.
4. Tap and select a Bluetooth setting to configure:
• Visibility timeout
automatically turn off the Discoverable option: 2 minutes, 5
minutes, 1 hour, or Never time out.
• Received files
Bluetooth.
• Rename device
• Help
: provides additional information on Bluetooth and
Bluetooth settings.
5. Tap the checkbox next to the device name to remove
the checkmark if you do not want your phone visible to
other Bluetooth devices.
is displayed on the status bar.
: use this setting to control when to
: shows the list of files received by using
: allows you to ren ame yo ur de vice.
Bluetooth
Tethering and Mobile hotspot
.
This option allows you to share your phones’s mobile data
connection via USB or as a portable Wi-Fi hotspot.
USB tethering
1. From the main Settings screen, tap
Mobile hotspot
2. Connect your phone to your PC using a USB cable.
3. Tap
feature. The USB tethering icon
top of your screen.
For more information, refer to “USB Tethering” on page
131.
Mobile Hotspot
1. From the main Settings screen, tap
Mobile hotspot
2. Turn Mobile Hotspot on by tapping the slider so that it
changes to the ON position .
The Mobile Hotspot icon
your screen.
3. Tap
.
USB tethering
Configure
to add a checkmark and activate the
.
at the bottom of the screen.
is displayed at the top of
Changing Y our Settings 71
Tethering and
is displayed at the
Tethering and
Page 82
4. Enter or edit the Network SSID, Hide my device,
Security setting, and Password.
Show password
5. Tap
them displayed.
Save
6. Tap
7. Tap for the following option:
Connecting to your Wi-Fi hotspot from other devices
1. Activate Wi-Fi on the device that wants to connect to
2. Find
72
.
• Timeout settings
be available as a portable Wi-Fi hotspot.
For more information, refer to “Mobile Hotspot” on page
132.
your phone.
SM-G870W_XXXX
connect to it. XXXX are four randomly generated digits
that will appear when you set up a Mobile hotspot on
your device.
The connected device can now use internet through
your Mobile hotspot.
and
Show advanced options
: allows you to set the time your device will
in the Wi-Fi network list and
to see
Note:
Activating Wi-Fi and connecting to your phone will be
different depending on the type of the other device.
Flight mode
Flight mode allows you to use many of your phone’s features,
such as Camera, Games, and more, when you are in an
airplane or in any other area where making or receiving calls
or data is prohibited.
Important!
When your phone is in Flight Mode, it cannot send or
receive any calls or access online information or
applications.
1. From the main Settings screen, tap
2. Tap the ON/OFF slider .
The Flight mode icon
screen.
is displayed at the top of your
Flight mode
Data Usage
From this screen you can view your Mobile data usage and
turn your Mobile data capability On or Off.
1. From the main Settings screen, tap
Data usage
.
.
Page 83
2. Tap
Mobile data
data usage on.
Set mobile data limit
3. Tap
allow a data limit to be set.
4. Touch and drag the orange limit bar to the GB limit that
you desire.
5. Tap the
date.
The data usage displays as a visual (chart) and also
displays a list of each application with a breakdown of
how much data was used per application.
Note:
Data is measured by your device. Your service provider
may account for data usage differently.
6. Tap to disp lay additional options. Tap to activate.
• Data roaming
• Restrict background data
from working unless you are connected to a Wi-Fi network.
• Auto-sync data
• Show Wi-Fi usage
usage.
to create a checkmark and turn Mobile
to create a checkmark and
Data usage cycle
drop-down menu and select a
: enables data roaming on your device.
: restricts some apps a nd servi ces
: allows your accounts to auto matica lly sync
: displays a Wi-Fi tab that shows Wi-Fi
• Mobile hotspots
: displays available mobile hotspots.
Location
The Location settings allow you to set up how the phone will
determine your location and the sensor settings for your
phone.
1. From the main Settings screen, tap
2. The menu is separated into various sections:
•Mode
: allows you to choose a location mode. Each mode
enables different technologies and affects both the accuracy
of the location and battery usage.
• Recent location requests
recently requested your location information.
• Location services
locations.
• My places
: allows you to add location information for your
Home, Work, and Car.
: displays services that have
: allows you to save up to 100 most recent
Location
More networks
This option displays additional Connectivity information.
From the main Settings screen, tap
Options display for Flight mode, Mobile networks,
Tethering and mobile hotspot, and VPN.
Changing Y our Settings 73
More networks
.
.
Page 84

Default messaging app
This option allows you to set the default messaging app that
you can use to send all of your messages.
From the main Settings screen, tap
➔
Default messaging app
and make a selection.
More networks
Mobile networks
Before you use applications such as Google Maps and find
your location or search for places of interest, you must enable
the Mobile networks options.
Mobile data
To enable data access over the mobile network, this option
must be selected. It is set on by default.
1. From the main Settings screen, tap
➔
Mobile networks
Mobile data
2. Tap
feature.
Data Roaming
Data roaming allows you to connect to your service provider’s
partner networks and access data services when you are out
of your service providers area of coverage.
74
.
to create a checkmark and activate the
More networks
1. From the main Settings screen, tap
➔
Mobile networks
Data roaming
2. Tap
the feature.
Access Point Names
To use Wi-Fi you need access to a wireless access point
(hotspot).
1. From the main Settings screen, tap
➔
Mobile networks
Access Point Names
2. Tap
A list of the Access Point names display. The active
access point displays a green, filled circle to the right of
the name.
Network Operators
Using this feature you can view the current network
connection. You can also scan and select a network operator
manually, or set the network selection to Automatic.
1. From the main Settings screen, tap
➔
Mobile networks
.
to create a checkmark and activate
.
.
.
More networks
More networks
More networks
Page 85
2. Tap
Network operators
The current network connection displays at the bottom
of the list.
.
VPN settings
The VPN settings menu allows you to set up and manage
Virtual Private Networks (VPNs).
Important!
Note:
Default setup options
You must deactivate data service prior to searching
for an available network.
Connecting to 2G networks slows the data transfer speed
and time.
Your phone default is set to Automatic (to automatically
search for an available network. You can set this option to
Manual to select a network each time you connect.
1. From the main Settings screen, tap
➔
Mobile networks
Network operators
2. Tap
Default setup
3. Tap
Manual
4. Tap
manually, or tap
automatically select a network.
.
.
.
to locate and connect to a network
Automatic
to allow the device to
More networks
Important!
Before you can use a VPN you must establish and
configure one.
Adding a Basic VPN
Follow these steps to add a basic VPN:
1. Before using VPN, you must first set up a screen unlock
PIN or password. For more information, refer to “Lock
screen” on page 82.
2. From the main Settings screen, tap
➔
VPN
.
Basic VPN
3. Tap
4. Tap
5. Enter a name for the VPN network in the
6. Select a VPN type from the
7. Enter the Server address and any other required fields
that are dependent upon the
previously.
.
(Add VPN network)
Changing Y our Settings 75
.
Type
drop-down menu.
Type
More networks
Name
you entered
field.
Page 86

8. Tap the
9. Tap the
10. Tap
PPP encryption (MPPE)
encryption.
Show advanced options
additional VPN options.
Save
to save your VPN settings.
check box to enable
check box to display
Adding an IPsec VPN
1. Before using VPN, you must first set up a scre en unlock
PIN or password. For more information, refer to “Lock
screen” on page 82.
2. From the main Settings screen, tap
➔
VPN
.
Advanced IPsec VPN
3. Tap
4. Tap
5. Enter a password, confirm the password, and tap
6. Enter a name for the VPN connection in the
7. Select an
8. Enter any other required information.
9. Tap
76
(Add IPsec VPN network)
connection name
IPsec connection type
menu.
Show advanced options
options.
.
field.
to display additional VPN
More networks
.
VPN
from the drop-down
OK
NFC
Android Beam
.
Save
10. Tap
NFC (Near Field Communication) allows data exchange when
you touch your device with another compatible device. This is
used for applications such as Android Beam and S Beam.
To activate NFC, follow these steps:
1. From the main Settings screen, tap
2. Tap the ON/OFF slider, located to the right of the NFC
When Android Beam is activated, you can beam app content
to another NFC-capable device by holding the devices close
together. You can beam browser pages, YouTube videos,
contacts, and more.
1. From the main Settings screen, tap
2. Tap the
3. Touch the back of your device with another NFC-
to save your VPN settings.
NFC
field, to turn NFC ON .
NFC
Android Beam
capable device and the content is transferred.
.
OFF / ON
icon to turn Android Beam ON
.
.
➔
Page 87
S Beam
When S Beam is activated, you can beam files to another
NFC-capable device by holding the devices close together.
You can beam images and videos from your Gallery, music
files from your Music app, and more.
1. From the main Settings screen, tap
S Beam
.
OFF / ON
2. Tap the
3. Touch the back of your device with another NFC-
capable device and the content is transferred.
icon to turn S Beam on .
NFC
➔
Tap and pay
Tap and pay allows you to select the default payment
application you want to use for making on-phone purchases.
1. From the main Settings screen, tap
Tap and pay
2. Select the app that you want as your default.
.
NFC
➔
Nearby devices
This option allows you to share your media files with certain
nearby devices when connected to the same Wi-Fi.
1. Connect to a Wi-Fi network. For more information, refer
to “Activating Wi-Fi” on page 69.
2. From the main Settings screen, tap
.
devices
OFF / ON
3. Tap the
4. Verify (
screen in your status bar.
Shared contents
5. Tap
like to share. Tap
Allowed devices
6. Tap
you would like to allow.
Denied devices
7. Tap
you would like to not allow.
Download to
8. Tap
downloaded (shared) content. Choose from Device or
SD card.
Download from other devices
9. Tap
actions you’ll take when you download content from
other devices. Choose from either Always accept,
Always ask, or Always reject.
icon to turn Nearby devices on
.
Nearby devices
, then select the destination of any
) appears at the top of the
, then check the media you would
OK
.
, then select the connected devices
, then select the connected devices
Changing Y our Settings 77
Nearby
, then select the
Page 88
Printing
With the Printing option, you can set your device to print on
compatible Samsung Wi-Fi printers.
1. From the main Settings screen, tap
2. If you have a Samsung printer, tap
Service Plugin
– or –
If you have an HP printer, tap
3. T ap the ON/OFF slider, to turn Printing ON .
Your device will search for compatible printers.
4. Follow the on-screen instructions.
5. Tap for additional options.
.
HP Print Service Plugin
Printing
Samsung Print
Screen Mirroring
The Screen Mirroring feature allows you to share the media
files on your device screen with an HDMI device such as an
HDMI TV.
Note:
This feature requires the optional AllShare Cast dongle
which is available as an accessory. See your Customer
Service Representative for more information.
78
1. From the main Settings screen, tap
.
Mirroring
2. Tap the ON/OFF slider, to turn on .
.
3. Connect the AllShare Cast dongle to the HDMI device
using an HDMI A-to-A cable.
Scan
4. Tap
to scan for available devices.
Screen
Sound
.
From this menu you can control the sounds on the phone.
From the main Settings screen, tap
The following options display:
Sound
.
Sound Mode
Sound mode allows you to select Sound, Vibrate, or Mute to
be used for all sounds.
1. From the main Settings screen, tap
Sound mode
2. Select the option that you would like to use for all of your
sounds.
.
Sound
➔
Volume
The Volume option allows you to change the volume for all
phone sounds in one easy location.
Page 89

1. From the main Settings screen, tap
Volume
.
2. Touch and drag the sliders to adjust the sound volume
for the various options.
OK
3. Tap
.
Sound
➔
Vibration intensity
Vibration intensity allows you to select how intense the
vibration is for different options.
1. From the main Settings screen, tap
Vibration intensity
2. Touch and drag the slider to adjust the Vibration
intensity for the various options.
.
Sound
➔
Music effects
Music effects allows you to set the Music effec ts control panel
that will be used when you play music on your phone.
1. From the main Settings screen, tap
Music effects
2. Select the option that you would like to use for your
Music effects control panel.
.
Sound
➔
Ringtones
This option allows you to set the ringtone.
Sound
1. From the main Settings screen, tap
Ringtones
2. Tap
3. Tap a ringtone and tap
– or –
Tap
.
OK
.
Add
to select a file from your music files.
.
Vibrations
This option allows you to set your phone to vibrate and ring.
Sound
1. From the main Settings screen, tap
Vibrations
2. Tap
3. Select a vibration pattern and tap
– or –
Tap
create your own vibration.
.
OK
Create
and follow the on-screen instructions to
.
.
Notifications
This option allows you to set the ringtone that will sound for
notifications and alarms.
1. From the main Settings screen, tap
Notifications
2. Tap
3. Tap a ringtone and tap
.
OK
.
Changing Y our Settings 79
Sound
.
Page 90

Vibrate when ringing
This option allows you to enable your phone to vibrate
whenever it rings.
1. From the main Settings screen, tap
Vibrate when ringing
2. Tap
enable the feature.
to create a checkmark and
Sound
.
System Tone Settings
The System tone settings are used when you use the dialing
pad, make a screen selection, lock your screen, or tap the
screen.
1. From the main Settings screen, tap
2. Tap any of the following options to create a checkmark
and activate the feature:
• Dialing keypad tone
the keyboard.
• Touch sou nds
• Screen lock sound
locked or unlocked.
• Haptic feedback
and on certain UI interactions.
80
: makes a sound when you tap a key on
: makes a sound when you touch the screen.
: makes a sound when your screen is
: makes a vibration when you tap soft keys
Sound
.
Samsung Keyboard Sound Settings
The Samsung keyboard sound settings are used when you
use the dialing pad, make a screen selection, lock your
screen, or tap the screen.
1. From the main Settings screen, tap
2. Tap any of the following options to create a checkmark
and activate the feature:
• Sound when tapped
the Samsung keyboard.
• Vibrate when tapped
on the Samsung keyboard.
: makes a sound when you tap a key on
: makes a vibration when you tap a key
Sound
.
Samsung Application Sound Settings
This section describes how to modify sound settings
associated with several frequently used apps.
1. From the main Settings screen, tap
2. Tap one of the following apps to access the settings:
•Call
: allows you to modify settings for call alerts, ringtone and
sound settings, and Voicemail sound settings.
• Messaging
•Email
: allows you to modify settings for the Messaging
app.
: allows you to modif y sett ings for y our Ema il ac counts.
Sound
.
Page 91

•S Planner
3. Follow the on-screen instructions to update your app
sound settings.
: allows you to modify settings for event notification
in your calendar app.
Display
In this menu, you can change various settings for the display.
From the main Settings screen, tap
The following options display:
•Brightness
•Font
• Screen rotation
• Smart stay
• Screen timeout
: configures the LCD Brightness levels. Tap
Automatic brightness to allow the phone to self-adjust or drag
the slider and tap OK.
: allows you to set the font style and font size that your
phone will use. You can also tap Get fonts online to choose
from a wider selection.
: allows you to switch the displa y orient ation
automatically when you ro tate the p hone.
: when activated, your screen stays on as long as
you are looking at it.
: allows you to adjust the delay time before the
screen automatically turns of f.
Display
.
• Screen mode
screen modes that affect the color and sharpness of your
display.
• Auto adjust screen tone
the phone analyzes the displayed screen image and adjusts
the LCD brightness.
•Daydream
your device is docked or sleeping. Tap the OFF / ON icon
next to Daydream to turn it on . Follow the on-screen
instructions.
• LED indicator
be used as indicators. Tap the features that you want
activated to create a checkmark.
• Increase touch sensitivity
sensitivity of your phone automatically depending on the type
of material on the display.
: allows you to select from several different
: allows you to save power because
: allows you to control what your screen does when
: allows you to set up how your LED lights can
: allows you to adjust the touch
Wallpaper
You can change the Wallpaper (background) of your home
and lock screens by following these steps:
1. From the main Settings screen, tap
Changing Y our Settings 81
Wallpaper
.
Page 92
2. Select the screen or screens that you would like to
modify. Select
lock screens
3. Scroll through the wallpaper thumbnails located at the
bottom of the screen. Tap the one you want.
4. It is displayed on your screen.
5. Tap
The new wallpaper is saved.
6. If you want to view all of your My Magazine updates in
one place on the Home screen, tap to create a
checkmark and activate the feature.
Home screen, Lock screen
.
Done
.
, or
Home and
Lock screen
Choose settings for unlocking your screen. For more
information about using the lock and unlock features, see
“Locking and Unlocking the Touch Screen” on page 7.
Screen Lock
1. From the main Settings screen, tap
Screen lock
2. Tap
screen instructions to set up your Screen lock:
•Swipe
82
for these options then follow the on-
: Swipe the screen to unlock it.
Lock screen
• Pattern
•PIN
• Password
•None
Lock screen options
Activate or deactivates various Unlock screen functions.
Note:
The Lock screen options will differ depending on what
type of Screen Lock you have selected in step 2.
1. From the main Settings screen, tap
2. The following options are available depending on the
Screen Lock type that you have selected:
.
• Dual clock
• Clock size
•Show date
: A screen unlock pattern is a touch gesture you
create and use to unlock your device. Follow the prompts to
create or change your screen unlock pattern.
: Select a PIN to use for unlocking the screen.
: Create a password for unlocking the screen.
: No pattern, PIN, or password is required. The screen
will never lock.
Lock screen
displays a dual clock on your lock screen when
roaming.
allows you to select t he si ze of the c lock that w ill
appear on your lockscreen.
displays the date on your lockscreen.
.
Page 93

• Camera shortcut
lockscreen.
• Owner information
want to be displayed on the lockscreen.
• Unlock effect
phone.
• Additional information
(from S Health app) information on your lockscreen.
• Help text
option only).
• Make pattern visible
draw it (Pattern options only).
• Vibration feedback
a wrong pattern (Pattern options only).
• Lock automatically
screen. (Pattern, Pin, and Password options only)
•
Lock instantly with power key
when the power key is pressed to turn the screen off.
displays a camera shortcut icon on your
displays information about you, that you
sets the effect you receive when unlocking the
displays Weather on Walking mate
shows help information on the Lock screen (Swipe
allows you to see the pattern as you
causes your phone to v ibrate if you ente r
allows you to set a time-out for lock
: Lock the screen instantly
Multi window
The Multi window feature allows you to run multiple
applications on the current screen at the same time. Fo r more
information, refer to “Using the Multi Window” on page 19.
1. From the main Settings screen, tap
2. Tap the ON/OFF slider, located to the right of the Multi
window field, to turn it on .
Open in multi window view
3. Tap
you want to automatically have Multi window activated
whenever you open files from My File s, Video, or any
attachments from emails or messages.
Tray position
4. Tap
you would like the Multi window tray to be located (Left
or Right).
5. From any screen, press and hold the
show or hide the multi window tray.
and select the side of the screen that
to create a checkmark if
Multi window
Back
key to
Notification panel
The Notification panel includes a pull-down list to show
information about processes that are running, recent
notifications, and alerts.
Changing Y our Settings 83
.
Page 94
1. From the main Settings screen, tap
.
panel
2. For more information, refer to “Notification Panel” on
page 29.
Notification
Toolbox
This feature allows you to customize a quick access panel t hat
hold up to five frequently used application shortcuts. Once
activated, this on-screen button can be placed anywhe re. This
button appears on top off current screens and can only be
disabled via either the Notifications Panel or via the Toolbox
screen.
For more information, refer to “Customizing the Toolbox” on
page 24.
Important!
There can only be at most five applic ations ass igned
to the quick access Toolbox button.
To activate the Toolbox:
1. From the main Settings screen, tap
84
Toolbox
.
2. In a single motion touch and slide the
the right to turn it on. The slider color indicates the
activation status.
When activated, the
appears on the current screen.
– or –
1. From the Notification panel, tap (
to display additional functions.
2. Toggle on the Toolbox activation button (turns green).
To deactivate the Toolbox:
1. From the main Settings screen, tap
2. In a single motion touch and slide the
the right to turn it off.
– or –
1. From the Notification panel, tap (
to display additional functions.
2. Toggle off the Toolbox activation button (turns grey).
To customize the Toolbox applications:
1. From the active Toolbox screen, tap
Toolbox access
Toolbox
slider to
button
Open Grid view
Toolbox
Toolbox
slider to
Open Grid view
Edit
.
)
.
)
Page 95
2. Place a check mark alongside up to five applications.
These will be quickly accessible via the on-screen
button.
Save
3. Tap
once you have completed the assignment of
your applications.
One-handed operation
The one-handed operation settings help you to use your
phone keypads easily with only one hand.
1. From the main Settings screen, tap
operation
.
OFF / ON
2. Tap the
the right to turn it on .
To activate One-handed operation:
Complete the set up process by grabbing the device in
one hand and then in a single motion, swipe you r thumb
from the edge of the screen towards the middle and
then back.
To deactivate One-handed operation:
Tap
view.
icon next to
Resume Normal View
One-handed operation
One-handed
to return to normal
to
Easy Mode
This application allows you to see your display using the
default layout or provide an easier user experience for the
first-time smartphone users using
1. From the main Settings screen, tap
2. Tap the button next to
green.
Done
3. Tap
.
Your phone is now in Easy mode.
Easy mode
Easy mode
.
Easy mode
to turn the button
Accessibility
Accessibility services are special features to make using the
device easier for those with certain physical disabilities. Use
the Accessibility settings to activate these services.
Note:
You can download accessibility applications from Play
Store and manage their use here.
1. From the main Settings screen, tap
2. The following options are available:
• Vision
:
Changing Y our Settings 85
Accessibility
.
.
Page 96

–
TalkBack
: activate the TalkBack feature. Ta lkBack, when
installed and enabled, speaks feedback to help blind and lowvision users.
–
Dark screen
times until you double press the Power key to turn the feature
off. The TalkBack feature must be enabled.
–
Rapid key input
than double tapping to enter a selection when using the
T alkBack feature.
–
Speak passwords
T alkBack feature must be enabled.
–
Font size
within menus, options, etc. Choose from: Tiny, Small, Normal,
Large, or Huge.
–
Magnification gestures
triple-tapping, double pinching, and dragging two fingers
across the screen.
–
Notification reminder
notifications. Touch and slide the slider
turn it on.
86
: allows you to keep your screen turned off at all
: allows you to release your finger rather
: reads out password information. he
: change the size of the fonts used on the device
: use exaggerated gestures such as
: plays a beep when you have unread
to the right to
–
Negative colours
from White text on a Black background to Black text on a
White background.
–
Colour adjustment
you are colour blind and have difficulty reading the display
because of the colors. Touch and slide the slider
the right to turn it on. Follow the on-screen instructions.
–
Accessibility shortcut
accessibility features. Touc h and s lide the slid er
the right to turn it on. Follow the on-screen instructions.
–
Text-to-speech options
speech settings. For more information, refer to
Settings” on page 97.
•Hearing
–
Flash notification
whenever you receive a notification.
–
Turn off all sounds
the device during taps, selections, notifications, etc.
–
Hearing aids
device for use with hearing aids.
: reverse the display of on-screen colours
: allows you to adjust the display colorus if
: allows you to quickly enable
: allows you to adjust your text-to-
:
: allows you to set your camera light to blink
: allows you to mute every sound made by
: allows you to improve the sound quality of your
“Speech
to
to
Page 97

–
Samsung subtitles (CC)
using applicable Samsung apps. Assistant menu: allows you
to improve the device accessibility for users with reduced
dexterity. Touch and slide the slider
turn it on. Follow the on-screen instructions.
–
Google subtitles (CC)
using applicable Google apps. Touch and slide the slider
to the right to turn it on. Follow the on- screen
instructions.
–
Sound balance
and Right balance when using a stereo device.
–
Mono audio
compressed into a single mono audio stream for use with a
single earbud/earphone.
–
Baby crying detector
crying baby is detected.
–
Auto haptic
response to the sounds of downloadable apps such as
games. Some apps do not support this feature.
• Dexterity and interaction
: causes your phone to automatically vibrate in
: allows you to turn on subtitles when
to the right to
: allows you to turn on subtitles when
: allows you to use the slider to set the L eft
: allows you to enable stereo audio to be
: causes your phone to vibrate when a
:
–
Assistant menu
accessibility for users with reduced dexterity. Touch and slide
the slider to the right to turn it on . Follow the onscreen instructions.
–
Air wake up
hand over the device when it is lying face up.
–
Smart scroll
screen will scroll according to your device’s tilt angle. Tap
the slider to the right of the Smart scroll field to activate the
feature. With Smart scroll, the screen will scroll depending
on the phone’s tilt angle once your eyes have been
detected.
–
Tap and hold delay
this action. Choose from: Short, Medium, Long, or Custom.
–
Interaction control
motions and screen timeout. You can also block areas of
the screen from touch interaction. Touch and slide the
slider to the right to turn it on . Follow the onscreen instructions.
: allows you to improve the device
: allows you to turn on your screen by waving your
: once your eyes have been detected, the
: allows you to select a time interval for
: allows you to enable or disable
Changing Y our Settings 87
Page 98

• Direct access
by pressing the Home key 3 times in quick succession. Select
the settings that you want to open to create a checkmark.
• Answering and ending calls
manner in which you accept incoming calls. Tap a selection to
create a checkmark.
• Single tap mode
calendar events and timer alerts, and answer or reject
incoming calls with a single tap.
• Manage accessibility
settings or share them with another device. You can export
your settings, import a previously saved file, or share your file
with another device.
: allows you to open the Accessibility settings
: allows you to set up the
: allows you to dismiss or snooze alarms,
: save and update your accessibility
Blocking Mode
When Blocking mode is enabled, notifications for selected
features will be disabled. You will only receive notifications of
incoming calls from people on your allowed list.
1. From the main Settings screen, tap
88
Blocking mode
2. In a single motion touch and slide the
slider to the right to turn it on .
Confirm that the Blocking mode active icon
appears in the Status bar.
3. Place a green checkmark adjacent to the features that
you would like to disable.
4. Configure a timeframe for these features to be active.
Remove the checkmark from the
From
configure the
Allowed contacts
5. Tap
exempted from these rules. Choose from None, All
contacts, Favorites, or Custom. Allowed contacts will
then appear in the
and To time fields.
to assign those contacts that are
Allowed contact list
Always
Private Mode
This feature allows you to hide personal content from being
accessed by anyone else using your device.
1. From the main Settings screen, tap
.
2. Read the information on the Welcome screen and tap
Next
to view more helpful information.
Start
3. Tap
.
Blocking mode
field to
.
Private mode
.
Page 99
4. Select an unlock method and complete the associated
set up process.
5. Confirm
Notifications area.
To disable Private Mode:
1. From the main Settings screen, tap
2. In a single motion touch and slide the slider to the left to
turn it off .
Private Mode active
appears in the
Private mode
Active key
With the dedicated Active key, you can quickly launch your
favorite application with one touch. You can set up your act ive
key to activate different apps depending on a short press or a
long press of the Active key.
1. From the main Settings screen, tap
Short press
2. Tap
3. Select the app that you want to be activated whenever
you short press the Active key.
Long press
4. Tap
5. Select the app that you want to be activated whenever
you long press the Active key.
.
.
Active key
.
6. If you want to use the Active key to take pictures when
your camera is open, tap the
checkbox to create a checkmark.
Capture with the active key
Motions and gestures
The Motions and Gestures settings allow you to set up various
Motion activation services.
.
From the main Settings screen, tap
gestures
.
Air browse
Air browse allows you to scroll through pages or go to the next
or previous item in a list by moving your hand up and down, or
left and right above the sensor located at the middle top of
your display.
1. From the main Settings screen, tap
gestures
➔
Air browse
2. In a single motion touch and slide the slider to the right
to turn it on .
3. Tap on the applications that you would like to enable to
use the Air browse feature. A checkmark will appear .
4. When using a supported application, move your open
hand across the screen to use Air browse.
.
Changing Y our Settings 89
Motions and
Motions and
Page 100
Direct call
With the Direct Call feature, your phone will dial the currently
displayed on-screen Contact entry as soon as you place the
device to your ear.
1. From the main Settings screen, tap
gestures
➔
Direct call
.
2. In a single motion touch and slide the slider to the right
to turn it on .
Motions and
Smart alert
Once Smart alert is enabled, you can pickup the device to be
alerted and notified if you have missed any calls or messages.
1. From the main Settings screen, tap
gestures
➔
Smart alert
2. In a single motion touch and slide the slider to the right
to turn it on .
90
.
Motions and
Mute/Pause
Once enabled, you can pause any on-screen video or mute
any current sound by simply covering the screen with your
hand or turning it over . Once you remove your hand from the
screen, the device goes back to normal by either continuing to
play the current video or unmuting the current sound.
1. From the main Settings screen, tap
gestures
➔
Mute/pause
2. In a single motion touch and slide the slider to the right
to turn it on .
3. Tap the following methods that you want to use to Mute/
Pause your phone:
• Covering screen with hand
to mute incoming calls and alarms, or to pause media while
the screen is on.
• Turning device over
calls, message alerts, and alarms, or to pause media.
•Smart pause
the screen and pauses a video when you look away.
.
: Place your hand on the screen
: Turn your phone over to mute incoming
: uses the front camera to detect if you are facing
Motions and
 Loading...