

Samsung GS4 Quick Start Manual

1
TABLE OF CONTENTS
YOUR PHONE 3
Front View Features 3
Bottom View 4
Side by Side View 5
Cool Apps 6
SIM Card 7
Memory Card 11
Battery 13
Power 15
Making a Call 16
Sending a Message 16
Home Screen 18
Ringtone 24
Volume 25
Voicemail 26
Contacts 27
Email 28
Bluetooth 32
TABLE OF CONTENTS

TABLE OF CONTENTS
2
Camera & Camcorder 33
Near Field Communication 35
Battery & Memory Management 38
NOTES 42
3
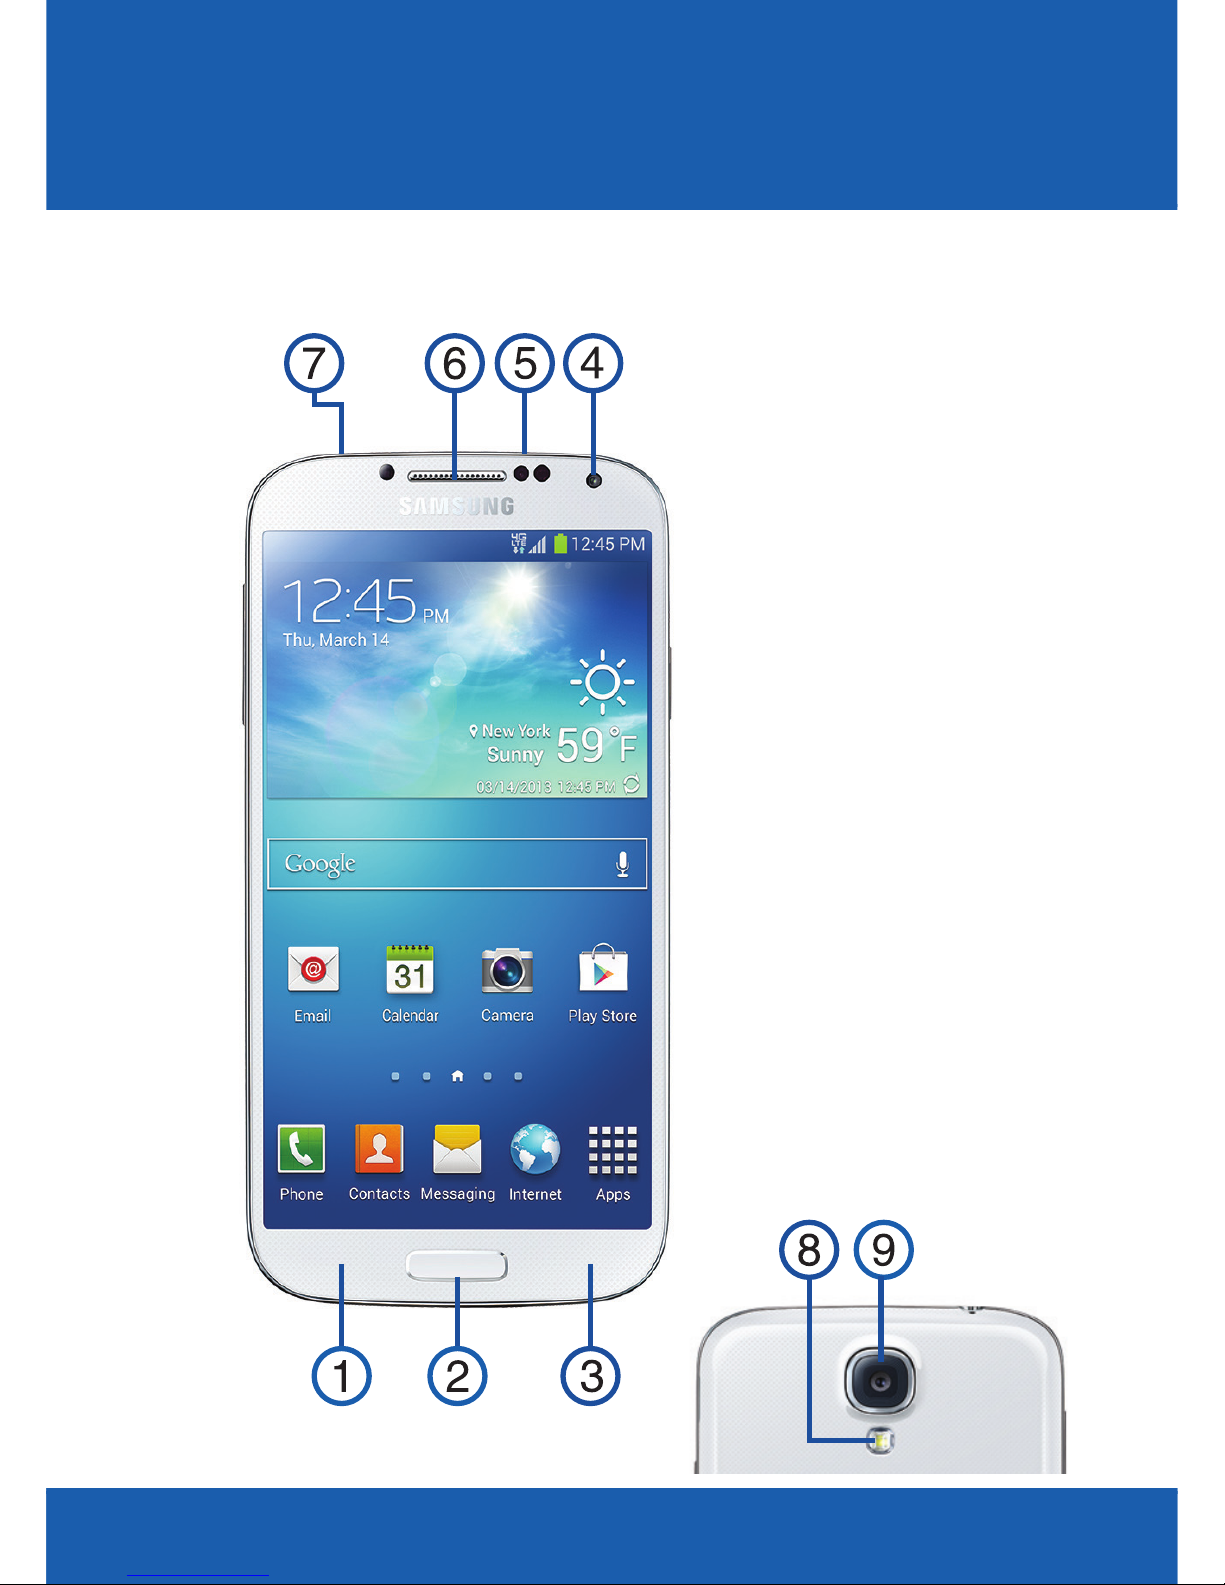
YOUR PHONE
1. MENU KEY
2. HOME/RECENT APPS
KEY
3. BACK KEY
4. FRONT FACING
CAMERA
5. INFRARED BLASTER
6. EARPIECE
7. HEADSET JACK
8. FLASH
9. CAMERA
YOUR PHONE
FRONT VIEW FEATURES
YOUR PHONE
4
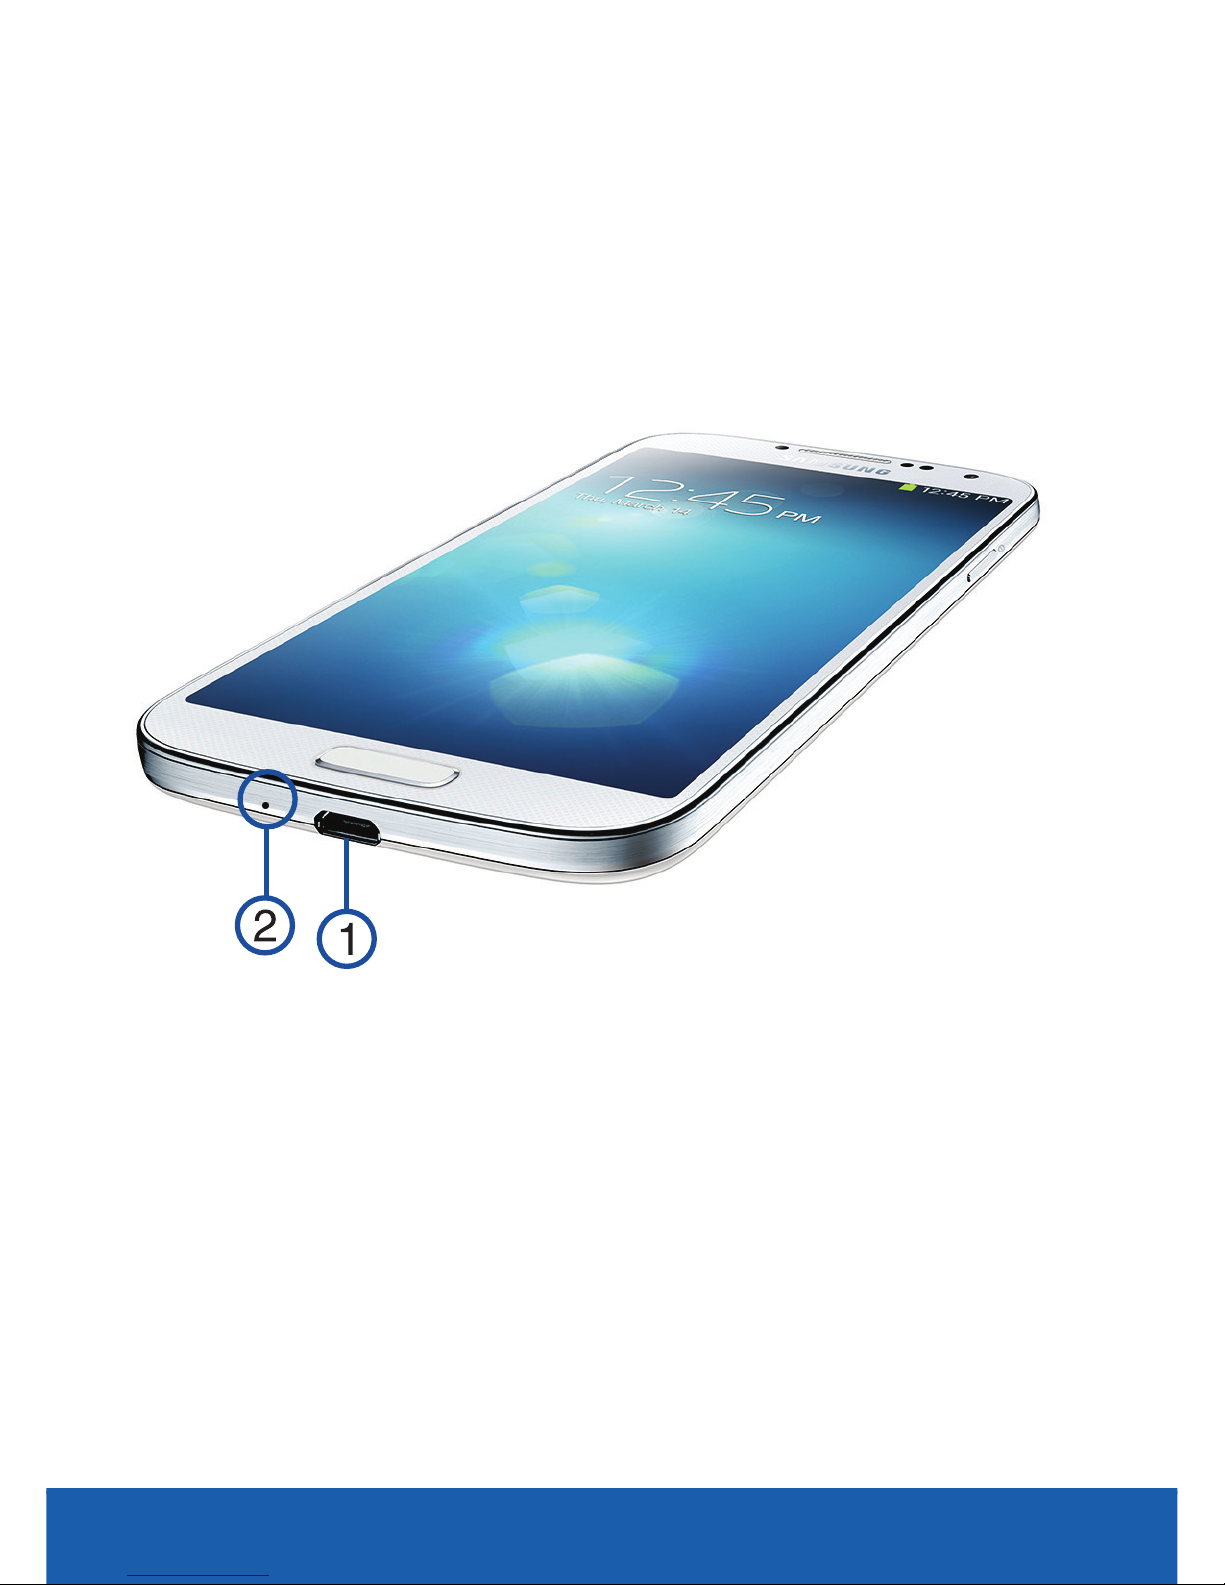
BOTTOM VIEW
1. CHARGING
PORT
2. MICROPHONE
5
YOUR PHONE
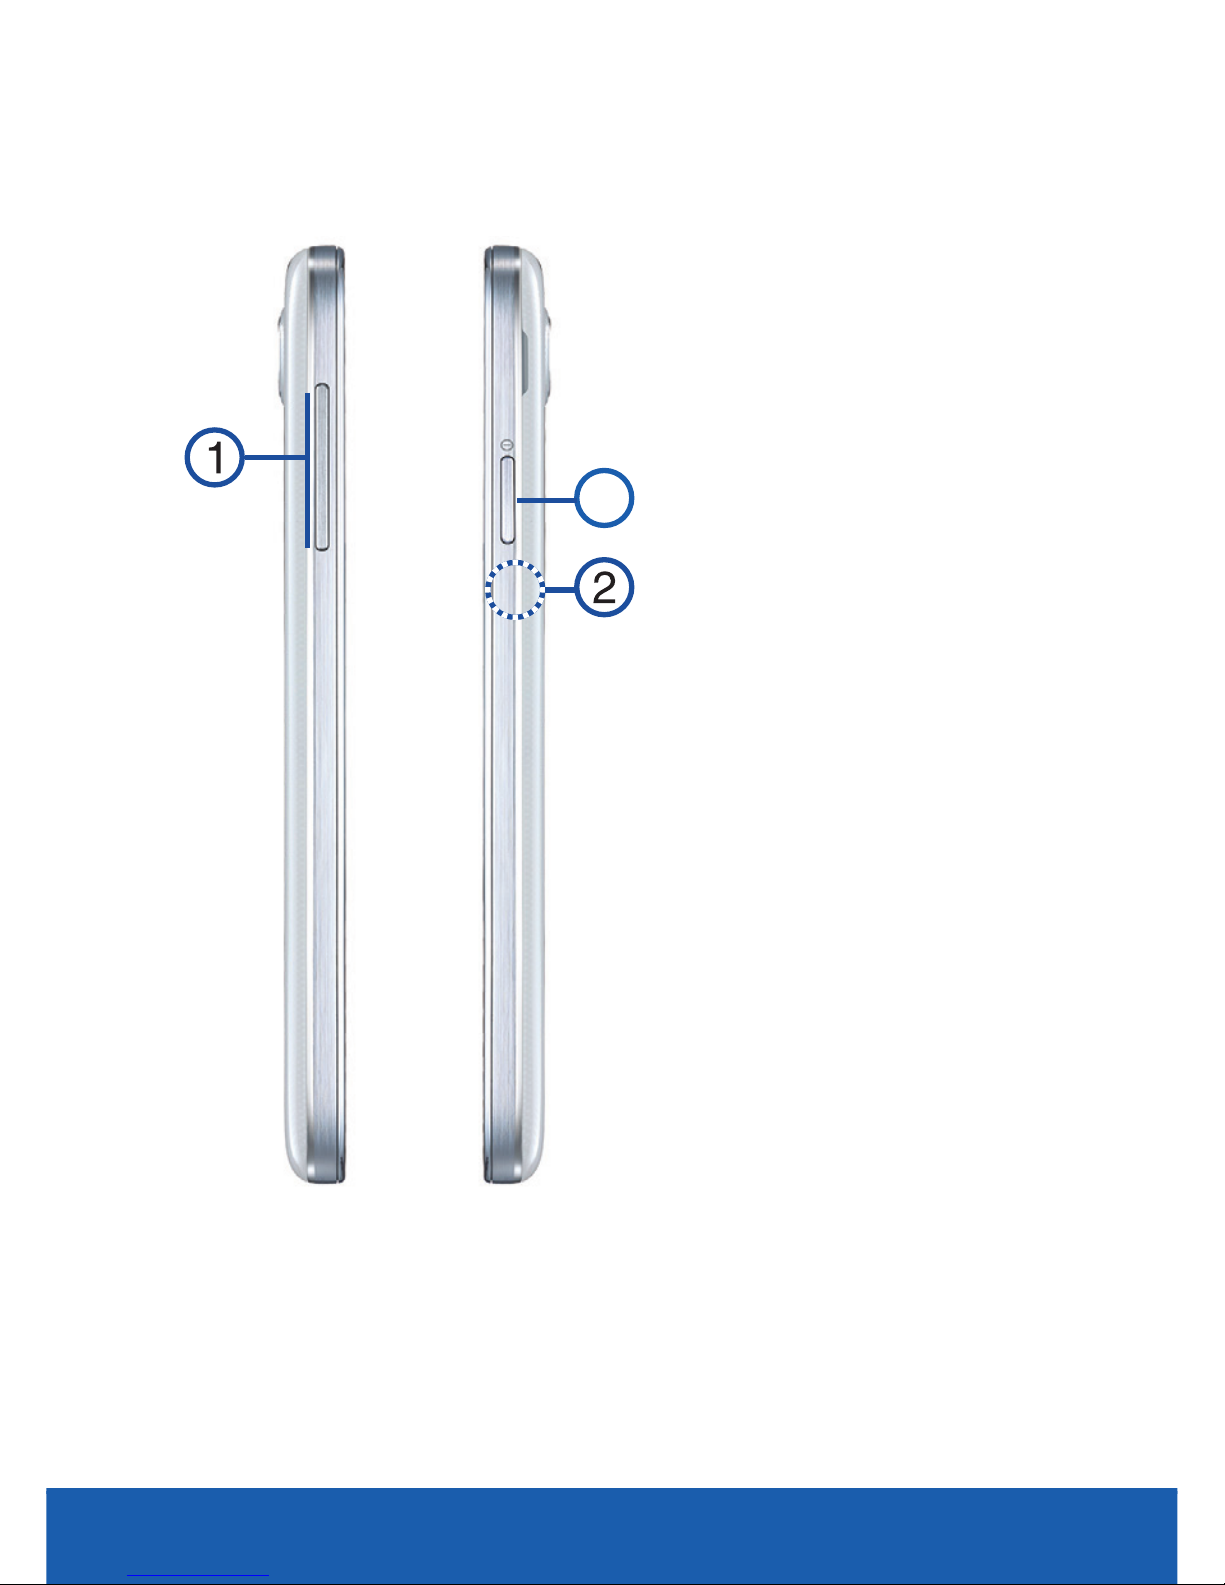
SIDE BY SIDE VIEW
3
1. VOLUME KEY
2. MEMORY CARD
SLOT*
3. POWER KEY
*The Memory Card
Slot is located under
the battery cover.

YOUR PHONE
6
COOL APPS
Samsung Link
Share your on-device media content with other
external devices, such as an HDTV, using DLNA®
(Digital Living Network Alliance) technology.
S Voice
Provides a built-in voice recognition system that
allows you to initiate several common tasks by using
natural speech.
ChatOn
Use the same profile, buddy list, and chat list on all
devices connected to your Samsung account.
Samsung Hub
Integrated store for media content that offers a
comprehensive and consistent media service
experience for users. Users can browse and purchase
all media content within a single store front.

SIM CARD
This device uses a micro SIM. The new micro SIM
(Subscriber Identity Module) card identifies your
phone to the wireless network. You cannot make
or receive calls or browse the Internet without a
properly installed micro SIM card. Other larger SIM
cards will not function or fit within this slot.
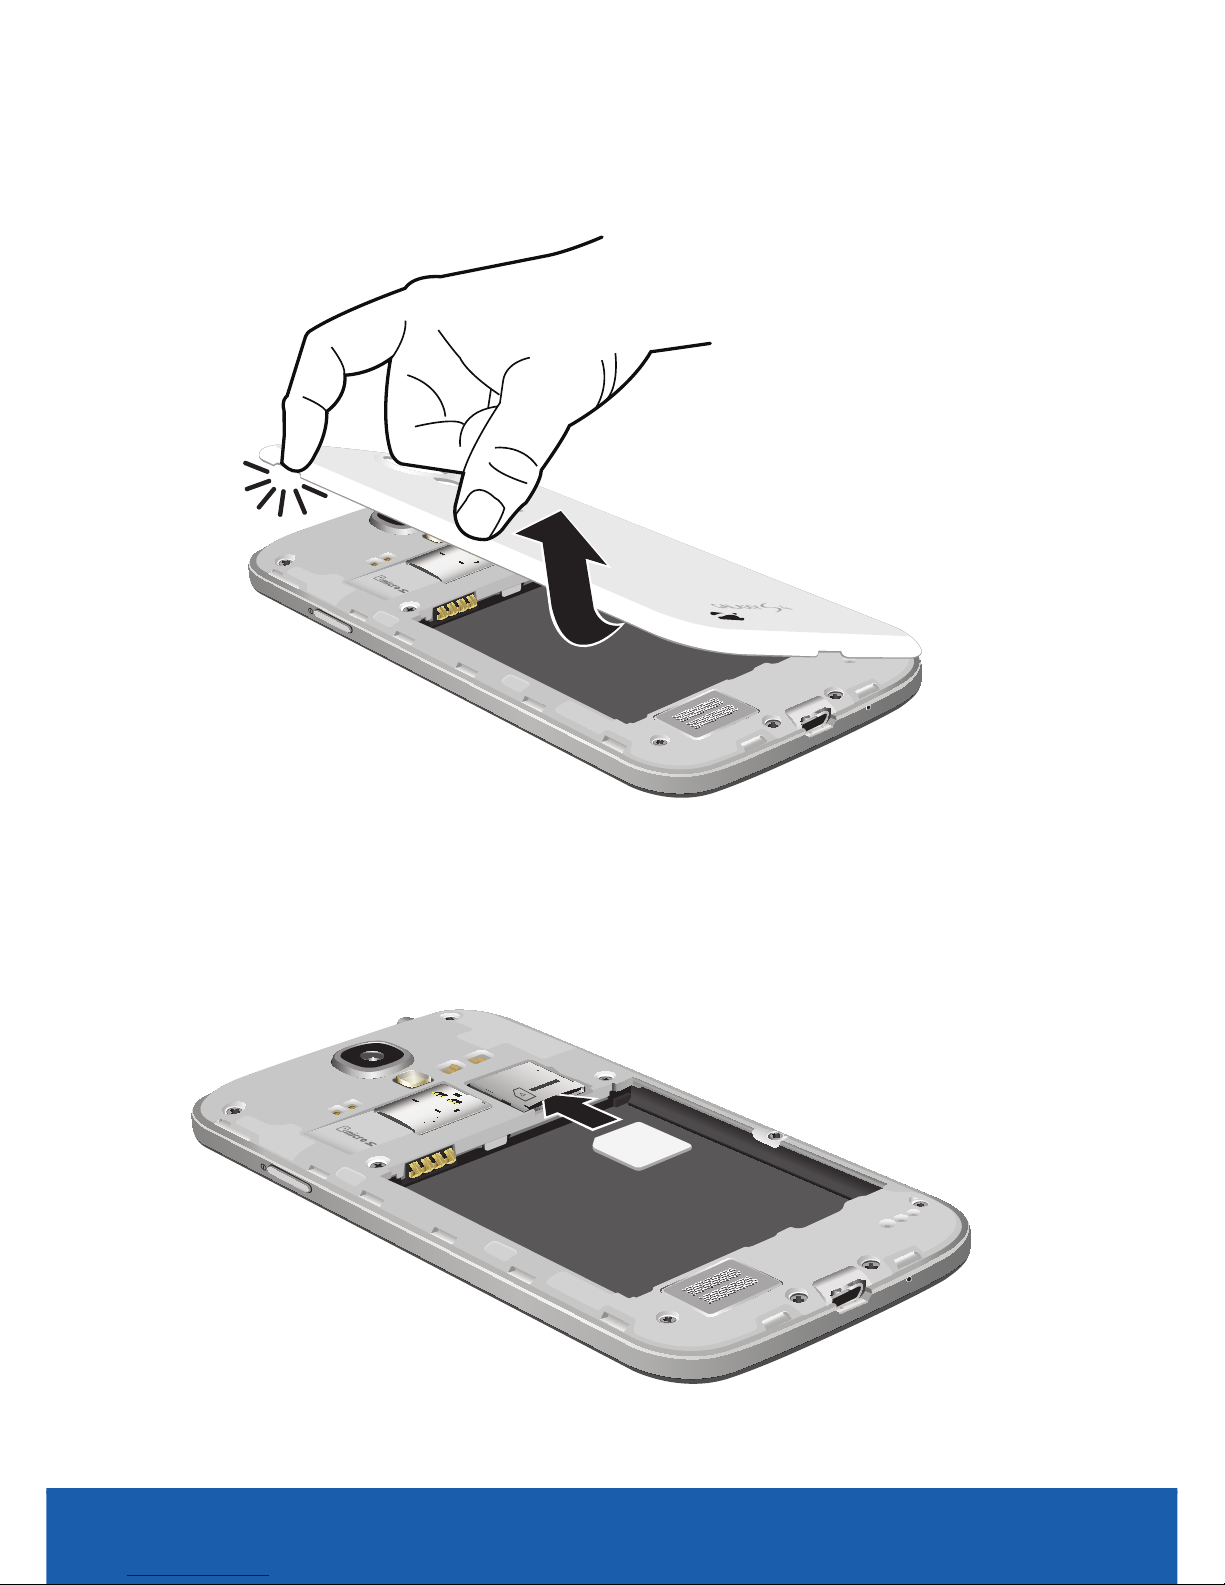
Insert the SIM card
1. Detach the SIM card from its packaging.
2. Hold the device firmly and locate the cover
release latch.
7
YOUR PHONE
YOUR PHONE
8
3. Place your fingernail in the opening and firmly
“pop” the cover off the device.
4. Carefully slide the micro SIM card into the SIM
card socket until it clicks into place.

9
YOUR PHONE
NOTE: This device requires a SIM card. Please insert the SIM card
included in the package prior to turning on the device. This SIM
card will only work with this device. Once the SIM card has
been inserted, do not remove!
If your SIM card is ever separated from the device or damaged,
your device will not function. If you experience any issues with
your device, contact Customer Service at
888-944-9400 (or dialing 611 on Your U.S. Cellular® handset)
or visit your nearest U.S. Cellular retail location.
SIM Card Limited Warranty
Subject to the exclusions contained below, United States
Cellular Corporation (“U.S. Cellular®”) warrants to the original
purchaser (“You” or “Your”) of the handset with which the
SIM card was provided that the SIM card will be free from
defects in material and workmanship for a period of one (1)
year from the date You purchased the handset (the “Warranty
Period”). This warranty is not transferable. Should a defect
appear during the Warranty Period, U.S. Cellular will send a
replacement SIM card to Your address within the United States
without charge provided that you request the replacement SIM
card during or within thirty (30) days following the Warranty
Period by calling U.S. Cellular Customer Service at
888-944-9400 (or dialing 611 on your U.S. Cellular handset)
or by visiting a U.S. Cellular retail store.

YOUR PHONE
10
REPLACEMENT OF THE SIM CARD AS PROVIDED HEREIN
IS YOUR EXCLUSIVE REMEDY UNDER THIS LIMITED
WARRANTY, AND IS IN LIEU OF ALL OTHER WARRANTIES,
EXPRESS OR IMPLIED INCLUDING, WITHOUT LIMITATION,
ANY WARRANTIES OF TITLE, FITNESS FOR A PARTICULAR
PURPOSE, MERCHANTABILITY, NON-INFRINGEMENT OR
ARISING FROM COURSE OF DEALING OR USAGE OF TRADE.
NEITHER U.S. CELLULAR NOR ANY OF ITS AFFILIATES OR
RETAILERS SHALL BE LIABLE TO YOU FOR ANY DIRECT,
INDIRECT, INCIDENTAL, SPECIAL, ECONOMIC, EXEMPLARY,
PUNITIVE OR CONSEQUENTIAL DAMAGES (INCLUDING,
WITHOUT LIMITATION, LOSS OF DATA, LOSS OF REVENUE
OR PROFITS, DAMAGE TO PROPERTY OR LOSS OF USE).
IN NO EVENT SHALL U.S. CELLULAR’S, ITS AFFILIATES’
OR RETAILERS’ LIABILITY TO YOU OR ANY THIRD PARTY
WITH RESPECT TO THE SIM CARD EXCEED THE COST OF
REPLACING THE SIM CARD.
THIS LIMITED WARRANTY SHALL BE CONSTRUED UNDER
THE LAWS OF THE STATE OF ILLINOIS, EXCLUDING ITS
CONFLICTS OF LAW PROVISIONS. SOME STATES AND
JURISDICTIONS DO NOT ALLOW LIMITATIONS ON HOW
LONG AN IMPLIED WARRANTY LASTS, OR THE DISCLAIMER
OR LIMITATION OF INCIDENTAL OR CONSEQUENTIAL
DAMAGES, SO THE ABOVE LIMITATIONS AND DISCLAIMERS
MAY NOT APPLY TO YOU.
No agent, employee, dealer, retailer, representative or reseller
is authorized to modify or extend the terms of this Limited
Warranty.

11
YOUR PHONE
MEMORY CARD
Your phone does not come with a microSD memory
card. However, you can purchase one separately and
use it to store your multimedia files.
NOTE: microSD memory cards include capacities of up to 2GB.
microSDHC™ memory card types can range from 4GB to up
to 64GB.
WARNING: Applications, personal settings and other stored data may
be lost or may not function properly if the memory card
is removed.

YOUR PHONE
12
Install the memory card
1. Locate the microSD card slot on the inside of
the phone.
2. Orient the card with the gold strips facing
down.
3. Carefully slide the microSD card into the card
socket until it clicks into place.
13
YOUR PHONE
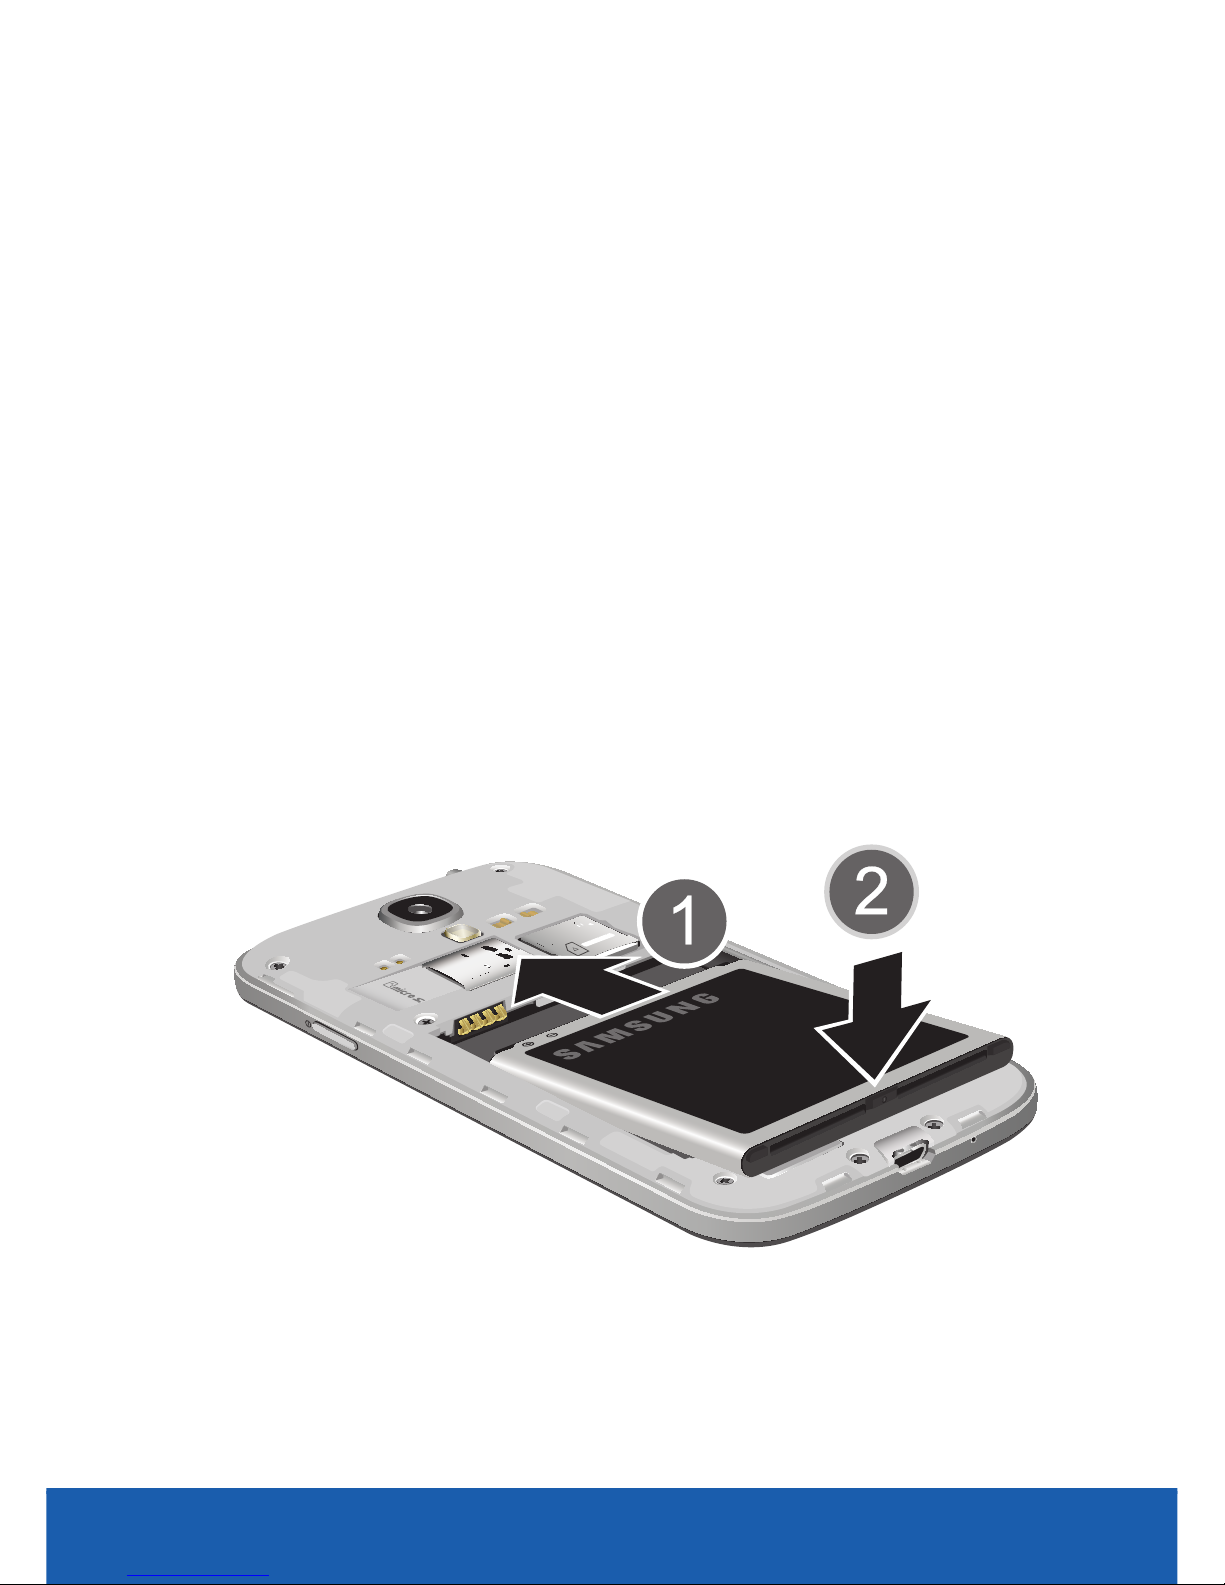
BATTERY
Your phone is shipped with the battery partially
charged. Please charge it fully before using it for the
first time.
Install the Battery
1. Slide the battery into the compartment (1) so
that the tabs on the end align with the slots
at the bottom of the phone, making sure the
connectors align.
2. Gently press down to secure the battery (2).
YOUR PHONE
14
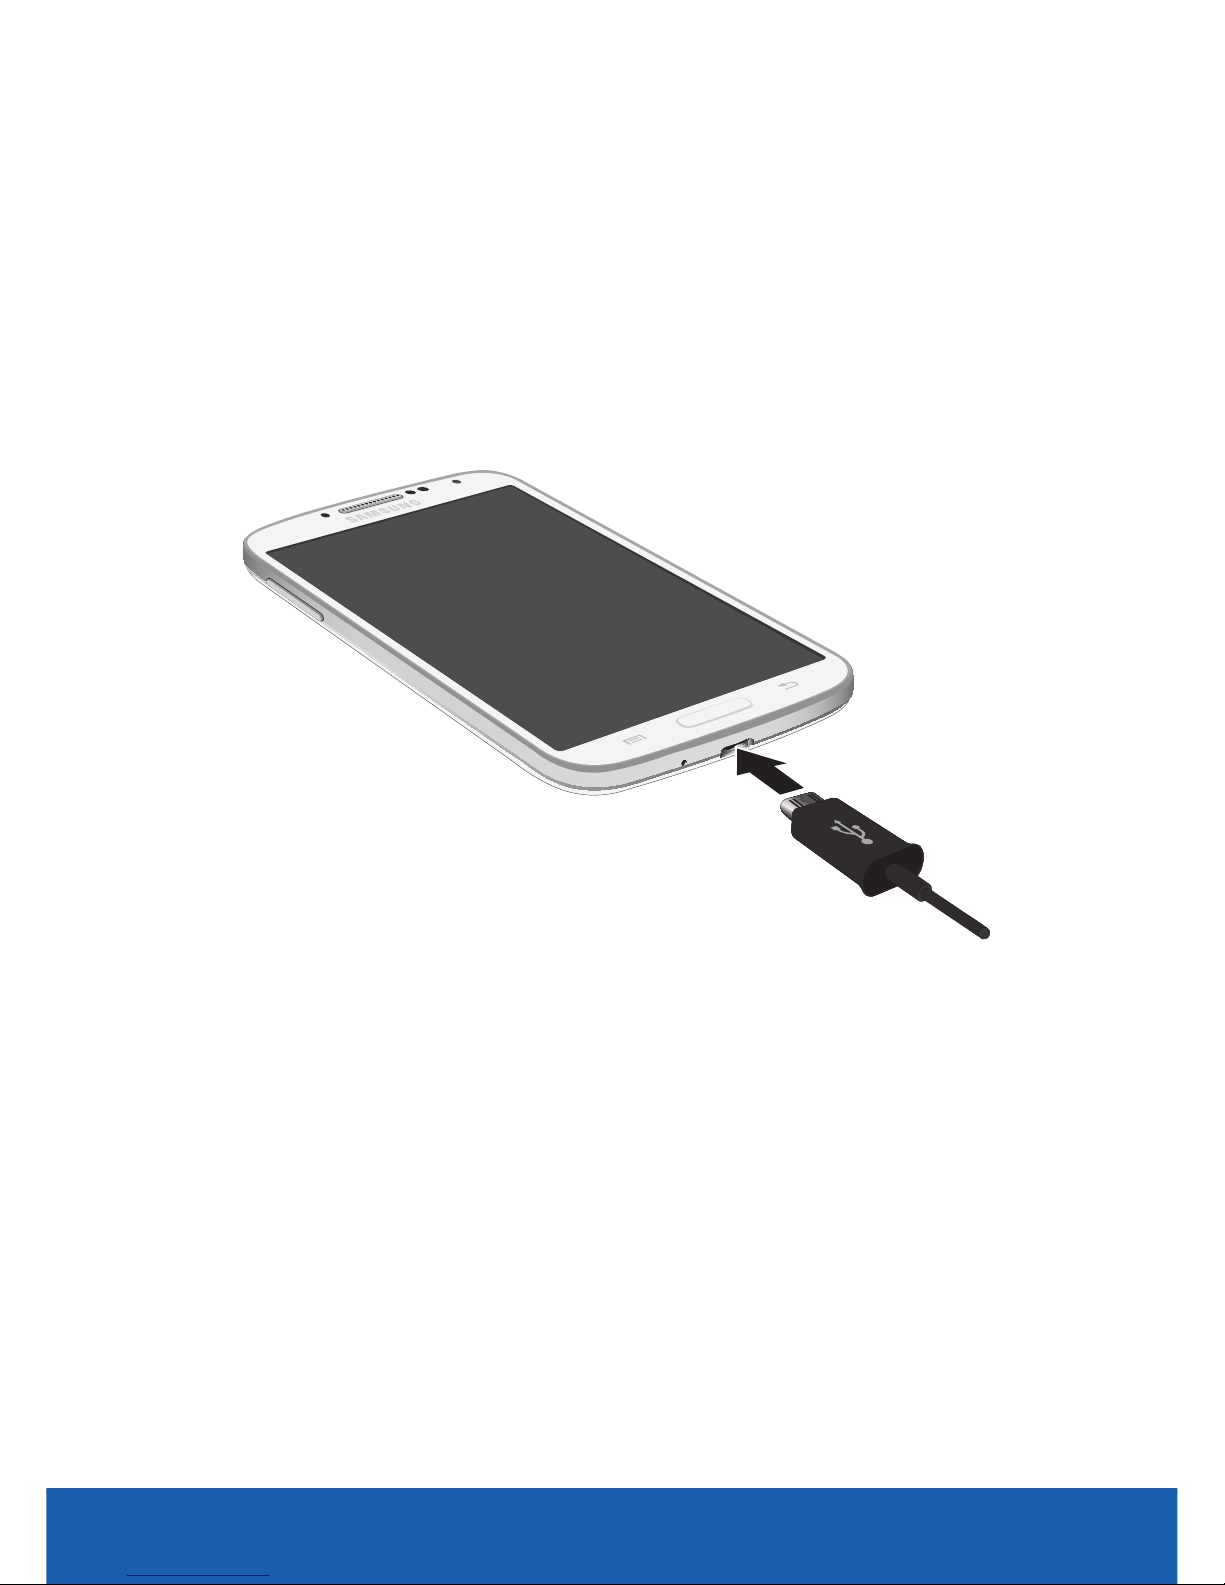
Charge the battery
1. Connect the USB cable to the charging head.
2. Insert the USB cable into the device’s Charger/
Accessory jack.
3. If using a wall charger, plug the charging head
into a standard AC power outlet. If using a
computer, remove the charging head and plug
the USB cable into computer’s USB port.
 Loading...