

Page 1

SGH-d407 Series
PORTABLE QUAD-BAND
MOBILE PHONE
User Guide
Please read this manual before operating your phone, and keep it for
future reference.
Printed in Korea
Code No.: GH68-09490A
English 04/2006. Rev. 1.0
Page 2

Intellectual Property
All Intellectual Property, as defined below, owned by or which is
otherwise the property of Samsung or its respective suppliers
relating to the SAMSUNG Phone, including but not limited to,
accessories, parts, or software relating thereto (the “Phone
System”), is proprietary to Samsung and protected under federal
laws, state laws, and international treaty provisions. Intellectual
Property includes, but is not limited to, inventions (patentable or
unpatentable), patents, trade secrets, copyrights, software, computer
programs, and related documentation and other works of authorship.
You may not infringe or otherwise violate the rights secured by the
Intellectual Property. Moreover, you agree that you will not (and will
not attempt to) modify, prepare derivative works of, reverse engineer,
decompile, disassemble, or otherwise attempt to create source code
from the software. No title to or ownership in the Intellectual Property
is transferred to you. All applicable rights of the Intellectual Property
shall remain with SAMSUNG and its suppliers.
©2006 Samsung Electronics Canada, Inc.. SAMSUNG is a registered
trademark of Samsung Electronics Co., Ltd. and its related entities.
Page 3

Table of Contents
Important Safety Precauti ons.......................................... 1
Your Phone................................................................ 3
Features of Your Phone ............................... .................. ........................... 3
Phone La yout ..................................... ..................................... .......... ....... 4
Display..................................................................................................... 8
Camera................................................................................................... 10
Getting Star ted ......................................................... 11
Installing the SIM Card...................................................................... ..... 11
Charging a Battery.................................................................................. 13
Switching the Phone On or Off................................................. .............. 15
Call Functio ns .......................................................... 16
Selecting Functions and Options............................................................ 16
Making a Call.......................................................................................... 17
Adjusting the Volume............................................................................. 19
Answering a Call .................................................................................... 20
Viewing Missed Calls............................................................................. 20
Quiet mode............................................................................................. 22
Options During a Call .................................................. 23
Putting a Call on Hold............................................................................ 23
Making a Multi-party Call ....................................................................... 23
Switching the Microphone Off (Mute) .................................................... 25
Muting or Sending Key Tones................................................................ 25
Sending a Sequence of DTMF Tones...................................................... 26
Searching for a Number in the Contact list............................................. 26
Using Text Messages............................................................................. 27
Call Waiting............................................................................................ 27
Entering Text ........................................................... 28
Changing the Text Input Mode.......................................................... ..... 28
Using T9 Mode....................................................................................... 28
Using Alphabet Mode............................................................................. 30
Using Number Mode.............................................................................. 32
Using Symbol Mode............................................................................... 32
i
Page 4

Menus.................................................................... 33
List of Menu Functions........................................................................... 34
Recent Calls ............................................................ 42
All Calls.................................................................................................. 42
Missed Calls........................................................................................... 42
Calls Made ............................................................................................. 43
Calls Received........................................................................................ 43
Delete All................................................................................................ 44
Call Timers............................................................................................. 44
Messages................................................................ 46
Instant Messaging.................................................................................. 46
Create new message.............................................................................. 47
My Me ssages .......... .... ......... ....... ....... ........ .......... ......... ........ ....... .......... 52
Templates.............................................................................................. 54
Voice Mail .............................................................................................. 54
Delete All................................................................................................ 54
Settings.................................................................................................. 55
Memory status....................................................................................... 58
Games .................................................................... 60
Get Games ............................................................................................. 60
My Games.............................................................................................. 60
Applications ............................................................ 62
Alarm..................................................................................................... 62
Calendar................................................................................................. 64
Task ....................................................................................................... 67
Note ....................................................................................................... 68
Tools...................................................................................................... 68
Media . ...... ..... ..... ...... ..... ..... ...... ..... ..... ...... ..... ..... ... 76
Camera................................................................................................... 76
Voice Recognition .................................................................................. 81
Record Audio......................................................................................... 86
FUN & Tunes ............................................................ 87
Audio...................................................................................................... 87
Graphics................................................................................................. 89
Video...................................................................................................... 91
ii
Page 5

Other files.............................................................................................. 92
Memory Status....................................................................................... 93
Contacts .... ..... ..... ...... ............................................. 94
Storing a Number with a Name.............................................................. 94
Contact List............................................................................................ 95
Group..................................................................................................... 97
Speed Dial.............................................................................................. 99
My Name Card ..................................................................................... 100
Own Number........................................................................................ 100
Management........................................................................................ 101
Settings................................................................. 1 04
Time & Date......................................................................................... 104
Phone Se ttings ........ .................................... ............................. ............ 105
Display settings.................................................................................... 107
Sound se ttings............................................ ............................. ............ 110
Network Services ................................................................................. 113
Bluetooth.............................................................................................. 117
Security................................................................................................ 118
Connection se ttings ......... ............................................. ....................... 121
Voice Recognition Settings ......................... ......................................... 123
Reset Settings...................................................................................... 124
Access Codes.......................................................... 125
Phone Pa ssword ..... .................................... ............................. ............ 125
PIN....................................................................................................... 126
PUK...................................................................................................... 126
Solving Problems...................................................... 127
Health and Safety Information ...................................... 130
Exposure to Radio Frequency (RF) Signals.......................................... 130
For Body Operation.............................................................................. 131
Precautions When Using Batteries....................................................... 132
Operating Environment ........................................................................ 133
Electronic Devices................................................................................ 133
Potentially Explosive Environments...................................................... 135
Emergency Calls................................................................................... 135
Other Important Safety Information ..................................................... 136
Care and Maintenance.......................................................................... 137
iii
Page 6

FCC Notice ........................................................................................... 138
Appendix A: CERTIFICATION INFORMATION (SAR)............................. 139
Appendix B: Safe and Responsible Wirel ess Phone Use ...................... 140
Appendix C: Consumer Update on Wireless Phones ......................... ... 144
STANDARD LIMITED WARRANTY .................................... 153
Index .................................................................... 158
iv
Page 7

Important Safety Precautions
Please read these guidelines before using your wireless phone.
Failure to comply with them may be dangerous or illegal.
Road Safety at All Times
Do not use a hand-held phone while driving; park the vehicle first.
Switching Off When Refueling
Do not use the phone at a refueling point (service station) or near
fuels or chemicals.
Switching Off in an Aircraft
Wireless phones can cause interference. Using them in an aircraft is
both illegal and dangerous.
Switching Off in Hospitals
Switch your phone off near medical equipment. Follow any
regulations or rules in force.
Interference
All wireless phones may be subject to interference, which could
affect their performance.
Special Regulations
Follow any special regulations in force in any area and always switch
your phone off whenever it is forbidden to use it, or when it may
cause interference or danger (for example, in a hospital).
Important Safety Precautions
1
Page 8

Sensible Use
Use the phone only in the normal position (held to the ear). Avoid
unnecessary contact with the antenna when the phone is switched
on.
Emergency Call
Ensure the phone is switched on and in service. Key in the
emergency number for your present location, then press the key.
You must deactivate any unnecessary features before you can make
an emergency call. Give all the necessary information as accurately
as possible. Do not end the call until given permission to do so.
Water Resistance
Your phone is not water-resistant. Keep it dry.
Accessories and Batteries
Use only Samsung-approved accessories and batteries. Use of any
unauthorized accessories could damage your phone and may be
dangerous.
Qualified Service
Only qualified service personnel may repair your phone.
For more detailed safety information, see “Health and Safety
Information” on page 130.
Important Safety Precautions
2
Page 9

Your Phone
Features of Your Phone
Your phone is lightweight, easy-to-use and offers many exciting
features. The following list outlines a few of the features included in
your phone:
♦Digital camera
♦Bluetooth® wireless technology
♦Instant Messaging
♦Voice Recognition for hands-free dialing
♦Speakerphone capability
♦Multimedia capability capable of playing downloaded ringtunes
and videos
♦Games & Applications feature provides file manager, audio player,
games, alarms, calendar, task list, calculator, world time, unit
convertor, timer, and stopwatch.
Your Phone
Your Phone
3
Page 10
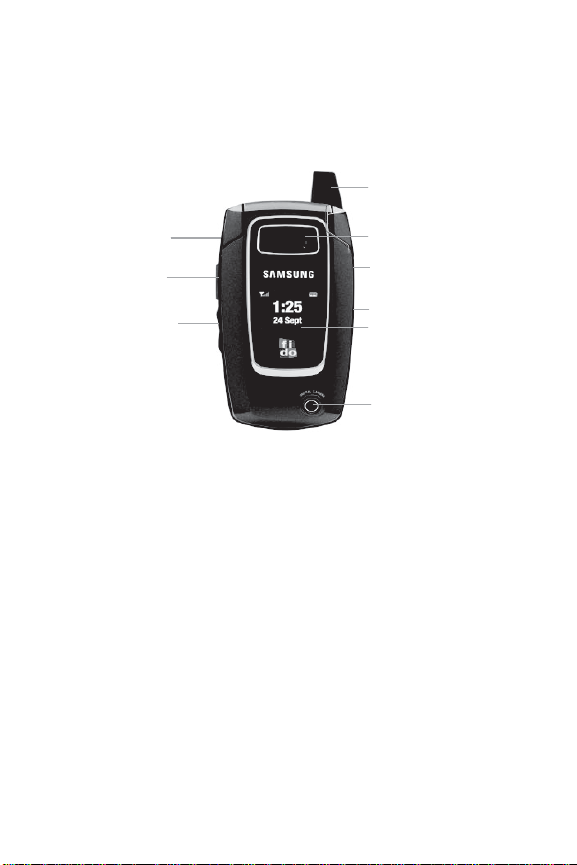
Phone Layout
Closed View of your Phone
The following illustrations show the main elements of your phone:
9. Antenna
1. Headset
Connector
2. Record
Audio Key
3. Volume/Menu
Navigation key
8. External Speaker
7. Voicecommand/
Speakerphone key
6. Camera key
5. External LCD
4. Camera lens
1. Headset Connector: Allows you to plug in a headset for safe,
convenient, hands-free conversations.
2. Record Audio key: Allows you to record voice memos using the
Record Audio menu.
3. Volume/Menu Navigation key: Allows you to adjust the ringer
volume in standby mode or adjust the voice volume during a call.
The volume key can also be used to scroll up or down to navigate
through the different menu options. To mute the ringer during an
incoming call, press the volume key up or down.
4. Camera lens: The camera lens used for taking photos and videos.
5. External LCD: Your phone has an external display on the front of
the phone. It indicates when you have an incoming call or
Your Phone
4
Page 11

message. It also displays date, time, reception, battery power,
and any icons associated with alerts, such as messages, or a set
alarm.
6. Camera key: The external camera key used to launch the camera
and take a photo or video.
7. Voice Command/Speakerphone key: Short press to show
Recent Calls and press and hold to launch Voice Command.
8. External Speaker: The external speaker allows you to hear the
other caller when using the speaker phone option.
9. Antenna: Used to obtain maximum reception.
Your Phone
Your Phone
5
Page 12
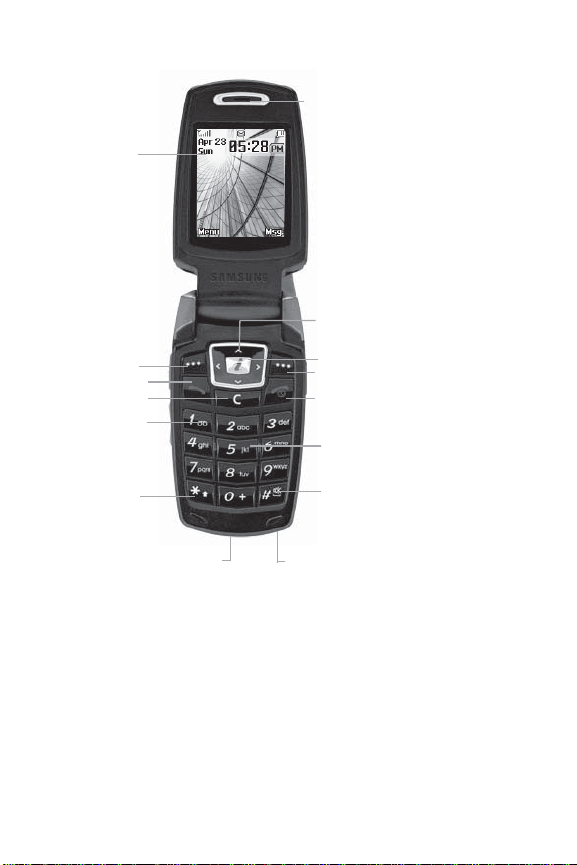
Open View of Your Phone
1. Display
2. Soft key
(left)
3. Send key
4. Clear key
5. Voicemail key
14. Earpiece
13. Navigation key
12 WAP Browser/Menu confirm key
2. Soft key
(right)
11. End key
10. Alphanumeric keypad
6. Asterisk/
Shift key
7. Power Interface Connector
9. Pound/Space/Quiet Mode key
8. Microphone
1. Display: This screen displays all the information needed to
operate your phone.
2. Soft key: Performs the functions indicated by the screen text on
the bottom of the display.
3. Send key: Allows you to place or receive a call. In standby mode,
press the key once to access the Recent Call log. If you press and
Your Phone
6
Page 13

hold the key down, you will initiate the most recent call from the
Recent Call log.
4. Clear key: Deletes characters from the display when you are in
text entry mode. When in a main menu, press to return to the
previous menu.
5. Voicemail key: Press and hold to automatically dial your
voicemail.
[
6. Asterisk/Shift key: Enters the
In text mode, press to change the character input type.
] character for calling features.
*
7. Power Interface Connector: The power interface connector is
used to plug in the charging accessories.
8. Microphone: The Microphone allows the other callers to hear you
clearly when you are speaking to them.
9. Pound/Space/Quiet Mode key: Enters the pound [#
] character
for calling features. In text entry mode, press to enter a space
between characters. Press and hold to place handset in Quiet
mode.
10. Alphanumeric keypad: Use these keys to enter numbers, letters
and characters.
11. End key: Ends a call. Press and hold this key for a few seconds to
power your phone On or Off. While in the main menu, it returns
the phone to standby mode and cancels you input. When you
receive an incoming call, press to reject call.
Your Phone
12. WAP Browser/Menu confirm key: When navigating through a
menu accepts the highlighted choice in the menu. If you press
once in Idle mode, the WAP browser will launch.
Your Phone
7
Page 14

13. Navigation key: This key allows you to scroll through phone
menu options and provides a shortcut to phone functions from
standby mode.
In Idle mode, the navigation keys act as shortcuts, allowing you
to access other menus directly. You can customize your shortcuts
(Menu 9.2.3) to your own personal preferences. The default
shortcuts are:
♦Down key: access the Contact List menu directly.
♦Up key: access the Media menu directly.
♦Left key: access the Recent Calls menu directly.
♦Right key: access the Messages directly.
When entering text, moves the cursor to the left or right,
depending on which side you press.
14. Earpiece: The earpiece allows you to hear the other caller.
Display
Display Layout
The display has the following areas:
Icons
Text and graphics area
Menu
Your Phone
8
Message
Soft key function indicators
Page 15
Area Desc ripti on
Icons Displays various icons. See page 9.
Text and
graphics area
Soft key
indicators
Displays messages, instructions and any
information that you enter, such as the number you
are dialing.
Shows the current functions assigned to the two
soft keys.
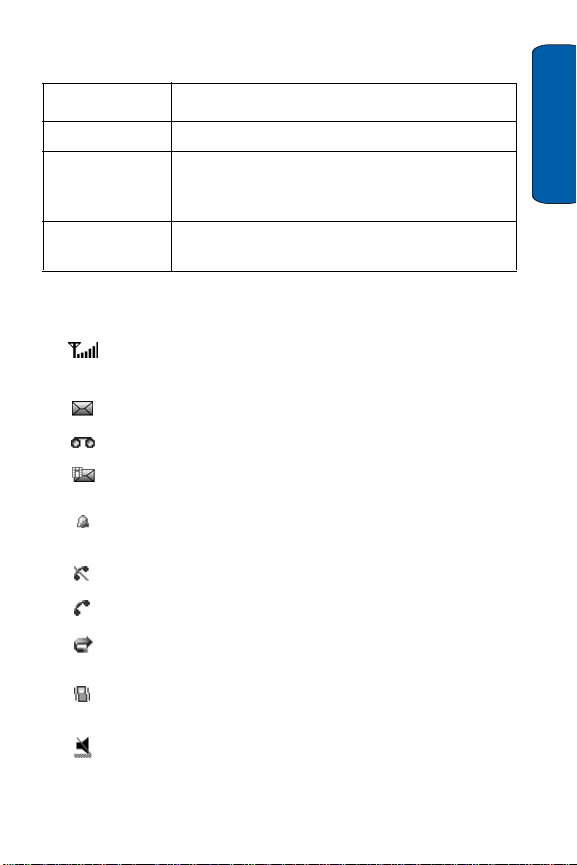
Icons
Shows the received signal strength. The greater the
number of bars, the stronger the signal.
Appears when a new text message has been received.
Appears when a new voice mail has been received.
Appears when a new multimedia message has been
received.
Appears when you set an alarm to ring at a specified time.
For details, see “Alarm” on page 62.
Appears when you are out of your service area.
Appears when a call is in progress.
Appears when the Call forwarding feature is active. For
details, see page “Call Forwarding” on page 113.
Appears when Alert type is vibration or you set the phone
to vibrate when you receive a call.
Appears when Quiet Mode is active.
Your Phone
Your Phone
9
Page 16

Shows the level of your battery. The more bars you see, the
more power you have remaining.
Appears when Bluetooth wireless technology is active.
Backlight
The backlight illuminates the display and the keypad. When you press
any key or open the phone, the backlight turns on and remains on for
a given period of time, depending on your setting in the Back Light
menu (Menu 9.3.6). When no keys are pressed, the display dims and
turns off after a specified length of time to conserve your battery
power.
♦To specify the length of time the backlight is active, use the
Backlight menu (Menu 9.3.6)). See “Backlight” on page 109 for
further details.
Camera
The embedded camera on the front of your phone allows you to take
a photo while on the move. For further details about the Camera
feature, see page 76.
Speakerphone Key
Use the speakerphone key (located on the right side of your phone)
in conjunction with the left soft key to switch from using the
earpiece to the speakerphone during a call. Use the volume keys
(located on the left side of your phone) to adjust the volume.
Your Phone
10
Page 17
Getting Started
Installing the SIM Card
When you subscribe to a cellular network, you are provided with a
plug-in SIM card loaded with your subscription details, such as your
PIN, any optional services, and other information.
Warning! The plug-in SIM card a nd its contacts can be easily dama ged by scratching or
bending, so be careful when handling, inserting, or removing the card. Keep all SIM
cards out of the reach of small children.
If necessary, switch off the phone by holding down the key until
the power-off image displays.
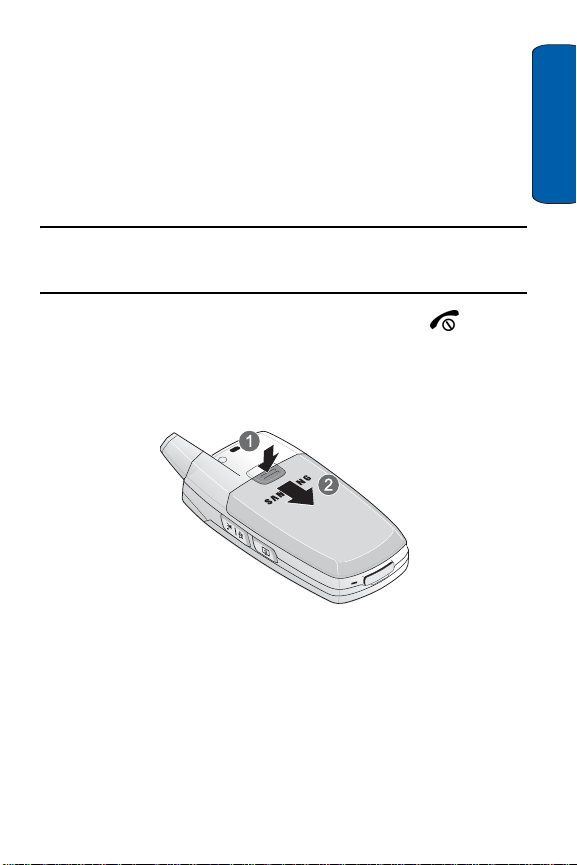
1. Remove the battery cover. To do so, press the ridged area on the
battery cover using your thumb (1) and gently slide it in the
direction of the arrow (2). Remove the battery/cover.
Getting Started
Getti ng St ar ted
11
Page 18
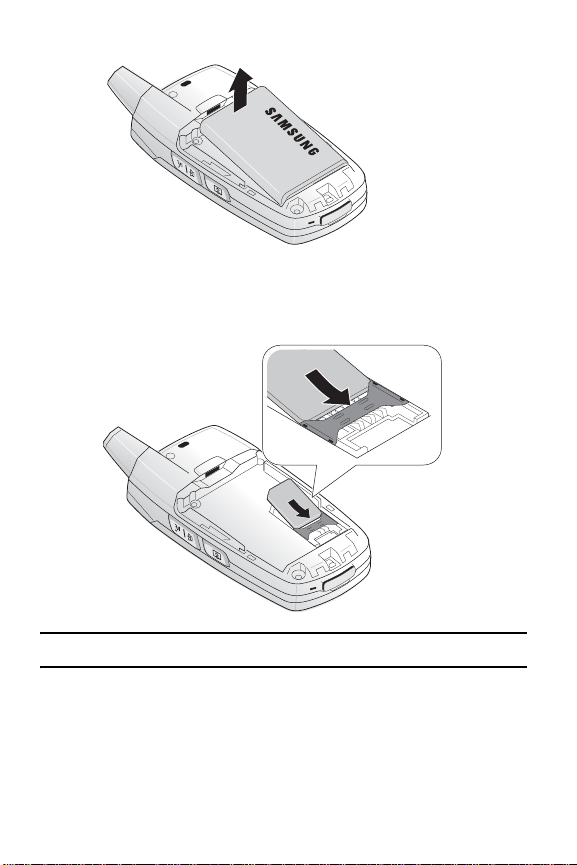
2. Remove the battery by lifting up, as shown.
3. Slide the SIM card into the SIM card socket so that the card locks
into place. Make sure the gold contacts of the card face into the
phone.
Note: If you need to remove the SIM card, slide it, as s hown, and take it out of the socket.
4. Replace the battery. Make sure that the battery is properly
installed before switching on the phone.
Getting Started
12
Page 19

5. Replace the battery cover by sliding it until it snaps into place.
Charging a Battery
Your phone is powered by a rechargeable Li-ion battery. A travel
adapter comes with your phone for charging the battery. Use only
approved batteries and chargers. Ask your local Samsung dealer for
further details.
You can use the phone while the battery is charging, but this causes
the phone to charge more slowly.
Note: You must fully charge the battery before using your phone for the first time. A
discharged battery takes about 200 minutes to recharge fully.
Getting Started
Getti ng St ar ted
13
Page 20

1. With the battery in position in the phone, plug the connector of
the travel adapter into the jack at the bottom of the phone.
2. Plug the adapter into a standard AC wall outlet. When charging is
finished, unplug the adaptor from the power outlet.
3. Press the buttons on both sides of the connector (1) and (2) pull
the connector out.
Getting Started
14
Page 21

Note: For connection to an electrical supply not located in Canada or the U.S., you must
use an adaptor of the prope r configuration for the power outlet. Use of the wrong
adapter could damage your phone and void your warranty.
Low Battery Indicator
When the battery is weak and only a few minutes of talk time
remain, a warning tone sounds and a message repeats at regular
intervals on the display. If this happens, the display dims to conserve
the remaining battery power.
When the battery level becomes too low, the phone automatically
turns off.
Check the battery indicator icon periodically and recharge as needed
to make sure the phone has enough battery power when needed.
Switching the Phone On or Off
1. Open the phone.
2. Press and hold the key until the phone switches on.
3. If the phone asks you to enter the phone password, enter the
password and press the OK soft key. It is preset to “00000000” at
the factory. For further details, see “Change Password” on
page 120.
4. If the phone asks for a PIN, enter the PIN and press the OK soft
key. For further details, see “PIN Check” on page 119.
Getting Started
The phone searches for your network and, after finding it, the idle
screen appears on the display. You can now make or receive a call.
5. When you wish to switch the phone off, press and hold the
key until the power-off image displays.
Getti ng St ar ted
15
Page 22

Call Functions
Selecting Functions and Options
The roles of the soft keys vary depending on the function you are
currently using. The labels on the bottom line of the display just
above each key indicate their current role.
Menu
Press the Left soft key
Menu
for
mode.
Msg.
Press the Right soft
key to access the
Msg.
menu.
The Left soft key can be used in several different ways.
♦In Idle mode, press to access the Menu.
♦When using other features, such as the web browser, the left soft
key performs a context-sensitive action, such as displaying the
Options submenu. This action is shown in the bottom left corner of
the Display Screen.
♦Some submenus display to the right of an option, indicating
additional sub-options. Highlight the option and press either the
Right navigation key or the key to display the sub-options.
The Right soft key can also be used in several different ways.
♦In Idle mode, press to access the Messages menu. (See
“Messages” on page 46.)
♦In text entry mode, press to change the character input type.
Call Functions
16
Page 23

♦When using other features, such as the web browser, the right soft
key performs a context-sensitive action. This action is shown in the
bottom right corner of the Display Screen.
Note: When you access a lis t of options, your phone highlights the current option. If,
however, the re are only two options, such as
highlights the option that is not currently active so that you can select it directly.
On/Off or Enable/Disable, your phone
Making a Call
When the idle screen displays, enter the area code and phone
number, then press the
Note: When you activate the Auto redial option in the Extra settings menu (Menu
9.2.4), the phone automatically redials up to ten times when the person does not answer
the call or is already on the phone. For carriers that automatically divert unanswered call
to voice ma il, the Auto redia l feature will not provide useful servic e. See “Extra Settings”
on page 106 for further details.
Making an International Call
1. Press and hold the key. The + character appears.
2. Enter the country code, area code and phone number and press
the
key.
key.
Call Functions
Call Functions
17
Page 24
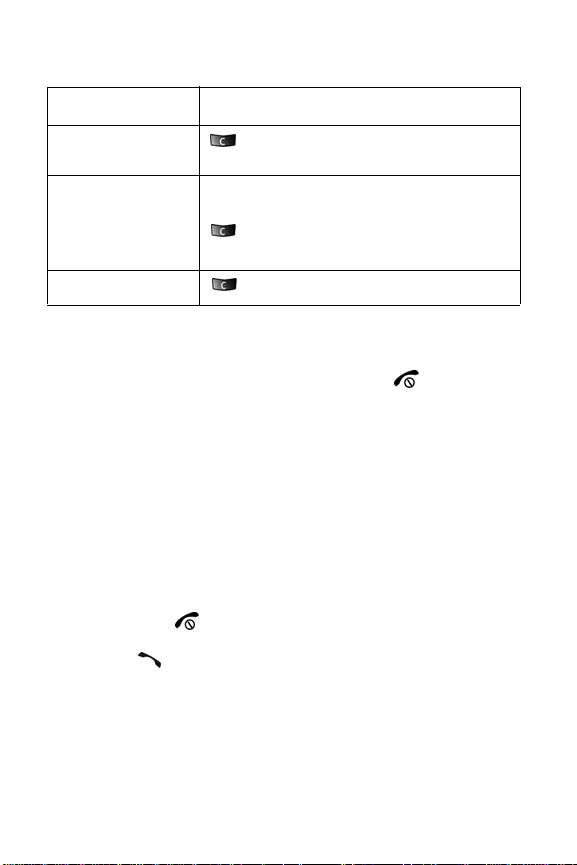
Correcting the Number
To clear Press the
the last digit
displayed
any other digit in the
number
the whole display
key.
Left or Right key until the cursor is immediately
to the right of the digit to be cleared. Press the
key. You can also insert a missing digit
simply by pressing the appropriate key.
key and hold it for more than one second.
Ending a Call
When you want to end your call, briefly press the key or close
the phone.
Redialling the Last Number
The phone stores the numbers you have dialed, received or missed if
the caller is identified. See “Recent Calls” on page 42 for further
details.
To recall any of these numbers:
1. If you have typed characters on the display, press either the Back
soft key or the key to return to Idle mode.
2. Press the key to display your Recent Calls. By default, the
Recent Calls list is displayed, showing all numbers made,
received or missed.
Call Functions
18
Page 25
3. Use the Up and Down keys to scroll through the numbers until
the number you want is highlighted.
To Pr ess t he
dial the number
edit the number Options soft key and select Details. The
delete the number Options soft key and select Delete
delete all of the
numbers in the Recent
Calls list
key.
number is displayed For further details,
see “Correcting the Number” on
page 18.
followed by Selected.
Options soft key and select Delete
followed by All. For further details, see
“Delete All” on page 44.
Making a Call from Contact list
You can store the phone numbers that you use regularly in the SIM
card or the phone’s memory, which are collectively called Contact
list. Simply select a name to recall the associated number. For further
details, see “Contacts” on page 94.
Adjusting the Volume
During a call, if you want to adjust the earpiece volume, use the
Volume keys on the left side of the phone.
♦Press the key to increase the volume level and the key to
decrease the level.
♦In Idle mode, you can also adjust the keypad tone volume using
these keys.
Call Functions
Call Functions
19
Page 26
Answering a Call
When somebody calls you, the phone rings and displays the
incoming call image. When the caller can be identified, the caller’s
phone number or name, if stored in your Contact list, displays.
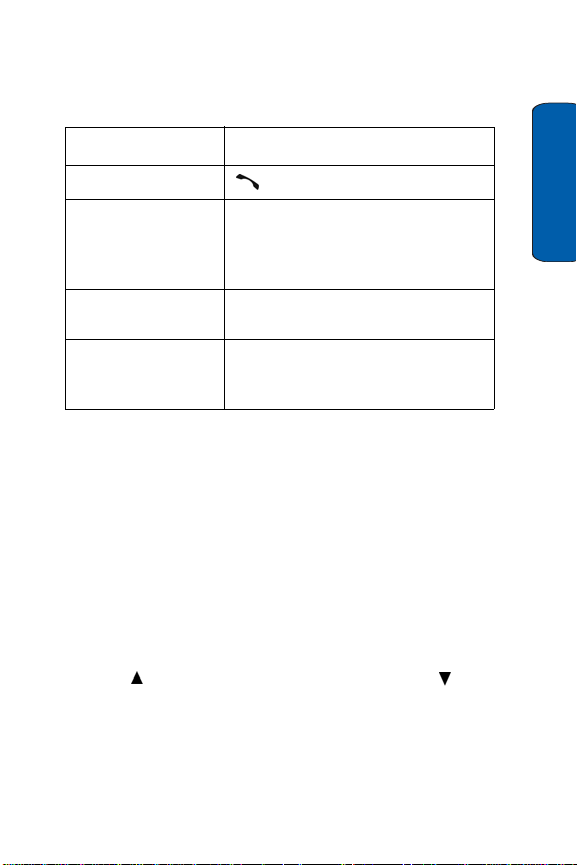
To answer a call
1. If necessary, open the phone.
2. Press the key or the Accept soft key to answer the incoming
call.
♦When the Anykey answer option in the Extra settings menu
(Menu 9.2.4) is activated, you can press any key to answer a
call except for the key and the Reject soft key. See “Extra
Settings” on page 106.
♦When the Open to answer option in the Extra settings menu
(Menu 9.2.4) is activated, you can answer the call simply by
opening the folder.
♦To reject the call, press and hold one of the Volume keys, or
press the Reject soft key or key.
3. End the call by pressing the key.
Note: You can answer a call while using the Contac t list or menu features. After ending
the call, the phone returns to the function screen you were using.
Viewing Missed Calls
When you are unable to answer a call, you can find out who called.
The number of calls you missed is displayed on the idle screen
immediately after a call is missed.
To view the missed call immediately:
1. If necessary, open the folder.
Call Functions
20
Page 27

2. Press the View soft key.
The number for the most recent missed call displays, if available.
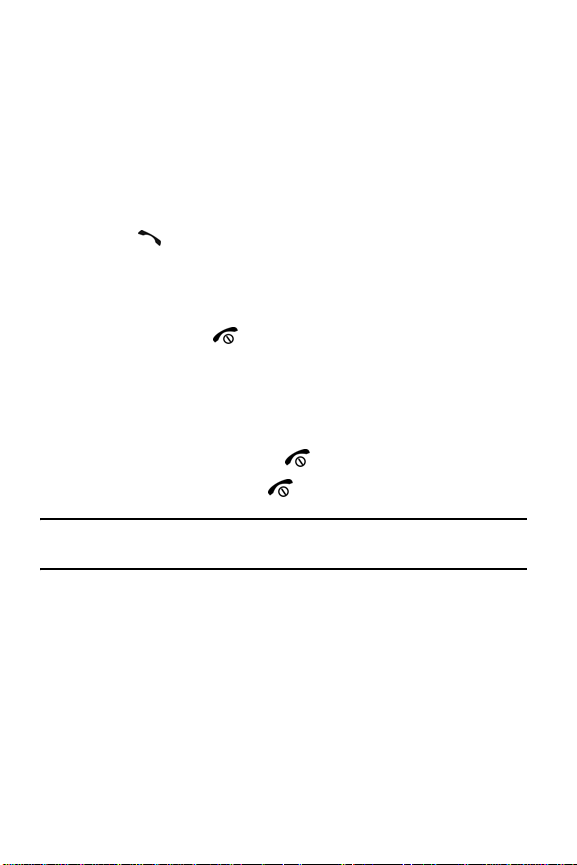
To Press th e
scroll through the missed
calls
call the number displayed
edit or delete a missed
call number
Up or Down key.
key.
Options soft key.
Saving a Missed Call Number
Note: When the number for the missed call is not avail able, the Edit option does not
display.
1. Press the View soft key.
2. Press the Up or Down key to highlight the number you wish to
save and press the Options soft key.
3. Select Save to Contacts and press the Select soft key.
4. Choose between the Phone and SIM locations and press the
Select soft key.
5. Enter the Name or choose from the provided list and press the
Save soft key.
Call Functions
For more options on this function, see “Storing a Number in Idle
Mode” on page 94.
Call Functions
21
Page 28

Deleting a Missed Call
To delete a missed call that appears on-screen:
1. Press the View soft key.
2. Highlight the call that you wish to delete. The most recent call is
highlighted by default.
3. Press the Options soft key and select Delete. Choose Selected to
delete the highlighted call or All to delete all missed calls.
You can press the key at any time to exit the Missed Call feature.
Note: You can access the Missed Call feature at any time by selecting the Missed Calls
menu (Menu 1.2). F or further details, see “Missed Calls” on page 42.
Quiet mode
Quiet mode is convenient when you wish to stop the phone from
making noise, such as when you are in a theater.
♦In Idle mode, press and hold the key until the “Silent All
activated” or “Vibration All activated” message and icon ( )
display.
♦To return to normal, press and hold the key until the “Silent All
deactivated” or “Vibration All deactivated” message displays.
Call Functions
22
Page 29

Options During a Call
Your phone provides a number of features that you can use during a
call.
Putting a Call on Hold
You can place the current call on hold whenever you want. You can
make another call while you have a call in progress if your network
supports this service.
♦To place a call on hold, simply press the Options soft key and
select Hold. You can reactivate the call whenever you want, by
pressing the Retrieve soft key.
To make a call while you have a call in progress:
1. Put the current call on hold by pressing the Hold soft key. Your
current call is placed on hold.
2. Enter the phone number that you wish to dial.
3. Press the key to dial the second call.
♦When you have an active call and another call on hold, you may
switch between the two calls, placing the active call on hold.
Simply press the Options soft key and select Swap.
The current call is placed on hold and the call on hold is
reactivated so that you can continue conversing with the other
person.
4. When you want to finish, end each call by pressing the key.
Making a Multi-party Call
A multi-party call is a network service that allows up to six people to
take part simultaneously in a multi-party or conference call.
Options During
Options During a Call
23
Page 30

Note: Please contact your service provider to determine if multi-party calling is
supported.
Setting up the Multi-party Call
1. Call the first participant in the normal way.
2. Call the second participant in the normal way. The first call is
automatically put on hold.
3. To join the first participant to the multi-party call, press the
Options soft key and select the Join option. Press the Select soft
key.
4. To add a new person to the multi-party call, call the person in the
normal way and press the Options soft key. Select the Join option
and press the Select soft key.
You can also add incoming callers by answering the call, pressing
the Options soft key, and selecting the Join option. Repeat as
required.
Having a Private Conversation with One Participant
1. Press the Options soft key and select Select One, and press the
OK soft key.
2. Highlight the desired partipant and press .
3. Select Private and press .
You can now talk privately to that person. The other participants can
still converse with each other.
4. To return to the multi-party call, press the Options soft key and
select the Join option. Press the OK soft key.
All the multi-party call participants can now hear each other.
Options During a Call
24
Page 31

Dropping One Participant
1. Press the Options soft key and select Select One, and press the
OK soft key.
2. Highlight the desired partipant and press .
3. Select Remove and press .
The call ends with that participant, but you can continue to talk to
the others.
4. When you want to end the multi-party call, press the key.
Switching the Microphone Off (Mute)
You can temporarily switch your phone’s microphone off so that the
other person on the call cannot hear you. For example, you wish to
say something to another person in the room but do not want the
person on the call to hear you.
To switch the microphone off temporaril y:
Press the Mute soft key.
The other person can no longer hear you.
To switch the microphone back on:
Press the Unmute soft key.
The other person can hear you again.
Muting or Sending Key Tones
These options allow you to turn the key tones off or on. If the Mute
keys option is selected, your phone does not transmit the DTMF
(Dual Tone Multi-Frequency) tones of the keys, which allows you to
press keys without hearing annoying key tones during a call.
Options During
Options During a Call
25
Page 32

Note: To communicate with answering machines or computerized telephone systems
using DTMF tones, the Send DTMF option must be selected.
Sending a Sequence of DTMF Tones
You can send the DTMF tones after entering the entire number you
need to send. This option is helpful for entering a password or an
account number when you call an automated system, like a banking
service.
To send the DTMF tones:
1. When you are connected to the teleservice system, press the
Options soft key.
2. Press the Down key to highlight the Send DTMF option.
3. Press the Select soft key.
4. Enter the number you want to send and press the OK soft key. The
tones are sent.
Searching for a Number in the Contact list
You can search for a number in the Contact list during a call.
1. Press the Options soft key.
2. Press the Down key to highlight the Address Book option.
3. Press the Select soft key. The Contacts menu is displayed.
4. Press for Contact List and enter the name that you wish to
find.
If you enter the first few letters of the name, the Contact list entries
are listed, starting with the first entry matching your input.
Options During a Call
26
Page 33

5. To view the highlighted entry, press the key.
For further details about the Contact list feature, see “Contacts” on
page 94.
Using Text Messages
If you receive a text message during a call, the Message icon ( )
flashes on the display. You can use the Text Message menu (Menu
2.2.1) to write new text messages. For further details about text
messaging, refer to “Creating a Text Message” on page 48.
Call Waiting
You can answer an incoming call while you have a call in progress, if
your network supports this service and you have set the Call
waiting option (Menu 9.5.3) to Activate. For further details about
call waiting, see “Call Waiting” on page 115.
To answer a call while you have a call in progress:
1. Press the key or the Accept soft key to answer the incoming
call. The first call is automatically put on hold.
2. To switch between the two calls, press the Options soft key and
select Swap.
3. To end the call being held, press the Options soft key and select
the End held call option.
To end the current call, press the key.
Options During
Options During a Call
27
Page 34

Entering Text
When using your phone, you will often need to enter text, such as
when storing a name in the Contact list, creating your personal
greeting or scheduling events on your calendar. You can enter
alphanumeric characters by using your phone’s keypad.
Your phone has the following text input modes:
♦T9 mode: This mode allows you to enter words with only one
keystroke per letter. Each key on the keypad has more than one
letter; for example, when you press the key once, J, K or L
displays. T9 mode automatically compares your keystrokes with an
internal linguistic dictionary to determine the correct word, thus
requiring far fewer keystrokes than the traditional Alphabet mode.
♦Alphabet mode: this mode allows you to enter letters by pressing
the key labeled with the letter you want. Press the key once, twice,
three or four times until the desired character displays.
♦Number mode: this mode allows you to enter numbers.
♦Symbol mode: this mode allows you to enter various symbols and
special characters.
Changing the Text Input Mode
When you are in a field that allows characters to be entered, you will
notice the text input mode indicator near the top-right corner of the
display.
♦Press to change betw een upper and l owercase or to switch to Number mode
().
♦Press and hold to switch between T9 ( ) and Alphabet ( ) modes.
♦Press and hold to switch to Symbol mode.
Using T9 Mode
T9 is a predictive text input mode that allows you to key in any
character using a single keystroke. This text input mode is based on a
Entering Text
28
Page 35

built-in dictionary. Your phone will select the most likely word based
on your keystroke combinations.
To enter a word in T9 mode:
1. When you are in T9 mode, start entering a word by pressing the 2
to 9 keys. Press each key only once for each letter.
Example
: To enter “HELLO” in T9 mode, press the , , ,
and keys.
The word that you are typing appears on the display. It may change
with each key that you press.
2. Enter the whole word before editing or deleting the keystrokes.
3. When the word displays correctly, go to step 4.
If the word displayed is not the one you want, press the key
repeatedly to display alternative word choices for the keys that you
have pressed.
4. Insert a space by pressing the key and start entering the next
word.
To add a new word into the T9 dictiona ry:
1. After pressing the keys corresponding to the word you want to
add, press the key to display the alternative words.
2. When you press the on the last alternative word, the left soft
key changes to Add. Press the Add soft key.
Entering Text
3. If necessary, clear the word using and enter the word you
want using Alphabet mode. See page 30.
4. Press the OK soft key.
Entering Text
29
Page 36

The word is added to the T9 dictionary and becomes the first word
for the associated key presses.
♦To enter periods or hyphens, press the key. T9 mode applies
grammar rules to ensure that the correct punctuation is used.
♦To shift the case in T9 mode, use the key.
♦You can move the cursor by using the Left and Right keys. To
delete letters, press . Press and hold to clear the display.
Using Alphabet Mode
Use the 0 to 9 keys to enter your text.
1. Press the keys labeled with the letter you want:
• Once for the first letter
• Twice for the second letter
• And so on
2. Select the other letters in the same way.
Note: The cursor moves to the right when you press a different key. When entering the
same letter twi ce or a different l etter on the same key, just wait for a few seconds for the
cursor to move to the right automatically, and then select the next letter.
Entering Text
30
Page 37

Refer to the following table for further details about the characters
available:
Characters in the Order Displayed
Key
Upper Case
Lower Case
Entering Text
space
space
€
space
space
€
♦To shift the case in Alphabet mode, use the key.
♦You can move the cursor by using the Left and Right keys. To
delete letters, press . Press and hold to clear the display.
Entering Text
31
Page 38

Using Number Mode
Number mode enables you to enter numbers into a text message.
Press the keys corresponding to the digits you want to enter.
Using Symbol Mode
Symbol mode enables you to insert symbols into a text message.
To Press the
select a symbol corresponding number key.
display more symbols Up or Down key.
clear the symbol(s)
insert the symbol(s) into
your message
cancel your input and
return to the previous
mode
. When the input field is empty,
this key returns the screen to the
previous mode.
OK soft key.
Back soft key.
Entering Text
32
Page 39

Menus
The navigation key on your phone allows you to scroll through
menus quickly and easily. The scroll bar at the right of the menu
keeps track of your position in the menu at all times.
♦To navigate through a menu, simply press the navigation key up or
down. If you are in a first-level menu, such as Settings, you may
also navigate to the next menu by pressing the navigation key left
or right.
♦As you navigate through the menu, menu options are highlighted.
Select any numbered option by simply pressing the corresponding
number on the phone’s keypad. You may also select any item by
highlighting it and pressing the Select soft key or the key.
♦Some submenus display to the right of an option, indicating
additional sub-options. Highlight the option and press either the
Right navigation key or the key to display the sub-options.
Accessing a Menu Funct ion
1. In Idle mode, press the Menu soft key to access Menu mode.
From the Menu, do one of the following:
♦Scroll using the Up, Down, Left and Right keys to reach a main
menu, Settings for example. Press the Select soft key or the
key to enter the highlighted menu.
♦Press the # beside the desired menu option. For example, for
Settings, press the 9 key.
2. If the menu contains sub-menus, Language for example, you can
access them by scrolling using the Up or Down key and pressing
the Select soft key or the key. Alternatively, press the
number beside the desired sub-menu option.
Menus
If the menu that you have selected contains further options,
repeat this step.
Menus
33
Page 40

To Pr ess the
scroll through the menus Up or Down key, or use the Volume
keys.
confirm the chosen
setting
return to the previous
Select soft key or key.
Back soft key or key.
menu level
exit the menu without
changing the settings
key.
List of Menu Functions
The following list shows the menu structure available and indicates
the number assigned to each option and the page where you can find
a description of each feature.
1. Recent Calls
1. All Calls
2. Missed Calls
3. Calls Made
4. Calls Rece ived
5. Delete All
• All Calls
• Mi ssed Ca lls
• Calls Made
• Ca lls Rece ived
6. Call Timers
•Last Call
•All Calls
• Re ceived Ca lls
Menus
34
(See page 42)
Page 41

2. Messages
1. IM
1. Sign In
2. Saved Conversations
3. Offline Conversations
4. Settings (See below for expanded
5. Help
1.Serv ice Provider Info.
2.About MSN Messenger/Help
2. Cre ate New M essage
1. Text Message
2. Multi media M essage
3. My M essages
1. Inbox
2. Sent
3. Outbox
4. Drafts
5. My Folders
4. Templates
5. Voice Mail
1. Connect to Voice Mail
2. Voice mail Number
6. Delete All
• All Messages
• Inbox
• Read
• Unread
• Sent
• Outbox
• Drafts
7. Settings
1. IM
1.Choose Your Community
• MSN Messenger
• Yahoo!
2.Profile Settings
(See page 46)
menu tree)
Te xt
• FIDO WAP
• FIDO MM S
3.Community Settings
• Sounds
• Sort by
• By Alphabet
• By Sta tus
• Auto Sign In
2. T ext Mess age
1.Send Settings
• Reply Path
• Delivery Report
• Beare r Selection
• GSM
• GPR S Preferred
2.Current Profile
3.Text Me ssage Prof ile
1.Setting 1
• Ser vice Cent er
• Defa ult
Dest ina tion
• Default Type
•Text
• Default Validity
•Maximum
•One H our
•6 Hours
•24 Hours
•One Week
• Settin g Name
3. M ultimedi a Messa ge
1.Send Settings
• Delivery Report
• Read Reply
• Priority
• Normal
• High
• Low
• Expiry Date
Menus
35
Menus
Page 42

• Maximum
• 1 Hour
• 12 Hours
• 1 Day
• 1 Week
• Delivery Time
• Immediately
• 1 Hour Later
• 12 Hours Later
• 1 Day Later
• 1 Week Later
2.Receive Settings
• Anonymous Reject
• ADS Allowed
• Information Allow ed
• Report Allowed
• Auto D ownload
3.Profile
• FIDO W AP
• FIDO MM S
4. Push Mes sage
• Receive
• Alw ays
• SMS-C Specific
• Neve r
• Service Center
5. Broadcast
1.Re ceive
• Disable
• Enable
2.Channel List
• All Channels
• Index
3.Language
• All
• English
• França is
8. Mem ory Status
3. Games
1. Get Gam es
2. My Games
(See page 60)
4. Applications
page 62)
1. Alarm
• Wake-up Call
• Alarm1
• Alarm2
• Aut o Pow er
2. Calendar
1. Month View
2. Week V iew
3. Day View
4. Schedule
5. Anniversary
6. Misce ll aneous
7. Misse d Alarm Even ts
3. Task
4. Note
5. Tools
1. Calculator
2. Converter
1.Currency
2.Length
3.Weight
4.Volume
5.Area
6.Temperature
3. Timer
4. Stopwatch
5. World Time
5. Fido Internet
page 71)
1. Fido Home
(See
(See
Menus
36
Page 43

2. Fav orites
3. Go to U RL
4. Browser Profiles
• FIDO WAP
• FIDO MMS
5. Cl ear Cach e
6. Media
1. Camera
2. Voice Recognition
3. Record Audio
(See pa ge 76)
7. FUN & Tunes
page 87)
1. Audio
1. Get Ring Tones
2. Downloaded Audio
3. Record
4. Recorded Audio
5. Favorite Audio
2. Graphics
1. Get Graphics
2. Down loaded G raphics
3. Photos
4. Favorite Graphics
3. Videos
1. Get Videos
2. Down loaded V ideo
3. Video Clips
4. Favorite Video
4. Other Files
5. Mem ory Status
1. My Files
2. Games
3. Applications
(See
8. Contacts
1. Contact List
2. Add Ne w Contact
1. Phone
2. SIM (FDN)
3. G roup
• None
4. Speed Dial
5. M y Name Card
6. O wn Number*
1. Voice Line 1
2. Voice Line 2
3. Data
7. M anagement
1. Default Saving
• Phone
•SIM
• Ask on Saving
2. Copy All to Phone
3. D elete All
•All
• Phone
•SIM
•SIM(FDN)
4. Memor y Status
8. Ser vice Nu mber
9. Settings
1. Time & Date
• Set Time
• AM/ PM
• AM
• PM
• Time Format
• 12 Hours
• 24 Hours
*. Depending on your SIM
card.
(See pa ge 94)
Menus
(See page 104)
Menus
37
Page 44

• Set Date
• Date Format
• MM/DD/YYYY
• YYYY/MM/DD
• DD/MM/YYYY
• Starting Day of Calendar
• Start with Sunday
• Start with Monday
• Auto Update
• On
• Off
• Confirm First
2. Phone Settings
1. Language
• Automatic
• English
• Fra nçais
2. Greeting Message
3. Shortcut
4. Extra Settings
• Auto Redial
• Open to Answer
• A nykey A nswer
• S ide Keyp ad Loc k
3. Disp lay Set tings
1. Wallpaper
1.Get more wallpaper
2.Downloaded Graphics
3.Photos
4.Favori te Graph ics
5.Default Wallpapers
2. Info Dis play
• Text Positio n
• Top
• Bottom
• Off
• Text M ode
• Outline
• Shadow
Menus
38
• Normal
• Text Col or
• White
• Orange
• Yellow
• Blue
• Green
• Violet
• Red
• Black
• Graphic Logo
• On
• Off
3. Skin
• Pattern 1
• Pattern 2
• Pattern 3
• Pattern 4
4. LCD Brightness
5. LCD Contrast
6. Backlight
• Main LCD O n
• 15 sec.
• 30 sec.
• 1 min.
• 3 min.
• 10 min.
• Main LCD D im
• 15 sec.
• 30 sec.
• 1 min.
• 3 min.
• Off
7. Dialing D isplay
1.Font Color
• Basic
• Rainbow
2.Background Color
4. Sound Settings
Page 45

1. Incoming Call
• Get Ring Tunes
• RingTone
• RingVolume
• Alert Type
• Melody
• Vibration
• Vibration then Melody
• Vibration & melody
2. Keypad Tone
• Tone
• Off
• DTMF
• Beep
• Drum
• Rain Drop
• Voice
• Xylophone
• Volume
3. Message Tone
1.Text Messa ge
• Tone
• Mode
• Tone
• Vibration
• Off
• Repetition
• Once
• Every 2 M in.
2.Multime dia Mes sage (sam e
options as Text message,
above)
3.Broadcast (same options as
Text M essage, ab ove)
4. Pow er O n/Off
•Off
• Tone 1
• Tone 2
5. Folder Tone
•Off
• Tone 1
• Tone 2
6. Quiet Mode
• Vibration A ll
• Silent All
7. Extra Tones
• Error Tone
• Minute Minder
• Connection Tone
• Alerts o n call
5. N etwork Services
1. Call Forwarding
1.Forward Always
1.Voic e Calls
2.Data Calls
2.Busy
1.Voic e Calls
2.Data Calls
3.No Rep ly
1.Voic e Calls
2.Data Calls
4.Unreachable
1.Voic e Calls
2.Data Calls
5.Cancel All
2. Call Barring
1.All Outgoing
1.Voic e Calls
2.Data Calls
2.International
1.Voic e Calls
2.Data Calls
3.International Except to Home
1.Voic e Calls
2.Data Calls
4.All Rec eiving
1.Voic e Calls
2.Data Calls
Menus
39
Menus
Page 46

5.Receivi ng Wh ile Abroa d
1.Voice Calls
2.Data Ca lls
6.Cancel All
7.Change Barring Password
3. Call Waiting
1.Voice Calls
•Activate
• De activate
2.Data Calls
•Activate
• De activate
3.Cancel All
4. Netw ork Selection
• Auto mati c
• Manual
5. Caller ID
• Default
• Hide Number
• Send Num ber
6. Closed User Group
6. Bluetooth
1. Turn B luetooth On/Off
• Off
• On
2. My D evices
3. My Phone’s Visibility
• Off
• On
4. My Phone’s Name
5. Secure Mode
• Off
• On
6. Bluetooth Services
1.He adset
2.Handsfree
3.Serial Port
4.Dial up
5.File Trans fer
Menus
40
6.Object Push
7. Security
1. PIN C heck
• Disable
• Enable
2. Change PIN
3. Phone Lock
• Disable
• Enable
4. Change Password
5. Privacy
• Phone Priv acy
• Messages
• Images
• Video
• Sound
• Address Book
• Call Log
6. SIM Lock
• Disable
• Enable
7. FDN Mode *
8. Change PIN2*
8. Connection Settings
• FI DO WAP
• FI DO MMS
9. Voice Recognition Settings
1. Choice Lists
• Auto mati c
• Always On
• Always Off
2. Sensititivity
• Reject More
• Recomm ended
• Reject Less
3. Digit Dialing
1.Adapt D igits
*. Depending on your SIM
card.
Page 47

2.Reset Digits
4. Sound
1.Prompts
• On
• Off
2.Digits
• On
• Off
3.Names
• On
• Off
4.Name Settings
1.Speed
• Faster
• Recommended
• Slower
2.Volume
• Louder
• Recommended
• Softer
5.Speakerphone
• On
• Off
5. About
0. Reset Settings
• All
• Phone Settings
• Display S ettings
• Sound Settings
Menus
Menus
41
Page 48

Recent Calls
In this menu, you can:
♦view calls you missed, received or made
♦view the length of calls made and received
Note: You can access the most recent numbers in the three types of call recor ds by
pressing the key in Idle mode.
All Calls
This menu (Menu 1.1) lets you view the last 30 numbers you dialed,
received or missed. Use the navigation key to scroll through the list,
and press the key to view call details.
The number is displayed along with the time and date when the call
was made.
By pressing the Options soft key, you can:
♦view call details.
♦call the number back. You can also dial the number by pressing
the key.
♦save the number to your Contact list.
♦send a message to the number.
♦delete the call from the list.
Missed Calls
This menu (Menu 1.2)lets you view the last 30 numbers of the calls
you received, but did not answer. Use the navigation key to scroll
through the list, and press the key to view call details.
The number is displayed along with the time and date when the call
was made.
By pressing the Options soft key, you can:
♦view call details.
Recent Calls
42
Page 49

♦call the number back. You can also dial the number by pressing
the key.
♦save the number to your Contact list.
♦send a message to the number.
♦delete the call from the list.
Calls Made
This menu (Menu 1.3) lets you view the last 30 numbers you dialed.
Use the navigation key to scroll through the list, and press the
key to view call details.
The number is displayed along with the time and date when the call
was made.
By pressing the Options soft key, you can:
♦view call details.
♦call the number back. You can also dial the number by pressing
the key.
♦save the number to your Contact list.
♦send a message to the number.
♦delete the call from the list.
Calls Received
This menu (Menu 1.4) lets you view the last 30 numbers you dialed,
received or missed. Use the navigation key to scroll through the list,
and press the key to view call details.
The number is displayed along with the time and date when the call
was made.
By pressing the Options soft key, you can:
♦view call details.
♦call the number back. You can also dial the number by pressing
the key.
♦save the number to your Contact list.
♦send a message to the number.
♦delete the call from the list.
Recent Calls
Recent Calls
43
Page 50

Delete All
This menu (Menu 1.5) allows you to delete all of the records in each
call record type. You can also delete all of your call records at one
time.
To Press the
select a call record type
to clear
add or remove a check
mark
delete the marked
records
Up or Down key. To delete all of your call
records, select All Calls.
key.
Delete soft key.
When a confirming message displays, press the Yes soft key to
confirm.
Call Timers
This menu (Menu 1.6) lets you view the timers for calls you made
and received.
Note: The actual time invoiced for calls by your s ervice provider may vary, depending on
network features, rounding-off for bi lling purposes and so on.
The following timers are available:
♦Last Call: length of the last call.
♦All Calls: total length of all calls you made since the timer was last
reset.
♦Received Calls: total length of all calls you received since the
timer was last reset.
Recent Calls
44
Page 51

To reset a timer, highlight the desired timer and press the Reset soft
key. You must first enter the phone password and then press the OK
soft key.
Note: The password is preset to “00000000” at the factory. To change this password, see
“Change Passw ord” on page 120.
Recent Calls
Recent Calls
45
Page 52

Messages
You can send and receive a range of different message types from
your mobile phone, including:
♦Instant Messaging allows you to send and receive instant
messages over a variety of different IM clients.
♦Create new message allows you to compose and send text and
multimedia messages to other phones able to receive the
messages.
♦Push Messages are text messages that you can receive and click
to immediately view an online page of content.
♦Broadcast messages allows you to receive specific information
related to a specific area (cell) from your service provider.
Instant Messaging
Instant Messaging (IM) (Menu 2.1) is a way of sending short, simple
messages that are delivered immediately to users online at that
moment.
Before using this feature, you need to subscribe to a messenger
service. For further details, contact your service provider.
Starting your Instant Messaging
1. Press Menu 2.1 for IM.
2. If this is the first time using Instant Messaging, scroll to the
desired IM service that you are subscribed to and press the
Select soft key.
Note: A warning message may appear reque sting that you accept the licensing
agreement for the IM service. If this message appears, press the Allow soft key to
continue.
3. Highlight the Sign on or Sign in option, depending on your IM
service and press the Select soft key.
Messages
46
Page 53

4. Enter the required sign on information such as ID and password
and press the OK soft key.
Note: The information required for sign on will vary depending on the instant
messaging provider you ar e using.
5. Follow the on-screen instructions to read, reply to, compose,
send, and manage your IM account.
Using the Instant Messenger Options
On the sign-on screen of the messenger, press the Select soft key to
access the following options:
Note: Depending on your IM community, the menu options will change slightly.
♦Sign on/Sign in: allows you to login to your IM account.
♦Saved conversations: shows permanent records of your IM
conversations.
♦Offline conversations: shows dynamic records of your last 10 IM
conversations.
♦Settings: allows you to change your Default community and
Community settings.
♦Help: provides various help information depending on the
community you have selected.
Create new message
Use the Create new message option (Menu 2.2)to compose new text
and multimedia messages:
♦Text messages allows you to send text messages (SMS) to
another text messaging-capable phone.
♦Multimedia messages can be sent to another multimedia message
(MMS) capable phone or an email address. Multimedia messages
can contain text, photos, videos and voice attachments.
Messages
Messages
47
Page 54

Creating a Text Message
1. Press Menu 2.2.1 for Text Message.
2. Create your message.
For further details about entering characters, see “Entering Text”
on page 28.
3. When you finish entering your message, press the Options soft
key and select Send Message, or press the key.
4. Enter the number(s) that you wish to send the message to.
♦To send the message to a recent caller, press the Options soft
key and select Recent Recipient. Highlight the desired entry
and press the Select soft key or the key.
♦To send the message to a Contact, press the Options soft key
and select Address Book. Highlight the desired entry and press
the Select soft key or the key.
♦To add another destination, select an empty slot and press the
Options soft key.
Note: When entering multipl e destinations, you can also choose Group and Save to
drafts options in addition to the other send opti ons.
5. To add additional destinations, repeat step 4. You can enter up to
30 destinations.
6. When you have finished entering the destinations, press the
Options soft key, highlight the Send option and press the Select
soft key.
Your phone sends the text message. After sending, the message
is saved in the Sent folder.
Messages
48
Page 55

Text Message Options
While you are composing your text message, press the Options soft
key to select from the following:
♦Send Message: allows you to send the message.
♦Insert: allows you to insert one of the following:
● Te xt Temp lates allows you to apply one of the preset message
templates to the text. Select one of the 10 items stored in the
Text messages template menu.
● Address Book allows you to add names and phone numbers to
your message from your Contacts list.
● Favorites allows you to add Internet addresses to your
message.
♦Add MEdia: allows you to add a picture, animation, or melody to
your message.
♦Attach: allows you to attach a Name card, Schedule, Anniversary,
Miscellaneous, or Task items to your message.
♦Save Message to: save the message to your Drafts or other folder.
♦Language select: allows you to set the language to English or
Français.
♦Text style: allows you to format the style of the text.
● For the Text size, Large, Normal, and Small size are available.
● Text mode options are Normal, Underline, and Strikethrough.
● The options for Bold and Italic are set by using the key to place
a checkmark by them.
♦Input Method: allows you to change your input method (i.e., T9,
AB or Numeric). For more information, see “Entering Text” on
page 28.
Messages
Creat ing a Long Text Message
When you write a text message, the phone automatically splits it into
several messages if the message exceeds the maximum number of
characters allowed in a single message. The number of split
messages to be sent is shown each time your message is split.
Messages
49
Page 56

Depending on your service provider, the maximum number of
characters may vary.
Creating and Sending a Multimedia Message
1. Press Menu 2.2.2 for Multimedia message. The media types
screen is displayed.
2. Add the message content by selecting the following media types:
♦Subject: allows you to enter text for the subject. When
finished, press to return to the media type screen. While
entering the subject text, the following Options are available:
• Save: saves the subject text, returning you to the media
type screen.
• Insert: allows you to insert Text templates to apply a
preset message template, Address Book to add names and
phone numbers from your Contacts list, or Favorites.
• Save to: save the message to your Drafts or other folder.
• Language Select: allows you to set the language to
English or Français.
• Input Method: allows you to select the Text entry method.
For more inforation, see “Entering Text” on page 28.
♦Graphics & Video: to take a picture or add an existing picture
or video from your Graphics or Video folders.
♦Audio: allows you to add a sound file. You can record a new
audio clip or add an existing audio clip, or select one of sound
clips stored in the Downloaded or Favorite audio folders.
♦Message: enter the message text. When finished, press to
return to the media type screen. While entering the message
text, the following Options are available:
• Save: saves the message text, returning you to the media
type screen.
• Insert: allows you to insert Text templates to apply a
preset message template, Address Book to add names and
phone numbers from your Contacts list, or Favorites.
Messages
50
Page 57

• Save to: save the message to your Drafts or other folder.
• Language Select: allows you to set the language to
English or Français.
• Input Method: allows you to select the Text entry method.
For more inforation, see “Entering Text” on page 28.
3. After you have created the message, press the Options soft key
and select Send.
Multimedia Message Options
While you are composing your multimedia message, press the
Options soft key to select from the following:
♦Add: allows you to add the selected media type.
● Add Graphics: allows you to add an image by selecting Create
or from an image stored in either Downloaded Graphics,
Photos or Favorite Graphics.
● Add Video: allows you to add a video by selecting Create or
from an video stored in either Downloaded Videos, Videos or
Favorite Videos.
● Add Audio: allows you to add an audio file by selecting Record
Audio or from an audio file stored in either Recorded Audio,
Downloaded Audio or Favorite Audio.
♦Preview: shows the message you created.
♦Send: allows you to send the message.
♦Save to: saves the message to the Draft folder or other folder.
♦Settings: allows you to adjust your MMS message settings.
♦Add Page: allows your to add another page to the message.
♦Delete Page: allows you to remove a page from the message.
♦Edit Page: changes the duration or order of the current page.
♦Attach: allows you to attach a Name card, Schedule, Anniversary,
Miscellaneous, or Task items to your message.
♦Remove Subject/Graphics & Video/Audio/Message: allows you to
remove the highlighted object from the multimedia message.
Messages
Messages
51
Page 58

My Messages
The My Messages screen (Menu 2.3) provides 4 message folders:
♦Inbox: stores incoming text and multimedia messages
♦Sent: stores the messages your phone has successfully sent.
♦Outbox: stores the messages your phone is attempting to send
temporarily.
♦Drafts: stores the messages you have saved without sending or
tried to send.
♦My Folders: stores the messages you have moved to a user-
created folder.
Viewing a Message in your Inbox
1. In Idle mode, press Menu 2.3.1. The message list opens. The
icons on the left of the number indicates the message type
♦ : indicates a text message
♦ : indicates multimedia message
♦ indicates a push message
The icons on the right of the message subject indicate the
memory location and the lock status.
2. To view a message in the list, highlight it and press .
For a Multimedia message, the display presents the message and
then switches to the message view screen.
3. Press the Up or Down key to scroll through the message screen.
For a Multimedia message, press the Left or Right key to scroll to
other pages, if the message has more than one page.
You can access the message options by pressing the Options soft
key. For more information, see below.
4. Press the or key to scroll to the previous or next message.
5. When you have finished, press the key.
Messages
52
Page 59

Using Message Options
While viewing a message, press the Options soft key to access the
following options:
Options for Text Messages
♦Reply: allows you to reply to the message received via a Te x t
Message.
♦Call Back: allows you to dial the number that the message has
listed.
♦Forward: allows you to forward the message to another
destination.
♦Delete: deletes the currently selected message.
♦Move to Phone/SIM: allows you to move the message to the
Phone or SIM card’s memory.
♦Extract Address: allows you to extract the recipient or sender’s
number or address, and URL from the message text so that you
can make a call, send a SMS or multimedia message, or save them
in your phone’s Contacts list.
♦Save Media/Attach: allows you to move the attachment to a
specific folder.
♦Protection: allows you to set the protection for the message.
Options for Multimedia Messages
♦Reply via: allows you to reply to the message received via either a
Text Message or a Multimedia Message.
♦Reply all via: allows you to reply to all addresses listed in the
recipient list.
♦Call back: allows you to dial the number from which the message
was originated.
♦Forward: allows you to forward the message to another
destination. You may Add Subject or simply Send.
♦Delete: deletes the message.
♦Save Address: allows you to extract the recipient or sender’s
number or address, and URL from the message text so that you
can make a call, send a SMS or multimedia message, or save them
in your phone’s Contacts list.
♦Save Contents: allows you to save the picture, video clip, or audio
clip from the message received.
Messages
Messages
53
Page 60

♦Properties: shows you information about the message.
Template s
Using this menu (Menu 2.4), you can preset the messages that you
use most frequently.
Select the message template you want and press the Options soft
key.
The following options are available:
♦Edit: allows you to edit the currently-highlighted message. For
further details about entering characters, see “Entering Text” on
page 28.
♦Send Message: allows you to compose a message with the
template already inserted into the body of the message. Once you
have completed your message, you can send, save and send, or
simply save it. For further details about how to send a message,
see page 48.
♦Delete: allows you to delete the message. You are asked to
confirm the deletion by pressing the Yes soft key.
♦Add New allows you to create a new template message.
Voice Mail
Use this menu (Menu 2.5) to store the number of the voice mail
server and access your voice mail messages.
♦Connect to Voice Mail: connect to the voice mail server to allow
you to listen to your messages.
♦Voicemail Number: enter the voice mail number.
Delete All
This menu (Menu 2.6) allows you to delete all of the text messages
in each message box. You can also delete all of your messages at one
time.
1. In Idle mode, press the Menu 2.6 for Delete All.
Messages
54
Page 61

2. Select the type of messages for which you want to delete.
To Pr ess the
select a message box Up or Down key. To delete all of your
messages, select All Messages.
place or remove a c heck
mark
delete the marked
messages
key.
Delete soft key.
When a confirming message displays, press the Yes soft key to
confirm.
Settings
You can set up various options for using text and multimedia
messaging services (Menu 2.7).
IM
The following IM settings options are available:
Choose Your Community
This setting sets the default IM community that your phone uses.
Your choices are MSN Messenger or Yahoo!
Profile Settings
This setting sets the default profile used for online access. Your
choices are FIDO WAP or FIDO MMS. For more information, see
“Connection settings” on page 121.
Messages
Messages
55
Page 62

Community Settings
This menu allows you to adjust your IM client’s behavior. Please note
that the menu options change slightly, depending on your IM
community. You can adjust the following settings:
♦Sounds: adjusts how your phone indicates a Receive message,
Contact alert or System message. You can select:
● Melody
● Vibration
● Silent
For each type of message, you can also set the Repetition
frequency. Choose between Once, Every 1 Min., and Every 2
Min..
♦Sort by: arranges your IM contacts by Alphabet or Status.
♦Auto Sign in: enables or disables auto-sign on.
Text Message
The following Text Message (SMS) settings options are available:
Send settings
♦Reply Path: allows the recipient of your message to send you a
reply message using your message center, if your network
supports this service.
♦Delivery Report: when this option is enabled, the network informs
you whether or not your message has been delivered.
♦Bearer selection: select the bearer to be used for each type of
network address accessed: GPRS preferred or GSM.
Current profile
The Current profile menu allows you to select which profile will be
used for text messaging. Highlight the profile you wish to use and
press the Select soft key.
Messages
56
Page 63

Text Message Profile
The Profile settings menu allows you to modify the settings for each
profile. Highlight the profile you wish to modify and press the Edit
soft key:
♦Service Center: allows the recipient of your message to send you
a reply through your message center, if your network supports
this service.
♦Default Destination: allows you to set a destination address for
any replies to your text message.
♦Default Type: set the default type (Te x t ) .
♦Default Validity: you can select the length of time your messages
are stored in the message center after they are sent. The actual
expiry date is determined by your service provider's configuration.
♦Setting Name: you can provide a custom name for your profile.
When you are finished editing your Profile setting, press the Save
Multimedia Message
The following options are available:
Send Sett ings
♦Delivery Report: when this option is enabled, the network informs
you whether or not your message has been delivered.
♦Read Reply: when this option is enabled, your phone sends a
request for a reply along with your message to the recipient.
♦Priority: you can select the priority level of your messages.
♦Expiry Date: you can select the length of time your messages are
stored in the message center after they are sent. The actual expiry
date is determined by your service provider's configuration.
♦Delivery Time: you can set a time delay before the phone sends
your messages.
Messages
Receive Settings
♦Anonymous Reject: you can set your phone to automatically reject
or receive anonymous messages.
♦ADS allowed: you can set your phone to automatically reject or
receive advertising messages.
Messages
57
Page 64

♦Information Allowed: allows messages with the category of
♦information.
♦Report allowed: when this option is enabled, the sender of an
incoming message receives a delivery report from the network.
♦Auto Download: when this option is enabled, all multimedia
messages will be autoamtically dowloaded to your phone.
Profile
This setting sets the default profile used for MMS access. Your
choices are FIDO WAP or FIDO MMS. For more information, see
“Connection settings” on page 121.
Push Message
The following options are available:
♦Receive: allows you to enable or disable the reception of push
messages. Choose between Always, SMS-C Specific and Never.
♦Service Center: allows the recipient of your message to send you
a reply through your message center, if your network supports this
service.
Broadcast messages
The following options are available:
♦Receive: allows you to enable or disable the reception of
broadcast messages.
♦Channel List: allows you to indicate the channels from which you
wish to receive broadcast messages. Press to check/uncheck
a channel. Press the Options soft key to Save, Add Channels,
Delete or Edit the marked channels.
♦Language: allows you to select your preferred language in which
to display cell broadcast messages. Please contact your service
provider for further details.
Memory status
You can check the memory amount available and remaining for
storing the messages.
Messages
58
Page 65

1. From the Idle menu, select Menu 2.8 for Memory Status.
2. The screen displays the amount of memory being used by your
text messages. Press the left and right soft keys to view the
memory usage of multimedia, broadcast and push messages.
3. When you have finished, press the key.
Messages
Messages
59
Page 66

Games
You can download and play games already stored on your phone.
Get Games
You can download more games from the network. A charge may
apply. Once you have downloaded games, they are added to your
phone’s list of games.
Note: Game services may not be available depending upon your se rvice provider.
My Games
Note: The procedures explained below are for the default games. For downloaded games,
the procedure may be different.
1. In Idle mode, press the Menu soft key to access the menu.
2. Highlight Games and press the Select soft key or the key.
3. Highlight My Games and press the key.
4. Scroll to the game you want and press the key.
5. On the startup screen of the game, scroll to an option using the
Navigation keys and press to confirm your selection.
While you are pl aying a
game, to
adjust the sound volume Volume keys
exit the game
Games
60
Press the
key.
Page 67

Viewing Game Information
1. In Idle mode, select Menu 3 for Games.
2. Highlight My Games and press the key.
3. Scroll to the game you want, press the Options soft key and
select Properties.
The display shows information about the game, such as the file size,
application version and its vendor.
4. To exit and return to the Options screen, press the OK soft key or
the key.
Deleting Games
1. From your list of games, scroll to the game you want to delete
and press the Options soft key.
2. Scroll to Delete and press the key.
3. Confirm that you want to delete the game by pressing the OK soft
key.
Note: The preloaded default games cannot be deleted.
Games
Games
61
Page 68

Applications
Applications enable you to:
♦set an alarm so that the phone rings at a specific time, such as to
remind you of an appointment.
♦view the calendar and organize your schedule.
♦use the phone as a calculator for basic mathematical equations or
currency exchange operations.
♦view times in different parts of the world.
♦use a timer or stopwatch.
Alarm
In Idle mode, press Menu 4.1 to start the Alarm feature. This feature
allows you to:
♦set the alarm to ring at a specific time.
♦set the phone to switch on automatically and ring the alarm even if
the phone is switched off.
The following options are available:
♦Wake-up Call: this alarm type repeats daily on a specified range of
days in the week.
♦Alarm1/2: this alarm type occurs only once or repeats daily.
♦Auto Power: when this option is set to On, the alarm rings at the
specified time, even if the phone is switched off. If the menu option
is set to Off and the phone is switched off at the specified time, the
alarm does not ring.
Applications
62
Page 69

To set an alarm or wake-up call:
1. Choose the type of alarm to be set and press the Select soft key.
2. Enable or disable the Alarm by pressing the Left or Right
navigation keys.
3. Press the Down navigation key to select Alarm Time. Use the
numeric keys to enter the time for the alarm to sound.
Your phone is preset to use 12-hour format. To change the
format, see “Time & Date” on page 104.
4. Press the Down navigation key to select AM/PM, if necessary.
Select AM or PM for 12-hour format by pressing the Left or
Right navigation keys.
5. Press the Down navigation key to select Repeat. Select Once,
Everyday, Except Weekend, or Except Sunday by pressing the
Left or Right navigation keys.
6. Press the Down navigation key to select Alarm Tone. Press
to display the available audio folders. See “FUN & Tunes” on
page 87 for further information about playing and selecting from
Downloads, Favorites or Defaults.
7. To stop the alarm or wake-up call when it rings, open the folder
and press the Confirm or Snooze soft key.
Applications
Applications
63
Page 70

Calendar
With the Calendar feature (Menu 4.2), you can:
♦consult the calendar to check your memos.
♦write memos to keep track of your schedule.
♦set an alarm to act as a reminder.
Consulting the Calendar
You can view the Calendar in one of the following ways:
♦Month View: a monthly calendar is displayed, the calendar appears
with today’s date highlighted.
♦Week View: displays all of your week’s appointments in hourly
blocks.
♦Day View: displays all the scheduled events for a given date.
♦Schedule: displays all your scheduled events.
♦Anniversary: displays all your Anniversary events.
♦Miscellaneous: displays all your Miscellaneous events.
♦Missed Alarm Events: displays all of your missed alarm events.
Depending on your current view, some of the following options are
available when you press the Options soft key:
♦View Mode: changes how the calendar is displayed between
Month View, Week View or Day View.
♦Create: allows you to create the following types of calendar
entries. See “Writing a Calendar Entry” on page 65 for further
information:
● Schedule: Indicates an event at a specific time and place.
● Anniversary: Indicates a special occasion.
● Miscellaneous: Indicates other unspecified events.
♦Go to: allows you to go to a specific date: Today or Date.
♦Delete: allows you to delete entries according to the following
criteria: Selected, Periods, This Month, This Week, This Day, or
All.
Applications
64
Page 71

Writing a Calendar Entry
You can create up to 100 calendar entries. To write or edit a calendar
entry on a specific date:
1. Select a timeslot on the current view (month, week or day), using
the Navigation keys and press the key.
Note: If you are on the Monthly view, you can skip to the previous or next month by
pressing the Volume k eys on the left side of the phone .
2. Press the Options soft key and select Create. Choose the type of
entry: Schedule, Anniversary, or Miscellaneous.
3. Enter the entry information. Press the Down navigation key to
select each option.
Note: Depending on the type of e ntr y, not all options will be available.
♦Subject/Occasion: Enter text describing the event. See “Entering
Text” on page 28 for further information.
♦Details: Enter additional information, if required.
♦Start Date: Enter the start date. Use the numeric keys to enter the
numbers for dates and times.
♦Start Time: Enter the start time.
♦AM/PM: Selects the time period for the Start Time.
♦End Date/Due Date: Enter the end date for the event or due date for
the task.
♦End Time: Enter the end time.
♦AM/PM: Selects the time period for the End Time.
♦Location: Enter text describing the location.
♦Alarm: Press the key to enable or disable the alarm. If enabled,
you can select the warning period Before and the Alarm Tone as
well as the time prior to the event. Press the key to select a
different alarm tone. See “Sound settings” on page 110 for further
information about alarm tones.
Applications
Applications
65
Page 72

♦Repeat: Press the key to enable or disable the repeat.
Depending on the type of entry, you can configure the repeat period
by pressing the Left or Right navigation key.
♦Until: Enter the date when the entry is no longer repeated.
4. Press the Save soft key to save the calendar entry.
The corners of the date on the calendar change to indicate that a
calendar entry exists for that date.
Viewing a Calendar Entry
When you select a day for which a calendar entry already exists, the
latest entry for the day displays.
If more than one entry is stored, press the Up or Down navigation
key to scroll to the previous or next entry. You can use the following
options by pressing the Options soft key:
♦View: allows you to view the highlighted entry details.
♦Create: allows you to create a new entry for the highlighted date.
♦Send via: allows you to send the highlighted entry in Text or
Multimedia message or to a compatible Bluetooth device.
♦View Mode: changes how the calendar is displayed: Month View,
Day View or Week View.
♦Delete: allows you to delete entries according to one of the listed
criteria.
Missed Alarm Events
The Missed Alarm Events shows all the calendar entries that you
have missed. If more than one entry is stored, press the Up or Down
navigation key to scroll to the previous or next entry. You can use the
following options by pressing the Options soft key:
♦View: allows you to view the highlighted entry details.
♦Delete: allows you to delete either the Selected missed alarm
event or All the missed alarm events.
Applications
66
Page 73

Task
You can use the Task function to in the same way you would use a todo list. When the task has been completed, you can check it off as
done.
To enter tasks into your Organizer, follow these steps:
1. In Idle mode, press Menu 4.3 to start the Task feature
2. The first time you enter the task menu, it will be empty. Press the
Options soft key and select Create. Press the Select soft key or
the key.
3. In the Task text box, enter your task. It can be up to 100
characters long.
4. Press the Down Navigation key and highlight the Start Date
option. If you want to have a start date, press the key to
check the box then use the Down key to highlight the Start date
text box. Enter the start date.
5. Scroll down and repeat step 4 for the Due Date date.
6. Scroll down and highlight Priority. Use the Left or Right
Navigation keys to select High, Normal, or Low.
7. Press the Save soft key.
To see your Task list, you can go to the Task option in the Organizer
or you can see each task under Day view of the calendar for the day it
was started.
To mark a task as Done:
1. Select the task in the task list.
Applications
2. Press the Options soft key and highlight Done. Press the Select
soft key or the key.
3. The task will have a check mark after it in the Task list.
Applications
67
Page 74

Note
You can use the Note function to in the same way you would use a todo list.
To enter notes into your Organizer, follow these steps:
1. In Idle mode, press Menu 4.4 to start the Note feature
2. The first time you enter the task menu, it will be empty. Press the
Options soft key and select Create. Press the Select soft key or
the key.
3. In the Note text box, enter your task. It can be up to 100
characters long.
4. Press the Save soft key.
Tools
The Tools menu (Menu 4.5) contains your Calculator, unit converter,
timer, stopwatch and world time.
Calculator
With this feature (Menu 4.5.1), you can use the phone as a
calculator. The calculator provides basic arithmetic functions:
addition, subtraction, multiplication and division.
1. Enter the first number using the numeric keys.
♦To delete mistakes or clear the display, press the key.
♦To include a decimal point or a bracket, press the left soft key
until the symbol you want displays.
2. Use the navigation key to select the operations that you want:
+ (addition), - (subtraction), X (multiplication),
3. Enter the second number.
÷ (division).
4. To view the result, press the key.
Applications
68
Page 75

5. Repeat steps 1 to 4 as many times as required.
Converter
Using the Converter application (Menu 4.5.2), you can easily
determine many unit conversions (length, weight, volume, area,
temperature) as well as currency conversions.
1. Select the conversion type and press the Select soft key:
♦Currency
♦Length
♦Weight
♦Volume
♦Area
♦Temperature
2. Press the Left or Right navigation key to select the original unit
type (From) and press Down to select the next field.
If you selected Currency, you can view the exchange rates by
pressing the View Rate soft key.
3. Enter the amount to convert. Use the key to insert a decimal.
Press Down to select the next field.
4. Press the Left or Right navigation key to select the new unit type
(To) and press Down to select the next field.
The converted value is displayed.
5. Press the Back soft key to calculate a new value.
Applications
Timer
The Timer application (Menu 4.5.3) allows you to create a digital
countdown.
To start the timer:
1. Press the Set soft key.
Applications
69
Page 76

2. Using the numeric keys, enter the amount of time that you wish
to countdown from and press the OK soft key. Press the key
to start timer.
3. Press the key to stop or restart timer.
Stopwatch
The Stopwatch application (Menu 4.5.4) allows you to use your
phone as a stop watch.
1. Press the key to start the stopwatch. You can take up to four
laptimes by pressing the key.
2. Press the Reset soft key to erase all stop watch times recorded.
World Time
The World Time (Menu 4.5.5) allows you to view the time of day or
night in any part of the world.
1. Use the navigation keys to scroll through different time zones. For
each time zone, a major city is displayed.
2. You can choose the following options by pressing the Options
soft key:
♦Save: Change the home time zone in the display.
♦Set Daylight Savings Time: Select daylight savings time for the
displayed time zone.
Applications
70
Page 77

Fido Internet
Your phone is equipped with a WAP (Wireless Application Protocol)
browser which allows you to access Internet sites specified for mobile
phones. This section explains how to access the WAP services of your
service provider and navigate the WAP browser.
Launching the Internet Browser
1. In Idle mode, press the key to launch the Internet
browser.
or
Press the Menu soft key to access menu mode and select
Fido Internet and press the Select soft key or the key.
Highlight Fido Home and press the Select soft key or the
key.
2. Your phone is connected to the network and loads the
homepage of the Wireless Web service provider. The
content of the start-up homepage depends on your Wireless
Web service provider.
3. To scroll through the screen, use the Up and Down
navigation keys.
4. To exit the browser at any time, simply press the key.
Accessing a Internet Site
There are several ways to access a Internet site:
• Selecting a link on the browser
• Using a bookmark item in the Favorites folder; use the Bookmarks
option on the browser menu list or Favorites menu.
• Entering a URL address manually; use the Go To URL option on the
browser menu list or http://
menu.
Launching the
Fido Internet
71
Page 78

Navigating the Internet Browser
• To scroll through browser items, press the Up or Down navigation
keys.
• To select a browser item, press the key.
• To select a numbered item, press the corresponding numeric key.
Entering Text in the Internet Browser
When you are prompted to enter text, the currently active text input
mode is indicated on the screen. For more information, see "Entering
Text" on page 28.
Downloading Multimedia Files
You can buy a variety of Multimedia files, such as ringtones, graphics,
applications, Multimedia contents, and so on from the Internet browser
and download them to your phone’s memory. Your phone has
embedded links to the Internet sits providing you with download
services, preset by your service provider.
1. In Idle mode, press the Menu soft key to access Menu
mode.
2. Highlight Fido Internet and press the Select soft key or the
key.
3. Select Fido Internet Home and press the Select soft key or
the key.
4. Find the item you want to download and follow the
instructions on the screen to purchase it.
Favorites
While navigating the Internet browser, you can bookmark the site to
quickly and easily access it at a future time. The URL addresses of the
book marked sites are stored in the Favorites folder, wherein you can use
the 8 preset URL addresses and store your favorite URL addresses.
Fido Internet
72
Page 79

Accessing a Internet Site Using Favorites
1. In Idle mode, press the Menu soft key to access Menu
mode.
2. Highlight Fido Internet and press the Select soft key or the
key.
3. Select Favorites.
4. Select a bookmark item from the Favorite list and press the
key.
Storing a URL Address
1. In Idle mode, press the Menu soft key to access Menu
mode.
2. Highlight Fido Internet and press the Select soft key or
the key.
3. Select Favorites.
4. Select an <Empty> location, and press the Select soft key
or key.
5. Enter a name for the bookmark. When you are finished,
press the Down navigation key.
6. Enter the URL address.
7. When you have finished, press the Save soft key.
Editing a Bookmark
1. From the Favorites list, highlight the bookmark you want to
change.
2. Press the Options soft key and select Edit.
3. Change the address and the name, as you would when
storing a new one.
4. When you have finished, press the Save soft key.
Favorites
Fido Internet
73
Page 80

Deleting a Bookmark
1. From the Favorites list, select the bookmark you want to
delete.
2. Press the Options soft key and select Delete. To delete the
current bookmark, highlight Selected and press . To
delete all your personal bookmarks, select All and
press .
3. Press the Yes soft key or the key to confirm the
deletion.
4. When you have finished, press the key.
Sending a Bookmark
You can send a bookmark to someone else via text messaging.
1. From the Favorites list, select the bookmark you want to
send.
2. Press the Options soft key and select Send URL.
3. The URL appears in the text message. For more information
on composing and sending text messages, see "Creating a
Text Message" on page 48.
Go to URL
The Go to URL screen allows you to directly type in a web address and
load that page without clicking on a link. To visit a web address directly,
enter the URL and press the Enter softkey. For more information on
entering text, see "Entering Text" on page 28.
Tip: Use the Symbolic text entry mode to conveniently enter periods and
characters such as “/”, “~” or”@”.
Fido Internet
74
Page 81

Browser Profiles
You can set up multiple server profiles for the Internet browser.
1. In Idle mode, press the Menu soft key to access menu
mode and select Fido Internet and press the Select soft
key or the key.
2. Using the Up or Down navigation key scroll to Browser
Profiles and press the Select soft key or the key.
3. Highlight the profile you want. Press the key to change
your profile. To edit the highlighted profile, press the
Options soft key and select Edit.For more information on
browser profiles, see "Connection settings" on page 121.
Note: The WAP settings may vary depending on the service provider.
Clear Cache
The cache is the phone’s temporary memory in which the most recently
accessed WAP pages are stored. You can clear the cache at anytime.
1. In Idle mode, press the Menu soft key to access Menu
mode.
2. Highlight Fido Internet and press the Select soft key or the
key.
3. Select Clear Cache.
4. Press the Yes soft key or the key to confirm deletion.
5. When you have finished, press the key
Browser
Fido Internet
75
Page 82

Media
The Media menu (Menu 6) provides access to the following features:
♦take pictures and video clips using the Camera.
♦use the hands-free Voice Recognition feature.
♦record audio clips
Camera
Using the camera menu (Menu 6.1) in your phone, you can take
photos of people or events while on the move. Additionally, you can
send photos to other people in a multimedia message or set one as a
wallpaper.
You can also record videos using your phone as a video camcorder.
The video clip can be send to other video multimedia message
capable phones.
Note: You can quickly enter the Camera menu by pressing the side Camera key.
Caution: Do not take photos of people without their permission. Do not take photos in a
place where camer as are not a llowed or where you might inter fere with another person’s
privacy.
Taking a Photo with the Folder Open
1. Press Menu 6.1 to start the camera. Alternatively, press and hold
the
Camera key ( )
The image to be captured appears on the display.
2. Adjust the image by aiming the camera at the subject.
on the right side of the phone in Idle mode.
3. Apply the desired effects and options using either the left soft key
or the keypad shortcuts (see “Using the Camera Options” on
page 77).
Media
76
Page 83

4. Press the Camera key ( ) on the right side of the phone or the
key to take the photo.
♦To discard the photo and return to the capture mode, press the
Options soft key and select Delete.
♦To return to the capture mode, press the Preview soft key.
Using the Camera Options
In Capture mode, you can use various Options by pressing the left
soft key.
To Pr ess t he
scroll to an option Up or Down key.
select the highlighted
option
return to Capture mode
Select soft key or the Right
key.
or Back soft key.
The following options are available:
♦Record Video: switches your phone to Video mode.
♦Shooting Mode: allows you to switch camera modes.
● Single Shot: the default for the camera
● Multi Shot: allows you to take a series of action stills. Select the
the number of photos the camera will take and the capture
speed, High or Normal. When you press the Camera key
()
the camera takes photos successively.
● Mosaic Shot: allows you to take a series of photos
successively and arrange them in a grid. Select the number of
photos in the grid and whether the camera automatically takes
the pictures or whether each picture is taken manually.
♦Effects: allows you to change the color tone or apply special
effects to the photo.
,
Media
Media
77
Page 84

♦Frames: allows you to use a decorated frame. Select a frame from
the list using the Navigation keys and press the View soft key. If
you wish to keep the selected frame press the Select soft key. To
return to the list, press the Back soft key.
♦Timer: allows you to have a delay time before the camera takes the
photo. Select the length of time you want. When you press the
Camera key, the camera takes the photo after a specified time.
♦Go to Photos: allows you to view photos stored in your photo
album.
♦Settings: allows you to change the options for taking a photo.
● Size: allows you to select a photo size. Once you change this
setting, it is saved for future shots.
● Quality: allows you to select the photo quality. Once you change
this setting, it is saved for future shots.
● View finder: allows you to change between Full screen, Full
Screen & indicator and Standard ratio display on your LCD
screen.
● Shutter Sound: allows you to change your camera’s shutter
sound.
● Zoom Sound: allows you to change whether your camera makes
a noise when you zoom in or out.
● Brightness Sound: allows you to change whether your camera
makes a noise when you change the Brightness level.
♦Camera Shortcuts: shows an illustration of the key commands
used in Camera mode. Use the Next or Previous soft key to move
through the illustrations.
Taking a Photo with the Folder Closed
1. Close the phone.
2. To turn the camera on, press and hold the Camera key ( ) on the
right side of the phone.
The image to be captured appears on the external display.
3. Adjust the image by aiming the camera at the subject.
Media
78
Page 85

4. Press the Camera key ( ) to take the photo. The image is saved
in the default storage location.
Options after taking your photo
When you press the Options soft key after saving a photo, the
following options are available:
♦Take Another allows you to take another photo immediately.
♦Send via: allows you to send the photo using a Multimedia
message or to a compatible Bluetooth enabled device.
♦Set as
:
Wallpaper
•
idle screen.
•
Caller ID
Contacts list entries.
: allows you to set the photo as your wallpaper for the
: allows yo u to set the ph oto as a caller ID image for
♦Delete: deletes the photo.
♦Rename: allows you to change the name of the photo.
♦Go to Photos: views the photo album in the handset.
♦Protection: prevents a photo in your photo album from being
accidentally deleted. You must unprotect a photo before it can be
deleted.
♦Properties: shows the properties of the photo, such as Name,
Time, Format, Size, Resolution, Quality and Protection.
Recording Video
Your camera is also capable of recording video.
1. Press Menu 6.1 to start the camera.
2. Press the left softkey and select Record Video.
3. Apply the desired effects and options
Media
4. Press the Camera key ( ) on the right side of the phone or the
key to start the video.
5. When you are finished, press the Camera key on the right side of
the phone or the key to stop the video.
Media
79
Page 86

The video clip is saved in the Videos folder.
Using the Video Optio ns
In Record mode, you can use various options for the camera by
pressing the left soft key. The following options are available:
♦Take Photo: switches your phone to Camera mode.
♦Effects: allows you to change the color tone or apply special
effects to the video.
♦Timer: allows you to set a time delay before the camera starts
recording a video. Select the length of delay you want. When you
press the key. The camera begins recording a video after the
specified time.
♦Go to Video: allows you to go to the Video menu. For more options
information, see “Video Clips” on page 91.
♦Settings: allows you to change the image settings.
● Size: allows you to set the image size to either (176x144) or
(128x96). The icon for the selected image size displays on the
capture screen.
● Screen Mode: allows you to set the screen display. Choose
from Full Screen ,Full Screen & Indicators or Standard Ratio.
● Audio Record: allows you to turn the audio On or Off.
● Zoom Sound: allows you to change whether your camera makes
a noise when you zoom in or out.
● Brightness Sound: allows you to change whether your camera
makes a noise when you change the Brightness level.
♦Video shortcuts: shows an illustration of the key commands used
in Video mode. Use the Next or Previous soft key to move through
the illustrations.
Options after taking your video
When you press the Options soft key after saving a video, the
following options are available:
♦Record Another allows you to take another video immediately.
♦Send via: allows you to send the video using a Multimedia
message or to a compatible Bluetooth enabled device.
Media
80
Page 87

♦Delete: deletes the video.
♦Rename: allows you to change the name of the video.
♦Go to Video: views the video album in the handset.
♦Protection: prevents a video in your video album from being
accidentally deleted. You must unprotect a video before it can be
deleted.
♦Properties: shows the properties of the video, such as Name,
Time, Format, Size, Resolution and Protection.
Voice Recognition
The Voice Recognition menu (Menu 6.2) allows you to control your
phone hands-free, using simple voice commands.
The following is a list of functions that you can perform using Voice
Recognition speech recognition on your phone.
♦Call <Name or #>: dial by saying either a Name or a number in
your Contacts list
♦ Lookup <Name>: open the contact record for any name in your
Contacts list.
♦Go to <App>: open any application installed on your device.
Calling a Name or Number
Use the Call command to place a call. If the number you want to call
is stored in your contact list, you can say the contact name and,
optionally, which number (Home, Office, Mobile, Fax or Other) you
want to call. If the number is not in your contact list, you can say the
number itself.
To call a name or number:
1. Start Voice Recognition (Menu 6.2). You hear “Say a
command.”
Media
2. Say “Call” followed by the name of a person in your contact list,
and optionally, the number location (Home, Office, Mobile, Fax
or Other) to call, or…
Media
81
Page 88

♦Say “Call” followed by a valid telephone number, or…
♦Say “Call” by itself to be prompted for a name or number.
Examples:
Call Angela Martinez
Call Tom Stewart at Office
Call Donna Harper's Mobile
Call 781-555-5200
3. After you say a name or number, you might be prompted “Did you
say Call?” followed by the first of up to three names or numbers.
4. To confirm a name or number, wait for the beep and then say
“Yes.”
5. You can also choose the correct name or number from the choice
list by pressing the number next to the preferred choice, or by
selecting it using the phone's navigation keys. For information on
turning off choice lists, or customizing their behavior, see the
appendix, “Voice Recognition Settings.”
6. If the phone recognizes a name that has more than one stored
number, it might prompt you “Which number?” Say the label for
the number you want, for example “Office,” “Home,” or “Mobile.”
Hints for Using Call
♦Wait for the beep before saying the command.
♦When saying a name, speak clearly and say the name of a person
in your contact list, first name followed by last name.
♦When saying a telephone number, pronounce each digit clearly and
distinctly but do not pause between the digits. Voice Recognition
recognizes the digits one, two, three, four, five, six, seven, eight,
nine, zero, and “oh.” It does not recognize expressions such as
“one eight hundred.” Instead, say “one eight zero zero.”
♦If Voice Recognition doesn't recognize numbers correctly, try
adapting digit dialing to your voice. To adapt digit dialing, choose
Media
82
Page 89

Digit Dialing’s Adapt Digits from the Voice Recognition Settings
menu.
Looking Up a Contact
Use the Lookup command to look up contact information for any
person stored in your contact list.
1. Start Voice Recognition (Menu 6.2). You hear “Say a command.”
2. Say “Lookup” followed by the name of a person in your contact
list.
Examples:
Lookup Angela Martinez
Lookup Tom Stewart
3. After you say a name, you might be prompted “Did you say
Lookup?” followed by the first of up to three names. To confirm a
name, wait for the beep and then say “Yes.” You can also choose
the correct item from the choice list using the phone's navigation
keys.
Opening an Application
Use the “Go To” command to open an application or access a menu
on your phone.
1. Start Voice Recognition (Menu 6.2). You hear “Say a command.”
2. Say “Go To” or…
Say “Go To” followed by the application you want to open or…
Say “Go To” followed by a menu item.
Examples:
Go To (To see a list of applications you can open)
Go To Calendar
Media
Media
83
Page 90

Hints for using Go To
Wait for the beep before saying the command.
♦To see a list of applications/menu items you can open, say “Go To”
but do not specify a destination. Voice Recognition displays a list
of valid destinations and prompts you with “Please Choose.” You
can then say the name of the application you want to open.
♦If the list is too long to fit on one screen, the screen will contain the
choice “Next Menu.” You can say one of the application or menu
names on the list, or say “Next Menu” to view the next screen
Voice Recognition settings
You can adjust the following Voice Recognition options by pressing
the Settings soft key and selecting one of the following submenus:
Choic e Lists
If Voice Recognition is not absolutely confident that it has correctly
identified a name or number, it can display a choice list of up to three
possibilities, and prompt you to confirm the correct one.
You can control when choice lists appear by changing the Choice
Lists setting to:
♦Automatic: Voice Recognition displays a choice list when it is not
confident it has identified the correct choice from among multiple
alternatives.
♦Always On: When there are multiple alternatives, Voice
Recognition always displays a choice list.
♦Always Off: Voice Recognition never displays a choice list. Instead,
the application picks the best from among the possible choices.
Sensitivity
In Voice Recognition, “sensitivity” controls the balance between
rejecting too much, which means the phone frequently does not
recognize names, numbers, or commands, and rejecting too little,
which means it frequently recognizes something even if nothing was
said.
Media
84
Page 91

When Voice Recognition rejects an utterance, it displays a message
such as “Please repeat…” or “No match found.” If you frequently
experience these messages, you might be able to get better
recognition by adjusting the Sensitivity setting toward Reject Less.
If you frequently experience false activations (Voice Recognition
detects a wrong match), you might be able to get better performance
by adjusting the Sensitivity setting toward Reject More.
Digit Dialing
Use the Digit dialing menu to adapt digit dialing to your voice.
♦Adapt Digits: Lets you adapt digits, which can improve Voice
Recognition of phone numbers. Adaptation takes about 60
seconds.
♦Reset Digits: Erases any digit adaptation you have done and resets
digit recognition to the factory default. If you have not adapted
digits, this option is grayed out.
Sound
You can customize the Voice Recognition user interface by turning
playback on or off for prompts, names, and numbers. You can also
change the speed and volume of name playback.
♦Prompts: Turns playback on or off for prompts such as “Please say
a command.”
♦Digits: Turns playback on or off for digits, for example, when
confirming a phone number.
♦Names: Turns playback on or off for names.
♦Names Settings: Adjusts the speed and volume of name
playback.
♦Speakerphone: Controls whether the speakerphone is always on
or off when voice recognition is started.
Media
About
Displays the software version.
Media
85
Page 92

Record Audio
You can record audio clips (Menu 6.3). After recording, you can send
the audio clip to other people using Multimedia Messaging.
To record an audio clip
1. Press Menu 6.3.
2. To start recording, press the Options soft key followed by Record
or press the key.
3. Record a memo by speaking into the microphone. You can pause
and re-start by pressing the key.
4. When you are finished, press the Stop soft key. By default, the
audio clip is stored in your Recorded Audio.
5. Press the Options soft key, and select one of the following
display:
♦Play: plays back your audio clip.
♦Record: enables you to record another audio clip.
♦Go to Recorded Audio: goes to your list of stored clips for
playback.
♦Send via: allows you to send the audio clip using a multimedia
message or a compatible Bluetooth enabled device.
♦Delete: allows you to delete the audio clip.
♦Rename: allows you to change the name of the video.
♦Protection: prevents an audio clip from being accidentally
deleted. You must unprotect an audio clip before it can be
deleted.
♦Properties: shows the properties of the audio clip, such as the
time and date it was saved, file size, length, protection status,
file format and file name.
Media
86
Page 93

FUN & Tunes
The FUN & Tunes menu (Menu 7) is used to manage your collection
of audio clips, graphics, downloaded video, and other files.
Audio
In this menu (Menu 7.1), you can select a new ringtone from your
collection of pre-provided and downloaded ring tunes. In addition,
you can play your recorded audio clips.
Get Ring Tones
This menu allows you to download ring tones from your service
provider. Follow the online instructions shown on your display
screen. Once you have downloaded ring tunes, they are added to
your phone’s list of ring tunes. See “Audio” on page 87.
Downloaded Audio
This menu allows you to select audio clips that you have downloaded
from your service provider and play them, assign them as your ringer
or alarm tone.
Highlight an item in the Downloaded Audio menu and press the
Options soft key. The following options are available:
♦Play: plays the sound.
♦Send via: allows you to send the sound via Multimedia message or
Bluetooth.
♦Set as: allows you to set the sound as your Ringtone or a Caller ID
ringtone.
♦Delete: allows you to delete the sound or delete all sounds.
♦Rename: allows you to change the name of the sound.
♦Move to Favorite Audio: moves the file to your Favorites folder.
♦Share for Bluetooth: allows the sound to be shared or released for
the use of another Bluetooth device.
♦Protection: allows you to lock the sound to protect it from
deletion.
FUN & Tunes
FUN & Tunes
87
Page 94

♦Properties: displays information about the sound, such as Name,
Date, Format, Size, and Protection.
Recorded Audio
The Recorded Audio contains your recorded audio clips. Highlight an
item in the Recorded Audio menu and press the Options soft key.
The following options are available:
♦Play: plays the audio clips
♦Send via: allows you to send the audio clips via Multimedia
message or Bluetooth.
♦Delete: allows you to delete the audio clips or delete all audio clips.
♦Rename: allows you to change the name of the audio clips.
♦Move to Favorite Audio: moves the file to your Favorites folder.
♦Share for Bluetooth: allows the audio clips to be shared or
released for the use of another Bluetooth device.
♦Protection: allows you to lock the audio clips to protect it from
deletion.
♦Properties: displays audio clip information, such as Name, Date,
Format, Size, and Protection.
Favorite Audio
The Favorite Audio contains audio clips moved into this folder..
Highlight an item in the Favorite Audio menu and press the Options
soft key. The following options are available:
♦Play: plays the audio clips
♦Send via: allows you to send the audio clips via Multimedia
message or Bluetooth.
♦Delete: allows you to delete the audio clips or delete all audio clips.
♦Rename: allows you to change the name of the audio clips.
♦Move to Downloaded Audio: moves the file to your Downloaded
Audio folder.
♦Share for Bluetooth: allows the audio clips to be shared or
released for the use of another Bluetooth device.
♦Protection: allows you to lock the audio clips to protect it from
deletion.
FUN & Tunes
88
Page 95

♦Properties: displays audio clip information, such as Name, Date,
Format, Size, and Protection.
Graphics
In this menu (Menu 7.2), you can select a new wallpaper image
from your collection of pre-provided and downloaded pictures. In
addition, you can send the images to other phones.
Get Graphics
Using the Get Graphics option, you can access your Service
Provider’s site where you can download new images.
Downloaded Graphics
This menu allows you to access your downloaded images.
Scroll to the image you want to view. By pressing the Options soft
key you can access the following options:
♦View: displays the image.
♦Send via: allows you to send the image via Multimedia message or
Bluetooth.
♦Set as: allows you to set the image as Wallpaper or as a Caller ID.
♦Delete: allows you to delete the image.
♦Rename: allows you to change the name of the item.
♦Move to Favorite Graphics: moves the file to your Favorites folder.
♦Share for Bluetooth: allows the image to be shared or released for
the use of another Bluetooth device.
♦Protection: allows you to lock the image to protect it from
deletion.
♦Properties: displays information about the image, such as Name,
Date, Format, Resolution, Size, and Protection.
FUN & Tunes
Photos
In this menu you can review the photos you’ve taken. By pressing the
Options soft key you can access the following options:
♦View: displays the image.
FUN & Tunes
89
Page 96

♦Send via: allows you to send the image via Multimedia message or
Bluetooth.
♦Set as: allows you to set the image as Wallpaper or as a Caller ID.
♦Delete: allows you to delete the image.
♦Rename: allows you to change the name of the item.
♦Move to Favorite Graphics: moves the file to your Favorites folder.
♦Slide show: allows you to see all of your photos in a slide show
presentation.
♦Share for Bluetooth: allows the image to be shared or released for
the use of another Bluetooth device.
♦Protection: allows you to lock the image to protect it from
deletion.
♦Properties: displays information about the image, such as Name,
Date, Format, Size, Resolution, Quality and Protection.
Favorite Graphics
This menu allows you to access images moved into this folder.
Scroll to the image you want to view. By pressing the Options soft
key you can access the following options:
♦View: displays the image.
♦Send via: allows you to send the image via Multimedia message or
Bluetooth.
♦Set as: allows you to set the image as Wallpaper or as a Caller ID.
♦Delete: allows you to delete the image.
♦Rename: allows you to change the name of the item.
♦Move to My Photos: moves the file to your My Photos folder.
♦Share for Bluetooth: allows the image to be shared or released for
the use of another Bluetooth device.
♦Protection: allows you to lock the image to protect it from
deletion.
♦Properties: displays information about the image, such as Name,
Date, Format, Resolution, Size, and Protection.
FUN & Tunes
90
Page 97

Video
In this menu (Menu 7.3), you can view videos downloaded from the
web server or received in multimedia messages. The following
options are available:
Get Videos
Using the Get Videos option, you can access your Service
Provider’s site where you can download new videos.
Downloaded Video
This menu allows you to access your downloaded video clips.
Scroll to the video you want to view. By pressing the Options soft key
you can access the following options:
♦Play: plays the video.
♦Send via: allows you to send the video via Multimedia message or
Bluetooth.
♦Delete: allows you to delete the video.
♦Rename: allows you to change the name of the video.
♦Move to Favorite Video: moves the file to your Favorite Video
folder.
♦Share for Bluetooth: allows the video to be shared or released for
the use of another Bluetooth device.
♦Protection: allows you to lock the video to protect it from deletion.
♦Properties: displays information about the video, such as Name,
Date, Format, Size, Resolution and Protection.
Video Clips
In this menu you can review the videos you’ve recorded. By pressing
the Options soft key you can access the following options:
♦Play: plays the video.
♦Send via: allows you to send the video via Multimedia message or
Bluetooth.
♦Delete: allows you to delete the video.
♦Rename: allows you to change the name of the video.
FUN & Tunes
FUN & Tunes
91
Page 98

♦Move to Favorite Video: moves the file to your Favorite Video
folder.
♦Share for Bluetooth: allows the video to be shared or released for
the use of another Bluetooth device.
♦Protection: allows you to lock the video to protect it from deletion.
♦Properties: displays information about the video, such as Name,
Date, Format, Size, Resolution and Protection.
Favorite Videos
In this menu you can review the videos you’ve taken and moven into
this folder. By pressing the Options soft key you can access the
following options:
♦Play: plays the video.
♦Send via: allows you to send the video via Multimedia message or
Bluetooth.
♦Delete: allows you to delete the video.
♦Rename: allows you to change the name of the video.
♦Move to Downloaded Video: moves the file to your Downloaded
Video folder.
♦Share for Bluetooth: allows the video to be shared or released for
the use of another Bluetooth device.
♦Protection: allows you to lock the video to protect it from deletion.
♦Properties: displays information about the video, such as Name,
Date, Format, Size, Resolution and Protection.
Other files
This option (Menu 7.4) allows you to view other types of files that
you have stored on your phone. This includes Excel spreadsheets,
text files, wmf files, PowerPoint presentations, PDFs, HTML, JPEGs,
GIFs, BMPs, and Word documents. You can send these files by
Bluetooth.
FUN & Tunes
92
Page 99

Memory Status
This menu (Menu 7.5) shows the amount of memory for My Files,
Games and Applications.
The display shows you the total, free and used space including the
number of multimedia files you recorded and the total number of
multimedia files you can additionally create.
FUN & Tunes
FUN & Tunes
93
Page 100

Contacts
You can store phone numbers and their corresponding names in
both your SIM card and phone’s memory. They are physically
separate but are used as a single entity, called your Contact List
(Menu 8).
Storing a Number with a Name
There are two ways to store a number:
♦From Idle mode, entering a number and using the Options soft key
and selecting Save to Contacts.
♦From the Contacts menu, using the Add New Contact option
(Menu 8.2).
Storing a Number in Idle Mode
As soon as you start to enter a number, Options appears above the
left soft key to allow you to store the number in the Contact List.
1. Enter the number you want to store.
Note: If you make a mistake while entering a number, correct it using . For further
details , see page 18.
2. When you are sure that it is correct, press the Options soft key.
3. Select Save to Contacts. Select the memory location to store the
new contact, either Phone or SIM.
Note: When you change phones, any numbers stored in your SIM card memory are
automatically available with the new phone, whereas any numbers stored in the phone’s
memory must be reentered or transferred us ing the optional data kit accessory. However,
contacts stored on the phone may include additional details not availa ble on the SIM
card.
Contacts
94
 Loading...