

Page 1

* Some of the contents of this manual may differ from your phone,
depending on the software installed or your service provider.
World Wide Web
http://www.samsungmobile.com
Printed in Korea
Code No.:GH68-05054A
English.(O2) 04/2004. Rev 1.0
Page 2

GPRS TELEPHONE
SGH-E600
Page 3

Page 4

Contents
Important Safety Precautions .......................... 7
Unpacking ........................................................ 9
Your Phone..................................................... 10
Phone Layout .......................................................... 10
Display................................................................... 13
Service Light........................................................... 16
Camera .................................................................. 17
Getting Started............................................... 18
Installing the SIM Card............................................. 18
Charging the Battery ................................................ 20
Switching the Phone On or Off................................... 22
Call Functions................................................. 23
Making a Call .......................................................... 23
Adjusting the Volume ............................................... 25
Answering a Call...................................................... 26
Viewing Missed Calls ................................................ 27
Quickly Switching to Silent Mode................................ 29
Selecting Functions and Options..................... 30
Phone Book .................................................... 32
Storing a Number with a Name.................................. 32
Using Phone Book Entry Options ................................ 35
Searching for and Dialling a Number in Phone Book ...... 36
Editing a Caller Group .............................................. 38
Speed-dialling ......................................................... 39
Deleting All of the Phone Book Entries ........................ 41
Checking the Memory Status ..................................... 42
Using the Service Dialling Numbers ............................ 43
Entering Text.................................................. 44
Changing the Text Input Mode................................... 45
Using T9 Mode ........................................................ 46
Using Alphabet Mode................................................ 48
Using Number Mode................................................. 49
Using Symbol Mode.................................................. 49
3
Page 5

Contents
Options During a Call...................................... 50
Putting a Call on Hold ............................................... 50
Using the Menu Functions ......................................... 51
Switching the Microphone Off (Mute) .......................... 52
Muting or Sending Key Tones .................................... 53
Sending a Sequence of DTMF Tones ........................... 53
Searching for a Number in Phone Book ....................... 54
Using the SMS Service.............................................. 54
Call Waiting ............................................................ 55
Making a Multi-party Call .......................................... 55
Using the Menus............................................. 58
Accessing a Menu Function by Scrolling ...................... 58
Using Shortcuts ....................................................... 59
List of Menu Functions .............................................. 60
Text Messages................................................ 66
Inbox
(Menu 1.1)
Outbox
Write New
Templates
Settings
Delete All
Memory Status
Voice Mail
Broadcast
..................................................... 66
(Menu 1.2)
(Menu 1.5)
................................................... 68
(Menu 1.3)
(Menu 1.4)
............................................... 69
............................................... 72
.................................................. 72
(Menu 1.6)
(Menu 1.8)
(Menu 1.9)
................................................ 74
(Menu 1.7)
........................................ 74
................................................ 75
................................................ 76
Multimedia Messages ..................................... 78
Inbox
(Menu 2.1)
Outbox
Draft
(Menu 2.3)
Write New
Templates
Delete All
Memory Status
Setup
(Menu 2.8)
MMS Profile
..................................................... 78
(Menu 2.2)
................................................... 81
...................................................... 82
(Menu 2.4)
(Menu 2.5)
(Menu 2.6)
............................................... 83
............................................... 87
................................................ 88
(Menu 2.7)
........................................ 88
..................................................... 89
(Menu 2.9)
............................................. 90
Call Records ................................................... 92
Missed Calls
Received Calls
Dialled Calls
Delete All
Call Time
Call Cost
4
(Menu 3.1)
(Menu 3.2)
(Menu 3.3)
(Menu 3.4)
(Menu 3.5)
(Menu 3.6)
............................................. 92
.......................................... 93
............................................ 93
................................................ 94
................................................. 95
................................................. 96
Page 6

Contents
Camera........................................................... 97
Take Photos
My Photos
Take Videos
My Videos
Delete All
Memory Status
(Menu 4.1)
(Menu 4.2)
(Menu 4.3)
(Menu 4.4)
(Menu 4.5)
(Menu 4.6)
............................................. 97
............................................. 102
........................................... 103
............................................ 104
.............................................. 105
...................................... 105
Sound Settings ............................................. 106
Ring Tone
Ring Volume
Alert Type
Keypad Tone
Message Tone
Folder Tone
Power On/Off
Extra Tones
(Menu 5.1)
(Menu 5.2)
(Menu 5.3)
(Menu 5.4)
(Menu 5.5)
(Menu 5.6)
(Menu 5.7)
(Menu 5.8)
.............................................. 106
.......................................... 106
............................................. 107
......................................... 107
........................................ 108
........................................... 109
......................................... 109
........................................... 110
Phone Settings ............................................. 111
Infrared Activate
Display Settings
Greeting Message
Own Number
Language
Security
Extra Settings
Short Cut
Reset Settings
(Menu 6.2)
(Menu 6.4)
(Menu 6.5)
(Menu 6.6)
(Menu 6.7)
(Menu 6.8)
(Menu 6.9)
(Menu 6.1)
.................................... 111
..................................... 112
(Menu 6.3)
................................... 114
......................................... 115
.............................................. 115
................................................ 116
........................................ 120
.............................................. 121
....................................... 121
Organiser ..................................................... 122
Alarm
(Menu 7.1)
Calendar
Time & Date
Calculator
To Do List
Voice Memo
Currency Exchange
................................................... 122
(Menu 7.2)
(Menu 7.4)
(Menu 7.5)
............................................... 124
(Menu 7.3)
.......................................... 126
.............................................. 128
............................................. 129
(Menu 7.6)
........................................... 132
(Menu 7.7)
................................. 134
5
Page 7

Contents
Network Services ......................................... 135
Call Diverting
Call Barring
Call Waiting
Network Selection
Caller ID
Closed User Group (CUG)
Band Selection
(Menu 8.1)
(Menu 8.2)
(Menu 8.3)
(Menu 8.5)
(Menu 8.7)
......................................... 135
........................................... 137
........................................... 139
(Menu 8.4)
............................................... 141
.................................. 140
(Menu 8.6)
....................................... 143
........................ 141
Funbox ......................................................... 144
WAP Browser
Games & More
Sounds
Images
Delete All
Memory Status
(Menu 9.1)
(Menu 9.2)
(Menu 9.3)
(Menu 9.4)
(Menu 9.5)
......................................... 144
....................................... 151
................................................. 154
................................................. 154
.............................................. 155
(Menu 9.6)
...................................... 155
Solving Problems.......................................... 156
Access Codes................................................ 159
Phone Password .................................................... 159
PIN ...................................................................... 160
PUK ..................................................................... 160
PIN2 .................................................................... 161
PUK2 ................................................................... 161
Barring Password................................................... 162
Health and Safety Information ..................... 163
SAR Certification Information .................................. 163
Precautions When Using Batteries ............................ 164
Road Safety .......................................................... 166
Operating Environment........................................... 166
Electronic Devices.................................................. 167
Potentially Explosive Environments .......................... 169
Emergency Calls .................................................... 170
Other Important Safety Information ......................... 171
Care and Maintenance ............................................ 172
Glossary ....................................................... 174
Index ........................................................... 180
Quick Reference Card ................................... 185
6
Page 8

Important Safety Precautions
Read these guidelines before using your wireless
phone. Failure to comply with them may be
dangerous or illegal.
Road Safety at All Times
Do not use a hand-held phone while driving; park
the vehicle first.
Switching Off When Refuelling
Do not use the phone at a refuelling point (service
station) or near fuels or chemicals.
Switching Off in an Aircraft
Wireless phones can cause interference. Using them
in an aircraft is both illegal and dangerous.
Switching Off in Hospitals
Switch your phone off near medical equipment.
Follow any regulations or rules in force.
Interference
All wireless phones may be subject to interference,
which could affect their performance.
Special Regulations
Meet any special regulations in force in any area
and always switch off your phone whenever it is
forbidden to use it, or when it may cause
interference or danger (in a hospital for example).
7
Page 9

Important Safety Precautions
Sensible Use
Use only in the normal position (held to the ear).
Avoid unnecessary contact with the antenna when
the phone is switched on.
Emergency Call
Ensure the phone is switched on and in service. Key
in the emergency number for your present location,
then press the key. You must deactivate any
unnecessary features before you can make an
emergency call. Give all the necessary information
as accurately as possible. Do not cut off the call
until given permission to do so.
Water Resistance
Your phone is not water-resistant. Keep it dry.
Accessories and Batteries
Use only Samsung-approved accessories and
batteries. Use of any unauthorised accessories
could damage your phone and may be dangerous.
Qualified Service
Only qualified service personnel may repair your
phone.
For more detailed safety information, see “Health
and Safety Information” on page 163.
CAUTION
RISK OF EXPLOSION IF A BATTERY IS REPLACED
BY AN INCORRECT TYPE.
DISPOSE OF USED BATTERIES ACCORDING
TO THE INSTRUCTIONS.
8
Page 10

Unpacking
’
l
Your package contains the following items:
Handset
Batteries
Note
: The items supplied with your phone may be
Travel Adapter
User
s Manua
different, depending on your country or service
provider.
You can obtain the following accessories for your
phone from your local Samsung dealer:
• Standard/slim batteries • Ear-microphone
• Simple hands-free kit • Data Kit
• Travel adapter • Hand strap
9
Page 11
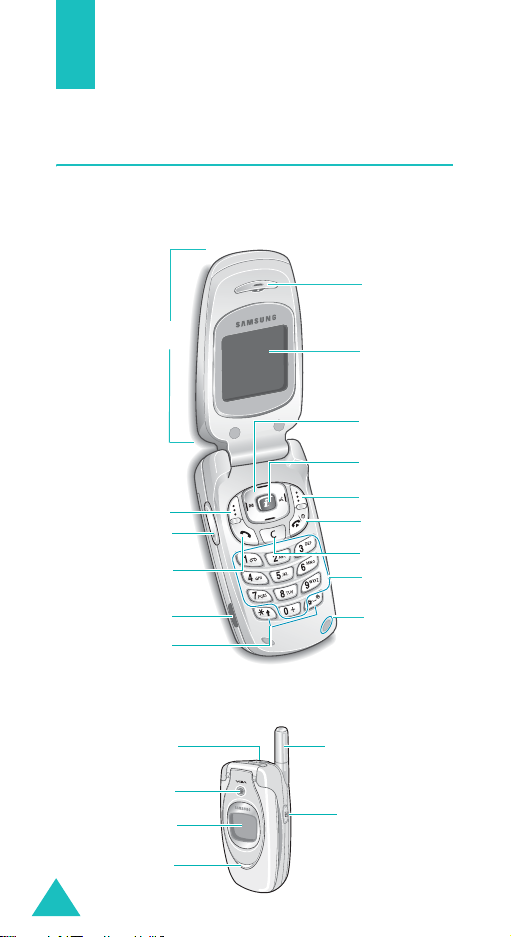
Your Phone
Phone Layout
The following illustrations show the main elements
of your phone:
Earpiece
Soft key (left)
Volu me/menu
browse keys
Dial/menu
confirmation key
IrDA port
function keys
Ear-microphone
External display
Service light
10
Folder
Special
jack
Camera
Display
Navigation (Up/
Down/Left/Right)
keys
WAP browser
key
Soft key (right)
Power on/off /
menu exit key
Cancel/
correction key
Alphanumeric
keys
Microphone
area
Antenna
Camera key
Page 12
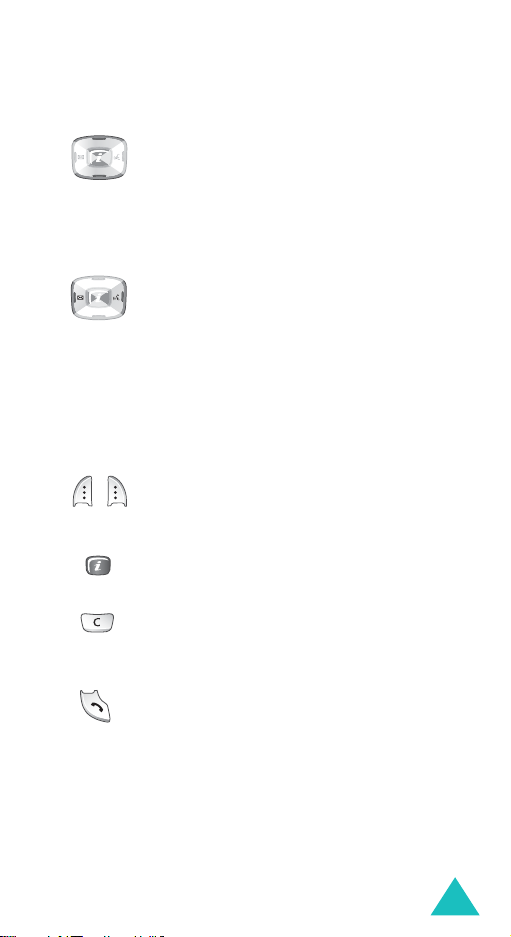
Key
(s)
(soft keys)
Your Phone
Description
In Menu mode, scrolls through the
menu options and Phone Book.
In Idle mode, allows you to access your
favourite menu options directly. For
further details about shortcuts, see
page 121.
In Menu mode, the Left key returns to
the previous menu level and the Right
key selects the current menu.
When entering text, moves the cursor
to the left and right respectively.
In Idle mode, the Left key allows you to
quickly access the
Text Messages
menu and the Right key allows you to
access the
Voice Memo
menu.
Performs the functions indicated by the
text above them, on the bottom line of
the display.
In Idle mode, launches the WAP
(Wireless Application Protocol) browser.
Deletes characters from the display.
In Menu mode, returns to the previous
menu level.
Makes or answers a call.
In Idle mode, recalls the last number
dialled or received when held down.
In Menu mode, selects a menu function
or stores information that you have
entered, such as a name in the phone
or SIM memory.
11
Page 13

Your Phone
Key
(s)
Description
(continued)
Ends a call. Also switches the phone on
and off when held down.
In Menu mode, cancels your input and
returns to Idle mode.
In Idle mode, accesses your voice mail
when held down.
Enters numbers, letters and some
special characters.
Enters special characters.
Performs various functions.
(on the right side of the phone)
In Idle mode, accesses the
Camera
menu to allow you to use the camera
application. Turns the camera on when
held down.
In Capture mode, works as a camera
shutter.
(on the left side of the phone)
During a call, adjust the earpiece
volume.
In Idle mode, with the fold open,
adjusts the keypad tone volume. With
the folder closed, turns the external
display on when held down.
In Menu mode, scrolls through the
menu options and Phone Book.
12
Page 14

Display
Display Layout
The display has three areas:
Icons
Text a n d
graphic area
Your Phone
Menu Name
Soft key
indicators
Area Description
First line Displays various icons. See
page 14.
Middle lines Displays messages, instructions
and any information that you
enter, such as the number you are
dialling.
Last line Shows the current functions
assigned to the two soft keys.
13
Page 15
Your Phone
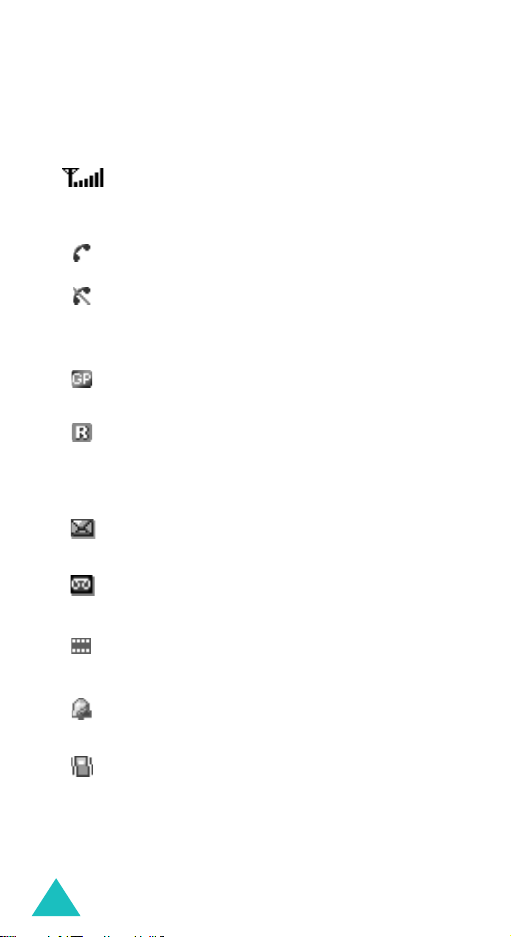
Icons
Icon Description
Shows the received signal strength. The
greater the number of bars, the stronger
the signal.
Appears when a call is in progress.
Appears when you are out of your service
area. When it displays, you cannot make or
receive a call.
Appears when you are connected to the
GPRS network.
Appears when you are out of your home
area and have logged onto a different
network; for example, when travelling in
other countries.
Appears when a new text message has
been received.
Appears when a new voice mail message
has been received.
14
Appears when a new multimedia message
has been received.
Appears when you set an alarm to ring at a
specified time.
Appears when Silent mode is active or
when you set the
5.3
) so that the phone vibrates when you
Alert Type
menu (
Menu
receive a call. For further details, see
page 29 and page 107 respectively.
Page 16

Your Phone
Icon Description
(continued)
Appears when the IrDA port is active. For
details, see page 111.
Appears when Mute mode is active.
Shows the level of your battery. The more
bars you see, the more power you have
remaining.
Backlight
The backlight illuminates the display and the
keypad. When you press any key or open the folder,
the backlight turns on. It turns off when no ke ys are
pressed within a given period of time, depending on
your setting in the
6.2.4
). The display turns off after one minute to
conserve your battery power.
To specify the length of time the backlight is active,
set the
Back Light
details.
Back Light
menu (
Menu
menu. See page 113 for further
15
Page 17
Your Phone
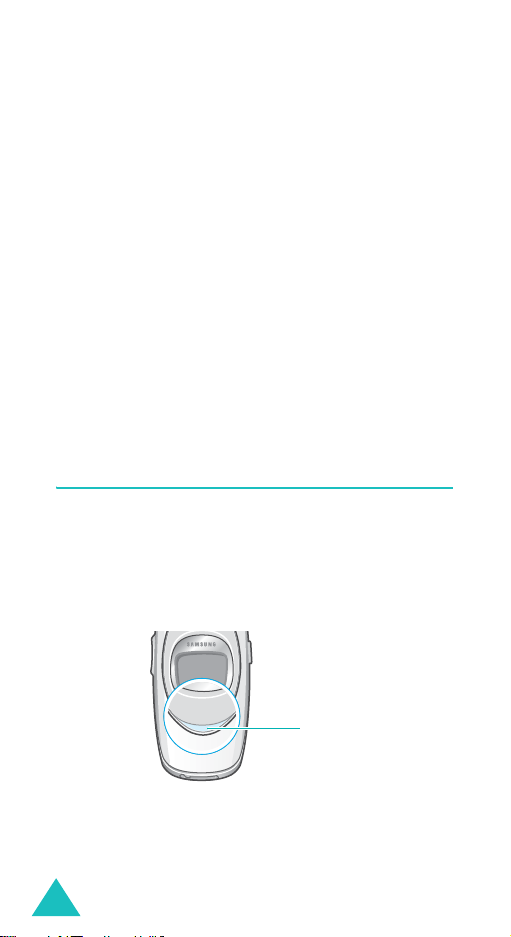
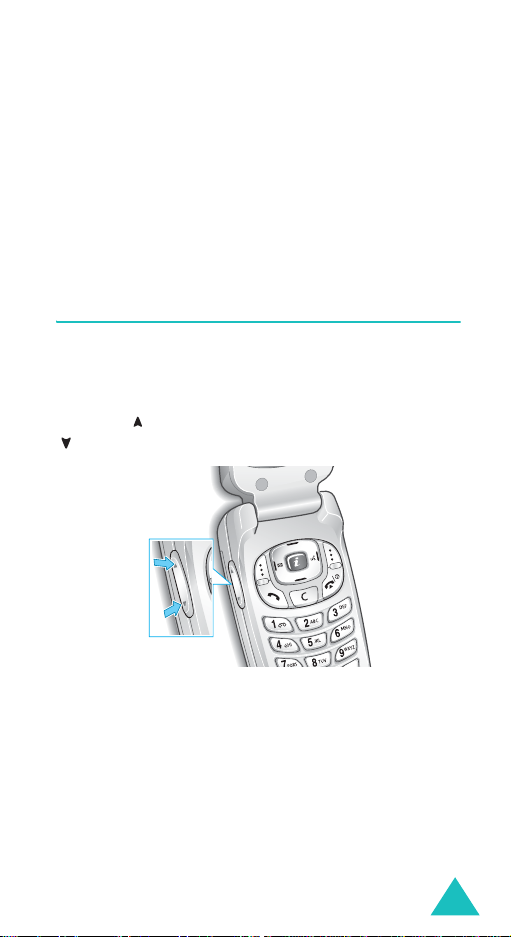
External Display
Your phone has an external display on the folder. It
indicates when you have an incoming call or a
message. It also alerts you at the specified time
when you have set an alarm by turning on its
backlight and showing the corresponding icon on it.
You can select a colour of the image to be displayed
in the
Front LCD
page 113 for further details.
When the folder is closed, press and hold one of the
Volume keys on the left side of the phone to turn
the display on. You can press the Camera key on
the right side of the phone to take a photo using the
external display.
menu (
Menu 6.2.2
). See
Service Light
The service light is on the folder. It flashes when
services are available on the phone.
To activate or deactivate the service light, set the
Service Light
for further details.
menu (
Menu 6.2.5
). See page 113
16
Service light
Page 18

Your Phone
Camera
The camera module on the folder of your phone
allows you to take a photo and record a video while
on the move.
For further details about the Camera feature, see
page 97.
17
Page 19
Getting Started
Installing the SIM Card
When you subscribe to a cellular network, you are
provided with a plug-in SIM card loaded with your
subscription details, such as your PIN, any optional
services available and so on.
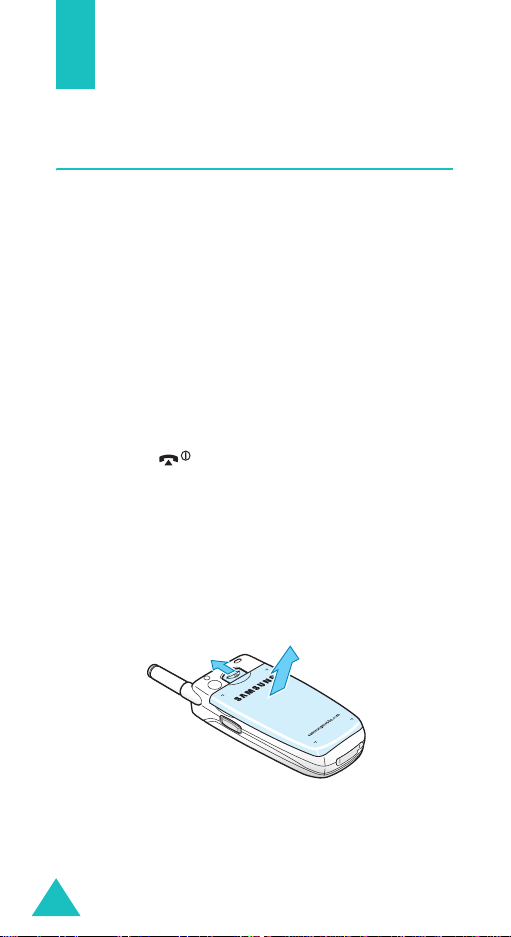
Important!
1. If necessary, switch off the phone by holding
down the key until the power-off image
displays.
2. Remove the battery. To do so:
➀
➁
The plug-in SIM card and its contacts
can be easily damaged by scratches or
bending, so be careful when handling,
inserting or removing the card.
Keep all SIM cards out of the reach of
small children.
Slide the battery lock towards the top of the
phone and hold it in that position.
Lift the battery away, as shown.
18
➀
➁
Page 20
Getting Started
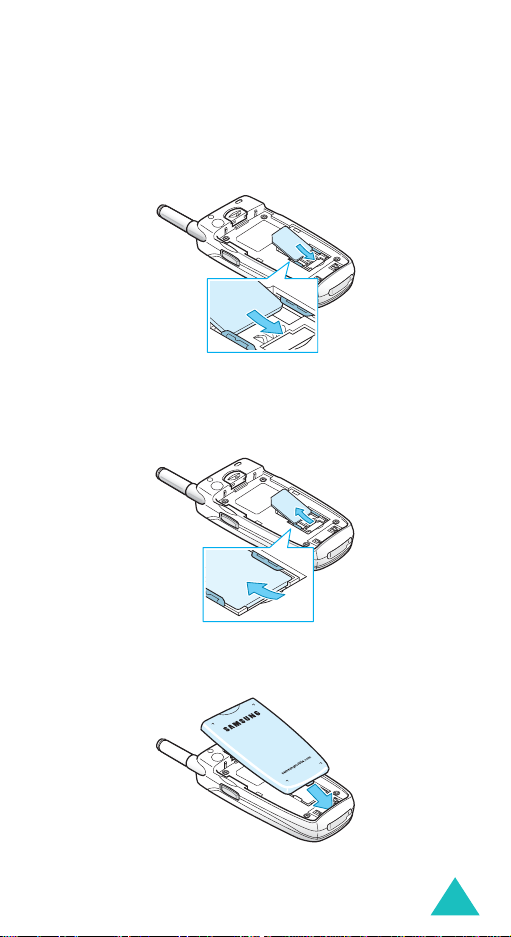
3. Slide the SIM card into the SIM card socket, as
shown, so that it locks the card into position.
Make sure the gold contacts of the card face into
the phone.
Note
: When you need to remove the SIM card,
slide it upwards, as shown, and take it out
of the socket.
4. Replace the battery so that the tabs on the end
align with the slots at the bottom of the phone.
19
Page 21

Getting Started
5. Press the battery down until it clicks into place.
Make sure that the battery is properly installed
before switching the power on.
Charging the Battery
Your phone is powered by a rechargeable Li-ion
battery. A travel adapter comes with your phone for
charging the battery. Use only approved batteries
and chargers. Ask your local Samsung dealer for
further details.
The travel adapter allows you to use the phone
while the battery is charging, but this causes the
phone to charge more slowly.
Note
: You must fully charge the battery before using
your phone for the first time. A discharged
battery is fully recharged in approximately
200 minutes.
1. With the battery in position on the phone, plug
the connector of the travel adapter into the jack
at the bottom of the phone.
20
Page 22

Getting Started
2. Plug the adapter into a standard AC wall outlet.
3. When charging is finished, unplug the adapter
from the power outlet and disconnect it from the
phone by pressing the buttons on both sides of
the connector and pulling the connector out.
➀
➁
Note
: You must unplug the adapter before removing
➀
the battery from the phone during charging;
otherwise, the phone could be damaged.
Low Battery Indicator
When the battery is weak and only a few minutes of
talk time remain, a warning tone sounds and a
message repeats at regular intervals on the display.
When this happens, your phone turns off the
backlight to conserve the remaining battery power.
When the battery level becomes too low, the phone
automatically turns off.
21
Page 23

Getting Started
Switching the Phone On or Off
1. Open the folder.
2. Press and hold the key until the phone
switches on.
3. If the phone asks you to enter a password, enter
the password and press the
preset to “00000000” at the factory. For further
details, see page 159.
4. If the phone asks for a PIN, enter the PIN and
press the
page 160.
The phone searches for your network and, after
finding it, the idle screen appears on the display.
Now, you can make or receive a call.
Note
5. When you wish to switch the phone off, press
and hold the key until the power-off image
displays.
OK
soft key. For further details, see
: The display language is preset to English at
the factory. To change the language, use
the
Language
further details, see page 115.
menu (
OK
soft key. It is
Menu 6.5
). For
22
Page 24

Call Functions
Making a Call
When the idle screen displays, enter the area code
and phone number, then press the key.
Note
: When you activate the
the
Extra Settings
phone automatically redials up to ten times if
the person does not answer the call or is
already on the phone. See page 120 for further
details.
Making an International Call
1. Press and hold the 0 key.
The
+
character appears.
2. Enter the country code, area code and phone
number and press the key.
Note:
Please consult your O2 Play & Go Welcome
pack for details about how to use your mobile
while abroad.
Correcting the Number
To clear Press the
the last digit
displayed
any other digit in
the number
the whole display
C
Left or Right key until the
cursor is immediately to the
right of the digit to be cleared.
Press the
insert a missing digit simply by
pressing the appropriate key.
C
than one second.
Auto Redial
menu (
Menu 6.7
key.
C
key. You can also
key and hold it for more
option in
), the
23
Page 25

Call Functions
Ending a Call
When you want to end your call, briefly press the
key or close the folder.
Redialling the Last Number
The phone stores the numbers you’ve dialled,
received or missed if the caller is identified. See
“Call Records” on page 92 for further details.
To recall any of these numbers:
1. If you have typed characters on the display,
press the key to return to Idle mode.
2. Press the key to display a list of the last
numbers in the order you made or received
them.
3. Use the Up and Down keys to scroll through the
numbers until the number you want highlights.
4. T
o Press the
dial the number key.
edit the number
delete the number
delete all of the
numbers on the
Call Log list
Options
select
number, referring to
“Correcting the Number”
on page 23.
Options
select
Options
select
details, see page 94.
soft key and
Edit
. Change the
soft key and
Delete
.
soft key and
Delete All
. For
24
Page 26
Call Functions
Making a Call from Phone Book
You can store the phone numbers that you use
regularly in the SIM card or the phone’s memory,
which are collectively called Phone Book. Simply
select a name to recall the associated number. For
further details about the Phone Book features, see
page 32.
Adjusting the Volume
During a call, if you want to adjust the earpiece
volume, use the Volume keys on the left side of the
phone.
Press the key to increase the volume level and the
key to decrease the level.
In Idle mode, you can also adjust the keypad tone
volume using these keys.
25
Page 27

Call Functions
Answering a Call
When somebody calls you, the phone rings and
displays the incoming call image.
When the caller can be identified, the caller’s phone
number or name, if stored in your Phone Book,
displays.
1. If necessary, open the folder. Press the key or
the
Accept
soft key to answer the incoming call.
When the
Settings
can press any key to answer a call except for the
page 120.
When
Settings
can answer the call simply by opening the folder.
See page 120.
Note
2. End the call by closing the folder or pressing the
Anykey Answer
menu (
Menu 6.7
key and the
the
Active Folder
menu (
: To reject the call, press and hold one of the
Volume keys before opening the folder, or
press the
key.
Reject
Menu 6.7
Reject
option in the
) is activated, you
soft key. See
option in the
) is activated, you
soft key or
Extra
Extra
key.
Note
: You can answer a call while using Phone Book
or menu features. After ending the call, the
display returns to the function screen you were
using.
26
Page 28
Call Functions
Viewing Missed Calls
When you are unable to answer a call for any
reason, you can find out who called you so that you
can call the person back.
The number of calls you missed displays on the idle
screen immediately after a call is missed.
To view the missed call immediately:
1. If the phone is closed, open the folder.
2. Press the
The number for the most recent missed call
displays, if available.
3.
To Press the
scroll through the
missed calls
call the number
displayed
edit or delete a missed
call number
View
soft key.
Up or Down key.
key.
Select
soft key. See
below.
Editing a Missed Call Number
Note
: When the number for the missed call is not
available, the
1. Press the
2. Press the Up or Down key to highlight the
option.
Options
Edit
option does not display.
soft key.
Edit
27
Page 29

Call Functions
3. Press the
Select
soft key.
4. Change the number.
5.
To Press the
call the number key.
store the number
Save
soft key and enter
the name and location.
For further details, see
page 32.
Deleting a Missed Call
1. Press the
2. If necessary, press the Up or Down key to
highlight the
3. Press the
You can press the key at any time to exit the
Missed Call feature.
Note
: You can access the Missed Call feature at any
Options
Select
Delete
soft key.
soft key.
option.
time by selecting the
(
Menu 3.1
). For further details, see page 92.
Missed Calls
menu
28
Page 30

Call Functions
Quickly Switching to Silent Mode
Silent mode is convenient when you wish to stop
the phone from ringing, in a theatre for example.
In Idle mode, press and hold the
“Silent Mode” message and the Vibration icon ( )
display.
In Silent mode, your phone changes the sound
settings as follows:
Option New Setting
Alert Type (
Keypad Tone (
Menu 5.3
Menu 5.4
)Vibration
)Off
key until the
Message Tone (
Folder Tone (
Power off tone Off
Extra Tones (
To exit and reactivate the previous sound settings,
press and hold the
Mode” appears. The Vibration icon ( ) no longer
displays.
Notes
:
• When you turn the phone off, Silent mode is
automatically deactivated.
• Activating Silent mode will not turn off the camera
shutter sound.
Menu 5.5
Menu 5.6
Menu 5.8
) Light + Vibration
)Off
)Off
key again until “Exit Silent
29
Page 31

Selecting Functions and Options
Your phone offers a set of functions that allow you
to customise it. These functions are arranged in
menus and sub-menus, accessed using the two soft
keys marked and . Each menu and sub-menu
allows you to view and alter the settings of a
particular function.
The roles of the soft keys vary according to the
function you are currently using; the labels on the
bottom line of the display just above each key
indicates its current role.
Example
:
Menu Name
Press the left soft
key to access Menu
mode.
30
Press the right soft
key to access the
Phone Book feature.
Page 32

Selecting Functions and Options
To view the various functions and options available
and to select the one you want:
1. Press the appropriate soft key.
2.
To Press the
select the:
• function displayed
Select
soft key or
the Right key.
• option highlighted
view the next function
or highlight the next
option on a list
move back to the
previous function or
option on a list
move back up one
level in the structure
exit the structure
Down key or key on
the left side of the
phone.
Up key or key on
the left side of the
phone.
Left key, soft key or
C
key.
key.
without changing the
settings
In some functions, you may be asked for a
password or PIN. Enter the code and press the
OK
soft key.
Note
: When you access a list of options, your phone
highlights the current option. If, however, there
are only two options, such as
Enable/Disable
, your phone highlights the
On/Off
or
option that is not currently active so that you
can select it directly.
31
Page 33

Phone Book
You can store phone numbers and their
corresponding names in both your SIM card and
your phone’s memories. They are physically
separate but are used as a single entity, called
Phone Book.
Storing a Number with a Name
There are two ways to store a number:
Save
•Using the
•Using the
menu
Storing a Number in Idle Mode
As soon as you start to enter a number,
appears above the left soft key to allow you to store
the number in Phone Book.
1. Enter the number you want to store.
Note
: If you make a mistake while entering a
2. When you are sure that it is correct, press the
Save
soft key.
soft key in Idle mode
New Entry
number, correct it using the
further details, see page 23.
option in the Phone Book
Save
C
key. For
3. Select an icon to identify the category of the
number to be stored. Three categories are
available:
• : Mobile phone number
• : Office number
• : Home number
To select the category, press the Left or Right
key and press the
32
Select
soft key.
Page 34

Phone Book
4. Select a memory location, either
SIM
or
Phone
by pressing the Up or Down key and press the
Select
soft key.
Note
: When you change phones, any numbers
stored in your SIM card memory are
automatically available with the new phone,
whereas any numbers stored in the phone’s
memory must be reentered.
5. Enter a name and press the OK soft key.
For further details about how to enter
characters, see page 44.
6. If you do not want to save the number and
name in the suggested location, press the
to clear the location number and enter another
location by pressing the number keys.
7. Press the
OK
soft key to store the name and
number.
After storing, the phone displays the Phone Book
entry or name you just created.
8.
To Press the
use the entry options
Options
soft key. For
further details, see
page 35.
return to the idle
key.
screen
C
,
key
33
Page 35

Phone Book
Storing a Number Using the Phone Book
Menu
1. When the idle screen displays, press the
soft key.
2. Scroll to
key and press the
3. Select an icon to identify the category of the
number to be stored by pressing the Left or
Right key, and press the
Note
4. Select a memory location, either
by pressing the Up or Down key and press the
Select
Note
5. Enter a name and press the OK soft key.
For further details about how to enter
characters, see page 44.
6. Enter the number or address you want to store
and press the
7. Continue the procedure from step 6 on page 33
to store the number.
New Entry
: The E-mail icon ( ) is available in this
step. It allows you to save an e-mail
address instead of a phone number.
soft key.
: When you are saving an e-mail address,
SIM is not available.
by pres si ng the Up or Do wn
Select
soft key.
Select
soft key.
SIM
Save
soft key.
or
Name
Phone
,
34
Page 36

Phone Book
Using Phone Book Entry Options
While accessing any Phone Book entry, press the
Options
entry.
The following options are available:
Paste
normal dialling mode. Use this option to dial a
number similar to one in Phone Book, such as a
different extension in the same office.
Use the
see page 23 for further details. When you are ready
to dial, press the key.
Edit: allows you to edit the name and/or number.
Photo Caller ID
photos you took using the camera as a caller ID
image to be displayed when you receive a call
from the selected number. For details about
camera feature, see page 97.
soft key to access the options for the
To Press the
select the
highlighted option
highlight a different
option
: allows you to paste the number into the
C
key to change the number as required;
Select
soft key or the Right
key.
Up or Down key until the
option you want is
highlighted.
: allows you to assign one of the
Delete
: allows you to delete the selected number
from Phone Book. You are asked to confirm that you
wish to delete the name and number by pressing
the
Yes
soft key.
35
Page 37

Phone Book
Copy
: allows you to copy the number to another
location. You can select the memory and the
location number.
Caller Group
Book entries in caller groups so that the phone
alerts you in a specific way when a person from one
of your groups calls you. Select one of the ten
groups available.
To remove an entry from a group, select the
Group
For further details about how to change caller group
properties, see page 38.
Add Entry
currently selected name.
: allows you to organise your Phone
No
option.
: allows you to add a new number to the
Searching for and Dialling a Number in Phone Book
After storing numbers in Phone Book, you can
search for them in two ways; by name and by caller
group.
Searching for a Number by Name
1. When the idle screen displays, press the
soft key.
2. Press the
highlights. You are asked to enter a name.
Select
soft key when
Search
Name
3. Enter the first few letters of the name that you
want to find.
The Phone Book entries are listed, starting with
the first entry matching your input.
36
Page 38

Phone Book
4.
To Press the
view the highlighted
View
soft key.
entry
select a different
entry
Up or Down key until
the entry you want
highlights.
look for a name
starting with a
key labelled with the
letter you want.
different letter
5. Once you have found the entry, press the key
to dial the number, or press the
Options
soft
key to access the Phone Book entry options; for
further details, see page 35.
Searching for a Number by Caller Group
1. When the idle screen displays, press the
Name
soft key.
2. Scroll to
Down key and press the
Group Search
by pressing the Up or
Select
soft key. You are
asked to enter a group name.
3. Enter the first few letters of the group name that
you want to find.
The caller groups are listed, starting with the
first group matching your input.
4. If necessary, scroll to a group by pressing the Up
or Down key and press the
View
soft key.
The Phone Book entries in the caller group are
listed.
37
Page 39

Phone Book
5.
To Press the
view the highlighted
entry
select a different
entry
6. Once you have found the entry, press the key
to dial the number, or press the
key to access the Phone Book entry options; for
further details, see page 35.
View
soft key.
Up or Down key until
the entry you want
highlights.
Options
soft
Editing a Caller Group
1. When the idle screen displays, press the
soft key.
2. Scroll to
Down key and press the
3. Scroll through the group list by pressing the Up
or Down key.
4. When the group you want highlights, press the
Options
5. Select each option and change the settings, as
you want. The following options are available:
•
•
38
Group Edit
soft key.
Call Ring Tone
to be used when you receive a voice call from
a person in the group.
SMS Tone
used when you receive a message from a
person in the group.
: allows you to set a ring tone to be
by pressing the Up or
Select
soft key.
: allows you to set a ring tone
Name
Page 40

Phone Book
•
Graphic
displayed when you receive a voice call from a
person in the group.
•
Group Name
the group. For further details about how to
enter characters, see page 44.
: allows you to set a graphic icon to be
: allows you to assign a name to
6. When you are finished, press the
C
or key.
Speed-dialling
Once you have stored phone numbers in Phone
Book, you can set up to eight speed-dial entries and
then dial them easily whenever you want, simply by
pressing the associated number key.
Note
: Your O2 Play & Go mobile has been preset for
you with some useful services using this
function. See O2 welcome pack for more
details.
Setting Up Speed-dial Entries
1. When the idle screen displays, press the
soft key.
2. Scroll to
Down key and press the
3. Select the key where you wish to assign the
speed-dialling number, from the
and press the
Note
Speed Dial
: Memory location 1 is reserved for your Voice
Mail server number.
by pressing the Up or
Select
OK
soft key.
soft key.
2
Name
to 9 keys,
39
Page 41

Phone Book
If you have already assigned a number to the
key, the
Options
soft key replaces the OK soft
key. Go to step 6.
4. Select a Phone Book entry from the list and
press the
View
soft key.
5. Select a number, if the entry has more than one,
by pressing the Up or Down key and press the
Select
soft key.
6. Once you have assigned a number to the key,
you can use the following options by pressing
the
Options
Change
•
soft key:
: allows you to assign a different
number to the key.
•
Delete
: allows you to clear the setting so that
no number is assigned to the key.
•
Delete All
: allows you to clear the settings for
all the keys so that no numbers are assigned
to any of the keys.
•
Number
: allows you to view the number
assigned to the key.
7. When you are finished, press the
C
or key.
Speed-dialling from Phone Book
To speed-dial the numbers assigned to the 2 to
keys, press and hold the appropriate key.
40
9
Page 42

Phone Book
Deleting All of the Phone Book Entries
You can delete all your entries from your phone’s
memory, your SIM card or both.
1. When the idle screen displays, press the
soft key.
Name
2. Scroll to
key and press the
3. To place a check mark by the memory location
you want to empty,
the
You can remove the check mark by pressing the
Unmark
4. Press the
the selected memory location.
5. Enter the phone password and press the
key.
Note
6. When the confirming message appears, press
the
To cancel the deletion, press the
7. When you are finished, press the
Delete All
Mark
soft key.
soft key.
Delete
: The password is preset to “00000000” at
the factory. To change this password, see
page 117.
Yes
soft key.
by pressing the Up or Down
Select
soft key.
All, SIM
soft key to delete the entries in
or
Phone
No
, press
OK
soft key.
C
or key.
soft
41
Page 43

Phone Book
Checking the Memory Status
You can check how many names and numbers are
stored in Phone Book, in both the SIM card’s and
phone’s memory. You can also see the capacity of
both memory location.
1. When the idle screen displays, press the
soft key.
2. Select the
the Up or Down key and press the
key.
3. Press the Up or Down key to view the number of
existing and total entries available in the SIM
card and phone’s memory.
4. When you are finished, press the
Memory Status
option by pressing
Name
Select
soft
C
or key.
42
Page 44

Phone Book
Using the Service Dialling Numbers
You can view the list of Service Dialling Numbers
(SDN) assigned by your service provider. These
numbers include emergency numbers, directory
enquiries and voice mail numbers.
1. When the idle screen displays, press the
soft key.
2. Select the
Down key and press the
3. Scroll through the numbers by using the Up or
Down key.
4. To dial the number displayed, press the
key.
Note
: This option is available only when your SIM card
SDN
option by pressing the Up or
supports Service Dialling Numbers.
Select
soft key.
Name
Dial
soft
43
Page 45

Entering Text
When using your phone, you will often need to
enter text, such as when storing a name in Phone
Book, creating your personal greeting or scheduling
events on your calendar. You can enter
alphanumeric characters by using your phone’s
keypad.
Your phone has the following text input modes:
•T9 mode
This mode allows you to enter words with only
one keystroke per letter. Each key on the keypad
has more than one letter; for example, when you
press the
automatically compares your keystrokes with an
internal linguistic dictionary to determine the
correct word, thus requiring far fewer keystrokes
than the traditional Alphabet mode.
• Alphabet mode
This mode allows you to enter letters by pressing
the key labelled with the letter you want. Press
the key once, twice, three or four times until it
displays.
• Number mode
This mode allows you to enter numbers.
5
key once, J, K or L displays. T9 mode
• Symbol mode
This mode allows you to enter various symbols
and special characters.
44
Page 46

Entering Text
Changing the Text Input Mode
When you are in a field that allows characters to be
entered, you will notice the text input mode
indicator on the display.
Example
: Writing a text message
Write New
Options
Text i n p u t
mode indicator
To select Press the right soft key
until
T9 mode displays. See page 46.
Alphabet mode displays. See page 48.
Number mode displays. See page 49.
Symbol mode the symbol list displays.
See page 49.
Note
: Additional text input modes may be available,
depending on your country.
45
Page 47

Entering Text
Using T9 Mode
T9 is a predictive text input mode that allows you to
key in any character using single keystrokes. This
text input mode is based on a built-in dictionary.
To enter a word in T9 mode:
1. When you are in T9 mode, start entering a word
by pressing the
once for each letter.
Example
The word that you are typing appears on the
display. It may change with each key that you
press.
2. Enter the whole word before editing or deleting
the keystrokes.
3. When the word displays correctly, go to step 4.
If not, press the
repeatedly to display alternative word choices
for the keys that you have pressed.
Example
2
to 9 keys. Press each key only
: To enter “HELLO” in T9 mode,
press the
: Both “OF” and “ME” use the 6 and 3
keys. The phone displays the most
commonly used choice first.
4, 3, 5, 5
0
key or the Up or Down key
and 6 keys.
4. Insert a space by pressing the key and start
entering the next word.
46
Page 48

Entering Text
To add a new word into the T9 dictionary:
1. After pressing the keys corresponding to the
word you want to add, press the
0
, Up or Down
key to display the alternative words.
2. When you press the
last alternative word, the display shows
the bottom line. Press the
3. If necessary, clear the word using the
0
, Up or Down key at the
Add
Add
soft key.
C
key and
on
enter the word you want to add using Alphabet
mode. See page 48.
4. Press the
OK
soft key.
The word is added to the T9 dictionary and
becomes the first word for the associated
keypress.
Note
: This feature may not be available for some
languages.
• To enter periods, hyphens or apostrophes, press
the
1
key. T9 mode applies grammar rules to
ensure that the correct punctuation is used.
Example
: The 1 key is used twice to display two
punctuation marks:
L E
T ’ S E A
T .
• To shift the case in T9 mode, use the key.
There are three cases; Capital lock ( ), Lower
case ( ) and Initial Capital ( ).
• You can move the cursor by using the Left and
Right keys. To delete letters, press the
Press and hold the
C
key to clear the display.
C
key.
47
Page 49

Entering Text
Using Alphabet Mode
Use the 1 to 0 keys to enter your text.
1. Press the keys labelled with the letter you want:
- Once for the first letter
- Twice for the second letter
- And so on
2. Select the other letters in the same way.
Note
: The cursor moves to the right when you press a
different key. When entering the same letter
twice or a different letter on the same key, just
wait for a few seconds for the cursor to move to
the right automatically, and then select the
next letter.
Refer to the table below for further details about the
characters available:
Key
Note
Characters in the Order Displayed
Upper Case
Space
Lower Case
: The characters available in Alphabet mode may
be different, depending upon your country.
48
Page 50

Entering Text
• To insert a space, press the key.
• To shift the case in Alphabet mode, use the
key. There are three cases; Capital lock ( ),
Lower case ( ) and Initial Capital ( ).
• You can move the cursor by using the Left and
Right keys. To delete letters, press the
Press and hold the
C
key to clear the display.
C
key.
Using Number Mode
Number mode enables you to enter numbers into a
text message. Press the keys corresponding to the
digits you want to enter.
Using Symbol Mode
Symbol mode enables you to insert symbols into a
text message.
To Press the
select a symbol corresponding number
key.
display more symbols Up or Down key.
clear the symbol(s)
insert the symbol(s)
into your message
cancel your input and
return to the previous
mode
C
key. When the input
field is empty, this key
returns the display to the
previous mode.
OK
soft key.
Back
soft key.
49
Page 51

Options During a Call
Your phone provides a number of control functions
that you can use during a call.
Putting a Call on Hold
Note
: This service is not available on your O2 Play &
Go mobile.
You can place the current call on hold whenever you
want. You can make another call while you have a
call in progress if your network supports this
service.
To place a call on hold, simply press the
key. You can reactivate the call whenever you want,
by pressing the
To make a call while you have a call in progress:
1. Enter the phone number that you wish to dial or
look it up in Phone Book.
For details about searching for a number in
Phone Book, see page 36.
2. Press the key to dial the second call.
The first call is automatically put on hold.
Or,
Unhold
soft key.
Hold
soft
1. Put the current call on hold by pressing the
soft key.
2. Make the second call in the normal way.
50
Hold
Page 52

Options During a Call
When you have an active call and a call on hold, you
may switch between the two calls, changing the one
on hold to active and placing the other on hold.
To switch between the two calls, simply press the
Swap
soft key.
The current call is placed on hold and the call on
hold is reactivated so that you can continue
conversing with the other person.
When you want to finish, end each call normally by
pressing the key.
Using the Menu Functions
During a call, you can access the main menu
functions.
1. Press the
2. Press the
highlights.
3. Press the Up or Down key to scroll through the
menu list.
Note
4. When the menu you want highlights, press the
Select
5. If the selected menu has sub-options, repeat
steps 3 and 4.
For further details about the menu functions
available, see the list on page 60.
Options
OK
: You cannot use some menus during a call.
They are deactivated on this list.
soft key.
soft key.
soft key when the
Menu
option
51
Page 53

Options During a Call
Switching the Microphone Off (Mute)
You can temporarily switch your phone’s
microphone off so that the other person on the
phone cannot hear you.
Example
To switch the microphone off temporarily:
: You wish to say something to another
person in the room but do not want the
person on the phone to hear you.
1. Press the
2. Press the Down key to highlight the
option.
3. Press the
The other person can no longer hear you.
To switch the microphone back on:
1. Press the
2. If necessary, press the Down key to highlight the
Unmute
3. Press the
The other person can hear you again.
52
Options
OK
soft key.
Options
option.
OK
soft key.
soft key.
soft key.
Mute
Page 54

Options During a Call
Muting or Sending Key Tones
These options allow you to turn the key tones off or
on. If the
does not transmit the DTMF (Dual Tone MultiFrequency) tones of the keys, which allows you to
press keys without hearing annoying key tones
during a call.
Note
Mute Keys
: To communicate with answering machines or
computerised telephone systems, the
Keys
option must be selected.
option is selected, your phone
Send
Sending a Sequence of DTMF Tones
You can send the DTMF tones after entering the
entire numbers you need to send.
This option is helpful for entering a password or an
account number when you call an automated
system, like a banking service.
To send the DTMF tones:
1. When you are connected to the teleservice
system, press the
Options
soft key.
2. Press the Down key to highlight the
option.
3. Press the
4. Enter the number you want to send and press
the
The tones are sent.
OK
soft key.
OK
soft key.
Send DTMF
53
Page 55

Options During a Call
Searching for a Number in Phone Book
You can search for a number in Phone Book during
a call.
1. Press the
2. Press the Down key to highlight the
option.
3. Press the
The Phone Book entries are listed.
4. Enter the name that you wish to find.
If you enter the first few letters of the name, the
Phone Book entries are listed, starting with the
first entry matching your input.
5. To view the highlighted entry, press the
soft key.
For further details about the Phone Book feature,
see page 32.
Options
OK
soft key.
soft key.
Phonebook
View
Using the SMS Service
If you receive an SMS (Short Message Service)
message during a call, the Message icon ( )
flashes on the display. The
enables you to read the message. You can also
write a new text message.
For further details about the SMS service, refer to
page 66.
SMS Service
option
54
Page 56

Options During a Call
Call Waiting
Note
: This service is not available on your O2 Play &
Go mobile.
You can answer an incoming call while you have a
call in progress, if your network supports this
service and you have set the
(
Menu 8.3
notified of an incoming call by a call waiting tone.
To answer a call while you have a call in progress:
1. Press the key to answer the incoming call.
The first call is automatically put on hold.
) to
Activate
Call Waiting
; see page 139. You are
menu
2. To switch between the two calls, press the
soft key.
3. To end the call on hold, press the
key and select the
To end the current call, press the key.
End Held Call
Options
option.
Swap
soft
Making a Multi-party Call
Note
: This service is not available on your O2 Play &
Go mobile.
A multi-party call is a network service that allows
up to six people to take part simultaneously in a
multi-party or conference call. For further details
about subscribing to this service, contact your
service provider.
Setting up the Multi-party Call
1. Call the first participant in the normal way.
2. Call the second participant in the normal way.
The first call is automatically put on hold.
55
Page 57

Options During a Call
3. To join the first participant to the multi-party
call, press the
Join
option. Press the OK soft key.
4. To add a new person to the multi-party call, call
the person in the normal way and press the
Options
press the
You can add incoming callers by answering the call,
pressing the
Join
option. Repeat as required.
Options
soft key. Select the
OK
soft key.
Options
soft key and select the
soft key, and selecting the
Join
option and
Having a Private Conversation With One
Participant
1. Press the
Select One
The list of call participants appears.
2. Highlight a person from the list by pressing
the Up or Down key, and press the
key or the key.
3. When the
OK
Now you can talk privately to that person. The
other participants can still converse with each
other.
4. To return to the multi-party call, press the
Options
Press the
All the multi-party call participants can now hear
each other.
56
Options
Private
soft key.
soft key and select the
OK
soft key and choose the
option. Press the OK soft key.
option highlights, press the
soft key.
Join
Select
option.
soft
Page 58

Dropping One Participant
Options During a Call
1. Press the
Select One
Options
soft key and choose the
option. Press the OK soft key.
The list of call participants appears.
2. Highlight a person from the list by pressing
the Up or Down key, and press the
Select
soft
key or the key.
3. Press the Down key to select the
option and press the
OK
soft key.
Remove
The call ends with that participant, but you can
continue to talk to the others.
4. When you want to end the multi-party call, close
the folder or press the key.
57
Page 59

Using the Menus
The phone offers a range of functions that allow you
to tailor it to your needs. These functions are
arranged in menus and sub-menus.
The menus and sub-menus can be accessed by
scrolling using the Navigation keys or by using the
shortcuts.
Accessing a Menu Function by Scrolling
1. In Idle mode, press the
Menu mode.
2. Scroll using the Up or Down key to reach a main
menu,
Phone Settings
Select
soft key or the Right key to enter the
menu.
3. If the menu contains sub-menus,
example, you can access them by scrolling using
the Up or Down key and pressing the
soft key or the Right key.
If the menu that you have selected contains
further options, repeat this step.
4.
To Press the
scroll through the
menus
confirm the chosen
setting
return to the previous
menu level
exit the menu without
changing the settings
58
Menu
soft key to access
for example. Press the
Language
Select
Up or Down key, or use
the Volume keys.
Select
soft key or the
Right key.
soft key or the Left
key.
key.
for
Page 60

Using the Menus
Using Shortcuts
The menu items, such as menu, sub-menus and
options, are numbered and can be accessed quickly
by using their shortcut numbers. The shortcut
number is shown at the bottom right next to the
soft key on the display. Simply press the
key and enter the number of the menu you want.
Notes
:
• The numbers assigned to each menu are indicated
on the list on page 60. They may not match the
menu number on the phone, depending on the
services supported by your SIM card.
• For the menu number 10, use the
Example: Accessing the
Language
0
key.
menu.
Menu
soft
1. Press the
2. Press the
3. Press the
The languages available display.
Menu
6
key for
5
key for
soft key.
Phone Settings
Language
.
.
59
Page 61

Using the Menus
List of Menu Functions
The following list shows the menu structure
available and indicates the number assigned to
each option and the page where you can find a
description of each feature.
Note
: If you use a SIM AT card that provides
additional services, the
when you press the
Menu mode. For further details, see your SIM
card instructions.
SIM AT
Menu
soft key to enter
menu displays
1. Text Messages
1.1 Inbox
1.2 Outbox
1.3 Write New
1.4 Templates
1.5 Settings
1.5.1 Setting 1
1.5.2 Setting 2
1.5.3 Common Setting
1.6 Delete All
1.7 Memory Status
1.7.1 SIM Memory
1.7.2 PHONE Memory
1.7.3 CB Memory
1.8 Voice Mail
1.8.1 Connect to Voice Server
1.8.2 Voice Server Number
1.9 Broadcast
1.9.1 Read
1.9.2 Receive
1.9.3 Channel List
1.9.4 Language
* Shows only if supported by your SIM card.
60
(see page 66)
*
*
Page 62

Using the Menus
2. Multimedia MSGs.
2.1 Inbox
2.2 Outbox
2.3 Draft
2.4 Write New
2.5 Templates
2.6 Delete All
2.7 Memory Status
2.8 Setup
2.8.1 Delivery Report
2.8.2 Read Reply
2.8.3 Auto Download
2.8.4 Message Acceptance
2.8.5 Hide ID
2.8.6 Expiry Date
2.8.7 Delivery Time
2.8.8 Priority
2.8.9 Report Allowed
2.8.0 Page Duration
2.9 MMS Profile
3. Call Records
3.1 Missed Calls
3.2 Received Calls
3.3 Dialled Calls
3.4 Delete All
3.5 Call Time
3.6 Call Cost
(see page 92)
3.5.1 Last Call Time
3.5.2 Total Sent
3.5.3 Total Received
3.5.4 Reset Timers
*
3.6.1 Last Call Cost
3.6.2 Total Cost
3.6.3 Max Cost
3.6.4 Reset Counters
3.6.5 Set Max Cost
3.6.6 Price/Unit
(see page 78)
* Shows only if supported by your SIM card.
61
Page 63

Using the Menus
4. Camera
(see page 97)
4.1 Take Photos
4.2 My Photos
4.3 Take Videos
4.4 My Videos
4.5 Delete All
4.6 Memory Status
5. Sound Settings
5.1 Ring Tone
5.2 Ring Volume
5.3 Alert Type
5.4 Keypad Tone
5.5 Message Tone
5.5.1 SMS Tone
5.5.2 SMS-CB Tone
5.5.3 MMS Tone
5.6 Folder Tone
5.7 Power On/Off
5.8 Extra Tones
6. Phone Settings
6.1 Infrared Activate
6.2 Display Settings
6.2.1 Wallpaper
6.2.2 Front LCD
6.2.3 Menu Style
6.2.4 Back Light
6.2.5 Service Light
6.2.6 Graphic Logo
6.3 Greeting Message
6.4 Own Number
6.5 Language
(see page 106)
(see page 111)
62
Page 64

Using the Menus
6. Phone Settings
6.6 Security
6.6.1 PIN Check
6.6.2 Change PIN
6.6.3 Phone Lock
6.6.4 Change Password
6.6.5 SIM Lock
6.6.6 Privacy
6.6.7 FDN Mode
6.6.8 Change PIN2
6.7 Extra Settings
6.8 Short Cut
6.9 Reset Settings
7. Organiser
7.1 Alarm
7.2 Calendar
7.3 Time & Date
7.4 Calculator
7.5 To Do List
7.6 Voice Memo
7.7 Currency Exchange
(see page 122)
7.1.1 Once Alarm
7.1.2 Daily Alarm
7.1.3 Morning Call
7.1.4 Remove Alarm
7.1.5 Autopower
7.3.1 Set Time
7.3.2 Set Date
7.3.3 World Time
7.3.4 Time Format
7.6.1 Record
7.6.2 Memo List
7.6.3 Delete All
7.6.4 Memory Status
(continued)
*
*
* Shows only if supported by your SIM card.
63
Page 65

Using the Menus
8. Network Services
8.1 Call Diverting
8.1.1 Divert Always
8.1.2 Busy
8.1.3 No Reply
8.1.4 Unreachable
8.1.5 Cancel All
8.2 Call Barring
8.2.1 All Outgoing
8.2.2 International
8.2.3 International Except to Home
8.2.4 All Incoming
8.2.5 Incoming While Abroad
8.2.6 Cancel All
8.2.7 Change Barring Password
8.3 Call Waiting
8.4 Network Selection
8.5 Caller ID
8.6 Closed User Group
8.6.1 Index List
8.6.2 Outside Access
8.6.3 Default Group
8.6.4 Deactivate
8.7 Band Selection
(see page 135)
*
* Shows only if the Closed User Group Feature is active.
64
Page 66

Using the Menus
9. Funbox
9.1 WAP Browser
9.2 Games & More
9.3 Sounds
9.4 Images
9.5 Delete All
9.6 Memory Status
(see page 144)
9.1.1 Home
9.1.2 Favorite
9.1.3 http://
9.1.4 Settings
9.1.5 Clear Cache
9.1.6 Push Message
9.6.1 Games
9.6.2 Sounds & Images
65
Page 67

Text Messages
Short Message Service (SMS) allows you to send
and receive short text messages to and from other
GSM mobile phones. In addition, your phone
supports the Enhanced Messaging Service (EMS),
which enables you to include photos, melodies, and
animated images in your messages. To use this
feature, you must subscribe to your service
provider’s message service.
The Text Message icon ( ) appears when you have
received new text messages. If the memory is full,
an error message displays and you will be unable to
receive any new messages. Use the
in each message box to delete unwanted messages.
Note
: In Idle mode, you can quickly access the
Message
menu by pressing the Left soft key.
Delete
option
Text
Inbox
This message box is used to store any messages
that you have received.
When you enter this menu, the list of messages in
the box displays with the senders’ phone numbers
or names, if available in your Phone Book.
1. Select a message from the list and press the
2. To scroll through the contents, press the Up or
3. To scroll to the previous or next message, press
66
(Menu 1.1)
Select
soft key to read the message contents.
Down key.
the or key.
Page 68

Text Messages
While reading a message, you can choose the
following options by pressing the
Delete
: allows you to delete the message.
Send
: allows you to send/resend the message. For
Options
soft key:
further details about how to send a message, see
page 69.
Text Reply
Call Back
Cut Address
: allows you to reply to the sender.
: allows you to call the sender back.
: allows you to extract the sender’s
number and URL, e-mail addresses or phone
numbers from the message text.
Move to Phone
: allows you to move the message
from the SIM card to the phone’s memory. This
option is only available for messages stored in the
SIM card.
Move to SIM
: allows you to move the message
from the phone’s memory to the SIM card. This
option is only available for messages stored in the
phone’s memory.
Select Objects
: allows you to save media items,
such as sounds or images, from the message into
your phone. You can then use these items when
writing a message. For details, see page 71.
67
Page 69

Text Messages
Outbox
This message box is used to store any messages
that you have already sent or will send.
When you enter this menu, a li st of messages in the
box displays with the recipients’ phone numbers or
names, if available in your Phone Book.
1. Select a message from the list and press the
View
2. To scroll through the contents, press the Up or
Down key.
3. To scroll to the previous or next message, press
the or key.
While reading a message, you can choose the
following options by pressing the
Delete
Send
further details about how to send a message, see
page 69.
Cut Address
number and URL, e-mail addresses or phone
numbers from the message text.
Move to Phone
from the SIM card to the phone’s memory. This
option is only available for messages stored in the
SIM card.
Move to SIM
from the phone memory to the SIM card. This
option is only available for messages stored in the
phone’s memory.
(Menu 1.2)
soft key to read the message contents.
: allows you to delete the message.
: allows you to send/resend the message. For
: allows you to extract the destination
: allows you to move the message
Options
: allows you to move the message
soft key:
68
Page 70

Text Messages
Select Objects
such as sounds or images, from the message into
your phone. You can then use these items when
writing a message. For details, see page 71.
Write New
In this menu, you can write and send text
messages.
Notes
:
• In Idle mode, you can quickly access this menu by
pressing and holding the Left soft key.
• When you add media items to the message, the
number of characters you are allowed to enter
decreases.
: allows you to save media items,
(Menu 1.3)
Creating a Simple Text Message
1. Create your message.
Note
: For further details about entering
characters, see page 44.
2. When you finish entering the message, press
the
Options
available:
•
Send Only
The message is then deleted after sending.
•
Save and Send
copy of the message and then sends the
message. You can read the message in your
Outbox.
•
Save Only
be sent at a later time. You can read the
message in your Outbox.
soft key. The following options are
: allows you to send the message.
: allows you to first save a
: allows you to save the message to
69
Page 71

Text Messages
• For further details about
Add Objects, Add Templates, Add
Phonebook, Add Bookmark
Text Formatting
and
Language
,
options, see page 70.
3. Select
the
Send Only
Select
or
soft key.
Save and Send
, and press
If you want to just save the message, select
Save Only
phone returns to the
. After saving the message, the
Text Messages
menu.
4. If you select a save option, choose the memory
location and press the
5. Enter a destination number and press the
OK
soft key.
OK
soft key.
The message is sent.
Note
: When the phone fails to send the message, it
asks you if you want to retry. Press the
key to confirm. Otherwise, press the
OK
Exit
soft
soft
key to return to the Write New screen.
Creating a Message Using the Options
1. Create a message.
2. Press the
Options
3. Select one of the following options by using the
Up and Down keys and pressing the
key:
•
Text Formatting
style of the text.
For the
Small
and
Off
Size
sizes are available. For the
Strikethrough
.
These attributes can be combined.
soft key.
: allows you to format the
attribute,
Normal, Large
attributes, select On or
Select
soft
and
Underline
70
Page 72

Text Messages
•
Add Objects
: allows you to add a sound,
melody, picture or animated image to the
message. Select the category of the object to
be added. In each category, you can select
from the various factory-set items or choose
an item received from other sources, such as
the Internet or other phones.
•
Add Templates
: allows you to apply one of
the preset message templates to the text.
Select one of five messages stored in the
Templates
menu (
Menu 1.4
). For further
details, see page 72.
•
Add Phonebook
: allows you to add a Phone
Book entry to your message. Select one from
the list.
•
Add Bookmark
: allows you to add a web
page address stored in your Favorite list
(
Menu 9.1.2
•
Language
). Select one from the list.
: allows you to change the language
to be used in T9 input mode. Select the
language to be used.
4. Complete the message, and send or save it by
following the procedure from step 2 on page 69.
71
Page 73

Text Messages
Templates
Using this menu, you can preset a maximum of five
messages that you most frequently use.
Select an empty location or one of the message
templates and press the
The following options are available:
Edit
: allows you to write a new message or edit the
message.
Note
: Fo
characters, see page 44.
Send Message
message. Once you have completed the message,
you can send, save and send, or simply save it. For
further details about how to send a message, see
page 69.
Delete
: allows you to delete the message. You are
asked to confirm the deletion by pressing the
soft key.
Settings
In this menu, you can set up default message
information. A setting group is a collection of
settings required to send messages. The number of
setting groups available depends on the capacity of
your SIM card.
(Menu 1.4)
r further details about how to enter
: allows you to retrieve the
(Menu 1.5)
Select
soft key.
Yes
Notes
:
• The setting options available in this menu may be
different, depending on your service provider.
• The last setting you accessed is automatically
activated for sending messages.
• Your service centre number has been preset for you.
The number can be found in your O2 welcome pack.
72
Page 74

Text Messages
Setting x
(where x is the setting group number):
each group has its own sub-menu.
Service Centre
: allows you to store or change the
number of your message centre, which is required
when sending messages. You must obtain this
number from your service provider.
Default Destination
: allows you to store the default
destination number. The number automatically
displays on the Destination screen when you create
a message.
Default Type
type to
: allows you to set the default message
Text, Fax, Email
or
Paging
. The network
can convert the messages into the selected format.
Default Validity
: allows you to set the length of time
your text messages are stored in the message
centre while attempts are made to deliver them.
Setting Name
: allows you to give a name to the
setting group currently being defined.
Common Setting
: The following options are
available:
Reply Path
: allows the recipient of your message to
send you a reply through your message centre, if
your network supports this service.
Delivery Reports
: allows you to activate or
deactivate the report function. When this function is
activated, the network informs you whether or not
your message has been delivered.
Bearer Selection
or
GPRS
: allows you to choose either
, depending on your network.
GSM
73
Page 75

Text Messages
Character Support: allows you to choose a
character type from
Automatic
recipient’s phone does not support it, your recipient
may not be able to read your message.
. If you select
GSM-Alphabet, Uni-code
Uni-code
and your
or
Delete All
This menu allows you to delete all of the text
messages in each message box. You can also
delete all of your messages at one time.
To Press the
select a message box
to clear
place a check mark
remove a check
mark
delete the marked
messages
When a confirming message displays, press the
soft key to confirm.
Memory Status
This menu shows the memory status and how many
messages are currently stored in the SIM card,
PHONE and CB (Cell Broadcast).
(Menu 1.6)
(Menu 1.7)
Up or Down key. To delete
all of your messages,
select
All Messages
Mark
soft key.
Unmark
Delete
soft key.
soft key.
.
Yes
74
Page 76

Text Messages
Voice Mail
This menu allows you to access your voice mailbox,
if your network supports this service.
The following options are available:
Connect to Voice Server
Mail feature, you must enter the voice server
number obtained from your service provider; see
menu option
and press the
messages.
You can quickly connect to the voice server by
pressing and holding the
Voice Server Number
voice mail server number, if necessary.
To Press the
enter the server
number
correct a digit
move the cursor to the
left or right without
clearing a digit
(Menu 1.8)
1.8.2
OK
soft key to listen to your
: before using the Voice
. You can then select this option
1
key in Idle mode.
: allows you to change the
corresponding numeric
keys.
C
key.
Left or Right key.
Notes
:
• On O2 Play & Go your voice mail number is 901.
Simply call 901 to listen to your messages at any
time.
• Voice Mail is a network feature. Please contact your
service provider for further details.
75
Page 77

Text Messages
Broadcast
Note
: This service is not available on your O2 Play &
Go mobile.
This network service allows you to receive text
messages on various topics, such as the weather or
traffic. Cell Broadcast (CB) messages display as
soon as they are received, provided that:
• the phone is in Idle mode.
•the
Receive
• the message channel is currently active on the
channel list.
The following options are available:
Read
: lets you view the received message. The
Volatile
network, but erases its contents as soon as the
phone is switched off. Scroll through the message
by using the Up and Down keys. While reading a
message, press the
message in the
Receive
reception of broadcast messages.
Channel List
from which you wish to receive broadcast
messages. The following options are available:
Select
: use to enable or disable channels on the list
by marking or unmarking them respectively. A
check mark displays in front of each selected
channel.
Add Channel
channel.
Delete
: use to remove a channel from the list.
(Menu 1.9)
option is set to
box displays the messages from the
Archive
: allows you to enable or disable the
: allows you to indicate the channels
: use to enter the ID and title for a new
Enable
Save
soft key to store the
box for later retrieval.
.
76
Page 78

Text Messages
Edit: use to change the ID and title of an existing
channel.
Language
: allows you to select your preferred
language to display the cell broadcast messages.
Please contact your service provider for further
details.
77
Page 79

Multimedia Messages
Multimedia Message Service (MMS) is a messaging
service very similar to the Short Message Service
(SMS). It provides automatic and immediate
delivery of personal multimedia messages from
phone to phone or from phone to e-mail.
In addition to the familiar text content of text
messages, multimedia messages can contain
images, graphics, voice and audio clips. An MMS
message is a multimedia presentation in a single
entry. It is not a text file with attachments.
Using the MMS feature, your phone can receive and
send messages that contain multimedia files, such
as your photos, sounds and images you downloaded
from the Internet and voice memos you recorded.
This function is available only if it is supported by
your service provider. Only phones that offer
multimedia message features can receive and
display multimedia messages.
Inbox
(Menu 2.1)
Viewing a Message When You Receive it
When a new multimedia message comes in, the
display shows the MMS Message icon ( ) and a
text notification along with the sender’s number.
1. Press the
information about the message, such as the
sender’s number, the message size and the
subject.
If you want to view the message later in the
Inbox, press the
78
Select
soft key to view brief
Exit
soft key.
Page 80

Multimedia Messages
2. To scroll through the message information, press
the Up or Down key.
3. Press the
Options
soft key to use the following
options:
•
Retrieve
: retrieves the message from the
MMS server.
•
Delete
: deletes the message.
More Properties
•
: shows you detailed
information about the message.
4. To read the message, press the
when
Retrieve
is highlighted.
Select
soft key
Your phone retrieves the message contents from
the server and displays it.
5. To scroll through the message, press the Up or
Down key.
6. When you are finished, press the key.
Viewing a Received Message in the Inbox
When you access the
list of multimedia messages you received displays
with the senders’ phone numbers, if they are
available in your Phone Book, or subjects. The icons
on the left tell you the status of the messages.
• : Messages that have been opened.
• : Messages that are unopened.
Inbox
menu (
Menu 2.1
), a
1. Select a message on the list and press the
Select
soft key.
The message displays and scrolls to the next
page, if it has one, after a specified time; for
details about setting the time, see page 89.
79
Page 81

Multimedia Messages
2. Press the OK soft key to go to the message view
screen.
Or, the display automatically switches to the
screen.
3. To scroll through the message, press the Up or
Down key.
If the message has more than one page, you
can scroll through the pages by using the Left
and Right keys.
While viewing a message, you can choose the
Message options by pressing the
Options
soft key.
If you are viewing a new message, the options are
the same as when you view a message as soon as it
is received. See the previous section.
When you are reviewing a message retrieved from
the MMS server, the following options are available:
Delete
: deletes the message.
Reply
: allows you to reply to the sender by sending
a text or multimedia message.
Call Back
Cut Address
: allows you to call the sender back.
: allows you to extract the sender’s
number or e-mail address and URL, other e-mail
addresses or phone numbers from the message
text.
Forward
: allows you to forward the message to
another person.
Save Picture
: allows you to save an image from
the message into your phone. Images are stored in
the
Images
folder (
Menu 9.4
).
80
Page 82

Multimedia Messages
Save Sound
message
Properties
message, such as the subject, sender’s e-mail
address or phone number, message size, recipient’s
e-mail address or phone number, its priority and the
time and date when the message was received.
Outbox
When you access this menu, the list of multimedia
messages that you sent or saved displays. The
icons on the left tell you the status of each
message.
• : Messages currently being sent
• : Messages sent
• : Messages your phone couldn’t send
• : Messages to be sent
• : Messages deferred
1. Select a message on the list and press the
Select
The message displays and scrolls to the next
page, if it has one, after a specified time; for
details about setting the time, see page 89.
: allows you to save a sound from the
into the
soft key.
Sounds
: shows you information about the
(Menu 2.2)
folder (
Menu 9.3
).
2. Press the
screen.
Or, the display automatically switches to the
screen.
OK
soft key to go to the message view
81
Page 83

Multimedia Messages
3. To scroll through the message, press the Up or
Down key.
If the message has more than one page, you
can scroll through the pages by using the Left
and Right keys.
While viewing a message, you can choose the
following options by pressing the
Delete
: deletes the message.
Cut Address
numbers or e-mail addresses and URL, e-mail
addresses or phone numbers from the message
text.
Send
Edit Message
contents, sound, photo or text.
Properties
message, such as the status, subject, sender’s email address or phone number, message size, and
the time and date when the message was sent.
: allows you to extract the destination
: allows you to resend the message.
: allows you to change the message
: shows you information about the
Options
soft key:
Draft
After creating a multimedia message, you can store
it in this message box to be sent at a later time.
For further details about viewing a message, see
“Outbox” on page 81.
82
(Menu 2.3)
Page 84

Multimedia Messages
Write New
This menu allows you to create a new multimedia
message and send to one or multiple destinations.
(Menu 2.4)
Creating and Sending a Multimedia
Message
1. Enter the subject of your message and press the
OK
soft key.
For further details about entering characters,
see page 44.
2. When
Add Here
soft key and add the message contents using
one of the following options:
•
Add Text
the
OK
Add My Photo
•
taken from using the camera on your phone.
Select
Take a Photo
Select a Photo
stored in the phone. For further details about
using the camera, see page 97.
•
Add Picture
in the
Images
photo and press the
add downloaded images if they are in correct
format and your service provider supports
them.
•
Add Sound
Select
Record
You can add downloaded sounds if your
service provider supports them.
highlights, press the
: enter the message text and press
soft key.
: allows you to add a photo
to take a new photo, or
to add one of the photos
: allows you to add a photo stored
folder (
: allows you to add a sound file.
to record a new voice memo.
Menu 9.4
Select
soft key. You can
Options
). Choose a
83
Page 85

Multimedia Messages
•
Send
: allows you to send the message. Use
this option when you have finished creating
the message.
•
Save
: saves the message in the
2.3
) or
Templates (Menu 2.5
Draft (Menu
) box for later
use. This option is activated after you add
contents to the message.
•
Settings
: allows you to change the message
settings. For further details about each setting
option, see page 89. After changing the
settings, you need to press the soft key or
the
C
key to go to back to the options screen.
Add Destination
•
: allows you to enter
destination numbers or addresses. See steps 6
to 11. After adding them, you need to press
the soft key or the
C
key to go to back to
the options screen.
•
Preview
: shows your message as it will
display on the recipient’s phone.
Note
: You can add text, an image and a sound
only once for each page.
3. Repeat step 2 until you finish creating your
message.
4. If you want to change the added items, press
the Up or Down key to highlight one and press
the
Options
Note
soft key.
: The options available are different,
depending on whether the item you select
on the message screen is text, an image, a
sound or the Page field.
The following options are available:
Edit Text/Picture/Sound
•
: allows you to
change the text or replace the image or sound
with another one.
84
Page 86

Multimedia Messages
•
Add Page
: allows you to add more pages.
After you add a page, the display shows you
the current page number and the memory
space used for the page. You can move to
each page using the Left or Right key on the
message screen.
•
Delete
: deletes the item from your message.
Duration
•
: allows you to set when an image or
a sound displays on the message presentation
screen and how long it will display for. When
the message is opened, the display shows the
item after a specified time in
Set Start Time
and scrolls to the next item after a specified
time in
Set Duration
Send
: allows you to send the message.
•
Save
: saves the message in the
•
2.3
) or
Templates (Menu 2.5
.
Draft (Menu
) box for later
use.
•
Settings
: allows you to change the message
settings. For further details about each setting
option, see page 89.
•
Add Destination
: allows you to enter
destination addresses. See steps 6 to 11.
•
Preview
: shows your message as it will
display on the recipient’s phone.
5. When you have finished creating the message,
choose
Send
from the options and press the
Select
soft key.
6. Select a destination type,
press the
Select
soft key.
To, Cc
or
Bcc
, and
85
Page 87

Multimedia Messages
7. Choose one of the following options and press
the
Select
soft key:
Phone Number
•
: allows you to enter the
phone number you want.
•
E-Mail
: allows you to enter the e-mail address
of the recipient.
•
Phone Book
: allows you to retrieve a number
from your Phone Book.
8. Enter a number or an e-mail address, or select
a number from Phone Book.
9. When the correct number or address displays,
press the
OK
soft key.
10. To add a destination, press the
when
Add Destination
highlights. Repeat from
Select
soft key
step 7.
If you want to edit the destinations, select one
and press the
Select
soft key. You can change
or delete it.
11. To enter additional numbers or addresses to the
other destination types, press the
C
key or the
soft key and repeat steps 6 through 10.
You can enter up to 10 destinations each for
Cc
and
Bcc
.
12. When you are finished entering the
destinations, select
the
Select
soft key.
Send Message
and press
Your phone sends the message.
86
To
,
Page 88

Multimedia Messages
Templates
This menu stores messages you saved as templates
so that you can use them to make new messages.
1. Scroll through the template list using the Up and
Down keys.
2. When the message template you want
highlights, press the
3. Press the
options, or the display automatically shows the
options after a specified time:
•
Edit Message
using the template. For further details about
how to send a message, see page 83.
•
Delete
are asked to confirm the deletion by pressing
the
4. Press the key to return to Idle mode.
(Menu 2.5)
Select
soft key.
OK
soft key to use the following
: allows you to send a message
: allows you to delete the message. You
Yes
soft key.
87
Page 89

Multimedia Messages
Delete All
This menu allows you to delete all of the multimedia
messages in each message box. You can also delete
all of your messages at one time.
To Press the
select a message box
to clear
place a check mark
remove a check
mark
delete the marked
messages
When a confirming message displays, press the
soft key to confirm.
Memory Status
You can check the amount of the memory being
used and the memory remaining for multimedia
messages.
Each time you press the
shows the total space, including the used and free
space. It also shows how much space is currently
occupied by each message box.
(Menu 2.6)
(Menu 2.7)
Up or Down key. To delete
all of your messages,
select
All Messages
Mark
soft key.
Unmark
Delete
Next
soft key.
soft key.
soft key, the display
.
Yes
88
Page 90

Multimedia Messages
Setup
You can change the default settings for sending or
receiving multimedia messages.
The following options are available:
Delivery Report
network informs you whether or not your message
has been delivered.
Read Reply
phone sends a request for a reply along with your
message to the recipient.
Auto Download
phone retrieves new incoming messages from the
MMS server without notifications. When this option
is enabled, the phone automatically retrieves new
messages from the server. As soon as you receive a
message, you can use more options while you are
reading. See page 80 for further details about the
options.
Message Acceptance
category of messages you want to receive.
Hide ID
number does not display on the recipient’s phone.
Expiry Date
your messages are stored in the message centre
after they are sent.
Delivery Time
phone sends your messages.
Priority
messages.
(Menu 2.8)
: when this option is enabled, the
: when this option is enabled, your
: you can set whether or not your
: you can specify the
: when this option is enabled, your phone
: you can select the length of time
: you can set a delay time before the
: you can select the priority level of your
89
Page 91

Multimedia Messages
Report Allowed
sender of an incoming message receives a delivery
report from the network.
Page Duration
page of outgoing message displays on the message
presentation screen. After a specified time, the
display automatically scrolls to the next page.
MMS Profile
In this menu, you can configure various network
settings that are required when you send or receive
multimedia messages.
Notes
:
• The last profile you accessed is automatically activated
for sending messages.
• If you change the MMS settings without first checking
with your service provider, the MMS feature may not
work properly.
• Your settings on your O2 Play & Go mobile should
already be set up for you, if not call O2 customer
services using the
The following options are available for each profile:
Profile Name
to the MMS server.
Connection URL
server.
Security
Secure
access; otherwise, choose
IP Address
connect to the MMS server.
: select a data transmission mode. Choose
to protect your data against unauthorised
: when this option is enabled, the
: you can set the length of time one
(Menu 2.9)
9
key or dial 08705678678.
: enter a name that you wish to assign
: enter the address of your MMS
Non-Secure
: enter the gateway address required to
.
90
Page 92

Multimedia Messages
User Name
: enter the user ID required to connect
to the MMS server.
Password
: enter the password required to connect
to the MMS server.
APN
: enter the access point name used for the
address of the MMS server.
For further details, contact your service provider.
91
Page 93

Call Records
In this menu, you can view the:
• calls you missed, received or dialled.
• length of your calls.
• cost of your calls.
Notes
:
• You can access the call records of all three types of
calls by pressing the
• The number of call records the phone can store may
be different depending on your SIM card.
key in Idle mode.
Missed Calls
This menu lets you view the last 20 calls you
received, but did not answer.
The number or name, if available, displays together
with the time and date when the call was received.
By pressing the
• edit the number, if available, and dial it or save it
in Phone Book.
• delete the call from the list.
You can also dial the number by pressing the
key.
92
(Menu 3.1)
Options
soft key, you can:
Page 94

Call Records
Received Calls
This menu lets you view the last 20 calls you
received.
The number or name, if available, displays together
with the time and date when the call was received.
By pressing the
• edit the number, if available, and dial it or save it
in Phone Book.
• delete the call from the list.
You can also dial the number by pressing the
key.
Dialled Calls
This menu lets you view the last 20 calls you
dialled.
The number or name, if available, displays together
with the time and date when the call was made.
By pressing the
• edit the number and dial it or save it in Phone
Book.
• delete the call from the list.
You can also dial the number by pressing the
key.
(Menu 3.2)
Options
(Menu 3.3)
Options
soft key, you can:
soft key, you can:
93
Page 95

Call Records
Delete All
This menu allows you to delete all of the records in
each call record. You can also delete all of your call
records at one time.
To Press the
select a call record to
clear
place a check mark
remove a check
mark
delete the marked
records
When a confirming message displays, press the
soft key to confirm.
(Menu 3.4)
Up or Down key. To delete
all of your call records,
select
All Calls
Mark
soft key.
Unmark
Delete
soft key.
.
soft key.
Yes
94
Page 96

Call Records
Call Time
This menu lets you view the time log for calls made
and received.
Note
: The actual time invoiced for calls by your
The following time logs are available:
Last Call Time
Total Sent
timer was last reset.
Total Received
since the timer was last reset.
Reset Timers
You must first enter the phone password and then
press the
Note
: The password is preset to “00000000” at the
(Menu 3.5)
servi
ce provider may vary, depending on
network features, rounding-off for billing
purposes and so on.
: length of the last call.
: total length of all calls made since the
: total length of all calls received
: option used to reset the call timers.
OK
soft key.
factory. To change this password, see
page 117.
95
Page 97

Call Records
Call Cost
Note
: This service is not available on your O2 Play &
This network feature lets you view the cost of calls.
This menu may not be available depending on your
SIM card.
The following options are available:
Last Call Cost
Total Cost
cost counter was last reset. If the total cost exceeds
the maximum cost set in the
you can no longer make any calls until you reset the
counter.
Max Cost
option. See below.
Reset Counters
counter. You must first enter your PIN2 (see
page 161) and then press the
Set Max Cost
cost authorised for your calls. You must first enter
your PIN2 (see page 161) and then press the
soft key.
Price/Unit
this price per unit is applied when calculating the
cost of your calls. You must first enter your PIN2
(see page 161) and then press the
(Menu 3.6)
Go mobile.
: cost of the last call you made.
: total cost of all calls made since the
: maximum cost set in the
: option used to enter the maximum
: option used to set the cost of one unit;
Set Max Cost
Set Max Cost
: option used to reset the cost
OK
soft key.
OK
soft key.
option,
OK
96
Page 98

Camera
Using the camera module embedded in your phone,
you can take photos of people or events while on
the move. You can also send photos to other people
in a multimedia message or set one as a wallpaper.
You can also record videos using the phone as a
camcorder.
Note
: You can quickly access the
pressing the Camera key ( ) on the right side
of the phone in Idle mode.
Camera
menu by
CAUTION
• Do not take photos of people without their
permission.
• Do not take photos in a place where cameras are not
allowed.
• Do not take photos in a place where you may
interfere with another person’s privacy.
Take Photos
In this menu, you can take a photo. The camera
produces JPEG photos.
Note
:
(Menu 4.1)
: When you take a photo in direct sunlight or in
bright conditions, shadows may appear on the
photo.
Taking a Photo with the Folder Open
1. Accessing the
camera on the folder of the phone. Or you can
press and hold the
side of the phone in Idle mode.
The image to be captured appears on the
display.
Take Photos
Camera key ( )
menu turns on the
on the right
97
Page 99

Camera
2. Adjust the image by aiming the camera at the
subject.
• Use the Left and Right keys to adjust the
brightness of the image.
• Use the Up and Down keys to zoom in or out.
• Use the Volume keys on the left side of the
phone to flip the image vertically or
horizontally.
• Use the
1
key to switch to Record mode. See
page 103.
• Use the
• Use the
• Use the
2
key to change the image size.
3
key to change the image quality.
4
key to switch to Night Shot mode.
• To use the camera options, press the left soft
key. For details, see page 99.
3. Press the left soft key or Camera key to take the
photo.
4. Press the
Save
soft key.
To discard the photo and return to Capture
mode, press the
5.
To Press the
use the photo
options
Cancel
soft key.
Options
further details, see
soft key. For
below.
return to Capture
mode
Preview
key.
soft key or C
return to Idle mode key.
98
Page 100

Camera
When you press the
Options
soft key after saving a
photo, the following options are available:
Send
: allows you to send the photo using a
multimedia message. For further details, see
page 83.
Set as
: allows you to set the image as your
wallpaper for the idle screen or a caller ID image for
Phone Book entries.
Rename
: allows you to change the name of the
photo.
Go to My Photos
you took in the
Delete
: deletes the photo.
Protection
: allows you to view the photos
My Photos
menu (
Menu 4.2
).
: allows you to protect the photo from
being deleted.
Properties
: shows the properties of the photo,
such as the file name, file size, time and date it was
saved, resolution and quality.
Using the Camera options
In Capture mode, you can use various options by
pressing the left soft key.
To Press the
scroll to an option Up or Down key.
Select
select the highlighted
option
return to Capture
mode
soft key or the
Right key.
soft key or
C
key.
99
 Loading...