

Samsung GALAXY NOTE II User Manual

GT-N7105T
Quick Start Guide
You can access the full user manual for more information.
To learn to access the user manual, see “Viewing the user manual” in this quick start
www.samsung.com
guide.
www.sar-tick.com
2
This product meets applicable national
SAR limits of 2.0 W/kg. The specific
maximum SAR values can be found in the
SAR information section of this guide.
When carrying the product or using
it while worn on your body, maintain
a distance of 1.5 cm from the body to
ensure compliance with RF exposure
requirements.
This device provides high quality mobile communication
and entertainment using Samsung’s high standards and
technological expertise.
• Content may differ from the final product, or from
software provided by service providers or carriers, and is
subject to change without prior notice.
• The items supplied with the device and any available
accessories may vary depending on the region or service
provider.
• The supplied items are designed only for this device and
may not be compatible with other devices.
• You can purchase additional accessories from your local
Samsung retailer. Make sure they are compatible with the
device before purchase.

• Other accessories may not be compatible with your
device.
• Samsung is not liable for performance issues or
incompatibilities caused by edited registry settings or
modified operating system software. Attempting to
customise the operating system may cause your device or
applications to work improperly.
Instructional icons
Warning: situations that could cause injury to
yourself or others
Caution: situations that could cause damage to
your device or other equipment
Note: notes, usage tips, or additional information
Copyright
Copyright © 2012 Samsung Electronics
This guide is protected under international copyright laws.
No part of this guide may be reproduced, distributed,
translated, or transmitted in any form or by any means,
electronic or mechanical, including photocopying,
recording, or storing in any information storage and
retrieval system, without the prior written permission of
Samsung Electronics.
3

Trademarks
• SAMSUNG and the SAMSUNG logo are registered
trademarks of Samsung Electronics.
• The Android logo, Google
Mail
, YouTube™, Google Play™ Store, and Google
™
Talk
are trademarks of Google, Inc.
™
• Bluetooth
Inc. worldwide.
• Windows Media Player
Microsoft Corporation.
4
is a registered trademark of Bluetooth SIG,
®
, Google Maps™, Google
™
is a registered trademark of
®
• Wi-Fi®, Wi-Fi Protected Setup™, Wi-Fi Direct™, Wi-Fi
CERTIFIED
of the Wi-Fi Alliance.
Your device uses a non-harmonised frequency and is
intended for use in all European countries. The WLAN can
be operated in the EU without restriction indoors, but
cannot be operated outdoors.
• All other trademarks and copyrights are the property of
their respective owners.
, and the Wi-Fi logo are registered trademarks
™
Getting started
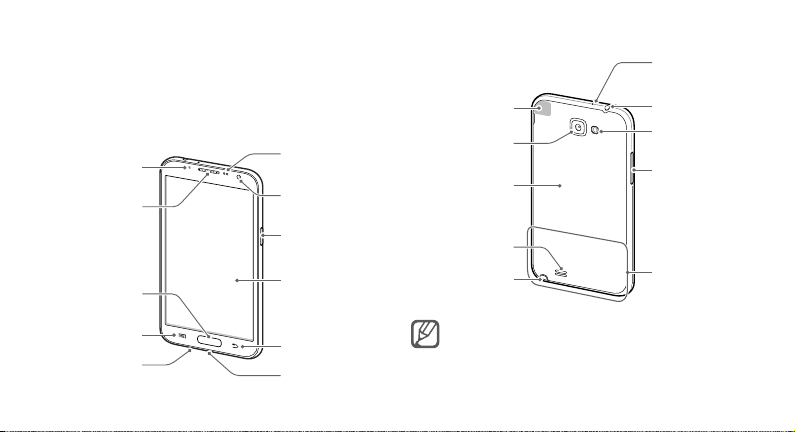
Device layout
Notication light
Earpiece
Home button
Proximity/Light
sensor
Front camera
Power button
Touch screen
GPS antenna
Rear camera
Back cover
Speaker
S Pen
Microphone for
speakerphone
Headset jack
Flash
Volume button
Main antenna
Menu button
Microphone
Back button
Multipurpose jack
Do not cover the antenna area with your hands
or other objects. This may cause connectivity
problems or drain the battery.
5
Getting started
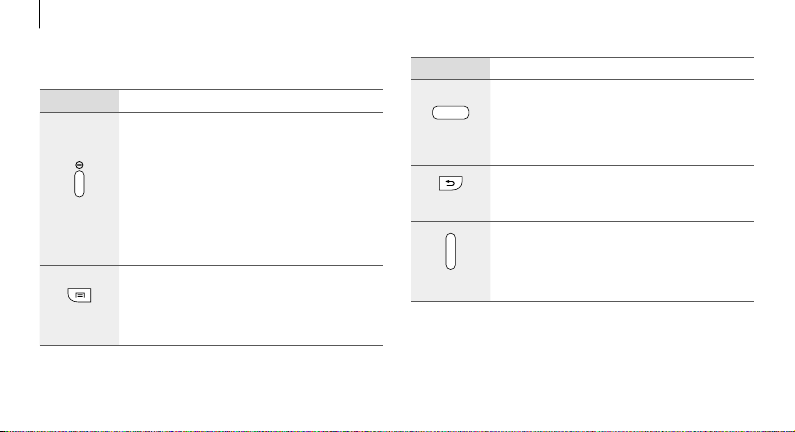
Buttons
Button Function
• Press and hold to turn the device on or
off.
• Press and hold for 8-10 seconds to reset
the device if it has fatal errors or hang-
Power
Menu
6
ups, or freezes.
• Press to lock or unlock the device. The
device goes into lock mode when the
touch screen turns off.
• Tap to open a list of options available for
the current screen.
• Tap and hold on the Home screen to
launch Google search.
Button Function
• Press to return to the Home screen.
• Press and hold to open the list of recent
Home
Back
Volume
applications.
• Press twice to launch S Voice.
• Tap to return to the previous screen.
• Press to adjust the device volume.
Getting started
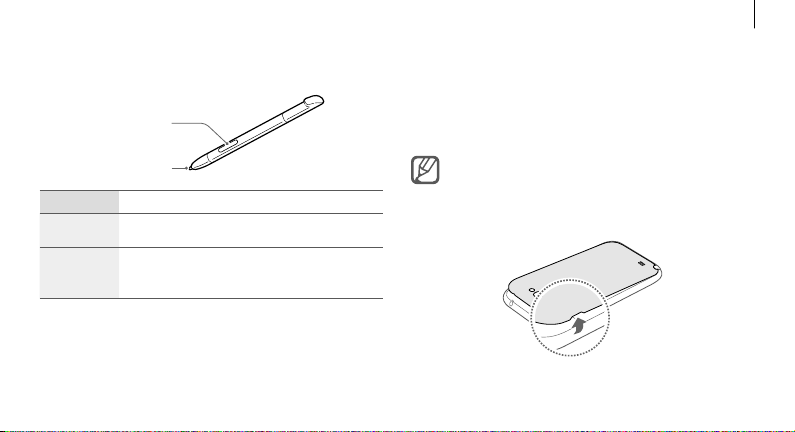
S Pen
S Pen button
S Pen tip
Name Function
S Pen tip • Perform basic S Pen actions.
S Pen
button
• Perform advanced S Pen actions.
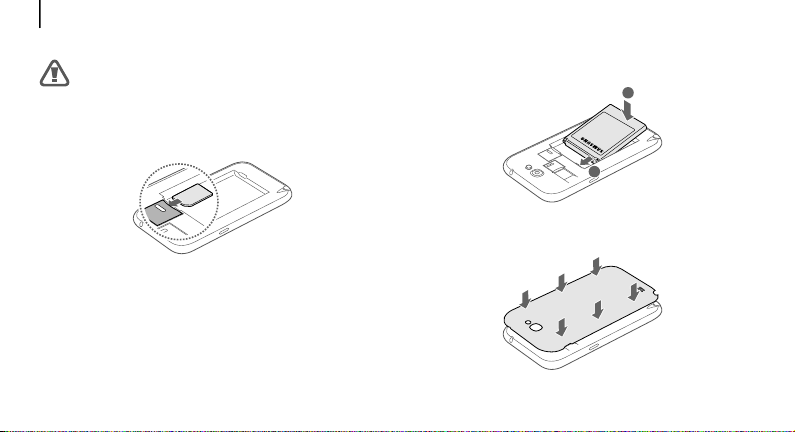
Installing the SIM or USIM card and
battery
Insert the SIM or USIM card provided by the mobile
telephone service provider, and the included battery.
Only microSIM cards work with the device.
Remove the back cover.
1
7
Getting started
Be careful not to damage your fingernails when you
remove the back cover.
Insert the SIM or USIM card with the gold-coloured
2
contacts facing downwards.
Push the SIM or USIM card into the slot until it locks in
3
place.
8
Insert the battery.
4
Replace the back cover.
5
2
1
Getting started
Charging the battery
Before using the device for the first time or when the
battery has been unused for extended periods, you must
charge the battery.
Use only Samsung-approved chargers, batteries,
and cables. Unapproved chargers or cables can
cause the battery to explode or damage the device.
Plug the small end of the charger into the multipurpose jack
of the device, and plug the large end of the charger into an
electric socket.
Connecting the charger improperly may cause
serious damage to the device. Any damage caused
by misuse is not covered by the warranty.
9
Getting started
After fully charging, disconnect the device from the charger.
First unplug the charger from the device, and then unplug it
from the electric socket.
Do not remove the battery before removing the
charger. This may damage the device.
To save energy, unplug the charger when not in use.
The charger does not have a power switch, so you
must unplug the charger from the electric socket
when not in use to avoid wasting power. The device
should remain close to the electric socket while
charging.
10
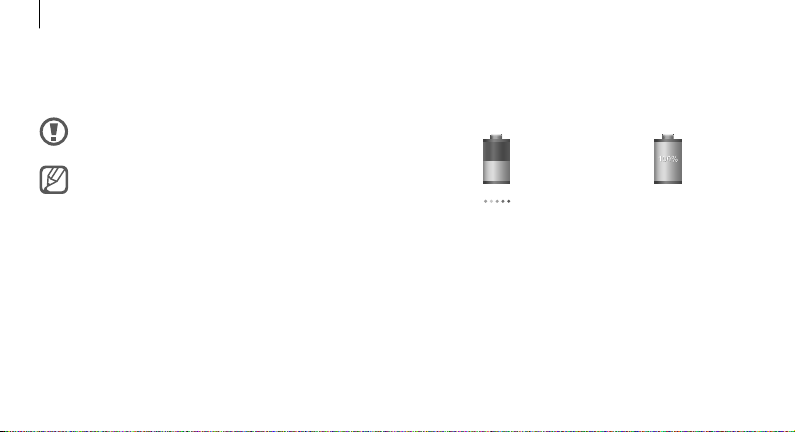
Checking the battery charge status
When you charge the battery while the device is off, the
following icons will show the current battery charge status:
Charging Fully charged
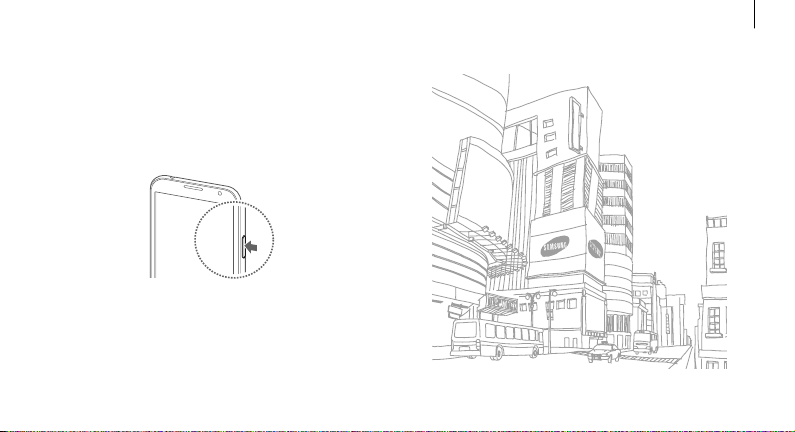
Turning the device on and off
When turning on the device for the first time, follow the
on-screen instructions to set up your device.
Press and hold the Power button for a few seconds to turn
the device on and off.
Getting started
11
 Loading...