

Page 1

4G LT E TA B L E T
User Manual
Please read this manual before operating your
tablet, and keep it for future reference.
Page 2

Intellectual Property
All Intellectual Property, as defined below, owned by or which is otherwise the property of Samsung or its respective suppliers relating to
the SAMSUNG Phone, including but not limited to, accessories, parts, or software relating there to (the “Phone System”), is proprietary
to Samsung and protected under federal laws, state laws, and international treaty provisions. Intellectual Property includes, but is not
limited to, inventions (patentable or unpatentable), patents, trade secrets, copyrights, software, computer programs, and related
documentation and other works of authorship. You may not infringe or otherwise violate the rights secured by the Intellectual Property.
Moreover, you agree that you will not (and will not attempt to) modify, prepare derivative works of, reverse engineer, decompile,
disassemble, or otherwise attempt to create source code from the software. No title to or ownership in the Intellectual Property is
transferred to you. All applicable rights of the Intellectual Property shall remain with SAMSUNG and its suppliers.
Open Source Software
Some software components of this product incorporate source code covered under GNU General Public License (GPL), GNU
Lesser General Public License (LGPL), OpenSSL License, BSD License and other open source licenses. To obtain the source code
covered under the open source licenses, please visit:
http://opensource.samsung.com
.
Disclaimer of Warranties; Exclusion of Liability
EXCEPT AS SET FORTH IN THE EXPRESS WARRANTY CONTAINED ON THE WARRANTY PAGE ENCLOSED WITH THE
PRODUCT, THE PURCHASER TAKES THE PRODUCT "AS IS", AND SAMSUNG MAKES NO EXPRESS OR IMPLIED WARRANTY
OF ANY KIND WHATSOEVER WITH RESPECT TO THE PRODUCT, INCLUDING BUT NOT LIMITED TO THE MERCHANTABILITY
OF THE PRODUCT OR ITS FITNESS FOR ANY PARTICULAR PURPOSE OR USE; THE DESIGN, CONDITION OR QUALITY OF
THE PRODUCT; THE PERFORMANCE OF THE PRODUCT; THE WORKMANSHIP OF THE PRODUCT OR THE COMPONENTS
CONTAINED THEREIN; OR COMPLIANCE OF THE PRODUCT WITH THE REQUIREMENTS OF ANY LAW, RULE,
SPECIFICATION OR CONTRACT PERTAINING THERETO. NOTHING CONTAINED IN THE INSTRUCTION MANUAL SHALL BE
Page 3

CONSTRUED TO CREATE AN EXPRESS OR IMPLIED WARRANTY OF ANY KIND WHATSOEVER WITH RESPECT TO THE
PRODUCT. IN ADDITION, SAMSUNG SHALL NOT BE LIABLE FOR ANY DAMAGES OF ANY KIND RESULTING FROM THE
PURCHASE OR USE OF THE PRODUCT OR ARISING FROM THE BREACH OF THE EXPRESS WARRANTY, INCLUDING
INCIDENTAL, SPECIAL OR CONSEQUENTIAL DAMAGES, OR LOSS OF ANTICIPATED PROFITS OR BENEFITS.
Modification of Software
SAMSUNG IS NOT LIABLE FOR PERFORMANCE ISSUES OR INCOMPATIBILITIES CAUSED BY YOUR EDITING OF
REGISTRY SETTINGS, OR YOUR MODIFICATION OF OPERATING SYSTEM SOFTWARE.
USING CUSTOM OPERATING SYSTEM SOFTWARE MAY CAUSE YOUR DEVICE AND APPLICATIONS TO WORK
IMPROPERLY. YOUR CARRIER MAY NOT PERMIT USERS TO DOWNLOAD CERTAIN SOFTWARE, SUCH AS CUSTOM OS.
©2013 Samsung Electronics Canada, Inc.
Do you have questions about your Samsung Mobile tablet? For 24 hour information and assistance, we offer a new FAQ/ARS
System (Automated Response System) at:
http://www.samsung.com/us/support
Nuance®, VSuite™, T9® Text Input, and the Nuance logo are trademarks or registered trademarks of Nuance Communications, Inc.,
or its affiliates in the United States and/or other countries.
®
The Bluetooth
word mark, figure mark (stylized “B Design”), and combination mark (Bluetooth word mark and “B Design”) are
registered trademarks and are wholly owned by the Bluetooth SIG.
microSD™ and the microSD logo are Trademarks of the SD Card Association.
®
Openwave
is a registered Trademark of Openwave, Inc.
LTE is a trademark of ETSI.
Page 4

and are trademarks of SRS Labs, Inc. CS Headphone and WOW HD technologies are incorporated under license
from SRS Labs, Inc.
®
, DivX Certified® and associated logos are trademarks of Rovi Corporation or its subsidiaries and are used under
, DivX
license.
®
DivX Certified
ABOUT DIVX VIDEO: DivX
Certified
to play DivX® video up to HD 720p, including premium content.
®
®
device that has passed rigorous testing to verify that it plays DivX video. Visit
is a digital video format created by DivX, LLC, a subsidiary of Rovi Corporation. This is an official DivX
www.divx.com
for more information and
software tools to convert your files into DivX videos.
®
ABOUT DIVX VIDEO-ON-DEMAND: This DivX Certified
Demand (VOD) movies. To obtain your registration code, locate the DivX VOD section in your device setup menu (tap
Settings > About device > Legal information > License settings > DivX® VOD > Register
Go to
vod.divx.com
for more information on how to complete your registration.
device must be registered in order to play purchased DivX Video-on-
Apps >
).
Google, the Google logo, Android, the Android logo, Google Play, Gmail, Google Mail, Google Maps, Google Music, Google Talk,
Picasa, YouTube and other marks are trademarks of Google Inc.
Wi-Fi is a registered trademark of the Wireless Fidelity Alliance, Inc.
©
Swype and the Swype logos are trademarks of Swype, Inc.
2010 Swype, Inc. All rights reserved.
IC Notice
This device complies with Industry Canada licence-exempt RSS standard(s). Operation is subject to the following two conditions:
(1) this device may not cause interference, and
(2) this device must accept any interference, including interference that may cause undesired operation of the device.
Page 5

Table of Contents
Section 1: Getting Started .............................1
Understanding This User Manual . . . . . . . . . . . . 1
Battery . . . . . . . . . . . . . . . . . . . . . . . . . . . . . . . . . 2
Installing the SIM Card . . . . . . . . . . . . . . . . . . . . . 4
Turning Your Device On and Off . . . . . . . . . . . . . 5
Setting Up Your Device . . . . . . . . . . . . . . . . . . . . 5
Creating a New Google Account . . . . . . . . . . . . . 5
Creating a Samsung Account . . . . . . . . . . . . . . . 6
Retrieving Your Google Account Password . . . . . 7
Memory Card . . . . . . . . . . . . . . . . . . . . . . . . . . . . 7
Locking and Unlocking the Touch Screen . . . . . . 8
Troubleshooting . . . . . . . . . . . . . . . . . . . . . . . . . . 8
Section 2: Understanding Your Device .......9
Features . . . . . . . . . . . . . . . . . . . . . . . . . . . . . . . . 9
Front View . . . . . . . . . . . . . . . . . . . . . . . . . . . . . 10
Home Screen . . . . . . . . . . . . . . . . . . . . . . . . . . . 12
Navigating Your Device . . . . . . . . . . . . . . . . . . . 14
S Pen . . . . . . . . . . . . . . . . . . . . . . . . . . . . . . . . . 15
Notifications . . . . . . . . . . . . . . . . . . . . . . . . . . . . 18
Status Details . . . . . . . . . . . . . . . . . . . . . . . . . . 18
Quick Settings . . . . . . . . . . . . . . . . . . . . . . . . . . 18
Status Bar . . . . . . . . . . . . . . . . . . . . . . . . . . . . . 22
Primary Shortcuts . . . . . . . . . . . . . . . . . . . . . . . 23
Widgets . . . . . . . . . . . . . . . . . . . . . . . . . . . . . . . 23
App Shortcuts . . . . . . . . . . . . . . . . . . . . . . . . . . 23
Folders . . . . . . . . . . . . . . . . . . . . . . . . . . . . . . . 24
Wallpapers . . . . . . . . . . . . . . . . . . . . . . . . . . . . 25
Using the Multi Window . . . . . . . . . . . . . . . . . . . 26
Apps Screen . . . . . . . . . . . . . . . . . . . . . . . . . . . 30
Memory Card . . . . . . . . . . . . . . . . . . . . . . . . . . . 31
Section 3: Contacts and Accounts ............ 32
Accounts . . . . . . . . . . . . . . . . . . . . . . . . . . . . . . 32
Contacts . . . . . . . . . . . . . . . . . . . . . . . . . . . . . . 33
Groups . . . . . . . . . . . . . . . . . . . . . . . . . . . . . . . . 36
Favourites . . . . . . . . . . . . . . . . . . . . . . . . . . . . . 38
Section 4: Entering Text ............................. 40
Text Input Methods . . . . . . . . . . . . . . . . . . . . . . 40
Using the Samsung Keyboard . . . . . . . . . . . . . . 40
i
Page 6

Using the Handwriting Feature . . . . . . . . . . . . . 43
Using Google Voice Typing . . . . . . . . . . . . . . . . 44
Section 5: Messaging .................................. 46
Types of Messages . . . . . . . . . . . . . . . . . . . . . . 46
Creating and Sending Messages . . . . . . . . . . . 46
Message Options . . . . . . . . . . . . . . . . . . . . . . . 47
Viewing New Received Messages . . . . . . . . . . 49
Deleting Messages . . . . . . . . . . . . . . . . . . . . . . 50
Message Search . . . . . . . . . . . . . . . . . . . . . . . . 50
Messaging Settings . . . . . . . . . . . . . . . . . . . . . . 50
Gmail . . . . . . . . . . . . . . . . . . . . . . . . . . . . . . . . . 52
Email . . . . . . . . . . . . . . . . . . . . . . . . . . . . . . . . . 55
Google Talk . . . . . . . . . . . . . . . . . . . . . . . . . . . . 58
Google+ . . . . . . . . . . . . . . . . . . . . . . . . . . . . . . . 62
Messenger . . . . . . . . . . . . . . . . . . . . . . . . . . . . 62
ChatON . . . . . . . . . . . . . . . . . . . . . . . . . . . . . . . 62
Section 6: Music .......................................... 64
Listening to Music . . . . . . . . . . . . . . . . . . . . . . . 64
Google Play Music . . . . . . . . . . . . . . . . . . . . . . 64
Music Player . . . . . . . . . . . . . . . . . . . . . . . . . . . 65
Section 7: Photos and Video ...................... 70
Camera . . . . . . . . . . . . . . . . . . . . . . . . . . . . . . . 70
ii
Video Player . . . . . . . . . . . . . . . . . . . . . . . . . . . .77
Gallery . . . . . . . . . . . . . . . . . . . . . . . . . . . . . . . .79
Section 8: Connections ...............................84
Internet . . . . . . . . . . . . . . . . . . . . . . . . . . . . . . . .84
Wi-Fi . . . . . . . . . . . . . . . . . . . . . . . . . . . . . . . . . .86
Wi-Fi Direct . . . . . . . . . . . . . . . . . . . . . . . . . . . . .87
Bluetooth . . . . . . . . . . . . . . . . . . . . . . . . . . . . . .89
Managing Downloads . . . . . . . . . . . . . . . . . . . . .91
Kies Via Wi-Fi . . . . . . . . . . . . . . . . . . . . . . . . . . .91
Synchronizing with Windows Media Player . . . .92
Connecting as a Mass Storage Device . . . . . . .93
Section 9: Applications ...............................94
Updating Applications . . . . . . . . . . . . . . . . . . . . .94
GPS Applications . . . . . . . . . . . . . . . . . . . . . . . .94
Alarm . . . . . . . . . . . . . . . . . . . . . . . . . . . . . . . . .95
aNote HD . . . . . . . . . . . . . . . . . . . . . . . . . . . . . .96
Calculator . . . . . . . . . . . . . . . . . . . . . . . . . . . . . .98
Calendar . . . . . . . . . . . . . . . . . . . . . . . . . . . . . . .98
Camera . . . . . . . . . . . . . . . . . . . . . . . . . . . . . . .100
ChatON . . . . . . . . . . . . . . . . . . . . . . . . . . . . . . .101
Chrome . . . . . . . . . . . . . . . . . . . . . . . . . . . . . . .101
Contacts . . . . . . . . . . . . . . . . . . . . . . . . . . . . . .101
Page 7

Downloads . . . . . . . . . . . . . . . . . . . . . . . . . . . . 101
Dropbox . . . . . . . . . . . . . . . . . . . . . . . . . . . . . . 102
Email . . . . . . . . . . . . . . . . . . . . . . . . . . . . . . . . 102
Flipboard . . . . . . . . . . . . . . . . . . . . . . . . . . . . . 102
Gallery . . . . . . . . . . . . . . . . . . . . . . . . . . . . . . . 102
Game Hub . . . . . . . . . . . . . . . . . . . . . . . . . . . . 102
Gmail . . . . . . . . . . . . . . . . . . . . . . . . . . . . . . . . 103
Google Search . . . . . . . . . . . . . . . . . . . . . . . . . 103
Google Settings . . . . . . . . . . . . . . . . . . . . . . . . 104
Google+ . . . . . . . . . . . . . . . . . . . . . . . . . . . . . 104
Group Play . . . . . . . . . . . . . . . . . . . . . . . . . . . . 104
Help . . . . . . . . . . . . . . . . . . . . . . . . . . . . . . . . . 105
Internet . . . . . . . . . . . . . . . . . . . . . . . . . . . . . . . 105
Learning Hub . . . . . . . . . . . . . . . . . . . . . . . . . . 105
Local . . . . . . . . . . . . . . . . . . . . . . . . . . . . . . . . 106
Maps . . . . . . . . . . . . . . . . . . . . . . . . . . . . . . . . 106
Messaging . . . . . . . . . . . . . . . . . . . . . . . . . . . . 107
Messenger . . . . . . . . . . . . . . . . . . . . . . . . . . . . 107
Music Player . . . . . . . . . . . . . . . . . . . . . . . . . . 107
My Files . . . . . . . . . . . . . . . . . . . . . . . . . . . . . . 107
Navigation . . . . . . . . . . . . . . . . . . . . . . . . . . . . 108
Paper Artist . . . . . . . . . . . . . . . . . . . . . . . . . . . 109
Play Books . . . . . . . . . . . . . . . . . . . . . . . . . . . 109
Play Magazines . . . . . . . . . . . . . . . . . . . . . . . . 109
Play Movies . . . . . . . . . . . . . . . . . . . . . . . . . . . 110
Play Music . . . . . . . . . . . . . . . . . . . . . . . . . . . . 110
Play Store . . . . . . . . . . . . . . . . . . . . . . . . . . . . 110
Polaris Office . . . . . . . . . . . . . . . . . . . . . . . . . . 111
Readers Hub . . . . . . . . . . . . . . . . . . . . . . . . . . 111
S Note . . . . . . . . . . . . . . . . . . . . . . . . . . . . . . . 112
S Voice . . . . . . . . . . . . . . . . . . . . . . . . . . . . . . 112
Samsung Apps . . . . . . . . . . . . . . . . . . . . . . . . 112
Samsung Link . . . . . . . . . . . . . . . . . . . . . . . . . 113
Settings . . . . . . . . . . . . . . . . . . . . . . . . . . . . . . 115
Smart Remote . . . . . . . . . . . . . . . . . . . . . . . . . 115
Talk . . . . . . . . . . . . . . . . . . . . . . . . . . . . . . . . . 116
Video Hub . . . . . . . . . . . . . . . . . . . . . . . . . . . . 116
Video Player . . . . . . . . . . . . . . . . . . . . . . . . . . 116
Voice Search . . . . . . . . . . . . . . . . . . . . . . . . . . 116
World Clock . . . . . . . . . . . . . . . . . . . . . . . . . . . 117
YouTube . . . . . . . . . . . . . . . . . . . . . . . . . . . . . 117
Section 10: Settings .................................. 119
Accessing Settings . . . . . . . . . . . . . . . . . . . . . 119
Wi-Fi . . . . . . . . . . . . . . . . . . . . . . . . . . . . . . . . 119
iii
Page 8

Bluetooth . . . . . . . . . . . . . . . . . . . . . . . . . . . . . 121
Data Usage . . . . . . . . . . . . . . . . . . . . . . . . . . . 122
More Settings . . . . . . . . . . . . . . . . . . . . . . . . . 123
Home screen mode . . . . . . . . . . . . . . . . . . . . . 128
Sound . . . . . . . . . . . . . . . . . . . . . . . . . . . . . . . 129
Display . . . . . . . . . . . . . . . . . . . . . . . . . . . . . . 130
Storage . . . . . . . . . . . . . . . . . . . . . . . . . . . . . . 131
Power Saving Mode . . . . . . . . . . . . . . . . . . . . 132
Battery . . . . . . . . . . . . . . . . . . . . . . . . . . . . . . . 132
Application Manager . . . . . . . . . . . . . . . . . . . . 132
Location Services . . . . . . . . . . . . . . . . . . . . . . 134
Lock Screen . . . . . . . . . . . . . . . . . . . . . . . . . . 135
Security . . . . . . . . . . . . . . . . . . . . . . . . . . . . . . 137
Language and Input . . . . . . . . . . . . . . . . . . . . 141
Cloud . . . . . . . . . . . . . . . . . . . . . . . . . . . . . . . . 144
Back Up and Reset . . . . . . . . . . . . . . . . . . . . . 145
Accounts . . . . . . . . . . . . . . . . . . . . . . . . . . . . . 146
Motion . . . . . . . . . . . . . . . . . . . . . . . . . . . . . . . 147
S Pen . . . . . . . . . . . . . . . . . . . . . . . . . . . . . . . 148
Accessory . . . . . . . . . . . . . . . . . . . . . . . . . . . . 149
Date and Time . . . . . . . . . . . . . . . . . . . . . . . . . 150
Accessibility . . . . . . . . . . . . . . . . . . . . . . . . . . . 150
iv
Developer Options . . . . . . . . . . . . . . . . . . . . . .152
About Device . . . . . . . . . . . . . . . . . . . . . . . . . .154
Section 11: Health and Safety ..................156
Getting the Most Out of Your Reception . . . . . .156
Maintaining Safe Use of and Access to Your Phone
156
Caring for the Battery . . . . . . . . . . . . . . . . . . . .158
Acknowledging Special Precautions and Industry
Canada Notice . . . . . . . . . . . . . . . . . . . . . . .159
Owner’s Record . . . . . . . . . . . . . . . . . . . . . . . .161
Index ............................................................162
Page 9

Section 1: Getting Started
This section helps you to quickly start using your device.
Understanding This User Manual
The sections of this manual generally follow the features of
your device. A robust index for features begins on page 162.
Also included is important safety information, beginning on
page 156, that you should know before using your device.
This manual gives navigation instructions according to the
default display settings. If you select other settings, navigation
steps may be different.
Unless otherwise specified, all instructions in this manual
assume that you are starting from a Home screen. To get to a
Home screen, you may need to unlock the device. For more
information, refer to “Locking and Unlocking the Touch
Screen” on page 8.
Note:
Instructions in this manual are based on default settings
and may vary from your device depending on the
software version on your device and any changes to the
device’s settings.
Note:
Unless stated otherwise, instructions in this user manual
start with the device unlocked, at the Home screen.
All screen images in this manual are simulated. Actual
displays may vary depending on the software version of
your device and any changes to the device’s settings.
Special Text
In this manual, some text is set apart from the rest. This
special text is intended to point out important information,
share quick methods for activating features, define terms, and
more. The definitions for these methods are as follows:
•
Notes
: Presents alternative options for the current feature, menu, or
sub-menu.
•
Tips
: Provides quick or innovative methods or useful shortcuts.
•
Important
: Points out important information about the current
feature that could affect performance.
•
Warning
: Brings important information to your attention that can
help to prevent loss of data or functionality or damage to your
device.
Getting Started 1
Page 10

Text Conventions
This manual provides condensed information about how to
use your device. To make this possible, the following text
conventions are used to represent often-used steps:
➔
Arrows are used to represent the sequence of selecting
successive options in longer, or repetitive, procedures. For
example:
From a Home screen, touch
➔
Display
➔
Screen timeout
Apps
➔
Settings
.
Battery
Your device is powered by a rechargeable, standard Li-Ion
battery. A Wall/USB Charger (Charging Head and USB cable)
are included with the device for charging the battery.
Note:
The battery comes partially charged. You must fully
charge the battery before using your device for the first
time.
After the first charge, you can use the device while
charging.
2
Warning!
Use only approved charging devices. Approved
accessories are designed to maximize battery life.
Using other accessories may invalidate your warranty
and may cause damage.
Battery Indicator
The Battery icon in the Status Bar shows the battery
power level. When battery power is 15% or less, your device
prompts you to charge the battery. If you continue to operate
the device without charging, the device powers off. For battery
use information, see “About Device” on page 154.
Tip:
Touch the Time field to display battery charge status.
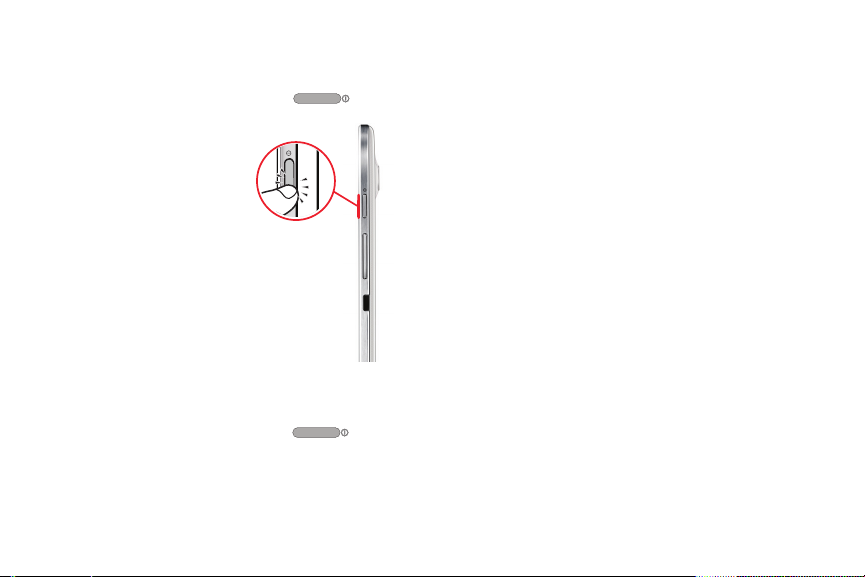
Charging the Battery
Your device comes with a Wall/USB Charger (Outlet
Connector, Charging Head, and USB cable) to charge your
device from any standard AC power outlet.
Page 11
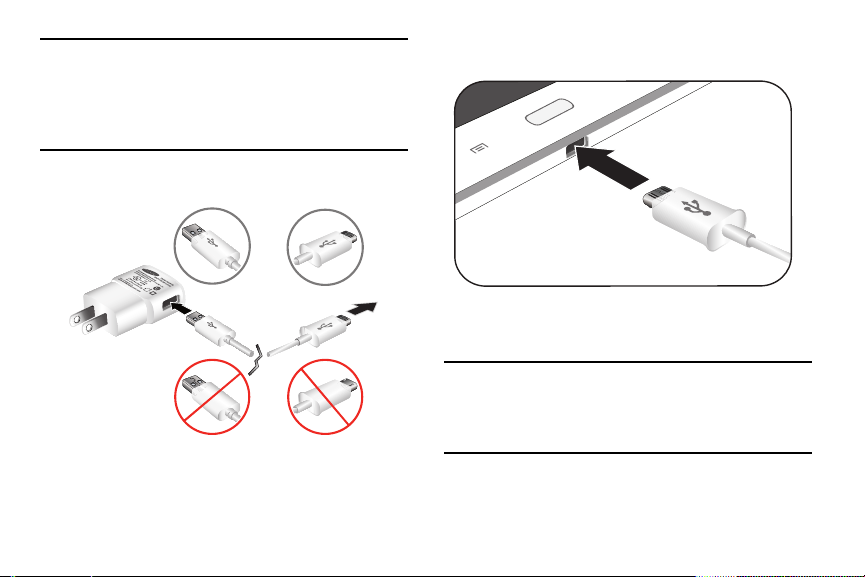
Note:
Correct
Incorrect
Correct
Incorrect
The battery comes partially charged. You must fully
charge the battery before using your device for the first
time.
After the first charge, you can use the device while
charging.
1. Insert the USB cable into the Charging Head.
2. Insert the USB cable into the device’s Charger/
Accessory Port.
3. Plug the Charging Head into a standard AC power
outlet.
Warning!
While the device is charging, if the touch screen does
not function due to an unstable power supply, unplug
the USB power adapter from the power outlet or
unplug the USB cable from the device.
Getting Started 3
Page 12

4. When charging is complete, unplug the Charging Head
from the power outlet and remove the USB cable from
the device.
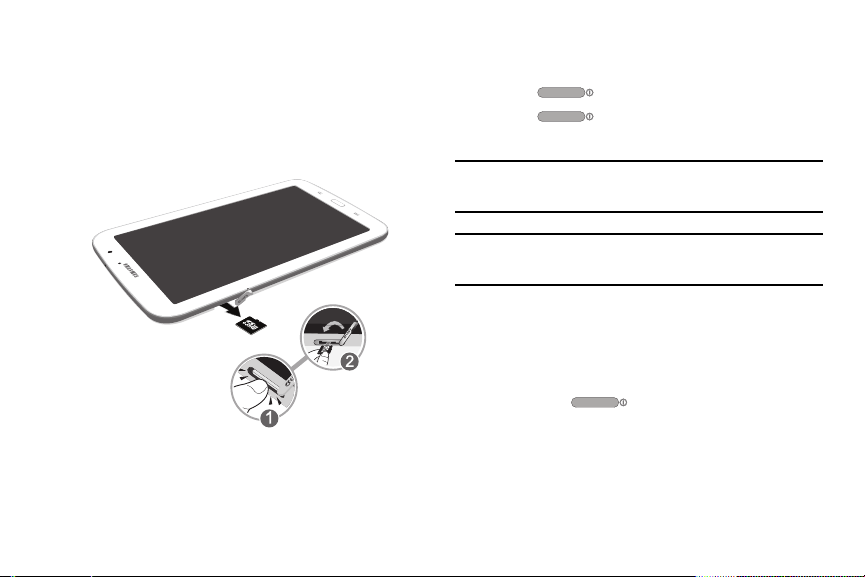
Installing the SIM Card
When you subscribe to a cellular network, you are provided
with a plug-in SIM card loaded with your subscription details,
such as your PIN, available optional services, and many
others features.
•
Make sure that the card’s gold contacts face downward and
that the notched corner of the card goes in first.
Important!
The plug-in SIM card information and its contacts
can be easily damaged by scratching or bending, so
be careful when handling, inserting, or removing the
card. Keep all SIM cards out of reach of small
children.
Carefully slide the SIM card into the SIM card socket (as
shown) until the card locks into place. The illustration
shows the screen facing up.
4
Note:
If the card is not inserted correctly, the device will not
detect the SIM card. Re-orient the card back into the slot
if the SIM is not detected.
Page 13
Turning Your Device On and Off
Turning Your Device On
Press and hold the
Note
: Your device’s internal
antenna is located along the top
back of the device. Do not block
the antenna; doing so may
affect signal quality and may
cause the device to operate at a
higher power level than is
necessary. For more
information, refer to “GPS
Applications” on page 94.
Turning Your Device Off
1. Press and hold the
2. At the prompt, touch
Power/Lock Key
Power/Lock Key
Power off
➔ OK.
.
Setting Up Your Device
When you first turn on your device, you are asked to set up a
few things. To do that, the following screens display. Some
screens can be skipped (touch
Back
). Some screens display depending on the options you
choose.
1. When you first turn on your tablet, the
displays.
2. The default language for your tablet is English. If you
would like to select French, tap the drop-down box then
Français
tap
3. If you are visually impaired or hard of hearing, tap
Accessibility to change the accessibility settings.
4. Tap Next.
5. Read and follow the instructions on each screen to set
up your tablet.
.
Skip
) or re-displayed (touch
Welcome!
screen
Creating a New Google Account
.
In order to utilize your device to the fullest extent, you will
need to create a Google™ Account when you first use your
device. With a Google Account, Google applications will
always be in sync between your tablet and computer.
Getting Started 5
Page 14
If you did not create a new account during the setup
procedure when you first turned your tablet on, follow these
steps:
1. From the Home screen, tap ➔
Add account
The
2. Tap
– or –
If you already have a Google account, tap
sign in and add the account to your tablet.
3. Follow the on-screen instructions to add a Google
Account.
Note:
Once you have created a Google account, you only need
to sign in.
➔
Google
.
Add a Google Account
New
to create a new Google account.
Settings
screen displays.
Existing
Creating a Samsung Account
An active Samsung account is required to begin accessing
applications such as ChatON and Samsung Hub. If you did
not create a Samsung account when you first set up your
tablet, follow these steps:
6
➔
to
1. From the home screen, tap ➔
Add account
2. Tap
3. Tap
4. Select your Country or region.
5. Tap
6. Tap
7. Tap the
8. Tap
9. Enter the required information and tap
You Samsung account is created.
.
Samsung account
Create new account
Terms and conditions
Privacy policy
I accept all the terms above
Agree
.
.
to read it and tap .
.
to read them and tap .
checkbox.
Settings
Sign up
➔
.
Page 15
Retrieving Your Google Account Password
A Google account password is required for Google
applications. If you misplace or forget your Google Account
password, follow these instructions to retrieve it:
1. From your computer, use an Internet browser to
navigate to
2. Once the URL loads, click on the
account?
http://google.com/accounts
.
Can’t access your
link and follow the on-screen instructions.
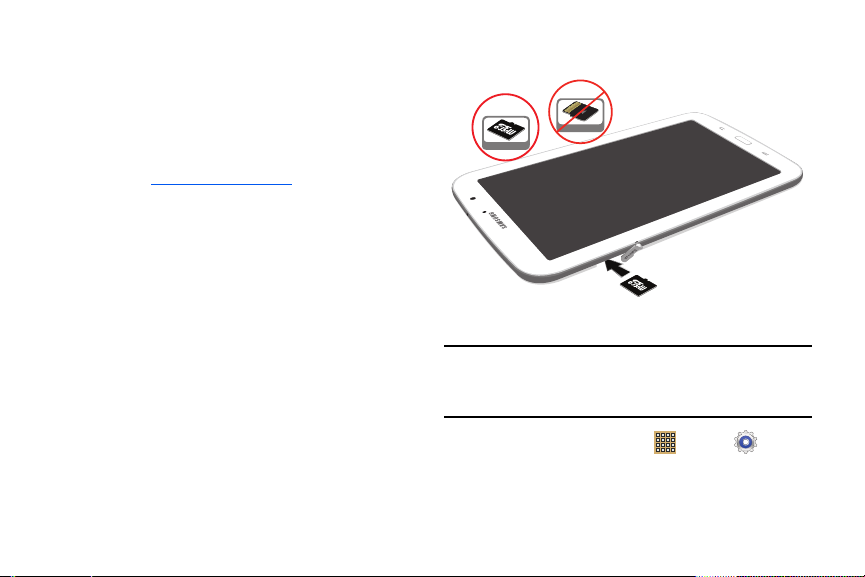
Memory Card
Your device supports removable microSD, microSDHC or
microSDXC memory cards with maximum capacities of 64 GB
(depending on the memory card manufacturer and type).
Memory cards are used to store music, photos, videos, and
other files.
Installing a Memory Card
1. Open the Memory Card Slot cover and turn to expose
the slot.
2. With the gold contacts facing down, carefully slide the
memory card into the slot, pushing gently until it clicks
into place.
3. Replace the Memory Card Slot cover.
Correct
Incorrect
Removing a Memory Card
Important!
To prevent damage to information stored on the
memory card, unmount the card before removing it
from the device.
1. From a Home screen, touch
➔
Storage
.
SD card
2. Under
touch
, touch Unmount SD card
OK
.
Apps
➔
Settings
and then
Getting Started 7
Page 16
3. Open the Memory Card Slot cover and turn to expose
the slot.
4. Gently press in on the memory card (1), so that it pops
out from the slot, and carefully pull the card out (2).
5. Replace the Memory Card Slot cover.
For more information, refer to “Memory Card” on page 31.
8
Locking and Unlocking the Touch Screen
1. Press to lock the touch screen.
2. Press again to display the lock screen then
swipe your finger across the screen to unlock.
Note:
Swipe is the default screen locking method. To change
your screen lock, see “Screen Lock” on page 135.
Tip:
From the Lock screen, touch and swipe one of the app
shortcut icons to launch that application.
Troubleshooting
If your device has fatal errors, hangs up, or freezes, you may
need to reset the device to regain functionality.
•
If your device is frozen and unresponsive, press and hold the
Power/Lock Key
for 8 to 10 seconds.
Page 17

Section 2: Understanding Your Device
This section outlines key features of your device and
describes the screen and the icons that appear when the
device is in use. It also shows how to navigate through the
device.
Features
•
8.0-inch WXGA (1280x800) TFT (PLS) LCD touch screen
•
Android Version 4.1.2
•
4G Network with 1.6 GHz quad-core processor
•
Full HTML Web Browser
•
Bluetooth 4.0 Wireless technology. For more information, refer to
“Bluetooth”
•
Built-in Wi-Fi technology (802.11 a/b/g/n)
•
5 Megapixel camera and camcorder, plus 1.3 Megapixel forward-
facing camera for video chat
•
Full integration of Google applications (Gmail, YouTube,
Google Maps, and Voice Search)
•
Photo Gallery that supports GIF, AGIF, JPEG, PNG, BMP, WBMP,
and WEBP formats
on page 121.
•
Messaging includes Gmail, Email (corporate and personal), Google
Talk (Instant Messaging), Google+, and Messenger
•
HD Video Player (1080p)
•
DivX Certified® to play DivX® video up
premium content
•
Supports HDMI/MHL connections to connect electronic devices to
high-definition televisions (HDTVs) and displays.
•
Music player that supports MP3, AAC/AAC+/EAAC+, WMA,
OGG (vorbis), FLAC, AC-3
•
2 GB RAM memory and 16GB on-board memory, which is used for
data storage and access
•
Support for microSD, microSDHC and microSDXC Memory Cards
•
S Pen for writing and playing games
•
Preloaded applications such as Google Play Books,
Store and Polaris Office. For more information, refer to
Application Information”
on page 30.
Understanding Your Device 9
to HD 720p
, including
Google Play
“More
Page 18
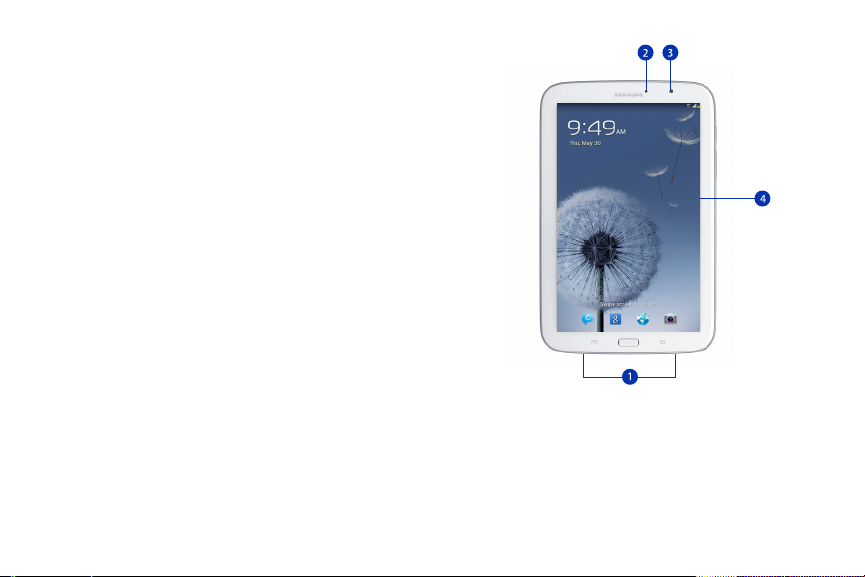
Front View
The following items can be found on the front of your device
as illustrated.
External Speakers
1.
notification tones, and for other sounds.
Light Sensor
2.
automatically and when taking photos with the
front-facing Camera.
Front-facing Camera Lens
3.
recording videos.
Display Screen
4.
rotates with the tablet as you turn it. You can turn this
feature on and off. For more information, refer to
“System Accessibility” on page 150.
10
: Used in music or video playback,
: Used to control screen brightness
: Used when taking photos or
: The orientation of the display screen
Page 19
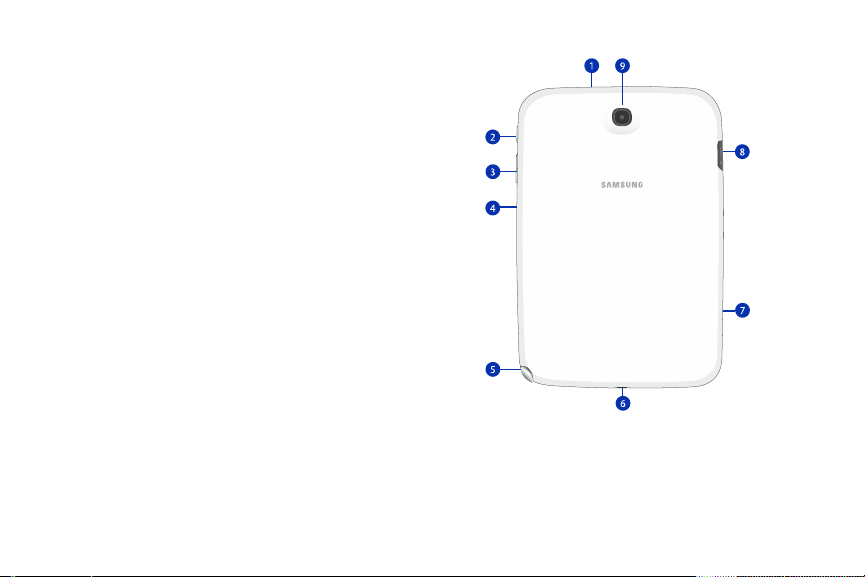
Back View
1.
3.5mm Headset Jack
Power/Lock Key
2.
off. Press to lock the device or to wake the screen for
unlocking.
Volume Key
3.
Master Volume. During music playback, press
volume.
Infrared Blaster
4.
controlling external devices. For more information, refer
to “Smart Remote” on page 115.
S Pen
: A built-in stylus that allows you to perform various
5.
functions. For more information, refer to “S Pen” on
page 15.
Charger/Accessory Port
6.
charging or to sync music and files.
SIM Card Slot
7.
Memory Card Slot
8.
files.
Camera Lens
9.
videos.
: Plug in for headphones.
: Press and hold to turn the device on or
: From a Home screen, press to adjust
: Used to emit infrared signals used for
: Plug in a USB cable for
: Install your SIM card here.
: Install a memory card for storage of
: Used when taking photos or recording
to adjust
Understanding Your Device 11
Page 20
Home Screen
The Home screen is the starting point for using your device.
Note:
Unless stated otherwise, instructions in this user manual
start with the device unlocked, at the Home screen.
12
Widgets
1.
2. Google Quick Search bar: a shortcut to Google Search
3.
4.
5.
6.
7.
8.
9.
: Applications that run on the Home screen.
Some widgets are found on the Home screen by default.
For more information, refer to “Widgets” on page 23.
that allows you to search for items on the internet.
Home screen
Place shortcuts, widgets, and other items to customize
your device to your needs.
App Shortcuts
more information, refer to “App Shortcuts” on page 23.
Primary Shortcuts
These shortcuts are found on the Home screen by
default. For more information, refer to “Primary
Shortcuts” on page 23.
Apps
Current screen indicator
is being displayed. For more information, refer to
“Extended Home Screen” on page 13.
Time
Status Icons
information, refer to “Status Bar” on page 22.
: The starting point for using your device.
: Shortcuts to common applications. For
: Shortcuts to common features.
: Display the Apps screen.
: Indicates which Home screen
: Displays the current time.
: Indicate the status of your tablet. For more
Page 21
Extended Home Screen
The Home screen consists of the Home panel, plus four
panels that extend beyond the display width to provide more
space for adding shortcuts and widgets.
Slide your finger horizontally across the screen to scroll to the
left or right side panels. As you scroll, the indicator at the top
of the display shows your current position.
Note:
The center panel displays when you touch
Home
Customizing the Home Screens
To customize the Home screens to suit your preferences:
1. Navigate to one of the Home screen panels.
2. Touch and hold on the screen until the
pop-up displays.
– or –
Use the S Pen to touch and hold on the screen until the
Home screen
3. Touch
wallpaper. For more information, refer to “Wallpapers”
on page 25.
4. Under
pop-up displays.
Set wallpaper
Add to Home screen
to change the Home screen
touch:
Home screen
• Apps and widgets
Home screen.
•Folder
to add a folder on a Home screen. For more
information, refer to
•Page
to add a Home screen.
to add app or widget shortcuts on the
“Folders”
on page 24.
Display Settings
You can customize display screen settings to your
.
preferences. For more information, refer to “Display” on
page 130.
Adding and Removing Home Screen Panels
Your device comes with five Home screen panels. You can
customize the Home screen by removing or adding panels.
Note:
The panel in the center position displays when you touch
Home
.
1. From a Home screen, pinch the screen from the left and
right side to the center to display the editing screen.
Tip:
Touch and hold on the screen until the
pop-up displays. Under
to add a Home screen.
Add to Home screen
Understanding Your Device 13
Home screen
, touch
Page
Page 22
2. Use these controls to configure panels:
Remove
: Touch and drag a panel to the Trash
Can to remove the panel from the Home screen.
It will turn red.
Add
: Touch to add a new panel, up to a total of
seven. This option is available when less than
seven panels have been added.
14
Default Home Page
upper right corner of a panel to set it as the default
home screen.
3. To rearrange the order of panels, touch and drag a
panel to a new location.
4. Touch
Back
: Touch the Home icon at the
to return to the Home screen
Navigating Your Device
Use command buttons and the touch screen to navigate.
Command Buttons
Back
Touch Back
step.
•
Touch an option in the list.
Application Bar
The Application Bar is the area along the top of various
application screens. It usually contains the Search and Menu
icons, as well as other icons that are used to display options
and settings.
to return to the previous screen, option, or
Page 23
Screen Navigation
Touch
Touch items to select or launch them. For example:
•
Touch the on-screen keyboard to enter characters or text.
•
Touch a menu item to select it.
•
Touch an application’s icon to launch the application.
Touch and Hold
Activate on-screen items. For example:
•
Touch and hold a widget on the home screen to move it.
•
Touch and hold on a field to display a pop-up menu of options.
Swipe, Flick, or Slide
Swipe, flick, or slide your finger vertically or horizontally across
the screen. For example:
•
Unlocking the screen.
•
Scrolling the Home screens or a menu.
Pinch
Use two fingers, such as your index finger
and thumb, to make an inward pinch motion
on the screen, as if you are picking
something up, or an outward motion by
sweeping your fingers out.
For example:
•
Pinch a photo in Gallery to zoom in.
•
Pinch a webpage to zoom in or out.
S Pen
The S Pen is a stylus that assists you in performing different
functions. By using the Pen button, you can minimize having
to switch between touch and pen input.
1
2
1.
Pen button
functionality to the S Pen. For more information, refer to
“Using the S Pen” on page 17.
2.
Stylus tip
screen.
: by pressing the Pen button, you can add
: the tip of the S Pen is used for tapping the
Understanding Your Device 15
Page 24

S Pen Settings
There are several settings available that control the behavior
of the S Pen. For example, you can choose a sound that will
play when you remove the S Pen from or return it to the slot in
your device.
Instead of the default menu of shortcuts that displays when
you remove the S Pen from your device, you can change the
setting so that the S Note, Calendar, or Polaris Office app
launches.
Also, there is a setting to display a hovering pen icon on the
screen when the pen tip is near the screen.
Plus, there is a setting that helps to conserve battery power by
causing your tablet not to try to detect the S Pen when it is in
its slot in your tablet.
For more information, refer to “S Pen” on page 148.
16
Removing the S Pen From Your Device
The S Pen is conveniently stored in your device to make it
easy to find.
To remove the S Pen, follow these steps:
1. Locate the S
Pen at the lower
right corner of
the device.Use
your fingernail or
a sharp object to
pull the end of
the S Pen out of
the device.(1)
2. Pull the S Pen
out of the device
(2).
Page 25
Using the S Pen
There are several different functions you can perform by using
the S Pen.
S Pen Screen Operations
The S Pen can be used for various screen operations.
•
Touch a command button, such as
Apps
or Email, with the S Pen instead of your finger.
The result is the same.
•
To sweep to the next screen, touch and drag the screen to the left or
right.
Launch Popup Note Mini App
To take quick notes or jot down ideas, you can launch the
Popup Note Mini App from the default menu of shortcuts that
displays when you remove the S Pen from your device. You
can also launch the Popup Note Mini App from any screen
with the S Pen.
Back
, or icons, such as
To open the Popup Note Mini App:
Hold the S Pen button and double-tap the screen.
Tip:
Touch to launch the S Note app. For information on
using your S Pen with the S Note app, see “S Note” on
page 112.
Understanding Your Device 17
Page 26
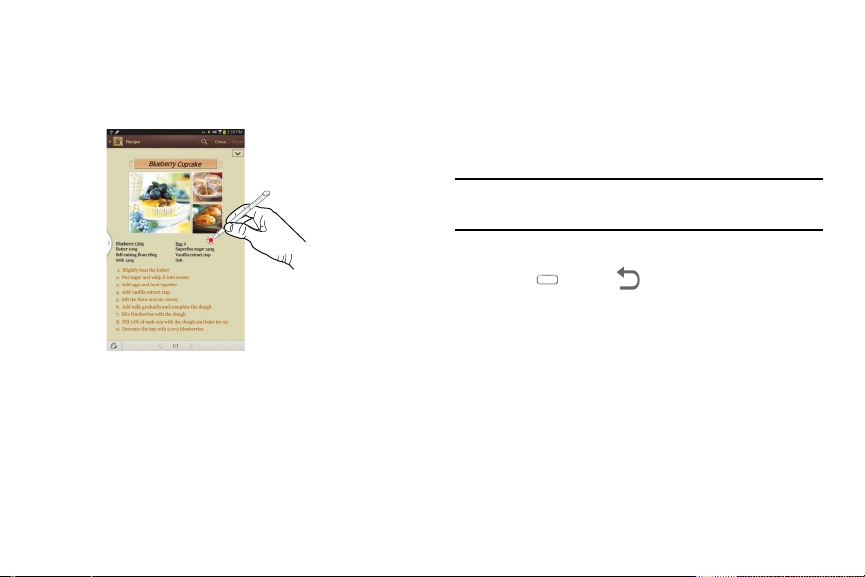
S Pen Screen Capture
To capture a screen image, hold the S Pen button and press
and hold the S Pen anywhere on the screen. Files are saved
in the
Screenshots
folder.
Notifications
When you receive a notification, the Notification icon displays
in the System Bar, to the left of the time. Notifications indicate
the arrival of Gmail, Email, alarms, and more.
18
Status Details
To display the current date and time, battery status, and Wi-Fi
connectivity status, open Status Details.
1. Tap and swipe down the top of the screen to see the
Quick Settings, Recommended shortcuts using your S
Pen and any notifications.
Note:
Recommended shortcuts for your S Pen are only
displayed when the S Pen is removed from your tablet.
2. Touch a notification summary to respond to it.
Home
or
Back
3. Press
swipe upwards to close the Status Details screen.
or use the S Pen and
Quick Settings
To view and control the most common settings for your tablet,
as well as accessing the complete Settings application, and
viewing your notifications, open the Quick Settings panel.
1. Tap and swipe down the top of the screen to see the
Quick Settings.
Page 27
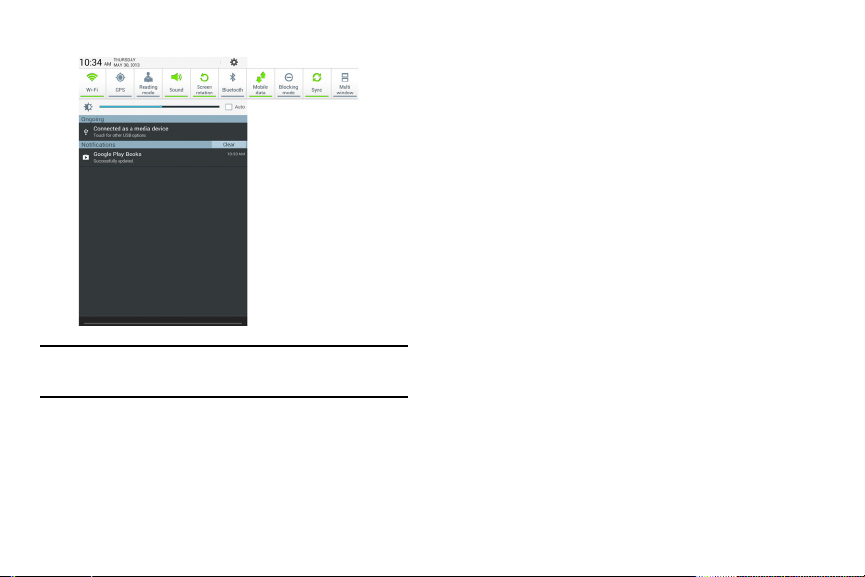
The Quick Settings pop-up displays.
Note:
Recommended shortcuts (S Pen) is also displayed when
the S Pen is removed from your tablet.
2. The Quick Settings are:
•Wi-Fi
: Touch to enable or disable Wi-Fi. For more information,
refer to
“Wi-Fi”
on page 86.
•GPS
: Touch to enable or disable Standalone GPS services.
For more information, refer to
page 135.
• Reading mode
reading.
• Sound / Vibrate / Mute
mode.
• Screen rotation
from landscape to portrait and vice versa. When Off the
screen is fixed in the current mode, either portrait or
landscape. For more information, refer to
Accessibility”
•Bluetooth
information, refer to
Sweep the pop-up to the left to see additional settings.
• Mobile data
applications such as Internet, Email, and YouTube.
• Blocking mode
features will be disabled.
•Sync
Synchronizes contacts, email, time, and a variety of accounts.
: Touch this to optimize the screen for
: When On the screen rotates automatically
on page 150.
: Touch to enable or disable Bluetooth. For more
: When enabled, you can use Mobile data for
: When enabled, notifications for selected
: Synchronizes your device with the network.
“Use GPS Satellites”
: Touch to enable or disable sound
“System
“Bluetooth”
Understanding Your Device 19
on page 89.
on
Page 28
• Multi window
at one time.
3. Touch the
brightness or touch
brightness automatically based on available light and
battery charge status.
4. Touch
more information, refer to “Settings” on page 119.
Notifications
5.
notification entry to display the details. Touch
remove Notification Icons from the System Bar.
For more information, refer to “Notifications” on page 18.
6. Press or or use the S Pen and swipe up to
close the Status Details screen.
Notifications display in the System Bar and, in some cases,
under the Notifications heading in the Quick Settings to alert
you to activity on the tablet such as new messages,
application downloads, software updates, and more. The
following table lists those icons.
System Alert
the Quick Settings for alerts.
20
: When enabled, multiple screens may display
Brightness
slider and drag it to set the
Auto
to allow the device to set
Settings
to open the Settings application. For
displays system notifications. Touch a
: Check under the Notifications heading in
Clear
to
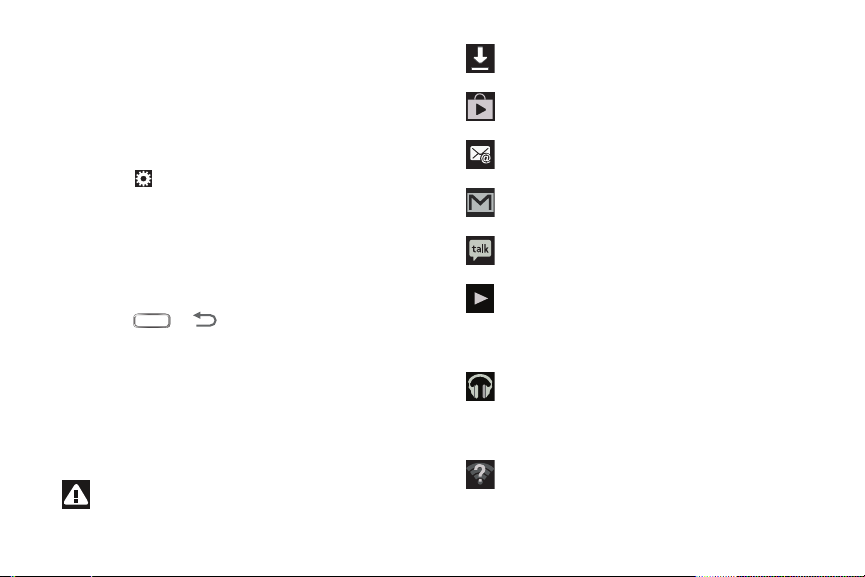
Download
: An application or file is being downloaded or
has been downloaded to the device.
Download Successful
update completed successfully.
New Email Message
to view and answer the email.
New Gmail Message
icon for additional information.
Google Talk Invitation
using Google Talk.
Music player
touch the Status Details to see the song title and music
player controls. For more information, refer to “Music
Player” on page 65.
Music App
: A song is playing in the Music app. Touch the
Music icon or touch the Status Details to see the song
title and music player controls. For more information,
refer to “Google Play Music” on page 64.
Wi-Fi networks available
range.
: A recent application download or
: You have new email. Touch Reply
: You have new Gmail. Touch the
: Someone has invited you to chat
: Music is playing. Touch the Music icon or
: An open Wi-Fi network is in
Page 29
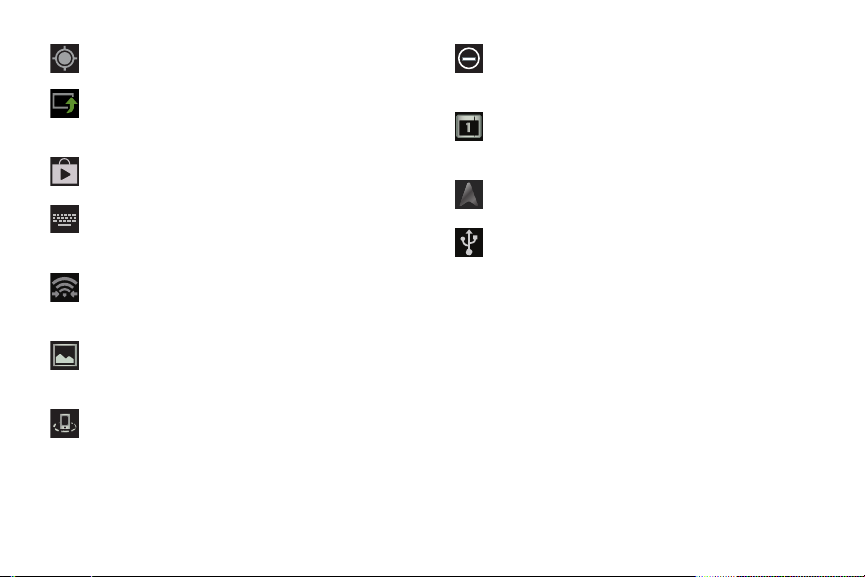
GPS Active
Software update
available for this device. For more information, refer to
“Software Update” on page 155.
Updates Available
have downloaded are available.
Set up input methods
displayed, touch this icon to display a menu of quick
keyboard settings.
Wi-Fi Direct
your tablet is connected to another device. For more
information, refer to “Wi-Fi Direct” on page 87.
Screenshot Captured
For more information, refer to “S Pen Screen Capture”
on page 18.
Nearby Devices
For more information, refer to “Nearby Devices” on
page 127.
: Displays when GPS is active.
: There may be a software update
: Updates to the applications you
: When the keyboard is being
: Displays when Wi-Fi Direct is active and
: A screenshot has been captured.
: The Nearby devices setting is enabled.
Blocking Mode
disabled. For more information, refer to “Blocking
Mode” on page 128.
Event
more information, refer to “Creating an Event or Task”
on page 99.
Navigation Active
more information, refer to “Navigation” on page 108.
USB Connected
using a USB cable.
: Notifications for selected features are
: This is a notification for one or more events. For
: The Navigation App is active. For
: Device is connected to a computer
Understanding Your Device 21
Page 30
Status Bar
The Status Bar is part of the System Bar and displays icons to
show network status, battery power, and other details.
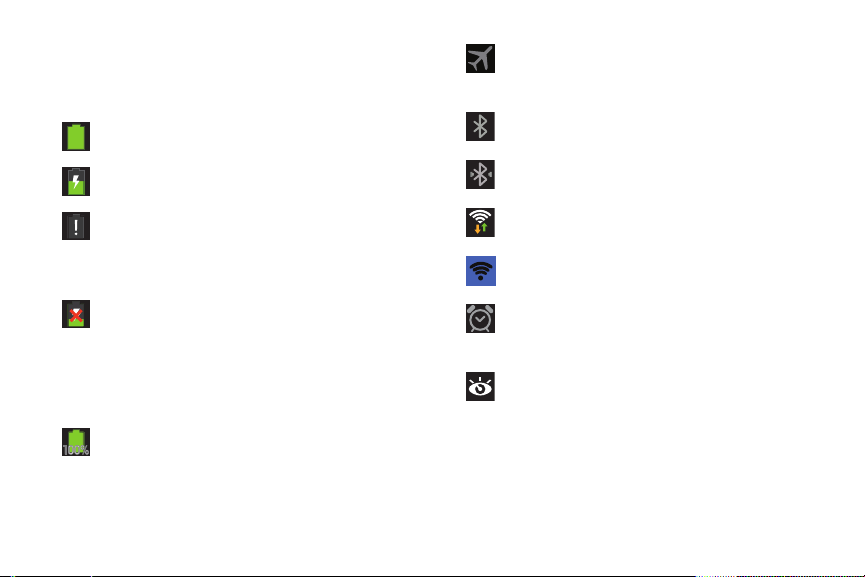
Battery Level
Charging Indicator
Device Power Critical
power remaining. At about 15 percent power remaining,
a pop-up is displayed to remind you to charge
immediately.
USB Connection Indicator
computer using a USB cable, but it is not charging. The
battery is only charged while connected to a computer,
if the device is turned off. When the device is off, press
the Power/Lock key to see the battery charging
indicator.
Battery Fully Charged
this indicator is displayed.
22
: Shown fully charged.
: Battery is charging.
: Battery has only three percent
: The device is connected to a
: When the battery is fully charged,
Flight Mode
which allows you to use many of your device’s features,
but it cannot access online information or applications.
Bluetooth Active
information, refer to “Bluetooth” on page 89.
Bluetooth Connected
Bluetooth device.
Wi-Fi Active
communicating with a Wireless Access Point (WAP).
Wi-Fi Hotspot Active: Displays when your phone as
been configured as a portable Wi-Fi hotspot.
Alarm Set
specified time. For mo re information, refer to “Alarm” on
page 95.
Smart stay
at it. For more information, refer to “Display” on
page 130.
: Indicates that the Flight Mode is active,
: Bluetooth is turned on. For more
: Your device is connected to a
: Wi-Fi is connected, active, and
: Displays when you set an alarm to ring at a
: Set the screen to stay on as long as you look
Page 31

Primary Shortcuts
Primary Shortcuts display at the bottom of the main Home
screen.
Tip:
The default for the main Home screen is the center Home
screen.
The default Primary Shortcuts are: Contacts, Messaging,
Calendar, Internet and Apps.
Widgets
When you first turn on your tablet, there are various widgets
on the center Home screen. They can also appear on the
Home screens to the left and right of the center Home screen.
Widgets are self-contained applications that you can place on
the Home screens to access your favorite features.
Adding Widgets to a Home screen
1. Navigate to the Home screen on which you want to
place the Widget and touch
Widgets
2. Touch the
Note:
Swipe across the screen horizontally to view all Widgets.
tab.
Apps
.
3. Touch and hold the widget’s icon until the Home screen
displays, then slide your finger where you want to place
the icon and release it.
Note:
There must be room on the screen where you want to
place the widget, otherwise the widget will not be added
to the Home screen.
Removing Widgets
Touch and hold the Widget until the
displays, then drag the widget to the
Note:
This action does not actually delete the Widget, it just
removes it from the current Home screen.
Remove
Remove
icon.
App Shortcuts
Use App Shortcuts for quick access to applications or
features, such as Email or other applications.
1. Navigate to the Home screen on which you want to
place the App Shortcut.
Apps
2. Touch
– or –
.
Understanding Your Device 23
icon
Page 32

Touch and hold on the screen until the
options pop-up displays and then touch
widgets
.
Apps
3. Touch the
4. Touch and hold the application icon until the Home
screen displays, then slide your finger where you want
to place the icon and release it.
For more information, refer to “Apps Screen” on
page 30.
5. Touch and hold the App Shortcut and then drag the
application icon to reposition it on the Home screen.
tab.
Home screen
Apps and
Removing App Shortcuts
Touch and hold the App Shortcut until
displays, then drag the App Shortcut to the
icon.
Remove
Remove
Folders
Place Folders on a Home screen to organize items together.
Adding Folders
To create a folder on a Home page:
1. Navigate to the desired Home screen.
24
2. Touch and hold on the screen until the
pop-up displays and then touch
The Create folder pop-up displays.
3. Touch the
enter a name for the folder, and touch
A new folder displays on the Home screen.
Unnamed folder
field, use the keyboard to
Folder
Home screen
.
OK
.
Managing Folders
To rename a folder:
Touch the folder, touch the current name, and use the
keyboard to enter a new name for the folder.
To add an App shortcut to a folder:
1. Add the App shortcut to the Home screen that the folder
is on.
2. Touch and hold the App shortcut, drag it to the folder,
and drop it.
To remove an App shortcut from a folder:
1. Touch the folder to view the contents.
2. Touch the App shortcut, drag it out of the folder, and
drop it on the Home screen.
Page 33

Removing a Folder
Touch and hold the folder until the
displays, then drag the folder to the
Note:
Any App shortcuts in the folder are also removed.
Remove
Remove
icon
icon.
Wallpapers
You can choose a picture to display on the Home Screen,
Lock screen, or on both the Home and Lock screens. Choose
from preloaded wallpaper images or select a photo you have
downloaded or taken with the Camera.
1. From a Home screen, touch and hold on the screen.
The
Home screen
2. Touch
3. Touch
Set wallpaper
The Set wallpaper pop-up displays.
Home screen, Lock screen
screens
Select wallpaper from
The
options:
options pop-up displays.
.
.
, or
Home and lock
pop-up displays the following
• Gallery
: Access the Gallery to select a photo. Touch a photo
to select it. Crop and resize the p icture, if desired. Touch
to save the picture as wallpaper. Touch
• Live wallpapers
animated wallpapers. Touch a wallpaper to see an example. If
available, touch
To u ch
to return to the Live wallpapers menu.
• Wallpapers
Touch an image to view it. Touch
wallpaper. Touch
Note:
Live wallpapers is not available for the Lock screen.
: Choose from pre-loaded interactive
Settings
to view options for the selection.
Set wallpaper
to save your choice. Touch Back
: Choose from pre-loaded wallpaper images.
Set wallpaper
Back
to return to the Home screen.
Understanding Your Device 25
Cancel
Done
to cancel.
to save it as
Page 34

Using the Multi Window
This feature allows you to run multiple applications on the
current screen at the same time.
Note:
Only applications found within the Multi window panel can
be active atop another current application on the screen.
When launching applications that contain multimedia files
(music/video), audio from both files will be played
simultaneously.
Turn on Multi window
The Multi window function is turned off by default. To turn it
on, from teh Home screen tap From a Home screen, touch
Apps
➔
Settings
➔
Display
➔
Multi window
Activating and Deactivating Multi window
To activate Multi window:
1. Press and hold the
tab appears (by default) on the left side of the screen.
Note:
Initially open activation, the entire apps panel is briefly
displayed, then minimized to only show the tab.
26
Back
key ( ). The Multi window
2. Tap the tab to open the application panel showing all
the available Multi window apps.
To deactivate Multi window:
Press and hold the
the Multi window tab from view.
Back
key ( ). This action hides
Repositioning the Multi Window
The Multi window contains two components: tab and apps
panel. The tab can be manually moved across the screen. The
apps panel (containing the scrollable apps) can be relocated
to lock onto the different sides of the screen
(top/bottom/left/right).
.
To move the tab:
1. Activate the Multi window feature.
2. In a single motion, touch and hold the tab for
approximately one second, then slowly drag it to its new
location
along the current
screen edge.
Page 35

Note:
This is a quick way to get the tab out of the way if you
can’t get to a button or option behind it.
To relocate the Multi window apps panel:
1. Activate the Multi window feature.
2. Tap the tab to display the apps panel (containing the
scrollable apps).
Note:
Notice that when the apps are visible, the tab turns a dark
grey. Its only in this state that the entire panel can be
relocated.
3. In a single motion, touch and hold the tab for
approximately one-second to detach it from the
screen (1), then slowly drag it to its new location
any other
available screen edge (2). You can move it to
the top, bottom, or either side.
Understanding Your Device 27
along
Page 36

Customizing the Multi Window apps
The applications found within the apps panel of the Multi
window can be organized by either being rearranged or
removed.
To rearrange the Multi window applications:
1. Activate the Multi window feature.
2. Tap the tab to display the apps panel (containing the
scrollable apps).
3. In a single motion, touch and hold a desired app until it
detaches from the panel, then carefully drag it to a new
location in the list of apps. Lift your finger or stylus off
the screen to let go of the app and drop it into its new
location.
To remove a Multi window application:
1. Activate the Multi window feature.
2. Tap the tab to display the apps panel (containing the
scrollable apps).
Edit
3. Tap the
reveal a staging area that can house any removed
applications from the Multi window panel.
28
button (located at the bottom of the list) to
4. Tap
Done
once you have completed the removal
process.
To restore a Multi window application:
1. Activate the Multi window feature.
2. Tap the tab to display the apps panel (containing the
scrollable apps).
Edit
3. Tap the
reveal the staging area containing any previously
removed apps.
4. Locate the desired application.
5. In a single motion, touch and hold a desired app until it
detaches from the staging area, then carefully drag it to
a new location in the current list of apps.
button (located at the bottom of the list) to
Using Multi Window to run multiple apps on the
same screen
Any of the apps found within the Multi window panel can be
run at the same time as a current on-screen app.
Once multiple apps are running on the same screen, you can
then choose to either swap their positions or maximize a
desired app.
Page 37

Note:
App #1
Maximize
App #2 Border
Switch
Positions
bar
Close
Only applications found within the Multi-window panel
can be active atop another current application on the
screen.
When launching applications that contain multimedia files
(music/video), audio from both files will be played
simultaneously.
In this example we will be launching both the Internet and
Maps applications.
1. Launch an application such as Maps.
•
2. Activate the Multi window feature.
3. Tap the tab to display the apps panel.
4. Touch and hold the desired app, such as Maps, until it
detaches from the panel.
5. In a single motion, drag it over the current app and drop
the new Multi window app over either the top or bottom
area of the current on-screen app.
From the Home screen, tap
Internet
Note:
Once two applications are running, the device displays a
split screen view containing both the initial app and the
new Multi window app. Each application is still
independent of the other.
To switch the arrangement of
the applications:
1. With the two
applications shown in
.
a split screen, tap the
Border bar to show the
on-screen icons.
2. Tap the desired
application area (top or
bottom).
3. Locate and tap
(
Switch app location
The current apps are
switched.
).
Understanding Your Device 29
Page 38

To increase the size of a desired application window:
1. With the two applications shown in a split screen, locate
the Border bar indicating the edge of the app window.
2. In a single motion, touch and hold the Border bar then
drag it to resize the desired window.
To split the current applications:
1. With the two applications shown in a split screen, tap
the Border bar to show the on-screen icons.
2. Tap the desired application area (top or bottom).
3. Locate and tap (
apps are the both maximized.
To exit the Multi window app, tap .
Maximize the app
). The current
Apps Screen
The
Apps
screen displays all applications installed on your
wireless device. Applications that you download and install
from Google Play or from the web are also added to a Home
screen.
The Apps icons are arranged in a Alphabetical grid. To
arrange the Apps icons in any order you choose, follow these
steps:
1. From a Home screen, touch
30
Apps
.
Menu
2. Touch
3. Touch
4. Touch
5. Touch and hold an icon and drag it to a new position.
6. Touch
You can place shortcuts to applications on the Home screen
for quick access to the application. For more information, refer
to “App Shortcuts” on page 23.
Customizable grid
Save
➔ View type
Menu
➔ Edit
to save the changes.
.
.
.
Application Information
To view information about an App, such as the amount of
storage it uses, force the App to stop, uninstall updates, and
clear data:
1. From a Home screen, touch
➔
Application manager
2. Touch the
All
the app to open a screen with details about the App.
.
tab, scroll through the apps list, and touch
Apps
➔
Settings
More Application Information
For more information, refer to “Applications” on page 94.
Page 39

In the Applications section, each application that is available
on the Applications screen is listed and described. If the
application is also described in another section of this user
manual, then a cross reference to that particular section is
provided. Various widgets are also described.
Memory Card
Your device supports removable microSD, microSDHC and
microSDXC memory cards for storing music, photos, videos,
and files.
Installing and Removing a Memor y Card
For more information about installing and removing a memory
card, see “Memory Card” on page 7.
2. After mounting the SD card, touch
3. Follow the prompts to confirm the formatting of the card.
Formatting a Memory Card Using Your Computer
Consult your computer and/or memory card reader
documentation for information about formatting memory cards.
Format SD card
.
Important!
To prevent damage to information stored on the
memory card, always unmount the card before
removing it from the device.
Formatting a Memory Card
Formatting erases all content from the memory card and
prepares it for use with your device.
Formatting a Memory Card Using Your Device
1. From a Home screen, touch
➔
Storage
.
Apps
➔
Settings
Understanding Your Device 31
Page 40

Section 3: Contacts and Accounts
This section explains how to manage contacts and accounts.
Accounts
Your device can synchronize with a variety of accounts. With
synchronization, information on your device is updated with
any information that changes in your accounts.
•
Samsung account
•
ChatON
“ChatON”
•
Dropbox
“Dropbox”
•
Email
: Add an Email account to sync Contacts. For more
information, refer to
•
Facebook
•
Google
and Gmail. For more information, refer to
•
LDAP
: Add an LDAP account to find entries in an LDAP directory
server.
•
Microsoft Exchange ActiveSync
sync Contacts, Calendar, and Email.
32
: Add your Samsung account.
: Add your ChatON account. For more information, refer to
on page 62.
: Add your Fropbox account. For more information, refer to
on page 102.
“Email”
on page 55.
: Add your Facebook account to sync Contacts.
: Add your Google account to sync your Contacts, Calendar,
“Gmail”
on page 52.
: Add your Exchange account to
Setting Up Your Accounts
Set up and manage your synchronized accounts with the
Accounts
setting.
1. From a Home screen, touch
➔ Add account
2. Touch the account type.
3. Follow the prompts to enter your account credentials to
complete the set-up process.
Your tablet communicates with the appropriate account
servers to set up your account. When complete, your
account displays in the
screen.
.
Accounts
Apps
➔
area of the Settings
Settings
Page 41

Contacts
Store contact information for your friends, family, and
colleagues to quickly access information or to send a
message.
To access Contacts:
From a Home screen, touch
➔
Contacts
.
Creating Contacts
1. From a Home screen, touch
➔
Contacts
➔
The
Save contact to
2. Touch
3. Touch the
4. Touch contact fields to display the keyboard and enter
Device, SIM,
set up.
contact.
information:
•
Some fields have preset values. Touch the field and touch the
desired value. For example, touch the Label tab and
touch a label for the field.
pop-up displays.
or an account that you have already
Contact photo to set up a photo to identify the
Apps
Apps
.
•
Other fields have to be input. Touch the field and use the
on-screen keyboard to input information.
•
Touching the check box next to some fields may make
additional fields available.
•
Touch to add additional fields.Touch to remove an
unused field. Also, touch
•
Touch the screen and swipe up or down to display additional
fields or touch
5. Touch
6. When you finish entering information, touch
Tip:
Done
to remove the keyboard.
– or –
Touch
Display a contact’s record and touch the
an email, the
map, or the
Cancel
Address
Website
Add another field
Next
on the keyboard to move to the next field.
to cancel and discard changes.
field to display the address on a
field to link to the website.
to add other fields.
Email
Updating Contacts
To update an existing contact:
Apps
1. From a Home screen, touch
➔
Contacts
.
Contacts and Accounts 33
Save
field to send
.
Page 42

2. Touch a contact in the Contacts list to view its
information.
Edit
3. Touch
4. Continue entering contact information. For more
information, refer to “Creating Contacts” on page 33.
.
Deleting Contacts
To delete a contact:
Apps
1. From a Home screen, touch
➔
Contacts
.
2. Touch a contact in the
information, and then touch
OK
.
touch
Contacts
list to view its
Delete
. At the prompt,
Managing Photo IDs
To remove or update a contact’s Photo ID:
1. From a Home screen, touch
Contacts
Edit
.
.
➔
2. Touch
3. Touch the Contact photo, then touch
Take picture, S Note, Pictures by people
34
Apps
Remove, Image
.
Contacts Display Options
There are various ways to display your Contacts and general
Contacts settings.
1. From a Home screen, touch
➔
2. Touch
3. From the
,
4. From the
Groups, Favourites
Contacts List, to view contacts various ways:
•Groups
Family, Friends, or groups you have created. The number of
contacts in the group is displayed next to the group name.
Touch a group name to show only contacts in that group. For
more information, refer to
page 36.
• Favourites
For more information, refer to
•Contacts
enter a keyword to list contacts that contain that keyword.
Menu
display and manage Contacts settings.
Apps
Contacts
.
, or
Contacts
, above the
: Displays the possible Groups, such as Co-workers,
“Creating a New Group”
: Show only your favourite, or starred, contacts.
“Favourites”
: Show all your contacts. Touch the
Groups, Favourites
to display the options for each grouping.
Contacts
, or
list, touch
Menu ➔ Settings
Contacts
on
on page 38.
Search
field and
list, touch
to
Page 43

Linked Contacts
Your device can synchronize with multiple accounts, including
Google, Corporate Exchange, and other email providers.
When you synchronize contacts from these accounts with your
device, you may have multiple contacts for one person.
Linking, or joining, imported contact records allows you to see
all the contact’s numbers and addresses together in one
contact entry. Linking also helps you keep your contacts
updated, because any changes that your contacts make to
their information in the respective accounts is automatically
updated the next time you synchronize with the account.
Joining Contacts
1. From a Home screen, touch
➔
Contacts
.
2. Touch a contact in the
information.
3. Touch
4. Touch the contact you want to Join.
The joined contact’s information is displayed with the
original contact’s information.
5. Repeat Steps 3 and 4 to join other contacts.
Menu
Contacts
➔
Join contact.
Apps
list to view its
Separating Contacts
1. From a Home screen, touch
➔
Contacts
.
2. Touch a contact in the
information.
3. Touch
A list of Joined contacts displays.
4. Touch ➔
The contact is removed from the list.
Menu
Contacts
➔
Separate contact.
OK
to separate a joined contact.
Apps
list to view its
Sharing Contact Information
You can send a contact’s information by way of Bluetooth to
other Bluetooth devices or in an Email or Gmail as an
attachment.
Note:
Not all Bluetooth devices accept contacts and not all
devices support transfers of multiple contacts. Check the
target device’s documentation.
Apps
1. From a Home screen, touch
➔
Contacts
.
Menu
➔
2. Touch
Share namecard via
Contacts and Accounts 35
.
Page 44

Tip:
Set up a contact record for yourself to share your
information with others.
3. At the prompt, choose a sending method such as
Bluetooth.
4. Follow the prompts to send the contact information.
Importing and Exporting Contacts
To back up and restore your contacts information, you can
export your contacts list to a storage device, such as a PC, or
import your contacts list (previously exported) from a storage
device.
1. Use the USB cable to connect your device to the
storage device.
2. From a Home screen, touch
➔
Contacts
.
Menu
3. Tou c h
The Import/Export contacts pop-up displays.
4. Touch an option and then follow the prompts to
complete the operation.
36
➔
Import/Export
Apps
.
Groups
Assign contacts to Groups to make searching for contacts
faster or to quickly send messages to group members.
Creating a New Group
Create a new group when you add or edit a contact.
1. From a Home screen, touch
Contacts
➔
2. Touch
3. Touch the
4. Touch the
5. Touch
Tip:
Once you create a new group, the Contacts List can be set to
display only the contacts in that group. For more information,
refer to “Contacts Display Options” on page 34.
Groups
enter a new Group name.
the contacts to be assigned to this group.
Contacts can belong to more than one group. Just touch
the contact’s
.
then touch .
Group name
Add member
Save
Groups
field and use the keyboard to
and place a
to save the new group name.
field and touch each group.
Apps
Done
next to
Page 45

Renaming a Group
To rename a group that you created:
1. From a Home screen, touch
Contacts
➔
2. Touch
3. Touch
4. Touch the
5. Touch to save the new group name.
Groups
rename.
Menu
enter a new Group name.
.
and then touch the group you want to
➔
Edit
.
Group name
field and use the keyboard to
Deleting Groups
To delete a group that you created:
1. From a Home screen, touch
➔
Contacts
.
Groups
2. Touch
delete.
3. Touch
The groups that can be deleted display.
and then touch any group you want to
Menu
➔
Delete groups
Apps
Apps
.
Select all
4. Touch
5. Touch Delete to delete the groups. Choose from
Group only or Group and group members.
or the name of each group to delete.
Adding Group Members
To add a contact to a group, just Edit a contact’s Group field.
For more information, refer to “Updating Contacts” on
page 33.
To add multiple contacts to a group:
Apps
1. From a Home screen, touch
➔
Contacts
.
Groups
2. Touch
want to add members.
3. Touch
The contacts that can be added display.
4. Touch
5. Touch Done to add the contacts to the group.
and then touch the group to which you
Menu
Select all
➔
Add member
or the name of each contact to add.
Contacts and Accounts 37
.
Page 46

Removing Group Members
To remove contacts from a group:
1. From a Home screen, touch
Contacts
➔
2. Touch
3. Tou c h
4. Touch
5. Touch Done to remove the contacts.
Groups
want to remove members.
Menu
Select all
Contacts are removed from the group and the group
name is removed from each contact’s
.
and then touch the group from which you
➔
Remove member
or the name of each contact to remove.
Apps
.
Group
field.
Favourites
Mark contact records with a gold star to identify them as
favourites.
Adding Favourites
To add a contact to the Favourites list:
Apps
1. From a Home screen, touch
➔
Contacts
.
2. Touch a contact to display it.
38
Star
3. Touch the
turns gold .
Tip:
You do not have to edit the contact to change the Starred
status.
next to the contact name so that it
Accessing Favourites
To view your favourites list:
1. From a Home screen, touch
Contacts
➔
2. Touch
Favourites
Only your starred contacts display.
.
above the Contacts List.
Apps
Removing Favourites
To remove one or more contacts from your favorites list:
1. From a Home screen, touch
➔
Contacts
.
Favoruites
2. Touch
Menu
3. Tou c h
4. Touch
5. Touch Done to remove the contacts.
To remove one contact from your favourites list:
above the Contacts List.
➔
Remove from favourites
Select all
or the name of each contact to remove.
Apps
.
Page 47

1. From a Home screen, touch
Contacts
➔
2. Touch a contact to display it.
3. Touch the
turns gray
.
Star
next to the contact’s name so that it
to remove it from the Favourites list.
Apps
Contacts and Accounts 39
Page 48

Section 4: Entering Text
This section describes how to select the desired text input
method when entering characters into your tablet. This section
also describes the predictive text entry system that reduces
the amount of key strokes associated with entering text.
Your tablet comes equipped with an orientation detector that
can tell if the tablet is being held in an upright (Portrait) or
sideways (Landscape) orientation. This is useful when
entering text.
Text Input Methods
There are three text input methods available:
•
Google Voice typing
•
Samsung keyboard (default)
keypad that can be used in portrait or landscape orientation.
You can set a default text entry method in Settings. For more
information, refer to “Keyboards and Input Methods” on
page 141.
To choose a text input method while entering text:
1. Open the Quick Settings panel and tap
method
2. Touch an input method to activate it.
40
: allows you to enter text by speaking.
: Samsung’s on-screen QWERTY
Choose input
.
Using the Samsung Keyboard
The Samsung keyboard is a custom virtual QWERTY
keyboard, featuring optional predictive text or continuous
input. Input characters by touching the on-screen keys with
your finger or use speech recognition.
You can enable predictive text, to have the Samsung
keyboard match your key touches to common words and
displays them. The Personalization option learns from GMail,
Facebook and Twitter. Log into these applications to enable
the Samsung keyboard to learn from your text input.
Keyboard Types
In addition to the default QWERTY keyboard, there are two
other types of the Samsung keyboard: a Floating keyboard
and a Split keyboard.
To change the keyboard type:
1. Use two fingers, such as your index
finger and thumb, to make an inward
pinch motion on the screen, where the
keyboard is displayed.
A pop-up displays the three keyboard types.
Page 49

2. Touch one of the keyboard types to display it.
The Split keyboard can be moved up and down and the
Floating keyboard can be moved anywhere.
Tap and hold with two fingers to move the Floating or
Split keyboard.
Configuring the Samsung Keyboard
You can configure the Samsung keyboard to your
preferences. While entering text:
Open the Quick Settings panel, tap
method
and then select
up.
– or –
Touch and hold on the keyboard and then select
from the pop-up menu
The Samsung keyboard settings screen displays.
Set up input methods
.
Choose input
in the pop-
For more information, refer to “Samsung Keyboard Settings”
on page 142.
Entering Upper and Lower Case Letters
The default case is initial capital (Abc). Enter upper and lower
case alphabet letters by touching the Shift key to toggle
the case, before touching the letter key(s).
•
Touch once to switch from Abc to ABC mode. When ABC mode is
enabled, the Shift key background turns blue.
•
Touch twice to switch to abc mode.
Entering Symbols and Numbers
The number keys are displayed at the top of the keyboard and
are always available.
To enter common symbols, touch to switch to symbol
mode, then touch the corresponding key.
There are two pages of symbols. Touch to switch to the
next page.
Touch and hold a vowel key (A, E, I, O, U, or Y) or the C, N, or
S key to open a small window where you can chose an
accented vowel or other alternate letter. Slide to the letter until
it is highlighted, and release.
Touch and hold the Period key ( . ) to open a small window
with a set of common symbols.
Entering Text 41
Page 50

Using Predictive Text
By using Predictive text, you can have next-letter prediction
and regional error correction, which compensates for pressing
the wrong keys on the QWERTY keyboard.
Note:
Enable Predictive text in Samsung keyboard settings. For
more information, refer to “Samsung Keyboard Settings”
on page 142.
While entering characters, potential word matches display in
the Predictive text area above the keyboard.
Touch a word to insert it into your text.
Tip:
Touch to display more words.
Samsung Keyboard Settings
For information on how you can configure your Samsung
keyboard settings, see “Samsung Keyboard Settings” on
page 142.
Using Google Voice Typing from the Samsung
Keyboard
When you enable the Google voice typing setting, you can use
your voice to enter text instead of the keyboard.
42
For more information about enabling Voice input, see “Using
Google Voice Typing” on page 44
Editing Text
You can edit the text you enter in text fields by cutting,
copying, or pasting text. These operations can be performed
within and across apps. However, some apps do not support
editing some or all of the text displayed while others may offer
their own way to select text.
Editing Existing Text
To edit text that you have entered:
1. Touch the text at the point you want to edit.
Cursor
The
2. Touch and drag the
necessary.
3. Enter additional text or delete text by repeatedly
touching the
Copying, Deleting, or Replacing Text
To select and copy, delete, or replace text:
1. Touch and hold the text or word you want to select.
The selected text is highlighted with a tab at each
end of the selection.
displays at the point you touched.
Cursor
to a better position, if
Delete
key.
Page 51

2. Touch and drag either tab to select more or less text.
Tip:
Touch
Select all
in the Application bar to select all text in
the field. Touch on another area of the screen or touch
Done
to deselect the text.
3. Depending on the action you want to take for the
selected text, in the Application bar touch:
• Select all
to highlight all text in the field.
•Cut
to remove the selected text.
•Copy
to save the selected text to the clipboard.
– or –
Enter text by typing or speaking to replace the selection
with what you type.
Pasting Text
To paste previously copied text:
1. Touch the text at the point you want to paste the copied
text.
The
Cursor
displays at the point you touched.
2. Touch the Cursor.
A pop-up displays.
Paste
3. Touch
To paste text directly from the clipboard:
1. Touch the
to the clipboard.
2. Touch a text block to paste that text where the
positioned.
in the pop-up.
Clipboard
key to display the text saved
Cursor
Closing the Keyboard
To close the keyboard:
Touc h
Close Keyboard
.
Using the Handwriting Feature
You can enter text simply by using your finger or the S Pen to
handwrite letters on your screen.
1. From a screen where you can enter text, activate the
keyboard by touching a text input field on the screen.
2. If necessary, open the Quick Settings panel, tap
input method
The Samsung keyboard displays.
3. Touch and hold on the keyboard and then select
The handwriting pad displays.
and then touch
from the pop-up menu
Samsung keyboard
.
Entering Text 43
Choose
.
is
Page 52

4. Use your finger tip or the S Pen to write out each
character. You can print or use cursive.
As you write, suggestions are offered in the word options area
in case the correct letters were not recognized.
Handwriting Tips
•
For uppercase letters, write the letter larger than the lowercase
letters.
•
Write a dash (horizontal line) to add a space.
•
Delete letters by sweeping from right to left.
•
To display numbers and symbols, touch and then touch a
number or symbol key. Touch the button marked 1/2 or 2/2 to see
more symbols and emoticons. Touch to exit the numbers and
symbols keyboard.
•
To return to the Samsung keyboard, touch .
Handwriting Settings
To change the Handwriting settings:
1. Open the Quick Settings panel, tap
method
and then touch
The Language and input settings screen displays.
2. Touch next to Samsung keyboard to display
Samsung keyboard settings.
44
Set up input methods
Choose input
.
3. Touch
4. Press
Handwriting
For more information, refer to “Samsung Keyboard
Settings” on page 142.
.
repeatedly to return to your message.
Using Google Voice Typing
You can use your voice to enter text using the Google voice
typing feature.
While entering text:
1. Open the Quick Settings panel, tap
. and then touch
method
– or –
Touch and hold on the keyboard and then select
from the pop-up menu
For more information, refer to “Keyboards and Input
Methods” on page 141.
2. At the
3. Keep speaking to add more text.
Speak now
into the microphone.
The software converts your voice to text, which is
displayed in the message.
Google voice typing
.
prompt, speak clearly and distinctly
Choose input
.
Page 53

4. Touch to display the Samsung keyboard.
Entering Text 45
Page 54

Section 5: Messaging
This section describes how to send and receive messages
and other features associated with messaging.
Types of Messages
Your device supports these types of messages:
•
Text and Multimedia Messages
MMS (picture, video or audio) messages.
•
Gmail
: Send and receive Gmail from your Google account.
•
Email
: Send and receive email from your email accounts, including
Corporate Exchange mail.
•
Google Talk
•
Google Messenger: Use Google Messenger to bring groups of
friends together into a simple group conversation.
•
ChatON
any device that has a mobile phone number.
The Short Message Service (SMS) lets you send and receive
text messages to and from other mobile phones or email
addresses. To use this feature, you may need to subscribe to
your service provider’s message service.
46
: Chat with other Google Talk users.
: Use ChatON to send and receive instant messages from
: Send and receive SMS (text) and
The Multimedia Messaging Service (MMS) lets you send and
receive multimedia messages (such as picture, video, and
audio messages) to and from other mobile phones or email
addresses. To use this feature, you may need to subscribe to
your service provider’s multimedia message service.
Important!
When creating a message, adding an image, a
sound file, or a video clip to a text message
changes the message from a text message to a
multimedia message.
Messaging icons are displayed at the top of the screen and
indicate when messages are received and their type. For more
information, refer to “Notifications” on page 18.
Creating and Sending Messages
1. From the main Home screen, tap
Compose
.
Messaging
➔
Page 55

Note:
The main Home screen initially contains the
Messaging
icon. If you delete it, or if you want to access
Messaging from another Home screen, you must tap
Apps
➔
Messaging
2. Tap on the
recipient or tap to select a recipient from Groups,
Favourites, or Contacts.
3. If adding a recipient from your Contacts, tap the contact
to place a checkmark then tap
The contact will be placed in the recipient field.
Note:
Enter additional recipients by separating each entry with
a semicolon (;) then using the previous procedure.
4. Tap the
keypad to enter a message. For more information, refer
to “Entering Text” on page 55.
5. Review your message and tap
Note:
If you exit a message before you send it, it will be
automatically saved as a draft.
Enter recipient
Enter message
.
field to manually enter a
Done
.
field and use the on-screen
Send
.
Message Options
Options before composing a message
1. From the main Home screen, tap
2. Before composing a message, press to reveal
additional messaging options:
• Delete threads
Select the messages to delete and a green checkmark will
appear next to the message. Tap
•Settings
information, refer to
: allows you to delete any message thread.
: allows you to access Messaging settings. For more
“Messaging Settings”
Options while composing a message
1. While composing a message, press to reveal
additional messaging options.
• Insert smiley
face to your message.
• Add text
calendar, or from a memo to add to your message. This is a
convenient feature for adding names, phone numbers,
events, etc. to your message.
to “Adding Additional Text”
• Add slide
: allows you to add emoticons, such as a happy
: allows you to copy text from your contacts,
: allows you to add a new page to a message.
Messaging
Delete
For more information, refer
on page 48.
.
.
on page 50.
Messaging 47
Page 56

• Add subject
•
Discard
screen.
: allows you to add a subject line.
: erase the message and return to the Messaging
Adding attachments to a message
To add an attachment to your message, tap and select
one of the following options:
•
Images
: allows you to tap an existing image from your Pictures list
to add it to your message.
•
Take picture
photo with the camera, and then add it to your message by tapping
Save
•
Video
then add it to your message
•
Record video
record a video clip using the camera, and then add it to your
message by tapping
•
Audio
Audio list, then add it to your message by tapping the circle to
the right of the audio so that it turns green, then tapping
•
S Note
48
: allows you to temporarily exit the message, take a
.
: allows you to choose an existing video from the Videos list,
.
: allows you to temporarily exit the message,
Save
.
: allows you to choose an existing audio file from the
: allows you to add a note that you have created.
Done
•
Calendar
allows you to add an event from your calendar. Select the
Done
desired event and tap
•
Location
: allows you to attach a thumbnail of a map showing
your location.
•
Contacts
: allows you to tap on an existing Address Book entry,
then add it to your message by tapping
.
Adding Additional Text
You can copy text such as names, phone numbers, and
events from your Contacts, Calendar or a Memo.
1. While composing a message, press ➔
2. At the Add text screen, select one of the following:
.
•S Note
: allows you to insert text from an existing note.
• Calendar
: allows you to add the name, date, and time of a
calendar event to your message.
•Location
: allows you to add an address and the link to the
location on Google Maps.
•Contacts
: allows you to add the name and phone number of
any of your contacts to your message.
• Text templates
sentences.
The information is added to your message.
: allows you to add pre-defined phrases and
Done
.
Add text
.
Page 57

Viewing New Received Messages
1. When you receive a new message, the new message
icon will appear at the top of your screen.
2. Open the Notification Bar and select the message.
– or –
Messaging
From the Home screen, tap
new message to view it.
The selected message appears in the display.
3. To play a multimedia message, tap
•
To pause playback of the multimedia message, tap .
4. To scroll through the message (if additional text pages
have been added), touch the screen and in a single
motion, scroll up or down the page.
Message Threads
Sent and received text and picture messages are grouped into
message threads. Threaded messages allow you to see all
the messages exchanged (similar to a chat program) and
displays a contact on the screen. Message threads are listed
in the order in which they were received, with the latest
message displayed at the top.
then tap the
.
To access message thread options:
•
From the main Messaging screen, touch and hold the message
thread to display the following options:
•
View contact
•
Add to Contacts
number to your Contacts list.
•
Delete thread
thread.
To access additional Bubble options:
•
Touch and hold a message bubble within an active message
conversation to display the following options:
•
Delete message
bubble from the thread.
•
Copy message text
bubble from the thread.
•
Lock/Unlock message
selected message bubble from being accidentally deleted.
•
Forward
message bubble to an external recipient.
•
Copy to SIM
as a single text message within the SIM card.
: displays the Contact’s Overview page.
: begins the process of adding the new
: deletes the currently selected message
: deletes the currently selected message
: copies the currently selected message
: locks or unlocks the currently
: allows you to forward the currently selected
: copies the currently selected message bubble
Messaging 49
Page 58

•
View message details
selected message bubble.
: displays details for the currently
Deleting Messages
Deleting a single message thread
1. From the Home screen, tap
2. Touch and hold a message, then tap
Delete
3. At the
cancel.
prompt, tap OK to delete or
Messaging
.
Delete thread
Cancel
.
to
Deleting multiple message threads
1. From the main Home screen, tap
2. Press ➔
3. Tap each thread you want to delete. A checkmark will
appear beside each thread you select.
Delete
4. Tap
5. At the
cancel.
Delete threads
.
Delete
prompt, tap OK to delete or
.
Messaging
Cancel
.
to
Message Search
You can search through your messages by using the Message
Search feature.
1. From the main Home screen, tap
50
Messaging
.
2. Tap .
3. Use the on-screen keypad to enter a word or phrase to
search for, then tap
4. All messages that contain the search string you entered
are displayed.
.
Messaging Settings
To configure the settings for text messages, multimedia
messages, Voice mails, and Push messages.
1. From the main Home screen, tap
Settings
➔
2. The following Messaging settings are available:
Display
Bubble style
•
styles for your messages. Bubbles are the rounded boxes
that surround each message.
•
Background style
background styles for your messages.
General settings:
• Delete old messages
reached, rather than having them overwritten.
.
: allows you to choose from several bubble
: allows you to choose from several
: deletes old messages when the limit is
Messaging
➔
Page 59

• Text message limit
messages can be in one conversation.
• Multimedia message limit
many multimedia messages can be in one conversation.
• Text templates
to use in your messaging.
Text message (SMS) settings:
• Delivery reports:
sent.
• Manage SIM card messages
messages that you have stored on your SIM card.
• Message center
Message center where your messages reside while the
system is attempting to deliver them.
• Input mode
messages. Choose between GSM Alphabet, Unicode, or
Automatic.
Multimedia message (MMS) settings:
• Delivery reports:
sent.
• Read reports:
: allows you to set a limit on how many text
: allows you to set a limit on how
: allows you to edit or add new text templates
Request a delivery report for each message
: allows you to manage the
: allows you to enter the number of your
: allows you to set the input mode for your text
Request a delivery report for each message
Request a read report for each message sent.
• Auto-retrieve
messages automatically.
• Roaming auto-retrieve
retrieve messages automatically when roaming.
•Creation mode
Restricted, or Warning.
–
–
–
• MMS alert
becomes active.
Push message settings:
• Push messages
the network.
•
Service loading
Cell Broadcast (CB) settings:
• CB activation
messages.
: allows the message system to retrieve
: allows the message system to
: allows you to select the creation mode, Free,
Restricted
: you can only create and submit messages with
content belonging to the Core MM Content Domain.
Warning
: the phone will warn you via pop up messages that
you are creating a multimedia message which does not fit the
Core MM Content Domain.
Free
: you may add any content to the message.
: allows you to receive an alert when MMS mode
: allows you to receive push messages from
: Select Always, Prompt or Never.
: allows you to receive Cell Broadcast (CB)
Messaging 51
Page 60

• Channel configuration
you will receive CB messages on.
Notifications settings:
• Notifications
your status bar.
• Select ringtone
message notifications.
•Vibrate
: allows you to configure the vibration mode
associated with message alerts.
• Message alert repetition
new message alerts. Choose from: Once, Every 2 minutes,
or Every 10 minutes.
• Preview message
preview of new message text on the Status bar.
Signature settings:
• Add signature
create a signature at the end of your outgoing text messages.
• Signature text
your message.
52
: allows you to set up the channel that
: allows you to see message notifications on
: allows you to set the ringtone for your
: allows you to set the interval for
: when enabled, allows you to view a
: when enabled, this feature allows you to
: allows you to enter a desired signature for
Gmail
Send and receive email with Gmail, Google’s web-based
email.
Tip:
To set up your Google account on your device, use
Accounts
settings. For more information, refer to
“Accounts” on page 146.
From a Home screen, touch
Setting Up Your Gmail Account
If you did not set up a Google account during the initial
configuration, the first time you launch Gmail, your device
prompts you to set up your Google account.
Note:
You can use more than one Google account on your
device. To add another account, touch
➔
Settings
➔
ADD ACCOUNT
1. From a Home screen, touch
The Add a Google Account screen displays.
Existing
2. Touch
•
At the
your Google
to sign in to an existing account.
Sign in
screen, use the on-screen keyboard to enter
Email
name and
Apps
.
Apps
Password
➔
Menu
➔
, then touch .
Gmail
Gmail
.
.
Page 61

– or –
Touch
New
to create a new account.
•
At the
You r name
screen, enter your first and last name, and
.
touch
•
At the
Choose username
account.
The Backup and restore screen displays.
3. Read the backup and restore information, touch the
option to enable or disable it, and then touch .
4. The device communicates with the Google server to set
up your account and synchronize your email. When
complete, your Gmail displays in the Inbox.
follow the prompts to create a new
Refreshing Your Gmail Account
Refresh your account to update your device from the Gmail
servers.
Apps
➔
1. From a Home screen, touch
2. Touch
Menu
➔ Refresh
.
Gmail
Managing Your Gmail Account
Use menu options to manage your Gmail account.
1. From a Home screen, touch
Apps
➔
Gmail
Menu
2. Touch
• Refresh:
• Manage labels
•Settings
“Gmail Account Settings”
• Send Feedback
•Help
: Learn about using Gmail.
for these options:
Update your device from the Gmail servers.
: Determine settings for each label.
: Configure settings. For more information, refer to
on page 55.
: Fill out a Google feedback form.
Managing Your Gmail Conversations
In addition to managing your Gmail account, there are options
for changing the status of one or more Gmail conversations in
an account.
1. From a Home screen, touch
2. Touch the coloured box to the left of one or more
conversations and then choose one of the following
options:
•Archive
.
.
: Archive the selected conversation. Archived
conversations are moved to the Archive folder.
• Mark as Read
conversations as read or unread. When a conversation is
marked as read, the title text is no loger bold. Touch
DONE
to remove the check marks.
/
Mark as Unread
Apps
➔
Gmail
: Mark the
Messaging 53
.
Page 62

•Move to :
• Change labels
Inbox, Personal, Receipts, Travel
touch
Tip:
To move a conversation to another folder, touch and drag it
to the folder tab.
3. Touch
• Delete
moved to the Trash folder.
• Add star
a yellow star. Starred conversations are listed in the Starred
folder.
• Mark important
indicator . Yellow indicates important.
•Mute
your inbox so that the conversation stays archived in the All
Mail folder.
• Report spam
emails that violate the Gmail Program Policies and/or Terms
of Use.
54
Move the conversation to a message folder.
: Relocate the conversations to the
, or
Work
folder and then
OK
.
Menu
for these options:
: Delete the conversations. Deleted conversations are
/
Remove star
: New messages added to muted conversations bypass
: Mark (or unmark) conversations with
/
Mark not important
: Report the conversations as spam, which are
: Change the importance
• Report phishing
phishing to aquire information such as usernames,
passwords and any other sensitive content.
: Report the conversations as potential
Composing and Sending Gmail
1. From a Home screen, touch
Compose
2. Tou c h
3. Touch the
names or email addresses, matching contacts display.
Touch a contact to add it to the field.
4. Touch the
5. Touch
6. While composing a message, the following options are
displayed:
•+ CC/BCC
• Attach
7. Touch
• Save draft:
• Attach video
To
Subject
Compose email
message. After creating the fields, touch to enter recipients.
message.
message.
.
field to enter recipients. As you enter
field to enter a subject.
to enter the text of your email.
: Create Cc (copy) and Bcc (blind copy) fields in the
: Launch Gallery to select a photo to add to the
Menu
for the following options:
Touch
Save draft
: Touch a video from your Gallery.
Apps
➔
to save a draft of this
Gmail
.
Page 63

•Discard
: Touch Discard to delete the message.
•Settings
: Configure settings. For more information, refer to
“Gmail Account Settings”
• Send feedback
•Help
: Learn about using Gmail.
8. Touch
SEND
: Fill out a Google feedback form.
to send this message
on page 55.
Gmail Account Settings
1. From a Home screen, touch
Menu
2. Touch
settings.
➔ Settings
Apps
➔
Gmail
to access your gmail
Use Email to view and manage all your email accounts in one
application.
Setting up Email Accounts
1. From a Home screen, touch
2. At the
Password
Set up email
screen, enter an
, then touch
Next
.
Apps
➔
Email address
Email
and
3. Your account’s incoming server settings are different
depending on the kind of email service for the account.
If you are asked
account:
Exchange ActiveSync
4. If you are setting up a Microsoft Exchange ActiveSync
account, tap
.
.
The Server settings screen displays.
5. Enter the required settings and touch
Account options
The
6. Enter the desired information in the different fields, then
tap
Next
Note:
For Microsoft Exchange ActiveSync accounts, the
Activate device administrator?
the information and touch
7. Enter an account name for the email account just
added, which is displayed on the email screen, and
enter Your name, if required.
8. Touch
What type of account?
POP3 account, IMAP account
.
.
Done
Manual setup
.
at the top of your screen.
screen is displayed.
Activate
, touch the type of
, or
Microsoft
Next
.
screen may appear. Read
to continue.
Messaging 55
Page 64

The device communicates with the appropriate server to
set up your account and synchronize your email. When
complete, your email appears in the Inbox for the
account.
Note:
To configure email account settings at any time, use
Menu ➔Settings
Account settings.
. Touch the account to display
Adding Additional Email Accounts
To add additional email accounts:
1. From a Home screen, touch
2. Touch
3. Enter the
Menu ➔Settings ➔ Add account
Email address, Password
Email
.
, and so on.
Managing Your Email Accounts
You can view email you receive for all accounts in the
Combined view
individually.
1. From a Home screen, touch
2. Touch the
56
screen or you can view email accounts
drop-down menu at the top left of the
screen to select:
• Combined view
: View all email in a combined inbox.
Email
.
• Priority sender inbox
account for all outgoing emails.
•<Account Name
: Use this setting to assign an email
>: View email for the account.
Managing Your Email Conversations
In addition to managing your Email account, there are options
for changing the status of one or more Email conversations in
an account.
1. From a Home screen, touch
2. Touch the box to the left of one or more conversations
and then choose one of the following options:
•Star
: Use to flag email as important or that you want to
.
locate later.
• Mark as Read
conversations as read or unread. Once a conversation is
marked as read, it has a gray background.
•Move to :
in the current email account or in a folder within another email
account.
• Delete
3. Touch
/
Mark as Unread
Relocate the conversations to another folder
: Delete the conversations.
Menu
for these options:
Email
.
: Mark the
Page 65

• Sort by
: Choose a method for listing your email
conversations.
• View mode
• Delete all
• Font size
•Settings
: Choose how to view your email conversations.
Choices are: Standard view and Conversations view.
: Delete all items for this email account.
: Select the font size for your email. Choose from,
Use device font sizes, Tiny, Small, Normal, Large, or Huge.
: Display the settings for this email account.
Composing and Sending Email
1. From a Home screen, touch
2. Touch an account, if you have more than one account
set up, then touch
3. Enter the recipient’s email address in the
•
If you are sending the email message to several recipients,
separate the email addresses with a comma. You can add as
many message recipients as you want.
•
To uc h to add a contact to the field.
•
To uc h
+Cc/Bcc
–
Use the Cc field to carbon copy additional recipients.
–
Use the
Bcc
•
To uc h
+Me
to add yourself as a recipient.
Compose
to add additional carbon copy recipients.
field to blind copy additional recipients.
.
Email
.
To
field.
4. Touch the
5. Touch the body of the email to enter the text of your
email.
6. While composing a message, the following options may
be displayed:
Subject
field to enter a subject.
Scheduling options
box and then set the Time and date for which the
email will be sent.
Priority
: Set the email priority. Options are: High,
Normal, or Low.
Attach
: Choose an attachment to add to the
message from the listed apps, such as My Files,
Images, Take picture, Video, Record video,
Audio, S Note, Calendar, Contacts, and Location.
Text mode: Enter text.
Drawing mode: Draw in the message using
drawing tools.
Undo
: Erase the previous input.
: Tap the Schedule sending
Messaging 57
Page 66

Redo
: Restore the previously erased input.
Insert
: Choose an item to insert into the message
from the listed apps, such as Images, S Note,
Calendar, Contacts, and Location.
Insert quick response
frequently use in emails.
Font size
: Choose a text font size of 9, 10,12, 14,
17, 21, 24, 28, or 36 points.
Bold
: Bold the following text. Touch again to turn
off bold.
Italics
: This action italicizes the subsequent
entered text.
Font color
: Set the color of the text font. The bar
changes to the selected color.
Background color
background of the email.
Pen settings: Select a drawing pen and colour.
58
: Insert text that you
: Set the color of the
7. Touch
Email Settings
Account settings lets you configure handling of email on your
device.
1. From a Home screen, touch
2. Tou c h
Google Talk
Talk is Google’s instant messaging and audio and video chat
service. You can use it to communicate, in real time, with other
people who also use Google Talk on another Android tablet or
phone or on a computer.
Tip:
Talk requires that you have a Google account. To set up
your Google account on your device use
For more information, refer to “Accounts” on page 146.
Eraser: Erase drawn content, set the eraser size.
Save
to save the email to the Drafts folder,
Send
to send the email, or
the email.
Menu
settings.
➔
Settings
Discard
Email
to modify your email
to delete
.
Accounts
settings.
Page 67

Open Talk and Sign In
1. From a Home screen, touch
If you are not signed in to a Google account, the Add a
Google Account screen displays.
Existing
2. Touch
or
New
For more information, refer to “Setting Up Your Gmail
Account” on page 52.
Note:
If you have already set up your Google account, you are
automatically logged in. Just touch the account.
Once sign in is complete, the Talk main screen displays.
, if you already have a Google account,
to create a Google account.
Apps
➔
Tal k
Invite a Friend to Chat
You can invite anyone with a Google Account to become your
friend in Google Talk, so you can chat with each other and
view each other’s online status.
1. While viewing your Friends list, touch
2. Enter your friend’s Email address and touch
Your friend’s address in Talk is a Gmail or other email
address that is configured to connect to Google Talk.
Add friend
DONE
.
If your friend accepts your invitation, they are added to
.
your Friends list in Talk and you can share each others
status in Talk and other applications.
View and Accept an Invitation to Become a
Friend
When a contact invites you to become a friend in Google Talk,
you receive a notification in the System Bar and the
invitation displays in your Friends list.
1. Touch the invitation.
2. Touch
.
Options While Chatting
There are several options that are available while you are
chatting.
Accept
, if you want to accept the invitation and
chat,
Decline
, if you do not want to chat with and share
your Google Talk status with the sender right now, or
Block
, if you do not want to receive any more invitations
from that person.
Accept
If you touch
list in Talk and you can share your status in Talk and
other applications.
, the friend is added to your Friends
Messaging 59
Page 68

1. Touch to search your chats for a word,
another friend to chat, to invite this friend to video
chat, or to invite this friend to voice chat.
Menu
2. Touch
are available while chatting. For more information, refer
to “Additional Talk Options” on page 60.
• End chat
• Go off the record/Stop chatting off the record
you want to stop saving your chat to the chat history.
•Friend info
you are chatting. The following options are also displayed:
–
Block
removes the person from your Friends list.
–
Remove
invitation. However, the friend is not blocked.
• Add to chat
conversation.
• Clear chat history
device.
• Settings
information, refer to
60
to display the following options, which
: End this chat session.
: Set whether
: Display information about the friend with which
: Keeps this person from sending you messages and
: Remove the friend as if you never accepted their
: Choose another friend to invite to this
: Remove the history of this chat from your
: Offers various settings for Google talk. For more
“Google Talk Settings”
on page 61.
to invite
•Help
: Displays additional help information.
• Send feedback
Note:
If you touch the
➔
Send chat invitation to,
again.
: Fill out a Google feedback form.
REMOVE
option, touch
to make the Friend visible
Add friend
Additional Talk Options
1. While viewing your Friends list, touch to search
your Talk messages. Use the on-screen keyboard to
enter a search term. Touch on the keyboard to
search your Talk messages.
Menu
2. Touch
• Display options
touch
Availability, Name
• End all chats
• Sign out
screen.
• Settings
information, refer to
•Help
: Displays additional help information.
• Send feedback
to display the following options:
: To set the way your friends list is sorted,
, or
Recency
.
: End all chats in which you are engaged.
: Sign out of Google Talk and display the Talk main
: Offers various settings for Google talk. For more
“Google Talk Settings”
: Fill out a Google feedback form.
on page 61.
Page 69

3. Touch a Friend’s entry to display the Chat entries for
that Friend.
Google Talk Settings
Use Google Talk Settings to configure your Talk account. If
you have more than one account, each maintains its own Talk
settings.
1. From a Home screen, touch
Menu
2. Touch
options:
GENERAL
• Mobile indicator
android next to your name in their Friends list when you are
signed into Google Talk on a tablet or phone.
• Away when screen off
Away when your screen turns off. When unchecked, your
status is not changed.
• Invitation notifications
invitation arrives.
CHAT NOTIFICATIONS
➔
Settings
: Check and your friends see an outline of an
: Check to change your Talk status to
: Show notification when a friend
Apps
➔
Tal k
, then touch an account for
• IM notifications
notification in the System Bar, or neither, when you receive a
text chat.
• Notification ringtone
you receive a text chat.
•Vibrate
when silent, or Never.
.
VOICE & VIDEO CHAT
• Video chat notifications
display a notification in the System Bar when you are invited
to a video chat.
• Video chat ringtone
you receive an invitation to a video chat.
•Vibrate
Never.
• Default video effect
ACCOUNT
• Blocked friends
Touch a blocked friend and then touch OK to unblock the
friend.
: Set whether to open a dialog, display a
: Set a ringtone to sound, or silent, when
: Set how vibrate functions. Choices are: Always, Only
: Set whether to open a dialog or
: Set a ringtone to sound, or silent, when
: Set the device to vibrate Always, Only when silent, or
: Set the video image stabilization.
: Displays a list of friends you have blocked.
Messaging 61
Page 70

• Clear search history
searches are shown until you search for new words.
• Manage account
more information, refer to
ABOUT
• Terms & privacy
privacy policies.
: Erases your search history. No previous
: Opens the Accounts and sync settings. For
“Accounts”
: Displays the Google Talk terms of use and
on page 146.
Google+
Share updates and see what is going on around you with
Google+ for mobile.
•
Share your thoughts and location.
•
Instantly upload your photos and videos as you take them.
•
Get updates from your circles in the stream.
•
Check in to a place.
•
Make plans on-the-go with group messaging.
•
View posts from people around you.
To get started:
1. From a Home screen, touch
➔
Google+
.
The Google+ home screen displays.
62
Apps
Menu
➔
Help
2. Touch
learn more about using Google+.
and then touch a topic to
Messenger
With Google Messenger, you can bring groups of friends
together into a simple group conversation, putting everyone
on the same page. When you get a new conversation in
Messenger, Google+ sends an update to your device.
To get started, touch the Messenger icon on the home screen
of the Google+ app or use the Messenger icon on your
Applications screen.
1. From a Home screen, touch
➔
Messenger
The Messenger screen displays.
Menu
2. Tou c h
getting started.
.
➔
Help
Apps
for more information on
ChatON
Provides a global mobile communication service where you
can chat with more than 2 buddies via a group chat. Share
things such as pictures, videos, animation messages
(Scribbles), audio, Contacts, Calendar entries, and Location
information.
Page 71

For more information, visit:
1. From a Home screen, touch
2. At the ChatON display, tap
Samsung account if you have not already done so. For
more information, refer to “Creating a Samsung
Account” on page 6.
– or –
Tap
Skip
if you have already signed in to your Samsung
account.
3. Enter your real name and tap
4. Follow the on-screen instructions to add a buddy and
begin your chat session.
https://web.samsungchaton.com
Apps
➔
Sign in
to sign in to your
OK
.
.
ChatON
.
Messaging 63
Page 72

Section 6: Music
This section explains how to use the music features of your
device including the Music app and the Music Player, and the
Music Hub.
Listening to Music
You can listen to music by using your device’s built-in
speakers, through a wired headset, or through a wireless
Bluetooth stereo headset.
For more information, refer to “Bluetooth” on page 89.
Vol ume Key
Press the
device to activate on-screen volume control, then touch and
drag on the scale to set volume. You can also press the
Volume Key to adjust playback volume.
on the side of the
Google Play Music
With Google Play Music, you can play music that you have
added to your music file as well as any music you copied from
your PC. While offline, you can listen to music you have
copied from your PC.
64
1. From the Home screen, tap ➔
All music on your device and external SD card is
displayed, including Music folders that may contain
multiple songs.
2. Tap a song to start playback.
3. From the main Play Music screen, you can tap any of
the following tabs for a more detailed listing of songs:
Playlists, Recent, Artists, Albums, Songs, and Genres.
4. Tap
Menu
for the following options:
• Settings
: allows you to view Open source licenses and the
music version for the Play Music application.
•Help
: allows you to view a help file on the Google Support
website.
Play Music
.
Page 73

Music Player
Music Player plays songs stored on your tablet or an installed
memory card.
1. From a Home screen, touch
➔
Music Player
The Music Player application searches your device’s
internal storage or on an installed memory card for
music and playlists. This can take from a few seconds to
several minutes, depending on the amount of new
music added since you last opened the application. It
then displays your music in several ways.
2. Touch a tab, such as
on, to change the way you view the contents of your
library.
3. Touch the Music application icon at the top-left of
the Application bar to return to the previous Music
screen.
.
Songs, Playlists, Albums
Searching for Music
To find music in your library:
1. From a Home screen, touch
➔
Music Player
.
Apps
Apps
, and so
2. Touch
name of an artist, album, or song.
Search
and use the keyboard to type the
Music Player Options and Settings
To use Music Player options and configure settings:
1. From a Home screen, touch
Music Player
➔
2. Touch
•Delete
: Delete a song, an album, or every song or album.
•Share via
share, touch
follow the on-screen instructions.
• Set as alarm tone
song as an alarm tone.
•
Scan for nearby devices
devices used to send or receive streaming media.
•Settings
: The following settings display:
Advanced
–
Sound settings
settings.
–
Lyri cs
: Display the lyrics of the song, if available.
.
Menu
to display the following options:
: Share your music. Select the songs you want to
Share
, touch an option, such as Bluetooth, and
: Choose a song and touch
: Choose
Apps
: Search for DLNA -compliant
SoundAlive
and
Set
to use the
Play speed
Music 65
Page 74

–
Music auto off
automatically by touching one of the time values.
Music menu
–
Music menu
appear on the main music screen. A check mark
an option means that it is enabled.
•End
: This option returns you to the home screen.
: Set the option Off or set your music to turn off
: Enable or disable the music display options that
Managing Playlists
To create, manage, or delete a playlist:
From a Home screen, touch
➔
Music Player
Creating a Playlist
Touch
keyboard to enter a name for the playlist.
Renaming a Playlist
1. Touch the
2. Touch a playlist, touch
Adding Songs to Playlists
1. Tou c h
66
Playlists
and use the keyboard to enter a new name for the
playlist.
.
Add to playlist
tab.
Add to playlist
➔ Create playlist
Menu
and touch a playlist.
next to
Apps
and use the
➔ Rename playlist
– or –
Playlists
Touch
Add music
mode.
All songs are displayed.
2. Tou c h
Add all
3. Touch
Removing Songs from Playlists
1. Tou c h
2. Tou c h
3. Touch
Changing the Order of a Playlist
1. Touch the
2. Touch
order
3. Touch the grid for an entry and drag the entry to a
new position in the list.
4. Touch
next to each song you want to add or next to
to add all songs to the playlist.
Done
to remove a song from the playlist.
Done
Playlists
in portrait mode.
Done
, touch a playlist, and then touch
or
Menu
➔ Add music
to save the playlist.
Add to playlist
to save the playlist.
Change order
to change the order and save the playlist.
and touch a playlist.
tab and touch a playlist.
or
Menu
in portrait
➔ Change
Page 75

Playing a Playlist
1. Touch the
2. Touch
3. Touch a song to start playing the playlist at that song.
Deleting a Playlist
1. Touch the
2. Touch
3. Touch the box next to a playlist title, touch
Playlists
tab.
Favourites, Most played
touch a playlist title that you created.
Playlists
tab and touch a playlist.
Delete
in the Application bar.
OK
then touch
.
, or
Recently added
Remove
Playing Music
To play a song:
1. From a Home screen, touch
Music Player
➔
2. Touch a song or touch an album or genre and then
touch a song in the list of songs on the album.
The song you touch starts to play. The tracks in the
current list play in order until you reach the end of the list
(unless you choose a repeat option). Otherwise,
playback stops only if you stop it, even when you switch
applications.
.
Apps
, or
, and
Accessing the Music Player
If you navigate away from the Music Player application and
music is playing, the Music notification icon is displayed
in the System Bar.
You can change songs or easily return to the Music Player:
1. Touch the System Bar and drag down to open the Quick
Settings panel.
2. Touch the album image to display the Music Player. You
can also pause and resume playback and skip to the
next or previous song in the panel. For more
information, refer to “Notifications” on page 18.
Music Player Controls
When a song is playing, the Music Player screen displays
various controls are available.
1. From a Home screen, touch
Music Player
➔
2. Touch a song or playlist to begin playback.
The music player displays below (portrait mode) or to
the right (landscape mode) of the music listing.
3. Touch the music player to enlarge it and touch the
screen to display the sound and playlist controls.
.
Apps
Music 67
and
Page 76

4. During playback, use the sound and playlist controls:
• Favourite
68
: Touch the star to mark the current song as a
favourite.
•Volume
: Touch to toggle Silent and Sound mode, then touch
and drag on the scale to set volume. You can also press the
Volume Key on the side of the device to adjust playback
volume.
• SoundAlive
•Info
•List Mode
• Shuffle
disabled, songs play in the order they appear in List view.
• Progress Bar
scan forward or backward through the current song.
• Playback Controls
songs:
–
–
–
• Repeat
disable repeat mode.
: Touch to view and set SoundAlive options.
: Touch to view information about the current song.
: Touch to switch to the list of songs.
: When enabled, songs play in random order. When
: Touch and drag the end of the progress bar to
: These buttons control the playback of
Touch to advance to the next song. Touch and hold
to scan forward through the current song.
Touch to go back to the previous song. Touch and hold
to scan backward through the current song.
Touch to pause playback. Touch to resume
playback.
: Touch to repeat the current song, repeat all songs, or
Page 77

Options While Playing a Song
There are various options and controls available while a song
is playing:
1. From a Home screen, touch
➔
Music Player
then a song.
2. Touch the music player to enlarge it.
3. Touch
• Add to playlist
playlist.
• Via Bluetooth
device.
•Share via
Bluetooth, select the songs you want to share, and touch
Share
.
• Set as alarm tone
• Scan for nearby devices
nearby devices.
•Settings
: Displays Music Player settings. For more
information, refer to
on page 65.
, touch a song or an album, and
Menu
to display the following options:
: Add the song to a new playlist or an existing
: Play the current song by using a Bluetooth
: Share your music. Touch an option, such as
: Use the current song as an alarm tone.
“Music Player Options and Settings”
Apps
: Discover and connect directly to
•End
: This option returns you to the home screen.
Music 69
Page 78

Section 7: Photos and Video
This section explains how to use your device’s built-in camera
and camcorder as well as the Image Viewer and Gallery to
view and manage photos and videos.
Camera
Use your device’s built-in camera and camcorder to take
photos and record videos.
Apps
➔
1. From a Home screen, touch
2. If a memory card is inserted, the first time you open the
camera the Storage location pop-up displays.Touch
to change the storage location to memory card or touch
Cancel
to use the device storage for storing pictures and
videos.
Note:
If memory card storage is used, photos are stored in the /
storage/sdcard0/DCIM/Camera folder as jpg files. For
more information, refer to “My Files” on page 107.
70
Camera
OK
.
Taking Photos
To take a photo:
1. From a Home screen, touch
2. Using the display as a viewfinder, compose your photo
by aiming the lens at the subject.
Apps
➔
Camera
.
Page 79

Use the Up and Down volume keys or Pinch the screen
to zoom in or out.
To configure settings, see “Camera Settings” on
page 71.
3. To take the photo, touch the
Back
4. Touch
previous screen.
Important!
Do not take photos of people without their
permission.
Do not take photos in places where cameras are not
allowed.
Do not take photos in places where you may
interfere with another person’s privacy.
to leave the Camera and display the
Camera
button.
Camera Settings
While taking photos, use the camera settings to configure the
camera for best results. Camera settings are represented by
icons on the left or top of the screen.
Editing Camera Settings Shortcuts
The first five icons are actually shortcuts to camera settings.
These five shortcuts can be customized to fit your preference.
Self-portrait
Effects
shortcuts.
To customize these shortcuts:
1. Touch
– or –
Touch and hold any of the shortcut icons to edit them.
2. Touch and hold a setting, then drag and drop it on one of
the five settings shortcuts to the left. The replaced
setting shortcut displays in the edit list.
, and
,
Shooting mode, Timer
Exposure value
Settings
➔
Edit shortcuts
Photos and Video 71
are default settings
.
Page 80

Configuring Camera Settings
To configure Camera settings:
While in Camera mode, touch a settings shortcut or
touch
settings:
• Edit shortcuts
• Use the volume key as
•GPS tag
• Self portrait
Warning!
• Shooting mode
72
Settings
to configure the following camera
: Customize your settings shortcuts. For more
information, refer to
on page 71.
zoom out, or to capture the picture.
and take a photo of yourself.
If the battery is low, the flash is not available. For
more information, refer to “Charging the Battery” on
page 2.
–
Single shot
“Editing Camera Settings Shortcuts”
: Press the volume key to zoom in or
: Touch to switch the GPS tag on or off.
: Touch to switch to the front-facing camera lens
: Choose an automatic shooting mode, from:
: Take a single photo.
–
Panorama
: Touch the Camera button to take a photo, then
use the on-screen guideline to move the viewfinder and take
up to 13 shots automatically.
–
Share shot
: Share photos with other users via Wi-Fi Direct. A
Wi-Fi Direct connection is required.
–
Buddy photo share
face detection.
–
Smile shot
on the subject’s face and take the photo.
–
Cartoon
•Effects
: Apply an effect to photos.
•Scene mode
you want to take.
• Exposure value
-2.0 to +2.0.
• Focus mode
•Timer
: Set a delay time to wait between touching the Camera
button and taking a photo.
• Resolution
• White balance
: Take and share photos with friends via
: Touch the Camera button to automatically focus
: Take a photo with cartoon effects.
: Choose a mode to match the kind of pictures
: Use the slider to set the exposure val ue from
: Set the focus mode to Auto focus or Macro.
: Choose a size for the photo.
: Set the light source.
Page 81

•ISO
: This value determines how sensitive the light meter is on
your digital camera. Use a lower ISO number to make your
camera less sensitive to light, a higher ISO number to take
photos with less light, or Auto to let the camera automatically
adjust the ISO for each of your shots.
• Metering
: Select a method for measuring light.
• Outdoor visibility
settings, enabling Outdoor visibility increases the brightness
of your screen to make it easier to see what you are shooting.
Note:
What you see on screen will not correspond to the
luminance of the actual photograph taken.
• Guidelines
photo composition.
• Contextual filenames
generated filename.
• Taking photos using voice
command to take a photo.
• Save as flipped
On
to take and save a mirror-image photo.
• Image quality
: When taking outdoor shots in bright
: Enable or disable an on-screen grid to aid in
: Enable or disable a system
: Enable or disable an voice
: Set self-portrait mode and set this option to
: Choose a quality setting for photos.
•Storage
: Set whether to store you photos on your device or
on your memory card, if one is installed.
• Reset
: Set all Camera settings to the defaults.
Viewing Photos with the Image Viewer
After taking a photo, use the Image Viewer to view, share,
delete, or edit photos.
1. Touch
2. Touch the screen to show or hide Image Viewer options.
3. Touch the screen with two fingers or double-tap on the
4. Sweep across the screen to display the next or previous
5. To set the photo as a favourite, touch
6. Touch
Image Viewer
screen to zoom all the way in or out. For more
information, refer to “Pinch” on page 15.
photo. The current photo is outlined in the thumbnails at
the bottom of the screen. Touch a thumbnail to view the
photo it represents.
such as Bluetooth, and follow the on-screen
instructions. After using this option, the most recent
Share option is displayed in the Application Bar.
to view the photo.
Share
to share the photo. Touch an option,
Photos and Video 73
Favourites
.
Page 82

Storage
Indicator
File
Size
Settings
Image
Viewer
Shortcuts
Current
Elapsed
Time
Available StorageRecord
7. To delete the photo being displayed, touch
Delete
and then touch
to delete the photo or
exit.
Slideshow
8. Touch
to display a slide show of the
available pictures and videos.
Menu
to select
Set as
9. Touch
to assign the photo as
a Contact photo or a Home screen, Lock screen, or
Home and lock screens wallpaper.
For more information, refer to “Viewing Photos and
Videos” on page 80.
Note:
Photos are stored as .jpg files in the device in the
/storage/sdcard0/DCIM/Camera folder or in a storage
card at /storage/extSdCard/DCIM/Camera. For more
information, refer to “My Files” on page 107.
Back
10. Press
to return to the Camera to take more
photos.
Cancel
Delete
to
Camcorder
Use your device’s built-in Camcorder to record high-definition
video in 1080p resolution.
1. From a Home screen, touch
Mode
2. Slide the
button to the
Apps
setting.
The Camcorder screen displays.
➔
Camcorder
Camera
.
74
Page 83

Recording Videos
1. From a Home screen, touch
Mode
2. Slide the
setting.
3. Using the display as a viewfinder, compose your shot by
aiming the lens at the subject.
To configure settings, see “Camcorder Settings” on
page 75.
4. To start recording, touch
During recording, the
5. To pause recording, touch
6. To stop recording, touch
7. Touch
the previous screen.
Important!
Do not take videos of people without their
permission.
Do not take videos in places where cameras are not
allowed.
Do not take videos in places where you may
interfere with another person’s privacy.
button to the
Record
Back
to leave the Camcorder and display
Apps
➔
Camcorder
Record
.
button flashes.
Pause.
Stop
.
Camera
Camcorder Settings
.
While taking videos, use the camcorder settings to configure
the camcorder for best results. Camcorder settings are
represented by icons on the left side of the screen.
Editing Camcorder Settings Shortcuts
As with the camera, the first five icons are actually shortcuts to
camcorder settings. These five shortcuts can be customized to
fit your preference.
Self-recording
Effects
shortcuts.
To customize these shortcuts, see “Editing Camera Settings
Shortcuts” on page 71.
Configuring Camcorder Settings
To configure Camcorder settings:
While in Camcorder mode, touch a settings shortcut or
touch
Camcorder settings:
• Edit shortcuts
information, refer to
on page 71.
,
Recording mode, Timer
, and
Exposure value
Settings
to configure the following
: Customize your settings shortcuts. For more
“Editing Camera Settings Shortcuts”
are default settings
Photos and Video 75
Page 84

• Use the volume key as: Press the volume key to zoom in or
zoom out.
•GPS tag
: Touch to switch the GPS tag on or off.
• Self recording
lens and record a video of yourself.
• Recording mode
Normal, Limit for MMS and Limit for email, which limits the
size of the video to 50 megabytes.
• Effects
• Exposure value
-2.0 to +2.0.
•Timer
starting recording.
• Resolution
• White balance
• Outdoor visibility
settings, enabling Outdoor visibility increases the brightness
of your screen to make it easier to see what you are
recording.
76
: Touch to switch to the front-facing camera
: Set a recording mode. Options are:
: Apply an effect to videos.
: Use the slider to set the exposure val ue from
: Set a delay to wait between touching Record and
: Set a size for the video.
: Set the light source.
: When recording outdoors in bright
Note:
What you see on screen will not correspond to the
luminance of the actual video taken.
• Guidelines
• Contextual filename
• Save as flipped
• Video quality
•Storage
• Reset
: Enable or disable an on-screen grid to aid in
video composition.
: Enter the file with an applicable name.
: Set self-recording mode and set this option
to
On
to take and save a mirror-image video.
: Choose a quality setting for videos.
: Set whether to store you videos o n your device or on
your memory card.
: Set all Camera settings to the defaults.
Viewing Videos with the Image Viewer
After recording a video, use the Image Viewer to play, share,
or delete your video.
1. Touch
2. Touch the screen to show or hide Image Viewer options.
3. Sweep across the screen to display the next or previous
Image Viewer
video. The current video is outlined in the thumbnails at
the bottom of the screen. Touch a thumbnail to view the
video it represents.
to view the video.
Page 85

4. To set the video as a favorite, touch
Share
5. Touch
such as Bluetooth, and follow the on-screen
instructions. After using this option, the most recent
Share option is displayed in the Application Bar.
6. Touch
available pictures and videos.
7. To delete the video being displayed, touch
Note:
Videos are stored as .mp4 files in the device in the
/storage/sdcard0/DCIM/Camera folder or in a storage
card at /storage/extSdCard/DCIM/Camera. For more
information, refer to “My Files” on page 107.
8. To play a video, touch
pause the video and touch
playing the video.
9. Touch
10. Touch and drag the white dot on the progress
bar to fast forward or rewind the video. Touch the left
end of the progress bar to restart the video. Touch the
right end of the progress bar to end the video playback.
to share the video. Touch an option,
Slideshow
to display a slide show of the
Play
SoundAlive
to set the sound quality.
Favorites
. Touch
Resume
to resume
Pause
.
Delete
to
– or –
Rewind
Touch
Fast Forward
11. To change the screen size of the video, touch Full
screen
view
some minor distortion), Original size view or
.
Full screen in ratio view (the video is enlarged
as much as possible without becoming distorted).
12. Touch
while viewing another screen. Touch and drag the popup video to the desired location on the screen. Doubletap the pop-up to return to full screen mode.
13. Touch the Bookmark to mark this video.
14. Press
to restart the video or
to end the video.
(the entire screen is used,
Pop up play
Back
to play a video as a small pop-up
to return to the Camcorder.
Video Player
Your device’s 8.0-inch 1280x800 WXGA
provides playback of videos. Use Video Player to view and
manage videos stored on your tablet.
1. From a Home screen, touch
➔
Video Player
2. Touch the
.
Thumbnails, List
, or
Folders
Photos and Video 77
which may cause
TFT (PLS) LCD
Apps
tab.
screen
Page 86

Search
3. Touch
search term. The current folder is searched and results
are displayed. Touch
4. While viewing the list, touch
• Go to Video Hub:
•List by
: Display videos by Name (default), Date, Size, or
Type.
•Share via
Bluetooth, and follow the on-screen instructions.
• Delete
: Touch videos to select them for deletion or touch
Select all
•
Video editor
your device, must be downloaded and installed from
Samsung Apps).
• Auto play next
of videos in the order they appear.
•
Scan for nearby devices
devices that can receive or display videos.
5. Touch a video to play it. While playing a video, touch the
screen to display or hide on-screen playback controls.
78
and use the keyboard to enter a
X
to remove the search field.
Menu
for options:
opens the Video Hub application.
: Share the video. Touch an option, such as
to delete all videos.
: Opens the video editor (not pre-installed on
: Touch to enable or disable automatic playing
: scans for nearby DLNA-compliant
6. To change the screen size of the video, touch
view
screen
some minor distortion), Original size view or
as much as possible without becoming distorted).
7. Touch
8. Touch
while viewing another screen. Touch and drag the popup video to the desired location on the screen. Doubletap the pop-up to return to full screen mode.
9. While the video is playing, touch
your favorite areas of the video. A yellow mark displays
on the progress bar.
10. During playback, press
•Share via
• Chapter preview
•Edit
(the entire screen is used,
Full screen in ratio view (the video is enlarged
SoundAlive
Pop up play
: Share the video. Touch an option, such as
Bluetooth, and follow the on-screen instructions.
video file, display the chapters. Touch a chapter to begin
playing the video at that point.
: Touch Trim or Video editor (download from Samsung
Apps).
to set the sound quality.
to play a video as a small pop-up
: If chapter information is recorded in the
which may cause
Menu
for options:
Bookmark
Full
to mark
Page 87

• Tag buddy:
• Add weather tag:
day, Snowy day, or Clear night.
• Via Bluetooth
•Video auto off
Choose from
mins
hours
•
Scan for nearby devices
devices that can receive or display the current video.
•Settings
–
–
–
–
–
–
• Details
Size, Resolution, and so on.
Assign a name to a person in a photo.
Choose from Sunny day, Cloudy day, Rainy
: Turn Bluetooth on to use Bluetooth services.
: Set the automated stop for the playing video.
Off, After playing, After 15 mins, After 30
,
After 1 hour, After 1 hour 30 mins
.
: scans for nearby DLNA-complia nt
: Touch this option to view the following:
Play speed
: Touch and drag the slider to decrease or increase
play speed.
Subtitles
: View subtitles for the video, if available.
Auto play next
play sequence.
Capture
Colour tone
Outdoor visibility
:: automatically play the following videos in the
: Turn On or Off the Capture mode.
: Set the colour tone to Normal, Warm, or Cold.
: Turn outdoor visibility On or Off.
: Provides details about the video, such as Name,
, and
After 2
For more information, refer to “Playing Videos” on page 82.
Gallery
Use Gallery to view, capture, and manage photos and videos.
Note:
Photos and videos are stored as .jpg and .mp4 files in the
device in the /storage/sdcard0/DCIM/Camera folder or in
a storage card at /storage/extSdCard/DCIM/Camera. For
more information, refer to “My Files” on page 107.
Selecting Photos and Videos to View
1. From a Home screen, touch
All albums display.
2. Choose items to display by making selections from the
menus in the Application bar:
Person, Group
3. To launch the Camera app, touch
4. Touch the icon next to Camera to change the way your
albums are displayed (
5. Touch
• Slideshow
videos.
• Tag buddy:
, or
Favourites
Grid, Timeline
Menu
to display the following options:
: View a slideshow of the available pictures and
Assign a name to a person in a photo.
Apps
➔
Gallery
Albums, Time, Locations
.
Camera
.
, or
Spiral
).
Photos and Video 79
.
,
Page 88

• New album
• Hidden Items:
•View by
• Select album:
•
•
• Settings
: Create a new album. Use the keyboard to enter
a name for the album.
Touch this icon to show items that have
been hidden.
: View content from all sources or set a single source,
such as in your device.
Touch one or more albums or groups that you
want to share, share, or delete.
Scan for nearby devices
devices that can receive or display photos and videos.
Show/Hide nearby devices
compliant devices that can receive or display photos and
videos, or hide the list.
: Set account to sync pictures and videos with, and
choose whether to sync only via Wi-Fi.
: scans for nearby DLNA-compliant
: display nearby DLNA-
Viewing Groups of Photos and Videos
1. From a Home screen, touch
2. Touch a category and then a group to view it.
Thumbnails for each photo and video in the group
display.
Camera
3. Touch
80
to take a photo or video.
Apps
➔
Gallery
4. Touch
available pictures and videos.
5. Touch
name for the album then tap OK.
6. Touch
• Select item:
Slideshow
New album
Menu
Touch one or more items that you want to share,
delete, or use for a slideshow.
Viewing Photos and Videos
1. From a Home screen, touch
2. Touch a category and then a group to view it, and then
touch a photo or video thumbnail.
3. Touch the screen to show or hide Gallery options.
4. Touch the screen with two fingers or double-tap on the
screen to zoom all the way in or out. For more
information, refer to “Pinch” on page 15.
5. Sweep across the screen to display the next or previous
.
photo or video. (Videos are indicated by the
button.) The current photo or video is outlined in the
thumbnails at the bottom of the screen. Touch a
thumbnail to view the photo or video it represents.
6. Touch to assign this photo of video as a Favourite.
to view a slideshow of the
to create a new album. Enter a
for these options:
Apps
➔
Gallery
Play
.
Page 89

7. Touch
option, such as Bluetooth, and follow the on-screen
instructions.
8. Touch the to choose from Start slideshow and
Slideshow settings.
9. To delete the photo or video being displayed, touch
10. Touch
photos:
• Face tag
• Tag buddy:
• Add weather tag:
• Photo frame
•Photo note
• Copy to clipboard
• Rotate left
• Rotate right
Share
to share the photo or video. Touch an
Delete
.
Menu
to display the following options for
: Set whether to look for a face in this picture.
Assign a name to a person in a photo.
Choose from Sunny day, Cloudy day, Rainy
day, Snowy day, or Clear night.
: Add a frame to the selected photo. Press
when completed or
90 degrees.
degrees.
Cancel
.
: Add a note to a photo.
: Copy the current photo to the clipboard.
: Allows you to rotate the photo counterclockwise
: Allows you to rotate the photo clockwise 90
Save
•Crop
: Allows you to crop the image. Touch and drag the crop
box or the sides or corners of the crop box to create the crop
Done
area, then touch
photo.
•Edit
: Use Photo Editor or Paper Artist to edit your photo.
•Set as
: Assign the photo as a Contact photo or a Home
screen, Lock screen, or Home and lock screens wallpaper.
• Buddy photo share
that person.
•Print
: Print the current photo to a Samsung printer.
• Rename
: Enter an new file name.
•
Scan for nearby devices
devices that can receive or display photos and videos.
• Details
: Provides details about the photo, such as title, time
taken, size, and so on.
There are three options for videos that are not playing:
• Tag buddy:
• Rename
: Enter an new file name.
•
Scan for nearby devices
devices that can receive or display videos.
. Touch X to stop without cropping the
: Detect the face in this picture and email
: scans for nearby DLNA-complia nt
Assign a name to a person in a photo.
: scans for nearby DLNA-complia nt
Photos and Video 81
Page 90

•Details
: Provides details about the video such as Title, Time,
Duration, and so on.
For menu options while a video is playing and other
video options, see “Video Player” on page 77.
11. Touch
Back
to return to the category screen.
Setting a Picture As
You can use the photos you take as a contact’s photo or as
wallpaper for the Home or Lock screen:
Apps
➔
1. From a Home screen, touch
2. Touch a category and then a group to view it, and then
touch a photo to select it.
Menu
➔ Set as
3. Touch
4. Touch
82
Contact photo
– or –
Touch
Home screen, Lock screen,
screen
.
A crop photo screen displays.
.
and then touch a contact entry.
or
Home and lock
Gallery
5. Touch and drag the crop box or the sides or corners of
Tip:
To remove a contact photo, see “Updating Contacts” on
page 33.
.
Tip:
To change wallpaper, see “Wallpapers” on page 25.
Playing Videos
1. From a Home screen, touch
2. Touch a category and then a group to view it, and then
Note:
Videos are marked with a
3. Touch
4. Touch
the crop box to create the crop area, then touch
save the cropped photo as the contact’s icon or
wallpaper. Touch
photo.
touch a video thumbnail to play the video.
Cancel
to stop without cropping the
Pause
to pause the video.
Resume
to resume playing the video.
Play
Apps
button.
➔
Done
Gallery
to
.
Page 91

5. Touch and drag the white dot on the progress
bar to fast forward or rewind the video. Touch the left
end of the progress bar to restart the video. Touch the
right end of the progress bar to end the video playback.
– or –
Rewind
Touch
to end the video.
to restart the video or
Fast Forward
Sharing Photos and Videos
Share photos and videos with your friends.
1. From a Home screen, touch
2. Touch a category and then a group to display
thumbnails.
Menu
Share
.
➔ Select item
3. Touch
4. Touch one or more photos and videos to highlight them
for sharing.
5. Touch
6. Touch an option, such as Bluetooth, and follow the
on-screen instructions.
.
Apps
➔
Gallery
.
Photos and Video 83
Page 92

Section 8: Connections
Your device includes features to connect to the Internet and to
other devices by using Wi-Fi, Bluetooth, or a USB cable.
Internet
Your device is equipped with a full HTML Browser that allows
you to access the Internet.
From a Home screen, touch
Navigating the Internet
The following options are available for Internet navigation.
Command Keys
Touch
Touch and hold
Touch
Touch
Touching and Dragging
•
Touch and drag your finger on the screen to navigate pages and to
reposition pages within the screen.
84
Back
or to return to the previous page.
Back
Forward
to go forward to a recent page.
Refresh
to reload the current page.
Internet
.
display browser History.
Entering Text in a Field
•
While browsing, touch a text field to display the virtual QWERTY
keyboard to enter text.
Zoom
•
Tap the screen twice to zoom in or out.
• Use two fingers, such as your index finger
and thumb, to zoom out by making an inward
pinch motion on the screen. To zoom in,
make an outward motion by sweeping your fingers out.
Tip:
For convenient browsing, you can rotate the device to
landscape mode.
Selecting Items On a Page
While browsing, use gestures and menus to navigate:
•
Touch an item to select it.
•
Touch a hyperlink to follow the link.
•
Touch and hold on a hyperlink or an image for options.
Page 93

Using Browser Windows
You can have multiple windows open at one time and easily
switch between windows.
1. From a Home screen, touch
2. To open a new window, touch at the top of the
screen.
3. To switch to another open window, touch its tab at the
top of the screen.
4. To delete an open window, touch the tab at the top of the
screen, and then touch .
Internet
.
Entering a URL
Access a website quickly by entering the URL.
Internet
1. From a Home screen, touch
URL
2. Touch the
the URL using the virtual QWERTY keyboard.
As you enter characters, potential matches display.
Note:
Touch X to clear the URL field, if necessary.
field at the top of the screen, then enter
.
3. Touch a match to complete the URL.
– or –
Continue entering characters and touch the
load the page.
Go
Creating Bookmarks
While browsing, bookmark a site to quickly access it later.
1. From a Home screen, touch
2. Browse to a website, touch
of the address field, enter the required information, and
OK
.
touch
A gold star displays on the Bookmarked page.
Internet
.
Add bookmark
Internet Menu
While viewing a webpage:
To uc h
To configure web settings:
To uc h
Follow the on-screen instructions.
Menu
for options.
Menu ➔ Settings
.
Connections 85
key to
at right
Page 94

Internet Quick Controls
Use Quick Controls to maximize your viewing area while
browsing the internet.
1. From a Home screen, touch
2. While viewing a webpage, touch
➔
Labs
, and then touch
function.
The Application and URL bars are hidden.
3. Swipe slowly inward from the left or right edge of the
screen to access quick controls.
4. Without lifting your finger, move to an option and then lift
your finger to initiate the option.
86
Internet
Quick controls
.
Menu ➔ Settings
to enable the
5. To cancel, display the Quick controls and touch
Settings
➔
Labs
and touch
uncheck it.
Quick controls
to
Wi-Fi
Wi-Fi is a wireless networking technology that provides access
to local area networks. Use your device’s Wi-Fi feature to:
•
Access the internet for browsing or to send and receive email.
•
Access your corporate network.
•
Use hotspots provided by hotels or airports while traveling.
Wi-Fi communication requires access to an existing Wireless
Access Point (WAP). WAPs can be Open (unsecured) or
Secured (requiring you to provide login credentials). Your
device supports the 802.11 a/b/g/n Wi-Fi protocol.
Configuring Wi-Fi Settings
For more information about configuring your device’s Wi-Fi
settings, see “Wi-Fi” on page 119.
Finding Wi-Fi Networks
You can have your device automatically notify you of available
networks. For more information, refer to “Advanced Settings”
on page 120.
Page 95

Turning Wi-Fi On
By default, your device’s Wi-Fi feature is turned off. Turning
Wi-Fi on makes your device able to discover and connect to
compatible in-range WAPs.
1. From a Home screen, touch
➔
Wi-Fi
.
2. Tap the ON/OFF slider, located to the right of the Wi-Fi
field, to turn Wi-Fi ON .
Apps
➔
Settings
Scanning and Connecting to a Wi-Fi Network
When you turn on Wi-Fi, your device searches for available
Wi-Fi connections, then displays them on screen.
Apps
➔
1. From a Home screen, touch
➔
Wi-Fi
.
OFF / ON
2. Touch the
device automatically scans for available Wireless
Access Points.
3. When the scan is complete, touch a Wi-Fi network to
connect. If the Wi-Fi network is open, your device
automatically connects. If the Wi-Fi network is secured,
enter the password at the prompt to connect.
icon to turn Wi-Fi on. Your
Settings
Adding a Wi-Fi Network Manually
4. From a Home screen, touch
➔
Wi-Fi
.
5. Touch the
6. Touch
• Network SSID
• Security
Note:
Depending on the Security protocol used by the WAP,
additional network information may be required, such as
a Password.
• Password
7. Touch
OFF / ON
Add Wi-Fi network
Point (WAP).
: Select the type of security used by the WAP.
key.
Save
icon to turn Wi-Fi on.
: Enter the name of the Wi-Fi Wireless Access
: If the WAP is secured, enter the password or hex
to save the settings.
Apps
, then enter network information:
Wi-Fi Direct
Wi-Fi Direct allows device-to-device connections so you can
transfer large amounts of data over a Wi-Fi connection.
1. From a Home screen, touch
➔
Wi-Fi
.
OFF / ON
2. Touch the
icon to turn Wi-Fi on.
Apps
Connections 87
➔
➔
Settings
Settings
Page 96

.
Accept
Wi-Fi Direct
on the device to
3. At the top of the Wi-Fi screen, tap the
button.
Your device will begin to search for other devices
enabled with Wi-Fi direct connections.
4. Enable Wi-Fi Direct (similar to Steps 1 - 3) on the device
to which you want to connect.
5. Once the device you want to connect to is displayed,
touch on it.
An Invitation to connect displays on the device to which
you want to connect.
6. On that device, touch
You have 30 seconds to touch
which you want to connect for the connection to be
made.
Once connected, the other device will show as
Connected
Sharing Information with Connected Device
To share videos, photos, or other information with the
connected device, follow these steps:
88
in your list of Wi-Fi Direct devices and the
icon will display at the bottom of your screen.
Accept
1. View the information that you want to share. For
example, if you want to share a photo, find the photo in
your camera viewer or
Share, Share via,
2. Touch the
The Wi-Fi Direct settings screen displays, Wi-Fi Direct is
turned on, and your device scans for other devices.
3. Touch a connected device name. For example,
Android_XXXX.
4. The other device displays a pop-up that indicates it is
receiving the file.
The file is transferred and can be found in
ShareViaWifi folder.
Note:
Depending on the other device model, the prompts and
shared folder information may differ.
Wi-Fi Direct
or
Send via
My Files
folder, then touch the
option.
option.
My Files
in the
Page 97

Bluetooth
Bluetooth is a short-range wireless communications
technology for exchanging information over a distance of
about 30 feet.
You do not need to line up the devices to send information
with Bluetooth. If the devices are in range, you can exchange
information between them, even if they are in different rooms.
Configuring Bluetooth Settings
Configure your device’s Bluetooth settings. For more
information, refer to “Bluetooth” on page 121.
Turning Bluetooth On or Off
To turn Bluetooth on or off:
Apps
1. From a Home screen, touch
➔
Settings
.
2. Under
Note:
Wireless and network
the
OFF / ON
icon to turn Bluetooth on or off.
When Bluetooth is on, the
the Status Bar.
Bluetooth
, on the Bluetooth tab, touch
icon displays in
Pairing with a Bluetooth Device
Search for a Bluetooth device and pair with it, to exchange
information between your device and the target device.
Tip:
After pairing, your device and the target device recognize
each other and exchange information without having to
enter a passcode or PIN.
Apps
➔
1. From a Home screen, touch
➔
Bluetooth
.
OFF / ON
2. Touch the
3. Enable the target device’s discoverable or visible mode.
4. Touch
5. From the list of found devices, touch the target device,
Scan
then follow the prompts to complete the pairing:
•
If the target device requires a PIN, enter a PIN for the target
device and touch
target device.
•
If the device allows automatic or smart pairing, your device
attempts to pair with the device automatically. Follow the
prompts on your device and the target device to complete the
pairing.
icon to turn Bluetooth on.
. Touch
Stop
at any time to stop scanning.
OK
. When prompted, enter the PIN on the
Connections 89
Settings
Page 98

Sharing Data with a Bluetooth Device
To send data to a Bluetooth device:
1. Select a file or item from an appropriate application.
2. Select an option for sharing data with the Bluetooth
feature.
Note:
The method for selecting an option may vary by data
type.
3. Search for and pair with a Bluetooth device. For more
information, refer to “Pairing with a Bluetooth Device” on
page 89.
90
Receiving Data from a Bluetooth Device
To receive data from a Bluetooth device:
1. Turn Bluetooth on. For more information, refer to
“Turning Bluetooth On or Off” on page 89.
Note:
To select the length of time that your device will be visible,
select
2. Pair with the Bluetooth device from which you want to
receive data. For more information, refer to “Pairing with
a Bluetooth Device” on page 89.
A Bluetooth authorization request pop-up displays when
a Bluetooth device sends data to your device.
3. Select
data.
A File received message displays.
Note:
Received data is saved to the Bluetooth folder. If you
receive a contact, it is saved to your contacts
automatically.
Menu
➔
Visibility timeout
Accept
to confirm that you are willing to receive
.
Page 99

Managing Downloads
Files, apps, and other items you download via Internet, Gmail,
Email, or in other ways, are stored on your tablet’s internal
storage. You can use the Downloads app to view, reopen, or
delete what you have downloaded.
To manage the demands on their networks or to help you
avoid unexpected charges, some mobile networks place
restrictions on the size of the files you can download. When
you are connected to such networks, and you try to download
an oversized-file, you are asked or required to delay
downloading the file until the next time you are connected to a
Wi-Fi network. At that time, the download resumes
automatically. The Downloads app can also be used to view
and manage these queued files.
Downloaded files are stored in the Download directory in your
tablet’s internal storage. You can view and copy files from this
directory when connected to a computer with a USB cable.
Uninstalling an App
Apps come pre-installed on your device and you can
download additional apps from Google Play. If you decide to,
you can uninstall apps you downloaded from Google Play and
other sources.
There are several ways to uninstall an app:
1. From a Home screen, touch
Application manager
➔
2. Touch the
3. Touch the app you want to uninstall.
4. Touch the
A pop-up displays the message
uninstalled.
5. Touch OK to confirm you want to uninstall the app.
You can also use Google Play to uninstall apps you
downloaded from there (see “Play Store” on page 110).
Downloaded
Uninstall
.
tab.
button.
Apps
➔
Settings
Application will be
Kies Via Wi-Fi
Samsung Kies is a software that enables you to update your
device firmware, synchronize files, and transfer data to and
from your device directly by connecting to the PC.
Note:
Some features will be supported through the System
Updates feature in the future. For more information, refer
to “Software Update” on page 155.
To learn more about Samsung Kies and Samsung
applications, browse featured applications and download Kies
at:
http://www.samsung.com/us/support/downloads
.
Connections 91
Page 100

Note:
Samsung Kies works on both PC and Macintosh
computers.
Connecting With Samsung Kies via Wi-Fi
1. From your PC, download the Samsung Kies application
Apps
.
if you don’t already have it. You can find it at
samsung.com
Warning!
Close any running applications before connecting
your device to a PC.
2. From your PC, launch the Samsung Kies application.
3. From your PC, connect to a Wi-Fi network.
4. From a Home screen, touch
➔
5. Touch
6. From your device, connect to the same Wi-Fi network
that your PC is connected to if you have not already
done so. For more information, refer to “Connecting
With Samsung Kies via Wi-Fi” on page 92.
92
.
Settings
.
More settings
➔ Kies via Wi-Fi
Synchronizing with Windows Media Player
Ensure that Windows Media Player is installed on your PC.
1. Attach your device to the computer with the USB cable.
Your computer recognizes the connection and displays
the AutoPlay screen.
2. Click the option to
to synchronize music files.
3. Select and drag the music files you want to the sync list
and begin synchronizing.
4. When finished, exit Windows Media Player and
disconnect the USB cable.
Sync digital media files to this device
 Loading...