

Samsung Galaxy Luna User Manual

SMARTPHONE
User Manual
Please read this manual before operating your
device and keep it for future reference.

Legal Notices
WARNING! This product contains chemicals known to the State of
California to cause cancer, birth defects, or other reproductive harm.
Formore information, please call 1-800-SAMSUNG (726-7864).
Intellectual Property
All Intellectual Property, as defined below, owned by or which is
otherwise the property of Samsung or its respective suppliers
relating to the SAMSUNG Phone, including but not limited to,
accessories, parts, or software relating there to (the “Phone
System”), is proprietary to Samsung and protected under federal
laws, state laws, and international treaty provisions. Intellectual
Property includes, but is not limited to, inventions (patentable or
unpatentable), patents, trade secrets, copyrights, software, computer
programs, and related documentation and other works of authorship.
You may not infringe or otherwise violate the rights secured by the
Intellectual Property. Moreover, you agree that you will not (and will
not attempt to) modify, prepare derivative works of, reverse engineer,
decompile, disassemble, or otherwise attempt to create source code
from the software. No title to or ownership in the Intellectual Propert y
is transferred to you. All applicable rights of the Intellectual Property
shall remain with SAMSUNG and its suppliers.
Legal Notices
TFN_S120VL_EN_UM_TN_PF4_070516_FINAL
i

Legal Notices
Open Source Software
Some software components of this product incorporate source code
covered under GNU General Public License (GPL), GNU Lesser
GeneralPublic License (LGPL), OpenSSL License, BSD License
and other open source licenses. Toobtain the source code covered
under the opensource licenses, please visit:
opensource.samsung.com
Disclaimer of Warranties; Exclusion of Liability
EXCEPT AS SET FORTH IN THE EXPRESS WARRANT Y CONTAINED
ON THE WARRANTY PAGE ENCLOSED WITH THE PRODUCT, THE
PURCHASER TAKES THE PRODUCT “AS IS”, AND SAMSUNG
MAKES NO EXPRESS OR IMPLIED WARRANTY OF ANY KIND
WHATSOEVER WITH RESPECT TO THE PRODUCT, INCLUDING
BUT NOT LIMITED TO THE MERCHANTABILITY OF THE PRODUCT
OR ITS FITNESS FOR ANY PARTICULAR PURPOSE OR USE;
THE DESIGN, CONDITION OR QUALITY OF THE PRODUCT; THE
PERFORMANCE OF THE PRODUCT; THE WORKMANSHIP OF THE
PRODUCT OR THE COMPONENTS CONTAINED THEREIN; OR
COMPLIANCE OF THE PRODUCT WITH THE REQUIREMENTS OF
ANY LAW, RULE, SPECIFICATION OR CONTRACT PERTAINING
THERETO. NOTHING CONTAINED IN THE INSTRUCTION MANUAL
SHALL BE CONSTRUED TO CREATE AN EXPRESS OR IMPLIED
WARRANTY OF ANY KIND WHATSOEVER WITH RESPECT TO THE
PRODUCT. IN ADDITION, SAMSUNG SHALL NOT BE LIABLE FOR
ANY DAMAGES OF ANY KIND RESULTING FROM THE PURCHASE
OR USE OF THE PRODUCT OR ARISING FROM THE BREACH OF
ii

Legal Notices
THE EXPRESS WARRANTY, INCLUDING INCIDENTAL, SPECIAL OR
CONSEQUENTIAL DAMAGES, OR LOSS OF ANTICIPATED PROFITS
OR BENEFITS.
Modification of Software
SAMSUNG IS NOT LIABLE FOR PERFORMANCE ISSUES OR
INCOMPATIBILITIES CAUSED BY YOUR EDITING OF REGISTRY
SETTINGS, OR YOUR MODIFICATION OF OPERATING SYSTEM
SOFTWARE.
USING CUSTOM OPERATING SYSTEM SOFTWARE MAY CAUSE
YOUR DEVICE AND APPLICATIONS TO WORK IMPROPERLY. YOUR
CARRIER MAY NOT PERMIT USERS TO DOWNLOAD CERTAIN
SOFTWARE, SUCH AS CUSTOM OS.
Samsung KNOX
Samsung KNOX™ is Samsung’s security platform and is a mark for
a Samsung device tested for security with enterprise use in mind.
Additional licensing fee may be required. For more information about
KNOX, please refer to: samsung.com/us/knox [061616]
iii

Legal Notices
Samsung Electronics America (SEA), Inc.
Address:
85 Challenger Road
Ridgefield Park,
New Jersey 07660
Phone:
1-800-SAMSUNG (726-7864)
Internet Address:
samsung.com
©2016 Samsung Electronics America, Inc. Samsung,
SamsungGalaxy, Samsung MilkMusic, and Smart Switch are
alltrademarks of Samsung Electronics Co., Ltd.
Other marks are the property of their respective owners.
Note: Screen images are simulated. Appearance of device may vary.
Do you have questions about your Samsung Mobile
Device?
For 24 hour information and assistance, we offer a new FAQ/ARS
System (Automated Response System) at: samsung.com/us/support
The actual available capacity of the internal memory is less than
the specified capacity because the operating system and default
applications occupy part of the memory. The available capacity may
change when you upgrade the device.
iv

Legal Notices
Legal Information
Important legal information can be accessed in writing on the mobile
device or at samsung.com
READ THIS INFORMATION BEFORE USING YOUR MOBILE
DEVICE.
Samsung Limited Warranty - This product is covered under
the applicable Samsung Limited Warranty INCLUDING ITS
DISPUTE RESOLUTION PROCEDURE and your right to opt out
of arbitration within 30 calendar days of the first consumer
purchase. You may opt out by either sending an email to
optout@sea.samsung.com with the subject line “Arbitration
Opt-Out” or by calling 1-800-SAMSUNG (726-7864). For more
detailed procedures, please refer to the “Dispute Resolution
Procedures and Arbitration and Opt-Out” section of the Limited
Warranty.
Full written terms and detailed information about the warranty
and obtaining service are available on the device at: Set tings >
About device > Legal information > Samsung legal or you may
access the online version of the Health/Safety and Warranty guide
for your device at:
English
samsung.com/us/Legal/Phone-HSGuide
Spanish
samsung.com/us/Legal/Phone-HSGuide -SP
The online version of the End User License Agreement (EULA)
foryour device can be found online at:
samsung.com/us/Legal/SamsungLegal-EULA4
v

Table of Contents
Table of Contents
Getting Started .........................................................................................1
Front View .............................................................................................2
Back View
Assemble Your Device
Set Up Your Device
Set Up Accounts on Your Device
Know Your Device ............................................................................... 19
Home Screen ....................................................................................20
Status Bar
Navigation
Notification Panel
Enter Text
Calling .......................................................................................................... 39
Phone Screen ...................................................................................40
Make and Answer Calls
Speed Dial
Emergency Calls
Set Up and Access Voicemail
............................................................................................. 4
.................................................................. 6
.......................................................................13
.........................................16
...........................................................................................26
...........................................................................................29
............................................................................32
.............................................................................................35
.............................................................43
..........................................................................................50
.............................................................................52
................................................55
vi

Table of Contents
Applications ............................................................................................. 57
Apps List ..............................................................................................58
Google Apps .....................................................................................63
TracFone Apps .................................................................................67
Additional Apps ...............................................................................68
Calculator ............................................................................................69
Calendar ..............................................................................................71
Camera and Video ........................................................................75
Clock ......................................................................................................81
Contacts ...............................................................................................86
Email ......................................................................................................96
Galaxy Apps ................................................................................... 100
Gallery ................................................................................................ 101
Internet ............................................................................................... 105
Memo .................................................................................................. 110
Messages ......................................................................................... 112
My Files ............................................................................................. 117
Voice Recorder ............................................................................. 119
Settings ....................................................................................................121
How to Use Settings .................................................................. 122
Wi-Fi ..................................................................................................... 123
vii

Table of Contents
Bluetooth
Airplane Mode
Data Usage
Mobile Networks
More Connection Settings
Smart Manager
Applications Settings
Sounds and Vibrations
Notifications
Display
Advanced Features
Wallpaper
Home Screen Settings
Lock Screen and Security
Privacy and Safety
Accessibility
Accounts
Google
Backup and Reset
Language and Input
Battery
Storage
.......................................................................................... 127
............................................................................... 131
..................................................................................... 132
.......................................................................... 133
..................................................... 134
............................................................................. 138
................................................................ 141
............................................................. 146
.................................................................................... 153
............................................................................................... 154
.................................................................... 158
......................................................................................... 159
............................................................. 160
...................................................... 161
...................................................................... 168
.................................................................................... 173
........................................................................................... 177
............................................................................................... 180
...................................................................... 181
................................................................... 185
................................................................................................ 189
.............................................................................................. 191
viii

Table of Contents
Date and Time
About Device
............................................................................... 195
................................................................................. 196
Software Update
.......................................................................... 197
ix

Getting Started
Learn about your mobile device
hardware, assembly procedures, and
how to get started using your new
device.
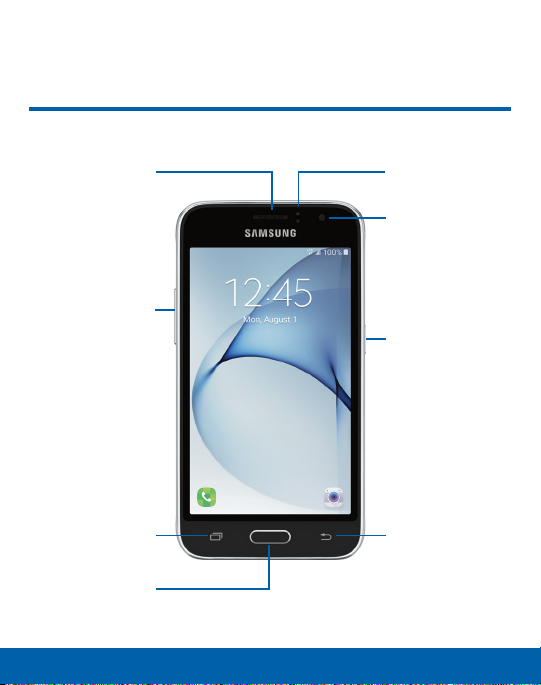
Front View
Earpiece
Volume key
Home key
Proximity
sensors
Front camera
Power key
BackRecent
2 Getting Started
Front View

Proximity sensors: Detect the presence of objects near the
•
device.
Front camera: Take self-portraits and record videos of yourself.
•
Power key: Press and hold to turn the device on or off, restart it,
•
or for quick access to Emergency mode. Press to lock or wake up
the screen.
Back: Return to the previous screen or close a dialog box, menu,
•
or keyboard.
Home key: Return to the Home screen.
•
Recent: Tap to display recent apps.
•
Volume key: Adjust the volume of your device’s sounds and audio
•
playback.
Earpiece: Listen to a call.
•
Getting Started 3 Front View
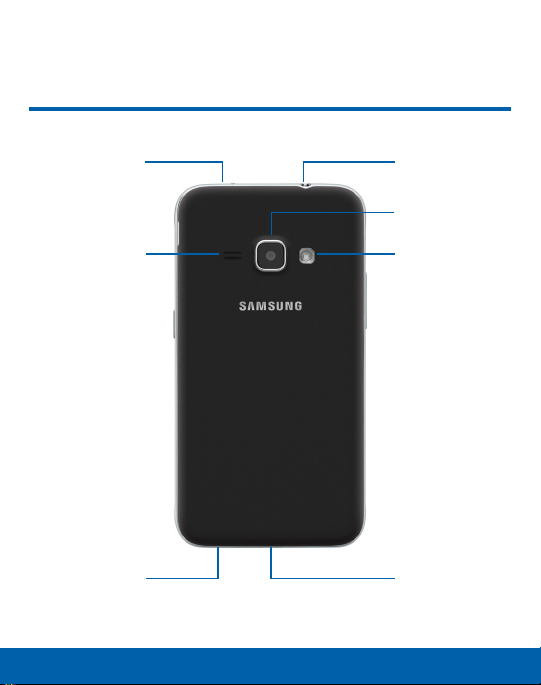
Back View
Microphone
Speaker Flash
Microphone
4 Getting Started
Headset jack
Rear camera
USB charger/
Accessoryport
Back View

Back View
Headset jack: Connect an optional headset (notincluded) .
•
Rear camera: Take pictures and record videos.
•
Flash: Illuminate subjects in low-light environments when taking a
•
photo or recording video.
USB charger/Accessory port: Connect the USBcharger
•
(included) and other optional accessories (not included).
Microphone: Record audio and detect voice commands.
•
Speaker: Play music and other sounds.
•
Getting Started 5 Back View
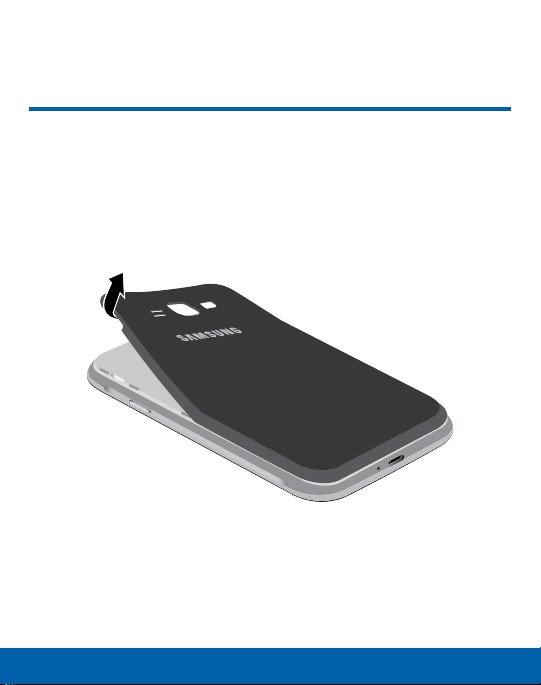
Assemble Your Device
This section helps you to assemble your device.
Remove the Back Cover
1. Remove the back cover using the slot on the topleft of your
device.
2. Lift the cover up and to the right of the device.
Warning: Do not bend or twist the back cover excessively. Doing so may
damage the cover.
6 Getting Started
Assemble Your Device
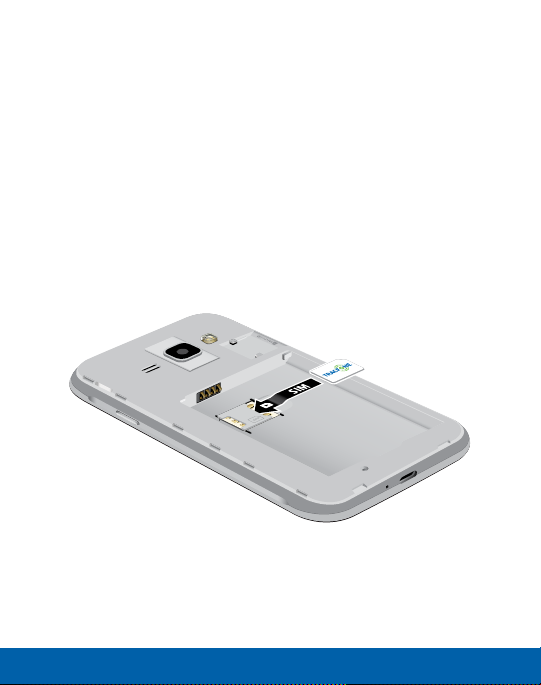
Install the SIM Card
Your device comes with the SIM card already installed. During
activation, your SIM card is loaded with your subscription details,
such as your Personal Identification Number (PIN) , available optional
services, and other features.
Warning: Please be careful when handling the SIMcard to avoid
damaging it. Keep all SIM cards outof reach of small children.
If you need to replace your SIM card, follow these steps:
► Carefully slide the SIM card into the SIM card slot.
Make sure that the card’s gold contacts face down into the
•
device and that the card is positioned as shown.
Caution: If the SIM card is not inserted correctly, the device cannot
detect it. Reorient the SIM card and place it back into the slot if it is not
detected.
Getting Started 7 Assemble Your Device
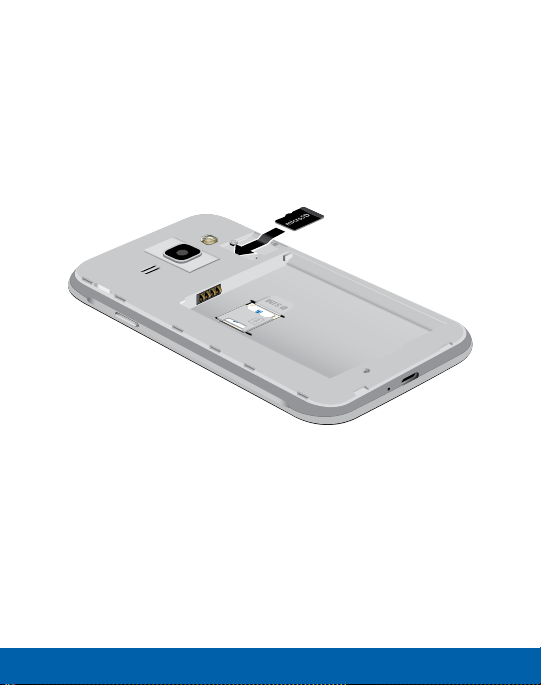
Install a Memory Card
You can install an optional microSD™ or microSDHC™ memory card
(not included) to add more memory space to your device.
Note: A memory card can be installed at any time. Itis not necessary to
install it prior to using the device.
► With the gold contacts facing down, carefully
card into the slot, pushing gently until it clicks into place.
Caution: If the memory card is not inserted correctly, the device cannot
detect it. Reorient the memory card and place it back into the slot if it is
not detected.
slide the memory
Getting Started 8 Assemble Your Device
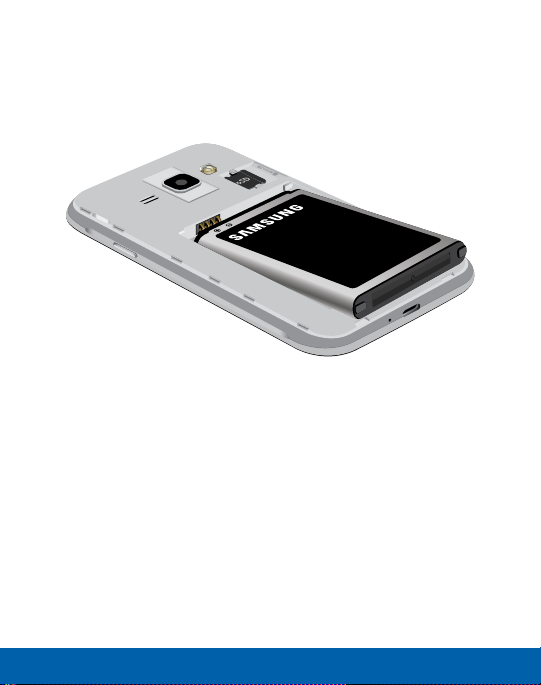
Install the Battery
To install the battery:
1. Insert the battery into the opening on the back of the device,
making sure the connectors align.
2. Gently press down to secure the battery.
Getting Started 9 Assemble Your Device
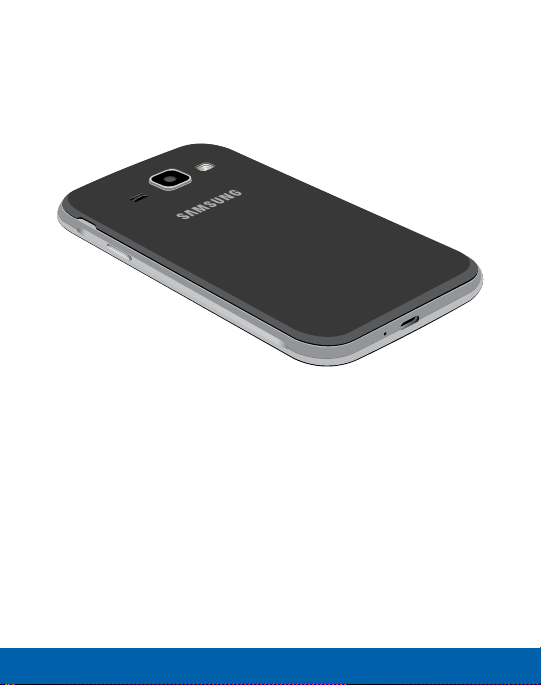
Replace the Back Cover
To replace the back cover:
1. Place the back cover onto the back of the device and press
down.
2. Press along the edge of the back cover until you have a secure
seal.
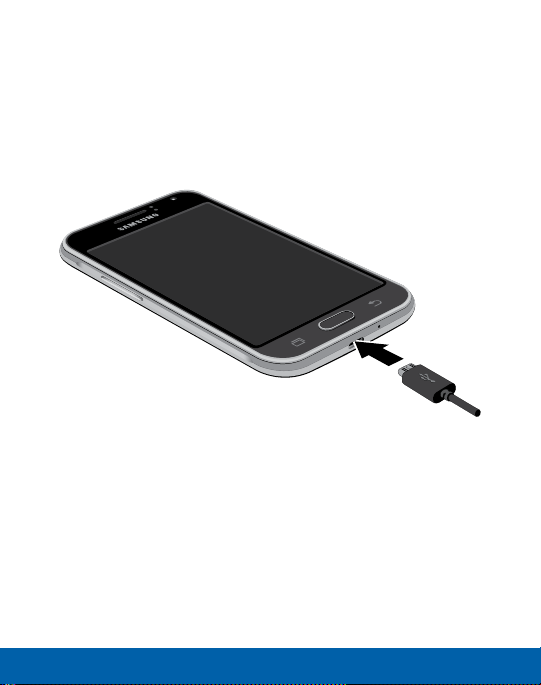
Charge the Battery
Your device is powered by a rechargeable, standard Li-Ion battery.
A USB charger (charging head and USB cable) is included with the
device for charging the battery from any standard outlet.
The battery comes partially charged. A fully discharged battery
requires up to four hours of charge time. You can use the device
while charging.
Getting Started 10 Assemble Your Device
Note: It is recommended you fully charge the battery before using your
device for the first time.
Caution: Use only charging devices and batteries approved by
Samsung. Samsung accessories are designed for your device to
maximize battery life. Using other accessories may invalidate your
warranty and may cause damage.
1. Insert the USB cable into the USB charger/Accessory port.
2. Connect the USB cable to the charging head, and then plug the
charging head into a standardoutlet.
3. Unplug the charging head from the outlet and remove the USB
cable from the device when charging is complete.
Getting Started 11 Assemble Your Device

When to Charge the Battery
When the battery is low and only a few minutes of operation remain,
the device sounds a warning tone at regular intervals.
In this condition, your device conserves its remaining battery power
by dimming the screen.
When the battery level becomes too low, the device automatically
turns off.
For a quick check of your battery level:
► View the battery charge indicator located in the top right corner
of your device’s display. Asolid color
You can also choose to display a percentage value. Viewing
a percentage value can provide a better idea of the remaining
charge on the battery. For more information, see “Battery” on
page189.
(
)
indicates a full charge.
Getting Started 12 Assemble Your Device

Set Up Your Device
Turn Your Device On or Off
The instructions below explain how to turn your device on or off.
Turn the Device On
To turn the device on:
► Press and hold the Power key until the device turns on.
Turn the Device Off
To turn the device off:
1. Press and hold the Power key until the Deviceoptions menu is
displayed.
2. Tap Power off, and confirm if prompted.
13 Getting Started
Set Up Your Device

Reset the Device
If your device stops responding to taps or finger gestures and you
are unable to turn it off, youcan reset your device.
► Press and hold the Power key and the Volumedown key at the
same time for morethan seven seconds.
Initial Set Up
The first time you turn your device on, a Welcome screen is
displayed. It guides you through the basics of setting up your device.
Follow the prompts to choose a default language, connect to a
®
Wi-Fi
network, set up accounts, learn about your device’s features,
andmore.
Note: Voice Assistant provides voice prompts and descriptions of items
on the screen to improve accessibility. During setup, you can enable or
disable Voice Assistant by pressing the Home key quickly three times.
Getting Started 14 Set Up Your Device

Secure Your Device
Use your device’s screen lock features to secure your device.
Lock the Device
By default, the device locks automatically when the screen times out.
To lock the device:
► Press the Power key.
Unlock the Device
The default Screen lock on your device is Swipe.
Note: To choose a more secure screen lock, see “Set a Screen
Lock” on page161.
To unlock the device:
► Press the Power key or Home key, and then drag your finger
across the screen.
Getting Started 15 Set Up Your Device
Set Up Accounts on Your Device
Samsung Account
Create a Samsung account for access to Samsung content and
apps on your device. When you turn on your device for the first time,
set up your existing Samsung account or create a new Samsung
account.
– or –
To create a new Samsung account or set up your Samsung
account on your device at any time, use Accounts settings.
Formore information, see“Accounts” on page177.
1. From a Home screen, tap
2. Tap
Apps > Settings >
Addaccount > Samsungaccount.
16 Getting Started
Set Up Accounts on Your Device
A
ccounts.

Google Account
Your new device uses your Google™ Account to fully utilize its
Android™ features, including Gmail™, GoogleHangouts™, and the
Google Play™ store.
When you turn on your device for the first time, set up your existing
Google Account or create a new GoogleAccount.
– or –
To create a new Google Account or set up your Google
Account on your device at any time, use Accounts settings.
Formore information, see“Accounts” on page177.
1. From a Home screen, tap
2. Tap
Addaccount > Google.
Apps > Accounts.
Factory Reset Protection
When you sign in to a Google Account on your device, Factory Reset
Protection is turned on. Factory Reset Protection (FRP) prevents
other people from using your device if it is reset to factory settings
without your permission. For example, if your device is lost or stolen
and a factory data reset is performed, only someone with your
GoogleAccount username and password can use the device.
You will not be able to access the device after a factory data reset
if you do not have your GoogleAccount username and password.
Formore information, see “Factory Data Reset” on page183.
Caution: You should remove your Google Account before shipping your
device to Samsung or any other service provider for service and before
resetting the device to factory settings.
Getting Started 17 Set Up Accounts on Your Device

Enable Factory Reset Protection
Adding a Google Account to your device automatically turns on
the Factory Reset Protection (FRP) security feature. For more
information, see google.com.
Disable Factory Reset Protection
To disable FRP, remove all Google Accounts from the device.
1. From a Home screen, tap
2. Tap Accounts > Google.
If you have more than one Google Account set up on your
•
device, tap the Google Account you want to remove.
3. Tap More > Remove account.
Apps > Settings.
Getting Started 18 Set Up Accounts on Your Device

Know Your Device
Learn about some of the key features
of your mobile device, including the
screens and icons, as well as how
to navigate the device and enter text
using the keyboard.
Warning: Please note that a touch screen responds
best to a light touch from the pad of your finger
or a capacitive stylus. Using excessive force or a
metallic object when pressing on the touch screen
may damage the tempered glass surface and void
the warranty.
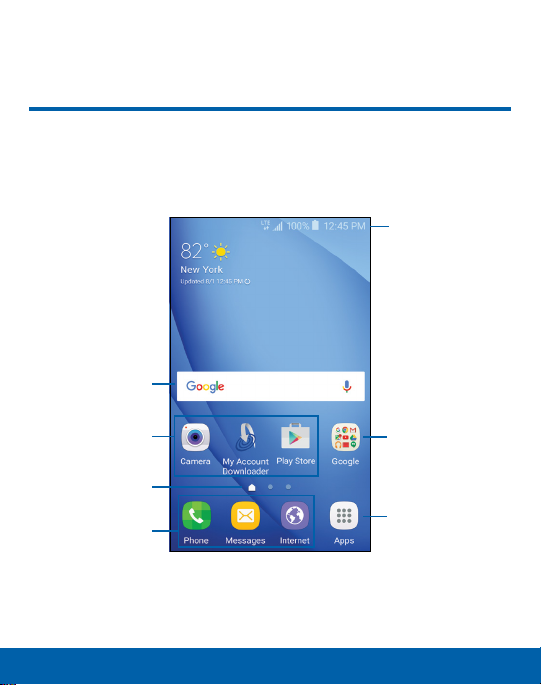
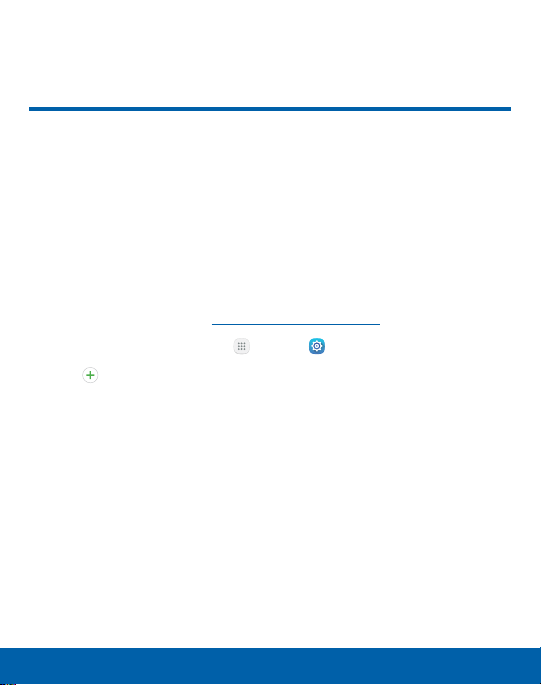
Home Screen
The Home screen is the starting point for using your
device.
Status bar
Widget
App shortcuts
Home screen
indicator
Primary app
shortcuts
App folder
Apps list
20 Know Your Device
Home Screen
 Loading...