

Page 1

User Manual
Please read this manual before operating your device
and keep it for future reference.
Page 2

Table of Contents
Read Me First ................................1
Maintaining Water and Dust Resistance
About the Gear S
Package Contents
..............................5
.............................5
.........3
Getting Started ...............................5
Optional Accessories
Device Layout
Using the SIM Card
Charging the Gear S
Replacing the Strap
Turning the Gear S On or Off
Connecting the Gear S to a Smartphone
Using the Touchscreen
...........................6
.................................6
............................7
...........................9
...........................14
..................16
.......16
........................20
Basics ........................................20
Basic Controls
................................24
Home Screen Layout
Notications
Moments Bar
Clock Screen
Customizing Your Gear S Style
Apps
Setting a Privacy Lock
Entering Text
Motions
Power Saving Features
Transferring Files Between the Gear S and a
Computer
Upgrading the Gear S
Connection Modes
..................................28
.........................................33
. . . . . . . . . . . . . . . . . . . . . . . . . . . . . . . . . . . . . . . 40
.....................................42
..........................26
.................................30
.................................31
................32
........................37
.................................37
.......................41
.........................43
............................44
Connections .................................44
Bluetooth
ii
.....................................45
Page 3

Mobile Networks ..............................48
.........................................49
Wi-Fi
Remote Connection
........................................51
Phone
...........................50
Apps ..........................................51
Contacts
Messages
Email
S Health
Schedule
S Voice
Alarm
Find My Device
Gallery
Music Player
Milk Music
Navigator
News Brieng
Running
Weather
......................................58
....................................59
.........................................62
......................................63
.....................................79
.......................................79
........................................81
...............................82
.......................................83
..................................84
....................................86
.....................................86
.................................87
......................................88
......................................89
Style
.........................................90
Settings ......................................90
..........................................91
Call
........................................93
Sound
.......................................93
Display
Connections
Messages
Do not Disturb
Double Press
Privacy Lock
Accessibility
Motions
Language & Input
Power Saving
Reset Gear
Gear Info
Samsung Gear
..................................94
....................................98
................................98
.................................98
..................................98
..................................99
. . . . . . . . . . . . . . . . . . . . . . . . . . . . . . . . . . . . . . 100
............................100
................................102
..................................103
....................................103
..............................104
Samsung Gear App ........................104
Edit the Gear Home Screen
Transfer Files to Gear
iii
..................106
........................106
Page 4

Apps and Settings ...........................107
Find My Gear
Settings
................................108
.....................................109
iv
Page 5

Read Me First
Please read this manual before using the Gear S
to ensure safe and proper use.
Descriptions are based on the Gear S default
•
settings.
Some content may differ, depending on the
•
region, service provider, or device’s software.
Content that requires high CPU and RAM
•
usage will affect the overall performance of
the device. Apps related to the content may
not work properly depending on the device’s
specications and the environment that it is
used in.
Samsung is not liable for performance issues
•
caused by apps supplied by providers other
than Samsung.
Samsung is not liable for performance issues
•
or incompatibilities caused by edited registry
settings or modied operating system software.
Attempting to customize the operating system
may cause the Gear S or apps to work
improperly.
Software, sound sources, wallpapers, images,
•
and other media provided with this Gear S
are licensed for limited use. Extracting and
using these materials for commercial or other
purposes is an infringement of copyright laws.
Users are entirely responsible for illegal use of
media.
You may incur additional charges for data
•
services, such as messaging, uploading and
downloading, auto-syncing, or using location
1
Page 6
services depending on your data plan. For
large data transfers, it is recommended to use
the Wi-Fi feature.
Default apps that come with the Gear S are
•
subject to updates and may no longer be
supported without prior notice. If you have
questions about an app provided with the
Gear S, contact a Samsung Service Center.
For user-installed apps, contact service
providers.
Modifying the Gear S operating system or
•
installing softwares from unofcial sources
may result in Gear S malfunctions and data
corruption or loss. These actions are violations
of your Samsung license agreement and will
void your warranty.
Instructional Icons
Warning: Situations that could cause injury to
yourself or others.
Caution: Situations that could cause damage
to your device or other equipment.
Note: Essential information for using the
device.
Tip: Additional information you may nd useful.
2
Page 7

Maintaining Water and Dust
Resistance
The device may be damaged if water or dust
enters the device. Follow these tips carefully to
prevent damage to the device and to maintain
the water- and dust-resistant performance of the
device.
Do not immerse the device in water deeper
•
than 1 m and keep it submerged for more than
30 minutes.
Do not expose the device to water moving
•
with force, such as water running from a tap,
ocean waves, or waterfalls.
If the device or your hands are wet, dry them
•
thoroughly before handling the device.
If the device is exposed to freshwater, dry
•
it thoroughly with a clean, soft cloth. If the
device is exposed to any liquid other than
freshwater, rinse the device with freshwater
immediately and dry it thoroughly with a
clean, soft cloth. Failure to rinse the device
in freshwater and dry it as instructed may
cause the device to suffer from operability
or cosmetic issues.
If the device is dropped or receives an
•
impact, the water-and dust-resistant features
of the device may be damaged.
If the device has been immersed in water or
•
the microphone or the speaker is wet, sound
may not be heard clearly during a call. Ensure
that the microphone or the speaker is clean
and dry by wiping it with a dry cloth.
The touchscreen and other features may not
•
work properly if the device is used in water
or in other liquids.
Your device has been tested in a controlled
•
environment and shown to be water-and
dust-resistant in certain circumstances
(meets requirements of classication IP67
as described by the international standard
3
Page 8

IEC 60529 - Degrees of Protection provided
by Enclosures [IP Code]; test conditions:
15 - 35°C, 86 - 106 kPa, 1 meter, for 30
minutes). Despite this classication, your
device is not impervious to water damage
in any situation.
4
Page 9

Getting Started
About the Gear S
Your Gear S connects to your smartphone, to
allow you to check notications, answer or make
calls, view and send messages, and more.
After you pair the Gear S with your smartphone,
you can use it in Gear Only mode to make calls,
and send and receive messages, even if Gear S
is outside Bluetooth range of the smartphone.
For more information about Gear S connection
modes, see “Connections”.
Package Contents
Check the product box for the following items:
Gear S
•
Charging dock and cable
•
Quick start guide
•
The items supplied with the Gear S and any
available accessories may vary depending on the
region or service provider.
The supplied items are designed only for this
Gear S and may not be compatible with other
devices.
Appearances and specications are subject to
change without prior notice.
5
Page 10

Optional Accessories
Microphone
Heart rate sensor
You can purchase additional accessories
•
from your local Samsung retailer. Make sure
they are compatible with the Gear S before
purchase.
Some accessories, such as docking devices,
•
may not have the same water- and dust-
resistance certication.
Use only Samsung-approved accessories.
•
Using unapproved accessories may cause the
performance problems and malfunctions that
are not covered by the warranty.
Availability of all accessories is subject to
•
change depending entirely on manufacturing
companies. For more information about
available accessories, refer to the Samsung
website.
Device Layout
Proximity
sensor
UV Sensor
Power/Home key
Speaker
Charging
terminal
6
Page 11
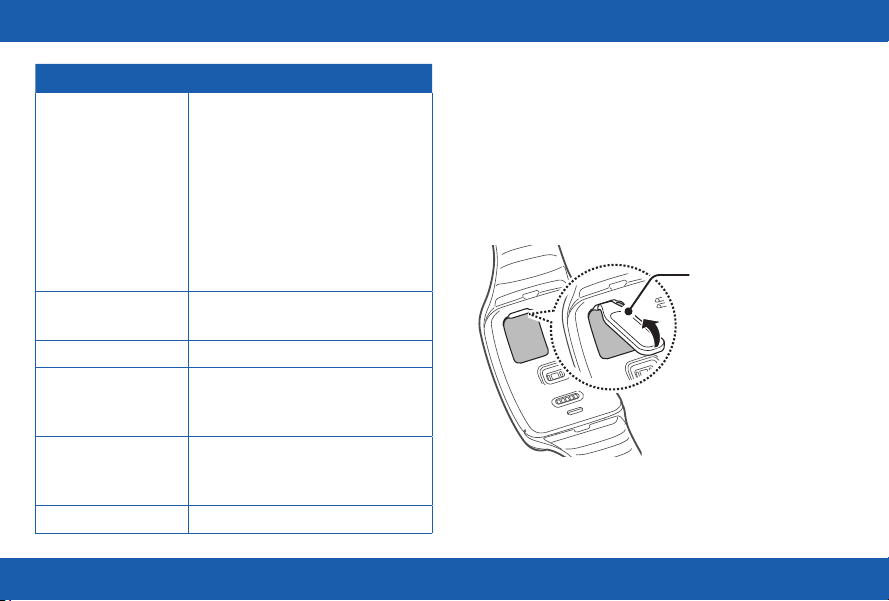
Feature Function
Power/Home Key • Press and hold to turn the
Gear S on or off.
• Press to move to the Clock
screen.
• Press to turn on the screen.
• Press and hold to restart the
Gear S.
Proximity Sensor • Detects when the Gear S is
near other items.
Speaker • Plays sounds.
Heart rate sensor • Measures your heart rate, for
use with apps like S Health on
the smartphone.
Charging terminal • Connects to the terminal on
the charging dock, to charge
the battery.
Microphone • Picks up sounds.
Using the SIM Card
Installing the SIM Card
Insert the SIM card provided by the mobile
telephone service provider.
1. Using the SIM ejector tool, remove the SIM
card cover.
SIM ejector tool
7
Page 12
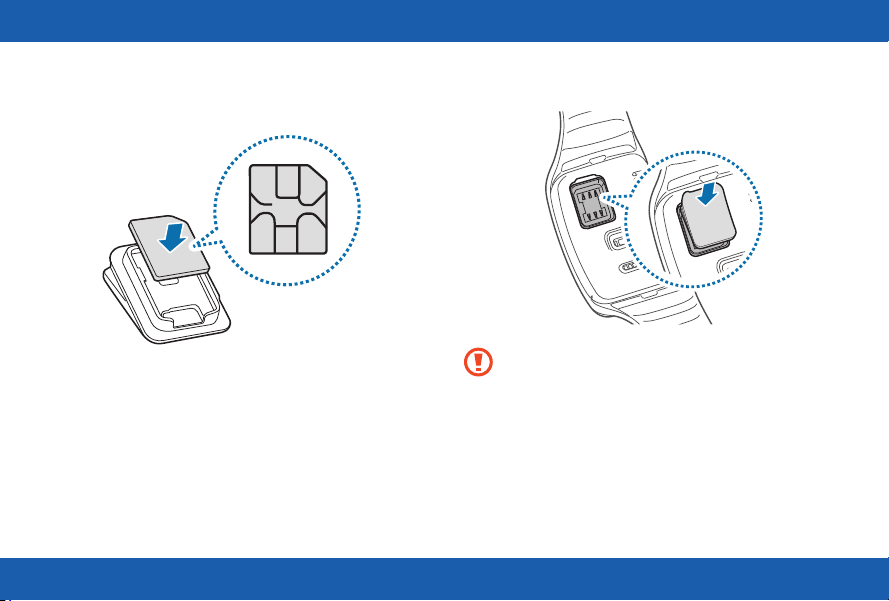
2. Insert the SIM card on the inside of the SIM
card cover with the gold-colored contacts
facing outwards.
3. Place the SIM card cover on the Gear S and
press the cover to close it.
Caution: Ensure that the SIM card
cover is closed tightly to prevent water
and dust entering the device. Open or
loose the cover may allow water and
dust to enter the device and cause
damage.
8
Page 13
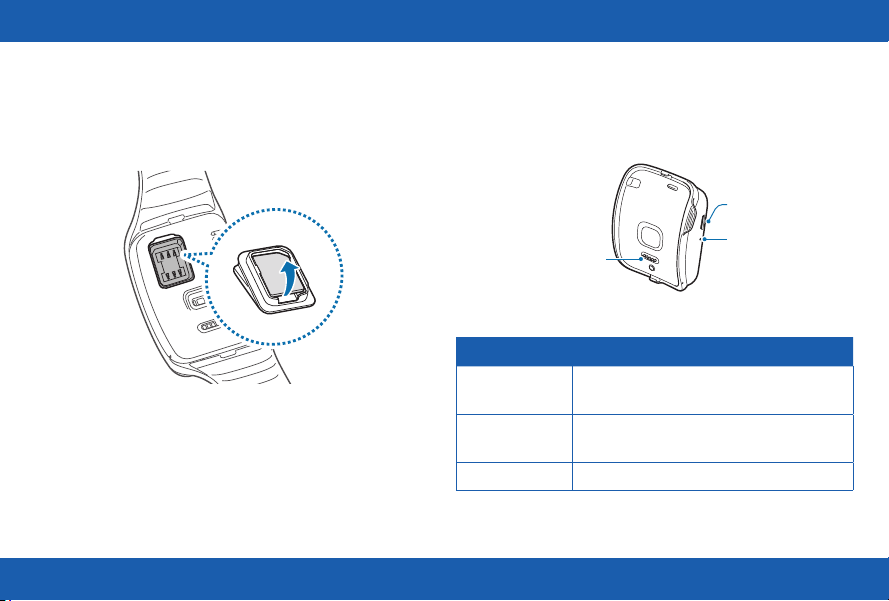
Removing the SIM Card
1. Using the SIM ejector tool, remove the SIM
card cover.
2. Pull out the SIM card.
Charging the Gear S
Charging dock with battery
USB port
Charging terminals
LED indicator
Feature Function
Charging
terminal
USB port Connect a USB cable, to charge the
LED indicator Lights to indicate device status.
Connects to the terminal on the
Gear S to charge the battery.
battery, or to sync information.
9
Page 14
About the Charging Dock
Use the charging dock to charge the battery in
your Gear S. The charging dock also contains a
battery. Take care not to lose the dock.
To charge the Gear S, connect it to the
•
charging dock.
The charging dock can be used as a backup
•
battery. Simply connect it to your Gear S (no
cable needed).
The charging dock automatically charges while
•
the Gear S is charging, or can be charged
independently without the Gear S.
About the Battery
Battery operating time is affected by device
•
usage patterns and the condition of the battery.
Battery life can be reduced when multiple apps
•
or features are running simultaneously.
Note: During charging, the
Gear S may heat up. This is normal
and should not affect the Gear S
lifespan or performance. If the battery
gets hotter than usual, the charger
may stop charging. If the Gear S is not
charging properly, contact a Samsung
Service Center.
10
Page 15
Charging the Battery
Before using your Gear S for the rst time,
charge the battery. You can charge the Gear S by
connecting it to the charging dock and plugging
the USB charger into an outlet, or by connecting
it to a computer with an optional USB cable (not
included).
If the battery is completely depleted, you won’t
be able to turn the Gear S on immediately. Allow
a depleted battery to charge for a few minutes
before turning on the Gear S.
Using Gear S during charging may cause the
battery to charge more slowly.
Caution: Use only Samsung-approved
chargers, batteries, and cables.
Unapproved chargers or cables can
cause damage. Connecting the charger
improperly may cause serious damage
to the Gear S. Any damage caused by
misuse is not covered by the warranty.
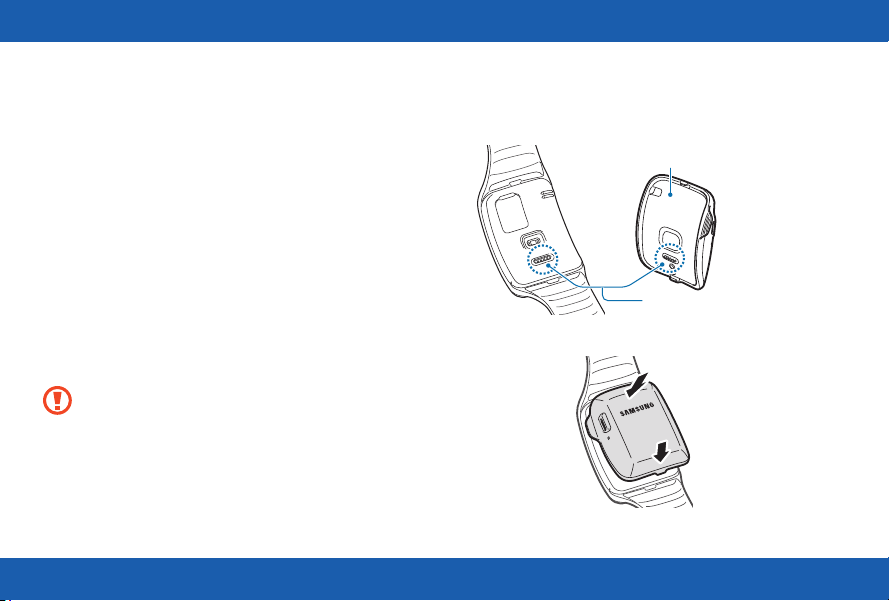
1. Connect the Gear S to the Charging dock with
the charging terminals facing each other.
Charging dock with battery
Charging terminals
11
Page 16
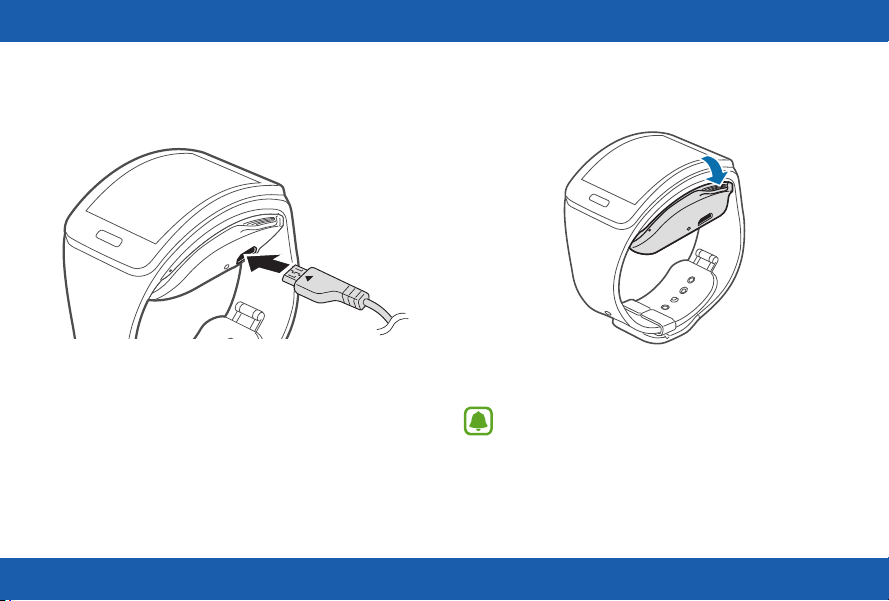
2. Connect the USB charger to the USB port on
the charging dock, and then plug the charger
into an electrical outlet.
3. After charging, disconnect the Gear S from the
Charging dock and unplug the USB charger
from the electrical outlet.
Note: To save energy, unplug the
charger when not in use. The charger
does not have a power switch, so you
must unplug it from the electrical outlet
when not in use to avoid wasting power.
12
Page 17
Checking the Battery Level
When you connect the Gear S to the charging
dock, the LED indicator shows the battery level.
Battery level Indicator color
100--80% Blue
80--20% Green
20--5% Red
5--0% Red blinking
Note: If the charging dock LED indicator
ashes yellow, there is a problem with
charging. Contact a Samsung Service
Center for support.
Wearing the Gear S
1. Release the buckle.
13
Page 18
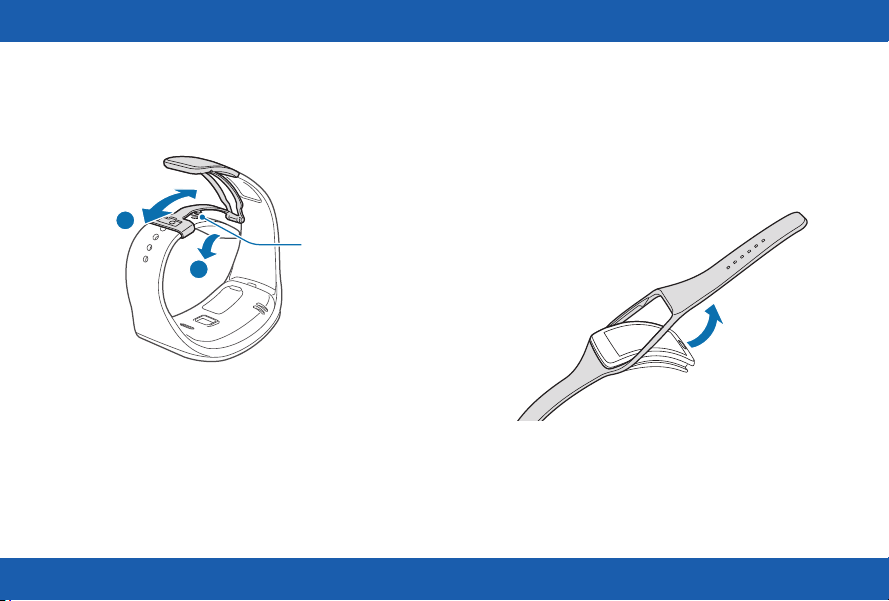
2. Open the clasp and place the strap around
your wrist. Adjust the length of the the strap by
moving the clasp, and then secure it with the
pin and press the buckle to close it.
2
Pin
1
Replacing the Strap
Detach the strap from the Gear S to replace it
with a new one.
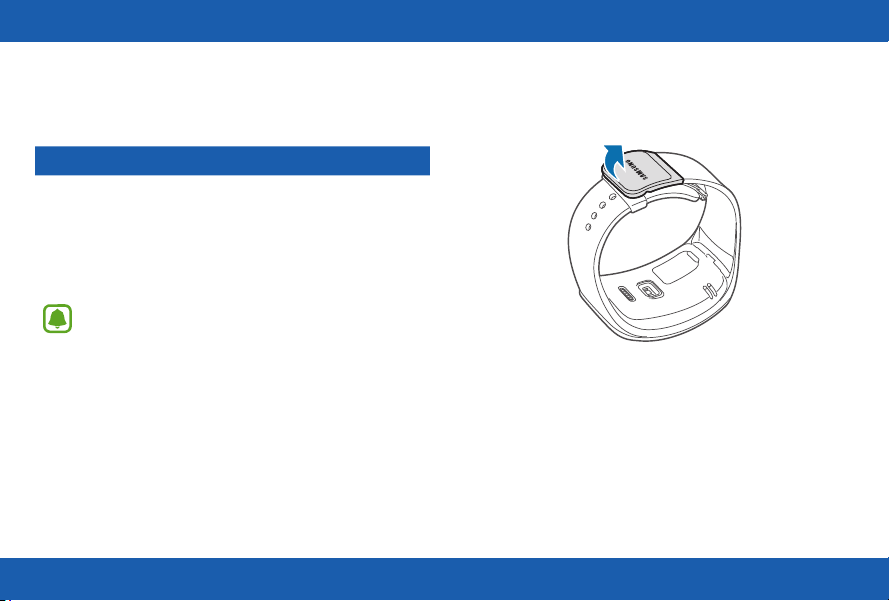
1. Hold the Gear S and pull the strap upwards to
detach it.
14
Page 19
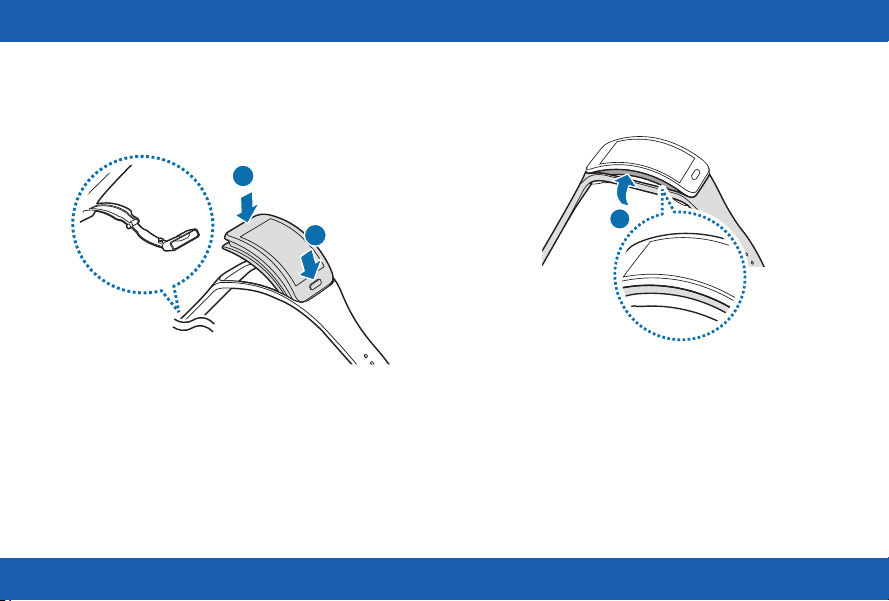
2. Insert one end of the Gear S into the mounting
hole of a new strap. Then, insert the other end
of the Gear S into the hole and pull the strap
up at the same time.
2
3. Ensure that the Gear S is sitting securely in the
mounting hole and that it is properly aligned
with the strap.
1
3
15
Page 20
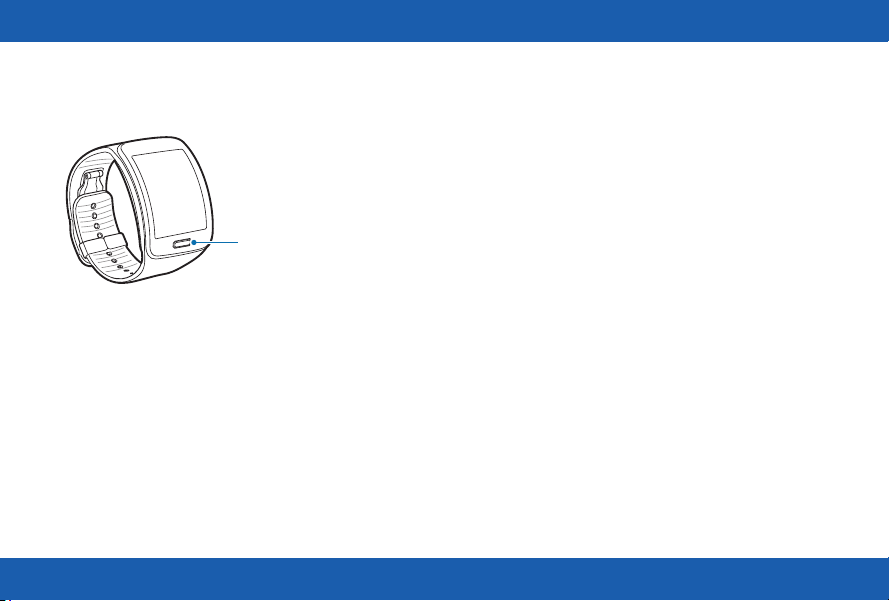
Turning the Gear S On or Off
Power/Home key
Connecting the Gear S to a
Smartphone
Connection Modes
There are several ways your Gear S can connect
to a smartphone. The Gear S functionality
depends on the connection mode.
When you congure Gear S connection settings,
they affect the way your Gear S works with the
connected smartphone.
To turn the Gear S on:
► Press and hold the Power/Home key.
To turn the Gear S off:
► Press and hold the Power/Home key, and
then tap Power off.
Connected via Bluetooth
In Bluetooth connection mode, the Gear S is
paired with the smartphone via Bluetooth.
While in Bluetooth connection mode, the
Gear S can receive notications and calls from
the connected smartphone, and you can use all
of the Gear S and Samsung Gear app functions.
16
Page 21
You will not receive calls or SMS messages to
the Gear S number until you have set the Mobile
Data setting to Always On.
Connected Remotely
When connected remotely, the Gear S is not
connected to the smartphone via Bluetooth, but is
still connected to the smartphone via the mobile
network.
While connected remotely, the Gear S can
receive notications and calls from the
smartphone, calls and SMS messages to the
Gear S phone number, and have limited access
to Samsung Gear app functions. Calls which
are placed will be dialed from the Gear phone
number.
While in Gear Only mode, the Gear S will only
send and receive SMS messages and calls to the
Gear S phone number, and will have no access
to Samsung Gear app functions.
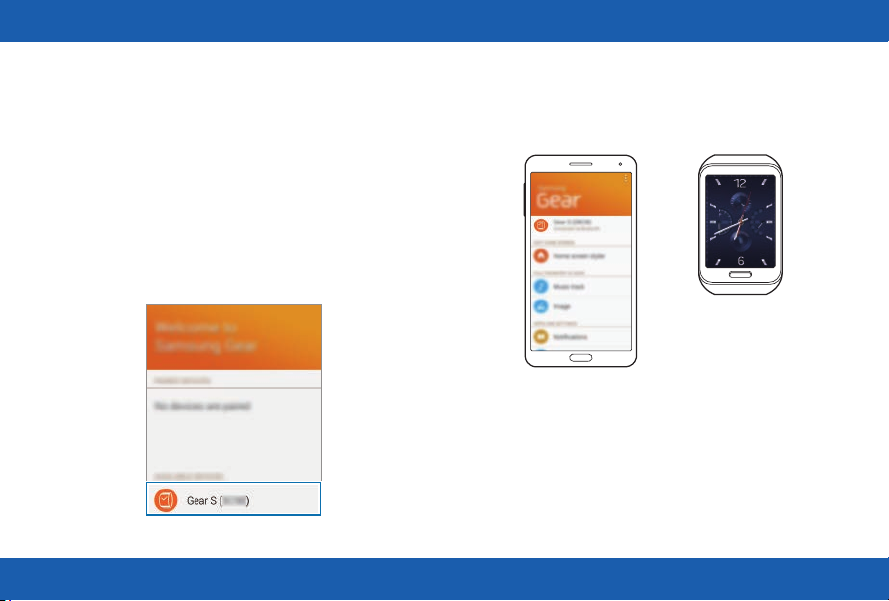
Pairing Your Gear S to a Smartphone
The rst time you turn on the Gear S, follow the
on-screen instructions to download and install
the Samsung Gear app on your smartphone.
Then, pair the Gear S with the smartphone via
Bluetooth to establish a connection between the
devices.
If you want to connect the Gear S to a different
smartphone, you will need to reset the
Gear S, to remove all data from the memory.
Refer to Reset Gear for more information.
Gear Only
In Gear Only mode, the Gear S is not connected
to the smartphone, and is operating as an
independent device.
Note: Connection methods and screens
may vary depending on the type of
smartphone and the software version.
17
Page 22
1. On Smartphone: Download the Samsung
Gear app from Galaxy Apps.
2. On Smartphone: Make sure Bluetooth is on,
and then select the Gear S from the list of
scanned devices. Tap OK when the Bluetooth
pairing request window appears.
3. On Gear S: When the Bluetooth pairing
request appears, tap OK.
4. On Smartphone: Follow the onscreen
instructions to complete the set-up.
When the devices are connected, the Gear S
displays the Clock screen and a tutorial, and the
Samsung Gear Manager app launches on the
smartphone.
18
Page 23

Signing in to Your Samsung Account
During the pairing process, the smartphone will
prompt you to sign in to your Samsung account.
Signing in to your Samsung account allows the
Gear S and the smartphone to remain connected
remotely when they are not connected via
Bluetooth.
The remote connection allows the Gear S
to receive notications and calls from your
smartphone, even when they are not within
Bluetooth range.
19
Page 24
Basics
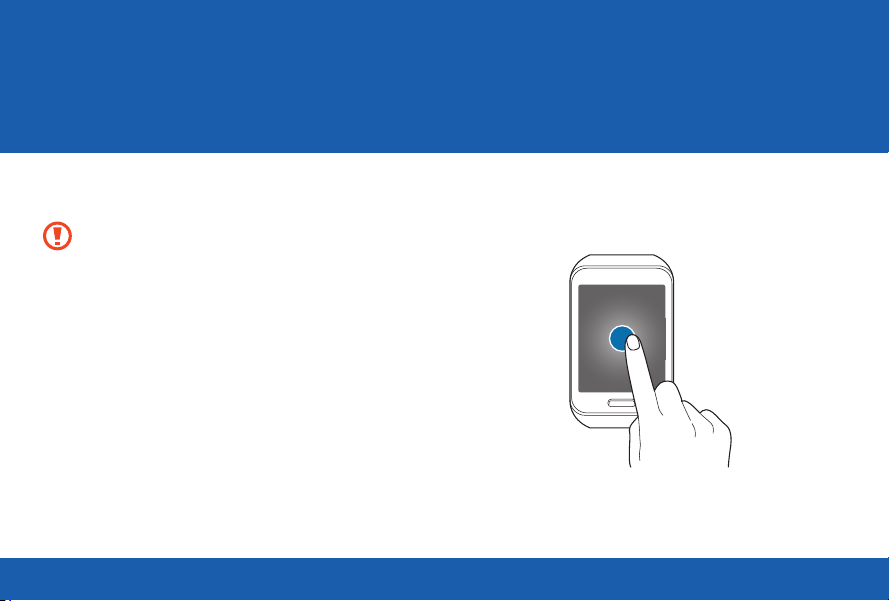
Using the Touchscreen
Caution: To avoid damaging the
touchscreen, do not tap it with anything
sharp or apply excessive pressure to it
with your ngertips.
Tap
To open an app, to select a menu item, or to
press an on-screen button, tap it with a nger.
20
Page 25
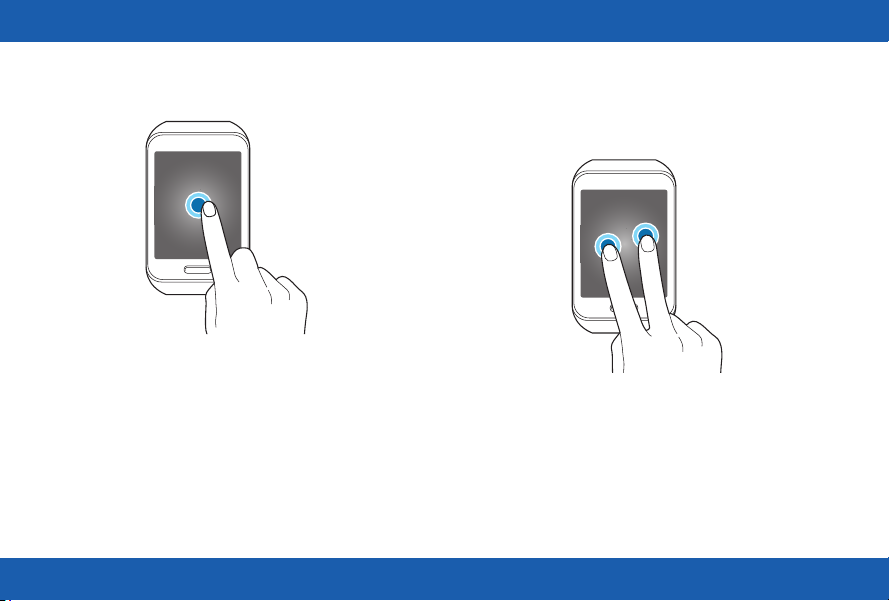
Touch and Hold
Touch and hold to access available options.
Touch and Hold with Two Fingers
Touch and hold with two ngers to open a list of
recently-used apps.
21
Page 26
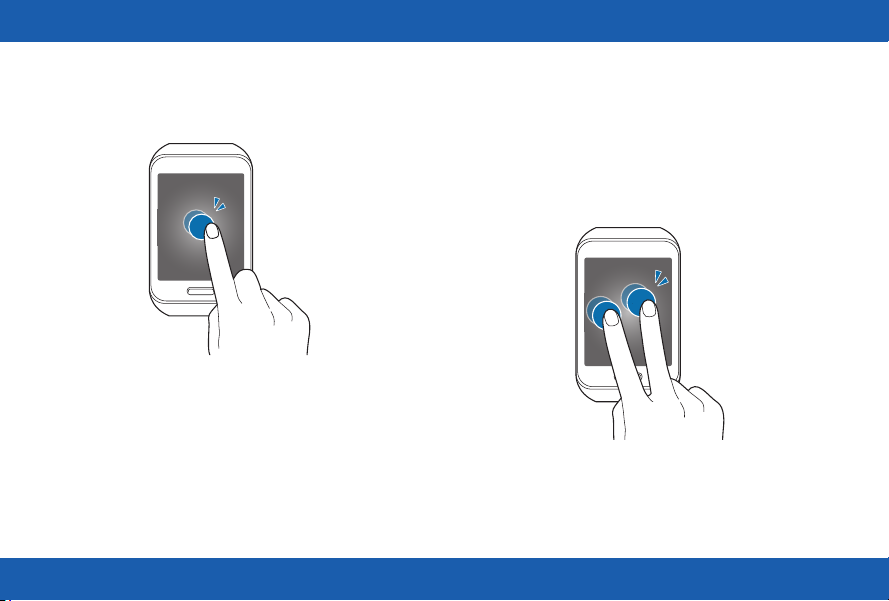
Double-tap
When viewing a picture, SMS message, or email,
double-tap to zoom in. Double-tap again to return.
Double-tap With Two Fingers
To check Gear S status, including Bluetooth,
the connection to the smartphone, sound mode,
mobile network status, and remaining battery
power, double-tap anywhere on the screen with
two ngers. You can also adjust the volume and
the brightness of the display.
22
Page 27

Swipe
Use your nger to swipe from the top, bottom, left
or right edges of the screen to perform actions.
When using an app, swipe left or right to perform
an action, such as scrolling through pictures in
Gallery, or moving to a new song in Music Player.
Swipe down from the top of the screen to return
to the previous screen.
Drag
To move an app on the Apps screen, touch and
hold it and drag it to a new position.
23
Page 28
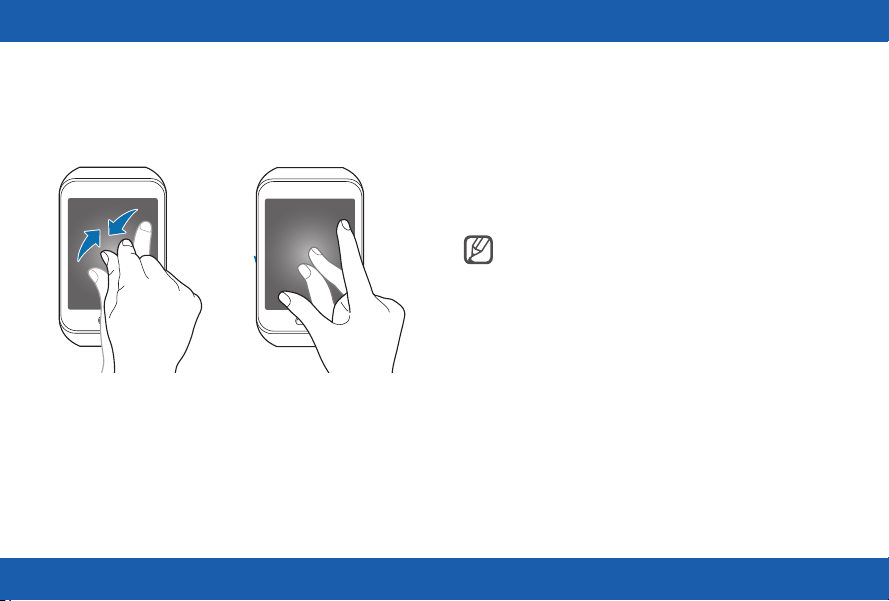
Spread and Pinch
When viewing a picture, SMS message, or email,
spread two ngers apart to zoom in. Pinch to
zoom out.
Basic Controls
Turning the Screen On or Off
To turn the screen on:
► Press the Power/Home key. The Gear S will
display the Clock screen.
Tip: The screen turns off if the Gear S
is not used for a period of time. You can
specify the screen timeout period in the
Gear Settings.
To turn the screen off:
► Press the Power/Home key.
24
Page 29

Adjusting the Brightness of the Display
You can adjust the display’s brightness on the
Gear S to suit the environment.
► On the Clock screen, drag the screen upwards
from the bottom edge of the screen to display
the Apps screen, and then tap Settings >
Display > Brightness.
Adjusting the Volume
Adjust the volume of sound that Gear S plays.
► On the Clock screen, drag the screen upwards
from the bottom edge of the screen to display
the Apps screen, and then tap Settings >
Sound > Volume.
Caution: Do not hold the Gear S
speaker close to your ear. Excessive
exposure to loud sounds can cause
hearing damage.
Switching the Sound Mode
You can quickly switch between modes, to control
whether your Gear S plays sounds or vibrations.
To switch to sound mode:
Press and hold the Power/Home key, and then
•
tap Sound or Vibration.
On the Clock screen, drag the screen upwards
•
from the bottom edge of the screen, and then
tap Settings > Sound > Sound mode >
Vibrate or Mute.
25
Page 30
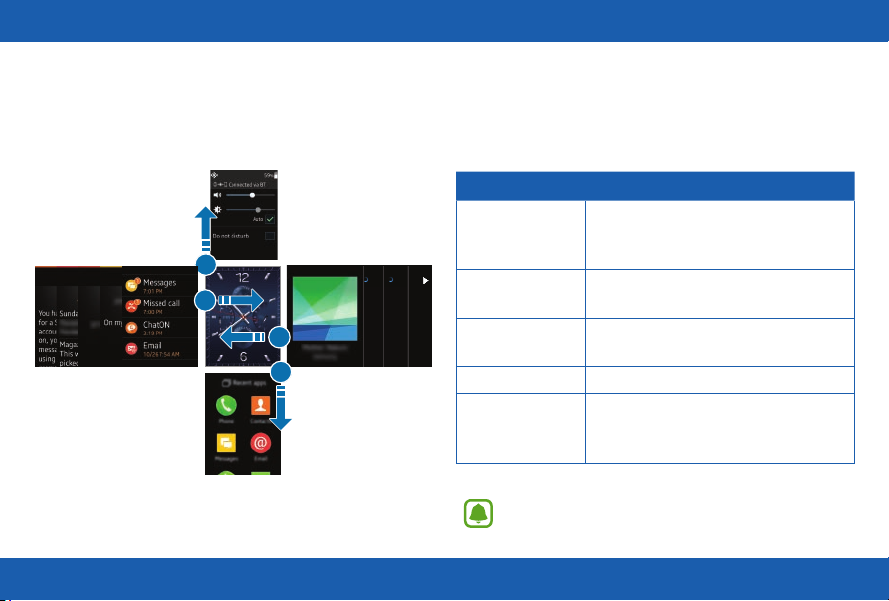
Home Screen Layout
Moments Bar
Notifications Widgets
The Home screen has multiple panels. Swipe to
the left or right to view notications or widgets, or
swipe from the top to display the Moments bar,
and from the bottom to display the Apps screen.
Panel Widget or feature
Notications View events, such as missed calls
or new messages, received on the
Gear S and on the smartphone.
Moments Bar View current status. For more
information, see “Moments Bar”.
Clock (Home) View the time, plus other info,
depending on the clock style.
Apps Screen Launch apps.
Widgets Music Player, S Health, and News
brieng Widgets available by default,
or you can Add widgets.
Apps Screen
Note: Default panel conguration may
vary, depending on the device software.
26
Page 31

Navigating the Home Screen
From the Clock screen:
Swipe up from the bottom to display the Apps
•
screen.
Swipe down from the top to display the
•
Moments bar.
Swipe to the left to see Notications.
•
Swipe to the right to move to the Widgets
•
panels.
Returning to the Previous Screen
Drag the screen downwards from the top edge of
the screen to return to the previous page.
27
Page 32

Adding Widgets to the Home Screen
You can customize the home screens by adding
widgets to the right of the Clock screen.
To add a widget:
► On the Home screen, swipe from the left side
of the screen until you see the Add screen, and
then tap
To Remove a Widget:
► Touch and hold the widget, and then tap
, and select a widget.
.
Notications
Stay up-to-date with a variety of notications,
such as missed calls or new messages received
on the smartphone and on the Gear S.
When the Gear S is not connected to the
smartphone via Bluetooth, you can still receive
notications from the smartphone. For more
information, refer to Connection Modes.
Viewing Notications
► From the Clock screen, swipe to the right to
display the Notications screen, and then tap
the notication.
Note: If a message includes long text or
attachments, check the message details
on your smartphone.
28
Page 33

Dismissing Notications
You can dismiss notications from the
Notications screen. This clears the notication,
but doesn’t affect the item.
To clear a single notication:
1. From the Notications screen, select a
notication.
2. Swipe up, tap the dots, and then tap Clear.
To clear all notications:
1. From the Notications screen, select a
notication type.
2. Swipe the screen down, and then tap Dismiss
all.
Blocking Notications
You can choose the types of notications you
want to receive on your Gear S. The Gear S must
be connected to the smartphone via Bluetooth
to access Gear S settings in the Samsung Gear
app.
► On Smartphone: Tap Apps >
Gear > Notications > Manage notications
and tap
notications.
29
next to the item to block its
Tip: To receive only incoming call and
alarm notications, on the smartphone
Apps > Samsung Gear >
tap
Notications, and then tap Limit
notications.
Samsung
Page 34

Moments Bar
To view status icons, or activate features quickly,
drag down from the top of the Clock screen to
display the Moments bar. The Moments bar
provides useful status information, and allows you
to quickly adjust basic settings.
Connection mode: The current connection
•
between the Gear S and smartphone. Modes
include: Gear Only, Connected remotely, and
Connected via BT (Bluetooth).
Volume: Drag the slider to adjust sound
•
volume.
Screen brightness: Drag the slider to adjust
•
the brightness of the screen, or tap Auto to
enable automatic screen brightness control.
Do not disturb: Mute the sound of incoming
•
calls and notications, except for alarms. Refer
to Do not disturb for more information.
30
Page 35

Clock Screen
The Clock screen is the home screen for the
Gear S.
When you press the Power/Home key from any
other screen, the Clock screen displays.
Customizing the Clock Screen
You can choose the type of clock to display on
the Clock screen, and even customize the clock’s
features.
To choose a clock type:
► On the Clock screen, touch and hold on the
screen and then swipe to the left or right to
browse clock types, and then tap a clock to
select it.
To customize a clock:
► When you select a clock, you can also edit
areas of the clock to your preferences. To
edit a clock, tap , and then tap highlighted
areas on the screen to scroll through available
options.
31
Page 36

To choose when the clock displays:
You can choose to have the clock display all the
time, even when the screen times out. When
the Clock always on option is enabled, the
clock displays in grayscale after timeout so you
can always check the time and quickly access
notications.
► From the Apps screen, tap Settings > Style >
Clocks > Clock always on.
Customizing Your Gear S Style
You can make your Gear S your own by choosing
the wallpaper, color theme, and font.
Choosing Wallpaper
Wallpaper displays in the background of the
home screens, except the Clock screen.
► From the Apps screen, tap Settings > Style >
Wallpapers, and then make a selection:
Tap a wallpaper to select it.
•
Tap to choose a solid wallpaper.
•
Tap to choose a picture stored on the
•
Gear S.
32
Page 37

Choosing a Color Theme
The color theme applies to the Gear S menus.
► From the Apps screen, tap Settings > Style >
Color theme, and then make a selection.
Choosing the Font
You can choose the font used on the Gear S
screens.
► From the Apps screen, tap Settings > Style >
Font, and then make a selection for Font style
and Font size.
Apps
To open the Apps screen:
► On the Clock screen, drag upwards from the
bottom edge of the screen.
33
Page 38

Opening Apps
To open an app:
► From the Clock screen, drag upwards from the
bottom edge of the screen to display the Apps
screen, and then select an app icon to open it.
To open a recently-used app:
► Tap Recent apps, and then tap an app icon.
Closing Apps
To close an app:
► Touch and hold the screen with two ngers to
display recent apps, and the touch and hold on
an app and drag it to the left or right.
To close all apps:
► Touch and hold the screen with two ngers to
display recent apps, and then tap Close all.
Rearranging Apps
► On the Apps screen, touch and hold an app
and drag it to the desired location.
Installing Apps
When the Gear S and the smartphone are
connected via Bluetooth, you can download and
install apps on the Gear S via the smartphone.
► On the Apps screen, swipe upwards and tap
Get more applications.
Note: You can only uninstall the
downloaded apps on the Gear S via
the smartphone. Refer to Uninstalling
apps in the Samsung Gear app for more
information.
34
Page 39

Status Icons
Status icons appear at the top of the Moments
screen.
You can also display status icons by double-
tapping on the screen with two ngers.
Common icons are listed in the table below.
Icon Status
Bluetooth connected. The Gear S is
connected to the smartphone via Bluetooth.
For more information, refer to “Bluetooth
Mode” on page 105.
Bluetooth disconnected. Bluetooth is on,
but the Gear S is not connected to the
smartphone via Bluetooth.
Remotely connected. Gear S is connected
to the smartphone via the mobile network
and the relay server. For more information,
refer to “Remote Connection Mode” on
page 106.
Icon Status
Bluetooth headset. The Gear S is
connected to a Bluetooth headset.
No service. Mobile network coverage is
not available. With no mobile network
coverage, Gear S cannot use Gear Only
mode.
4G service. The Gear S is connected to
the mobile network, and 4G coverage is
available.
Signal strength. Coverage for mobile
network service.
Wi-Fi connected. The Gear S is connected
to a Wi-Fi network.
Location service in use. The location
setting is enabled, and the Gear S is
communicating with GPS to determine
location.
35
Page 40

Icon Status
Mute mode enabled. The Gear S will
not play any sounds or vibration for
notications.
Vibration mode enabled. The Gear S will
play a vibration for notications, instead of
a sound.
Airplane mode enabled. Gear S is not
connected to the mobile network. While in
Airplane mode, you cannot use Gear S for
calls or messaging, or other features that
require a mobile network connection, such
as News Brieng. You can use Wi-Fi and
Bluetooth, and other features like Music
Player.
Battery status. The percentage of
remaining battery power also displays.
Icon Status
Do Not Disturb mode enabled. The
Gear S won’t alert you to any new
notications, but you can use Gear S to
call or send messages, or use the other
features.
36
Page 41

Setting a Privacy Lock
Entering Text
You can set a privacy lock to prevent others from
using or accessing personal data and information
stored on the Gear S when it is disconnected
from the smartphone.
If you set a privacy lock, the Gear S will lock
automatically when it disconnects from the
smartphone.
Setting a Privacy Lock
You can set a 4-digit PIN to secure the Gear S.
► On the Apps screen, tap Settings > Privacy
lock > Privacy lock > PIN.
Unlocking the Screen
► Press the Power/Home key to turn on the
screen, and then and enter the unlock PIN.
Keyboard layout
When you tap a text entry eld on the screen, a
keyboard displays to enter text.
Suggested keywords
Enter uppercase. For
all caps, tap twice
Enter numbers and
punctuation marks
37
Enter a space
Note: Some languages do not support
text entry. To enter text, you must
change the input language to one of the
supported languages.
Delete a preceding
character
Break to the next line
Page 42

Changing the Input Language
While entering text, you can change the input
language at any time. Use one of these methods:
Touch and hold 123 at the lower-left corner of
•
the keyboard, and then select a language.
Slide the space key left or right.
•
Tip: To add more languages, touch and
hold 123, and then tap
input languages and select a language
to add.
> Select
Changing the Keyboard Layout
► Touch and hold 123 at the lower-left corner
of the keyboard, tap
keyboard layout.
Tip: On the 3 x 4 keyboard, a key has
three or four characters. To enter a
character, tap the corresponding key
repeatedly until the desired character
appears.
38
, and then select a
Page 43

Use Additional Keyboard Functions
► Touch and hold 123 at the lower-left corner of
the keyboard to access other functions.
EN(US): Select an input language to use.
•
: Enter text by voice.
•
: Enter text using templates.
•
: Change the keyboard settings.
•
123: Enter numbers and punctuation marks.
•
Sym: Enter symbols.
•
: Insert emoticons.
•
Entering Text by Voice
Speak the text you want to enter.
► Touch and hold 123 at the lower-left corner of
the keyboard, and then tap
39
.
Start or pause
entering text
by voice
Page 44

Motions
You can use motions to control the Gear S.
Wake-up Gesture
When the Wake-up gesture is enabled, the
Gear S recognizes when you pick it up and
displays a screen. You can choose whether it
displays the clock, or the last page you accessed
before the screen turned off. Refer to Display
settings for more information about choosing the
wake-up screen.
To enable or disable the Wake-up gesture:
► On the Apps screen, tap Settings > Motions
and tap Wake-up gesture.
Note: Excessive shaking or impact on
the Gear S may result in unintended
inputs.
40
Page 45

Mute/Pause
When the Mute/Pause gesture is enabled, you
can cover the screen with your palm to mute
incoming calls or alarms, or to pause media
playback.
To enable or disable the Mute/Pause gesture:
► On the Apps screen, tap Settings > Motions
and tap Mute/pause.
Power Saving Features
Use Power saving mode to saves battery power.
All functions except calling, messaging, and
•
notications are turned off, and mobile data
connection deactivates when the screen turns
off.
Screens use gray tones instead of color.
•
The Clock always on feature is disabled, and a
•
special power saving screen displays.
Wi-Fi and motion features are disabled.
•
To enable power saving:
► On the Apps screen, tap Settings > Power
saving, and then tap Power saving mode >
Turn on power saving mode.
To disable power saving:
► From the special power saving screen, tap
> Disable Power saving, and then tap OK.
41
Page 46

Transferring Files Between the
Gear S and a Computer
Move audio, images, or other types of les from a
computer to the Gear S, or vice versa.
For more information about transferring les, refer
to Transferring les from the smartphone to the
Gear S for more information.
Caution: Do not disconnect the
Gear S and the USB cable while
transferring les. Doing so may damage
the Gear or result in data loss.
Note: The Gear may not connect
properly if connected via a USB hub.
Connect the Gear directly to the
computer’s USB port.
Connecting as a Media Device
1. Connect the Gear to the charging dock.
2. Connect the charging dock to a computer
using a USB cable.
3. On the computer, use the le browser and
double-click Gear S (XXXX) > Gear.
4. Select a le on the computer and copy it to the
desired storage location on the Gear S.
5. Disconnect the charging dock from the Gear S
and the computer.
42
Page 47

Upgrading the Gear S
The Gear S can be upgraded to the latest
software.
To upgrade the Gear S, connect the Gear S to the
smartphone via Bluetooth, and use the Samsung
Gear app.
1. On smartphone: Tap Apps > Samsung Gear.
2. On smartphone: Select the Gear S from
the display, and then tap Software update
> Update now and follow the prompts to
complete the update.
Caution:
Check the Gear’s battery status before
•
upgrading the software. Charge the battery
fully before upgrading the software.
Do not turn off the smartphone while the
•
Gear S is upgrading.
While upgrading the Gear S, do not launch
•
other apps on the smartphone or operate
the Gear S. Doing so may overload the
smartphone.
43
Page 48

44
Page 49

Connections
Connection Modes
There are several ways your Gear S can connect
to a smartphone. The Gear S functionality
depends on the connection mode.
When you congure Gear S connection settings,
they may affect the way your Gear S works with a
connected smartphone.
Connected via Bluetooth
When connected via Bluetooth, the Gear S is
paired with the smartphone via Bluetooth.
While connected via Bluetooth, the
Gear S can receive notications and calls from
the connected smartphone, calls and SMS
messages to the Gear S phone number (if mobile
data is set to Always On), and you can use all of
the Gear S and Samsung Gear app functions.
Connected Remotely
When connected remotely, the Gear S is not
connected to the smartphone via Bluetooth, but is
still connected to the smartphone via the mobile
network.
While connected remotely, the Gear S can
receive notications and calls from the
smartphone, calls and SMS messages to the
Gear S phone number, and have limited access
to Samsung Gear app functions. Calls which
are placed will be dialed from the Gear phone
number.
45
Page 50

Gear Only
In Gear Only mode, the Gear S is not connected
to the smartphone, and is operating as a
independent device.
While in Gear Only mode, the Gear S will only
send and receive SMS messages and calls to the
Gear S phone number, and will have no access
to Samsung Gear app functions.
Bluetooth
When you connect the Gear S to your
smartphone via Bluetooth, the Gear S can
access all Gear S and Samsung Gear app
functions.
For more information about connecting Gear S to
a smartphone via Bluetooth, see “Connecting a
New Gear” on page 105.
You can also use Bluetooth to connect the
Gear S to a Bluetooth headset.
Turn Bluetooth On or Off
► From the Apps screen, tap Settings >
Connections > Bluetooth, and then tap the
check box beside Bluetooth to turn it on or off.
46
Page 51

Connecting to a Bluetooth Headset
When you pair the Gear S with a Bluetooth
headset, the Gear S remembers the pairing and
will connect to the headset automatically any time
it detects the headset.
To disconnect from a Bluetooth headset:
► On Gear: From the Apps screen, tap Settings
> Connections > Bluetooth, and then tap the
name of the headset. Follow the on-screen
instructions to disconnect the headset.
To pair with a Bluetooth headset:
1. On Bluetooth Headset: Turn on Bluetooth,
and make the headset discoverable.
2. On Gear: Turn on Bluetooth. From the Apps
screen, tap Settings > Connections >
Bluetooth, and then tap the check box beside
Bluetooth to enable or disable the feature.
3. On Gear: Tap BT headset, and then tap the
name of the headset to select it.
4. Follow the on-screen instructions to complete
the pairing.
Note: When you disconnect from
a Bluetooth headset, the Gear S
remembers the pairing so you can
connect at a later time. You can use the
Unpair setting to make Gear S forget the
headset.
Unpairing from a Bluetooth headset:
► On Gear: From the Apps screen, tap Settings
> Connections > Bluetooth, and then tap
the cog icon next to the headset name. Follow
the on-screen instructions to complete the
unpairing the headset.
47
Page 52

Congure Bluetooth Settings
Congure settings for the Bluetooth feature.
Note: Bluetooth must be turned on to
congure Bluetooth settings.
► From the Apps screen, tap Settings >
Connections > Bluetooth.
Notices About Using Bluetooth
Ensure that your Gear S and the other
•
Bluetooth device are within the Bluetooth
connection range (10 m). The distance may
vary depending on the environment the
devices are used in.
Bluetooth uses the same frequency as some
•
industrial, scientic, medical, and low power
products and interference may occur when
making connections near these types of
products.
Samsung is not responsible for the loss,
•
interception, or misuse of data sent or received
via the Bluetooth feature.
Always ensure that you share and receive
•
data with devices that are trusted and properly
secured. If there are obstacles between
the devices, the operating distance may be
reduced.
Some devices, especially those that are not
•
tested or approved by the Bluetooth SIG, may
be incompatible with your Gear S.
Do not use the Bluetooth feature for illegal
•
purposes (for example, pirating copies of
les or illegally tapping communications for
commercial purposes).
Samsung is not responsible for the
•
repercussion of illegal use of the Bluetooth
feature.
48
Page 53

Mobile Networks
The Gear S can connect to mobile networks, to
allow remote connection to a smartphone, and for
Gear Only connection mode.
You can also congure other mobile network
settings to control whether, and how, the Gear S
accesses mobile data service.
Using Mobile Networks
You can congure how Gear S accesses mobile
networks, and whether it can access mobile data
or service while roaming.
1. On the Apps screen, tap Settings >
Connections > Mobile networks
2. Tap Use mobile networks to choose an
option:
Auto on/off: When enabled, the Gear S
•
will automatically turn access to the mobile
network on or off, depending on whether
the Gear S is connected to the smartphone
via Bluetooth. Access to the mobile network
will turn off automatically when the Gear
S is connected to the smartphone via
Bluetooth, and turn on when the Bluetooth is
disconnected. There is a delay between the
end of the Bluetooth connection and the start
of mobile network connection.
Always on: When enabled, the Gear S is
•
always connected to the mobile network,
when it is available.
Always off: When enabled, the Gear S
•
never accesses the mobile network. Note
that if the Gear S can’t access the mobile
network, you cannot use the remote
connection or Gear Only modes.
49
Page 54

Wi-Fi
You can connect the Gear S to Wi-Fi to connect
to your smartphone remotely, or to update your
news and weather information when the Gear S
is not connected to the smartphone. This feature
is available when the Gear S is not connected to
the smartphone.
1. On the Apps screen, tap Settings >
Connections > Wi-Fi and tap Wi-Fi.
2. Tap Wi-Fi networks > Scan.
3. Select a network from the Wi-Fi networks list.
If the network requires a password, enter the
password to connect to it.
4. Tap Connect.
Adding Wi-Fi Networks
You can also add Wi-Fi networks manually, by
entering information about the network. You may
need to do this if the Wi-Fi network is hidden, or
not visible in a scan.
1. On the Apps screen, tap Settings >
Connections > Wi-Fi and tap Wi-Fi.
2. Tap Wi-Fi networks >
3. Enter the network name in Find hidden
network and tap OK.
Tip: After connecting your Gear S
to a Wi-Fi network, the Gear S will
automatically connect to that network
each time it is available, without
requiring a password. To prevent the
Gear S from connecting to the network
automatically, select it from the list of
networks and tap Forget.
50
.
Page 55

Remote Connection
You can remotely connect the Gear S to the
smartphone when a Bluetooth connection
between the devices is not available. When this
feature is activated, you can receive notications
from the smartphone and use apps that require
a network connection on the Gear S. For more
information, refer to “Connection Modes” on page
16.
1. On smartphone: Sign in to your Samsung
account.
2. On smartphone: Tap Apps > Samsung
Gear > Settings, and then tap Use Remote
connection.
51
Page 56

Apps
Phone
Make a voice call using the keypad, from your
contacts list, or from the call logs.
Note: If a Bluetooth connection between
the two devices is not available,
outgoing calls will only be made from
the Gear S phone number.
Setting an Outgoing Number
You can choose the phone number that displays
for calls you make from the Gear S. By default,
outgoing calls display the smartphone phone
number.
► On the Apps screen, tap Settings > Call >
Outgoing number > Gear or Mobile device.
Note: You can only set an outgoing
number when the Gear S is connected
to the smartphone via Bluetooth or
remote connection.
52
Page 57

Making Calls from the Phone
On the Apps screen, tap Phone > , enter a
•
number using the keypad, and then tap
Call.
Enter the number
using the keypad
Choose a contact
Note: If the Gear S becomes hotter
than usual due to a long call or a hot
environment, calls may disconnect. To
make a call again, wait for the Gear S to
cool down.
View call and
message logs
Delete a character
Making Calls from Call Logs
► On the Apps screen, tap Phone > Logs,
and then use one of these methods:
Drag a log entry to the right to call the
•
number.
Select a log entry, and then tap Call.
•
Making Calls from Contacts
► On the Apps screen, tap Contacts, and then
use one of these methods:
Drag a contact to the right to call the
•
contact’s default number.
Select a contact, and then tap Call or
•
select a phone number.
53
Page 58

Receiving calls
<An incoming call to the
Gear’s phone number>
<An incoming call to the
smartphone’s number>
Answering a Call
When a call comes in, you can answer it using
one of these methods:
Drag to the right.
•
If the voice control feature is activated, say
•
“Accept” to answer the call. Refer to Call for
more information on activating this option.
Rejecting a Call
When a call comes in, you can reject the call, and
send the caller to voicemail. To reject a call, use
one of these methods:
Drag to the left. To send a message to
•
the caller, select a message from the list of
rejection messages.
If the voice control feature is activated, say
•
“Reject” to reject the call. Refer to Call for more
information on this option.
54
Page 59

Missed Calls
If you miss a call, a notication displays on the
screen.
To view missed call notications:
On the Clock screen, swipe to the right.
•
On the Apps screen, tap Phone > Logs.
•
Voicemail
Calls that you don’t answer go to voicemail. If you
miss a call or reject a call on the smartphone, the
call goes to voicemail.
If you forward calls from the smartphone to
Gear S, missed calls will go to the Gear S
voicemail, and will continue going to the Gear S
voicemail until you turn off forwarding.
Checking Voicemail on Gear S
When you receive a new voicemail notication,
you can access voicemail from Gear S to listen to
the message.
1. From the Clock screen, swipe from the left
edge of the screen to display Notications.
2. Tap a voicemail, or swipe across it from left or
right, to view the notication.
3. To access voicemail, tap a notication, and
then tap
55
.
Page 60

Forwarding Calls to Gear S
If you turn on Auto call forwarding, when Gear
S is in Remote Connection mode, calls to the
smartphone are automatically forwarded to the
Gear S. You can turn on Auto call forwarding
when you pair your Gear S with a smartphone,
in the Gear S Settings, or in Settings of the
Samsung Gear app on the smartphone.
When call forwarding is active:
Your smartphone will ring a few times for
•
an incoming call, and then the call will be
forwarded to your Gear S.
If you do not answer the call on your Gear S,
•
the caller may leave a voicemail that you can
listen to on your Gear S.
To use call forwarding, the Use Remote
connection setting must be enabled on the
Samsung Gear app on the smartphone (this is
enabled by default).
Call forwarding continues until your Gear S and
smartphone are connected again, via Bluetooth
or remote connection.
Note: Depending on your service
provider, call forwarding may require a
separate subscription, and may result in
additional charges.
If you uninstall the Samsung Gear app
while call forwarding is active, you will
need to turn off call forwarding in the
smartphone’s Call settings.
Turn off call forwarding before switching
or removing SIMs in either the
smartphone or Gear S, to avoid calls
being routed to unintended devices.
56
Page 61

Turn Call Forwarding On or Off from Gear S
► From the Apps screen, tap Settings > Call >
Auto call forwarding, and then tap the check
box beside Turn on.
Turn Call Forwarding On or Off from
Samsung Gear App
► On smartphone: On the Apps screen, tap
Samsung Gear > Settings > Auto call
forwarding, and then tap the checkbox beside
Turn on.
Options During Calls
During a call, you can use in-call options.
Using the Call Screen
Access
additional
Adjust
the volume
options
57
Continue the
call on the
mobile device
End the
current call
Mute the
microphone
Page 62

Transferring Calls to the Smartphone
You can transfer the call from the Gear S to
the smartphone, to continue the call on the
smartphone.
► On the Call screen, tap
.
Switching to a Bluetooth Headset
Switch the call from Gear S to a Bluetooth
headset to continue the call on the headset.
If the Gear S is already connected to a
•
Bluetooth headset, tap
Bluetooth headset.
If the Gear S is not connected to a Bluetooth
•
headset, open the Apps screen, tap Settings
> Connections, and then > BT headset,
and then select a Bluetooth headset from the
detected devices list.
> to switch to the
Muting the Microphone
You can to turn off the microphone so that the
other party cannot hear you.
► On the Call screen, tap
.
Opening the Keypad
You can open the keypad, to enter a number, or
to make another call.
► On the Call screen, tap
58
> .
Page 63

Contacts
When the Gear S and the smartphone are
connected, the Gear S automatically retrieves
contacts from the smartphone and displays them
on the screen.
Searching for Contacts
► On the Apps screen, tap Contacts, and then
use one of these methods:
Scroll up or down the contacts list.
•
Drag a nger along the index at the right side
•
of the contacts list to scroll through it quickly.
Tap and enter search criteria.
•
Using Contacts
When you nd a contact on the Gear S, tap the
contact to access options:
Make a call: Tap , or tap a phone number if
•
the contact has more than one number saved.
Send a message: Tap to create a new
•
message addressed to the contact.
Send an email: If the contact has an email
•
address, tap the address to create an email
addressed to them.
Favorites
When you set contacts as favorites on the
smartphone, they display at the top of the Gear S
contacts screen so you can nd them easily.
59
Page 64

Messages
View messages and reply, or call the sender
using the Gear S. The Gear S displays messages
that are sent to the Gear S and smartphone.
Note: You may incur additional charges
for sending or receiving messages when
you are roaming.
Sending Messages
When Gear S is connected to a smartphone, you
can use Gear S to send messages from either
device’s phone number. By default, the Gear S
sends messages using the smartphone’s number.
1. From the Apps screen, tap Messages.
2. Tap
3. Add recipients and enter a message, and then
> Compose to create a new message.
tap
to send the message.
Connection Mode and Messaging
When you send and view messages from
Gear S, the connection mode affects how the
messages are handled:
Connected via Bluetooth:
Message sent from the smartphone number by
•
default. Messages to the smartphone can be
viewed on the smartphone or Gear S.
Messages to the Gear S phone number cannot
•
be viewed on either device.
Connected Remotely:
Messages are sent from the smartphone
•
number by default. Messages to the
smartphone can be viewed on the smartphone
or Gear S.
Messages to the Gear S phone number can be
•
viewed on the Gear S.
60
Page 65

Gear Only:
All messages are sent from the Gear S phone
•
number. Only messages sent to the Gear S
phone number can be viewed on Gear S.
When you connect to the smartphone, you will
•
be able to see messages sent to and from that
device again. Even after being reconnected,
the smartphone cannot view any messages
sent to or from the Gear S phone number.
Viewing Incoming Messages
Viewing messages as they arrive:
When you receive a new message, Gear S alerts
you by displaying a notication. You can tap the
notication to view the message.
Checking messages at any time:
1. From the Clock screen, swipe from the left side
of the screen to display Notications.
2. Tap a message to view it. While viewing a
message, you can use these options:
To zoom in on the screen while viewing a
•
message, double-tap the screen or spread
your ngers apart on the screen.
To view the message on the smartphone,
•
tap
> Show on device.
To reply to a message, tap , enter your
•
message, and then tap
61
.
Page 66

Responding to Messages
While viewing a message notication, you can
respond to the message, call the sender, or open
the Messages app to view the message thread.
1. From the Clock screen, swipe from the left side
of the screen to display Notications.
2. Tap a message to view it. While viewing a
message, you can use these options. You may
need to swipe up to see the controls.
Tap to respond to the message.
•
Tap > Call to call the sender.
•
Tap > Open app to open Messages to view
•
the entire message thread.
Tap > Dismiss to clear the notication.
•
Clearing Message Notications
After you view a message, you can clear
the notication so it no longer displays on
Notications.
1. From the Clock screen, swipe from the left side
of the screen to display Notications.
2. Tap a message to view it, and then tap
Clear. You may need to swipe up to see the
controls.
62
>
Page 67

Email
View emails received on the smartphone and
reply to them.
Sending Emails
1. On the Apps screen, tap Email.
2. Drag the screen downwards from the center of
the screen and tap Compose.
3. Add recipients and enter a message, and then
tap
to send the message.
Reading Emails
► On the Apps screen, tap Email and select an
email to view it. While viewing an email, you
can use these options:
To zoom in on the screen while viewing an
•
email, double-tap the screen or spread your
ngers apart on the screen.
To view the email on the smartphone, tap
•
Show on device.
To reply to a message, tap , enter your
•
message, and then tap
63
.
Page 68

S Health
S Health helps you manage your health. Set
tness goals and regularly record and check your
progress.
When the Gear S is synced with a compatible
S Health app on the smartphone, you can use
additional features. The additional features
include checking your physical condition and
exercise records, and more.
Note: Pedometer, Sleep, Exercise,
UV, and Heart Rate are intended for
leisure, well-being and tness purposes
only and are not intended for medical
use. Before using these apps, read
the instructions carefully. Consult a
medical professional if you experience
any health problems or need medical
assistance.
Before You Start Exercising
This app can be used to monitor your exercise.
While moderate physical activity, such as brisk
walking, is safe for most people, health experts
suggest that you talk with your doctor before you
start an exercise program, particularly if you have
any of the following conditions:
Heart disease
•
Asthma or lung disease
•
Diabetes, or liver or kidney disease
•
Arthritis
•
You should also check with your doctor if you
have symptoms suggestive of heart, lung, or
other serious disease, such as:
Pain or discomfort in your chest, neck, jaw, or
•
arms during physical activity
Dizziness or loss of consciousness
•
64
Page 69

Shortness of breath with mild exertion or at
•
rest, or when lying down or going to bed.
Ankle swelling, especially at night
•
A heart murmur or a rapid or pronounced
•
heartbeat
Muscle pain when walking upstairs or up a hill
•
that goes away when you rest
The American College of Sports Medicine
recommends that you see your doctor before
engaging in vigorous exercise if two or more of
the following apply:
You are a man older than age 45 or a woman
•
older than age 55.
You have a family history of heart disease
•
before age 55.
You smoke or quit smoking in the past six
•
months.
You have not exercise for three months or
•
more.
You are overweight or obese.
•
You have high blood pressure or high
•
cholesterol.
You have impaired glucose tolerance, also call
•
pre-diabetes.
When in Doubt - Check it Out
If you are unsure of your health status, have
several health problems, or are pregnant, you
should speak with your doctor before starting a
new exercise program. Working with your doctor
ahead of time is a good way to plan an exercise
program that is right and safe for you. Consider it
the rst step on your path to physical tness.
Note:
The accuracy of the heart rate sensor may
•
be diminished depending on measurement
conditions and surroundings.
Use the HR feature only for measuring your
•
heart rate.
65
Page 70

Do not look directly at the heart rate sensor’s
•
lights. Doing so may impair your vision. Please
make sure children do not look directly at the
lights.
Cold ambient temperatures may affect your
•
measurement; during winter or cold weather,
keep yourself warm when checking your heart
rate.
Take heart rate measurements when you are
•
seated and relaxed. Do not move your body
while taking heart rate measurements. Doing
so may cause your heart rate to be recorded
inaccurately.
If you receive a reading that is very different
•
from your expected heart rate, rest for 30
minutes and then measure again.
Smoking or consuming alcohol before taking
•
measurements may cause your heart rate to
be different from your normal heart rate.
Do not talk, yawn, or breathe deeply while
•
taking heart rate measurements. Doing so
may cause your heart rate to be recorded
inaccurately.
Because the heart rate sensor uses light to
•
approximate heart rate, its accuracy may
vary due to physical factors that affect light
absorption and reection, such as blood
circulation/blood pressure, skin condition and
location and concentration of blood vessels. In
addition, if your heart rate is extremely high or
low, measurements may be inaccurate.
Users with thin wrists may receive inaccurate
•
heart rate measurements when the device
is loose, causing the light to be reected
unevenly. If heart rate measurement is not
working properly, adjust the position of the
device’s heart rate sensor to the right, left, up,
or down on your wrist, or turn the device so the
heart rate sensor sits rmly against the inside
of your wrist. If the heart rate sensor is dirty,
wipe the sensor and try again. Obstructions
66
Page 71

between the device’s strap and your wrist,
such as body hair, dirt, or other objects may
prevent the light from reecting evenly. Please
make sure you remove such obstructions
before use.
If your device becomes hot to the touch,
•
remove it until it cools. Exposing skin to a hot
surface of the device for a long time may cause
skin burn.
Measuring Your Heart Rate
When measuring your heart rate, wear the Gear
S snugly above your wrist as shown in the gure
below. Do not fasten the Gear S too tightly.
<Rear>
Heart rate sensor
67
Page 72

Setting up a User Prole
1. On the Apps screen, tap S Health.
2. Read the information about using this app and
tap OK.
3. Follow the on-screen instructions to select your
gender, and enter your birth date, physical
statistics, and choose other options.
Pedometer
The Pedometer feature counts the number of
steps you have taken and measures the distance
travelled. It also calculates the calories you have
used.
1. On the Apps screen, tap S Health >
Pedometer.
2. When you use this feature for the rst time,
read the information about the health pace
feature and inactive time alert, scroll upwards,
and then select an option.
3. To stop measuring, tap
> Pause.
Access
additional
options
Exercise
distance
Total calories
burned
Using the Healthy Pace Feature
If you walk more than 10 minutes a day, the Gear
S displays the healthy pace icon.
► On the Pedometer main screen, tap
Healthy pace and tick Healthy pace.
68
>
Page 73

Setting an Alert for Inactive Time
Display alerts on the screen if you do not move
for a specic period of time.
► On the Pedometer main screen, tap
Inactive time, and then tick Inactive time.
>
Viewing Your Step Count in a Graph
View your step count for a period in a graph.
► On the Pedometer main screen, swipe
upwards.
Exercise Mate
Record your exercise information and burnt
calories using S Health’s exercise feature.
1. On the Apps screen, tap S Health > Exercise.
2. Select a type of exercise to monitor.
3. Tap Start to start monitoring.
4. Tap Agree to allow this feature to use your
current location information.
5. The heart rate measurement starts. Start
running when the measurement is completed.
You can view information, such as calories
burned and speed, on the screen.
6. To nish exercising, tap the screen and tap
Stop > OK.
7. Swipe to the left or right to view your exercise
information.
69
Page 74

Listen to music.
Exercise time
Heart rate
Note:Before using this feature, pregnant
women, the elderly, and young children,
users suffering from conditions, such
as chronic heart disease or high
blood pressure, are recommended to
seek the advice of a licensed medical
professional.
Exercise distance
Note: The built-in Location feature
is used to check information, such
as altitude and speed, when you
are cycling or hiking. Make sure the
Location feature is active and that
the Gear S and the smartphone are
connected at all times while using this
feature.
If you feel dizzy, experience pain,
or have difculty breathing during
exercise, stop using this feature and
seek the advice of a licensed medical
professional.
Be aware of following conditions before
exercising in cold weather conditions:
Avoid using the device in cold weather. If
•
possible, use the device indoors.
If you use the device outside in cold weather,
•
cover the Gear with your sleeves before using
it.
70
Page 75

Measure your heart rate before you start to
•
exercise. If you measure your heart rate during
exercise, measurements may be inaccurate.
If you have just purchased or have reset the
•
Gear, read the on-screen information about the
app and create your prole. When creating a
prole, you can register your maximum heart
rate either automatically or manually.
The maximum heart rate is the fastest heart
•
rate an individual can achieve through
exercise. If you know your maximum heart
rate, enter it manually. If you set the maximum
heart rate to be measured automatically, the
Gear S will calculate it using “210 - (0.65 x
age)”.
Caution: If you feel pain or discomfort
while exercising, stop immediately and
consult a medical professional.
Using the Coaching Feature while Exercising
in Running Mode
Use the personalized coaching feature to
exercise safely and effectively. You will receive
real-time coaching advice that leads you through
a safe and effective workout that keeps you t.
About the Coaching Feature
The coaching feature includes Firstbeat
technology to provide personalised exercise
guidance. Firstbeat uses training goal analysis
that measures the accumulated physical load
during a workout and assesses the impact on
your tness. Training goal levels are based
on your physical prole and the heart rate
information recorded while you work out. Your
training goal increases when you perform
effective exercise and the coaching feature uses
the training goal to provide you with feedback.
71
Page 76

The feedback is provided by the feature via
prompts, such as ‘speed up’, ‘keep up this pace’,
and ‘slow down’. When you rst start to use the
coaching feature, it will estimate an appropriate
training goal level based on your prole. As you
exercise, it will analyse your training history and
provide more personalised guidance. A typical
workout may start at a lower intensity and sharply
increase in intensity towards the end.
Visit www.rstbeat./te for more information.
Running
1. On the Exercise main screen, tap Running.
2. Tap
3. Drag the screen downwards from the top edge
4. Tap Start, and then start running when the
5. When you nish running, tap the screen
72
and enable Coaching, and then tap
Coaching to set a training goal, duration, and
maximum heart rate.
of the screen to return to the Running screen.
heart rate measurement is complete. You can
view information, such as burnt calories and
speed, on the screen.
and tap Stop > OK to stop monitoring your
exercise information.
Page 77

Viewing a Log of Burned Calories
Compare your burned calorie records for a period
by viewing them in a graph.
► On the Exercise main screen, select a type of
exercise and swipe upwards.
View your burnt calories in a
graph
Tip: Measured distance may differ
from the actual distance due to uneven
strides, walking in place, and pacing
around. Only records from the past thirty
days are saved. You can view previous
data on the smartphone in the S Health
app.
73
Page 78

Measuring Heart Rate
Measure and record your heart rate.
Note: The Gear’s heart rate
measurement feature is intended for
tness and informational purposes
only and is not intended for use in the
diagnosis of disease or other conditions,
or in the cure, mitigation, treatment, or
prevention of disease. Refer to Wearing
the Gear for details.
Be Aware of Following Conditions Before
Measuring your Heart Rate:
Rest for 5 minutes before taking
•
measurements.
If the measurement is very different from the
•
expected heart rate, rest for 30 minutes and
then measure it again.
During winter or in cold weather, keep yourself
•
warm when measuring your heart rate.
Smoking or consuming alcohol before taking
•
measurements may cause your heart rate to
be different from your normal heart rate.
Do not talk, yawn, or breathe deeply while
•
taking heart rate measurements. Doing so
may cause your heart rate to be recorded
inaccurately.
Do not move your body from the sensor while
•
taking heart rate measurements. Doing so
may cause your heart rate to be recorded
inaccurately.
Do not apply excessive force to the sensor.
•
Heart rate measurements may vary depending
•
on the measurement method and the
environment they are taken in.
74
Page 79

Measuring your Heart Rate
1. On the Apps screen, tap S Health > Heart
Rate.
2. When you use this feature for the rst time,
read the information about measuring your
heart rate and tap OK.
3. Tap Start to begin measuring your heart rate.
After a moment, your current heart rate will
display on the screen.
To view more information, tap the screen.
•
To add tag information rate, tap .
•
Viewing Heart Rate Records in a Graph
View and compare your heart rate records for a
period in a graph.
On the Heart rate main screen, swipe upwards.
Access
additional
options.
Maximum
heart rate
View data
in a graph
Tip: Only records from the past thirty
days are saved. You can view previous
data on the mobile device where the
S Health app is installed.
75
Page 80

Viewing Sleep Information
Monitor your sleep patterns and record how much
sleep you get by detecting body movements while
you sleep. You can transfer the records to the
smartphone.
When the Gear is monitoring your sleep duration,
blocking mode is activated.
1. On the Apps screen, tap S Health > Sleep.
2. When you use this feature for the rst time,
read the information about measuring sleep
data and tap OK.
3. Tap Record sleep.
4. Read the information about measuring sleep
data and tap OK. The sleep duration appears
on the screen when sleep recording starts.
5. Tap I’m awake > OK to stop recording.
76
Page 81

Viewing your Sleep Data in a Graph
► On the Sleep main screen, swipe upwards.
Tip: Only records from the past thirty
days are saved. You can view previous
data on the mobile device where the
S Health app is installed.
Access additional information.
Sleep duration
View data in a graph
Measuring the UV Level
Measure UV levels in your current location and
record the UV level data.
1. On the All apps screen, tap S Health > UV.
2. When you use this feature for the rst time,
read the information about UV measurements
and tap OK, and then tap Start.
3. Face the Gear’s screen towards the sun. The
UV level will appear on the screen when the
measurement is complete.
77
Page 82

Viewing the UV Level Records in a Graph
On the UV main screen, swipe upwards.
Access additional options.
UV level
View data in a graph
Note: The Gear’s UV measurement
feature cannot be used for medical
purposes.
Be Aware of the Following Conditions Before
Measuring UV Level:
During winter or in humid environment,
•
measurements may differ from the actual UV
level.
Do not obstruct the UV sensor. Doing so may
•
cause the UV level to be recorded inaccurately.
If the UV sensor is dirty, wipe the sensor before
•
measuring.
If you measure UV levels indoors, the
•
measurement may be inaccurate.
UV level measurements may vary depending
•
on the measurement method and the
environment they are taken in.
78
Page 83

Additional Information about S Health
The personal information collected by S Health
•
may be stored on the Gear for informative
purposes only. Samsung does not receive,
store, nor transmit your personal information.
(But if you sign in to your Samsung account
from S Health, your data may be saved
on the server for data backup purposes.)
Personal information may be stored until the
completion of such purposes. You can delete
personal data stored by S Health by using the
Reset data option in the Settings menu or by
uninstalling the app. Resetting the data will
delete all information stored in the server. To
delete any data you have shared with social
networks or transferred to storage devices, you
must delete them separately.
You assume full responsibility for the
•
inappropriate use of data shared on social
networks or transmitted to others. Use caution
when sharing your personal data with others.
If the Gear is connected to a mobile device,
•
verify the communication protocol to conrm
proper operation. If you use a wireless
connection, such as Bluetooth or ANT+,
the Gear may be affected by electronic
interference from other devices. Avoid using
the Gear near other devices that transmit radio
waves.
The content used in the S Health app may vary
•
depending on the software version of the app.
The services provided with the app are subject
to change or the cancellation of support without
prior notice.
Available S health functions and services
•
may vary depending on the local laws and
regulations in your region.
79
Page 84

Schedule
S Voice
View the events scheduled on the smartphone’s
Calendar.
1. On the Apps screen, tap Schedule.
2. Select an event from the list to view the details.
Swipe to the left or right, or tap the left or right
arrows to change the date.
Perform various tasks simply by speaking.
Once you activate S Voice, you can wake up the
Gear from any screen when you say “Hi Gear.”
Note: S Voice does not support all
languages.
Using S Voice
1. On the Apps screen, tap S Voice. When
S Voice is active, the microphone icon turns
red.
2. Say a voice command. If you say a command
and the device recognizes it, the microphone
icon at the bottom of the screen ashes green.
Then, the device performs the command. To
repeat a voice command or say a different
command, tap
80
.
Page 85

Tips for Better Voice Recognition
Speak clearly.
•
Speak in quiet places.
•
Do not use offensive or slang words.
•
The Gear may not recognize your commands or
may perform unwanted commands depending on
your surroundings or how you speak.
Changing the Wake-up Command
You can speak the wake-up command to launch
S Voice when the device is in standby mode. By
default, the wake-up command is “Hi Gear”, but
you can change the wake-up command.
1. On the Apps screen, tap S Voice.
2. Tap
> Voice wake-up > Change command.
Waking up S Voice in Standby Mode
If S Voice is not used for a certain period, it
automatically switches to standby mode.
► Tap the microphone icon or say “Hi Gear” to
the device to resume voice recognition.
Disabling Voice Prompt
When Voice prompt is enabled, the Gear provides
voice feedback when you say commands.
1. On the Apps screen, tap S Voice.
2. Tap
81
and deselect Voice prompt.
Tap > Example Commands to view
examples of available voice commands.
Page 86

Alarm
Setting Alarms
1. On the Apps screen, tap Alarm > .
2. Set an alarm time, select the days on which
the alarm will repeat, set other various alarm
options.
3. Tap Save. The saved alarm is added to the
alarms list.
4. In the alarms list, tap
or tap
to deactivate the alarm.
to activate the alarm
Stopping Alarms
► Drag outside the large circle to stop an
alarm. If the alarm includes a snooze option,
drag
alarm after a specied length of time.
outside the large circle to repeat the
Deleting Alarms
1. On the Apps screen, tap Alarm.
2. Drag the screen downwards from the center of
the screen and tap Delete.
3. Tick alarms and tap Delete.
82
Page 87

Find My Device
If you misplace the connected smartphone,
Gear S can help you nd it.
1. On Gear: On the Apps screen, tap Find My
Device.
2. On Gear: Tap Start.
3. On smartphone: The smartphone plays
sounds and turns on the screen.
4. On smartphone: When you nd the
smartphone, drag
on the smartphone, or tap Stop on the Gear S.
outside the large circle
Viewing the Location of the Mobile Device
Note: To use this feature, you must turn
on Share location on the smartphone.
While in Bluetooth connection mode
with the smartphone, open the Samsung
Gear app, and then tap Settings >
Share location.
1. On Gear: On the Apps screen, tap Find My
Device.
2. On Gear: Tap
3. On Gear: The address of the current location
of the smartphone displays. To display the
location on a map, tap Show on map.
83
> Locate device.
Page 88

Gallery
View images stored in the mobile device after
transferring the images to the Gear. Refer to
Transferring les from the mobile device to the
Gear for more information.
Transferring Photos from a Smartphone to
Gear S
Use the Samsung Gear app to transfer photos to
your Gear S, to view on the Gear S.
1. On smartphone: From the Apps screen, tap
Samsung Gear > My apps.
2. On smartphone: Tap next to Gallery, and
then tap Send les to Gear.
3. On smartphone: Choose les to transfer, and
then tap Done.
Viewing Photos
1. On the Apps screen, tap Gallery.
2. Follow the on-screen instructions to start using
Gallery. To transfer images to the Gear, tap
Show on device.
3. Select a photo.
Deleting Photos
Deleting one photo
1. On the Apps screen, tap Gallery.
2. Select an image and tap
> Delete.
Deleting Multiple Photos
1. Tap and hold an image to delete, and then tap
more images to mark them for deletion.
2. Tap
84
at the bottom of the screen.
Page 89

Music Player
Listen to music saved on the Gear S and on the
smartphone.
Transferring Music from a Smartphone to
Gear S
Use the Samsung Gear app to transfer music to
your Gear S, to listen on the Gear S.
1. On smartphone: From the Apps screen, tap
Samsung Gear > My apps.
2. On smartphone: Tap next to Music
Player, and then tap Send tracks to Gear.
3. On smartphone: Choose songs to transfer,
and then tap Send.
Playlists: Tap a playlist, and then tap songs
•
to select them.
Tracks: Tap individual songs to select them.
•
Albums: Tap an album, and then tap songs
•
to select them.
Automatically Transferring Music from a
Smartphone to Gear S During Charging
When Auto send tracks to Gear is turned
on, tracks from the selected playlist will be
automatically copied to Gear S whenever your
smartphone and Gear S are both charging.
1. On smartphone: From the Apps screen, tap
Samsung Gear > My apps.
2. On smartphone: Tap
Player, and then tap Auto send tracks to
Gear.
3. On smartphone: Choose a playlist.
Note: When Auto send tracks to Gear
is turned on, you won’t be able to send
tracks to your Gear S manually.
85
next to Music
Page 90

Playing Music
1. On the Apps screen, tap Music Player.
2. When the pop-up window with information
about transferring music to the Gear appears,
tap OK. To transfer music to the Gear, tap
Show on device.
3. Swipe to the left or right and select a song to
play.
Controlling Music Playback on the
Smartphone
When you play music on your smartphone, you
can control playback from the Gear.
► On the Apps screen, tap Music Player >
Mobile device and tap
.
>
Adjust the volume
Pause and resume
playback
Tap to restart the
current song or skip
to the previous song,
or hold to scan
backward
Access additional
options
Open the playlist
Tap to skip to the
next song, or hold to
scan forward
86
Page 91

Milk Music
Navigator
Exclusive to Galaxy owners, Milk Music is a radio
service that gives you more of what you love and
helps you discover new music, too – all curated
by top DJs and industry pros.
Before you use the Milk Music app on your Gear
S, you must download and install the app from
Galaxy Apps. To download and install an app on
the Gear S, the Gear S must be connected to the
smartphone via Bluetooth, and the smartphone
must have access to the mobile network or to
Wi-Fi.
1. On the Apps screen, tap Milk Music.
2. Follow the onscreen instructions to download
and install the app.
Get directions for a selected location in the form
of spoken and visual instructions.
Note: Map information provided by the
Gear should only be used by people
on foot. For your safety, do not use this
app while driving a vehicle or riding a
bicycle.
1. On the Apps screen, tap Navigator.
2. The rst time you use the app, read the terms
and conditions, and tap Agree if you want to
continue.
3. Tap Jump in. Read the information about the
app, swipe to the right, and then tap
4. The Gear will search for your current location.
To update your location again, drag the screen
downwards from the center of the screen and
tap Refresh location.
5. Tap
87
and set a destination.
.
Page 92

To view your current location and the route
•
to the destination, tap
To view the search history, swipe to the right.
•
To customize settings, download ofine
•
maps (when connected to Wi-Fi) , and more,
swipe to the left.
To view your route to the destination, you
•
need to be connected to the smartphone via
Bluetooth.
6. Select a destination from the list and tap
To view more information, such as route or
•
distance, scroll upwards.
To update the route, drag the screen
•
downwards from the center of the screen
and tap Refresh routes.
7. Tap
8. Follow the directions on the screen to reach
to get directions. Gear will display the
directions and any route changes depending
on your movements.
the destination.
.
Note: To set the Gear to vibrate to
warn you of an upcoming turn, drag the
screen downwards from the centre of
the screen and tap Vibration on.
News Brieng
View the latest articles in various categories. You
can get briefed on news categories that interest
.
you on the main pages of this feature.
1. On the Apps screen, tap News Brieng.
2. The rst time you open the app, follow the
onscreen instructions to read and agree to the
terms and conditions..
3. Swipe to the left or right to select a news
category. To display more categories, tap
tap Categories.
4. Select an article and swipe upwards to read
more. To read the article on the mobile device,
tap
.
88
and
Page 93

Running
Running records your exercising by tracking your
distance, pace, and time. Check your monthly
records and compare them with your friends.
Starting Running
You must download and install Running on the
mobile device to use this app on the Gear.
1. Gear On the All apps screen, tap Running.
The mobile device displays the installation
screen of Running.
2.
Mobile device Download and install Running.
3. Mobile device Read the information about
this app and tap GET STARTED.
4. Mobile device Select an account to sign in
with, enter your email address and password,
and then tap LOG IN > Done.
Starting to Exercise
1. Gear On the All apps screen, tap Running
and tap the screen.
2. Gear Tap
play music during exercising.
3. Gear If you do not want to sync your account
with social network sites, tap SKIP. To sync
your account with a social network site, sign in
to the website.
4. Gear Tap the screen to start exercising.
To view your exercise records for this month,
•
swipe to the right on the Running main
screen.
To compare your exercise records with
•
friends, swipe to the left on the Running
main screen. You can add your friends to
compete with them.
5. Gear When you are nished exercising, tap
the screen and tap
89
to play music or tap not to
> .
Page 94

Weather
View weather information on the Gear S.
When the Gear S and smartphone are connected
via Bluetooth or remote connection, you can get
weather information for locations you set on the
smartphone.
In Gear Only mode, the app displays local
weather information.
1. On the Apps screen, tap Weather.
2. To view the weather information for the week,
tap the screen.
90
Page 95

Settings
Style
Clocks
1. On the Apps screen, tap Settings > Style.
2. Tap Clocks, and then congure options:
Clock type: Choose a style of clock. Swipe
•
left and right to scroll through the available
clocks, and then tap one to select it.
To modify a clock, tap , and then tap an
-
editable area of the clock. Editable areas
are circled in blue.
Clock always on: When turned on, the clock
•
will always display on the screen. When you
turn the screen off (or it times out), a grayscale clock will continue to display.
Wallpapers
Choose a background for the screens.
1. On the Apps screen, tap Settings > Style.
2. Tap Wallpapers, and then congure options:
Tap a wallpaper to select it. You may need to
•
swipe across the screen to scroll through the
available wallpapers.
To choose a solid color, tap .
•
To choose a picture, tap .
•
91
Page 96

Color theme
Choose a theme for the screens.
1. On the Apps screen, tap Settings > Style.
2. Tap Color theme, and then tap a theme to
select it. You may need to swipe left or right to
view available themes,
Font
Change the font type and size for the screen.
1. On the Apps screen, tap Settings > Style.
2. Tap Font, and then congure options:
Font style: Change the font type.
•
Font size: Change the font size.
•
Call
Customize the settings for calling features.
Auto Call Forwarding
Congure options for forwarding incoming calls
from your smartphone to your Gear S.
1. On the Settings screen, tap Call.
2. Tap Auto call forwarding to congure
forwarding options.
Turn on: Follow the onscreen instructions to
•
conrm information and turn forwarding.
Number setting: By default, this is the Gear
•
S phone number.
92
Page 97

General Forwarding Options
1. On the Settings screen, tap Call.
2. Tap options to congure them:
Outgoing number: Choose which device’s
•
phone number to use for outgoing calls
when it is connected to your mobile device
via Bluetooth.
Voicemail: Tap Voicemail number to dial
•
voicemail.
Voice control: Set the Gear to answer or
•
reject a call with voice commands.
Caller ID: Set whether to display your caller
•
ID to other parties for outgoing calls.
Call waiting: Allow incoming call alerts when
•
a call is in progress.
Note: Depending on your service
provider, call forwarding may require a
separate subscription, and may result in
additional charges.
If you uninstall the Samsung Gear app
while call forwarding is active, you will
need to turn off call forwarding in the
smartphone’s Call settings.
Turn off call forwarding before switching
or removing SIMs in either the
smartphone or Gear S, to avoid calls
being routed to unintended devices.
93
Page 98

Sound
Display
Change the settings for various sounds on the
Gear.
► On the Settings screen, tap Sound.
Sound mode: Select Gear’s sound mode
•
from sound, vibration, and mute.
Volume: Adjust the volume level for various
•
sounds, such as multimedia, ringtones,
notications, and system sounds.
Vibration: Adjust the intensity of the
•
vibration notication.
Ringtones: Select a ringtone to alert you to
•
incoming calls.
Notications: Select a tone that sounds
•
when events occur, such as incoming
messages and missed calls.
Touch sounds: Set the Gear to make a
•
sound when apps or options are selected on
the touchscreen.
Change the settings for the display.
► On the Settings screen, tap Display.
Brightness: Adjust the brightness for the
•
display.
Screen timeout: Set the length of time the
•
Gear waits before turning off the display’s
backlight.
Wake-up screen:
•
Clock: Set the Gear to display the clock
-
when you wake up the Gear.
Last screen: Set the Gear to display the
-
last screen you were using when you wake
up the Gear.
Date and time: Set the date and time on the
•
Gear manually, if the Gear is not connected
to the smartphone.
94
Page 99

Connections
Congure settings to control connections with
other devices or networks.
Note: Follow all posted warnings and
directions from authorized personnel in
areas where the use of wireless devices
is restricted, such as airplanes and
hospitals.
Bluetooth
Congure settings for the Bluetooth feature.
► On the Settings screen, tap Connections >
Bluetooth.
Bluetooth: Turn Bluetooth on or off.
•
BT headset: Search for Bluetooth headsets
•
and connect them to the Gear S.
Make visible: Set the Gear S to appear in
•
other devices’ lists when they search for
Bluetooth devices.
Notices About Using Bluetooth
Ensure that your Gear and the other Bluetooth
•
device are within the Bluetooth connection
range (10 m). The distance may vary
depending on the environment the devices are
used in.
Samsung is not responsible for the loss,
•
interception, or misuse of data sent or received
via the Bluetooth feature.
Bluetooth uses the same frequency as some
•
industrial, scientic, medical, and low power
products and interference may occur when
making connections near these types of
products.
Always ensure that you share and receive
•
data with devices that are trusted and properly
secured. If there are obstacles between
the devices, the operating distance may be
reduced.
95
Page 100

Some devices, especially those that are not
•
tested or approved by the Bluetooth SIG, may
be incompatible with your Gear.
Do not use the Bluetooth feature for illegal
•
purposes (for example, pirating copies of
les or illegally tapping communications for
commercial purposes).
Samsung is not responsible for the
•
repercussion of illegal use of the Bluetooth
feature.
Mobile Networks
► On the Settings screen, tap Connections >
Mobile networks.
Mobile networks:
•
Auto on/off: When enabled, the Gear S
-
will automatically turn access to the mobile
network on or off, depending on whether
the Gear S is connected to the smartphone
via Bluetooth. Access to the mobile
network will turn off automatically when the
Gear S is connected to the smartphone via
Bluetooth, and turn on when the Bluetooth
is disconnected. There is a delay between
the end of the Bluetooth connection and
the start of mobile network connection.
Always on: When enabled, the Gear S is
-
always connected to the mobile network,
when it is available.
Always off: When enabled, the Gear S
-
never accesses the mobile network. Note
that if the Gear S can’t access the mobile
network, you cannot use the remote
96
 Loading...