

Page 1

MIKROHULLçMò S†TÌ
G2618C
Haszn‡lati utas’t‡sa
Code No.: DE68-01129C
Page 2

E Haszn‡lati utas’t‡s
fontos inform‡ci—kat tartalmaz
a mikrohull‡mœ sŸtÎrÎl.
KŽrjŸk, szak’tson idÎt az elolvas‡s‡ra,
hogy kihaszn‡lhassa a mikrohull‡mœ
sŸtÎ šsszes elÎnyŽt!
TartalomjegyzŽk
◆ TANçCSOK ƒS ADATOK
■ A mikrohull‡mœ sŸtÎ rŽszei...................................................................... 2
■ VezŽrlÎpanel .............................................................................................. 3
◆ HOGYAN KELL EZT A F†ZETET HASZNçLNI?.......................... 4
◆
A MIKROHULLçMò S†TÌ ELHELYEZƒSE ƒS ELÌKƒSZêTƒSE
■ Biztons‡gi figyelmeztetŽsek..................................................................... 5
■ TartozŽkok................................................................................................... 7
■ A mikrohull‡mœ sŸtÎ elhelyezŽse ........................................................... 8
■ Hogyan mõkšdik a mikrohull‡mœ sŸtÎ?................................................. 9
■ A sŸtÎ mõkšdŽsŽnek ellenÎrzŽse ........................................................... 9
■ TeendÎ problŽma esetŽn.......................................................................... 10
H
◆ F
Ì
ZƒS A MIKROHULLçMòS†TÌVEL
■ FÎzŽs/felmeleg’tŽs..................................................................................... 11
■ A fÎzŽs megszak’t‡sa................................................................................ 12
■ A fÎzŽsi idÎ meghosszabb’t‡sa............................................................... 12
■ ƒtelek felolvaszt‡sa ................................................................................... 13
■ ƒtelek azonnali meleg’tŽse....................................................................... 13
■ FÎzŽsi teljes’tmŽnyek t‡bl‡zata............................................................... 14
◆ HAGYOM
■ GrillezŽs....................................................................................................... 15
ç
NYOS FÌZƒSI MîDSZEREK
◆ TANçCSOK ƒS ADATOK
■ Haszn‡lhat— edŽnyek................................................................................ 16
■ SŸtŽsi œtmutat— .......................................................................................... 17
■ A mikrohull‡mœ sŸtÎ tiszt’t‡sa ................................................................. 23
■ A mikrohull‡mœ sŸtÎ t‡rol‡sa Žs jav’t‡sa............................................... 23
■ Mõszaki specifik‡ci—.................................................................................. 24
1
Page 3

A mikrohull‡mœ sŸtÎ rŽszei
H
Ajt— z‡r—nyelvei
SzellÎzÎlyukak
Ajt—
†vegt‡nyŽr
FõtÎelem
GšrgÎsgyõrõ
SzellÎzÎlyukak
ÒIdÎÓ gomb
ÒTeljes’tmŽnyÓ gomb
Ajt—nyit‡s
nyom—gombja
Ajt—z‡r ny’l‡sai
Csatlakoz—
2
Page 4

VezŽrlÎpanel
Felolvaszt‡s
H
Azonnali meleg’tŽs
Ajt—nyit— nyom—gombja
3
Page 5

Hogyan kell ezt a fŸzetet haszn‡lni?
H
A mikrohull‡mœ sŸtÎ Haszn‡lati utas’t‡sa sok hasznos inform‡ci—t tartalmaz a
mikrohull‡mœ sŸtÎrÎl:
◆ biztons‡gi —vintŽzkedŽseket
◆ a megfelelÎ tartozŽkokat Žs edŽnyzetet
◆ hasznos fÎzŽsi tan‡csokat.
A tartalomjegyzŽk elÎtti oldalon egy Gyors emlŽkeztetÎ œtmutat— tal‡lhat—, mely
h‡rom alapmõveletet ismertet:
◆ egy Žtel megfÎzŽsŽt
◆ egy Žtel felolvaszt‡s‡st
◆ egy Žtel grillezŽsŽt.
E Haszn‡lati utas’t‡s vŽgŽn l‡that— a sŸtÎ Žs a sŸtÎ vezŽrlÎpaneljŽnek ‡br‡ja, ezek
seg’tsŽgŽvel …n kšnnyebben megtal‡lhatja az egyes tartozŽkokat Žs
kezelÎgombokat!
A sŸtÎ be‡ll’t‡s‡t lŽpŽsrÎl-lŽpŽsre ismertetÎ magyar‡zatokn‡l az al‡bbi
szimb—lumok szerepelnek:
☛
FIGYELMEZTETƒS MEGJEGYZƒS
➢
A MIKROHULLçMMAL KAPCSOLATOS FIGYELMEZTETƒSEK
Az al‡bbi figyelmeztetŽsek be nem tart‡sa esetŽn sŽrŸlŽst okozhat a mikrohull‡m!
(a) Sose pr—b‡lja a sŸtÎt nyitott ajt—val mõkšdtetni, vagy ne pr—b‡lja kiiktatni az ajt— biztons‡gi
reteszelŽsŽt, Žs ne dugjon semmit az ajt— reteszelÎ ny’l‡saiba!
(b) Ne helyezzen semmilyen t‡rgyat a sŸtÎ ajtaja Žs elÎlapja kšzŽ, Žs ne hagyja, hogy
Žtelmaradv‡nyok vagy tiszt’t—szermaradv‡nyok gyõljenek šssze az ajt— tšm’tÎfelŸletein!
†gyeljen, hogy az ajt— Žs az ajt— tšm’tÎfelŸletei mindig tiszt‡k legyenek, ezŽrt tšršlje le ezeket
haszn‡lat ut‡n egy nedves ronggyal, azut‡n tšršlje sz‡razra!
(c) Ne haszn‡lja a sŸtÎt, ha megsŽrŸlt, hanem elÎszšr feltŽtlenŸl jav’ttassa meg egy a gy‡rt— ‡ltal
betan’tott szerelÎvel!
Nagyon fontos, hogy a sŸtÎ ajtaja j—l csuk—djŽk, Žs hogy ne legyen sŽrŸlt:
(1) Az ajt—, az ajt— tšm’tŽse Žs a tšm’tÎfelŸletek
(2) Az ajt— forg—p‡ntja (ne legyen eltšrve vagy meglazulva)
(3) Aa villamos csatlakoz—k‡bel!
(d) A sŸtÎt kiz‡r—lag csak a mikrohull‡mœ kŽszŸlŽkek szerv’zelŽsŽre kikŽpzett, a gy‡rt— ‡ltal
betan’tott szerelÎnek szabad jav’tania!
4
Page 6

Biztons‡gi figyelmeztetŽsek
MielÎtt Žtelt vagy folyadŽkot meleg’t a mikrohull‡mœ sŸtÎben, ellenÎrizze az al‡bbi
biztons‡gi figyelmezetŽsek betart‡s‡t!
1 NE HASZNçLJON fŽmedŽnyt a mikrohull‡mœ sŸtÎben:
◆ FŽmdobozokat
◆ Arany vagy ezŸst cs’kkal d’sz’tett porcel‡nt
◆ FŽmny‡rsat, vill‡t, stb.!
Ok: Ilyenkor villamos ’v vagy szikr‡z‡s jšn lŽtre a sŸtÎben, mely tšnkreteheti azt.
2 NE MELEGêTSEN:
◆ Hermetikusan lez‡rt palackokat, befÎttes Ÿvegeket, edŽnyeket
PŽld‡ul: z‡rt bŽbiŽteles Ÿvegeket
◆ Z‡rt hŽjœ Žteleket
PŽld‡ul: toj‡st, hŽj‡ban lŽvÎ mogyor—t, paradicsomot!
Ok: A keletkezÎ belsÎ nyom‡s fšlrobbanthatja ezeket.
Tan‡cs: Vegye le a fedelet, illetve szurk‡lja ‡t egy vill‡val a hŽjat!
H
3 NE MôK…DTESSE Ÿresen a mikrohull‡mœ sŸtÎt!
Ok: Tšnkremehetnek a sŸtÎ falai.
Tan‡cs: Hagyjon mindig egy poh‡r vizet a sŸtÎben! A v’z elnyeli a mikrohull‡mokat, ha vŽletlenŸl Ÿresen kapcsolja be a sŸtÎt.
4 NE TAKARJA LE az oldals— vagy a h‡ts— szellÎzÎny’l‡sokat konyharuh‡val vagy pap’rral!
Ok: A rongy vagy a pap’r meggyulladhat a sŸtÎbÎl kilŽpÎ forr— levegÎtÎl.
5 MINDIG haszn‡ljon edŽnyfog— kesztyõt, amikor kivesz egy edŽnyt a sŸtÎbÎl!
Ok: Egyes edŽnyek elnyelik a mikrohull‡mokat, ezenk’vŸl az Žtel is mindig fšlmeleg’ti az edŽnyt. EzŽrt az edŽny forr— lehet!
6 NE ƒRINTSE meg a fõtÎelemet vagy a sŸtÎ falait!
Ok: A sŸtÎ falai forr—k lehetnek, a sŸtŽs befejezŽse ut‡n is! Ne engedje, hogy gyulŽkony anyagok Žrintkezzenek a sŸtÎ
belsejŽvel, amig a sŸtÎ ki nem hõl!
7 Hogy ne keletkezzŽk tõz a sŸtÎben:
◆ Ne t‡roljon gyœlŽkony anyagokat benne,
◆ Vegye le a dr—tz‡rakat a pap’rzacsk—kr—l vagy a mõanyagzacsk—kr—l,
◆ Ne haszn‡lja a sŸtÎt ujs‡gpap’r sz‡r’t‡s‡ra,
◆ Ha fŸstšt vesz Žszre, tartsa csukva az ajt—t Žs kapcsolja ki a sŸtÎt vagy szak’tsa meg a sŸtÎ ‡ramell‡t‡s‡t!
5
Page 7

Biztons‡gi figyelmeztetŽsek
H
8 Legyen nagyon —vatos, ha folyadŽkot vagy bŽbiŽtelt meleg’t:
◆ MINDIG hagyjon legal‡bb 20 mp-nyi pihentetŽsi idÎt a sŸtÎ kikapcsol‡sa ut‡n, hogy kiegyenl’tÎdhessŽk a hÎmŽrsŽklet!
◆ Keverje meg a bŽbiŽtelt vagy a folyadŽkot a meleg’tŽs kšzben ha szŸksŽges, Žs MINDIG keverje meg a meleg’tŽs ut‡n!
◆ A hirtelen felforr‡s Žs az esetleges leforr‡z‡s megelÎzŽse vŽgett keverje meg a folyadŽkot a meleg’tŽs elÎtt, kšzben Žs
ut‡n!
◆ Ha leforr‡zn‡ mag‡t, tartsa be az al‡bbi ELSÌSEGƒLYNYœJTçSI UTASêTçST:
• M‡rtsa a kezŽt hideg v’zbe legal‡bb 10 percig!
• Kštšzze be tiszta, sz‡raz kštszerrel.
• Ne tegyen a sebre semmilyen krŽmet, olajat vagy oldatot!
◆ SOSE tšltse meg sz’nŸltig az edŽnyt folyadŽkkal, Žs olyan edŽnyt haszn‡ljon, mely fšlŸl szŽlesebb, mint alul, nehogy
kifuthasson a folyadŽk! A szõknyakœ palackok felrobbanhatnak, ha tœlhevŸlnek!
◆ EllenÎrizze MINDIG a bŽbiŽtel vagy a tej hÎmŽrsŽkletŽt, mielÎtt a bab‡nak adja!
◆ SOSE meleg’tse a bŽbiŽtelt œgy, hogy rajta van a kupak, mert fšlrobbanhat az Ÿveg, ha tœlmelegszik!
9 †gyeljen a h‡l—zati csatlakoz—k‡belre:
◆ Ne m‡rtsa a k‡belt vagy a h‡l—zati csatlakoz—dugaszt v’zbe, Žs tartsa t‡vol a hÎforr‡sokt—l!
◆ Ne haszn‡lja a sŸtÎt sŽrŸlt csatlakoz—k‡bellel vagy a h‡l—zati csatlakoz—dugasszal!
10 çlljon karnyœjt‡snyira az sŸtÎtÎl, amikor kinyitja az ajt—t!
Ok: A ki‡raml— forr— levegÎ vagy gÎz leforr‡zhatja!
11 Tartsa tiszt‡n a mikrohull‡mœ sŸtÎ belsejŽt!
Ok: A sŸtÎ falaira vagy alj‡ra r‡sŸlt Žlelmiszer darabok vagy zs’rfoltok k‡ros’thatj‡k a festŽkrŽteget, Žs csškkenthetik a
sŸtÎ hat‡sfok‡t.
12 ÒKattan—Ó hang hallhat— a sŸtÎ mõkšdŽse kšzben, kŸlšnšsen felolvaszt‡s kšzben.
Ok: A vezŽrlŽs m—dos’totta a sŸtÎ teljes’tmŽnyŽt, ennek hangja hallhat—. Ez norm‡lis.
13 Ha a mikrohull‡mœ sŸtÎt Ÿresen, terhelŽs nŽlkŸl haszn‡lj‡k, a sŸtÎ automatikusan kikapcsol a biztons‡g ŽrdekŽben. Kb. 30 perc
mœlva a sŸtÎ œjra haszn‡lhat—.
14 Ne tšrÎdjŽk azzal, ha a fÎzŽs befejezŽse ut‡n a sŸtÎ mŽg tov‡bb mõkšdik.
Ok: Ilyenkor a sŸtÎ lehõti a belsÎ villamos rŽszeket a fÎzŽs ut‡n. (A kijelzÎn Ò0Ó l‡that—).
Nyissa ki az ajt—t vagy nyomja meg b‡rmely gombot (az Ò1min +Ó gomb kivŽtelŽvel)a sŸtÎ le‡ll’t‡s‡hoz.
FONTOS BIZTONSçGI FIGYELMEZTETƒS
Ha mõanyaggal bevont pap’r vagy egyŽb ŽghetÎ csomagol‡sœ Žtelt meleg’t vagy fÎz,
nŽzzen be idÎnŽknt a sŸtÎbe!
FIGYELEM!
Ne engedje, hogy kisgyerekek haszn‡lj‡k vagy j‡tsszanak a mikrohull‡mœ sŸtÎvel!
Ne hagyjon kisgyerekeket felŸgyelet nŽlkŸl a mikrohull‡mœ sŸtÎ kšzelŽben, ha haszn‡lja
azt!
Ne t‡roljon, vagy dugjon el gyerekeket ŽrdeklÎ t‡rgyakat kšzvetlenŸl a sŸtÎ fšlštt!
6
Page 8
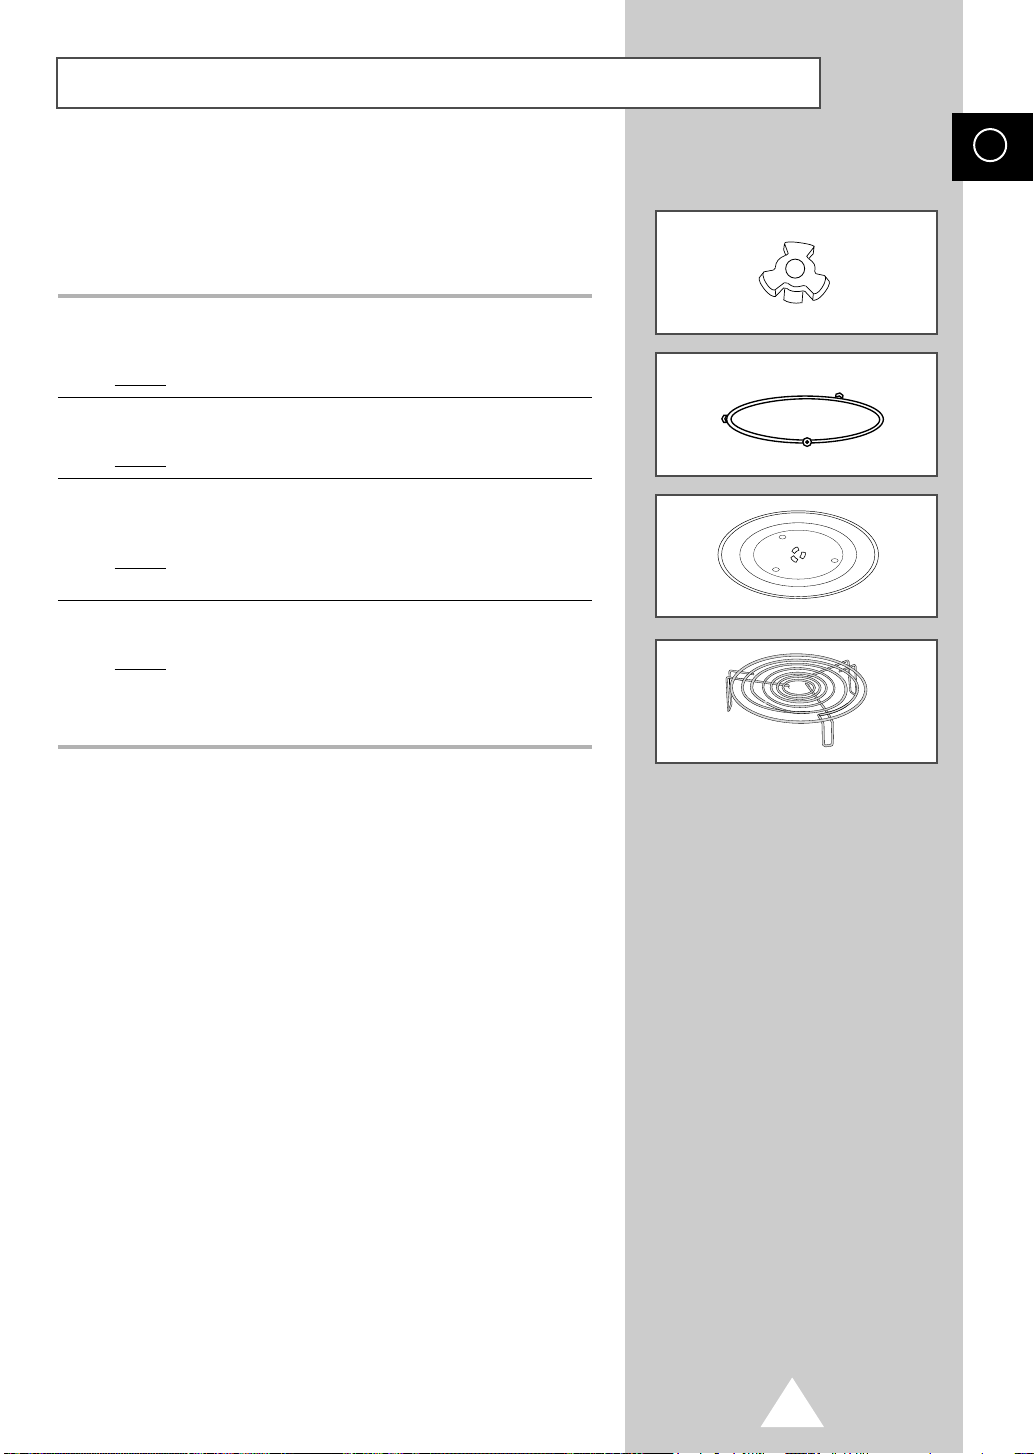
TartozŽkok
A mikrohull‡mœ sŸtÎnek, az …n ‡ltal megv‡s‡rolt t’pust—l
fŸggÎen, sz‡mos tartozŽka van, melyek kŸlšnbšzÎ m—don
haszn‡lhat—k.
1 Csatlakoz—, a gy‡rban m‡r felrakt‡k a mikrohull‡mœ sŸtÎ motorj‡nak
tengelyŽre.
H
1
Szerepe: A csatlakoz— forgatja az Ÿvegt‡nyŽrt.
2 GšrgÎsgyõrõ, a sŸtÎ kšzepŽre kell elhelyezni.
Szerepe: A gšrgÎsgyõrõ tartja az Ÿvegt‡nyŽrt.
3 †vegt‡nyŽr, a gšrgÎsgyõrõre kell r‡rakni, œgy, hogy a kšzepe a csatlakoz—n
legyen.
Szerepe: Az Ÿvegt‡nyŽr szolg‡l fÎzŽsi felŸletkŽnt; tiszt’t‡shoz kšnnyen
kivehetÎ.
4 FŽm‡llv‡ny, az Ÿgegt‡nyŽrra kell r‡rakni.
Szerepe: A fŽm‡llv‡ny seg’tsŽgŽvel egyszerre kŽt Žtel fÎzhetÎ. Egy kisebb
‡tmŽrÎjõ Žtel elhelyezhetÎ az Ÿvegt‡nyŽron, egy m‡sodik Žtel
pedig az ‡llv‡nyon. A fŽm‡llv‡ny grillezŽshez Žs kombin‡lt
fÎzŽshez haszn‡lhat—.
TILOS a mikrohull‡mœ sŸtÎt a gšrgÎsgyõrõ Žs az
☛
Ÿvegt‡nyŽr nŽlkŸl haszn‡lni!
2
3
4
7
Page 9

A mikrohull‡mœ sŸtÎ elhelyezŽse
H
20 cm
ylŠpuolella
10 cm
takana
10 cm
sivulla
Helyezze el a sŸtÎt egy s’k, v’zszintes Žs stabil
felŸleten.
1
A sŸtÎ elhelyezŽsekor Ÿgyeljen arra, hogy a sŸtÎ megfelelÎen
szellÎzhessŽk, ezŽrt hagyjon legal‡bb 10 cm szabad teret a sŸtÎ
mšgštt Žs mindkŽt oldal‡n, Žs 20 cm-t a sŸtÎ fšlštt.
2
Szedje ki az šsszes csomagol—anyagot a sŸtÎbÎl.
Rakja be a sŸtÎbe a gšrgÎsgyõrõt Žs a forg—asztalt.
EllenÎrizze, hogy a forg—asztal szabadon elforog-e.
☛ Ne fedje le a sŸtÎ szellÎzÎny’l‡sait, mert a sŸtÎ tœlhevŸlhet
Žs automatikusan kikapcsolhatja mag‡t. Ilyenkor nem
mõkšdik, am’g megfelelÎen le nem hõl.
☛ Az šn szemŽlyi biztons‡ga ŽrdekŽben a mikrohull‡mœ sŸtÎt
egy megfelelÎen fšldelt, AC 230 V, 50 Hz v‡lt—‡ramœ
konnektorhoz kell csatlakoztatni. Ha megsŽrŸl a csatlakoz—k‡bel, akkor az csak speci‡lis k‡bellel (I-SHENG SP022,
KDK KKP4819D, EURO ELECTRIC 3410, SAMIL SP-106B,
MOONSUNG EP-48E) cserŽlhetÎ ki. Forduljon a Samsung
kirendeltsŽghez.
☛ Ne ‡ll’tsa fel a mikrohull‡mœ sŸtÎt forr— vagy p‡r‡s
kšrnyezetben, pŽld‡ul egy hagyom‡nyos k‡lyha vagy egy
radi‡tor kšzelŽben. A sŸtÎ ‡ramfelvŽtelŽre tekintettel kell
lenni, Žs az esetleges hosszabb’t—k‡belnek ugyanolyan
ampersz‡mœnak kell lennie, mint a sŸtÎ csatlakoz—k‡bele.
Tšršlje ki nedves ronggyal a sŸtÎ belsejŽt Žs tšršlje le az ajt—
tšm’tŽseit, mielÎtt elÎszšr haszn‡lja a sŸtÎt.
8
Page 10
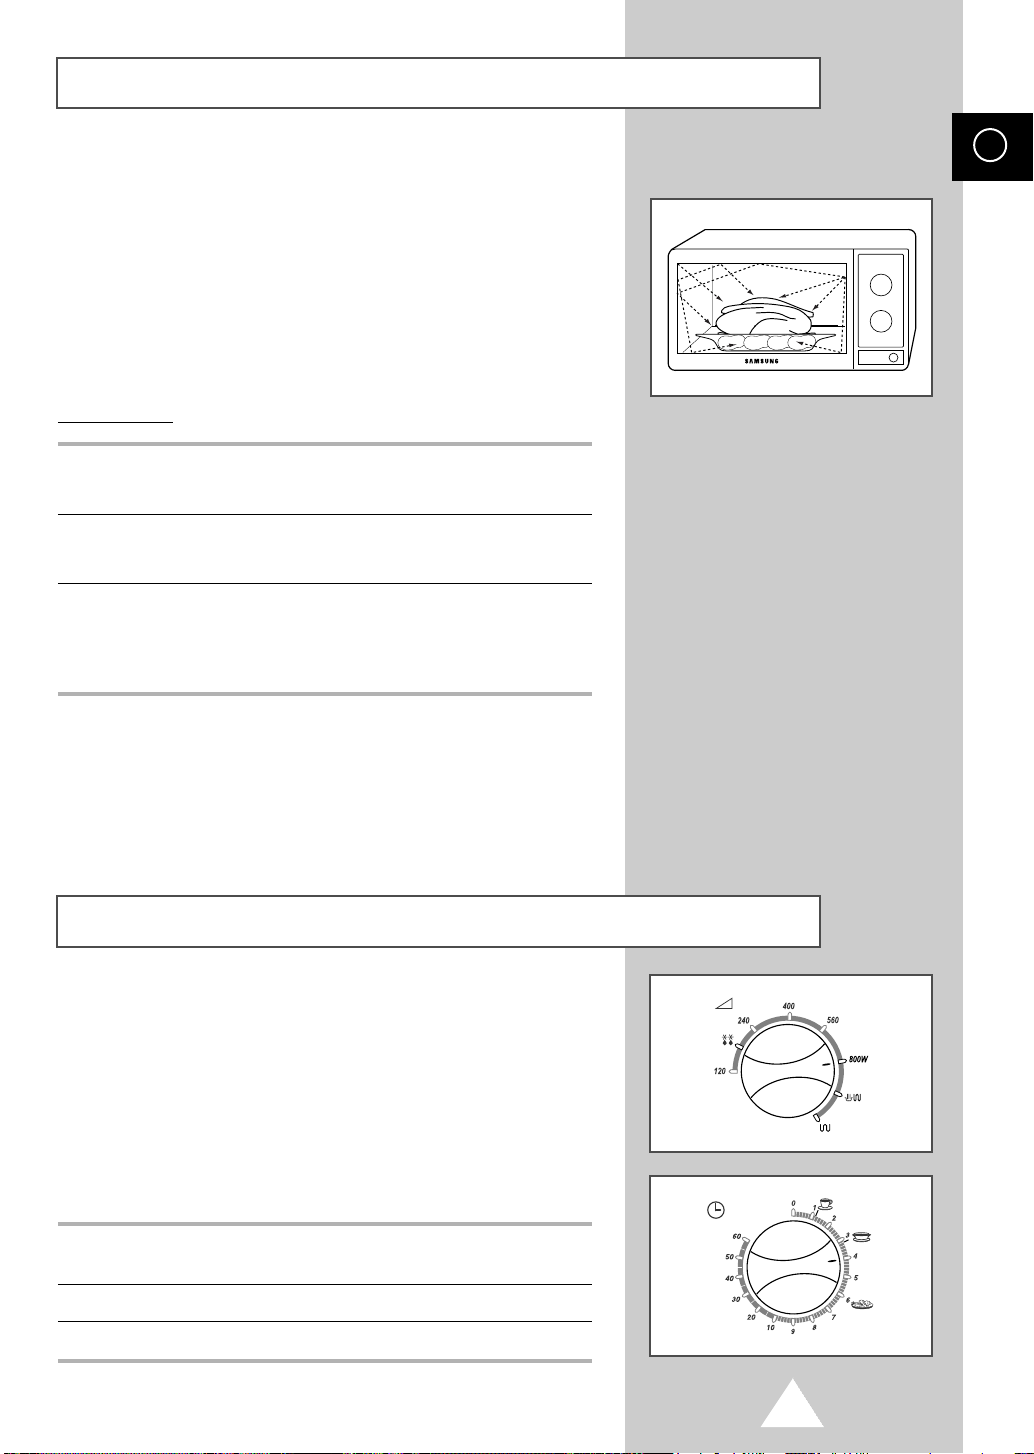
Hogyan mõkšdik a mikrohull‡mœ sŸtÎ?
A mikrohull‡m egy nagyfrekvenci‡s elektro-m‡gneses hull‡m,
melyet az u.n. magnetron ‡ll’t elÎ. A mikrohull‡m ‡ltal sz‡ll’tott
energia seg’tsŽgŽvel az Žtel megfÎ vagy felmelegszik anŽlkŸl,
hogy megv‡ltozna a sz’ne vagy az alakja.
A mikrohull‡mot …n a kšvetkezÎkre haszn‡lhatja:
◆
felolvaszt‡sra,
◆
felmeleg’tŽsre,
◆
fÎzŽsre.
A fÎzŽs elve
1 A magnetron ‡ltal lŽtrehozott mikrohull‡m egyenletesen Žri az Žtelt, mert az
Žtel forog az Ÿvegt‡nyŽron. EzŽrt az Žtel egyenletesen fÎ meg.
2 A mikrohull‡mot az Žtel felsÎ kb. 2,5 cm-es rŽtege nyeli el. Onnan a hÎ
h·tad‡ssal terjed az Žtel belseje felŽ.
3 A fÎzŽsi idÎ az Žtel al‡bbi tulajdons‡gait—l fŸgg:
◆ MennyisŽgŽtÎl Žs sõrõsŽgŽtÎl,
◆ V’ztartalm‡t—l,
◆ Kiindul‡si hÎmŽrsŽkletŽtÎl (hõtve van-e vagy nem).
H
Mivel az Žtel kšzepe h·tad‡ssal fÎ meg, a fÎzŽs
☛
folytat—dik azt kšvetÎen is, hogy …n kiveszi az
Žtelt a sŸtÎbÎl. EzŽrt be kell tartani az e fŸzetben
Žs a receptekben elÎ’rt pihentetŽsi idÎt, hogy:
◆ Egyenletesen megfÎjšn az Žtel kšzepe is,
◆ MindenŸtt egyenletes hÎmŽrsŽkletõ legyen
az Žtel.
A sŸtÎ mõkšdŽsŽnek ellenÎrzŽse
Az al‡bbi egyszerõ elj‡r‡ssal …n b‡rmikor ellenÎrizheti,
hogy a mikrohull‡mœ sŸtÎ j—l mõkšdik-e. ProblŽma
esetŽn l‡sd az al‡bbi ÒTeendÎ problŽma esetŽnÓ c’mõ
pontot!
◆ A sŸtÎn legyen egy megfelelÎ h‡l—zati
➢
1 Nyissa ki a sŸtÎ ajtaj‡t a vezŽrlÎpanel jobb als— sark‡ban lŽvÎ nagy ajt—nyit—
csatlakoz—aljzathoz kell csatlakoztatva!
◆ Az Ÿvegt‡nyŽr legyen a helyŽn a sŸtÎben!
◆ Ha a maxim‡list—l (100 % = 800 W) eltŽrÎ
teljes’tmŽnyt ‡ll’t be, a v’z kŽsÎbb kezd el
forrni!
gombbal! Rakjon be egy poh‡r vizet az Ÿvegt‡nyŽrra! Csukja be az ajt—t!
2 çll’tsa be a maxim‡lis teljes’tmŽnyt a ÒTeljes’tmŽnyÓ gombbal.
3 çll’tson be 4..5 perces idÎt az ÒIdÎÓ gombbal!
9
Page 11

TeendÎ problŽma esetŽn
H
Egy œj kŽszŸlŽk megszok‡sa mindig eltart egy bizonyos ideig. Az al‡bbi felsorol‡sban
tal‡lhat— problŽm‡k esetŽn pr—b‡lkozzŽk az itt feltŸntetett megold‡sokkal! êgy idÎt
takar’that meg Žs megsp—rolhatja a szerviz felesleges kih’v‡s‡t.
PROBLƒMA TEENDÌ/MEGOLDçS
◆
Kondenz‡ci— a sŸtÎben Ezek norm‡lis jelensŽgek
◆
LŽg‡ram az ajt— kšrŸl
◆
FŽnykiszŸremlŽs az ajt— kšrŸl
◆
GÎz lŽp ki az ajt—n‡l Žs a szellÎzÎny’l‡sokb—l
A sŸtÎ nem kezd mõkšdni az ÒIdÎÓ elforgat‡sakor
Az Žtel egy‡ltal‡n nem fÎ meg
Az Žtel vagy tœlfÎ vagy nem fÎ meg elŽggŽ
Szikr‡z‡s van a sŸtÎben
A sŸtÎ zavarja a tŽvŽ-Žs a r‡di—vŽtelt.
◆
Csukva van az ajt—?
◆
J—l ‡ll’totta be az ÒIdÎÓ-t?
◆
Becsukta az ajt—t?
◆
Nem terhelte tœl a villamos ‡ramkšrt Žs ezŽrt nem olvadt ki
a biztos’tŽk vagy nem szak’tott meg a biztos’t— automata?
◆
A fÎzŽsi idÎt az Žtel fajt‡-j‡nak megfelelÎen ‡ll’totta be?
◆
MegfelelÎ teljes’tmŽnyt v‡lasztott?
◆
Nem haszn‡l fŽmcs’kkal ell‡- tott edŽnyt?
◆
Nem hagytott egy vill‡t vagy m‡s fŽmt‡rgyat a sŸtÎben?
◆
Nincs alum’niumf—lia tœl kšzel a belsÎ falakhoz?
◆
KismŽrtŽkõ zavar‡s norm‡lis, ha mõkšdik a sŸtÎ.
Megold‡s: A sŸtÎt a tŽvŽtÎl, r‡di—t—l vagy az antenn‡kt—l
t‡vol kell elhelyezni!
◆
Ha a zavar‡s a sŸtÎ mikropro-cesszor‡ra is hat, a kijelzÎ
el‡ll’t—dhat.
Megold‡s: Hœzza ki a csatlako-z—dugaszt, majd dugja
vissza! çll’tsa be œjra az —r‡t!
.
Ha …n a fenti utas’t‡sok elolvas‡sa ut‡n sem kŽpes megoldani a problŽm‡t, akkor:
◆ êrja le a sŸtÎ modellsz‡m‡t Žs gy‡rt‡si sz‡m‡t a sŸtÎ h‡tlapj‡r—l,
◆ Keresse elÎ a garanciajegyet (v‡s‡rl‡s d‡tuma Žs helye),
◆ Fogalmazza meg a problŽm‡t!
Ezut‡n vegye fšl a kapcsolatot a legkšzelebbi SAMSUNG szervizzel!
10
Page 12

FÎzŽs/felmeleg’tŽs
Az al‡bbi egyszerõ le’r‡s elmagyar‡zza, hogyan fÎzhet
meg vagy meleg’thet fel egy Žtelt.
EllenÎrizze mindig a sŸtÎ be‡ll’t‡s‡t, mielÎtt
☛
felŸgyelet nŽlkŸl hagyja a sŸtÎt!
1 Nyissa ki az ajt—t a vezŽrlÎpanel jobb als— sark‡ban lŽvÎ nagy gomb
megnyom‡s‡val! Rakja be az Žtelt az Ÿvegt‡nyŽr kšzepŽre! Csukja be az ajt—t!
2 çll’tsa a maxim‡lis ‡ll‡sba a ÒTeljes’tmŽnyÓ gombot!
Modell G2618C
Max. teljes’tmŽny 800W
3
çll’tsa be a fÎzŽsi/meleg’tŽsi idÎt az ÒIdÎÓ gombbal.
KšvetkezmŽny: A sŸtÎ vil‡g’t‡sa kigyullad, Žs az Ÿvegt‡nyŽr forogni kezd.
ElkezdÎdik a fÎzŽs/meleg’tŽs.
…n megv‡ltoztathatja a teljes’tmŽnyt fÎzŽs
➢
kšzben a ÒTeljes’tmŽnyÓ gomb eforgat‡s‡val.
H
11
Page 13

A fÎzŽs megszak’t‡sa
H
…n b‡rmikor megszak’thatja a fÎzŽst, hogy:
◆ EllenÎrizze az Žtelt,
◆ Mgford’tsa vagy megkeverje az Žtelt,
◆ Pihentesse az Žtelt.
A fÎzŽs megszak’t‡sa... TeendÎ
...ideiglenesen:
...vŽglegesen: çll’tsa Ò0Ó-ra az ÒIdÎÓ gombot!
A fÎzŽsi idÎ meghosszabb’t‡sa
A hagyom‡nyos fÎzŽshez hasonl—an elÎfordulhat, hogy
fÎzŽs kšzben …n œgy tal‡lja, kissŽ m—dos’tani kell a fÎzŽsi
idÎn.
A lehetÎsŽgek:
◆
Nyissa ki az ajt—t!
:
KšvetkezmŽny
A fÎzŽs folytat‡s‡hoz csukja be az ajt—t!
le‡ll a fÎzŽs.
12
◆ B‡rmikor ellenÎrizheti az Žtelt, ha kinyitja az ajt—t,
◆ Nšvelheti vagy csškkentheti a fÎzŽsi idÎt.
A fÎzŽsi idÎ meghosszabb’t‡s‡hoz ‡ll’tsa az ÒIdÎÓ gombot a k’v‡nt œj ŽrtŽkre!
A fÎzŽsi idÎ a fÎzŽs kšzben csak a mikrohull‡mœ,
➢
a grillezÎ Žs a kombin‡lt (mikrohull‡m + grill)
m—dban m—dos’that— .
Page 14

ƒtelek felolvaszt‡sa
1 Nyissa ki a sŸtÎ ajtaj‡t ajobb als— sarokban lŽvÎ ajt—nyit— gombbal.
2 Rakja be a mŽlyhõtštt Žtelt Žs csukja be az ajt—t!
3 çll’tsa a ÒTeljes’tmŽnyÓ gombot a felolvaszt‡s szimb—lum‡ra ( ).
4 çll’tsa be az ÒIdÎÓ gombbal a k’v‡nt felolvaszt‡si idÎt.
KšvetkezmŽny: ElkezdÎdik a felolvaszt‡s.
H
ƒtelek azonnali meleg’tŽse
1 Rakja be az Žtelt a sŸtÎbe Žs csukja be az ajt—t.
2 çll’tsa a ÒTeljes’tmŽnyÓ gombot a maxim‡lis ‡ll‡sba.
3 çll’tsa az ÒIdÎÓ gombot az azonnali meleg’tŽs k’v‡nt szimb—lum‡ra (italok,
leves/m‡rt‡s vagy friss gyŸmšlcs).
Az azonnali meleg’tŽsre vonatkoz— paramŽtereket
➢
az al‡bbi t‡bl‡zat tartalmazza.
Szimb—lum MegnevezŽs Adagnagys‡g PihentetŽsi idÎ
Italok 150 ml 1-2 min
Leves/m‡rt‡s 200-300 ml 2 min
Friss zšldsŽg 200-300 g 2 min
13
Page 15

FÎzŽsi teljes’tmŽnyek t‡bl‡zata
H
A ÒTeljes’tmŽnyÓ gombbal …n be‡ll’thatja a sŸtÎ
teljes’tmŽnyŽt Žs ezzel az Žtel felmeleg’tŽsŽhez vagy
megfÎzŽsŽhez szŸksŽges idÎt. Tšbb teljes’tmŽny kšzŸl
v‡laszthat:
TELJESêTMƒNY-FOKOZAT
Nagy
KšzŽpnagy
Kšzepes
KšzŽpkicsi
Felolvaszt‡s( )
Kicsi
GrillezŽs
Kombin‡lt
%
100 %
70 %
50 %
30 %
20 %
15 %
-
100 %
MIKRO
800 W
560 W
400 W
240 W
160 W
120 W
-
800 W
(18%)
G2618C
GRILL
-
-
-
-
-
1000 W
1000 W
(82%)
A fÎzŽsi receptekben Žs az e Haszn‡lati utas’t‡sban
szereplÎ fÎzŽsi idÎk az ott feltŸntetett teljes’tmŽnyeknek
felelnek meg.
Nagyobb teljes’tmŽnyhez ršvidebb fÎzŽsi idÎ, kisebb teljes’tmŽnyhez hosszabb fÎzŽsi
idÎ tartozik.
14
Page 16
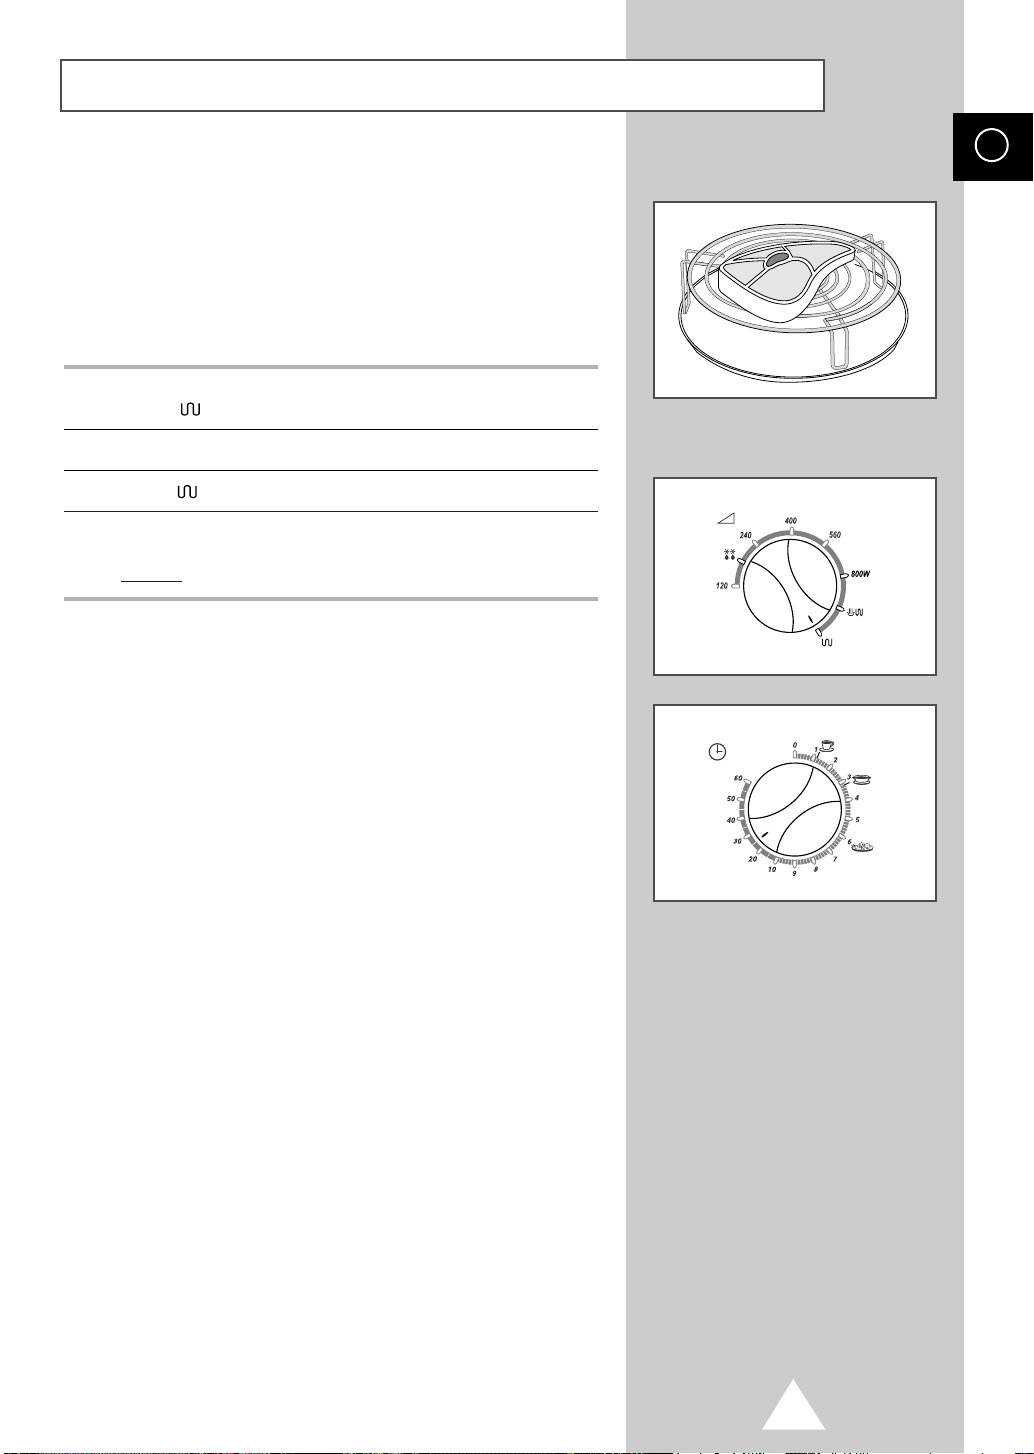
GrillezŽs
A grillezŽssel …n gyorsan megsŸtheti Žs megbarn’thatja az
Žtelt, mikrohull‡m haszn‡lata nŽlkŸl. A grillezŽshez egy
grillezÎ ‡llv‡nyt mellŽkeltŸnk a sŸtÎhšz.
H
☛ Haszn‡ljon mindig edŽnyfog— kesztyõt, amikor
megfogja a sŸtÎben lŽvÎ edŽnyt, mert az nagyon
forr— lehet.
1
Melegtse elÎ a sŸtÎt a k’v‡nt hÎmŽrsŽkletre a ÒTeljes’tmŽnyÓ gombot a grillezŽs
szimb—lu( ) m‡ra ‡ll’tva, Žs az ÒIdÎÓ gombot a megfelelÎ ŽrtŽkre elforgatva.
2
Nyissa ki az ajt—t Žs rakja be az Žtelt az ‡llv‡nyra.
3
çll’tsa a
( )
gombot a grillezŽs szimb—lum‡ra.
4
çll’tsa az id™ gombot a megfelel™ ŽrtŽkre.
KšvetkezmŽny
: ElkezdÎdik a grillezŽs.
➢ Nem baj, ha a sŸt™ grillezŽs kšzben ki- majd
bekapcsol, ez a tœlmelegedŽs megel™zŽsŽt
szolg‡lja.
15
Page 17

Haszn‡lhat— edŽnyek
H
A mikrohull‡mœ sŸtÎben csak akkor fÎ meg az Žtel, ha a mikrohull‡mok ‡t tudnak hatolni
az Žtelt tartalmaz— edŽny fal‡n, teh‡t az edŽny nem veri vissza vagy nyeli el Îket.
EzŽrt gondosan kell megv‡lasztani az edŽnyeket. Ha az edŽnyen fel van tŸntetve, hogy
mikrohull‡mœ sŸtÎhšz haszn‡lhat—, akkor az biztosan megfelelÎ.
Az al‡bbi t‡bl‡zat felsorolja a kŸlšnbšzÎ edŽnyfajt‡kat, Žs kšzli, hogy azok mikŽnt
haszn‡lhat—k a mikrohull‡mœ sŸtÎben.
EDƒNY MIKROHULLçM- MEGJEGYZƒS
Alum’niumf—lia
Pir’t—t‡nyŽr
Porcel‡n- Žs cserŽpedŽny
Eldobhat— poliŽszter karton
GyorsŽtel csomagol‡sok
•
PolisztirŽn csŽszŽk Žs dobozok
•
Pap’rzacsk—k vagy œjs‡gpap’r
• òjrahasznos’tott pap’r vagy fŽmszeg‡lyek ✘
†veg‡ru
•
JŽnai edŽny
•
FinomŸveg‡ru
•
†vegkancs—k
FŽm
•
EdŽnyek
•
MŽlyhõtÎzacsk—t lez‡r— dr—t
çLLîSçG
✔ ✘
✔
✔
✔
✔
✘
✔
Kis mennyisŽgben haszn‡lhat— a tœlsŸlŽs elleni
vŽdelemhez. Szikr‡z‡s jšhet lŽtre, ha a f—lia tœl kšzel
van a sŸtÎ fal‡hoz, vagy ha tœl sokat haszn‡lnak belÎle!
Ne meleg’tse elÎ 8 percnŽl tov‡bb!
A porcel‡n, a cserŽp, a m‡zas porcel‡n ‡ltal‡ban
haszn‡lhat—, ha nincs fŽmcs’kkal d’sz’tve.
Egyes mŽlyhõtštt Žteleket ilyen edŽnyekbe edŽnyek
csomagolnak.
Haszn‡lhat— az Žtel meleg’tŽsŽhez.
Tœlmeleg’tŽs esetŽn a polisztirŽn megolvadhat.
Meggyulladhat.
Szikr‡z‡st okozhat.
Haszn‡lhat—, ha nincs fŽmcs’kkal d’sz’tve.
✔ Haszn‡lhat— Žtel vagy folyadŽkok meleg’tŽsŽhez. A vŽkony
✔ Le kell venni a fedelet. Csak meleg’tŽshez haszn‡lhat—k.
Ÿveg megrepedhet vagy eltšrhet, ha tœl gyorsan felmelegszik.
✘
✘
Szikr‡z‡st vagy tŸzet okozhatnak.
Szikr‡z‡st vagy tŸzet okozhat.
Pap’r
•
T‡lc‡k, csŽszŽk, szalvŽt‡k
•
òjrahasznos’tott pap’r
Mõanyag
•
Dobozok
•
Takar— f—lia
•
MŽlyhõtÎ zacsk—k
Viaszolt vagy zs’rpap’r
16
✔
✘
✔
✔
✔ ✘
✔
Ršvid fÎzŽshez Žs meleg’tŽshez, valamint a
fšlšsleges nedvessŽg elnyelŽsŽhez.
Szikr‡z‡st okozhat.
KŸlšnšsen, ha h·ll— mõanyagb—l kŽszŸltek. A tšbbi
mõanyag deform‡l—dhat vagy elszinezÎdhet magas
hÎmŽrsŽkleten. Ne haszn‡ljon melamin mõanyagot!
A nedvessŽg visszatart‡s‡hoz haszn‡lhat—. Ne Žrjen a
f—lia az Žtelhez! Legyen —vatos a f—lia elt‡vol’t‡sakor,
mert forr— gÎz lŽphet ki!
Csak ha forr‡s-‡ll—ak vagy mikrohull‡m-‡ll—ak. Ne
z‡r—djanak hermetikusan. SzŸksŽg esetŽn lyukassza ki
Îket egy vill‡val!
Haszn‡lhat—k a nedvessŽg visszatart‡s‡ra Žs a
fršcskšlŽs megelÎzŽsŽre.
Page 18

SŸtŽsi œtmutat—
NŽh‡ny sŸtŽsi tan‡cs
Az Žtel elrendezŽsŽnŽl tartsa be az al‡bbi tan‡csokat, hogy
egyenletesen sŸljšn meg az Žtel a mikrohull‡mœ sŸt™ben. NE
FELEDKEZZƒK el a pihentetŽsi id™r™l.
H
MŽrtŽkegysŽgek ‡tsz‡mit‡si t‡bl‡zata
Unoia
1
2
3
4 (1/4 lb)
5 (1/4 pint)
6
7
8 (1/2 lb)
9
10(1/2 pint)
11
12(3/4 lb)
13
14
15(3/4 pint)
16(1 lb)
17
18
19
20(1 pint)
Megkšzel’tÎ
ŽrtŽkek(g/ml)
25
50
75
100
150
175
200
225
250
275
300
350
375
400
425
450
475
500
550
575
Az Žtel vŽkonyabb rŽszei, melyek
gyorsabban sŸlnek meg, legyenek az
edŽny kšzepe felŽ elhelyezve.
PŽld‡k: Csirkecomb, b‡r‡nyborda,
egŽsz hal
Ha ugyanabb—l az Žtelfajt‡b—l tšbb
darabot akar elkŽsz’teni, v‡lasszon ki
egyforma darabokat, Žs helyezze el
™ket kšr alakban az edŽnyben.
PŽlda: Burgony‡k, karfioldarabok,
paradicsomok
Bor’tsa be alum’niumf—li‡val az Žtel
legvŽkonyabb rŽszŽt, hogy nehogy
tœlsŸljšn (az alum’nium-f—lia ne Žrjen
a sŸt™ fal‡hoz).
PŽlda: EgŽsz hal feje Žs farka,
egŽsz csirke sz‡rnya
Az Žtelek b™rŽt egy vill‡val ki kell
lyuggatni, hogy elt‡vozhassŽk a g™z
Žs ne repedjen fel a b™r.
PŽlda: Burgonya, paradicsom,
kolb‡sz, toj‡s s‡rg‡ja,
egŽsz hal
17
Page 19

Felmeleg’tŽs
H
F™
FOGçSOK
Z…LDSƒGEK,
F™ZELƒKEK
MAGAS
KEMƒNYITï
TARTALMò
ƒTELEK
ƒTEL TELJESêTMƒNY MEGJEGYZƒS
Egyt‡lŽtelek
1 t‡nyŽr
2 t‡nyŽr
4 t‡nyŽr
F™tt hœs, csirke, hœs-szelet,
burgerek, stb.
1 adat
2 adag
Megkeverhet™ raguk
1 adag
2 adag
4-6 adag
Nem megkeverhet™ Žtelek,
(pl. lasagne)
1 adag
2 adag
4 adag
1 adag
2 adag
4 adag
Pite
1 csal‡di pite, mŽlyh.
1 adag pite
2 adag pite
Hœsos pite
1 adag pite
4 adag pite
S†TƒSI ID™
(Perc)
2-3
3-4 1/2
6-8
1 1/2-3
2 1/2-4 1/2
2-4
4-6
6-10
5-8
9-12
12-16
1-1 1/2
1 1/2-3
3 1/2-6
7-10
2
3 1/2-4
1/4-1/2
3/4-2 1/2
70 %
70 %
70 %
30 %
30 %
50 %
100 %
70 %
100 %
100 %
100 %
100 %
•
…ntse r‡ a m‡rt‡st a hœsra, a hœs Žs a
zšldsŽgek a t‡nyŽr szŽlŽn legyenek.
•
Ford’tsa meg az id™ felŽnŽl.
•
Rakja r‡ egy t‡nyŽr‡llv‡nyra.
•
Fedje le sŸt™f—li‡val.
•
Rendezze ‡t egyszer sŸtŽs kšzben.
•
Fedje le sŸt™f—li‡val..
•
Keverje meg j—l 1 perc mœlva.
•
Fedje le sŸt™f—li‡val.
•
Forgassa meg a t‡lat 2 percenkŽnt.
•
Fedje le sŸt™f—li‡val.
•
Keverje meg j—l a fŽlid™nŽl.
•
Ha szŸksŽges, vegye ki a f—lia-t‡lc‡b—l.
•
Rakja r‡ nedvsz’v— konyhapap’rra, Žs ezzel
fedje is le.
Pizza
Rizs
F™tt tŽszta
KONZERV ƒTELEK
KŽszŽtelek (sŸlt zšldbab.
spagetti), levesek Žs
rizspuding
Norm‡l puding
PUDINGOK
Kar‡csonyi puding
1 egŽsz pizza
1 szelet pizza
1 adag, el™f™tt
4 adag, el™f™tt
Currys rizs
1 adag
4 adag
200 g
425 g
1 adag
4 adag
1 adag
EgŽsz (450 g)
3-4
1 1/2-2
2-3
8-10
3-5
3-4
10-12
2-3
3-4
1-1 1/2
2-3
1/2-1
4-5
70 %
100 %
70 %
100 %
100 %
100 %
100 %
70 %
---
•
Tegyen r‡ egy kis tejfšlt vagy vajat, hogy:
- nedvesebbŽ v‡ljŽk
- ne ragadjon šssze
•
Tegyen r‡ egy kis tejfšlt vagy vajat, hogy:
- nedvesebbŽ v‡ljŽk
- ne ragadjon šssze
•
Rakja ‡t egy mikrohull‡m‡ll— t‡lba.
•
Fedje le sŸt™f—li‡val.
•
Keverje meg j—l 1 Žs 2 perc mœlva.
•
Fedje le sŸt™f—li‡val.
•
Felszolg‡l‡s el™tt pihentesse 2-3 percig,
kŸlšnšsen ha lekv‡r van a tetejŽn.
•
Meleg’tse fel —vatosan egy lefedetlen
t‡lban, mert tœlhev’tŽs esetŽn
meggyulladhat a puding a nagy alkoholŽs cukortartalom miatt.
18
Page 20

Felolvaszt‡s
HòS
BAROMFI
HALAK
GY†M…-
LCS…K
LISZT
TARTALMò
TERMƒKEK
ƒTEL MEGJEGYZƒS
EgybesŸlt hœsok (marha,
birka, diszn—, stb.)
Vagdalt marha/birka
Hœsszelet, diszn—borda,
birkaborda
Kolb‡sz, szalonna
Ragu
Hœskock‡k
EgŽsz csirke, kacsa,
pulyka, stb.
Combok, sz‡rnyak
kicsi
nagy
EgŽsz hal (lazac, makrŽla)
FilŽk (lepŽnyhyal, hering)
Szeletek (t™kehal, lazac)
GarnŽlar‡kok, fŽsŸs-kagyl—k)
Zacsk—ban f™tt hal
…mlesztett, puha gyŸmšlcs
(m‡lna, cseresznye, eper)
…mlesztett kemŽny gyŸmšlcs
(alma, barack, rebarbarar)
PŸrŽ, gyŸmšlcs-desszert.
GyŸmšlcsšs pite, soml—i
galuska, tœr—slepŽny,
gyŸmšlcsr‡tŽttel
KenyŽr
Nagy szeletelt/szeleteletlen cip—
Kis szeletelt/szeleteletlen cip—
1 szelet
KenyŽrtekercs Žs kifli
1
2
4
KisŸtetlen cukr‡sz-sŸtemŽny
Tšltštt gyŸmšlcskos‡rka
(18-20 cm)
Kolb‡sztekercsek (4)
Pisk—ta
EgŽsz
Darab
S†TƒSI ID™
(Perc/450 g)
8-11
7 - 9
6 - 9
4 - 5
15
7 - 8
8 - 10
6 - 8
7 - 9
4 - 5
3 - 5
4 - 5
5 - 6
(225 g-onkŽnt)
3 - 5
6 - 8
7 - 8
7 - 10
3 - 4
5 - 7 / 6 - 8
3 - 5 / 4 - 6
10-20 mp
15 - 15 mp
30 mp
1-1 1/2
1
(225 g-onkŽnt)
4 - 5
2 - 3
1/2
1 - 1
40-60 mp
PIHENTETƒSI ID™
(Perc)
20-30
10 - 15
10 - 15
5
5 perc fŽlid™nŽl
5 perc a vŽgŽn
10 - 15
20 - 30
10 - 15
10 - 15
5 - 10
10 - 15
10 - 15
5 - 10
5
5 - 10
5 - 10
10 - 15
10 - 15
10 - 15
10 - 15
-
1-2
1-2
1-2
20
5 - 10
5
5 - 10
•
A vŽkony rŽszeket fedje le f—li‡val.
•
Ford’tsa meg kŽtszer felolvaszt‡s kšzben.
•
V‡lassza szŽt ™ket gyakran.
•
A felolvadt darabokat vegye ki minŽl
hamarabb, Žs pihentesse.
•
Ford’tsa meg a fŽlid™nŽl.
•
A vŽkony rŽszeket fedje le f—li‡val, ha szŸksŽges.
•
V‡lassza szŽt Žs rendezze ‡t kŽtszer
felolvaszt‡s kšzben.
•
Tšrdelje szŽt, Žs a felolvadt darabokat vegye
ki.
•
Takarja le f—li‡val a sz‡rnyakat, a mellcsontot,
ha szŸksŽges.
•
El™szšr a mellrŽszt olvassza le, Žs ford’tsa
meg a fŽlid™nŽl.
•
A vŽkonyabb rŽszek a t‡l kšzepŽn legyenek.
•
Forgassa meg Žs rendezze ‡t kŽtszer a
felolvaszt‡s kšzben.
•
Fedje le a vŽkony vŽgeket f—li‡val, ha szŸksŽges.
•
Egy rŽtegben rendezze el.
•
Ford’tsa meg egyszer felolvaszt‡sw kšzben.
•
Keverje meg a fŽlid™nŽl.
•
Lyuggassa ki a zacsk—t Žs rakja be egy
mikrohull‡m‡ll— t‡lba.
•
Ford’tsa meg a fŽlid™nŽl.
•
MŽrje le a k’v‡nt mennyisŽget.
•
Keverje meg egyszer, vagy rendezze ‡t ™ket a
felolvaszt‡s Žs a pihentetŽs kšzben.
•
Keverje meg —vatosan felolvaszt‡s kšzben.
•
Rakja r‡ a szerv’roz— t‡nyŽrra.
•
Vegye ki a mœanyag csomagol‡sb—l.
•
Rakja r‡ egy nedvsz’v— konyha-pap’rra.
•
Ford’tsa meg a fŽlid™nŽl.
•
A tœl hosszœ felolvaszt‡s kisz‡r’tja a kenyeret
•
Vegye ki a csomagol‡sb—l.
•
Rakja r‡ egy nedvsz’v— konyha-pap’rra.
•
Ford’tsa meg gyakran, hogy sehol se
melegedjŽk fel.
•
Rakja r‡ egy a szerv’roz—t‡nyŽron elhelyezett
konyhapap’rra.
•
Vegye el a pap’rt a szerv’roz‡s el™tt.
•
Csomagolja be mindegyik tekercset
konyhapap’rba, a nedvessŽg felsz’v‡s‡hoz.
•
LŽnyeges a pihentetŽsi id™!
•
Rakja r‡ konyhapap’rra.
H
19
Page 21

Hœs sŸtŽse
H
MARHA
BIRKA
ƒTEL TELJESêTMƒNY MEGJEGYZƒS
Kis szelet (filŽ)
VŽresen
Kšzepesen
J—l ‡tsŸtve
Vastag szelet
(borda, far, l‡gy hœs)
VŽresen
Kšzepesen
J—l ‡tsŸtve
Marhaszegy Žs p‡rolt
marhasŸlt (j—l ‡tsŸtve)
Beefsteak (225 g)
VŽresen
J—l ‡tsŸtve
Puh‡bb rŽszek
(comb, filŽ)
Kšzepesen
J—l ‡tsŸtve
KemŽnyebb rŽszek
(lapocka, csontos mell)
J—l ‡tsŸtve
S†TƒSI ID™
(450 g-onkŽnt)
6
6 - 8
8 - 9
10 - 12
13
14 - 15
20
3
5
10 - 12
12 - 14
15
100 %
3 percig, azut‡n
50 %
100 %
5 percig, azut‡n
50 %
100 %
5 percig, azut‡n
30 %
MED-HIGH (70%)
100 %
5 percig, azut‡n
50 %
•
Ford’tsa meg a fŽlid™nŽl.
•
Pihentesse 15-25 percig.
•
Fedje be f—li‡val a csontot Žs a kŸls™ szŽlt
•
Ford’tsa meg a fŽlid™nŽl.
•
Pihentesse 15-25 percig.
•
SŸsse fed™ alatt.
•
Pihentesse 20 percig.
---
•
Ford’tsa meg a fŽlid™nŽl.
•
Pihentesse 15-25 percig.
.
SERTƒS
BORJò
F†ST…LT
SONKA
Bordaszelet, hœsszelet
J—l ‡tsŸtve
Lapocka
J—l ‡tsŸtve
Bordaszelet
J—l ‡tsŸtve
Comb, lapocka, bŽlsz’n
J—l ‡tsŸtve 15 100 %
Egy darabban (j—l ‡tsŸtve)
Szeletek (j—l ‡tsŸtve)
Bacon
1 szelet
2 szelet
4 szelet
8 - 10
10 - 12
5 perc. azut‡n
8 - 10
5 perc. azut‡n
10 - 12
6 - 8
3/4 - 11/4
11/2 - 21/4
23/4 - 4
70 %
100 %
50 %
70 %
50 %
50 %
70 %
100 %
•
A vŽkonyabb rŽszek a t‡l kšzepŽn legyenek.
•
Pihentesse 5 percig.
•
Ford’tsa meg a fŽlid™nŽl.
•
Pihentesse 15-25 percig.
•
A vŽkonyabb rŽszek az edŽny kšzepŽn
legyenek.
•
Pihentesse 5 percig.
•
Ford’tsa meg a fŽlid™nŽl.
•
Pihentesse 15-20 percig.
•
Ford’tsa meg a fŽlid™nŽl.
•
Pihentesse 15-20 percig.
•
Ford’tsa meg a fŽlid™nŽl.
•
Pihentesse 5 percig.
•
Fedje le laz‡n konyhapap’rral.
20
Page 22

Friss zšldsŽgek sŸtŽse
BURGONYA
Z…LDBAB,
BORSî,. stb.
KçPOSZTA,
KARFIOL,
stb.
GY…KERES
Z…LDSƒGEK
EGYƒB
Z…LDSƒGE
ƒTEL MENNYISƒG MEGJEGYZƒS
EgŽsz burgony‡k,
hŽj‡ban
Megtiszt’tott Žs (3 cm-es)
kock‡kra v‡gott biurgo-ny‡k
Zšldbab
Szeletelt fut—bab
Juliskabab
Zšldbors—
Msange-tout
K‡poszta
(nagyra felvagdalva)
Kelbimb—
Karfiol, szŽttšrdelve
Brokkoli
Spen—t
Tavaszi zšldsŽgek
S‡rgarŽpa, vŽkonyra
szeletelve
CŽkla (h‡mozatlan)
Kar—rŽpa Žs fehŽrrŽpa
Pasztern‡k (negyedelve)
Gomba
Hagyma
EgŽsz
Negyedelt
Paradicsom
Courgettes
Zeller (fŽlbe v‡gva)
Csšves kukorica
Sp‡rga
Artics—ka
Tšk, 3 cm-es kock‡kra
v‡gva
1
2
4
3
450 g
450 g
225 g
225 g
375 g
1/2 kšzepes
450 g
225 g
1 fej
450 g
225 g
450 g
450 g
450 g
225 g
4 kšzepes
450 g
450 g
225 g
2 nagy
4-5
2
225 g
4
1
2
4
450 g
1
225 g
S†TƒSI IDÌ
(Percben, 100 %-n‡l)
4 - 5
6 - 8
12 - 14
6 - 7
6 - 8
5 - 6
4 - 5
4 - 6
6 - 7
5 - 7
8 - 10
5 - 7
10
7 - 8
4 - 5
5 - 6
7 - 8
10
6 - 7
12 - 15
10 - 12
2 - 3
4 - 6
2 - 3
2 - 3
3 - 4
2 - 3
2 - 3
3 - 4
6 - 8
5 - 6
4 - 5
6 - 7
• Mossa meg Žs szurk‡ljja ‡t ™ket egy vill‡val.
• Ha m‡r teljesen megsŸltek, csomagolja be
egy f—li‡ba Žs hagyja pihenni 5 percet.
• Rakja be egy nagy t‡lva Žs fedje le j—l.
• Keverje meg a fŽlid™nŽl.
• Ha pŸrŽt akar csin‡lni, sŸsse 1-2 perccel
tov‡bb.
• …ntsšn hozz‡ 30 ml vizet.
• K—stolja meg a minim‡lis sŸtŽsi id™ ut‡n.
• Azonnal t‡lalja!
•
…ntsšn hozz‡ 60 ml vizet.
•
…ntsšn hozz‡ 60 ml vizet.
•
Rendezze el a karfioldarabokat œgy, hogy a
vŽkonyabb rŽszŸk a t‡l kšzepe felŽ legyen.
•
SŸsse meg a puh‡bb leveleket nagyon kevŽs
v’zzel.
•
Fedje le j—l.
•
…ntsšn hozz‡ 60 ml vizet.
•
…ntsšn hozz‡ 60 ml vizet.
•
Fedje le j—l.
•
Keverje meg a fŽlid™nŽl.
•
Csomagolja be sŸt™f—li‡ba, vagy sŸsse egy
lefedett edŽnyben.
•
SŸsse lefedett edŽnyben, olvasztott vajjal.
•
Ne sŸsse tœl.
•
SŸsse egy lefedett edŽnyben, v’z nŽlkŸl.
•
Felezze el keresztben
•
Hintse meg vajjal vagy reszelt sajttal.
•
SŸsse fed™ nŽlkŸli edŽnyben.
•
SŸsse egy kis v’zben, hogy Žppen
megpuhuljon.
•
…ntsšn hozz‡ 30 ml vizet.
•
Csomagolja be mindegyiket sŸt™f—li‡ba vagy
rakja be egy lapos edŽnybe.
•
Ford’tsa meg kŽtszer sŸtŽs kšzben.
•
…ntsšn hozz‡ 60 ml vizet.
•
Csomagolja be sŸt™f—li‡ba.
•
Rakja be egy nagy t‡lba, Žs fedje le j—l.
•
Keverje meg a fŽlid™nŽl.
•
Ha pŸrŽt akar kŽsz’teni, sŸsse 1-2 perccel
tov‡bb.
H
21
Page 23

MŽlyhŸ tštt zšldsŽgek
H
BURGONY
Z…LDBAB,
BORSî, stb.
KçPOSZTA,
KARFIOL.
stb.
ƒTEL MENNYISƒG MEGJEGYZƒS
Burgonyaszeletek
(1 cm vastag)
Zšldbab
Juliskabab
Zšldbors—
Mange-tout
Vegyes zšldsŽg
K‡poszta
Kelbimb—
Karfiol
Brokkoli
1
2
450 g
375 g
125 g
225 g
450 g
225 g
125 g
225 g
225 g
225 g
225 g
225 g
S†TƒSI IDÌ
(Percben, 100 %-n‡l)
4 - 5
6 - 8
8 - 10
7 - 8
2 - 3
4 - 5
8
4 - 5
3 - 4
4 - 6
3 - 4
4 - 5
5 - 6
5
•
R—sejbni nem kŽsz’thet™ mikrohull‡mœ
sŸt™ben.
•
…ntsšn hozz‡ 30 ml vizet.
•
Rakja be egy lapos edŽnybe, Žs fedje le.
•
…ntsšn hozz‡ 30 ml vizet.
•
…ntsšn hozz‡ 45 ml vizet.
•
…ntsšn hozz‡ 30 ml vizet.
•
K—stolja meg a megadott minim‡lis sŸtŽsi id™
ut‡n, nehogy tœlsŸljšn.
•
…ntsšn hozz‡ 30 ml vizet.
•
Rendezze ‡t a fŽlid™nŽl.
•
Pihentesse 1-2 percet, Žs s—zza meg.
Ne šntsšn hozz‡ vizet.
GY…KERES
Z…LDSƒGEK
EGYƒB
Z…LDSƒGEK
Spen—t
S‡rgarŽpa 225 g 4 - 6
Csšves kukorica
ƒdes kukorica
225 g
1
3 - 4
225 g
4 - 5
2 - 3
8 - 10
3 - 4
---
•
…ntsšn hozz‡ 30 ml vizet.
•
Adjon hozz‡ kŽshegynyi vajat.
•
Adjon hozz‡ 30 ml vizet.
22
Page 24

A mikrohull‡mœ sŸtÎ tiszt’t‡sa
A mikrohull‡mœ sŸtÎ al‡bbi rŽszeit rendszeresen meg kell
tiszt’tani, hogy ne alakuljanak zs’r- Žs Žtellerak—d‡sok:
◆ A belsÎ Žs a kŸlsÎ felŸleteket,
◆ Az ajt—t Žs az ajt— tšm’tŽseit,
◆ Az Ÿvegt‡nyŽrt Žs a gšrgÎsgyõrõt.
†gyeljen mindig arra, hogy az ajt— tšm’tŽsei
☛
tiszt‡k legyenek, Žs az ajt— j—l csuk—djŽk!
1 Tiszt’tsa meg a sŸtÎ kŸlsejŽt egy meleg szappanos v’zbe m‡rtott puha
ronggyal! Azut‡n tšršlje sz‡razra.
2 T‡vol’tsa el a felfršcskšlŽseket Žs a szennyezÎdŽseket a belsÎ felŸletekrÎl
vagy a gšrgÎsgyõrõrÎl egy szappanos ronggyal. Azut‡n tšršlje Îket sz‡razra.
3 A megkemŽnyedett ŽtelrŽszecskŽk meg-puh’t‡s‡hoz Žs a kellemetlen szag
megszŸntetŽsŽhez rakjon be egy poh‡r hig’tott citromlŽt az Ÿvegt‡nyŽrra Žs
meleg’tse 10 percig, maxim‡lis teljes’tmŽnnyel.
4 Mosogassa el a mosogat—gŽp‡ll— Ÿvegt‡nyŽrt, ha szŸksŽges!
☛ Minden egyes haszn‡lat ut‡n tisztitsa ki a
sŸtÎteret higitott tisztit—folyadŽkkal.Az esetleges
sŽrŸlŽsek elkerŸlŽse miatt v‡rja meg amig a sŸtÎ
teljesen kihŸl.
H
Tan‡csok:
NE …NTS…N vizet a szellÎzÎny’l‡sokba!
Ne haszn‡ljon a tiszt’t‡shoz koptat— termŽkeket vagy old—szereket!
†gyeljen nagyon az ajt—tšm’tŽsek tiszt’t‡s‡ra, hogy a szennyezÎdŽsek:
◆ ne gyõlhessenek ott šssze,
◆ ne akad‡lyozhass‡k az ajt—
csuk—d‡s‡t!
A mikrohull‡mœ sŸtÎ t‡rol‡sa Žs jav’t‡sa
Az al‡bbiakra kell Ÿgyelni a mikrohull‡mœ sŸtÎ t‡rol‡sa
vagy szervizelŽse ut‡n.
Nem szabad a sŸtÎt haszn‡lni, ha megsŽrŸlt az ajt— vagy
az ajt— tšm’tŽse:
◆ Eltšrštt a forg—p‡nt,
◆ Megrong‡l—dtak a tšm’tŽsek,
◆ Deform‡l—dott a sŸtÎ h‡za.
A mikrohull‡mœ sŸtÎt csak szakkŽpzett mikrohull‡mœkŽszŸlŽk szerelÎvel szabad jav’ttatni!
NE szerelje le a sŸtÎrÎl a kŸlsÎ h‡zat! Ha elromlott a
☛
sŸtÎ, akkor:
◆ Hœzza ki a h‡l—zati csatlakoz—dugaszt a fali
konnektorb—l, Žs
◆ Keresse fel a legkšzelebbi szervizt!
A sŸtÎ t‡rol‡sa
A sŸtÎt sz‡raz, pormentes helyen kell t‡rolni.
Ok:
A por Žs a nedvessŽg k‡ros hat‡ssal van a sŸtÎ mõkšdÎ rŽszeire.
23
Page 25

Mõszaki specifik‡ci—
H
A SAMSUNG folyamatosan tšrekszik termŽkei tškŽletes’tŽsŽre. EzŽrt elÎzetes Žrtes’tŽs
nŽlkŸl m—dos’thatja az al‡bbi mõszaki adatokat vagy a haszn‡lati utas’t‡st.
Modell G2618C
Villamos csatlakoz‡s 230 V ~ 50 Hz
Felvett teljes’tmŽny
Mikrohull‡m 1200 W
GrillezŽs 1000 W
Kombin‡lt 1350 W
Leadott teljes’tmŽny 800 W
†zemi frekvencia 2450 Hz
Magnetron OM75SH(31)
HõtŽs Ventill‡torral
MŽretek
ôrtartalom 17 liter
Sœly
(szŽlessŽg x mŽlysŽg x magass‡g)
KŸlsÎ 489 x 275 x 364 mm
BelsÎ 306 x 181 x 322 mm
Nett— kb. 15.5 kg
(IEC-705)
24
Page 26

ELECTRONICSELECTRONICS
Printed in UK
Page 27

MICROWAVE OVEN
G2618C
Owner’s Instructions
and
Cooking Guide
Page 28

You have just purchased a
SAMSUNG microwave oven.
Your Owner’s Instructions contain much
valuable information on cooking with your
microwave oven. Take the time to read them
as they will help you take full advantage of
the microwave oven features.
Contents
◆ O
VEN ........................................................................................................................ 2
◆ C
ONTROL PANEL ...................................................................................................... 3
◆ USING THIS INSTRUCTIONS BOOKLET........................................................................ 4
◆ I
NSTALLING AND P
■ Safety Precautions ........................................................................................ 5
■ Accessories................................................................................................... 7
■ Installing Your Microwave Oven.................................................................... 8
■ How a Microwave Oven Works ..................................................................... 9
■ Checking that Your Oven is Operating Correctly........................................... 9
■ What to Do if You are in Doubt or Have a Problem....................................... 10
◆ COOKING WITH YOUR MICROWAVE OVEN
■ Cooking/Reheating........................................................................................ 11
■ Stopping the Cooking.................................................................................... 12
■ Adjusting Extra Time ..................................................................................... 12
■ Manual Defrosting Food................................................................................ 13
■ Instant Reheat Guide..................................................................................... 13
■ Power Level and Time Variations.................................................................. 14
◆ TRADITIONAL COOKING METHODS
■ Grilling ........................................................................................................... 15
◆ RECOMMENDATIONS FOR USE
■ CookWare Guide........................................................................................... 16
■ Cooking Guide............................................................................................... 17
■ Cleaning Your Microwave Oven.................................................................... 23
■ Storing and Repairing Your Microwave Oven ............................................... 23
■ Technical Specifications................................................................................ 24
REPARING YOUR MICROWAVE OVEN
GB
1
Page 29

GB
Oven
DOOR LATCHES
VENTILATION HOLES
DOOR
GLASS PLATE
VENTILATION HOLES
HEATING ELEMENT
COUPLER
ROLLER RING
VARIABLE
COOKING POWER
CONTROL KNOB
SAFETY INTERLOCK
HOLES
TIMER KNOB
OPEN DOOR
PUSH BUTTON
2
Page 30

Control Panel
DEFROST
GB
INSTANT COOK
OPEN DOOR PUSH
BUTTON
Page 31

GB
Using this Instructions Booklet
You have just purchased a SAMSUNG microwave oven. Your Owner’s Instructions contain much
valuable information on cooking with your microwave oven:
◆ Safety precautions
◆ Suitable accessories and cookware
◆ Useful cooking tips
At the front of the booklet you will find illustrations of the oven, and more importantly the control panel,
correspanding to your microwave model type.
The step-by-step procedures use two different symbols.
☛
Important Note
➢
PRECAUTIONS TO AVOID POSSIBLE EXPOSURE TO EXCESSIVE MICROWAVE ENERGY
Failure to observe the following safety precautions may result in harmful exposure to microwave energy.
(a) Under no circumstances should any attempt be made to operate the oven with the door open or to tamper with
the safety interlocks (door latches) or to insert anything into the safety interlock holes.
(b) Do not place any object between the oven door and front face or allow food or cleaner residues to accumulate
on sealing surfaces. Ensure that the door and door sealing surfaces are kept clean by wiping after use first with
a damp cloth and then with a soft dry cloth.
(c) Do not operate the oven if it is damaged until it has been repaired by a qualified microwave service technician
trained by the manufacturer.
It is particularly important that the oven door closes properly and that there is no damage to the:
(1) Door, door seals and sealing surfaces
(2) Door hinges (broken or loose)
(3) Power cable
(d) The oven should not be adjusted or repaired by anyone other than a properly qualified microwave service
technician trained by the manufacturer.
4
Page 32

Safety Precautions
Before cooking food or liquids in your microwave oven, please check that the following safety
precautions are taken.
1 DO NOT use any metallic cookware in the microwave oven:
◆ Metallic containers
◆ Dinnerware with gold or silver trimmings
◆ Skewers, forks, etc.
Reason: Electric arcing or sparking may occur and may damage the oven.
2 DO NOT heat:
◆ Airtight or vacuum-sealed bottles, jars, containers
Example: Baby food jars
◆ Airtight food
Example: Eggs, nuts in shells, tomatoes
Reason: The increase in pressure may cause them to explode.
Tip
: Remove lids and pierce skins, bags, etc.
GB
3 DO NOT operate the microwave oven when it is empty.
Reason
: The oven walls may be damaged.
: Leave a glass of water inside the oven at all times. The water will absorb the microwaves if you accidentally
Tip
set the oven going when it is empty.
4 DO NOT cover the rear ventilation slots with cloths or paper.
Reason: The cloths or paper may catch fire as hot air is evacuated from the oven.
5 ALWAYS use oven gloves when removing a dish from the oven.
Reason: Some dishes absorb microwaves and heat is always transferred from the food to the dish.
The dishes are therefore hot.
6 DO NOT touch heating elements or interior oven walls.
Reason: These walls may be hot enough to burn even after cooking has finished, although they do not appear to be so.
Do not allow inflammable materials to come into contact with any interior area of the oven. Let the oven cool
down first.
7 To reduce the risk of fire in the oven cavity:
◆ Do not store flammable materials in the oven
◆ Remove wire twist ties from paper or plastic bags
◆ Do not use your microwave oven to dry newspapers
◆ If smoke is observed, keep the oven door closed and switch off or disconnect the oven from the power supply
5
Page 33

GB
Safety Precautions (continued)
8 Take particular care when heating liquids and baby foods.
◆ ALWAYS allow a standing time of at least 20 seconds after the oven has been switched off to allow the temperature
to equalize.
◆ Stir during heating if necessary and ALWAYS stir after heating.
◆ To prevent eruptive boiling and possible scalding, you should stir before, during, and after heating.
◆ In the event of scalding, follow these FIRST AID instructions:
• Immerse the scalded area in cold water for at least 10 minutes.
• Cover with a clean, dry dressing.
• Do not apply any creams, oils or lotions.
◆ NEVER fill the container to the top and choose a container that is wider at the top than at the bottom to prevent the
liquid from boiling over. Bottles with narrow necks may also explode if overheated.
◆ ALWAYS check the temperature of baby food or milk before giving it to the baby.
◆ NEVER heat a baby’s bottle with the teat on, as the bottle may explode if overheated.
9 Be careful not to damage the power cable.
◆ Do not immerse the power cable or plug in water and keep the power cable away from heated surfaces.
◆ Do not operate this appliance if it has a damaged power cable or plug.
10 Stand at arm’s length from the oven when opening the door.
Reason
: The hot air or steam released may cause scalding.
11 Keep the inside of the oven clean.
Reason
: Food particles or spaltered oils stuck to oven walls or floor can cause the damage of painting and reduce the
efficiency of the oven.
12 “Clicking” sound might be noticed while operating, especially at defrosting mode.
Reason: When the power output is changing electrically, you may hear that sound. This is normal.
13 When the microwave oven is operating without any load, the power will be cut off automatically for safety. After standing
over 30 min, you can operate the oven normally.
IMPORTANT SAFETY INSTRUCTIONS
During cooking, you should look into the oven from time to time when food is being heated or cooked
in disposable containers of plastic, paper or other combustible materials.
IMPORTANT
Young children should NEVER be allowed to use or play with the microwave oven.
Nor should they be left unattended near the microwave oven when it is in use.
Items of interest to children should not be stored or hidden just above the oven.
CAUTION
Microwave radiations
Person must not be exposed to microwave energy, which can be irradiated by magnetron or other
microwave generator due to a wrong connection or use.
All the in and out microwave connections.
The wave guide, the flange and the joints must be safe.
6
Page 34

Accessories
Depending on the model that you have purchased, you are supplied
with several accessories that can be used in a variety of ways.
1 Coupler, already placed over the motor shaft in the base of the oven.
Purpose: The coupler rotates the glass plate.
2
Roller ring, to be placed in the centre of the oven.
Purpose: The roller ring supports the glass plate.
3 Glass plate, to be placed on the roller ring with the centre fitting on to the
coupler.
GB
1
2
Purpose: The glass plate serves as the main cooking surface; it can be
easily removed for cleaning.
4 Metal rack, to be placed on the glass plate.
Purpose: The metal rack can be used to cook two dishes at the same
time. A small dish may be placed on the glass plate and a
second dish on the rack. The metal rack can be used in grill and
combination cooking
☛
DO NOT operate the microwave oven without the
roller ring and the glass plate.
3
4
7
Page 35

GB
20 cm
above
Installing Your Microwave Oven
Place the oven on a flat, level surface strong enough to safely bear
the weight of the oven.
10 cm
behind
10 cm
on the side
1
When you install your oven, Make sure there is adequate
ventilation for your oven by leaving at least 10 cm
(4 inches) of space behind, on the sides of the oven
and 20 cm (8 inches) of above
2
Remove all packing materials inside the oven.
Install the roller ring and turntable.
Check that the turntable rotates freely.
☛ Never block the air vents as the oven may overheat and
automatically switch itself off.
It will remain inoperable until it has cooled sufficiently.
☛ For your personal safety, plug the cable into a 3-pin, 230 Volt,
50Hz, AC earthed socket. If the power cable of this appliance
is damaged, it must be replaced by a special cable
(I-SHENG SP022, KDK KKP4819D, EUROELECTRIC 3410,
SAMIL SP-106B, MOONSUNG EP-48E). Contact your local
dealer to have it replaced. The power cable of ISRAEL is
PENCON(ZD16A), S/AFRICA APEX LEADS SA16 and
NIGERIA, GHANA, KENYA and U.A.E is PENCON(UD13A1).
.
☛ Do not install the microwave oven in hot or damp
surroundings like next to a traditional oven or radiator.
The power supply specifications of the oven must be
respected and any extension cable used must be of the same
standard as the power cable supplied with the oven.
Wipe the interior and the door seal with a damp cloth before
using your microwave oven for the first time.
8
Page 36

How a Microwave Oven Works
Microwaves are high-frequency electromagnetic waves; the energy
released enables food to be cooked or reheated without changing
either the form or the colour.
You can use your microwave oven to:
◆ Defrost
◆ Reheat
◆ Cook
Cooking Principle
1 The microwaves generated by the magnetron are distributed uniformly as
the food rotates on the glass plate. The food is thus cooked evenly.
2 The microwaves are absorbed by the food up to a depth of about 1 inch
(2.5 cm). Cooking then continues as the heat is dissipated within the food.
3 Cooking times vary according to the recipient used and the properties of
the food:
◆ Quantity and density
◆ Water content
◆ Initial temperature (refrigerated or not)
☛
As the centre of the food is cooked by heat
dissipation, cooking continues even when you have
taken the food out of the oven. Standing times
specified in recipes and in this booklet must therefore
be respected to ensure:
◆ Even cooking of the food right to the centre
◆ The same temperature throughout the food
GB
Checking that Your Oven is Operating Correctly
The following simple procedure enables you to check that your
oven is working correctly at all times. If you are in doubt, refer to
the section entitled “What to Do if You are in Doubt or Have a
Problem” on the next page.
➢ ◆ The oven must be plugged into an appropriate
wall socket.
◆ The glass plate must be in position in the oven.
◆ If a power level other than the maximum is used,
the water takes longer to boil.
1 Open the oven door. Place a bowl of water on the glass plate.
Close the door.
2 Set the power level to maximum by turning COOKING POWER CONTROL
knob.
3 Set the time to 4 to 5 minutes by turing the TIMER knob.
9
Page 37

GB
What to Do if You are in Doubt or Have a Problem
Becoming familiar with a new appliance always takes a little time. If you have any of the problems listed
below, try the solutions given. They may save you the time and inconvenience of an unnecessary service
call.
Problem Checks/Explanation/Solution
◆ Condensation inside the oven This is normal.
◆ Air flow around the door and outer casing
◆ Light reflection around the door and outer casing
◆ Steam escaping from around the door or vents
The oven does not start when you turn the TIMER knob. ◆ Is the door completely?
The food is not cooked at all ◆
The food is either overcooked or undercooked ◆ Was the appropriate cooking length set for the type of food?
Sparking and cracking occur inside the oven (arcing) ◆ Have you used a dish with metal trimmings?
The oven causes interference with radios or televisions ◆ Slight interference may be observed on televisions or radios
Have you set the timer correctly?
◆ Is the door closed?
◆ Have you overloaded the electric circuit and caused a fuse to
blow or a breaker to be triggered?
◆ Was an appropriate power level chosen?
◆ Have you left a fork or other metal utensil inside the oven?
◆ Is aluminium foil too close to the inside walls?
when the oven is operating. This is normal.
Solution
: Install the oven away from televisions, radios and
aerials.
If the above guidelines do not enable you to solve the problem, take a note of:
◆ The model and serial numbers, normally printed on the rear of the oven
◆ Your warranty details (date and place of purchase)
◆ A clear description of the problem
Then contact your local dealer or SAMSUNG after-sales service.
10
Page 38

Cooking/Reheating
The following procedure explains how to cook or reheat food.
GB
☛ ALWAYS check your cooking settings before leaving
the oven unattended.
1 Open the oven door by pushing the large button in the button right-hand
corner of the control panel. Place the food in the centre of the glass plate.
Close the door.
2 Set the power level to maximum by turning COOKING POWER CONTROL
knob.
Model G2618C
MAXIMUM POWER 800W
3 Set the time by turning TIMER knob.
: The oven light comes on and the glass plate starts rotating.
Result
Cooking starts.
➢ You can change the power level during cooking by
turning the COOKING POWER CONTROL knob.
11
Page 39

GB
Stopping the Cooking
You can stop cooking at any time so that you can:
◆ Check the food
◆ Turn the food over or stir it
◆ Leave it to stand
To stop the cooking... Then...
Temporarily ◆ Open the door
Result: Cooking stops.
To resume cooking, close the door.
Completely Turn the TIMER knob to ‘0’..
Adjusting Extra Time
Like traditional cooking, you may find that, depending on the
food’s characteristics or your tastes, you have to adjust the cooking
times slightly. You can:
◆ Check how cooking is progressing at any time simply by
◆ Increase the remaining cooking time
To increase the cooking time of your food, simply move the TIMER knob to any
increased setting that you require.
➢ You can only adjust the time during cooking when the
opening the door
microwave grill or alternating function of microwave and
grill are selected.
Page 40

Manual Defrosting Food
1 Open the oven door by pushing the large button in the button right-hand
corner of the control panel.
2 Place the frozen food in the oven and close the door.
3 Turn the COOKING POWER CONTROL knob to defrost symbol ( ).
4 Turn the TIMER knob to select the appropriate time.
Result
: Defrosting begins.
GB
Instant Reheat Guide
1 Place the food in the oven and close the door.
2 Turn the COOKING POWER CONTROL knob to Max Power.
3 Turn the TIMER knob to select instant cook,(drinks, soup/sauce and fresh
vegetable).
➢ Refer to the table below about instant cook.
Symbol Recipes Serving size Standing Time
Drinks 150 ml 1 - 2 mins.
(Reheating)
Soup/ 200~300 ml 2 mins.
Sauce
(Reheating)
Fresh 200 ~ 300 g 2 mins.
Vegetables
(Cooking)
Page 41

GB
Power Levels and Time Variations
Operation ;
Set the COOKING POWER CONTROL knob to the appropriate
power level by turning it.
The power level function enables you to adapt the amount of
energy dissipated and thus the time required to cook or reheat your
food, according to its type and quantity. You can choose between
several power levels.
POWER LEVEL
%
G2618C
MWO GRILL
HIGH
MEDIUM HIGH
MEDIUM
MEDIUM LOW
DEFROST ( )
LOW
GRILL ( )
Alternating function of MW
and GRILL
Proportion of the time during the
running function for 100 sec.
100%
70%
50%
30%
20%
15%
-
100%
800W
560W
400W
240W
160W
120W
-
800W
18%
-
-
-
-
-
-
1000W
1000W
82%
The cooking times given in recipes and in this booklet correspond
to the specific power level indicated.
If you select a... Then the cooking time must be...
Higher power level Decreased
Lower power level Increased
Page 42

Grilling
The grill enables you to heat and brown food quickly, without
using microwaves. To this aim, a grill rack is supplied with your
microwave oven.
GB
☛ Always use oven gloves when touching the recipients
in the oven, as they will be very hot.
1 Preheat the grill to the required temperature, by turning the COOKING
POWER CONTROL knob to GRILL symbol ( ), and turning the TIMER
knob to the appropriate time.
2 Open the door and place the food on the rack.
3 Turn the COOKING POWER CONTROL knob to GRILL symbol ( ).
4 Turn the TIMER knob to the appropriate time.
Result
: Grilling starts:
➢
Please don’t mind if heater turns off and on while grilling. This
system is originally designed to prevent overheating of the
oven.
Page 43

GB
Cookware Guide
To cook food in the microwave oven, the microwaves must be able to penetrate the food, without being
reflected or absorbed by the dish used.
Care must therefore be taken when choosing the cookware. If the cookware is marked microwave-safe,
you do not need to worry.
The following table lists various types of cookware and indicates whether and how they should be used in
a microwave oven.
Cookware Microwave-Safe Comments
Aluminium foil ✔ ✘ Can be used in small quantities to protect areas against
overcooking. Arcing can occur if the foil is too close to the oven
wall or if too much foil is used.
Browning plate ✔ Do not preheat for more than eight minutes.
China and earthenware ✔ Porcelain, pottery, glazed earthenware and bone china are
usually suitable, unless decorated with a metal trim.
Disposable polyester ✔ Some frozen foods are packaged in these dishes.
cardboard dishes
Fast-food packaging
•
Polystyrene cups and
containers polystyrene to melt.
✔ Can be used to warm food. Overheating may cause the
• Paper bags or newspaper ✘ May catch fire.
•
Recycled paper or metal trims
Glassware
•
Oven-to-table ware
✘ May cause arcing.
✔ Can be used, unless decorated with a metal trim.
• Fine glassware ✔ Can be used to warm foods or liquids. Delicate glass may
break or crack if heated suddenly.
•
Metal
Glass jars
✔ Must remove the lid. Suitable for warming only.
• Dishes ✘ May cause arcing or fire.
• Freezer bag twist ties ✘
Paper
• Plates, cups, napkins and ✔ For short cooking times and warming. Also to absorb excess
kitchen paper moisture.
• Recycled paper ✘ May cause arcing.
Plastic
• Containers ✔ Particularly if heat-resistant thermoplastic. Some other plastics
may warp or discolour at high temperatures. Do not use
Melamine plastic.
• Cling film ✔ Can be used to retain moisture. Should not touch the food.
Take care when removing the film as hot steam will escape.
• Freezer bags ✔ ✘ Only if boilable or oven-proof. Should not be airtight. Prick with
a fork, if necessary.
Wax or grease-proof paper ✔ Can be used to retain moisture and prevent spattering.
16
Page 44

Cooking Guide
A Few Cooking Techniques
To ensure even cooking of the food in your microwave oven, lay the
food out carefully using the following simple techniques. DO NOT
forget to observe standing times.
GB
Imperial/Metric Conversion Chart
OUNCES/FLUID
OUNCES
1
2
3
4 (1/4 lb)
5 (1/4 pint)
6
7
8 (1/2 lb)
9
10(1/2 pint)
11
12(3/4 lb)
13
14
15(3/4 pint)
16(1 lb)
17
18
19
20(1 pint)
APPROXIMATE
GRAMMES/MILLILITRES
25
50
75
100
150
175
200
225
250
275
300
350
375
400
425
450
475
500
550
575
When cooking food with irregular
forms, place the thinnest parts, which
will cook faster, towards the centre of
the dish.
Examples: Chicken legs, lamb cutlets,
whole fish.
If you are cooking several pieces of
the same type of food, try to have
them of even sizes and place then in
a ring around the dish.
Examples: Potatoes, cauliflower
pieces, tomatoes.
To prevent the thinnest parts of some
food from becoming overcooked,
cover the tips with small pieces of
aluminium foil (keep away from the
oven walls).
Examples: Heads and tails of whole
fish, wings on a whole
chicken.
Food with skins must be pricked with
a fork to allow the steam to escape
and to prevent the skin from breaking.
Examples: Potatoes, tomatoes,
sausages, egg yolks,
whole fish.
17
Page 45

Reheating
GB
MAIN
COURSES
VEGETABLES
STARCHY
FOODS
Food Power Level Comments
Individual plates of food
1 plate
2 plates
4 plates
Cooked meats, chicken,
chops, burgers, etc.
1 serving
2 servings
Stirrable casseroles
1 serving
2 servings
4-6 servings
Non-stirrable dishes
(eg. LASAGNE)
1 serving
2 servings
4 servings
1 serving
2 servings
4 servings
Pies
1 family pie, chilled
1 individual pie
2 individual pies
Cooking Time
(Mins.)
2 - 3
3 - 41/2
6 - 8
11/2 - 3
21/2 - 41/2
2 - 4
4 - 6
6 - 10
5 - 8
9 - 12
12 - 16
1 - 1
1/2
11/2 - 3
31/2 - 6
7 - 10
2
3
1/2 - 4
MED-HIGH (70%)
MED-HIGH (70%)
MED-HIGH (70%)
MED-LOW (30%)
MED-LOW (30%)
MEDIUM (50%)
HIGH (100%)
MED-HIGH (70%)
HIGH (100%)
HIGH (100%)
• Cover the meat with gravy, with the meat and
vegetables towards the outside of the plate.
• Turn half way through heating.
• Stack on a plate stacker.
• Cover with cling film.
• Re-arrange once during cooking.
• Cover with cling film.
• Stir well after 1 minute.
• Cover with cling film.
• Rotate dish at 2-minute intervals.
• Cover with cling film.
• Stir well half way through cooking.
• If necessary, remove from foil tray.
• Stand on and cover with absorbent
kitchen paper.
CANNED FOODS
PUDDINGS
mince pies
1 individual pie
4 individual pie
Pizza
1 whole individual pizza
1 slice of pizza
Rice
1 serving cooked
4 servings cooked
Individual curry with rice
Pasta
1 serving
4 servings
Convenience foods
(baked beans, spaghetti),
soups and rice pudding
7oz (200g)
15oz (425g)
Sponge pudding
1 serving
4 servings
Christmas pudding
1 serving
Whole (1lb-450g)
1/4 - 1/2
3/4 - 2
3 - 4
11/2 - 2
2 - 3
8 - 10
3 - 5
3- 4
10 - 12
2 - 3
3- 4
1/2
1 - 1
2 - 3
1/2 - 1
4 - 5
1/2
HIGH (100%)
HIGH (100%)
MED-HIGH (70%)
HIGH (100%)
MED-HIGH (70%)
MED-HIGH (70%
HIGH (100%) •
HIGH (100%)
HIGH (100%)
MED-HIGH (70%)
---
• Add a little stock, cream or butter to:
- Add moisture
- Prevent sticking
• Add a little stock, cream or butter to:
- Add moisture
- Prevent sticking
Transfer to a suitable oven-proof dish.
• Cover with cling film.
• Stir well after 1 and 2 minutes.
• Cover with cling film.
• Leave to stand for 2 to 3 minutes before
serving, particularly if topped with jam.
• Reheat carefully in an uncovered dish, as
the high alcohol and sugar content could
cause the pudding to burn if overheated.
18
Page 46

Defrosting
MEAT
POULTRY
FISH
Food Standing Time (Mins.) Comments
Whole joints (beef, lamb,
pork, etc.)
Minced beef/lamb
Steak, chops, cutlets
Sausages, bacon
Cooked casseroles
Cubed meat
Whole chicken, duck,
turkey, etc.
Drumsticks, wings, thighs
Small
Large
Whole fish (trout, mackerel)
Fillets (plaice, kippers)
Steaks (cod, salmon)
Prawns, scallops
Boil in bag fish
Cooking Time
(Mins. per lb/450g)
8 - 11
7 - 9
6 - 9
4 - 5
15
7 - 8
8 - 10
6 - 8
7 - 9
4 - 5
3 - 5
4 - 5
5 - 6
(per 8oz/225g)
3 - 5
20 - 30
10 - 15
10 - 15
5
5 mins. half way,
5 mins. at end
10 - 15
20 - 30
10 - 15
10 - 15
5 - 10
10 - 15
10 - 15
5 - 10
5
• Shield any thin or narrow ends with foil.
• Turn twice during defrosting.
• Break apart frequently.
• Remove thawed pieces as soon as
possible and leave to stand.
• Turn half way through defrosting.
• Shield ends and bones with foil, if necessary.
•
Separate and re-arrange twice during defrosting.
• Break up and set aside thawed pieces as they
defrost.
• Shield wings, breast bone, drumsticks with
foil, as necessary.
• Defrost breast side down first and turn half
way through defrosting.
• Arrange thinner ends towards the centre of the dish.
• Turn and re-arrange twice during defrosting.
• Shield thin ends with foil, if necessary.
• Arrange in a single layer.
• Turn once during defrosting.
• Stir half way through defrosting.
• Pierce the bag and place in an oven-proof dish.
• Turn half way through defrosting.
GB
FRUIT
FLOUR
PRODUCTS
Loose, soft fruit
(raspberries, cherries,
strawberries)
Loose, hard fruit
(apples, peaches, rhubarb)
Purees, fruit dessert
Fruit pie, trifles, cheesecakes
with fruit toppings
Bread
Large sliced/unsliced loaf
Small sliced/unsliced loaf
1 slice
Bread rolls and croissants
1
2
4
Uncooked pastry
Filled flans
(7-8 in/18-20 cm)
Sausage rolls (4)
Sponge cakes
Whole
Individual
6 - 8
7 - 8
7 - 10
3 - 4
5 - 7 / 6 - 8
3 - 5 / 4 - 6
10 - 20 secs.
15 - 15 secs.
30 secs.
1 - 11/2
1
(per 8oz-225g)
4 - 5
2 - 3
1 - 11/2
40 - 60 secs.
5 - 10
5 - 10
10 - 15
10 - 15
10 - 15
10 - 15
-
1 - 2
1 - 2
1 - 2
20
5 - 10
5
5 - 10
• Measure out required amount.
• Stir once or re-arrange during defrosting
and standing time.
• Stir carefully during defrosting.
• Stand on serving plate.
• Remove from plastic wrapping.
• Stand on absorbent kitchen paper.
• Turn over halfway through defrosting.
• Over-defrosting will dehydrate the bread.
• Remove from wrapping.
• Stand on absorbent kitchen paper.
• Turn frequently so that it does not get warm in places.
• Stand on kitchen paper on the serving plate.
• Remove paper before serving.
•
Wrap each roll in kitchen paper to absorb moisture.
• The standing time is essential.
• Stand on kitchen paper.
19
Page 47

Cooking Meat
GB
BEEF
LAMB
Food Power Level Comments
Small roasts (fillet)
Rare
Medium
Well done
Thick roasts
(rib, rump, top side)
Rare
Medium
Well done
Brisket and pot roasts
(well done)
Steak (225g)
Rare
Well done
Tender cuts
(leg, fillet, crown)
Medium
Well done
Tougher cuts
(shoulder, boned breast)
Well done
Cooking Time
(Mins. per lb/450g)
6
6 - 8
8 - 9
10 - 12
13
14 - 15
20
3
5
10 - 12
12 - 14
15
HIGH (100%)
for first 3 min. then
MEDIUM (50%)
HIGH (100%)
for first 5 min. then
MEDIUM (50%)
HIGH (100%)
for first 5 min. then
DEFROST (30%)
MED-HIGH (70%)
HIGH (100%)
for first 5 min. then
MEDIUM (50%)
• Turn over half way through cooking.
• Stand for 15 - 25 minutes.
• Shield bone and outer edge with foil.
• Turn over half way through cooking.
• Stand for 15 - 25 minutes.
• Cook covered.
• Stand for 20 minutes.
---
• Turn over half way through cooking.
• Stand for 15 - 25 minutes.
PORK
VEAL
GAMMON
Chops, cutlets
Well done
Leg, shoulder
Well done
Chops
Well done
Leg, shoulder, loin, rack
Well done
Joints (well done)
Steaks (well done)
Bacon
1 slice
2 slices
4 slices
8 - 10
10 - 12
8 - 10
15
10 - 12
6 - 8
3/4 - 11/4
1
1/2 - 21/4
2
3/4 - 4
MED-HIGH (70%)
HIGH (100%)
for first 5 min. then
MEDIUM (50%)
MED-HIGH (70%)
HIGH (100%)
for first 5 min. then
MEDIUM (50%)
MEDIUM (50%)
MED-HIGH (70%)
HIGH (100%)
•
Arrange the thin ends towards the centre of the dish.
• Stand for 5 minutes.
• Turn over half way through cooking.
• Stand for 15 - 25 minutes.
•
Arrange the thin ends towards the centre of the dish.
• Stand for 5 minutes.
• Turn over half way through cooking.
• Stand for 15 - 20 minutes.
• Turn over half way through cooking.
• Stand for 15 - 20 minutes.
• Turn over half way through cooking.
• Stand for 5 minutes.
• Loosely cover with kitchen paper.
20
Page 48

Cooking Fresh Vegetables
POTATOES
BEANS,
PEAS, etc.
CABBAGE,
CAULIFLOWER,
etc.
ROOT
VEGETABLES
Food Quantityl Comments
Whole jacket potatoes
Pealed potatoes cut into
1 inch (3 cm) cubes
French beans
Sliced runner beans
Broad beans
Peas
Mange-tout
Cabbage
(roughly chopped)
Brussel sprouts
Cauliflower, divided into
flowerets
Broccoli
Spinach
Spring greens
Carrots
(thinly sliced)
Beetroot (unpeeled)
Swede and turnip
Parsnips (quartered)
1
2
4
3
1lb (450g)
1lb (450g)
8oz (225g)
8oz (225g)
12oz (375g)
1/2 medium
1lb (450g)
8oz (225g)
1 whole
1lb (450g)
8oz (225g)
1lb (450g)
1lb (450g)
1lb (450g)
8oz (225g)
4 medium
1lb (450g)
1lb (450g)
Cooking Time
(Mins. at HIGH)
4 - 5
6 - 8
12 - 14
6 - 7
6 - 8
5 - 6
4 - 5
4 - 6
6 - 7
5 - 7
8 - 10
5 - 7
10
7 - 8
4 - 5
5 - 6
7 - 8
10
6 - 7
12 - 15
10 - 12
• Wash well and prick all over with a fork.
• When almost cooked, wrap in foil and leave to stand
for 5 minutes.
• Place in a large oven-proof dish and cover tightly.
• Stir well half way through the cooking time.
• If mashing, add 1 - 2 minutes to the cooking time.
• Add 2 fl. oz (30ml) of water.
• Taste after the minimum cooking time.
• Serve immediately.
• Add 4 fl. oz (60ml) of water.
• Add 4 fl. oz (60ml) of water.
• Arrange the flowerets with the stalks
towards the centre of the dish.
Cook tender leaves only with very little water.
•
• Cover lightly.
• Add 4 fl. oz (60ml) of water.
• Add 4 fl. oz (60ml) of water.
• Cover tightly.
• Stir half way through cooking.
•
Wrap in cling film or cook in a covered dish.
GB
OTHER
VEGETABLES
Mushrooms
Onions
Whole
Quartered
Tomatoes
Courgettes
Celery stalks (halved)
Corn on the cob
Asparagus
Artichokes
Pumpkin in 1 inch (3 cm)
cubes
8oz (225g)
2 large
4 - 5
2
8oz (225g)
4 stalks
1
2
4
1lb (450g)
1
8oz (225g)
2 - 3
4 - 6
2 - 3
2 - 3
3 - 4
2 - 3
2 - 3
3 - 4
6 - 8
5 - 6
4 - 5
6 - 7
• Cook in a covered dish with melted butter.
• Do not overcook.
Blanch in a covered dish with no additional water.
•
• Halve crosswise.
• Dot with butter or grated cheese.
• Cook in an uncovered dish.
• Cook in a little water until just soft.
• Add 2 fl. oz (30ml) of water.
• Wrap individually in cling film or place in a
shallow oven-proof dish.
• Turn twice during cooking.
• Add 4 fl. oz (60ml) of water.
• Wrap individually in cling film.
• Place in a large oven-proof dish and cover tightly.
• Stir well half way through cooking.
• If mashing, add 1 - 2 minutes to the cooking time.
21
Page 49

Cooking Frozen Vegetables
GB
POTATOES
BEANS,
PEAS, etc.
CABBAGE,
CAULIFLOWE
R, etc.
Food Quantityl Comments
Potato slices
(1/2 inch/1cm thick)
French beans
Broad beans
Peas
Mange-tout
Mixed vegetables
Cabbage
Brussel sprouts
Cauliflower
Broccoli
1
2
1lb (450g)
12oz (375g)
4oz (125g)
8oz (225g)
1lb (450g)
8oz (225g)
4oz (125g)
8oz (225g)
8oz (225g)
8oz (225g)
8oz (225g)
8oz (225g)
Cooking Time
(Mins. at HIGH)
4 - 5
6 - 8
8 - 10
7 - 8
2 - 3
4 - 5
8
4 - 5
3 - 4
4 - 6
3 - 4
4 - 5
5 - 6
5
• Oven chips are unsuitable for microwave
cooking.
• Add 2 fl. oz (30ml) of water.
• Place in a shallow oven-proof dish and
cover.
• Add 2 fl. oz (30ml) of water.
• Add 3 fl. oz (45ml) of water.
• Add 2 fl. oz (30ml) of water.
• Taste after the minimum cooking time to
avoid overcooking.
• Add 2 fl. oz (30ml) of water.
• Rearrange half way through cooking.
•
Leave to stand for 1 - 2 minutes and salt to taste.
• Do not add any water.
ROOT
VEGETABLES
OTHER
VEGETABLES
Spinach
Carrots 8oz (225g) 4 - 6 • Add 2 fl. oz (30ml) of water.
Corn on the cob
Sweet corn
8oz (225g)
1
3 - 4
8oz (225g)
4 - 5
2 - 3
8 - 10
3 - 4
• Add a knob of butter.
• Add 2 fl. oz (30ml) of water.
---
22
Page 50

Cleaning Your Microwave Oven
GB
The following parts of your microwave oven should be cleaned
regularly to prevent grease and food particles from building up:
◆ Inside and outside surfaces
◆ Door and door seals
◆ Glass plate and roller ring
☛ ALWAYS ensure that the door seals are clean and the
door closes properly.
1 Clean the outside surfaces with a soft cloth and warm, soapy water. Rinse
and dry.
2 Remove any splashes or stains on the inside surfaces or on the roller ring
with a soapy cloth. Rinse and dry.
3 To loosen hardened food particles and remove smells, place a cup of
diluted lemon juice on the glass plate and heat for ten minutes at maximum
power.
4 Wash the dishwasher-safe plate whenever necessary.
☛
Clean the microwave oven cavity right often each use
with a mild detergent solution, but let the microwave
oven cool down before cleaning in order to avoid
injury.
Recommendations
DO NOT spill water in the vents.
NEVER use any abrasive products or
chemical solvents.
Take particular care when cleaning the
door seals to ensure that no particles:
◆ Accumulate
◆ Prevent the door from closing
correctly
Storing and Repairing Your Microwave Oven
A few simple precautions should be taken when storing or having
your microwave oven serviced.
The oven must not be used if the door or door seals are damaged:
◆ Broken hinge
◆ Deteriorated seals
◆ Distorted or bent oven casing
Only a qualified microwave service technician should perform
repairs.
☛ NEVER remove the outer casing from the oven. If the
oven is faulty and needs servicing or you are in doubt
about its condition:
◆ Unplug it from the wall socket
◆ Contact the nearest after-sales service centre
Storing the Oven
If you wish to store your oven away temporarily, choose a dry, dust-free place.
: Dust and damp may adversely affect the working parts in the oven.
Reason
23
Page 51

GB
Technical Specifications
SAMSUNG strives to improve its products at all times. Both the design specifications and these user
instructions are thus subject to change without notice.
Power source 230 V ~ 50 Hz
Power consumption
Microwave 1200 W
Grill 1000 W
Combined mode 1350 W
Output power 800 W (IEC-705 )
Operating frequency 2,450 MHz
Magnetron OM75SH(31)
Cooling method Cooling fan motor
Dimensions (W x H x D)
Outside 489 x 275 x 364 mm
Oven cavity 306 x 181 x 322 mm
Volume 0.6 cubic feet
Weight
Net 15.5 kg approx.
24
Page 52

ELECTRONICS
Printed in UK
 Loading...