

Samsung Freeform M User Manual

MOBILE PHONE
User Manual
Please read this manual before operating your
phone and keep it for future reference.

Intellectual Property
All Intellectual Property, as defined below, owned by or which is otherwise the property of Samsung or its respective suppliers
relating to the SAMSUNG Phone, including but not limited to, accessories, parts, or software relating there to (the “Phone
System”), is proprietary to Samsung and protected under federal laws, state laws, and international treaty provisions. Intellectual
Property includes, but is not limited to, inventions (patentable or unpatentable), patents, trade secrets, copyrights, software,
computer programs, and related documentation and other works of authorship. You may not infringe or otherwise violate the
rights secured by the Intellectual Property. Moreover, you agree that you will not (and will not attempt to) modify, prepare
derivative works of, reverse engineer, decompile, disassemble, or otherwise attempt to create source code from the software. No
title to or ownership in the Intellectual Property is transferred to you. All applicable rights of the Intellectual Property shall remain
with SAMSUNG and its suppliers.
Open Source Software
Some software components of this product incorporate source code covered under GNU General Public License (GPL), GNU Lesser
General Public License (LGPL), OpenSSL License, BSD License and other open source licenses. To obtain the source code covered
under the open source licenses, please visit:
http://opensource.samsung.com
.
Disclaimer of Warranties; Exclusion of Liability
EXCEPT AS SET FORTH IN THE EXPRESS WARRANTY CONTAINED ON THE WARRANTY PAGE ENCLOSED WITH THE PRODUCT, THE
PURCHASER TAKES THE PRODUCT "AS IS", AND SAMSUNG MAKES NO EXPRESS OR IMPLIED WARRANTY OF ANY KIND
WHATSOEVER WITH RESPECT TO THE PRODUCT, INCLUDING BUT NOT LIMITED TO THE MERCHANTABILITY OF THE PRODUCT OR
ITS FITNESS FOR ANY PARTICULAR PURPOSE OR USE; THE DESIGN, CONDITION OR QUALITY OF THE PRODUCT; THE
PERFORMANCE OF THE PRODUCT; THE WORKMANSHIP OF THE PRODUCT OR THE COMPONENTS CONTAINED THEREIN; OR
COMPLIANCE OF THE PRODUCT WITH THE REQUIREMENTS OF ANY LAW, RULE, SPECIFICATION OR CONTRACT PERTAINING
T189N_UM_English_ME8_PS_062713_F5

THERETO. NOTHING CONTAINED IN THE INSTRUCTION MANUAL SHALL BE CONSTRUED TO CREATE AN EXPRESS OR IMPLIED
WARRANTY OF ANY KIND WHATSOEVER WITH RESPECT TO THE PRODUCT. IN ADDITION, SAMSUNG SHALL NOT BE LIABLE FOR
ANY DAMAGES OF ANY KIND RESULTING FROM THE PURCHASE OR USE OF THE PRODUCT OR ARISING FROM THE BREACH OF
THE EXPRESS WARRANTY, INCLUDING INCIDENTAL, SPECIAL OR CONSEQUENTIAL DAMAGES, OR LOSS OF ANTICIPATED PROFITS
OR BENEFITS.
Modification of Software
SAMSUNG IS NOT LIABLE FOR PERFORMANCE ISSUES OR INCOMPATIBILITIES CAUSED BY YOUR EDITING OF REGISTRY SETTINGS,
OR YOUR MODIFICATION OF OPERATING SYSTEM SOFTWARE.
USING CUSTOM OPERATING SYSTEM SOFTWARE MAY CAUSE YOUR DEVICE AND APPLICATIONS TO WORK IMPROPERLY. YOUR
CARRIER MAY NOT PERMIT USERS TO DOWNLOAD CERTAIN SOFTWARE, SUCH AS CUSTOM OS.
Samsung Telecommunications America (STA), LLC
Headquarters:
1301 E. Lookout Drive
Richardson, TX 75082
Customer Care Center:
1000 Klein Rd.
Plano, TX 75074
Toll Free Tel: 1.888.987.HELP (4357)

Internet Address:
http://www.samsung.com
©
2013 Samsung Telecommunications America, LLC. Samsung is a registered trademark of Samsung Electronics Co., Ltd.
Do you have questions about your Samsung Mobile Device?
For 24 hour information and assistance, we offer a new FAQ/ARS System (Automated Response System) at:
www.samsung.com/us/support
Nuance®, VSuite™, T9® Text Input, and the Nuance logo are trademarks or registered trademarks of Nuance Communications,
Inc., or its affiliates in the United States and/or other countries.
®
and NetFront™ are trademarks or registered trademarks of ACCESS Co., Ltd. in Japan and other countries.
ACCESS
The Bluetooth
®
word mark, figure mark (stylized “B Design”), and combination mark (Bluetooth word mark and “B Design”) are
registered trademarks and are wholly owned by the Bluetooth SIG.
microSD™ and the microSD logo are Trademarks of the SD Card Association.
®
Openwave
is a registered Trademark of Openwave, Inc.
Wi-Fi is a registered trademark of the Wireless Fidelity Alliance, Inc.

Table of Contents
Section 1: Getting Started .......................... 4
Understanding this User Manual . . . . . . . . . . . . 4
Battery Cover . . . . . . . . . . . . . . . . . . . . . . . . . . 5
Battery . . . . . . . . . . . . . . . . . . . . . . . . . . . . . . . 7
Charging a Battery . . . . . . . . . . . . . . . . . . . . . . 8
Installing the Memory Card . . . . . . . . . . . . . . . 9
Using the Travel Adapter . . . . . . . . . . . . . . . . . 9
Switching the Phone On or Off . . . . . . . . . . . . 10
Locking and Unlocking the Screen . . . . . . . . . 11
Setting Up Your Voice Mail . . . . . . . . . . . . . . . 11
Section 2: Understanding Your Phone ..... 12
Features . . . . . . . . . . . . . . . . . . . . . . . . . . . . 12
Front View . . . . . . . . . . . . . . . . . . . . . . . . . . . 12
Side Views . . . . . . . . . . . . . . . . . . . . . . . . . . . 15
Back View . . . . . . . . . . . . . . . . . . . . . . . . . . . 15
Display Layout . . . . . . . . . . . . . . . . . . . . . . . . 16
Icons . . . . . . . . . . . . . . . . . . . . . . . . . . . . . . . 16
Backlight . . . . . . . . . . . . . . . . . . . . . . . . . . . . 17
Menu Navigation . . . . . . . . . . . . . . . . . . . . . . 18
Go to Menu . . . . . . . . . . . . . . . . . . . . . . . . . . 19
Section 3: Call Functions ..........................20
Displaying Your Phone Number . . . . . . . . . . . 20
Making a Call . . . . . . . . . . . . . . . . . . . . . . . . . 20
Answering a Call . . . . . . . . . . . . . . . . . . . . . . 22
Recent Calls . . . . . . . . . . . . . . . . . . . . . . . . . . 24
Call Waiting . . . . . . . . . . . . . . . . . . . . . . . . . . 26
3-Way Calling (Multi-Party Calling) . . . . . . . . . 27
Section 4: Entering Text ............................28
Using the QWERTY Keypad . . . . . . . . . . . . . . . 28
Changing the Text Input Mode . . . . . . . . . . . . 30
Section 5: Messages .................................32
Types of Messages . . . . . . . . . . . . . . . . . . . . 32
Creating and Sending Messages . . . . . . . . . . 32
Viewing New Received Messages . . . . . . . . . . 34
Using Message Options . . . . . . . . . . . . . . . . . 34
Deleting Messages . . . . . . . . . . . . . . . . . . . . . 35
Messages Settings . . . . . . . . . . . . . . . . . . . . . 35
Using Email . . . . . . . . . . . . . . . . . . . . . . . . . . 37
1

Section 6: Managing Your Contacts .........38
Contacts Settings . . . . . . . . . . . . . . . . . . . . . .38
Adding a New Contact . . . . . . . . . . . . . . . . . . . 38
Using Contacts . . . . . . . . . . . . . . . . . . . . . . . . 41
Contacts Entry Options . . . . . . . . . . . . . . . . . . 41
Finding My Own Phone Number . . . . . . . . . . .42
FDN Mode . . . . . . . . . . . . . . . . . . . . . . . . . . . . 42
Group Settings . . . . . . . . . . . . . . . . . . . . . . . .43
Adding Speed Dial Entries . . . . . . . . . . . . . . . .44
Managing Contacts Entries . . . . . . . . . . . . . . . 45
Section 7: Camera .....................................47
Using the Camera . . . . . . . . . . . . . . . . . . . . . . 47
Camera Options . . . . . . . . . . . . . . . . . . . . . . .48
Using the Camcorder . . . . . . . . . . . . . . . . . . . . 51
Camcorder Options . . . . . . . . . . . . . . . . . . . . .52
Section 8: My Folder .................................54
Memory Card Settings . . . . . . . . . . . . . . . . . . .54
Audio . . . . . . . . . . . . . . . . . . . . . . . . . . . . . . .55
Downloads . . . . . . . . . . . . . . . . . . . . . . . . . . . 56
Pictures . . . . . . . . . . . . . . . . . . . . . . . . . . . . . . 56
Video . . . . . . . . . . . . . . . . . . . . . . . . . . . . . . . . 58
Other Files . . . . . . . . . . . . . . . . . . . . . . . . . . . .59
2
Used Space . . . . . . . . . . . . . . . . . . . . . . . . . . .59
Section 9: Browser ...................................60
Browser . . . . . . . . . . . . . . . . . . . . . . . . . . . . . .60
Features . . . . . . . . . . . . . . . . . . . . . . . . . . . . .60
Exiting the Browser . . . . . . . . . . . . . . . . . . . . .61
Navigating the Browser . . . . . . . . . . . . . . . . . .61
Favorites . . . . . . . . . . . . . . . . . . . . . . . . . . . . .61
Enter a URL . . . . . . . . . . . . . . . . . . . . . . . . . . .62
Clear Cache . . . . . . . . . . . . . . . . . . . . . . . . . . .62
Section 10: Applications ........................... 63
Calls . . . . . . . . . . . . . . . . . . . . . . . . . . . . . . . .63
Contacts . . . . . . . . . . . . . . . . . . . . . . . . . . . . .63
Messaging . . . . . . . . . . . . . . . . . . . . . . . . . . . .63
Calendar . . . . . . . . . . . . . . . . . . . . . . . . . . . . .63
Music . . . . . . . . . . . . . . . . . . . . . . . . . . . . . . .66
MetroWEB . . . . . . . . . . . . . . . . . . . . . . . . . . . .69
Metro411 . . . . . . . . . . . . . . . . . . . . . . . . . . . .69
Camera . . . . . . . . . . . . . . . . . . . . . . . . . . . . . .70
My Folder . . . . . . . . . . . . . . . . . . . . . . . . . . . .70
Wi-Fi . . . . . . . . . . . . . . . . . . . . . . . . . . . . . . . .70
Tools . . . . . . . . . . . . . . . . . . . . . . . . . . . . . . . .71

Section 11: Changing Your Settings ........ 80
Sound Profile . . . . . . . . . . . . . . . . . . . . . . . . . 80
Display . . . . . . . . . . . . . . . . . . . . . . . . . . . . . . 83
Time and Date . . . . . . . . . . . . . . . . . . . . . . . . 84
Phone Settings . . . . . . . . . . . . . . . . . . . . . . . . 85
Calls Settings . . . . . . . . . . . . . . . . . . . . . . . . . 90
Connectivity . . . . . . . . . . . . . . . . . . . . . . . . . . 92
Network Selection . . . . . . . . . . . . . . . . . . . . . 94
Configuring Your Phone’s USB Settings . . . . . 95
Applications Settings . . . . . . . . . . . . . . . . . . . 95
Memory Management . . . . . . . . . . . . . . . . . . 97
Software Update . . . . . . . . . . . . . . . . . . . . . . 98
Section 12: Health and Safety
Information ................................................ 99
Exposure to Radio Frequency (RF) Signals . . . 99
Specific Absorption Rate (SAR) Certification
Information . . . . . . . . . . . . . . . . . . . . . . . . 104
FCC Part 15 Information to User . . . . . . . . . . 105
Smart Practices While Driving . . . . . . . . . . . 106
Battery Use and Safety . . . . . . . . . . . . . . . . . 107
Samsung Mobile Products and Recycling . . . 109
UL Certified Travel Charger . . . . . . . . . . . . . 110
Display / Touch-Screen . . . . . . . . . . . . . . . . 111
GPS & AGPS . . . . . . . . . . . . . . . . . . . . . . . . . 111
Emergency Calls . . . . . . . . . . . . . . . . . . . . . 112
Care and Maintenance . . . . . . . . . . . . . . . . . 113
Responsible Listening . . . . . . . . . . . . . . . . . 114
Operating Environment . . . . . . . . . . . . . . . . . 116
Restricting Children's Access to Your
Mobile Device . . . . . . . . . . . . . . . . . . . . . . 118
FCC Notice and Cautions . . . . . . . . . . . . . . . 118
Other Important Safety Information . . . . . . . . 119
Section 13: Warranty Information ..........121
Standard Limited Warranty . . . . . . . . . . . . . . 121
End User License Agreement for Software . . 126
Index .........................................................134
3

Section 1: Getting Started
This section explains how to start using your phone by
configuring your hardware and setting up your voice mail.
Understanding this User Manual
The sections of this manual generally follow the features of
your phone. A robust index for features begins on page 134.
Also included is important safety information that you should
know before using your phone. This information is available
near the back of the guide, beginning on page 99.
This manual provides navigation instructions according to
the default display settings. If you select other settings,
navigation may be different.
Unless otherwise specified, all instructions in this manual
assume you are starting from the Home screen and using the
available keys.
4
Special Text
This manual includes notes, tips and warnings, in special text
that is set apart to point out important information, share
quick methods for activating features, and to define terms.
The definitions for these methods are as follows:
•
Notes
: Presents options for the current feature or menu.
•
Tips
: Provides quick methods or useful shortcuts.
•
Important
: Points out important information about the current
feature that could affect performance.
•
Warning
: Brings to your attention important information to
prevent loss of data or functionality, or even prevent damage to
your phone.
Text Conventions
This manual provides condensed information about how to
use your phone. The following text conventions are used to
represent often-used steps:
➔ Arrows are used to represent successive menu
selections.
For example: From the Home screen, press Menu ➔
Settings ➔ Phone ➔ Language.
Note:
The battery, SIM card and SD card are installed under
the battery cover.
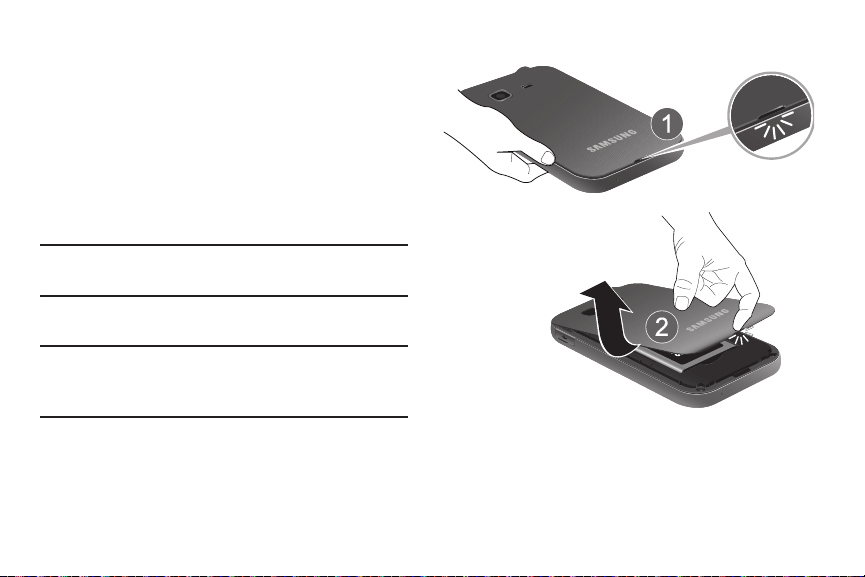
Battery Cover
Caution!
Do not bend or twist the back cover excessively
during installation or removal. Doing so may damage
the cover.
To Removing the Battery Cover:
1. Remove the battery cover by placing your thumbnail in
the slot at the bottom of the phone (1). If you have
fragile nails, use a pointed object.
2. Lift the cover up and off the phone (2).
To replace the battery cover:
Position the battery cover over the battery
compartment and press down until you hear a click.
Getting Started 5
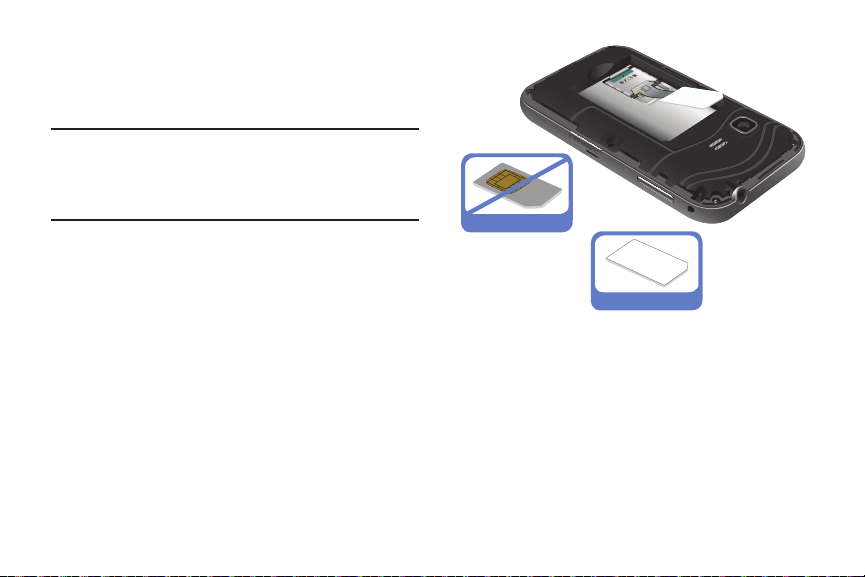
SIM Card Overview
The SIM card is loaded with your subscription details such as
your telephone number, PIN, available optional services, and
many other features.
Important!
The SIM card and its information can be easily
damaged by scratching or bending, so be careful
when handling, inserting, or removing the card.
Keep all SIM cards out of reach of small children.
This card contains the necessary information for identifying
and authenticating the user to the IMS (IP Multimedia
Subsystem). If available, you can remove the previous SIM
and replace it with the new one.
Installing and Removing the SIM card
To install the SIM card:
1. Carefully slide the SIM card into the SIM card socket
until the card is securely seated.
6
Incorrect
Correct
2. Make sure that the card’s gold contacts face into the
device and that the upper-left angled corner of the card
is positioned as shown.
To remove the SIM card:
1. Remove the battery cover.
2. Carefully place your fingernail into the end of the SIM
slot and push the card slightly out.
3. Carefully slide the SIM card out of the SIM card socket.
Note:
If the card is not inserted correctly, the device will not
detect it and no service will be available. If this happens,
turn off the device, remove the card, and reinstall the
card in the correct orientation.
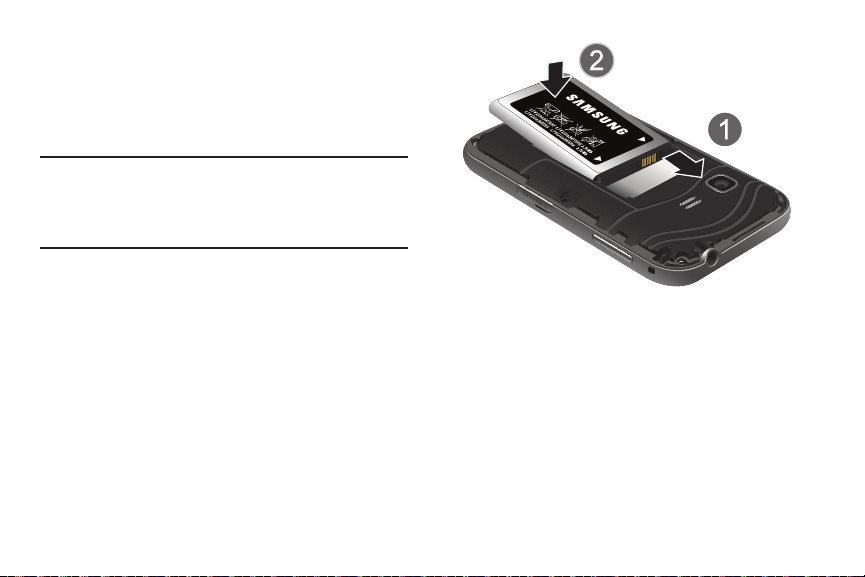
Battery
Before using your device for the first time, install the battery
and charge it fully.
Installing the Battery
1. Align the gold contacts of the battery with the contacts
in the battery compartment in the phone (1).
2. Press the battery down until it clicks into place (2).
Make sure that the battery is properly installed before
switching on the phone.
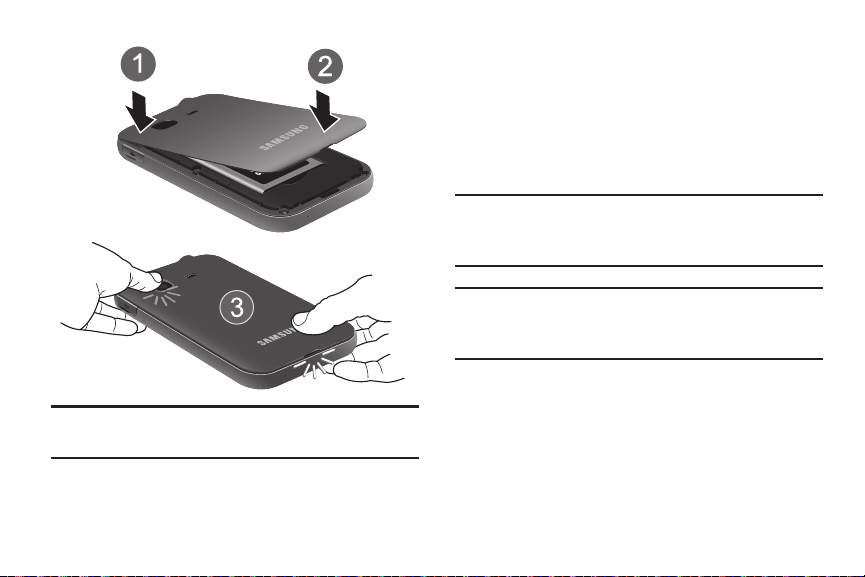
3. Replace the battery cover onto the back of the phone in
the direction shown by the arrow (1).
4. Press down along the bottom of the phone until you
hear a light click (2).
5. Press down firmly along the edges to ensure that the
cover is flush with the phone (3).
Getting Started 7
Note:
Make sure the battery is properly installed before
switching on the phone.
8
Charging a Battery
Your phone is powered by a rechargeable Li-ion battery. The
Travel Adapter that is used to charge the battery, is included
with your phone. Use only Samsung-approved batteries and
chargers.
You can use the phone while the battery is charging,
although doing so requires additional charging time.
Note:
You must fully charge the battery before using your
phone for the first time. A discharged battery recharges
fully in approximately 4 hours.
Note:
Long backlight settings, searching for service, vibrate
mode, browser use, and other variables may reduce the
battery’s talk and standby times.
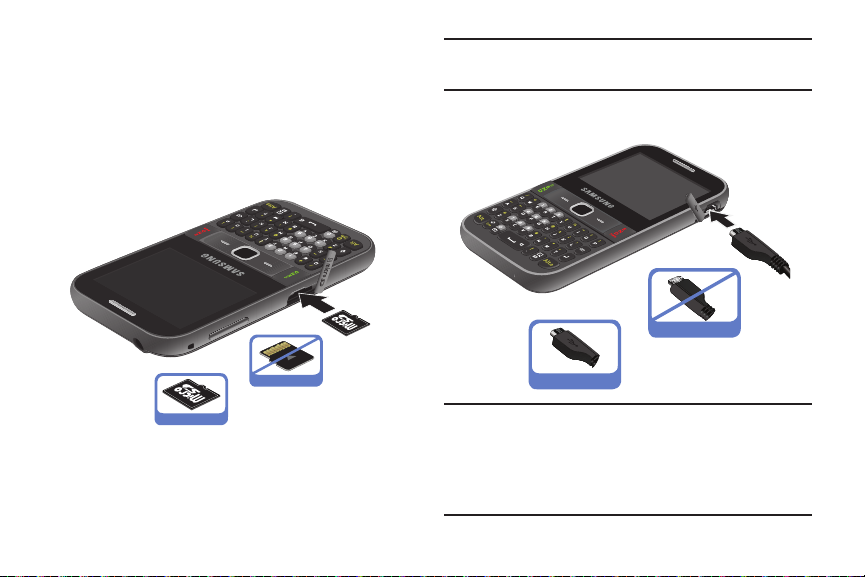
Installing the Memory Card
Correct
Incorrect
Correct
Incorrect
Your phone supports the use of a memory card (microSD) for
data storage of such things as data, music, pictures, and
video files. This type of memory card is designed for use with
this mobile phone and other devices.
1. Move the card cover to reveal the slot opening.
2. Push the microSD card into the slot until it clicks.
Note:
Make sure the microSD gold contact pins face
downward and the card is securely inserted.
Using the Travel Adapter
3. Once secured, put the cover back into place to cover
the opening.
Important!
Verify that the handset battery is installed prior to
connection. If the battery is not properly installed
and the wall charger is connected, the handset
may power off and on continuously, preventing
proper operation.
Getting Started 9
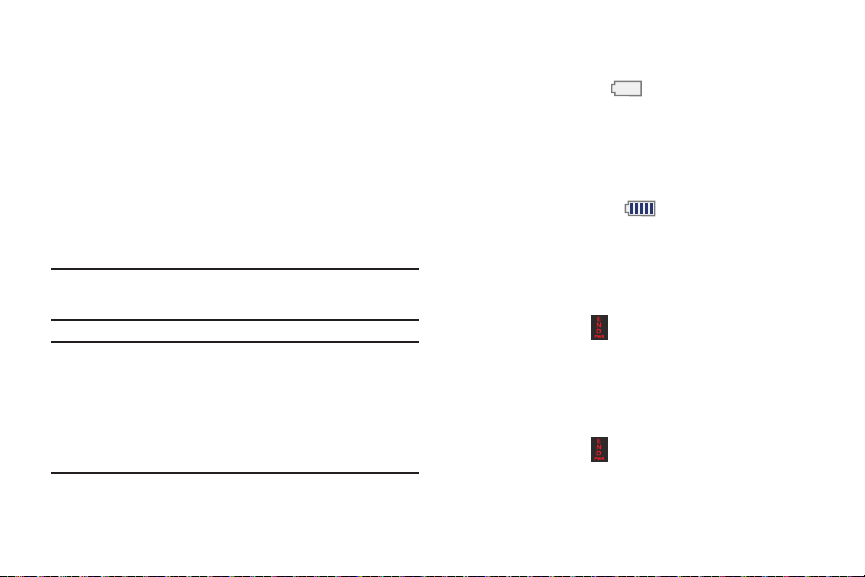
1. With the battery installed, remove the plastic cover of
the Power/Accessory Interface connector on the upper
right side of phone.
2. Plug the data cable into the base piece provided and
into the Power/Accessory Interface connector on your
phone.
3. Plug the base piece into a standard AC wall outlet.
4. When the battery is fully charged, the phone displays a
message telling you the battery is full. Remove the
connector from the phone.
Note:
Failure to unplug the wall charger before you remove the
battery, can cause damage to the phone.
Warning!
If your device has a touch screen display, please
note that a touch-screen responds best to a light
touch from the pad of your finger or a non-metallic
stylus. Using excessive force or a metallic object
when pressing on the touch screen may damage the
tempered glass surface and void the warranty.
10
Low Battery Indicator
When the battery is weak and only a few minutes of talk time
remain, the battery icon ( ) blinks and the device sounds
a warning tone at regular intervals. In this condition, your
phone conserves its remaining battery power by reducing the
backlight’s brightness and entering a dimming mode. For a
quick check of your battery level, glance at the battery
charge indicator located in the upper-right corner of your
device’s display. Five bars ( ) indicate a full charge.
When the battery level becomes too low, the phone
automatically turns off.
Switching the Phone On or Off
To turn the phone on:
Press and hold until the phone switches on.
The phone launches the activation splash screen and
searches for the network. Once the network has been
found, you can make or receive calls.
To turn the phone off:
Press and hold until the phone switches off.
Note:
The display language (Screen Text) is preset to English
at the factory. To change the language, press
Settings
➔
Phone
➔
Language
.
Menu
Locking and Unlocking the Screen
1. To lock the phone screen, press and hold .
Unlock
➔
soft key
Auto Key
2. To unlock the phone screen, press the
and then press the
Note:
The Auto Key Lock feature automatically locks the
screen when the screen times out. To change the default
setting, press
Lock
.
OK
soft key.
Menu➔ Settings
➔
Phone
➔
Setting Up Your Voice Mail
1. In Idle mode, press and hold . You may be
prompted to enter a password.
2. Follow the tutorial to create a password, record a
greeting, and record your name.
Note:
These steps may be different depending on your
network.
Accessing Your Voice Mail
1. In Idle mode, press and hold .
2. When connected, follow the voice prompts from the
voice mail center.
Accessing Your Voice Mail From Another Phone
1. Dial your wireless phone number.
2. When you hear your voicemail greeting, press the
asterisk key (*).
3. Enter your passcode using the keypad.
Getting Started 11

Section 2: Understanding Your Phone
This section outlines some key features of your phone. It also
displays the screen and the icons that display when the
phone is in use.
Features
Your phone is lightweight, easy-to-use and offers many
significant features. The following list outlines a few of the
features included in your phone.
•
2.0 Megapixel Camera with 4x Digital Zoom
•
Camera and Camcorder
•
Bluetooth®
• Wi-Fi
•
User friendly, menu driven access to features and options
•
Display and QWERTY Keypad
•
Sound/Image media capability
•
microSD card compatibility for use in data storage and access.
•
Email
12
Wireless Technology
®
®
•
Tools feature provides Camera, Voice Services, Record Audio,
Alarms, Calendar, Tasks, Memo, Calculator, Tip Calculator, Eco
Calculator, Converter, World Clock, Timer, and Stopwatch.
•
Metro 411 application
Front View
The following illustrations show the main elements of your
phone.
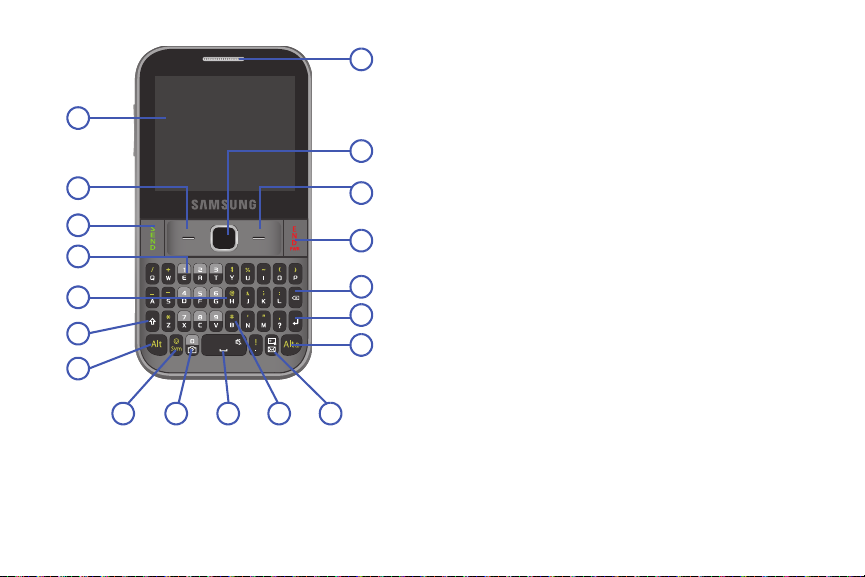
1
2
3
4
5
6
7
8 9
10 11 12
13
14
15
16
17
18
19
Display: S
1.
hows information needed to operate your
phone: signal strength, battery level, time and date,
and more.
2.
Left Soft key
the Left Soft Key.
Send key
3.
press and hold to recall the last number dialed or
received.
4.
Voice mail key
automatically dial your voice mail phone number.
QWERTY Keypad
5.
and characters using a full QWERTY keypad interface.
Shift key
6.
Lock. Press once more to remove Cap Lock.
Alt key
7.
and symbols displayed on the upper half of the keys.
Press Alt twice to continue to enter the numbers and
symbols on the top half of the key, until you press
Alt once again.
Sym key
8.
symbols grid.
Camera key
9.
Camera.
: Press to select the option displayed above
: Press to make or answer a call. In Idle mode,
: Press and hold for two seconds to
: Allows you to enter numbers, letters,
: While entering text, press twice to select Cap
: While entering text, press to enter the numbers
: While entering text, press to display the
: In Idle mode, press and hold to launch the
Understanding Your Phone 13

Space Bar key
10.
space. In Idle mode, press and hold to toggle between
the Silent profile and Normal profile.
Pound key
11.
between the Silent profile and Normal profile.
Go to key
12.
idle screen without navigating through the main menu
icons and sub menus. For more information, refer to
“Go to Menu” on page 19.
Alt/Lock key
13.
numbers and symbols displayed on the upper half of
the keys. Press Alt twice to continue to enter the
numbers and symbols on the top half of the key, until
you press Alt once again. Press and hold to Lock the
keypad.
Enter key
14.
message.
Cancel/Clear key
15.
In idle mode, press to launch the calendar.
14
: While entering text, press to enter a
: In Idle mode, press and hold to toggle
: Allows you to access applications from the
: While entering text, press to enter the
: Press to start a new line when typing a
: Deletes characters from the display.
Power On/Off (END) key
16.
hold for two seconds to turn phone on or off. While in
the Menu mode, returns phone to Idle mode, then
cancels input.
Right Soft key
17.
above the Right Soft Key.
Navigation/OK key
18.
across the navigation pad to scroll through the menu
options. Press to accept the highlighted option.
19.
Earpiece
: Use during calls to listen to callers.
: Press to end a call. Press and
: Press to select the option displayed
: In menu mode, slide your finger
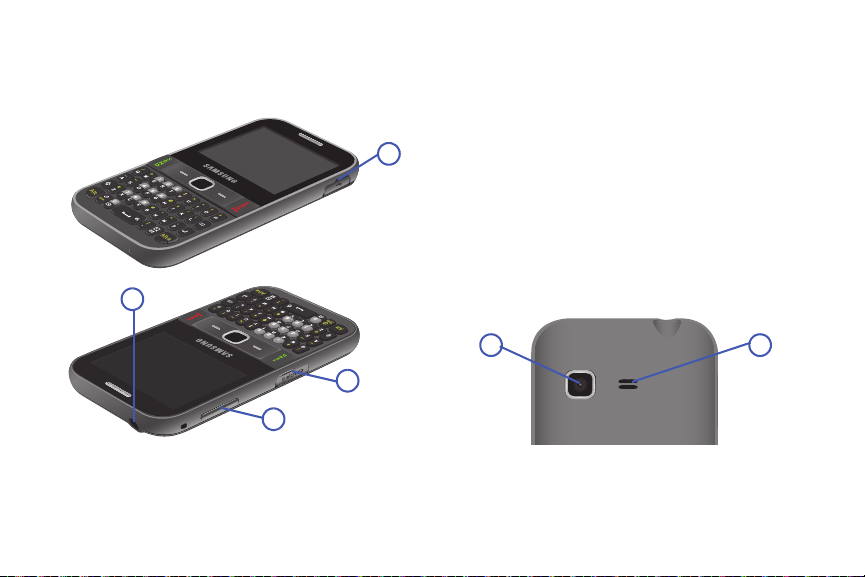
Side Views
1
4
3
2
1 2
The following illustration shows the side details of your
phone.
1.
USB Power/Accessory connector
a power cable or optional accessories such as a USB/
data cable.
Allows you to connect
:
2.
Earphone jack
headset so you can listen to music.
3.
Volume keys
volume. During calls or music playback, press to adjust
volume. Press to mute the ringtone of an incoming call.
Press and hold to send an incoming call directly to
voicemail.
4.
Memory card port
microSDHC card.
: Allows you to connect a hands-free
: From the Home screen, press to adjust
: Allows you to install a microSD or
Back View
The following illustration shows the back view of the phone
with the camera lens.
1.
Camera Lens
External Speaker
2.
: Used to take pictures and shoot videos.
: Allows you to hear music.
Understanding Your Phone 15
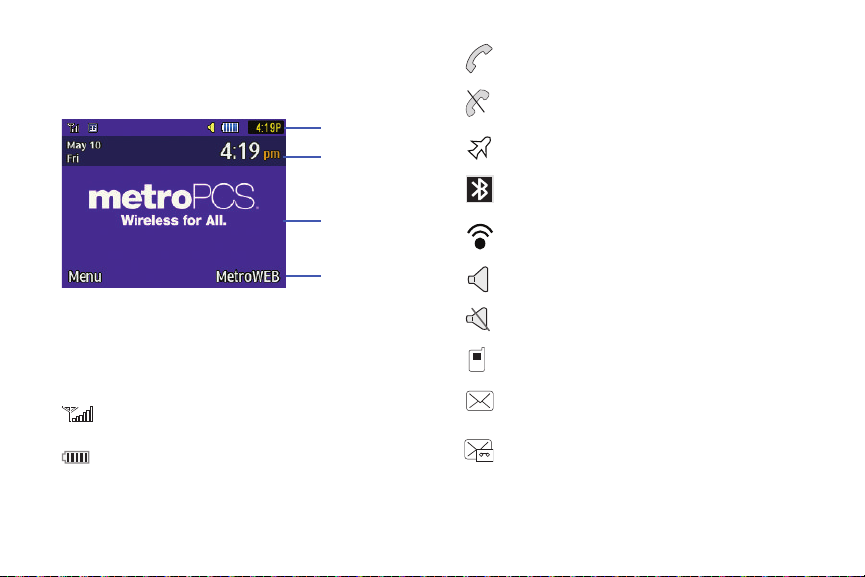
Display Layout
Indicators
Main Display
Soft Key
Time and Date
Indicators
Your display screen provides information about the phone’s
status and options.
Displays when a call is in progress.
Displays when the phone is not receiving a
signal.
Displays when the phone is in Airplane mode.
Displays when Bluetooth wireless technology is
active.
Displays when Wi-Fi technology is active.
Displays when Normal volume control is active.
Icons
The following list identifies the symbols on your phone
display:
Shows the received signal strength. The greater
the number of bars, the stronger the signal.
Shows the level of your battery. The more bars
you see, the more power remains.
16
Displays when Vibration Mode is active.
Displays in the View Tab when you miss a call.
Displays in the View Tab when you receive a
new text or picture message.
Displays in the View Tab when you receive a
new voice mail.
Displays in the View Tab when you receive a
@
View Tabs
new email message.
Displays when you set an alarm to ring at a
specified time.
Backlight
A backlight illuminates the internal display and the keypad.
When you press any key, the backlight comes on. It goes off
when no keys are pressed within a given period of time,
depending on the setting in the
display turns off after one minute to conserve battery power.
Backlight Time
menu. The
The
On
setting determines how long the keypad backlight
remains on. The
Dim
setting determines how long after the
keypad backlight goes off that the display backlight remains
lit.
To access the Backlight menu:
1. In Idle mode, press
Light Settings
2. Highlight the On option and press
Menu
➔
Backlight Time
➔
Settings
and press .
➔
Display
Edit
. Use the Up or
➔
Down Navigation key to select the time the keypad
backlight is on. You can choose:
30 Seconds, 1 Minutes, 3 Minutes
10 Seconds
or
,
10 Minutes
.
3. Press to apply your change and exit the menu.
4. Press the
press
Edit
key to highlight the
. Use the Up or Down Navigation key to
Dim
option and
Down
select the time the display backlight remains on
after the keypad backlight times out. You can choose:
Off,
5 Seconds, 30 Seconds, 1 Minute
3 Minutes
.
or
5. Press Save to apply your change and exit the menu.
Understanding Your Phone 17

Menu Navigation
This section explains the menu navigation for your phone.
Menus and sub-menus can be accessed by scrolling using
the Navigation key or by using the shortcut keys.
Accessing a Menu
1. In Idle mode, press the
the Navigation keys to reach a main menu item. Press
Select
soft key or the key to enter the menu.
the
2. If the menu contains sub-menus, you can access them
by first highlighting the option and then by pressing the
Select
soft key or the key. If the menu you
selected contains further options, repeat this step.
3. To scroll through these menus, press the
Navigation key or the
side of your phone). Press the
key to make your selection.
4. To return to the previous menu level, press the
soft key.
5. To exit the menu without changing the settings, press
the key.
18
Menu
soft key and scroll using
Volume
key (located on the left
Select
soft key or the
Up
or
Down
Back
Using Shortcut Numbers
Numbered menu items, such as menus, sub-menus, and
options can be quickly accessed by using their shortcut
numbers.
In Menu mode, Main Menus can be accessed by pressing the
number keys (1 to 0, * and #) corresponding to their location
on the screen.
Example:
Access the Music Player.
1. In Idle mode, press the
2. Press the key to access
Menu
soft key (Left Softkey).
Music
.
Go to Menu
Go to menu allows you to access applications from the idle
screen without navigating through the main menu icons and
sub menus. There are twelve available shortcuts, eight are
preassigned (Create Message, Email, Inbox, Music, Contacts,
Alarms, and Tools), and four empty shortcuts you can assign
(9, 10, 11, and 12).
Note:
To enter 10 for My Menu, enter a 0.
To enter 11, enter an asterisk (*). To enter 12, enter the
pound sign (#).
To navigate Go to menu:
1. In Idle mode, press both (
together at the same time, and highlight a shortcut.
2. Press the key to access the selected option.
– or –
Options
Press the
available, depending on whether or not the selected
shortcut has been assigned:
soft key. The following options are
ALT
) and (
Go to
Options for assigned shortcuts:
•Open
: open the selected shortcut and displays the submenus,
launches the selected application, or displays a screen.
•Change
: changes the currently selected shortcut and assigns
another shortcut to this field.
•Remove
: removes the selected shortcut from this field.
• Remove all
Options for unassigned shortcuts:
•Define
• Remove all
)
: removes all the shortcuts from the fields in this
menu.
: allows you to choose from a list of applications to
assign to the shortcut key.
: removes all the shortcuts from the fields in this
menu.
Understanding Your Phone 19
Section 3: Call Functions
This section describes how to make or answer a call.
Displaying Your Phone Number
Press
Menu
➔
Settings ➔ Phone ➔ Own Number
Making a Call
From the Idle screen, use the keypad to enter the
number you wish to call and press .
Note:
When you activate the
Call menu (
Auto Redial
person does not answer the call or is on the phone.
Menu ➔ Settings ➔ Calls ➔ Voice Call
) the phone automatically redials when the
Making an International Call
1. From the Idle screen, press and hold . The +
character displays.
2. Use the keypad to enter the country code, area code,
and phone number.
•
If you make a mistake, press until the desired numbers
are deleted.
20
Auto Redial
option in the Voice
.
➔
3. Press .
Manual Pause Dialing
To manually call a number with pause(s) without storing it in
your Contacts list:
1. From the Idle screen, use the keypad to enter the
phone number.
2. Press and hold to add a two-second pause (
Use the keypad to enter the additional numbers.
3. Press to make your call.
Tip:
You can create pauses longer than two seconds by
entering multiple two-second pauses (ex:
6 second pause).
PPP
P
for a
).

Correcting an Entered Number
Use the following steps to correct a character entered
incorrectly.
1. After entering a number using the keypad:
•
If you make a mistake, press to erase a single character.
•
Press and hold to erase the entire string of numbers.
2. Press to return to the Idle screen.
Ending a Call
Press the key.
Using the Volume Keys
During a call, use the Volume keys on the left side of the
phone to increase or decrease the earpiece volume.
In Idle mode, use the Volume keys to adjust the ringer
volume.
Press one of the volume keys to immediately silence the tone
of an incoming call or alarm.
Making a Call Using Speed Dial
You can assign a shortcut number to a phone number for
speed dialing.
1. Press
Note:
2. Highlight an unused number and press
3. Select
4. Highlight a contact to assign to the number and press
To make a call using the Speed Dial feature from the Idle
screen:
Menu
➔
Contacts
➔
Speed Dial List
Dial List
screen displays showing the numbers 2
through 9.
The number 1 is reserved for Voice Mail.
Assign
.
Address Book
Select
or the key.
Press and hold the speed dial number. The phone
number assigned will automatically be called.
or
FDN Contacts
Call Functions 21
. The
Options
.
Speed
➔

Answering a Call
When a call is received, the phone rings and displays the
caller phone number or name, if stored in Contacts.
1. From the Incoming call screen, press or
•
If the
Any Key
option is activated (
➔
General ➔
answer a call except .
2. Press to end the call.
Note:
You can answer a call while using Contacts or other
menu feature. After ending the call, the phone returns to
the previously active screen.
Call Answer
Menu ➔
), you can press any key to
Placing a Call on Hold
While on a call, you can place the call on hold to answer an
incoming call or place a new call, if your network supports
this service. You can place the current call on hold.
To place a call on hold:
1. While on a call, press
2. Press
22
Resume
Options ➔
to continue the conversation.
Hold
Accept
Settings ➔
.
.
Calls
3. Press
To make a new call while you have a call in progress:
1. While on a call, press
2. Dial the new phone number or look it up in Contacts.
3. Press to dial the second number.
4. Press to end the current call.
Options ➔
– or –
Press to end the call.
– or –
Options ➔
Press
– or –
Options ➔
Press
Active call, Held call
End Call
Options ➔
New call
End
and press to select either:
, or
to disconnect.
to dial the second number.
All calls
.
Hold
.

When you have an active call and a call on hold, you may
switch between the two calls.
To switch between two calls:
1. Press
2. Press to end the current call.
Options ➔
– or –
Options ➔
Press
Active call, Held call
Swap
.
End
and then press to select
, or
All calls
.
In-Call Options
While on a call, you can press the
microphone, or press
speakerphone, and press the
following options:
•
Hold
: places the current call on hold.
•
Contacts
: allows you to access your Address Book information.
•
Save to Contacts/View Contact Details
number’s Address Book information or save the number as a new
entry. This option only appears if the number is in your address
book.
•
New call
: places the current call on hold and then allows you to
enter and call another number.
Spkr on
Mute
soft key to mute the
to put the call on
Options
soft key to access the
: allows you to view the
•
Send Message
Multimedia Message.
•
More
–
Calendar
still maintaining the active call.
–
Memo
–
Send DTMF
the contacts you have selected. These DTMF tones are sent as
a group. The DTMF tones are the tones used in phones for tone
dialling, sounding when you press the number keys. This option
is helpful for entering a password or an account number when
you call an automated system, like a banking service.
•
End call
: allows you to create and send a new Text or
:
: Allows you to temporarily access your calendar while
: Allows you to access Notes.
: Sends DTMF (Dual Tone Multi-Frequency) tones to
: Allows you to end the active call.
Using the Speakerphone During an Active Call
While in an active call, it is possible to enable the
speakerphone feature.
1. Dial the number and press .
2. Press to activate the speakerphone.
Volume
3. Press the
phone) to adjust the volume.
keys (located on the left side of your
Call Functions 23

Switching off the Microphone (Mute)
You can temporarily switch your phone microphone off, so
that the other person cannot hear you.
To switch the microphone off temporarily during a call:
1. During the active call, press Mute. The option is
replaced with Unmute.
2. Press Unmute to deactivate the Mute function and
reactivate the microphone.
Recent Calls
The phone stores the numbers of the calls you’ve dialed,
received, or missed in the
1. From the Idle Screen, press . The default view is a
list of all calls.
2. Press the
3. Highlight an entry and press
24
Left
within the available tabs:
Made
, or
Calls Received
Recent Calls
or
Right
Navigation key to navigate
All calls, Missed calls, Calls
.
menu.
to dial the number.
Viewing All Calls
1. From the Idle Screen, press to view
Calls screen.
2. Scroll through the list of All Calls. As a call highlights,
the details are displayed.
3. Press to dial the number of the call you are
viewing.
4. Highlight a call and press the
the following options:
•Details
: allows you to view the caller’s name, phone number,
time and date called as well as the length of the call.
•Call
: allows you to automatically dial the selected number.
• Save to Contacts
Address Book on either the Phone or SIM card. This option only
displays if the number is not already in your Address Book.
• Send Message
message to the caller.
•Delete
• View contact details
Book information. This option only appears if the contact is in
your address book.
: allows you to save the number to your
: allows you to sent a text or Multimedia
: allows you to delete a Selected call or All calls.
Options
: allows you to view the contact’s Address
All Calls
soft key to view
in the

• Add to Reject List
highlighted number to a rejection list. Numbers found in this list
are automatically redirected to your voicemail.
: allows you to assign the currently
Viewing Missed Calls
1. From the Idle Screen, briefly press and use the
Right
navigation key to scroll to the
screen. The recently missed calls display.
2. Scroll through the list of missed calls. As the call
highlights, the details display. Press to dial the
number of the call you are viewing.
3. To move to another call type, press the
Navigation key to make your selection.
Missed Calls
Left
or
Right
Saving a Missed Call to your Address Book
1. From the Idle Screen, briefly press and use the
Right
navigation key to scroll to the
screen.
2. Highlight the desired missed call.
3. Press
Options ➔ Save to Contacts
Missed Calls
.
Sending a Message to a Missed Call
1. From the Idle Screen, briefly press and use the
Right
navigation key to scroll to the
screen.
2. Highlight the desired missed call.
3. Press
4. From the
Options ➔ Send Message
Create Message
text field and use the keypad to type a message.
Deleting a Missed Call
1. From the Idle Screen, briefly press and use the
Right
navigation key to scroll to the
screen.
2. Highlight the desired missed call.
Options
➔
3. Press
key to choose
4. At the
cancel.
Delete?
Delete
Selected
prompt, press
Missed Calls
.
screen, highlight the empty
Missed Calls
and press the
or
All
Right
navigation
.
Yes
to delete or No to
Call Functions 25

Adding a Number to the Rejected List
1. From the Idle Screen, press to view
Calls screen.
2. Scroll through the list of All Calls and highlight the
desired number.
Options
➔
3. Press
4. Press
Yes
Add to Reject List
to add the selected number.
All Calls
in the
and press .
Removing a Number from the Rejected List
1. In Idle mode, press
General
➔
2. Select the
3. Highlight the desired number you wish to remove and
either press (
26
Auto Reject
Reject List
Uncheck
Menu
➔
Settings
➔
and press .
field and press .
) or press
Options
Calls
➔
➔
Delete
Call Waiting
The Call Waiting feature allows you to answer an incoming
call while you have a call in progress, if this service is
supported by the network. You must activate Call Waiting in
the settings menu.
1. Press
2. Press
To answer a call with Call Waiting activated, while you have a
call in progress:
1. Press to answer the next incoming call. The first
.
2. To switch between the two calls, press
Menu
➔
Settings
➔
Calls
➔
Call Waiting
incoming call by a call waiting tone.
call is automatically placed on hold.
Swap
Swap
the previous call.
.
Options➔ A
.
places the current call on hold and then activates
ctivate. You are notified of an
Voice Call
Options
➔
➔
 Loading...