

Page 1

FP-T5084
FP-T5884
FP-T6374
PLASMA DISPLAY
Owner’s
Instructions
Register your product at www.samsung.com/global/register
Record your Model and Serial number here for future reference.
▪ Model _______________ ▪ Serial No. _______________
Page 2

Important Warranty Information Regarding Television Format Viewing
Wide screen format PDP Displays (16:9, the aspect ratio of the screen width to height) are primarily designed to view wide
screen format full-motion video. The images displayed on them should primarily be in the wide screen 16:9 ratio format,
or expanded to fill the screen if your model offers this feature and the images are constantly moving. Displaying stationary
graphics and images on screen, such as the dark side-bars on nonexpanded standard format television video and
programming, should be limited to no more than 5% of the total television viewing per week.
Additionally, viewing other stationary images and text such as stock market reports, video game displays, station logos,
web sites or computer graphics and patterns, should be limited as described above for all televisions. Displaying stationary
images that exceed the above guidelines can cause uneven aging of PDP Displays that leave subtle, but permanent
burned-in ghost images in the PDP picture. To avoid this, vary the programming and images, and primarily display
full screen moving images, not stationary patterns or dark bars.
On PDP models that offer picture sizing features, use these controls to view different formats as a full screen picture.
Be careful in the selection and duration of television formats used for viewing. Uneven PDP aging as a result of format
selection and use, as well as burned-in images, are not covered by your Samsung limited warranty.
U.S.A Only
The product unit accompanying this user manual is licensed under certain intellectual property rights of certain
third parties. In particular, this product is licensed under the following US patents: 5,991,715, 5,740,317, 4,972,484,
5,214,678, 5,323,396, 5,539,829, 5,606,618, 5,530,655, 5,777,992, 6,289,308, 5,610,985, 5,481,643, 5,544,247,
5,960,037, 6,023,490, 5,878,080, and under US Published Patent Application No. 2001-44713-A1.
This license is limited to private non-commercial use by end-user consumers for licensed contents. No rights are
granted for commercial use. The license does not cover any product unit other than this product unit and the license
does not extend to any unlicensed product unit or process conforming to ISO/IEC 11172-3 or ISO/IEC 13818-3 used or
sold in combination with this product unit. The license only covers the use of this product unit to encode and/or decode
audio files conforming to the ISO/IEC 11172-3 or ISO/IEC 13818-3. No rights are granted under this license for product
features or functions that do not conform to the ISO/IEC 11172-3 or ISO/IEC 13818-3.
Other countries
The product unit accompanying this user manual is licensed under certain intellectual property rights of certain third
parties. This license is limited to private non-commercial use by end-user consumers for licensed contents. No rights
are granted for commercial use. The license does not cover any product unit other than this product unit and the license
does not extend to any unlicensed product unit or process conforming to ISO/IEC 11172-3 or ISO/IEC 13818-3 used or
sold in combination with this product unit. The license only covers the use of this product unit to encode and/or decode
audio files conforming to the ISO/IEC 11172-3 or ISO/IEC 13818-3. No rights are granted under this license for product
features or functions that do not conform to the ISO/IEC 11172-3 or ISO/IEC 13818-3.
© 2007 Samsung Electronics Co., Ltd. All rights reserved.
English - 2
Page 3

English - 3
User Instructions
Screen Image retention
Do not display a still image (such as on a video game) on the plasma display panel for more than several minutes as it can
cause screen image retention. This image retention is also known as “screen burn”. To avoid such image retention, refer to
page 26 of this manual to reduce the degree of brightness and contrast of the screen when displaying a still image.
Altitude
The PDP can only operate normally at heights under 6500ft.
Heat on the top of the PDP TV
The top side of the product may be hot after long periods of use as heat dissipates from the panel through the vent hole in
the upper part of the product.
This is normal and does not indicate any defect or operation failure of the product.
However, children should be prevented from touching the upper part of the product.
The product is making a ‘cracking’ noise.
A ‘cracking’ noise may occur when the product contracts or expands due to a change of surrounding environment such as
temperature or humidity. This is normal and not a defect of the unit.
Cell Defects
The PDP uses a panel consisting of 1,230,000(SD-level) to 3,150,000(HD-level) pixels which require sophisticated
technology to produce. However, there may be a few bright or dark pixels on the screen. These pixels will have no impact
on the performance of the product.
Avoid operating the TV at temperatures below 5°C (41°F)
A still image displayed too long may cause permanent damage to the PDP Panel.
Watching the PDP TV in 4:3 format for a long period of time may leave traces of borders displayed on
the left, right and center of the screen caused by the difference of light emission on the screen.
Playing a DVD or a game console may cause similar effects to the screen.
Damages caused by the above effect are not covered by the Warranty.
After-images on the Screen.
Displaying still images from Video games and PC for longer than a certain period of time may produce partial after-images.
To prevent this effect, reduce the ‘brightness’ and ‘contrast’ when displaying still images for a long time.
Warranty
Warranty does not cover any damage caused by image retention.
Burn-in is not covered by the warranty.
Page 4

Contents
GENERAL INFORMATION
■ List of Features .............................................................. 5
■
Accessories ....................................................................
■
Viewing the Control Panel .............................................
■
Viewing the Connection Panel .......................................
■
Remote Control .............................................................. 8
■
Installing Batteries in the Remote Control .....................9
5
6
7
CONNECTIONS
■ Connecting VHF and UHF Antennas .............................9
■ Connecting Cable TV ...................................................
■ Connecting a VCR ....................................................... 11
■ Connecting an S-VHS VCR ......................................... 11
■ Connecting a Camcorder .............................................12
■ Connecting a DVD Player/Cable Box/Satellite receiver
(Set-Top Box) ..............................................................
■ Connecting a DVD Player/Cable Box/Satellite receiver
(Set-Top Box) via HDMI ..............................................
■ Connecting a DVD Player/Cable Box/Satellite receiver
(Set-Top Box) via DVI .................................................
■ Connecting a Digital Audio System ..............................
■ Connecting an Amplifier/DVD Home Theater ..............
■ Connecting a PC .......................................................... 14
10
12
13
13
14
14
OPERATION
■ Turning the TV On and Off ...........................................15
■ Plug & Play Feature .....................................................15
■ Changing Channels .....................................................17
■ Adjusting the Volume ...................................................
■ Viewing the Display .....................................................
■ Viewing the Menus ......................................................
■ Memorizing the Channels ............................................ 19
■ Setting Up Your Remote Control ..................................
■ To Select the Source ....................................................
■ To Edit the I
nput Source Name ....................................25
18
18
18
20
25
PICTURE CONTROL
■ Using Automatic Picture Settings .................................26
■ Digital Noise Reduction ...............................................27
■ Changing the Screen Size ........................................... 28
■ Configuring Detailed Settings on the Picture ...............
■ Active Color ..................................................................
■ DNIe (Digital Natural Image engine) ............................30
■ Selecting the Film Mode ..............................................31
■ Setting the Blue Screen Mode ..................................... 31
■ Setting the HDMI Black Level ...................................... 31
■ Viewing Picture-in-Picture ............................................
■ Freezing the Current Picture ........................................ 33
29
30
32
SOUND CONTROL
■ Using Automatic Sound Settings .................................34
■ Customizing the Sound ................................................ 34
■ Setting the TruSurround XT .........................................
■
Choosing a Multi-Channel Sound (MTS) Track - Digital
■
Choosing a Multi-Channel Sound (MTS) Track - Analog
■ Automatic Volume Control ...........................................
■ Selecting the Internal Mute .......................................... 36
■ Adjusting the TV On/Off Melody Sound .......................
■ Listening to the Sound of the Sub (PIP) Picture ..........37
Symbols
Press
One-Touch
Button
35
.. 35
.. 36
36
37
➢
Note
English - 4
CHANNEL CONTROL
■ Selecting the Antenna .................................................. 38
■ Adding and Erasing Channels .....................................
■ Setting Your Favorite Channels ...................................
■ Viewing the Channel Lists ...........................................
■ Setting the Default Channel List Mode ........................ 40
■ Labeling Channels ....................................................... 41
■ Fine Tuning Analog Channels ......................................
■ Checking the Digital-Signal Strength ........................... 42
■ LNA (Low Noise Amplifier) ...........................................
38
39
40
41
42
PC DISPLAY
■ Using Your TV as a Computer (PC) Display ................ 43
■ Display Modes ............................................................ 43
■ Setting up the TV with your PC .................................... 44
■ Setting the Home Theater PC ......................................
45
TIME SETTING
■ Setting the Time ........................................................... 46
FUNCTION DESCRIPTION
■ Selecting a Menu Language ........................................ 49
■ Using the Game Mode ................................................. 49
■
Viewing Closed Captions (On-Screen Text Messages) - Digital
■
Viewing Closed Captions (On-Screen Text Messages) - Analog
■ Menu Transparency Level ...........................................
■ Setting the Light Effect .................................................
■ Using the Energy Saving Feature ................................ 53
■ Preventing Screen Burn-in ........................................... 53
■ Reducing the Effects of Screen Burn ...........................
■ Setting the Function Help ............................................ 54
■ Using the V-Chip .......................................................... 55
■ Upgrading the Software ............................................... 61
....
.. 51
50
52
52
54
WISELINK
■ Using the WISELINK Function ..................................... 62
■ Using the WISELINK Mode ......................................... 63
■ Using the Photo (JPEG) List ........................................ 64
■ Using the Music (MP3) List .......................................... 70
■ Using the Setup Menu ................................................. 71
ABOUT ANYNET
■ What is Anynet+? ......................................................... 72
■ Connecting Anynet
■ Setting Up Anynet
■ Scanning and Switching between Anynet
■ Recording .................................................................... 74
■ Listening through a Receiver (Home theater) .............. 75
■ Troubleshooting for Anynet
+
+
Devices ....................................... 72
+
......................................................
+
........................................
+
Devices .... 73
73
75
APPENDIX
■ Troubleshooting ........................................................... 76
■
Auto Wall-mount adjustment (Sold separately) (FP-T5084)
■ Wall Mount Kit Specifications (VESA) ..........................
■ How to attach the Stand-Base ..................................... 79
■ Specifications ...............................................................
■ Dimensions (FP-T5084) ............................................... 80
■ Dimensions (FP-T5884) ............................................... 81
■ Dimensions (FP-T6374) ............................................... 82
.. 77
78
79
Page 5

English - 5
General Information
RETURN
FAV.CH
List of Features
• Adjustable picture settings that can be stored in the TV’s memory.
• Automatic timer to turn the TV on and off.
• A special sleep timer.
• V-Chip function.
• Excellent Digital Interface & Networking :
With a built-in HD digital tuner, non-subscription HD broadcasts can be viewed with no Cable Box/Satellite receiver (SetTop Box) needed.
• HDMI/DVI connection of your PC to this TV.
• Remote Control
The supplied remote can be used to operate the TV as well as most DVD players, Set-top boxes, Cable Boxes and VCRs.
• Excellent Picture Quality
- DNIe technology provides life-like clear images.
• SRS TruSurround XT
- SRS TruSurround XT provides a virtual Dolb
Accessories
Please make sure the following items are included with your TV. If any items are missing, contact your dealer.
y surround system.
Remote Control
(BN59-00599A) /
AAA Batteries
(4301-000103)
Cover-Bottom /
Screws (2ea)
(FP-T5084/FP-T5884,
Refer to page 79)
See the bottom of the page for Ferrite Core usage.
➢
Power Cord
(3903-000144)
Ferrite Core for
Power Cord
(3301-001110)
Owner’s Instructions /
Quick Setup Guide
Ferrite Core for
Side-AV / S-VIDEO / HDMI
(3301-001305)
Warranty Card /
Registration Card /
Safety Guide Manual
Ferrite Core for
Headphone
(3301-001456)
Cloth-Clean
The following parts are sold separately and are available at most electronics stores.
S-VIDEO Cable (BN39-00149A) HDMI Cable (BN39-00641A) HDMI/DVI cable (BN39-00643A) Component Cables (RCA)
PC Cable (BN39-00115A) PC Audio Cable (BN39-00061B) Optical Cable Antenna Cable (BN39-00333A)
Ferrite Core (Power Cord, Audio/Video Cable, S-Video Cable,
➢
(BN39-00279A)
Headphone, HDMI Cable)
The ferrite cores are used to shield the cables from interference.
When connecting a cable, open the ferrite core and clip it around the cable
near the plug.
Page 6

Viewing the Control Panel
Buttons on the Lower-Right Part of the Panel
The buttons on the lower-right panel control your TV’s basic features, including the on-screen menu.
To use the more advanced features, you must use the remote control.
FP-T5084/FP-T5884
FP-T6374
The product color and shape may vary depending on the model.
➢
1
SOURCE
Toggles between all the available input sources
(TV, AV1, AV2, S-Video1, S-Video2, Component1,
Component2, PC, HDMI1, HDMI2, or HDMI3).
In the on-screen menu, use this button as you
➢
would use the ENTER button on the remote control.
(FP-T5084/FP-T5884)
2
MENU
Press to see an on-screen menu of your TV’s features.
3
+ VOL –
Press to increase or decrease the volume. In the on-
screen menu, use the + VOL – buttons as you would
use the ◄ and ► buttons on the remote control.
4
CH
Press to change channels.
In the on-screen menu, use the CH buttons as
you would use the ▲ and ▼ buttons on the remote
control.
5
Press to confirm a selection.
6
Press to turn the TV on and off.
Blinks and turns off when the power is on and lights up
Aim the remote control towards this spot on the TV.
7
English - 6
(ENTER)
POWER
Power Indicator
in stand-by mode.
Remote Control Sensor
Speakers
Page 7
English - 7
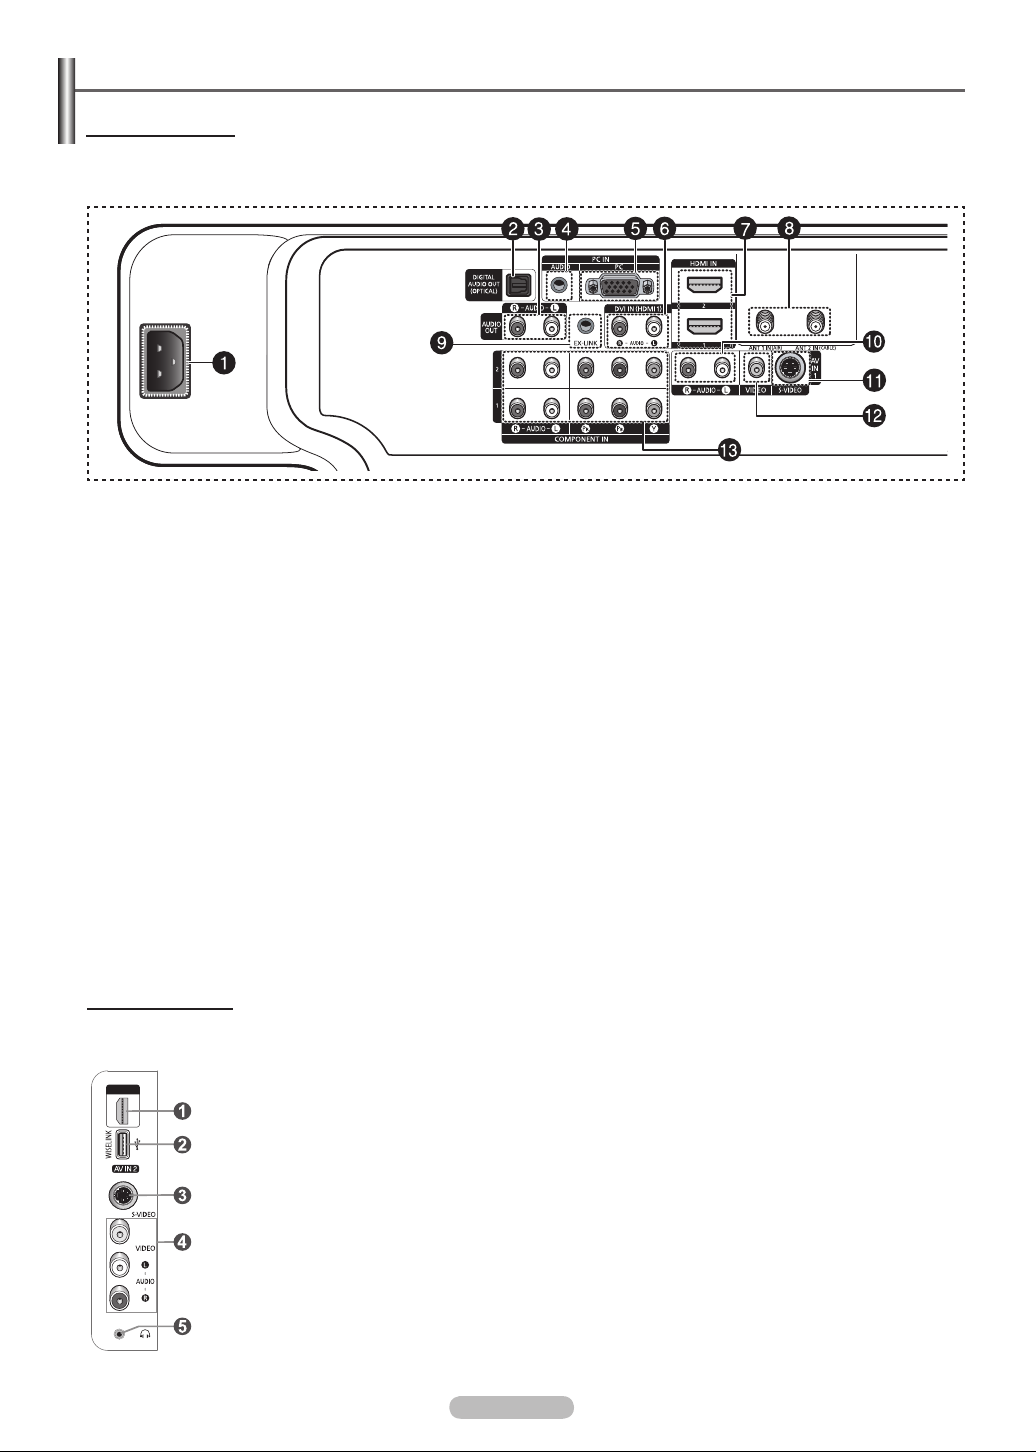
Viewing the Connection Panel
Rear Panel Jacks
Use the rear panel jacks to connect A/V components that will be connected continuously, such as VCR or DVD players. For
more information on connecting equipment, see pages 9-14. The product color and shape may vary depending on the model.
1
POWER IN
Connect the supplied power cord.
2
DIGITAL AUDIO OUT (OPTICAL)
Connect to a Digital Audio component.
3
AUDIO OUT (R/L)
Audio outputs to external devices.
4
PC AUDIO IN
Connect to the audio output jack on your PC.
5
PC IN
Connect to the video output jack on your PC.
6
DVI IN (HDMI 1) (AUDIO-R/L)
Connect to the DVI audio output jack of an external device.
7
HDMI IN 1, 2
Connect to the HDMI jack of a device with an HDMI
output. (HDMI 1 supports HDMI-DVI IN and connection
from a PC.)
- This input can also be used as a DVI connection with
separate analog audio inputs. An optional HDMI/DVI
cable will be necessary to make this connection.
When using an optional HDMI/DVI adapter, the DVI
-
analog audio inputs on your TV allow you to receive left
and right audio from your DVI device.
8
ANT 1 IN(AIR)/ANT 2 IN(CABLE)
Uses a 75Ω Coaxial connector for an Air/Cable
Network.
9
EX-LINK
Connect this to the jack on the optional wall mount
bracket. This will allow you to adjust the TV viewing
angle using your remote control.
The model FP-T5884 / FP-T6374 cannot be wall
➢
mounted. The EX-LINK jack on the FP-T5884
functions as RS-232C control jack. The EX-LINK
jack on the FP-T6374 functions as a service jack.
0
AUDIO-R/L (AV IN 1)
Audio inputs for external devices, such as a camcorder
or VCR.
!
S-VIDEO (AV IN 1)
S-Video input for external devices with an S-Video
output, such as a camcorder or VCR.
@
VIDEO (AV IN 1)
Video input for external devices, such as a camcorder
or VCR.
#
COMPONENT IN 1, 2
Component video (Y/PB/PR) and audio (R-AUDIO-L) inputs.
Side Panel Jacks
Use the right side panel jacks to connect a component that is used only occasionally, such as a camcorder or video game.
The product color and shape may vary depending on the model.
1
HDMI IN 3
Connect to the HDMI jack of a device with an HDMI output.
2
WISELINK
Connect a USB mass storage device to view photo files (JPEG) and play audio files (MP3).
3
S-VIDEO (AV IN 2)
S-Video input for external devices with an S-Video output.
4
AV IN 2
Video and audio inputs for external devices.
5
HEADPHONE
You can connect a set of headphones if you wish to watch a television program without
disturbing other people in the room.
Page 8

Remote Control
RETURN
FAV.CH
You can use the remote control up to a distance of about 23 feet from the TV. When using the remote, always
point it directly at the TV. You can also use your remote control to operate your VCR, Cable box, DVD player,
or Set-Top Box.
1
This is a special remote control for
➢
the visually impaired, and has Braille
points on the POWER, Channel,
Volume, STOP, and PLAY/PAUSE
buttons.
The performance of the remote control
➢
POWER
Turns the TV on and off.
2
NUMERIC BUTTONS
Press to directly select a channel.
3
–
Press to select additional channels
(digital and analog) being broadcast
by the same station. For example,
to select channel “54-3”, press “54”,
then press “–” and “3”.
4
CH LIST
Used to display Channel Lists on the
screen.
5
ANTENNA
Press to select “AIR” or “CABLE”.
6
VCR/DVD Functions
- Rewind
- Stop
- Play/Pause
- Fast/Forward
7
Press to increase or decrease the
8
Press to temporarily cut off the
9
Displays the main on-screen menu.
0
Press to select the sound mode.
!
Returns to the previous menu.
@
Press to select the picture mode.
#
Controls the caption decoder.
$
Press to switch to your favorite
%
Press to select a preset time interval
^
Selects SRS TruSurround XT mode.
&
SET
Sets the remote to control your TV,
*
TV/DVD/STB/CABLE/VCR
Press to operate your TV, DVD
–
+ VOL
volume.
MUTE
sound.
MENU
S.MODE
RETURN
P.MODE
CAPTION
FAV.CH
channels.
SLEEP
for automatic shut off.
SRS
VCR, Cable, DVD player, or Set-Top
Box.
player, STB, CABLE (box), or VCR.
(
Press to backlight the VOL, CH,
and active source button (TV, DVD,
CABLE, STB, VCR) on the remote.
)
SOURCE
Press to display all of the available
video sources.
a
PRE-CH
Tunes to the previous channel.
b
WISELINK
This function enables you to view
and play photo (JPEG) and audio
files (MP3) from an external device.
(Refer to pages 63 (JPEG) and 69 (MP3))
c
REC
This remote can be used to control
recording on Samsung DVD
recorders. (Refer to page 74)
d
CH
Press to change channels.
e
EXIT
Press to exit the menu.
f
UP▲/DOWN▼/LEFT◄/
RIGHT►/ENTER
Use to select on-screen menu items
and change menu values.
g
INFO
Press to display information on the
TV screen.
h
Anynet+
Runs the Anynet+ functions and sets
up Anynet+ devices.
i
STILL
Press to stop the action during a
particular scene. Press again to
resume normal video.
j
P.SIZE
Press to change the screen size.
k
PIP
Picture-in Picture ON/OFF.
l
CH /
Displays the available channels in
sequence. (These buttons change
channels in the PIP window only.)
m
MTS
Press to choose stereo, mono or
Separate Audio Program (SAP
broadcast).
n
RESET
When your remote does not work,
change the batteries and press
the RESET button for 2-3 seconds
before use.
may be affected by bright light.
English - 8
Page 9

English - 9
Installing Batteries in the Remote Control
1 Lift the cover at the back of the remote control upward as shown in the figure.
2 Install two AAA size batteries.
Make sure to match the “+” and “–” ends of the batteries with the diagram inside the
➢
compartment.
Do not mix battery types, i.e. alkaline and manganese.
➢
3 Close the cover as shown in the figure.
Remove the batteries and store them in a cool, dry place if you won’t be using the
➢
remote control for a long time. The remote control can be used up to about 23 feet
from the TV. (Assuming typical TV usage, the batteries last for about one year.)
If the remote control doesn’t work, check the following:
➢
1. Is the TV power on?
2. Are the plus and minus ends of the batteries reversed?
3. Are the batteries drained?
4. Is there a power cut, or is the power cord unplugged?
5. Is there a special fluorescent light or a neon sign nearby?
Connections
Connecting VHF and UHF Antennas
If your antenna has a set of leads that look like this, see “Antennas with 300 Ω Flat Twin
Leads” below.
If your antenna has one lead that looks like this, see “Antennas with 75 Ω Round Leads”.
If you have two antennas, see “Separate VHF and UHF Antennas”.
Antennas with 300 Ω Flat Twin Leads
If you are using an off-air antenna (such as a roof antenna or “rabbit ears”) that has 300 Ω
twin flat leads, follow the directions below.
1 Place the wires from the twin leads under the screws on a 300-75 Ω adapter (not supplied).
Use a screwdriver to tighten the screws.
2 Plug the adaptor into the ANT 1 IN (AIR) or ANT 2 IN (CABLE) terminal on the back of the TV.
Antennas with 75 Ω Round Leads
1
Plug the antenna lead into the ANT 1 IN (AIR) or ANT 2 IN (CABLE) terminal on the back of the TV.
Separate VHF and UHF Antennas
If you have two separate antennas for your TV (one VHF and one UHF), you must combine
the two antenna signals before connecting the antennas to the TV. This procedure requires
an optional combiner-adaptor (available at most electronics shops).
1 Connect both antenna leads to the combiner.
2 Plug the combiner into the ANT 1 IN (AIR) or ANT 2 IN (CABLE) terminal on the bottom of the
back panel.
UHF
VHF
ANT 1 IN (AIR)
UHF
VHF
ANT 1 IN (AIR)
ANT 1 IN (AIR)
Page 10
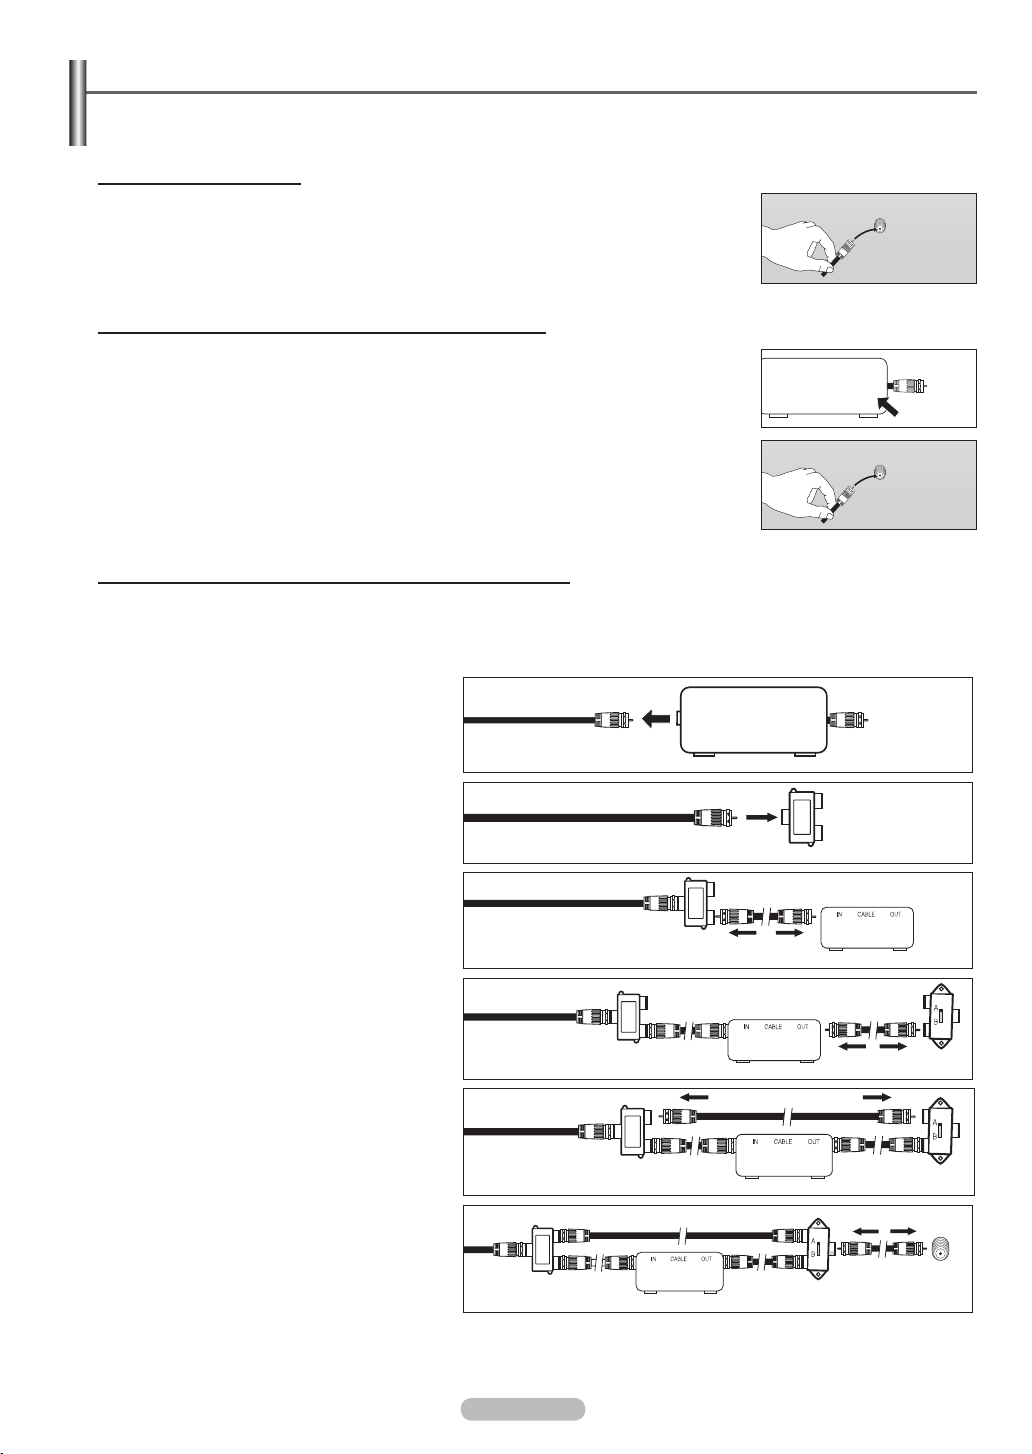
Connecting Cable TV
To connect to a cable TV system, follow the instructions below.
Cable without a Cable Box
1 Plug the incoming cable into the ANT 2 IN(CABLE) terminal on the back of the TV.
Because this TV is cable-ready, you do not need a cable box to view
➢
unscrambled cable channels.
Connecting to a Cable Box that Descrambles All Channels
1 Find the cable that is connected to the ANT OUT terminal on your cable box.
This terminal might be labeled “ANT OUT”, “VHF OUT” or simply, “OUT”.
➢
2 Connect the other end of this cable to the ANT 2 IN(CABLE) terminal on the back of
the TV.
Connecting to a Cable Box that Descrambles Some Channels
If your cable box descrambles only some channels (such as premium channels), follow the instructions below.
You will need a two-way splitter, an RF (A/B) switch, and four lengths of Antenna cable. (These items are available
at most electronics stores.)
ANT IN
ANT 2 IN (CABLE)
ANT OUT
ANT 2 IN (CABLE)
1 Find and disconnect the cable that is
connected to the ANT IN terminal on your
cable box.
This terminal might be labeled “ANT IN”,
➢
“VHF IN” or simply, “IN”.
2 Connect this cable to a two-way splitter.
3 Connect an Antenna cable between an
OUTPUT terminal on the splitter and the IN
terminal on the cable box.
4 Connect an Antenna cable between the
ANT OUT terminal on the cable box and the
B–IN terminal on the RF(A/B) switch.
5 Connect another cable between the other
OUT terminal on the splitter and the A–IN
terminal on the RF (A/B) switch.
6 Connect the last Antenna cable between
the OUT terminal on the RF (A/B) switch
and the ANT 2 IN (CABLE) terminal on the
rear of the TV.
Incoming
cable
Incoming
cable
Incoming
Incoming
cable
Splitter
cable
Splitter
Splitter
ANT IN
Incoming
Splitter
cable
Cable Box
Cable Box
Splitter
RF (A/B)
Switch
Cable Box
RF (A/B)
Switch
RF (A/B)
Switch
TV Rear
ANT 2 IN (CABLE)
After you have made this connection, set the A/B switch to the “A” position for normal viewing. Set the A/B switch to the “B”
position to view scrambled channels. (When you set the A/B switch to “B”, you will need to tune your TV to the cable box’s
output channel, which is usually channel 3 or 4.)
English - 10
Page 11
English - 11
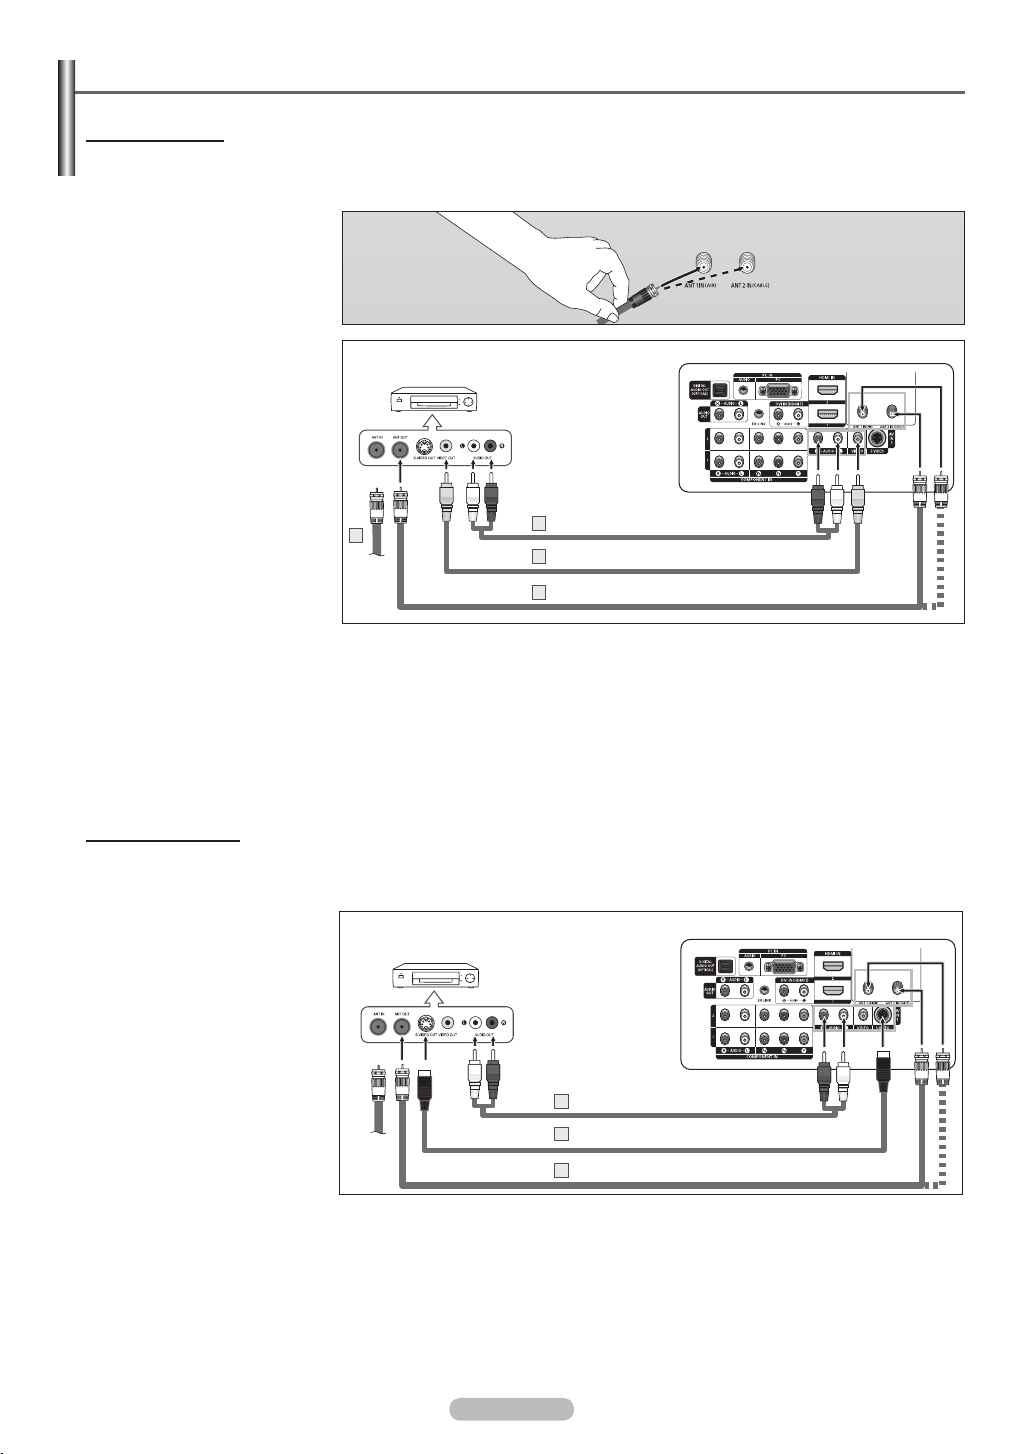
Connecting a VCR
Video Connection
These instructions assume that you have already connected your TV to an antenna or a cable TV system (according
to the instructions on pages 9~10). Skip step 1 if you have not yet connected to an antenna or a cable system.
1 Unplug the cable or antenna
from the back of the TV.
2 Connect the cable or antenna
to the ANT IN terminal on the
back of the VCR.
3 Connect an Antenna Cable
between the ANT OUT
terminal on the VCR and the
ANT 1 IN(AIR) or ANT 2 IN
(CABLE) terminal on the TV.
4 Connect a Video Cable
between the VIDEO OUT
jack on the VCR and the AV
IN 1 [VIDEO] jack on the TV.
5 Connect Audio Cables
between the AUDIO OUT
jacks on the VCR and the AV
IN 1 [R-AUDIO-L] jacks on
the TV.
If you have a “mono”
➢
(non-stereo) VCR, use a Yconnector (not supplied) to
hook up to the right and left
audio input jacks of the TV.
If your VCR is stereo, you
must connect two cables.
VCR Rear Panel
2
Each VCR has a different back panel configuration.
➢
When connecting a VCR, match the color of the connection terminal to the cable.
➢
Audio Cable(Not supplied)5
Video Cable(Not supplied)4
Antenna cable(Not supplied)3
TV Rear Panel
S-Video Connection
Your Samsung TV can be connected to the S-Video jack of a VCR.
(This connection delivers a better picture when compared to the regular Video connection above.)
1 To begin, follow steps 1–3
in the previous section to
connect the antenna or cable
VCR Rear Panel
TV Rear Panel
to your VCR and your TV.
2 Connect an S-Video Cable
between the S-VIDEO OUT
jack on the VCR and the AV
IN 1 [S-VIDEO] jack on the
TV.
3 Connect Audio Cables
between the AUDIO OUT
jacks on the VCR and the AV
IN 1 [R-AUDIO-L] jacks on
Audio Cable (Not supplied)
3
S-Video Cable(Not supplied)2
Antenna cable(Not supplied)3
the TV.
An S-Video may be included with your VCR. (If not, check your local electronics store.)
Each VCR has a different back panel configuration.
➢
When connecting a VCR, match the color of the connection terminal to the cable.
➢
Page 12

Connecting a Camcorder
The side panel jacks on your TV make it easy to connect a camcorder to your TV.
They allow you to view the camcorder tapes without using a VCR
1 Connect a Video Cable
(or S-Video Cable) between
the AV IN 2 [VIDEO]
(or S-VIDEO) jack on the TV
and the VIDEO OUT jack on
the Camcorder.
2 Connect Audio Cables
between the AV IN 2
[L-AUDIO-R] jacks on the TV
and the AUDIO OUT jacks on
the Camcorder.
TV Side Panel
S-Video Cable(Not supplied)
1
or
Camcorder
Each Camcorder has a different back panel configuration.
➢
When connecting a Camcorder, match the color of the connection terminal to the cable
➢
Video Cable (Not supplied)1
Audio Cable (Not supplied)2
.
Connecting a DVD Player/Cable Box/Satellite receiver (Set-Top Box)
The rear panel jacks on your TV make it easy to connect a DVD Player/Cable Box/Satellite receiver (Set-Top Box)
to your TV.
1 Connect Component Cables
between the COMPONENT
IN 1 [Y, P
COMPONENT IN 2 [Y, P
B
, PR] (or
B
,
PR]) jacks on the TV and the
COMPONENT OUT [Y, P
B
,
PR] jacks on the DVD Player/
Cable Box/Satellite receiver
(Set-Top Box).
2 Connect Audio Cables
between the COMPONENT
IN 1 [R-AUDIO-L](or
COMPONENT IN 2
[R-AUDIO-L]) jacks on the TV
and the AUDIO OUT jacks
on the DVD Player/Cable
Box/Satellite receiver (SetTop Box)
DVD Player / Cable Box/Satellite receiver (Set-Top Box)
Audio Cable (Not supplied)2
Component Cable (Not supplied)1
Component video separates the video into Y (Luminance (brightness)), PB
➢
(Blue) and PR (Red) for enhanced video quality. Be sure to match the component
video and audio connections. For example, if connecting the video cable to
COMPONENT IN, connect the audio cable to COMPONENT IN also.
Each DVD Player/Cable Box/Satellite receiver (Set-Top Box) has a different back
➢
panel configuration.
When connecting a DVD Player/Cable Box/Satellite receiver (Set-Top Box), match
➢
the color of the connection terminal to the cable.
TV Rear Panel
English - 12
Page 13

English - 13
Connecting a DVD Player/Cable Box/Satellite receiver (Set-Top Box) via HDMI
This connection can only be made if there is an HDMI Output jack on the external device. This connection will
provide the highest quality picture.
1 Connect an HDMI Cable
between the HDMI IN 2 on
the TV and the HDMI OUT on
the DVD Player/Cable Box/
Satellite receiver (Set-Top
Box).
DVD Player / Cable Box/Satellite receiver (Set-Top Box)
HDMI Cable (Not supplied)1
What is HDMI?
• HDMI, or high-definition multimedia interface, is an interface that enables the
transmission of digital audio and video signals using a single cable.
• The difference between HDMI and DVI is that the HDMI device is smaller in size and
has the HDCP (High Bandwidth Digital Copy Protection) coding feature installed.
Each DVD Player/Cable Box/Satellite receiver (Set-Top Box) has a different back
➢
panel configuration.
When connecting via HDMI, you do not need to connect Audio Cables. You only
➢
need to connect Audio cables when connecting via HDMI/DVI.
The TV may not output sound and pictures may be displayed with abnormal color
➢
when DVD players/Cable Boxes/Satellite receivers supporting HDMI versions older
than 1.3 are connected. When connecting an older HDMI cable and there is no
sound, connect the HDMI cable to the HDMI IN 1 jack and the audio cables to the
DVI IN (HDMI1) [R-AUDIO-L] jacks on the back of the TV. If this happens, contact
the company that provided the DVD player/Cable Box/Satellite receiver to confirm
the HDMI version, then request an upgrade.
HDMI cables that are not 1.3 may cause annoying flicker or no screen display.
➢
TV Rear Panel
Connecting a DVD Player/Cable Box/Satellite receiver (Set-Top Box) via DVI
This connection can only be made if there is a DVI Output jack on the external device.
1 Connect a HDMI/DVI Cable
or DVI-HDMI Adapter
between the [HDMI IN 1] jack
on the TV and the DVI jack
on the DVD Player/Cable
Box/Satellite receiver (SetTop Box).
2 Connect Audio Cables
between the DVI IN (HDMI 1)
[R-AUDIO-L] jack on the TV
and the AUDIO OUT jacks
on the DVD Player/Cable
Box/Satellite receiver (SetTop Box).
DVD Player / Cable Box/Satellite receiver (Set-Top Box)
Audio Cable (Not supplied)2
HDMI/DVI Cable (Not supplied)1
Each DVD Player/Cable Box/Satellite receiver (Set-Top Box) has a different back
➢
panel configuration.
When connecting a DVD Player/Cable Box/Satellite receiver (Set-Top Box), match
➢
the color of the connection terminal to the cable.
When using an HDMI/DVI cable connection, you must use the HDMI IN1 terminal.
➢
TV Rear Panel
Page 14

Connecting a Digital Audio System
The rear panel jacks on your TV make it easy to connect a Digital Audio System to your TV.
1 Connect an Optical Cable
between the DIGITAL AUDIO
OUT (OPTICAL) jacks on
Digital Audio System
TV Rear Panel
the TV and the Digital Audio
Input (OPTICAL) jacks on the
Digital Audio System.
When a Digital Audio System
is connected to the “DIGITAL
AUDIO OUT (OPTICAL)”
jack:
Decrease the gain (volume)
of the TV, and adjust the
volume level with the
system’s volume control.
What is OPTICAL?
• An optical cable converts an electric signal into an optical light signal, and transmits
it through glass fibers. S/PDIF is a transmission system of digital audio in the form of
Optical Cable (Not supplied)
a light wave that uses a glass conductor.
5.1CH audio is possible when the TV is connected to an external device
➢
supporting 5.1CH.
Each Digital Audio System has a different back panel configuration.
➢
When the COMPONENT IN or HDMI IN jacks are connected, the Optical jack
➢
on the TV outputs 2 channel audio only. If you want to hear 5.1 channel audio,
connect the DIGITAL AUDIO OUT (OPTICAL) jack on the DVD player or Cable/
Satellite Box directly to an Amplifier or Home Theater, not the TV.
Connecting an Amplifier/DVD Home Theater
1 Connect Audio Cables
between the AUDIO OUT
[R-AUDIO-L] jacks on the TV
and AUDIO IN [L-AUDIO-R]
jacks on the Amplifier/DVD
Home Theater.
When an audio amplifier is
connected to the “AUDIO
OUT [R-AUDIO-L]” jacks:
Decrease the gain (volume)
of the TV, and adjust the
volume level with the
Amplifier’s volume control.
Connecting a PC
Amplifier/DVD Home Theater
Audio Cable (Not supplied)
Each Amplifier/DVD Home Theater has a different back panel configuration.
➢
When connecting an Amplifier/DVD Home Theater, match the color of the
➢
connection terminal to the cable.
TV Rear Panel
Using the D-Sub Cable
1 Connect a D-Sub Cable
between PC IN [PC] jack on
the TV and the PC output
jack on your computer.
2 Connect a PC Audio Cable
between the PC IN [AUDIO]
jack on the TV and the Audio
Out jack of the sound card on
your computer.
Using the HDMI/DVI Cable
1 Connect a HDMI/DVI cable
between the [HDMI IN 1] jack
on the TV and the PC output
jack on your computer.
2
Connect a 3.5 mm Stereo plug
to 2 RCA cable between the
DVI IN (HDMI 1) [R-AUDIO-L]
jack on the TV and the Audio
Out jack of the sound card on
your computer.
Using the D-Sub Cable
PC
PC Audio Cable (Not supplied)2
D-Sub Cable (Not supplied)1
Using the HDMI/DVI Cable
PC
3.5 mm Stereo plug to 2 RCA Cable (Not supplied)2
HDMI/DVI Cable (Not supplied)1
Each PC has a different back panel configuration.
➢
When connecting a PC, match the color of the connection terminal to the cable.
➢
When using an HDMI/DVI cable connection, you must use the HDMI IN1 terminal.
➢
English - 14
TV Rear Panel
TV Rear Panel
Page 15

English - 15
Operation
Turning the TV On and Off
Press the POWER button on the remote control.
You can also use the POWER button on the TV.
It may take a while when your TV starts.
➢
Plug & Play Feature
When the TV is initially powered On, basic settings proceed automatically and subsequently:
1 Press the POWER button on the remote control.
The message Menu language, Shop Mode, Channels and Time will be set. is
displayed.
2 Press the ENTER button, the Select the language of the OSD menu is
automatically displayed.
Press the ▲ or ▼ button to select language, then press the ENTER button.
The message Select Home Mode when installing this TV at home. is
automatically displayed.
3 Press the ◄ or ► button to select Shop or Home, then press the ENTER
button.
The default selection is Home.
➢
We recommend setting the TV to Home mode for the best picture in your
➢
home environment.
Shop mode is only intended for use in retail environments.
➢
If the unit is accidentally set to Shop mode and you want to return to
➢
Dynamic (Home) mode, press any Volume button and then hold down the
MENU button for five seconds on the TV panel.
4 Press the ▲ or ▼ button to memorize the channels of the selected connection.
Press the ENTER button to select Start.
If the antenna is connected to ANT1 IN(AIR), select Air and if it is connected
➢
to ANT 2 IN(CABLE), select
If both ANT 1 IN(AIR) and ANT 2 IN(CABLE) are connected,
➢
Cable.
select the Air + Cable.
In Cable mode, select the correct analog signal cable system source among
➢
STD, HRC, and IRC by pressing the ▲ or ▼ button, then press the ENTER
button. If you have Digital cable, select the cable system signal source for
both Analog and Digital. Contact your local cable company to identify the
type of cable system that exists in your particular area.
To memorize the channels, press the ► button to select
Start, then press
the ENTER button.
Contact your local cable company to identify the type of cable system that
exists in your particular area.
Menu language, Shop Mode,
i
Channels and Time will be set.
Start
Plug & Play
Select the language of the OSD.
Menu Language :
Move
Select Home Mode when installing this TV at home.
Shop
Move
Select the antennas to memorize.
Air
Cable
Air + Cable
Move
Select the cable system.
Analog
STD
HRC
IRC
Digital
STD
HRC
IRC
Move
English
Español
Français
Enter
Plug & Play
Enter
Plug & Play
Enter
Plug & Play
Enter
Home
Start
Start
Start
Start
Skip
Skip
Skip
Skip
Continued...
Page 16
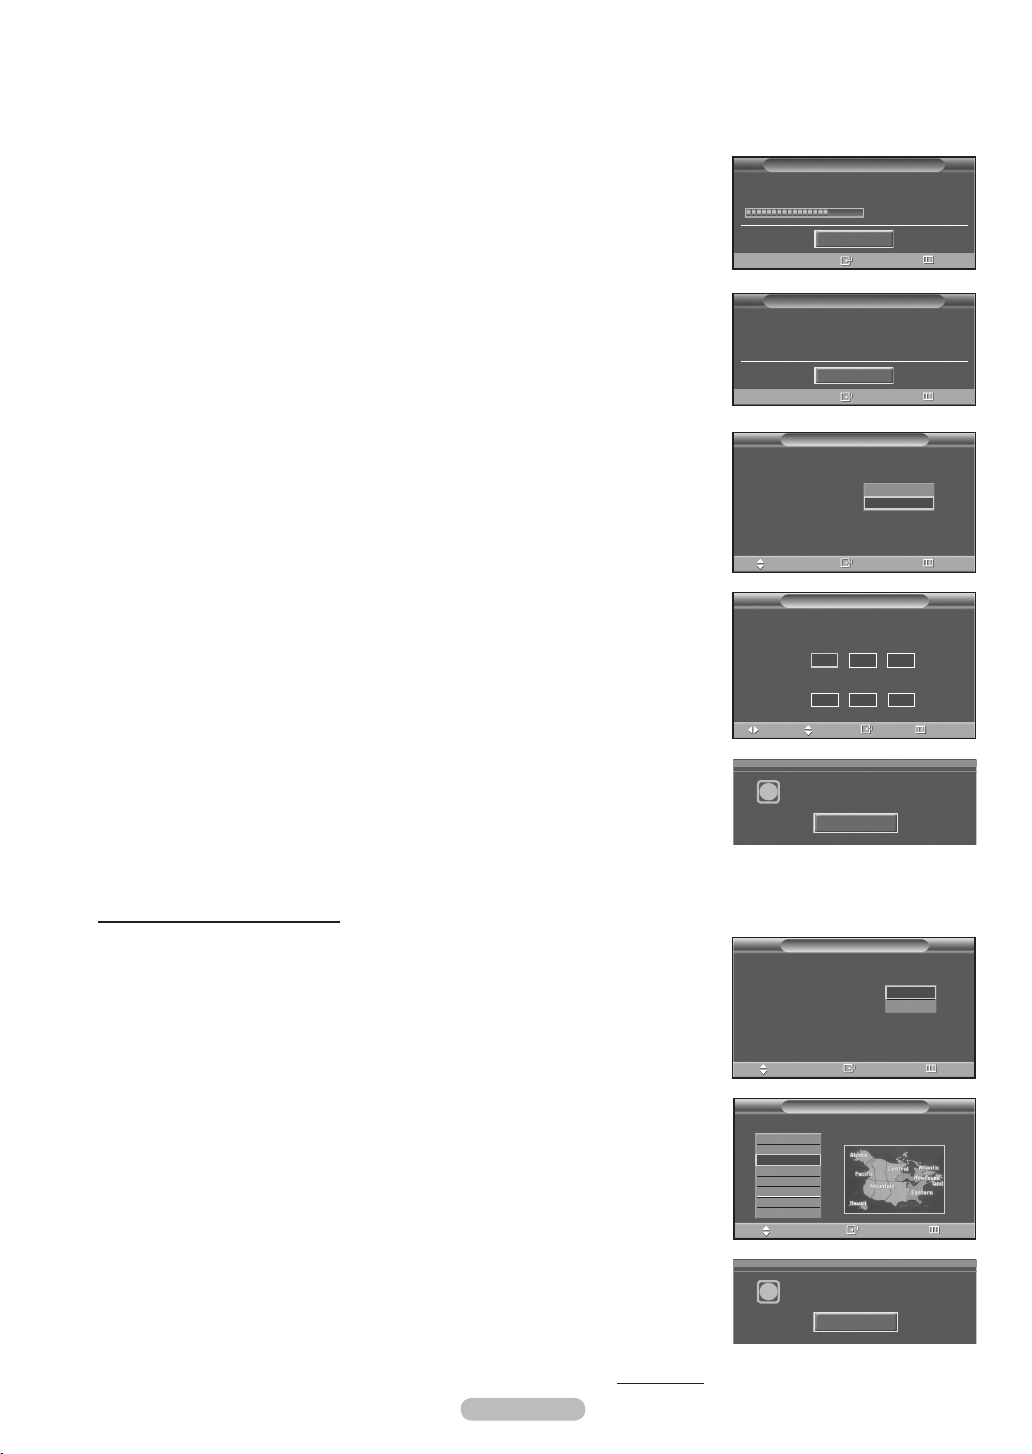
5 The TV will begin memorizing all of the available channels.
After all the available channels are stored, the Auto program menu reappears.
Press the ENTER button when channel memorization is complete.
The Clock Mode menu is automatically displayed.
To stop the search before it has finished, press the ENTER button with Stop
➢
selected.
Plug & Play
Auto Program in progress.
Auto Program is completed.
14 Channels were memorized.
Air : 9 , Cable : 5.
Cable Channel 67
Stop
Enter
Plug & Play
OK
Enter
68%
Skip
Skip
6 Press the ▲ or ▼ button to select Manual if you want to set the current
time manually, then press the
ENTER button. Set current date and time. is
displayed.
If you select Auto, Set to daylight savings time. is displayed, then go to
➢
step 9.
7 Press the ◄ or ► button to move to Month, Day, Year, Hour, Minute, or
am/pm. Set the date and time you want by pressing the ▲ or ▼ button,
then press the MENU button.
You can set the Month, Day, Year, Hour, and Minute directly by pressing
➢
the number buttons on the remote control.
8 The message Enjoy your watching. is displayed.
When you have finished, press the ENTER button.
Even if the ENTER button is not pressed, the message will automatically
➢
disappear after several seconds.
Setting the Clock Automatically
9 Press the ▲ or ▼ button to select On or Off, then press the ENTER button.
Select the time zone in which you live. menu is automatically displayed.
Plug & Play
Select the clock mode.
Clock Mode :
Move
Move
Enjoy your watching.
i
Set to daylight savings time.
Daylight Savings Time :
Manual
Auto
Enter
Plug & Play
Set current date and time.
Month Day Year
--
Hour Minute am/pm
--
Adjust
Plug & Play
OK
----
--
--
--
Enter
On
Off
Skip
Skip
10 Press the ▲ or ▼ button to highlight the time zone for your local area.
Press the ENTER button.
If clock is not automatically set, see page 48 to set the clock.
11 The message
Enjoy your watching. is displayed.
When you have finished, press the ENTER button.
Even if the ENTER button is not pressed, the message will automatically
➢
disappear after several seconds.
English - 16
Continued...
Move
Select the time zone in which you live.
Newfoundland
Atlantic
Eastern
Central
Mountain
Pacific
Alaska
Hawaii
Move
Enjoy your watching.
i
Enter
Plug & Play
Enter
OK
Skip
Skip
Page 17

English - 17
If you want to reset this feature...
1 Press the MENU button to display the menu.
Press the ▲ or ▼ button to select Setup, then press the ENTER button.
2 Press the ENTER button to select Plug & Play. For further details on setting up
options, refer to the page 15~16.
The Plug & Play feature is only available in the TV and DTV mode.
➢
Changing Channels
Using the Channel Buttons
1 Press the CH or CH button to change channels.
When you press the CH or CH button, the TV changes channels in
➢
sequence. You will see all the channels that the TV has memorized.
(The TV must have memorized at least three channels). You will not
see channels that were either erased or not memorized. See page 19 to
memorize channels.
Using the Number Buttons
1 Press the number buttons to go directly to a channel. For example, to select
channel 27, press 2, then 7.
The TV will change channels when you press the second number.
Plug & Play
Language : English
Time
Game Mode : Off
V-Chip
Caption
Menu Transparency
▼
More
Move
Menu language, Shop Mode,
i
Channels and Time will be set.
Start
SetupT V
: Medium
Enter
Return
►
►
►
►
►
►
►
Using the “-” Button
The “-” button is used to select stations that broadcast a digital signal.
1 For example, for Channel 7-1, press 7, then -, then 1.
HD indicates the TV is receiving a Digital High Definition signal.
➢
SD indicates the TV is receiving a Standard Definition signal.
For quick channel change, press the number buttons, then press the ENTER
➢
button.
Using the PRE-CH Button to select the Previous Channel
Use the number buttons to quickly tune to any channel.
1 Press the PRE-CH button. The TV will switch to the last channel viewed.
To quickly switch between two channels that are far apart, tune to one
➢
channel, then use the number button to select the second channel.
Then use the PRE-CH button to quickly alternate between them.
Page 18
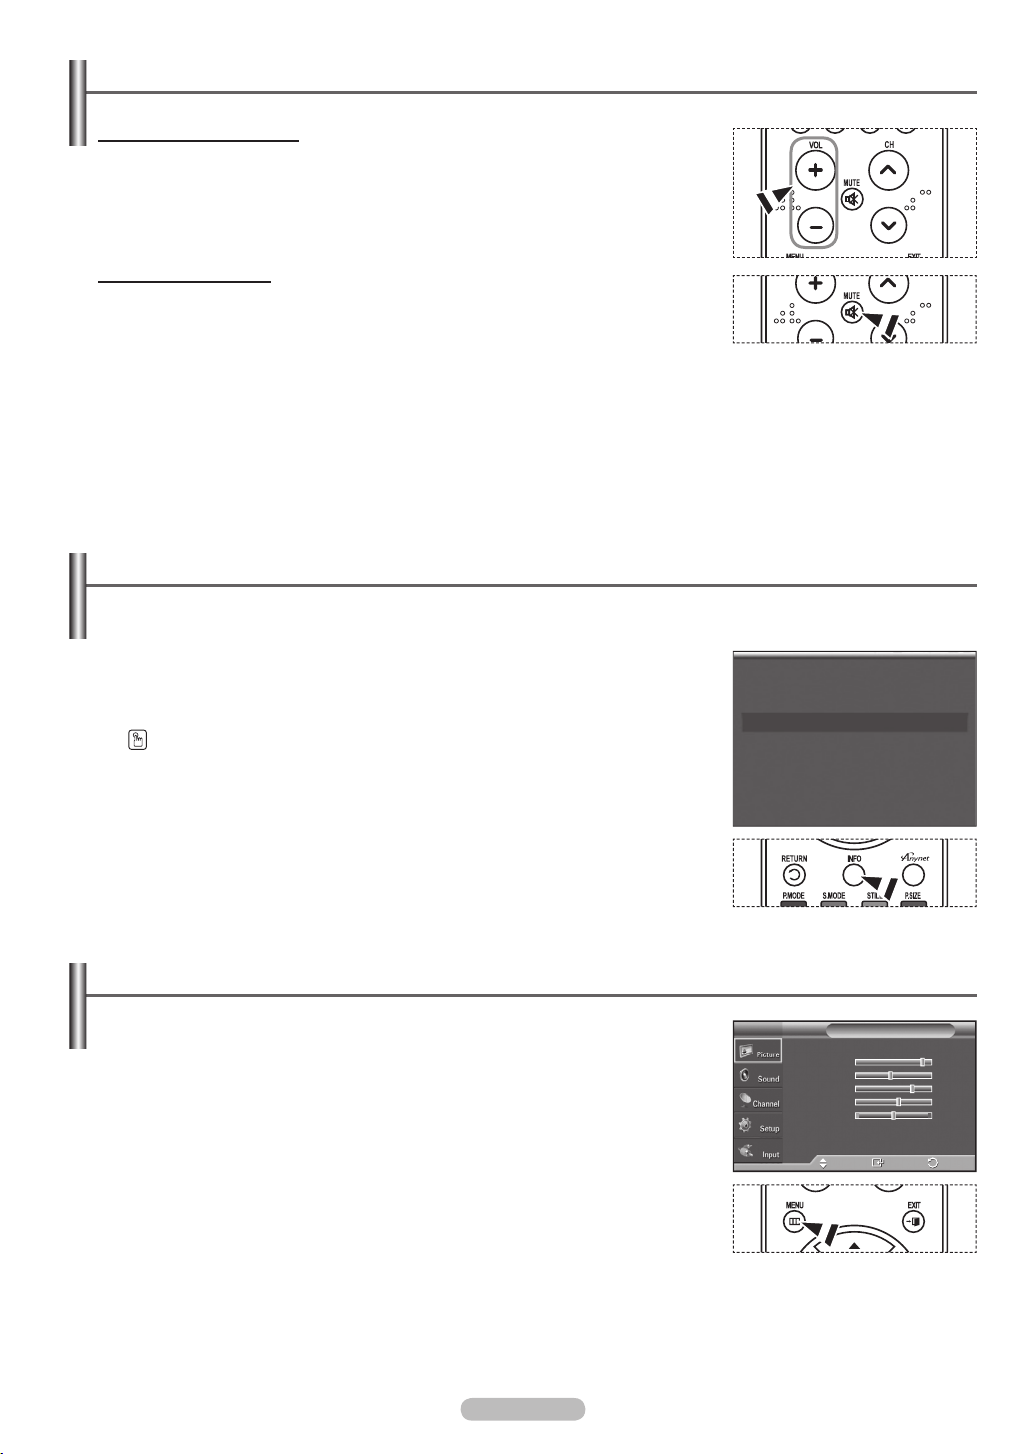
Adjusting the Volume
Using the Volume Buttons
1 Press the VOL + or VOL – button to increase or decrease the volume.
Using the Mute Button
At any time, you can cut off the sound using the
MUTE button.
1 Press MUTE and the sound cuts off.
The word “Mute” will appear in the lower-left corner of the screen.
2 To turn mute off, press the MUTE button again, or simply press the VOL + or
VOL –
button.
Viewing the Display
The display identifies the current channel and the status of certain audio-video settings.
1 Press the INFO button on the remote control.
The TV will display the channel, the type of sound, and the status of certain
picture and sound settings.
Press the INFO button once more or wait approximately 10 seconds and it disappears
automatically.
Viewing the Menus
1 With the power on, press the MENU button.
The main menu appears on the screen. Its left side has five icons:
Picture, Sound, Channel, Setup, Input.
2 Use the ▲ or ▼ button to select one of the five icons.
Then press the ENTER button to access the icon’s sub-menu.
3 Press the EXIT button to exit.
It takes about one minute until the on-screen menu disappears.
➢
Air 28
Mono
Picture Mode : Dynamic
Sound Mode : Custom
MTS : Stereo
12 : 00 am
Mode : Dynamic
Contrast 100
Brightness 45
Sharpness 75
Color 55
Tint G 50 R 50
▼
More
Move
PictureT V
Enter
►
Exit
English - 18
Page 19

English - 19
Memorizing the Channels
Your TV can memorize and store all of the available channels for both air and cable channels. After the available
channels are memorized, use the CH or CH button to scan through the channels. This eliminates the need
to change channels by entering the channel digits. There are three steps for memorizing channels: selecting a
broadcast source, memorizing the channels (automatic) and adding and deleting channels (manual).
Selecting the Video Signal-source
Before your television can begin memorizing the available channels, you must
specify the type of signal source that is connected to the TV (i.e. an air or a cable
system).
1 Press the MENU button to display the menu.
Press the ▲ or ▼ button to select Channel, then press the ENTER button.
2 Press the ENTER button select Antenna.
Press the ▲ or ▼ button to select Air or Cable, then press the ENTER button.
Press the
EXIT button to exit.
Storing Channels in Memory (Automatic Method)
1 Press the MENU button to display the menu.
Press the ▲ or ▼ button to select Channel, then press the ENTER button.
2 Press the ▲ or ▼ button to select Auto Program, then press the ENTER
button.
3 Press the ▲ or ▼ button to select the antenna connection, then press the
ENTER button.
Air: “Air” antenna signal.
➢
Cable: “Cable” antenna signal.
Air+Cable: “Air” and “Cable” antenna signals.
If the antenna is connected to ANT 2 IN (CABLE), select Cable and if it is
➢
connected to ANT 1 IN (AIR), select
If both ANT 1 IN and ANT 2 IN are connected, select the Air + Cable.
➢
If you selected Air, then go to step 5.
➢
Air.
4 Press the ▲ or ▼ to select the correct analog signal cable system source
among STD, HRC, and IRC, then press the ENTER button. If you have Digital
cable TV, select the cable system signal source for both Analog and Digital.
If you have Digital cable TV, select the signal source for both Analog and
➢
Digital.
STD, HRC, and IRC identify various types of cable TV systems. Contact
➢
your local cable company to identify the type of cable system that exists in
your particular area. At this point the signal source has been selected.
5 The TV begins memorizing all available stations.
If you want to stop Auto Programming, press the
ENTER button. The Stop
Auto Program? message will be displayed. Select Yes by pressing the ◄ or ►
button.
Press the
➢
EXIT button to exit.
The TV must be connected to antenna/cable in order to receive digital TV
signals. Even if a particular channel is deleted from the memory, you can
always tune to that channel directly by using the number buttons on the
remote control.
• All available DTV and analog channels are automatically stored in
➢
memory.
• It takes approximately 3 to 10 minutes to memorize channels.
Antenna : Air
Auto Program
Clear Scrambled Channel
Channel List
Name
Fine Tune
Signal Strength
LNA : On
Move
Antenna : Air
Auto Program
Clear Scrambled Channel
Channel List
Name
Fine Tune
Signal Strength
LNA : On
Move
Antenna : Air
Auto Program
Clear Scrambled Channel
Channel List
Name
Fine Tune
Signal Strength
LNA : On
Move
Select the antennas to memorize.
Air
Cable
Air + Cable
Move
Select the cable system.
Analog
STD
HRC
IRC
Digital
STD
HRC
IRC
Move
Auto Program
Auto Program in progress.
Stop
Enter
Auto Program
Stop Auto Program?
Yes No
Move
Enter
ChannelT V
Enter
Return
ChannelT V
Air
Cable
Enter
Return
ChannelT V
Enter
Return
Auto ProgramT V
Start
Start
Start
Return
Enter
Auto ProgramT V
Start
Enter
Return
Cable Channel 67
68 %
Return
68 %
Return
►
►
►
►
►
►
►
►
►
►
►
►
►
►
►
►
Page 20

Setting Up Your Remote Control
After your remote control has been properly set up, your remote control can operate in five different modes:
TV, VCR, Cable, DVD, or Set-Top Box. Pressing the corresponding button on the remote control allows you to
switch among these modes, and control whichever piece of equipment you choose.
➢
The remote control might not be compatible with all DVD Players, VCRs, Cable boxes, and Set-Top Boxes.
Setting Up the Remote to Operate Your VCR
1 Turn off your VCR.
2 Press the
3 Press the SET button on your TV’s remote control.
4 Using the number buttons on your remote control, enter three digits of the VCR code listed
on page 22 of this manual for your brand of VCR. Make sure you enter three digits of the
code, even if the first digit is a “0”. (If more than one code is listed, try the first one.)
5 Press the POWER button on the remote control. Your VCR should turn on if your remote
is set up correctly.
If your VCR does not turn on after set-up, repeat steps 2, 3 and 4, but try one of the other codes
listed for your brand of VCR. If no other codes are listed, try each VCR code, 000 through 080.
Note on Using Remote Control Modes: VCR
When your remote control is in VCR mode, the volume buttons still control your TV’s volume.
VCR button on your TV’s remote control.
Setting Up the Remote to Operate Your Cable Box
1 Turn off your cable box.
2 Press the CABLE button on your TV’s remote control.
3 Press the
4 Using the number buttons on your remote control, enter three digits of the cable box code
listed on page 23 of this manual for your brand of cable box. Make sure you enter three
digits of the code, even if the first digit is a “0”. (If more than one code is listed, try the first
one.)
5 Press the
Your cable box should turn on if your remote is set up correctly.
If your cable box does not turn on after set-up, repeat steps 2, 3 and 4, but try one of the other
codes listed for your brand of cable box. If no other codes are listed, try each code, 000 through
046.
Note on Using Remote Control Modes: Cable Box
When your remote control is in CABLE mode, the volume buttons still control your TV’s volume.
SET button on your TV’s remote control.
POWER button on the remote control.
Continued...
English - 20
Page 21
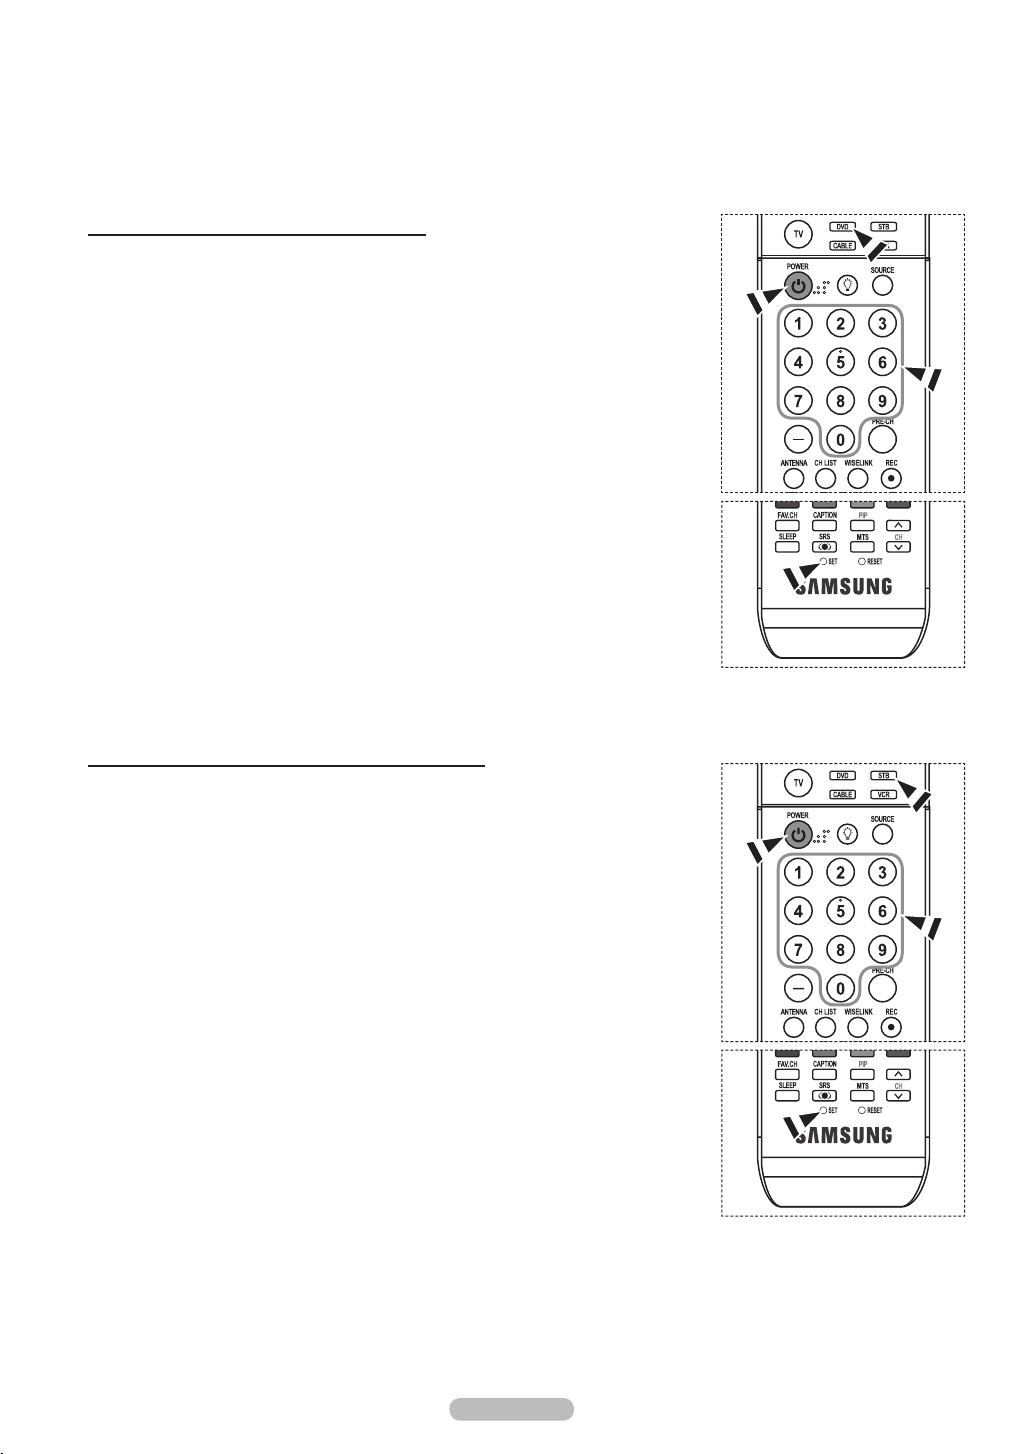
English - 21
Setting Up the Remote to Operate Your DVD
1 Turn off your DVD.
2 Press the
3 Press the SET button on your TV’s remote control.
4 Using the number buttons on your remote control, enter three digits of the DVD code listed
on page 24 of this manual for your brand of DVD. Make sure you enter three digits of the
code, even if the first digit is a “0”. (If more than one code is listed, try the first one.)
5 Press the POWER button on the remote control.
Your DVD should turn on if your remote is set up correctly.
If your DVD does not turn on after set-up, repeat steps 2, 3 and 4, but try one of the other codes
listed for your brand of DVD. If no other codes are listed, try each code, 000 through 141.
Note on Using Remote Control Modes: DVD
When your remote control is in DVD mode, the volume buttons still control your TV’s volume.
DVD button on your TV’s remote control.
Setting Up the Remote to Operate Your Set Top Box
1 Turn off your STB.
2 Press the STB button on your TV’s remote control.
3 Press the
4 Using the number buttons on your remote control, enter three digits of the STB code listed
on page 23 of this manual for your brand of STB. Make sure you enter three digits of the
code, even if the first digit is a “0”. (If more than one code is listed, try the first one.)
5 Press the
Your STB should turn on if your remote is set up correctly.
SET button on your TV’s remote control.
POWER button on the remote control.
If your STB does not turn on after set-up, repeat steps 2, 3 and 4, but try one of the other codes
listed for your brand of STB. If no other codes are listed, try each code, 000 through 074.
Note on Using Remote Control Modes: STB
When your remote control is in STB mode, the volume buttons still control your TV’s volume.
Page 22

Remote Control Codes
VCR
Brand
SAMSUNG
ADMIRAL
AIWA
AKAI
AUDIO DYNAMICS
BELL&HOWELL
BROKSONIC
CANDLE
CANON
CITIZEN
COLORTYME
CRAIG
CURTIS MATHES
DAEWOO
DB
DIMENSIA
DYNATECH
ELECTROHOME
EMERSON
FISHER
FUNAI
GENERAL ELECTRIC
GO VIDEO
LG(Goldstar)
HARMAN KARDON
HITACHI
INSTANT REPLAY
JC PENNEY
JCL
KENWOOD
KLH
LIOYD
LOGIK
LXI
JVC
MAGNAVOX
MARANTZ
MARTA
KONIA
ORION
MEI
MEMOREX
MGA
MIDLAND
MINOLTA
Code
000 001 002 003 004 005 077 078 079
020
025
004 027 032
007 026
018
022
002 003 006 008 015 055
021 056
002 003 006 008 015 055
007
002 024
002 007 008 017 021 025 056 064 066
003 010 011 012 013 014 015 016
007 026
017
025
034
001 003 006 021 022 025 030 032 034
040 047 050 052 060 063 065 066 067
069 073
018 024 028 029 048 051 061
025
002 005 017 021 056
002
006 007 008 009 010
007
019 025 041 042 074
021
002 007 018 019 021 026 037 041
054 056
007 008 018 021 026 037
007 008 018 026 037
070
025
038
025
081 082 083
021 056 059
007 008 018 021 026 037 062
006
036
073 074 075 076
021
006 021 024 025
034
005
019 041 075
Brand
MITSUBISHI
MONTGOMERY WARD
MTC
MULTITECH
NEC
OPTIMUS
PANASONIC
PENTAX
PENTEX RESEARCH+
PHILCO
PHILIPS
PIONEER
PORTLAND
PROSCAN
QUARTZ
QUASAR
RADIO SHACK/
REALISTIC
RCA
SANSUI
SANYO
SCOTT
SEARS
SHARP
SHIMTOM
SIGNATURE
SONY
SYLVANIA
SYMPHONIC
TANDY
TASHIKA
TATUNG
TEAC
TECHNICS
TEKNIKA
TMK
TOSHIBA
TOTEVISION
UNITECH
VECTOR RESEARCH
VICTOR
VIDEO CONCEPTS
VIDEOSONIC
WARDS
YAMAHA
ZENITH
Code
019 034 041 046
020
002 025
002 005 025 038
007 008 018 026 037 062 064
020
021 056 071 072
019 041 075
008
021 056 059
021 080
019 026 039 053
015 049 055
017
018
021 056
006 018 020 021 024 025 029 034
048 056
002 017 019 021 035 041 043 057
068 076
026
018 024
003 047 052 067
006 018 019 024 028 029 041 048 051
020 034 045 015
027 033 038 058
025
027 033 044
021 025 056 059
025
018 025
006
037
025 037 068
021
006 021 025 031
066
003 019 029 051 052
002 006
002
007 026
026
007 026
002
002 003 006 019 020 021 024 025 034
038 041
007 008 018 026 037
023 027 033
English - 22
Continued...
Page 23

English - 23
CABLE BOX
Brand
SAMSUNG
GI
HAMLIN
HITACHI
JERROLD
MACOM
MAGNAVOX
OAK
PANASONIC
PHILIPS
PIONEER
RCA
REGAL
Code
000 001 002 003 004 005 006 007
041
003 024 031
025 030
038 039
025 030
019 023 028
026
003 022 027 037 044
019 021 023 028
004 018 020 044
014 022 040
003
SAMSUNG SET-TOP BOX
Product
Ground wave STB
CABLE STB
Satellite STB
Code
000 001 002 008 013
000 004 008 013
000 003 008 013
SET-TOP BOX
Brand
ALPHASTAR
ANAM
CHANNEL MASTER
CROSSDIGITAL
CHAPARRAL
DIRECT TV
DAEWOO
DISH NETWORK SYSTEM
DISHPRO
DRAKE
DX ANTENNA
ECHOSTAR
EXPRESSVU
GOI
GE
GENERAL INSTRUMENT
HTS
HOME CABLE
HITACHI
HUGHES NETWORK
IQ
IQ PRISM
JANEIL
JERROID
JVC
Code
023
043
018 034
019
035
015 016 017 019 022 045 060
061 062 065 066 067 068
074
069 070
069
018 024 032
027
025 069 070 071
069
069
065
046 047 048 063 064
069
056
022
015 017
020
020
059
063
069 070
Brand
REGENCY
SA
SCIENTIFIC ATLAN
SPRUCER
STARGATE 2000
SYLVANIA
TEXSCAN
TOCOM
UNIVERSAL
VIEWSTAR
WARNER AMEX
ZENITH
Brand
LG(Goldstar)
MAGNAVOX
MEMOREX
MOTOROLA
MACOM
MITSUBISHI
NEXT LEVEL
PHILIPS
PRIMESTAR
PANASONIC
PAYSAT
PROSCAN
RCA
RADIOSHACK
REALISTIC
STS
STAR TRAK
SKY
SKY LIFE
SHACK
STAR CHOICE
SONY
TOSHIBA
ULTIMATE TV
UNIDEN
ZENITH
Code
015 023
042 043
042 043
022
036
016
016
032
033 034
019 021 023 028
046
017 029 035 037 045
Code
044 073
016 021 036 038 039 040 041 042
016
064
018
015
047 048 064
015 016 017 021 033 036 038 039
040 041 042 067
046 049 050 063
058 059 061 062
016
065 066
051 052 053 065 066
064
057
020 027
026
031
005 006 007
064
064
054 060
015 017 028 029 030 072
060 066
016 021 037 055 056 057
024 031 068
Continued...
Page 24

SAMSUNG DVD
Product
DVD
DVDR
BD Record
VCR COMBO
VCR Record
DHR COMBO
DVD
Brand
ANAM
AUDIOVOX
AUDIOLOGIC
ANABA
APEX DIGITAL
AIWA
BROKSONIC
BLAUPUNKT
B&K
CURTIS MATHES
CYBER HOME
CLARION
CIRRUS
CINEVISION
DAEWOO
DENON
FARENHEIT
FISHER
GPX
GO VIDEO
GE
GREENHILL
HITACHI
HITEKER
HOYO
HARMAN / KARDON
IRT
INTEGRA
JBL
JVC
JATON
KENWOOD
KISS
KONKA
KLH
LG(Goldstar)
LOEWE
LASONIC
MOBILE AUTHORITY
MEMOREX
MALATA
MAGNAVOX
MINTEK
MONYKA
Code
000 001 002
003 004
005 006
007 008 009 010 011
012
013
Code
030
075
085
072
070 071 074 086 083 084 088
111 112
114
062
074
122 123
027
065 077 078 079 082
080 125
081
095
066
146
067 068
090
060
061 089 133 135
069 074
074
064 113
071
073
091 110
089
092
091
022 033 115 116
073
051 108 109
073
059 100 106 107
074 075
025 031
057
058
054
055
056
076 093
074 094
073
Product
Home Theater VCR COMBO
HDD Record COMBO
TWIN TRAY COMBO
STB DVD COMBO
DVD Receiver
AV Receiver
Brand
NORCENT
NEXT BASE
NEC
NANTAUS
NESA
OPTOMEDIA ELECTRONICS
OPTIVIEW
ONKYO
PHILCO
PRINCETON
PROSCAN
PANASONIC
PHILIPS
ROTEL
RIO
RCA
RAITE
ROWA
SAMPO
SONY
SHERWOOD
SVA
SYLVANIA
SHARP
SANSUI
SANYO
SHINSONIC
SANYO
THOMSON
TOSHIBA
TECHNICS
TVIEW
TOKAI
TEAC
TECHWOOD
TREDEX
URBAN CONCEPTS
VENTURER
VOCOPRO
YAMAHA
YAMAKAWA
XWAVE
ZENITH
Code
014 015 016
017
018
019
020
021
Code
048 049 050
052
053
144
074
105
072
076 092 119
044 045
046 047
023
024 034 124 134 136 137 138
036 076
117 118
120
023 035 074 075 131 132
073
038
104
026 029 126 127 128 129
130 141
039 041
042
043 093
140
062
062
094
090
145
028 062 076
139
072
073
096
097
098 099 101
076
075
102
032 063
040 073
103
076 121
English - 24
Page 25

To Select the Source
Use to select TV or other external input sources such as DVD players or Cable Box/Satellite receivers (Set-Top
Box) connected to the TV. Use to select the input source of your choice.
1 Press the MENU button to display the menu.
Press the ▲ or ▼ button to select Input, then press the ENTER button.
2 Press the ENTER button to select Source List.
Source List : TV
Edit Name
WISELINK
Anynet+ (HDMI-CEC)
InputT V
Press the ▲ or ▼ button to select the signal source, then press the ENTER
button.
You can choose between the following sets of jacks: AV1, S-Video1,
➢
Component1, Component2, PC, HDMI1, or HDMI2 on the TV’s rear panel
and AV2, S-Video2, or HDMI3 on the TV’s side panel.
HDMI1, HDMI2, or HDMI3 input can only be selected when the external
➢
device is turned on and connected via HDMI.
You can choose only those external devices that are connected to the TV.
➢
You can also press the SOURCE button on the remote control to view an external
signal source.
Move
TV
AV1 :
AV2 :
S-Video1 :
S-Video2 :
Component1 :
Component2 :
▼
More
Move
Source ListT V
Enter
- - - -
- - - -
- - - -
- - - -
- - - -
- - - -
Enter
Return
To Edit the Input Source Name
You can name the device connected to the input jacks to make your input source selection easier.
Return
►
►
1 Press the MENU button to display the menu.
Press the ▲ or ▼ button to select Input, then press the ENTER button.
Press the ▲ or ▼ button to select Edit Name, then press the ENTER button.
2 Press the ▲ or ▼ button to select AV1, AV2, S-Video1, S-Video2,
Component1, Component2, PC, HDMI1, HDMI2, or HDMI3 input jack,
then press the ENTER button.
3 Press the ▲ or ▼ button to select VCR, DVD, D-VHS, Cable STB, HD STB,
Satellite STB, PVR STB, AV Receiver, DVD Receiver, Game, Camcorder,
DVD Combo, PC, VOD STB, or TV input source, then press the ENTER button.
Press the
➢
EXIT button to exit.
When a PC with a resolution of 1920 x 1080@60Hz is connected to the
HDMI IN 1 port, you should set the HDMI1 mode to PC in the Edit Name of
the Input mode. If the HDMI1 mode is not PC, it works depending on the TV
setting.
Source List : TV
Edit Name
WISELINK
Anynet+ (HDMI-CEC)
Move
Edit NameT V
AV1 :
AV2 :
S-Video1 :
S-Video2 :
Component1 :
Component2 :
▼
More
Move
Edit NameT V
AV1 :
AV2 :
S-Video1 :
S-Video2 :
Component1 :
Component2 :
▼
More
Move
Edit NameT V
Move
AV Receiver
DVD Receiver
Game
Camcorder
DVD Combo
PC
VOD STB
TV
AV1 :
AV2 :
S-Video1 :
S-Video2 :
Component1 :
Component2 :
▼
More
InputT V
Enter
- - - -
- - - -
- - - -
- - - -
- - - -
- - - -
Enter
- - - -
- - - -
VCR
- - - -
DVD
- - - -
D-VHS
- - - -
Cable STB
HD STB
- - - -
Satellite STB
- - - -
PVR STB
Enter
▲
- - - -
- - - -
- - - -
- - - -
- - - -
- - - -
Enter
►
►
Return
►
►
►
►
►
►
Return
▼
Return
Return
English - 25
Page 26

Picture Control
Using Automatic Picture Settings
Your new Plasma TV gives you optimal control over the picture you’re watching. You can change the screen size,
improve the image quality, even watch something else without turning off what you’re currently watching. Please
be aware that the best picture on this TV will be obtained from High Definition (HD) sources such as Digital cable
or DVD players.
Your TV has three automatic picture settings (“Dynamic”, “Standard”, and “Movie”) that are preset at the factory.
You can activate either Dynamic, Standard, or Movie by making a selection from the menu.
1 Press the MENU button to display the menu.
Press the ENTER button to select Picture.
2 Press the ENTER button to select Mode.
Press the ▲ or ▼ button to select the Dynamic, Standard, or Movie picture
setting, then press the ENTER button.
• Choose Dynamic to increase the clarity and sharpness of the picture.
• Choose Standard for general TV watching mode.
• Choose Movie when watching movies.
Press the P.MODE button on the remote control to select one of the standard picture
settings.
3 Press the ▲ or ▼ button to select Contrast, Brightness, Sharpness, Color,
or Tint, then press the ENTER button.
4 Press the ◄ or ► button to decrease or increase the value of a particular item.
Press the ENTER button.
• Tint doesn’t operate in PC mode.
➢
• In PC mode, only the
Contrast and Brightness can be selected.
• Each adjusted setting will be stored separately according to its input mode.
• When you make changes to
Contrast, Brightness, Sharpness, Color, or
Tint. The OSD color will also be adjusted accordingly.
Move
Move
Move
PictureT V
Enter
PictureT V
Dynamic
Standard
Movie
Enter
ModeT V
Enter
Return
Return
Return
Return
Mode : Dynamic
Contrast 100
Brightness 45
Sharpness 75
Color 55
Tint G 50 R 50
▼
More
Mode : Dynamic
Contrast 100
Brightness 45
Sharpness 75
Color 55
Tint G 50 R 50
▼
More
Mode : Dynamic
Contrast 100
Brightness 45
Sharpness 75
Color 55
Tint G 50 R 50
▼
More
Contrast 100
Move Adjust
►
English - 26
Continued...
Page 27
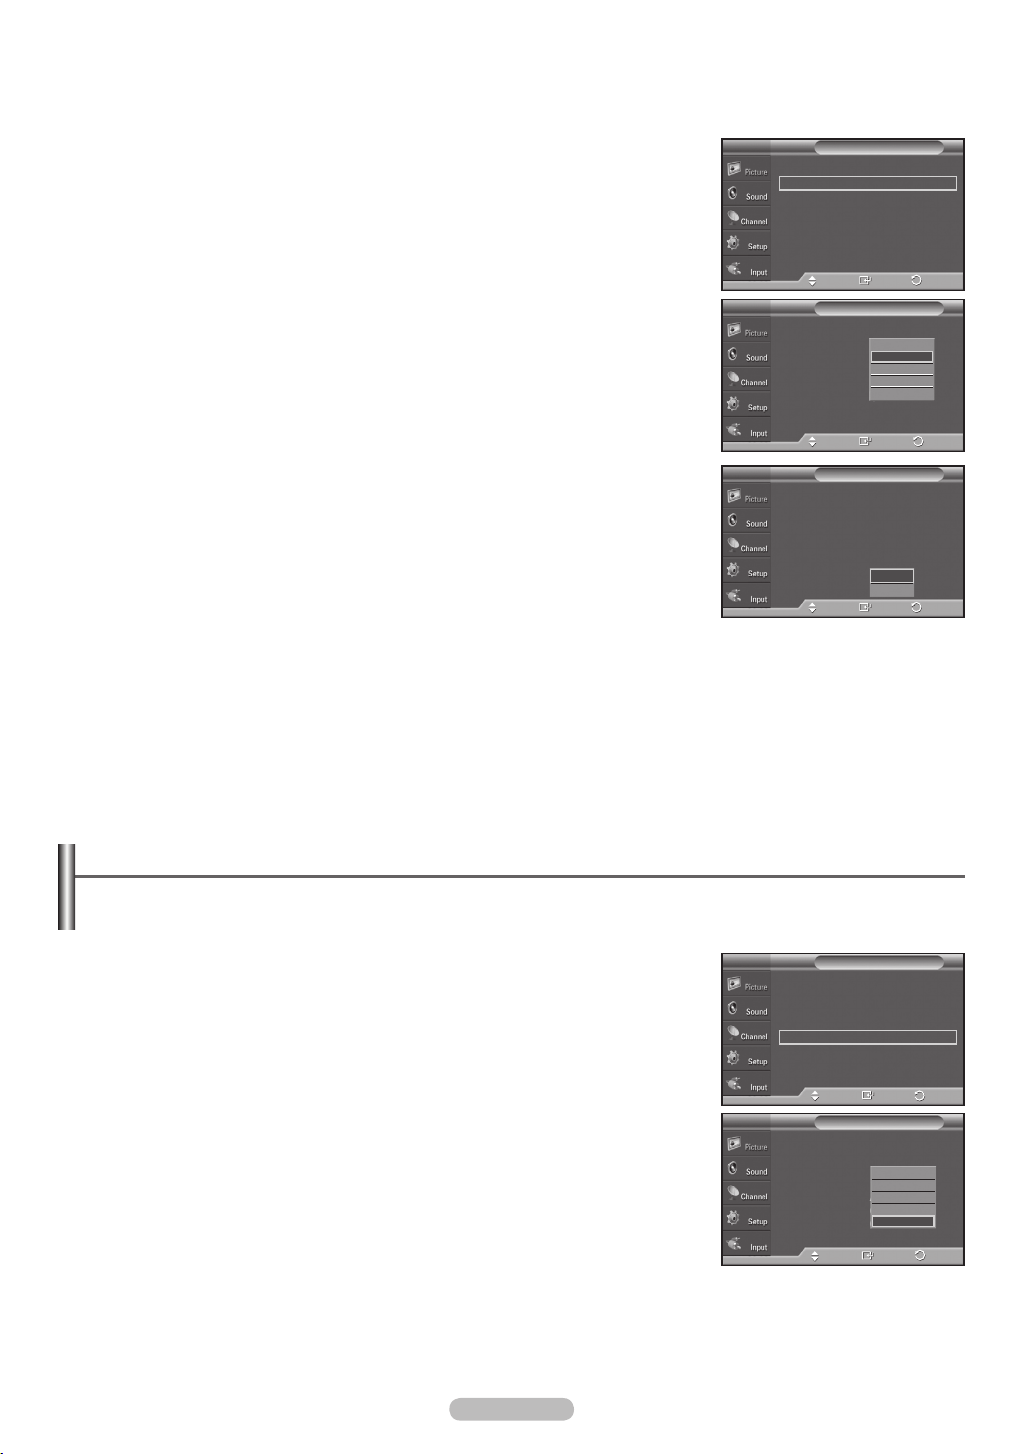
English - 27
5 Press the ▲ or ▼ button to select Color Tone, then press the ENTER button.
6 Press the ▲ or ▼ button to select Cool2, Cool1, Normal, Warm1, or Warm2,
then press the ENTER button.
When the picture mode is set to Dynamic or Standard, Warm1 and Warm2
➢
cannot be selected.
Resetting the Picture Settings to the Factory Defaults
7 Press the ▲ or ▼ button to select Reset, then press the ENTER button.
Press the ▲ or ▼ button to select OK, then press the ENTER button.
Press the
➢
EXIT button to exit.
Each picture mode can be reset.
Move
Move
Move
PictureT V
PictureT V
PictureT V
Enter
Cool2
Cool1
Normal
Warm1
Warm2
Enter
OK
Cancel
Enter
▲
More
Color Tone : Cool1
Detailed Settings
Size : 16:9
Digital NR : Auto
Active Color : On
DNIe : On
Reset : OK
▲
More
Color Tone : Cool1
Detailed Settings
Size : 16:9
Digital NR : Auto
Active Color : On
DNIe : On
Reset : OK
▲
More
Color Tone : Cool1
Detailed Settings
Size : 16:9
Digital NR : Auto
Active Color : On
DNIe : On
Reset :
Return
Return
Return
►
►
►
►
►
►
►
Digital Noise Reduction
If the broadcast signal received by your TV is weak, you can activate the Digital Noise Reduction feature to help
reduce any static and ghosting that may appear on the screen.
1 Press the MENU button to display the menu.
Press the ENTER button to select Picture.
2 Press the ▲ or ▼ button to select Digital NR, then press the ENTER button.
3 Press the ▲ or ▼ button to select Off, Low, Mediunm, High, or Auto, then
press the ENTER button.
Press the
➢
EXIT button to exit.
The Digital NR function is available in all modes except PC.
▲
More
Color Tone : Cool1
Detailed Settings
Size : 16:9
Digital NR : Auto
Active Color : On
DNIe : On
Reset : OK
▲
More
Color Tone : Cool1
Detailed Settings
Size : 16:9
Digital NR : Auto
Active Color : On
DNIe : On
Reset : OK
Move
Move
PictureT V
PictureT V
Enter
Off
Low
Medium
High
Auto
Enter
Return
Return
►
►
►
►
►
►
►
Page 28

Changing the Screen Size
Occasionally, you may want to change the size of the image on your screen. Your TV comes with six screen size
options, each designed to work best with specific types of video input. Your cable box or satellite receiver may
have its own set of screen sizes as well.
In general you should view the TV in 16:9 mode as much as possible.
Move
Move
PictureT V
SizeT V
▲
Po sit io n
▼
Enter
Enter
Re set
Return
Return
►
►
►
►
►
►
►
1 Press the MENU button to display the menu.
Press the ENTER button to select Picture.
2 Press the ▲ or ▼ button to select Size, then press the ENTER button.
3 Press the ▲ or ▼ button to select the screen format you want.
Press the ENTER button.
Press the
• 16:9 : Sets the picture to 16:9 wide mode.
• Zoom1 : Magnifies the size of the picture on the screen.
• Zoom2 : Expands the Zoom1 format picture.
• Wide Fit : Enlarges the aspect ratio of the picture to fit the entire screen.
• 4:3 : Sets the picture to 4:3 normal mode.
• Just Scan : Use this function to see the full image without any cutoff when HDMI,
EXIT button to exit.
Component (720p/1080i/1080p) or DTV(1080i) signals are input.
Press the P.SIZE button on the remote control to change the picture size.
▲
More
Color Tone : Cool1
Detailed Settings
Size : 16:9
Digital NR : Auto
Active Color : On
DNIe : On
Reset : OK
16:9
Zoom1
Zoom2
Wide Fit
4:3
Just Scan
16:9
Sets the picture to 16:9
wide mode.
Wide Fit
Enlarges the aspect ratio
of the picture to fit the
entire screen.
Zoom1
The screen size when
Wide screen is vertically
enlarged.
4:3
Sets the picture to 4:3
normal mode.
Zoom2
The screen size when
the Zoom1 screen is
vertically enlarged.
Just Scan
Use this function to see the
full image without any cutoff
when HDMI, Component
(720p/1080i/1080p) or
DTV(1080i) signals are input.
• Some cable boxes and satellite receivers have their own set of screen sizes,
➢
which may differ from the ones above.
• In TV, VIDEO, S-VIDEO, and COMPONENT(480i, 480p) modes, all screen
modes can be selected. (16:9 ➞ Zoom1 ➞ Zoom2 ➞ 4:3)
• In COMPONENT(720p, 1080i) or HDMI(720p, 1080i) mode, 16:9, 4:3 and
Wide Fit
can be selected.
• In Zoom1, Zoom2 and Wide Fit modes, you can move the picture on the
screen by pressing the ▲ or ▼ button.
• You can not change the picture size when PIP is set to Double.
• When Double (
, ) mode has been set in PIP, the Picture Size cannot
be set.
• Wide Fit can be used when watching a Digital HD (High Definition) signal.
Wide Fit sets the optimum picture format by expanding it both horizontally and
vertically. For example, you can reset the picture in 4:3 format to 16:9. Wide Fit
does not support all external devices (DVD, VCR etc.).
English - 28
Page 29

English - 29
Making Detailed Picture Settings
Samsung’s new TVs allow you to make even more precise picture settings than previous models. See below to
make Detailed picture settings.
1 Press the MENU button to display the menu.
Press the ENTER button to select Picture.
2 Press the ▲ or ▼ button to select Detailed Settings, then press the ENTER
button.
3 Select the desired Detailed Settings option by pressing the ▲ or ▼ button, then
press the ENTER button.
4 When you are satisfied with your setting, press the ENTER button.
Press the
When the picture mode is set to Dynamic, Detailed Settings cannot be
➢
EXIT button to exit.
selected.
Black Adjust: Off/Low/Medium/High
You can select the black level on the screen to adjust the screen depth.
Dynamic Contrast: Off/Low/Medium/High
You can adjust the screen contrast so that the optimal contrast is provided.
Gamma: -3 ~ 3
You can adjust the Primary Color (Red, Green Blue) Intensity.
Press the ◄ or ► button until you reach the optimal setting.
Color Space: Auto/Wide
Color space is a color matrix composed of red, green, and blue colors. Select your
favorite color space and experience the most natural color.
You can set the color reproduction space for the input signal to
• Auto: Auto Color Space automatically adjusts to the most natural color tone
based on program sources.
• Wide: Wide Color Space offers deep and rich color tone.
Auto or Wide.
White Balance: R-Offset/G-Offset/B-Offset/R-Gain/G-Gain/B-Gain/Reset
You can adjust the color temperature for more natural picture colors.
R-Offset/G-Offset/B-Offset/R-Gain/G-Gain/B-Gain: Changing the adjustment
value will refresh the adjusted screen. Select the desired option by pressing the
▲ or ▼ button, then press the ENTER button. Press the ◄ or ► button until you
reach the optimal setting.
• R offset: Adjusts the red color darkness.
• G offset: Adjusts the green color darkness.
• B offset: Adjusts the blue color darkness.
• R gain: Adjusts the red color brightness.
• G gain: Adjusts the green color brightness.
• B gain: Adjusts the blue color brightness.
• Reset: The previously adjusted white balance will be reset to the factory defaults.
My Color Control: Pink/Green/Blue/White/Reset
This setting can be adjusted to suit your personal preferences.
Pink/Green/Blue/White: Select the desired color by pressing the ▲ or ▼ button,
then press the ENTER button. Press the ◄ or ► button until you reach the optimal
setting.
When using the My Color Control Feature, the current picture remains in
➢
movement.
Reset: The previously adjusted colors will be reset to the factory defaults.
▲
More
Color Tone : Cool1
Detailed Settings
Size : 16:9
Digital NR : Auto
Active Color : On
DNIe : On
Reset : OK
Black Adjust : Off
Dynamic Contrast
Gamma : 0
Color Space : Wide
White Balance
My Color Control
Edge Enhancement
xvYCC
Black Adjust : Off
Dynamic Contrast
Gamma : 0
Color Space : Wide
White Balance
My Color Control
Edge Enhancement
xvYCC
Black Adjust : Off
Dynamic Contrast
Gamma : 0
Color Space : Wide
White Balance
My Color Control
Edge Enhancement
xvYCC
Gamma 0
Black Adjust : Off
Dynamic Contrast
Gamma : 0
Color Space : Wide
White Balance
My Color Control
Edge Enhancement
xvYCC
T V
R-Offset 15
G-Offset 15
B-Offset 15
R-Gain 15
G-Gain 15
B-Gain 15
Reset
T V
Pink 15
Green 15
Blue 15
White 15
Reset
PictureT V
Move
Detailed SettingsT V
: Off
: Off
: Off
Move
Detailed SettingsT V
: Off
: Off
: Off
Move
Detailed SettingsT V
: Off
: Off
: Off
Move
Adjust
Detailed SettingsT V
: Off
: Off
: Off
Move
White Balance
Move
My Color Control
Enter
Enter
Off
Low
Medium
High
Enter
Off
Low
Medium
High
Enter
Return
Auto
Wide
Enter
Enter
Return
Return
Return
Return
Return
Return
►
►
►
►
►
►
►
►
►
►
►
►
►
►
►
Move
Enter
Return
Page 30

Edge Enhancement: Off/On
You can emphasize object boundaries.
xvYCC: Off/On
Setting the xvYCC mode to On increases detail and color space when watching
movies from an external device (ie. DVD player) connected to the HDMI or
Component IN jacks.You must set the Picture Mode to Movie to enjoy this feature.
The xvYCC function works only in Component or HDMI mode.
➢
Active Color
If you turn on this option, the blue and green colors will be more vivid.
Detailed SettingsT V
Black Adjust : Off
Dynamic Contrast
Gamma : 0
Color Space : Wide
White Balance
My Color Control
Edge Enhancement
xvYCC
Black Adjust : Off
Dynamic Contrast
Gamma : 0
Color Space : Wide
White Balance
My Color Control
Edge Enhancement
xvYCC
: Off
: Off
: Off
Move
Detailed SettingsT V
: Off
: Off
: Off
Move
Off
On
Enter
Off
On
Enter
Return
Return
1 Press the MENU button to display the menu.
Press the ENTER button to select Picture.
2 Press the ▲ or ▼ button to select Active Color, then press the ENTER button.
3 Press the ▲ or ▼ button to select Off or On, then press the ENTER button.
Press the
This function is not available in PC mode.
➢
This function is not available in Standard or Movie mode.
➢
EXIT button to exit.
▲
More
Color Tone : Cool1
Detailed Settings
Size : 16:9
Digital NR : Auto
Active Color : On
DNIe : On
Reset : OK
▲
More
Color Tone : Cool1
Detailed Settings
Size : 16:9
Digital NR : Auto
Active Color : On
DNIe : On
Reset : OK
Move
Move
PictureT V
►
►
►
►
►
►
Enter
PictureT V
Off
On
Enter
►
Return
Return
DNIe (Digital Natural Image engine)
This TV includes the DNIe function to provide high visual quality. If you set DNIe to on, you can view the screen
with the DNIe feature activated. If you set the DNIe to Demo, you can view the applied DNIe and normal pictures
on the screen, for demonstration purposes. Using this function, you can view the difference in the visual quality.
1 Press the MENU button to display the menu.
Press the ENTER button to select Picture.
2 Press the ▲ or ▼ button to select DNIe, then press the ENTER button.
This function doesn’t work when the Input Source is PC.
➢
3 Press the ▲ or ▼ button to select Off, Demo or On, then press the
ENTER button.
Press the
• Off: Switches off the DNIe mode.
• Demo: The screen before applying DNIe appears on the right and the screen
• On: Switches on the DNIe mode.
➢
EXIT button to exit.
after applying DNIe appears on the left.
The DNle function is not supported in the Movie mode.
▲
More
Color Tone : Cool1
Detailed Settings
Size : 16:9
Digital NR : Auto
Active Color : On
DNIe : On
Reset : OK
▲
More
Color Tone : Cool1
Detailed Settings
Size : 16:9
Digital NR : Auto
Active Color : On
DNIe : On
Reset :
Move
Move
PictureT V
PictureT V
Enter
Off
Demo
On
Enter
Return
Return
►
►
►
►
►
►
►
English - 30
Page 31
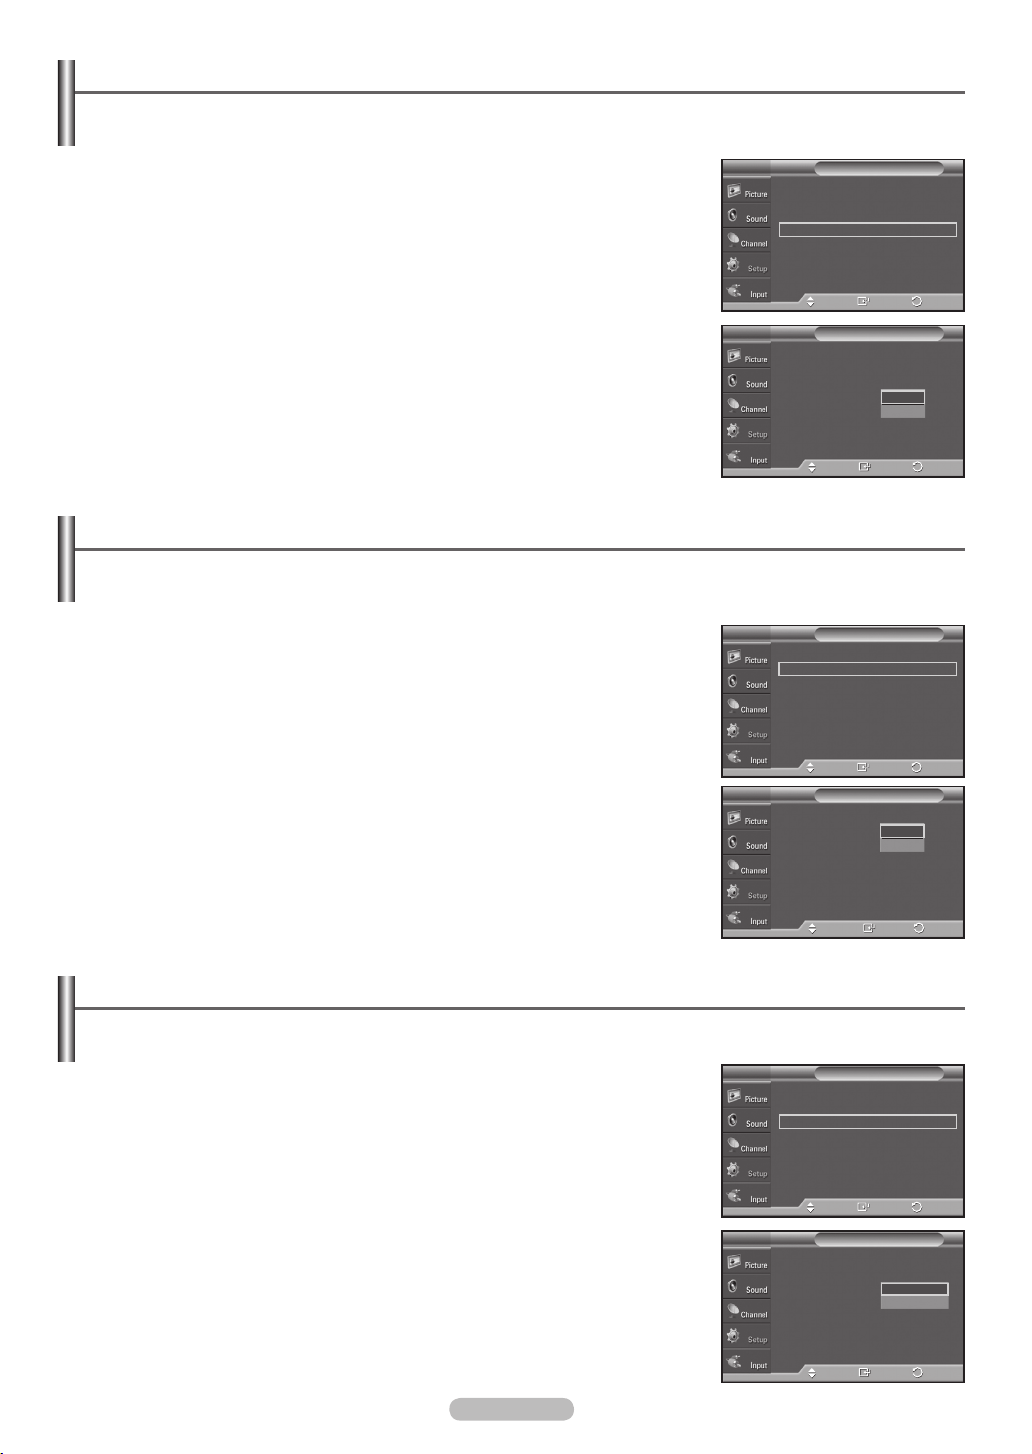
English - 31
Selecting the Film Mode
Automatically senses and processes film signals from all sources and adjusts the picture for optimum quality.
1 Press the MENU button to display the menu.
Press the ▲ or ▼ button to select Setup, then press the ENTER button.
2 Press the ▲ or ▼ button to select Film Mode, then press the ENTER button.
3 Press the ▲ or ▼ button to select Off or On, then press the ENTER button.
Press the
EXIT button to exit.
▲
More
Screen Burn Protection
HDMI Black Level : Normal
Film Mode : Off
Wall-Mount Adjustment
PIP
Function Help : On
SW Upgrade
▲
More
Screen Burn Protection
HDMI Black Level : Normal
Film Mode : Off
Wall-Mount Adjustment
PIP
Function Help : On
SW Upgrade
Move
Move
SetupT V
SetupT V
Enter
Enter
Off
On
►
►
►
►
►
►
►
Return
Return
Setting the Blue Screen Mode
If no signal is being received or the signal is very weak, a blue screen automatically replaces the noisy picture
background. If you wish to continue viewing the poor picture, you must set the “Blue Screen” mode to “Off”.
1 Press the MENU button to display the menu.
Press the ▲ or ▼ button to select Setup, then press the ENTER button.
2 Press the ▲ or ▼ button to select Blue Screen, then press the ENTER button.
3 Press the ▲ or ▼ button to select Off or On, then press the ENTER button.
Press the
➢
EXIT button to exit.
A Blue Screen is displayed when there is no signal from an external device,
regardless of the Blue Screen Setting.
T V
▲
More
Blue Screen : Off
Melody : Medium
PC
Home Theater PC : Off
Light Effect :
Energy Saving : Off
▼
More
T V
▲
More
Blue Screen : Off
Melody : Medium
PC
Home Theater PC : Off
Light Effect :
Energy Saving : Off
▼
More
Move
Move
Setup
In Watching TV
Enter
Setup
Off
On
In Watching TV
Enter
►
►
►
►
►
►
Return
Return
Setting the HDMI Black Level
Use this function to adjust the Black Level of the picture while in HDMI mode.
1 Press the MENU button to display the menu.
Press the ▲ or ▼ button to select Setup, then press the ENTER button.
2 Press the ▲ or ▼ button to select HDMI Black Level, then press the ENTER
button.
3 Press the ▲ or ▼ button to select Normal or Low, then press the ENTER
button.
Press the
This function is active only when an external device is connected to a TV via
➢
HDMI.
EXIT button to exit.
Move
Move
SetupT V
SetupT V
Enter
Enter
Normal
Low
▲
More
Screen Burn Protection
HDMI Black Level : Normal
Film Mode : Off
Wall-Mount Adjustment
PIP
Function Help : On
SW Upgrade
▲
More
Screen Burn Protection
HDMI Black Level : Normal
Film Mode : Off
Wall-Mount Adjustment
PIP
Function Help : On
SW Upgrade
Return
Return
►
►
►
►
►
►
►
Page 32
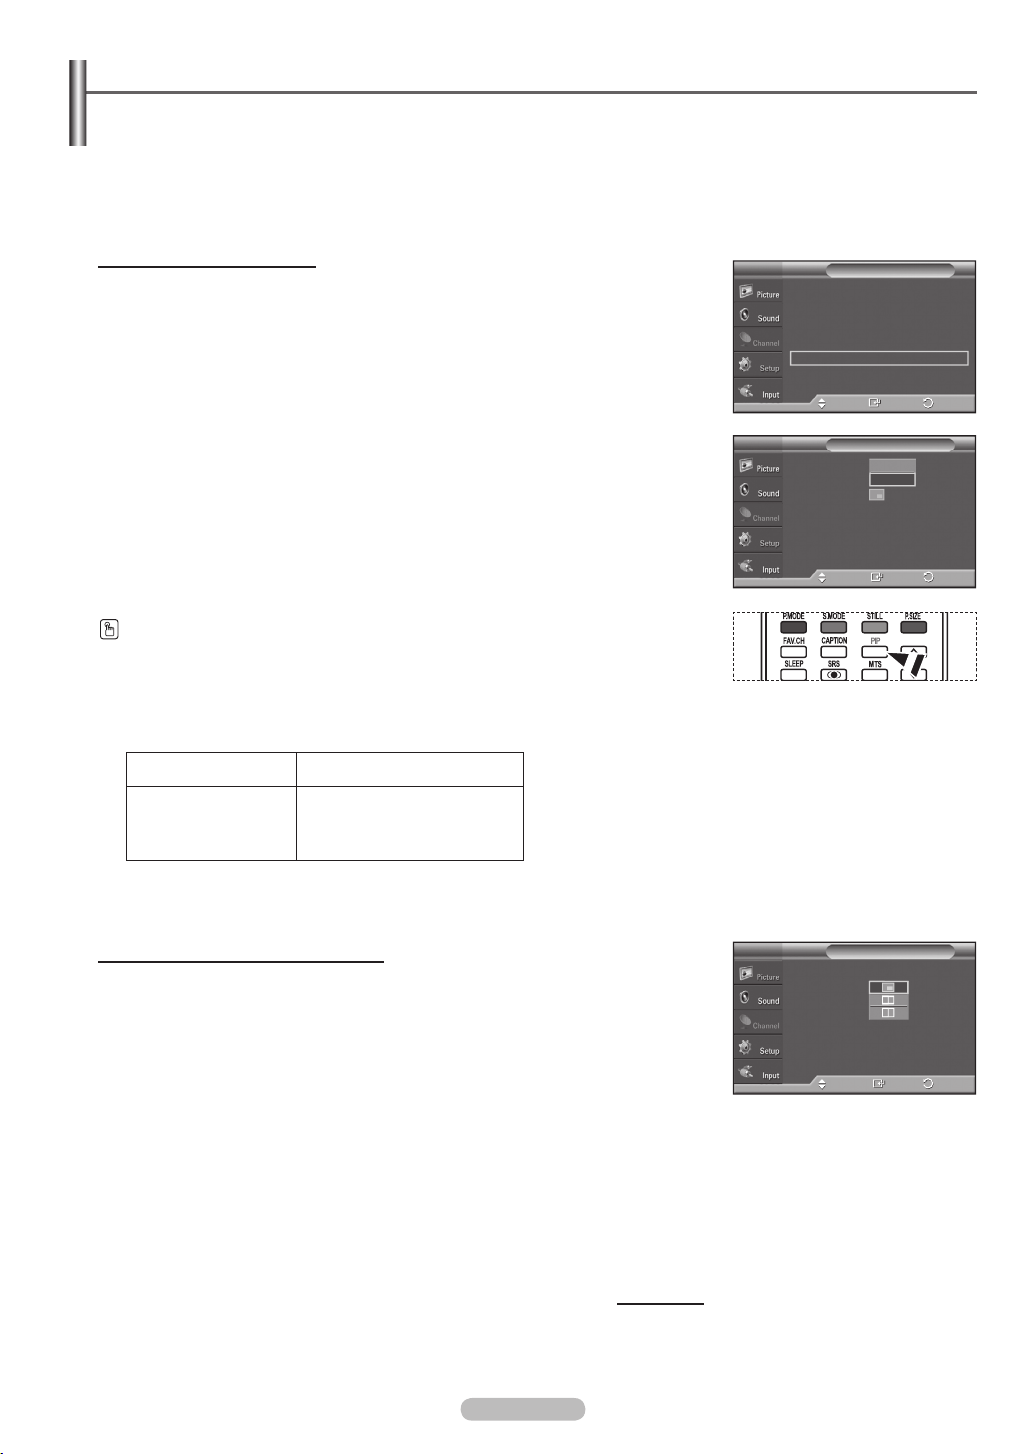
Viewing Picture-in-Picture
This product has one built-in tuner, which does not allow PIP to function in the same mode. For example, you
cannot watch one TV channel in the main screen, and a different one in the PIP screen. Please see ‘PIP Settings’
below for details. You can use the PIP feature to simultaneously watch two video sources. (See page 37 to select
the PIP picture sound.)
While the V-Chip is in operation, the PIP function cannot be used. (Refer to page 55)
➢
Activating Picture-in-Picture
1 Press the MENU button to display the menu.
Press the ▲ or ▼ button to select Setup, then press the ENTER button.
Press the ▲ or ▼ button to select PIP, then press the ENTER button.
2 Press the ENTER button again.
Press the ▲ or ▼ button to select On, then press the ENTER button.
If you turn the TV off while watching in PIP mode and turn it on again, the
➢
PIP window will disappear.
Press the PIP button on the remote control to activate or deactivate the PIP.
Analog TV signals can be viewed on the PIP screen while viewing the
➢
picture from an external source (DVD, Set-top box, PC etc.) connected to the
Component 1, 2, PC and HDMI 1, 2, 3 jacks on the main screen.
Main picture Sub picture
Component 1,2
HDMI 1,2,3
Analog TV broadcasts only
PC
Move
Move
SetupT V
Enter
PIPT V
Off
On
Enter
▲
More
Screen Burn Protection
HDMI Black Level : Normal
Film Mode : Off
Wall-Mount Adjustment
PIP
Function Help : On
SW Upgrade
PIP : Off
Size :
Position :
Channel : DTV Air 3 - 0
Return
Return
►
►
►
►
►
►
►
Changing the Size of the PIP Window
3 Press the ▲ or ▼ button to select Size, then press the ENTER button.
Press the ▲ or ▼ button to select the desired size of the PIP window, then press
the ENTER button.
If the main picture is in PC and HDMI 1 modes, Size is not available.
➢
You may notice that the picture in the PIP window becomes slightly
➢
unnatural when you use the main picture to view a game or karaoke.
Continued...
English - 32
PIPT V
PIP : On
Size :
Position :
Channel : DTV Air 3 - 0
Move
Enter
Return
Page 33
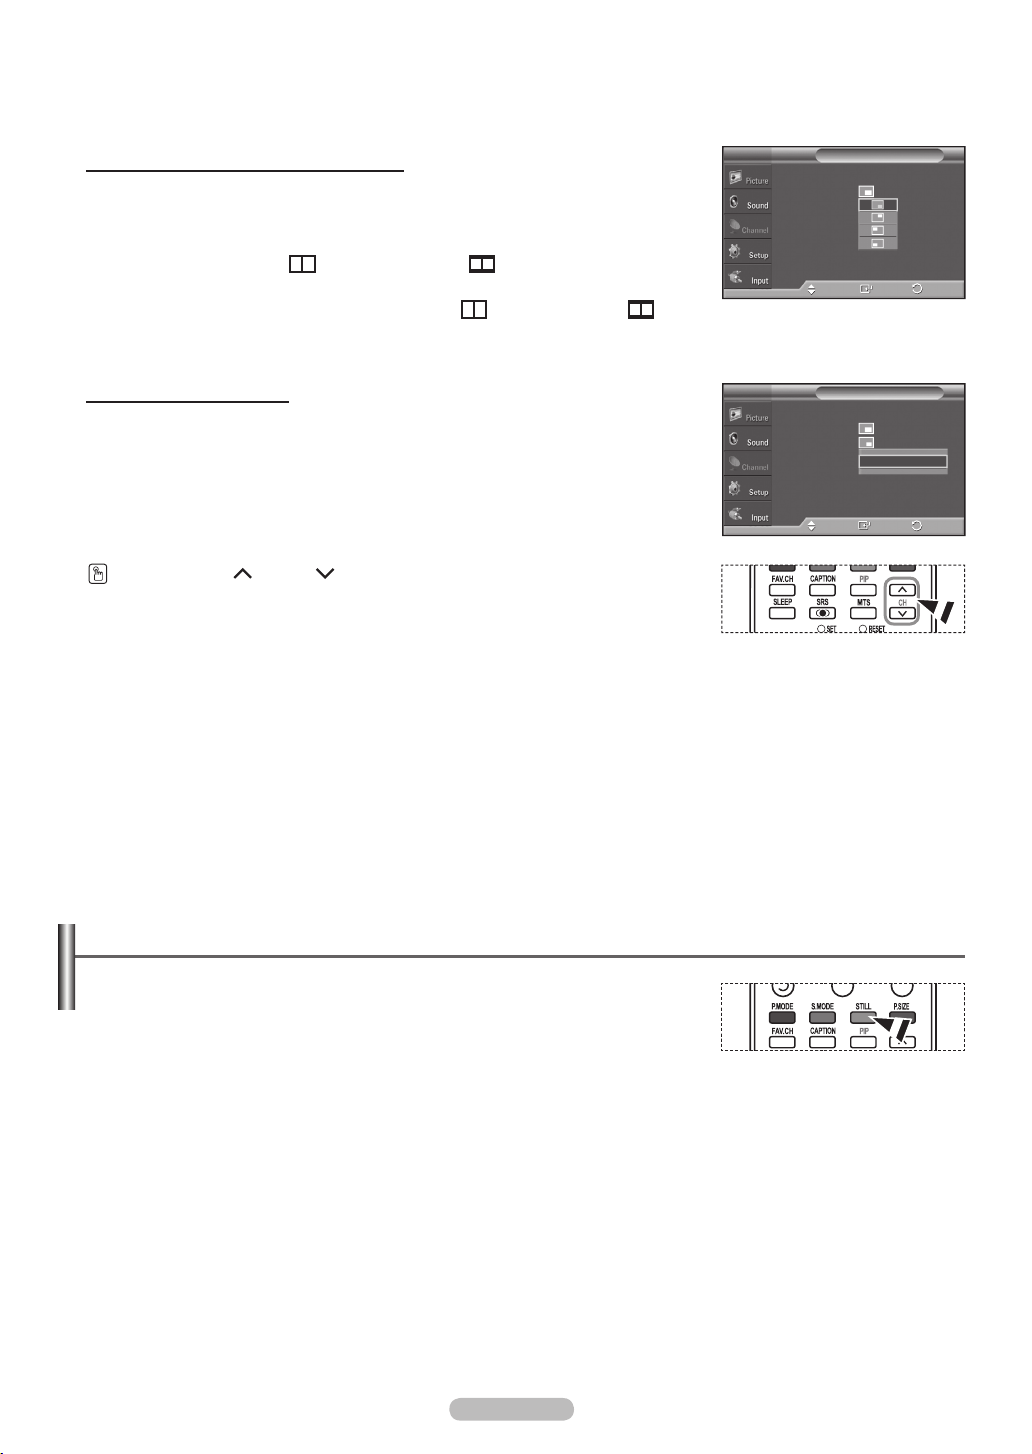
English - 33
Changing the Position of the PIP Window
4 Press the ▲ or ▼ button to select Position, then press the ENTER button.
Press the ▲ or ▼ button to select the desired PIP window position, then press
the ENTER button.
In Double Window (
➢
) and Double Wide ( ) modes, Position cannot
be selected.
If the PIP window is set to Double Window (
➢
mode, the screen size or alignment may slightly differ depending on the
) or Double Wide ( )
signal type.
PIPT V
PIP : On
Size :
Position :
Channel : DTV Air 3 - 0
Move
Enter
Return
Changing the PIP Channel
5 Press the ▲ or ▼ button to select Channel, then press the ENTER button.
Press the ▲ or ▼ button at the bottom of the remote to select the desired
channel in the PIP window, then press the
MAIN: PC / HDMI 1,2,3 / Component 1,2
➢
ENTER button.
PIP: TV(Analog)
Press the
Press the PIP CH
channel.
EXIT button to exit.
and CH
buttons on the remote control to change the PIP
Freezing the Current Picture
PIPT V
PIP : On
Size :
Position :
Channel : DTV Air 3 - 0
Move
▲
DTV Air 3 - 0
▲
Enter
Return
1 Press the STILL button to freeze a moving picture.
Normal sound will still be heard. Press again to cancel.
➢
To prevent screen burn-in, this function will automatically cancel after 5
➢
minutes.
While V-Chip is in operation, the Still function cannot be used.
➢
Page 34
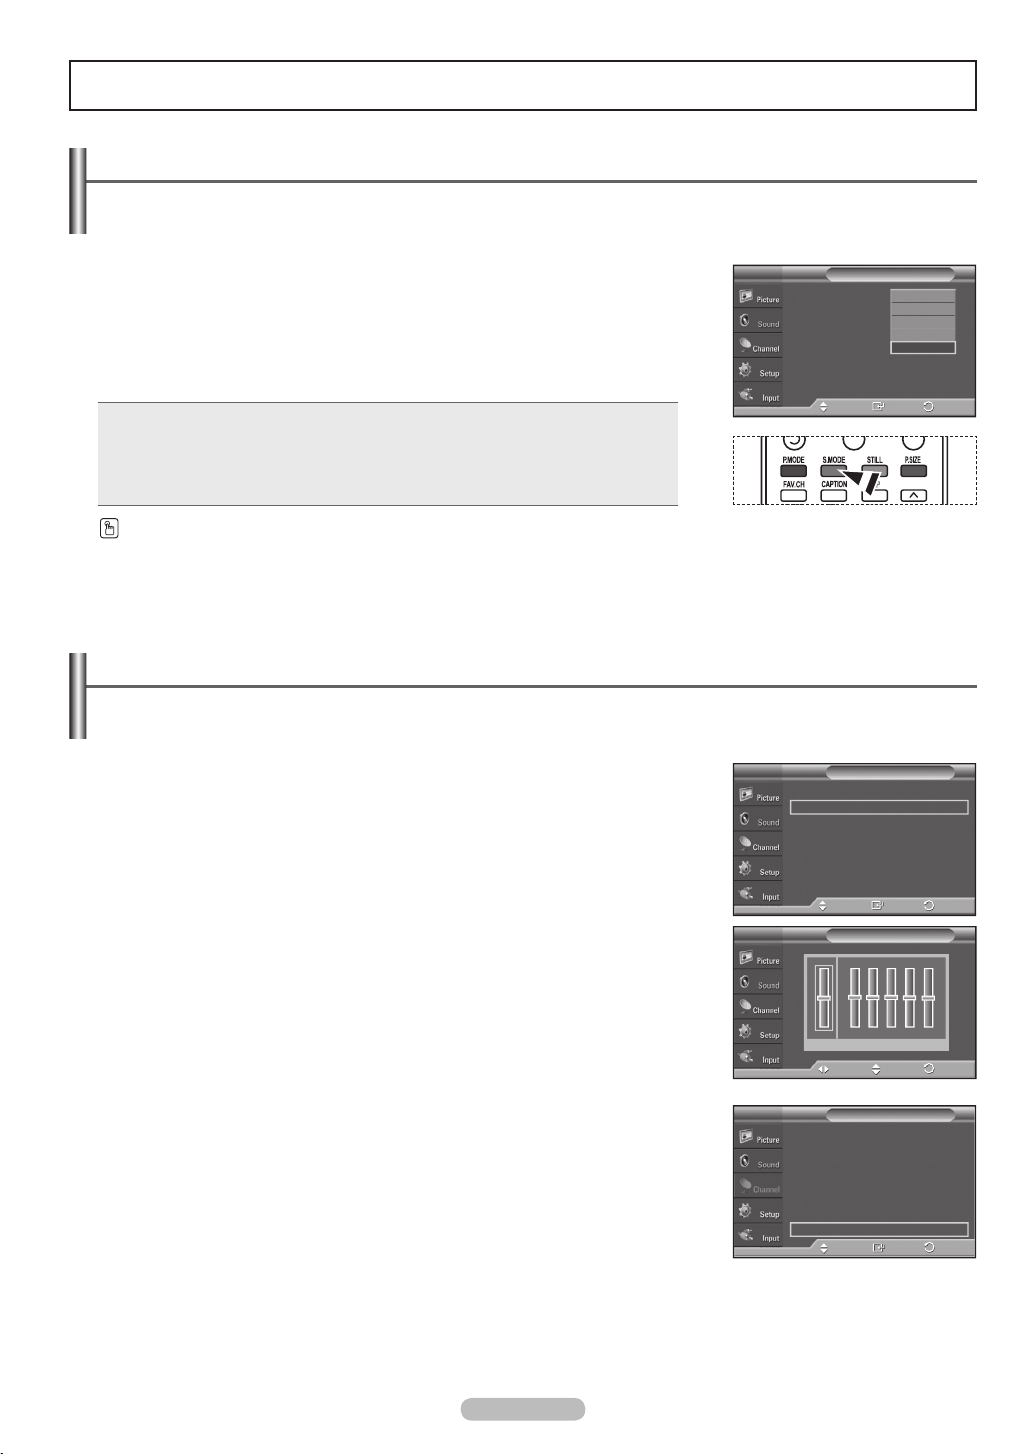
Sound Control
Using Automatic Sound Settings
Your TV has automatic sound settings (“Standard”, “Music”, “Movie”, “Speech”, and “Custom”) that are preset at
the factory. Or you can select “Custom”, which automatically recalls your personalized sound settings.
1 Press the MENU button to display the menu.
Press the ▲ or ▼ button to select Sound, then press the ENTER button.
2 Press the ENTER button to select Mode. Press the ▲ or ▼ button to select
Standard, Music, Movie, Speech, or Custom sound setting, then press the
ENTER button.
Press the
• Choose Standard for the standard factory settings.
EXIT button to exit.
Mode : Custom
Equalizer
SRS TruSurround XT
Multi-Track Options
Auto Volume : Off
Internal Mute : Off
Sound Select : Main
Reset
Move
SoundT V
: Off
Enter
Standard
Music
Movie
Speech
Custom
• Choose Music when watching music videos or concerts.
• Choose Movie when watching movies.
• Choose Speech when watching a show that is mostly dialog (i.e., news).
• Choose Custom to recall your personalized settings (see Customizing the Sound).
Press the S.MODE button on the remote control to select one of the standard sound
settings.
Customizing the Sound
The sound settings can be adjusted to suit your personal preference. (Alternatively, you can use one of the
“automatic” settings.)
1 Press the MENU button to display the menu.
Press the ▲ or ▼ button to select Sound, then press the ENTER button.
2 Press the ▲ or ▼ button to select Equalizer, then press the ENTER button.
3 Press the ◄ or ► button to select a particular frequency to adjust.
Press the ▲ or ▼ button to increase or decrease the level of the particular
frequency, then press the
Press the
➢
EXIT button to exit.
• R/L Sound Balance Adjustment: To adjust the sound balance of the R/L
ENTER button.
speakers.
• Frequency Adjustment (100Hz, 300Hz, 1KHz, 3KHz, 10KHz): To adjust
the level of different frequencies.
If you make any changes to the equalizer settings, the sound mode is
➢
automatically switched to the Custom mode.
Mode : Custom
Equalizer
SRS TruSurround XT
Multi-Track Options
Auto Volume : Off
Internal Mute : Off
Sound Select : Main
Reset
R
L
Balance
SoundT V
: Off
Move
Enter
EqualizerT V
+
0
-
100Hz 300Hz 1KHz 3KHz 10KHz
Move
Adjust
Return
Return
+
0
-
Return
►
►
►
►
►
►
►
Resetting the Equalizer Settings to the Factory Defaults
To operate the Reset function, the Game mode must be set to On.
(Refer to page 49)
1 Press the MENU button to display the menu.
Press the ▲ or ▼ button to select Sound, then press the ENTER button.
2 Press the ▲ or ▼ button to select Reset, then press the ENTER button.
The equalizer resets to the factory defaults.
➢
Press the
EXIT button to exit.
English - 34
SoundT V
Mode : Custom
Equalizer
SRS TruSurround XT
Multi-Track Options
Auto Volume : Off
Internal Mute : Off
Sound Select : Main
Reset
Move
: Off
Enter
Return
►
►
►
►
►
►
►
Page 35
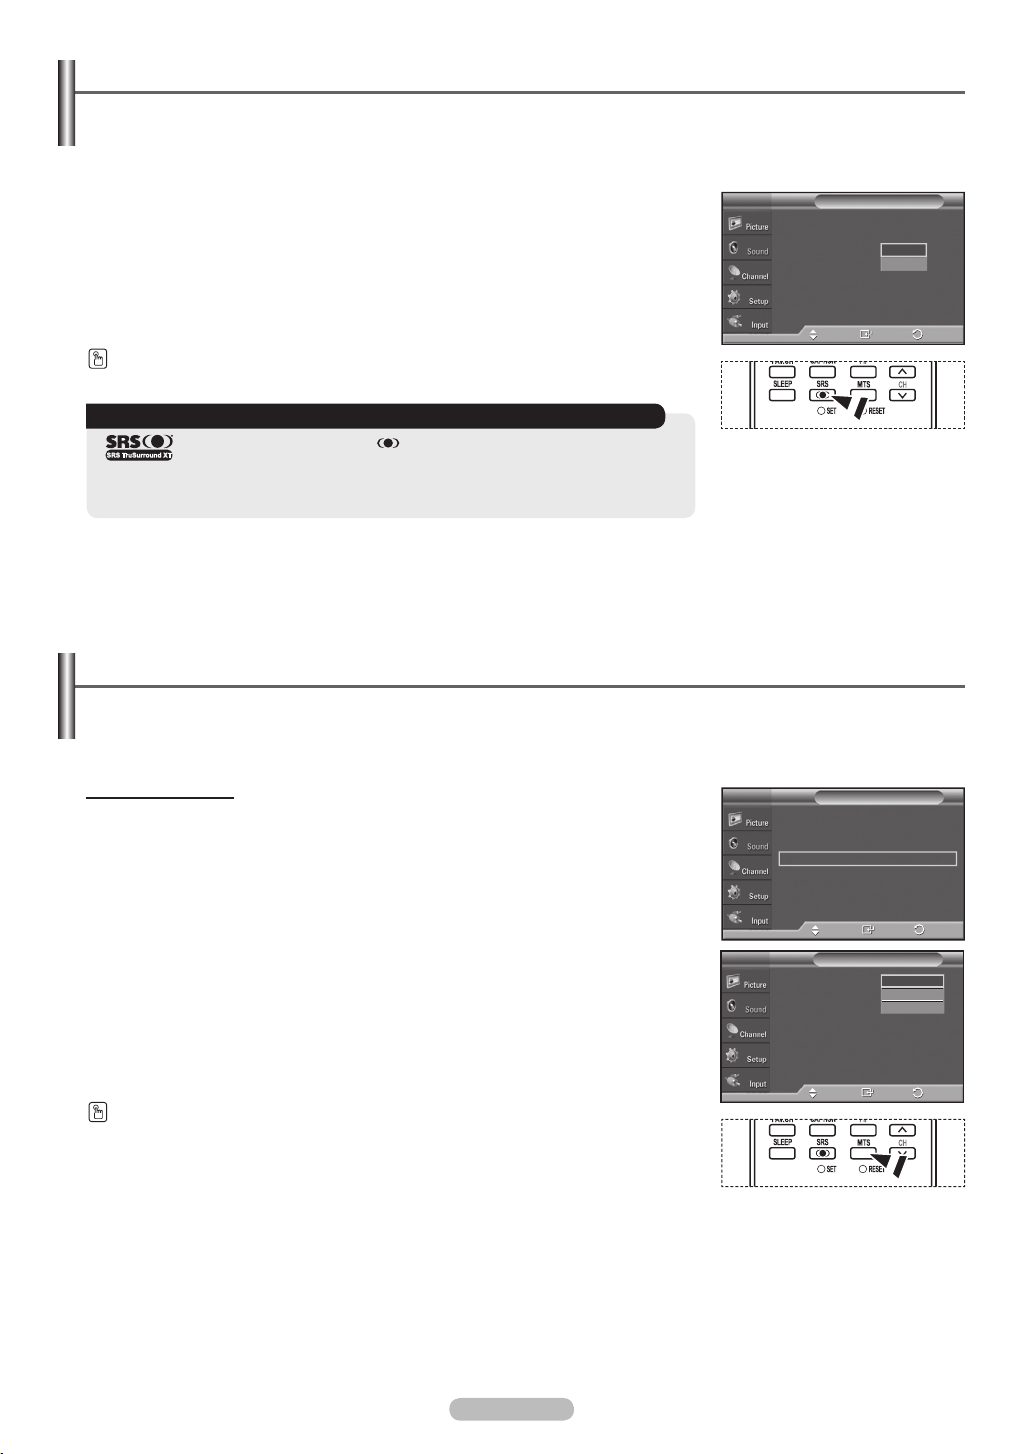
English - 35
Setting the TruSurround XT
TruSurround XT is a patented SRS technology that solves the problem of playing 5.1 multichannel content over
two speakers. TruSurround delivers a compelling, virtual surround sound experience through any two-speaker
playback system, including internal television speakers. It is fully compatible with all multi channel formats.
1 Press the MENU button to display the menu.
Press the ▲ or ▼ button to select Sound, then press the ENTER button.
2 Press the ▲ or ▼ button to select SRS TruSurround XT, then press the
ENTER button.
3 Press the ▲ or ▼ button to select Off or On, then press the ENTER button.
Press the
EXIT button to exit.
Mode : Custom
Equalizer
SRS TruSurround XT
Multi-Track Options
Auto Volume : Off
Internal Mute : Off
Sound Select : Main
Reset
Move
SoundT V
: Off
Enter
Off
On
Return
Press the SRS button on the remote control to select On or Off.
TRADEMARK & LABEL LICENSE NOTICE
TruSurround XT, SRS and Symbol are trademarks of
SRS Labs, Inc.
TruSurround XT technology is incorporated under license from
SRS Labs, Inc.
Choosing a Multi-Channel Sound (MTS) Track - Digital
The digital-TV broadcast system is capable of simultaneous transmission of many audio tracks (for example,
simultaneous translations of the program into foreign languages). The availability of these additional
“multitracks” depends upon the program.
Preferred language
1 Press the MENU button to display the menu.
Press the ▲ or ▼ button to select Sound, then press the ENTER button.
2 Press the ▲ or ▼ button to select Multi-Track Options, then press the ENTER
button.
3 Press the ENTER button to select Preferred Language.
Press the ▲ or ▼ button to choose the language (
English, Spanish, or French)
you want, then press the ENTER button.
Press the
➢
EXIT button to exit.
You can only select the language from among the actual languages being
broadcast.
Press the MTS button on the remote control to listen to the language other than the
preferred language.
SoundT V
Mode : Custom
Equalizer
SRS TruSurround XT
Multi-Track Options
Auto Volume : Off
Internal Mute : Off
Sound Select : Main
Reset
Preferred Language : English
Multi-Track Sound : Stereo
Move
Move
: Off
Enter
Multi-Track OptionsT V
English
Spanish
French
Enter
Return
Return
►
►
►
►
►
►
►
Page 36
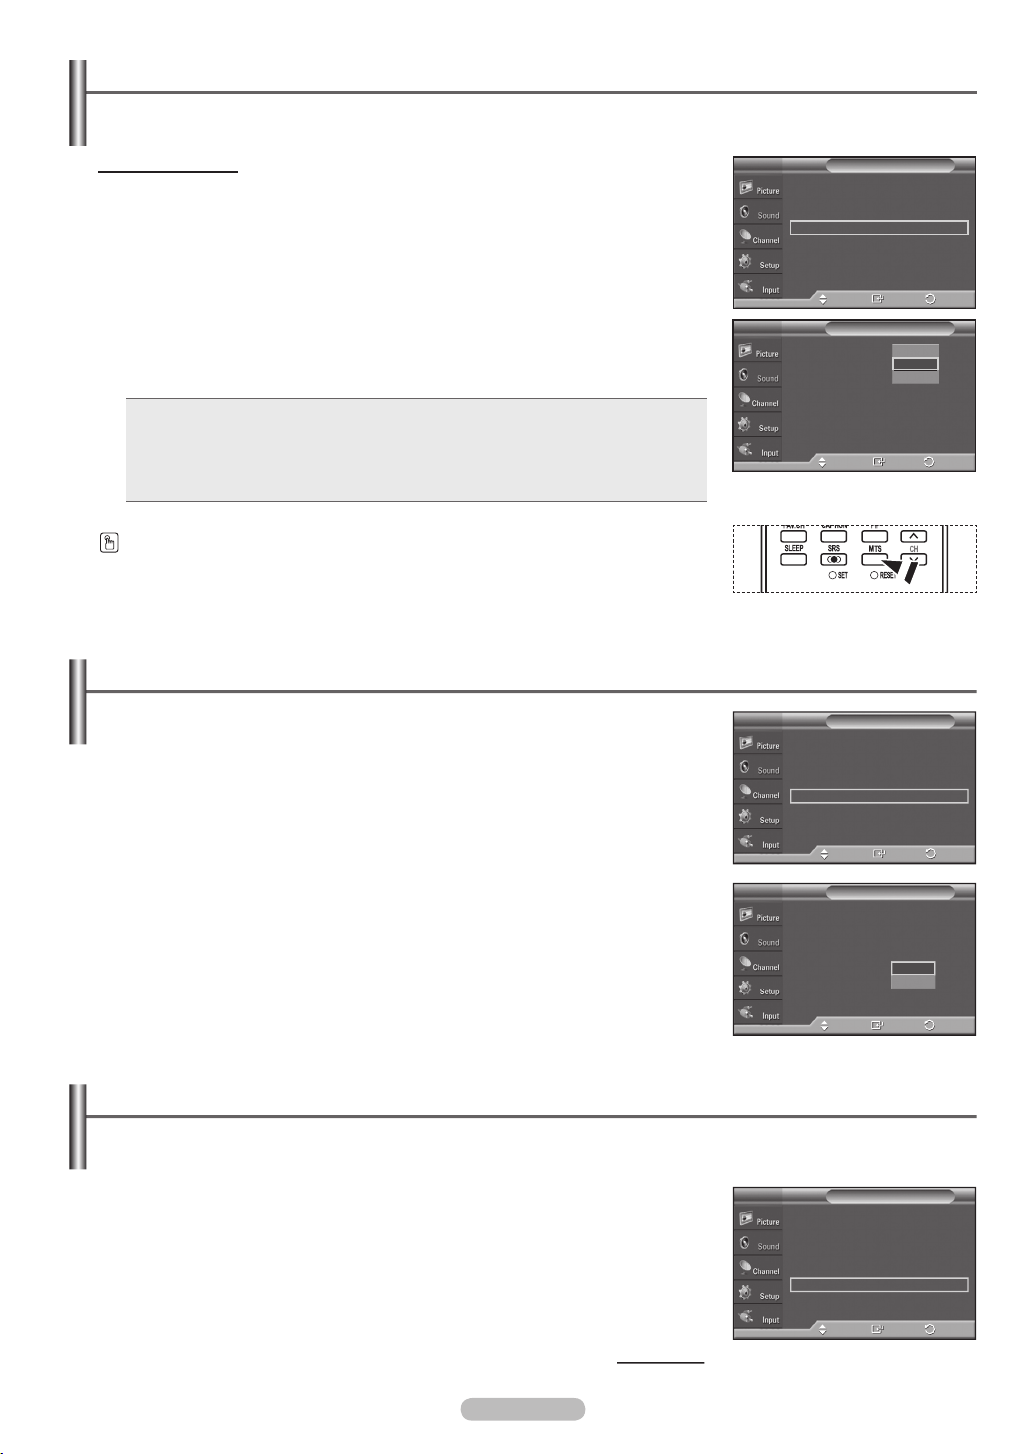
Choosing a Multi-Channel Sound (MTS) Track - Analog
Depending on the particular program being broadcast, you can listen to Mono, Stereo or SAP.
Multi-Track Sound
1 Press the MENU button to display the menu.
Press the ▲ or ▼ button to select Sound, then press the ENTER button.
2 Press the ▲ or ▼ button to select Multi-Track Options, then press the ENTER
button.
3 Press the ENTER button to select Multi-Track Sound.
Press the ▲ or ▼ button to select a setting you want, then press the ENTER
button.
Press the
• Choose Mono for channels that are broadcasting in mono, or if you are having a
• Choose Stereo for channels that are broadcasting in stereo.
• Choose SAP to listen to the Separate Audio Program, which is usually a foreign-
Press the MTS buttons on the remote control to select Mono, Stereo, or SAP.
EXIT button to exit.
difficulty receiving a stereo signal.
language translation.
Automatic Volume Control
Reduces the difference in volume level among broadcasters.
1 Press the MENU button to display the menu.
Press the ▲ or ▼ button to select Sound, then press the ENTER button.
2 Press the ▲ or ▼ button to select Auto Volume, then press the ENTER button.
SoundT V
Mode : Custom
Equalizer
SRS TruSurround XT
Multi-Track Options
Auto Volume : Off
Internal Mute : Off
Sound Select : Main
Reset
Preferred Language : English
Multi-Track Sound : Stereo
Mode : Custom
Equalizer
SRS TruSurround XT
Multi-Track Options
Auto Volume : Off
Internal Mute : Off
Sound Select : Main
Reset
Move
Move
Move
: Off
Enter
Multi-Track OptionsT V
Mono
Stereo
SAP
Enter
SoundT V
: Off
Enter
Return
Return
Return
►
►
►
►
►
►
►
►
►
►
►
►
►
►
Move
SoundT V
: Off
Off
On
Return
Enter
3 Press the ▲ or ▼ button to select Off or On, then press the ENTER button.
Press the
EXIT button to exit.
Mode : Custom
Equalizer
SRS TruSurround XT
Multi-Track Options
Auto Volume : Off
Internal Mute : Off
Sound Select : Main
Reset
Selecting the Internal Mute
Sound output from the TV speakers is muted. This is useful when you want to listen to audio through your sound
system instead of the TV.
Move
SoundT V
: Off
Enter
Return
►
►
►
►
►
►
►
1 Press the MENU button to display the menu.
Press the ▲ or ▼ button to select Sound, then press the ENTER button.
2 Press the ▲ or ▼ button to select Internal Mute, then press the ENTER button.
Continued...
English - 36
Mode : Custom
Equalizer
SRS TruSurround XT
Multi-Track Options
Auto Volume : Off
Internal Mute : Off
Sound Select : Main
Reset
Page 37
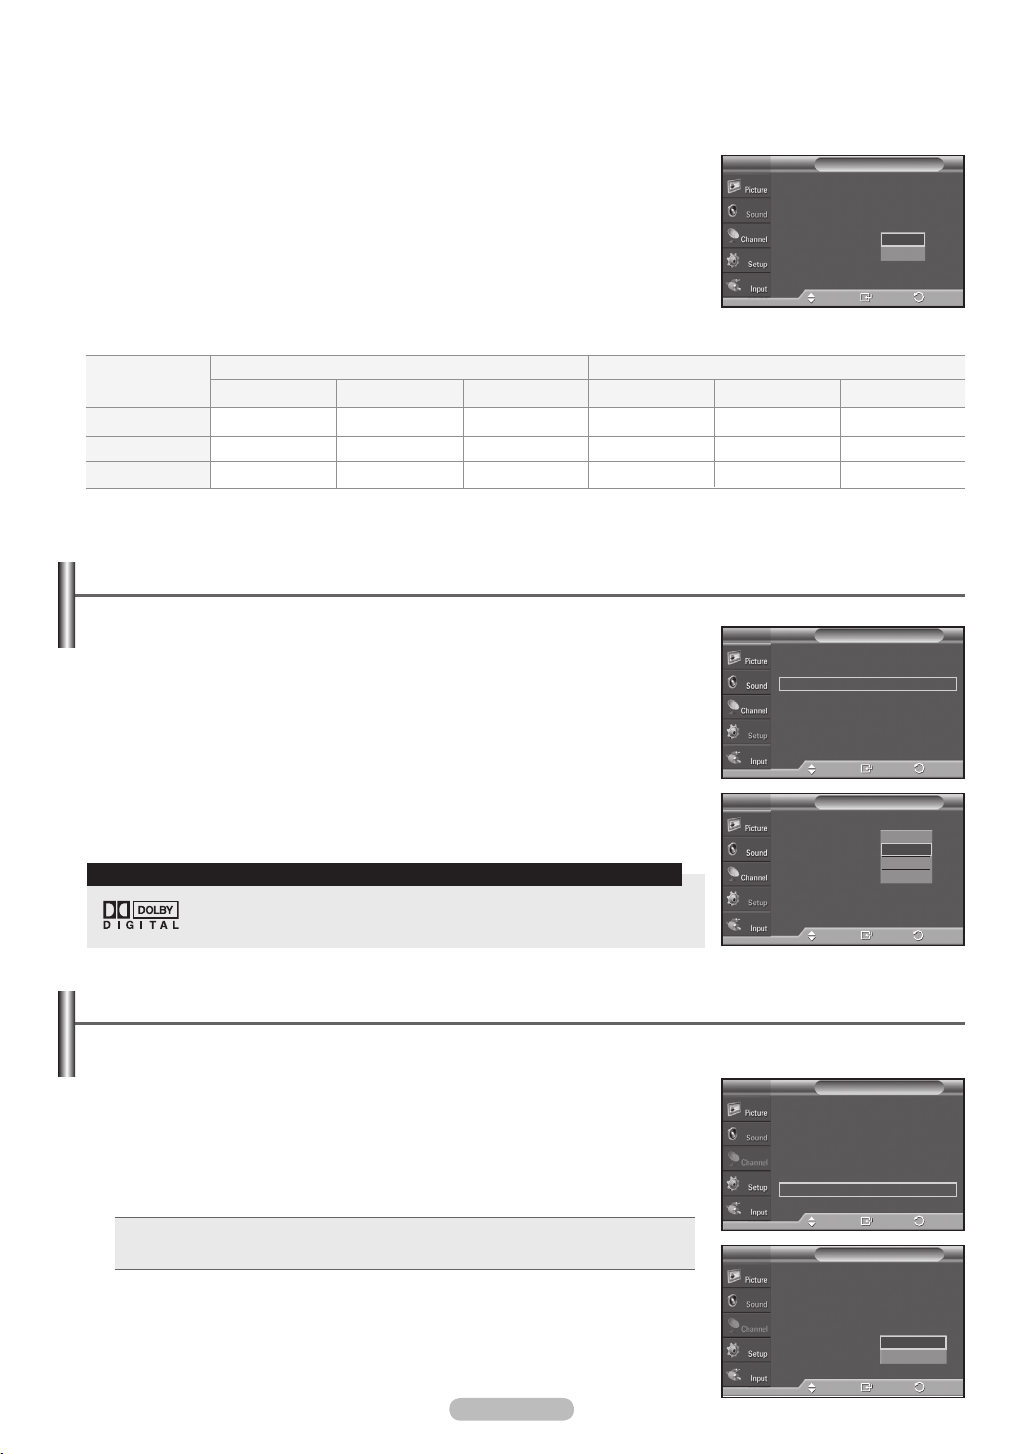
English - 37
3 Press the ▲ or ▼ button to select Off or On, then press the ENTER button.
Press the
➢
EXIT button to exit.
• When Internal Mute is set to On, Sound menus except Multi-track Options
cannot be adjusted.
• The left/right audio outputs and digital audio outputs (Optical) remain
enabled.
• The VOL +
, VOL - and MUTE buttons do not operate when the Internal
Mute is set to On.
Audio Out Optical (R/L Out) to Sound System
TV
Sound Output
Sound Output
Mute
Internal Mute Off
Internal Mute On
Video No Signal
TV
Speaker Output
Mute
Mute
TV’s Internal Speakers
AV, S-Video
Speaker Output
Mute
Mute
Component, PC, HDMI
Speaker Output
Mute
Mute
Adjusting the TV On/Off Melody Sound
Mode : Custom
Equalizer
SRS TruSurround XT
Multi-Track Options
Auto Volume : Off
Internal Mute : Off
Sound Select : Main
Reset
Move
AV, S-Video
Sound Output
Sound Output
Mute
SoundT V
: Off
Off
On
Return
Enter
Component, PC, HDMI
Sound Output
Sound Output
Mute
The TV power on/off melody sound volume can be adjusted.
1 Press the MENU button to display the menu.
Press the ▲ or ▼ button to select Setup, then press the ENTER button.
2 Press the ▲ or ▼ button to select Melody, then press the ENTER button.
▲
Blue Screen : Off
Melody : Medium
PC
Home Theater PC : Off
Light Effect :
Energy Saving : Off
▼
3 Press the ▲ or ▼ button to select Off, Low, Medium, or High, then press the
ENTER button.
Press the
TRADEMARK & LABEL LICENSE NOTICE
EXIT button to exit.
Manufactured under license from Dolby Laboratories. Dolby and the double-D
symbol are trademarks of Dolby Laboratories.
▲
Blue Screen : Off
Melody : Medium
PC
Home Theater PC : Off
Light Effect :
Energy Saving : Off
▼
Listening to the Sound of the Sub (PIP) Picture
When the PIP feature is activated, you can listen to the sound of the sub (PIP) picture.
1 Press the MENU button to display the menu.
Press the ▲ or ▼ button to select Sound, then press the ENTER button.
2 Press the ▲ or ▼ button to select Sound Select, then press the ENTER button.
3 Press the ▲ or ▼ button to select Sub, then press the ENTER button.
Press the
• Main: Used to listen to the sound of the main picture.
• Sub: Used to listen to the sound of the sub picture.
You can select this option when PIP is set to On.
➢
EXIT button to exit.
Mode : Custom
Equalizer
SRS TruSurround XT
Multi-Track Options
Auto Volume : Off
Internal Mute : Off
Sound Select : Main
Reset
Mode : Custom
Equalizer
SRS TruSurround XT
Multi-Track Options
Auto Volume : Off
Internal Mute : Off
Sound Select : Main
Reset
More
More
More
More
Move
Move
Move
Move
SetupT V
In Watching TV
Enter
SetupT V
Off
Low
Medium
High
In Watching TV
Enter
SoundT V
: Off
Enter
SoundT V
: Off
Main
Sub
Enter
►
►
►
►
►
►
Return
Return
►
►
►
►
►
►
►
Return
Return
Page 38
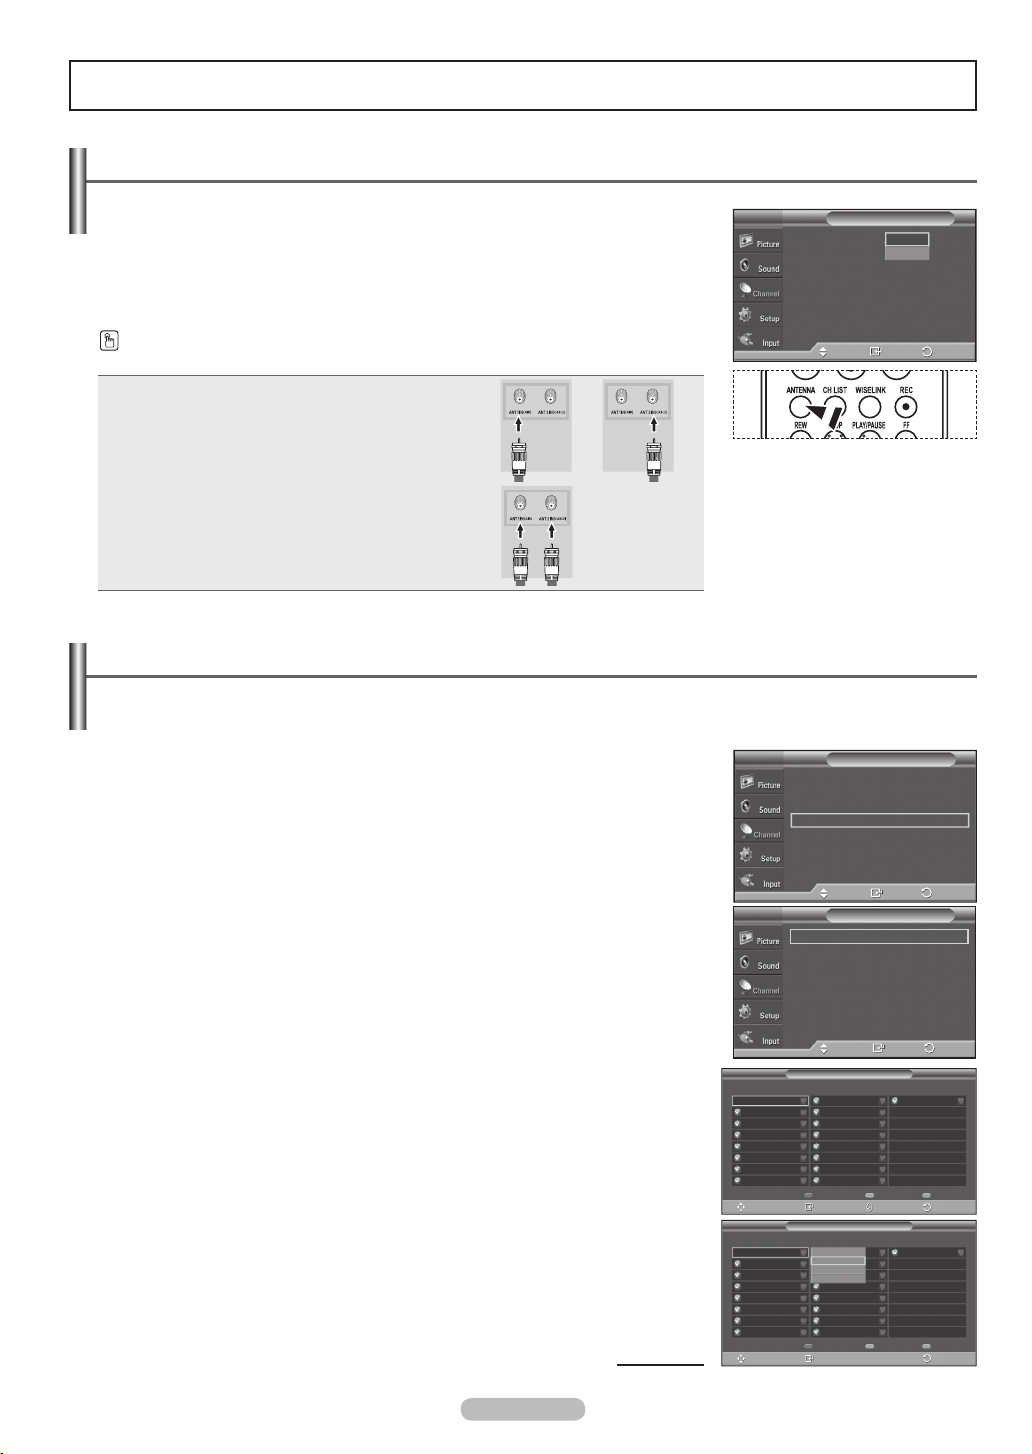
Channel Control
Selecting the Antenna
1 Press the MENU button to display the menu.
Press the ▲ or ▼ button to select Channel, then press the ENTER button.
2 Press the ENTER button to select Antenna.
Press the ▲ or ▼ button to select Air or Cable, then press the ENTER button.
Press the
Press the ANTENNA button on the remote control to select Air or Cable.
If the antenna is connected to ANT1 IN(AIR),
➢
select Air and if it is connected to ANT2 IN(CABLE),
EXIT button to exit.
Antenna : Air
Auto Program
Clear Scrambled Channel
Channel List
Name
Fine Tune
Signal Strength
LNA : On
Move
ChannelT V
Air
Cable
Enter
Return
select Cable.
If both ANT1 IN(AIR) and ANT2 IN(CABLE) are
➢
connected, select the antenna input you want. If the
antenna input is not selected properly, noise may
appear on the screen.
Adding and Erasing Channels
You can add or delete a channel to display the channels you want. To use the Channel List function, first run Auto
Program (see page 19).
Move
ChannelT V
►
►
►
►
►
►
►
►
Return
Enter
Channel ListT V
►
►
►
►
1 Press the MENU button to display the menu.
Press the ▲ or ▼ button to select Channel, then press the ENTER button.
2 Press the ▲ or ▼ button to select Channel List, then press the ENTER button.
3 Press the ▲ or ▼ button to select Added, then press the ENTER button.
Antenna : Air
Auto Program
Clear Scrambled Channel
Channel List
Name
Fine Tune
Signal Strength
LNA : On
All
Added
Favorite
Default List Mode : All
4 Press the ▲/▼/◄/► buttons to select a channel to add, then press the ENTER
button.
Press the ▲ or ▼ button to select Add, then press the ENTER button to add the
channel.
Press the
➢
RETURN button to return.
All added channels will be shown in the Added menu.
Continued...
English - 38
DTV Air 2
DTV Air 2
Air 3
Air 4
Air 5
Air 6
Air 7
DTV Air 7-1
Air 9
Move
DTV Air 2
DTV Air 2
Air 3
Air 4
Air 5
Air 6
Air 7
DTV Air 7-1
Air 9
Move
Move
Enter
Channel List /Added
Delete All
Page
Delete All
Air 16
Air 18
DTV Air 9-1
Air 10
Air 11
DTV Air 11-1
Air 12
Air 13
Air 14
Air 15
List Mode Add All
Enter
Channel List /Added
Watch
DTV Air 9-1
Add
Air 10
Delete
Air 11
Favorite
DTV Air 11-1
Air 12
Air 13
Air 14
Air 15
List Mode Add All
Enter
Return
Return
Return
Page 39
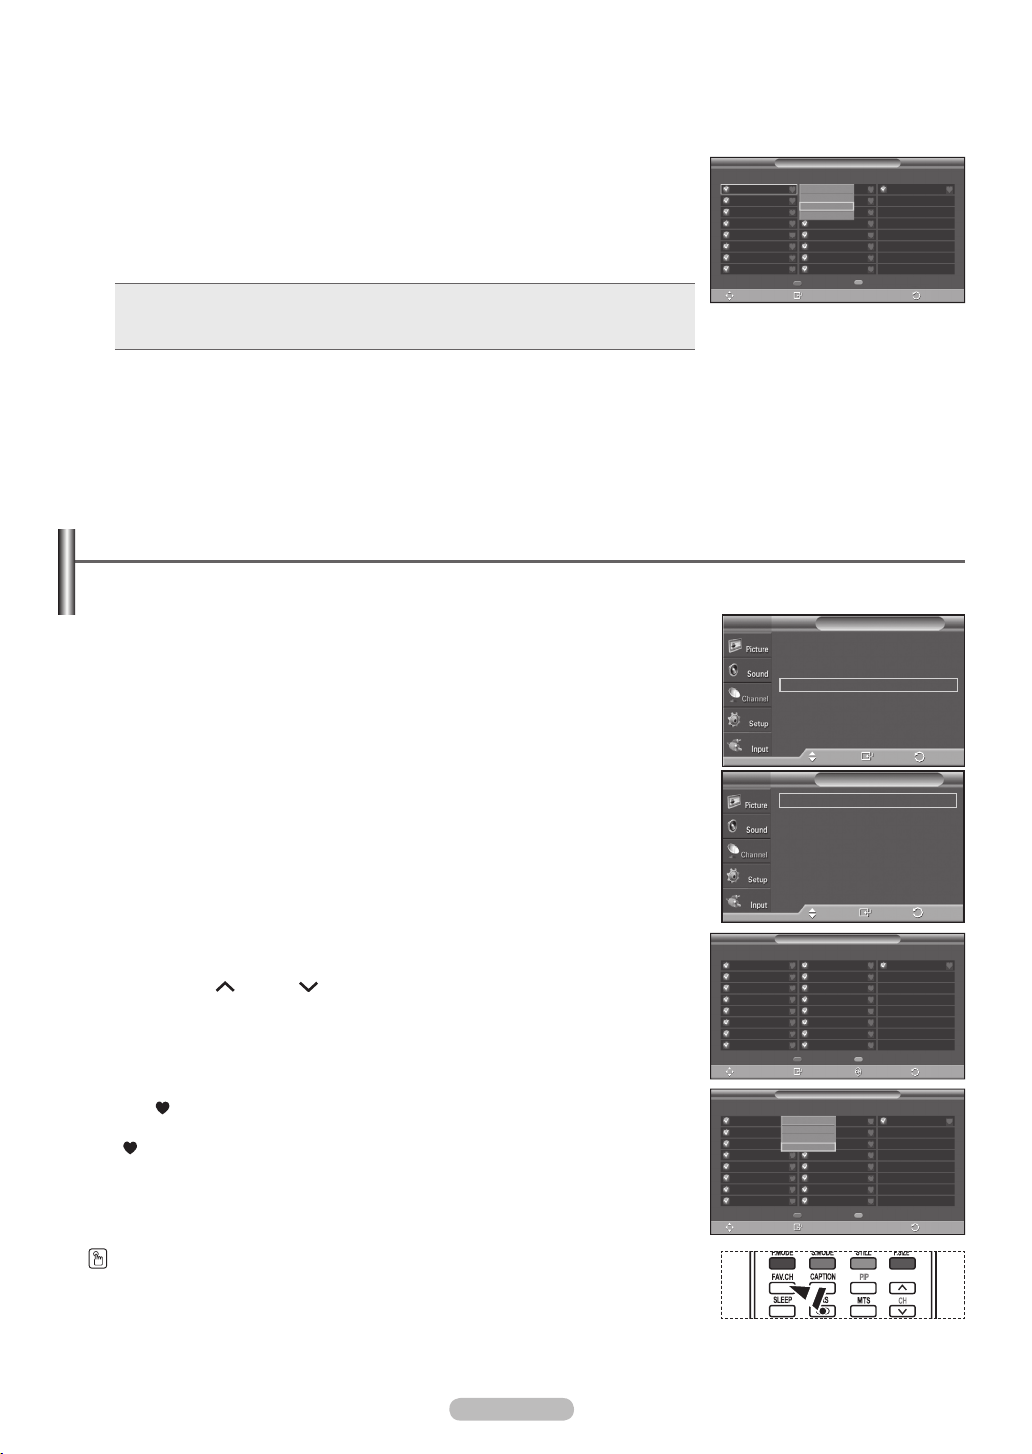
English - 39
5 Press the ▲/▼/◄/► buttons to select a channel to delete, then press the
ENTER button.
Press the ▲ or ▼ button to select Delete, then press the ENTER button to
delete the channel.
Press the
• P.MODE (RED) button: Press repeatedly to select All, Added, or Favorite.
• S.MODE (GREEN) button: Press to add all channels deleted.
• STILL (YELLOW) button: Press to delete all channels memorized.
EXIT button to exit.
Setting Your Favorite Channels
You can set channels you watch frequently as favorites.
DTV Air 2
DTV Air 2
Air 3
Air 4
Air 5
Air 6
Air 7
DTV Air 7-1
Air 9
Move
Channel List /Added
Watch
DTV Air 9-1
Add
Air 10
Delete
Air 11
Favorite
DTV Air 11-1
Air 12
Air 13
Air 14
Air 15
List Mode
Enter
Delete All
Air 16
Return
1 Press the MENU button to display the menu.
Press the ▲ or ▼ button to select Channel, then press the ENTER button.
2 Press the ▲ or ▼ button to select Channel List, then press the ENTER button.
3 Press the ▲ or ▼ button to select All or Added, then press the ENTER button.
4 Press the ▲/▼/◄/► buttons to select a channel as a favorite channel, then
press the ENTER button.
Press the
CH and CH button to display the next channel list page.
5 Press the ▲ or ▼ button to select Favorite, then press the ENTER button.
The “ ” symbol will be highlighted and the channel will be set as a Favorite.
To cancel your Favorite channel selection, press the
ENTER button until the
“ ” symbol disappears.
Press the
➢
➢
To select the favorite channels you have set up, press the FAV.CH button on the remote
control.
EXIT button to exit.
Only memorized channels can be set as favorite channels.
All favorite channels will be shown on the Favorite menu.
DTV Air 2
DTV Air 2
Air 3
Air 4
Air 5
Air 6
Air 7
DTV Air 7-1
Air 9
Move
DTV Air 2
DTV Air 2
Air 3
Air 4
Air 5
Air 6
Air 7
DTV Air 7-1
Air 9
Move
ChannelT V
Antenna : Air
Auto Program
Clear Scrambled Channel
Channel List
Name
Fine Tune
Signal Strength
LNA : On
Move
Enter
Channel ListT V
All
Added
Favorite
Default List Mode : All
Move
Enter
Channel List /Added
DTV Air 9-1
Air 10
Air 11
DTV Air 11-1
Air 12
Air 13
Air 14
Air 15
Enter
DTV Air 9-1
Air 10
Air 11
DTV Air 11-1
Air 12
Air 13
Air 14
Air 15
Enter
Delete All
Page
Delete All
List Mode
Channel List /Added
Watch
Add
Delete
Favorite
List Mode
Air 16
Air 16
Return
Return
Return
Return
►
►
►
►
►
►
►
►
►
►
►
►
Page 40
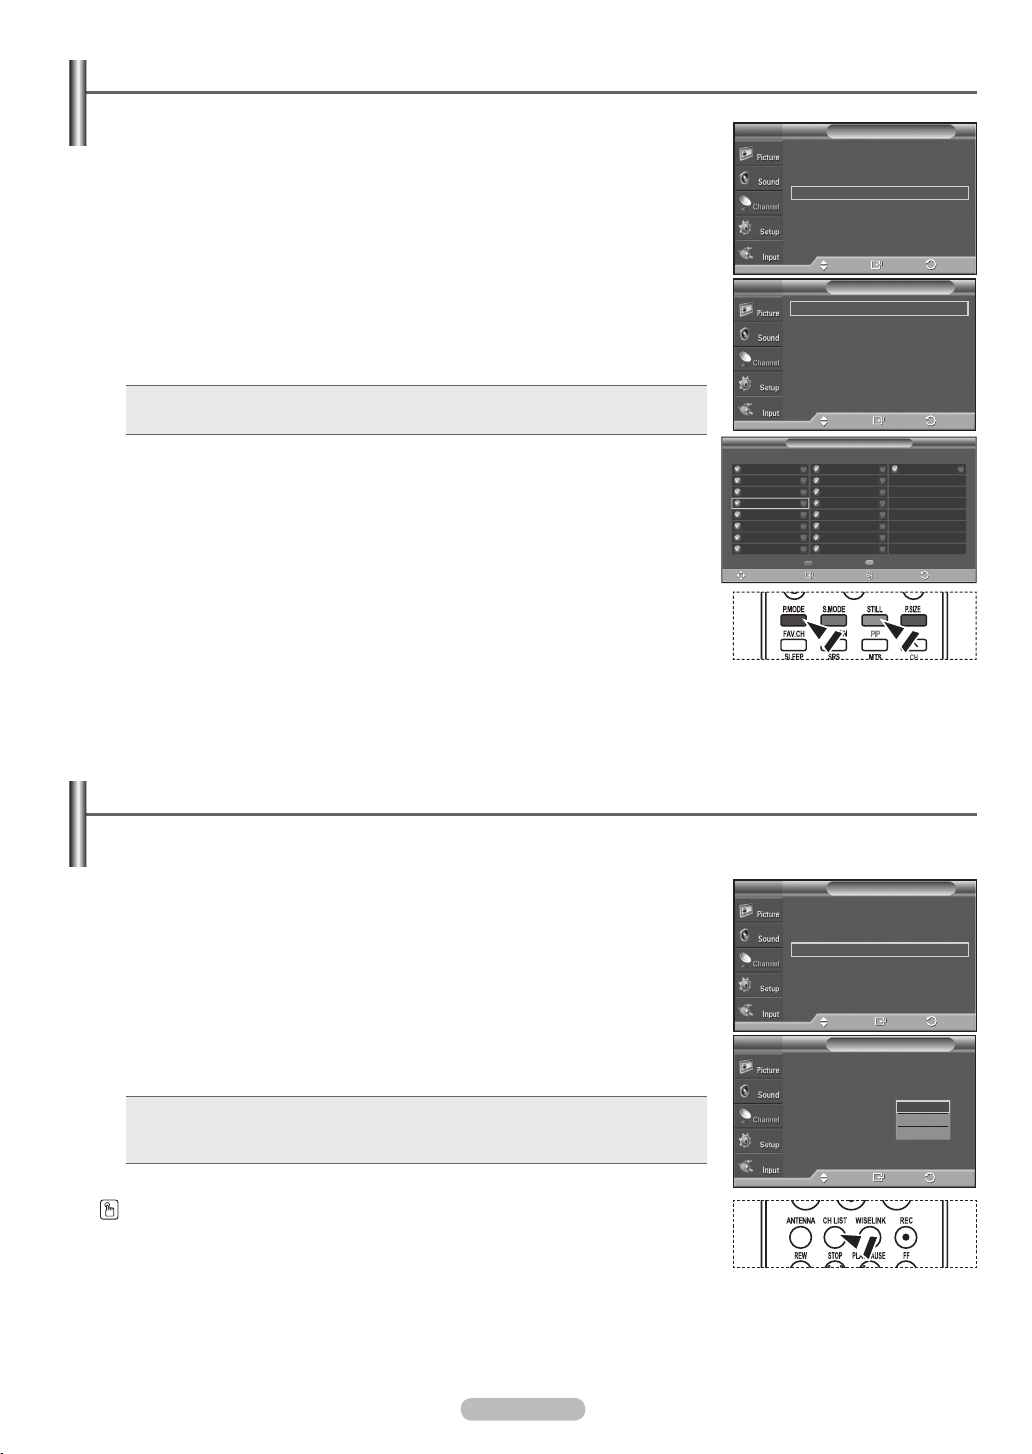
Viewing the Channel Lists
You can display a list of all channels, added channels or your favorite channels.
1 Press the MENU button to display the menu.
Press the ▲ or ▼ button to select Channel, then press the ENTER button.
2 Press the ▲ or ▼ button to select Channel List, then press the ENTER button.
3 Press the ▲ or ▼ button to select All, Added or Favorite, then press the
ENTER button.
To toggle between your all channels, add channels, or favorite channels, use the
P.MODE(RED) button on the remote control.
• P.MODE (RED) button: Press repeatedly to select All, Added, or Favorite.
• STILL (YELLOW) button: Press to delete all channels memorized.
DTV Air 2
DTV Air 2
Air 3
Air 4
Air 5
Air 6
Air 7
DTV Air 7-1
Air 9
Move
ChannelT V
Antenna : Air
Auto Program
Clear Scrambled Channel
Channel List
Name
Fine Tune
Signal Strength
LNA : On
Move
Enter
Channel ListT V
All
Added
Favorite
Default List Mode : All
Move
Enter
Channel List /Added
DTV Air 9-1
Air 10
Air 11
DTV Air 11-1
Air 12
Air 13
Air 14
Air 15
Delete All
List Mode
Enter
Page
Air 18
Return
Return
Return
►
►
►
►
►
►
►
►
►
►
►
►
Setting the Default Channel List Mode
You can set All, Added, or Favorite to be the Default List that appears when you press the CH LIST button.
1 Press the MENU button to display the menu.
Press the ▲ or ▼ button to select Channel, then press the ENTER button.
2 Press the ▲ or ▼ button to select Channel List, then press the ENTER button.
3 Press the ▲ or ▼ button to select Default List Mode, then press the ENTER
button.
Press the ▲ or ▼ button to select All, Added, or Favorite, then press the
ENTER button.
Select the Channel list you want to appear when you press the CH LIST
➢
button.
• All:
Shows All the channels when you press the CH LIST button on the remote control.
• Added:
• Favorite:
Shows Added channels when you press CH LIST button on the remote control.
Shows Favorite channels when you press CH LIST button on the remote control.
Press the EXIT button to exit.
Press the CH LIST button on the remote control to bring up the Channel List.
Antenna : Air
Auto Program
Clear Scrambled Channel
Channel List
Name
Fine Tune
Signal Strength
LNA : On
All
Added
Favorite
Default List Mode : All
Move
Move
ChannelT V
►
►
►
►
►
►
►
►
Return
Enter
Channel ListT V
All
Added
Favorite
Return
Enter
English - 40
Page 41
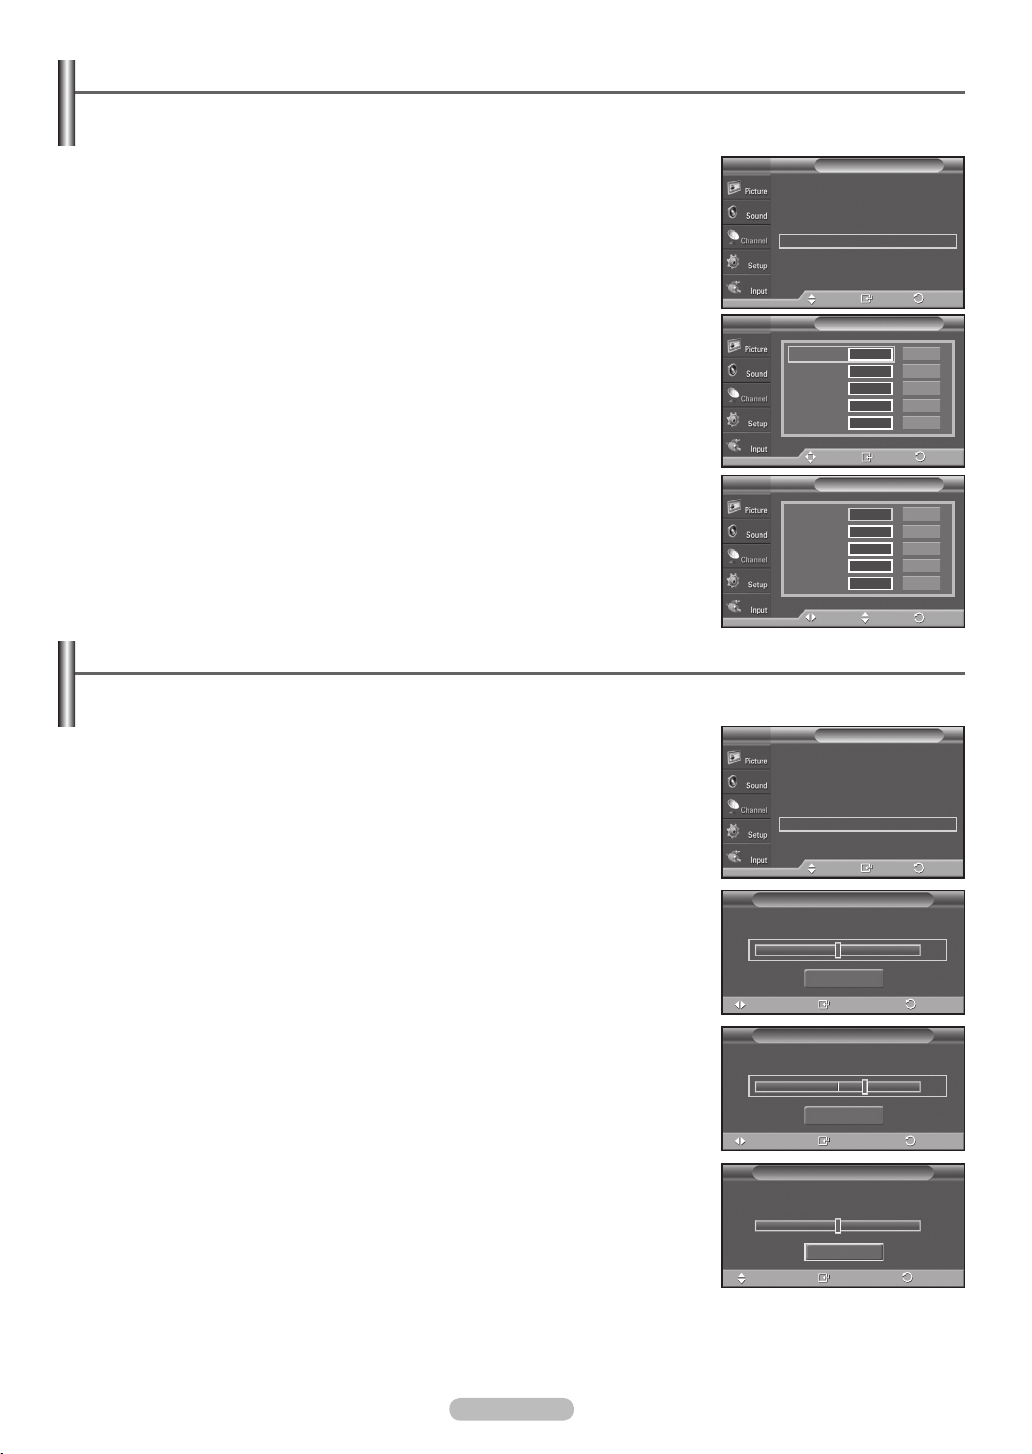
English - 41
Labeling Channels
Channels can labeled so that their call letters appear whenever the channel is selected.
1 Press the MENU button to display the menu.
Press the ▲ or ▼ button to select Channel, then press the ENTER button.
Press the ▲ or ▼ button to select Name, then press the ENTER button.
2 Press the ▲ or ▼ button to select the channel to be assigned a new name, then
press the ENTER button.
3 Press the ▲ or ▼ button to select a letter, a number or a blank (Results in this
sequence: A~Z, 0~9, +,
-
, *, /, blank).
Press the ► button to switch to the next field, which will be selected.
Select the second letter or digit by pressing the ▲ or ▼ button, as above.
Repeat the process to select the last three digits. When you have finished,
press the ENTER button to assign the new name.
To erase the assigned new name, select
Clear by pressing the ◄ or ► button,
then press the ENTER button.
Press the
➢
EXIT button to exit.
The names of digital broadcasting channels are automatically assigned and
thus cannot be assigned by users.
Fine Tuning Analog Channels
Use fine tuning to manually adjust a particular channel for optimal reception.
1 Press the MENU button to display the menu.
Press the ▲ or ▼ button to select Channel, then press the ENTER button.
2 Press the ▲ or ▼ button to select Fine Tune, then press the ENTER button.
3 Press the ◄ or ► button to adjust the fine tuning.
4 To store the fine tuning setting in the TV’s memory, press the ENTER button.
To reset the fine tuning setting, press the ▼ button to select
Reset, then press
the ENTER button.
Press the
➢
➢
EXIT button to exit.
Only analog TV channels can be fine tuned.
“ * ” will appear next to the number of fine-tuned channels.
Air 4
Air 4 * Fine Tuned
Air 4
Antenna : Air
Auto Program
Clear Scrambled Channel
Channel List
Name
Fine Tune
Signal Strength
LNA : On
Move
Air 6
Air 7
Air 9
Air 11
Air 13
▼
Move
Air 6 A
Air 7
Air 9
Air 11
Air 13
▼
Move
Antenna : Air
Auto Program
Clear Scrambled Channel
Channel List
Name
Fine Tune
Signal Strength
LNA : On
Move
Fine Tune
Adjust
Fine Tune
Adjust
Fine Tune
Move
Reset
Save
Reset
Save
Reset
Enter
ChannelT V
►
►
►
►
►
►
►
►
Return
Enter
NameT V
Clear
Clear
Clear
Clear
Clear
Return
Enter
NameT V
▲
Clear
▼
Clear
Clear
Clear
Clear
Return
Adjust
ChannelT V
►
►
►
►
►
►
►
►
Return
Enter
0
Return
+10
Return
0
Return
Page 42
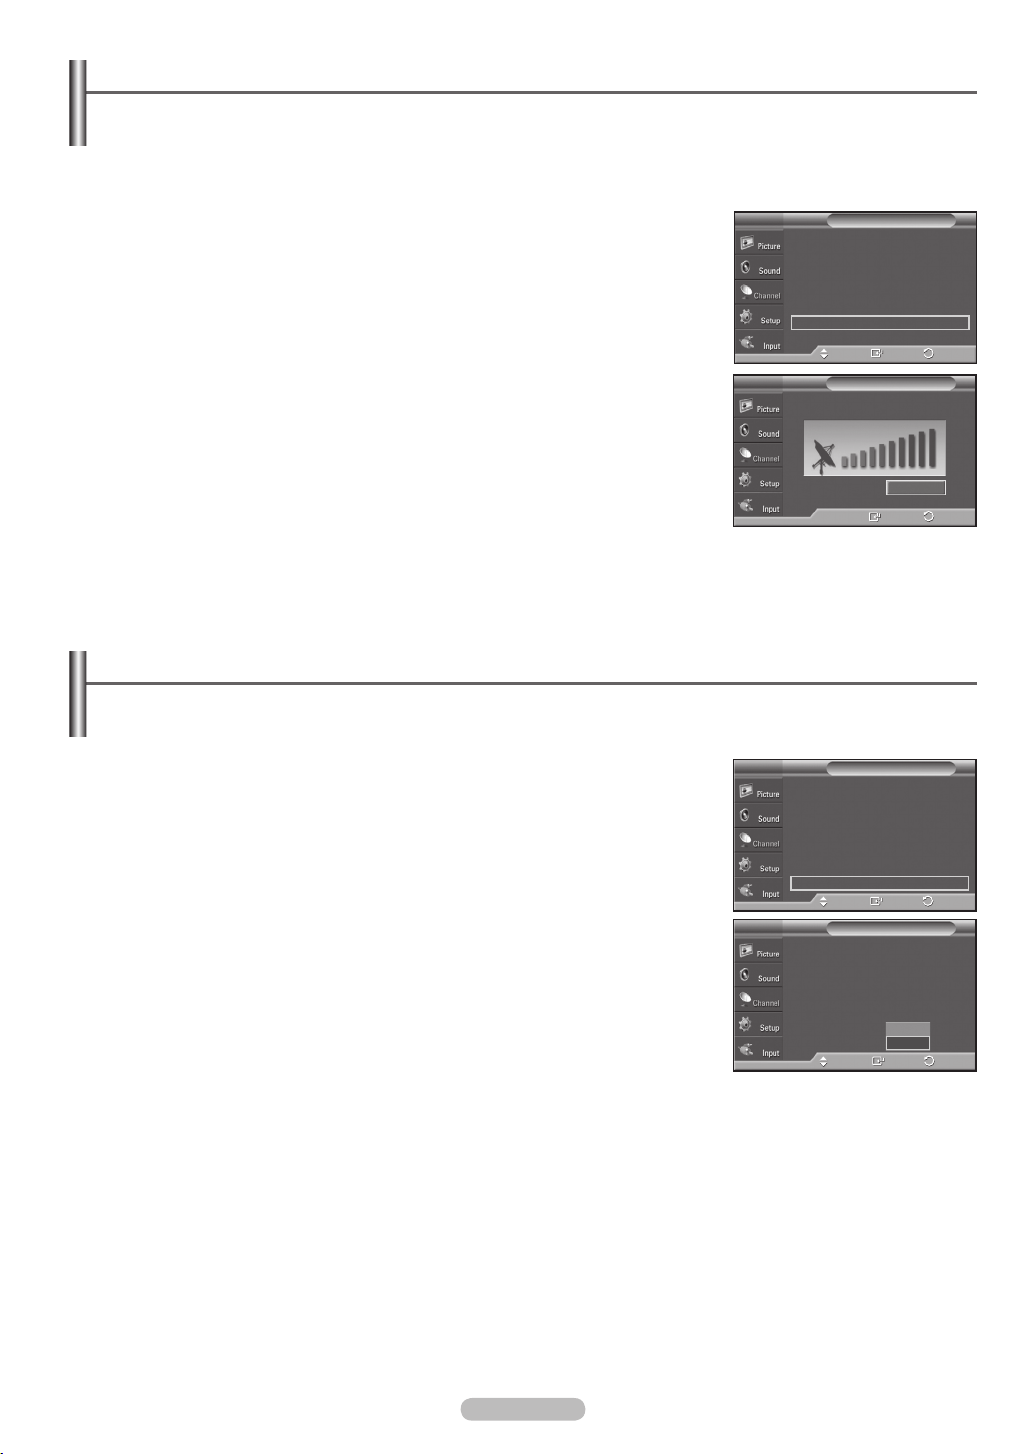
Checking the Digital-Signal Strength
Unlike analog channels, which can vary in reception quality from “snowy” to clear, digital (HDTV) channels
have either perfect reception quality or you will not receive them at all. So, unlike analog channels, you cannot
fine tune a digital channel. You can, however, adjust your antenna to improve the reception of available digital
channels.
1 Press the MENU button to display the menu.
Press the ▲ or ▼ button to select Channel, then press the ENTER button.
2 Press the ▲ or ▼ button to select Signal Strength, then press the ENTER
button. If the signal strength meter indicates that the signal is weak, physically
adjust your antenna to increase the signal strength.
Continue to adjust the antenna until you find the best position with the strongest
signal.
Press the
You can also press the
EXIT button to exit.
ENTER button to select OK then press the EXIT button
Antenna : Air
Auto Program
Clear Scrambled Channel
Channel List
Name
Fine Tune
Signal Strength
LNA : On
Move
ChannelT V
►
►
►
►
►
►
►
►
Return
Enter
Signal StrengthT V
to exit the menu.
OK
Return
Enter
LNA (Low Noise Amplifier)
If the TV is operating in a weak-signal area, sometimes the LNA function can improve the reception (a low-noise
preamplifier boosts the incoming signal).
Move
Move
ChannelT V
►
►
►
►
►
►
►
►
Return
Enter
ChannelT V
Off
On
Return
Enter
1 Press the MENU button to display the menu.
Press the ▲ or ▼ button to select Channel, then press the ENTER button.
2 Press the ▲ or ▼ button to select LNA, then press the ENTER button.
3 Press the ▲ or ▼ button to select Off or On, then press the ENTER button.
Press the
➢
➢
EXIT button to exit.
If the picture is noisy with the LNA set to On, select Off.
The LNA setting must be made separately for each channel.
Antenna : Air
Auto Program
Clear Scrambled Channel
Channel List
Name
Fine Tune
Signal Strength
LNA : On
Antenna : Air
Auto Program
Clear Scrambled Channel
Channel List
Name
Fine Tune
Signal Strength
LNA : On
English - 42
Page 43
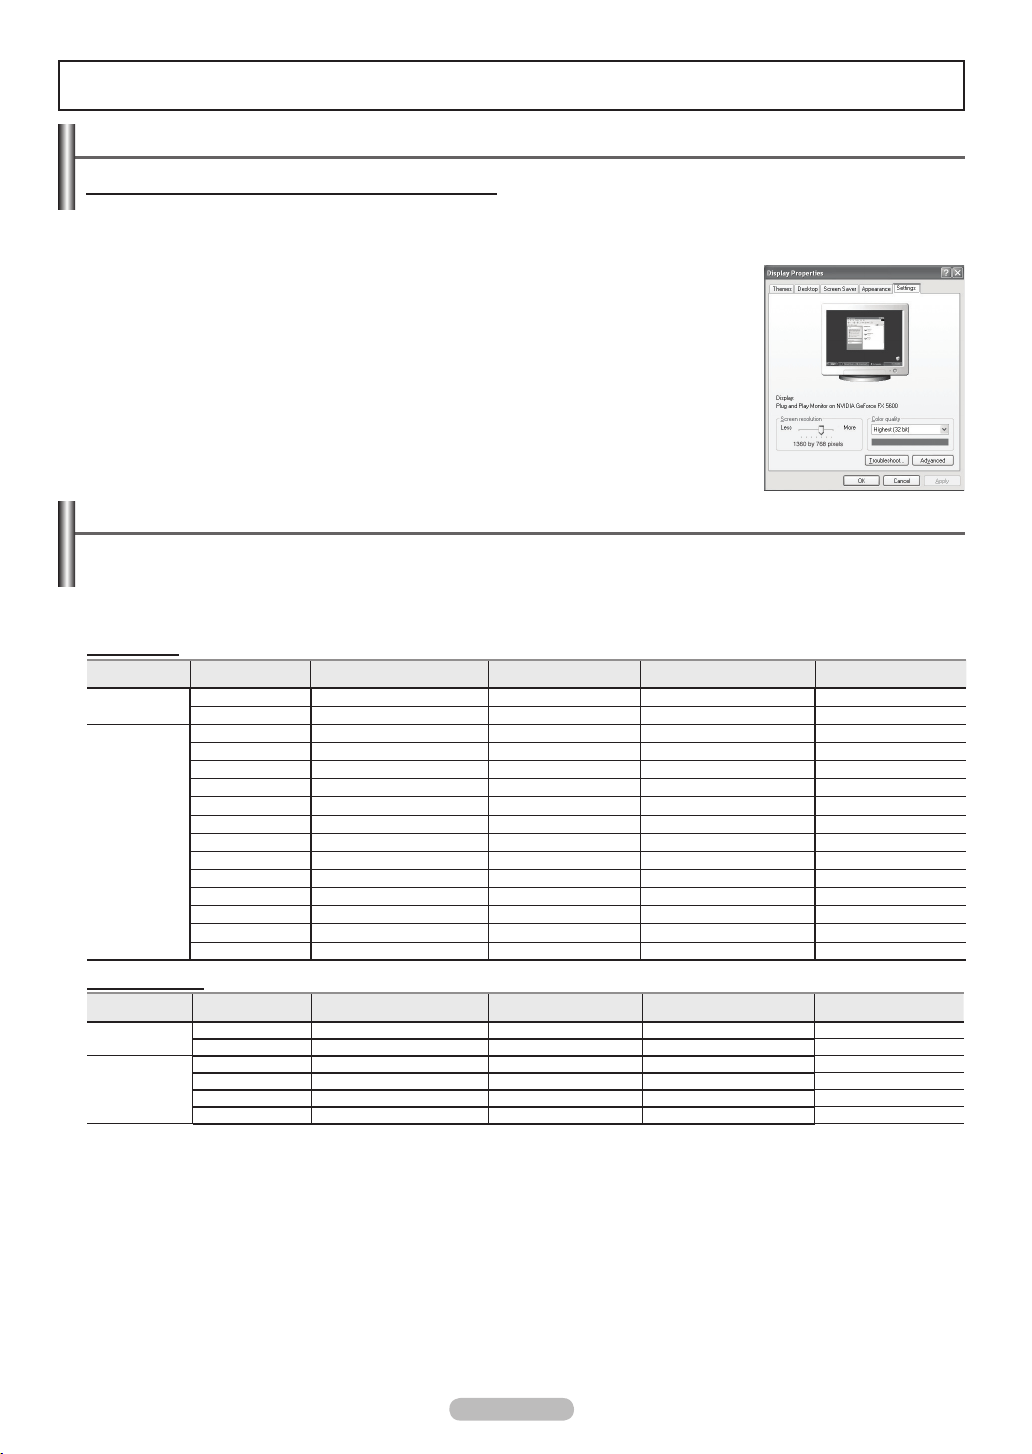
English - 43
PC Display
Using Your TV as a Computer (PC) Display
Setting Up Your PC Software (Based on Windows XP)
The Windows display-settings for a typical computer are shown below. The actual screens on your PC will probably be
different, depending upon your particular version of Windows and your particular video card. However, even if your actual
screens look different, the same basic set-up information will apply in almost all cases. (If not, contact your computer or
Video Card manufacturer.)
1 First, click on Control Panel on the Windows start menu.
2 When the control panel window appears, click on Appearance and Themes and a
display dialog-box will appear.
3 When the control panel window appears, click on Display and a display dialog-box will
appear.
4 Navigate to the Settings tab on the display dialog-box.
The correct size setting (resolution)
Optimum: 1920 x 1080 pixels
If a vertical-frequency option exists on your display settings dialog box, the correct value
is 60 or 60 Hz. Otherwise, just click OK and exit the dialog box.
Display Modes
If the signal from the system equals the standard signal mode, the screen is adjusted automatically. If the signal
from the system doesn’t equal the standard signal mode, adjust the mode by referring to your videocard user
guide; otherwise there may be no video. For the display modes listed below, the screen image has been optimized
during manufacture.
D-Sub Input
Display Mode RESOLUTION Horizontal Frequency(kHz) Vertical Frequency(Hz) Pixel Clock Frequency(MHz) Sync Polarity(H/V)
IBM
VESA
HDMI/DVI Input
Display Mode RESOLUTION Horizontal Frequency(kHz) Vertical Frequency(Hz) Pixel Clock Frequency(MHz) Sync Polarity(H/V)
IBM
VESA
• The interlace mode is not supported.
• The TV operates abnormally if a non-standard video format is selected.
• The table above conforms to IBM/VESA regulations and is based on using the PC Input.
• When this TV is used as a PC display, 32-bit color is supported.
➢
• Depending on the manufacturer, your PC display screen might appear different. (and depending on your particular version of Windows.)
Check your PC instruction book for information about connecting your PC to a TV.
• If a vertical and horizontal frequency-select mode exists, select 60Hz (vertical) and 48.4KHz (horizontal).
In some cases, abnormal signals (such as stripes) might appear on the TV screen when the PC power is turned off (or if the PC is disconnected).
•
If so, press the SOURCE button on the remote control or TV panel to enter a VIDEO mode. Also, make sure that the PC is connected.
720 X 400 31.469 70.087 28.322 -/+
640 X 480 31.469 59.940 25.175 -/640 X 480 37.861 72.809 31.500 -/640 X 480 37.500 75.000 31.500 -/800 X 600 35.156 56.250 36.000 +/+
800 X 600 37.879 60.317 40.000 +/+
800 X 600 48.077 72.188 50.000 +/+
800 X 600 46.875 75.000 49.500 +/+
1024 X 768 48.363 60.004 65.000 -/1024 X 768 56.476 70.069 75.000 -/1024 X 768 60.023 75.029 78.750 +/+
1280 X 1024 63.981 60.020 108.000 +/+
1280 X 1024 79.986 75.025 123.000 +/+
1600 X 1200 75.000 60.000 162.000 +/+
1920 X 1080 66.587 59.934 138.500 +/-
720 X 400 31.469 70.087 28.322
640 X 480 31.469 59.940 25.175 -/800 X 600 37.879 60.317 40.000 +/+
1024 X 768 48.364 60.000 65.000 -/1280 X 1024 63.981 60.020 108.000 +/+
1920 X 1080 66.587 59.934 138.500 +/-
-/+
Page 44
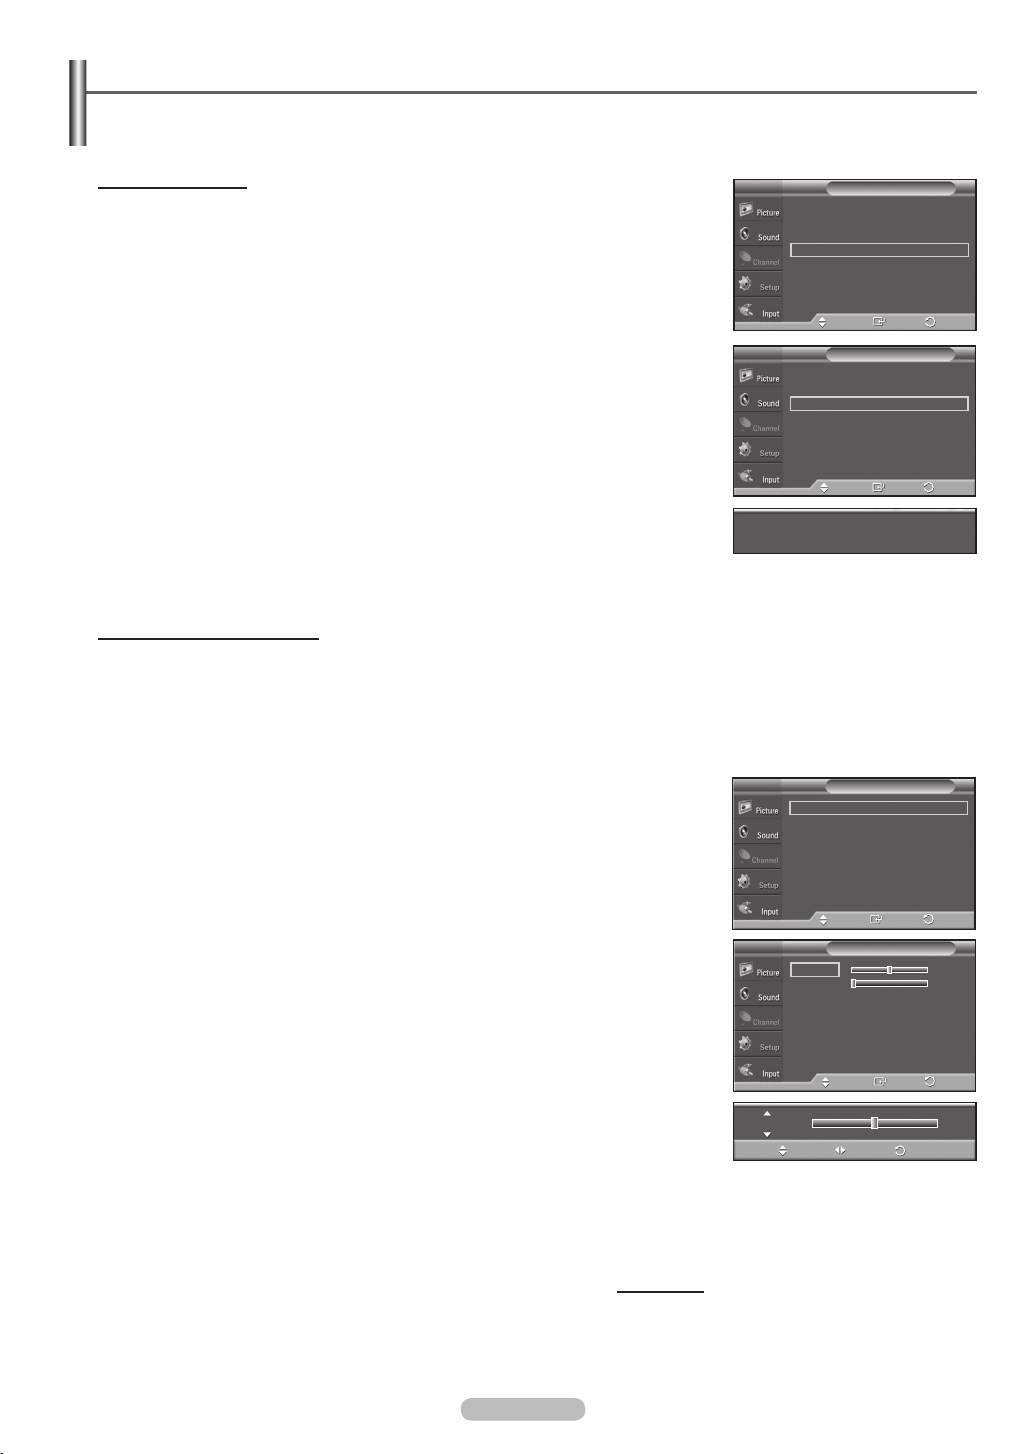
Setting up the TV with your PC
Use the Auto Adjust function to have the TV set automatically adjust the video signals it receives from the PC.
The function also automatically fine-tunes the settings and adjusts the frequency values and positions.
How to Auto Adjust
1 Press the MENU button to display the menu.
Press the ▲ or ▼ button to select Setup, then press the ENTER button.
Press the ▲ or ▼ button to select PC, then press the ENTER button.
2 Press the ▲ or ▼ button to select Auto Adjustment, then press the ENTER
button. The message Auto Adjustment in progress. Please wait.
appears on
the screen and the picture adjustments are automatically activated.
Press the
➢
➢
EXIT button to exit.
This function does not work in DVI-Digital mode.
You must be in PC mode.
Adjusting the Screen Quality
The purpose of the picture quality adjustment is to remove or reduce picture
noise. If the noise is not removed by fine tuning alone, then make the vertical
frequency adjustments and fine tune again. After the noise has been reduced,
re-adjust the picture so that it is aligned in the center of the screen.
You must be in PC mode.
➢
1 Press the MENU button to display the menu.
Press the ▲ or ▼ button to select Setup, then press the ENTER button.
Press the ▲ or ▼ button to select PC, then press the ENTER button.
2 Press the ENTER button to select Image Lock.
T V
▲
More
Blue Screen : Off
Melody : Medium
PC
Home Theater PC : Off
Light Effect :
Energy Saving : Off
▼
More
Image Lock
Position
Auto Adjustment
Image Reset
Auto Adjustment in progress. Please wait.
Image Lock
Position
Auto Adjustment
Image Reset
Move
Move
Setup
In Watching TV
Enter
PCT V
Enter
PCT V
Return
Return
►
►
►
►
►
►
►
►
►
►
3 Press the ▲ or ▼ button to select Coarse or Fine, then press the ENTER
button.
Press the ◄ or ► button to adjust the screen quality, then press the
ENTER
button.
Press the
➢
EXIT button to exit.
This feature may change the width of the image. If necessary, adjust the
position to center.
Continued...
English - 44
Enter
Enter
Return
Return
Return
Move
Image LockT V
Coarse 50
Fine 0
Move
Coarse 50
Move Adjust
Page 45
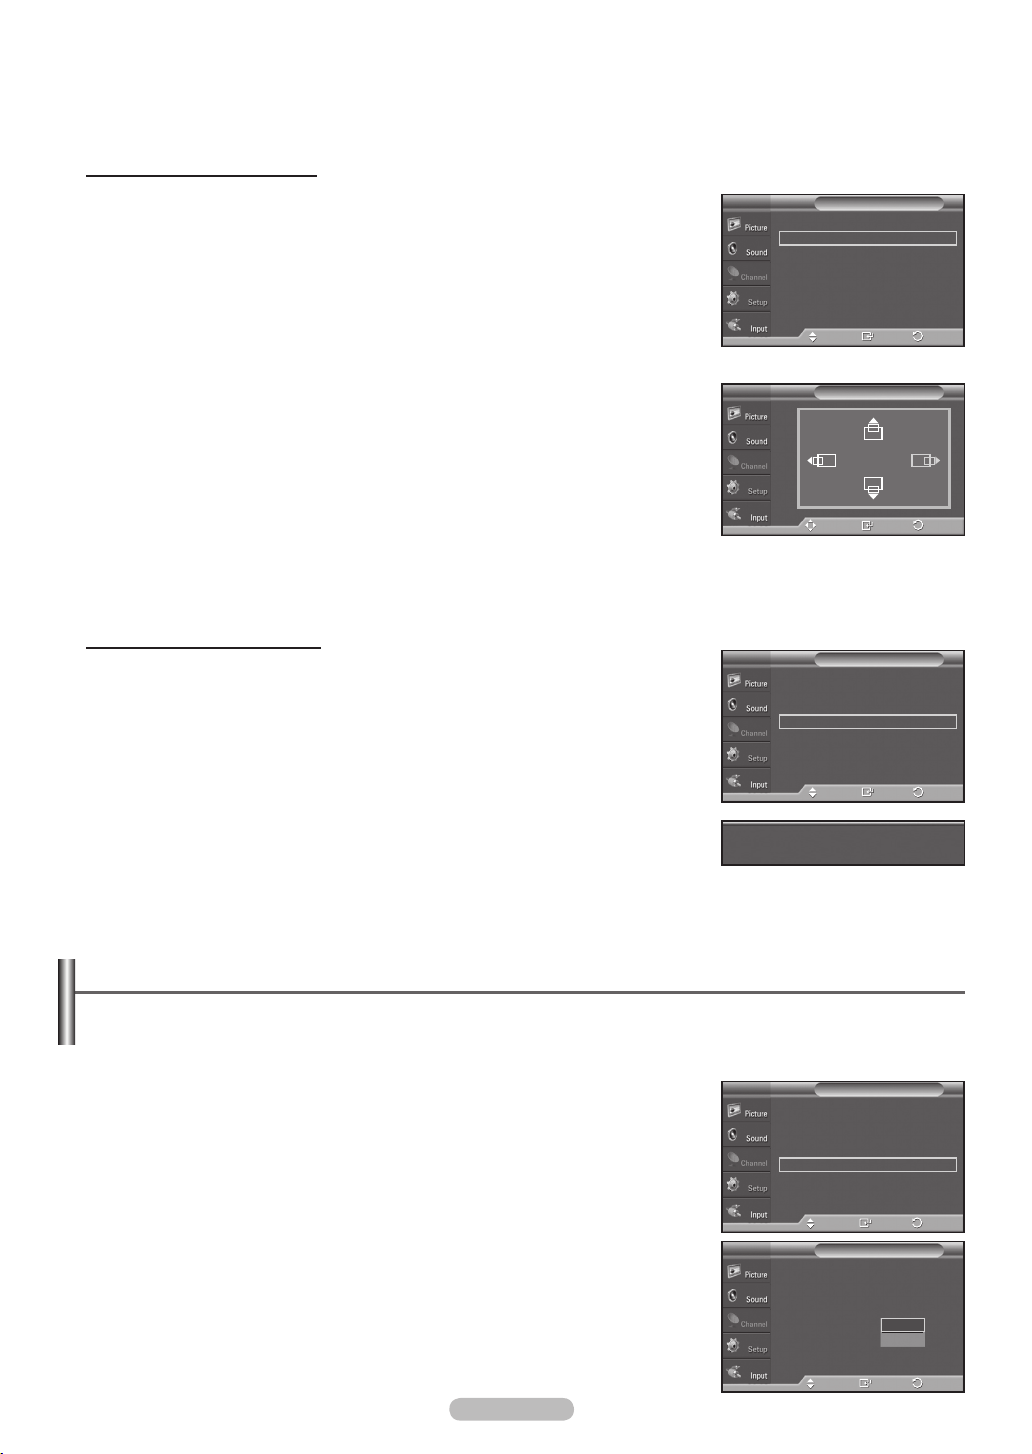
English - 45
Changing the Screen Position
You can adjust the position of the screen after connecting the TV to your PC.
Change to the PC mode first.
➢
1 Press the MENU button to display the menu.
Press the ▲ or ▼ button to select Setup, then press the ENTER button.
Press the ▲ or ▼ button to select PC, then press the ENTER button.
2 Press the ▲ or ▼ button to select Position, then press the ENTER button.
Image Lock
Position
Auto Adjustment
Image Reset
Move
PCT V
Enter
Return
►
►
3 Press the ▲ or ▼ button to adjust the V-Position.
Press the ◄ or ► button to adjust the H-Position.
Press the ENTER button.
Press the
EXIT button to exit.
Initializing the Screen Position
Change to the PC mode first.
➢
1 Press the MENU button to display the menu.
Press the ▲ or ▼ button to select Setup, then press the ENTER button.
Press the ▲ or ▼ button to select PC, then press the ENTER button.
2 Press the ▲ or ▼ button to select Image Reset, then press the ENTER button.
The message Image Reset is completed. appears on the screen.
Press the
➢
EXIT button to exit.
The previously adjusted settings will be reset to the factory defaults.
PositionT V
Enter
Adjust
PCT V
Image Lock
Position
Auto Adjustment
Image Reset
Move
Enter
Image Reset is completed.
Return
Return
►
►
Setting the Home Theater PC
This function enables you to view higher quality pictures while in PC Mode. After setting the Home Theater PC function
to On, you can go into the Detailed Settings menu and make adjustments without affecting settings in the regular TV
mode.
Move
Move
SetupT V
In Watching TV
Enter
Setup
Off
On
In Watching TV
Enter
►
►
►
►
►
►
Return
Return
1 Press the MENU button to display the menu.
Press the ▲ or ▼ button to select Setup, then press the ENTER button.
Press the ▲ or ▼ button to select Home Theater PC, then press the ENTER
button.
2 Press the ▲ or ▼ button to select Off or On, then press the ENTER button.
Press the
This function is available only in PC mode.
➢
EXIT button to exit.
▲
More
Blue Screen : Off
Melody : Medium
PC
Home Theater PC : Off
Light Effect :
Energy Saving : Off
▼
More
T V
▲
More
Blue Screen : Off
Melody : Medium
PC
Home Theater PC : Off
Light Effect :
Energy Saving : Off
▼
More
Page 46
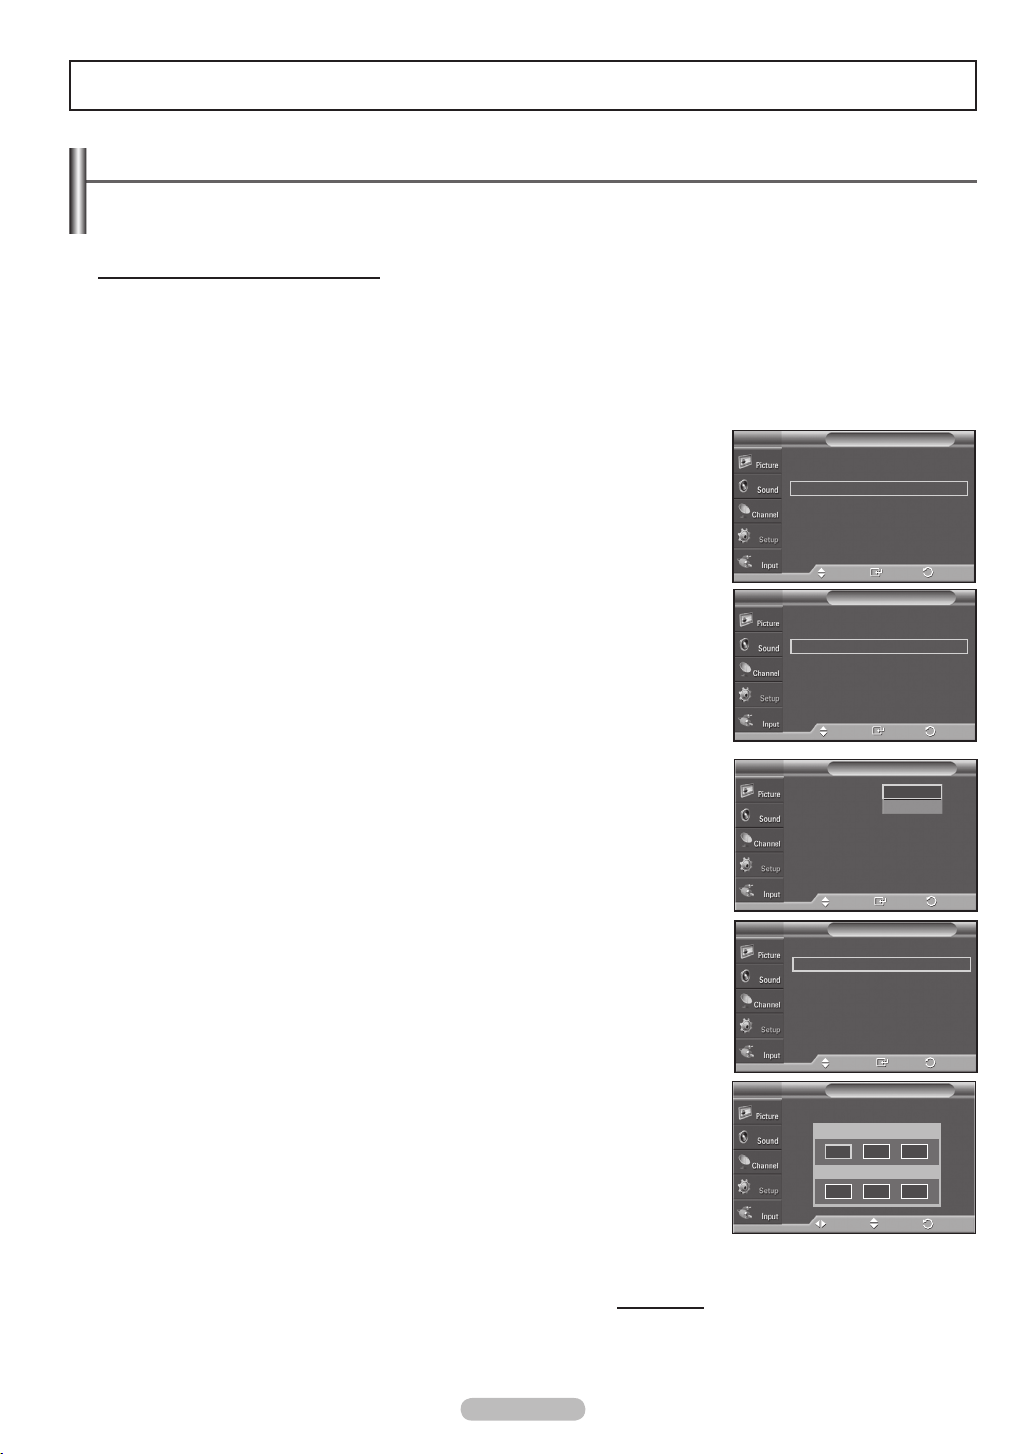
Time Setting
Setting the Time
Setting the clock is necessary in order to use the various timer features of the TV. Also, you can check the time
while watching the TV. (Just press the INFO button.)
Option 1: Setting the Clock Manually
1 Press the MENU button to display the menu.
Press the ▲ or ▼ button to select Setup, then press the ENTER button.
Press the ▲ or ▼ button to select Time, then press the ENTER button.
2 Press the ENTER button to select Clock.
3 Press the ENTER button to select Clock Mode.
Press the ▲ or ▼ button to select Manual, then press the ENTER button.
4 Press the ▲ or ▼ button to select Clock Set, then press the ENTER button.
5 Press the ◄ or ► button to move to Month, Day, Year, Hour, Minute, or am/
pm. Set the date and time you want by pressing the ▲ or ▼ button, then press
the ENTER button.
Press the
➢
➢
EXIT button to exit.
The current time will appear every time you press the INFO button.
You can set the Month, Day, Year, Hour, and Minute directly by pressing
the number buttons on the remote control.
SetupT V
Plug & Play
Language : English
Time
Game Mode : Off
V-Chip
Caption
Menu Transparency
▼
More
--/ --/ ----/ -- : -- --
Clock
Sleep Timer : Off
Timer1 : Inactivated
Timer2 : Inactivated
Timer3 : Inactivated
Clock Mode : Auto
Clock Set
Time Zone
DST : Off
Clock Mode : Manual
Clock Set
Time Zone
DST : Off
Set current date and time.
: Medium
Move
Enter
TimeT V
Move
Enter
ClockT V
Manual
Auto
Move
Enter
ClockT V
Move
Enter
Clock SetT V
Month Day Year
--
Hour Minute am/pm
--
Move
----
--
--
--
Adjust
Return
Return
Return
Return
Return
►
►
►
►
►
►
►
►
►
►
►
►
►
►
►
►
English - 46
Continued...
Page 47
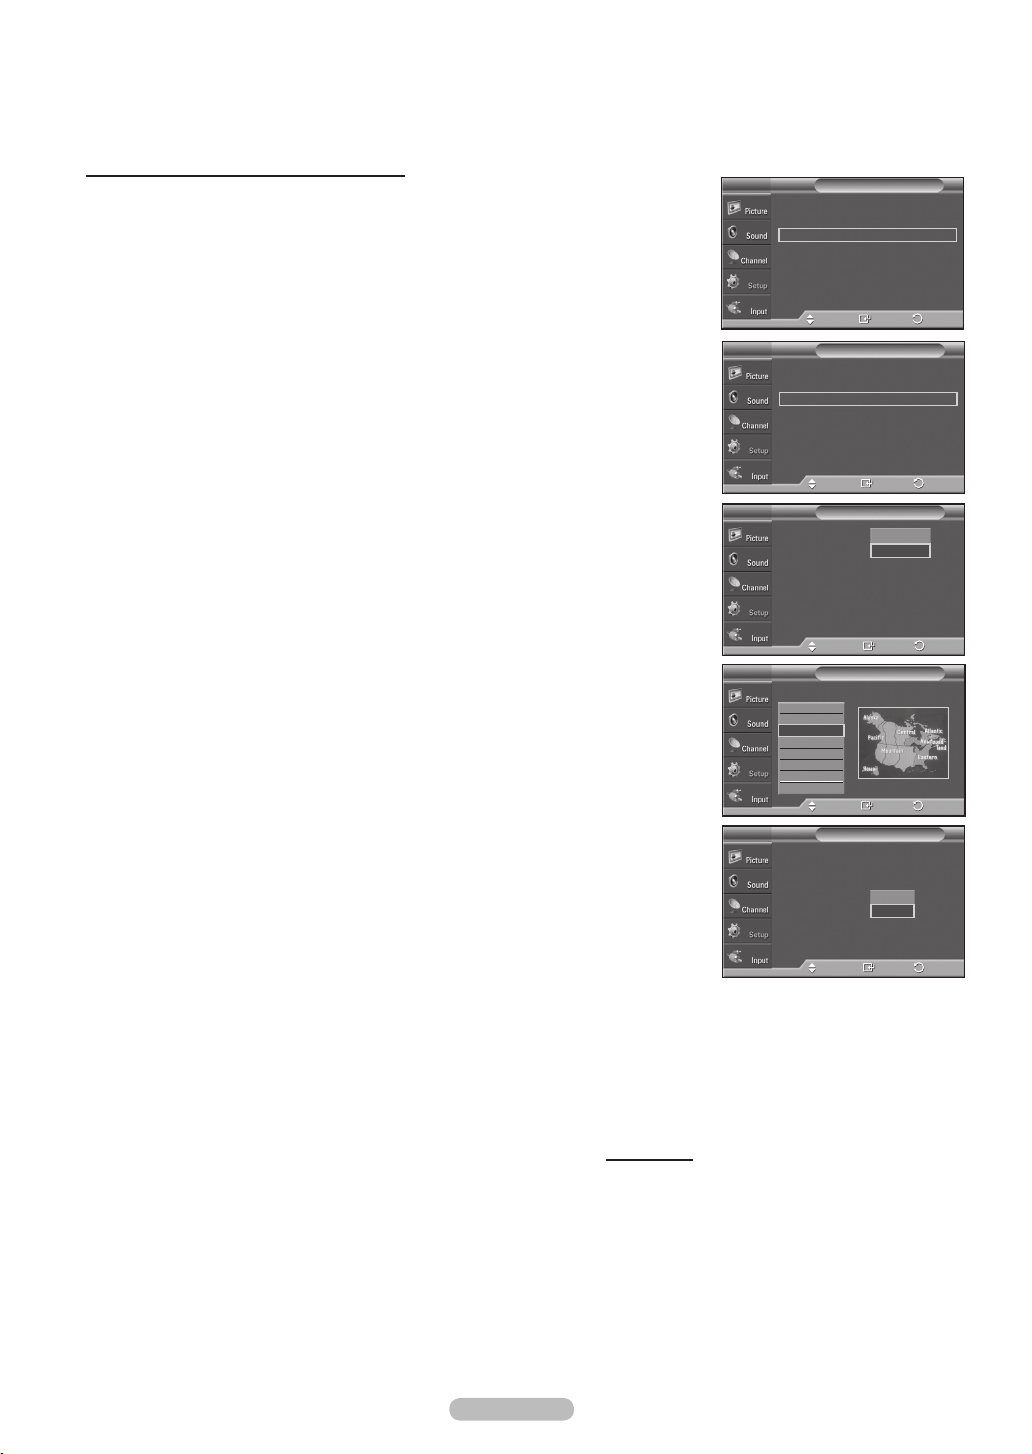
English - 47
Option 2: Setting the Clock Automatically
The Clock can be set automatically if you are receiving a digital signal.
1 Press the MENU button to display the menu.
Press the ▲ or ▼ button to select Setup, then press the ENTER button.
Press the ▲ or ▼ button to select Time, then press the ENTER button.
2 Press the ENTER button to select Clock.
3 Press the ENTER button to select Clock Mode.
Press the ▲ or ▼ button to select Auto, then press the ENTER button.
SetupT V
Plug & Play
Language : English
Time
Game Mode : Off
V-Chip
Caption
Menu Transparency
▼
More
--/ --/ ----/ -- : -- --
Clock
Sleep Timer : Off
Timer1 : Inactivated
Timer2 : Inactivated
Timer3 : Inactivated
Clock Mode : Auto
Clock Set
Time Zone
DST : Off
Move
Move
: Medium
Enter
TimeT V
Enter
ClockT V
Manual
Auto
Return
Return
►
►
►
►
►
►
►
►
►
►
►
►
4 Press the ▲ or ▼ button to select Time Zone, then press the ENTER button.
5 Press the ▲ or ▼ button to highlight the time zone for your local area, then
press the ENTER button.
6 Press the ▲ or ▼ button to select DST (Daylight Saving Time), then press the
ENTER button.
Press the ▲ or ▼ button to select On or Off, then press the ENTER button.
Press the
➢
EXIT button to exit.
Depending on the broadcast station and signal, the auto time may not be set
correctly. If this occurs, set the time manually.
Antenna or Cable must be connected in order to set the time automatically.
➢
Continued...
Move
T V
Select the time zone in which you live.
Newfoundland
Atlantic
Eastern
Central
Mountain
Pacific
Alaska
Hawaii
Clock Mode : Auto
Clock Set
Time Zone
DST : Off
Time Zone
Move
Move
Return
Enter
Return
Enter
ClockT V
On
Off
Return
Enter
Page 48
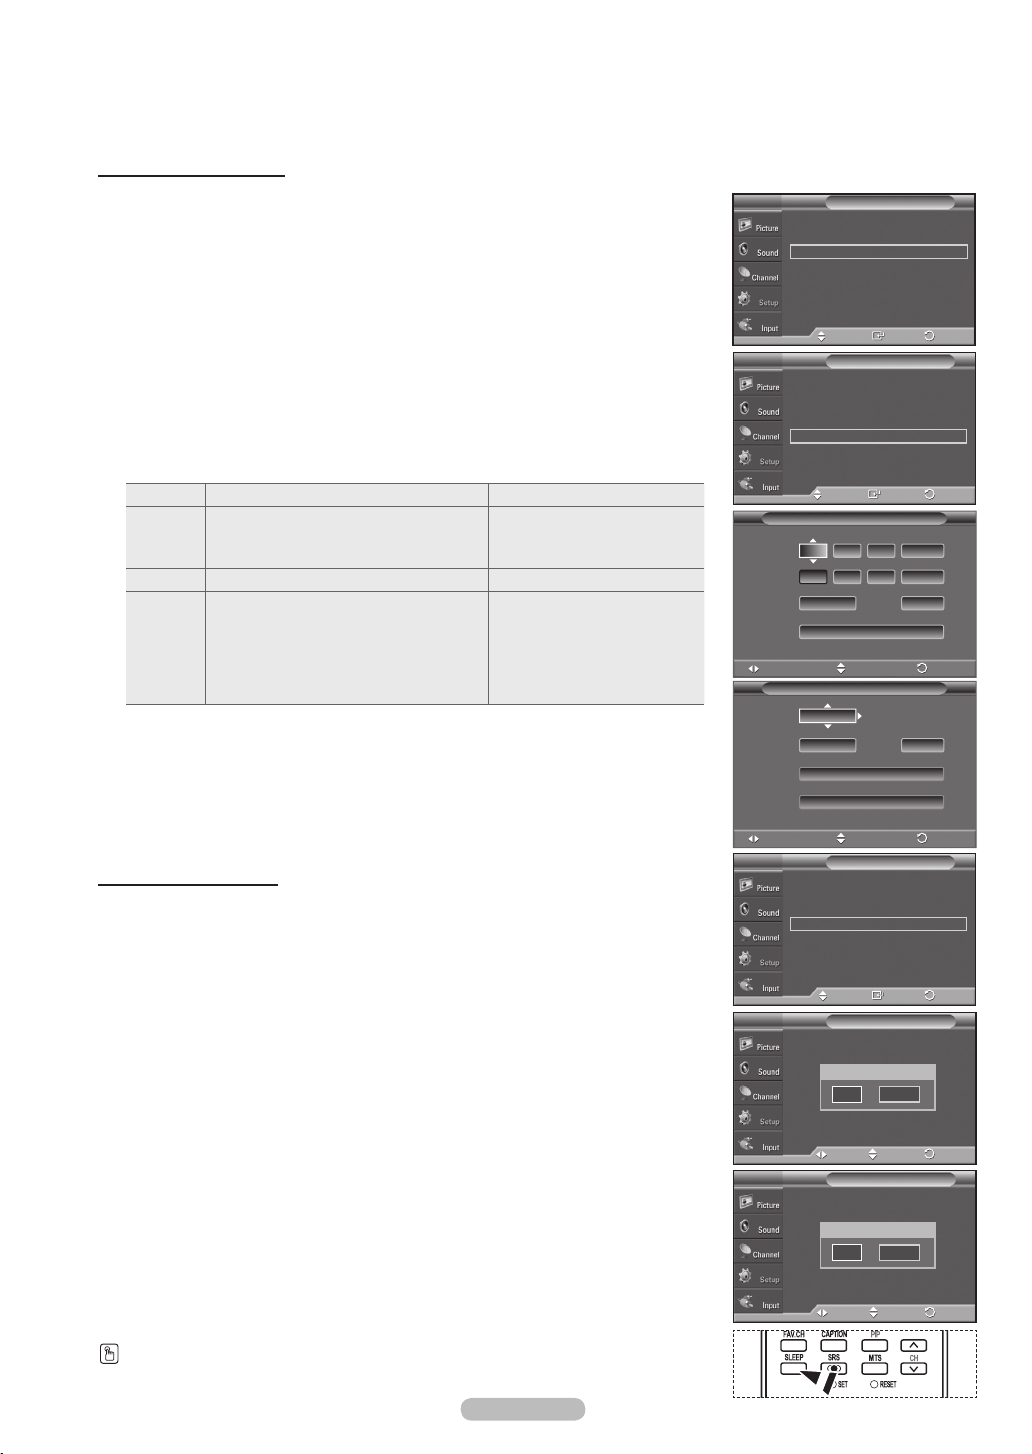
Setting the On/Off Timer
Use this feature to set the TV to turn on or off at a desired time. You must set
the clock first.
1 Press the MENU button to display the menu.
Press the ▲ or ▼ button to select Setup, then press the ENTER button.
Press the ▲ or ▼ button to select Time, then press the ENTER button.
2 Press the ▲ or ▼ button to select Timer1, Timer2,or Timer3, then press the
ENTER button. The timer menu is displayed.
Press the ▲ or ▼ button to adjust hour, then press the ► button to move to the
next step. Set other items using the same method as above.
3 Press the ◄ or ► button to select the desired item below.
Press the ▲ or ▼ button to adjust the setting.
Press the
Repeat
Volume Select the desired turn on volume level. Press the ▲ or ▼ button
Contents
➢
EXIT button to exit.
Activate or Inactivate Press the ▲ or ▼ button
Select Once, Everyday, Mon-Fri, Mon- Sat,
Sat-Sun. Sets the desired day(s) of the
Press the ▲ or ▼ button
week you want the TV to turn on.
When the On Timer is active, you can
turn on a specific channel or play back
contents such as photo or audio files.
Press the ▲ or ▼ button
(Make sure that an USB device is
connected to your TV.)
You can set the hour, and minute directly by pressing the number buttons on
the remote control.
Auto Power Off
➢
When you set the timer
controls are operated for 3 hours after the TV was turned on by timer.
On, the television will eventually turn off, if no
This function is only available in timer On mode and prevents overheating,
which may occur if a TV is on for too long time.
Setting the Sleep Timer
The sleep timer automatically shuts off the TV after a preset time (30, 60, 90,
120, 150 and 180 minutes).
1 Press the MENU button to display the menu.
Press the ▲ or ▼ button to select Setup, then press the ENTER button.
Press the ▲ or ▼ button to select Time, then press the ENTER button.
2 Press the ▲ or ▼ button to select Sleep Timer, then press the ENTER button.
T V
Plug & Play
Language : English
Time
Game Mode : Off
V-Chip
Caption
Menu Transparency
▼
More
1/ 1/ 2007/ 12 : 04 am
Clock
Sleep Timer : Off
Timer1 : Inactivated
Timer2 : Inactivated
Timer3 : Inactivated
On Time :
Off Time :
Repeat Volume
Contents
Source
Antenna Channel
Music
Photo
12 0 am
12 0 am
Onc e
Move
Cable
Move
1/ 1/ 2007/ 12 : 04 am
Clock
Sleep Timer : Off
Timer1 : Inactivated
Timer2 : Inactivated
Timer3 : Inactivated
Setup
Move
TimeT V
Move
Timer 1
TV Ai r 3
Adjust
Contents
TV
None
None
Adjust
TimeT V
Move
Sleep TimerT V
Set sleep timer.
Minute Activation
---
: Medium
Enter
Enter
Enter
▲
Off
▼
Ina ctivat e
Ina ctivat e
10
3
Return
Return
Return
Return
Return
►
►
►
►
►
►
►
►
►
►
►
►
►
►
►
►
►
3 Press the ▲ or ▼ button to select the minute.
Setting the Timer sets the
Activation to On automatically.
To cancel the set sleep timer:
Press the ► button to select
Press the ▲ or ▼ button to select
Press the
Press the SLEEP button on the remote control until the appropriate time interval appears
(any of the preset values from 30 min to 180 min).
EXIT button to exit.
Activation.
Off, then press the ENTER button.
English - 48
Move
Adjust
Sleep TimerT V
Set sleep timer.
Minute Activation
▲
30
On
▼
Move
Adjust
Return
Return
Page 49
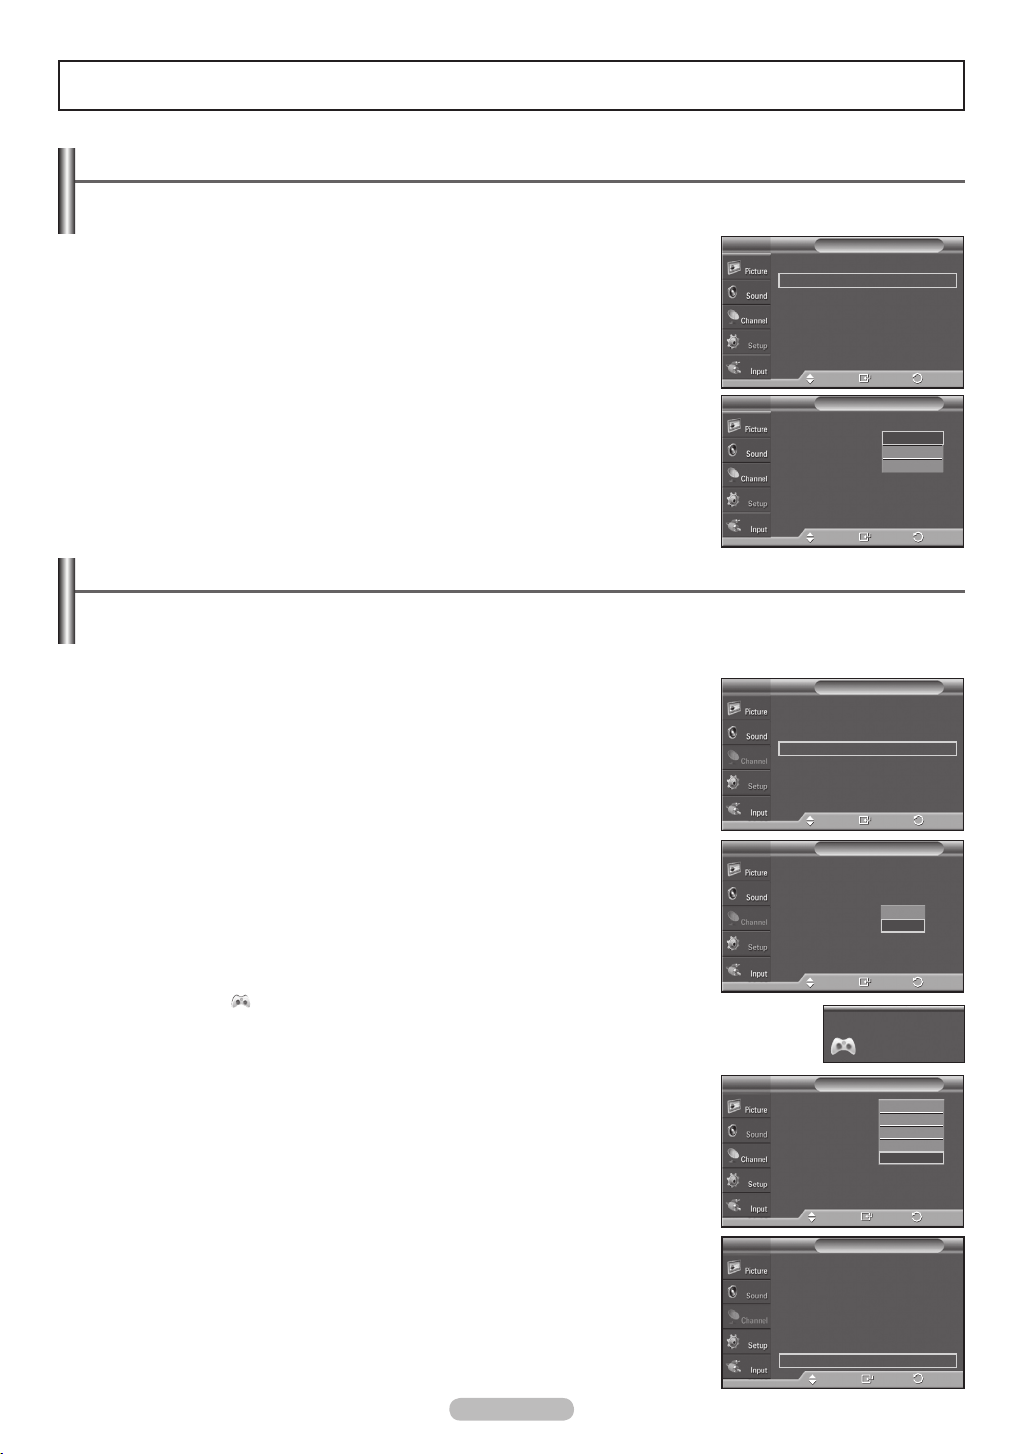
English - 49
Function Description
Selecting a Menu Language
Move
Move
SetupT V
: Medium
Enter
SetupT V
English
Español
Français
: Medium
Enter
Return
Return
►
►
►
►
►
►
►
1 Press the MENU button to display the menu.
Press the ▲ or ▼ button to select Setup, then press the ENTER button.
Press the ▲ or ▼ button to select Language, then press the ENTER button.
2 Press the ▲ or ▼ button to select the appropriate language: English, Español,
or Français, then press the ENTER button.
Press the
EXIT button to exit.
Plug & Play
Language : English
Time
Game Mode : Off
V-Chip
Caption
Menu Transparency
▼
More
Plug & Play
Language : English
Time
Game Mode : Off
V-Chip
Caption
Menu Transparency
▼
More
Using the Game Mode
When connecting to a game console such as PlayStationTM or XboxTM, you can enjoy a more realistic gaming
experience by selecting the game menu.
1 Press the MENU button to display the menu.
Press the ▲ or ▼ button to select Setup, then press the ENTER button.
2 Press the ▲ or ▼ button to select Game Mode, then press the ENTER button.
3 Select Off or On by pressing the ▲ or ▼ button, then press the ENTER button.
4 Press the EXIT button to exit.
Restrictions on Game mode (Caution)
➢
• To disconnect the game console and connect another external device, set
the Game mode to Off in the setup menu.
• If you display the TV menu in Game mode, the screen shakes slightly.
• The icon (
) appears on the screen which means that Game Mode is on
with the selected source.
If Game Mode is On
➢
• The Picture Mode is automatically changed to Game and cannot be
changed.
• The Sound Mode in the Sound menu is deactivated. You must adjust the
sound using the equalizer.
• The Reset in the Sound menu is activated. The Reset function restores
Equalizer settings to the factory default settings.
Game Mode is not available in TV mode.
➢
If the picture is poor when a game console is connected to the TV, try turning
➢
the Game Mode Off then On again.
Plug & Play
Language : English
Time
Game Mode : Off
V-Chip
Caption
Menu Transparency
▼
More
Plug & Play
Language : English
Time
Game Mode : Off
V-Chip
Caption
Menu Transparency
▼
More
Mode : Custom
Equalizer
SRS TruSurround XT
Multi-Track Options
Auto Volume : Off
Internal Mute : Off
Sound Select : Main
Reset
Mode : Custom
Equalizer
SRS TruSurround XT
Multi-Track Options
Auto Volume : Off
Internal Mute : Off
Sound Select : Main
Reset
SetupT V
: Medium
Move
Enter
SetupT V
Off
On
: Medium
Move
Enter
AV1
Game Mode
SoundT V
Standard
Music
Movie
: Off
Speech
Custom
Move
Enter
SoundT V
: Off
Move
Enter
Return
Return
Return
Return
►
►
►
►
►
►
►
►
►
►
►
►
►
►
Page 50
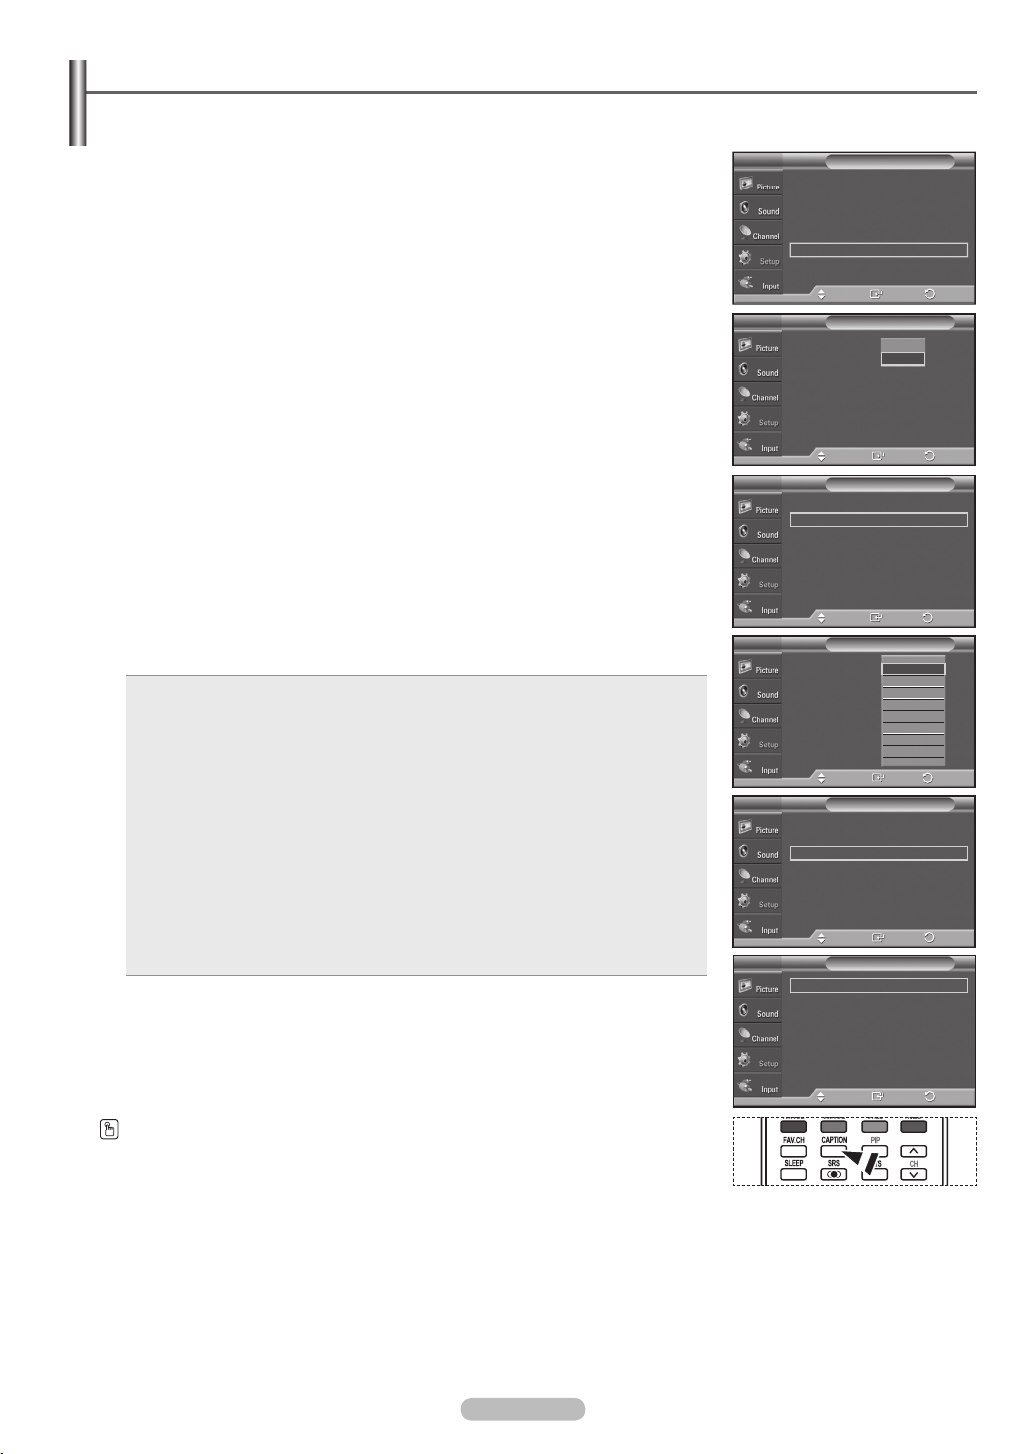
Viewing Closed Captions (On-Screen Text Messages) - Digital
The Digital Captions function operates on digital channels.
1 Press the MENU button to display the menu.
Press the ▲ or ▼ button to select Setup, then press the ENTER button.
2 Press the ▲ or ▼ button to select Caption, then press the ENTER button.
3 Press the ENTER button to select Caption.
Press the ▲ or ▼ button to select On, then press the ENTER button.
4 Press the ▲ or ▼ button to select Caption Mode, then press the ENTER button.
Press the ▲ or ▼ button to select submenu (Default, Service1~Service6,
CC1~CC4 or Text1~Text4) you want, then press the ENTER button.
5. Press the ▲ or ▼ button to select Caption Options, then press the ENTER
button.
6 Press the ▲ or ▼ button to select Size, then press the ENTER button.
Press the ▲ or ▼ button to select the desired caption option, then press the
ENTER button.
Press the ▲ or ▼ button to select the desired sub-menu options (see options
below), then press the ENTER button.
Press the
➢
➢
➢
➢
EXIT button to exit.
The availability of captions depends on the program being broadcast.
Default means to follow the standard set by the broadcaster.
Foreground and Background cannot be set to have the same color.
Foreground Opacity and Background Opacity cannot be both set to
Transparent.
• Size: This option consists of Default, Small, Standard, and Large. The default is Default.
• Font Style: This option consists of Default, Style0 ~ Style7. You can change the font you
• Foreground Color: This option consists of Default, White, Black, Red, Green, Blue,
• Background Color: This option consists of Default, White, Black, Red, Green, Blue,
• Foreground Opacity: This option consists of Default, Transparent, Translucent, Solid,
• Background Opacity: This option consists of Default, Transparent, Translucent, Solid,
• Return to Default: This option sets each of Size, Font Style, Foreground Color,
Press the CAPTION button on the remote control to select On or Off.
want. The default is
Yellow
Default.
, Magenta, and Cyan. You can change the color of the letter.
The default is Default.
Yellow
, Magenta, and Cyan. You can change the background color of
the caption. The default is
Default.
and Flashing. You can change the opacity of the letter.
and Flashing. You can change the background opacity of the
caption.
Background Color, Foreground Opacity, and Background Opacity
to its default.
SetupT V
Plug & Play
Language : English
Time
Game Mode : Off
V-Chip
Caption
Menu Transparency
▼
More
Caption : Off
Caption Mode : Default
Caption Options
Caption : On
Caption Mode : Default
Caption Options
Caption : Off
Caption Mode : Default
Caption Options
Caption : On
Caption Mode : Default
Caption Options
Size : Default
Font Style : Default
Foreground Color : Default
Background Color : Default
Foreground Opacity : Default
Background Opacity : Default
Return to Default
Move
Move
Move
Move
Move
Move
Caption OptionsT V
: Medium
Enter
CaptionT V
Off
On
Enter
CaptionT V
Enter
CaptionT V
Default
Service1
Service2
Service3
Service4
Service5
Service6
CC1
Enter
CaptionT V
Enter
Enter
►
▼
►
Return
Return
Return
Return
Return
Return
►
►
►
►
►
►
►
►
►
►
►
►
►
►
►
►
►
►
English - 50
Page 51
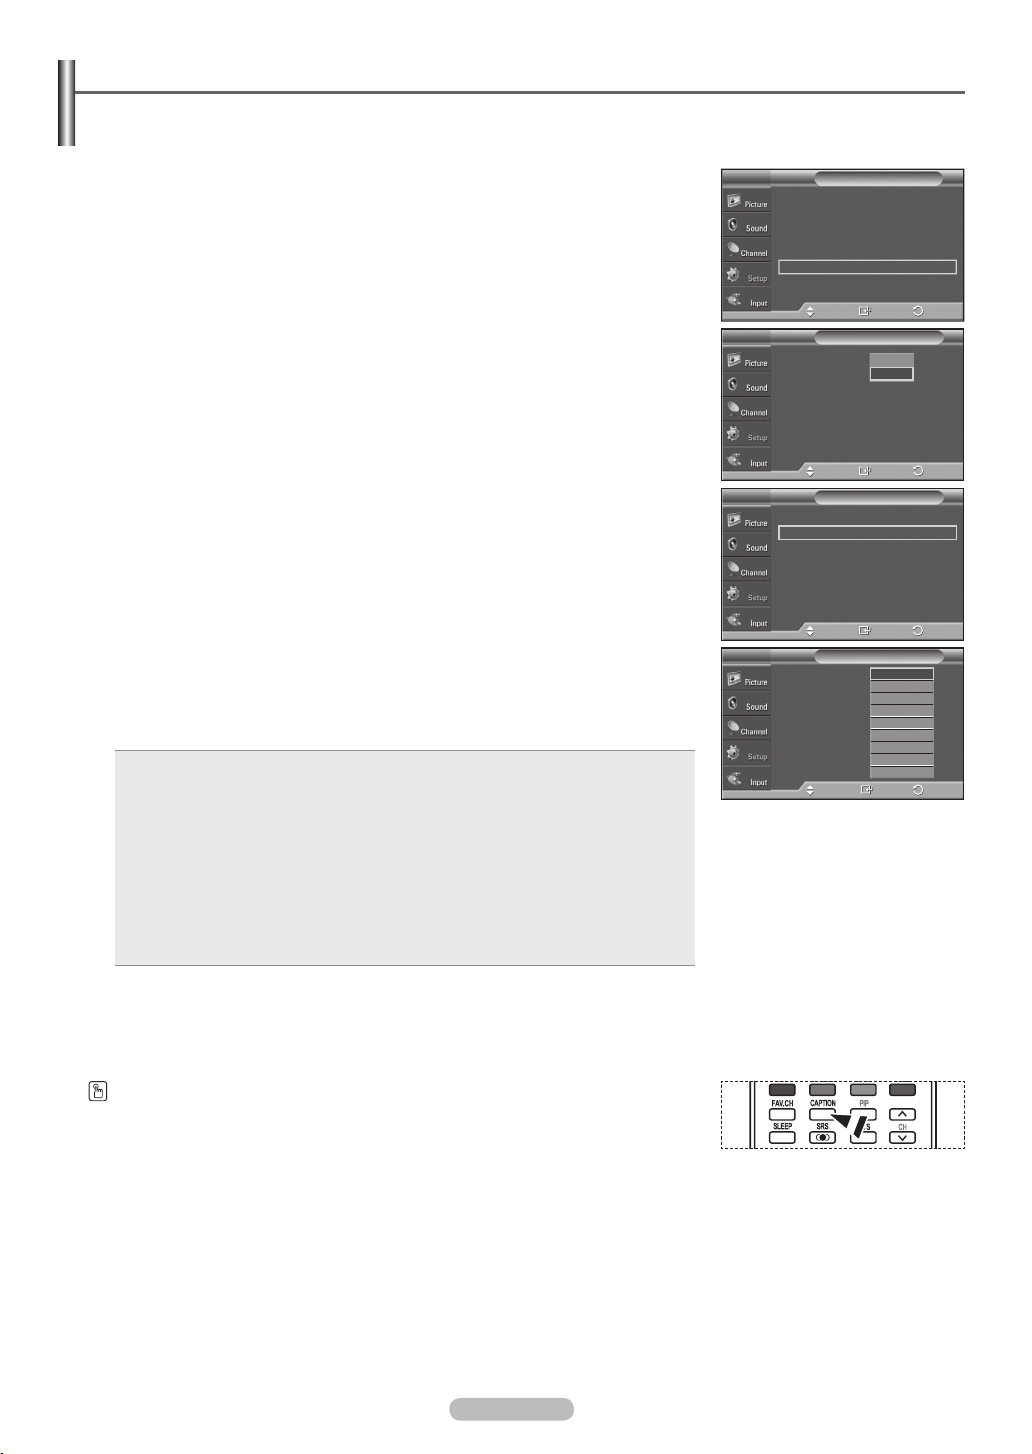
English - 51
Viewing Closed Captions (On-Screen Text Messages) - Analog
The Analog Caption function operates in either analog TV channel mode or external signal mode. (Depending on
the broadcasting signal, the Analog Caption function may operate on digital channels.)
1 Press the MENU button to display the menu.
Press the ▲ or ▼ button to select Setup, then press the ENTER button.
2 Press the ▲ or ▼ button to select Caption, then press the ENTER button.
3 Press the ENTER button to select Caption.
Press the ▲ or ▼ button to select On, then press the ENTER button.
4 Press the ▲ or ▼ button to select Caption Mode, then press the ENTER
button. Press the ▲ or ▼ button to select submenu (CC1~CC4 or Text1~Text4)
you want, then press the ENTER button.
Press the
• The default is Default.
• CC1: The Primary Synchronous Caption Service. These are captions in the primary
• CC2: The Special Non-Synchronous Use Captions.This channel carries data that is intended
• CC3: Secondary Synchronous Caption Service.
• CC4: Special Non-Synchronous Use Captions. Similar to CC2.
• Text1: First Text Service. This may be various non-program related data.
• Text2: Second Text Service. Additional data, usually not program related.
• Text3/Text4: Third and Fourth Text Services. These data channels should be used only if
EXIT button to exit.
language that must be in sync with the sound, preferably matched to a specific frame.
to augment information carried in the program.
Alternate program-related caption data, typically second language captions.
Text1 and Text2 are not sufficient.
SetupT V
Plug & Play
Language : English
Time
Game Mode : Off
V-Chip
Caption
Menu Transparency
▼
More
Caption : Off
Caption Mode : Default
Caption Options
Caption : On
Caption Mode : Default
Caption Options
Caption : Off
Caption Mode : Default
Caption Options
Move
Move
Move
Move
: Medium
Enter
CaptionT V
Off
On
Enter
CaptionT V
Enter
CaptionT V
Default
CC1
CC2
CC3
CC4
Text 1
Text 2
Text 3
Text 4
Enter
►
Return
Return
Return
Return
►
►
►
►
►
►
►
►
►
• The Caption feature doesn’t work in COMPONENT, PC, HDMI(DVI)
➢
modes.
• The availability of captions depends on the program being broadcast.
You can also press the CAPTION button on the remote control to select Captions
On or Off.
Page 52
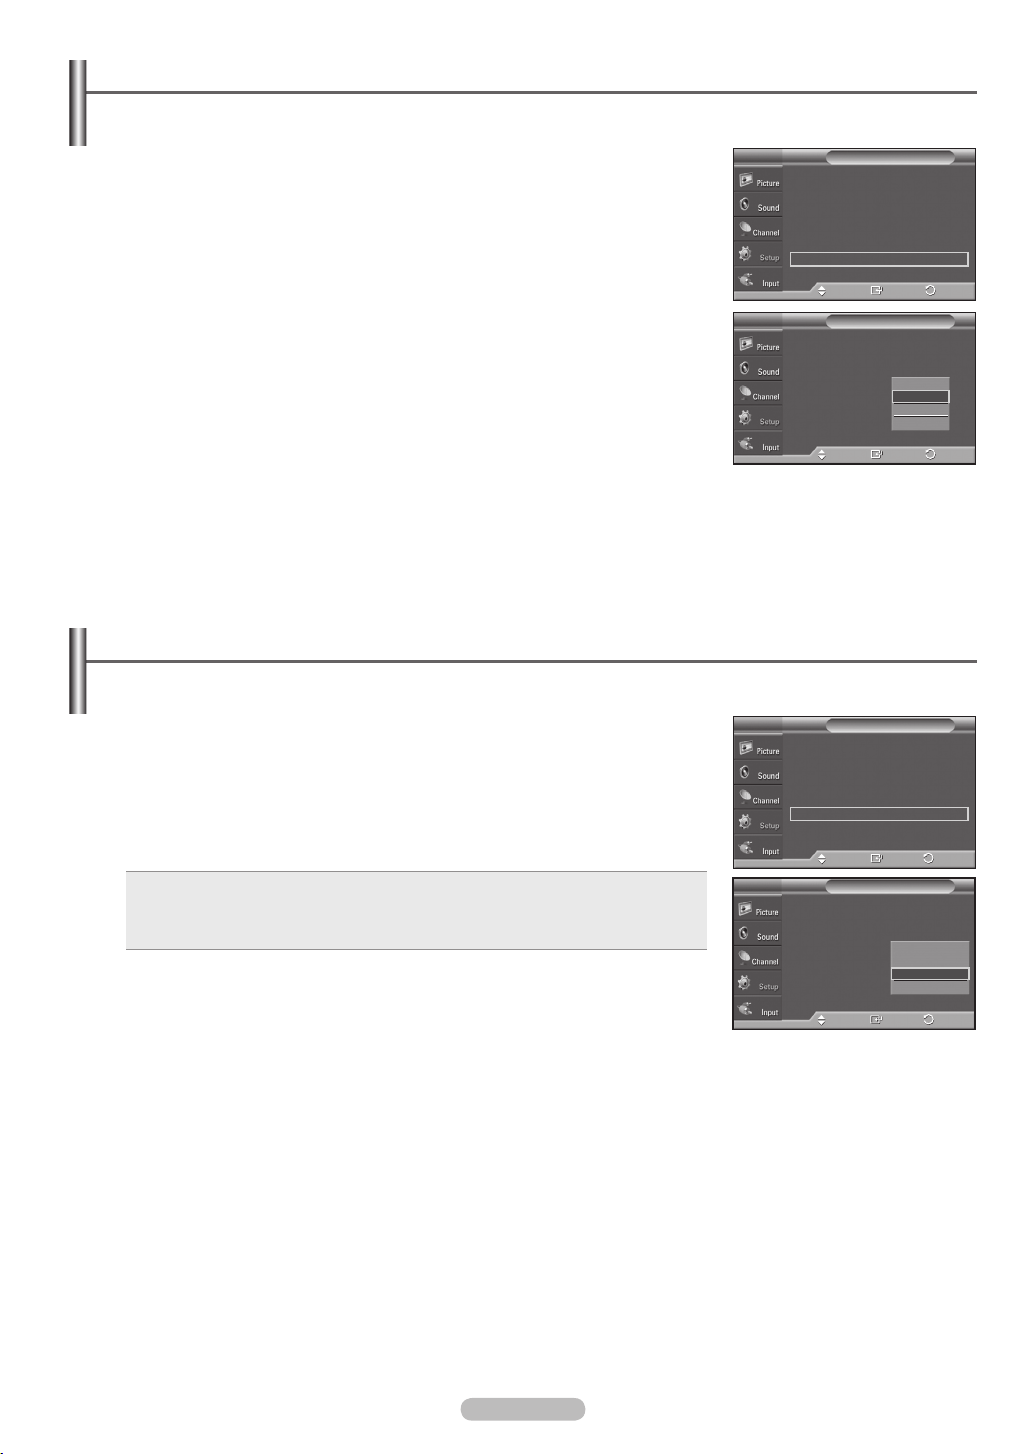
Menu Transparency Level
Adjusts the transparency of the menu screen.
1 Press the MENU button to display the menu.
Press the ▲ or ▼ button to select Setup, then press the ENTER button.
2 Press the ▲ or ▼ button to select Menu Transparency, then press the ENTER
button.
3 Press the ▲ or ▼ button to select level, then press the ENTER button.
Press the
EXIT button to exit.
Setting the Light Effect
You can turn the blue LED on the front of your TV on/off.
1 Press the MENU button to display the menu.
Press the ▲ or ▼ button to select Setup, then press the ENTER button.
2 Press the ▲ or ▼ button to select Light Effect, then press the ENTER button.
Press the ▲ or ▼ button to select Off, In Standby, In Watching TV, or Always,
then press the ENTER button.
Press the
• Off: The LED is always off.
• In Standby:
• In Watching TV:
• Always: The LED is always lit.
Set the Light Effect to Off to reduce power consumption.
➢
EXIT button to exit.
The LED lights while in Standby mode and it turns off when your TV is turned on.
The LED lights when watching TV and it turns off when your TV is turned off.
Plug & Play
Language : English
Time
Game Mode : Off
V-Chip
Caption
Menu Transparency
▼
More
Plug & Play
Language : English
Time
Game Mode : Off
V-Chip
Caption
Menu Transparency
▼
More
▲
More
Blue Screen : Off
Melody : Medium
PC
Home Theater PC : Off
Light Effect :
Energy Saving : Off
▼
More
T V
▲
More
Blue Screen : Off
Melody : Medium
PC
Home Theater PC : Off
Light Effect :
Energy Saving : Off
▼
More
Move
Move
Move
Move
SetupT V
: Medium
Enter
SetupT V
High
Medium
Low
Opaque
: Medium
Enter
SetupT V
In Watching TV
Enter
Setup
Off
In Standby
In Watching TV
In Watching TV
Always
Enter
►
►
►
►
►
►
►
Return
Return
►
►
►
►
►
►
Return
Return
English - 52
Page 53
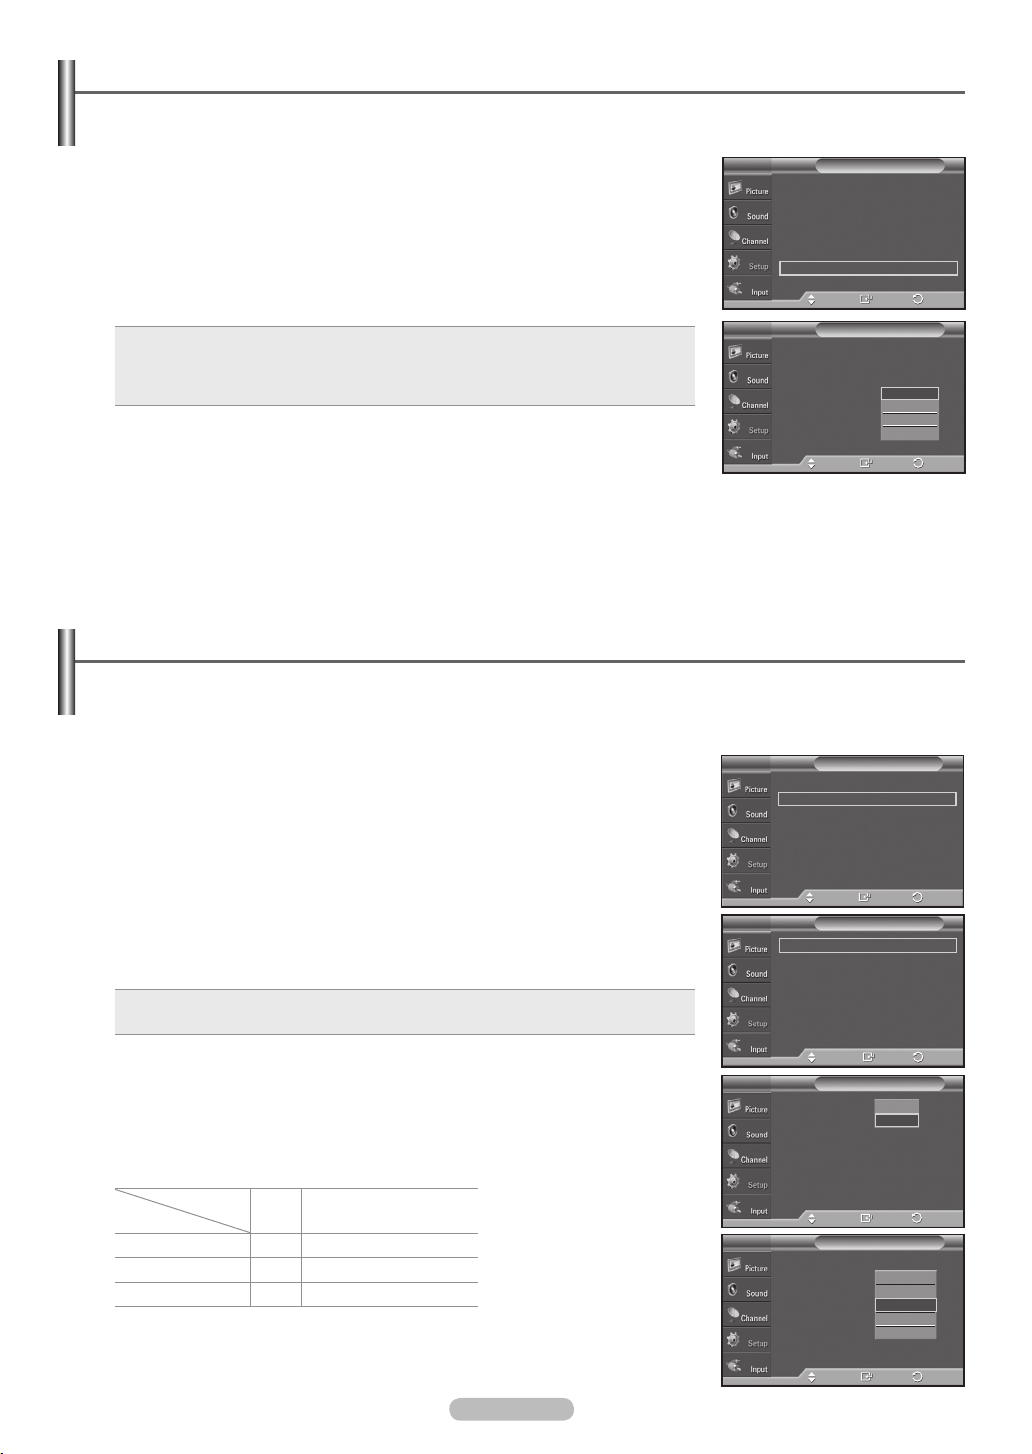
English - 53
Using the Energy Saving Feature
This feature adjusts the power consumption of the unit in order to save energy.
1 Press the MENU button to display the menu.
Press the ▲ or ▼ button to select Setup, then press the ENTER button.
2 Press the ▲ or ▼ button to select Energy Saving, then press the ENTER
button.
Press the ▲ or ▼ button to select Off, Low, Medium, or High, then press the
ENTER button.
Press the
• Off: Switches off the Energy Saving mode.
• Low: Operates in standard mode.
• Medium: Enters medium power saving mode.
• High: Enters maximum power saving mode.
EXIT button to exit.
T V
▲
More
Blue Screen : Off
Melody : Medium
PC
Home Theater PC : Off
Light Effect :
Energy Saving : Off
▼
More
T V
▲
More
Blue Screen : Off
Melody : Medium
PC
Home Theater PC : Off
Light Effect :
Energy Saving : Off
▼
More
Move
Move
Setup
In Watching TV
Enter
Setup
Off
Low
In Watching TV
Medium
High
Enter
Preventing Screen Burn-in
To reduce the possibility of screen burn, this unit is equipped with screen burn prevention technology. This
technology enables you to set picture movement up/down (Vertical Line) and side to side (Horizontal Dot).
The Time setting allows you to program the time between movement of the picture in minutes.
Return
Return
►
►
►
►
►
►
1 Press the MENU button to display the menu.
Press the ▲ or ▼ button to select Setup, then press the ENTER button.
2 Press the ▲ or ▼ button to select Screen Burn Protection, then press the
ENTER button.
3 Press the ENTER button to select Pixel Shift, then press the ENTER button.
Pressing the ▲ or ▼ button will alternate between On and Off.
You will also see the items
• Pixel Shift: Using this function, you can minutely move pixels on the PDP in horizontal or
vertical direction to prevent after-images on the screen.
Horizontal Dot, Vertical Line and Time.
4 Press the ▲ or ▼ button to select the item you wish to change, then press the
ENTER button.
Press the ▲ or ▼ button to change the value of the item, then press the ENTER
button.
• Optimum condition for pixel shift;
TV/AV1/AV2/S-Video/
PC
Component/HDMI
Horizontal Dot 1 2
Vertical Line
Time(min)
Press the
EXIT button to exit.
1 2
2 2
Move
Screen Burn ProtectionT V
Move
Move
SetupT V
Enter
Return
Return
Enter
Pixel ShiftT V
Off
On
Return
Enter
Pixel ShiftT V
0
1
2
3
4
▲
More
Screen Burn Protection
HDMI Black Level : Normal
Film Mode : Off
Wall-Mount Adjustment
PIP
Function Help : On
SW Upgrade
Pixel Shift
White
Scrolling
Side Gray : Dark
Pixel Shift : On
Horizontal Dot : 2
Vertical Line : 2
Time : 2
Pixel Shift : On
Horizontal Dot : 2
Vertical Line : 2
Time : 1
►
►
►
►
►
►
►
►
►
►
►
Move
Enter
Return
Page 54
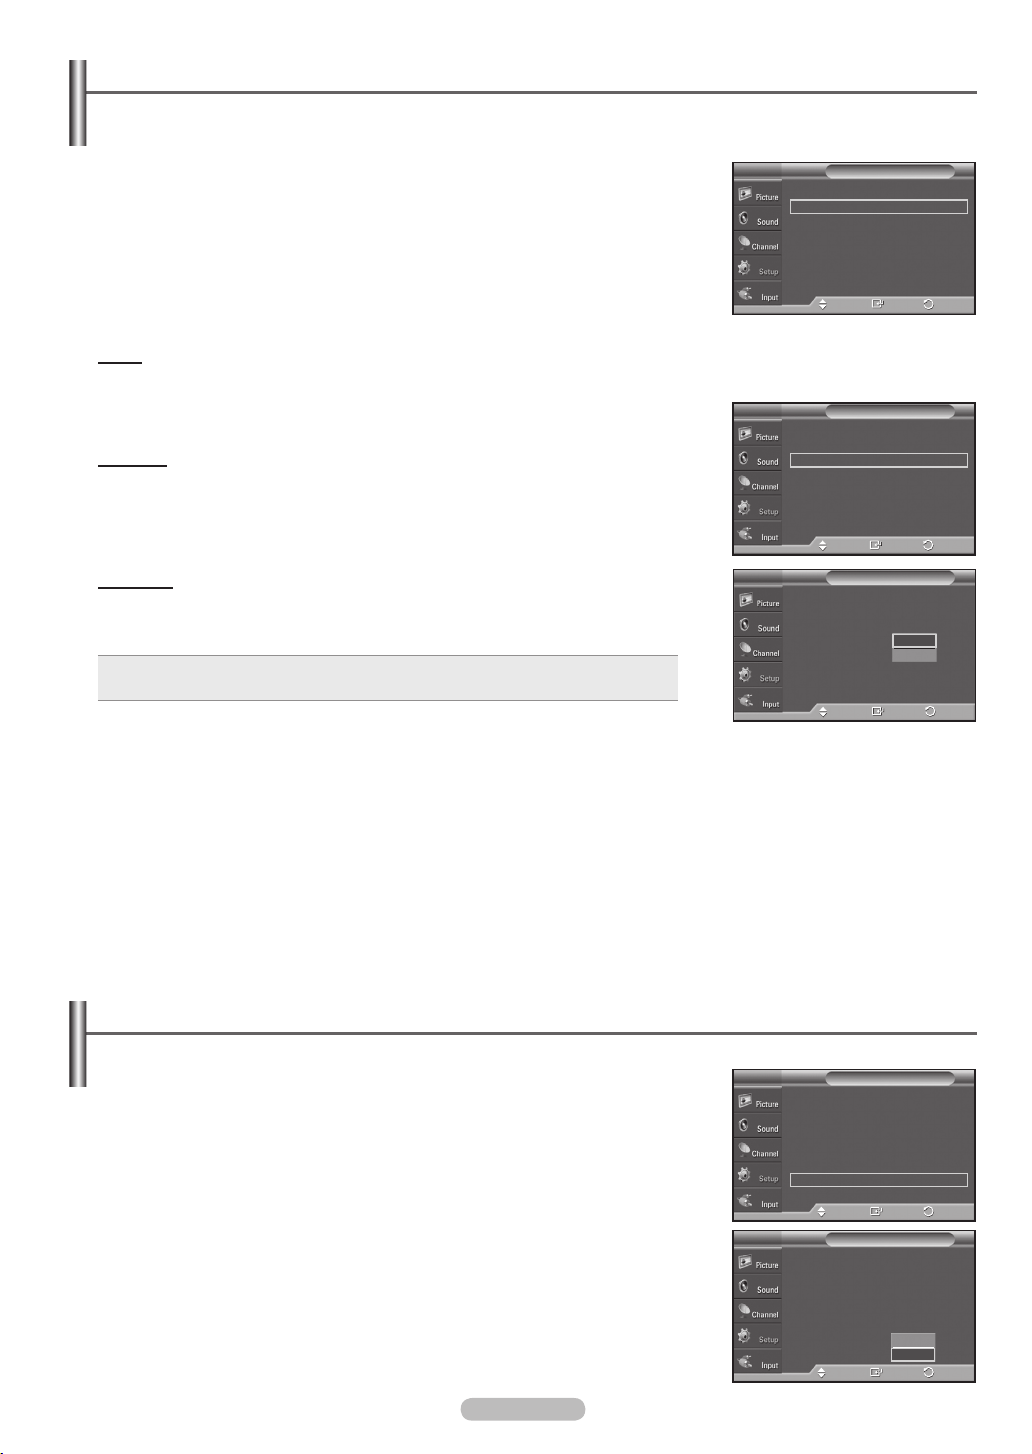
Reducing the Effects of Screen Burn
If screen burn has occurred, you can select a white screen or scrolling to help remove screen burn artifacts.
1 Press the MENU button to display the menu.
Press the ▲ or ▼ button to select Setup, then press the ENTER button.
2 Press the ▲ or ▼ button to select Screen Burn Protection, then press the
ENTER button.
3 Press the ▲ or ▼ button to select White, Scrolling, or Side Gray
then press the ENTER button.
Press the
EXIT button to exit.
White
This function removes after-images on the screen by changing the color of pixels to
white. Use this function when there are remaining after-images or symbols on the
screen especially when you displayed a still image on the screen for a long time.
Scrolling
This function removes after-images on the screen by moving all the pixels on the
PDP according to a pattern. Use this function when there are remaining after-images
or symbols on the screen especially when you displayed a still image on the screen
for a long time.
Side Gray
When you watch TV with the screen ratio of 4:3, the screen is prevented from any
damage by adjusting the white balance on both extreme left and right sides.
To prevent the screen burn from happening, select Dark or Light.
• Dark: When you set the screen ratio to 4:3, it darkens the left and right sides.
• Light: When you set the screen ratio to 4:3, it brightens the left and right sides.
To remove after-images on the screen, use either the White or Scrolling
➢
function. Although both functions remove after-images on the screen,
Scrolling
is more effective.
The after-image removal function has to be executed for a long time
➢
(approximately 1 hour) to effectively remove after-images on the screen. If the
after-image is not removed after performing the function, repeat the function
again.
Press any key on the remote control to cancel this feature.
➢
Screen Burn ProtectionT V
Pixel Shift
White
Scrolling
Side Gray : Dark
Move
Enter
Screen Burn ProtectionT V
Pixel Shift
White
Scrolling
Side Gray : Dark
Move
Enter
Screen Burn ProtectionT V
Pixel Shift
White
Scrolling
Side Gray : Dark
Move
Dark
Light
Enter
Return
Return
Return
►
►
►
►
►
►
►
►
Setting the Function Help
Displays help on the menu functions.
1 Press the MENU button to display the menu.
Press the ▲ or ▼ button to select Setup, then press the ENTER button.
2 Press the ▲ or ▼ button to select Function Help, then press the ENTER
button.
3 Press the ▲ or ▼ button to select Off or On, then press the ENTER button.
Press the
➢
EXIT button to exit.
The Function Help default setting is On.
English - 54
▲
More
Screen Burn Protection
HDMI Black Level : Normal
Film Mode : Off
Wall-Mount Adjustment
PIP
Function Help : On
SW Upgrade
T V
▲
More
Screen Burn Protection
HDMI Black Level : Normal
Film Mode : Off
Wall-Mount Adjustment
PIP
Function Help : On
SW Upgrade
Move
Move
SetupT V
Enter
Setup
Enter
Off
On
►
►
►
►
►
►
►
Return
Return
Page 55
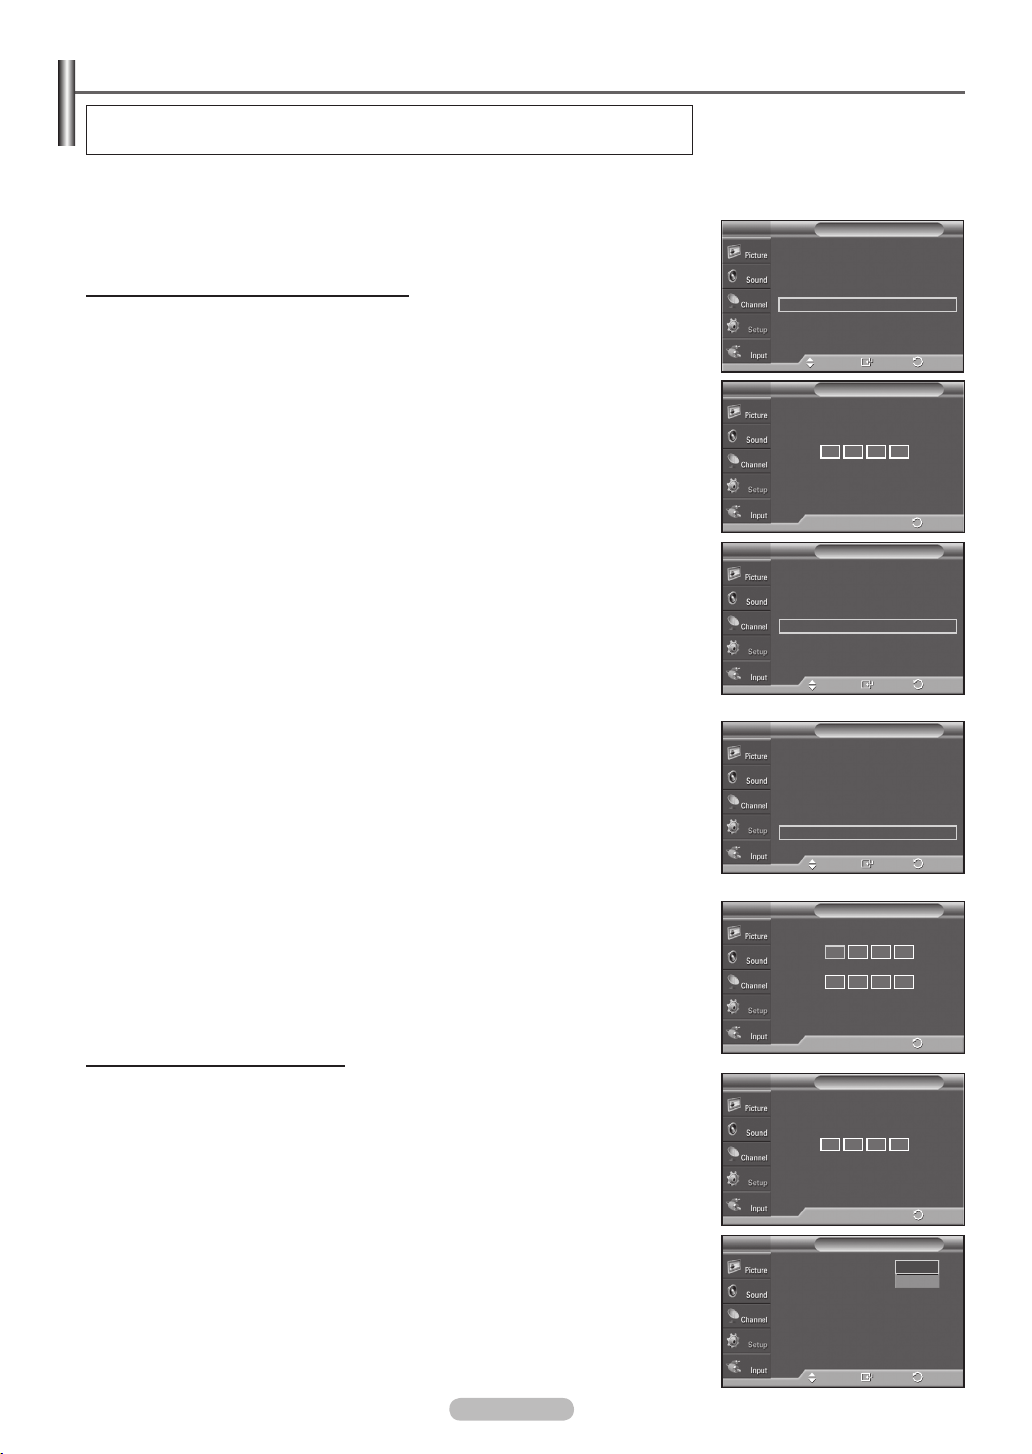
English - 55
Using the V-Chip
U.S.A Only
This product is covered by the following U.S. patents : US4,930,158 US4,930,160
The V-Chip feature automatically locks out programs that are deemed inappropriate for children. The user must
enter a PIN (personal ID number) before any of the V-Chip restrictions are set up or changed.
When the V-Chip feature is activated, the PIP features do not function.
➢
V-Chip function is not available in HDMI or component mode.
➢
Setting Up Your Personal ID Number (PIN)
1 Press the MENU button to display the menu.
Press the ▲ or ▼ button to select Setup, then press the ENTER button.
2 Press the ▲ or ▼ button to select V-Chip, then press the ENTER button.
The message Enter PIN will appear. Enter your 4 digit PIN number.
The default PIN number of a new TV set is 0-0-0-0.
➢
T V
Plug & Play
Language : English
Time
Game Mode : Off
V-Chip
Caption
Menu Transparency
▼
More
Enter PIN
Move
Setup
►
►
►
►
►
: Medium
Enter
V-ChipT V
* *
*
►
►
Return
*
3 The V-Chip screen will appear.
Press the ▲ or ▼ button to select Change PIN, then press the ENTER button.
The Change PIN screen will appear. Choose any 4 digits for your PIN and
enter them. Re-enter the same 4 digits. When the message PIN is changed
successfully.
Press the
If you forget the PIN, press the remote-control buttons in the following
➢
is displayed, your PIN has been memorized.
EXIT button to exit.
sequence, which resets the pin to 0-0-0-0 : Power Off. → MUTE → 8 → 2 →
4 → Power On.
How to Enable/Disable the V-Chip
1 Press the MENU button to display the menu.
Press the ▲ or ▼ button to select Setup, then press the ENTER button.
2 Press the ▲ or ▼ button to select V-Chip, then press the ENTER button.
The message Enter PIN will appear. Enter your 4 digit PIN number.
Enter
Return
Return
0~9 Enter PIN
V-ChipT V
V-Chip Lock : Off
TV Parental Guidelines
MPAA Rating
Downloadable U.S. Rating
Change PIN
Move
<for USA models only>
V-ChipT V
V-Chip Lock : Off
TV Parental Guidelines
MPAA Rating
Canadian English
Canadian French
Downloadable U.S. Rating
Change PIN
Enter
Return
Move
<for Canada models only>
Change PINT V
Enter new PIN
Confirm new PIN
0~9 Enter PIN
V-ChipT V
Enter PIN
* * * *
Return
►
►
►
►
►
►
►
►
►
►
►
►
3 The V-Chip screen will appear.
To enable the V-Chip feature, press the
ENTER button so that the V-Chip Lock
field is On. (Pressing the ▲ or ▼ button will alternate between On and Off.)
Press the ENTER button.
Press the
EXIT button to exit.
Enter
Return
Off
On
Return
0~9 Enter PIN
V-ChipT V
V-Chip Lock : Off
TV Parental Guidelines
MPAA Rating
Canadian English
Canadian French
Downloadable U.S. Rating
Change PIN
Move
Page 56
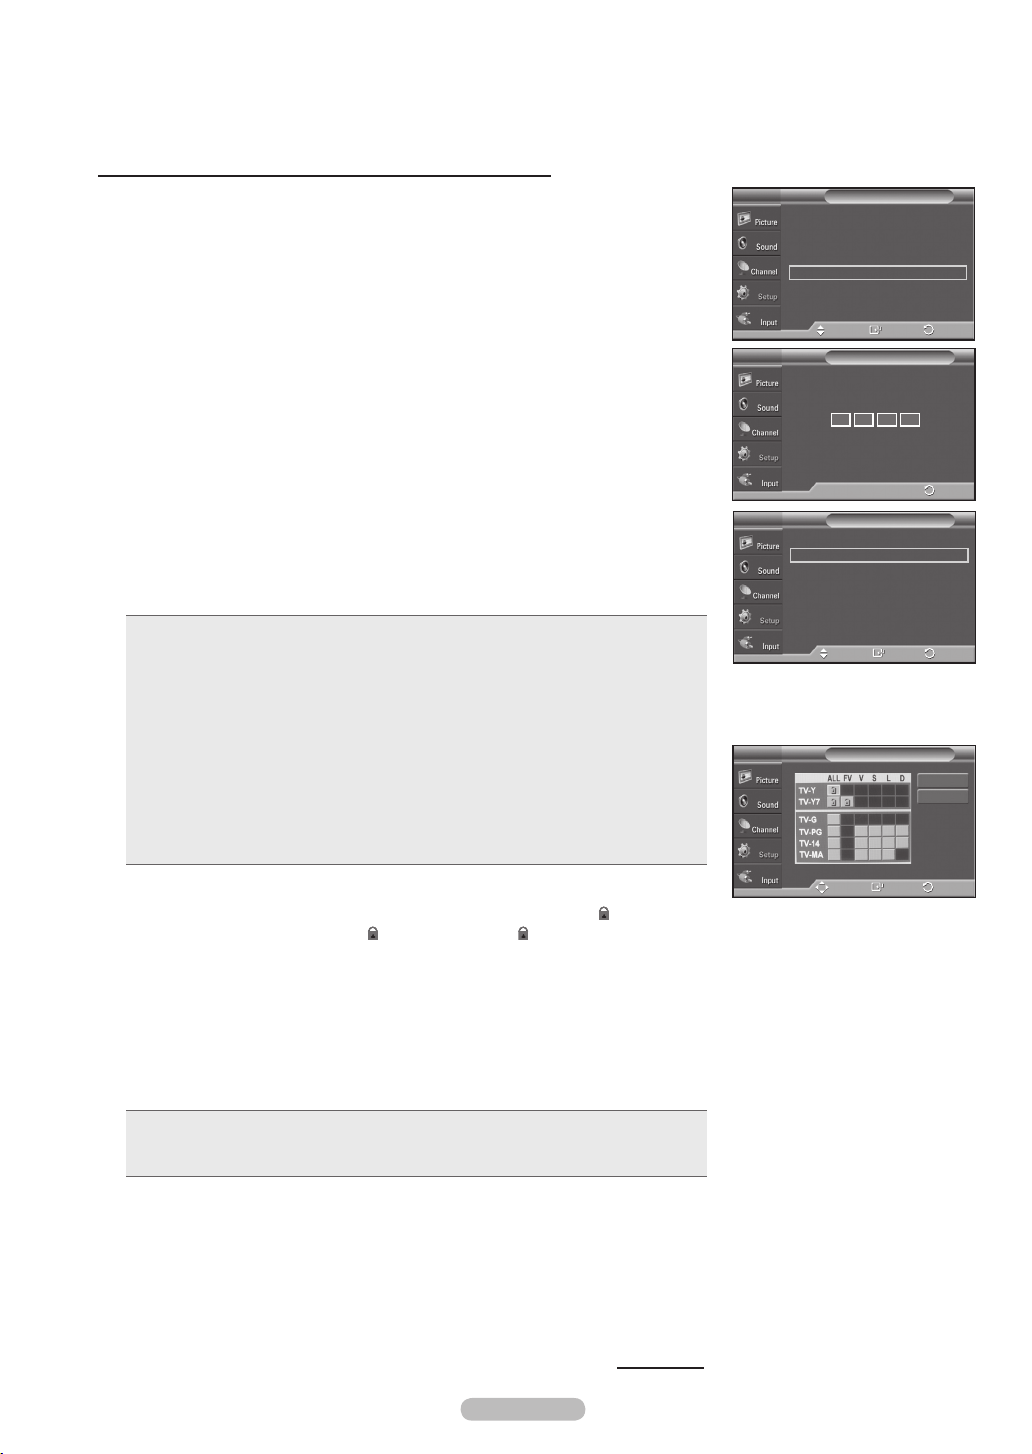
How to Set up Restrictions Using “TV Parental Guidelines”
First, set up a personal identification number (PIN), and enable the V-Chip.
(See previous section.) Parental restrictions can be set up using either of two
methods: The TV guidelines or the MPAA rating.
1 Press the MENU button to display the menu.
Press the ▲ or ▼ button to select Setup, then press the ENTER button.
SetupT V
Plug & Play
Language : English
Time
Game Mode : Off
V-Chip
Caption
Menu Transparency
▼
More
Move
: Medium
Enter
V-ChipT V
Return
►
►
►
►
►
►
►
2 Press the ▲ or ▼ button to select V-Chip, then press the ENTER button.
The message Enter PIN will appear. Enter your 4 digit PIN number.
3 The V-Chip screen will appear. Press the ▲ or ▼ button to select TV Parental
Guidelines, then press the ENTER button.
4 The TV Parental Guidelines screen will appear.
Press the ▲ or ▼ button to select one of the six aged based categories:
• TV-Y: All children. The themes and elements in this program are specifically designed
for a very young audience, including children from ages two to six.
• TV-Y7: Directed to older children. The themes and elements in this program may
include mild physical or comedic violence, or may frighten children under the age of
seven.
• TV-G: General audience. It contains little or no violence, no strong language, and little
or no sexual dialog or situations.
• TV-PG: Parental guidance suggested. This program may contain infrequent coarse
language, limited violence, some suggestive sexual dialog and situations.
• TV-14: Parents strongly cautioned. This program may contain sophisticated themes,
sexual content, strong language and more intense violence.
• TV-MA: Mature audiences only. This program may contain mature themes, profane
language, graphic violence and explicit sexual content.
5 At this point, one of the TV-Ratings is selected.
Press the ENTER button. Depending on your existing setup, the “ ” symbol will
be selected. (Blank = Unblocked, = Blocked) While “ ” is selected, press the
ENTER button to block or unblock the category.
To select a different TV-Rating, press the ▲ or ▼ button and then repeat the
process.
Allow all: Press to unlock all TV ratings.
➢
Block all: Press to lock all TV ratings.
The TV-Y, TV-Y7, TV-G, TV-PG, TV-14 and TV-MA have additional options.
➢
See the next step to change any of the following sub-ratings:
Enter PIN
* * * *
0~9 Enter PIN
V-ChipT V
V-Chip Lock : On
TV Parental Guidelines
MPAA Rating
Canadian English
Canadian French
Downloadable U.S. Rating
Change PIN
Move
Enter
TV Parental GuidelinesT V
Move
Enter
Return
Return
Allow All
Block All
Return
►
►
►
►
►
►
►
• FV: Fantasy violence.
• D: Sexually suggestive dialog.
• L: Adult language.
The V-Chip will automatically block certain categories that are “more
➢
• S: Sexual situation.
• V: Violence.
restrictive”. For example, if you block TV-Y category, then TV-Y7 will
automatically be blocked. Similarly, if you block the TV-G category, then all
the categories in the “young adult” group will be blocked (TV-G, TV-PG,
TV-14, and TV-MA). The subratings (D, L, S, V) work together similarly.
(See next section.)
Continued...
English - 56
Page 57
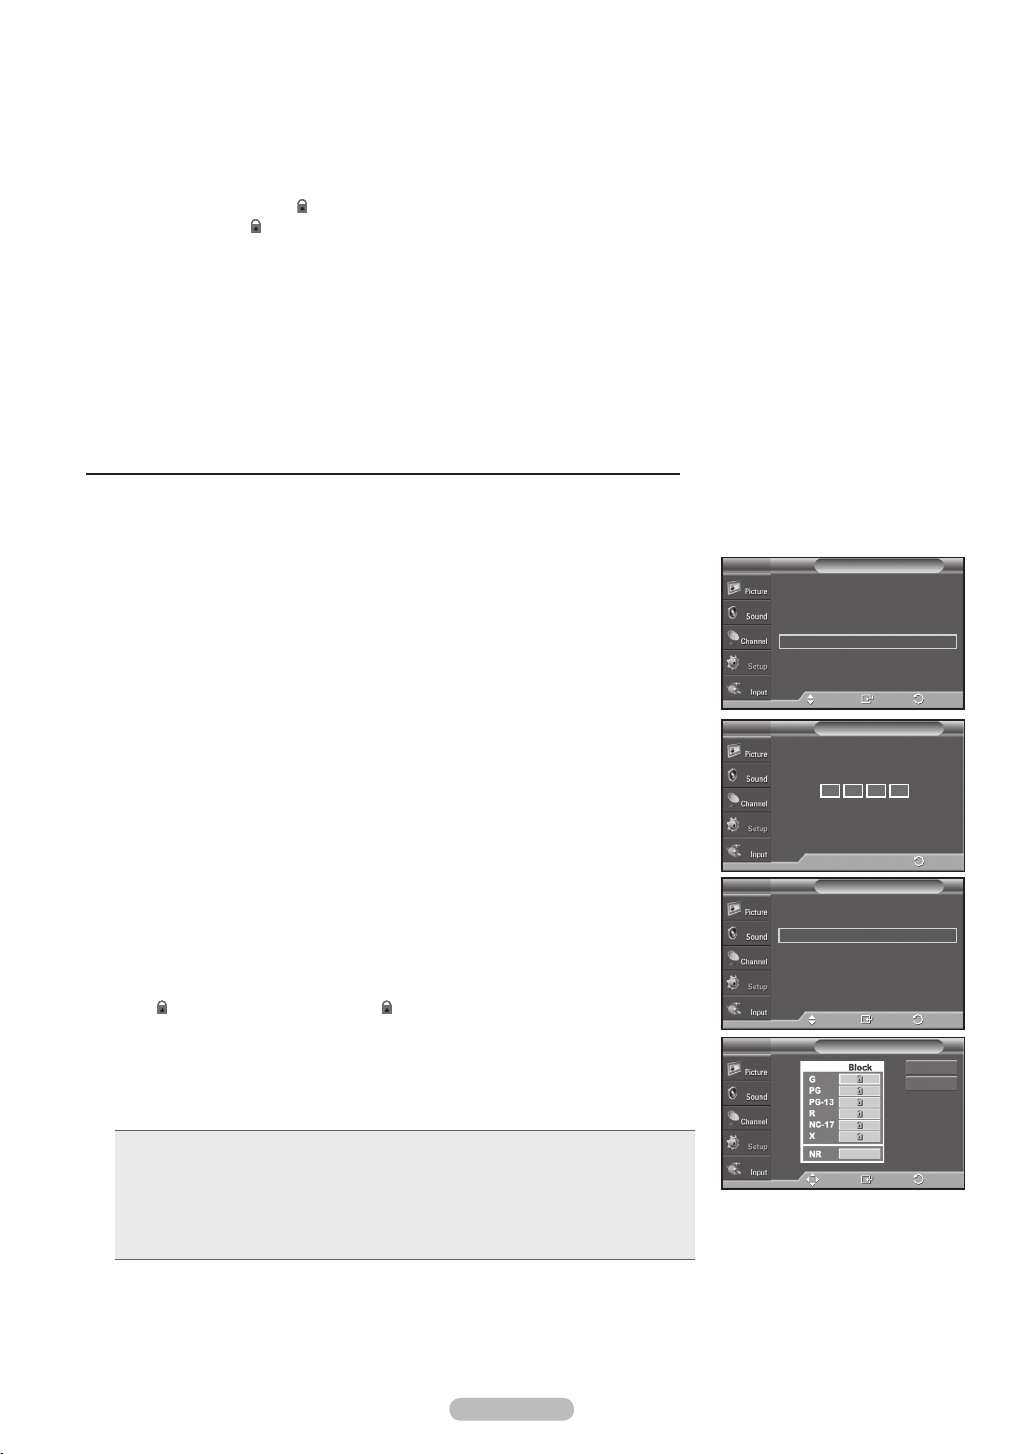
English - 57
6 How to set the FV, D, L, S and V sub-ratings. First, select one of these TV-
Ratings: TV-Y, TV-Y7, TV-G, TV-PG, TV-14, or TV-MA (See Step
4), and press
the ENTER button. The “ ” symbol will be displayed for each
sub-rating. While “ ” is selected, press the ► button to go to a sub rating.
Press the ENTER to block the sub rating. To select a different TV-Rating,
press the ▲ or ▼ button and then repeat the process.
7 Press the EXIT button to clear all the screens. (Or proceed to the next section,
and set up additional restrictions based on the MPAA codes.)
These categories consist of two separate groups: TV-Y and TV-Y7 (young
➢
children through age 7), and TV-G through TV-MA (everybody else).
The restrictions for these two groups work independently: If a household
includes very young children as well as young adults, the TV guidelines must
be set up separately for each age group.
How to Set up Restrictions Using “MPAA Ratings” (G, PG, PG-13, R, NC-17, X, NR )
The MPAA rating system uses the Motion Picture Association of America
(MPAA) system, and its main application is for movies. When the V-Chip
lock is on, the TV will automatically block any programs that are coded with
objectionable ratings (either MPAA or TV-Ratings).
1 Press the MENU button to display the menu.
Press the ▲ or ▼ button to select Setup, then press the ENTER button.
2 Press the ▲ or ▼ button to select V-Chip, then press the ENTER button.
The message
Enter PIN will appear. Enter your 4 digit PIN number.
T V
Plug & Play
Language : English
Time
Game Mode : Off
V-Chip
Caption
Menu Transparency
▼
More
Move
Setup
: Medium
Enter
V-ChipT V
Return
►
►
►
►
►
►
►
3 The V-Chip screen will appear. Press the ▲ or ▼ button to select MPAA
Rating, then press the ENTER button.
4 Press the ▲ or ▼ button to select an appropriate restriction.
Press the ENTER button to activate the restriction selected.
The “ ” symbol is indicated. While “ ” is selected, press the ENTER button to
block or unblock the category.
Press the
➢
EXIT button to exit.
Allow all: Press to unlock all TV ratings.
Block all: Press to lock all TV ratings.
• G: General audience (no restriction).
• PG: Parental guidance suggested.
• PG-13: Parents strongly cautioned.
• R: Restricted. Children under 17 should be accompanied by an adult.
• NC-17: No children under age 17.
• X: Adults only.
• NR: Not rated.
The V-Chip will automatically block any category that is “more restrictive”.
➢
For example, if you block the PG-13 category, then R, NC-17 and X will
automatically be blocked also.
Enter PIN
* *
*
0~9 Enter PIN
V-ChipT V
V-Chip Lock : On
TV Parental Guidelines
MPAA Rating
Canadian English
Canadian French
Downloadable U.S. Rating
Change PIN
Move
Enter
MPAA RatingT V
Move
Enter
*
Return
Return
Allow All
Block All
Return
►
►
►
►
►
►
►
Page 58
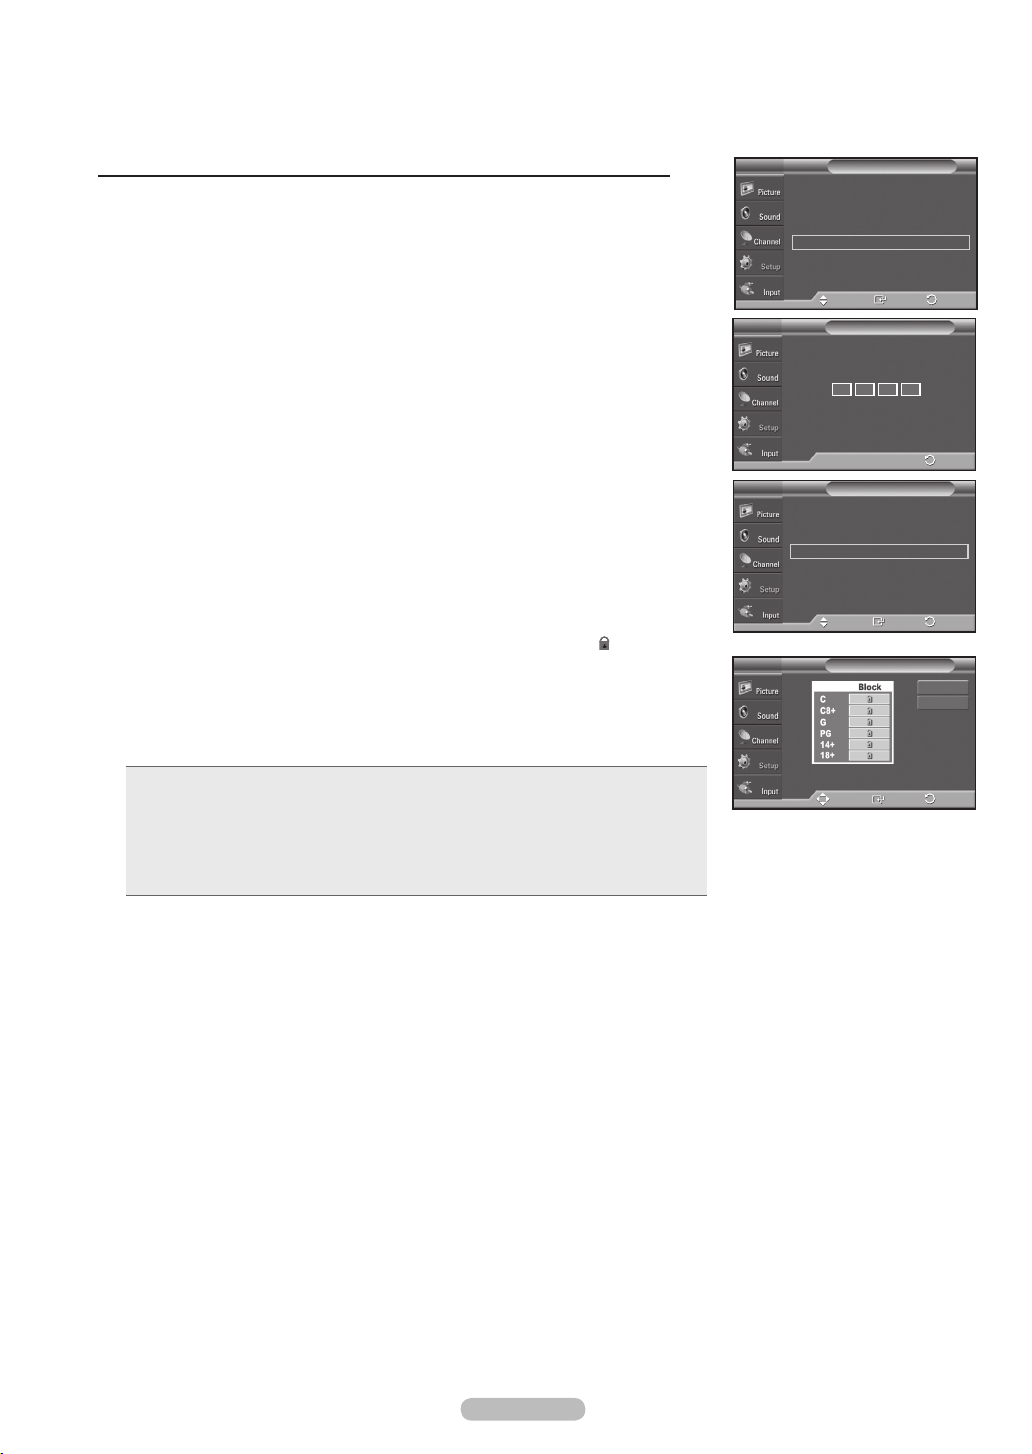
How to Set up Restrictions Using “Canadian English” (for Canada Models)
1 Press the MENU button to display the menu.
Press the ▲ or ▼ button to select Setup, then press the ENTER button.
2 Press the ▲ or ▼ button to select V-Chip, then press the ENTER button.
The message Enter PIN will appear. Enter your 4 digit PIN number.
SetupT V
Plug & Play
Language : English
Time
Game Mode : Off
V-Chip
Caption
Menu Transparency
▼
More
Enter PIN
: Medium
Move
V-ChipT V
* * * *
Enter
Return
►
►
►
►
►
►
►
3 The V-Chip screen will appear. Press the ▲ or ▼ button to select Canadian
English, then press the ENTER button
4 Press the ▲ or ▼ button to select an appropriate restriction.
Press the ENTER button to activate the restriction selected. The “ ” symbol is
indicated.
Press the
➢
EXIT button to exit.
Allow all: Press to unlock all TV ratings.
Block all: Press to lock all TV ratings.
• C: Programming intended for children under age 8.
• C8+:
Programming generally considered acceptable for children 8 years and over to watch on their own.
• G: General programming, suitable for all audiences.
• PG: Parental guidance.
• 14+: Programming contains themes or content which may not be suitable for viewers under the age
of 14.
• 18+: Adult programming.
The V-Chip will automatically block any category that is “more restrictive”.
➢
For example, if you block G category, then PG, 14+ and 18+ will
automatically be blocked also.
V-Chip Lock : On
TV Parental Guidelines
MPAA Rating
Canadian English
Canadian French
Downloadable U.S. Rating
Change PIN
T V
0~9 Enter PIN
V-ChipT V
Move
Canadian English
Move
Enter
Enter
Return
Return
Allow All
Block All
Return
►
►
►
►
►
►
►
English - 58
Page 59
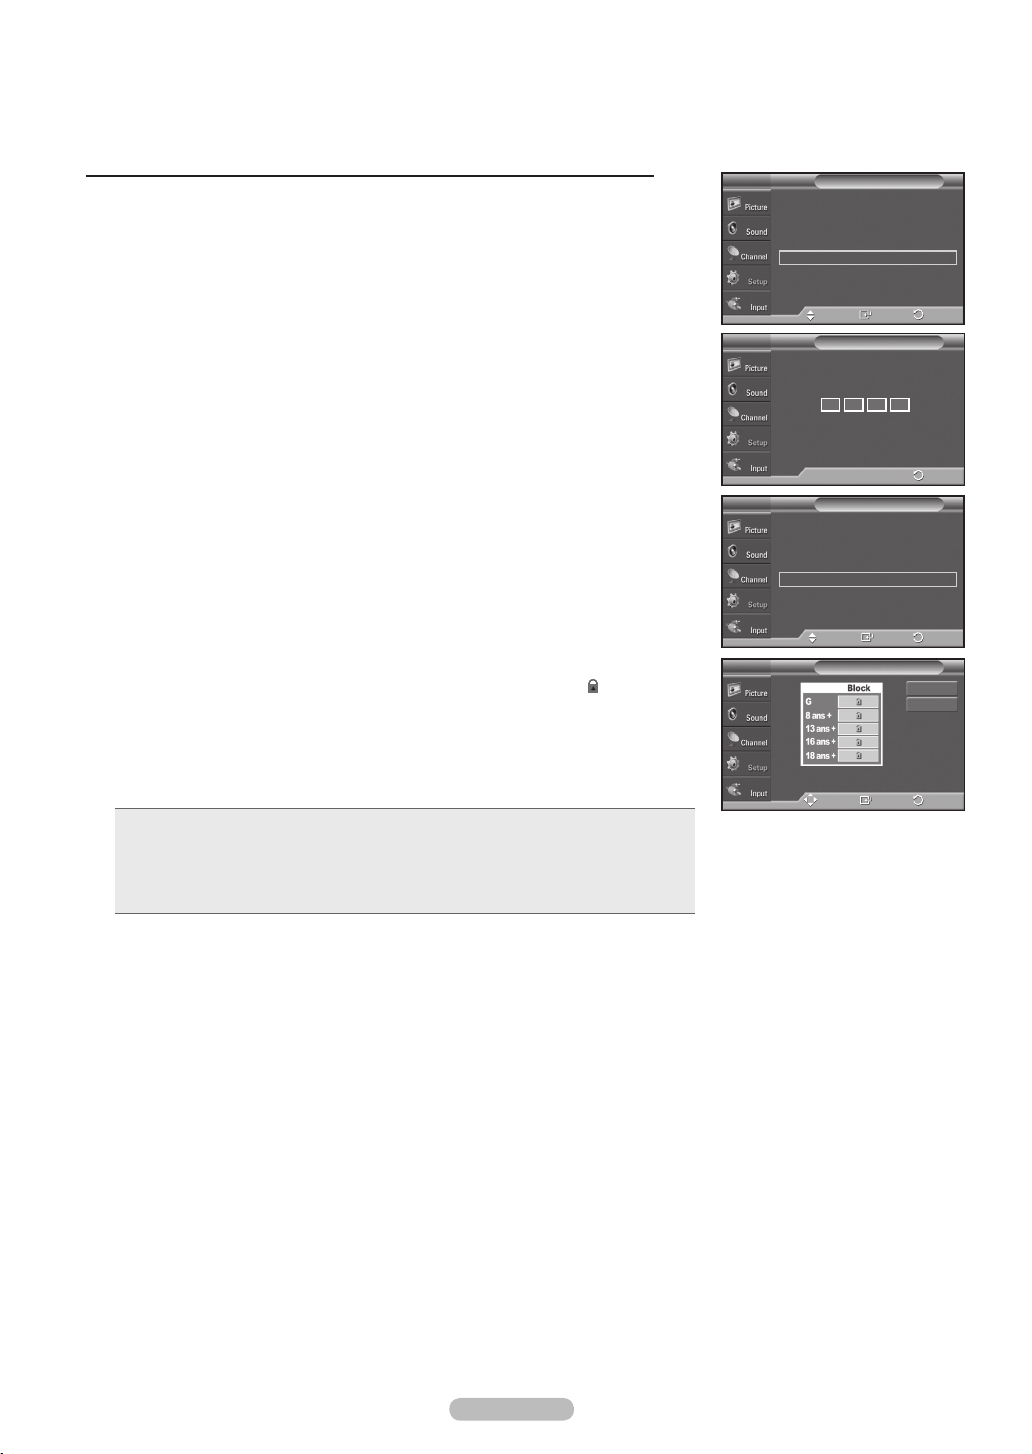
English - 59
How to Set up Restrictions Using “Canadian French” (for Canada Models)
1 Press the MENU button to display the menu.
Press the ▲ or ▼ button to select Setup, then press the ENTER button.
2 Press the ▲ or ▼ button to select V-Chip, then press the ENTER button.
The message Enter PIN will appear. Enter your 4 digit PIN number.
T V
Plug & Play
Language : English
Time
Game Mode : Off
V-Chip
Caption
Menu Transparency
▼
More
Enter PIN
Setup
Move
V-ChipT V
* * * *
: Medium
Enter
Return
►
►
►
►
►
►
►
3 The V-Chip screen will appear. Press the ▲ or ▼ button to select Canadian
French, then press the ENTER button.
4 Press the ▲ or ▼ button to select an appropriate restriction.
Press the ENTER button to activate the restriction selected. The “ ” symbol is
indicated.
Press the
➢
EXIT button to exit.
Allow all: Press to unlock all TV ratings.
Block all: Press to lock all TV ratings.
• G:
General.
• 8 ans+: Not recommended for young children.
• 13 ans+: Programming may not be suitable for children under the age of 13.
• 16 ans+: Programming is not suitable for children under the age of 16.
• 18 ans+: Programming restricted to adults.
The V-Chip will automatically block any category that is “more restrictive”.
➢
For example, if you block 8 ans+ category, then 13 ans+, 16 ans+ and 18
ans+ will automatically be blocked also.
0~9 Enter PIN
V-ChipT V
V-Chip Lock : On
TV Parental Guidelines
MPAA Rating
Canadian English
Canadian French
Downloadable U.S. Rating
Change PIN
Move
Enter
Canadian FrenchT V
Move
Enter
Return
Return
Allow All
Block All
Return
►
►
►
►
►
►
►
Page 60
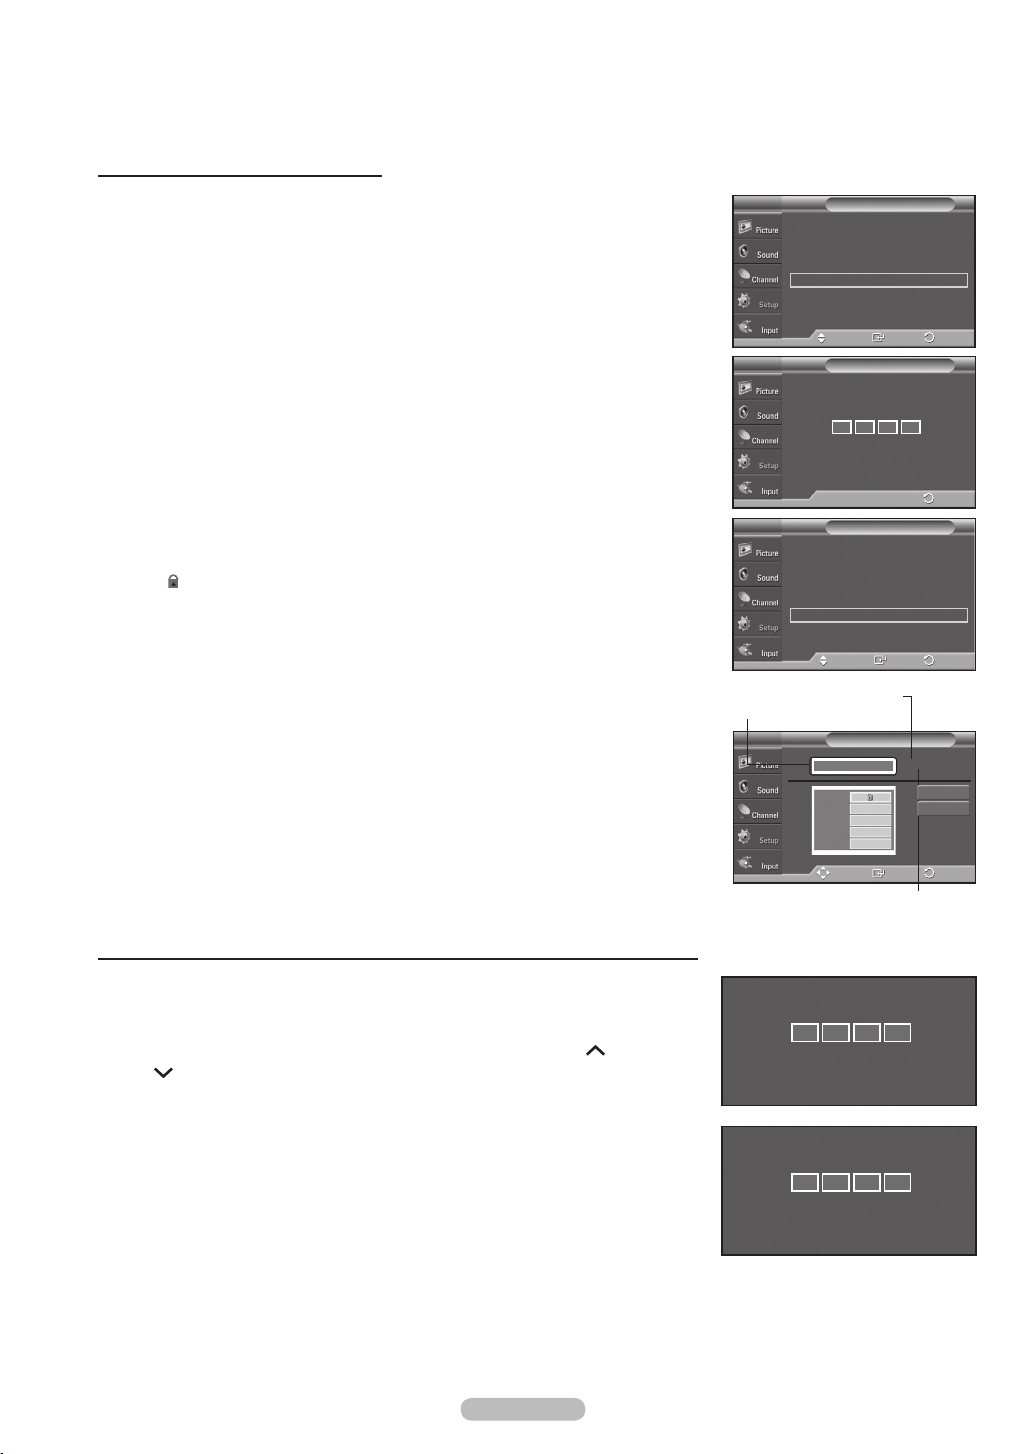
Using the V-Chip for Digital channels
Parental restriction information can be used while watching DTV channels.
1 Press the MENU button to display the menu.
Press the ▲ or ▼ button to select Setup, then press the ENTER button.
2 Press the ▲ or ▼ button to select V-Chip, then press the ENTER button.
The message Enter PIN will appear. Enter your 4 digit PIN number.
3 The V-Chip screen will appear. Press the ▲ or ▼ button to select
Downloadable U.S. Rating, then press the ENTER button.
If information is not downloaded from the broadcasting station, the
➢
Downloadable U.S. Rating menu is deactivated.
Parental restriction information is automatically downloaded while watching
➢
DTV channels. It may take several seconds.
The Downloadable U.S. Rating menu is available for use after information
➢
is downloaded from the broadcasting station. However, depending on the
information from the broadcasting station, it may not be available for use.
4 Press the ▲ or ▼ button to select an appropriate restriction
Press the ENTER button to activate the restriction selected.
The “ ” symbol is indicated.
Press the
➢
EXIT button to exit.
Allow all: Press to unlock all TV ratings.
Block all: Press to lock all TV ratings.
Parental restriction levels differ depending on the broadcasting station.
➢
The default menu name and downloadable US rating changes depending on
➢
the downloaded information.
Even if you set the on-screen display to your desired language, the
➢
Downloadable U.S. Rating menu will appear in English only.
The rating will automatically block certain categories that are more
➢
restrictive.
The rating titles (for example: Humor Level..etc) and TV ratings (for
➢
example: DH,MH,H..etc) may differ depending on the broadcasting station.
How to Reset the TV after the V-Chip Blocks a Channel (“Emergency Escape”)
If the TV is tuned to a restricted channel, the V-Chip will block it. The screen
will go blank and the following message will appear:
1 Enter your PIN.
To resume normal viewing, tune to a different channel using
CH or
CH button. Under certain conditions (depending on the rating of the local TV
programs) the V-Chip might lock out all the channels. In this case, use the
V-Chip function for an “emergency escape”:
2 Press the MENU button. Press the ▲ or ▼ button to select Setup, then press
the ENTER button.
3 Press the ▲ or ▼ button to select V-Chip, then press the ENTER button.
4 Enter your PIN, then press the ENTER button, and press the ▲ or ▼ button to
temporarily disable the V-Chip Lock.
If you forget the PIN, press the remote-control buttons in the following
➢
sequence, which resets the pin to 0-0-0-0 : Power Off. → MUTE → 8 → 2 →
4 → Power On.
T V
Plug & Play
Language : English
Time
Game Mode : Off
V-Chip
Caption
Menu Transparency
▼
More
Enter PIN
V-Chip Lock : On
TV Parental Guidelines
MPAA Rating
Canadian English
Canadian French
Downloadable U.S. Rating
Change PIN
Rating title
T V
Humor Level ► 1/2
Channel Is Locked by
Use the NUMBER buttons to enter your
pin number to unlock all channels.
Press EXIT to clear PIN.
Press MENU for main menu.
Channel Is Locked by
Use the NUMBER buttons to enter your
pin number to unlock all channels.
Press EXIT to clear PIN.
Press MENU for main menu.
Setup
: Medium
Move
Enter
V-ChipT V
* *
*
0~9 Enter PIN
V-ChipT V
Move
The number of
current rating
information
Downloadable U.S. Rating
DH
MH
H
VH
EH
Move
Enter
The number of
all the rating
information
TV-PG[ S ]
TV-PG[ L ]
Enter
*
Return
Return
Return
Allow All
Block All
Return
►
►
►
►
►
►
►
►
►
►
►
►
►
►
English - 60
Page 61
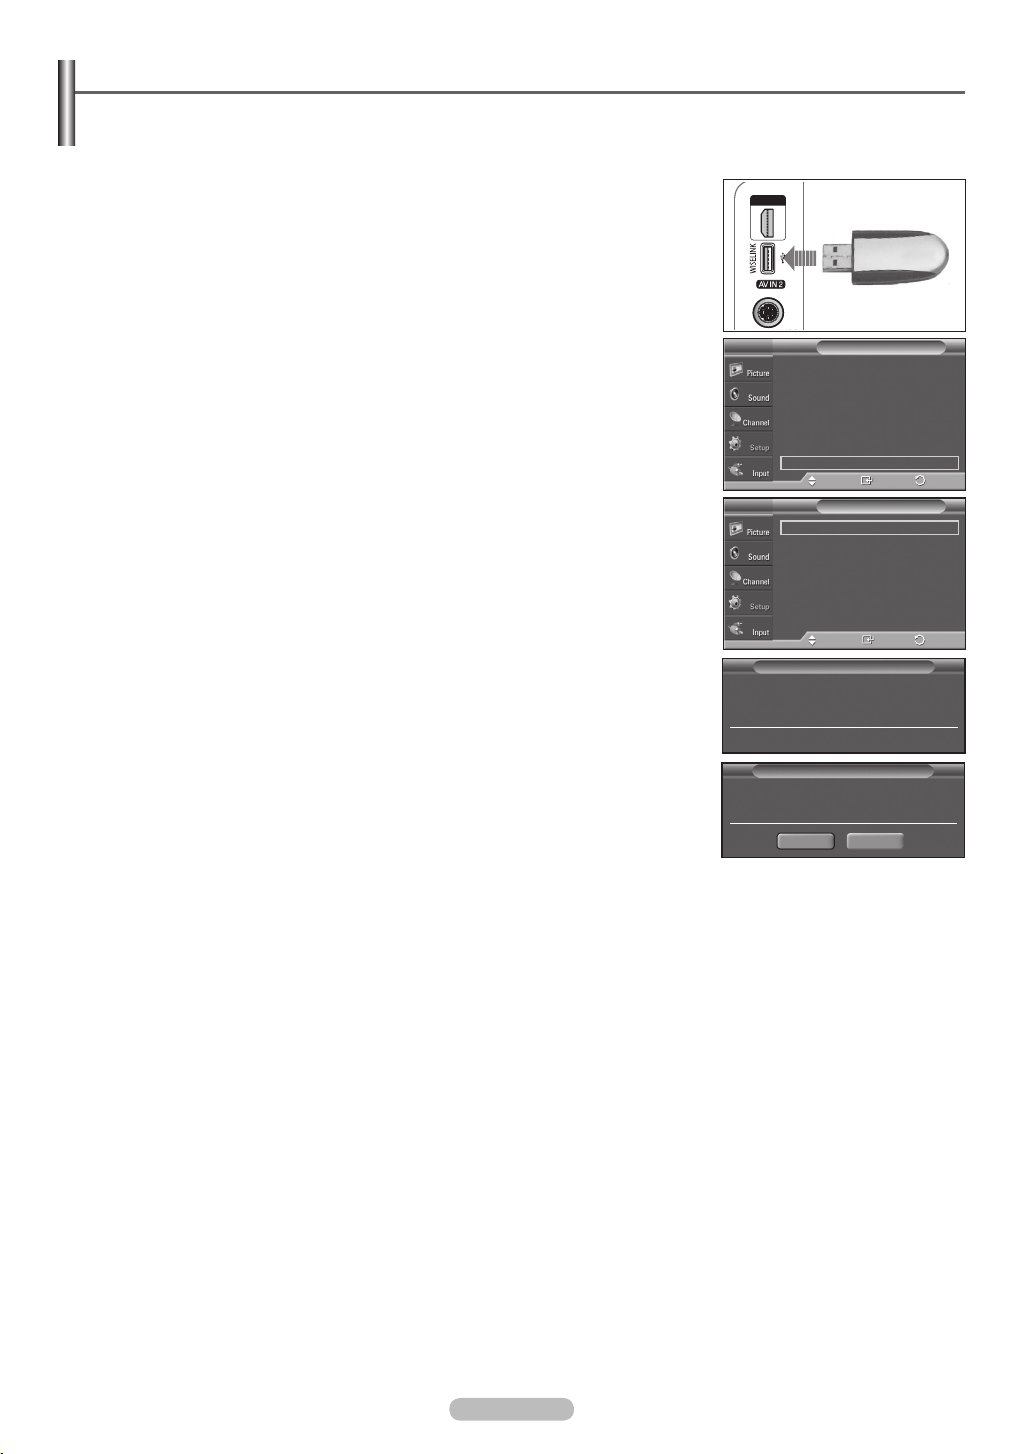
English - 61
Upgrading the Software
Samsung may offer upgrades for your TV’s firmware in the future. Please contact the Samsung call center at
1-800-SAMSUNG to receive information about downloading upgrades and using a USB drive. Upgrades will be
possible by connecting a USB drive to the USB port located on the side of your TV.
1 Insert a USB drive containing the firmware upgrade into the USB Upgrade Port
on the side of the TV.
2 Press the MENU button to display the menu.
Press the ▲ or ▼ button to select Setup, then press the ENTER button.
3 Press the ▲ or ▼ button to select SW Upgrade, then press the ENTER button.
4 Press the ▲ or ▼ button to select USB, then press the ENTER button.
The message Scanning for USB... It may take up to 30 seconds. is displayed.
5 If the firmware on the USB is properly recognized, the message Upgrade
version xxxx to version xxxx? The system would be reset after upgrade. is
displayed.
Press the ◄ or ► button to select OK, then press the ENTER button.
The upgrade starts.
Please be careful not to disconnect the power or remove the USB drive while
upgrades are being applied.
The TV will shut off and turn on automatically after completing the firmware
upgrade.
When software is upgraded, video and audio settings you have made will
➢
return to their default (factory) settings. We recommend you write down your
settings so that you can easily reset them after the upgrade.
▲
More
Screen Burn Protection
HDMI Black Level : Normal
Film Mode : Off
Wall-Mount Adjustment
PIP
Function Help : On
SW Upgrade
USB
Scanning for USB...
It may take up to 30 seconds.
Move
SW UpgradeT V
Move
SW Upgrade
SetupT V
Enter
Enter
Return
Return
►
►
►
►
►
►
►
►
SW Upgrade
Upgrade version XXXX to version XXXX ?
The system would be reset after upgrade.
OK Cancel
Page 62
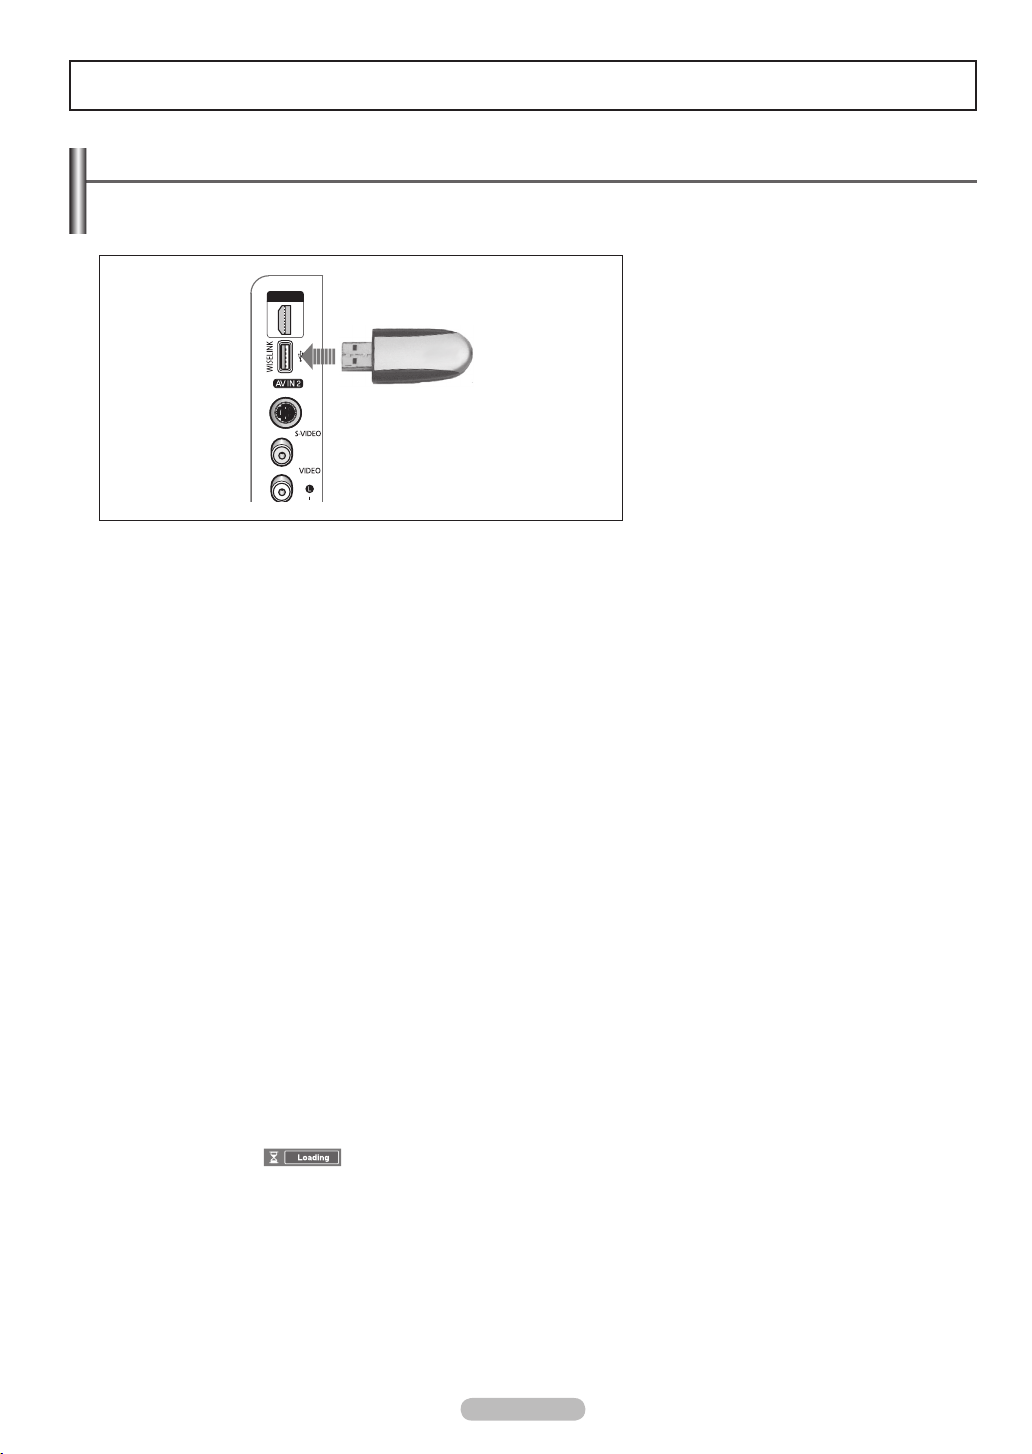
WISELINK
Using the WISELINK Function
This function enables you to view and listen to photo (BASELINE, JPEG) and audio files (MP3) saved on a USB
Mass Storage Class device.
TV Side Panel
USB (Not supplied)
WISELINK only supports USB Mass Storage Class devices (MSC). MSC is a
➢
Mass Storage Class Bulk-Only Transport device. Examples of MSC are Thumb
drives and Flash Card Readers. It does not support USB HDD and HUB.
This product supports USB devices that have only 512byte data block size.
➢
Do not apply excessive force when you insert/eject the memory card or USB
➢
device.
Do not place the memory card or USB device near a strong electro-magnetic
➢
device.
Do not allow metal substances to come in contact with the terminals on the
➢
memory card.
Do not bend, drop or apply strong shock to memory cards or USB devices.
➢
Only alphanumeric characters must be used as a folder name or filename
➢
(photo, music). The filename with non-alphanumeric characters is displayed with
“???”.
If a filename is too long, the filename is represented as follows: “filename...+.jpg”
➢
or “filename...+.mp3”.
The file system supports FAT16/32, not NTFS.
➢
Certain types of USB Digital camera and audio devices may not be compatible
➢
with this TV.
Before inserting your memory card or USB device into the TV, please back up
➢
your files. SAMSUNG is not responsible for any data file damage or data loss.
The data files in memory cards might be erased due to electrostatic discharge
➢
(EST), loose contact, or dust.
Some memory devices may not be recognized when the TV is turned on and
➢
switched to WISELINK Mode. If this occurs, remove and reinstall the memory
device in question.
Directly connect the USB device to the USB jack on your TV. Compatibility
➢
problems may occur when using a USB hub.
We recommended using the sequential JPEG format. If the progressive JPEG
➢
mode is used, decoding may fail due to use of much memory.
When the loading ( ) icon is displayed, do not remove the USB device.
➢
PTP (Picture Transfer Protocol) or MTP (Media Transfer Protocol) is not
➢
supported on this TV.
USB devices that require their own driver CDs may not be recognized. (When
➢
a USB device is connected to your PC, Windows searches for an eligible driver
for the device. However, if the USB device is not a bulk-only device it cannot be
used with the PC.)
Insert a USB device containing JPEG and/or
MP3 files into the WISELINK jack (USB jack)
on the side of the TV.
English - 62
Page 63
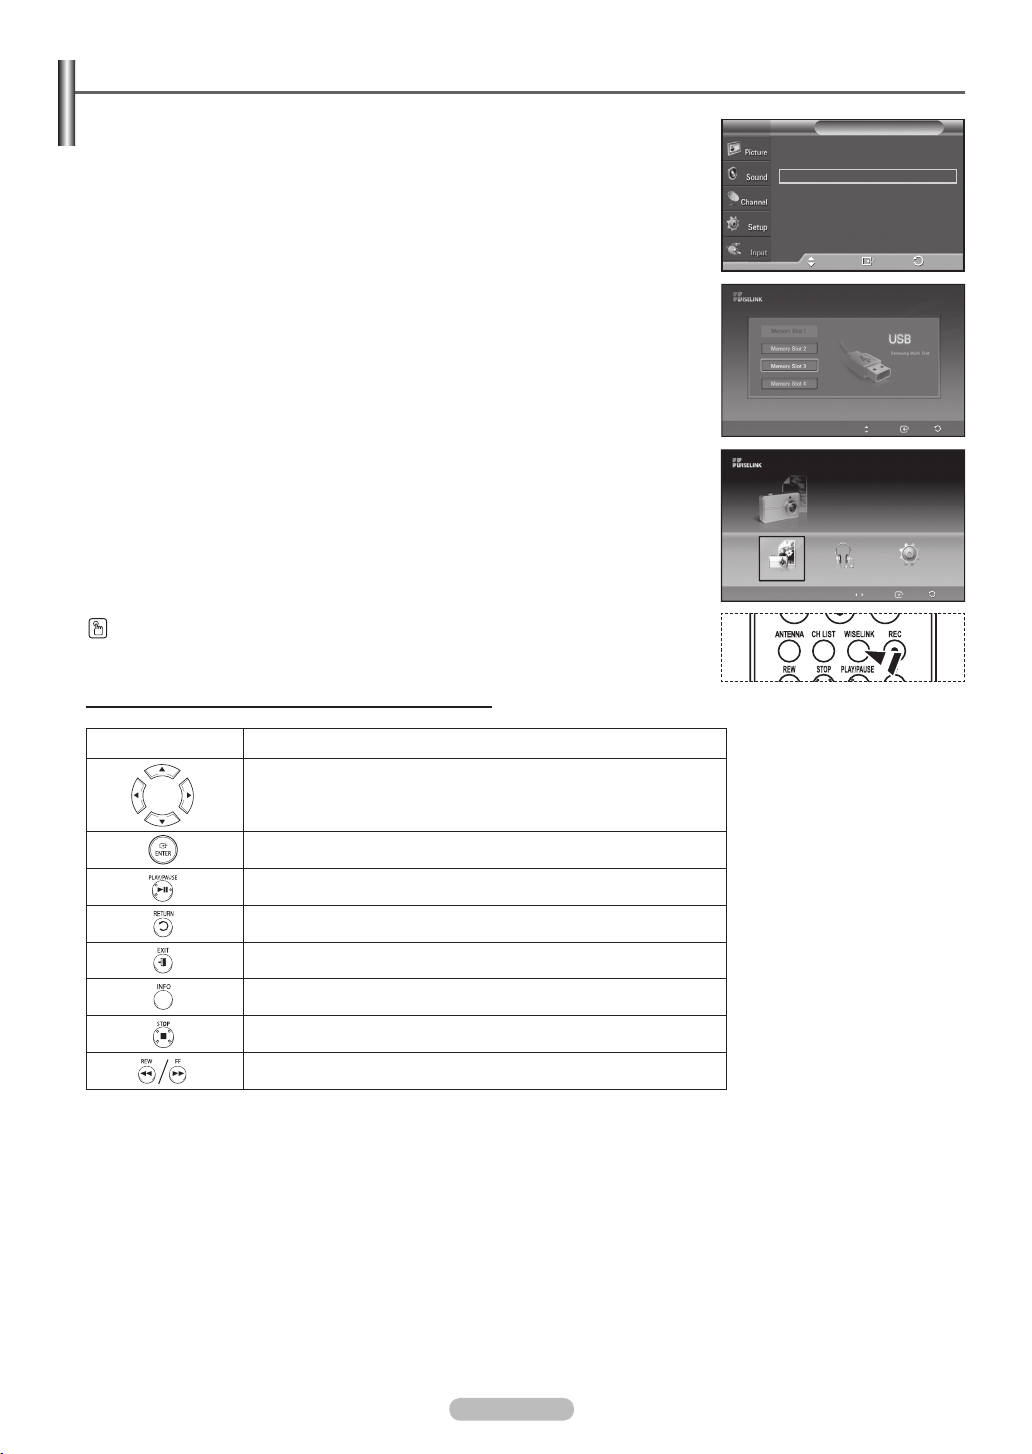
English - 63
Using the WISELINK Mode
1 Press the MENU button to display the menu.
Press the
Press the ▲ or ▼ button to select
ENTER button to select Input.
WISELINK, then press the ENTER button.
2 Press the ▲ or ▼ button to select a corresponding memory device, then press
the ENTER button.
A menu for selecting the Photo or Music files or setup function on a selected
memory device will be displayed.
The WISELINK menu differs depending on the USB Memory Device
➢
connected to TV.
3 Press the ◄ or ► button to select an icon (Photo, Music or Setup), then press
the ENTER button.
To exit WISELINK mode, press the
Exit the screen by pressing the WISELINK button on the remote control,
➢
WISELINK button on the remote control.
and enter the WISELINK screen again.
Press the WISELINK button on the remote control to turn on the WISELINK mode.
Using the Remote Control Button in WISELINK Menu
Source List : TV
Edit Name
WISELINK
(HDMI-CEC)
Anynet+
Move
Photo
CELLDISK2.0
315MB/495MB Free
Photo
Music Setup
InputT V
Return
Enter
Move Enter Exit
Move Enter Return
►
►
Button Operations
Move the cursor and select an item.
Select the currently selected item.
Play or pause the Slide Show or MP3 file.
Return to the previous menu.
Stop the current function and return to the previous menu.
Run various functions from the Photo and Music menus.
Stop the current slide show or MP3 file.
Page Up or Down (file list item)
Page 64
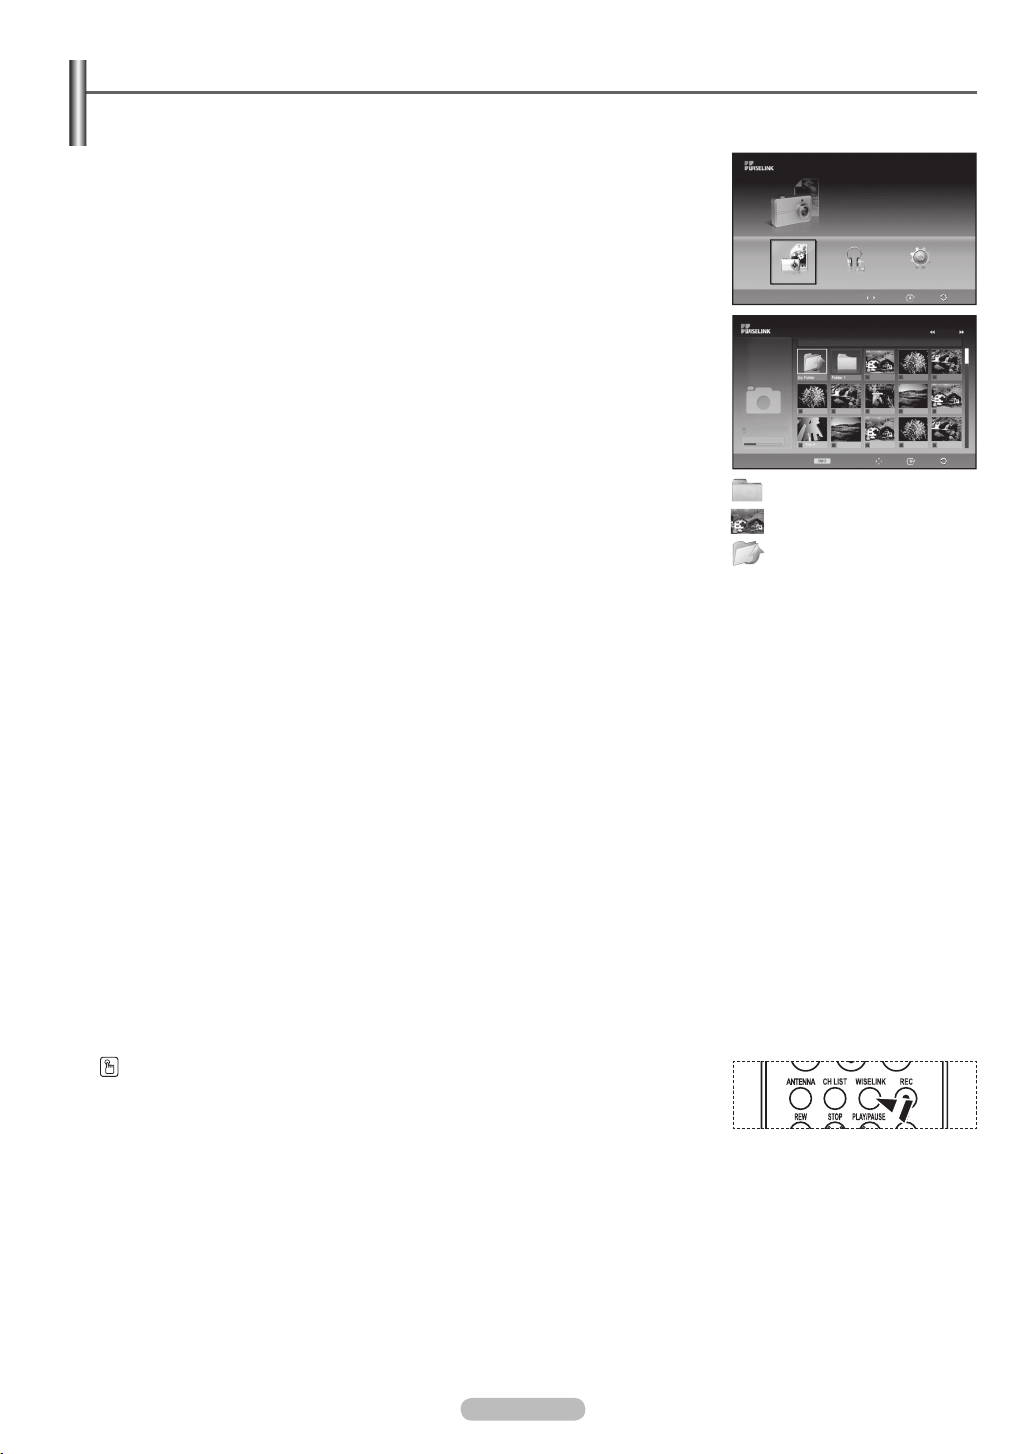
Using the Photo (JPEG) List
Photo 0001
File 2
File 4
File 9
File 10
File 11
File 12
File 13
File 5
File 6
File 7
File 8
None
You can play back the JPEG files saved on a memory device in various ways.
1 After switching the mode to WISELINK, select the memory device that you have
inserted. (Refer to page 63)
2 Press the ◄ or ► button to select Photo, then press the ENTER button.
JPEG files and existing folders are displayed.
Photo
CELLDISK2.0
315MB/495MB Free
3 Press the ▲/▼/◄/► buttons to select a file, then press the ENTER button.
Pressing the button over a photo icon displays the currently selected photo
➢
in full screen. However, JPEG files smaller than 640x480 pixels are zoomedin at 4 times their original size. (e.g. If a photo’s original size is 200x200
pixels, it is displayed at 800x800 pixels.)
Press the INFO button and select View to view a photo image at its original
➢
size.
Pressing the button over a folder icon shows the JPEG files included in the
➢
folder.
While a full screen is displayed, ◄ or ► buttons will let you see another
➢
photo image in the same folder.
Press the PLAY/PAUSE button when a Photo icon is selected to start a Slide
➢
Show.
To exit WISELINK mode, press the
Moving to a photo may take a few seconds because the file needs to be
➢
WISELINK button on the remote control.
loaded. At this point, the icon will appear.
This menu shows only the files whose extension is jpeg (or jpg).
➢
Files with other formats such as gif or tiff will not be displayed.
Fifteen thumbnail photos are displayed per page.
➢
The thumbnails are numbered from left to right and from top to bottom, from
➢
1 to 15.
Folders are displayed first and they are followed by all JPEG files in the
➢
current folder. The folders and JPEG files are sorted in alphabetical order.
If the photo is displayed in full screen, you can zoom in and out or rotate the
➢
photo on the screen. (Refer to pages 68~69)
It takes a while to show JPEG files as thumbnail images.
➢
WISELINK for this product supports JPEG files up to 8K x 8K pixels. For
➢
progressive JPEG files or files whose size exceeds 8MB, the photo will be
displayed as a thumbnail only. When trying to view a progressive JPEG file,
the message Not supported mode will appear. When trying to view a file
exceeding 8MB, the message This file is too large to decode will appear.
The higher the image resolution advances, the longer the display time takes.
➢
You cannot decode images beyond a horizontal resolution of 5000.
➢
You cannot decode images beyond a vertical resolution of 4000.
➢
Photo
Up Folder
Photo
Folder
Jan 22, 2007
1 / 14
CELLDISK2.0
315MB/495MB Free
Photo Menu Move Open Return
: Folder icon
: Photo icon
: Move to the previous
folder stage icon
Music Setup
Move Enter Return
1/10 Page
Press the WISELINK button on the remote control to turn on the WISELINK mode.
English - 64
Page 65
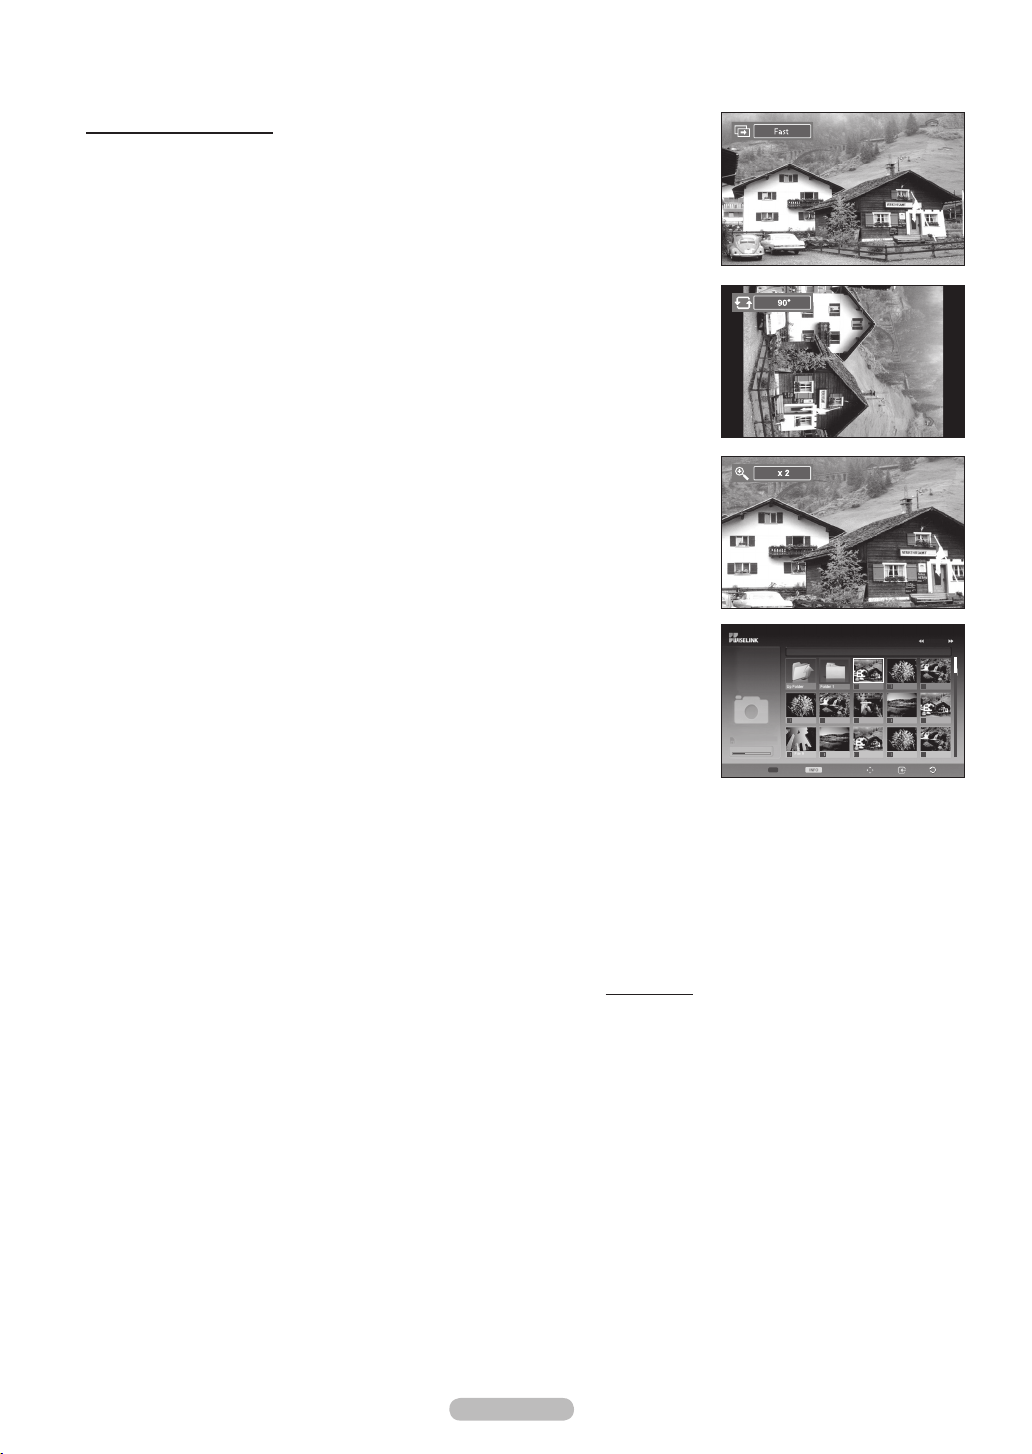
English - 65
Using the Options Menu
Photo 0001
File 2
File 4
File 9
File 10
File 11
File 12
File 13
File 5
File 6
File 7
File 8
None
Slide Show:
Starts a slide show.
(Refer to Viewing a Slide Show on page 66)
Rotate:
You can rotate images in full screen mode.
Images are rotated in the order of 90°, 180°, 270° and 0° (original state).
(Refer to Rotating on page 68)
You cannot save a rotated image.
➢
It may take long time to rotate the large-size file.
➢
Zoom:
You can zoom into images in full screen mode.
Images are zoomed in the order of X2, X4 and X1 (original size).
(Refer to Zooming-In on page 69)
You cannot save a zoomed-in image.
➢
When the JPEG image resolution is greater than the screen size, you cannot
➢
use the Zoom function.
The Zoom function is not available for the image files that have the resolution of
➢
1920x1080 or greater.
Photo
400x340
53 KB
May 1, 2007
1 / 14
Photo 0001
1/10 Page
List:
Displays the stored files, folders and file info.
Continued...
CELLDISK2.0
315MB/495MB
Select Photo Menu Move View Return
Page 66
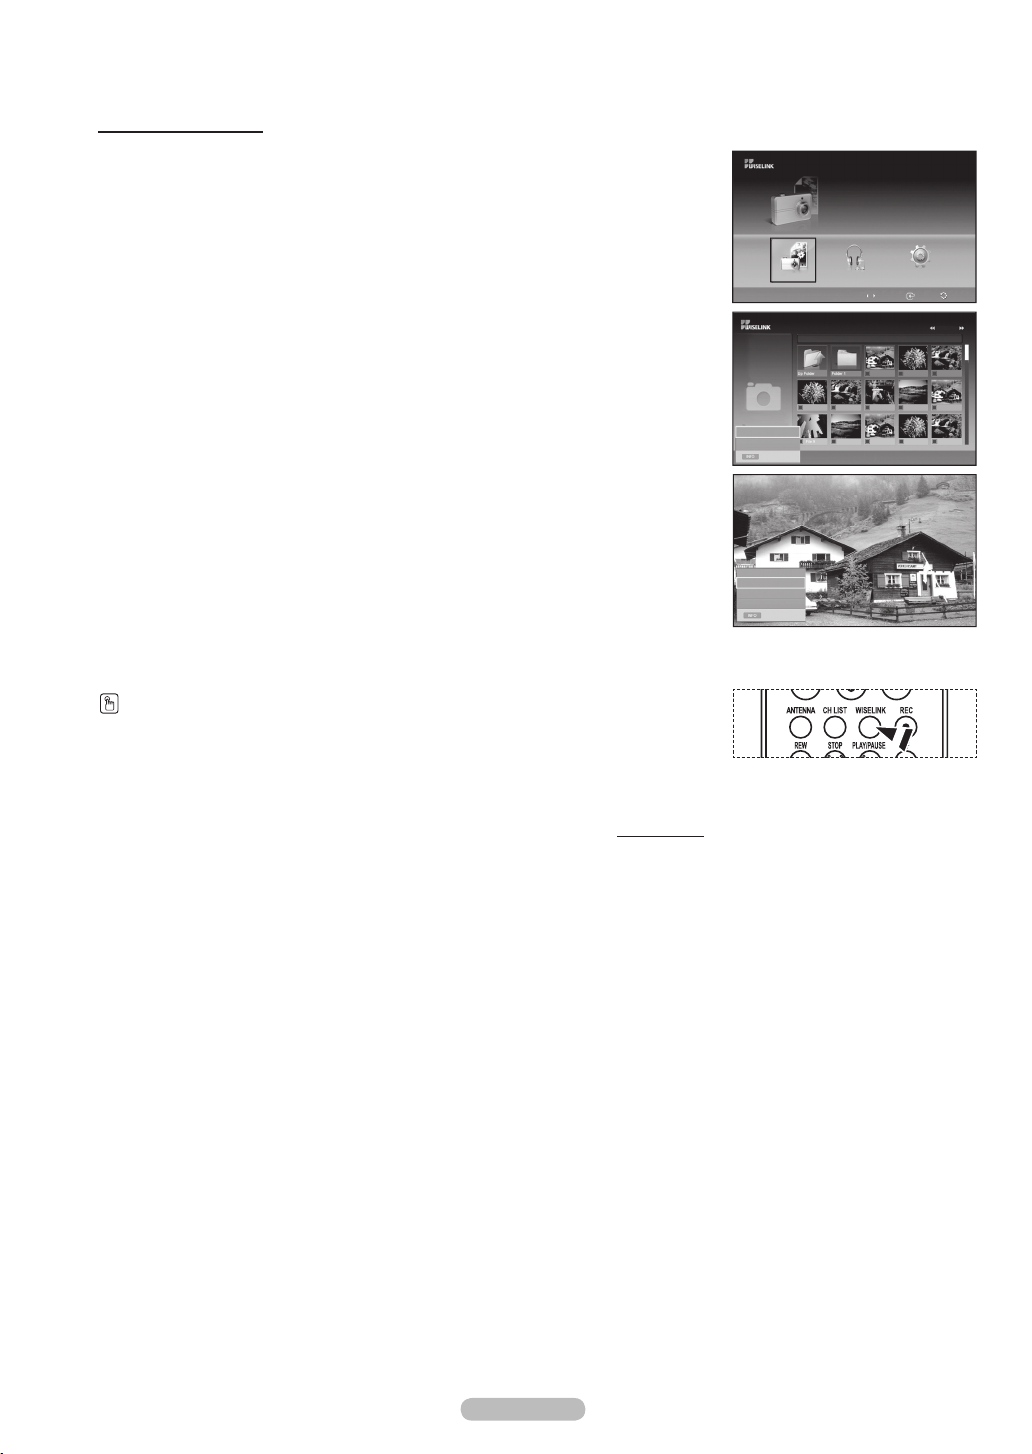
Viewing a Slide Show
Photo 0001
File 2
File 4
File 9
File 10
File 11
File 12
File 13
File 5
File 6
File 7
File 8
None
1 After switching the mode to WISELINK, select the memory device that you have
inserted. (Refer to page 63)
2 Press the ◄ or ► button to select Photo, then press the ENTER button.
JPEG files and existing folders are displayed.
Photo
CELLDISK2.0
315MB/495MB Free
3 Press the INFO button to display the option (Slide Show, Cancel the selected
file).
4 Press the ▲ or ▼ button to select Slide Show, then press the ENTER button.
The Slide show displays all JPEG files in the selected folder at a preset
➢
speed.
During the slide show, files are displayed in order from the currently shown
➢
file.
MP3 files can be automatically played during the slide show if the Default
➢
Background Music is set to On. To enable this function, MP3 files and
other photo files must be located in the same folder on the memory device.
To run the slide show repeatedly, change the setting by referring to page 71.
➢
Press the PLAY/PAUSE button when a Photo icon is selected to start a Slide
➢
Show.
5 Press the INFO button during the slide show to set the following options (Slide
Show Speed, Background Music, Background Music Setting, List).
6 Press the ▲ or ▼ button to select the option, then press the ENTER button.
Press the WISELINK button on the remote control to turn on the WISELINK mode.
Continued...
Photo
Photo
400x340
53 KB
May 1, 2007
1 / 14
Slide Show
Cancel the selected file
Exit
Slide Show Speed
Background Music
Background Music Setting
List
Exit
Photo 0001
Music Setup
Move Enter Return
1/10 Page
English - 66
Page 67
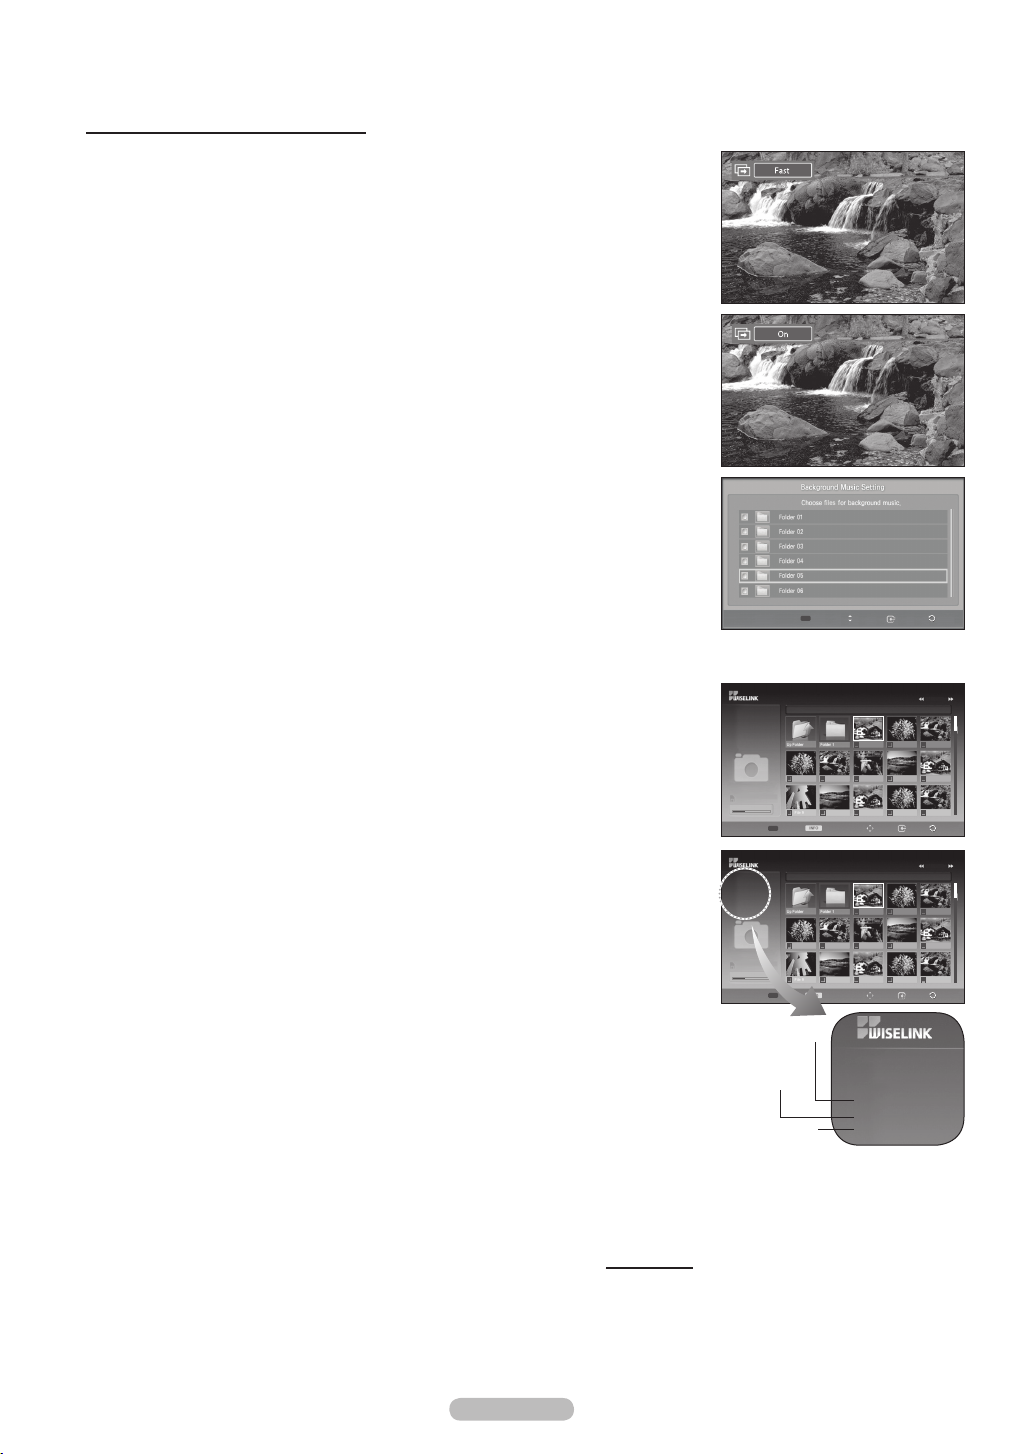
English - 67
Using the Menu during a Slide Show
Photo 0001
File 2
File 4
File 9
File 10
File 11
File 12
File 13
File 5
File 6
File 7
File 8
None
Photo 0001
File 2
File 4
File 9
File 10
File 11
File 12
File 13
File 5
File 6
File 7
File 8
None
Slide Show Speed:
Select to control the Slide Show Speed.
Each time the ENTER button is pressed, the speed changes repeatedly.
(Normal → Slow → Fast)
Background Music:
Select to choose whether you want to play MP3 files during a slide show. Each time
the ENTER button is pressed, the background music activation changes repeatedly.
(On → Off)
Background Music Setting:
While the slide show is in progress, MP3 files and folders under the same directory
are displayed.
Select a folder using the ▲ or ▼ button and press the ENTER button.
The selected folder will be highlighted.
Press the RETURN button again to return to the slide show screen.
The selected background music is played.
If you turn Off the Background Music, even if the Background Music Settings
➢
have been set up, the background music will not be played.
◄◄
1/1 Page
►►
Select Move Enter Return
List:
JPEG files and existing folders are displayed. To exit WISELINK mode, press the
WISELINK button on the remote control. Press the EXIT button to switch to the
WISELINK start screen where another memory card can be selected.
When selecting a photo file, the photo file information is displayed on the Top
➢
left of the TV screen, such as the resolution, the size, the date modified and
the order of the file in the current directory.
Continued...
Photo 0001
Photo
400x340
53 KB
May 1, 2007
1 / 14
CELLDISK2.0
315MB/495MB Free
Select Photo Menu Move View Return
Photo 0001
Photo
400x340
53 KB
May 1, 2007
1 / 14
CELLDISK2.0
315MB/495MB Free
Select Photo Menu Move View Return
Resolution
Date modified
Order of the file
in the current
directory
Photo
400x340
53 KB
May 1, 2007
1 / 14
1/10 Page
1/10 Page
Page 68
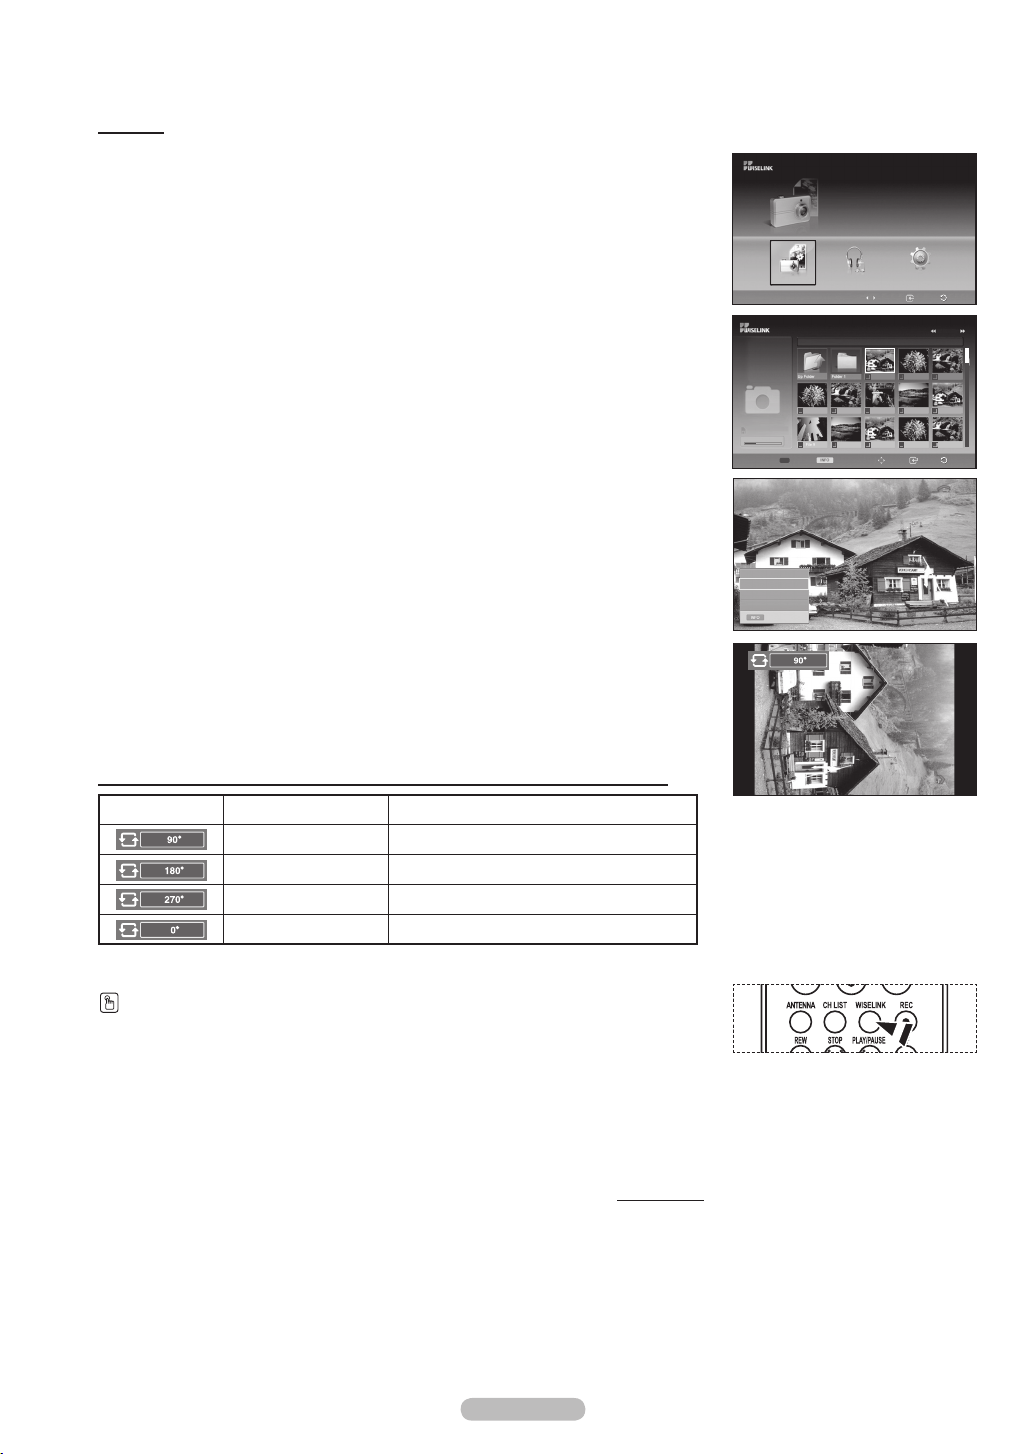
Rotating
Photo 0001
File 2
File 4
File 9
File 10
File 11
File 12
File 13
File 5
File 6
File 7
File 8
None
1 After switching the mode to WISELINK, select the memory device that you have
inserted. (Refer to page 63)
2 Press the ◄ or ► button to select Photo, then press the ENTER button.
JPEG files and existing folders are displayed.
Photo
CELLDISK2.0
315MB/495MB Free
3 Press the ▲/▼/◄/► buttons to select a file, then press the ENTER button.
Pressing the button over a photo icon shows the currently selected photo in full
screen.
4 Press the INFO button to display the option (Slide Show, Rotate, Zoom, List).
Press the ▲ or ▼ button to select
Each time the
(
90° → 180° → 270° → 0°)
Rotating directly from 90 degrees to 270 degrees is not possible.
➢
When rotating a photo, the edge of the photo may not be displayed on the
➢
ENTER button is pressed, the photo rotates repeatedly.
Rotate, then press the ENTER button.
screen.
To exit WISELINK mode, press the
The rotated file is not saved.
➢
The Rotating function information icon
Icon Current OSD Function
Rotating (90°) To rotate a photo by 90 degrees
Rotating (180°) To rotate a photo by 180 degrees
Rotating (270°) To rotate a photo by 270 degrees
Rotating (0°) To rotate a photo to its original state.
WISELINK button on the remote control.
(Displayed at the top left of the screen)
.
Music Setup
Photo 0001
Select Photo Menu Move View Return
Photo
400x340
53 KB
May 1, 2007
1 / 14
CELLDISK2.0
315MB/495MB Free
Slide Show
Rotate
Zoom
List
Photo
Exit
Move Enter Return
1/10 Page
Press the WISELINK button on the remote control to turn on the WISELINK mode.
English - 68
Continued...
Page 69
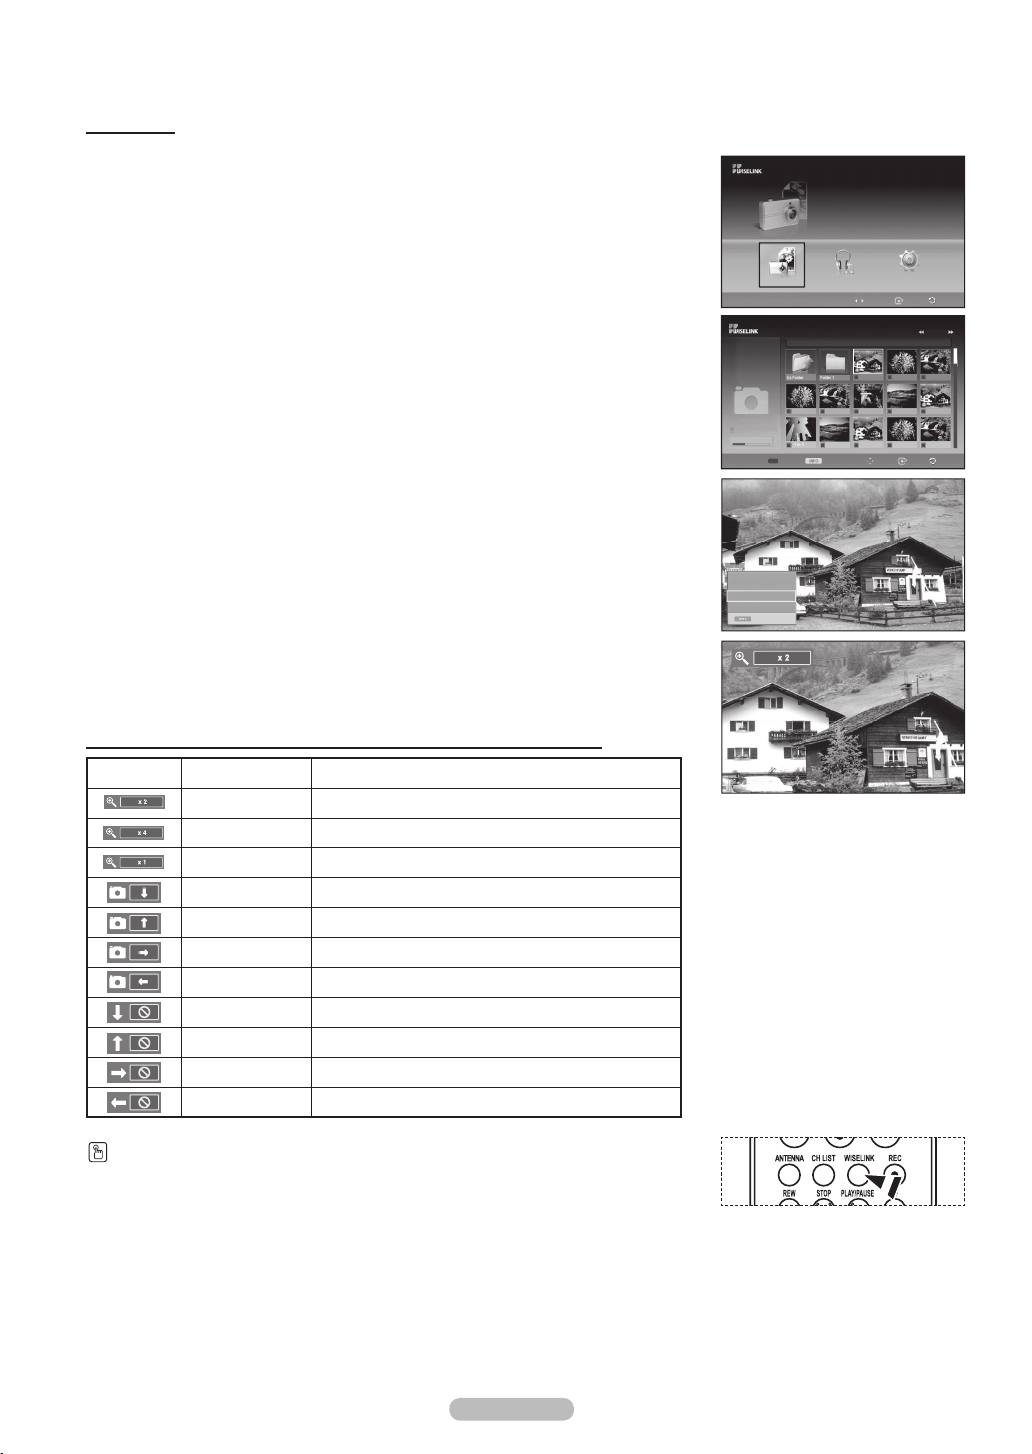
English - 69
Zooming-In
Photo 0001
File 2
File 4
File 9
File 10
File 11
File 12
File 13
File 5
File 6
File 7
File 8
None
1 After switching the mode to WISELINK, select the memory device that you have
inserted. (Refer to page 63)
2 Press the ◄ or ► button to select Photo, then press the ENTER button.
JPEG files and existing folders are displayed.
Photo
CELLDISK2.0
315MB/495MB Free
3 Press the ▲/▼/◄/► buttons to select a file, then press the ENTER button.
Pressing the button over a photo icon shows the currently selected photo in full
Photo
screen.
4 Press the INFO button to display the option (Slide Show, Rotate, Zoom, List).
Press the ▲ or ▼ button to select
Each time the
(
X1 → X2 → X4)
ENTER button is pressed, the photo size increases.
• X1: Restore the photo to its original size.
• X2: Zoom-in to the photo X2.
• X4: Zoom-in to the photo X4.
Zoom, then press the ENTER button.
Slide Show
Rotate
Zoom
List
To move the enlarged photo image up/down/left/right, press the ▲/▼/◄/►
buttons.
To exit WISELINK mode, press the
Zoom function information icon
Icon Current OSD Function
Zoom (x2) Zoom-in to a photo x2.
Zoom (x4) Zoom-in to a photo x4.
Zoom (x1) Restore a photo to its original size.
Pan Down Pan down to view the lower part of a zoomed-in photo.
Pan Up Pan up to view the upper part of a zoomed-in photo.
Pan Right Pan right to view the right side of a zoomed-in photo.
Pan Left Pan left to view the left side of a zoomed-in photo.
Pan Down (END) Pan to the bottom of a zoomed-in photo
Pan Up (END) Pan to the top of a zoomed-in photo.
Pan Right (END) Pan to the right-most part of a zoomed-in photo.
Pan Left (END) Pan to the left-most part of a zoomed-in photo.
WISELINK button on the remote control.
(Displayed at the top left of the screen)
.
400x340
53 KB
May 1, 2007
1 / 14
CELLDISK2.0
315MB/495MB Free
Exit
Photo
Music Setup
Photo 0001
Select Photo Menu Move View Return
Move Enter Return
1/10 Page
Press the WISELINK button on the remote control to turn on the WISELINK mode.
Page 70
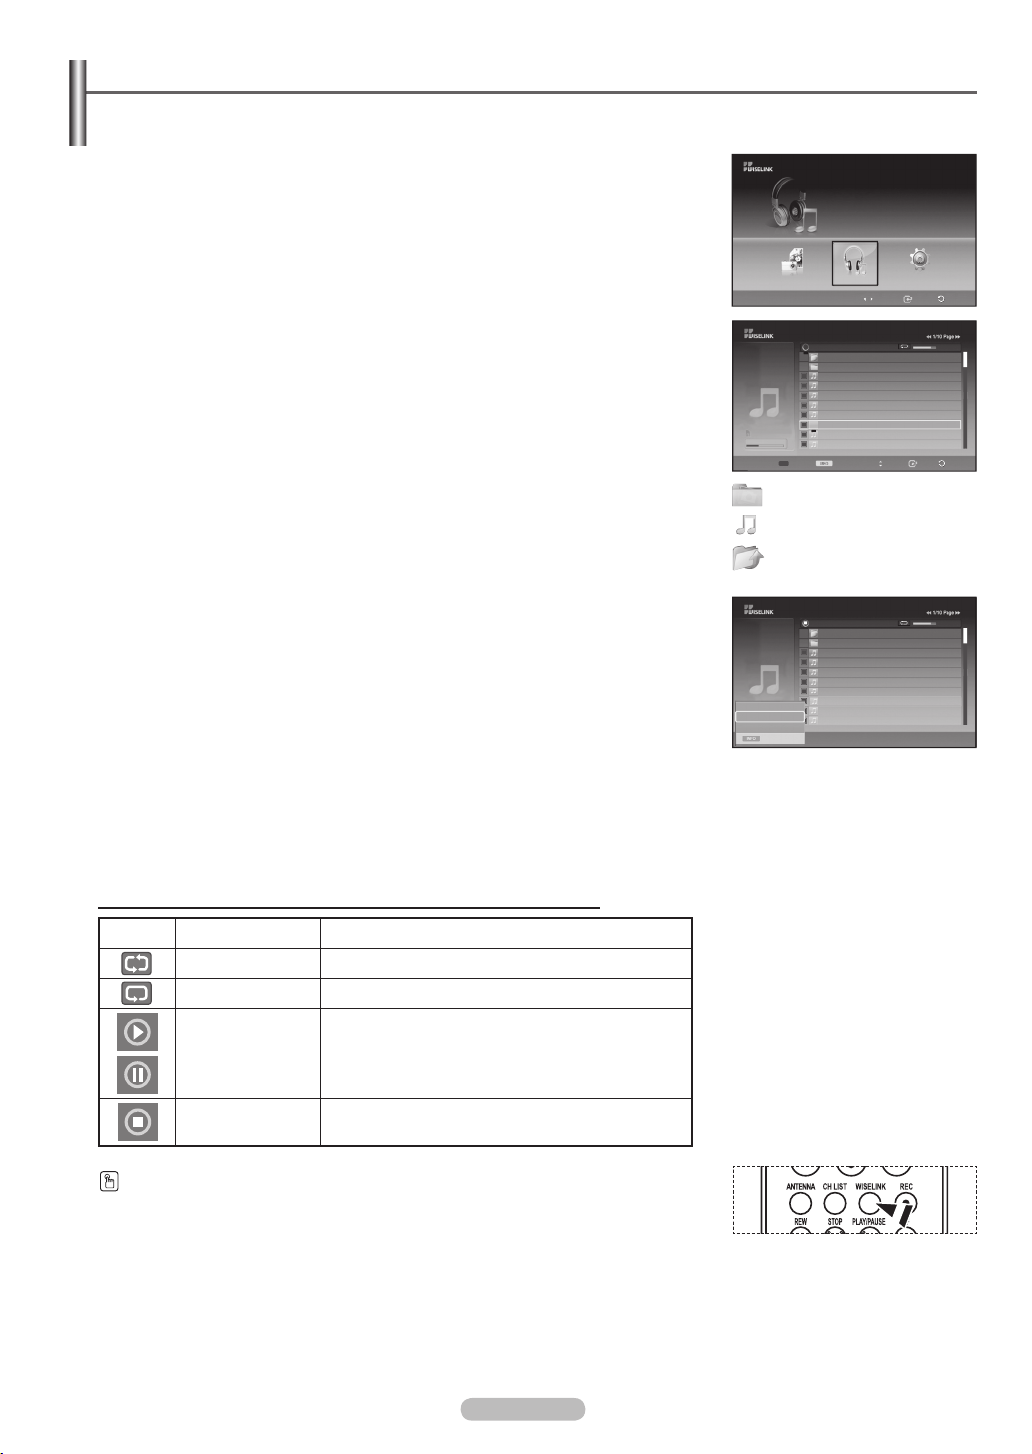
Using the Music (MP3) List
You can play back the MP3 files saved on a memory device in various ways.
1 After switching the mode to WISELINK, select the memory device that you have
inserted. (Refer to page 63)
2 Press the ◄ or ► button to select Music, then press the ENTER button.
MP3 files and existing folders are displayed.
Music
CELLDISK2.0
315MB/495MB Free
Music SetupPhoto
Move Enter Return
3 Press the ▲ or ▼ buttons to select a file to be played, then press the ENTER
button.
Pressing the ENTER button while a music file is highlighted immediately
➢
plays the music file.
Pressing the ENTER button while a folder is highlighted shows the music
➢
files in the folder.
To select a file on the next page, press the REW or FF button.
➢
4 To select all files or a file, press the INFO button to display the Music menus.
Press the ENTER button to select Play, Music Repeat, or Cancel the selected
file.
5 Press the PLAY/PAUSE button while playing an MP3 file to pause the file.
Press the STOP
To exit WISELINK mode, press the
This menu shows only the files whose extension is mp3. Files with other
➢
button to stop playback.
WISELINK button on the remote control.
extensions are not displayed, even if they have been saved on the same
memory device.
The selected file is displayed on the top of the screen with its playing time.
➢
To adjust the music volume, press the VOL+ or VOL- button on the remote
➢
control.
To mute the sound, press the
FF and REW functions do not work during the play.
➢
The playing time of each MP3 file can be found in the file information.
➢
MUTE button on the remote control.
When not found, it may be displayed as 00:00:00.
Music function information icon
(Displayed at the top left of the screen)
.
Nat King Cole-Fly me to the moon
►
Music
5959 KB
Nov 14, 2007
6/14
►
Upper Folder
Folder 1
001 Swan Song feat.TBNY 00:04:01
002 Beatles-Yesterday 00:04:28
003 Fall in Love 00:04:12
004 Tom Waits-Time 00:05:39
005 Chuk Mangione-Feel So good 00:04:30
►
►
CELLDISK2.0
315MB/495MB
006 Nat King Cole-Fly me to the moon 00:05:25
007 Ryuichi Sakamoto-Rain 00:04:30
008 Bon jovi-This ain’t a love song 00:03:54
Select Music Menu Move Play Return
: Folder icon
: Music list icon
: Move to the previous
folder stage icon
Exit
Nat King Cole-Fly me to the moon
Upper Folder
Folder 1
001 Swan Song feat.TBNY 00:04:01
002 Beatles-Yesterday 00:04:28
003 Fall in Love 00:04:12
004 Tom Waits-Time 00:05:39
005 Chuk Mangione-Feel So good 00:04:30
006 Nat King Cole-Fly me to the moon 00:05:25
007 Ryuichi Sakamoto-Rain 00:04:30
008 Bon jovi-This ain’t a love song 00:03:54
Music
5959 KB
Nov 14, 2007
6/14
Play
Music Repeat
Cancel the selected file
00:04:00
00:04:00
Icon Current OSD Function
(Music) All Repeat When all music files in the folder are repeated.
(Music) All When all music files in the folder are played once.
Pressing PLAY/PAUSE button on the remote control
(Music) Play/Pause
stops music for a while. Pressing this button once more
resumes music.
(Music) Stop
Music stops by pressing STOP button on the remote
control.
Press the WISELINK button on the remote control to turn on the WISELINK mode.
English - 70
Page 71
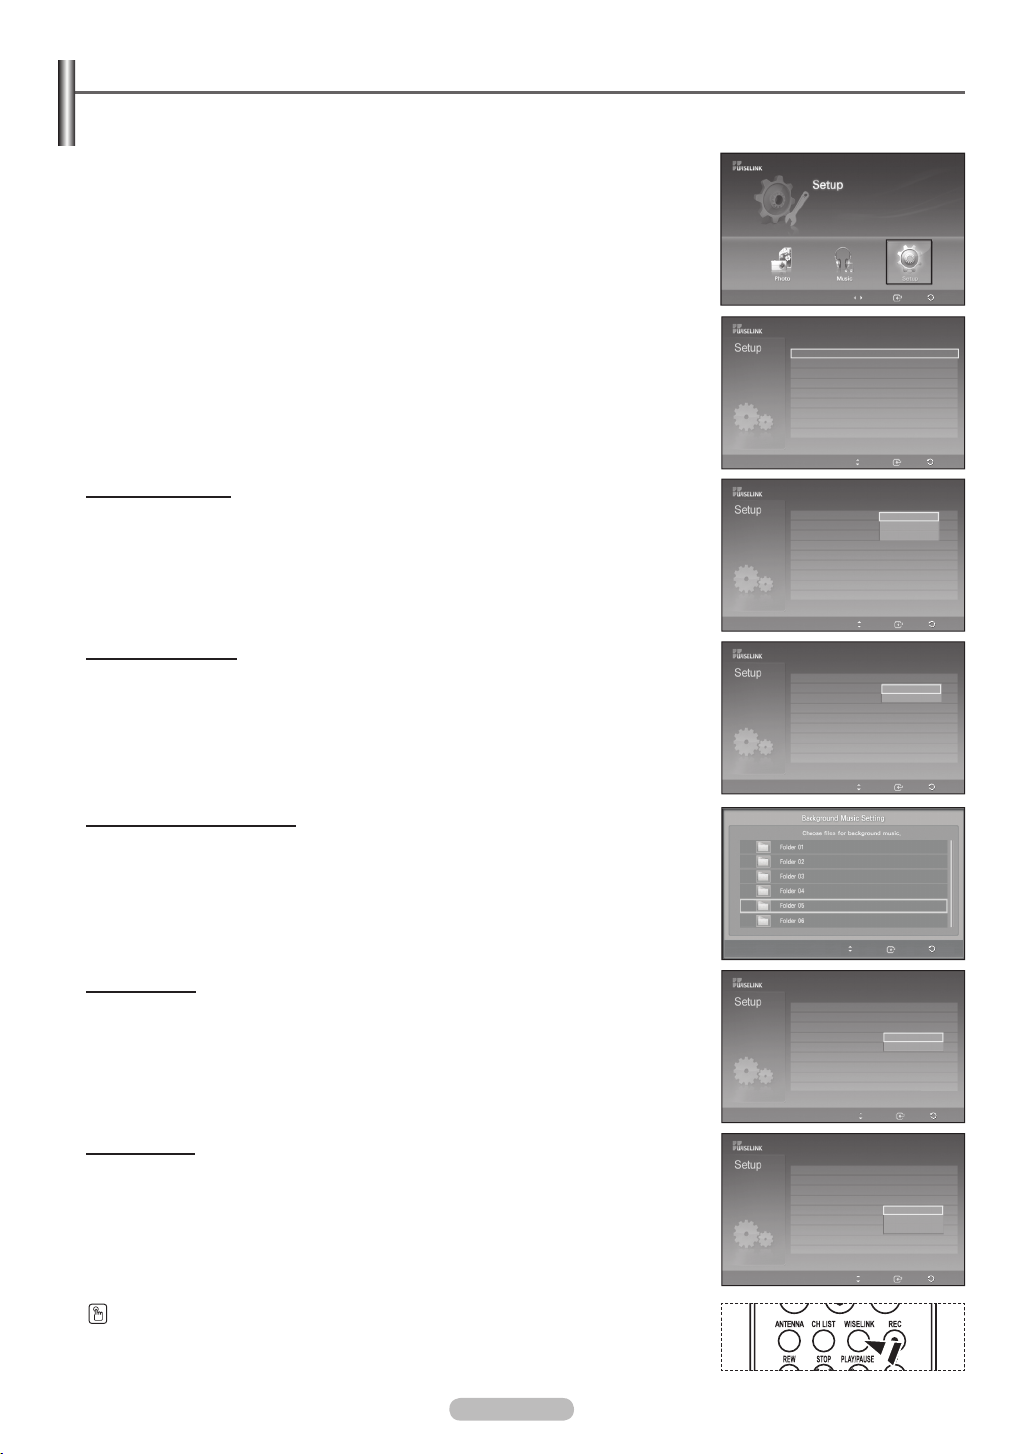
English - 71
Using the Setup Menu
Setup displays the user settings of the WISELINK menu
1 After switching the mode to WISELINK, select the memory device that you have
inserted. (Refer to page 63)
2 Press the ◄ or ► button to select Setup, then press the ENTER button.
The Setup menu is displayed.
3 Press the ▲ or ▼ button to select an item you want, then press the ENTER
button.
4 Press the ▲ or ▼ button to select the option, then press the ENTER button.
Slide Show Speed:
Select to control the Slide Show Speed.
You can select
Background Music:
Select whether to play an MP3 file, or not, during a slide show.
You can select Background Music
Fast, Normal or Slow.
On or Music Off.
Music SetupPhoto
Move Enter Return
Slide Show Speed : Fast ►
Background Music : On ►
Background Music Setting ►
Music Repeat : On ►
Screen Saver : 5 min. ►
Move Enter Return
Slide Show Speed : Fast
Background Music : On
Background Music Setting
Music Repeat : On
Screen Saver : On
Slide Show Speed : Fast
Background Music : On
Background Music Setting
Music Repeat : On
Screen Saver : On
Fast
Normal
Slow
Move Enter Return
On
Off
Background Music Setting:
While a slide show is in progress, use the Background Music Setting to select a
music file to listen to.
Select an MP3 file as the background music.
Music Repeat:
• On: Plays back a music file or all music files repeatedly.
• Off: Doesn’t play back repeatedly.
Screen Saver:
Select to set the waiting time before the screen saver appears.
The screensaver will appear when no button is pressed for 1, 3 or 5 minutes.
Press the WISELINK button on the remote control to turn on the WISELINK mode.
Move Enter Return
◄◄
1/1 Page
►►
Move Enter Return
Slide Show Speed : Fast
Background Music : On
Background Music Setting
Music Repeat : On
Screen Saver : On
Move Enter Return
Slide Show Speed : Fast
Background Music : On
Background Music Setting
Music Repeat : On
Screen Saver : On
Move Enter Return
On
Off
1 min
3 min
5 min
Page 72
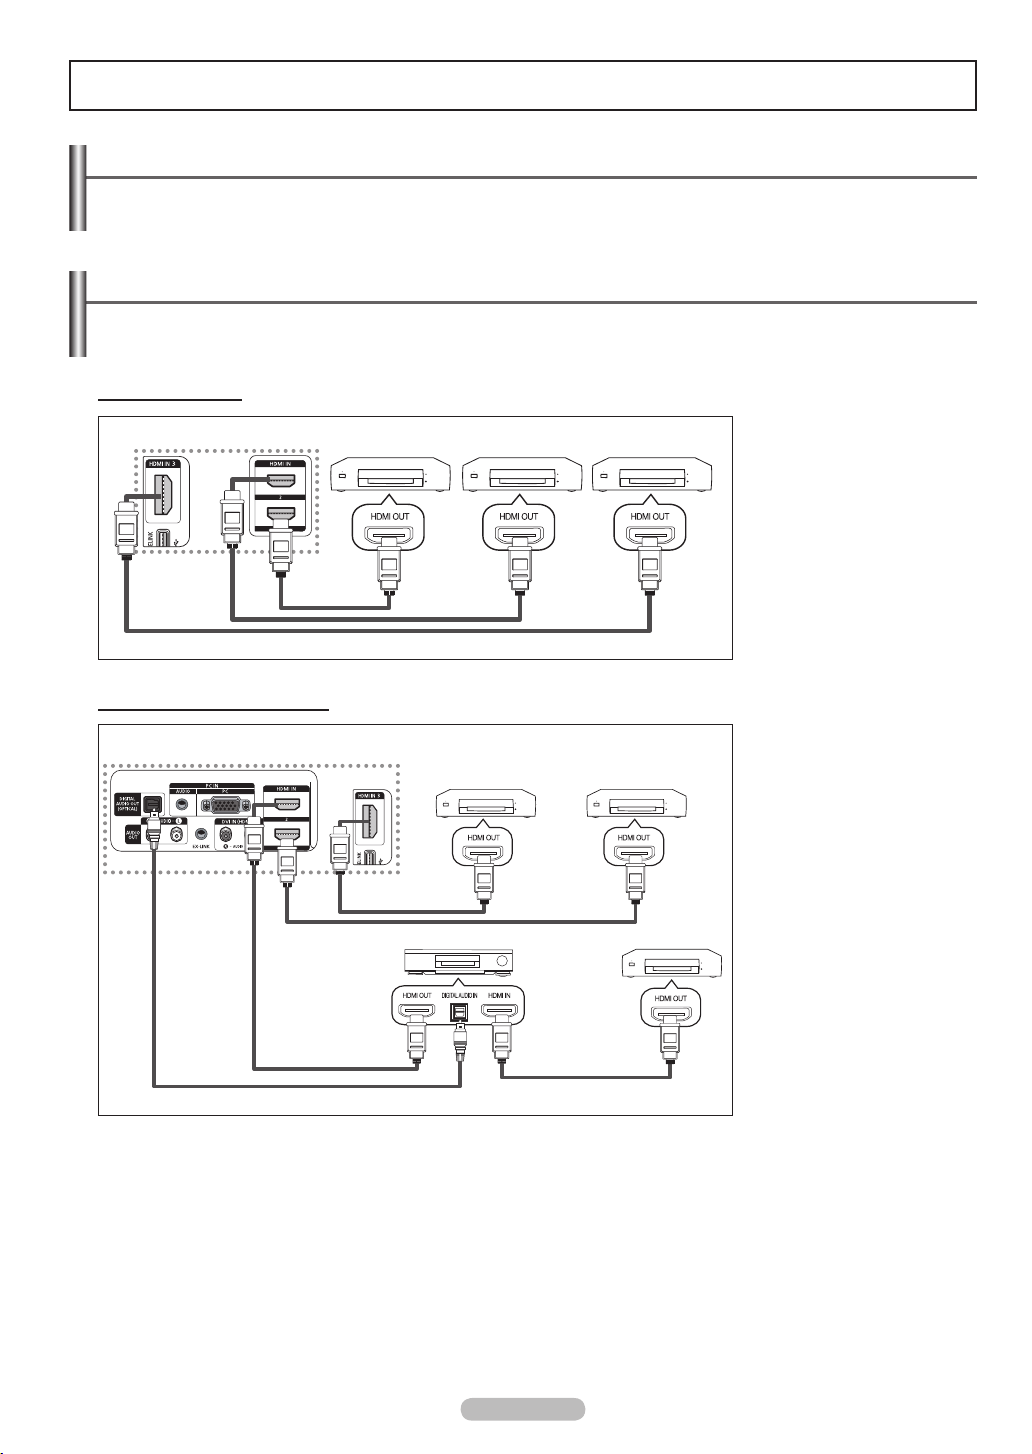
About Anynet
+
What is Anynet+?
Anynet+ is a function that enables you to control all connected Samsung devices that support Anynet+ with your
Samsung TV’s remote.
Connecting Anynet+ Devices
The Anynet+ system can be used only with Samsung devices that have the Anynet+ feature. To be sure your
Samsung device has this feature, check if there is an Anynet+ logo on it.
To connect to a TV
TV
Anynet+ Device 1 Anynet+ Device 2 Anynet+ Device 3
Connect the [HDMI 1], [HDMI 2]
or [HDMI 3] jack on the TV
and the HDMI OUT jack of the
corresponding Anynet
using an HDMI cable.
+
device
HDMI 1.3 Cable
HDMI 1.3 Cable
To connect to
Connect the Optical cable between the Digital Audio Out (Optical) jack on your TV and the Digital Audio Input on the
➢
Home Theater.
Connect only one Home Theater.
➢
When following the connection above, the Optical jack only outputs 2 channel audio. You will only hear sound from the
➢
Home Theater’s Front Left and Right speakers and the subwoofer. If you want to hear 5.1 channel audio, connect the
DIGITAL AUDIO OUT (OPTICAL) jack on the DVD player or Cable/Satellite Box (ie Anynet Device 1 or 2) directly to
the Amplifier or Home Theater, not the TV. Please see the home theater’s user manual for more information.
Some HDMI cables may not support Anynet+ functions.
➢
Anynet
➢
Anynet
➢
a Home Theater
TV
Optical Cable
+
works when the AV device supporting Anynet
+
supports up to 12 AV devices in total. Note that you can connect up to 3 devices of the same type.
HDMI 1.3 Cable
HDMI 1.3 Cable
Anynet+ Device 1 Anynet+ Device 2
HDMI 1.3 Cable
Home Theater
HDMI 1.3 Cable
HDMI 1.3 Cable
+
is in the Standby or On status.
Anynet+ Device 3
1. Connect the [HDMI 1],
[HDMI 2] or [HDMI 3]
jack on the TV and the
HDMI OUT jack of the
corresponding Anynet
device using an HDMI
cable.
2. Connect the HDMI IN jack
of the home theater and
the HDMI OUT jack of the
corresponding Anynet
device using an HDMI
cable.
+
+
English - 72
Page 73
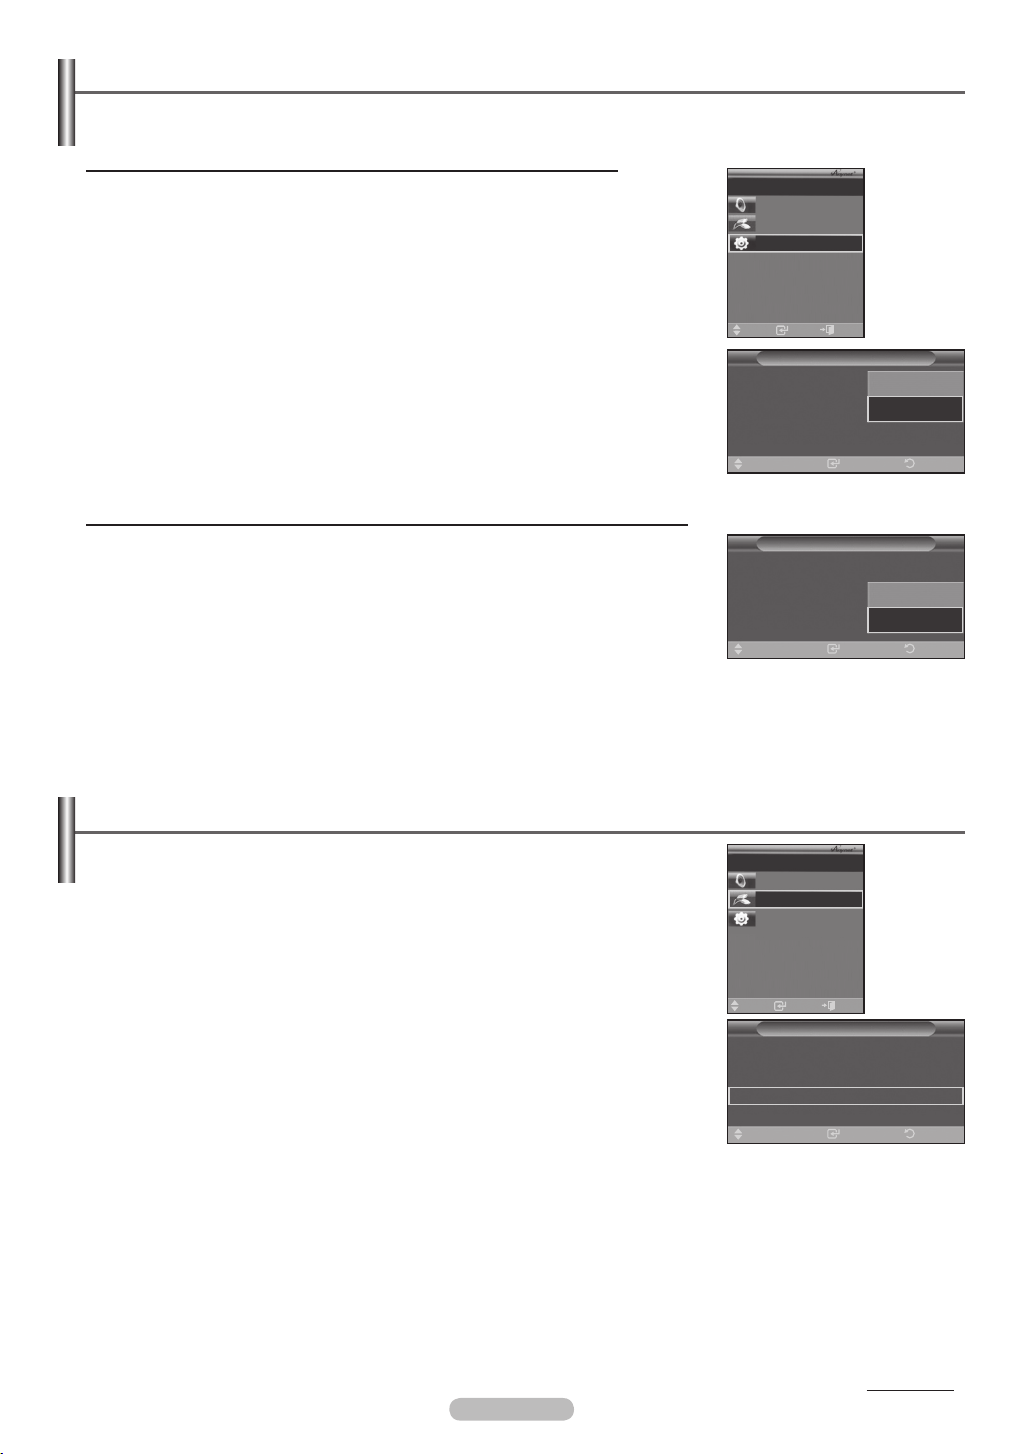
English - 73
Setting Up Anynet
+
The following settings help set the Anynet+ functions.
To use the Anynet+ Function, Anynet+ (HDMI-CEC) must be set to On
1 Press the Anynet+ button.
Press the ▲ or ▼ button to select Setup, then press the ENTER button.
2 Press the ENTER button to select Anynet+ (HDMI-CEC), then press the
ENTER button.
TV Air 28
Recevier: On
Connect Recorder
Setup
3 Press the ▲ or ▼ button to select On, then press the ENTER button.
The Anynet+ (HDMI-CEC) function is enabled.
➢
If you select Off, Anynet+ (HDMI-CEC) is disabled.
➢
When the Anynet+ (HDMI-CEC) function is disabled, all the Anynet+ related
➢
operations are deactivated.
Move
Anynet+ (HDMI-CEC)
Auto Turn Off
Searching Connections
Move
Exit
Enter
Anynet+ Setup
: Off
: Off
Off
On
Enter Return
Setting an Anynet+ Device to turn Off Automatically when the TV is Turned Off
2 Press the ▲ or ▼ button to select Auto Turn Off, then press the ENTER button.
3 Press the ▲ or ▼ button to select On, then press the ENTER button.
The Auto Turn Off function is enabled.
➢
If you select Off, the Auto Turn Off function is canceled.
➢
Press the
The active source on the TV remote must be set to TV to use the Anynet+ function.
➢
If you set Auto Turn Off to On, connected external devices are also turned off when the TV is turned off.
➢
EXIT button to exit.
Anynet+ (HDMI-CEC)
Auto Turn Off
Searching Connections
Move
Anynet+ Setup
: On
: Off
Enter Return
Off
On
If an external device is still recording, it may or may not turn off.
Scanning and Switching between Anynet+ Devices
1 Press the Anynet+ button.
+
Anynet
➢
devices connected to the TV are listed.
2 Press the ▲ or ▼ button to select a particular device and press the ENTER button.
It is switched to the selected device.
3 If you cannot find a device you want, press the ▲ or ▼ button to select Searching
Connections, then press the ENTER button.
The message Configuring Anynet
+
connection... is displayed.
When searching devices complete, the connected devices are listed in the Anynet+
menu.
Switching to the selected devices may take up to 2 minutes. You cannot cancel the
➢
operation during the switching operation.
The time required to scan for devices is determined by the number of connected
➢
devices.
When the device scan is complete, the number of devices found are not displayed.
➢
Although the TV automatically scans devices when it is turned on using the POWER button, devices connected when
➢
the TV is already on are not displayed in the device list. In this case, select the Searching Connections menu to search
devices.
If you have selected an external device by pressing the SOURCE button, you cannot use the Anynet+ function. Make
➢
sure to switch to an external Anynet
+
device by using the Anynet
+
button.
TV Air 28
Recevier: On
Connect Recorder
Setup
Move
Enter
Exit
Anynet+ Setup
Anynet+ (HDMI-CEC)
Auto Turn Off
Searching Connections
Move
: On ►
: On ►
Enter Return
►
Continued...
Page 74
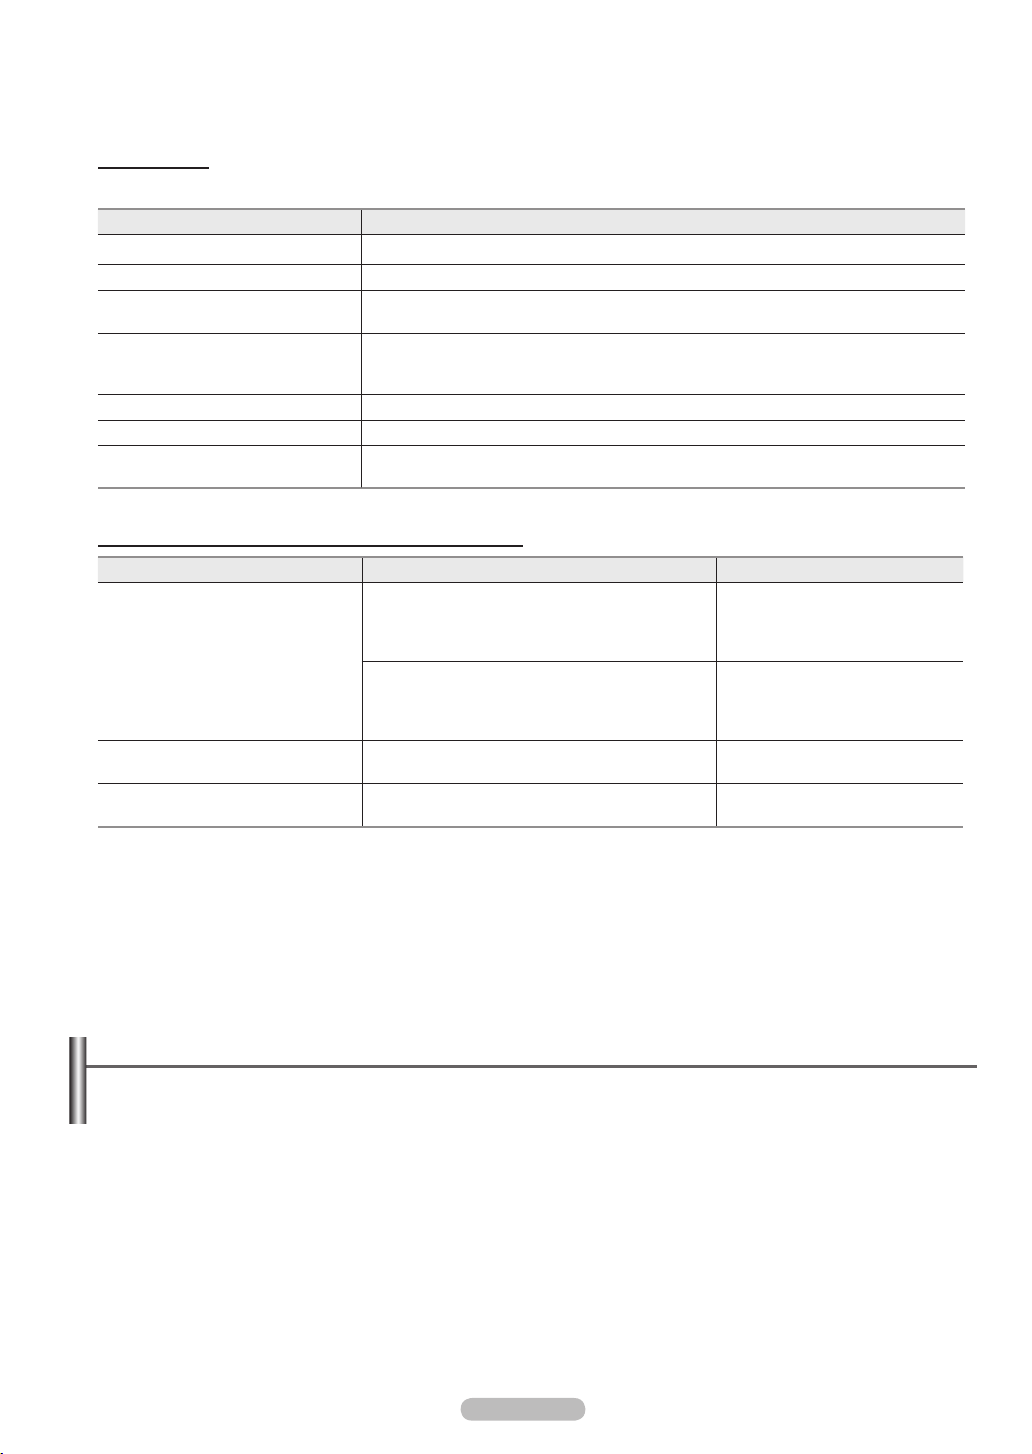
Anynet+ Menu
The Anynet+ menu changes depending on the type and status of the Anynet+ devices connected to the TV.
Anynet+ Menu Description
View TV Switches from Anynet
Record Starts a recording. (This menu works only for a device supporting recording.)
(Device_Name) Menu Shows the menu of the connected device.
Example: When a DVD Recorder is connected, the DVD Recorder’s title menu appears.
(Device_Name) Operation Shows the play control menu of the connected device.
Example: When a DVD Recorder is connected, the play control menu of the DVD Recorder
appears.
Connect (Device_Name) Your TV connects to the corresponding device.
Receiver Sound is output through the receiver (home theater).
Setup You can set the Anynet+ (HDMI-CEC), auto turn off, and searching connections for using
Anynet+.
+
to TV broadcast mode.
TV Remote Control Buttons Available in Anynet+ Mode
Device Type Operating Status Available Buttons
After switching to the device, when the menu of the
corresponding device is displayed on the screen.
Anynet+ Device
After switching to the device, while playing a file
Device with built-in Tuner
Audio Device When a Receiver is activated
After switching to the device, when you are watching
a TV program
Numeric buttons
▲/▼/◄/►/ENTER buttons
Color buttons
EXIT button
◄◄ (Backward search)
►►(Forward search)
(Stop)
►
(Play/Pause)
CH ▲/▼ button
VOL +/- button
MUTE button
The Anynet
➢
The REC button works only while in the recordable state.
➢
You cannot control Anynet
➢
+
function only works when the active source on the TV remote control is set to TV.
+
devices using the buttons on the side of the TV. You can control Anynet
+
devices only
using the TV remote control.
The TV remote control may not work under certain conditions. In this case, reselect the Anynet+ device.
➢
The Anynet
➢
The ◄◄, ►► operations may differ depending on the device.
➢
+
functions do not operate with other manufacturers’ products.
Recording
You can make a recording of a TV program using a recorder.
Press the REC button.
Recording begins. (Only when the Anynet
You can record the source streams by selecting Record after pressing the Anynet+ button.
➢
Pressing the REC button will record whatever you are currently watching. If you are watching video from another
➢
device, the video from the device is recorded.
Before recording, check whether the antenna jack is properly connected to the recording device.
➢
To properly connect an antenna to a recording device, refer to the recording devices users manual.
+
enabled recording device is connected.)
English - 74
Page 75
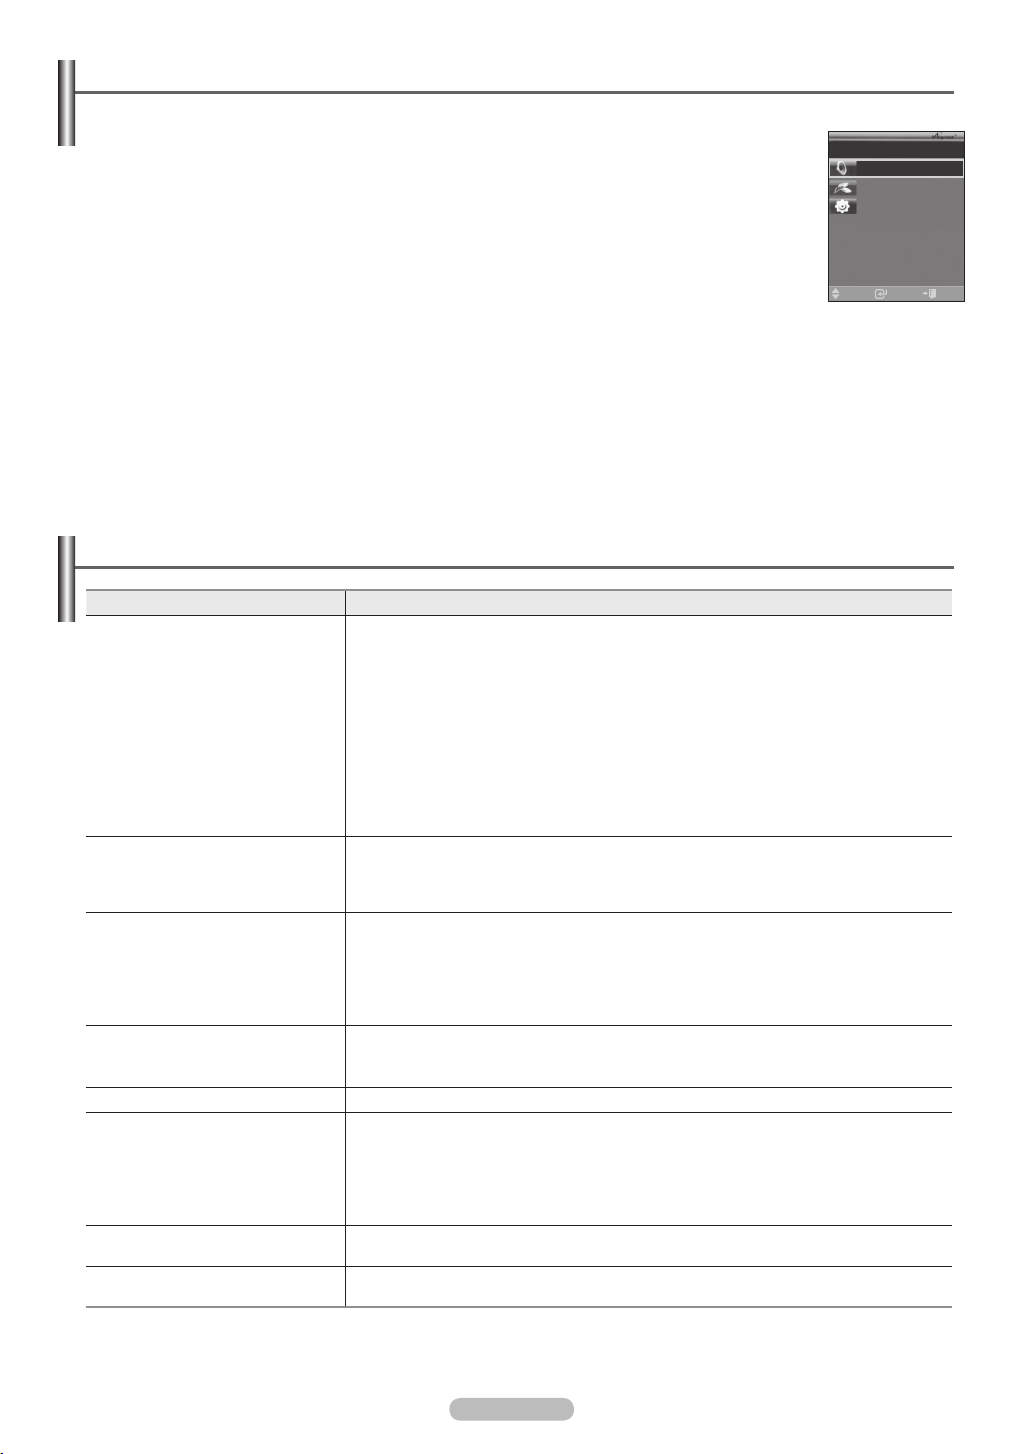
English - 75
Listening through a Receiver (Home theater)
You can listen to sound through a receiver instead of the TV speaker.
1 Press the Anynet+ button.
Press the ▲ or ▼ button to select Receiver, then press the ENTER button.
2 Press the ◄ or ► button to select to On, then press the ENTER button.
Now you can listen to sound through the receiver.
3 Press the EXIT button to exit.
TV Air 28
Recevier: On
Connect Recorder
Setup
When the receiver (home theater) is set to On, you can hear sound output from the TV’s Optical
➢
Move
Enter
Exit
jack. When the TV is displaying a DTV(air) signal, the TV will send out 5.1 channel sound to the
Home theater receiver. When the source is a digital component such as a DVD and is connected
to the TV via HDMI, only 2 channel sound will be heard from the Home Theater receiver.
If your receiver supports audio only, it may not appear in the device list.
➢
The receiver will work when you have properly connected the Optical IN jack of the receiver to the Optical Out jack of
➢
the TV.
When using the WISELINK feature, sound may not output properly through the receiver.
➢
When listening through the receiver, there are restrictions for using the PIP and audio-related(MTS, Preferred
➢
language) menus.
Troubleshooting for Anynet
Symptom Solution
Anynet+ does not work. ■ Check if the device is an Anynet+ device. The Anynet+ system supports Anynet+ devices
+
I want to start Anynet
I want to exit Anynet+. ■ Select View TV in Anynet+ menu.
The message Connecting to
Anynet+ device... appears on the
screen.
The Anynet
The connected device is not
displayed.
The TV program cannot be
recorded.
The TV sound is not output through
the receiver.
+
device does not play. You cannot use the play function when Plug & Play is in progress.
. ■ Check if the Anynet+ device is properly connected to the TV and check if the Anynet+
+
only.
■ Connect only one receiver (home theater).
■ Check if the Anynet+ device power cord is properly connected.
■ Check the Anynet+ device’s Video/Audio/HDMI 1.3 cable connections.
■ Check whether Anynet+ (HDMI-CEC) is set to On in the Anynet+ setup menu.
■ Check whether the TV remote control is in TV mode.
■ Check whether it is Anynet+ exclusive remote control.
■ Anynet+ doesn’t work at a certain condition. (Searching channels, Operating WISELINK)
■ When connecting or removing the HDMI 1.3 cable, please make sure to search devices
again or restart your TV.
■ Check if the Anynet+ Function of Anynet+ device is set on.
(HDMI-CEC) is set to On in the Anynet+ Setup menu.
■ Press the TV button on the TV remote control to switch to TV. Then press the Anynet+
button to show the Anynet+ menu and select a menu you want.
■ Press the SOURCE button on the TV remote control and select a device other than
Anynet+ devices.
■ Press any of CH, CH LIST, PRE-CH, and FAV.CH to change the TV mode.
(Note that the channel button operates only when an Anynet+ device with a built-in tuner
is not connected.)
■ You cannot use the remote control when you are configuring Anynet+ or switching to a
view mode.
■ Use the remote control when the Anynet+ setting or switching to view mode is complete.
■ Check whether or not the device supports Anynet+ functions.
■ Check whether or not the HDMI 1.3 cable is properly connected.
■ Check whether Anynet+ (HDMI-CEC) is set to On in the Anynet+ setup menu.
■ Search Anynet+ devices again.
■ You can connect an Anynet+ device using the HDMI 1.3 cable only. Some HDMI cables
may not support Anynet+ functions.
Check whether the antenna jack on the recording device is properly connected.
Connect the optical cable between TV and the receiver.
Page 76
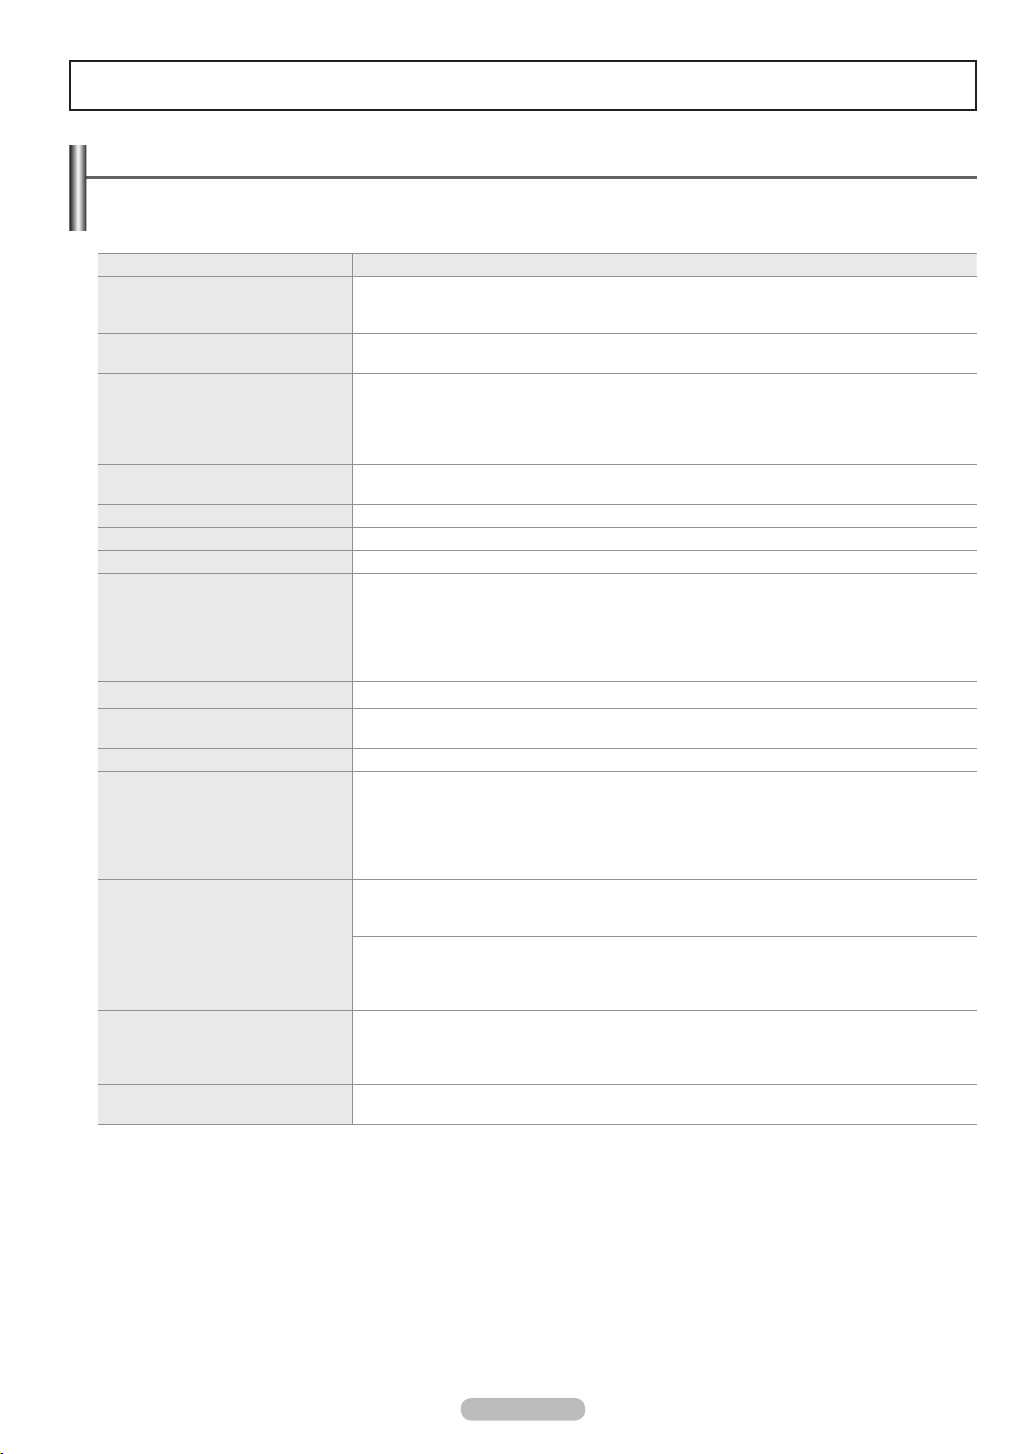
Appendix
Troubleshooting
If the TV seems to have a problem, first try this list of possible problems and solutions.
If none of these troubleshooting tips apply, call your nearest Samsung service center.
Problem Possible Solution
Poor picture quality. Try another channel.
Poor sound quality. Try another channel.
No picture or sound. Try another channel.
No sound or sound is too low at
maximum volume.
Picture rolls vertically. Check all connections.
The TV operates erratically. Unplug the TV for 30 seconds, then try operating it again.
The TV won’t turn on.
Remote control malfunctions Replace the remote control batteries.
Digital broadcasting screen problem. Please check the digital signal strength and input antenna.
The image is too light or too dark. Adjust the Brightness and Contrast.
The image is too large or too small. Adjust the Size settings.
The visual qualities of digital channels
vary.
Screen is black and power indicator
light blinks steadily.
Although the TV caption shows HD,
the visual quality is not satisfactory.
The damaged picture appears in the
corner of the screen.
Adjust the antenna.
Check all wire connections.
Adjust the antenna.
Press the SOURCE button.
Make sure the TV is plugged in.
Check the antenna connections.
Make sure the MUTE button is off.
First, check the volume of units connected to your TV (digital broadcasting receiver, DVD, cable
broadcasting receiver, VCR, etc.). Then, adjust the TV volume accordingly.
Make sure the wall outlet is working.
Clean the upper edge of the remote control (transmission window).
Check the battery terminals.
Press the TV button to put your remote control in the TV mode.
Make sure the remote has batteries.
Check that the “+” and “-” ends of the batteries are inserted correctly.
Adjust the Fine tuning.
The visual qualities of digital channels may vary depending on the original production method
(analog or digital).
- If the original production method is digital: High visual quality.
- If the original production method is analog: The digital program displayed on the screen is
originally an analog program which has been converted to digital.
The visual quality is of an SD(Standard Definition) grade.
On your computer; check the Power and Signal Cable.
The TV is using its power management system.
Move the computer’s mouse or press any key on the keyboard.
On your equipment check (STB, DVD, etc) ; Power and Signal Cable.
The TV is using its power management system.
Press the Source button on the panel or remote control.
Turn the TV off and on.
The HD(High Definition) caption that appears when switching channels or when pressing the
Information button on the remote control means the selected channel is a digital channel. If the
broadcasting station converts an analog signal into digital and transmits the signal, the visual
quality may not be perfect.
If Just Scan is selected in some external devices, the damaged picture may appear in the
corner of the screen. This symptom is caused by external devices, not TV.
English - 76
Page 77
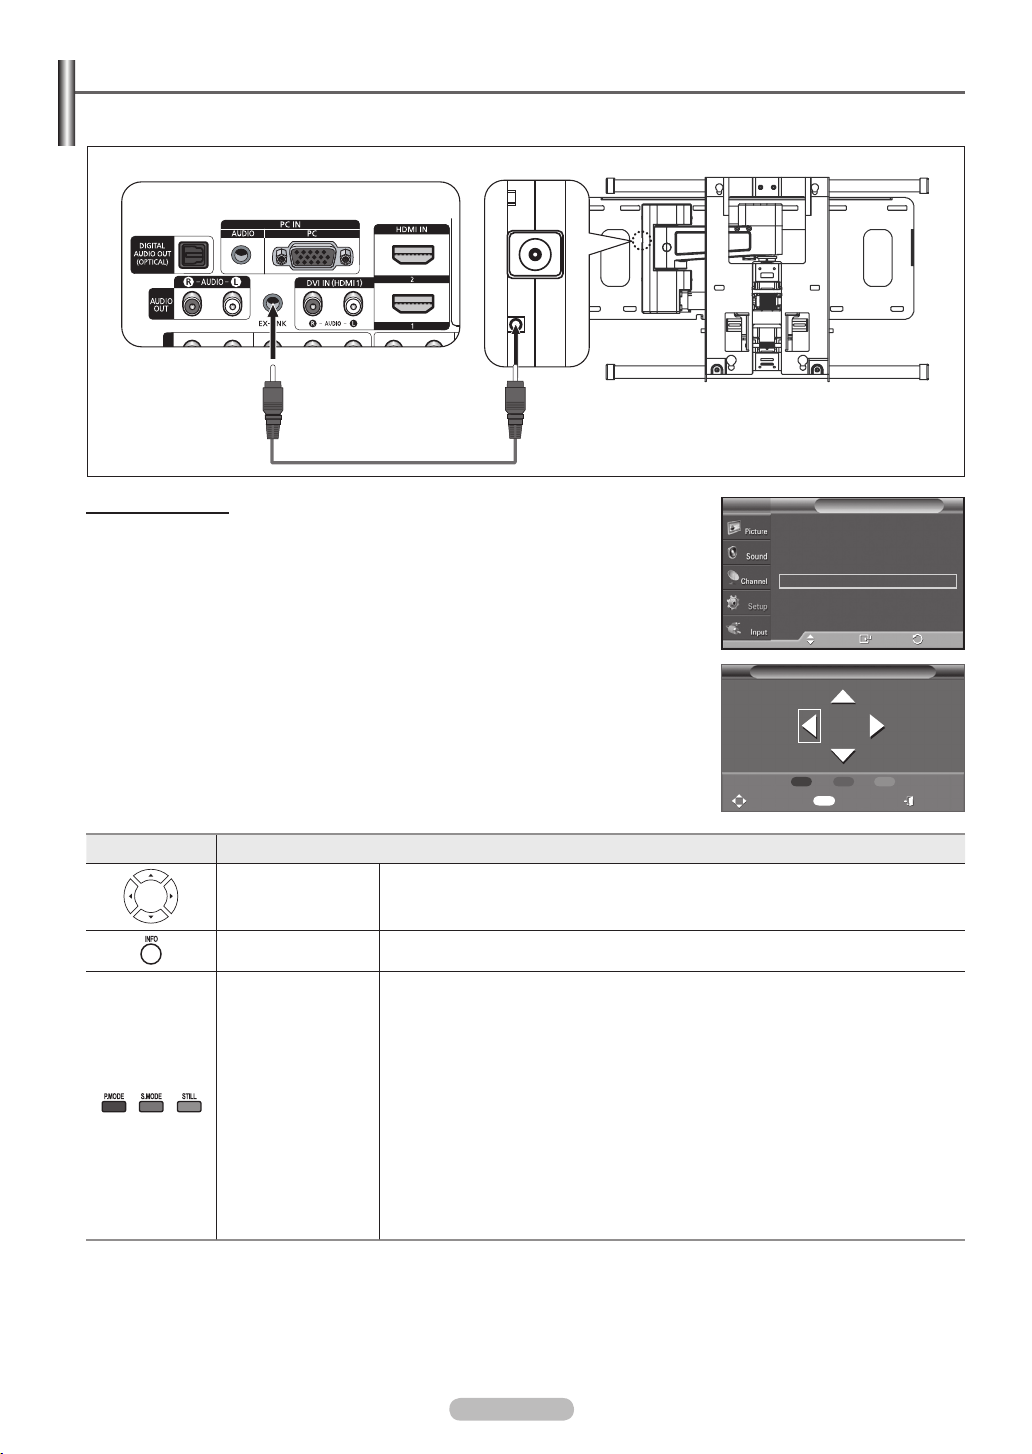
English - 77
Auto Wall-mount adjustment (Sold separately) (FP-T5084)
Once the auto wall mount is installed, the position of your TV can be easily adjusted.
TV Rear Panel
EX-LINK Cable (Not supplied)
Entering the menu
1 Press the MENU button to display the menu.
Press the ▲ or ▼ button to select Setup, then press the ENTER button.
2 Press the ▲ or ▼ button to select Wall-Mount Adjustment, then press the
ENTER button.
3 Adjust to the desired position using the ▲/▼/◄/► buttons.
Press the
If you press an arrow button when no OSD is displayed on the TV screen, the
➢
EXIT button to exit.
Adjustment screen appears.
When you turn the power off, your TV moves to the initial installation position.
➢
When you turn the power on, your TV moves to the last adjusted position.
Using the remote Control Buttons
Button Operations
Wall-mount angle
Tilt Up, Tilt Down, Move right, Move left
adjustment
Auto Wall-Mount
▲
More
Screen Burn Protection
HDMI Black Level : Normal
Film Mode : Off
Wall-Mount Adjustment
PIP
Function Help : On
SW Upgrade
Wall-Mount Adjustment
Position1
Position
Adjust
SetupT V
Move
Enter
1 2 3
INFO
Center
Exit
Return
►
►
►
►
►
►
►
Reset Moves to the initial installation position.
Remembering the
position and moving
to the remembered
position
1. Select the Direction buttons of the remote control.
2. Press the red button (Select Position 1).
3. Adjust the set to a desired position following the wall mount owner’s manual.
4. When 10 seconds have passed in a particular position, the wall mount
adjustment screen disappears and the current position is stored in Select
Position 1.
5. By using the green button (Select Position 2), and the yellow button (Select
Position 3), you can save positions according to the procedures above.
6. You can save 3 respective positions. To the red button (Select Position 1),
green button (Select Position 2), and yellow button (Select Position 3). If you
press a button after saving, the set automatically moves to that saved angle.
7. If you additionally move the set from a saved position, the last position is
saved.
For installation, refer to the Installation Manual provided with the wall mount.
➢
For product installation and the installation and moving of the wall mount, make
➢
sure to consult a specialized installation company.
This installation manual is to be used when attaching the wall mount to a wall.
➢
When attaching to other building materials, please contact your nearest dealer.
Page 78
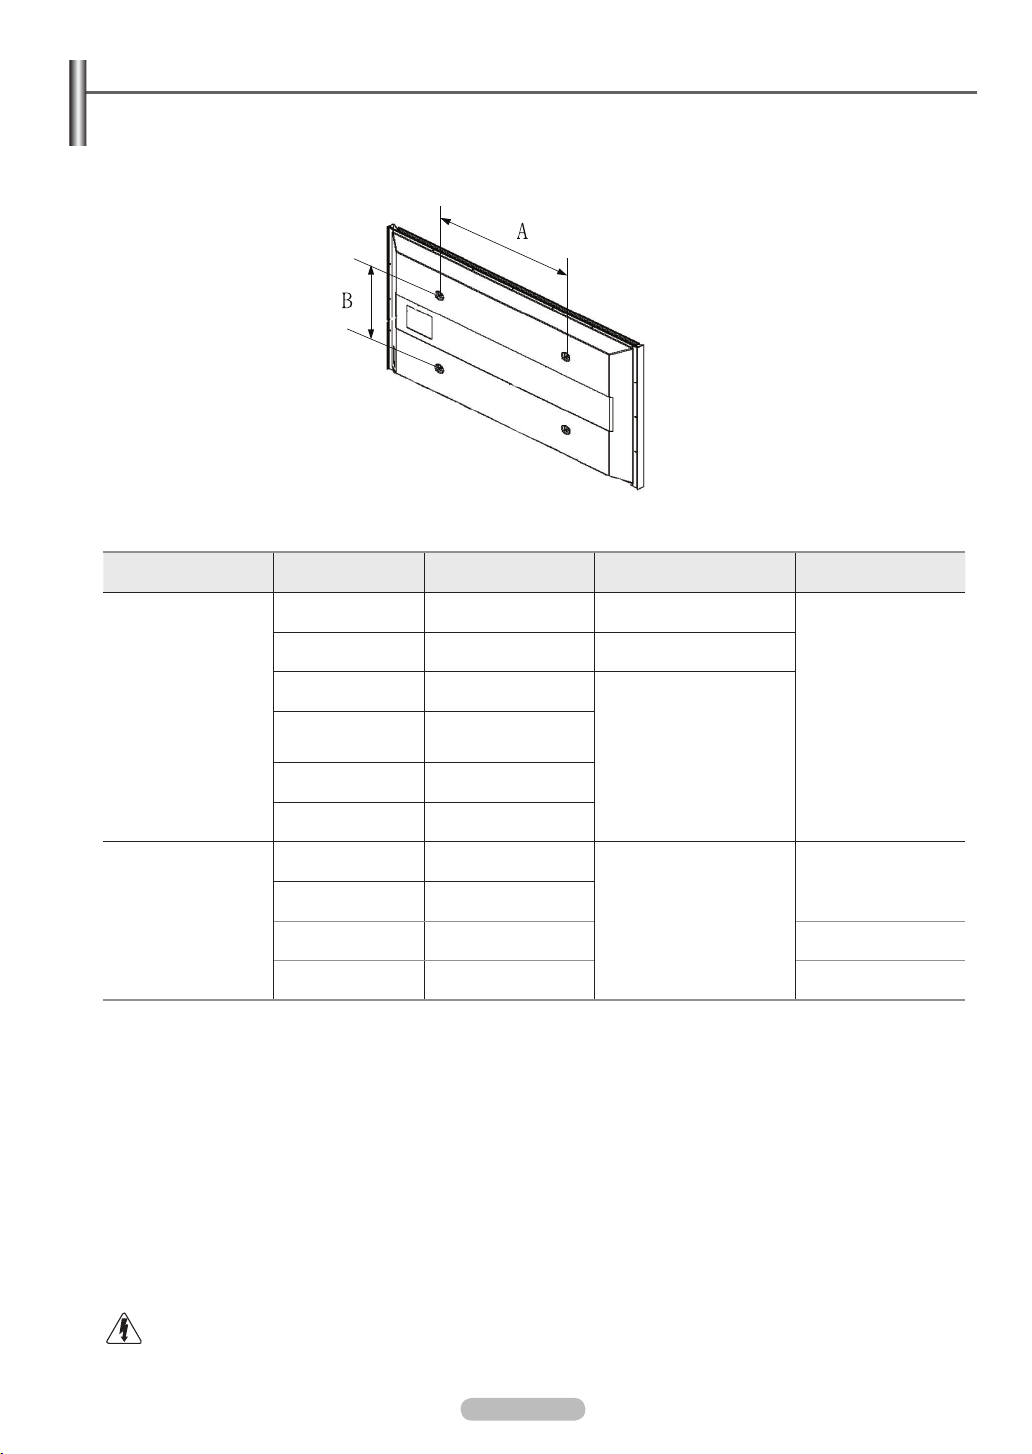
Wall Mount Kit Specifications (VESA)
Install your wall mount on a solid wall perpendicular to the floor.
When attaching to other building materials, please contact your nearest dealer.
If installed on a ceiling or slanted wall, it may fall and result in severe personal injury.
Product Family inch VESA Spec. (A * B) Standard Screw Quantity
23 ~ 26 200 * 100 M4
32 ~ 40 200 * 200 M6
46 ~ 52 600 * 400
LCD-TV
PDP-TV
We provided the standard dimensions for wall mount kits as shown in the table above.
➢
When purchasing our wall mount kit, a detailed installation manual and all parts necessary for assembly are
➢
provided.
Do not use screws longer than the standard dimension, as they may cause damage to the inside of the TV set.
➢
For wall mounts that do not comply with the VESA standard screw specifications, the length of the screws may differ
➢
depending on their specifications.
Do not use screws that do not comply with the VESA standard screw specifications.
➢
Do not use fasten the screws too strongly, this may damage the product or cause the product to fall, leading to
personal injury. Samsung is not liable for these kinds of accidents.
Samsung is not liable for product damage or personal injury when a non-VESA or non-specified wall mount is used
➢
or the consumer fails to follow the product installation instructions.
Our 57” and 63” models do not comply with VESA Specifications. Therefore, you should use our dedicated wall
➢
mount kit for this model.
Do not exceed 15 degrees tilt when mounting this TV.
➢
Do not install your Wall Mount Kit while your TV is turned on.
It may result in personal injury due to electric shock.
57
57 ~ 70 800 * 400
80 ~ 1400 * 800
42 ~ 50 600 * 400
55 ~ 70 800 * 400
63 No VESA 6
80 ~ 1400 * 800 4
700 * 400
(No VESA)
M8
M8
4
4
English - 78
Page 79
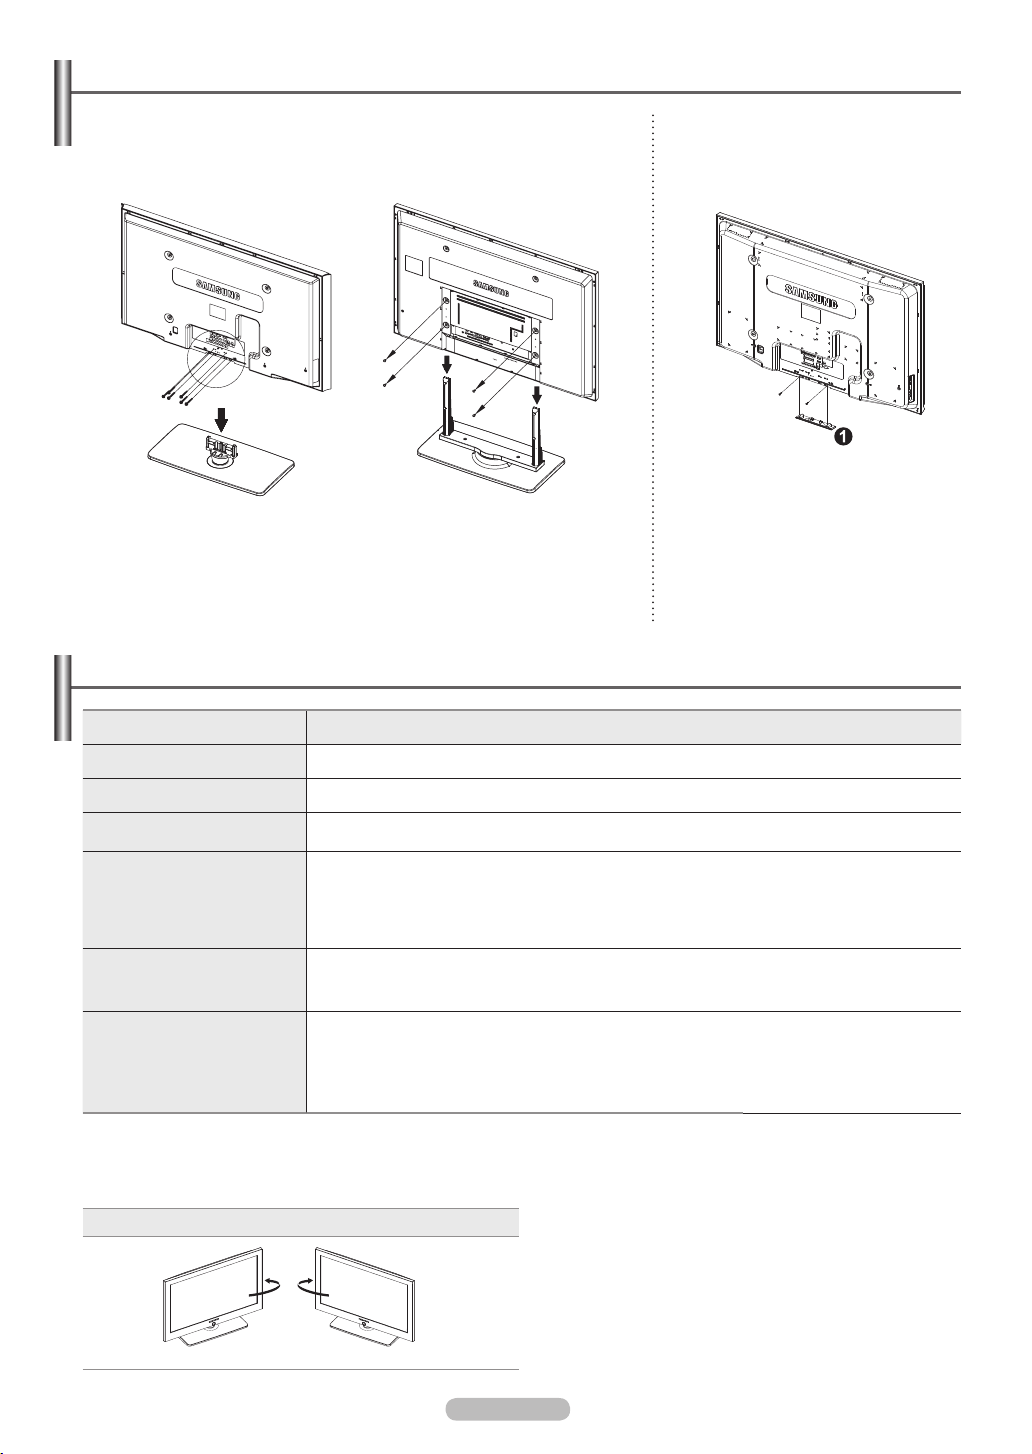
How to attach the Stand-Base
Using the screws for securing the stand base and the monitor, firmly attach
the monitor to the stand base.
(The exterior of the set may be different from the picture.)
FP-T5084/FP-T5884 FP-T6374
Warning
Firmly secure the stand to the TV before moving it, as the stand may fall and
could cause serious injury.
Two or more people should carry the TV. Never lay the TV on the floor
➢
because of possible damage to the screen. Always store the TV upright.
Specifications
When mounting your TV on a wall,
install the cover (1) on the stand-base
using two screws.
Model Name FP-T5084 FP-T5884 FP-T6374
Screen Size (Diagonal) 50 inch 58 inch 63 inch
PC Resolution 1920 x 1080 @ 60 Hz 1920 x 1080 @ 60 Hz 1920 x 1080 @ 60 Hz
Sound (Output) 15W + 15W 15W + 15W 15W + 15W
Dimension (W x H x D)
Body
With stand
Weight
Body
With stand
Environmental Considerations
Operating Temperature
Operating Humidity
Storage Temperature
Storage Humidity
This device is a Class B digital apparatus.
➢
Design and specifications are subject to change without prior notice.
➢
For the power supply and Power Consumption, refer to the label attached to the product.
➢
Stand Swivel (Left / Right)
50.8 X 29.1 X 3.7 inches
(1289.3 X 739.2 X 94.7 mm)
50.8 X 31.7 X 12.6 inches
(1289.3 X 804 X 319.9 mm)
98.8 lbs (44.8 kg)
106.9 lbs (48.5 kg)
50 °F to 104 °F (10 °C to 40 °C)
10% to 80%, non-condensing
-4 °F to 113 °F (-20 °C to 45 °C)
5% to 95%, non-condensing
57.7 X 33 X 3.9 inches
(1465.1 X 838 X 99.7 mm)
57.7 X 35.6 X 13.6 inches
(1465.1 X 904.7 X 344.7 mm)
130.1 lbs (59.0 kg)
141.1 lbs (64.0 kg)
50 °F to 104 °F (10 °C to 40 °C)
10% to 80%, non-condensing
-4 °F to 113 °F (-20 °C to 45 °C)
5% to 95%, non-condensing
60.2 X 39.4 X 3.5 inches
(1528 X 1001 X 88 mm)
60.2 X 42.8 X 16.7 inches
(1528 X 1087 X 423 mm)
149.9 lbs (68.0 kg)
196.2 lbs (89.0 kg)
50 °F to 104 °F (10 °C to 40 °C)
10% to 80%, non-condensing
-4 °F to 113 °F (-20 °C to 45 °C)
5% to 95%, non-condensing
-20° ~ 20°
English - 79
Page 80
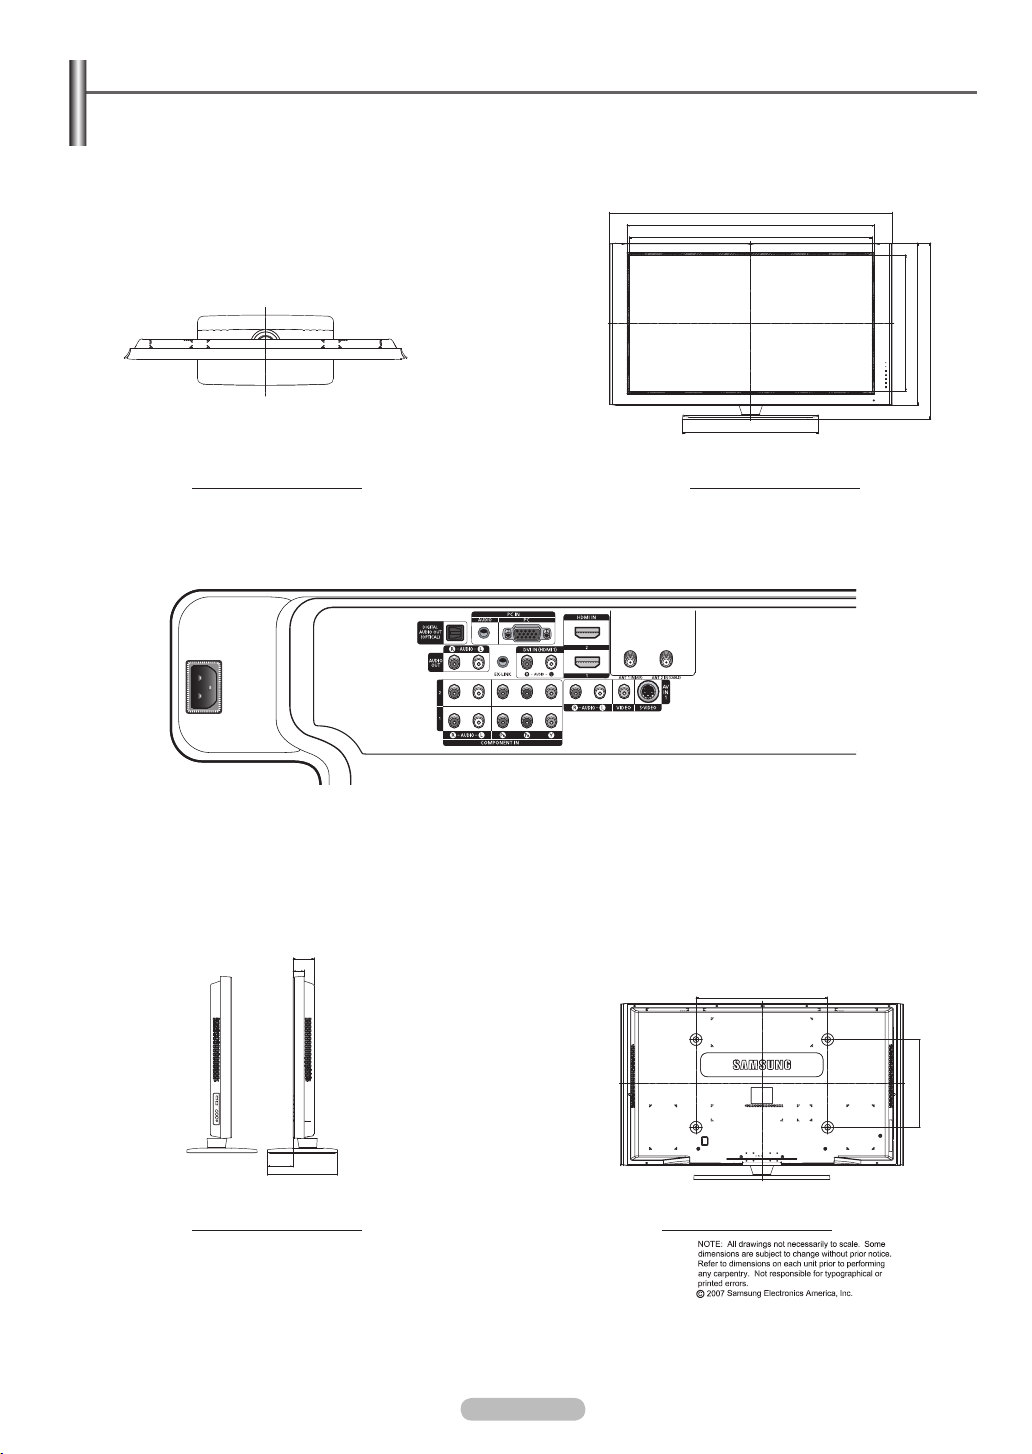
Dimensions (FP-T5084)
50.8
44.4
43.6
24.4
24.5
29.1
31.7
TOP VIEW
FRONT VIEW
JACK PANEL DETAIL 2.3"H x 18.8"W @ 5.8" UP FROM BOTTOM
3.7
2.0
23.6
4.6
12.6
SIDE VIEW REAR VIEW
English - 80
15.8
Page 81
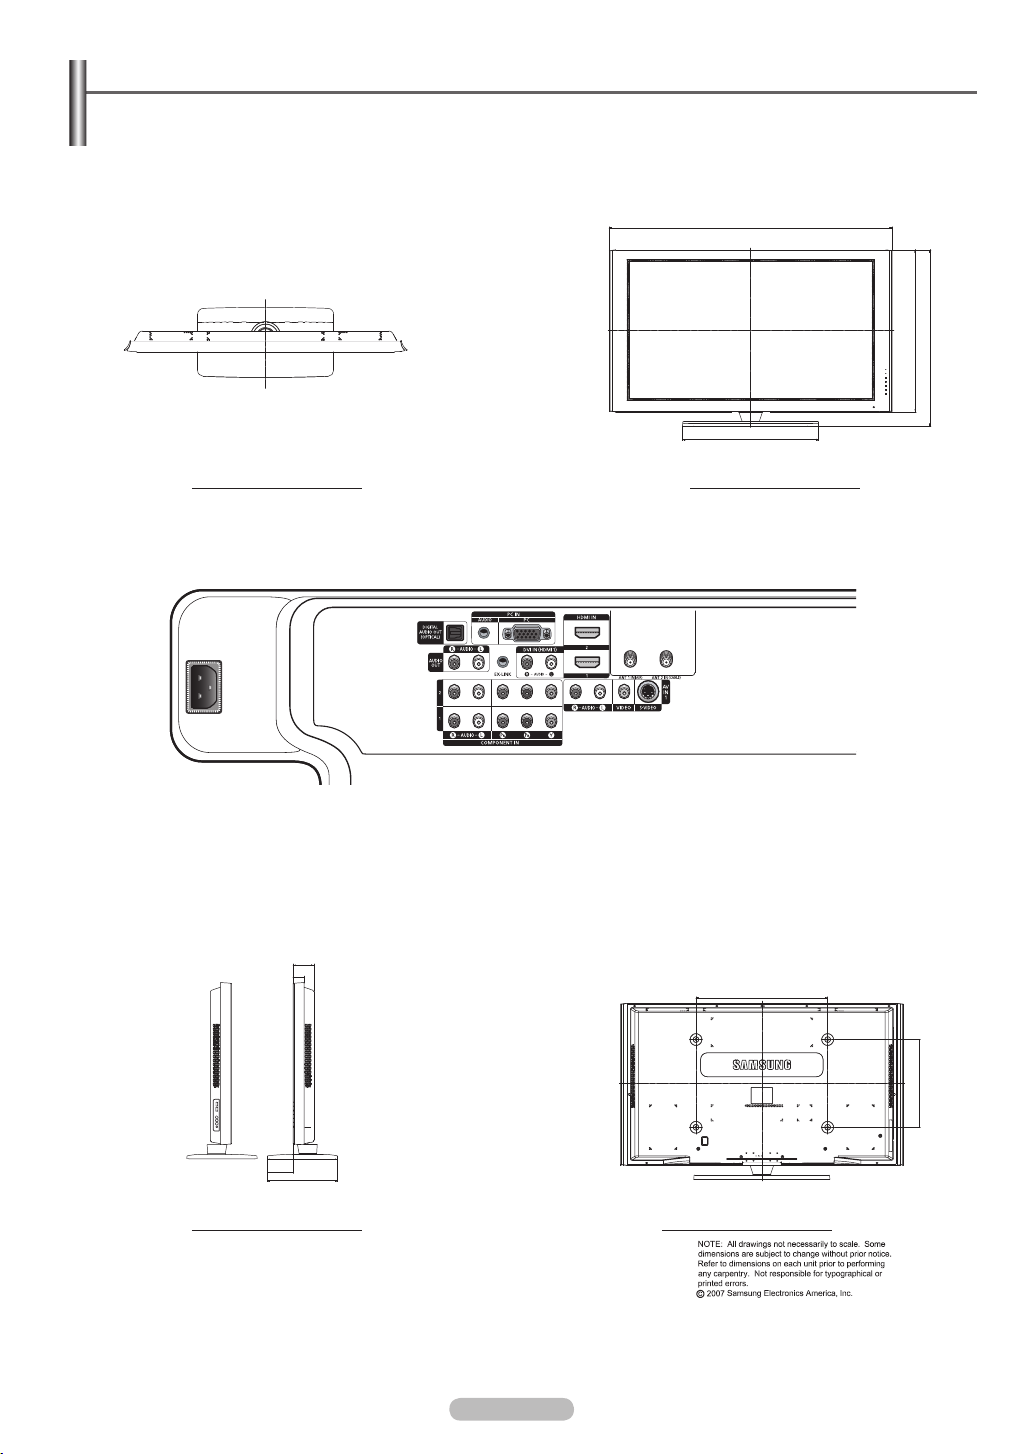
English - 81
Dimensions (FP-T5884)
57.7
29.1
33
35.6
TOP VIEW
FRONT VIEW
JACK PANEL DETAIL 2.3"H x 18.8"W @ 5.8" UP FROM BOTTOM
3.9
2.0
23.6
5.3
13.6
SIDE VIEW REAR VIEW
15.8
Page 82
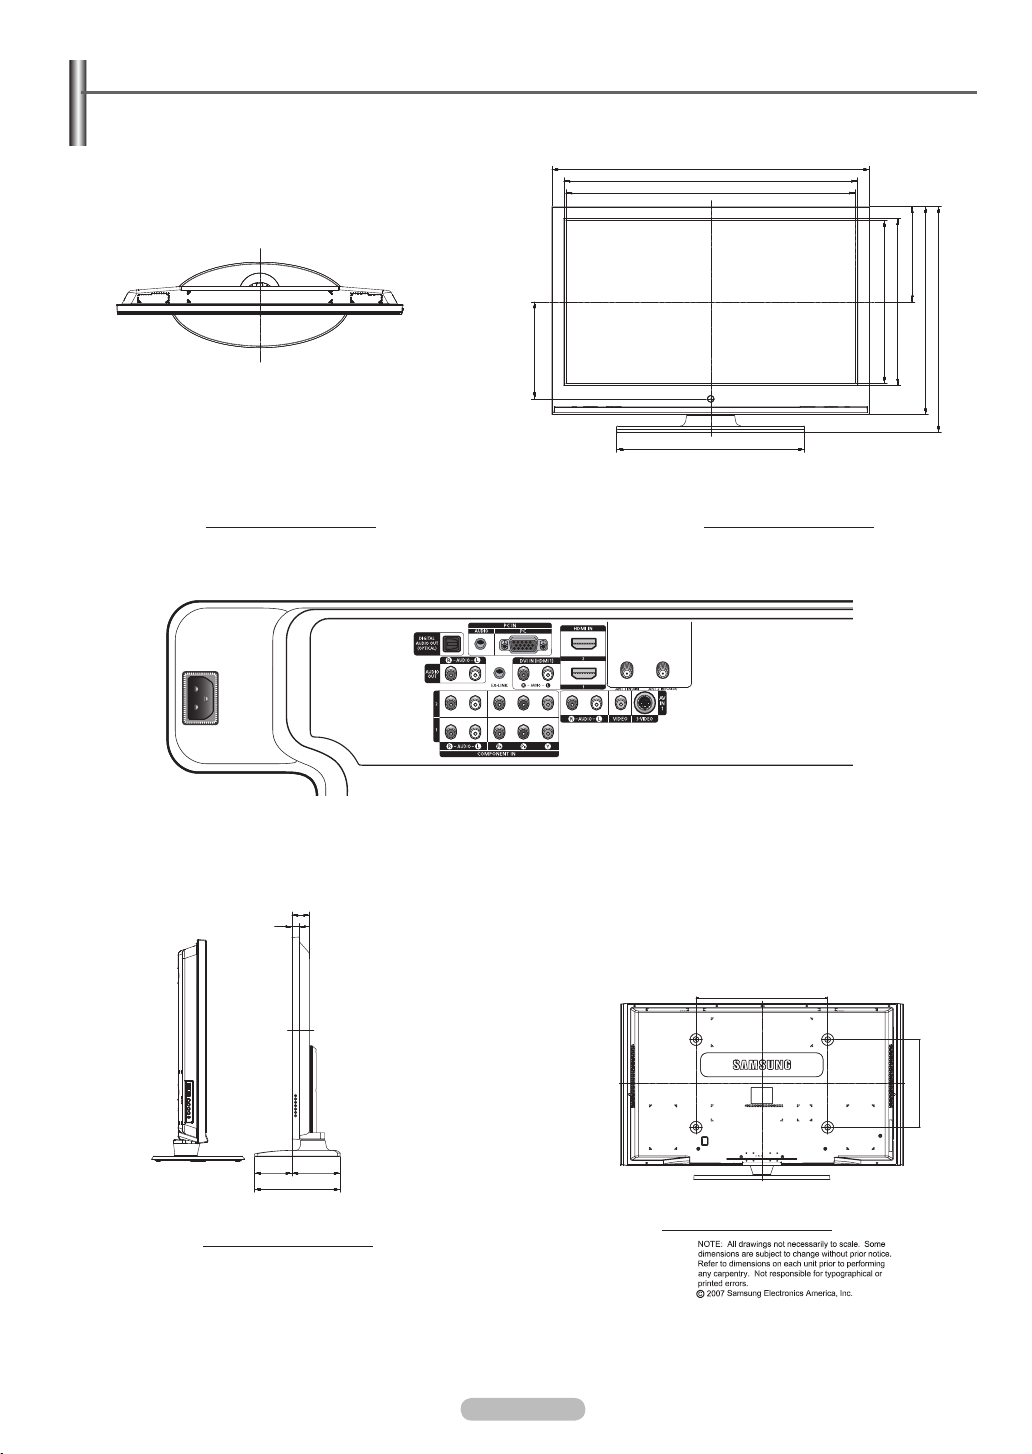
Dimensions (FP-T6374)
18.4
60.2
55.6
54.8
35.6
30.8
31.6
18.1
39.4
42.8
TOP VIEW
JACK PANEL DETAIL 2.3"H x 18.8"W @ 5.8" UP FROM BOTTOM
3.4
1.5
FRONT VIEW
26.6
16.0
7.2
SIDE VIEW
9.4
16.6
REAR VIEW
English - 82
Page 83

This page is intentionally
left blank.
Page 84

This page is intentionally
left blank.
Page 85
FP-T5084
FP-T5884
FP-T6374
MONITEUR À PLASMA
Manuel du
propriétaire
Enregistrez vos produits Samsung en vous connectant sur :
www.samsung.com/global/register
Inscrivez ici le modèle et le numéro de série pour référence ultérieure.
▪ Modèle _______________ ▪ N° de série _______________
Page 86

Remarques importantes sur la garantie relative au format de l’image du téléviseur
Le format écran large des écrans à plasma (16:9, soit le rapport hauteur/largeur de l’image) est conçu principalement pour
les vidéos plein écran à écran large. Les images affichées sur ces écrans devraient être principalement du format d’écran
large de rapport 16:9,
ou élargies pour remplir l’écran si le modèle est doté de cette fonction et si les images bougent continuellement. Afficher des
graphiques et images fixes à l’écran, comme les barres noires latérales des vidéo pour téléviseur de format standard et
les émissions de ce format doivent se limiter à 5 % du temps d’écoute par semaine.
En outre, l’affichage d’autres images et textes fixes, comme des rapports boursiers, des jeux vidéos, des logos des stations,
des sites Web ou des graphismes et motifs informatiques doit être limité, comme il est indiqué ci-dessus pour tous les
téléviseurs. Afficher des
images fixes qui ne respectent pas les directives ci-dessus peut causer un vieillissement inégal des écrans à plasma
en y créant des images rémanentes, subtiles mais permanentes. Pour éviter ce problème, varier les émissions et les
images et regarder principalement
des images en mouvement en plein écran, et non pas des motifs fixes ou des barres noires.
Dans les modèles d’écran à plasma qui offrent des caractéristiques de format d’image, utiliser ces commandes pour obtenir
différents formats en plein écran.
Prendre garde au choix des formats et à leur durée d’utilisation. Le vieillissement inégal d’un écran à plasma causé par la
sélection et l’utilisation d’un format
et les images rémanentes ne sont pas couverts par la garantie limitée de Samsung.
États-Unis seulement
L’appareil qui accompagne ce guide de l’utilisateur est fabriqué sous licence en vertu de droits de propriété intellectuelle
de certaines tierces parties. Ce produit est protégé en vertu des brevets américains suivants : 5 991 715, 5 740 317,
4 972 484, 5 214 678, 5 323 396, 5 539 829, 5 606 618, 5 530 655, 5 777 992, 6 289 308, 5 610 985, 5 481 643,
5 544 247, 5 960 037, 6 023 490, 5 878 080, et en vertu de la demande de brevet nº 2001-44713-A1 publiée aux ÉtatsUnis.
Cette licence permet aux consommateurs d’utiliser le contenu sous licence à des fins non commerciales. Aucun droit
n’est accordé à l’égard d’une utilisation commerciale. Cette licence ne couvre aucun autre appareil que celui-ci et ne
s’applique pas aux produits non pourvus d’une licence ni à tout processus conforme à la norme ISO/IEC 11172-3 ou
ISO/IEC 13818-3 utilisé ou vendu de pair avec ce produit. La licence ne couvre que l’utilisation de cet appareil à des
fins d’encodage et/ou de décodage de fichiers audio conformément à la norme ISO/IEC 11172-3 ou ISO/IEC 13818-3.
Aucun droit n’est accordé en vertu de cette licence en ce qui a trait aux caractéristiques ou fonctions du produit qui ne
sont pas conformes à la norme ISO/IEC 11172-3 ou ISO/IEC 13818-3.
Autres pays
L’appareil qui accompagne ce guide de l’utilisateur est fabriqué sous licence en vertu de droits de propriété intellectuelle
de certaines tierces parties. Cette licence permet aux consommateurs d’utiliser le contenu sous licence à des fins
non commerciales. Aucun droit n’est accordé à l’égard d’une utilisation commerciale. Cette licence ne couvre aucun
autre appareil que celui-ci et ne s’applique pas aux produits non pourvus d’une licence ni à tout processus conforme
à la norme ISO/IEC 11172-3 ou ISO/IEC 13818-3 utilisé ou vendu de pair avec ce produit. La licence ne couvre que
l’utilisation de cet appareil à des fins d’encodage et/ou de décodage de fichiers audio conformément à la norme
ISO/IEC 11172-3 ou ISO/IEC 13818-3. Aucun droit n’est accordé en vertu de cette licence en ce qui a trait aux
caractéristiques ou fonctions du produit qui ne sont pas conformes à la norme ISO/IEC 11172-3 ou ISO/IEC 13818-3.
Français - 2
Page 87
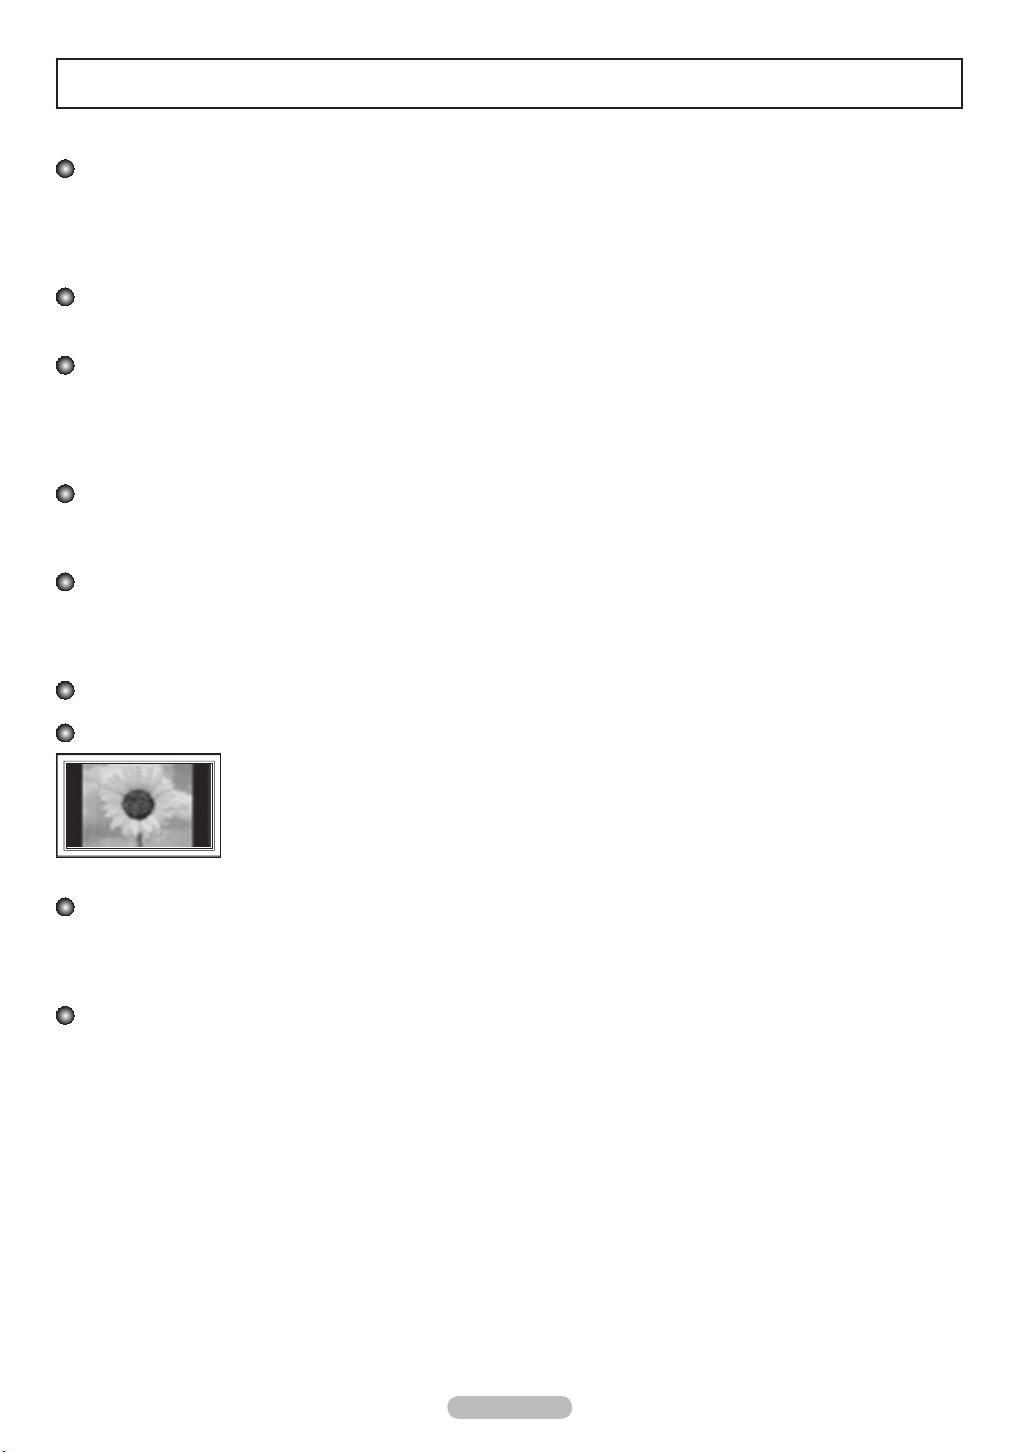
Guide de l’utilisateur
Image rémanente
Un écran à plasma ne doit pas présenter une image fixe (comme celle des jeux vidéos) durant un laps de temps trop
important, car elle peut causer une image rémanente. Ce phénomène est aussi appelé “brûlure d’écran” Pour éviter une
telle image rémanente, la page 26 du présent guide explique comment diminuer la luminosité et le contraste de l’écran
pour afficher une image fixe.
Altitude
L’écran à plasma ne fonctionne normalement qu’à une altitude inférieure à 6 500 pi.
Chaleur à la partie supérieure de l’écran à plasma
Le dessus de l’appareil peut devenir chaud après un fonctionnement prolongé alors que la chaleur se dissipe par les
orifices de ventilation aménagés dans la partie supérieure de l’écran.
Cet état est normal et n’est pas le signe d’une défectuosité du produit.
Toutefois, il faut empêcher les enfants de toucher cette partie de l’écran.
L’appareil laisse entendre un craquement.
Un craquement peut se produire lorsque l’appareil se contracte ou se dilate à cause d’un changement au milieu ambiant,
comme la température ou l’humidité. Cela est normal et n’est pas le signe d’une défectuosité.
Défauts de cellules
L’écran à plasma comporte de 1 230 000 (définition standard) à 3 150 000 (haute définition) pixels dont la création
nécessite une technologie hautement perfectionnée. Toutefois, il peut y avoir quelques pixels lumineux ou sombres à
l’écran. Ces pixels n’ont aucune incidence sur le rendement du produit.
Éviter de faire fonctionner le téléviseur à une température inférieure à 5 °C (41 °F)
Une image fixe affichée trop longtemps peut endommager l’écran à plasma de façon permanente.
Le fait de regarder l’écran à plasma en format 4:3 durant une longue période peut laisser des traces
de bordures apparaissant à gauche, à droite et au centre de l’écran causées par une différence
d’émission de lumière à l’écran.
Un DVD ou un jeu vidéo peut avoir le même effet sur l’écran.
Les dommages ainsi provoqués ne sont pas couverts par la garantie.
Image rémanente à l’écran.
Les images fixes des jeux vidéo et des ordinateurs affichées durant une longue période peuvent causer des images
rémanentes partielles.
Pour éviter cet effet, réduire la luminosité et le contraste lorsque des images fixes doivent rester longtemps à l’écran.
Garantie
La garantie ne couvre pas les dommages causés par la rémanence.
L’image rémanente n’est pas couverte par la garantie.
Français - 3
Page 88

Table des matières
RENSEIGNEMENTS GÉNÉRAUX
■
Liste des caractéristiques .........................................5
■
Accessoires .............................................................. 5
■
Affichage du panneau de configuration ....................6
■
Affichage du panneau de branchement ...................7
■
Télécommande ......................................................... 8
■
Insertion des piles dans la télécommande ...............9
BRANCHEMENTS
■
Branchement des antennes VHF et UHF ................. 9
■
Branchement du câble de télédistribution ..............10
■
Branchement d’un magnétoscope .......................... 11
■
Branchement d’un caméscope ...............................12
■
Branchement d’un lecteur DVD, câblosélecteur ou
récepteur satellite ................................................... 12
■
Branchement d’un lecteur DVD, câblosélecteur ou
récepteur satellite à l’aide d’un câble HDMI ........... 13
■
Branchement d’un lecteur DVD, câblosélecteur ou
récepteur satellite à l’aide d’un câble DVI ..............13
■
Branchement d’un système audio numérique ........ 14
■
Branchement d’un amplificateur ou d’un système
de cinéma maison à DVD ....................................... 14
■
Branchement d’un ordinateur ................................. 14
FONCTIONNEMENT
■
Mise sous tension/hors tension du téléviseur ......... 15
■
Fonction Prêt-à-l’emploi .........................................15
■
Changement de canal ............................................17
■
Réglage du volume ................................................18
■
Affichage des paramètres ......................................18
■
Affichage des menus ..............................................18
■
Mémorisation des canaux ......................................19
■
Programmation de la télécommande .....................20
■
Pour choisir la source .............................................25
■
Pour entrer le nom de la source d’entrée ............... 25
RÉGLAGE DE L’IMAGE
■
Réglage automatique de l’image ............................26
■
Réduction numérique des bruits ............................. 27
■
Modification du format de l’image ........................... 28
■
Réglages d’image détaillés ....................................29
■
Active Color (couleur activée) ................................30
■
Technologie DNIe (Digital Natural Image engine) ..30
■ Réglage du mode Film
■
Réglage du mode écran bleu .................................31
■
Réglage du Nv nr HDMI .........................................31
■
Affichage de l’image sur image ..............................32
■
Arrêt sur Image ....................................................... 33
PARAMÈTRES AUDIO
■
Réglage automatique du son .................................34
■
Réglages audio ......................................................34
■
Réglage de TruSurround XT ..................................35
■
Sélection d’une piste de son multicanaux - numérique ...
■
Sélection d’une piste de son multicanaux - analogique
■
Contrôle automatique du volume ...........................36
■
Sélection de la sourdine interne ............................. 36
■
Réglage de la mélodie de marche/arrêt du téléviseur
■
Écoute du son provenant de la fenêtre secondaire (ISI)
Symboles
Appuyer
.......................................31
35
.. 36
..37
..37
Bouton à
une touche
➢
Remarque
Français - 4
RÉGLAGE DES CANAUX
■
Sélection de l’antenne ............................................ 38
■
Ajout et suppression de canaux .............................38
■
Sélection des canaux favoris .................................. 39
■
Visualisation des listes de canaux .......................... 40
■
Réglage du mode de liste des canaux par défaut .. 40
■
Identification des canaux ........................................41
■
Syntonisation précise des canaux analogiques .....41
■
Contrôle de l’intensité du signal numérique ...........42
■
Amplificateur à faible bruit (LNA) ............................ 42
ÉCRAN D’ORDINATEUR
■
Utilisation du téléviseur comme écran d’ordinateur 43
■
Modes d’affichage ..................................................43
■
Configuration du téléviseur par l’ordinateur ............ 44
■
Réglage du PC cinéma maison .............................45
RÉGLAGE DE L’HORLOGE
■
Réglage de l’horloge ..............................................46
DESCRIPTION DES FONCTIONS
■
Sélection de la langue de menu ............................. 49
■
Utilisation du mode Jeu (Game) ............................. 49
■
Affichage des sous-titres codés (messages à l’écran)
- numériques ..........................................................50
■
Affichage des sous-titres codés (messages à l’écran)
- analogiques ..........................................................51
■
Niveau de transparence .........................................52
■
Réglage de l’effet lumineux .................................... 52
■
Fonction économiseur d’énergie ............................53
■
Prévention de la brûlure d’écran ............................53
■
Réduction des effets de la brûlure d’écran .............54
■
Réglage des fonctions d’aide .................................54
■
Fonction Puce V ..................................................... 55
■
Mise à jour du logiciel .............................................61
WISELINK
■ Utilisation de la fonction WISELINK
■ Utilisation du mode WISELINK
■
Utiliser la liste Photo (JPEG)
■ Utiliser la liste de pièces musicales (MP3)
■ Menu de configuration
À propos d’Anynet
■
Qu’est-ce qu’Anynet+? ........................................... 72
■
Branchement d’appareils Anynet
■
Configuration d’Anynet
■
Balayage et permutation entre les appareils Anynet+ ..73
■
Enregistrement ....................................................... 74
■
Écoute par l’intermédiaire d’un récepteur (cinéma
maison) ................................................................... 75
■
Dépannage de la fonction Anynet
ANNEXE
■
Identification des problèmes ................................... 76
■
Support mural à réglage automatique (vendu
séparément) (FP-T5084) ........................................77
■
Spécifications du jeu d’installation murale (VESA)
■
Comment assembler le support
■
Spécifications .........................................................79
■
Dimensions (FP-T5084) .........................................80
■
Dimensions (FP-T5884) .........................................81
■
Dimensions (FP-T6374) .........................................82
+
....................................64
........................................ 71
+
.........................................
................................ 79
................. 62
.........................63
...... 70
+
.........................
+
........................
....78
72
73
75
Page 89
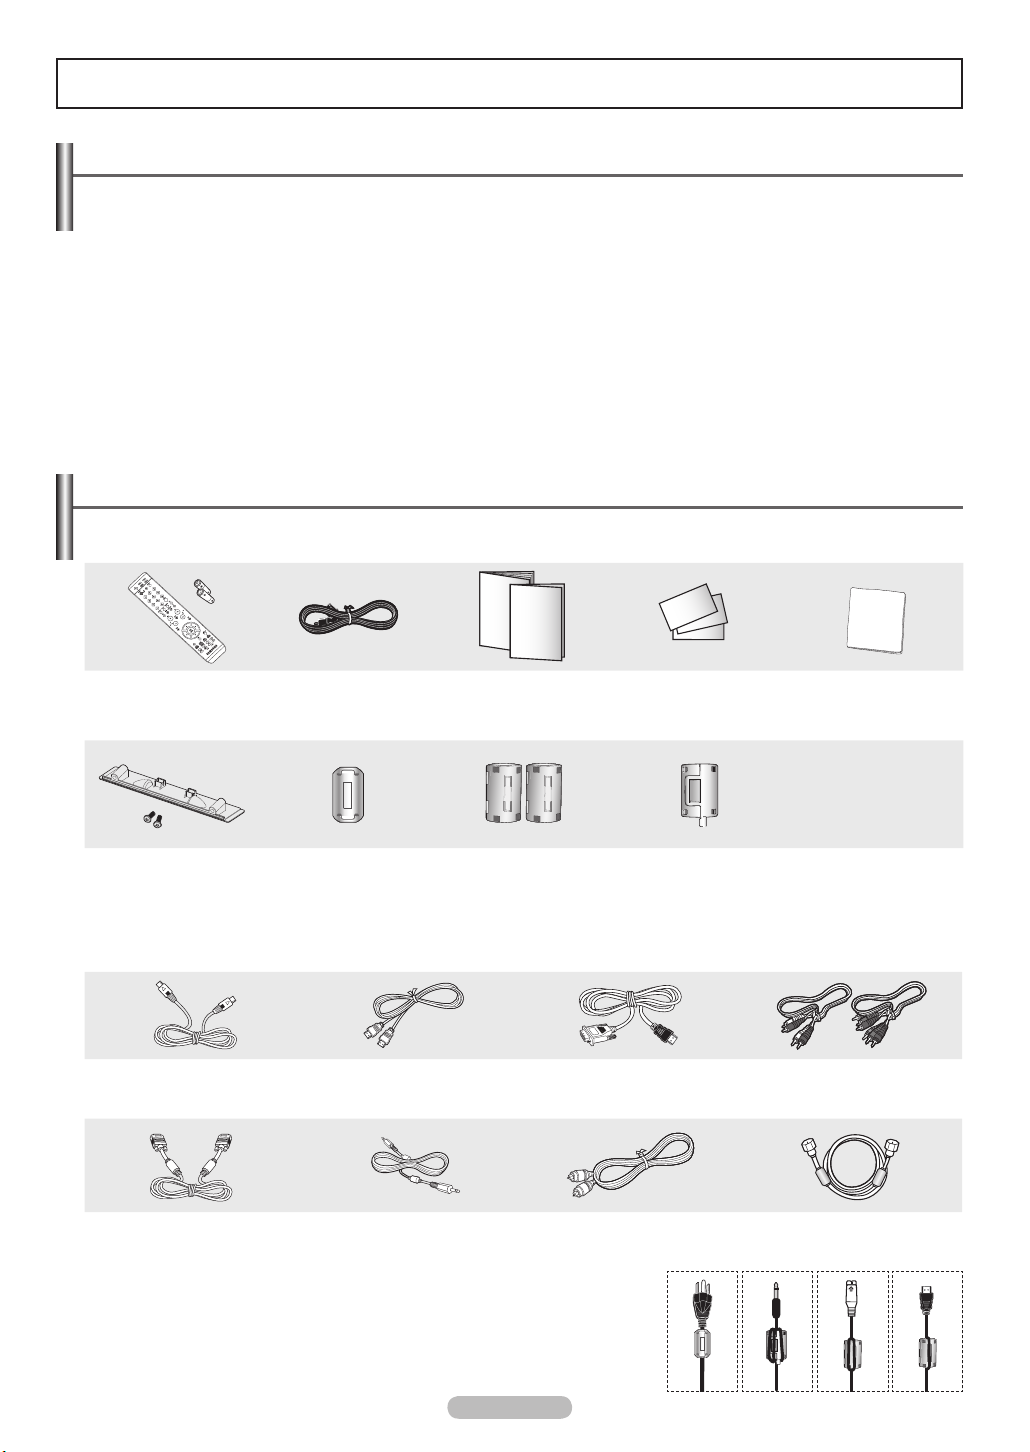
Renseignements généraux
RETURN
FAV.CH
Liste des caractéristiques
• Réglages vidéo pouvant être enregistrés dans la mémoire du téléviseur.
• Minuterie pour allumer et éteindre automatiquement le téléviseur.
• Minuterie spéciale de mise hors tension de l’appareil.
• Fonction de contrôle parental V-Chip.
• Excellents interface et réseautage numérique :
Grâce au syntoniseur numérique HD intégré, les diffusions non payantes HD peuvent être visualisées sans
câblosélecteur ou récepteur satellite.
• Connexion HDMI/DVI de votre PC à ce téléviseur.
• Télécommande
La télécommande peut être utilisée pour contrôler le téléviseur, ainsi que la plupart des lecteurs DVD, récepteurs,
câblosélecteurs et magnétoscopes.
• Excellente qualité d’image
- La technologie DNIe offre des images d’une clarté s’approchant de la réalité.
• SRS TruSurround XT
- SRS TruSurround XT offre un système ambiophonique Dolby virtuel.
Accessoires
Veiller à ce que tous les articles suivants soient inclus avec le téléviseur.
Si des articles sont manquants, contacter le détaillant.
Télécommande(BN59-00599A)/
Piles AAA (4301-000103)
Couvre base/Vis (2ea)
(FP-T5084/FP-T5884,
Consulter la page 79)
Pour savoir comment utiliser le tore magnétique, consultez le bas de la page.
➢
Cordon d’alimentation
(3903-000144)
Tore de ferrite pour le
câble d’alimentation
(3301-001110)
Guide de l’utilisateur/
Guide de configuration
rapide
Tore de ferrite pour câble de
prise AV latérale / S-VIDÉO /
HDMI (3301-001305)
Carte de garantie/
Carte d’enregistrement/
Guide de sécurité
Tore de ferrite pour câble
de prise Casque d’écoute
(3301-001456)
Linge de nettoyage
Les pièces suivantes sont vendues séparément et sont disponibles dans la plupart des magasins d’électronique.
Câble S-VIDÉO (BN39-00149A) Câble HDMI (BN39-00641A) Câble HDMI/DVI
Câble d’ordinateur
(BN39-00115A)
Câble audio d’ordinateur
(BN39-00061B)
(BN39-00643A)
Câble optique Câble d’antenne (BN39-00333A)
Câbles pour composant (RCA)
(BN39-00279A)
Tore magnétique (cordon d’alimentation, câble audio/vidéo,
➢
câble S-Vidéo, casque d’écoute, câble HDMI)
Les tores de ferrite sont utilisés pour protéger les câbles contre les
interférences. Lorsque vous branchez un câble, ouvrez le tore de ferrite et
fixez-le sur le pourtour du câble au niveau de la fiche.
Français - 5
Page 90
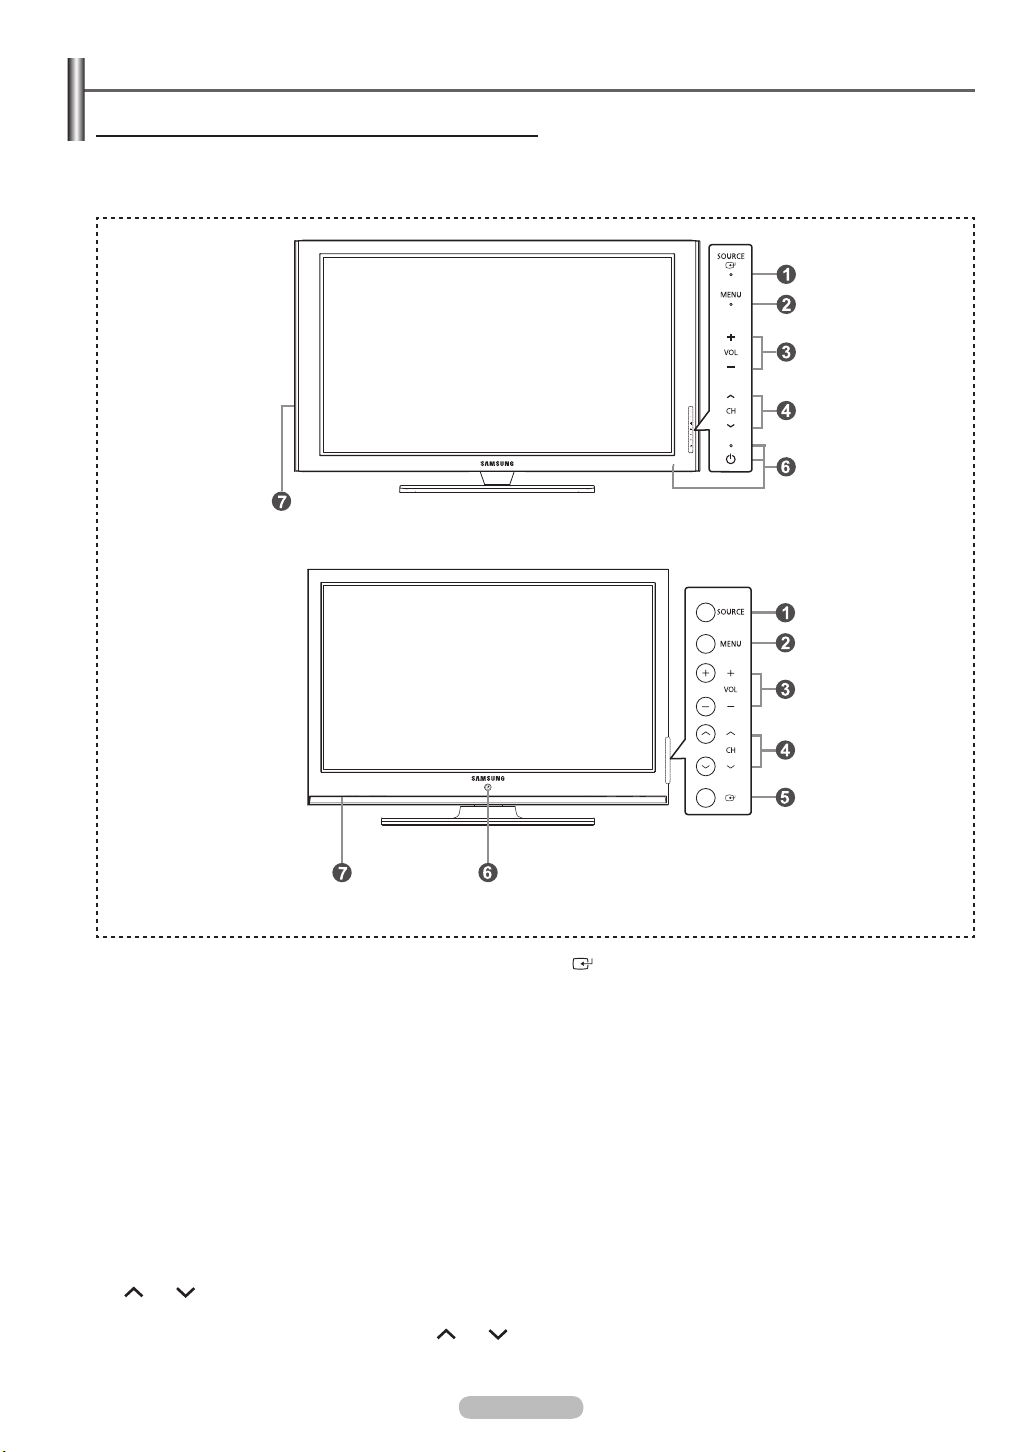
Affichage du panneau de configuration
Touches dans la partie inférieure droite du panneau
Touches de la partie inférieure droite du panneauLes touches du panneau inférieur droit permettent de
commander les principales fonctions du téléviseur, y compris le menu à l’écran.
Pour accéder aux fonctions plus avancées, utiliser la télécommande.
FP-T5084/FP-T5884
FP-T6374
La couleur et la forme de l’appareil peuvent varier selon le modèle.
➢
1
SOURCE
Alterner entre toutes les sources d’entrée accessibles
(TV, AV1, AV2, S-Video1, S-Video2, Composant1,
Composant2, PC, HDMI1, HDMI2, ou HDMI3).
Dans le menu à l’écran, utilisez ce bouton de
➢
la même manière que le bouton ENTER de la
télécommande. (FP-T5084/FP-T5884)
2
MENU
Afficher à l’écran le menu des fonctions du téléviseur.
3
+ VOL –
Augmenter ou diminuer le volume. Dans le menu
à l’écran, utiliser les touches + VOL – de la
même manière que les touches ◄ and ► de la
télécommande.
4
CH
Changer de canal.
Dans le menu à l’écran, utiliser les touches
de la même manière que les touches ▲ et ▼ de la
télécommande.
CH
Français - 6
5
Confirmer une sélection.
6
POWER
Allumer et éteindre le téléviseur.
Voyant d’alimentation
Clignote et s’éteint lorsque le téléviseur est sous
tension et s’allume en mode de mise en veille.
Capteur de télécommande
Pointer la télécommande vers ce capteur sur le
téléviseur.
7
Speakers (Haut-parleurs)
(ENTER)
Page 91
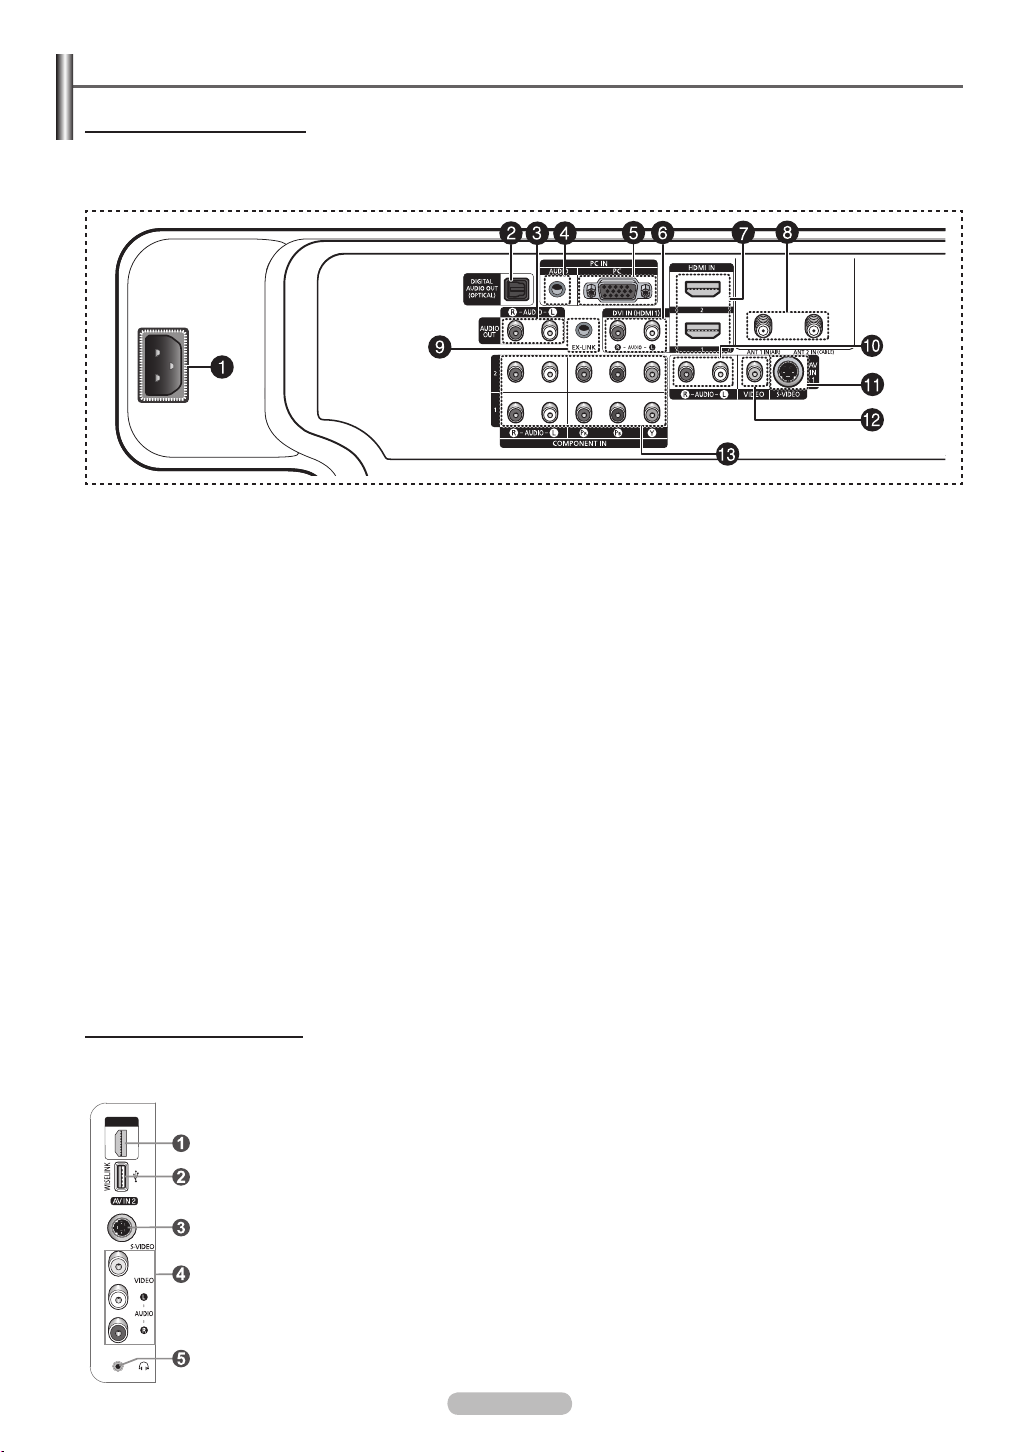
Affichage du panneau de branchement
Prises du panneau arrière
Utiliser les prises du panneau arrière pour brancher des composants audiovisuels utilisés continuellement, par exemple un
magnétoscope ou un lecteur DVD. Pour savoir comment brancher ce matériel, consulter les pages 9 à 14.
La couleur et la forme de l’appareil peuvent varier selon le modèle.
1
ENTRÉE DE L’ALIMENTATION
Brancher le cordon d’alimentation fourni avec le
téléviseur.
2
DIGITAL AUDIO OUT (OPTICAL)
Brancher à un composant audio numérique.
3
AUDIO OUT (R/L)
Sorties audio pour appareils externes.
4
PC AUDIO IN
Brancher à la prise de sortie audio d’un ordinateur.
5
PC IN
Brancher à la prise de sortie vidéo d’un ordinateur.
6
DVI IN (HDMI 1) (AUDIO-R/L)
Brancher à la prise de sortie audio DVI d’un appareil
externe.
7
HDMI IN 1, 2
Brancher à la prise HDMI d’un appareil avec sortie
HDMI. (Seul HDMI 1 prend en charge HDMI-DVI IN et
PC).
- Cette entrée peut également servir de branchement
DVI avec entrées audio analogiques distinctes. Un
câble HDMI/DVI optionnel est nécessaire pour faire ce
branchement.
Lorsque l’adaptateur HDMI/DVI en option est utilisé, les
-
entrées audio analogiques DVI du téléviseur permettent
de recevoir le son des sorties gauche et droite de
l’appareil DVI.
8
ANT 1 IN(AIR)/ANT 2 IN(CABLE)
Utilise un connecteur coaxial de 75 Ω pour l’antenne et
le réseau câblé.
9
EX-LINK
Brancher cette sortie à la prise sur le support mural
en option. Cette fonction permet de régler l’angle de
visionnement du téléviseur à l’aide de la télécommande.
Les modèles FP-T5884 / FP-T6374 ne peuvent
➢
pas être installés au mur. La prise EX-LINK sur le
modèle FP-T5884 fonctionne comme une prise de
contrôle RS-232C. La prise EX-LINK sur le modèle
FP-T6374 fonctionne comme une prise de service.
0
AUDIO-R/L (AV IN 1)
Entrées audio pour appareils externes, comme un
caméscope ou un magnétoscope.
!
S-VIDEO (AV IN 1)
Entrée S-Vidéo pour appareils externes pourvus
d’une sortie S-Vidéo, comme un caméscope ou un
magnétoscope.
@
VIDEO (AV IN 1)
Entrée vidéo pour appareils externes, comme un
caméscope ou un magnétoscope.
#
ENTRÉE COMPOSANT (COMPONENT) IN 1, 2
Entrées de composants vidéo (Y/PB/PR) et audio
(R-AUDIO-L).
Prises du panneau latéral
Les prises du panneau latéral droit permettent de brancher un composant utilisé occasionnellement, comme un
caméscope ou une console de jeu vidéo. La couleur et la forme de l’appareil peuvent varier selon le modèle.
1
ENTRÉE HDMI IN 3
Brancher à la prise HDMI d’un appareil avec sortie HDMI.
2
WISELINK
Brancher une mémoire de grande capacité USB pour voir des fichiers de photographies (JPEG)
et lire des fichiers sonores (MP3).
3
ENTRÉE S-VIDEO (AV IN 2)
Entrée S-vidéo pour appareils externes pourvus d’une sortie S-Vidéo.
4
ENTRÉE AV IN 2
Entrées vidéo et audio pour les appareils externes.
5
ÉCOUTEURS (HEADPHONE)
Permet de brancher des écouteurs pour écouter une émission de télévision sans déranger les
autres personnes qui se trouvent dans la pièce.
Français - 7
Page 92
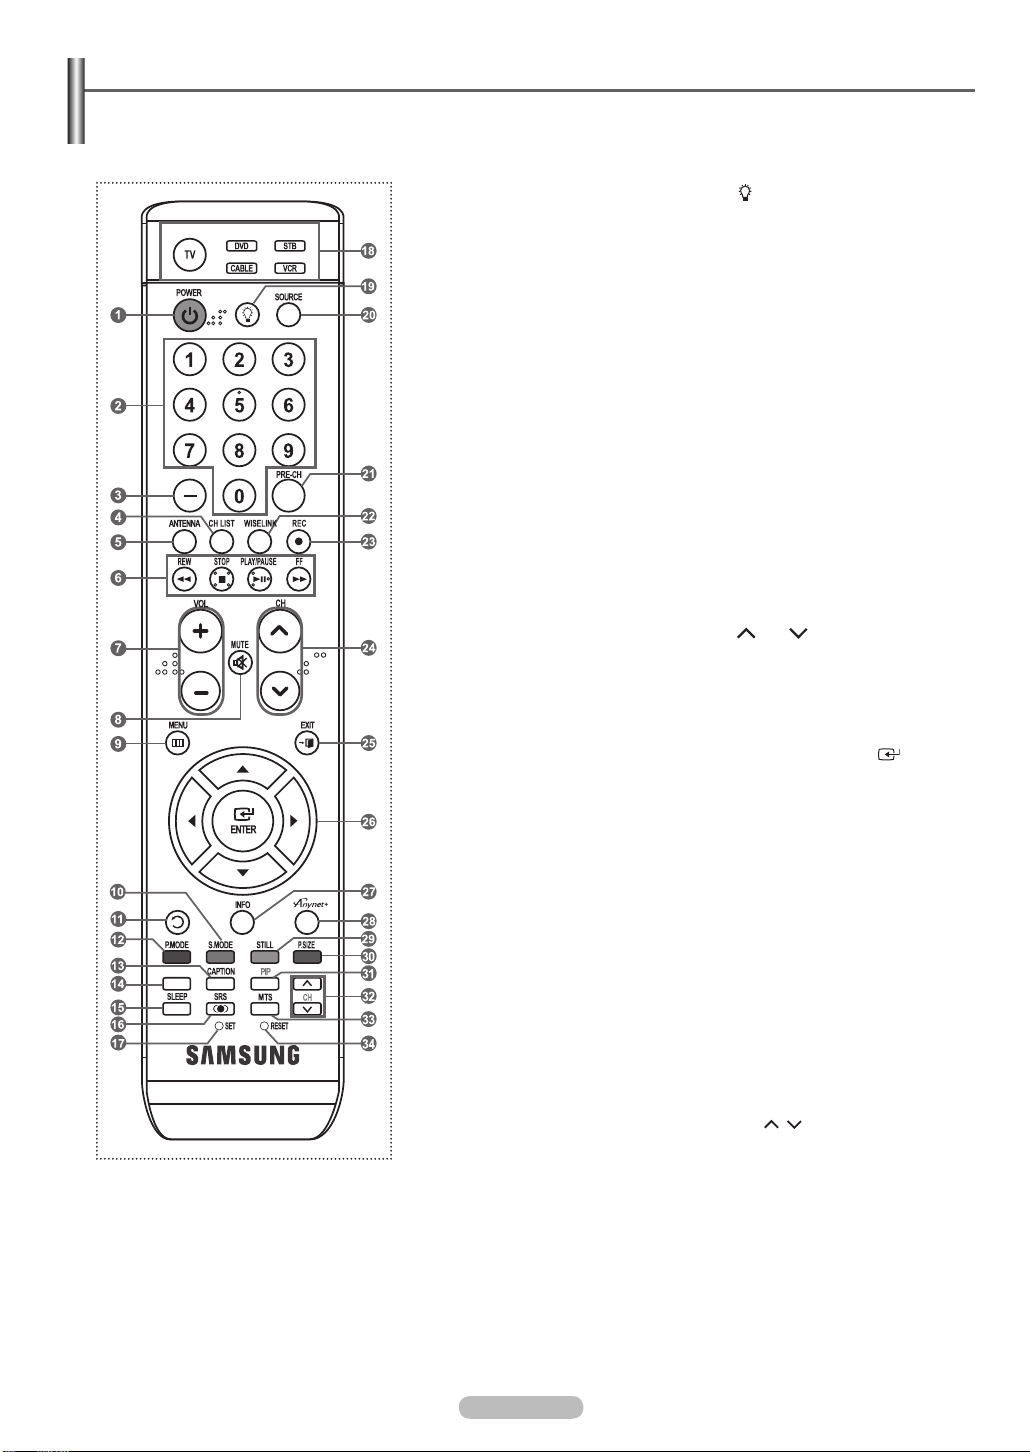
Télécommande
RETURN
FAV.CH
La télécommande peut être utilisée jusqu’à une distance d’environ 7 mètres (23 pieds) du téléviseur. Toujours
diriger la télécommande directement vers le téléviseur. Il est également possible d’utiliser la télécommande pour
contrôler le téléviseur, le câblosélecteur, le lecteur DVD ou le récepteur.
1
Cette télécommande a été
➢
spécialement conçue pour les
personnes ayant une déficience
visuelle. Les touches POWER,
Channel, Volume, STOP et LECTURE/
PAUSE
comportent des points de
braille.
Un éclairage ambiant intense peut
➢
nuire à l’efficacité de la télécommande.
POWER
Permet d’allumer et d’éteindre le
téléviseur.
2
TOUCHES NUMÉRIQUES
Sélectionner directement un
canal.
3
–
Appuyer sur cette touche pour
choisir des canaux supplémentaires
(numériques et analogiques) diffusés
par la même station. Par exemple,
pour choisir le canal 54-3, appuyer
sur 54, puis sur - et sur 3.
4
CH LIST
Afficher la liste des canaux à
l’écran.
5
ANTENNA
Appuyer sur cette touche pour
choisir “Air” ou “Câble”.
6
Fonctions magnétoscope/DVD
- Rembobinage
- Arrêt
- Lecture/pause
- Avance rapide
7
Augmenter ou diminuer le volume.
8
Couper le son temporairement.
9
Afficher le menu principal à l’écran.
0
Sélectionner le mode sonore.
!
Retourner au menu précédent.
@
Activer le mode image.
#
Permet de commander la fonction de
$
Appuyer sur cette touche pour
%
Appuyer sur cette touche pour
^
Sélectionner le mode SRS
&
SET
Configure la télécommande
*
TV/DVD/STB/CABLE/VCR
Appuyer sur cette touche pour
–
+ VOL
MUTE
MENU
S.MODE
RETURN
P.MODE
CAPTION
sous-titrage.
FAV.CH
passer aux canaux favoris.
SLEEP
régler d’avance une durée au terme
de laquelle le téléviseur s’éteindra
automatiquement.
SRS
TruSurround XT.
pour commander le téléviseur, le
magnétoscope, le câblosélecteur, le
lecteur DVD ou le récepteur.
commander le téléviseur, le lecteur
DVD, le récepteur, le câblosélecteur
ou le magnétoscope.
Français - 8
(
Appuyer sur cette touche pour
illuminer les touches VOL et CH
et la touche source active (TV,
DVD, CABLE, STB, VCR) de la
télécommande.
)
SOURCE
Appuyer sur cette touche pour
afficher toutes les sources vidéo
accessibles.
a
PRE-CH
Syntoniser le canal précédent.
b
WISELINK
Cette fonction permet de visualiser des
photographies (JPEG) et d’écouter
des fichiers audio (MP3) depuis un
dispositif de mémoire. (Consulter les
pages 64 (JPEG), 70 (MP3))
c
REC
Cette fonction peut être utilisée pour
commander l’enregistrement sur les
enregistreurs Samsung.
(Consulter la page 74)
d
CH
Permet de changer le canal.
e
EXIT
Appuyer sur cette touche pour quitter
le menu.
f
HAUT▲/BAS▼/GAUCHE◄/
DROITE►/ENTER
Pour sélectionner des options de
menu et modifier leur valeur.
g
INFO
Appuyer sur cette touche pour
afficher de l’information à l’écran.
h
Anynet+
Exécuter les fonctions Anynet+ et
configurer les appareils Anynet+.
i
PAUSE
Immobiliser l’image pendant
une scène particulière. Appuyer
de nouveau sur la touche pour
reprendre la diffusion normale.
j
P.SIZE
Pour changer de format d’affichage.
k
PIP
Activation/désactivation de l’image
sur image.
l
CH /
Pour faire défiler les canaux
disponibles. (Ces touches permettent
de changer les canaux dans la
fenêtre ISI seulement).
m
MTS
Pour sélectionner le son stéréo,
mono ou SAP (Separate Audio
Program).
n
RESET
Lorsque la télécommande ne
fonctionne pas, changer les piles
et appuyer sur la touche RESET
pendant 2 à 3 secondes avant de la
réutiliser.
Page 93
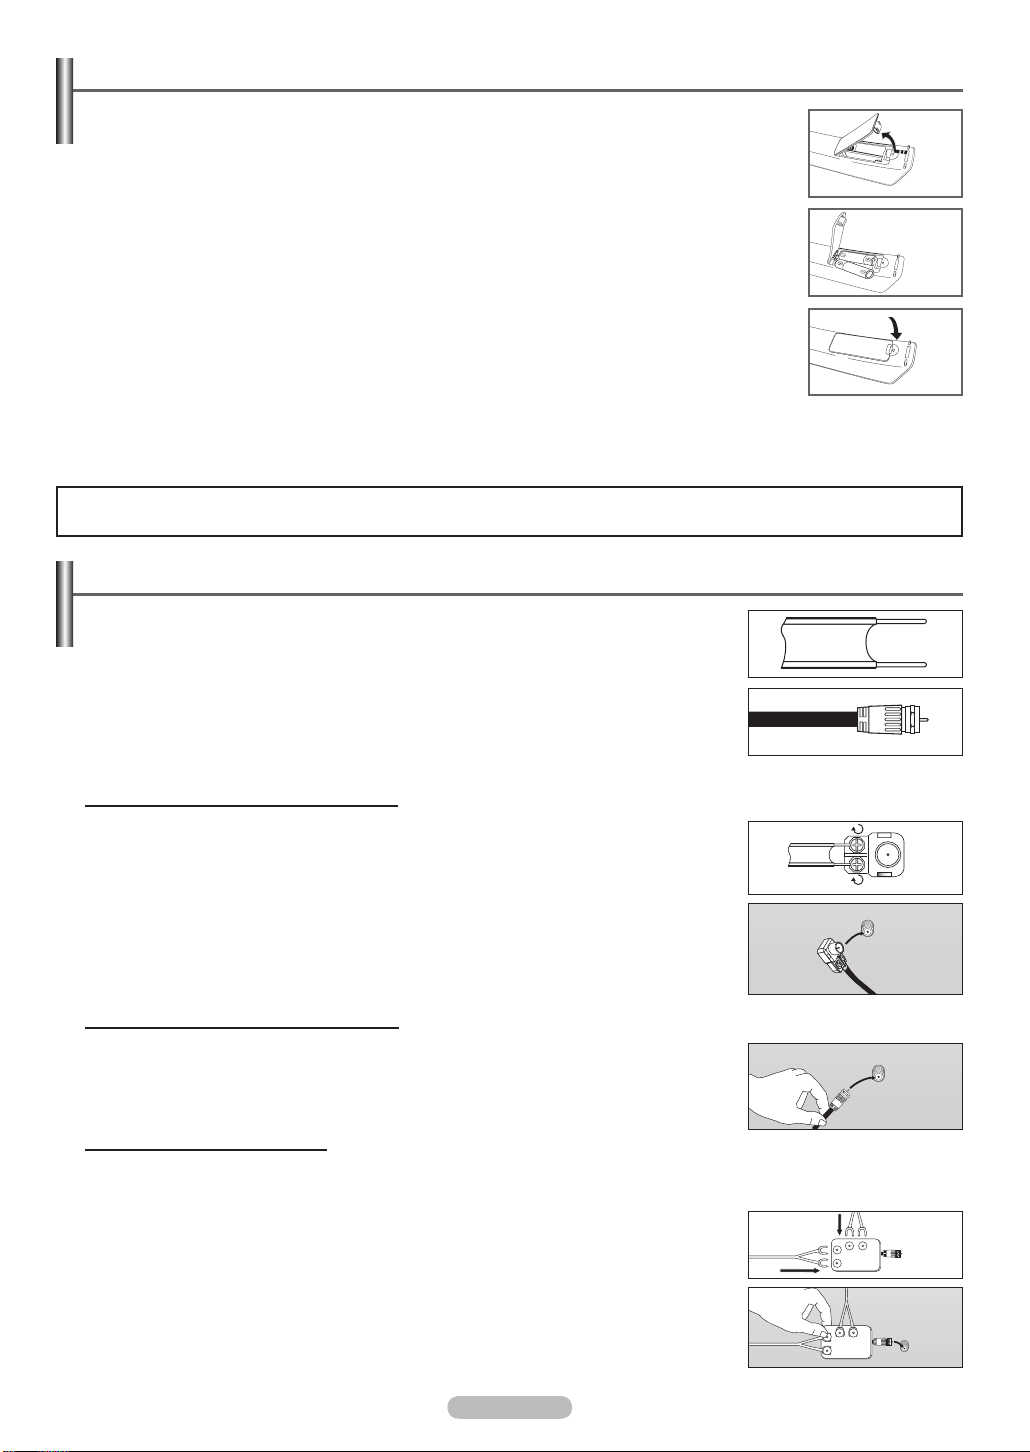
Insertion des piles dans la télécommande
1 Soulever le couvercle à l’arrière de la télécommande, comme illustré.
2 Installer deux piles AAA.
Veiller à faire correspondre les bornes + et – des piles avec le diagramme à
➢
l’intérieur du compartiment.
Ne pas utiliser de piles de types différents, par exemple : une pile alcaline et une
➢
pile au manganèse.
3 Fermer le couvercle, comme illustré.
Si la télécommande ne doit pas être utilisée pour une longue période, retirer les
➢
piles et les ranger dans un endroit frais et sec. La télécommande a une portée
d’environ 7 mètres (23 pieds). Les piles offrent une autonomie d’environ un an en
usage normal.
Si la télécommande ne fonctionne pas, vérifiez les points suivants :
➢
1. Le téléviseur est-il sous tension?
2. Les bornes plus et moins des piles sont-elles inversées?
3. Les piles sont-elles déchargées?
4. Y a-t-il une interruption de courant? Le cordon d’alimentation est-il débranché?
5. Y a-t-il une source lumineuse fluorescente ou une enseigne au néon à proximité?
Branchements
Branchement des antennes VHF et UHF
Si l’antenne est dotée de conducteurs semblables à ceux représentés ici, consulter
à la rubrique “Antenne 300 Ω à deux conducteurs plats” ci-dessous.
Si l’antenne est dotée d’un câble de branchement semblable à celui représenté ici,
consulter la rubrique “Antenne 75 Ω à connecteur rond”.
Si le téléviseur est pourvu de deux antennes, consulter la rubrique “Antennes VHF
et UHF séparées”.
Antenne 300 Ω à deux conducteurs plats
Si une antenne conventionnelle (par exemple, une antenne de toit ou des “oreilles
de lapin”) dotée de deux conducteurs plats de 300 Ω est utilisée, procéder comme
suit :
1 Installer les fils des deux conducteurs sous les vis de l’adaptateur de 300-75 Ω (non
fourni).Serrer les vis à l’aide d’un tournevis.
2 Brancher l’adaptateur dans l’entrée ANT 1 IN (AIR) ou ANT 2 IN (CABLE), à l’arrière
du téléviseur.
Antennes à conducteur rond de 75 ohms
1 Brancher le conducteur de l’antenne dans l’entrée ANT 1 IN (AIR) ou ANT 2 IN
(CABLE), à l’arrière du téléviseur.
Antennes VHF et UHF séparées
Si le téléviseur est pourvu de deux antennes séparées (une antenne VHF et une antenne
UHF), leurs signaux doivent être combinés avant de raccorder les antennes au téléviseur.
Pour cette opération, un multiplexeur-adaptateur en option (en vente dans la plupart des
boutiques d’électronique) est nécessaire.
1 Raccorder les conducteurs des deux antennes au combinateur.
2 Brancher le combinateur dans l’entrée (AIR) ou ANT 2 IN (CABLE), à l’arrière du
téléviseur.
VHF
ANT 1 IN (AIR)
UHF
VHF
UHF
ANT 1 IN (AIR)
ANT 1 IN (AIR)
Français - 9
Page 94
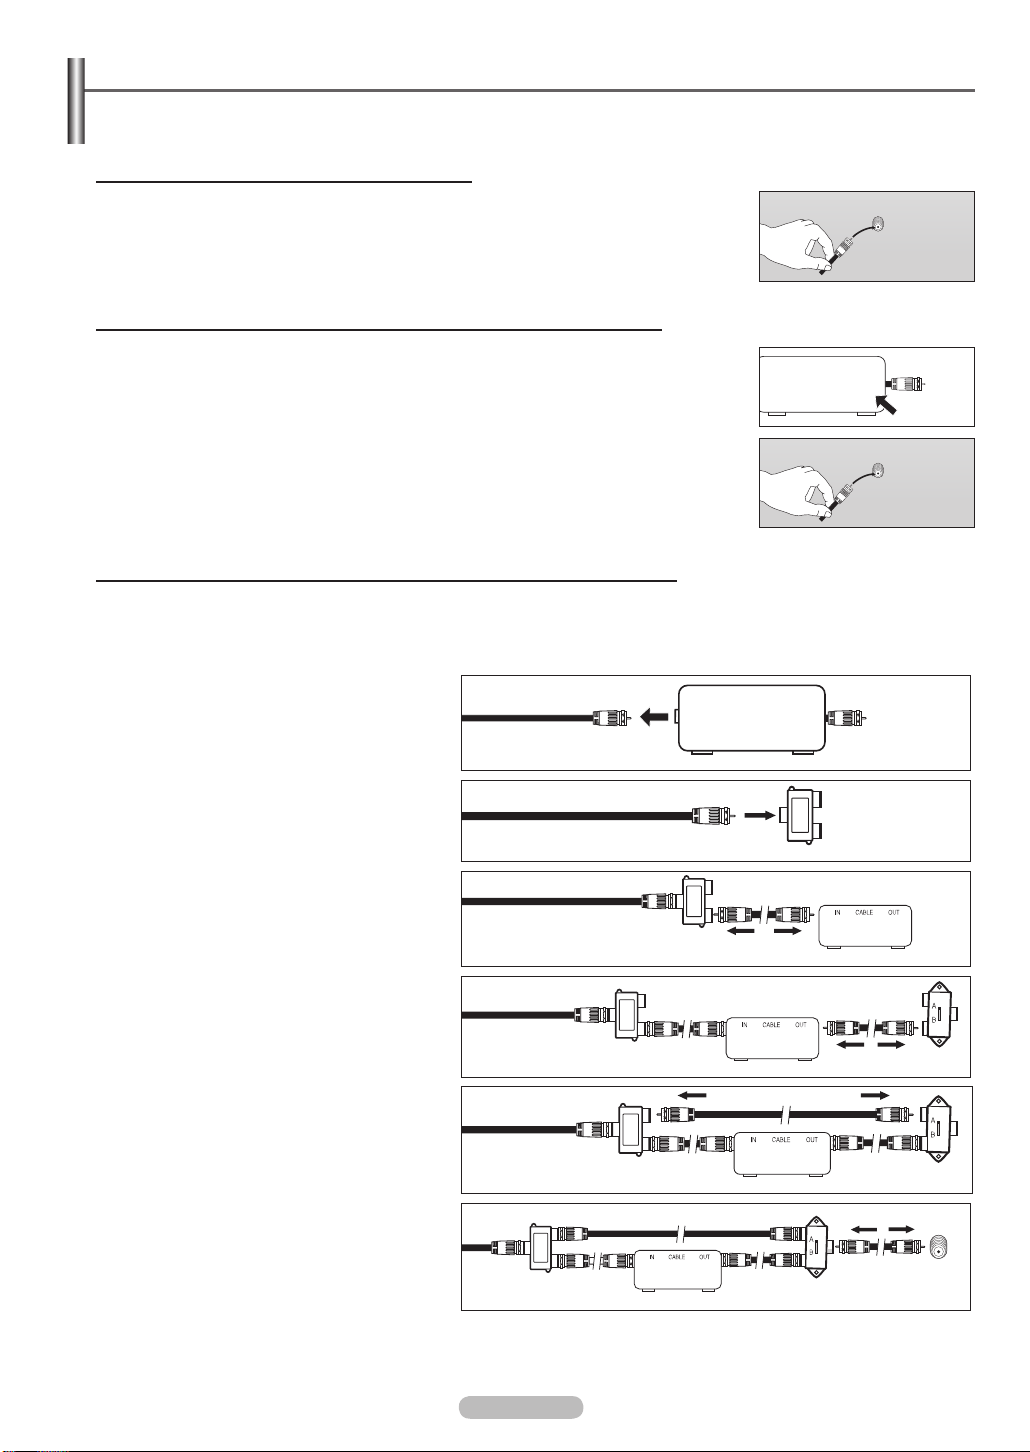
Branchement du câble de télédistribution
Pour raccorder un service de câblodistribution, procéder comme suit :
Service de câblodistribution sans câblosélecteur
1 Brancher le câble dans la prise ANT 2 IN (CABLE) située à l’arrière du téléviseur.
Ce téléviseur étant configuré pour le câble, il n’est pas nécessaire de posséder un
➢
câblosélecteur pour recevoir les canaux de câblodistribution diffusés en clair.
Branchement d’un câblosélecteur de désembrouillage de tous les canaux
1 Repérer le câble raccordé à la sortie d’antenne ANT OUT du câblosélecteur.
Cette prise peut porter la mention “ANT OUT”, “VHF OUT” ou simplement “OUT”.
➢
2 Brancher l’autre extrémité du câble à l’entrée ANT 2 IN (CABLE) à l’arrière du
téléviseur.
Branchement d’un câblosélecteur de désembrouillage de certaines chaînes
Si le câblosélecteur débrouille seulement certaines chaînes (par exemple les chaînes spécialisées), procéder
comme suit : Un répartiteur à deux voies, un commutateur RF (A/B) et quatre câbles d’antenne sont nécessaires.
(Ces articles sont offerts dans la plupart des boutiques d’électronique).
ANT IN
ANT 2 IN (CABLE)
ANT OUT
ANT 2 IN (CABLE)
1 Repérer et débrancher le câble raccordé
à l’entrée d’antenne ANT IN de le
câblosélecteur.
Cette prise peut porter l’inscription “ANT IN”,
➢
“VHF IN” ou simplement “IN”.
ANT IN
2 Relier ce câble à un répartiteur à deux
voies.
En entrée câble
Séparateur
3 Raccorder un câble d’antenne entre une
sortie OUTPUT du répartiteur et l’entrée IN
câble
du câblosélecteur.
En entrée
Séparateur
Câblosélecteur
4 Raccorder un câble d’antenne entre
la sortie d’antenne ANT OUT du
câblosélecteur et l’entrée B-IN du
commutateur RF (A/B).
En entrée
câble
Séparateur
Câblosélecteur
RF (A/B)
Interrupteur
5 Raccorder un autre câble entre l’autre sortie
du séparateur et l’entrée A du commutateur
RF (A/B).
6 Raccorder le dernier câble d’antenne
entre la sortie du commutateur RF (A/B)
et l’entrée ANT 2 IN (CABLE) à l’arrière du
téléviseur.
En entrée
En entrée
câble
câble
Séparateur
Séparateur
Câblosélecteur
RF (A/B)
Interrupteur
RF (A/B)
Interrupteur
Arrière du
téléviseur
ANT 2 IN (CABLE)
Une fois les branchements effectués, régler le commutateur A/B à la position A pour un visionnement normal. Régler
le commutateur A/B à la position B pour obtenir les canaux brouillés. (Lorsque la position B du commutateur A/B est
sélectionnée, il faut également syntoniser la chaîne du signal de sortie du câblodistributeur, habituellement la chaîne
3 ou 4.)
Français - 10
Page 95
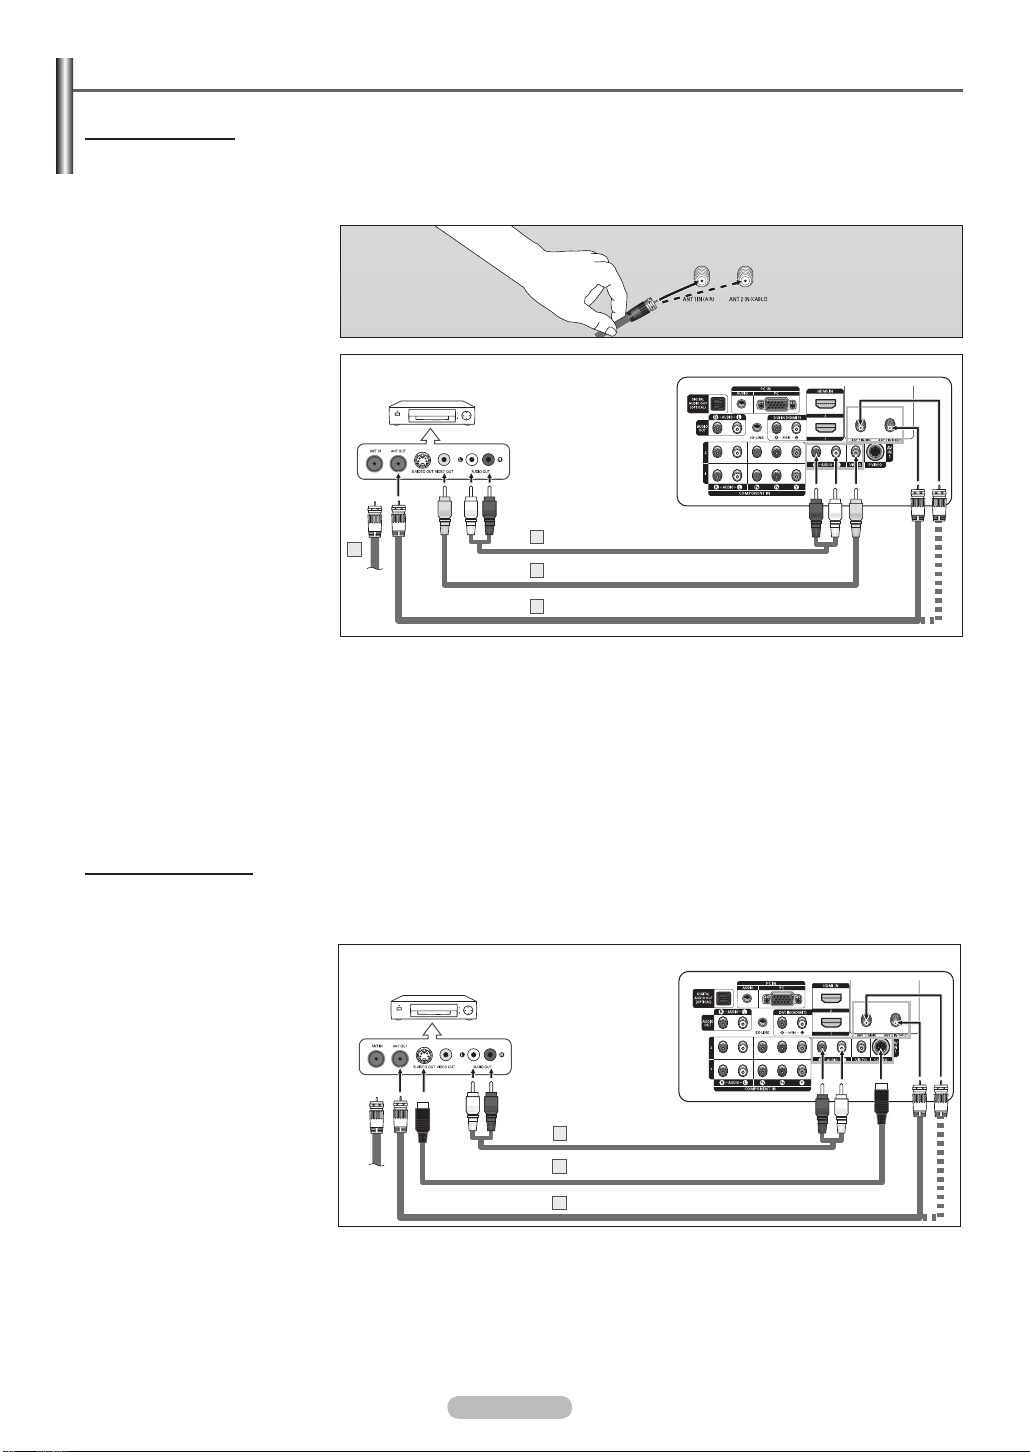
Branchement d’un magnétoscope
Branchement vidéo
Ces instructions supposent que le téléviseur est déjà branché à une antenne ou à un système de câblodistribution
(conformément aux instructions des pages 9 et 10). Ignorer l’étape 1 si le téléviseur n’est pas branché à une antenne
ou un système de câblodistribution.
1 Débrancher le câble ou
l’antenne à l’arrière du
téléviseur.
2 Brancher le câble ou
l’antenne à l’entrée ANT IN à
l’arrière du magnétoscope.
3 Raccorder un câble
d’antenne entre la sortie
d’antenne ANT OUT du
magnétoscope et l’entrée
ANT 1 IN (AIR) ou ANT 2 IN
(CABLE) du téléviseur.
4 Raccorder un câble vidéo
entre la sortie VIDEO OUT du
magnétoscope et l’entrée AV
IN 1 [VIDEO] du téléviseur.
5 Raccorder les câbles audio
entre les sorties AUDIO OUT
du magnétoscope et les
entrées AV IN 1 [R-AUDIO-L]
du téléviseur.
Si le magnétoscope est un
➢
modèle “mono” (non stéréo),
relier les prises d’entrée
audio droite et gauche
du téléviseur au moyen
d’un connecteur en Y (non
fourni). Si le magnétoscope
fonctionne en stéréo, deux
câbles distincts doivent être
branchés.
Branchement S-Vidéo
Panneau arrière
du magnétoscope
2
Chaque magnétoscope possède une configuration de panneau arrière différente.
➢
Lors du branchement d’un magnétoscope, les couleurs du câble et de la borne de
➢
Câble audio (non fourni)5
Câble vidéo (non fourni)4
Câble d’antenne (non fourni)3
branchement doivent correspondre.
Panneau arrière du téléviseur
Le téléviseur Samsung peut être branché à la prise S-Vidéo d’un magnétoscope.
(Ce raccordement offre une
meilleure qualité d’image que celle offerte par le raccordement vidéo standard ci-dessus).
1 Pour commencer, suivre les
étapes 1 à 3 de la section
précédente pour brancher
Panneau arrière
du magnétoscope
Panneau arrière du téléviseur
l’antenne ou le câble
au magnétoscope et au
téléviseur.
2 Raccorder un câble S-vidéo
entre la sortie S-VIDEO
OUT du magnétoscope et
l’entrée AV IN 1 [S-VIDEO] du
téléviseur.
3 Raccorder les câbles audio
entre les sorties AUDIO OUT
Câble audio (non fourni)
3
Câble S-Vidéo (non fourni)2
Câble d’antenne (non fourni)3
du magnétoscope et les
entrées AV IN 1 [R-AUDIO-L]
du téléviseur.
Votre magnétoscope peut avoir une prise S-Vidéo. (Sinon, se procurer les câbles
requis dans une boutique d’électronique.)
Chaque magnétoscope possède une configuration de panneau arrière différente.
➢
Lors du branchement d’un magnétoscope, les couleurs du câble et de la borne de
➢
branchement doivent correspondre.
Français - 11
Page 96
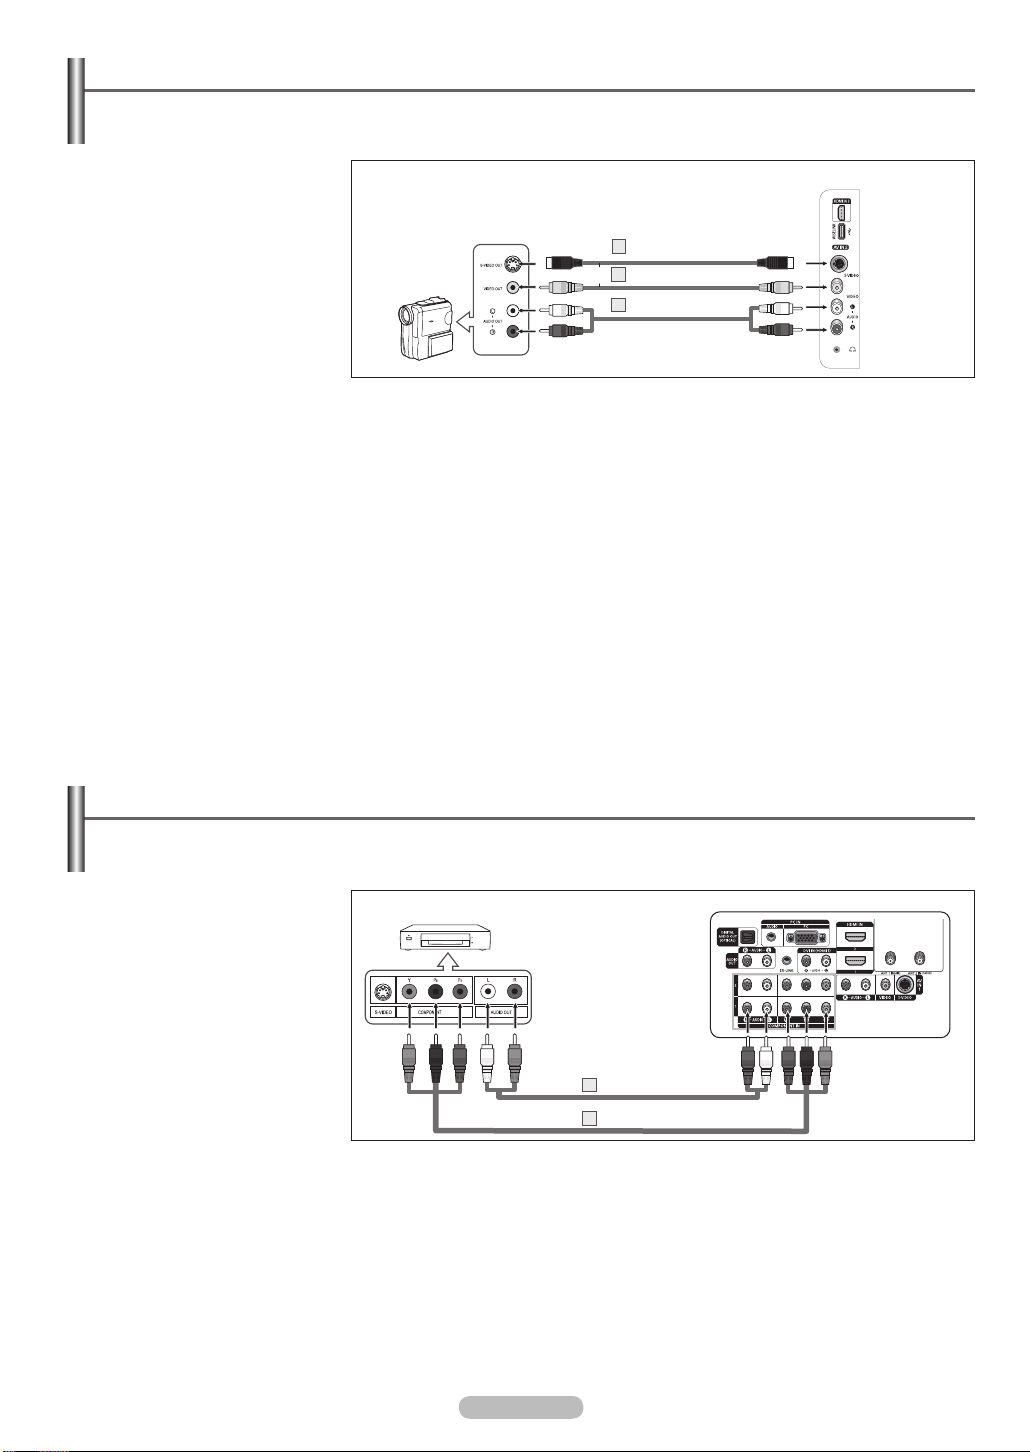
Branchement d’un caméscope
Les prises du panneau latéral du téléviseur simplifient le branchement d’un caméscope.
Ils permettent de regarder directement les cassettes du caméscope, sans passer par un magnétoscope.
1 Raccorder un câble vidéo
(ou S-Vidéo) entre la prise
d’entrée vidéo AV IN 2
[VIDEO] (ou S-VIDEO) du
téléviseur et la prise de sortie
VIDEO OUT du caméscope.
2 Raccorder les câbles audio
entre les prises d’entrée
AV IN 2 [L-AUDIO-R] du
téléviseur et les prises
de sortie AUDIO OUT du
caméscope.
Panneau latéral du téléviseur
Câble S-Vidéo (non fourni)
1
ou
Caméscope
Chaque caméscope possède une configuration de panneau arrière différente.
➢
Lors du branchement d’un caméscope, les couleurs du câble et de la borne de
➢
branchement doivent correspondre
Câble vidéo (non fourni)1
CâbleAudio (non fourni)2
.
Branchement d’un lecteur DVD, câblosélecteur ou récepteur satellite
Les prises du panneau arrière du téléviseur simplifient le branchement d’un lecteur DVD, câblosélecteur ou
récepteur satellite.
1 Brancher un câble de
composant entre les prises
d’entrée COMPONENT IN 1
[Y, P
B
, PR] (ou COMPONENT
IN 2 [Y, P
B
, PR]) du téléviseur
et les prises de sortie
COMPONENT OUT [Y,
PB, PR] du lecteur DVD,
câblosélecteur ou récepteur
satellite.
2 Brancher les câbles audio
entre les prises d’entrée
COMPONENT IN 1 [RAUDIO-L] (ou COMPONENT
IN 2 [R-AUDIO-L]) du
téléviseur et les prises de
sortie AUDIO OUT du lecteur
DVD, câblosélecteur ou
récepteur satellite.
Lecteur DVD, câblosélecteur
ou récepteur satellite
CâbleAudio (non fourni)2
Câble de composant(non fourni)1
Le composant vidéo sépare le vidéo en Y (luminance (luminosité)), PB (bleu) and
➢
Panneau arrière du téléviseur
PR (rouge) pour une qualité d’image supérieure. S’assurer que les branchements
audio et vidéo correspondent. Par exemple, si le câble vidéo est branché à la prise
d’entrée COMPONENT IN, le câble audio doit être branché à la prise d’entrée
COMPONENT IN.
La configuration du panneau arrière de chaque lecteur DVD, câblosélecteur ou
➢
récepteur satellite est différente.
Au moment du branchement d’un lecteur DVD, câblosélecteur ou récepteur
➢
satellite, les couleurs du câble et de la borne de raccordement doivent
correspondre.
Français - 12
Page 97
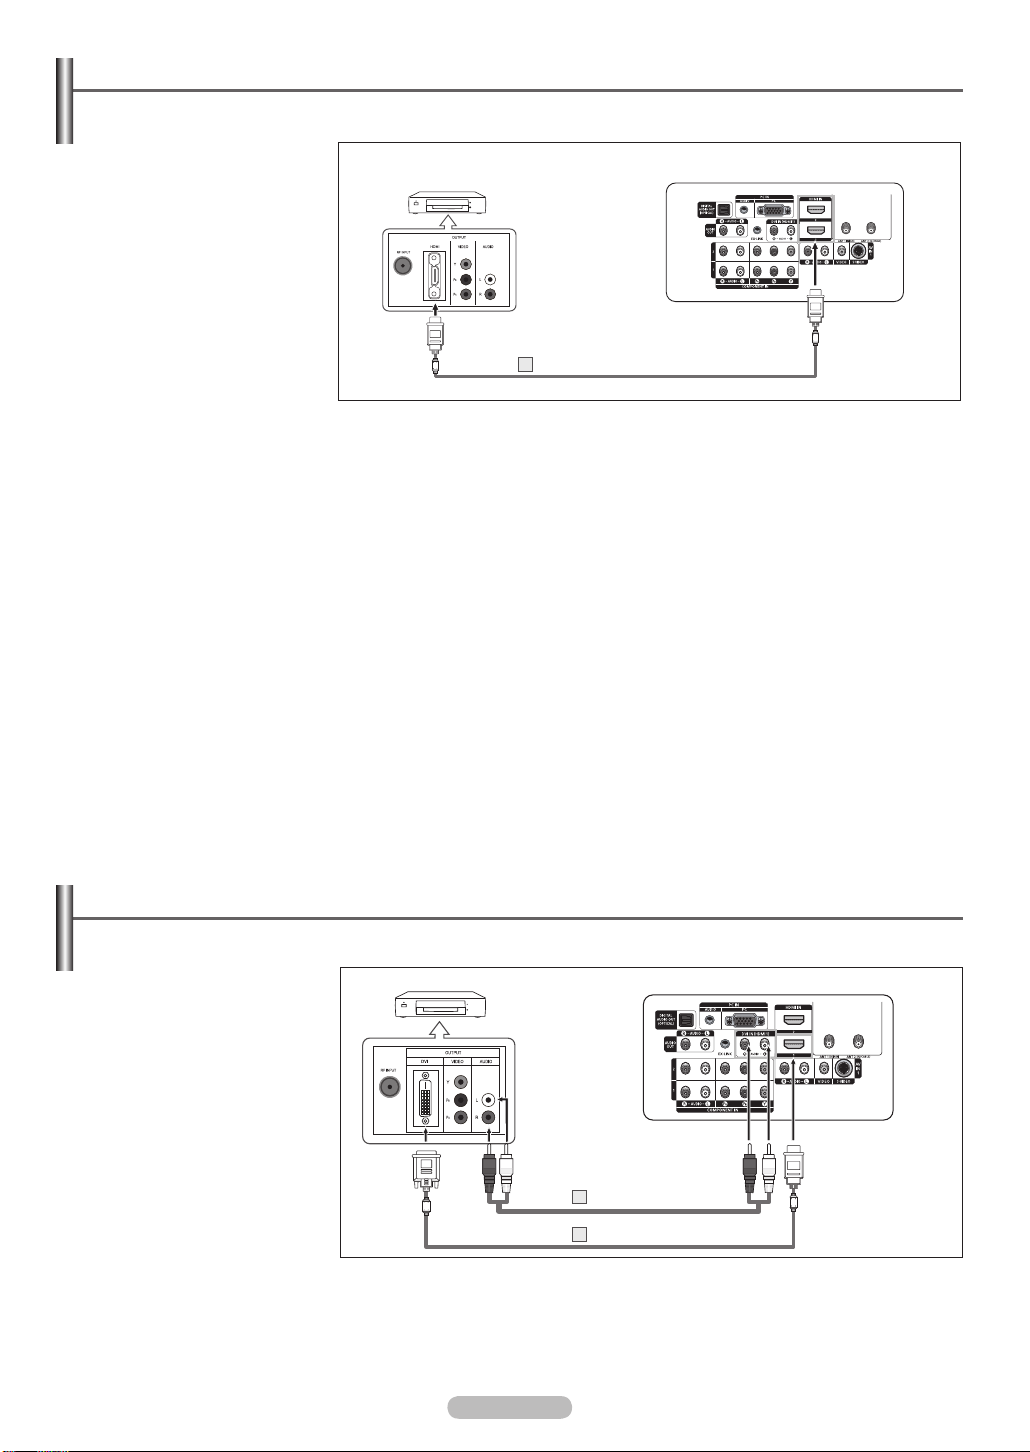
Branchement d’un lecteur DVD, câblosélecteur ou récepteur satellite à l’aide d’un câble HDMI
Cette connexion assure la meilleure qualité d’image.
1 Brancher un câble HDMI
entre la prise d’entrée HDMI
IN 2 du téléviseur et la prise
de sortie HDMI OUT du
lecteur DVD, câblosélecteur
ou récepteur satellite.
Lecteur DVD, câblosélecteur ou
récepteur satellite
Câble HDMI(non fourni)1
Qu’est-ce que la HDMI?
• La HDMI est une interface multimédia à haute définition qui permet la transmission
de signaux numériques audio et vidéo à l’aide d’un seul câble.
• La différence entre les interfaces HDMI et DVI réside dans le fait que la HDMI
est de plus petites dimensions, qu’elle est dotée du composant de codage HDCP
(protection contre la copie numérique à large bande passante).
La configuration du panneau arrière de chaque lecteur DVD, câblosélecteur ou
➢
récepteur satellite est différente.
Lorsque le branchement est réalisé par la prise HDMI, il n’est pas nécessaire de
➢
brancher un câble audio. Les câbles audio ne sont nécessaires que dans le cas
d’un branchement par la prise HDMI/DVI.
Le téléviseur peut ne pas émettre de son ou afficher des images de couleur
➢
anormale lorsqu’est branché un lecteur DVD, câblosélecteur ou récepteur satellite
prenant en charge des versions HDMI antérieures à la version 1.3. Si l’on branche
un câble HDMI d’une version antérieure et qu’il n’y a pas de son, il faut brancher
le câble HDMI à la prise d’entrée HDMI IN 1 et les câbles audio aux prises DVI
IN (HDMI1) [R AUDIO-L] sur le panneau arrière du téléviseur. Si cela se produit,
communiquez avec les sociétés qui fournissent des appareils externes afin de
confirmer la version HDMI, puis demandez une mise à niveau.
Certains câbles HDMI de versions antérieures peuvent provoquer des nuisances à
➢
l’écran ou une absence d’image.
Dans ce cas, utilisez un câble prenant en charge la dernière version HDMI (HDMI
1.3).
Panneau arrière du téléviseur
Branchement d’un lecteur DVD, câblosélecteur ou récepteur satellite à l’aide d’un câble DVI
Ce branchement n’est possible que si l’appareil externe est pourvu d’une prise de sortie DVI.
1 Brancher un câble de
raccordement HDMI/DVI ou
un adaptateur DVI-HDMI
entre la prise [HDMI IN 1] du
téléviseur et la prise DVI du
lecteur DVD, câblosélecteur
ou récepteur satellite.
2 Brancher les câbles audio
entre la prise d’entrée DVI
IN (HDMI 1) [R-AUDIO-L] du
téléviseur et les prises de
sortie AUDIO OUT du lecteur
DVD, câblosélecteur ou
récepteur satellite.
Lecteur DVD, câblosélecteur ou récepteur satellite
CâbleAudio (non fourni)2
Câble HDMI/DVI(non fourni)1
La configuration du panneau arrière de chaque lecteur DVD, câblosélecteur ou
➢
récepteur satellite est différente.
Au moment du branchement d’un lecteur DVD, câblosélecteur ou récepteur
➢
satellite, les couleurs du câble et de la borne de raccordement doivent
correspondre.
La prise d’entrée HDMI IN 1 doit être utilisée pour un branchement de câble HDMI/DVI.
➢
Français - 13
Panneau arrière du téléviseur
Page 98
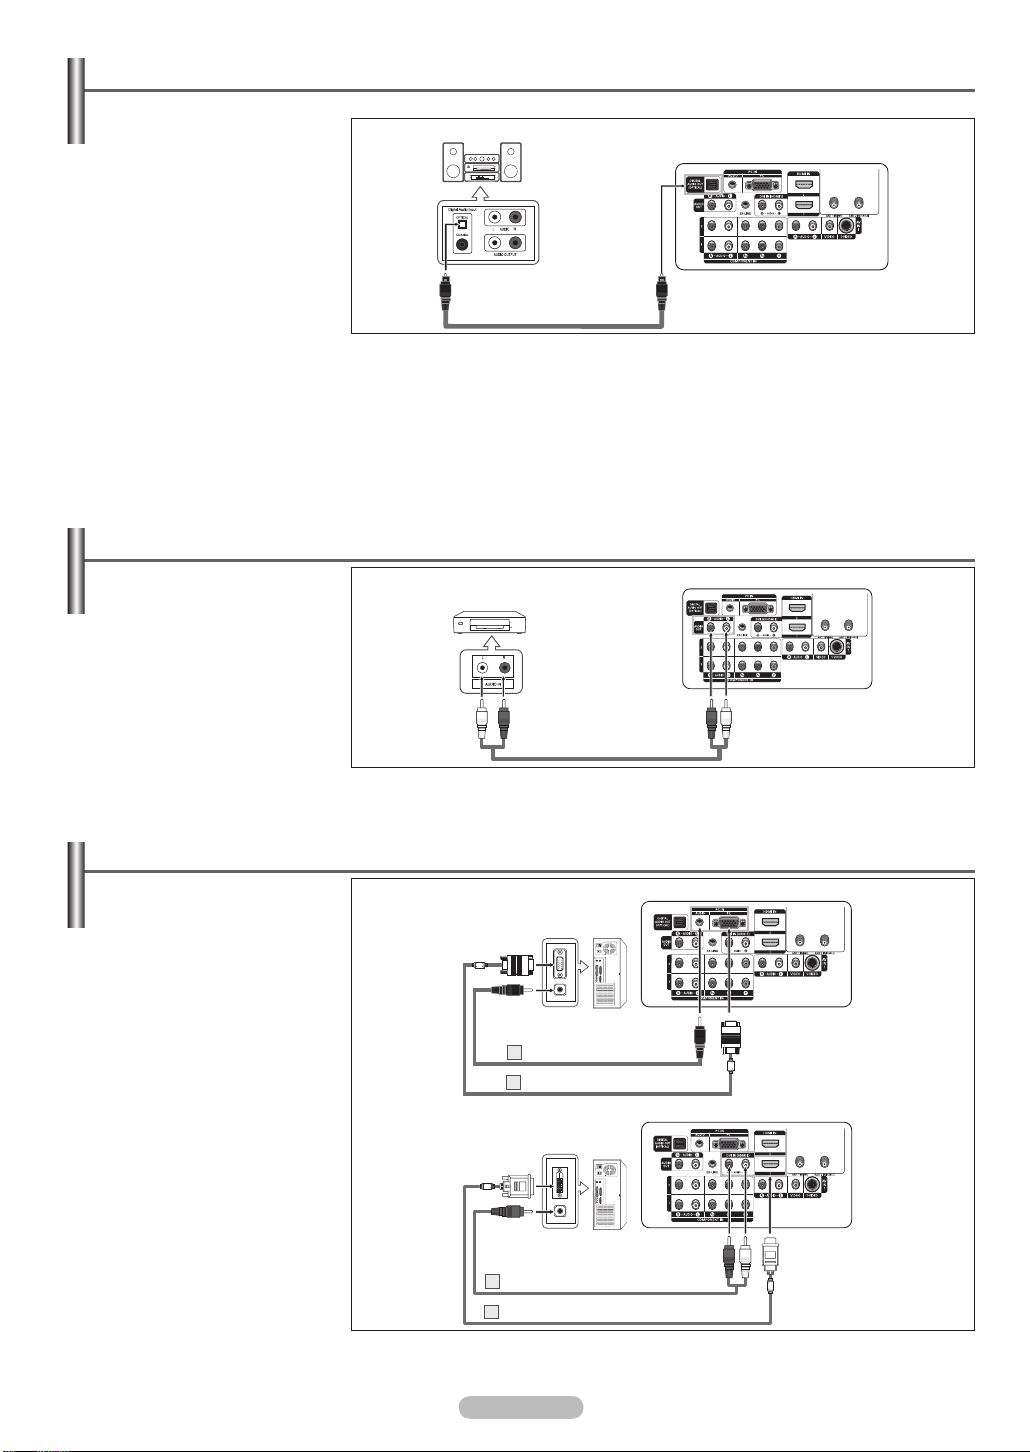
Branchement d’un système audio numérique
Les prises du panneau arrière du téléviseur permettent de brancher facilement un système audio numérique.
1 Brancher un câble optique
entre les prises de sortie
numérique optique DIGITAL
Système audionumérique
Panneau arrière du téléviseur
AUDIO OUT (OPTICAL)
du téléviseur et les prises
d’entrée audionumérique du
système audionumérique.
Lorsqu’un système
audionumérique est branché
à la sortie “DIGITAL AUDIO
OUT (OPTICAL)” :
Baisser la sortie (volume)
du téléviseur puis régler le
volume à l’aide du système
de contrôle de volume.
Que signifie OPTIQUE?
•
Un câble optique convertit un signal électrique en un signal lumineux optique et le
transmet par des fibres de verre. Un système transmet des signaux audionumériques
sous forme d’onde lumineuse, le format S/PDIF, par le biais d’un conducteur en verre.
La diffusion audio en 5.1 canaux est possible lorsque le téléviseur est raccordé à
➢
un appareil externe doté de cette fonction audio.
Chaque appareil externe d’entrée possède une configuration de panneau arrière différente.
➢
Lorsque les prises d’entrées COMPONENT IN ou HDMI IN sont branchées, la prise optique
➢
du téléviseur n’émet pas de son. Pour entendre le son, brancher directement la prise de sortie
Câble optique (non fourni)
optique DIGITAL AUDIO OUT (OPTICAL) du lecteur DVD ou du câblosélecteur/récepteur satellite
sur un amplificateur ou un ensemble de cinéma maison, et non pas sur le téléviseur.
Branchement d’un amplificateur ou d’un système de cinéma maison à DVD
1 Brancher les câbles audio
entre la prise de sortie
AUDIO OUT [R-AUDIO-L] du
téléviseur et la prise d’entrée
AUDIO IN [L-AUDIO-R] de
l’amplificateur ou du système
de cinéma maison à DVD.
Lorsqu’un amplificateur
audio est branché aux sorties
AUDIO OUT (AUDIO L/R) :
Baisser la sortie (volume)
du téléviseur puis régler le
volume à l’aide du contrôle
de volume de l’amplificateur.
Amplificateur ou d’un système
de cinéma maison à DVD
CâbleAudio (non fourni)
Chaque amplificateur/système de cinéma maison à DVD possède une
➢
configuration de panneau arrière différente.
Lors du branchement d’un amplificateur ou système de cinéma maison à DVD, les
➢
couleurs du câble et de la borne de branchement doivent correspondre.
Panneau arrière du téléviseur
Branchement d’un ordinateur
À l’aide du câble D-Sub
1 Brancher un câble D-Sub
entre la prise d’entrée PC IN
À l’aide du câble D-Sub
PC
[PC] du téléviseur et la prise
de sortie PC de l’ordinateur.
2 Brancher un câble audio PC
entre la prise d’entrée PC
IN [AUDIO] du téléviseur et
la prise de sortie audio de la
carte son de l’ordinateur.
À l’aide du câble HDMI/DVI
1
Brancher un câble HDMI/DVI
entre la prise d’entrée
IN 1]
du téléviseur et la prise
[HDMI
À l’aide du câble HDMI/DVI
CâbleAudio (non fourni)2
Câble D-Sub (non fourni)1
PC
de sortie PC de l’ordinateur.
2
Brancher un câble pourvu
d’une fiche stéréo de 3,5 mm
et de deux fiches RCA entre la
prise d’entrée DVI IN (HDMI 1)
[R-AUDIO-L] du téléviseur et
la prise de sortie audio de la
carte son de l’ordinateur.
La configuration du panneau arrière de chaque ordinateur est différente.
➢
Lors du branchement d’un ordinateur, les couleurs du câble et de la borne de branchement doivent correspondre.
➢
La prise d’entrée HDMI IN 1 doit être utilisée pour un branchement de câble HDMI/DVI.
➢
Câble pourvu d’une fiche stéréo de 3,5 mm et de deux fiches RCA (non fourni)
2
Câble HDMI/DVI (non fourni)1
Français - 14
Panneau arrière du téléviseur
Panneau arrière du téléviseur
Page 99
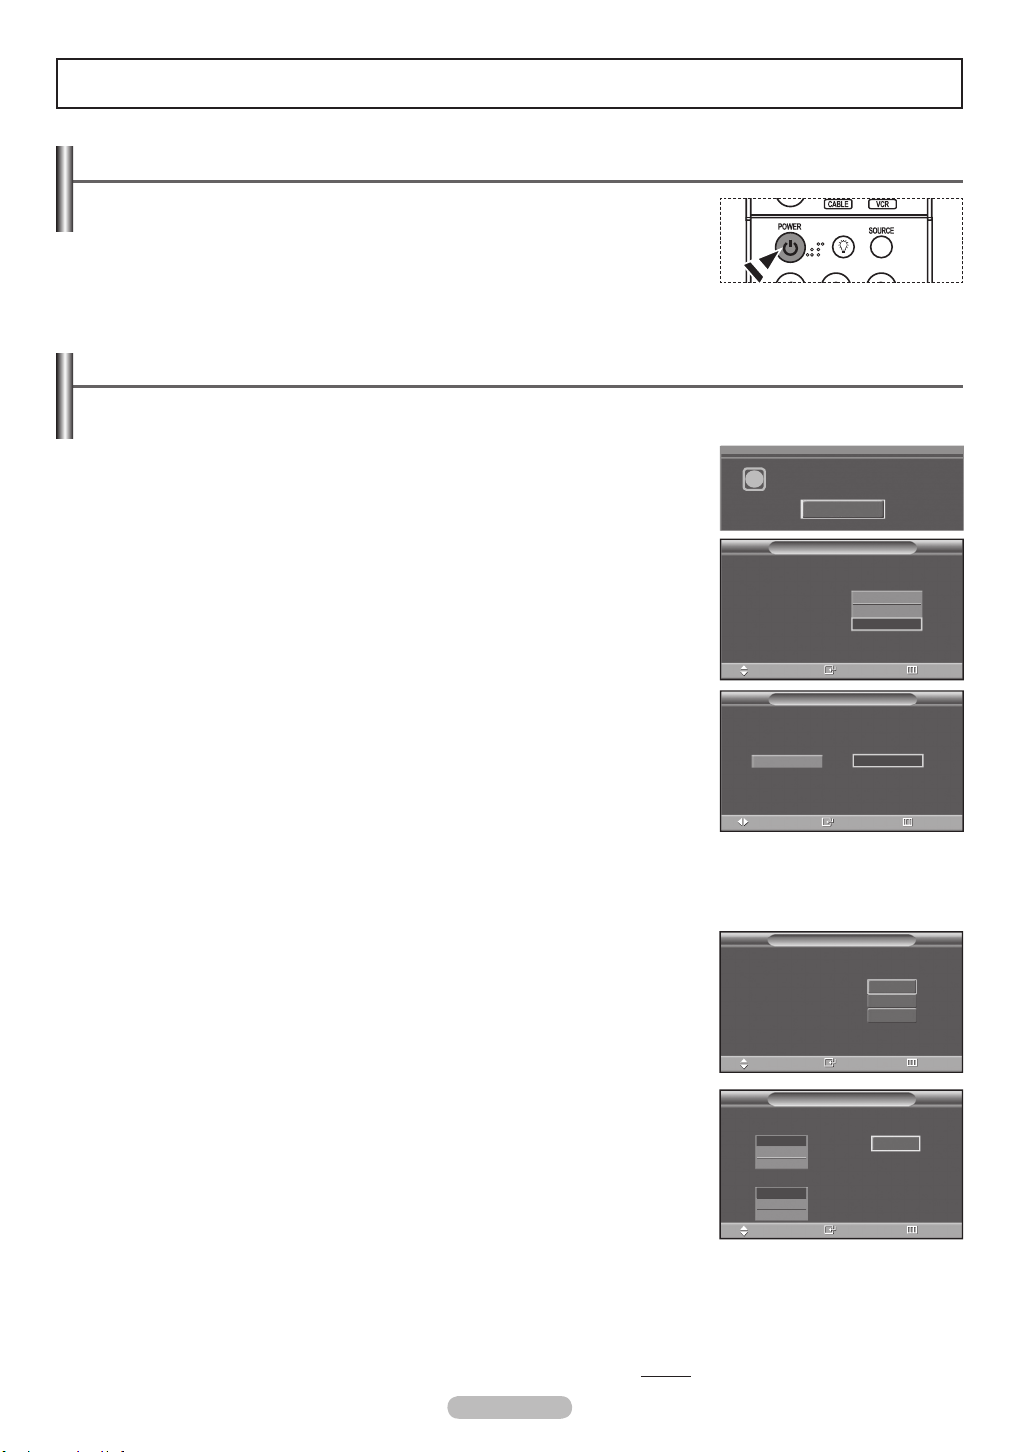
Fonctionnement
Mise sous tension/hors tension du téléviseur
Appuyer sur la touche POWER de la télécommande.
Il est aussi possible d’utiliser la touche POWER du téléviseur.
Le téléviseur peut prendre un certain temps avant de s’allumer.
➢
Fonction Prêt-à-l’emploi
Au moment de la première mise en marche du téléviseur, les réglages de base s’effectuent automatiquement et
subséquemment :
1 Appuyer sur la touche POWER de la télécommande.
Le message
La langue des menus, le mode Magasin, les canaux et l’heure
sont réglés. s’affiche.
2 Appuyez sur la touche ENTER; le menu Select the language of the OSD
(Sélectionner la langue d’affichage) s’affiche automatiquement.
Appuyer sur la touche ▲ ou ▼ pour sélectionner la langue, suivie de la touche
ENTER.
Le message Choisissesz le mode Maison lorsque vous installez ce
téléviseur à la maison. s’affiche automatiquement.
3 Appuyer sur la touche ◄ ou ► pour sélectionner Magasin ou Maison, suivie de
la touche ENTER.
La sélection par défaut est Maison.
➢
Nous recommandons de régler le téléviseur sur le mode Maison pour une
➢
meilleure image à la maison.
Le mode Magasin n’est destiné qu’à une utilisation dans un environnement
➢
commercial.
Pour retourner au mode Dynamique (Maison), dans l’éventualité où
➢
l’appareil se retrouve accidentellement en mode Magasin, appuyer sur la
touche Volume et tenir enfoncé la touche
MENU du panneau du téléviseur
pendant cinq secondes.
4 Appuyer sur la touche ▲ ou ▼ pour mémoriser les canaux du branchement
sélectionné. Appuyer sur
Si l’antenne est branchée sur la prise d’entrée ANT 1 IN (AIR), sélectionner
➢
ENTER pour choisir Démarrer.
Air. Si elle est branchée sur la prise d’entrée ANT 2 IN (CABLE),
sélectionner Câble.
Si les prises ANT 2 IN (AIR) et ANT 1 IN (CABLE) sont toutes deux utilisées,
➢
sélectionner Air+Câble.
En mode câble, il est possible de sélectionner la source de signal analogue
➢
appropriée (STD, HRC ou IRC) en appuyant sur la touche ▲ ou ▼, puis sur
ENTER. Si le câble est numérique, sélectionner la source de signal pour une
diffusion analogique et numérique.
Pour connaître le système utilisé dans un secteur particulier, communiquer
avec le câblodistributeur.
Appuyer sur la touche ► pour choisir Démarrer, puis sur ENTER pour
mémoriser les canaux.
Pour connaître le système utilisé dans un secteur particulier, communiquer
avec le câblodistributeur.
La langue des menus, le mode Magasin,
i
les canaux et l’heure sont réglés.
Démarrer
Prêt à l’emploi
pour sélectionner la langue dáfeichage.
Menu langue :
Dépl.
Choisissesz le mode Maison lorsque vous installez
ce téléviseur à la maison.
Magasin
Dépl.
Choisir les antennes à mettre en mémoire.
Air
Câble
Air + Câble
Dépl.
Choisit un type de signal de câble pour votre emplacement.
Analogique
STD
HRC
IRC
Numérique
STD
HRC
IRC
Dépl.
English
Español
Français
Intro.
Prêt à l’emploi
Intro.
Prêt à l’emploi
Intro.
Prêt à l’emploi
Intro.
Maison
Démarrer
Démarrer
Démarrer
Démarrer
Passer
Passer
Passer
Passer
Français - 15
Suite...
Page 100
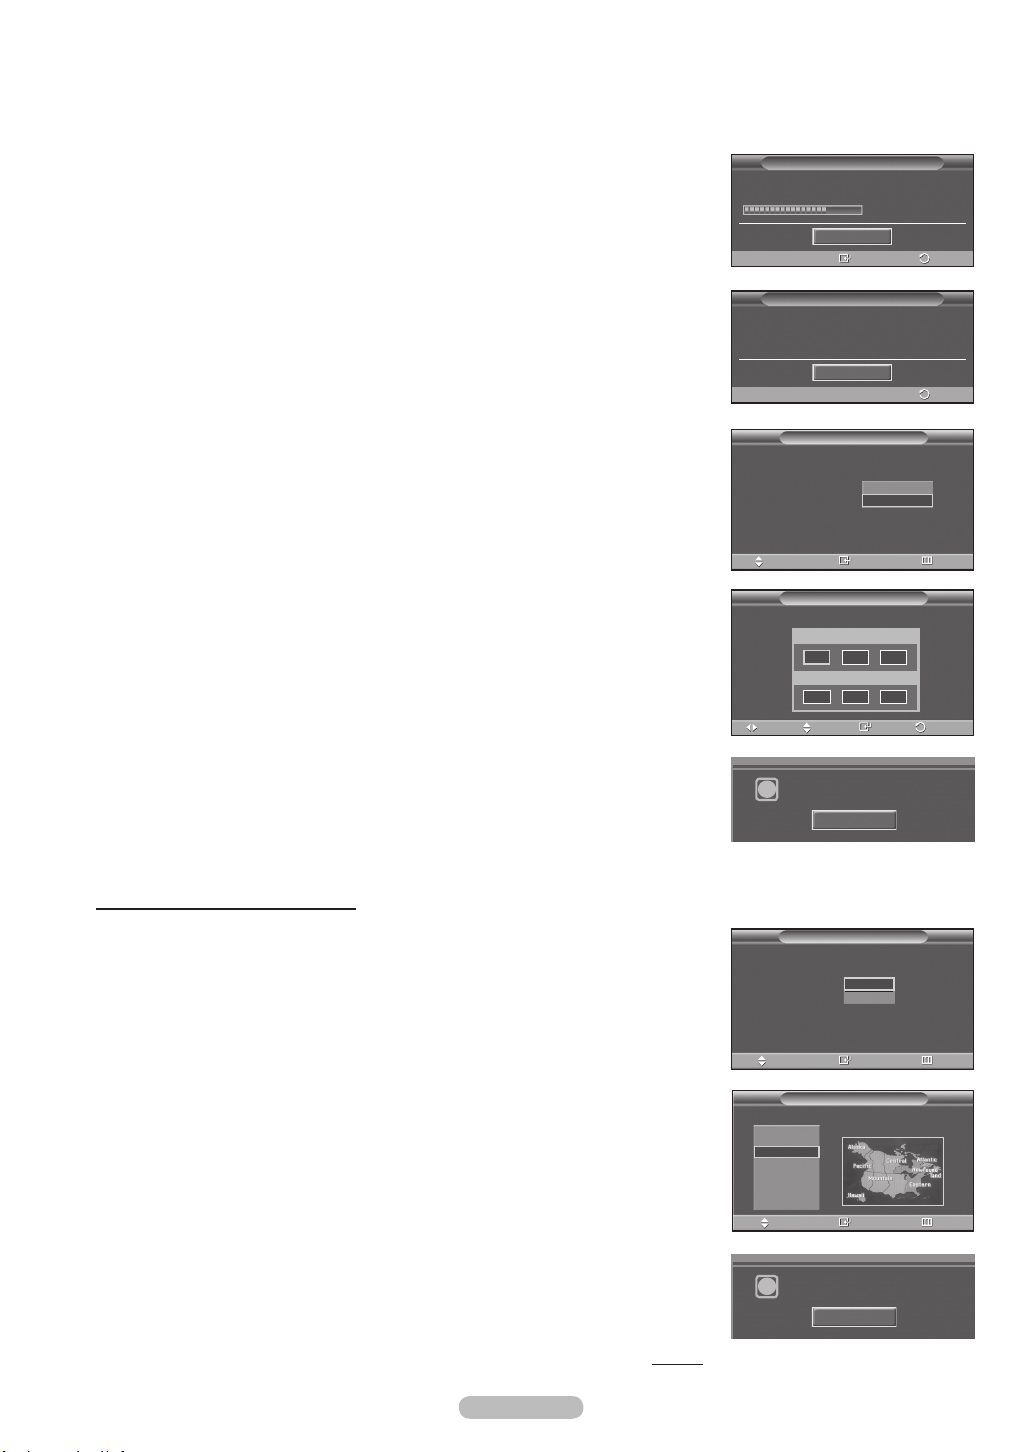
5 Le téléviseur commence la mémorisation des canaux accessibles.
Une fois la mémorisation de tous les canaux terminée, le menu Prog. auto
(Auto program) réapparaît. Appuyer sur la
ENTER lorsque les canaux ont été
mémorisés. Le menu Mode Horloge s’affiche automatiquement.
Pour arrêter la recherche avant la fin, appuyer sur la touche ENTER lorsque
➢
la fonction d’arrêt est sélectionnée.
Prêt à l’emploi
Progr. Aut. en cours
Arrêt
Intro.
Prêt à l’emploi
Progr.Aut. terminée.
14 Canaux déjà mémorisés.
Air : 9 , Câble : 5.
OK
Intro.
Câble Chaîne 67
68%
Passer
Passer
6 Appuyer sur la touche ▲ ou ▼ pour sélectionner Manuel pour régler l’heure
manuellement, suivie de la touche ENTER. Entrer l’heure et la date actuelles
s’affiche.
Si Auto est sélectionné, Régler l’horloge à l’heure avancée s’affiche;
➢
passer à l’étape 9.
7 Appuyer sur la touche ◄ ou ► pour passer à Mois, Jour, Année, Heure,
Minute ou am/pm. Régler la date et l’heure en appuyant sur la touche ▲ or ▼,
suivie de la touche MENU.
Il est possible de régler directement le Mois, le Jour, l’Année, les Heure, et
➢
les Minute en appuyant sur les touches numériques de la télécommande.
8 Le message Profitez de votre écoute s’affiche.
Appuyer sur la touche ENTER lorsque terminé.
Même sans appuyer sur la touche ENTER, le message s’efface
➢
automatiquement au bout de quelques secondes.
Réglage automatique de l’horloge
9 Appuyer sur la touche ▲ ou ▼ pour sélectionner Activé ou Désactivé, suivie
de la touche ENTER. Choisir le fuseau horaire de la région. le menu s’affiche
automatiquement.
Prêt à l’emploi
Choisir les mode horloge
Mode horloge :
Dépl.
Entrez la date et l’heure en cours.
Mois Jour Année
Heure Minute am/pm
Dépl. Réglage
Profitez de votre visionnage.
i
Régler l’horloge á l’heure avancée.
Heure avancée :
Intro.
Prêt à l’emploi
--
--
--
--
OK
Prêt à l’emploi
On
Off
Manuel
Auto
Intro.
----
--
Passer
Passer
10 Appuyez sur la touche ▲ ou ▼ pour mettre en évidence votre fuseau horaire.
Appuyer sur la touche ENTER.
Si l’horloge ne se règle pas automatiquement, consulter la page 48.
11 Le message
Profitez de votre écoute s’affiche.
Appuyer sur la touche ENTER lorsque terminé.
Même sans appuyer sur la touche ENTER, le message s’efface
➢
automatiquement au bout de quelques secondes.
Suite...
Français - 16
Dépl.
Choisissez le fuseau horaire où vous trouvez.
Newfoundland
Atlantique
Est
Centre
Rocheuses
Pacifique
Alaska
Hawaii
Dépl.
Profitez de votre visionnage.
i
Intro.
Intro.
Prêt à l’emploi
Intro.
Intro.
OK
Passer
Passer
Passer
Passer
 Loading...