

Page 1
Dishwasher
DW-BG970 Series
DW-BG770 Series
DW-BG570 Series
user manual
This manual is made with 100% recycled paper.
imagine the possibilities
Thank you for purchasing this Samsung
product. To receive a more complete
service, please register your product at
www.samsung.com/register
DD68-00092A_EN.indd 1 10/14/2011 3:08:50 PM
Page 2
Features of your new
Samsung dishwasher
Your new dishwasher will change the way you feel about washing kitchenware.
From its specialised features to its energy eciency, your new Samsung
dishwasher ensures that washing your kitchenware is as easy and enjoyable as
possible.
1. A Sleek Digital Touch Panel
Your new Samsung dishwasher comes with a sleek control panel that incorporates digital touch
sensors for greater ease-of-use.
2. 3-Tier Filtration System
Your new Samsung dishwasher’s 3-tier filtration system filters every last bit of food from your
dishes, cups, cooking utensils and cutlery. The advanced filtration system thoroughly filters out
and collects all food remains so that you can rest assured knowing that your dishes will come out
spotless.
Samsung dishwashers have the most powerful filtration systems in their class.
3. Condensing Drying Technology (DW-BG770/DW-BG570)
Your new Samsung dishwasher utilizes the latent thermal energy from the final rinse cycle to drying
the load. This not only saves energy, but also prevents steam from escaping the dishwasher and
injuring you and your loved ones.
4. SDP Drying Technology (DW-BG970)
Your new Samsung dishwasher utilizes Super Desiccant Polymer (SDP) technology to dry your
dishes following the last rinse cycle. This not only saves energy, but also prevents steam from
escaping the dishwasher and injuring you and your loved ones.
This user manual contains important information concerning the use and care of your new Samsung
dishwasher. Refer to the manual for detailed instructions on using the control panel and for tips on how to
get the best out of the latest features and technologies of your new dishwasher. The “Cycle Chart” section
contains a summarised table of the available programmes, and the “Troubleshooting” section contains
information on solving common problems.
2_ Features of your new Samsung dishwasher
DD68-00092A_EN.indd 2 10/14/2011 3:08:50 PM
Page 3

Safety instructions
Congratulations on your new Samsung dishwasher. This manual contains important
information on the installation, use and care of your appliance. Please take time
to read this manual to take full advantage of your dishwasher’s many benefits and
features.
WHAT YOU NEED TO KNOW ABOUT SAFETY INSTRUCTIONS
Please read this manual thoroughly to ensure that you know how to safely and eciently operate the
extensive features and functions of your new appliance and retain it at a safe place near the appliance for
your future reference. Use this appliance only for its intended purpose as described in this user manual.
Warning and important safety instructions in this manual do not cover all possible conditions and
situations that may occur. It is your responsibility to use common sense, caution, and care when installing,
maintaining, and operating your dishwasher.
Because the following operating instructions cover various models, the characteristics of your dishwasher
may dier slightly from those described in this manual and not all warning signs may be applicable. If you
have any questions or concerns, contact your nearest service center or find help and information online at
www.samsung.com.
IMPORTANT SAFETY SYMBOLS AND PRECAUTIONS
Important safety symbols
Hazards or unsafe practices that may result in severe personal injury and/or property damage.
WARNING
Hazards or unsafe practices that may result in personal injury and/or property damage.
CAUTION
To reduce the risk of fire, explosion, electric shock, or personal injury when using your
CAUTION
dishwasher, follow these basic safety precautions:
Do NOT attempt.
Do NOT disassemble.
Do NOT touch.
Follow directions explicitly.
Unplug the power plug from the wall socket.
Make sure the appliance is grounded to prevent electric shock.
Call the service centre for help.
Note
These warning symbols are here to prevent injury to you and others.
Please follow them explicitly.
Keep these instructions in a safe place and ensure that new users are familiar with the content. Pass them
on to any future owner.
Safety instructions _3
DD68-00092A_EN.indd 3 10/14/2011 3:08:51 PM
Page 4

Safety instructions
Important safety precautions
This appliance conforms to current safety requirements. Inappropriate use can, however, lead to
personal injury and damage to property.
To avoid the risk of accidents and damage to the appliance, please read these instructions carefully
before using it for the first time. They contain important information on its safety, use and maintenance.
As with any equipment using electricity and moving parts, potential hazards exist. To safely operate
this appliance, become familiar with its operation and exercise care when using it.
CAUTION
Do not let children (or pets) play on or in your dishwasher. The dishwasher door does not open easily
from the inside, and children may be seriously injured if trapped inside.
WARNING
Children should be supervised to ensure that they do not play with the appliance.
WARNING
If the plug (power supply cord) is damaged, it must be replaced by the manufacturer or its service
agent or a similarly qualified person in order to avoid a hazard.
CAUTION
This appliance must be positioned to be accessible to the power plug after installation, the water
supply tabs and the drain pipes.
INSTRUCTION ABOUT THE WEEE MARK
Correct Disposal of This Product (Waste Electrical & Electronic Equipment)
(Applicable in the European Union and other European countries with separate
collection systems)
The WEEE mark on a product, accessory or literature indicates that the product and its electronic
accessories (e.g. charger, headset, USB cable) should not be disposed of with other household
waste at the end of its working life. To prevent possible harm to the environment or to your health from
uncontrolled waste disposal, please separate these items from other types of waste and recycle them
responsibly to promote the sustainable reuse of material resources.
Household users should contact either the retailer where they purchased this product, or their local
government oce for details on where and how they can take these items for environmentally safe
recycling.
Business users should contact their supplier and check the terms and conditions of the purchase contract.
This product and its electronic accessories should not be mixed with other commercial waste for disposal.
4_ Safety instructions
DD68-00092A_EN.indd 4 10/14/2011 3:08:51 PM
Page 5

INSTRUCTIONS WHEN USING YOUR DISHWASHER
This dishwasher is not designed for commercial use. It is intended for use in domestic households and
in similar working and residential environments such as:
• Shops
• Oces and showrooms
and by residents in establishments such as:
• Hostels and guest houses.
It must only be used as a domestic appliance as specified in these user manual, for cleaning domestic
crockery and cutlery.
Any other usage is not supported by the manufacturer and could be dangerous.
The manufacturer cannot be held liable for damage resulting from incorrect or improper use or
operation.
Do not use solvents in the dishwasher. Danger of explosion.
WARNING
Do not inhale or ingest dishwasher detergent. Dishwasher detergents contain irritant or corrosive
ingredients which can cause burning in the nose, mouth and throat if swallowed, or inhibit breathing.
WARNING
Consult a doctor immediately if detergent has been swallowed or inhaled.
Avoid leaving the door open unnecessarily, as you could trip over it.
CAUTION
Do not sit or lean on the opened door. This could cause the dishwasher to tip and be
damaged, and you could get injured.
CAUTION
Only use detergent and rinse aid formulated for domestic dishwashers. Do not use washing‐up liquid.
Do not fill the rinse aid reservoir with powder or liquid detergent. This will cause serious damage to the
reservoir.
Inadvertently filling the salt reservoir with powder or liquid dishwasher detergent will damage the water
softener. Make sure you have picked up the correct packet of dishwasher salt before filling the salt
CAUTION
reservoir.
Please only use special coarse grained dishwasher salt for reactivation, as other salts may contain
insoluble additives which can impair the functioning of the softener.
In an appliance with a cutlery basket (depending on model), cutlery is cleaned and dried more if placed
in eciently the basket with the handles downwards. However, to avoid the risk of injury, place knives
CAUTION
and forks etc. with the handles upwards.
Plastic items which cannot withstand being washed in hot water, such as disposable plastic
containers, or plastic cutlery and crockery should not be cleaned in the dishwasher.
The high temperatures in the dishwasher may cause them to melt or lose shape.
On models with Delay Start function, make sure that the dispenser is dry before adding detergent.
Wipe dry if necessary. Detergent will clog if poured into a damp dispenser and may not be thoroughly
dispersed.
Knives and other utensils with sharp points must be loaded in the basket with their points down or
placed in a horizontal position.
WARNING
INSTRUCTIONS FOR PROTECTING YOUR CHILDREN
This appliance is not a toy! To avoid the risk of injury, keep children well away and do not allow them to
play in or around the dishwasher or to use the controls. They will not understand the potential dangers
WARNING
posed by it. They should be supervised whenever you are working in the kitchen.
There is also a danger that children playing might shut themselves in the dishwasher.
Safety instructions _5
DD68-00092A_EN.indd 5 10/14/2011 3:08:51 PM
Page 6
Safety instructions
This appliance can be used by children aged from 8 years and above and persons with reduced
physical, sensory or mental capabilities or lack of experience and knowledge if they have been given
WARNING
supervision or instruction concerning use of the appliance in a safe way and understand the hazards
involved. Children shall not play with the appliance.
Cleaning and user maintenance shall not be made by children without supervision.
Older children may only use the dishwasher when its operation has been clearly explained to them and
they are able to use it safely, recognising the dangers of misuse.
WARNING
KEEP CHILDREN AWAY FROM DETERGENTS! Dishwasher detergents contain irritant and corrosive
ingredients which can cause burning in the mouth, nose and throat if swallowed, or inhibit breathing.
WARNING
Keep children away from the dishwasher when the door is open.
There could still be detergent residues in the cabinet.
Consult a doctor immediately if your child has swallowed or inhaled detergent.
INSTRUCTIONS FOR INSTALLING YOUR DISHWASHER
Before setting up the appliance, check it for any externally visible damage. Under no circumstances
should you use a damaged appliance. A damaged appliance could be dangerous.
WARNING
The dishwasher must only be plugged into the electricity supply via a suitable switched socket.
The electrical socket must be easily accessible after the dishwasher is installed so that it can
CAUTION
be disconnected from the electricity supply at any time. (Refer to the “Meeting the installation
requirements” section on page 10).
There must be no electrical sockets behind the dishwasher. Danger of overheating and fire risk if the
dishwasher were to be pushed up against a plug.
WARNING
The dishwasher must not be installed under a hob. The high radiant temperatures which are
sometimes generated by a hob could damage the dishwasher. For the same reason it should not be
WARNING
installed next to open fires or other appliances which give o heat, such as heaters etc.
Do not connect the dishwasher to the mains supply until it has been fully installed and any adjustment
has been made to the door springs.
Before connecting the appliance, check that the connection data on the data plate (voltage and
connected load) match the mains electricity supply. If in any doubt, consult a qualified electrician.
CAUTION
The electrical safety of this appliance can only be guaranteed when continuity is complete between it
and an eective grounding system. It is most important that this basic safety requirement is present
and regularly tested and where there is any doubt the electrical system in the house should be
checked by a qualified electrician.
The manufacturer cannot be held liable for the consequences of an inadequate grounding system (e.g.
electric shock).
Do not connect the appliance to the mains electricity supply by a multi‐socket unit or an extension
lead. These do not guarantee the required safety of the appliance (e.g. danger of overheating).
CAUTION
This appliance may only be installed in mobile installations such as ships if a risk assessment of the
installation has been carried out by a suitably qualified engineer.
The plastic housing of the water connection contains an electrical component. The housing must not
be submerged in water.
CAUTION
There are electrical wires in the hose of Aqua-Stop. Never cut the water inlet hose, even if it is too long.
Installation, maintenance and repairs may only be carried out by a suitably qualified and competent
person in strict accordance with current national and local safety regulations. Repairs and other work
by unqualified persons can be dangerous. The manufacturer cannot be held liable for unauthorised
work.
6_ Safety instructions
DD68-00092A_EN.indd 6 10/14/2011 3:08:51 PM
Page 7
The integrated waterproof system oers protection from water damage, provided the following
conditions are met:
CAUTION
• The dishwasher is correctly installed and plumbed in.
• The dishwasher is properly maintained and parts are replaced where it can be seen that this is
necessary.
• The stopcock has been turned o when the appliance is not used for a longer period of time (e.g.
during holidays).
• The waterproof system will work even if the appliance is switched o. However, the appliance must
remain connected to the electricity supply.
A damaged appliance can be dangerous. If the dishwasher gets damaged, switch it o at the mains
and call your dealer or the service department.
WARNING
Unauthorised repairs could result in unforeseen dangers for the user, for which the manufacturer
cannot accept liability. Repairs should only be undertaken by an approved service technician.
Faulty components must only be replaced by original spare parts. Only when these parts are fitted can
the safety of the appliance can be guaranteed.
Always disconnect the dishwasher from the electrical supply for maintenance work (switch o at the
wall socket and remove the plug).
If the connection cable is damaged it must be replaced with a special cable, available from the
manufacturer. For safety reasons, this must only be fitted by the service department or an authorised
CAUTION
service technician.
In countries where there are areas which may be subject to infestation by cockroaches or other
vermin, pay particular attention to keeping the appliance and its surroundings in a clean condition at all
WARNING
times. Any damage which may be caused by cockroaches or other vermin will not be covered by the
guarantee.
In the event of a fault or for cleaning purposes, the appliance is only completely isolated from the
electiricity supply when:
CAUTION
• it is switched o at the wall socket and the plug is withdrawn, or
• it is switched o at the mains, or
• the mains fuse is disconnected, or
• the screw-out fuse is removed (in countries where this is applicable).
Do not make any alterations to the appliance, unless authorised to do so by the manufacturer.
Never open the casing/housing of the appliance.
Tempering with electrical connections or components and mechanical parts is highly dangerous and
CAUTION
can cause operational faults or electric shock.
While the appliance is under guarantee, repairs should only be undertaken by a service technician
authorised by the manufacturer. Otherwise the guarantee will be invalidated.
When installing the product, make sure there is space at the top, left, right and back of the product to
ensure proper ventilation.
CAUTION
If there is insucient space between the product and the sink, it may damage the sink or allow mold to
grow.
Safety instructions _7
DD68-00092A_EN.indd 7 10/14/2011 3:08:52 PM
Page 8
Contents
SETTING UP YOUR DISHWASHER
9
9 Checking the parts and control panel
10 Meeting the installation requirements
BEFORE USING THE PRODUCT
FOR THE FIRST TIME
12
12 Using the water softening system
13 Using the Sound On/O function
13 Using dishwasher salt
14 Using rinse aid
LOADING YOUR DISHWASHER
15
15 Dishwashing guidelines
15 Using the baskets
19 Using detergent
TROUBLESHOOTING AND
INFORMATION CODES
27
27 Check these points if your dishwasher...
29 Information codes
PROGRAMME CHART
30
30 Programme chart
APPENDIX
31
31 Disposing the dishwasher and helping
the environment
31 Declaration of conformity
31 Specifications
FOR STANDARD TEST
OPERATING YOUR DISHWASHER
21
21 Basic instructions
21 Using the programme selection buttons
22 Using the Delay Start function
22 Using the digital display
23 Using additional functions
CLEANING AND MAINTAINING
YOUR DISHWASHER
24
24 Cleaning the exterior
24 Cleaning the wash cabinet
24 Cleaning the filters
25 Cleaning the spray arms
26 Storing your dishwasher
32
8_ Contents
DD68-00092A_EN.indd 8 10/14/2011 3:08:52 PM
Page 9
Setting up your dishwasher
Be sure to have your technician follow these instructions closely to ensure the safe
and normal operation of your new dishwasher.
This product comes with a separate installation manual. Refer to it for detailed installation instructions.
CHECKING THE PARTS AND CONTROL PANEL
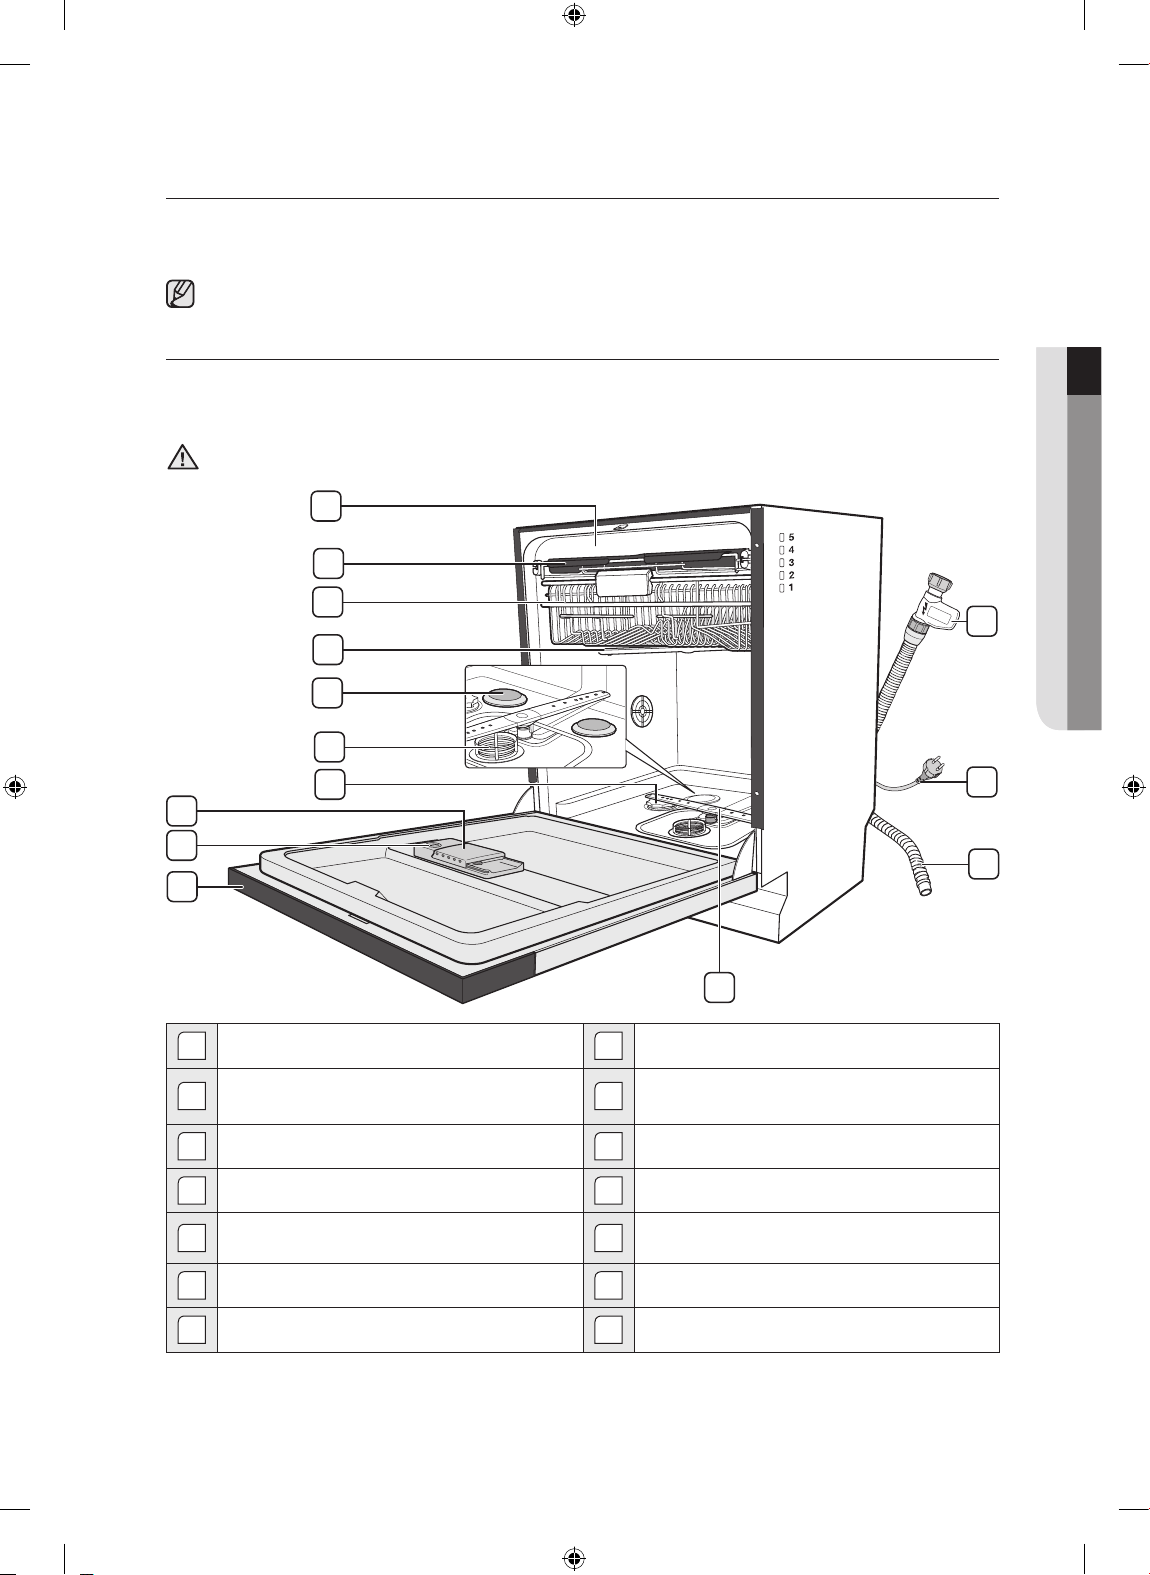
When your dishwasher has been unpacked, make sure that you’ve received all the parts shown below.
If your dishwasher was damaged during shipping, or if you do not have all the parts, contact Samsung
Customer Service or your Samsung dealer.
Keep the packaging out of the reach of children to ensure their safety, after unpacking your
dishwasher.
WARNING
1
2
3
4
5
6
7
8
9
10
01 SETTING UP
14
13
12
11
1
Top spray arm (not shown)
Cutlery tray (DW-BG970/DW-BG770)
2
Cutlery basket (DW-BG570) (see page 18)
3
Upper basket
4
Upper spray arm
Intensive zone spray disk (DW-BG970/
5
DW-BG770)
6
Filter combination
7
Salt reservoir
8
Detergent dispenser
9
Rinse aid reservoir
10
Control panel
11
Lower spray arm
12
Drain hose
13
Power cord
14
Aqua-Stop
Setting up your dishwasher _9
DD68-00092A_EN.indd 9 10/14/2011 3:08:52 PM
Page 10
Setting up your dishwasher
10
11
12
13
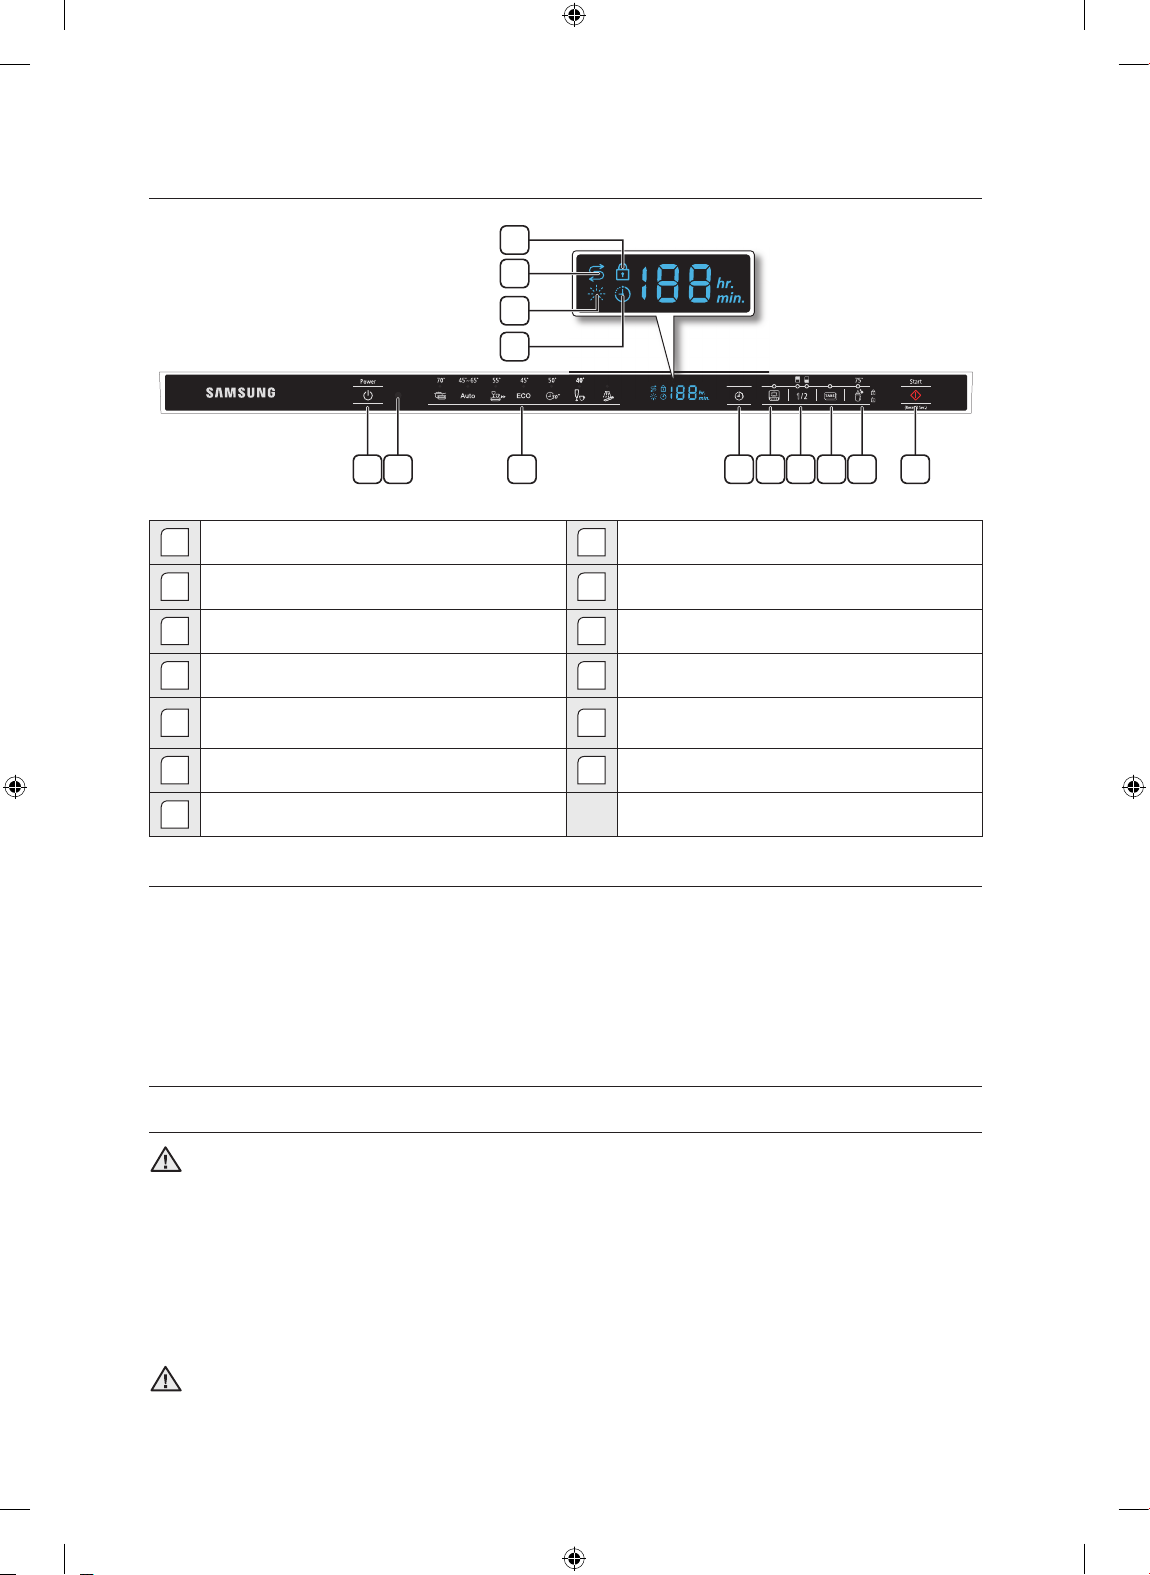
1 3 4 5 6 7 8 9
2
1
Power button
2
Process indicator
3
Programme selection buttons
4
Delay Start button
Intensive Zone button (DW-BG970/DW-
5
BG770 only)
6
Half Load button
7
Multi Tabs button
8
Sanitize/Child Lock button
9
Start/Reset button
10
Child Lock indicator
11
Salt Refill indicator
12
Rinse Refill indicator
13
Delay Start indicator
Checking the accessories
• User manual
• Installation manual
• Installation kit
• Warranty card
• Energy label
• Funnel (Refer to the “Filling the salt reservoir” section on page 13)
MEETING THE INSTALLATION REQUIREMENTS
Power supply and grounding
Do not use an extension cord.
Only use the power cord that came with the dishwasher.
WARNING
When preparing for the installation, ensure that your power supply oers:
• An AC 220-240V/50Hz fuse or a circuit breaker.
• An individual branch circuit serving your dishwasher.
Your dishwasher must be grounded. If your dishwasher malfunctions or breaks down, grounding will reduce
the risk of electric shock by providing a path of least resistance for the electric current.
Your dishwasher comes with a power cord and a grounded, three-prong plug that can be inserted into a
properly installed and grounded outlet.
Do not connect the ground wire to a plastic plumbing line, gas line, or hot water pipe.
WARNING
10_ Setting up your dishwasher
DD68-00092A_EN.indd 10 10/14/2011 3:08:53 PM
Page 11
Improperly connecting the grounding conductor can result in electric shock.
Check with a qualified electrician or technician if you are unsure whether your dishwasher has been properly
grounded.
Do not modify the plug provided with the dishwasher. If it does not fit the outlet, have a proper outlet
installed by a qualified electrician.
CAUTION
Water supply
Do not drink the water from inside the dishwasher.
WARNING
• The dishwasher may be connected to a cold or hot water supply, max 60ºC.
• A stopcock with a 3/4” male thread must be provided on tap.
• The water pressure must be between 0.05MPa and 0.8MPa. If the water pressure is to less, the water
supply valve may not operated properly causing the dishwasher to turn o. If the water pressure is too
high, a pressure reducer valve must be fitted.
You can reduce the risk of leaks and water damage by:
CAUTION
• Making water taps easily accessible.
• Turning o the taps when the dishwasher is not in use.
• Periodically checking the fittings for leaks.
Using Aqua-Stop
The Aqua-Stop was invented as the perfect leakage protection system.
It is attached to the water supply hose and automatically cuts o the water flow in the event of damage to
the hose.
Aqua-Stop is an electrical component.
CAUTION
• Take care that you do not damage the Aqua-Stop.
• Do not twist or bend the water supply hose connected to the Aqua-Stop.
If the Aqua-Stop has been damaged, shut o the water taps and pull out the power plug right away.
Once these steps have been taken, contact Samsung Customer Service or a qualified technician.
CAUTION
01 SETTING UP
Drain
If you are using a drain exclusively for the dishwasher, connect the drain hose to a drain that is between
30cm to 70cm o the ground.
Connecting the drain hose to a drain more than 80cm o the ground can result the water in the dishwater
flowing back or draining incompletely.
Flooring
For best performance, your dishwasher must be installed on a solid, even floor.
Wooden floors may need to be reinforced to minimize vibrations. Carpeting and soft tiles are contributing
factors to vibrations and may cause your dishwasher to move slightly while operating.
Never install your dishwasher on a platform or poorly supported structure.
CAUTION
Ambient temperature
Do not install your dishwasher in an area exposed to freezing temperatures. Your dishwasher always retains
some water in the water valve, pump and hose and if the water freezes in the machine or hoses, it may
damage the appliance and its components.
Setting up your dishwasher _11
DD68-00092A_EN.indd 11 10/14/2011 3:08:53 PM
Page 12
Before using the product for
the first time
USING THE WATER SOFTENING SYSTEM
Better washing results require the use of soft water.
Hard water contains impurities that can hinder the washing performance.
You will need to soften the water if the water supply is harder than 1.0mmol/ℓ (6°d – German scale). To do
this, you need:
• Dishwasher salt.
• Configuration of the water hardness level according to your area.
For more information about the water hardness level in your area, contact your local water department.
If the hardness level of your water supply is unsteady, set the dishwasher to the highest measurement.
For example, if the water hardness reading ranges from 6.7mmol/ℓ to 9.0mmol/ℓ, set the dishwasher
to 9.0mmol/ℓ.
The dishwasher’s default water hardness level setting is 3 (4.0-5.5mmol/ℓ). If this setting matches the water
hardness level in your area, there is no need to change it.
If you need to change the water hardness level, follow the instructions below.
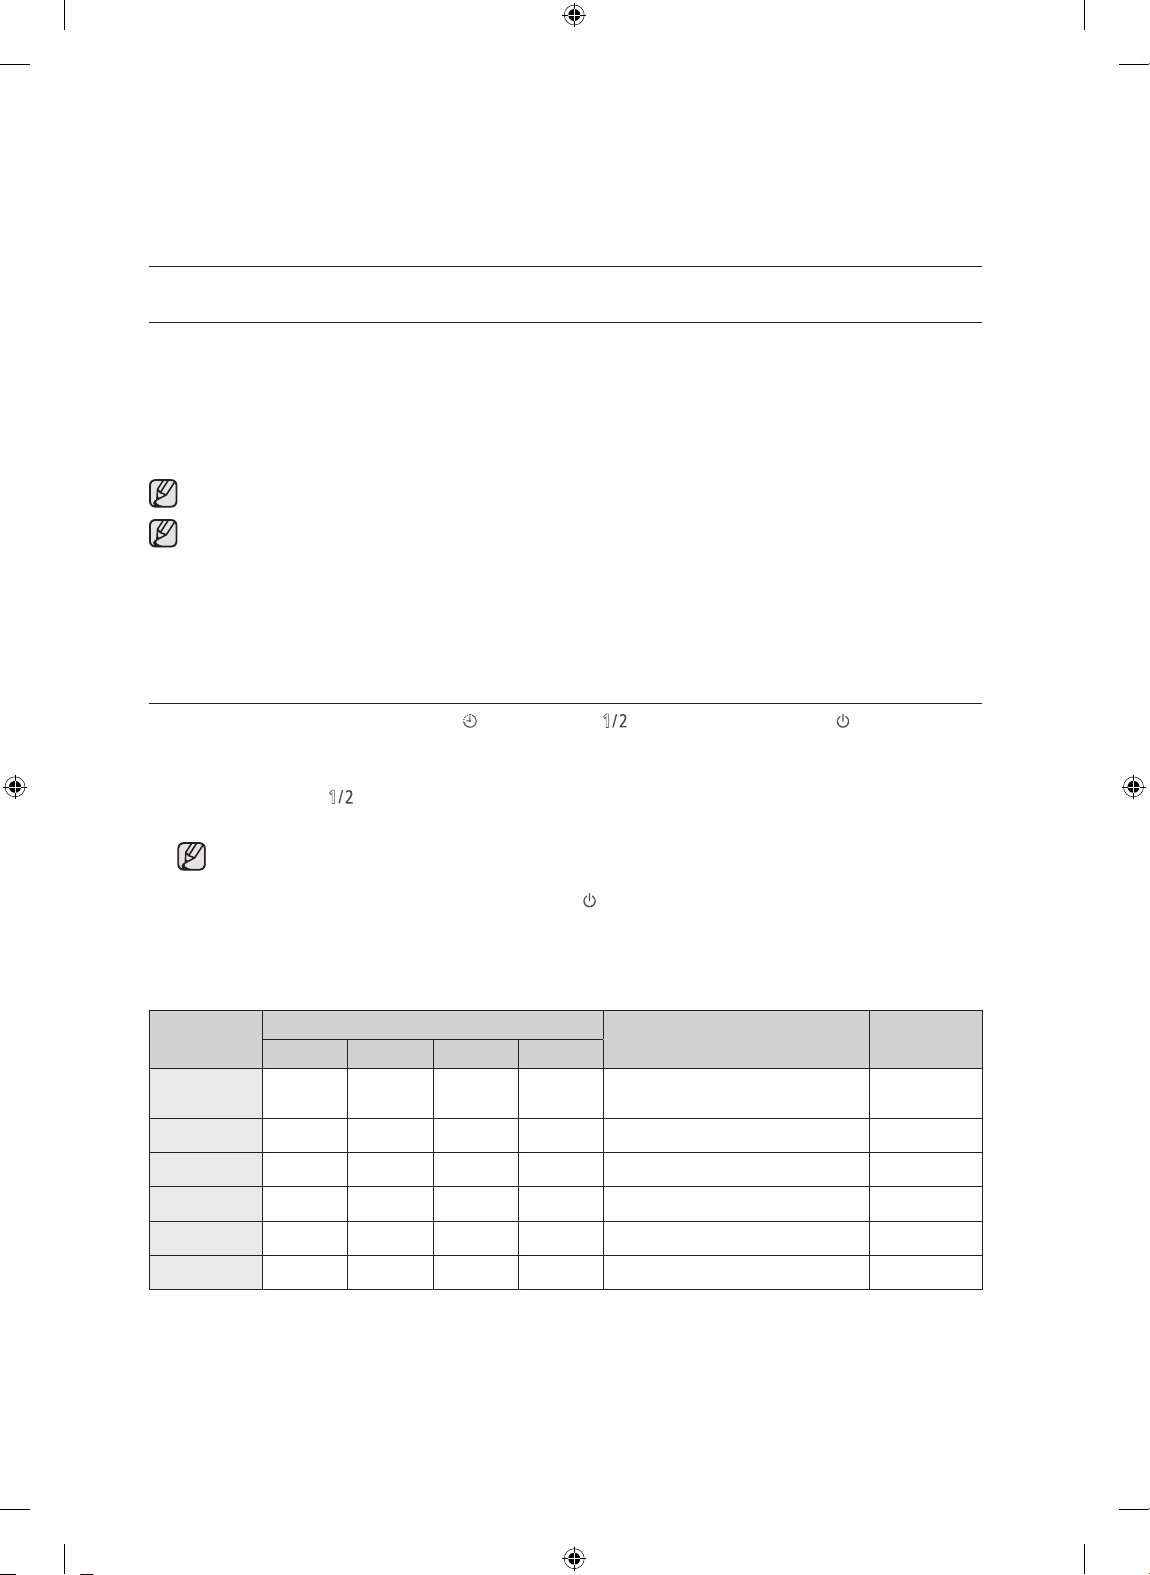
Setting the water hardness level
1. While holding down the Delay Start and Half Load buttons, press the Power button to
access the setting for the water hardness level.
2. Once you enter the setting for the water hardness, the current hardness level setting is displayed.
3. Use the Half Load
table below for the water hardness level setting in your area.)
If the water hardness level in your area is very low, you do not need to use dishwasher salt.
However, you set the water hardness setting for the dishwasher to 0.
4. To exit the water hardness setting, press the Power
button to select the water hardness level from Level 0 to Level 5. (Refer to the
button.
Water hardness level chart
The water hardness is measured using German degrees (°dH), French degrees (°TH), or mmol/ℓ
(International unit for the water hardness).
Level
L0 <6 <10 <1.0
L1 6~14 10~25 1~2.5 1/8 Yes Yes
L2 14~23 25~40 2.5~4.0 1/5 Yes Yes
L3 23~31 40~55 4.0~5.5 1/3 Yes Yes
L4 31~40 55~70 5.5~7.0 1/2 Yes Yes
L5 >40 >70 >7.0 1/1 Yes Yes
12_ Before using for the first time
ºdH ºTH mmol/ℓ Range
Water hardness
No
recycle
Regeneration softening/
washing cycle(ECO program)
No No
Salt
injection
DD68-00092A_EN.indd 12 10/14/2011 3:08:53 PM
Page 13
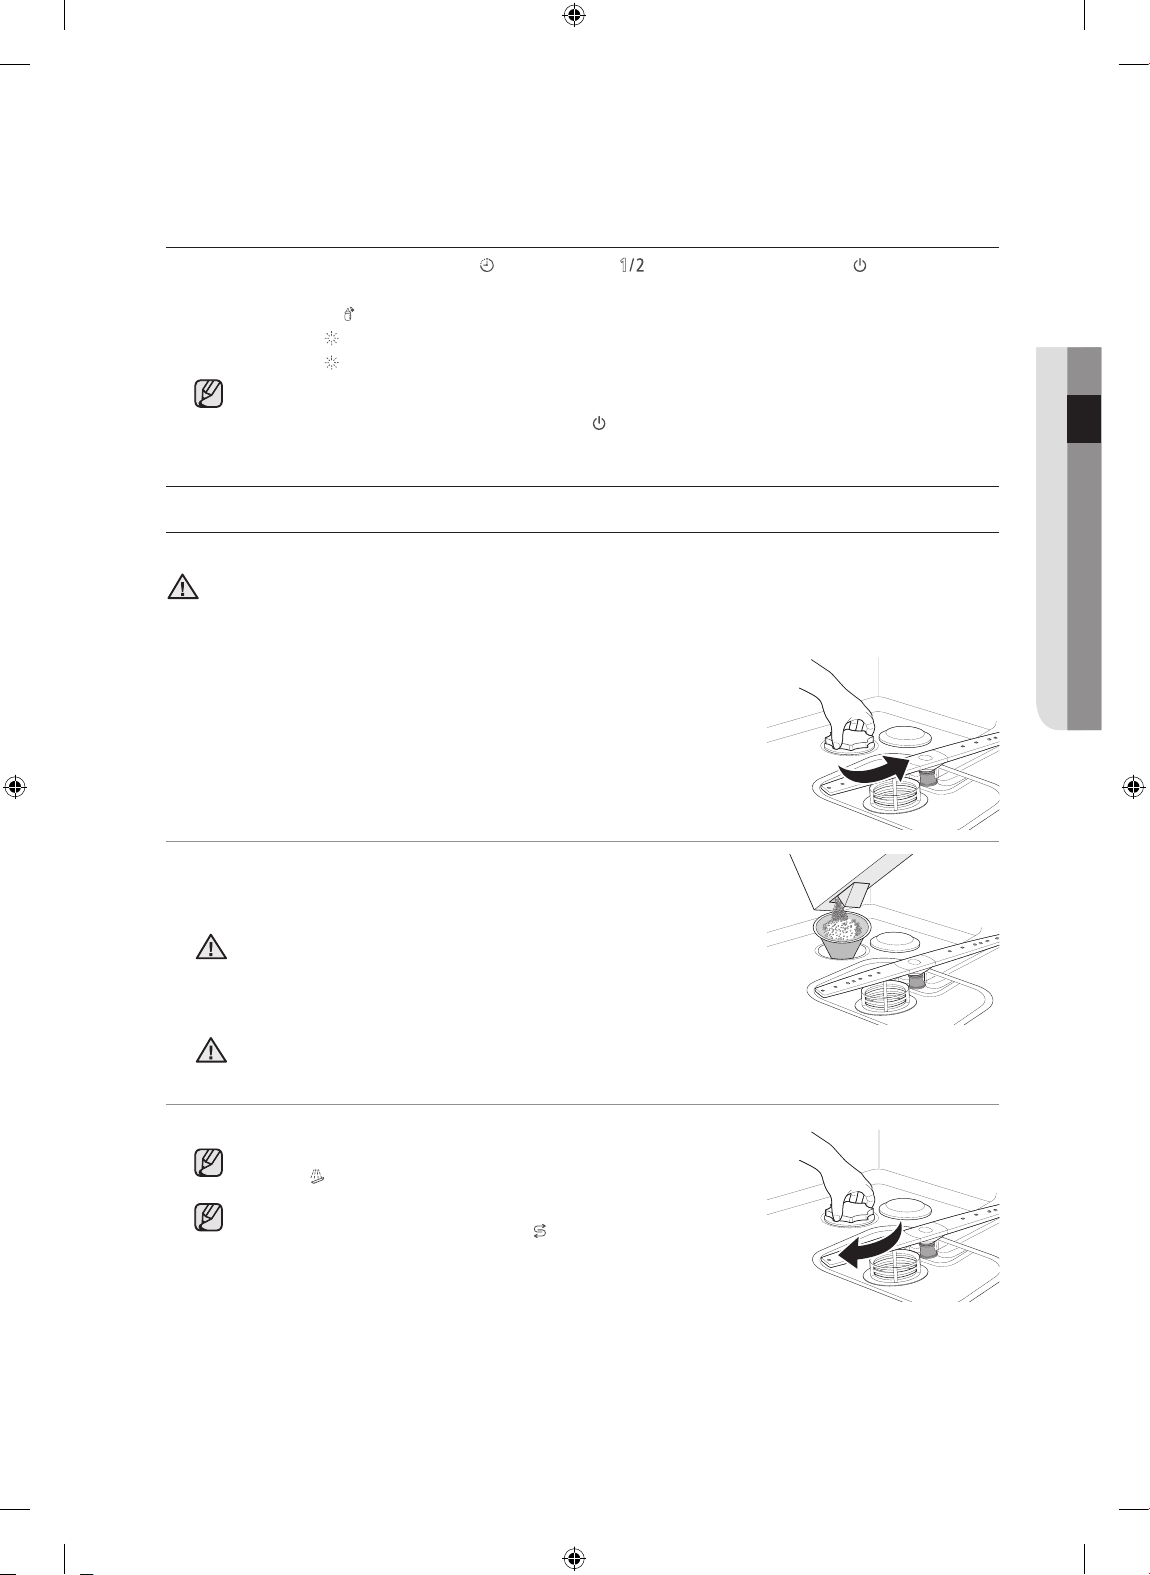
USING THE SOUND ON/OFF FUNCTION
1. While holding down the Delay Start and Half Load buttons, press the Power button to
access the setting to activate/deactivate the Sound On/O function.
2. Press the Sanitize
- “Rinse Refill
- “Rinse Refill
button to activate or deactivate the Sound On/O function.
” indicator turns on to indicate that Sound On function has been activated.
” indicator turns o to indicate that Sound O function has been activated.
Even though Sound O function has been activated, the error sound plays when an error occurs.
3. To exit the Sound On/O setting, press the Power
button.
USING DISHWASHER SALT
Filling the salt reservoir
In order to use soft water, you need to fill the salt reservoir with dishwasher salt.
Use dishwasher salt only.
Do not use any other type of salt or solvent. This may damage the salt reservoir and the water
CAUTION
softening system.
1. Open the door.
2. Open the salt reservoir cap by rotating it counterclockwise.
02 BEFORE USING
3. Fill the salt reservoir with water(only required when switching on the
appliance for the first time)
4. Add the dishwasher salt.
The salt reservoir’s capacity is about 1kg. Do not overfill the salt
reservoir.
CAUTION
5. Remove excess salt from around the salt reservoir opening and cap
seal.
If the excess salt is not removed, the salt reservoir cap may not
close properly and allow salt water flow out with negative impact
CAUTION
to the performance.
6. Rotate the salt reservoir cap clockwise until it is completely shut.
If you are not planning on washing dishes right away, run the
Prewash
to clean the cabinet of excess salt.
Depending on the size of the salt grains, it may take a while for
the salt to dissolve and the “Salt Refill
” indicator to turn o.
Before using for the first time _13
DD68-00092A_EN.indd 13 10/14/2011 3:08:55 PM
Page 14
Before using the product for
the first time
Checking the Salt Refill indicator
If the “Salt Refill ” indicator is lit, add dishwasher salt as described above.
A lit “Salt Refill
on.
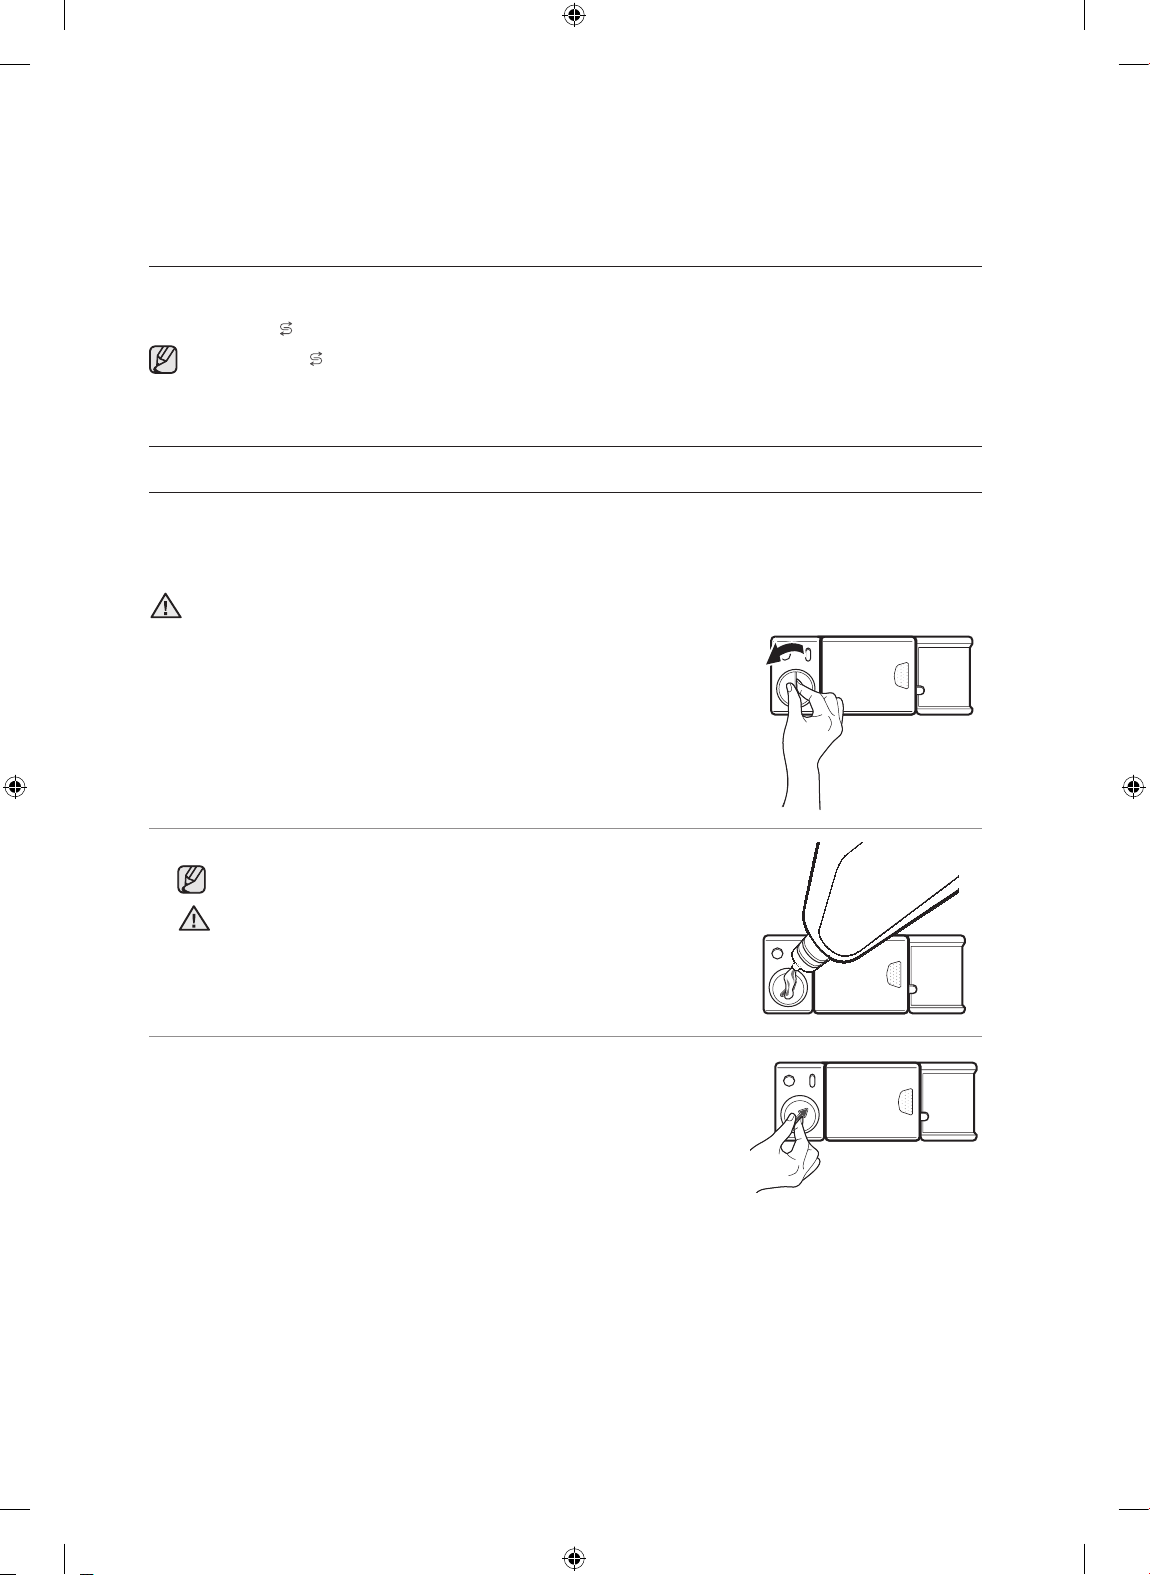
USING RINSE AID
Filling the rinse aid reservoir
As soon as the rinse aid refill indicator lights up on the control panel , refill with rinse aid. Your dishwasher
has been designed to use liquid rinse aid only.
Using a powdered rinse aid will clog up the reservoir opening and cause the dishwasher to malfunction.
Rinse aid improves the drying performance of the dishwasher.
Do not add regular detergent into the rinse aid reservoir.
CAUTION
1. Remove the rinse aid reservoir cap by rotating it counterclockwise.
” indicator means that there remains salt for three more cycles from the first switched
2. Fill the rinse aid reservoir with rinse aid.
Use the viewing port when filling the rinse aid.
Do not fill the reservoir above the rinse aid level as the rinse aid
may overflow during the wash cycle.
CAUTION
3. Turn the rinse aid setting to a rinse aid amount between 1 and 6. The
higher the level, the more rinse aid will be used.
If you are unable to rotate the rinse aid leveller with ease, try using a
coin.
4. Close the rinse aid reservoir cap by rotating it clockwise.
14_ Before using for the first time
DD68-00092A_EN.indd 14 10/14/2011 3:08:55 PM
Page 15
Loading your dishwasher
DISHWASHING GUIDELINES
Follow these simple guidelines to get the best results and save energy.
Before loading dishes
Remove food remains such as bones, fruit seeds, etc. and waste such as toothpicks, paper napkins,
etc. from your dishes. Food remains and waste can damage your dishes, make noise and even result
CAUTION
in a product malfunction.
Do not wash items that are covered with ash, sand, wax, lubricating grease or paint.
These materials will damage the dishwasher and ash does not dissolve and will distribute in hole
WARNING
interior.
Items not suitable for the dishwasher
• Copper, brass, tin, ivory and aluminium items or with an adhesive
• Non-heat resistant plastics
• Craft items, antiques, valuable vases and decorative glassware
• Colours painted over a glaze
• Wooden cutlery and crockery or items with wooden parts
• Delicate glassware, or glassware containing lead crystal
Silverware that has been in contact with foods containing sulphur can become discoloured. These
include egg yolks, onions, mayonnaise, mustard, fish, fish brine and marinades.
• Clouding may occur on glasses after frequent washing. Do not wash delicate glassware, or glassware
containing lead crystal in the dishwasher.
Aluminium components (e.g. grease filters) must not be cleaned with caustic, alkaline cleaning agents.
These may damage the material, or in extreme cases, cause a severe chemical reaction. Use only
WARNING
Items e. g. glasses, porcelain and cutlery which the manufacturer declare as dishwasher-proof.
03 LOADING
USING THE BASKETS
Handling the baskets
Do not use excessive force to slide the baskets in or out. This may damage the baskets and the items
inside the baskets.
CAUTION
Loading your dishwasher _15
DD68-00092A_EN.indd 15 10/14/2011 3:08:56 PM
Page 16
Loading your dishwasher
Using the upper basket
Use the upper basket for mainly small, light or delicate items such as cups, saucers, glasses, dessert
bowls, etc.
Adjusting the upper basket
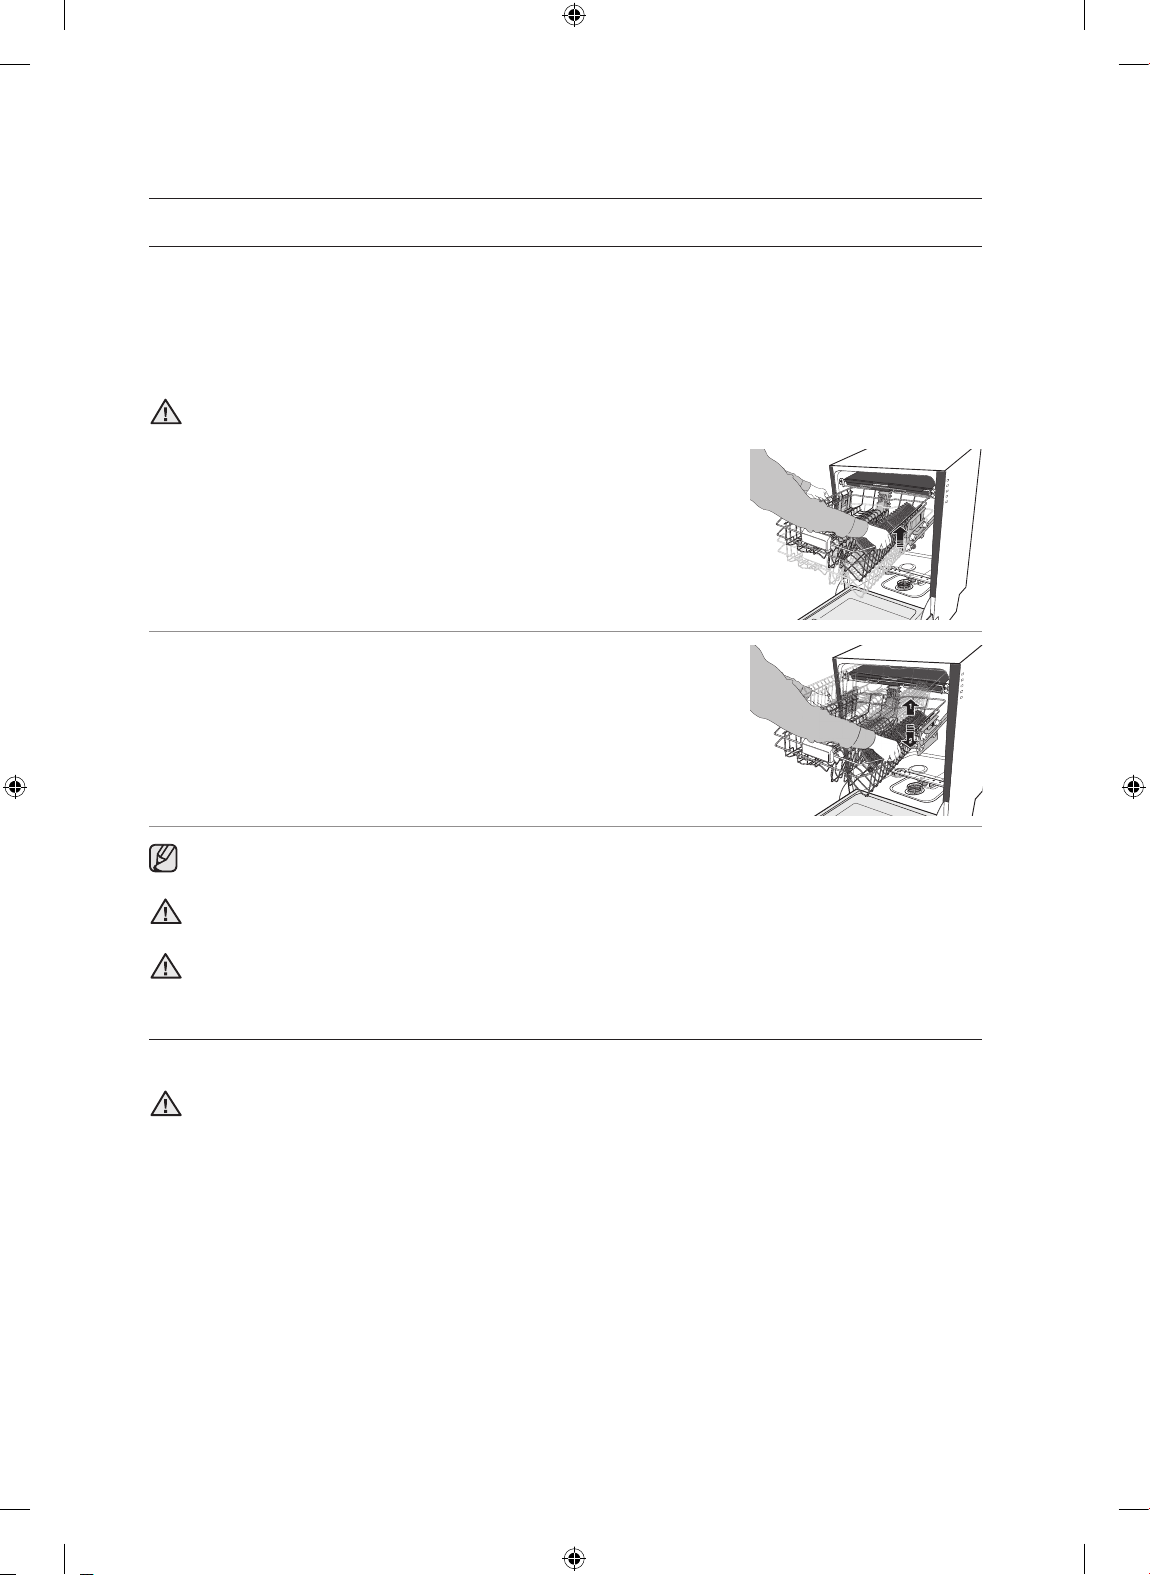
You can adjust the height of the upper basket for additional clearance for placing large items in either the
upper or lower basket.
Remove all items from the cup selves before adjusting the height. Failing to do so may damage the
items and the basket.
CAUTION
1. Pull out the upper basket.
2. To raise the upper basket: Hold the upper basket on both sides and
gently pull it up as far as possible.
3. To lower the upper basket: Hold the upper basket on both sides, and
lift it up for a short step. And then push it down gently.
Whenever you adjust the height, make sure that the upper spray arm will not become caught on the
dishes loaded in the lower basket as it spins.
Make sure that the upper basket is level. If the upper basket is raised on one side, it will prevent the
door from closing fully and cause problems with the dishwasher operation.
CAUTION
Do not raise the upper basket on one side only. Doing so will prevent the door from closing fully and
consequently cause problems with the dishwasher’s operation.
CAUTION
Using the lower basket
Use the lower basket for large plates and heavy items such as serving platters, pans, pots, bowls, etc.
Small items such as saucers can also be placed in the lower basket.
Do not place delicate glassware in the lower basket.
CAUTION
16_ Loading your dishwasher
DD68-00092A_EN.indd 16 10/14/2011 3:08:57 PM
Page 17
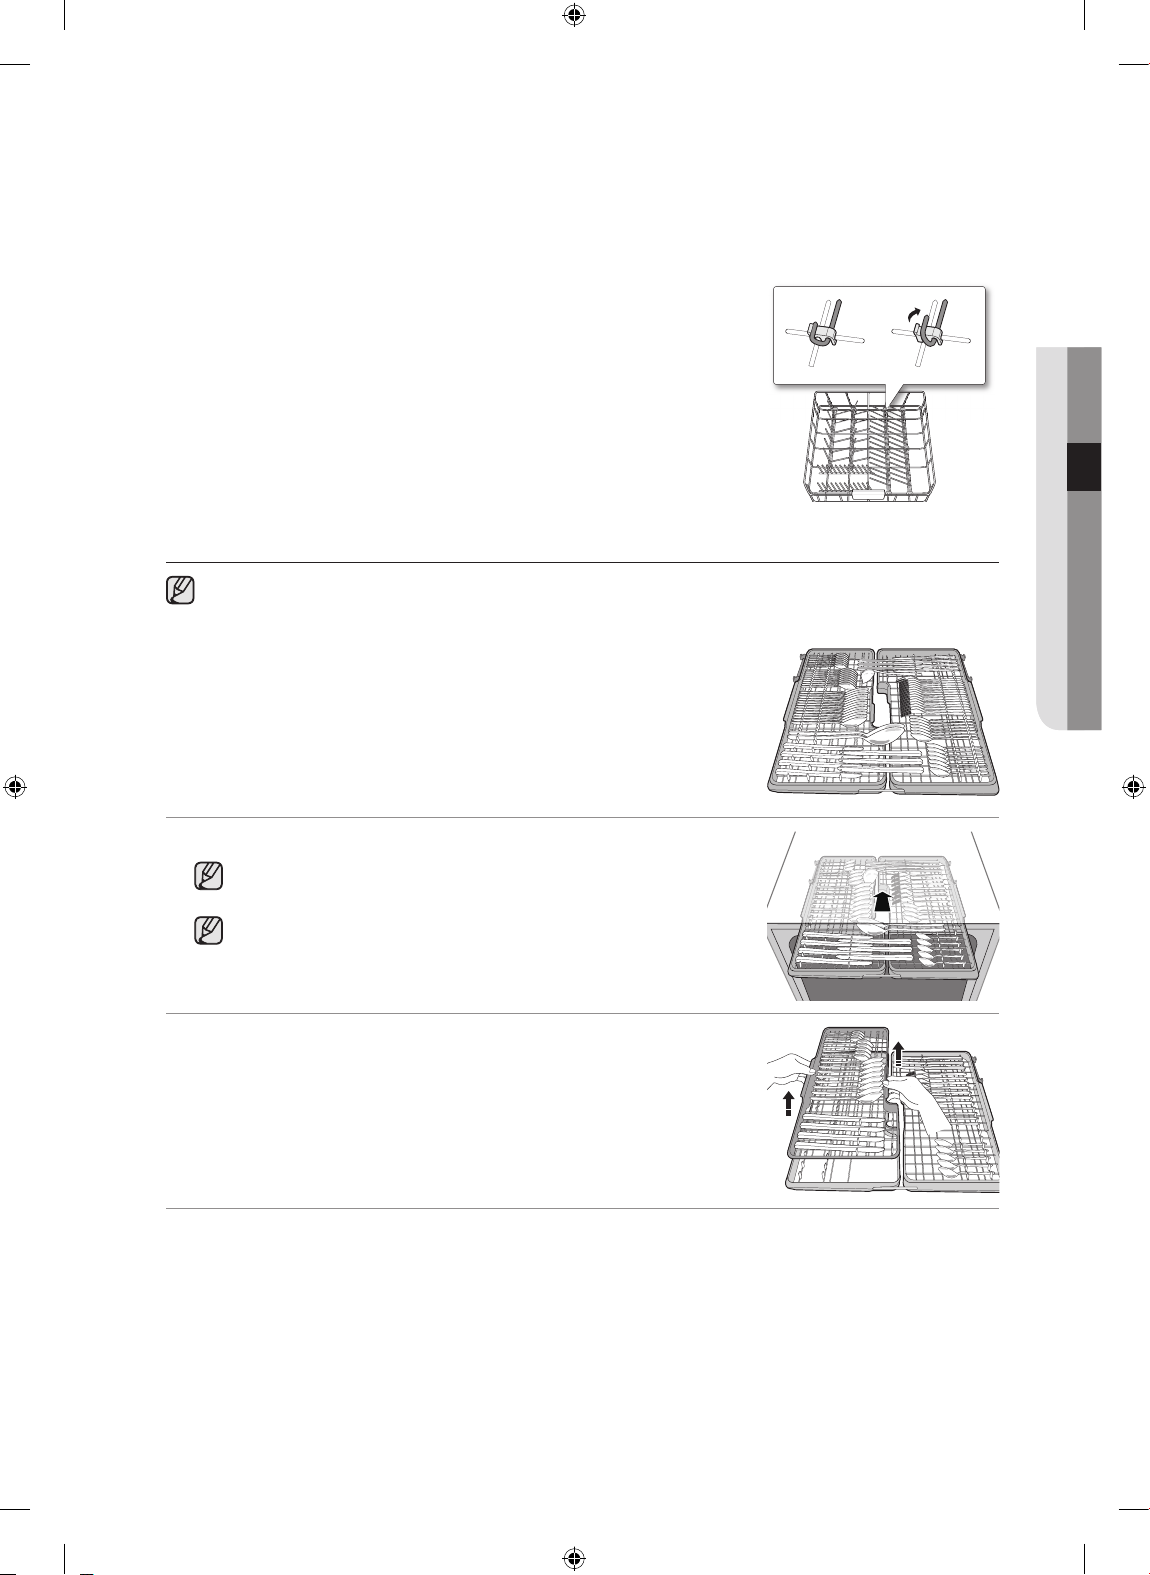
Using the hinged spikes
Foldable hinged spikes allow you to make room in the lower basket for large items.
1. Flatten the hinged spikes by pressing them down.
Using the cutlery tray (DW-BG970, DW-BG770)
The cutlery tray inserts can be detached from the cutlery tray.
For example, you can remove one side of the inserts to make room for larger items in the upper
basket.
1. Arrange the cutlery in the cutlery tray inserts as shown.
03 LOADING
2. Attach the inserts to the cutlery tray.
Placing large items such as cake cutters in the tray can result in
interference with the top spray arm.
If spoon handles do not fit between the holders, then place them
the other way round.
3. Remove the cutlery tray inserts from the cutlery tray after the end of the
programme.
Loading your dishwasher _17
DD68-00092A_EN.indd 17 10/14/2011 3:08:58 PM
Page 18
Loading your dishwasher
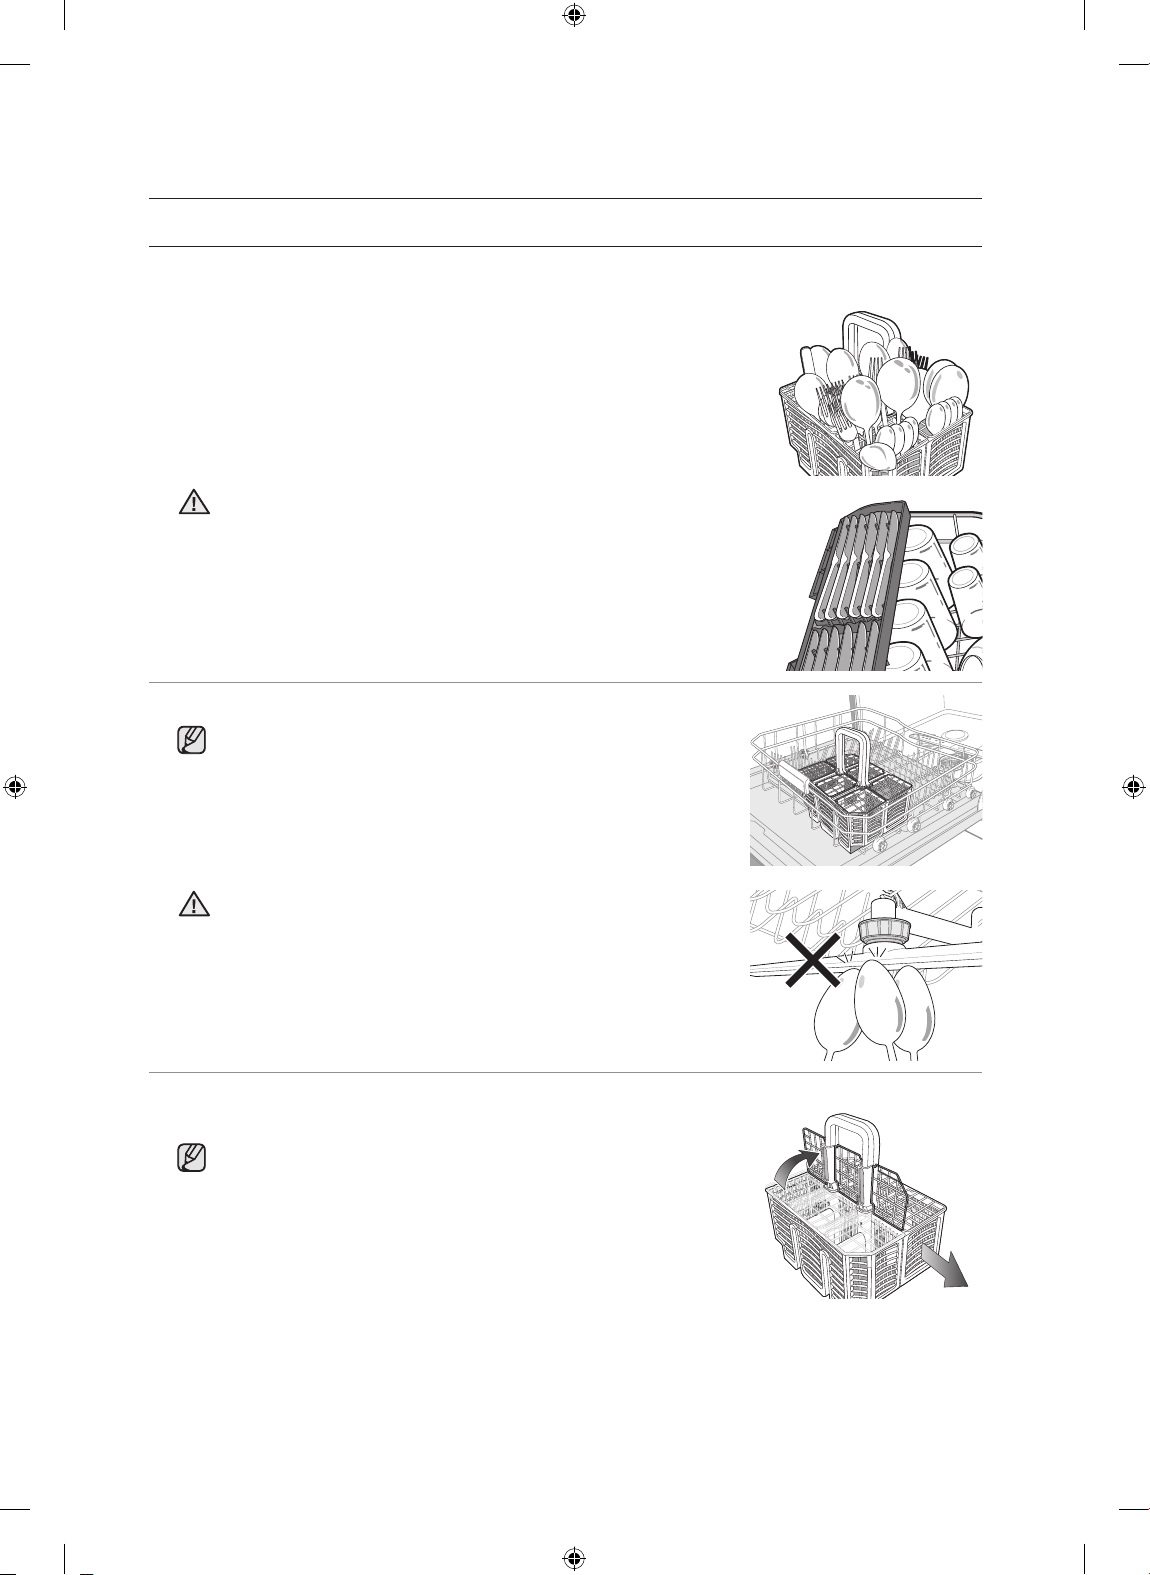
Using the cutlery basket (DW-BG570)
The cutlery basket has cover so that each knife, spoon, or fork can be placed on individual stands to
prevent chipping and discolouration.
1. Place the dierent types of cutlery in the baskets as shown.
For safety purposes, place knives in the knife rack.
CAUTION
2. Place the cutlery basket in the lower basket.
If you are washing a small amount of cutlery only, you may
separate the cutlery basket and use only one side.
Do not place long items inside the cutlery basket. The handle may
be too long and interfere with the upper spray arm.
CAUTION
The cutlery basket can be used with the cover opened.
1. Raise the cover and attach it to the handle as shown in the diagram.
To separate the cutlery basket into two baskets, pull one side of
the cutlery basket in the direction of the arrow in the figure while
holding the other side.
18_ Loading your dishwasher
DD68-00092A_EN.indd 18 10/14/2011 3:09:00 PM
Page 19
Using the cup selves
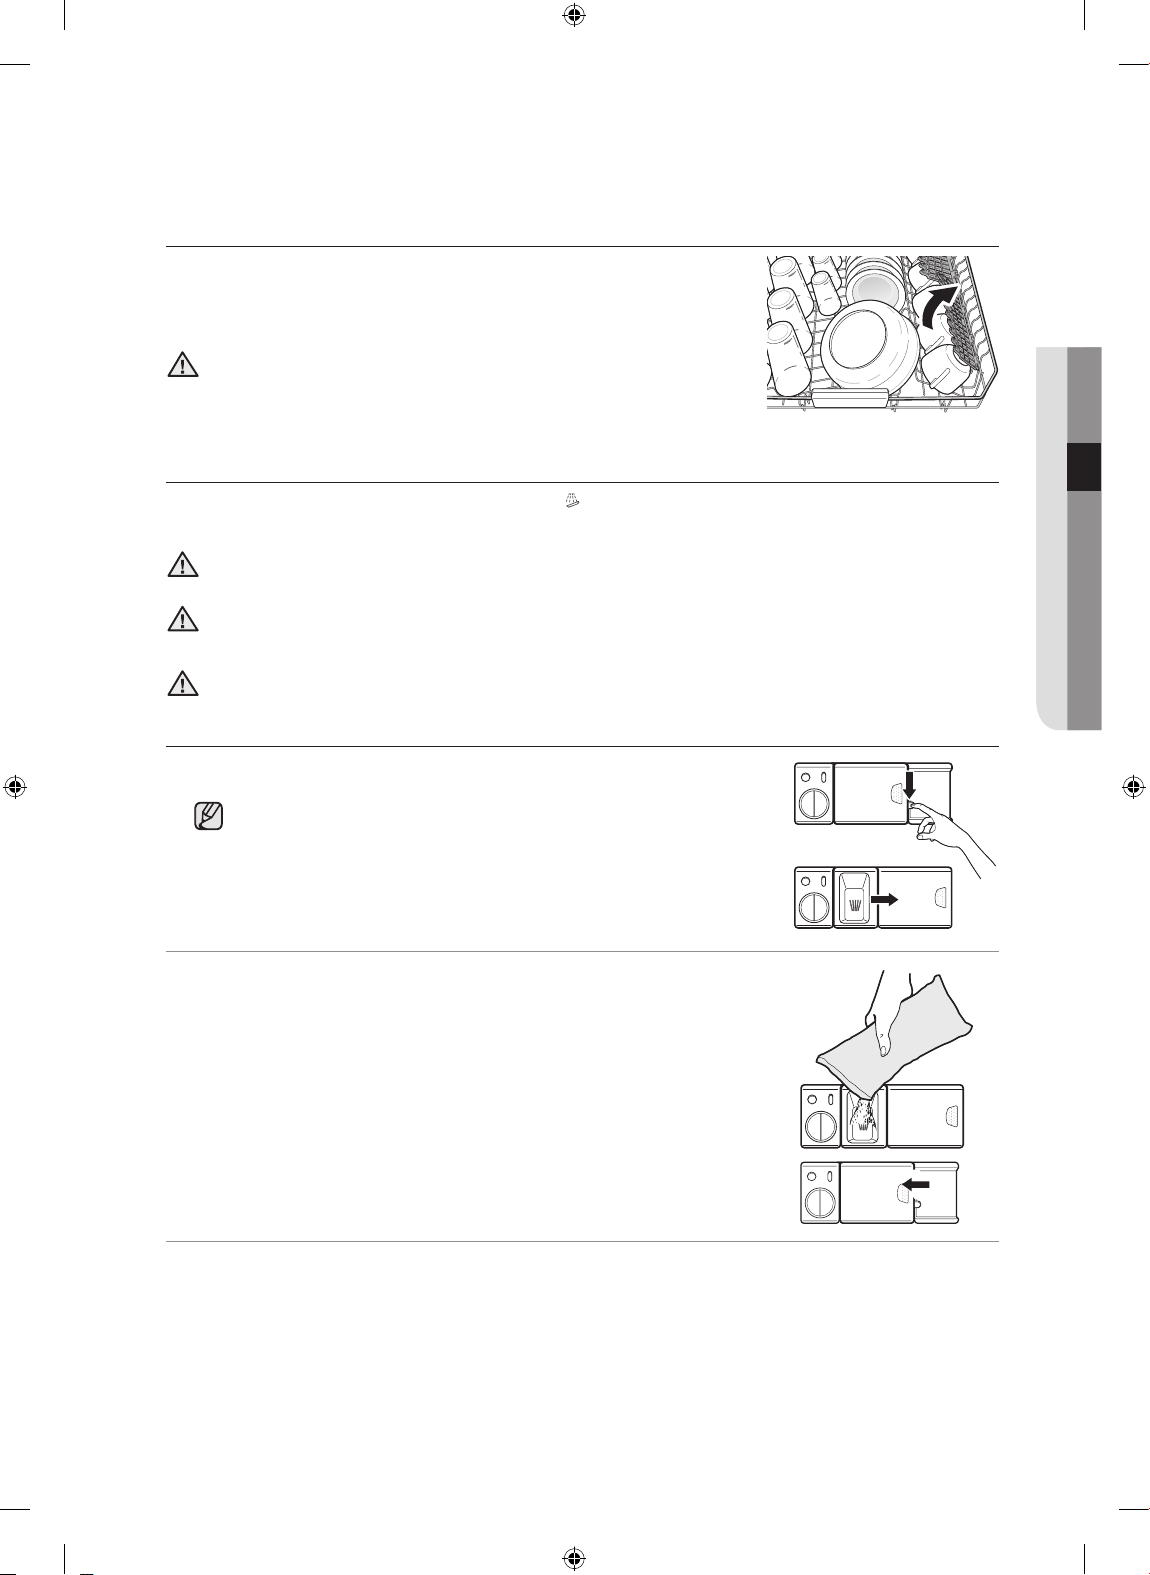
You can place cups, small items and long cooking utensils on the cup
selves. This is also a very convenient way to wash wine glasses.
Place wine glasses on the pegs of the cup selves. The cup selves can also
be folded back when not in use.
Do not adjust the level of the upper basket with the glass supports
propped up. This will make it impossible to push in the upper basket.
CAUTION
USING DETERGENT
All dishwasher programme, except for for Prewash , require detergent in the detergent compartment.
Add the correct amount of detergent for the selected programme to ensure the best performance.
Use dishwasher detergent only. Regular detergent produces too much foam, which may decrease the
dishwasher’s performance or cause it to malfunction.
CAUTION
Do not breathe in the fumes of dishwasher detergent or swallow it. Dishwasher detergent contains
irritants and caustic chemicals that can induce respiratory conditions. If you have inhaled the fumes of
WARNING
detergent or swallowed it, seek medical attention immediately.
Keep dishwasher detergent out of the reach of children.
WARNING
Filling the detergent dispenser
1. Open the detergent dispenser flap by pushing the detergent dispenser
release catch.
The flap is always opened at the end of a dishwashing cycle.
03 LOADING
2. Add the recommended amount of detergent into the main wash
detergent compartment.
3. Close the flap by pushing it to the left and then pressing it down.
Loading your dishwasher _19
DD68-00092A_EN.indd 19 10/14/2011 3:09:00 PM
Page 20
Loading your dishwasher
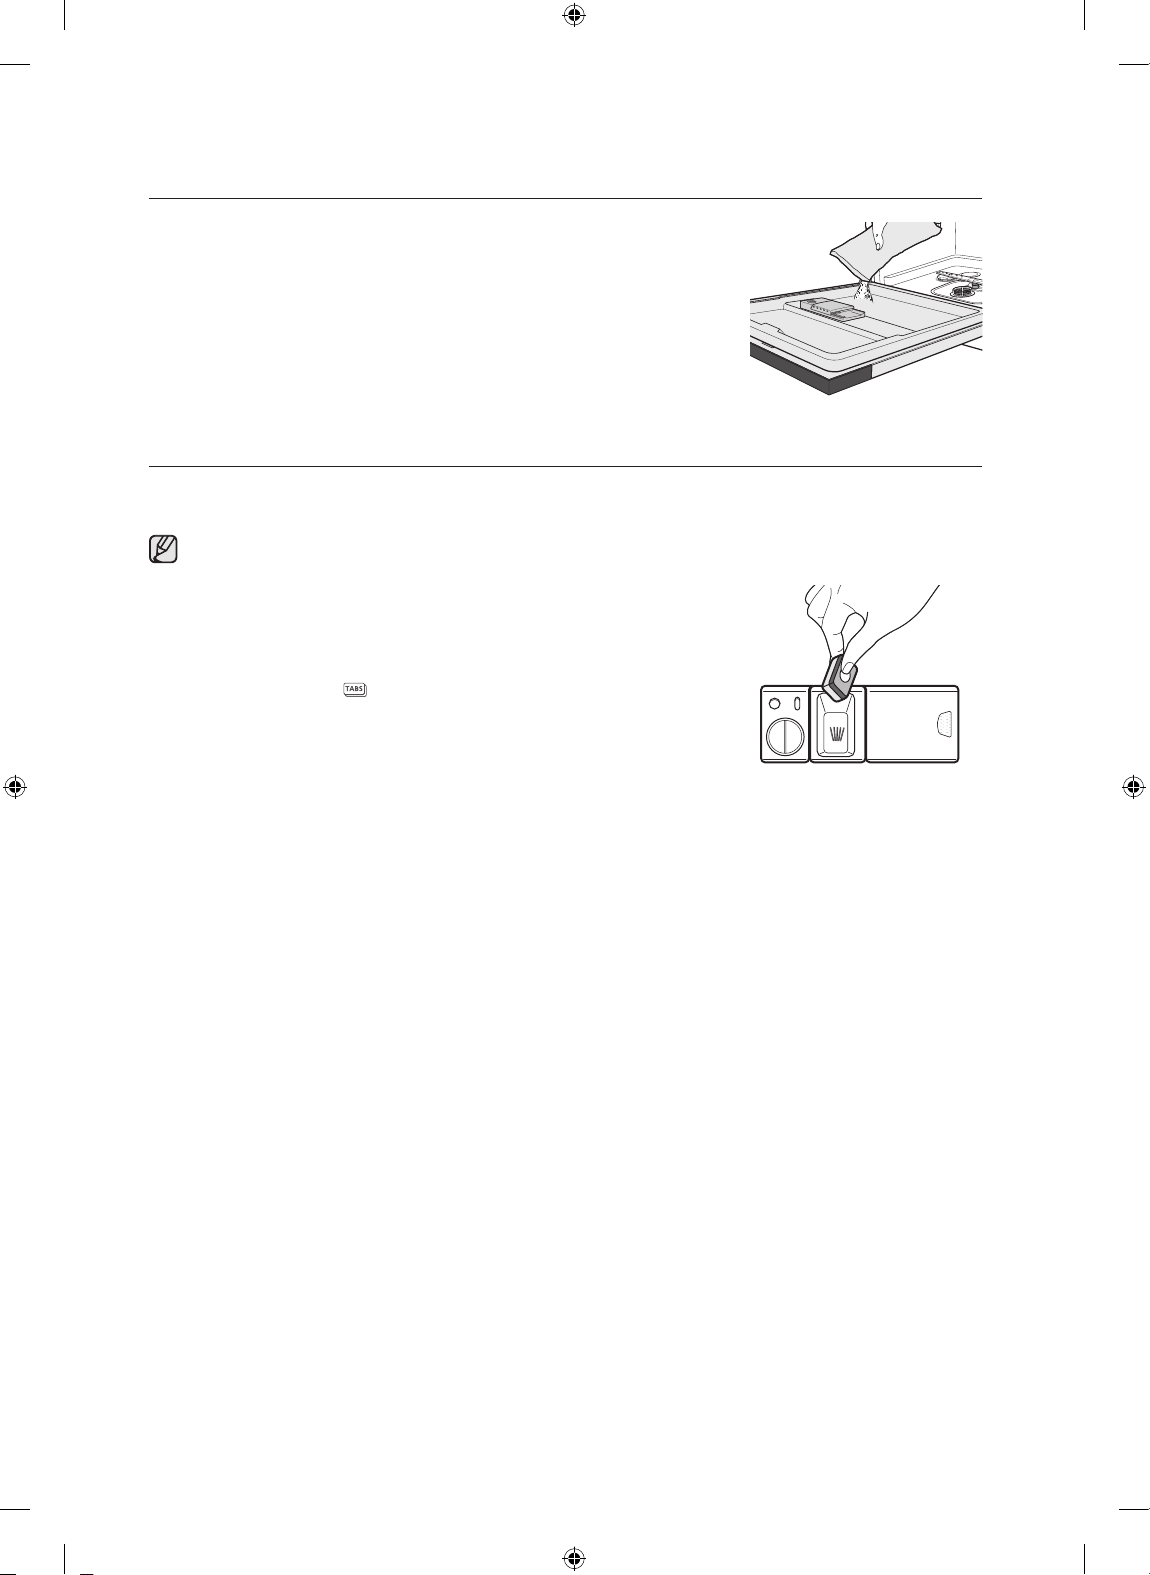
4. For better cleaning result, especially if you have very dirt items, add
small amount(about 8g) of detergent on the door. That will act in
prewash phase.
Using multi tabs
You can also use 2-in-1, 3-in-1, or 4-in-1 multi tabs.
Multi tabs, depending on the type, combine dishwasher detergent with rinse aid and/or dishwasher salt.
Refer to the manufacturer’s instructions before using a multi tab product and verify that it is suitable for
the water hardness level in your area.
1. Push the detergent dispenser’s release catch and open the detergent
dispenser flap.
2. Add the multi tab into the main wash detergent compartment and
close the flap.
3. Push the Multi Tabs
Multi Tabs function.
button on the control panel to activate the
20_ Loading your dishwasher
DD68-00092A_EN.indd 20 10/14/2011 3:09:01 PM
Page 21
Operating your dishwasher
BASIC INSTRUCTIONS
1. Open the door.
2. Load the baskets.
Do not overload the baskets.
CAUTION
3. Make sure the spray arms are not obstructed.
4. Add the appropriate amount of dishwasher detergent into the dispenser and on the door (if required).
5. Push the Power
6. Select a programme appropriate for the type of load. (Refer to the “Using the programme selection
buttons” section on page 21.)
The indicator for the selected programme illuminates.
7. Select any additional functions.
This turns on the corresponding indicators.
8. Push the Start/Reset
9. Short time after the end of the programme, open the door and push the Power
dishwasher.
10. Unload the baskets.
Unload the lower basket, the upper basket, and the cutlery tray (if loaded) in this order.
This will prevent water from the upper basket dropping onto items in the lower basket.
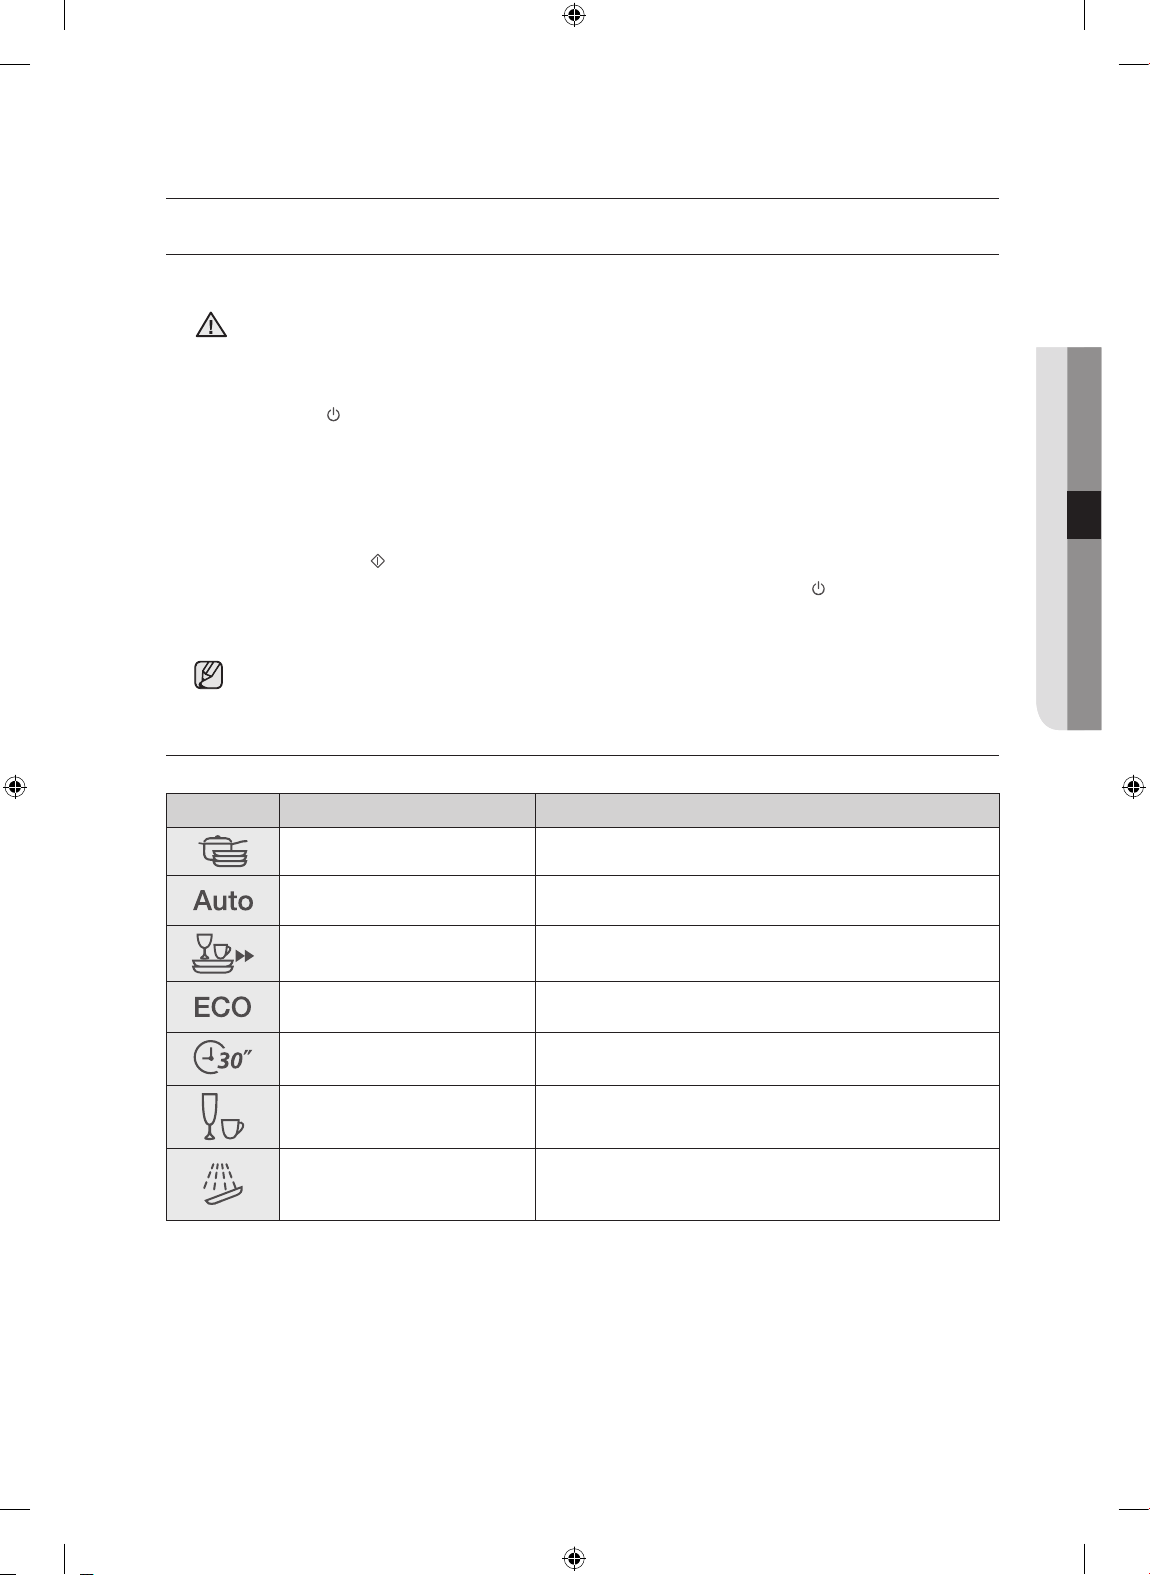
USING THE PROGRAMME SELECTION BUTTONS
Select a programme appropriate for the type of load and soiling.
button to turn on the dishwasher.
button and close the door to start.
button to turn o the
04 OPERATING
Symbol Programme Description
Intensive 70ºC Heavily soiled items include pots and pans
Auto 40~65ºC
Express 65ºC Normally soiled daily using items, with short cycle time
ECO 45ºC
Quick 50ºC Lightly soiled with very short cycle time
Delicate 40ºC Lightly soiled delicate items
Prewash
Lightly to heavily soiled daily using items, automatic
detection of the amount of soils
Normally soiled daily using items, with reduced energy
and water consumptions
Cold rinse for remove only dirt on dishes stored for a long
time or soaking dishes which are dried up before other
programme running.
Operating your dishwasher _21
DD68-00092A_EN.indd 21 10/14/2011 3:09:02 PM
Page 22
Operating your dishwasher
Interrupting a programme
If you open the door while a programme is in progress, the programme is temporarily halted. To resume the
programme, simply close the door.
The water in the dishwasher may be extremely hot.
Only open the door when absolutely necessary and exercise extreme caution.
CAUTION
Changing a programme
If a programme has already started and you want to change it, follow the instructions below:
If the detergent dispenser flap has been opened, do not change the programme.
1. Open the door to interrupt the programme.
2. Push and hold the Start/Reset
• Once the programme is reset, the dishwasher will perform a 1 minute drain. You will be able to
change the programme once the draining ends.
• To skip the draining process, press the Power
press the button again to turn it back on.
You will have to select additional functions again.
3. Change the programme and push the Start/Reset
4. Close the door to start the new programme.
USING THE DELAY START FUNCTION
You can set the dishwasher to start a programme at a later time by choosing a delay of between 1
and 24 hours (in 1 hour increments).
1. Open the door and load the baskets.
2. Add the appropriate amount of dishwasher detergent into the dispenser and on the door (if required).
3. Push the Power
4. Select the programme and functions.
5. Set the delay time using the Delay Start
6. Push the Start/Reset
down.
7. To cancel the Delay Start function, press and hold the Start/Reset
programme.
button to turn on the dishwasher.
button. The Delay Start indicator lights up, and the clock begins to count
button for 3 seconds to reset the programme.
button to turn the dishwasher o and then
button.
button.
button for 3 seconds to reset the
USING THE DIGITAL DISPLAY
The digital display shows the remaining wash time, status information (Delay Start, Salt Refill, Rinse Refill,
and Child Lock) and error codes.
If an error occurs while the product is operating, the code associated with the error is displayed and a
beeping sound will be played. Refer to the “Information codes” section on page 29.
Time display
The time display area indicates the time remaining until the end of the selected programme in hours and
minutes.
For detailed information on programme times, refer to the “Programme chart” section on page 30.
The time remaining may vary even with the same programme. This can be due to dierence in water
temperature, the reactivation cycle, and the size and state of the load.
22_ Operating your dishwasher
DD68-00092A_EN.indd 22 10/14/2011 3:09:02 PM
Page 23
Salt Refill indicator
If the “Salt Refill ” indicator is lit, it means the dishwasher is low on dishwasher salt and needs to be
refilled.
To refill the salt reservoir, refer to the “Filling the salt reservoir” section on page 13.
Rinse Refill indicator
If the “Rinse Refill ” indicator is lit, it means the dishwasher is low on rinse aid and requires a refill.
To refill the rinse aid reservoir, refer to the “Filling the rinse aid reservoir” section on page 14.
USING ADDITIONAL FUNCTIONS
Intensive Zone
Use this function for hard-to-clean, heavily soiled dishes, pot & pan, and dishes with heavy oil. Locate items
above the Intensive zone spray disk (refer to the “Checking the parts and control panel” section on page
9) and press the Intensive Zone button.
Half Load
For small amount of loading items, use either the upper or lower basket only to save energy.
Press the Half Load
Multi Tabs
If you wish to use a 2-in-1, 3-in-1, or 4-in-1 multi tablet detergent, select a programme and then push the
Multi Tabs button. (The Multi Tabs function is available with all programme except Prewash .)
Selecting the Multi Tabs function turns on the “Rinse Refill
a refill is required.
Sanitize
Push the Sanitize button for the best possible hygiene in your dishwasher. At the final rinse it heat up to
70ºC and hold this temperature for a several minutes.
This function is available with all programme except Prewash
button to select the upper or lower basket.
” indicator. However, this does not mean that
and Delicate .
04 OPERATING
Child Lock
The Child Lock function locks all buttons so that the selected programme cannot be changed.
Activating/Deactivating
To activate or deactivate the Child Lock function, push and hold the Sanitize button for 3 seconds.
The “Child Lock ” indicator turns on to indicate that Child Lock function has been activated.
Activating the Child Lock function locks all buttons.
Operating your dishwasher _23
DD68-00092A_EN.indd 23 10/14/2011 3:09:03 PM
Page 24
Cleaning and maintaining your dishwasher
Keeping your dishwasher clean improves its performance, reduces unnecessary
repairs, and prolongs its life.
CLEANING THE EXTERIOR
It’s best to clean spills on the exterior of your dishwasher as they occur.
Use a soft, damp piece of cloth to gently wipe away spills and dust from the control panel.
Do not use benzene, wax, thinner, chlorine bleach, or alcohol. These chemicals may discolour the
inner walls of the dishwasher and cause stains.
CAUTION
Do not clean the dishwasher by sprinkling water over it. In particular, protect the electrical components
from coming into contact with water.
CAUTION
If your dishwasher has a stainless steel door panel, it can be cleaned with a stainless steel cleaner for
Home Appliances or similar product using a clean, soft cloth.
CLEANING THE WASH CABINET
If there are limescale or grease deposits in the cabinet, remove these by damp cloth or run a programme
which has highest rinsing temperature without any loading items after filling detergent dispenser with
dishwasher detergent.
Do not remove the front seal on the container. Removing the seal can cause the dishwasher to leak or
malfunction.
CAUTION
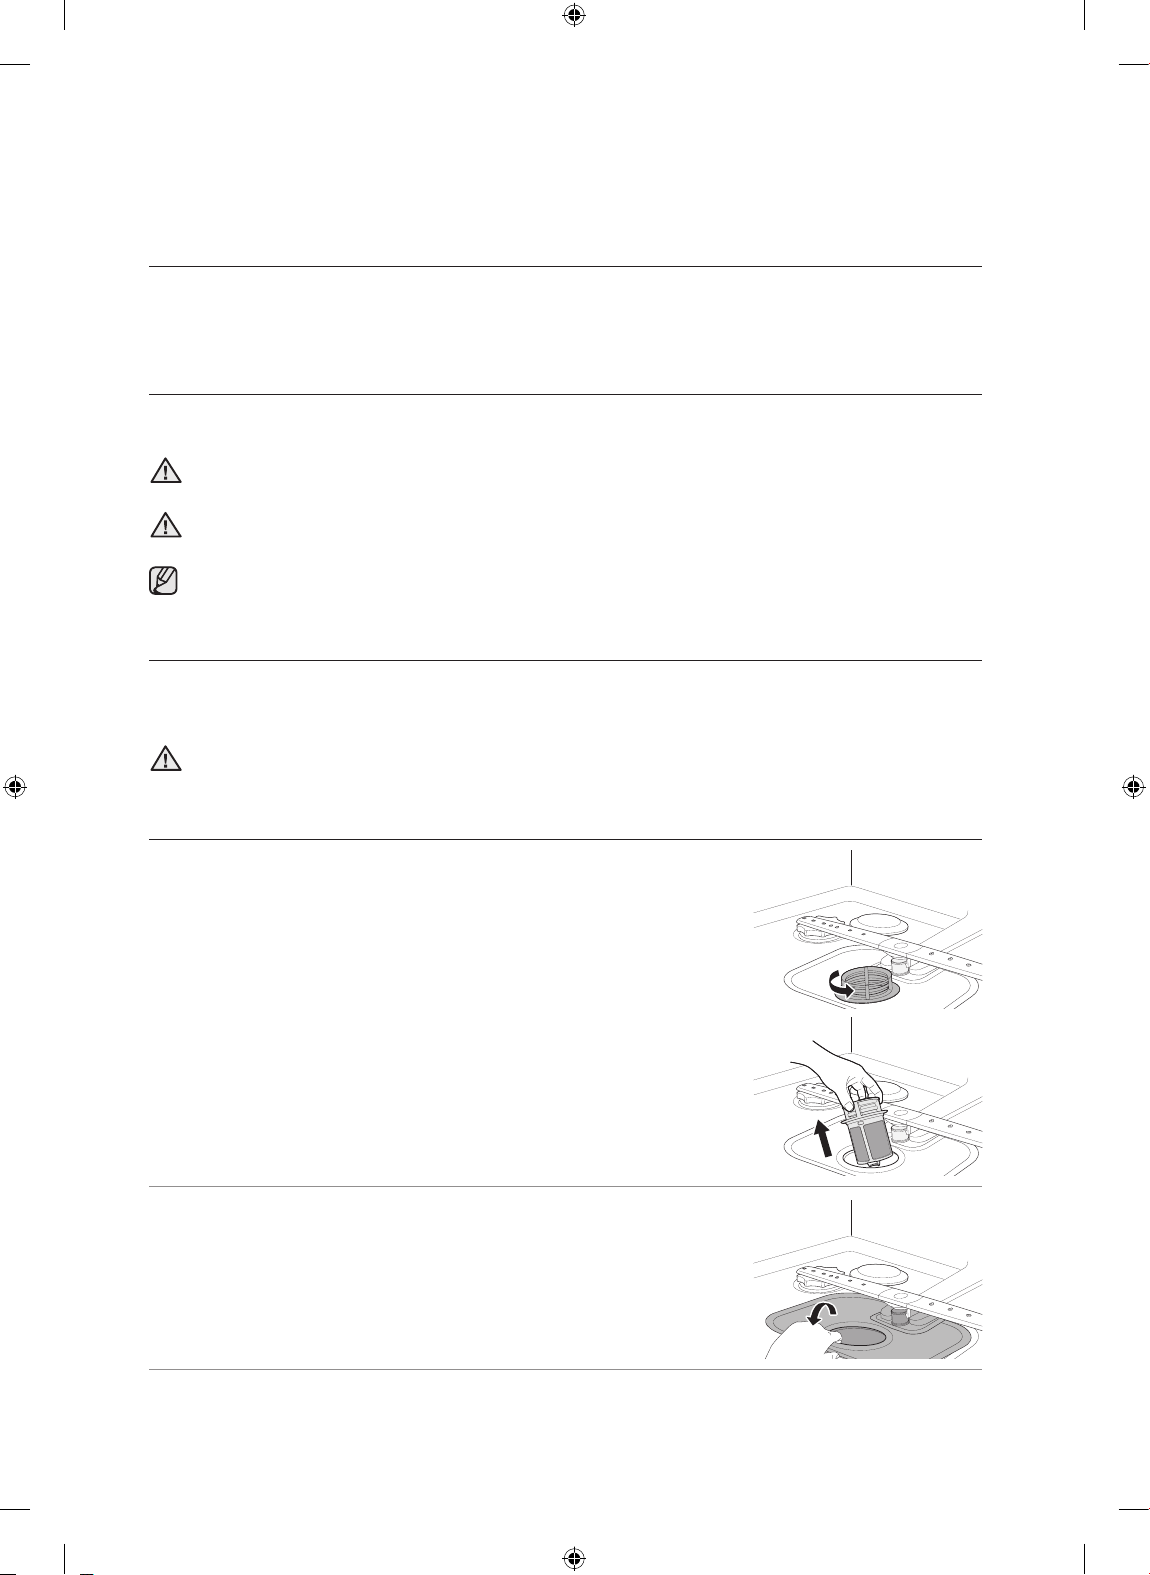
CLEANING THE FILTERS
1. Turn o the dishwasher.
2. Rotate the filter insert counterclockwise to unfasten and then detach the
filter insert.
3. Remove the fine filter (flat rectangular).
24_ Cleaning and maintaining your dishwasher
DD68-00092A_EN.indd 24 10/14/2011 3:09:04 PM
Page 25
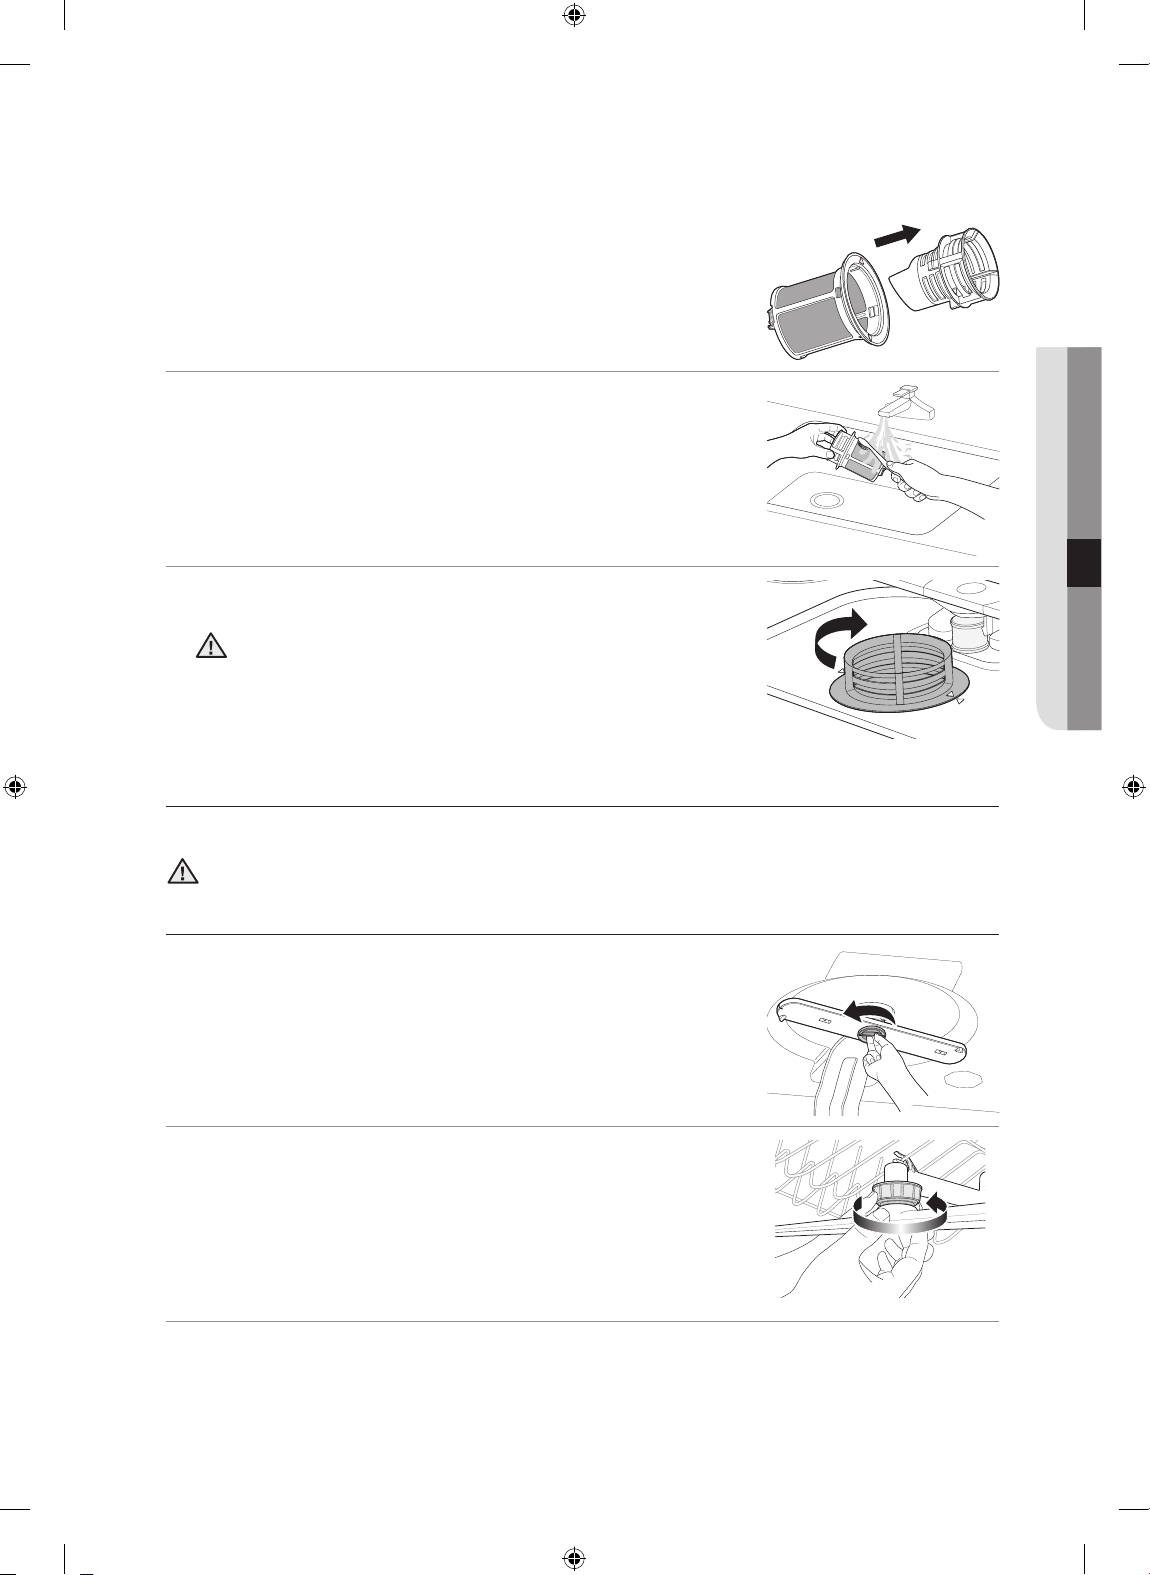
4. Disassemble the coarse filter and micro filter.
5. Remove any dirt or other remains from the filters and rinse them under
running water.
6. Reassemble the filters in the reverse order of the dissasembly, replace
the filter insert, and rotate clockwise to the close arrow.
If the filter insert is not closed properly, the performance will be
decreased.
CAUTION
CLEANING THE SPRAY ARMS
If the dishwasher continues to perform poorly or the jets on the spray arms seem clogged, clean the spray
arms. When removing the spray arms, take care as they break easily.
Turn o the dishwasher before removing the spray arms.
CAUTION
05 CLEANING AND MAINTAINING
Cleaning the spray arms
1. Remove the cutlery tray insert (DW-BG970/DW-BG770). (Refer to the
“Using the baskets” section on page 15.)
2. Rotate the handle on the middle of the top spray arm in the
counterclockwise direction and detach the arm.
3. Unfasten and remove the nut holding the upper spray arm in place and
detach the arm.
Cleaning and maintaining your dishwasher _25
DD68-00092A_EN.indd 25 10/14/2011 3:09:04 PM
Page 26
Cleaning and maintaining your
dishwasher
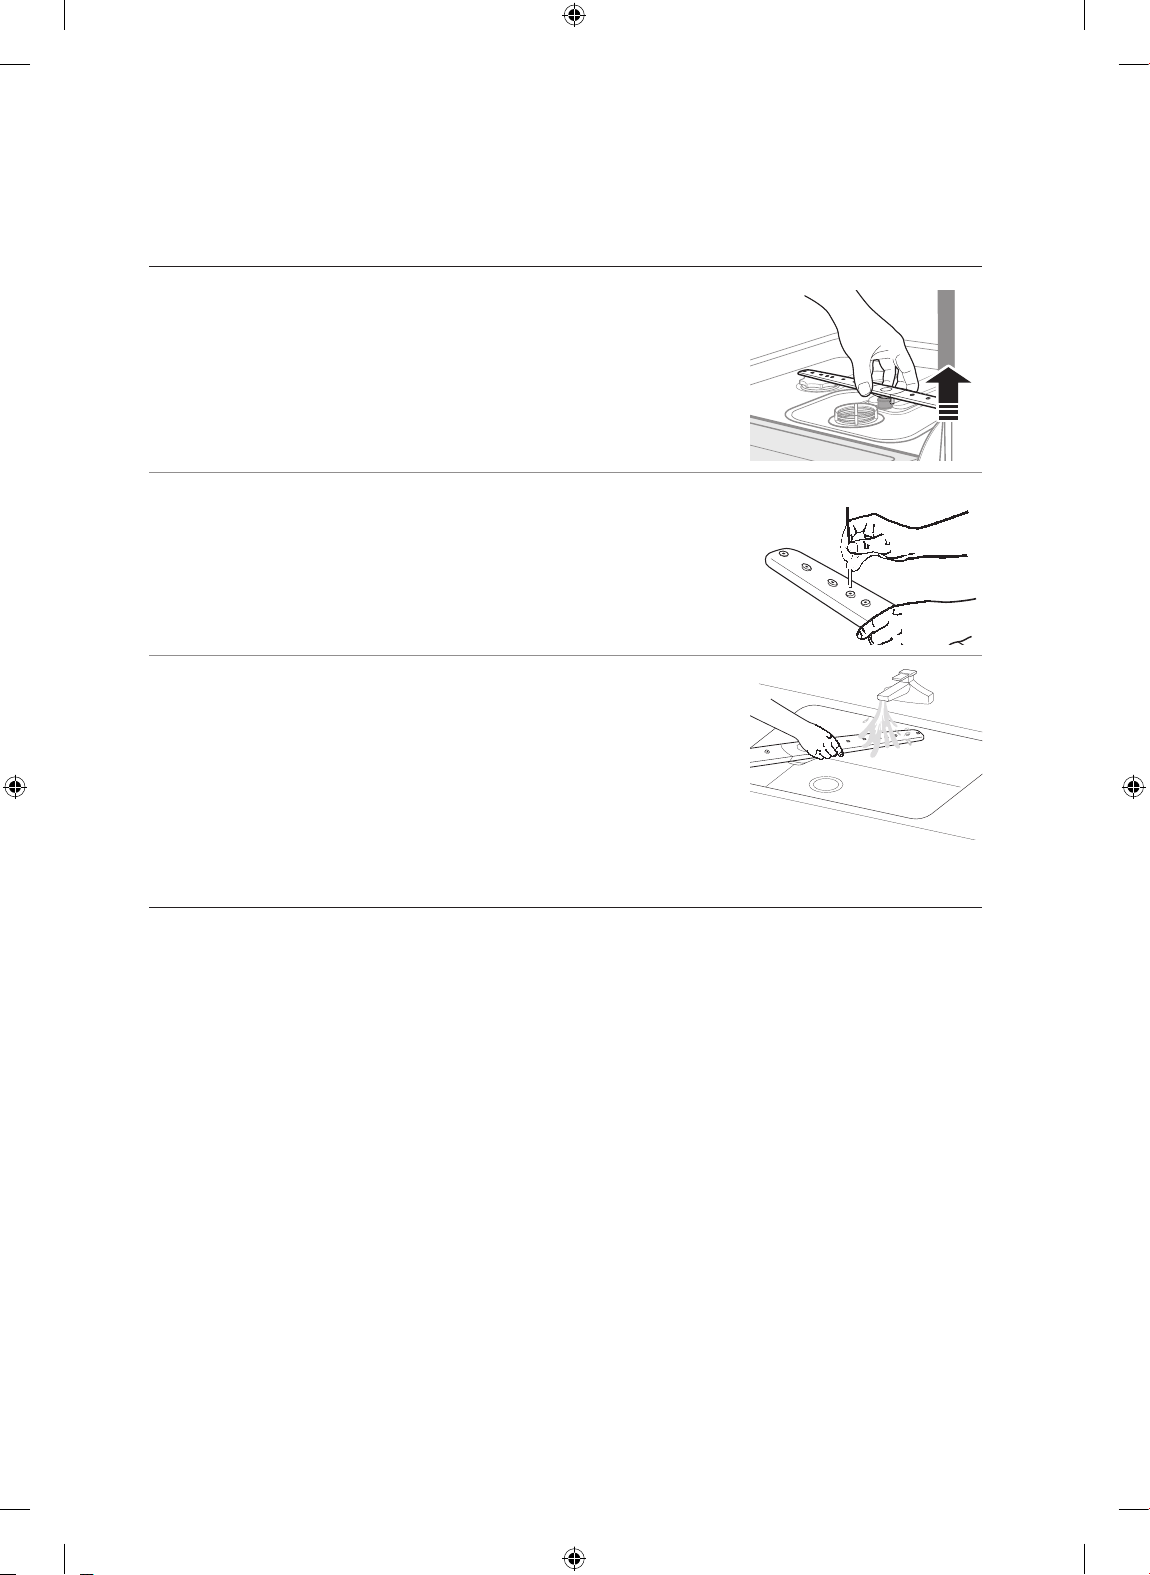
4. Remove the lower basket.
5. Firmly pull the lower spray arm upward at once to remove it.
6. Use a pointed object such as a toothpick to push out food particles in
the spray arm’s jets.
7. Rinse thoroughly under running water.
8. Reattach the spray arms and check that they rotate freely.
STORING YOUR DISHWASHER
If you need to store your dishwasher for an extended period of time, first drain the unit fully and then
disconnect the water hose.
Your dishwasher can become damaged if water is left in the hoses and internal components before storing
it. After draining and disconnecting the dishwasher, be sure to turn o the water supply valve and circuit
breaker.
26_ Cleaning and maintaining your dishwasher
DD68-00092A_EN.indd 26 10/14/2011 3:09:05 PM
Page 27
Troubleshooting and information codes
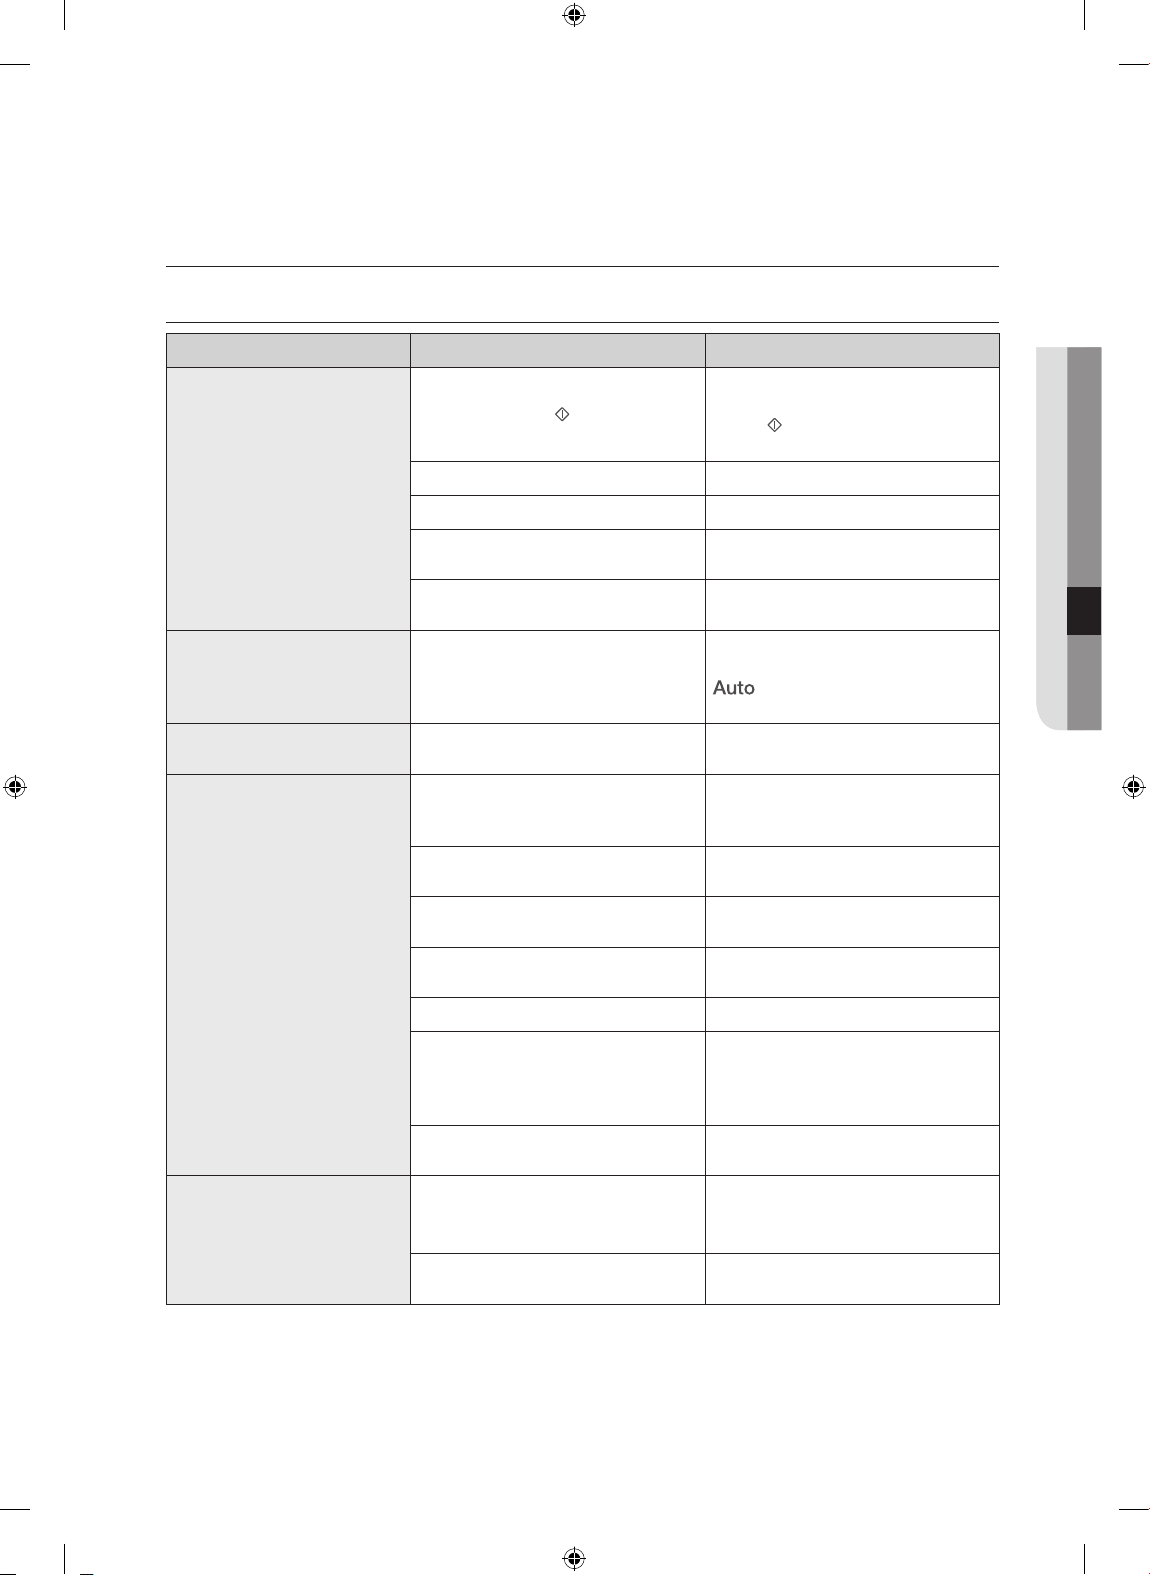
CHECK THESE POINTS IF YOUR DISHWASHER...
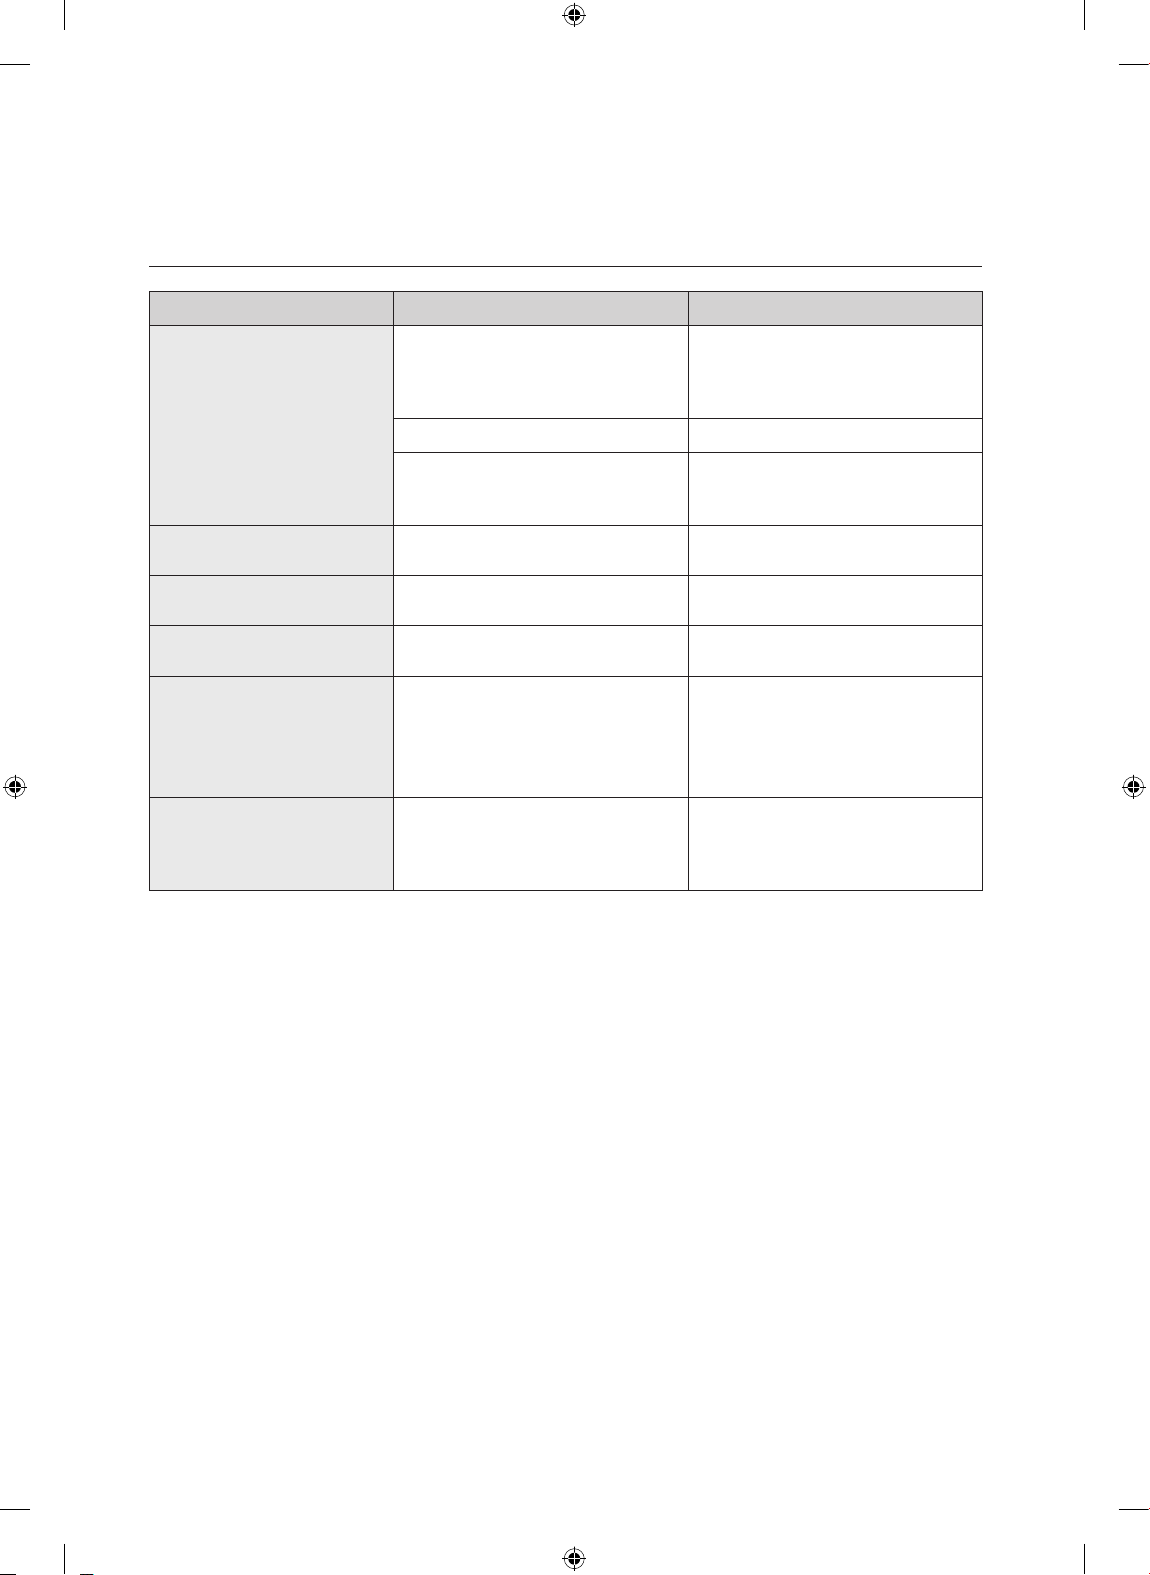
PROBLEM POSSIBLE CAUSE SOLUTION
Will not start.
Has a bad odour.
Has water remaining after the
programme has finished.
Has food particles remaining
on the dishes.
Does not dry dishes well.
The door is not closed completely.
The Start/Reset
selected.
No programme is selected. Select a programme.
The power cord is not connected. Connect the power cord.
There is no water supplied.
The control panel is locked.
There is water left over from the last
cycle.
The drain hose is folded or clogged. Straighten and unclog the hose.
An inappropriate programme was
been selected.
The filter is contaminated or not
correctly fasten.
No dishwasher detergent or not
enough detergent is being used.
The pressure of the supplied water
is low.
Spray arm jets are clogged. Clean the spray arms.
The dishes are improperly loaded.
The water is too hard.
There is no rinse aid in the
dispenser or not enough rinse aid
was used.
Multi taps were used without
selecting the Multi Tap function.
button is not
Check that the door is latched and
closed completely. Press the Start/
Reset
door.
Check that the water supply valve
is open.
Deactivate the Child Lock function
to unlock the control panel.
Add detergent without loading
dishes and run the Auto
dishwasher.
Select a programme according
to the soil level of the dishes as
directed in this manual.
Clean the filter and make sure the
filters are fitted properly.
Use an automatic dishwasher
detergent or use more detergent.
The water supply pressure must be
between 0.05MPa and 0.8MPa.
Rearrange the dishes so they
have good water access and do
not interfere with spray arm and
dispenser operation.
Check salt refill indicator and refill
dishwasher salt.
Check the dispenser and add rinse
aid.
Check rinse aid setting.
Select the Multi Tap function or use
rinse aid.
button before closing the
programme to clean the
06 TROUBLESHOOTING
Troubleshooting and information codes _27
DD68-00092A_EN.indd 27 10/14/2011 3:09:05 PM
Page 28
Troubleshooting and
information codes
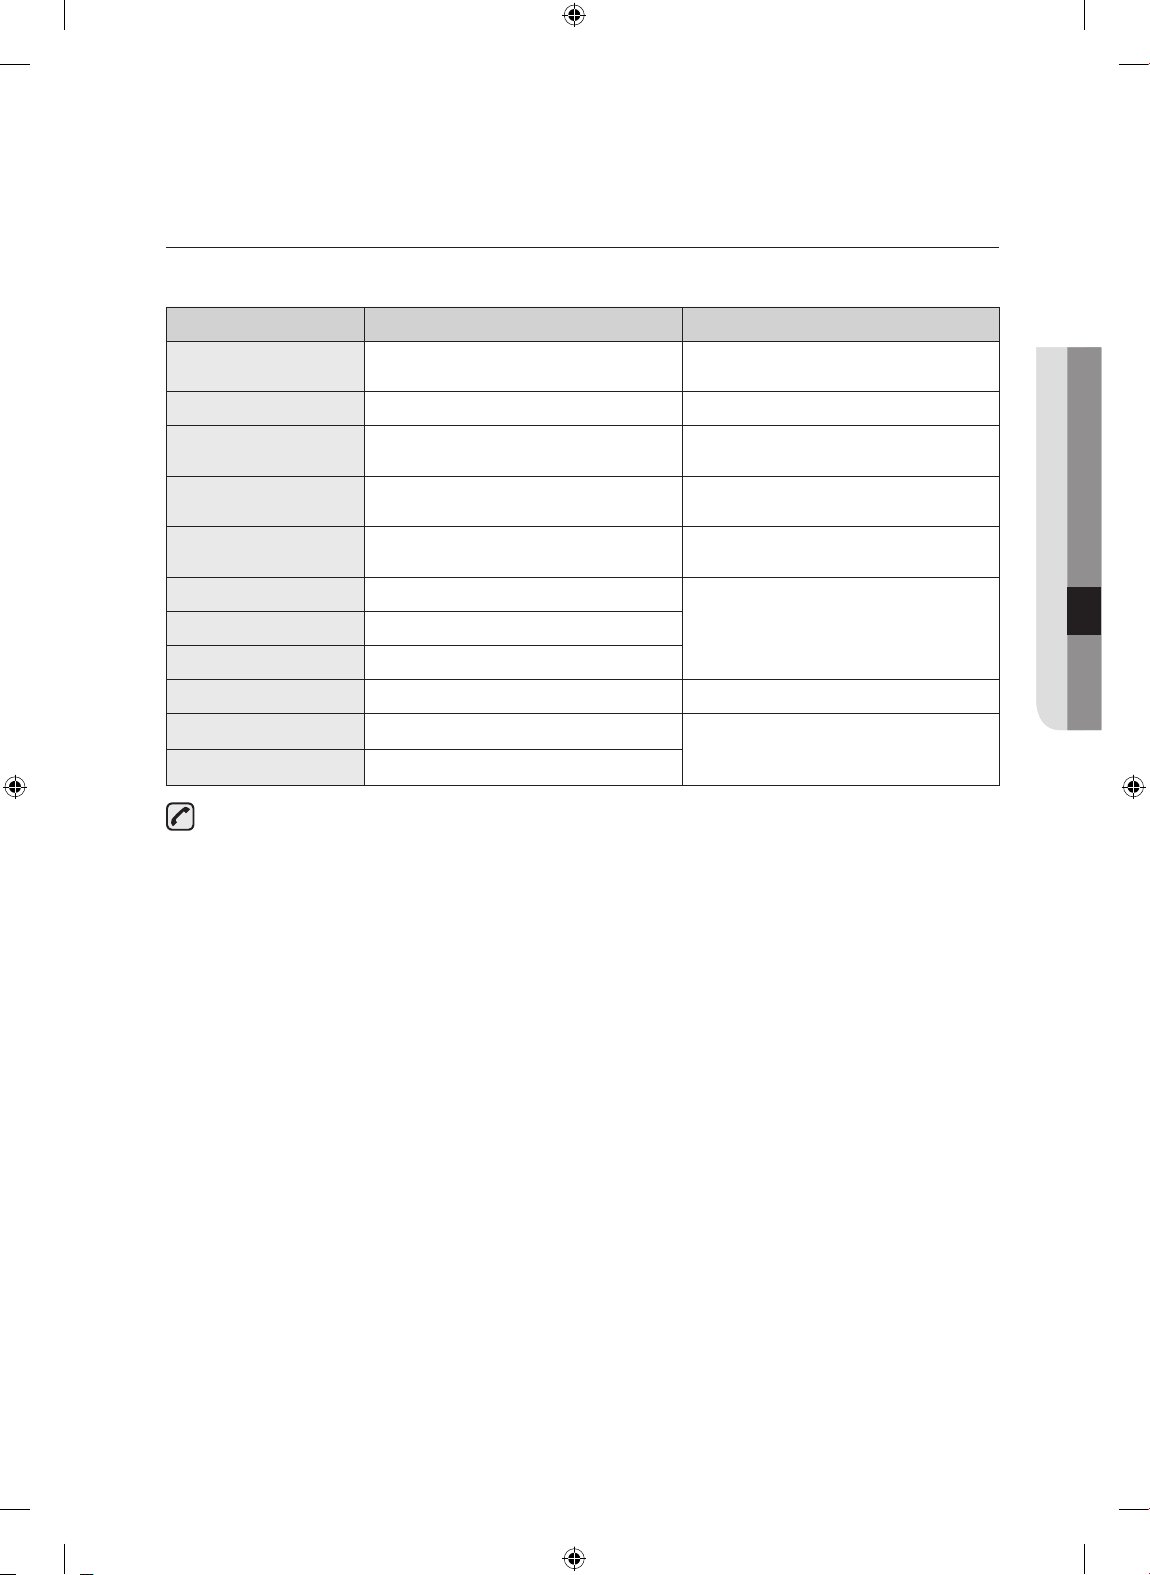
PROBLEM POSSIBLE CAUSE SOLUTION
The dishwasher beeps when the
Is too noisy.
Leaves a yellow or brown film
on cups or dishes
Does not have any indicators
lit.
Does not have smoothly
rotating arms.
Leaves a white coating on
cutlery or crockery after
cleaning.
Starts by itself. (DW-BG970)
dispenser cover is opened and
during the initial stage of draining
the pump operation.
The dishwasher is not level. Ensure that the dishwasher is level.
There is a ‘chopping’ sound
because an arm is bumping against
the dishes.
This can occurs from coee and tea
soils.
The power cord is not connected. Connect the power cord.
The arms are clogged with food
particles.
Hard water was used.
The dishwasher has not been
turned on for more than two days.
This is a normal operation.
Rearrange the dishes.
Use programme with higher
temperature.
Clean the arms.
Check the salt fill indicator and
softener setting is correct according
to the water hardness of your area.
Check salt reservoir cap is correctly
fitted.
This is an automated drying cycle
that keeps the SDP clean and is not
a malfunction. (If you wish to stop
the cycle, press the Power button.)
28_ Troubleshooting and information codes
DD68-00092A_EN.indd 28 10/14/2011 3:09:05 PM
Page 29
INFORMATION CODES
Information codes are displayed to help you better understand what is occurring with your dishwasher.
If any of the codes below occur, you should select the Reset option and follow the respective instruction.
CODE SYMBOL MEANING SOLUTION
bE2 Button key error
3E, AE Internal communication error Turn o and restart the appliance.
5E Drain error
4E Water supply error
4E1 Hot water supply
HE, HE1 Heater error
tE Temperature sensor error
1E Low water level error
PE Flow changer error Turn o and restart the appliance.
LE Leakage error
OE Over water level error
For more information about the error codes, or if you are unable to resolve the problem using the
suggested solution, refer to the back of this manual and contact your Samsung Customer Service
centre.
Check any button is pressed more
than 30 sec.
Check whether the drain hose is
clogged or folded.
Make sure the water supply valve
open.
Make sure the temperature of supplied
water is not higher than 80 ºC.
Turn o and unplug the power plug,
close water supply valve and contact
service center.
Turn o and unplug the power plug,
close water supply valve and contact
service center.
06 TROUBLESHOOTING
Troubleshooting and information codes _29
DD68-00092A_EN.indd 29 10/14/2011 3:09:05 PM
Page 30
Programme chart
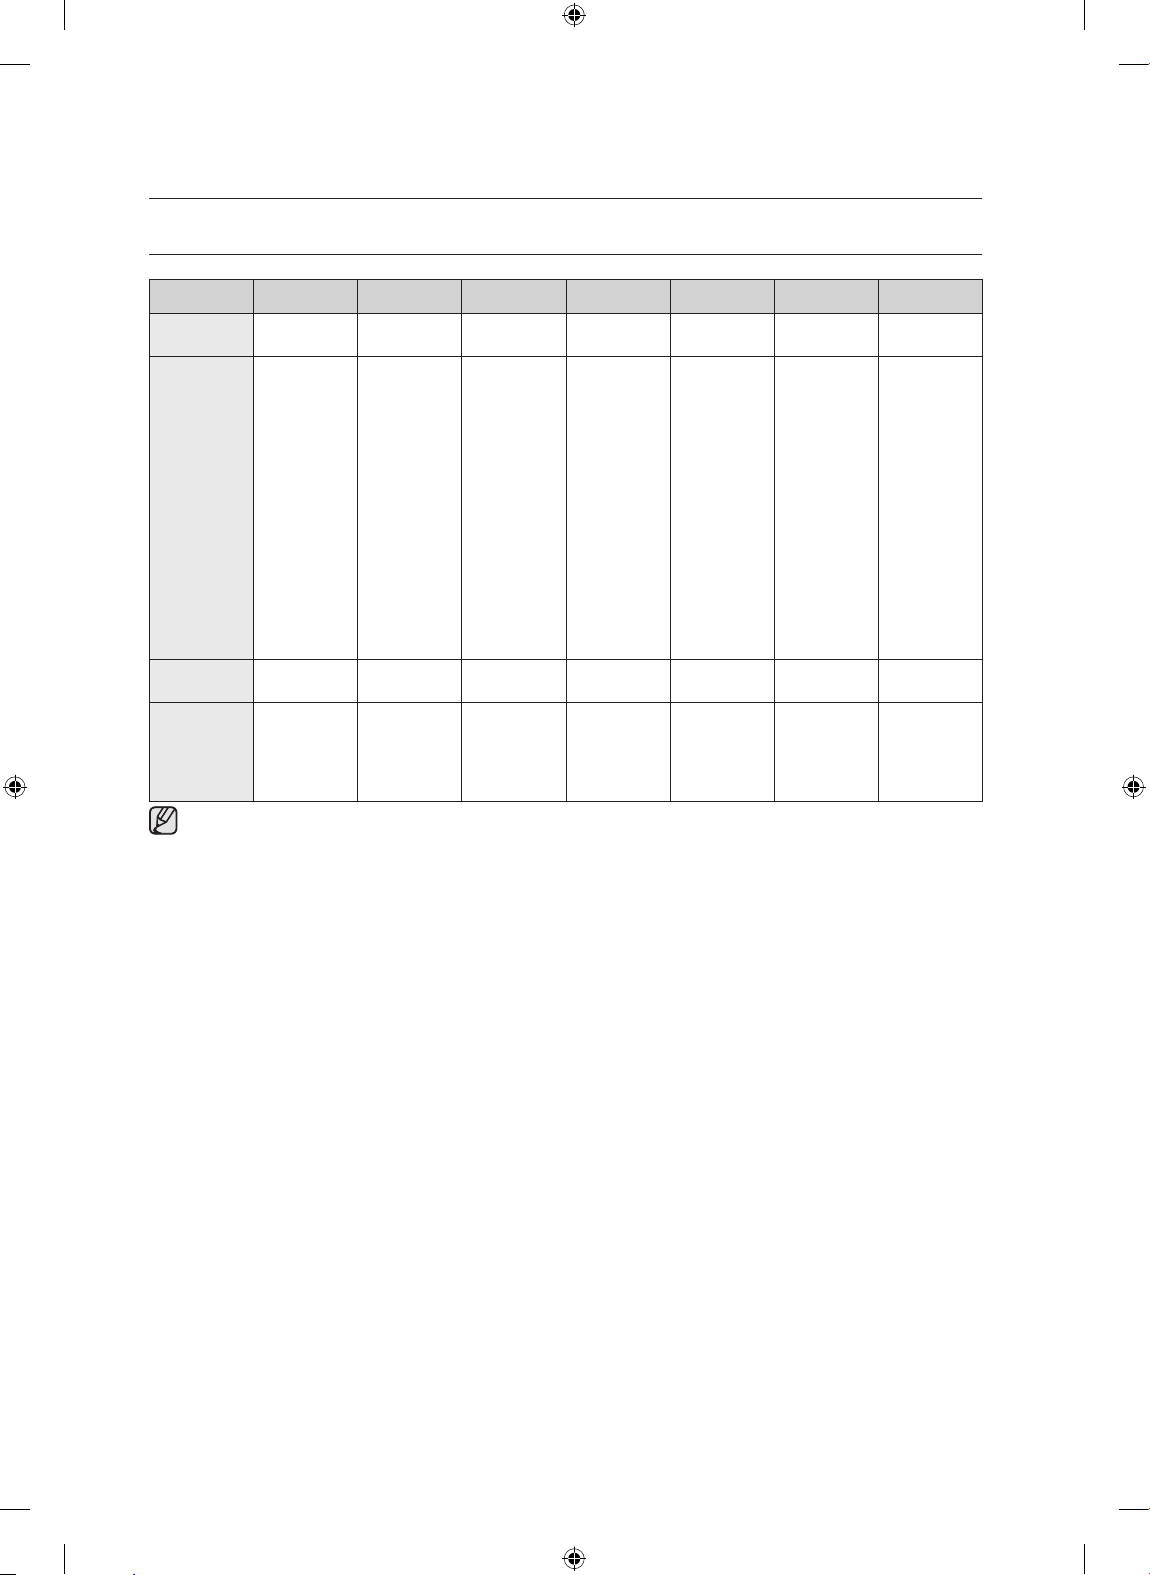
PROGRAMME CHART
Soil level Intensive 70 Auto 40-65 Express 65 Eco 45 Quick 50 Delicate 40 Prewash
Amount of
food remains
Heavy
Very light to
Heavy
Normal Normal Light Light Very light
Program
sequence
Washing time
(Min)
Water
consumption
(L)
Prewash
Mainwash
1st rinse
2nd rinse
Hot rinse
Dry
End
148 90~148 87 145 34 83 17
17 9.1~17 11.6
Prewash
Mainwash
1st rinse
(2nd rinse)
Hot rinse
Dry
End
Prewash
Mainwash
1st rinse
Hot rinse
Dry
End
Prewash
Mainwash
1st rinse
Hot rinse
Dry
End
10
(DW-BG970,
DW-BG770)
12
(DW-BG570)
Mainwash
1st rinse
Hot rinse
End
10.5 10.1 3.7
The wash time may dier depending on the temperature of the supplied water.
Prewash
Mainwash
1st rinse
Hot rinse
Dry
End
Cold rinse
End
30_ Programme chart
DD68-00092A_EN.indd 30 10/14/2011 3:09:05 PM
Page 31
Appendix
DISPOSING THE DISHWASHER AND HELPING THE ENVIRONMENT
Your dishwasher is manufactured from recyclable materials. If you decide to dispose of it, please observe
your local waste disposal regulations. Cut o the power cord so that the appliance cannot be connected to
a power source.
Remove the door so that animals and children cannot get trapped inside the appliance.
Do not exceed the detergent quantities recommended in the detergent manufacturers’ instructions.
DECLARATION OF CONFORMITY
This product complies with the requirements of these directives:
EMC-Directive 2004/108/EC
Low Voltage Directive 2006/95/EC
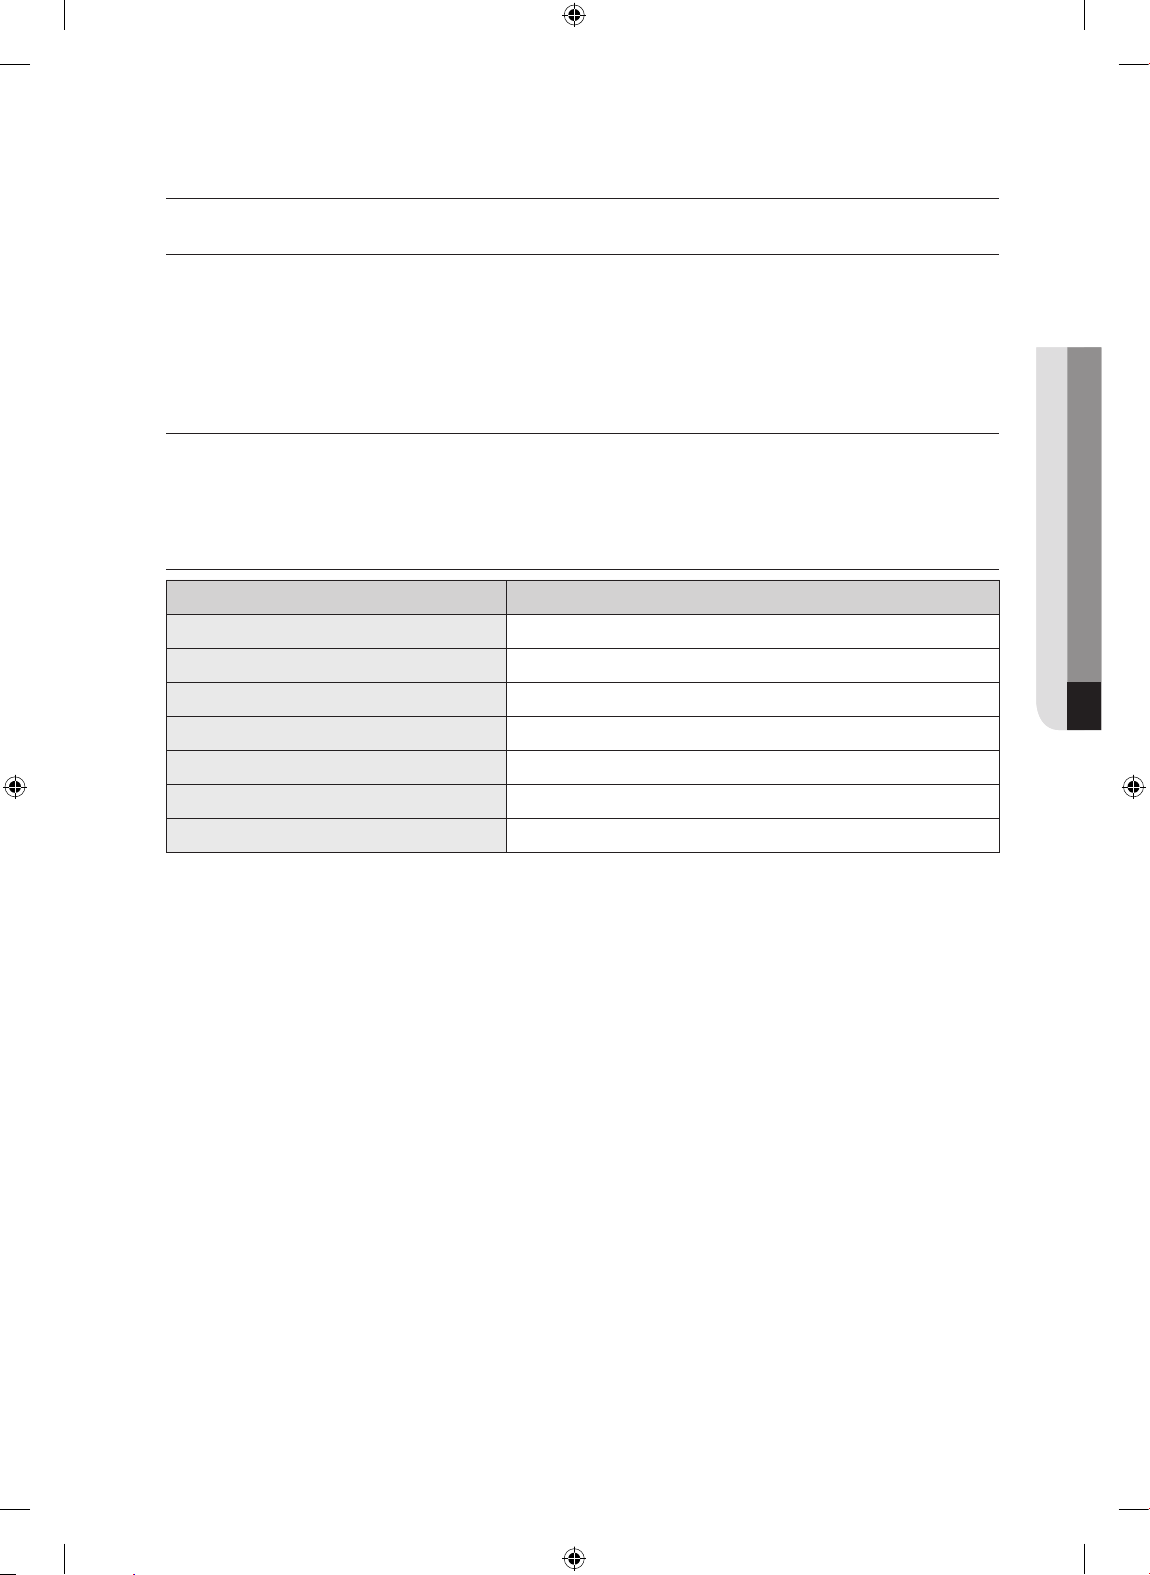
SPECIFICATIONS
MODEL DW-BG970, DW-BG770, DW-BG570
Power AC220 ~ 240V / 50Hz
Type Built in
Water pressure 0.05 - 0.8MPa
Wash capacity (place settings) 14 (DW-BG970, DW-BG770), 13 (DW-BG570)
Rated power 2000 ~ 2300W
08 APPENDIX
Dimension 598mm(W) X 815mm(H) X 550mm(D)
Weight Unpacked 46.0kg / Packed 50.0kg
Appendix _31
DD68-00092A_EN.indd 31 10/14/2011 3:09:06 PM
Page 32
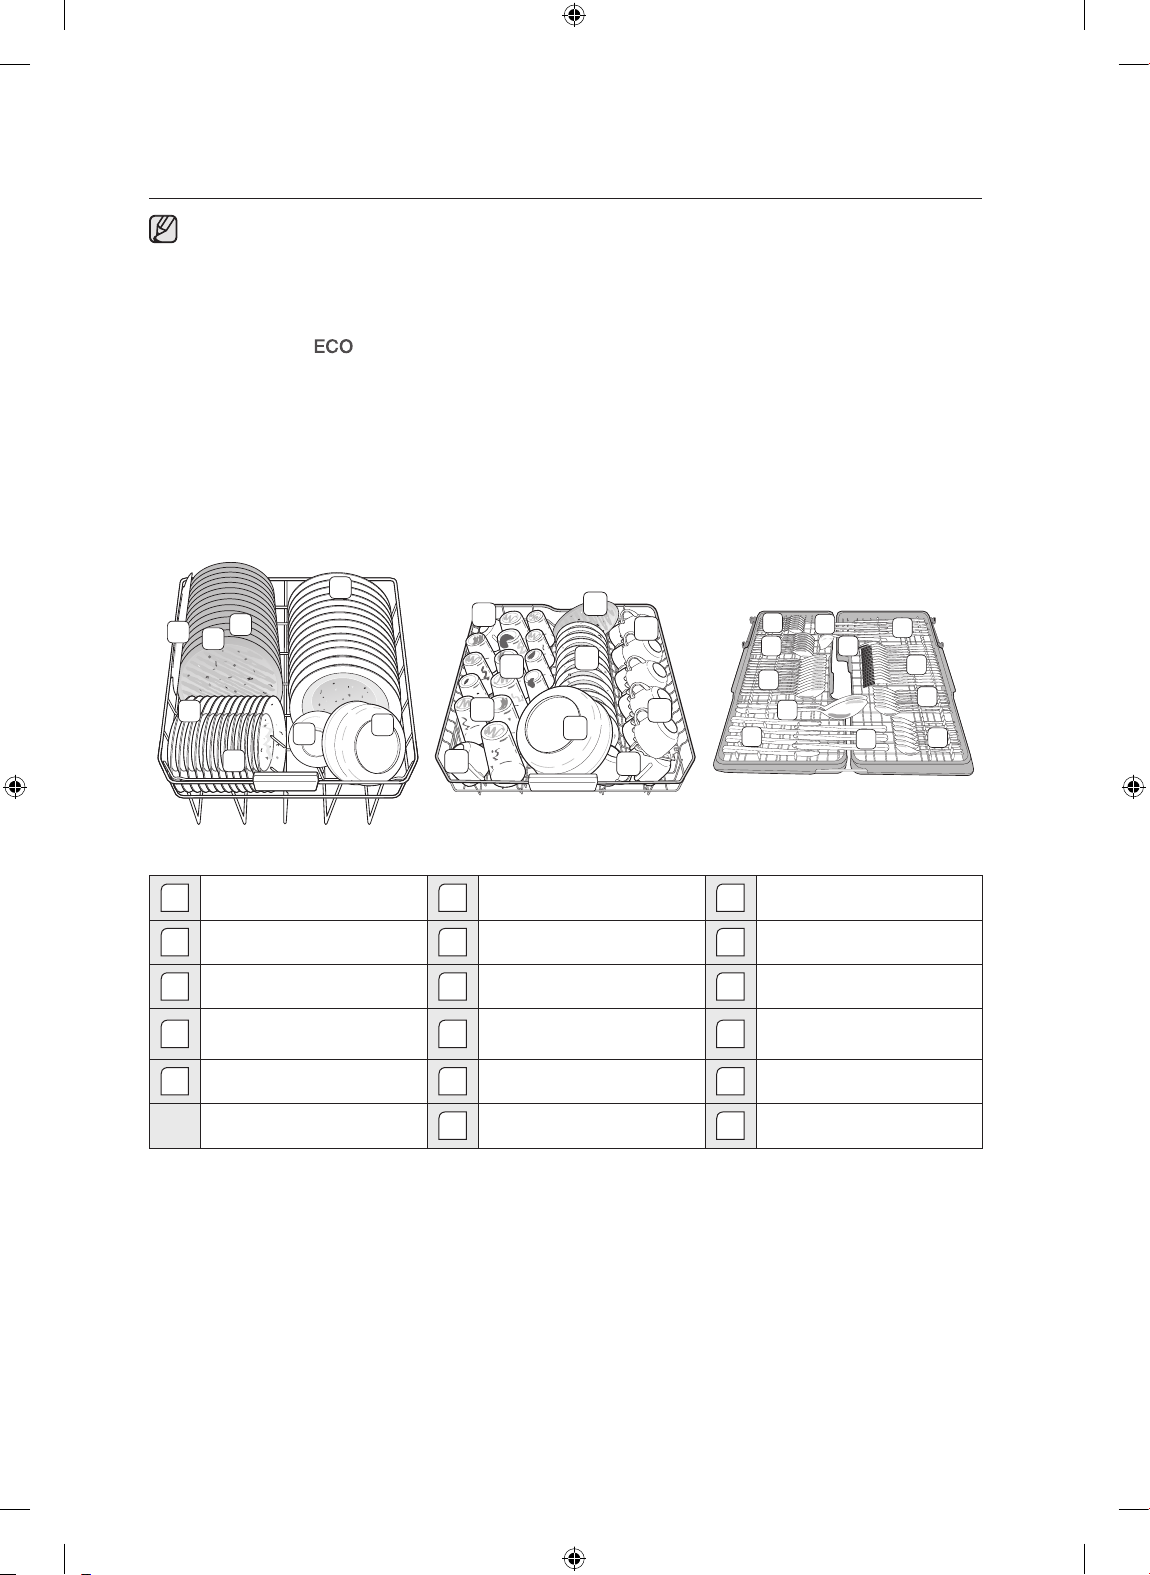
For standard test
The diagrams below show the proper way to load the baskets based on the European Standards
(EN50242).
• Washing capacity: 14 (DW-BG970, DW-BG770) / 13 (DW-BG570) place settings
• Test standard: EN50242/IEC60436
• Position of upper basket: Low
• Programme: Eco
• Additional options: None
• Rinse aid setting: 6
• Dosage of the standard detergent
- 14PS: 7g + 28g
- 13PS: 6g + 26.5g
• For the arrangement of the items, refer Figure A, B, C.
14 place settings
1
11
3
2
5
9
4
9
6
8
8
6
5
6
7
6
10
6
16
15
12
17
14
<Lower basket> <Upper basket> <Cutlery tray>
1
Soup plate : Oat flake
2
Dinner plate : Egg
3
Dinner plate : Meat
4
Dessert dish : Spinach
5
Dessert dish : Egg
6
Cup : Tea
7
Saucer : Tea
8
Glass : Milk
Small bowl, Middle bowl
9
: Spinash
10
Big bowl : Meat
11
Oval plate : Margarine
12
Soup spoon : Oat flake
13
Fork : Egg
14
Knife
15
Dessert spoon
16
Tea spoon
17
Serving cutlery
14
14
17
13
15
14
16
DD68-00092A_EN.indd 32 10/14/2011 3:09:06 PM
Page 33
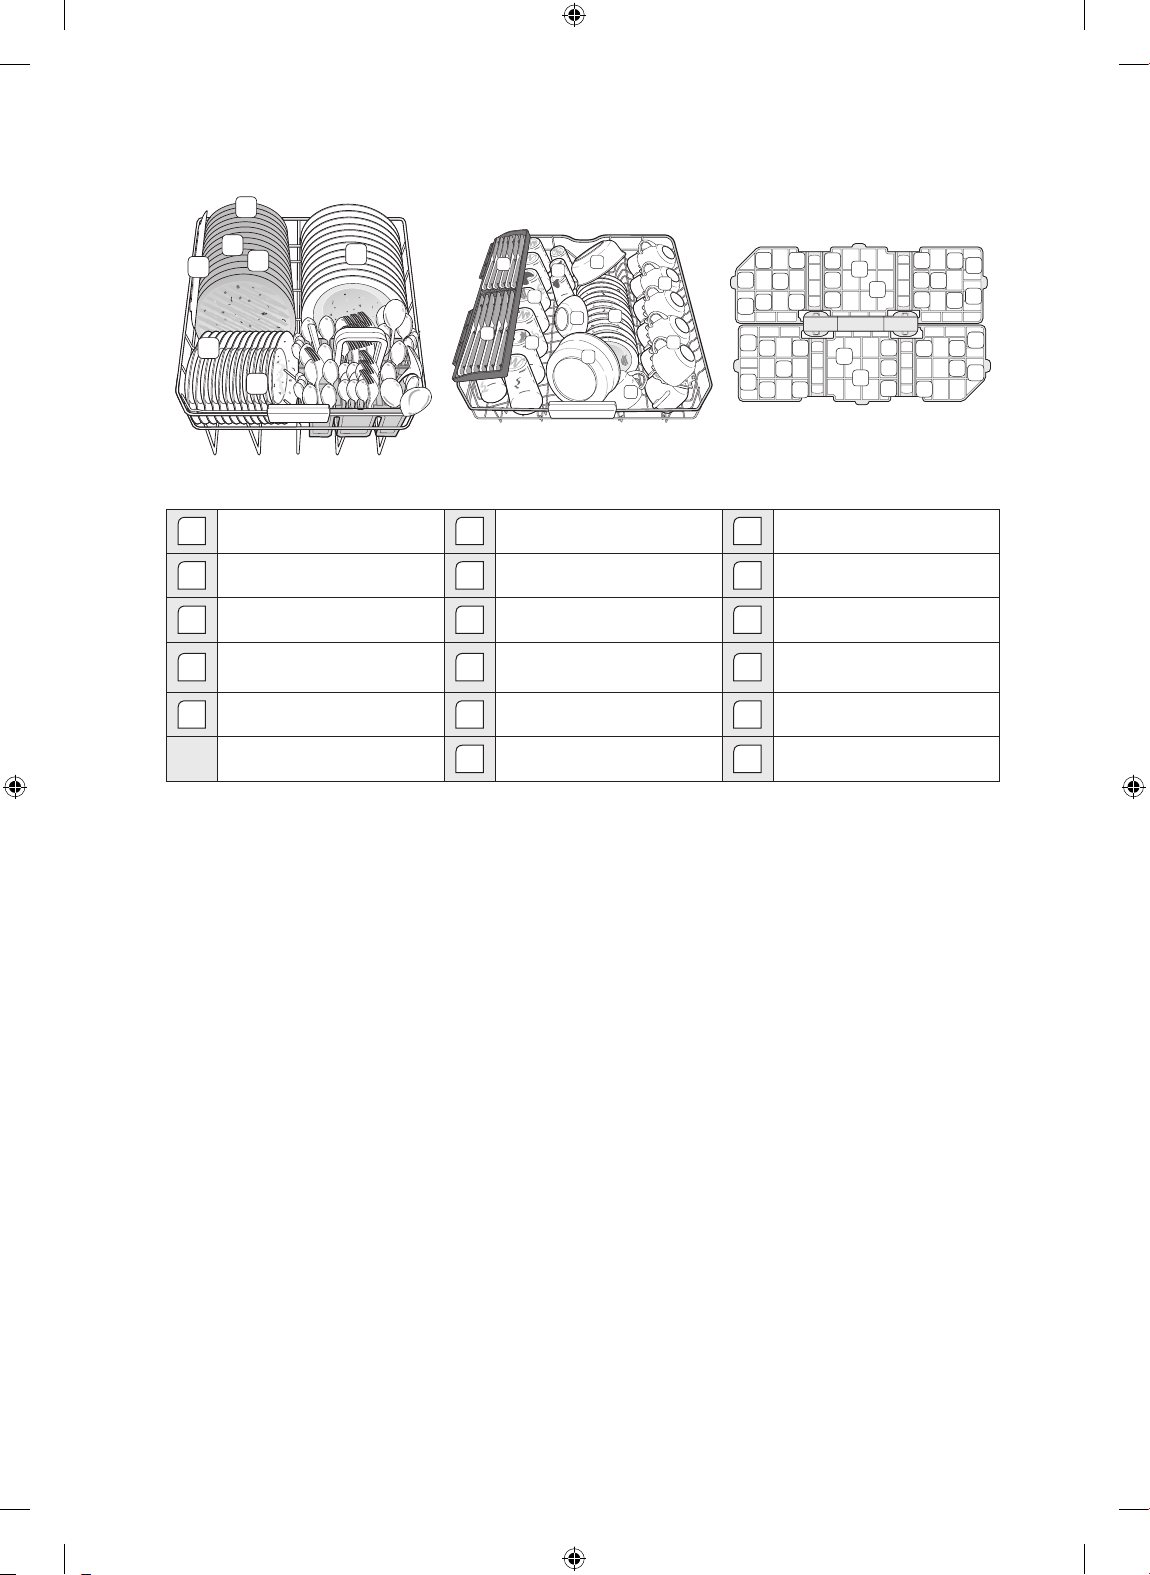
13 place settings
1
2
11
3
5
4
1
14
8
14
8
9
8
9
10
6
7
6
6
16
16
16
16
12
14
12 12
12 12
13
12 12
12
<Lower basket> <Upper basket> <Cutlery basket>
1
Soup plate : Oat flake
2
Dinner plate : Egg
3
Dinner plate : Meat
4
Dessert dish : Spinach
5
Dessert dish : Egg
6
Cup : Tea
7
Saucer : Tea
8
Glass : Milk
Small bowl, Middle bowl
9
: Spinash
10
Big bowl : Meat
11
Oval plate : Margarine
12
Soup spoon : Oat flake
13
Fork : Egg
14
Knife
15
Dessert spoon
16
Tea spoon
17
Serving cutlery
15
13
15
15
15
15
12
12
16
15
13
17
16
12
12
13
13
13
16
17
12
17
16
17
DD68-00092A_EN.indd 33 10/14/2011 3:09:07 PM
Page 34
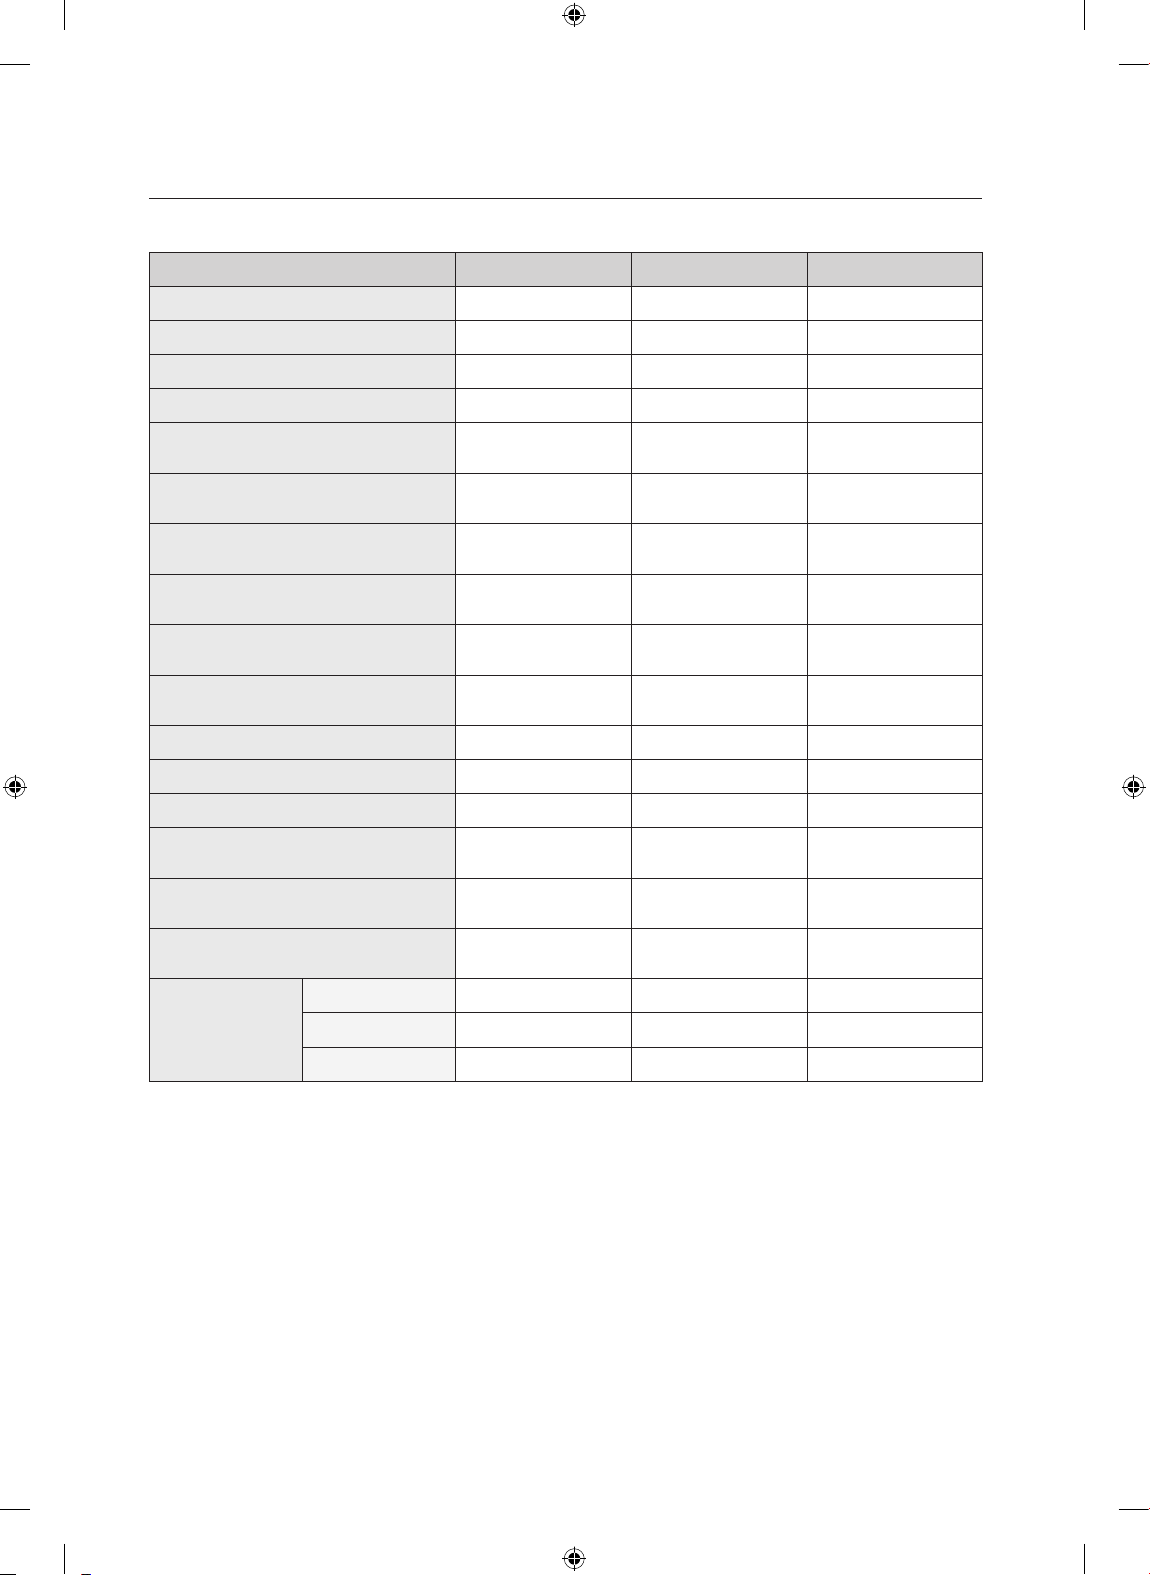
Product fiche
REGULATION (EU) No 1059/2010
Supplier SAMSUNG SAMSUNG SAMSUNG
Model name DW-BG970 DW-BG770 DW-BG570
Rated Capacity (place setting) 14 14 13
Energy eciency class A+++ A++ A+
Eco label No No No
Annual energy consumption,
(AEC) (kWh/year)
Standard cycle energy
consumption, (Et) (Kwh)
Power consumption o mode, Po
(W)
Power consumption left-on mode,
Pl (W)
Annual water consumption (AWC),
(L)
Standard programme water
consumption, (L)
Cleaning eciency class A A A
236 256 276
0.83 0.90 0.97
0.45 0.45 0.45
3 3 3
2800 2800 3360
10 10 12
Drying eciency class A A A
Standard programme Eco Eco Eco
Programme time for the standard
cycle
Duration of the left-on mode, (Tl)
(min)
Airborne acoustical noise
emissions (dBA re 1pW)
Built-in Yes Yes Yes
Installation
Built-under - - -
Free standing - - -
145 145 145
10 10 10
40 43 45
DD68-00092A_EN.indd 34 10/14/2011 3:09:07 PM
Page 35
Note
DD68-00092A_EN.indd 35 10/14/2011 3:09:08 PM
Page 36
QUESTIONS OR COMMENTS?
COUNTRY CALL OR VISIT US ONLINE AT
AUSTRIA
BELGIUM 02-201-24-18
CZECH 800 - SAMSUNG (800-726786) www.samsung.com
DENMARK 70 70 19 70 www.samsung.com
FINLAND 030 - 6227 515 www.samsung.com
FRANCE 01 48 63 00 00 www.samsung.com
HUNGARY 06-80-SAMSUNG(726-7864) www.samsung.com
ITALIA 800-SAMSUNG(726-7864) www.samsung.com
LUXEMBURG 261 03 710 www.samsung.com
NETHERLANDS
NORWAY 815-56 480 www.samsung.com
POLAND
PORTUGAL 80820-SAMSUNG(726-7864) www.samsung.com
0900-SAMSUNG (0900-7267864)
0810 - SAMSUNG
(7267864, 0.07/min)
( 0,10/min)
0 801 1SAMSUNG(172678)
022-607-93-33
www.samsung.com
www.samsung.com/be (Dutch)
www.samsung.com/be_fr (French)
www.samsung.com
www.samsung.com
SLOVAKIA 0800-SAMSUNG(726-7864) www.samsung.com
SPAIN 902 - 1 - SAMSUNG (902 172 678) www.samsung.com
SWEDEN 0771 726 7864 (SAMSUNG) www.samsung.com
U.K 0845 SAMSUNG (7267864)
SWITZERLAND
AUSTRALIA 1300 362 603 www.samsung.com
NEW ZEALAND 0800 SAMSUNG (0800 726 786) www.samsung.com
TURKEY 444 77 11 www.samsung.com
SOUTH AFRICA 0860-SAMSUNG(726-7864) www.samsung.com
U.A.E / IRAN 800-SAMSUNG(726-7864) www.samsung.com
BAHRAIN 8000-4726 www.samsung.com
JORDAN 800-22273 www.samsung.com
0848 - SAMSUNG
(7267864, CHF 0.08/min)
www.samsung.com/ch
www.samsung.com/ch_fr (French)
www.samsung.com
Code No.: DD68-00092A_EN
DD68-00092A_EN.indd 36 10/14/2011 3:09:08 PM
 Loading...