

Samsung DVD-V4600 User Manual

Instruction Manual
Mode d’emploi
DVD-V4600
www.samsung.ca

Remote Control Overview

Safety Instructions
Table of Contents
This symbol is intended to alert the user to the presence of uninsulated
RISK OF ELECTRIC SHOCK
DO NOT OPEN
CAUTION: TO REDUCE THE RISK OF ELECTRIC
SHOCK, DO NOT REMOVE COVER (OR BACK).
NO USER SERVICEABLE PARTS INSIDE. REFER
SERVICING TO QUALIFIED SERVICE PERSONNEL.
“dangerous voltage” within the product’s enclosure that may be of sufficient
magnitude to constitute a risk of fire or electric shock to persons.
This symbol is intended to alert the user to the presence of important operating and maintenance (servicing) instructions in the literature accompanying the appliance.
Note to CATV system installer: This reminder is provided to call CATV system installer's attention to Article 820-40 of
the National Electrical Code (Section 54 of Canadian Electrical Code, Part I) that provides guidelines for proper grounding and, in particular, specifies that the cable ground shall be connected to the grounding system of the building as
close to the point of cable entry as practical.
Caution: FCC regulations state that any unauthorized changes or modifications to this equipment may void the user's
authority to operate it.
Caution: To prevent electric shock, match wide blade of plug to wide slot, fully insert.
Attention: Pour eviter les chocs electriques, introduire la lame le plus large de la fiche dans la borne correspondante de
la prise et pousser jusqu’au fond.
Important : One Federal Court has held that unauthorized recording of copyrighted TV programs is an infringement of
U.S. copyright laws.
Certain Canadian programs may be copyrighted and any unauthorized recording in whole or in part may be a violation
of these rights.
To prevent damage which may result in fire or electric shock hazard,
do not expose this appliance to rain or moisture.
Important Safety Instructions
1. Read these instructions.
2. Keep these instructions.
3. Heed all warnings.
4. Follow all instructions.
5. Do not use this apparatus near water.
6. Clean only with dry cloth.
7. Do not block any ventilation openings. Install in accordance with the manufacturer’s instructions.
8. Do not install near any heat sources such as radiators, heat registers, stoves, or other apparatus (including ampli
fiers) that produce heat.
9. Do not defeat the safety purpose of the polarized or grounding-type plug. A polarized plug has two blades with one
wider than the other. A grounding type plug has two blades and a third grounding prong. The wide blade or the
third prong are provided for your safety. If the provided plug does not fit into your outlet, consult an electrician for
replacement of the obsolete outlet.
10. Protect the power cord from being walked on or pinched particularly at plugs, convenience receptacles, and the
point where they exit from the apparatus.
11. Only use attachments/accessories specified by the manufacturer.
12. Use only with cart, stand, tripod, bracket, or table specified by the manufacturer, or sold with the apparatus. When
a cart is used, use caution when moving the cart/apparatus combination to avoid injury from tip-over.
13. Unplug this apparatus during lightning storms or when unused for long periods of time.
14. Refer all servicing to qualified service personnel. Servicing is required when the apparatus has been damaged in
any way, such as power-supply cord or plug is damaged, liquid has been spilled or objects have fallen into the
apparatus, the apparatus has been exposed to rain or moisture, does not operate normally, or has been dropped.
Safety
Important Safety Instructions . . . . . . . . . . . . . 2
Welcome
Feature Summary . . . . . . . . . . . . . . . . . . . . . 4
Disc Type and Characteristics . . . . . . . . . . . . 4
1 - System Overview
Unpack . . . . . . . . . . . . . . . . . . . . . . . . . . . . . 5
Front Panel Overview . . . . . . . . . . . . . . . . . . 6
Rear Panel . . . . . . . . . . . . . . . . . . . . . . . . . . 6
Front Panel Display . . . . . . . . . . . . . . . . . . . . 7
Insert Batteries into Remote . . . . . . . . . . . . . 7
2 - Getting Started
Basic Connections/Auto Setup . . . . . . . . . . . 7
3 - Advanced Connections
Stereo Connections . . . . . . . . . . . . . . . . . . . . 8
S-Video/Component Video Connections (for DVD)
Monitor TV Connections
. . . . . . . . . . . . . . . . . 9
Connecting Other Video Equipment
4 - DVD Sound Setup
A/V Receiver Connections
5 - Basic Operation
Deck Control Buttons
Basic DVD Operation
Basic VCR Operation
Basic TV Tuner Operations
6 - System Setup
On-Screen Menu Navigation
Menu Language
Manual Clock Set
Tuner Band Setting
Auto Channel Memory
Channel Add/Delete
Front Panel Dimmer
Auto Power Off
7 - DVD Setup
. . . . . . . . . . . . . . . . . . . . . . . . 15
Disc Menu Language
Audio Language
. . . . . . . . . . . . . . . . 10
. . . . . . . . . . . . . . . . . . . 10
. . . . . . . . . . . . . . . . . . . 10
. . . . . . . . . . . . . . . . . . . 11
. . . . . . . . . . . . . . . 11
. . . . . . . . . . . . . . 11
. . . . . . . . . . . . . . . . . . . . . . . 12
. . . . . . . . . . . . . . . . . . . . . . 12
. . . . . . . . . . . . . . . . . . . . . 13
. . . . . . . . . . . . . . . . . . . 13
. . . . . . . . . . . . . . . . . . . . 14
. . . . . . . . . . . . . . . . . . . . 14
. . . . . . . . . . . . . . . . . . . 15
. . . . . . . . . . . . . . . . . . . . . . . 16
. . . . 8
. . . . . . . . . 9
Subtitle Language
Digital Output
DTS
. . . . . . . . . . . . . . . . . . . . . . . . . . . . . . . 17
Dynamic Compression
PCM Down Sampling
TV Aspect Ratio
Black Level
Alt Video Out
Parental
8 - DVD Operations
Special Playback Features
Disc Menu Navigation
EZ View
Title/Chapter/Time Selection
Angle View
Subtitle
A to B Repeat
Repeat Chapter/Title
Audio
. . . . . . . . . . . . . . . . . . . . . . . . . . . . . . . 27
Bookmarks
Function (DVD)
9 - VCR Playback
. . . . . . . . . . . . . . . . . . . . . . 16
. . . . . . . . . . . . . . . . . . . . . . . . . 17
. . . . . . . . . . . . . . . . . . 18
. . . . . . . . . . . . . . . . . . . 18
. . . . . . . . . . . . . . . . . . . . . . . 19
. . . . . . . . . . . . . . . . . . . . . . . . . . 19
. . . . . . . . . . . . . . . . . . . . . . . . . 20
. . . . . . . . . . . . . . . . . . . . . . . . . . . . . 21
. . . . . . . . . . . . . . . 22
. . . . . . . . . . . . . . . . . . . 22
. . . . . . . . . . . . . . . . . . . . . . . . . . . . . 23
. . . . . . . . . . . . . . 24
. . . . . . . . . . . . . . . . . . . . . . . . . . . 25
. . . . . . . . . . . . . . . . . . . . . . . . . . . . . 25
. . . . . . . . . . . . . . . . . . . . . . . . 26
. . . . . . . . . . . . . . . . . . . . 26
. . . . . . . . . . . . . . . . . . . . . . . . . . . 27
. . . . . . . . . . . . . . . . . . . . . . . . 28
Special VCR Playback Features
Tracking
. . . . . . . . . . . . . . . . . . . . . . . . . . . . . 29
Auto Play
. . . . . . . . . . . . . . . . . . . . . . . . . . . . 29
S-VHS Playback
Variable Search System
10 - VCR Recording
Basic Recording
Special Recording Features
One Touch Recording (OTR)
Record Speed
11 - Timer Recording
How to Set a Timer Recording
Function(VCR)
Appendix - Help
Technical Specifications
. . . . . . . . . . . . . . . . . . . . . . . 30
. . . . . . . . . . . . . . . . . 30
. . . . . . . . . . . . . . . . . . . . . . . 31
. . . . . . . . . . . . . . . 31
. . . . . . . . . . . . . . 32
. . . . . . . . . . . . . . . . . . . . . . . . 32
. . . . . . . . . . . . . 33
. . . . . . . . . . . . . . . . . . . . . . . . 33
. . . . . . . . . . . . . . . . . 34
. . . . . . . . . . . . 28
ENG-2
ENG-3

Feature Summary
Disc Type and Characteristics
DVD+VCR Features
• Perfect compatibility to play back DVDs,
audio CDs or VHS Tapes.
• Enjoy a DVD movie while recording a TV
show to the VCR.
• Auto Setup instantly finds the time and runs
channel search.
• RF inputs and outputs for all kinds of TVs
available.
• Composite, S-Video, and Component Video
outputs.
• Universal remote provides the full operation
on DVD+VCR.
• On-Screen Program
(English/French/Spanish).
DVD Features
• 10-bit video digital to analog converter and
27MHz advanced digital filter.
• Playback of 96KHz/24-bit sources.
• DTS digital output for DTS-enhanced
DVDs.
VCR Features
• Hi-Fi Stereo VCR.
• Superior slow motion and stop action
(with 4 heads).
• Playback of S-VHS tapes with a better than
standard resolution.
• INTRO Scan, Zero Return, and END Search.
• 7-event/1 month timer recording.
• Time remaining counter, real time counter.
Note
* Discs which cannot be played with this
player.
• DVD-ROM • DVD-RAM
• CDI • CDV
• HD layer of super Audio CD
• CDGs play audio only, not graphics.
* Ability to play back may depend on recording
conditions.
• DVD-R • CD-RW
• DVD+RW, -RW • CD-ROM
Disc Markings
• Play Region Number
~
NTSC
STEREO
DIGITAL
SOUND
Play Region Number
Both the DVD player and the discs are coded by
region. These regional codes must match in order for
the disc to play. If the codes do not match, the disc
will not play.
The Region Number for this player is described
on the rear panel of the player.
• NTSC broadcast system in U.S.A, Canada,
Korea, Japan, etc.
• Dolby Digital disc
• Stereo disc
• Digital Audio disc
• DTS disc
• MP3 disc
Disc Types (Logos)
DVD
VIDEO-CD
Recording Types
Audio
+
Video
Audio
Disc Size Max. Playing Time Characteristics
•
12 Cm
8 Cm
12 Cm
Single-sided 240 min.
Double-sided 480 min.
Single-sided 80 min.
Double-sided 160 min.
74 min.
DVD contains excellent sound and video
due to Dolby Digital and MPEG-2 system.
•
Various screen and audio functions can
be easily selected through the on-screen
menu.
•
Video with CD sound, VHS quality &
MPEG-1 compression technology.
+
Video
AUDIO-CD
Audio
* It may not be to play CD-R,CD-RW and DVD-R in all cases due to the type of disc or condition of the recording.
8 Cm
12 Cm
8 Cm
20 min.
74 min.
20 min.
•
An LP is recorded as an analog signal
with more distortion. CD is recorded as a
Digital Signal with better audio quality,
less distortion and less deterioration of
audio quality over time.
Unpack
When you unpack the DVD+VCR, please check the following list of items is included in the packing case.
DVD-VCR Registration Card User’s Guide
RCA cable for
Audio/Video connection
(AC97-01746A)
(AD68-00078A) (AK68-00368A)
Remote Control
(AK59-00021B
)
1.5V “AAA” Batteries- 2EA
(AC43-12002H)
ENG-4 ENG-5
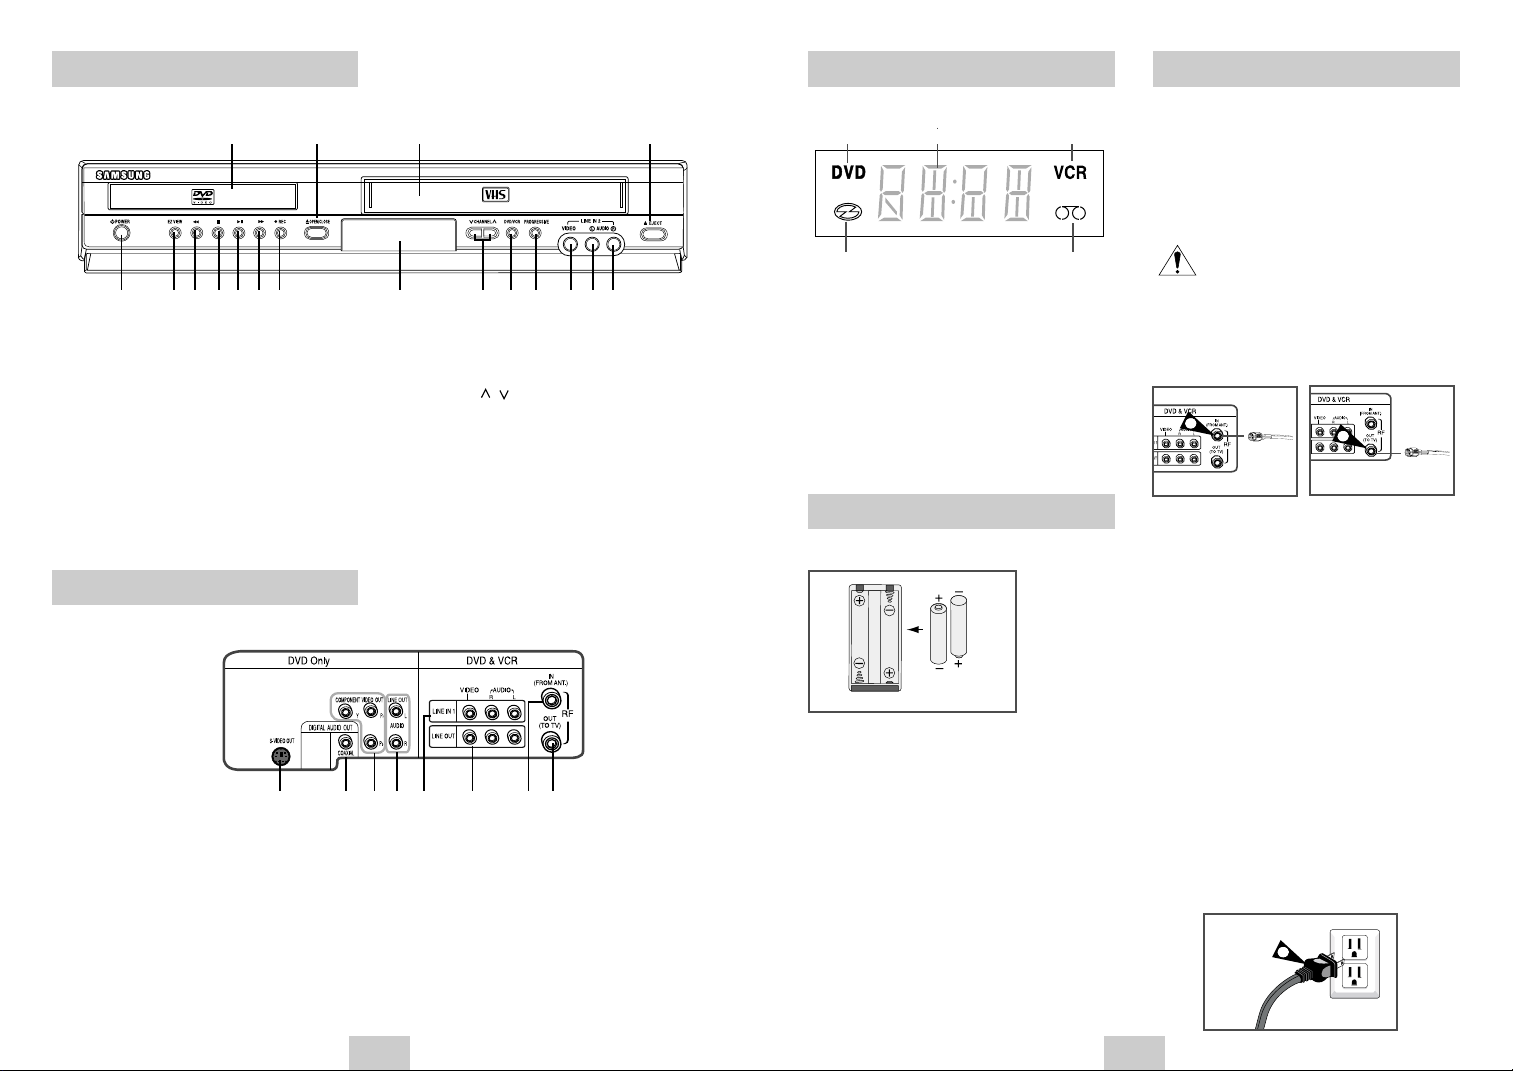
Front Panel Overview
Front Panel Display
Basic Connections/Auto Setup
1 2 3 4
5 6 7 8 9 10 11 12 13 14 15 16 17 18
1 DVD DECK
2 DVD OPEN/CLOSE
3 VCR DECK
4 VCR EJECT
5 POWER
6 EZ VIEW
7 REWIND/REV
8 STOP
9 PLAY/PAUSE
Rear Panel
1 S-VIDEO OUT
2 DIGITALAUDIO OUT(COAXIAL)
3 COMPONENT VIDEO OUT
4 AUDIO LINE OUT TO TV
(S-VIDEO OR COMPONENT)
10 FAST-FORWARD/FWD
11 RECORD
12 FRONT PANEL DISPLAY
13 CHANNEL /
14 DVD-VCR SELECT
15 PROGRESSIVE
16 LINE IN 2 COMPOSITE VIDEO JACK
17 LINE IN 2 LEFT AUDIO JACK
18 LINE IN 2 RIGHT AUDIO JACK
1 2 3 4 5 6 7 8
5 LINE IN 1
6 LINE OUT TO TV (COMPOSITE)
7 RF ANTENNA INPUT
8 RF OUT TO TV (RF THROUGH ONLY)
1 2 3
4 5
1 When the light is on, DVD is operating.
2 The time, counter position, time remaining or
current deck status is indicated.
3 VCR is activated.
4 DVD or VCD, CD media is loaded.
5 VHS videotape is loaded.
Insert Batteries into Remote
• Remove the battery cover on the remote
• Insert two 1.5V “AAA” batteries as shown,
making sure of the correct polarities(+/-)
• Slide the cover back onto remote.
You will need to connect the DVD-VCR to a TV and run
Auto Setup. The Auto Setup will automatically search for
channels and then set your DVD-VCR's internal clock.
NOTES:
• See Appendix A for Advanced Connections.
• Standard RF or Line connection between your TV
and DVD-VCR are required to run DVD+VCR
setup menu, even if you connect S-Video or
Component Video Output for a better picture
quality.
Connect the RF Antenna Cable to your DVD-VCR
1
Connect an external indoor/outdoor antenna or wall
outlet antenna cable to the Ant-In jack on the rear
panel. (RF Through Only)
1
From Antenna or Cable
2
To T V’s Antenna Input
2 Connect your DVD-VCR to a TV
RF Connection
Using the RF antenna cable, connect the OUT jack
(TO TV) on the rear panel of your DVD-VCR to
your TV’s Antenna Input.
Line Connection
Using an RCA-type audio/video cable (red, white,
yellow), connect the LINE OUT jacks on the rear
panel of your DVD-VCR to your TV's Line In jacks.
Use the three cables as follows: red for right audio,
white for left audio, and yellow for video.
NOTE: If your TV is equipped with RCA jacks, it is
better to use the Line Connection method.
3 Plug In
Your DVD-VCR's power should be plugged into a
standard 120V/60Hz wall outlet. Avoid pressing any
buttons on the remote control or on the unit during
an Auto Setup. While your DVD-VCR is running an
Auto Setup, “AUTO” will blink. When Auto Setup is
complete, the current time will be displayed on the
front panel displayed. In case Auto Clock set fails to
locate a channel to set the clock, you should set
the clock manually. See page 12.
ENG-6 ENG-7
3
Basic Connections/Auto Setup
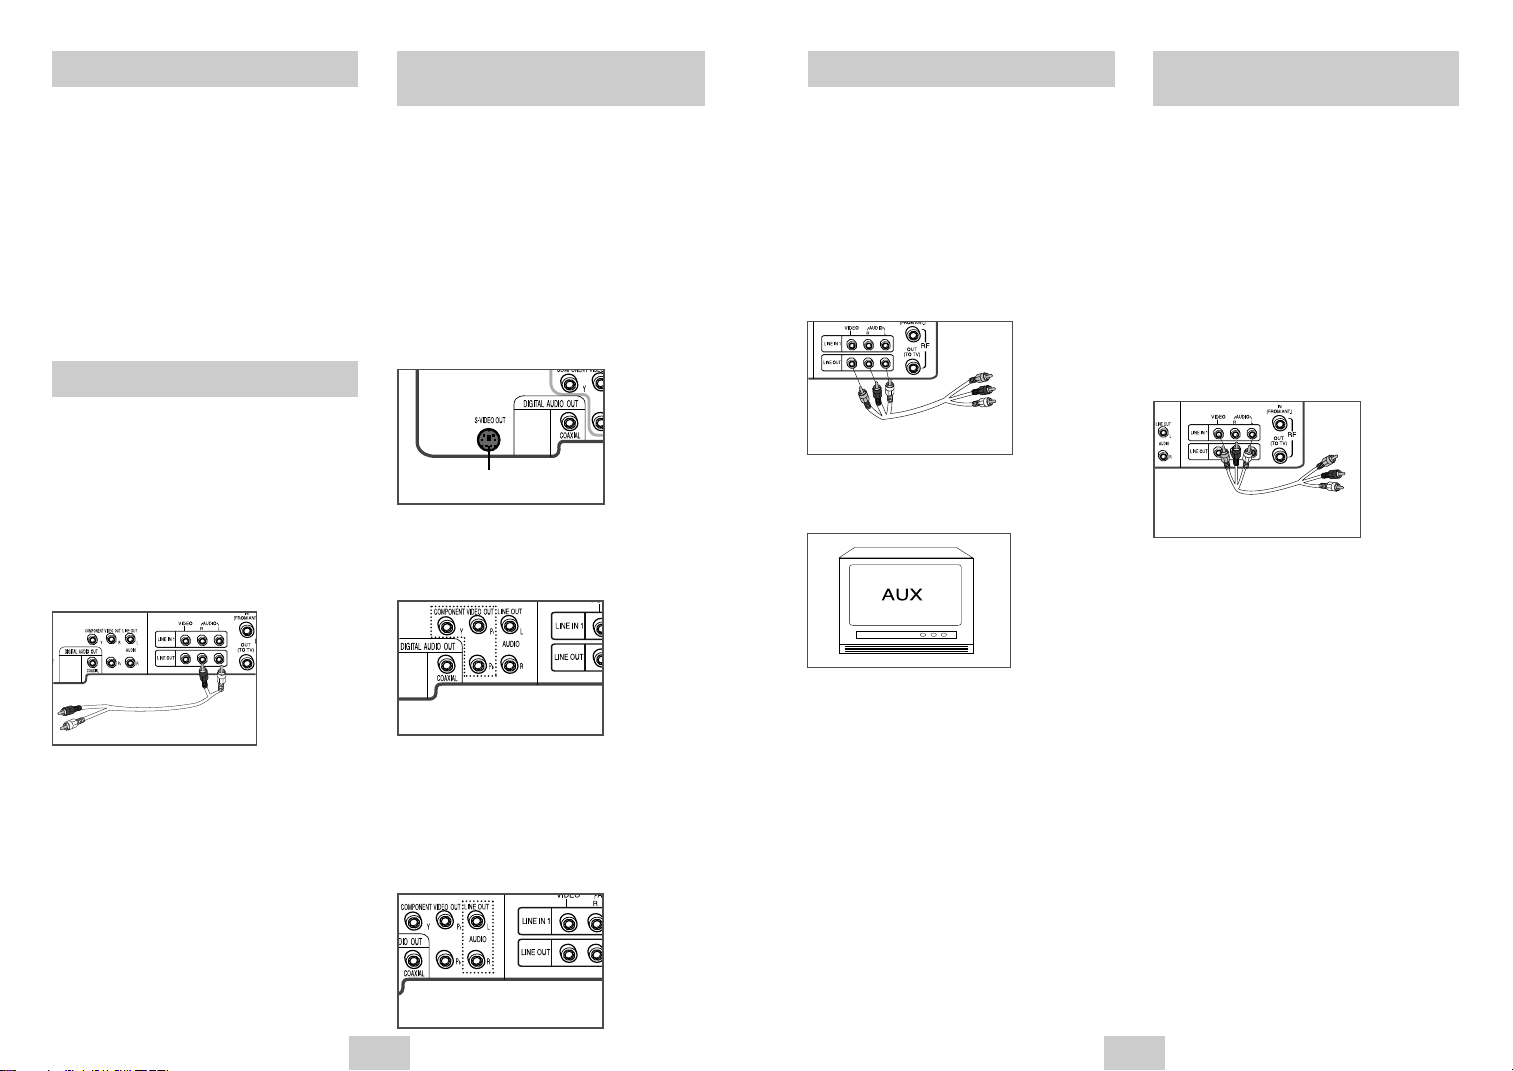
S-Video/Component Video
Connections (for DVD)
Monitor TV Connections
Connecting Other Video
Equipment
4 Turn On your DVD-VCR
Turn on the power by pressing the POWER button
on the remote control or on the front panel of the
unit.
5 Turn On your TV
Turn on the TV by pressing the POWER button.
6 Set the TV to Line
Set your TV to its Line Input.
Stereo Connections
You can connect your DVD-VCR to your home stereo
system or stereo TV and enjoy stereo sound when
watching a movie or TV.
1 Connect DVD-VCR to Stereo
Using RCA cables, connect the Line Out Left and
Right Audio jacks on the rear panel of the DVD-VCR
to the Auxiliary Inputs on your stereo receiver.
Connect the Video Output also in case you are using
a stereo TV.
2 Set Stereo to Auxiliary Mode
Set your stereo receiver or TV to either “Aux” or
“Tape” regardless of which line input you are using for
your particular device.
3 Play a Tape
Insert a DVD or Hi-Fi stereo videotape into your
system. Be sure to adjust the volume on your stereo
receiver or TV. Audio will be heard through your
stereo speakers
• If there is no stereo sound even after you have
inserted a Hi-Fi stereo videotape, press the AUDIO
button until “Hi-Fi” appears on the on-screen display.
Use the S-Video or Component Video connection
method only for the DVD player. The tuner and VCR
can still be viewed through the RF or line inputs.
To activate your alternative (S-Video or Component)
video selection, follow the “Alt Video Out” instructions
on page 20. Keep in mind that you can choose either
S-Video or Component only, but not both. A superior
video quality can be obtained when watching a DVD
on your DVD-VCR if your TV is equipped with S-Video
or Component Video inputs.
1 Connect S-Video Out to TV
Using an S-Video cable, connect the S-VIDEO OUT
on the rear panel of your DVD-VCR to the S-Video
Input on your TV.
To S-Video Input on Your TV
2 Connect Component Video Out to TV
Using a component video cable, connect the
COMPONENT VIDEO OUT (Y, Pb, Pr) on the rear
panel of your DVD-VCR to the Component Video
Input on your TV.
To Component Video Input
on Your TV
3 Connect Audio Out (DVD only)
Using RCA audio cables, connect the LEFT/RIGHT
Line Out jacks on the rear panel of your DVD/VCR
to the LEFT/RIGHT Audio Line In jacks on your TV.
• When connecting your DVD-VCR to a TV with the
S-Video or Component Video Output, make sure
that you use these Line Out jacks.
• To activate your connection, see “Alt Video Out”
on page 20.
Monitor-style televisions offer improved sound and
picture over regular televisions because they receive
the audio and video signals directly from the DVD-VCR
through the line inputs.
NOTE: A monitor television is not the same as a
computer monitor.
1 Connect VCR to Monitor TV
Connect RCA cables from the Audio/Video Line Out
jacks on the rear panel of the DVD-VCR to the
Audio/Video Line Inputs of your monitor TV.
To Monitor TV Audio/Video Inputs
2 Set TV to Auxiliary Mode
Set your monitor TV to “Aux,” “Video,” or “Line.” Refer
to your monitor television owner’s manual for the
correct setting.
3 Connection is Complete
You can connect a wide variety of audio/video
equipment to your DVD-VCR, including:
• An additional VCR
• Laser Disc Player
• DVD Player
• Camcorder
• Satellite Receiver
• Video Game
Since all of these devices use essentially the same
connections, they will be described together.
1 Connect Device to DVD-VCR
Connect RCA cables from the Audio and Video Line
Outputs of your external device to the Audio and
Video Line Inputs on the front or rear panel of the
DVD-VCR.
Audio/Video Outputs of
External Device
2 Watch Device
Play your external device, then press the INPUT
SEL. button until the playback from Line1 (rear panel
inputs) or Line2 (front panel inputs) appears on your
TV screen.
3 Record Device
First, play your external device. Next, press the
INPUT SEL. button until the playback from Line1
(rear panel inputs) or Line2 (front panel inputs)
appears on your TV screen. Then press Record on
the Front panel and Remote Control.
4 Timer Record From Device
Select Line1 (L1) or Line2 (L2) as your record source
in the Timer Record menu. All other Timer Record
settings should be set in the usual manner.
To Left/Right Audio Inputs
on Your TV
ENG-8 ENG-9
Language : English
Front Display : Auto
Auto Power Off : Off
A/V Receiver Connections
Deck Control Buttons
Basic VCR Operation Basic TV Tuner Operations
To take full advantage of the movie theater experience
that DVD offers, you may want to connect your DVDVCR to a complete Surround Sound system, including
an A/V Receiver and six Surround Sound speakers.
Before You Begin...
• If your A/V receiver is equipped with a Dolby
Digital Decoder, you have the option to bypass the
DVD-VCR’s built-in Dolby Digital Decoder. Use the
Digital Audio Out connection below.
To Digital Audio Input of an A/V
Receiver with a Dolby Digital Decoder
1 Digital Audio Out
Connect a digital coaxial cable from the Digital
Audio Out jack on the rear panel of the DVD-VCR
to the corresponding Digital Audio Input jack on
your A/V Receiver:
• Coaxial
• Use whichever connection is available on your
A/V Receiver.
The DVD-VCR uses one set of controls to operate both
decks. The following buttons are helpful in successfully
controlling each deck.
1 POWER Button
Press the Power button on the remote control or
front panel to turn on the DVD-VCR.
2 DVD Button
Press the DVD button on the remote control or front
panel when you want to control the DVD deck.
• The DVD indicator will light on the Front Panel
Display to show that the DVD deck is selected.
3 VCR Button
Press the VCR button on the remote control or front
panel when you want to control the VCR deck.
• The VCR indicator will light on the Front Panel
Display to show that the VHS deck is selected.
4 INPUT SEL. Button
Press the INPUT SEL. button repeatedly to cycle
through all of your input sources, including the
Tuner(Ch##), Line 1 (rear AV input), and Line 2
(front AV input).
• Input selection is only available when the VCR
deck is selected.
Basic DVD Operation
Follow the instructions below to playback a DVD.
1 Open the Disc Tray
Press the OPEN/CLOSE button on your remote
control or on the front panel of the unit to turn on
the power and open the disc tray.
2 Insert a Disc
Put a disc in the center of the tray, with the labelprinted side facing up.
3 Close the Disc Tray
Press the OPEN/CLOSE button on your remote
control or on the front panel of the unit to close the
disc tray.
4 Play a DVD
Press the ❿ll(PLAY/PAUSE) button on your remote
control or on the front panel of the unit.
• Most discs will start to playback as soon as the
tray closes.
• If a DVD has a MENU, the menu may pop up on
TV screen.
5 Additional DVD Options
• See pages 15 ~ 21 for advanced DVD Setup options.
• See pages 22 ~ 28 for special DVD Playback
features.
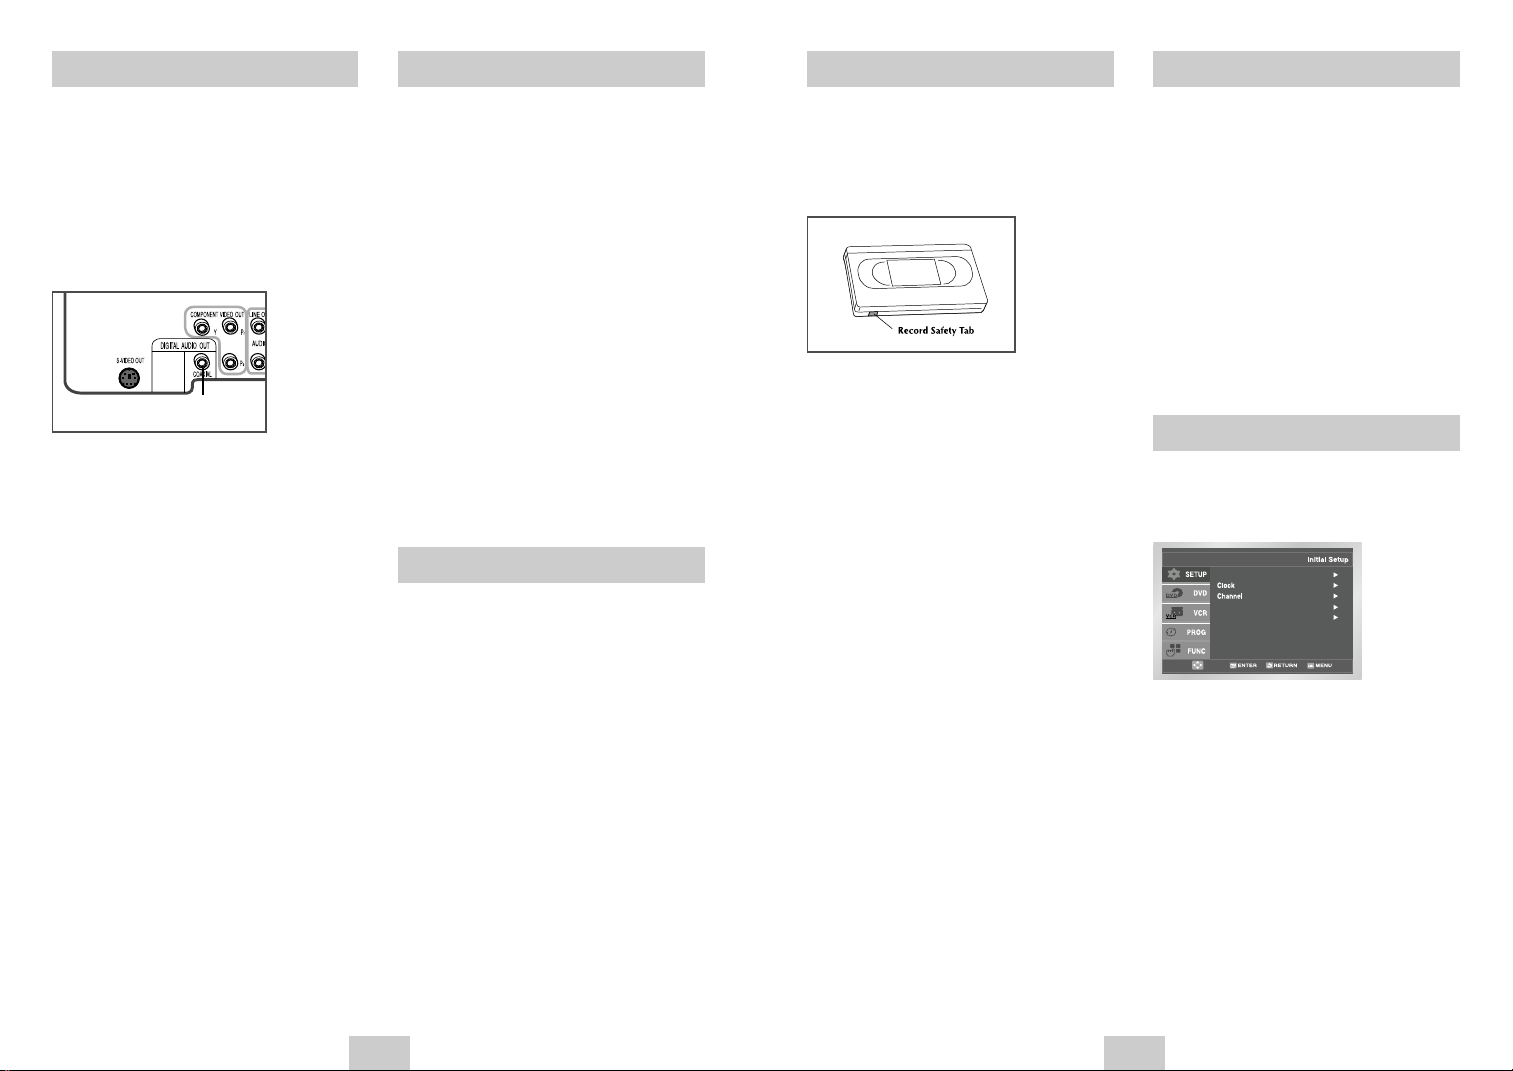
To play a standard VHS videotape, just insert it into the
VCR deck and press the Play button. You can turn on
the Auto Play to enable the VCR deck to play
automatically when you insert a videotape that is
missing the Record Safety Tab. See page 33.
1 Insert VHS Tape
Insert a standard VHS videotape into the VCR
deck.
• When a videotape is inserted, power will turn on
automatically.
2 Play Tape
Press the ❿ll(PLAY/PAUSE) button on the remote
control or on the front panel of the unit. The
videotape will begin to play automatically if it is
missing the Record Safety Tab and Auto Play is
turned on. See page 33.
3 Stop Playback
Press the ■(STOP) button on the remote control or
on the front panel of the unit.
4 Additional VCR Options
• See pages 28~30 for special VCR Playback
features.
• See pages 31~32 for VCR Recording features.
• See page 33 for Timer Recording features.
When watching TV using the DVD-VCR's built-in TV
tuner, use the buttons below.
1 Channel UP/DOWN
Use these buttons to move to the previous or the
next channel.
2 0-9 Buttons
Use these buttons to select the desired channel
directly.
• Press the button number one for two seconds to
activate the button 100+.
- This function is activated only on Cable TV Mode.
3 INFO. Button
Press this button to display the current channel.
• This also works in DVD and VCR mode.
On-Screen Menu Navigation
The on-screen menus allow you to enable or disable
various functions on your DVD-VCR. Use the following
buttons to open and navigate through the on-screen
menus.
1 MENU Button
Press this button while the DVD is in Stop or Play
mode to open the on-screen MAIN MENU.
2 UP/DOWN and LEFT/RIGHT
Use these buttons to move the selection bar UP,
DOWN, LEFT and RIGHT to cycle through the menu
options.
3 ENTER Button
Press this button to confirm any new settings.
4 RETURN Button
Press this button to return to the last MENU screen
displayed or to exit the on-screen MENU all together.
ENG-10 ENG-11
Ant./Cable : Cable TV
Auto Channel Memory
Channel Add/Delete
Language : English
Front Display : Auto
Auto Power Off : Off
Language : English
Front Display : Auto
Auto Power Off : Off
Ant./Cable : Cable TV
Auto Channel Memory
Channel Add/Delete
Menu Language Manual Clock Set
Front Display : Auto
Auto Power Off : Off
Language : English
Language : English
Front Display : Auto
Auto Power Off : Off
Language : English
Front Display : Auto
Auto Power Off : Off
Manual Clock
2004 THU
Tuner Band Setting
Auto Channel Memory
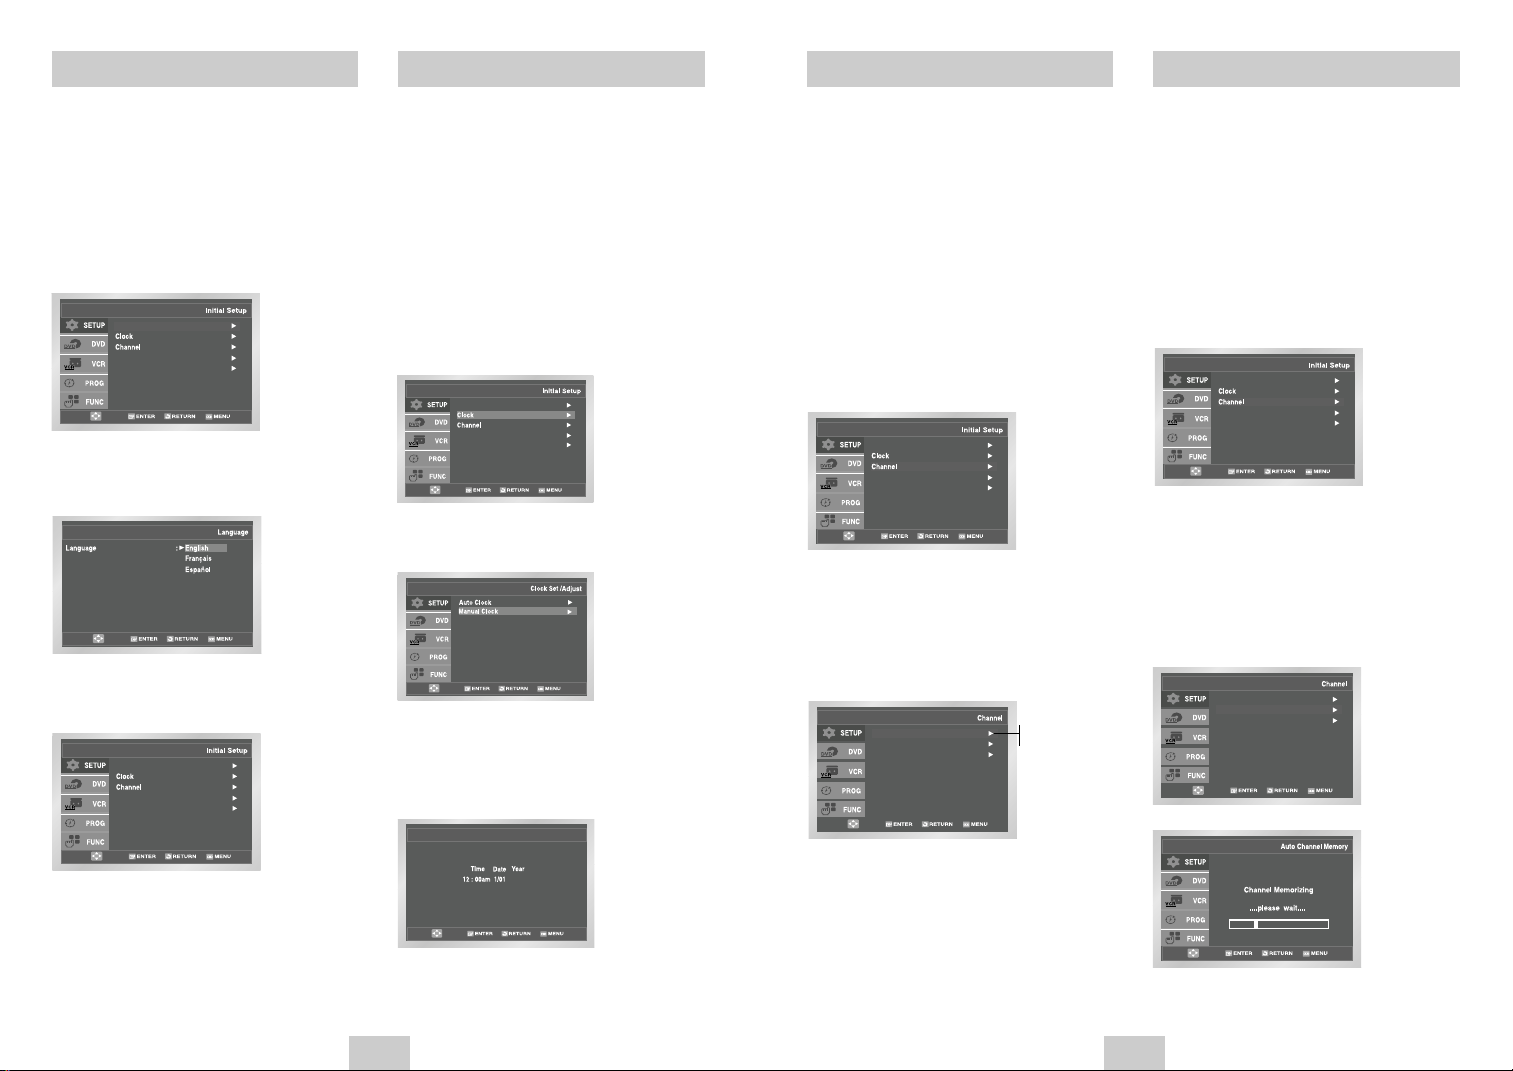
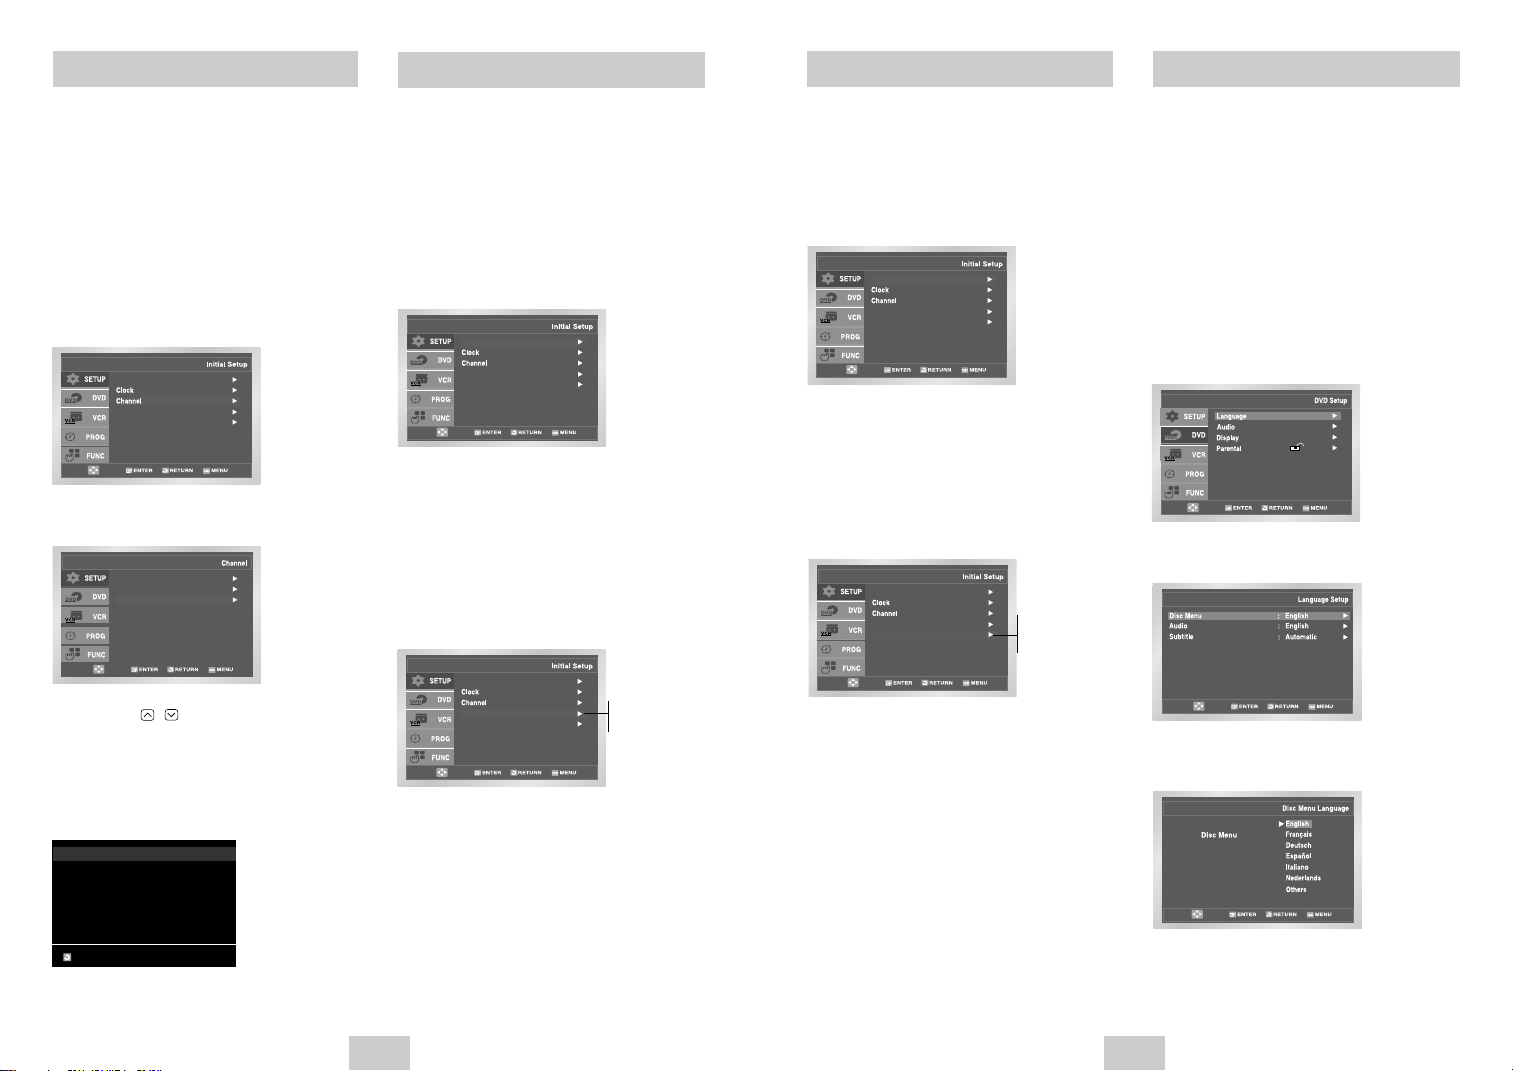
To change the on-screen MENU language to English,
French or Spanish, follow these steps.
1 Open “MENU”
Press the MENU button while the DVD is in Stop or
Play mode.
2 Select “SETUP”
Using the UP/DOWN buttons, move the selection
bar to “SETUP” then press ENTER to select.
3 Select “Language”
Use the UP/DOWN buttons to highlight “Language”
then press the ENTER button.
4 Set menu Language
Place the selection bar next to your desired
Language, then press the ENTER button.
If Auto Setup fails to set the DVD-VCR’s internal clock
by locating a local TV station, follow these steps to set
the date and time manually.
NOTE: For accurate Timer Recording, your DVD-VCR's
internal clock must be set correctly.
1 Open “MENU”
Press the MENU button while the DVD is in Stop or
Play mode.
2 Select “SETUP”
Using the UP/DOWN buttons, move the selection
bar to “SETUP” then press ENTER to select.
3 Select “Clock”
Use the UP/DOWN buttons to highlight “Clock ”
then press the ENTER button.
4 Select “Manual Clock”
Move the highlight to “Manual Clock”, then press
the ENTER button.
• The Clock Set/Adjust menu will change as shown.
5 Set the Clock
Use the LEFT/RIGHT buttons to select each of the
following options, then use the UP/DOWN buttons
to set each option:
• Hour – Set the hour • Month – Set the month.
• Minute – Set the minute. • Day – Set the day.
• Year – Set the year
This feature allows you to manually set the DVD-VCR’s
tuner band to Antenna or Cable, whichever you
connected to the Antenna In jack during initial setup.
• Use this setting only if Auto Setup detected the
incorrect tuner band, i.e. channels are coming in on
the wrong channel numbers.
1 Open “MENU”
With the DVD in Stop or Play mode, press the
MENU button.
2 Select “SETUP”
Using the UP/DOWN buttons, move the selection
bar to “SETUP” then press ENTER to select.
3 Select “Channel”
Using the UP/DOWN buttons, move the selection
bar to “Channel”, then press ENTER to select.
4 Select “Ant./Cable”
Move the selection arrow to “Ant./Cable” then press
right to select from the following options:
• Antenna - Indicates that the DVD-VCR is
connected to an indoor or outdoor VHF/UHF
antenna.
• Cable TV - Indicates that the DVD-VCR is
connected to Cable TV.
Cable TV
Antenna
Auto Channel Memory will automatically seek and store
all active channels in your area.
1 Open “MENU”
With the DVD in Stop or Play mode, press the
MENU button.
2 Select “SETUP”
Using the UP/DOWN buttons, move the selection
bar to “SETUP” then press ENTER to select.
3 Select “Channel”
Using the UP/DOWN buttons, move the selection
bar to “Channel”, then press ENTER to select.
4 Run “Auto channel memory”
Move the selection arrow to “Auto Channel
Memory,” then press ENTER to select.
• The DVD-VCR will automatically search for all
available channels in the selected Tuner Band.
This procedure may take a few minutes to
complete.
• When finished, the lowest channel found will be
displayed.
6 Confirm Settings
Press the RETURN button to confirm your clock
settings and to return to the Clock Set/Adjust.
• Press the RETURN button three times to exit the
menu.
ENG-12 ENG-13
Front Display : Auto
Auto Power Off : Off
Language : English
Language : English
Front Display : Auto
Auto Power Off : Off
Channel Add/Delete
Ant./Cable : Cable TV
Auto Channel Memory
Channel Add/Delete
Language : English
Front Display : Auto
Auto Power Off : Off
Language : English
Front Display : Auto
Auto Power Off : Off
Front Display : Auto
Auto Power Off : Off
Language : English
Front Panel Dimmer
Auto Power Off
Disc Menu Language
Use this feature if Auto Channel Search missed a
channel that you would like to add, delete a channel
you wish to remove.
1 Open “MENU”
With the DVD in Stop or Play mode, press the
MENU button.
2 Select “SETUP”
Using the UP/DOWN buttons, move the selection
bar to “Setup” then press ENTER to select.
3 Select “Channel”
Using the UP/DOWN buttons, move the selection
bar to “Channel”, then press ENTER to select.
4 Select “Channel Add/Delete”
Move the selection bar to “Channel Add/Delete,”
then press ENTER to select.
5 Select Channel to Add/Delete
Use the CH / buttons to tune in the channel
number you wish to add or delete.
6 Select “Channel Add/Delete”
Press right button to add or press left button to
delete the channel from your channel list.
• Repeat steps 4 and 5 to add or delete additional
channels.
CHANNEL ADD/DELETE
Select channel : [02]
You can set the Front Panel Display to be bright all the
time, dim all the time, dim during power off.
1 Open “ MENU”
With the DVD in Stop or Play mode, press the
MENU button.
2 Select “SETUP”
Using the UP/DOWN buttons, move the selection
bar to “Setup” then press ENTER to select.
3 Set “Front Display”
Move the selection bar to “Front Display,” then
press right button to select from the following
options:
• Auto – Front Panel Display will dim automatically
during power off.
• Bright – Front Panel Display will be bright all the
time.
• Dim – Front Panel Display will be dim all the time.
Auto
Bright
Dim
1 Open “MENU”
With the DVD in Stop or Play mode, press the
MENU button.
2 Select “SETUP”
Using the UP/DOWN buttons, move the selection
bar to “SETUP” then press ENTER to select.
3 Set “Auto Power Off”
Move the selection bar to “Auto Power Off”, then
press right button to select from following options:
• Off – Auto power off is disabled.
• 1Hr – DVD-VCR will auto shut off 1 hour after the
last button is pressed.
• 2Hr – DVD-VCR will auto shut off 2 hours after
the last button is pressed.
Off
1Hr
2Hr
To set the Disc Menu Language to your preferred
language, follow these steps. If your preferred language
is available on a DVD, your Disc Menu Language will
automatically be set to the language you choose.
1 Open “MENU”
Press the MENU button while the DVD is in Stop
mode.
2 Select “DVD”
Use the UP/DOWN buttons to highlight “DVD”, then
press the ENTER button.
3 Select “Language”
Move the selection bar to “Language” then press
ENTER to select.
4 Select “Disc Menu”
Highlight “Disc Menu”, then press the ENTER
button.
5 Set “Disc Menu Language” Preference
Highlight your preferred language for disc menus,
then press the ENTER button.
and press [❿] to ADD
press [➛] to DELETE
RETURN CH
❷
ENG-14 ENG-15

PCM Down Sampling : On
PCM Down Sampling : On
Audio Language
Subtitle
Subtitle Language
Automatic
Subtitle Language
Digital Output
DTS
To set the Audio Language to your preferred language,
follow these steps. If your preferred language is
available on a DVD, your Audio Language will
automatically be set to the language you choose.
1 Open “MENU”
Press the MENU button while the DVD is in Stop
mode.
2 Select “DVD”
Use the UP/DOWN buttons to highlight “DVD” then
press the ENTER button.
3 Select “Language”
Move the selection bar to “Language” then press
ENTER to select.
4 Select “Audio”
Highlight “Audio,” then press the ENTER button.
5 Set “Audio Language” Preference
Highlight your preferred language for audio
soundtracks, then press the ENTER button.
To set the Subtitle Language to your preferred language,
follow these steps. If your preferred language is
available on a DVD, your Subtitle Language will
automatically be set to the language you choose.
1 Open “MENU”
Press the MENU button while the DVD is in Stop
mode.
2 Select “DVD”
Use the UP/DOWN buttons to highlight “DVD”
then press the ENTER button.
3 Select “Language”
Move the selection bar to “Language” then press
ENTER to select.
4 Select “Subtitle”
Highlight “Subtitle”, then press the ENTER button.
5 Set “Subtitle Language” Preference
Highlight your preferred language for subtitles, then
press the ENTER button.
If your A/V receiver is equipped with a Dolby Digital
decoder, your DVD-VCR can output Dolby Digital 5.1
sound, but you MUST enable this feature in the menu
system to prevent damage to your speakers.
NOTE: Select “Bitstream” ONLY if you have connected
a Dolby Digital-equipped A/V receiver to the
Digital Output (coaxial) on the DVD-VCR rear
panel.
1 Open “MENU”
Press the MENU button while the DVD is in Stop
mode.
2 Select “DVD”
Use the UP/DOWN buttons to highlight “DVD”
then press the ENTER button.
3 Select “Audio”
Highlight “Audio”, then press the ENTER button.
4 Set “Digital Output”
Highlight “Digital Output” then press the RIGHT
button to select one of the following options:
• PCM – To use your DVD/TV with an A/V
receiver without a Dolby Digital
decoder.
• Bitstream –To use your DVD/TV with an A/V
receiver with a Dolby Digital decoder.
PCM
Bitstream
If your A/V receiver is equipped with a DTS decoder,
your DVD-VCR can output DTS digital sound, but you
MUST enable this feature in the menu system.
NOTE: Select “On” ONLY if you have connected a
DTS-equipped A/V receiver to the Digital audio
Out (coaxial) on the DVD-VCR rear panel.
1 Open “MENU”
Press the MENU button while the DVD is in Stop
mode.
2 Select “DVD”
Use the UP/DOWN buttons to highlight “DVD”
then press the ENTER button.
3 Select “Audio”
Highlight “Audio”, then press the ENTER button.
4 Set “DTS”
Highlight “DTS” then press the RIGHT button to
select one of the following options:
• Off – To use your DVD/TV with an A/V receiver
NOT equipped with a DTS decoder.
• On – To use your DVD/TV with an A/V receiver
equipped with a DTS decoder
Off
On
ENG-16 ENG-17

On
Display Setup
Display Setup
Dynamic Compression
PCM Down Sampling : On
Off
On
On
PCM Down Sampling : On
PCM Down Sampling
TV Aspect Ratio
Black Level
Dynamic Compression restrains the dynamic range of
sounds, i.e. the difference between the loud and quiet
passages of a DVD audio track.
1 Open “MENU”
Press the MENU button while the DVD is in Stop
mode.
2 Select “DVD”
Use the UP/DOWN buttons to highlight “DVD”
then press the ENTER button.
3 Select “Audio”
Highlight “Audio”, then press the ENTER button.
4 Set “Dynamic Compression”
Highlight “Dynamic Compression”, then press the
RIGHT button to select one of the following options:
• On – This will compress the total dynamic range
of the DVD audio, making quiet passages
in the audio signal louder and loud
passages softer.
• Off – This will preserve the original dynamic
range.
On
Off
If your amplifier is not capable of reproducing a 96kHz
signal, PCM downsampling should be set to on.
1 Open “MENU”
Press the MENU button while the DVD is in Stop
mode.
2 Select “DVD”
Use the UP/DOWN buttons to highlight “DVD ”
then press the ENTER button.
3 Select “Audio”
Highlight “Audio”, then press the ENTER button.
4 Set “PCM Down Sampling”
Highlight “PCM Down Sampling”, then press the
RIGHT button to select one of the following options:
• On – When a 96K audio disc is played, 96K will
be downsampled to 48K and outputted.
• Off – When a 96K disc is played, 96K will be
outputted.
On
Off
Set the aspect ratio (length x width) of your TV screen
so the DVD player will display movies at the
appropriate size for your television. Choose from
standard, letterbox, or widescreen format.
1 Open “MENU”
Press the MENU button while the DVD is in Stop
mode.
2 Select “DVD”
Use the UP/DOWN buttons to highlight “DVD”
then press the ENTER button.
3 Select “Display”
Highlight “Display”, then press the ENTER button.
4 Set “TV Aspect”
Highlight “TV Aspect” then press the RIGHT button
to select one of the following options:
• Widescreen - This method allows you to view the
full 16:9 picture on a widescreen television.
• Letterbox - This method displays the full width of
the widescreen movie on a standard 4:3
television. As a result, black bars will appear at
the top and bottom of the screen.
• Pan-Scan - The familiar way of watching DVD and
VHS movies, this method selectively crops (by
panning and scanning to keep the most important
part of the picture visible) wide screen movies to
fit a standard 4:3 television screen.
The Black Level feature adjusts the reference level of
black in the video signal to one of two choices:
• Off - Standard NTSC black level. Yields
consistent contrast through all sources.
• On - Enhanced black level, for increased contrast
during DVD playback.
1 Open “MENU”
Press the MENU button while the DVD is in Stop
mode.
2 Select “DVD”
Use the UP/DOWN buttons to highlight “DVD ”
then press the ENTER button.
3 Select “Display”
Highlight “Display”, then press the ENTER button.
4 Set “Black Level”
Highlight “Black Level,” then press the RIGHT
button to select one of the following options:
• On – This will enhance the Black Level for
increased brightness/contrast when
viewing DVDs.
• Off – This is the Standard NTSC reference Black
Level for consistent brightness/contrast
across all sources.
On
Off
ENG-18 ENG-19
No
0~9
Yes
Alt Video Out
On
Display Setup
Parental
The “Alt Video Out” option must be set in the onscreen menu if you have connected your DVD-VCR to a
TV using the S-VIDEO OUT or COMPONENT VIDEO
OUT jacks.
• Use the S-Video or Component Video connection
method only for the DVD player. The tuner and
VCR can still be viewed through the RF or line
outputs.
1 Open “MENU”
Press the MENU button while the DVD is in Stop
mode.
2 Select “DVD”
Use the UP/DOWN buttons to highlight “DVD,”
then press the ENTER button.
3 Select “Display”
Highlight “Display”, then press the ENTER button.
4 Set “Alt Video Out”
Highlight “Alt Video Out,” then press the RIGHT
button to select one of the following options:
• S-Video - Select this if you are using the S-Video
OUT jack on the rear panel to connect to a TV.
• Component - Select this if you are using the
COMPONENT VIDEO OUT jacks on the rear
panel to connect to a Progressive(480p) or
Interlaced (480i) TV.
• See your TV owner’s manual to determine what
type of TV you have.
- Interlace : Interlaced Scan mode will work.
- Progressive : Progressive Scan mode will work,
and Video and S-Video will not work.
• Press the Progressive button on the front panel if
you have a Progressive scan TV only. Otherwise,
the picture will be disturbed.
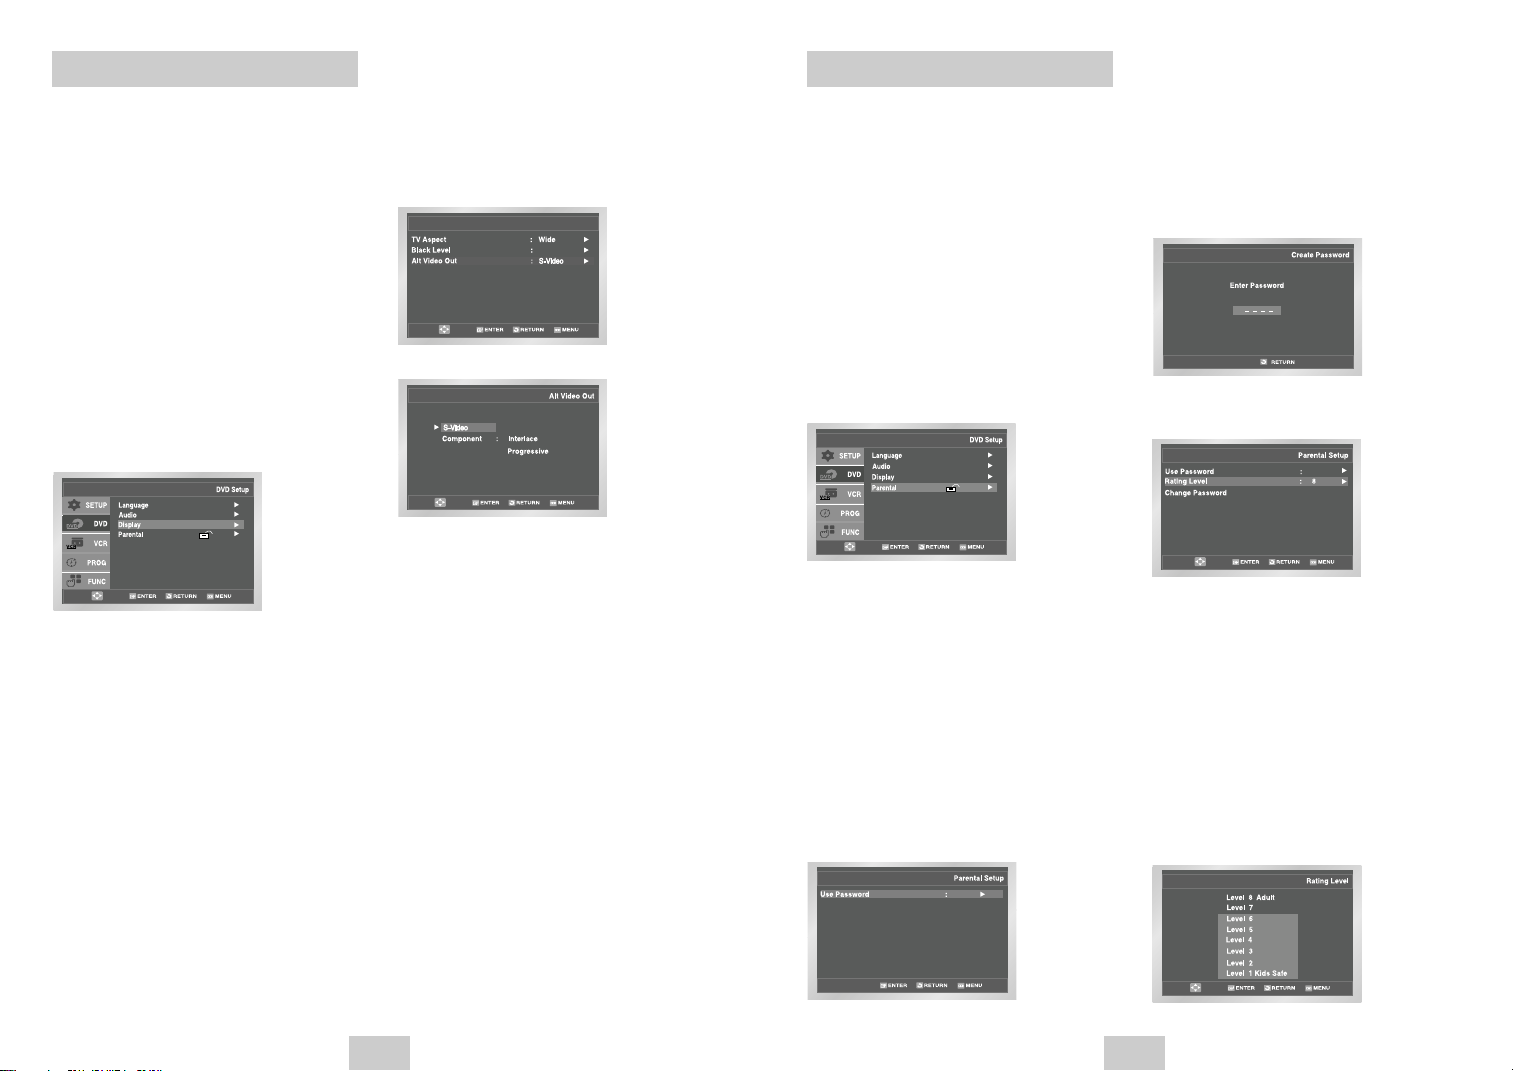
Rating Control is a password protected system that
allows you to block playback of DVDs based on their
content. The system uses an eight level rating system.
• If you try to play a DVD that exceeds the selected
rating, an error message will appear.
• Not all discs are rated.
1 Open “MENU”
Press the MENU button while the DVD is in Stop
mode.
2 Select “DVD”
Use the UP/DOWN buttons to highlight “DVD ”
then press the ENTER button.
3 Select “Parental”
Highlight “Parental”, then press the ENTER button.
4 Select “Use Password”
Press the RIGHT button to select one of the
following options:
• No - No password is necessary to view a DVD or
to change the Rating Level. No additional
settings are necessary.
• Yes - A password is necessary to view a DVD and
to view the Rating Level. The menu will
change as shown.
NOTES:
• The first time “Use Password” is set to “No,”
you will be prompted to enter a new password.
• If the “Enter Password” screen appears, then
“Use Password” has already been set to
“Yes.” Please skip to Step 6.
• There is no default password.
5 Enter Password
Use the numeric buttons (0-9) on the remote
control to enter the 4-digit password.
• Write your password down, and keep it in a safe
place in case you need to change your settings
later.
6 Select “Rating Level”
Move the selection bar to “Rating Level,” then
press ENTER to select.
7 Change Rating Level
Use the UP/DOWN buttons to select one of the
following ratings:
• Level 8 Adult • Level 4
• Level 7 • Level 3
• Level 6 • Level 2
• Level 5 • Level 1 Kids Safe
All ratings above the level you select will also be
blocked, e.g., if you select Level 6, then Levels 7
and 8 will also be blocked.
Press Enter to confirm your selection.
• If you forgot your password, press power on from
a cold start with no disc in the unit. Press the REW
and F.F buttons simultaneously on the front panel
for 5 seconds. The “Reset Ok” message will appear.
Press the POWER button.
ENG-20 ENG-21
 Loading...