

Samsung DVD-V1000 Owner’s Manual
DVD-VIO00
Instruction Manual
VIDEO
_ Hi-Fi
www.samsungasc.com
Important Safety Instructions
WARNING:
TO reduce the risk of fire or electric shock, do not
expose this appliance to rain or moisture. Do not
open the cabinet; dangerous high voltage is present.
Refer servicing to qualified personnel only. This
DVD-VCR should only be used with 120V, 60Hz
(standard U.S. household) current.
WARNING:
TO AVOID HAZARDOUS EXPOSURE TO
INVISIBLE LASER RADIATION, DO NOT OPEN
OR REMOVE/DEFEAT LASER TRANSPORT
PROTECTIVE HOUSING.
USER/INSTALLER CAUTION:
Your authority to operate this FCC certified
equipment could be voided if you make changes or
modifications not expressly approved by the
manufacturer, who is responsible for compliance
with Part 15 ECC rules.
NOTE TO CATV SYSTEM INSTALLER:
This reminder is provided to call the CATV system
installer's attention to Article 820-40 of the
National Electronic Code that provides guidelines
for proper grounding and, in particular, specifies
that the cable ground shall be connected to the
grounding system of the building, as close to the
)oint of cable entry as practical.
CAU_ON: TO REDUCE 1HEBSK OF ELECTRIC SHOCK
DO NOT REMOVE COVER
NO USER-SERMCEABLE PARI_ INSIDE
REFER sIErN1CING TO QUAUFIED SERVICE PERSONNEL
the user to the presence of
//_ This symbol is intended to alert
uninsulated dangerous voltage
within the product's enclosure
that may be of sufficient
magnitude to constitute risk of
fire or electric shock.
the user to the presence of
//_ This symbol is intended to alert
important operating and
maintenance instructions in the
literature accompanying this
product.
Copy Notification
Federal law provides severe civil and criminal
penalties for the unauthorized reproduction,
distribution, or exhibition of copyrighted motion
pictures and videotapes. (Title 17, United States
Code, Sections 501 and 506).
Macrovision Notification
This product incorporates copyright protection
technology that is protected by method claims of
certain U.S. patents and other intellectual property
rights owned by Macrovision Corporation and other
rights owners. Use of this copyright protection
technology must be authorized by Macrovision
Corporation, and is intended for home and other
limited viewing uses only unless otherwise
authorized by Macrovision Corporation. Reverse
engineering or disassembly is prohibited.
CAUTION:
TO prevent fire, shock hazard, or annoying
interference, use only the recommended
accessories. To prevent electric shock, do not use
this (polarized) plug with an extension cord,
receptacle, or other outlet unless the blades can be
fully inserted to prevent blade exposure. To reduce
the risk of electric shock, do not remove the unit
cover or back. There are no serviceable parts
inside. Refer servicing to qualified personnel only.
CUIDADO:
Para prevenir incendio, riesgo de choque, o
interferencia enfadosa, use solamente los
accesorios recomendados. Para prevenir
electrochoque, no use este enchufe (potarizado)
con un cordon de extension, toma de corriente, o
cualquier otra toma a menos que los dientes
puedan set completamente insertados para prevenir
exposiciOn de los dientes. Para reducir et riesgo de
descarga electrica, no remueva la cubierta o la
parte posterior del equipo. Dentro del equipo no
hay partes que requieren servicio. Dirijase
solamente a personal calificado cuando requiera
servicio.
ATTENTION:
Pour eviter les incendis, risque de chocs, ou
interferences fScheuses, employer seulement les
accessoires recommandes. Pour eviter les chocs
electriques, ne pas employer cette prise (polarisee)
avec une rallonge, une prise de courant ou une
autre sortie de courant _ moins que les lames
peuvent etre inserees 8 fond pour l'exposition des
lames. Pour reduire les risques de chocs
electriques, ne pas retirer le couvercle ou l'arriere
du module. II n'y a pas de piece utilisable
I'interieur. Ne faire effectuer Fentretien que par un
personnel qualifie.
1. READ INSTRUCTIONS - All the safety and operating instructions should be read before the DVD-VCR is operated.
2. RETAIN INSTRUCTIONS - The safety and operating instructions should be retained for future reference,
3. HEED WARNIr'JGS - All warnings on the DVD-VCR and in the operating instructions should be adhered to.
4. FOLLOW II_ISTRUCTIONS - All operating and maintenance instructions should be followed.
5. CLEANII_JG - Unplug this DVD-VCR from the wall outlet before cleaning. Do not use liquid or aerosol cleaners. Use
a dry cloth for dusting cabinet.
6. ATTACHMENTS - Do not use attachments not recommended by the product manufacturer, as they may be
hazardous,
7. WATER & MOISTURE - DO not use this DVD-VCR near water--for example, near a bathtub, wash bowl, kitchen
sink, laundry tub, in a wet basement, near a swimming pool or the like.
8. ACCESSORIES - Do not place this DVD-VCR on an unstable cart, stand, tripod, bracket or table, The DVD-VCR may
fall, causing serious injury to a child or adult, and serious damage to the unit. Use only with a cart, stand, tripod,
bracket or table recommended by the manufacturer or sold with the DVD-VCR. Any mounting of the unit should
follow the manufacturer's instructions and should use a mounting accessory recommended by the manufacturer,
8a. An appliance and cart combination should be moved with care. Quick stops, excessive force, and uneven surfaces
may cause the appliance and cart combination to overturn.
9. VENTILATION - Slots and openings in the cabinet are provided for ventilation to ensure reliable operation of the
DVD-VCR and to protect it from overheating, These openings must not be blocked or covered. Never place your
VCR on a bed, sofa, rug or other similar surface, on or near a radiator or heat register, This DVD-VCR should not be
placed in a built-in installation such as a bookcase or rack unless proper ventilation is provided or the
manufacturer's instructions have been adhered to.
10. POWER SOURCES - This DVD-VCR should be operated only from the type of power source indicated on the
marking label. If you are not sure of the type of power supply to your home consult your appliance dealer or local
power company,
11. GROUNDING OR £OLARIZATIOF; - This DVD-VCR may be equipped with either a polarized 2-wire AC line plug
(a plug having one blade wider than the other) or a 3-wire grounding plug having a third (grounding) pin.
The 2-wire polarized plug will fit into the power outlet only one way. This is a safety feature, If you are unable to
insert the plug fully into the outlet try reversing the plug. If the plug still fails to fit, contact your electrician to replace
your obsolete Outlet. Do not defeat the safety purpose of the polarized plug.
12. POWER-CORD PROTECTION - Power-supply cords should be routed so that they are not likely to be walked on or
pinched by items placed upon or against them, paying particular attention to cords of plugs, convenience
receptacles, and the point where they exit from the DVD-VCR.
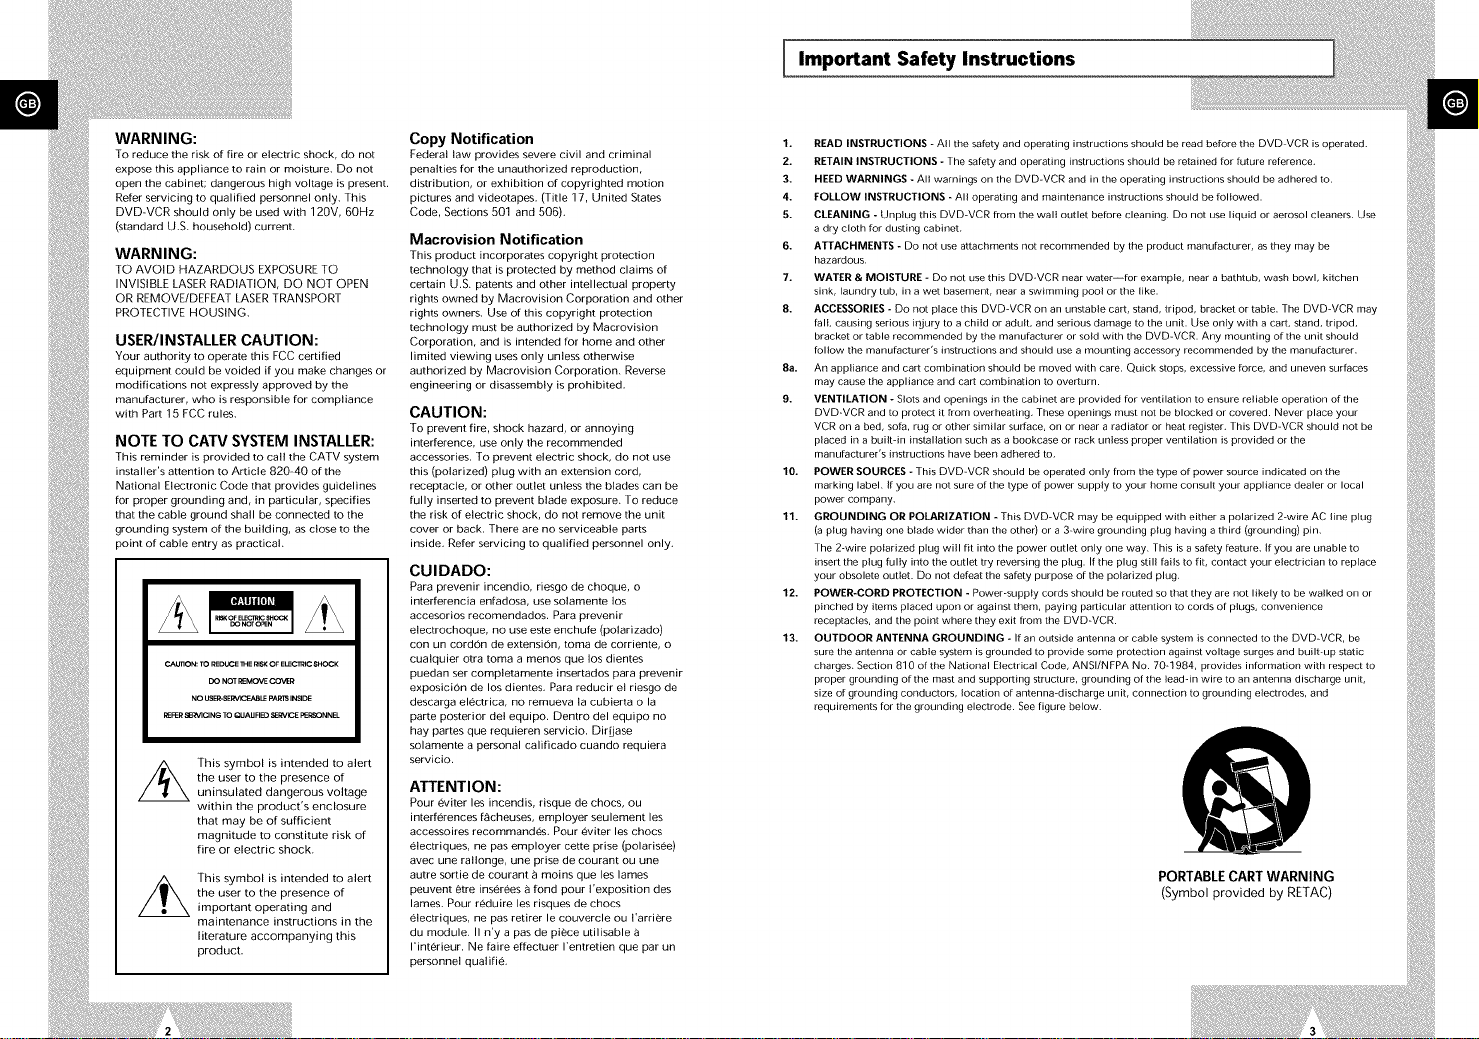
13. OUTDOOR ANTENNA GROUNDING - If an outside antenna or cable system is connected to the DVD-VCR, be
sure the antenna or cable system is grounded to provide some protection against voltage surges and built-up static
charges. Section 810 of the National Electrical Code, ANSI/NFPA No. 70-1984, provides information with respect to
proper grounding of the mast and supporting structure, grounding of the leaddn wire to an antenna discharge unit,
size of grounding conductors, location of antenna-discharge unit, connection to grounding electrodes, and
requirements for the grounding electrode. See figure below.
PORTABLE CART WARNING
(Symbol provided by RETAC)
14. LIGHTNING - For added protection of this DVD-VCR during a lightning storm, or when it is lelt unattended and
unused for long periods of time, unplug it from the wall outlet and disconnect the antenna or cable system. This
will prevent damage to the DVD-VCR due to lightning and power line surges.
15. POWER LINES - An outside antenna system should not be located in the vicinity of overhead power lines or other
electric light or power circuits, where it can fall into such power lines or circuits. When installing an Outside
antenna system extreme care should be taken to keep from touching such power lines or circuits as contact with
them might be fatal.
16. OVERLOADING - Do not overload wall outlets and extension cords as this can result in the risk of fire or electric
shock.
17. OBJECTS AND LIQUIDS - Never push objects of any kind into this DVD=VCR through openings as they may touch
dangerous voltage points or short Out parts that could result in a fire or electric shock. Never spill liquids of any
kind onto the unit. Should spillage Occur, unplug the DVD-VCR and have it checked by a technician before use.
18. SERVICING - Do not attempt to service this DVD-VCR yourself as opening or removing covers may expose you to
a dangerous voltage or other hazards. Refer all servicing to qualified service personnel.
19. DAMAGE REQUIRIr'JG SERVICE - Unplug this DVD-VCR from the wall outlet and refer servicing to qualified
service personnel under the following conditions:
a. When the power supply cord or plug is damaged.
b. If any liquid has been spilled onto or objects have fallen into the DVD-VCR<
c. If the DVD-VCR has been exposed to rain or water.
d. If the DVD-VCR does not operate normally by following the operating instructions. Adjust only those controls
that are covered by the operating instructions. Improper adjustment of other controls may result in damage and
will often require extensive work by a qualified technician to restore the DVD-VCR to its normal operation.
e. If the DVD-VCR has been dropped or the cabinet has been damaged.
f. When the DVD-VCR exhibits a distinct change in performanceithis indicates a need for service.
20. REPLACEMENT PARTS - When replacement parts are required, be sure the service technician has used
replacement parts specified by the manufacturer or those having the same characteristics as the original part.
Unauthorized substitutions may result in fire, electric shock or other hazards.
21. SAFETY CHECK - Upon completion of any service or repairs to this DVD-VCR ask the service technician to perform
safety checks to determine that the DVD-VCR is in safe operating order.
22. HEAT - This DVD-VCR should be situated away from heat sources such as radiators, stoves, or other products
(including amplifiers) that produce heat.
Table of Contents
Safety ..................................................... 3
• Important Safety Instructions ....................................... 3
Welcome ................................................... 8
• Feature Summary ............................................... 8
• Unpacking ..................................................... 8
1 - System Overview .......................................... 9
• Front Panel Overview ............................................. 9
• Rear Panel ..................................................... 9
• Remote Control Overview ......................................... 10
• Insert Remote Control Batteries ..................................... 10
• Front Panel Display .............................................. 11
2 - Getting Started ........................................... 12
• Basic Connections ............................................... 12
• Auto Setup ..................................................... 13
3 - Basic Operation ........................................... 14
• Deck Control Buttons ............................................. 14
• Basic DVD Playback ............................................. 14
• BasicVHS Playback ............................................. 15
• Basic TV Tuner Operations ........................................ 16
4 - System Setup ................................................. 16
• On-Screen Menu Navigation ....................................... 16
• Menu Language ................................................. 17
• Manual Clock Set ................................................ 18
• Daylight Savings Time ............................................ 19
• Time Zone ..................................................... 20
• Auto Clock Set Channel ........................................... 21
• Tuner Band Setting .............................................. 22
• Auto Channel Search ............................................. 23
• Add/Remove Channels ........................................... 24
• ShowWeak Channels ............................................ 25
• Tuner Audio .................................................... 26
• Child Lock ..................................................... 26
• Front Panel Dimmer .............................................. 27
5 - DVD Setup ............................................... 27
• TV Aspect Ratio ................................................. 27
• Still Mode ...................................................... 28
• Black Level ..................................................... 28
• Audio Language ................................................. 29
• Subtitle Language ............................................... 30
• Disc Menu Language ............................................. 31
• Dynamic Compression ............................................ 32
• Rating Control Settings ........................................... 33
• Changing the Rating Control Password ............................... 34

Table of Contents ] I Table of Contents
• 6 - DVD Sound Setup ......................................... 35
• A/V Receiver Connections ......................................... 35
• Dolby Digital Decoder Setting ...................................... 36
• DTS Decoder Setting ............................................. 37
• 7 - DVD Operations .......................................... 38
• Special Playback Features ......................................... 38
• Disc Menu Navigation ............................................ 39
• Title/ChaptedTime Selection ....................................... 40
• Zoom ......................................................... 41
• Angle ......................................................... 41
• Subtitle ........................................................ 42
• A-B Repeat ..................................................... 43
• Repeat ChaptedTitle ............................................. 44
• Audio ......................................................... 44
• Bookmarks ..................................................... 45
• Programmed Playback ............................................ 46
• Random Playback ............................................... 47
• MP3 Playback .................................................. 47
• 3D Sound ...................................................... 48
• 8 - VCR Playback ............................................ 49
• SpeciatVCR Playback Features .................................... 49
• Tracking ....................................................... 50
• Auto Play/Rewind ................................................ 51
• S-VHS Playback ................................................ 51
• 9 - VCR Recording ........................................... 52
• Basic Recording ................................................. 52
• Special Recording Features ........................................ 53
• One-Touch Recording (OTR) ....................................... 54
• Record Speed .................................................. 55
• Record Source .................................................. 55
• Date/Time Stamp ................................................ 56
• Copying from DVD To VHS ........................................ 57
• Audio Dubbing a Pre-recorded Videocassette .......................... 58
• 10 - Timer Recording ......................................... 59
• How to Set a Timer Recording ...................................... 59
• Timer Recording Errors/Solutions ................................... 61
• 11 - Search/Index Features .................................... 62
• The Clock/Counter Button ......................................... 62
• Placing Index Marks .............................................. 63
• Index Scan ..................................................... 63
• Index Search ................................................... 64
• Blank Search ................................................... 64
• Direct Time Search .............................................. 65
• Return to 0:00:00 ................................................ 66
• Appendix A - Advanced Connections ............................. 67
• S-Video/Component Video Connections (for DVD) ...................... 67
• AIt Video Out Setting ............................................. 68
• Stereo Connections .............................................. 69
• MonitorTV Connections ........................................... 70
• Connecting Other Video Equipment .................................. 71
• Using the TV Buttons on the Remote Control .......................... 72
• Appendix B - Help ............................................ 73
• Technical Specifications ........................................... 73

Fea,ureSumm.,, I [Fro.,,a.e,Ove,.iew
System Features
• Complete versatility to play DVD, VCDs, audio CDs or VHS Tapes.
Watch a DVD while recording a TV show to the VCR.
Auto Setup automatically sets clock and searches for channels.
A/V switching between TV, VCR and DVD deck with TV view button for ease of use.
Remote controls both DVD and VCR decks.
Composite, S-Video and Component video outputs for Hgh connectivity and optimum performance.
RF inputs and outputs for connection to all TVs-new or old.
Child Lock.
English/French/Spanish on-screen programming.
Records from DVD to VHS (unless DVD is copy protected with Macrovision).
DVD Features
• 10-bit video digital to analog converter and 27MHz advanced digital filter.
• Playback of 96KHz/24-bit sources.
• DTS digital output for DTS-enhanced DVDs.
• Playback MP3 files from CD-ROM
• Continued audio dudng 2x speed playback.
VCR Features
• Hi-Fi Stereo VCR.
• 4 heads for superior slow motion and stop action.
• Playback of S-VHS tapes at better than standard resolution.
• VISS Index Search/Scan, Zero Return, Direct Time Search, Blank Search.
• 16-event/1 year timer recording.
• Time remaining counter, real time counter.
Unpacking
3 14 4 15 5
16 17
1 DVD DECK (p.14) 11 DVD-VCR SELECT(p.14)
2 DVD OPEN/CLOSE (p.14) 12 FRONT PANEL DISPLAY (p.11)
3 VCR DECK(p.14) 13 COPY(p.57)
4 RECORD(p.52) 14 CHANNEL +/-(p.16)
5 VCR EJECT (p.15) 15 LINE 1 COMPOSITE VIDEO JACK
6 POWER(p.14) 16 LINE 1 LEFTAUDIO JACK
7 REWlND/REV (p.38, 49) 17 LINE 1 RIGHT AUDIO JACK
8 PLAY/PAUSE (p.14, 15)
9 STOP (p.38)
10 FAST-FORWARD/FWD(p.38,49)
Rear Panel
I
As you unpack, please check that the following items are included in your DVD-VCR packing case:
DVD-VCR (1)
Warranty/Registration Card (1)
User's Guide (1)
RCA cable for AudioNideo connection (1)
RF (Radio Frequency) Antenna Cable (1)
Remote Control (1)
1.5V "AA" Batteries (2)
_iiiiiiiiiiiiiiiiiiiiiiiiiiiiiiiiiiiiiiiiiiiiiiiiiiiiiiiiiiiiiiiiiiiiiiii_._
.=_IE!iiiiiiii!i;!!iiiiii!iii:;iiil ._
1
1 RF ANTENNA INPUT 7 COMPONENT VIDEO OUT
2 RF OUT TO TV 8 S-VIDEO OUT
3 VCR TUNER CHANNEL SELECTOR 9 DIGITAL AUDIO OUT
4 LINE IN 2 (OPTICAL)
5 LINE OUT TO TV (COMPOSITE) 10 DIGITAL AUDIO OUT(COAXIAL)
6 AUDIO LINE OUT TO TV
(S-VIDEO OR COMPONENT)
10--
11
12--
13
14
15
16--
17
.emo,eCon,.o,Ove.ie. [ [Fron,Pane,Oi.p,.,
1 POWER (p.14)
2 AUTO TRACKING (p.50)
I m
2
3
4
5
6
7
8--
9
SAMSUNG
TRACKING +/- (p.50)
3 SHUTTLE <</>>(p.49)
4 ANGLE (p.41)
5 3DSOUND (p.48)
100+ (p.48)
6 A DUB(p.58)
7 DVD(p.14)
8 TV VIEW (p.14)
INPUT (p.72)
9 VOLUME +/-(p.16)
10 REWIND (p.38,49)
SKIP BACK (p.38, 49)
11 STOP (p.38)
12 RECORD (p.52)
13 DISPLAY/UP (p.16, 40, 49)
14 MODE/LEFT (p.46, 47)
REPEAT (p.43, 44, 49)
15 SETUP (p.16)
ENTER (p.16)
16 TITLE (p.39)
SP/SLP (p.55)
17 SUBTITLE (p.42)
SET TIMER (p.59)
18 OPEN/CLOSE (p.14)
19 o-g (p.16)
20 ZOOM (p.41)
21 TV/VCR (p.16)
22 VCR, TV SELECT (p.72)
23 PREVIOUS CHANNEL (p.16, 72)
24 CHANNEL +/-(p.16)
25 FAST-FORWARD (p.38, 49)
SKIP NEXT (p.38)
26 MENU (p.39)
CLEAR (p.16)
27 PLAY/PAUSE (p.14, 15)
28 SKIP/F.ADV/RIGHT (p.38, 48)
29 CLOCK/COUNTER/DOWN (p.62)
30 MARK (p.45, 63)
SEARCH (p.64)
INDEX (p.63)
31 AUDIO (p.26, 44)
RETURN (p.16)
1 2 3 4
Jovoooo1,o
11 12 13 14 15 16
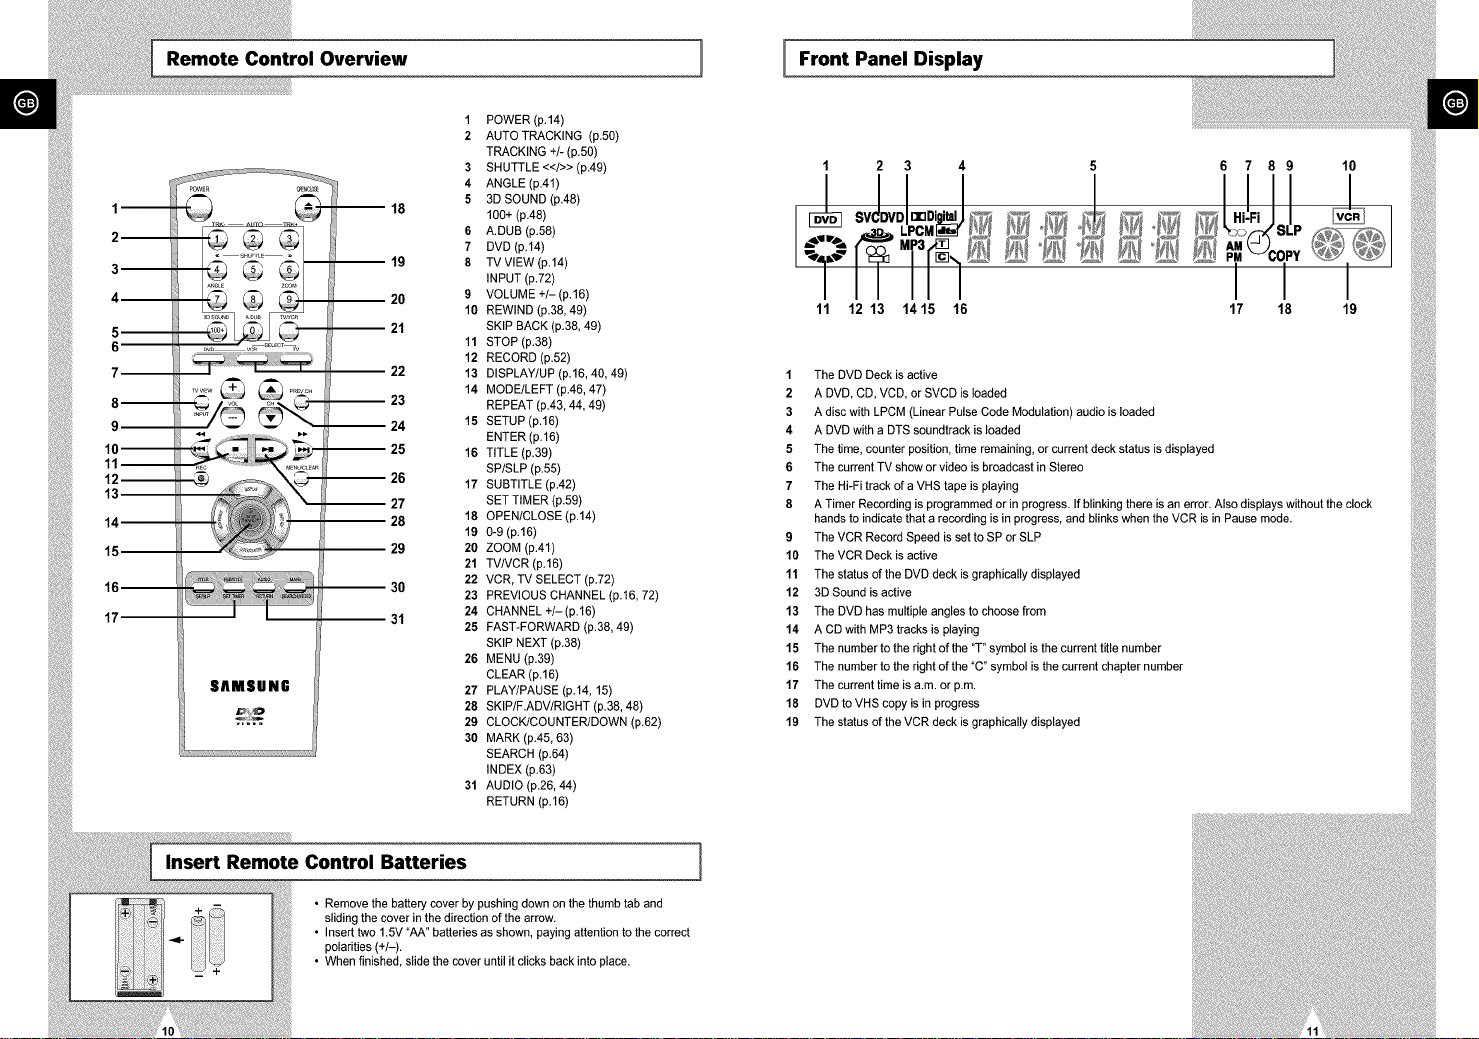
1 The DVD Deck is active
2 A DVD, CD, VCD, or SVCD is loaded
3 A disc with LPCM (Linear Pulse Code Modulation) audio is loaded
4 A DVD with a DTS soundtrack is loaded
5 The time, counter position, time remaining, or current deck status is displayed
6 The current TV show or video is broadcast in Stereo
7 The Hi-Fi track of a VHS tape is playing
8 A Timer Recording is programmed or in progress. If blinking there is an error. Also displays without the clock
hands to indicate that a recording is in progress, and blinks when the VCR is in Pause mode.
9 The VCR Record Speed is set to SP or SLP
10 The VCR Deck is active
11 The status of the DVD deck is graphically displayed
12 3D Sound is active
13 The DVD has multiple angles to choose from
14 A CD with MP3 tracks is playing
15 The number to the right of the "T" symbol is the current title number
16 The number to the right of the "C" symbol is the current chapter number
17 The current time is a.m. or p.m.
18 DVD to VHS copy is in progress
19 The status of the VCR deck is graphically displayed
-
5 6 7 8 9 10
°NN °@ .';%0,, ,
I I I
17 18 19
Insert Remote Control Batteries
• Remove the battery cover by pushing down on the thumb tab and
sliding the cover in the direction of the arrow.
• Insert two 1.5V "AA" batteries as shown, paying attention to the correct
polarities (+/-).
• When finished, slide the cover until it clicks back into place.
E
...i°Co..e°,io.. ] [,.,oSe,.p
From Antenna or Cable
'y,1
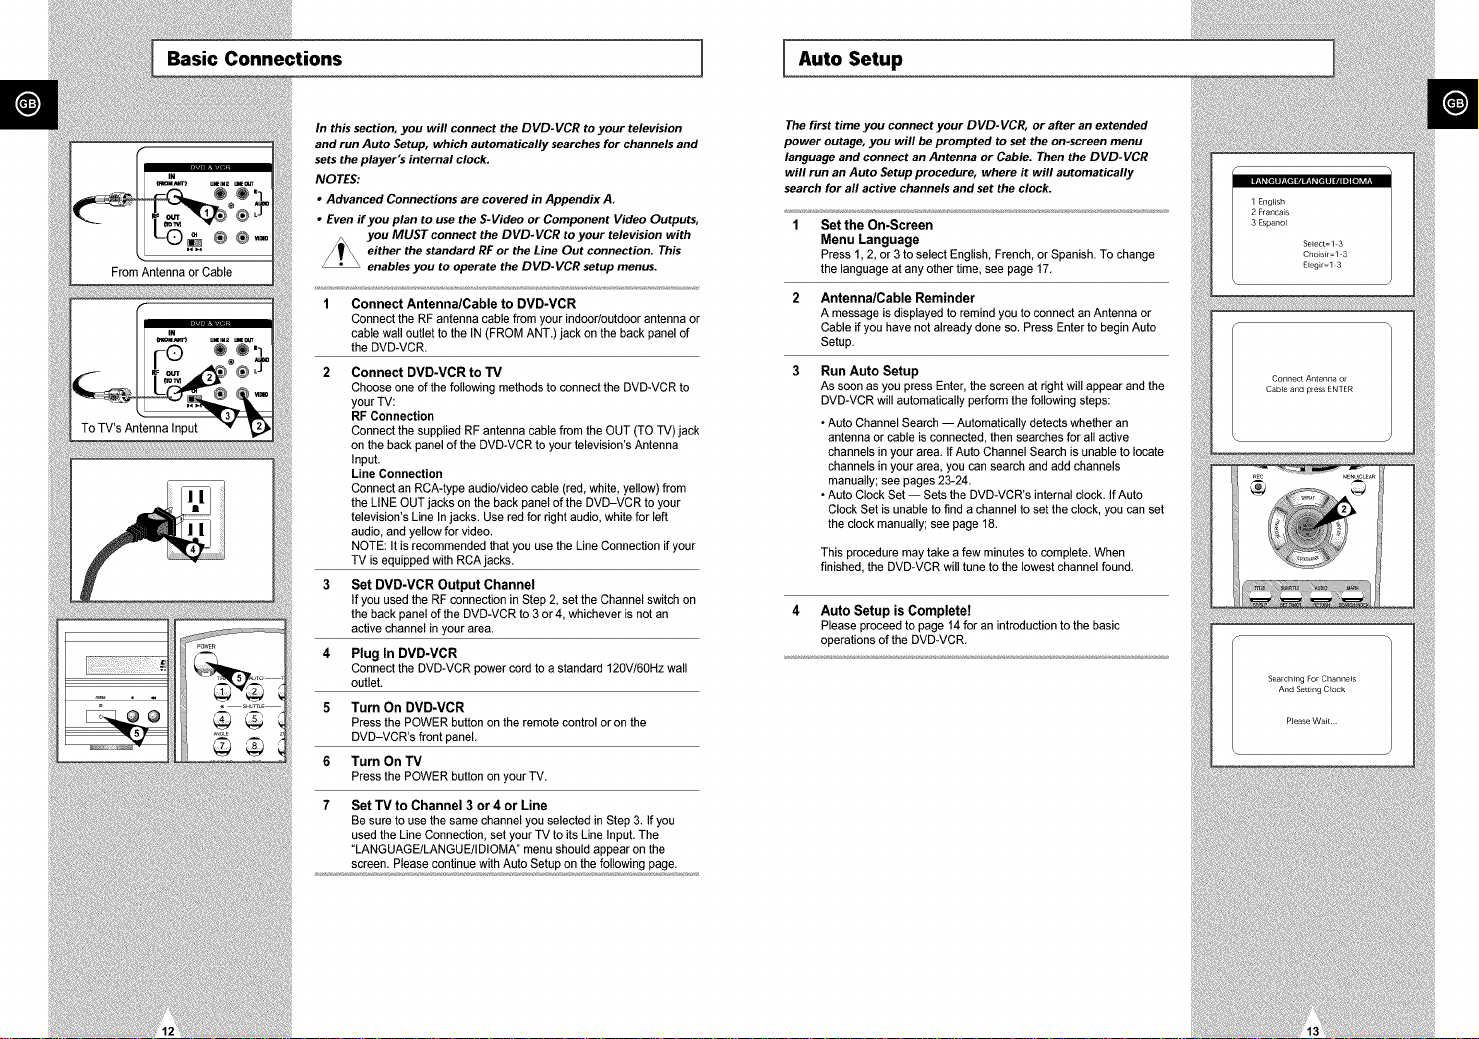
In this section, you will connect the DVD-VCR to your television
and run Auto Setup, which automatically searches for channels and
sets the player's internal clock.
NOTES:
• Advanced Connections are covered in Appendix A,
• Even if you plan to use the S-Video or Component Video Outputs,
you MUST connect the DVD-VCR to your television with
_ ither the standard RF or the Line Out connection, This
enables you to operate the DVD-VCR setup menus.
1 Connect Antenna/Cable to DVD-VCR
Connect the RF antenna cable from your indoor/outdoor antenna or
cable wall outlet to the IN (FROM ANT.) jack on the back panel of
the DVD-VCR.
2 Connect DVD-VGR to TV
Choose one of the following methods to connect the DVD-VCR to
your TV:
RF Connection
Connect the supplied RF antenna cable from the OUT (TO TV) jack
on the back panel of the DVD-VCR to your television's Antenna
Input.
Line Connection
Connect an RCA-type audio/video cable (red, white, yellow) from
the LINE OUT jacks on the back panel of the DVD-VCR to your
television's Line In jacks. Use red for right audio, white for left
audio, and yellow for video.
NOTE: It is recommended that you use the Line Connection if your
TV is equipped with RCA jacks.
3 Set DVD-VCR Output Channel
If you used the RF connection in Step 2, set the Channel switch on
the back panel of the DVD-VCR to 3 or 4, whichever is not an
active channel in your area.
4 Plug In DVD-VGR
Connect the DVD-VCR power cord to astandard 120V/60Hz wall
outlet.
5 Turn On DVD-VGR
Press the POWER button on the remote control oron the
DVD-VCR's front panel.
6 Turn On TV
Press the POWER button on your TV.
7 Set TV to Channel 3 or 4 or Line
Be sure to use the same channel you selected in Step 3. If you
used the Line Connection, set your TV to its Line Input. The
"LANGUAGE/LANGUE/IDIOMA" menu should appear on the
screen. Please continue with Auto Setup on the following page.
The first time you connect your DVD-VCR, or after an extended
power outage, you will be prompted to set the on-screen menu
language and connect an Antenna or Cable. Then the DVD-VCR
will run an Auto Setup procedure, where it will automatically
search for all active channels and set the clock.
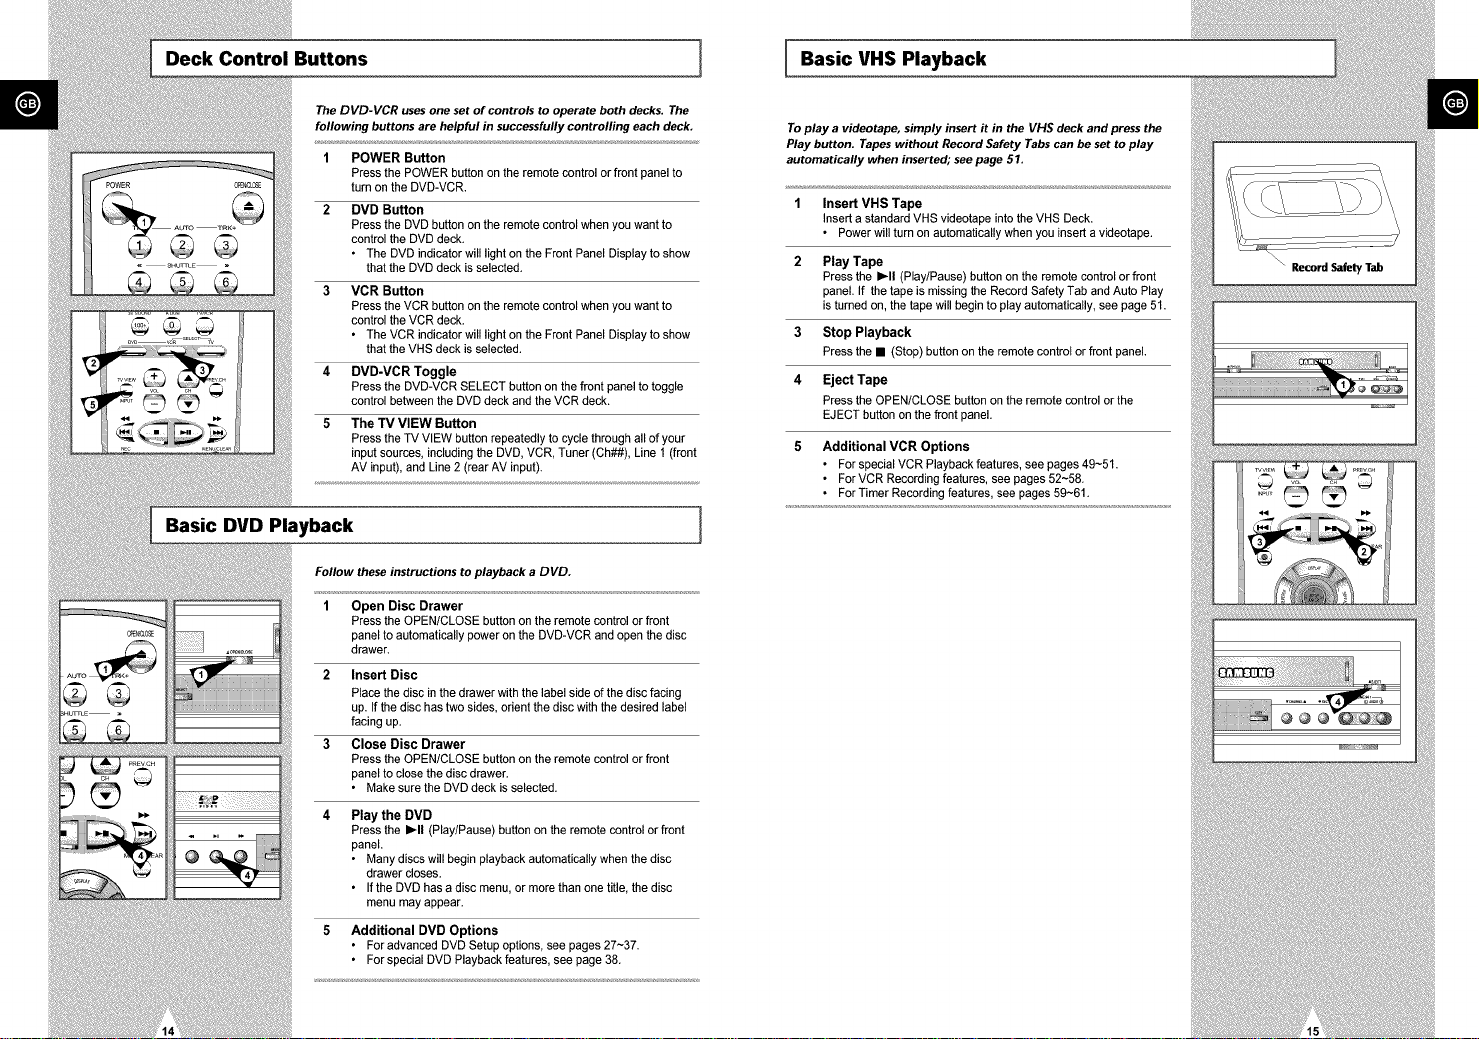
Set the On-Screen
Menu Language
Press 1,2,or 3 to select English,French,or Spanish.To change
the languageat any other time, see page 17.
Antenna/Cable Reminder
A message is displayed to remind you to connect an Antenna or
Cable if you have not already done so. Press Enter to begin Auto
Setup.
Run Auto Setup
As soon as you press Enter, the screen at right will appear and the
DVD-VCR will automatically perform the following steps:
• Auto Channel Search -- Automatically detects whether an
antenna or cable is connected, then searches for all active
channels in your area. If Auto Channel Search is unable to locate
channels in your area, you can search and add channels
manually; see pages 23-24.
• Auto Clock Set -- Sets the DVD-VCR's internal clock. IfAuto
Clock Set is unable to find a channel to set the clock, you can set
the clock manually; see page 18.
This procedure may take a few minutes to complete. When
finished, the DVD-VCR will tune to the lowest channel found.
4 Auto Setup is Complete!
Please proceed to page 14 for an introduction to the basic
operations of the DVD-VCR.
1 English
2 Franca_s
3 Espanol
Connect Antenna or
CaMe and press ENTER
Searching For Channels
And Selling C_ock
Selects1 3
Cho_s_r=l 3
Eleg_r=l 3
AUTO
Oec.Co.,.o,Bu.o.. I [Ba.icV.SP,a.bac.
The DVD-VCR uses one set of controls to operate both decks. The
following buttons are helpful in successfully controlling each deck,
1
2
4
5
Basic DVD Playback
Follow these instructions to playback a DVD.
1 Open Disc Drawer
2 Insert Disc
iiii
3 Close Disc Drawer
4 Play the DVD
5 Additional DVD Options
POWER Button
Press the POWER button on the remote control or front panel to
turn on the DVD-VCR.
DVD Button
Press the DVD button on the remote control when you want to
control the DVD deck.
• The DVD indicator will light on the Front Panel Display to show
that the DVD deck is selected.
VCR Button
Press the VCR button on the remote control when you want to
control the VCR deck.
• The VCR indicator will light on the Front Panel Display to show
that the VHS deck is selected.
DVD-VCR Toggle
Press the DVD-VCR SELECT button on the front panel to toggle
control between the DVD deck and the VCR deck.
The TV VIEW Button
Press the TV VIEW button repeatedly to cycle through all of your
input sources, including the DVD, VCR, Tuner (Ch##), Line 1 (front
AV input), and Line 2 (rear AV input).
Press the OPEN/CLOSE button on the remote control or front
panel to automatically power on the DVD-VCR and open the disc
drawer.
Place the disc in the drawer with the label side of the disc facing
up. If the disc has two sides, orient the disc with the desired label
facing up.
Press the OPEN/CLOSE button on the remote control or front
panel to close the disc drawer.
• Make sure the DVD deck is selected.
Press the I_11 (Play/Pause) button on the remote control or front
panel.
• Many discs will begin playback automatically when the disc
drawer closes.
• If the DVD has a disc menu, or more than one title, the disc
menu may appear.
• For advanced DVD Setup options, see pages 27~37.
• For special DVD Playback features, see page 38.
I
To play a videotape, simply insert it in the VHS deck and press the
Play button. Tapes without Record Safety Tabs can be set to play
automatically when inserted; see page 51,
1 Insert VHS Tape
Insert a standard VHS videotape into the VHS Deck.
• Power will turn on automatically when you insert a videotape.
2 Play Tape
Press the I_11 (Play/Pause) button on the remote control or front
panel. If the tape is missing the Record Safety Tab and Auto Play
is turned on, the tape will begin to play automatically, see page 51.
3 Stop Playback
Press the • (Stop) button on the remote control or front panel.
4 Eject Tape
Press the OPEN/CLOSE button on the remote control or the
EJECT button on the front panel.
5 Additional VCR Options
• For special VCR Playback features, see pages 49~51.
• For VCR Recording features, see pages 52~58.
• For Timer Recerding features, see pages 59~61.
Basic "IV Tuner Operations ] [ Menu Language
The following buttons are used when watching television via the
DVD-VCR's built-in TV tuner,
1 TVNC R
Press to switch between your TV's tuner and the VCR's internal
tuner.
2 Channel Up/Down
Press to change to the next or previous channel.
3 6-9 Buttons
Press to select channels directly.
4 160+ Button
Press to select channels 100 and Hgher. First, press the 100+
button, then press the remaining digits using the 0-9 buttons.
5 Previous Channel
Press to jump directly to the previously viewed channel.
6 Volume
Press to adjust the volume of the program you are watcHng.
• Also works in DVD and VCR mode.
7 Display
Press to display the channel you are watcHng.
• Also works in DVD and VCR mode.
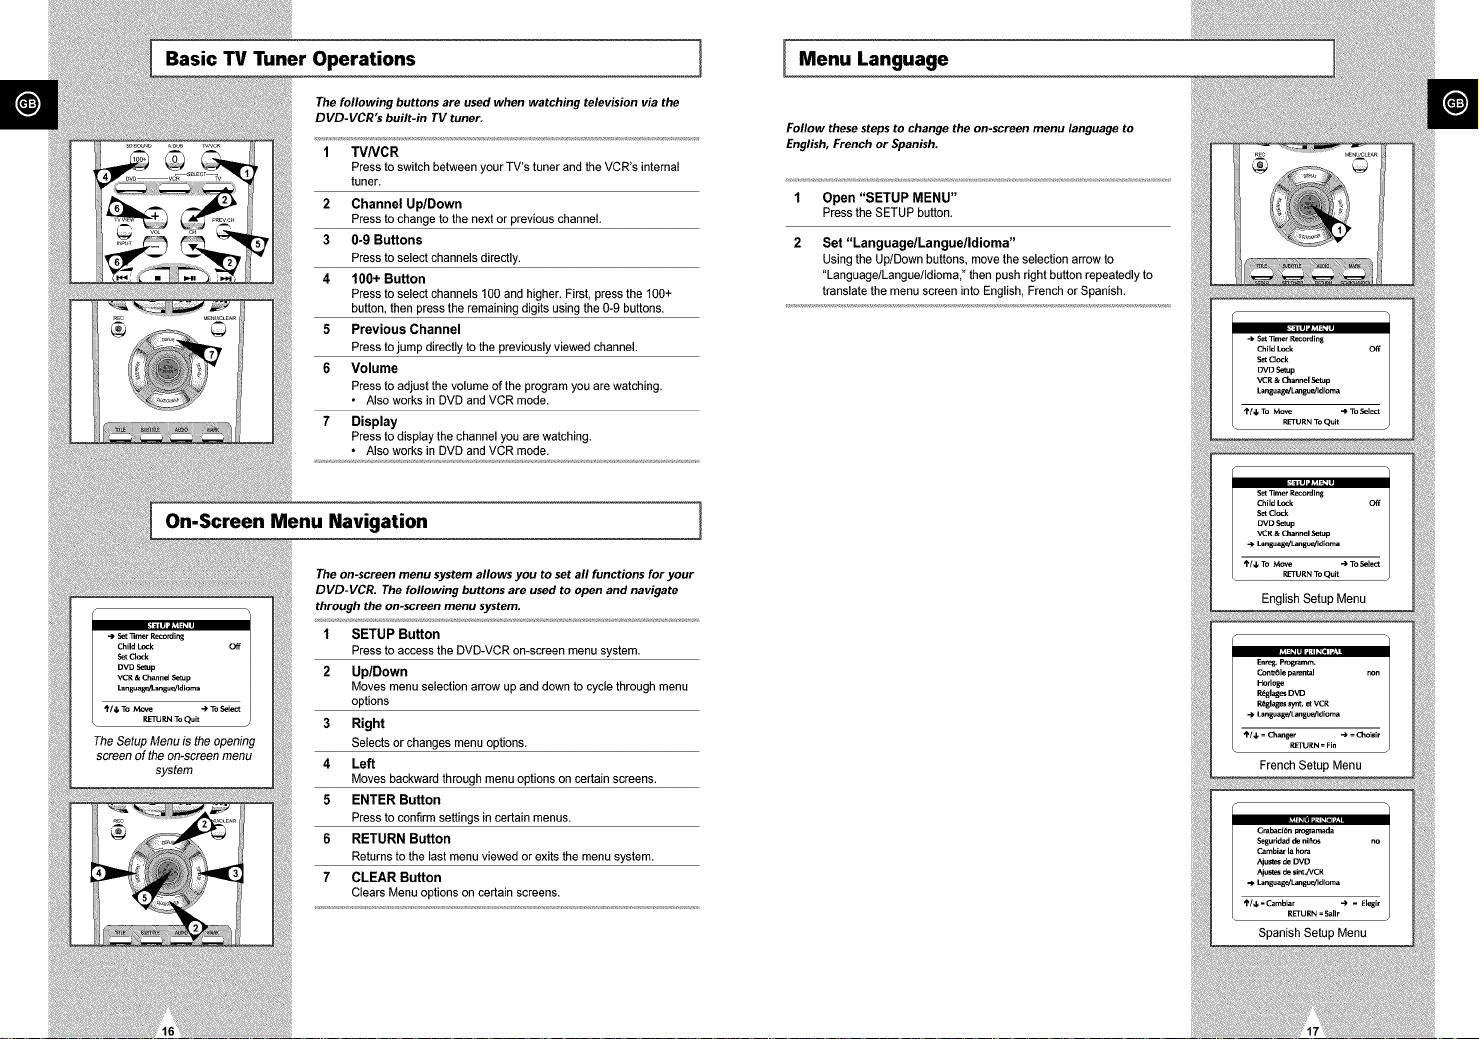
Follow these steps to change the on-screen menu language to
English, French or Spanish.
1 Open "SETUP MENU"
Press the SETUP button.
2 Set "LanguagelLanguelldioma"
Using the Up/Down buttons, move the selection arrow to
"Language/Langue/Idiomai' then push right button repeatedly to
translate the menu screen into English, French or Spanish.
On-Screen Menu Navigation
Set 33mer Recording
Child Lock Off
Set Cl_k
DVD Setup
VCR & Channel Setup
\ RETU Pd_ TO Quit J
The Setup Menu is the opening
screen of the on-screen menu
system
The on-screen menu system allows you to set all functions for your
DVD-VCR. The following buttons are used to open and navigate
through the on-screen menu system.
1 SETUP Button
Press to access the DVD-VCR on-screen menu system.
2 Up/Down
Moves menu selecfion arrow up and down to cycle through menu
options
3 Right
Selects or changes menu options.
4 Left
Moves backward through menu opfions on certain screens.
5 ENTER Button
Press to confirm settings in certain menus.
6 RETURN Button
Returns to the last menu viewed or exits the menu system.
7 CLEAR Button
Clears Menu options on certain screens.
I

Manual Clock Set 1 I Daylight Savings Time
SetCl_k
DVDSetup
VCR & ChannelSetup
Languag_Langu_ldi_a
_/_ To Move _ To Select
RETURN ToQuK
F
Set 11m_ Recondlng
Child L_k Off
") Set Cl_k
DVD Setup
VCR & Channel Setup
I_nguage__angue!Idi_a
_'/_, To Move ") To Select
\ RETURN ToQuit
Auto Clock Set Off
Daylight Savir_ Aura
.eSet Cl_k
If Auto Setup was unable to find a local TV station to set the DVD-
VCR's internal clock, follow these instructions to set the date/time
manually.
NOTE: It is important to set the clock for accurate Timer
Recording.
1 Open "SETUP MENU"
Pressthe SETUPbutton.
2 Select "Set Clock"
Usingthe up/down,move theselection arrowto "Set Clock," then
pushright to select.
3 Turn Off "Auto Clock Set"
Move the selection arrow to "Auto Clock Set," then pushrightto
turn this feature"Off."
• The "SetClockMenu"will change as shown.
4 Select "Set Clock"
Move the selection arrow to"Set Clock,"then push rightto select.
5 Set the Clock
Push the left/right to select each of the following options, then push
up/down (or use the 0-9 buttons) to set each option:
• Set Month - Enter the month as a 2-digit number; i.e. for
January, press "01".
• Set Year- Enter the year as a 2-digit number; i.e. for 2001,
press "01".
• Set Day- Enter the day as a 2-digit number; Le. for the ninth,
press "09".
• Set Hour-Enter the hour as a 2-digit number; Le. for 12:00,
press "12".
• Set Minute -Enter the minute as a 2-digit number; Le. for 00:25,
press "25".
• Set AM/PM - Enter 1 for AM and 2 for PM
Confirm Settings
Press the RETURN button to save your clock settings and return to
the Setup menu.
• Press Return again to exit.
You can set the DVD-VCR to adjust for Daylight Savings Time. Use
this feature only if Auto Clock Set has incorrectly set the time.
NOTE: If you are an Arizona resident, turn Daylight Savings Time
off and choose Mountain Standard Time on page 20.
1 Open "SETUP MENU"
Press the SETUP button.
2 Select "Set Clock"
Using the up/down, move the selection arrow to "Set Clock," then
push right to select.
3 Set "Daylight Savings"
Move the selection arrow to "Daylight Savings," then push right to
select from the following options:
• Auto - Uses Auto Clock Set information to determine if your area
adjusts for Daylight Savings Time.
• On - The DVD-VCR's clock will adjust for Daylight Savings Time
on the first Sunday in April and the last Sunday in October.
• Off- No Daylight Savings Time adjustments will be made.
Time Zone 1 [ Auto Clock Set Channel
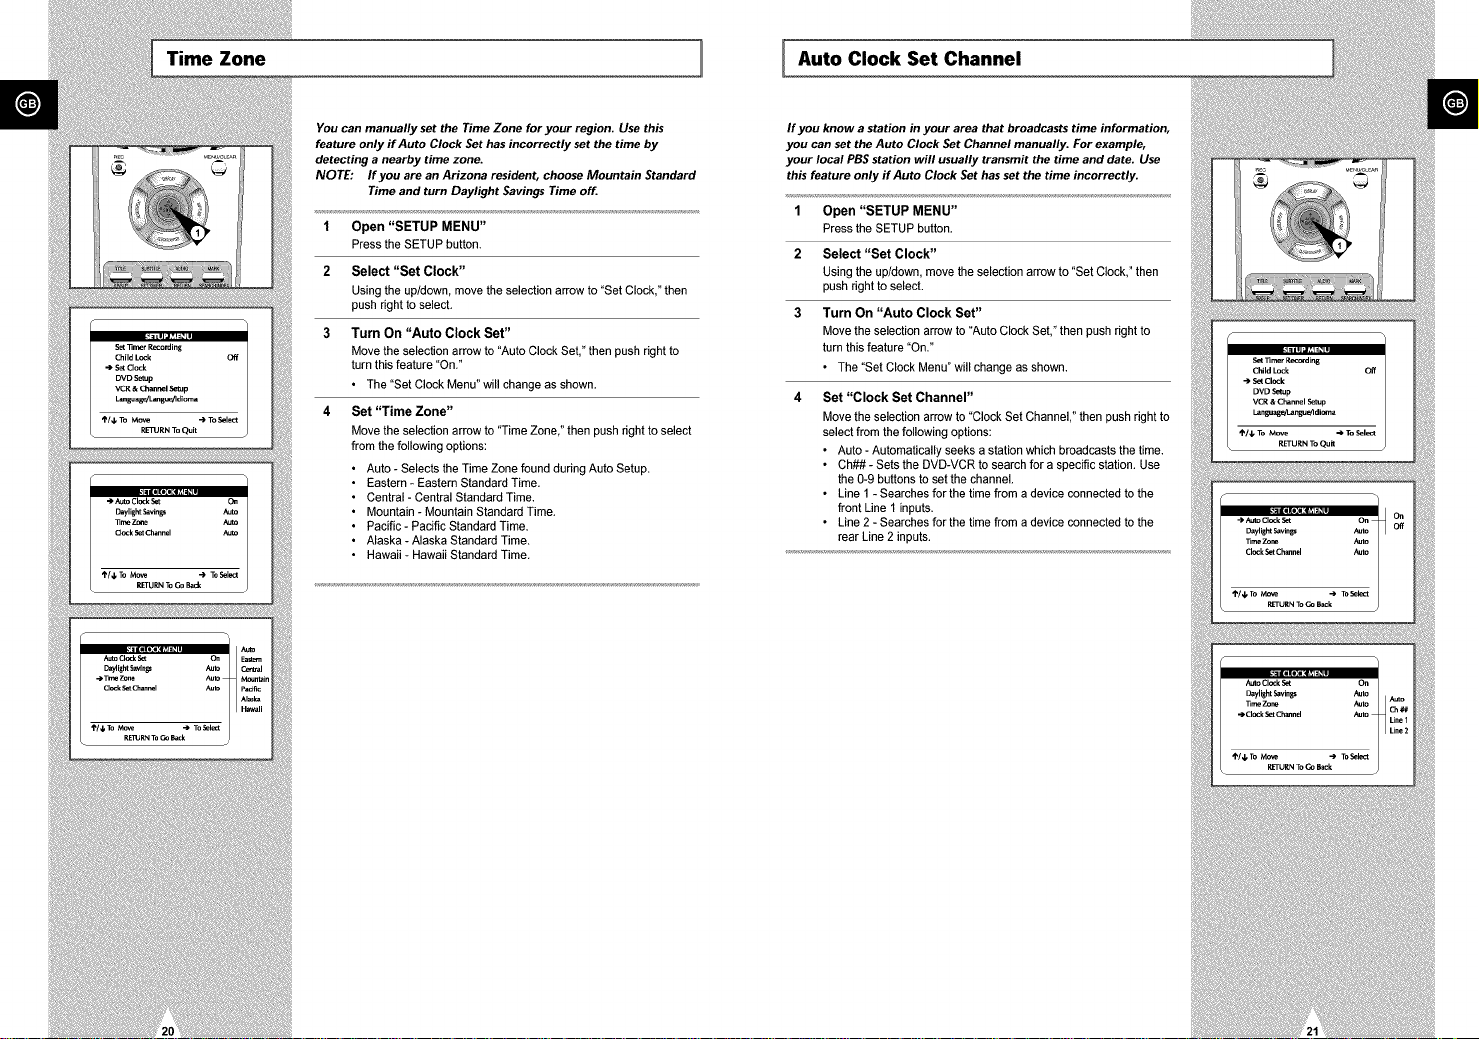
You can manually set the Time Zone for your region. Use this
feature only if Auto Clock Set has incorrectly set the time by
detecting a nearby time zone.
NOTE: If you are an Arizona resident, choose Mountain Standard
Time and turn Daylight Savings Time off.
1 Open "SETUP MENU"
Press the SETUP button.
2 Select "Set Clock"
Using the up/down, move the selection arrow to "Set Clock," then
push right to select.
3 Turn On "Auto Clock Set"
Move the selection arrow to"Auto Clock Set," then push right to
turn this feature "On."
• The "Set Clock Menu" will change as shown.
4 Set "Time Zone"
Move the selection arrow to "Time Zone," then push right to select
from the following options:
Auto - Selects the Time Zone found during Auto Setup.
Eastern - Eastern Standard Time.
Central - Central Standard Time.
Mountain - Mountain Standard Time.
Pacific - Pacific Standard Time.
Alaska - Alaska Standard Time.
Hawaii - Hawaii Standard Time.
If you know a station in your area that broadcasts time information,
you can set the Auto Clock Set Channel manually. For example,
your local PBS station will usually transmit the time and date. Use
this feature only if Auto Clock Set has set the time incorrectly.
1 Open "SETUP MENU"
Press the SETUP button.
2 Select "Set Clock"
Using the up/down, move the selection arrow to "Set Clock," then
push right to select.
3 Turn On "Auto Clock Set"
Move the selection arrow to "Auto Clock Set," then push right to
turn this feature "On."
• The "Set Clock Menu" will change as shown.
4 Set "Clock Set Channel"
Move the selection arrow to "Clock Set Channel," then push right to
select from the following options:
• Auto - Automatically seeks a station which broadcasts the time.
• Ch## - Sets the DVD-VCR to search for a specific station. Use
the 0-9 buttons to set the channel.
• Line 1 - Searches for the time from a device connected to the
front Line 1 inputs.
• Line 2 - Searches for the time from a device connected to the
rear Line 2 inputs.
Tuner Band Setting Auto Channel Search
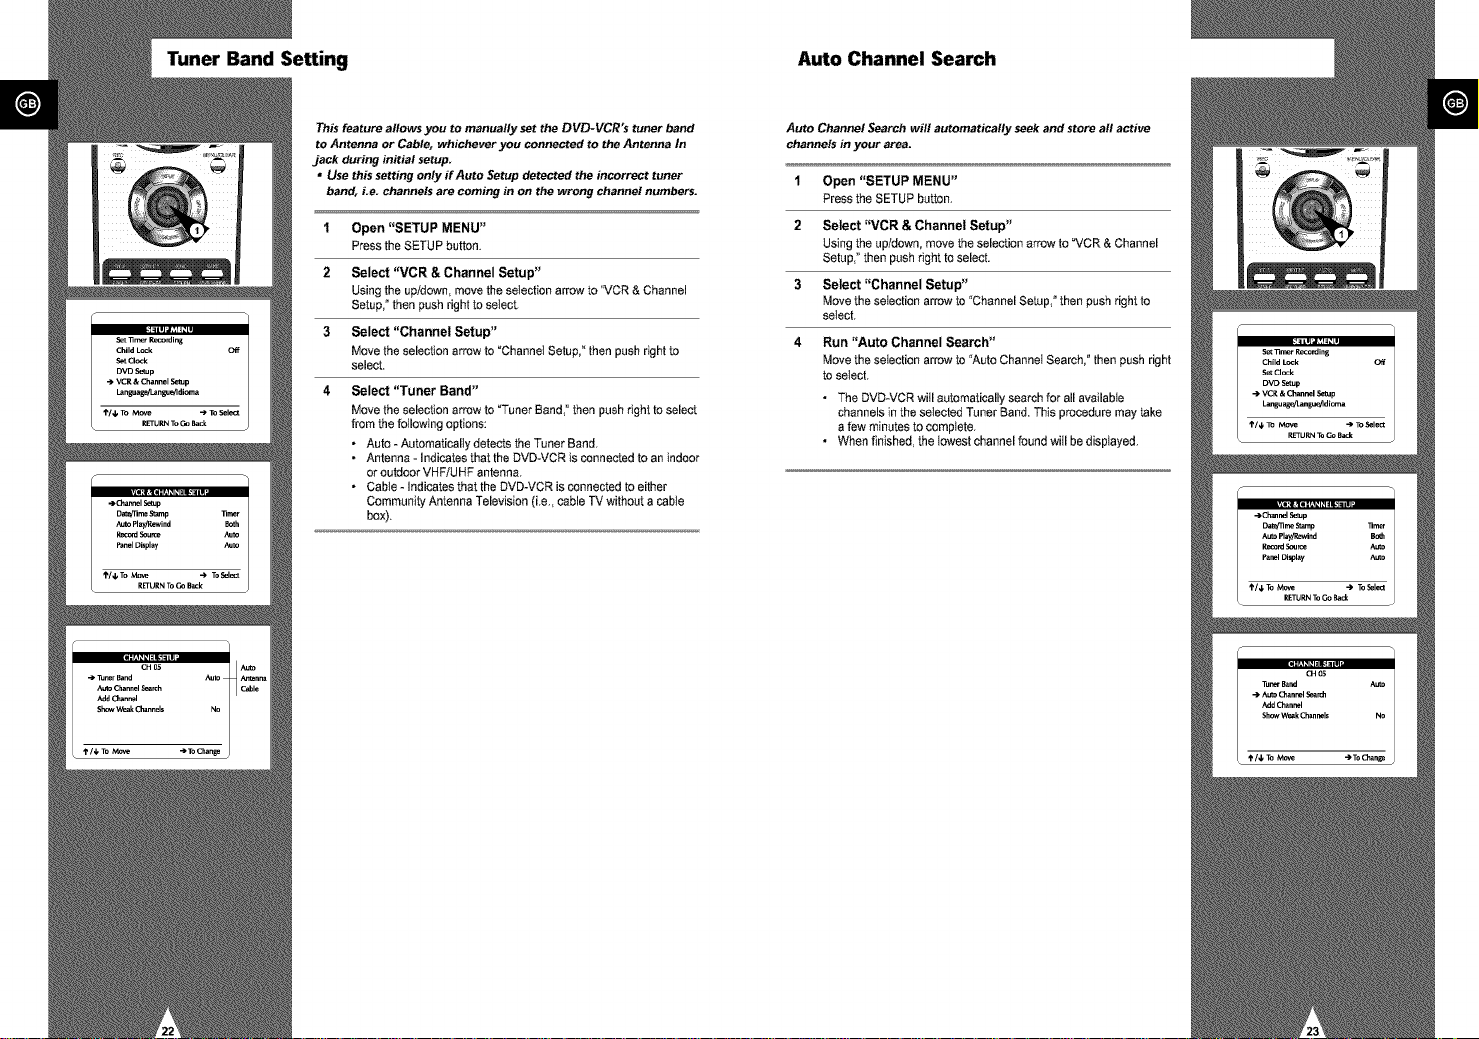
This feature allows you to manually set the DVD-VCR's tuner band
to Antenna or Cable, whichever you connected to the Antenna In
jack during initial setup.
* Use this setting only ffAuto Setup detected the incorrect tuner
band, Le. channels are coming in on the wrong channel numbers.
1 Open "SETUP MENU"
Press the SETUP button.
2 Select "VCR & Channel Setup"
Using the up]down, move the selection arrow to "VCR & Channel
Setup," then push right to select.
3 Select "Channel Setup"
Move the selection arrow to "Channel Setup," then push right to
select.
4 Select "Tuner Band"
Move the selection arrow to Tuner Band," then push right to select
from the following options:
• Auto - Automatically detects the Tuner Band.
• Antenna - indicates that the DVD-VCR is connected to an indoor
or outdoor VHF]UHF antenna.
• Cabte - Indicates that the DVD-VCR is connected to either
Community Antenna Television (i.e., cable TV without a cable
box).
Auto Channel Search will automatically seek and store all active
channels in your area.
1 Open "SETUP MENU"
Pressthe SETUPbutton,
2 Select "VCR & Channel Setup"
Usingthe up/down,move the selection arrow to"VCR& Channel
Setup,"then push rightto select.
3 Select "Channel Setup"
Move theselection arrowto "ChannelSetup,"then pushright to
select.
4 Run "Auto Channel Search"
Move theselection arrowto "AutoChannel Search,"thenpush right
tosetect.
• The DVD-VCR wiil automatically search for all available
channels in the selected Tuner Band. This procedure may take
a few minutes to complete,
• When finished, the lowest channel found wiil be displayed,
 Loading...