

Page 1
Samsung Electronics 4-1
4. Operating Instructions
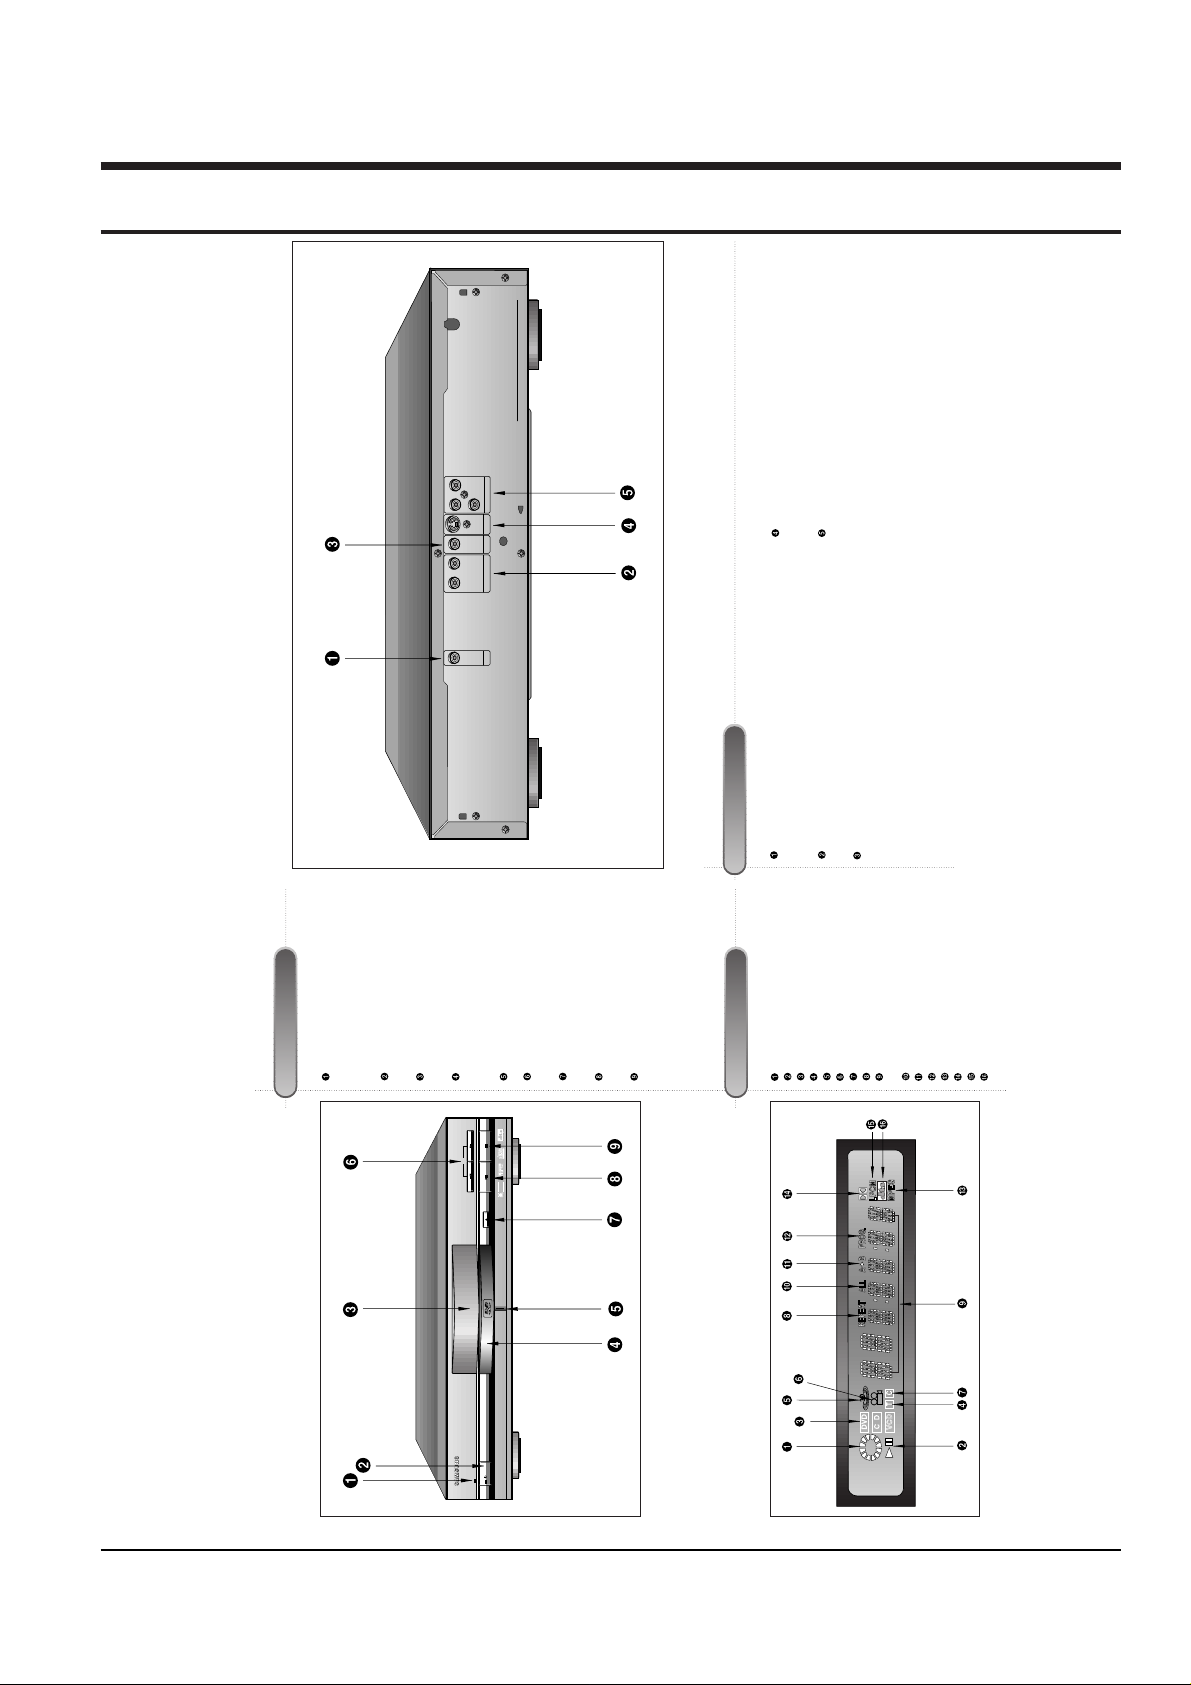
Description-Front Panel
Front Panel Controls
Front Display
STANDBY LAMP
• When the unit is first plugged in, the indi-
cator lights. When power is pressed on,
the lamp goes out.
POWER
• Use to turn the power on and off.
DISPLAY (See below)
• Operation indicators are displayed here.
DISC TRAY
• Press OPEN/CLOSE to open and close
the disc tray.
GREEN LAMP
SKIP/SEARCH
• Use to skip or search a scene or music.
OPEN/CLOSE
• Press to open and close the disc tray.
PLAY/PAUSE
• Begin or pause disc play.
STOP
• Stops disc play.
DISC OPERATION ROTARY INDICATOR
OPERATION INDICATOR
DISC TYPE INDICATOR
TRACK INDICATOR
3D SOUND INDICATOR
ANGLE INDICATOR
CHAPTER INDICATOR
REPEAT INDICATOR
CHAPTER, TITLE, TRACK & MESSAGE
INDICATOR
ALL REPEAT INDICATOR
A-B REPEAT INDICATOR
PROGRAM PLAYINDICATOR
MPEG INDICATOR
DOLBY DIGITAL INDICATOR
LINEAR PCM INDICATOR
DTS INDICATOR
Description-Rear Panel
DIGITAL AUDIO OUT JACK
• Use a coaxial digital cable to connect to an A/V Amplifier that
contains a Dolby Digital decoder or DTS decoder.
ANALOG AUDIO OUT JACKS
• Connect to the Audio input jacks of your television, audio/video
receiver, or VCR.
VIDEO OUT JACK
• Use a video cable to connect this jack to the Video input on
your television.
S-VIDEO OUT JACK
• Use the S-Video cable to connect this jack to the S-Video jack
on your television for a higher quality picture.
COMPONENT VIDEO OUT JACKS
• Use these jacks if you have a TV with component video in
jacks. These jacks provide Pr, Pb and Yvideo. Along with S-
Video, Component Video provides the best picture quality.
Rear Panel
YPb
COMPONENT VIDEO OUT
Pr
VIDEO OUT S-VIDEO OUT
R L
ANALOG AUDIO OUT
DIGITAL
AUDIO OUT
DIGITAL VIDEO
SKIP
N-2-2
SPATIALIZER
DVD/VIDEO-CD/CD PLAYER DVD-709
STANDBY
OPEN/
CLOSE
OPEN/
CLOSE
POWER
24bit 96kHz AUDIO D/A CONVERTER
Page 2
Operating Instructions
4-2 Samsung Electronics
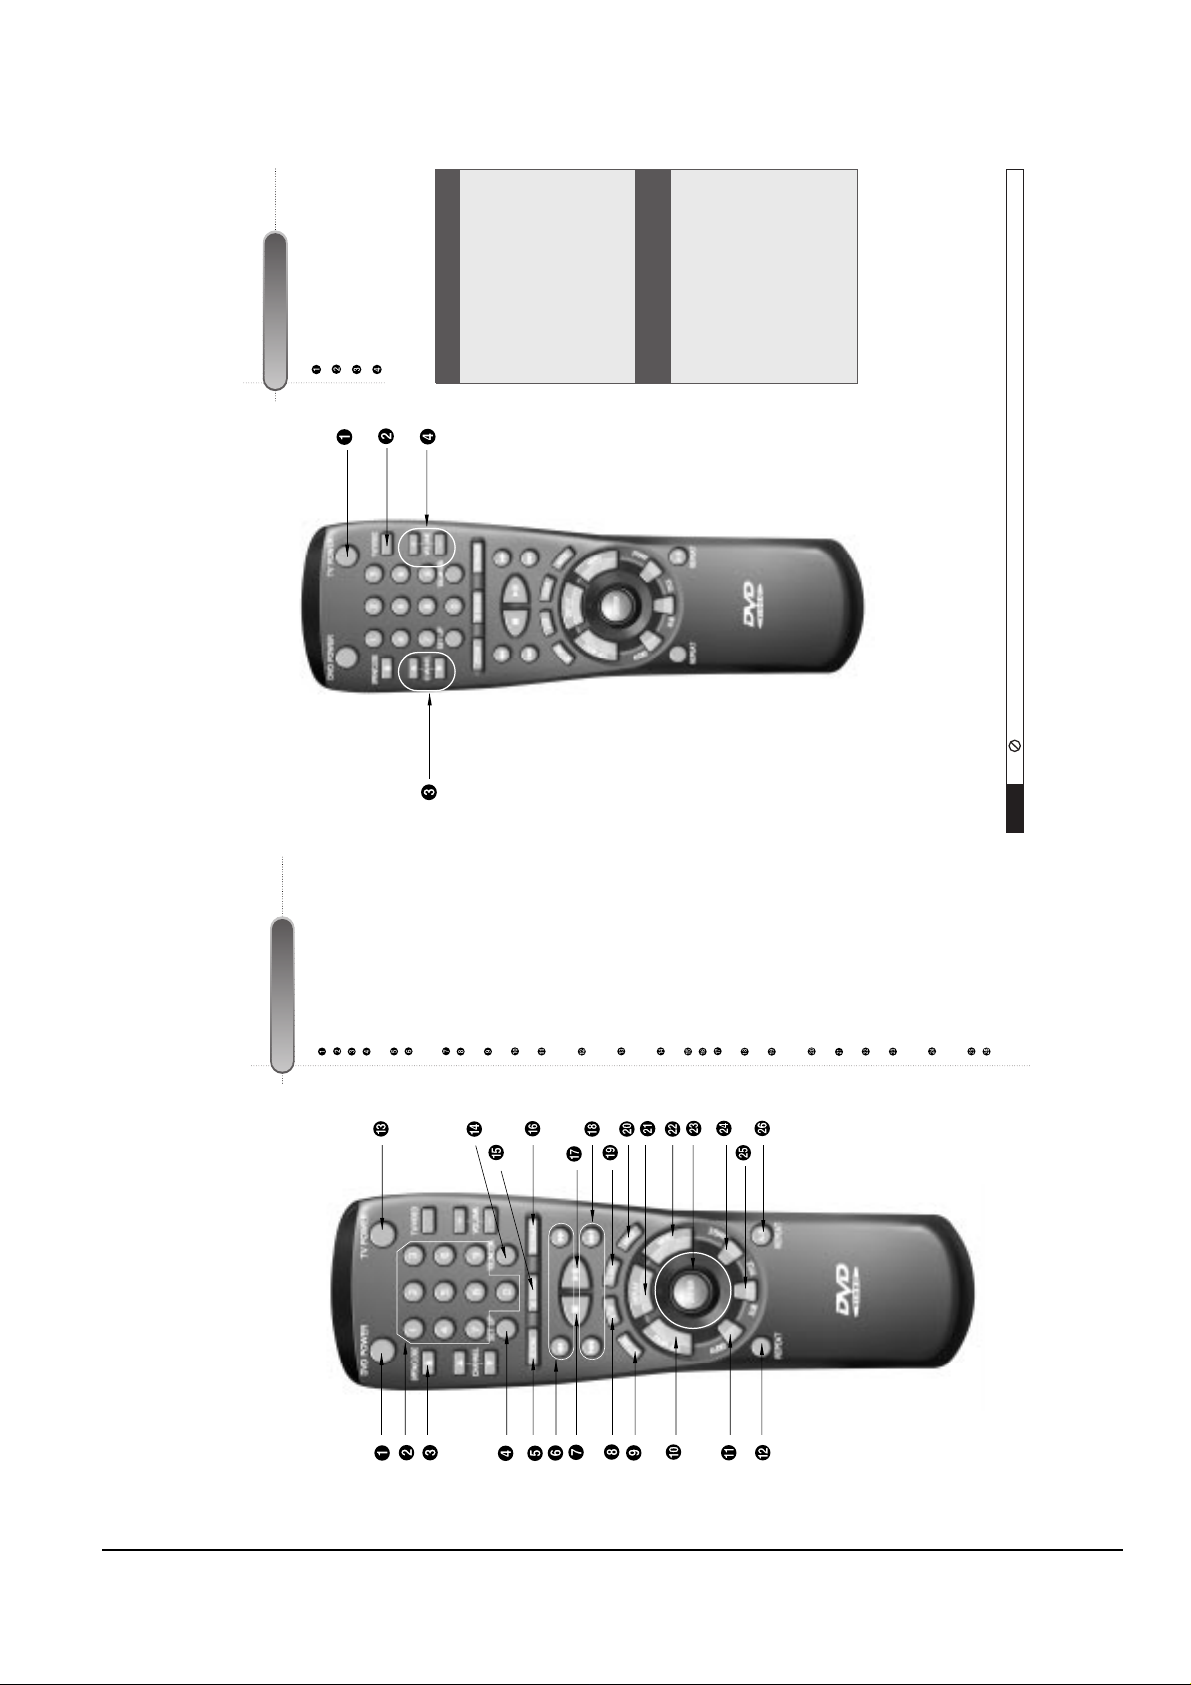
ATour of the Remote Control
DVD Function Buttons
DVD POWER Button
NUMBER Buttons
OPEN/CLOSE Button
SETUP Button
• Brings up the DVD player’s Setup menu.
ZOOM Button
SEARCH Buttons
• Allows you to search forward/backward
through a disc.
STOP Button
STEP Button
• Advances playback one frame at a time.
RETURN Button
• Returns to a previous menu.
TOP MENU Button
• Accesses a music or video display directly.
AUDIO Button
• Use this button to access various audio
functions on a disc.
REPEAT Button
• Allows you to repeat play a title, chapter,
track, or disc.
TV POWER Button
• Use to set the remote to control a compati-
ble TV.
VOLUME CON. Button
• To control the master volume of the player.
3D SOUND Button
BOOKMARK Button
PLAY/PAUSE Button
• Begin/Pause disc play.
SKIP Buttons
• Use to skip the title, chapter, or track.
CLEAR Button
• Use to remove menus or status displays
from the screen.
MODE Button
• Allows you to program a specific order.
DISPLAYButton
• Displays the current disc mode.
MENU Button
• Brings up the Disc menu.
ENTER/DIRECTION Button
(UP/DOWN or LEFT/RIGHT Button)
• This button functions as a toggle switch.
ANGLE Button
• Use to access various camera angles on a
DVD.
SUBTITLE Button
A-B REPEAT Button
• Use to mark a segment to repeat between
A and B.
ATour of the Remote Control (Cont’d)
TV Function Buttons
TV POWER Button
TV/VIDEO Selection Button
CHANNEL UP/DOWN Buttons
VOLUME UP/DOWN Buttons
NOTE
This icon indicates an invalid button press.
If remote doesn’t operate
properly:
1.
Open the battery cover on
the back of the remote.
2.
Insert two AAbatteries.
Make sure that the polari-
ties (+ and -) are aligned
correctly.
3.
Replace the battery cover.
• Check the polarity + - of the
batteries (Dry-Cell)
• Check if the batteries are
drained.
• Check if remote sensor is
blocked by obstacles.
• Check if there is any fluores-
cent lighting nearby.
Install Batteries in the Remote
Page 3

Operating Instructions
Samsung Electronics 4-3
Choosing a Connection
The following show examples of connections commonly used to connect the DVD player with a TV and other
components.
Before Connecting the DVD Player Connecting to a TV (For Video)
MIXED AUDIO OUT
R
L
R L
COMPONENT VIDEO OUT
Y
Y
PbPbPr
Pr
VIDEO OUT
S-VIDEO OUT
TV
DVD
PLAYER
Connecting to a TV
• Method 1
DVD Player + TV with Video Input Jack
• Method 2
DVD Player + TV with S-Video Input Jack
• Method 3
DVD Player + TV with Component Video Jacks
• Always turn off the DVD player, TV, and other
components before you connect or disconnect any
cables.
• Refer to owner’s manual of the components you
are connecting for more information on those par-
ticular components.
TV (Normal, Widescreen, Projection, etc..)
Audio Input Jacks
Good
pictureBasic Audio
OR
OR
AV Cable
(included)
S-Video
Cable
(included)
Video Cables
(not included)
Better
picture Best picture
Video Input Jack S-Video Jack Component Video Jacks
Method 1 Method 2 Method 3
Choosing a Connection (Cont’d)
DIGITAL
AUDIO OUT
R L
ANALOG AUDIO OUT
R L
AUDIO
SYSTEM
DVD
PLAYER
Connecting to an Audio System
Method 1 Method 2
Analog Audio Out
Audio Input Jacks
Digital Audio Input Jack
Dolby Digital Decoder2ch Amplifier
Digital Audio Out
Rear Panel
DIGITAL
AUDIO OUT
ANALOG AUDIO OUT
R L
VIDEO OUT S-VIDEO OUT
COMPONENT VIDEO OUT
YPb
Pr
Connecting to an Audio System
• Method 1
DVD Player + 2ch Stereo Amplifier or Dolby Pro
Logic Decoder
• Method 2
DVD Player + Amplifier with Dolby Digital
Decoder/DTS Decoder
Page 4

Operating Instructions
4-4 Samsung Electronics
MEMO
 Loading...