

Page 1
Heat Pump Dryer
User manual
DV9*M52****/DV8*M52****/DV7*M52****/DV9*M50****/
DV8*M50****/DV7*M50****
Untitled-12 1 4/24/2017 5:00:18 PM
Page 2

Contents
Contents
Safety information 4
What you need to know about the safety instructions 4
Important safety symbols 4
Important safety precautions 5
Critical installation warnings 7
Critical usage warnings 9
Usage cautions 10
Critical cleaning warnings 11
Instructions about the WEEE 12
Installation 13
What’s included 13
Installation requirements 15
Dryer 17
Drain hose (if necessary) 18
Installation checklist 21
Before using the dryer 21
Door reversal 21
Operations 29
Control panel 29
Getting started 35
Special features 39
Maintenance 40
Control panel 40
Exterior 40
Drum 40
Lint lter 40
Water tank 42
Heat exchanger 43
Troubleshooting 45
Checkpoints 45
Information codes 46
English2
Untitled-12 2 4/24/2017 5:00:19 PM
Page 3

Appendix 47
Fabric care chart 47
Protecting the environment 48
Specication 49
Consumption data 50
Sheet of household tumble driers 52
Contents
English 3
Untitled-12 3 4/24/2017 5:00:19 PM
Page 4

Safety information
Congratulations on your new Samsung dryer. This manual contains important information
on the installation, use, and care of your appliance. Please take the time to read this
manual to take full advantage of your dryer’s many benets and features.
What you need to know about the safety instructions
Warnings and Important Safety Instructions in this manual do not cover all possible
Safety information
conditions and situations that may occur. It is your responsibility to use common sense,
caution, and care when installing, maintaining, or operating your dryer.
Always contact your manufacturer about problems or conditions you do not understand.
Important safety symbols
What the icons and signs in this user manual mean:
WARNING
Hazards or unsafe practices that may result in severe personal injury, death and/or
property damage.
CAUTION
Hazards or unsafe practices that may result in personal injury and/or property damage.
NOTE
Indicates that a risk of personal injury or material damage exists.
Read the instructions
These warning signs are here to prevent injury to yourself and others.
Please follow them explicitly.
After reading this manual, store it in a safe place for future reference.
Read all instructions before using the appliance.
As with any equipment that uses electricity and moving parts, potential hazards exist.
To safely operate this appliance, familiarize yourself with its operation and exercise care
when using it.
WARNING - Risk of Fire
• Clothes dryer installation must be performed by a qualied technician.
• Install the clothes dryer according to the manufacturer’s instructions and local codes.
• To reduce the risk of severe injury or death, follow all installation instructions.
English4
Untitled-12 4 4/24/2017 5:00:19 PM
Page 5

Important safety precautions
WARNING
To reduce the risk of re, electric shock, or injury to persons
when using your appliance, follow basic precautions, including the
following:
1. This appliance is not to be used by persons (including children)
with reduced physical, sensory or mental capabilities, or lack
of experience and knowledge, unless they have been given
supervision or instruction concerning use of the appliance by a
person responsible for their safety.
2. For use in Europe: This appliance can be used by children aged
from 8 years and above and persons with reduced physical,
sensory or mental capabilities or lack of experience and
knowledge if they have been given supervision or instruction
concerning use of the appliance in a safe way and understand
the hazards involved. Children shall not play with the appliance.
Cleaning and user maintenance shall not be made by children
without supervision.
3. Children should be supervised to ensure that they do not play
Safety information
with the appliance.
4. If the supply cord is damaged, it must be replaced by the
manufacturer, its service agent or similarly qualied persons in
order to avoid a hazard.
5. The new hose-sets supplied with the appliance are to be used and
that old hose-sets should not be reused.
6. For appliances with ventilation openings in the base, that a carpet
must not obstruct the openings.
English 5
Untitled-12 5 4/24/2017 5:00:19 PM
Page 6

Safety information
7. For use in Europe: Children of less than 3 years should be kept
away unless continuously supervised.
8. CAUTION: In order to avoid a hazard due to inadvertent resetting
of the thermal cut-out, this appliance must not be supplied
Safety information
through an external switching device, such as a timer, or
connected to a circuit that is regularly switched on and off by the
utility.
9. The tumble dryer is not to be used if industrial chemicals have
been used for cleaning.
10. The lint trap has to be cleaned frequently, if applicable.
11. Lint must not to be allowed to accumulate around the tumble
dryer. (not applicable for appliances intended to be vented to the
exterior of the building)
12. Adequate ventilation has to be provided to avoid the back ow
of gases into the room from appliances burning other fuels,
including open res.
13. Do not dry unwashed items in the tumble dryer.
14. Items that have been soiled with substances such as cooking oil,
acetone, alcohol, petrol, kerosene, spot removers, turpentine,
waxes and wax removers should be washed in hot water with
an extra amount of detergent before being dried in the tumble
dryer.
15. Items such as foam rubber (latex foam), shower caps, waterproof
textiles, rubber backed articles and clothes or pillows tted with
foam rubber pads should not be dried in the tumble dryer.
16. Fabric softeners, or similar products, should be used as specied
by the fabric softener instructions.
English6
Untitled-12 6 4/24/2017 5:00:19 PM
Page 7

17. The nal part of a tumble dryer cycle occurs without heat (cool
down cycle) to ensure that the items are left at a temperature
that ensures that the items will not be damaged.
18. Remove all objects from pockets such as lighters and matches.
19. WARNING: Never stop a tumble dryer before the end of the
drying cycle unless all items are quickly removed and spread out
so that the heat is dissipated.
20. Exhaust air must not be discharged into a ue which is used for
exhausting fumes from appliances burning gas or other fuels.
21. The appliance must not be installed behind a lockable door, a
sliding door or a door with a hinge on the opposite side to that of
the tumble dryer, in such a way that a full opening of the tumble
dryer door is restricted.
22. WARNING: The appliance must not be supplied through an
external switching device, such as a timer, or connected to a
circuit that is regularly switched on and off by a utility.
Heat pump model only: The instructions shall also include the
substance of the following:
WARNING: In the appliance enclosure or in the built-in structure,
Safety information
keep ventilation openings clear of obstruction.
WARNING: Do not damage the refrigerant circuit.
Critical installation warnings
WARNING
The installation of this appliance must be performed by a qualied technician or service
company.
• Failure to do so may result in electric shock, re, an explosion, problems with the
product, or injury.
English 7
Untitled-12 7 4/24/2017 5:00:19 PM
Page 8

Safety information
Plug the power cord into a wall socket and use the socket for this appliance only. In
addition, do not use an extension cord.
• Sharing a wall socket with other appliances using a power strip or extending the power
cord may result in electric shock or re.
• Ensure that the power voltage, frequency and current are the same as those of the
product specications. Failure to do so may result in electric shock or re. Failure Plug
Safety information
the power plug into the wall socket rmly.
Remove all foreign substances such as dust or water from the power plug terminals and
contact points using a dry cloth on a regular basis.
• Unplug the power plug and clean it with a dry cloth.
• Failure to do so may result in electric shock or re.
Keep all packaging materials well out of the reach of children, as packaging materials can
be dangerous to children.
• If a child places a bag over its head, it may result in suffocation.
This appliance must be properly grounded.
Do not ground the appliance to a gas pipe, plastic water pipe, or telephone line.
• This may result in electric shock, re, an explosion, or problems with the product
• Never plug the power cord into a socket that is not grounded correctly and make sure
that it is in accordance with local and national codes.
Do not install or keep the product exposed to the outdoor elements.
Do not use a damaged power plug, damaged power cord or loose wall socket.
• This may result in electric shock or re.
If the plug (power supply cord) is damaged, it must be replaced by the manufacturer or its
service agent or a similar qualied technician in order to avoid a hazard.
This appliance should be positioned to be accessible to the power plug after installation.
Do not pull or excessively bend the power cord.
Do not twist or tie the power cord.
Do not hook the power cord over a metal object, place a heavy object on the power cord,
insert the power cord between objects, or push the power cord into the space behind the
appliance.
• This may result in electric shock or re.
Do not pull the power cord, when unplugging the power plug.
• Unplug the power plug by holding the plug.
• Failure to do so may result in electric shock or re.
English8
Untitled-12 8 4/24/2017 5:00:19 PM
Page 9

This appliance must be properly grounded. Never plug the power cord into a receptacle
that is not grounded adequately and in accordance with local and national codes. See
installation instructions for grounding this appliance.
Install this appliance in a location with solid, level oor.
• Failing to do so may result in abnormal vibrations, noise or problems with the product.
Since an ingredient in hair spray may degrade the hydrophile property of the heat
exchanger so that dew may appear on the outer surface of the appliance when the cooling
operation is running, do not install the appliance in a beauty salon.
This appliance should be positioned so that the power plug, the water supply taps, and the
drain pipes are accessible.
Critical usage warnings
WARNING
Do not let children or pets on or into the product. In addition, when disposing of this
product, disassemble the door lock (lever).
• This may result in children falling and injuring themselves.
• If children become locked in the product, there is a danger of suffocation.
Do not try to access the inside of the product when the drum is rotating.
Do not sit on the product or lean against the door.
• This may result in the product turning over and resulting in injury.
Dry the laundry only after it was spun by an appropriate washing machine.
Do not dry unwashed items in the tumble dryer.
Do not drink the condensed water.
Never stop a tumble dryer before the end of the drying cycle unless all items are quickly
removed and spread out so that the heat is dissipated.
Do not dry laundry contaminated by inammable materials such as gasoline, kerosene,
benzene, thinner, alcohol, etc.
• This may result in electric shock, re or explosion.
Safety information
Do not let pets chew or play with the dryer.
• This may result in electric shock or injury.
When disposing of the product, separate the door and the power cord before disposing of
the product.
• Failing to do so may result in damage to the power code or an injury.
Do not touch the power plug with wet hands.
• This may result in electric shock.
English 9
Untitled-12 9 4/24/2017 5:00:19 PM
Page 10

Safety information
When gas (city gas, propane gas, LP gas) leaks, do not touch this appliance or the power
cord, ventilate immediately.
• At this time, do not use the ventilating fan.
• A spark may cause an explosion or re.
Do not repair, replace, or attempt to service any part of the appliance unless specically
Safety information
recommended in the user-repair instructions. You must also have the skills necessary to
service this appliance.
Do not attempt to repair, disassemble, or modify the appliance yourself.
• Do not use any fuse(such as cooper, steel wire, etc.) other than the standard fuse.
• When repairing or reinstalling the appliance is required, contact your nearest service
center.
• Failure to do so may result in electric shock, re, problems with the product, or injury.
The product you have purchased is designed for domestic use only.
The use for business purposes qualies as product misuse. In this case, the product will
not be covered by the standard warranty provided by Samsung and no responsibility can
be attributed to Samsung for malfunctions or damages resulting from such misuse.
If the product generates strange noise, smells of something burning, or generates smoke,
immediately cut-off the power and contact the service center.
• Otherwise, it may cause an electric shock or re as a result.
Do not let children (or pets) play in or on your product. The product door does not open
easily from the inside and children may be seriously injured if trapped inside.
Usage cautions
CAUTION
Do not stand on top of the appliance or place objects (such as laundry, lighted candles,
lighted cigarettes, dishes, chemicals, metal objects, etc.) on the appliance.
• This may result in electric shock, re, problems with the product, or injury.
Do not touch the glass door and inside of the drum during or just after drying as it is hot.
• This may result in burns.
Do not press the buttons using sharp objects such as pins, knifes, ngernails, etc.
• This may result in electric shock or injury.
Do not dry laundry containing forming rubber (latex) or similar rubber textures.
• If forming rubber is heated, it may start a re.
English10
Untitled-12 10 4/24/2017 5:00:19 PM
Page 11

Do not dry laundry contaminated by vegetable oil or cooking oil as a large amount of the
oil will not be removed when washing the laundry. In addition, use the Cool Down cycle so
that the laundry is not heated.
• The oxidization heat of the oil may start a re.
Make sure that the pockets of all clothing to be dried are empty.
• Hard, sharp objects, such as coins, safety pins, nails, screws, or stones can cause
extensive damage to the appliance.
Do not dry clothing with large buckles, buttons, or other heavy metal (zippers, hooks and
eyelets, button-up covers).
If necessary, use the laundry net for small and lightweight laundry such as fabric tie belt ,
apron strings, and underwire bras which can dissolve or break during a cycle.
Recommend against using drying sheets to reduce static electricity as this could lead to
damage to your laundry and also potential damage to the appliance.
• This may result in damage to the laundry.
Do not use the dryer near dangerous powders such as coal dust, wheat our, etc.
• This may result in electric shock, re or an explosion.
Do not place inammable materials near the product.
• This may result in toxic gases from the product, damage to parts, electric shock, re or
an explosion.
• The appliance should not be placed behind lockable doors etc.
Safety information
Do not touch the rear side of the appliance during or immediately after drying is
complete.
• The appliance remains hot and may cause burns.
Contains uorinated greenhouse gases.
Hermetically sealed equipment.
Do not vent gases into the atmosphere.
Refrigerant (Type): R-134a (GWP = 1430)
Refrigerant (Charging)
• DV**M52**** : 0.37kg, 0.529tCO
2e
• DV**M50**** : 0.32kg, 0.458tCO2e
Critical cleaning warnings
WARNING
Do not clean the appliance by spraying water directly onto it.
Do not use benzene, thinner or alcohol to clean the appliance.
English 11
Untitled-12 11 4/24/2017 5:00:19 PM
Page 12

Safety information
• This may result in discoloration, deformation, damage, electric shock or re.
Before cleaning or performing maintenance, unplug the appliance from the wall socket.
• Failure to do so may result in electric shock or re.
Clean the lter case before and after using the dryer.
Clean the inside of the product on a regular basis by asking an authorized service
Safety information
engineer.
Clean the Heat Exchanger with a soft brush or vacuum cleaner once a month, Do not touch
the heat exchanger with your hand. Otherwise, it may cause an injury.
The interior of the dryer should be cleaned periodically by qualied service personnel.
Instructions about the WEEE
Correct Disposal of This Product (Waste Electrical & Electronic
Equipment)
(Applicable in countries with separate collection systems)
This marking on the product, accessories or literature indicates
that the product and its electronic accessories (e.g. charger,
headset, USB cable) should not be disposed of with other
household waste at the end of their working life. To prevent
possible harm to the environment or human health from
uncontrolled waste disposal, please separate these items from
other types of waste and recycle them responsibly to promote the
sustainable reuse of material resources.
Household users should contact either the retailer where they
purchased this product, or their local government ofce, for details
of where and how they can take these items for environmentally
safe recycling.
Business users should contact their supplier and check the terms
and conditions of the purchase contract. This product and its
electronic accessories should not be mixed with other commercial
wastes for disposal.
For information on Samsung’s environmental commitments and product specic
regulatory obligations e.g. REACH visit: samsung.com/uk/aboutsamsung/
samsungelectronics/corporatecitizenship/data_corner.html
English12
Untitled-12 12 4/24/2017 5:00:20 PM
Page 13
Installation
01
02
07
06
03
05
04
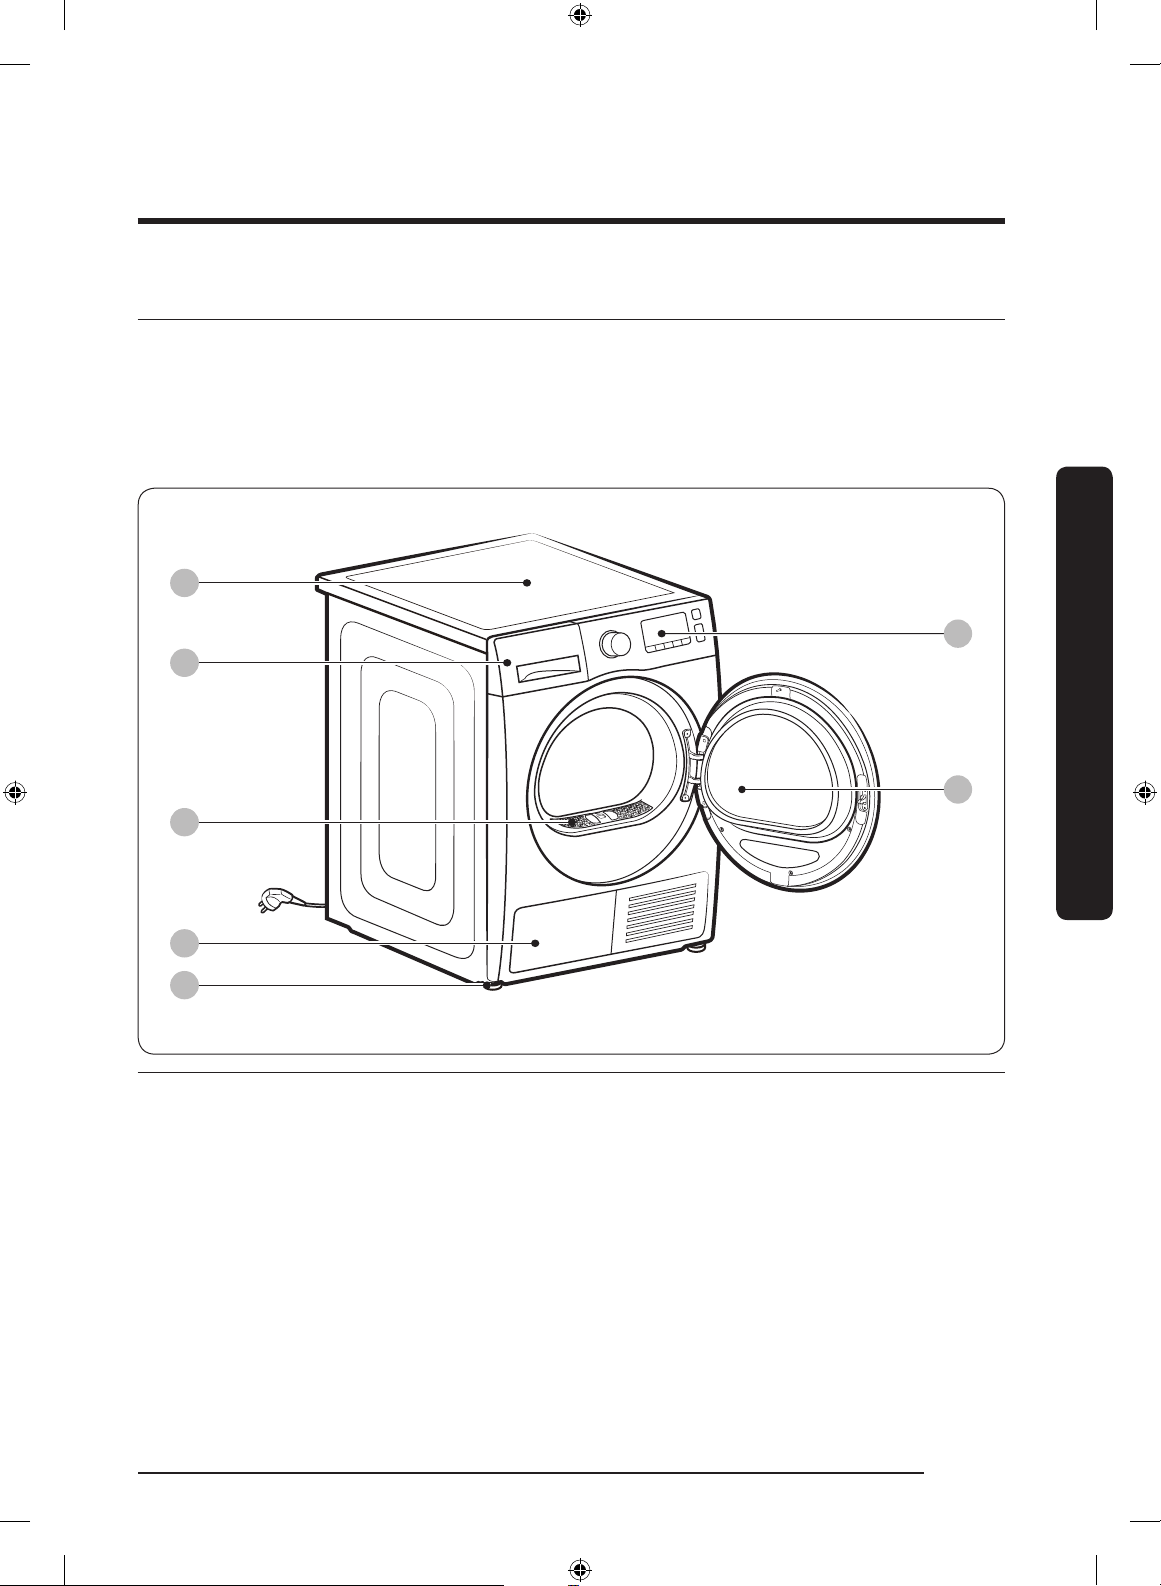
What’s included
Carefully unpack the dryer. Keep all packaging materials away from children. The parts
and location of parts shown below may differ from your dryer. Before installation, make
sure the dryer has all the parts listed here. If the dryer and/or parts are damaged or
missing, contact the nearest Samsung customer service center.
Dryer at a glance
Installation
01 Top cover 02 Water Tank
03 Lint lter 04 Heat exchanger
05 Levelling Leg 06 Door
07 Control Panel
Untitled-12 13 4/24/2017 5:00:20 PM
English 13
Page 14

Installation
Accessories (supplied)
Hose guide Cable tie Hose connector
Installation
Accessories (not supplied)
(Part # SK-DH; SK-DA; SKK-
• The stacking kit allows the dryer to be stacked on top of a washer. Please note that the
• For stacking instructions with the dryer, see the installation manual included in the
• For information about model-specic availability of the stacking kit, see the installation
Long drain hose (2 m) User manual Rack Dry (applicable
models only)
Bracket-Stacking kit
DF)
NOTE
stacking kit can only be used with Samsung washers and dryers. To purchase a stacking
kit (Part # SK-DH; SK-DA; SKK-DF), contact a Samsung service center or local appliance
retailer. The stacking kit differs with the model.
stacking kit.
manual included in the stacking kit.
Stacking kit
(SKK-DD, SKK-DDX)
English14
Untitled-12 14 4/24/2017 5:00:21 PM
Page 15

Installation requirements
NOTE
This dryer must be installed by a qualied installer. If service is required due to poor or
faulty installation, it is considered the owner’s responsibility and may void the warranty.
Keep these instructions for future reference.
WARNING
• Do not plug the power cord into a wall outlet before the dryer is completely installed.
• Have two or more persons help move the dryer.
• Do not let children or pets play in, on, or around the dryer. Proper supervision is
necessary at all times.
• Keep all packaging materials away from children.
• Do not replace a damaged power cord or power plug yourself. Have Samsung or a
qualied service technician replace a damaged power cord or power plug.
• Do not attempt to repair, disassemble, or modify the dryer. For any repairs, contact the
nearest Samsung service center.
• Remove the door/lids from all discarded appliances to avoid children from suffocating.
• If the dryer generates a strange noise, burning smells, or smoke, unplug the power plug
immediately and contact the nearest Samsung service center.
• Do not unplug the dryer while it is operating.
• Do not place ammable objects near the dryer.
Installation
English 15
Untitled-12 15 4/24/2017 5:00:21 PM
Page 16

Installation
Location requirements
Select a level, well-constructed surface that will withstand vibrations. Select a location
where a grounded, 3-prong outlet is easily accessible.
• Install the dryer indoors only.
• Do not install the dryer in areas exposed to the weather.
• Do not install the dryer where the temperature may fall below 5 °C or rise above 35 °C.
• Do not install the dryer where gas may leak.
• Do not block the cooling grill’s air inlet located at the dryer front.
Alcove or closet installation
For alcove or closet installation, the dryer requires the following minimum clearances:
Installation
If installing the dryer with a washer, the front of the alcove or closet must have an
unobstructed air opening of at least 490 mm.
WARNING
Sides Top Front Rear
25 mm 25 mm 490 mm 51 mm
Electrical and grounding requirements
• The dryer requires an AC 220-240 V 50 Hz electrical supply.
• The dryer must be properly grounded. If the dryer malfunctions or breaks down,
grounding reduces the risk of electric shock by providing a path of least resistance for
the electric current. The dryer comes with a power cord that has a 3-prong grounding
plug. The plug must be plugged into an appropriate outlet that is properly installed and
grounded in accordance with all local codes and ordinances.
• If you have any questions regarding the electrical or grounding requirements, please
contact Samsung or a qualied electrician.
WARNING
• Plug into a grounded, 3-prong outlet.
• Do not use a damaged power plug, cord, or loose or damaged wall outlet.
• Do not use an adapter or an extension cord.
• Improper connection of the equipment-grounding conductor may result in electric
shock. If you are unsure if the dryer is properly grounded, check with a qualied
electrician.
• Do not modify the power plug, power cord, or power outlet in any way.
• Do not connect the ground wire to plastic plumbing lines, gas lines, or hot water pipes.
English16
Untitled-12 16 4/24/2017 5:00:21 PM
Page 17

Dryer
A
B
C D
Before you install the dryer, make sure you have read Installation requirements on
page 15. Please note that the following instructions are for installation without using a
drain hose. For instructions for using a drain hose, see the next section, Drain hose. For
convenience, consider installing the dryer next to your washer.
1. Gently slide the dryer into the desired
location.
2. Use a level (A) and check the levelness
of the dryer from side to side and front
to back.
3. If the dryer is not level, adjust the
levelling leg (B). Turning the leg
counter-clockwise retracts the leg.
Turning the leg clockwise extends the
leg.
4. Once the dryer is level, make sure the
dryer stands rmly on the oor.
5. Plug in the dryer.
Installation
NOTE
• To set the dryer to the same height as
the washer, fully retract (C) the levelling
legs by turning them counter clockwise,
then loosen (D) the legs by turning
them clockwise.
• Extend the levelling leg only as much
as necessary. Extending the levelling
leg more than necessary can cause the
dryer to vibrate.
English 17
Untitled-12 17 4/24/2017 5:00:21 PM
Page 18

Installation
A
B
Drain hose (if necessary)
Installation
The dryer comes with a built-in water tank.
However, if you do not want to use the
water tank, you may install the drain hose.
The provided accessory hose (long drain
hose) can be used as an extension to the
drain hose.
1. Remove the drain hose from hole (A),
and insert it into hole (B).
English18
Untitled-12 18 4/24/2017 5:00:22 PM
Page 19

A
2. Insert one end of the accessory hose
A
CB
(long drain hose) into hole (A).
3. Insert the other end (outlet) of the
accessory hose to the drainage system
in one of the following ways:
Over a wash basin:
Installation
1. Make sure to place the end of the
accessory hose lower than 90 cm (*)
from the bottom of dryer.
2. To bend some point of the accessory
hose, use the supplied plastic hose
guide (B) and secure the guide to the
wall with a hook or to the tap with a
piece of string. Assemble the drain hose
(A) and the hose guide (B) and x them
with the cable-tie (C).
3. You can drain the condensed water by
connecting the accessory hose (long
drain hose) to the drain-outlet directly.
CAUTION
Do not extend the drain hose. Water may
leak from the connected area. Use a long
drain hose.
English 19
Untitled-12 19 4/24/2017 5:00:22 PM
Page 20

Installation
A
By using the drain pipe of the wash basin:
1. Assemble the hose connector (A), and
attach it to the end of the accessory
hose as shown.
CAUTION
To prevent water leak, make sure to
connect the hose and the connector rmly.
Installation
2. Connect the hose adapter directly to the
drain pipe of the wash basin.
English20
Untitled-12 20 4/24/2017 5:00:23 PM
Page 21

Installation checklist
• The dryer is plugged into a properly grounded outlet.
• All packaging material is completely removed and properly disposed.
• The dryer is level and standing rmly on the oor.
• Start the dryer to make sure that it runs, heats, and shuts off.
• Run a TIME DRY cycle for 20 minutes to see if the HC information code is displayed. If
this is the case, contact a local service center.
• After installation, we recommend that you wait at least 1 hour before using the dryer.
Before using the dryer
• Make sure no accessory remains inside the drum.
• Plug in the power cord just before operating the dryer.
• Do not block the air inlet hole of the cooling grill at the front of the dryer.
• Do not place inammable objects near the dryer and keep the surroundings clean.
• Keep the dryer level with the ground.
• Do not remove the adjustable levelling legs of the dryer. They are necessary to keep
the dryer level with the ground.
Door reversal
You might want to reverse the direction of the door, depending on your site conditions or
to your needs.
WARNING
Make sure door reversal is performed by a qualied technician.
Type 1
1. Open the door, and then loosen the two
screws on the door hinge. While holding
the door with both hands, slightly lift to
remove it.
Installation
English 21
Untitled-12 21 4/24/2017 5:00:23 PM
Page 22

Installation
2. Use a thin object to remove the door
sealing.
Installation
3. On the inside of the door, remove the
upper 3 screws and the lower 3 screws
on the glass holder, and then remove
the glass holder.
4. When complete, rotate the door cover
by 180 degrees.
English22
Untitled-12 22 4/24/2017 5:00:23 PM
Page 23

5. Insert the glass holder into the new
position of the door cover. Make sure
the door hinge is in the same position
as in the gure.
6. Tighten the upper 3 screws and the
lower 3 screws on the glass holder.
NOTE
The screw shapes differ by dimension.
Make sure you tighten the correct screw.
7. Insert the door sealing in the correct
position.
Installation
English 23
Untitled-12 23 4/24/2017 5:00:24 PM
Page 24

Installation
8. Remove the 2 screws that remain after
removing the door hinge.
Installation
9. Loosen the 4 screws on the lever
holder. Remove the lever holder, and
then reinsert it to the opposite side.
10. On the opposite hinge frame, tighten
the removed 2 screws in step 7 above.
Note that you must tighten them on the
right (top-right and bottom-right) of the
frame.
English24
Untitled-12 24 4/24/2017 5:00:24 PM
Page 25

11. Move the bottom screws of the door
hinge to the upper side of the door
hinge. Then, tighten the screws. (DV**M
5***1*/DV**M5***2*/DV**M5***3* models
only)
Type 2 (DV**M5***K* models)
12. Put the door hinge on the opposite side,
and then tighten the 2 screws to x the
door to the dryer.
1. Remove the door hinge, and then
remove the door.
- Remove 2 bolt-screws on the door.
Installation
English 25
Untitled-12 25 4/24/2017 5:00:24 PM
Page 26

Installation
A
B
2. Remove 2 screws (A) from the door
lever.
Installation
3. Remove 14 screws (B) from the inner
holder.
4. Remove the inner-holder glass, and
then turn the door cover by 180
degrees.
English26
Untitled-12 26 4/24/2017 5:00:25 PM
Page 27

5. Insert the inner-holder glass into the
B
A
reversed door cover.
6. Tighten the 14 screws (B) on the inner
holder.
CAUTION
Make sure you tighten the screws (B) on
the inner holder, not the screws (A).
7. Tighten the 2 screws (A) on the door
lever.
CAUTION
Make sure you tighten the screws (A) on
the door lever, not the screws (B).
Installation
English 27
Untitled-12 27 4/24/2017 5:00:25 PM
Page 28

Installation
8. Move the bottom screws of the door
hinge to the upper side of the door
hinge. Then, tighten the screws.
Installation
To return the door to the initial position, follow the steps again. Please note that the door,
hinges, and other parts would be in the opposite orientation as listed in these steps.
9. Fix the door hinge on the opposite side.
- Tighten the 2 bolt-screws.
NOTE
English28
Untitled-12 28 4/24/2017 5:00:26 PM
Page 29

Operations
01
11
12
03
04
05 06
07
09
10
02
01
11
12
03
04
05 06
08
09
10
02
Control panel
DV9*M5*****/DV8*M5*****
DV7*M5*****
Operations
Untitled-12 29 4/24/2017 5:00:26 PM
English 29
Page 30

Operations
Displays all cycle information, including cycle time, information
codes, and dryer status. See the table below for status details.
01 Digital Graphic
02 Cycle Selector
Operations
03 Wrinkle
04 Dry Level
05 Time
Display
Prevent
Drying in progress
Cooling in progress Wrinkle Prevent
Stop
Wrinkle Prevent in
progress
Check lter Mixed Load Bell
Delay End Smart Check
Empty the water tank
Turn the dial to select a cycle. See the Cycle overview on page 32
for available cycles.
Adds approximately 2 hours of intermittent tumbling at the end
of the selected cycle to reduce wrinkles. A large circle appears in
display panel, and the drum rotates intermittently. To activate,
press Wrinkle Prevent. The corresponding indicator lights up.
Press to select the dryness level in the SHIRTS, TOWELS, COTTON,
MIXED LOAD, and SYNTHETICS cycles. The dryness can be set in
three levels (1-3). Level 1 is used to partially dry items that lay at
or hang to dry. Level 3 is the strongest and is used to dry larger or
bulk loads.
Press to adjust the cycle time for TIME DRY, WARM AIR, and COOL
AIR cycles.
The following time options (unit: minute) are available: 30, 60, 90,
120, and 150.
• 120 minutes and 150 minutes are not available for WARM AIR
and COOL AIR cycles.
• The exact drying time differs depending on the humidity of the
load.
Child Lock activated/
deactivated
Heat-exchanger clean
alarm
Sound on/off
English30
Untitled-12 30 4/24/2017 5:00:28 PM
Page 31

06 Mixed Load
Bell
07 Lamp
(DV9*M5*****/
DV8*M5*****)
08 Smart Check
(DV7*M5*****)
09 Sound On/Off
10 Delay End
11 Start/Pause
12 Power
This alarm is available only with SHIRTS, COTTON, MIXED LOAD, and
SYNTHETICS cycle. If a load contains mixed fabrics, the Mixed Load
Bell indicator ( ) blinks when the average dryness of the item is
80 % dry. This lets you take items that you don’t want fully dried or
that dry quickly out of the dryer early while letting others continue
to dry.
Press to turn on or off the interior lamp. The lamp stays lit for 5
minutes after it has turned on, and then turns off automatically.
If the dryer has detected an issue, Smart Check allows you to check
the status of the dryer using a smart phone.
Press to mute/unmute the sound of the control panel. The sound
setting is retained when you turn the dryer off and turn it on again.
You can adjust the nish time of the selected cycle in 1-hour
increments all the way up to 24 hours.
Press to start or pause a cycle. If the dryer is running, press the
button once to pause the dryer. Press again to resume.
Press to turn the dryer on/off. If the dryer turns on for 10 minutes
without any button being pressed, the dryer automatically turns off.
Operations
English 31
Untitled-12 31 4/24/2017 5:00:28 PM
Page 32

Operations
Cycle overview
SHIRTS Use to quickly dry one item such as a shirt. 4
IRON DRY
DELICATES For items to be handled with care such as lingerie. 2
WOOL
TOWELS Use to dry loads such as bath towels. 6
BEDDING
Operations
OUTDOOR CARE
COOL AIR
WARM AIR
Cycle Description
This cycle nishes the drying process in a moist state,
which facilitates ironing.
For machine washable and tumble dryable wool only.
For best results, turn laundry inside out before drying.
For bulky items such as blankets, sheets, comforters,
and light duvets.
For outdoor wear such as skiwear and mountain
clothing, and also for fabrics such as spandex, stretch,
and microber. It is recommended to use this cycle
after you have washed your laundry using the
OUTDOOR CARE cycle with your washing machine.
All types of fabric. For freshening up or airing items
of laundry that have not been worn for long.
For small, pre-dried items. The dry time defaults to 30
minutes.
Timed cycle for all types of fabric except for wool
and silk. Dry laundry that is still slightly damp or
has already been pre-dried. Also suitable for the
subsequent drying of multi-layered, thick laundry that
does not dry readily.
Max load
(kg)
4
2
2
2
-
-
NOTE
This cycle is suitable for drying individual woollen
fabrics, sports shoes and soft toys. Only dry these
using the basket for woollens.
English32
Untitled-12 32 4/24/2017 5:00:28 PM
Page 33

Cycle Description
TIME DRY
QUICK DRY 35'
SYNTHETICS
MIXED LOAD
COTTON
Use to set a desired dry time.
1. Turn the Cycle Selector to select TIME DRY.
2. Press Time to set the drying time between 30
minutes and 150 minutes. Keep pressing Time
cycles through the available time options in
30-minute increments.
NOTE
The actual cycle time may differ depending on the
dryness of items.
For drying light cotton synthetics or items that needs
quick drying. The default dry time is 35 minutes.
For lightly soiled blouses, and shirts that are made of
polyester (Diolen, Trevira), polyamide (Perlon, nylon),
or other similar blends.
For mixed loads consisting of cotton and synthetic
fabrics.
For lightly cottons, bed linen, table linen, underwear,
towels, and shirts.
Max load
(kg)
-
1
4
Operations
Max
Max
English 33
Untitled-12 33 4/24/2017 5:00:28 PM
Page 34

Operations
Cycle chart
NOTE
For best results, follow the load size recommendations for each dry cycle.
•
Large load: Fill the drum to about ¾ full. Do not add items over this level as they
need to tumble freely.
• Medium load : Fill the drum to about ½ full.
• Small load : Fill the drum with 3-5 items, not more than ¼ full.
Cycle Recommended items Load size Dry Level
SHIRTS
IRON DRY
DELICATES Silk, ne fabrics and lingerie.
Non-iron shirts or blouses made of cotton, linen,
synthetic bres or blended fabrics.
This cycle nishes the drying process in a moist
state, which facilitates ironing.
4
4
2
Available
Unavailable
Unavailable
Operations
WOOL
TOWELS Use to dry loads such as bath towels.
BEDDING
OUTDOOR CARE
COOL AIR
WARM AIR
TIME DRY All types of fabric; time programme. – Unavailable
QUICK DRY 35' Synthetics and light cottons
SYNTHETICS Synthetic or blended fabrics.
MIXED LOAD
COTTON
For machine washable and tumble dryable wool
only.
For bulky items such as blankets, sheets, comforters,
and light duvets.
For outdoor wear such as skiwear and mountain
clothing, and also for fabrics such as spandex,
stretch, and microber.
All types of fabric. For freshening up or airing items
of laundry that have not been worn for long.
Small Items & damp clothing Everyday items
suitable for heat drying
Mixed load consisting of cotton and synthetic
fabrics
For lightly cottons, bed linen, table linen, underwear,
towels, and shirts.
2
Unavailable
6
Available
2
Unavailable
2
Unavailable
– Unavailable
– Unavailable
1
Unavailable
4
Available
7, 8, 9
Available
7, 8, 9
Available
English34
Untitled-12 34 4/24/2017 5:00:29 PM
Page 35

Getting started
Simple steps to start
1. Press Power to turn the dryer on.
2. Load the dryer and close the door.
3. Turn the Cycle Selector to select a cycle.
4. Change the cycle settings (Dry Level, and Time) as necessary.
5. Select necessary settings and options to your preference. (Wrinkle Prevent, Lamp,
Mixed Load Bell, and/or Delay End).
6. Press Start/Pause. The dryer indicator lights up, and the estimated cycle time appears
on the display.
NOTE
The number of available settings and options differs with the cycle.
To change the cycle during operation
1. Press Start/Pause to stop operation.
2. Select a different cycle.
3. Press and hold Start/Pause to start new cycle.
Sorting and loading
• Put only one wash load in the dryer at a time.
• Avoid mixing heavy and lightweight items together.
• To increase drying efciency when drying one or two items, add a dry towel to the
load.
• For best results, untangle items before inserting into the dryer.
• Overloading restricts the tumbling process, resulting in uneven drying and wrinkling.
• Unless recommended on the care label, avoid drying woolens or berglass items.
• Avoid drying unwashed items.
• Do not dry items soiled with oil, alcohol, gasoline, etc.
Operations
English 35
Untitled-12 35 4/24/2017 5:00:29 PM
Page 36

Operations
A
Rack Dry (applicable models only)
Set the drying time up to 150 minutes according to the moisture and weight of the items
to dry. When drying laundry using the drying rack, the TIME DRY cycle is recommended.
Operations
1. Position the drying rack in the drum,
inserting the front lips of the rack into
the holes of the door diaphram.
2. Place items on the rack, leaving enough
space where air can circulate. For
clothing items, fold and place at on the
rack. For shoes, place shoes with their
soles facing down.
3. Close the door and press Power. Select
TIME DRY, and then press Time to select
the drying time.
4. Press Start/Pause.
A. Rack dry
English36
Untitled-12 36 4/24/2017 5:00:29 PM
Page 37

Drying suggestions
Items (max 1.5 kg) Description
Washable sweaters (block to shape and lay
at on rack)
Stuffed toys (cotton or polyester ber
lled)
When drying the laundry using the rack,
fold and place the clothes on the rack
to prevent the clothing from becoming
wrinkled.
Stuffed toys (foam or rubber-lled)
Foam rubber pillows
Sneakers To dry sports shoes, place the shoes on
the rack so that the soles of the shoes are
facing downwards.
CAUTION
• Drying foam rubber, plastic, or rubber on a heat setting may cause damage to the
items and lead to a re hazard.
• To prevent damage to shoes, use Dry Rack.
Operations
English 37
Untitled-12 37 4/24/2017 5:00:29 PM
Page 38

Operations
Cycle guide
Always follow the care label when drying. If care label instructions are not available, refer
to the following table.
Bedspreads and
comforters
Blankets • For best results, dry only one blanket at a time.
Cloth diapers • Use the High temperature settings.
Down-lled items • Do not dry on a heat setting. Doing so may cause a re
Foam rubber (rug backs,
stuffed toys, etc.)
Pillows • Add a few dry towels to help tumble and uff items.
Operations
Plastics (shower
curtains, outdoor
furniture covers, etc.)
Do not use the dryer to dry items that are not listed above.
• Use the High temperature settings.
hazard. Only use the COOL AIR cycle.
• Do not dry on a heat setting. Doing so may cause a re
hazard. Only use the COOL AIR cycle.
• Do not dry kapok or foam pillows with heat. Use only the
COOL AIR cycle.
• Use COOL AIR or TIME DRY.
• Set the dry level to lower or the lowest.
CAUTION
English38
Untitled-12 38 4/24/2017 5:00:30 PM
Page 39

Special features
Delay End
You can set the dryer to complete a
selected cycle at your set time.
1. Select a cycle with necessary options.
2. Press Delay End repeatedly to set a
time between 1 hours and 24 hours in
1-hour increments.
3. Press Start/Pause. The corresponding
indicator blinks, and the clock begins
counting down to the set time.
NOTE
To cancel the Delay End settings, restart
the dryer using the Power button.
Child Lock
Child Lock prevents children from playing
with the dryer. When Child Lock is
activated, all buttons except for the Power
button are disabled.
To activate/deactivate Child Lock,
simultaneously press and hold Mixed Load
Bell and Smart Control or Wrinkle Prevent
and Dry Level for 3 seconds.
Smart Check
If the dryer has detected an issue, Smart
Check allows you to check the status of the
dryer using a smartphone. Please note that
Smart Check can only be used for Galaxy
and iPhone series smartphones.
To use Smart Check, make sure you have
downloaded the Samsung Smart Washer/
Dryer app, and then follow the steps
below.
1. Press and hold Time and Mixed Load
Bell for 3 seconds or press Smart Check.
The LED’s on the display panel rotate,
and the Smart Check code is displayed.
2. On the smartphone, open the Samsung
Smart Washer/Dryer app and tap the
Smart Check button.
3. Focus the smartphone’s camera on the
Smart Check code shown on the display
panel.
4. If the information code is recognized,
the app provides detailed information
for the issue and further instructions.
Operations
NOTE
If Child Lock is activated, and the dryer is
turned off and then on again, Child Lock
remains activated.
Untitled-12 39 4/24/2017 5:00:30 PM
NOTE
• If the dryer reects light on the display,
the smartphone may fail to recognize
the information code.
• If the smartphone fails to recognize the
code, manually enter the information
code into the smartphone.
English 39
Page 40

Maintenance
WARNING
• Do not clean the dryer by directly spraying water onto the dryer.
• Do not clean the dryer with benzene, thinner, alcohol, or acetone. This may cause
discoloration, deformation, damage, electric shock, or re.
• Before cleaning the dryer, be sure to unplug the power cord.
Control panel
Clean with a soft, damp cloth. Do not use abrasive cleaners. Do not spray cleaners directly
on the panel. Immediately wipe up any spills or liquids from the control panel.
Exterior
Clean with a soft, damp cloth. Do not use abrasive cleaners. Avoid using or placing sharp
or heavy objects near/on the dryer. Keep detergent and laundry supplies on the pedestal
(sold separately) or in a separate storage container.
Drum
Clean with a damp cloth with a mild, non-abrasive cleaner suitable for stainless steel.
Wipe remaining residue with a clean, dry cloth.
Maintenance
Lint lter
Clean the lint lter after each load.
1. Open the door and pull the lint lter
upward to remove.
English40
Untitled-12 40 4/24/2017 5:00:30 PM
Page 41

A
2. Open the outer lter and remove the
inner lter (A).
3. Unfold both the inner lter and the
outer lter.
4. Remove the lint from both lters, and
then clean them in running water. When
complete, dry them thoroughly.
5. Put the inner lter into the outer lter,
and then reinsert the lint lter into the
original position.
CAUTION
• Clean the lint lter after each load. Otherwise, the drying performance may decrease.
• Do not operate the dryer without the inner lter inside the outer lter.
• Using the dryer with a wet lint lter may cause mold, bad odors, or a decrease in
drying performance.
Maintenance
English 41
Untitled-12 41 4/24/2017 5:00:30 PM
Page 42

Maintenance
A
B
Water tank
To avoid leaks, empty the water tank after every load.
Maintenance
1. Using both hands, pull the water tank
(A) forward to remove.
2. Empty the water through the drain hole
(B) and place the water tank back into
place.
NOTE
If you empty the water tank and press
Start/Pause, the corresponding indicator
turns off.
English42
Untitled-12 42 4/24/2017 5:00:31 PM
Page 43

Heat exchanger
A
B
C
Clean the heat exchanger at least once a month. As a reminder, the heat exchanger
indicator lights up on the display when the heat exchanger needs to be cleaned.
1. Gently press the top part of the outer
cover (A) to open.
2. Unlock the xers (B).
Maintenance
3. Remove the inner cover (C).
Untitled-12 43 4/24/2017 5:00:32 PM
English 43
Page 44

Maintenance
4. Clean the heat exchanger with a soft
brush or vacuum cleaner.
CAUTION
• To avoid physical injury and burns, do
not touch or clean the heat exchanger
with bare hands.
• Do not use water to clean the heat
exchanger.
• Do not exert force to the heat
exchanger. You may damage the
heat exchanger which may lead to a
decrease in drying performance.
5. Clean the inner cover with a smooth,
damp cloth.
Maintenance
6. Reinsert the inner cover to its original
position, and then lock the xers.
7. Close the outer cover.
NOTE
After cleaning, make sure the xers are
locked.
English44
Untitled-12 44 4/24/2017 5:00:33 PM
Page 45

Troubleshooting
Checkpoints
If you encounter an issue with the dryer, rst check the table below and try the
suggestions.
Symptom Action
• Make sure the door is completely closed.
• Make sure the power cord is plugged in.
Dryer does not run
Dryer does not heat
Dryer does not dry
Dryer is noisy
Dries unevenly
Dryer emits an odor
Dryer turns off before
the load is dry
• Check the home’s circuit breaker and fuses.
• Empty the water tank.
• Clean the lint lter.
• Check the home’s circuit breaker and fuses.
• Select a heat setting other than COOL AIR.
• Check the lint lter and heat exchanger lter. Clean them if
necessary.
• Dryer may be in the cool-down phase of the cycle.
Check the above, plus…
• Make sure the dryer is not overloaded.
• Sort light and heavy items separately.
• Reposition large, bulky items to ensure even drying.
• Check that the dryer is draining properly.
• For small loads, add a few dry towels.
• Clean the lint lter and heat exchanger lter.
• Check for coins, buttons, lighters, etc.
• Make sure the dryer is level and standing rmly on the
oor.
• The dryer may hum due to air moving through the drum
and fan. This is normal.
• Seams, pockets, and other parts of clothing are harder to
dry than others. This is normal.
• Sort heavy and light items separately.
• The dryer may draw household odors in from the
surrounding air and then exhaust them. This is normal.
• Dryer load is too small. Add more items and restart the
cycle.
• Dryer load is too large. Remove items and restart the cycle.
Troubleshooting
English 45
Untitled-12 45 4/24/2017 5:00:33 PM
Page 46

Troubleshooting
Lint on clothes
Items still wrinkled
after Wrinkle Prevent
Odors remain in items
after Cool Air
Information codes
If the dryer fails to operate, you may see an information code on the display. Check the
table below and try the suggestions.
Information code Meaning Action
tC Air temperature sensor issue
tC5
dC
Troubleshooting
HC Compressor overheat Call for service.
9C2 Low voltage detected
5C
Symptom Action
• Make sure the lint lter is clean before every load.
• Dry lint-producing items (fuzzy towels) separate from lint
trappers, such as black linen pants.
• Divide larger loads into smaller loads.
• Small loads of 1-4 items work best.
• Load fewer items. Load similar type items.
• Make sure to thoroughly wash items with strong odors.
Clean the lint lter and/or heat
exchanger lter. If this continues, call
for service.
Compressor temperature
sensor issue
Running the dryer with door
open
Water tank full
Drain pump is out of order
Wait 2-3 minutes. Turn the power on
and restart.
Close the door and restart.
If this continues, call for service.
Check if the power cord is plugged
in. If this continues, call for service.
Empty the water tank, turn the
power on, and restart. If this
continues, call for service.
For any codes not listed above, or if the information code continues to appear, call for
service.
English46
Untitled-12 46 4/24/2017 5:00:33 PM
Page 47

Appendix
Fabric care chart
The following symbols provide garment
care direction. The Clothing care labels
include symbols for drying, bleaching,
drying and ironing, or dry cleaning when
necessary. The use of symbols ensures
consistency among garment manufacturers
of domestic and imported items. Follow
care label directions to maximize garment
life and reduce laundering problems.
Wash cycle
Normal
Permanent Press / Wrinkle
Resistant / Wrinkle Control
Gentle / Delicates
Hand Wash
Water Temperature**
Bleach
Any Bleach (when needed)
Only Non-Chlorine (color-safe)
Bleach (when needed)
Tumble Dry Cycle
Normal
Permanent Press / Wrinkle
Resistant / Wrinkle Control
Gentle/ Delicates
Special instructions
Line Dry / Hang to Dry
Drip Dry
Dry Flat
Hot
Warm
Cold
NOTE
** The dot symbols represent appropriate
wash water temperatures for various
items. The temperature range for Hot
is 41-52 °C, for Warm 29-41 °C and for
Cold 16-29 °C. (Wash water temperature
must be a minimum of 16 °C for detergent
activation and effective cleaning.)
Heat setting
High
Medium
Low
Any Heat
No Heat/Air
Appendix
English 47
Untitled-12 47 4/24/2017 5:00:36 PM
Page 48

Appendix
Iron dry or steam temperatures
High
Medium
Low
Warning symbols for laundering
Do Not Wash
Do Not Wring
Do Not Bleach
Do Not Tumble Dry
No Steam (added to iron)
Do Not Iron
Dry-clean
Dry-clean
Do Not dry-clean
Line Dry/ Hang to Dry
Drip Dry
Dry Flat
Protecting the environment
This appliance is manufactured from recyclable materials. If you decide to dispose of this
appliance, please observe local waste disposal regulations. Cut off the power cord so that
the appliance cannot be connected to a power source. Remove the door so that animals
and small children cannot get trapped inside the appliance.
Appendix
English48
Untitled-12 48 4/24/2017 5:00:38 PM
Page 49

Specication
E
A
B
DV9*M52****, DV8*M52****, DV7*M52****
TYPE FRONT LOADING DRYER
A 600 mm
B 850 mm
DIMENSIONS
C 600 mm
D 640 mm
E 1095 mm
WEIGHT 50 kg
ELECTRICAL REQUIREMENTS
220–240 V /
50 Hz
ALLOWABLE TEMPERATURE 5-35 °C
D
C
550-600 W
Appendix
English 49
Untitled-12 49 4/24/2017 5:00:38 PM
Page 50

Appendix
DV9*M50****, DV8*M50****, DV7*M50****
TYPE FRONT LOADING DRYER
A 600 mm
B 850 mm
DIMENSIONS
WEIGHT 50 kg
ELECTRICAL REQUIREMENTS
ALLOWABLE TEMPERATURE 5-35 °C
Consumption data
C 600 mm
D 640 mm
E 1095 mm
220–240 V /
50 Hz
750-850 W
Appendix
* : Weight of dry laundry
** : EN 61121:2013 test program
All data without a “star” against it was calculated using EN 61121:2013
Consumption data can vary from the nominal values given above depending in the size
of the load, types of textiles, residual moisture levels after spinning, uctuations in the
electricity supply and any extra options selected.
Model Program Load (kg)* Energy (kWh)
9 1.56 188
COTTON**
4.5 0.9 130
DV9*M52****
IRON DRY** 9 1.1 130
SYNTHETICS 4.5 0.71 86
8 1.43 169
COTTON**
4 0.8 120
DV8*M52****
IRON DRY** 8 1.02 118
SYNTHETICS 4 0.65 80
7 1.26 148
COTTON**
3.5 0.73 110
DV7*M52****
IRON DRY** 7 0.94 108
SYNTHETICS 3.5 0.61 75
Max. Duration
(Minutes)
English50
Untitled-12 50 4/24/2017 5:00:38 PM
Page 51

Model Program Load (kg)* Energy (kWh)
Max. Duration
(Minutes)
9 2.20 190
COTTON**
4.5 1.12 130
DV9*M50****
IRON DRY ** 9 1.70 155
SYNTHETICS 4.5 0.85 78
8 1.87 170
COTTON**
4 1.10 125
DV8*M50****
IRON DRY ** 8 1.54 140
SYNTHETICS 4 0.78 72
7 1.67 150
COTTON**
3.5 1.00 120
DV7*M50****
IRON DRY ** 7 1.43 130
SYNTHETICS 3.5 0.67 68
* : Weight of dry laundry
** : EN 61121:2013 test program
All data without a “star” against it was calculated using EN 61121:2013
Consumption data can vary from the nominal values given above depending in the size
of the load, types of textiles, residual moisture levels after spinning, uctuations in the
electricity supply and any extra options selected.
English 51
Untitled-12 51 4/24/2017 5:00:39 PM
Appendix
Page 52

Appendix
Sheet of household tumble driers
Data sheet for Domestic Tumble Driers
As detailed in EU regulation No. 392/2012
“*” Asterisk(s) means variant model and can be varied (0-9) or (A-Z).
Appendix
NOTE
Samsung
Model Name DV7*M52**** DV8*M52**** DV9*M52****
Capacity kg 7 8 9
Type Condenser Condenser Condenser
Energy Efciency
A+++ (highest efciency) to D (least efcient) A+++ A+++ A+++
Energy Consumption
Annual Energy Consumption (AE_C)
Automatic dryness detector Yes Yes Yes
Energy consumption (E_dry) standard cotton
programme at full load
Energy consumption (E_dry.1/2) standard cotton
programme at partial load
off mode and left-on mode
The power consumption off-mode (P_o) at full load W 0.50 0.50 0.50
The power consumption in left-on mode (P_l) at
full load
Duration of the left-on mode min 10 10 10
Programme to which the information on the label and the Sheet
2)
relate
programme duration of the standard program
Weighted Programme time standard cotton
programme at full load and partial load
Programme Time (T_dry) standard cotton
programme at full load
Programme Time (T_dry.1/2) standard cotton
programme with partial load
condensation efciency class
A (most efcient) to G (least efcient) B B B
Average condensation efciency at full load % 81 81 81
Average condensation efciency at partial load % 81 81 81
Weighted condensation efciency % 81 81 81
Airborne noise emissions
Dry at full load dB (A) re 1 pW 65 65 65
Name of company Samsung Electronics Co., Ltd.
1)
kWh/yr 158 176 194
kWh 1.26 1.43 1.56
kWh 0.73 0.80 0.90
W 5.00 5.00 5.00
Cotton + Dry Level 2 (Wrinkle Prevent off)
min 126 141 155
min 148 169 188
min 110 120 130
English52
Untitled-12 52 4/24/2017 5:00:39 PM
Page 53

Samsung
Model Name DV7*M50**** DV8*M50**** DV9*M50****
Capacity kg 7 8 9
Type Condenser Condenser Condenser
Energy Efciency
A+++ (highest efciency) to D (least efcient) A++ A++ A++
Energy Consumption
Annual Energy Consumption (AE_C)
1)
kWh/yr 211 235 258
Automatic dryness detector Yes Yes Yes
Energy consumption (E_dry) standard cotton
programme at full load
Energy consumption (E_dry.1/2) standard cotton
programme at partial load
kWh 1.67 1.87 2.20
kWh 1.00 1.10 1.12
off mode and left-on mode
The power consumption off-mode (P_o) at full
load
The power consumption in left-on mode (P_l) at
full load
W 0.50 0.50 0.50
W 5.00 5.00 5.00
Duration of the left-on mode min 10 10 10
Programme to which the information on the label and the Sheet
2)
relate
Cotton + Dry Level 2 (Wrinkle Prevent off)
programme duration of the standard program
Weighted Programme time standard cotton
programme at full load and partial load
Programme Time (T_dry) standard cotton
programme at full load
Programme Time (T_dry.1/2) standard cotton
programme with partial load
min 133 144 156
min 150 170 190
min 120 125 130
condensation efciency class
A (most efcient) to G (least efcient) B B B
Average condensation efciency at full load % 81 81 81
Average condensation efciency at partial load % 81 81 81
Weighted condensation efciency % 81 81 81
Airborne noise emissions
Dry at full load dB (A) re 1 pW 65 65 65
Name of company Samsung Electronics Co., Ltd.
Appendix
English 53
Untitled-12 53 4/24/2017 5:00:39 PM
Page 54

Appendix
NOTE
1. Energy consumption is measured as the annual 9 kg 258 kWh (8 kg 235 kWh) used per
year, based on 160 drying cycles of the standard cotton programme at full and partial
load, and the consumption of the low-power modes. Actual energy consumption per
cycle will depend on how the appliance is used.
2. ‘standard cotton programme’ used at full and partial load is the standard drying
programme to which the information in the label and the che relates, that this
programme is suitable for drying normal wet cotton laundry and that it is the most
efcient programme in terms of energy consumption for cotton. Consumption data can
vary from the nominal values given above depending in the size of the load, types of
textiles, residual moisture levels after spinning, uctuations in the electricity supply
and any extra options selected.
Appendix
English54
Untitled-12 54 4/24/2017 5:00:39 PM
Page 55

Memo
Untitled-12 55 4/24/2017 5:00:39 PM
Page 56

QUESTIONS OR COMMENTS?
COUNTRY CALL OR VISIT US ONLINE AT
UK 0330 SAMSUNG (7267864) www.samsung.com/uk/support
IRELAND (EIRE) 0818 717100 www.samsung.com/ie/support
DC68-03794A-01
Untitled-12 56 4/24/2017 5:00:39 PM
 Loading...