


Chapter 2
Guided Setup
Phone Setup
Press the DIRECTV button on your remote control to start Phone Setup.
Final Steps. The last step of Guided Setup, Phone Setup, begins automatically the first
time you press the DIRECTV button on your remote control. The DIRECTV DVR should
be connected to a telephone line. The DVR occasionally makes a brief phone call to get
updates to the DVR service and Showcases, and for pay per view functionality.
By default, the DVR will not pick up the phone if the line is busy. If you pick up the phone
while the DVR is using the line, the DVR’s modem will disconnect. To use the phone line
you should hang up, wait at least 45 seconds, then pick up the phone again to get a dial
tone.
DVR Service Terms. This screen appears after the Final Steps screen. The DIRECTV
Service Agreement is printed on your first monthly statement from DIRECTV. We
encourage you to read it.
Area Code. The DVR service uses your area code to determine which local dial-in
numbers are available. If you make a mistake, press LEFT arrow to correct it.
Phone Dialing Options. Most people will not need to change the settings the DVR uses to
dial out. However, if your phone system uses special dialing options, select “Yes.” See
“Phone Dialing Options” on page 102 for help with the various settings.
30
Update Dial-In Numbers. The DVR makes a toll-free call to get a list of local dial-in
numbers. The call usually takes less than five minutes, and its status displays on the
screen. If the call fails, check the Troubleshooting chapter of this guide, on page 132.
Dial-In Numbers. The DVR uses the dial-in number you select from the list on this screen
to make its daily calls to the DVR service. The list may be too long to fit on one screen. To
see more numbers, press CHAN DOWN.

Phone Setup
No Local Numbers. If you chose a local dial-in number, you will not see this screen. If you
selected “None of the Above” on the Dial-In Numbers screen, select “Request 800 number
authorization” here. Selecting this option temporarily selects the toll-free number and
submits a request to use the toll-free number. It is the current policy of DIRECTV to allow
you to use the toll-free number if there are no local numbers available.
Dialing Format. Choose the dialing format you need. For example, should the dial-in
number be preceded by your area code, and should a “1” precede the area code? In some
areas, even local numbers must be dialed using the area code.
Test Phone Connection Call. This screen appears while the DVR tests the phone dialing
options and local dial-in number you have chosen. You should see a message that says
“Test Successful!” Press SELECT or the RIGHT arrow to continue. If the phone test does
not succeed, you may need to pick a different dial-in number, or change the dialing
format. Use the LEFT arrow to go back to previous screens and make changes to dialing
options.
Congratulations! You’ve completed Guided Setup. You can now press the DIRECTV
Button on your remote control to go to DIRECTV Central.
Care of Your DIRECTV DVR. Your DVR should remain connected to your satellite dish
antenna and plugged in to a live power source and a phone line at all times. This lets it
record programs and make phone calls to keep its data up-to-date.
If your DVR is having difficulty
dialing out, try the following: P ress
LEFT arrow until you return to the Phone
Dialing Options screen. Select Set Dial
Prefix, and enter the dialing prefix
“,#034” (comma, pound, zero, three,
four). Use the PAUSE button to enter a
comma, and the ENTER button to enter a
pound. This command sets the DVR’s
modem to a slower speed, which helps
phone calls succeed in some
environments. The DVR does not dial the
prefix as part of the number.
2
Moving Your DVR. If you take your DVR with you to a location without satellite access—
for example, on a weekend get-away to a mountain cabin—you will still be able to
connect it to a television and watch programs saved in the Now Playing List.
After completing Guided Setup one time, whenever you unplug the DVR and plug it back
in, it will search for a satellite signal. When you see the message “Acquiring Satellite
31

Chapter 2
Guided Setup
Information,” you can press the DIRECTV button on the remote control to go directly to
DIRECTV Central. From DIRECTV Central, programs in your DVR’s Now Playing List
are always available. If you start your DVR without properly connecting it to a DIRECTV
satellite television signal, the DVR will not show live TV or provide any live TV
functions.
Your DVR should NOT be used with any digital PBX phone system. Doing so may
permanently damage your DVR’s modem and will void your warranty. Digital PBX
phone systems allow many phones to share a single telephone number and are usually
used in hotels and offices. If you are installing the DVR in your home, it is unlikely you
are using a digital PBX phone system.
Next Up, the 5 Tours. Now that you are finished with Guided Setup, you’re ready to have
fun with your DVR! We suggest you start with the five short tours provided in “The
Basics in 5 Short Tours” on page 33. These will guide you through the basics and show
you some fun features of the DIRECTV
DVR.
32

CHAPTER
3
The Basics in 5 Short Tours
Tour 1: Play with Live TV 34
Tour 2: DIRECTV Advanced Program Guide™ 36
Tour 3: Find and Record Your Favorite Programs 38
Tour 4: Search for New Programs 40
Tour 5: Now Playing List 42
Cool Things You Can Do 43

Chapter 3
G
u
i
d
e
L
i
s
t
The Basics in 5 Short Tours
Tour 1: Play with Live TV
Vol
Chan
o
c
r
d
e
R
P
e
a
g
P
y
l
a
In this tour, you’ll take a look at how you can control live TV. So grab your remote!
First, press the PAUSE button—the program you’re watching pauses. Now you can
stand up and stretch, or go to the kitchen and get a snack. You can pause live TV for up to
30 minutes! With Dual Tuner, you can switch between two channels in live TV without
losing the saved portion of either one.
( )
-
S
w
l
o
TVSAT
o
w
P
e
r
V
T
n
p
I
u
t
V
T
But for now, press PLAY and the program resumes.
Next, press BACK and the program rewinds. Press BACK a second time—it goes
faster! A third time—faster still! Both the FORWARD and BACK buttons have three
speeds. Press BACK a fourth time to return to normal speed.
Press PAUSE once more, then immediately press FORWARD and you get frame-byframe forward! Press BACK and you get frame-by-frame backward! When your show is
paused, FORWARD and BACK let you go frame by frame. Press PLAY to resume
watching at normal speed.
Try out the INSTANT REPLAY button. INSTANT REPLAY jumps you back 8
seconds—useful for when you miss a great sports play or a bit of dialog, or for when you
fast forward too far.
Press INSTANT REPLAY again, then immediately press SLOW — you get your
own slow-motion replay!
Finally, try the ADVANCE button. Presto! You’re caught up to live TV.
34

Status Bar
Tour 1: Play with Live TV
Press PAUSE or PLAY to see the status bar. It shows a one-hour period. The green
segment is the portion of the current hour that has been saved by your DIRECTV
The right edge of the green part is always the current time.
The white line marks the part of the program you are currently watching. If it is anywhere
back in the green segment you are “behind” real time.
Press CHAN UP. When you change channels, the DVR starts to save what is showing on
the new channel. With Dual Tuner, 30 minutes of live TV is saved on both tuners. That
means you can use the instant replay, slow motion and pause features on either channel. If
you leave one of these two channels, however, the saved information on the original
channel is cleared, and the DVR starts saving live TV on the new channel.
DVR.
Channel Banner
The channel banner describes the program you’re currently watching. Press INFO or the
RIGHT arrow to see the channel banner. The channel banner is only there for a few
seconds, but you can bring it back by pressing INFO or the RIGHT arrow again. While the
banner is visible, press the RIGHT arrow to switch from a small, to medium, to large
banner. Each version has a different amount of information.
Keep pressing the RIGHT arrow until you see the largest version of the channel banner.
Notice the small icons on the right side. Each symbol represents a useful feature, like
swapping tuners or setting Parental Controls. Press the UP and DOWN arrows to highlight
different icons. Pressing SELECT while an icon is highlighted will take you to that
feature. Finally, press the EXIT button—the channel banner disappears. (EXIT gets rid of
graphics that aren’t part of the program you’re watching.)
Now go have fun playing with live TV, then come back for the next tour!
Status Bar
channel banner
3
This white line
tells you where
you are.
selectable
icons
35

Chapter 3
The Basics in 5 Short Tours
If you find that the Program Guide
or the CHAN UP/DOWN buttons
are not showing channels you want to
see, filtering or a custom channel list is
probably turned on. Check the Guide
Options (from the Program Guide, press
INFO).
Tour 2: DIRECTV Advanced Program Guide
™
While you’re watching live TV, the Advanced Program Guide lets you see what’s on,
change channels, schedule recordings, and more. To see it, press the GUIDE button on
your remote control.
Changing Channels
The guide shows a list of channels on the left and different times across the top. One
program is highlighted—it’s a different color than the others. Its description appears at the
top of the grid. Press the UP or DOWN arrows to move to a different channel, then press
SELECT. Pressing SELECT on a program that is currently showing changes the channel
to display that program and hides the guide.
Scheduling a Recording
Press the GUIDE button to bring back the Program Guide. It’s easy to record a program
using the guide. Simply highlight the program you want and press the RECORD button. A
transparent screen appears, from which you select “Record this Showing.” If the program
is currently playing, the DVR changes channels and begins recording; otherwise, the
recording is scheduled for the future. When you’re recording, the red light on the front of
the DVR illuminates.
Making a List of Favorite Channels
36
You can create a list of your favorite channels and then set the guide to show only
channels that are on the list. This is a quick way to see programs coming up on the
channels that are most important to you.

Tour 2: DIRECTV Advanced Program Guide™
First, create a list of favorite channels. Press the DIRECTV button to see DIRECTV
Central. Highlight “Messages & Setup,” then press SELECT. Next, select “My
Preferences,” then “Customize Channels,” then “Favorite Channels.” A list of all
DIRECTV
fit on one screen!) Press CHAN DOWN a few times. Each time you press it, you see the
next screen of channels. Press CHAN UP to see a previous screen. You can also jump to a
specific channel by entering the channel number on the remote.
Highlight a channel you want to include in your list of favorites and press SELECT. A
checkmark appears beside the channel. To remove a channel, highlight one that has a
checkmark and press SELECT—the checkmark disappears. Now find a few more
channels for your list and select them to give them checkmarks.
channels appears. (DIRECTV provides many, many more channels than will
Using Your Channel List
When you want to change the way the guide appears and what it displays, you can use
Guide Options. Press the GUIDE button to see the guide. While it is visible, press the
INFO button to see Guide Options.
On the Guide Options screen, press the DOWN arrow once so “All” (to the right of
“Channels”) is highlighted. “All” is the current channel list and includes all available
DIRECTV channels. Press the RIGHT arrow twice to change the list to “Favorites,” then
press SELECT. “Done changing options” becomes highlighted. Press SELECT again and
voilà, the guide appears using your new custom channel list!
3
Now the guide only shows channels in your list. Use the UP and DOWN arrows to move
around a bit on your new customized guide, then press the EXIT button to hide the guide.
Press CHAN UP a few times—notice it skips some channels now. CHAN UP/DOWN is
also affected by the channel list; it only tunes to channels that are on the list. You can still
tune to other channels by entering numbers.
37
Chapter 3
If you do not see the program you
wish to find in the list of programs,
it may be because the DVR is still gathering
Program Guide data. A message at the
bottom of the screen will tell you how much
data the DVR has. The DVR should be done
collecting Program Guide data within 48
hours of finishing Guided Setup.
The Basics in 5 Short Tours
Tour 3: Find and Record
Your Favorite Programs
You can always record a program you’re watching by pressing the RECORD button on
your remote control. What’s more, if you have not changed the channel for a while, your
DIRECTV DVR will add to your recording whatever part of the program it has already
saved, up to 30 minutes. Your DVR also provides many ways to quickly search large
numbers of programs, find your favorites, and schedule recordings in advance. Even
buying and recording pay per view events is quick and easy, without any need to use a
phone. What’s more, if a program is part of a series, you can get a Season Pass
series. A Season Pass records every episode of a selected program that airs on a given
channel.
Search by Title
In this tour, we’ll show you how to get a Season Pass. As an example, we’ll be searching
for a fictitious show called The Downtown Lawyers, but you can use the same steps to
search for your favorite program.
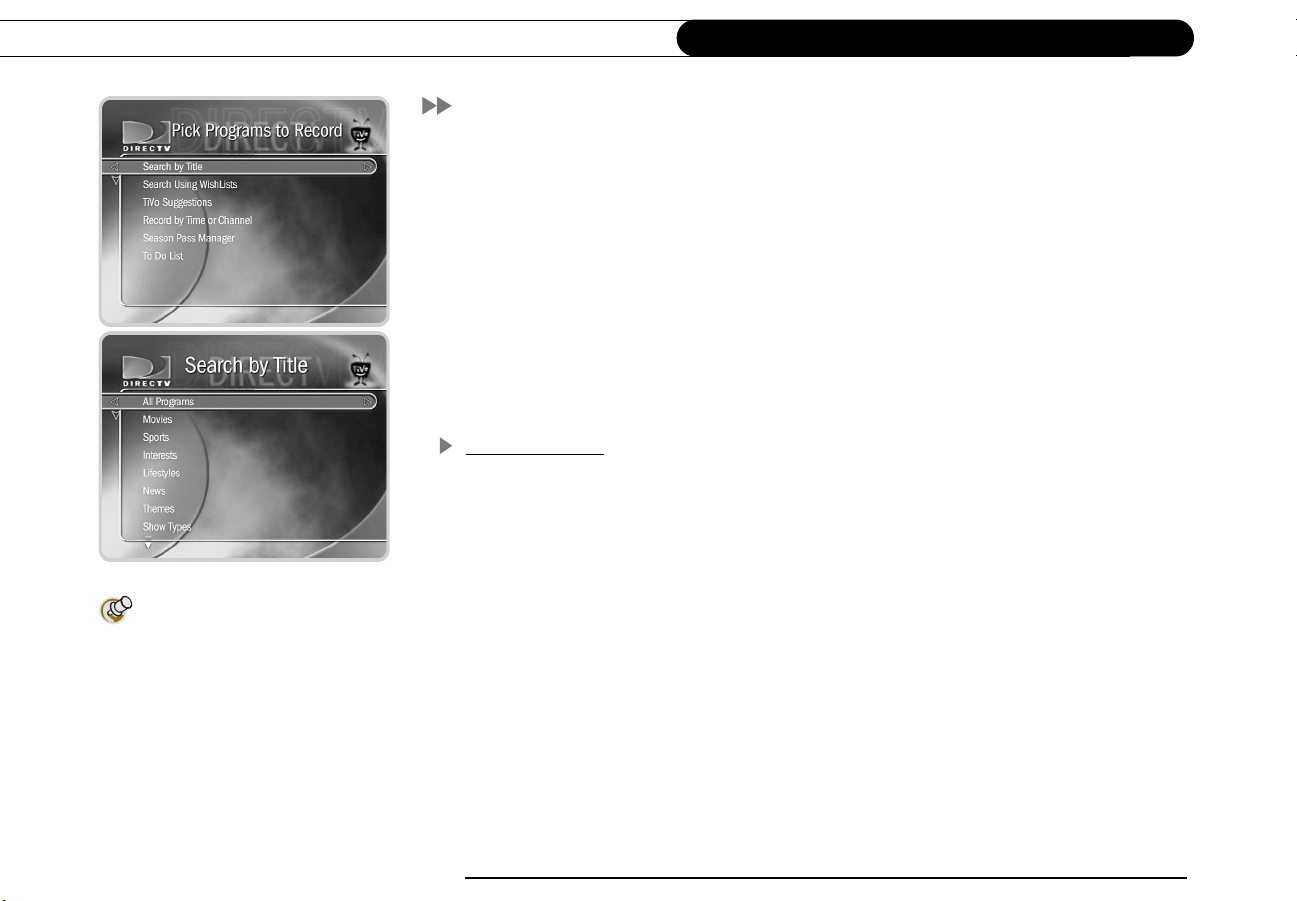
To get started, press the DIRECTV button to see DIRECTV Central. Press the DOWN
arrow to highlight Pick Programs to Record. Press SELECT. The Pick Programs to
Record screen appears. As you can see, there are many ways to search for a program.
Since you know the program’s title, highlight Search by Title and press SELECT. The
next screen lets you limit your search to any of several categories, but for now, choose
“All Programs” and press SELECT.
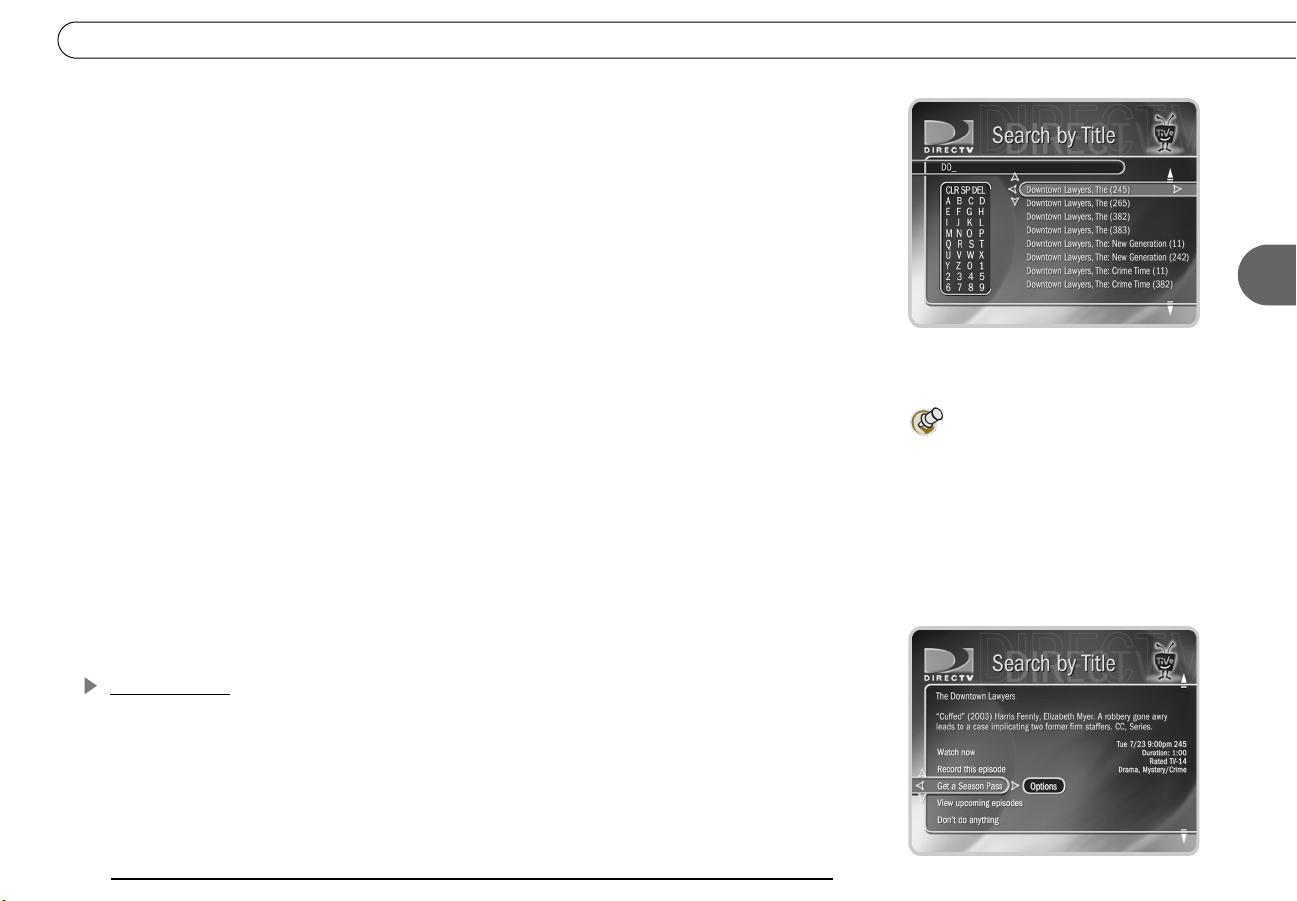
The next screen has a picture of an alphanumeric keypad. Notice the white box around the
“A”. Use the RIGHT, LEFT, UP, and DOWN arrows to move the box. To find The
Downtown Lawyers, you would move the box to “D” and press SELECT. A list of
programs appears on the right side of the screen. (Notice, the list alphabetizes without “A”
™
to the
38
Tour 3: Find and Record Your Favorite Programs
or “The.”) Move the white box to “O” and press SELECT again. The list changes. Your
DVR searches through all available programs (usually, data for the next two weeks) to
find those that begin with “DO,” then lists those programs. This can be a great way to find
a show if you are not sure of its full name.
If you make a mistake entering text, select “DEL” on the screen (or press BACK on the
remote control). To clear all text, use CLR on the screen (or press the CLEAR button on
the remote control). Next, enter a “W.” If The Downtown Lawyers existed, you would see
it in the title list at the right. Press the RIGHT arrow until you move off the alphanumeric
keypad and onto the list of programs. Press the UP or DOWN arrow to highlight the show
of your choice, then press SELECT. The Program Information screen appears. This screen
tells you about the program and lets you set up a recording.
3
Highlight Get a Season Pass, and press SELECT. A screen appears to confirm your
choice. Confirmation screens help you make sure the DIRECTV DVR is doing what you
want. Press SELECT again. You now have a Season Pass.
To see all your scheduled recordings, go to DIRECTV Central, then Pick Programs to
Record, then To Do List. To cancel a recording, highlight it and press SELECT. The
Program Information screen appears. Select “Cancel only this episode.” On the next
screen confirms that the recording has been deleted from the To Do List. Press select to
return to the To Do List. To cancel an entire Season Pass, go to DIRECTV Central, then
“Pick Programs to Record,” then “To Do List.” Select a program, then select “Cancel/edit
the Season Pass.” Select “Cancel this Season Pass.”
Pay Per View
You can order pay per view events using your remote control. Some events have dedicated
channels that allow ordering more than 24 hours in advance, but for most events, pricing
information becomes available within 24 hours of the event’s air-time. Once that
information is available, you can select and record the event as you would any other
program. When you select an event, a special pay per view Program Information screen
will appear with options to purchase it. For a complete description, see page 85.
There may be more than one
listing for the show you are
searching for. Select the one that airs new
episodes of the show on a channel you
39
Chapter 3
The Basics in 5 Short Tours
Tour 4: Search for New Programs
Your DIRECTV DVR helps you find what you want to watch—both exciting new shows
and old favorites you might have forgotten.
Showcases
Showcases list the best programs offered by television’s biggest networks. These
Showcases group programs in theme packages, giving you one-stop-shopping
convenience when browsing for programs to record. Packages include the biggest
blockbuster movies, mini-series, hottest specials, hit series and shows from the greatest
stars on TV, as well as special Showcases featuring entertaining and informative video.
Showcases are updated during your DVR’s daily phone call.
Once you’re inside a Showcase, use the arrow buttons and SELECT to explore the
selections. When you get to a list of programs, select a title to see the Program Information
screen. If the program airs on a channel you receive, you can set up a recording here—it’s
that easy!
TiVolution Magazine
Magazine, an interactive guide to the best upcoming shows on television. You’ll find
premieres, specials, and offbeat gems, making it easy for you to schedule recordings. New
content is delivered fresh to your DVR during the daily phone call. TiVolution Magazine
is always available under Showcases. To find it, press the DIRECTV button, select
“Showcases,” then “TiVolution Magazine.”
®
. You’ll always find something fun and unusual in TiVolution
40

Tour 4: Search for New Programs
TiVo Suggestions (Thumbs Up and Thumbs Down)
TiVo Suggestions is a personalized list of shows selected to match your preferences. How
is this magic possible? Any time you watch programs, live or pre-recorded, or browse
programs with the Program Guide, you can rate them. If you like a program, press the
green THUMBS UP
THUMBS DOWN
Over time, the more shows you rate with your Thumb buttons, the better TiVo
Suggestions will be at finding programs you like. The suggestions are listed under TiVo
Suggestions in order of how closely they match your preferences.
Try it! Press GUIDE to bring up the DIRECTV Advanced Program Guide
few programs and rate them by pressing the THUMBS UP
button. Then go to “DIRECTV Central,” then “Pick Programs to Record,” then
™
“TiVo Suggestions.” Suggested programs based on your Thumb ratings appear in TiVo
Suggestions. (If you don’t see programs yet, come back later—it may take a few hours the
first time.) You can press SELECT on a suggestion, then set up a recording.
As an added bonus, when the DIRECTV DVR
record some of TiVo Suggestions. You will find them at the bottom of the Now Playing
List, below programs you requested. TiVo Suggestions never replace shows you explicitly
request and they do not prevent those shows from being recorded. Recorded suggestions
are always the first programs deleted to make room for recordings you request.
™
™ button on your remote control. If you dislike it, press the red
™
™. You can give a program up to three Thumbs, up or down.
™
. Highlight a
™
™ or THUMBS DOWN™
has empty space, it may automatically
3
Your personal TV preferences are
just that: personal. (DIRECTV
privacy policies are included in your first
monthly statement.)
41
Chapter 3
The Basics in 5 Short Tours
Tour 5: Now Playing List
Your DIRECTV DVR can record many hours of programming. (Enough to fill a slew of
video tapes!) Fortunately, it also labels and organizes all those saved programs. Unlike a
VCR, the Now Playing List on your DVR gives you instant access to all recorded
programs—no need to spend time searching for an episode on that tape you thought you
used.
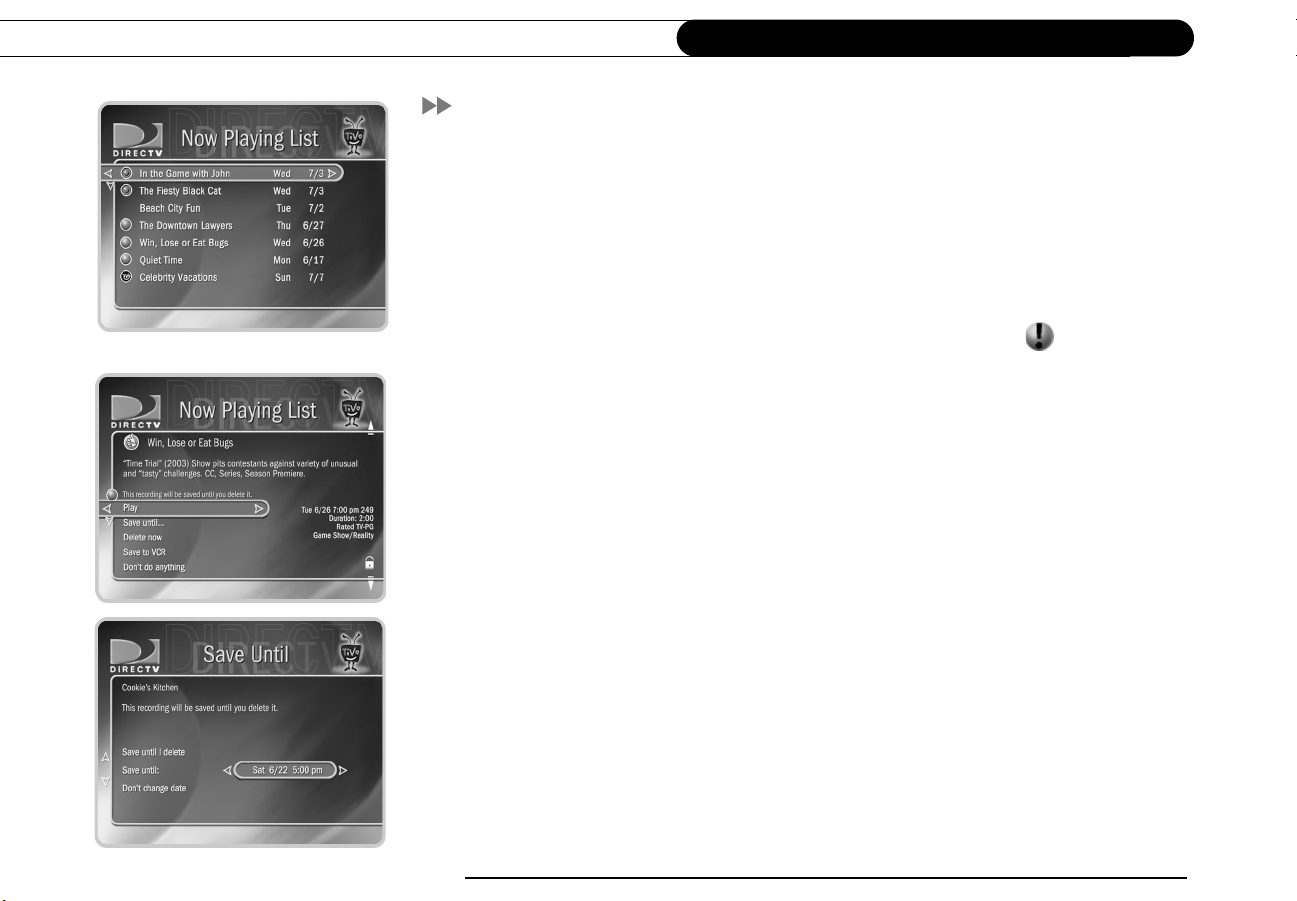
To go to the Now Playing List, press the LIST button. Programs you recorded are at the
top of the list, in the order they were recorded. An icon (like this one: ) to the left of a
program’s title tells you the recording’s current status. (For a summary of what these icons
mean, see the inside back cover of this guide.)
Programs you request will appear in the Now Playing List the moment recording begins.
You can watch any title in the list—even one that is still being recorded—by highlighting
it, then pressing the PLAY button.
Try it! Highlight a program in the Now Playing List and press PLAY. OK, now for the
cool part: Watch the program for at least five minutes, then press the LEFT arrow to go
back to Now Playing List. Select the same program again—the Program Information
screen says “Resume Playing” instead of “Play.” Select “Resume Playing” and return to
the program from the point you left it!
42
Save until . . . Programs you choose to record are saved at least two days by default. To
see options for saving a program longer, highlight the program in the Now Playing List,
then press SELECT.
The Program Information screen appears. Select “Save until....” On the next screen, use
the UP/DOWN arrows to highlight the date, then use the RIGHT/LEFT arrows to change
it. When you are done, press SELECT.

Cool Things You Can Do
Cool Things You Can Do
Never be late for your favorite programs: Working late? Stuck in traffic? Don’t worry. If
you set up a recording or a Season Pass, the program will be waiting for you in the Now
Playing List. You can even start watching from the beginning while it finishes recording.
Make your television wishes come true with a WishList™: Have a favorite actor? A
favorite hobby or interest? How about a favorite sports team? If they’re on TV, chances
are a WishList
Looking for good movies? Kids’ shows? Science fiction? With Search by Title, you can
browse all the upcoming programs in a particular category and find shows you didn’t
know were on (see page 38).
™
will find them. See page 73.
3
See a good preview, record the show: If you’re watching live TV and a promotion
comes on for an upcoming program, you may see an iPreview
one: Press THUMBS UP while you see the icon to automatically set up a
recording for the program. You don’t have to remember when it’s on—it will be recorded!
(If you didn’t schedule a recording when you saw the icon, rewind until it’s visible again.)
Filter the Program Guide: Want to try something new for dinner tonight? It’s easy to
make the Program Guide show only a certain kind of program—for example, cooking
shows. You’ll use the Guide Options screen to choose the desired filter (in this example,
it’s “Lifestyles,” then “Cooking”) and turn on filtering. (See page 50.) Once you’ve turned
on the filter, programs that do not fit the selected category appear in gray on the guide
until you highlight them. In addition, if a given channel doesn’t have any shows that fit the
category within the next six hours, that channel doesn’t show up in the guide. You can
always turn filtering off to show all channels in the guide.
™
icon like this
43

Chapter 3
The Basics in 5 Short Tours
Use the Overtime Scheduler™ (and don’t miss overtime!): Programs sometimes start
before they’re supposed to and often end later than scheduled. With Recording Options,
you can “pad” your recordings to account for variations by using the Overtime
Scheduler.
Use the EXIT button: The EXIT button hides the status bar, guide, channel banner, and
anything else that is not part of the program.
Record two programs at the same time with Dual Tuner! Your DIRECTV DVR has two
tuners—which means it can record programs on two channels at the same time. To
activate both tuners, both Satellite In jacks on the back of the DVR must be connected to
cables from your satellite dish antenna (or a multiswitch), and you must choose the “Two
cables” option in of Satellite Dish Setup (described on page 25). With dual tuner you can
watch more of your favorite programs, even when they’re on at the same time.
The Star and the Clapboard: You will occasionally see a yellow star ( ) on
DIRECTV Central. The star signals a new selection that may change the next time you
visit. Depending on the selection, it may allow you to record a program, watch a preview,
or go to a special Showcase. Don’t worry if you pass up a particular new selection; keep
going back to DIRECTV Central until it appears again.
The clapboard icon—on DIRECTV Central, or in a Showcase—indicates that a selection
includes a video preview. If the clapboard has a green triangle in it ( ), you can press
PLAY to play the video. If there is no green triangle, the current selection takes you to
another screen where you’ll find the actual video clip.
™
See page 62.
44

CHAPTER
4
Watching Live TV
Let’s Go! 46
DIRECTV Advanced Program Guide™ 48
Channel Banner 51
Play with Live TV 52
Status Bar 53
Music Channels 54
Standby 55

Chapter 4
Your DVR automatically saves up to
30 minutes of live TV on the
channel you’re watching. With Dual Tuner,
you can switch between two channels,
and 30 minutes of live TV will be saved on
each channel. If you leave one of these
two channels, the saved information on
the original channel is cleared, and the
DVR starts saving live TV on the new
channel.
Live TVWatching Live TV
Let’s Go!
Here are two ways to watch live TV:
• Press the LIVE TV button on your remote control.
• From DIRECTV Central, highlight Watch Live TV and press SELECT.
Changing Channels
There are a number of ways to change channels—choose what’s easiest for you:
• Tired of channel surfing? Press GUIDE to bring up the Advanced Program Guide
Then highlight a program in progress and press SELECT.
• You can also change channels by pressing the numbers on your remote control. The
channel automatically changes after a few seconds, or you can press ENTER/LAST to
make the change right away. If you make a mistake, press CLEAR to clear numbers
you have entered. Use the ADVANCE button ( ) for long channel numbers that
include a dash, to separate the primary digits from the other digits.
• Use the CHAN UP/DOWN button on your remote control to tune to channels on the
current channel list.
• To jump back to the previous channel you were on (without entering any numbers),
press ENTER/LAST.
™
.
46

Recording a Live Program
To start recording a program while you’re watching it, press RECORD. From the options
that display, choose “Record this showing.” Or you can choose “Season Pass and other
options” to see the Program Information screen and either get a Season Pass (page 59) or
change Recording Options (page 60). The recording will stop automatically when the
program ends. You can stop it before that by pressing the RECORD button. A transparent
screen will appear with a selection to “Stop the current recording.” You can also select a
program in the Now Playing List, and then choose “Stop recording.”
Even when you are not recording a program, the DVR saves up to 30 minutes of live TV
from the current channel. If you change channels and you have Dual Tuner enabled, the
DVR starts saving on the new channel as well. When you start to record a live program, if
the DVR has saved a portion of that program, it adds what has been saved to the beginning
of your recording.
With Dual Tuner, if you’re switching between two channels by using the DOWN arrow,
the DVR saves up to 30 minutes of live TV on both channels. If you move to a new
channel (that is, a third channel), the saved portion on the first channel is cleared, and the
DVR starts to save live TV on the new channel (in addition to the other most recent
channel you were watching). You can use the fast forward, instant replay, and slow
motion features on either of the two current channels.
Let’s Go!
4
As soon as the DVR starts
recording a program, you can find
that recording on the Now Playing list by
pressing the DIRECTV button twice.
47

Chapter 4
Live TVWatching Live TV
DIRECTV Advanced Program Guide
While you are watching live TV, the Advanced Program Guide™ shows you current and
upcoming programs. You can use it to see what’s on, change the channel, schedule a
recording, purchase and/or record pay per view events when pricing information is
available, alter Thumb ratings, or select a channel filter. The guide has program
information for up to the next two weeks.
To display the guide, press the GUIDE button. To hide the guide, press GUIDE again (or
press EXIT).
There are two styles of the Advanced Program Guide
Guide. They provide similar information. The Grid Guide is the default style. You can
choose the one you prefer when you customize the guide (see page 50).
Use the UP, DOWN, RIGHT and LEFT arrows to move through the guide. Use CHAN
UP/DOWN to page up or down. On the Grid Guide, use the FORWARD and BACK
buttons to jump through programming information 90 minutes at a time. (On the List
Guide, the FORWARD and BACK buttons jump through 30 minutes of programming
information at a time.)
Changing channels. To change the channel you are watching while in the guide,
highlight a program in progress and press SELECT.
™
: the Grid Guide and the List
™
48
Recording a program. If the program is in progress, highlight it in the guide and press
RECORD. If the program is on later, highlight it and press RECORD or SELECT. If the
program you have chosen is not a pay per view event, a transparent screen displays. Select
“Record this showing.” If you have chosen a pay per view program, the pay per view
screen displays.

DIRECTV Advanced Program Guide™
Title, date, time the program airs, and
other applicable information (rating,
alternate audio, CC, Dolby Digital)
Channel number and channel
call letters
Guide options (Push INFO button
to set)
Current time
Grid Guide
List Guide
Program description
and Thumb rating
Time slo ts
Program listings
Channel list and
category filter
currently in use
Selected channel
The following icons may appear
beside programs in the guide:
This appears beside pay per view
events that are All Day Ticket
replays.
This appears beside programs
that have an alternate
audio track.
This appears beside programs
that have a Dolby Digital
sound track.
This appears beside programs
that are broadcast in letterbox
format, which displays the full
width of the program and leaves
a black margin at the top and
bottom of the screen.
4
Programs during this
time slot
Upcoming programs
on the selected
channel
49

Chapter 4
By customizing the guide, you can
use it to display only program
information you want to see. For example,
you can use the movie filter to quickly
check what movies are on, or use the
“Favorite Channels” list to see
information for your previously selected
channels.
Live TVWatching Live TV
Customizing the Guide
Guide Options. By customizing the guide, you can choose to use either the Grid Guide or
the List Guide. You can also change the day and time displayed, select a channel list, and
set the guide to filter program information by category. To customize the guide, press
GUIDE to make it visible, then press INFO to see Guide Options. Highlight an option and
then change it with the LEFT and RIGHT arrows. Save your changes by pressing INFO
again or GUIDE. To discard your changes, press EXIT.
• Channels. Select a channel list to use in the guide (“All,” “Channels You Receive,” or
“Favorite Channels”). The default, “All,” displays all of the DIRECTV
you have customized the Channels You Receive list in My Preferences to include only
channels you receive, you can select “You Receive” on this screen to show only
channels you receive in the guide. Similarly, if you have customized the “Favorite
Channels” list, the guide will only show channels in that list.
• Day and Time. Use the LEFT and RIGHT arrows to change the day or time displayed
in the guide.
• Style. Change the style of the guide to Grid Guide or List Guide.
• Filtering. Turn guide filtering on or off.
• Choose filter. Choose a category with which to filter the guide. When filtering is on,
programs that do not fit the selected category appear grayed on the guide until you
highlight them. In addition, if a channel has no programs in the selected category
within six hours of the time on the guide, the Grid Guide will not show that channel.
channels. If
50

Channel Banner
Channel Banner
The channel banner appears at the top of the screen when you change channels or press
INFO, THUMBS UP or THUMBS DOWN, or the RIGHT arrow during a program. It
disappears after a few seconds. You can set a preference (see page 96), to decide how long
the banner stays on the screen when you change channels. Press EXIT (or INFO) to hide
the channel banner.
Use the RIGHT arrow to cycle through three versions of the channel banner: small (with
only the current time and channel), medium (adds the title, running time, and ratings), and
large (with a program description and icons for useful shortcuts). The size of the banner
you last viewed becomes the default size when you change channels.
Channel Banner Shortcuts. The large channel banner has a number of selectable icons.
To select an icon, use the UP and DOWN arrows to highlight it, then press SELECT.
Select to start a recording. This icon is bright when the DVR is recording a
program, dim when it is not recording.
Select to display what’s on the other tuner (for Dual Tuner). This icon is bright if
the program on the other tuner is being recorded. It is dim if the program on the
other tuner is not being recorded.
Alternate audio usually changes the language of the program. Sometimes there are
other types of alternate audio. If an alternate audio track is available, this icon will
be bright, otherwise it will be dim. Highlight this icon and press SELECT to choose
an alternate audio track.
Select to display Parental Controls (see page 90). If Parental Controls are off, the
padlock appears unlocked and dim. If they are on, it appears locked and bright. If
they are temporarily turned off, it appears unlocked and bright.
If this icon is bright, you have new messages. Select to display Messages & Setup.
Pressing the RIGHT arrow cycles through
channel banner styles, from
small . . .
to medium . . .
4
to large . . .
51

Chapter 4
Live TVWatching Live TV
Play with Live TV
The INSTANT REPLAY button has
many uses but one of the most
helpful is to compensate when you fast
forward too far. Press INSTANT REPLAY to
rewind eight seconds. Press it again if you
really missed the mark. (You could rewind
through a whole program using only
INSTANT REPLAY!)
WARNING TO PROJECTION TV
OWNERS! Be careful about using
the pause feature for long periods of time
if you have a projection TV. Most
projection TVs are sensitive and “burn in”
still images very quickly. If you pause
your program for too long, you may
permanently damage your screen.
Part of the fun of watching live TV and recorded programs with your DIRECTV DVR is
using the pause, instant replay, and slow motion features. Here’s a list of the things you
can do with the special buttons on your remote control:
Record: Records a program. You can press RECORD when you are watching a
program in live TV, or when a program title is highlighted on the guide.
Play: Shows programs at normal speed. The status bar appears for five seconds.
Pause: Freezes the picture. To resume, press PLAY, or press PAUSE again.
Frame-by-Frame: To move frame-by-frame: first press the PAUSE button. Then
press either the BACK or FORWARD button. For continuous frame-by-frame
back or forward, hold down the BACK or FORWARD button.
Back: Plays the program in reverse. Press BACK once, twice, or three times to go
backward fast, faster, or fastest.
Forward: Plays the program in fast forward. As with reverse, pressing the
FORWARD button repeatedly cycles through three speeds of fast forward.
Slow: Slows down the speed of the program.
Instant Replay: Instantly plays the last eight seconds of the program again.
Advance: (a) If you are watching live TV, catches up to the current time. (b) When
you are fast forwarding in a recorded program, instantly jumps ahead to the next
tick mark (short white line on the status bar). When you are rewinding, jumps back
to the previous tick mark. (c) If you are watching a recorded program, jumps to the
end of the recording. Press again to jump to the beginning of the recording.
52
.

Status Bar
When you press PLAY, PAUSE, FORWARD or BACK, a status bar appears on the lower
part of your screen. In live TV, the status bar represents one hour (notice the white tick
marks every 15 minutes). In recorded programs, the bar shows the program’s length. The
green portion of the bar represents the part of the program saved by the DVR. The DVR
automatically saves up to 30 minutes of live TV. You can rewind and fast forward through
the saved portions of a program.
Status Bar
In live TV, the right edge of the green segment represents the current time. A white
vertical line shows where you are in the saved portion of the program. If the white line is
anywhere back in the green segment, you are behind live TV. When you’re behind live
TV, you can press the ADVANCE button ( ) to catch up.
Status bar for live TV.
Status bar for a twohour recorded
program.
This is where you are
now.
The BACK button has
been pressed twice.
This shows which
special feature you are
using. (This is the
symbol for pause.)
tick marks (15 min. apart)
This recorded program
is two hours long.
This is where you
catch up with live TV
and the current time.
4
The EXIT button hides the status
bar, guide, channel banner, and
anything else that is not part of the
program.
53

Chapter 4
Live TVWatching Live TV
Music Channels
Some DIRECTV channels feature continuous music. You can tune to a music channel
just as you would any other channel. You cannot record music channels or use special
features—such as pause or rewind—on a music channel.
Music Channels have a special music banner that displays for five minutes when you first
tune to them. You can bring the music banner back to the screen by pressing the RIGHT
arrow, or INFO. The music banner is updated continuously as information comes in from
the satellite. It may not always have complete information.
54

Standby
You can put your DIRECTV DVR in standby mode by selecting “Standby” from
DIRECTV Central, or by pressing the STANDBY button on the front of your DVR.
• If you temporarily turned off Parental Controls, standby mode enables them again.
• The lights on the front of the DVR go out and it shows a black screen on your TV. It
responds to only a few buttons on the remote control.
• The DVR will not tune to previously ordered pay per view programs unless you have
them scheduled to be recorded.
• Programs that are recording or scheduled to record will record in standby mode.
To turn off standby mode, press the DIRECTV button on your remote control.
Standby
4
Standby mode and local channels. If you have an antenna or receive cable service in
addition to DIRECTV
input. In this case, standby mode lets you watch channels received by your antenna or
cable. However, you won’t be able to use the DVR service or other features with those
channels. (For example, you cannot make Season Pass recordings for those programs.)
®
programming, you may have it connected to your DVR’s RF
55

Chapter 4
Live TVWatching Live TV
56

CHAPTER
5
Finding and
Recording Programs
Recording Programs: The Basics 58
Finding Programs to Record 68
I Already Know What I Want to Record 69
I Know What I Like 73
Help Me Find New Programs 79

Chapter 5
Finding and Recording Programs
Recording Programs: The Basics
All programs saved on your DVR are listed in the Now Playing List (no more searching
through unlabeled videotapes!). To go to the Now Playing List, press the DIRECTV
button on your remote control twice, or press the LIST button. As soon as a recording
begins, it appears at the top of the list. You can watch any title in the Now Playing List,
even one that is still being recorded.
Now Playing List
To watch a program in the Now Playing List, highlight it and press PLAY. If you have
watched part of the program already, it resumes from the point you stopped watching. To
delete a program in the list, highlight it and press CLEAR. Press SELECT to confirm.
Selecting a program in the Now Playing List displays a Program Information screen where
you can:
• Play (or Resume playing).
• Save until.... To change the date when the program may be deleted, press the DOWN
arrow until the date is highlighted, then press the RIGHT or LEFT arrows until the
date you want appears. Press SELECT to return to the Program Information screen.
58
•Stop Recording.
• Delete Now.
• Save to VCR. Saves a program from the Now Playing List to a videotape (see
page 66).
DIRECTV Central Now Playing List

Recording Programs: The Basics
Getting a Season Pass
A Season Pass records every episode of a series that airs on a certain channel—even if the
day or time slot changes! It is totally automatic and really easy to set up. Just select a
program (from the DIRECTV Advanced Program Guide
a Season Pass.” Season Pass recordings have the following characteristics:
• No duplicates within 28 days. If you watch or delete a particular episode or showing,
it will not be recorded automatically again for 28 days. This prevents the Now Playing
List from filling up with shows you probably don’t want. If you want to record
duplicates, select the program on the Season Pass screen, then choose “Change
recording options,” highlight “Show Type options,” and select “All (with duplicates).”
• Parental Controls. If Parental Controls are on when you schedule a Season Pass, the
DVR checks its current program information to see if any upcoming program violates
a Parental Control. If a program does, the DVR requires the current password to
continue. See page 90.
• Keep at Most=5. By default, five episodes of the program are kept in the Now Playing
List. You can change this setting. See page 60.
• Resolving conflicts. The DVR service resolves scheduling conflicts by comparing
recording priorities. You can change priorities using the Season Pass Manager. See
page 60.
™
, for example) and choose “Get
If some Season Pass programs are
not recording, you may need to
change their priority with the Season
Pass Manager. See page 60.
An exception to the 28-day, no-
duplicates feature may occur if the
program wasn’t watched but was deleted
from the Now Playing List to make room
for another recording you requested.
Another reason a duplicate recording
might be made is if the program
information describes the program
incorrectly.
5
Repeating Recordings. In addition to being characteristics of the Season Pass, the above
also apply to two other types of recordings that repeat automatically:
•A manual repeat recording records on a specific channel at a specific time (much like
the recordings you would set up with a VCR). See page 72.
•An auto-recording WishList records all the programs a WishList finds. See page 78.
59

Chapter 5
Finding and Recording Programs
Managing Your Season Pass recordings. With Dual Tuner, you can record two programs
at the same time. Conflicts will occur only if you try to schedule a third recording that
overlaps the other two. By default, the oldest Season Pass has the greatest priority. If some
Season Pass programs are not recording, you may need to change their priority with the
Season Pass Manager. To do this, go to DIRECTV Central, then select “Pick Programs to
Record,” then “Season Pass Manager.”
To change the priority order:
1. Use the UP/DOWN arrow buttons to highlight one of your repeating recordings.
2. Press the RIGHT arrow to highlight the arrows to the right of the title.
3. Use the UP/DOWN arrows to move the selected title up or down in the list.
Resolving Conflicts. If a conflict occurs when you’re setting up a new repeating
recording, you’ll be shown which programs are involved. You’ll also be given options to
resolve the conflict:
• Record the program you just requested and cancel one of the already scheduled
programs. This gives the new repeating recording the highest priority.
• Record only those programs that do not conflict with others previously scheduled to
record. This gives the new repeating recording the lowest priority.
60
Setting Recording Options
When you set up a recording, you can set various recording options. You can change them
later by selecting the program in the To Do List or Season Pass Manager.
The Program Information screen that appears when you select a program includes choices
to “Record this episode” and “Get a Season Pass.” When one of these recording actions is
DIRECTV Central Season Pass Manager Get a Season Pass Options

Recording Programs: The Basics
highlighted, “Options” appears to its right. To see the current Recording Options, use the
arrow buttons to highlight “Options,” then press SELECT.
To set Recording Options:
1. On the Recording Options screen, use the UP/DOWN arrows to highlight an option.
2. Press the RIGHT and LEFT arrows to change the setting.
3. When you are done, press SELECT or highlight “Record with these options.”
4. Press SELECT again to schedule the recording with the new options.
To cancel your changes, press the LEFT arrow.
Recording Options include:
• Keep At Most. (Only available for a repeating recording.) This option sets the
maximum number of programs to save as part of the series. The default is five. This is
useful for news programs for which you only want the most recent episode, or
children’s programs for which you may want to keep several episodes but do not want
to fill up the Now Playing List.
• Show Type. (Only available for a repeating recording.) You can select “Repeats &
first run,” “First run only,” which records only new episodes, and “All (with
duplicates).”
5
• Keep Until. (Only available for a repeating recording.) If you change this setting from
“Space needed” (the default) to “Until I delete,” programs are saved until you delete
them. If your DVR fills up with programs marked “Until I delete,” it will stop making
new recordings until you delete some old programs.
DIRECTV Central Season Pass Manager or To Do List
61

Chapter 5
Finding and Recording Programs
• Keep At Least. (Only available for an individual recording.) This option sets the
minimum amount of time for the DVR to keep a recording. The default setting is two
days, except for pay per view events, which default to “Save until I delete.”
The next two items on the list are collectively known as the Overtime Scheduler
• Start Recording. Use this setting to start recording a program before its scheduled
beginning. For example, to catch the first joke of a comedy series, you can set the
Season Pass to start recording one minute early. The default is “On-time,” but you can
choose to start recording 1, 2, 3, 4, 5 or 10 minutes before the program is scheduled to
begin.
• Stop Recording. Use this setting to stop recording a program after its scheduled end
time. For example, you may want to continue recording for a while after the scheduled
end of a sports event, should it go into overtime. The default setting is “On-time,” but
you can stop recording 1, 2, 5, 15, or 30 minutes, or 1, 1.5 or 3 hours after a program is
scheduled to end.
Tip. You can sometimes resolve recording conflicts by changing the Stop Recording or
Start Recording options. For example, if you set a program to start recording one minute
early, it may conflict with a recording of the program before it. To resolve the conflict,
simply change the Start Recording option back to “On-time.”
™
.
62
DIRECTV Central Pick Programs to Record Season Pass Manager or To Do List

Recording Programs: The Basics
Program Information Screen
In the Program Guide, highlighting a program title (that is not currently playing) and
pressing SELECT displays some information about the program. You can also choose
“Season Pass & other options” to get to the Program Information screen. The Program
Information screen includes a brief description of the selected program. It also shows the
program’s start time, channel, duration, ratings, advisories, and other attributes. For more
details on a given program, press INFO at a Program Information screen. The Program
Details screen appears.
If you have given a program a Thumb rating, Thumbs Up/Thumbs Down icons appear at
the top of the Program Information screen. You can change the rating here by pressing
THUMBS UP or THUMBS DOWN.
Ratings and Advisories. The Program Information screen shows ratings and advisories
for the selected program. For a description of movie and television ratings, and of
television advisories, see “Parental Controls” on page 90. A movie may also have
advisories, regardless of whether it has a rating. The following movie advisory codes may
appear in parentheses after the description:
AC: Adult Content SC: Sexual Content N: Nudity
AL: Adult Language MV: Mild Violence BN: Brief Nudity
GL: Graphic Language GV: Graphic Violence RP: Rape
5
Other attributes. Other attributes may appear in parentheses after the description of a
program. These may include genre information or technical notes such as CC (for closed
captioning), letterbox (which means the program is broadcast in letterbox, a wide-screen
format) and Dolby Digital.
63

Chapter 5
Finding and Recording Programs
Actions you can take. The lower part of the Program Information screen shows actions
you can take. Available actions vary depending on what kind of program is selected and
whether the program is already recorded or is scheduled to record.
• For actions you can take on programs that are scheduled to record (programs in the To
Do List), see page 65.
• For actions you can take on pay per view programs, see page 39.
• For actions you can take on recorded programs (programs in the Now Playing List),
see page 58.
If the program is not yet scheduled to record, you can take these actions:
• Record this program/episode. Schedules a recording of the current program. You
can also use the RIGHT arrow to highlight “Options,” then press SELECT to change
Recording Options.
• Get a Season Pass. (Only available if the program is part of a series.) Select this to get
a Season Pass for the program.
• View upcoming episodes/showings. Displays a list of upcoming episodes/showings
of the program on all channels.
64
• Don’t do anything. Returns to the previous screen without making changes. LEFT
arrow also selects “Don’t do anything.”

Recording Programs: The Basics
Reviewing the To Do List
The To Do List shows all scheduled recordings. To view it, go to DIRECTV Central, then
Pick Programs to Record, then To Do List. After setting up a recording, you can confirm
that it is scheduled on the To Do List. Individual recordings have a single checkmark
( ) to the left of the program title. Season Pass and manual repeat recordings have a
double checkmark ( ), and WishList searches (see page 73) have a star ( ).
Season Pass recordings with no upcoming episodes to record appear at the bottom of the
list.
Select a recording from the To Do List. Then you can:
• Change recording options. Highlight Record as planned, then press the right arrow
and select “Options” to see Recording Options. If the program is part of a Season
Pass, changing Recording Options from the To Do List only makes changes for a
single episode, not for the Season Pass. Choose Cancel/edit the Season Pass to make
changes for all episodes.
• View upcoming episodes/showings. Displays a list of upcoming episodes/showings
of the selected program. Programs scheduled to record have a checkmark, double
checkmark, or a star. Select a program to see the Program Information screen.
• Cancel this recording or Cancel only this episode/showing. Cancel a single
recording or a single episode from a Season Pass.
• Cancel/edit the Season Pass. From this screen you can cancel the Season Pass, view
upcoming programs, or change recording options for the whole Season Pass.
• Cancel/edit manual repeat recording. Lets you cancel or change recording options
for a manual repeat recording.
DIRECTV Central Pick Programs to Record To Do List
Canceling the recording of a pay
per view event does not
automatically cancel the purchase. You
must cancel the purchase on the
Purchases screen, described on page 85.
5
65

Chapter 5
Finding and Recording Programs
View Recording History
This is an advanced feature for those who really want all the details. It is available as a
selection in the To Do List, and displays a history of programs that have been deleted or
have not recorded. The history also lists recordings that were requested but will not be
recorded, as well as the reason for not making the recording.
Selecting a program displays a screen that explains how and when the program was
removed from the Now Playing List or To Do List. If the program is scheduled for the
future, you can select “More recording options” on this screen to reschedule it.
Saving Programs to a VCR
If you have a VCR, you can save a program from the Now Playing List to a videotape.
You will not be able to watch live TV or recordings while saving.
Most of the buttons on your remote that control live TV work as usual during Save to
VCR. Keep in mind that the VCR will record the video exactly as it plays. This means you
can fast forward through the boring parts! (It also means the VCR will record the channel
banner, status bar, and any icons that appear if you press buttons on the remote.)
Preparing for Save to VCR:
66
1. Set up your VCR. Be sure you have connected your DVR’s video and audio to the
VCR’s video and audio. See the Start Here poster that came with your DVR.
2. Be sure your VCR is set to record input from your DIRECTV
video source. (See your VCR’s instructions for how to set the input.)
3. Make sure you have a videotape in the VCR.
DIRECTV Central Now Playing List Program Info Save to VCR
DVR, not some other

Recording Programs: The Basics
Using Save to VCR:
1. Go to the Now Playing List, highlight the show you want to save, then press SELECT.
2. Using the arrow buttons, highlight “Save to VCR,” then press SELECT.
3. Select “Start saving from the beginning.”
4. A title screen appears for ten seconds. When you see it, press your VCR’s record
button.
5. When the program is over, press stop on your VCR.
Stopping Save to VCR:
Going to live TV interrupts (or stops) the transfer. You can resume saving later.
1. Press a button (for example, the DIRECTV button) that would interrupt Save to VCR.
The videotape icon appears.
2. While the icon is visible, press the same button again.
3. A confirmation screen appears. On the confirmation screen, choose either “Stop saving
for now. Resume later” or “Cancel saving to VCR.”
4. Press stop on your VCR.
To resume saving the program:
1. Go to the Now Playing List, select the program, and then choose “Save to VCR.”
2. Choose “Save from the paused location.” A countdown screen appears.
To ensure that your VCR has time to begin recording, press record on your VCR before
the countdown gets to “1.”
DIRECTV Central Now Playing List Program Info Save to VCR
5
67

Chapter 5
Finding and Recording Programs
Finding Programs to Record
Find shows to record. The DVR service allows you to quickly set up recordings for the
shows you already know you love. It also helps you search for fun, exciting new programs
that match your interests, hobbies, favorite stars and genres. Which of the following
statements fits your mood today?
68
I already know what I want to record
(page 69)
I know what I like
(page 73)
Help me find new programs
(page 79)
Set up recordings. After finding a program, it’s easy to schedule a recording. You can
schedule one recording or choose one of these options to set up a repeating recording:
• Season Pass recordings record every episode of a program on a specified channel (see
page 59).
• An auto-recording WishList records every program a WishList finds (see page 78).
• A manual recording records a chosen time and channel and can be set to repeat once
each week, every day, or just on weekdays or weekends (see page 72).
Programs you have scheduled to be recorded appear in the To Do List (see page 65). To
watch recorded programs, select them in the Now Playing List (see page 58).
Describes Search by Title and
Record by Time or Channel.
Describes Wishlist searches.
Describes TiVo Suggestions and
Showcases

I Already Know What I Want to Record
I Already Know What I Want to Record
The following options are useful if you already know the title of the program you want to
record:
• Search by Title
• Record by Time or Channel
• Manually Record by Time or Channel
Search by Title
Use Search by Title if you are looking for a specific program and you know its name.
1. After selecting Search by Title, you have the option of limiting your search to a
category of programs (such as movies or sports). This is useful if you just want to
browse through a list of upcoming programs in a given category and/or subcategory. If
you do not want to choose a category, select “All Programs.”
2. The next screen lets you type the title of the program you are looking for. Use the
arrow buttons on the remote to move around the keypad. Press SELECT on each letter
of your program title. As you select letters, a list of programs appears to the right of the
keypad. Continue entering letters until you see your program in the list. (For a quick
review of how to enter titles using the onscreen keypad, see “Tour 3: Find and Record
Your Favorite Programs” on page 38.)
3. Use the RIGHT arrow to move the highlight to the program list.
4. When you find a program you want to record, highlight it and press SELECT to bring
up the Program Information screen.
DIRECTV Central Pick Programs to Record Search by Title
5
69

Chapter 5
Finding and Recording Programs
Record by Time/Channel
Record by Time/Channel offers you three choices: Browse by Time, Browse by Channel,
and Manually Record Time/Channel. These options are described separately in the next
few pages.
Browse by Time
Browse by Time lets you browse all programs on a particular day and time. For example,
you can browse all the movies on Saturday night. With Browse by Time, you can filter the
list to see only programs on your Favorite Channels or only programs in a particular
category. To learn how to program your list of Favorite Channels, see page 50. To find a
program:
1. Use the arrow buttons to highlight a category (for example, “Movies”) to narrow the
list of programs. Then press SELECT.
2. Select a subcategory (for example, “Comedy”), then press SELECT.
3. Use the UP and DOWN arrows to select the day of programming that you want to see.
Press the RIGHT arrow to move the highlight to the time column.
4. Use the UP and DOWN arrows to select a time. The time will advance in half-hour
increments.
70
5. Press SELECT to bring up the list of programs without leaving the time selector (or
press the RIGHT arrow to bring up the list of programs and move to the list at the same
time). When you find a program you want to record, highlight it and press SELECT to
bring up the Program Information screen.
DIRECTV Central Pick Programs to Record Record by Time/Channel

I Already Know What I Want to Record
Browse by Channel
Browse by Channel lets you browse through programs on a particular channel. You can
start with all channels or just your favorites. To browse by channel:
1. Highlight and select either “All Channels,” which includes all the channels you
receive, or “Favorite Channels,” which includes just the channels you have selected as
your favorites.
2. Use the UP and DOWN arrows to select the date you want to browse. Press the
RIGHT arrow to move the highlight to the channel column.
3. Use the UP and DOWN arrows to select a channel. (You can also use the numbers on
the remote to type in a channel, then press ENTER/LAST.)
4. Press SELECT to bring up the list of programs without leaving the channel selector (or
press the RIGHT arrow to bring up the list of programs and move to the list at the same
time).
5. When you find a program you want to record, highlight it and press SELECT to bring
up the Program Information screen. Then you can view upcoming episodes, set up a
Season Pass, or record an individual showing.
5
DIRECTV Central Pick Programs to Record Record by Time/Channel Browse by Channel
71

Chapter 5
Record by Time or Channel is
useful for times when you want to
record only a portion of a program, for
example, the opening monologue of a talk
show.
Finding and Recording Programs
Manually Record by Time or Channel
Manually Record Time/Channel lets you schedule a recording on a specific channel at a
specific time, just as you would with a VCR. You can also create a manual repeat
recording for every week, every day, or every weekday. To create a manual recording:
1. To choose the Recording Type, use the UP and DOWN arrows to select “One Time,”
or “Repeating.” Then press the RIGHT arrow.
2. To choose the day(s) for the recording, use the UP and DOWN arrows to change the
current selection. If you chose “Repeating,” you can also choose to repeat the
recording on a specified day of the week, on every weekday (select “Every M-F”) or
every day (select “Every Day”).
3. To choose a channel, use the UP and DOWN
arrows or enter a number from the number
keypad. Press the RIGHT arrow.
4. To set the hour, minute, and am/pm for the
start and stop time, use UP/DOWN arrows to
change the current selection. Press the
RIGHT arrow to move to the next step, LEFT
arrow to move back.
72
5. To schedule the recording, press SELECT. A
confirmation screen appears. The recording will be named with a “best guess” based
on program guide listings for that time and channel. This will help you find your
program later in the To Do List or Now Playing List.
Pick Programs to Record Record by Time/Channel Manually Record by Time/Channel

I Know What I Like
If you know what you like, WishList searches are great! They allow you to find and
automatically record shows that match your interests, tastes, passions, and whims. You
can search for future programs with your favorite actor or director by creating an Actor or
Director WishList. You can also create a Category Only WishList to find programs
tailored to particular categories. The Keyword WishList and the Title WishList allow you
to search for specific words or phrases in program descriptions and titles.
Try a WishList!
For example, you could create a Category Only WishList for the category “Movies” and
subcategory “Action/Adventure.” You could then use it occasionally to look at a list of all
action/adventure movies airing in the next two weeks. The list would be constantly
updated by program guide data.
You could search for something more specific by creating an Actor WishList for Elizabeth
Myer, and then include the category “Movies,” and subcategory “Romance.” This
WishList would only find romance movies with Elizabeth Myer.
Using a Keyword WishList, you can look for something very specific. For example, the
Keyword WishList “LIGHTNING” with category “Football” would find Lightning
football (but not baseball) games for you.
I Know What I Like
5
Here’s another example: You could make a Keyword WishList to find a 1986 remake of ta
movie called The Fright, starring Chris Fields. The keyword entry would look like this:
“CHRIS FIELDS” FRIGHT. Not only does this WishList find a specific program—it
finds the specific version! (You could also find this movie by making a Keyword
DIRECTV Central Pick Programs To Record Search Using WishLists
73

Chapter 5
If you set up an auto-recording
WishList for sports, consider using
the Overtime Scheduler
option described on see page 62) to make
sure you don’t miss the most exciting part
of the game!
™
(a recording
Finding and Recording Programs
WishList for the movie’s title and year. In that case, the keyword entry might look like
this: “THE FRIGHT” 1986.)
After you make a WishList, you can periodically view what it finds by selecting “View all
upcoming WishList programs,” or selecting an individual WishList, then selecting “View
upcoming programs.” Then you can schedule recordings for the programs or episodes you
want. (See page 78 for more details.)
Can a WishList Do More Than Search?
You can set a WishList to auto-record, and it will record every program the WishList
finds. For example, with the Elizabeth Myer Actor WishList, you would automatically
collect Elizabeth Myer romance movies in the Now Playing List.
Some WishList searches are better suited to browsing than to auto-recording. For
example, you could create a Category Only WishList for the category “Documentary.”
This WishList would find every upcoming documentary. You could then occasionally
browse the WishList and choose the upcoming documentaries you want to record.
The more specific a WishList is, the better suited it is to auto-recording. For example, an
auto-recording Keyword WishList with the keywords SNICKS and RABBITS, and
category “Sports/Basketball” would only record basketball games with both of these
teams—a great way to ensure that you enjoy this season’s rivalry. (For more on autorecording a WishList, see page 78.)
74
DIRECTV Central Pick Programs To Record Search Using WishLists

Creating a WishList
From Search Using WishLists, select “Create new WishList.” Next, select the type of
WishList: Actor, Director, Category Only, Keyword, or Title. For most WishList
searches, you use the keypad on the next screen to spell out what you’re looking for.
As the last step, you’ll then be able to select a category and subcategory to narrow your
search. For example, if you want movies with Elizabeth Myer, but not documentaries or
talk shows, select “Movies.” To search every category, select “Don’t specify a category.”
Category Only WishList: Use the UP and DOWN buttons to highlight a category, then
press SELECT. A subcategories list appears. Highlight a subcategory, then press
SELECT. To search all subcategories, you can also select “Don’t specify a subcategory.”
Actor or Director WishList Searches: Spell the person’s last name first by using the arrow
keys to move the selection box around the keypad and pressing SELECT to enter the
highlighted letter. As you select letters, a list of names appears to the right of the keypad.
If you see the person’s name, press the arrow
buttons to highlight the name you want and press
SELECT. To search for a name that is not on the
list, enter the name in the format: LAST NAME,
FIRST NAME. You must match the spelling of the
name exactly, and you must use a comma (in the
keypad under the letter W). If an actor or director is
not listed, and none of their programs are in the
Program Guide, try a Keyword WishList.
I Know What I Like
5
DIRECTV Central Pick Programs To Record Search Using WishLists
75

Chapter 5
Finding and Recording Programs
Keyword or Title WishList Searches: You can create a Keyword WishList with one
keyword or with several. If you enter more than one keyword, the WishList only finds
programs that match all of your keywords. With Keyword WishList searches, the DVR
service checks for your keywords in the program or episode title, description, actor,
director, year, and category information. Title WishList searches work very similarly, but
the DVR service searches only program and episode titles.
Spell your keyword(s) by using the arrow buttons to move around, then pressing SELECT
to enter highlighted letters on the keypad. You can enter as many characters as will fit on
the screen. When you have finished, use the RIGHT arrow to highlight “Done creating
keywords,” then press SELECT.
Using * in WishList Searches. To search for similar words in Keyword and Title
WishList searches, use the asterisk (*) as a special symbol that replaces the endings of
words. For example, the keyword HELI* would find shows containing “helicopter,”
“heliport,” “helium,” as well as the movie “Helicopter Cops.” To enter an asterisk, press
the SLOW ( ) button as you are spelling out your keyword or title.
The asterisk can be helpful when you’re looking for a range of similar words, as in the
example above, or if you’re just not sure how something is spelled. Pop quiz: is it
“irresistible” or “irresistable?” Use the keyword IRRESIST* and don’t worry about it!
Two things to note about using the asterisk:
76
• It can only be used at a word’s end; it cannot be used to omit letters at the beginning or
in the middle of a word. (For example, HELI*ER or *COPTER would not work.)
• Be as specific as possible. For example, do not use keywords like TH*. There will not
be enough room to show all the results of a keyword that is too general.
DIRECTV Central Pick Programs To Record Search Using WishLists

I Know What I Like
Tips for entering keywords
• To specify an exact phrase in a Keyword or Title WishList, surround a set of words
with quotation marks (to enter quotation marks, press PAUSE ( ). For example, the
keyword BILL SIMON might also turn up a documentary about Simon Branden with a
director whose name is Bill. Use “BILL SIMON” to be certain you find programs that
only feature Bill Simon.
• If you enter more than one keyword in Keyword or Title WishList searches, only
programs that match all of your keywords (for example, “CHRIS FIELDS” FRIGHT)
are found.
• If you want to include an exact phrase and additional keywords, there should be a
space between the final quotation mark and the beginning of the next word. You can
place a space character by selecting SP on the grid of letters or by pressing
FORWARD ( ).
• Replace hyphens ( - ), slashes ( / ) and periods ( . ) with spaces. For example, you
would use the keyword phrase 10 10 to search for the title “10/10.” For an Actor
WishList for Sarah Mills-Jones, use MILLS JONES, SARAH. You can place a space
character by selecting SP on the grid of letters or by pressing FORWARD ( ).
• Any other marks, such as apostrophes ( ’ ) and ampersands ( & ), are ignored. For
example, you would use the keyword phrase 6 OCLOCK NEWS to search for the title
“6 O’Clock News.” (Note that commas ( , ) are also ignored, except in actor and
director WishList searches, where they are essential.)
• For dollar signs ( $ ) substitute the letter S. For example, to find “$50,000 Chance,”
use S50000. (In Search by Title, skip the dollar signs to find these titles.)
Title WishList searches are an
excellent way to search for a
program that is not on in the next couple
of weeks, but that you would want to
record if it ever came on. For example, if
you want to record “The Shadow Country”
the next time it airs, create a Title
WishList for the phrase “Shadow
Country.” Set the WishList to auto-record.
If you want to make sure the program will
record, give the WishList a high priority
with the Season Pass Manager. (See page
59.) The next time “The Shadow Country”
comes on, your WishList will record it.
If you see too many programs
when you select “View upcoming
programs,” the WishList you are using is
probably better suited for searching and
browsing than for auto-recording.
5
DIRECTV Central Pick Programs to Record Search Using WishLists
77

Chapter 5
Finding and Recording Programs
Browsing, Recording, and Editing WishList Searches
To browse all WishList items: Select “View all upcoming WishList programs.” This
displays a list of up to 10 programs from each of your WishList searches—and up to 200
programs total. The list is divided to display programs found by each WishList. To record
a program, select its title, then choose “Record this episode” on the Program Information
screen.
To browse an individual WishList: Highlight the WishList and press SELECT. Select
“View upcoming programs,” which searches through current program information and
creates a list of up to 200 unique upcoming programs that match this WishList. This list
displays the first airing of an episode or program.
To see all the showings of upcoming episodes (up to two weeks into the future), select the
title of the program in the “Upcoming programs” list generated by your WishList. Then
select “View upcoming episodes.” A comprehensive list appears, including several
episodes with showings on different channels and different time slots. The Program
Information screen also includes an option for recording a particular program.
If you create an auto-recording
WishList with the category
“Sports,” previews of pay per view
programs may be recorded and appear on
your Now Playing List. These will be
marked as partial recordings on the
Program Information screen. You will not
be charged for such recordings.
78
Auto-recording WishList searches. When you create a WishList or select it, you can
choose to “Auto-record WishList programs.” This means every program the WishList
finds will be automatically recorded.
Auto-recording WishList searches themselves and their upcoming recordings are marked
with a star ( ). To be sure that all your WishList programs are recorded, give the
WishList a high priority in the Season Pass Manager. See page 59 for details.
To edi t a Wis hList . Select the WishList, then select “Edit WishList.” You can change your
WishList—for example, to correct a misspelling or to add a category.
DIRECTV Central Pick Programs to Record Search Using WishLists

Help Me Find New Programs
Help Me Find New Programs
The DVR service provides special features that help you sift through upcoming programs
to find shows you’d like:
TiVo Suggestions these show up in the Now Playing List if they’re recorded.
Showcases go to DIRECTV Central, then select this option.
TiVo Suggestions
Your DVR tries to make sure there is always something interesting on for you to watch.
How does it know what you will like? It tries to predict your preferences based on Thumb
ratings you have given other programs, and on the single THUMBS UP given to programs
you choose to record. You can check TiVo Suggestions occasionally to see what’s new.
The list of programs is ranked, so shows you are more likely to enjoy are near the top. To
view the list, go to DIRECTV Central, then select “Pick Programs to Record,” then “TiVo
Suggestions.”
TiVo Suggestions improve over time as you record and rate programs. The more you use
the Thumb buttons, the better TiVo Suggestions become. You can use the Thumb buttons
while you are browsing TiVo Suggestions or whenever you are:
• Watching live TV or browsing the guide.
• Viewing a Program Information screen (for example, to schedule a recording).
• Looking through a Showcase such as TiVolution Magazine.
5
Only programs airing on channels
in the Channels You Receive list
can be recorded as TiVo Suggestions.
Your personal TV preferences are
just that: personal. DIRECTV
privacy policies are available on the web
at DIRECTV.com.
DIRECTV Central Pick Programs to Record TiVo Suggestions
79
 Loading...