

Page 1
filename[C:\Documents and
Settings\gotanda\Desktop\3083946111SLVD500PUC0414\010SET.fm]
010COV.book Page 61 Thursday, April 24, 2003 12:37 PM
Notes
• If you select surround setting while playing a DVD, the player does not output Dolby Digital
signals from the DIGITAL AUDIO OUT (OPTICAL or COAXIAL) jack (when you set
“Dolby Digital” to “D-PCM”).
• If you connect a component that does not conform to the selected audio signal, a loud noise
(or no sound) will come out from the speakers, affecting your ears or causing the speakers to
be damaged.
DVD Settings and Adjustments
Audio Setup
filename[010SET.fm] model name1[SLV-D500P] [3-083-946-11 (1) US]
61
Page 2
filename[C:\Documents and
Settings\gotanda\Desktop\3083946111SLVD500PUC0414\010SET.fm]
010COV.book Page 62 Thursday, April 24, 2003 12:37 PM
Screen Setup
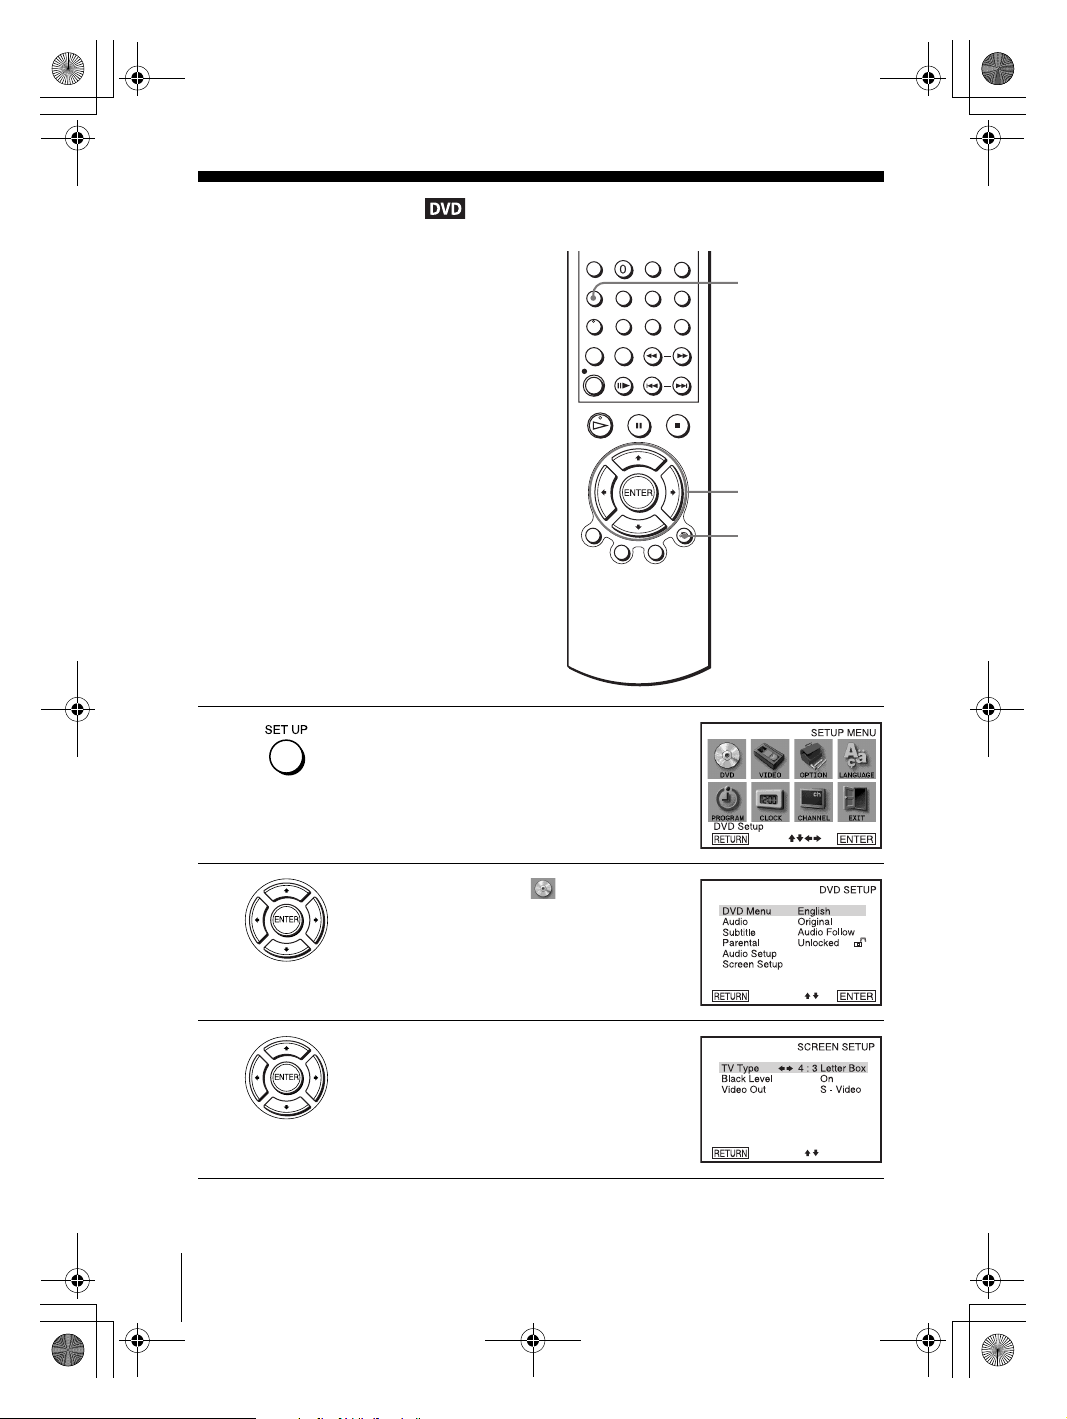
“Screen Setup” allows you to set the screen
according to the playback and connection
conditions.
SET UP
V/v/B/b
ENTER
O RETURN
62
Screen Setup
1
2
3
Press SET UP when the DVD player is in stop
mode.
The “SETUP MENU” appears.
Press V/v/B/b to select (DVD Setup),
then press ENTER.
The “DVD SETUP” menu appears.
Press V/v to select “Screen Setup,” then press
ENTER.
filename[010SET.fm] model name1[SLV-D500P] [3-083-946-11 (1) US]
Page 3

filename[C:\Documents and
Settings\gotanda\Desktop\3083946111SLVD500PUC0414\010SET.fm]
010COV.book Page 63 Thursday, April 24, 2003 12:37 PM
4
5
6
Press V/v to select the setup item from the displayed list:
“TV Type,” “Black Level,” or “Video Out.”
Press B/b to select an item, then press O RETURN to confirm the setting.
Press O RETURN repeatedly to exit the menu.
Menu choices
• TV Type (DVD only)
Selects the aspect ratio of the connected TV (4:3 standard or wide).
The default setting is indicated in bold print.
DVD Settings and Adjustments
4:3 Letter Box Select this when you connect a 4:3 screen TV. Displays a wide
picture with bands on the upper and lower portions of the screen.
4:3 Pan Scan Select this when you connect a 4:3 screen TV. Automatically
displays the wide picture on the entire screen and cuts off the
portions that do not fit.
16:9 Select this when you connect a wide-screen TV or a TV with a wide
mode function.
4:3 Pan Scan4:3 Letter Box 16:9
•Black Level
You can enhance the black level by increasing the brightness and contrast when
viewing DVDs with the PROGRESSIVE indicator turned off.
The default setting is indicated in bold print.
On Increases the contrast.
Off Stops the increase of the contrast.
continued
Screen Setup
filename[010SET.fm] model name1[SLV-D500P] [3-083-946-11 (1) US]
63
Page 4
filename[C:\Documents and
Settings\gotanda\Desktop\3083946111SLVD500PUC0414\010SET.fm]
010COV.book Page 64 Thursday, April 24, 2003 12:37 PM
•Video Out
You must set this setting when you use S VIDEO OUT or COMPONENT VIDEO
OUT jacks to connect to the TV.
The default setting is indicated in bold print.
S-Video Select this when you use the S VIDEO OUT jack on the rear panel
Component Select this when you use the COMPONENT VIDEO OUT jacks
Tip
• You can select the type of signal output from the COMPONENT VIDEO OUT jacks.
When you press the PROGRESSIVE button on the front panel when the DVD player is in
stop mode, progressive signal is selected and the PROGRESSIVE indicator lights up in blue.
Select this when you have a TV that can accept progressive signal.
When you are connected to a standard (interlace format) TV, turn off the PROGRESSIVE
indicator.
Notes
• Playback settings stored in the disc take priority over the “DVD SETUP” menu settings and
not all the functions described may work.
• Depending on the DVD, “4:3 Letter Box” may be selected automatically instead of “4:3 Pan
Scan” or vice versa.
• The connection using S VIDEO OUT or COMPONENT VIDEO OUT jacks is only for the
DVD player.
• If you select progressive signal when you connect the DVD player to a TV that cannot accept
the signal in progressive format, the image quality will deteriorate. In this case, press the
PROGRESSIVE button to turn off the PROGRESSIVE indicator.
• You can output progressive signal only from COMPONENT VIDEO OUT jacks. If you turn
on the PROGRESSIVE indicator when you set “Video Out” to “S-video”, COMPONENT
VIDEO OUT takes priority over S VIDEO OUT.
• The PROGRESSIVE button is not available when the DVD player is in play mode. Use the
PROGRESSIVE button in stop mode.
to connect to the TV.
on the rear panel to connect to the TV.
64
Screen Setup
filename[010SET.fm] model name1[SLV-D500P] [3-083-946-11 (1) US]
Page 5
filename[C:\Documents and
Settings\gotanda\Desktop\3083946111SLVD500PUC0414\010SET.fm]
010COV.book Page 65 Thursday, April 24, 2003 12:37 PM
Setting the display or sound track
language
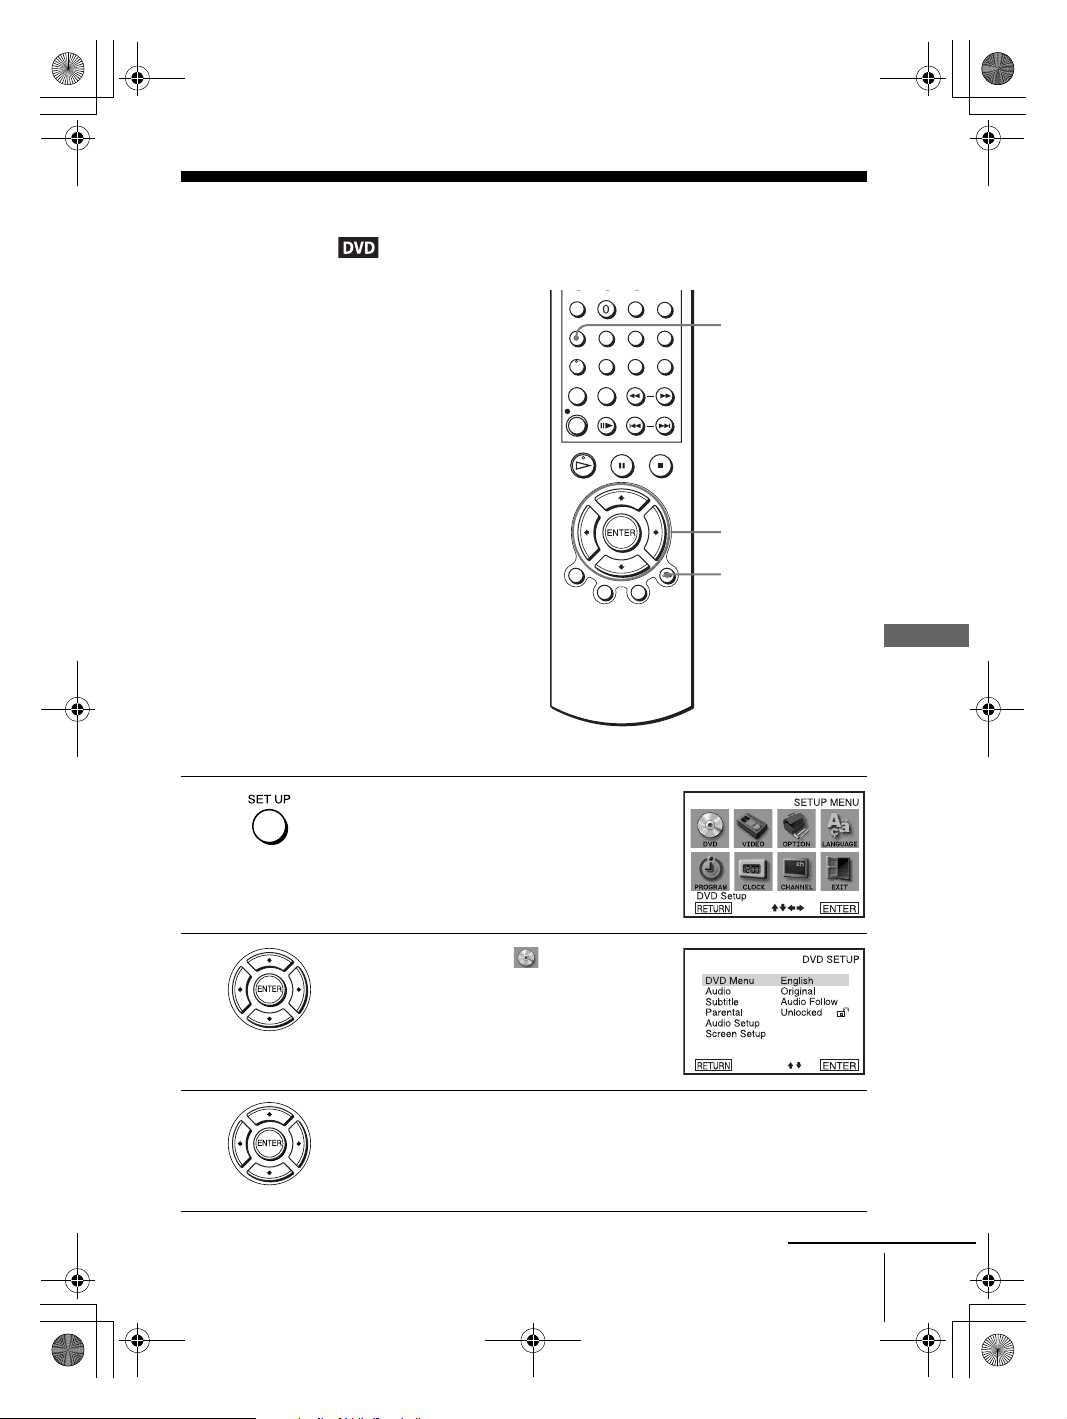
You can set various languages for the disc’s
menu, sound track or subtitle.
1
Press SET UP when the DVD player is in stop
.
mode
The “SETUP MENU” appears.
SET UP
V/v/B/b
ENTER
O RETURN
DVD Settings and Adjustments
2
3
Press V/v/B/b to select (DVD Setup),
then press ENTER.
The “DVD SETUP” menu appears.
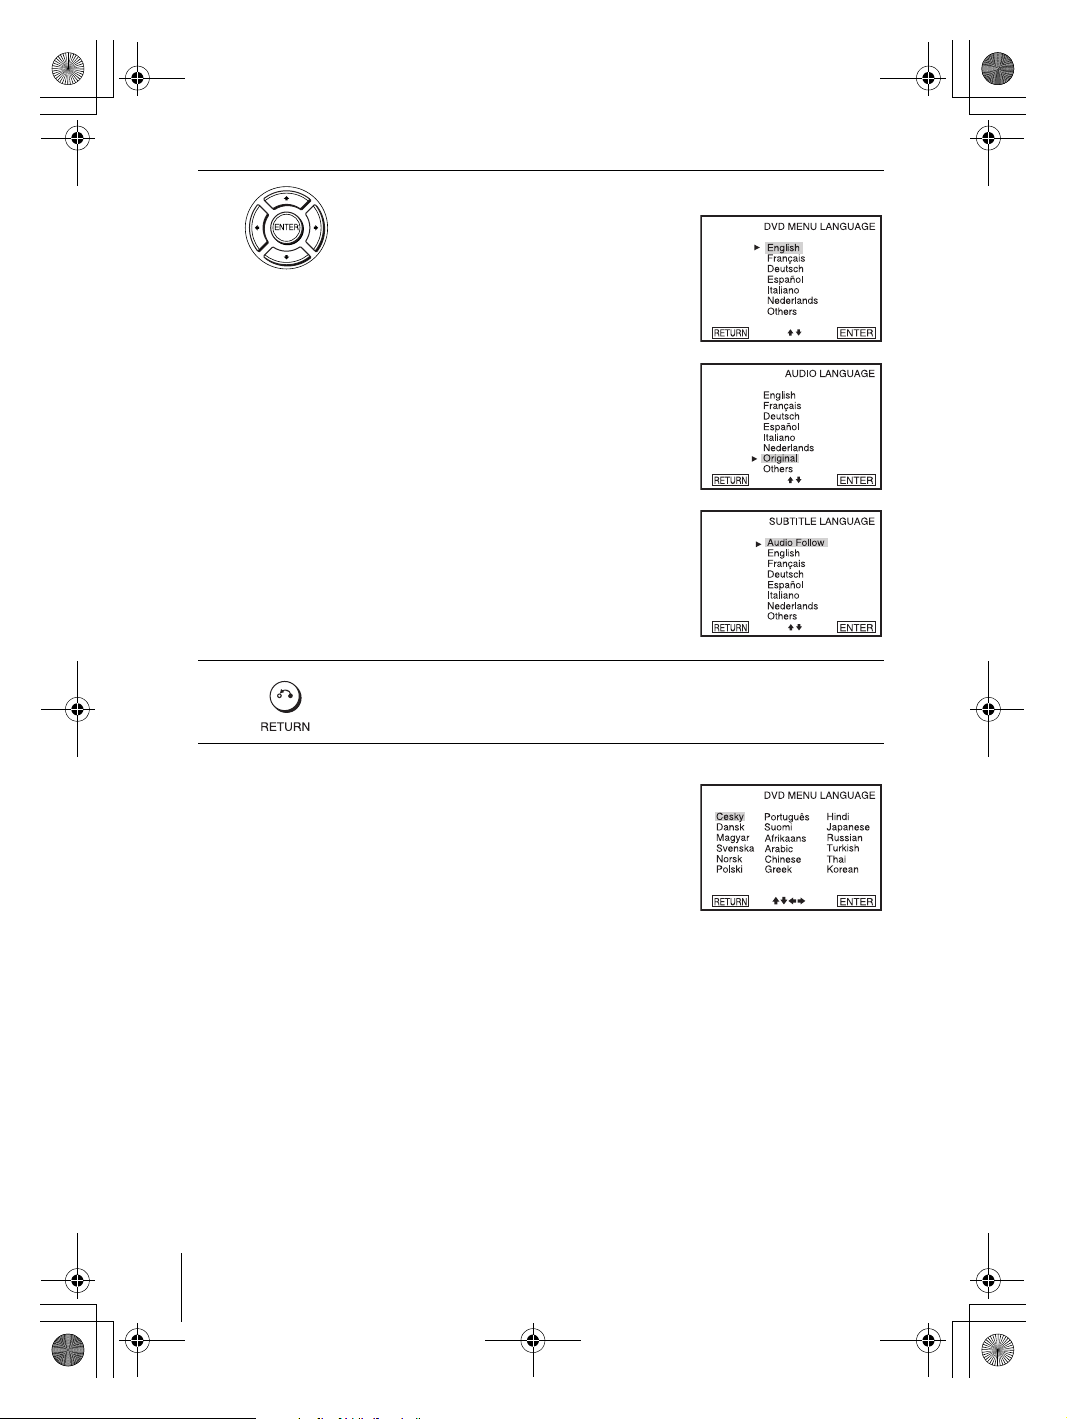
Press V/v to select the language setup item from the displayed list:
“DVD Menu,” “Audio,” or “Subtitle.”
Then press ENTER.
continued
Setting the display or sound track language
filename[010SET.fm] model name1[SLV-D500P] [3-083-946-11 (1) US]
65
Page 6
filename[C:\Documents and
Settings\gotanda\Desktop\3083946111SLVD500PUC0414\010SET.fm]
010COV.book Page 66 Thursday, April 24, 2003 12:37 PM
4
5
Press V/v to select the desired language, then press ENTER.
• DVD MENU LANGUAGE
You can select the desired language for the
disc’s menu.
• AUDIO LANGUAGE
Switches the language of the sound track.
When you select “Original,” the language
given priority in the disc is selected.
• SUBTITLE LANGUAGE
Switches the language of the subtitle
recorded on the DVD.
When you select “Audio Follow,” the
language for the subtitles changes according
to the language you selected for the sound
track.
Press O RETURN repeatedly to exit the menu.
Tip
If you select “Others” in step 4, an additional language
menu appears. Press V/v/B/b to select the desired
language, then press ENTER.
Notes
• When you select a language that is not recorded on the DVD in step 4, one of the recorded
languages will be automatically selected.
• Playback settings stored in the disc take priority over the DVD SETUP settings and not all the
functions described may work.
66
Setting the display or sound track language
filename[010SET.fm] model name1[SLV-D500P] [3-083-946-11 (1) US]
Page 7
filename[\\Win-78\got78\2003 ComboUC 500\3083946111SLVD500PUC0424\010SET.fm]
010SET.fm Page 67 Tuesday, May 6, 2003 6:48 PM
Parental Control (limiting playback by children)
Playback of some DVDs can be limited
according to a predetermined level such as
the age of the users. The “Parental Control”
function allows you to set a playback
limitation level.
Number
buttons
SET UP
1
2
DVD Settings and Adjustments
V/v/B/b
ENTER
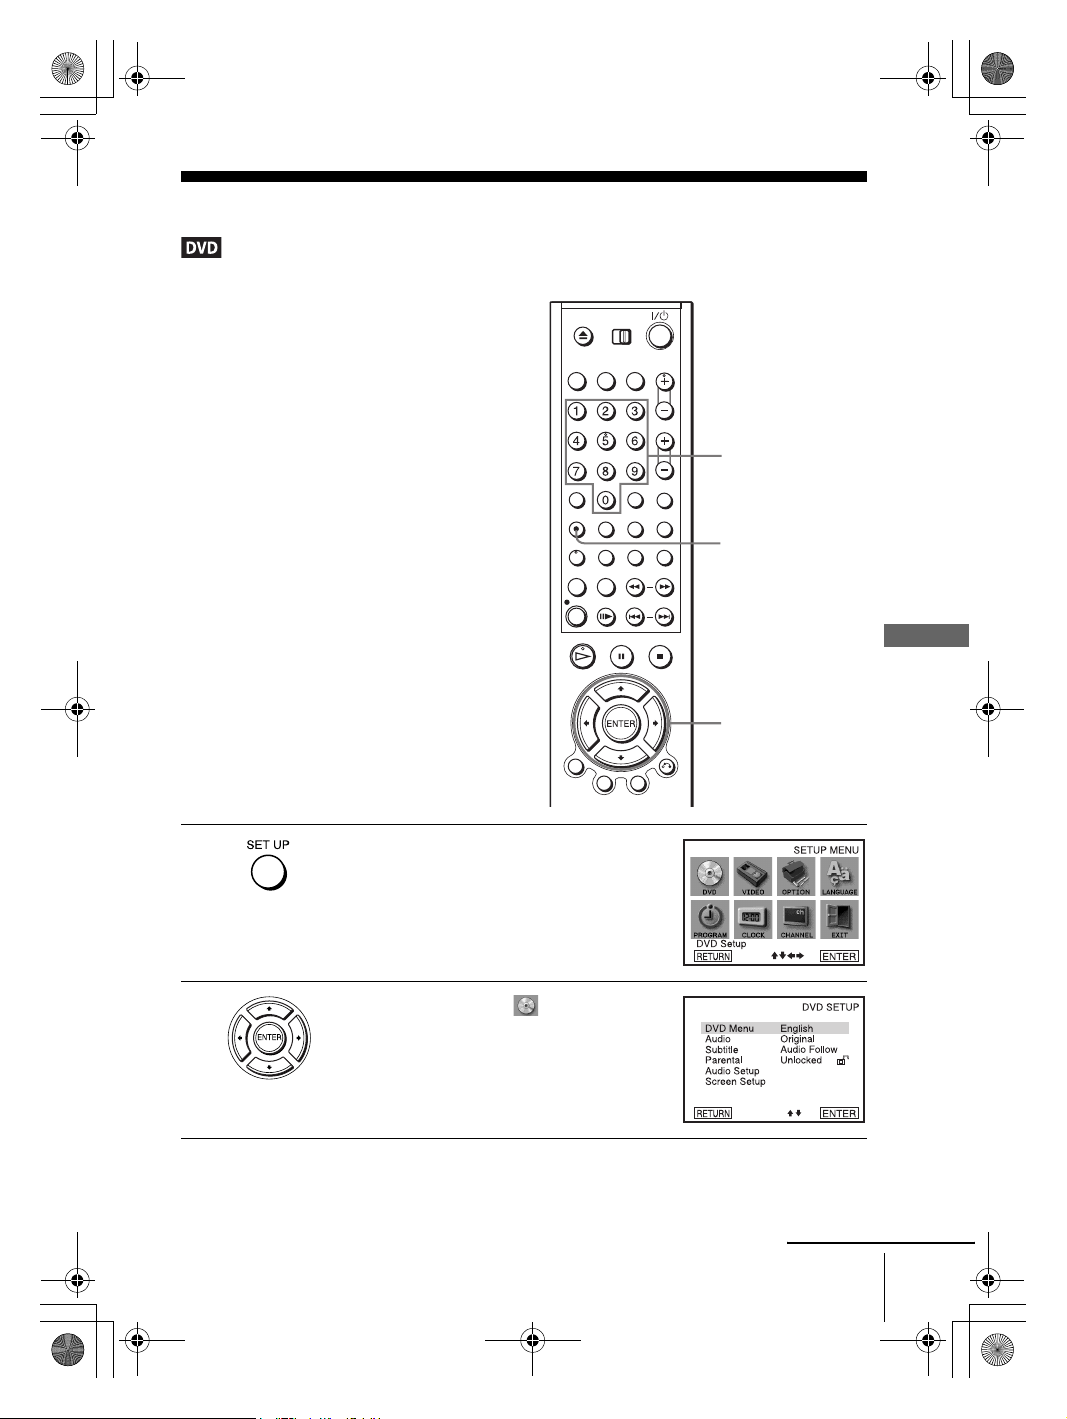
Press SET UP when the DVD player is in stop
mode.
The “SETUP MENU” appears.
Press V/v/B/b to select (DVD Setup),
then press ENTER.
The “DVD SETUP” menu appears.
continued
Parental Control (limiting playback by children)
filename[010SET.fm] model name1[SLV-D500P] [3-083-946-11 (1) US]
67
Page 8
filename[C:\Documents and
Settings\gotanda\Desktop\3083946111SLVD500PUC0414\010SET.fm]
010COV.book Page 68 Thursday, April 24, 2003 12:37 PM
3
4
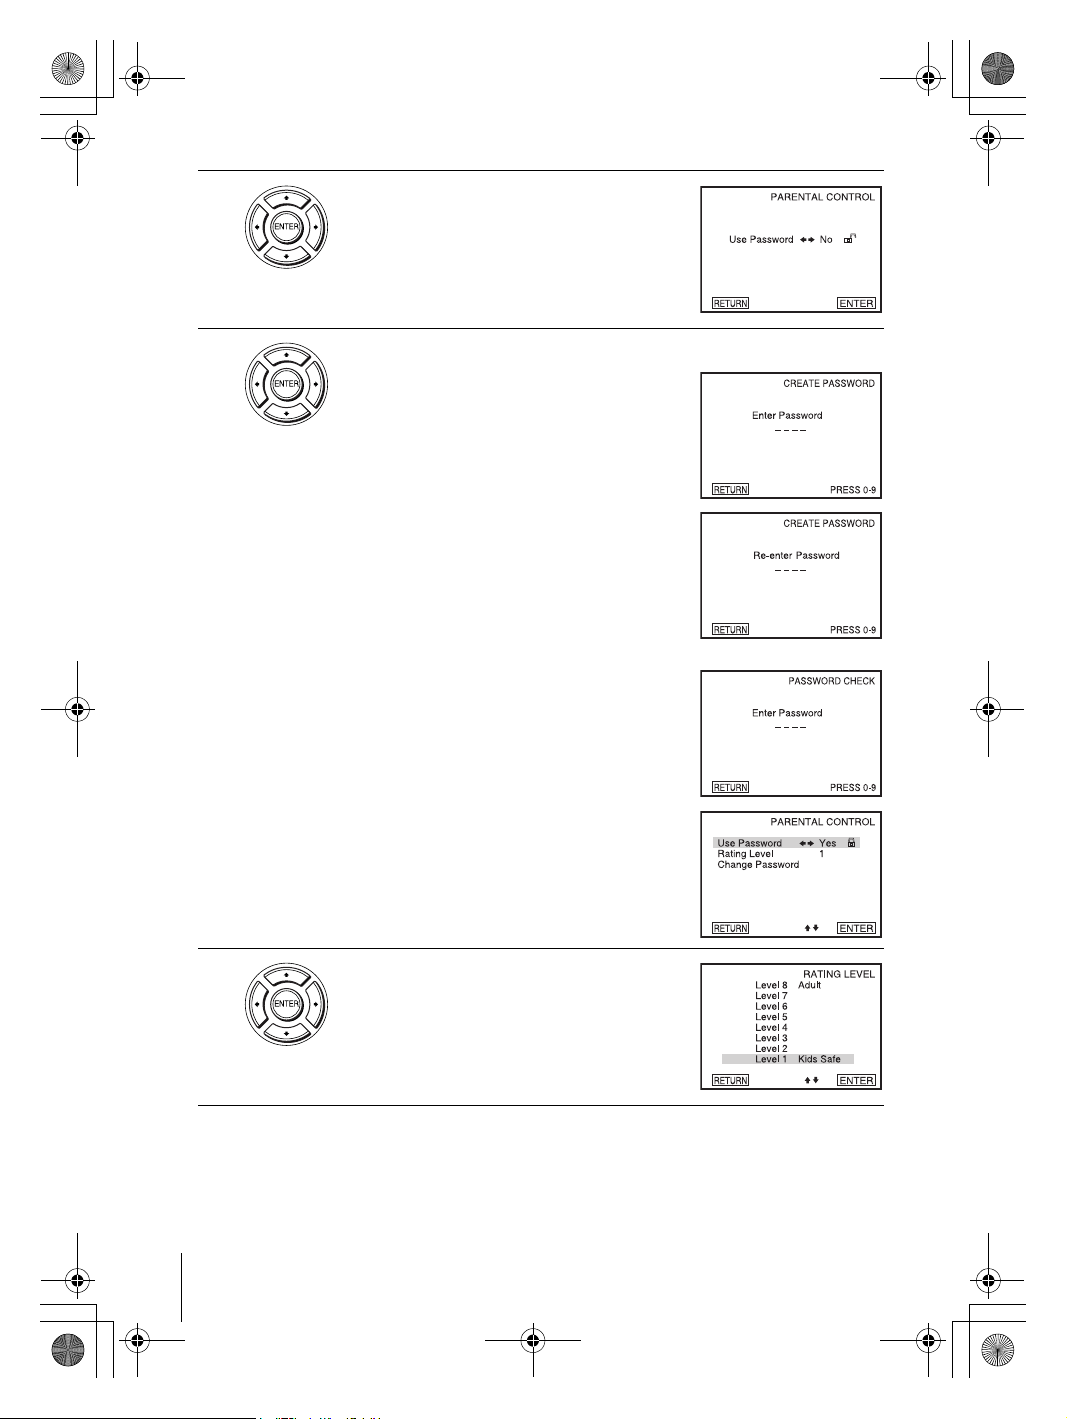
Press V/v to select “Parental,” then press
ENTER.
Press b to select “Yes”.
• If you have not entered a password
The display for registering a new password
appears.
Enter a 4-digit password using the number
buttons.
The display for confirming the password
appears.
Re-enter the password.
• When you have already registered a
password
The display for entering the password appears.
Enter a 4-digit password using the number
buttons.
5
68
Parental Control (limiting playback by children)
Press V/v to select “Rating Level,” then press
ENTER.
filename[010SET.fm] model name1[SLV-D500P] [3-083-946-11 (1) US]
Page 9
filename[C:\Documents and
Settings\gotanda\Desktop\3083946111SLVD500PUC0414\010SET.fm]
010COV.book Page 69 Thursday, April 24, 2003 12:37 PM
6
7
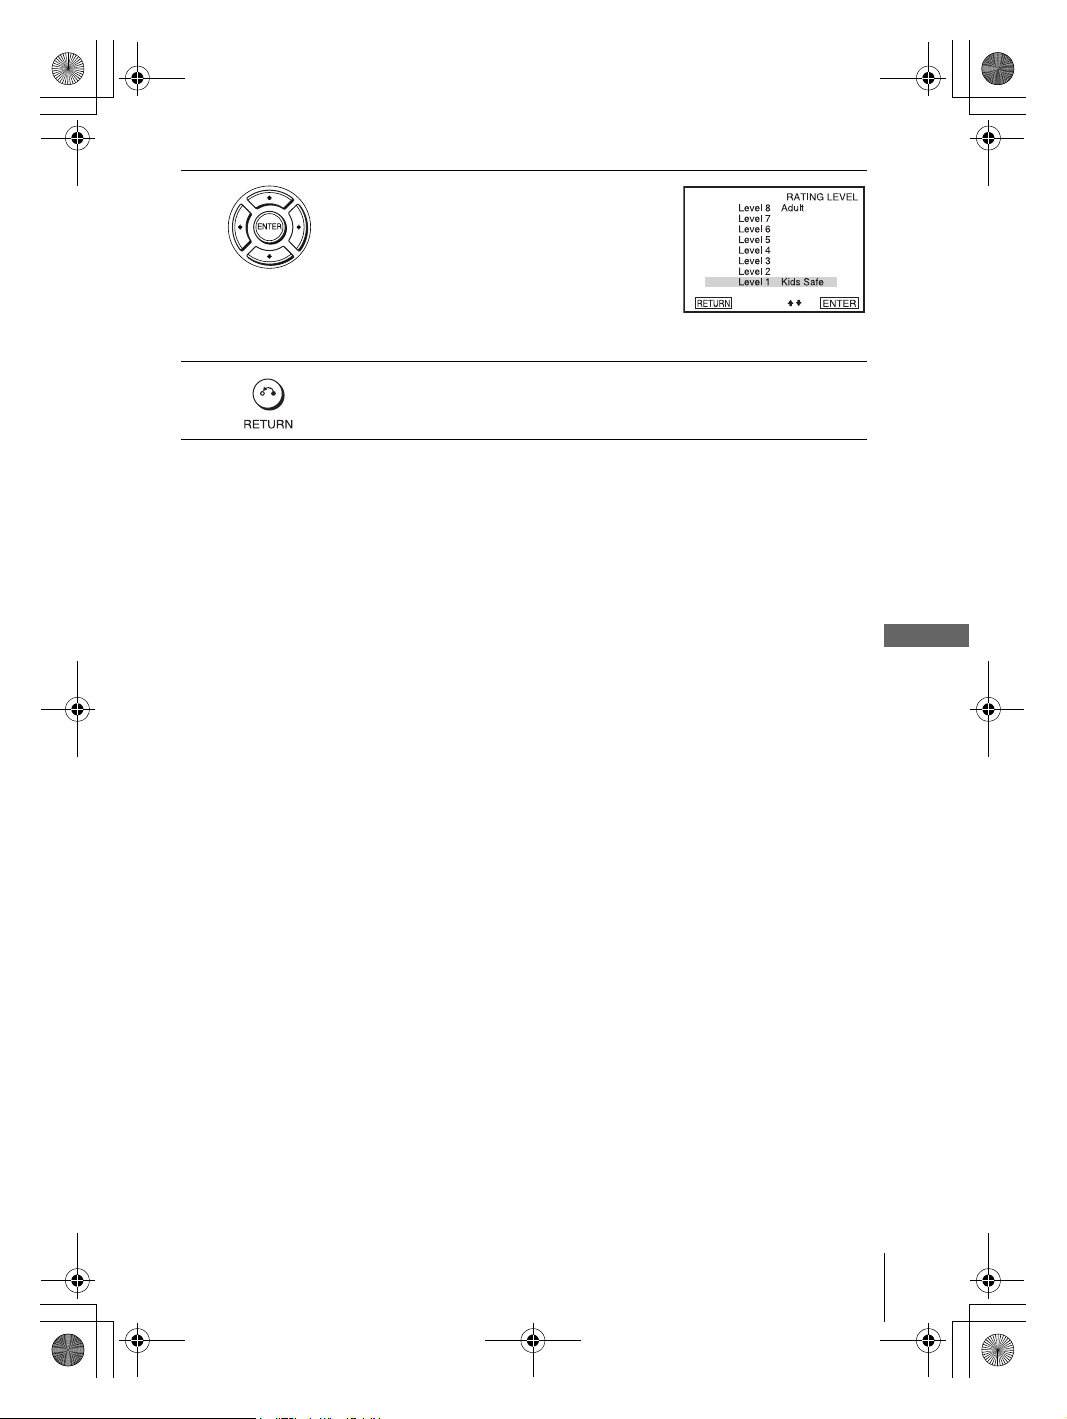
Press V/v to select the level you want, then
press ENTER.
The options are as follows.
Level 8 (Adult) y Level 7 y Level 6 y
Level 5 y Level 4 y Level 3 y Level 2
y Level 1 (Kids Safe)
The lower the value, the stricter the limitation.
Press O RETURN repeatedly to exit the menu.
To change the password
Select “Change Password” in step 4.
1
The display for entering a new password appears.
Enter a new 4-digit password using the number buttons.
2
The display for confirming the password appears.
Re-enter the new password.
3
To turn off the Parental Control function
Set “Use Password” to “No” in Step 4.
To play a disc for which Parental Control is set
Insert the disc, then press H PLAY.
1
The display for entering your password appears.
Enter your 4-digit password using the number buttons.
2
The player starts playback.
DVD Settings and Adjustments
If you forget your password
Remove the disc and turn off the DVD-VCR.
1
Turn on the DVD-VCR again with no disc in the unit.
2
Hold down m and M on the front panel simultaneously for 5 seconds.
3
“reset ok” appears on the screen.
Turn off the DVD-VCR.
4
The password is cleared.
To create a new password, follow step 4 on page 68.
5
Notes
• When you play DVDs which do not have the Parental Control function, playback cannot be
limited on this player.
• All the ratings higher than the level you select will be blocked.
• Write your password down and keep it in a safe place in case you forget it.
Parental Control (limiting playback by children)
filename[010SET.fm] model name1[SLV-D500P] [3-083-946-11 (1) US]
69
Page 10
filename[C:\Documents and
Settings\gotanda\Desktop\3083946111SLVD500PUC0414\010DVD.fm]
010COV.book Page 70 Thursday, April 24, 2003 12:37 PM
DVD Additional Operations
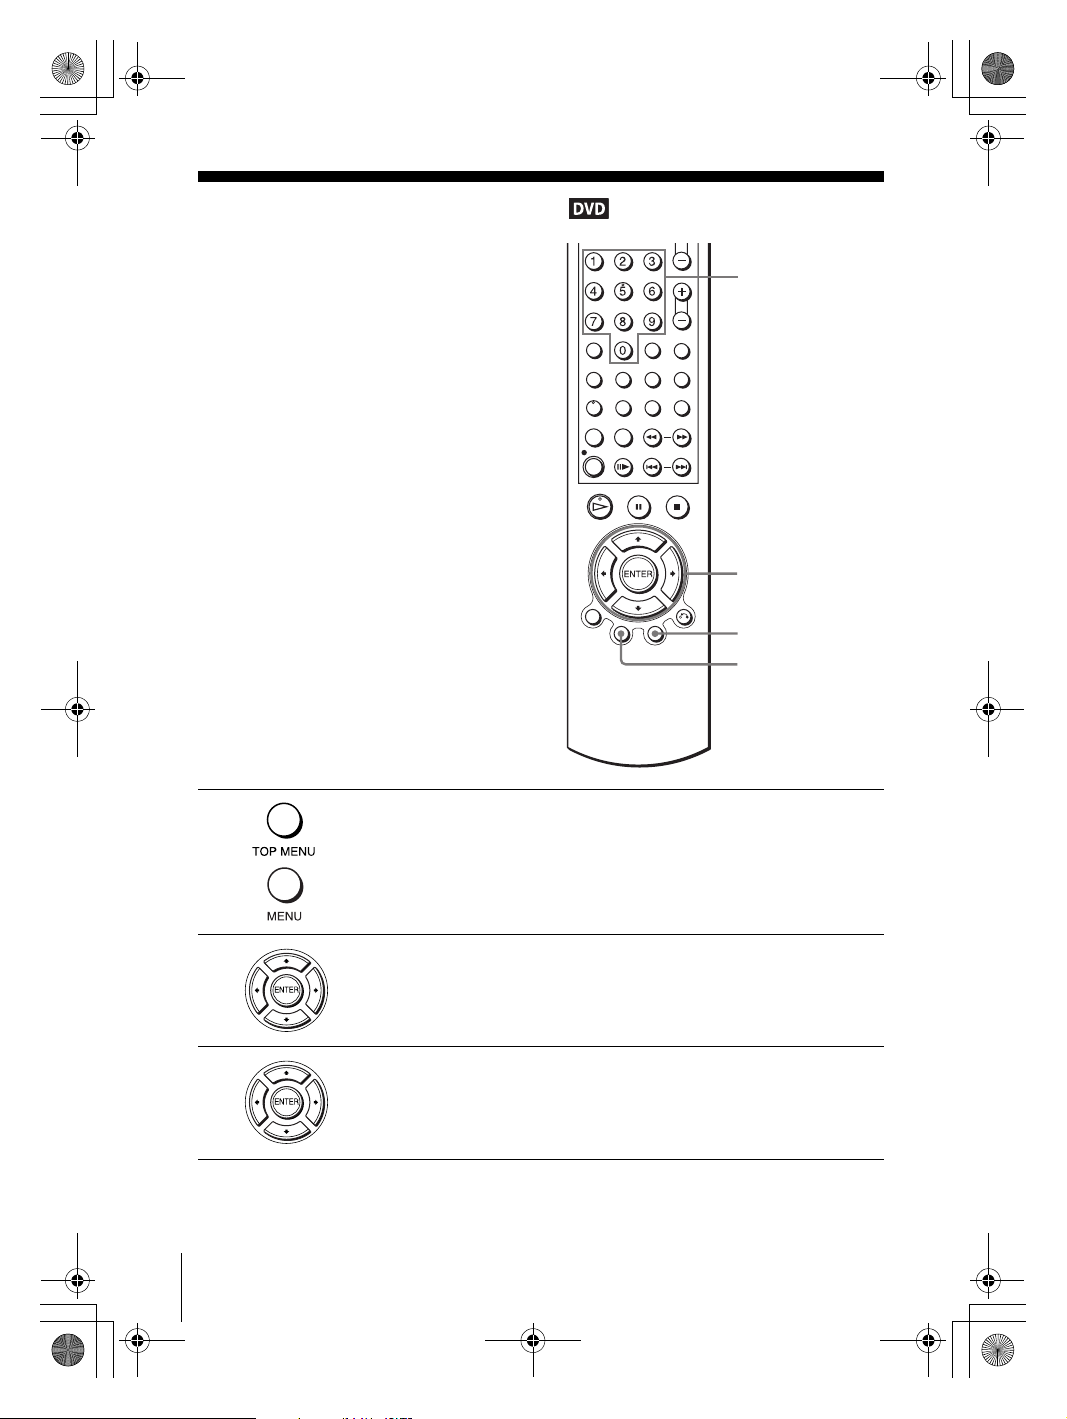
Using the DVD’s menu
A DVD is divided into long sections of a
picture or a music feature called “titles.”
When you play a DVD which contains
several titles, you can select the title you
want using the TOP MENU button.
When you play DVDs that allow you to
select items such as the language for the
subtitles and the language for the sound,
select these items using the MENU button.
Number
buttons
V/v/B/b
ENTER
MENU
1
2
3
TOP
MENU
Press TOP MENU or MENU.
The disc’s menu appears on the TV screen.
The contents of the menu vary from disc to disc.
Press V/v/B/b to select the item you want to play or change.
You can also use the number buttons to select the item.
Press ENTER.
Note
• Depending on the DVD, you may not be able to use the TOP MENU button.
70
Using the DVD’s menu
filename[010DVD.fm] model name1[SLV-D500P] [3-083-946-11 (1) US]
Page 11
filename[C:\Documents and
Settings\gotanda\Desktop\3083946111SLVD500PUC0414\010DVD.fm]
010COV.book Page 71 Thursday, April 24, 2003 12:37 PM
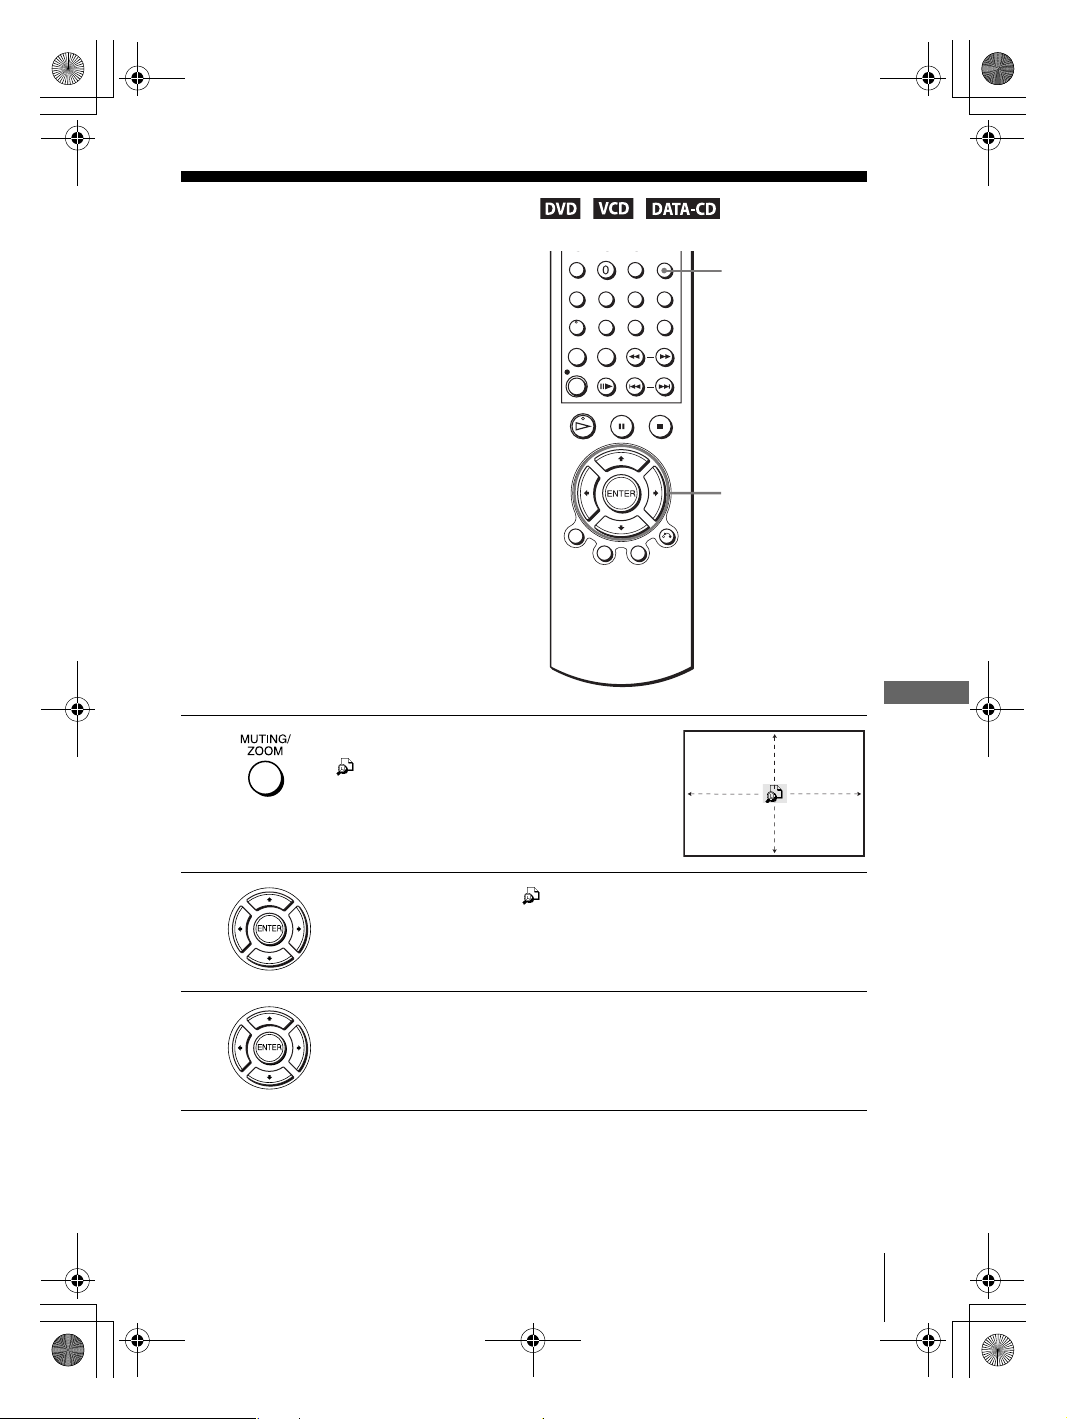
Zooming into a scene
You can zoom into a scene during playback
or still mode. To zoom into a JPEG image,
see “Playing JPEG image files” on page 87.
1
Press ZOOM.
“ ” appears.
ZOOM
V/v/B/b
ENTER
DVD Additional Operations
2
3
Press V/v/B/b to move “ ” to the position where you want to zoom in.
Press ENTER repeatedly to change the magnification.
Each time you press the button, the magnification changes as shown below.
2× t 4× t 2× t normal magnification
Notes
• You cannot use 4
• The zoom function may not work depending on the DVD.
× magnification when you play VIDEO CDs.
filename[010DVD.fm] model name1[SLV-D500P] [3-083-946-11 (1) US]
Zooming into a scene
71
Page 12
filename[C:\Documents and
Settings\gotanda\Desktop\3083946111SLVD500PUC0414\010DVD.fm]
010COV.book Page 72 Thursday, April 24, 2003 12:37 PM
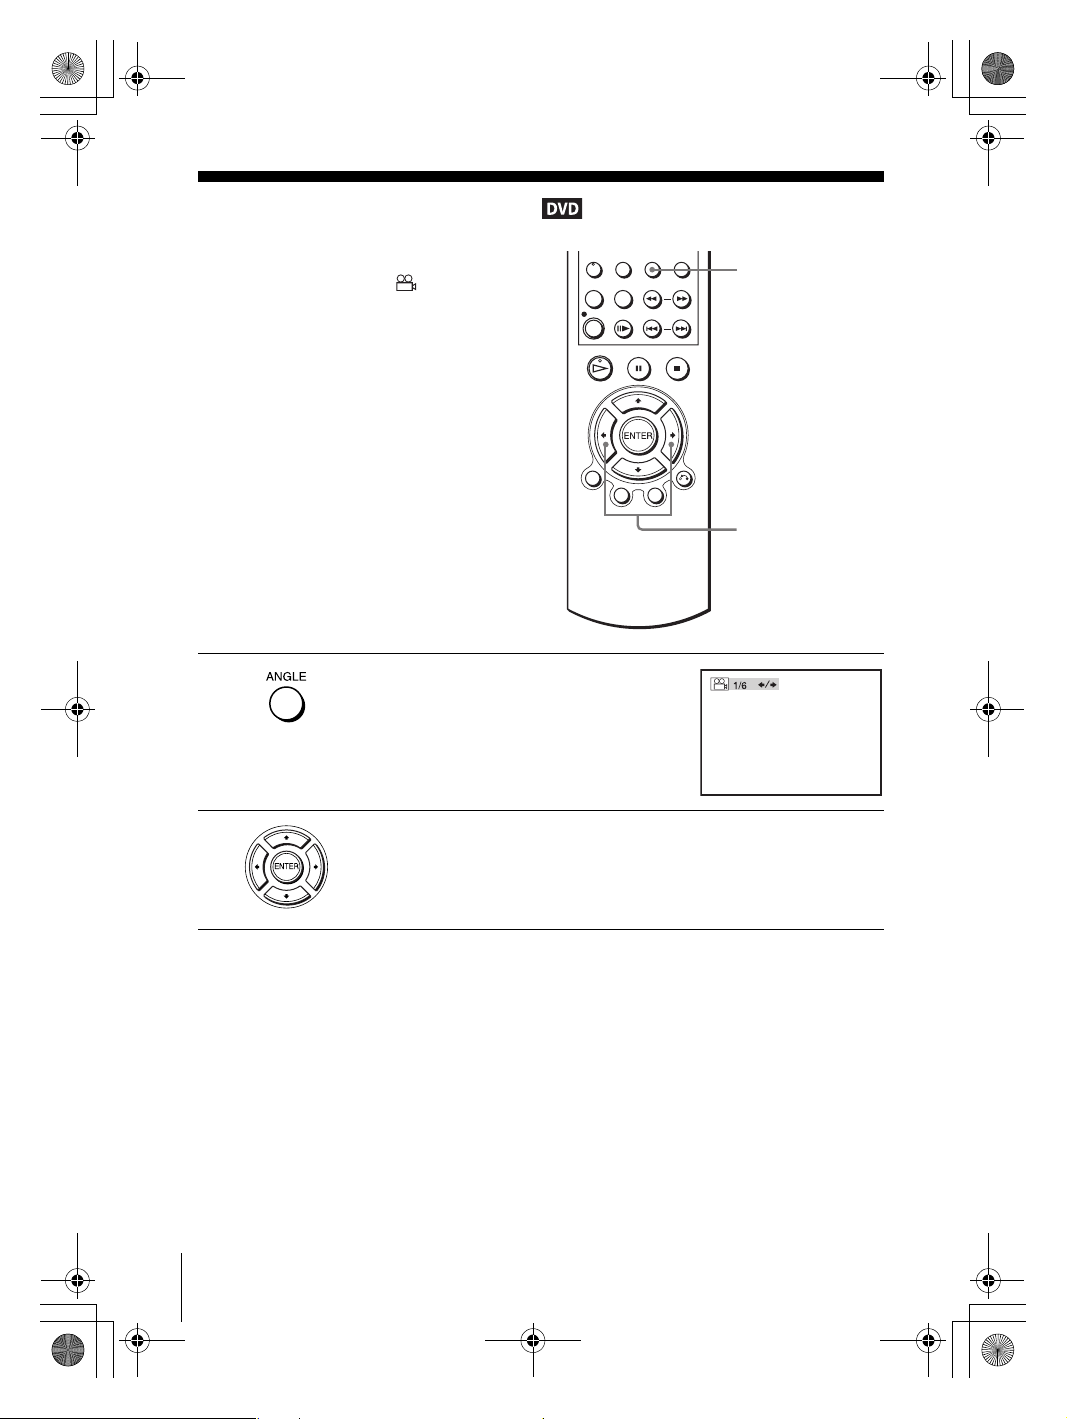
Changing the angles
If various angles (multi-angles) for a scene
are recorded on the DVD, “ ” appears in
the display when you press ANGLE during
playback. This means that you can change
the viewing angle.
1
2
Press ANGLE during playback.
The angle number appears on the display.
The number after the slash indicates the total
number of angles.
Press B/b repeatedly to select the angle number.
The scene changes to the selected angle.
ANGLE
B/b
72
Changing the angles
Note
• Depending on the DVD, you may not be able to change the angles even if multi-angles are
recorded on the DVD.
filename[010DVD.fm] model name1[SLV-D500P] [3-083-946-11 (1) US]
Page 13
filename[C:\Documents and
Settings\gotanda\Desktop\3083946111SLVD500PUC0414\010DVD.fm]
010COV.book Page 73 Thursday, April 24, 2003 12:37 PM
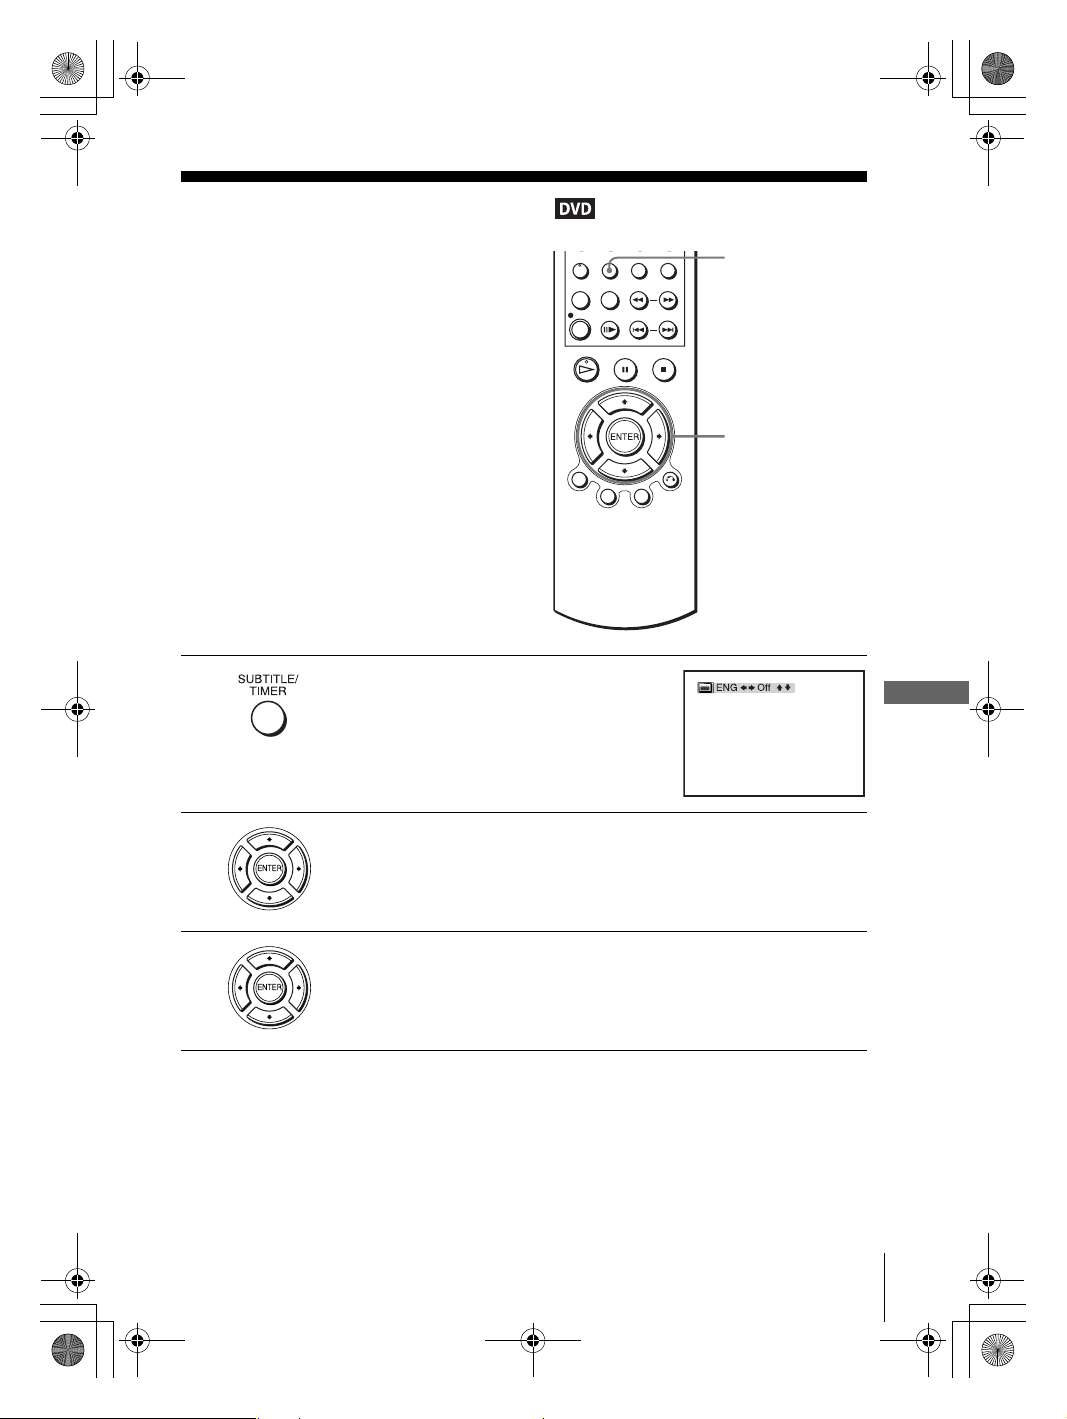
Displaying the subtitle
If subtitles are recorded on the disc, you can
change the subtitles or turn them on and off
whenever you want while playing a DVD.
1
2
Press SUBTITLE during playback.
Press B/b repeatedly to select the language.
Depending on the DVD, the choice of language varies.
Refer to “DVD Audio/Subtitle Language” on page 117 for the abbreviation
of the language.
SUBTITLE
V/v/B/b
ENTER
DVD Additional Operations
3
Press V/v repeatedly to select “On.”
To turn off the subtitles
Select “Off” in step 3.
Note
• Depending on the DVD, you may not be able to change the subtitles even if multilingual
subtitles are recorded on it. You also may not be able to turn them off.
Displaying the subtitle
filename[010DVD.fm] model name1[SLV-D500P] [3-083-946-11 (1) US]
73
Page 14
filename[C:\Documents and
Settings\gotanda\Desktop\3083946111SLVD500PUC0414\010DVD.fm]
010COV.book Page 74 Thursday, April 24, 2003 12:37 PM
Various play mode functions (Program play,
Shuffle play, Repeat play)
You can set the following play modes:
• Program play (page 74)
• Shuffle play (page 76)
• Repeat play (page 77)
Note
• The play mode is canceled when:
– you open the disc tray
– the player enters standby mode by pressing [/1.
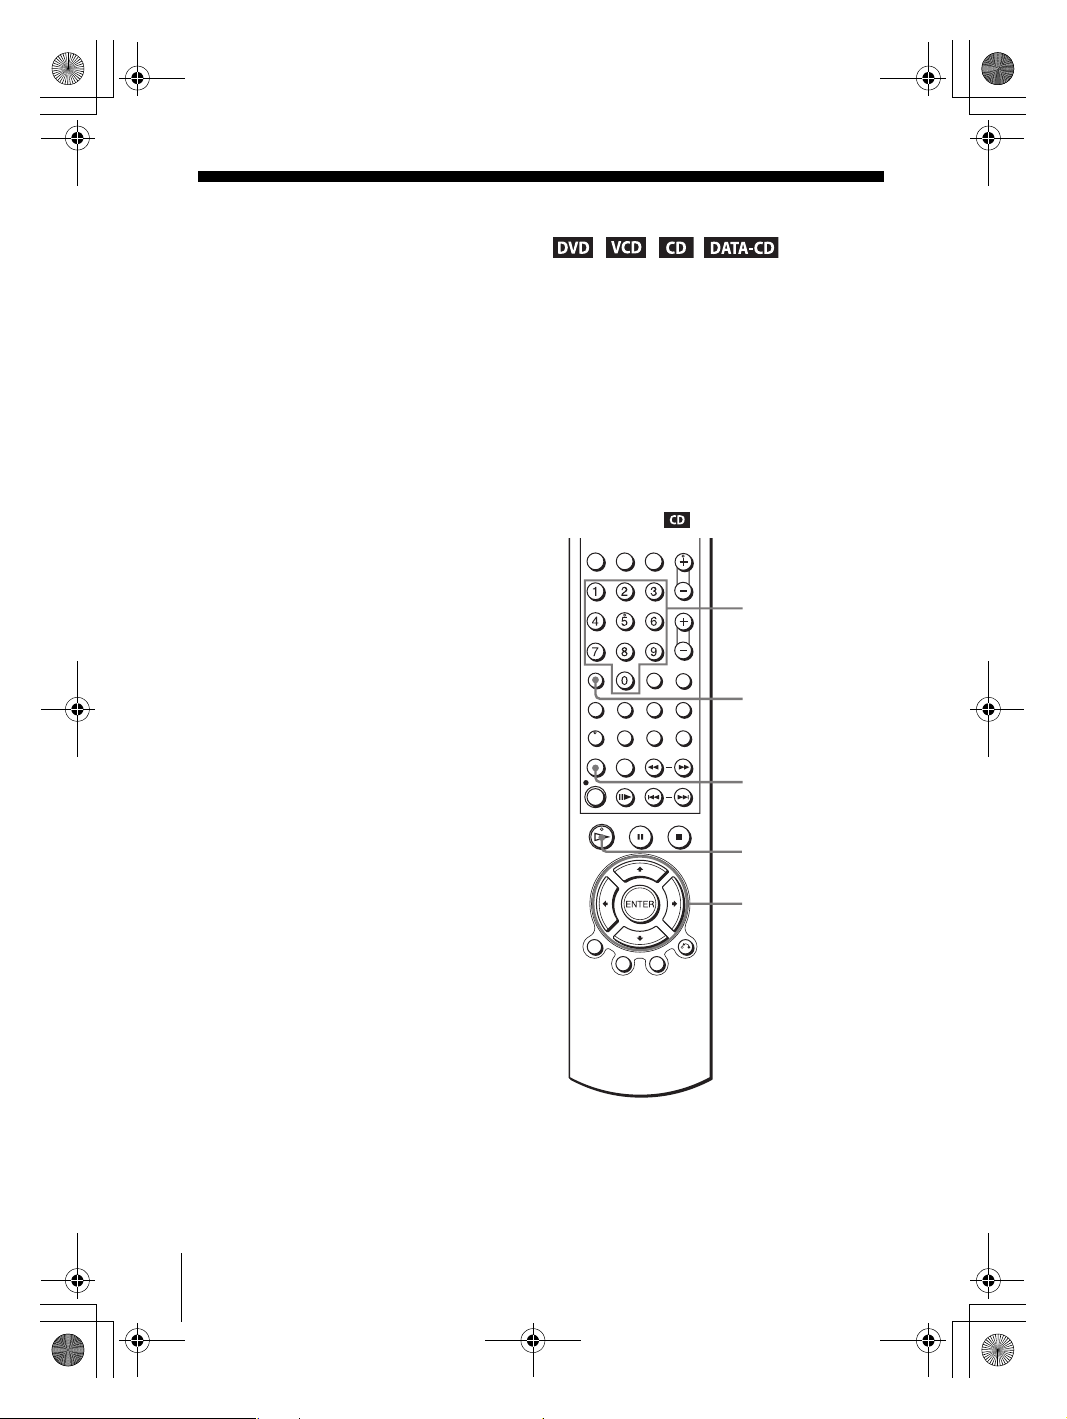
Creating your own program (Program play)
You can play the contents of a disc in the
order you want by arranging the order of the
tracks on the disc to create your own
program. You can program up to 20 tracks.
Number
buttons
CLEAR
REPEAT
74
Various play mode functions (Program play, Shuffle play, Repeat play)
filename[010DVD.fm] model name1[SLV-D500P] [3-083-946-11 (1) US]
H PLAY
V/v/B/b
ENTER
Page 15
filename[C:\Documents and
Settings\gotanda\Desktop\3083946111SLVD500PUC0414\010DVD.fm]
010COV.book Page 75 Thursday, April 24, 2003 12:37 PM
1
2
3
4
5
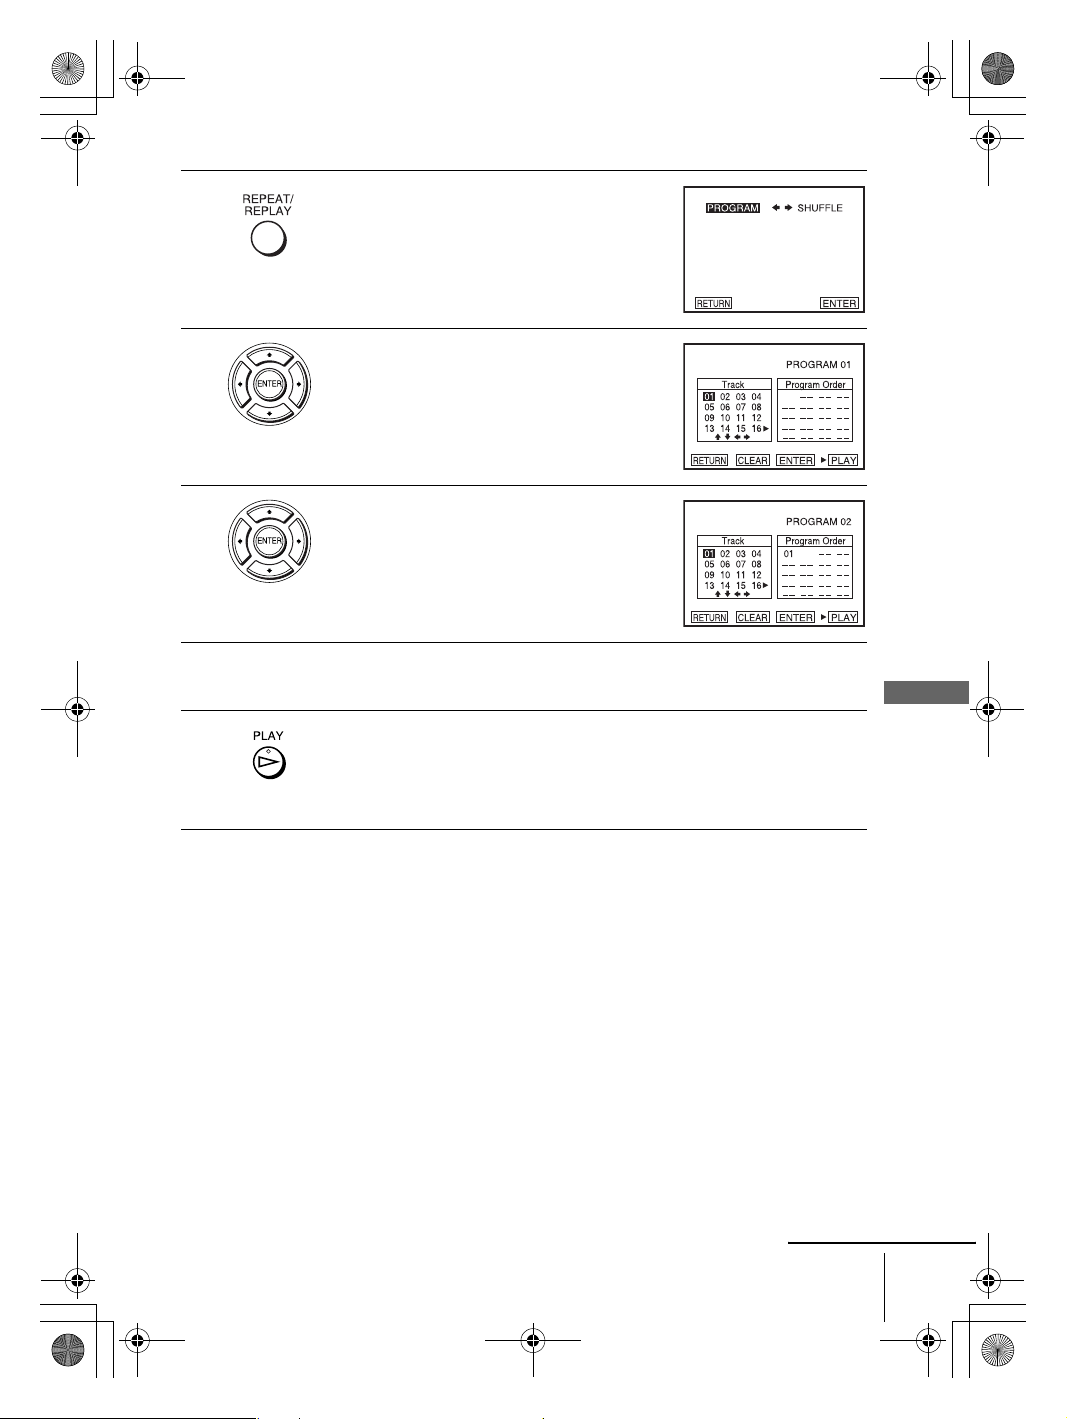
Press REPEAT when the DVD player is in stop
mode.
Press B/b to select “PROGRAM”, then press
ENTER.
Press V/v/B/b to select the track number you
want to program, then press ENTER.
You can also use the number buttons to enter
the track number.
To program other tracks, repeat step 3.
The programed track numbers are displayed in the selected order.
DVD Additional Operations
Press H PLAY to start program play.
Program play starts.
When the program ends, you can restart the same program again by
pressing H PLAY.
To stop program play
Press CLEAR.
To change or cancel a program
Follow steps 1 and 2 of “Creating your own program (Program play).”
1
Press CLEAR.
2
The last programed number is canceled.
Follow step 3 for new programing.
3
Various play mode functions (Program play, Shuffle play, Repeat play)
filename[010DVD.fm] model name1[SLV-D500P] [3-083-946-11 (1) US]
continued
75
Page 16
filename[C:\Documents and
Settings\gotanda\Desktop\3083946111SLVD500PUC0414\010DVD.fm]
010COV.book Page 76 Thursday, April 24, 2003 12:37 PM
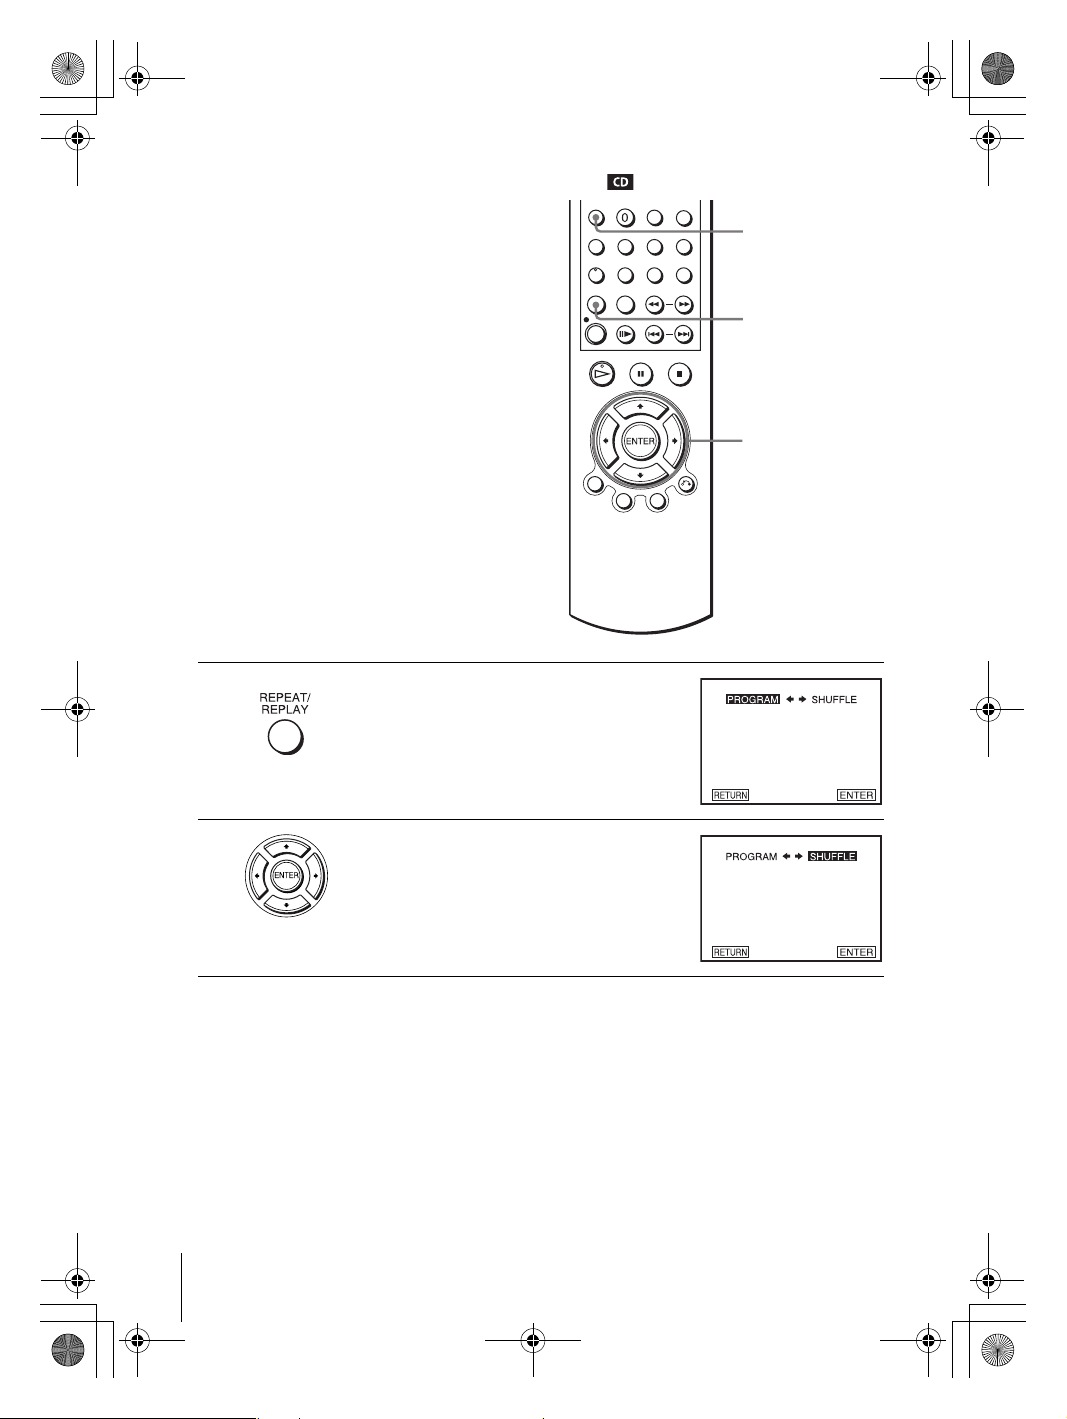
Playing in random order (Shuffle play)
You can shuffle the playback order of tracks.
Subsequent “shuffling” may produce a
different playing order.
CLEAR
REPEAT
V/v/B/b
ENTER
1
2
Press REPEAT when the DVD player is in stop
mode.
Press B/b to select “SHUFFLE”, then press
ENTER.
To return to normal play
Press CLEAR.
76
Various play mode functions (Program play, Shuffle play, Repeat play)
filename[010DVD.fm] model name1[SLV-D500P] [3-083-946-11 (1) US]
Page 17
filename[C:\Documents and
Settings\gotanda\Desktop\3083946111SLVD500PUC0414\010DVD.fm]
010COV.book Page 77 Thursday, April 24, 2003 12:37 PM
Playing repeatedly (Repeat play)
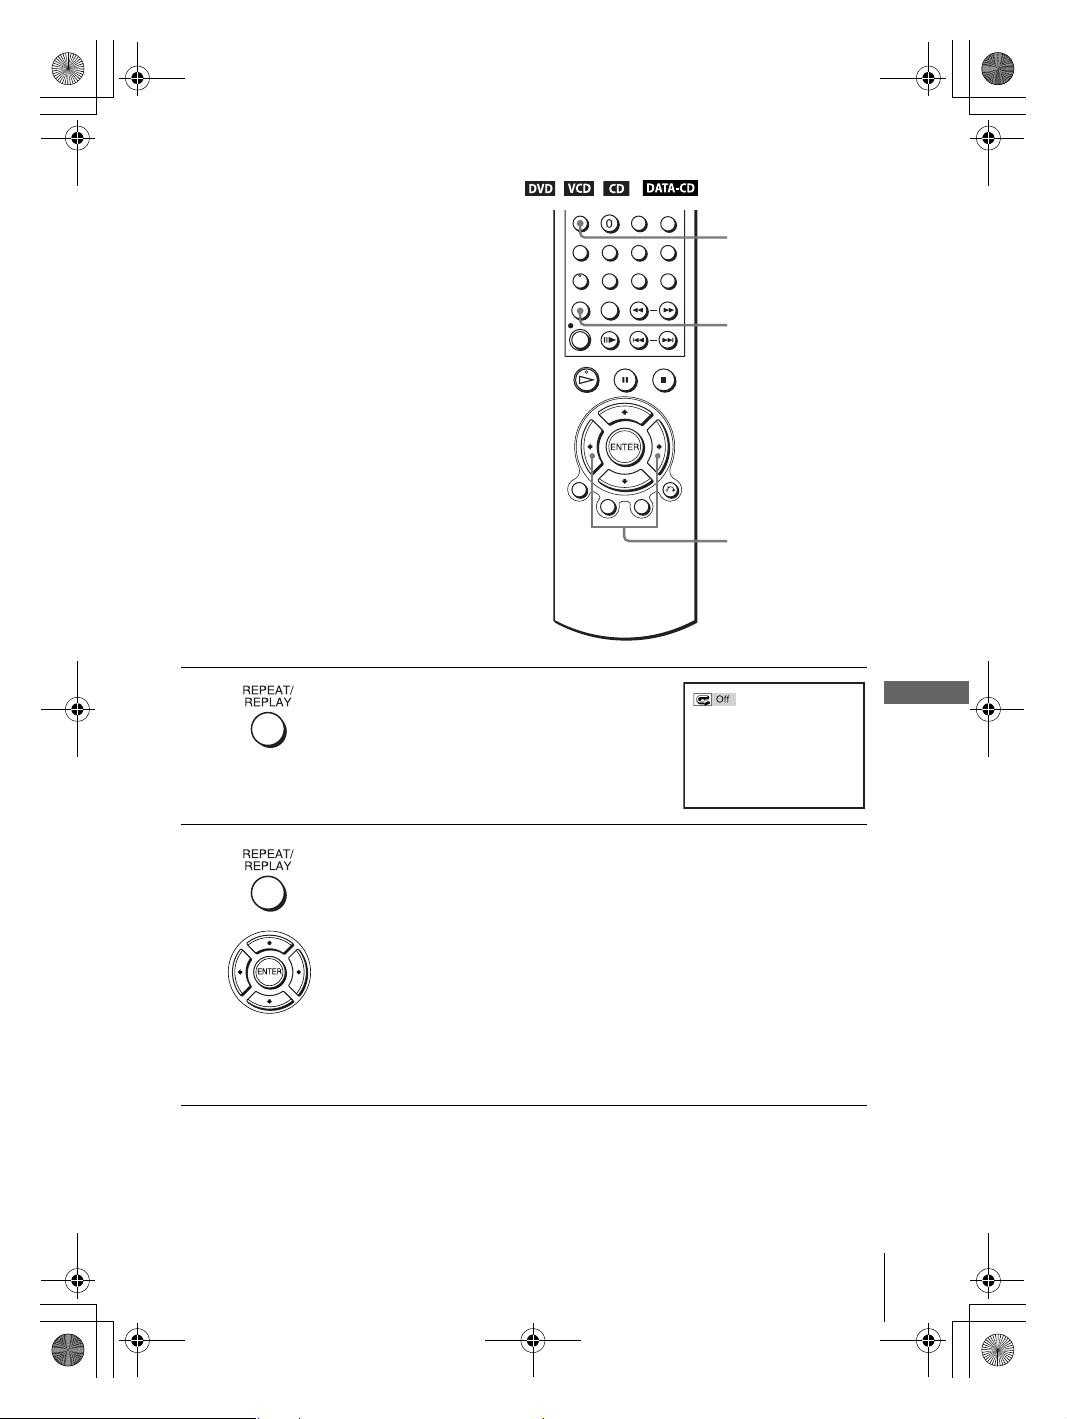
You can play all of the titles or tracks on a
disc or a single title, chapter, or track
repeatedly.
CLEAR
REPEAT
B/b
1
2
Press REPEAT during playback.
DVD Additional Operations
Press REPEAT or B/b repeatedly to select the item to be repeated.
When playing a DVD
• Chapter: repeats the current chapter.
• Title: repeats the current title on a disc.
When playing a VIDEO CD or CD
• Track: repeats the current track.
• Disc: repeats all of the tracks.
When playing a DATA CD (MP3 audio)
• Track: repeats the current track.
To return to normal play
Select “Off” or press CLEAR in step 2.
Various play mode functions (Program play, Shuffle play, Repeat play)
filename[010DVD.fm] model name1[SLV-D500P] [3-083-946-11 (1) US]
77
Page 18
filename[C:\Documents and
Settings\gotanda\Desktop\3083946111SLVD500PUC0414\010DVD.fm]
010COV.book Page 78 Thursday, April 24, 2003 12:37 PM
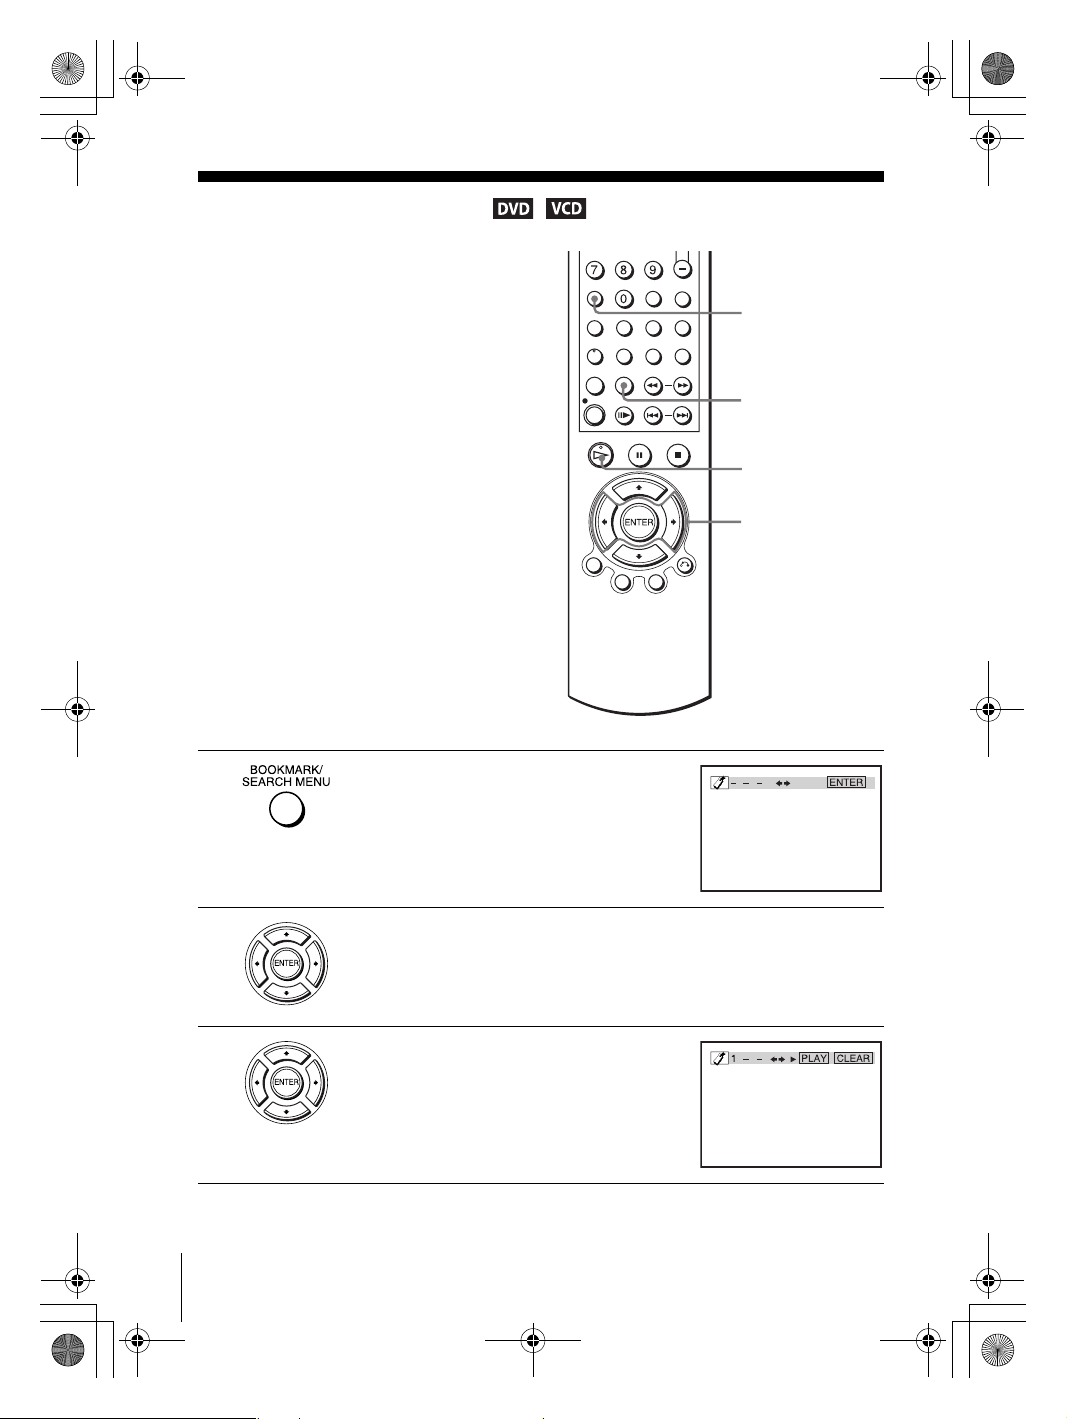
Using bookmarks
You can store scenes in the player’s memory
as bookmarks.
You can set up to three bookmarks.
Select “MENU OFF” before setting up
bookmarks on a VIDEO CD (see “Playing
VIDEO CDs with “MENU ON/OFF”
Functions” on page 90).
CLEAR
BOOKMARK
H PLAY
B/b
ENTER
1
2
3
78
Using bookmarks
Press BOOKMARK during playback.
Three bookmark placeholders (- - - ) appear
next to the bookmark icon.
Press B/b to select one of the placeholders.
Play the DVD scene you want, then press
ENTER.
The selected placeholder changes to a number
(1, 2 or 3).
filename[010DVD.fm] model name1[SLV-D500P] [3-083-946-11 (1) US]
Page 19
filename[C:\Documents and
Settings\gotanda\Desktop\3083946111SLVD500PUC0414\010DVD.fm]
010COV.book Page 79 Thursday, April 24, 2003 12:37 PM
To cancel the bookmark
Press CLEAR after step 3.
To exit the Bookmark menu
Press BOOKMARK.
To playback the scene where you insert a bookmark
Press BOOKMARK during playback.
1
Press B/b to select the bookmark placeholder, then press H PLAY to play the
2
bookmark.
Note
• Depending on the DVD, you may not be able to use the bookmark function.
Using bookmarks
DVD Additional Operations
79
filename[010DVD.fm] model name1[SLV-D500P] [3-083-946-11 (1) US]
Page 20
filename[C:\Documents and
Settings\gotanda\Desktop\3083946111SLVD500PUC0414\010DVD.fm]
010COV.book Page 80 Thursday, April 24, 2003 12:37 PM
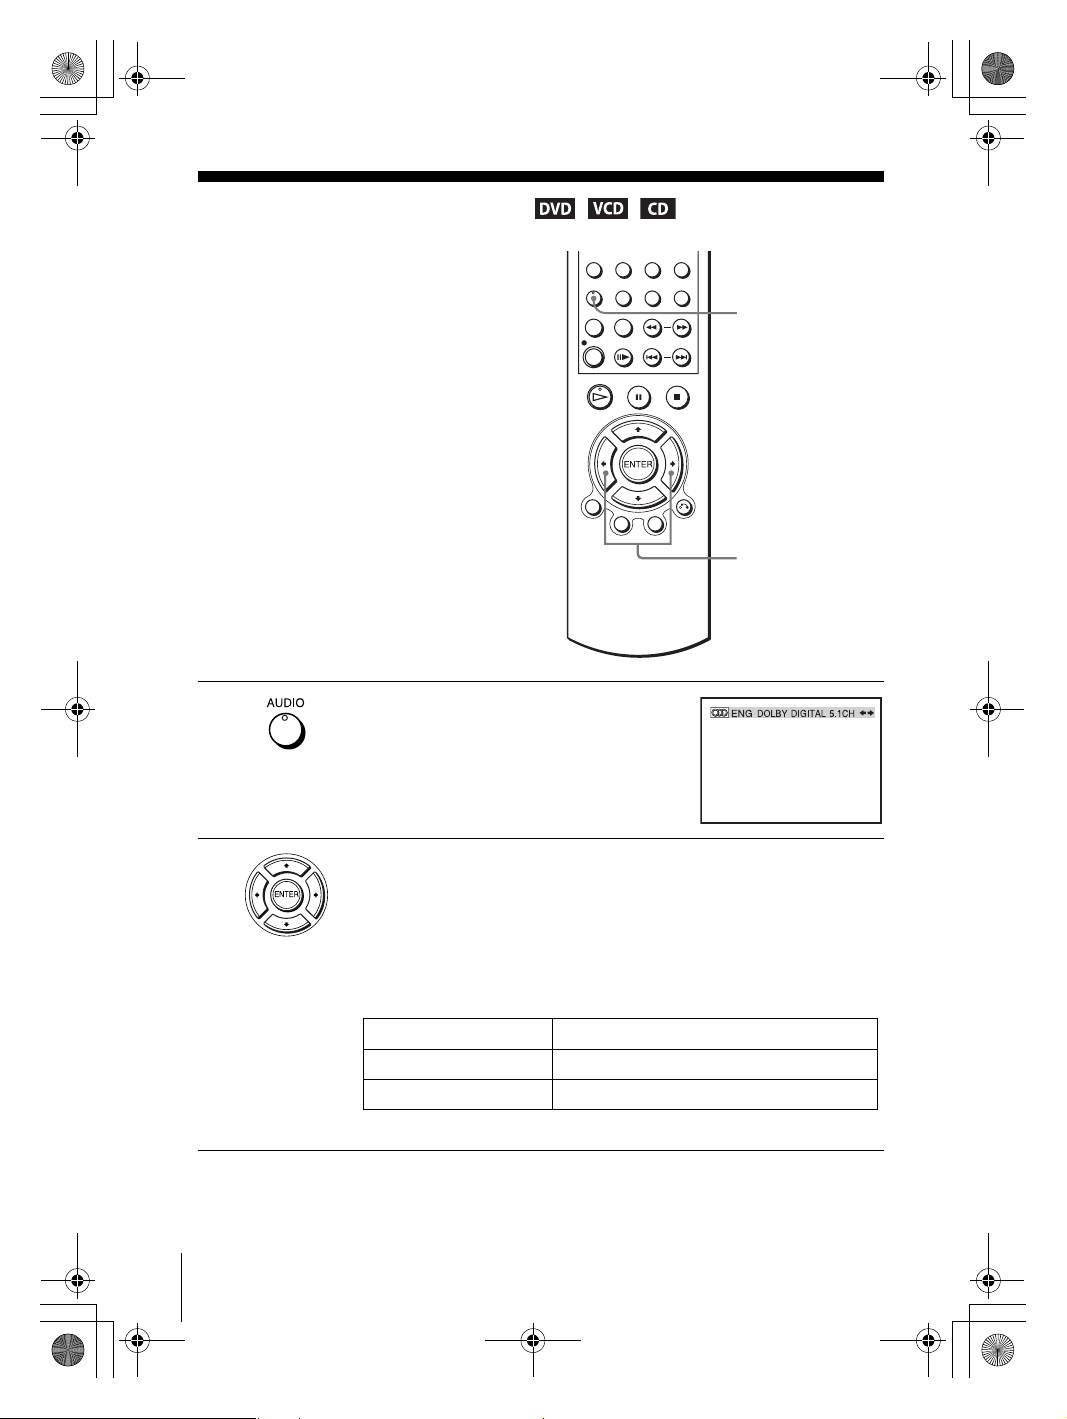
Changing the sound
When playing a DVD recorded in multiple
audio formats (PCM, Dolby Digital, or
DTS), you can change the audio format. If
the DVD is recorded with multilingual
tracks, you can also change the language.
With CDs, DATA CDs, or VIDEO CDs, you
can select the sound from the right or left
channel and listen to the sound of the
selected channel through both the right and
left speakers. For example, when playing a
disc containing a song with the vocals on the
right channel and the instruments on the left
channel, you can hear the instruments from
both speakers by selecting the left channel.
AUDIO
B/b
1
2
80
Changing the sound
Press AUDIO during playback.
Press B/b repeatedly to select the desired language/audio setting.
• When playing a DVD
Depending on the DVD, the choice of language varies.
Refer to “DVD Audio/Subtitle Language” on page 117 for the
abbreviation of the language.
• When playing a VIDEO CD or CD
The default setting is indicated in bold print.
STEREO
Left The sound of the left channel (monaural)
Right The sound of the right channel (monaural)
The standard stereo sound
filename[010DVD.fm] model name1[SLV-D500P] [3-083-946-11 (1) US]
Page 21
filename[C:\Documents and
Settings\gotanda\Desktop\3083946111SLVD500PUC0414\010DVD.fm]
010COV.book Page 81 Thursday, April 24, 2003 12:37 PM
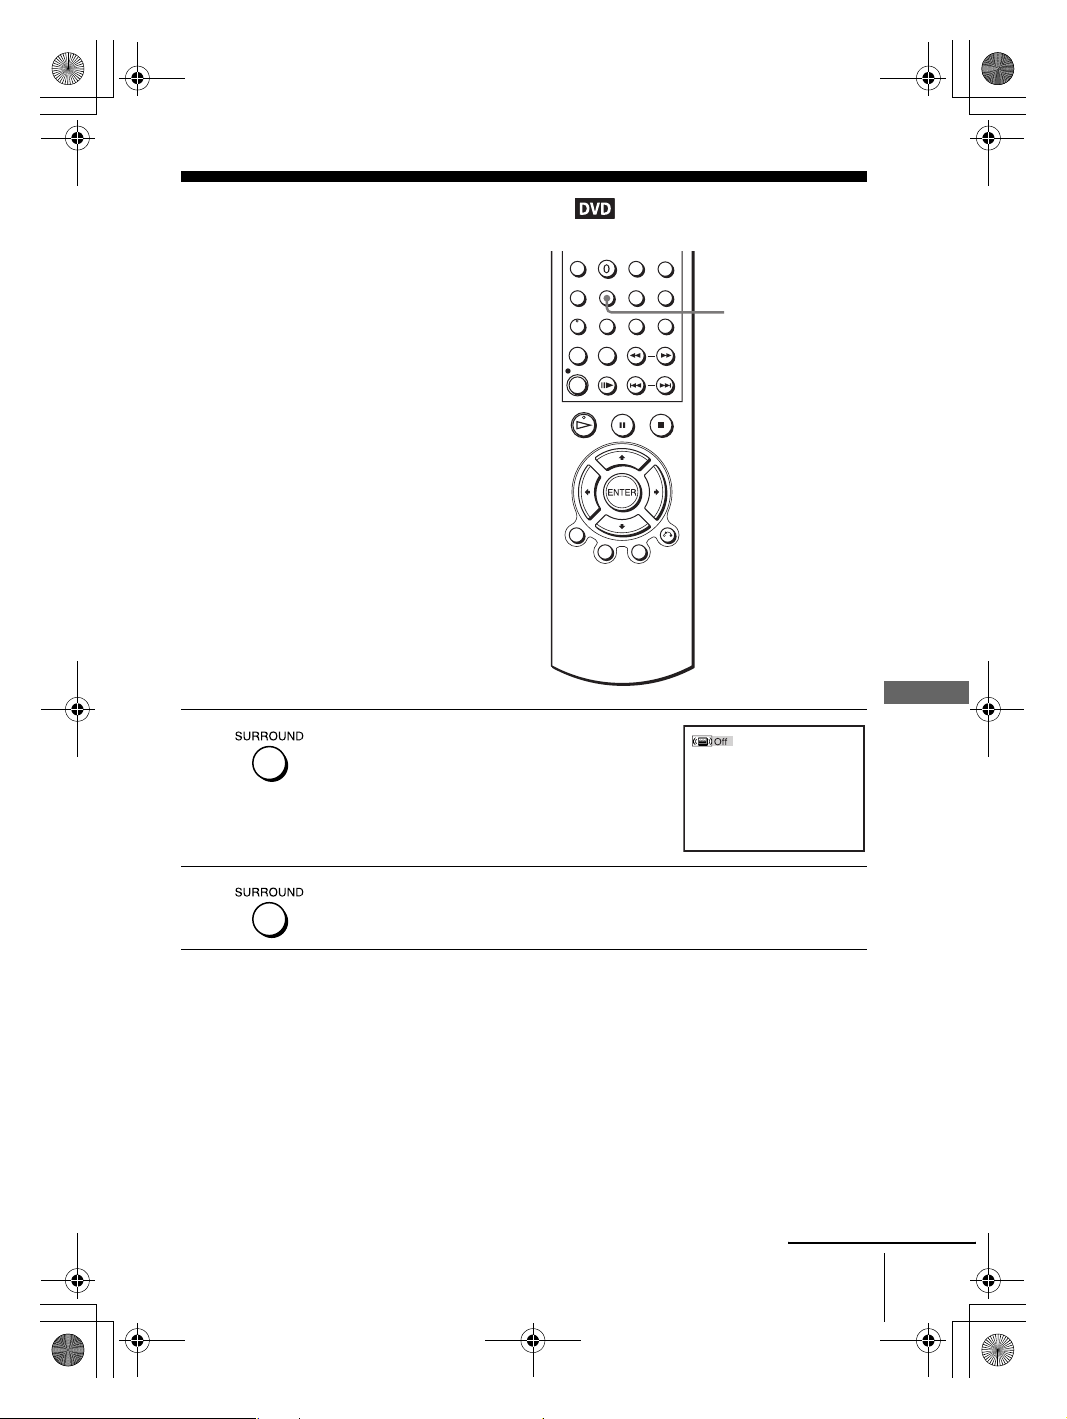
Virtual surround setting
When you connect a stereo TV or 2 front
speakers, SURROUND lets you enjoy surround
sound effects by using sound imaging to create
virtual rear speakers from the sound of the front
speakers without using actual rear speakers.
This function is designed to work with the LINE
OUT AUDIO L/R jacks.
SURROUND
1
2
Press SURROUND during playback.
Press SURROUND repeatedly to select “On.”
To cancel the setting
Select “Off” in step 2.
continued
Virtual surround setting
DVD Additional Operations
81
filename[010DVD.fm] model name1[SLV-D500P] [3-083-946-11 (1) US]
Page 22
filename[C:\Documents and
Settings\gotanda\Desktop\3083946111SLVD500PUC0414\010DVD.fm]
010COV.book Page 82 Thursday, April 24, 2003 12:37 PM
Notes
• When the playing signal does not contain a signal for the rear speakers, the surround effects
will be difficult to hear.
• When you activate the surround effect, turn off the surround setting of the connected TV or
amplifier (receiver).
• Make sure that your listening position is between and at an equal distance from your
speakers, and that the speakers are located in similar surroundings.
• If you use the DIGITAL AUDIO OUT (OPTICAL or COAXIAL) jack and set “Dolby
Digital” to “Dolby Digital” or “DTS” to “On” in “AUDIO SETUP” menu, sound will come
from your speakers but it will not have the surround effect.
• Certain audio features of this product manufactured under a license from Desper Products,
Inc. Spatializer
®
, VBX™ and the circle-in-square device are trademarks owned by Desper
Products, Inc.
82
Virtual surround setting
filename[010DVD.fm] model name1[SLV-D500P] [3-083-946-11 (1) US]
Page 23
filename[C:\Documents and
Settings\gotanda\Desktop\3083946111SLVD500PUC0414\010DVD.fm]
010COV.book Page 83 Thursday, April 24, 2003 12:37 PM
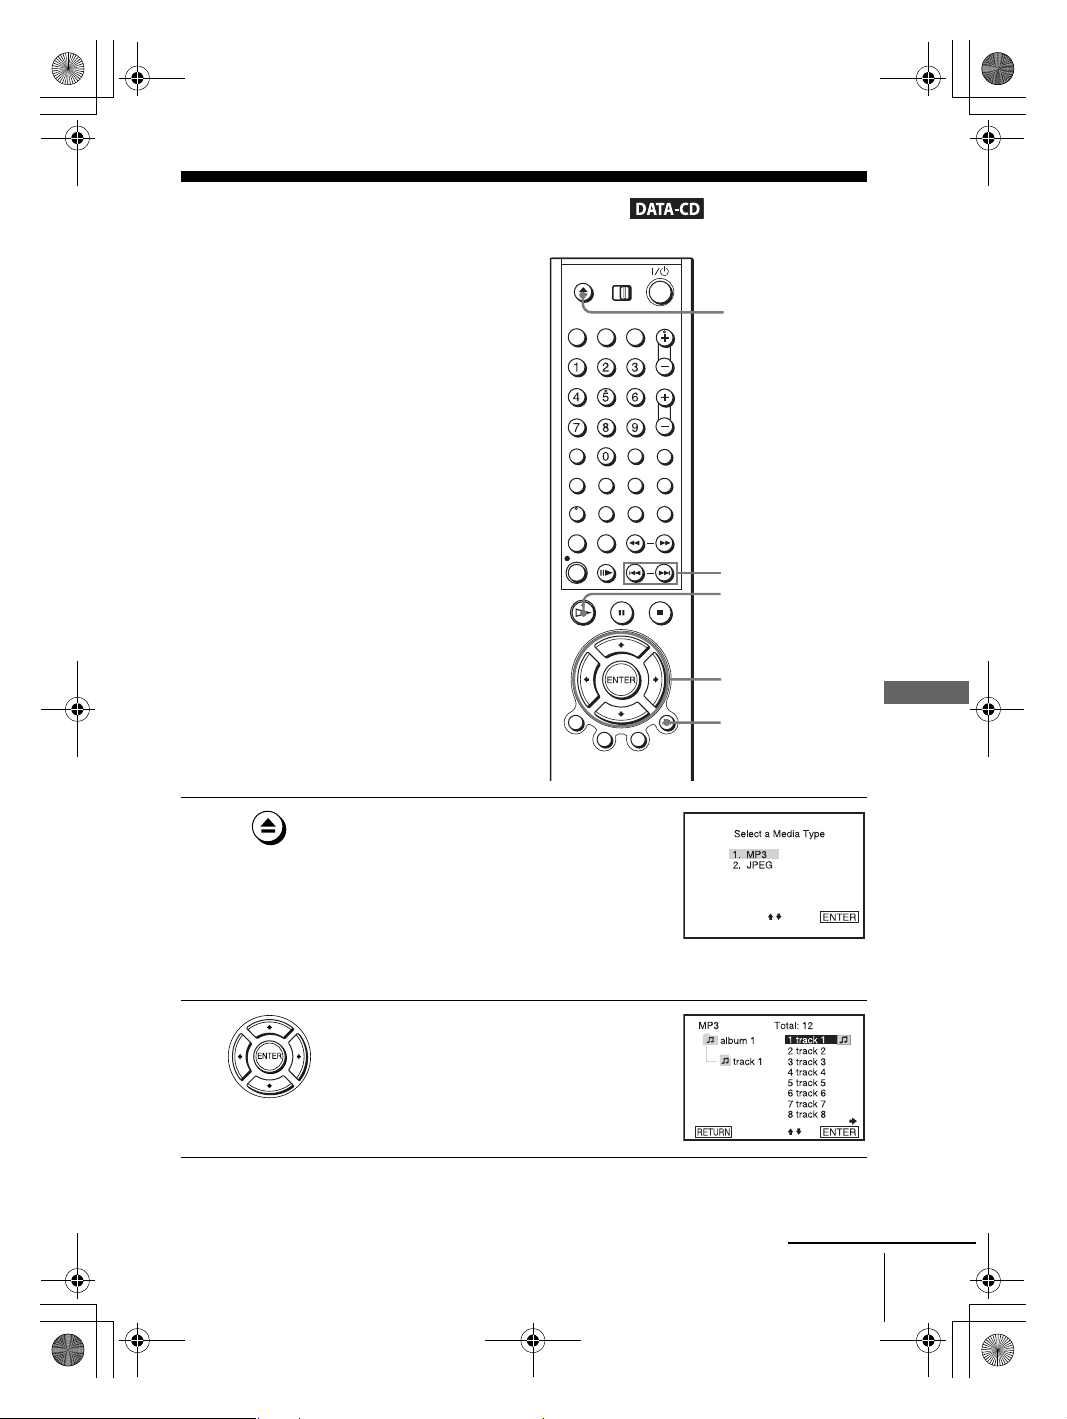
Playing an MP3 audio track
You can play back DATA CDs (CD-ROMs/
CD-Rs/CD-RWs) recorded in MP3 (MPEG1
Audio Layer 3) format.
Z
./ >
H PLAY
1
2
Press Z and place a DATA CD on the disc tray,
then press Z to close the tray.
When you load a DATA CD which contains
MP3 audio tracks and JPEG image files,
“Select a Media Type” menu appears.
If you load a DATA CD which contains only
MP3 audio files, the MP3 display appears.
Then you can skip step 2.
Press V/v to select “MP3”, then press ENTER.
V/v/B/b
ENTER
O RETURN
continued
DVD Additional Operations
Playing an MP3 audio track
filename[010DVD.fm] model name1[SLV-D500P] [3-083-946-11 (1) US]
83
Page 24
filename[C:\Documents and
Settings\gotanda\Desktop\3083946111SLVD500PUC0414\010DVD.fm]
010COV.book Page 84 Thursday, April 24, 2003 12:37 PM
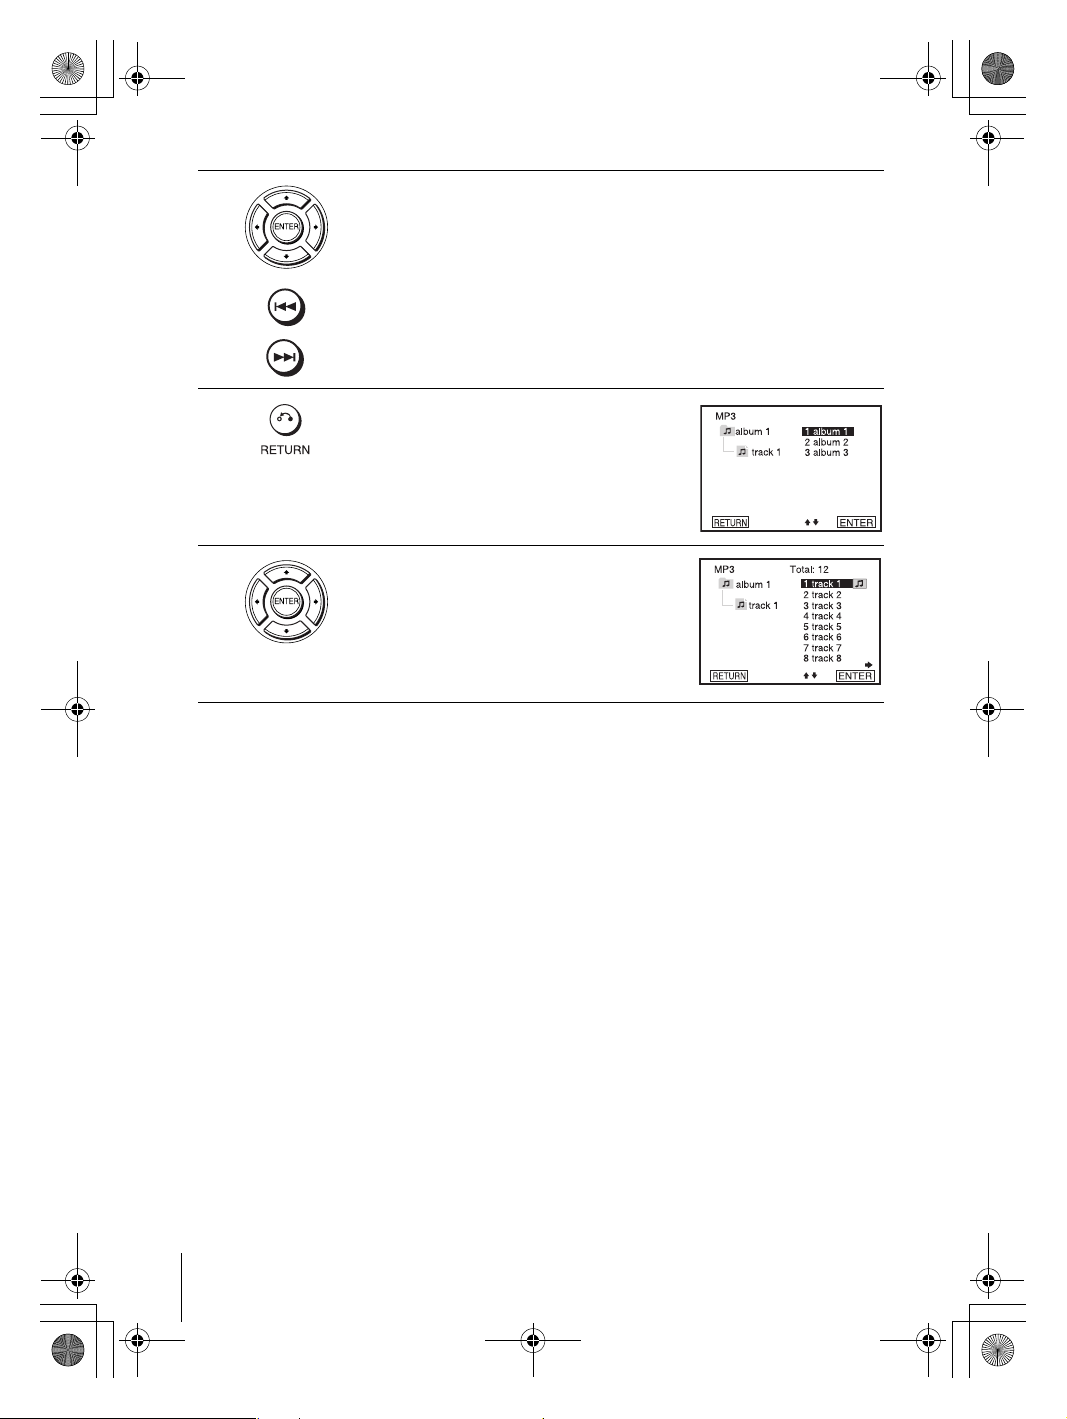
3
4
5
Press V/v or ./ > to select the desired track, then press ENTER.
The selected track starts playing.
When a track or album is being played, its title is shaded. The playing track
number appears on the display window.
To change the album, press O RETURN.
Press V/v to select an album, then press
ENTER.
The list of tracks contained in the album
appears.
To select a track, repeat step 2.
To go to the next or previous page
Press b or B.
To return to the previous display
Press O RETURN.
To return to the “Select a Media Type” menu
Press x STOP twice, then press TOP MENU.
To turn off the display
Press x STOP, then press O RETURN repeatedly.
Notes
• Only the letters in the alphabet and numbers can be used for album or track names. Anything
else is displayed as an asterisk.
• Up to 10 alphanumeric characters can be displayed for album or track names.
• ID3 tags cannot be displayed.
84
Playing an MP3 audio track
filename[010DVD.fm] model name1[SLV-D500P] [3-083-946-11 (1) US]
Page 25

filename[C:\Documents and
Settings\gotanda\Desktop\3083946111SLVD500PUC0414\010DVD.fm]
010COV.book Page 85 Thursday, April 24, 2003 12:37 PM
About MP3 audio tracks
You can play MP3 audio tracks on CD-ROMs, CD-Rs, or CD-RWs. However, the
discs must be recorded according to ISO9660 level 1, level 2, or Joliet format for the
player to recognize the tracks.
You can also play discs recorded in Multi Session.
See the instructions of the CD-R/RW device or recording software (not supplied) for
details on the recording format.
To play a Multi Session CD
This player can play Multi Session CDs when an MP3 audio track is located in the
first session. Any subsequent MP3 audio tracks, recorded in the later sessions, can
also be played back. When audio tracks and images in music CD format or video CD
format are recorded in the first session, only the first session will be played back.
Notes
• If you put the extension “.MP3” to data not in MP3 format, the player cannot recognize the
data properly and will generate a loud noise which could damage your speaker system.
• The player cannot play audio tracks in MP3PRO format.
• This player supports MP3 audio tracks recorded with a bit rate of 128 kbps and a sampling
frequency of 44.1 kHz. Attempting to play MP3 audio tracks recorded with different
specifications may result in loud noise, sound skipping or speaker damage.
• Depending on the disc, playback may take some time to start.
The Playback order of MP3 audio tracks
The playback order of albums and tracks recorded on a DATA CD is as follows.
• Structure of disc contents
Tree 1 Tree 2 Tree 3 Tree 4 Tree 5
album
track
DVD Additional Operations
continued
Playing an MP3 audio track
filename[010DVD.fm] model name1[SLV-D500P] [3-083-946-11 (1) US]
85
Page 26
filename[C:\Documents and
Settings\gotanda\Desktop\3083946111SLVD500PUC0414\010DVD.fm]
010COV.book Page 86 Thursday, April 24, 2003 12:37 PM
When you insert a DATA CD and press H PLAY, the numbered tracks are played
sequentially, from
1 through 7. Any sub-albums/tracks contained within a currently
selected album take priority over the next album in the same tree. (Example: C
contains D so
4 is played before 5.)
When you press O RETURN and the list of MP3 albums appears (page 84), the
albums are arranged in the following order: A t B t C t D t F t G.
Albums that do not contain tracks (such as album E) do not appear in the list.
Tips
• If you add numbers (01, 02, 03, etc.) to the front of the track file names, the tracks will be
played in that order.
• Since a disc with many trees takes longer to start playback, place your albums within the first
two trees.
Notes
• Depending on the software you use to create the DATA CD, the playback order may differ
from the illustration above.
• The playback order above may not be applicable if there are more than a total of 200 albums
and tracks in the DATA CD.
• The player can recognize up to 100 albums (the player will count just albums, including
albums that do not contain MP3 audio tracks). The player will not play any albums beyond
the first 100 albums. Of the first 100 albums, the player will play no more than a combined
total of 200 albums and tracks.
86
Playing an MP3 audio track
filename[010DVD.fm] model name1[SLV-D500P] [3-083-946-11 (1) US]
Page 27

filename[C:\Documents and
Settings\gotanda\Desktop\3083946111SLVD500PUC0414\010DVD.fm]
010COV.book Page 87 Thursday, April 24, 2003 12:37 PM
Playing JPEG image files
You can play JPEG image files on DATA CDs
(CD-ROMs/CD-Rs/CD-RWs).
Z
./ >
H PLAY
1
2
V/v/B/b
ENTER
DVD Additional Operations
TOP MENU
DISPLAY
Press Z and place a DATA CD on the disc tray,
then press Z to close the tray.
When you load a DATA CD which contains
MP3 audio tracks and JPEG image files,
“Select a Media Type” menu appears.
If you load a DATA CD which contains only
JPEG image files, the ALBUM display
appears. Then you can skip step 2.
Press V/v to select “JPEG”, then press
ENTER.
The ALBUM display will appears.
To display the total number of JPEG image
files on the disc, press DISPLAY.
DISPLAY
continued
Playing JPEG image files
filename[010DVD.fm] model name1[SLV-D500P] [3-083-946-11 (1) US]
87
Page 28
filename[C:\Documents and
Settings\gotanda\Desktop\3083946111SLVD500PUC0414\010DVD.fm]
010COV.book Page 88 Thursday, April 24, 2003 12:37 PM
3
4
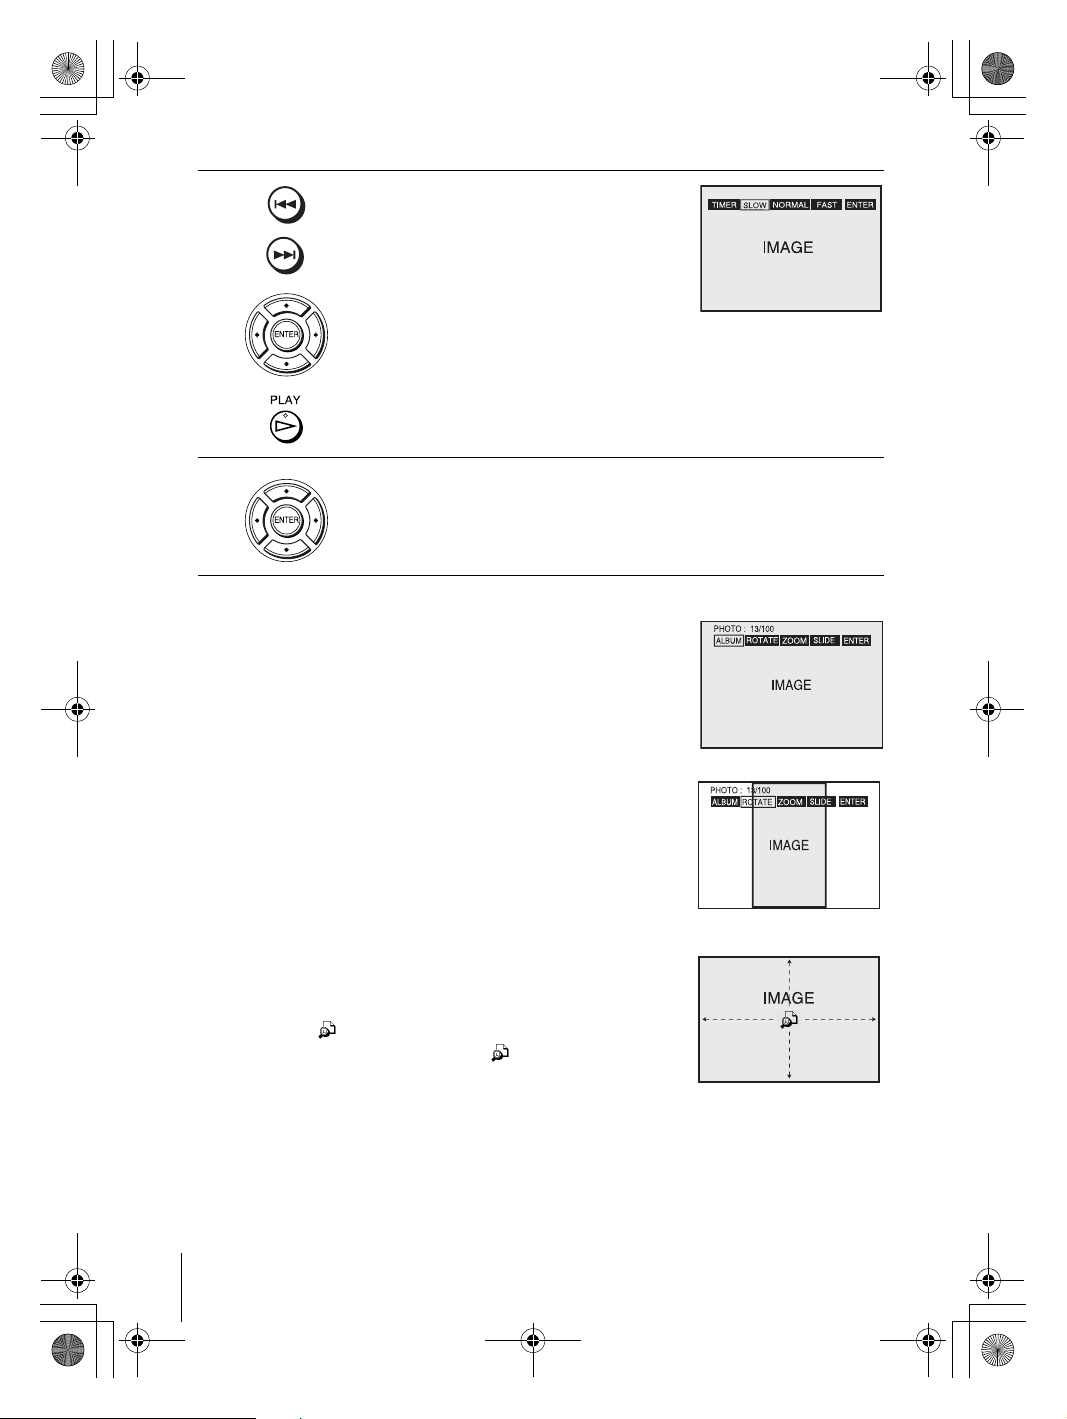
Press ./ > to select the next/previous
ALBUM page, press V/v/B/b to select an
image in the ALBUM display, then press
H PLAY.
The TIMER menu appears.
Press B/b to select the desired play speed, then press ENTER.
Slide show starts from the selected image.
To display an image
Press V/v/B/b to select an image in the ALBUM
1
display, then press ENTER.
The selected image number appears in the display
window.
To display the next/previous image, press ./ >.
2
To rotate an image
1
2
To zoom in an image
1
2
3
4
88
Playing JPEG image files
Press V/v/B/b to select an image in the ALBUM
display, then press ENTER.
Press B/b to select ROTATE, then press ENTER.
Each time you press ENTER, the image turns
clockwise by 90°.
Press V/v/B/b to select an image in the ALBUM
display, then press ENTER.
Press B/b to select ZOOM, then press ENTER.
“ ” appears.
Press V/v/B/b to move “ ” to the position where
you want to zoom in.
Press ENTER repeatedly to change the magnification.
Each time you press ENTER, the magnification
changes as shown below.
2× t 4× t 2× t normal magnification
filename[010DVD.fm] model name1[SLV-D500P] [3-083-946-11 (1) US]
Page 29
filename[C:\Documents and
Settings\gotanda\Desktop\3083946111SLVD500PUC0414\010DVD.fm]
010COV.book Page 89 Thursday, April 24, 2003 12:37 PM
To enjoy the Slide show
Press V/v/B/b to select an image in the ALBUM
1
display, then press ENTER.
Press B/b to select SLIDE, then press ENTER.
2
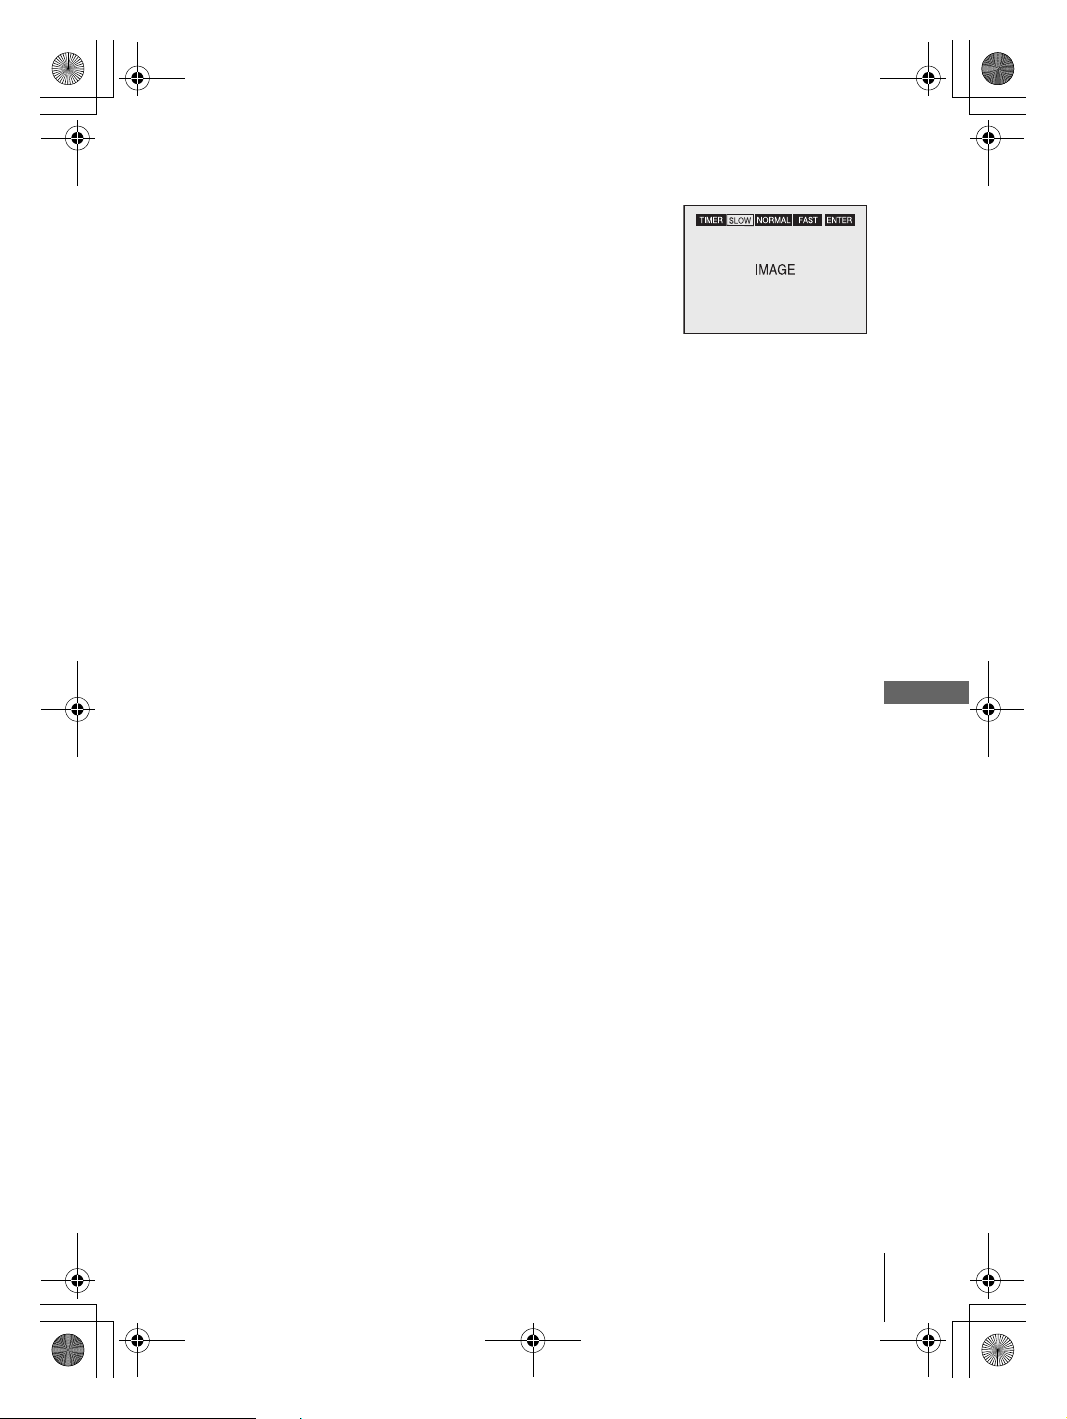
The TIMER menu appears.
Press B/b to select the desired play speed, then press
3
ENTER.
Slide show starts.
To turn on/off the menu in the single image display
Press DISPLAY in the single image display.
To turn on/off the total number of images in the ALBUM display
Press DISPLAY in the ALBUM display.
To return to the ALBUM display
Press DISPLAY to turn on the menu and press B/b to select ALBUM, then press
ENTER. You can also use MENU button to return to the ALBUM display. Press
. repeatedly to return to the first ALBUM page.
To return to the “Select a Media Type” menu
Press x STOP twice, then press TOP MENU.
Notes
• Slide show can play in only one direction.
• You cannot rotate or zoom in the image during Slide show.
• If you select ALBUM in the rotated image display, the images in the ALBUM display will
also be rotated. Correct the rotation in the ROTATE menu.
About JPEG image files
You can play JPEG image files on CD-ROMs, CD-Rs, or CD-RWs. However, the
discs must be recorded according to ISO9660 level 1, level 2, or Joliet format for the
player to recognize the files.
You can also play discs recorded in Multi Session.
See the instructions of the CD-R/RW device or recording software (not supplied) for
details on the recording format.
To play a Multi Session CD
This player can play Multi Session CDs when an JPEG image file is located in the
first session. Any subsequent JPEG image files, recorded in the later sessions, can
also be played back. When audio tracks and images in music CD format or video CD
format are recorded in the first session, only the first session will be played back.
Notes
• The system can play the extension “.JPG” or “.JPEG.”
Some CD-Rs or CD-RWs cannot be played on this system depending on file format.
•
• If you add the extension “.JPG” or “.JPEG” to data not in JPEG format, the display will be
blank.
• Depending on the disc or the size of image files, playback may take some time to start.
Tip
• If you add numbers (01, 02, 03, etc.) to the front of the file names, the files will be played in
that order.
DVD Additional Operations
Playing JPEG image files
filename[010DVD.fm] model name1[SLV-D500P] [3-083-946-11 (1) US]
89
Page 30
filename[C:\Documents and
Settings\gotanda\Desktop\3083946111SLVD500PUC0414\010DVD.fm]
010COV.book Page 90 Thursday, April 24, 2003 12:37 PM
Playing VIDEO CDs with “MENU ON/OFF”
Functions
The PBC (Playback control) function allows
you to search and perform other operations
interactively. PBC playback follows a selection
menu displayed on your TV screen.
The “MENU ON” function is the PBC function.
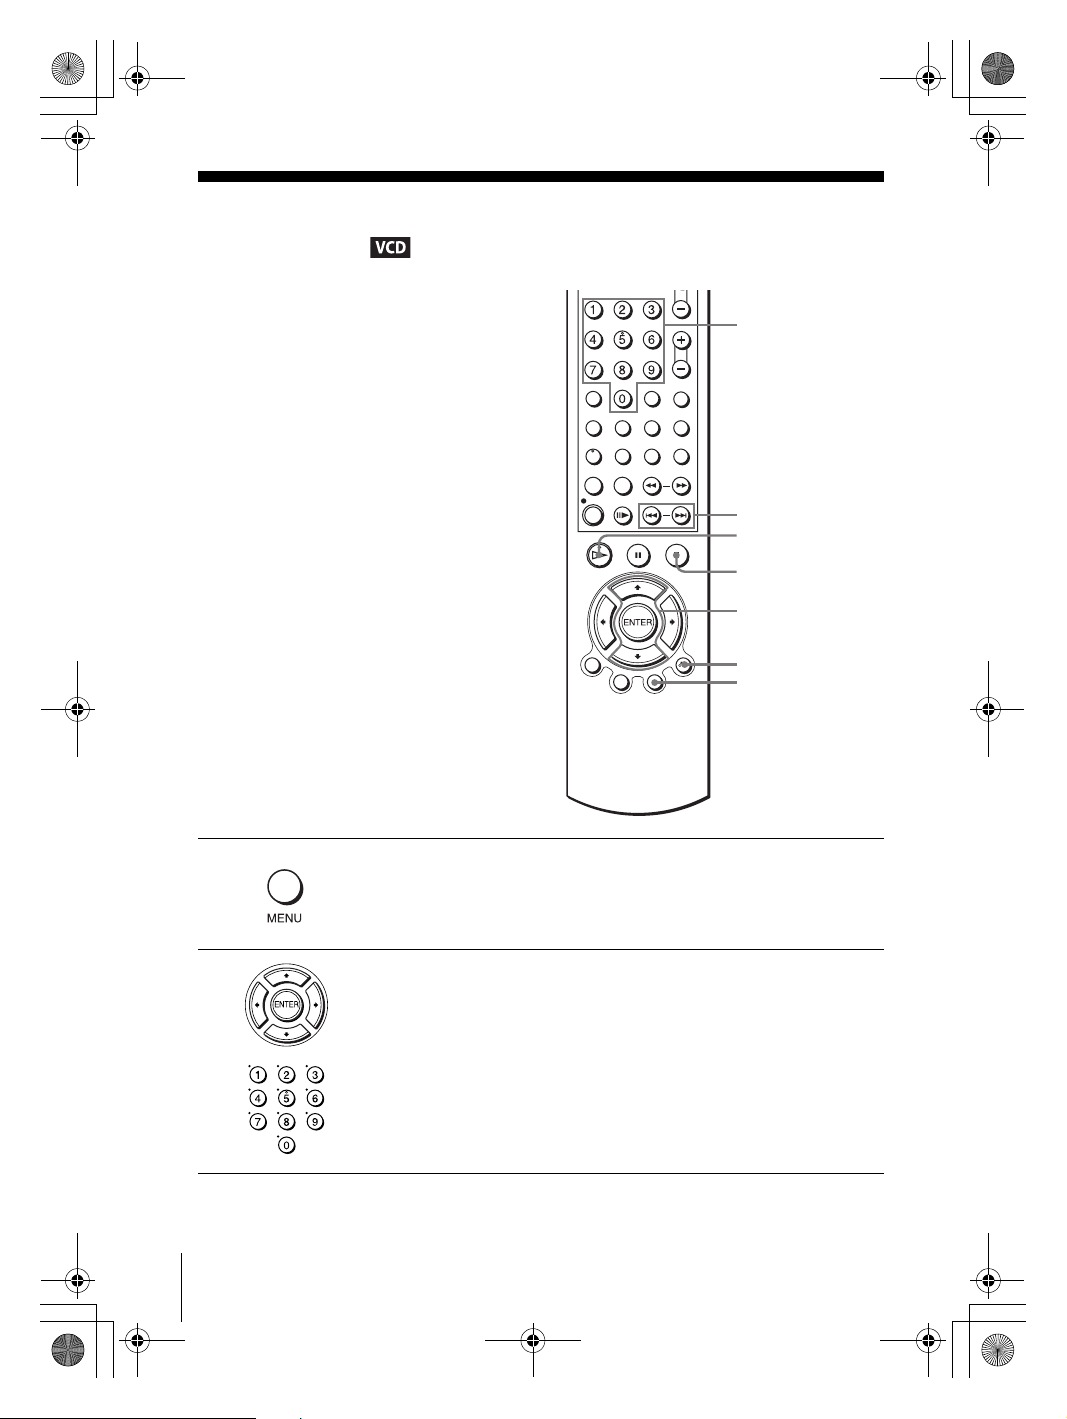
Number
buttons
./>
H PLAY
x STOP
V/v
ENTER
O RETURN
MENU
1
2
90
Playing VIDEO CDs with “MENU ON/OFF” Functions
Press MENU to select “MENU ON.”
The menu for your selection appears.
Press V/v to select the item number you want.
You can also use the number buttons to select the item number and track.
filename[010DVD.fm] model name1[SLV-D500P] [3-083-946-11 (1) US]
Page 31
filename[C:\Documents and
Settings\gotanda\Desktop\3083946111SLVD500PUC0414\010DVD.fm]
010COV.book Page 91 Thursday, April 24, 2003 12:37 PM
3
4
Press ENTER.
Follow the instructions in the menu for interactive operations.
Refer to the instructions supplied with the disc, as the operating procedure
may differ depending on the VIDEO CD.
To return to the menu
Press O RETURN.
To play using “MENU OFF”
Press MENU to select “MENU OFF.”
When “MENU OFF” is selected, the DVD player starts continuous play. You cannot play still
pictures such as a menu.
To return to “MENU ON,” press MENU to select “MENU ON.”
Note
• Depending on the VIDEO CD, “Press ENTER” in step 3 may appear as “Press SELECT” in
the instructions supplied with the disc. In this case, press H PLAY.
DVD Additional Operations
Playing VIDEO CDs with “MENU ON/OFF” Functions
filename[010DVD.fm] model name1[SLV-D500P] [3-083-946-11 (1) US]
91
Page 32
filename[C:\Documents and
Settings\gotanda\Desktop\3083946111SLVD500PUC0414\010ADDO.fm]
010COV.book Page 92 Thursday, April 24, 2003 12:37 PM
VCR Additional Operations
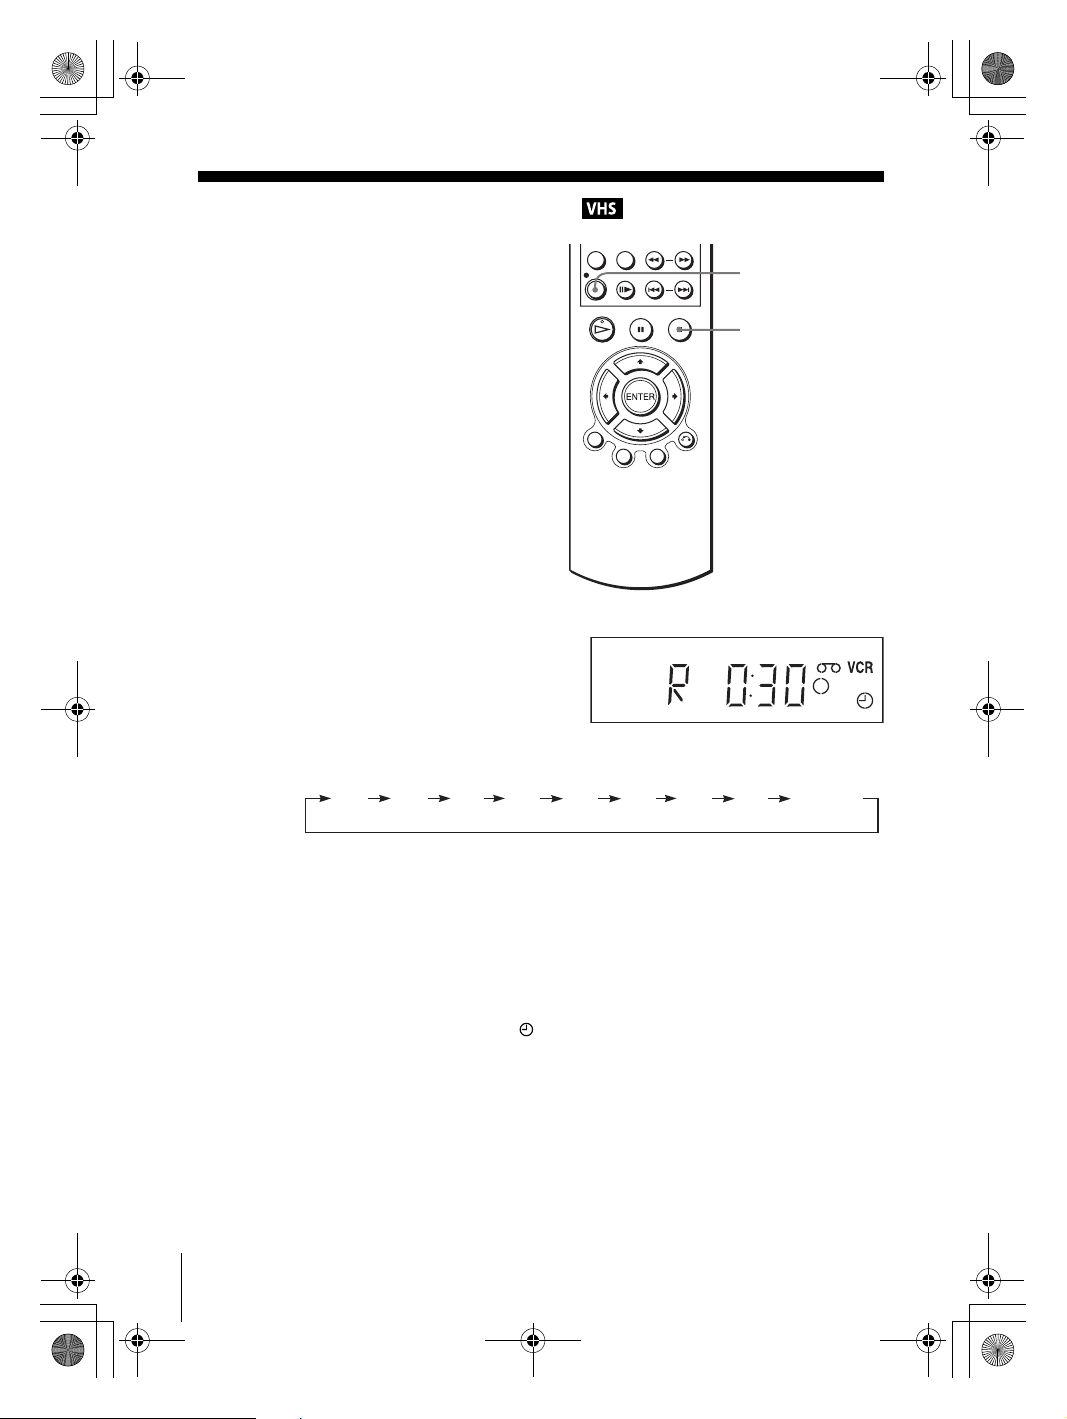
Quick Timer Recording
After you have started recording, you can
have the VCR stop recording automatically
after a specified duration.
While recording, press z REC.
1
z REC
x STOP
92
Quick Timer Recording
Press z REC repeatedly to set the duration time.
2
Each press advances the time as follows.
0:30 1:00 1:30
The tape counter decreases minute by minute to 0:00, then the VCR stops
recording.
To extend the duration
Press z REC repeatedly to set a new duration time.
To cancel the duration
Press z REC repeatedly until the indicator disappears and the VCR returns to
normal recording mode.
To stop while recording
Press x STOP.
Note
• You cannot display the current tape time in the display window when setting the recording
duration time.
2:00 2:30
3:00
3:30 4:00
Normal
recording
filename[010ADDO.fm] model name1[SLV-D500P] [3-083-946-11 (1) US]
Page 33
filename[C:\Documents and
Settings\gotanda\Desktop\3083946111SLVD500PUC0414\010ADDO.fm]
010COV.book Page 93 Thursday, April 24, 2003 12:37 PM
Recording stereo and bilingual programs
Recording stereo programs
When you receive a program broadcast in stereo, press AUDIO to display “Hi-Fi” on
the TV screen. You can also select “Left,” “Right,” or “Mono.” If there is noise in the
stereo program, select “Mono.” The sound will be recorded in monaural (on both hifi and normal audio tracks) but with less noise.
Recording bilingual programs
Press AUDIO to display “SAP” on the TV screen. When a SAP (Second Audio
Program) is received, “SAP” appears on the TV screen. When MAIN is selected, the
VCR records only the main sound.
Selecting the sound during playback
During playback, press AUDIO to select the sound you want.
To listen to On-screen display Display window
Stereo Hi-Fi STEREO indicator
Left channel Left STEREO indicator
Right channel Right STEREO indicator
Monaural sound on the
normal audio track
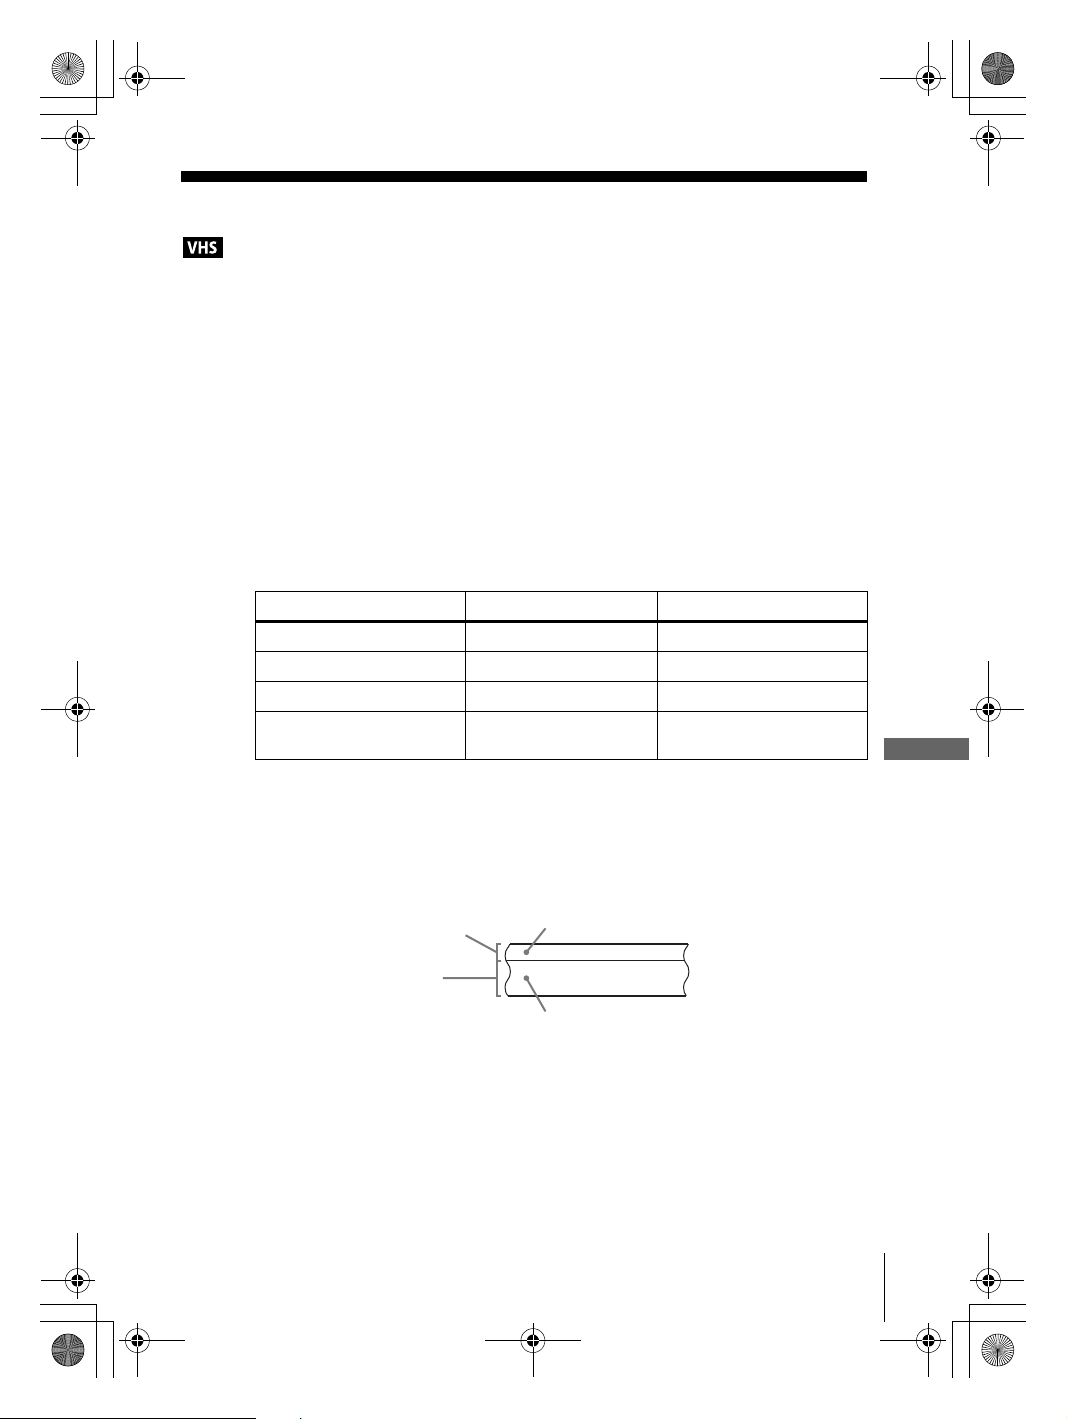
How sound is recorded on a video tape
The VCR records sound onto two separate tracks. Hi-fi audio is recorded onto the
main track along with the picture. Monaural sound is recorded onto the normal audio
track along the edge of the tape.
Mono No indicator
VCR Additional Operations
Normal audio track
Monaural sound
Hi-fi audio track
(main track)
Stereo sound
(left/right channels)
Notes
• To play a tape in stereo, you must use the A/V connections.
• When you play a tape recorded in monaural, the sound is heard in monaural regardless of the
AUDIO setting.
Recording stereo and bilingual programs
filename[010ADDO.fm] model name1[SLV-D500P] [3-083-946-11 (1) US]
93
Page 34
filename[C:\Documents and
Settings\gotanda\Desktop\3083946111SLVD500PUC0414\010ADDO.fm]
010COV.book Page 94 Thursday, April 24, 2003 12:37 PM
Searching using various functions
The VCR automatically marks the tape with
an index signal at the point where each
recording begins.
You can easily find a specific point using
various search functions.
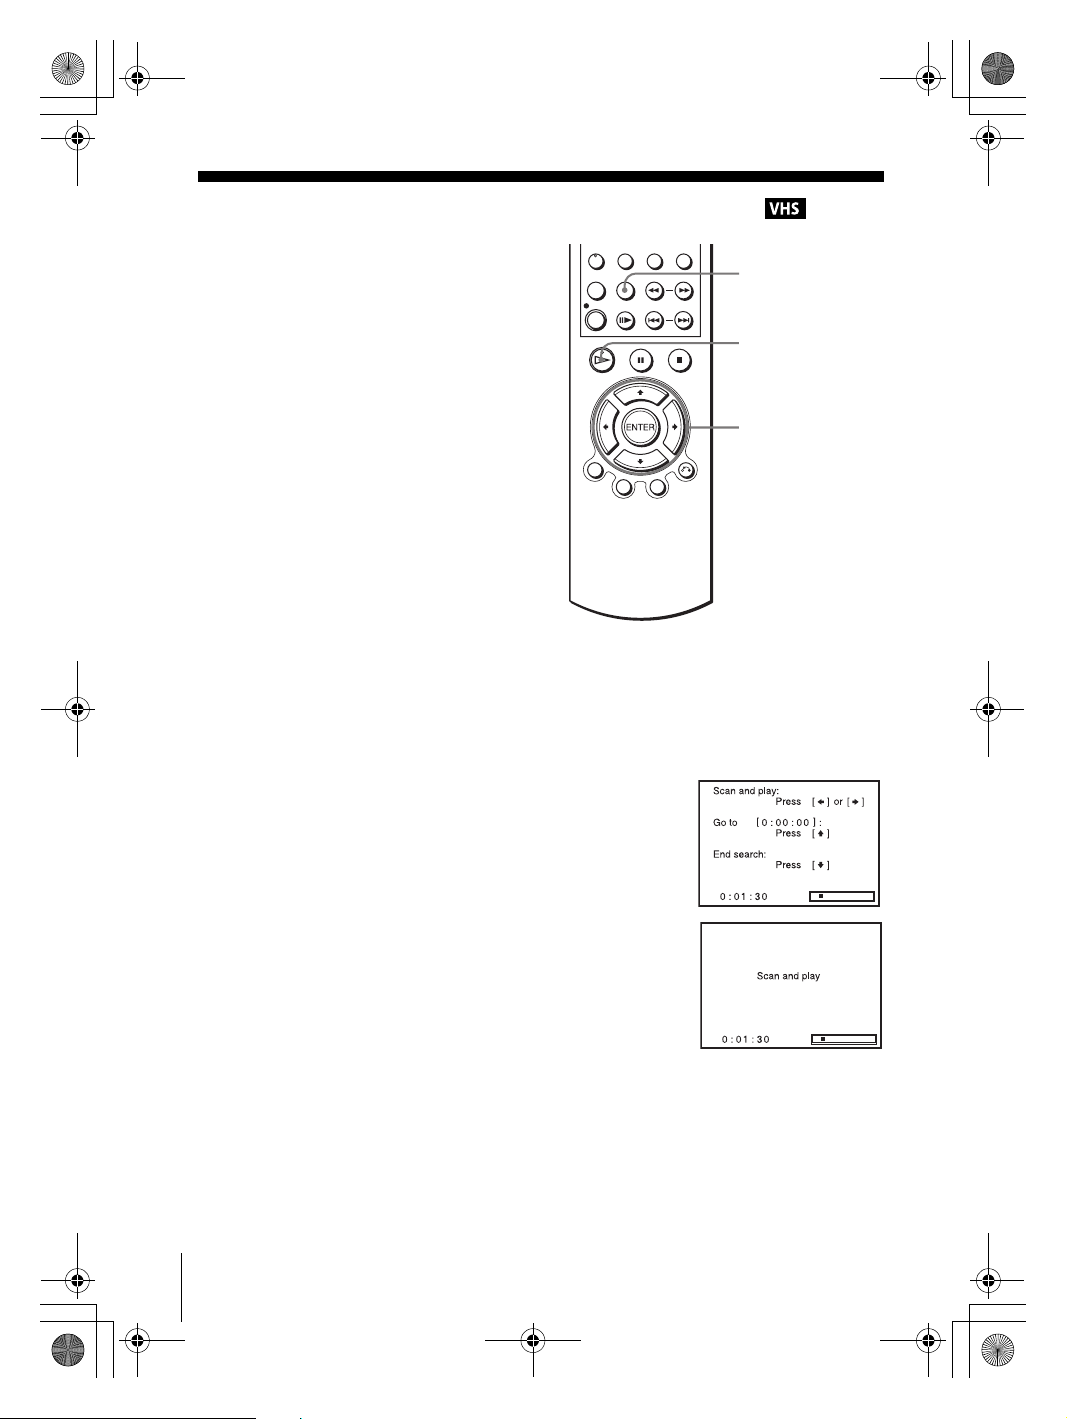
To search using the index function (Scan and Play)
The VCR automatically marks the tape with an index signal at the point where each
recording begins. Use these signals as references to find a specific recording.
Insert an indexed tape into the VCR.
1
Press SEARCH MENU.
2
SEARCH
MENU
H PLAY
V/v/B/b
Press b to scan ahead, or B to scan backwards.
3
The VCR searches and then plays back for about five
seconds.
Press H PLAY to view that program.
4
If you do not press H PLAY, the VCR automatically searches for the next index
mark, or until it reaches the end of the tape.
94
Searching using various functions
filename[010ADDO.fm] model name1[SLV-D500P] [3-083-946-11 (1) US]
Page 35
filename[C:\Documents and
Settings\gotanda\Desktop\3083946111SLVD500PUC0414\010ADDO.fm]
010COV.book Page 95 Thursday, April 24, 2003 12:37 PM
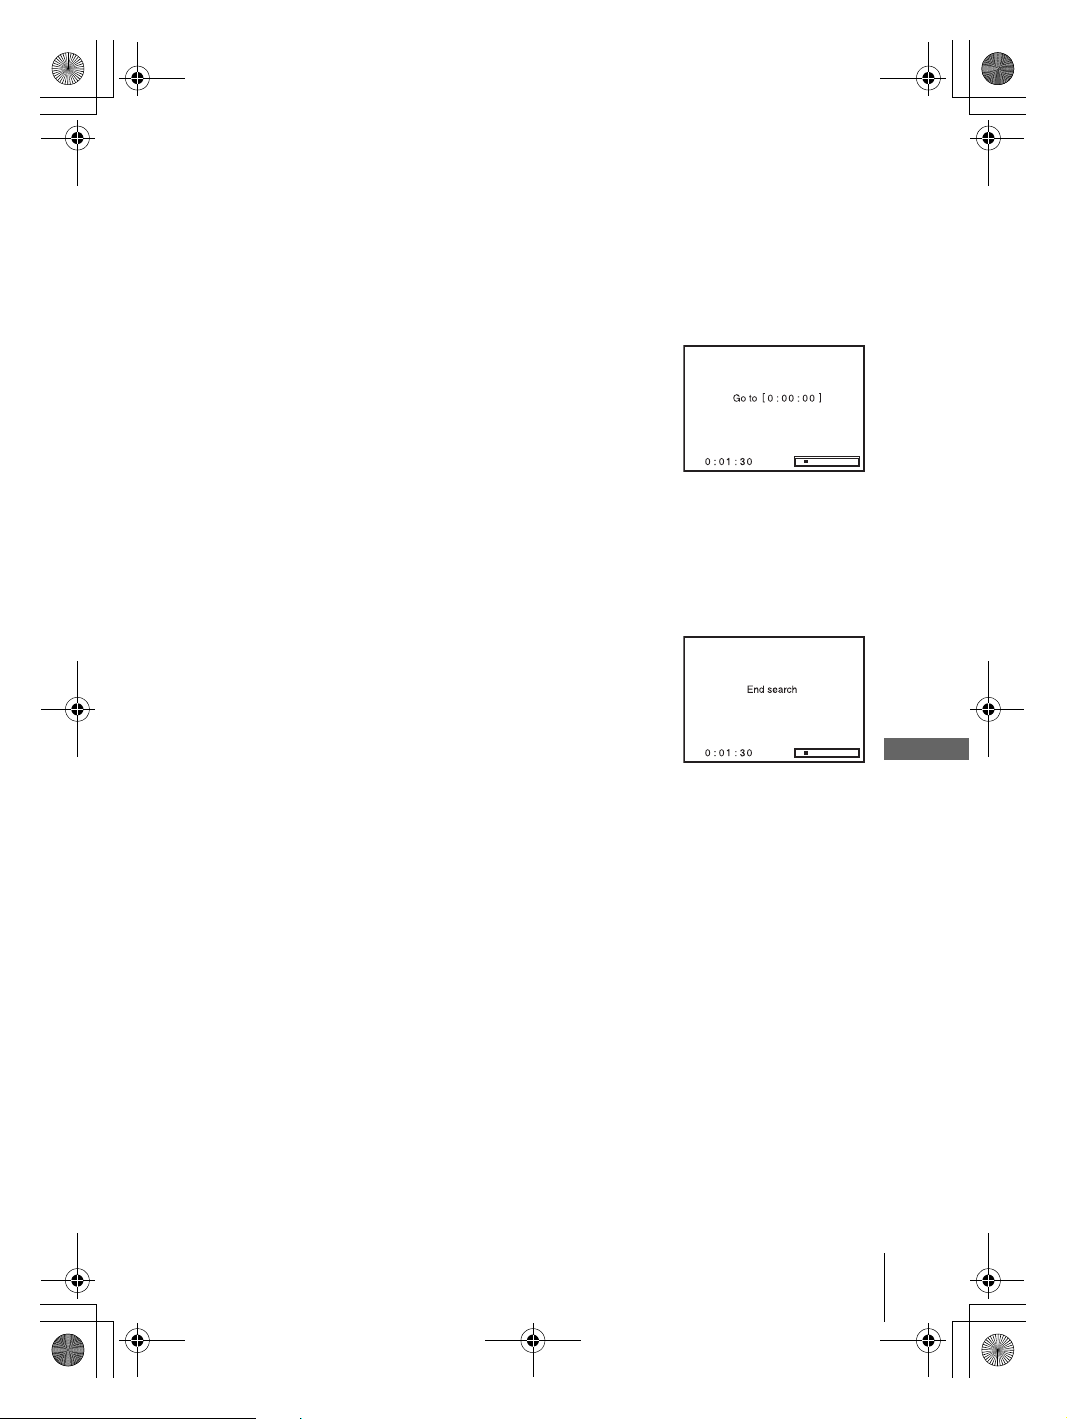
To search for the counter 0:00:00 point
To mark a point on the tape that you want to find later, reset the tape counter to
“0:00:00.”
The VCR automatically fast-forwards or rewinds to the 0:00:00 point on the tape
counter.
Press SEARCH MENU.
1
Press V.
2
The VCR starts searching and automatically stops at
the 0:00:00 point.
To search for a blank portion of the tape
The VCR automatically searches for the beginning of a blank portion. You can easily
find a point you can start recording from.
Press SEARCH MENU.
1
Press v.
2
The VCR starts searching and automatically stops at
the beginning of a blank space. If no blank space is
found, the VCR reaches the end.
Note
• Once in recording mode, if the VCR is put in pause and then released to start the recording,
no index mark will be inserted. An index mark will be inserted if the channel is changed
while VCR is put in pause.
Searching using various functions
VCR Additional Operations
95
filename[010ADDO.fm] model name1[SLV-D500P] [3-083-946-11 (1) US]
Page 36

filename[C:\Documents and
Settings\gotanda\Desktop\3083946111SLVD500PUC0414\010ADDO.fm]
010COV.book Page 96 Thursday, April 24, 2003 12:37 PM
Adjusting the picture (tracking)
Although the VCR automatically adjusts the tracking
when playing a tape, distortion may occur if the
recording is in poor condition. In this case, manually
adjust the tracking.
Press TRACKING +/– to display the tracking meter.
The distortion should disappear as you press one of
the two tracking buttons.
To resume automatic tracking adjustment, eject the
tape and reinsert it.
Note
• The auto tracking adjustment cannot be guaranteed to work with tapes recorded in the LP
mode on other VCRs.
Tracking meter
96
Adjusting the picture (tracking)
filename[010ADDO.fm] model name1[SLV-D500P] [3-083-946-11 (1) US]
Page 37
filename[C:\Documents and
Settings\gotanda\Desktop\3083946111SLVD500PUC0414\010ADDO.fm]
010COV.book Page 97 Thursday, April 24, 2003 12:37 PM
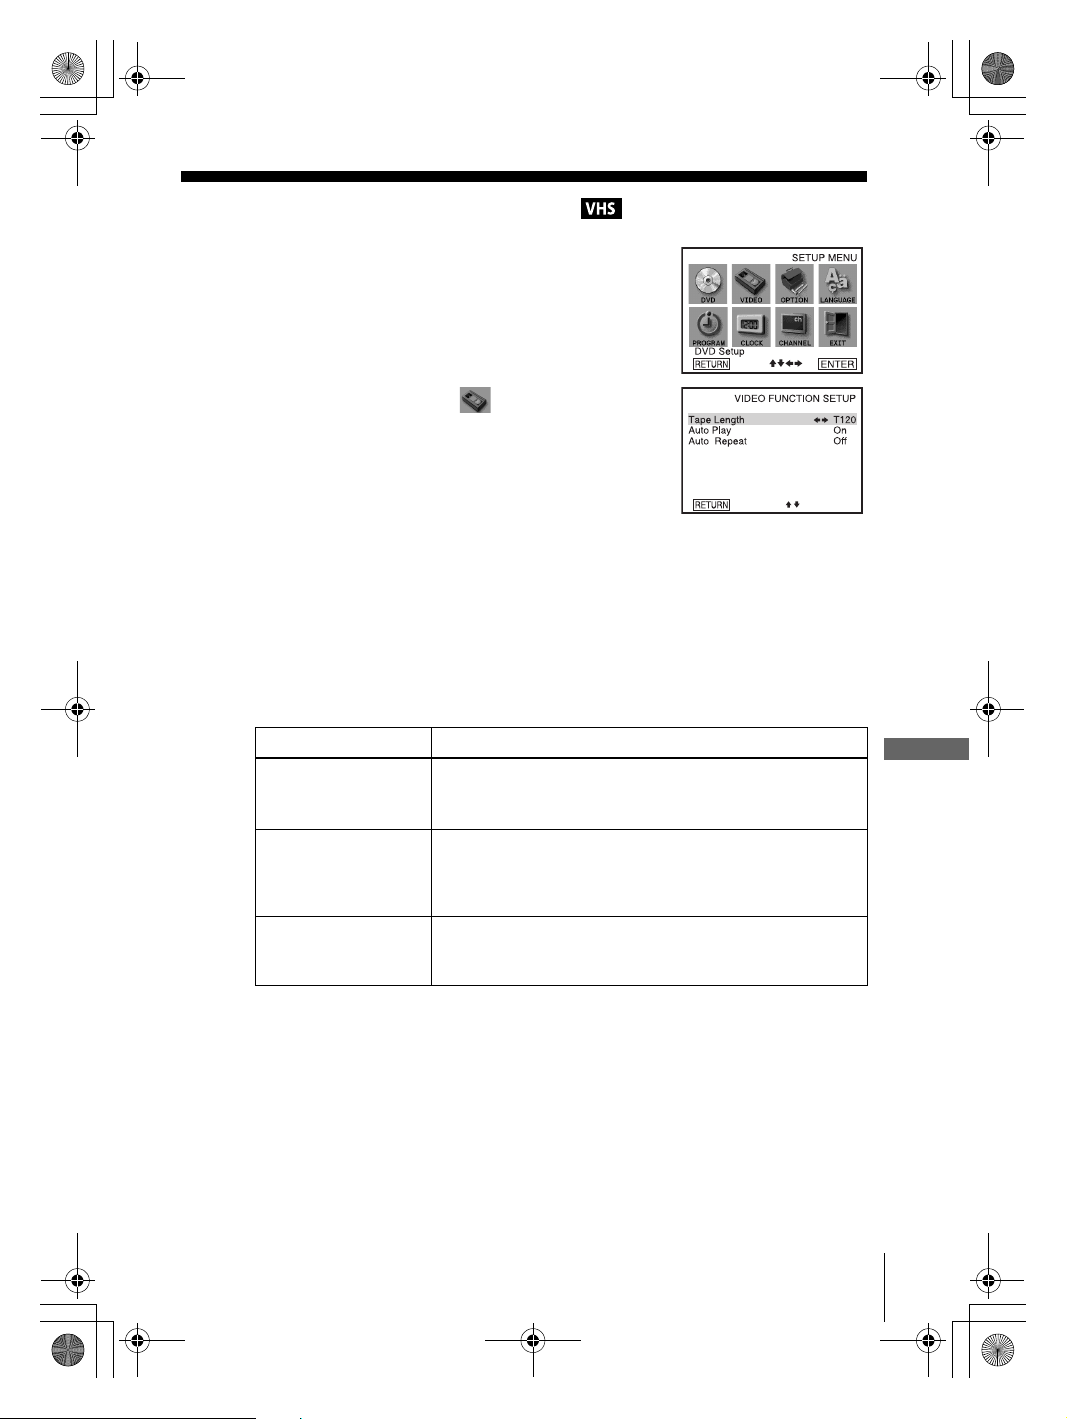
Changing menu options
Press SET UP when the DVD player is in stop
1
mode.
Press V/v/B/b to select (Video Function
2
Setup), then press ENTER.
The “VIDEO FUNCTION SETUP” menu appears.
Press V/v to select the option to change.
3
Press B/b to change the setting.
4
Press O RETURN repeatedly to exit the menu.
5
Menu choices
The default settings are indicated in bold print.
Menu option Set this option to
Tape L e n g t h • T-120 when using a T-120 or shorter length tape.
• T-160 when using a T-160 length tape.
• T-180 when using a T-180 or longer length tape.
Auto Play • On to start playback automatically, when you insert a tape with
its safety tab removed.
• Off to turn off Auto play. You need to press H PLAY to start
playback, even if you insert a tape with its safety tab removed.
Auto Repeat • On to play back a tape repeatedly. The VCR rewinds a tape to
the beginning and restarts playback automatically.
• Off to turn off Auto repeat.
VCR Additional Operations
Changing menu options
filename[010ADDO.fm] model name1[SLV-D500P] [3-083-946-11 (1) US]
97
Page 38
filename[C:\Documents and
Settings\gotanda\Desktop\3083946111SLVD500PUC0414\010ADDO.fm]
010COV.book Page 98 Thursday, April 24, 2003 12:37 PM
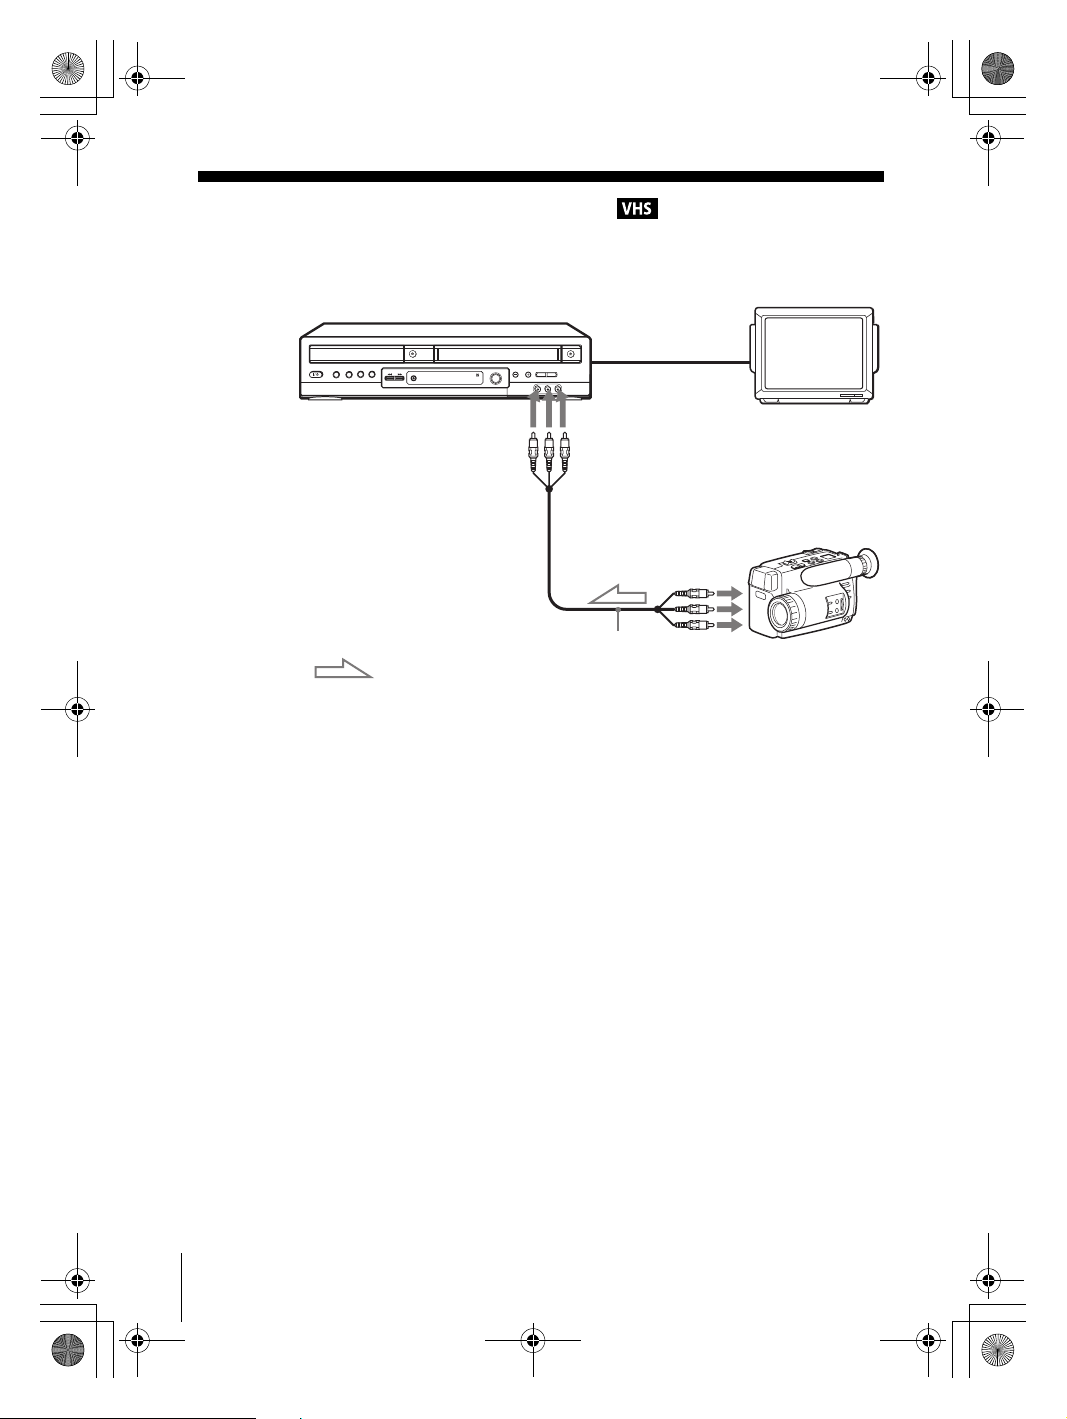
Editing with another VCR
How to connect to record on this VCR
This VCR (Recorder)
LINE-2 IN
TV
Other VCR (Player)
LINE OUT
Audio/video cord (not supplied)
: Signal flow
Notes
• Make sure you connect the plugs to jacks of the same color.
• If the other VCR is a monaural type and connected to this VCR’s LINE-2 IN jacks, connect
the audio plug to the AUDIO L (white) jack. The sound is recorded on both right and left
channels. If you connect to the AUDIO R (red) jack, the sound is recorded only on the right
channel.
• If you connected this VCR to both the LINE IN and LINE OUT jacks of the other VCR,
select the input correctly to prevent a humming noise.
• You can use the LINE IN 1 jacks for editing. If the other VCR is a monaural type the sound
is recorded only on the channel whose jack is connected to the audio plug. To record on both
right and left channels, connect the audio plugs to the AUDIO L/R jacks using an audio/video
cord (not supplied).
98
Editing with another VCR
filename[010ADDO.fm] model name1[SLV-D500P] [3-083-946-11 (1) US]
Page 39
filename[C:\Documents and
Settings\gotanda\Desktop\3083946111SLVD500PUC0414\010ADDO.fm]
010COV.book Page 99 Thursday, April 24, 2003 12:37 PM
Operation (when recording on this VCR)
Before you start editing
• Turn on the VCR and the TV and set
it to the video channel.
• Press INPUT SELECT or CH +/– to
display “LINE 1” or “LINE 2” in the
display window.
• Press SP/EP to select the tape speed,
SP or EP.
Insert a source tape with its safety tab removed into the other (playback) VCR.
1
Search for the point to start playback and set it to playback pause.
Insert a tape into this (recording) VCR. Search for the point to start recording
2
and press X PA US E.
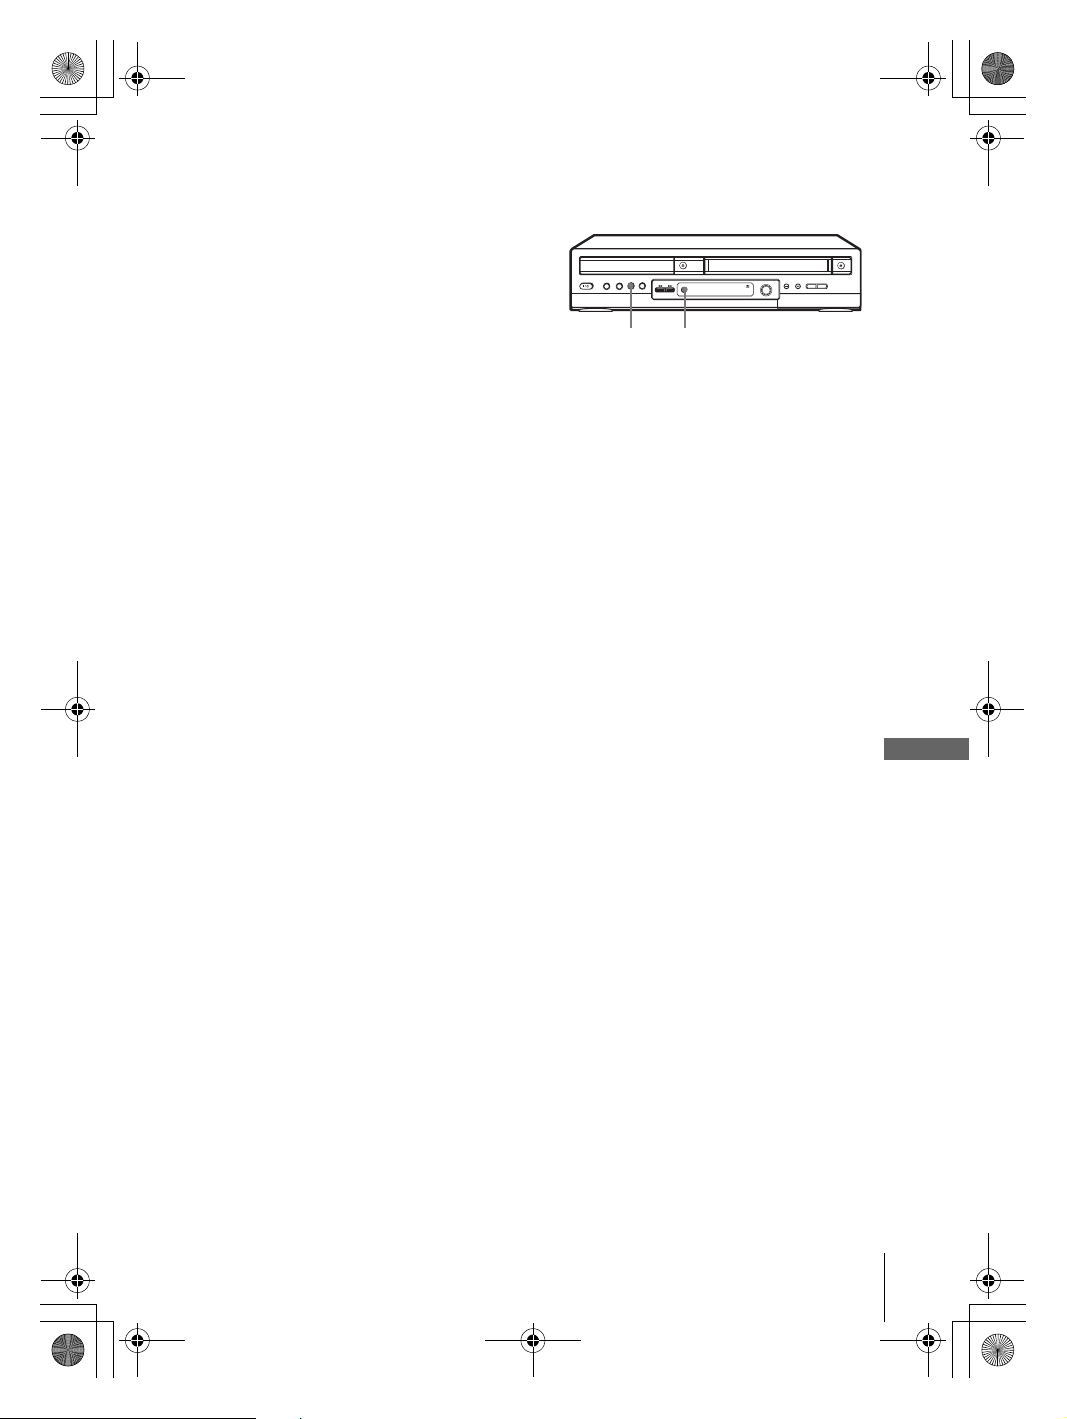
Press z REC on this VCR to set it to recording pause.
3
To start editing, press the X PAUSE buttons on both VCRs at the same time.
4
To stop editing
Press the x STOP buttons on both VCRs.
z RECX PAU SE
Tip
• To cut out unwanted scenes while editing, press X PAUSE on this VCR when an unwanted
scene begins. When it ends, press X PAUSE again to resume recording.
VCR Additional Operations
Editing with another VCR
filename[010ADDO.fm] model name1[SLV-D500P] [3-083-946-11 (1) US]
99
Page 40
filename[C:\Documents and
Settings\gotanda\Desktop\3083946111SLVD500PUC0414\010ADDI.fm]
010COV.book Page 100 Thursday, April 24, 2003 12:37 PM
Additional Information
General setup information
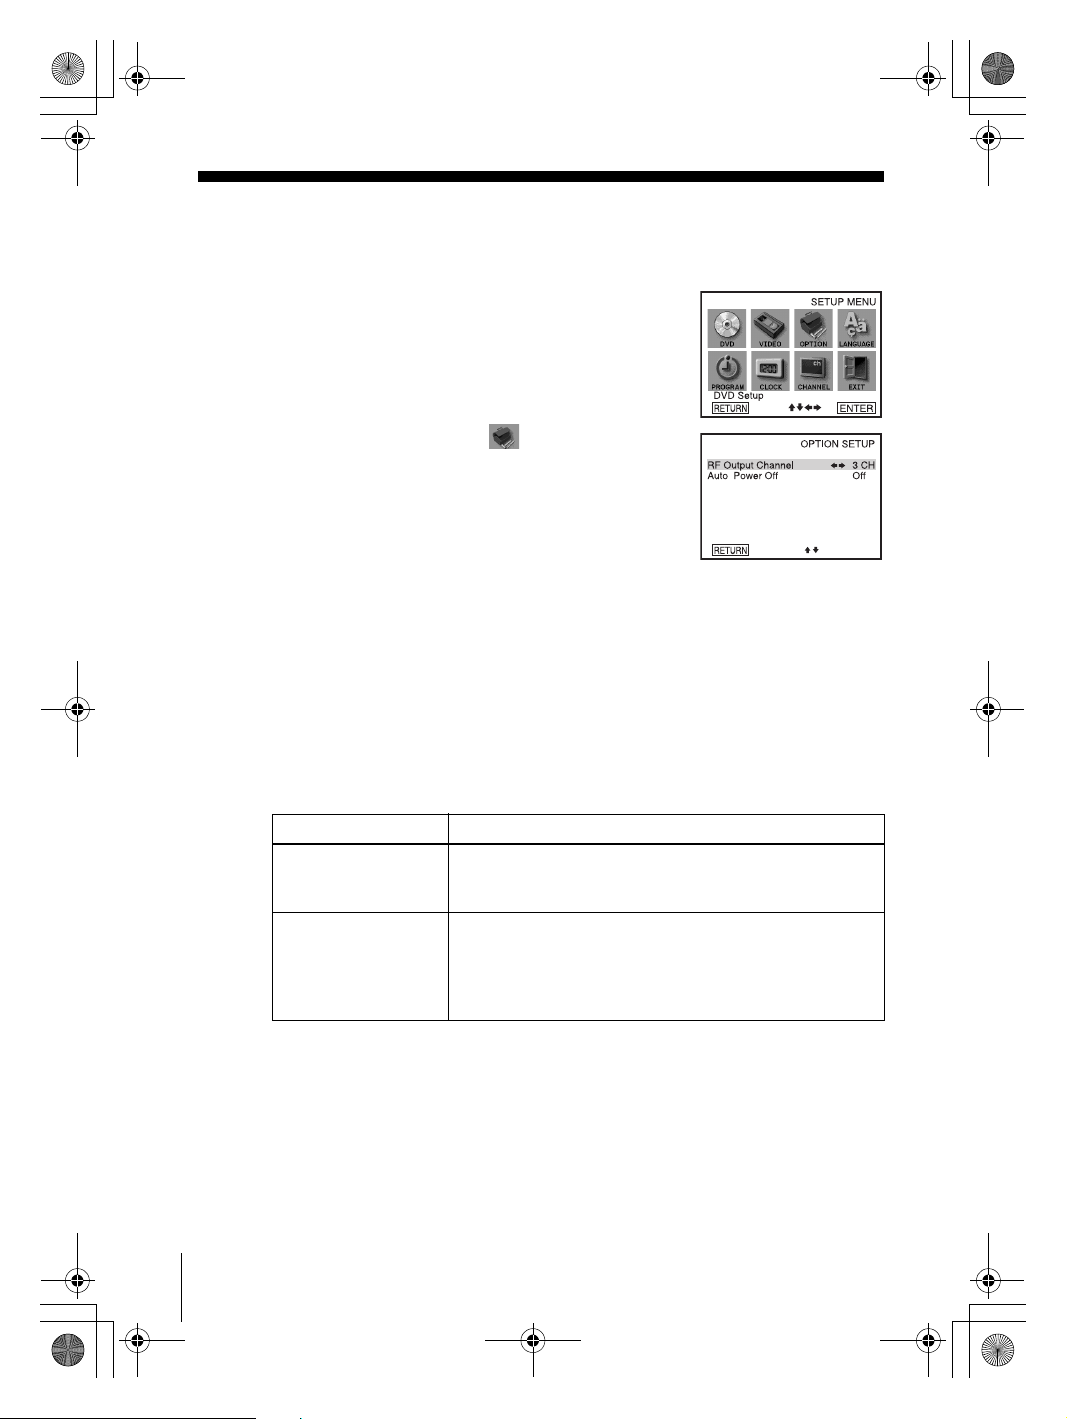
Changing setup options
Press SET UP when the DVD player is in stop mode.
1
Press V/v/B/b to select (Option setup), then
2
press ENTER.
The “OPTION SETUP” menu appears.
Press V/v to select the option to change.
3
Press B/b to change the setting.
4
Press O RETURN repeatedly to exit the menu.
5
If you have changed the RF Output Channel, a confirmation message appears.
Press ENTER to confirm the changed channel.
100
General setup information
Menu choices
Initial settings are indicated in bold print.
Menu option Set this option to
RF Output Channel • 3CH when using channel 3 to receive the VCR signal.
• 4CH when using channel 4 to receive the VCR signal.
For details, see page 101.
Auto Power Off • 1Hr to turn off the VCR automatically one hour after the last
operation.
• 2Hr to turn off the VCR automatically two hours after the last
operation.
• Off to set no specific time to turn off.
filename[010ADDI.fm] model name1[SLV-D500P] [3-083-946-11 (1) US]
Page 41
filename[C:\Documents and
Settings\gotanda\Desktop\3083946111SLVD500PUC0414\010ADDI.fm]
010COV.book Page 101 Thursday, April 24, 2003 12:37 PM
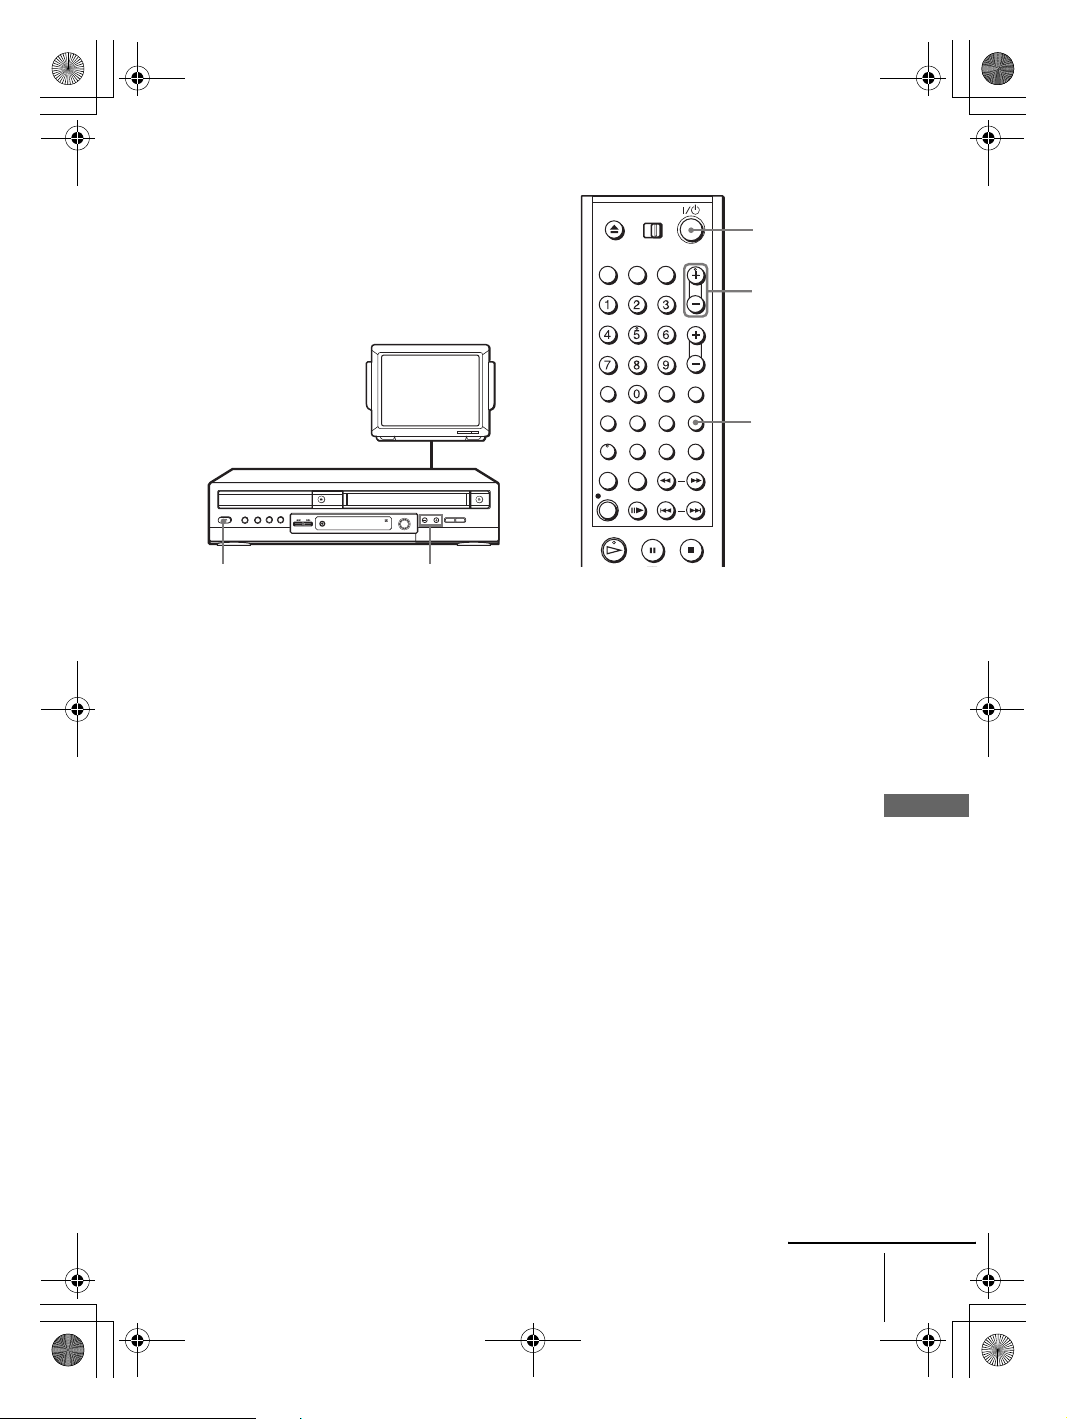
Setting the RF Output channel
When connecting the DVD-VCR to the TV
using only the antenna cable, you must set
the RF Output channel in the “OPTION
SETUP” menu so that the TV can receive the
correct signal from the DVD-VCR.
TV
CHANNEL +/–?/1
Set the RF Output channel to “3CH” or “4CH” (see page 100 to set the channel),
1
whichever channel is not used in your area. If both are used, set the switch to
either channel.
Press ?/1 to turn on the DVD-VCR.
2
Press TV/VIDEO to turn on “VCR” in the DVD-VCR’s display window.
3
Press CH +/– to display a channel number in the display window.
4
Select an active channel number in your area.
Turn on your TV and set it to the channel you selected in step 1 (3CH or 4CH).
5
The channel you selected in step 4 appears on the TV screen. If the channels
change when you press CH +/–, you have made the correct setting.
Whenever you use the DVD-VCR, set the TV to the channel selected in step 1.
?/1
CH +/–
TV/VIDEO
Additional Information
continued
General setup information
filename[010ADDI.fm] model name1[SLV-D500P] [3-083-946-11 (1) US]
101
Page 42
filename[C:\Documents and
Settings\gotanda\Desktop\3083946111SLVD500PUC0414\010ADDI.fm]
010COV.book Page 102 Thursday, April 24, 2003 12:37 PM
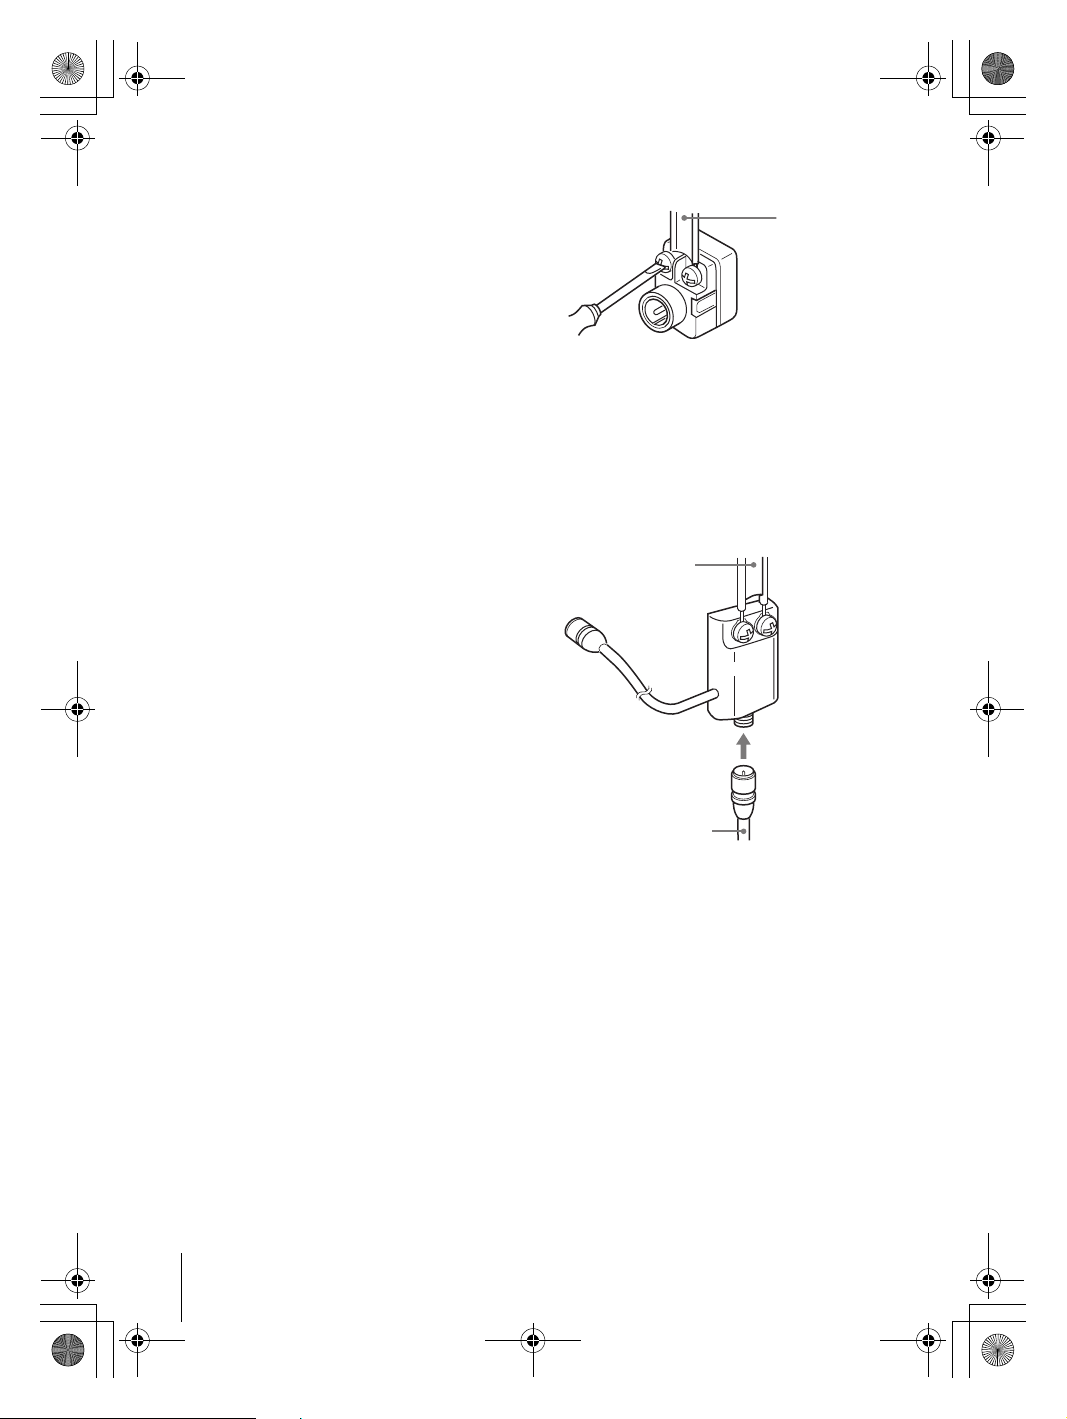
Attaching the external antenna connector
When using a 300-ohm twin lead cable for a
VHF/UHF antenna, use an antenna connector
(not supplied) to connect the antenna to the
DVD-VCR.
Loosen the screws on the antenna connector.
1
Wind the twin leads around the screws on the antenna connector.
2
Retighten the screws.
3
Attaching a UHF/VHF band mixer
When using both a 75-ohm coaxial cable and
a 300-ohm twin lead cable for a VHF/UHF
antenna, use a UHF/VHF band separator/
mixer (not supplied) to connect the antenna
to the DVD-VCR.
300-ohm twin
lead cable
300-ohm twin
lead cable
Antenna
connector (not
supplied)
UHF/VHF
band
separator/
mixer (not
supplied)
102
General setup information
75-ohm coaxial
cable
Loosen the screws on the mixer.
1
Wind the twin leads around the screws on the mixer.
2
Retighten the screws.
3
Connect the 75-ohm coaxial cable to the mixer.
4
filename[010ADDI.fm] model name1[SLV-D500P] [3-083-946-11 (1) US]
Page 43
filename[C:\Documents and
Settings\gotanda\Desktop\3083946111SLVD500PUC0414\010ADDI.fm]
010COV.book Page 103 Thursday, April 24, 2003 12:37 PM
Troubleshooting
If you have any questions or problems not covered below, please consult your nearest Sony
dealer. (For customers in USA)
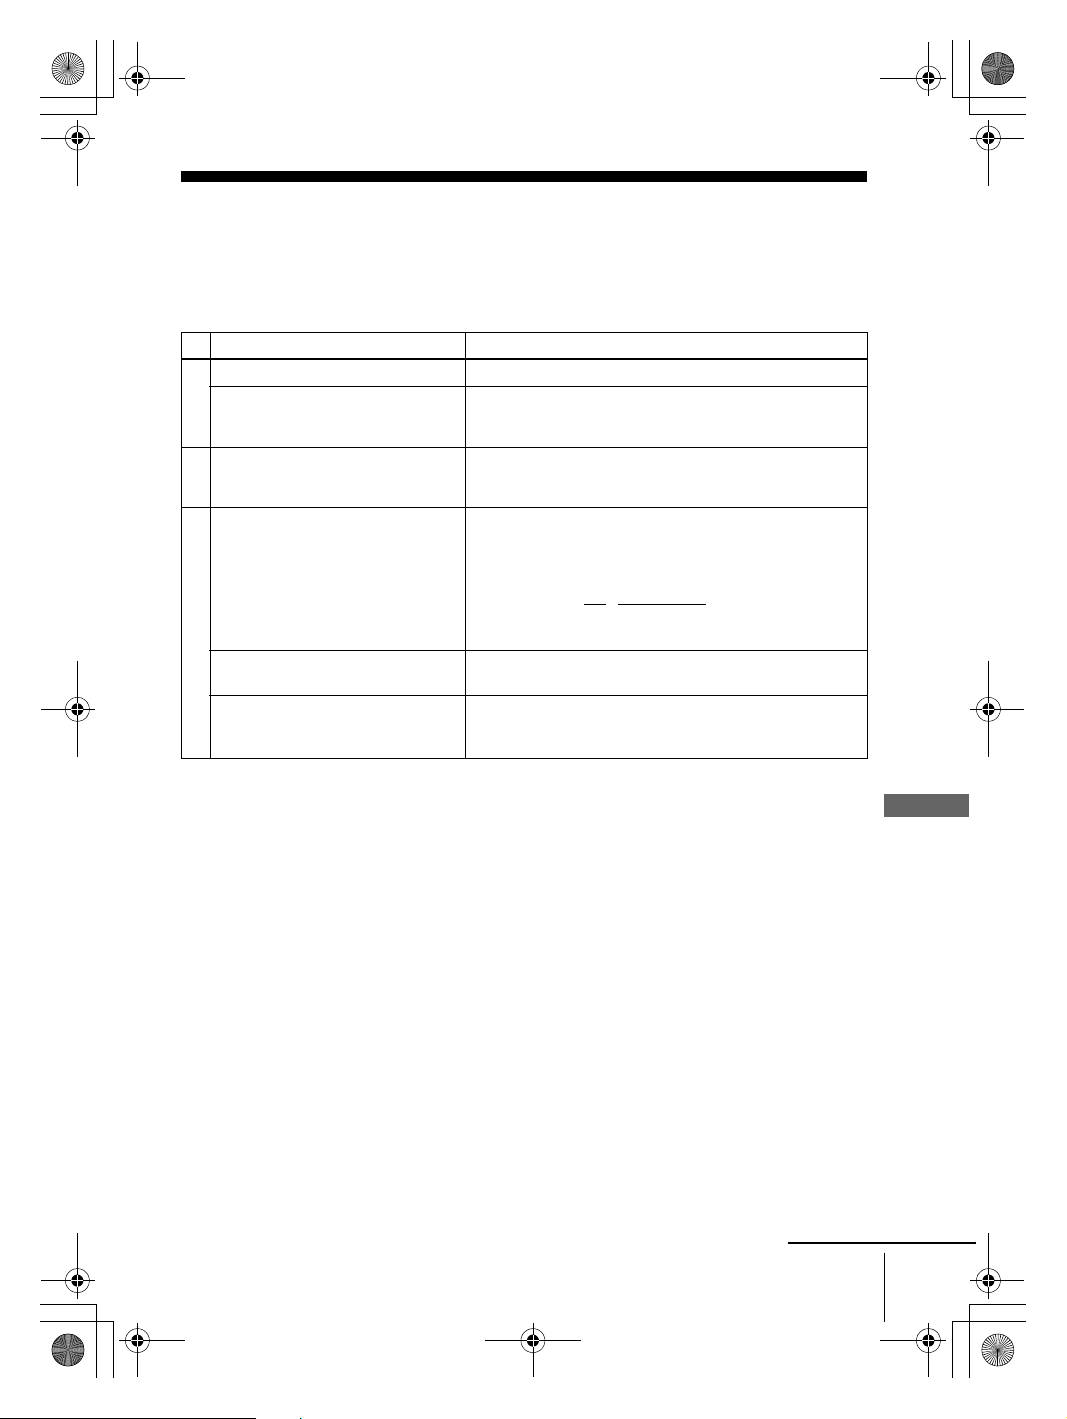
General Troubleshooting
Symptom Remedy
The ?/1 switch does not function. • Connect the AC power cord securely.
The power is turned on but the DVD-
VCR does not operate.
Power
The clock has stopped and “--:--”
appears in the display window.
Clock
The remote commander does not
function.
Others
The tracking meter does not appear
on the screen.
You cannot control other TVs. • Set your TV’s code number. The code number may
• Moisture condensation has occurred. Turn the power off,
unplug the AC power cord and leave the DVD-VCR to
dry for over three hours.
• The clock stops if the DVD-VCR is disconnected from
the wall outlet. Reset the clock (and timer).
• Make sure you are pointing the remote commander at the
remote sensor on the DVD-VCR.
• Replace all the batteries in the remote commander with
new ones if they are weak.
• Make sure the TV
• Select correctly VIDEO or DVD with the SELECT DVD/
VIDEO button.
• The recording condition of the tape is very poor and
tracking cannot be adjusted.
change when you replace the batteries of the remote
commander.
/ DVD·VIDEO switch is set correctly.
Additional Information
continued
Troubleshooting
filename[010ADDI.fm] model name1[SLV-D500P] [3-083-946-11 (1) US]
103
Page 44
filename[C:\Documents and
Settings\gotanda\Desktop\3083946111SLVD500PUC0414\010ADDI.fm]
010COV.book Page 104 Thursday, April 24, 2003 12:37 PM
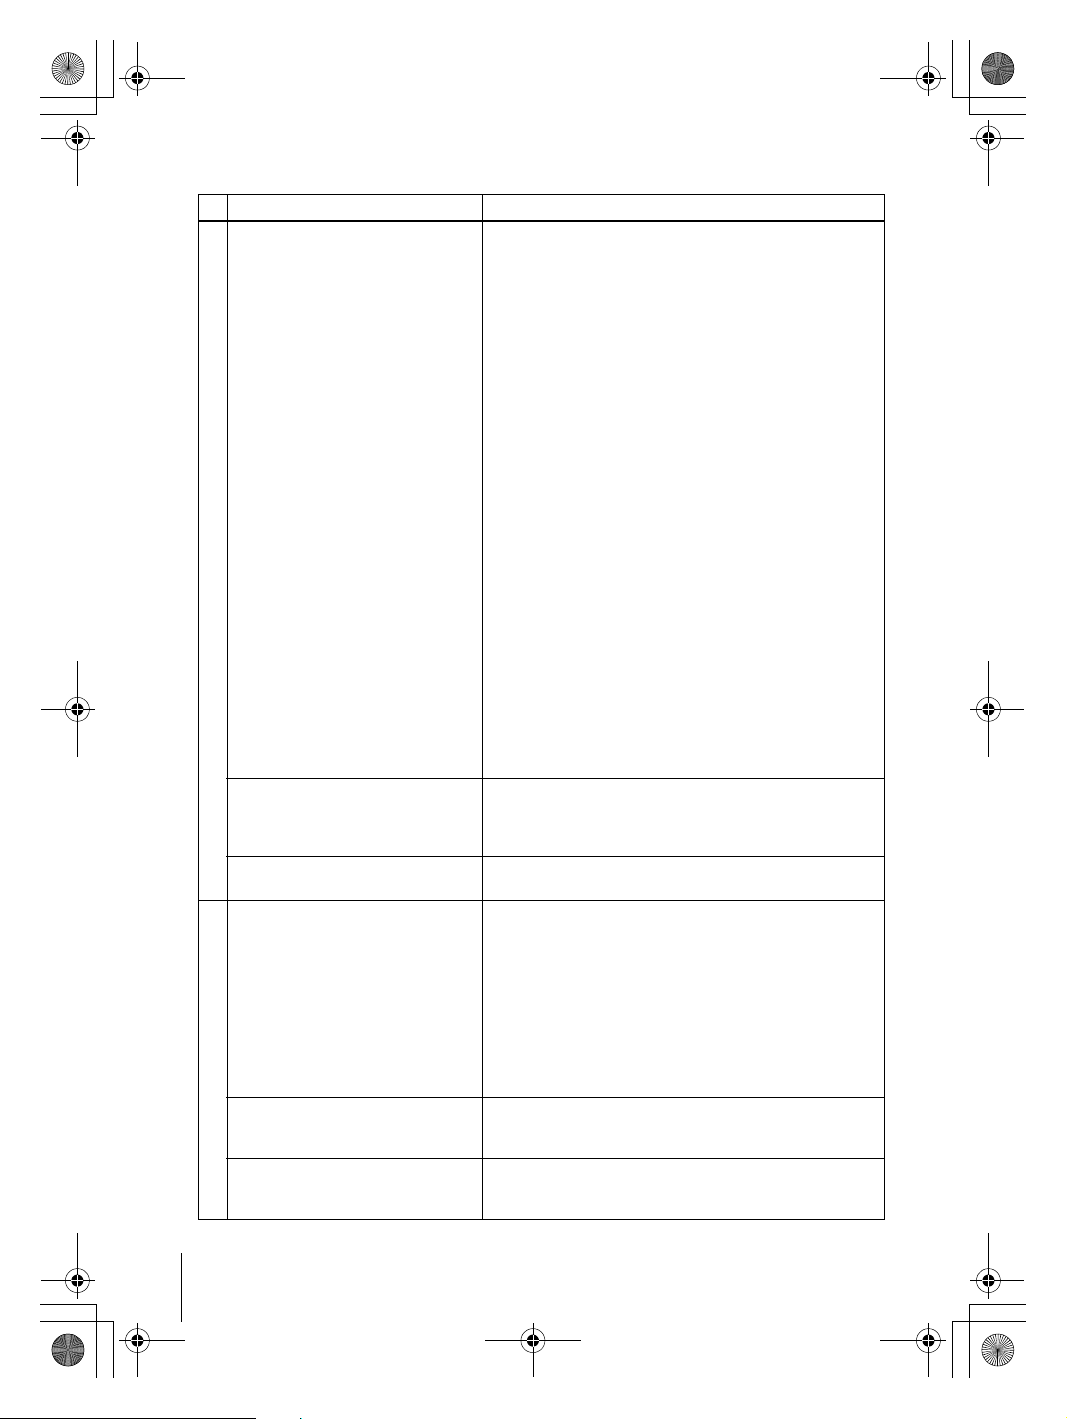
DVD Troubleshooting
Symptom Remedy
There is no picture/picture noise
appears.
Picture
Even though you set the aspect ratio
in “TV Type” of the “SCREEN
SETUP” menu the picture does not
fill the screen.
There is no picture from your VCR
connected to the LINE IN jacks.
There is no sound. • Re-connect the connecting cord securely.
Sound
Sound is noisy. • When playing a CD with DTS sound tracks, noise will
The sound volume is low. • The sound volume is low on some DVDs. The sound
• Re-connect the connecting cord securely.
• The connecting cords are damaged.
• Check the connection to your TV (page 12) and switch
the input selector on your TV so that the signal from the
player appears on the TV screen.
• The disc is dirty or flawed.
• If the picture output from your player goes through your
VCR to get to your TV or if you are connected to a
combination TV/VIDEO player, the copy-protection
signal applied to some DVD programs could affect
picture quality. If you still experience problems even
when you connect your player directly to your TV, please
try connecting your player to your TV’s S VIDEO input
(page 57).
• You have set the player to progressive format (the
PROGRESSIVE indicator lights up in blue) eventhough
your TV cannot accept the progressive signal. In this
case, press the PROGRESSIVE button on the front panel
until the PROGRESSIVE indicator turns off (page 64).
• Even if your TV is compatible with progressive format
(480p) signals, the image may be affected when you set
the player to progressive format. In this case, press the
PROGRESSIVE button so that the PROGRESSIVE
indicator turns off and the player is set to normal
(interlace) format (page 64).
• COMPONENT VIDEO OUT jack is not used or “Video
Out” of the “SCREEN SETUP” menu is not set correctly
while the PROGRESSIVE indicator lights up in blue.
Check the setting (page 64) and connection (page 57) or
press the PROGRESSIVE button so that the
PROGRESSIVE indicator turns off.
• The aspect ratio of the disc is fixed on your DVD.
• The DVD player must be in standby mode to view
pictures from your VCR.
• The connecting cord is damaged.
• The player is connected to the wrong input jack on the
amplifier (receiver) (page 13).
• The amplifier (receiver) input is not correctly set.
• The player is in pause mode or in Slow-motion Play mode.
• The player is in fast forward or fast reverse mode.
• If the audio signal does not come through the DIGITAL
AUDIO OUT (OPTICAL or COAXIAL) jack, check the
audio settings (page 59).
come from the LINE OUT L/R (AUDIO) jacks (page 33)
or DIGITAL OUT (OPTICAL or COAXIAL) jack.
volume may improve if you set “Audio DRC” to “TV
Mode” (page 60).
104
Troubleshooting
filename[010ADDI.fm] model name1[SLV-D500P] [3-083-946-11 (1) US]
Page 45
filename[C:\Documents and
Settings\gotanda\Desktop\3083946111SLVD500PUC0414\010ADDI.fm]
010COV.book Page 105 Thursday, April 24, 2003 12:37 PM
Symptom Remedy
The disc does not play. • The disc is turned over.
• Insert the disc with the playback side facing down on the
disc tray.
• The disc is skewed.
• The player cannot play certain discs (page 6).
• The region code on the DVD does not match the player.
• Moisture has condensed inside the player (page 3).
• The player cannot play CD-Rs, CD-RWs, or DVD-Rs that
are not finalized (page 7).
• Make sure the TV
• Select correctly VIDEO or DVD with SELECT DVD/
VIDEO button.
The MP3 audio track cannot be
played (page 83).
The JPEG image file cannot be
played.
Operation
The title of the MP3 audio album/
track or JPEG image album/file is not
correctly displayed.
The disc does not start playing from
the beginning.
The player starts playing the disc
automatically.
Playback stops automatically. • While playing discs with an auto pause signal, the player
You cannot perform some functions
such as stop, search, slow-motion
play, repeat play, shuffle play, or
program play.
The language for the sound track
cannot be changed.
• The DATA CD is not recorded in the MP3 format that
conforms to ISO9660 Level 1/Level 2 or Joliet.
• The MP3 audio track does not have the extension “.MP3.”
• The data is not formatted in MP3 even though it has the
extension “.MP3.”
• The data is not MPEG1 Audio Layer 3 data.
• The player cannot play audio tracks in MP3PRO format.
• The DATA CD is not recorded in JPEG format that
conforms to ISO9660 Level 1/Level 2 or Joliet.
• The JPEG image file does not have the extension “.JPG”
or “.JPEG.”
• The data is not formatted in JPEG even though it has the
extension “.JPG” or “JPEG.”
• Length or width of the image is more than 4720 dots.
• The player can only display numbers and alphabet. Other
characters are displayed as asterisks.
• Program play, shuffle play, or repeat play, has been
selected (pages 74, 76, 77).
• Resume play has taken effect (page 32).
• The disc features an auto playback function.
stops playback at the auto pause signal.
• Depending on the disc, you may not be able to do some
operations. See the operating manual that comes with the
disc.
• Try using the DVD’s menu instead of the direct selection
button on the remote (page 70).
• Multilingual tracks are not recorded on the DVD being
played.
• The DVD prohibits the changing of the language for the
sound track.
/ DVD·VIDEO switch is set correctly.
Additional Information
continued
Troubleshooting
filename[010ADDI.fm] model name1[SLV-D500P] [3-083-946-11 (1) US]
105
Page 46
filename[C:\Documents and
Settings\gotanda\Desktop\3083946111SLVD500PUC0414\010ADDI.fm]
010COV.book Page 106 Thursday, April 24, 2003 12:37 PM
Symptom Remedy
The subtitle language cannot be
changed or turned off.
The angles cannot be changed. • Try using the DVD’s menu instead of the direct selection
Operation
The player does not operate properly. • When static electricity, etc., causes the player to operate
• Try using the DVD’s menu instead of the direct selection
button on the remote (page 70).
• Multilingual subtitles are not recorded on the DVD being
played.
• The DVD prohibits the changing of the subtitles.
button on the remote (page 70).
• Multi-angles are not recorded on the DVD being played.
• The DVD prohibits changing of the angles.
abnormally, unplug the player.
VCR Troubleshooting
Symptom Remedy
The playback picture does not appear
on the TV screen.
The picture is not clear. • Adjust the tracking with the TRACKING +/– buttons.
Playback
The picture rolls vertically during
picture search.
The picture has no sound. • The tape is defective.
A TV program does not appear on
the TV screen.
TV reception is poor. • Adjust the TV antenna.
The tape starts playing as soon as it is
Recording
inserted.
The tape is ejected when you press
z REC.
Nothing happens when you press
z REC.
• Make sure the TV is set to the channel for the VCR. If
you are using a monitor, set it to video input.
• The video heads are dirty (see the last page of
“Troubleshooting”). Clean the video heads using a Sony
video head cleaning cassette. If a Sony cleaning cassette
is not available in your area, have the heads cleaned at
your nearest Sony dealer (a standard service fee will be
charged). Do not use a commercially available liquid
type cleaning cassette, as it may damage the video heads.
• The video heads may have to be replaced. Consult your
local Sony dealer for more information.
• Adjust the vertical hold control on the TV or monitor.
• If you made A/V connections, check the audio cord
connection.
• Make sure the TV is set to the channel for the VCR. If
you are using a monitor, set it to video input.
• Select the correct source with the INPUT SELECT or
CH +/– buttons. Select a channel number when recording
TV programs; select “L1” or “L2” when recording from
other equipment.
• The safety tab has been removed. To record on this tape,
cover the tab hole.
• Check that the safety tab has not been removed.
• Make sure the tape is not at its end.
106
Troubleshooting
filename[010ADDI.fm] model name1[SLV-D500P] [3-083-946-11 (1) US]
Page 47
filename[C:\Documents and
Settings\gotanda\Desktop\3083946111SLVD500PUC0414\010ADDI.fm]
010COV.book Page 107 Thursday, April 24, 2003 12:37 PM
Symptom Remedy
The timer does not operate. • Check that the clock is set.
• Make sure a tape has been inserted.
• Check that the safety tab has not been removed.
• Make sure the tape is not at its end.
• Make sure a program has been set for timer recording.
• Make sure your timer settings are past the current time.
• Check that the cable box is turned on.
Timer recording
A tape cannot be inserted. • Check that a tape is not already in the tape compartment.
The VCR mecanism needs to be
cleaned.
Others
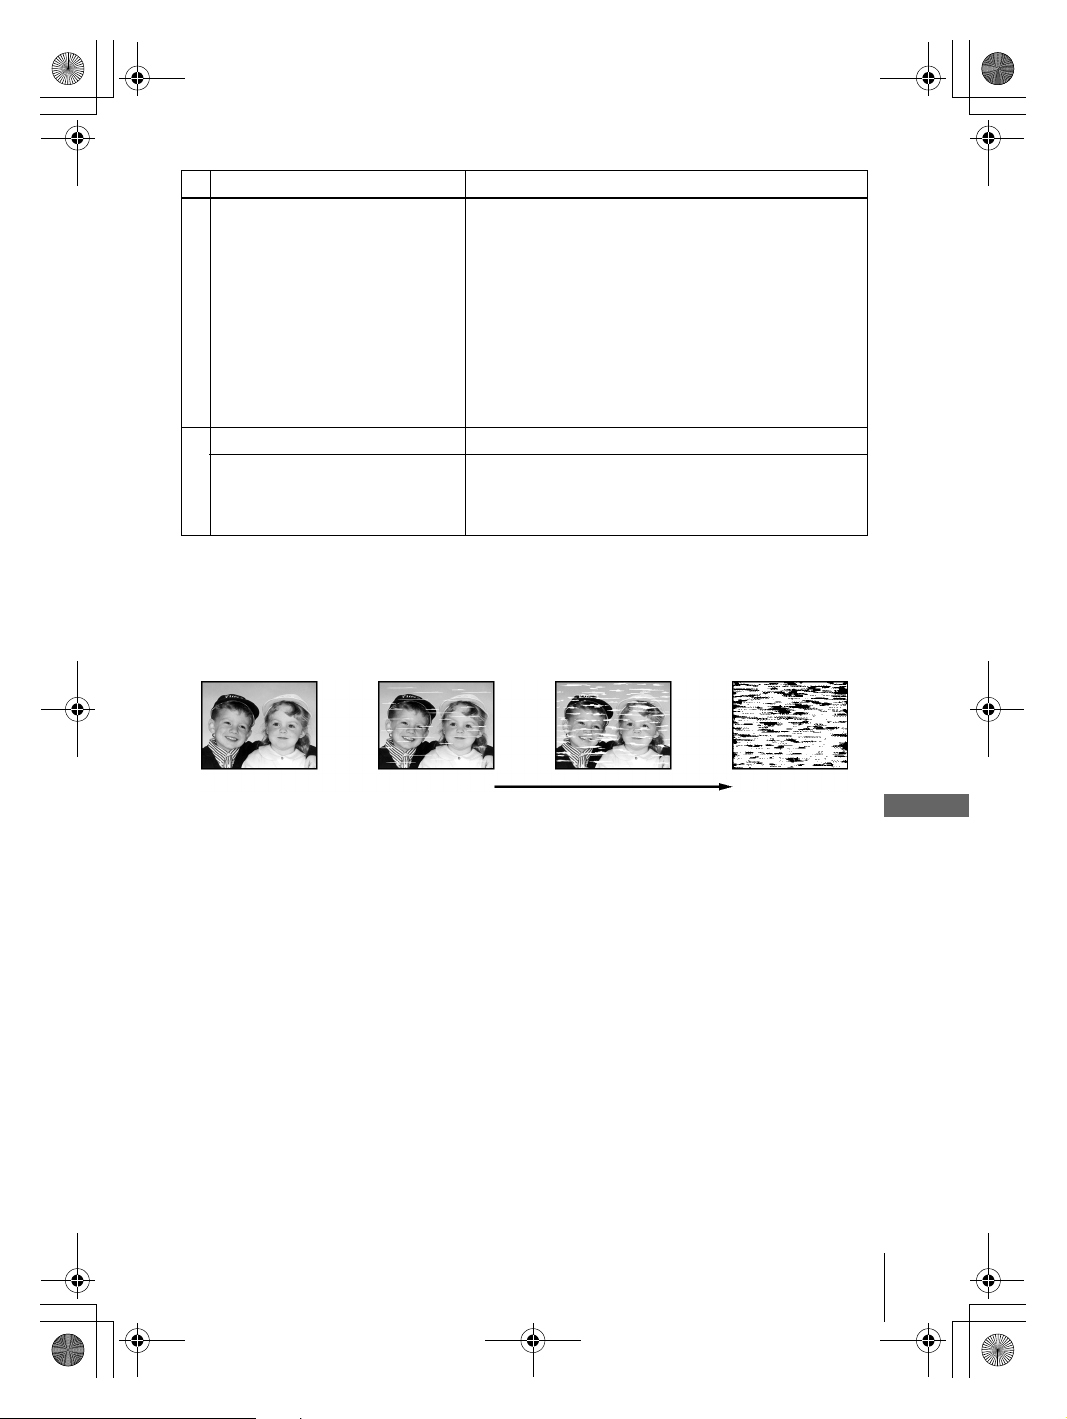
Symptoms caused by contaminated video heads
• The clock stops if the DVD-VCR is disconnected from
the wall outlet for more than one minute. Reset the clock
and timer.
• Turn the power off and unplug the AC power cord.
• Clean the cabinet, panel and controls with a dry, soft
cloth, or a soft cloth slightly moistened with a mild
detergent solution. Do not use any type of solvent, such
as alcohol or benzine.
• Normal picture • Unclear picture• Rough picture
initial
contamination
• No picture (or
black & white
screen appears)
terminal
Additional Information
Troubleshooting
filename[010ADDI.fm] model name1[SLV-D500P] [3-083-946-11 (1) US]
107
Page 48
filename[\\Win-78\got78\2003 ComboUC 500\3083946111SLVD500PUC0424\010ADDI.fm]
010ADDI.fm Page 108 Wednesday, May 7, 2003 2:06 PM
Glossary
Chapter (page 34)
Sections of a picture or a music feature that
are smaller than titles. A title is composed of
several chapters. Depending on the disc, no
chapters may be recorded.
Dolby Digital (pages 55 and 60)
Digital audio compression technology
developed by Dolby Laboratories. This
technology conforms to 5.1-channel
surround sound. The rear channel is stereo
and there is a discrete subwoofer channel in
this format. Dolby Digital provides the same
5.1 discrete channels of high quality digital
audio found in Dolby Digital cinema audio
systems. Good channel separation is realized
because all of the channel data are recorded
discretely and little deterioration is realized
because all channel data processing is digital.
Dolby Surround (Pro Logic) (page 55)
Audio signal processing technology that
Dolby Laboratories developed for surround
sound. When the input signal contains a
surround component, the Pro Logic process
outputs the front, center and rear signals.
The rear channel is monaural.
DTS (page 60)
Digital audio compression technology that
Digital Theater Systems, Inc. developed.
This technology conforms to 5.1-channel
surround sound. The rear channel is stereo
and there is a discrete subwoofer channel in
this format. DTS provides the same 5.1
discrete channels of high quality digital
audio.
Good channel separation is realized because
all of the channel data is recorded discretely
and little deterioration is realized because all
channel data processing is digital.
DVD (page 6)
A disc that contains up to 8 hours of moving
pictures even though its diameter is the same
as a CD.
The data capacity of a single-layer and
single-sided DVD is 4.7 GB (Giga Byte),
which is 7 times that of a CD. The data
capacity of a double-layer and single-sided
DVD is 8.5 GB, a single-layer and doublesided DVD is 9.4 GB, and double-layer and
double-sided DVD is 17GB.
The picture data uses the MPEG 2 format,
one of the worldwide standards of digital
compression technology. The picture data is
compressed to about 1/40 (average) of its
original size. The DVD also uses a variable
rate coding technology that changes the data
to be allocated according to the status of the
picture. Audio information is recorded in a
multi-channel format, such as Dolby Digital,
allowing you to enjoy a more real audio
presence.
Furthermore, various advanced functions
such as the multi-angle, multilingual, and
Parental Control functions are provided with
the DVD.
DVD-RW (page 6)
A DVD-RW is a recordable and rewritable
disc that is the same size as a DVD VIDEO.
The DVD-RW has two different modes: VR
mode and Video mode. DVD-RWs created
in Video mode have the same format as a
DVD VIDEO, while discs created in VR
(Video Recording) mode allow the contents
to be programmed or edited.
DVD+RW (page 6)
A DVD+RW (plus RW) is a recordable and
rewritable disc. DVD+RWs use a recording
format that is comparable to the DVD
VIDEO format.
108
Glossary
filename[010ADDI.fm] model name1[SLV-D500P] [3-083-946-11 (1) US]
Page 49
filename[\\Win-78\got78\2003 ComboUC 500\3083946111SLVD500PUC0424\010ADDI.fm]
010ADDI.fm Page 109 Wednesday, May 7, 2003 2:06 PM
Interlace format (page 64)
Interlace format shows every other line of an
image as a single “field” and is the standard
method for displaying images on television.
The even number field shows the even
numbered lines of an image, and the odd
numbered field shows the odd numbered
lines of an image.
Progressive format (pages 58 and 64)
Compared to the Interlace format that
alternately shows every other line of an
image (field) to create one frame, the
Progressive format shows the entire image at
once as a single frame. This means that
while the Interlace format can show 30
frames/60 fields in one second, the
Progressive format can show 60 frames in
one second. The overall picture quality
increases and still images, text, and
horizontal lines appear sharper. This player
is compatible with the 480 progressive
format.
Title (page 34)
The longest section of a picture or music
feature on a DVD, movie, etc., in video
software, or the entire album in audio
software.
Track (page 34)
Sections of a picture or a music feature on a
CD or VIDEO CD (the length of a song).
Additional Information
Glossary
filename[010ADDI.fm] model name1[SLV-D500P] [3-083-946-11 (1) US]
109
Page 50
filename[C:\Documents and
Settings\gotanda\Desktop\3083946111SLVD500PUC0414\010ADDI.fm]
010COV.book Page 110 Thursday, April 24, 2003 12:37 PM
Specifications
System
Laser
Semiconductor laser
Format
VHS NTSC standard
Video recording system
Rotary head helical scanning FM system
Video heads
Double azimuth four heads
Video signal
NTSC color, EIA standards
Tap e sp eed
SP: 33.35 mm/s (1
EP: 11.12 mm/s (
LP: 16.67 mm/s (
playback only
Maximum recording/playback time
8 hrs. in EP mode (with T-160 tape)
Rewind time
Approx. 1 min (with T-120 tape)
3
8
7
16
11
16
inches/s)
inches/s)
inches/s),
Tuner section
Channel coverage
VHF 2 to 13
UHF 14 to 69
CATV A-8 to A-1, A to W, W+1 to W+84
Antenna
75-ohm antenna terminal for VHF/UHF
Audio characteristics
Frequency response
DVD VIDEO (PCM 96 kHz): 2 Hz to 44 kHz (±1.0
dB)/DVD VIDEO (PCM 48 kHz): 2 Hz to 22 kHz
(±0.5 dB)/CD: 2 Hz to 20 kHz (±0.5 dB)
Signal-to-noise ratio (S/N ratio)
115 dB (LINE OUT (L/R) AUDIO jacks only)
Harmonic distortion
0.003 %
Dynamic range
DVD VIDEO: 103 dB/CD: 99 dB
Wow and flutter
Less than detected value (±0.001% W PEAK)
Inputs and outputs
LINE IN 1 and LINE-2 IN
VIDEO IN, phono jack (1 each)
Input signal: 1 Vp-p, 75 ohms, unbalanced, sync
negative
AUDIO IN, phono jacks (2 each)
Input level: 327 mVrms
Input impedance: more than 47 kilohms
LINE OUT
VIDEO OUT, phono jack (1)
Output signal: 1 Vp-p, 75 ohms, unbalanced, sync
negative
AUDIO OUT, phono jacks (2)
Standard output: 327 mVrms
Load impedance: 47 kilohms
Output impedance: less than 10 kilohms
DIGITAL OUT
OPTICAL, Optical output jack
–18 dBm (wave length: 660 nm)
COAXIAL, phono jack
Output signal: 0.5 Vp-p, 75 ohms
COMPONENT VIDEO OUT (Y, Pb, Pr)
Phono jack
Y: 1.0 Vp-p/Pb, Pr: 0.7 Vp-p, 75 ohms
S-VIDEO OUT
4-pin, mini-DIN jack
Y: 1.0 Vp-p, unbalanced, sync negative
C: 0.286 Vp-p, load impedance 75 ohms
Timer section
Clock
Quartz locked
Timer indication
12-hour cycle
Timer setting
8 programs (max.)
The signals from LINE OUT L/R (AUDIO) jacks are
measured. When you play PCM sound tracks with a 96
kHz sampling frequency, the output signals from the
DIGITAL OUT (OPTICAL or COAXIAL) jack are
converted to 48 kHz sampling frequency.
110
Specifications
filename[010ADDI.fm] model name1[SLV-D500P] [3-083-946-11 (1) US]
Page 51
filename[C:\Documents and
Settings\gotanda\Desktop\3083946111SLVD500PUC0414\010ADDI.fm]
010COV.book Page 111 Thursday, April 24, 2003 12:37 PM
General
Power requirements
120 V AC, 60 Hz
Power consumption
28 W
Operating temperature
0°C to 45°C (32°F to 113°F)
Storage temperature
–20°C to 60°C (–4°F to 140°F)
Operating humidity
25% to 80%
Dimensions including projecting parts and controls
(w/h/d)
Approx. 430 × 95 × 303 mm
(Approx. 17 × 3.7 × 11.8 inches)
Mass
Approx. 4.0 kg (Approx. 8.8 lbs)
Supplied accessories
Remote commander (1)
Size AA (R6) batteries (2)
75-ohm coaxial cable with F-type connectors (1)
Audio/video cord (pinplug ×3 y pinplug ×3) (1)
Design and specifications are subject to change without
notice.
Additional Information
Specifications
111
filename[010ADDI.fm] model name1[SLV-D500P] [3-083-946-11 (1) US]
Page 52
filename[\\Win-78\got78\2003 ComboUC 500\3083946111SLVD500PUC0424\010ADDI.fm]
010ADDI.fm Page 112 Wednesday, May 7, 2003 2:54 PM
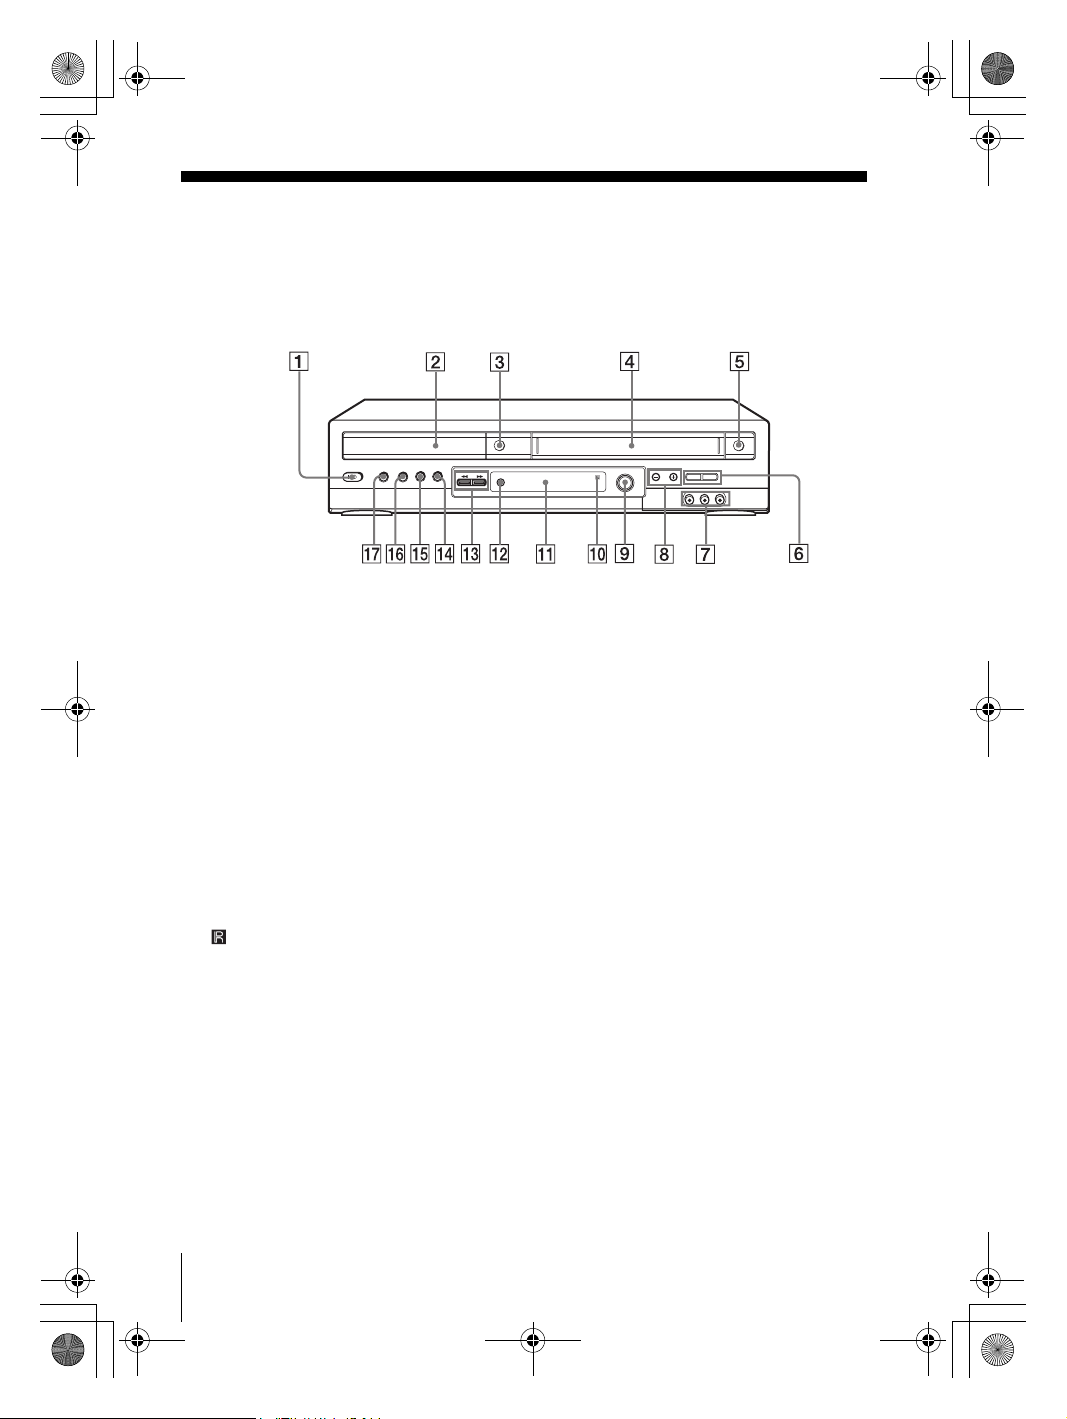
Index to parts and controls
Refer to the pages indicated in parentheses ( ) for details.
Front panel
A ?/1 POWER switch (10) (37)
B Disc tray (31)
C A (open/close) button (31) (32)
D Tape compartment (39)
E A (eject) button (37)
F SELECT DVD/VIDEO (9)
G LINE-2 IN VIDEO/AUDIO L/R jacks*
(98)
2
H CHANNEL +/– buttons*
(39)
I DIAL TIMER (45)
J Remote sensor
K Display window (32) (37)
L z REC (record) button (40)
M m (rewind)/M (fast-forward) button
(32) (37)
N x (stop) button (32) (37)
O X (pause) button (32) (37)
P H (play) button (32) (37)
1
Q PROGRESSIVE button/indicator (58)
(64)
*1Covered
2
*
CHANNEL + button has a tactile dot. Use the
tactile dot as a reference.
112
Index to parts and controls
filename[010ADDI.fm] model name1[SLV-D500P] [3-083-946-11 (1) US]
Page 53
filename[C:\Documents and
Settings\gotanda\Desktop\3083946111SLVD500PUC0414\010ADDI.fm]
010COV.book Page 113 Thursday, April 24, 2003 12:37 PM
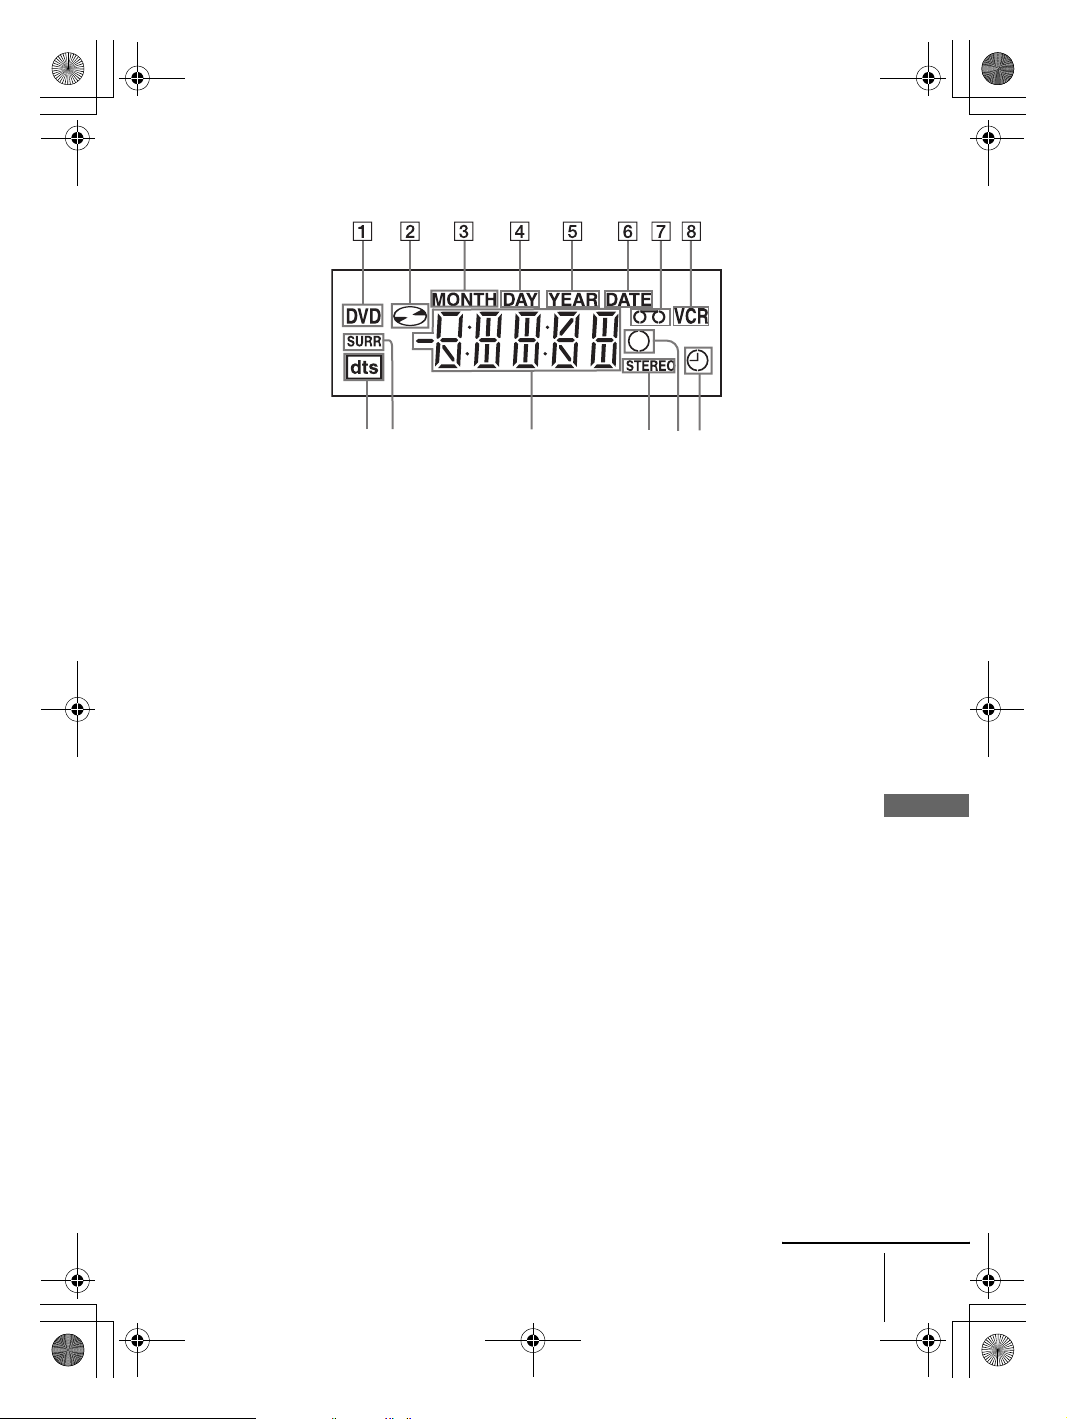
Display window
qdqf
A DVD indicator (32)
B Disc indicator (32)
C MONTH indicator (45)
D DAY indicator (48)
E YEAR indicator (48)
F DATE indicator (45)
G Tape indicator (37)
q;
9
qaqs
H VCR indicator (37)
I Timer indicator (43)
J Record indicator (40)
K STEREO indicator (93)
L Playing time/clock/current status
indicator (32)
M SURR (surround) indicator (81)
N DTS indicator (60)
Additional Information
continued
Index to parts and controls
filename[010ADDI.fm] model name1[SLV-D500P] [3-083-946-11 (1) US]
113
Page 54
filename[C:\3083946111SLVD500PUC0424\010ADDI.fm]
010ADDI.fm Page 114 Tuesday, May 6, 2003 9:53 AM
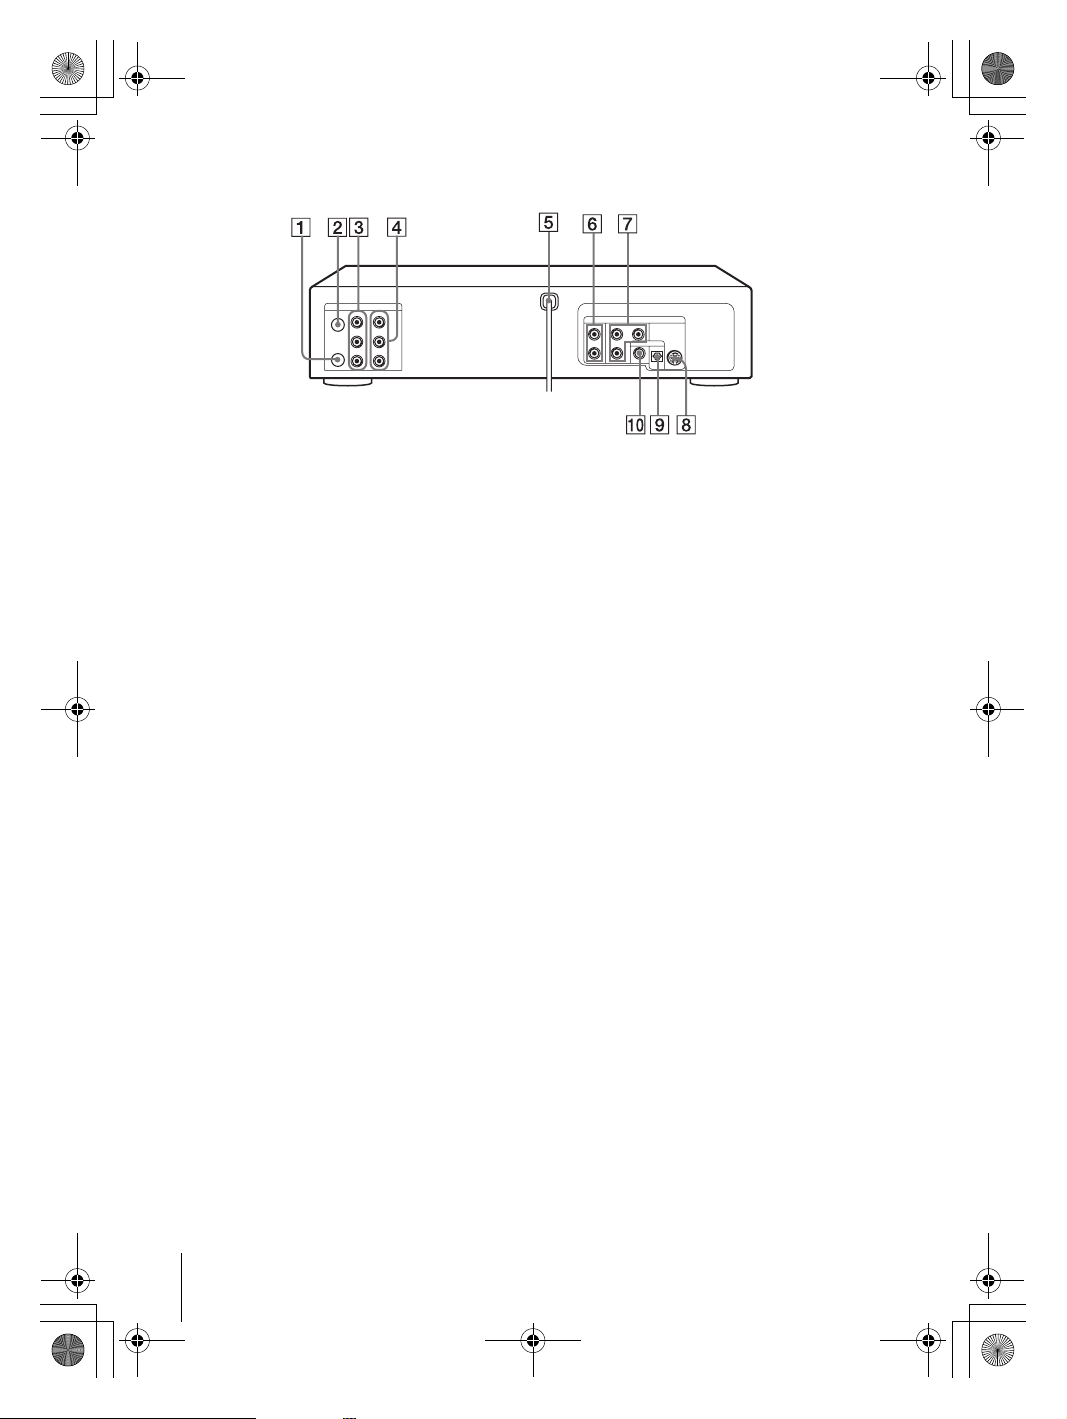
Rear panel
DVD player and VCR
A RF OUT (TO TV) connector (14)
B RF IN (FROM ANT.) connector (14)
C LINE OUT VIDEO/AUDIO L/R jacks
(13)
D LINE IN 1 VIDEO/AUDIO L/R jacks
(13)
E AC power cord (12) (15) (17)
DVD player only
F LINE OUT AUDIO L/R jacks (57)
G COMPONENT VIDEO OUT Pr/Pb/Y
jacks (58)
H S VIDEO OUT jack (57)
I DIGITAL AUDIO OUT/OPTICAL jack
(56)
J DIGITAL AUDIO OUT/COAXIAL jack
(56)
114
Index to parts and controls
filename[010ADDI.fm] model name1[SLV-D500P] [3-083-946-11 (1) US]
Page 55
filename[C:\Documents and
Settings\gotanda\Desktop\3083946111SLVD500PUC0414\010ADDI.fm]
010COV.book Page 115 Thursday, April 24, 2003 12:37 PM
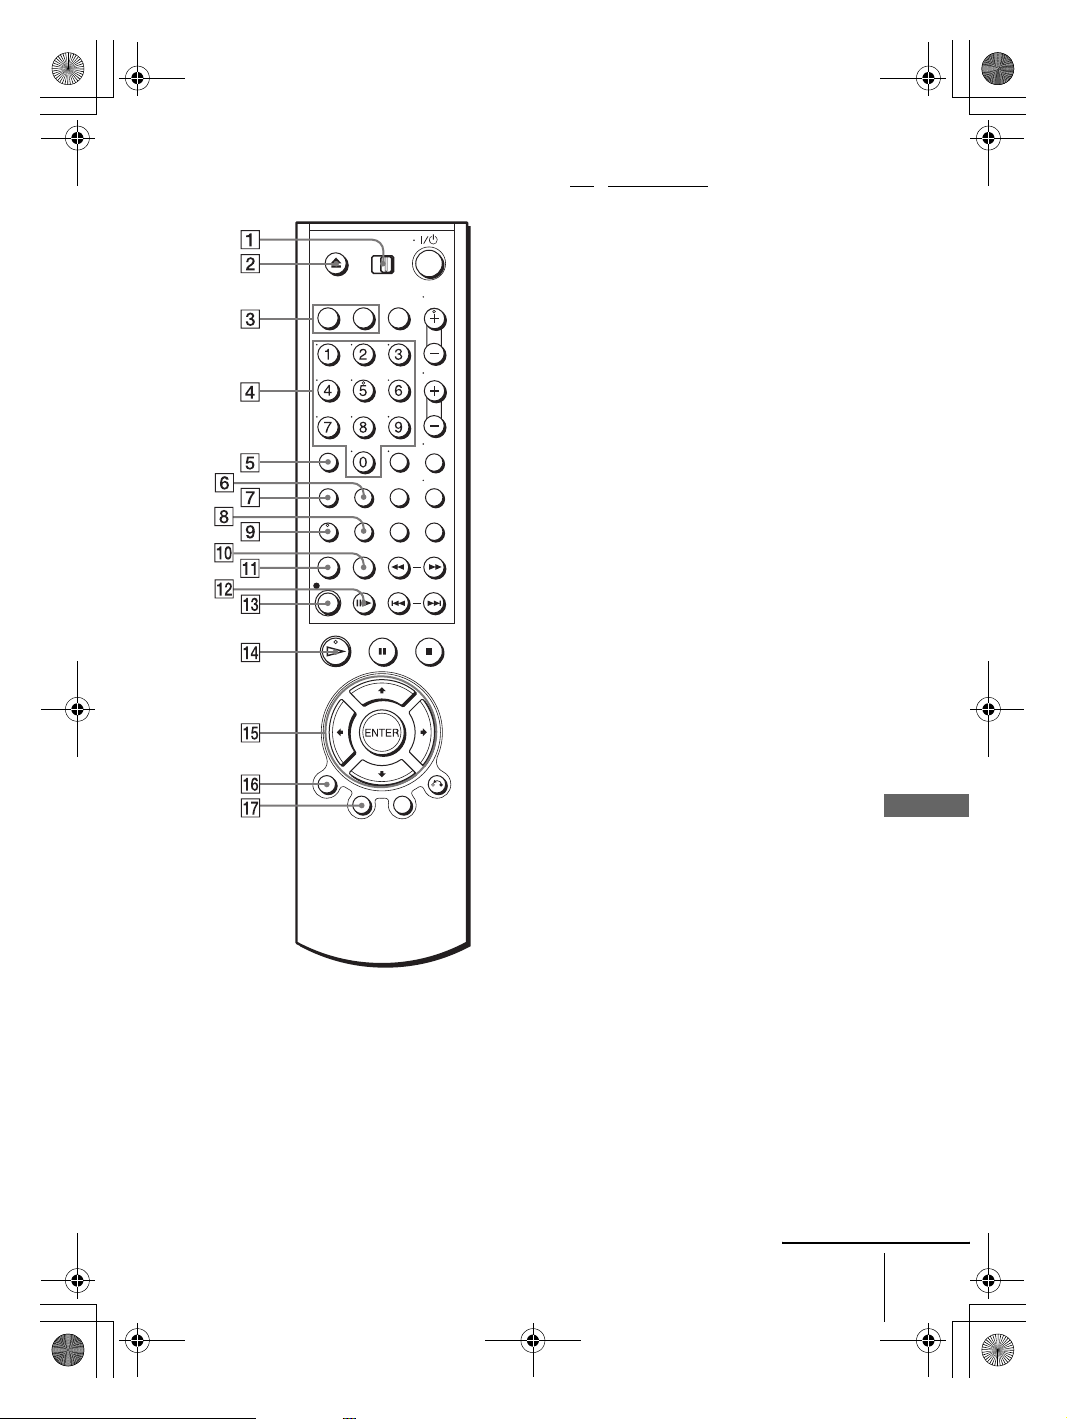
Remote commander
A TV / DVD•VIDEO switch (9)
B Z button (31) (32) (37)
[for DVD] (open/close) button
[for VIDEO] (eject) button
C SELECT DVD/VIDEO buttons (9)
D Number buttons* (27)
E CLEAR button (38) (43) (75)
F SURROUND button (81)
G SET UP button (19)
H SUBTITLE/TIMER button (42) (73)
[for DVD] SUBTITLE button
[for VIDEO] TIMER button
I AUDIO button* (80) (93)
J BOOKMARK/SEARCH MENU button
(78) (94)
[for DVD] BOOKMARK button
[for VIDEO] SEARCH MENU button
K REPEAT/REPLAY button (37) (75)
[for DVD] REPEAT button
[for VIDEO] REPLAY button
L C SKIP button (32) (38)
M z REC (record) button (40)
N H PLAY button* (32) (37)
O V/v/B/b button (19)
P DISPLAY button (34) (40)
Q TOP MENU button (70)
∗ Number 5, AUDIO and H PLAY buttons have
a tactile dot. Use the tactile dot as a reference.
continued
Index to parts and controls
Additional Information
115
filename[010ADDI.fm] model name1[SLV-D500P] [3-083-946-11 (1) US]
Page 56
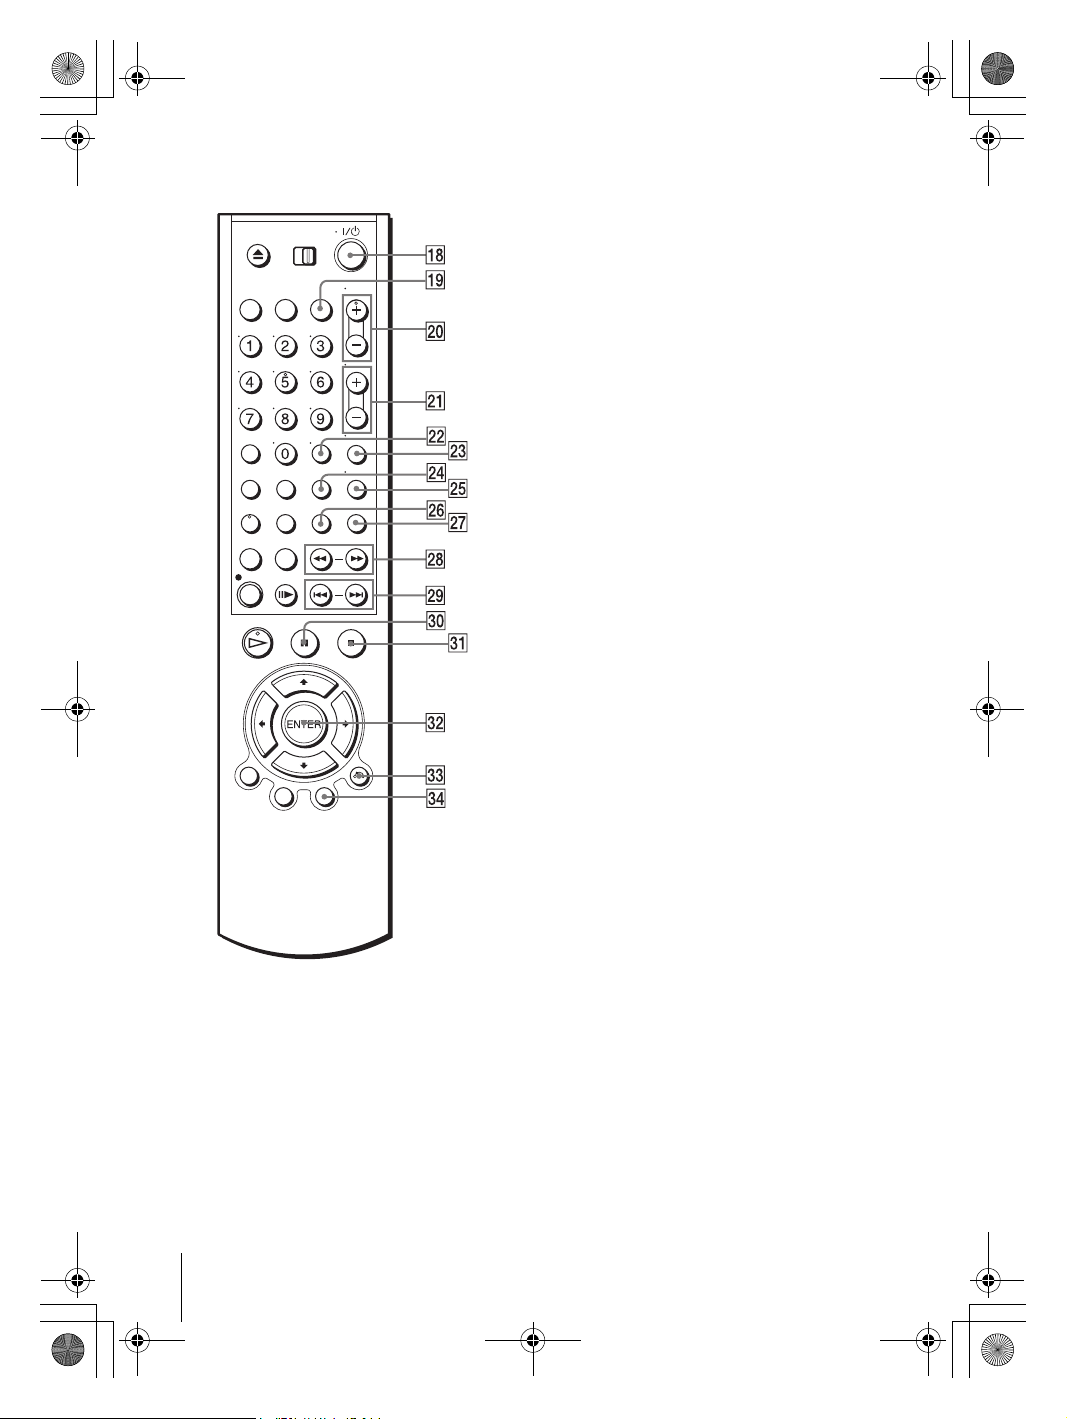
filename[\\Win-78\got78\2003 ComboUC 500\3083946111SLVD500PUC0424\010ADDI.fm]
010ADDI.fm Page 116 Wednesday, May 7, 2003 2:16 PM
R ?/1 (power) switch (10) (37)
S VCR Plus+ button (50)
T CH (channel)/TRACKING +/– buttons*
(39) (96)
U VOL (volume) +/– buttons (10)
2
V ENTER button*
(19)
W MUTING/ZOOM button (10) (71)
[for DVD] ZOOM button
[for VIDEO] No function
[for Sony TV only] MUTING button
X SP (Standard Play)/EP (Extended Play)
button (40)
Y TV/VIDEO button (41)
Z ANGLE button (72)
wj INPUT SELECT button (41)
1
wk m/M SCAN/SLOW y buttons (32)
(37)
[for DVD] m SCAN button
M SCAN button
SLOW y button
[for VIDEO] m (rewind) button
M (fast-forward) button
SLOW y button
wl ./> SHUTTLE PREV/NEXT
buttons (32) (38)
[for DVD] .PREV (previous) button
> NEXT (next) button
[for VIDEO] ./> SHUTTLE
button
e; X PAUSE button (32) (37)
ea x STOP button (32) (37)
2
es ENTER button*
(19)
ed O RETURN button (19)
ef MENU button (70)
*1CH/TRACKING + button has a tactile dot.
Use the tactile dot as a reference.
2
*
The ENTER buttons 22 and 32 can be used
interchangeably.
116
Index to parts and controls
filename[010ADDI.fm] model name1[SLV-D500P] [3-083-946-11 (1) US]
Page 57

filename[C:\Documents and
Settings\gotanda\Desktop\3083946111SLVD500PUC0414\010ADDI.fm]
010COV.book Page 117 Thursday, April 24, 2003 12:37 PM
DVD Audio/Subtitle Language
Abbreviation Language
ARA Arabic
CHI Chinese
CRO Croatian
CZK Czech
DAN Danish
DEU German
ENG English
ESP Spanish
FIN Finish
FRA French
GRE Greek
HUN Hungarian
IDN Indonesian
IND Hindi
ISL Islandic
ITA Italian
IWR Hebrew
JPN Japanese
KOR Korean
MAL Malay
NLD Dutch
NOR Norwegian
POL Polish
POR Portuguese
RUS Russian
SVE Swedish
THA Thai
TUR Turquish
VIE Vietnamese
ZAF Afrikaans
Additional Information
DVD Audio/Subtitle Language
filename[010ADDI.fm] model name1[SLV-D500P] [3-083-946-11 (1) US]
117
Page 58
filename[C:\Documents and
Settings\gotanda\Desktop\3083946111SLVD500PUC0414\010COVIX.fm]
010COV.book Page 118 Thursday, April 24, 2003 12:37 PM
Index
Numerics
16:9 63
4:3 Letter Box
4:3 Pan Scan
63
63
A
Adjusting
Angle
Antenna hookup
Audio track
Audio/video (A/V) hookup
Auto Clock Set
picture
tracking
72
96
96
14
93
20
B
Bookmark 78
C
Cable hookup 12
Changing menu option
Channel line-up chart
Cleaning the video heads
Clock setting
Commercial Skip
Connecting
Counter
20
Cable TV
external antenna connector
102
UHF/VHF band mixer
38
97
28
37
18
D
DATA CD 6, 83, 87
Demonstration Mode
Dial Timer
Disabling channels
DOLBY DIGITAL
DTS
Dubbing. see Editing
DVD
45
56, 80
6
49
26
55, 80
E
Editing 98
EP mode
40
H
Handling discs 7
Hi-fi audio track
93
106
102
13
J
JPEG 6, 87
L
Language selecting 19
LP mode
41
M
Monaural 93
Monitoring audio during
playback
93
MP3
6, 83
N
Normal audio track 93
P
Parental Control 67
PBC (Playback control)
Picture adjustment
Playback
at various speeds
frame by frame
MP3 audio track
program play
repeat play
selecting the sound
shuffle play
skip
37
slow motion
VIDEO CDs
Presetting channels
Program play
Progressive
R
Recording
bilingual programs
SAP broadcasts
saving
stereo broadcasts
using the Dial Timer
using the VCR Plus+
system
while watching another
program
Repeat play
RF channel
77
74
58, 109
41
50
41, 44
77
101
96
32, 38
74
76
33, 38
90
24
32, 37
83
93
93
93
93
90
45
S
Safety tab 41
SAP (Second Audio Program)
93
Searching
at various speeds
for a blank portion
for the counter 0 point
Scan and Play
Shuffle play
SP mode
40
STEREO
Stereo
Subtitle
80
93
73
32, 37
95
95
94
76
T
Timer setting
daily/weekly recording
using the Dial Timer
using the VCR Plus+
system
Tracking adjustment. see
Adjusting
50
44
45
U
Usable discs 6
V
VCR Plus+ system
channel set up
recording
VIDEO CD
28
50
6
Z
Zoom 71
118
Index
filename[010COVIX.fm] model name1[SLV-D500P] [3-083-946-11 (1) US]
Page 59
010COV.book Page 119 Thursday, April 24, 2003 12:37 PM
Page 60
filename[C:\Documents and
Settings\gotanda\Desktop\3083946111SLVD500PUC0414\010BCO.fm]
010COV.book Page 120 Thursday, April 24, 2003 12:37 PM
Sony Corporation Printed in China AK68-00160A
filename[010BCO.fm] model name1[SLV-D500P] [3-083-946-11 (1) US]
 Loading...