

DCB-H360R
Instructions for use
GB
MF68-00397A
DIGITAL CABLE HD RECEIVER
REV. 1.2
DIGITAL CABLE HD RECEIVER
SAFETY INSTRUCTIONS
This STB has been manufactured to satisfy international safety standards.
Please read the following recommended safety precautions carefully.
MAINS SUPPLY: AC 100-240V~, 50/60Hz
OVERLOADING: Do not overload wall outlets, extension cords or adapters as this
can result in fire or electrical shock.
LIQUIDS: Keep liquids away from the STB.
CLEANING: Before cleaning, disconnect the STB from the wall socket.
Use a cloth lightly dampened with water(no solvents) to clean the
exterior.
VENTILATION: Do not block the STB ventilation holes. Ensure that free airflow is
maintained around the STB. Never store the STB where it is exposed
to direct sunlight or near heating equipment e.g. a radiator.
Never stack other electronic equipment on top of the STB.
Place the STB at least 30mm from the wall. Need at least 10mm from
the top and both side of the STB for ventilation.
DCB-H360R
GB
Correct Disposal of This Product
(Waste Electrical & Electronic Equipment)
(Applicable in the European Union and other European
countries with separate collection systems)
This marking shown on the product or its literature,
indicates that it should not be disposed with other
household wastes at the end of its working life. To prevent possible harm
to the environment or human health from uncontrolled waste disposal,
please separate this from other types of wastes and recycle it responsibly
to promote the sustainable reuse of material resources.
Household users should contact either the retailer where they purchased
this product, or their local government office, for details of where and
how they can take this item for environmentally safe recycling.
Business users should contact their supplier and check the terms and
conditions of the purchase contract. This product should not be mixed
with other commercial wastes for disposal.
ATTACHMENTS: Do not use any attachment that is not recommended by the
manufacturer; it may cause a hazard or damage the equipment.
SERVICING: Do not attempt to service this product yourself.
Any attempt to do so will make the warranty invalid.
Refer all servicing to a qualified service agent.
LIGHTNING: If the STB is installed in an area subject to intense lightning activity,
protection devices for the STB mains connector and modem telephone
line are essential. The individual manufacturer’s instruction for
safeguarding other equipment, such as TV set, Hi-Fi, etc., connected
to the STB must also be followed during lightning storms.
GROUNDING: CATV cable MUST BE EARTHED.
The grounding system must comply with local regulations.
NNoottee : Dispose the used batteries at designated place for environment protection.
To disconnect the apparatus from the mains, the plug must be pulled out from the
mains socket, therefore the mains plug shall be readily operable.
GB-1

DCB-H360R
DCB-H360R
TECHNICAL OVERVIEW
TECHNICAL OVERVIEW
What are SDTV and HDTV ?
SDTV
SDTV is a digital TV format that provides a high quality picture at resolutions that can be
displayed on standard TV sets (see more on resolutions later in this chapter).
HDTV
HDTV is a digital TV format that provides the highest quality picture at resolutions that can be
displayed on computer monitors and HDTV-ready TV displays (see more on resolutions later in
this chapter).
Resolution
Resolution refers to the number of pixels on the screen. The higher the resolution, the better
the visual quality.
Digital broadcasts are classified into HD and SD grades according to the visual quality. In
general, HD (High Definition) grade supports resolutions of 1920x1080i and 1280x720p and an
aspect ratio of 16:9 for both ATSC and DVB standards.
SD (Standard Definition) grade supports resolutions of 720x480p and 720x480i for the ATSC
standard, and supports resolutions of 720x576p and 720x576i for the DVB standard.
SD grade usually supports an aspect ratio of 4:3. However, it may differ depending on the
region.
DVB-C ( Cable Digital Video Broadcasting)
Aspect ratio
In addition to resolution, HDTV is also defined by the aspect ratio of its broadcasts.
Aspect ratio means the shape of the screen as defined by the ratio of the screen’s width to its
height. For analog TV and SDTV, the aspect ratio is 4 units wide by 3 units high (usually written
4:3). This is the familiar shape of conventional TVs — slightly wider than they are tall.
For HDTV broadcasts, the aspect ratio is 16:9 (nearly twice as wide as it is tall).
This is, not coincidentally, more like the shape of movies shown in theaters.
This makes HDTV an ideal format for broadcasting and viewing movies on a TV.
But what happens if you are watching a nearly square-shaped 4:3 broadcast on a rectangular
16:9 TV, or vice-versa? The HD Receiver allows you to choose from a variety of screen formats
to help you deal with those scenarios.
GB
Dolby®Digital 5.1
Dolby Digital 5.1 provides 5 discrete channels of digital audio information for use by A/V receivers
capable of decoding the 5.1 channel signal.
The audio signals are broken into left-front, center, right-front, left-rear, right-rear and a
low-frequency effects channel (designed for subwoofers).
The result when connected to a compatible Dolby Digital 5.1 channel A/V receiver and speaker
setup is a home theater experience that provides much of the dynamic range, 360-degree
imaging, and sonic excitement of a real theater.
To take full advantage of the Dolby Digital 5.1 capabilities of the HD Receiver, you will need a
Dolby Digital 5.1 compatible A/V receiver connected to the HD Receiver through the Dolby Digital
Optical jack.
AC-3 is a sound encoding/decoding technology developed in 1987 for movie theatres and means
an AC-3 bit stream. AC-3 is used synonymously with Dolby Digital nowadays.
Digital video broadcasting - cable (DVB-C) is European standard DVB for digital broadcasting
transmission via cable. DVB-C system provide audio/video digital transmission through mpeg-2
format and utilize QAM modulation system.
DVB-C standard has been developed so that a digital broadcasting signal can be sent through
VHF/UHF channels. The advantages of this standard are relatively protected environment with
respect to distortion and signal path attenuation so a higher signal to noise ratio can be
achieved and no negative effect from multipath so higher order modulation schemes can be
implemented.
GB-2
DIGITAL CABLE RECEIVER
HDMI (High Definition Multimedia Interface)
HDMI is an interface to enable the digital transmission of video and audio data with just
a single connector.Using HDMI the receiver transmits a digital video and audio signal
and displays as a vivid picture on a TV having an HDMI input jack.
GB-3
DCB-H360R
DCB-H360R
CONTENT
Safety Instructions . . . . . . . . . . . . . . . . . . . . . . . . . . . . . . . . . . . . . 1
Technical Overview . . . . . . . . . . . . . . . . . . . . . . . . . . . . . . . . . . . . . 2
Content . . . . . . . . . . . . . . . . . . . . . . . . . . . . . . . . . . . . . . . . . . . . . . 4
General Features . . . . . . . . . . . . . . . . . . . . . . . . . . . . . . . . . . . . . . . 5
Connecting Your “STB” . . . . . . . . . . . . . . . . . . . . . . . . . . . . . . . . . 6
Description . . . . . . . . . . . . . . . . . . . . . . . . . . . . . . . . . . . . . . . . . . . 12
Front Panel . . . . . . . . . . . . . . . . . . . . . . . . . . . . . . . . . . . . . . . . . . 12
Rear Panel. . . . . . . . . . . . . . . . . . . . . . . . . . . . . . . . . . . . . . . . . . . 13
Remote Control Unit. . . . . . . . . . . . . . . . . . . . . . . . . . . . . . . . . . . . 14
Basic Functions. . . . . . . . . . . . . . . . . . . . . . . . . . . . . . . . . . . . . . . . 16
Operating The Receiver . . . . . . . . . . . . . . . . . . . . . . . . . . . . . . . . . 22
Main Menu . . . . . . . . . . . . . . . . . . . . . . . . . . . . . . . . . . . . . . . . . . . . 22
1. Installation . . . . . . . . . . . . . . . . . . . . . . . . . . . . . . . . . . . . . . . . 22
1.1 Manual Scanning . . . . . . . . . . . . . . . . . . . . . . . . . . . . . . . 23
1.2 Parental Control . . . . . . . . . . . . . . . . . . . . . . . . . . . . . . . . 23
1.3 Reset to Factory Defaults . . . . . . . . . . . . . . . . . . . . . . . . . 24
1.4 Software Update . . . . . . . . . . . . . . . . . . . . . . . . . . . . . . . . 24
2. Channel . . . . . . . . . . . . . . . . . . . . . . . . . . . . . . . . . . . . . . . . . . 24
2.1 Update List . . . . . . . . . . . . . . . . . . . . . . . . . . . . . . . . . . . . 24
2.2 Favorite Channels . . . . . . . . . . . . . . . . . . . . . . . . . . . . . . . 25
2.3 Set Channel Lock . . . . . . . . . . . . . . . . . . . . . . . . . . . . . . . 25
3. System . . . . . . . . . . . . . . . . . . . . . . . . . . . . . . . . . . . . . . . . . . . 26
3.1 Language Selection. . . . . . . . . . . . . . . . . . . . . . . . . . . . . . 26
3.2 OSD Settings . . . . . . . . . . . . . . . . . . . . . . . . . . . . . . . . . . 27
3.3 Media Settings . . . . . . . . . . . . . . . . . . . . . . . . . . . . . . . . . 28
3.4 Change PIN Code . . . . . . . . . . . . . . . . . . . . . . . . . . . . . . . 29
3.5 Timer Settings. . . . . . . . . . . . . . . . . . . . . . . . . . . . . . . . . . 29
3.6 System Information . . . . . . . . . . . . . . . . . . . . . . . . . . . . . . 30
4. Mail Box . . . . . . . . . . . . . . . . . . . . . . . . . . . . . . . . . . . . . . . . . . 30
5. Irdeto Menu. . . . . . . . . . . . . . . . . . . . . . . . . . . . . . . . . . . . . . . . 31
5.1 CA Status . . . . . . . . . . . . . . . . . . . . . . . . . . . . . . . . . . . . . 31
5.2 IRD Status . . . . . . . . . . . . . . . . . . . . . . . . . . . . . . . . . . . . 31
5.3 Loader Status . . . . . . . . . . . . . . . . . . . . . . . . . . . . . . . . . . 31
Available TV Manufacturer Numbers . . . . . . . . . . . . . . . . . . . . . . . 32
Troubleshooting . . . . . . . . . . . . . . . . . . . . . . . . . . . . . . . . . . . . . . . 38
Disposal . . . . . . . . . . . . . . . . . . . . . . . . . . . . . . . . . . . . . . . . . . . . . . 38
Technical Specifications . . . . . . . . . . . . . . . . . . . . . . . . . . . . . . . . . 39
1. USER SECTION
2. TUNER SECTION
3. VIDEO SECTION
4. AUDIO SECTION
GENERAL FEATURES
DIGITAL HD/SDTV BROADCASTING RECEPTION
SOFTWARE DOWNLOAD VIA NETWORK
ADVANCED ELECTRONIC PROGRAM GUIDE
MULTI LANGUAGE SUPPORTED FOR OSD
SUBTITLE & TELETEXT(OSD ) SUPPORTED
WITH MULTI LANGUAGE
FULL FUNCTION INFRARED REMOTE CONTROL UNIT
SCART OUTPUT
LOW POWER CONSUMPTION
4 FAVORITE LISTS
AUTO UPDATED EPG
PASS LOOP FOR RGB SIGNAL
15 TIMERS TO RESERVE PROGRAMS(EVENTS) FOR TURNING
ON/OFF
VHF, UHF BAND 50.5~858 MHz
MAX 7.252 Msps SYMBOL RATE
16~256 QAM Modulation Format
RF LOOP-THROUGH OUTPUT FOR OTHER RECEIVER OR TV
DVB-C COMPLIANT
MPEG-2: HD(MP@HL), SD(MP@ML)
H.264: MP@L3, MP@L4, HP@L4 up to 30 Mbps
USER SELECTABLE OUTPUT FORMATS 1080i, 720p, 576p, (576i)
1~30 Mbps DATA RATE
SUPPORTS ASPECT RATIO 4:3(NORMAL) AND 16:9(WIDE SCREEN)
HDMI, COMPONENT, COMPOSITE, SCART
DOLBY DECODING
MPEG-1 AUDIO LAYER 1, LAYER 2
MPEG-2 AUDIO
MONO, DUAL, STEREO AND JOINT STEREO AUDIO MODE
32, 44.1 AND 48 kHz SAMPLING FREQUENCIES
VOLUME CONTROL AND MUTE FUNCTION THROUGH
REMOTE CONTROL
SPDIF DIGITAL AUDIO OUTPUT
GB
GB-4
DIGITAL CABLE RECEIVER
GB-5
DCB-H360R
YPbPrL
R
HDMI
ANT.IN
Y
P
B
PR
(OPTICAL)
AUDIO OUT
DIGITAL
HDMI OUT
RF OUT
VIDEO OUT
AUDIO OUT
VIDEO OUT
COMPONENT
AV1
(TV)
AV2
(EXT)
R
L
ANT.IN
Y
P
B
PR
H
RF OUT
VIDEO OUT
AUDIO OUT
VIDEO OUT
COMPONENT
AV1
(TV)
AV2
(EXT)
R
L
YPbPrL
R
HDMI
ANT.IN
Y
P
B
PR
RF OUT
VIDEO OUT
AUDIO OUT
VIDEO OUT
COMPONENT
R
L
ANT.IN
Y
P
B
PR
(OPTICAL)
AUDIO OUT
DIGITAL
HDMI OUT
RF OUT
VIDEO OUT
AUDIO OUT
VIDEO OUT
COMPONENT
AV1
(TV)
AV2
(EXT)
R
L
DCB-H360R
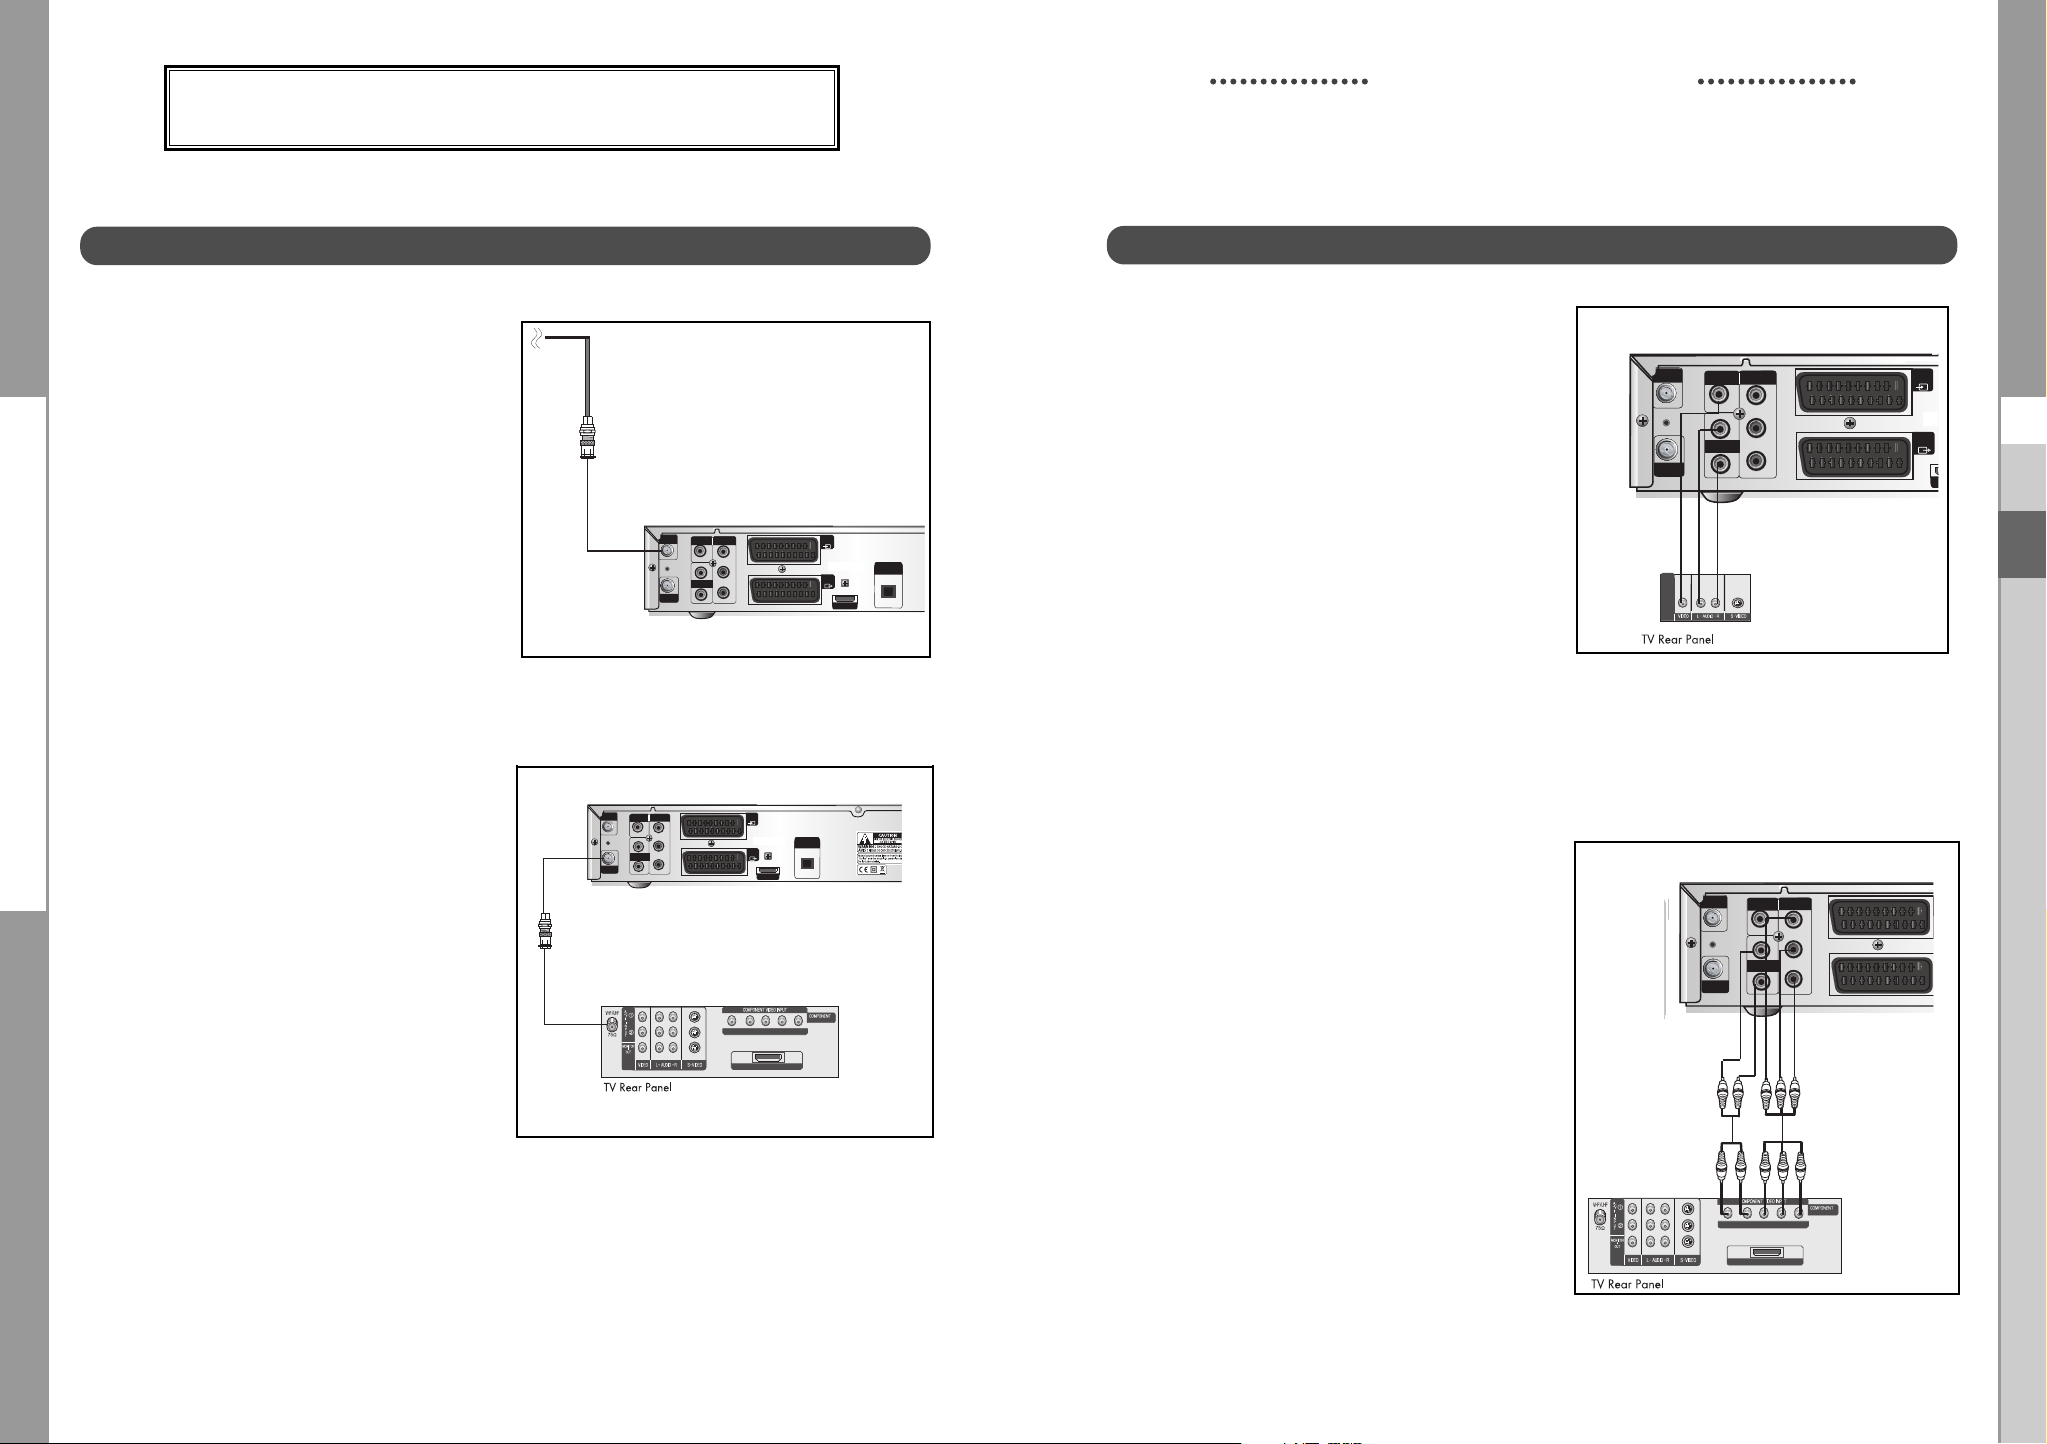
Connecting Your STB
CONNECTING YOUR “STB”
Connecting the receiver cable system
ANT.IN Connection
After installing your cable system, connect the
coaxial cable to “ANT.IN” terminal marked at the
rear of the STB.
All cable connectors should be finger tightened;
do not use any kind of wrench while tightening
connectors. The cable should be 75ohm
impedance coaxial cable.
RF OUT Connection
To facilitate the user using analog receiver
to view analog channels, STB has
been provided with a loop through terminal
marked as “RF OUT”.
Connect the coaxial cable from this terminal
to the IF input terminal of your analog
receiver. Now by keeping the STB in
standby, you will be able to tune and view
analog channels from your analog receiver.
Set-Top Box Rear Panel
Set-Top Box Rear Panel
Connecting the Set-Top Box to a TV Set
Composite Connection
1. Connect the cable system to
the ANT.IN jack on the Set-Top
Box.
2. Connect the Video Cables.
Connect a Composite video cable between
the VIDEO OUT jacks on the Set-Top Box and
the TV INPUT jacks on the TV.
3. Connect the Audio Cables.
Connect an audio cable between the L/R
AUDIO OUT jacks on the Set-Top Box and the
L/R AUDIO IN jacks on the TV.
Component Connection
1. Connect the cable system to
the ANT.IN jack on the Set Top Box
2. Connect the Video Cables.
YP
BPR
format :
Connect a Component video cable
between the VIDEO OUT jacks on the
Set-Top Box and the TV INPUT jacks on
the TV.
3. Connect the Audio Cables.
Connect an audio cable between the
L/R AUDIO OUT jacks on the Set-Top
Box and the L/R AUDIO IN jacks on the
TV.
Set-Top Box Rear Panel
GB
Set-Top Box Rear Panel
GB-6
DIGITAL CABLE RECEIVER
GB-7
DCB-H360R
Y
P
B
PR
(OPTICAL)
AUDIO OUT
DIGITAL
HDMI OUT
AV1
(TV)
AV2
(EXT)
ON
ANT.IN
Y
P
B
PR
(OPTICAL)
AUDIO OUT
DIGITAL
HDMI OUT
RF OUT
VIDEO OUT
AUDIO OUT
VIDEO OUT
COMPONENT
AV1
(TV)
AV2
(EXT)
R
L
YPbPrL
R
HDMI
REAR VCR
TV REAR PANEL
HDMI
ANT.IN
Y
P
B
PR
(OPTICAL)
AUDIO OUT
DIGITAL
HDMI OUT
RF OUT
VIDEO OUT
AUDIO OUT
VIDEO OUT
COMPONENT
AV1
(TV)
AV2
(EXT)
R
L
DCB-H360R
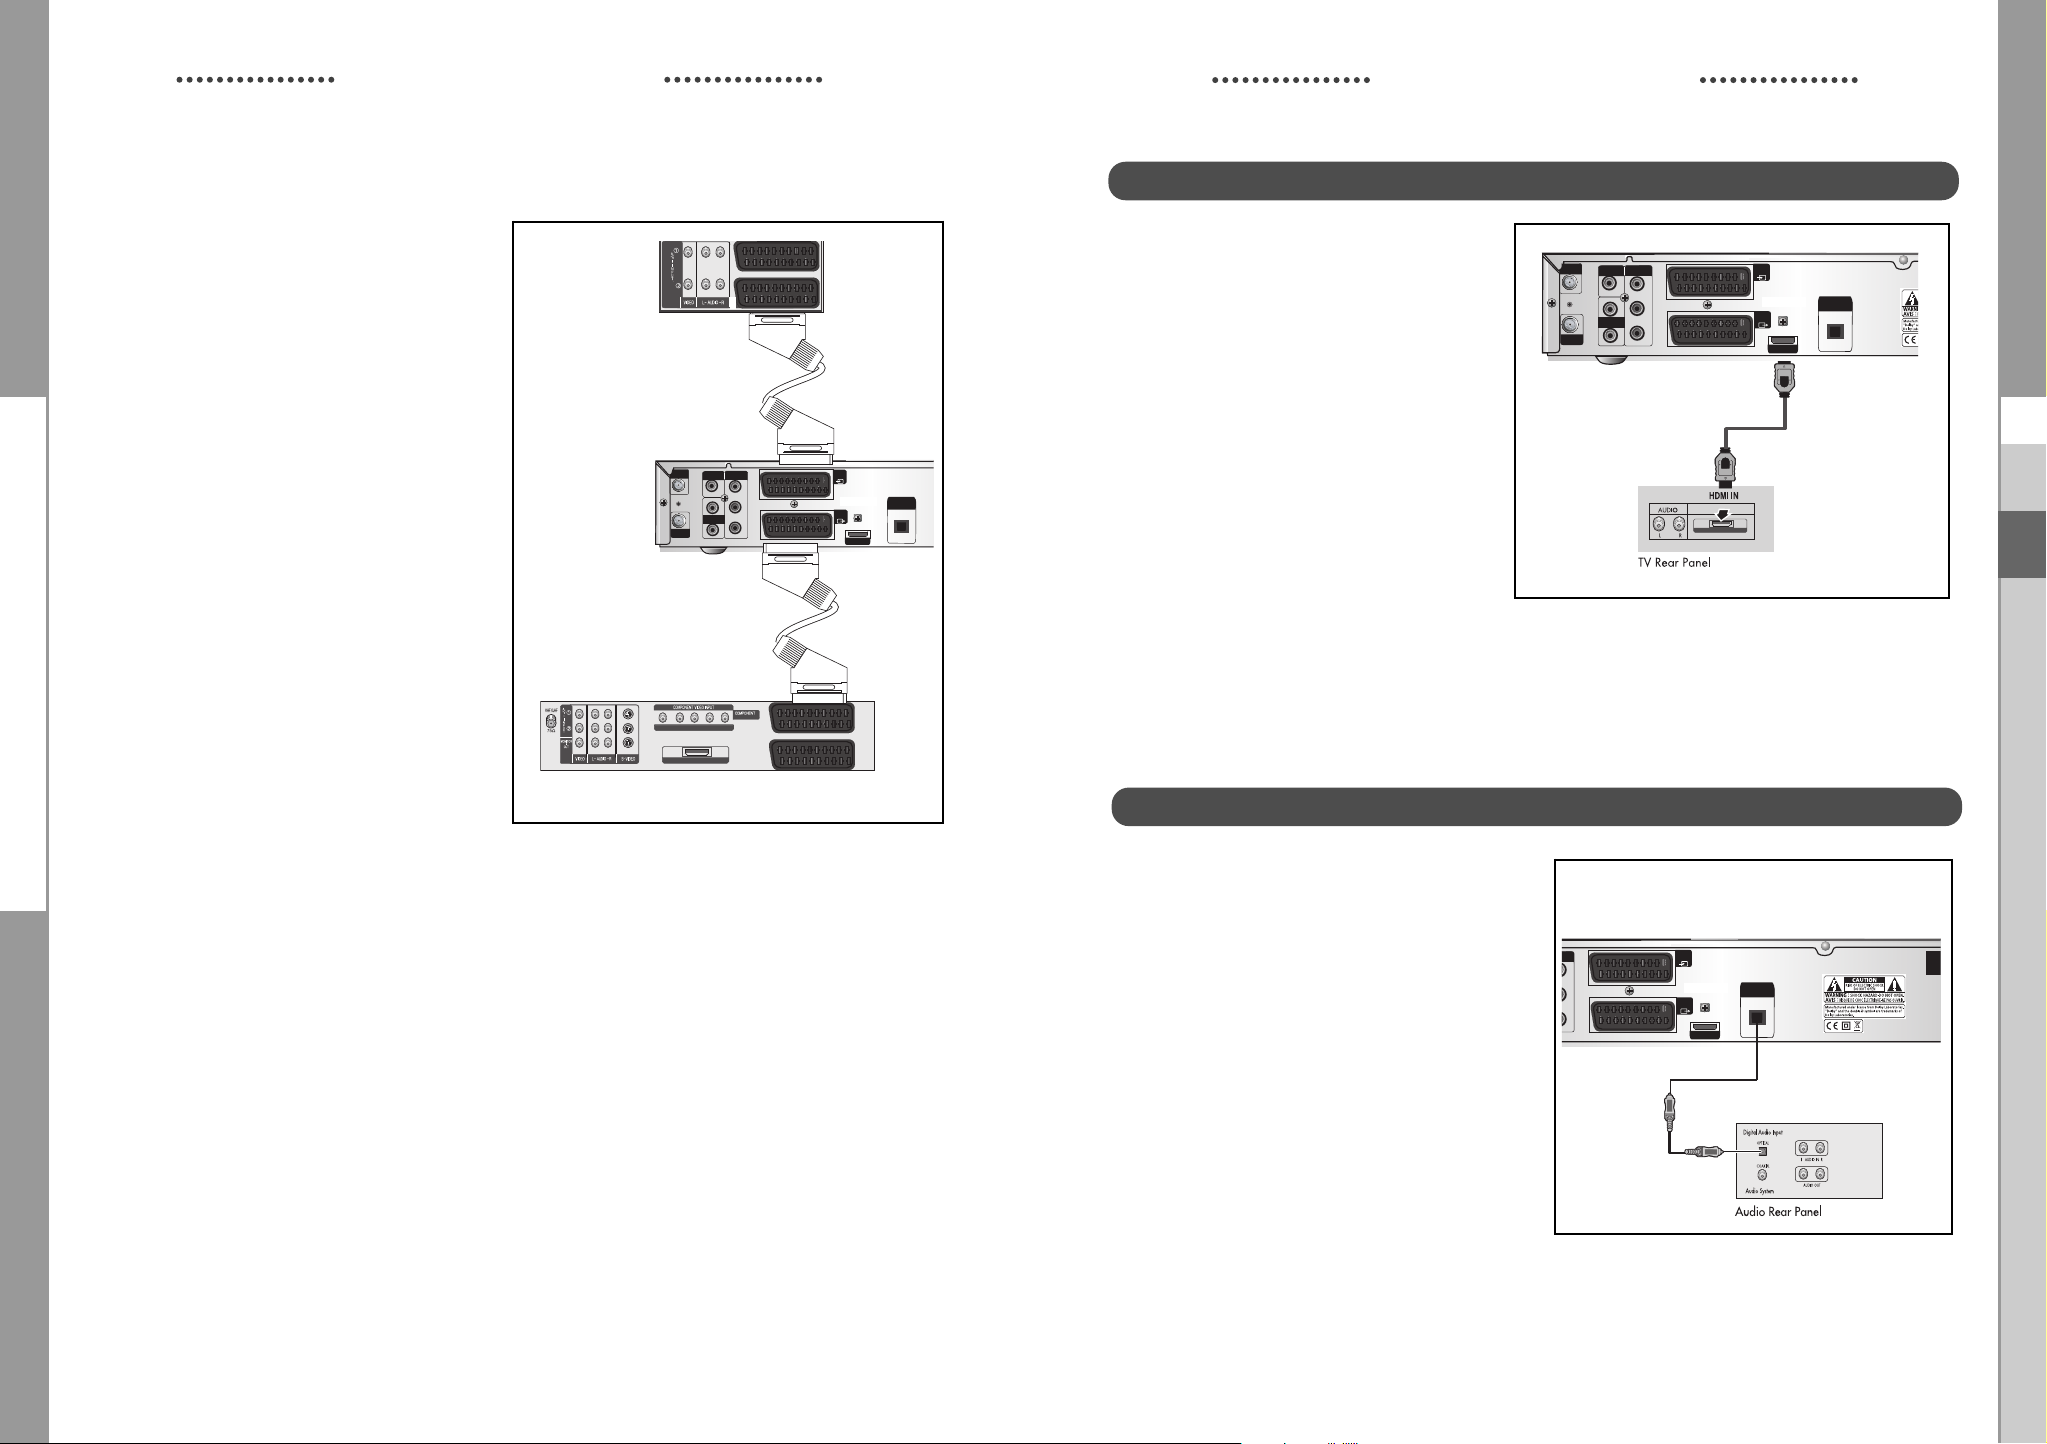
Scart Connection
1. Connect the cable system to
the ANT.IN jack on the Set-Top
Box.
2. Connect a Scart cable between
the VCR OUT jacks on VCR and the
Scart AV2 (EXT) jacks on the STB.
3, Connect Scart cable between AV1
(TV) jack on the STB and jack Scart
Input on the TV
Connecting Your STB
Set-Top Box Rear Panel
Connecting Your STB
Connecting the Set-Top Box to a TV with a HDMI jack
Set-Top Box Rear Panel
1. Connect the cable system to
the ANT.IN jack on the Set-Top
Box.
2. Connect a HDMI cable
between the HDMI OUT jack
on the Set-Top Box and
the HDMI IN jack on the HDMI
device (TV , Monitor)
NNoottee : Depend on any receiver, HDMI
OUT may not operate properly.
GB
Connecting an Audio Component
There are many types of audio systems on the
market today.
A simplified illustration of an audio system is
shown to the right. For more information, see
your audio system owner’s manual.
For An optical digital audio input, connect the
audio system to the DIGITAL AUDIO OUT
GB-8
DIGITAL CABLE RECEIVER
(OPTICAL) jack on the Set-Top Box.
Set-Top Box Rear Panel
GB-9
DCB-H360R
DCB-H360R
Connecting Your STB
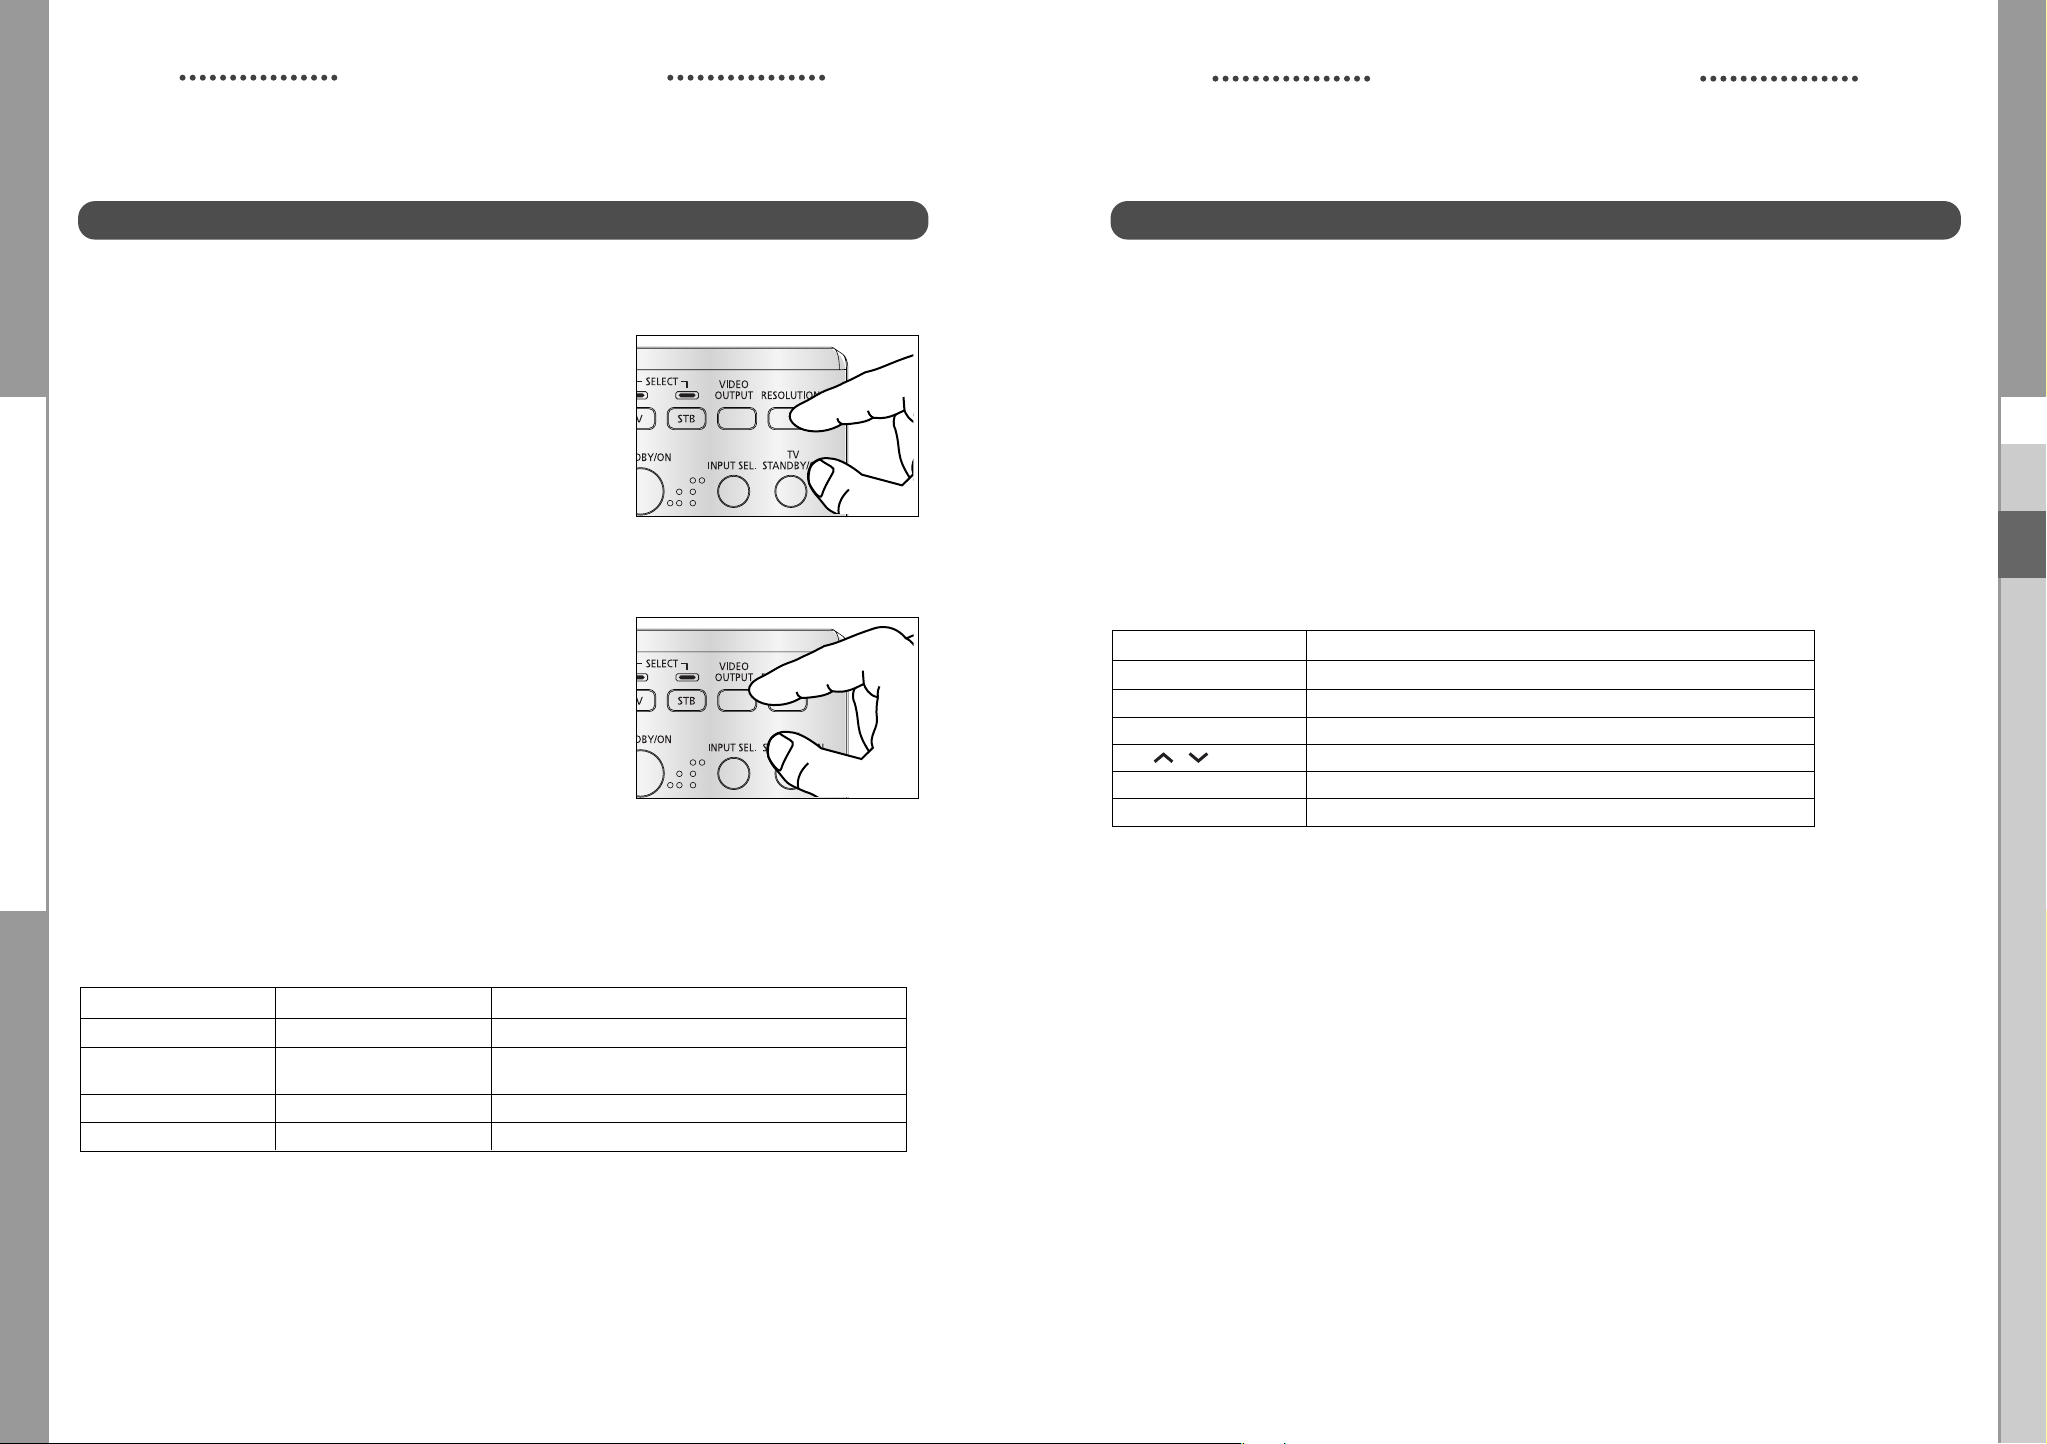
Selecting the Resolution and the DTV Output Signal
You can select the appropriate video output for the connected TV or monitor mode.
To select the resolution:
● Select a resolution by using the RESOLUTION key on the
remote control and referring to the following table.
NNoottee : EXIT key at the front of the HD receiver also
operates as RESOLUTION key, when any OSD
is not displayed on the screen.
To select the video output signal:
● Select the output signal by using the VIDEO OUTPUT
key on the remote control and referring to the
following table.
RGB: Select the output signal by using the
VIDEO OUTPUT key on the remote control
referring to the following table.
BPR: Select YPBPR when the TV is connected to the
YP
Component (YP
of the HD receiver.
Resolution and Video Output
Video Out Available Resolution Output Status
Composite 576i Always output.
Scart 576i Scart output can be selected between RGB and
Component (YP
HDMI 1080i/720p/576p The 576i resolution is not supported.
BPR
BPR) and HDMI output port
Composite.
) 1080i/720p/576p The 576i resolution is not supported.
Connecting Your STB
Setting Up TV Operations with the Remote Control
Enter the manufacturer number into the remote control to control the TV with the remote control (see
“Available TV Manufacturer Numbers” on pages 32~37).
1. Turn the TV on.
2. Point the remote control towards the TV.
3. Enter the TV manufacturer number by using the NUMERICAL keys while pressing the TV key.
E.g. For a Samsung TV, press 0, 0 and 1 in this order by using the NUMERICAL keys while
pressing the TV key.
4. When the TV is turned off or on, the configuration is finished.
TV functions that you can control with the remote control
Button key Function
TV STANDBY/ON
INPUT SEL
VOL+/-
CH /
MUTE
0~9
NNoottee : 1.
There is a model that can only be turned on by pressing the numeric key ‘0’ on
the remote control.
2.
TV models of other manufacturer that can be controlled with the remote control
are limited, and some functions may not work.
3.
If you replace the remote control batteries or enter a new manufacturer number,
the previously configured TV manufacturer number is deleted.
4.
When a connected device is an integrated TV model (VCR, DVDP), take care
when using the remote control because it may operate both of them
simultaneously.
5.
If the configuration number does not work, try another number.
Press to turn the TV on or off.
Press to select an external input source for the TV.
Press to adjust the TV volume / Exclusive to the TV
Press to select a TV channel.
Press to mute the TV sound.
Press to select TV channel.
GB
NNoottee : Initial value is YP
BPR (1080i resolution) mode.
GB-10
DIGITAL CABLE RECEIVER
GB-11
DCB-H360R
DCB-H360R
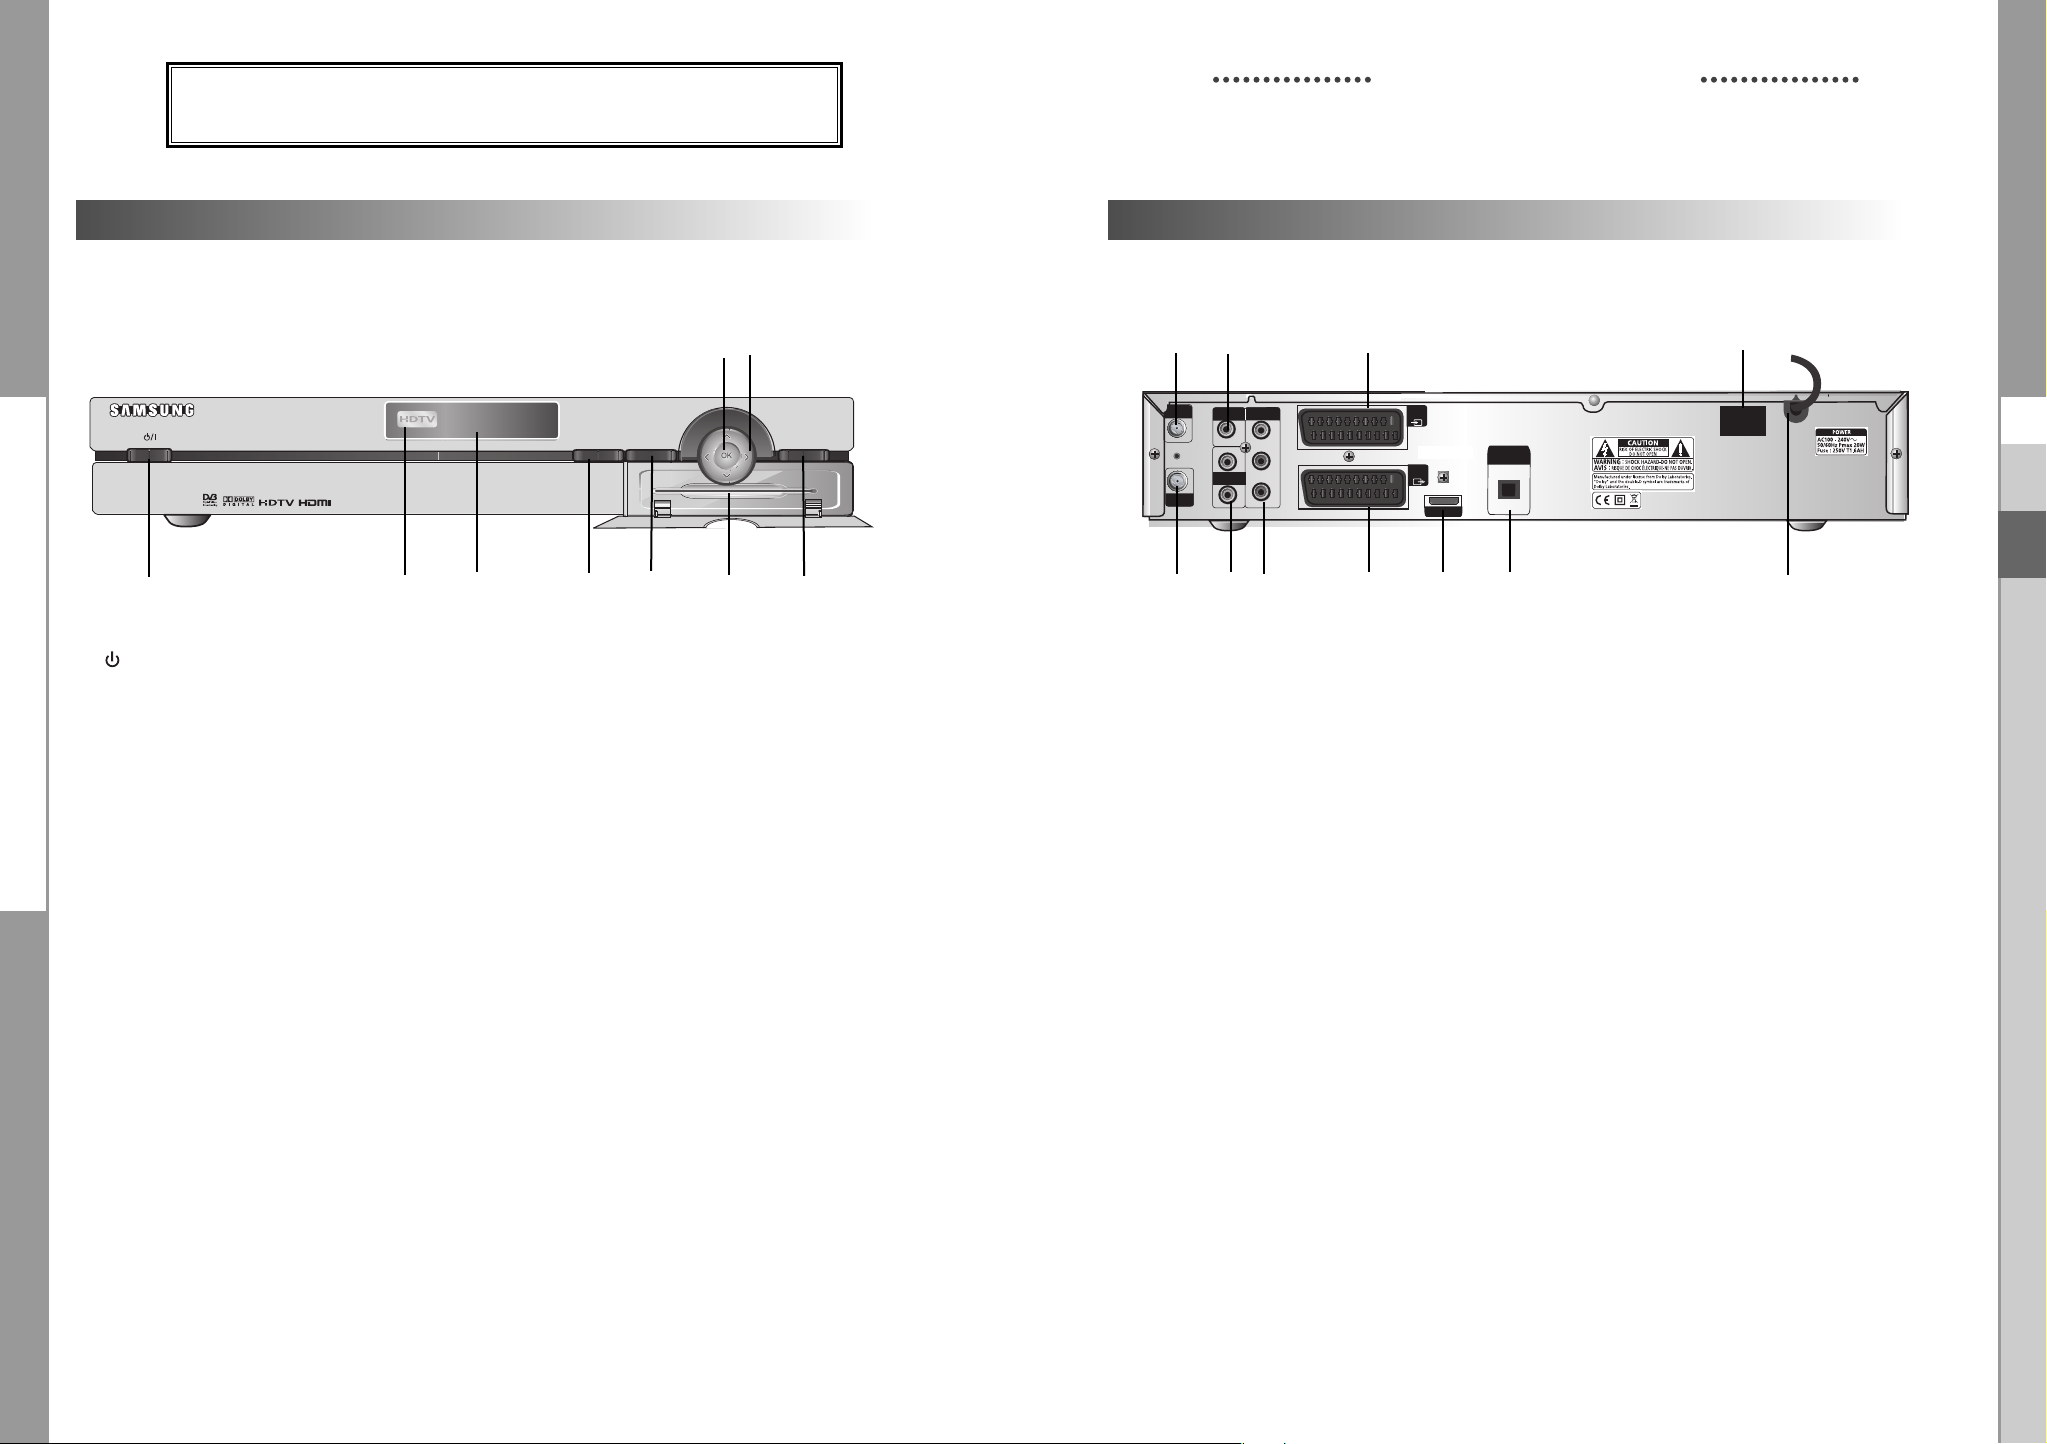
DESCRIPTION
DESCRIPTION
Front Panel
6
7
HIGH DEFINITION CABLE RECEIVER DCB-H360R
MENU
GUIDE
1
2
3
4
5
89
1. / I Turns the receiver operating or standby mode.
2. HDTV Displays the broadcasting status. When the STB detects a
HD Broadcasting signal, the HDTV logo lights.
3. Display Window Displays information about digital HDTV receiver.
4. GUIDE Press to display the on-screen Electronic Program Guide (EPG)
5. MENU Displays the main menu.
6. OK Selects highlighted items on Guide and Menu screens.
>
<
7. These arrow keys navigate in the on screen guide and menu
< >
system.
8. Card Slot Slot for Irdeto Smartcard.
9. EXIT Clears on-screen displays and returns to TV program viewing.
EXIT
Rear Panel
3
1
VIDEO OUT
L
AUDIO OUT
R
COMPONENT
VIDEO OUT
Y
P
B
PR
ANT.IN
RF OUT
245
7
AV2
(EXT)
DIGITAL
AV1
(TV)
HDMI OUT
6
AUDIO OUT
(OPTICAL)
89 11
1. ANT.IN This port is connected to your cable system via a coaxial cable.
2. RF OUT Connects a TV or other receiver via a coaxial cable.
3. VIDEO OUT Connect to a TV, monitor or other external display device through the
Analog Video IN port.
4. AUDIO OUT Connect to a TV, audio receiver or other external device through the
analog Audio IN port.
5. COMP. VIDEO OUT Connect to a TV, monitor or other external display device through the
Component Video IN (YP
BPR). At this time, the VIDEO OUTPUT key
on the remote control has to be YPBPR mode.
6. AV1 (TV) This is used to connect to your TV.
7. AV2 (EXT) This is used to connect to your VCR, DVD or other receiver.
8. HDMI OUT Use the HDMI cable to connect this jack on your television for the best
quality picture.
10
ON
POWER
OFF
GB
GB
GB-12
9. DIGITAL AUDIO OUT Output for connection to a digital amplifier.
10. POWER SWITCH This is used to supply(ON) or interupt (OFF) the power.
11. POWER CORD Connect to the wall outlet of AC 100-240V, 50/60Hz.
DIGITAL CABLE RECEIVER
GB-13

DCB-H360R
18
19
20
22
23
29
26
16
17
13
14
15
24
27
10
11
12
21
25
28
30
DCB-H360R
Remote Control Unit
DESCRIPTION
1.
TV (for TV exclusive use)
Switches the remote control mode to TV mode.
2.
STB
Switches the remote control mode to receiver mode.
3. STANDBY/ON
Turns the receiver operating or standby mode.
4. 0 ~ 9 NUMERICAL keys
Press the number keys to tune to a channel or to
enter numbers on menu screens.
5. FAV. CH
Use the key to switch between favorite lists.
6. ALT
Press once to select the soundtrack list and twice
to select video track list.
7. FREEZE
Press once to hold the picture, twice to release.
8. AUDIO
Change the audio to the left, right or both channel.
9. CH. LIST
The scanned channel list appears.
10.Vol+ /Vol-
Adjust the volume level
11. MENU
Press to display the on-screen menus.
12. ¦
These keys are for moving the highlight bar for
selecting options on the menu.
13. GUIDE
Press to display the on-screen Electronic Program
Guide (EPG).
14. P.SIZE
Press to change the screen format according to
the screen aspect ratio and the input signal format.
15. COLOR (RED, GREEN, YELLOW, BLUE)
Use according to the instructions on the screen
when using a menu or guide screen.
DESCRIPTION
16
. RESOLUTION
Selects the output resolution format between 1080i, 720p, and 576p (576i) according to the
video input of the TV or monitor.
17. VIDEO OUPUT
Selects Video Output format between RGB and YP
video input of TV or monitor
18. TV STANDBY/ON
Turns the TV operating or standby mode.(for TV exclusive use)
19. INPUT SEL
Press to select the input source in the TV (for TV exclusive use)
20. PRE. CH
Turn to the previous channel.
21. SUBTITLE
Displays the subtitle on the screen.
22. TEXT
Displays the teletext OSD mode on the screen.
23. TIMER
This is used to reserve a program by EPG.
24. TV/RADIO
Toggles between the TV channel and Radio channel.
<
25. CH /
Press to change the channel
26. RETURN
Press to return to the previous menu.
27. MUTE
Mutes the audio
28. OK
Press to confirm and save any data to the receiver in the menu system
29. INFO
Displays the program information in the screen. Press it once and basic information
appears.Press it twice and detailed information appears in the text box.
30. EXIT
Clears on-screen displays and return to program viewing.
>
BPR according to the
GB
GB
NNoottee : When inserting batteries,
make sure that the polarity(+/-) is correct.
GB-14
DIGITAL CABLE RECEIVER
GB-15
DCB-H360R
DCB-H360R
BASIC FUNCTIONS
BASIC FUNCTIONS
1. Display Screen
Before you can view the television program, you must perform the installation.
Therefore you will see only menu images at first.
After the television channels have been programmed, you will see the following picture(banner)
each time you switch channels:
! Parental Rating.
@ Favorite Group Number.
# Locked Channel.
$ Scramble Channel.
% Teletext.
● Press the INFO key in view mode.
● Select the channel by pressing NUMERICAL 0-9 or
^ Subtitle.
& Soundtrack.
* Mail.
( Announcement.
) Dolby Digital.
to move to TV or Radio channel
You will also see this picture each time you change the channels.
When you press the TV/RADIO key on the remote control. TV and Radio program are toggled.
1 HD/SD
2 16:9/4:3
3 Program Progressive Bar.
keys and select the TV/RADIO key
2. Volume Control
To control the volume level :
● Press
● Press the MUTE key to turn to silence mode.
● Press the MUTE key again or
NNoottee
the VOL- or VOL+
keys to adjust the volume level.
VOL- / VOL+
keys in order to cancel the mute function.
: HDMI sound is controlled by TV, not HD receiver.
3. Select Soundtrack
● Press the ALT key to see the soundtrack list.
● Press the
● The soundtrack service is not provided for every channel
and depends on the conditions the operator is in.
and OK key to select one.
GB
Detailed program information
● Press the INFO key three times while you are viewing a program
First you will see the banner described above.
After the INFO key is pressed in the second time, detailed information for current program can
be displayed on another banner, if there is more information. When this information is more than
one page, YELLOW and BLUE keys can be used for scroll up and down.
NNoottee
: This service depends on service provider.
GB-16
DIGITAL CABLE RECEIVER
4. Select Videotrack
● Press the ALT key twice to see the videotrack list.
● Press the
● The videotrack service is not provided for every channel
and depends on the conditions the operator is in.
NNoottee : When you select AUTO in the selection window,
and OK key to select one.
operation will follow System Setup of main menu.
GB-17
DCB-H360R
DCB-H360R
BASIC FUNCTIONS
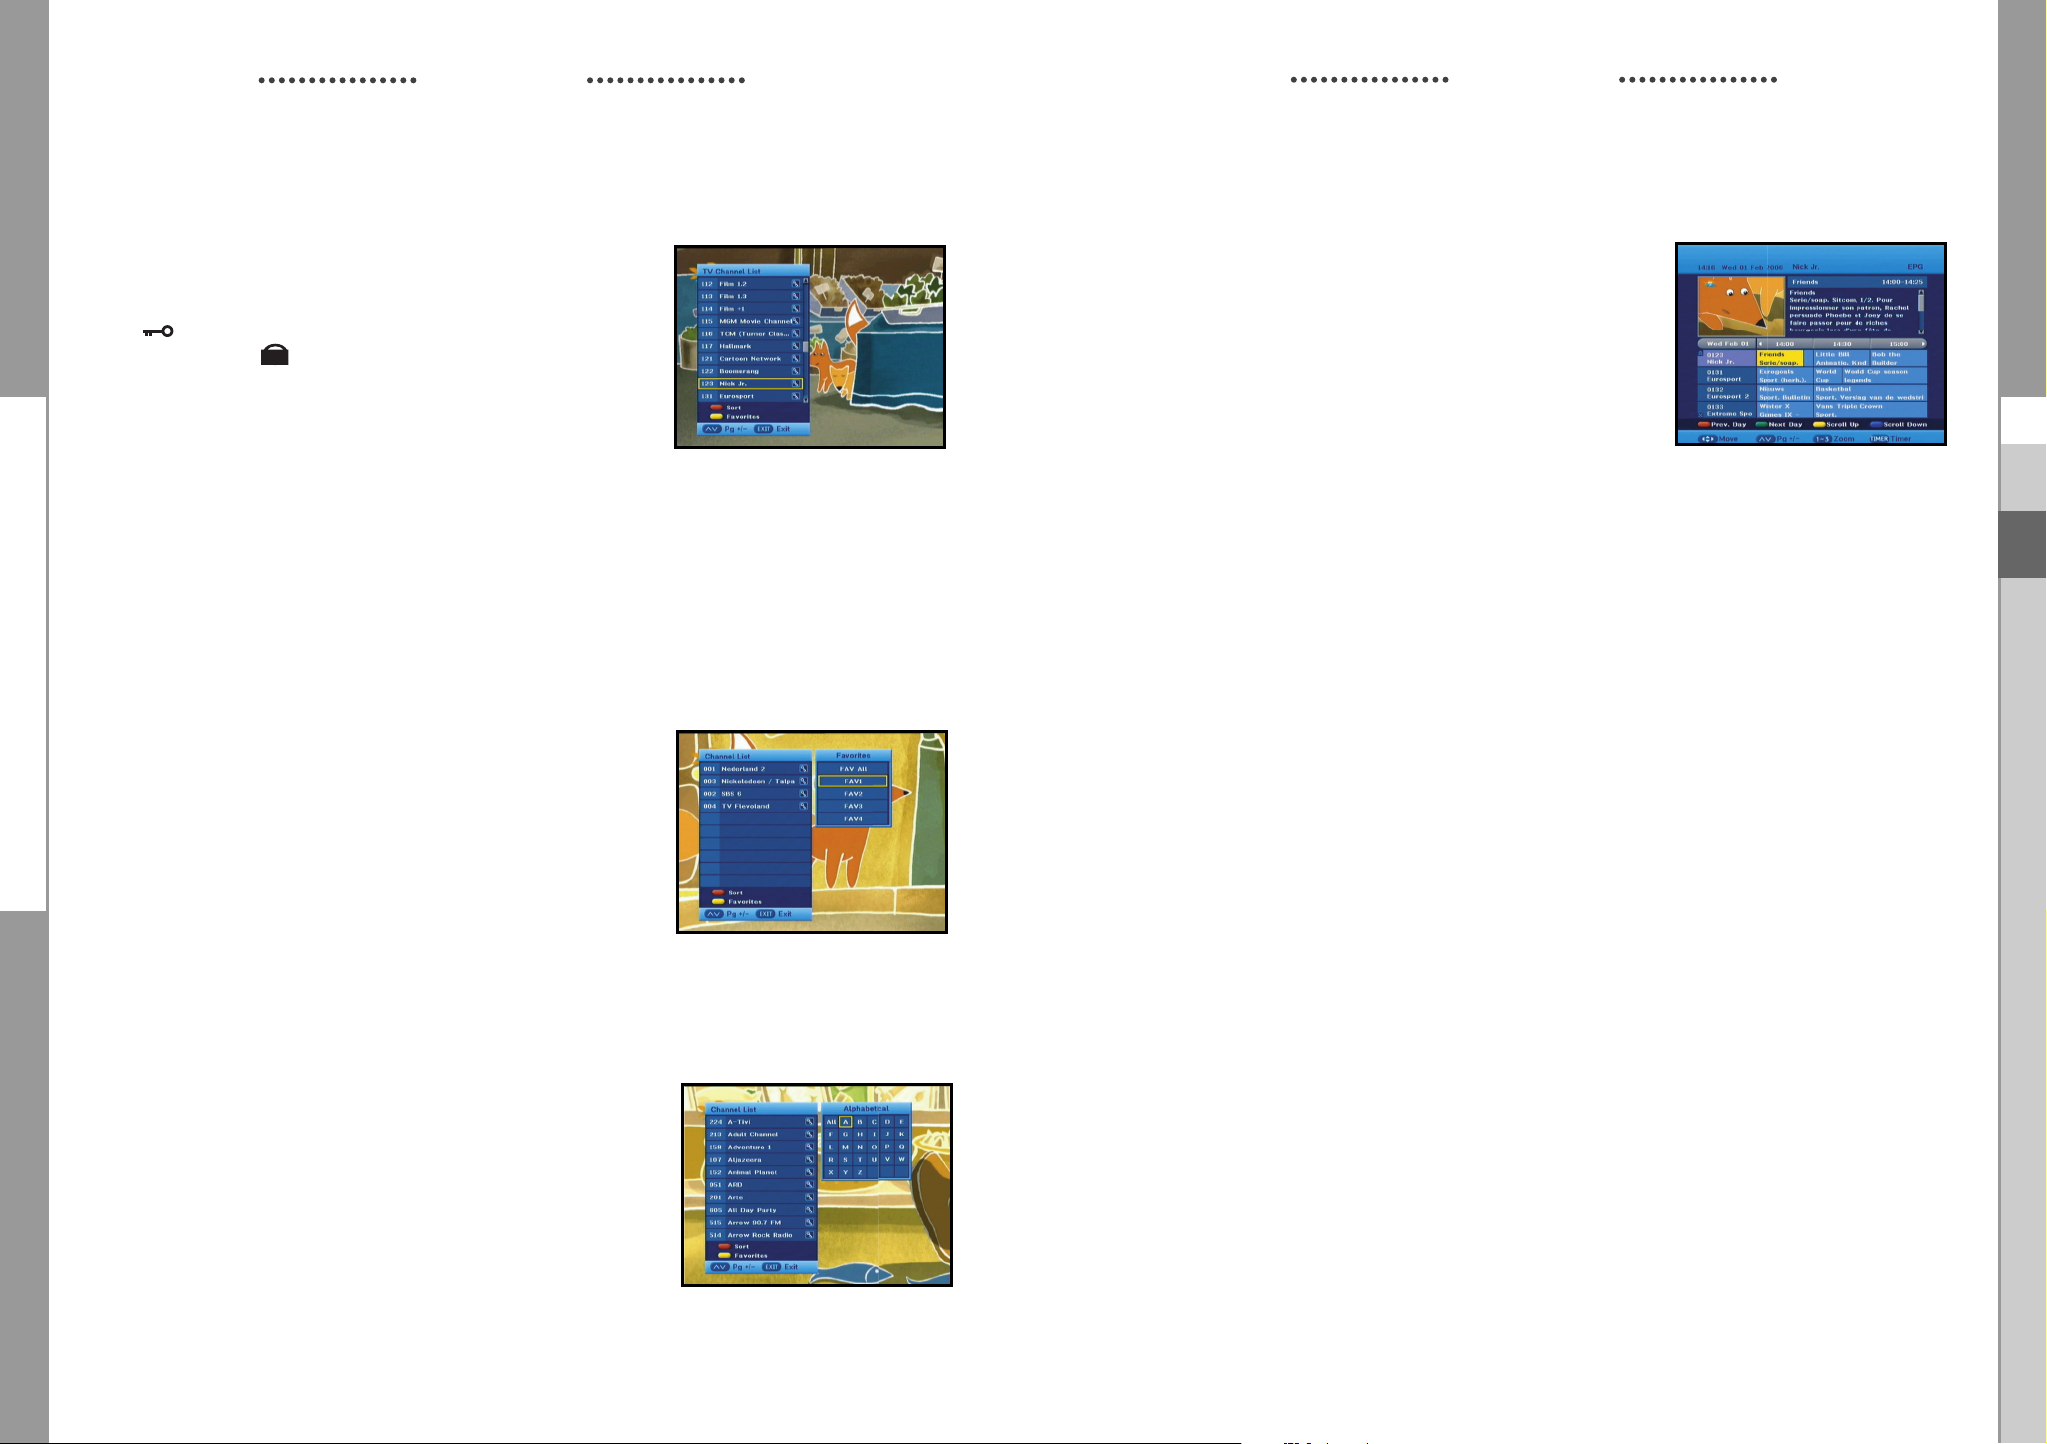
5. Channel List
● Press the CH LIST key while you are viewing a program.
● Select list by pressing the TV/RADIO key.
The icon behind the channel name symbolises scrambled
channel, and the icon behind the channel name shows
locked channel.
● Select the channel by pressing the
control.
● Press the OK key to watch that channel.
The colour key corresponds the following service list.
● YELLOW key : Favorites
● RED key : (Alphabetical) Sort
<
● Press the (Page Up/Dn) keys to move to next or previous page.
>
keys on the remote
BASIC FUNCTIONS
6. Guide (EPG) Menu
EPG-Electronic Program Guide
The electronic program guide gives you information
for the channels.
NNoottee
: 1. This service depends on service provider.
2. After receiver recognized the GMT-time
from the signal which takes few seconds,
it can display correct EPG information.
● Press the GUIDE key while you are viewing a program.
● RED key is for moving back to the previous date.
● GREEN key is for moving to the next coming date.
● YELLOW key can be used for scroll up, if there is more information than one page.
● BLUE key can be used for scroll down, if there is more information than one page.
GB
● Press the EXIT key to exit.
5.1 Favorite Channel List
● Press the YELLOW key on the remote control to select the
group of favorite channel list.
● Press the YELLOW key to switch between favorite channel list
and channel list.
● Use the
keys to select a favorite group or a channel that
you want.
<
● Press the (Page Up/Dn) keys to move to next or previous page.
● Press the EXIT key to exit
>
5.2 Alphabetical Channel LIst
● Press the RED key on the remote control to select the
Alphabetical channel list.
● Press the RED key to switch between alphabetical channel list
and channel list.
Time interval can be adjusted by press keys as followings on EPG screen:
1 key: 1 hour and 30 minutes 2 key: 30 minutes 3 key: 15 minutes
With the TV/RADIO key you can browse among the various programs lists.
● Select the channel by pressing the
● When the TIMER key on the remote control is pressed in the EPG screen, if the current channel
keys and press the OK key to watch this channel.
involves an event, timer is set immediately and the set timer is indicated on the EPG screen.
A program that has been set in this way is indicated on Timer Setting.
● Use the
keys to select a Alphabetical group or a channel
that you want.
● Press the EXIT key to exit.
GB-18
DIGITAL CABLE RECEIVER
GB-19
DCB-H360R
DCB-H360R
BASIC FUNCTIONS
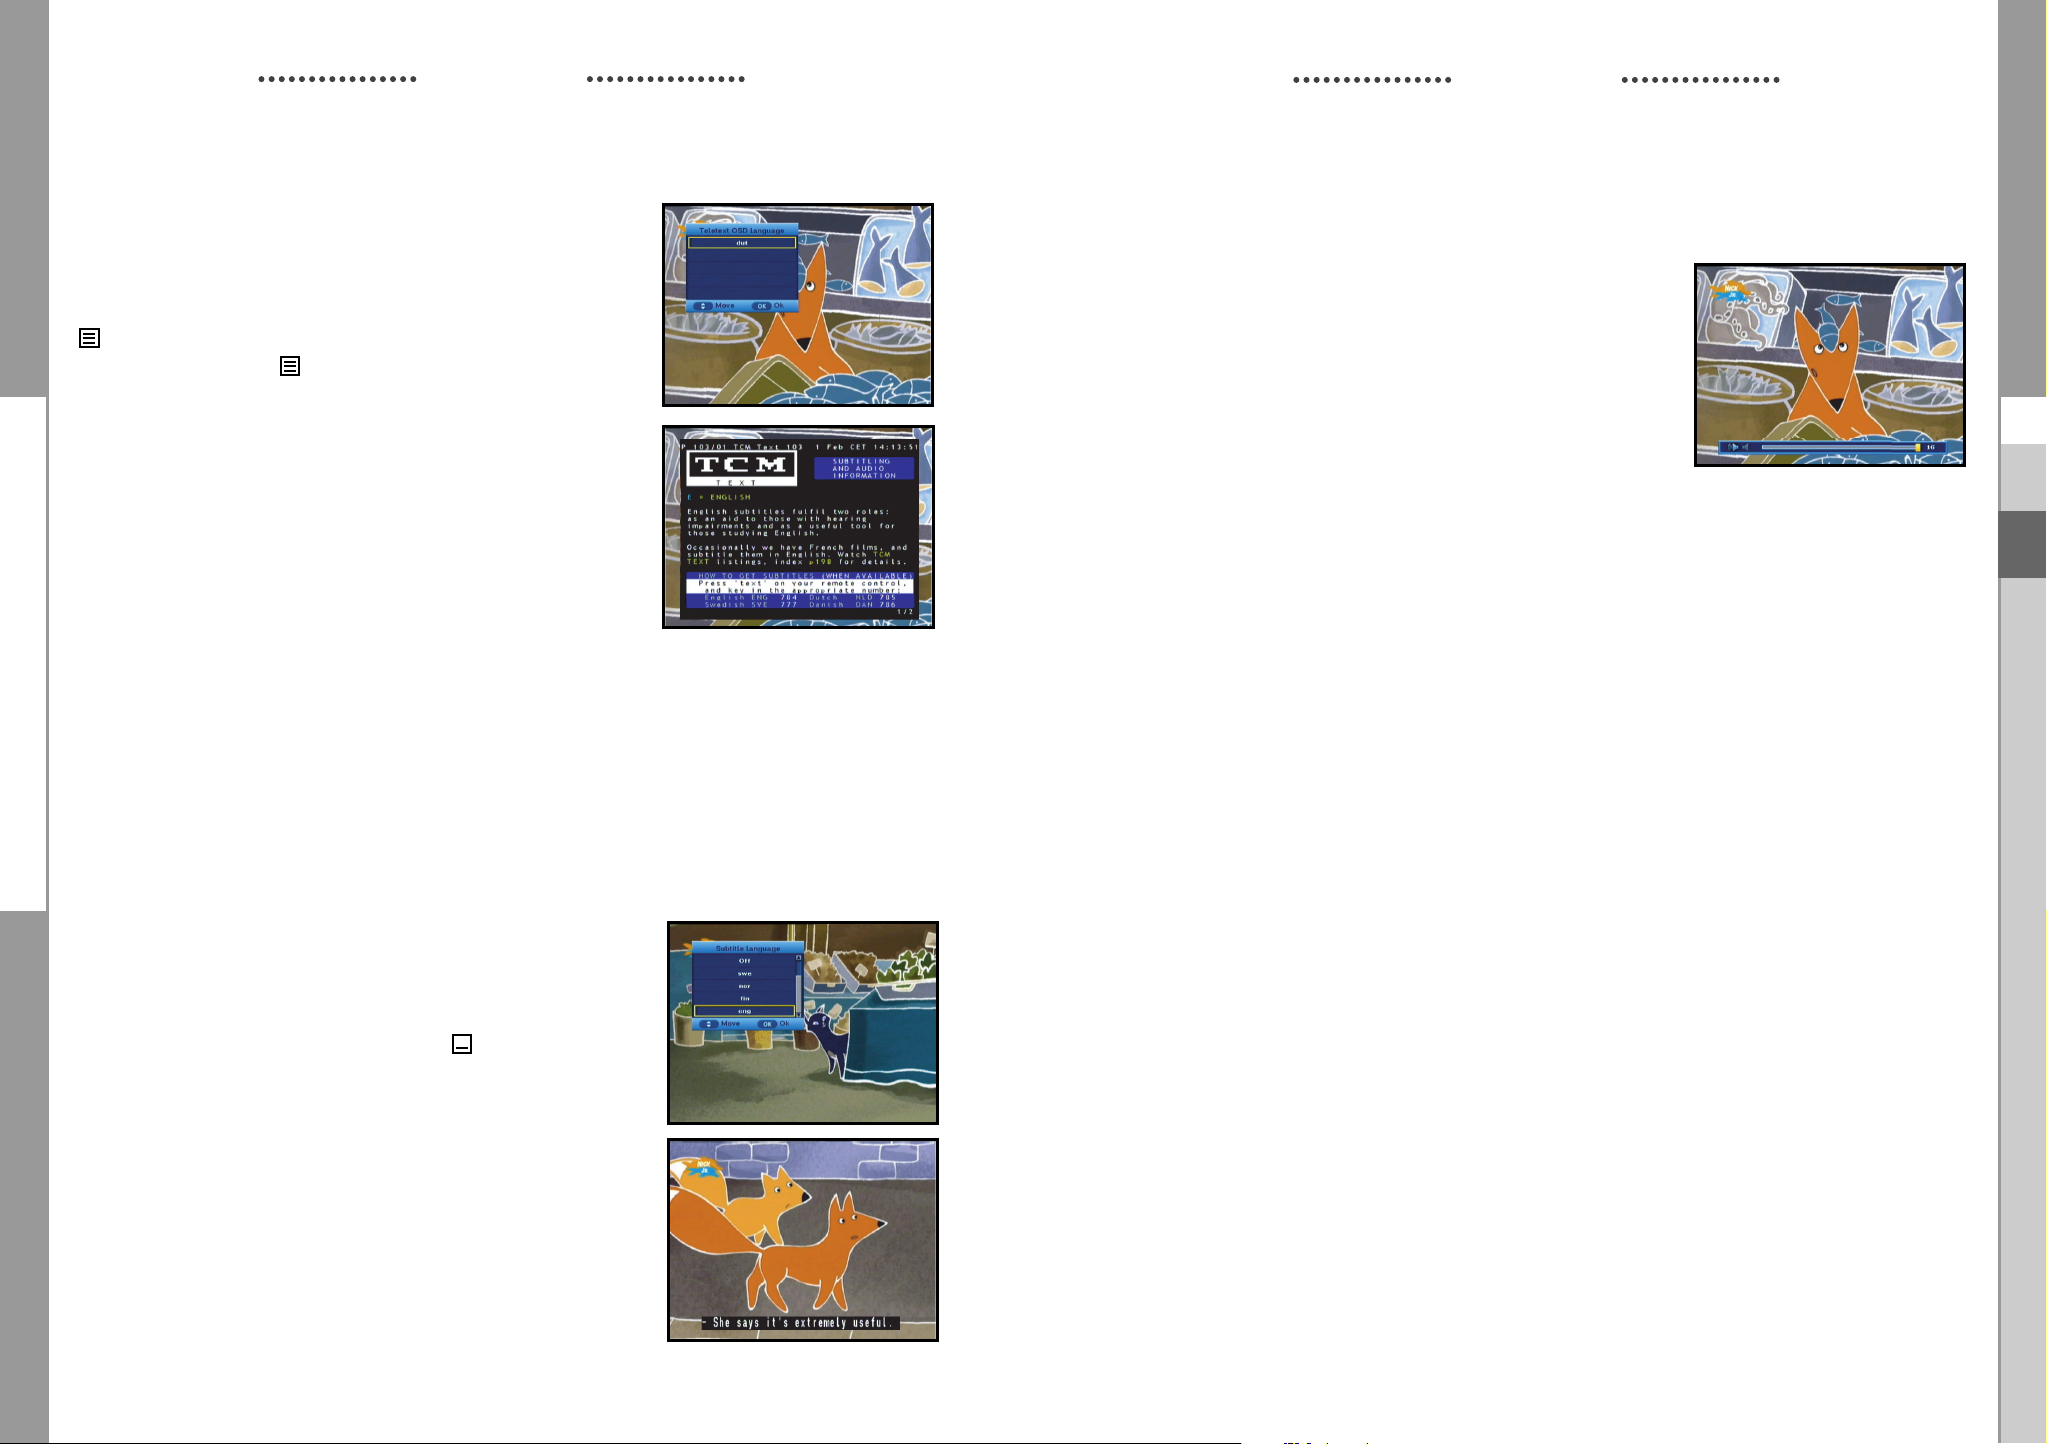
7. Teletext OSD
When the current broadcasting program provides Teletext, press
the TEXT key once to see the current language list for Teletext in
order to get teletext in OSD regardless of TV type.
icon on the banner shows that Teletext is available on this
event(program). Even is displayed on the banner, Teletext
may not be available due to broadcasting.
● Press the EXIT key to exit.
NNoottee :
When the connected TV provides the Teletext
feature, this function is not supported.
The HD receiver does not support the Teletext
VBI function.
BASIC FUNCTIONS
9. Audio Mode
You can choose a mode among left, right or stereo using the AUDIO
key.
To change the audio mode:
● Press the AUDIO key to select the left, right or stereo.
GB
GB
When the teletext application is active following keys can be used:
● NUMERICAL keys: 0.....9 are used to change main page.
Then in the left upper corner will be visible number of the main page. If the broadcasting
program provides this page after the moment (usually about 20s), this page will be visible.
●
keys are used to change main page , just (+1) for key and (-1) for key.
● ¦ keys are used to change Next/Previous subpage number.
Sometimes broadcaster send one or more subpages on one main page. To change sub-page
number just press ¦ or key, if subpages will be exist in STB memory then next/previous
subpage will be displayed.
8. Subtitle
When the current broadcasting program provides subtitle,
press the SUBTITLE key to see the current subtitle language list.
If subtitle is available on current program, is displayed on the
banner .
To change the subtitle language:
● Press the SUBTITLE key once to see the subtitle language
List.
● Use the
● Press the OK key and then the subtitle language you want is
displayed.
keys to select a subtitle language you want.
NNoottee : When you select AUTO in the selection window,
operation will follow System Setup of main menu.
GB-20
DIGITAL CABLE RECEIVER
GB-21
DCB-H360R
DCB-H360R
OPERATING THE RECEIVER
OPERATING THE RECEIVER
Main Menu
After installing your cable system and STB with appropriate
connectors.
● Plug in the AC main power and switch on the receiver.
● Press the MENU key to bring up the main menu.
The following on screen display will appear:
The sub menu topics will be displayed.
For the sub-menus Installation, Channel , System, Mailbox and Irdeto
Before you begin with the “Installation” menu, you should check in the 3th menu
“System” whether all the information are applicable for you.
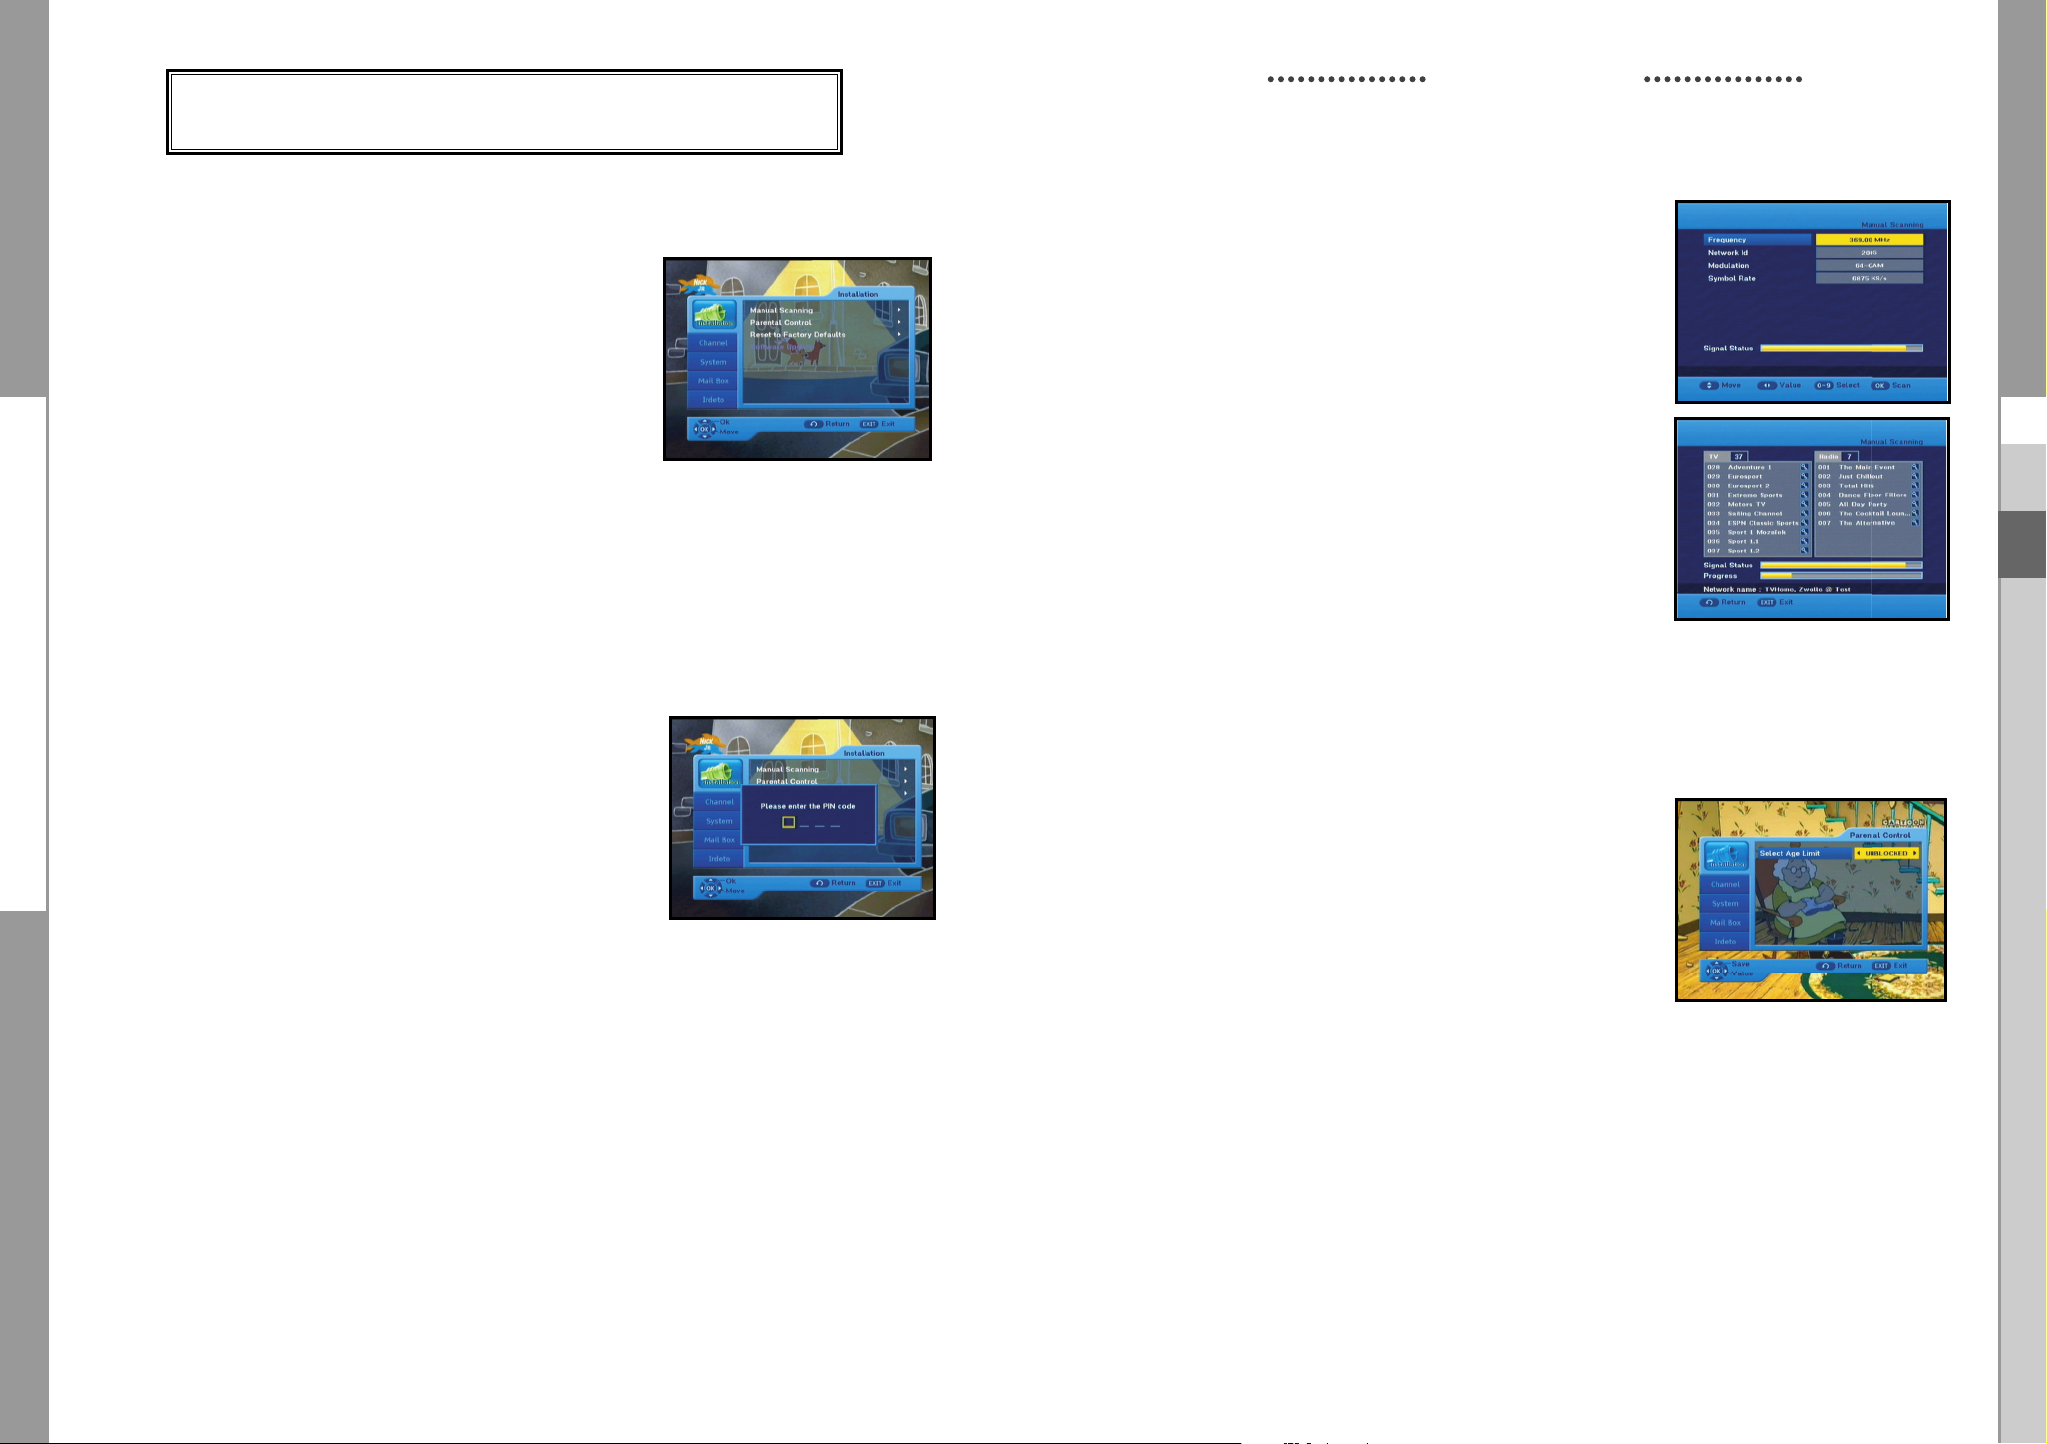
1. Installation
The menu provides settings for customizing, adding new services
and displaying the status of the receiver.
● Select “Installation” in the main menu to select the
sub menu.
● Enter the PIN Code.
If you have not entered your own PIN Code then the
PIN Code 0000 applies, which was set at the factory.
1.1 Manual Scanning
To tune-in new channels, the STB has been provided with
“Manual Scanning” where the channel data can be entered by
the user. After selecting the “Manual Scanning” from the
Installation Menu, the following screen will be displayed:
● Input the frequency of the channel you want to find.
● Input the Network ID of the channel you want to find.
Ask your cable operator.
● Select the Modulation of the channel you want to find.
You can select the value of 16, 32, 64, 128 and 256.
● Input the symbol rate of channel you want to find.
● After select option, press the OK key to start the scan
process.
● Press the EXIT key to exit the menu .
NNoottee
: When you see “NOT COMPLETE CHANNEL”, please scan again with following
instuction of service provider.
1.2 Parental Control
Parental rating protects your children from adult content.
This option is set in Installation Parental Control menu.
● Use the ¦keys to select age for your youngest child
then press the OK key to save this setting.
● All services which age grade is greater than set will be
blocked and request to enter the PIN Code.
GB
GB
GB-22
● If you want blocked all services, select “ALL BLOCKED”.
● By default, all services are “UNBLOCKED”.
Please enter the PIN Code.
● This banner is shown if service which age grade is greater than
set in Parental Control menu. Enter four digits PIN Code to
hide this banner and show service content.
Factory PIN Code is 0000, and you can change it in
Change PIN Code menu.
● Press the EXIT key to exit the menu.
DIGITAL CABLE RECEIVER
GB-23
DCB-H360R
DCB-H360R
OPERATING THE RECEIVER
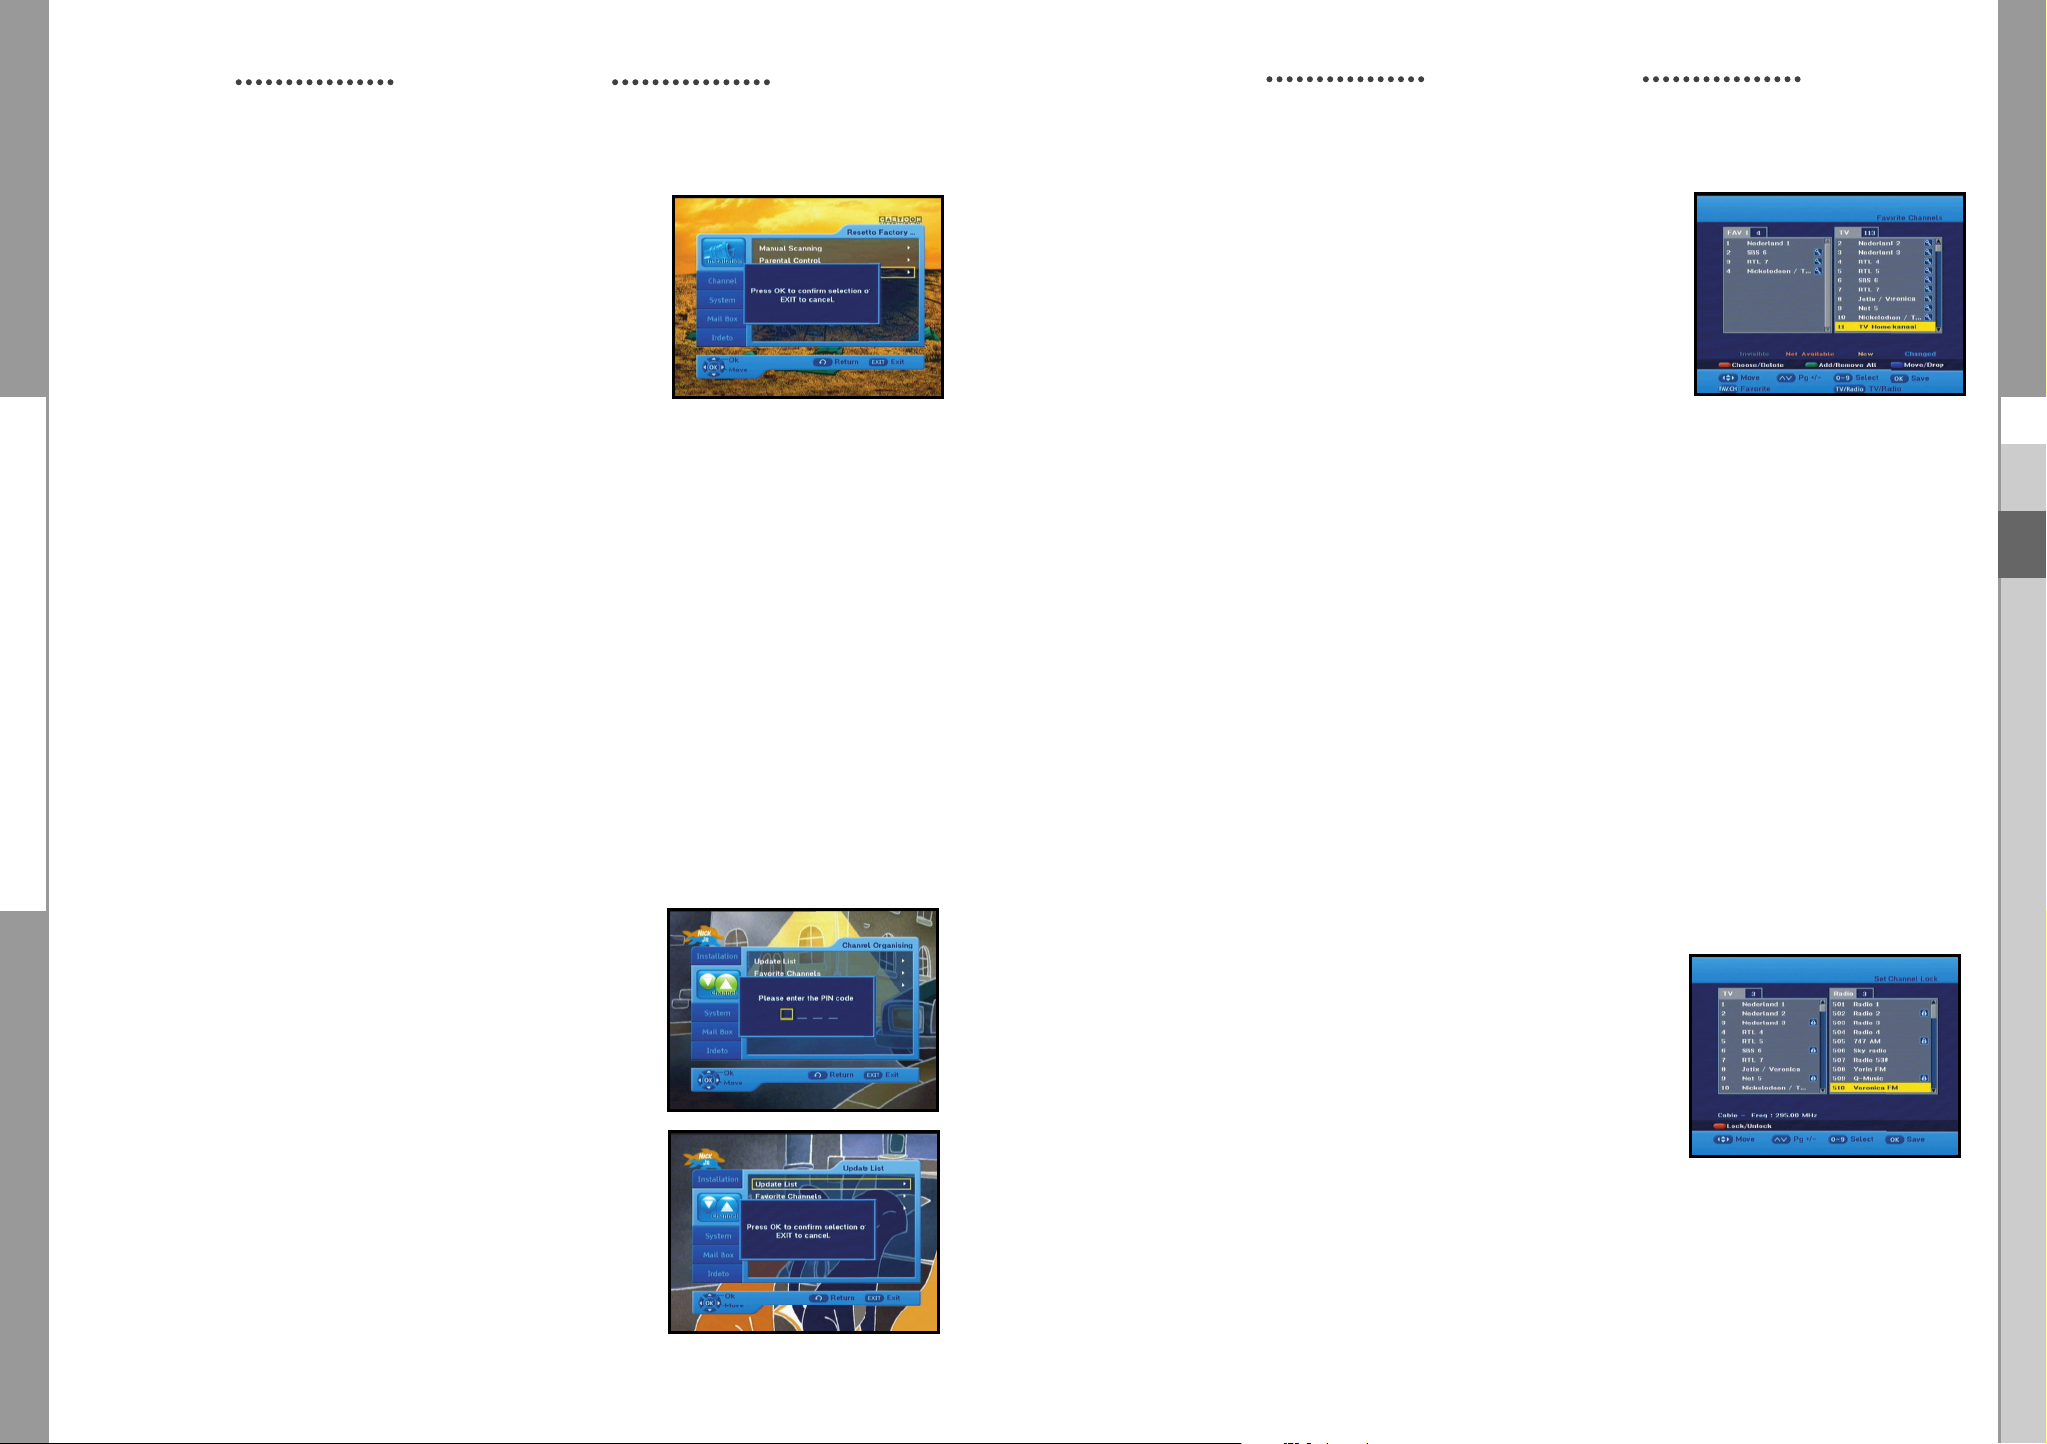
1.3 Reset to Factory Defaults
This is to recover the Factory set values in case the user has
encountered some problems after changing any values of
channel data and others which may be in error.
The screen display will be as follows:
At the request window, if you press the OK key, the receiver
will be reset to factory default settings automatically.
NNoottee
: This causes your previous settings to be deleted!
All settings and information including channel data will
be deleted.
● Press the EXIT key to exit the menu .
1.4 Software Update
This option is enabled only if your cable provider sends software for your STB.
To upgrade the software, place the cursor on Installation Software Update menu and
press the OK key. If new software is available, banner “Start Software Updating Process ?”
will be displayed. There is also information about estimated time of software download.
Press the OK key to confirm and start Software Updating process.
If there is the newest software on your STB “You don’t need to update software !” will be
displayed.
NNoottee
: STB automatically reboots for software upgrading process. During the upgrading
process, TV screen will remain blank for approximately 10 minutes. Window display at
the STB front panel will show the progress. Service will be resumed automatically after
the upgrade is completed.
OPERATING THE RECEIVER
2.2 Favorite Channels
You can immediately register the present channel to the desired
Favorite Group.
In addition, you can register a channel to multiple favorite groups.
● Select the desired Favorite Group(FAV1~FAV4) using the
FAV.CH key.
● Select the desired channel list using the or numeric keys
at the TV or RADIO list window.
● Press the RED key and then register the selected
channel at the Favorite Group.
● Then press the OK key for confirmation.
You can change TV list or Radio list by the TV/RADIO key and change favorite list
by the FAV.CH key.
● When you press the TV/RADIO key, TV list and Radio list are toggled.
● Press the FAV.CH key to select another favorite list.
● Press the EXIT key to exit the menu.
To delete channels from Favorite Group:
● Select a channel list to delete with the keys.
● Press the RED key to delete the selected channel from the favorite channels.
● Press the EXIT key to exit the menu.
NNoottee
: One favorite list can contain max 200 channels.
GB
GB
● Press the EXIT key to exit the menu.
2. Channel
The “Channel” menu has three functions:
Saving changes on channel list by select Update List and it
provides making four favourite lists and set channel lock,
as you want.
● Enter the PIN Code.
If you have not entered your own PIN Code, 0000 applies which
was set at the factory.
2.1 Update List
When some new channels will be transmitted to your cable
network, these channels would be shown on channel list
green colored. To save these channels, use Channel
List.
GB-24
Update
2.3 Set Channel Lock
● Select the TV or RADIO channel window by pressing the
¦keys.
● Focus the channel by pressing the keys.
● Select the channel lock by pressing the RED key.
● Press the OK key for confirmation.
This will lock the channel. Whenever you need to view the
channel, you will have to enter the PIN Code at the request
window.
To cancel the lock:
● Press the RED key again in order to cancel the lock.
● Press the EXIT key to exit the menu .
.
DIGITAL CABLE RECEIVER
GB-25
DCB-H360R
DCB-H360R
OPERATING THE RECEIVER
3. System
This option enables you to change the system settings as your
requirements.
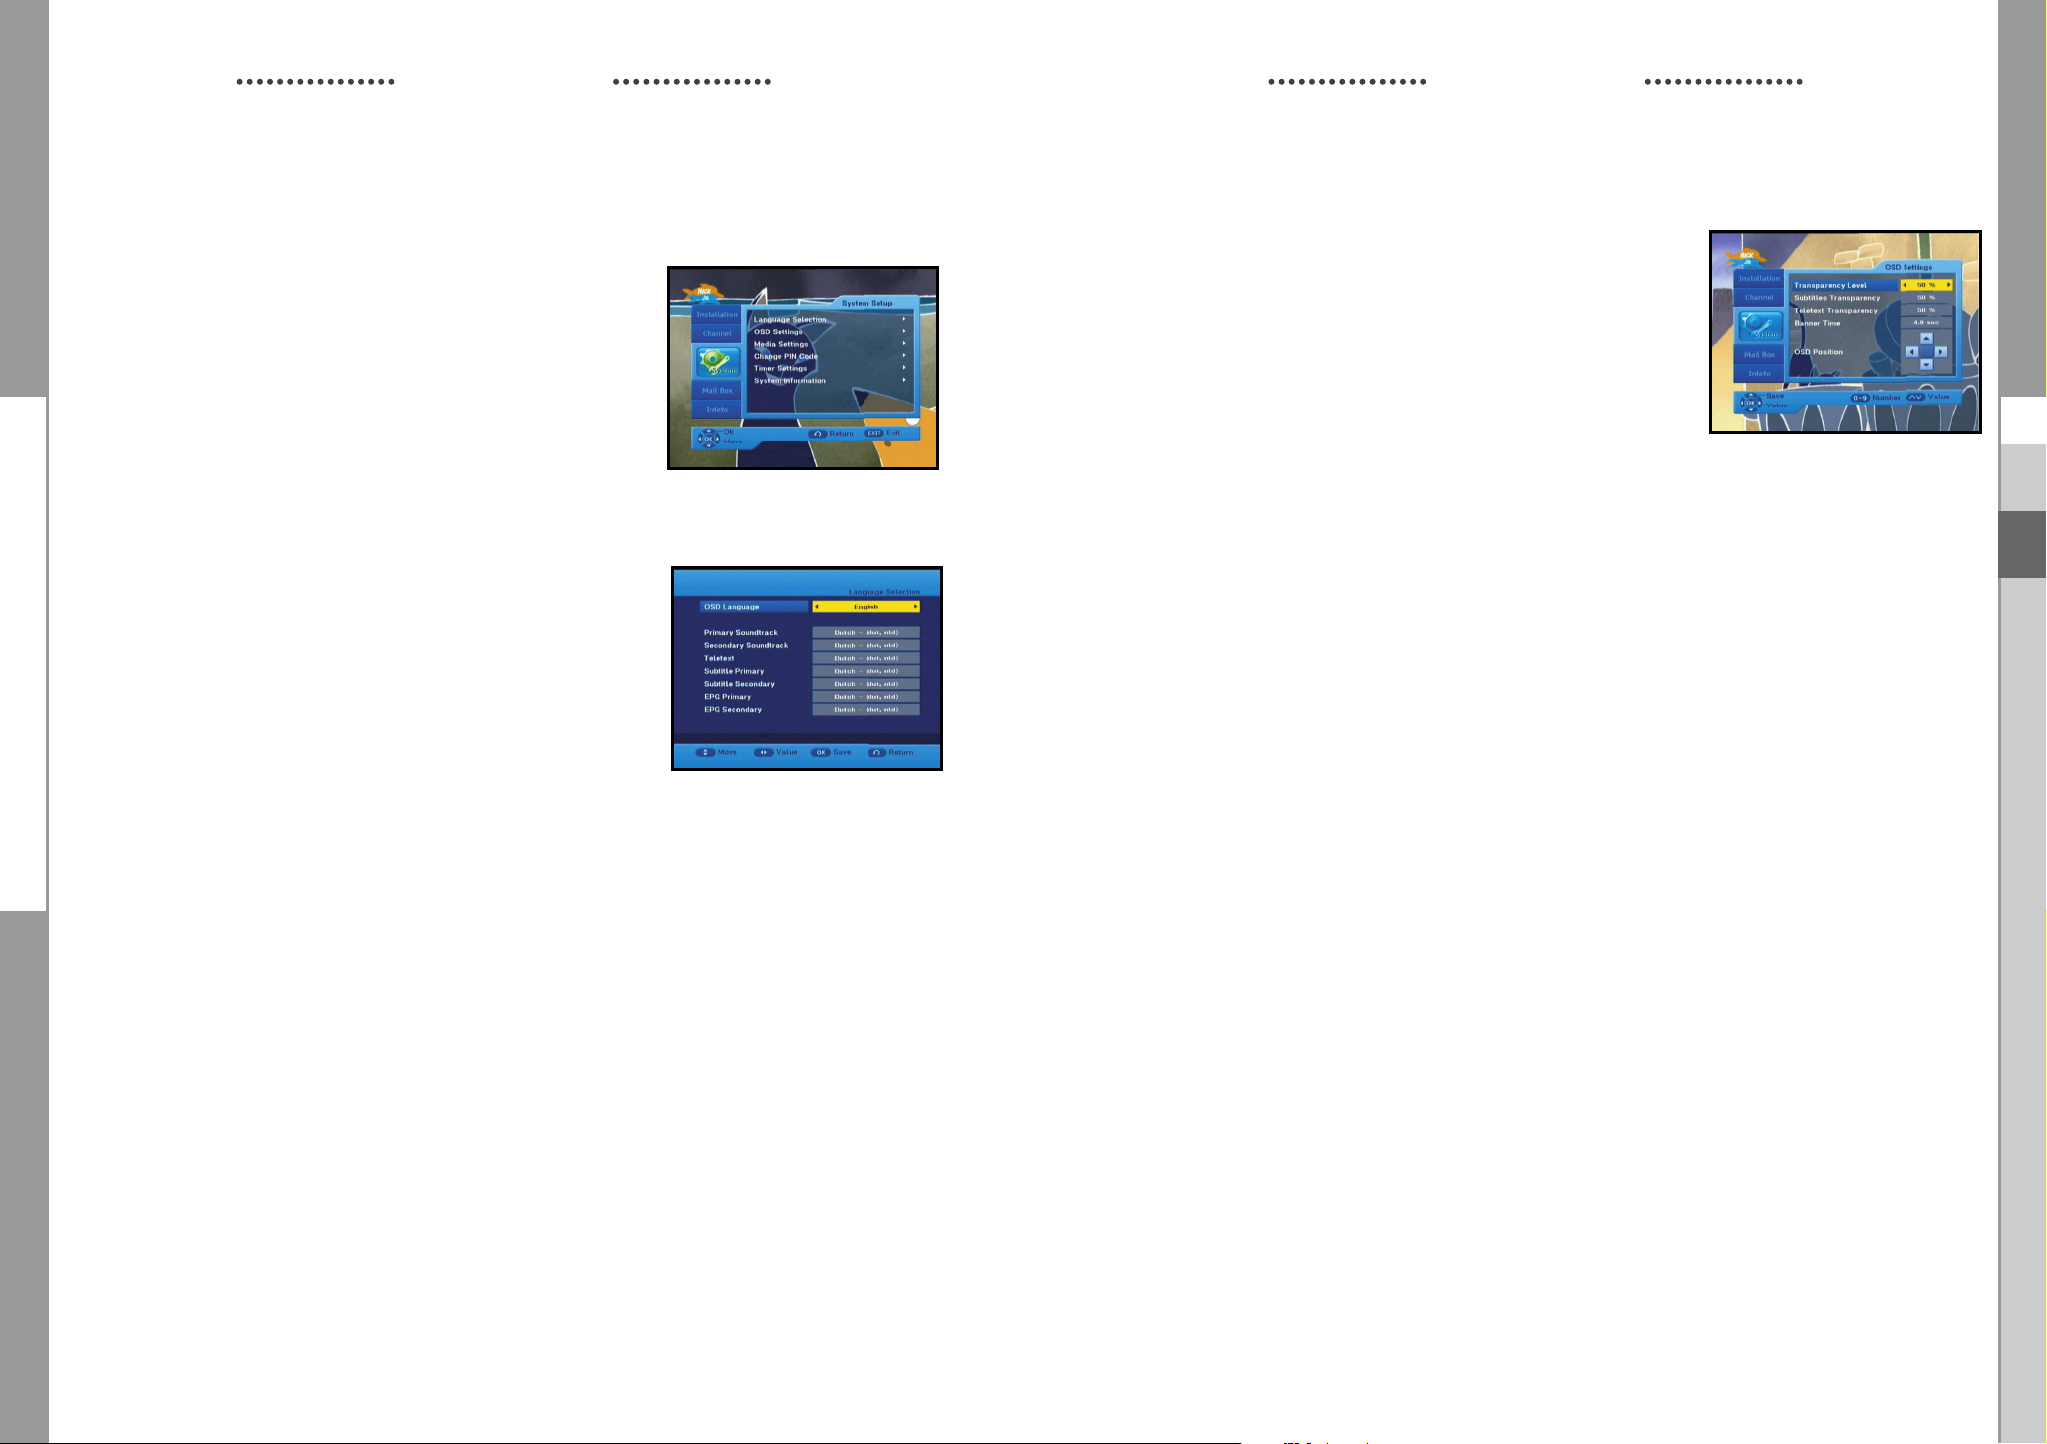
3.1 Language Selection
The “Language Selection” option allows the user to select
the desired language of the OSD, Soundtrack, Teletext, Subtitle
or EPG. However, these languages for Soundtrack, Teletext,
Subtitle and EPG depend on broadcasting.
For example, even the language for Subtitle can be selected, it
may not be supported because of no Subtitle on the program.
● There are 3 OSD languages available and 37 languages
supported for soundtracks, subtitles,Teletext, and EPG.
● To select the desired language menu, press the
change language and press the OK key.
¦
keys to
OPERATING THE RECEIVER
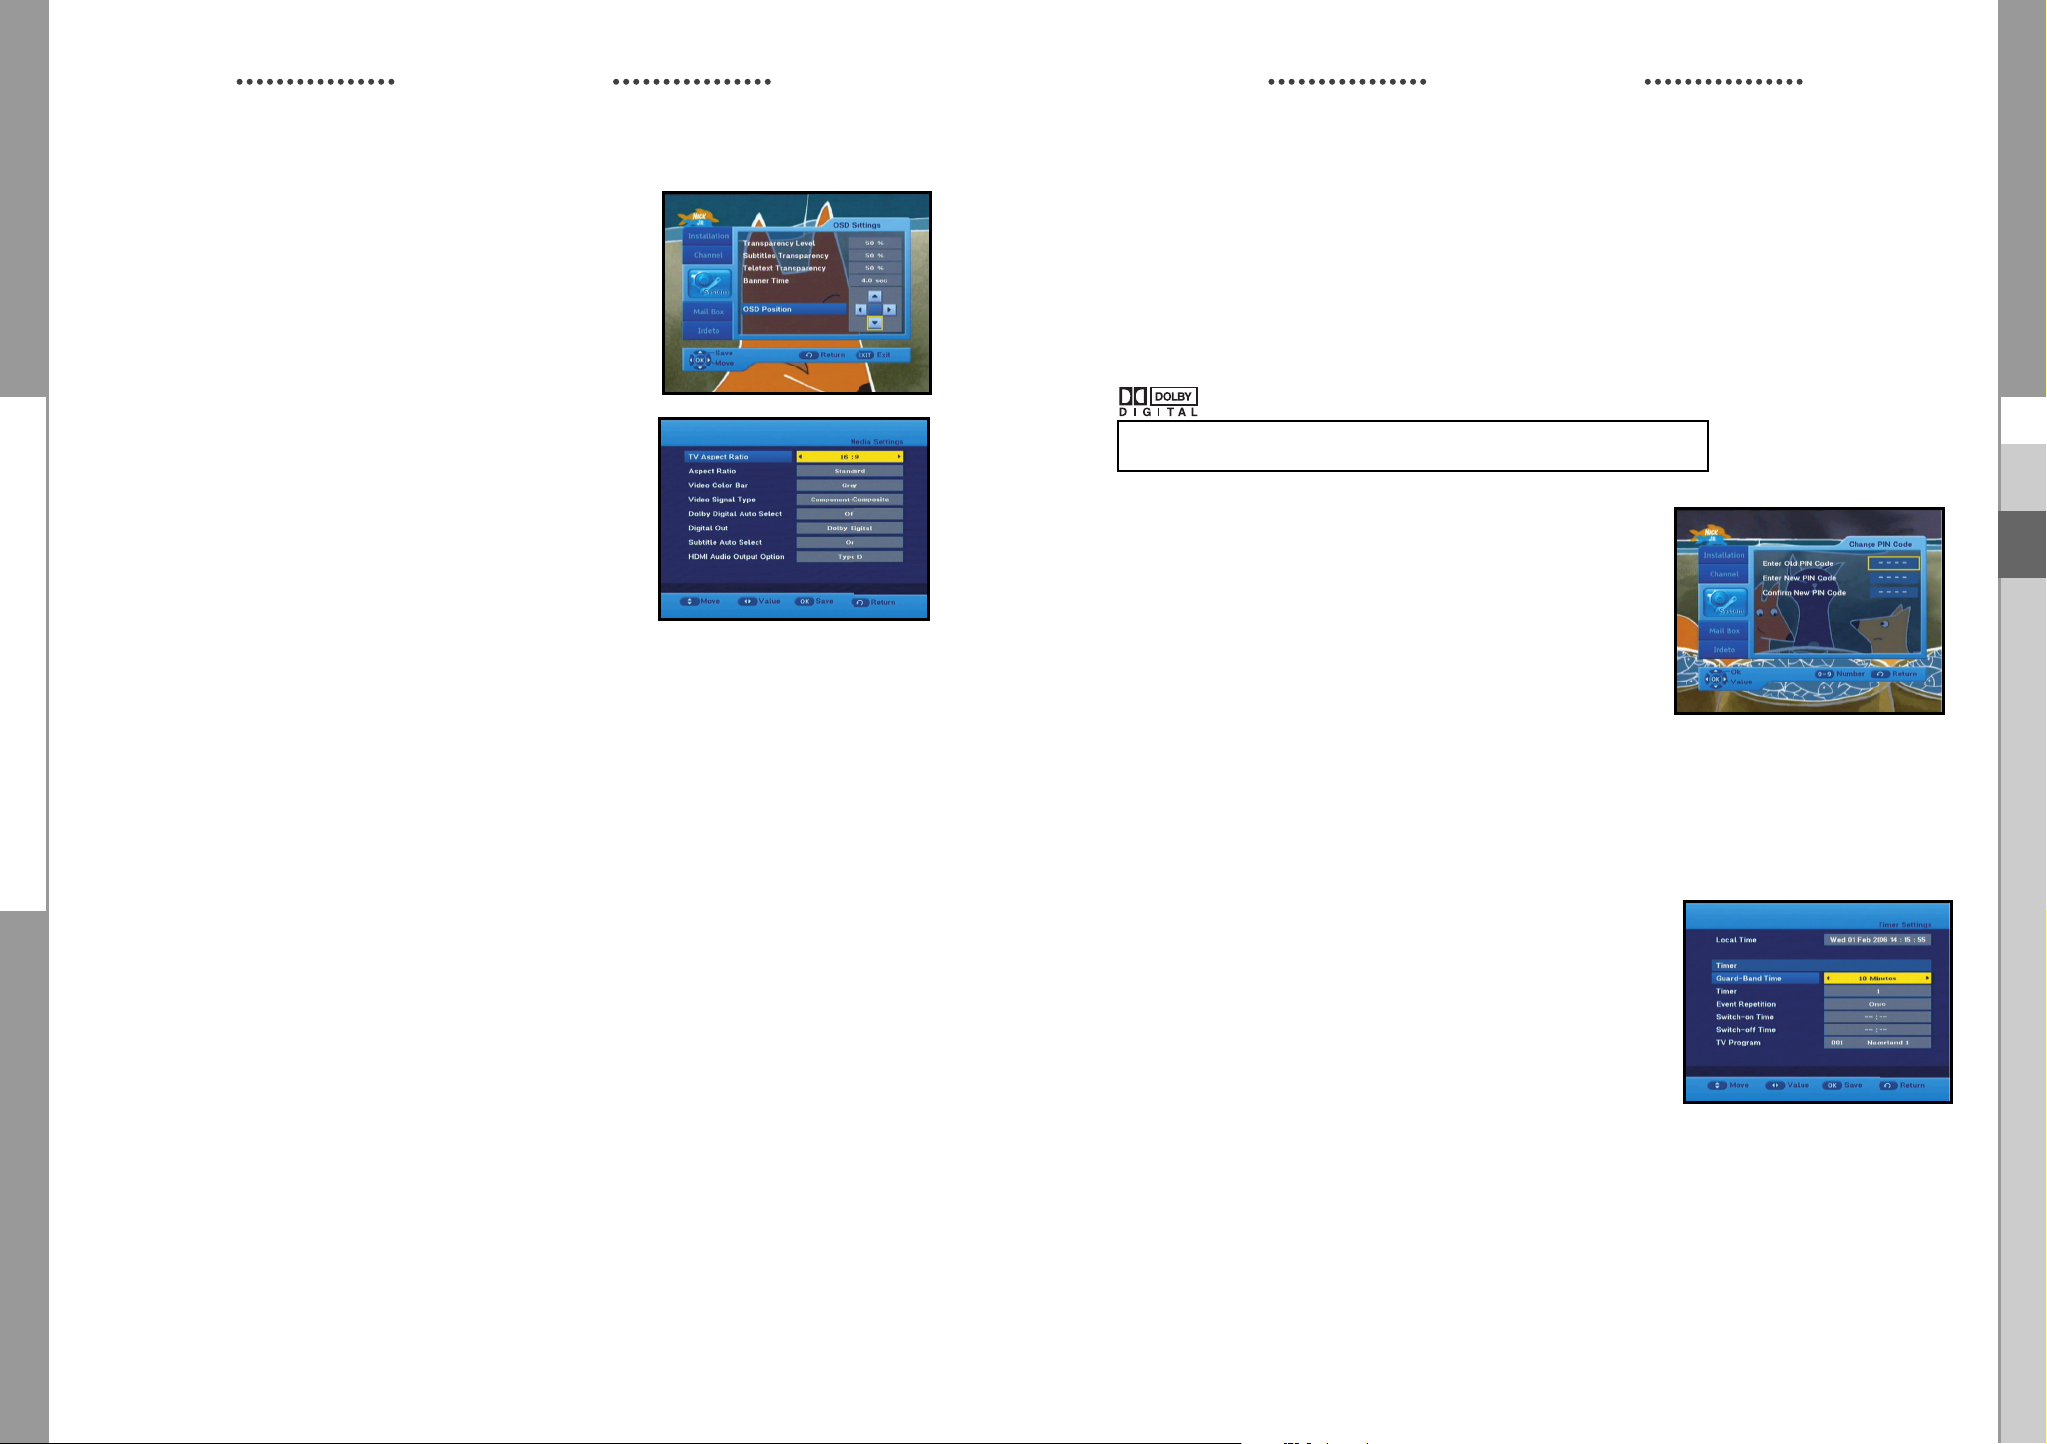
3.2 OSD Settings
You can set the transparency of OSD, subtitle and Teletext,
banner display time and OSD Position.
● Select OSD Transparency level.
The OSD Transparency level from 0 to 100%.
Setting is made with the numeric keys,
¦
keys : Setting in increment of 1%.
>
<
CH /CH keys: Setting in increment of 10%.
● Select Subtitle Transparency level.
The OSD Transparency level from 0 to 100%.
Setting is made with the numeric keys,
¦
keys : Setting in increment of 1%.
>
<
CH /CH keys: Setting in increment of 10%.
● Select Teletext Transparency level.
The OSD Transparency level from 0 to 100%.
Setting is made with the numeric keys,
¦
keys : Setting in increment of 1%.
>
<
CH /CH keys: Setting in increment of 10%.
¦
¦
¦
<
or CH /CH keys.
<
or CH /CH keys .
<
or CH /CH keys .
>
GB
GB
>
>
● The soundtracks, subtitle, Teletext, and EPG will vary according
to the selected language.
● Press the EXIT key to exit the menu .
GB-26
● Set the display duration of the information(banner) box displayed in the screen.
The time ranges from 0.5 to 60.0 seconds.
Setting is made with the numeric keys,
¦
keys : Adjusting in increment of 0.5sec.
>
<
CH /CH keys: Adjusting in increment of 1 sec.
NNoottee
: This setting does not apply to info banner and info window.
DIGITAL CABLE RECEIVER
¦
keys or CH /CH keys.
GB-27
<
>
DCB-H360R
DCB-H360R
OPERATING THE RECEIVER
OSD Position
● Place the cursor on the position you want, and press the
¦or
keys until the screen moves to the position
you want.
The screen will move to the position you want.
● Press the EXIT key to exit the menu .
3.3 Media Settings
You can set the various media settings you want.
Place the cursor on this sub menu and press OK.
● Press the
the
● Press the OK key to confirm.
Screen Format
● Select the Screen Format according to your TV : STANDARD 4:3 or WIDE SCREEN 16:9
ratio type.4:3 Video aspect ratio: PAN&SCAN, Full Screen 14:9 LB (Letter Box), 16:9 LB
● When selecting 16:9 for the screen format, you can select an aspect ratio of 4:3 for a movie.
(However, the 16:9 video menu is not available in this aspect ratio).
16:9 Video aspect ratio: Standard, Wide
● When selecting 4:3 for the screen format, you can select an aspect ratio of 16:9 for a movie.
(However, the 4:3 video menu is not available in this aspect ratio).
● Select Video Color Bar: Black or Grey.
- Warning!
Do not display the video color bar in black for extended periods of time as you may
experience temporary or permanent image burn. See also the precaution instructions
regarding your display device.
● Select the Video Signal Type :
Composite + Component, Composite + RGB
● Select the Dolby Digital Auto Select : On or Off.
On : Outputs the Dolby Digital signal first.
Off : Outputs other audio formats first.
● Select the Digital Out : Dolby Digital or PCM.
Dolby Digital : When Dolby Digital Auto Selected is on, outputs the Dolby Digital signal first.
PCM : When Dolby Digital Auto Selected is on, outputs the PCM signal first.
NNoottee: If any receiver does not support Dolby Digital, “PCM” should be selected to hear the
keys to move the sub items and press
¦
keys to select the option.
sound via HDMI.
OPERATING THE RECEIVER
● Select the Subtitle Auto Select : On, Hearing Impaired or off.
● Select the HDMI Audio Output Option : Type A, Type B, Type C or Type D.
NNoottee
: Depend on any receiver, HDMI audio may not work properly. Please choose right type of
HDMI Audio Output Option.
● Press the EXIT key to exit the menu .
Manufactured under license from Dolby Laboratories.
“Dolby” and the double-D symbol are trademarks of Dolby Laboratories.
3.4 Change PIN Code
To change the PIN Code, select the fourth option “Change PIN
Code”.
This will take you to the following menu:
In this option, you need to enter the current PIN Code at the
first cursor, and at the second cursor enter the desired PIN
Code.
To confirm, you need to enter the new PIN Code again.
Please remember the PIN Code should be a 4 digit numerical value.
THE FACTORY PRESET PIN Code : 0 0 0 0.
● Press the EXIT key to exit the menu .
3.5 Timer Settings
1) Guard Band Time
Guard-Band time is a function to ensure, that whole event will
fit in set time boundaries.
1 minute of Guard-Band Time means that STB will start this
timer operation 1 minute before set time and end 1 minute
after set time.
2) Timer
15 timers are supported including timer(s) from EPG.
● Select the timer number on ‘Timer’ using the
● Press the
¦
keys to choose event repetition you want to reserve :
Daily, Every Sunday, Every Monday, Every Tuesday, Every Wednesday, Every Thursday,
Every Friday, Every Saturday and Once.
If the timer is set from EPG screen, EPG is displayed on ‘Event Repetition’.
¦
keys from 1 to 15.
GB
GB
GB-28
DIGITAL CABLE RECEIVER
GB-29
DCB-H360R
DCB-H360R
OPERATING THE RECEIVER
● Press the Numerical (0~9) keys to set the time you want and press the
keys to
choose a switch time you want to reserve. If set time on ‘Switch-on Time’ is same as one
on ’Switch-off Time’, this timer works for 24 hours.
● Select TV program to set the event program by pressing the
¦
keys.
When you press the TV/RADIO key, TV program and Radio program are toggled.
● Even you can set timers on Daily and Every Monday or Every Sunday, etc.
The priority has the repetition event which is less. For example, when you set timers onOnce
and daily, ‘Once’ will work in stead of ‘Daily’ at that day. If the timer is running, ‘Running’
message with a timer number is displayed on ‘Timer’.
● Press the EXIT key to exit the menu.
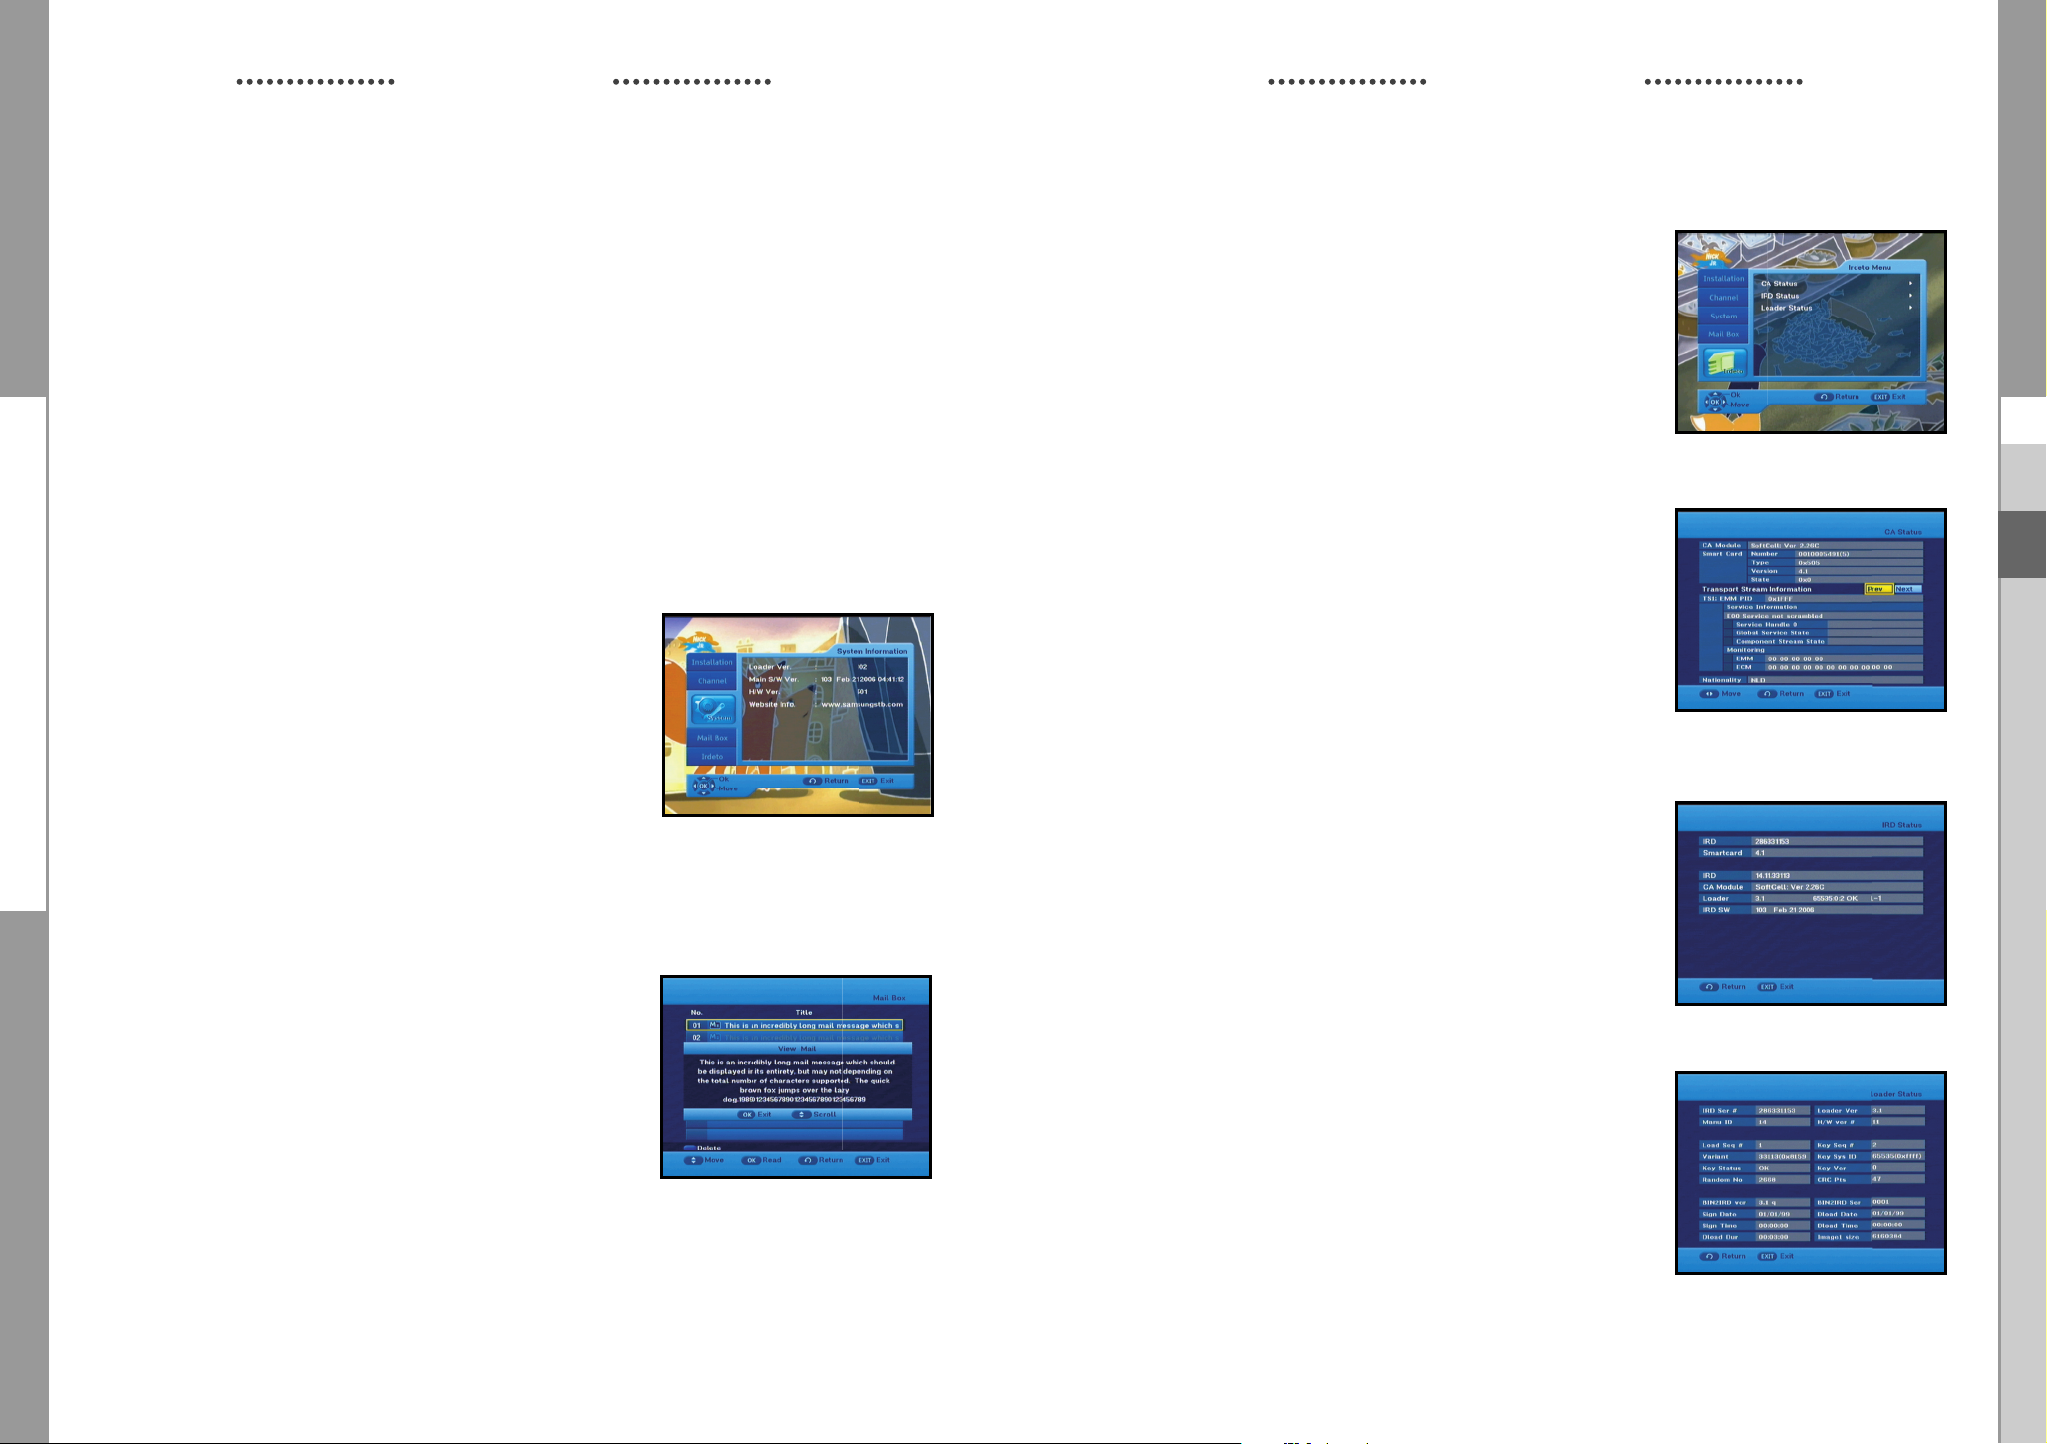
3.6 System Information
If you have to contact your service provider or a service center
they might ask for information available from this menu.
Place the cursor on this sub menu and press the OK key.
The following will be the on-screen display.
OPERATING THE RECEIVER
5. Irdeto Menu
The menu provides the information of the smartcard and
the STB. Press the OK key to enter the sub menu.
5.1 CA Status
You can see the CA status (Smart Card EMM/ECM
information).
● Press the EXIT key to exit the menu.
GB
GB
● Press the EXIT key to exit the menu.
4. Mail Box
You can read the message sent to the individual decoders.
We can save the maximum 10 mail messages.
● Press the EXIT key to exit the menu.
5.2 IRD Status
You can see the IRD status (technical information about
the IRD, CA, Smart Card and software loaded into it).
● Press the EXIT key to exit the menu.
5.3 Loader Status
You can see the information about the IRD, and software
loaded into it.
● Press the EXIT key to exit the menu.
GB-30
DIGITAL CABLE RECEIVER
GB-31
DCB-H360R
1. TV key + 3-Digit User Code
2. TV Operating keys: TV STANDBY/ON, 0~9, CH
TV
Maker (BRAND) NAME CODE NUMBER (3DIGIT) LIST
SAMSUNG 001 002 003 004 005 006 007 008 009
A.R. SYSTEMS 049 152
ACCENT 049 152
ACEC 112
ACURA 195
ADMIRAL 065 076 163 171 190 307 324 369 466
ADYSON 379
AGASHI 076 379
AGEF 324
AIKO 049 076 102 141 152 172 195 225 379
AIWA 377 459
AKAI 049 050 055 066 076 102 107 123 139
AKIBA 049 123 152 380 378
AKITO 049 106 152
AKURA 049 076 123 195 378 426 470
ALARON 042 379
ALBA 018 049 050 107 123 134 163 168 195
ALBIRAL 371
ALCYON 407
ALLORGAN 050 094 236 379
ALLSTAR 049 152
AMPLIVISION 113 379 421 425
AMSTRAD 012 049 076 123 131 152 172 195 225
ANAM 049 152 195
ANAM NATIONAL 049 152
ANGLO 076 195
ANITECH 049 076 152 195 407
ANSONIC 045 049 107 112 152 195 210 226 391
ARC EN CIEL 074 182 186 424 453 463
ARCAM 379 424
ARISTONA 049 050 065 079 112 152 160
ARTHUR MARTIN 107 127 136 139 153 307 425
ASA 020 065 078 080 091 146 171 197 307
ASBERG 049 152 407
ASORA 195
ASTRA 195
ASUKA 050 076 123 378 379
ATLANTIC 049 050 071 113 152 236 379
ATORI 195
AUCHAN 107 425
AUDIOSONIC 049 074 076 152 182 195 213 379 421
AUDIOTON 050 076 379 421
AUSIND 090 407
AUTOVOX 050 071 078 079 080 083 090 156 236
AWA 018 049 131 152 195 226 320 379 426
AYOMI 411
BAIRD 074 102 182 209 218 379 409
BANG & OLUFSEN 324
BARCO 107 371 480
BASIC LINE 049 107 123 195 226 378
BASTIDE 379
Available TV Manufacturer Numbers
/
, VOL+/-, INPUT SEL, MUTE
Maker (BRAND) NAME CODE NUMBER (3DIGIT) LIST
010 050 066 076 102 195 217 365 379
421
481
141 150 152 172 182 195 209 225 379
428 433 437 471 475
225 232 379 413 421 457
426 476
413 421
324 375 408 449
324 379 407 413 449 468 470
433
BAUR 049 107 150 152 172 247 249 357 414
BEKO 152 241 421 433 460
BEON 049 152 163
BEST 213 421
BESTAR 049 152 226 421
BINATONE 379
BLACK STAR 413
BLACKTRON 378
BLACKWAY 378
BLAUPUNKT 057 060 113 247 249 345 451 454 481
BLUE SKY 049 123 152 195 217 232 378 380 457
BLUE STAR 378
BONDSTEC 413
BOOTS 050 106 379
BPL 049 152 378
BRANDT 014 074 182 186 218 424 436 452 462
BRANDT ELECTRONIC 074 453 463
BRANDT ELECTRONIQUE 074 182 186 453
BRINKMANN 049 152 163
BRIONVEGA 049 065 083 152 167 172 324 356 476
BRITANNIA 379
BROTHER 076
BRUNS 065 324
BSR 094 107 110 139 168
BTC 123
BUSH 018 049 076 094 106 107 123 134 139
BUSH(UK) 107 168
CAPSONIC 049 076 152 380
CARREFOUR 018 177
CASCADE 049 064 152 195
CASIO 049 152
CATHAY 049 152
CCE 049 152 379
CENTURION 049 152
CENTURY 065 163 324 411 413 481
CGE 011 090 093 094 107 139 142 163 168
CIHAN 217
CIMLINE 123 134 195
CITY 195
CLARIVOX 049 125 163
CLATRONIC 045 049 076 113 123 152 195 225 379
CMS HIGHTEC 379
COMTEL 125 217
CONCORDE 195
CONDOR 045 049 050 113 152 163 195 210 378
CONTEC 018 131 195 320 379
CONTINENTAL EDISON 014 074 182 186 232 424 453 462 463
COSMEL 195 213
CROSLEY 065 090 093 094 104 107 139 324 346
CROWN 049 152 163 170 195 209 232 407 421
CRYSTAL 477
CS ELECTRONICS 123 379 413
CTC 413
CTC CLATRONIC 045
CURTIS MATHES 126 190
454 470 475
142 172 193 195 209 217 225 226 232
307 378 379 457 458 470 480
346 348 369 407 413 421 480
407 413 421
379 413 421 467
348 407 413 469 481
470
Available TV Manufacturer Numbers
TV
Maker (BRAND) NAME CODE NUMBER (3DIGIT) LIST
CURTIS MATHES 126 190
CYBERTRON 123
DAENYK 042
DAEWOO 049 123 152 193 195 226 379 456 464
DAINICHI 123 379
DANSAI 049 076 141 152 195 379
DANSETTE 426
DANTAX 421
DATSURA 209
DAWA 049 152
DAYTON 049 152 195 226
DE GRAAF 107 139 209 307 479
DECCA 049 102 106 120 217
DECCA(UK) 046 049 050 102 106 131 152 379
DEITRON 049 152
DENKO 076
DENON 126
DERWENT 105
DESMET 049 113 152
DIGATRON 049
DIGILINE 049 152
DIXI 049 152 195 379 413
DORIC 104 105
DREAN 049 152
DTS 195
DUAL 049 050 107 139 152 156 168 182 243
DUAL TEC 040 050 168 195 379
DUMONT 045 065 080 102 139 146 324 375 379
DUMONT-FINLUX 020 045 078 091 104
DUX 049 112 152
DYNATRON 049 152
ELBE 049 107 123 152 172 210 243 369 391
ELBIT 217
ELCIT 045 046 062 065 104 107 150 168 324
ELECTA 076 378
ELECTRO TECH 195
ELEKTA 076 378
ELG 049 152
ELIN 020 049 107 139 152 172 195 379 470
ELITE 049 123 152 467
ELMAN 045 168
ELTA 195 076 379
EMERSON 012 042 049 065 113 152 225 324 378
ERRES 049 112 152
ESC 049 152
ETRON 049 107 139 152 195
EURO-FEEL 076
EUROMAN 049 076 152 379 421
EUROPA 049 152
EUROPHON 045 046 049 050 068 107 120 152 168
EXPERT 071 107 236 425
EXQUISIT 049 152 413
FAMILY LIFE 049 152
FENNER 152 195 226
FERGUSON 049 050 074 076 080 082 102 103 182
FIDELITY 049 050 076 107 152 225 307 379 475
FILSAI 050 379
FINLANDIA 033 139 172 197 209 307 375 470 474
FINLUX 020 042 045 049 078 080 090 091 102
379 414 417 424 468 470
449 469
411 421 435
413
479
413 475 481
379 413
218 247 409 411 436 452 472
104 107 139 146 152 163 197 210 324
375 379 407 408 428 429 437 449 469
Maker (BRAND) NAME CODE NUMBER (3DIGIT) LIST
FIRST LINE 045 049 094 102 107 134 139 152 191
FISHER 018 041 050 065 069 102 104 107 139
FLINT 049 102 123 152 380
FNR 045
FORMENTI 049 090 107 113 139 307 324 379 407
FORMENTI-PHOENIX 050 104 113 307
FORTRESS 190 324
FRABA 049 152 421
FRIAC 045 049 152 195
FRONTECH 066 076 139 195 307 379 413 466 470
FUJITSU 042 045 071 102 107 195 236 379
FUJITSU GENERAL 195 379
FUNAI 042 076 094
GALAXI 045 049 152
GALAXIS 045 049 152 163 421
GBC 104 107 139 168 195 226 480
GE 074 182 218 378
GEANT CASINO 107 425
GEC 049 102 104 107 120 152 171 172 307
GEC(UK) 046 050 102 107 150 162
GELOSO 062 104 107 139 168 171 195 226 307
GENERAL 064 074 182
GENERAL TECHNIC 195
GENEXXA 049 123 152 307 426 466
GOLDHAND 379
GOLDLINE 213
GOLDSTAR(LG) 049 050 055 107 139 152 168 172 182
GOODMANS 018 042 049 076 102 134 139 141 152
GORENJE 421
GPM 123
GRADIENTE 049 152 170 177
GRAETZ 049 090 104 136 139 152 153 162 171
GRANADA 013 018 033 041 049 102 104 105 112
GRANADA(UK) 046 050 090 107 139 162 307
GRANDIN 049 107 113 123 152 195 378 380 425
GRONIC 045 379
GRUNDIG 049 080 090 152 232 247 249 407 454
HALIFAX 076 379
HAMPTON 379
HANIMEX 094
HANSEATIC 018 049 050 094 104 107 113 152 172
HANTAREX 045 046 049 152 195
HANTOR 049 152
HARLEY DAVIDSON 042
HARWOOD 049 152 195 426
HAUPPAUGE 049 152
HAVERMY 190
HCM 049 076 123 152 163 195 378 379 426
HEMA 195 379
HEMMERMANN 150 470
HIFIVOX 074 182 186 424 453 463
195 209 210 226 379 411 413 457 470
156 172 209 320 324 379 408 414 421
470
467 469 480 481
477
379 470
413 469 481
195 219 379 413 414 421 460
182 193 195 218 225 226 232 379 428
450 456 464
172 198 225 307 466 469 475
120 152 171 172 198 209 218 238 241
307 379 407 425 470 471 472 474
435
455
195 241 324 378 379 391 421 455 467
470 475
DCB-H360R
GB
GB-32
DIGITAL CABLE RECEIVER
GB-33

DCB-H360R
DCB-H360R
Available TV Manufacturer Numbers
TV
Maker (BRAND) NAME CODE NUMBER (3DIGIT) LIST
HIGASHI 050
HIGHLINE 049 076 152
HIKONA 123
HINARI 012 018 042 049 066 094 107 123 134
HISAWA 123 378 380 425
HIT 324
HITACHI 018 020 033 049 050 074 086 099 102
HITACHI FUJIAN 013
HITSU 123 195 380
HORNYPHON 049 112 152
HOSHAI 123 380
HUANYU 193 226 379
HYGASHI 379
HYPER 050 168 195 379 413
HYPERSONIC 172
HYPSON 049 076 152 217 378 379 380 425
IBERIA 049 152
ICE 049 076 123 152 195 225 379
ICES 123 379
IMPERIAL 011 049 090 093 094 107 142 152 163
INDIANA 049 152
INGELEN 090 104 136 139 153 162 171 198 232
INGERSOLL 195
INNO HIT 046 049 050 066 102 123 152 195 217
INNOVATION 049 152
INTERACTIVE 210
INTERBUY 076 195 413
INTERFUNK 049 065 067 074 090 104 107 112 139
INTERNAL 049 152
INTERVISION 045 049 055 076 107 123 152 225 232
IR 346
IRRADIO 049 066 090 123 152 195 407 413
ISUKAI 049 123 152 378
ITC 379 480
ITS 049 076 123 152 225 378 379
ITT 042 090 107 134 139 150 162 171 172
ITT-NOKIA 042 090 104 107 134 136 139 150 153
ITV 076 049 152 413
JEAN 018
JEC 141
JET POINT 365
JVC 018 103 123 170 182 225 409 433 439
KAISUI 049 050 123 152 195 378 379 380
KAMOSONIC 050
KAMP 379
KAPSCH 071 107 172 236 466
KARCHER 020 045 049 050 068 076 107 152 195
KATHREIN 455
KAWASHO 379
KB ARISTOCRAT 107
139 195 209 232 307
104 107 110 126 127 139 150 152 162
168 171 182 186 218 238 307 379 466
469 470 472 479
168 307 346 348 369 407 413 421 470
480
435 466
379 407 413
150 152 153 172 182 307 324 413 421
453 463 466 475
378 379 380 413 421
193 197 198 209 307 375 428 466 469
470 471 475 479
162 171 172 193 197 198 209 307 375
470 428 433 435 437
465
217 378 421 435
Maker (BRAND) NAME CODE NUMBER (3DIGIT) LIST
KENDO 045 049 055 134 152 172 210 413 421
KENNEDY 071 079 104 107 139 236 369 480
KINGSLEY 379
KLARMAX 371
KNEISSEL 049 152 210 243 369 391 411 421 435
KOLSTER 045 049 152 470
KONKA 049 123 152 225
KONTAKT 232
KORPEL 049 152
KORTING 065 094 113 324 421
KOSMOS 049 152
KOTRON 076 426
KOYODA 195
KRAKING 411
KRIESLER 050 065 079 112 152 160
KTV 050 379
KURO 445
KYOSHU 076 163 426
KYOTO 107
LECSON 049 152
LEMAIR 210
LENCO 049 107 152 195 226
LENOIR 050 195
LESA 413
LEYCO 049 076 094 102 152
LIESENK & TTER 049 112 152 345
LIFE 440 441 443 444
LIFETEC 049 076 123 152 195 226 440 441 443
LLOYD_S 195
LOEWE 035 049 089 120 152 324 391 421
LOEWE OPTA 035 046 049 065 120 144 152 213 324
LOGIK 131 225
LOGIX 195
LUMA 071 107 110 152 171 172 195 210 226
LUMATRON 049 076 107 152 172 236 379
LUX MAY 049 152 195
LUXOR 042 050 090 107 127 139 150 172 197
LYCO 076
MAAZ 371
MADISON 049 152
MAGNADYNE 045 046 062 065 104 107 120 139 150
MAGNAFON 045 046 050 068 090 120 379 407 481
MAGNAVOX 018 042 049 152
MAGNUM 440 441 443 444
MANDOR 076
MANESTH 076 094 113 134 141 152 379 467
MANHATTAN 049 195
MARANTZ 049 152 455
MARELLI 324
MARK 049 152 195 226 379
MASUDA 123 195 225
MATSUI 012 018 041 049 050 094 100 102 106
MAXIMAL 139
MAXWELL 371
MEDIATOR 049 112 152
MEDION 049 152 195 217 457
MEGAS 435
MEGATRON 126
MELECTRONIC 020 049 074 152 182 193 195 197 210
MELVOX 425
435 476
444
236 307
209 307 375 428 429 470 472 473 475
168 324 413 469
107 131 134 141 150 152 171 195 209
218 225 232 247 307 379 380 470
226 375 379 408 413 428 429 466 470
Available TV Manufacturer Numbers
TV
Maker (BRAND) NAME CODE NUMBER (3DIGIT) LIST Maker (BRAND) NAME CODE NUMBER (3DIGIT) LIST
MELVOX 425
MEMOREX 099 195 217
MEMPHIS 102 125 195 213
MERCURY 049 152 195
METZ 049 065 067 070 092 247 324 412 420
MICROMAXX 049 152 195
MICROSTAR 440 441 443 444
MINERVA 080 090 232 247 249 407 454
MINOKA 049 152 426 470
MITSUBISHI 013 018 049 065 105 131 152 157 190
MIVAR 046 050 058 072 081 090 120 379 391
MONACO 195
MORGAN_S 049 152
MOTION 407
MOTOROLA 190
MTC 152 379 421 470
MTEC 106
MULTISTANDARD 045
MULTITEC 049 152 195
MULTITECH 045 046 049 050 120 152 195 379 407
MURPHY 102 104 105 107 171 307 379
MURPHY(UK) 162
MUSIKLAND 123
MYRYAD 455
NAD 172 209 475
NAIKO 049 152
NAKIMURA 049 152 226
NAONIS 040 071 079 110 171
NAT 085 151
NATIONAL 033 085 104
NEC 018 049 113 131 152 177 195 226 379
NECKERMANN 011 049 050 065 107 139 152 163 210
NEDIATOR 152
NEI 049 125 152 225 477
NESCO 042 413
NETSAT 049 152
NETWORK 213
NEUFUNK 049 152 195 435
NEW TECH 049 050 152 182 195 379
NEW WORLD 123
NICAMAGIC 379
NIKKAI 018 049 076 102 123 125 139 141 152
NOBLEX 049 076 152
NOBLIKO 045 050 080 090 379 407
NOGAMATIC 074 182 186 424 453 463
NOKIA 090 104 107 134 136 139 150 153 157
NORDMENDE 049 074 083 150 152 182 186 218 247
NOVATRONIC 020 049 152 226
OCEANIC 086 094 104 107 108 109 139 172 209
OCEANIC(F) 150
ODEON 076
OKANO 049 076 102 152 421
OMEGA 076
ONCEAS 050
ONWA 123 225
OPERA 049 152
454 481
247 324 454
407 414 421 434
413 421 470
380
247 249 307 324 357 379 413 421 455
470 481
195 213 379 066
162 171 172 193 197 198 209 226 307
375 428 429 433 437 465 470 475 478
479
307 424 453 463 469 481
425 466 469 475
OPTIMUS 099
OPTONICA 190
ORBIT 049 152
ORION 012 042 045 049 076 094 113 131 134
ORLINE 049 123 152
ORMENTI-PHOENIX 104
ORMOND 195
OSAKA 066
OSAKI 049 066 076 102 106 123 152 226 379
OSIO 049 152
OSO 123
OSUME 018 102 123
OTAKE 450
OTTO VERSAND 018 049 050 074 094 104 107 113 134
P.T ACTRON 217
PAEL 050 379
PALLADIUM 049 107 152 163 210 247 324 357 379
PALSONIC 049 055 076 152 379 426
PANAMA 049 076 152 195 379 413
PANASONIC 016 049 099 104 107 139 151 152 172
PANAVISION 049 152 210
PATHE CINEMA 107 113 379 391 411 425 467 470 480
PATHE CINEMA(F) 050 168
PATHE MARCONI 014 074 182 186 424 453 462 463
PAUSA 195
PAUZA 195
PERDIO 049 102 107 113 152 467
PERFEKT 049 152
PERSHIN 425
PHILCO 011 016 049 065 090 093 094 104 107
PHILEX 471
PHILHARMONIC 379
PHILIPS 014 049 050 065 079 089 112 152 160
PHOENIX 049 050 102 104 107 113 152 324 379
PHONOLA 049 050 065 079 112 152 160 324 379
PILOT 049 152
PIONEER 049 074 152 172 182 209 218 307 421
PLANTRON 049 076 152 195
PLAYSONIC 379
POLICOM 074
POPPY 195
PORTLAND 226
POWERPOINT 232
PRANDONI-PRINCE 046 090 120 171 172 307 407 413
PRECISION 379
PREMIER 142
PRIMA 076 195 307
PRINCE 046 171
PRINZ 102 470
PROFEX 107 139 195 407 475
PROFI-TRONIC 045 049 152
PROLINE 049 102 112 191 366 436
PROSONIC 049 085 151 152 195 225 226 379 421
139 150 152 191 195 216 366 367 426
467
426
139 152 172 190 218 247 249 357 362
379 413 414 454 455 467 469 470 480
481
413 421 470
396 420 466 469 481
481
126 142 152 163 168 324 346 348 369
407 413 421 480 481
182 193 216 217 220 226 247 249 324
427 455 482
421
427 466
GB
GB-34
DIGITAL CABLE RECEIVER
GB-35

DCB-H360R
DCB-H360R
Available TV Manufacturer Numbers
TV
Maker (BRAND) NAME CODE NUMBER (3DIGIT) LIST Maker (BRAND) NAME CODE NUMBER (3DIGIT) LIST
PROTECH 045 049 076 125 139 152 163 195 379
PROVISION 049 152
PYE 050 065 079 112 152 160 226 324
PYMI 049 112 152 195 226 324
QUADRA VISION 425
QUASAR 045 046 068 099 413
QUELLE 018 020 049 050 074 076 078 080 090
QUESTA 018
RADIALVA 049 074 107 123 152
RADIOLA 014 049 050 065 079 112 152 160
RADIOMARELLI 045 046 062 065 104 105 150 152 168
RADIONETTE 020 150
RADIOSHACK 049 152
RADIOTONE 049 076 152 163 195 421 426
RANK ARENA 018
RCA 190 218 436
RECOR 049 152
RECTILIGNE 049 152
REDIFFUSION 018 059 104 105 139 171 172 307 471
REDIFFUSION(UK) 150 162
REDSTAR 049 152
REFLEX 049 152
REOC 460
REVOX 049 152 421
REX 040 071 079 107 110 152 171 210 236
RFT 076 102 241 324 391 421
RHAPSODY 379
R-LINE 049 152
ROADSTAR 049 076 123 152 163 195
ROBOTRON 065 324
RODEX 049 152
ROWA 458
ROWSONIC 050
ROYAL LUX 421 426
RTF 065
SABA 046 065 074 077 107 120 139 172 182
SACCS 411
SAGEM 378 380 435
SAISHO 012 050 076 107 131 134 195 307 379
SALORA 033 107 127 136 139 150 153 171 172
SAMBERS 045 046 068 090 120 407 481
SANDRA 379
SANELA 411
SANSUI 049 152 225
SANTON 195
SANYO 018 020 041 049 050 065 102 107 131
SAVE 049 152
SBR 049 112 152
SCHAUB LORENZ 090 104 136 139 153 162 171 198 307
SCHNEIDER 014 040 049 050 065 069 079 104 107
413 457 470 477 480
091 094 113 131 139 146 150 152 153
172 195 247 249 320 345 346 348 357
379 408 413 449 451 454 470 475 480
481
324 413
475
243 307 413 466
186 218 307 324 424 436 452 453 463
466 469 481
477
198 209 307 466 470 472 474 475 479
152 195 198 209 320 379 391 408 421
481
433 469 470 475
112 123 139 152 156 160 168 172 182
195 225 243 307 379 382 413 414 417
457 468 470
SCOTT 042
SEARS 042
SEG 018 045 049 050 076 107 152 172 195
SEI 012 045 049 094 107 139 152 236 324
SEI SINUDYNE 446
SELECO 040 071 079 107 110 152 171 172 210
SENCORA 195
SENTRA 123 139 141 195
SERINO 380 435
SHARP 018 094 170 190 320 362
SHORAI 042 094
SIAM 049 152
SIAREM 045 046 065 104 107 120 139 324 469
SIEMENS 018 049 066 113 152 247 249 307 320
SIERA 050 065 079 112 152 160
SIERRA 049 112 152
SIESTA 421
SILVA 049 152 379
SILVER 018 042 049 076 152 172
SINGER 045 049 065 104 152 195 324 369 413
SINUDYNE 012 045 065 094 104 107 134 139 150
SKANTIC 307 472 473
SKY 049 152
SKYWORTH 448
SOGERA 113
SOLAVOX 066 102 107 139 172 307 466 471
SONAWA 123
SONITRON 209 379 421
SONNECLAIR 049 152
SONOKO 049 050 076 152 195 378 379
SONOLOR 107 139 172 209 357 425 466
SONTEC 049 094 152 421
SONY 018 045 131 211 346 357 358 370
SOUND & VISION 045 123 226
SOUND WAVE 049 113 163
SOUNDESIGN 042
SPECTRA 195
SSANGYONG 195
STANDARD 049 050 113 123 152 195 226 379
STARLIGHT 049 076 107 152 195
STENWAY 123 378
STERN 040 071 079 107 110 152 171 236 243
STRATO 049 076 152 195
SUNKAI 049 094 123 134 152 191 232 367 380
SUNSTAR 049 152 195 225
SUNWOOD 049 152 195
SUPERLA 379
SUPERTECH 049 123 152 195 379
SUPRA 195 226
SUSUMU 123 218
SUTRON 195
SWISSLINE 413
SYDNEY 379
SYSLINE 049
SYTONG 379
TACTUS 106
TANDBERG 065 074 078 172 182 210 213 420 449
TANDY 050 102 123 190 307 379 413 466
TASHIKO 018 050 107 177 379 470 474
232 379 413 407 457 480
357 469 470 481
236 243 307 369 466 476
481
345 451 454 469 481
425
152 172 210 216 236 324 357 366 367
469 470 481
307 466
Available TV Manufacturer Numbers
TV
Maker (BRAND) NAME CODE NUMBER (3DIGIT) LIST Maker (BRAND) NAME CODE NUMBER (3DIGIT) LIST
TATUNG 049 050 102 106 120 131 152 217 379
TCM 440 441 443 444
TEAC 049 076 152 163 195 217 378 380 426
TEC 040 050 064 168 195 213 218 243 379
TECH LINE 049 152 195
TECHICA 123
TECHNEMA 113 467
TECHNICS 099
TECHNOL ACE 042
TEDELEX 379
TEIRON 195
TEKNIKA 042
TELEAVIA 014 074 182 186 218 424 453 462 463
TELECOR 049 107 123 152 379
TELEFUNKEN 049 064 074 082 152 182 186 187 218
TELEFUSION 049 152
TELEGAZI 049 076 107 123 152
TELEMEISTER 049 113 152 467
TELESONIC 049 152
TELESTAR 049 152
TELETECH 049 152 195 213 413
TELETON 018 067 071 107 236 379 470
TELEVIDEON 050 104 107 113 379
TELEVISO 425
TEMCO 094
TEMPEST 049 152 195
TENNESSEE 049 152
TENSAI 020 050 055 094 113 123 152 195 225
TESMET 439
TETUNG 046
TEVION 049 152 195
TEXET 050 123 195 226 379
THOMSON 014 024 049 064 074 134 152 182 186
THORN 049 102 103 106 141 152 218 226 346
THORN-FERGUSON 074 076 080 082 103 218 357 358 375
TOKAI 049 102 107 152 195 213 226 379
TOKYO 141 379
TOMASHI 123 378
TOSHIBA 018 045 128 141 369 379
TOWADA 045 379 470 480
TOYODA 195
TRAKTON 076
TRANS CONTINENS 046 049 152 171 307 379
TRANSONIC 049 152 380 458
TRANSTEC 379
TRIDENT 379
TRISTAR 123
TRIUMPH 012 046 049 128 152 197 375
UHER 049 069 071 080 090 113 152 163 226
ULTRA 409
ULTRAVOX 045 049 050 065 104 107 139 152 226
UNIC LINE 049 152
UNITED 049 152
UNIVERSUM 011 012 018 020 049 074 076 094 107
UNIVOX 049 107 152 213 324 411
UTAX 050
VEGAVOX 163
457 458 470
413 480
230 346 348 424 436 452 453 463
226 379 413 450 467
218 230 424 436 453 462 463 470
348 408 409 411 454 464 470 475
236 307 407 414 421 467
324 379 413 471
131 152 163 172 195 197 210 213 247
320 345 346 357 375 379 407 408 413
421 428 429 437 454 470 480
VESTEL 049 107 125 152 379
VEXA 152 195
VICTOR 170
VIDEO SYSTEM 049 152
VIDEOLOGIQUE 123 379
VIDEOSAT 413 447
VIDEOSYSTEM 049 152
VIDEOTECHNIC 113 226 379
VIDEOTON 107 472
VIDIKRON 045
VIDTECH 018
VIPER 213
VISIOLA 379
VISION 049 113 152 467
VISOREX 442
VISTAR 172 236
VOLTEC 074
VORTEC 152
VOXSON 049 065 090 152 163 171 307 324 407
WALTHAM 049 152 163 182 307 379 472
WATSON 049 107 113 123 152 195 247 467
WATT RADIO 045 050 068 104 107 139 150 379 470
WEGA 018 049 139 152 324
WEGA COLOR 065 088
WEGAVOX 195
WELTBLICK 113 152
WESTINGHOUSE 094 152
WESTON 168
WHARFEDALE 049 152
WHITE 045
WHITE WESTINGHOUSE 049 050 113 152 213 379 467
WINCO 426
WINDSTAR 378
XRYPTON 049 152
YAMISHI 049 123 152 378 379 380
YOKAN 049 152
YOKO 049 050 076 123 152 195 379 413 421
YORX 123
ZANUSSI 040 071 079 110 152 171 236 307 379
ZOPPAS 040 071 079 110 171 307
466
480
477
GB
GB-36
DIGITAL CABLE RECEIVER
GB-37
DCB-H360R
DCB-H360R
TROUBLESHOOTING
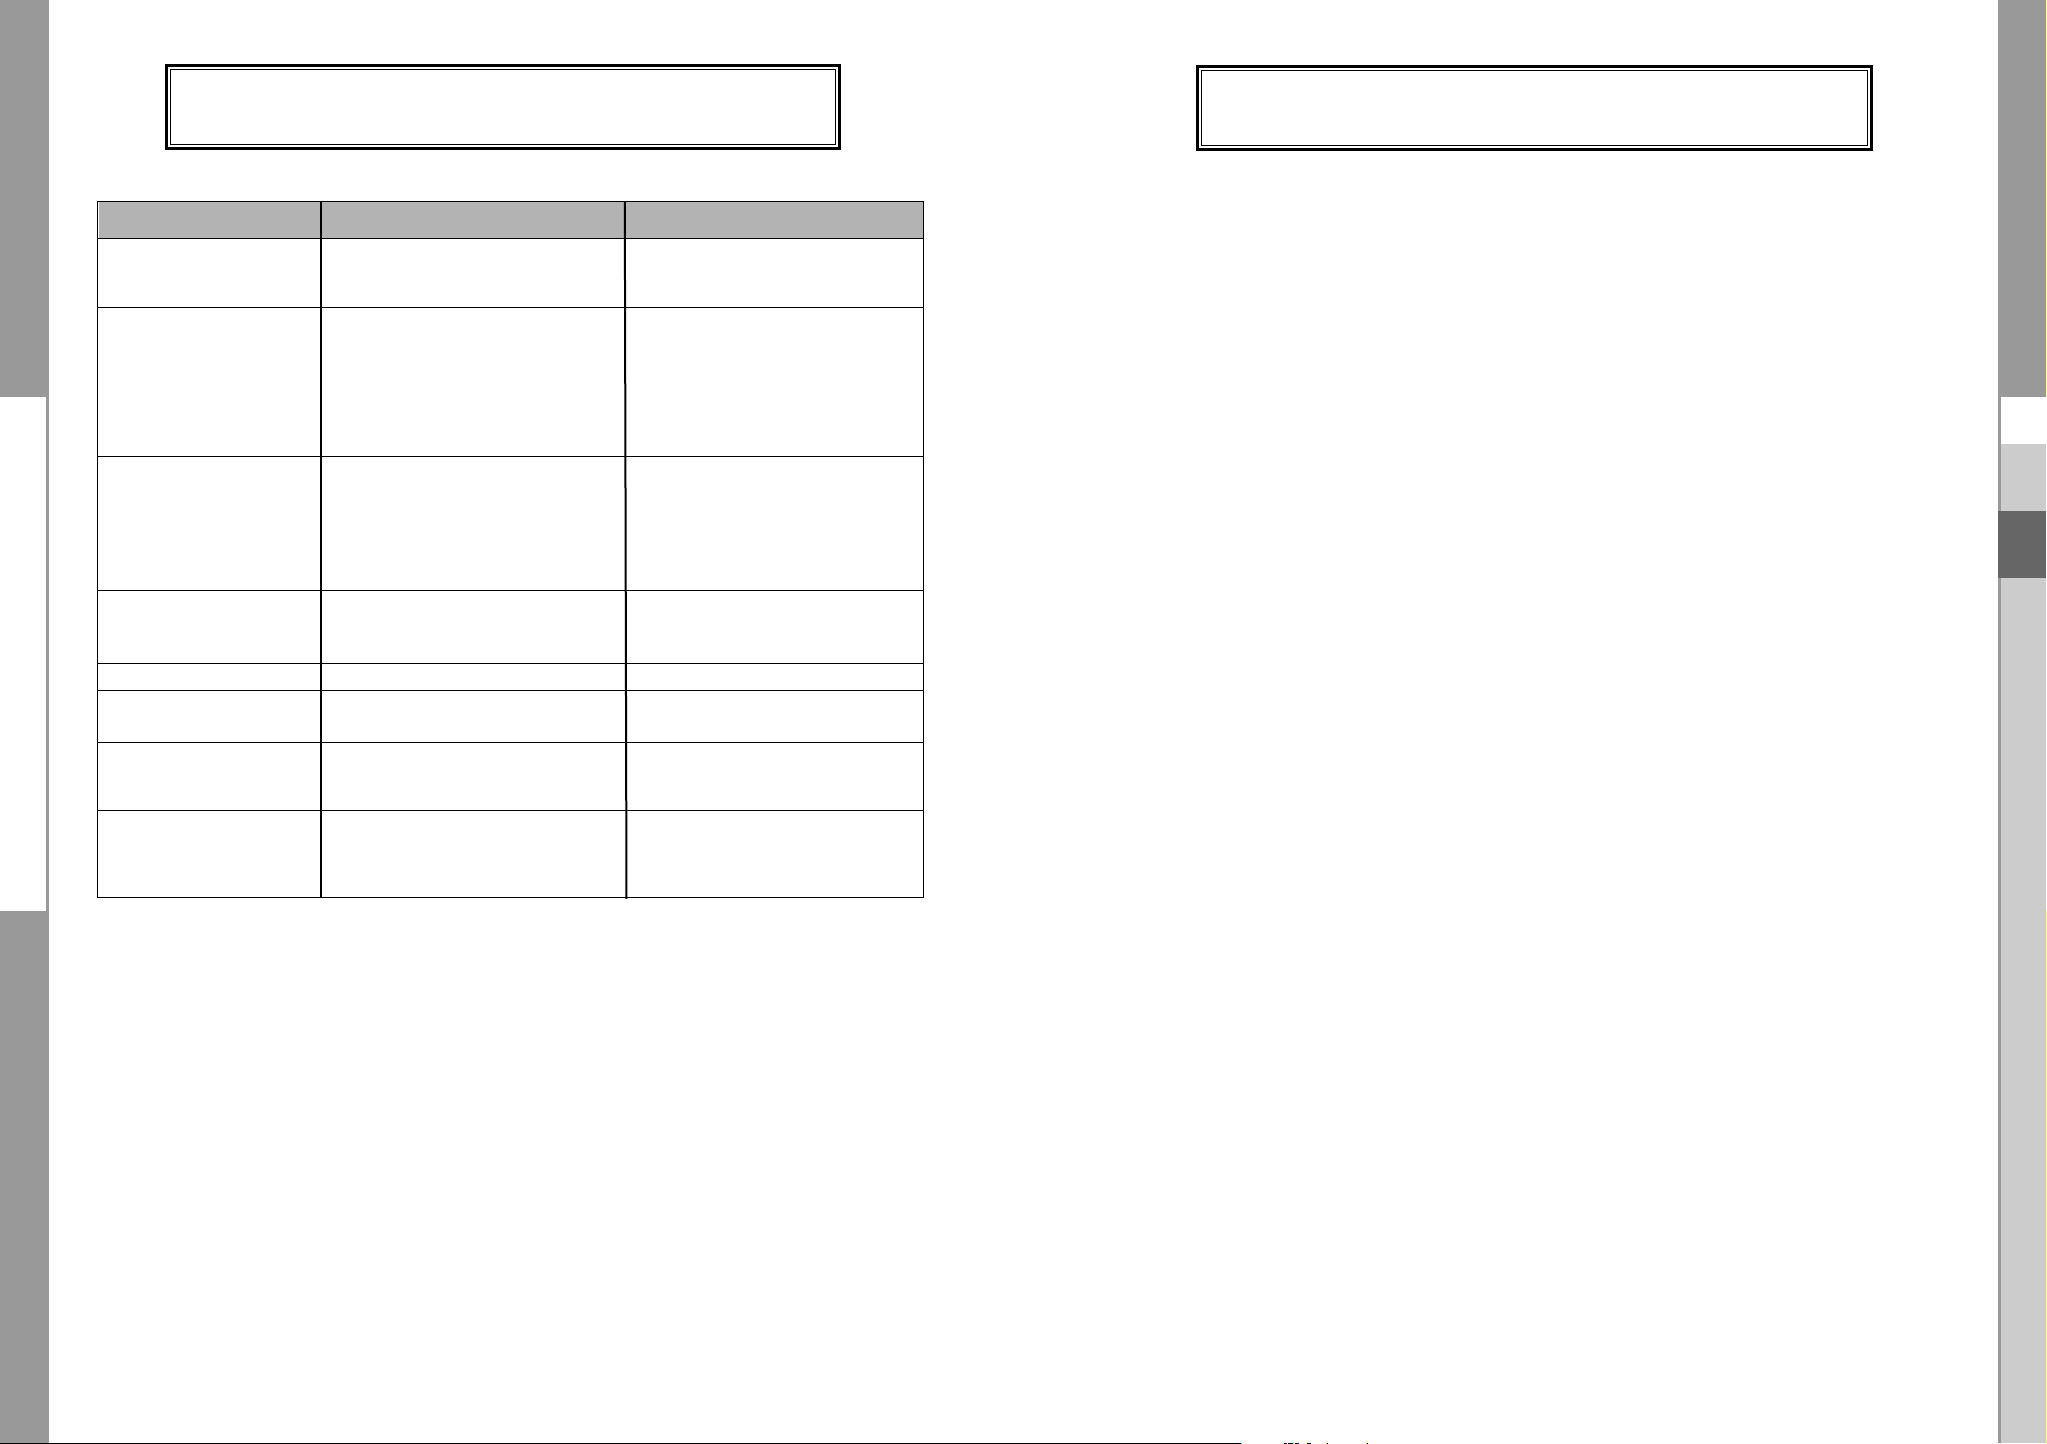
Problem Possible cause Solution of the problem
No display LED on Power cord not plugged in correctly Power cord plug in correctly
the front panel;
No power supply
No pictures on the screen Receiver in Standby mode; Set receiver to “On”;
SCART,RCA or HDMI not connected Check connection;
tightly to video input of television;
Incorrect channel or video output Check channel and video input of TV
selected on television: (TV instruction manual);
Incorrect video output selection on HD Check video output on HD receiver
Receiver (Refer to page 10)
No sound SCART or Audio connected incorrectly; Check connection;
Loudness level = 0; Increase loudness on television set
or HD receiver;
Muting active; Press the MUTE key;
No HDMI sound Check HDMI Audio Output Option
(Please refer to page 29)
Remote Control does not Incorrect Operation; Point remote control towards the
operate directly receiver;
Batteries dead or inserted incorrectly Replace batteries or insert correctly
Poor picture quality Signal strength too low Check all wire connections
Menu screen does not Channel lists not installed; Scan channels. Please go to
disappear Installation menu;
On-Screen Error Messages; Signal cable not connected or not tight Check connection
“Searching for signal”;
“No signal”
On-Screen Error Messages; Smartcard (Depend on model)
“Smartcard Failure” - not plugged in correctly; Check the smartcard;
“Unknown smartcard”
“Please insert Smartcard” - not plugged in Insert the smartcard
DISPOSAL
TECHNICAL SPECIFICATIONS
Power supply
Type : SMPS
Input voltage : AC 100-240V~, 50/60 Hz
Fuse rating : 250 V/T1.6AH
Tuner & Demodulator
Input Frequency : 50.5~858 MHz
Channel Bandwith 8 MHz
DEMODULATION : QAM DVB-C
SYMBOL RATE : MAX 7.252 Msps
Constellation : 16, 32, 64, 128, 256 QAM
CABLE OUT : RF LOOP-THROUGH OUTPUT for other
receiver or TV
Video decoder
System decoding : MPEG-2 ISO/IEC 13818-2
Profile@Level (MP@HL(HD), MP@ML(SD))
H.264 ISO/IEC 14496-10
(MP@L3, MP@L4, HP@L4 up to 30 Mbps)
Resolution : 1080i, 720p, 576p, (576i)
Video Output: SD output (2 SCART (AV1,AV2), Composite RCA)
HD output (Component (YPBPR), HDMI)
Video Format 4:3(Normal) & 16:9 (Widescreen)
Audio Decoder
System decoding : MPEG Audio-1 ISO/IEC 11172-3
(Layer1, Layer2)
MPEG Audio-2 ISO/IEC 13818-3
Dolby Digital (AC-3)
Audio mode : Mono, Dual stereo, Joint stereo
Sampling Rate: 32kHz, 44.1kHz, 48kHz, 96kHz
GB
The device, packaging material (e.g. Styrofoam) and the batteries must never be disposed of
with household refuse. Please obtain appropriate information about the regulations in your
community, and dispose of all refuse in accordance with regulations at the separate locations
provided.
GB-38
DIGITAL CABLE RECEIVER
Audio output : Analog output (L/R (RCA) 1 CH)
Digital output (S/PDIF(Optical))
PHISICAL SPECIFICATION
Size (W x D x H) 351 x 227 x 60 mm
Weight (Net) 2.2Kg
GB-39

DCB-H360R
DCB-H360R
MEMO
MEMO
GB
GB-40
DIGITAL CABLE RECEIVER
GB-41

GB-42
DIGITAL CABLE
DCB-H360R
MEMO

DCB-H360R
Gebruiksaanwijzing
NL
MF68-00397A
DIGITALE HD-KABELONTVANGER
REV. 1.2
DIGITALE HD-KABELONTVANGER

Veiligheidsvoorschriften
Deze STB is geproduceerd overeenkomstig de internationale veiligheidsnormen.
Lees de volgende aanbevolen veiligheidsvoorschriften aandachtig door.
DCB-H360R
Een juiste verwijdering van dit product
(Afgedankte elektrische en elektronische apparaten)
(Van toepassing in de Europese Unie en in andere
Europese landen met een gescheiden inzameling)
Wanneer dit symbool op een product of in de documentatie
bij een product wordt weergegeven, mag het product aan
het eind van de levenscyclus niet worden afgevoerd met het
huishoudelijk afval. Om negatieve gevolgen voor het milieu en de
volksgezondheid door een ongecontroleerde afvalverwerking te
voorkomen, verzoeken we u dit afval te scheiden van andere soorten
afval zodat de grondstoffen op een verantwoorde kunnen wijze kunnen
worden gerecycled voor duurzaam hergebruik. Particulieren kunnen
contact opnemen met de leverancier van het product of de lokale
overheid voor meer informatie over het milieuvriendelijk en veilig
recyclen van het betreffende product. Bedrijven moeten contact
opnemen met de leverancier en de bepalingen en voorwaarden in het
koopcontract raadplegen. Dit product mag niet worden afgevoerd met
ander commercieel afval.
NETVOEDING:
OVERBELASTING:
VLOEISTOFFEN:
REINIGEN:
VENTILATIE:
AANSLUITINGEN:
REPARATIES:
BLIKSEM:
AARDE:
OOOOppppmmmmeeeerrrrkkkkiiiinnnngg
gg: Geef gebruikte batterijen ter bescherming van het milieu af bij een speciaal
daarvoor bestemd inzamelpunt.
Om het apparaat geheel van het lichtnet los te koppelen, moet u de stekker uit
het stopcontact halen. Zorg er daarom voor dat de stekker gemakkelijk
bereikbaar is.
AC 100-240 V~, 50/60 Hz
Zorg dat contactdozen, verlengsnoeren of adapters niet worden
overbelast. Dit kan leiden tot brand of een elektrische schok.
Gebruik geen vloeistoffen in de buurt van de STB.
Trek voordat u het apparaat reinigt de stekker uit het stopcontact.
Gebruik een met water bevochtigde doek (geen oplosmiddelen) om de
behuizing te reinigen.
NL
Dek de ventilatieopening van STB niet af. Zorg voor een vrije
luchtstroom rond de STB.
Bewaar de STB niet op een plaats waar het apparaat wordt
blootgesteld aan direct zonlicht, of in de nabijheid van
verwarmingsapparatuur, zoals een radiator.
Plaats geen elektronische apparatuur boven op de STB.
Plaats de STB minimaal 30 mm van de muur. Aan de bovenkant en
beide zijkanten van de STB moet u minimaal 10 mm vrijhouden voor
ventilatie.
Gebruik geen aansluitingen die niet worden aanbevolen door de
fabrikant. Dit kan leiden tot gevaarlijke situaties of schade aan het
apparaat.
Voer zelf geen reparaties uit aan het product.
Indien dit wel wordt geprobeerd, komt de garantie te vervallen.
Laat onderhoud en reparaties over aan een gekwalificeerde
onderhoudsmonteur.
Als de STB is geïnstalleerd in een gebied waar het regelmatig hevig
onweert, zijn stroomonderbrekers voor de netaansluiting van de STB
en de telefoonlijn van de modem essentieel.
De afzonderlijke instructies van de fabrikant voor de beveiliging van
andere apparaten, zoals een tv, stereo, enzovoort, die zijn aangesloten
op de STB, moeten ook in acht worden genomen tijdens een
onweersbui.
CATV-kabel MOET ZIJN GEAARD.
Het geaarde systeeminstellingen moet voldoen aan de lokale
regelgeving.
NL-1

DCB-H360R
DCB-H360R
TECHNISCH OVERZICHT
Technisch overzicht
Wat is SDTV en HDTV?
SDTV
SDTV is de standaard voor digitale tv met een hoog beeldkwaliteit. De gebruikte resoluties zijn
geschikt voor standaard-tv's (zie verderop in dit hoofdstuk voor meer informatie over de resolutie).
HDTV
HDTV is de standaard voor digitale tv met de hoogste beeldkwaliteit. De gebruikte resoluties
zijn geschikt voor computerschermen en tv-schermen die geschikt zijn voor HDTV (zie verderop
in dit hoofdstuk voor meer informatie over de resolutie).
Resolutie
De resolutie heeft betrekking op het aantal pixels op het scherm.
Hoe hoger de resolutie, hoe beter de beeldkwaliteit.
Digitale uitzendingen kunnen op basis van de beeldkwaliteit worden onderverdeeld in HD en
SD.
Doorgaans ondersteunt de HD-kwaliteit (High Definition) resoluties van 1920x1080i en
1280x720p en een beeldverhouding van 16:9 voor zowel ATSC en DVB.
SD (Standard Definition) ondersteunt resoluties van 720x480p en 720x480i voor ATSC en resoluties van 720x576p en 720x576i voor DVB.
SD ondersteunt doorgaans een beeldverhouding van 4:3. Dit kan echter per regio verschillen.
DVB-C (Cable Digital Video Broadcasting)
Digital video broadcasting - cable (DVB-C) is de Europese standaard-DVB voor digitale
uitzendingen via de kabel.
Met het DVB-C-systeeminstellingen worden de audio/videosignalen digitaal verzonden in een
mpeg-2-indeling en wordt er gebruikgemaakt van het QAM-modulatiesysteem.
De DVB-C-standaard is ontwikkeld zodat een digitaal signaal kan worden uitgezonden via
VHF/UHF-kanalen.
De voordelen van deze standaard zijn een relatief beveiligde omgeving met betrekking tot vervorming en een demping van het signaalpad zodat er een hogere signaal/ruis-ratio wordt
bereikt, zonder de negatieve effecten van meerdere paden zodat er hogere modulatieschema's
kunnen worden geïmplementeerd.
Breedte/hoogte-verhouding
Naast de resolutie wordt de HDTV gedefinieerd aan de hand van de beeldverhouding van de
uitzendingen.
De beeldverhouding of aspectratio betreft de vorm van het beeld zoals gedefinieerd door de
verhouding van de breedte tot de hoogte van het scherm.
Voor analoge tv en standaard digitale tv (SDTV) is de beeldverhouding 4 eenheden breed bij 3
eenheden hoog (doorgaans wordt dit geschreven als 4:3).
Dit is de bekende vorm van ouderwetse tv's; iets breder dan hoog.
Voor HDTV-uitzendingen is de verhouding 16:9 (bijna twee keer zo breed als hoog).
Deze verhouding lijkt, niet geheel toevallig, meer op de verhouding die wordt gebruikt voor
bioscoopfilms.
Hierdoor is HDTV een ideale indeling voor zowel tv-uitzendingen als films.
Maar wat gebeurt er als u naar een bijna vierkante 4:3-uitzending kijkt op een tv met een
rechthoekige verhouding van 16:9, of vice versa? In dergelijk gevallen kunt u met de HDontvanger kiezen uit verschillende schermformaten.
Dolby®Digital 5.1
Dolby Digital 5.1 levert 5 afzonderlijke kanalen met digitale audiogegevens die kunnen worden
gebruikt door A/V-ontvangers die 5.1-kanaalsignalen kunnen decoderen.
De audiosignalen worden opgedeeld in linksvoor, midden, rechtsvoor, linksachter, rechtsachter
en een kanaal voor de lage frequenties (ontwikkeld voor subwoofers).
Het resultaat in combinatie met een compatibele Dolby Digital 5.1-kanaals A/V-ontvanger en
luidsprekersysteem is een dynamisch bereik, 360 graden imaging en geluidseffecten zoals in de
bioscoop.
Om optimaal gebruik te maken van de Dolby Digital 5.1-mogelijkheden van de HD-ontvanger,
moet u een A/V-ontvanger op de Dolby Digital Optical-aansluiting van de HD-ontvanger
aansluiten die geschikt is voor Dolby Digital 5.1.
AC-3 is een technologie voor het coderen en decoderen van geluid dat in 1987 is ontwikkeld voor
bioscopen en waarmee de bitstroom AC-3 wordt aangeduid. AC-3 is tegenwoordig synoniem aan
Dolby Digital.
HDMI (High Definition Multimedia Interface)
NL
NL-2
HDMI is een interface waarmee video- en audiogegevens met slechts één aansluiting digitaal
kunnen worden verzonden.
Door middel van HDMI verzendt de ontvanger een digitaal video- en audiosignaal en wordt een
helder beeld verkregen op een tv met een HDMI-ingang.
DIGITALE HD-KABELONTVANGER
NL-3

DCB-H360R
DCB-H360R
INHOUD
Veiligheidsvoorschriften . . . . . . . . . . . . . . . . . . . . . . . . . . . . . . . . . . .1
Technisch overzicht . . . . . . . . . . . . . . . . . . . . . . . . . . . . . . . . . . . . . . 2
Inhoud . . . . . . . . . . . . . . . . . . . . . . . . . . . . . . . . . . . . . . . . . . . . . . . . .4
Algemene kenmerken . . . . . . . . . . . . . . . . . . . . . . . . . . . . . . . . . . . . 5
De STB aansluiten . . . . . . . . . . . . . . . . . . . . . . . . . . . . . . . . . . . . . . . 6
Beschrijving . . . . . . . . . . . . . . . . . . . . . . . . . . . . . . . . . . . . . . . . . . . 12
Voorzijde . . . . . . . . . . . . . . . . . . . . . . . . . . . . . . . . . . . . . . . . . . . . 12
Achterzijde . . . . . . . . . . . . . . . . . . . . . . . . . . . . . . . . . . . . . . . . . . .13
Afstandsbediening . . . . . . . . . . . . . . . . . . . . . . . . . . . . . . . . . . . . . 14
Basisfuncties . . . . . . . . . . . . . . . . . . . . . . . . . . . . . . . . . . . . . . . . . . 16
De ontvanger bedienen . . . . . . . . . . . . . . . . . . . . . . . . . . . . . . . . . . . 22
Hoofdmenu . . . . . . . . . . . . . . . . . . . . . . . . . . . . . . . . . . . . . . . . . . . . 22
1. Installatie . . . . . . . . . . . . . . . . . . . . . . . . . . . . . . . . . . . . . . . . . 22
1.1 Netwerk installatie . . . . . . . . . . . . . . . . . . . . . . . . . . . . . . . . 23
1.2 Kinderslot . . . . . . . . . . . . . . . . . . . . . . . . . . . . . . . . . . . . . . 23
1.3 Standaardinstellingen opnieuw instellen . . . . . . . . . . . . . . . 24
1.4 Software bijwerken . . . . . . . . . . . . . . . . . . . . . . . . . . . . . . . 24
2. Kanaal . . . . . . . . . . . . . . . . . . . . . . . . . . . . . . . . . . . . . . . . . . . 24
2.1 Vernieuw lijst . . . . . . . . . . . . . . . . . . . . . . . . . . . . . . . . . . . . 24
2.2 Favoriete kanalen . . . . . . . . . . . . . . . . . . . . . . . . . . . . . . . . 25
2.3 Kanaal vergrendelen . . . . . . . . . . . . . . . . . . . . . . . . . . . . . . 25
3. Systeeminstellingen . . . . . . . . . . . . . . . . . . . . . . . . . . . . . . . . . 26
3.1 Taal selecteren . . . . . . . . . . . . . . . . . . . . . . . . . . . . . . . . . . 26
3.2 OSD instellen . . . . . . . . . . . . . . . . . . . . . . . . . . . . . . . . . . . 27
3.3 Media instellen . . . . . . . . . . . . . . . . . . . . . . . . . . . . . . . . . . 28
3.4 PIN-code wijzigen . . . . . . . . . . . . . . . . . . . . . . . . . . . . . . . . .29
3.5 Timer instellen . . . . . . . . . . . . . . . . . . . . . . . . . . . . . . . . . . .29
3.6 Systeeminformatie . . . . . . . . . . . . . . . . . . . . . . . . . . . . . . . . 30
4. Mail Box . . . . . . . . . . . . . . . . . . . . . . . . . . . . . . . . . . . . . . . . . . 30
5. Menu Irdeto . . . . . . . . . . . . . . . . . . . . . . . . . . . . . . . . . . . . . . . . 31
5.1 CA Status . . . . . . . . . . . . . . . . . . . . . . . . . . . . . . . . . . . . . . 31
5.2 IRD Status . . . . . . . . . . . . . . . . . . . . . . . . . . . . . . . . . . . . . 31
5.3 Loader Status . . . . . . . . . . . . . . . . . . . . . . . . . . . . . . . . . . . 31
Beschikbare nummers tv-fabrikanten . . . . . . . . . . . . . . . . . . . . . . . 32
Problemen oplossen . . . . . . . . . . . . . . . . . . . . . . . . . . . . . . . . . . . . 38
Afvalverwerking . . . . . . . . . . . . . . . . . . . . . . . . . . . . . . . . . . . . . . . . 38
Technische specificaties . . . . . . . . . . . . . . . . . . . . . . . . . . . . . . . . . 39
Algemene kenmerken
1. GEBRUIKERSGEDEELTE
2. TUNERGEDEELTE
3. VIDEOGEDEELTE
4. AUDIOGEDEELTE
ONTVANGST VAN DIGITALE HD/SDTV-UITZENDINGEN
SOFTWARE DOWNLOADEN VIA HET NETWERK
GEAVANCEERDE ELEKTRONISCHE PROGRAMMAGIDS
MEERTALIGE SCHERMMENU'S
ONDERTITELING EN TELETEKST (OSD ) IN MEERDERE TALEN
VOLLEDIG FUNCTIONELE INFRARODE AFSTANDSBEDIENING
SCARTUITGANG
ENERGIEZUINIG
4 VOORKEURSLIJSTEN
EPG DIE AUTOMATISCH WORDT BIJGEWERKT
PASS LOOP VOOR RGB-SIGNAAL
15 TIMERS OM PROGRAMMA'S (GEBEURTENISSEN) VOOR INEN UITSCHAKELEN TE RESERVEREN
VHF-, UHF-BAND 50,5~858 MHz
SYMBOOLFREQUENTIE VAN MAX. 7,252 Msps
MODULATIE-INDELING 16~256 QAM
RF LOOP-THROUGH-UITGANG VOOR ANDERE ONTVANGER
OF TV
COMPATIBEL MET DVB-C
MPEG-2: HD(MP@HL), SD(MP@ML)
H.264: MP@L3, MP@L4, HP@L4 maximaal 30 Mbps
DOOR DE GEBRUIKER TE SELECTEREN UITVOERFORMATEN
1080i, 720p, 576p, (576i)
GEGEVENSSNELHEID 1~30 Mbps
ONDERSTEUNT EEN BEELDVERHOUDING VAN 4:3
(NORMAAL) EN 16:9 (BREEDBEELD)
HDMI, COMPONENT, COMPOSIET, SCART
DOLBY DECODING
MPEG-1 AUDIO LAYER 1, LAYER 2
MPEG-2 AUDIO
MONO, DUAL, STEREO EN JOINT STEREO AUDIOMODI
SAMPLINGFREQUENTIES VAN 32, 44.1 EN 48 kHz
VOLUMEREGELING EN DEMPFUNCTIE OP
AFSTANDSBEDIENING
SPDIF DIGITALE AUDIO-UITGANG
NL
NL-4
DIGITALE HD-KABELONTVANGER
NL-5

DCB-H360R
YPbPrL
R
HDMI
ANT.IN
Y
P
B
PR
(OPTICAL)
AUDIO OUT
DIGITAL
HDMI OUT
RF OUT
VIDEO OUT
AUDIO OUT
VIDEO OUT
COMPONENT
AV1
(TV)
AV2
(EXT)
R
L
ANT.IN
Y
P
B
PR
H
RF OUT
VIDEO OUT
AUDIO OUT
VIDEO OUT
COMPONENT
AV1
(TV)
AV2
(EXT)
R
L
YPbPrL
R
HDMI
ANT.IN
Y
P
B
PR
RF OUT
VIDEO OUT
AUDIO OUT
VIDEO OUT
COMPONENT
R
L
ANT.IN
Y
P
B
PR
(OPTICAL)
AUDIO OUT
DIGITAL
HDMI OUT
RF OUT
VIDEO OUT
AUDIO OUT
VIDEO OUT
COMPONENT
AV1
(TV)
AV2
(EXT)
R
L
DCB-H360R
De STB aansluiten
De STB aansluiten
De kabels van de ontvanger aansluiten
ANT.IN-aansluiting
Nadat u het kabelsysteem hebt geïnstalleerd,
sluit u de coaxkabel aan op de ingang ANT.IN
aan de achterzijde van de STB.
Alle kabelaansluitingen moeten met de hand
worden aangedrukt; gebruik geen sleutel bij de
bevestiging. De kabel moet een coaxkabel zijn
met een impedantie van 75 ohm.
RF OUT-aansluiting
Voor gebruikers die een analoge ontvanger
gebruiken om analoge kanalen weer te
geven, is de STB uitgerust met de RF OUTuitgang.
Sluit de coaxkabel hier op aan en sluit het
andere uiteinde aan op de IF inputaansluiting van uw analoge ontvanger. Door
de STB stand-by te houden kunt u met de
analoge ontvanger kanalen instellen en
weergeven.
Achterzijde Set-Top Box
Achterzijde Set-Top Box
Achterzijde TV
De Set-Top Box aansluiten op een tv
Composietverbinding
1. Sluit het kabelsysteem aan op de ANT.INingang op de Set-Top Box.
2. Sluit de videokabels aan.
Sluit de composietvideokabel aan op de VIDEO
OUT- uitgang op de Set-Top Box en de TV
INPUT-ingang op de tv.
3. Sluit de audiokabels aan.
Gebruik een audiokabel om een verbinding te
maken tussen de L/R AUDIO OUT-uitgang op
de Set-Top Box en de L/R AUDIO IN-ingang op
de tv.
Componentverbinding
1. Sluit het kabelsysteem aan op de ANT.IN-
ingang op de Set-Top Box.
2. Sluit de videokabels aan.
BPR-indeling: sluit de
YP
componentvideokabel aan op de VIDEO
OUT-uitgang op de Set-Top Box en de TV
INPUT-ingang op de tv.
3. Sluit de audiokabels aan.
Gebruik een audiokabel om een verbinding
te maken tussen de L/R AUDIO OUTuitgang op de Set-Top Box en de L/R
AUDIO IN-ingang op de tv.
Achterzijde Set-Top Box
NL
Achterzijde TV
Achterzijde Set-Top Box
Achterzijde TV
NL-6
DIGITALE HD-KABELONTVANGER
NL-7

DCB-H360R
Y
P
B
PR
(OPTICAL)
AUDIO OUT
DIGITAL
HDMI OUT
AV1
(TV)
AV2
(EXT)
ON
ANT.IN
Y
P
B
PR
(OPTICAL)
AUDIO OUT
DIGITAL
HDMI OUT
RF OUT
VIDEO OUT
AUDIO OUT
VIDEO OUT
COMPONENT
AV1
(TV)
AV2
(EXT)
R
L
YPbPrL
R
HDMI
REAR VCR
TV REAR PANEL
HDMI
ANT.IN
Y
P
B
PR
(OPTICAL)
AUDIO OUT
DIGITAL
HDMI OUT
RF OUT
VIDEO OUT
AUDIO OUT
VIDEO OUT
COMPONENT
AV1
(TV)
AV2
(EXT)
R
L
DCB-H360R
De STB aansluiten
Scartaansluiting
1. Sluit het kabelsysteem aan op de ANT.INingang op de Set-Top Box.
2. Sluit een scartkabel aan op de VCR OUTaansluiting op de video en de Scart AV2
(EXT)-aansluiting op de STB.
3. Sluit een scartkabel aan op AV1 (TV)aansluiting van de STB en de
scartaansluiting op de tv.
Achterzijde Set-Top Box
De STB aansluiten
De Set-Top Box aansluiten op een tv met een HDMI-aansluiting
1. Sluit het kabelsysteem aan op de
ANT.IN-ingang op de Set-Top Box.
2. Sluit een HDMI-kabel aan tussen de
HDMI OUT-uitgang op de Set-Top Box
en de HDMI IN-ingang op het HDMIapparaat (tv, monitor).
OOOOppppmmmmeeeerrrrkkkkiiiinnnngg
gg: Mogelijk werkt de HDMI-
uitgang niet correct. Dit is
afhankelijk van de ontvanger.
Achterzijde Set-Top Box
Achterzijde TV
NL
Achterzijde TV
Een audiocomponent aansluiten
Er zijn vandaag de dag vele soorten
audiosystemen op de markt.
Rechts ziet u een vereenvoudigde illustratie van
een audiosysteem. Raadpleeg de
gebruiksaanwijzing bij het audiosysteem voor
meer informatie.
Voor een optische digitale audio-invoer, sluit u
het audiosysteem aan op de ingang DIGITAL
AUDIO OUT (OPTICAL) op de Set-Top Box.
Achterzijde Set-Top Box
Achterzijde audio
NL-8
DIGITALE HD-KABELONTVANGER
NL-9

DCB-H360R
DCB-H360R
De STB aansluiten
De resolutie en het DTV-uitgangssignaal selecteren
U kunt voor de aangesloten tv of monitor de bijbehorende video-uitvoer selecteren.
De resolutie selecteren:
●
Gebruik de toets RESOLUTION op de afstandsbediening
om een resolutie te selecteren en raadpleeg hierbij de
volgende tabel.
OOOOppppmmmmeeeerrrrkkkkiiiinnnngggg::
Het signaal voor video-uitvoer selecteren:
●
Gebruik de toets VIDEO OUTPUT op de afstandsbediening
om het uitvoersignaal te selecteren en raadpleeg hierbij de
volgende tabel.
RGB: Gebruik de toets VIDEO OUTPUT op de
BPR
YP
::: Als er geen schermmenu's worden
weergegeven, heeft de toets EXIT aan de
voorzijde van de HD-ontvanger dezelfde functie
als de toets RESOLUTION.
afstandsbediening om het uitvoersignaal te selecteren
en raadpleeg hierbij de volgende tabel.
: Selecteer YPBPRwanneer de tv is aangesloten op de Component- (YPBPR) en HDMI-
uitvoerpoort van de HD-ontvanger.
De STB aansluiten
De tv bedienen met de afstandsbediening
Toets op de afstandsbediening het nummer voor het betreffende merk in om deze voor de tv te
kunnen gebruiken (zie 'Beschikbare nummers tv-fabrikanten' op pagina 32~37).
1. Zet de tv aan.
2. Richt de afstandsbediening op de tv.
3. Houd de toets TV ingedrukt en geef met de CIJFERTOETSEN het nummer voor het betreffende
merk op. Voor een tv van bijvoorbeeld het merk Samsung houdt u de toets TV ingedrukt en drukt u
achtereenvolgens op de CIJFERTOETSEN 0, 0 en 1.
4. Wanneer de tv wordt uit- of ingeschakeld, is de configuratie voltooid.
Tv-functies op de afstandsbediening
Toets Functie
TV STANDBY/ON
INPUT SEL
VOL+/-
CH /
MUTE
0~9
Druk op deze knop om de tv aan of uit te zetten.
Druk op deze toets om een externe invoerbron voor de tv te selecteren.
Druk op deze toets om het volume van de tv aan te passen / Alleen voor de tv.
Druk op deze toetsen om een tv-kanaal te selecteren.
Druk op deze toets om het geluid van de tv te dempen.
Druk op deze toetsen om een tv-kanaal te selecteren.
NL
Resolutie en video-uitvoer
Video-uitvoer Beschikbare resolutie Uitvoerstatus
Composiet 576i Altijd uitvoer.
Scart 576i Voor de scartuitvoer kunt u kiezen tussen RGB en
Composiet
BPR
Component (YP
HDMI 1080i/720p/576p De 576i-resolutie wordt niet ondersteund.
OOOOppppmmmmeeeerrrrkkkkiiiinnnngg
gg: De beginwaarde is de YPBPR-modus (met een resolutie van 1080i).
) 1080i/720p/576p De 576i-resolutie wordt niet ondersteund.
NL-10
DIGITALE HD-KABELONTVANGER
OOOOppppmmmmeeeerrrrkkkkiiiinnnngg
gg: 1. Er is een model dat alleen kan worden ingeschakeld door op de
afstandsbediening op de cijfertoets 0 te drukken.
2. Het aantal modellen van andere fabrikanten dat kan worden bediend met
de afstandsbediening, is beperkt. Bovendien is het mogelijk dat bepaalde
functies niet werken.
3. Als u de batterijen in de afstandsbediening vervangt of een nieuw
fabrieksnummer opgeeft, wordt het vorige fabrieksnummer dat u hebt
ingesteld, verwijderd.
4. Wanneer het aangesloten apparaat een geïntegreerd tv-model is (VCR,
DVDP), kan het gebeuren dat beide apparaten tegelijk worden bediend.
5. Als het configuratienummer niet werkt, probeert u een ander nummer.
NL-11

DCB-H360R
DCB-H360R
BESCHRIJVING
BESCHRIJVING
Voorzijde
6
7
HIGH DEFINITION CABLE RECEIVER DCB-H360R
MENU
GUIDE
1
2
3
4
5
89
1. / I Hiermee schakelt u de ontvanger in of zet u de ontvanger stand-by.
2. HDTV De uitzendstatus.
Wanneer de STB een HD-uitzendsignaal detecteert, gaat het HDTV-
logo branden.
3. Displayvenster Hierin wordt informatie weergegeven over de HDTV-ontvanger.
EXIT
Achterzijde
3
1
VIDEO OUT
L
AUDIO OUT
R
COMPONENT
VIDEO OUT
Y
B
P
PR
ANT.IN
RF OUT
245
7
AV2
(EXT)
DIGITAL
AV1
(TV)
HDMI OUT
6
AUDIO OUT
(OPTICAL)
89 11
1. ANT.IN Deze poort is via een coaxkabel aangesloten op het kabelsysteem.
2. RF OUT Gebruik deze aansluiting om via een coaxkabel een tv aan te
sluiten.
3. VIDEO OUT Gebruik deze aansluiting om via de Analog Video IN-poort een tv,
monitor of andere extern weergaveapparaat aan te sluiten.
4. AUDIO OUT Gebruik deze uitgang om een via de analoge Audio IN-poort een TV,
audio-ontvanger of ander extern apparaat aan te sluiten.
10
ON
POWER
OFF
NL
4. GUIDE U drukt op deze toets om de elektronische programmagids (EPG) op
het scherm weer te geven.
5. MENU Druk op deze toets om het hoofdmenu weer te geven
6. OK Druk op deze toets om de gemarkeerde items in de gids en
schermmenu's te selecteren.
>
<
7. Gebruik deze pijltoetsen om door de menu's en de gids op het scherm
< >
te bladeren.
8. KAARTSLOT De sleuf voor de Irdeto-smartcard.
9. EXIT Hiermee sluit u de schermweergave en keert u terug naar het tv-
programma.
NL-12
DIGITALE HD-KABELONTVANGER
BPR
5. COMP. VIDEO OUT Gebruik deze aansluiting om via de Component Video IN (YP
)poort een tv, monitor of ander extern weergaveapparaat aan te
sluiten.
Op dit moment moet de toets VIDEO OUTPUT op de
afstandsbediening zich in de YPBPR-modus bevinden.
6. AV1 (TV) Gebruik deze aansluiting om uw tv aan te sluiten.
7. AV2 (EXT) Deze aansluiting wordt gebruikt om uw video, dvd of een andere
ontvanger aan te sluiten.
8. HDMI OUT Sluit uw tv met de HDMI-kabel aan op deze uitgang voor de beste
beeldkwaliteit.
9. DIGITAL AUDIO OUT Uitgang voor het aansluiten van een digitale versterker.
10. AAN/UIT-SCHAKELAAR Wordt gebruikt om de voeding in te schakelen (ON) of te
onderbreken (OFF).
11. NETSNOER Sluit het netsnoer aan op een stopcontact van 100-240 V, 50/60 Hz.
NL-13

DCB-H360R
18
19
20
22
23
29
26
16
17
13
14
15
24
27
10
11
12
21
25
28
30
DCB-H360R
Afstandsbediening
OOOOppppmmmmeeeerrrrkkkkiiiinnnngg
gg: Wanneer u de batterijen plaatst,
moet u ervoor zorgen dat positie
van de polen (+/-) correct is.
BESCHRIJVING
1. TV (alleen voor de tv)
Hiermee schakelt u de tv-modus in voor de
afstandsbediening.
2. STB
Hiermee schakelt u de ontvangermodus in voor de
afstandsbediening.
3. STANDBY/O
Hiermee schakelt u de ontvanger in of zet u de
ontvanger stand-by.
4. CIJFERTOETSEN (0 ~ 9)
Druk op de cijfertoetsen om een kanaal te selecteren
of nummers op te geven in de schermmenu's.
5. FAV. CH
Gebruik deze toets om tussen de voorkeurslijsten te
schakelen.
6. ALT
Druk een keer op de toets om de soundtracklijst te
selecteren en twee keer om de videolijst te selecteren.
7. FREEZE
Druk een keer op de toets om het beeld stil te zetten,
druk nogmaals op de toets om verder te gaan.
8. AUDIO
Met deze toets kunt u het geluid via het linkerkanaal,
het rechterkanaal of via beide kanalen weergeven.
9. CH. LIST
De lijst met gescande kanalen wordt weergegeven.
10. Vol+ /Vol-
Met deze toetsen stelt u het volumeniveau in.
11. MENU
Druk op deze toets om de schermmenu's weer te
geven.
12. ¦
Met deze toetsen verplaatst u de selectiebalk waarmee u
een optie in een menu kunt markeren.
13. GUIDE
U drukt op deze toets om de elektronische
programmagids (EPG) op het scherm weer te geven.
14. P.SIZE
Druk op deze toets om het beeldformaat aan te passen
aan de beeldverhouding en de indeling van het
invoersignaal.
15. KLEUR (ROOD, GROEN, GEEL, BLAUW)
Gebruik deze toetsen zoals wordt aangegeven in de
instructies op het scherm voor een schermmenu of een
gidsvenster.
BESCHRIJVING
16. RESOLUTION
Met deze toets selecteert u een uitvoerresolutie van 1080i, 720p of 576p (576i), overeenkomstig de
video-invoer van de tv of monitor.
17. VIDEO OUPUT
Met deze toets stelt u de video-uitvoer in op RGB of YPBPR, overeenkomstig de video-invoer van de tv
of monitor.
18. TV STANDBY/ON
Hiermee schakelt u de tv in of zet u de tv stand-by (alleen voor de tv).
19. INPUT SEL
Druk op deze toets om de invoerbron voor de tv te selecteren (alleen voor de tv).
20. PRE. CH
Het vorige kanaal weergeven.
21. SUBTITLE
De ondertiteling weergeven.
22. TEXT
De OSD-modus voor teletekst op het scherm weergeven.
23. TIMER
Deze toets wordt gebruikt om een programma via EPG te reserveren.
24. TV/RADIO
Met deze toets schakelt u tussen het tv-kanaal en het radiokanaal.
<
25. CH /
Druk op een van deze toetsen om het kanaal te wijzigen.
26. RETURN
Druk op deze toets om terug te keren naar het vorige kanaal.
27. MUTE
Met deze toets dempt u het geluid.
28. OK
Druk op deze toets om de gegevens die u via het menusysteem voor de ontvanger opgeeft, te
bevestigen en op te slaan.
29. INFO
Met deze toets geeft u de programma-informatie weer op het scherm.
Druk een keer op de toets om basisinformatie weer te geven.
Druk twee keer op de toets om gedetailleerde informatie in het tekstvak weer te geven.
30. EXIT
Hiermee sluit u de schermweergave en keert u terug naar het programma dat wordt weergegeven.
>
NL
NL-14
DIGITALE HD-KABELONTVANGER
NL-15

DCB-H360R
DCB-H360R
BASISFUNCTIES
BASISFUNCTIES
1. Weergavescherm
Voordat u een tv-programma kunt weergeven, moet u het apparaat configureren. Daarom krijgt u
aanvankelijk alleen menuafbeeldingen te zien.
Nadat de tv-kanalen zijn geprogrammeerd, wordt telkens wanneer u het kanaal wijzigt, de
volgende afbeelding (balk) weergegeven:
! Kinderslot.
@ Favoriet.
# Vergrendeld kanaal.
$ Gecodeerd kanaal.
% Teletekst
●
Druk in de weergavemodus op de toets INFO.
●
Selecteer het kanaal via de CIJFERTOETSEN (0-9) of de toetsen
^ Ondertiteling
& Soundtrack.
* Mail.
( Aankondiging.
) Dolby Digital.
TV/RADIO voor het tv- of radiokanaal.
Deze afbeelding wordt ook weergegeven telkens wanneer u het kanaal wijzigt.
Wanneer u op de toets TV/RADIO op de afstandsbediening drukt, schakelt u tussen het tv- en
radioprogramma.
1 HD/SD
2 16:9/4:3
3 Voortgang.
en druk op de toets
2. Volume instellen
Het volumeniveau instellen.
● Druk op de toets VOL- of VOL+ om het volumeniveau aan te passen.
● Druk op de toets MUTE om het geluid te dempen.
● Druk nogmaals op de toets MUTE of druk op VOL- of VOL+ om de dempfunctie uit te
schakelen.
OOOOppppmmmmeeeerrrrkkkkiiiinnnngg
gg: Het HDMI-geluid is afkomstig van de tv en niet van de HD-ontvanger.
3. Een soundtrack selecteren
● Druk op de toets ALT om de lijst met soundtracks weer te
geven.
● Gebruik de toetsen
selecteren.
● De soundtrackservice is niet voor elk kanaal beschikbaar
en is afhankelijk van de voorwaarden van het bedrijf.
en OK om een soundtrack te
NL
Gedetailleerde programma-informatie
●
Druk twee keer op de toets INFO drie keer u een programma weergeeft.
De hiervoor beschreven balk wordt weergegeven.
Wanneer u nogmaals op de toets INFO drukt, kan er, indien deze informatie beschikbaar is, op
een andere balk gedetailleerde informatie worden weergegeven voor het huidige programma.
Als deze informatie meerdere pagina's beslaat, kunt u met de GELE en BLAUWE toetsen
omhoog en omlaag bladeren.
OOppmmeerrkkiinngg: De beschikbaarheid van deze service is afhankelijk van de serviceprovider.
NL-16
DIGITALE HD-KABELONTVANGER
4. Een videotrack selecteren
● Druk twee keer op de toets ALT om de lijst met
videotracks weer te geven.
● Gebruik de toetsen
selecteren.
● De videotrackservice is niet voor elk kanaal beschikbaar
en is afhankelijk van de voorwaarden van het bedrijf.
OOOOppppmmmmeeeerrrrkkkkiiiinnnngg
gg: Wanneer u in het selectievenster AUTO selecteert, worden de systeeminstellingen
opstelling in het hoofdmenu gebruikt.
en OK om een videotrack te
NL-17

DCB-H360R
DCB-H360R
BASISFUNCTIES
5. Lijst met kanalen
●
Druk op de toets CH LIST terwijl u een programma weergeeft.
●
Selecteer een lijst door op de toets TV/RADIO te drukken.
Het pictogram achter het kanaal geeft aan dat het een
gecodeerd kanaal betreft. Het pictogram achter de naam
van het kanaal geeft aan dat het kanaal is vergrendeld.
●
Selecteer het kanaal door op de toetsen
op de
afstandsbediening te drukken.
●
Druk op OK om het kanaal weer te geven.
De kleurtoets komt overeen met de volgende servicelijst.
Met de GROENE toets gaat u naar de eerstvolgende datum.
●
GELE toets: voorkeuren
●
RODE toets: (alfabetisch) soort
>
●
Druk op de of (Page Up/Dn) om naar de volgende of vorige pagina te gaan.
●
Druk op de toets EXIT om het menu te verlaten.
<
5.1 Lijst met favoriete kanalen
●
Druk op de GELE toets op de afstandsbediening om een lijst
met favoriete kanalen te selecteren.
●
Druk op de GELE toets om te schakelen tussen de lijst met
favoriete kanalen en de lijst met kanalen.
●
Gebruik de toetsen
te selecteren.
●
Druk op de of (Page Up/Dn) om naar de volgende of vorige
<
pagina te gaan.
●
Druk op de toets EXIT om het menu te verlaten.
>
om een voorkeursgroep of een kanaal
BASISFUNCTIES
6. Programma-informatie (EPG)
EPG-Electronic Program Guide
Deze elektronische programmagids bevat informatie over de
kanalen.
OOOOppppmmmmeeeerrrrkkkkiiiinnnngg
●
Druk op de toets GUIDE terwijl u een programma weergeeft.
●
Met de RODE toets gaat u naar de vorige datum.
●
Met de GROENE toets gaat u naar de eerstvolgende datum.
●
Als de informatie meerdere pagina's beslaat, kunt u met de GELE toets omhoog bladeren.
●
Als de informatie meerdere pagina's beslaat, kunt u met de BLAUWE toets omlaag bladeren.
U kunt het tijdsinterval als volgt instellen met de toetsen op het EPG-scherm:
Toets 1: 90 minuten
Toets 2: 30 minuten
Toets 3: 15 minuten
Met de toets TV/RADIO kunt u door de verschillende programmalijsten bladeren.
●
Selecteer een kanaal door op
te geven.
●
Wanneer u in het EPG-scherm op de toets TIMER van de afstandsbediening drukt terwijl er
voor het huidige kanaal een gebeurtenis gaande is, wordt de timer onmiddellijk ingesteld en
weergegeven in het EPG-scherm. Als een programma op deze manier is ingesteld, wordt dit
weergegeven bij Timer instellen.
gg: 1. De beschikbaarheid van deze service is
afhankelijk van de serviceprovider.
2. Nadat de ontvanger na een paar seconden de
GMT-tijd heeft herkend, wordt de juiste EPGinformatie weergegeven.
te drukken en druk vervolgens op OK om dit kanaal weer
NL
5.2 Alfabetische lijst met kanalen
●
Druk op de RODE toets op de afstandsbediening om een
alfabetische lijst met kanalen te selecteren.
●
Druk op de RODE toets om te schakelen tussen de alfabetische
lijst met kanalen en de lijst met kanalen.
●
Gebruik de toetsen
kanaal te selecteren.
●
Druk op de toets EXIT om het menu te verlaten.
om een alfabetische groep of een
NL-18
DIGITALE HD-KABELONTVANGER
NL-19

DCB-H360R
DCB-H360R
BASISFUNCTIES
7. Teletekst OSD
Wanneer er voor het huidige programma teletekst beschikbaar is,
drukt u een keer op de toets TEXT om de huidige talenlijst voor
teletekst weer te geven om ongeacht het type tv teletekst op het
scherm weer te geven.
Een in de balk geeft aan dat er teletekst beschikbaar is voor
deze gebeurtenis (programma).
Zelfs als er een op de balk wordt weergegeven, is het
mogelijk dat er vanwege het type uitzending geen teletekst
beschikbaar is.
●
Druk op de toets EXIT om het menu te verlaten.
OOOOppppmmmmeeeerrrrkkkkiiiinnnngg
Wanneer de teletekstfunctie is ingeschakeld, kunt u de
volgende toetsen gebruiken:
●
CIJFERTOETSEN: 0.....9 worden gebruikt om de hoofdpagina te wijzigen.
In de linkerbovenhoek wordt het paginanummer weergegeven.
Als deze pagina beschikbaar is, wordt de pagina weergegeven (doorgaans duurt dit ongeveer
20 seconden).
●
Met de toetsen
●
De toetsen
Mogelijk bevat een hoofdpagina meerdere subpagina's.
Om het subpaginanummer te wijzigen drukt u op ¦of . Als de subpagina's in het
geheugen van de STB staan, wordt de volgende/vorige subpagina weergegeven.
gg: Als de aangesloten tv een teletekstfunctie bevat,
wordt deze functie niet ondersteund.
De HD-ontvanger ondersteunt de Teletext VBI-
functie niet.
kunt u de pagina wijzigen, (+1) voor en (-1) voor .
¦
gebruikt u om naar de volgende/vorige subpagina te gaan.
BASISFUNCTIES
8. Ondertiteling
Wanneer er voor het huidige programma ondertiteling beschikbaar is,
drukt u op de toets ONDERTITELING om de lijst met beschikbare
talen voor de ondertiteling weer te geven.
Als er voor het huidige programma ondertiteling beschikbaar is, wordt
het pictogram op de balk weergegeven.
De taal voor de ondertiteling wijzigen:
●
Druk een keer op de toets ONDERTITELING om de lijst met talen
voor de ondertiteling weer te geven.
●
Gebruik de toetsen
●
Druk op OK om de gewenste taal weer te geven.
OOOOppppmmmmeeeerrrrkkkkiiiinnnngg
gg: Wanneer u in het selectievenster AUTO selecteert,
om de gewenste taal te selecteren.
worden de systeeminstellingen opstelling in het
hoofdmenu gebruikt.
9. Audiomodus
U kunt deze modus met de toets AUDIO instellen op links, rechts of
stereo.
De audiomodus wijzigen:
● Druk op de toets AUDIO om links, rechts of stereo te selecteren.
NL
NL-20
DIGITALE HD-KABELONTVANGER
NL-21

DCB-H360R
DCB-H360R
DE ONTVANGER BEDIENEN
DE ONTVANGER BEDIENEN
1.1 Netwerk installatie
Hoofdmenu
Nadat het kabelsysteem met de juiste connectoren is
aangesloten op de STB:
●
Steek de stekker in het stopcontact en zet de ontvanger aan.
●
Druk op de toets MENU om het hoofdmenu weer te geven.
Het volgende scherm verschijnt:
De onderwerpen van de submenu's
Installatie, Kanaal, Systeeminstellingen, Mail Box en Irdeto worden weergegeven.
Voordat u het menu Installatie bewerkt, moet u controleren of de gegevens in het derde
menu, Systeeminstellingen, op u van toepassing zijn.
1. Installatie
In dit menu kunt u de instellingen aanpassen, nieuwe services
toevoegen en de status van de ontvanger weergeven.
●
Selecteer in het hoofdmenu de optie Installatie om het
submenu weer te geven.
●
Geef de pincode op.
Als u nog geen pincode hebt opgegeven, kunt u de pincode 0000
gebruiken. Dit is de fabrieksinstelling.
Voor het instellen van nieuwe kanalen is de STB uitgerust met
de functie Netwerk installatie. Deze functie kan
worden gebruikt om de kanaalgegevens op te geven. Nadat u
in het menu Installatie de optie Handmatig kanalen zoeken hebt
geselecteerd, wordt het volgende scherm weergegeven:
●
Geef de frequentie op van het gezochte kanaal.
●
Geef de netwerk-id van het gezochte kanaal op.
Neem hiervoor contact op met uw kabelmaatschappij.
●
Geef de modulatie op van het gezochte kanaal.
U kunt kiezen uit 16, 32, 64, 128 en 256.
●
Geef de symboolfrequentie op van het gezochte kanaal.
●
Nadat u de optie hebt geselecteerd, drukt u op OK om te
scannen.
●
Druk op de toets EXIT om het menu te verlaten.
OOOOppppmmmmeeeerrrrkkkkiiiinnnngg
gg: Wanneer de tekst NOT COMPLETE CHANNEL
wordt weergegeven, probeert u nogmaals te scannen en volgt u de instructies van
de serviceprovider.
1.2 Kinderslot
Met het kinderslot kunt u voorkomen dat uw kinderen naar programma's voor volwassenen
kunnen kijken.
Deze optie stelt u in via het menu Installatie Kinderslot.
●
Gebruik de toetsen
kind te selecteren en druk vervolgens op OK om deze
instelling op te slaan.
●
Alle services met een leeftijdsgrens die hoger is, worden
geblokkeerd. Om deze programma's te kunnen bekijken
moet er een pincode worden opgegeven.
●
Als u alle services wilt blokkeren, selecteert u ALLES
GEBLOKKEERD.
●
Standaard zijn alle services ingesteld op NIETS GEBLOKKEERD.
¦
om een leeftijd voor uw jongste
NL
NL-22
Voer de PIN-code in.
●
Deze melding wordt weergegeven als een service wordt geblokkeerd waarvoor de
leeftijdsgrens hoger is dan de leeftijdsgrens die is opgegeven in het menu Kinderslot. Geef
de viercijferige pincode op om deze melding te verbergen en de inhoud weer te geven.
De fabrieksinstelling voor de pincode is 0000, maar u kunt de pincode wijzigen in het menu
PIN-code wijzigen.
●
Druk op de toets EXIT om het menu te verlaten.
DIGITALE HD-KABELONTVANGER
NL-23

DCB-H360R
DCB-H360R
DE ONTVANGER BEDIENEN DE ONTVANGER BEDIENEN
1.3 Standaardinstellingen opnieuw instellen
Met de optie Standaardinstellingen opnieuw instellen kunt u de
fabrieksinstellingen herstellen in het geval er problemen optreden
nadat u de kanaalgegevens of andere gegevens hebt gewijzigd.
Het volgende scherm wordt weergegeven:
Als er een venster met een melding wordt weergegeven, drukt u
op OK zodat automatisch de fabrieksinstellingen voor de
ontvanger worden hersteld.
OOOOppppmmmmeeeerrrrkkkkiiiinnnngg
gg: Al uw eerdere instellingen worden gewist!
Alle instellingen en gegevens, inclusief de
kanaalgegevens, worden verwijderd.
●
Druk op de toets EXIT om het menu te verlaten.
1.4 Software opwaarderen
De optie Software bijwerken is alleen beschikbaar als de kabelmaatschappij software voor uw
STB levert.
Als u de software wilt bijwerken, plaatst u de cursor in het menu Installatie Software
opwaarderen en drukt u op de toets OK.
Als er nieuwe software beschikbaar is, wordt de balk “Start software opwaardeer procedure?”
weergegeven. Er wordt tevens aangegeven hoe lang het downloaden van software ongeveer
gaat duren. Druk op OK om te bevestigen en de software bij te werken.
Als de meest recente software al op uw STB is geïnstalleerd, wordt de melding “Er is geen
software-update nodig!” weergegeven.
OOOOppppmmmmeeeerrrrkkkkiiiinnnngg
●
Druk op de toets EXIT om het menu te verlaten.
gg: Voordat het bijwerken van de software wordt gestart, wordt de STB automatisch
opnieuw opgestart. Tijdens het bijwerken van de software zal uw tv-scherm
ongeveer 10 minuten geen beeld weergeven. In het display van de STB kunt u de
voortgang controleren. Als het bijwerken voltooid is, wordt de service automatisch
hervat.
2.2 Favoriete kanalen
U kunt het huidige kanaal meteen toevoegen aan de gewenste
lijst met favoriete kanalen.
U kunt een kanaal zelfs aan meerdere lijsten met
favoriete kanalen toevoegen.
● Selecteer de gewenste lijst met favoriete kanalen (FAV1~FAV4)
met de toets FAV.CH.
● Selecteer in het venster TV of RADIO met de toetsen of
de cijfertoetsen de gewenste kanaallijst.
● Druk op de RODE toets en voeg het geselecteerde kanaal toe aan de lijst met
favoriete kanalen.
● Druk vervolgens op OK om te bevestigen.
U kunt schakelen tussen de lijsten TV en Radio door op de toets TV/RADIO te drukken
en vervolgens met de toets FAV.CH uw lijst met favoriete kanalen wijzigen.
● Wanneer u op de toets TV/RADIO drukt, schakelt u tussen de lijsten TV en Radio.
● Druk op de toets FAV.CH om een andere voorkeurslijst te selecteren.
● Druk op de toets EXIT om het menu te verlaten.
Kanalen uit uw lijst met favoriete kanalen verwijderen:
● Gebruik de toetsen om een lijst met kanalen te selecteren die uw wilt
verwijderen.
● Druk op de RODE toets om het geselecteerde kanaal uit de lijst met favoriete kanalen
te verwijderen.
● Druk op de toets EXIT om het menu te verlaten.
OOOOppppmmmmeeeerrrrkkkkiiiinnnngg
gg: Een voorkeurslijst kan maximaal 200 kanalen bevatten.
NL
2. Kanaal
Het menu Kanaal heeft drie functies:
Het opslaan van wijzigingen in de lijst met kanalen door Update
List te selecteren, het samenstellen van vier lijsten met favoriete
kanalen en het vergrendelen van kanalen.
●
Voer de PIN-code in.
Als u nog geen pincode hebt opgegeven, kunt u de pincode 0000
gebruiken. Dit is de fabrieksinstelling.
2.1 Vernieuw lijst
Wanneer er via de kabelmaatschappij enkele nieuwe zenders
worden doorgegeven, worden deze kanalen weergegeven in een
groengekleurde lijst.
U kunt deze kanalen opslaan via Kanaal Vernieuw lijst.
NL-24
2.3 Kanaal vergrendelen
● Selecteer met de toetsen ¦ het venster voor het tv- of
radiokanaal.
● Selecteer het kanaal met de toetsen .
● Selecteer het kanaalslot door op de RODE toets te drukken.
● Druk op OK om de selectie te bevestigen.
Hiermee is het kanaal vergrendeld.
Wanneer u het kanaal wilt bekijken, wordt er een venster
weergegeven waarin u een pincode moet opgeven.
Een kanaal ontgrendelen:
● Druk nogmaals op de RODE toets om het kanaal te ontgrendelen.
● Druk op de toets EXIT om het menu te verlaten.
DIGITALE HD-KABELONTVANGER
NL-25

DCB-H360R
3.
Systeeminstellingen
Met deze optie kunt u de systeeminstellingen naar wens aanpassen.
DE ONTVANGER BEDIENEN DE ONTVANGER BEDIENEN
3.2
OSD instellen
U kunt de transparantie, de weergavetijd, het kleurenschema en de
positie voor de schermweergave, ondertiteling en teletekst
instellen.
● Selecteer een transparantieniveau voor de schermweergave.
U kunt een transparantieniveau tussen 0 en 100% instellen.
U kunt de instellingen opgeven met de cijfertoetsen of met de
toetsen
¦
CH /CH -toetsen: de waarde met 10% verhogen of verlagen.
¦
toetsen : de waarde met 1% verhogen of verlagen.
<
>
<
of CH /CH .
>
DCB-H360R
3.1
Taal selecteren
Met de optie Taal selecteren kunt u de gewenste taal voor de
schermweergave, soundtrack, teletekst, ondertiteling of EPG
selecteren.
Welke talen er beschikbaar zijn voor de soundtrack, teletekst,
ondertiteling en EPG is afhankelijk van de zender.
Het kan bijvoorbeeld voorkomen dat de taal voor de ondertiteling
wel kan worden geselecteerd, maar dat dit niet wordt ondersteund
omdat het programma niet is ondertiteld.
● Er zijn 3 schermtalen beschikbaar en de soundtracks, ondertiteling, teletekst en EPG
worden ondersteund in 37 talen.
● Om de gewenste taal te selecteren, drukt u op de toetsen
Vervolgens drukt u op OK.
● De soundtracks, ondertiteling, teletekst en EPG worden weergegeven in de
geselecteerde taal.
● Druk op de toets EXIT om het menu te verlaten.
¦
om de taal te wijzigen.
● Selecteer een transparantieniveau voor de ondertiteling.
U kunt een transparantieniveau tussen 0 en 100% instellen.
U kunt de instellingen opgeven met de cijfertoetsen of met de toetsen
¦
toetsen : de waarde met 1% verhogen of verlagen.
<
CH /CH toetsen: de waarde met 10% verhogen of verlagen.
● Selecteer een transparantieniveau voor de teletekst.
U kunt een transparantieniveau tussen 0 en 100% instellen.
U kunt de instellingen opgeven met de cijfertoetsen of met de toetsen
¦
CH /CH toetsen: de waarde met 10% verhogen of verlagen.
● Stel de weergavetijd voor een informatievak (balk) in.
U kunt een tijd opgeven tussen de 0,5 en 60 seconden.
U kunt de instellingen opgeven met de cijfertoetsen of met de toetsen
¦
<
CH /CH toetsen: de waarde met 1 seconde verhogen of verlagen.
OOOOppppmmmmeeeerrrrkkkkiiiinnnngg
>
toetsen : de waarde met 1% verhogen of verlagen.
<
>
toetsen : de waarde met 0,5 seconde verhogen of verlagen.
>
gg: Deze instelling is niet van toepassing op informatiebalken en informatievensters.
¦
of CH /CH .
¦
of CH /CH .
¦
of CH /CH .
<
<
<
NL
>
>
>
NL-26
DIGITALE HD-KABELONTVANGER
NL-27

DCB-H360R
Plaats van de schermteksten (OSD)
● Plaats de cursor op de gewenste positie en gebruik de toetsen
¦
verplaatsen.
Het scherm wordt naar de gewenste positie verplaatst.
● Druk op de toets EXIT om het menu te verlaten.
3.3
Media instellen
U kunt meerdere gewenste media-instellingen opgeven.
Plaats de cursor op dit submenu en druk op OK.
● Druk op
¦
● Druk op OK om de selectie te bevestigen.
Beeldformaat
● Selecteer een beeldformaat dat geschikt is voor uw tv :
selecteer een standaard- of breedbeeldverhouding,
STANDAARD 4:3 of BREEDBEELD 16:9.
4:3 Hoogte-breedteverhouding: PAN&SCAN, Volledig scherm 14:9 LB (Letter Box), 16:9 LB
● Wanneer u het beeldformaat 16:9 selecteert, kunt u een beeldverhouding van 4:3 voor een
film selecteren.
(Het videomenu 16:9 is niet beschikbaar in deze beeldverhouding.)
16:9 Hoogte-breedteverhouding: Standaard, Breedbeeld.
● Wanneer u het beeldformaat 4:3 selecteert, kunt een u een beeldverhouding van 16:9 voor
een film selecteren.(Het videomenu 4:3 is echter niet beschikbaar in deze beeldverhouding.)
● Selecteer de kleur voor de videobalk: zwart of grijs.
- Waarschuwing!
Geef de videobalk niet te lang weer in zwart, aangezien dit kan leiden tot tijdelijk of
permanent inbranden van de afbeelding. Raadpleeg ook de veiligheidsvoorschriften met
betrekking tot het weergaveapparaat.
● Selecteer het type videosignaal:
Composiet + Component, Composiet + RGB
● Stel de automatische selectie voor het digitale Dolby-signaal in: On of Off.
On: het Dolby Digital-signaal wordt eerst uitgevoerd.
Off: de andere audio-indelingen worden eerst uitgevoerd.
● Stel de digitale uitvoer in: Dolby Digital of PCM.
Dolby Digital: Wanneer u Dolby Digital selecteert. krijgt het dolby digitalsignaal voorrang.
PCM: Wanneer u PCM selecteert, krijgt het PCM-signaal voorrang.
OOOOppppmmmmeeeerrrrkkkkiiiinnnngg
● Stel de automatische selectie voor de ondertiteling in: Aan, Slechthorenden of Uit.
DE ONTVANGER BEDIENEN DE ONTVANGER BEDIENEN
of
om het scherm naar de gewenste positie te
om de subitems te verplaatsen en druk op
om de optie te selecteren.
gg: Als de ontvanger Dolby Digital niet ondersteunt, “PCM” selecteren om het
geluid via HDMI te horen.
● Stel de automatische selectie HDMI audio-uitgang optie : Type A, Type B, Type C of Type D.
OOOOppppmmmmeeeerrrrkkkkiiiinnnngg
gg: Afhankelijk van de ontvanger, is het mogelijk dat HDMI audio niet goed werkt.
Kies daartoe de juiste optie bij HDMI audio uitvoer.
● Druk op de toets EXIT om het menu te verlaten.
Geproduceerd onder licentie van Dolby Laboratories.
Dolby en het symbool met de dubbele D zijn handelsmerken van Dolby Laboratories.
3.4
PIN-code wijzigen
Als u de pincode wilt wijzigen, selecteert u de vierde optie, PIN-code wijzigen.
Het volgende menu wordt weergegeven:
Voor deze optie geeft u bij de eerste cursor de huidige pincode
op en bij de tweede cursor de nieuwe pincode.
Om de nieuwe pincode te bevestigen, geeft u de pincode
nogmaals op.
De pincode moet een code zijn die uit vier cijfers bestaat.
DE FABRIEKSINSTELLING VOOR DE PINCODE : 0 0 0 0.
● Druk op de toets EXIT om het menu te verlaten.
3.5
Timer instellen
1) Extra tijd
Extra tijd is een functie die ervoor zorgt dat een
gebeurtenis volledig binnen de opgegeven tijdsgrenzen past.
Een Extra tijd van 1 minuut betekent dat de STB deze
timerbewerking 1 minuut voor de ingestelde tijd start en 1 minuut
na de ingestelde tijd stopt.
2) Timer
Er worden 15 timers ondersteund, inclusief EPG-timers.
● Gebruik de toetsen
● Gebruik de toetsen
¦
om voor Timer een timernummer tussen 1 en 15 op te geven.
¦
om de gebeurtenisherhaling te selecteren die u wilt reserveren:
Dagelijks, Iedere zondag, Iedere maandag, Iedere dinsdag, Iedere woensdag, Iedere
donderdag, Iedere vrijdag, Iedere zaterdag en Eenmalig. Als u de timer in het EPG-scherm
instelt, wordt bij Herhaalde gebeurtenis EPG weergegeven.
● Gebruik de Cijfertoetsen (0~9) om de gewenste tijd in te stellen en gebruik de toetsen
om de schakeltijd te selecteren die u wilt reserveren.
Als de ingestelde tijd voor Inschakeltijd hetzelfde is als voor Uitschakeltijd, werkt de timer
gedurende 24 uur. Gebruik de toetsen
¦
om een tv-programma te selecteren waarvoor u
de gebeurtenis wilt instellen.
● Wanneer u op de toets TV/RADIO drukt, schakelt u tussen een tv- en radioprogramma.
U kunt timers instellen op Dagelijks en Iedere maandag of Iedere zaterdag, enzovoort.
DCB-H360R
NL
NL-28
DIGITALE HD-KABELONTVANGER
NL-29

DCB-H360R
● De kortste herhalingsgebeurtenis heeft voorrang.
Wanneer u bijvoorbeeld timers instelt voor Eenmalig en Dagelijks, krijgt de instelling
Eenmalig op de betreffende dag voorrang boven Dagelijks.
Als de timer is geactiveerd, wordt bij Timer de melding Running en een timernummer
weergegeven.
● Druk op de toets EXIT om het menu te verlaten.
3.6 Systeeminformatie
Als u contact moet opnemen met uw serviceprovider of een
helpdesk, wordt er mogelijk naar informatie in dit menu gevraagd.
Plaats de cursor op dit submenu en druk op OK.
De volgende informatie wordt op het scherm weergegeven.
●
Druk op de toets EXIT om het menu te verlaten.
DE ONTVANGER BEDIENEN DE ONTVANGER BEDIENEN
5. Menu Irdeto
Dit menu bevat informatie over de smartcard en de STB.
Druk op OK om het submenu weer te geven.
5.1 CA Status
U kunt u de CA-status weergeven (Smart Card EMM/ECMinformatie).
●
Druk op de toets EXIT om het menu te verlaten.
DCB-H360R
NL
4. Mail Box
U kunt het bericht lezen dat naar de afzonderlijke decoders is
verzonden.
Er kunnen maximaal 10 berichten worden opgeslagen.
●
Druk op de toets EXIT om het menu te verlaten.
5.2 IRD Status
U kunt de IRD-status weergeven (technische informatie over
de IRD, CA, Smartcard en de hierin geladen software).
●
Druk op de toets EXIT om het menu te verlaten.
5.3 Loader Status
U kunt informatie over de IRD en de hierin geladen software
weergeven.
●
Druk op de toets EXIT om het menu te verlaten.
NL-30
DIGITALE HD-KABELONTVANGER
NL-31

DCB-H360R
1. TV-toets + 3-cijferige code
2. Toetsen voor de bediening van de tv: TV STANDBY/ON, 0~9, CH / , VOL+/-, INPUT SEL,
MUTE
TV
Naam fabrikant (MERKNAAM) CODENUMMER (3 CIJFERS)
SAMSUNG 001 002 003 004 005 006 007 008 009
A.R. SYSTEMS 049 152
ACCENT 049 152
ACEC 112
ACURA 195
ADMIRAL 065 076 163 171 190 307 324 369 466
ADYSON 379
AGASHI 076 379
AGEF 324
AIKO 049 076 102 141 152 172 195 225 379
AIWA 377 459
AKAI 049 050 055 066 076 102 107 123 139
AKIBA 049 123 152 380 378
AKITO 049 106 152
AKURA 049 076 123 195 378 426 470
ALARON 042 379
ALBA 018 049 050 107 123 134 163 168 195
ALBIRAL 371
ALCYON 407
ALLORGAN 050 094 236 379
ALLSTAR 049 152
AMPLIVISION 113 379 421 425
AMSTRAD 012 049 076 123 131 152 172 195 225
ANAM 049 152 195
ANAM NATIONAL 049 152
ANGLO 076 195
ANITECH 049 076 152 195 407
ANSONIC 045 049 107 112 152 195 210 226 391
ARC EN CIEL 074 182 186 424 453 463
ARCAM 379 424
ARISTONA 049 050 065 079 112 152 160
ARTHUR MARTIN 107 127 136 139 153 307 425
ASA 020 065 078 080 091 146 171 197 307
ASBERG 049 152 407
ASORA 195
ASTRA 195
ASUKA 050 076 123 378 379
ATLANTIC 049 050 071 113 152 236 379
ATORI 195
AUCHAN 107 425
AUDIOSONIC 049 074 076 152 182 195 213 379 421
AUDIOTON 050 076 379 421
AUSIND 090 407
AUTOVOX 050 071 078 079 080 083 090 156 236
AWA 018 049 131 152 195 226 320 379 426
AYOMI 411
BAIRD 074 102 182 209 218 379 409
BANG & OLUFSEN 324
BARCO 107 371 480
BASIC LINE 049 107 123 195 226 378
BASTIDE 379
Beschikbare nummers tv-fabrikanten
>
<
Naam fabrikant (MERKNAAM) CODENUMMER (3 CIJFERS)
010 050 066 076 102 195 217 365 379
421
481
141 150 152 172 182 195 209 225 379
428 433 437 471 475
225 232 379 413 421 457
426 476
413 421
324 375 408 449
324 379 407 413 449 468 470
433
BAUR 049 107 150 152 172 247 249 357 414
BEKO 152 241 421 433 460
BEON 049 152 163
BEST 213 421
BESTAR 049 152 226 421
BINATONE 379
BLACK STAR 413
BLACKTRON 378
BLACKWAY 378
BLAUPUNKT 057 060 113 247 249 345 451 454 481
BLUE SKY 049 123 152 195 217 232 378 380 457
BLUE STAR 378
BONDSTEC 413
BOOTS 050 106 379
BPL 049 152 378
BRANDT 014 074 182 186 218 424 436 452 462
BRANDT ELECTRONIC 074 453 463
BRANDT ELECTRONIQUE 074 182 186 453
BRINKMANN 049 152 163
BRIONVEGA 049 065 083 152 167 172 324 356 476
BRITANNIA 379
BROTHER 076
BRUNS 065 324
BSR 094 107 110 139 168
BTC 123
BUSH 018 049 076 094 106 107 123 134 139
BUSH(UK) 107 168
CAPSONIC 049 076 152 380
CARREFOUR 018 177
CASCADE 049 064 152 195
CASIO 049 152
CATHAY 049 152
CCE 049 152 379
CENTURION 049 152
CENTURY 065 163 324 411 413 481
CGE 011 090 093 094 107 139 142 163 168
CIHAN 217
CIMLINE 123 134 195
CITY 195
CLARIVOX 049 125 163
CLATRONIC 045 049 076 113 123 152 195 225 379
CMS HIGHTEC 379
COMTEL 125 217
CONCORDE 195
CONDOR 045 049 050 113 152 163 195 210 378
CONTEC 018 131 195 320 379
CONTINENTAL EDISON 014 074 182 186 232 424 453 462 463
COSMEL 195 213
CROSLEY 065 090 093 094 104 107 139 324 346
CROWN 049 152 163 170 195 209 232 407 421
CRYSTAL 477
CS ELECTRONICS 123 379 413
CTC 413
CTC CLATRONIC 045
CURTIS MATHES 126 190
454 470 475
142 172 193 195 209 217 225 226 232
307 378 379 457 458 470 480
346 348 369 407 413 421 480
407 413 421
379 413 421 467
348 407 413 469 481
470
Beschikbare nummers tv-fabrikanten
TV
Naam fabrikant (MERKNAAM) CODENUMMER (3 CIJFERS)
CURTIS MATHES 126 190
CYBERTRON 123
DAENYK 042
DAEWOO 049 123 152 193 195 226 379 456 464
DAINICHI 123 379
DANSAI 049 076 141 152 195 379
DANSETTE 426
DANTAX 421
DATSURA 209
DAWA 049 152
DAYTON 049 152 195 226
DE GRAAF 107 139 209 307 479
DECCA 049 102 106 120 217
DECCA(UK) 046 049 050 102 106 131 152 379
DEITRON 049 152
DENKO 076
DENON 126
DERWENT 105
DESMET 049 113 152
DIGATRON 049
DIGILINE 049 152
DIXI 049 152 195 379 413
DORIC 104 105
DREAN 049 152
DTS 195
DUAL 049 050 107 139 152 156 168 182 243
DUAL TEC 040 050 168 195 379
DUMONT 045 065 080 102 139 146 324 375 379
DUMONT-FINLUX 020 045 078 091 104
DUX 049 112 152
DYNATRON 049 152
ELBE 049 107 123 152 172 210 243 369 391
ELBIT 217
ELCIT 045 046 062 065 104 107 150 168 324
ELECTA 076 378
ELECTRO TECH 195
ELEKTA 076 378
ELG 049 152
ELIN 020 049 107 139 152 172 195 379 470
ELITE 049 123 152 467
ELMAN 045 168
ELTA 195 076 379
EMERSON 012 042 049 065 113 152 225 324 378
ERRES 049 112 152
ESC 049 152
ETRON 049 107 139 152 195
EURO-FEEL 076
EUROMAN 049 076 152 379 421
EUROPA 049 152
EUROPHON 045 046 049 050 068 107 120 152 168
EXPERT 071 107 236 425
EXQUISIT 049 152 413
FAMILY LIFE 049 152
FENNER 152 195 226
FERGUSON 049 050 074 076 080 082 102 103 182
FIDELITY 049 050 076 107 152 225 307 379 475
FILSAI 050 379
FINLANDIA 033 139 172 197 209 307 375 470 474
FINLUX 020 042 045 049 078 080 090 091 102
379 414 417 424 468 470
449 469
411 421 435
413
479
413 475 481
379 413
218 247 409 411 436 452 472
104 107 139 146 152 163 197 210 324
375 379 407 408 428 429 437 449 469
Naam fabrikant (MERKNAAM) CODENUMMER (3 CIJFERS)
FIRST LINE 045 049 094 102 107 134 139 152 191
FISHER 018 041 050 065 069 102 104 107 139
FLINT 049 102 123 152 380
FNR 045
FORMENTI 049 090 107 113 139 307 324 379 407
FORMENTI-PHOENIX 050 104 113 307
FORTRESS 190 324
FRABA 049 152 421
FRIAC 045 049 152 195
FRONTECH 066 076 139 195 307 379 413 466 470
FUJITSU 042 045 071 102 107 195 236 379
FUJITSU GENERAL 195 379
FUNAI 042 076 094
GALAXI 045 049 152
GALAXIS 045 049 152 163 421
GBC 104 107 139 168 195 226 480
GE 074 182 218 378
GEANT CASINO 107 425
GEC 049 102 104 107 120 152 171 172 307
GEC(UK) 046 050 102 107 150 162
GELOSO 062 104 107 139 168 171 195 226 307
GENERAL 064 074 182
GENERAL TECHNIC 195
GENEXXA 049 123 152 307 426 466
GOLDHAND 379
GOLDLINE 213
GOLDSTAR(LG) 049 050 055 107 139 152 168 172 182
GOODMANS 018 042 049 076 102 134 139 141 152
GORENJE 421
GPM 123
GRADIENTE 049 152 170 177
GRAETZ 049 090 104 136 139 152 153 162 171
GRANADA 013 018 033 041 049 102 104 105 112
GRANADA(UK) 046 050 090 107 139 162 307
GRANDIN 049 107 113 123 152 195 378 380 425
GRONIC 045 379
GRUNDIG 049 080 090 152 232 247 249 407 454
HALIFAX 076 379
HAMPTON 379
HANIMEX 094
HANSEATIC 018 049 050 094 104 107 113 152 172
HANTAREX 045 046 049 152 195
HANTOR 049 152
HARLEY DAVIDSON 042
HARWOOD 049 152 195 426
HAUPPAUGE 049 152
HAVERMY 190
HCM 049 076 123 152 163 195 378 379 426
HEMA 195 379
HEMMERMANN 150 470
HIFIVOX 074 182 186 424 453 463
195 209 210 226 379 411 413 457 470
156 172 209 320 324 379 408 414 421
470
467 469 480 481
477
379 470
413 469 481
195 219 379 413 414 421 460
182 193 195 218 225 226 232 379 428
450 456 464
172 198 225 307 466 469 475
120 152 171 172 198 209 218 238 241
307 379 407 425 470 471 472 474
435
455
195 241 324 378 379 391 421 455 467
470 475
DCB-H360R
NL
NL-32
DIGITALE HD-KABELONTVANGER
NL-33

DCB-H360R
DCB-H360R
Beschikbare nummers tv-fabrikanten
TV
Naam fabrikant (MERKNAAM) CODENUMMER (3 CIJFERS)
HIGASHI 050
HIGHLINE 049 076 152
HIKONA 123
HINARI 012 018 042 049 066 094 107 123 134
HISAWA 123 378 380 425
HIT 324
HITACHI 018 020 033 049 050 074 086 099 102
HITACHI FUJIAN 013
HITSU 123 195 380
HORNYPHON 049 112 152
HOSHAI 123 380
HUANYU 193 226 379
HYGASHI 379
HYPER 050 168 195 379 413
HYPERSONIC 172
HYPSON 049 076 152 217 378 379 380 425
IBERIA 049 152
ICE 049 076 123 152 195 225 379
ICES 123 379
IMPERIAL 011 049 090 093 094 107 142 152 163
INDIANA 049 152
INGELEN 090 104 136 139 153 162 171 198 232
INGERSOLL 195
INNO HIT 046 049 050 066 102 123 152 195 217
INNOVATION 049 152
INTERACTIVE 210
INTERBUY 076 195 413
INTERFUNK 049 065 067 074 090 104 107 112 139
INTERNAL 049 152
INTERVISION 045 049 055 076 107 123 152 225 232
IR 346
IRRADIO 049 066 090 123 152 195 407 413
ISUKAI 049 123 152 378
ITC 379 480
ITS 049 076 123 152 225 378 379
ITT 042 090 107 134 139 150 162 171 172
ITT-NOKIA 042 090 104 107 134 136 139 150 153
ITV 076 049 152 413
JEAN 018
JEC 141
JET POINT 365
JVC 018 103 123 170 182 225 409 433 439
KAISUI 049 050 123 152 195 378 379 380
KAMOSONIC 050
KAMP 379
KAPSCH 071 107 172 236 466
KARCHER 020 045 049 050 068 076 107 152 195
KATHREIN 455
KAWASHO 379
KB ARISTOCRAT 107
139 195 209 232 307
104 107 110 126 127 139 150 152 162
168 171 182 186 218 238 307 379 466
469 470 472 479
168 307 346 348 369 407 413 421 470
480
435 466
379 407 413
150 152 153 172 182 307 324 413 421
453 463 466 475
378 379 380 413 421
193 197 198 209 307 375 428 466 469
470 471 475 479
162 171 172 193 197 198 209 307 375
470 428 433 435 437
465
217 378 421 435
Naam fabrikant (MERKNAAM) CODENUMMER (3 CIJFERS)
KENDO 045 049 055 134 152 172 210 413 421
KENNEDY 071 079 104 107 139 236 369 480
KINGSLEY 379
KLARMAX 371
KNEISSEL 049 152 210 243 369 391 411 421 435
KOLSTER 045 049 152 470
KONKA 049 123 152 225
KONTAKT 232
KORPEL 049 152
KORTING 065 094 113 324 421
KOSMOS 049 152
KOTRON 076 426
KOYODA 195
KRAKING 411
KRIESLER 050 065 079 112 152 160
KTV 050 379
KURO 445
KYOSHU 076 163 426
KYOTO 107
LECSON 049 152
LEMAIR 210
LENCO 049 107 152 195 226
LENOIR 050 195
LESA 413
LEYCO 049 076 094 102 152
LIESENK & TTER 049 112 152 345
LIFE 440 441 443 444
LIFETEC 049 076 123 152 195 226 440 441 443
LLOYD_S 195
LOEWE 035 049 089 120 152 324 391 421
LOEWE OPTA 035 046 049 065 120 144 152 213 324
LOGIK 131 225
LOGIX 195
LUMA 071 107 110 152 171 172 195 210 226
LUMATRON 049 076 107 152 172 236 379
LUX MAY 049 152 195
LUXOR 042 050 090 107 127 139 150 172 197
LYCO 076
MAAZ 371
MADISON 049 152
MAGNADYNE 045 046 062 065 104 107 120 139 150
MAGNAFON 045 046 050 068 090 120 379 407 481
MAGNAVOX 018 042 049 152
MAGNUM 440 441 443 444
MANDOR 076
MANESTH 076 094 113 134 141 152 379 467
MANHATTAN 049 195
MARANTZ 049 152 455
MARELLI 324
MARK 049 152 195 226 379
MASUDA 123 195 225
MATSUI 012 018 041 049 050 094 100 102 106
MAXIMAL 139
MAXWELL 371
MEDIATOR 049 112 152
MEDION 049 152 195 217 457
MEGAS 435
MEGATRON 126
MELECTRONIC 020 049 074 152 182 193 195 197 210
MELVOX 425
435 476
444
236 307
209 307 375 428 429 470 472 473 475
168 324 413 469
107 131 134 141 150 152 171 195 209
218 225 232 247 307 379 380 470
226 375 379 408 413 428 429 466 470
Beschikbare nummers tv-fabrikanten
TV
Naam fabrikant (MERKNAAM) CODENUMMER (3 CIJFERS)
MELVOX 425
MEMOREX 099 195 217
MEMPHIS 102 125 195 213
MERCURY 049 152 195
METZ 049 065 067 070 092 247 324 412 420
MICROMAXX 049 152 195
MICROSTAR 440 441 443 444
MINERVA 080 090 232 247 249 407 454
MINOKA 049 152 426 470
MITSUBISHI 013 018 049 065 105 131 152 157 190
MIVAR 046 050 058 072 081 090 120 379 391
MONACO 195
MORGAN_S 049 152
MOTION 407
MOTOROLA 190
MTC 152 379 421 470
MTEC 106
MULTISTANDARD 045
MULTITEC 049 152 195
MULTITECH 045 046 049 050 120 152 195 379 407
MURPHY 102 104 105 107 171 307 379
MURPHY(UK) 162
MUSIKLAND 123
MYRYAD 455
NAD 172 209 475
NAIKO 049 152
NAKIMURA 049 152 226
NAONIS 040 071 079 110 171
NAT 085 151
NATIONAL 033 085 104
NEC 018 049 113 131 152 177 195 226 379
NECKERMANN 011 049 050 065 107 139 152 163 210
NEDIATOR 152
NEI 049 125 152 225 477
NESCO 042 413
NETSAT 049 152
NETWORK 213
NEUFUNK 049 152 195 435
NEW TECH 049 050 152 182 195 379
NEW WORLD 123
NICAMAGIC 379
NIKKAI 018 049 076 102 123 125 139 141 152
NOBLEX 049 076 152
NOBLIKO 045 050 080 090 379 407
NOGAMATIC 074 182 186 424 453 463
NOKIA 090 104 107 134 136 139 150 153 157
NORDMENDE 049 074 083 150 152 182 186 218 247
NOVATRONIC 020 049 152 226
OCEANIC 086 094 104 107 108 109 139 172 209
OCEANIC(F) 150
ODEON 076
OKANO 049 076 102 152 421
OMEGA 076
ONCEAS 050
ONWA 123 225
OPERA 049 152
454 481
247 324 454
407 414 421 434
413 421 470
380
247 249 307 324 357 379 413 421 455
470 481
195 213 379 066
162 171 172 193 197 198 209 226 307
375 428 429 433 437 465 470 475 478
479
307 424 453 463 469 481
425 466 469 475
Naam fabrikant (MERKNAAM) CODENUMMER (3 CIJFERS)
OPTIMUS 099
OPTONICA 190
ORBIT 049 152
ORION 012 042 045 049 076 094 113 131 134
ORLINE 049 123 152
ORMENTI-PHOENIX 104
ORMOND 195
OSAKA 066
OSAKI 049 066 076 102 106 123 152 226 379
OSIO 049 152
OSO 123
OSUME 018 102 123
OTAKE 450
OTTO VERSAND 018 049 050 074 094 104 107 113 134
P.T ACTRON 217
PAEL 050 379
PALLADIUM 049 107 152 163 210 247 324 357 379
PALSONIC 049 055 076 152 379 426
PANAMA 049 076 152 195 379 413
PANASONIC 016 049 099 104 107 139 151 152 172
PANAVISION 049 152 210
PATHE CINEMA 107 113 379 391 411 425 467 470 480
PATHE CINEMA(F) 050 168
PATHE MARCONI 014 074 182 186 424 453 462 463
PAUSA 195
PAUZA 195
PERDIO 049 102 107 113 152 467
PERFEKT 049 152
PERSHIN 425
PHILCO 011 016 049 065 090 093 094 104 107
PHILEX 471
PHILHARMONIC 379
PHILIPS 014 049 050 065 079 089 112 152 160
PHOENIX 049 050 102 104 107 113 152 324 379
PHONOLA 049 050 065 079 112 152 160 324 379
PILOT 049 152
PIONEER 049 074 152 172 182 209 218 307 421
PLANTRON 049 076 152 195
PLAYSONIC 379
POLICOM 074
POPPY 195
PORTLAND 226
POWERPOINT 232
PRANDONI-PRINCE 046 090 120 171 172 307 407 413
PRECISION 379
PREMIER 142
PRIMA 076 195 307
PRINCE 046 171
PRINZ 102 470
PROFEX 107 139 195 407 475
PROFI-TRONIC 045 049 152
PROLINE 049 102 112 191 366 436
PROSONIC 049 085 151 152 195 225 226 379 421
139 150 152 191 195 216 366 367 426
467
426
139 152 172 190 218 247 249 357 362
379 413 414 454 455 467 469 470 480
481
413 421 470
396 420 466 469 481
481
126 142 152 163 168 324 346 348 369
407 413 421 480 481
182 193 216 217 220 226 247 249 324
427 455 482
421
427 466
NL
NL-34
DIGITALE HD-KABELONTVANGER
NL-35

DCB-H360R
DCB-H360R
Beschikbare nummers tv-fabrikanten
TV
Naam fabrikant (MERKNAAM) CODENUMMER (3 CIJFERS)
PROTECH 045 049 076 125 139 152 163 195 379
PROVISION 049 152
PYE 050 065 079 112 152 160 226 324
PYMI 049 112 152 195 226 324
QUADRA VISION 425
QUASAR 045 046 068 099 413
QUELLE 018 020 049 050 074 076 078 080 090
QUESTA 018
RADIALVA 049 074 107 123 152
RADIOLA 014 049 050 065 079 112 152 160
RADIOMARELLI 045 046 062 065 104 105 150 152 168
RADIONETTE 020 150
RADIOSHACK 049 152
RADIOTONE 049 076 152 163 195 421 426
RANK ARENA 018
RCA 190 218 436
RECOR 049 152
RECTILIGNE 049 152
REDIFFUSION 018 059 104 105 139 171 172 307 471
REDIFFUSION(UK) 150 162
REDSTAR 049 152
REFLEX 049 152
REOC 460
REVOX 049 152 421
REX 040 071 079 107 110 152 171 210 236
RFT 076 102 241 324 391 421
RHAPSODY 379
R-LINE 049 152
ROADSTAR 049 076 123 152 163 195
ROBOTRON 065 324
RODEX 049 152
ROWA 458
ROWSONIC 050
ROYAL LUX 421 426
RTF 065
SABA 046 065 074 077 107 120 139 172 182
SACCS 411
SAGEM 378 380 435
SAISHO 012 050 076 107 131 134 195 307 379
SALORA 033 107 127 136 139 150 153 171 172
SAMBERS 045 046 068 090 120 407 481
SANDRA 379
SANELA 411
SANSUI 049 152 225
SANTON 195
SANYO 018 020 041 049 050 065 102 107 131
SAVE 049 152
SBR 049 112 152
SCHAUB LORENZ 090 104 136 139 153 162 171 198 307
SCHNEIDER 014 040 049 050 065 069 079 104 107
413 457 470 477 480
091 094 113 131 139 146 150 152 153
172 195 247 249 320 345 346 348 357
379 408 413 449 451 454 470 475 480
481
324 413
475
243 307 413 466
186 218 307 324 424 436 452 453 463
466 469 481
477
198 209 307 466 470 472 474 475 479
152 195 198 209 320 379 391 408 421
481
433 469 470 475
112 123 139 152 156 160 168 172 182
195 225 243 307 379 382 413 414 417
457 468 470
Naam fabrikant (MERKNAAM) CODENUMMER (3 CIJFERS)
SCOTT 042
SEARS 042
SEG 018 045 049 050 076 107 152 172 195
SEI 012 045 049 094 107 139 152 236 324
SEI SINUDYNE 446
SELECO 040 071 079 107 110 152 171 172 210
SENCORA 195
SENTRA 123 139 141 195
SERINO 380 435
SHARP 018 094 170 190 320 362
SHORAI 042 094
SIAM 049 152
SIAREM 045 046 065 104 107 120 139 324 469
SIEMENS 018 049 066 113 152 247 249 307 320
SIERA 050 065 079 112 152 160
SIERRA 049 112 152
SIESTA 421
SILVA 049 152 379
SILVER 018 042 049 076 152 172
SINGER 045 049 065 104 152 195 324 369 413
SINUDYNE 012 045 065 094 104 107 134 139 150
SKANTIC 307 472 473
SKY 049 152
SKYWORTH 448
SOGERA 113
SOLAVOX 066 102 107 139 172 307 466 471
SONAWA 123
SONITRON 209 379 421
SONNECLAIR 049 152
SONOKO 049 050 076 152 195 378 379
SONOLOR 107 139 172 209 357 425 466
SONTEC 049 094 152 421
SONY 018 045 131 211 346 357 358 370
SOUND & VISION 045 123 226
SOUND WAVE 049 113 163
SOUNDESIGN 042
SPECTRA 195
SSANGYONG 195
STANDARD 049 050 113 123 152 195 226 379
STARLIGHT 049 076 107 152 195
STENWAY 123 378
STERN 040 071 079 107 110 152 171 236 243
STRATO 049 076 152 195
SUNKAI 049 094 123 134 152 191 232 367 380
SUNSTAR 049 152 195 225
SUNWOOD 049 152 195
SUPERLA 379
SUPERTECH 049 123 152 195 379
SUPRA 195 226
SUSUMU 123 218
SUTRON 195
SWISSLINE 413
SYDNEY 379
SYSLINE 049
SYTONG 379
TACTUS 106
TANDBERG 065 074 078 172 182 210 213 420 449
TANDY 050 102 123 190 307 379 413 466
TASHIKO 018 050 107 177 379 470 474
232 379 413 407 457 480
357 469 470 481
236 243 307 369 466 476
481
345 451 454 469 481
425
152 172 210 216 236 324 357 366 367
469 470 481
307 466
Beschikbare nummers tv-fabrikanten
TV
Naam fabrikant (MERKNAAM) CODENUMMER (3 CIJFERS)
TATUNG 049 050 102 106 120 131 152 217 379
TCM 440 441 443 444
TEAC 049 076 152 163 195 217 378 380 426
TEC 040 050 064 168 195 213 218 243 379
TECH LINE 049 152 195
TECHICA 123
TECHNEMA 113 467
TECHNICS 099
TECHNOL ACE 042
TEDELEX 379
TEIRON 195
TEKNIKA 042
TELEAVIA 014 074 182 186 218 424 453 462 463
TELECOR 049 107 123 152 379
TELEFUNKEN 049 064 074 082 152 182 186 187 218
TELEFUSION 049 152
TELEGAZI 049 076 107 123 152
TELEMEISTER 049 113 152 467
TELESONIC 049 152
TELESTAR 049 152
TELETECH 049 152 195 213 413
TELETON 018 067 071 107 236 379 470
TELEVIDEON 050 104 107 113 379
TELEVISO 425
TEMCO 094
TEMPEST 049 152 195
TENNESSEE 049 152
TENSAI 020 050 055 094 113 123 152 195 225
TESMET 439
TETUNG 046
TEVION 049 152 195
TEXET 050 123 195 226 379
THOMSON 014 024 049 064 074 134 152 182 186
THORN 049 102 103 106 141 152 218 226 346
THORN-FERGUSON 074 076 080 082 103 218 357 358 375
TOKAI 049 102 107 152 195 213 226 379
TOKYO 141 379
TOMASHI 123 378
TOSHIBA 018 045 128 141 369 379
TOWADA 045 379 470 480
TOYODA 195
TRAKTON 076
TRANS CONTINENS 046 049 152 171 307 379
TRANSONIC 049 152 380 458
TRANSTEC 379
TRIDENT 379
TRISTAR 123
TRIUMPH 012 046 049 128 152 197 375
UHER 049 069 071 080 090 113 152 163 226
ULTRA 409
ULTRAVOX 045 049 050 065 104 107 139 152 226
UNIC LINE 049 152
UNITED 049 152
UNIVERSUM 011 012 018 020 049 074 076 094 107
UNIVOX 049 107 152 213 324 411
UTAX 050
VEGAVOX 163
457 458 470
413 480
230 346 348 424 436 452 453 463
226 379 413 450 467
218 230 424 436 453 462 463 470
348 408 409 411 454 464 470 475
236 307 407 414 421 467
324 379 413 471
131 152 163 172 195 197 210 213 247
320 345 346 357 375 379 407 408 413
421 428 429 437 454 470 480
Naam fabrikant (MERKNAAM) CODENUMMER (3 CIJFERS)
VESTEL 049 107 125 152 379
VEXA 152 195
VICTOR 170
VIDEO SYSTEM 049 152
VIDEOLOGIQUE 123 379
VIDEOSAT 413 447
VIDEOSYSTEM 049 152
VIDEOTECHNIC 113 226 379
VIDEOTON 107 472
VIDIKRON 045
VIDTECH 018
VIPER 213
VISIOLA 379
VISION 049 113 152 467
VISOREX 442
VISTAR 172 236
VOLTEC 074
VORTEC 152
VOXSON 049 065 090 152 163 171 307 324 407
WALTHAM 049 152 163 182 307 379 472
WATSON 049 107 113 123 152 195 247 467
WATT RADIO 045 050 068 104 107 139 150 379 470
WEGA 018 049 139 152 324
WEGA COLOR 065 088
WEGAVOX 195
WELTBLICK 113 152
WESTINGHOUSE 094 152
WESTON 168
WHARFEDALE 049 152
WHITE 045
WHITE WESTINGHOUSE 049 050 113 152 213 379 467
WINCO 426
WINDSTAR 378
XRYPTON 049 152
YAMISHI 049 123 152 378 379 380
YOKAN 049 152
YOKO 049 050 076 123 152 195 379 413 421
YORX 123
ZANUSSI 040 071 079 110 152 171 236 307 379
ZOPPAS 040 071 079 110 171 307
466
480
477
NL
NL-36
DIGITALE HD-KABELONTVANGER
NL-37

DCB-H360R
DCB-H360R
PROBLEMEN OPLOSSEN
Probleem Mogelijke oorzaak Oplossing
De lampjes aan de Het netsnoer is niet goed aangesloten Sluit het netsnoer goed aan.
voorzijde branden niet.
Geen stroomtoevoer.
Er zijn geen beelden op De ontvanger staat stand-by. Schakel de ontvanger in.
het scherm zichtbaar SCART, RCA of HDMI is niet goed Controleer de aansluiting.
aangesloten op de videoaansluiting op de tv.
Er is op de tv een verkeerd kanaal Controleer het kanaal en de videoof verkeerde video-uitgang geselecteerd. uitgang van de tv (raadpleeg de
Er is een verkeerde video-uitgang handleiding bij de tv).
op de HD-ontvanger geselecteerd. Controleer de video-uitgang op de
HD-ontvanger (zie pagina 10).
Geen geluid. De scart- of audiokabel is verkeerd Controleer de aansluiting.
aangesloten. Het volumeniveau is 0. Stel het volumeniveau op de tv of
HD-ontvanger hoger in.
De dempfunctie is ingeschakeld; Druk op de toets MUTE;
Geen HDMI geluid Controleer de instelling van de optie
HDMI Audio uitvoer. (zie pagina 29).
De afstandsbediening De batterijen zijn leeg of niet Richt de afstandsbediening op de
werkt niet goed. goed geplaatst. ontvanger.
Vervang de batterijen of plaats deze
correct.
Slechte beeldkwaliteit. Het signaal is te zwak Controleer alle kabelverbindingen.
Het schermmenu wordt Er is geen lijst met kanalen opgegeven. Stel de kanalen in. Ga naar het
niet verborgen. menu Installatie.
De foutmelding De signaalkabel is niet of niet goed Controleer de aansluiting.
“Bezig met zoeken naar signaal” aangesloten.
“Geen signaal”
De foutmelding De Smartcard (afhankelijk van het model)
“Smartcard defect” - is niet goed geplaatst; Controleer de smartcard
“Onbekende smartcard”
“Voer smartcard in a.u.b.” - is niet geplaatst Plaats de smartcard.
wordt weergegeven.
TECHNISCHE SPECIFICATIES
Netvoeding
Type: SMPS
Ingangsspanning: AC 100-240 V~, 50/60 Hz
Zekering : 250 V/T1.6AH
Tuner en demodulator
Ingangsfrequentie: 50,5~858 MHz
Bandbreedte kanaal 8 MHz
DEMODULATIE : QAM DVB-C
SYMBOOLFREQUENTIE: MAX. 7,252 Msps
Constellatie: 16, 32, 64, 128, 256 QAM
KABELUITGANG: RF LOOP-THROUGH voor andere ontvanger of tv
Videodecoder
Systeemdecodering: MPEG-2 ISO/IEC 13818-2
Profile@Level (MP@HL(HD), MP@ML(SD))
H.264 ISO/IEC 14496-10
(MP@L3, MP@L4, HP@L4 maximaal 30 Mbps)
Resolutie: 1080i, 720p, 576p, (576i)
Video-uitgang: SD-uitgang (2 SCART (AV1,AV2), Composiet RCA)
HD-uitgang (Component (YPBPR), HDMI)
Video-indeling 4:3 (normaal) en 16:9 (breedbeeld)
Audiodecoder
Systeemdecodering: MPEG Audio-1 ISO/IEC 11172-3
(Layer1, Layer2)
MPEG Audio-2 ISO/IEC 13818-3
Dolby Digital (AC-3)
Audiomodus Mono, Dual stereo, Joint stereo
Samplingfrequentie: 32 kHz, 44,1 kHz, 48 kHz, 96 kHz
Audio-uitgang: Analoge uitgang (L/R (RCA) 1 CH)
Digital uitgang (S/PDIF(optisch))
NL
AFVALVERWERKING
Het apparaat, het verpakkingsmateriaal (bijvoorbeeld styrofoam) en de batterijen mogen nooit
worden afgevoerd met het huishoudelijk afval.
Raadpleeg lokale instanties voor informatie over de regels in uw gemeente en verwerk het
afval overeenkomstig de lokale regelgeving.
NL-38
DIGITALE HD-KABELONTVANGER
Fysieke specificaties
Afmetingen (B x D x H) 351 x 227 x 60 mm
Gewicht (netto) 2.2 kg
NL-39

DCB-H360R
DCB-H360R
NOTITIES
NOTITIES
NL
NL-40
DIGITALE HD-KABELONTVANGER
NL-41

NL-42
DIGITALE HD-KAB
DCB-H360R
NOTITIES

DCB-H360R
Consignes d'utilisation
FR
MF68-00397A
RECEPTEUR CABLE NUMERIQUE HD
REV. 1.2
RECEPTEUR CABLE NUMERIQUE HD

CONSIGNES DE SECURITE
Ce décodeur a été fabriqué conformément aux normes de sécurité internationales.
Veuillez lire et respecter attentivement les consignes de sécurité suivantes.
ALIMENTATION SECTEUR : CA 100-240 V~, 50/60 Hz
SURCHARGE : Pour éviter tout risque d'incendie ou de choc électrique, ne
surchargez pas les prises murales, les rallonges ou les
adaptateurs.
LIQUIDES : Ne placez aucun liquide à proximité du décodeur.
NETTOYAGE : Avant de nettoyer le boîtier décodeur, débranchez-le de la
prise murale. Nettoyez l'extérieur de l'appareil à l'aide d'un
linge légèrement humide (sans solvant).
AERATION : N'obstruez pas les trous de ventilation du décodeur. Assurez-
vous que l'air circule librement autour de l'appareil.
Ne placez jamais le boîtier décodeur dans des lieux exposés à
un ensoleillement direct ou à proximité d'appareils de
chauffage (ex. : radiateurs). Ne superposez jamais d'autres
appareils électroniques sur le décodeur. Laissez un espace
d’au moins 30 mm entre le mur et le décodeur. Laissez un
espace d’au moins 10 mm au-dessus et de chaque côté du
décodeur pour la ventilation.
DCB-H360R
FR
Mise au rebut appropriée du produit
(déchets d'équipements électriques et électroniques)
(applicable dans l'Union européenne et les autres
pays d'Europe dotés d'un système de tri sélectif)
Ce symbole figurant sur le produit ou sa documentation
indique qu’en fin de vie, celui-ci ne doit pas être jeté avec
les autres ordures ménagères. Pour éviter toute nuisance à
l'environnement ou à la santé due à des mises au rebut non conformes
des déchets, veuillez séparer ce produit des autres types de déchets et le
recycler de façon responsable afin de promouvoir la réutilisation à long
terme des ressources matérielles. Pour assurer un recyclage du produit
dans le respect de l'environnement, les particuliers doivent s'enquérir des
lieux et procédures appropriés auprès du détaillant qui leur a vendu
l'article ou auprès des collectivités locales. Les utilisateurs professionnels
doivent contacter leur fournisseur et se reporter aux conditions stipulées
dans le contrat d'achat. Ce produit ne doit pas être jeté avec les autres
déchets commerciaux.
FIXATION : Pour éviter tout danger ou tout dommage sur l'appareil,
n'utilisez que les types de fixation recommandés par le
fabricant.
MAINTENANCE : Ne tentez jamais de réparer ce produit vous-même.
Toute opération allant à l’encontre de cette interdiction entraîne
automatiquement l’annulation de la garantie.
Confiez toutes les réparations à un technicien qualifié.
ECLAIRAGE : Si le décodeur est installé dans un lieu exposé à un éclairage
intense, il convient d'utiliser des dispositifs de protection pour
les prises d'alimentation secteur du boîtier et les lignes
téléphoniques du modem. En cas d'orage, toutes les consignes
de sécurité des fabricants des autres équipements (ex. :
téléviseur, chaîne hi-fi, etc.) reliés au boîtier décodeur doivent
également être suivies.
MISE A LA TERRE : Le câble CATV DOIT ETRE MIS A LA TERRE.
Le système de mise à la terre doit être conforme à la
réglementation locale en vigueur.
RRRReeeemmmmaaaarrrrqqqquuuueeee
: Pour protéger l'environnement, jetez les piles dans les conteneurs prévus à cet
effet.
Pour déconnecter complètement l’appareil du réseau, vous devez retirer la prise
de la fiche. Veillez donc à ce que la prise soit facile d’accès.
FR-1

DCB-H360R
DCB-H360R
DESCRIPTION TECHNIQUE
DESCRIPTION TECHNIQUE
Que signifient les sigles SDTV et HDTV ?
SDTV
SDTV est un format de télévision numérique qui offre une haute qualité d'image à des résolutions pouvant être affichées sur un téléviseur standard (plus de détails concernant les résolutions sont mentionnés plus loin dans ce chapitre).
HDTV
HDTV est un format de télévision numérique offrant une qualité d'image supérieure, à des résolutions pouvant être affichées sur un écran d'ordinateur et de téléviseur HDTV-Ready (plus de
détails concernant les résolutions sont mentionnés plus loin dans ce chapitre).
Résolution
La résolution correspond au nombre de pixels sur l'écran.
Plus la résolution est élevée, meilleure est la qualité visuelle.
Les diffusions numériques sont classées en catégories HD et SD en fonction de la qualité
visuelle.
En général, la catégorie HD (haute définition) prend en charge des résolutions de 1920x1080i
et 1280x720p et un format de 16:9 pour les normes ATSC et DVB.
La qualité SD (définition standard) prend en charge des résolutions de 720x480p et 720x480i
pour la norme ATSC, et des résolutions de 720x576p et 720x576i pour la norme DVB.
La qualité SD prend généralement en charge un format d’image de 4:3. Cependant, des différences peuvent exister selon le pays.
DVB-C (radiodiffusion vidéonumérique par câble)
La radiodiffusion vidéonumérique – câble (DVB-C) correspond à la norme européenne DVB
concernant la transmission de la diffusion numérique par câble.
Le système DVB-C fournit une transmission numérique audio/vidéo au format Mpeg-2 et utilise
la technique de modulation d'amplitude en quadrature (QAM).
La norme DVB-C a été développée de manière à permettre l'envoi d'un signal d'émission
numérique via des canaux VHF/UHF.
Cette norme a l'avantage d'offrir un environnement relativement protégé en matière de distorsion et d'affaiblissement de propagation de signal. Ainsi, un signal plus élevé du taux de bruit
peut être atteint et l'effet négatif des trajets multiples peut être évité, ce qui permet la mise en
place de schémas de modulation plus élevés.
Format d’image
La qualité HDTV est définie par la résolution, mais aussi par le format d’image de ses diffusions.
Le rapport hauteur/largeur, ou format d'image, correspond à la forme de l'écran tel qu'elle est
définie par le rapport entre la largeur et la hauteur de l'écran.
Sur des téléviseurs analogiques et SDTV, le rapport hauteur/largeur est de 4 unités en largeur
par 3 unités en hauteur (généralement écrit 4:3).
Il s'agit du format le plus répandu pour les téléviseurs classiques (images légèrement plus larges
que hautes).
Pour les téléviseurs HDTV, le rapport hauteur/largeur est de 16:9 (images presque deux fois plus
larges que hautes).
Ce format est conçu pour ressembler à celui des films diffusés en salle.
Le format HDTV est donc parfaitement adapté à la diffusion et au visionnage de films sur un
téléviseur.
Peut-on visionner un programme 4:3 (forme proche de celle du carré) sur un téléviseur 16:9
(forme rectangulaire) et inversement ? Le récepteur HD vous permet de choisir parmi plusieurs
formats d'écran et constitue une aide notable dans ce type de situation.
Dolby® Digital 5.1
La technologie Dolby Digital 5.1 offre 5 canaux discrets d'informations audio numériques pouvant
être utilisés par des récepteurs A/V capables de décoder le signal du canal 5.1.
Les signaux audio sont répartis entre les canaux avant gauche, central, avant droite, arrière
gauche, arrière droite et un canal d'effets basse fréquence (conçu pour les caissons de basses).
L’association d’un récepteur A/V compatible avec la technologie Dolby Digital numérique 5.1
canaux et du réglage des enceintes vous permet de bénéficier de tous les avantages de la qualité home cinéma : gamme dynamique étendue, panorama 360 degrés et puissance acoustique
d'un vrai cinéma.
Pour profiter pleinement des fonctionnalités de la technologie Dolby Digital 5.1 proposées par le
récepteur HD, vous aurez besoin de relier un récepteur A/V compatible Dolby Digital 5.1 au
récepteur HD via la prise optique Dolby Digital.
AC-3 est une technologie d'encodage / de décodage développée en 1987 à l'usage des cinémas
et signifie train binaire AC-3. Aujourd'hui, la technologie AC-3 est un synonyme de Dolby Digital.
HDMI (High Definition Multimedia Interface- Interface multimédia haute définition)
Le HDMI est une interface qui permet la transmission par voie numérique de données audio et
vidéo à l'aide d'un simple connecteur.
Lorsque vous utilisez le HDMI, le récepteur transmet un signal audio et vidéo numérique et
affiche une image claire sur un téléviseur disposant d'une prise d'entrée HDMI.
FR
FR-2
RECEPTEUR CABLE NUMERIQUE HD
FR-3

DCB-H360R
DCB-H360R
TABLE DES MATIERES
Consignes de sécurité . . . . . . . . . . . . . . . . . . . . . . . . . . . . . . . . . . . . . . 1
Description technique . . . . . . . . . . . . . . . . . . . . . . . . . . . . . . . . . . . . . . 2
Table des matières . . . . . . . . . . . . . . . . . . . . . . . . . . . . . . . . . . . . . . . . 4
Caractéristiques générales . . . . . . . . . . . . . . . . . . . . . . . . . . . . . . . . . . 5
Branchement de votre « décodeur » . . . . . . . . . . . . . . . . . . . . . . . . . . . 6
Description . . . . . . . . . . . . . . . . . . . . . . . . . . . . . . . . . . . . . . . . . . . . . . 12
Façade . . . . . . . . . . . . . . . . . . . . . . . . . . . . . . . . . . . . . . . . . . . . . . . . . 12
Panneau arrière . . . . . . . . . . . . . . . . . . . . . . . . . . . . . . . . . . . . . . . . . . 13
Télécommande . . . . . . . . . . . . . . . . . . . . . . . . . . . . . . . . . . . . . . . . . . . 14
Fonctions de base . . . . . . . . . . . . . . . . . . . . . . . . . . . . . . . . . . . . . . . . . 16
Utilisation du récepteur . . . . . . . . . . . . . . . . . . . . . . . . . . . . . . . . . . . . 22
Menu principal . . . . . . . . . . . . . . . . . . . . . . . . . . . . . . . . . . . . . . . . . . . . 22
1. Installation . . . . . . . . . . . . . . . . . . . . . . . . . . . . . . . . . . . . . . . . . . . 22
1.1 Balayage manuel . . . . . . . . . . . . . . . . . . . . . . . . . . . . . . . . . . . 23
1.2 Contrôle Parental . . . . . . . . . . . . . . . . . . . . . . . . . . . . . . . . . . 23
1.3 Rétablir les paramètres par défaut . . . . . . . . . . . . . . . . . . . . . . 24
1.4 Mettre à jour le logiciel . . . . . . . . . . . . . . . . . . . . . . . . . . . . . . 24
2. Chaîne . . . . . . . . . . . . . . . . . . . . . . . . . . . . . . . . . . . . . . . . . . . . . . . 24
2.1 Mettre à jour la liste . . . . . . . . . . . . . . . . . . . . . . . . . . . . . . . . 24
2.2 Chaînes Préférées . . . . . . . . . . . . . . . . . . . . . . . . . . . . . . . . . . 25
2.3 Verrouiller chaîne . . . . . . . . . . . . . . . . . . . . . . . . . . . . . . . . . . 25
3. Configuration système . . . . . . . . . . . . . . . . . . . . . . . . . . . . . . . . . 26
3.1 Choix de la langue. . . . . . . . . . . . . . . . . . . . . . . . . . . . . . . . . . 26
3.2 Paramètres OSD . . . . . . . . . . . . . . . . . . . . . . . . . . . . . . . . . . . 27
3.3 Paramètres Média . . . . . . . . . . . . . . . . . . . . . . . . . . . . . . . . . . 28
3.4 Modifier le code PIN . . . . . . . . . . . . . . . . . . . . . . . . . . . . . . . . 29
3.5 Paramètres du programmateur . . . . . . . . . . . . . . . . . . . . . . . . 29
3.6 Information système . . . . . . . . . . . . . . . . . . . . . . . . . . . . . . . . 30
4. Boîte aux lettres . . . . . . . . . . . . . . . . . . . . . . . . . . . . . . . . . . . . . . . 30
5. Menu Irdeto . . . . . . . . . . . . . . . . . . . . . . . . . . . . . . . . . . . . . . . . . . . 31
5.1 Etat CA . . . . . . . . . . . . . . . . . . . . . . . . . . . . . . . . . . . . . . . . . . 31
5.2 Etat IRD . . . . . . . . . . . . . . . . . . . . . . . . . . . . . . . . . . . . . . . . . 31
5.3 Etat du chargeur . . . . . . . . . . . . . . . . . . . . . . . . . . . . . . . . . . . 31
Numéros de fabricant de téléviseurs disponibles . . . . . . . . . . . . . . . . 32
Dépannage . . . . . . . . . . . . . . . . . . . . . . . . . . . . . . . . . . . . . . . . . . . . . . 38
Mise au rebut . . . . . . . . . . . . . . . . . . . . . . . . . . . . . . . . . . . . . . . . . . . . . 38
Caractéristiques techniques . . . . . . . . . . . . . . . . . . . . . . . . . . . . . . . . . 39
CARACTERISTIQUES GENERALES
1. SECTION UTILISATEUR
RECEPTION DE PROGRAMMES NUMERIQUES HD/SDTV
TELECHARGEMENT DE LOGICIEL VIA LE RESEAU
GUIDE ELECTRONIQUE DES PROGRAMMES AVANCE
AFFICHAGE A L'ECRAN MULTILINGUE
SOUS-TITRES ET TELETEXTE (AFFICHAGE A L'ECRAN) MULTILINGUES
TELECOMMANDE INFRAROUGE A FONCTIONS COMPLETES
SORTIE PERITEL
FAIBLE CONSOMMATION D'ENERGIE
4 LISTES DE FAVORIS
MISE A JOUR AUTOMATIQUE DU GUIDE EPG
BOUCLE POUR LE SIGNAL RVB
15 MINUTERIES POUR RESERVER DES PROGRAMMES (EVENEMENTS)
A LA MISE SOUS TENSION/HORS TENSION
2. SECTION SYNTONISEUR
BANDE VHF, UHF 50.5~858 MHz
DEBIT DE SYMBOLES 7.252 Msps MAXI
FORMAT DE MODULATION QAM 16~256
SORTIE RF EN BOUCLE POUR UN AUTRE RECEPTEUR OU
TELEVISEUR
3. SECTION VIDEO
COMPATIBLE DVB-C
MPEG-2 : HD (MP@HL), SD (MP@ML)
H.264: MP@L3, MP@L4, HP@L4 jusqu'à 30 Mbps
FORMATS DE SORTIE SELECTIONNABLES PAR L'UTILISATEUR 1080i,
720p, 576p, (576i)
DEBIT 1~30 Mbps
PREND EN CHARGE LES FORMATS D’IMAGE 4:3 (NORMAL) ET 16:9
(ECRAN LARGE)
HDMI, COMPOSANT, COMPOSITE, PERITEL
4. SECTION AUDIO
DECODAGE DOLBY
MPEG-1 1 COUCHE, 2 COUCHES
MPEG-2 AUDIO
MODES MONO, DUAL, STEREO ET JOINT STEREO AUDIO
FREQUENCES D'ECHANTILLONNAGE 32 - 44,1 ET 48 kHz
FONCTION CONTROLE DU VOLUME ET MUET VIA
LA TELECOMMANDE
SORTIE AUDIO NUMERIQUE SPDIF
GB
FR
FR-4
RECEPTEUR CABLE NUMERIQUE HD
FR-5

DCB-H360R
YPbPrL
R
HDMI
ANT.IN
Y
P
B
PR
(OPTICAL)
AUDIO OUT
DIGITAL
HDMI OUT
RF OUT
VIDEO OUT
AUDIO OUT
VIDEO OUT
COMPONENT
AV1
(TV)
AV2
(EXT)
R
L
ANT.IN
Y
P
B
PR
H
RF OUT
VIDEO OUT
AUDIO OUT
VIDEO OUT
COMPONENT
AV1
(TV)
AV2
(EXT)
R
L
YPbPrL
R
HDMI
ANT.IN
Y
P
B
PR
RF OUT
VIDEO OUT
AUDIO OUT
VIDEO OUT
COMPONENT
R
L
ANT.IN
Y
P
B
PR
(OPTICAL)
AUDIO OUT
DIGITAL
HDMI OUT
RF OUT
VIDEO OUT
AUDIO OUT
VIDEO OUT
COMPONENT
AV1
(TV)
AV2
(EXT)
R
L
DCB-H360R
Branchement du décodeur
BRANCHEMENT DE VOTRE « DECODEUR »
Branchement du système de câble du récepteur
Branchement ANT.IN
Après avoir installé votre système par câble,
reliez le câble coaxial à la borne « ANT.IN »
située à l'arrière du décodeur.
Tous les connecteurs des câbles doivent être
serrés avec les doigts. N'utilisez aucun type de
clé pour les resserrer. Un câble coaxial
garantissant une impédance de 75 ohm est
nécessaire.
Branchement RF OUT
Afin de faciliter l'utilisation du récepteur
analogique pour le visionnement de canaux
analogiques, le décodeur est équipé d'une
boucle via la borne « FR OUT ».
A l'aide du câble coaxial, reliez cette borne
à la borne d'entrée IF de votre récepteur
analogique. Désormais, en mettant le
décodeur en mode Veille, vous pourrez
syntoniser et visionner des canaux
analogiques à partir de votre récepteur
analogique.
Panneau arrière du boîtier décodeur
Panneau arrière du boîtier décodeur
Branchement du décodeur
Branchement du câble composite
1. Branchez le système par câble sur la prise
ANT.IN du décodeur.
2. Branchez les câbles vidéo.
A l'aide d'un câble vidéo Composite, reliez les
prises VIDEO OUT du décodeur et TV INPUT
du téléviseur.
3. Branchez les câbles audio.
A l'aide d'un câble audio, reliez la prise L/R
AUDIO OUT du décodeur à la prise L/R AUDIO
IN du téléviseur.
Branchement du câble Composant
1. Branchez le système par câble sur la
prise ANT.IN du décodeur.
2. Branchez les câbles vidéo.
Format YPBPR : à l'aide d'un câble vidéo
Composant, reliez la prise VIDEO OUT
du décodeur à la prise TV INPUT du
téléviseur.
3. Branchez les câbles audio.
A l'aide d'un câble audio, reliez la prise
L/R AUDIO OUT du décodeur à la prise
L/R AUDIO IN du téléviseur.
Panneau arrière du boîtier décodeur
FR
Panneau arrière du téléviseur
Panneau arrière du boîtier décodeur
Panneau arrière du téléviseur
FR-6
RECEPTEUR CABLE NUMERIQUE HD
FR-7

DCB-H360R
Y
P
B
PR
(OPTICAL)
AUDIO OUT
DIGITAL
HDMI OUT
AV1
(TV)
AV2
(EXT)
ON
ANT.IN
Y
P
B
PR
(OPTICAL)
AUDIO OUT
DIGITAL
HDMI OUT
RF OUT
VIDEO OUT
AUDIO OUT
VIDEO OUT
COMPONENT
AV1
(TV)
AV2
(EXT)
R
L
YPbPrL
R
HDMI
REAR VCR
HDMI
ANT.IN
Y
P
B
PR
(OPTICAL)
AUDIO OUT
DIGITAL
HDMI OUT
RF OUT
VIDEO OUT
AUDIO OUT
VIDEO OUT
COMPONENT
AV1
(TV)
AV2
(EXT)
R
L
DCB-H360R
Branchement du décodeur
Branchement du câble péritel
1. Branchez le système par câble sur
la prise ANT.IN du décodeur.
2. A l'aide d'un câble péritel, reliez la prise
VCR OUT du magnétoscope à la prise
péritel AV2 (EXT) du décodeur.
3. A l'aide du câble péritel, reliez la prise
AV1 (TV) du décodeur à la prise
d'entrée péritel du téléviseur.
Panneau arrière du VCR
Panneau arrière du décodeur
Branchement du décodeur
Branchement du décodeur à un téléviseur possédant une prise HDMI.
1. Branchez le système par câble sur la
prise ANT.IN du décodeur.
2. A l'aide d'un câble HDMI, reliez la prise
HDMI OUT du décodeur à la prise
HDMI IN de l'appareil HDMI (téléviseur,
écran)
RRRReeeemmmmaaaarrrrqqqquuuuee
ee : Avec certains récepteurs, il se
peut que la sortie HDMI ne
fonctionne pas correctement.
Panneau arrière du décodeur
FR
Panneau arrière du téléviseur
Panneau arrière du téléviseur
Branchement du câble audio Composant
Il existe aujourd'hui sur le marché de nombreux
types de systèmes audio.
La figure de droite représente de façon simplifiée
un de ces systèmes. Pour plus d'informations,
reportez-vous au manuel d'utilisation de votre
système audio.
Pour une entrée audio numérique optique,
branchez le système audio à la prise DIGITAL
AUDIO OUT (OPTICAL) du décodeur.
Panneau arrière du décodeur
Panneau arrière du audio
FR-8
RECEPTEUR CABLE NUMERIQUE HD
FR-9

DCB-H360R
DCB-H360R
Branchement du décodeur
Sélection de la résolution et du signal de sortie de la télévision numérique.
Vous pouvez sélectionner la sortie vidéo appropriée pour le téléviseur branché ou le mode écran.
Pour sélectionner la résolution :
● Sélectionnez une résolution à l'aide de la touche
RESOLUTION de la télécommande et du tableau cidessous.
RRRReeeemmmmaaaarrrrqqqquuuuee
Pour sélectionner le signal de sortie vidéo :
● Sélectionnez le signal de sortie à l'aide de la touche
VIDEO OUTPUT de la télécommande et du tableau cidessous.
RVB : Sélectionnez le signal de sortie à l'aide de la
YP
ee : La touche EXIT à l'avant du récepteur HD peut
aussi être utilisée comme touche RESOLUTION
en cas d'absence d'affichage à l’écran.
touche VIDEO OUTPUT de la télécommande et
du tableau ci-dessous.
BPR : Sélectionnez YPBPR lorsque le téléviseur est relié
au port de sortie Composant (YPBPR) et HDMI
du récepteur HD.
Branchement du décodeur
Réglage des fonctions du téléviseur à l'aide de la télécommande
Saisissez le numéro du fabricant dans la télécommande pour pouvoir contrôler le téléviseur à l'aide
de celle-ci (voir la rubrique « Numéros de fabricants de téléviseurs disponibles » pages 32 à 37).
1. Allumez le téléviseur.
2. Pointez la télécommande en direction du téléviseur.
3. Saisissez le numéro du fabricant du téléviseur en utilisant les touches NUMERIQUES tout en
maintenant la touche TV enfoncée.
Ex. : Si vous possédez un téléviseur Samsung, appuyez sur les touches NUMERIQUES 0, 0 et 1
(dans cet ordre) tout en maintenant la touche TV enfoncée.
4. Dès la mise sous tension/hors tension du téléviseur, la configuration est terminée.
Fonctions du téléviseur pouvant être activées à l'aide de la télécommande
Touche Fonction
TV STANDBY/ON
INPUT SEL
VOL+/-
CH /
MUTE
0~9
RRRReeeemmmmaaaarrrrqqqquuuuee
ee : 1. Il existe un modèle qui ne peut être allumé qu'en appuyant sur la touche
numérique « 0 » de la télécommande.
Permet la mise sous ou hors tension du téléviseur.
Permet de sélectionner une source d'entrée externe pour le téléviseur.
Permet de régler le volume du téléviseur / exclusive au téléviseur.
Permet de sélectionner une chaîne de télévision.
Permet de désactiver le son du téléviseur.
Permet de sélectionner une chaîne de télévision.
FR
Résolution et sortie vidéo
Sortie vidéo Résolution disponible Etat de sortie
Composite 576i Toujours Sortie.
Péritel 576i Pour la sortie péritel, RVB ou
Composite peuvent être sélectionnés.
Composant (YPBPR) 1080i/720p/576p La résolution 576i n'est pas prise en charge.
HDMI 1080i/720p/576p La résolution 576i n'est pas prise en charge.
RRRReeeemmmmaaaarrrrqqqquuuuee
ee : La valeur initiale est le mode YPBPR (résolution 1080i).
FR-10
RECEPTEUR CABLE NUMERIQUE HD
2. Les modèles de téléviseurs d'autres fabricants pouvant être contrôlés à
partir de la télécommande sont limités ; tous ne permettent pas d'utiliser
l’ensemble des fonctions.
3. Si vous changez les piles de la télécommande ou si vous saisissez un
nouveau numéro de fabricant, celui que vous aviez configuré
précédemment est supprimé.
4. Sachez que lorsque vous utilisez la télécommande alors que l'un des
appareils branchés est un modèle intégré au téléviseur (magnétoscope,
lecteur DVD), il se peut que la télécommande fonctionne sur les deux
appareils simultanément.
5. Si le numéro de configuration ne fonctionne pas, essayez un autre
numéro.
FR-11

DCB-H360R
DCB-H360R
DESCRIPTION
DESCRIPTION
Façade
6
7
HIGH DEFINITION CABLE RECEIVER DCB-H360R
MENU
GUIDE
1
2
3
4
5
89
1. / I Permet d'allumer le récepteur ou de le faire passer en mode Veille.
2. HDTV Affiche l'état de la diffusion. Lorsque le décodeur détecte un signal de
diffusion HD, le logo HDTV s'illumine.
3. Fenêtre d'affichage Affiche des informations sur le récepteur HDTV numérique.
4. GUIDE Permet d'afficher à l'écran le guide électronique des programmes
(EPG)
5. MENU Permet d'afficher le menu principal.
6. OK Permet de sélectionner les éléments apparaissant en surbrillance sur
les écrans Guide et Menu.
>
<
7. Ces flèches permettent de vous déplacer sur les écrans Guide et
< >
Menu.
8. Fente pour carte Emplacement pour la carte intelligente Irdeto.
9. EXIT Permet d'effacer les affichages à l’écran et de revenir au programme
télévisé.
EXIT
Panneau arrière
3
1
VIDEO OUT
L
AUDIO OUT
R
COMPONENT
VIDEO OUT
Y
B
P
PR
ANT.IN
RF OUT
245
7
AV2
(EXT)
DIGITAL
AV1
(TV)
HDMI OUT
6
AUDIO OUT
(OPTICAL)
89 11
1. ANT.IN Ce port est relié à votre système par câble via un câble
coaxial.
2. RF OUT Permet de relier un téléviseur ou un autre récepteur via un
câble coaxial.
3. VIDEO OUT Permet de relier un téléviseur, un écran ou un autre dispositif
de visualisation externe via le port d'entrée vidéo analogique.
4. AUDIO OUT Permet de relier un téléviseur, un récepteur audio ou un autre
dispositif externe via le port d'entrée audio analogique.
5. COMP. VIDEO OUT Permet de relier un téléviseur, un écran ou un autre dispositif
de visualisation externe via l'entrée vidéo composant
(YPBPR). Pour ce faire, la touche VIDEO OUTPUT de la
télécommande doit être en mode YPBPR.
6. AV1 (TV) Permet de brancher l'appareil à votre téléviseur.
7. AV2 (EXT) Permet de brancher un magnétoscope, un lecteur DVD ou un
autre appareil au récepteur.
8. HDMI OUT Utilisez le câble HDMI pour relier cette prise à votre téléviseur
et bénéficier d'une meilleure qualité d'image.
10
ON
POWER
OFF
FR
FR
FR-12
9. DIGITAL AUDIO OUT Sortie utilisée pour brancher un amplificateur numérique.
10. INTERRUPTEUR POWER Il permet d'allumer (ON) ou d'éteindre (OFF) l'alimentation.
11. CORDON D'ALIMENTATION Permet de brancher l'appareil sur une prise murale de CA
100-240 V, 50/60 Hz
RECEPTEUR CABLE NUMERIQUE HD
.
FR-13

DCB-H360R
18
19
20
22
23
29
26
16
17
13
14
15
24
27
10
11
12
21
25
28
30
DCB-H360R
Télécommande
RRRReeeemmmmaaaarrrrqqqquuuuee
ee : Au moment d'insérer les piles, veillez
à ce que la polarité (+/-) soit juste.
DESCRIPTION
1. TV (uniquement pour l'utilisation du téléviseur)
Permet de passer du mode Télécommande au mode TV.
2. STB
Permet de passer du mode Télécommande au mode
Récepteur.
3. STANDBY/ON
Permet d'allumer le récepteur ou de passer en mode
Veille.
4. Touches NUMERIQUES 0 ~ 9
Permettent de sélectionner un canal ou de saisir des
numéros sur les écrans de menu.
5. FAV. CH
Permet de basculer d'une liste de favoris à une autre.
6. ALT
Appuyez une fois pour sélectionner une liste de plages
sonores et deux fois pour sélectionner une liste de
plages vidéo.
7. FREEZE
Appuyez une fois pour mettre la lecture en pause et
deux fois pour désactiver cette fonction.
8. AUDIO
Permet de faire passer le son sur le canal gauche, droit
ou sur les deux.
9. CH. LIST
La liste des canaux recherchés apparaît.
10. Vol+ /Vol-
Permet de régler le volume sonore.
11. MENU
Permet d’afficher les menus à l'écran.
12.
¦
Ces touches permettent de déplacer la barre de
surbrillance pour sélectionner les options du menu.
13. GUIDE
Permet d'afficher à l'écran le guide électronique des
programmes (EPG).
14. P.SIZE
Appuyez sur cette touche pour changer le format
d'écran en fonction du format d'image et du format de
signal d'entrée.
15. COULEUR (ROUGE, VERT, JAUNE, BLEU)
Utilisez ces touches en suivant les instructions
affichées à l’écran lorsque vous effectuez des
recherches dans l'écran Menu ou Guide.
DESCRIPTION
16. RESOLUTION
Permet de sélectionner le format de résolution de sortie (1080i, 720p ou 576p (576i)) en fonction de
l'entrée vidéo du téléviseur ou de l'écran.
17. VIDEO OUPUT
Permet de sélectionner un format de sortie vidéo entre RVB et YPBPR en fonction de l'entrée vidéo du
téléviseur ou de l'écran.
18. TV STANDBY/ON
Permet d'allumer le téléviseur ou de passer en mode Veille (uniquement pour l'utilisation du téléviseur)
19. INPUT SEL
Permet de sélectionner la source d'entrée du téléviseur (uniquement pour l'utilisation du téléviseur)
20. PRE. CH
Permet de revenir au canal précédent.
21. SUBTITLE
Permet d'afficher les sous-titres à l'écran.
22. TEXT
Permet de sélectionner le mode d'affichage à l'écran du télétexte.
23. TIMER
Permet de réserver un programme à l'aide du guide EPG.
24. TV/RADIO
Permet de basculer entre un canal Téléviseur et un canal Radio.
<
25. CH /
26. RETURN
27. MUTE
28. OK
29. INFO
30. EXIT
>
Permet de changer de canal
Permet de revenir au menu précédent.
Permet de désactiver le son.
Permet de confirmer et d'enregistrer des données sur le récepteur dans le menu.
Permet d'afficher à l'écran les informations concernant le programme.
Appuyez une fois sur cette touche et les informations de base s'affichent.
Appuyez deux fois sur cette touche et des informations détaillées s'affichent dans une zone de texte.
Permet d'effacer les affichages à l’écran et de revenir au programme télévisé en cours.
FR
FR
FR-14
RECEPTEUR CABLE NUMERIQUE HD
FR-15

DCB-H360R
DCB-H360R
FONCTIONS DE BASE
FONCTIONS DE BASE
1. Ecran d'affichage
Vous devez effectuer l'installation avant de pouvoir regarder le programme télévisé de votre
choix.
En conséquence, seules des images de menu s’affichent dans un premier temps.
Une fois les canaux du téléviseur programmés, l'image suivante (bandeau) s'affiche à chaque
fois que vous changez de canal :
! Le contrôle parental.
@ Favori.
# Verrouillage des canaux.
$ Canal de bousculade.
% Télétexte.
●
Appuyez sur la touche INFO en mode Affichage.
●
Sélectionnez le canal à l'aide des touches NUMERIQUES
^ Sous-titres.
& Bande sonore.
* Mail.
( Annonce.
) Dolby Digital.
touche TV/RADIO pour accéder à la télévision ou à la radio.
Cette image s'affiche également lorsque vous changez de canal.
Appuyer sur la touche TV/RADIO de la télécommande permet de basculer entre un programme
télévisé et un programme radiophonique.
1 HD/SD
2 16:9/4:3
3 Progression.
0-9 ou
puis appuyez sur la
2. Réglage du volume
Pour régler le volume :
●
Appuyez sur les touches VOL - ou VOL + pour régler le volume.
●
Appuyez sur la touche MUTE pour activer la sourdine.
●
Appuyez à nouveau sur la touche MUTE ou sur les touches VOL - / VOL + pour désactiver la
sourdine.
RRRReeeemmmmaaaarrrrqqqquuuuee
ee : Le son HDMI est commandé par le téléviseur et non par le récepteur HD.
3. Sélection d'une bande son
●
Appuyez sur la touche ALT pour consulter la liste des
bandes son.
●
Appuyez sur les touches
sélectionner une.
●
Le service de bande son n'est pas fourni pour tous les
canaux et dépend des conditions dans lesquelles se
trouve l'opérateur.
et OK pour en
FR
Informations détaillées concernant les programmes
●
Appuyez à trois reprises sur la touche INFO lorsque vous visionnez un programme.
Vous voyez tout d'abord s’afficher le bandeau décrit plus haut.
Après avoir appuyé pour la seconde fois sur la touche INFO, les informations détaillées
concernant le programme en cours, s'il y en a davantage, s'affichent sur un autre bandeau.
Lorsque ces informations ne tiennent pas sur une seule page, les touches JAUNE et BLEUE
permettent de faire défiler l'écran vers le haut ou vers le bas.
RRRReeeemmmmaaaarrrrqqqquuuuee
ee : Ce service est fonction du fournisseur de services.
FR-16
RECEPTEUR CABLE NUMERIQUE HD
4. Sélection d'une bande vidéo
●
Appuyez à deux reprises sur la touche ALT pour
consulter la liste des bandes vidéo.
●
Appuyez sur les touches
sélectionner une.
●
Le service de bande vidéo n'est pas fourni pour tous
les canaux et dépend des conditions dans lesquelles
se trouve l'opérateur.
RRRReeeemmmmaaaarrrrqqqquuuuee
ee : Lorsque vous sélectionnez AUTO dans la fenêtre de sélection, le fonctionnement
sera conforme aux installation de système du menu principal.
et OK pour en
FR-17

DCB-H360R
DCB-H360R
FONCTIONS DE BASE
5. Liste des canaux
●
Appuyez sur la touche CH LIST lorsque vous visionnez un
programme.
●
Sélectionnez la liste en appuyant sur la touche TV/RADIO.
L'icône situé après le nom du canal indique que ce
dernier est brouillé et l'icône indique qu'il est verrouillé.
●
Sélectionnez le canal à l'aide des touches
de la
télécommande.
●
Appuyez sur la touche OK pour regarder ce canal.
Les touches colorées correspondent aux services suivants.
La touche VERTE permet d'atteindre la prochaine date à
venir.
●
Touche JAUNE : Favoris
●
Touche ROUGE : (Alphabétique) Sorte
<
●
Appuyez sur les touches (page précédente/suivante) pour atteindre la page
>
suivante ou la page précédente.
●
Appuyez sur la touche EXIT pour quitter le menu.
5.1 Liste des canaux favoris
●
Appuyez sur la touche JAUNE de la télécommande pour
sélectionner le groupe de favoris de la liste des canaux.
●
Appuyez sur la touche JAUNE pour basculer entre la liste
des canaux favoris et la liste des canaux.
●
Utilisez les touches
pour sélectionner le groupe de
favoris ou le canal de votre choix.
<
●
Appuyez sur les touches (page précédente/suivante)
>
pour atteindre la page suivante ou la page précédente.
●
Appuyez sur la touche EXIT pour quitter le menu.
5.2 Liste alphabétique des canaux
●
Appuyez sur la touche ROUGE de la télécommande pour
sélectionner la liste alphabétique des canaux.
●
Appuyez sur la touche ROUGE pour basculer entre la liste
alphabétique des canaux et la liste des canaux.
●
Utilisez les touches
alphabétique ou le canal de votre choix.
●
Appuyez sur la touche EXIT pour quitter le menu.
pour sélectionner le groupe
FONCTIONS DE BASE
6. Menu du guide (EPG)
EPG - Guide électronique des programmes
Le guide électronique des programmes vous fournit des
informations concernant les canaux.
RRRReeeemmmmaaaarrrrqqqquuuuee
●
Appuyez sur la touche GUIDE lorsque vous visionnez un programme.
●
La touche ROUGE permet de revenir à la date précédente.
●
La touche VERTE permet d'atteindre la prochaine date à venir.
●
La touche JAUNE permet de faire défiler l'écran vers le haut s'il y a plus d'une page
d'informations.
●
La touche BLEUE permet de faire défiler l'écran vers le bas s'il y a plus d'une page
d'informations.
Il est possible de régler l'intervalle de temps en appuyant sur des touches de la manière
suivante sur l'écran EPG :
Touche 1 : 1 heure 30 minutes, Touche 2 : 30 minutes, Touche 3 : 15 minutes
La touche TV/RADIO vous permet de parcourir les différentes listes de programmes.
●
Sélectionnez le canal en appuyant sur les touches
le regarder.
●
Si le canal actuel implique un événement, la minuterie est réglée immédiatement et s'affiche
sur l'écran EPG lorsque vous appuyez sur la touche TIMER de la télécommande sur l'écran
EPG. Un programme qui a été réglé de cette manière est affiché sur Timer Setting.
ee : 1. Ce service est fonction du fournisseur de
services.
2. Le récepteur peut afficher des informations
EPG correctes après s’être calé sur l’heure
GMT (heure du méridien de Greenwich) à
partir du signal, ce qui nécessite quelques secondes.
, puis appuyez sur la touche OK pour
FR
FR-18
RECEPTEUR CABLE NUMERIQUE HD
FR-19

DCB-H360R
DCB-H360R
FONCTIONS DE BASE
7. Affichage à l'écran du télétexte
Lorsque le programme en cours propose le télétexte, appuyez
une fois sur la touche TEXT pour afficher la liste actuelle des
langues pour le télétexte afin d'obtenir l'affichage du télétexte à
l'écran quel que soit le type de téléviseur. La présence de l'icône
sur le bandeau indique que le télétexte est disponible pour
cet événement (programme). Il est possible que le télétexte ne
soit pas disponible même si cette icône est affichée sur le
bandeau. Cela est dû à la diffusion.
● Appuyez sur la touche EXIT pour quitter le menu.
RRRReeeemmmmaaaarrrrqqqquuuuee
Vous pouvez utiliser les touches suivantes lorsque
l'application télétexte est active :
● Touches NUMERIQUES : 0....9 permettent de changer la page principale.
Le numéro de la page principale s'affiche ensuite dans le coin supérieur gauche.
Si le programme en cours propose cette page après un moment (environ 20 s. en général),
cette page s'affiche.
● Les touches
pour la touche .
● Les touches
suivante/précédente.
Les diffuseurs envoient parfois une ou plusieurs pages secondaires sur une page principale.
Pour modifier le numéro de la page secondaire, appuyez simplement sur la touche ¦ou .
Si les pages secondaires se trouvent dans la mémoire du décodeur, la page secondaire
suivante/précédente s'affiche.
ee : Cette fonction n'est pas prise en charge si le
téléviseur raccordé propose la fonction Télétexte.
Le récepteur HD ne prend pas en charge la
fonction télétexte à intervalle de trame.
permettent de changer la page principale, (+1) pour la touche et (-1)
¦
permettent de changer le numéro de la page secondaire
FONCTIONS DE BASE
8. Sous-titres
Lorsque le programme actuellement diffusé est sous-titré,
appuyez sur la touche SUBTITLE pour afficher la liste des
langues proposées.
Si des sous-titres sont disponibles pour le programme actuel,
s'affiche sur le bandeau.
Pour changer la langue des sous-titres :
● Appuyez une fois sur la touche SUBTITLE pour afficher la liste
des langues de sous-titrage.
● Sélectionnez la langue de sous-titrage de votre choix à l'aide
des touches
● Appuyez sur la touche OK et la langue de sous-titrage
.
sélectionnée s'affiche.
RRRReeeemmmmaaaarrrrqqqquuuuee
ee : Lorsque vous sélectionnez AUTO dans la fenêtre
de sélection, le fonctionnement sera conforme aux
installation de système du menu principal.
9. Mode Audio
La touche AUDIO vous permet de sélectionner gauche, droite
ou stéréo.
Pour changer le mode Audio :
●
Appuyez sur la touche AUDIO pour sélectionner gauche,
droite ou stéréo.
FR
FR
FR-20
RECEPTEUR CABLE NUMERIQUE HD
FR-21

DCB-H360R
Menu principal
Après avoir raccordé votre système par câble et installé le
décodeur avec les connecteurs appropriés :
●
Branchez le cordon d'alimentation principale CA et mettez le
récepteur sous tension.
●
Appuyez sur la touche MENU pour afficher le menu principal.
L’écran représenté à droite s’affiche :
Les noms des sous-menus s'affichent pour les sous-menus
Installation, Chaîne, Configuration système, Boite aux lettres et Irdeto.
Avant de vous intéresser au menu « Installation », vérifiez dans le menu « Configuration
système » que toutes les informations s'appliquent à votre cas.
1. Installation
Le menu propose des réglages permettant de personnaliser des
options, d'ajouter de nouveaux services et d'afficher l'état du
récepteur.
●
Sélectionnez « Installation » dans le menu principal pour
sélectionner le sous-menu.
●
Saisissez le code PIN.
Si vous n'avez pas modifié le code PIN, le code par défaut 0000
s'applique.
UTILISATION DU RECEPTEUR
UTILISATION DU RECEPTEUR
1.1 Balayage manuel
Pour la recherche de nouveaux canaux, le décodeur est équipé d'une fonction « Balayage
manuel » qui permet à l'utilisateur de saisir les données concernant le canal. Lorsque vous
sélectionnez « Balayage manuel » dans le menu Installation,
l'écran représenté à droite s'affiche :
●
Saisissez la fréquence du canal que vous souhaitez
rechercher.
●
Saisissez l'indicatif de réseau du canal que vous souhaitez
rechercher.
●
Renseignez-vous auprès de votre câblodistributeur.
●
Sélectionnez la modulation du canal que vous souhaitez
rechercher.
●
Vous pouvez choisir entre les valeurs suivantes : 16, 32, 64,
128 et 256.
●
Saisissez le débit de symboles du canal que vous souhaitez
rechercher.
●
Après avoir sélectionné une option, appuyez sur la touche OK
pour lancer la recherche.
●
Appuyez sur la touche EXIT pour quitter le menu.
RRRReeeemmmmaaaarrrrqqqquuuuee
ee : Lorsque le message « NOT COMPLETE CHANNEL » s'affiche, veuillez effectuer
une nouvelle fois la recherche en suivant les instructions du fournisseur de service.
1.2 Contrôle Parental
Le contrôle parental vous permet d'empêcher vos enfants
d'accéder aux émissions pour adultes.
Cette option peut être réglée dans le menu Installation
Contrôle Parental.
●
Sélectionnez l'âge de votre cadet à l'aide des touches
puis appuyez sur la touche OK pour enregistrer ce réglage.
●
Tous les services pour lesquels l'âge requis est supérieur à
celui qui a été défini sont bloqués et nécessitent la saisie du code PIN.
●
Si vous souhaitez bloquer tous les services, sélectionnez « TOUS BLOQUES ».
●
Par défaut, tous les services sont « DEBLOQUE »
¦
DCB-H360R
FR
FR
FR-22
Saisissez le code PIN.
●
Ce bandeau s'affiche si l'âge requis pour accéder au service est supérieur à l'âge défini dans le
menu Contrôle Parental. Saisissez un code PIN à quatre chiffres pour masquer ce bandeau et
afficher le contenu du service.
La code PIN par défaut est 0000. Vous pouvez le modifier dans le menu Modifier le code PIN.
●
Appuyez sur la touche EXIT pour quitter le menu.
RECEPTEUR CABLE NUMERIQUE HD
FR-23

DCB-H360R
DCB-H360R
UTILISATION DU RECEPTEUR UTILISATION DU RECEPTEUR
1.3 Rétablir les paramètres par défaut
Cette fonction permet de restaurer les valeurs par défaut lorsque
l'utilisateur rencontre des problèmes après avoir modifié les
valeurs des données concernant les canaux ou toute autre valeur
susceptible d'être erronée.
L'écran représenté à droite s’affiche :
Si vous appuyez sur OK dans le menu d'invite, les paramètres par
défaut du récepteur sont rétablis automatiquement.
RRRReeeemmmmaaaarrrrqqqquuuuee
ee : Vos précédents réglages seront supprimés !
L'ensemble des réglages et des informations seront supprimés, y compris les
données concernant les canaux.
●
Appuyez sur la touche EXIT pour quitter le menu.
1.4 Mettre à jour le logiciel
Cette option n'est activée que si votre câblodistributeur envoie un logiciel pour votre décodeur.
Pour mettre à jour le logiciel, placez le curseur sur Installation Mettre à jour le logiciel et
appuyez sur la touche OK. Si un nouveau logiciel est disponible, le bandeau « Commencer la
mise à jour du logiciel ? » s'affiche. Des informations concernant le temps estimé pour le
téléchargement du logiciel sont également fournies. Appuyez sur la touche OK pour confirmer et
lancer la procédure de mise à jour du logiciel. Si un logiciel plus récent est installé sur votre
décodeur, le message « Le logiciel n’a pas besoin d’être mis à jour ! » s'affiche.
RRRReeeemmmmaaaarrrrqqqquuuuee
●
Appuyez sur la touche EXIT pour quitter le menu.
ee : Avant de commencer la mise à jour du logiciel, le décodeur redémarre
automatiquement. Aucune image ne s’affichera sur l’écran de votre téléviseur
pendant la mise à jour du logiciel (environ 10 minutes). Vous pouvez contrôler la
progression de la mise à jour sur l’afficheur du décodeur. Une fois la mise à jour
terminée, le décodeur se remet automatiquement en service.
2.2
Chaînes Préférées
Vous pouvez enregistrer immédiatement le canal actuel dans le
groupe de favoris de votre choix.
Vous pouvez également enregistrer un même canal dans
plusieurs groupes de favoris.
●
Sélectionnez le groupe de favoris de votre choix (FAV1~FAV4)
à l'aide de la touche FAV.CH.
●
Sélectionnez la liste de canaux que vous souhaitez à l'aide des
touches
●
Appuyez sur la touche ROUGE et enregistrez le canal sélectionné dans le groupe de favoris.
●
Appuyez ensuite sur la touche OK pour confirmer.
ou des touches numériques dans la fenêtre TV ou RADIO.
Vous pouvez basculer entre la liste TV et la liste RADIO à l'aide de la touche TV/RADIO et
modifier la liste des favoris à l'aide de la touche FAV.CH.
●
La touche TV/RADIO vous permet de basculer entre la liste TV et la liste Radio.
●
Appuyez sur la touche FAV.CH pour sélectionner une autre liste de favoris.
●
Appuyez sur la touche EXIT pour quitter le menu.
Pour supprimer des canaux d'un groupe de favoris :
●
Sélectionnez une liste de canaux à supprimer à l'aide des touches
●
Appuyez sur la touche ROUGE pour supprimer le canal sélectionné de la liste des canaux
.
favoris.
●
Appuyez sur la touche EXIT pour quitter le menu.
Remarque : une liste de favoris peut contenir un maximum de 200 canaux.
FR
FR
2. Chaîne
Le menu « Chaîne » dispose de trois fonctions :
l'enregistrement des modifications apportées à la liste des canaux
grâce à la fonction Update List, l'établissement de quatre listes de
favoris et le verrouillage des canaux, selon votre choix.
●
Saisissez le code PIN.
Si vous n'avez pas modifié le propre code Pin, le code par défaut
0000 s'applique.
2.1 Mettre à jour la liste
Lorsque de nouveaux canaux sont transmis à votre réseau câblé,
ils s'affichent en vert sur la liste des canaux.
Pour les enregistrer, sélectionnez Chaîne Mettre à jour la
liste.
FR-24
RECEPTEUR CABLE NUMERIQUE HD
2.3
Verrouiller chaîne
●
Sélectionnez la fenêtre TV ou RADIO à l'aide des touches
●
Sélectionnez le canal à l'aide des touches
●
Sélectionnez le verrouillage du canal à l'aide de la touche
.
¦
.
ROUGE.
●
Appuyez sur la touche OK pour confirmer.
Le canal est verrouillé.
Lorsque vous souhaitez visualiser le canal, saisissez le code PIN dans la fenêtre d'invite.
Pour désactiver le verrouillage :
●
Appuyez à nouveau sur la touche ROUGE pour désactiver le verrouillage.
●
Appuyez sur la touche EXIT pour quitter le menu.
FR-25

DCB-H360R
DCB-H360R
UTILISATION DU RECEPTEUR
3. Configuration système
Cette option vous permet de modifier les paramètres système
en fonction de vos besoins.
3.1
Choix de la langue
L'option «Choix de la langue » permet à l'utilisateur de
sélectionner la langue de l'affichage à l'écran, de la bande son,
du télétexte, des sous-titres ou du guide EPG.
La langue de la bande son, du télétexte, des sous-titres et du
guide EPG dépend cependant du type de diffusion.
Par exemple, même si la langue des sous-titres peut être
sélectionnée, cette langue peut ne pas être prise en charge
car le programme ne dispose d'aucun sous-titres.
●
Il existe 3 langues d'affichage à l'écran disponibles et 37 langues prises en charge pour les
bandes son, les sous-titres, le télétexte et le guide EPG.
●
Pour sélectionner le menu de langue souhaité, appuyez sur les touches
la langue, puis appuyez sur la touche OK.
●
Les bandes son, les sous-titres, le télétexte et le guide EPG varient en fonction de la langue
sélectionnée.
¦
pour modifier
UTILISATION DU RECEPTEUR
3.2
Paramètres OSD
Vous pouvez définir la transparence de l'affichage à l'écran, des
sous-titres et du télétexte ainsi que le bandeau d'affichage de
l'heure et la position de l'affichage à l'écran.
●
Sélectionnez le niveau de transparence de l'affichage à l'écran.
Le niveau de transparence de l'affichage à l'écran varie de 0 à
100 %.
Le réglage s’effectue à l'aide des touches numériques, des
<
<
<
¦
ou des touches CH /CH .
¦
: réglage par incréments de 1 %.
<
>
>
¦
: réglage par incréments de 1 %.
<
>
>
¦
: réglage par incréments de 1 %.
<
>
>
¦
: réglage par incréments de 0,5 s.
<
>
touches
Touches
Touches CH /CH : réglage par incréments de 10 %.
●
Sélectionnez le niveau de transparence des sous-titres.
Le niveau de transparence varie de 0 à 100 %.
Le réglage s’effectue à l'aide des touches numériques, des touches
CH /CH .
Touches
Touches CH /CH : réglage par incréments de 10 %.
●
Sélectionnez le niveau de transparence du télétexte.
Le niveau de transparence varie de 0 à 100 %.
Le réglage s’effectue à l'aide des touches numériques, des touches
CH /CH .
Touches
Touches CH /CH : réglage par incréments de 10 %.
●
Sélectionnez la durée d'affichage de la boîte d'information (bandeau) affichée à l'écran.
La durée varie de 0,5 à 60 secondes.
Le réglage s’effectue à l'aide des touches numériques, des touches
CH /CH .
Touches
Touches CH /CH : réglage par incréments de 1 s.
<
>
¦
ou des touches
¦
ou des touches
¦
ou des touches
FR
FR
●
Appuyez sur la touche EXIT pour quitter le menu.
FR-26
RRRReeeemmmmaaaarrrrqqqquuuuee
RECEPTEUR CABLE NUMERIQUE HD
ee : Le réglage ne s'applique pas au bandeau et à la fenêtre d'information.
FR-27

DCB-H360R
DCB-H360R
UTILISATION DU RECEPTEUR
Position de l'affichage à l'écran
●
Placez le curseur à l’emplacement de votre choix et appuyez
longuement sur les touches
¦
ou
jusqu'à ce que
l'écran se déplace sur la position souhaitée.
L'écran se déplace sur la position souhaitée.
●
Appuyez sur la touche EXIT pour quitter le menu.
3.3 Paramètres Média
Vous pouvez définir le réglage des supports de votre choix.
Placez le curseur sur ce sous-menu et appuyez sur OK.
●
Appuyez sur les touches
éléments, puis sur les touches
●
Appuyez sur la touche OK pour confirmer.
Format d'écran
●
Sélectionnez le format d'écran de votre choix en fonction de
votre téléviseur.
Type de rapport STANDARD 4:3 ou ECRAN LARGE 16:9.
Format vidéo 4:3 : PAN & BALAYAGE, BL (boîte aux lettres) plein écran 14:9, BL 16:9
●
Lors de la sélection du format d'écran 16:9, vous pouvez sélectionner un rapport de 4:3 pour
visualiser un film. (cependant, le menu vidéo 16:9 n'est pas disponible pour ce format).
Format vidéo 16:9 : standard, large
●
Lors de la sélection du format d'écran 4:3, vous pouvez sélectionner un rapport de 16:9 pour
visualiser un film (cependant, le menu vidéo 4:3 n'est pas disponible pour ce format).
●
Sélectionnez la barre de couleur vidéo : noir ou gris.
- Avertissement !
N'affichez pas la barre de couleur vidéo en noir durant des périodes prolongées car une brûlure
d'image temporaire ou prolongée pourrait se produire. Reportez-vous également aux
précautions d'emploi de votre écran.
●
Sélectionnez le type de signal vidéo :
Composite + Composant, Composite + RVB
●
Définissez la sélection automatique Dolby Digital : Activé ou Désactivé.
Activé : Permet d'émettre en premier le son Dolby Digital.
Désactivé : Permet d'émettre en premier les autres formats audio.
●
Définissez la sélection Digital sortie : Dolby Digital ou PCM.
Dolby Digital : lorsque vous sélectionnez Dolby Digital, le signal Dolby Digital devient prioritaire.
PCM : lorsque vous sélectionnez PCM, le signal PCM devient prioritaire.
RRRReeeemmmmaaaarrrrqqqquuuuee
ee : Si le récepteur ne supporte pas Dolby Digital, l'option PCM doit être choisi pour
entendre le son par l’intermédiaire de HDMI.
●
Choisissez la sélection automatique des sous-titres : Activé, Malentendants (sous-titres pour les
malentendants) ou Désactivé.
pour déplacer les sous-
¦
pour sélectionner l'option.
UTILISATION DU RECEPTEUR
●
Choisissez la sélection sortie audio HDMI une option : Type A, Type B, Type C ou Type D.
RRRReeeemmmmaaaarrrrqqqquuuuee
ee : En fonction du récepteur, le son du HDMI audio ne fonctionne pas correctement.
Choisissez l’option sortie audio correcte.
●
Appuyez sur la touche EXIT pour quitter le menu.
Fabriqué sous licence par Dolby Laboratories.
« Dolby » et le symbole représentant deux D sont des marques déposées de Dolby Laboratories.
3.4 Modifier le code PIN
Pour modifier le code PIN, sélectionnez la quatrième option «
Modifier le code PIN ».
Cela vous permet d'accéder au menu suivant :
A l'aide de cette option, saisissez le code PIN actuel sur la
première ligne et saisissez le code PIN souhaité sur la seconde
ligne.
Saisissez une deuxième fois le nouveau code PIN pour le
confirmer.
Le code PIN doit être une valeur numérique composée de 4
chiffres.
Le code PIN PAR DEFAUT est : 0 0 0 0.
●
Appuyez sur la touche EXIT pour quitter le menu.
3.5
Paramètres du programmateur
1) Bande de garde
Le temps de la bande de garde est une fonction permettant de
s'assurer que la totalité de l’enregistrement figurera dans la limite
de temps fixée. 1 minute de temps de bande de garde signifie
que le décodeur démarre l'opération programmée 1 minute avant
et la termine 1 minute après le temps défini.
2) Temporisateur
15 minuteries différentes sont prises en charge, y compris la/les
minuterie(s) associées au guide EPG.
●
Sélectionnez un numéro de minuterie compris entre 1 et 15 en choisissant l'option
« Temporisateur » à l'aide des touches
●
Appuyez sur les touches
¦
pour sélectionner le type de répétition d'événement de votre
choix : Chaque jour, Chaque dimanche, Chaque lundi, Chaque mardi, Chaque mercredi,
Chaque jeudi, Chaque vendredi, Chaque samedi et Une fois.
Si la minuterie est réglée à partir de l'écran EPG, EPG s'affiche dans « Répétition
d’évènements ».
¦
.
FR
FR
FR-28
RECEPTEUR CABLE NUMERIQUE HD
FR-29

DCB-H360R
DCB-H360R
UTILISATION DU RECEPTEUR
●
Appuyez sur les touches Numériques (0~9) pour régler l'heure de votre choix, puis sur les
touches
pour sélectionner un horaire de changement. Si l'heure affichée dans l’option
« Heure d’allumage » est la même que celle affichée dans « Heure de désactivation », la
minuterie fonctionne 24 heures.
●
Sélectionnez un programme télévisé pour définir le programme à l'aide des touches
¦
La touche TV/RADIO vous permet de basculer entre le programme télévisé et le programme
radio.
●
Vous pouvez régler vous-même les minuteries sur Chaque jour et Chaque lundi ou sur
Chaque dimanche,etc. L'événement qui se répète le moins souvent est prioritaire. Par
exemple, lorsque vous réglez des minuteries sur Une fois et Chaque jour, « Une fois » a la
priorité sur « Chaque jour » pendant le jour concerné. Si la minuterie est en marche, le
message « En cours de traitement » associé à un numéro de minuterie s'affiche sur l’écran «
Temporisateur».
●
Appuyez sur la touche EXIT pour quitter le menu.
3.6
Information système
Si vous devez contacter votre fournisseur de services ou un
service d’assistance technique, il est possible que l'on vous
demande certaines informations auxquelles vous pouvez
accéder depuis ce menu.
Placez le curseur sur ce sous-menu et appuyez sur la touche
OK. L'écran représenté à droite s’affiche.
●
Appuyez sur la touche EXIT pour quitter le menu.
UTILISATION DU RECEPTEUR
5.
Menu Irdeto
Ce menu fournit des informations concernant la carte
intelligente et le décodeur. Appuyez sur la touche OK pour
accéder au sous-menu.
.
5.1 Etat CA
Vous pouvez consulter l'état du CA (informations sur la carte
intelligente EMM/ECM).
FR
● Appuyez sur la touche EXIT pour quitter le menu.
FR
5.2 Etat IRD
Vous pouvez consulter l'état de l'IRD (informations techniques
concernant l'IRD, ainsi que le CA, la carte intelligente et le
logiciel qui y sont chargés).
4.
Boîte aux lettres
Vous pouvez lire le message envoyé à chacun des décodeurs.
Nous pouvons enregistrer jusqu'à 10 messages électroniques.
●
Appuyez sur la touche EXIT pour quitter le menu.
FR-30
RECEPTEUR CABLE NUMERIQUE HD
● Appuyez sur la touche EXIT pour quitter le menu.
5.3 Etat du chargeur
Vous pouvez consulter les informations concernant l'IRD et le
logiciel qui y est chargé.
● Appuyez sur la touche EXIT pour quitter le menu.
FR-31

DCB-H360R
Numéros des fabricants de téléviseurs disponibles
DCB-H360R
Numéros des fabricants de téléviseurs disponibles
1. Touche TV + code utilisateur à 3 chiffres
2. Touches de fonction du téléviseur : TV STANDBY/ON, 0~9, CH / , VOL+/-, INPUT SEL,
MUTE
TV
NOM (MARQUE) du fabricant LISTE DES CODES (A 3 CHIFFRES)
SAMSUNG 001 002 003 004 005 006 007 008 009
A.R. SYSTEMS 049 152
ACCENT 049 152
ACEC 112
ACURA 195
ADMIRAL 065 076 163 171 190 307 324 369 466
ADYSON 379
AGASHI 076 379
AGEF 324
AIKO 049 076 102 141 152 172 195 225 379
AIWA 377 459
AKAI 049 050 055 066 076 102 107 123 139
AKIBA 049 123 152 380 378
AKITO 049 106 152
AKURA 049 076 123 195 378 426 470
ALARON 042 379
ALBA 018 049 050 107 123 134 163 168 195
ALBIRAL 371
ALCYON 407
ALLORGAN 050 094 236 379
ALLSTAR 049 152
AMPLIVISION 113 379 421 425
AMSTRAD 012 049 076 123 131 152 172 195 225
ANAM 049 152 195
ANAM NATIONAL 049 152
ANGLO 076 195
ANITECH 049 076 152 195 407
ANSONIC 045 049 107 112 152 195 210 226 391
ARC EN CIEL 074 182 186 424 453 463
ARCAM 379 424
ARISTONA 049 050 065 079 112 152 160
ARTHUR MARTIN 107 127 136 139 153 307 425
ASA 020 065 078 080 091 146 171 197 307
ASBERG 049 152 407
ASORA 195
ASTRA 195
ASUKA 050 076 123 378 379
ATLANTIC 049 050 071 113 152 236 379
ATORI 195
AUCHAN 107 425
AUDIOSONIC 049 074 076 152 182 195 213 379 421
AUDIOTON 050 076 379 421
AUSIND 090 407
AUTOVOX 050 071 078 079 080 083 090 156 236
AWA 018 049 131 152 195 226 320 379 426
AYOMI 411
BAIRD 074 102 182 209 218 379 409
BANG & OLUFSEN 324
BARCO 107 371 480
BASIC LINE 049 107 123 195 226 378
BASTIDE 379
010 050 066 076 102 195 217 365 379
421
481
141 150 152 172 182 195 209 225 379
428 433 437 471 475
225 232 379 413 421 457
426 476
413 421
324 375 408 449
324 379 407 413 449 468 470
433
NOM (MARQUE) du fabricant LISTE DES CODES (A 3 CHIFFRES)
BAUR 049 107 150 152 172 247 249 357 414
BEKO 152 241 421 433 460
BEON 049 152 163
BEST 213 421
BESTAR 049 152 226 421
BINATONE 379
BLACK STAR 413
BLACKTRON 378
BLACKWAY 378
BLAUPUNKT 057 060 113 247 249 345 451 454 481
BLUE SKY 049 123 152 195 217 232 378 380 457
BLUE STAR 378
BONDSTEC 413
BOOTS 050 106 379
BPL 049 152 378
BRANDT 014 074 182 186 218 424 436 452 462
BRANDT ELECTRONIC 074 453 463
BRANDT ELECTRONIQUE 074 182 186 453
BRINKMANN 049 152 163
BRIONVEGA 049 065 083 152 167 172 324 356 476
BRITANNIA 379
BROTHER 076
BRUNS 065 324
BSR 094 107 110 139 168
BTC 123
BUSH 018 049 076 094 106 107 123 134 139
BUSH(UK) 107 168
CAPSONIC 049 076 152 380
CARREFOUR 018 177
CASCADE 049 064 152 195
CASIO 049 152
CATHAY 049 152
CCE 049 152 379
CENTURION 049 152
CENTURY 065 163 324 411 413 481
CGE 011 090 093 094 107 139 142 163 168
CIHAN 217
CIMLINE 123 134 195
CITY 195
CLARIVOX 049 125 163
CLATRONIC 045 049 076 113 123 152 195 225 379
CMS HIGHTEC 379
COMTEL 125 217
CONCORDE 195
CONDOR 045 049 050 113 152 163 195 210 378
CONTEC 018 131 195 320 379
CONTINENTAL EDISON 014 074 182 186 232 424 453 462 463
COSMEL 195 213
CROSLEY 065 090 093 094 104 107 139 324 346
CROWN 049 152 163 170 195 209 232 407 421
CRYSTAL 477
CS ELECTRONICS 123 379 413
CTC 413
CTC CLATRONIC 045
CURTIS MATHES 126 190
454 470 475
142 172 193 195 209 217 225 226 232
307 378 379 457 458 470 480
346 348 369 407 413 421 480
407 413 421
379 413 421 467
348 407 413 469 481
470
TV
NOM (MARQUE) du fabricant LISTE DES CODES (A 3 CHIFFRES) NOM (MARQUE) du fabricant LISTE DES CODES (A 3 CHIFFRES)
CURTIS MATHES 126 190
CYBERTRON 123
DAENYK 042
DAEWOO 049 123 152 193 195 226 379 456 464
DAINICHI 123 379
DANSAI 049 076 141 152 195 379
DANSETTE 426
DANTAX 421
DATSURA 209
DAWA 049 152
DAYTON 049 152 195 226
DE GRAAF 107 139 209 307 479
DECCA 049 102 106 120 217
DECCA(UK) 046 049 050 102 106 131 152 379
DEITRON 049 152
DENKO 076
DENON 126
DERWENT 105
DESMET 049 113 152
DIGATRON 049
DIGILINE 049 152
DIXI 049 152 195 379 413
DORIC 104 105
DREAN 049 152
DTS 195
DUAL 049 050 107 139 152 156 168 182 243
DUAL TEC 040 050 168 195 379
DUMONT 045 065 080 102 139 146 324 375 379
DUMONT-FINLUX 020 045 078 091 104
DUX 049 112 152
DYNATRON 049 152
ELBE 049 107 123 152 172 210 243 369 391
ELBIT 217
ELCIT 045 046 062 065 104 107 150 168 324
ELECTA 076 378
ELECTRO TECH 195
ELEKTA 076 378
ELG 049 152
ELIN 020 049 107 139 152 172 195 379 470
ELITE 049 123 152 467
ELMAN 045 168
ELTA 195 076 379
EMERSON 012 042 049 065 113 152 225 324 378
ERRES 049 112 152
ESC 049 152
ETRON 049 107 139 152 195
EURO-FEEL 076
EUROMAN 049 076 152 379 421
EUROPA 049 152
EUROPHON 045 046 049 050 068 107 120 152 168
EXPERT 071 107 236 425
EXQUISIT 049 152 413
FAMILY LIFE 049 152
FENNER 152 195 226
FERGUSON 049 050 074 076 080 082 102 103 182
FIDELITY 049 050 076 107 152 225 307 379 475
FILSAI 050 379
FINLANDIA 033 139 172 197 209 307 375 470 474
FINLUX 020 042 045 049 078 080 090 091 102
379 414 417 424 468 470
449 469
411 421 435
413
479
413 475 481
379 413
218 247 409 411 436 452 472
104 107 139 146 152 163 197 210 324
375 379 407 408 428 429 437 449 469
FIRST LINE 045 049 094 102 107 134 139 152 191
FISHER 018 041 050 065 069 102 104 107 139
FLINT 049 102 123 152 380
FNR 045
FORMENTI 049 090 107 113 139 307 324 379 407
FORMENTI-PHOENIX 050 104 113 307
FORTRESS 190 324
FRABA 049 152 421
FRIAC 045 049 152 195
FRONTECH 066 076 139 195 307 379 413 466 470
FUJITSU 042 045 071 102 107 195 236 379
FUJITSU GENERAL 195 379
FUNAI 042 076 094
GALAXI 045 049 152
GALAXIS 045 049 152 163 421
GBC 104 107 139 168 195 226 480
GE 074 182 218 378
GEANT CASINO 107 425
GEC 049 102 104 107 120 152 171 172 307
GEC(UK) 046 050 102 107 150 162
GELOSO 062 104 107 139 168 171 195 226 307
GENERAL 064 074 182
GENERAL TECHNIC 195
GENEXXA 049 123 152 307 426 466
GOLDHAND 379
GOLDLINE 213
GOLDSTAR(LG) 049 050 055 107 139 152 168 172 182
GOODMANS 018 042 049 076 102 134 139 141 152
GORENJE 421
GPM 123
GRADIENTE 049 152 170 177
GRAETZ 049 090 104 136 139 152 153 162 171
GRANADA 013 018 033 041 049 102 104 105 112
GRANADA(UK) 046 050 090 107 139 162 307
GRANDIN 049 107 113 123 152 195 378 380 425
GRONIC 045 379
GRUNDIG 049 080 090 152 232 247 249 407 454
HALIFAX 076 379
HAMPTON 379
HANIMEX 094
HANSEATIC 018 049 050 094 104 107 113 152 172
HANTAREX 045 046 049 152 195
HANTOR 049 152
HARLEY DAVIDSON 042
HARWOOD 049 152 195 426
HAUPPAUGE 049 152
HAVERMY 190
HCM 049 076 123 152 163 195 378 379 426
HEMA 195 379
HEMMERMANN 150 470
HIFIVOX 074 182 186 424 453 463
195 209 210 226 379 411 413 457 470
156 172 209 320 324 379 408 414 421
470
467 469 480 481
477
379 470
413 469 481
195 219 379 413 414 421 460
182 193 195 218 225 226 232 379 428
450 456 464
172 198 225 307 466 469 475
120 152 171 172 198 209 218 238 241
307 379 407 425 470 471 472 474
435
455
195 241 324 378 379 391 421 455 467
470 475
FR
FR-32
RECEPTEUR CABLE NUMERIQUE HD
FR-33

DCB-H360R
DCB-H360R
Numéros des fabricants de téléviseurs disponibles
TV
NOM (MARQUE) du fabricant LISTE DES CODES (A 3 CHIFFRES)
HIGASHI 050
HIGHLINE 049 076 152
HIKONA 123
HINARI 012 018 042 049 066 094 107 123 134
HISAWA 123 378 380 425
HIT 324
HITACHI 018 020 033 049 050 074 086 099 102
HITACHI FUJIAN 013
HITSU 123 195 380
HORNYPHON 049 112 152
HOSHAI 123 380
HUANYU 193 226 379
HYGASHI 379
HYPER 050 168 195 379 413
HYPERSONIC 172
HYPSON 049 076 152 217 378 379 380 425
IBERIA 049 152
ICE 049 076 123 152 195 225 379
ICES 123 379
IMPERIAL 011 049 090 093 094 107 142 152 163
INDIANA 049 152
INGELEN 090 104 136 139 153 162 171 198 232
INGERSOLL 195
INNO HIT 046 049 050 066 102 123 152 195 217
INNOVATION 049 152
INTERACTIVE 210
INTERBUY 076 195 413
INTERFUNK 049 065 067 074 090 104 107 112 139
INTERNAL 049 152
INTERVISION 045 049 055 076 107 123 152 225 232
IR 346
IRRADIO 049 066 090 123 152 195 407 413
ISUKAI 049 123 152 378
ITC 379 480
ITS 049 076 123 152 225 378 379
ITT 042 090 107 134 139 150 162 171 172
ITT-NOKIA 042 090 104 107 134 136 139 150 153
ITV 076 049 152 413
JEAN 018
JEC 141
JET POINT 365
JVC 018 103 123 170 182 225 409 433 439
KAISUI 049 050 123 152 195 378 379 380
KAMOSONIC 050
KAMP 379
KAPSCH 071 107 172 236 466
KARCHER 020 045 049 050 068 076 107 152 195
KATHREIN 455
KAWASHO 379
KB ARISTOCRAT 107
139 195 209 232 307
104 107 110 126 127 139 150 152 162
168 171 182 186 218 238 307 379 466
469 470 472 479
168 307 346 348 369 407 413 421 470
480
435 466
379 407 413
150 152 153 172 182 307 324 413 421
453 463 466 475
378 379 380 413 421
193 197 198 209 307 375 428 466 469
470 471 475 479
162 171 172 193 197 198 209 307 375
470 428 433 435 437
465
217 378 421 435
NOM (MARQUE) du fabricant LISTE DES CODES (A 3 CHIFFRES)
KENDO 045 049 055 134 152 172 210 413 421
KENNEDY 071 079 104 107 139 236 369 480
KINGSLEY 379
KLARMAX 371
KNEISSEL 049 152 210 243 369 391 411 421 435
KOLSTER 045 049 152 470
KONKA 049 123 152 225
KONTAKT 232
KORPEL 049 152
KORTING 065 094 113 324 421
KOSMOS 049 152
KOTRON 076 426
KOYODA 195
KRAKING 411
KRIESLER 050 065 079 112 152 160
KTV 050 379
KURO 445
KYOSHU 076 163 426
KYOTO 107
LECSON 049 152
LEMAIR 210
LENCO 049 107 152 195 226
LENOIR 050 195
LESA 413
LEYCO 049 076 094 102 152
LIESENK & TTER 049 112 152 345
LIFE 440 441 443 444
LIFETEC 049 076 123 152 195 226 440 441 443
LLOYD_S 195
LOEWE 035 049 089 120 152 324 391 421
LOEWE OPTA 035 046 049 065 120 144 152 213 324
LOGIK 131 225
LOGIX 195
LUMA 071 107 110 152 171 172 195 210 226
LUMATRON 049 076 107 152 172 236 379
LUX MAY 049 152 195
LUXOR 042 050 090 107 127 139 150 172 197
LYCO 076
MAAZ 371
MADISON 049 152
MAGNADYNE 045 046 062 065 104 107 120 139 150
MAGNAFON 045 046 050 068 090 120 379 407 481
MAGNAVOX 018 042 049 152
MAGNUM 440 441 443 444
MANDOR 076
MANESTH 076 094 113 134 141 152 379 467
MANHATTAN 049 195
MARANTZ 049 152 455
MARELLI 324
MARK 049 152 195 226 379
MASUDA 123 195 225
MATSUI 012 018 041 049 050 094 100 102 106
MAXIMAL 139
MAXWELL 371
MEDIATOR 049 112 152
MEDION 049 152 195 217 457
MEGAS 435
MEGATRON 126
MELECTRONIC 020 049 074 152 182 193 195 197 210
MELVOX 425
435 476
444
236 307
209 307 375 428 429 470 472 473 475
168 324 413 469
107 131 134 141 150 152 171 195 209
218 225 232 247 307 379 380 470
226 375 379 408 413 428 429 466 470
Numéros des fabricants de téléviseurs disponibles
TV
NOM (MARQUE) du fabricant LISTE DES CODES (A 3 CHIFFRES)
MELVOX 425
MEMOREX 099 195 217
MEMPHIS 102 125 195 213
MERCURY 049 152 195
METZ 049 065 067 070 092 247 324 412 420
MICROMAXX 049 152 195
MICROSTAR 440 441 443 444
MINERVA 080 090 232 247 249 407 454
MINOKA 049 152 426 470
MITSUBISHI 013 018 049 065 105 131 152 157 190
MIVAR 046 050 058 072 081 090 120 379 391
MONACO 195
MORGAN_S 049 152
MOTION 407
MOTOROLA 190
MTC 152 379 421 470
MTEC 106
MULTISTANDARD 045
MULTITEC 049 152 195
MULTITECH 045 046 049 050 120 152 195 379 407
MURPHY 102 104 105 107 171 307 379
MURPHY(UK) 162
MUSIKLAND 123
MYRYAD 455
NAD 172 209 475
NAIKO 049 152
NAKIMURA 049 152 226
NAONIS 040 071 079 110 171
NAT 085 151
NATIONAL 033 085 104
NEC 018 049 113 131 152 177 195 226 379
NECKERMANN 011 049 050 065 107 139 152 163 210
NEDIATOR 152
NEI 049 125 152 225 477
NESCO 042 413
NETSAT 049 152
NETWORK 213
NEUFUNK 049 152 195 435
NEW TECH 049 050 152 182 195 379
NEW WORLD 123
NICAMAGIC 379
NIKKAI 018 049 076 102 123 125 139 141 152
NOBLEX 049 076 152
NOBLIKO 045 050 080 090 379 407
NOGAMATIC 074 182 186 424 453 463
NOKIA 090 104 107 134 136 139 150 153 157
NORDMENDE 049 074 083 150 152 182 186 218 247
NOVATRONIC 020 049 152 226
OCEANIC 086 094 104 107 108 109 139 172 209
OCEANIC(F) 150
ODEON 076
OKANO 049 076 102 152 421
OMEGA 076
ONCEAS 050
ONWA 123 225
OPERA 049 152
454 481
247 324 454
407 414 421 434
413 421 470
380
247 249 307 324 357 379 413 421 455
470 481
195 213 379 066
162 171 172 193 197 198 209 226 307
375 428 429 433 437 465 470 475 478
479
307 424 453 463 469 481
425 466 469 475
NOM (MARQUE) du fabricant LISTE DES CODES (A 3 CHIFFRES)
OPTIMUS 099
OPTONICA 190
ORBIT 049 152
ORION 012 042 045 049 076 094 113 131 134
ORLINE 049 123 152
ORMENTI-PHOENIX 104
ORMOND 195
OSAKA 066
OSAKI 049 066 076 102 106 123 152 226 379
OSIO 049 152
OSO 123
OSUME 018 102 123
OTAKE 450
OTTO VERSAND 018 049 050 074 094 104 107 113 134
P.T ACTRON 217
PAEL 050 379
PALLADIUM 049 107 152 163 210 247 324 357 379
PALSONIC 049 055 076 152 379 426
PANAMA 049 076 152 195 379 413
PANASONIC 016 049 099 104 107 139 151 152 172
PANAVISION 049 152 210
PATHE CINEMA 107 113 379 391 411 425 467 470 480
PATHE CINEMA(F) 050 168
PATHE MARCONI 014 074 182 186 424 453 462 463
PAUSA 195
PAUZA 195
PERDIO 049 102 107 113 152 467
PERFEKT 049 152
PERSHIN 425
PHILCO 011 016 049 065 090 093 094 104 107
PHILEX 471
PHILHARMONIC 379
PHILIPS 014 049 050 065 079 089 112 152 160
PHOENIX 049 050 102 104 107 113 152 324 379
PHONOLA 049 050 065 079 112 152 160 324 379
PILOT 049 152
PIONEER 049 074 152 172 182 209 218 307 421
PLANTRON 049 076 152 195
PLAYSONIC 379
POLICOM 074
POPPY 195
PORTLAND 226
POWERPOINT 232
PRANDONI-PRINCE 046 090 120 171 172 307 407 413
PRECISION 379
PREMIER 142
PRIMA 076 195 307
PRINCE 046 171
PRINZ 102 470
PROFEX 107 139 195 407 475
PROFI-TRONIC 045 049 152
PROLINE 049 102 112 191 366 436
PROSONIC 049 085 151 152 195 225 226 379 421
139 150 152 191 195 216 366 367 426
467
426
139 152 172 190 218 247 249 357 362
379 413 414 454 455 467 469 470 480
481
413 421 470
396 420 466 469 481
481
126 142 152 163 168 324 346 348 369
407 413 421 480 481
182 193 216 217 220 226 247 249 324
427 455 482
421
427 466
FR
FR-34
RECEPTEUR CABLE NUMERIQUE HD
FR-35

DCB-H360R
DCB-H360R
Numéros des fabricants de téléviseurs disponibles
TV
NOM (MARQUE) du fabricant LISTE DES CODES (A 3 CHIFFRES)
PROTECH 045 049 076 125 139 152 163 195 379
PROVISION 049 152
PYE 050 065 079 112 152 160 226 324
PYMI 049 112 152 195 226 324
QUADRA VISION 425
QUASAR 045 046 068 099 413
QUELLE 018 020 049 050 074 076 078 080 090
QUESTA 018
RADIALVA 049 074 107 123 152
RADIOLA 014 049 050 065 079 112 152 160
RADIOMARELLI 045 046 062 065 104 105 150 152 168
RADIONETTE 020 150
RADIOSHACK 049 152
RADIOTONE 049 076 152 163 195 421 426
RANK ARENA 018
RCA 190 218 436
RECOR 049 152
RECTILIGNE 049 152
REDIFFUSION 018 059 104 105 139 171 172 307 471
REDIFFUSION(UK) 150 162
REDSTAR 049 152
REFLEX 049 152
REOC 460
REVOX 049 152 421
REX 040 071 079 107 110 152 171 210 236
RFT 076 102 241 324 391 421
RHAPSODY 379
R-LINE 049 152
ROADSTAR 049 076 123 152 163 195
ROBOTRON 065 324
RODEX 049 152
ROWA 458
ROWSONIC 050
ROYAL LUX 421 426
RTF 065
SABA 046 065 074 077 107 120 139 172 182
SACCS 411
SAGEM 378 380 435
SAISHO 012 050 076 107 131 134 195 307 379
SALORA 033 107 127 136 139 150 153 171 172
SAMBERS 045 046 068 090 120 407 481
SANDRA 379
SANELA 411
SANSUI 049 152 225
SANTON 195
SANYO 018 020 041 049 050 065 102 107 131
SAVE 049 152
SBR 049 112 152
SCHAUB LORENZ 090 104 136 139 153 162 171 198 307
SCHNEIDER 014 040 049 050 065 069 079 104 107
413 457 470 477 480
091 094 113 131 139 146 150 152 153
172 195 247 249 320 345 346 348 357
379 408 413 449 451 454 470 475 480
481
324 413
475
243 307 413 466
186 218 307 324 424 436 452 453 463
466 469 481
477
198 209 307 466 470 472 474 475 479
152 195 198 209 320 379 391 408 421
481
433 469 470 475
112 123 139 152 156 160 168 172 182
195 225 243 307 379 382 413 414 417
457 468 470
NOM (MARQUE) du fabricant LISTE DES CODES (A 3 CHIFFRES)
SCOTT 042
SEARS 042
SEG 018 045 049 050 076 107 152 172 195
SEI 012 045 049 094 107 139 152 236 324
SEI SINUDYNE 446
SELECO 040 071 079 107 110 152 171 172 210
SENCORA 195
SENTRA 123 139 141 195
SERINO 380 435
SHARP 018 094 170 190 320 362
SHORAI 042 094
SIAM 049 152
SIAREM 045 046 065 104 107 120 139 324 469
SIEMENS 018 049 066 113 152 247 249 307 320
SIERA 050 065 079 112 152 160
SIERRA 049 112 152
SIESTA 421
SILVA 049 152 379
SILVER 018 042 049 076 152 172
SINGER 045 049 065 104 152 195 324 369 413
SINUDYNE 012 045 065 094 104 107 134 139 150
SKANTIC 307 472 473
SKY 049 152
SKYWORTH 448
SOGERA 113
SOLAVOX 066 102 107 139 172 307 466 471
SONAWA 123
SONITRON 209 379 421
SONNECLAIR 049 152
SONOKO 049 050 076 152 195 378 379
SONOLOR 107 139 172 209 357 425 466
SONTEC 049 094 152 421
SONY 018 045 131 211 346 357 358 370
SOUND & VISION 045 123 226
SOUND WAVE 049 113 163
SOUNDESIGN 042
SPECTRA 195
SSANGYONG 195
STANDARD 049 050 113 123 152 195 226 379
STARLIGHT 049 076 107 152 195
STENWAY 123 378
STERN 040 071 079 107 110 152 171 236 243
STRATO 049 076 152 195
SUNKAI 049 094 123 134 152 191 232 367 380
SUNSTAR 049 152 195 225
SUNWOOD 049 152 195
SUPERLA 379
SUPERTECH 049 123 152 195 379
SUPRA 195 226
SUSUMU 123 218
SUTRON 195
SWISSLINE 413
SYDNEY 379
SYSLINE 049
SYTONG 379
TACTUS 106
TANDBERG 065 074 078 172 182 210 213 420 449
TANDY 050 102 123 190 307 379 413 466
TASHIKO 018 050 107 177 379 470 474
232 379 413 407 457 480
357 469 470 481
236 243 307 369 466 476
481
345 451 454 469 481
425
152 172 210 216 236 324 357 366 367
469 470 481
307 466
Numéros des fabricants de téléviseurs disponibles
TV
NOM (MARQUE) du fabricant LISTE DES CODES (A 3 CHIFFRES)
TATUNG 049 050 102 106 120 131 152 217 379
TCM 440 441 443 444
TEAC 049 076 152 163 195 217 378 380 426
TEC 040 050 064 168 195 213 218 243 379
TECH LINE 049 152 195
TECHICA 123
TECHNEMA 113 467
TECHNICS 099
TECHNOL ACE 042
TEDELEX 379
TEIRON 195
TEKNIKA 042
TELEAVIA 014 074 182 186 218 424 453 462 463
TELECOR 049 107 123 152 379
TELEFUNKEN 049 064 074 082 152 182 186 187 218
TELEFUSION 049 152
TELEGAZI 049 076 107 123 152
TELEMEISTER 049 113 152 467
TELESONIC 049 152
TELESTAR 049 152
TELETECH 049 152 195 213 413
TELETON 018 067 071 107 236 379 470
TELEVIDEON 050 104 107 113 379
TELEVISO 425
TEMCO 094
TEMPEST 049 152 195
TENNESSEE 049 152
TENSAI 020 050 055 094 113 123 152 195 225
TESMET 439
TETUNG 046
TEVION 049 152 195
TEXET 050 123 195 226 379
THOMSON 014 024 049 064 074 134 152 182 186
THORN 049 102 103 106 141 152 218 226 346
THORN-FERGUSON 074 076 080 082 103 218 357 358 375
TOKAI 049 102 107 152 195 213 226 379
TOKYO 141 379
TOMASHI 123 378
TOSHIBA 018 045 128 141 369 379
TOWADA 045 379 470 480
TOYODA 195
TRAKTON 076
TRANS CONTINENS 046 049 152 171 307 379
TRANSONIC 049 152 380 458
TRANSTEC 379
TRIDENT 379
TRISTAR 123
TRIUMPH 012 046 049 128 152 197 375
UHER 049 069 071 080 090 113 152 163 226
ULTRA 409
ULTRAVOX 045 049 050 065 104 107 139 152 226
UNIC LINE 049 152
UNITED 049 152
UNIVERSUM 011 012 018 020 049 074 076 094 107
UNIVOX 049 107 152 213 324 411
UTAX 050
VEGAVOX 163
457 458 470
413 480
230 346 348 424 436 452 453 463
226 379 413 450 467
218 230 424 436 453 462 463 470
348 408 409 411 454 464 470 475
236 307 407 414 421 467
324 379 413 471
131 152 163 172 195 197 210 213 247
320 345 346 357 375 379 407 408 413
421 428 429 437 454 470 480
NOM (MARQUE) du fabricant LISTE DES CODES (A 3 CHIFFRES)
VESTEL 049 107 125 152 379
VEXA 152 195
VICTOR 170
VIDEO SYSTEM 049 152
VIDEOLOGIQUE 123 379
VIDEOSAT 413 447
VIDEOSYSTEM 049 152
VIDEOTECHNIC 113 226 379
VIDEOTON 107 472
VIDIKRON 045
VIDTECH 018
VIPER 213
VISIOLA 379
VISION 049 113 152 467
VISOREX 442
VISTAR 172 236
VOLTEC 074
VORTEC 152
VOXSON 049 065 090 152 163 171 307 324 407
WALTHAM 049 152 163 182 307 379 472
WATSON 049 107 113 123 152 195 247 467
WATT RADIO 045 050 068 104 107 139 150 379 470
WEGA 018 049 139 152 324
WEGA COLOR 065 088
WEGAVOX 195
WELTBLICK 113 152
WESTINGHOUSE 094 152
WESTON 168
WHARFEDALE 049 152
WHITE 045
WHITE WESTINGHOUSE 049 050 113 152 213 379 467
WINCO 426
WINDSTAR 378
XRYPTON 049 152
YAMISHI 049 123 152 378 379 380
YOKAN 049 152
YOKO 049 050 076 123 152 195 379 413 421
YORX 123
ZANUSSI 040 071 079 110 152 171 236 307 379
ZOPPAS 040 071 079 110 171 307
466
480
477
FR
FR-36
RECEPTEUR CABLE NUMERIQUE HD
FR-37

DCB-H360R
DCB-H360R
DEPANNAGE
Problème Cause possible Solution
DEL éteinte sur Cordon d'alimentation mal branché Branchez le cordon d'alimentation
la façade; correctement
pas d'alimentation
Aucune image affichée Récepteur en veille ; Allumez le récepteur;
à l'écran Péritel, RCA ou HDMI mal raccordés Vérifiez la connexion;
à l'entrée vidéo du téléviseur;
Canal ou sortie vidéo sélectionné(e) Vérifiez le canal et l'entrée vidéo du
sur le téléviseur incorrect(e); téléviseur (manuel d’utilisation du
Sortie vidéo sélectionnée sur téléviseur);
le récepteur HD incorrecte Vérifiez la sortie vidéo du récepteur
HD (reportez-vous à la page 10)
Pas de son PERITEL ou Audio mal branché; Vérifiez la connexion;
Volume = 0 ; Augmentez le volume du téléviseur ou
récepteur HD.
Sourdine activée; Appuyez sur la touche MUTE.
Pas de HDMI son Vérifiez l’option sortie audio
(reportez-vous à la page 29).
La télécommande ne Piles déchargées ou mal insérées Pointez la télécommande vers le
fonctionne pas directement récepteur;
Utilisation incorrecte Changez les piles ou insérez-les
correctement
Mauvaise qualité d'image Signal trop faible Vérifiez tout le câblage
L'écran de menu ne Les listes de canaux ne sont pas Recherchez les canaux. Rendez-vous
disparaît pas installées dans le menu Installation;
Messages d'erreur à l'écran; Câble de transmission de signaux pas Vérifiez la connexion
“Recherche du signal en cours”; ou mal branché
“Aucun signal”
Messages d'erreur à l'écran; Smartcard (selon le modèle)
“Erreur Smartcard” - mal insérée; Vérifiez la carte intelligente;
“Smartcard inconnue”
“Insérez Smartcard” - non insérée Insérez la carte intelligente
CARACTERISTIQUES TECHNIQUES
Alimentation
Type : SMPS
Tension d’entrée : CA 100-240 V~, 50/60 Hz
Calibre des fusibles : 250 V/T1.6AH
Syntoniseur et démodulateur
Fréquence d'entrée : 50,5~858 MHz
Bande passante des canaux 8 MHz
DEMODULATION : QAM DVB-C
DEBIT DE SYMBOLES : MAXI. 7 252 Msps
Constellation : 16, 32, 64, 128, 256 MAQ
SORTIE CABLE : SORTIE RF EN BOUCLE pour un autre récepteur ou
téléviseur
Décodeur vidéo
Décodage de système : MPEG-2 ISO/IEC 13818-2
Profile@Level (MP@HL(HD), MP@ML(SD))
H.264 ISO/IEC 14496-10
(MP@L3, MP@L4, HP@L4 jusqu'à 30 Mbps)
Résolution : 1080i, 720p, 576p, (576i)
Sortie vidéo : Sortie SD (2 péritels (AV1, AV2), Composite RCA)
Sortie HD (composant (YPBPR), HDMI)
Format vidéo 4:3 (Normal) et 16:9 (Ecran large)
Décodeur audio
Décodage de système : MPEG Audio-1 ISO/IEC 11172-3
(1 couche, 2 couches)
MPEG Audio-2 ISO/IEC 13818-3
Dolby Digital (AC-3)
Mode Audio : Mono, Dual stereo, Joint stereo
Débit d'échantillonnage : 32 kHz, 44,1 kHz, 48 kHz, 96 kHz
FR
MISE AU REBUT
L'appareil, l'emballage (ex. : mousse de polystyrène) et les piles ne doivent jamais être jetés
avec les autres déchets ménagers.
Veuillez vous renseigner sur la réglementation locale en matière de mise au rebut et vous y
conformer en jetant vos déchets aux endroits prévus à cet effet.
FR-38
RECEPTEUR CABLE NUMERIQUE HD
Sortie audio : Sortie analogique (G/D (RCA) 1 canal)
Sortie numérique (S/PDIF(Optique))
CARACTERISTIQUES PHYSIQUES
Dimensions (L x P x H) 351 x 227 x 60 mm
Poids (net) 2,2 kg
FR-39

DCB-H360R
DCB-H360R
NOTES
NOTES
FR
FR-40
RECEPTEUR CABLE NUMERIQUE HD
FR-41

FR-42
RECEPTEUR CABLE
DCB-H360R
NOTES
 Loading...